Android Programming The Big Nerd Ranch Guide
User Manual:
Open the PDF directly: View PDF ![]() .
.
Page Count: 625 [warning: Documents this large are best viewed by clicking the View PDF Link!]
- Table of Contents
- Learning Android
- Chapter 1 Your First Android Application
- Chapter 2 Android and Model-View-Controller
- Chapter 3 The Activity Lifecycle
- Chapter 4 Debugging Android Apps
- Chapter 5 Your Second Activity
- Chapter 6 Android SDK Versions and Compatibility
- Chapter 7 UI Fragments and the Fragment Manager
- Chapter 8 Creating User Interfaces with Layouts and Widgets
- Chapter 9 Displaying Lists with ListFragment
- Chapter 10 Using Fragment Arguments
- Chapter 11 Using ViewPager
- Chapter 12 Dialogs
- Chapter 13 Audio Playback Using MediaPlayer
- Chapter 14 Retained Fragments
- Chapter 15 Localization
- Chapter 16 The Action Bar
- Chapter 17 Saving and Loading Local Files
- Chapter 18 Context Menus and Contextual Action Mode
- Chapter 19 Camera I: Viewfinder
- Chapter 20 Camera II: Taking Pictures and Handling Images
- Chapter 21 Implicit Intents
- Chapter 22 Two-Pane Master-Detail Interfaces
- Chapter 23 More About Intents and Tasks
- Chapter 24 Styles And Includes
- Chapter 25 XML Drawables And 9-Patches
- Chapter 26 HTTP & Background Tasks
- Chapter 27 Loopers, Handlers, and HandlerThread
- Chapter 28 Search
- Chapter 29 Background Services
- Chapter 30 Broadcast Intents
- Chapter 31 Browsing The Web & WebView
- Chapter 32 Custom Views and Touch Events
- Chapter 33 Tracking the Device’s Location
- Chapter 34 Local Databases with SQLite
- Chapter 35 Loading Asynchronous Data With Loaders
- Chapter 36 Using Maps
- Chapter 37 Afterword
- Index


ptg11078569
Android Programming
THE BIG NERD RANCH GUIDE
BILL PHILLIPS & BRIAN HARDY

ptg11078569
Android Programming: The Big Nerd Ranch Guide
by Bill Phillips and Brian Hardy
Copyright © 2013 Big Nerd Ranch, Inc.
All rights reserved. Printed in the United States of America. This publication is protected by copyright, and
permission must be obtained from the publisher prior to any prohibited reproduction, storage in a retrieval system,
or transmission in any form or by any means, electronic, mechanical, photocopying, recording, or likewise. For
information regarding permissions, contact
Big Nerd Ranch, Inc.
1989 College Ave.
Atlanta, GA 30317
(404) 478-9005
http://www.bignerdranch.com/
book-comments@bignerdranch.com
The 10-gallon hat with propeller logo is a trademark of Big Nerd Ranch, Inc.
Exclusive worldwide distribution of the English edition of this book by
Pearson Technology Group
800 East 96th Street
Indianapolis, IN 46240 USA
http://www.informit.com
The authors and publisher have taken care in writing and printing this book but make no expressed or implied
warranty of any kind and assume no responsibility for errors or omissions. No liability is assumed for incidental
or consequential damages in connection with or arising out of the use of the information or programs contained
herein.
Android, Dalvik, Google Play, Google TV, Google Chrome, Chrome, Gmail, and Nexus are trademarks of
Google Inc. Eclipse is a trademark of Eclipse Foundation, Inc. Java, and all Java-based trademarks are trademarks
of Oracle Corporation and/or its affiliates. Mac is a trademark of Apple Inc., registered in the U.S. and other
countries. Windows is a registered trademark of Microsoft Corporation in the United States and other countries.
Linux is the registered trademark of Linus Torvalds in the U.S. and other countries. Flickr is a registered trademark
of Yahoo! Inc.
Many of the designations used by manufacturers and sellers to distinguish their products are claimed as
trademarks. Where those designations appear in this book, and the publisher was aware of a trademark claim, the
designations have been printed with initial capital letters or in all capitals.
ISBN-100321804333
ISBN-13978-0321804334
First edition, second printing, September 2013

ptg11078569
iii
Dedication
For Donovan. May he live a life filled with activities and
know when to use fragments.
— B.H.

ptg11078569
This page intentionally left blank

ptg11078569
v
Acknowledgments
We feel a bit sheepish having our names on the cover of this book. The truth is that without an army of
collaborators, this book could never have happened. We owe them all a debt of gratitude.
• Chris Stewart and Owen Matthews, who contributed great foundational content for several
chapters.
• Our co-instructors, Chris Stewart and Christopher Moore. We thank them for their patience in
teaching work-in-progress material, their suggestions and corrections for that material, and their
consultation when we were considering sweeping changes.
• Our coworkers Bolot Kerimbaev and Andrew Lunsford. Their feedback was instrumental in our
decision to highlight the use of fragments.
• Our technical reviewers, Frank Robles, Jim Steele, Laura Cassell, Mark Dalrymple, and Magnus
Dahl, who helped us find and fix flaws.
• Thanks to Aaron Hillegass. Aaron’s faith in people is one of the great and terrifying forces of
nature. Without it, we would never have had the opportunity to write this book, nor would we ever
have completed it. (He also gave us money, which was very friendly of him.)
• Our editor, Susan Loper, has an amazing ability to turn our programmery ramblings and bad jokes
into thoughtful, concise prose. And better jokes. Without her help, this would not have been a fun
book to read. She taught us everything we know about clear and approachable technical writing.
• Thanks to NASA. Our little book seems small and silly in comparison to exploring the solar
system.
• Ellie Volckhausen, who designed our cover.
• Elizabeth Holaday, our copy-editor, who found and smoothed rough spots.
• Chris Loper at IntelligentEnglish.com, who designed and produced the print book and the EPUB
and Kindle versions. His DocBook toolchain made life much easier, too.
• The folks at Facebook, who gave us so much fantastic feedback on the course.
Finally, thanks to our students. We wish that we had room to thank every single student who gave us a
correction or opinion on the book as it was shaping up. It is your curiosity we have worked to satisfy,
your confusions we have worked to clarify. Thank you.

ptg11078569
This page intentionally left blank

ptg11078569
vii
Table of Contents
Learning Android .......................................................................................................... xvii
Prerequisites ......................................................................................................... xvii
How to Use This Book .......................................................................................... xvii
How This Book Is Organized ................................................................................. xviii
Challenges .................................................................................................. xviii
Are you more curious? ................................................................................... xix
Code Style ............................................................................................................ xix
Typographical Conventions ...................................................................................... xix
Android Versions .................................................................................................... xx
The Necessary Tools ............................................................................................... xx
Downloading and installing the ADT Bundle ....................................................... xx
Downloading earlier SDK versions .................................................................... xxi
A hardware device ........................................................................................ xxii
1. Your First Android Application ....................................................................................... 1
App Basics .............................................................................................................. 2
Creating an Android Project ....................................................................................... 3
Navigating in Eclipse ................................................................................................ 7
Laying Out the User Interface ..................................................................................... 8
The view hierarchy ......................................................................................... 12
Widget attributes ............................................................................................. 12
Creating string resources .................................................................................. 14
Previewing the layout ...................................................................................... 14
From Layout XML to View Objects ........................................................................... 15
Resources and resource IDs .............................................................................. 16
Wiring Up Widgets ................................................................................................. 18
Organizing imports .......................................................................................... 19
Getting references to widgets ............................................................................ 20
Setting listeners .............................................................................................. 20
Running on the Emulator ......................................................................................... 24
For the More Curious: Android Build Process .............................................................. 26
Android build tools ......................................................................................... 28
2. Android and Model-View-Controller ............................................................................... 31
Creating a New Class .............................................................................................. 32
Generating getters and setters ............................................................................ 33
Model-View-Controller and Android .......................................................................... 35
Benefits of MVC ............................................................................................ 36
Updating the View Layer ......................................................................................... 37
Updating the Controller Layer ................................................................................... 39
Running on a Device ............................................................................................... 44
Connecting your device .................................................................................... 44
Configuring your device for development ............................................................ 45
Adding an Icon ...................................................................................................... 45
Adding resources to a project ............................................................................ 46
Referencing resources in XML .......................................................................... 47
Challenges ............................................................................................................. 48

ptg11078569
Android Programming
viii
Challenge: Add a Listener to the TextView .................................................................. 49
Challenge: Add a Previous Button ............................................................................. 49
Challenge: From Button to ImageButton ..................................................................... 49
3. The Activity Lifecycle ................................................................................................. 53
Logging the Activity Lifecycle .................................................................................. 54
Making log messages ...................................................................................... 54
Using LogCat ................................................................................................. 56
Rotation and the Activity Lifecycle ............................................................................ 61
Device configurations and alternative resources .................................................... 61
Saving Data Across Rotation .................................................................................... 65
Overriding onSaveInstanceState(Bundle) ............................................................. 66
The Activity Lifecycle, Revisited ............................................................................... 67
For the More Curious: Testing onSaveInstanceState(Bundle) ........................................... 69
For the More Curious: Logging Levels and Methods ..................................................... 70
4. Debugging Android Apps ............................................................................................. 73
The DDMS Perspective ............................................................................................ 74
Exceptions and Stack Traces ..................................................................................... 76
Diagnosing misbehaviors .................................................................................. 77
Logging stack traces ........................................................................................ 78
Setting breakpoints .......................................................................................... 80
Using exception breakpoints ............................................................................. 83
File Explorer .......................................................................................................... 84
Android-Specific Debugging ..................................................................................... 85
Using Android Lint ......................................................................................... 85
Issues with the R class ..................................................................................... 87
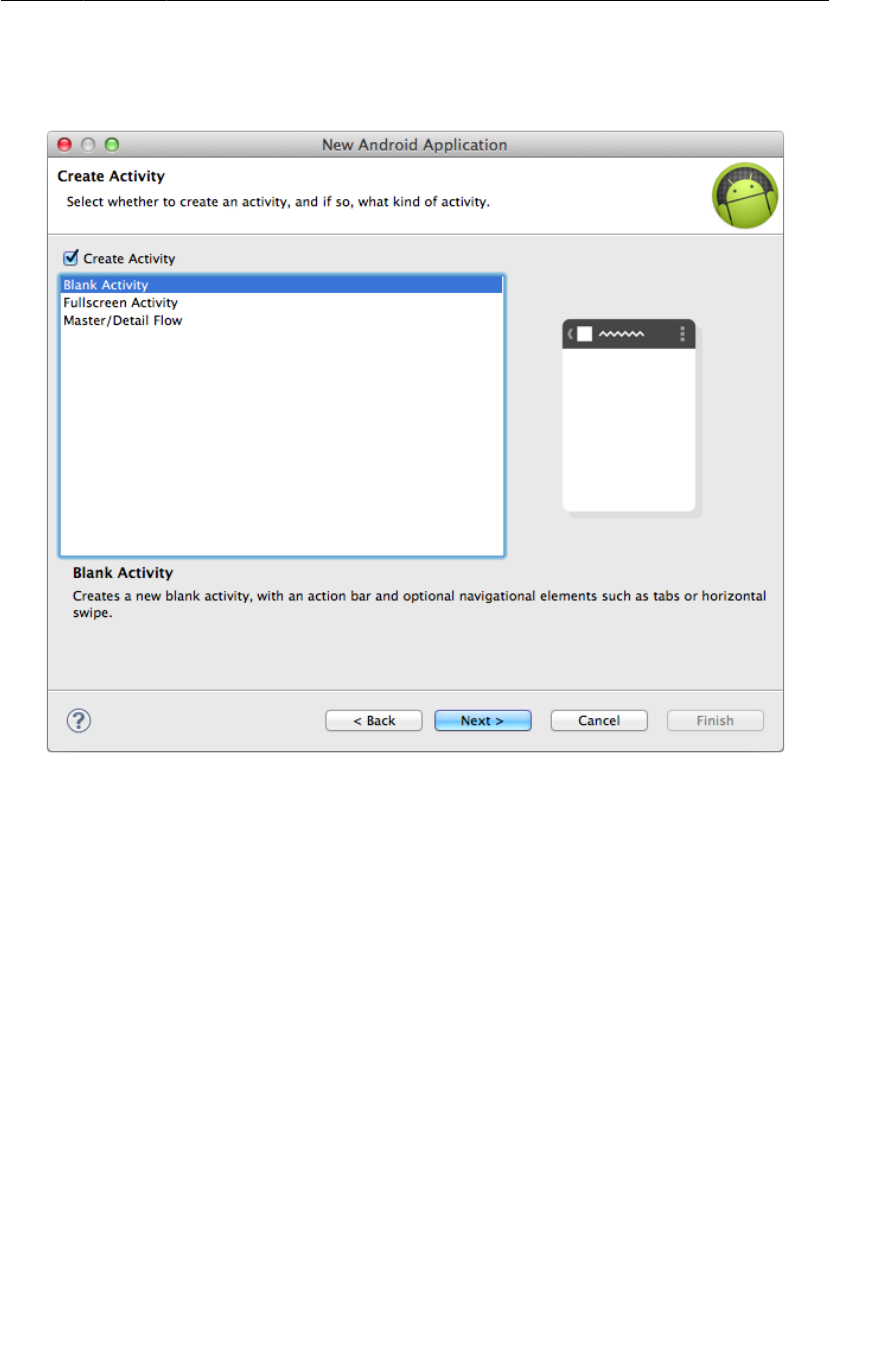
5. Your Second Activity ................................................................................................... 89
Setting Up a Second Activity .................................................................................... 90
Creating a new layout ...................................................................................... 91
Creating a new activity subclass ........................................................................ 95
Declaring activities in the manifest ..................................................................... 97
Adding a Cheat button to QuizActivity ............................................................... 98
Starting an Activity ................................................................................................. 99
Communicating with intents ............................................................................ 100
Passing Data Between Activities .............................................................................. 101
Using intent extras ........................................................................................ 102
Getting a result back from a child activity ......................................................... 104
How Android Sees Your Activities ........................................................................... 109
Challenge ............................................................................................................. 112
6. Android SDK Versions and Compatibility ...................................................................... 113
Android SDK Versions ........................................................................................... 113
Compatibility and Android Programming ................................................................... 114
Honeycomb was big ...................................................................................... 114
Minimum SDK version .................................................................................. 116
Target SDK version ....................................................................................... 116
Build SDK version ........................................................................................ 116
Adding code from later APIs safely .................................................................. 118
Using the Android Developer Documentation ............................................................. 120
Challenge: Reporting the Build Version ..................................................................... 122

ptg11078569
Android Programming
ix
7. UI Fragments and the Fragment Manager ....................................................................... 125
The Need for UI Flexibility .................................................................................... 126
Introducing Fragments ............................................................................................ 126
Starting CriminalIntent ........................................................................................... 127
Creating a new project ................................................................................... 130
Fragments and the support library .................................................................... 131
Creating the Crime class ................................................................................. 133
Hosting a UI Fragment ........................................................................................... 134
The fragment lifecycle ................................................................................... 134
Two approaches to hosting .............................................................................. 135
Defining a container view ............................................................................... 136
Creating a UI Fragment .......................................................................................... 137
Defining CrimeFragment’s layout ..................................................................... 137
Creating the CrimeFragment class .................................................................... 139
Adding a UI Fragment to the FragmentManager ......................................................... 142
Fragment transactions .................................................................................... 143
The FragmentManager and the fragment lifecycle ............................................... 145
The Reason All Our Activities Will Use Fragments ..................................................... 147
For the More Curious: Developing for Honeycomb, ICS, Jelly Bean, and Beyond .............. 147
8. Creating User Interfaces with Layouts and Widgets .......................................................... 149
Upgrading Crime .................................................................................................. 149
Updating the Layout .............................................................................................. 150
Wiring Widgets ..................................................................................................... 152
More on XML Layout Attributes ............................................................................. 153
Styles, themes, and theme attributes .................................................................. 153
Screen pixel densities and dp and sp ................................................................. 154
Android’s design guidelines ............................................................................ 155
Layout parameters ......................................................................................... 156
Margins vs. padding ...................................................................................... 156
Using the Graphical Layout Tool ............................................................................. 157
Adding a new widget ..................................................................................... 159
Editing attributes in properties ......................................................................... 160
Reorganizing widgets in the outline view ........................................................... 161
Updating child layout parameters ..................................................................... 162
How android:layout_weight works .................................................................... 164
Summary of graphical layout tool .................................................................... 165
Widget IDs and multiple layouts ...................................................................... 165
Challenge: Formatting the Date ............................................................................... 166
9. Displaying Lists with ListFragment ............................................................................... 167
Updating CriminalIntent’s Model Layer ..................................................................... 168
Singletons and centralized data storage .............................................................. 169
Creating a ListFragment ......................................................................................... 170
An Abstract Activity for Hosting a Fragment ............................................................. 171
A generic fragment-hosting layout .................................................................... 172
An abstract Activity class ............................................................................... 172
ListFragment, ListView, and ArrayAdapter ................................................................ 178
Creating an ArrayAdapter<T> ......................................................................... 180
Responding to list item clicks .......................................................................... 183

ptg11078569
Android Programming
x
Customizing List Items .......................................................................................... 184
Creating the list item layout ............................................................................ 184
Creating an adapter subclass ........................................................................... 187
10. Using Fragment Arguments ....................................................................................... 191
Starting an Activity from a Fragment ........................................................................ 191
Putting an extra ............................................................................................ 192
Retrieving an extra ........................................................................................ 193
Updating CrimeFragment’s view with Crime data ................................................ 193
The downside to direct retrieval ....................................................................... 195
Fragment Arguments .............................................................................................. 195
Attaching arguments to a fragment ................................................................... 195
Retrieving arguments ..................................................................................... 196
Reloading the List ................................................................................................. 196
Getting Results with Fragments ............................................................................... 198
11. Using ViewPager ..................................................................................................... 201
Creating CrimePagerActivity ................................................................................... 202
Laying out views in code ................................................................................ 203
ViewPager and PagerAdapter ........................................................................... 204
Integrating CrimePagerActivity ........................................................................ 205
FragmentStatePagerAdapter vs. FragmentPagerAdapter ........................................ 208
For the More Curious: How ViewPager Really Works .................................................. 209
12. Dialogs .................................................................................................................. 211
Creating a DialogFragment ..................................................................................... 213
Showing a DialogFragment ............................................................................. 214
Setting a dialog’s contents .............................................................................. 215
Passing Data Between Two Fragments ...................................................................... 217
Passing data to DatePickerFragment ................................................................. 218
Returning data to CrimeFragment ..................................................................... 220
Challenge: More Dialogs ........................................................................................ 225
13. Audio Playback Using MediaPlayer ............................................................................ 227
Adding Resources ................................................................................................. 228
Defining the layout for HelloMoonFragment .............................................................. 230
Manually resetting the app theme ..................................................................... 231
Creating HelloMoonFragment .................................................................................. 231
Using a Layout Fragment ....................................................................................... 232
Audio Playback .................................................................................................... 233
Wiring buttons to play and stop ....................................................................... 235
Challenge: Pausing Audio Playback .......................................................................... 236
For the More Curious: Playing Video ........................................................................ 236
Challenge: Playing Video in HelloMoon .................................................................... 236
14. Retained Fragments .................................................................................................. 237
Retaining a Fragment ............................................................................................. 237
Rotation and Retained Fragments ............................................................................. 238
Retained Fragments: As Nice as All That? ................................................................. 240
Rotation Handling and onSaveInstanceState(Bundle) .................................................... 241
For the More Curious: Rotation Before Fragments ...................................................... 243
15. Localization ............................................................................................................ 245
Localizing Resources ............................................................................................. 245

ptg11078569
Android Programming
xi
Default resources ........................................................................................... 246
Configuration Qualifiers ......................................................................................... 247
Prioritizing alternative resources ....................................................................... 247
Multiple qualifiers ......................................................................................... 249
Finding the best-matching resources ................................................................. 250
More Resource Rules and Regulations ...................................................................... 251
Resource naming ........................................................................................... 251
Resource directory structure ............................................................................ 251
Testing Alternative Resources .................................................................................. 251
16. The Action Bar ........................................................................................................ 253
Options Menus ..................................................................................................... 253
Defining an options menu in XML ................................................................... 255
Creating the options menu .............................................................................. 257
Responding to options menu selections ............................................................. 260
Enabling Ancestral Navigation ................................................................................. 262
Enabling the app icon .................................................................................... 262
Responding to the Up button ........................................................................... 264
An Alternative Menu Item ...................................................................................... 266
Creating an alternative menu file ...................................................................... 266
Toggling the menu item title ........................................................................... 267
“Just one more thing...” .................................................................................. 268
Challenge: An Empty View for the List ..................................................................... 270
17. Saving and Loading Local Files .................................................................................. 273
Saving and Loading Data in CriminalIntent ................................................................ 273
Saving crime data to a JSON file ..................................................................... 274
Loading crimes from the filesystem .................................................................. 278
Challenge: Use External Storage .............................................................................. 280
For the More Curious: The Android Filesystem and Java I/O ......................................... 280
Accessing files and directories ......................................................................... 281
18. Context Menus and Contextual Action Mode ................................................................ 283
Defining a Context Menu Resource .......................................................................... 284
Implementing a Floating Context Menu ..................................................................... 284
Creating the context menu .............................................................................. 284
Registering for the context menu ...................................................................... 285
Responding to an action ................................................................................. 286
Implementing Contextual Action Mode ..................................................................... 287
Enabling multiple selection ............................................................................. 288
Action mode callbacks in a list view ................................................................. 289
Changing activated item backgrounds ............................................................... 291
Implementing contextual action mode in other views ........................................... 293
Compatibility: Fallback or Duplicate? ....................................................................... 293
Challenge: Deleting from CrimeFragment .................................................................. 294
For the More Curious: ActionBarSherlock ................................................................. 294
Challenge: Using ActionBarSherlock ........................................................................ 296
Basic ABS integration in CriminalIntent ............................................................ 297
More advanced integration .............................................................................. 297
Even more advanced integration ....................................................................... 298
19. Camera I: Viewfinder ............................................................................................... 299

ptg11078569
Android Programming
xii
Creating the Fragment Layout ................................................................................. 300
Creating CrimeCameraFragment .............................................................................. 302
Creating CrimeCameraActivity ................................................................................ 303
Adding activity and camera permissions to the manifest ....................................... 303
Using the Camera API ........................................................................................... 304
Opening and releasing the camera .................................................................... 304
SurfaceView, SurfaceHolder, and Surface ........................................................... 306
Determining preview size ............................................................................... 310
Starting CrimeCameraActivity from CrimeFragment ............................................ 311
For the More Curious: Running Activities from the Command Line ................................ 316
20. Camera II: Taking Pictures and Handling Images ........................................................... 319
Taking a Picture .................................................................................................... 319
Implementing Camera callbacks ....................................................................... 321
Setting the picture size ................................................................................... 324
Passing Data Back to CrimeFragment ....................................................................... 324
Starting CrimeCameraActivity for a result ......................................................... 325
Setting a result in CrimeCameraFragment .......................................................... 326
Retrieving filename in CrimeFragment .............................................................. 327
Updating the Model Layer ...................................................................................... 328
Adding a Photo class ..................................................................................... 329
Giving Crime a photo property ........................................................................ 330
Setting the photo property ............................................................................... 330
Updating CrimeFragment’s View .............................................................................. 331
Adding an ImageView .................................................................................. 332
Image handling ............................................................................................. 334
Showing Larger Image in a DialogFragment .............................................................. 338
Challenge: Crime Image Orientation ......................................................................... 341
Challenge: Deleting Photos ..................................................................................... 341
For the More Curious: Deprecation in Android ........................................................... 342
21. Implicit Intents ........................................................................................................ 345
Adding Buttons ..................................................................................................... 346
Adding a Suspect to the Model Layer ....................................................................... 348
Using a Format String ............................................................................................ 348
Using Implicit Intents ............................................................................................ 350
Parts of an implicit intent ............................................................................... 350
Sending a crime report ................................................................................... 351
Asking Android for a contact .......................................................................... 353
Checking for responding activities .................................................................... 357
Challenge: Another Implicit Intent ........................................................................... 357
22. Two-Pane Master-Detail Interfaces .............................................................................. 359
Adding Layout Flexibility ....................................................................................... 360
Modifying SingleFragmentActivity ................................................................... 361
Creating a layout with two fragment containers ................................................... 361
Using an alias resource .................................................................................. 363
Activity: Fragment Boss ......................................................................................... 365
Fragment callback interfaces ........................................................................... 365
For the More Curious: More on Determining Device Size ............................................. 373
23. More About Intents and Tasks .................................................................................... 375

ptg11078569
Android Programming
xiii
Setting Up NerdLauncher ....................................................................................... 375
Resolving an Implicit Intent .................................................................................... 376
Creating Explicit Intents at Runtime ......................................................................... 379
Tasks and the Back Stack ....................................................................................... 380
Using NerdLauncher as a Home Screen .................................................................... 383
Challenge: Icons, Reordering Tasks .......................................................................... 384
For the More Curious: Processes vs. Tasks ................................................................. 384
24. Styles And Includes ................................................................................................. 387
Setting Up the RemoteControl Project ....................................................................... 388
Setting up RemoteControlActivity .................................................................... 388
Setting up RemoteControlFragment .................................................................. 389
Cleaning Up with Styles ......................................................................................... 392
Finishing the Layout .............................................................................................. 394
For the More Curious: include and merge .................................................................. 397
Challenge: Style Inheritance .................................................................................... 398
25. XML Drawables And 9-Patches .................................................................................. 399
XML Drawables ................................................................................................... 400
State List Drawables .............................................................................................. 402
Layer List and Inset Drawables ................................................................................ 404
Using 9-Patch Images ............................................................................................ 406
26. HTTP & Background Tasks ....................................................................................... 413
Creating PhotoGallery ............................................................................................ 414
Networking Basics ................................................................................................ 417
Asking permission to network ......................................................................... 419
Using AsyncTask to Run on a Background Thread ...................................................... 419
You and Your Main Thread ..................................................................................... 421
Beyond the main thread .................................................................................. 422
Fetching XML From Flickr ..................................................................................... 422
Using XmlPullParser ...................................................................................... 426
From AsyncTask Back to the Main Thread ................................................................ 429
For the More Curious: More on AsyncTask ................................................................ 431
Cleaning Up AsyncTasks ................................................................................ 432
Challenge: Paging ................................................................................................. 433
27. Loopers, Handlers, and HandlerThread ........................................................................ 435
Preparing GridView for Displaying Images ................................................................ 435
Downloading Lots of Small Things .......................................................................... 438
Communicating with the Main Thread ...................................................................... 438
Assembling a Background Thread ............................................................................ 439
Messages and Message Handlers .............................................................................. 441
Message anatomy .......................................................................................... 441
Handler anatomy ........................................................................................... 441
Using handlers .............................................................................................. 442
Passing handlers ............................................................................................ 445
For the More Curious: AsyncTask vs. Threads ............................................................ 449
Challenge: Preloading and Caching .......................................................................... 450
28. Search .................................................................................................................... 451
Searching Flickr .................................................................................................... 451
The Search Dialog ................................................................................................. 453

ptg11078569
Android Programming
xiv
Creating a search interface .............................................................................. 453
Searchable activities ....................................................................................... 455
Hardware search button .................................................................................. 458
How Search works ........................................................................................ 458
Launch modes and new intents ........................................................................ 459
Simple persistence with shared preferences ........................................................ 461
Using SearchView on Post-Android 3.0 ..................................................................... 463
Challenges ........................................................................................................... 465
29. Background Services ................................................................................................ 467
Creating an IntentService ........................................................................................ 467
What Services Are For ........................................................................................... 470
Safe background networking ........................................................................... 470
Looking for New Results ........................................................................................ 471
Delayed Execution with AlarmManager .................................................................... 472
PendingIntent ............................................................................................... 474
Managing alarms with PendingIntent ................................................................ 475
Controlling Your Alarm .......................................................................................... 475
Updating options menu items .......................................................................... 477
Notifications ......................................................................................................... 478
For the More Curious: Service Details ...................................................................... 480
What service does (and does not) do ................................................................. 480
A service’s lifecycle ...................................................................................... 480
Non-sticky services ........................................................................................ 481
Sticky services .............................................................................................. 481
Bound services ............................................................................................. 481
30. Broadcast Intents ..................................................................................................... 485
Waking Up on Boot ............................................................................................... 485
Broadcast receivers in the manifest ................................................................... 486
How to use receivers ...................................................................................... 488
Filtering Foreground Notifications ............................................................................ 489
Sending broadcast intents ............................................................................... 489
Dynamic broadcast receivers ........................................................................... 490
Using private permissions ............................................................................... 492
Receiving results with ordered broadcasts .......................................................... 495
Receivers and Long-running Tasks ........................................................................... 499
31. Browsing The Web & WebView ................................................................................. 501
One Last Bit of Flickr Data .................................................................................... 501
The Easy Way: Implicit Intents ................................................................................ 503
The Harder Way: WebView ..................................................................................... 503
Using WebChromeClient to spruce things up ...................................................... 508
Proper rotation with WebView ......................................................................... 509
For the More Curious: Injecting JavaScript Objects ..................................................... 510
32. Custom Views and Touch Events ................................................................................ 513
Setting Up the DragAndDraw Project ....................................................................... 513
Setting up DragAndDrawActivity ..................................................................... 514
Setting up DragAndDrawFragment ................................................................... 515
Creating a Custom View ......................................................................................... 516
Creating BoxDrawingView .............................................................................. 516

ptg11078569
Android Programming
xv
Handling Touch Events .......................................................................................... 518
Tracking across motion events ......................................................................... 519
Rendering Inside onDraw(…) .................................................................................. 522
Challenge: Rotations .............................................................................................. 524
33. Tracking the Device’s Location .................................................................................. 525
Getting Started with RunTracker ............................................................................. 525
Setting up RunActivity ................................................................................... 526
Setting up RunFragment ................................................................................. 527
Locations and the LocationManager ......................................................................... 528
Receiving Broadcast Location Updates ...................................................................... 531
Updating the UI with Location Data ......................................................................... 532
Faster Answers: the Last Known Location ................................................................. 536
Testing Locations on Real and Virtual Devices ........................................................... 537
34. Local Databases with SQLite ..................................................................................... 541
Storing Runs and Locations in a Database ................................................................. 541
Querying a List of Runs From the Database ............................................................... 548
Displaying a List of Runs Using CursorAdapter .......................................................... 550
Creating New Runs ............................................................................................... 553
Working with Existing Runs .................................................................................... 555
Challenge: Identifying the Current Run ..................................................................... 560
35. Loading Asynchronous Data With Loaders ................................................................... 561
Loaders and the LoaderManager .............................................................................. 561
Using Loaders in RunTracker .................................................................................. 563
Loading the List of Runs ........................................................................................ 563
Loading a Single Run ............................................................................................ 567
Loading the Last Location for a Run ........................................................................ 570
36. Using Maps ............................................................................................................ 573
Adding the Maps API to RunTracker ........................................................................ 573
Use a real device to test maps ......................................................................... 573
Install and use the Google Play services SDK ..................................................... 573
Obtain a Google Maps API key ....................................................................... 574
Update RunTracker’s manifest ......................................................................... 574
Showing the User’s Location on a Map ..................................................................... 575
Displaying a Run’s Path ......................................................................................... 579
Adding Markers for Run Start and Finish .................................................................. 582
Challenge: Live Updates ......................................................................................... 583
37. Afterword ............................................................................................................... 585
The Final Challenge .............................................................................................. 585
Shameless Plugs .................................................................................................... 585
Thank You ........................................................................................................... 585
Index ........................................................................................................................... 587

ptg11078569
This page intentionally left blank

ptg11078569
xvii
Learning Android
As a beginning Android programmer, you face a steep learning curve. Learning Android is like moving
to a foreign city. Even if you speak the language, it will not feel like home at first. Everyone around
you seems to understand things that you are missing. Things you already knew turn out to be dead
wrong in this new context.
Android has a culture. That culture speaks Java, but knowing Java is not enough. Getting your head
around Android requires learning many new ideas and techniques. It helps to have a guide through
unfamiliar territory.
That’s where we come in. At Big Nerd Ranch, we believe that to be an Android programmer, you
must:
•write Android applications
•understand what you are writing
This guide will help you do both. We have trained hundreds of professional Android programmers
using it. We lead you through writing several Android applications, introducing concepts and
techniques as needed. When there are rough spots, when some things are tricky or obscure, you will
face it head on, and we will do our best to explain why things are the way they are.
This approach allows you to put what you have learned into practice in a working app right away rather
than learning a lot of theory and then having to figure out how to apply it all later.
You will come away with the experience and understanding you need to get going as an Android
developer.
Prerequisites
To use this book, you need to be familiar with Java, including classes and objects, interfaces, listeners,
packages, inner classes, anonymous inner classes, and generic classes.
If these ideas do not ring a bell, you will be in the weeds by page 2. Start instead with an introductory
Java book and return to this book afterward. There are many excellent introductory books available, so
you can choose one based on your programming experience and learning style.
If you are comfortable with object-oriented programming concepts, but your Java is a little rusty, you
will probably be okay. We will provide some brief reminders about Java specifics (like interfaces
and anonymous inner classes). Keep a Java reference handy in case you need more support as you go
through the book.
How to Use This Book
This book is not a reference book. Its goal is to get you over the initial hump to where you can get
the most out of the reference and recipe books available. It is based on our five-day class at Big Nerd
Ranch. As such, it is meant to be worked through from the beginning. Chapters build on each other and
skipping around is unproductive.
In our classes, students work through these materials, but they also benefit from the right environment
– a dedicated classroom, good food and comfortable board, a group of motivated peers, and an
instructor to answer questions.

ptg11078569
Learning Android
xviii
As a reader, you want your environment to be similar. That means getting a good night’s rest and
finding a quiet place to work. These things can help, too:
• Start a reading group with your friends or coworkers.
• Arrange to have blocks of focused time to work on chapters.
• Participate in the forum for this book at forums.bignerdranch.com.
• Find someone who knows Android to help you out.
How This Book Is Organized
In this book, you will write eight Android apps. A couple are very simple and take only a chapter to
create. Others are more complex. The longest app spans thirteen chapters. All are designed to teach
you important concepts and techniques and give you direct experience using them.
GeoQuiz In your first app, you will explore the fundamentals of Android projects,
activities, layouts, and explicit intents.
CriminalIntent The largest app in the book, CriminalIntent lets you keep a record of your
colleagues’ lapses around the office. You will learn to use fragments, master-
detail interfaces, list-backed interfaces, menus, the camera, implicit intents,
and more.
HelloMoon In this small shrine to the Apollo program, you will learn more about
fragments, media playback, resources, and localization.
NerdLauncher Building this custom launcher will give you insight into the intent system and
tasks.
RemoteControl In this toy app, you will learn to use styles, state list drawables, and other
tools to create attractive user interfaces.
PhotoGallery A Flickr client that downloads and displays photos from Flickr’s public
feed, this app will take you through services, multithreading, accessing web
services, and more.
DragAndDraw In this simple drawing app, you will learn about handling touch events and
creating custom views.
RunTracker This app lets you track and display on a map your travels around town (or
around the world). In it, you will learn how to use location services, SQLite
databases, loaders, and maps.
Challenges
Most chapters have a section at the end with exercises for you to work through. This is your
opportunity to use what you have learned, explore the documentation, and do some problem-solving on
your own.

ptg11078569
Are you more curious?
xix
We strongly recommend that you do the challenges. Going off the beaten path and finding your way
will solidify your learning and give you confidence with your own projects.
If you get lost, you can always visit forums.bignerdranch.com for some assistance.
Are you more curious?
There are also sections at the ends of chapters labeled “For the More Curious.” These sections offer
deeper explanations or additional information about topics presented in the chapter. The information in
these sections is not absolutely essential, but we hope you will find it interesting and useful.
Code Style
There are three areas where our choices differ from what you might see elsewhere in the Android
community:
We use anonymous inner classes for listeners.
This is mostly a matter of opinion. We find it makes for cleaner code. It puts the listener’s
method implementations right where you want to see them. In high performance contexts,
anonymous inner classes may cause problems, but for most circumstances they work fine.
After we introduce fragments in Chapter7, we use them for all user interfaces.
This is something we feel strongly about. Many Android developers still write activity-based
code. We would like to challenge that practice. Once you get comfortable with fragments, they
are not that difficult to work with. Fragments have clear advantages over activities that make
them worth the effort, including flexibility in building and presenting your user interfaces.
We write apps to be compatible with Gingerbread and Froyo devices.
The Android platform has changed with the introduction of Ice Cream Sandwich and Jelly
Bean and soon Key Lime Pie. However, the truth is that half of devices in use still run Froyo
or Gingerbread. (You will learn about the different and deliciously-named Android versions in
Chapter6.)
Therefore, we intentionally take you through the difficulties involved in writing apps that
are backwards-compatible with Froyo or at least Gingerbread. It is easier to learn, teach, and
program in Android if you start with the latest platform. But we want you to be able to develop
in the real world where Gingerbread phones still make up more than 40% of devices.
Typographical Conventions
To make this book easier to read, certain items appear in certain fonts. Variables, constants, and types
appear in a fixed-width font. Class names, interface names, and method names appear in a bold, fixed-
width font.

ptg11078569
Learning Android
xx
All code and XML listings will be in a fixed-width font. Code or XML that you need to type
in is always bold. Code or XML that should be deleted is struck through. For example, in the
following method implementation, you are deleting the call to makeText(…) and adding the call to
checkAnswer(true).
@Override
public void onClick(View v) {
Toast.makeText(QuizActivity.this, R.string.incorrect_toast,
Toast.LENGTH_SHORT).show();
checkAnswer(true);
}
Android Versions
This book teaches Android development for all widely-used versions of Android. As of this writing,
that is Android 2.2 (Froyo) - Android 4.2 (Jelly Bean). As Android releases new versions, we will
keep track of changes at forums.bignerdranch.com and offer notes on using this book with the latest
version.
The Necessary Tools
To get started, you will need the ADT (Android Developer Tools) Bundle. This includes:
Eclipse
an integrated development environment used for Android development. Because Eclipse is
also written in Java, you can install it on a PC, a Mac, or a Linux computer. The Eclipse user
interface follows the “native look-and-feel” of your machine, so your screen may not look
exactly like screenshots in this book.
Android Developer Tools
a plug-in for Eclipse. This book uses ADT (Android Developer Tools) 21.1. You should make
sure you have that version or higher.
Android SDK
the latest version of the Android SDK
Android SDK tools and platform-tools
tools for debugging and testing your apps
A system image for the Android emulator
lets you create and test your apps on different virtual devices
Downloading and installing the ADT Bundle
The ADT Bundle is available from Android’s developer site as a single zip file.
1. Download the bundle from http://developer.android.com/sdk/index.html.
ptg11078569
Downloading earlier SDK versions
xxi
2. Extract the zip file to where you want Eclipse and the other tools installed.
3. In the extracted files, find and open the eclipse directory and launch Eclipse.
If you are running on Windows, and Eclipse will not start, you may need to install the Java
Development Kit (JDK6), which you can download from www.oracle.com.
If you are still having problems, return to http://developer.android.com/sdk/index.html for more
information.
Downloading earlier SDK versions
The ADT Bundle provides the SDK and the emulator system image from the latest platform. However,
you will need other platforms to test your apps on earlier versions of Android.
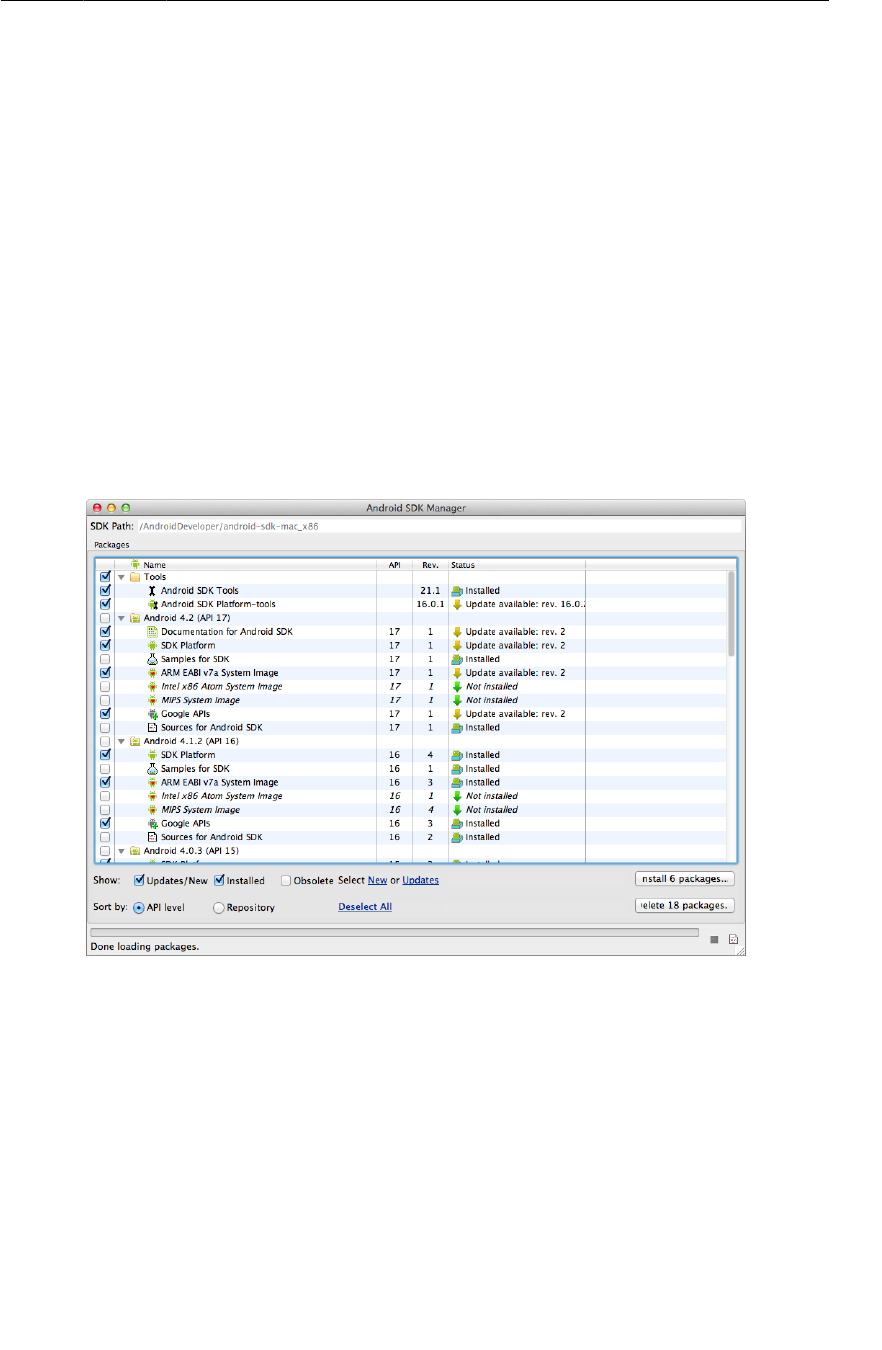
You can get components for each platform using the Android SDK Manager. In Eclipse, select Window
→ Android�SDK�Manager.
Figure 1Android SDK Manager
For every version going back to Android 2.2 (Froyo), we recommend selecting and installing:
• the SDK�Platform
•an�emulator�system�image
• the Google�APIs
Note that downloading these components may take a while.

ptg11078569
Learning Android
xxii
The Android SDK Manager is also how to get Android’s latest releases, like a new platform or an
update of the tools.
A hardware device
The emulator is useful for testing apps. However, it is good to have an actual Android device to run
apps on as well. The last app in the book will require a hardware device.
ptg11078569
1
1
Your First Android Application
This first chapter is full of new concepts and moving parts required to build an Android application. It
is OK if you do not understand everything by the end of this chapter. You will be revisiting these ideas
again and in greater detail as you proceed through the book.
The application you are going to create is called GeoQuiz. GeoQuiz tests the user’s knowledge of
geography. The user presses True or False to answer the question on screen, and GeoQuiz provides
instant feedback.
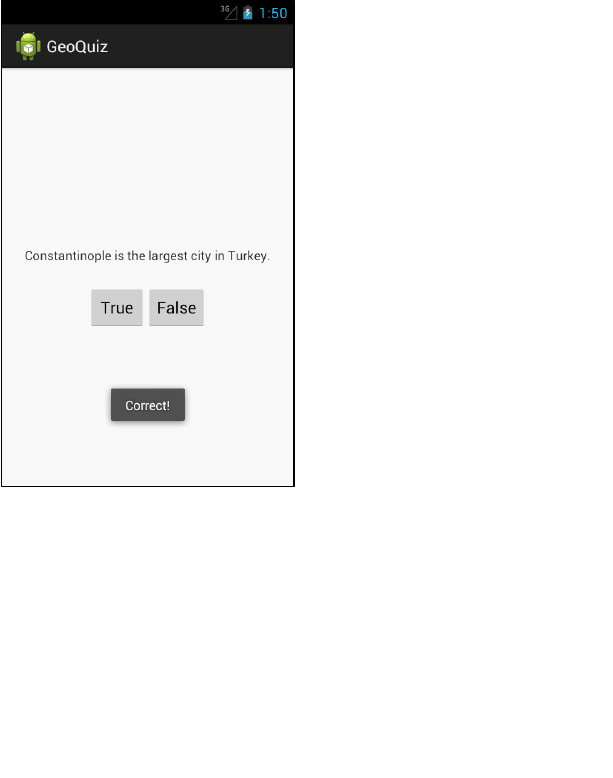
Figure1.1 shows the result of a user pressing the False button:
Figure 1.1(It’s Istanbul, not Constantinople)
ptg11078569
Chapter 1Your First Android Application
2
App Basics
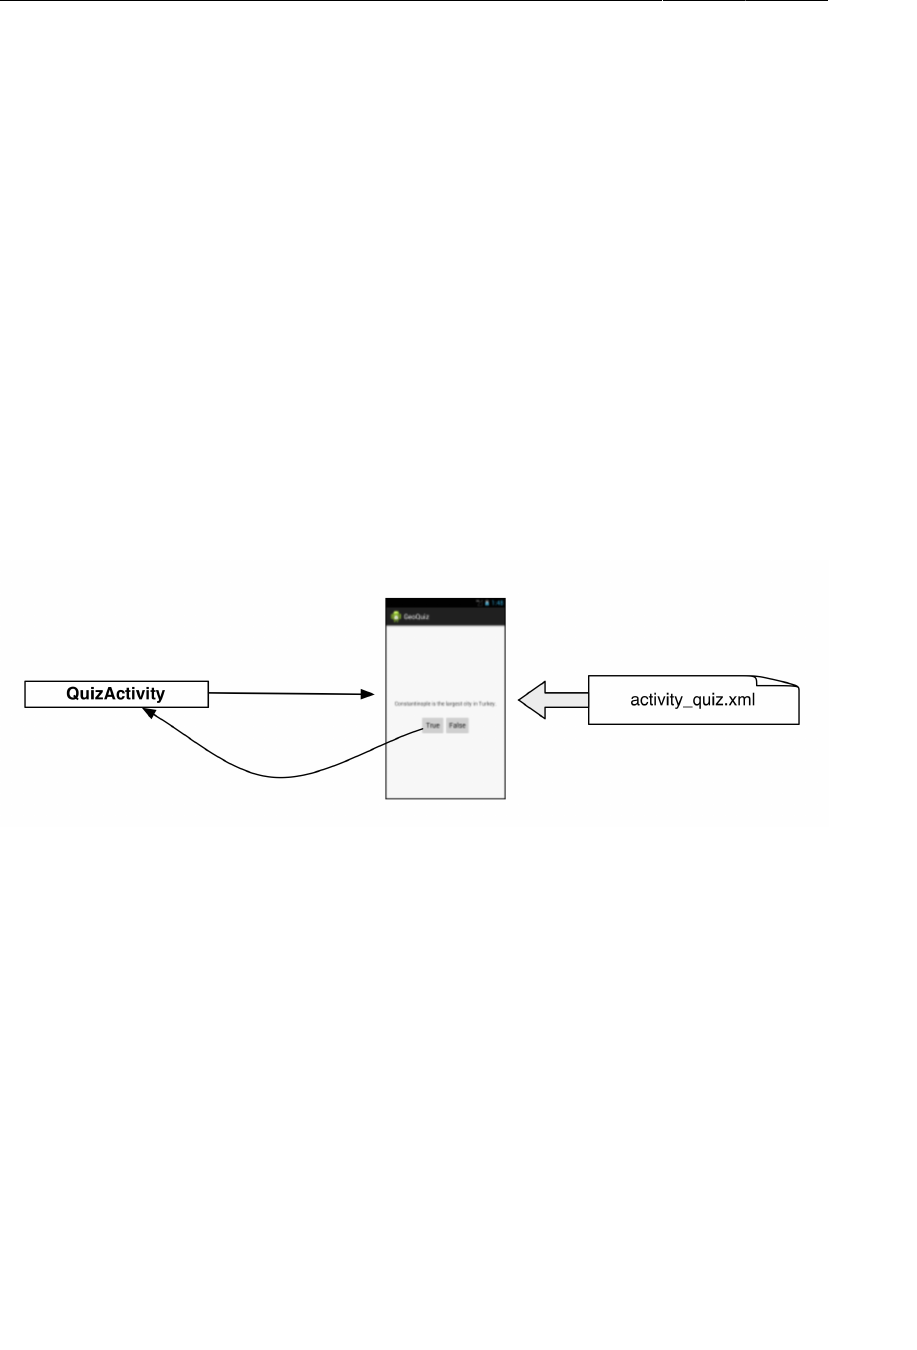
Your GeoQuiz application will consist of an activity and a layout:
• An activity is an instance of Activity, a class in the Android SDK. An activity is responsible for
managing user interaction with a screen of information.
You write subclasses of Activity to implement the functionality that your app requires. A simple
application may need only one subclass; a complex application can have many.
GeoQuiz is a simple app, so it will have a single Activity subclass named QuizActivity.
QuizActivity will manage the user interface shown in Figure1.1.
• A layout defines a set of user interface objects and their position on the screen. A layout is made
up of definitions written in XML. Each definition is used to create an object that appears on
screen, like a button or some text.
GeoQuiz will include a layout file named activity_quiz.xml. The XML in this file will define
the user interface shown in Figure1.1.
The relationship between QuizActivity and activity_quiz.xml is diagrammed in Figure1.2.
Figure 1.2QuizActivity manages what activity_quiz.xml defines
With those ideas in mind, let’s build an app.
ptg11078569
Creating an Android Project
3
Creating an Android Project
The first step is to create an Android project. An Android project contains the files that make up an
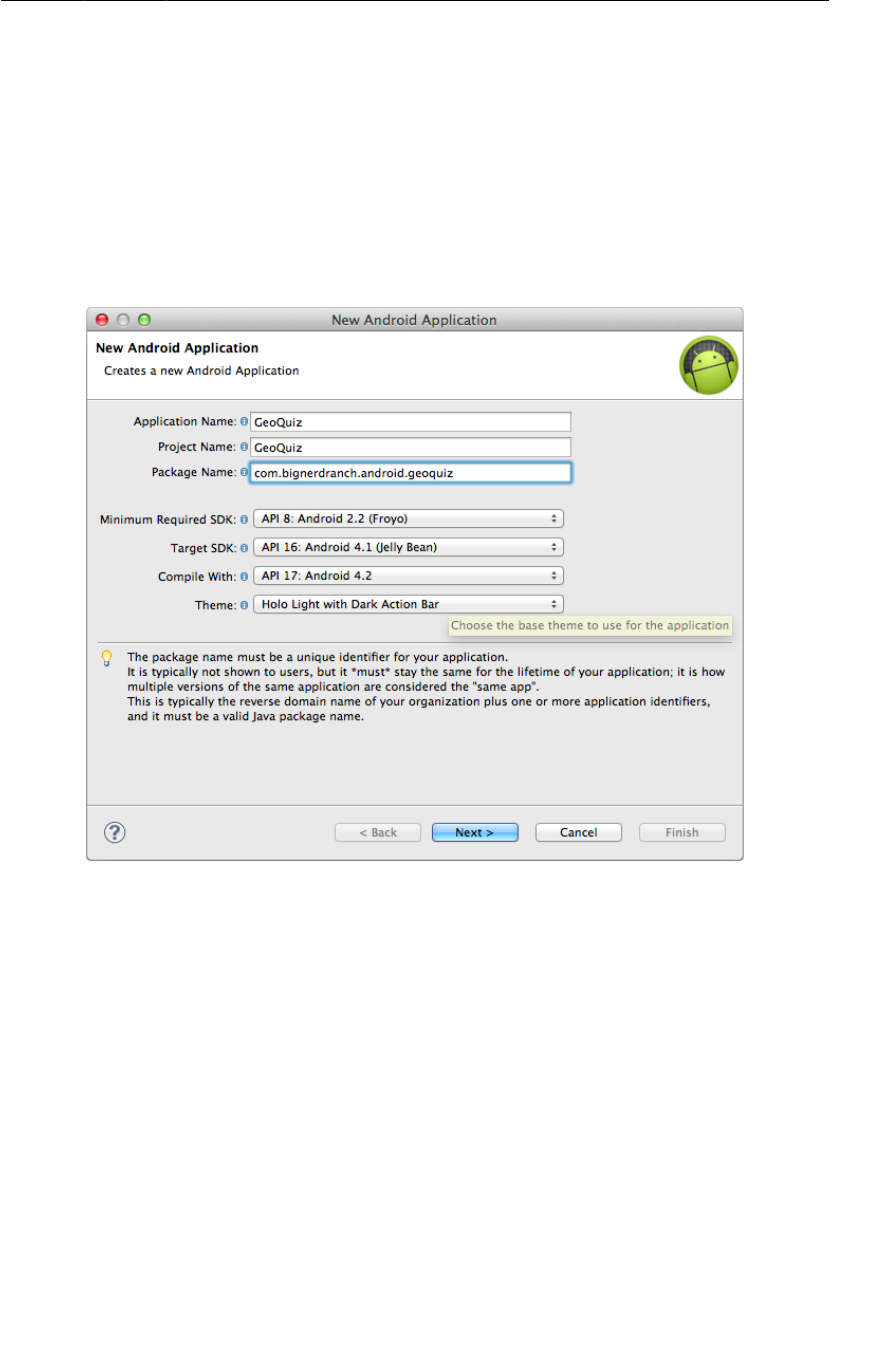
application. To create a new project, open Eclipse and choose File → New → Android�Application
Project to open the new application wizard.
In the first dialog, enter GeoQuiz as the application name (Figure1.3). The project
name will automatically update to match the application’s. For the package name, enter
com.bignerdranch.android.geoquiz.
Figure 1.3Creating a new application
Notice that the package name you entered uses a “reverse DNS” convention in which the domain name
of your organization is reversed and suffixed with further identifiers. This convention keeps package
names unique and distinguishes applications from each other on a device and on Google Play.
The next four fields configure your application to work with different versions of Android. The default
settings are what you need for GeoQuiz, so you can ignore these for now. You will learn about the
different versions of Android in Chapter6.
Android updates its tools several times a year, so your wizard may look slightly different from what we
are showing you. This is usually not a problem; the choices to make should stay pretty much the same.
(If your wizard looks very different, then the tools have changed more drastically. Do not panic. Head
to this book’s forum at forums.bignerdranch.com, and we will help you navigate the latest version.)
Click Next.

ptg11078569
Chapter 1Your First Android Application
6
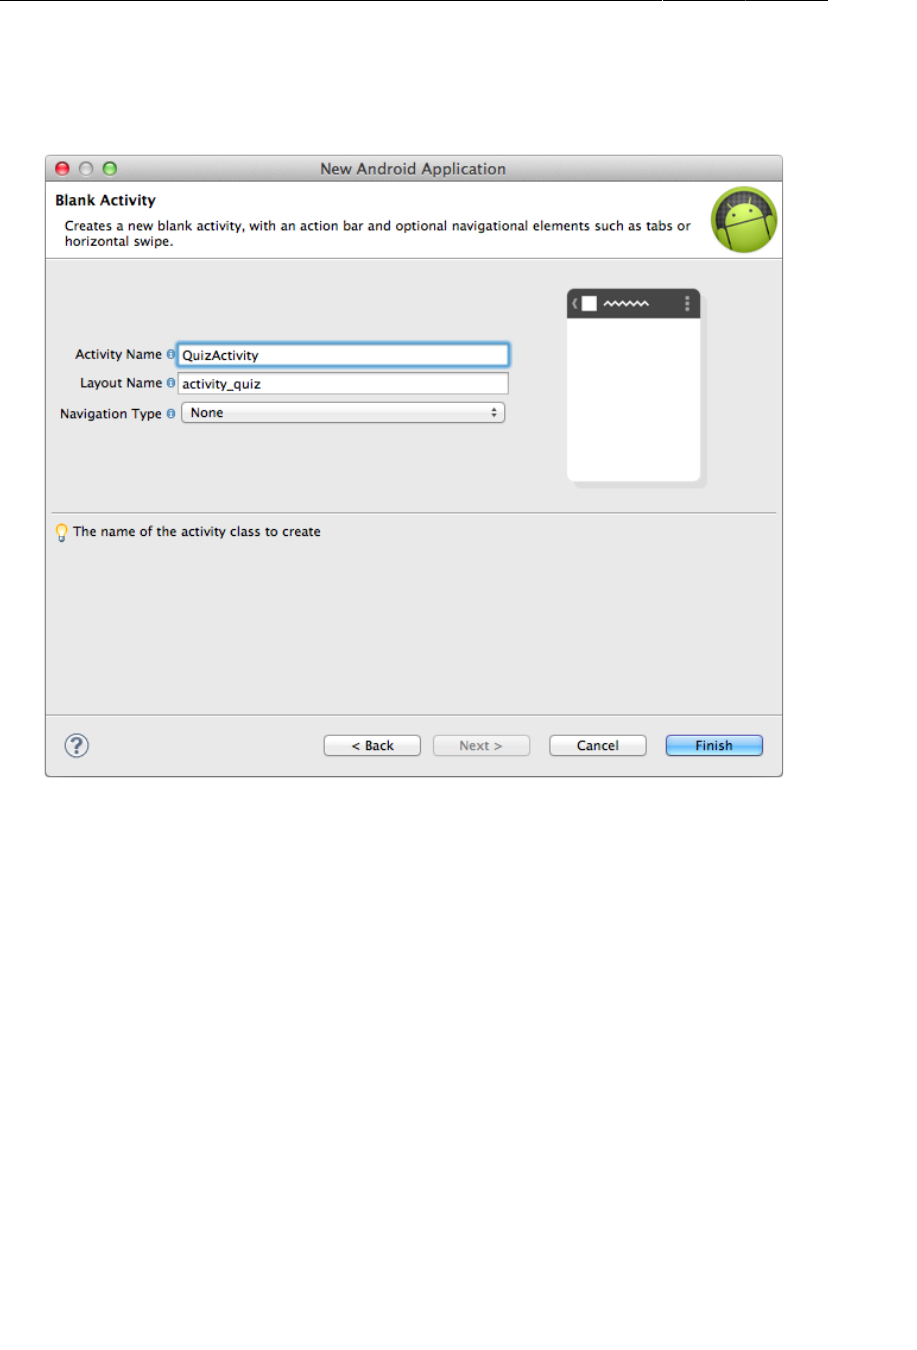
In the final dialog of this wizard, name the activity subclass QuizActivity (Figure1.6). Notice the
Activity suffix on the class name. This is not required, but it is an excellent convention to follow.
Figure 1.6Configuring the new activity
The layout name will automatically update to activity_quiz to reflect the activity’s new name. The
layout name reverses the order of the activity name, is all lowercase, and has underscores between
words. This naming style is recommended for layouts as well as other resources that you will learn
about later.
Leave Navigation�Type as None and click Finish. Eclipse will create and open your new project.
ptg11078569
Navigating in Eclipse
7
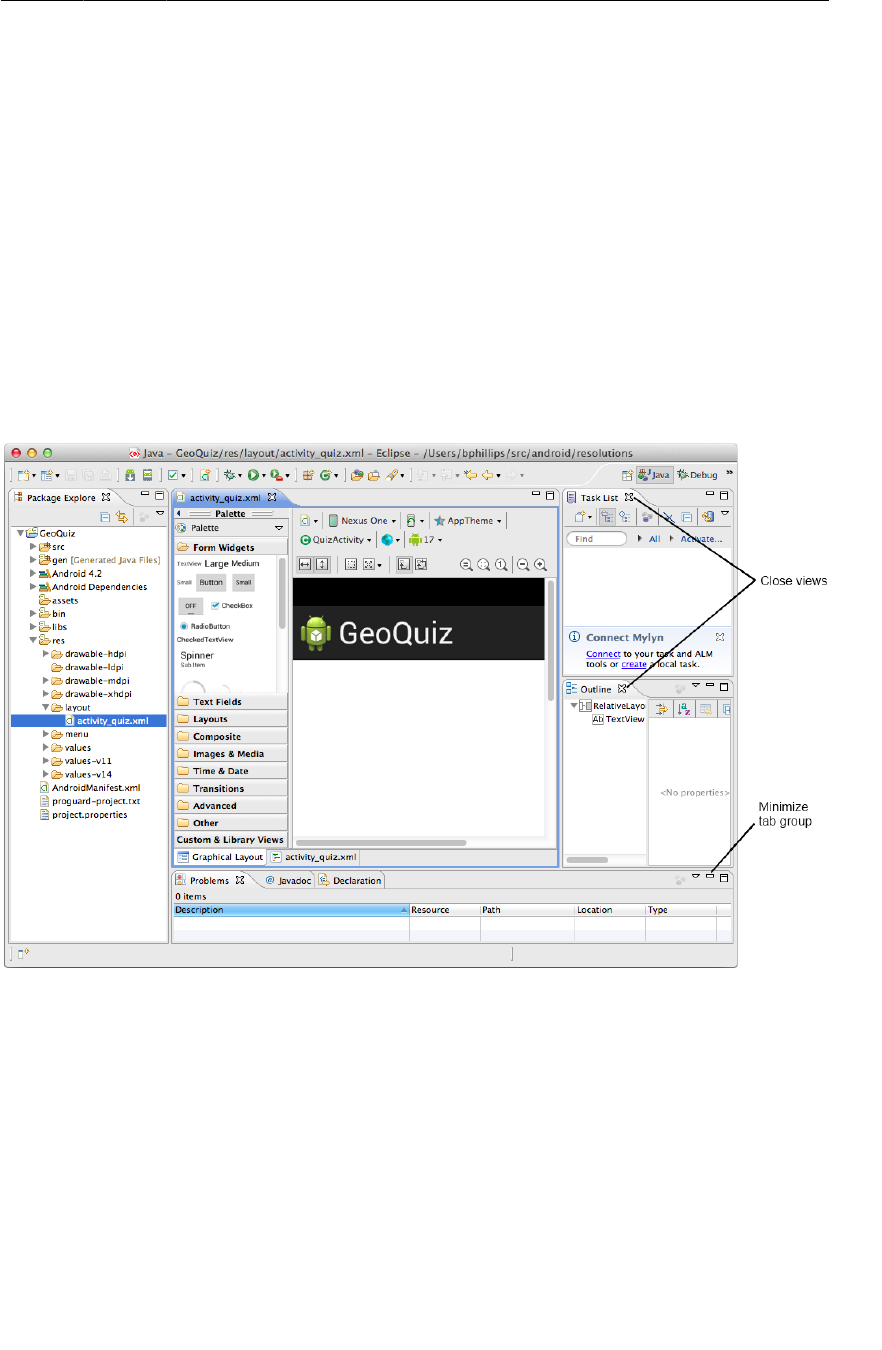
Navigating in Eclipse
Eclipse opens your project in the workbench window, as shown in Figure1.7. (If you have a brand-new
installation, close Eclipse’s welcome screen to reveal the workbench window.)
The different panes of the workbench window are called views.
The lefthand view is the package explorer. From the package explorer, you can manage the files
associated with your project.
The middle view is the editor. To get you started, Eclipse has opened activity_quiz.xml in the editor.
There are also views on the righthand side and the bottom of the workbench. Close any views on the
righthand side by clicking the x next to the view’s name (Figure1.7). The views at the bottom are in a
tab group. Instead of closing these views, minimize the entire tab group using the control at the group’s
top-right corner.
Figure 1.7Uncluttering the workbench window
When you minimize a view, it is corralled into a toolbar on the margin of the Eclipse workbench. You
can mouse over any of the small icons in these toolbars to see the names of the views and click on any
icon to restore that view.

ptg11078569
Chapter 1Your First Android Application
8
Laying Out the User Interface
By default, Eclipse opened activity_quiz.xml in Android’s graphical layout tool, which shows you
a preview of the layout. The graphical layout tool can be useful, but for now you are going to work in
XML to get a better understanding of how layouts work.
To get to the raw XML, select the tab at the bottom of the editor labeled activity_quiz.xml.
Currently, activity_quiz.xml defines the default activity layout. The defaults change frequently, but
the XML will look something like Listing 1.1.
Listing 1.1Default activity layout (activity_quiz.xml)
<RelativeLayout xmlns:android="http://schemas.android.com/apk/res/android"
xmlns:tools="http://schemas.android.com/tools"
android:layout_width="match_parent"
android:layout_height="match_parent"
tools:context=".QuizActivity" >
<TextView
android:layout_width="wrap_content"
android:layout_height="wrap_content"
android:layout_centerHorizontal="true"
android:layout_centerVertical="true"
android:text="@string/hello_world" />
</RelativeLayout>
First, notice that activity_quiz.xml does not start with a line declaring its version and encoding:
<?xml version="1.0" encoding="utf-8"?>
As of ADT 21, this line is no longer required in Android layout files. However, you will still see it in
many cases.
The default activity layout defines two widgets: a RelativeLayout and a TextView.
Widgets are the building blocks you use to compose a user interface. A widget can show text or
graphics, interact with the user, or arrange other widgets on the screen. Buttons, text input controls, and
check boxes are all types of widgets.
The Android SDK includes many widgets that you can configure to get the appearance and behavior
you want. Every widget is an instance of the View class or one of its subclasses (such as TextView or
Button).
Figure1.8 shows how the RelativeLayout and TextView defined in Listing 1.1 would appear on
screen.
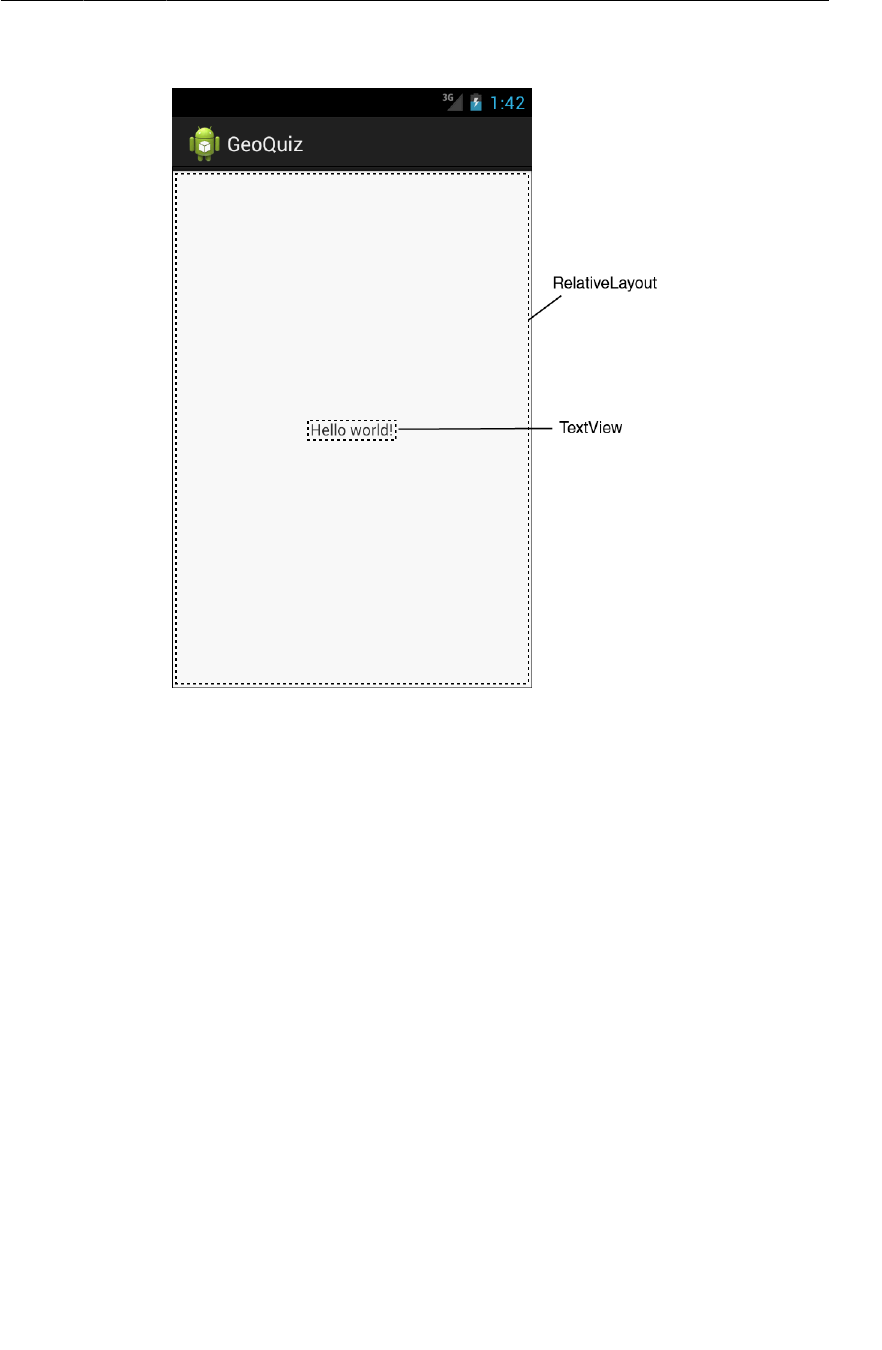
ptg11078569
Laying Out the User Interface
9
Figure 1.8Default widgets as seen on screen
But these are not the widgets you are looking for. The interface for QuizActivity requires five
widgets:
• a vertical LinearLayout
• a TextView
• a horizontal LinearLayout
• two Buttons
Figure1.9 shows how these widgets compose QuizActivity’s interface.
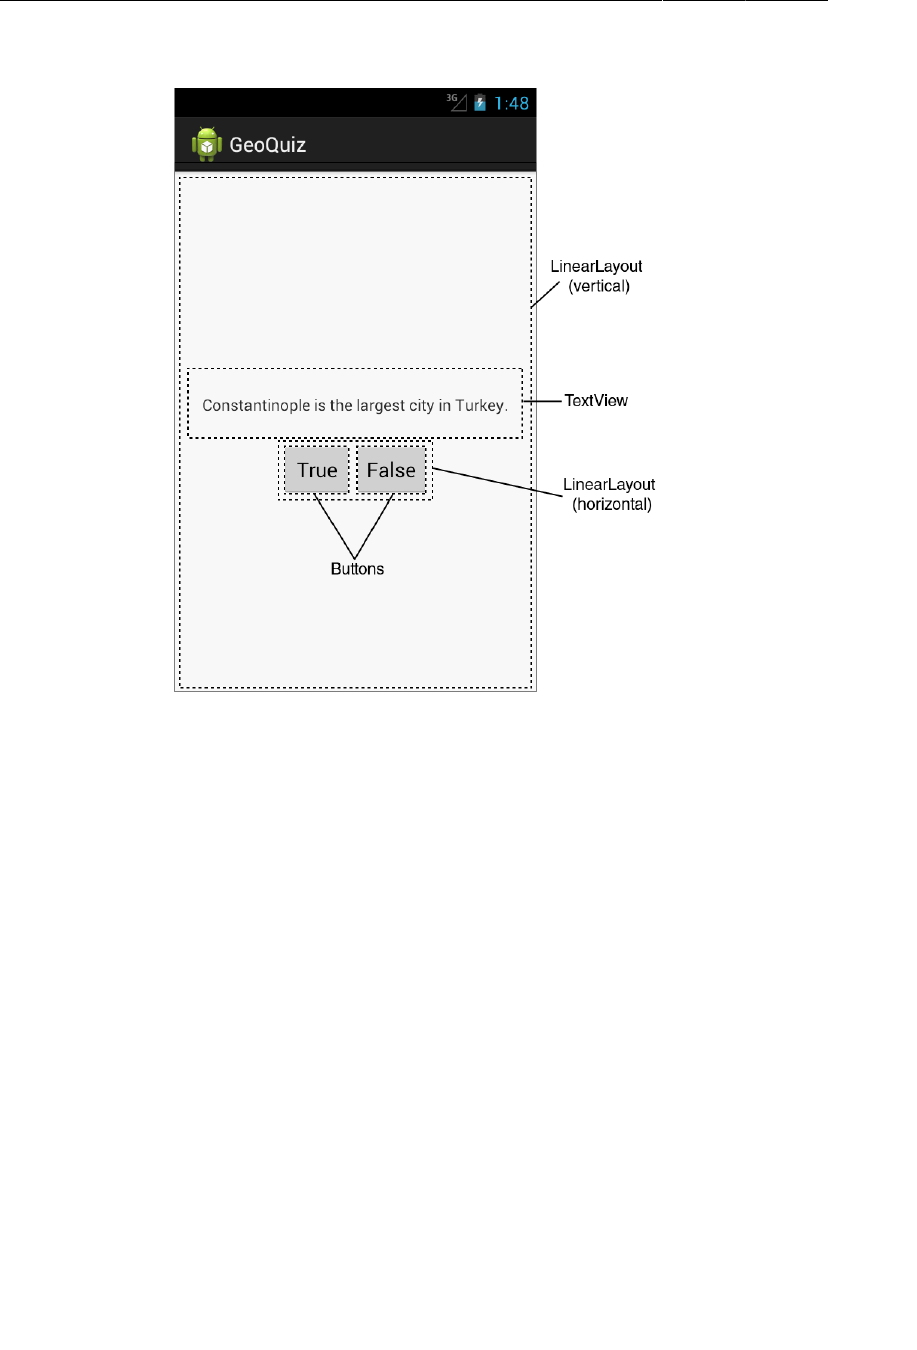
ptg11078569
Chapter 1Your First Android Application
10
Figure 1.9Planned widgets as seen on screen
Now you need to define these widgets in activity_quiz.xml.
In activity_quiz.xml, make the changes shown in Listing 1.2. The XML that you need to delete
is struck through, and the XML that you need to add is in a bold font. This is the pattern we will use
throughout the book.
Do not worry about understanding what you are typing; you will learn how it works next. However, do
be careful. Layout XML is not validated, and typos will cause problems sooner or later.
Depending on your version of the tools, you might get errors on the three lines that start with
android:text. Ignore these errors for now; you will fix them soon.

ptg11078569
Laying Out the User Interface
11
Listing 1.2Defining widgets in XML (activity_quiz.xml)
<RelativeLayout xmlns:android="http://schemas.android.com/apk/res/android"
xmlns:tools="http://schemas.android.com/tools"
android:layout_width="match_parent"
android:layout_height="match_parent"
tools:context=".QuizActivity" >
<TextView
android:layout_width="wrap_content"
android:layout_height="wrap_content"
android:layout_centerHorizontal="true"
android:layout_centerVertical="true"
android:text="@string/hello_world" />
</RelativeLayout>
<LinearLayout xmlns:android="http://schemas.android.com/apk/res/android"
android:layout_width="match_parent"
android:layout_height="match_parent"
android:gravity="center"
android:orientation="vertical" >
<TextView
android:layout_width="wrap_content"
android:layout_height="wrap_content"
android:padding="24dp"
android:text="@string/question_text" />
<LinearLayout
android:layout_width="wrap_content"
android:layout_height="wrap_content"
android:orientation="horizontal" >
<Button
android:layout_width="wrap_content"
android:layout_height="wrap_content"
android:text="@string/true_button" />
<Button
android:layout_width="wrap_content"
android:layout_height="wrap_content"
android:text="@string/false_button" />
</LinearLayout>
</LinearLayout>
Compare your XML with the user interface shown in Figure1.9. Every widget has a corresponding
XML element. The name of the element is the type of the widget.
Each element has a set of XML attributes. Each attribute is an instruction about how the widget should
be configured.
To understand how the elements and attributes work, it helps to look at the layout from a hierarchical
perspective.
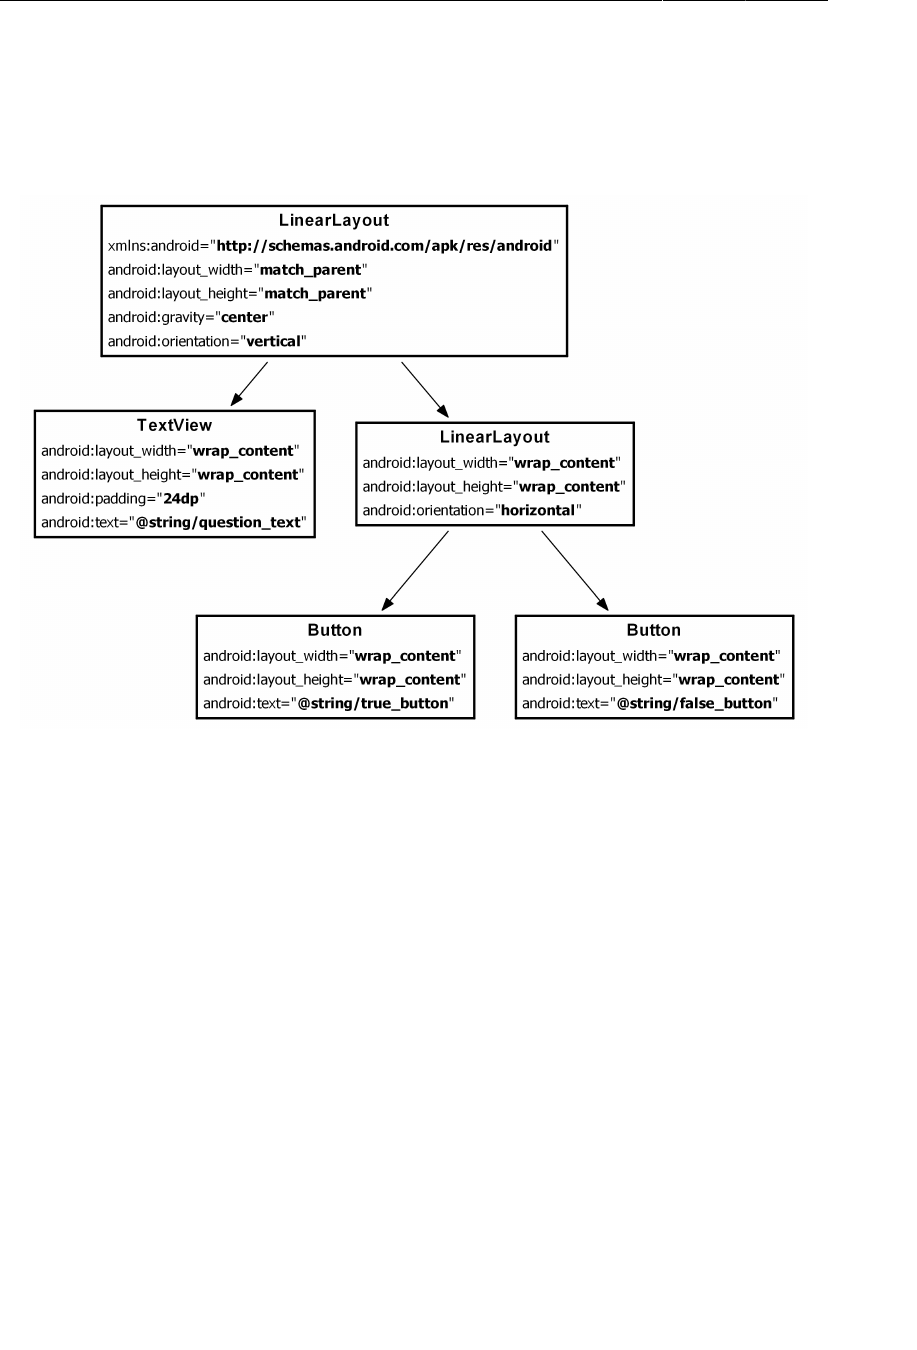
ptg11078569
Chapter 1Your First Android Application
12
The view hierarchy
Your widgets exist in a hierarchy of View objects called the view hierarchy. Figure1.10 shows the view
hierarchy that corresponds to the XML in Listing 1.2.
Figure 1.10Hierarchical layout of widgets and attributes
The root element of this layout’s view hierarchy is a LinearLayout. As the root element, the
LinearLayout must specify the Android resource XML namespace at http://schemas.android.com/
apk/res/android.
LinearLayout inherits from a subclass of View named ViewGroup. A ViewGroup is a widget that
contains and arranges other widgets. You use a LinearLayout when you want widgets arranged
in a single column or row. Other ViewGroup subclasses are FrameLayout, TableLayout, and
RelativeLayout.
When a widget is contained by a ViewGroup, that widget is said to be a child of the ViewGroup. The
root LinearLayout has two children: a TextView and another LinearLayout. The child LinearLayout
has two Button children of its own.
Widget attributes
Let’s go over some of the attributes that you have used to configure your widgets:

ptg11078569
Widget attributes
13
android:layout_width and android:layout_height
The android:layout_width and android:layout_height attributes are required for almost every type
of widget. They are typically set to either match_parent or wrap_content:
match_parent view will be as big as its parent
wrap_content view will be as big as its contents require
(You may see fill_parent in some places. This deprecated value is equivalent to match_parent.)
For the root LinearLayout, the value of both the height and width attributes is match_parent. The
LinearLayout is the root element, but it still has a parent – the view that Android provides for your
app’s view hierarchy to live in.
The other widgets in your layout have their widths and heights set to wrap_content. You can see in
Figure1.9 how this determines their sizes.
The TextView is slightly larger than the text it contains due to its android:padding="24dp" attribute.
This attribute tells the widget to add the specified amount of space to its contents when determining its
size. You are using it to get a little breathing room between the question and the buttons. (Wondering
about the dp units? These are density-independent pixels that you will learn about in Chapter8.)
android:orientation
The android:orientation attribute on the two LinearLayout widgets determines whether
their children will appear vertically or horizontally. The root LinearLayout is vertical; its child
LinearLayout is horizontal.
The order in which children are defined determines the order in which they appear on screen. In a
vertical LinearLayout, the first child defined will appear topmost. In a horizontal LinearLayout, the
first child defined will be leftmost. (Unless the language of the device is a language that runs right-to-
left, such as Arabic or Hebrew. In that case, the first child will be rightmost.)
android:text
The TextView and Button widgets have android:text attributes. This attribute tells the widget what
text to display.
Notice that the values of these attributes are not literal strings. They are references to string resources.
A string resource is a string that lives in a separate XML file called a strings file. You can give a widget
a hard-coded string, like android:text="True", but it is usually not a good idea. Placing strings into a
separate file and then referencing them is better. In Chapter15, you will see how using string resources
makes localization easy.
The string resources you are referencing in activity_quiz.xml do not exist yet. Let’s fix that.

ptg11078569
Chapter 1Your First Android Application
14
Creating string resources
Every project includes a default strings file named strings.xml.
In the package explorer, find the res/values directory, reveal its contents, and open strings.xml.
Ignore the graphical interface and select the strings.xml tab at the bottom of the editor.
The template has already added a few string resources for you. Remove the unused string named
hello_world and add the three new strings that your layout requires.
Listing 1.3Adding string resources (strings.xml)
<?xml version="1.0" encoding="utf-8"?>
<resources>
<string name="app_name">GeoQuiz</string>
<string name="hello_world">Hello, world!</string>
<string name="question_text">Constantinople is the largest city in Turkey.</string>
<string name="true_button">True</string>
<string name="false_button">False</string>
<string name="menu_settings">Settings</string>
</resources>
(Do not delete the menu_settings string. Your project came with a menu already prepared. Deleting
menu_settings will cause cascading errors in other files related to the menu.)
Now whenever you refer to @string/false_button in any XML file in the GeoQuiz project, you will
get the literal string “False” at runtime.
Save strings.xml. If you had errors in activity_quiz.xml about the missing string resources, they
should now be gone. (If you still have errors, check both files for typos.)
The default strings file is named strings.xml, but you can name a strings file anything you want.
You can also have multiple strings files in a project. As long as the file is located in res/values/, has
a resources root element, and contains child string elements, your strings will be found and used
appropriately.
Previewing the layout
Your layout is now complete, and you can preview the layout in the graphical layout tool. First,
make sure that your files are saved and error-free. Then return to activity_quiz.xml and select the
Graphical�Layout tab at the bottom of the editor.
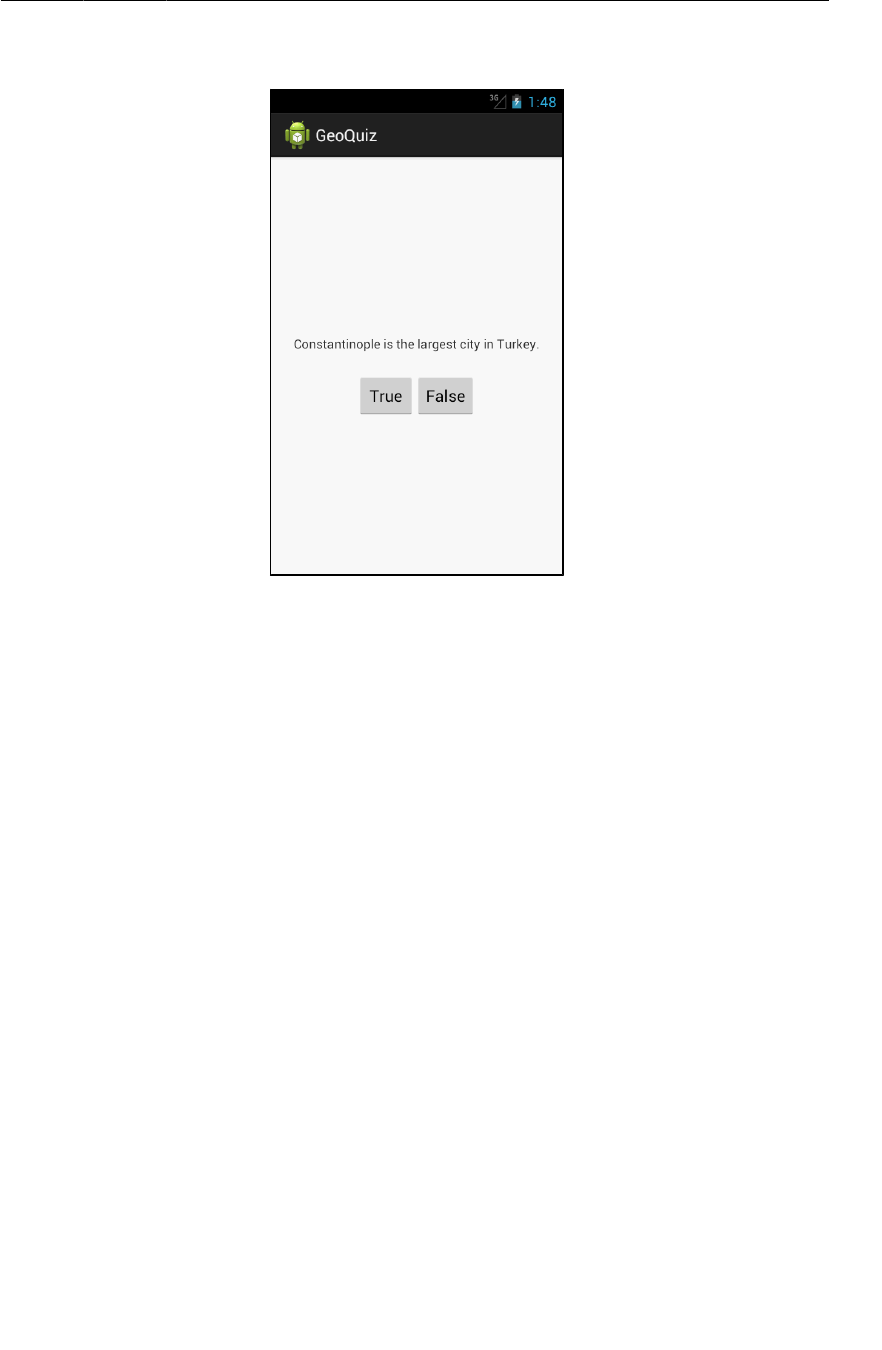
ptg11078569
From Layout XML to View Objects
15
Figure 1.11Preview in graphical layout tool (activity_quiz.xml)
From Layout XML to View Objects
How do XML elements in activity_quiz.xml become View objects? The answer starts in the
QuizActivity class.
When you created the GeoQuiz project, a subclass of Activity named QuizActivity was created for
you. The class file for QuizActivity is in the src directory of your project. The src directory is where
the Java code for your project lives.
In the package explorer, reveal the contents of the src directory and then the contents of the
com.bignerdranch.android.geoquiz package. Open the QuizActivity.java file and take a look at
its contents (Listing 1.4).

ptg11078569
Chapter 1Your First Android Application
16
Listing 1.4Default class file for QuizActivity (QuizActivity.java)
package com.bignerdranch.android.geoquiz;
import android.app.Activity;
import android.os.Bundle;
import android.view.Menu;
public class QuizActivity extends Activity {
@Override
public void onCreate(Bundle savedInstanceState) {
super.onCreate(savedInstanceState);
setContentView(R.layout.activity_quiz);
}
@Override
public boolean onCreateOptionsMenu(Menu menu) {
getMenuInflater().inflate(R.menu.activity_quiz, menu);
return true;
}
}
(If you are not seeing all of the import statements, click the ⊕ symbol to the left of the first import
statement to reveal the others.)
This file has two Activity methods: onCreate(Bundle) and onCreateOptionsMenu(Menu).
Ignore onCreateOptionsMenu(Menu) for now. You will return to menus in detail in Chapter16.
The onCreate(Bundle) method is called when an instance of the activity subclass is created. When an
activity is created, it needs a user interface to manage. To get the activity its user interface, you call the
following Activity method:
public void setContentView(int layoutResID)
This method inflates a layout and puts it on screen. When a layout is inflated, each widget in the layout
file is instantiated as defined by its attributes. You specify which layout to inflate by passing in the
layout’s resource ID.
Resources and resource IDs
A layout is a resource. A resource is a piece of your application that is not code – things like image
files, audio files, and XML files.
Resources for your project live in a subdirectory of the res directory. In the package explorer, you can
see that activity_quiz.xml lives in res/layout/. Your strings file, which contains string resources,
lives in res/values/.
To access a resource in code, you use its resource ID. The resource ID for your layout is
R.layout.activity_quiz.
To see the current resource IDs for GeoQuiz, go to the package explorer and reveal the contents of the
gen directory. Find and open R.java. Because this file is generated by the Android build process, you
should not change it, as you are subtly warned at the top of the file.

ptg11078569
Resources and resource IDs
17
Listing 1.5Current GeoQuiz resource IDs (R.java)
/* AUTO-GENERATED FILE. DO NOT MODIFY.
...
*/
package com.bignerdranch.android.geoquiz;
public final class R {
public static final class attr {
}
public static final class drawable {
public static final int ic_launcher=0x7f020000;
}
public static final class id {
public static final int menu_settings=0x7f070003;
}
public static final class layout {
public static final int activity_quiz=0x7f030000;
}
public static final class menu {
public static final int activity_quiz=0x7f060000;
}
public static final class string {
public static final int app_name=0x7f040000;
public static final int false_button=0x7f040003;
public static final int menu_settings=0x7f040006;
public static final int question_text=0x7f040001;
public static final int true_button=0x7f040002;
}
...
}
This is where the R.layout.activity_quiz comes from – it is an integer constant named
activity_quiz within the layout inner class of R.
Your strings also have resource IDs. You have not yet referred to a string in code, but if you did, it
would look like this:
setTitle(R.string.app_name);
Android generated a resource ID for the entire layout and for each string, but it did not generate IDs for
the individual widgets in activity_quiz.xml. Not every widget needs a resource ID. In this chapter,
you will only interact with the two buttons in code, so only they need resource IDs.
To generate a resource ID for a widget, you include an android:id attribute in the widget’s definition.
In activity_quiz.xml, add an android:id attribute to each button.

ptg11078569
Chapter 1Your First Android Application
18
Listing 1.6Adding IDs to buttons (activity_quiz.xml)
<LinearLayout xmlns:android="http://schemas.android.com/apk/res/android"
... >
<TextView
android:layout_width="wrap_content"
android:layout_height="wrap_content"
android:padding="24dp"
android:text="@string/question_text" />
<LinearLayout
android:layout_width="wrap_content"
android:layout_height="wrap_content"
android:orientation="horizontal">
<Button
android:id="@+id/true_button"
android:layout_width="wrap_content"
android:layout_height="wrap_content"
android:text="@string/true_button" />
<Button
android:id="@+id/false_button"
android:layout_width="wrap_content"
android:layout_height="wrap_content"
android:text="@string/false_button" />
</LinearLayout>
</LinearLayout>
Notice that there is a + sign in the values for android:id but not in the values for android:text. This
is because you are creating the IDs and only referencing the strings.
Save activity_quiz.xml. Return to R.java to confirm that you have two new resource IDs in the R.id
inner class.
Listing 1.7New resource IDs (R.java)
public final class R {
...
public static final class id {
public static final int false_button=0x7f070001;
public static final int menu_settings=0x7f070002;
public static final int true_button=0x7f070000;
}
...
Wiring Up Widgets
Now that the buttons have resource IDs, you can access them in QuizActivity. The first step is to add
two member variables.

ptg11078569
Organizing imports
19
Type the following code into QuizActivity.java. (Do not use auto-complete; type it in yourself.)
After you save the file, it will report two errors.
Listing 1.8Adding member variables (QuizActivity.java)
public class QuizActivity extends Activity {
private Button mTrueButton;
private Button mFalseButton;
@Override
public void onCreate(Bundle savedInstanceState) {
super.onCreate(savedInstanceState);
setContentView(R.layout.activity_quiz);
}
...
}
You will fix the errors in just a second. First, notice the m prefix on the two member (instance) variable
names. This prefix is an Android naming convention that we will follow throughout this book.
Now mouse over the error flags to the left of the code. They report the same problem: Button�cannot�be
resolved�to�a�type.
These errors are telling you that you need to import the android.widget.Button class into
QuizActivity.java. You could type the following import statement at the top of the file:
import android.widget.Button;
Or you can do it the easy way and organize your imports.
Organizing imports
When you organize imports, you ask Eclipse to look at your code and determine what you need from
the Java and Android SDKs. It imports what you need and removes any previously imported classes
that you are no longer using.
To organize your imports, press:
• Command+Shift+O for Mac
• Ctrl+Shift+O for Windows and Linux
This should get rid of the errors. (If you still have errors, check for typos in your code and XML.)
Now you can wire up your button widgets. This is a two-step process:
• get references to the inflated View objects
• set listeners on those objects to respond to user actions

ptg11078569
Chapter 1Your First Android Application
20
Getting references to widgets
In an activity, you can get a reference to an inflated widget by calling the following Activity method:
public View findViewById(int id)
This method accepts a resource ID of a widget and returns a View object.
In QuizActivity.java, use the resource IDs of your buttons to retrieve the inflated objects and assign
them to your member variables. Note that you must cast the returned View to Button before assigning
it.
Listing 1.9Getting references to widgets (QuizActivity.java)
public class QuizActivity extends Activity {
private Button mTrueButton;
private Button mFalseButton;
@Override
public void onCreate(Bundle savedInstanceState) {
super.onCreate(savedInstanceState);
setContentView(R.layout.activity_quiz);
mTrueButton = (Button)findViewById(R.id.true_button);
mFalseButton = (Button)findViewById(R.id.false_button);
}
...
}
Setting listeners
Android applications are typically event-driven. Unlike command-line programs or scripts, event-
driven applications start and then wait for an event, such as the user pressing a button. (Events can also
be initiated by the OS or another application, but user-initiated events are the most obvious.)
When your application is waiting for a specific event, we say that it is “listening for” that event. The
object that you create to respond to an event is called a listener. A listener is an object that implements
a listener interface for that event.
The Android SDK comes with listener interfaces for various events, so you do not have to write your
own. In this case, the event you want to listen for is a button “click,” so your listener will implement
the View.OnClickListener interface.
Start with the True button. In QuizActivity.java, add the following code to onCreate(…) just after
the variable assignment.

ptg11078569
Setting listeners
21
Listing 1.10Set listener for True button (QuizActivity.java)
...
@Override
public void onCreate(Bundle savedInstanceState) {
super.onCreate(savedInstanceState);
setContentView(R.layout.activity_quiz);
mTrueButton = (Button)findViewById(R.id.true_button);
mTrueButton.setOnClickListener(new View.OnClickListener() {
@Override
public void onClick(View v) {
// Does nothing yet, but soon!
}
});
mFalseButton = (Button)findViewById(R.id.false_button);
}
}
(If you have a View�cannot�be�resolved�to�a�type error, organize your imports using Command+Shift+O
or Ctrl+Shift+O to import the View class.)
In Listing 1.10, you set a listener to inform you when the Button known as mTrueButton has been
pressed. The setOnClickListener(OnClickListener) method takes a listener as its argument. In
particular, it takes an object that implements OnClickListener.
Using anonymous inner classes
This listener is implemented as an anonymous inner class. The syntax is a little tricky, but
it helps to remember that everything within the outermost set of parentheses is passed into
setOnClickListener(OnClickListener). Within these parentheses, you create a new, nameless class
and pass its entire implementation.
mTrueButton.setOnClickListener(new View.OnClickListener() {
@Override
public void onClick(View v) {
// Does nothing yet, but soon!
}
});
All of the listeners in this book will be implemented as anonymous inner classes. Doing so puts the
implementations of the listener’s methods right where you want to see them. And there is no need for
the overhead of a named class because the class will be used in one place only.
Because your anonymous class implements OnClickListener, it must implement that interface’s sole
method, onClick(View). You have left the implementation of onClick(View) empty for now, and the
compiler is okay with that. A listener interface requires you to implement onClick(View), but it makes
no rules about how to implement it.
(If your knowledge of anonymous inner classes, listeners, or interfaces is rusty, you may want to
review some Java before continuing or at least keep a reference nearby.)
Set a similar listener for the False button.
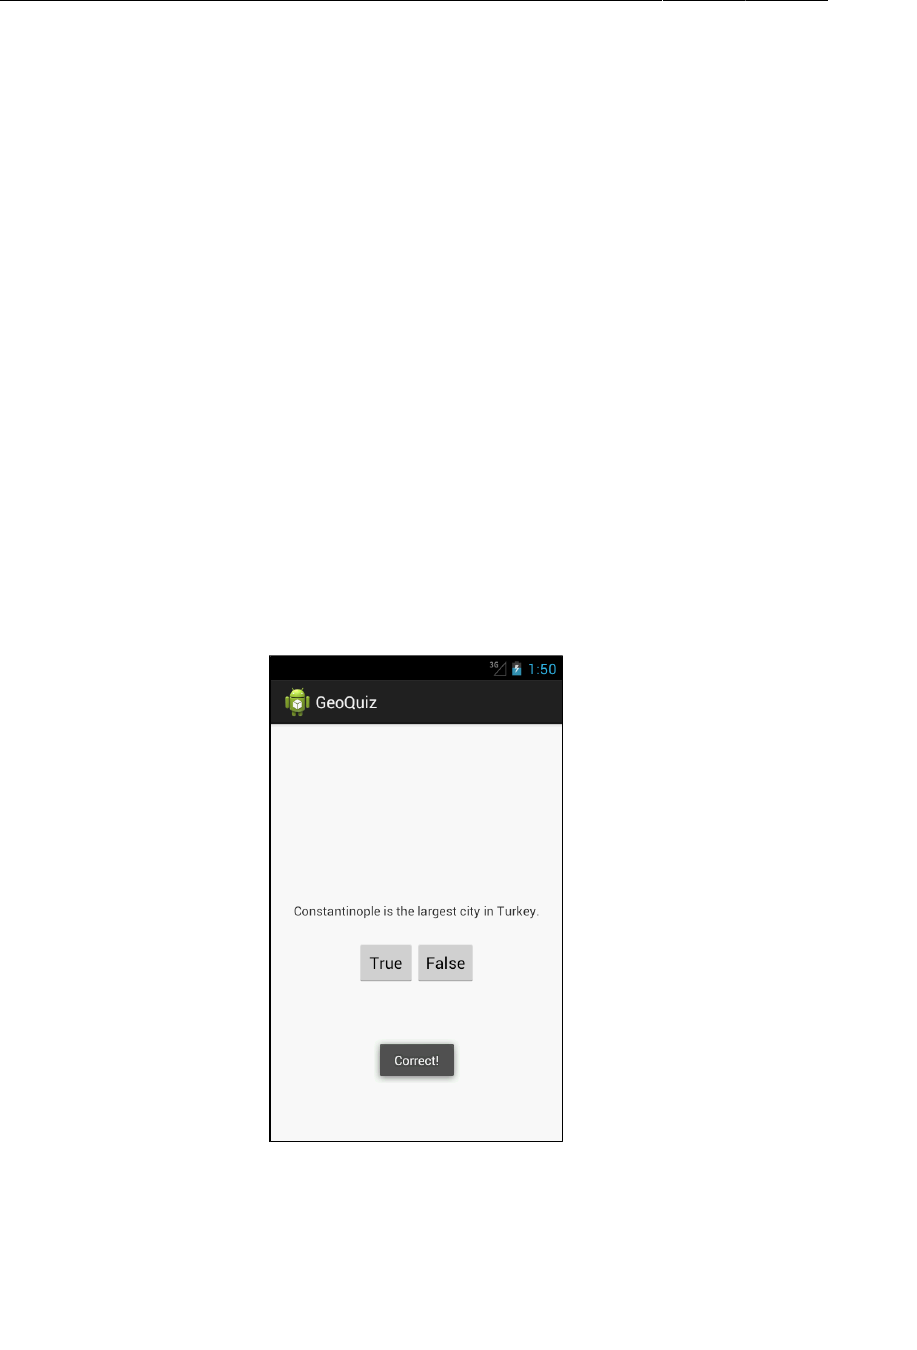
ptg11078569
Chapter 1Your First Android Application
22
Listing 1.11Set listener for False button (QuizActivity.java)
...
mTrueButton.setOnClickListener(new View.OnClickListener() {
@Override
public void onClick(View v) {
// Does nothing yet, but soon!
}
});
mFalseButton = (Button)findViewById(R.id.false_button);
mFalseButton.setOnClickListener(new View.OnClickListener() {
@Override
public void onClick(View v) {
// Does nothing yet, but soon!
}
});
}
Making toasts
Now to make the buttons fully-armed and operational. You are going to have a click of each button
trigger a pop-up message called a toast. A toast is a short message that informs the user of something
but does not require any input or action. You are going to make toasts that announce whether the user
answered correctly or incorrectly (Figure1.12).
Figure 1.12A toast providing feedback
First, return to strings.xml and add the string resources that your toasts will display.

ptg11078569
Setting listeners
23
Listing 1.12Adding toast strings (strings.xml)
<?xml version="1.0" encoding="utf-8"?>
<resources>
<string name="app_name">GeoQuiz</string>
<string name="question_text">Constantinople is the largest city in Turkey.</string>
<string name="true_button">True</string>
<string name="false_button">False</string>
<string name="correct_toast">Correct!</string>
<string name="incorrect_toast">Incorrect!</string>
<string name="menu_settings">Settings</string>
</resources>
To create a toast, you call the following method from the Toast class:
public static Toast makeText(Context context, int resId, int duration)
The Context parameter is typically an instance of Activity (Activity is a subclass of Context). The
second parameter is the resource ID of the string that the toast should display. The Context is needed
by the Toast class to be able to find and use the string’s resource ID. The third parameter is usually one
of two Toast constants that specify how long the toast should be visible.
After you have created a toast, you call Toast.show() on it to get it on screen.
In QuizActivity, you are going to call makeText(…) in each button’s listener (Listing 1.13). Instead of
typing everything in, try using Eclipse’s auto-complete feature to add these calls.
Using auto-complete
Auto-complete can save you a lot of time, so it is good to become familiar with it early.
Start typing the code addition shown in Listing 1.13. When you get to the period after the Toast class,
a pop-up window will appear with a list of suggested methods and constants from the Toast class.
To choose one of the suggestions, press the tab key to focus on the auto-complete pop-up. (If you
wanted to ignore auto-complete, you could just keep typing. It will not complete anything for you if
you do not press the tab key or click on the pop-up window.)
From the list of suggestions, select makeText(Context, int, int). Auto-complete will add the
complete method call for you, including placeholder values for the arguments.
The first placeholder will be highlighted; type in the real value – QuizActivity.this. Then press the
tab key again to go to the next placeholder, and so on until you have added the code shown in Listing
1.13.

ptg11078569
Chapter 1Your First Android Application
24
Listing 1.13Making toasts (QuizActivity.java)
...
mTrueButton.setOnClickListener(new View.OnClickListener() {
@Override
public void onClick(View v) {
Toast.makeText(QuizActivity.this,
R.string.incorrect_toast,
Toast.LENGTH_SHORT).show();
}
});
mFalseButton.setOnClickListener(new View.OnClickListener() {
@Override
public void onClick(View v) {
Toast.makeText(QuizActivity.this,
R.string.correct_toast,
Toast.LENGTH_SHORT).show();
}
});
In makeText(…), you pass the instance of QuizActivity as the Context argument. However, you
cannot simply pass the variable this as you might expect. At this point in the code, you are defining
the anonymous class where this refers to the View.OnClickListener.
Because you used auto-complete, you do not have to organize your imports to get the Toast class.
When you accept an auto-complete suggestion, the necessary classes are imported automatically.
Running on the Emulator
To run an Android application, you need a device – either a hardware device or a virtual device. Virtual
devices are powered by the Android emulator, which ships with the developer tools.
To create an Android virtual device (AVD), choose Window → Android�Virtual�Device�Manager. When
the AVD Manager appears, click the New... button on the righthand side of the window.
In the dialog that appears, you are offered many options for configuring a virtual device. For your first
AVD, choose to emulate a Galaxy�Nexus device running Google�APIs�–�API�Level�17, as shown in
Figure1.13. If you are running on Windows, you will need to change the RAM from 1024 to 512 to get
the AVD to behave properly. Then click OK.
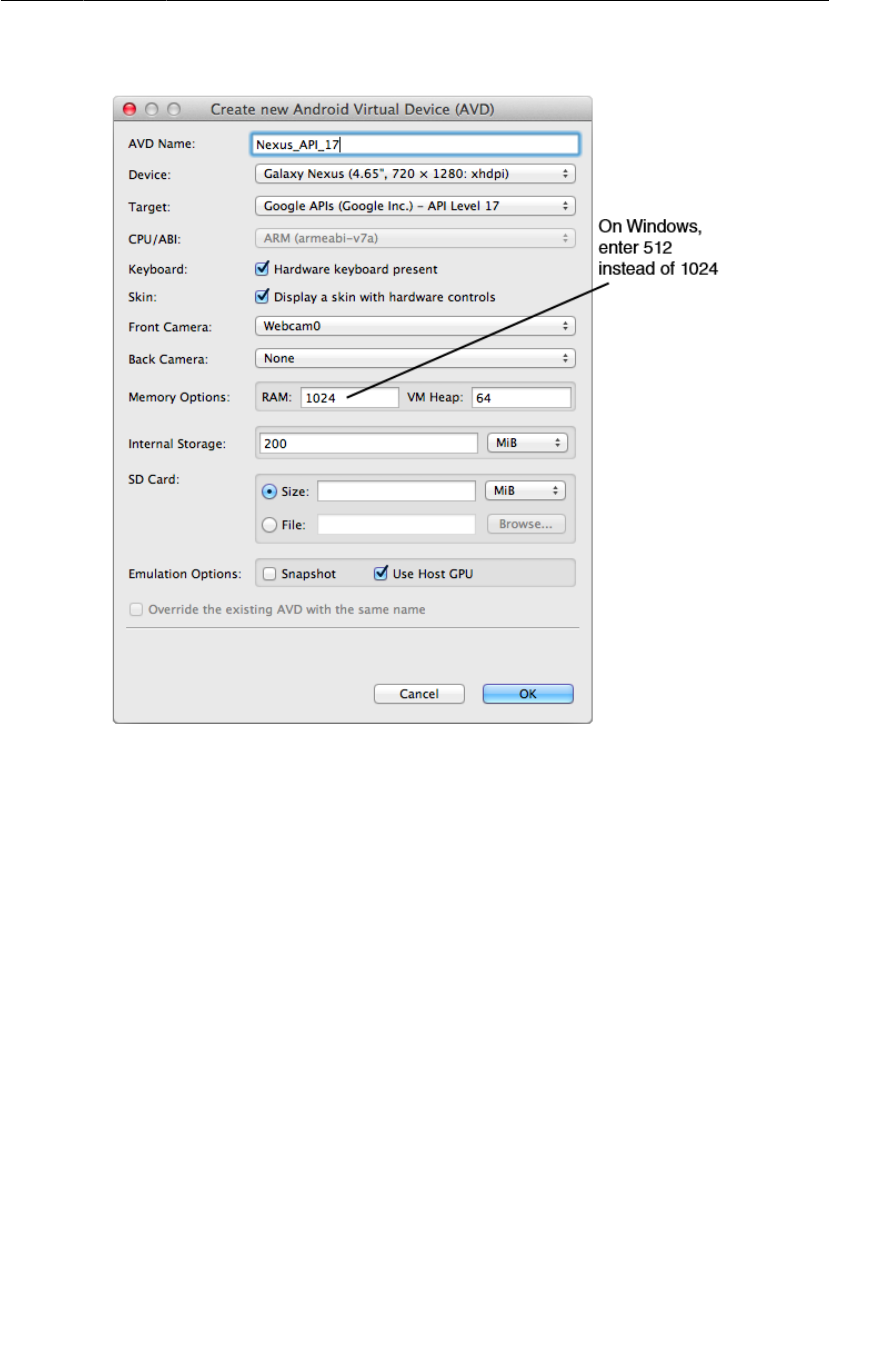
ptg11078569
Running on the Emulator
25
Figure 1.13Creating a new AVD
Once you have an AVD, you can run GeoQuiz on it. In the package explorer, right-click the GeoQuiz
project folder. From the context menu, choose Run�As → Android�Application. Eclipse will find the
virtual device you created, install the application package on it, and run the app. Eclipse may ask you if
you want to auto-monitor with LogCat. Say yes.
Starting up the emulator can take a while, but eventually your GeoQuiz app will launch on the AVD
that you created. Press buttons and admire your toasts. (Note that if the app launches and you are not
around, you may have to unlock the AVD when you come back. The AVD works like a real device, and
it will lock itself after a time.)
If GeoQuiz crashes when launching or when you press a button, LogCat will appear at the bottom
of your workbench. Look for exceptions in the log; they will be an eye-catching red color. The Text
column will tell you the exception’s name and give you the line where the problem occurred.
ptg11078569
Chapter 1Your First Android Application
26
Figure 1.14An example NullPointerException at line 21
Compare your code with the code in the book to try to find the cause of the problem. Then try running
again.
Keep the emulator running; you do not want to wait for it to launch on every run. You can stop the app
by pressing the Back button (the arrow that is making a U-turn). Then re-run the app from Eclipse to
test changes.
The emulator is useful, but testing on a real device gives more accurate results. In Chapter2, you will
run GeoQuiz on a hardware device. You will also give GeoQuiz more geography questions with which
to test the user.
For the More Curious: Android Build Process
By now, you probably have some burning questions about how the Android build process works.
You have already seen that Eclipse builds your project automatically as you modify it rather than
on command. During the build process, the Android tools take your resources, code, and the
AndroidManifest.xml file (which contains meta-data about the application) and turn them into
an .apk file. This file is then signed with a debug key, which allows it to run on the emulator. (To
distribute your .apk to the masses, you have to sign it with a release key. There is more information
about this process in the Android developer documentation at http://developer.android.com/
tools/publishing/preparing.html.)
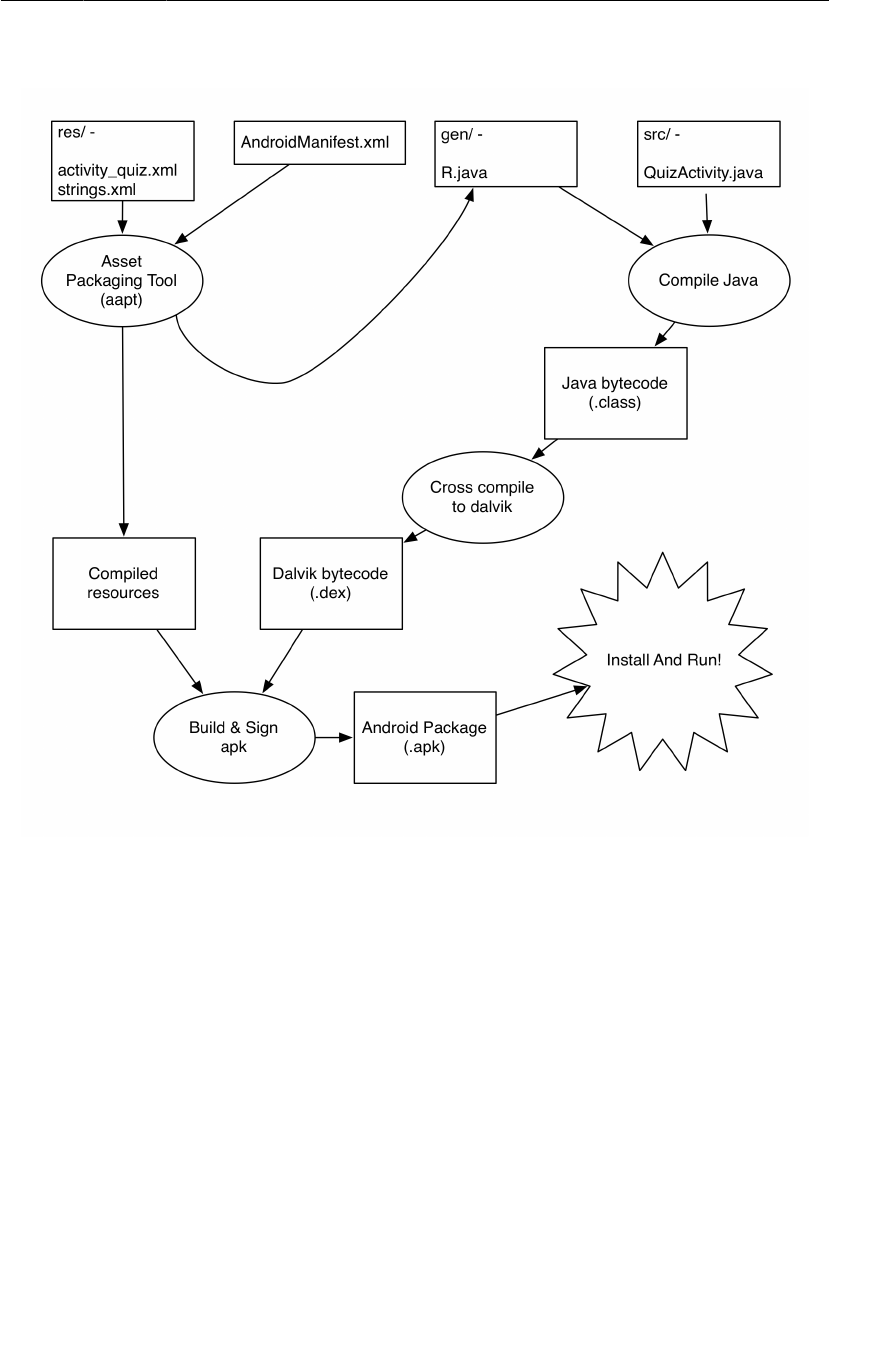
ptg11078569
For the More Curious: Android Build Process
27
Figure 1.15Building GeoQuiz
How do the contents of activity_quiz.xml turn into View objects in an application? As part of the
build process, aapt (Android Asset Packaging Tool) compiles layout file resources into a more compact
format. These compiled resources are packaged into the .apk file. Then, when setContentView(…) is
called in the QuizActivity’s onCreate(…) method, the QuizActivity uses the LayoutInflater class
to instantiate each of the View objects as defined in the layout file.
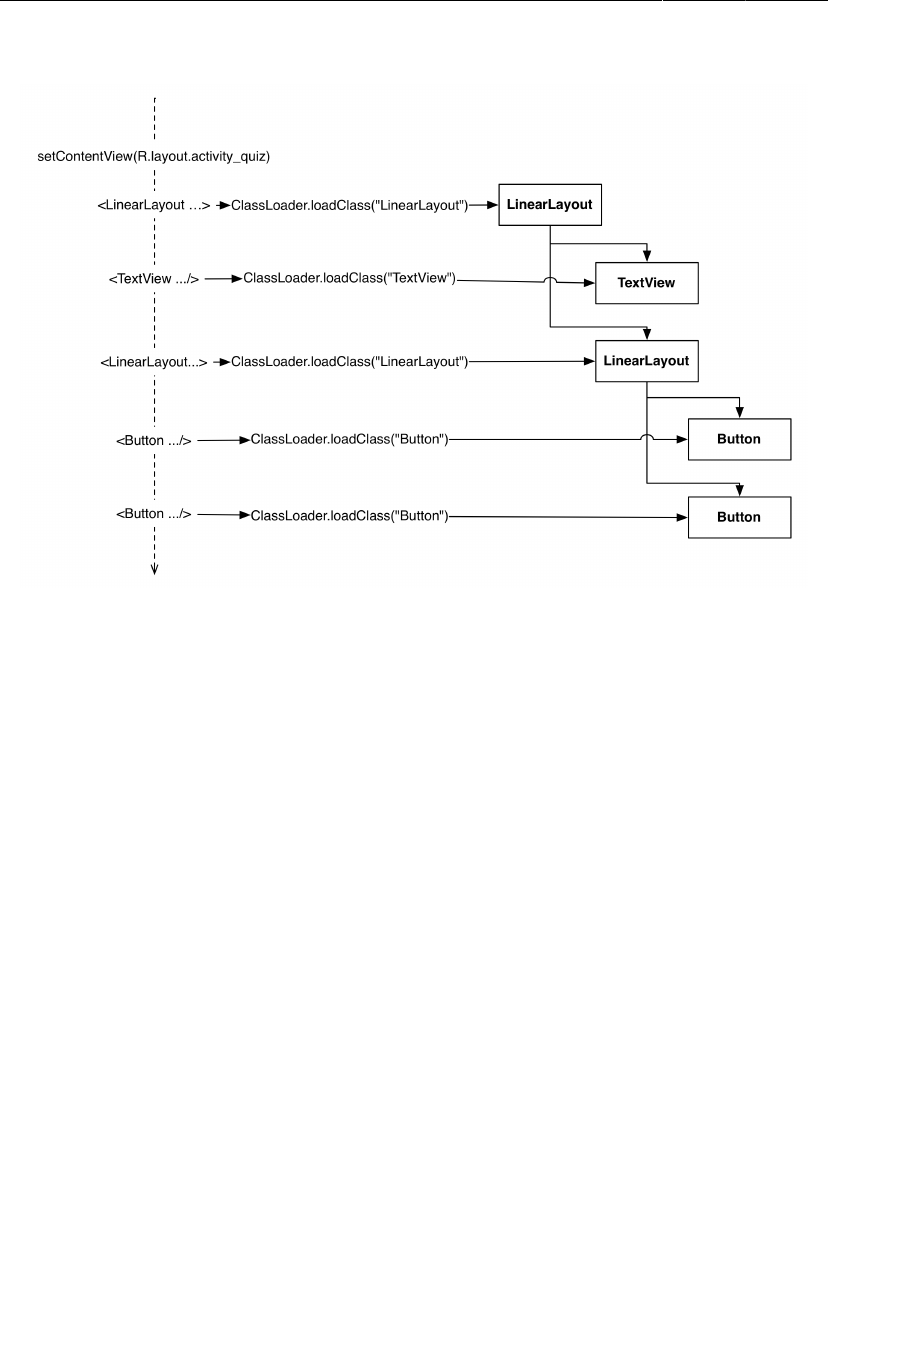
ptg11078569
Chapter 1Your First Android Application
28
Figure 1.16Inflating activity_quiz.xml
(You can also create your view classes programmatically in the activity instead of defining them in
XML. But there are benefits to separating your presentation from the logic of the application. The main
one is taking advantage of configuration changes built into the SDK, which we’ll talk more about in
Chapter3.)
For more details on how the different XML attributes work and how views display themselves on the
screen, see Chapter8.
Android build tools
All of the builds you have seen so far have been executed from within Eclipse. This build is integrated
into the ADT plugin you are using – it invokes standard Android build tools like aapt, but the build
process itself is managed by Eclipse.
You may, for your own reasons, want to perform builds from outside of Eclipse. The easiest way to do
this is to use a command line build tool. The most popular two tools are maven and ant. Ant does less,
but it is much easier to use. Start by doing two things:
• Make sure that ant is installed and that you can run it.
• Make sure that both the tools/ and platform-tools/ folders in your Android SDK are included
in your executable search paths.
Now navigate to your project’s directory and run the following command:
$ android update project -p .

ptg11078569
Android build tools
29
The Eclipse project generator template does not include an appropriate build.xml for ant. This first
command generates build.xml for you. You only need to run it this one time.
Next, build your project. To build and sign a debug .apk, run the following command in the same
folder:
$ ant debug
This will actually perform your build. It will create an .apk file located in bin/your-project-name-
debug.apk. Once you have the .apk in hand, install it by running this command:
$ adb install bin/your-project-name-debug.apk
This will install your app on whatever device is connected. It will not run the app, though. For that, you
will need to pull up the launcher and launch the app by hand.

ptg11078569
This page intentionally left blank
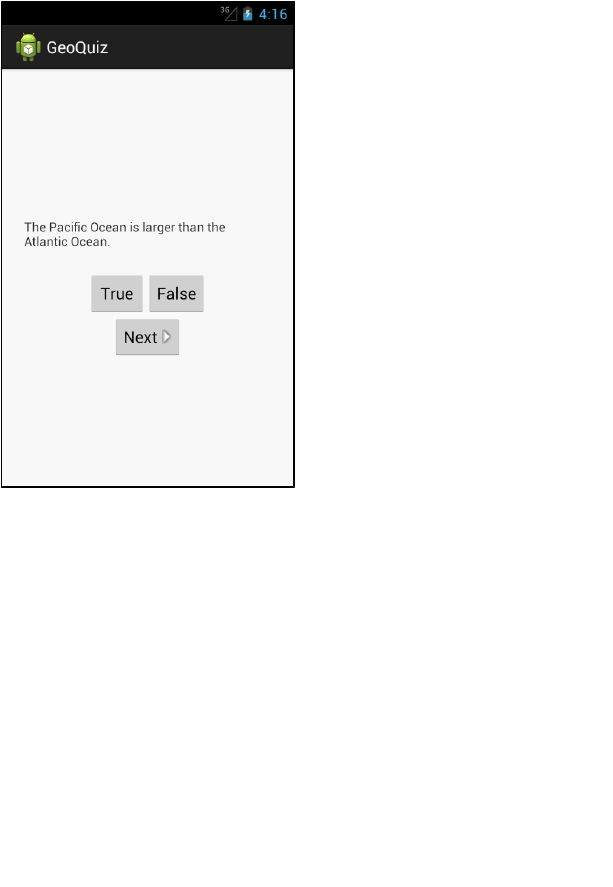
ptg11078569
31
2
Android and Model-View-
Controller
In this chapter, you are going to upgrade the GeoQuiz app to present more than one question.
Figure 2.1More questions!
To make this happen, you are going to add a class named TrueFalse to the GeoQuiz project. An
instance of this class will encapsulate a single true-false question.
Then, you will create an array of TrueFalse objects for QuizActivity to manage.
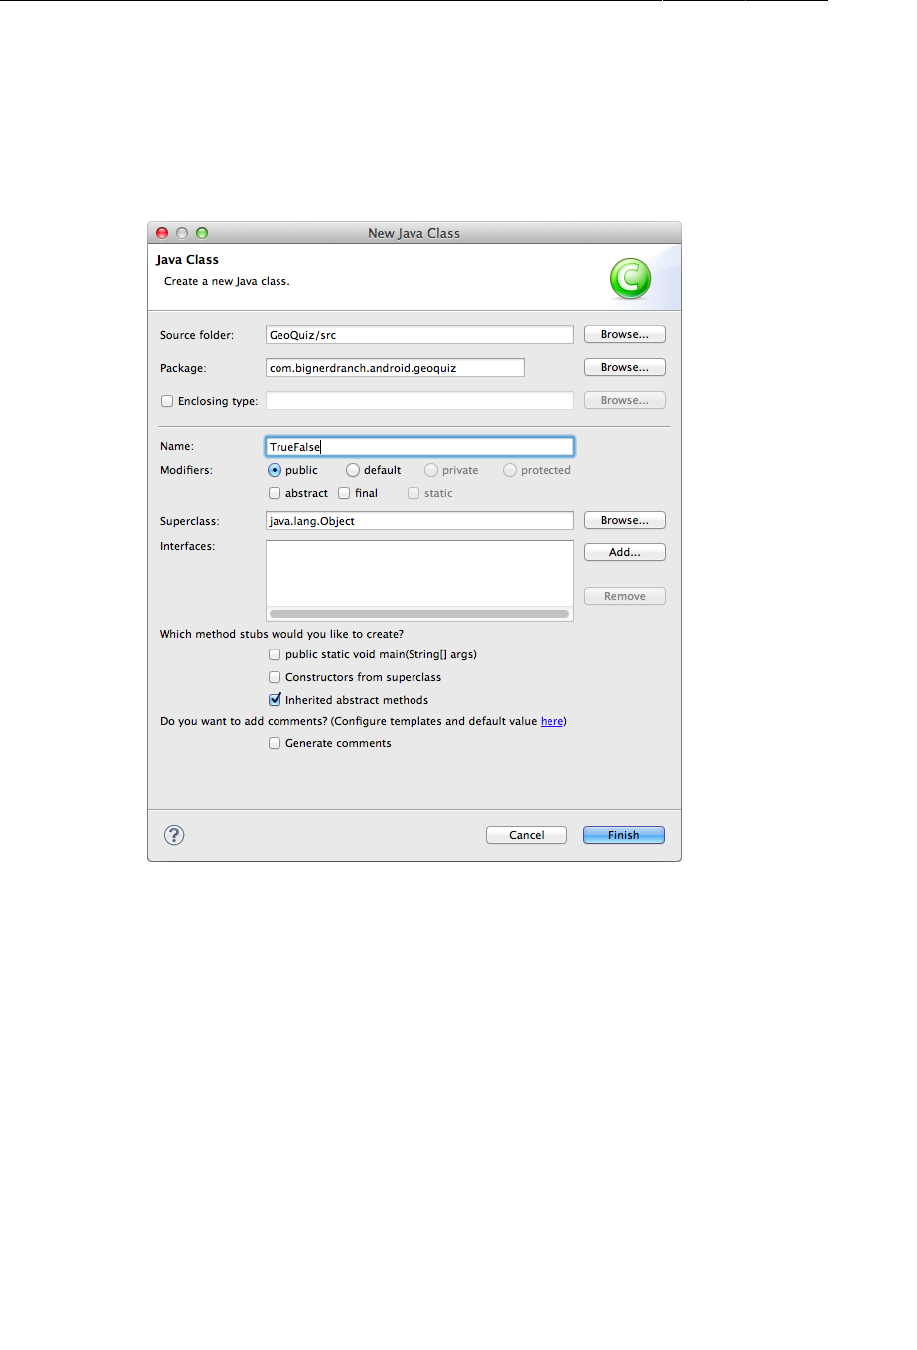
ptg11078569
Chapter 2Android and Model-View-Controller
32
Creating a New Class
In the package explorer, right-click the com.bignerdranch.android.geoquiz package and select New
→ Class. Name the class TrueFalse, leave its superclass as java.lang.Object, and click Finish.
Figure 2.2Creating the TrueFalse class
In TrueFalse.java, add two member variables and a constructor:
Listing 2.1Adding to TrueFalse class (TrueFalse.java)
public class TrueFalse {
private int mQuestion;
private boolean mTrueQuestion;
public TrueFalse(int question, boolean trueQuestion) {
mQuestion = question;
mTrueQuestion = trueQuestion;
}
}
ptg11078569
Generating getters and setters
33
Why is mQuestion an int and not a String? The mQuestion variable will hold the resource ID (always
an int) of a string resource for the question. You will create the question string resources in a later
section. The mTrueQuestion variable indicates whether the statement is true or false.
These variables need getter and setter methods. Rather than typing them in yourself, you can have
Eclipse generate the implementations for you.
Generating getters and setters
The first step is to configure Eclipse to recognize the m prefix for member variables and to use is rather
than get for boolean variables.
Open Eclipse’s preferences (from the Eclipse menu on Mac and from Windows → Preferences on
Windows). Under Java preferences, select Code�Style.
In the Conventions�for�variable�names: table, select the Fields row (Figure2.3). Click the Edit button
and add m as a prefix for fields. Then add s as a prefix for static fields. (You will not be using the s
prefix in the GeoQuiz project, but it will be useful in later projects.)
Make sure the Use�‘is’�prefix�for�getters�that�return�boolean is checked. Then click OK.
Figure 2.3Setting Java code style preferences
What is the point of setting these prefixes? Now when you ask Eclipse to generate a getter for
mQuestion, it will create getQuestion() rather than getMQuestion() and isTrueQuestion() rather
than isMTrueQuestion().

ptg11078569
Chapter 2Android and Model-View-Controller
34
Back in TrueFalse.java, right-click after the constructor and select Source → Generate�Getters�And
Setters... Click the Select�All button to create a getter and setter for each variable.
Click OK, and Eclipse will generate code for the four methods.
Listing 2.2Generated getters and setters (TrueFalse.java)
public class TrueFalse {
private int mQuestion;
private boolean mTrueQuestion;
public TrueFalse(int question, boolean trueQuestion) {
mQuestion = question;
mTrueQuestion = trueQuestion;
}
public int getQuestion() {
return mQuestion;
}
public void setQuestion(int question) {
mQuestion = question;
}
public boolean isTrueQuestion() {
return mTrueQuestion;
}
public void setTrueQuestion(boolean trueQuestion) {
mTrueQuestion = trueQuestion;
}
}
Your TrueFalse class is now complete. In a moment, you will modify QuizActivity to work with
TrueFalse. First, let’s take a look at the big picture of how the pieces of GeoQuiz will work together.
You are going to have QuizActivity create an array of TrueFalse objects. It will then interact with the
TextView and the three Buttons to display questions and provide feedback on the user’s responses.
ptg11078569
Model-View-Controller and Android
35
Figure 2.4Object diagram for GeoQuiz
Model-View-Controller and Android
Notice that the objects in Figure2.4 are separated into three sections labeled Model, Controller, and
View. Android applications are designed around an architecture called Model-View-Controller, or
MVC for short. MVC states that any object in your application must be a model object, a view object,
or a controller object.
• A model object holds the application’s data and “business logic.” Model classes are typically
designed to model the things your app is concerned with, such as a user, a product in a store, a
photo on a server, or a television show. Or a true-false question. Model objects have no knowledge
of the user interface; their sole purpose is holding and managing data.
In Android applications, model classes are generally custom classes you create. All of the model
objects in your application compose its model layer.
GeoQuiz’s model layer consists of the TrueFalse class.
•View objects know how to draw themselves on the screen and how to respond to user input, like
touches. A simple rule of thumb is that if you can see it on screen, then it is a view.
Android provides a wealth of configurable view classes. You can also create custom view classes.
An application’s view objects make up its view layer.
GeoQuiz’s view layer consists of the widgets that are inflated from activity_quiz.xml.
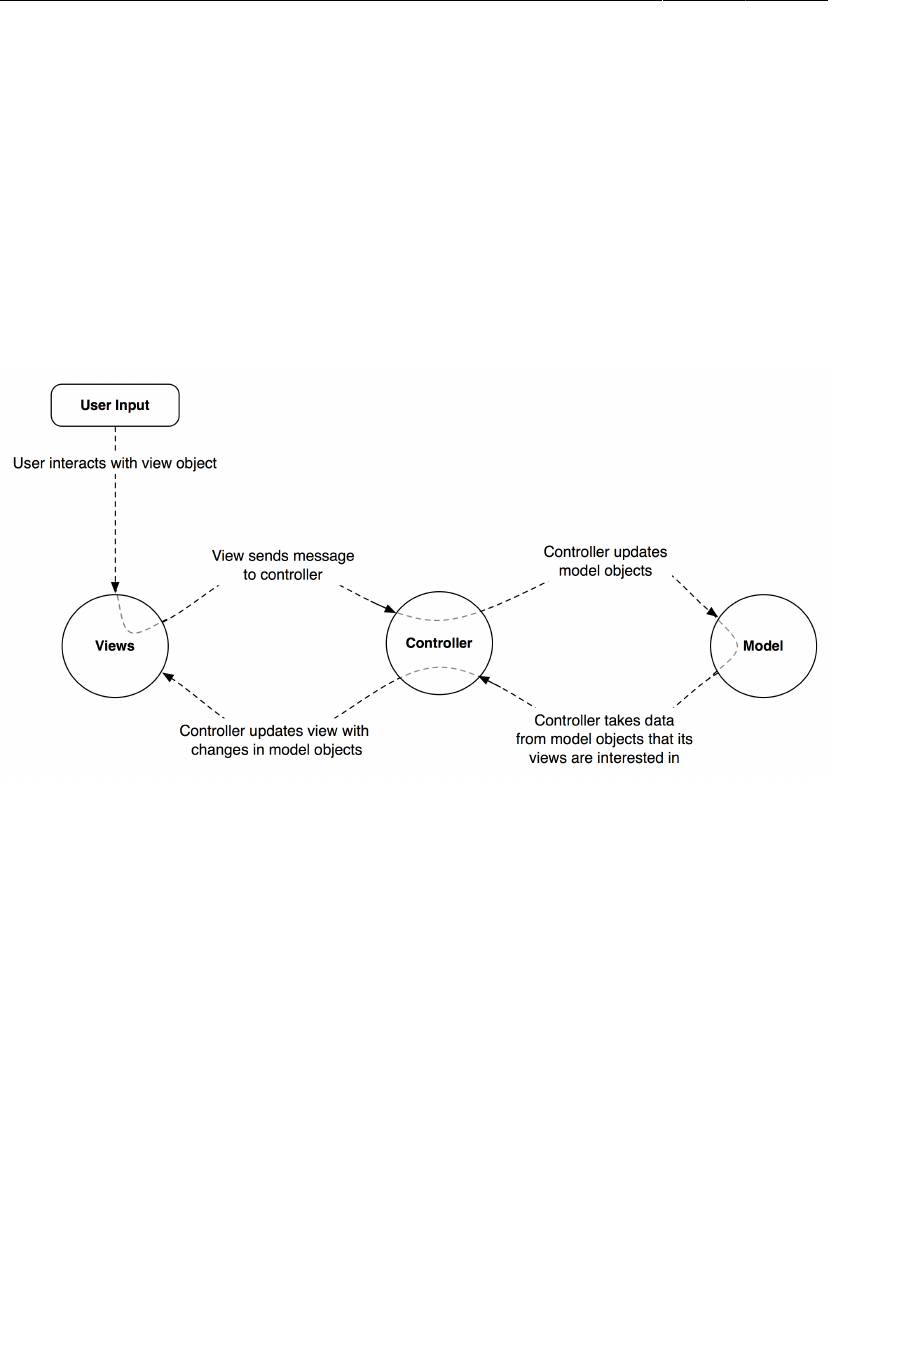
ptg11078569
Chapter 2Android and Model-View-Controller
36
•Controller objects tie the view and model objects together. They contain “application logic.”
Controllers are designed to respond to various events triggered by view objects and to manage the
flow of data to and from model objects and the view layer.
In Android, a controller is typically a subclass of Activity, Fragment, or Service. (You will
learn about fragments in Chapter7 and services in Chapter29.)
GeoQuiz’s controller layer, at present, consists solely of QuizActivity.
Figure2.5 shows the flow of control between objects in response to a user event, like a press of a
button. Notice that model and view objects do not talk to each other directly; controllers sit squarely in
the middle of everything, receiving messages from some objects and dispatching instructions to others.
Figure 2.5MVC flow with user input
Benefits of MVC
An application can accumulate features until it is too complicated to understand. Separating code into
classes helps you design and understand the application as a whole; you can think in terms of classes
instead of individual variables and methods.
Similarly, separating classes into model, view, and controller layers helps you design and understand
an application; you can think in terms of layers instead of individual classes.
GeoQuiz is not a complicated app, but you can still see the benefits of keeping layers separate here. In
a moment, you are going to update GeoQuiz’s view layer to include a Next button. When you do that,
you will not need to remember a single thing about the TrueFalse class you just created.
MVC also makes classes easier to reuse. A class with restricted responsibilities is more reusable than
one with its fingers in every pie.
For instance, your model class, TrueFalse, knows nothing about the widgets used to display a true-
false question. This makes it easy to use TrueFalse throughout your app for different purposes. For
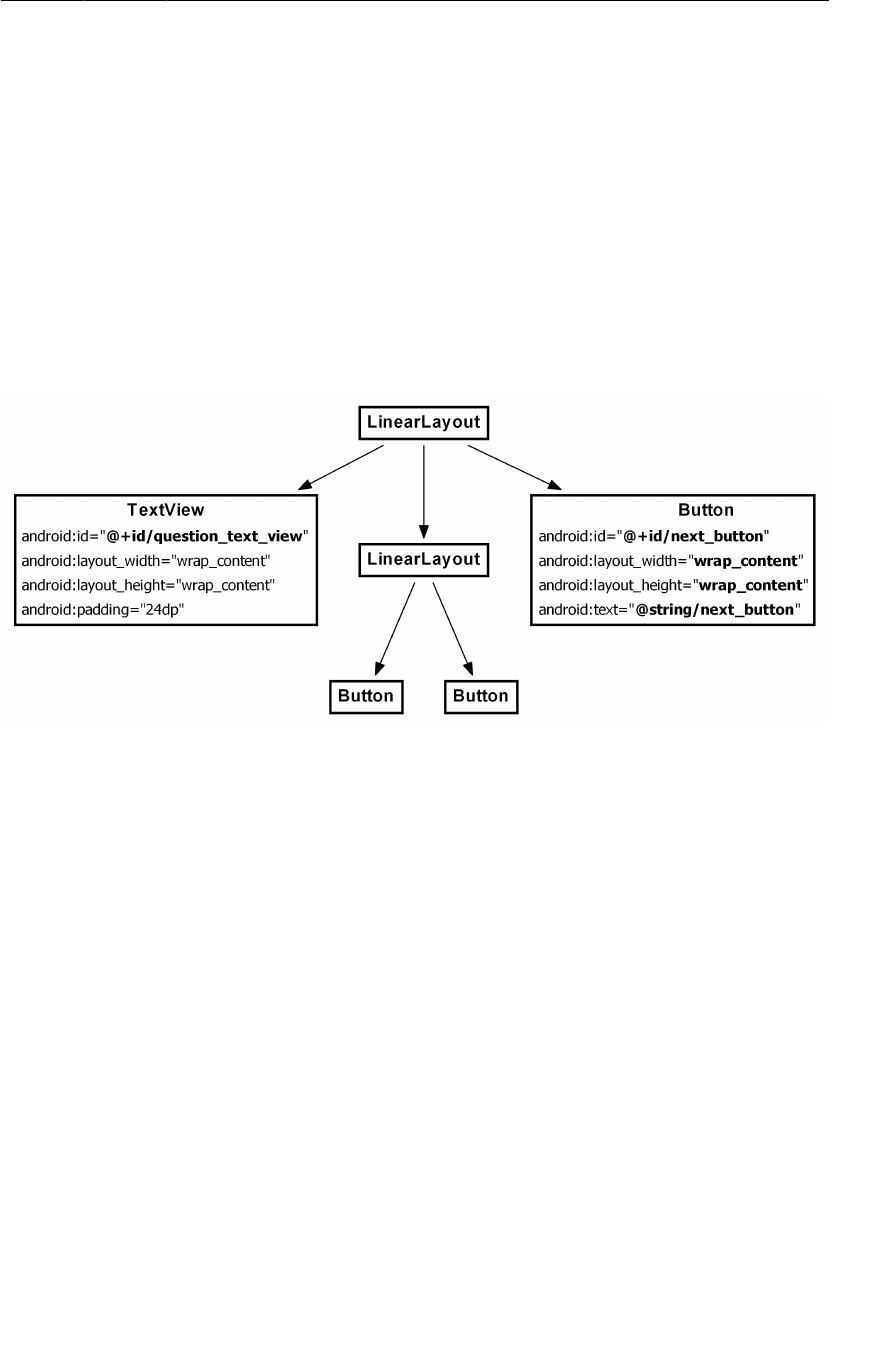
ptg11078569
Updating the View Layer
37
example, if you wanted to display a list of all the questions at once, you could use the same object that
you use here to display just one question at a time.
Updating the View Layer
Now that you have been introduced to MVC, let’s update GeoQuiz’s view layer to include a Next
button.
In Android, objects in the view layer are typically inflated from XML within a layout file. The
sole layout in GeoQuiz is defined in activity_quiz.xml. This layout needs updating as shown in
Figure2.6. (Note that we are not showing the attributes of unchanged widgets to save space.)
Figure 2.6New button!
So the changes you need to make to the view layer are
• remove the android:text attribute from the TextView. You no longer want a hard-coded question
to be part of its definition.
• Give the TextView an android:id attribute. This widget will need a resource ID so that you can
set its text in QuizActivity’s code.
• Add the new Button widget as a child of the root LinearLayout.
Return to activity_quiz.xml and make it happen.

ptg11078569
Chapter 2Android and Model-View-Controller
38
Listing 2.3New button... and changes to the text view (activity_quiz.xml)
<LinearLayout
... >
<TextView
android:id="@+id/question_text_view"
android:layout_width="wrap_content"
android:layout_height="wrap_content"
android:padding="24dp"
android:text="@string/question_text"
/>
<LinearLayout
... >
...
</LinearLayout>
<Button
android:id="@+id/next_button"
android:layout_width="wrap_content"
android:layout_height="wrap_content"
android:text="@string/next_button" />
</LinearLayout>
Save activity_quiz.xml, and you may see a familiar error pop up to alert you about a missing string
resource.
Return to res/values/strings.xml. Remove the question string and add a string for the new button.
Listing 2.4Updating strings (strings.xml)
...
<string name="app_name">GeoQuiz</string>
<string name="question_text">Constantinople is the largest city in Turkey.</string>
<string name="true_button">True</string>
<string name="false_button">False</string>
<string name="next_button">Next</string>
<string name="correct_toast">Correct!</string>
...
While you have strings.xml open, go ahead and add the strings for the set of geography questions
that will be shown to the user.

ptg11078569
Updating the Controller Layer
39
Listing 2.5Adding question strings in advance (strings.xml)
...
<string name="incorrect_toast">Incorrect!</string>
<string name="menu_settings">Settings</string>
<string name="question_oceans">The Pacific Ocean is larger than
the Atlantic Ocean.</string>
<string name="question_mideast">The Suez Canal connects the Red Sea
and the Indian Ocean.</string>
<string name="question_africa">The source of the Nile River is in Egypt.</string>
<string name="question_americas">The Amazon River is the longest river
in the Americas.</string>
<string name="question_asia">Lake Baikal is the world\'s oldest and deepest
freshwater lake.</string>
...
Notice that you use the escape sequence \' in the last value to get an apostrophe in your string. You
can use all the usual escape sequences in your string resources, such as \n for a new line.
Save your files. Then return to activity_quiz.xml and preview your layout changes in the graphical
layout tool.
That is all for now for GeoQuiz’s view layer. Time to wire everything up in your controller class,
QuizActivity.
Updating the Controller Layer
In the previous chapter, there was not that much happening in GeoQuiz’s one controller,
QuizActivity. It displayed the layout defined in activity_quiz.xml. It set listeners on two buttons
and wired them to make toasts.
Now that you have multiple questions to retrieve and display, QuizActivity will have to work harder
to tie GeoQuiz’s model and view layers together.
Open QuizActivity.java. Add variables for the TextView and the new Button. Also, create an array
of TrueFalse objects and an index for the array.
Listing 2.6Adding variables and a TrueFalse array (QuizActivity.java)
public class QuizActivity extends Activity {
private Button mTrueButton;
private Button mFalseButton;
private Button mNextButton;
private TextView mQuestionTextView;
private TrueFalse[] mQuestionBank = new TrueFalse[] {
new TrueFalse(R.string.question_oceans, true),
new TrueFalse(R.string.question_mideast, false),
new TrueFalse(R.string.question_africa, false),
new TrueFalse(R.string.question_americas, true),
new TrueFalse(R.string.question_asia, true),
};
private int mCurrentIndex = 0;
...

ptg11078569
Chapter 2Android and Model-View-Controller
40
Here you call the TrueFalse constructor several times and create an array of TrueFalse objects.
(In a more complex project, this array would be created and stored elsewhere. In later apps, you will
see better options for storing model data. For now, we are keeping it simple and just creating the array
within your controller.)
You are going to use mQuestionBank, mCurrentIndex, and the accessor methods in TrueFalse to get a
parade of questions on screen.
First, get a reference for the TextView and set its text to the question at the current index.
Listing 2.7Wiring up the TextView (QuizActivity.java)
public class QuizActivity extends Activity {
...
@Override
protected void onCreate(Bundle savedInstanceState) {
super.onCreate(savedInstanceState);
setContentView(R.layout.activity_quiz);
mQuestionTextView = (TextView)findViewById(R.id.question_text_view);
int question = mQuestionBank[mCurrentIndex].getQuestion();
mQuestionTextView.setText(question);
mTrueButton = (Button)findViewById(R.id.true_button);
...
}
}
Save your files and check for any errors. Then run GeoQuiz. You should see the first question in the
array appear in the TextView.
Now let’s see about the Next button. First, get a reference to the button. Then set a
View.OnClickListener on it. This listener will increment the index and update the TextView’s text.

ptg11078569
Updating the Controller Layer
41
Listing 2.8Wiring up the new button (QuizActivity.java)
public class QuizActivity extends Activity {
...
@Override
protected void onCreate(Bundle savedInstanceState) {
super.onCreate(savedInstanceState);
setContentView(R.layout.activity_quiz);
mQuestionTextView = (TextView)findViewById(R.id.question_text_view);
int question = mQuestionBank[mCurrentIndex].getQuestion();
mQuestionTextView.setText(question);
...
mFalseButton.setOnClickListener(new View.OnClickListener() {
@Override
public void onClick(View v) {
Toast.makeText(QuizActivity.this,
R.string.correct_toast,
Toast.LENGTH_SHORT).show();
}
});
mNextButton = (Button)findViewById(R.id.next_button);
mNextButton.setOnClickListener(new View.OnClickListener() {
@Override
public void onClick(View v) {
mCurrentIndex = (mCurrentIndex + 1) % mQuestionBank.length;
int question = mQuestionBank[mCurrentIndex].getQuestion();
mQuestionTextView.setText(question);
}
});
}
}
You now have code in two separate places that updates the mQuestionTextView variable. Take a
moment to put this code into a private method instead, as shown in Listing 2.9. Then call that method
in the mNextButton’s listener and at the end of onCreate(Bundle) to initially set the text in the
activity’s view.

ptg11078569
Chapter 2Android and Model-View-Controller
42
Listing 2.9Encapsulating with updateQuestion() (QuizActivity.java)
public class QuizActivity extends Activity {
...
private void updateQuestion() {
int question = mQuestionBank[mCurrentIndex].getQuestion();
mQuestionTextView.setText(question);
}
@Override
protected void onCreate(Bundle savedInstanceState) {
...
mQuestionTextView = (TextView)findViewById(R.id.question_text_view);
int question = mQuestionBank[mCurrentIndex].getQuestion();
mQuestionTextView.setText(question);
mNextButton.setOnClickListener(new View.OnClickListener() {
@Override
public void onClick(View v) {
mCurrentIndex = (mCurrentIndex + 1) % mQuestionBank.length;
int question = mQuestionBank[mCurrentIndex].getQuestion();
mQuestionTextView.setText(question);
updateQuestion();
}
});
updateQuestion();
}
}
Run GeoQuiz and test your new Next button.
Now that you have the questions behaving appropriately, it is time to turn to the answers. Here again,
you will implement a private method to encapsulate code rather than writing similar code in two
places.
The method that you are going to add to QuizActivity is
private void checkAnswer(boolean userPressedTrue)
This method will accept a boolean variable that identifies whether the user pressed True or False.
Then, it will check the user’s answer against the answer in the current TrueFalse object. Finally, after
determining whether the user answered correctly, it will make a Toast that displays the appropriate
message to the user.
In QuizActivity.java, add the implementation of checkAnswer(boolean) shown in Listing 2.10.

ptg11078569
Updating the Controller Layer
43
Listing 2.10Adding checkAnswer(boolean) (QuizActivity.java)
public class QuizActivity extends Activity {
...
private void updateQuestion() {
int question = mQuestionBank[mCurrentIndex].getQuestion();
mQuestionTextView.setText(question);
}
private void checkAnswer(boolean userPressedTrue) {
boolean answerIsTrue = mQuestionBank[mCurrentIndex].isTrueQuestion();
int messageResId = 0;
if (userPressedTrue == answerIsTrue) {
messageResId = R.string.correct_toast;
} else {
messageResId = R.string.incorrect_toast;
}
Toast.makeText(this, messageResId, Toast.LENGTH_SHORT)
.show();
}
@Override
protected void onCreate(Bundle savedInstanceState) {
...
}
}
Within the button’s listeners, call checkAnswer(boolean), as shown in Listing 2.11.

ptg11078569
Chapter 2Android and Model-View-Controller
44
Listing 2.11Calling checkAnswer(boolean) (QuizActivity.java)
public class QuizActivity extends Activity {
...
@Override
protected void onCreate(Bundle savedInstanceState) {
...
mTrueButton = (Button)findViewById(R.id.true_button);
mTrueButton.setOnClickListener(new View.OnClickListener() {
@Override
public void onClick(View v) {
Toast.makeText(QuizActivity.this,
R.string.incorrect_toast,
Toast.LENGTH_SHORT).show();
checkAnswer(true);
}
});
mFalseButton = (Button)findViewById(R.id.false_button);
mFalseButton.setOnClickListener(new View.OnClickListener() {
@Override
public void onClick(View v) {
Toast.makeText(QuizActivity.this,
R.string.correct_toast,
Toast.LENGTH_SHORT).show();
checkAnswer(false);
}
});
mNextButton = (Button)findViewById(R.id.next_button);
...
}
}
GeoQuiz is ready to run again. Let’s get it running on a real device.
Running on a Device
In this section, you will set up your system, device, and application to get GeoQuiz running on your
hardware device.
Connecting your device
First, plug the device into your system. If you are developing on a Mac, your system should recognize
the device right away. On Windows, you may need to install the adb (Android Debug Bridge) driver. If
Windows cannot find the adb driver, then download one from your device’s manufacturer’s website.
You can confirm that your device is recognized by opening the Devices view. The quickest way to the
Devices view is to open the DDMS perspective by clicking the DDMS button at the top right corner of
the Eclipse workbench. The Devices view should appear on the lefthand side of the workbench. You
should see your AVD and your hardware device listed in this view.

ptg11078569
Configuring your device for development
45
To get back to the editor and other views, click the Java button at the top right corner of the
workbench.
If you are having trouble getting your device recognized, the first thing to try is resetting adb. In the
Devices view, click on the downward pointing arrow at the top-right of the view. This will reveal a
menu. The bottom choice is Reset�adb. Select this item, and, after a moment, your device may appear
in the list.
If resetting adb does not work, you can find more help on the Android developers site. Start
at http://developer.android.com/tools/device.html. Or visit this book’s forum at
forums.bignerdranch.com for more troubleshooting help.
Configuring your device for development
To test apps on your device, you need to set it up to accept applications that are not from Google Play.
• On devices running Android 4.1 or earlier, open the device’s Settings and go to Applications.
Make sure that Unknown�sources is checked.
•On devices running Android 4.2, go to Settings → Security to find the Unknown�sources option.
You also need to enable USB debugging on the device.
•On devices running versions of Android earlier than 4.0, go to Settings → Applications →
Development and find the option to enable USB�debugging.
•On devices running Android 4.0 or 4.1, go to Settings → Developer�options instead.
•On Android 4.2, Developer�options is not visible by default. To enable it, go to Settings → About
Tablet/Phone and press Build�Number 7 times. Then you can return to Settings, see Developer
options, and enable USB�debugging.
As you can see, the options vary considerably across devices. If you are having problems enabling your
device, visit http://developer.android.com/tools/device.html for more help.
Run GeoQuiz as before. Eclipse will offer a choice between running on the virtual device or the
hardware device plugged into your system. Select the hardware device and continue. GeoQuiz will
launch on your device. (If you are not offered a choice and GeoQuiz starts in the emulator, recheck the
steps above and make sure your device is plugged in.)
Adding an Icon
GeoQuiz is now up and running, but the user interface would be spiffier if the Next button also
displayed a right-pointing arrow icon.
You can find such an arrow in the solutions file for this book (http://www.bignerdranch.com/
solutions/AndroidProgramming.zip). The solutions file is a collection of Eclipse projects – one for
each chapter.
Download this file and open the 02_MVC/GeoQuiz/res directory. Within this directory, locate the
drawable-hdpi, res/drawable-mdpi, and drawable-xhdpi directories.
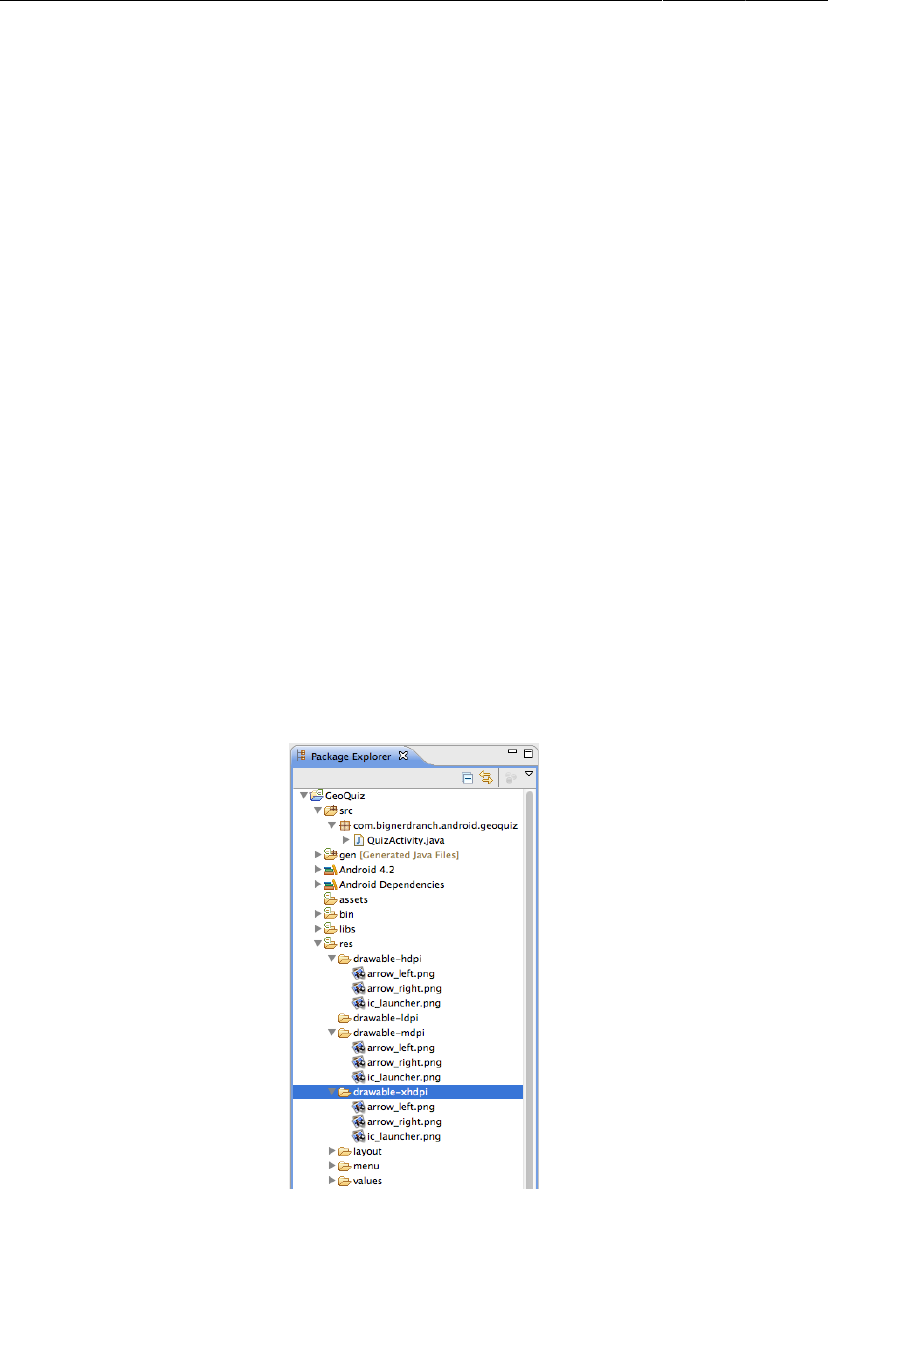
ptg11078569
Chapter 2Android and Model-View-Controller
46
The suffixes on these directory names refer to the screen pixel density of a device:
mdpi medium-density screens (~160dpi)
hdpi high-density screens (~240dpi)
xhdpi extra-high-density screens (~320dpi)
(There is also a low-density – ldpi – category, but most of the devices with low-density screens are
now retired.)
Within each directory, you will find two image files – arrow_right.png and arrow_left.png. These
files have been customized for the screen pixel density specified in the directory’s name.
In production apps, it is important to provide images for the different screen pixel densities in your
projects. Providing different images will reduce artifacts from images being scaled up and down. All of
the images in your project will be installed with your app, and the OS will choose the best one for that
specific device.
Adding resources to a project
The next step is to add the image files to GeoQuiz’s resources.
In the package explorer, reveal the contents of your res directory and find the three subdirectories
whose names match those in the solutions file.
Copy the files from each directory in the solutions to the corresponding directory in the package
explorer.
Figure 2.7Arrow icons in GeoQuiz drawable directories

ptg11078569
Referencing resources in XML
47
Note that if you drag and drop a file, you will get a prompt like Figure2.8. Choose to copy the file
rather than link to it.
Figure 2.8Copy. Don’t link.
Including images in your app is as simple as that. Any .png, .jpg, or .gif file you add to a res/
drawable folder will be automatically assigned a resource ID. (Note that filenames must be lower-case
and not have any spaces.)
After you have copied the files, open gen/R.java and look for your new resource IDs in the
R.drawable inner class. There are only two new resource IDs: R.drawable.arrow_left and
R.drawable.arrow_right.
These resource IDs are not qualified by screen density. So you do not need to determine the device’s
screen density at runtime. All you have to do is use this resource ID in your code. When the app is run,
the OS will determine the appropriate image to display on that particular device.
You will learn more about how Android resource system works starting in Chapter3. For now, let’s put
that right arrow to work.
Referencing resources in XML
You use resource IDs to reference resources in code. But you want to configure the Next button to
display the arrow in the layout definition. How do you reference a resource from XML?
With a slightly different syntax. Open activity_quiz.xml and add two attributes to the Button widget
definition.

ptg11078569
Chapter 2Android and Model-View-Controller
48
Listing 2.12Adding an icon to the Next button (activity_quiz.xml)
<LinearLayout
... >
...
<LinearLayout
... >
...
</LinearLayout>
<Button
android:id="@+id/next_button"
android:layout_width="wrap_content"
android:layout_height="wrap_content"
android:text="@string/next_question_button"
android:drawableRight="@drawable/arrow_right"
android:drawablePadding="4dp"
/>
</LinearLayout>
In an XML resource, you refer to another resource by its resource type and name. A reference to a
string resource begins with @string/. A reference to a drawable resource begins with @drawable/.
You will learn more about naming resources and working in the res directory structure starting in
Chapter3.
Run GeoQuiz. Admire your button’s new appearance. Then test it to make sure it still works as before.
GeoQuiz does, however, have a bug. While GeoQuiz is running, press the Next button to show another
question. Then rotate the device. (If you are running on the emulator, press Control+F12/Ctrl+F12 to
rotate.)
After you rotate, you will be looking at the first question again. How did this happen and how can you
fix it?
The answers to those questions have to do with the activity lifecycle, which is the topic of Chapter3.
Challenges
Challenges are exercises at the end of the chapter for you to do on your own. Some are easy and
provide practice doing the same thing you have done in the chapter. Other challenges are harder and
require more problem-solving.
We cannot encourage you enough to take on these challenges. Tackling them cements what you
have learned, builds confidence in your skills, and bridges the gap between us teaching you Android
programming and you being able to do Android programming on your own.
If you get stuck while working on a challenge, take a break and come back and try again fresh. If that
does not help, check out the forum for this book at forums.bignerdranch.com. In the forum, you
can review questions and solutions that other readers have posted as well as ask questions and post
solutions of your own.
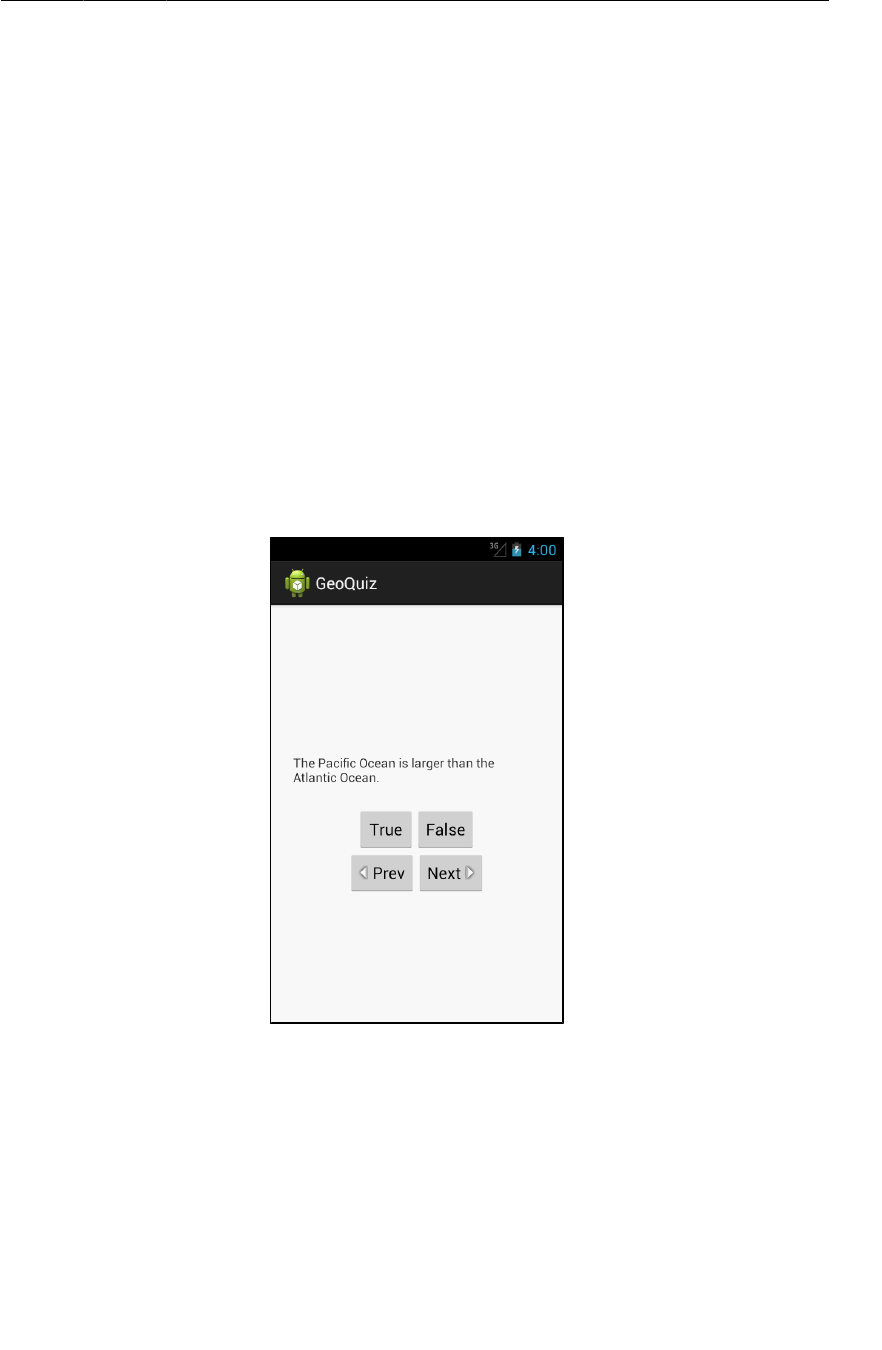
ptg11078569
Challenge: Add a Listener to the TextView
49
To protect the integrity of your current project, we recommend you make a copy in Eclipse and work
on challenges in the new copy.
Right-click the project in the package explorer, select Copy, and then right-click again to paste the
copied project. You will be prompted to name the new project, and then it will appear in the package
explorer ready for work.
Challenge: Add a Listener to the TextView
Your Next button is nice, but you could also make it so that a user could press the TextView itself to see
the next question.
Hint: You can use the View.OnClickListener listener for the TextView that you have used with the
Buttons because TextView also inherits from View.
Challenge: Add a Previous Button
Add a button that the user can press to go back one question. The UI should look something like
Figure2.9.
Figure 2.9Now with a previous button!
This is a great challenge to do. It requires you to retrace on your own many of the steps in these two
chapters.
Challenge: From Button to ImageButton
Perhaps the user interface would look even better if the next and previous buttons showed only icons.
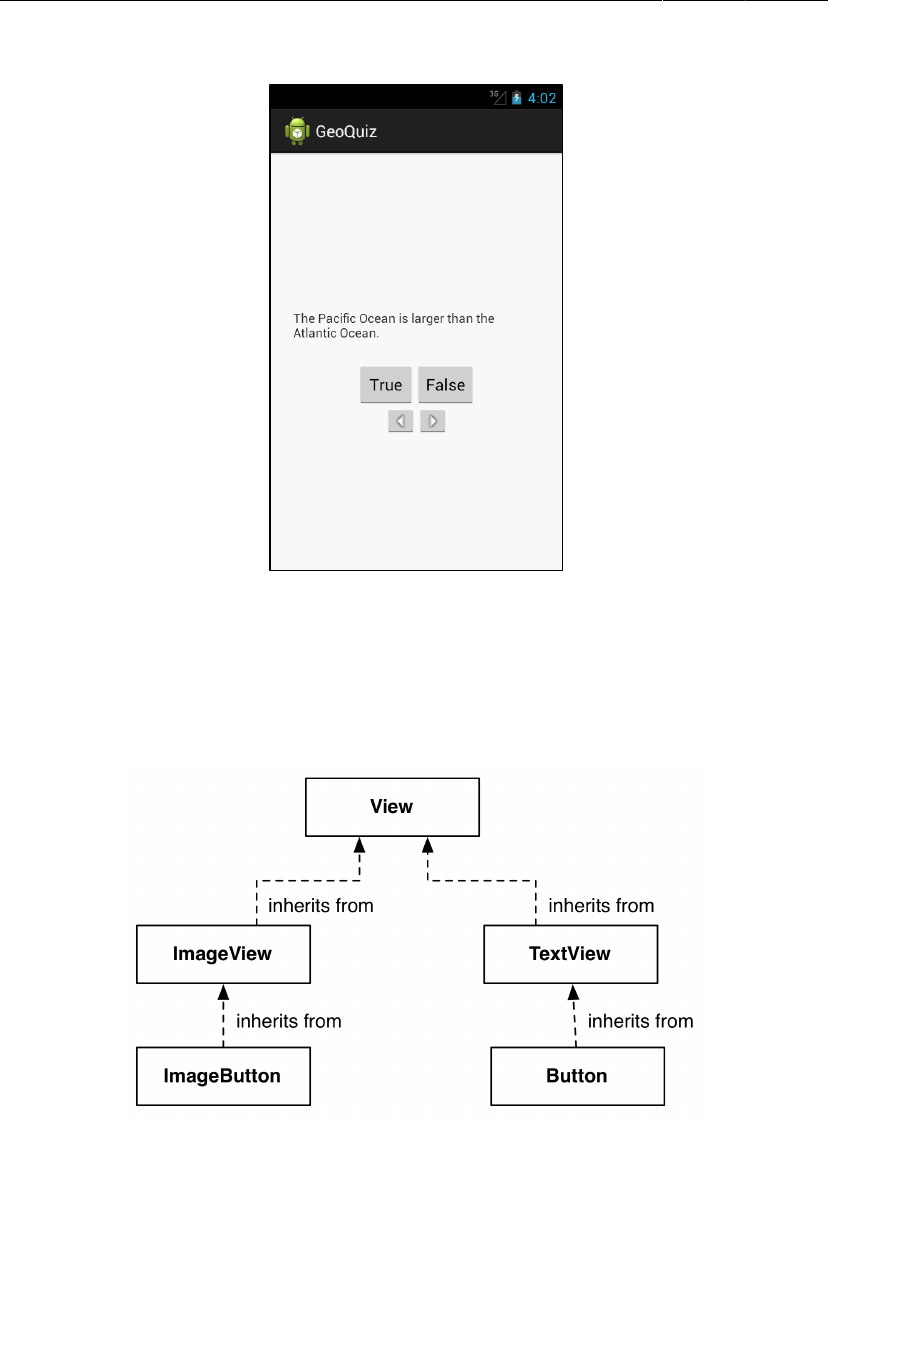
ptg11078569
Chapter 2Android and Model-View-Controller
50
Figure 2.10Icon-only buttons
To accomplish this challenge, these two widgets must become ImageButtons instead of regular
Buttons.
ImageButton is a widget that inherits from ImageView. Button, on the other hand, inherits from
TextView.
Figure 2.11Inheritance diagram for ImageButton and Button

ptg11078569
Challenge: From Button to ImageButton
51
You can replace the text and drawable attributes on the Next button with a single ImageView attribute:
<Button ImageButton
android:id="@+id/next_button"
android:layout_width="wrap_content"
android:layout_height="wrap_content"
android:text="@string/next_button"
android:drawableRight="@drawable/arrow_right"
android:drawablePadding="4dp"
android:src="@drawable/arrow_right"
/>
Of course, you will need to modify QuizActivity to work with ImageButton.
After you have changed these buttons to ImageButtons, Eclipse will warn you about a missing
android:contentDescription attribute. This attribute supports accessibility for low-vision readers.
You set the value to a string, and then that string is read aloud when users have the appropriate settings
applied.
Finally, add an android:contentDescription attribute to each ImageButton.

ptg11078569
This page intentionally left blank
ptg11078569
53
3
The Activity Lifecycle
Every instance of Activity has a lifecycle. During this lifecycle, an activity transitions between
three possible states: running, paused, and stopped. For each transition, there is an Activity method
that notifies the activity of the change in its state. Figure3.1 shows the activity lifecycle, states, and
methods.
Figure 3.1Activity state diagram
Subclasses of Activity can take advantage of the methods named in Figure3.1 to get work done at
critical transitions in the activity’s lifecycle.

ptg11078569
Chapter 3The Activity Lifecycle
54
You are already acquainted with one of these methods – onCreate(Bundle). The OS calls this method
after the activity instance is created but before it is put on screen.
Typically, an activity overrides onCreate(…) to prepare the specifics of its user interface:
• inflating widgets and putting them on screen (in the call to (setContentView(int))
• getting references to inflated widgets
• setting listeners on widgets to handle user interaction
• connecting to external model data
It is important to understand that you never call onCreate(…) or any of the other Activity lifecycle
methods yourself. You override them in your activity subclasses, and Android calls them at the
appropriate time.
Logging the Activity Lifecycle
In this section, you are going to override lifecycle methods to eavesdrop on QuizActivity’s lifecycle.
Each implementation will simply log a message informing you that the method has been called.
Making log messages
In Android, the android.util.Log class sends log messages to a shared system-level log. Log has
several methods for logging messages . Here is the one that you will use most often in this book:
public static int d(String tag, String msg)
The d stands for “debug” and refers to the level of the log message. (There is more about the Log levels
in the final section of this chapter.) The first parameter identifies the source of the message, and the
second is the contents of the message.
The first string is typically a TAG constant with the class name as its value. This makes it easy to
determine the source of a particular message.
In QuizActivity.java, add a TAG constant to QuizActivity:
Listing 3.1Adding TAG constant (QuizActivity.java)
public class QuizActivity extends Activity {
private static final String TAG = "QuizActivity";
...
}
Next, in onCreate(…), call Log.d(…) to log a message.

ptg11078569
Making log messages
55
Listing 3.2Adding log statement to onCreate(…) (QuizActivity.java)
public class QuizActivity extends Activity {
...
@Override
public void onCreate(Bundle savedInstanceState) {
super.onCreate(savedInstanceState);
Log.d(TAG, "onCreate(Bundle) called");
setContentView(R.layout.activity_quiz);
...
This code may cause an error regarding the Log class. If so, press Command+Shift+O (Ctrl+Shift
+O) to organize your imports. Eclipse will then ask you to choose which class to import. Choose
android.util.Log.
Now override five more methods in QuizActivity:
Listing 3.3Overriding more lifecycle methods (QuizActivity.java)
} // End of onCreate(Bundle)
@Override
public void onStart() {
super.onStart();
Log.d(TAG, "onStart() called");
}
@Override
public void onPause() {
super.onPause();
Log.d(TAG, "onPause() called");
}
@Override
public void onResume() {
super.onResume();
Log.d(TAG, "onResume() called");
}
@Override
public void onStop() {
super.onStop();
Log.d(TAG, "onStop() called");
}
@Override
public void onDestroy() {
super.onDestroy();
Log.d(TAG, "onDestroy() called");
}
}
Notice that you call the superclass implementations before you log your messages. These superclass
calls are required. Calling the superclass implementation before you do anything else is critical in
onCreate(…); the order is less important in the other methods.
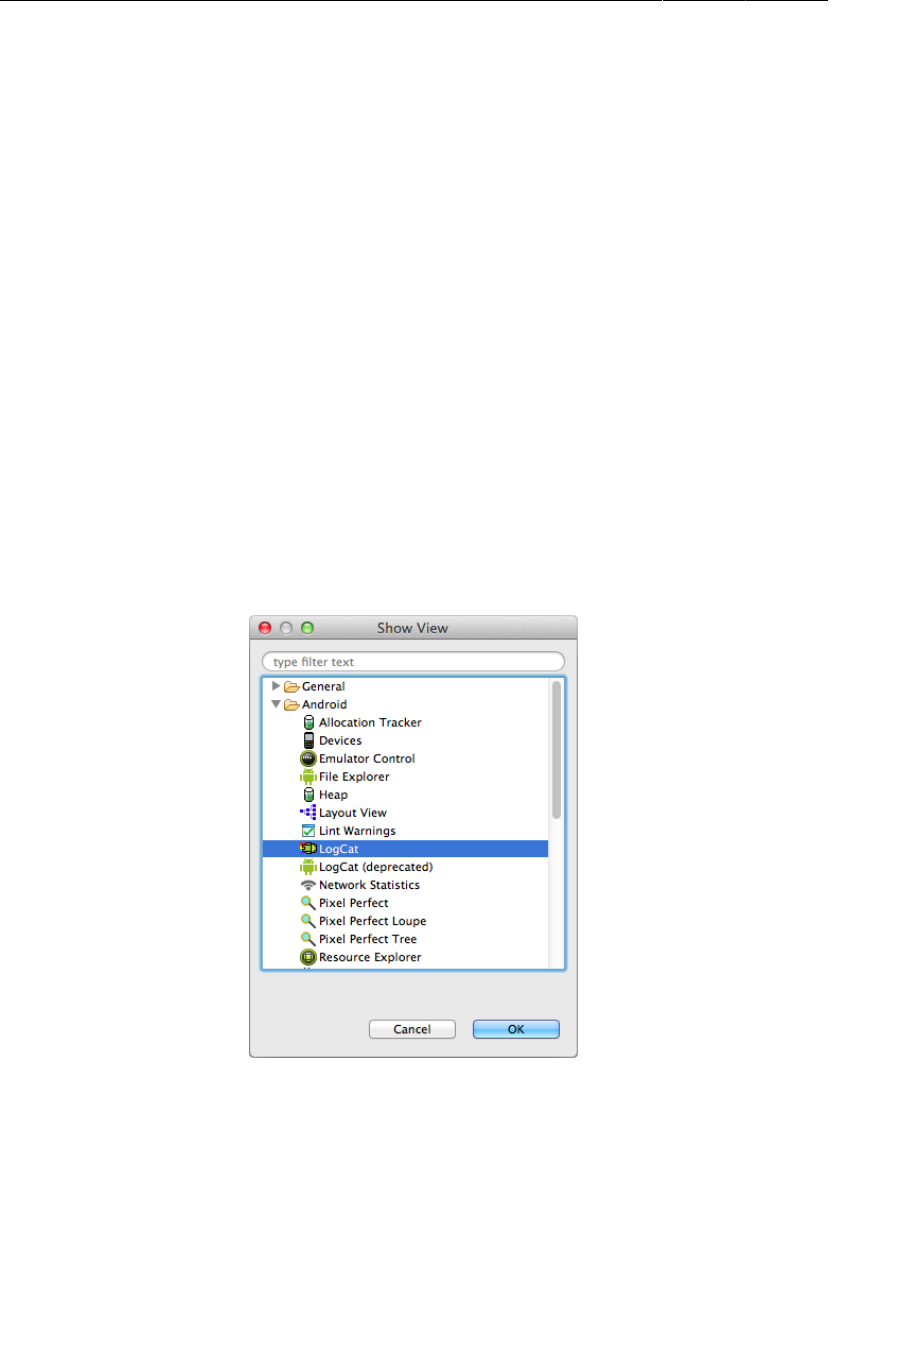
ptg11078569
Chapter 3The Activity Lifecycle
56
You may have been wondering about the @Override annotation. This asks the compiler to ensure that
the class actually has the method that you are attempting to override. For example, the compiler would
be able to alert you to the following misspelled method name:
public class QuizActivity extends Activity {
@Override
public void onCreat(Bundle savedInstanceState) {
super.onCreate(savedInstanceState);
setContentView(R.layout.activity_quiz);
}
...
The Activity class does not have an onCreat(Bundle) method, so the compiler will complain. Then
you can fix the typo rather than accidentally implementing QuizActivity.onCreat(Bundle).
Using LogCat
To access to the log while the application is running, you can use LogCat, a log viewer included in the
Android SDK tools.
To get to LogCat, select Window → Show�View → Other... In the Android folder, find and select LogCat
and click OK (Figure3.2).
Figure 3.2Finding LogCat
LogCat will open in the right half of your screen and annoyingly shrink your editor. It would be better
if LogCat were at the bottom of the workbench window.
To get it there, drag from the tab of the LogCat view to the toolbar at the bottom-right corner of the
workbench.
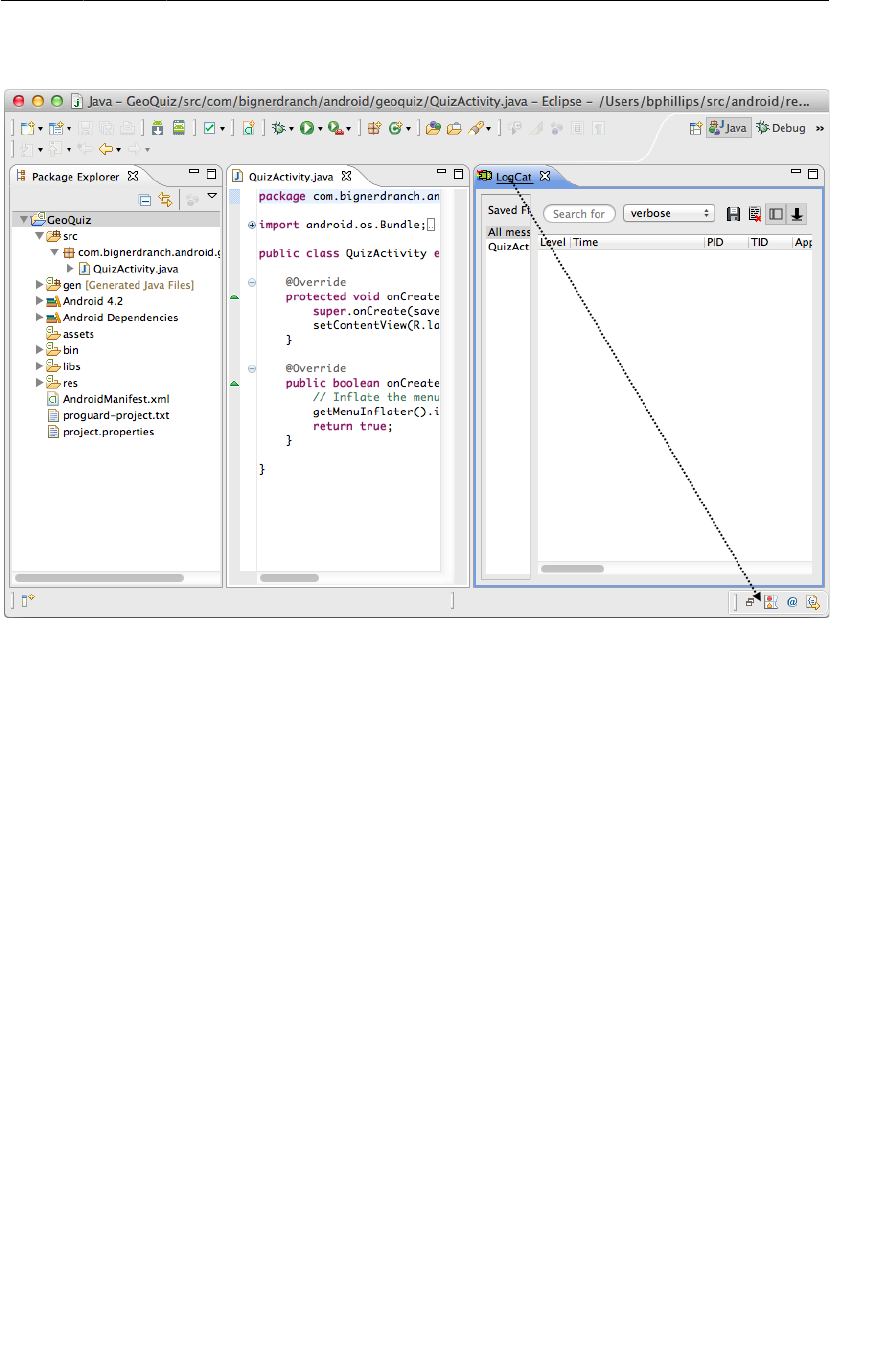
ptg11078569
Using LogCat
57
Figure 3.3Drag from LogCat tab to bottom-right toolbar
The LogCat view will close, and its icon (a horizontal Andy with Nyan rainbow feet) will appear in the
toolbar. Click the icon, and LogCat will reopen at the bottom of the window.
Your Eclipse workbench should now look something like Figure3.4. You can resize the panes in
LogCat by dragging their boundaries. This is true for any of the panes in the Eclipse workbench.
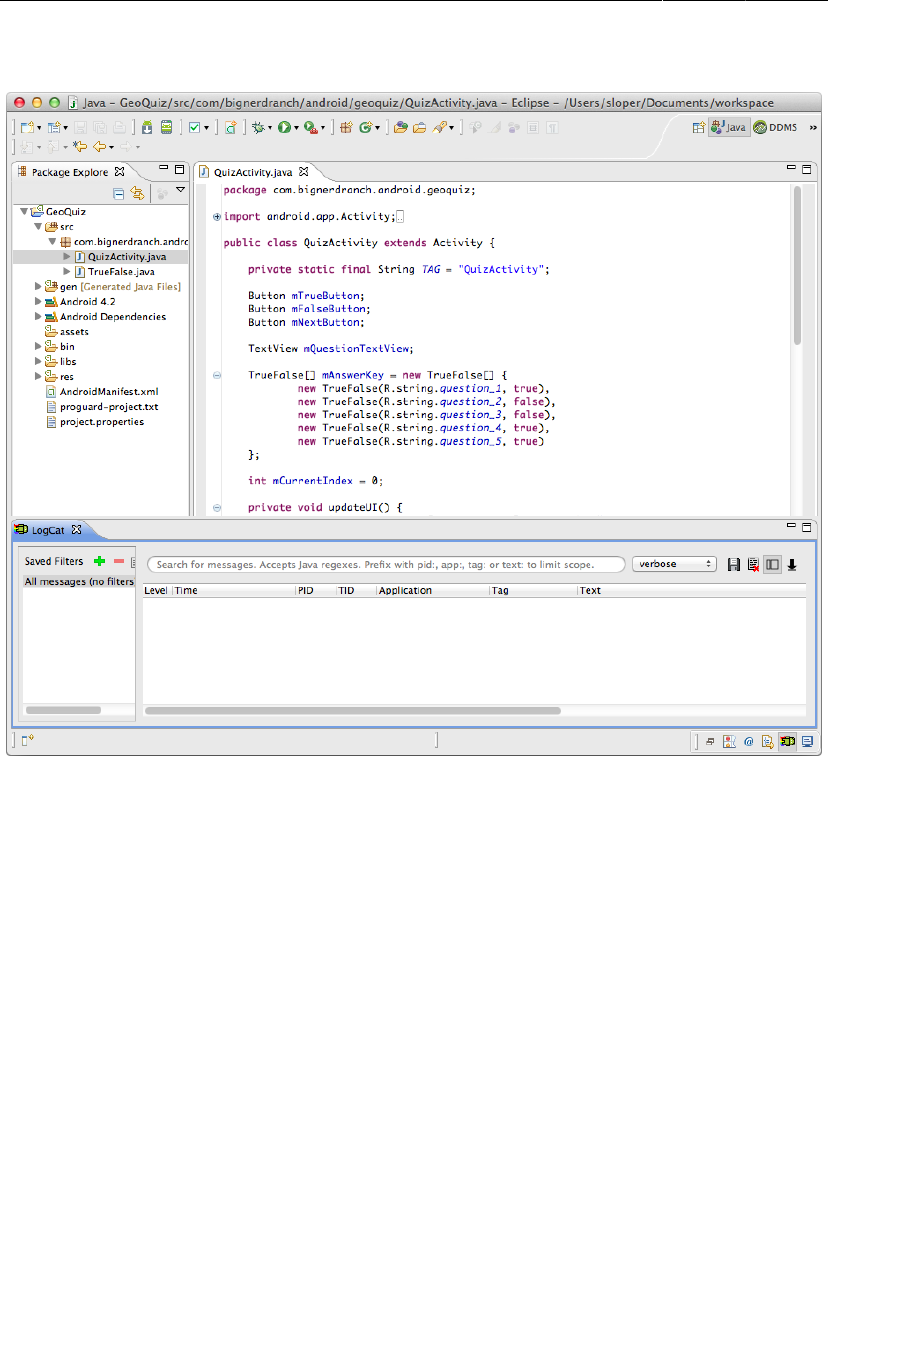
ptg11078569
Chapter 3The Activity Lifecycle
58
Figure 3.4Eclipse workbench – now with LogCat
Run GeoQuiz, and messages will start appearing fast and furiously in LogCat. Most of the messages
will be system output. Scroll to the bottom of the log to find your messages. In LogCat’s Tag column,
you will see the TAG constant you created for QuizActivity.
(If you do not see any messages in LogCat, LogCat may be monitoring the wrong device. Select
Window → Show�View → Other... and open the Devices view. Select the device you are currently
running on and then return to LogCat.)
To make your messages easier to find, you can filter the output using the TAG constant. In LogCat,
click the green + button at the top of the lefthand pane to create a message filter. Name the filter
QuizActivity and enter QuizActivity in the by�Log�Tag: field (Figure3.5).
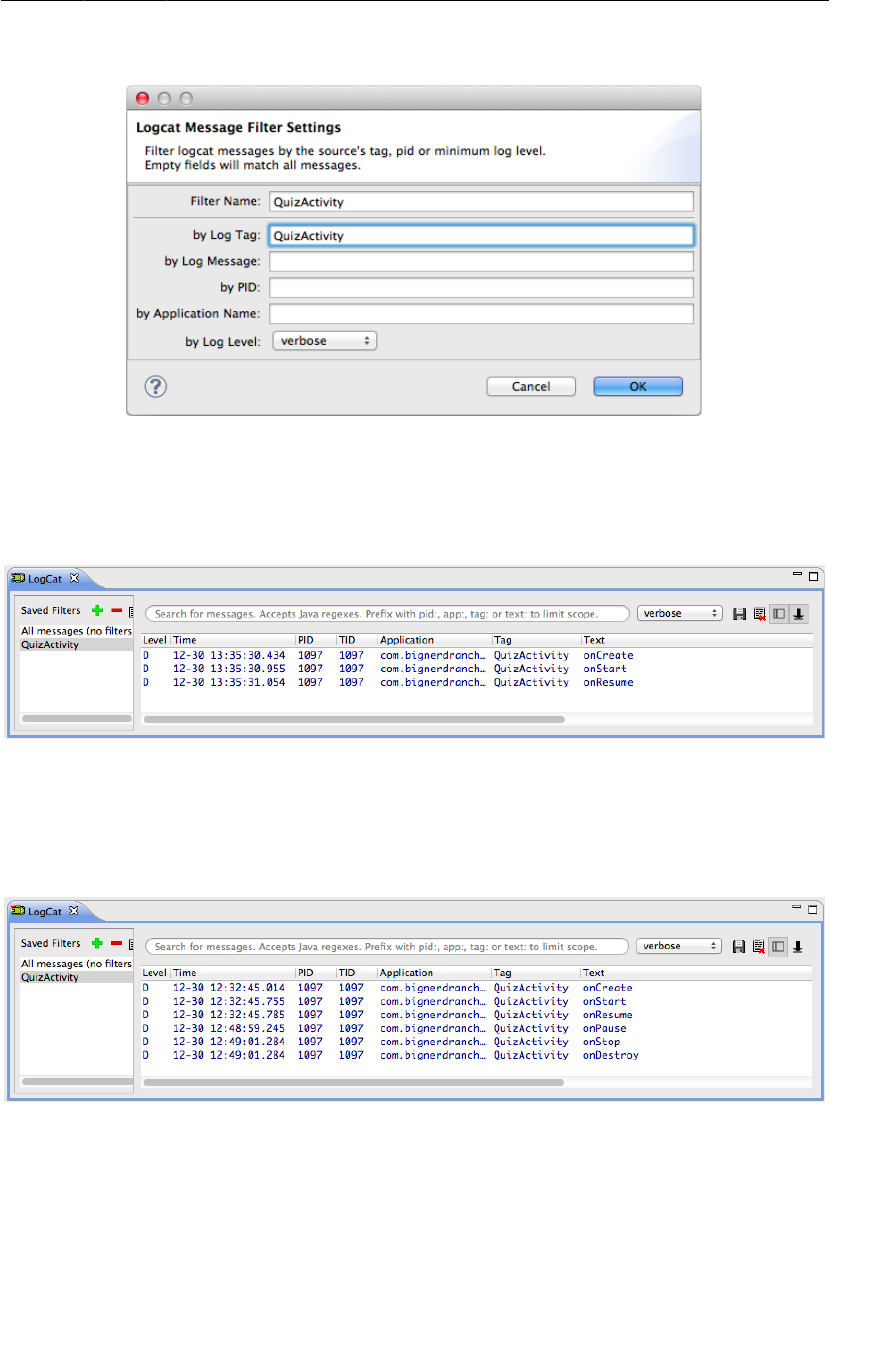
ptg11078569
Using LogCat
59
Figure 3.5Creating a filter in LogCat
Click OK, and a new tab will open showing only messages tagged QuizActivity (Figure3.6). Three
lifecycle methods were called after GeoQuiz was launched and the initial instance of QuizActivity
was created.
Figure 3.6Launching GeoQuiz creates, starts, and resumes an activity
(If you are not seeing the filtered list, select the QuizActivity filter from LogCat’s lefthand pane.)
Now let’s have some fun. Press the Back button on the device and then check LogCat. Your activity
received calls to onPause(), onStop(), and onDestroy().
Figure 3.7Pressing the Back button destroys the activity
When you pressed the Back button, you told Android, “I’m done with this activity, and I won’t need
it anymore.” Android then destroyed your activity. This is Android’s way of being frugal with your
device’s limited resources.
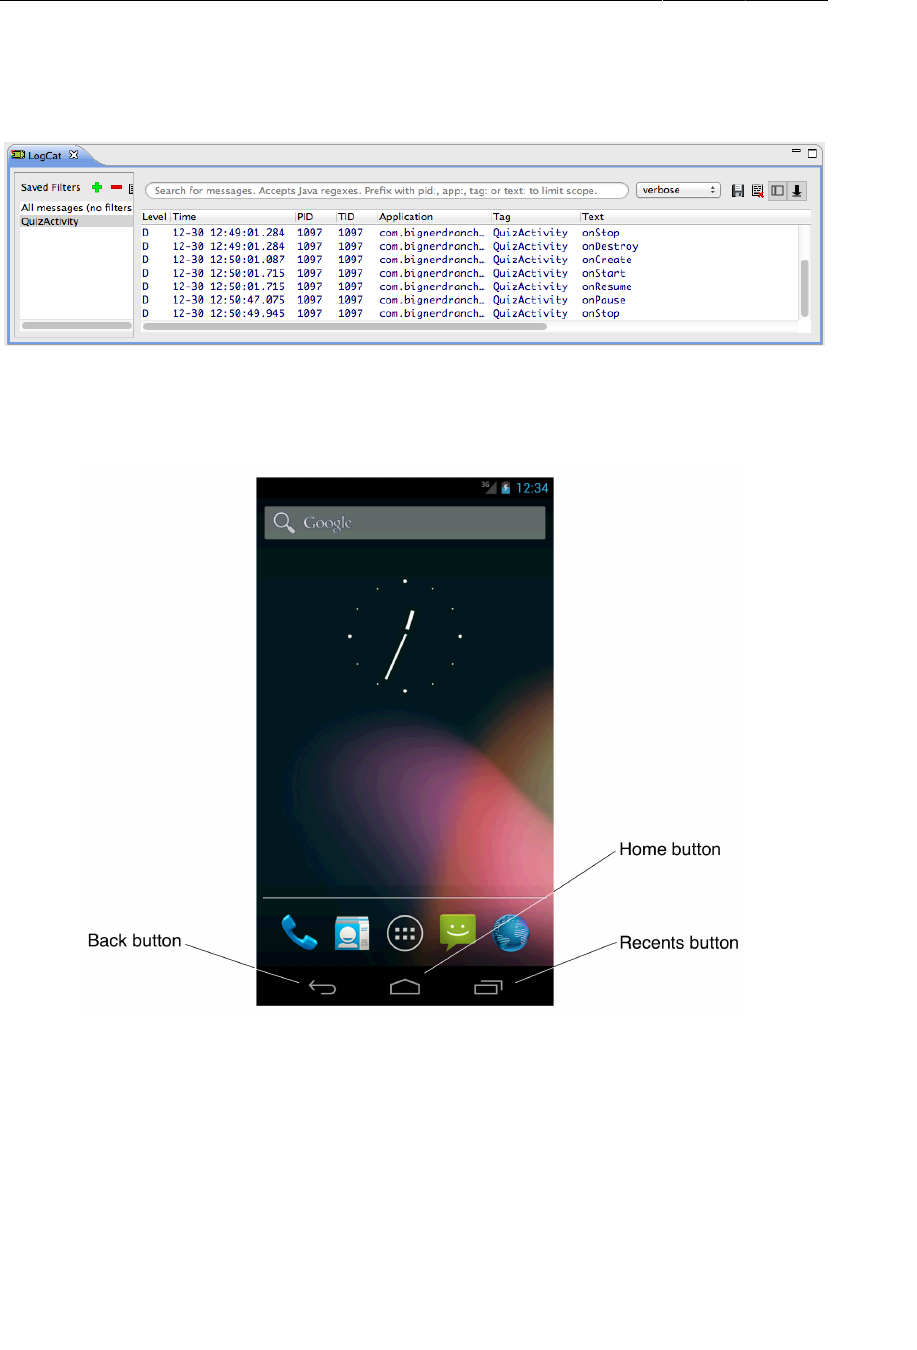
ptg11078569
Chapter 3The Activity Lifecycle
60
Relaunch GeoQuiz. Press the Home button and then check LogCat. Your activity received calls to
onPause() and onStop(), but not onDestroy().
Figure 3.8Pressing the Home button stops the activity
On the device, pull up the task manager. On newer devices, press the Recents button next to the Home
button (Figure3.9). On devices without a Recents button, long-press the Home button.
Figure 3.9Home, Back, and Recents buttons
In the task manager, press GeoQuiz and then check LogCat. The activity was started and resumed, but
it did not need to be created.
Pressing the Home button tells Android, “I’m going to go look at something else, but I might come
back.” Android pauses and stops your activity but tries not to destroy it in case you come back.
However, a stopped activity’s survival is not guaranteed. When the system needs to reclaim memory, it
will destroy stopped activities.
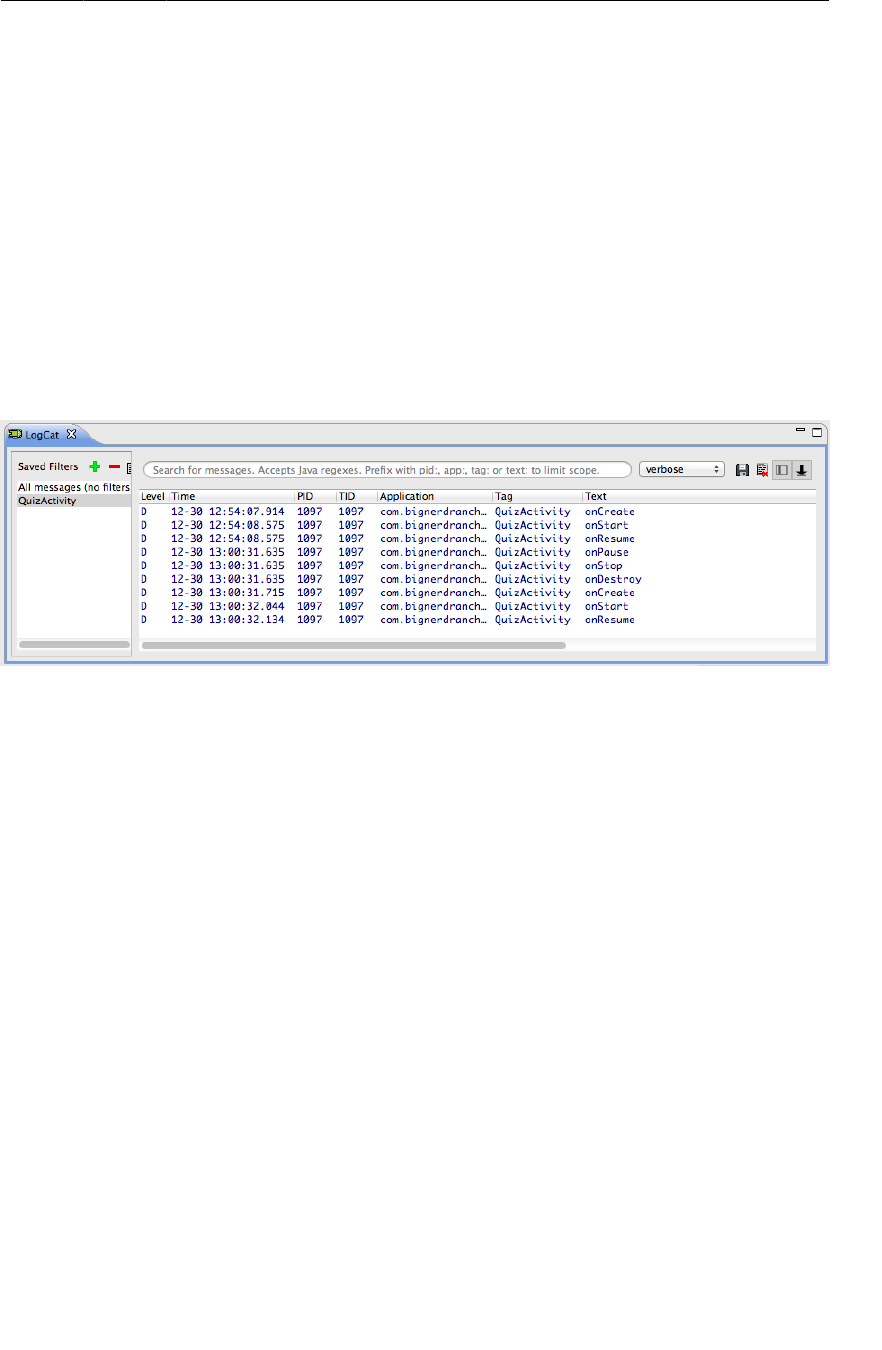
ptg11078569
Rotation and the Activity Lifecycle
61
Finally, imagine a small pop-up window that only partially covers the activity. When one of these
appears, the activity behind it is paused and cannot be interacted with. The activity will be resumed
when the pop-up window is dismissed.
As you continue through the book, you will override the different activity lifecycle methods to do real
things for your application. When you do, you will learn more about the uses of each method.
Rotation and the Activity Lifecycle
Let’s get back to the bug you found at the end of Chapter2. Run GeoQuiz, press the Next button to
reveal the second question, and then rotate the device. (For the emulator, press Control+F12/Ctrl+F12
to rotate.)
After rotating, GeoQuiz will display the first question again. Check LogCat to see what has happened.
Figure 3.10QuizActivity is dead. Long live QuizActivity!
When you rotated the device, the instance of QuizActivity that you were looking at was destroyed,
and a new one was created. Rotate the device again to witness another round of destruction and rebirth.
This is the source of your bug. Each time a new QuizActivity is created, mCurrentIndex is initialized
to 0, and the user starts over at the first question. You will fix this bug in a moment. First, let’s take a
closer look at why this happens.
Device configurations and alternative resources
Rotating the device changes the device configuration. The device configuration is a set of
characteristics that describe the current state of an individual device. The characteristics that make up
the configuration include screen orientation, screen density, screen size, keyboard type, dock mode,
language, and more.
Typically, applications provide alternative resources to match different device configurations. You saw
an example of this when you added multiple arrow icons to your project for different screen densities.
Screen density is a fixed component of the device configuration; it cannot change at runtime. On the
other hand, some components, like screen orientation, can change at runtime.
When a runtime configuration change occurs, there may be resources that are a better match for the
new configuration. To see this in action, let’s create an alternative resource for Android to find and use
when the device’s screen orientation changes to landscape.
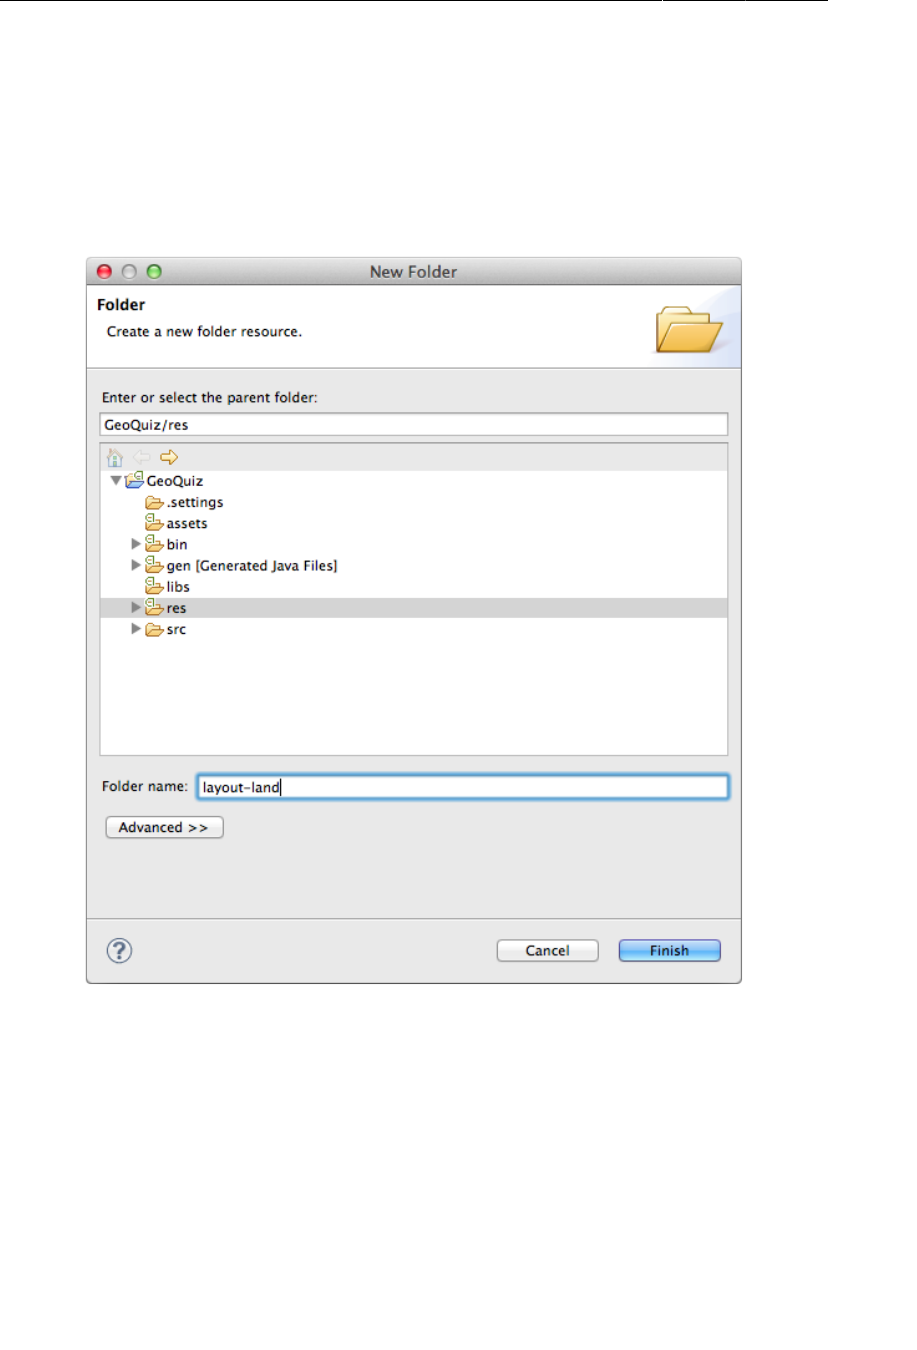
ptg11078569
Chapter 3The Activity Lifecycle
62
Creating a landscape layout
First, minimize LogCat. (If you accidentally close LogCat instead, you can always re-open it from
Window → Show�View...)
Next, in the package explorer, right-click the res directory and create a new folder. Name this folder
layout-land.
Figure 3.11Creating a new folder
Copy the activity_quiz.xml file from res/layout/ to res/layout-land/. You now have a landscape
layout and a default layout. Keep the filename the same. The two layout files must have the same
filename so that they can be referenced with the same resource ID.
The -land suffix is another example of a configuration qualifier. Configuration qualifiers on res
subdirectories are how Android identifies which resources best match the current device configuration.
You can find the list of configuration qualifiers that Android recognizes and the pieces of the device
configuration that they refer to at http://developer.android.com/guide/topics/resources/
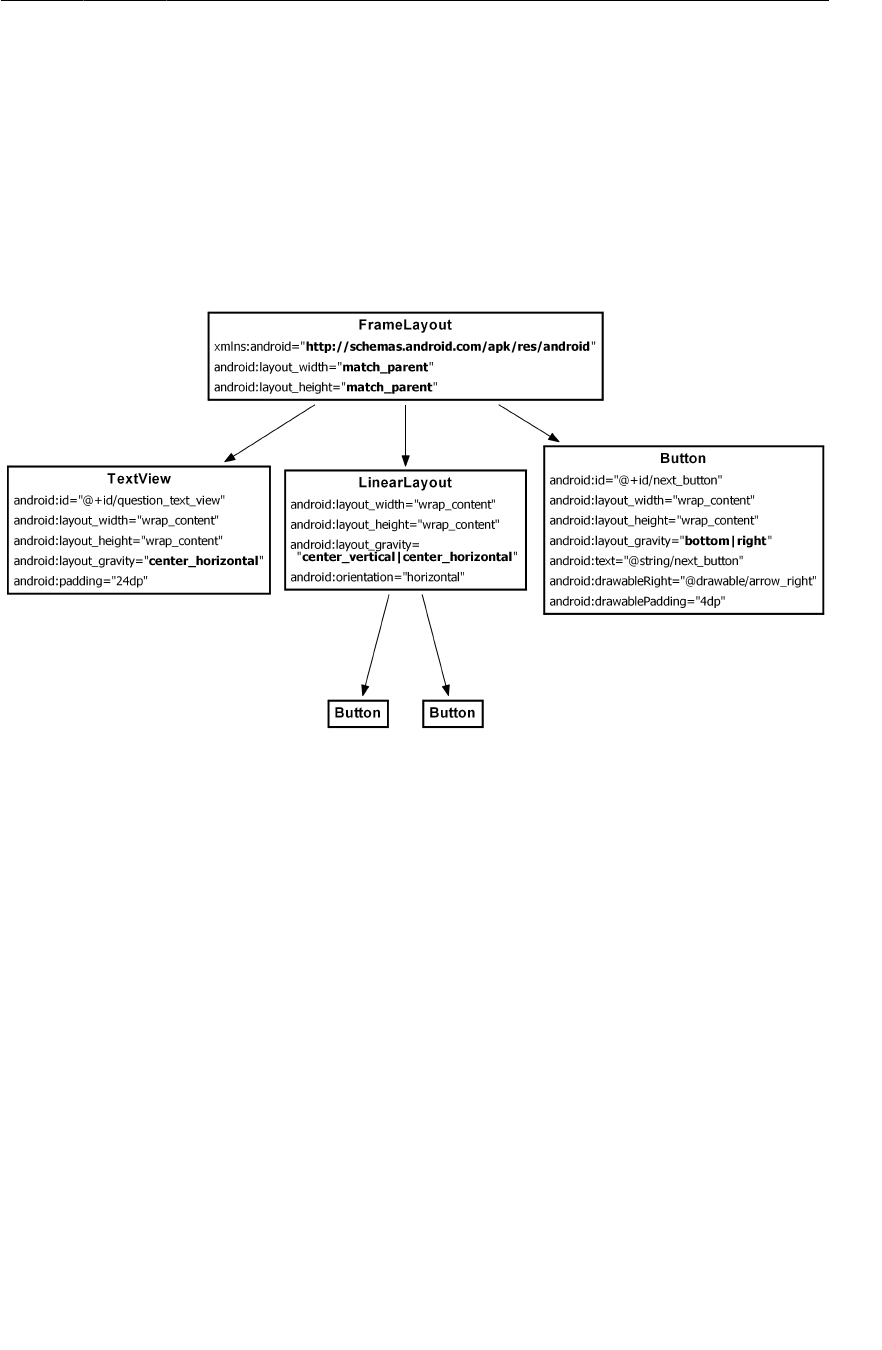
ptg11078569
Device configurations and alternative resources
63
providing-resources.html. You will also get more practice working with configuration qualifiers in
Chapter15.
When the device is in landscape orientation, Android will find and use resources in the res/
layout-land directory. Otherwise, it will stick with the default in res/layout/.
Let’s make some changes to the landscape layout so that it is different from the default. Figure3.12
shows the changes that you are going to make.
Figure 3.12An alternative landscape layout
The FrameLayout will replace the LinearLayout. FrameLayout is the simplest ViewGroup and does not
arrange its children in any particular manner. In this layout, child views will be arranged according to
their android:layout_gravity attributes.
The TextView, LinearLayout, and Button need android:layout_gravity attributes. The Button
children of the LinearLayout will stay exactly the same.
Open layout-land/activity_quiz.xml and make the necessary changes using Figure3.12. You can
use Listing 3.4 to check your work.

ptg11078569
Chapter 3The Activity Lifecycle
64
Listing 3.4Tweaking the landscape layout (layout-land/activity_quiz.xml)
<LinearLayout xmlns:android="http://schemas.android.com/apk/res/android"
android:layout_width="match_parent"
android:layout_height="match_parent"
android:gravity="center"
android:orientation="vertical" >
<FrameLayout xmlns:android="http://schemas.android.com/apk/res/android"
android:layout_width="match_parent"
android:layout_height="match_parent" >
<TextView
android:id="@+id/question_text_view"
android:layout_width="wrap_content"
android:layout_height="wrap_content"
android:layout_gravity="center_horizontal"
android:padding="24dp" />
<LinearLayout
android:layout_width="wrap_content"
android:layout_height="wrap_content"
android:layout_gravity="center_vertical|center_horizontal"
android:orientation="horizontal" >
...
</LinearLayout>
<Button
android:id="@+id/next_button"
android:layout_width="wrap_content"
android:layout_height="wrap_content"
android:layout_gravity="bottom|right"
android:text="@string/next_button"
android:drawableRight="@drawable/arrow_right"
android:drawablePadding="4dp"
/>
</LinearLayout>
</FrameLayout>
Run GeoQuiz again. Rotate the device to landscape to see the new layout. Of course, this is not just a
new layout; it is a new QuizActivity as well.
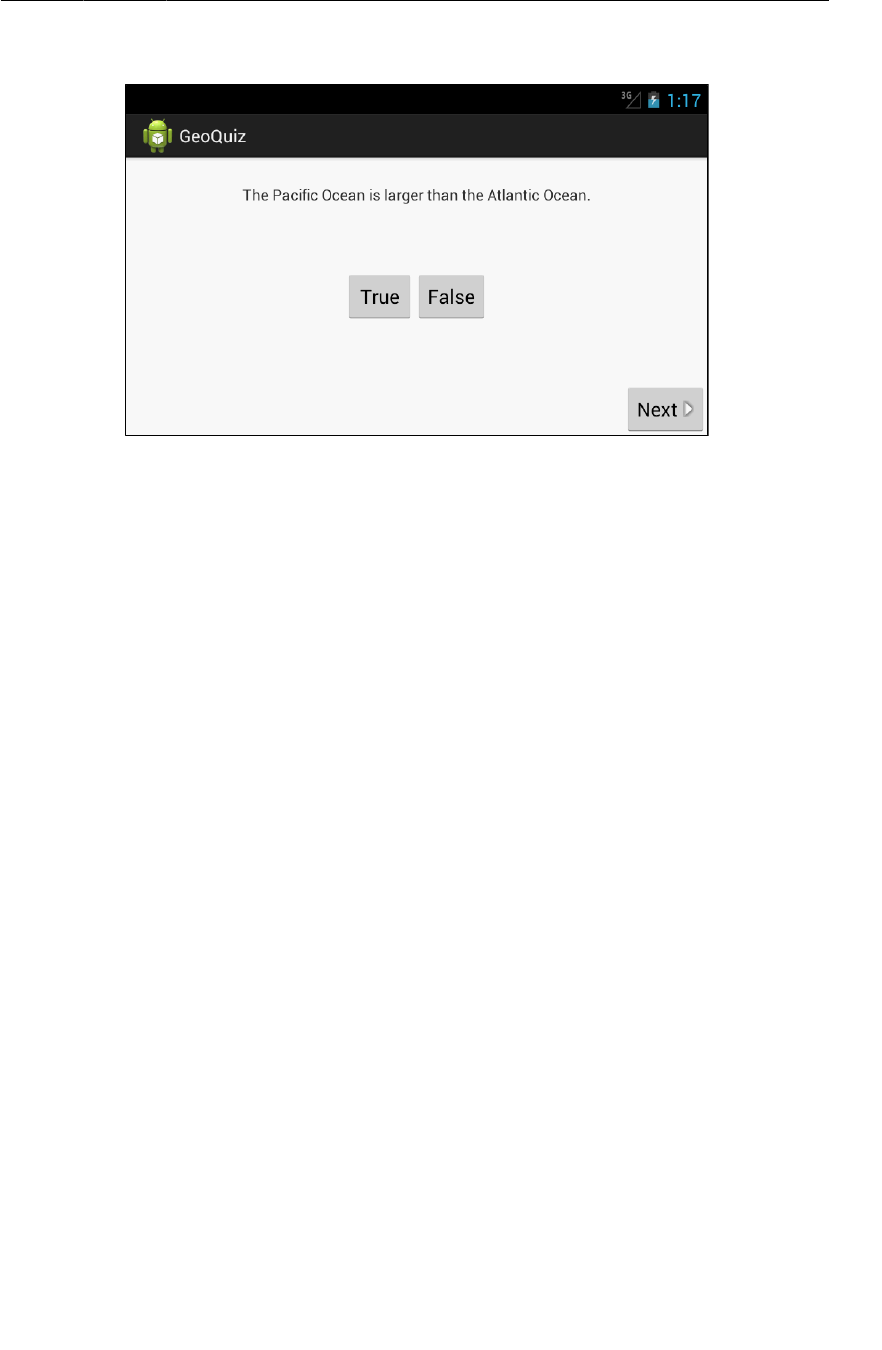
ptg11078569
Saving Data Across Rotation
65
Figure 3.13QuizActivity in landscape orientation
Rotate back to portrait to see the default layout and yet another new QuizActivity.
Android does the work of determining the best resource for you, but it has to create a
new activity from scratch to do it. For a QuizActivity to display a different layout,
setContentView(R.layout.activity_quiz) must be called again. And this will not happen unless
QuizActivity.onCreate(…) is called again. Thus, Android destroys the current QuizActivity on
rotation and starts fresh to ensure that it has the resources that best match the new configuration.
Note that Android destroys the current activity and creates a new one whenever any runtime
configuration change occurs. A change in keyboard availability or language could also occur at
runtime, but a change in screen orientation is the runtime change that occurs most frequently.
Saving Data Across Rotation
Android does a great job of providing alternative resources at the right time. However, destroying and
recreating activities on rotation can cause headaches, too, like GeoQuiz’s bug of reverting back to the
first question when the device is rotated.
To fix this bug, the post-rotation QuizActivity needs to know the old value of mCurrentIndex. You
need a way to save this data across a runtime configuration change, like rotation. One way to do this is
to override the Activity method
protected void onSaveInstanceState(Bundle outState)
This method is normally called by the system before onPause(), onStop(), and onDestroy().
The default implementation of onSaveInstanceState(…) asks all of the activity’s views to save their
state as data in the Bundle object. A Bundle is a structure that maps string keys to values of certain
limited types.

ptg11078569
Chapter 3The Activity Lifecycle
66
You have seen this Bundle before. It is passed into onCreate(Bundle)
@Override
public void onCreate(Bundle savedInstanceState) {
super.onCreate(savedInstanceState);
...
When you override onCreate(…), you call onCreate(…) on the activity’s superclass and pass in the
bundle you just received. In the superclass implementation, the saved state of the views is retrieved and
used to recreate the activity’s view hierarchy.
Overriding onSaveInstanceState(Bundle)
You can override onSaveInstanceState(…) to save additional data to the bundle and then read that
data back in onCreate(…). This is how you are going to save the value of mCurrentIndex across
rotation.
First, in QuizActivity.java, add a constant that will be the key for the key-value pair that will be
stored in the bundle.
Listing 3.5Adding a key for the value (QuizActivity.java)
public class QuizActivity extends Activity {
private static final String TAG = "QuizActivity";
private static final String KEY_INDEX = "index";
Button mTrueButton;
...
Next, override onSaveInstanceState(…) to write the value of mCurrentIndex to the bundle with the
constant as its key.
Listing 3.6Overriding onSaveInstanceState(…) (QuizActivity.java)
mNextButton.setOnClickListener(new View.OnClickListener() {
@Override
public void onClick(View v) {
mCurrentIndex = (mCurrentIndex + 1) % mQuestionBank.length;
updateQuestion();
}
});
updateQuestion();
}
@Override
public void onSaveInstanceState(Bundle savedInstanceState) {
super.onSaveInstanceState(savedInstanceState);
Log.i(TAG, "onSaveInstanceState");
savedInstanceState.putInt(KEY_INDEX, mCurrentIndex);
}

ptg11078569
The Activity Lifecycle, Revisited
67
Finally, in onCreate(…), check for this value. If it exists, assign it to mCurrentIndex.
Listing 3.7Checking bundle in onCreate(…) (QuizActivity.java)
...
if (savedInstanceState != null) {
mCurrentIndex = savedInstanceState.getInt(KEY_INDEX, 0);
}
updateQuestion();
}
Run GeoQuiz and press Next. No matter how many device or user rotations you perform, the newly-
minted QuizActivity will “remember” what question you were on.
Note that the types that you can save to and restore from a Bundle are primitive types and objects that
implement the Serializable interface. When you are creating custom classes, be sure to implement
Serializable if you want to save them in onSaveInstanceState(…).
Testing the implementation of onSaveInstanceState(…) is a good idea – especially if you are saving
and restoring objects. Rotation is easy to test; testing low-memory situations is harder. There is
information at the end of this chapter about how to simulate your activity being destroyed by Android
to reclaim memory.
The Activity Lifecycle, Revisited
Overriding onSaveInstanceState(Bundle) is not just for handling rotation. An activity can also be
destroyed if the user navigates away for a while and Android needs to reclaim memory.
Android will never destroy a running activity to reclaim memory – the activity must be in the paused
or stopped state to be destroyed. If an activity is paused or stopped, then its onSaveInstanceState(…)
method has been called.
When onSaveInstanceState(…) is called, the data is saved to the Bundle object. That Bundle object is
then stuffed into your activity’s activity record by the OS
To understand the activity record, let’s add a stashed state to the activity lifecycle (Figure3.14).
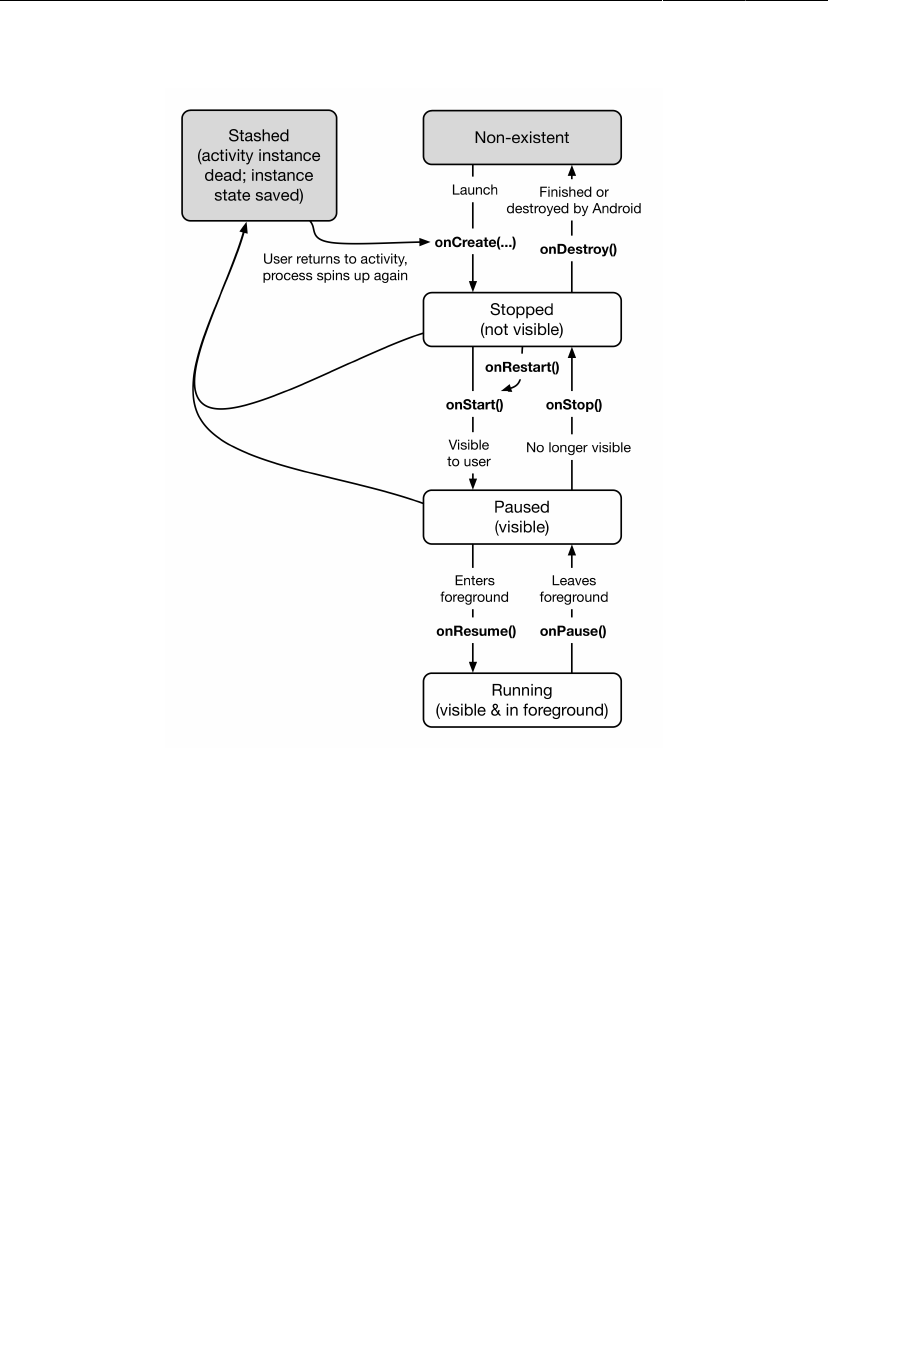
ptg11078569
Chapter 3The Activity Lifecycle
68
Figure 3.14The complete activity lifecycle
When your activity is stashed, an Activity object does not exist, but the activity record object lives on
in the OS. The OS can reanimate the activity using the activity record when it needs to.
Note that your activity can pass into the stashed state without onDestroy() being called. However,
you can always rely on onPause() and onSaveInstanceState(…) to be called. Typically, you override
onSaveInstanceState(…) to stash data in your Bundle and onPause() for anything else that needs to
be done.
Under some situations, Android will not only kill your activity but also completely shut down your
application’s process. This will only happen if the user is not currently looking at your application, but
it can (and does) happen. Even in this case, the activity record will live on and enable a quick restart of
your activity if the user returns.
So when does the activity record get snuffed? When the user presses the Back button, your activity
really gets destroyed, once and for all. At that point, your activity record is discarded. Activity records
are also typically discarded on reboot and may also be discarded if they are not used for a long time.
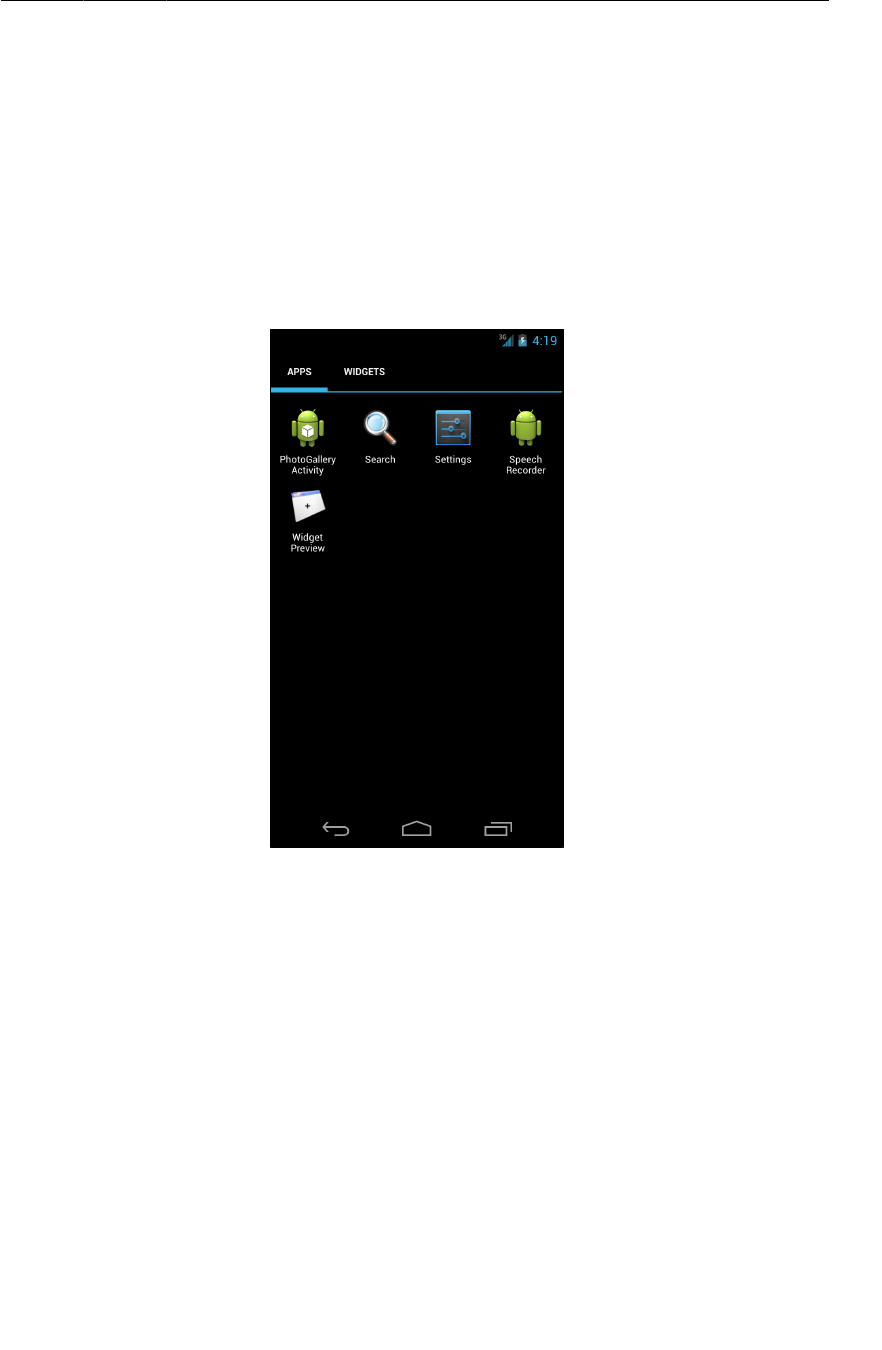
ptg11078569
For the More Curious: Testing onSaveInstanceState(Bundle)
69
For the More Curious: Testing
onSaveInstanceState(Bundle)
If you are overriding onSaveInstanceState(Bundle), you should test that your state is being saved
and restored as expected. This is easy to do on the emulator.
Start up a virtual device. Within the list of applications on the device, find the Settings app. This app is
included with most system images used on the emulator.
Figure 3.15Finding the Settings app
Launch Settings and select Development�options. Here you will see many possible settings. Turn on the
setting labeled Don’t�keep�activities.

ptg11078569
Chapter 3The Activity Lifecycle
70
Figure 3.16Don’t keep activities selected
Now run your app and press the Home button. Pressing Home causes the activity to be paused and
stopped. Then the stopped activity will be destroyed just as if the Android OS had reclaimed it for its
memory. Then you can restore the app to see if your state was saved as you expected.
Pressing the Back button instead of the Home button will always destroy the activity regardless of
whether you have this development setting on. Pressing the Back button tells the OS that the user is
done with the activity.
To run the same test on a hardware device, you must install Dev Tools on the device. For more
information, visit http://developer.android.com/tools/debugging/debugging-devtools.html.
For the More Curious: Logging Levels and Methods
When you use the android.util.Log class to send log messages, you control not only the content of a
message, but also a level that specifies how important the message is. Android supports five log levels,
shown in Figure3.17. Each level has a corresponding method in the Log class. Sending output to the
log is as simple as calling the corresponding Log method.
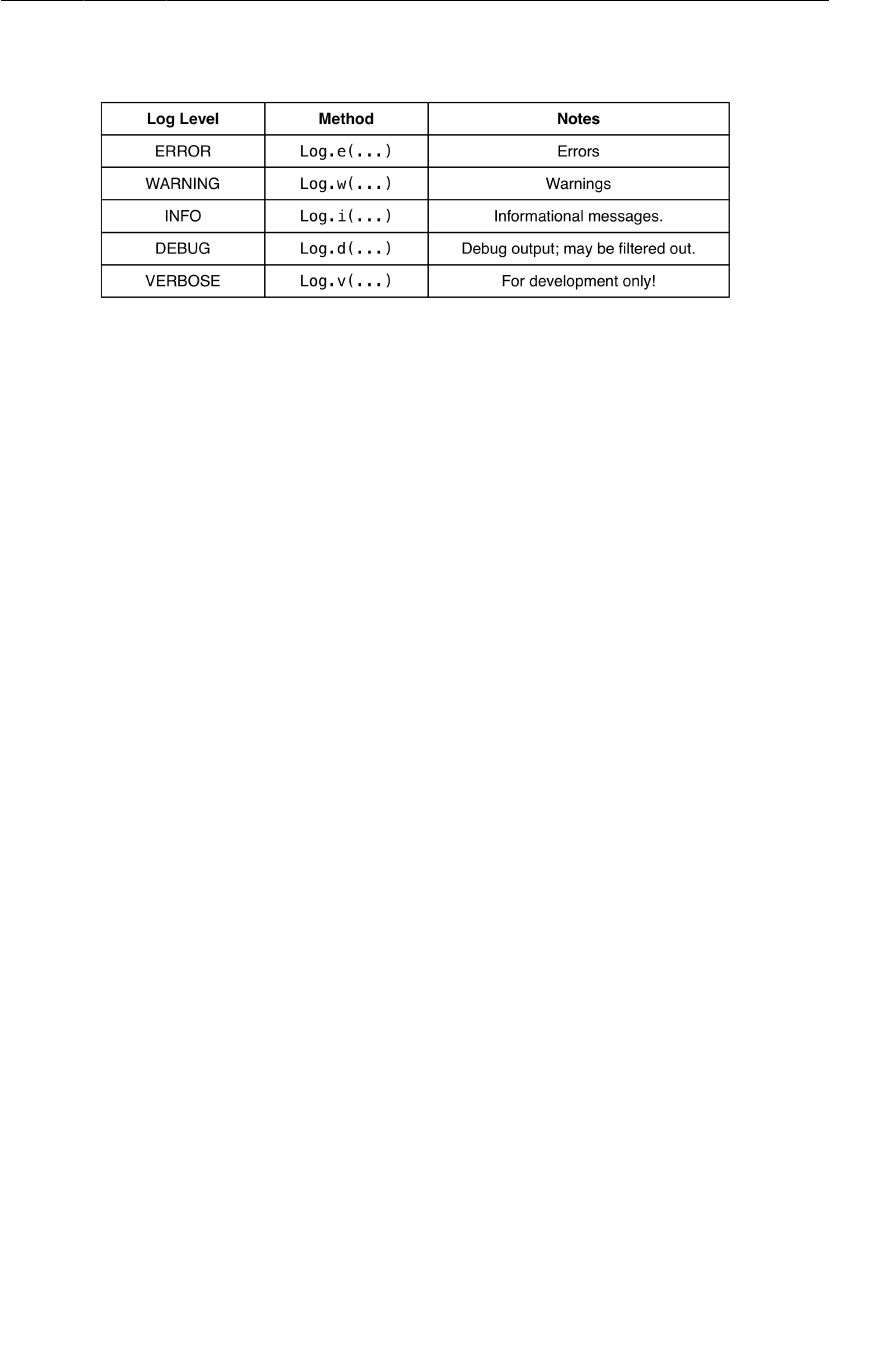
ptg11078569
For the More Curious: Logging Levels and Methods
71
Figure 3.17Log levels and methods
In addition, each of the logging methods has two signatures: one which takes a tag string and a
message string and a second that takes those two arguments plus an instance of Throwable, which
makes it easy to log information about a particular exception that your application might throw. Listing
3.8 shows some sample log method signatures. Use regular Java string concatenation to assemble your
message string, or String.format if you have fancier needs.
Listing 3.8Different ways of logging in Android
// Log a message at "debug" log level
Log.d(TAG, "Current question index: " + mCurrentIndex);
TrueFalse question;
try {
question = mQuestionBank[mCurrentIndex];
} catch (ArrayIndexOutOfBoundsException ex) {
// Log a message at "error" log level, along with an exception stack trace
Log.e(TAG, "Index was out of bounds", ex);
}

ptg11078569
This page intentionally left blank

ptg11078569
73
4
Debugging Android Apps
In this chapter, you will find out what to do when apps get buggy. You will learn how to use LogCat,
Android Lint, and the debugger that comes with Eclipse.
To practice debugging, the first step is to break something. In QuizActivity.java, comment out the
code in onCreate(Bundle) where you pull out mQuestionTextView.
Listing 4.1Comment out a crucial line (QuizActivity.java)
@Override
protected void onCreate(Bundle savedInstanceState) {
super.onCreate(savedInstanceState);
Log.d(TAG, "onCreate() called");
setContentView(R.layout.activity_quiz);
mQuestionTextView = (TextView)findViewById(R.id.question_text_view);
//mQuestionTextView = (TextView)findViewById(R.id.question_text_view);
mTrueButton = (Button)findViewById(R.id.true_button);
mTrueButton.setOnClickListener(new View.OnClickListener() {
...
});
...
}
Run GeoQuiz and see what happens.
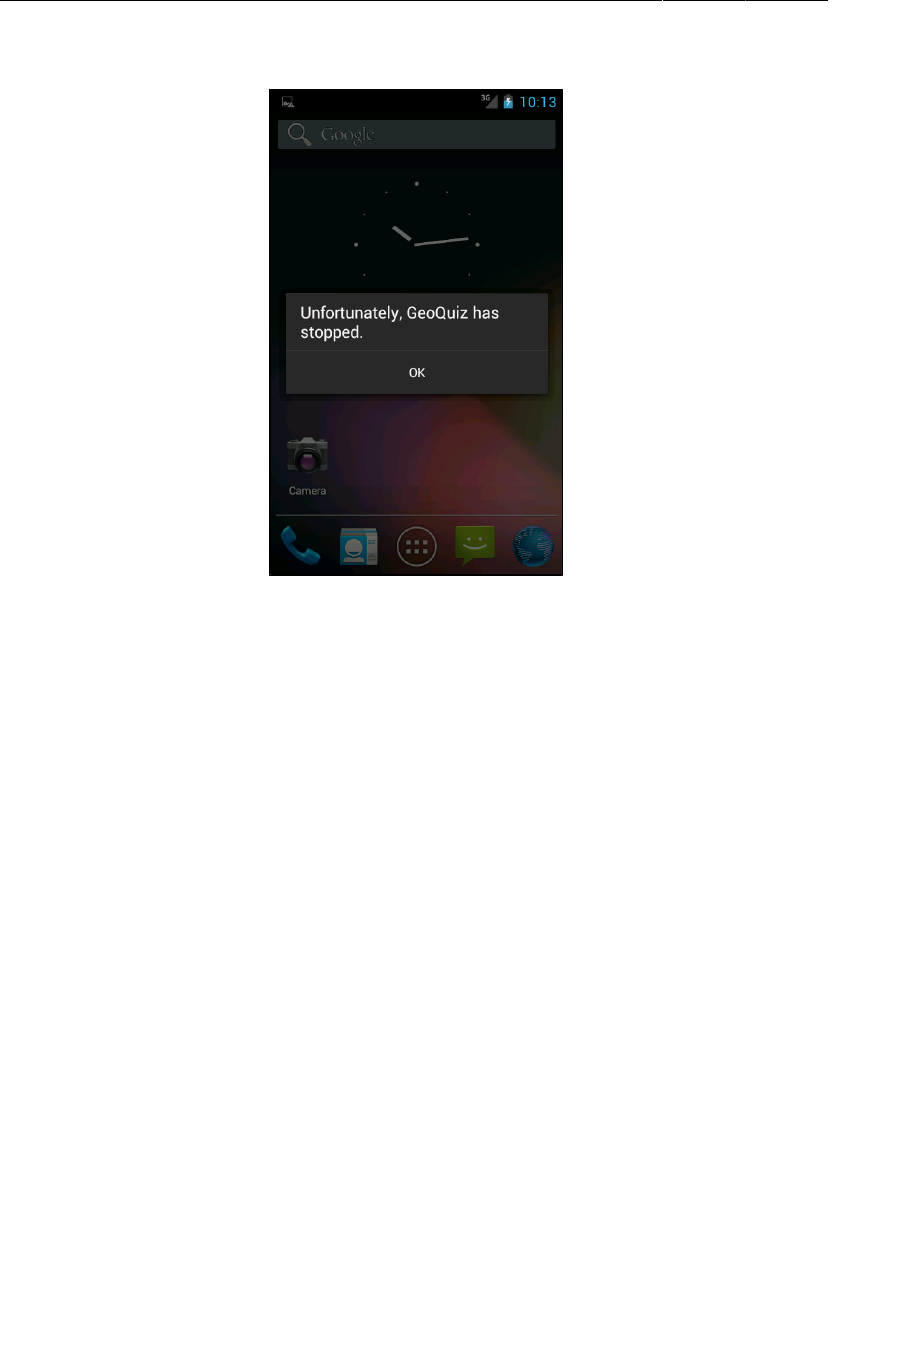
ptg11078569
Chapter 4Debugging Android Apps
74
Figure 4.1GeoQuiz is about to E.X.P.L.O.D.E.
Figure4.1 shows the message that appears when your app crashes and burns. Different versions
of Android will have slightly different messages, but they all mean the same thing. Of course, you
know what is wrong with your app, but if you did not, it might help to look at your app from a new
perspective.
The DDMS Perspective
From the Eclipse menu, select Window → Open�Perspective → DDMS.
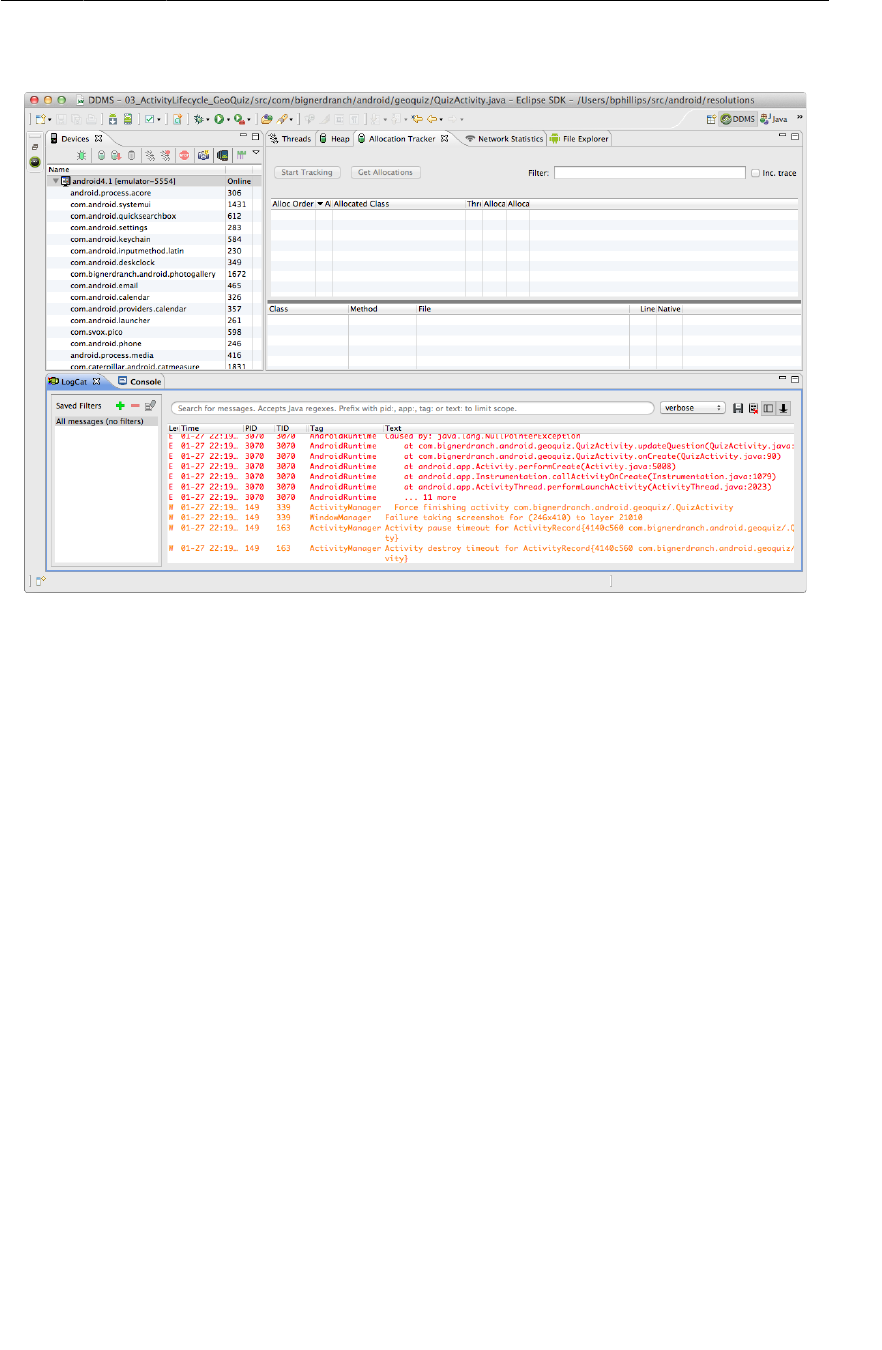
ptg11078569
The DDMS Perspective
75
Figure 4.2DDMS Perspective
A perspective is a pre-defined set of views in Eclipse. You usually want to see different views when
you are debugging than when you are editing, so Eclipse puts each set of views together into a
perspective.
Perspectives are pre-defined, but they are not set in stone. You can add and remove views from any
of them, and Eclipse will remember your choices. If you ever need to start fresh, you can return a
perspective to its default state by choosing Window → Reset�Perspective...
The default perspective where you have been editing code is called the Java perspective. The
perspectives that you currently have open are listed near the top-right of the Eclipse workbench, and
you can click on those buttons to switch between them.
Figure4.2 shows the DDMS perspective. DDMS stands for Dalvik Debug Monitor Service. Behind the
scenes, DDMS does the footwork for all Android debugging. The DDMS perspective includes LogCat
and the Devices view.
The Devices view shows you which devices and virtual devices are connected to your computer.
Problems you are having with a specific device can usually be solved in this view.
For example, is your device not showing up as an option when you run an application? Click the
downward-pointing triangle at the top-right corner and select Reset�adb. Often, rebooting adb will
find your device. Or is LogCat showing output for the wrong device? No problem – click to select the
device you want to see output from, and LogCat will switch to showing output from that device.
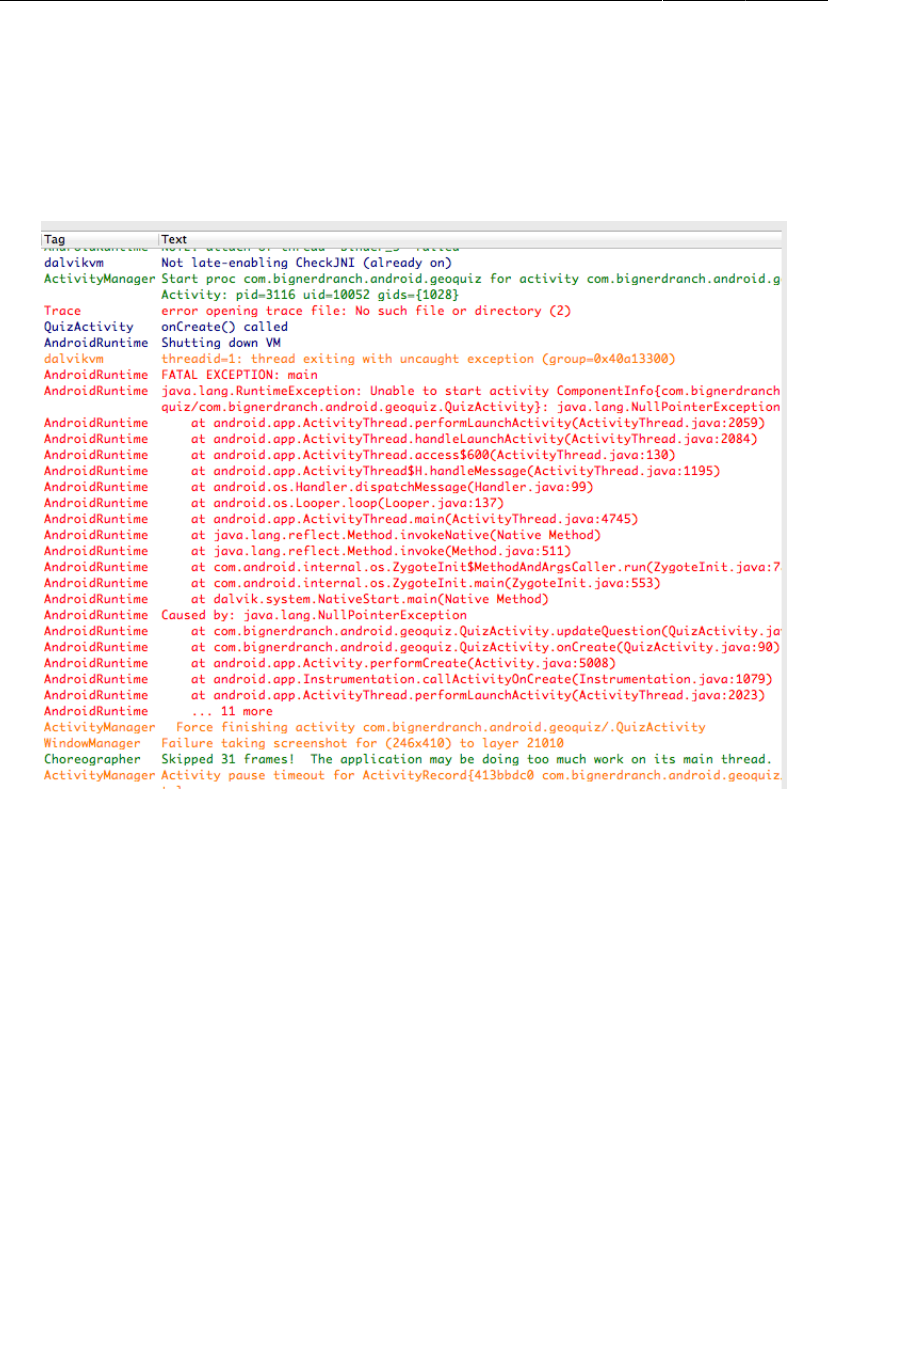
ptg11078569
Chapter 4Debugging Android Apps
76
Exceptions and Stack Traces
Now back to your app’s problem. Expand the LogCat pane so that you can see what has happened. If
you scroll up and down in LogCat, you should eventually find an expanse of red. This is a standard
AndroidRuntime exception report.
Figure 4.3Exception and stack trace in LogCat
The report tells you the top-level exception and its stack trace, then the exception that caused that
exception and its stack trace, and so on and so forth until it finds an exception with no cause.
In most of the code you will write, that last exception with no cause is the interesting one. Here the
exception without a cause is a java.lang.NullPointerException. The line just below this exception
is the first line in its stack trace. This line tells you the class and method where the exception occurred
as well as what file and line number the exception occurred on. Double-click this line, and Eclipse will
take you to that line in your source code.
The line to which you are taken is the first use of the mQuestionTextView variable, inside
updateQuestion(). The name NullPointerException gives you a hint to the problem: this variable
was not initialized.
Uncomment the line initializing mQuestionTextView to fix the bug.
When you run into runtime exceptions, remember to look for the last exception in LogCat and the first
line in its stack trace that refers to code that you have written. That is where the problem occurs, and it
is the best place to start looking for answers.

ptg11078569
Diagnosing misbehaviors
77
If a crash occurs on a device while it is not plugged in, all is not lost. The device will store the latest
lines written to the log. The length and expiration of the stored log depends on the device, but you can
usually count on retrieving log results within ten minutes. Just plug in the device, pull up DDMS in
Eclipse, and select your device in the Devices view. LogCat will fill itself with the stored log.
Diagnosing misbehaviors
Problems with your apps will not always be crashes. In some cases, they will be misbehaviors. For
example, suppose that every time you pressed the Next button, nothing happened. That would be a non-
crashing, misbehaving bug.
In QuizActivity.java, make a change to the mNextButton listener to comment out the code that
increments mCurrentIndex.
Listing 4.2Forget a critical line of code (QuizActivity.java)
@Override
protected void onCreate(Bundle savedInstanceState) {
super.onCreate(savedInstanceState);
...
mNextButton = (Button)findViewById(R.id.next_button);
mNextButton.setOnClickListener(new View.OnClickListener() {
@Override
public void onClick(View v) {
mCurrentIndex = (mCurrentIndex + 1) % mQuestionBank.length;
//mCurrentIndex = (mCurrentIndex + 1) % mQuestionBank.length;
updateQuestion();
}
});
...
}
Run GeoQuiz and press the Next button. You should see no effect.
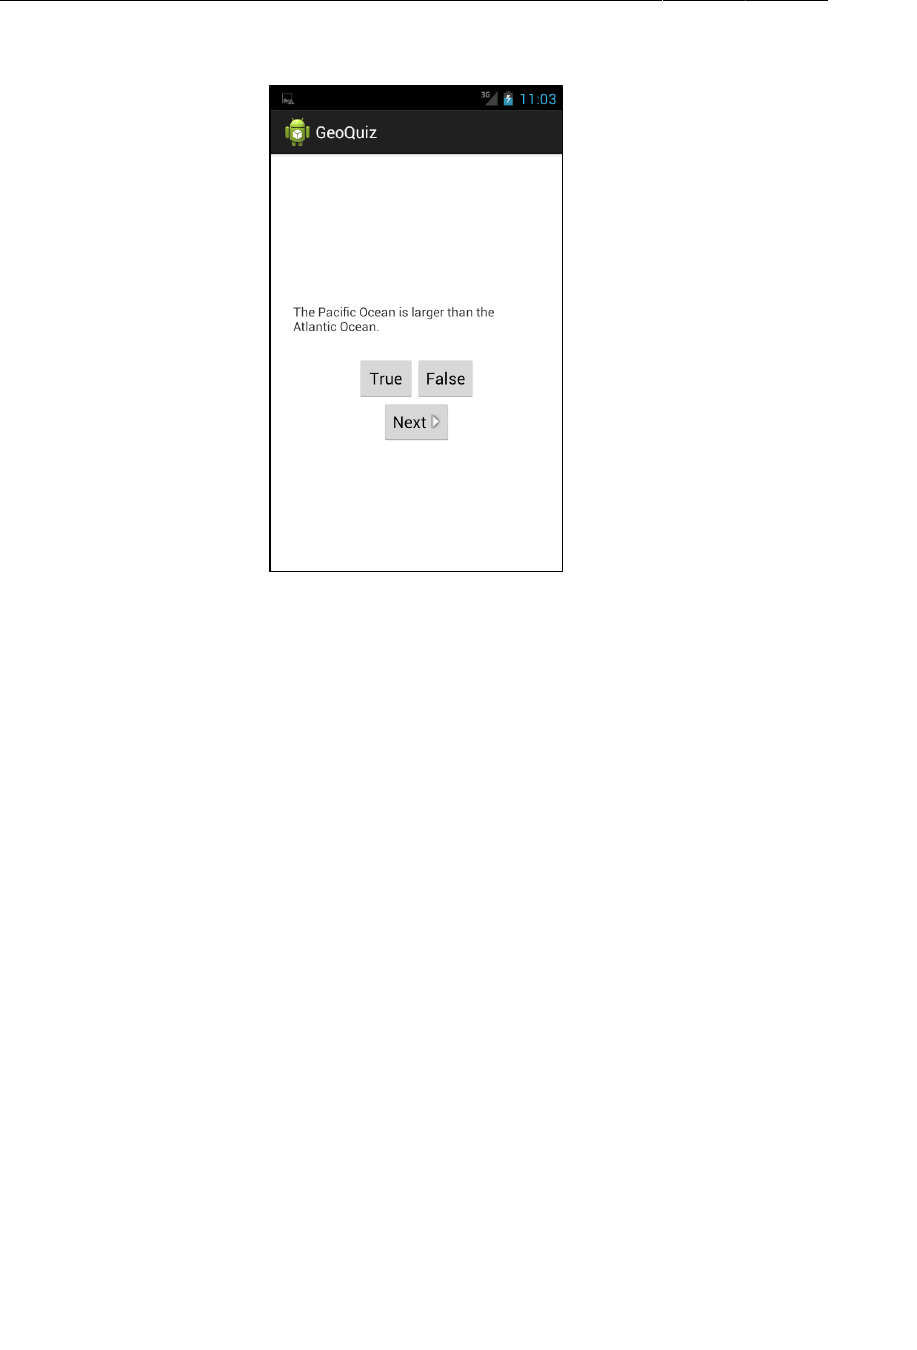
ptg11078569
Chapter 4Debugging Android Apps
78
Figure 4.4Pressing Next does nothing
This bug is trickier than the last bug. It is not throwing an exception, so fixing the bug is not a simple
matter of making the exception go away. On top of that, this misbehavior could be caused in two
different ways: the index might not be changing, or updateQuestion() might not be called.
If you had no idea what was causing the problem, you would need to track down the culprit. In the
next few sections, you will see two ways to do this: diagnostic logging of a stack trace and using the
debugger to set a breakpoint.
Logging stack traces
In QuizActivity, add a log statement to updateQuestion().
Listing 4.3Exception for fun and profit (QuizActivity.java)
public class QuizActivity extends Activity {
...
public void updateQuestion() {
Log.d(TAG, "Updating question text for question #" + mCurrentIndex,
new Exception());
int question = mQuestionBank[mCurrentIndex].getQuestion();
mQuestionTextView.setText(question);
}
The Log.d(String, String, Throwable) version of Log.d logs the entire stack trace just like
with the AndroidRuntime exception you saw earlier. The stack trace will tell you where the call to
updateQuestion() was made.

ptg11078569
Logging stack traces
79
The exception that you pass to Log.d(…) does not have to be a thrown exception that you caught. You
can create a brand new Exception() and pass it to the method without ever throwing it, and you will
get a report of where the exception was created.
Run GeoQuiz, press the Next button, and then check the output in LogCat.
Figure 4.5The results
The top line in the stack trace is the line where you logged out the Exception. Two lines after that you
can see where updateQuestion() was called from within your onClick(…) implementation. Double-
click this line, and you will be taken to where you commented out the line to increment your question
index. But do not get rid of the bug; you are going to use the debugger to find it again in a moment.
Logging out stack traces is a powerful tool, but it is also a verbose and revealing one. Leave a bunch of
these hanging around, and soon LogCat will be an unmanageable mess. Also, a competitor might steal
your ideas by reading your stack traces to understand what your code is doing.
On the other hand, sometimes a stack trace showing what your code does is exactly what you need. If
you are seeking help with a problem at http://stackoverflow.com or forums.bignerdranch.com, it
often helps to include a stack trace. You can copy and paste lines directly from LogCat or save selected
output to a text file by clicking the button that looks like a floppy disk at the top-right of the LogCat
view.
Before continuing, comment out the TAG constant and delete the log statement in QuizActivity.java.
Listing 4.4Farewell, old friend (QuizActivity.java)
public class QuizActivity extends Activity {
...
public void updateQuestion() {
Log.d(TAG, "Updating question text for question #" + mCurrentIndex,
new Exception());
int question = mQuestionBank[mCurrentIndex].getQuestion();
mQuestionTextView.setText(question);
}
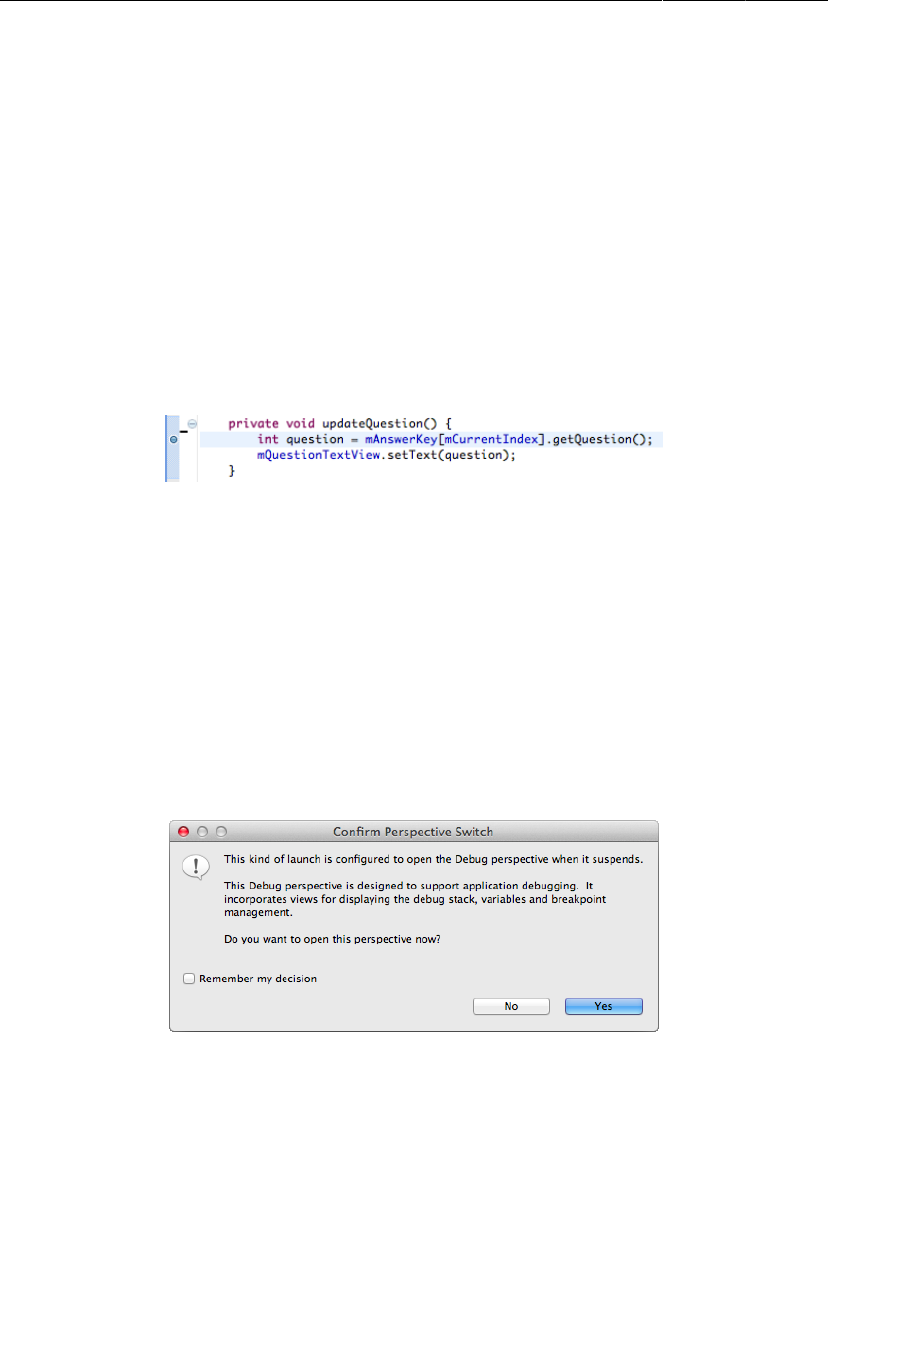
ptg11078569
Chapter 4Debugging Android Apps
80
Commenting out TAG will remove the unused variable warning. You could delete it, but you never know
when you will need it again to log messages.
Setting breakpoints
Try using the debugger that comes with Eclipse to track down the same bug. You can set a breakpoint
on updateQuestion() to see whether it was called. A breakpoint will pause execution before this line
executes and allow you to examine line-by-line what happens next.
In QuizActivity.java, return to the updateQuestion() method. In the first line of this method,
double-click the gray bar in the lefthand margin. You should now see a blue circle in the gray bar. This
is a breakpoint.
Figure 4.6A breakpoint
To engage the debugger and trigger your breakpoint, you need to debug your app instead of running
it. To debug your app, right-click on the GeoQuiz project and select Debug�As → Android�Application.
Your device will report that it is waiting for the debugger to attach, and then it will proceed normally.
Once your app is up and running with the debugger attached, your app will pause. Firing up GeoQuiz
called QuizActivity.onCreate(Bundle), which called updateQuestion(), which hit your breakpoint.
If this is the first time you have used the debugger, you will now see a large rectangle of words about
opening the Debug perspective. Open the Debug perspective by clicking Yes.
Figure 4.7Switch to the Debug perspective
Eclipse will then open the Debug perspective. In the middle of the Debug perspective is an editor
view. You can see that this editor has opened QuizActivity.java and highlighted the line with the
breakpoint where execution has paused.
Above the editor is the Debug view. This view shows the current stack trace.
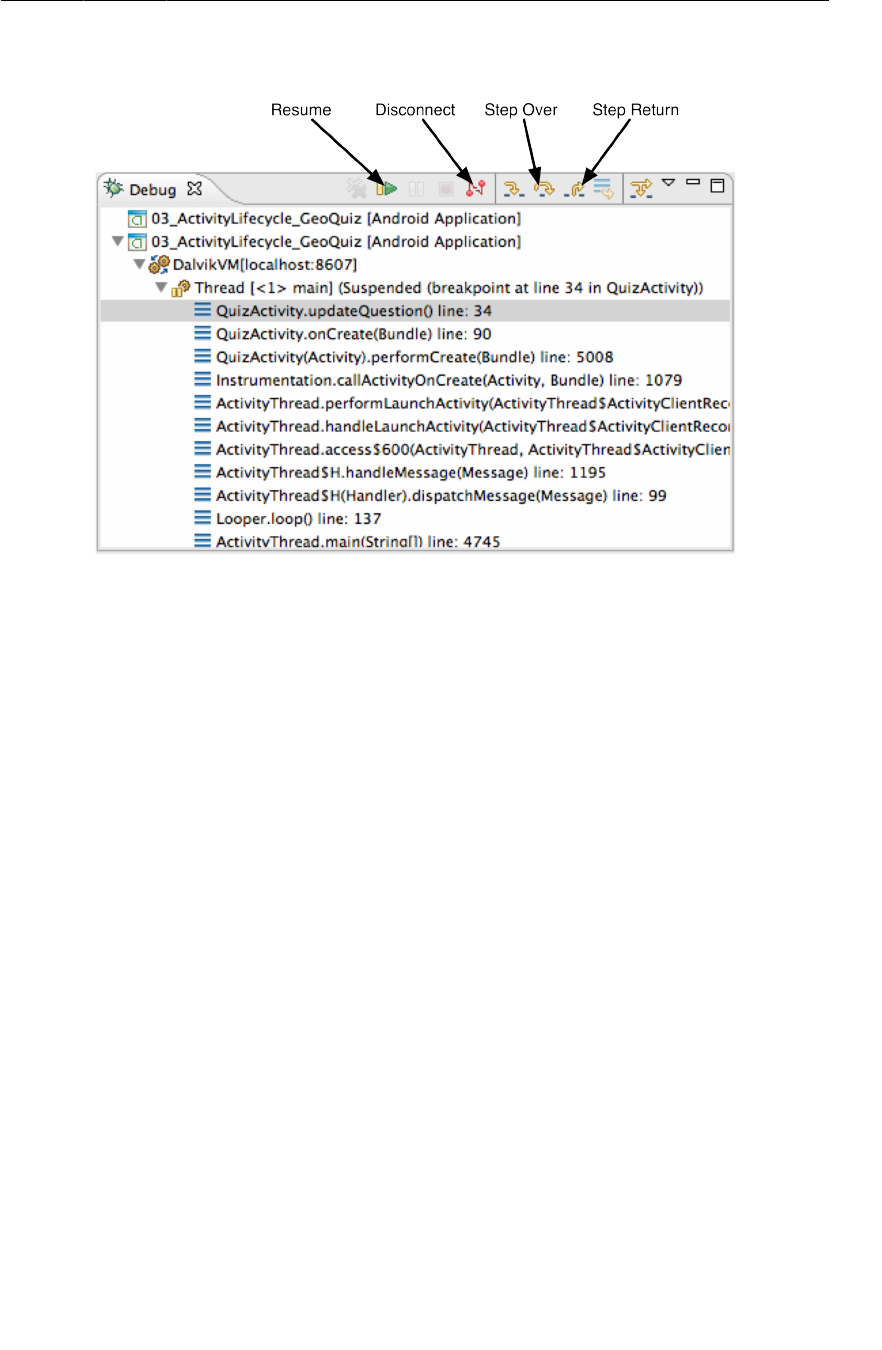
ptg11078569
Setting breakpoints
81
Figure 4.8The Debug view
You can use the buttons with the yellow arrows at the top of the view to step through your
program. You can see from this stack trace that updateQuestion() has been called from inside
onCreate(Bundle). You are interested in investigating the Next button behavior, though, so click the
Resume button to continue execution. Then press the Next button again to see if your breakpoint is
activated (it should be).
Now that you are at an interesting point of execution, you can take a look around. At the top right, find
the Variables view. Here you can examine the values of the objects in your program. When you first
see this view, you will only see one value: this (the QuizActivity itself). Click the disclosure triangle
next to this or press the right arrow key to expand it. It should look something like Figure4.9:
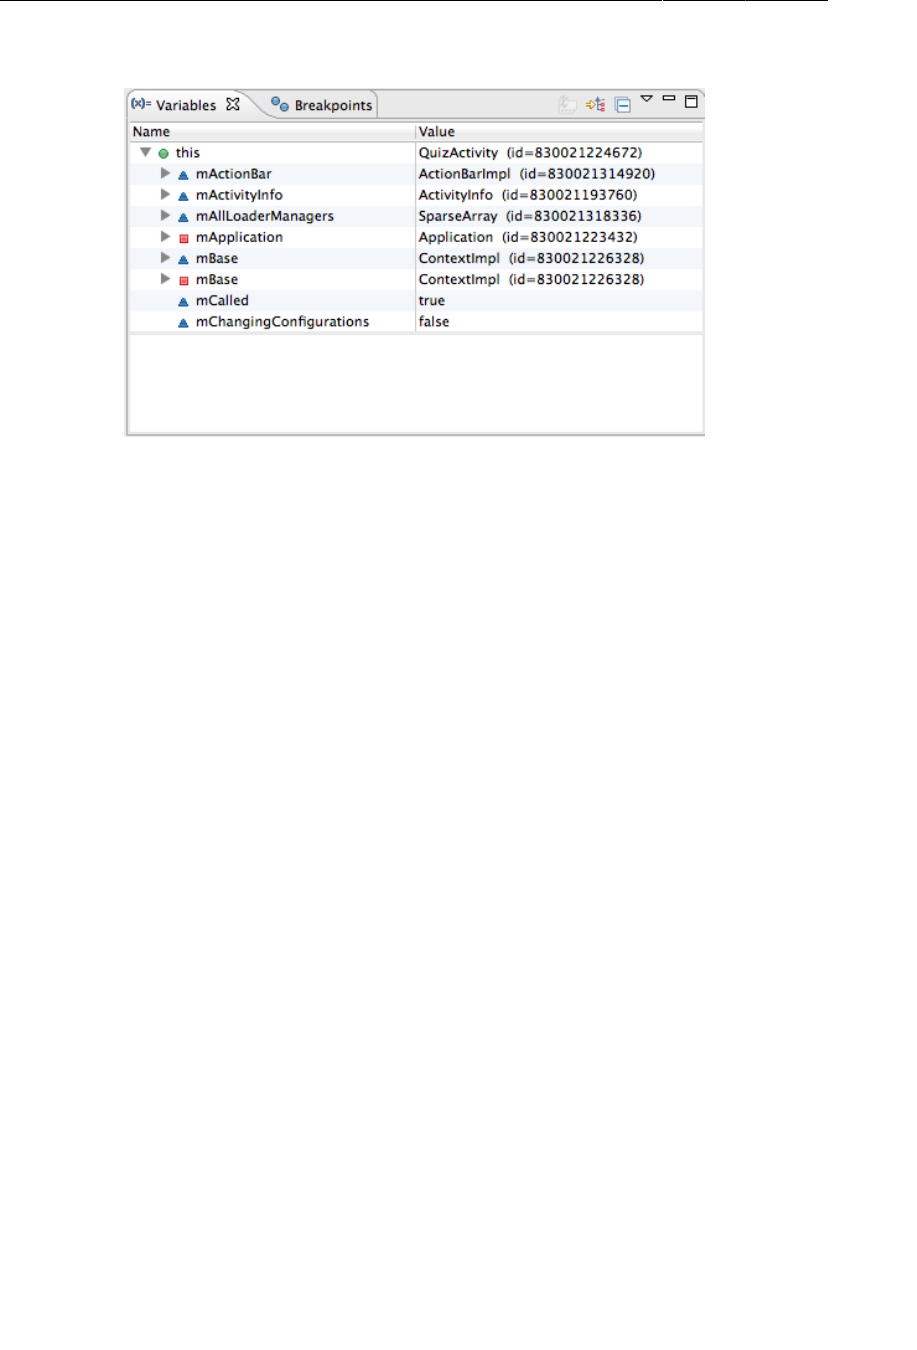
ptg11078569
Chapter 4Debugging Android Apps
82
Figure 4.9A view of your variables
The colorful shapes next to the variable names tell you the variable’s visibility:
green circle public variable
blue triangle default variable (visible within the same package)
yellow diamond protected variable
red square private variable
Your expanded this is a little overwhelming. Your this view includes more than just the instance
variables declared in QuizActivity. It also includes all the variables declared in its superclass,
Activity, in Activity’s superclass, in its super-superclass, and so on.
You are only interested in one value: mCurrentIndex. Scroll down in the variables view until you see
mCurrentIndex. Sure enough, it still has a value of 0.
This code looks perfectly fine. To continue your investigation, you need to step out of this method.
Click the button to the right of the Step�Over button, whose tooltip reads Step�Return. (There is a
helper method called access$1(QuizActivity) that also gets called, so you will need to click Step
Return twice.)
Check the editor view. It has now jumped you over to your mNextButton’s OnClickListener, right
after updateQuestion() was called. Pretty nifty.
You will want to fix this implementation, but before you make any changes to code, you need to stop
debugging your app. You can do this in two ways: you can either stop the program, or you can simply
disconnect the debugger. To stop the program, you choose your program’s running process inside the
DDMS Devices view and click the red stop sign button to kill the process. Usually it is easier to simply
disconnect. To do that, click the Disconnect button labeled above in Figure4.8. Then switch back to the
Java perspective and return your OnClickListener to its former glory.

ptg11078569
Using exception breakpoints
83
Listing 4.5Returning to normalcy (QuizActivity.java)
@Override
protected void onCreate(Bundle savedInstanceState) {
super.onCreate(savedInstanceState);
...
mNextButton = (Button)findViewById(R.id.next_button);
mNextButton.setOnClickListener(new View.OnClickListener() {
@Override
public void onClick(View v) {
//mCurrentIndex = (mCurrentIndex + 1) % mQuestionBank.length;
mCurrentIndex = (mCurrentIndex + 1) % mQuestionBank.length;
updateQuestion();
}
});
...
}
You also need to remove your breakpoint. Select the Breakpoints view next to the Variables view. (If
you do not see this view, you can open it by selecting Window → Show�View → Breakpoints.) From
there, you can select the breakpoint and click the dark grey x button at the top of the view.
You have tried out two ways of tracking down a misbehaving line of code: stack trace logging and
setting a breakpoint in the debugger. Which is better? Each has its uses, and one or the other will
probably end up being your favorite.
Logging out stack traces has the advantage that you can see stack traces from multiple places in one
log. The downside is that to learn something new you have to add new log statements, rebuild, deploy,
and navigate through your app to see what happened. The debugger is more convenient. If you run
your app with the debugger attached (by selecting Debug�As → Android�Application), then you can set a
breakpoint while the application is still running and poke around to find out information about multiple
issues.
Using exception breakpoints
If that were not enough decisions to make, you can also use the debugger to catch exceptions. Go back
and comment out the line where you assign mQuestionTextView one more time. Then select Run →
Add�Java�Exception�Breakpoint... to pull up the exception breakpoint dialog.
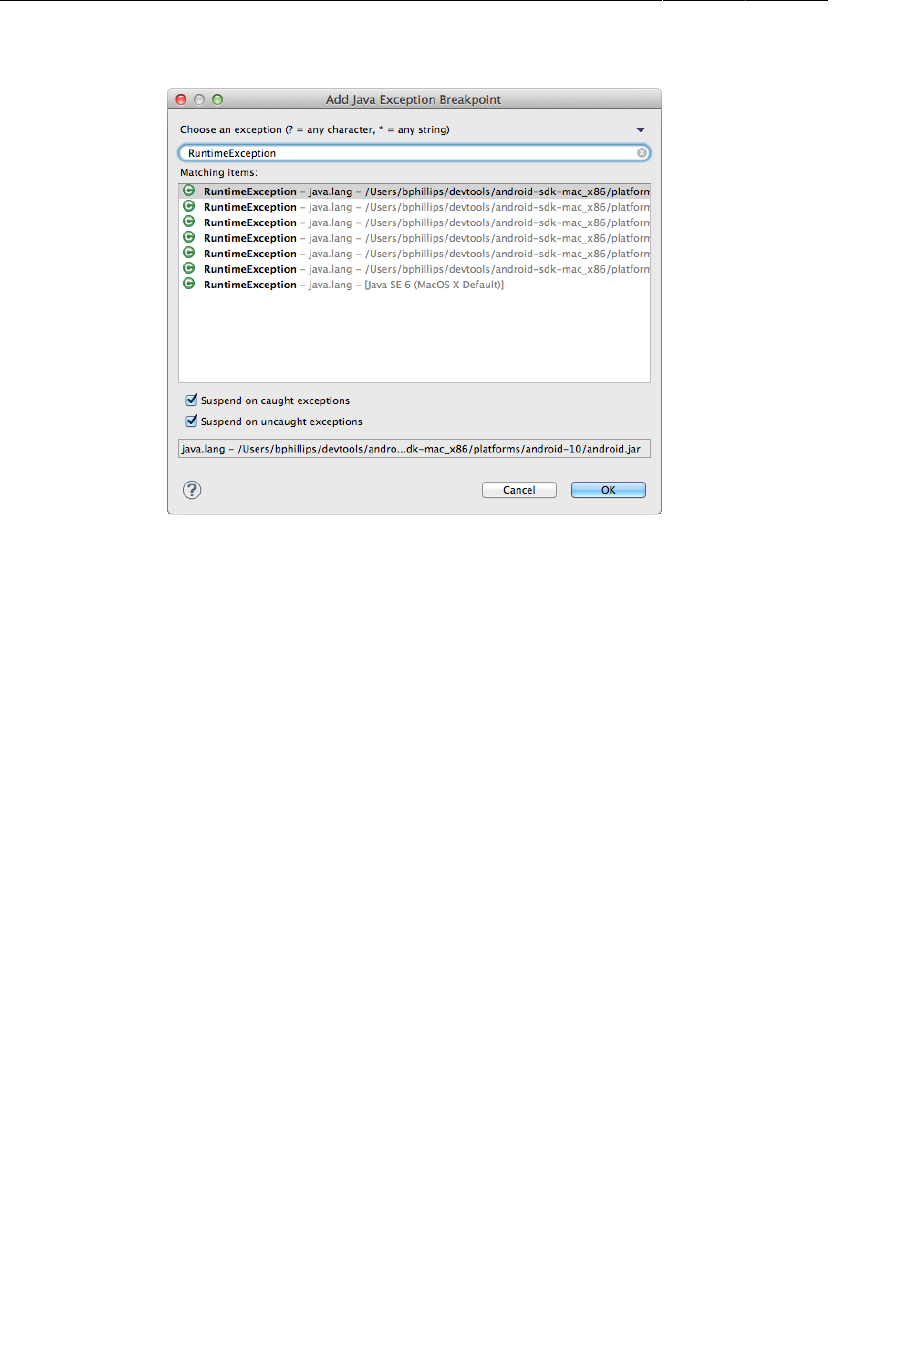
ptg11078569
Chapter 4Debugging Android Apps
84
Figure 4.10Setting an exception breakpoint
This dialog allows you to set a breakpoint that is triggered when an exception is thrown, wherever it
might happen. You can limit it to only uncaught exceptions, or apply it to both caught and uncaught
exceptions.
In Android, most exceptions will be caught by the framework, which will then show you the dialog you
saw earlier and shut down your process. That means you will usually want to select the Suspend�on
caught�exceptions option for your exception breakpoints.
Next, choose what kind of exception to catch. Type in RuntimeException and choose any of
the selections that come up. RuntimeException is the superclass of NullPointerException,
ClassCastException, and other runtime problems you can run into, so it makes for a nice catch-all.
It will not catch those subclass exception types until you do one more thing, though. Switch
to the Debug perspective and look at your Breakpoints view. You should see your shiny new
RuntimeException breakpoint there. Click on it and check Subclasses�of�this�exception so that your
debugger will break on NullPointerException, too.
Now debug GeoQuiz. This time, your debugger will jump right to the line where the exception was
thrown as soon as it happens. Exquisite.
Now, this is a fairly big hammer. If you leave this breakpoint on while debugging, you can expect it
to stop on some framework code, or in other places you do not expect. So you may want to turn it off
when you are not using it.
File Explorer
The DDMS perspective offers other power tools for checking out what your application is doing. One
particularly handy one is the file explorer. Click the File�Explorer view from the tab group on the right.
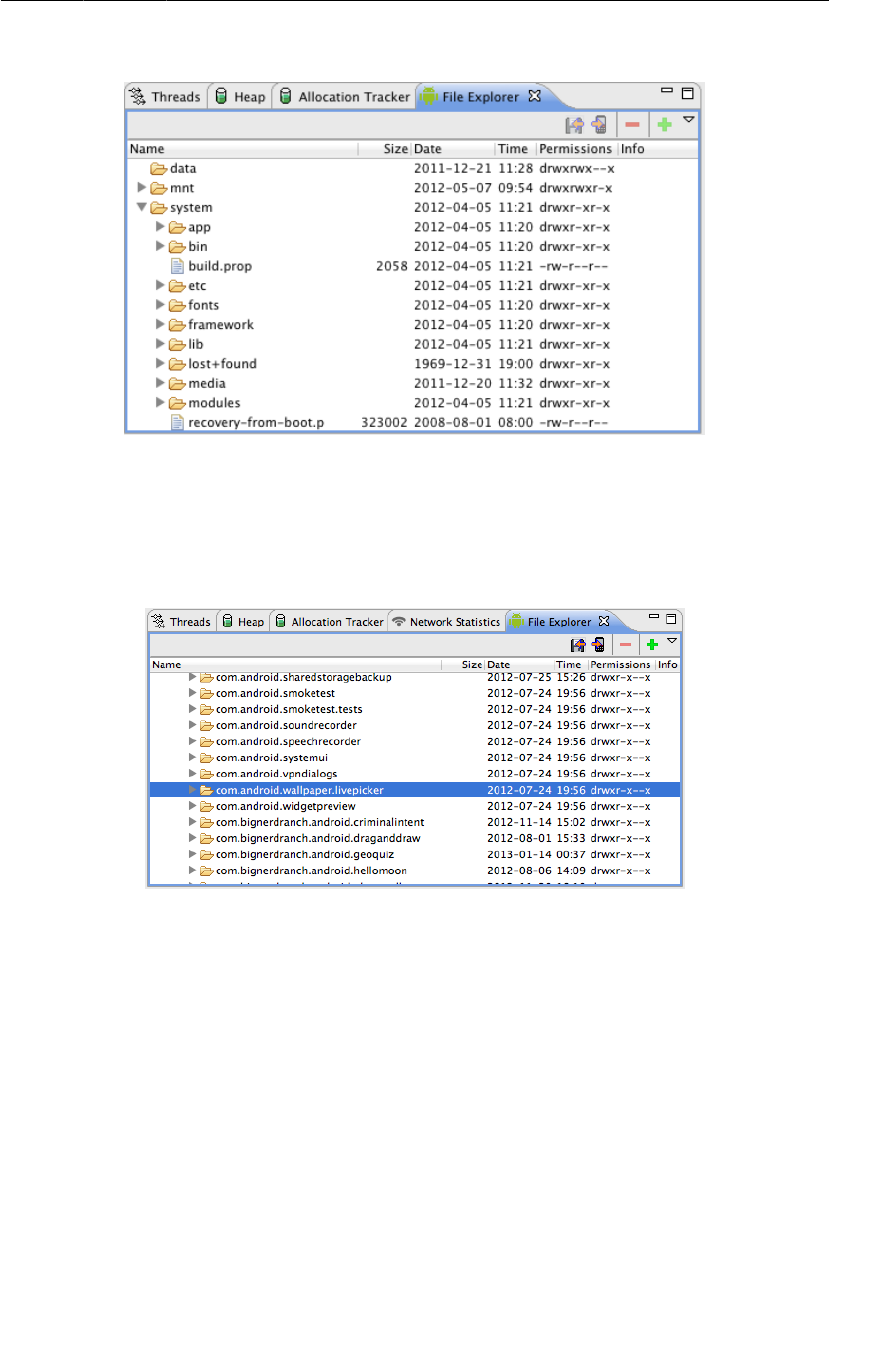
ptg11078569
Android-Specific Debugging
85
Figure 4.11The file explorer
You can use this tool to browse around a device’s file system and download and upload files. On a
physical device, you will not be able to see inside /data, but on an emulator you can – which means
that you can peek into your app’s personal storage area. In the latest version of Android, that storage
area is in /data/data/[your package name].
Figure 4.12GeoQuiz’s data directory (in an emulator)
There is nothing to see right now, but in Chapter17 you will be able to see the files you write to private
storage here.
Android-Specific Debugging
Most Android debugging is just like Java debugging. However, you will run into issues with Android-
specific parts, such as resources, that the Java compiler knows nothing about.
Using Android Lint
This is where Android Lint comes in. Android Lint is a static analyzer for Android code. A static
analyzer is a program that examines your code to find defects without running it. Android Lint uses
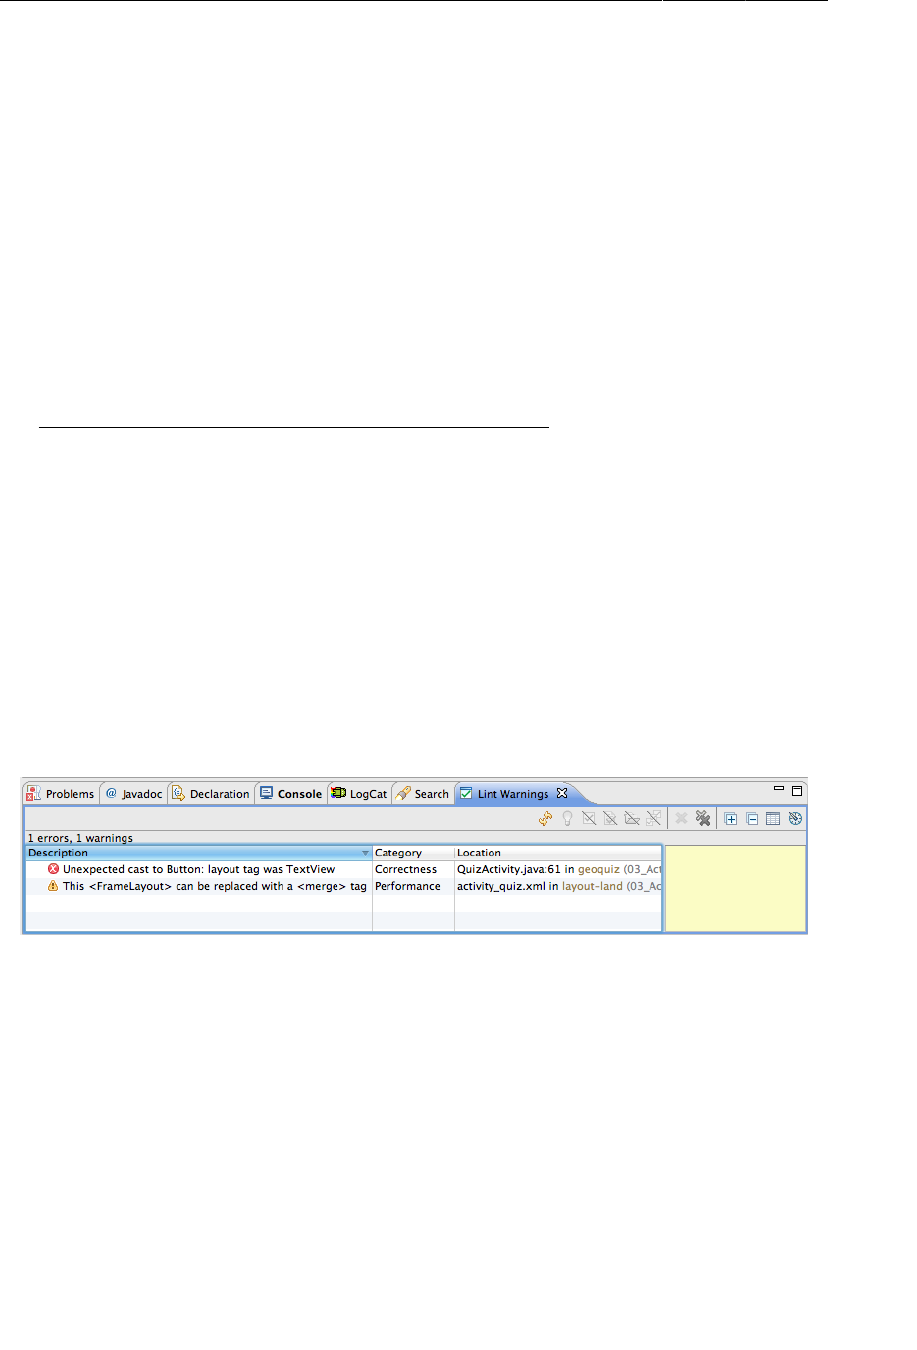
ptg11078569
Chapter 4Debugging Android Apps
86
its knowledge of the Android frameworks to look deeper into your code and find problems that the
compiler cannot. In most cases, Android Lint’s advice is worth taking.
In Chapter6, you will see Android Lint warn you about compatibility problems. Android Lint can also
perform type-checking for objects that are defined in XML. Make the following casting mistake in
QuizActivity:
Listing 4.6A simple mix-up (QuizActivity.java)
@Override
protected void onCreate(Bundle savedInstanceState) {
super.onCreate(savedInstanceState);
Log.d(TAG, "onCreate() called");
setContentView(R.layout.activity_quiz);
mQuestionTextView = (TextView)findViewById(R.id.question_text_view);
mTrueButton = (Button)findViewById(R.id.true_button);
mTrueButton = (Button)findViewById(R.id.question_text_view);
...
}
Because you used the wrong resource ID, this code will attempt to cast a TextView as a Button at
runtime. This will cause an improper cast exception. The Java compiler sees no problem with this code,
but Android Lint will catch this error before you run your app.
In the package explorer, right-click the GeoQuiz project and select Android�Tools → Run�Lint:�Check
for�Common�Errors to see the Lint�Warnings view.
Figure 4.13Lint warnings
Here you can see Android Lint reporting one error and one warning. You already know about the error:
with the wrong resource ID, the cast to Button is guaranteed to fail. Go ahead and correct the cast in
onCreate(Bundle).

ptg11078569
Issues with the R class
87
Listing 4.7Fixing that simple mix-up (QuizActivity.java)
@Override
protected void onCreate(Bundle savedInstanceState) {
super.onCreate(savedInstanceState);
Log.d(TAG, "onCreate() called");
setContentView(R.layout.activity_quiz);
mQuestionTextView = (TextView)findViewById(R.id.question_text_view);
mTrueButton = (Button)findViewById(R.id.question_text_view);
mTrueButton = (Button)findViewById(R.id.true_button);
...
}
The warning from Android Lint is less consequential. This warning suggests using a merge tag for
layout-land/activity_quiz.xml. Unfortunately, Android Lint is wrong here. You should not replace
FrameLayout with a merge tag here because you are relying on FrameLayout to position your widgets
in a specific way.
Issues with the R class
You are familiar with build errors that occur when you reference resources before adding them or
delete resources that other files refer to. Usually, resaving the files once the resource is added or the
references are removed will cause Eclipse to rebuild without any fuss.
Sometimes, however, these build errors will persist or appear seemingly out of nowhere. If this happens
to you, here are some things you can try:
Run Android Lint
Select Window → Run�Android�Lint. This can often pull the pieces of your project together.
Clean your project
Select Project → Clean. Eclipse will rebuild the project from scratch, which often results in an
error-free build.
Recheck the validity of the XML in your resource files
If your R.java file was not generated for the last build, you will see errors in your project
wherever you reference a resource. Often, this is caused by an XML typo in one of your XML
files. Layout XML is not validated, so typos in these files will not be pointedly brought to your
attention. Finding the typo and resaving the file should cause R.java to regenerate.
Delete your gen directory
If you cannot get Eclipse to generate a new R.java file, you can delete the entire gen directory.
When Eclipse rebuilds, it will create a new gen directory with a fully-functional R class.

ptg11078569
Chapter 4Debugging Android Apps
88
If you are still having problems with resources or having different problems, give the error messages
and your layout files a fresh look. It is easy to miss mistakes in the heat of the moment. Check out any
Android Lint errors and warnings as well. A cool-headed reconsideration of the error messages may
turn up a bug or typo.
Finally, if you are stuck or having other issues with Eclipse, check the archives at http://
stackoverflow.com or visit the forum for this book at http://forums.bignerdranch.com.
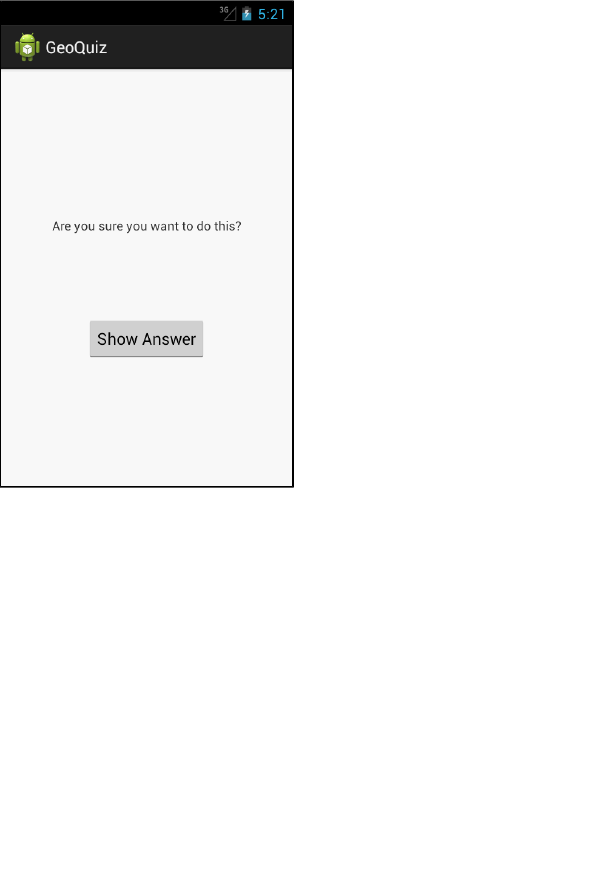
ptg11078569
89
5
Your Second Activity
In this chapter, you will add a second activity to the GeoQuiz app. An activity controls a screen of
information, and this activity will add a second screen that offers users a chance to see the answer to
the current question.
Figure 5.1CheatActivity offers the chance to peek at the answer
If the user chooses to view the answer and then returns to the QuizActivity and answers the question,
he or she will get a new message.
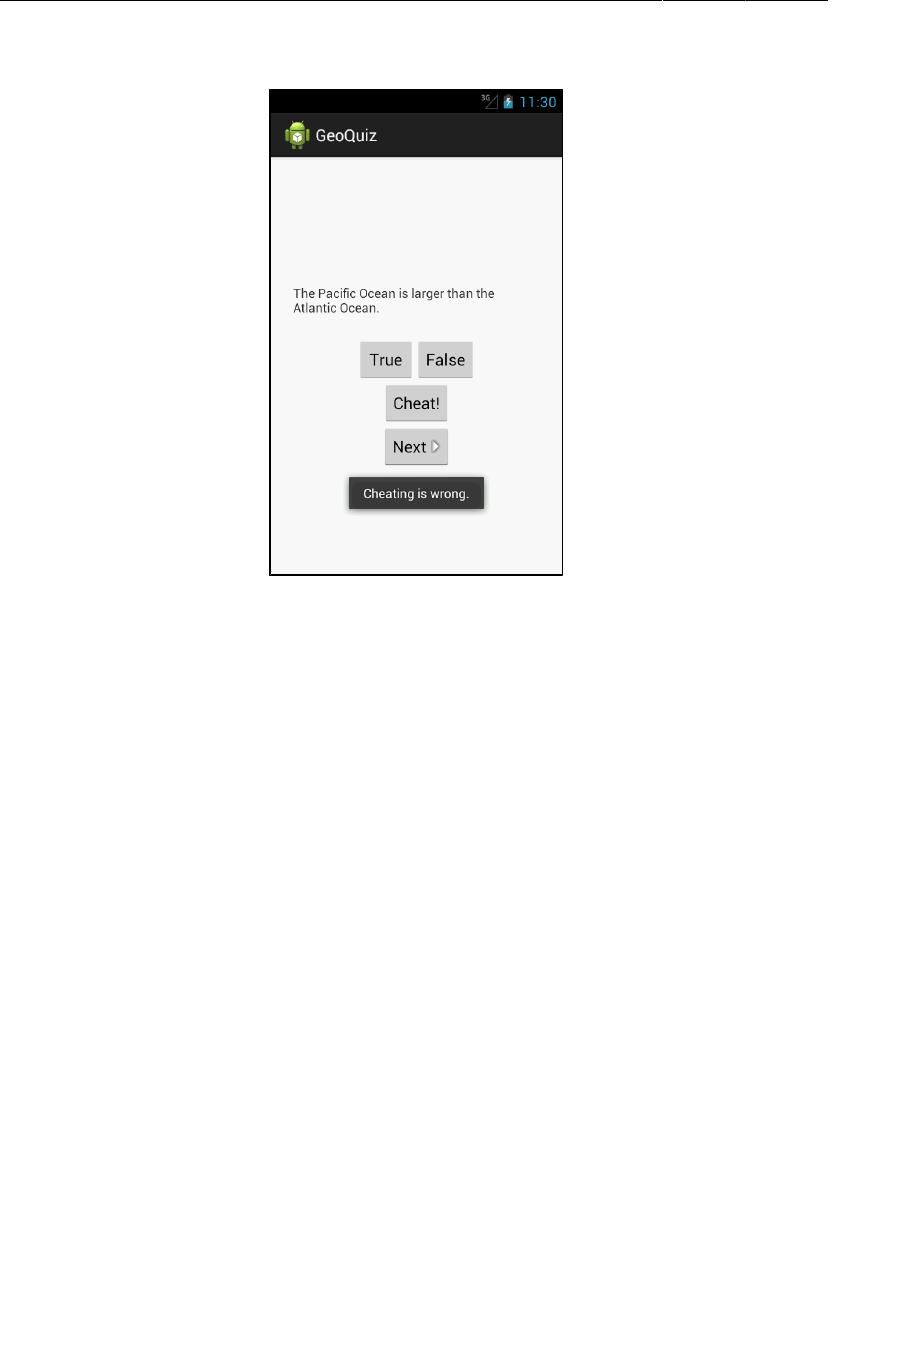
ptg11078569
Chapter 5Your Second Activity
90
Figure 5.2QuizActivity knows if you’ve been cheating
Why is this a good Android programming exercise? You will learn how to
• create a new activity and a new layout without the help of the new application wizard
• start an activity from another activity. Starting an activity means asking the OS to create an
activity instance and call its onCreate(Bundle) method.
• pass data between the parent (starting) activity and the child (started) activity
Setting Up a Second Activity
There is a lot to do in this chapter. You are going to start by creating a new layout for CheatActivity
and then create the CheatActivity class itself.
But first, open strings.xml and add all the strings you will need for this chapter.
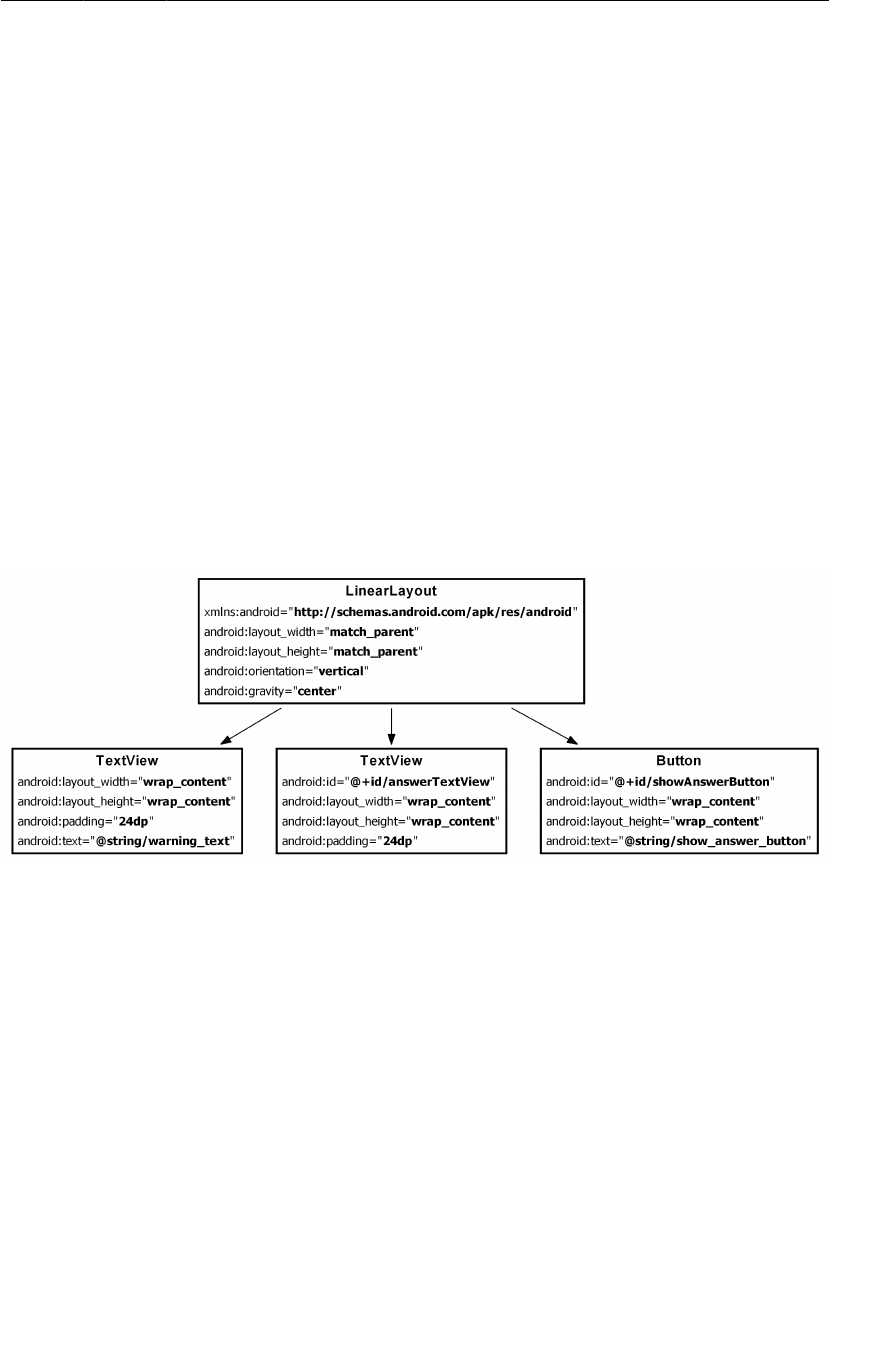
ptg11078569
Creating a new layout
91
Listing 5.1Adding strings (strings.xml)
<?xml version="1.0" encoding="utf-8"?>
<resources>
...
<string name="question_asia">Lake Baikal is the world\'s oldest and deepest
freshwater lake.</string>
<string name="cheat_button">Cheat!</string>
<string name="warning_text">Are you sure you want to do this?</string>
<string name="show_answer_button">Show Answer</string>
<string name="judgment_toast">Cheating is wrong.</string>
</resources>
Creating a new layout
The screenshot at the beginning of the chapter shows you what CheatActivity’s view should look like.
Figure5.3 shows the widget definitions.
Figure 5.3Diagram of layout for CheatActivity
To create the layout file, right-click on the res/layout directory in the package explorer and select
New → Other... Within the Android folder, find and select Android�XML�Layout�File (Figure5.4). Then
click Next.
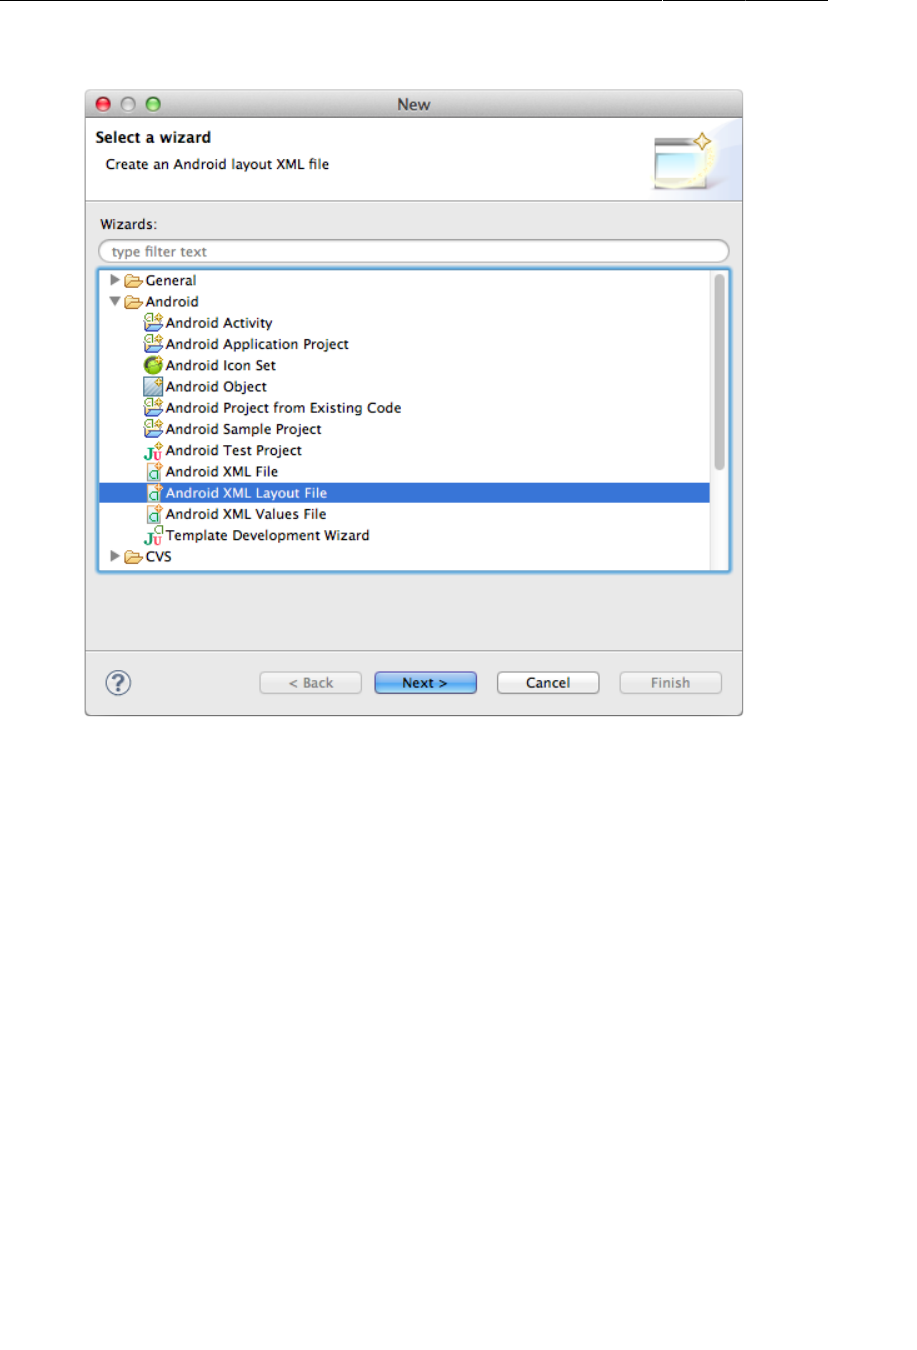
ptg11078569
Chapter 5Your Second Activity
92
Figure 5.4Creating a new layout file
In the dialog that appears, name the layout file activity_cheat.xml and select LinearLayout as its
root element. Then click Finish.
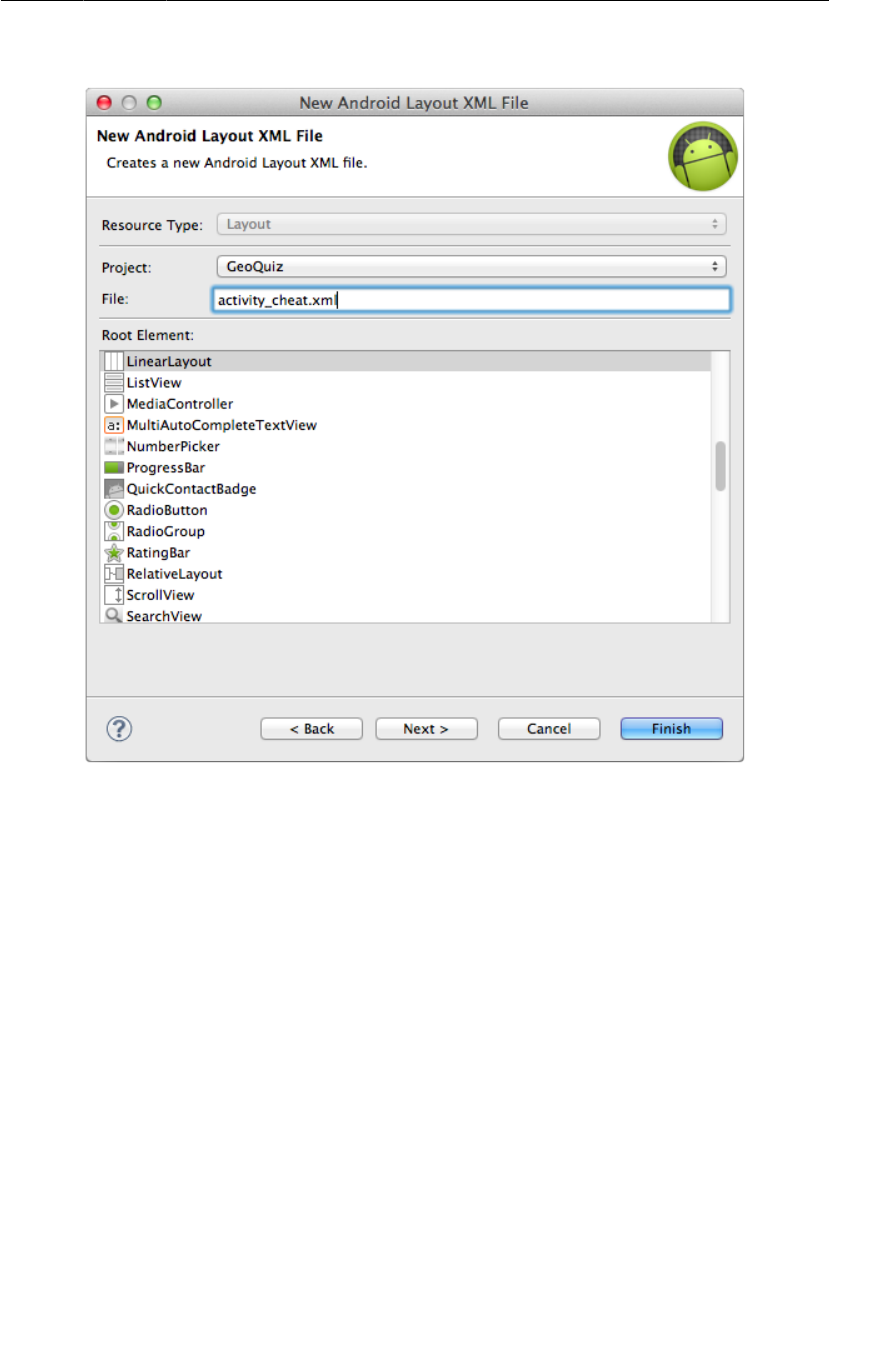
ptg11078569
Creating a new layout
93
Figure 5.5Naming and configuring new layout file
When the file opens, navigate to the XML. Notice that this wizard included the line
<?xml version="1.0" encoding="utf-8"?>
at the top of the file. This line is not required for XML layout files, but it is still added to layout files
created from some sources, like this layout wizard.
(By the way, if you are allergic to GUIs, you do not have to use the layout wizard. You can just create
a new file named activity_cheat.xml in the res/layout directory and then refresh the res/layout
folder so that Eclipse finds it. This is true for most of the Eclipse wizards. Feel free to create XML
files and Java class files however you normally would. The new Android application wizard is the only
wizard you cannot avoid.)
The layout wizard created the root LinearLayout for you. You just need to add an android:gravity
attribute and the three children.
Try creating the XML for activity_cheat.xml using Figure5.3 as a guide. After Chapter8, we will
only show layout diagrams like Figure5.3 instead of long passages of XML, so it is good to start using
them now to create your layout XML. You can check your work against Listing 5.2.

ptg11078569
Chapter 5Your Second Activity
94
Listing 5.2Filling out second activity’s layout (activity_cheat.xml)
<?xml version="1.0" encoding="utf-8"?>
<LinearLayout xmlns:android="http://schemas.android.com/apk/res/android"
android:layout_width="match_parent"
android:layout_height="match_parent"
android:orientation="vertical"
android:gravity="center">
<TextView
android:layout_width="wrap_content"
android:layout_height="wrap_content"
android:padding="24dp"
android:text="@string/warning_text" />
<TextView
android:id="@+id/answerTextView"
android:layout_width="wrap_content"
android:layout_height="wrap_content"
android:padding="24dp" />
<Button
android:id="@+id/showAnswerButton"
android:layout_width="wrap_content"
android:layout_height="wrap_content"
android:text="@string/show_answer_button" />
</LinearLayout>
Save your file and switch to the graphical layout tool to preview the layout.
You will not be creating a landscape alternative for activity_cheat.xml, but there is a way to preview
how the default layout will appear in landscape.
In the graphical layout tool, find the button in the toolbar above the preview pane that looks like a
device with a green arrow. Click this button to change the orientation of the preview.

ptg11078569
Creating a new activity subclass
95
Figure 5.6Previewing activity_cheat.xml in landscape
The default layout works well enough in both orientations, so let’s move on to creating the activity
subclass.
Creating a new activity subclass
In the package explorer, right-click on the com.bignerdranch.android.geoquiz package and select
New → Class.
In the dialog that appears, name this class CheatActivity. In the Superclass: field, type
android.app.Activity (Figure5.7).
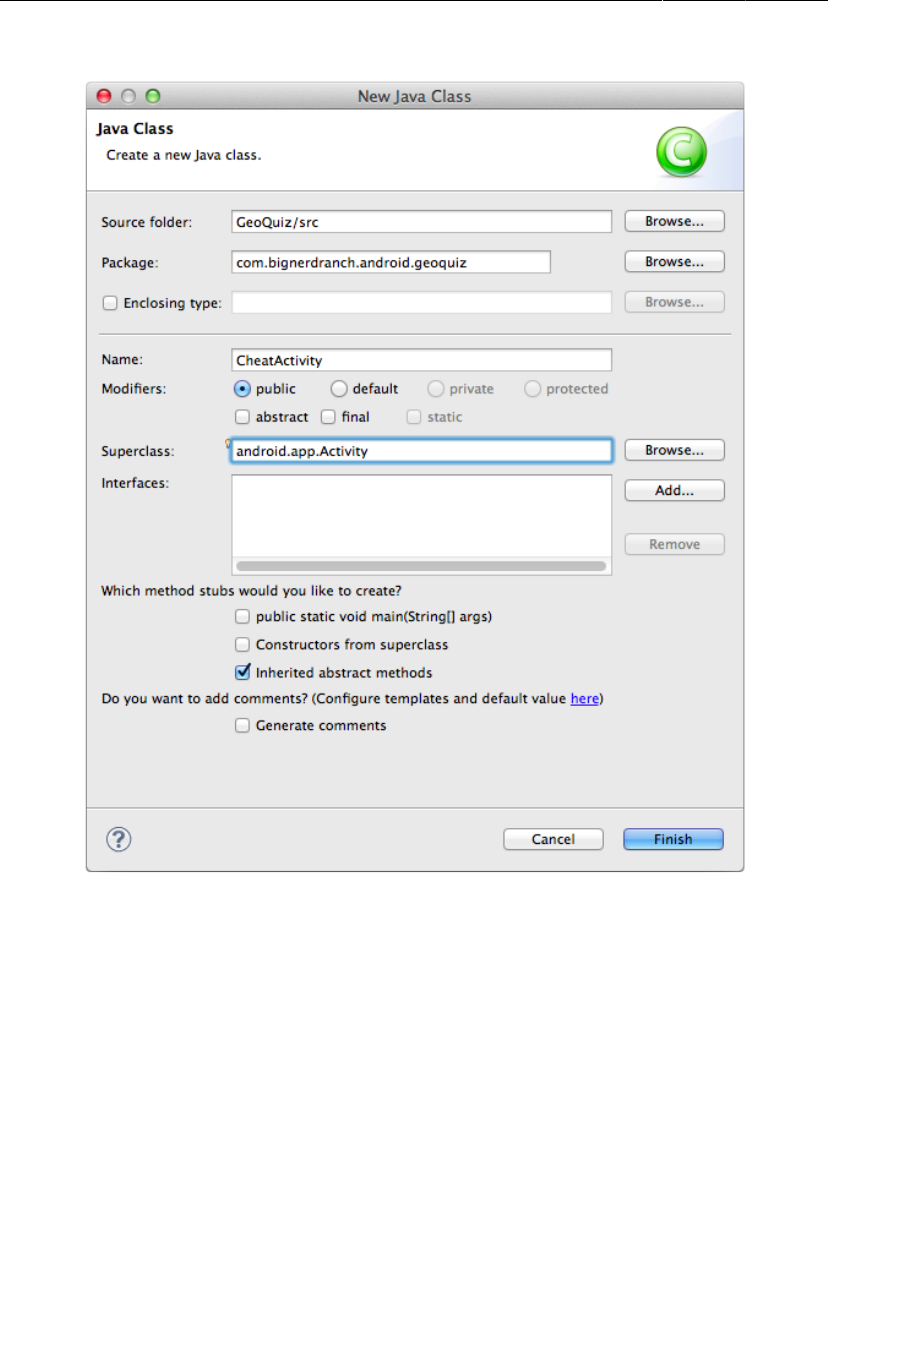
ptg11078569
Chapter 5Your Second Activity
96
Figure 5.7Create CheatActivity class
Click Finish, and Eclipse will open CheatActivity.java in the editor.
Add an implementation of onCreate(…) that passes the resource ID of the layout defined in
activity_cheat.xml to setContentView(…).
Listing 5.3Overriding onCreate(…) (CheatActivity.java)
public class CheatActivity extends Activity {
@Override
protected void onCreate(Bundle savedInstanceState) {
super.onCreate(savedInstanceState);
setContentView(R.layout.activity_cheat);
}
}

ptg11078569
Declaring activities in the manifest
97
CheatActivity will eventually do more in its onCreate(…) method. But, for now, let’s move on to the
next step: declaring CheatActivity in the application’s manifest.
Declaring activities in the manifest
The manifest is an XML file containing metadata that describes your application to the Android OS.
The file is always named AndroidManifest.xml, and it lives in the root directory of your project.
In the package explorer, find and open AndroidManifest.xml in the root directory of the project.
Ignore the GUI editor and select the AndroidManifest.xml tab at the bottom of the editor.
Every activity in an application must be declared in the manifest so that the OS can access it.
When you used the new application wizard to create QuizActivity, the wizard declared the activity for
you. For CheatActivity, you have to do it yourself.
In AndroidManifest.xml, add a declaration for CheatActivity, as shown in Listing 5.4.
Listing 5.4Declaring CheatActivity in the manifest (AndroidManifest.xml)
<?xml version="1.0" encoding="utf-8"?>
<manifest xmlns:android="http://schemas.android.com/apk/res/android"
package="com.bignerdranch.android.geoquiz"
android:versionCode="1"
android:versionName="1.0" >
<uses-sdk
android:minSdkVersion="8"
android:targetSdkVersion="17" />
<application
android:allowBackup="true"
android:icon="@drawable/ic_launcher"
android:label="@string/app_name"
android:theme="@style/AppTheme" >
<activity
android:name="com.bignerdranch.android.geoquiz.QuizActivity"
android:label="@string/app_name" >
<intent-filter>
<action android:name="android.intent.action.MAIN" />
<category android:name="android.intent.category.LAUNCHER" />
</intent-filter>
</activity>
<activity
android:name=".CheatActivity"
android:label="@string/app_name" />
</application>
</manifest>
The android:name attribute is required, and the dot at the start of this attribute’s value tells the OS that
this activity’s class is in the package specified in the package attribute in the manifest element at the
top of the file.
There are many interesting things in the manifest, but for now, let’s stay focused on getting
CheatActivity up and running. You will learn about the different parts of the manifest in later
chapters.

ptg11078569
Chapter 5Your Second Activity
98
Adding a Cheat button to QuizActivity
The plan is for the user to press a button in QuizActivity to get an instance of CheatActivity
on screen. So you need new buttons in layout/activity_quiz.xml and layout-land/
activity_quiz.xml.
In the default layout, add the new button as a direct child of the root LinearLayout. Its definition
should come right before the Next button.
Listing 5.5Adding a Cheat! button to the default layout (layout/
activity_quiz.xml)
...
</LinearLayout>
<Button
android:id="@+id/cheat_button"
android:layout_width="wrap_content"
android:layout_height="wrap_content"
android:text="@string/cheat_button" />
<Button
android:id="@+id/next_button"
android:layout_width="wrap_content"
android:layout_height="wrap_content"
android:text="@string/next_button" />
</LinearLayout>
In the landscape layout, have the new button appear at the bottom and center of the root FrameLayout.
Listing 5.6Adding a Cheat! button to the landscape layout (layout-land/
activity_quiz.xml)
...
</LinearLayout>
<Button
android:id="@+id/cheat_button"
android:layout_width="wrap_content"
android:layout_height="wrap_content"
android:layout_gravity="bottom|center"
android:text="@string/cheat_button" />
<Button
android:id="@+id/next_button"
android:layout_width="wrap_content"
android:layout_height="wrap_content"
android:layout_gravity="bottom|right"
android:text="@string/next_button"
android:drawableRight="@drawable/arrow_right"
android:drawablePadding="4dp" />
</FrameLayout>
Save your layout files and reopen QuizActivity.java. Add a variable, get a reference, and set a
View.onClickListener stub for the Cheat! button.
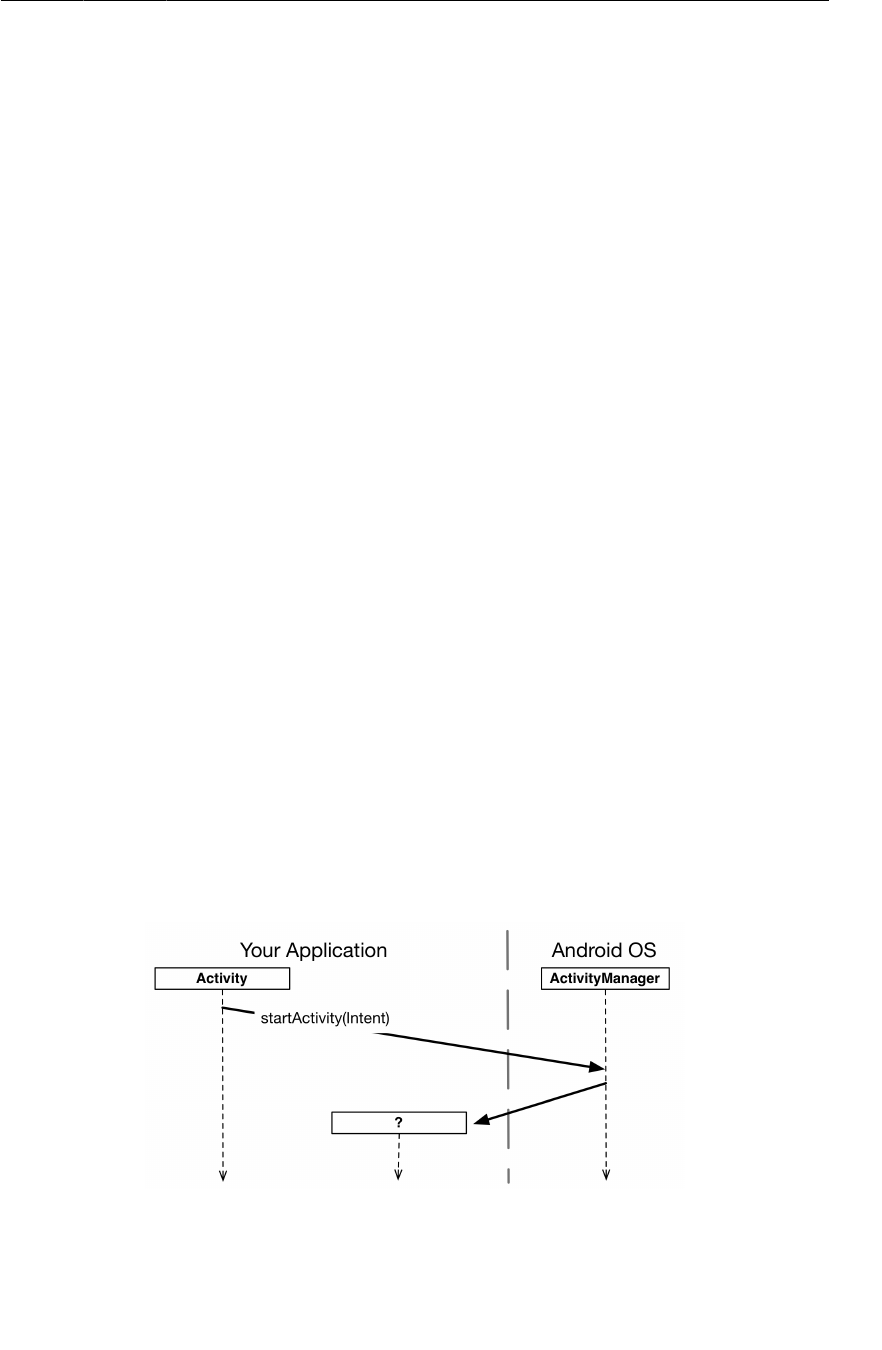
ptg11078569
Starting an Activity
99
Listing 5.7Wiring up the Cheat! button (QuizActivity.java)
public class QuizActivity extends Activity {
...
private Button mNextButton;
private Button mCheatButton;
@Override
protected void onCreate(Bundle savedInstanceState) {
...
mCheatButton = (Button)findViewById(R.id.cheat_button);
mCheatButton.setOnClickListener(new View.OnClickListener() {
@Override
public void onClick(View v) {
// Start CheatActivity
}
});
updateQuestion();
}
...
}
Now you can get to the business of starting CheatActivity.
Starting an Activity
The simplest way one activity can start another is with the Activity method
public void startActivity(Intent intent)
You might guess that startActivity(…) is a class method that you call on the Activity subclass that
you want to start. But it is not. When an activity calls startActivity(…), this call is sent to the OS.
In particular, it is sent to a part of the OS called the ActivityManager. The ActivityManager then
creates the Activity instance and calls its onCreate(…) method.
Figure 5.8Starting an activity

ptg11078569
Chapter 5Your Second Activity
100
How does the ActivityManager know which Activity to start? That information is in the Intent
parameter.
Communicating with intents
An intent is an object that a component can use to communicate with the OS. The only components
you have seen so far are activities, but there are also services, broadcast receivers, and content
providers.
Intents are multi-purpose communication tools, and the Intent class provides different constructors
depending on what you are using the intent to do.
In this case, you are using an intent to tell the ActivityManager which activity to start, so you will use
this constructor:
public Intent(Context packageContext, Class<?> cls)
The Class object specifies the activity that the ActivityManager should start. The Context object tells
the ActivityManager which package the Class object can be found in.
Figure 5.9The intent: telling ActivityManager what to do
Within mCheatButton’s listener, create an Intent that includes the CheatActivity class. Then pass the
intent into startActivity(Intent) (Listing 5.8).
Listing 5.8Starting CheatActivity (QuizActivity.java)
...
mCheatButton = (Button)findViewById(R.id.cheat_button);
mCheatButton.setOnClickListener(new View.OnClickListener() {
@Override
public void onClick(View v) {
Intent i = new Intent(QuizActivity.this, CheatActivity.class);
startActivity(i);
}
});
updateQuestion();
}
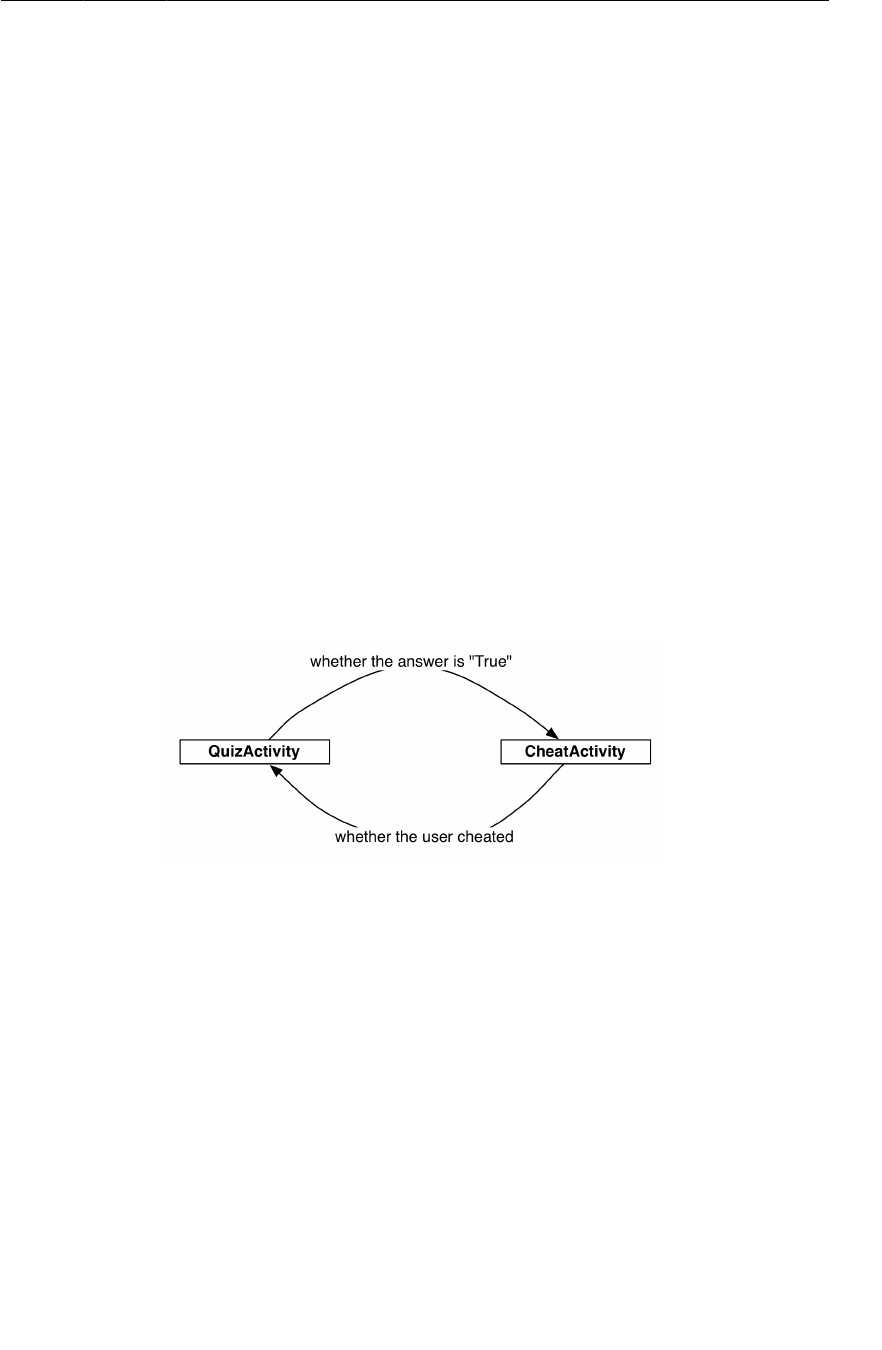
ptg11078569
Passing Data Between Activities
101
Before starting the activity, the ActivityManager checks the package’s manifest for a declaration with
the same name as the specified Class. If it finds a declaration, it starts the activity, and all is well. If
it does not, you get a nasty ActivityNotFoundException. This is why all of your activities must be
declared in the manifest.
Explicit and implicit intents
When you create an Intent with a Context and a Class object, you are creating an explicit intent. You
use explicit intents to start activities within your application.
It may seem strange that two activities within your application must communicate via the
ActivityManager, which is outside of your application. However, this pattern makes it easy for an
activity in one application to work with an activity in another application.
When an activity in your application wants to start an activity in another application, you create an
implicit intent. You will use implicit intents in Chapter21.
Run GeoQuiz. Press the Cheat! button, and an instance of your new activity will appear on screen.
Now press the Back button. This will destroy the CheatActivity and return you to the QuizActivity.
Passing Data Between Activities
Now that you have a QuizActivity and a CheatActivity, you can think about passing data between
them. The following diagram shows what data you will pass between the two activities.
Figure 5.10The conversation between QuizActivity and CheatActivity
The QuizActivity will inform the CheatActivity of the answer to the current question when the
CheatActivity is started.
When the user presses the Back button to return to the QuizActivity, the CheatActivity will be
destroyed. In its last gasp, it will send data to the QuizActivity about whether the user cheated.
You will start with passing data from QuizActivity to CheatActivity.
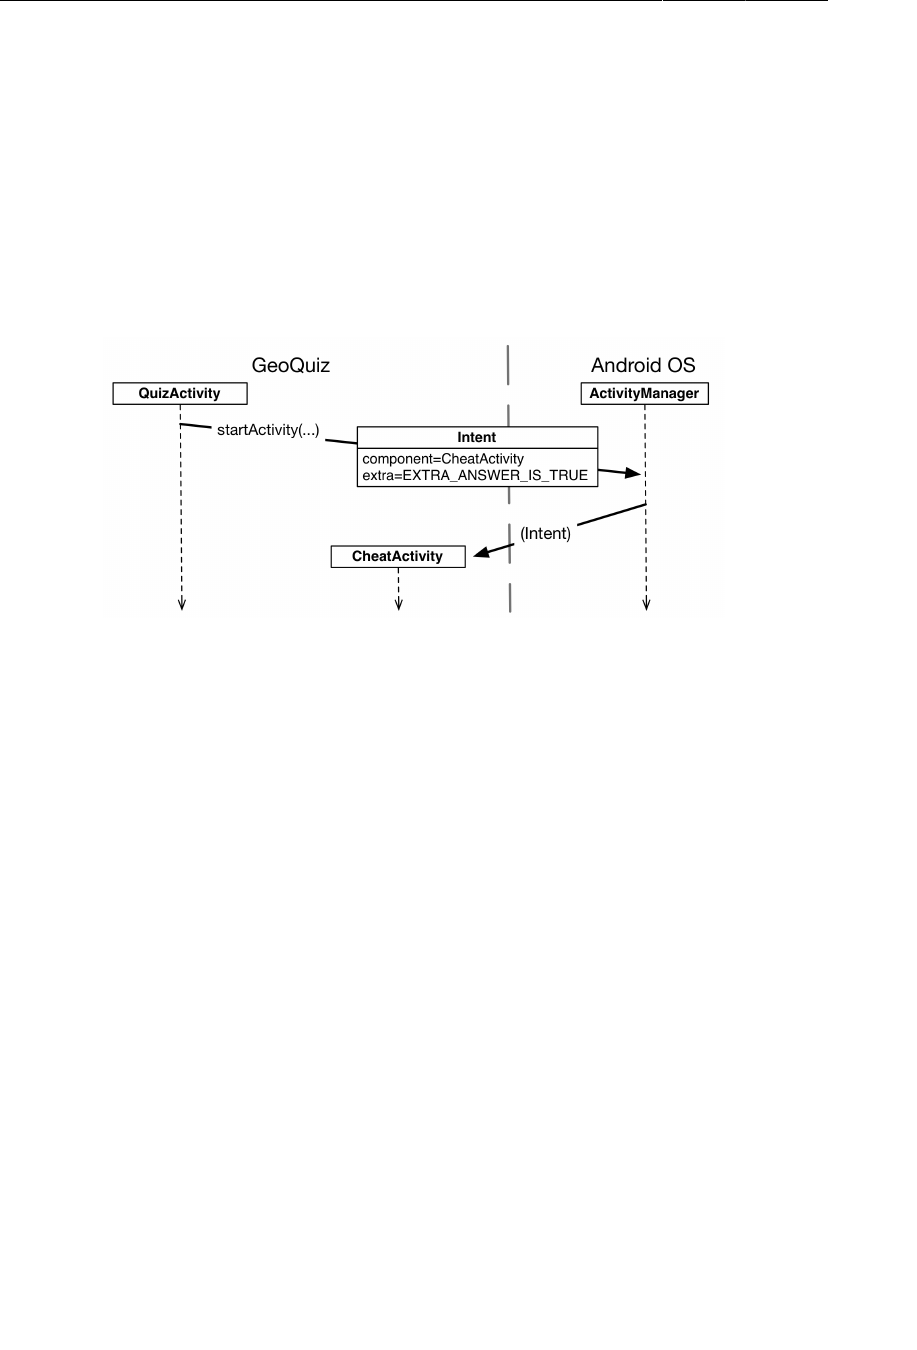
ptg11078569
Chapter 5Your Second Activity
102
Using intent extras
To inform the CheatActivity of the answer to the current question, you will pass it the value of
mQuestionBank[mCurrentIndex].isTrueQuestion();
You will send this value as an extra on the Intent that is passed into startActivity(Intent).
Extras are arbitrary data that the calling activity can include with an intent. The OS forwards the intent
to the recipient activity, which can then access the extra and retrieve the data.
Figure 5.11Intent extras: communicating with other activities
An extra is structured as a key-value pair, like the one you used to save out the value of mCurrentIndex
in QuizActivity.onSaveInstanceState(Bundle).
To add an extra to an intent, you use Intent.putExtra(…). In particular, you will be calling
public Intent putExtra(String name, boolean value)
Intent.putExtra(…) comes in many flavors, but it always has two arguments. The first argument is
always a String key, and the second argument is the value, whose type will vary.
In CheatActivity.java, add a key for the extra.
Listing 5.9Add extra constant (CheatActivity.java)
public class CheatActivity extends Activity {
public static final String EXTRA_ANSWER_IS_TRUE =
"com.bignerdranch.android.geoquiz.answer_is_true";
...
An activity may be started from several different places, so you should define keys for extras on the
activities that retrieve and use them. Using your package name as a qualifier for your extra, as seen in
Listing 5.9, prevents name collisions with extras from other apps.

ptg11078569
Using intent extras
103
Next, return to QuizActivity and put the extra on the intent.
Listing 5.10Putting an extra on the intent (QuizActivity.java)
...
mCheatButton.setOnClickListener(new View.OnClickListener() {
@Override
public void onClick(View v) {
Intent i = new Intent(QuizActivity.this, CheatActivity.class);
boolean answerIsTrue = mQuestionBank[mCurrentIndex].isTrueQuestion();
i.putExtra(CheatActivity.EXTRA_ANSWER_IS_TRUE, answerIsTrue);
startActivity(i);
}
});
updateQuestion();
}
You only need one extra, but you can put multiple extras on an Intent if you need to.
To retrieve the value from the extra, you will use
public boolean getBooleanExtra(String name, boolean defaultValue)
The first argument is the name of the extra. The second argument of getBooleanExtra(…) is a default
answer if the key is not found.
In CheatActivity, retrieve the value from the extra and store it in a member variable.
Listing 5.11Using an extra (CheatActivity.java)
public class CheatActivity extends Activity {
...
private boolean mAnswerIsTrue;
@Override
protected void onCreate(Bundle savedInstanceState) {
super.onCreate(savedInstanceState);
setContentView(R.layout.activity_cheat);
mAnswerIsTrue = getIntent().getBooleanExtra(EXTRA_ANSWER_IS_TRUE, false);
}
}
Note that Activity.getIntent() returns the Intent object that was forwarded in
startActivity(Intent).
Finally, in CheatActivity, wire up the answer TextView and the Show�Answer button to use the
retrieved value.

ptg11078569
Chapter 5Your Second Activity
104
Listing 5.12Enabling cheating (CheatActivity.java)
public class CheatActivity extends Activity {
...
private boolean mAnswerIsTrue;
private TextView mAnswerTextView;
private Button mShowAnswer;
@Override
protected void onCreate(Bundle savedInstanceState) {
super.onCreate(savedInstanceState);
setContentView(R.layout.activity_cheat);
mAnswerIsTrue = getIntent().getBooleanExtra(EXTRA_ANSWER_IS_TRUE, false);
mAnswerTextView = (TextView)findViewById(R.id.answerTextView);
mShowAnswer = (Button)findViewById(R.id.showAnswerButton);
mShowAnswer.setOnClickListener(new View.OnClickListener() {
@Override
public void onClick(View v) {
if (mAnswerIsTrue) {
mAnswerTextView.setText(R.string.true_button);
} else {
mAnswerTextView.setText(R.string.false_button);
}
}
});
}
}
This code is pretty straightforward. You set the TextView’s text using TextView.setText(int).
TextView.setText(…) has many variations, and here you use the one that accepts the resource ID of a
string resource.
Run GeoQuiz. Press Cheat! to get to CheatActivity. Then press Show�Answer to reveal the answer to
the current question.
Getting a result back from a child activity
At this point, the user can cheat with impunity. Let’s fix that by having the CheatActivity tell the
QuizActivity whether the user chose to view the answer.
When you want to hear back from the child activity, you call the following Activity method:
public void startActivityForResult(Intent intent, int requestCode)
The first parameter is the same intent as before. The second parameter is the request code. The request
code is a user-defined integer that is sent to the child activity and then received back by the parent. It
is used when an activity starts more than one type of child activity and needs to tell who is reporting
back.

ptg11078569
Getting a result back from a child activity
105
In QuizActivity, modify mCheatButton’s listener to call startActivityForResult(Intent, int).
Listing 5.13Calling startActivityForResult(…) (QuizActivity.java)
...
mCheatButton.setOnClickListener(new View.OnClickListener() {
@Override
public void onClick(View v) {
Intent i = new Intent(QuizActivity.this, CheatActivity.class);
boolean answerIsTrue = mQuestionBank[mCurrentIndex].isTrueQuestion();
i.putExtra(CheatActivity.EXTRA_ANSWER_IS_TRUE, answerIsTrue);
startActivity(i);
startActivityForResult(i, 0);
}
});
updateQuestion();
}
QuizActivity will only ever start one type of child activity. It does not matter what you send, so here
you pass 0 for the required parameter.
Setting a result
There are two methods you can call in the child activity to send data back to the parent:
public final void setResult(int resultCode)
public final void setResult(int resultCode, Intent data)
Typically, the result code is one of two pre-defined constants: Activity.RESULT_OK or
Activity.RESULT_CANCELED. (You can use another constant, RESULT_FIRST_USER, as an offset when
defining your own result codes.)
Setting result codes is useful when the parent needs to take different action depending on how the child
activity finished.
For example, if a child activity had an OK button and a Cancel button, the child activity would set
a different result code depending on which button was pressed. Then the parent activity would take
different action depending on the result code.
Calling setResult(…) is not required of the child activity. If you do not need to distinguish
between results or receive arbitrary data on an intent, then you can let the OS send a default
result code. A result code is always returned to the parent if the child activity was started with
startActivityForResult(…). If setResult(…) is not called, then, when the user presses the Back
button, the parent will receive Activity.RESULT_CANCELED.
Sending back an intent
In this implementation, you are interested in passing some arbitrary data back to QuizActivity. So you
are going to create an Intent, put an extra on it, and then call Activity.setResult(int, Intent) to
get that data into QuizActivity’s hands.

ptg11078569
Chapter 5Your Second Activity
106
Earlier, you defined the constant for the extra received by CheatActivity within CheatActivity. You
will do the same for this new extra that CheatActivity will send to QuizActivity. This is because
the incoming and outgoing extras both define the interface for CheatActivity. That way, if you want
to use CheatActivity elsewhere in your app, you are referring to constants defined entirely within
CheatActivity.
In CheatActivity, add a constant for the extra’s key and a private method that creates an intent, puts
an extra on it, and sets a result. Then call this method in the Show�Answer button’s listener.
Listing 5.14Setting a result (CheatActivity.java)
public class CheatActivity extends Activity {
public static final String EXTRA_ANSWER_IS_TRUE =
"com.bignerdranch.android.geoquiz.answer_is_true";
public static final String EXTRA_ANSWER_SHOWN =
"com.bignerdranch.android.geoquiz.answer_shown";
...
private void setAnswerShownResult(boolean isAnswerShown) {
Intent data = new Intent();
data.putExtra(EXTRA_ANSWER_SHOWN, isAnswerShown);
setResult(RESULT_OK, data);
}
@Override
protected void onCreate(Bundle savedInstanceState) {
...
// Answer will not be shown until the user
// presses the button
setAnswerShownResult(false);
...
mShowAnswer.setOnClickListener(new View.OnClickListener() {
@Override
public void onClick(View v) {
if (mAnswerIsTrue) {
mAnswerTextView.setText(R.string.true_button);
} else {
mAnswerTextView.setText(R.string.false_button);
}
setAnswerShownResult(true);
}
});
}
}
When the user presses the Show�Answer button, the CheatActivity packages up the result code and
the intent in the call to setResult(int, Intent).
Then, when the user presses the Back button to return to the QuizActivity, the ActivityManager calls
the following method on the parent activity:
protected void onActivityResult(int requestCode, int resultCode, Intent data)
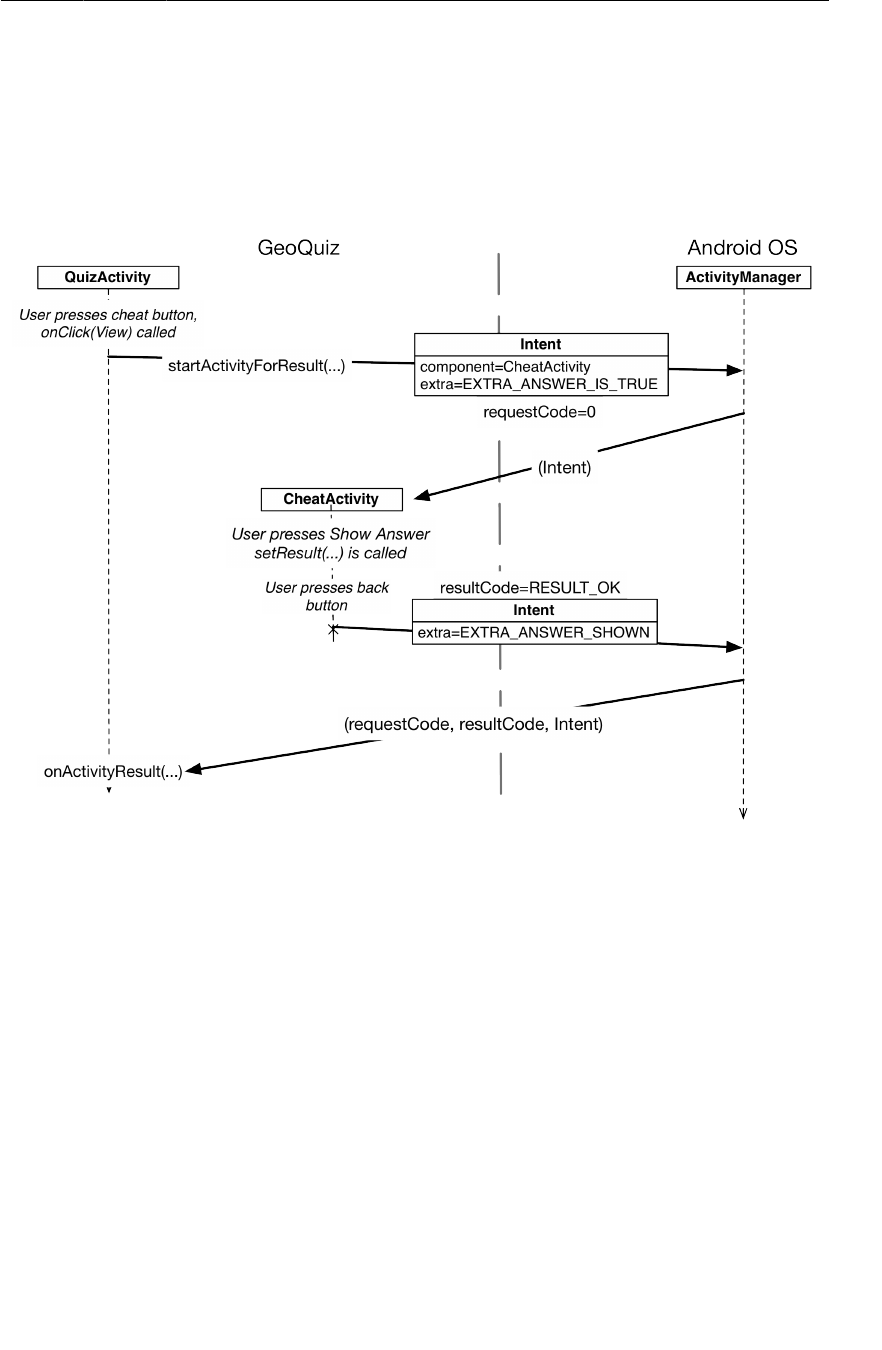
ptg11078569
Getting a result back from a child activity
107
The parameters are the original request code from QuizActivity and the result code and intent passed
into setResult(…).
Figure5.12 shows this sequence of interactions.
Figure 5.12Sequence diagram for GeoQuiz
The final step is to override onActivityResult(int, int, Intent) in QuizActivity to handle the
result.
Handling a result
In QuizActivity.java, add a new member variable to hold the value that CheatActivity is passing
back. Then override onActivityResult(…) to retrieve it.

ptg11078569
Chapter 5Your Second Activity
108
Listing 5.15Implementing onActivityResult(…) (QuizActivity.java)
public class QuizActivity extends Activity {
...
private int mCurrentIndex = 0;
private boolean mIsCheater;
...
@Override
protected void onActivityResult(int requestCode, int resultCode, Intent data) {
if (data == null) {
return;
}
mIsCheater = data.getBooleanExtra(CheatActivity.EXTRA_ANSWER_SHOWN, false);
}
...
}
You can see in this implementation of onActivityResult(…) that QuizActivity has no interest in the
request code or the result code. In other cases, you would write conditional code based on those values.
Finally, modify the checkAnswer(boolean) method in QuizActivity to check whether the user
cheated and respond appropriately.

ptg11078569
How Android Sees Your Activities
109
Listing 5.16Changing toast message based on value of mIsCheater
(QuizActivity.java)
private void checkAnswer(boolean userPressedTrue) {
boolean answerIsTrue = mQuestionBank[mCurrentIndex].isTrueQuestion();
int messageResId = 0;
if (mIsCheater) {
messageResId = R.string.judgment_toast;
} else {
if (userPressedTrue == answerIsTrue) {
messageResId = R.string.correct_toast;
} else {
messageResId = R.string.incorrect_toast;
}
}
Toast.makeText(this, messageResId, Toast.LENGTH_SHORT)
.show();
}
@Override
protected void onCreate(Bundle savedInstanceState) {
...
mNextButton = (Button)findViewById(R.id.next_button);
mNextButton.setOnClickListener(new View.OnClickListener() {
@Override
public void onClick(View v) {
mCurrentIndex = (mCurrentIndex + 1) % mQuestionBank.length;
mIsCheater = false;
updateQuestion();
}
});
...
}
Run GeoQuiz. Cheat and see what happens.
How Android Sees Your Activities
Let’s look at what is going on OS-wise as you move between activities. First, when you click on
the GeoQuiz app in the launcher, the OS does not start the application; it starts an activity in the
application. More specifically, it starts the application’s launcher activity. For GeoQuiz, QuizActivity
is the launcher activity.
When the template created the GeoQuiz application and QuizActivity, it made QuizActivity the
launcher activity by default. Launcher activity status is specified in the manifest by the intent-filter
element in QuizActivity’s declaration (Listing 5.17).
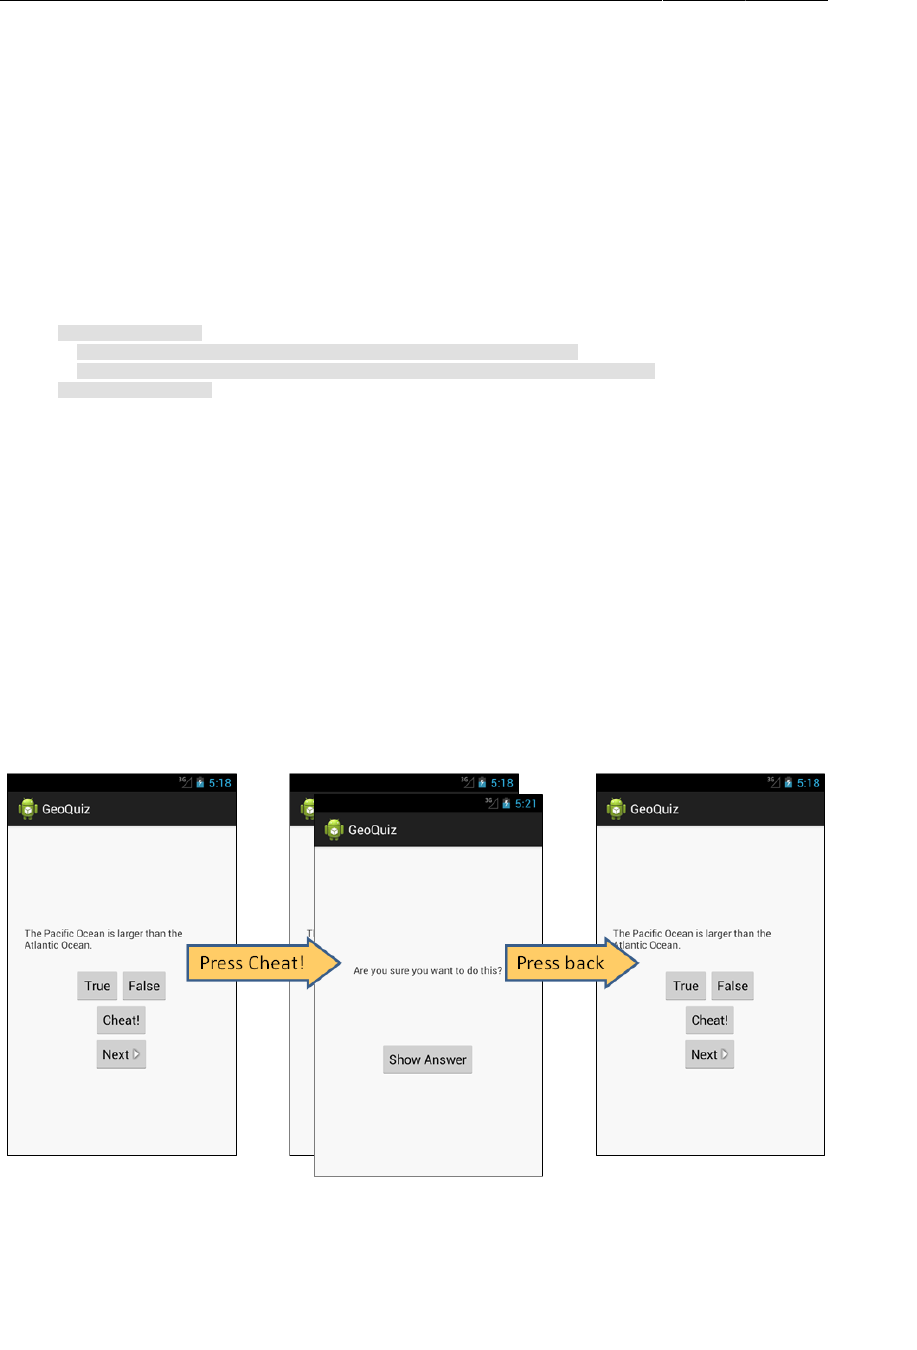
ptg11078569
Chapter 5Your Second Activity
110
Listing 5.17QuizActivity declared as launcher activity
(AndroidManifest.xml)
<?xml version="1.0" encoding="utf-8"?>
<manifest xmlns:android="http://schemas.android.com/apk/res/android"
... >
...
<application
... >
<activity
android:name="com.bignerdranch.android.geoquiz.QuizActivity"
android:label="@string/app_name" >
<intent-filter>
<action android:name="android.intent.action.MAIN" />
<category android:name="android.intent.category.LAUNCHER" />
</intent-filter>
</activity>
<activity
android:name=".CheatActivity"
android:label="@string/app_name" />
</application>
</manifest>
After the instance of QuizActivity is on screen, the user can press the Cheat! button. When this
happens, an instance of CheatActivity is started – on top of the QuizActivity. These activities exist
in a stack (Figure5.13).
Pressing the Back button in CheatActivity pops this instance off the stack, and the QuizActivity
resumes its position at the top.
Figure 5.13GeoQuiz’s back stack
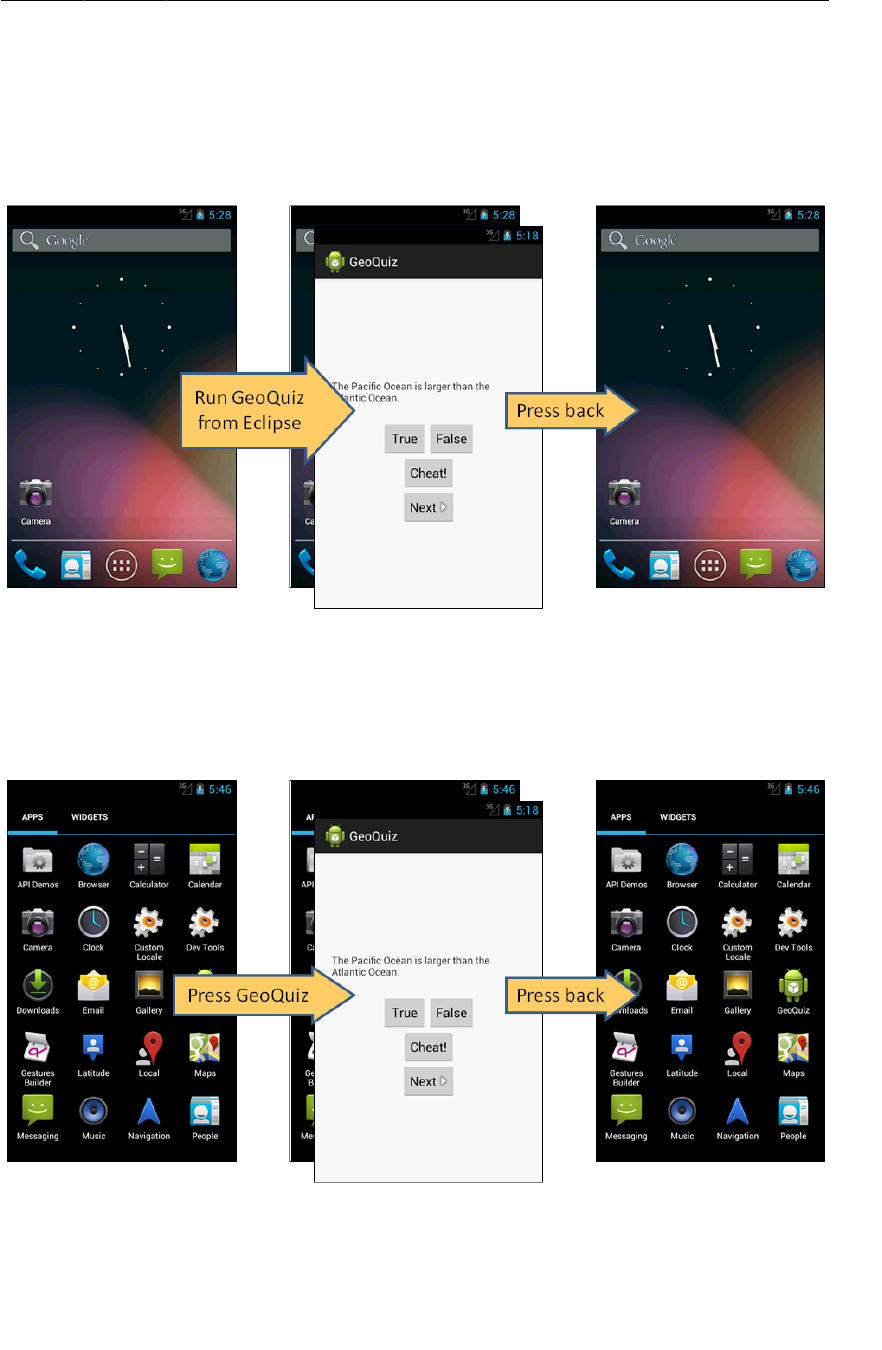
ptg11078569
How Android Sees Your Activities
111
A call to Activity.finish() in CheatActivity would also pop the CheatActivity off the stack.
If you run GeoQuiz from Eclipse and press Back from the QuizActivity, the QuizActivity will be
popped off the stack and you will return to the last screen you were viewing before running GeoQuiz.
Figure 5.14Looking at Home screen, running from Eclipse
If you started GeoQuiz from the launcher application, pressing Back from QuizActivity will return
you to the launcher.
Figure 5.15Running GeoQuiz from launcher

ptg11078569
Chapter 5Your Second Activity
112
Pressing Back from the launcher will return you to the screen you were looking at before you opened
the launcher.
What you are seeing here is that the ActivityManager maintains a back stack and that this back stack
is not just for your application’s activities. Activities for all applications share the back stack, which is
one reason the ActivityManager is involved in starting your activities and lives with the OS and not
your application. The stack represents the use of the OS and device as a whole rather than the use of a
single application.
(Wondering about the “up” button? We will discuss how to implement and configure this button in
Chapter16.)
Challenge
Cheaters never win. Unless, of course, they persistently circumvent your anti-cheating measures.
Which they probably will. Because they are cheaters.
GeoQuiz has a few major loopholes. For this challenge, you will busy yourself with closing them. Here
the loopholes are in ascending order, from easiest to hardest to close:
• Users can rotate CheatActivity after they cheat to clear out the cheating result.
• Once they get back, users can rotate QuizActivity to clear out mIsCheater.
• Users can press Next until the question they cheated on comes back around.
Good luck!
ptg11078569
113
6
Android SDK Versions and
Compatibility
Now that you have gotten your feet wet with the GeoQuiz app, let’s review some background material
about the different versions of Android. The information in this chapter is important to have under your
belt as you continue with the book and develop more complex and realistic apps.
Android SDK Versions
Table6.1 shows the SDK versions, the associated versions of the Android firmware, and the
percentages of devices currently running them as of March 2013.
Table 6.1Android API levels, firmware versions, and % of devices in use
API level Codename Device firmware version % of devices in use
17 4.2 1.6
16 Jelly Bean 4.1 14.9
15 Ice Cream Sandwich (ICS) 4.0.3, 4.0.4 28.6
13 3.2 0.9
12
Honeycomb
(released for tablets only) 3.1.x 0.3
10 2.3.3 - 2.3.7 43.9
9Gingerbread 2.3.2, 2.3.1, 2.3 0.2
8 Froyo 2.2.x 7.5
7 Eclair 2.1.x 1.9
Each “codenamed” release is followed by incremental releases. For instance, Ice Cream Sandwich was
initially released as Android 4.0 (API level 14). It was almost immediately replaced with incremental
releases culminating in Android 4.0.3 and 4.0.4 (API level 15).
The percentages shown in Table6.1 will change, of course, but they do reveal an important trend:
Android devices running older versions are not immediately upgraded or replaced when a newer
version is available. As of March 2013, half of devices are still running Froyo or Gingerbread SDK
versions. Android 2.3.7 (the last Gingerbread update) was released in September 2011. In contrast,
only 1.6% of devices are running Android 4.2, which was released in November 2012.

ptg11078569
Chapter 6Android SDK Versions and Compatibility
114
(If you are curious, the data in this table is kept current at http://developer.android.com/
resources/dashboard/platform-versions.html. You can also find trend data there.)
Why do so many devices still run older versions of Android? Most of it has to do with heavy
competition among Android device manufacturers and US carriers. Carriers want features and phones
that no other network has. Device manufacturers feel this pressure, too – all of their phones are based
on the same OS, but they want to stand out from the competition. The combination of this pressure
from the market and the carriers means that there is a bewildering array of devices with proprietary,
one-off modifications of Android.
A device with a proprietary version of Android is not able to run a new version of Android released
by Google. Instead, it must wait for a compatible proprietary upgrade. That upgrade might not be
available until months after Google releases its version, if it is ever available at all. Manufacturers often
choose to spend resources on newer devices rather than keeping older ones up-to-date. And sometimes
the hardware on an older device is simply not powerful enough to run a newer version of Android.
Compatibility and Android Programming
The delay in upgrades combined with regular new releases makes compatibility an important issue in
Android programming. To reach a broad market, Android developers must create apps that perform
well on devices running Froyo, Gingerbread, Honeycomb, Ice Cream Sandwich, and Jelly Bean
versions of Android, as well as on different device form factors.
Targeting different sizes of devices is easier than you might think. Phone screens are a variety of sizes,
but the Android layout system does a good job at adapting. Tablets require more work, but in that
case you can use configuration qualifiers to do the job (as you will see in Chapter22). For Google TV
(which also runs Android), though, the differences in UI are large enough that you would usually want
a separate app.
Versions are a different story. When releases are incremental, there is little problem with backwards
compatibility. However, there has been one especially tectonic shift.
Honeycomb was big
The biggest issue in Android compatibility is navigating the divide between the pre- and post-
Honeycomb worlds. The release of Honeycomb was a major shift in Android and introduced a new UI
and new architectural components. Honeycomb was just for tablets and Google TV (and not widely
adopted), so it was not until Ice Cream Sandwich that these new developments were widely available.
Since then, new releases have been more incremental.
Given that more than half of devices still run Gingerbread or older devices, developers cannot make a
clean break and forsake that which came before. Eventually older devices will become less prevalent,
but this is happening much more slowly than you might imagine.
Thus, Android developers must spend time ensuring backwards compatibility and bridging the gap
between Gingerbread (API level 10) and Honeycomb (API level 11) and beyond. Android has provided
help for maintaining backwards compatibility. There are also third-party libraries that can help. But
maintaining compatibility does complicate learning Android programming.
Often you will have to learn two ways of doing things as well as how to integrate those two ways.
At other times, you will learn just one way that seems inordinately complicated because you are
addressing at least two sets of requirements.
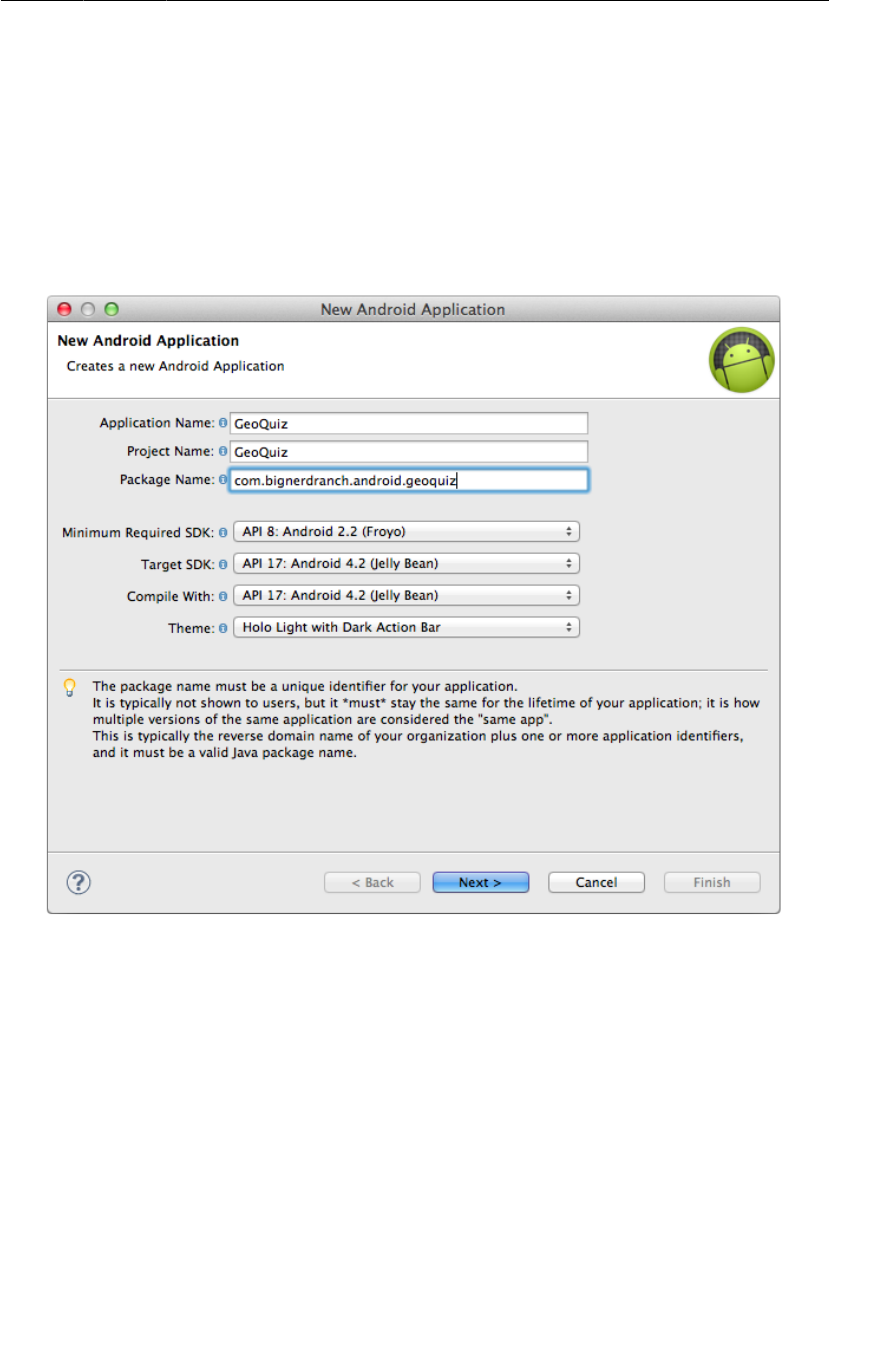
ptg11078569
Honeycomb was big
115
If you can swing it, we suggest going to sleep for a couple of years. Then you can wake up and
learn Android programming once Gingerbread devices no longer make up a meaningful share of the
market. If that is not possible, we hope it is at least helpful to understand the reason for some of the
complications.
When you created the GeoQuiz project, you set three SDK versions within the new application wizard.
(Note that Android uses the terms “SDK version” and “API level” interchangeably.)
Figure 6.1Remember me?
Let’s see where each of these settings lives in your project, explain the default choices, and see how to
change them.
The minimum required SDK version and the target SDK version are both set in the manifest. From
the package explorer, reopen AndroidManifest.xml. Within the uses-sdk element find the values for
android:minSdkVersion and android:targetSdkVersion.

ptg11078569
Chapter 6Android SDK Versions and Compatibility
116
Listing 6.1Finding minSdkVersion in the manifest (AndroidManifest.xml)
<?xml version="1.0" encoding="utf-8"?>
<manifest xmlns:android="http://schemas.android.com/apk/res/android"
package="com.bignerdranch.android.geoquiz"
android:versionCode="1"
android:versionName="1.0" >
<uses-sdk
android:minSdkVersion="8"
android:targetSdkVersion="17" />
...
</manifest>
Minimum SDK version
Recall that the manifest is meta-data that the OS uses to interact with your app. The minSdkVersion
value is a hard floor below which the OS should refuse to install the app.
By setting this version to API level 8 (Froyo), you give Android permission to install GeoQuiz on
devices running Froyo or higher. Android will refuse to install GeoQuiz on a device running, say,
Eclair.
Looking again at Table6.1, you can see why Froyo is a good choice for a minimum SDK version: it
allows your app to be installed on 95% of devices in use.
Target SDK version
The targetSdkVersion value tells Android which API level your app was designed to run on. Most
often this will be the latest Android release.
When would you lower the target SDK? New SDK releases can change how your app appears on
a device or even how the OS behaves behind the scenes. If you have already designed an app, you
should confirm that it works as expected on new releases. Check the documentation at http://
developer.android.com/reference/android/os/Build.VERSION_CODES.html to see where
problems might arise. Then you can modify your app to work with the new behavior or lower the target
SDK. Lowering the target SDK ensures that your app will still run with the appearance and behavior of
the targeted version on which it worked well. Any changes in subsequent releases are ignored.
Build SDK version
The last SDK setting labeled Compile�With in Figure6.1 is the build SDK version. This setting is not
found in the manifest. Whereas the minimum and target SDK versions are advertised to the OS, the
build SDK version is private information between you and the compiler.
Android’s features are exposed through the classes and methods in the SDK. The build SDK version,
or build target, specifies which version to use when building your own code. When Eclipse is looking
to find the classes and methods you refer to in your imports, the build target determines which SDK
version it checks against.
The best choice for a build target is the latest API level (currently 17, Jelly Bean). However, you can
change the build target of an existing application if you need to. For instance, you might want to update
the build target when yet another version of Android is released.
ptg11078569
Build SDK version
117
To change the build target, right-click the GeoQuiz project in the package explorer and select
Properties. From the lefthand side of the dialog, select Android and you will see all of your options for
different build targets.
Figure 6.2Changing the build target
Wondering about the difference between the Google APIs and Android Open Source Project targets?
The Google APIs include the Android APIs plus Google’s additions – most importantly the APIs for
using Google Maps.
GeoQuiz’s build target is fine as it is, so click Cancel and let’s move on.

ptg11078569
Chapter 6Android SDK Versions and Compatibility
118
Adding code from later APIs safely
The difference between GeoQuiz’s minimum SDK version and build SDK version leave you with a
compatibility gap to manage. For example, in GeoQuiz, what happens if you call code from an SDK
version that is later than the minimum SDK of Froyo (API level 8)? When your app is installed and run
on a Froyo device, it will crash.
This used to be a testing nightmare. However, thanks to improvements in Android Lint, potential
problems caused by calling newer code on older devices can be caught at runtime. If you use code from
a higher version than your minimum SDK, Android Lint will report build errors.
Right now, all of GeoQuiz’s simple code was introduced in API level 8 or earlier. Let’s add some code
from API level 11 and see what happens.
Open QuizActivity.java. In onCreate(Bundle), add the following code that creates a subtitle in the
action bar that specifies what area of geographic knowledge you are testing.
Listing 6.2Adding action bar code (QuizActivity.java)
protected void onCreate(Bundle savedInstanceState) {
super.onCreate(savedInstanceState);
Log.d(TAG, "onCreate() called");
setContentView(R.layout.activity_quiz);
ActionBar actionBar = getActionBar();
actionBar.setSubtitle("Bodies of Water");
mIsCheater = false;
(We are using a literal string here for simplicity’s sake. If you really wanted a subtitle or even different
subtitles for different groups of quiz questions, then you would add one or more string resources and
refer to them here.)
Organize your imports to import the ActionBar class. The ActionBar class was introduced in API
level 11, so this code would crash on a device running a lower version than that. You will see more of
ActionBar in Chapter16. Here we will just use it as an example of code that is unfamiliar to Froyo.
After organizing your imports, select GeoQuiz in the package explorer and choose Android�Tools →
Run�Lint:�Check�for�Common�Errors. Because your build SDK version is API level 17, the compiler
itself has no problem with this code. Android Lint, on the other hand, knows about your minimum
SDK version and will complain loudly.
The error messages read something like Class�requires�API�level�11�(current�min�is�8). Basically,
Android Lint will not let you build until you address this compatibility problem.
How do you get rid of these errors? One option is to raise the minimum SDK version to 11. However,
raising the minimum SDK version is not really dealing with this compatibility problem as much as
ducking it. If your app cannot be installed on Gingerbread and older devices, then you no longer have a
compatibility problem.
A better option is to wrap the ActionBar code in a conditional statement that checks the device’s
version of Android.

ptg11078569
Adding code from later APIs safely
119
Listing 6.3Checking the device’s build version first
@Override
protected void onCreate(Bundle savedInstanceState) {
super.onCreate(savedInstanceState);
Log.d(TAG, "onCreate() called");
setContentView(R.layout.activity_quiz);
if (Build.VERSION.SDK_INT >= Build.VERSION_CODES.HONEYCOMB) {
ActionBar actionBar = getActionBar();
actionBar.setSubtitle("Bodies of Water");
}
}
The Build.VERSION.SDK_INT constant is the device’s version of Android. You then compare
that version with the constant that stands for Honeycomb. (Version codes are listed at http://
developer.android.com/reference/android/os/Build.VERSION_CODES.html.)
Now your ActionBar code will only be called when the app is running on a device with Honeycomb or
higher. You have made your code safe for Froyo, and Android Lint should be content. However, if you
try to run again, you will get the same error.
Suppressing Lint compatibility errors
Unfortunately, Android Lint cannot figure out what you have done here, so you have to suppress the
errors explicitly. Add the following annotation before the implementation of onCreate(Bundle).
Organize your imports to import android.annotation.TargetApi.
Listing 6.4Giving Android Lint a helpful clue
@TargetApi(11)
@Override
protected void onCreate(Bundle savedInstanceState) {
super.onCreate(savedInstanceState);
Log.d(TAG, "onCreate() called");
setContentView(R.layout.activity_quiz);
if (Build.VERSION.SDK_INT >= Build.VERSION_CODES.HONEYCOMB) {
ActionBar actionBar = getActionBar();
actionBar.setSubtitle("Bodies of Water");
}
}
To understand why you need this annotation in addition to the if statement, imagine that Android
programming is a beach. In the water at this beach, there are sharks – runtime exceptions from using
newer methods or classes on older devices. Android Lint is a lifeguard on the beach. It is keeping a
lookout, eager to jump in and save you if it looks like a shark is coming near.
The code in Listing 6.4 does two things: it uses shark repellent, and it waves off the lifeguard. The if
statement is your shark repellent. Wrapped in that if statement, the getActionBar() method will only
be called when it is available, and the sharks will not attack you. The @TargetApi(11) annotation is
waving off the lifeguard (Android Lint) saying, “Don’t worry about these sharks – I’ve got it under
control.” Then the lifeguard will refrain from swooping down to pull you out of the water.
So if you wave off the lifeguard with the @TargetApi annotation, please make sure you are wearing
your SDK_INT shark repellent. Otherwise, you will be eaten by runtime exception sharks.
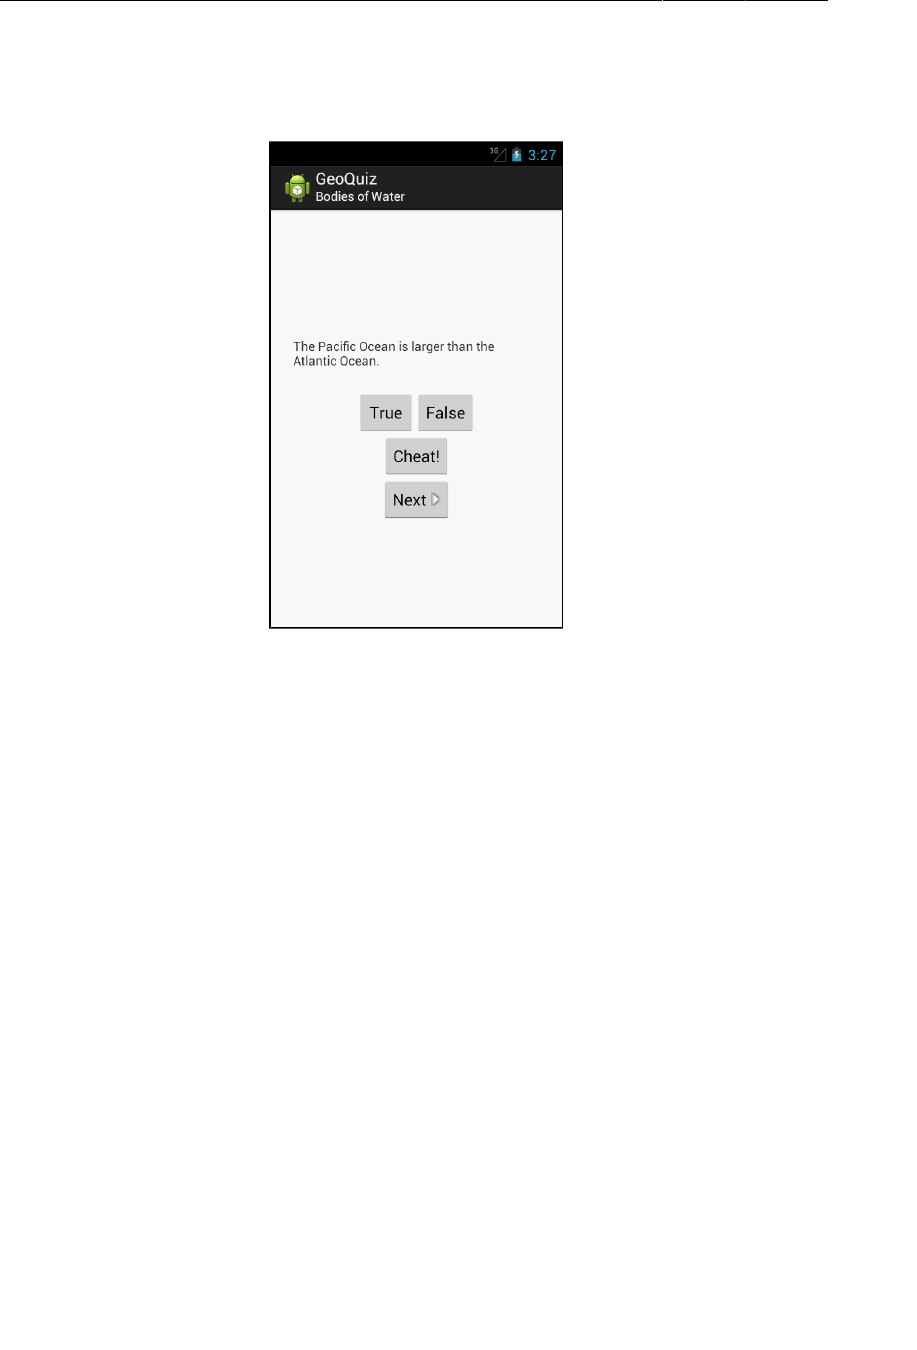
ptg11078569
Chapter 6Android SDK Versions and Compatibility
120
Run GeoQuiz on a Honeycomb or higher device and check out your new subtitle.
Figure 6.3Action bar with subtitle
You can also run GeoQuiz on a Froyo or Gingerbread device (virtual or otherwise). It will not have an
action bar or a subtitle, but you can confirm that the app still runs safely.
Using the Android Developer Documentation
Android Lint errors will tell you what API level your incompatible code is from. But you can also find
out which API level particular classes and methods belong to in Android’s developer documentation.
It is good to get comfortable using the developer documentation right away. There is far too much in
the Android SDKs to keep in your head, and, with new versions appearing regularly, you will need to
learn what is new and how to use it.
The Android developer documentation is an excellent and voluminous source of information. The main
page of the documentation is http://developer.android.com/. It is split into three parts: Design,
Develop, and Distribute. The Design section of the documentation includes patterns and principles for
the UI design of your apps. The Develop section contains documentation and training. The Distribute
section shows you how to prepare and publish your apps on Google Play or through open distribution.
It is all worth perusing when you get a chance.
The Develop section is further divided into four areas:
Android�Training beginning and advanced developer training modules including
downloadable sample code
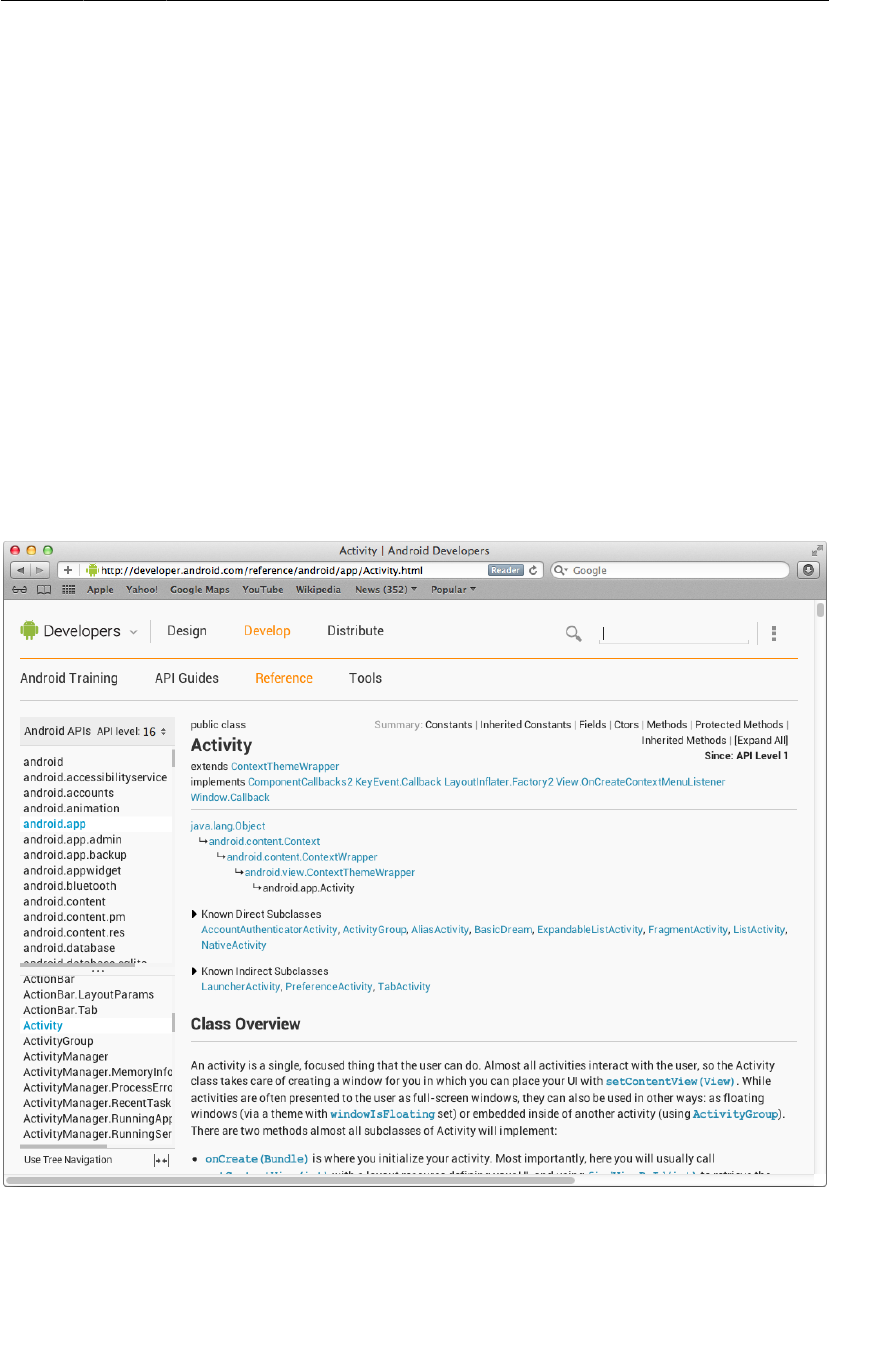
ptg11078569
Using the Android Developer Documentation
121
API�Guides topic-based descriptions of app components, features, and best practices
Reference searchable, linked documentation of every class, method, interface,
attribute constant, etc. in the SDK
Tools Descriptions and links to developer tools
You do not have to be online to have access to the documentation. If you navigate on your filesystem
to where you have downloaded the SDKs, there is a docs directory that contains the complete
documentation.
To determine what API level getActionBar() belongs to, search for this method using the search
bar at the top-right of the browser. The first result will be an API Guide concerning the action bar.
However, what you want are results from the reference section. Filter the search results by clicking
Reference on the lefthand side.
Select the first result, and you will be sent to the Activity class reference page. At the top of this page
are links to its different sections. Click the Methods link to see a list of Activity’s methods.
Figure 6.4Activity reference page
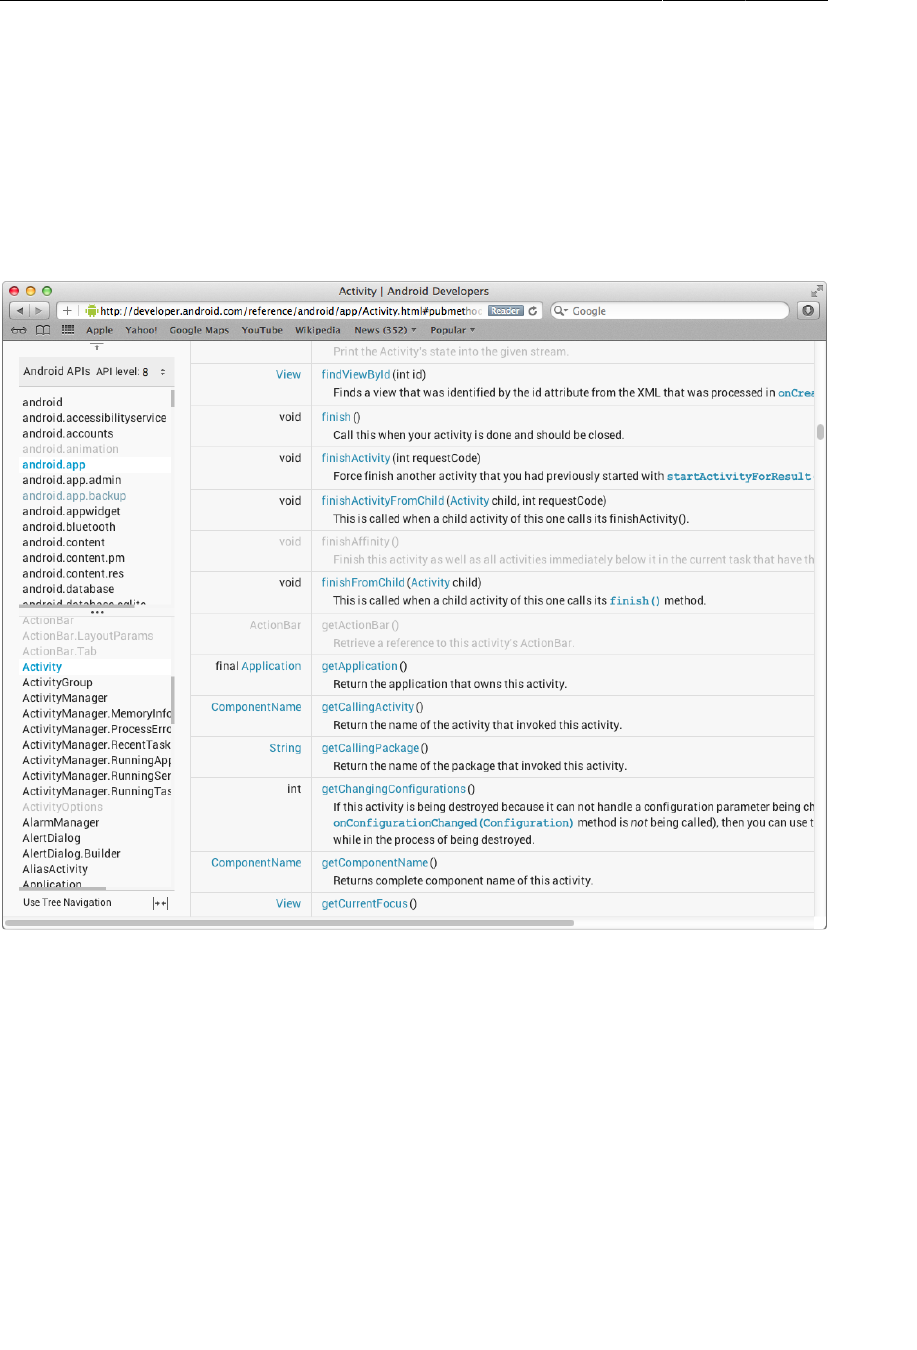
ptg11078569
Chapter 6Android SDK Versions and Compatibility
122
Scroll down, find the getActionBar() method, and click on the method name to see a description. To
the right of the method signature, you can see that getActionBar() was introduced in API level 11.
If you want to see which Activity methods are available in, say, API level 8, you can filter the
reference by API level. On the lefthand side of the page where the classes are indexed by package,
find where it says API�level:�17. Click the adjacent control and select 8 from the list. Everything that
Android has introduced after API level 8 will be grayed-out.
Figure 6.5Activity methods filtered for API level 8
As you continue through this book, be sure to visit the documentation often. You will certainly need
the documentation to tackle the challenge exercises, but also consider exploring whenever you get
curious about particular classes, methods, or other topics. Android is always updating and improving
the documentation, so there is always something new to learn.
Challenge: Reporting the Build Version
Add a TextView widget to the GeoQuiz layout that reports the API level that the device is running to
the user.
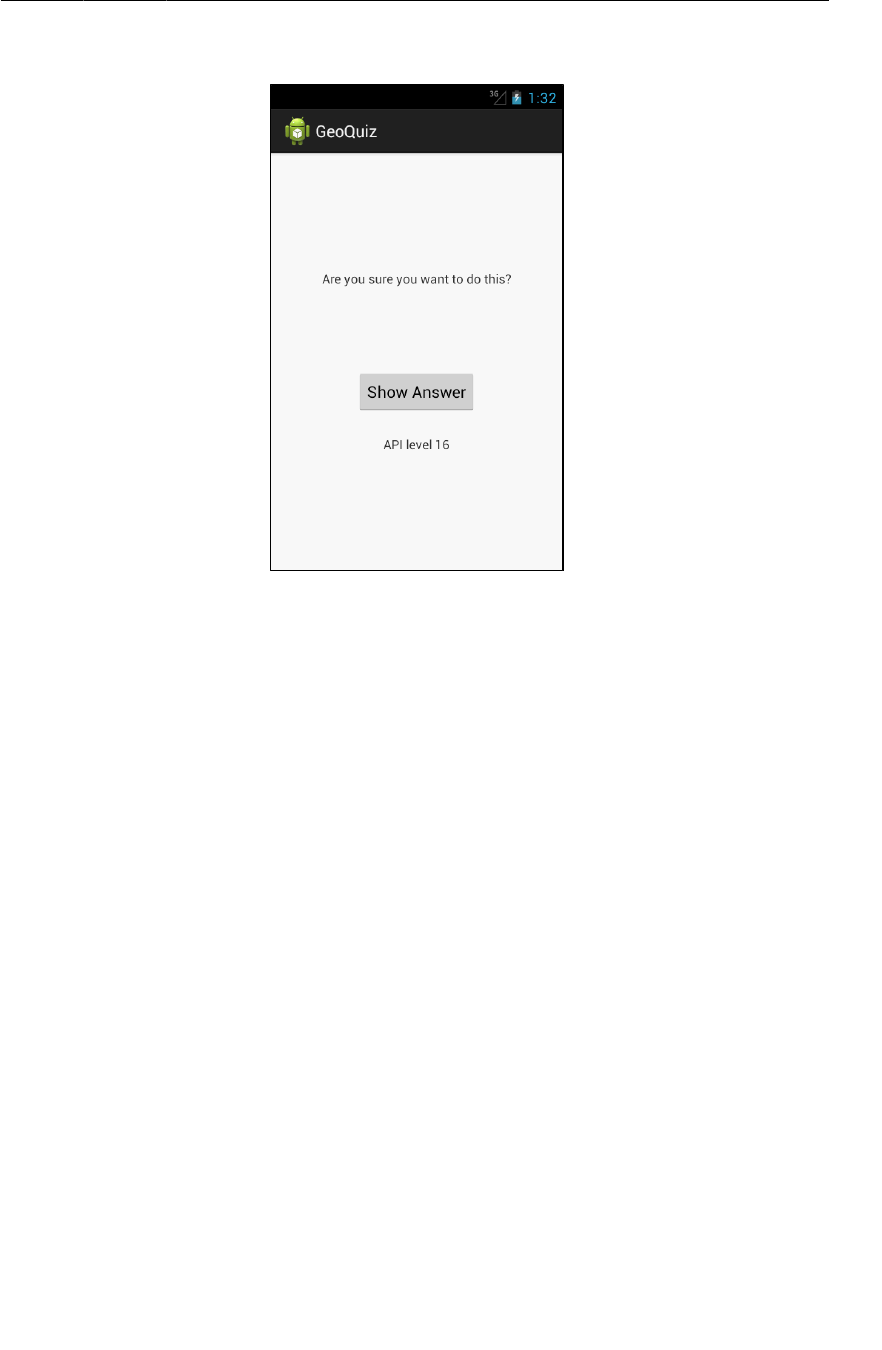
ptg11078569
Challenge: Reporting the Build Version
123
Figure 6.6Finished challenge
You cannot set this TextView’s text in the layout because you will not know the device’s build
version until runtime. Find the TextView method for setting text in the TextView reference page in
Android’s documentation. You are looking for a method that accepts a single argument – a string (or a
CharSequence).
Use other XML attributes listed in the TextView reference to adjust the size or typeface of the text.

ptg11078569
This page intentionally left blank
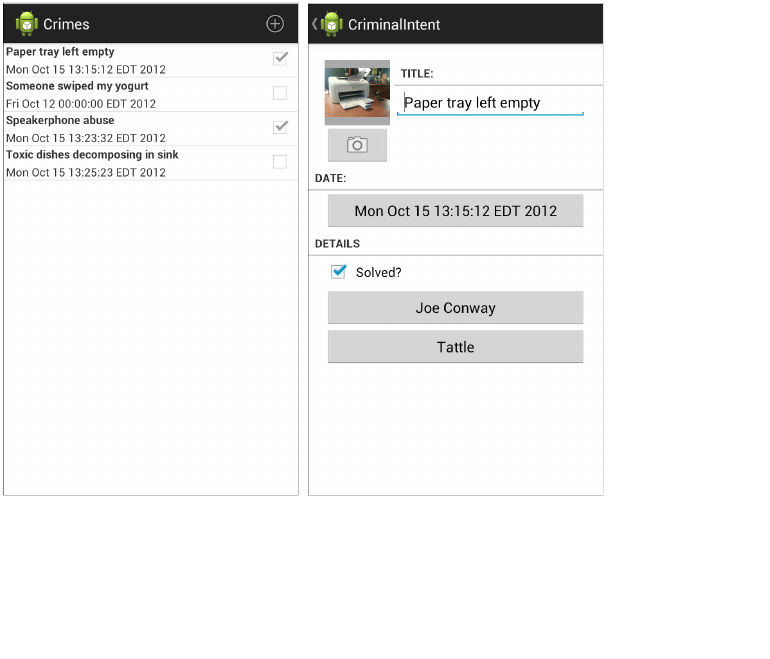
ptg11078569
125
7
UI Fragments and the Fragment
Manager
In this chapter, you will start building an application named CriminalIntent. CriminalIntent records the
details of “office crimes” – things like leaving dirty dishes in the breakroom sink or walking away from
an empty shared printer after your documents have printed.
With CriminalIntent, you can make a record of a crime including a title, a date, and a photo. You can
also identify a suspect from your contacts and lodge a complaint via email, Twitter, Facebook, or other
app. After documenting and reporting a crime, you can proceed with your work free of resentment and
ready to focus on the business at hand.
CriminalIntent is a complex app that will take thirteen chapters to complete. It will have a list-detail
interface: The main screen will display a list of recorded crimes. Users will be able add new crimes or
select an existing crime to view and edit its details.
Figure 7.1CriminalIntent, a list-detail app
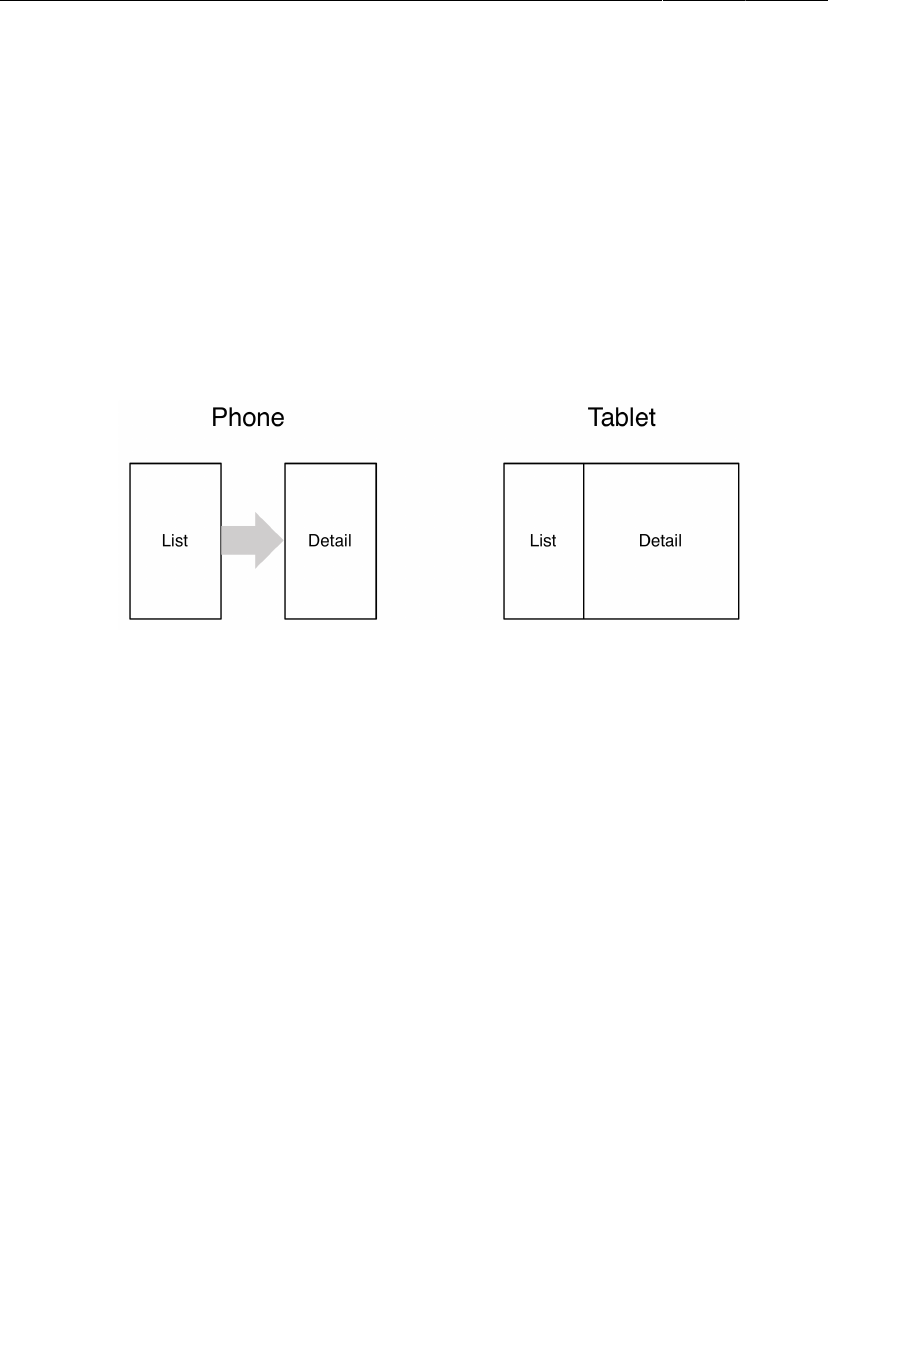
ptg11078569
Chapter 7UI Fragments and the Fragment Manager
126
The Need for UI Flexibility
You might imagine that a list-detail application consists of two activities: one managing the list and the
other managing the detail view. Clicking a crime in the list would start an instance of the detail activity.
Pressing the Back button would destroy the detail activity and return you to the list where you could
select another crime.
That would work, but what if you wanted more sophisticated presentation and navigation between
screens?
• Imagine that your user is running CriminalIntent on a tablet. Tablets and some larger phones
have screens large enough to show the list and detail at the same time – at least in landscape
orientation.
Figure 7.2Ideal list-detail interface for phone and tablet
• Imagine the user is viewing a crime on a phone and wants to see the next crime in the list. It
would be better if the user could swipe to see the next crime without having to return to the list.
Each swipe should update the detail view with information for the next crime.
What these scenarios have in common is UI flexibility: the ability to compose and recompose an
activity’s view at runtime depending on what the user or the device requires.
Activities were not built to provide this flexibility. An activity’s views may change at runtime, but the
code to control those views must live inside the activity. As a result, activities were tightly coupled to a
particular screen used by the user.
Introducing Fragments
You can get around the letter of the law of Android by moving the app’s UI management from the
activity to one or more fragments.
A fragment is a controller object that an activity can deputize to perform tasks. Most commonly, the
task is managing a user interface. The user interface can be an entire screen or just one part of the
screen.
A fragment managing a user interface is known as a UI fragment. A UI fragment has a view of its own
that is inflated from a layout file. The fragment’s view contains the interesting UI elements that the
user wants to see and interact with.
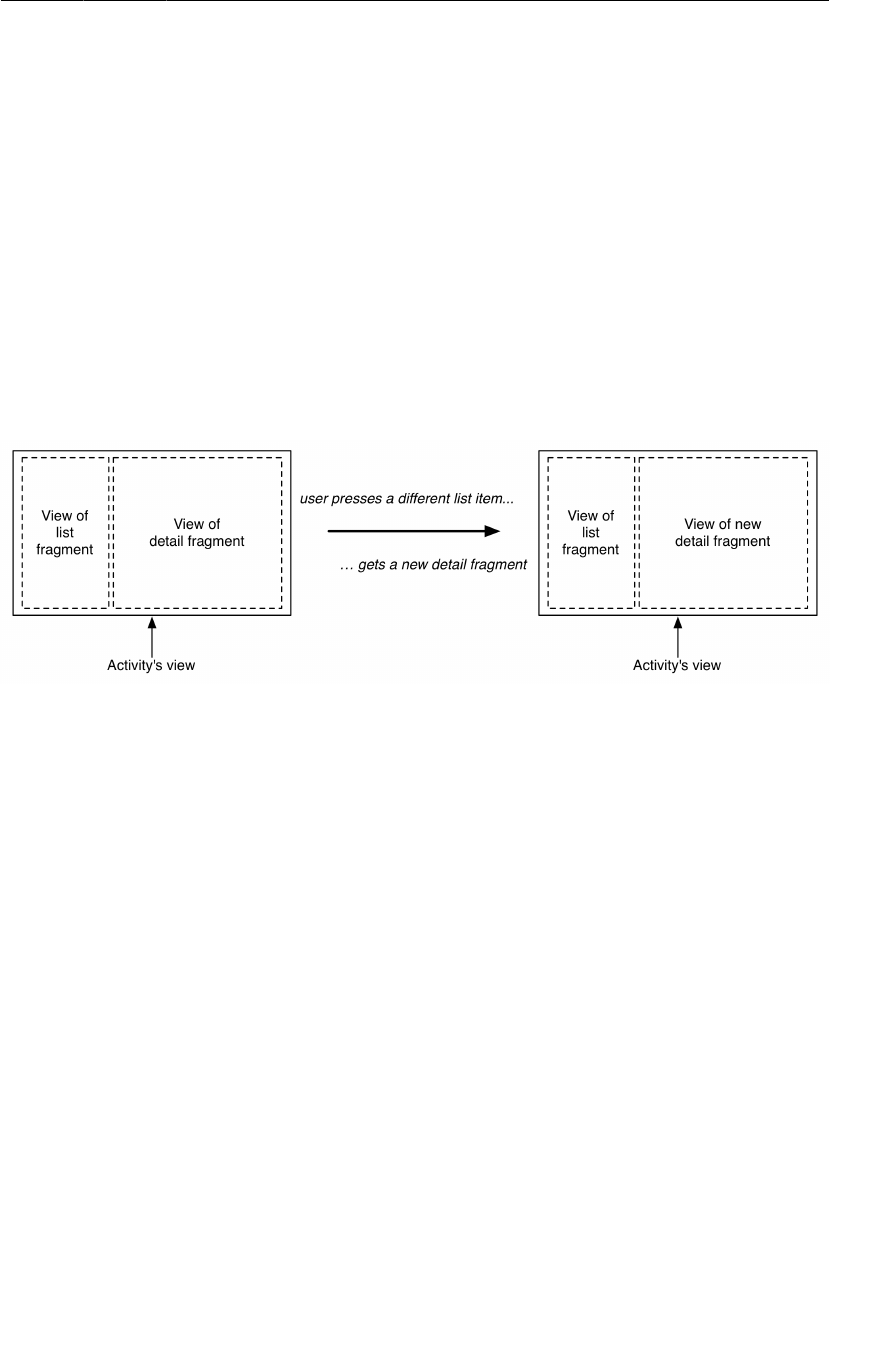
ptg11078569
Starting CriminalIntent
127
The activity’s view contains a spot where the fragment’s view will be inserted. Or it might have several
spots for the views of several fragments.
You can use the fragment(s) associated with the activity to compose and re-compose the screen as your
app and users require. The activity’s view technically stays the same throughout its lifetime, and no
laws of Android are violated.
Let’s see how this would work in a list-detail application when displaying the list and detail together.
You would compose the activity’s view from a list fragment and a detail fragment. The detail view
would show the details of the selected list item.
Selecting another item should display a new detail view. This is easy with fragments; the activity will
replace the detail fragment with another detail fragment (Figure7.3). No activities need to die for this
major view change to happen.
Figure 7.3Detail fragment is swapped out
Using UI fragments separates the UI of your app into building blocks, which is useful for more than
just list-detail applications. Working with individual blocks, it is easy to build tab interfaces, tack on
animated sidebars, and more.
Achieving this UI flexibility comes at a cost: more complexity, more moving parts, and more code.
You will reap the benefits of using fragments in Chapter11 and Chapter22. The complexity, however,
starts now.
Starting CriminalIntent
In this chapter, you are going to start on the detail part of CriminalIntent. Figure7.4 shows you what
CriminalIntent will look like at the end of this chapter.
It may not seem like a very exciting goal to shoot for. Just keep in mind that this chapter is about laying
the foundation to do bigger things later.
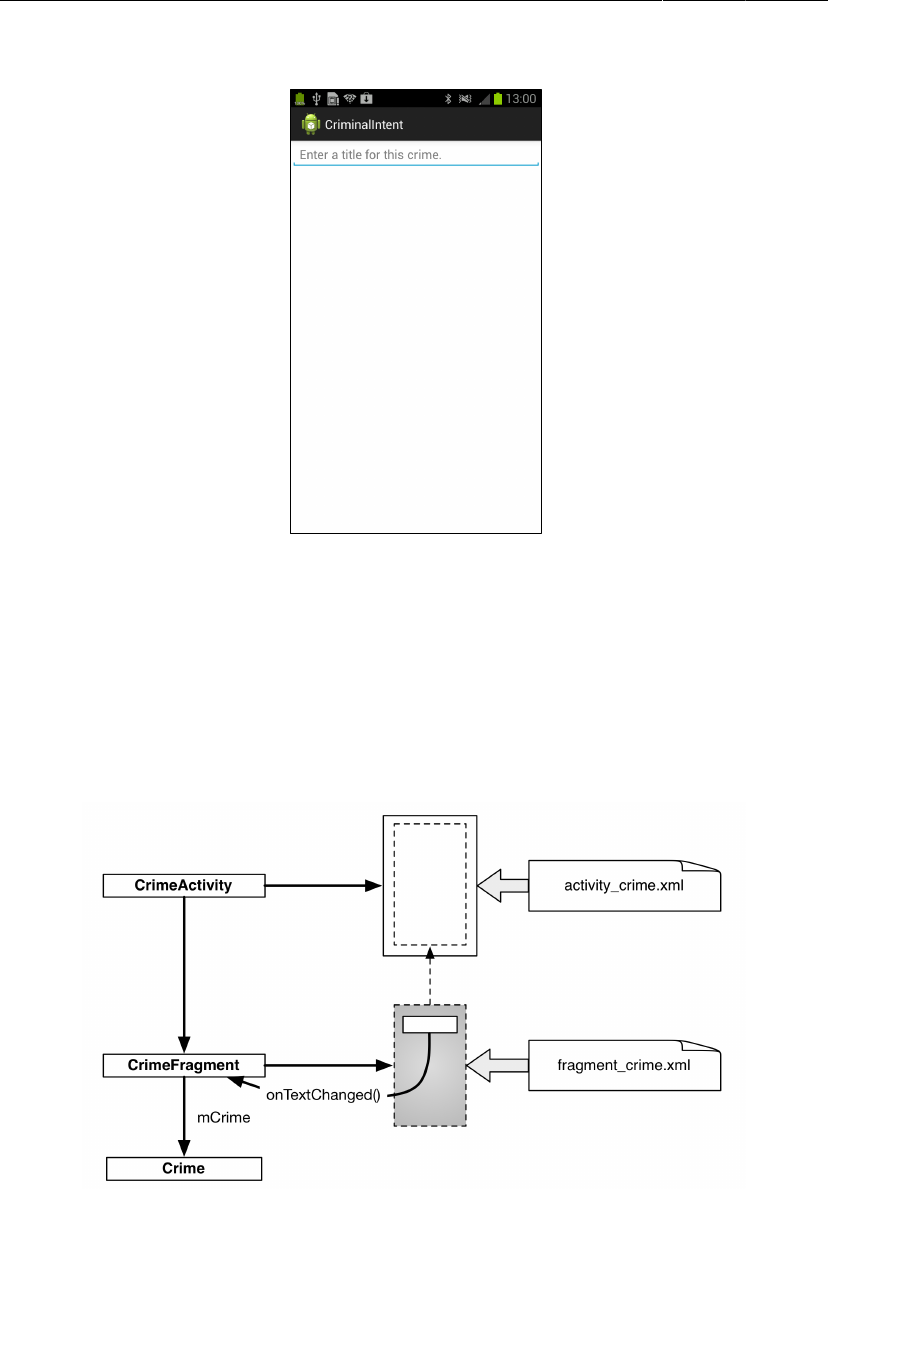
ptg11078569
Chapter 7UI Fragments and the Fragment Manager
128
Figure 7.4CriminalIntent at the end of this chapter
The screen shown in Figure7.4 will be managed by a UI fragment named CrimeFragment. An instance
of CrimeFragment will be hosted by an activity named CrimeActivity.
For now, think of hosting as the activity providing a spot in its view hierarchy where the fragment can
place its view (Figure7.5). A fragment is incapable of getting a view on screen itself. Only when it is
placed in an activity’s hierarchy will its view appear.
Figure 7.5CrimeActivity hosting a CrimeFragment

ptg11078569
Starting CriminalIntent
129
CriminalIntent will be a large project, and one way to keep your head wrapped around a project is with
an object diagram. Figure7.6 gives you the big picture of CriminalIntent. You do not have to memorize
these objects and their relationships, but it is good to have an idea of where you are heading before you
start.
You can see that CrimeFragment will do the sort of work that your activities did in GeoQuiz: create and
manage the user interface and interact with the model objects.
Figure 7.6Object diagram for CriminalIntent (for this chapter)
Three of the classes shown in Figure7.6 are classes that you will write: Crime, CrimeFragment, and
CrimeActivity.
An instance of Crime will represent a single office crime. In this chapter, a crime will have only a title
and an ID. The title is a descriptive name, like “Toxic sink dump” or “Someone stole my yogurt!”. The
ID will uniquely identify an instance of Crime.
For this chapter, you will keep things very simple and use a single instance of Crime. CrimeFragment
will have a member variable (mCrime) to hold this isolated incident.
CrimeActivity’s view will consist of a FrameLayout that defines the spot where the CrimeFragment’s
view will appear.
CrimeFragment’s view will consist of a LinearLayout and an EditText. CrimeFragment will have a
member variable for the EditText (mTitleField) and will set a listener on it to update the model layer
when the text changes.
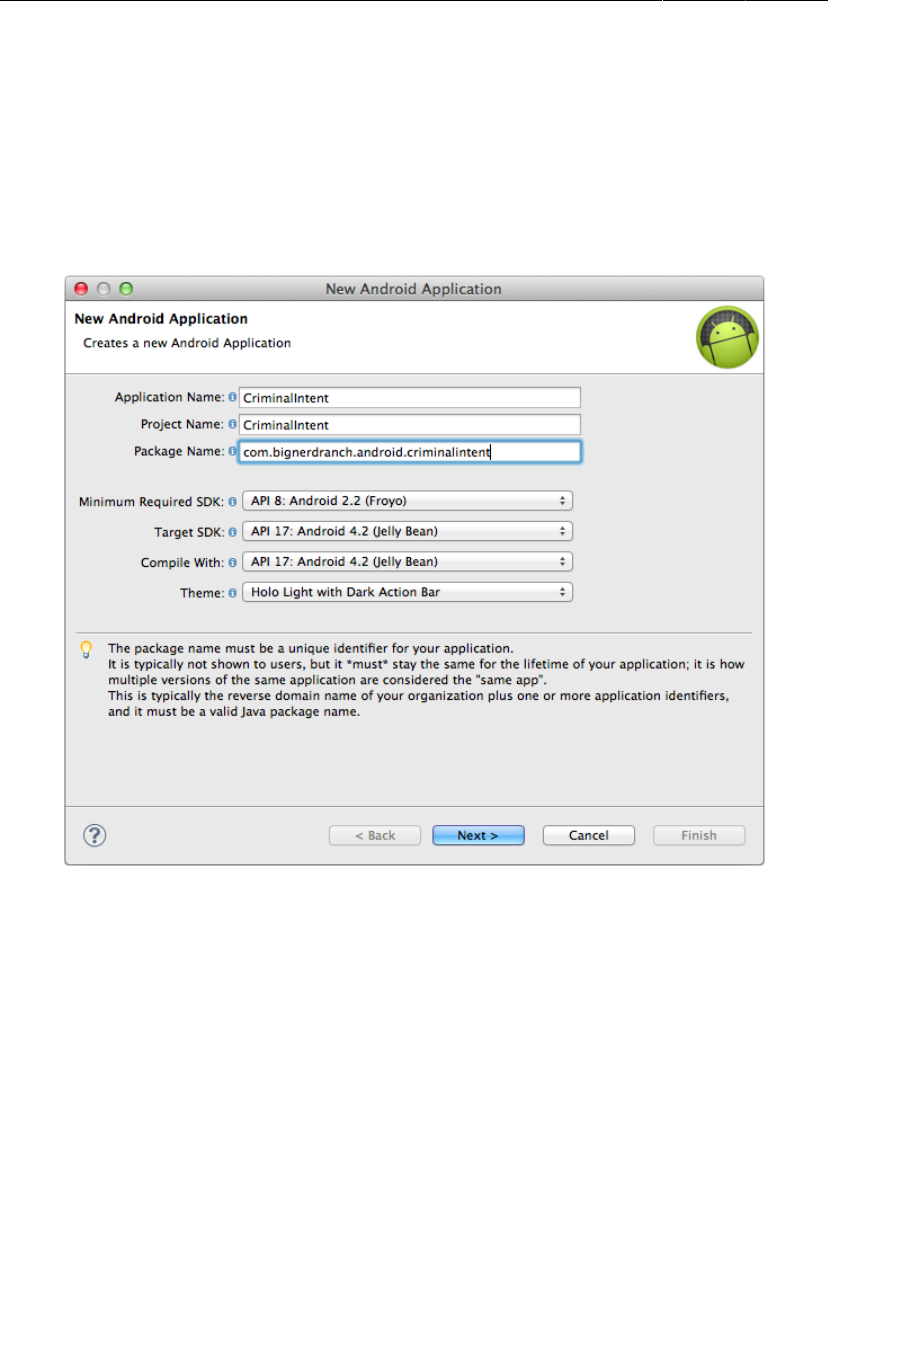
ptg11078569
Chapter 7UI Fragments and the Fragment Manager
130
Creating a new project
Enough talk; time to build a new app. Create a new Android application (New →
Android�Application�Project). Name the application CriminalIntent and name the package
com.bignerdranch.android.criminalintent, as shown in Figure7.7. Build to the latest APIs and
ensure that the app is compatible with devices running Froyo.
Figure 7.7Creating the CriminalIntent application
In the next dialog, uncheck the box to create a custom launcher icon and click Next. After that, choose
to create an activity using the blank activity template and click Next.
Finally, name the activity CrimeActivity and click Finish (Figure7.8).
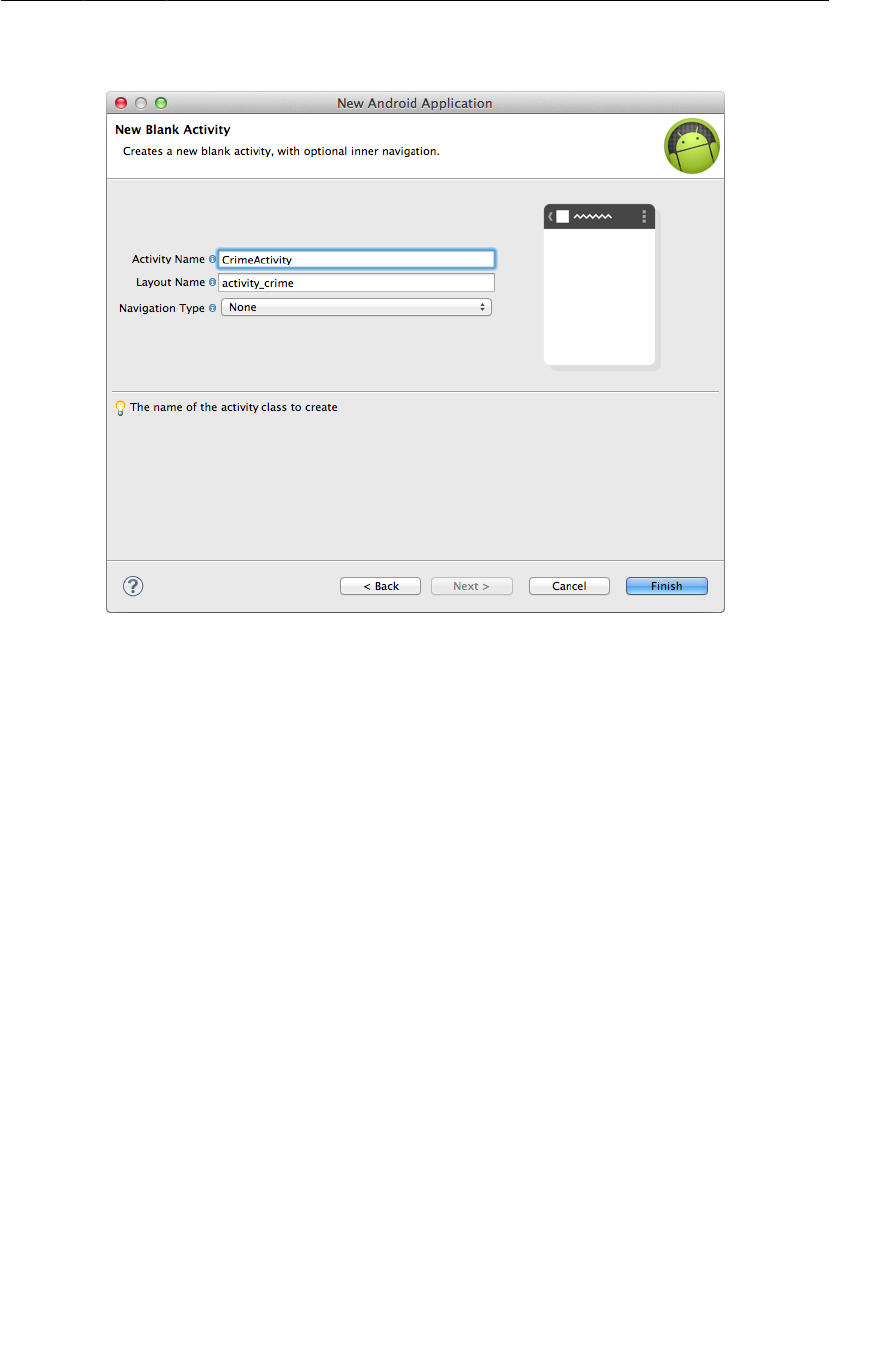
ptg11078569
Fragments and the support library
131
Figure 7.8Configuring CrimeActivity
Fragments and the support library
Fragments were introduced in API level 11 along with the first Android tablets and the sudden need for
UI flexibility. You have created CriminalIntent with a minimum required SDK of 8, so you must find a
way to ensure its compatibility with older versions of Android.
Fortunately, in the case of fragments, ensuring backwards-compatibility is relatively painless: you
simply use the fragment-related classes found in Android’s support library.
The support library is already a part of your project. You can find the support library under libs/
android-support-v4.jar where it was added by the template. The support library includes a
Fragment class (android.support.v4.app.Fragment) that you can use on any Android device running
API level 4 or higher.
When you use a support library class, it is not just used on older versions where no native class is
available; it is also used on newer versions instead of the native class.
Another important support library class is FragmentActivity
(android.support.v4.app.FragmentActivity). Using fragments requires activities that know how to
manage fragments. In Honeycomb and later versions of Android, all Activity subclasses know how
to manage fragments. In earlier versions, Activity knows nothing about fragments – and neither will
your Activity subclass. For compatibility with lower API levels, you subclass FragmentActivity
instead. FragmentActivity is an Activity subclass that provides the fragment-managing capabilities
of the newer Activity class, even on earlier Android versions.
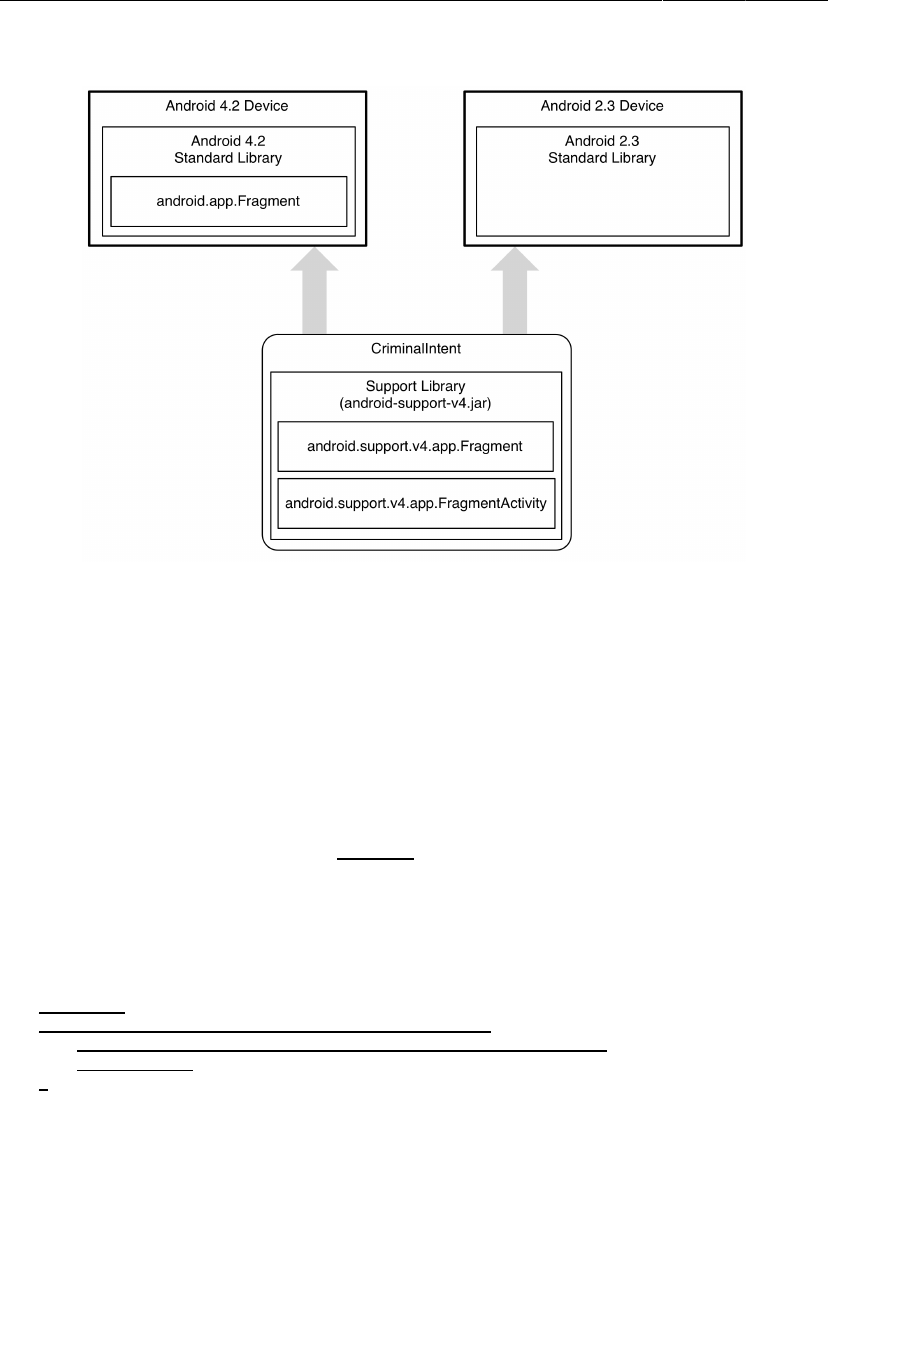
ptg11078569
Chapter 7UI Fragments and the Fragment Manager
132
Figure 7.9Where the different fragment classes live
Figure7.9 shows you the name of each of these classes and where they live. Since the support library
(and android.support.v4.app.Fragment) lives with your application, it is safe to use no matter where
your app is running.
In the package explorer, find and open CrimeActivity.java. Change CrimeActivity’s
superclass to FragmentActivity. While you are there, remove the template’s implementation of
onCreateOptionsMenu(Menu). (You will be creating an options menu for CriminalIntent from scratch
in Chapter16.)
Listing 7.1Tweaking template code (CrimeActivity.java)
public class CrimeActivity extends Activity FragmentActivity {
@Override
public void onCreate(Bundle savedInstanceState) {
super.onCreate(savedInstanceState);
setContentView(R.layout.activity_crime);
}
@Override
public boolean onCreateOptionsMenu(Menu menu) {
getMenuInflater().inflate(R.menu.activity_crime, menu);
return true;
}
}
Before proceeding further with CrimeActivity, let’s create the model layer for CriminalIntent by
writing the Crime class.
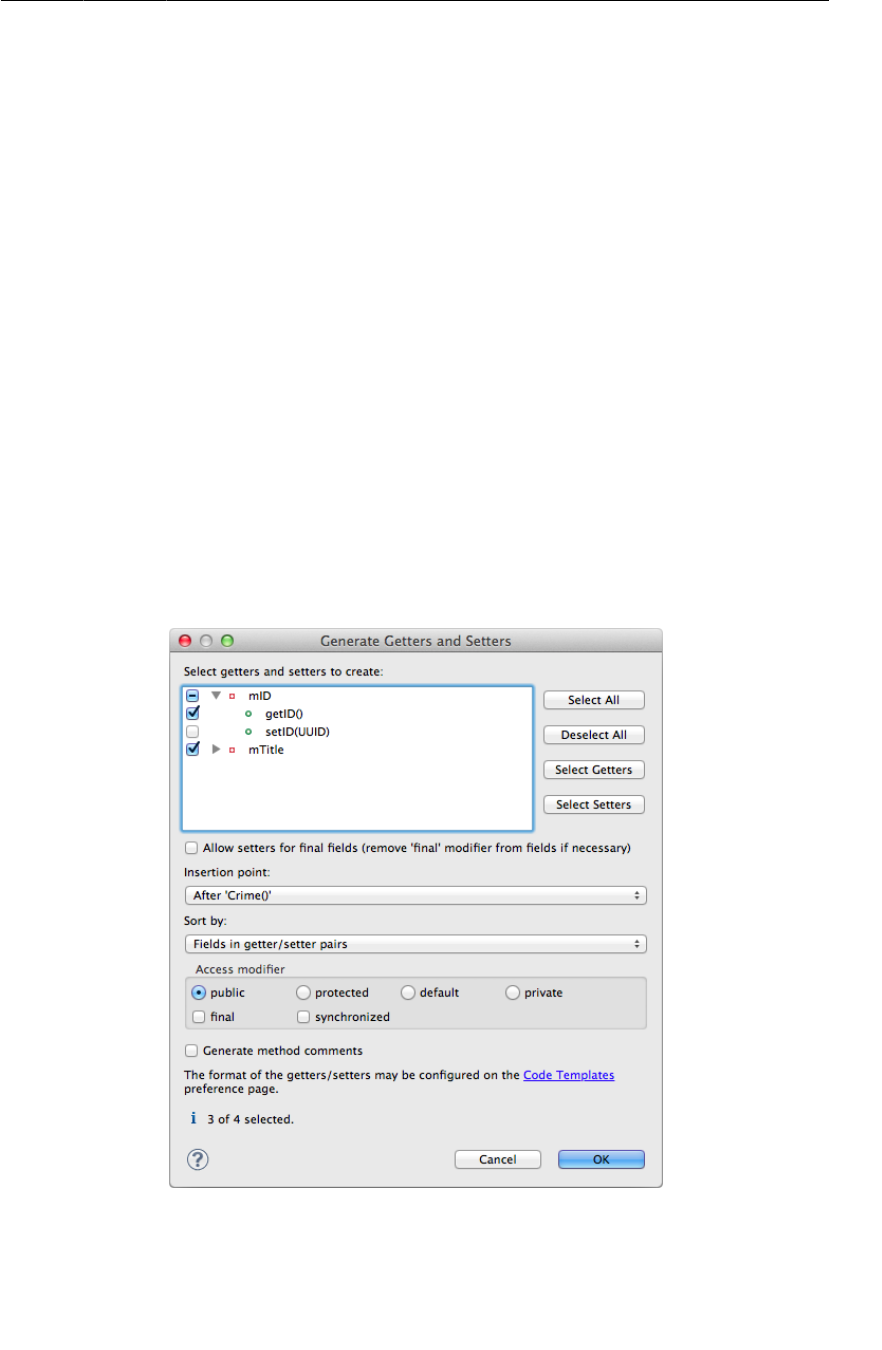
ptg11078569
Creating the Crime class
133
Creating the Crime class
In the package explorer, right-click the com.bignerdranch.android.criminalintent package and
select New → Class. Name the class Crime, leave its superclass as java.lang.Object, and click
Finish.
In Crime.java, add the following code:
Listing 7.2Adding to Crime class (Crime.java)
public class Crime {
private UUID mId;
private String mTitle;
public Crime() {
// Generate unique identifier
mId = UUID.randomUUID();
}
}
Next, you want to generate only a getter for the read-only mId and both a getter and setter for mTitle.
Right-click after the constructor and select Source → Generate�Getters�and�Setters. To generate only a
getter for mId, click the arrow to the left of the variable name to reveal the possible methods and check
only the box beside getId(), as shown in Figure7.10.
Figure 7.10Generate two getters and one setter

ptg11078569
Chapter 7UI Fragments and the Fragment Manager
134
Listing 7.3Generated getters and setter (Crime.java)
public class Crime {
private UUID mId;
private String mTitle;
public Crime() {
mId = UUID.randomUUID();
}
public UUID getId() {
return mId;
}
public String getTitle() {
return mTitle;
}
public void setTitle(String title) {
mTitle = title;
}
}
That is all you need for the Crime class and for CriminalIntent’s model layer in this chapter.
At this point, you have created the model layer and an activity that is capable of hosting a fragment in a
way that is compatible with Froyo and Gingerbread versions. Now you will get into the details of how
the activity performs its duties as host.
Hosting a UI Fragment
To host a UI fragment, an activity must
• define a spot in its layout for the fragment’s view
• manage the lifecycle of the fragment instance
The fragment lifecycle
Figure7.11 shows the fragment lifecycle. It is similar to the activity lifecycle: it has stopped, paused,
and running states, and it has methods you can override to get things done at critical points – many of
which correspond to activity lifecycle methods.
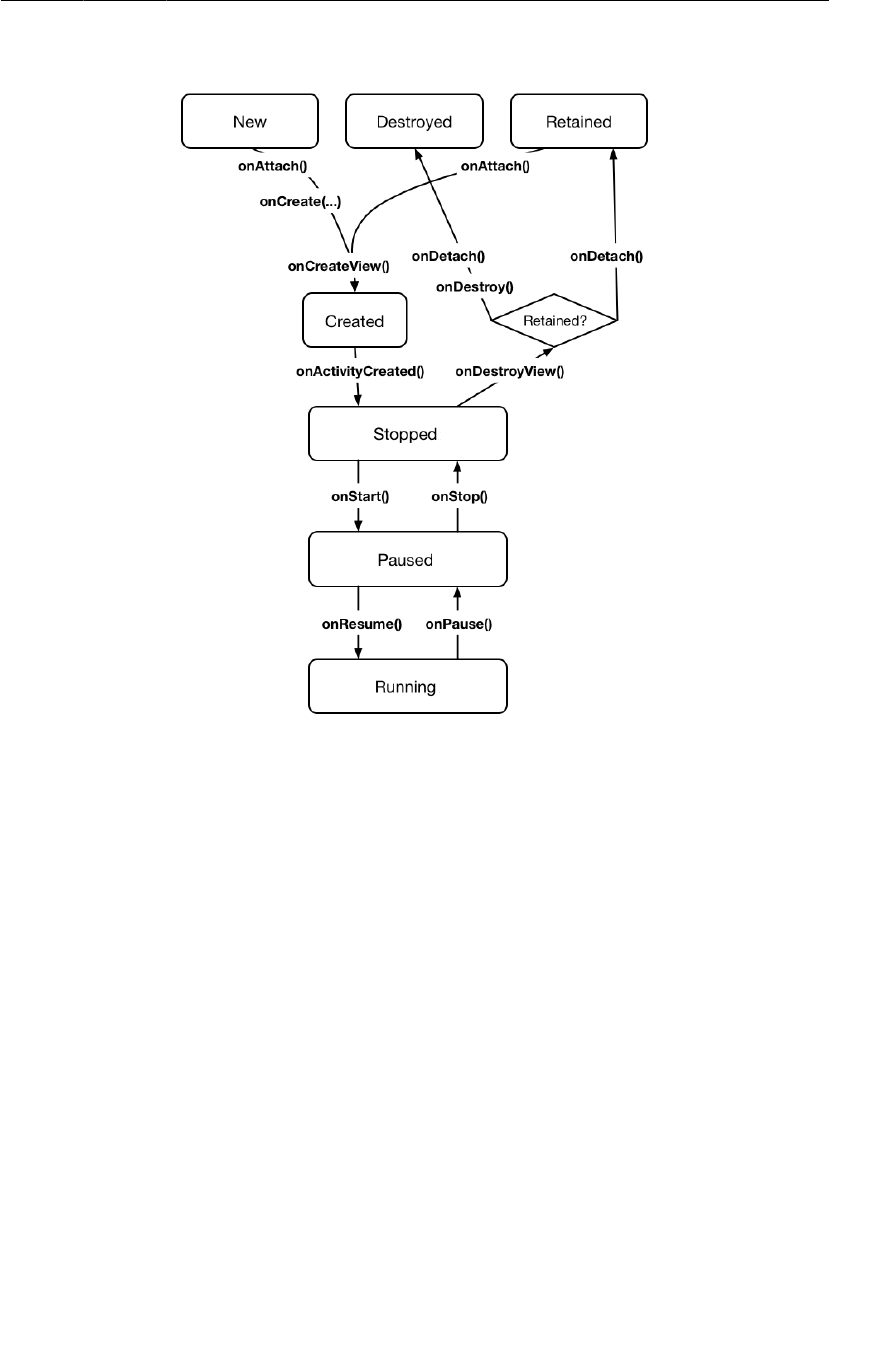
ptg11078569
Two approaches to hosting
135
Figure 7.11Fragment lifecycle diagram
The correspondence is important. Because a fragment works on behalf of an activity, its state should
reflect the activity’s state. Thus, it needs corresponding lifecycle methods to handle the activity’s work.
One critical difference between the fragment lifecycle and the activity lifecycle is that fragment
lifecycle methods are called by the hosting activity, not the OS. The OS knows nothing about the
fragments that an activity is using to manage things. Fragments are the activity’s internal business.
You will see more of the fragment lifecycle methods as you continue building CriminalIntent.
Two approaches to hosting
You have two options when it comes to hosting a UI fragment in an activity:
• add the fragment to activity’s layout
• add the fragment in the activity’s code
The first approach is known as using a layout fragment. It is simple but inflexible. If you add the
fragment to the activity’s layout, you hard-wire the fragment and its view to the activity’s view and
cannot swap out that fragment during the activity’s lifetime.
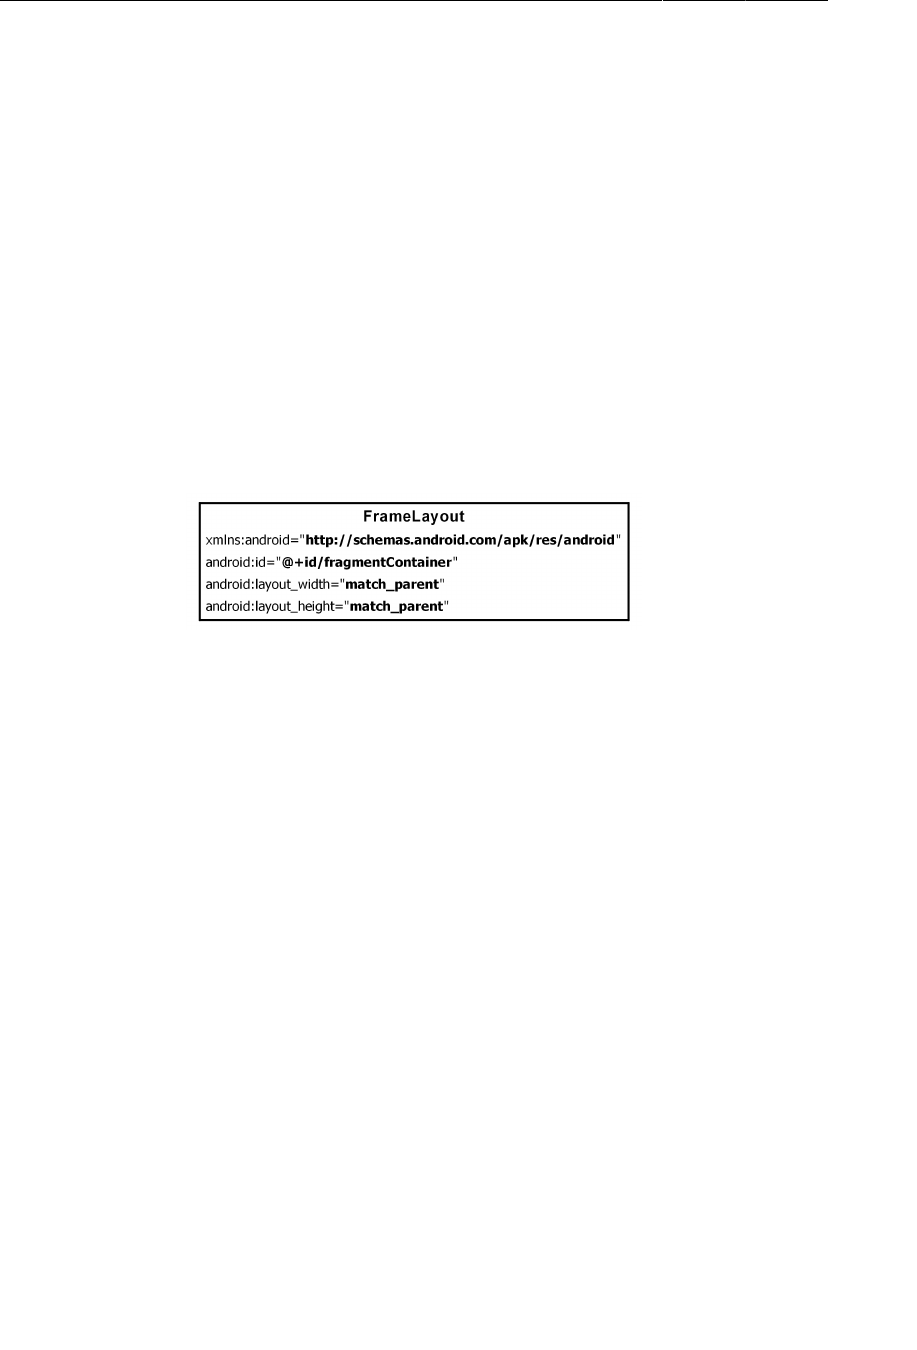
ptg11078569
Chapter 7UI Fragments and the Fragment Manager
136
Despite their inflexibility, layout fragments are useful, and you will see more of them in Chapter13.
The second approach is the more complex way to host, but it is the only way to have control at runtime
over your fragments. You determine when the fragment is added to the activity and what happens to it
after that. You can remove the fragment, replace it with another, and then add the first fragment back
again.
Thus, to achieve real UI flexibility you must add your fragment in code. This is the approach you will
use for CrimeActivity’s hosting of a CrimeFragment. The code details will come later in the chapter.
First, you are going to define CrimeActivity’s layout.
Defining a container view
You will be adding a UI fragment in the hosting activity’s code, but you still need to make a spot for
the fragment’s view in the activity’s view hierarchy. In CrimeActivity’s layout, this spot will be the
FrameLayout shown in Figure7.12.
Figure 7.12Fragment-hosting layout for CrimeActivity
This FrameLayout will be the container view for a CrimeFragment. Notice that the container view is
completely generic; it does not name the CrimeFragment class. You can and will use this same layout
to host other fragments.
Locate CrimeActivity’s layout at res/layout/activity_crime.xml. Open this file and replace the
default layout with the FrameLayout diagrammed in Figure7.12. Your XML should match that in
Listing 7.4.
Listing 7.4Create fragment container layout (activity_crime.xml)
<?xml version="1.0" encoding="utf-8"?>
<FrameLayout xmlns:android="http://schemas.android.com/apk/res/android"
android:id="@+id/fragmentContainer"
android:layout_width="match_parent"
android:layout_height="match_parent"
/>
Note that, while activity_crime.xml consists solely of a container view for a single fragment, an
activity’s layout can be more complex and define multiple container views as well as widgets of its
own.
You can preview your layout file or run CriminalIntent to check your code. You will only see an empty
FrameLayout because the CrimeActivity is not yet hosting a fragment.
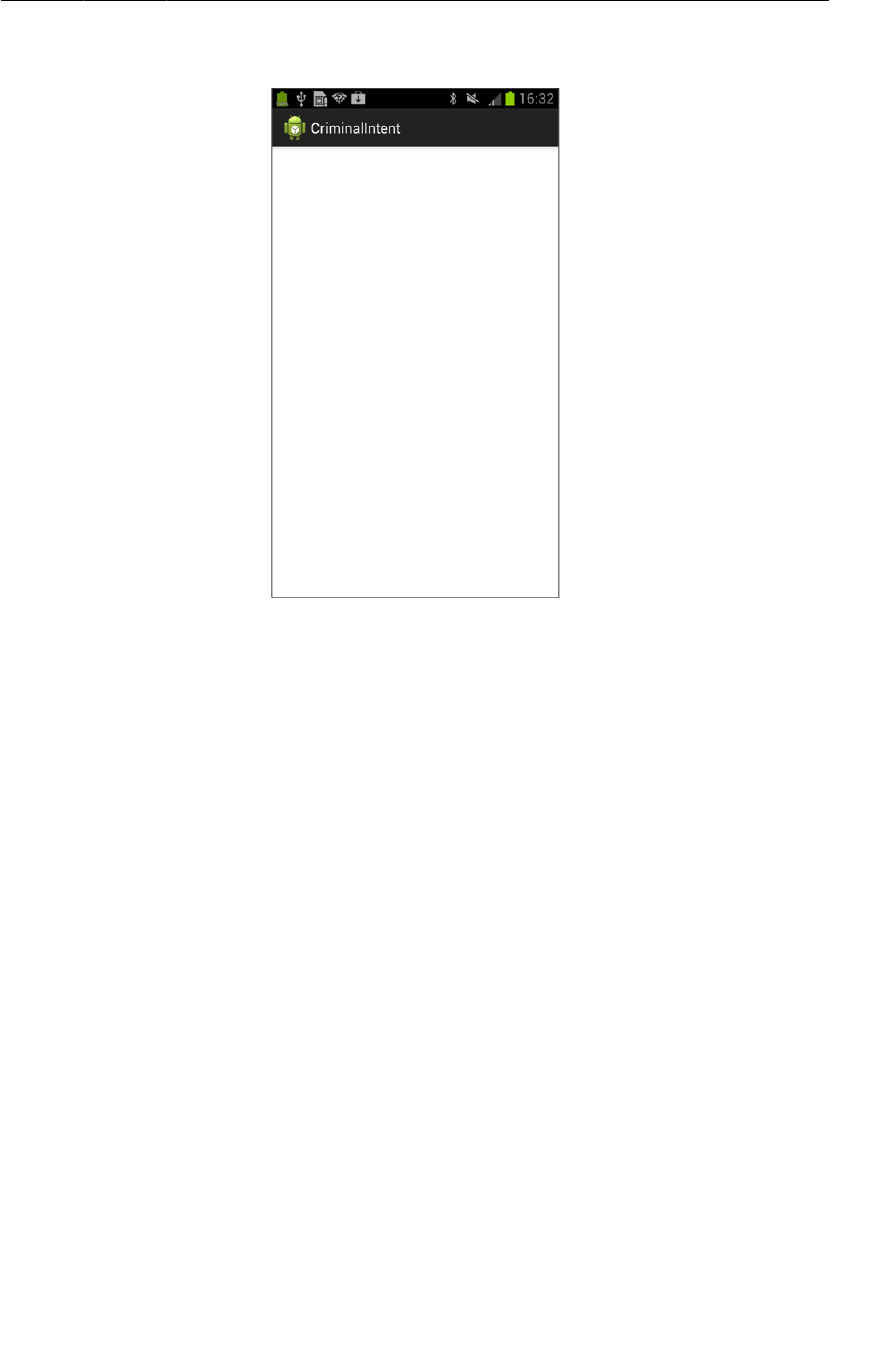
ptg11078569
Creating a UI Fragment
137
Figure 7.13An empty FrameLayout
Later, you will write code that puts a fragment’s view inside this FrameLayout. But first you need to
create a fragment.
Creating a UI Fragment
The steps to creating a UI fragment are the same as those you followed to create an activity:
• compose an interface by defining widgets in a layout file
• create the class and set its view to be the layout that you defined
• wire up the widgets inflated from the layout in code
Defining CrimeFragment’s layout
CrimeFragment’s view will display the information contained within an instance of Crime. Eventually,
the Crime class and CrimeFragment’s view will include many interesting pieces, but for this chapter,
you just need a text field to contain the crime’s title.
Figure7.14 shows the layout for CrimeFragment’s view. It consists of a vertical LinearLayout that
contains an EditText. EditText is a widget that presents an area where the user can add or edit text.
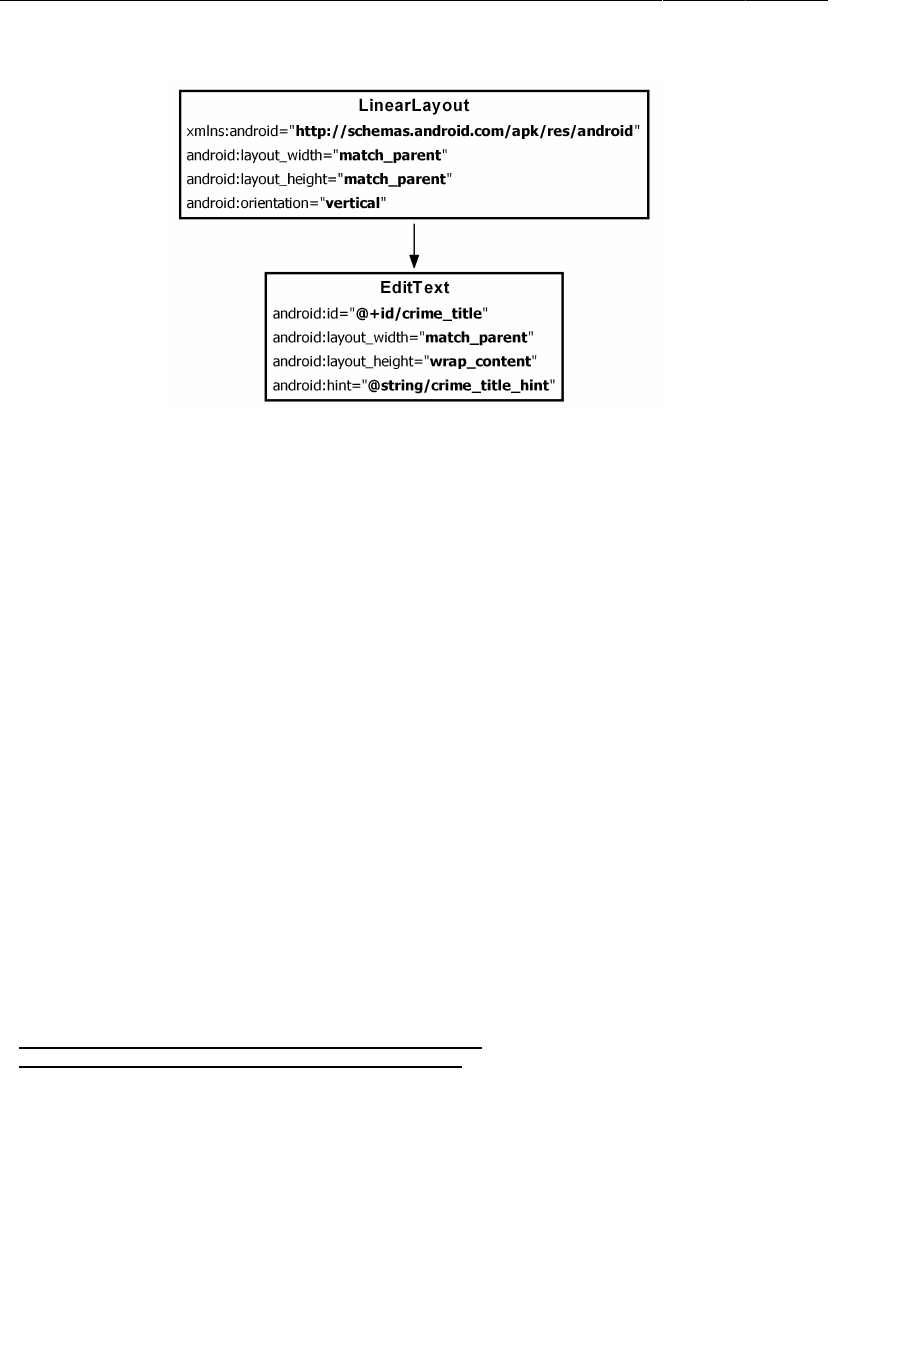
ptg11078569
Chapter 7UI Fragments and the Fragment Manager
138
Figure 7.14Initial layout for CrimeFragment
To create a layout file, right-click the res/layout folder in the package explorer and select New →
Android�XML�File. Make sure that the resource type is Layout and name this file fragment_crime.xml.
Select LinearLayout as the root element and click Finish.
When the file opens, navigate to the XML. The wizard has added the LinearLayout for you. Using
Figure7.14 as a guide, make the necessary changes to fragment_crime.xml. You can use Listing 7.5
to check your work.
Listing 7.5Layout file for fragment’s view (fragment_crime.xml)
<?xml version="1.0" encoding="utf-8"?>
<LinearLayout xmlns:android="http://schemas.android.com/apk/res/android"
android:layout_width="match_parent"
android:layout_height="match_parent"
android:orientation="vertical"
>
<EditText android:id="@+id/crime_title"
android:layout_width="match_parent"
android:layout_height="wrap_content"
android:hint="@string/crime_title_hint"
/>
</LinearLayout>
Open res/values/strings.xml, add a crime_title_hint string resource and remove the unneeded
hello_world and menu_settings string resources that the template created for you.
Listing 7.6Adding and deleting strings (res/values/strings.xml)
<?xml version="1.0" encoding="utf-8"?>
<resources>
<string name="app_name">CriminalIntent</string>
<string name="hello_world">Hello world!</string>
<string name="menu_settings">Settings</string>
<string name="title_activity_crime">CrimeActivity</string>
<string name="crime_title_hint">Enter a title for the crime.</string>
</resources>
Save your files. Deleting the menu_settings string caused an error in your project. To fix it, go to the
package explorer and find the file res/menu/activity_crime.xml. This file is a definition of the menu
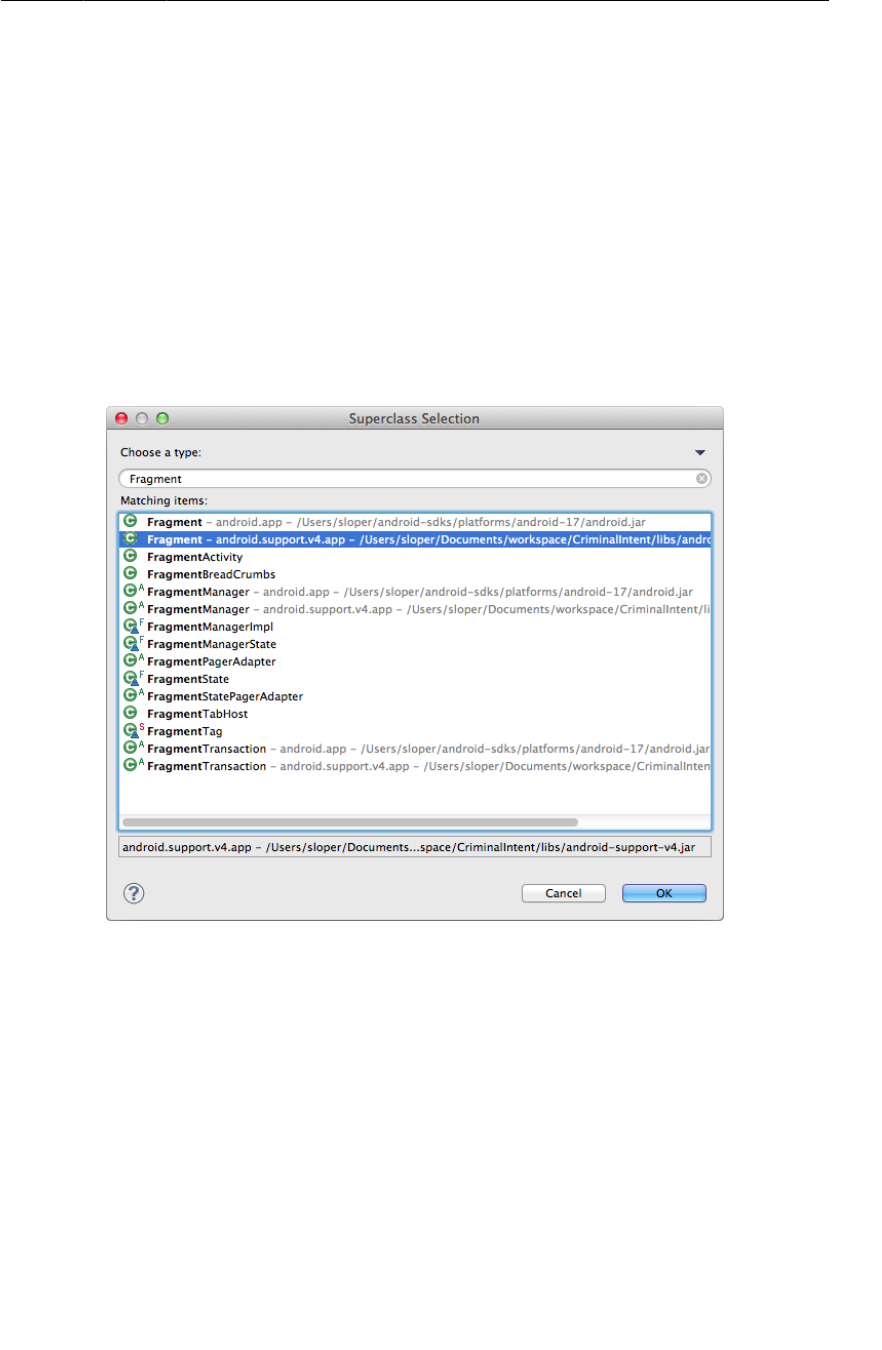
ptg11078569
Creating the CrimeFragment class
139
that the template created, and it references the menu_settings string. You will not be using this menu
file for CriminalIntent, so you can simply delete it from the package explorer.
Deleting the menu resource will cause Eclipse to rebuild. Your project should now be error-free.
Switch to the graphical layout tool to see a preview of fragment_crime.xml.
Creating the CrimeFragment class
Right-click the com.bignerdranch.android.criminalintent package and select New → Class.
Name the class CrimeFragment and then click the Browse button to set the superclass. In the
window that appears, start typing Fragment. The wizard will suggest a few classes. Choose the
android.support.v4.app.Fragment class, which is the Fragment class from the support library. Click
OK.
Figure 7.15Choosing the support library’s Fragment class
(If you are seeing multiple versions of android.support.v4.app.Fragment, make sure to select the
one that is part of the CriminalIntent project found in CriminalIntent/libs/.)
Implementing fragment lifecycle methods
CrimeFragment is a controller that interacts with model and view objects. Its job is to present the
details of a specific crime and update those details as the user changes them.
In the GeoQuiz app, your activities did most of their controller work in activity lifecycle methods. In
CriminalIntent, this work will be done by fragments in fragment lifecycle methods. Many of these
methods correspond to the Activity methods you already know, such as onCreate(Bundle).

ptg11078569
Chapter 7UI Fragments and the Fragment Manager
140
In CrimeFragment.java, add a member variable for the Crime instance and an implementation of
Fragment.onCreate(Bundle).
Listing 7.7Overriding Fragment.onCreate(Bundle) (CrimeFragment.java)
public class CrimeFragment extends Fragment {
private Crime mCrime;
@Override
public void onCreate(Bundle savedInstanceState) {
super.onCreate(savedInstanceState);
mCrime = new Crime();
}
}
There are a couple of things to notice in this implementation. First, Fragment.onCreate(Bundle) is a
public method whereas Activity.onCreate(Bundle) is protected. Fragment.onCreate(…) and other
Fragment lifecycle methods must be public because they will be called by whatever activity is hosting
the fragment.
Second, similar to an activity, a fragment has a bundle to which it saves and retrieves its state.
You can override Fragment.onSaveInstanceState(Bundle) for your own purposes just like with
Activity.onSaveInstanceState(Bundle).
Note what does not happen in Fragment.onCreate(…): you do not inflate the fragment’s view.
You configure the fragment instance in Fragment.onCreate(…), but you create and configure the
fragment’s view in another fragment lifecycle method:
public View onCreateView(LayoutInflater inflater, ViewGroup parent,
Bundle savedInstanceState)
This method is where you inflate the layout for the fragment’s view and return the inflated View to the
hosting activity. The LayoutInflater and ViewGroup parameters are necessary to inflate the layout.
The Bundle will contain data that this method can use to recreate the view from a saved state.
In CrimeFragment.java, add an implementation of onCreateView(…) that inflates
fragment_crime.xml.
Listing 7.8Overriding onCreateView(…) (CrimeFragment.java)
public class CrimeFragment extends Fragment {
private Crime mCrime;
@Override
public void onCreate(Bundle savedInstanceState) {
super.onCreate(savedInstanceState);
mCrime = new Crime();
}
@Override
public View onCreateView(LayoutInflater inflater, ViewGroup parent,
Bundle savedInstanceState) {
View v = inflater.inflate(R.layout.fragment_crime, parent, false);
return v;
}
}

ptg11078569
Creating the CrimeFragment class
141
Within onCreateView(…), you explicitly inflate the fragment’s view by calling
LayoutInflater.inflate(…) and passing in the layout resource ID. The second parameter is your
view’s parent, which is usually needed to configure the widgets properly. The third parameter tells the
layout inflater whether to add the inflated view to the view’s parent. You pass in false because you
will add the view in the activity’s code.
Wiring widgets in a fragment
The onCreateView(…) method is also the place to wire up the EditText to respond to user input. After
the view is inflated, get a reference to the EditText and add a listener.
Listing 7.9Wiring up the EditText widget (CrimeFragment.java)
public class CrimeFragment extends Fragment {
private Crime mCrime;
private EditText mTitleField;
...
@Override
public View onCreateView(LayoutInflater inflater, ViewGroup parent,
Bundle savedInstanceState) {
View v = inflater.inflate(R.layout.fragment_crime, parent, false);
mTitleField = (EditText)v.findViewById(R.id.crime_title);
mTitleField.addTextChangedListener(new TextWatcher() {
public void onTextChanged(
CharSequence c, int start, int before, int count) {
mCrime.setTitle(c.toString());
}
public void beforeTextChanged(
CharSequence c, int start, int count, int after) {
// This space intentionally left blank
}
public void afterTextChanged(Editable c) {
// This one too
}
});
return v;
}
}
Getting references in Fragment.onCreateView(…) works nearly the same as in
Activity.onCreate(…). The only difference is that you call View.findViewById(int) on the
fragment’s view. The Activity.findViewById(int) method that you used before is a convenience
method that calls View.findViewById(int) behind the scenes. The Fragment class does not have a
corresponding convenience method, so you have to call the real thing.
Setting listeners in a fragment works exactly the same as in an activity. In Listing 7.9, you create an
anonymous class that implements the TextWatcher listener interface. TextWatcher has three methods,
but you only care about one: onTextChanged(…).
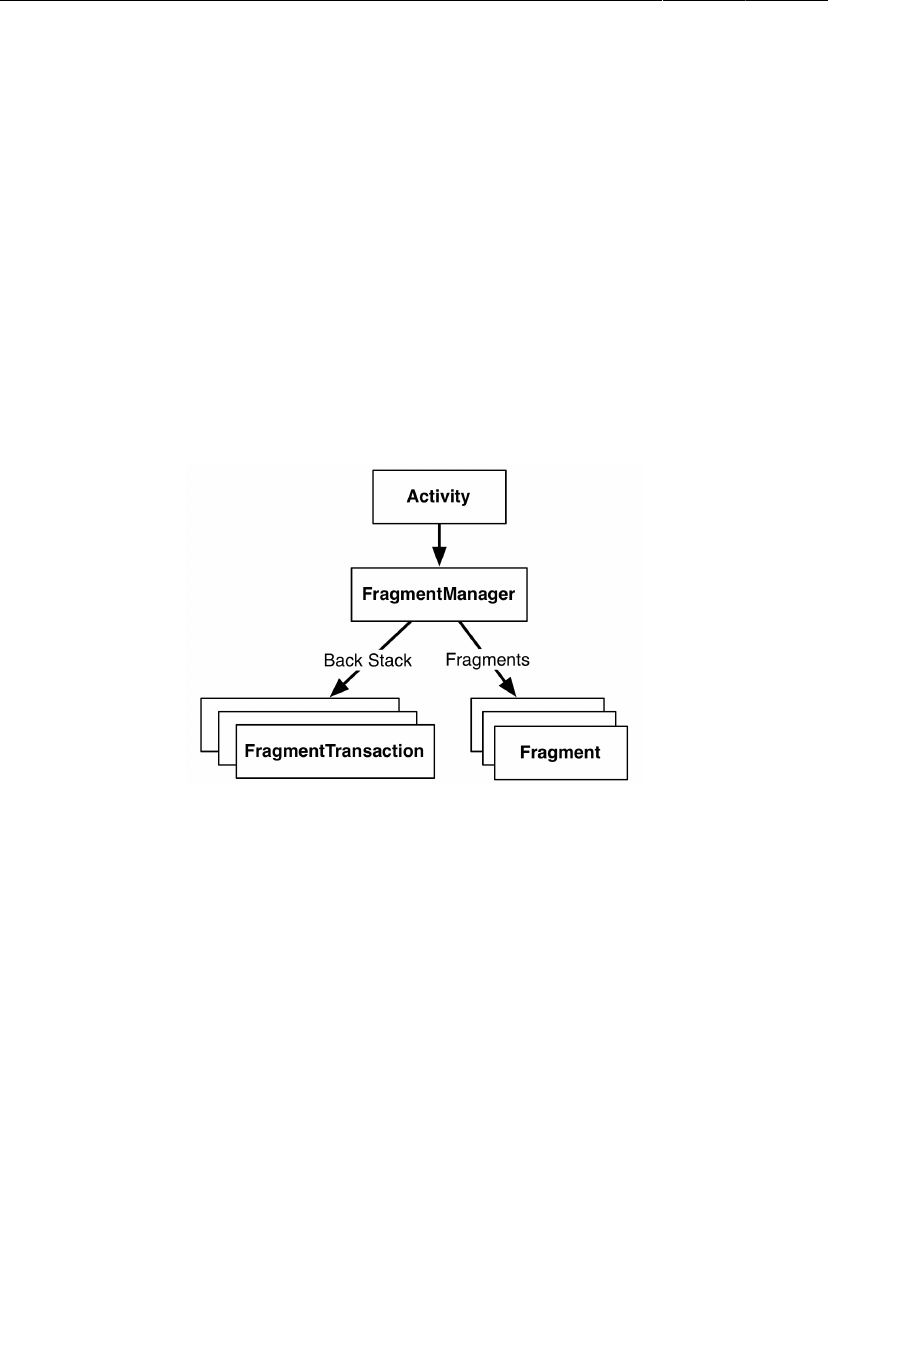
ptg11078569
Chapter 7UI Fragments and the Fragment Manager
142
In onTextChanged(…), you call toString() on the CharSequence that is the user’s input. This method
returns a string, which you then use to set the Crime’s title.
Your code for CrimeFragment is now complete. It would be great if you could run CriminalIntent now
and play with the code you have written. But you cannot. Fragments cannot put their views on screen.
To realize your efforts, you first have to add a CrimeFragment to CrimeActivity.
Adding a UI Fragment to the FragmentManager
When the Fragment class was introduced in Honeycomb, the Activity class was changed to include a
piece called the FragmentManager. The FragmentManager is responsible for managing your fragments
and adding their views to the activity’s view hierarchy.
The FragmentManager handles two things: a list of fragments and a back stack of fragment transactions
(which you will learn about shortly).
Figure 7.16The FragmentManager
For CriminalIntent, you will only be concerned with the FragmentManager’s list of fragments.
To add a fragment to an activity in code, you make explicit calls to the activity’s FragmentManager.
The first step is to get the FragmentManager itself. In CrimeActivity.java, add the following code to
onCreate(…).
Listing 7.10Get the FragmentManager (CrimeActivity.java)
public class CrimeActivity extends FragmentActivity {
/** Called when the activity is first created. */
@Override
public void onCreate(Bundle savedInstanceState) {
super.onCreate(savedInstanceState);
setContentView(R.layout.activity_crime);
FragmentManager fm = getSupportFragmentManager();
}
}

ptg11078569
Fragment transactions
143
You call getSupportFragmentManager() because you are using the support library and the
FragmentActivity class. If you were not interested in compatibility with pre-Honeycomb devices,
then you would subclass Activity and call getFragmentManager().
Fragment transactions
Now that you have the FragmentManager, add the following code to give it a fragment to manage. (We
will step through this code afterwards. Just get it in for now.)
Listing 7.11Adding a CrimeFragment (CrimeActivity.java)
public class CrimeActivity extends FragmentActivity {
/** Called when the activity is first created. */
@Override
public void onCreate(Bundle savedInstanceState) {
super.onCreate(savedInstanceState);
setContentView(R.layout.activity_crime);
FragmentManager fm = getSupportFragmentManager();
Fragment fragment = fm.findFragmentById(R.id.fragmentContainer);
if (fragment == null) {
fragment = new CrimeFragment();
fm.beginTransaction()
.add(R.id.fragmentContainer, fragment)
.commit();
}
}
}
The best place to start understanding the code that you added in Listing 7.11 is not at the beginning.
Instead, find the add(…) operation and the code around it. This code creates and commits a fragment
transaction.
Listing 7.12A fragment transaction (CrimeActivity.java)
if (fragment == null) {
fragment = new CrimeFragment();
fm.beginTransaction()
.add(R.id.fragmentContainer, fragment)
.commit();
Fragment transactions are used to add, remove, attach, detach, or replace fragments in the fragment
list. They are the heart of how you use fragments to compose and recompose screens at runtime. The
FragmentManager maintains a back stack of fragment transactions that you can navigate.
The FragmentManager.beginTransaction() method creates and returns an instance of
FragmentTransaction. The FragmentTransaction class uses a fluent interface - methods that
configure FragmentTransaction return a FragmentTransaction instead of void, which allows you to
chain them together. So the highlighted code in Listing 7.12 says, “Create a new fragment transaction,
include one add operation in it, and then commit it.”

ptg11078569
Chapter 7UI Fragments and the Fragment Manager
144
The add(…) method is the meat of the transaction. It has two parameters: a container view ID and the
newly-created CrimeFragment. The container view ID should look familiar. It is the resource ID of the
FrameLayout that you defined in activity_crime.xml. A container view ID serves two purposes:
• It tells the FragmentManager where in the activity’s view the fragment’s view should appear.
• It is used as a unique identifier for a fragment in the FragmentManager’s list.
When you need to retrieve the CrimeFragment from the FragmentManager, you ask for it by container
view ID:
Listing 7.13Existing fragment retrieved by container view ID
(CrimeActivity.java)
FragmentManager fm = getSupportFragmentManager();
Fragment fragment = fm.findFragmentById(R.id.fragmentContainer);
if (fragment == null) {
fragment = new CrimeFragment();
fm.beginTransaction()
.add(R.id.fragmentContainer, fragment)
.commit();
}
It may seem odd that the FragmentManager identifies the CrimeFragment using the resource ID of a
FrameLayout. But identifying a UI fragment by the resource ID of its container view is built into how
the FragmentManager operates.
Now we can summarize the code you added back in Listing 7.11 from start to finish.
First, you ask the FragmentManager for the fragment with a container view ID of
R.id.fragmentContainer. If this fragment is already in the list, the FragmentManager will return it.
Why would a fragment already be in the list? The call to CrimeActivity.onCreate(…) could be in
response to CrimeActivity being recreated after being destroyed on rotation or to reclaim memory.
When an activity is destroyed, its FragmentManager saves out its list of fragments. When the activity
is recreated, the new FragmentManager retrieves the list and recreates the listed fragments to make
everything as it was before.
On the other hand, if there is no fragment with the given container view ID, then fragment will be null.
In this case, you create a new CrimeFragment and a new fragment transaction that adds the fragment to
the list.
CrimeActivity is now hosting a CrimeFragment. Run CriminalIntent to prove it. You should see the
view defined in fragment_crime.xml, as shown in Figure7.17.
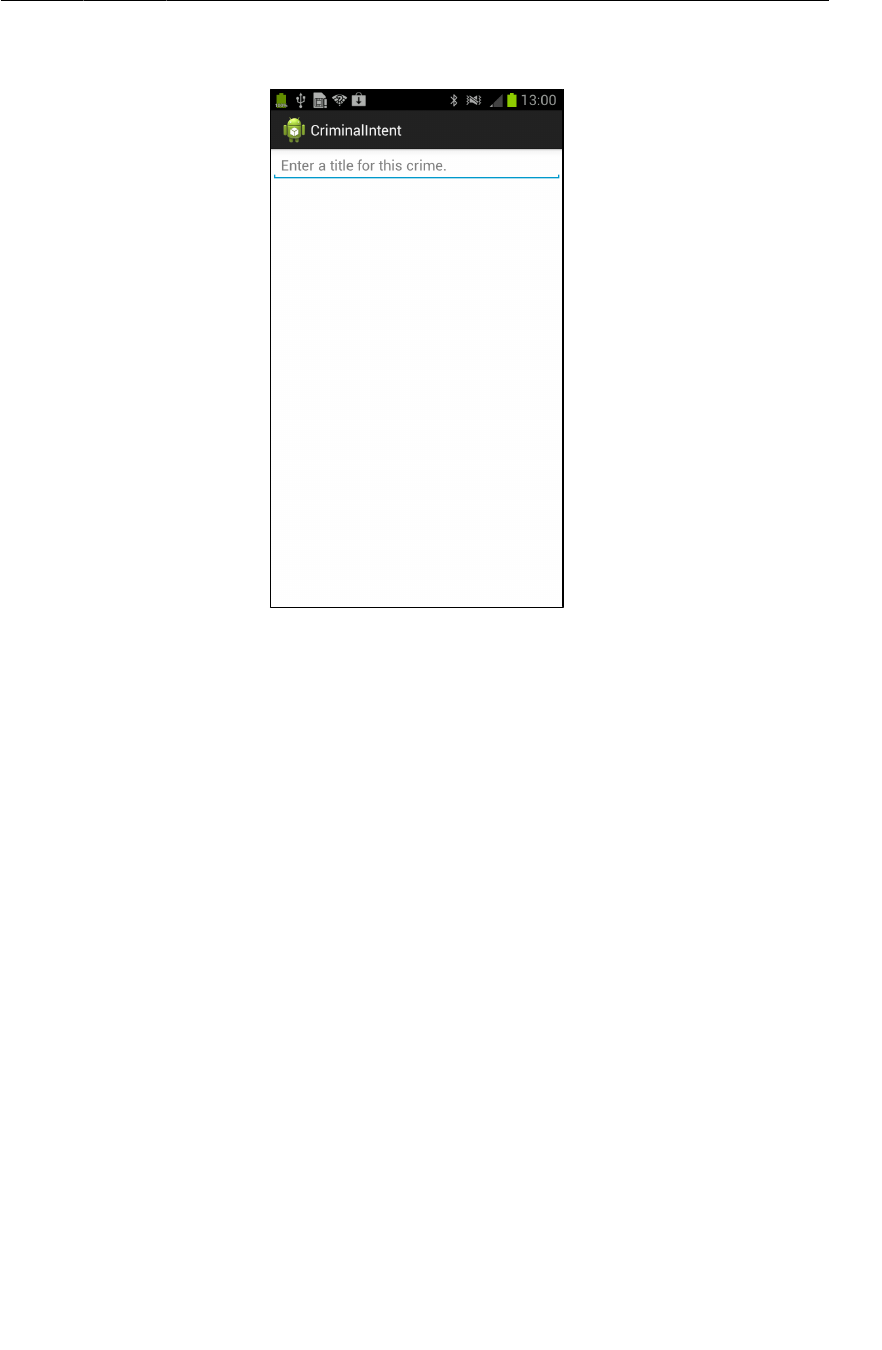
ptg11078569
The FragmentManager and the fragment lifecycle
145
Figure 7.17CrimeFragment’s view hosted by CrimeActivity
A single widget on screen may not seem like a much of a reward for all the work you have done in this
chapter. But what you have done is a lay a solid foundation to do greater things with CriminalIntent in
the chapters ahead.
The FragmentManager and the fragment lifecycle
Now that you know about the FragmentManager, let’s take another look at the fragment lifecycle.
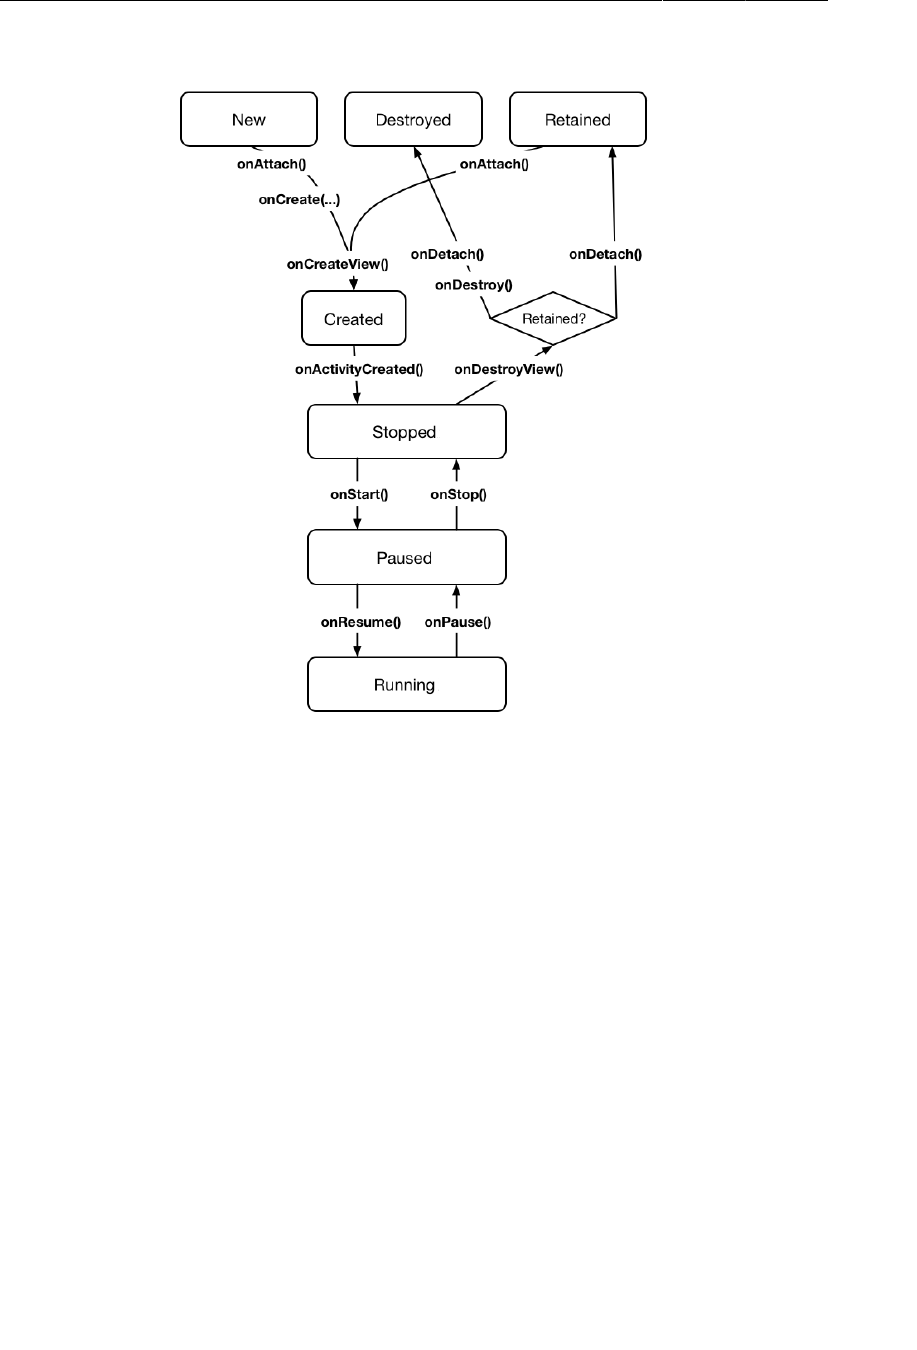
ptg11078569
Chapter 7UI Fragments and the Fragment Manager
146
Figure 7.18The fragment lifecycle, again
The FragmentManager of an activity is responsible for calling the lifecycle methods of the fragments in
its list. The onAttach(Activity), onCreate(Bundle), and onCreateView(…) methods are called when
you add the fragment to the FragmentManager.
The onActivityCreated(…) method is called after the hosting activity’s onCreate(…) method has
executed. You are adding the CrimeFragment in CrimeActivity.onCreate(…), so this method will be
called after the fragment has been added.
What happens if you add a fragment while the activity is already stopped, paused, or running?
In that case, the FragmentManager immediately walks the fragment through whatever steps are
necessary to get it caught up to the activity’s state. For example, when you add a fragment to an
activity that is already running, that fragment gets calls to onAttach(Activity), onCreate(Bundle),
onCreateView(…), onActivityCreated(Bundle), onStart(), and then onResume().
Once the fragment’s state is caught up to the activity’s state, the hosting activity’s FragmentManager
will call further lifecycle methods around the same time it receives the corresponding calls from the OS
to keep the fragment’s state aligned with that of the activity. There is no guarantee about whether the
fragment’s methods will be called before or after the activity’s methods.
When you are using the support library, there is one small difference in the fragment lifecycle: If you
add a fragment in Activity.onCreate(…), then onActivityCreated(…) is not called immediately

ptg11078569
The Reason All Our Activities Will Use Fragments
147
after Activity.onCreate(…). Instead, it is called as Activity.onStart() is being performed. Why?
It is impossible to call onActivityCreated(…) at the right time from FragmentActivity in pre-
Honeycomb SDKs, so it is called as soon as the next lifecycle method occurs. In practice, this usually
makes no difference; onStart() occurs immediately after Activity.onCreate(…) anyway.
The Reason All Our Activities Will Use Fragments
From here on, all of the apps in this book will use fragments – no matter how simple. This may seem
like overkill. Many of the examples you will see in following chapters could be written without
fragments. The user interfaces could be created and managed from activities, and doing so might even
be less code.
However, we believe it is better for you to become comfortable with the pattern you will most likely
use in real life.
You might think it would be better to begin a simple app without fragments and add them later, when
(or if) necessary. There is an idea in Extreme Programming methodology called YAGNI. YAGNI
stands for “You Aren’t Gonna Need It,” and it urges you not to write code if you think you might need
it later. Why? Because YAGNI. It is tempting to say “YAGNI” to fragments.
Unfortunately, adding fragments later can be a minefield. Changing an activity to an activity hosting
a UI fragment is not difficult, but there are swarms of annoying gotchas. Keeping some interfaces
managed by activities and having others managed by fragments only makes things worse because you
have to keep track of this meaningless distinction. It is far easier to write your code using fragments
from the beginning and not worry about the pain and annoyance of reworking it later, or having to
remember which style of controller you are using in each part of your application.
Therefore, when it comes to fragments, we have a different principle: AUF, or “Always Use
Fragments.” You can kill a lot of brain cells deciding whether to use a fragment or an activity, and it is
just not worth it. AUF!
For the More Curious: Developing for Honeycomb,
ICS, Jelly Bean, and Beyond
In this chapter, you learned how to use the support library to enable fragments for a project with a
minimum SDK less than API level 11. However, if you were developing exclusively for newer SDKs,
then you would not need to use the support library. Instead, you could use the native fragment classes
in the standard library.
To use standard library fragments, you would make four changes to the project:
• Set the application’s build target and minimum SDK to API level 11 or higher.
• Subclass the standard library Activity class (android.app.Activity) instead of
FragmentActivity. Activities have support for fragments out of the box on API level 11 or
higher.
• Subclass android.app.Fragment instead of android.support.v4.app.Fragment.
• To get the FragmentManager, call getFragmentManager() instead of
getSupportFragmentManager().

ptg11078569
This page intentionally left blank

ptg11078569
149
8
Creating User Interfaces with
Layouts and Widgets
In this chapter, you will learn more about layouts and widgets while adding a crime’s date and status to
CriminalIntent.
Upgrading Crime
Open Crime.java and add two new fields. The Date field represents the date a crime occurred. The
boolean field represents whether the crime has been solved.
Listing 8.1Adding more fields to Crime (Crime.java)
public class Crime {
private UUID mId;
private String mTitle;
private Date mDate;
private boolean mSolved;
public Crime() {
mId = UUID.randomUUID();
mDate = new Date();
}
...
}
Initializing the Date variable using the default Date constructor sets mDate to the current date. This will
be the default date for a crime.
Next, generate getters and setters for your new fields (Source → Generate�Getters�and�Setters...).
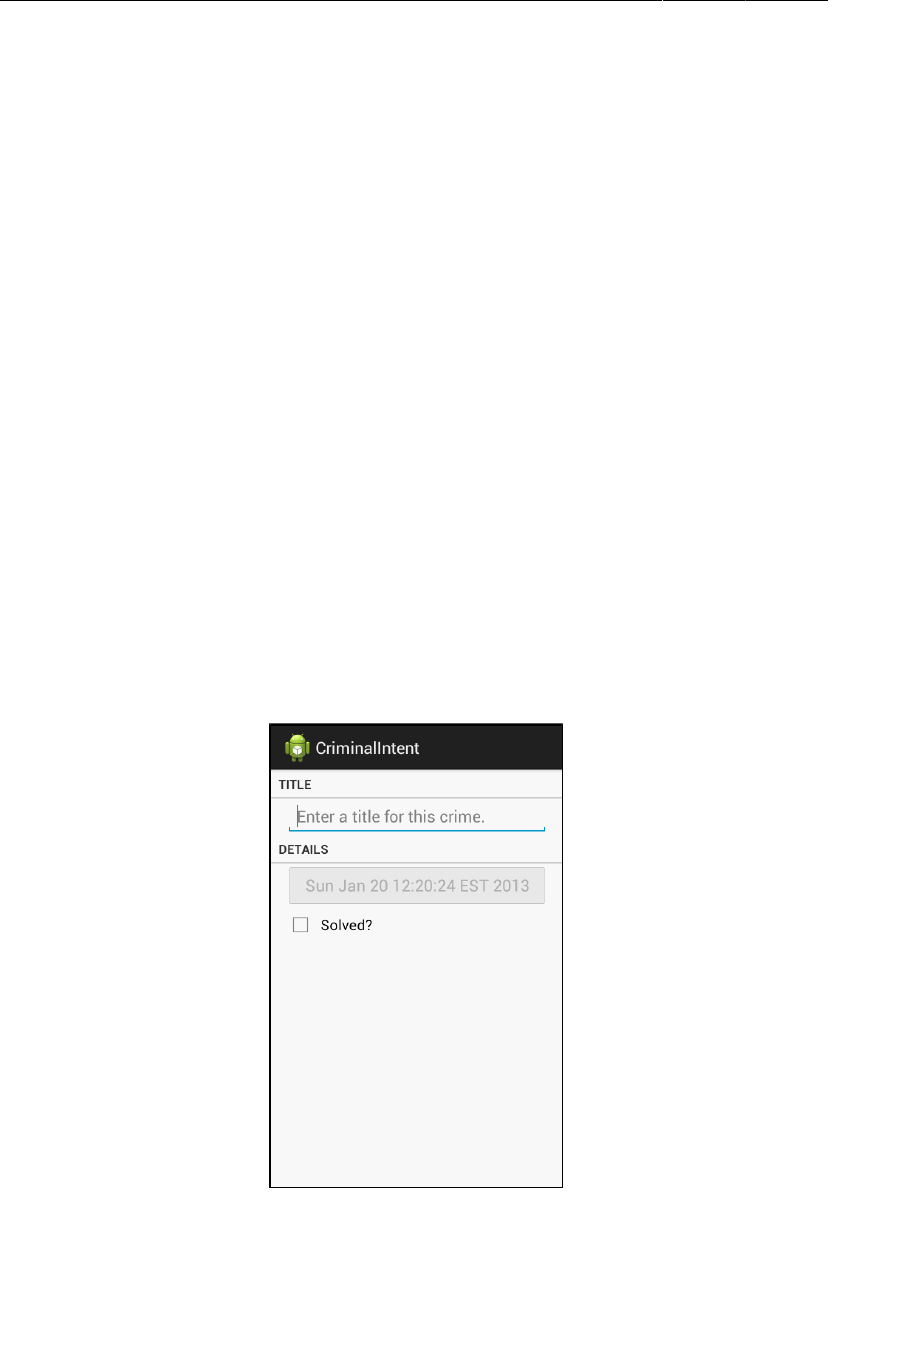
ptg11078569
Chapter 8Creating User Interfaces with Layouts and Widgets
150
Listing 8.2Generated getters and setters (Crime.java)
public class Crime {
...
public void setTitle(String title) {
mTitle = title;
}
public Date getDate() {
return mDate;
}
public void setDate(Date date) {
mDate = date;
}
public boolean isSolved() {
return mSolved;
}
public void setSolved(boolean solved) {
mSolved = solved;
}
}
Your next steps are updating the layout in fragment_crime.xml with new widgets and wiring up those
widgets in CrimeFragment.java.
Updating the Layout
Here is what CrimeFragment’s view will look like by the end of this chapter.
Figure 8.1CriminalIntent, episode 2

ptg11078569
Updating the Layout
151
To get this on screen, you are going to add four widgets to CrimeFragment’s layout: two TextView
widgets, a Button, and a CheckBox.
Open fragment_crime.xml and make the changes shown in Listing 8.3. You may get errors from
missing string resources that you will create in a moment.
Listing 8.3Adding new widgets (fragment_crime.xml)
<?xml version="1.0" encoding="utf-8"?>
<LinearLayout xmlns:android="http://schemas.android.com/apk/res/android"
android:layout_width="match_parent"
android:layout_height="wrap_content"
android:orientation="vertical"
>
<TextView
android:layout_width="match_parent"
android:layout_height="wrap_content"
android:text="@string/crime_title_label"
style="?android:listSeparatorTextViewStyle"
/>
<EditText android:id="@+id/crime_title"
android:layout_width="match_parent"
android:layout_height="wrap_content"
android:layout_marginLeft="16dp"
android:layout_marginRight="16dp"
android:hint="@string/crime_title_hint"
/>
<TextView
android:layout_width="match_parent"
android:layout_height="wrap_content"
android:text="@string/crime_details_label"
style="?android:listSeparatorTextViewStyle"
/>
<Button android:id="@+id/crime_date"
android:layout_width="match_parent"
android:layout_height="wrap_content"
android:layout_marginLeft="16dp"
android:layout_marginRight="16dp"
/>
<CheckBox android:id="@+id/crime_solved"
android:layout_width="match_parent"
android:layout_height="wrap_content"
android:layout_marginLeft="16dp"
android:layout_marginRight="16dp"
android:text="@string/crime_solved_label"
/>
</LinearLayout>
Notice that you did not give the Button an android:text attribute. This button will display the date of
the Crime being displayed, and its text will be set in code.
Why display the date on a Button? You are preparing for the future. For now, a crime’s date defaults
to the current date and cannot be changed. In Chapter12, you will wire up the button so that a click
presents a DatePicker widget from which the user can set the date to something else.
There are some new things in this layout to discuss, such as the style attribute and the margin
attributes. But first let’s get CriminalIntent up and running with the new widgets.
Return to res/values/strings.xml and add the necessary string resources.

ptg11078569
Chapter 8Creating User Interfaces with Layouts and Widgets
152
Listing 8.4Adding string resources (strings.xml)
<resources>
<string name="app_name">CriminalIntent</string>
<string name="title_activity_crime">CrimeActivity</string>
<string name="crime_title_hint">Enter a title for this crime.</string>
<string name="crime_title_label">Title</string>
<string name="crime_details_label">Details</string>
<string name="crime_solved_label">Solved?</string>
</resources>
Save your files and check for typos.
Wiring Widgets
The CheckBox needs to display whether a Crime has been solved. You also need to update the Crime’s
mSolved field when a user toggles the CheckBox.
For now, all the new Button needs to do is display the date in the Crime’s mDate field.
In CrimeFragment.java, add two new instance variables.
Listing 8.5Adding widget instance variables (CrimeFragment.java)
public class CrimeFragment extends Fragment {
private Crime mCrime;
private EditText mTitleField;
private Button mDateButton;
private CheckBox mSolvedCheckBox;
@Override
public void onCreate(Bundle savedInstanceState) {
...
Organize your imports to resolve the reference to CheckBox.
Next, in onCreateView(…), get a reference to the new button, set its text as the date of the crime, and
disable it for now.
Listing 8.6Setting Button text (CrimeFragment.java)
@Override
public View onCreateView(LayoutInflater inflater, ViewGroup parent,
Bundle savedInstanceState) {
View v = inflater.inflate(R.layout.fragment_crime, parent, false);
...
mTitleField.addTextChangedListener(new TextWatcher() {
...
});
mDateButton = (Button)v.findViewById(R.id.crime_date);
mDateButton.setText(mCrime.getDate().toString());
mDateButton.setEnabled(false);
return v;
}

ptg11078569
More on XML Layout Attributes
153
Disabling the button ensures that it will not respond in any way to the user pressing it. It also changes
its appearance to advertise its disabled state. In Chapter12, you will enable the button when you set its
listener.
Moving on to the CheckBox, get a reference and set a listener that will update the mSolved field of the
Crime.
Listing 8.7Listening for CheckBox changes (CrimeFragment.java)
...
mDateButton = (Button)v.findViewById(R.id.crime_date);
mDateButton.setText(mCrime.getDate().toString());
mDateButton.setEnabled(false);
mSolvedCheckBox = (CheckBox)v.findViewById(R.id.crime_solved);
mSolvedCheckBox.setOnCheckedChangeListener(new OnCheckedChangeListener() {
public void onCheckedChanged(CompoundButton buttonView, boolean isChecked) {
// Set the crime's solved property
mCrime.setSolved(isChecked);
}
});
return v;
}
When you import the OnCheckedChangeListener interface, Eclipse will offer you a choice between
an interface defined in the CompoundButton class and one defined in the RadioGroup class. Choose the
CompoundButton interface; CheckBox is a subclass of CompoundButton.
If you used auto-complete, you may also see an @Override annotation above your
onCheckedChanged(…) method that Listing 8.7 does not have. You can ignore this difference.
@Overrides are not required for methods defined in interfaces.
Run CriminalIntent. Toggle the new CheckBox and admire your disabled Button that displays the date.
More on XML Layout Attributes
Let’s go back over some of the attributes you added in fragment_crime.xml and answer some
lingering questions you might have about widgets and attributes.
Styles, themes, and theme attributes
A style is an XML resource that contains attributes that describe how a widget should look and behave.
For example, the following is a style resource that configures a widget with a larger-than-normal text
size.
<style name="BigTextStyle">
<item name="android:textSize">20sp</item>
<item name="android:layout_margin">3dp</item>
</style>
You can create your own styles (and you will in Chapter24). You add them to a styles file in res/
values/ and refer to them in layouts like this: @style/my_own_style.

ptg11078569
Chapter 8Creating User Interfaces with Layouts and Widgets
154
Take another look at the TextView widgets in fragment_crime.xml; each has a style attribute that
refers to a style created by Android. This particular style makes the TextViews look like list separators
and comes from the app’s theme. A theme is a collection of styles. Structurally, a theme is itself a style
resource whose attributes point to other style resources.
Android provides platform themes that your apps can use. When you created CriminalIntent, the
wizard suggested Holo�Light�with�Dark�Action�Bar as the app’s theme and you accepted.
You can apply a style from the app’s theme to a widget using a theme attribute
reference. This is what you are doing in fragment_crime.xml when you use the value
?android:listSeparatorTextViewStyle.
In a theme attribute reference, you tell Android’s runtime resource manager, “Go to the app’s theme
and find the attribute named listSeparatorTextViewStyle. This attribute points to another style
resource. Put the value of that resource here.”
Every Android theme will include an attribute named listSeparatorTextViewStyle, but its definition
will be different depending on the overall look and feel of the particular theme. Using a theme attribute
reference ensures that the TextViews will have the correct look and feel for your app.
You will learn more about how styles and themes work in Chapter24.
Screen pixel densities and dp and sp
In fragment_crime.xml, you specify the margin attribute values in terms of dp units. You have seen
these units in layouts before; now it is time to learn what they are.
Sometimes you need to specify values for view attributes in terms of specific sizes (usually in pixels
but sometimes points, millimeters, or inches). You see this most commonly with attributes for text size,
margins, and padding. Text size is the pixel height of the text on the device’s screen. Margins specify
the distances between views, and padding specifies the distance between a view’s outside edges and its
content.
Android automatically scales images to different screen pixel densities using the drawable-ldpi,
drawable-mdpi, and drawable-hdpi directories. But what happens when your images scale, but your
margins do not? Or what happens when the user configures a larger-than-default text size?
To solve these problems, Android provides density-independent dimension units that you can use to
get the same size on different screen densities. Android translates these units into pixels at runtime, so
there is no tricky math for you to do.
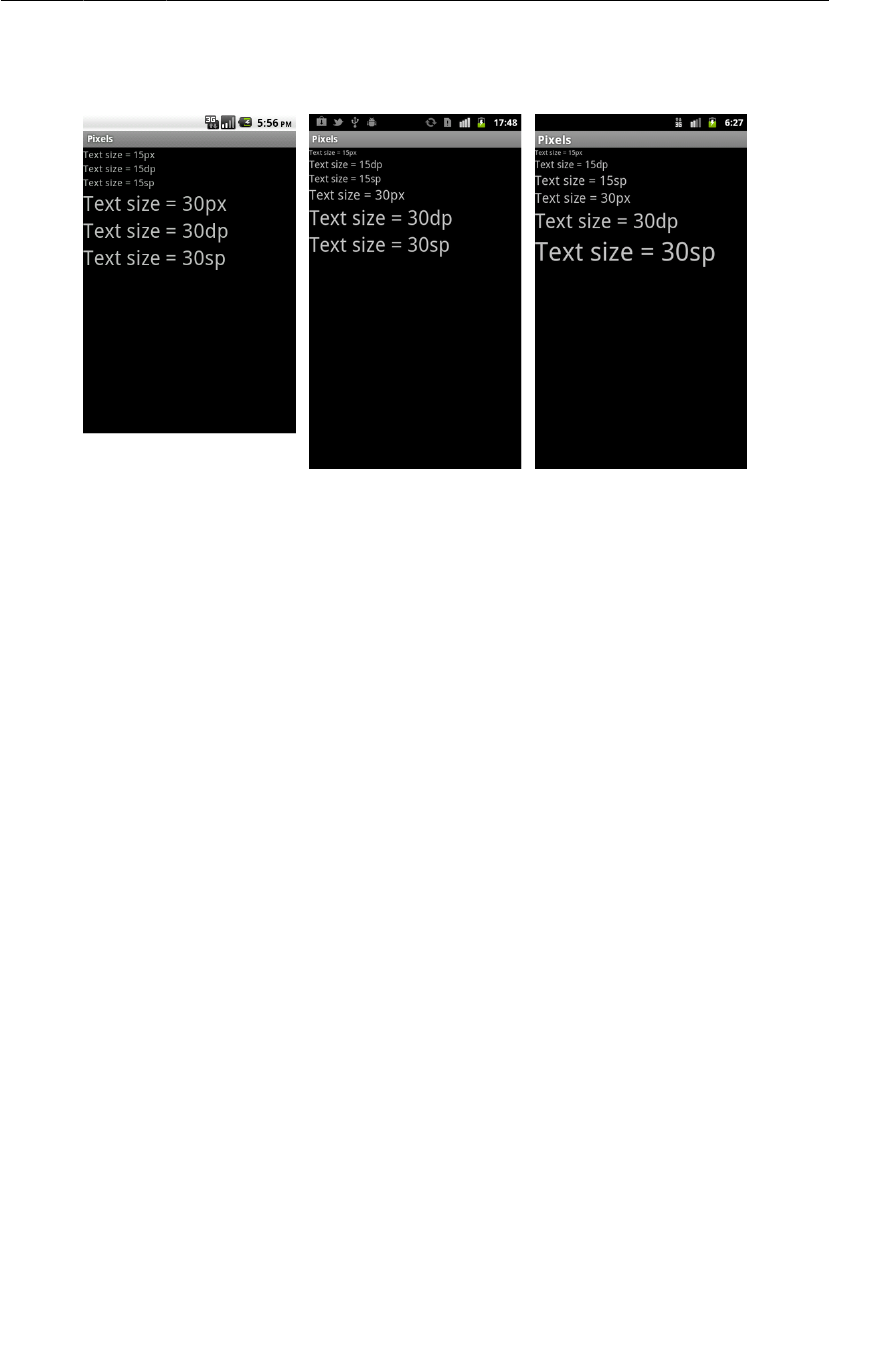
ptg11078569
Android’s design guidelines
155
Figure 8.2Dimension units in action on TextView (left: MDPI; middle: HDPI; right:
HDPI with large text)
dp (or dip) Short for density-independent pixel and usually pronounced “dip.” You typically
use this for margins, padding, or anything else for which you would otherwise
specify size with a pixel value. When your display is a higher density, density-
independent pixels will expand to fill a larger number of screen pixels. One dp is
always 1/160th of an inch on a device’s screen. You get the same size regardless
of screen density.
sp Short for scale-independent pixel. Scale-independent pixels are density-
independent pixels that also take into account the user’s font size preference. You
will almost always use sp to set display text size.
pt, mm, in These are scaled units like dp that allow you to specify interface sizes in points
(1/72 of an inch), millimeters, or inches. However, we do not recommend using
them: not all devices are correctly configured for these units to scale correctly.
In practice and in this book, you will use dp and sp almost exclusively. Android will translate these
values into pixels at runtime.
Android’s design guidelines
Notice that for your margins, you use a 16dp value for the margins in Listing 8.3. This value follows
Android’s “48dp rhythm” design guideline. You can find all of Android design guidelines at http://
developer.android.com/design/index.html.
Modern Android apps should follow these guidelines as closely as possible. The guidelines rely
heavily on newer Android SDK functionality that is not always available or easy to achieve on older
devices. Some of the recommendations can be followed using the support library, but many require the
use of a third-party library, like ActionBarSherlock, which you can read about in Chapter16.

ptg11078569
Chapter 8Creating User Interfaces with Layouts and Widgets
156
Layout parameters
By now, you have probably noticed that some attribute names begin with layout_
(android:layout_marginLeft) and others do not (android:text).
Attributes whose names do not begin with layout_ are directions to the widget. When it is inflated, the
widget calls a method to configure itself based on each of these attributes and their values.
When an attribute’s name begins with layout_, that attribute is a direction to that widget’s parent.
These attributes are known as layout parameters, and they tell the parent layout how to arrange the
child element within the parent.
Even when a layout object like LinearLayout is the root element of a layout, it is still a widget with a
parent and has layout parameters. When you defined the LinearLayout in fragment_crime.xml, you
gave it attributes for android:layout_width and android:layout_height. These attributes will be
used by the LinearLayout’s parent layout when it is inflated. In this case, the LinearLayout’s layout
parameters will be used by the FrameLayout in CrimeActivity’s content view.
Margins vs. padding
In fragment_crime.xml, you have given widgets margin and padding attributes. Beginning developers
sometimes get confused between these attributes. Now that you understand what a layout parameter is,
the difference is easier to explain. Margin attributes are layout parameters. They determine the distance
between widgets. Given that a widget can only know about itself, margins must be the responsibility of
the widget’s parent.
Padding, on the other hand, is not a layout parameter. The android:padding attribute tells the widget
how much bigger than its contents it should draw itself. For example, say you wanted the date button
to be spectacularly large without changing its text size. You could add the following attribute to the
Button, save your layout, and run again.
Listing 8.8Padding in action (fragment_crime.xml)
<Button android:id="@+id/crime_date"
android:layout_width="match_parent"
android:layout_height="wrap_content"
android:layout_marginLeft="16dp"
android:layout_marginRight="16dp"
android:padding="80dp"
/>
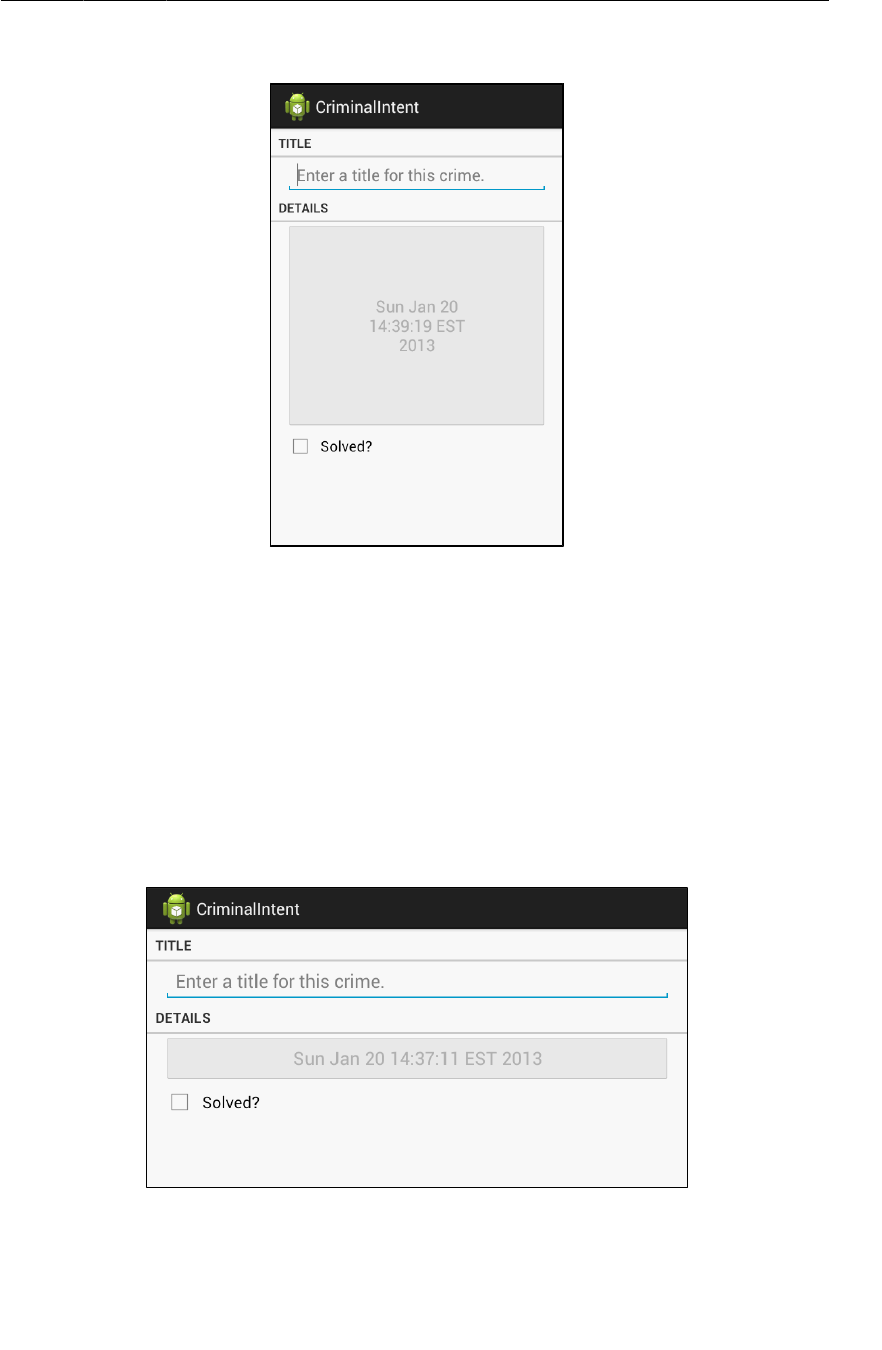
ptg11078569
Using the Graphical Layout Tool
157
Figure 8.3I like big buttons and I cannot lie...
Alas, you should probably remove this attribute before continuing.
Using the Graphical Layout Tool
So far, you have created layouts by typing XML. In this section, you will use the graphical layout tool.
In particular, you are going to make an alternative landscape layout for CrimeFragment.
Most built-in layout classes, like LinearLayout, will automatically stretch and resize themselves and
their children on rotation. Sometimes, however, the default resizing does not make the best use of the
available space.
Run CriminalIntent and rotate the device to see the CrimeFragment layout in landscape orientation.
Figure 8.4CrimeFragment in landscape mode
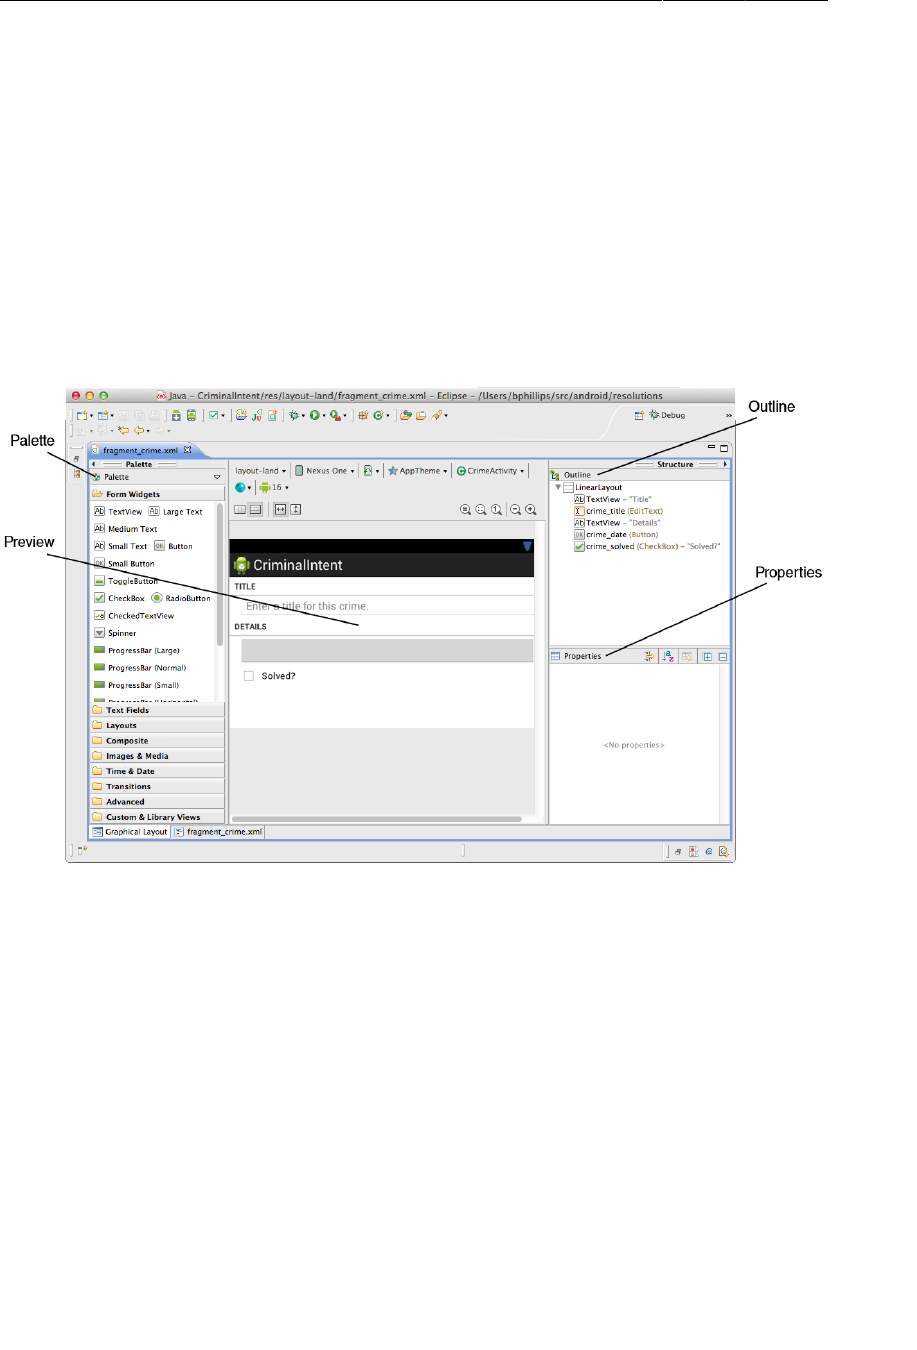
ptg11078569
Chapter 8Creating User Interfaces with Layouts and Widgets
158
The date button becomes oddly long; it would be better if the landscape layout had the button and
check box side by side. To make this happen, create the res/layout-land directory (right-click res/
in the package explorer and select New → Folder). Then copy fragment_crime.xml into res/layout-
land/.
To make these changes using the graphical layout tool, first close res/layout/fragment_crime.xml
if you have it open in the editor. Then open res/layout-land/fragment_crime.xml and select the
Graphical�Layout tab.
In the middle of the graphical layout tool is the preview you have already seen. On the lefthand side is
the palette. This view contains all the widgets you could wish for, organized by category.
Figure 8.5Views in the graphical layout tool
The outline view is to the right of the preview. The outline shows how the widgets are organized in the
layout.
Beneath the outline view is the properties view. In this view, you can view and edit the attributes of the
widget selected in the outline.
Now let’s consider what changes to make to this layout. Take a look at Figure8.6.

ptg11078569
Adding a new widget
159
Figure 8.6Landscape layout for CrimeFragment
The changes can be broken into four parts:
• add a new LinearLayout widget to the layout
• edit the attributes of the LinearLayout
• make the Button and CheckBox widgets children of the LinearLayout
• update the layout parameters of the Button and CheckBox
Adding a new widget
You can add a widget by selecting it in the palette and then dragging to the outline view. Click the
Layouts category in the palette. Select LinearLayout�(Horizontal) and drag to the outline view. Drop this
LinearLayout on top of the root LinearLayout to add it as a direct child of the root LinearLayout.
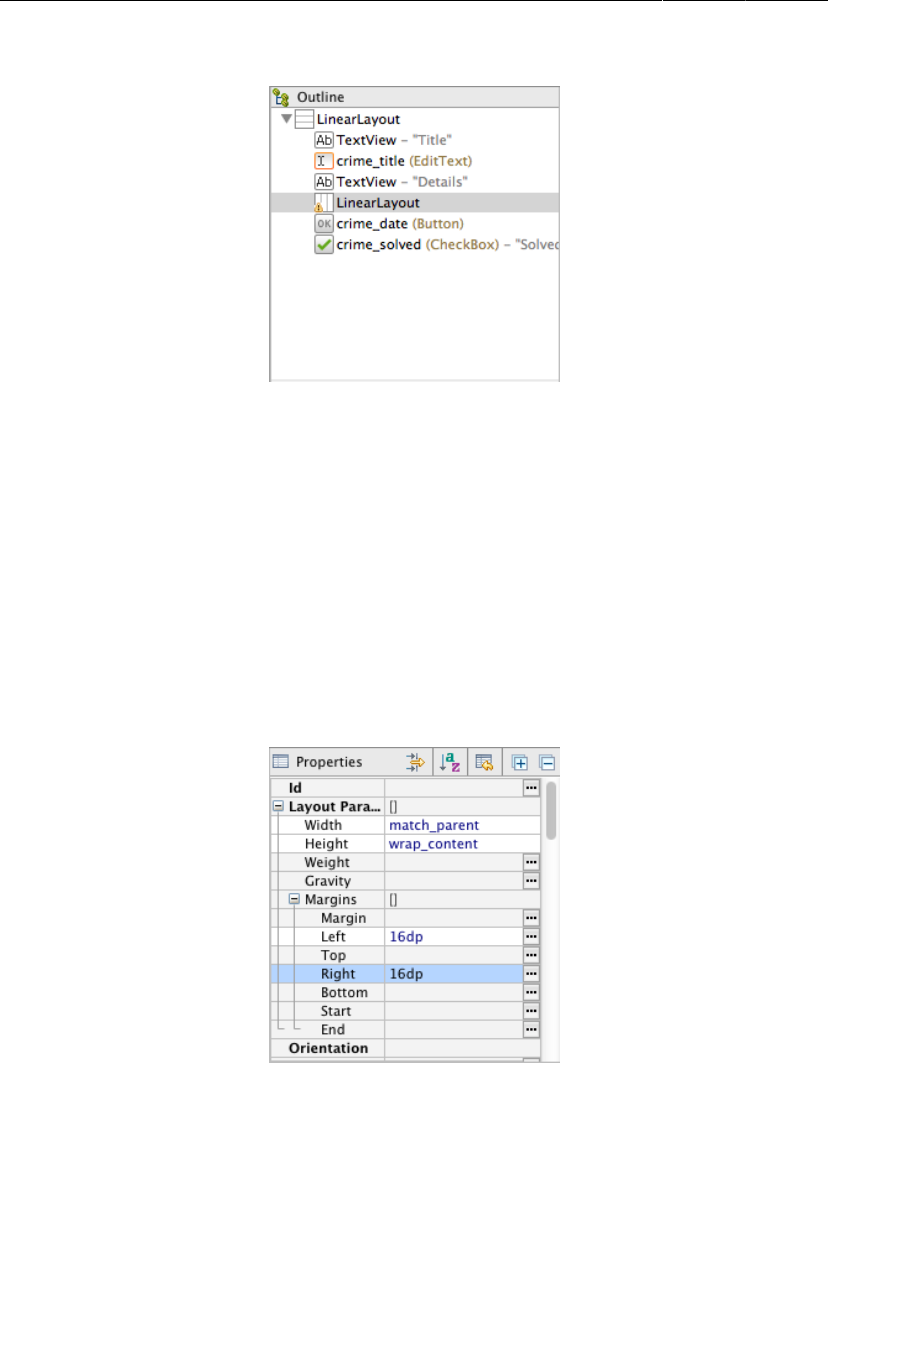
ptg11078569
Chapter 8Creating User Interfaces with Layouts and Widgets
160
Figure 8.7LinearLayout added to fragment_crime.xml
You can add widgets by dragging from the palette to the preview, too. However, layout widgets are
often empty or obscured by other views, so it can be hard to see exactly where to drop a widget in the
preview to get the hierarchy you want. Dragging to the outline view makes this much easier.
Editing attributes in properties
Select the new LinearLayout in the outline view to display its attributes in the properties view. Expand
the Layout�Parameters category and then the Margins category.
You want the new LinearLayout’s margins to match your other widgets. Select the field next to Left
and type 16dp. Do the same for the right margin.
Figure 8.8Margins set in properties view
(On some platforms, you will get a pop-up window when attempting to type in these fields. This pop-
up is a workaround for a known bug. Unfortunately, the workaround will not allow you to enter a
value. So, if this happens, save your file and switch to the XML. Then copy the two margin attributes
from the EditText to the LinearLayout.)
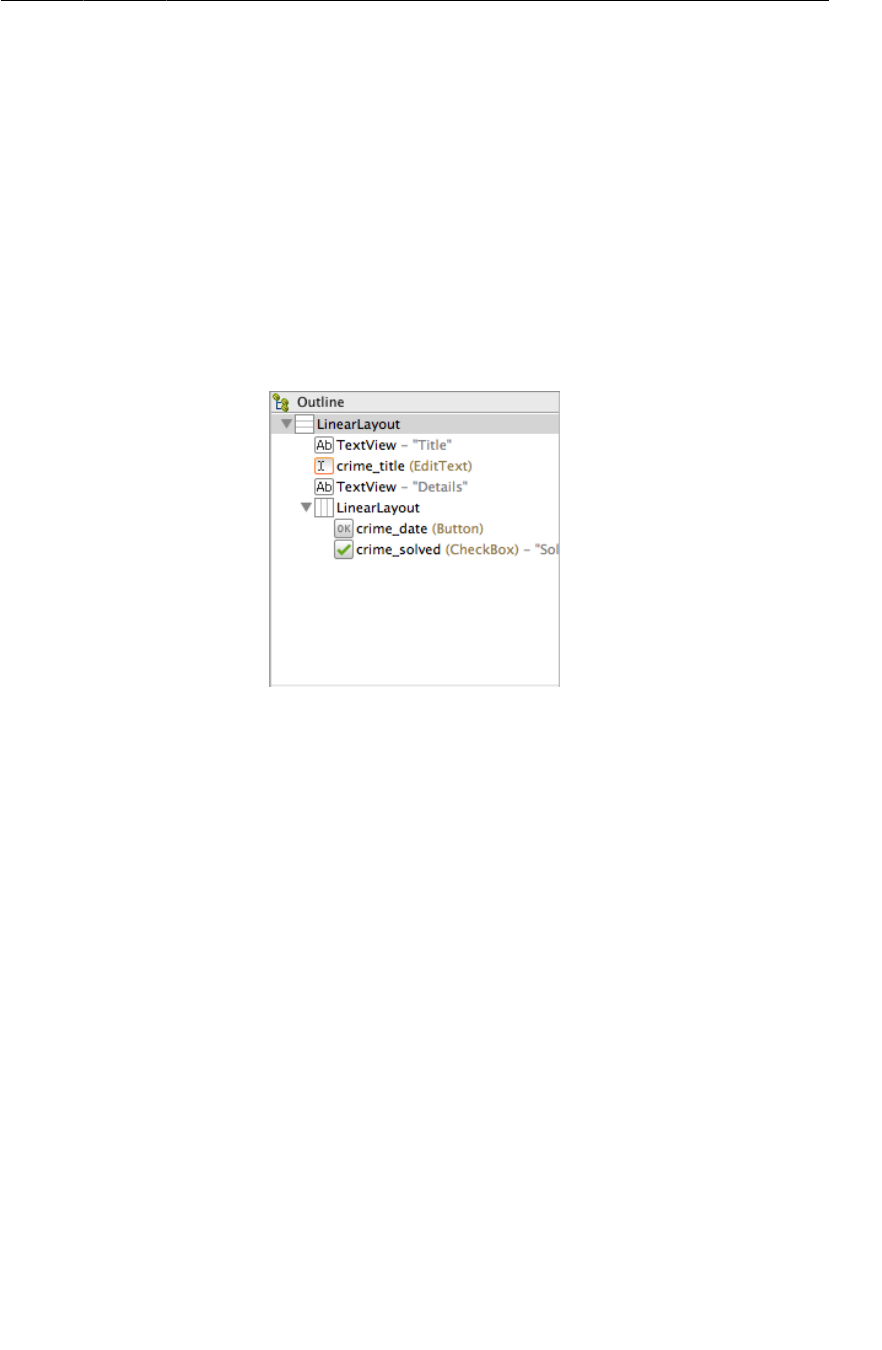
ptg11078569
Reorganizing widgets in the outline view
161
Save your layout file and switch to the XML by selecting the fragment_crime.xml tab at the bottom of
the preview. You should see a LinearLayout element with the margin attributes you just added.
Reorganizing widgets in the outline view
The next step is to make the Button and CheckBox children of the new LinearLayout. Return
to the graphical layout tool, and, in the outline view, select the Button and drag it on top of the
LinearLayout.
The outline should reflect that the Button is now a child of the new LinearLayout. Do the same for the
CheckBox.
Figure 8.9Button and CheckBox now children of new LinearLayout
If widget children are out of order, you can reorder them in the outline view by dragging. You can also
delete widgets from the layout in the outline view, but be careful: deleting a widget also deletes its
children.
Back in the preview, the CheckBox seems to be missing. The Button is obscuring it. The LinearLayout
considered the width (match_parent) of its first child (the Button) and gave the first child all of the
space leaving nothing for the CheckBox (Figure8.10).
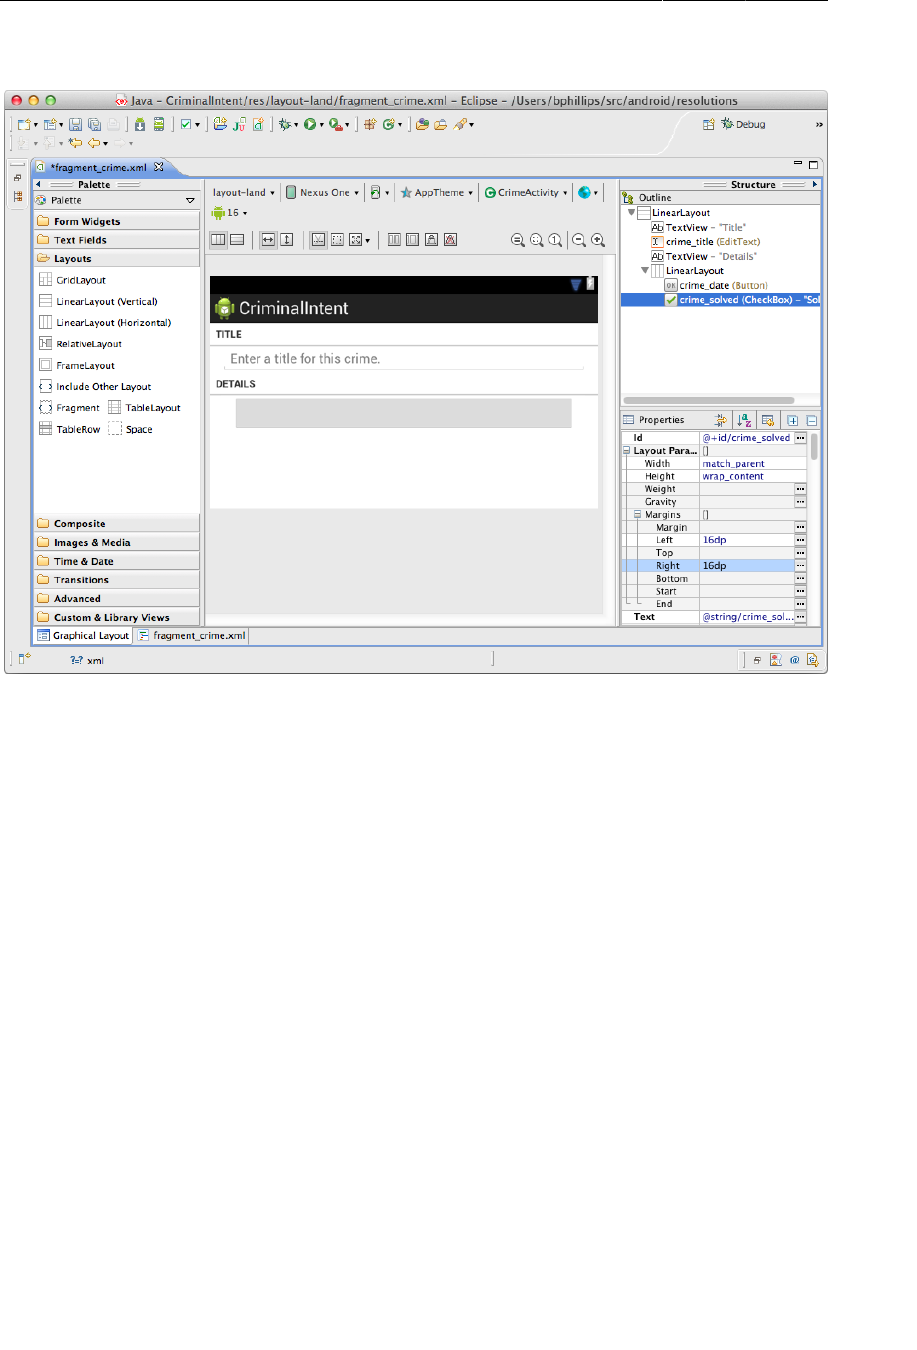
ptg11078569
Chapter 8Creating User Interfaces with Layouts and Widgets
162
Figure 8.10The first-defined Button child obscures the CheckBox
You can introduce some equity in the LinearLayout’s parenting by adjusting the layout parameters of
its children.
Updating child layout parameters
First, select the date button in the outline. In the properties view, click on the current Width value and
change it to wrap_content.
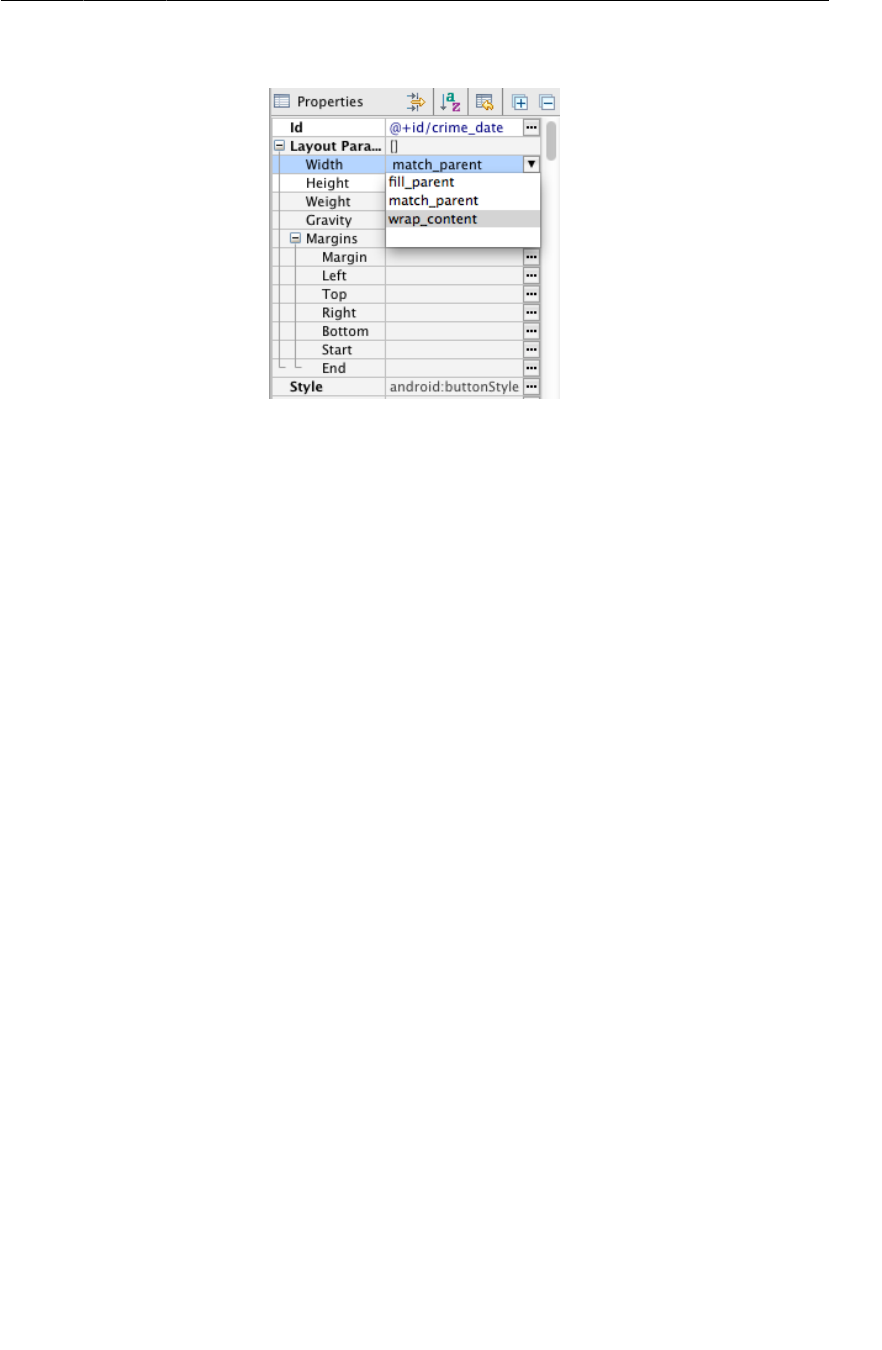
ptg11078569
Updating child layout parameters
163
Figure 8.11Changing Button’s width to wrap_content
Next, delete both of the button’s 16dp margin values. The button will not need these margins now that
it is inside the LinearLayout.
Finally, find the Weight field in the Layout�Parameters section and set its value to 1. This field
corresponds to the android:layout_weight attribute shown in Figure8.6.
Select the CheckBox in the outline view and make the same attribute changes: Width should be
wrap_content, Weight should be 1, and the margins should be empty.
Check the preview to confirm that both widgets are now visible. Then save your file and return to the
XML to confirm your changes. Listing 8.9 shows the relevant XML.

ptg11078569
Chapter 8Creating User Interfaces with Layouts and Widgets
164
Listing 8.9XML for the graphically-created layout (layout-land/
fragment_crime.xml)
...
<TextView
android:layout_width="match_parent"
android:layout_height="wrap_content"
android:text="@string/crime_details_label"
style="?android:listSeparatorTextViewStyle"
/>
<LinearLayout
android:layout_width="match_parent"
android:layout_height="wrap_content"
android:layout_marginLeft="16dp"
android:layout_marginRight="16dp" >
<Button
android:id="@+id/crime_date"
android:layout_width="wrap_content"
android:layout_height="wrap_content"
android:layout_weight="1" />
<CheckBox
android:id="@+id/crime_solved"
android:layout_width="wrap_content"
android:layout_height="wrap_content"
android:layout_weight="1"
android:text="@string/crime_solved_label" />
</LinearLayout>
</LinearLayout>
How android:layout_weight works
The android:layout_weight attribute tells the LinearLayout how to distribute its children. You have
given both widgets the same value, but that does not necessarily make them the same width on screen.
To determine the width of its child views, LinearLayout uses a mixture of the layout_width and
layout_weight parameters.
LinearLayout makes two passes to set the width of a view. In the first pass, LinearLayout looks at
layout_width (or layout_height, for vertical orientation). The value for layout_width for both the
Button and CheckBox is now wrap_content, so each view will get only enough space to draw itself
(Figure8.12).
(It is hard to see how layout weights work in the preview because your button’s contents are not part
of the layout itself. The following figures show what the LinearLayout would look like if the button
already had its contents.)
Figure 8.12Pass 1: space given out based on layout_width
In the next pass, LinearLayout allocates any extra space based on the values for layout_weight
(Figure8.13).
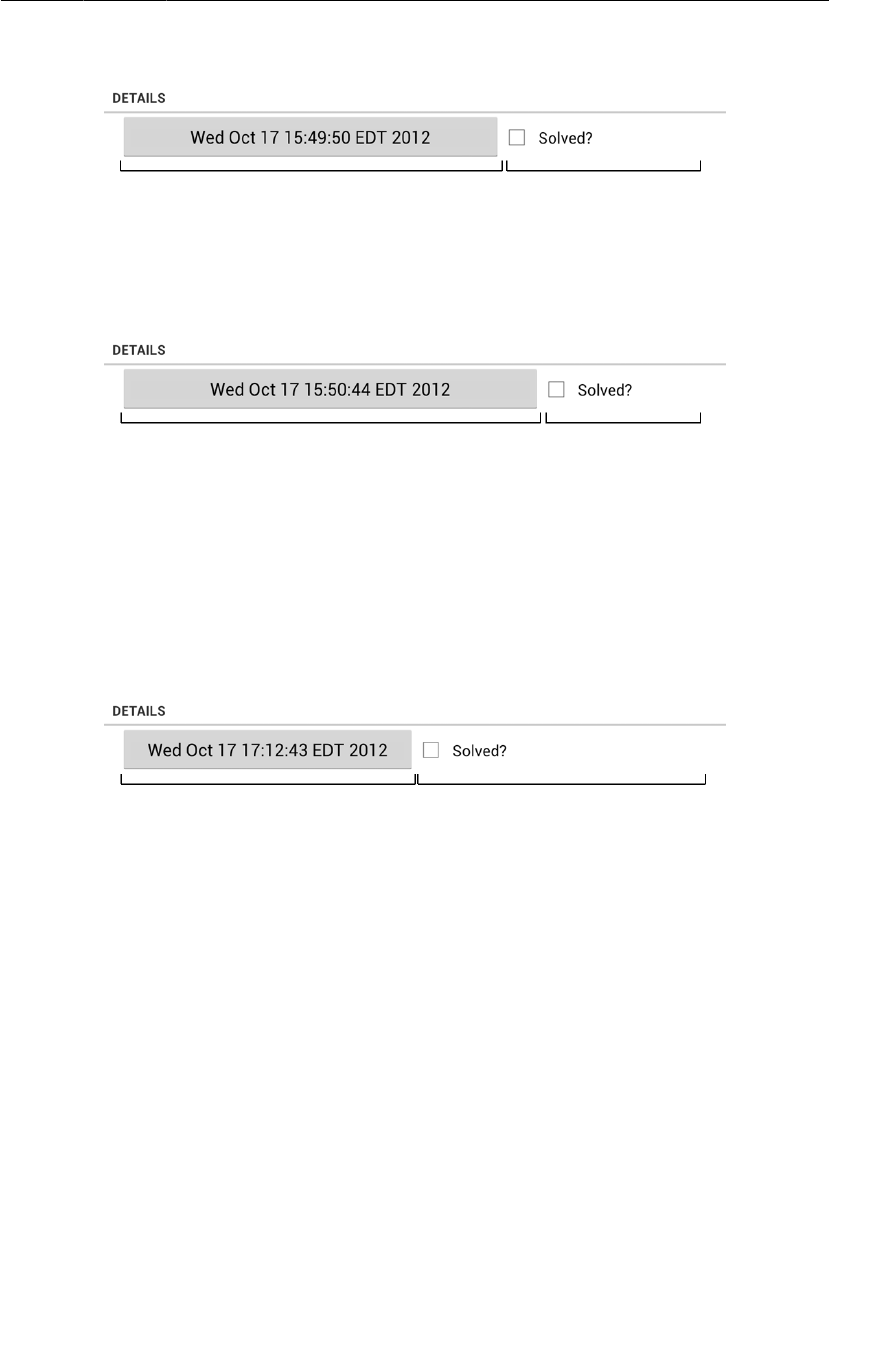
ptg11078569
Summary of graphical layout tool
165
Figure 8.13Pass 2: extra space given out based on 1:1 layout_weight
In your layout, the Button and CheckBox have the same value for layout_weight, so they split the
extra space 50/50. If you set the weight for your Button to 2, then it would receive 2/3 of the extra
space, leaving 1/3 for the CheckBox (Figure8.14).
Figure 8.14Extra space divided unevenly based on 2:1 layout_weight
Any floating point number can be a valid weight. Programmers have different conventions for the
kinds of weights they use. In fragment_crime.xml, you are using a “cocktail recipe” style weighting.
Another common convention is to have weights add up to 1.0 or 100, which would make the weight for
the button in the last example 0.66 or 66, respectively.
What if you want the LinearLayout to allocate exactly 50% of its width to each view? You simply skip
the first pass by setting the layout_width of each widget to 0dp instead of wrap_content. This leaves
layout_weight the sole component in the LinearLayout’s decision-making (Figure8.15).
Figure 8.15When layout_width="0dp", only layout_weight values matter
Summary of graphical layout tool
The graphical layout tool is useful, and Android is improving it with every ADT release. However, it
can still be slow and buggy at times. Sometimes, you may want to go back to typing XML. You can
switch between making changes in the graphical layout tool and in XML. Just be sure to save the file
before switching tabs to be safe.
Feel free to use the graphical layout tool to create layouts in this book. From now on, we will show you
a diagram like Figure8.6 when you need to create a layout. You can decide how to create it – XML,
graphical layout tool, or a little of both.
Widget IDs and multiple layouts
The two layouts that you have created for CriminalIntent do not vary significantly, but there may be
times when your layouts will. When this is the case, you should ensure that widgets actually exist
before you access them in code.

ptg11078569
Chapter 8Creating User Interfaces with Layouts and Widgets
166
If you have a widget in one layout and not another, use null-checking in the code to determine if the
widget is present in the current orientation before calling methods on it:
Button landscapeOnlyButton = (Button)v.findViewById(R.id.landscapeOnlyButton);
if (landscapeOnlyButton != null) {
// Set it up
}
Finally, remember that a widget must have the same android:id attribute in every layout in which it
appears so that your code can find it.
Challenge: Formatting the Date
The Date object is more of a timestamp than a conventional date. A timestamp is what you see when
you call toString() on a Date, so that is what you have on your button. While timestamps make for
good documentation, it might be nicer if the button just displayed the date as humans think of it – like
“Oct 12, 2012.” You can do this with an instance of the android.text.format.DateFormat class. The
place to start is the reference page for this class in the Android documentation.
You can use methods in the DateFormat class to get a common format. Or you can prepare your own
format string. For a more advanced challenge, create a format string that will display the day of the
week as well – for example, “Tuesday, Oct 12, 2012.”
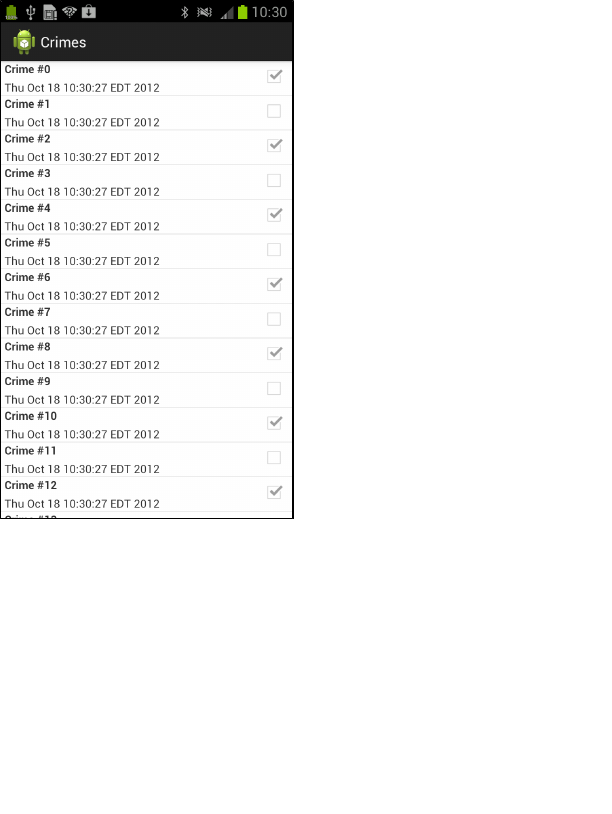
ptg11078569
167
9
Displaying Lists with
ListFragment
CriminalIntent’s model layer currently consists of a single instance of Crime. In this chapter, you will
update CriminalIntent to work with a list of crimes. The list will display each Crime’s title and date and
whether the case has been solved.
Figure 9.1A list of crimes
Figure9.2 shows the overall plan for CriminalIntent in this chapter.
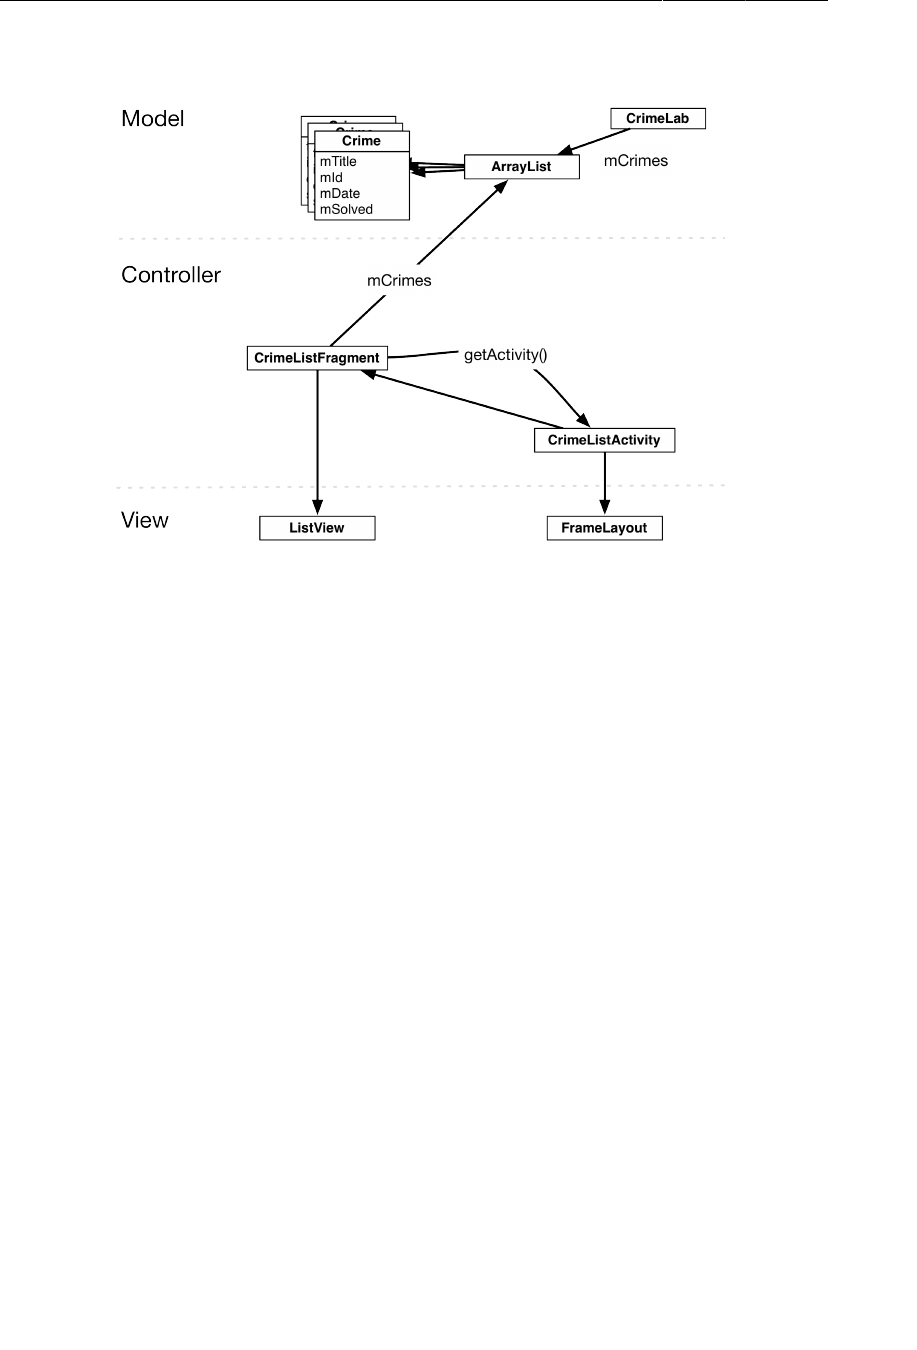
ptg11078569
Chapter 9Displaying Lists with ListFragment
168
Figure 9.2CriminalIntent with a list of crimes
In the model layer, you have a new object, CrimeLab, that will be a centralized data stash that stores
Crime objects.
Displaying a list of crimes requires a new activity and a new fragment in CriminalIntent’s controller
layer: CrimeListActivity and CrimeListFragment.
CrimeListFragment will be a subclass of ListFragment, which is a subclass of Fragment that comes
with built-in help for displaying lists. These controllers will interact with each other and CrimeLab to
access the data in the model layer.
(Where are CrimeActivity and CrimeFragment in Figure9.2? They are part of the detail view,
so we are not showing them here. In Chapter10, you will connect the list and the detail parts of
CriminalIntent.)
In Figure9.2, you can also see the view objects associated with CrimeListActivity and
CrimeListFragment. The activity’s view will consist of a fragment-containing FrameLayout. The
fragment’s view will consist of a ListView. You will learn more about how ListFragment and
ListView interact later in the chapter.
Updating CriminalIntent’s Model Layer
The first step is to upgrade CriminalIntent’s model layer from a single Crime object to an ArrayList of
Crime objects.
ArrayList<E> is a Java class that supports an ordered list of objects of a given type. It provides
methods for retrieving, adding, and deleting elements.

ptg11078569
Singletons and centralized data storage
169
Singletons and centralized data storage
You are going to store the array list of crimes in a singleton. A singleton is a class that allows only one
instance of itself to be created.
A singleton exists as long as the application stays in memory, so storing the list in a singleton will keep
the crime data available no matter what happens with activities, fragments, and their lifecycles.
To create a singleton, you create a class with a private constructor and a get() method that returns the
instance. If the instance already exists, then get() simply returns the instance. If the instance does not
exist yet, then get() will call the constructor to create it.
Right-click the com.bignerdranch.android.criminalintent package and choose New → Class.
Name this class CrimeLab and then click Finish.
In CrimeLab.java, implement CrimeLab as a singleton with a private constructor and a get(Context)
method.
Listing 9.1Setting up the singleton (CrimeLab.java)
public class CrimeLab {
private static CrimeLab sCrimeLab;
private Context mAppContext;
private CrimeLab(Context appContext) {
mAppContext = appContext;
}
public static CrimeLab get(Context c) {
if (sCrimeLab == null) {
sCrimeLab = new CrimeLab(c.getApplicationContext());
}
return sCrimeLab;
}
}
Notice the s prefix on the sCrimeLab variable. You are using this Android convention to make it clear
that sCrimeLab is a static variable.
The CrimeLab constructor requires a Context parameter. This is common in Android; having
a Context parameter allows the singleton to start activities, access project resources, find your
application’s private storage, and more.
Notice in get(Context) that you do not directly pass in the Context parameter to the constructor. This
Context could be an Activity or another Context object, like Service. You cannot be sure that just
any Context will exist as long as CrimeLab needs it, which is for the life of the application.
To ensure that your singleton has a long-term Context to work with, you call
getApplicationContext() and trade the passed-in Context for the application context. The
application context is a Context that is global to your application. Whenever you have an application-
wide singleton, it should always use the application context.
Let’s give CrimeLab some Crime objects to store. In CrimeLab’s constructor, create an empty
ArrayList of Crimes. Also add two methods: a getCrimes() method that returns the array list and a
getCrime(UUID) that returns the Crime with the given ID (Listing 9.2).

ptg11078569
Chapter 9Displaying Lists with ListFragment
170
Listing 9.2Setting up the ArrayList of Crime objects (CrimeLab.java)
public class CrimeLab {
private ArrayList<Crime> mCrimes;
private static CrimeLab sCrimeLab;
private Context mAppContext;
private CrimeLab(Context appContext) {
mAppContext = appContext;
mCrimes = new ArrayList<Crime>();
}
public static CrimeLab get(Context c) {
...
}
public ArrayList<Crime> getCrimes() {
return mCrimes;
}
public Crime getCrime(UUID id) {
for (Crime c : mCrimes) {
if (c.getId().equals(id))
return c;
}
return null;
}
}
Eventually, the ArrayList will contain user-created Crimes that can be saved and reloaded. But for
now, populate the array list with 100 boring Crime objects (Listing 9.3).
Listing 9.3Generating crimes (CrimeLab.java)
private CrimeLab(Context appContext) {
mAppContext = appContext;
mCrimes = new ArrayList<Crime>();
for (int i = 0; i < 100; i++) {
Crime c = new Crime();
c.setTitle("Crime #" + i);
c.setSolved(i % 2 == 0); // Every other one
mCrimes.add(c);
}
}
Now you have a fully-loaded model layer and 100 crimes to get on screen.
Creating a ListFragment
Create a new class named CrimeListFragment. Click Browse to choose a superclass. Search
for and select ListFragment – android.support.v4.app and then click Finish to generate
CrimeListFragment.
ListFragment was introduced in Honeycomb, but it is duplicated in the support
library. So compatibility is not a problem as long as you use the support library class,
android.support.v4.app.ListFragment.

ptg11078569
An Abstract Activity for Hosting a Fragment
171
In CrimeListFragment.java, override onCreate(Bundle) to set the title of the activity that will host
this fragment.
Listing 9.4Adding onCreate(Bundle) to the new fragment
(CrimeListFragment.java)
public class CrimeListFragment extends ListFragment {
@Override
public void onCreate(Bundle savedInstanceState) {
super.onCreate(savedInstanceState);
getActivity().setTitle(R.string.crimes_title);
}
}
Notice the getActivity() method. This Fragment convenience method returns the hosting
activity and allows a fragment to handle more of the activity’s affairs. Here you use it to call
Activity.setTitle(int) to change what is displayed on the action bar (or title bar on older devices)
to the value of the passed-in string resource.
You are not going to override onCreateView(…) or inflate a layout for CrimeListFragment.
The default implementation of a ListFragment inflates a layout that defines a full-
screen ListView, and you will use this layout for now. In later chapters, you will override
CrimeListFragment.onCreateView(…) to add more advanced features.
In strings.xml, add the string resource for the list activity title.
Listing 9.5Adding string resource for the new activity title (strings.xml)
...
<string name="crime_solved_label">Solved?</string>
<string name="crimes_title">Crimes</string>
</resources
CrimeListFragment needs access to the list of crimes stored in CrimeLab. In
CrimeListFragment.onCreate(…), get the CrimeLab singleton and then get the list of crimes.
Listing 9.6Accessing crimes in CrimeListFragment
(CrimeListFragment.java)
public class CrimeListFragment extends ListFragment {
private ArrayList<Crime> mCrimes;
@Override
public void onCreate(Bundle savedInstanceState) {
super.onCreate(savedInstanceState);
getActivity().setTitle(R.string.crimes_title);
mCrimes = CrimeLab.get(getActivity()).getCrimes();
}
}
An Abstract Activity for Hosting a Fragment
In a moment, you will create the CrimeListActivity class that is designed to host a
CrimeListFragment. First, let’s set up a view for CrimeListActivity.

ptg11078569
Chapter 9Displaying Lists with ListFragment
172
A generic fragment-hosting layout
For CrimeListActivity, you can simply reuse the layout defined in activity_crime.xml (Listing
9.7). This layout provides a FrameLayout as a container view for a fragment, which is then named in
the activity’s code.
Listing 9.7activity_crime.xml is already generic
<?xml version="1.0" encoding="utf-8"?>
<FrameLayout xmlns:android="http://schemas.android.com/apk/res/android"
android:id="@+id/fragmentContainer"
android:layout_width="match_parent"
android:layout_height="match_parent"
/>
Because activity_crime.xml does not name a particular fragment, you can use it for any activity
hosting a single fragment. Let’s rename it activity_fragment.xml to reflect its larger scope.
First, close activity_crime.xml in the editor if you have it open. Next, in the package explorer,
right-click res/layout/activity_crime.xml. (Be sure to right-click activity_crime.xml and not
fragment_crime.xml.)
From the context menu, select Refactor → Rename... Rename this layout activity_fragment.xml.
When you rename a resource, the references to it are updated automatically.
On older versions of ADT, renaming a resource does not update references. If Eclipse is reporting an
error in CrimeActivity.java, then you need to manually update the reference in CrimeActivity, as
shown in Listing 9.8.
Listing 9.8Update layout file for CrimeActivity (CrimeActivity.java)
public class CrimeActivity extends FragmentActivity {
/** Called when the activity is first created. */
@Override
public void onCreate(Bundle savedInstanceState) {
super.onCreate(savedInstanceState);
setContentView(R.layout.activity_crime);
setContentView(R.layout.activity_fragment);
FragmentManager fm = getSupportFragmentManager();
Fragment fragment = fm.findFragmentById(R.id.fragmentContainer);
if (fragment == null) {
fragment = new CrimeFragment();
fm.beginTransaction()
.add(R.id.fragmentContainer, fragment)
.commit();
}
}
}
An abstract Activity class
To create the CrimeListActivity class, you could reuse CrimeActivity’s code. Look back at the
code you wrote for CrimeActivity (Listing 9.8). It is simple and almost generic. In fact, the only non-
generic code is the instantiation of the CrimeFragment before it is added to the FragmentManager.

ptg11078569
An abstract Activity class
173
Listing 9.9CrimeActivity is almost generic (CrimeActivity.java)
public class CrimeActivity extends FragmentActivity {
/** Called when the activity is first created. */
@Override
public void onCreate(Bundle savedInstanceState) {
super.onCreate(savedInstanceState);
setContentView(R.layout.activity_fragment);
FragmentManager fm = getSupportFragmentManager();
Fragment fragment = fm.findFragmentById(R.id.fragmentContainer);
if (fragment == null) {
fragment = new CrimeFragment();
fm.beginTransaction()
.add(R.id.fragmentContainer, fragment)
.commit();
}
}
}
Nearly every activity you will create in this book will require the same code. To avoid typing it again
and again, you are going to stash it in an abstract class.
Create a new class named SingleFragmentActivity in CriminalIntent’s package. Make this class a
subclass of FragmentActivity and check the box marked abstract to make SingleFragmentActivity
an abstract class (Figure9.3).
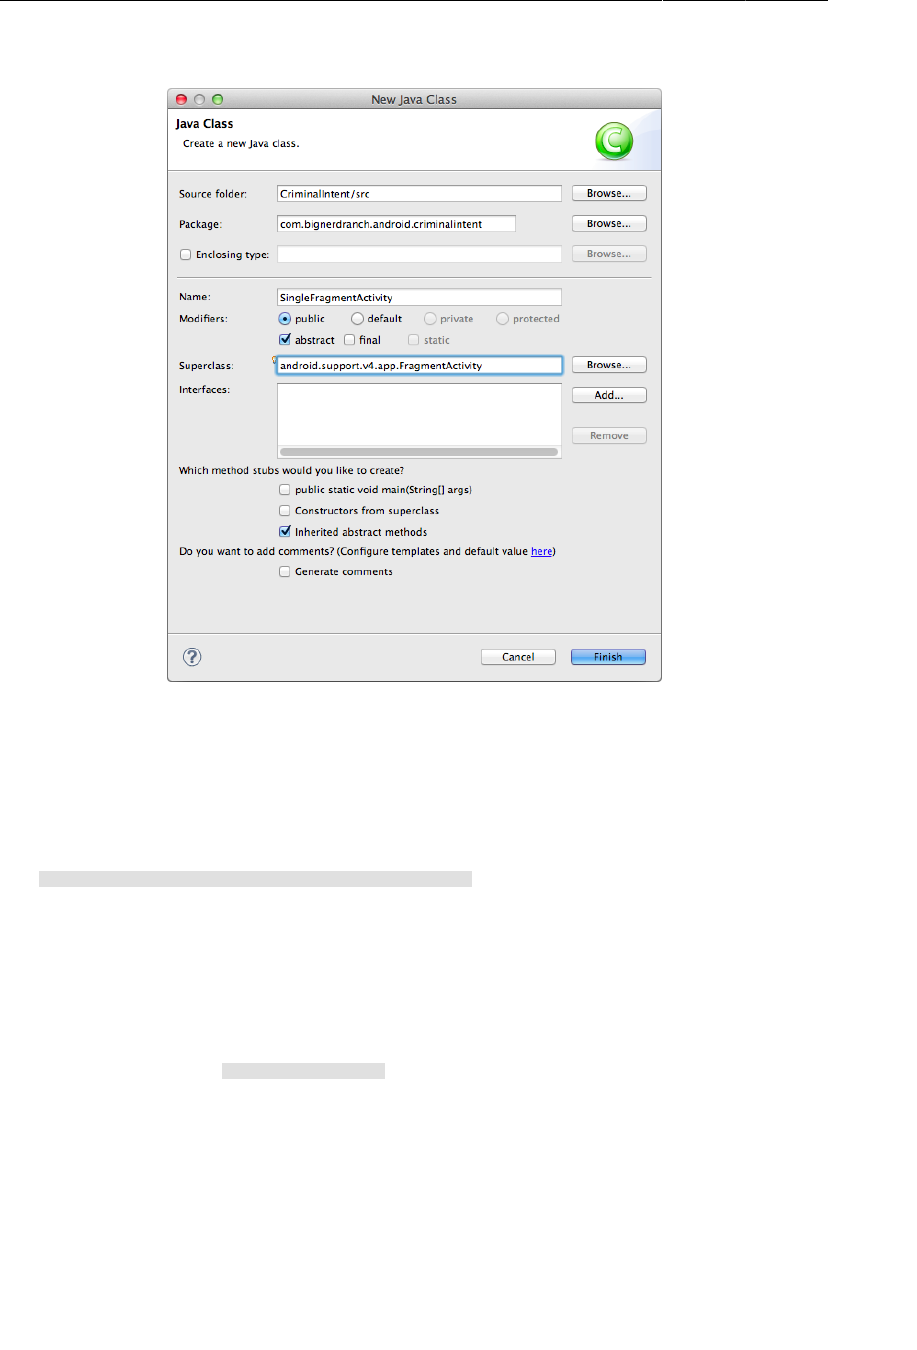
ptg11078569
Chapter 9Displaying Lists with ListFragment
174
Figure 9.3Create abstract SingleFragmentActivity class
Click Finish and add the following code to SingleFragmentActivity.java. Except for the highlighted
portions, it is identical to your old CrimeActivity code.
Listing 9.10Add a generic superclass (SingleFragmentActivity.java)
public abstract class SingleFragmentActivity extends FragmentActivity {
protected abstract Fragment createFragment();
@Override
public void onCreate(Bundle savedInstanceState) {
super.onCreate(savedInstanceState);
setContentView(R.layout.activity_fragment);
FragmentManager fm = getSupportFragmentManager();
Fragment fragment = fm.findFragmentById(R.id.fragmentContainer);
if (fragment == null) {
fragment = createFragment();
fm.beginTransaction()
.add(R.id.fragmentContainer, fragment)
.commit();
}
}
}
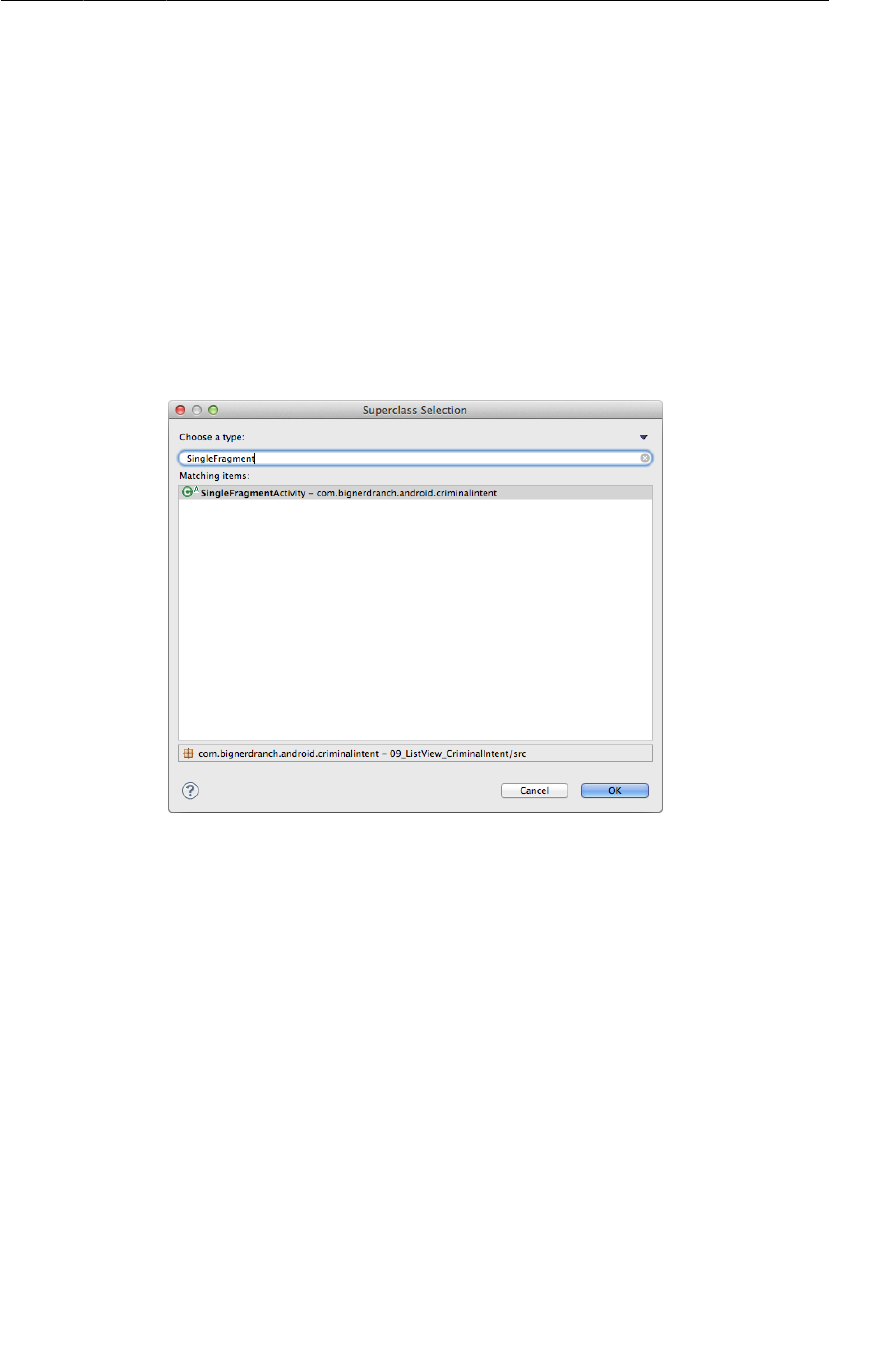
ptg11078569
An abstract Activity class
175
In this code, you set the activity’s view to be inflated from activity_fragment.xml. Then you look for
the fragment in the FragmentManager in that container, creating and adding it if it does not exist.
The only difference between the code in Listing 9.10 and the code in CrimeActivity is an
abstract method named createFragment() that you use to instantiate the fragment. Subclasses of
SingleFragmentActivity will implement this method to return an instance of the fragment that the
activity is hosting.
Using an abstract class
Try it out with CrimeListActivity. Create a new class named CrimeListActivity. You can set its
superclass as SingleFragmentActivity in the wizard. Just browse to select the superclass, type in
SingleFragmentActivity, and Eclipse will offer it as a choice. Select it and then click Finish.
Figure 9.4Selecting SingleFragmentActivity
Eclipse will open CrimeListActivity.java, and it will already have a stub for createFragment().
Have this method return a new instance of CrimeListFragment.
Listing 9.11Implement CrimeListActivity (CrimeListActivity.java)
public class CrimeListActivity extends SingleFragmentActivity {
@Override
protected Fragment createFragment() {
return new CrimeListFragment();
}
}
It would be best if CrimeActivity worked the same way. Return to CrimeActivity.java. Remove the
existing code from CrimeActivity and rewrite it as a subclass of SingleFragmentActivity, as shown
in Listing 9.12.

ptg11078569
Chapter 9Displaying Lists with ListFragment
176
Listing 9.12Clean up CrimeActivity (CrimeActivity.java)
public class CrimeActivity extends FragmentActivity SingleFragmentActivity {
/** Called when the activity is first created. */
@Override
public void onCreate(Bundle savedInstanceState) {
super.onCreate(savedInstanceState);
setContentView(R.layout.activity_fragment);
FragmentManager fm = getSupportFragmentManager();
Fragment fragment = fm.findFragmentById(R.id.fragmentContainer);
if (fragment == null) {
fragment = new CrimeFragment();
fm.beginTransaction()
.add(R.id.fragmentContainer, fragment)
.commit();
}
}
@Override
protected Fragment createFragment() {
return new CrimeFragment();
}
}
SingleFragmentActivity will save you a lot of typing and time as you proceed through the book. And
now your activity code is nice and tidy.
Declaring CrimeListActivity
Now that you have created CrimeListActivity, you must declare it in the manifest. In addition, you
want the list of crimes to be the first screen that the user sees when CriminalIntent is launched, so
CrimeListActivity should be the launcher activity.
In the manifest, declare CrimeListActivity and move the launcher intent filter from CrimeActivity’s
declaration to CrimeListActivity’s, as shown in Listing 9.13.

ptg11078569
An abstract Activity class
177
Listing 9.13Declaring CrimeListActivity as the launcher activity
(AndroidManifest.xml)
...
<application
android:allowBackup="true"
android:icon="@drawable/ic_launcher"
android:label="@string/app_name"
android:theme="@style/AppTheme" >
<activity android:name=".CrimeListActivity">
<intent-filter>
<action android:name="android.intent.action.MAIN" />
<category android:name="android.intent.category.LAUNCHER" />
</intent-filter>
</activity>
<activity android:name=".CrimeActivity"
android:label="@string/app_name">
<intent-filter>
<action android:name="android.intent.action.MAIN" />
<category android:name="android.intent.category.LAUNCHER" />
</intent-filter>
</activity>
</application>
</manifest>
CrimeListActivity is now the launcher activity. Run CriminalIntent, and you will see
CrimeListActivity’s FrameLayout hosting an empty CrimeListFragment.
Figure 9.5Blank CrimeListActivity screen
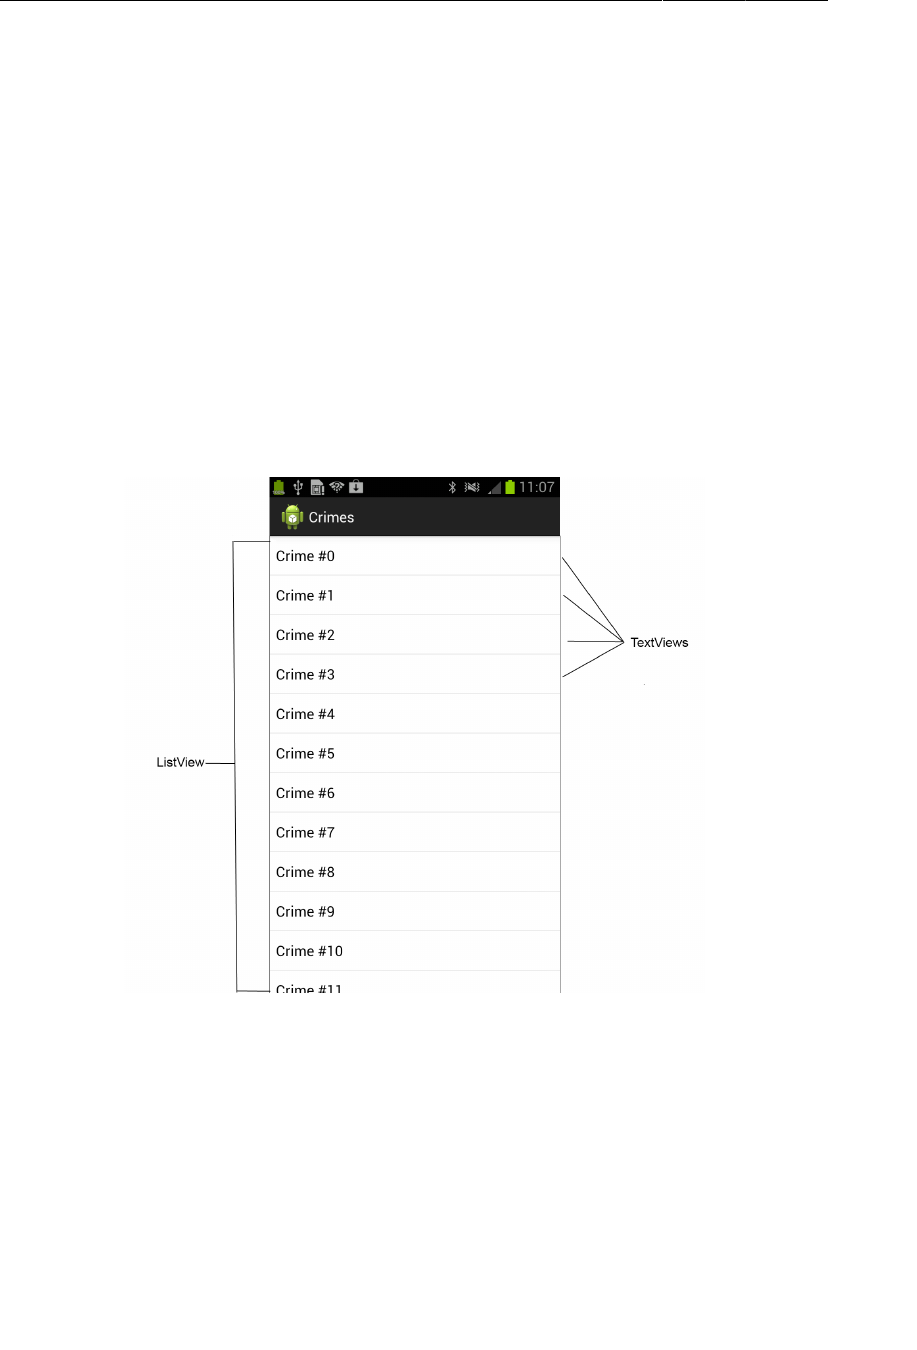
ptg11078569
Chapter 9Displaying Lists with ListFragment
178
ListFragment shows a progress spinner in its implicit ListView when the ListView has nothing to
display. You have given CrimeListFragment access to the array of Crimes, but you have not yet done
anything to display their data in the ListView. You will start work on that next.
ListFragment, ListView, and ArrayAdapter
Instead of a spinner, you want CrimeListFragment’s ListView to show list items to the user. Each list
item should contain data about an instance of Crime.
ListView is a subclass of ViewGroup, and each list item is displayed as a child View object of the
ListView. Depending on the complexity of what you need the list to display, these child View objects
can be complex View objects or very simple ones.
Your first implementation of providing list items for display will be simple: a list item will only display
the title of a Crime, and the View object will be a simple TextView.
Figure 9.6A ListView with child TextViews
In Figure9.6, you can see eleven TextViews and a hint of a twelfth. If you were able to scroll this
screenshot, the ListView would show you additional TextViews – Crime�#12, Crime�#13, etc.
So where do these View objects come from? Does the ListView have them ahead of time? That would
be inefficient. A View object only needs to exist when it is on screen. Lists can be enormous, and
unnecessarily creating and storing view objects for an entire list could cause performance and memory
problems.
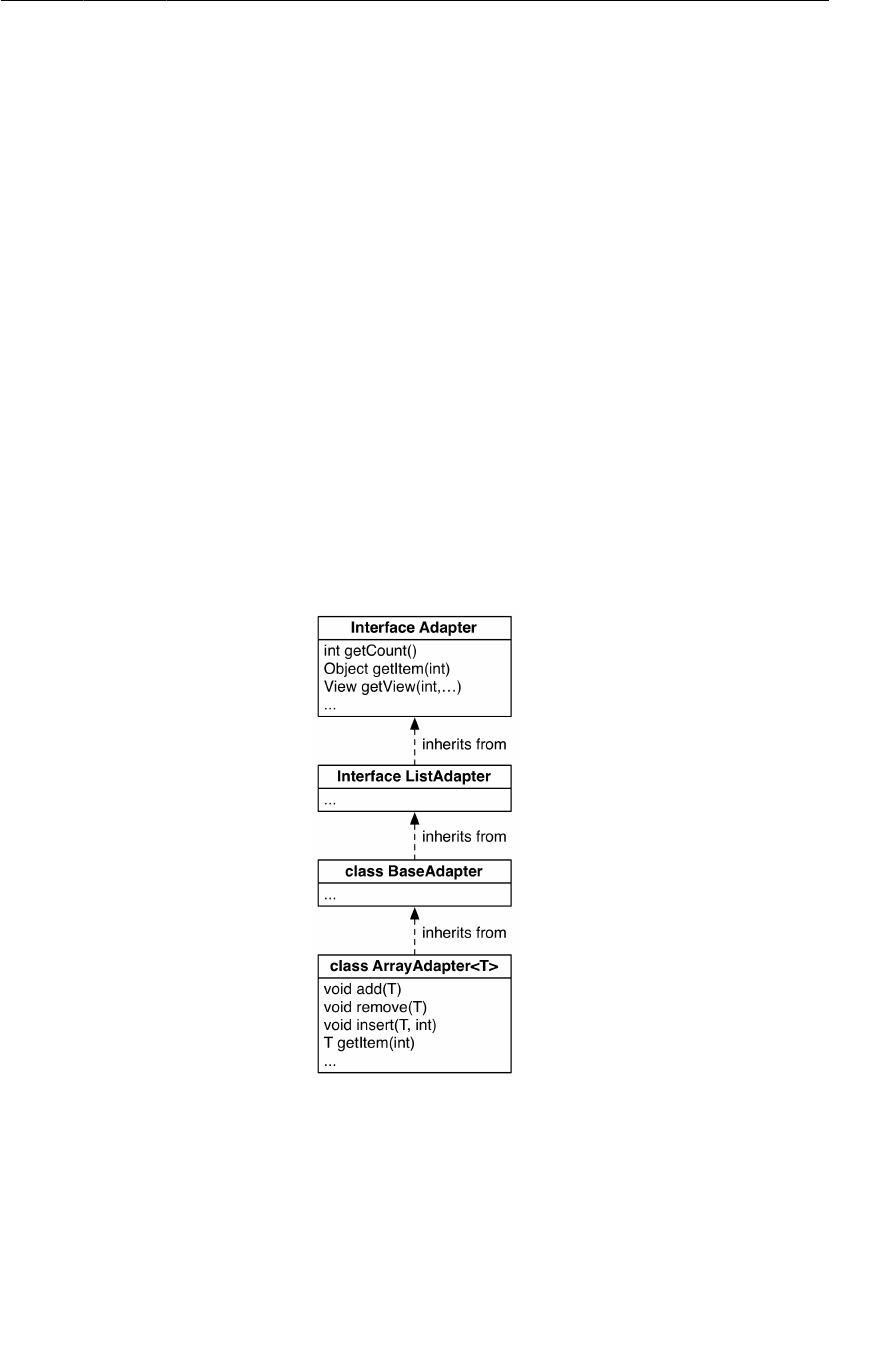
ptg11078569
ListFragment, ListView, and ArrayAdapter
179
The wiser course is to create view objects only as they are needed. The ListView asks for a view object
when it needs to display a certain list item.
Whom does the ListView ask? It asks its adapter. An adapter is a controller object that sits between
the ListView and the data set containing the data that the ListView should display.
The adapter is responsible for
• creating the necessary view object
• populating it with data from the model layer
• returning the view object to the ListView
An adapter is an instance of a class that implements the Adapter interface. You are going to use an
instance of ArrayAdapter<T>, which is an adapter that knows how to work with data in an array (or an
ArrayList) of T type objects.
Figure9.7 shows the pedigree of the ArrayAdapter<T> class. Each link in the chain provides another
level of specialization.
Figure 9.7ArrayAdapter<T> inherits from BaseAdapter, which inherits from
ListAdapter...
When the ListView needs a view object to display, it will have a conversation with its adapter.
Figure9.8 shows an example of a conversation that a ListView might initiate with its array adapter.
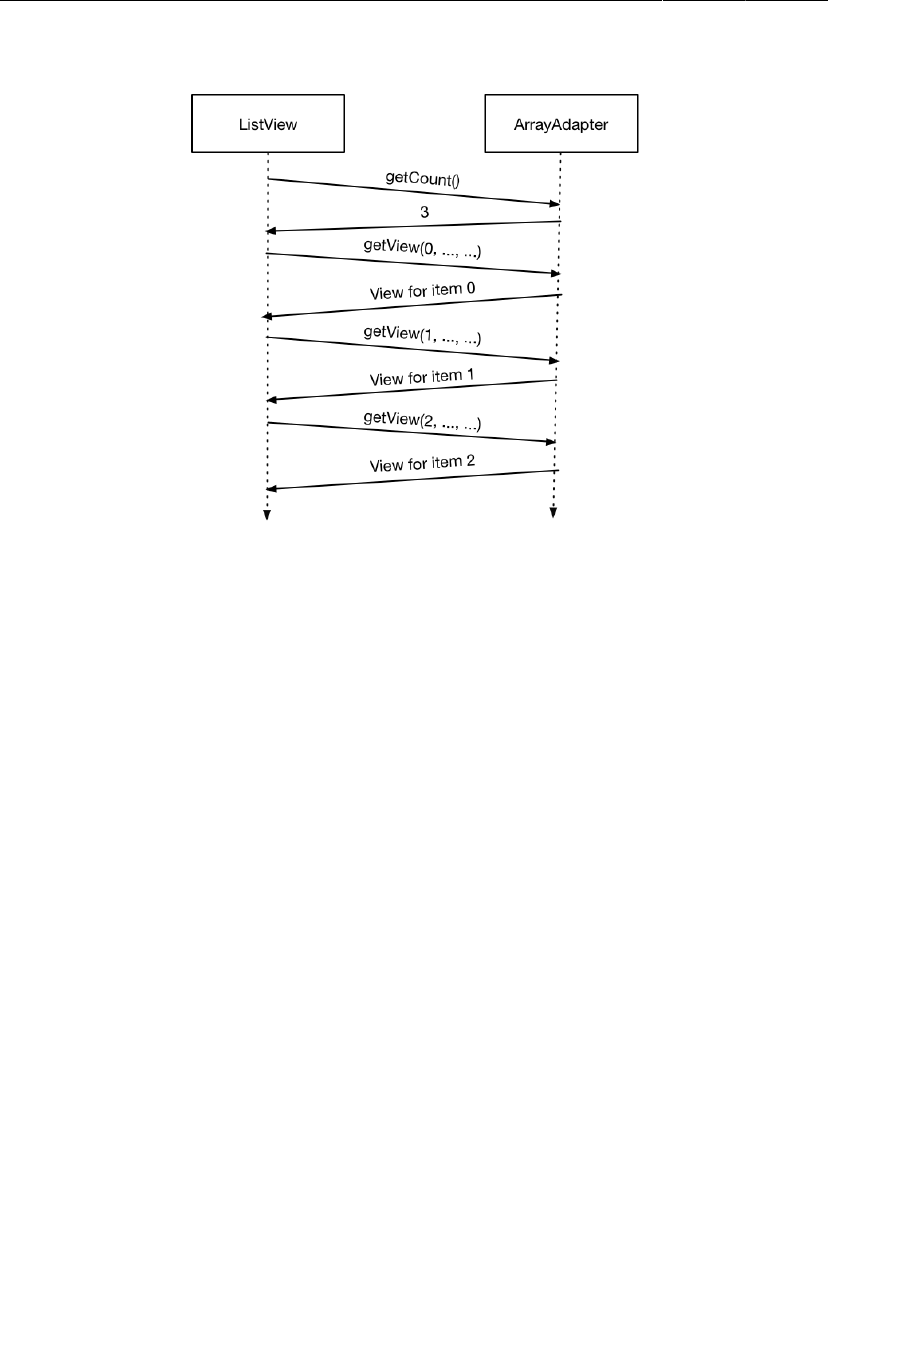
ptg11078569
Chapter 9Displaying Lists with ListFragment
180
Figure 9.8A scintillating ListView-Adapter conversation
First, the ListView asks how many objects are in the array list by calling the adapter’s getCount()
method. (This is important to avoid out of range errors.)
Then the ListView calls the adapter’s getView(int, View, ViewGroup) method. The first argument is
the position of the list item that the ListView is looking for.
Within its implementation of getView(…), the adapter creates a view object from the correct item in the
array list and returns that view object to the ListView. The ListView then adds the view object to itself
as a child view, which gets the new view on screen.
You will learn more about the mechanics of getView(…) later in the chapter when you override it to
create custom list items.
Creating an ArrayAdapter<T>
Initially, you are going to create a default implementation of ArrayAdapter<T> for CrimeListFragment
using the following constructor:
public ArrayAdapter(Context context, int textViewResourceId, T[] objects)
In the array adapter’s constructor, the first parameter is a Context object required to use the resource
ID that is the second parameter. The resource ID identifies the layout that the ArrayAdapter will use to
create the view object. The third parameter is the data set.
In CrimeListFragment.java, create an instance of ArrayAdapter<T> and make it the adapter for
CrimeListFragment’s ListView (Listing 9.14).

ptg11078569
Creating an ArrayAdapter<T>
181
Listing 9.14Setting up the ArrayAdapter (CrimeListFragment.java)
@Override
protected void onCreate(Bundle savedInstanceState) {
super.onCreate(savedInstanceState);
getActivity().setTitle(R.string.crimes_title);
mCrimes = CrimeLab.get(getActivity()).getCrimes();
ArrayAdapter<Crime> adapter =
new ArrayAdapter<Crime>(getActivity(),
android.R.layout.simple_list_item_1,
mCrimes);
setListAdapter(adapter);
}
The setListAdapter(ListAdapter) method is a ListFragment convenience method that you can use
to set the adapter of the implicit ListView managed by CrimeListFragment.
The layout that you specify in the adapter’s constructor (android.R.layout.simple_list_item_1) is
a pre-defined layout from the resources provided by the Android SDK. This layout has a TextView as
its root element.
Listing 9.15Source code for android.R.layout.simple_list_item_1
<TextView xmlns:android="http://schemas.android.com/apk/res/android"
android:id="@android:id/text1"
style="?android:attr/listItemFirstLineStyle"
android:paddingTop="2dip"
android:paddingBottom="3dip"
android:layout_width="match_parent"
android:layout_height="wrap_content" />
You could specify a different layout in this constructor as long as its root element is a TextView.
Thanks to the default behavior of ListFragment, you can run now, and the ListView will be
instantiated and displayed and will start conversing with its adapter.
Run CriminalIntent. List items will appear instead of a spinner. However, the text that each view is
displaying is not particularly helpful to the user.
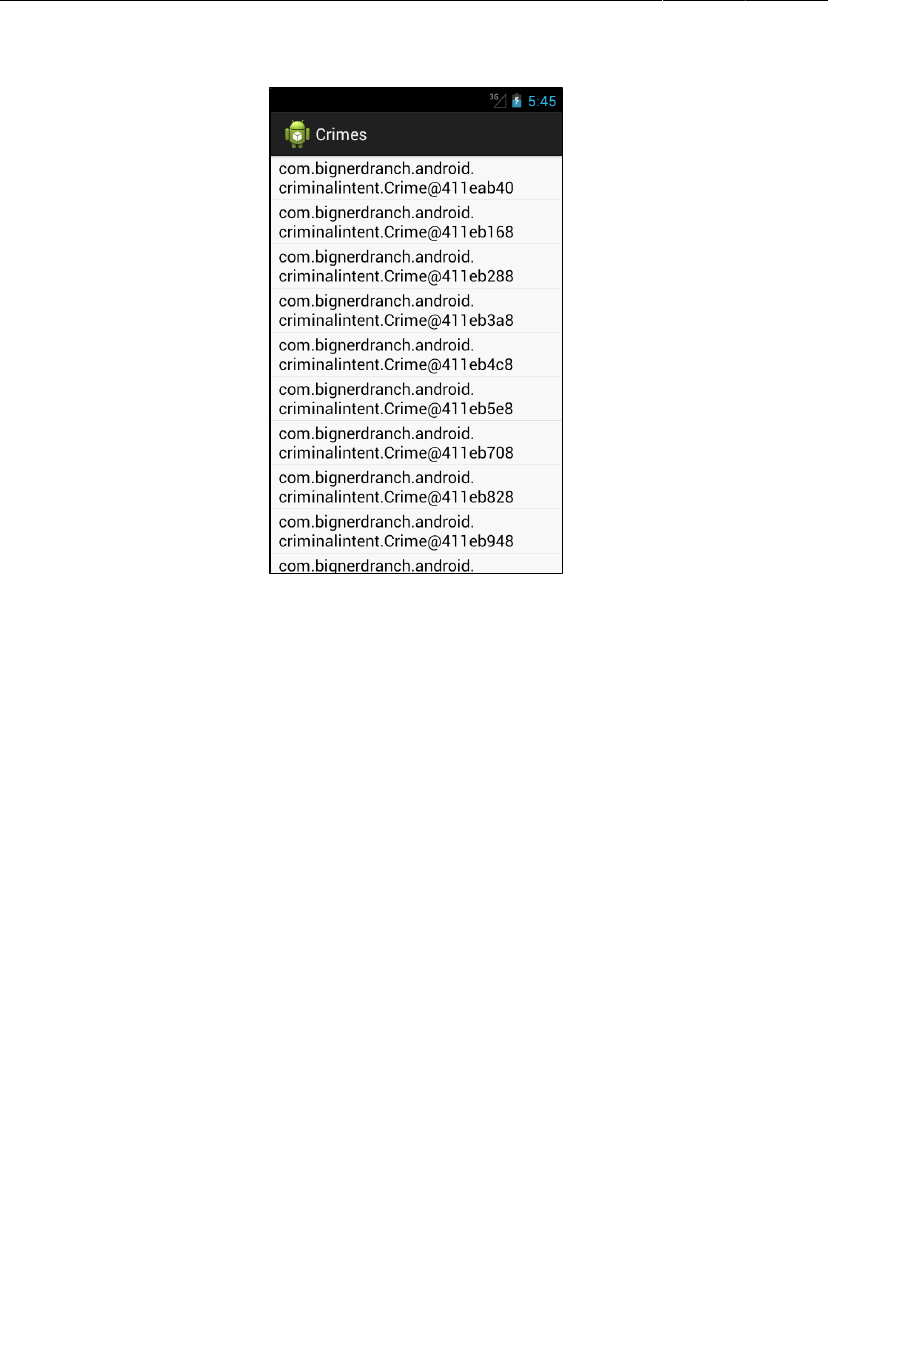
ptg11078569
Chapter 9Displaying Lists with ListFragment
182
Figure 9.9List items showing class names and memory addresses
The default implementation of ArrayAdapter<T>.getView(…) relies on toString(). It inflates
the layout, finds the correct Crime object, and then calls toString() on the object to populate the
TextView.
Crime does not currently override toString(), so it uses java.lang.Object’s implementation, which
returns the fully-qualified class name and memory address of the object.
To have the adapter create a more useful view for a Crime, open Crime.java and override toString()
to return the crime’s title.
Listing 9.16Overriding Crime.toString() (Crime.java)
...
public Crime() {
mId = UUID.randomUUID();
mDate = new Date();
}
@Override
public String toString() {
return mTitle;
}
...
Run CriminalIntent again. Scroll through the list to see more crimes.
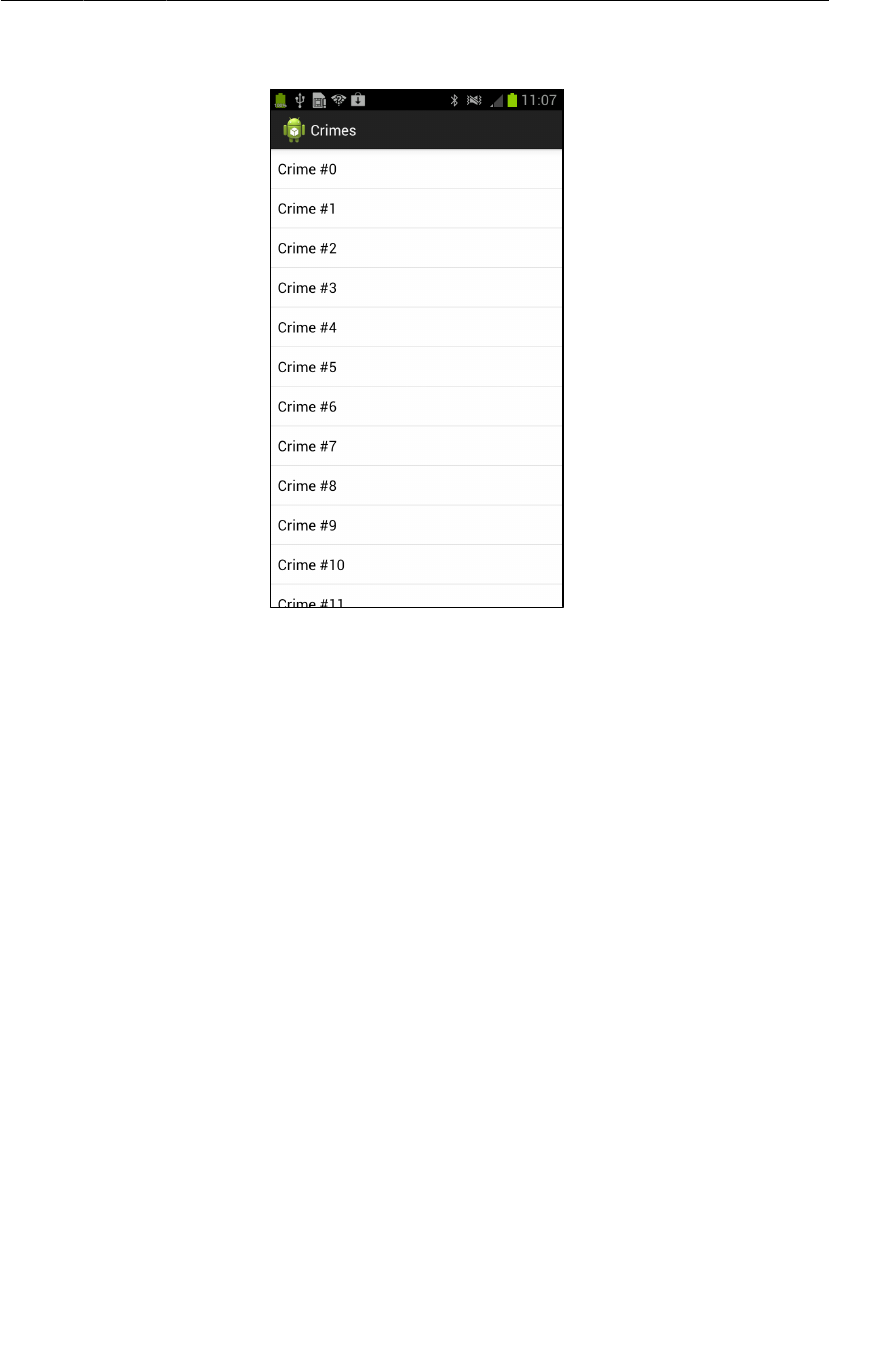
ptg11078569
Responding to list item clicks
183
Figure 9.10Simple list items showing crime titles
As you scroll, the ListView is calling getView(…) on the adapter to get the views that it needs to
display.
Responding to list item clicks
To respond to the user touching a list item, you override another convenience method of
ListFragment:
public void onListItemClick(ListView l, View v, int position, long id)
Whether the user “clicks” with a hardware button, a soft key, or a touch of a finger, the result still goes
through onListItemClick(…).
In CrimeListFragment.java, override onListItemClick(…) to have the adapter return the Crime for
the item that was clicked and then log that Crime’s title.
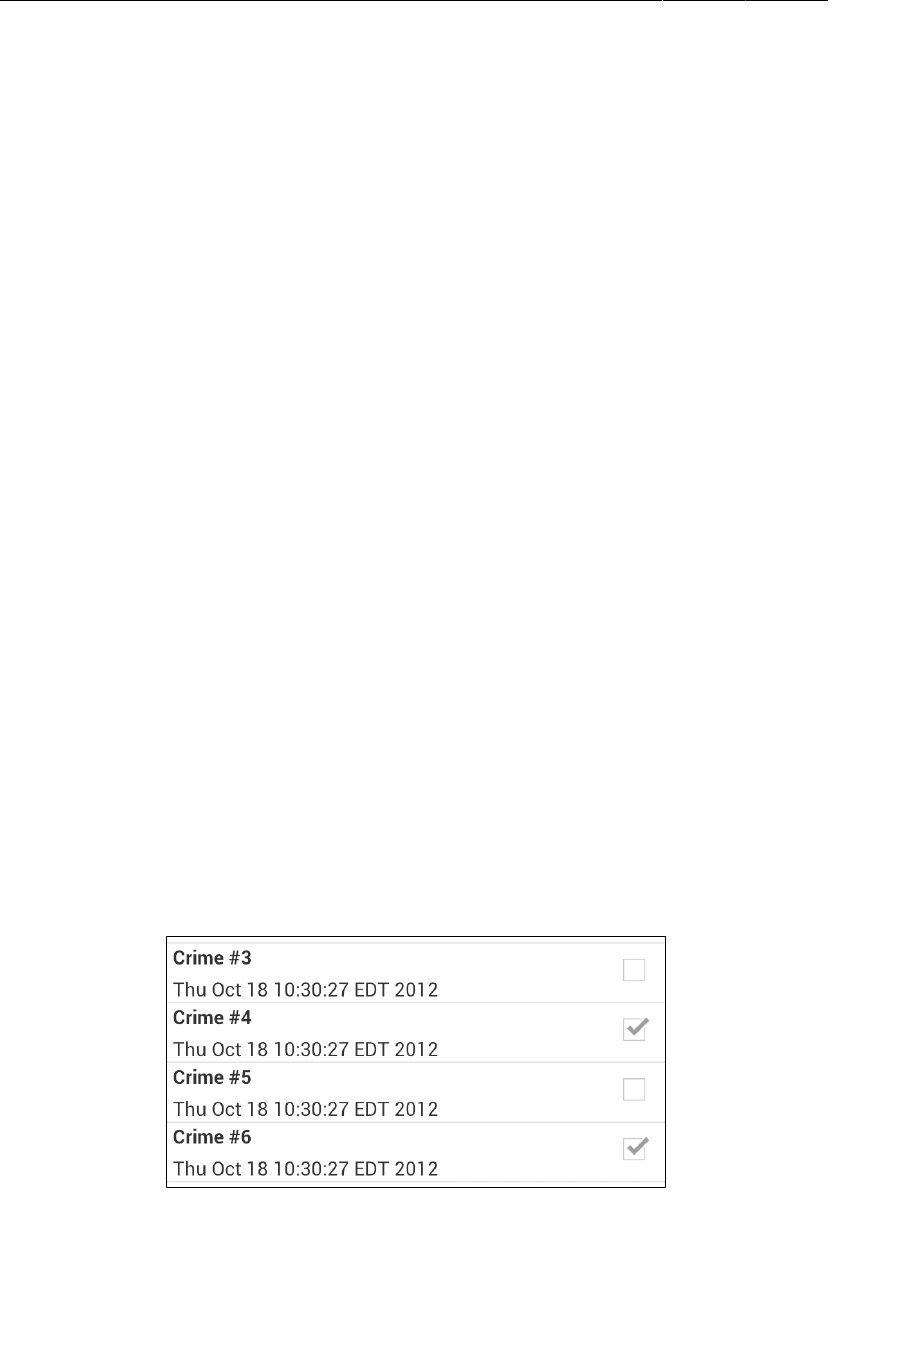
ptg11078569
Chapter 9Displaying Lists with ListFragment
184
Listing 9.17Overriding onListItemClick(…) to log Crime title
(CrimeListFragment.java)
public class CrimeListFragment extends ListFragment {
private static final String TAG = "CrimeListFragment";
...
@Override
public void onListItemClick(ListView l, View v, int position, long id) {
Crime c = (Crime)(getListAdapter()).getItem(position);
Log.d(TAG, c.getTitle() + " was clicked");
}
The getListAdapter() method is a ListFragment convenience method that returns the adapter that
is set on the ListFragment’s list view. You then call the adapter’s getItem(int) method using the
position parameter of onListItemClick(…) and cast the result to a Crime.
Run CriminalIntent again. Click a list item and check the log to confirm that the correct Crime was
retrieved.
Customizing List Items
So far, each of your list items only displays the title of a Crime – the result of Crime.toString().
When you want to display more than just a string, you can create custom list items. Implementing
custom list items requires two things:
• creating a new layout in XML that defines the view for the list item
• creating a subclass of ArrayAdapter<T> that knows how to create, populate, and return the view
defined in the new layout
Creating the list item layout
For CriminalIntent, a list item’s layout should include the crime’s title, its date, and whether the case
has been solved (Figure9.11). This layout calls for two TextViews and a CheckBox.
Figure 9.11A handful of custom list items

ptg11078569
Creating the list item layout
185
You create a new layout for a list item view the same way you do for the view of an activity or a
fragment. In the package explorer, right-click the res/layout directory and choose New → Other...
→ Android�XML�File. In the dialog that appears, choose Layout as the resource type, name the file
list_item_crime.xml, set the root element to RelativeLayout, and click Finish.
In a RelativeLayout, you use certain layout parameters to arrange child views relative to the root
layout and to each other. You are going to have the CheckBox align itself to the righthand side of the
RelativeLayout. The two TextViews will align themselves relative to the CheckBox.
Figure9.12 shows the widgets for the custom list item layout. The CheckBox child must be defined first
even though it will appear on the righthand side of the layout. This is because the TextViews will use
the ID of the CheckBox as an attribute value.
For the same reason, the title TextView must be defined before the date TextView. In a layout file, a
widget must be defined before other widgets can use its ID in their definitions.
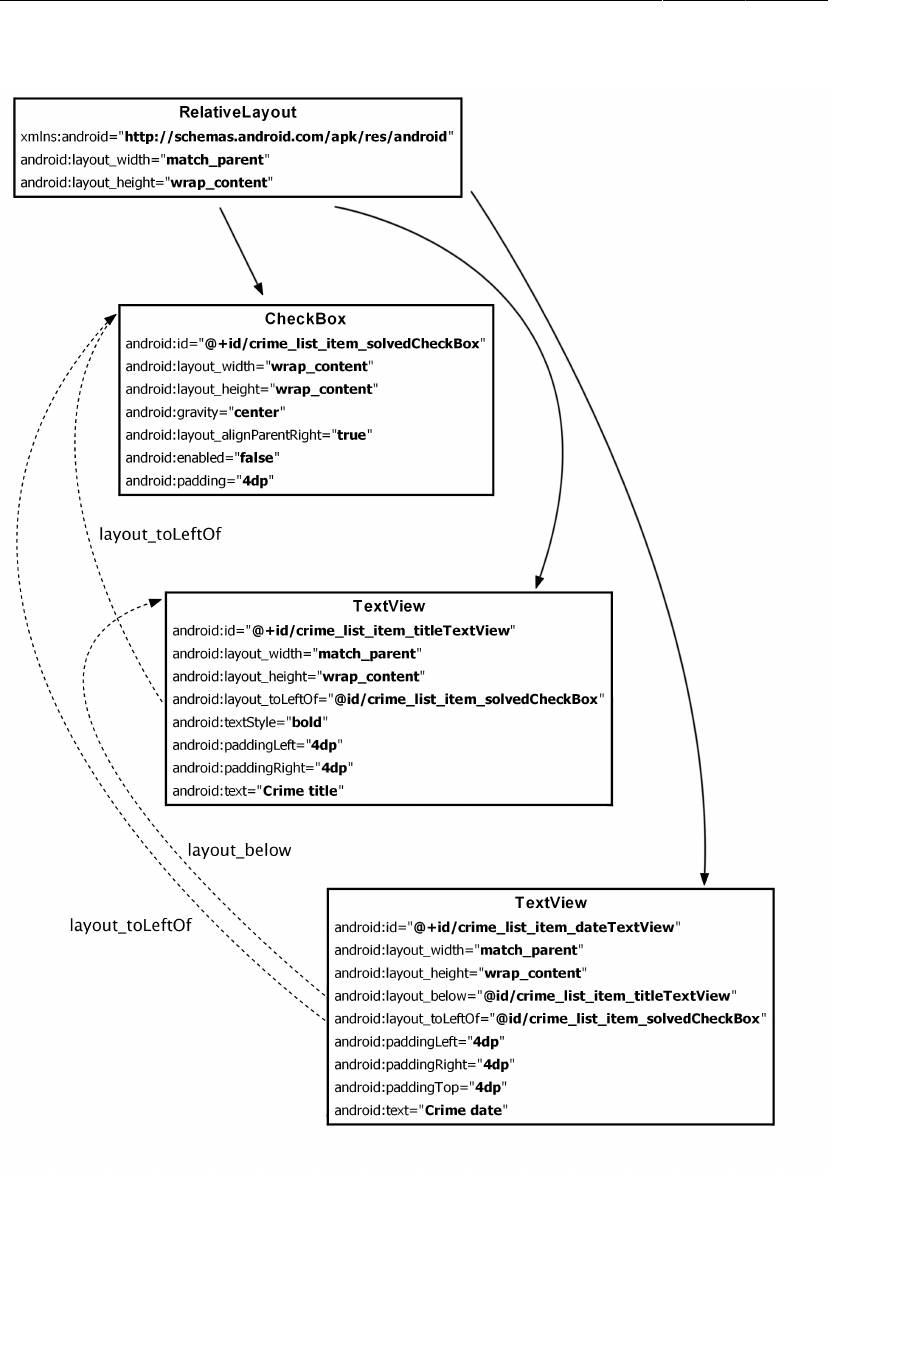
ptg11078569
Chapter 9Displaying Lists with ListFragment
186
Figure 9.12Custom list item layout (list_item_crime.xml)

ptg11078569
Creating an adapter subclass
187
Notice that when you use a widget’s ID in another widget’s definition, you do not include the +. The +
sign is used to create the ID when it first appears in a layout file – typically in an android:id attribute.
Also, notice that you are using literal strings instead of string resources for the android:text
attributes. These text attributes are dummy text for developing and testing. The adapter will provide the
values that the user will see. Because these particular strings will never be seen by users, there is little
benefit to creating string resources.
Your custom list item layout is complete, and you can turn to the next step – creating a custom adapter.
Creating an adapter subclass
Your custom layout is designed to display Crime-specific list items. The data for these list items must
be obtained using Crime accessor methods, so you need a new adapter that knows how to work with
Crime objects.
In CrimeListFragment.java, create a subclass of ArrayAdapter as an inner class of
CrimeListFragment.
Listing 9.18Adding custom adapter as inner class (CrimeListFragment.java)
public void onListItemClick(ListView l, View v, int position, long id) {
Crime c = (Crime)(getListAdapter()).getItem(position);
Log.d(TAG, c.getTitle() + " was clicked");
}
private class CrimeAdapter extends ArrayAdapter<Crime> {
public CrimeAdapter(ArrayList<Crime> crimes) {
super(getActivity(), 0, crimes);
}
}
}
The call to the superclass constructor is required to properly hook up your dataset of Crimes. You will
not be using a pre-defined layout, so you can pass 0 for the layout ID.
The place to create and return a custom list item is the ArrayAdapter<T> method:
public View getView(int position, View convertView, ViewGroup parent)
The convertView parameter is an existing list item that the adapter can reconfigure and return instead
of creating a brand new object. Reusing view objects is a performance advantage because you do not
constantly create and destroy the same type of object. A ListView can only display so many list items
at a time, so there is no reason to have a number of unused view objects floating around and using up
memory.
In the CrimeAdapter class, override getView(…) to return a view inflated from your custom layout and
populated with the correct Crime data (Listing 9.19).

ptg11078569
Chapter 9Displaying Lists with ListFragment
188
Listing 9.19Overriding getView(…) (CrimeListFragment.java)
private class CrimeAdapter extends ArrayAdapter<Crime> {
public CrimeAdapter(ArrayList<Crime> crimes) {
super(getActivity(), 0, crimes);
}
@Override
public View getView(int position, View convertView, ViewGroup parent) {
// If we weren't given a view, inflate one
if (convertView == null) {
convertView = getActivity().getLayoutInflater()
.inflate(R.layout.list_item_crime, null);
}
// Configure the view for this Crime
Crime c = getItem(position);
TextView titleTextView =
(TextView)convertView.findViewById(R.id.crime_list_item_titleTextView);
titleTextView.setText(c.getTitle());
TextView dateTextView =
(TextView)convertView.findViewById(R.id.crime_list_item_dateTextView);
dateTextView.setText(c.getDate().toString());
CheckBox solvedCheckBox =
(CheckBox)convertView.findViewById(R.id.crime_list_item_solvedCheckBox);
solvedCheckBox.setChecked(c.isSolved());
return convertView;
}
}
In this implementation of getView(…), you first check to see if a recycled view was passed in. If not,
you inflate one from the custom layout.
Whether you are working with a new object or a recycled object, you call Adapter’s getItem(int)
method to get the Crime for the current position in the list.
After you have the correct Crime, you get a reference to each widget in the view object and configure it
with the Crime’s data. Finally, you return the view object to the ListView.
Now you can hook up your custom adapter in CrimeListFragment. At the top of
CrimeListFragment.java, update the implementations of onCreate(…) and onListItemClick(…) to
use a CrimeAdapter, as in Listing 9.20.
Listing 9.20Using a CrimeAdapter (CrimeListFragment.java)
ArrayAdapter<Crime> adapter = new ArrayAdapter<Crime>(this,
android.R.layout.simple_list_item_1,
mCrimes);
CrimeAdapter adapter = new CrimeAdapter(mCrimes);
setListAdapter(adapter);
}
public void onListItemClick(ListView l, View v, int position, long id) {
Crime c = (Crime)(getListAdapter()).getItem(position);
Crime c = ((CrimeAdapter)getListAdapter()).getItem(position);
Log.d(TAG, c.getTitle() + " was clicked");
}

ptg11078569
Creating an adapter subclass
189
Since you are casting to CrimeAdapter, you get the benefits of type-checking. CrimeAdapter can only
hold Crime objects, so you no longer need to cast to Crime.
Under ordinary circumstances, you would now be ready to run. However, because you have a
CheckBox in your list item, there is one more change to make. A CheckBox is focusable by default. This
means that a click on a list item will be interpreted as toggling the CheckBox and will not reach your
onListItemClick(…) method.
This internal quirk of ListView means that any focusable widget that appears in a list item layout (like
a CheckBox or a Button) should be made non-focusable to ensure that a click on a list item will work as
you expect.
Because your CheckBox only reports information and is not tied to any application logic, there is a
simple solution. You can update list_item_crime.xml to define the CheckBox as not focusable.
Listing 9.21Making the CheckBox non-focusable (list_item_crime.xml)
...
<CheckBox android:id="@+id/crime_list_item_solvedCheckBox"
android:layout_width="wrap_content"
android:layout_height="match_parent"
android:gravity="center"
android:layout_alignParentRight="true"
android:enabled="false"
android:focusable="false"
android:padding="4dp" />
...
Run your app and scroll through your custom list items. Click a list item and check the log to confirm
that CrimeAdapter is returning the correct crimes. If you are able to get the application to run but the
layout does not look right, return to list_item_crime.xml and recheck your layout.
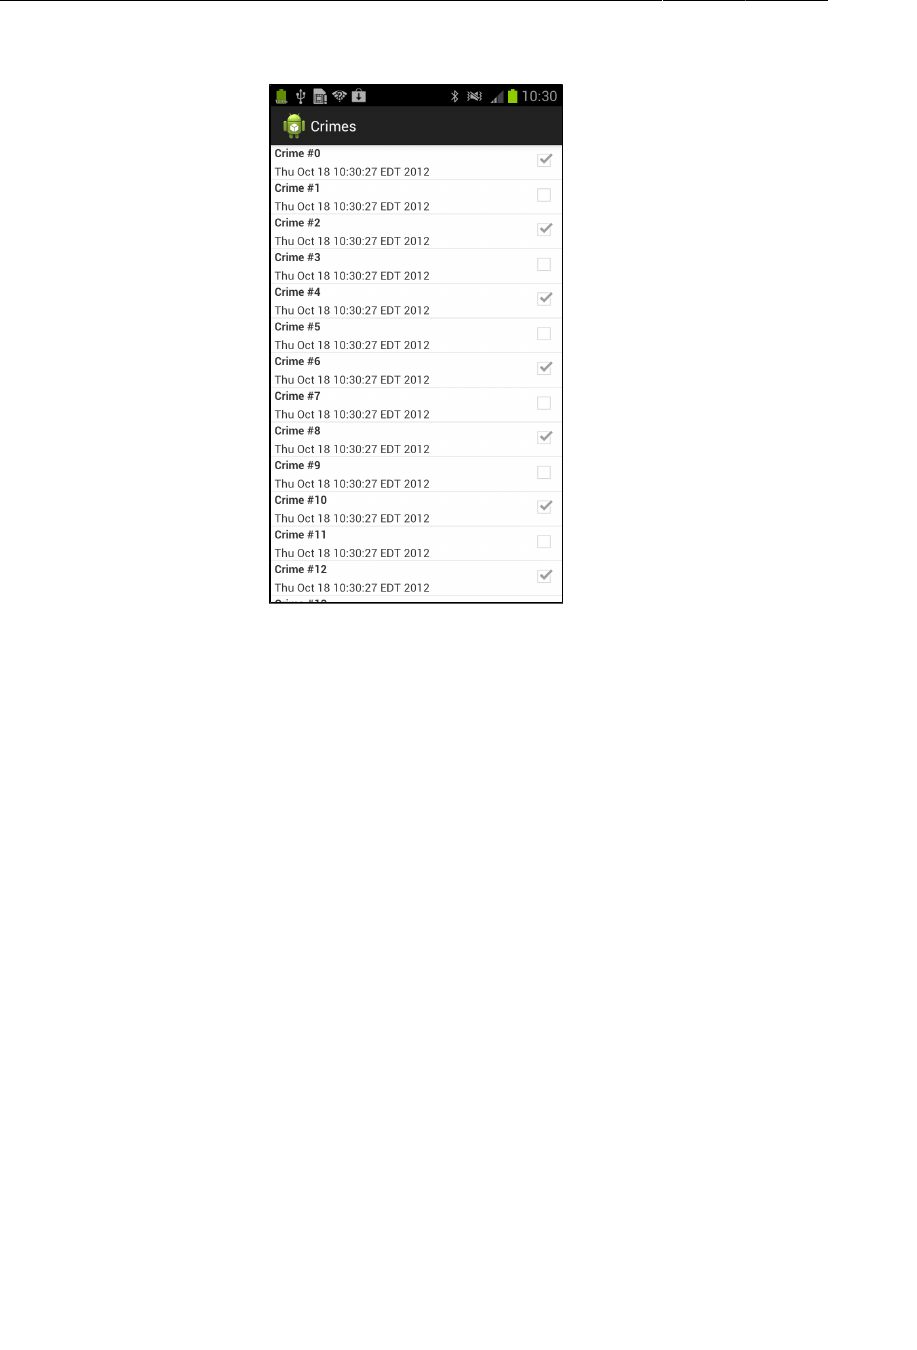
ptg11078569
Chapter 9Displaying Lists with ListFragment
190
Figure 9.13Now with custom list items!
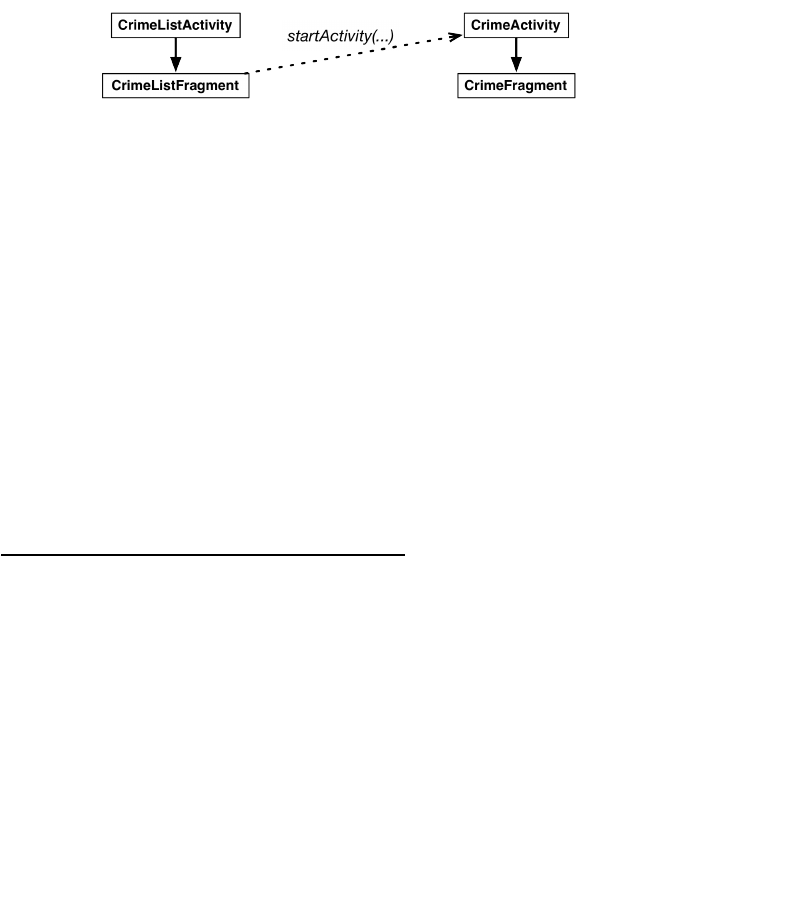
ptg11078569
191
10
Using Fragment Arguments
In this chapter, you will get the list and the detail parts of CriminalIntent working together. When a
user clicks on an item in the list of crimes, a new CrimeActivity hosting a CrimeFragment will appear
and display the details for a particular instance of Crime.
Figure 10.1Starting CrimeActivity from CrimeListActivity
In GeoQuiz, you had one activity (QuizActivity) start another activity (CheatActivity). In
CriminalIntent, you are going to start the CrimeActivity from a fragment. In particular, you will have
CrimeListFragment start an instance of CrimeActivity.
Starting an Activity from a Fragment
Starting an activity from a fragment works nearly the same as starting an activity from another activity.
You call the Fragment.startActivity(Intent) method, which calls the corresponding Activity
method behind the scenes.
In CrimeListFragment’s implementation of onListItemClick(…), replace logging the crime’s title
with code that starts an instance of CrimeActivity. (Ignore the warning about the Crime variable being
unused; you will be using it again in the next section.)
Listing 10.1Starting CrimeActivity (CrimeListFragment.java)
public void onListItemClick(ListView l, View v, int position, long id) {
// Get the Crime from the adapter
Crime c = ((CrimeAdapter)getListAdapter()).getItem(position);
Log.d(TAG, c.getTitle() + " was clicked");
// Start CrimeActivity
Intent i = new Intent(getActivity(), CrimeActivity.class);
startActivity(i);
}
Here CrimeListFragment creates an explicit intent that names the CrimeActivity class.
CrimeListFragment uses the getActivity() method to pass its hosting activity as the Context object
that the Intent constructor requires.
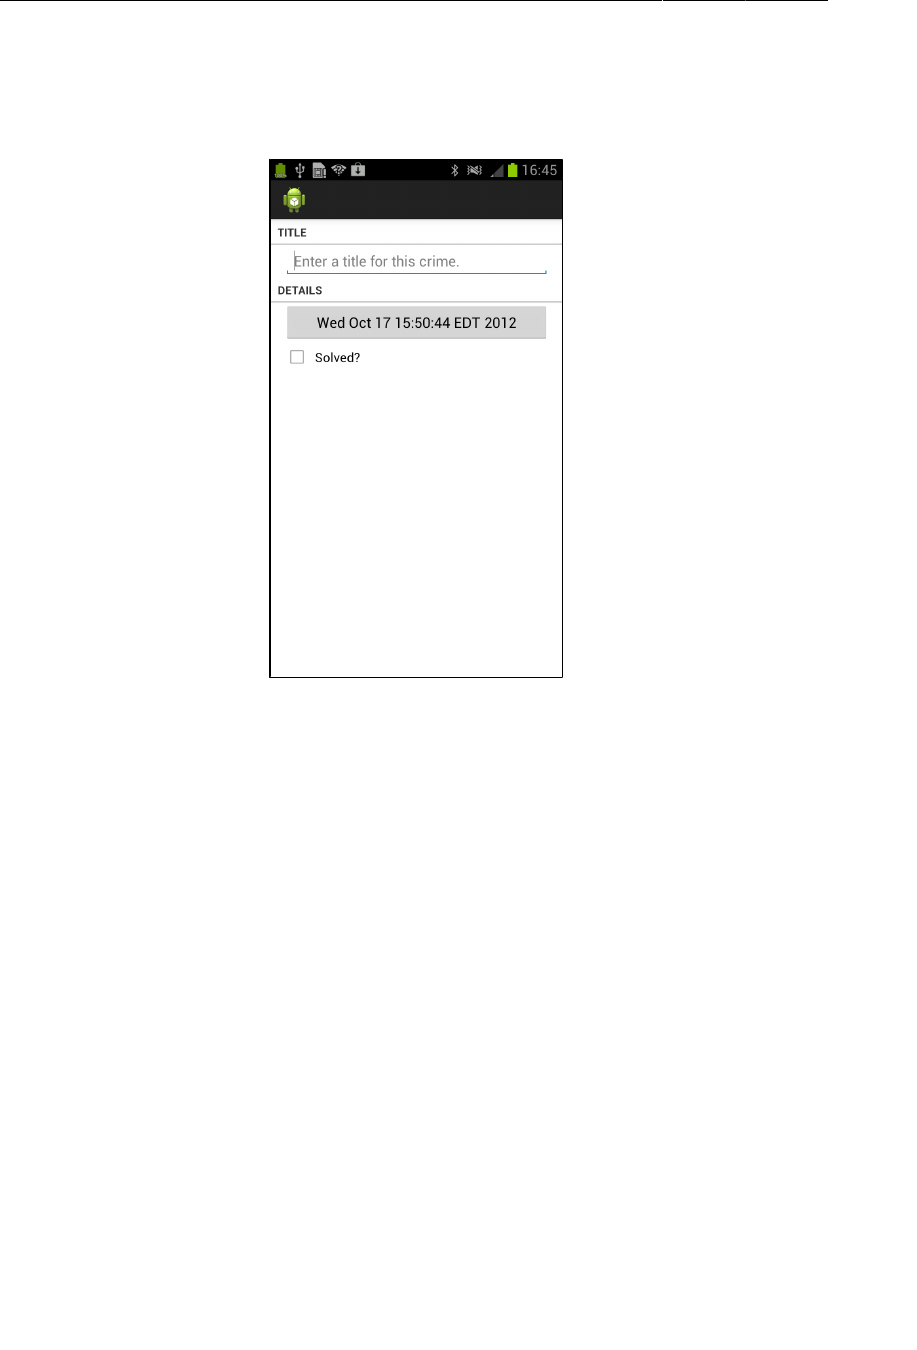
ptg11078569
Chapter 10Using Fragment Arguments
192
Run CriminalIntent. Click on any list item, and you will see a new CrimeActivity hosting a
CrimeFragment.
Figure 10.2A blank CrimeFragment
The CrimeFragment does not yet display the data for a specific Crime because you have not told it
which Crime to display.
Putting an extra
You can tell CrimeFragment which Crime to display by making the mCrimeId an Intent extra. In
onListItemClick(…), put the mCrimeId of the selected Crime on the intent that starts CrimeActivity.
This code will have an error because you have not yet created the CrimeFragment.EXTRA_CRIME_ID
key. Ignore the error; you will create the key next.
Listing 10.2Starting CrimeActivity with an extra
(CrimeListFragment.java)
public void onListItemClick(ListView l, View v, int position, long id) {
// Get the Crime from the adapter
Crime c = ((CrimeAdapter)getListAdapter()).getItem(position);
// Start CrimeActivity
Intent i = new Intent(getActivity(), CrimeActivity.class);
i.putExtra(CrimeFragment.EXTRA_CRIME_ID, c.getId());
startActivity(i);
}

ptg11078569
Retrieving an extra
193
After creating an explicit intent, you call putExtra(…) and pass in a string key and the value to pair
with it (the mCrimeId). In this case, you are calling putExtra(String, Serializable) because UUID
is a Serializable object.
Retrieving an extra
The mCrimeId is now safely stashed in the intent that belongs to CrimeActivity. However, it is the
CrimeFragment class that needs to retrieve and use that data.
There are two ways a fragment can access data in its activity’s intent: an easy, direct shortcut and a
complex, flexible implementation. First, you are going to try out the shortcut. Then you will implement
the complex and flexible solution that involves fragment arguments.
In the shortcut, CrimeFragment will simply use the getActivity() method to access the
CrimeActivity’s intent directly. Return to CrimeFragment and add the key for the extra. Then, in
onCreate(Bundle), retrieve the extra from CrimeActivity’s intent and use it to fetch the Crime.
Listing 10.3Retrieving the extra and fetching the Crime (CrimeFragment.java)
public class CrimeFragment extends Fragment {
public static final String EXTRA_CRIME_ID =
"com.bignerdranch.android.criminalintent.crime_id";
private Crime mCrime;
...
public void onCreate(Bundle savedInstanceState) {
super.onCreate(savedInstanceState);
mCrime = new Crime();
UUID crimeId = (UUID)getActivity().getIntent()
.getSerializableExtra(EXTRA_CRIME_ID);
mCrime = CrimeLab.get(getActivity()).getCrime(crimeId);
}
In Listing 10.3, other than the call to getActivity(), the code is the same as if you were retrieving
the extra from the activity’s code. The getIntent() method returns the Intent that was used to start
CrimeActivity. You call getSerializableExtra(String) on the Intent to pull the UUID out into a
variable.
After you have retrieved the ID, you use it to fetch the Crime from CrimeLab. The CrimeLab.get(…)
method requires a Context object, so CrimeFragment passes the CrimeActivity.
Updating CrimeFragment’s view with Crime data
Now that CrimeFragment fetches a Crime, its view can display that Crime’s data. Update
onCreateView(…) to display the Crime’s title and solved status. (The code for displaying the date is
already in place.)
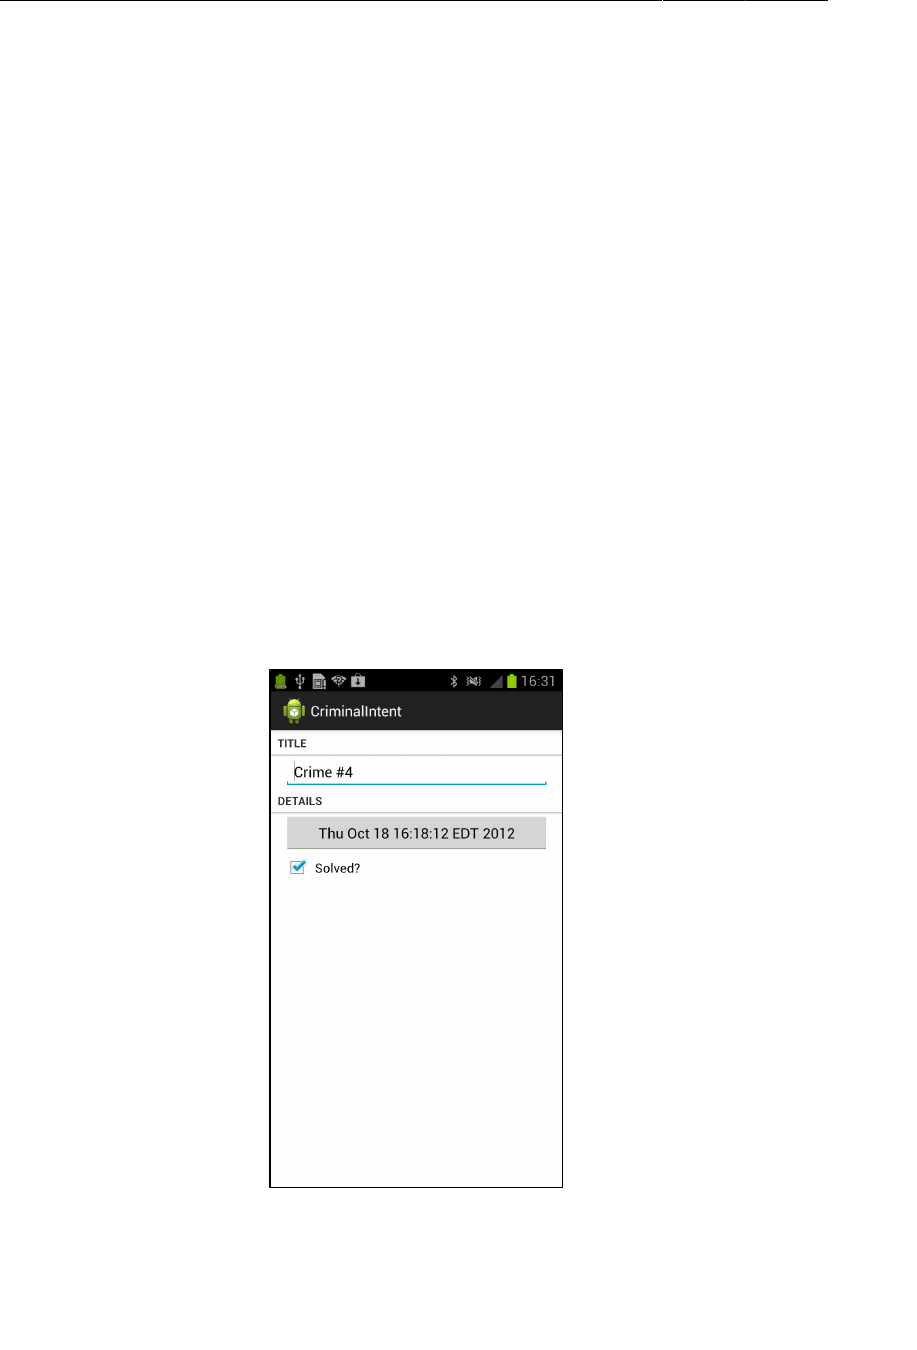
ptg11078569
Chapter 10Using Fragment Arguments
194
Listing 10.4Updating view objects (CrimeFragment.java)
@Override
public View onCreateView(LayoutInflater inflater, ViewGroup parent,
Bundle savedInstanceState) {
...
mTitleField = (EditText)v.findViewById(R.id.crime_title);
mTitleField.setText(mCrime.getTitle());
mTitleField.addTextChangedListener(new TextWatcher() {
...
});
...
mSolvedCheckBox = (CheckBox)v.findViewById(R.id.crime_solved);
mSolvedCheckBox.setChecked(mCrime.isSolved());
mSolvedCheckBox.setOnCheckedChangeListener(new OnCheckedChangeListener() {
...
});
...
return v;
}
Run CriminalIntent. Select Crime�#4 and watch a CrimeFragment instance with the correct crime data
appear.
Figure 10.3The crime that you wanted to see

ptg11078569
The downside to direct retrieval
195
The downside to direct retrieval
Having the fragment access the intent that belongs to the hosting activity makes for simple code.
However, it costs you the encapsulation of your fragment. CrimeFragment is no longer a reusable
building block because it expects that it will always be hosted by an activity whose Intent defines an
extra named EXTRA_CRIME_ID.
This may be a reasonable expectation on CrimeFragment’s part, but it means that CrimeFragment, as
currently written, cannot be used with just any activity.
A better solution is to stash the mCrimeId someplace that belongs to CrimeFragment rather than
keeping it in CrimeActivity’s personal space. The CrimeFragment could then retrieve this data
without relying on the presence of a particular extra in the activity’s intent. The “someplace” that
belongs to a fragment is known as its arguments bundle.
Fragment Arguments
Every fragment instance can have a Bundle object attached to it. This bundle contains key-value pairs
that work just like the intent extras of an Activity. Each pair is known as an argument.
To create fragment arguments, you first create a Bundle object. Next, you use type-specific “put”
methods of Bundle (similar to those of Intent) to add arguments to the bundle.
Bundle args = new Bundle();
args.putSerializable(EXTRA_MY_OBJECT, myObject);
args.putInt(EXTRA_MY_INT, myInt);
args.putCharSequence(EXTRA_MY_STRING, myString);
Attaching arguments to a fragment
To attach the arguments bundle to a fragment, you call Fragment.setArguments(Bundle). Attaching
arguments to a fragment must be done after the fragment is created but before it is added to an activity.
To hit this window, Android programmers follow a convention of adding a static method named
newInstance() to the Fragment class. This method creates the fragment instance and bundles up and
sets its arguments.
When the hosting activity needs an instance of that fragment, you have it call the newInstance()
method rather than calling the constructor directly. The activity can pass in any required parameters to
newInstance(…) that the fragment needs to create its arguments.
In CrimeFragment, write a newInstance(UUID) method that accepts a UUID, creates an arguments
bundle, creates a fragment instance, and then attaches the arguments to the fragment.
Listing 10.5Writing a newInstance(UUID) method (CrimeFragment.java)
public static CrimeFragment newInstance(UUID crimeId) {
Bundle args = new Bundle();
args.putSerializable(EXTRA_CRIME_ID, crimeId);
CrimeFragment fragment = new CrimeFragment();
fragment.setArguments(args);
return fragment;
}

ptg11078569
Chapter 10Using Fragment Arguments
196
Now CrimeActivity should call CrimeFragment.newInstance(UUID) when it needs to create
a CrimeFragment. It will pass in the UUID it retrieved from its extra. Return to CrimeActivity
and in createFragment(), retrieve the extra from CrimeActivity’s intent and pass it into
CrimeFragment.newInstance(UUID).
Listing 10.6Using newInstance(UUID) (CrimeActivity.java)
@Override
protected Fragment createFragment() {
return new CrimeFragment();
UUID crimeId = (UUID)getIntent()
.getSerializableExtra(CrimeFragment.EXTRA_CRIME_ID);
return CrimeFragment.newInstance(crimeId);
}
Notice that the need for independence does not go both ways. CrimeActivity has to know plenty
about CrimeFragment, like that it has a newInstance(UUID) method. This is fine. Hosting activities
should know the specifics of how to host their fragments, but fragments should not have to know
specifics about their activity. At least, not if you want to maintain the flexibility of independent
fragments.
Retrieving arguments
When a fragment needs to access its arguments, it calls the Fragment method getArguments() and
then one of the type-specific “get” methods of Bundle.
Back in CrimeFragment.onCreate(…), replace your shortcut code with retrieving the UUID from the
fragment arguments.
Listing 10.7Getting crime ID from the arguments (CrimeFragment.java)
@Override
public void onCreate(Bundle savedInstanceState) {
super.onCreate(savedInstanceState);
UUID crimeId = (UUID)getActivity().getIntent()
.getSerializableExtra(EXTRA_CRIME_ID);
UUID crimeId = (UUID)getArguments().getSerializable(EXTRA_CRIME_ID);
mCrime = CrimeLab.get(getActivity()).getCrime(crimeId);
}
Run CriminalIntent. The app will behave the same, but you should feel all warm and fuzzy inside for
maintaining CrimeFragment’s independence. You are also well-prepared for the next chapter where
you will implement more sophisticated navigation in CriminalIntent.
Reloading the List
There is one more detail to take care of. Run CriminalIntent, click a list item, and then modify that
Crime’s details. These changes are saved to the model, but when you return to the list, the list view is
unchanged.
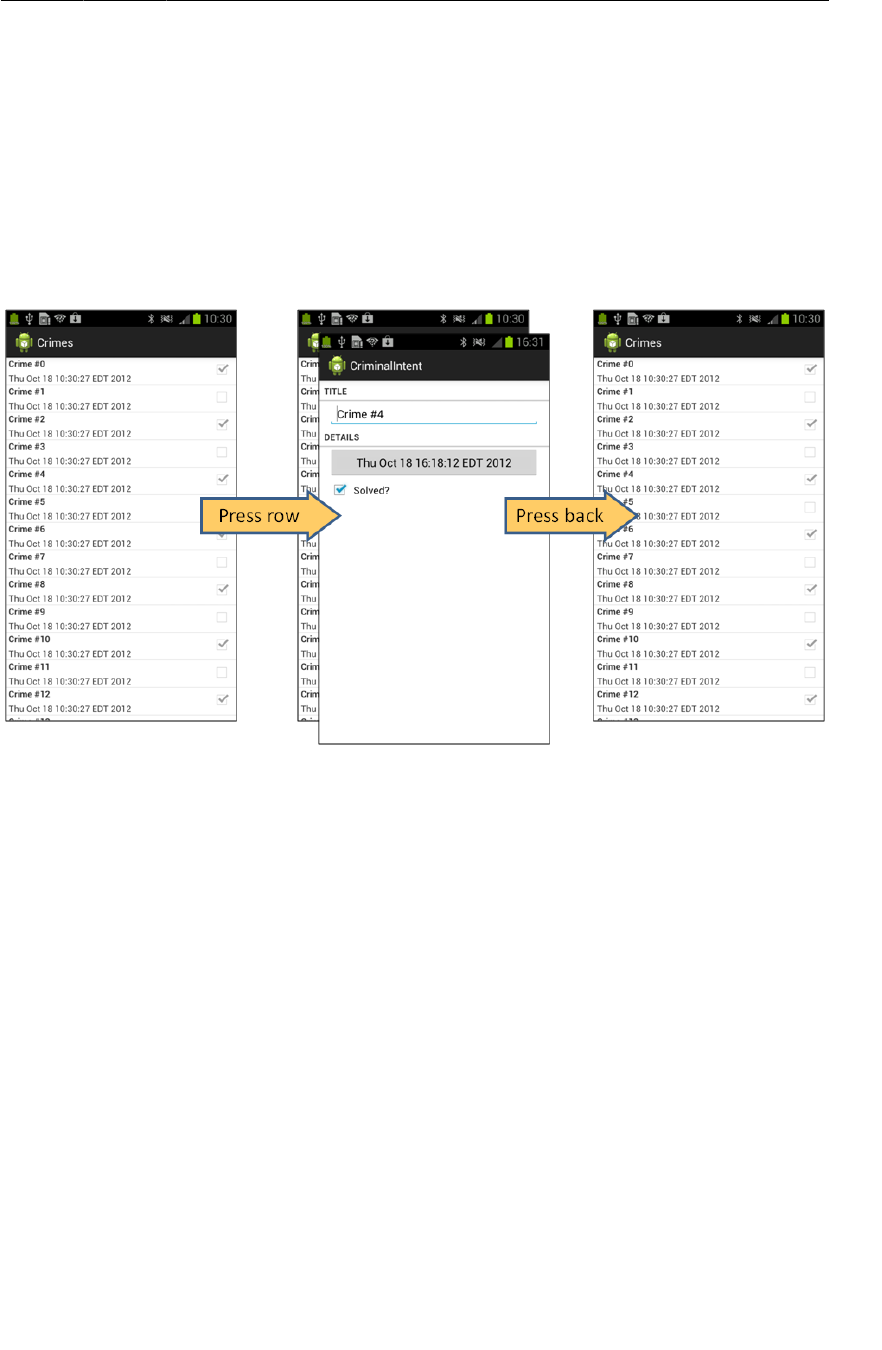
ptg11078569
Reloading the List
197
The list view’s adapter needs to be informed that the data set has changed (or may have changed) so
that it can refetch the data and reload the list. You can work with the ActivityManager’s back stack to
reload the list at the right moment.
When CrimeListFragment starts an instance of CrimeActivity, the CrimeActivity is put on top of
the stack. This pauses and stops the instance of CrimeListActivity that was initially on top.
When the user presses the Back button to return to the list, the CrimeActivity is popped off the stack
and destroyed. At that point, the CrimeListActivity is started and resumed.
Figure 10.4CriminalIntent’s back stack
When the CrimeListActivity is resumed, it receives a call to onResume() from the OS. When
CrimeListActivity receives this call, its FragmentManager calls onResume() on the fragments that the
activity is currently hosting. In this case, the only fragment is CrimeListFragment.
In CrimeListFragment, override onResume() to reload the list.
Listing 10.8Reloading the list in onResume() (CrimeListFragment.java)
@Override
public void onResume() {
super.onResume();
((CrimeAdapter)getListAdapter()).notifyDataSetChanged();
}
Why override onResume() to update the list view and not onStart() ? You cannot assume that your
activity will be stopped when another activity is in front of it. If the other activity is transparent, your
activity may just be paused. If your activity is paused and your update code is in onStart(), then the
list will not be reloaded. In general, onResume() is the safest place to take action to update a fragment’s
view.
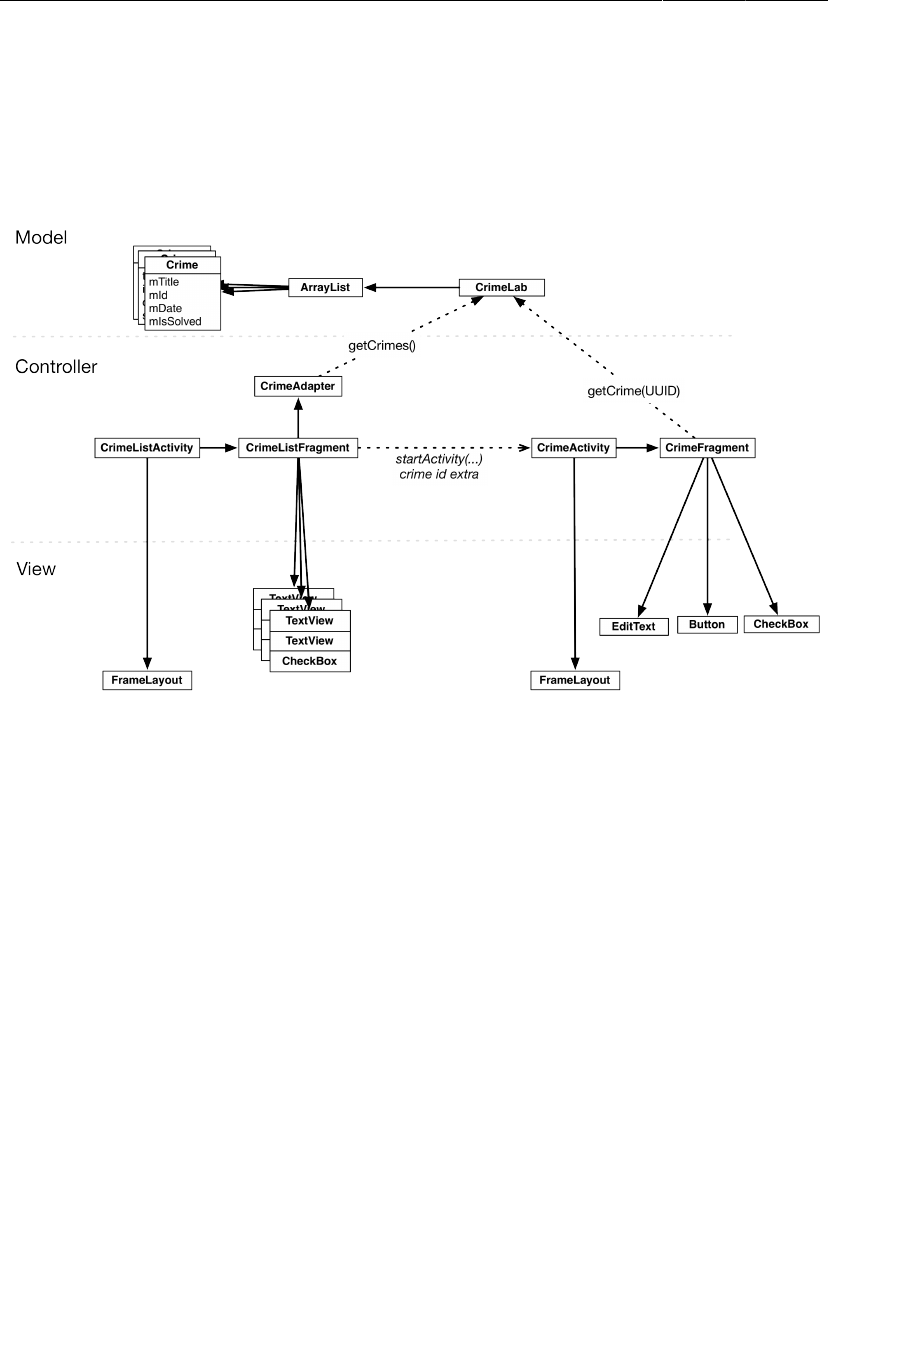
ptg11078569
Chapter 10Using Fragment Arguments
198
Run CriminalIntent. Select a crime and change its details. When you return to the list, you will
immediately see your changes.
You have made progress with CriminalIntent in the last two chapters. Let’s take a look at an updated
object diagram.
Figure 10.5Updated object diagram for CriminalIntent
Getting Results with Fragments
In this chapter, you did not need a result back from the started activity. What if you did? Your code
would look a lot like it did in GeoQuiz. Instead of using the Activity’s startActivityForResult(…)
method, you would use Fragment.startActivityForResult(…). Instead of overriding
Activity.onActivityResult(…), you would override Fragment.onActivityResult(…).
public class CrimeListFragment extends ListFragment {
private static final int REQUEST_CRIME = 1;
...
public void onListItemClick(ListView l, View v, int position, long id) {
// Get the Crime from the adapter
Crime c = ((CrimeAdapter)getListAdapter()).getItem(position);
Log.d(TAG, c.getTitle() + " was clicked");
// Start CrimeActivity
Intent i = new Intent(getActivity(), CrimeActivity.class);
startActivityForResult(i, REQUEST_CRIME);
}

ptg11078569
Getting Results with Fragments
199
@Override
public void onActivityResult(int requestCode, int resultCode, Intent data) {
if (requestCode == REQUEST_CRIME) {
// Handle result
}
}
}
Fragment.startActivityForResult(Intent,int) is similar to the Activity method with the same
name. It includes some additional code to route the result to your fragment from its host activity.
Returning results from a fragment is a bit different. A fragment can receive a result from an activity,
but it cannot have its own result. Only activities have results. So while Fragment has its own
startActivityForResult(…) and onActivityResult(…) methods, it does not have any setResult(…)
methods.
Instead, you tell the host activity to return a value. Like this:
public class CrimeFragment extends Fragment {
...
public void returnResult() {
getActivity().setResult(Activity.RESULT_OK, null);
}
}
You will get a chance to return an activity result from a fragment in CriminalIntent in Chapter20.

ptg11078569
This page intentionally left blank
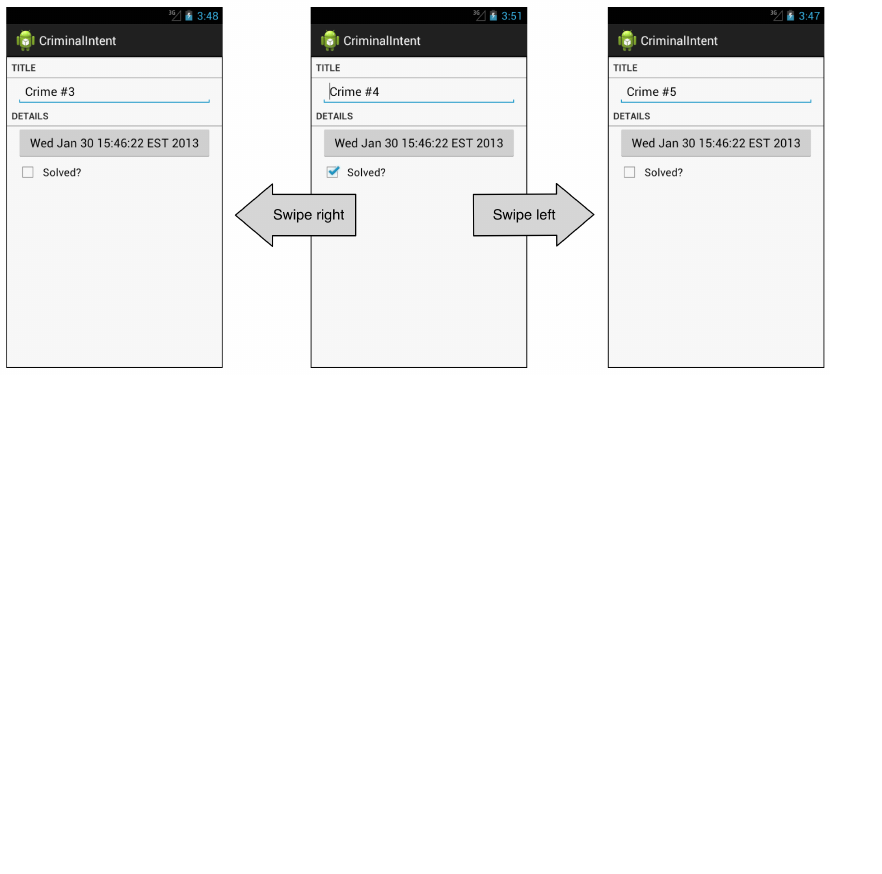
ptg11078569
201
11
Using ViewPager
In this chapter, you will create a new activity to host CrimeFragment. This activity’s layout will consist
of an instance of ViewPager. Adding a ViewPager to your UI lets users navigate between list items by
swiping across the screen to “page” forward or backward through the crimes.
Figure 11.1Swiping to page through crimes
Figure11.2 shows an updated diagram for CriminalIntent. The new activity will be named
CrimePagerActivity and will take the place of CrimeActivity. Its layout will consist of a ViewPager.
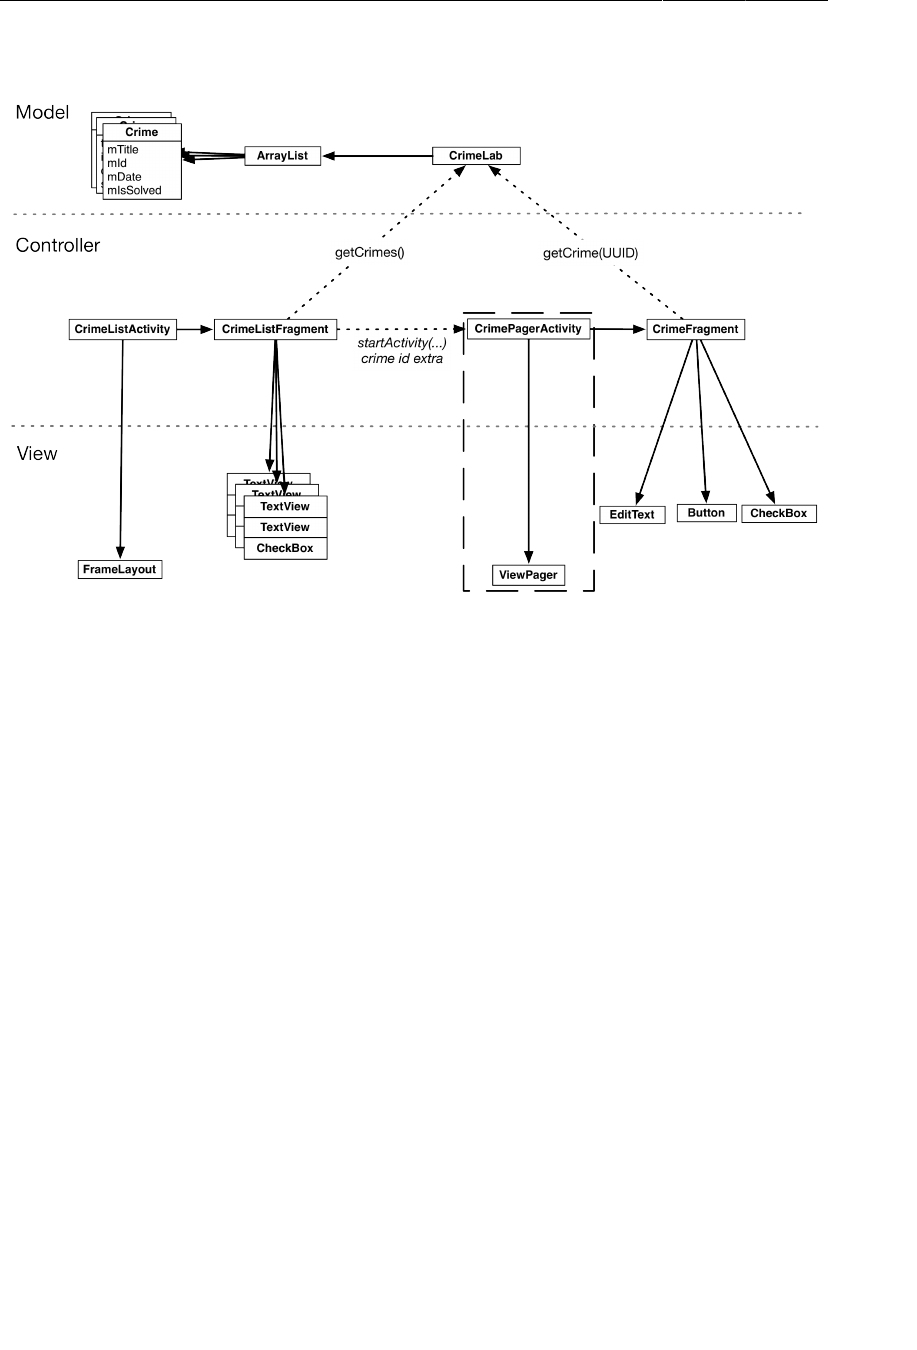
ptg11078569
Chapter 11Using ViewPager
202
Figure 11.2Layout diagram for CrimePagerActivity
The only new objects you need to create are within the dashed rectangle in the diagram above. Nothing
else in CriminalIntent needs to change to implement paging between detail views. In particular, you
will not have to touch the CrimeFragment class thanks to the work you did in Chapter10 to ensure
CrimeFragment’s independence.
Here are the tasks ahead in this chapter:
• create the CrimePagerActivity class
• define a view hierarchy that consists of a ViewPager
• wire up the ViewPager and its adapter in CrimePagerActivity
• modify CrimeListFragment.onListItemClick(…) to start CrimePagerActivity instead of
CrimeActivity
Creating CrimePagerActivity
CrimePagerActivity will be a subclass of FragmentActivity. It will create and manage the
ViewPager.
Create a new class named CrimePagerActivity. Make its superclass FragmentActivity. In
onCreate(Bundle), simply call through to the superclass – you will create your instance of ViewPager
in a moment.

ptg11078569
Laying out views in code
203
Listing 11.1Set up ViewPager (CrimePagerActivity.java)
public class CrimePagerActivity extends FragmentActivity {
private ViewPager mViewPager;
@Override
public void onCreate(Bundle savedInstanceState) {
super.onCreate(savedInstanceState);
}
}
Laying out views in code
Elsewhere in this book, you have defined view layouts in layout XML files. This is generally a good
idea, but there is nothing in Android that requires you to define your layout this way. Your view
hierarchy in this chapter will be simple – just a single view. So instead of using an XML file, let’s
define your hierarchy in code. Since you only have one view here, this is not an involved task.
No magic is necessary to create a view: just call its constructor. Unfortunately, that does not leave you
completely free of XML. Resource IDs are still required for some components. ViewPager is one of
them. The FragmentManager requires that any view used as a fragment container must have an ID.
ViewPager is a fragment container, so you will need to assign an ID to it.
That gives you the following list of things to do:
• create a resource ID for your ViewPager
• create an instance of ViewPager and assign it to mViewPager.
• configure it by assigning a resource ID to it.
• set your ViewPager as the content view of your activity.
Standalone ID resources
Defining a standalone resource ID is not unlike defining a string resource: you create an item element
in an XML file in res/values. Create a new Android XML resource file called res/values/ids.xml
to store your IDs in, and add an ID called viewPager:
Listing 11.2Create standalone resource ID (res/values/ids.xml)
<?xml version="1.0" encoding="utf-8"?>
<resources>
<item type="id" name="viewPager" />
</resources>
With your ID created, you are ready to create and show your ViewPager. Instantiate your ViewPager
and set it as the content view:

ptg11078569
Chapter 11Using ViewPager
204
Listing 11.3Create content view programmatically
(CrimePagerActivity.java)
@Override
public void onCreate(Bundle savedInstanceState) {
super.onCreate(savedInstanceState);
mViewPager = new ViewPager(this);
mViewPager.setId(R.id.viewPager);
setContentView(mViewPager);
}
The ViewPager class is from the support library. Unlike Fragment, ViewPager is only available in the
support library; there is not a “standard” ViewPager class in a later SDK.
ViewPager and PagerAdapter
A ViewPager is like an AdapterView (the superclass of ListView) in some ways. An AdapterView
requires an Adapter to provide views. A ViewPager requires a PagerAdapter.
However, the conversation between ViewPager and PagerAdapter is much more involved than the
conversation between AdapterView and Adapter. Luckily, you can use FragmentStatePagerAdapter,
a subclass of PagerAdapter, to take care of many of the details.
FragmentStatePagerAdapter will boil down the conversation to two simple methods: getCount() and
getItem(int). When your getItem(int) method is called for a position in your array of crimes, you
will return a CrimeFragment configured to display the crime at that position.
In CrimePagerActivity, add the following code to set the ViewPager’s pager adapter and implement
its getCount() and getItem(int) methods.

ptg11078569
Integrating CrimePagerActivity
205
Listing 11.4Set up pager adapter (CrimePagerActivity.java)
public class CrimePagerActivity extends FragmentActivity {
private ViewPager mViewPager;
private ArrayList<Crime> mCrimes;
@Override
public void onCreate(Bundle savedInstanceState) {
super.onCreate(savedInstanceState);
mViewPager = new ViewPager(this);
mViewPager.setId(R.id.viewPager);
setContentView(mViewPager);
mCrimes = CrimeLab.get(this).getCrimes();
FragmentManager fm = getSupportFragmentManager();
mViewPager.setAdapter(new FragmentStatePagerAdapter(fm) {
@Override
public int getCount() {
return mCrimes.size();
}
@Override
public Fragment getItem(int pos) {
Crime crime = mCrimes.get(pos);
return CrimeFragment.newInstance(crime.getId());
}
});
}
}
Let’s go through this code. In the first line, you get your data set from CrimeLab – the ArrayList of
crimes. Next, you get the activity’s instance of FragmentManager.
Then you set the adapter to be an unnamed instance of FragmentStatePagerAdapter.
Creating the FragmentStatePagerAdapter requires the FragmentManager. Remember that
FragmentStatePagerAdapter is your agent managing the conversation with ViewPager. For your agent
to do its job with the fragments you return in getItem(int), it needs to be able to add them to your
activity. That is why it needs your FragmentManager.
(What exactly is your agent doing? The short story is that it is adding the fragments you return to your
activity and helping ViewPager identify the fragments’ views so that they can be placed correctly. More
details are in the For the More Curious section at the end of the chapter.)
The pager adapter’s two methods are straightforward. The getCount() method returns how many items
there are in the array list. The getItem(int) method is where the magic happens. It fetches the Crime
instance for the given position in the dataset. It then uses that Crime’s ID to create and return a properly
configured CrimeFragment.
Integrating CrimePagerActivity
Now you can begin the process of decommissioning CrimeActivity and putting CrimePagerActivity
in its place.
First, you want pressing a list item in CrimeListFragment to start an instance of CrimePagerActivity
instead of CrimeActivity.

ptg11078569
Chapter 11Using ViewPager
206
Return to CrimeListFragment.java and modify onListItemClick(…) to start a CrimePagerActivity.
Listing 11.5Fire it up (CrimeListFragment.java)
@Override
public void onListItemClick(ListView l, View v, int position, long id) {
// Get the Crime from the adapter
Crime c = ((CrimeAdapter)getListAdapter()).getItem(position);
// Start CrimeActivity
Intent i = new Intent(getActivity(), CrimeActivity.class);
// Start CrimePagerActivity with this crime
Intent i = new Intent(getActivity(), CrimePagerActivity.class);
i.putExtra(CrimeFragment.EXTRA_CRIME_ID, c.getId());
startActivity(i);
}
You also need to add CrimePagerActivity to the manifest so that the OS can start it. While you are in
the manifest, remove CrimeActivity’s declaration.
Listing 11.6Add CrimePagerActivity to manifest (AndroidManifest.xml)
<?xml version="1.0" encoding="utf-8"?>
<manifest ...>
...
<application ...>
...
<activity
android:name=".CrimeActivity"
android:label="@string/app_name" >
</activity>
<activity android:name=".CrimePagerActivity"
android:label="@string/app_name">
</activity>
</application>
</manifest>
Finally, to keep your project tidy, delete CrimeActivity.java from the package explorer.
Run CriminalIntent. Press Crime�#0 to view its details. Then swipe left and right to browse more
crimes. Notice that the paging is smooth and there is no delay in loading. By default, ViewPager
loads the item currently on screen plus one neighboring page in each direction so that the response
to a swipe is immediate. You can tweak how many neighboring pages are loaded by calling
setOffscreenPageLimit(int).
But all is not yet perfect with your ViewPager. Press Back to return to the list of crimes and press a
different item. You will see the first crime displayed again instead of the crime that you asked for.
By default, the ViewPager shows the first item in its PagerAdapter. You can have it show the crime
that was selected by setting the ViewPager’s current item to the index of the selected crime.
At the end of CrimePagerActivity.onCreate(…), find the index of the crime to display by looping
through and checking each crime’s ID. When you find the Crime instance whose mId matches the
crimeId in the intent extra, set the current item to the index of that Crime.

ptg11078569
Integrating CrimePagerActivity
207
Listing 11.7Set initial pager item (CrimePagerActivity.java)
public class CrimePagerActivity extends FragmentActivity {
@Override
public void onCreate(Bundle savedInstanceState) {
...
FragmentManager fm = getSupportFragmentManager();
mViewPager.setAdapter(new FragmentStatePagerAdapter(fm) {
...
});
UUID crimeId = (UUID)getIntent()
.getSerializableExtra(CrimeFragment.EXTRA_CRIME_ID);
for (int i = 0; i < mCrimes.size(); i++) {
if (mCrimes.get(i).getId().equals(crimeId)) {
mViewPager.setCurrentItem(i);
break;
}
}
}
}
Run CriminalIntent. Selecting any list item should display the details of the correct Crime.
There is one more feature you can add. You can replace the activity’s title that appears on the action bar
(or the title bar on older devices) with the title of the current Crime. To make this happen, implement
the ViewPager.OnPageChangeListener interface.
Listing 11.8Add OnPageListener (CrimePagerActivity.java)
@Override
public void onCreate(Bundle savedInstanceState) {
super.onCreate(savedInstanceState);
mViewPager = new ViewPager(this);
mViewPager.setId(R.id.viewPager);
setContentView(mViewPager);
mCrimes = CrimeLab.get(this).getCrimes();
FragmentManager fm = getSupportFragmentManager();
mViewPager.setAdapter(new FragmentStatePagerAdapter(fm) {
...
});
mViewPager.setOnPageChangeListener(new ViewPager.OnPageChangeListener() {
public void onPageScrollStateChanged(int state) { }
public void onPageScrolled(int pos, float posOffset, int posOffsetPixels) { }
public void onPageSelected(int pos) {
Crime crime = mCrimes.get(pos);
if (crime.getTitle() != null) {
setTitle(crime.getTitle());
}
}
});
...
}
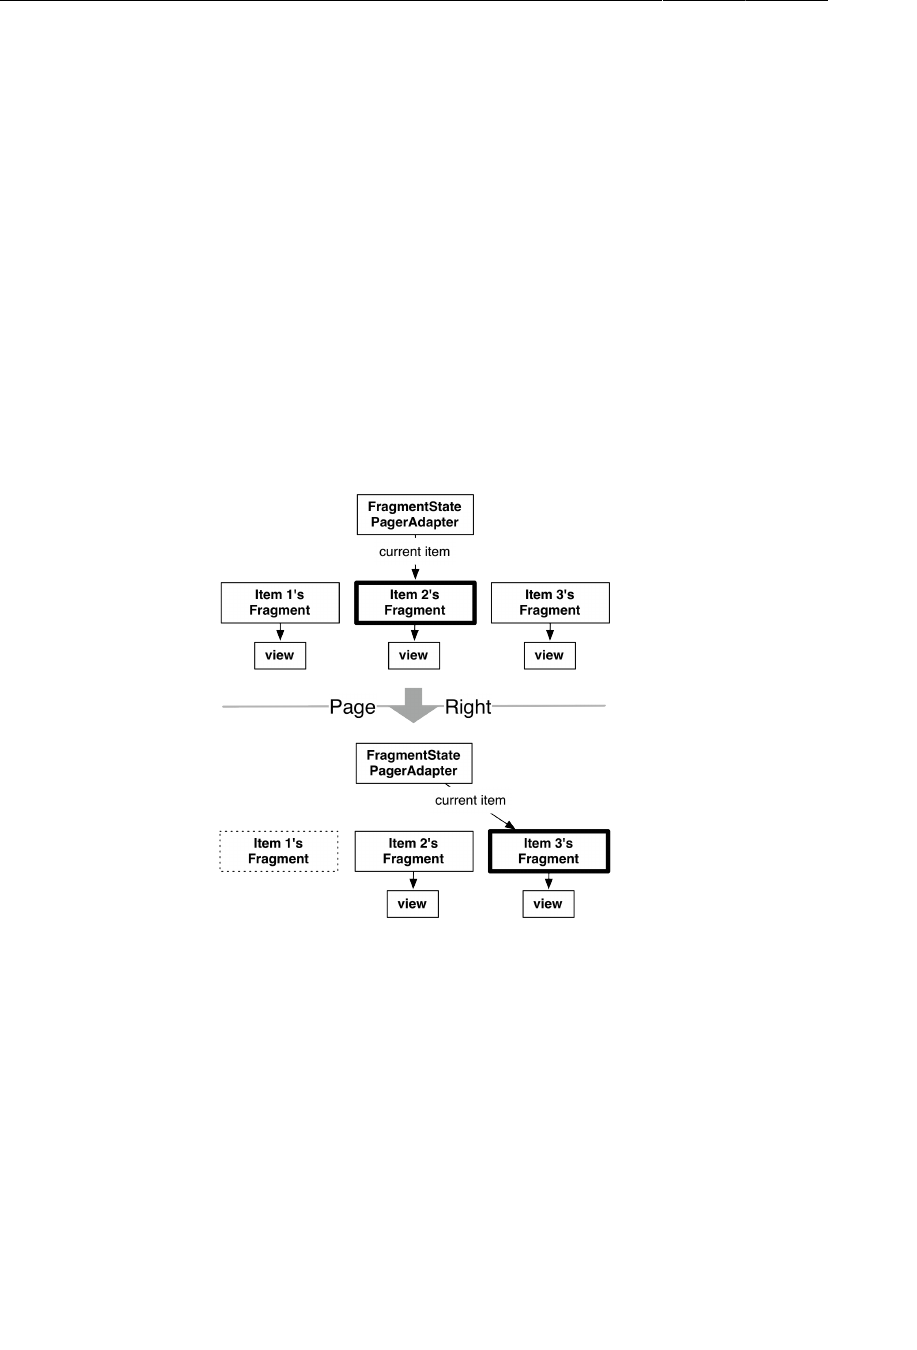
ptg11078569
Chapter 11Using ViewPager
208
OnPageChangeListener is how you listen for changes in the page currently being displayed by
ViewPager. When the page changes, you set CrimePagerActivity’s title to the title of the Crime.
You are only interested in which page is currently selected, so you only implement
onPageSelected(…). The onPageScrolled(…) method tells you exactly where your page is going
to be, and onPageScrollStateChanged(…) tells you whether the page animation is being actively
dragged, settling to a steady state, or idling.
Run CriminalIntent to see that each swipe updates the activity’s title to the mTitle of the current
Crime. And that is it. Your ViewPager is now fully-armed and operational.
FragmentStatePagerAdapter vs. FragmentPagerAdapter
There is another PagerAdapter type that you can use called FragmentPagerAdapter.
FragmentPagerAdapter is used exactly like FragmentStatePagerAdapter. It only differs in how it
unloads your fragments when they are no longer needed.
Figure 11.3FragmentStatePagerAdapter’s fragment management
With FragmentStatePagerAdapter, your unneeded fragment is destroyed. A transaction is
committed to completely remove the fragment from your activity’s FragmentManager. The “state” in
FragmentStatePagerAdapter comes from the fact that it will save out your fragment’s Bundle from
onSaveInstanceState(Bundle) when it is destroyed. When the user navigates back, the new fragment
will be restored using that instance state.
By comparison, FragmentPagerAdapter does nothing of the kind. When your fragment is no
longer needed, FragmentPagerAdapter calls detach(Fragment) on the transaction instead of
remove(Fragment). This destroys the fragment’s view, but leaves the fragment instance alive in the
FragmentManager. So the fragments created by FragmentPagerAdapter are never destroyed.
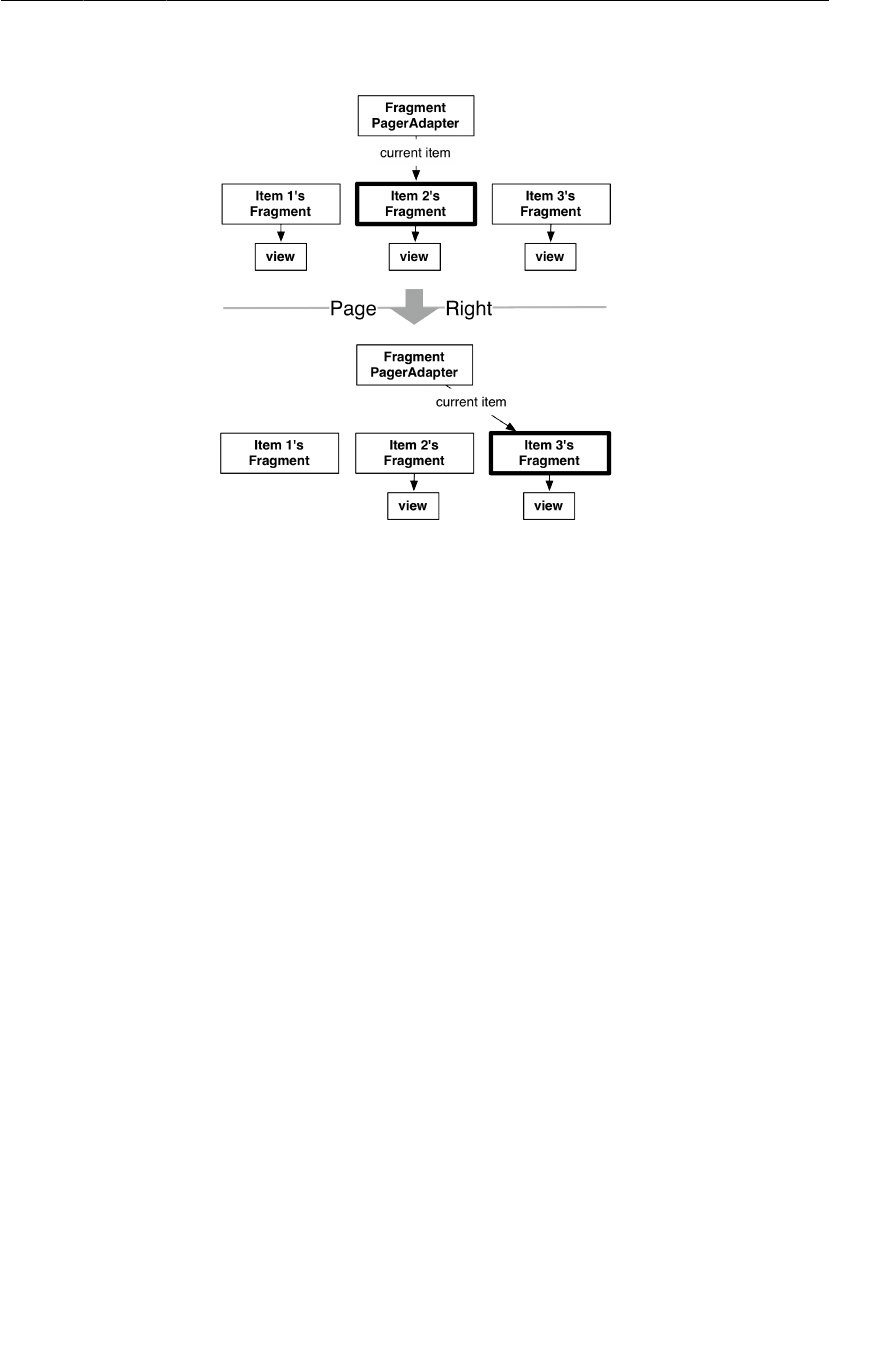
ptg11078569
For the More Curious: How ViewPager Really Works
209
Figure 11.4FragmentPagerAdapter’s fragment management
Which kind of adapter you want to use depends on your application. In general,
FragmentStatePagerAdapter is more frugal with memory. CriminalIntent is displaying what could be
a long list of crimes, each of which will eventually include a photo. You do not want to keep all that
information in memory, so you use FragmentStatePagerAdapter.
On the other hand, if your interface has a small, fixed number of fragments, FragmentPagerAdapter
is safe and appropriate. The most common example of this scenario is a tabbed interface. Some detail
views have enough details to require two screens, so the details are split across multiple tabs. Adding
a swipable ViewPager to this interface makes the app tactile. Keeping these fragments in memory can
make your controller code easier to manage, and because this style of interface usually has only two or
three fragments per activity, there is little danger of running low on memory.
For the More Curious: How ViewPager Really Works
The ViewPager and PagerAdapter classes handle many things for you behind the scenes. This section
will supply more details about what is going on back there.
Two caveats before we get into this discussion: First, according to the documentation, ViewPager is
still under development, so these interfaces could change in the future. Second, you do not need to
understand the nitty-gritty details in most cases.
But if you need to implement the PagerAdapter interface yourself, you will need to know how the
ViewPager-PagerAdapter relationship differs from an ordinary AdapterView-Adapter relationship.
So why is ViewPager not an AdapterView? There is an AdapterView subclass called Gallery that
behaves similarly. Why not use that?
Using an AdapterView in this case would be a lot of work because you could not use your existing
Fragment. An Adapter expects you to provide a View instantly. However, your FragmentManager

ptg11078569
Chapter 11Using ViewPager
210
determines when your fragment’s view is created, not you. So when Gallery comes knocking at your
Adapter’s door for your fragment’s view, you will not be able to create the fragment and provide its
view immediately.
This is the reason ViewPager exists. Instead of an Adapter, it uses a class called PagerAdapter.
PagerAdapter is more complicated than Adapter because it does more of the work of managing views
than Adapter does. Here are the basics:
Instead of a getView(…) method that returns a view, PagerAdapter has the following methods:
public Object instantiateItem(ViewGroup container, int position)
public void destroyItem(ViewGroup container, int position, Object object)
public abstract boolean isViewFromObject(View view, Object object)
PagerAdapter.instantiateItem(ViewGroup, int) tells the pager adapter to create an item view for a
given position and add it to a container ViewGroup, and destroyItem(ViewGroup, int, Object) tells
it to destroy that item. Note that instantiateItem(ViewGroup, int) does not say to create the view
right now. The PagerAdapter could create the view at any time after that.
Once the view has been created, ViewPager will notice it at some point. To figure out which
item’s view it is, it calls isViewFromObject(View, Object). The Object parameter is an
object received from a call to instantiateItem(ViewGroup, int). So if ViewPager calls
instantiateItem(ViewGroup, 5) and receives object A, isViewFromObject(View, A) should return
true if the View passed in is for item 5, and false otherwise.
This is a complicated process for the ViewPager, but it is less complicated for the PagerAdapter,
which only needs to be able to create views, destroy views, and identify which object a view comes
from. This loose requirement gives a PagerAdapter implementation enough wiggle room to create and
add a new fragment inside instantiateItem(ViewGroup, int) and return the fragment as the Object
to keep track of. Then isViewFromObject(View, Object) looks like this:
@Override
public boolean isViewFromObject(View view, Object object) {
return ((Fragment)object).getView() == view;
}
Implementing all those PagerAdapter overrides would be a pain to do every time you needed to use
ViewPager. Thank goodness for FragmentPagerAdapter and FragmentStatePagerAdapter.
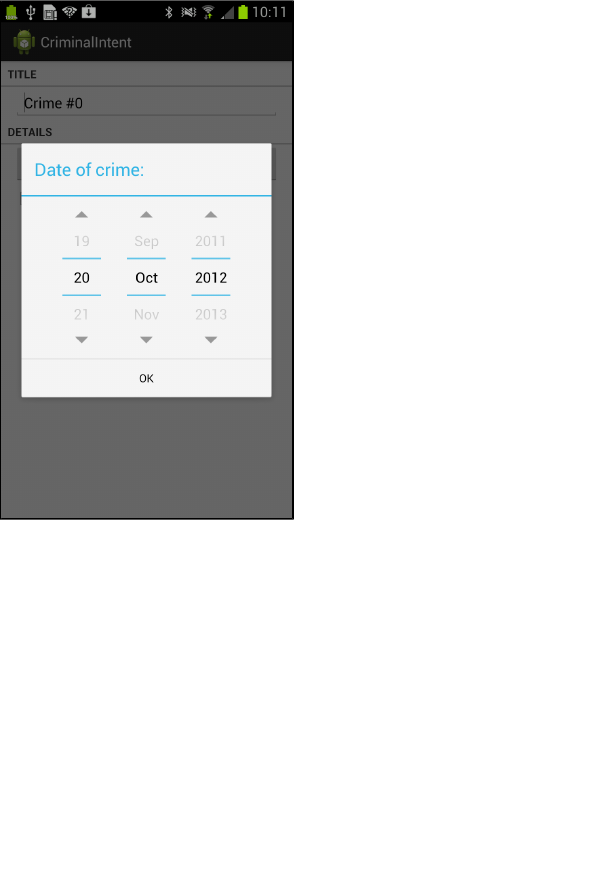
ptg11078569
211
12
Dialogs
Dialogs demand attention and input from the user. They are useful for presenting a choice or important
information. In this chapter, you will add a dialog in which users can change the date of a crime.
Pressing the date button in CrimeFragment will present this dialog (Figure12.1).
Figure 12.1A dialog for picking the date of a crime
The dialog in Figure12.1 is an instance of AlertDialog, a subclass of Dialog. AlertDialog is the all-
purpose Dialog subclass that you will use most often.
(There is a DatePickerDialog subclass of AlertDialog that sounds perfect for what you are doing.
However, as of this writing DatePickerDialog has some buggy behavior, and using AlertDialog is
easier than working around these bugs.)
The AlertDialog in Figure12.1 is wrapped in an instance of DialogFragment, a subclass of Fragment.
It is possible to display an AlertDialog without a DialogFragment, but Android does not recommend

ptg11078569
Chapter 12Dialogs
212
it. Having the dialog managed by the FragmentManager gives you more options for presenting the
dialog.
In addition, a bare AlertDialog will vanish if the device is rotated. On the other hand, if the
AlertDialog is wrapped in a fragment, then the dialog will be recreated and put on screen after
rotation.
For CriminalIntent, you are going to create a DialogFragment subclass named DatePickerFragment.
Within DatePickerFragment, you will create and configure an instance of AlertDialog that displays a
DatePicker widget. DatePickerFragment will be hosted by CrimePagerActivity.
Figure12.2 shows you an overview of these relationships.
Figure 12.2Object diagram for two fragments hosted by CrimePagerActivity
Your first tasks are
• creating the DatePickerFragment class
• building an AlertDialog
• getting the dialog on screen via the FragmentManager
Later in the chapter, you will wire up the DatePicker and pass the necessary data between
CrimeFragment and DatePickerFragment.
Before you get started, add the string resource shown in Listing 12.1.

ptg11078569
Creating a DialogFragment
213
Listing 12.1Add string for dialog title (values/strings.xml)
<resources>
...
<string name="crime_solved_label">Solved?</string>
<string name="crimes_title">Crimes</string>
<string name="date_picker_title">Date of crime:</string>
</resources>
Creating a DialogFragment
Create a new class named DatePickerFragment and make its superclass the support library’s version
of DialogFragment: android.support.v4.app.DialogFragment.
DialogFragment includes the following method:
public Dialog onCreateDialog(Bundle savedInstanceState)
The FragmentManager of the hosting activity calls this method as part of putting the DialogFragment
on screen.
In DatePickerFragment.java, add an implementation of onCreateDialog(…) that builds an
AlertDialog with a title and one OK button. (You will add the DatePicker widget later.)
Listing 12.2Creating a DialogFragment (DatePickerFragment.java)
public class DatePickerFragment extends DialogFragment {
@Override
public Dialog onCreateDialog(Bundle savedInstanceState) {
return new AlertDialog.Builder(getActivity())
.setTitle(R.string.date_picker_title)
.setPositiveButton(android.R.string.ok, null)
.create();
}
}
In this implementation, you use the AlertDialog.Builder class that provides a fluent interface for
constructing an AlertDialog instance.
First, you pass a Context into the AlertDialog.Builder constructor, which returns an instance of
AlertDialog.Builder.
Next, you call two AlertDialog.Builder methods to configure your dialog:
public AlertDialog.Builder setTitle(int titleId)
public AlertDialog.Builder setPositiveButton(int textId,
DialogInterface.OnClickListener listener)
This setPositiveButton(…) method accepts a string resource and an object that implements
DialogInterface.OnClickListener. In Listing 12.2, you pass in an Android constant for OK and
null for the listener parameter. You will implement a listener later in the chapter.
(A positive button is what the user should press to accept what the dialog presents. There are two other
buttons that you can add to an AlertDialog: a negative button and a neutral button. These designations
determine the positions of the buttons in the dialog (when there is more than one). On Froyo and

ptg11078569
Chapter 12Dialogs
214
Gingerbread devices, the positive button is left-most. On newer devices, the order is flipped, and the
positive button is right-most.)
Finally, you finish building the dialog with a call to AlertDialog.Builder.create(), which returns
the configured AlertDialog instance.
There is more that you can do with AlertDialog and AlertDialog.Builder, and the details are well-
covered in the developer documentation. For now, let’s move on to the mechanics of getting your
dialog on screen.
Showing a DialogFragment
Like all fragments, instances of DialogFragment are managed by the FragmentManager of the hosting
activity.
To get a DialogFragment added to the FragmentManager and put on screen, you can call the following
methods on the fragment instance:
public void show(FragmentManager manager, String tag)
public void show(FragmentTransaction transaction, String tag)
The string parameter uniquely identifies the DialogFragment in the FragmentManager’s list. Whether
you use the FragmentManager or FragmentTransaction version is up to you – if you pass in a
FragmentManager, a transaction will automatically be created and committed for you. Here, you will
pass in a FragmentManager.
In CrimeFragment, add a constant for the DatePickerFragment’s tag. Then, in onCreateView(…),
remove the code that disables the date button and set a View.OnClickListener that shows a
DatePickerFragment when the date button is pressed.
Listing 12.3Show your DialogFragment (CrimeFragment.java)
public class CrimeFragment extends Fragment {
public static final String EXTRA_CRIME_ID =
"com.bignerdranch.android.criminalintent.crime_id";
private static final String DIALOG_DATE = "date";
...
@Override
public View onCreateView(LayoutInflater inflater, ViewGroup parent,
Bundle savedInstanceState) {
...
mDateButton = (Button)v.findViewById(R.id.crime_date);
mDateButton.setText(mCrime.getDate().toString());
mDateButton.setEnabled(false);
mDateButton.setOnClickListener(new View.OnClickListener() {
public void onClick(View v) {
FragmentManager fm = getActivity()
.getSupportFragmentManager();
DatePickerFragment dialog = new DatePickerFragment();
dialog.show(fm, DIALOG_DATE);
}
});
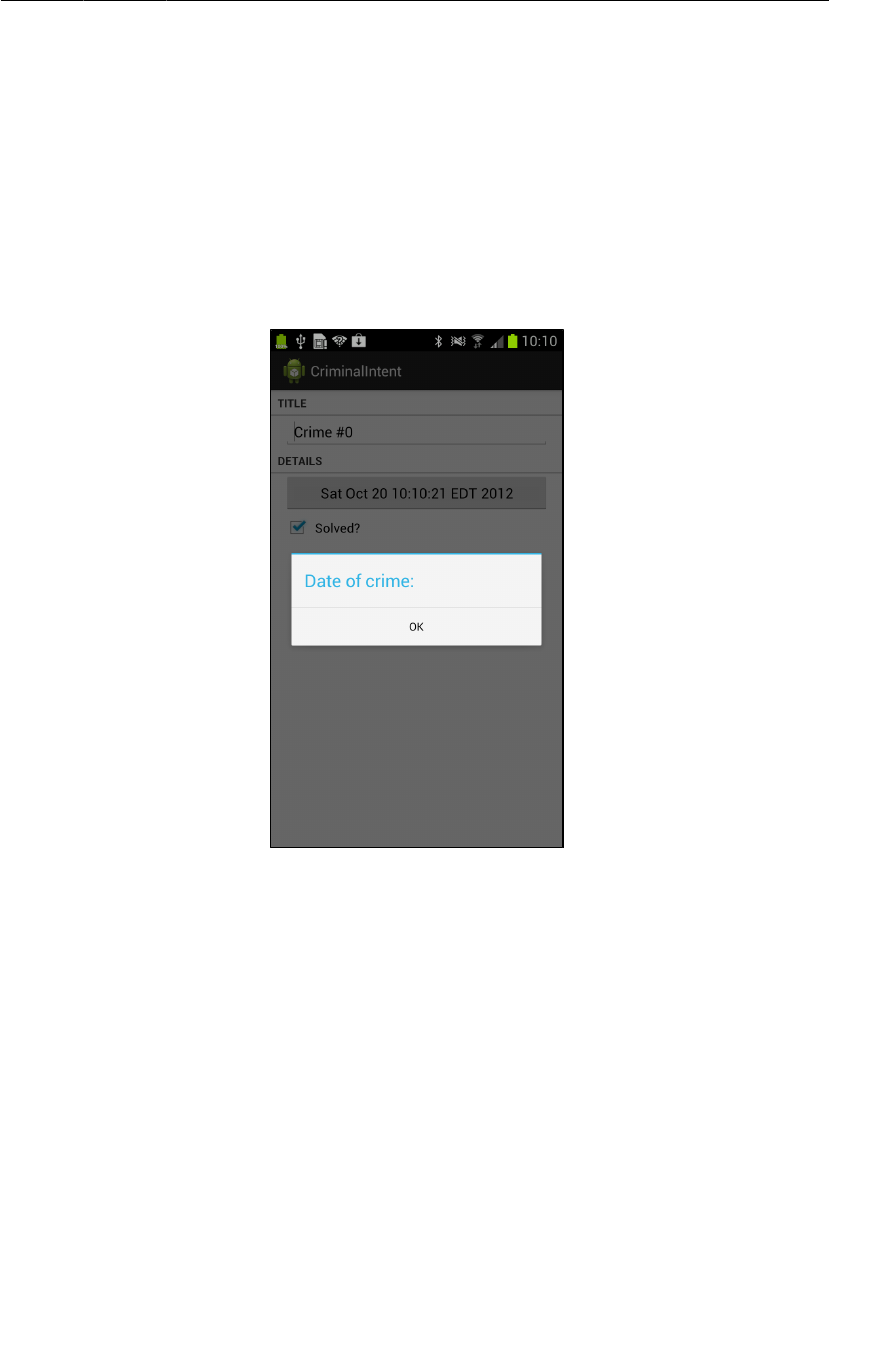
ptg11078569
Setting a dialog’s contents
215
mSolvedCheckBox = (CheckBox)v.findViewById(R.id.crime_solved);
...
return v;
}
...
}
Run CriminalIntent and press the date button to see the dialog. Press the OK button to dismiss the
dialog.
Figure 12.3An AlertDialog with a title and a button
Setting a dialog’s contents
Next, you are going to add a DatePicker widget to your AlertDialog using the following
AlertDialog.Builder method:
public AlertDialog.Builder setView(View view)
This method configures the dialog to display the passed-in View object between the dialog’s title and its
button(s).
In the package explorer, create a new layout file named dialog_date.xml and make its root element
DatePicker. This layout will consist of a single View object – a DatePicker – that you will inflate and
pass into setView(…).
Configure the DatePicker as shown in Figure12.4.
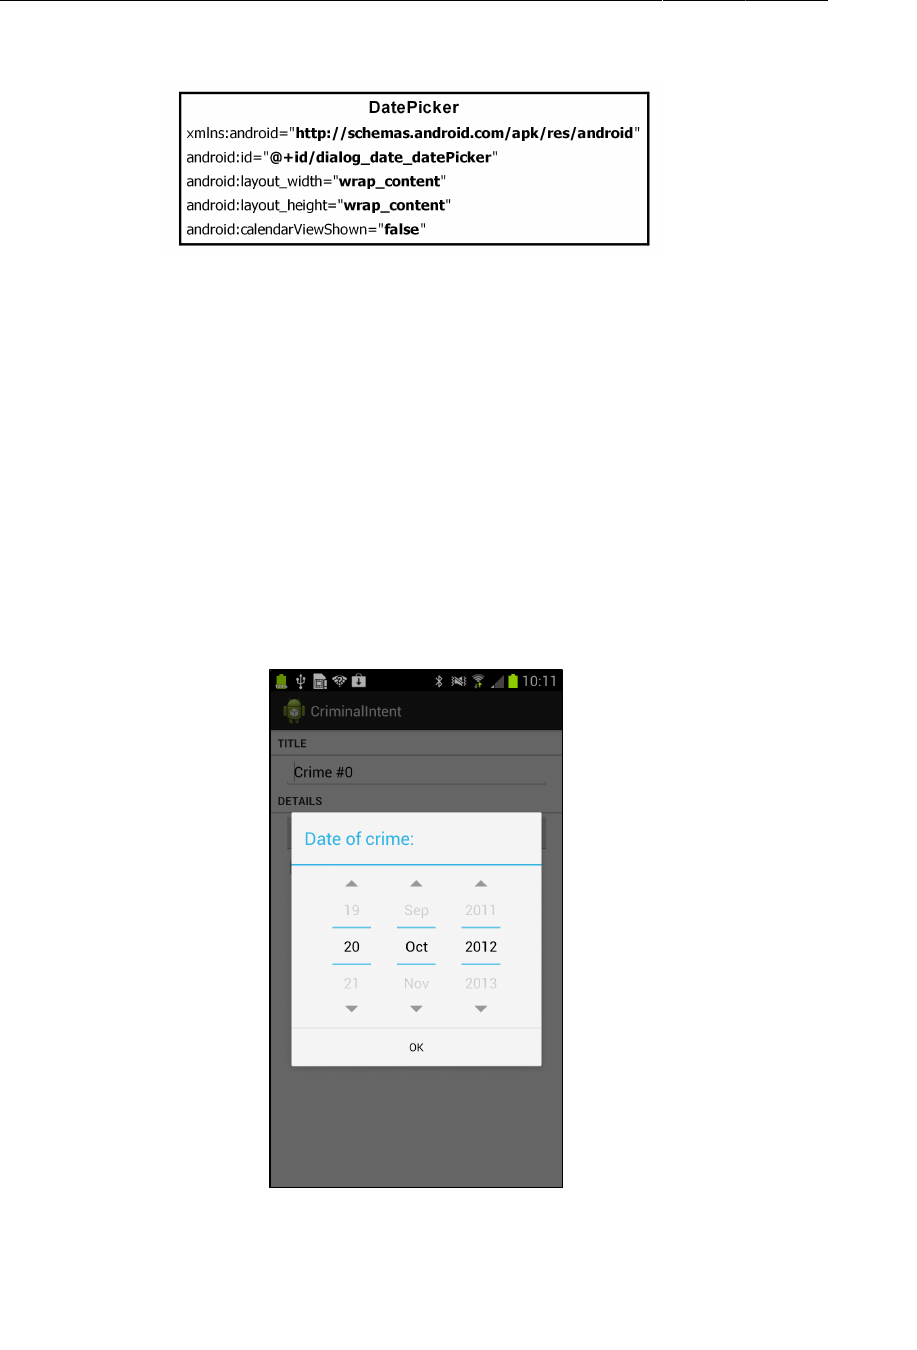
ptg11078569
Chapter 12Dialogs
216
Figure 12.4DatePicker layout (layout/dialog_date.xml)
In DatePickerFragment.onCreateDialog(…), inflate this view and then set it on the dialog.
Listing 12.4Add DatePicker to AlertDialog (DatePickerFragment.java)
@Override
public Dialog onCreateDialog(Bundle savedInstanceState) {
View v = getActivity().getLayoutInflater()
.inflate(R.layout.dialog_date, null);
return new AlertDialog.Builder(getActivity())
.setView(v)
.setTitle(R.string.date_picker_title)
.setPositiveButton(android.R.string.ok, null)
.create();
}
Run CriminalIntent. Press the date button to confirm that the dialog now presents a DatePicker.
Figure 12.5An AlertDialog with a DatePicker
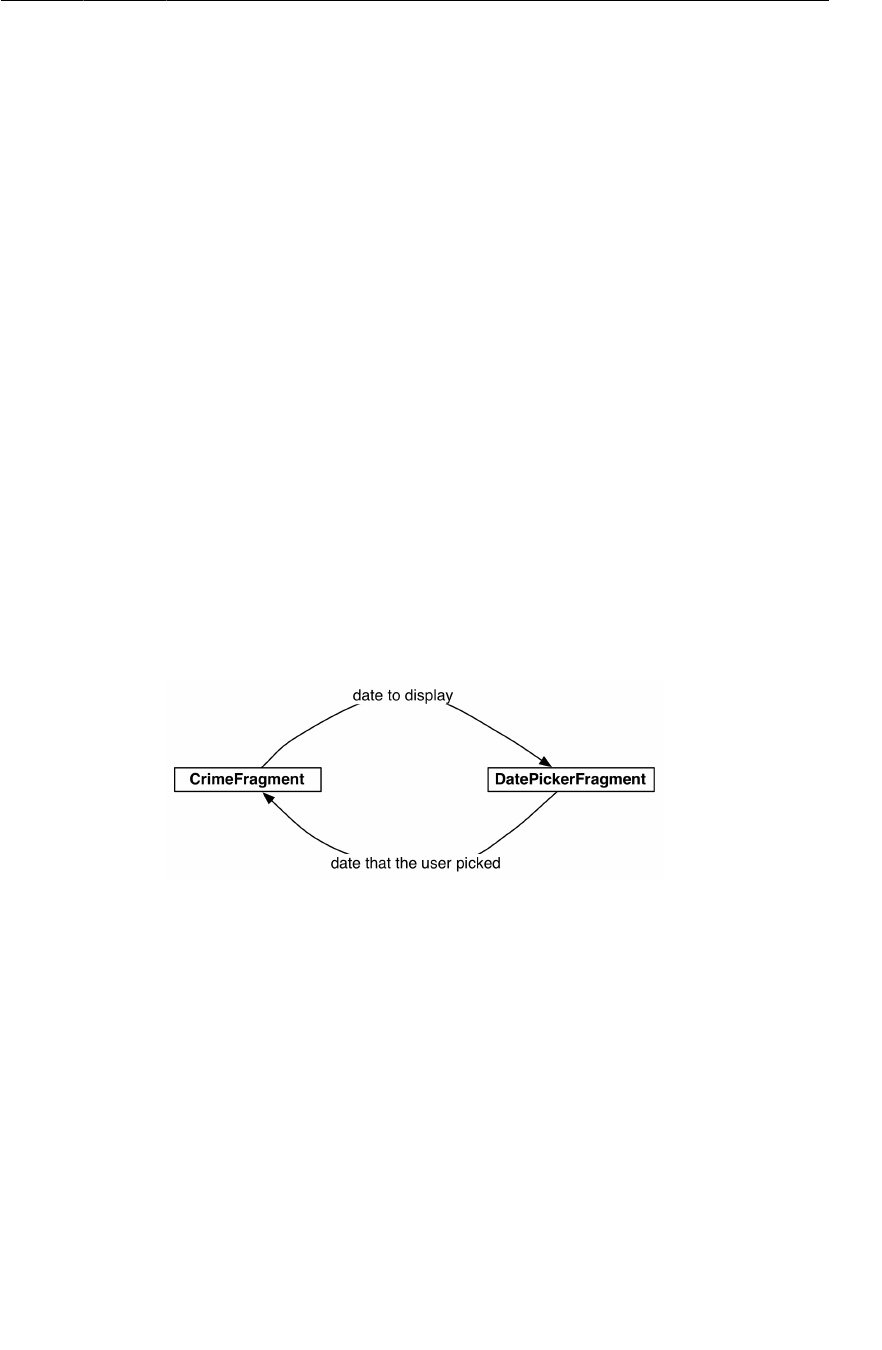
ptg11078569
Passing Data Between Two Fragments
217
You may be wondering why you went to the trouble of defining and inflating a layout when you could
have created the DatePicker object in code like this:
@Override
public Dialog onCreateDialog(Bundle savedInstanceState) {
DatePicker dp = new DatePicker(getActivity());
return new AlertDialog.Builder(getActivity())
.setView(dp)
...
.create();
}
Using a layout makes modifications easy if you change your mind about what the dialog should
present. For instance, what if you wanted a TimePicker next to the DatePicker in this dialog? If you
are already inflating a layout, you can simply update the layout file, and the new view will appear.
Your dialog is on screen and looks good. In the next section, you will wire it up to present the Crime’s
date and allow the user to change it.
Passing Data Between Two Fragments
You have passed data between two activities, and you have passed data between two fragment-based
activities. Now you need to pass data between two fragments that are hosted by the same activity –
CrimeFragment and DatePickerFragment (Figure12.6).
Figure 12.6Conversation between CrimeFragment and DatePickerFragment
To get the crime’s date to DatePickerFragment, you are going to write a newInstance(Date) method
and make the Date an argument on the fragment.
To get the new date back to the CrimeFragment so that it can update the model layer and its own
view, you will package up the date as an extra on an Intent and pass this Intent in a call to
CrimeFragment.onActivityResult(…).
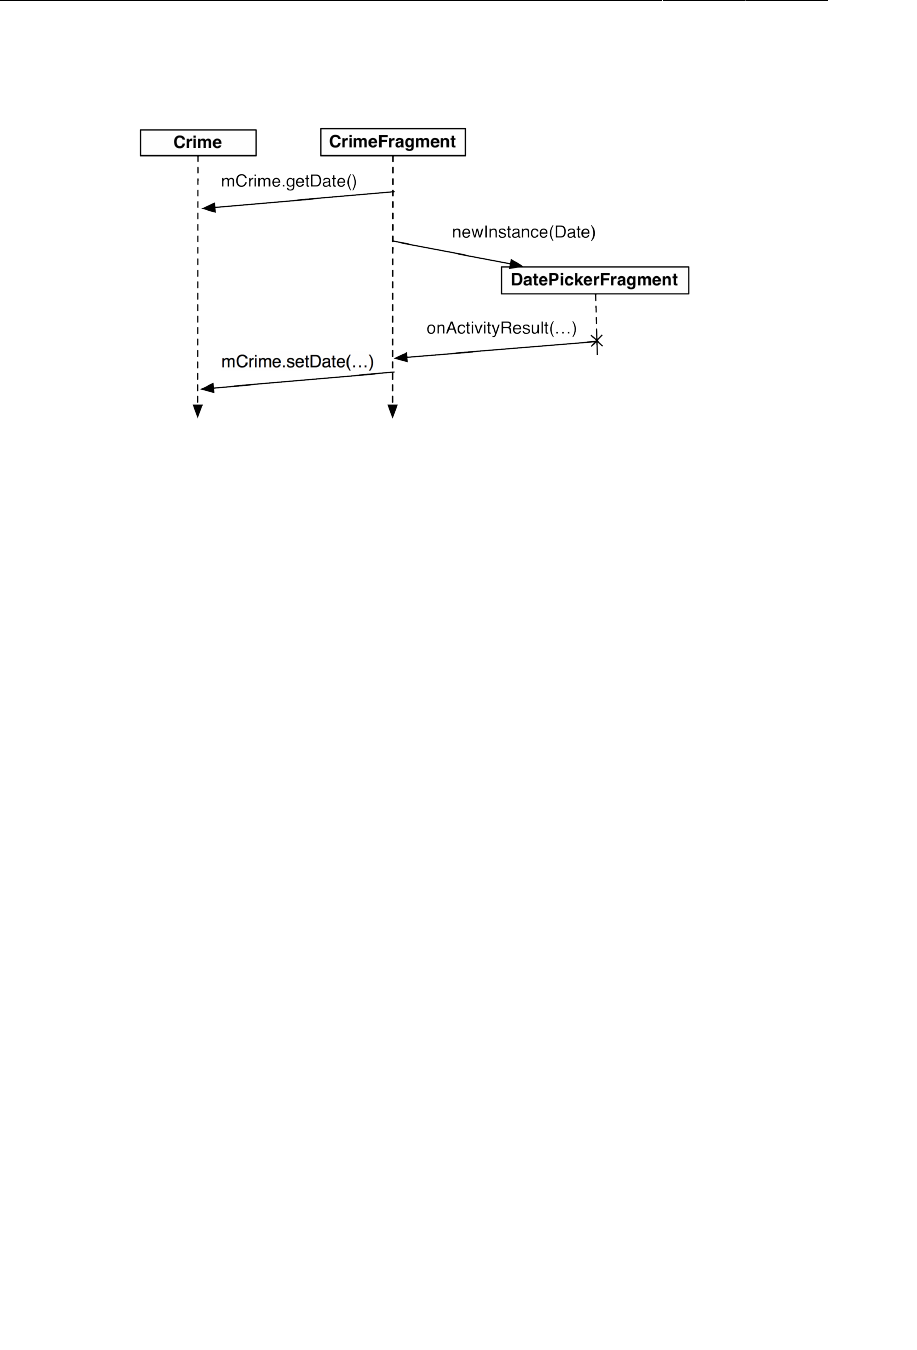
ptg11078569
Chapter 12Dialogs
218
Figure 12.7Sequence of events between CrimeFragment and
DatePickerFragment
It may seem strange to call Fragment.onActivityResult(…) given that the hosting activity receives no
call to Activity.onActivityResult(…) in this interaction. However, using onActivityResult(…) to
pass data back from one fragment to another not only works, but it also offers some flexibility in how
you present a dialog fragment, as you will see later in the chapter.
Passing data to DatePickerFragment
To get data into your DatePickerFragment, you are going to stash the date in DatePickerFragment’s
arguments bundle, where the DatePickerFragment can access it.
Creating and setting fragment arguments is typically done in a newInstance() method that replaces the
fragment constructor. In DatePickerFragment.java, add a newInstance(Date) method.
Listing 12.5Adding a newInstance(Date) method
(DatePickerFragment.java)
public class DatePickerFragment extends DialogFragment {
public static final String EXTRA_DATE =
"com.bignerdranch.android.criminalintent.date";
private Date mDate;
public static DatePickerFragment newInstance(Date date) {
Bundle args = new Bundle();
args.putSerializable(EXTRA_DATE, date);
DatePickerFragment fragment = new DatePickerFragment();
fragment.setArguments(args);
return fragment;
}
...
}

ptg11078569
Passing data to DatePickerFragment
219
In CrimeFragment, remove the call to the DatePickerFragment constructor and replace it with a call to
DatePickerFragment.newInstance(Date).
Listing 12.6Add call to newInstance() (CrimeFragment.java)
@Override
public View onCreateView(LayoutInflater inflater,
ViewGroup parent, Bundle savedInstanceState) {
...
mDateButton = (Button)v.findViewById(R.id.crime_date);
mDateButton.setOnClickListener(new View.OnClickListener() {
public void onClick(View v) {
FragmentManager fm = getActivity()
.getSupportFragmentManager();
DatePickerFragment dialog = new DatePickerFragment();
DatePickerFragment dialog = DatePickerFragment
.newInstance(mCrime.getDate());
dialog.show(fm, DIALOG_DATE);
}
});
return v;
}
DatePickerFragment needs to initialize the DatePicker using the information held in the Date.
However, initializing the DatePicker requires integers for the month, day, and year. Date is more of a
timestamp and cannot provide integers like this directly.
To get the integers you need, you must create a Calendar object and use the Date to configure the
Calendar. Then you can retrieve the required information from the Calendar.
In onCreateDialog(…), get the Date from the arguments and use it and a Calendar to initialize the
DatePicker.

ptg11078569
Chapter 12Dialogs
220
Listing 12.7Date extraction and DatePicker initialization
(DatePickerFragment.java)
@Override
public Dialog onCreateDialog(Bundle savedInstanceState) {
mDate = (Date)getArguments().getSerializable(EXTRA_DATE);
// Create a Calendar to get the year, month, and day
Calendar calendar = Calendar.getInstance();
calendar.setTime(mDate);
int year = calendar.get(Calendar.YEAR);
int month = calendar.get(Calendar.MONTH);
int day = calendar.get(Calendar.DAY_OF_MONTH);
View v = getActivity().getLayoutInflater()
.inflate(R.layout.dialog_date, null);
DatePicker datePicker = (DatePicker)v.findViewById(R.id.dialog_date_datePicker);
datePicker.init(year, month, day, new OnDateChangedListener() {
public void onDateChanged(DatePicker view, int year, int month, int day) {
// Translate year, month, day into a Date object using a calendar
mDate = new GregorianCalendar(year, month, day).getTime();
// Update argument to preserve selected value on rotation
getArguments().putSerializable(EXTRA_DATE, mDate);
}
});
...
}
When you initialize the DatePicker, you also set an OnDateChangedListener on it. When the user
changes the date in the DatePicker, you update the Date to reflect the change. In the next section, you
will pass this Date back to CrimeFragment.
At the end of onDateChanged(…), you write the Date back to the fragment’s arguments. You do this to
preserve the value of mDate in case of rotation. If the device is rotated while the DatePickerFragment
is on screen, then the FragmentManager will destroy the current instance and create a new one. When
the new instance is created, the FragmentManager will call onCreateDialog(…) on it, and the instance
will get the saved date from the arguments. It is a simpler way to preserve the value than saving out its
state in onSaveInstanceState(…).
(If you have worked more with fragments, you may be wondering why not “retain”
DatePickerFragment instead? Using a retained fragment is a great tool for handling rotation that you
will learn about in Chapter14. Unfortunately, DialogFragment currently has a bug that causes retained
instances to misbehave, so retaining DatePickerFragment is not a good option.)
Now CrimeFragment is successfully telling DatePickerFragment what date to show. You can run
CriminalIntent and make sure that everything works as before.
Returning data to CrimeFragment
To have CrimeFragment receive the date back from DatePickerFragment, you need a way to keep
track of the relationship between the two fragments.

ptg11078569
Returning data to CrimeFragment
221
With activities, you call startActivityForResult(…), and the ActivityManager keeps track of the
parent-child activity relationship. When the child activity dies, the ActivityManager knows which
activity should receive the result.
Setting a target fragment
You can create a similar connection by making CrimeFragment the target fragment of
DatePickerFragment. To create this relationship, you call the following Fragment method:
public void setTargetFragment(Fragment fragment, int requestCode)
This method accepts the fragment that will be the target and a request code just like the one you send
in startActivityForResult(…). The target fragment can use the request code later to tell which
fragment is reporting back.
The FragmentManager keeps track of the target fragment and request code. You can retrieve them by
calling getTargetFragment() and getTargetRequestCode() on the fragment that has set the target.
In CrimeFragment.java, create a constant for the request code and then make CrimeFragment the
target fragment of the DatePickerFragment instance.
Listing 12.8Set target fragment (CrimeFragment.java)
public class CrimeFragment extends Fragment {
public static final String EXTRA_CRIME_ID =
"com.bignerdranch.android.criminalintent.crime_id";
private static final String DIALOG_DATE = "date";
private static final int REQUEST_DATE = 0;
...
@Override
public View onCreateView(LayoutInflater inflater, ViewGroup parent,
Bundle savedInstanceState) {
...
mDateButton.setOnClickListener(new View.OnClickListener() {
public void onClick(View v) {
FragmentManager fm = getActivity()
.getSupportFragmentManager();
DatePickerFragment dialog = DatePickerFragment
.newInstance(mCrime.getDate());
dialog.setTargetFragment(CrimeFragment.this, REQUEST_DATE);
dialog.show(fm, DIALOG_DATE);
}
});
return v;
}
...
}
Sending data to the target fragment
Now that you have a connection between CrimeFragment and DatePickerFragment, you need to send
the date back to CrimeFragment. You are going to put the date on an Intent as an extra.

ptg11078569
Chapter 12Dialogs
222
What method will you use to send this intent to the target fragment? Oddly enough, you will have
DatePickerFragment pass it into CrimeFragment.onActivityResult(int, int, Intent).
Activity.onActivityResult(…) is the method that the ActivityManager calls on the
parent activity after the child activity dies. When dealing with activities, you do not call
Activity.onActivityResult(…) yourself; that is the ActivityManager’s job. After the activity has
received the call, the activity’s FragmentManager then calls Fragment.onActivityResult(…) on the
appropriate fragment.
When dealing with two fragments hosted by the same activity, you can borrow
Fragment.onActivityResult(…) and call it directly on the target fragment to pass back data. It has
exactly what you need:
• a request code that matches the code passed into setTargetFragment(…) to tell the target who is
returning the result
• a result code to determine what action to take
• an Intent that can have extra data
In DatePickerFragment, create a private method that creates an intent, puts the date on it as an extra,
and then calls CrimeFragment.onActivityResult(…). In onCreateDialog(…), replace the null
parameter of setPositiveButton(…) with an implementation of DialogInterface.OnClickListener
that calls the private method and passes in a result code.
Listing 12.9Calling back to your target (DatePickerFragment.java)
private void sendResult(int resultCode) {
if (getTargetFragment() == null)
return;
Intent i = new Intent();
i.putExtra(EXTRA_DATE, mDate);
getTargetFragment()
.onActivityResult(getTargetRequestCode(), resultCode, i);
}
@Override
public Dialog onCreateDialog(Bundle savedInstanceState) {
...
return new AlertDialog.Builder(getActivity())
.setView(v)
.setTitle(R.string.date_picker_title)
.setPositiveButton(android.R.string.ok, null)
.setPositiveButton(
android.R.string.ok,
new DialogInterface.OnClickListener() {
public void onClick(DialogInterface dialog, int which) {
sendResult(Activity.RESULT_OK);
}
})
.create();
}

ptg11078569
Returning data to CrimeFragment
223
In CrimeFragment, override onActivityResult(…) to retrieve the extra, set the date on the Crime, and
refresh the text of the date button.
Listing 12.10Responding to the dialog (CrimeFragment.java)
@Override
public void onActivityResult(int requestCode, int resultCode, Intent data) {
if (resultCode != Activity.RESULT_OK) return;
if (requestCode == REQUEST_DATE) {
Date date = (Date)data
.getSerializableExtra(DatePickerFragment.EXTRA_DATE);
mCrime.setDate(date);
mDateButton.setText(mCrime.getDate().toString());
}
}
The code that sets the button’s text is identical to code you call in onCreateView(…). To avoid setting
the text in two places, encapsulate this code in a private updateDate() method and then call it in
onCreateView(…) and onActivityResult(…).
Listing 12.11Cleaning up with updateDate() (CrimeFragment.java)
public class CrimeFragment extends Fragment {
...
private void updateDate() {
mDateButton.setText(mCrime.getDate().toString());
}
@Override
public View onCreateView(LayoutInflater inflater, ViewGroup parent,
Bundle savedInstanceState) {
View v = inflater.inflate(R.layout.fragment_crime, parent, false);
...
mDateButton = (Button)v.findViewById(R.id.crime_date);
mDateButton.setText(mCrime.getDate().toString());
updateDate();
...
@Override
public void onActivityResult(int requestCode, int resultCode, Intent data) {
if (resultCode != Activity.RESULT_OK) return;
if (requestCode == REQUEST_DATE) {
Date date = (Date)data
.getSerializableExtra(DatePickerFragment.EXTRA_DATE);
mCrime.setDate(date);
mDateButton.setText(mCrime.getDate().toString());
updateDate();
}
}
}
Now the circle is complete. The dates must flow. He who controls the dates controls time itself.
Run CriminalIntent to ensure that you can, in fact, control the dates. Change the date of a Crime and
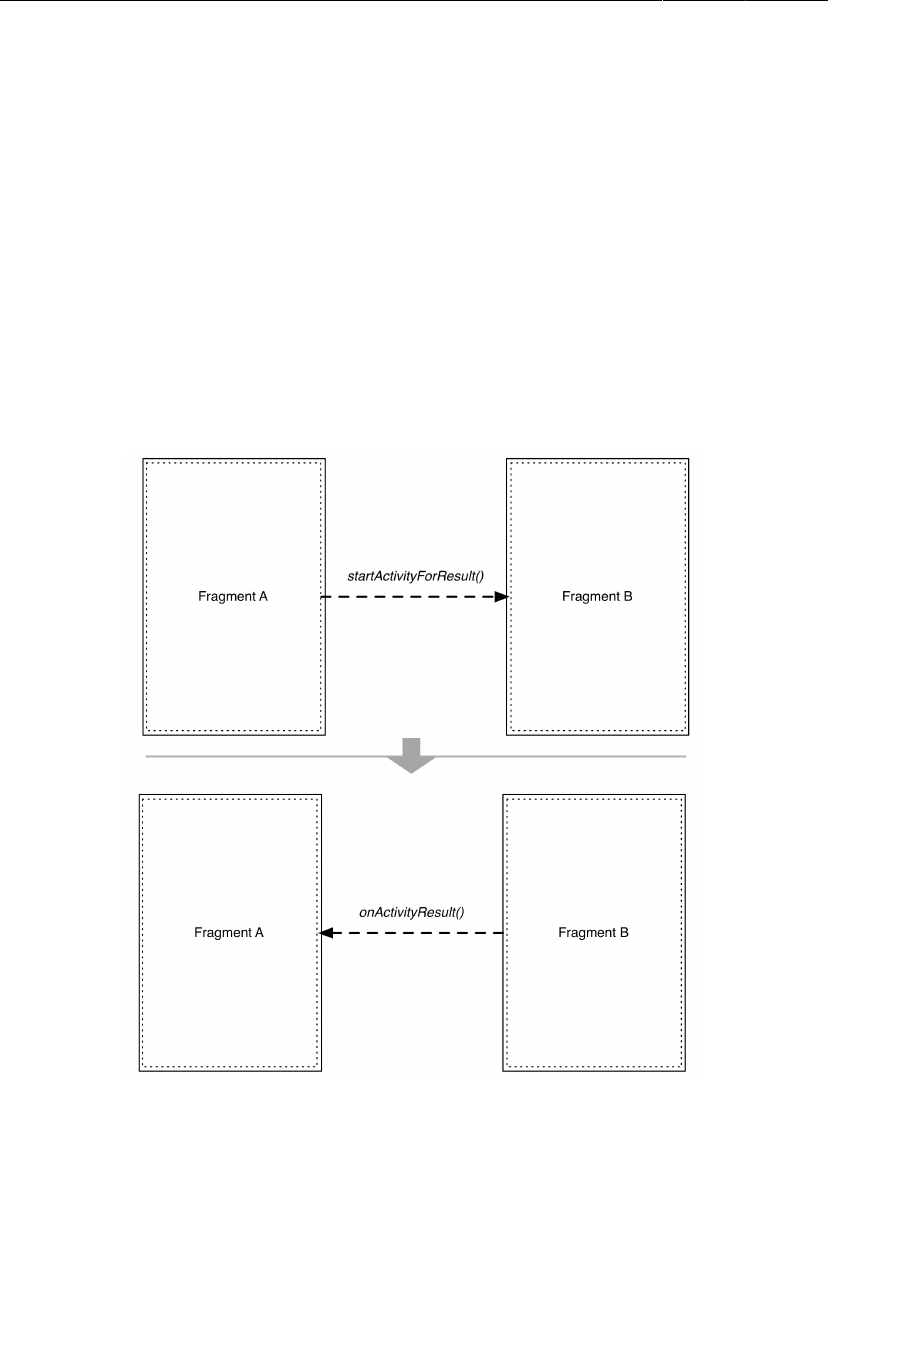
ptg11078569
Chapter 12Dialogs
224
confirm that the new date appears in CrimeFragment’s view. Then return to the list of crimes and check
the Crime’s date to ensure that the model layer was updated.
More flexibility in presenting a DialogFragment
Using onActivityResult(…) to send data back to a target fragment is especially nice when you are
writing an app that needs lots of input from the user and more room to ask for it. And you want this
app working well on phones and tablets.
On a phone, you do not have much screen real estate, so you would likely use an activity with a full-
screen fragment to ask the user for input. This child activity would be started by a fragment of the
parent activity calling startActivityForResult(…). On the death of the child activity, the parent
activity would receive a call to onActivityResult(…), which would be forwarded to the fragment that
started the child activity.
Figure 12.8Inter-activity communication on phones
On a tablet, where you have plenty of room, it is often better to present a DialogFragment to the user
to get the same input. In this case, you set the target fragment and call show(…) on the dialog fragment.
When dismissed, the dialog fragment calls onActivityResult(…) on its target.
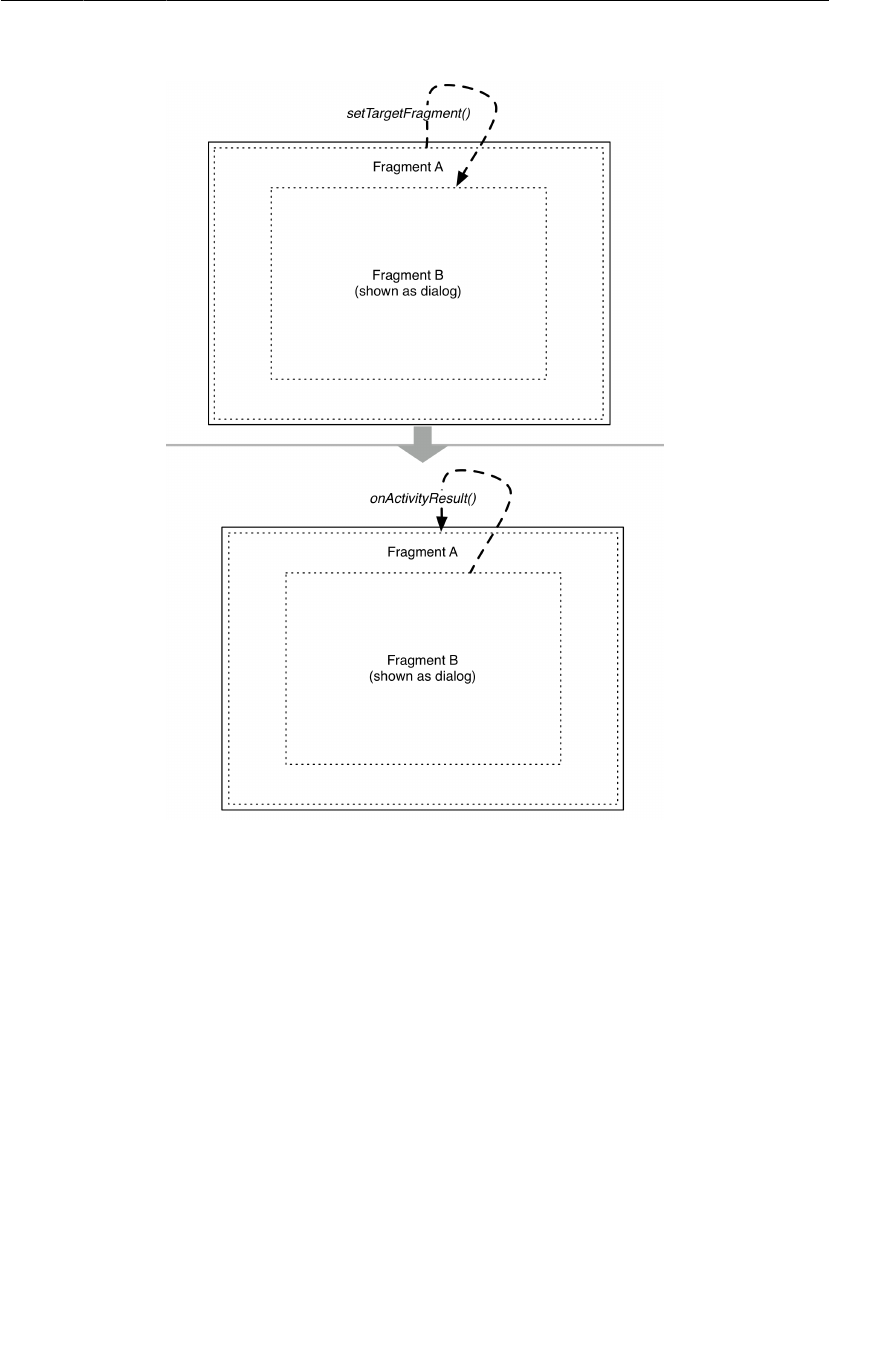
ptg11078569
Challenge: More Dialogs
225
Figure 12.9Inter-fragment communication on tablets
The fragment’s onActivityResult(…) will always be called, whether the fragment started an activity
or showed a dialog. So you can use the same code for different presentations.
When setting things up to use the same code for a full-screen fragment or a dialog fragment, you
can override DialogFragment.onCreateView(…) instead of onCreateDialog(…) to prepare for both
presentations.
Challenge: More Dialogs
For an easy challenge, write another dialog fragment named TimePickerFragment that allows the
user to select what time of day the crime occurred using a TimePicker widget. Add another button to
CrimeFragment that will display a TimePickerFragment.
For a harder challenge, stay with a single button interface, but have that button display a dialog that
offers the user a choice: change the time or change the date. Then fire up a second dialog when the user
makes a selection.

ptg11078569
This page intentionally left blank
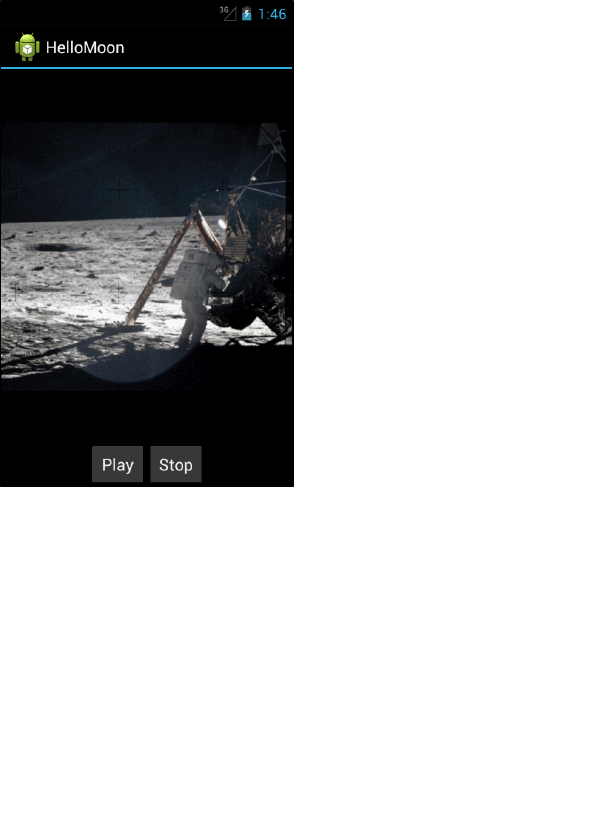
ptg11078569
227
13
Audio Playback Using
MediaPlayer
For the next three chapters, you are going to put CriminalIntent on hiatus and build another application.
This app will play a historical audio file using the MediaPlayer class.
Figure 13.1Hello, Moon!
MediaPlayer is the Android class for audio and video playback. It can play media from different
sources (like a local file or streamed from the Internet) and in many different formats (like WAV, MP3,
Ogg Vorbis, MPEG-4, and 3GPP).
Create a new project named HelloMoon. In the first dialog, select Holo�Dark for the app’s theme.
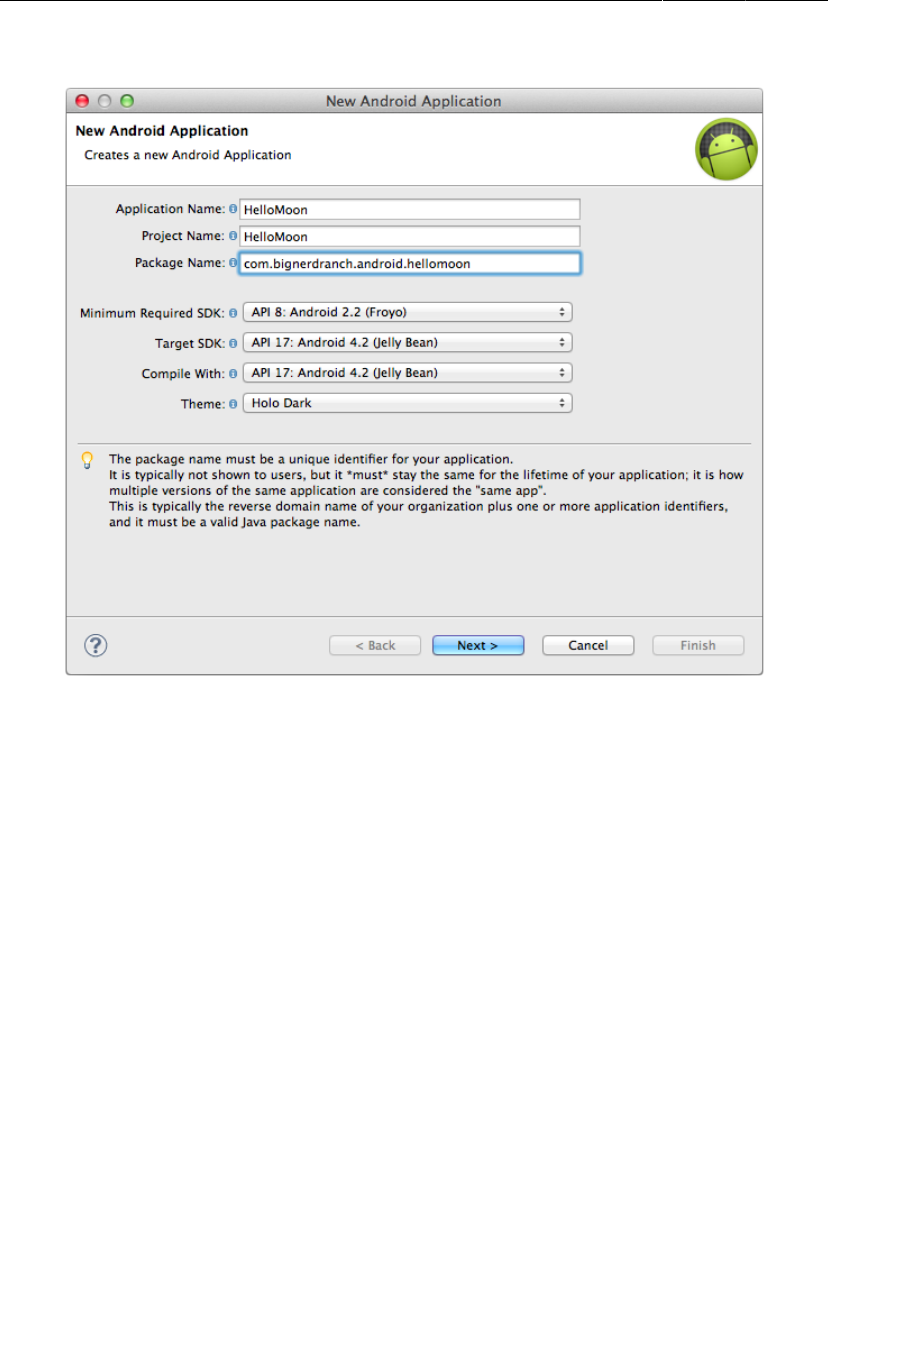
ptg11078569
Chapter 13Audio Playback Using MediaPlayer
228
Figure 13.2Creating HelloMoon with Holo Dark theme
Click Next. This app will not have a custom launcher icon. It will use the blank activity template. Have
the template create an activity named HelloMoonActivity.
Adding Resources
HelloMoon requires an image file and an audio file that are available in the solutions file for this book
(http://www.bignerdranch.com/solutions/AndroidProgramming.zip). Within the solutions, find
the following files:
•13_Audio/HelloMoon/res/drawable-mdpi/armstrong_on_moon.jpg
•13_Audio/HelloMoon/res/raw/one_small_step.wav
For this simple app, we have created a single armstrong_on_moon.jpg file for screens of medium
density (~160 dpi), which Android considers the baseline. Copy armstrong_on_moon.jpg to the
drawable-mdpi directory.
The audio file will be placed in the res/raw directory. The raw directory is a catch-all for resources
that do not need special handling from Android’s build system.
The res/raw directory is not created by default for a project, so you have to add it. (Right-click the res
directory and select New → Folder.) Then copy one_small_step.wav to the new directory.
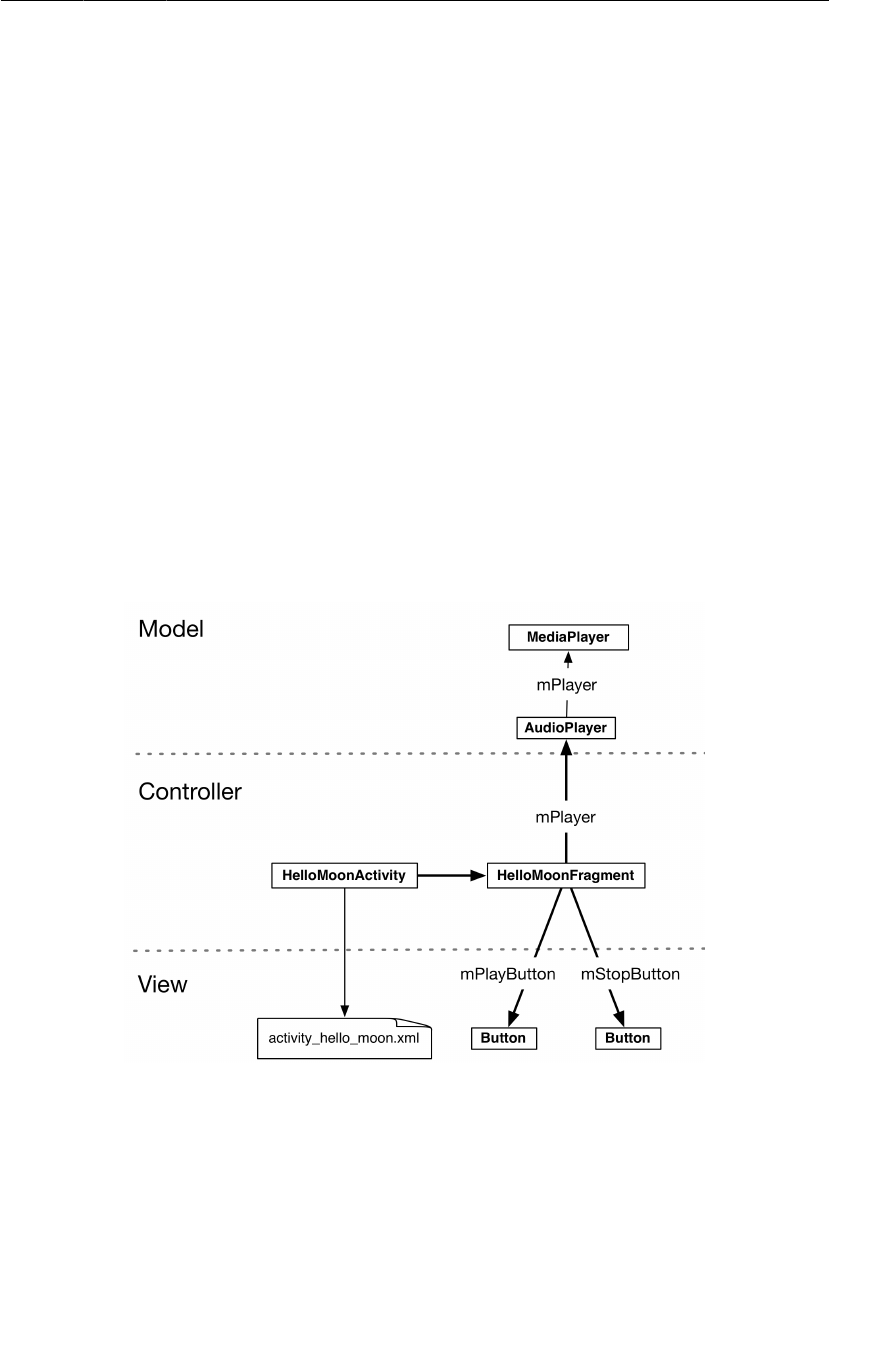
ptg11078569
Adding Resources
229
(You can also copy 13_Audio/HelloMoon/res/raw/apollo_17_stroll.mpg into res/raw/. There is
information and a challenge at the end of this chapter about playing video that will use this file.)
While you are thinking about resources, open res/values/strings.xml and add the strings that
HelloMoon requires:
Listing 13.1Adding strings (strings.xml)
<?xml version="1.0" encoding="utf-8"?>
<resources>
<string name="app_name">HelloMoon</string>
<string name="hello_world">Hello world!</string>
<string name="menu_settings">Settings</string>
<string name="hellomoon_play">Play</string>
<string name="hellomoon_stop">Stop</string>
<string name="hellomoon_description">Neil Armstrong stepping
onto the moon</string>
</resources>
(Wondering why HelloMoon uses “Play” and “Stop” strings for buttons instead of icons? You will be
localizing this app in Chapter15. Using icons would make localization less fun.)
Now that you have the necessary resources in place, let’s take a look at the overall plan for HelloMoon.
Figure 13.3Object diagram for HelloMoon
HelloMoon will have one activity, HelloMoonActivity, that hosts a HelloMoonFragment.
AudioPlayer is a class that you will write to encapsulate the MediaPlayer. Encapsulating the
MediaPlayer is not required; you could have HelloMoonFragment interact directly with MediaPlayer.
But this design helps keep your code nice and separate.
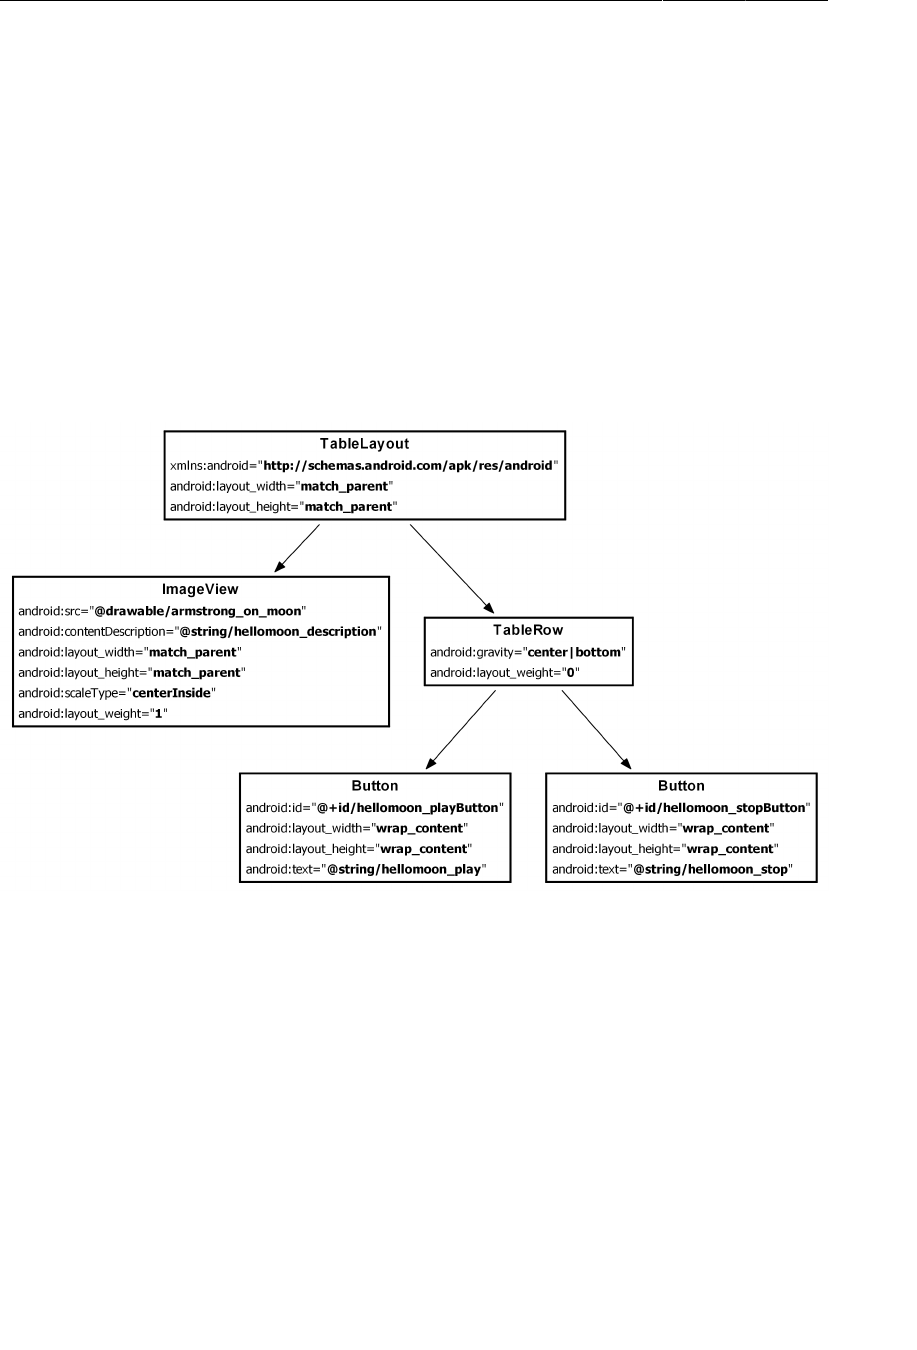
ptg11078569
Chapter 13Audio Playback Using MediaPlayer
230
Before you create the AudioPlayer class, you are going to set up the rest of the app. By now, you are
familiar with these steps:
• define a layout for the fragment
• create the fragment class
• modify the activity and its layout to host the fragment
Defining the layout for HelloMoonFragment
Create a new Android XML layout file named fragment_hello_moon.xml. Make its root element a
TableLayout.
Use Figure13.4 to flesh out fragment_hello_moon.xml.
Figure 13.4Layout diagram for HelloMoon
TableLayout works a lot like a LinearLayout. Instead of nesting LinearLayouts, you can arrange
widgets using TableRows. TableLayout and TableRow can team up to make it easier to arrange views in
neat columns. Here, TableLayout helps arrange your buttons side by side in equally sized columns.
Why is the ImageView not in a TableRow? Children of TableRow act like “cells” of a table. Your
goal here is for the ImageView to span the entire screen. If it were the child of a TableRow, then
TableLayout would try to make other cells in its column span the screen, too. As a direct child of
the TableLayout, it can do what it likes, and leave the Buttons to act as side-by-side, equal-width
columns.
Notice that the TableRow widget does not have to declare height and width attributes. It uses the
TableLayout’s width and height as well as every other attribute of the TableLayout. A nested
LinearLayout, on the other hand, can offer more flexibility in how your widgets will appear.

ptg11078569
Manually resetting the app theme
231
Preview the layout in the graphical tool. What color background are you seeing? You selected Holo
Dark for HelloMoon’s theme in the wizard. However, as of this writing, the wizard ignores your theme
choice and always assigns a light theme. Let’s see how to fix that.
(If you see a dark background, the wizard has been fixed and you will not need to manually reset the
app theme as described in the following section.)
Manually resetting the app theme
An application’s theme is declared in the application element of the manifest:
...
<application
android:allowBackup="true"
android:icon="@drawable/ic_launcher"
android:label="@string/app_name"
android:theme="@style/AppTheme" >
...
</application>
</manifest>
The android:theme attribute is not required; if a theme is not declared, then the device’s default will
be used.
You can see that the value given here is a reference to a resource – @style/AppTheme. In the package
explorer, find and open res/values/styles.xml. Within the style element named AppBaseTheme,
change the parent value to android:Theme.
Listing 13.2Modifying default styles file (res/values/styles.xml)
<style name="AppBaseTheme" parent="android:Theme.Light">
<style name="AppBaseTheme" parent="android:Theme">
In the res directory, you also have two qualified values directories and each contain a styles.xml
file. The qualifiers on these directories refer to API levels. The values in res/values-v11/styles.xml
will be used for API levels 11-13, and the values in res/values-v14/styles.xml will be used for API
levels 14 and higher.
Open res/values-v11/styles.xml and change the parent of AppBaseTheme to android:Theme.Holo.
This is the theme you want on all devices running API 11 and higher, so the res/values-v14/
directory now gets in the way. Delete it from the HelloMoon project.
Save your files and preview the layout again. Your layout should now have a dark background that
blends nicely with your image file.
Creating HelloMoonFragment
Create a new class named HelloMoonFragment and make its superclass
android.support.v4.app.Fragment.
Override HelloMoonFragment.onCreateView(…) to inflate the layout you just defined and get
references to the buttons.

ptg11078569
Chapter 13Audio Playback Using MediaPlayer
232
Listing 13.3Initial HelloMoonFragment setup (HelloMoonFragment.java)
public class HelloMoonFragment extends Fragment {
private Button mPlayButton;
private Button mStopButton;
@Override
public View onCreateView(LayoutInflater inflater, ViewGroup parent,
Bundle savedInstanceState) {
View v = inflater.inflate(R.layout.fragment_hello_moon, parent, false);
mPlayButton = (Button)v.findViewById(R.id.hellomoon_playButton);
mStopButton = (Button)v.findViewById(R.id.hellomoon_stopButton);
return v;
}
}
Using a Layout Fragment
In CriminalIntent, you have been hosting fragments by adding them in the activity’s code. In
HelloMoon, you are going to use a layout fragment instead. When you use a layout fragment, you
specify the fragment class in a fragment element.
Open activity_hello_moon.xml and replace its contents with the fragment element shown in Listing
13.4.
Listing 13.4Creating a layout fragment (activity_hello_moon.xml)
<?xml version="1.0" encoding="utf-8"?>
<fragment xmlns:android="http://schemas.android.com/apk/res/android"
android:id="@+id/helloMoonFragment"
android:layout_width="match_parent"
android:layout_height="match_parent"
android:name="com.bignerdranch.android.hellomoon.HelloMoonFragment">
</fragment>
There is only one change that you need to make in HelloMoonActivity’s code before you can run the
app. Change HelloMoonActivity’s superclass to FragmentActivity.
Listing 13.5Make HelloMoonActivity a FragmentActivity
(HelloMoonActivity.java)
public class HelloMoonActivity extends Activity FragmentActivity {
/** Called when the activity is first created. */
@Override
public void onCreate(Bundle savedInstanceState) {
super.onCreate(savedInstanceState);
setContentView(R.layout.activity_hello_moon);
}
}
Run HelloMoon. You should see HelloMoonFragment’s view hosted by HelloMoonActivity.
That is all it takes to host a layout fragment. You named the fragment class in the layout and it
was added to the activity and put on screen. Here is what happened behind the scenes. When
HelloMoonActivity called .setContentView(…) and inflated activity_hello_moon.xml, it found the

ptg11078569
Audio Playback
233
fragment element. At that point, the FragmentManager created an instance of HelloMoonFragment and
added it to its list. It then called HelloMoonFragment’s onCreateView(…) and placed the view that this
method returns in the spot that the fragment tag was keeping warm.
Figure 13.5Lifecycle of a layout fragment
What does this ease cost you? You lose the flexibility and power you get when explicitly working with
the FragmentManager:
• You can override the fragment’s lifecycle methods to respond to events, but you have no control
over when these methods are called.
• You cannot commit fragment transactions that remove, replace, or detach a layout fragment. You
are stuck with what you have when the activity is created.
• You cannot attach arguments to a layout fragment. Attaching arguments must be done after the
fragment is created and before it is added to the FragmentManager. With layout fragments, these
events all happen out of your reach.
But with a simple app or with a static part of a complex app, using a layout fragment can be a
reasonable choice.
Now that your HelloMoonFragment is safely hosted, let’s turn to the audio portion of our program.
Audio Playback
Create a new class in the com.bignerdranch.android.hellomoon package named AudioPlayer. Leave
its superclass as java.lang.Object.
In AudioPlayer.java, add a member variable to hold an instance of MediaPlayer and methods to stop
and play this instance.

ptg11078569
Chapter 13Audio Playback Using MediaPlayer
234
Listing 13.6Simple playback code using MediaPlayer (AudioPlayer.java)
public class AudioPlayer {
private MediaPlayer mPlayer;
public void stop() {
if (mPlayer != null) {
mPlayer.release();
mPlayer = null;
}
}
public void play(Context c) {
mPlayer = MediaPlayer.create(c, R.raw.one_small_step);
mPlayer.start();
}
}
In the play(Context) method, you call MediaPlayer.create(Context, int). MediaPlayer needs
the Context to make sense of the audio file’s resource ID. (There are other MediaPlayer.create(…)
methods to use if you are getting audio from somewhere else, like the Internet or a local URI.)
In AudioPlayer.stop(), you release the MediaPlayer and set mPlayer to null. Calling
MediaPlayer.release() destroys the instance.
Destruction is an aggressive interpretation of “stop,” but there is good reason to be aggressive.
MediaPlayer will hold on to the audio decoder hardware and other system resources until you call
release(). These resources are shared across all apps. The MediaPlayer class includes a stop()
method. It puts your MediaPlayer instance in a stopped state, from which it can eventually be
restarted. However, in simple audio playback, it is better citizenship to destroy the instance with
release() and then recreate it later.
So here is a simple rule: keep exactly one MediaPlayer around and keep it around only as long as it is
playing something.
To enforce this rule, make a couple of changes to play(Context). Add an initial call to stop() and set
a listener to call stop() when the audio file has finished playing.
Listing 13.7There can be only one (AudioPlayer.java)
...
public void play(Context c) {
stop();
mPlayer = MediaPlayer.create(c, R.raw.one_small_step);
mPlayer.setOnCompletionListener(new MediaPlayer.OnCompletionListener() {
public void onCompletion(MediaPlayer mp) {
stop();
}
});
mPlayer.start();
}
}

ptg11078569
Wiring buttons to play and stop
235
Calling stop() at the beginning of play(Context) prevents the creation of multiple instances of
MediaPlayer if the user clicks the Play button twice. Calling stop() when the file has finished playing
releases your hold on the MediaPlayer instance as soon as you no longer need it.
You also need to call AudioPlayer.stop() in HelloMoonFragment to prevent the MediaPlayer
from continuing playback after the fragment has been destroyed. In HelloMoonFragment, override
onDestroy() to call AudioPlayer.stop().
Listing 13.8Override onDestroy() (HelloMoonFragment.java)
...
@Override
public void onDestroy() {
super.onDestroy();
mPlayer.stop();
}
}
The MediaPlayer can continue playing after the HelloMoonFragment is destroyed because the
MediaPlayer works on a different thread. We are intentionally ignoring this multi-threading aspect of
HelloMoon. You will learn more about managing threads in Chapter26.
Wiring buttons to play and stop
Return to HelloMoonFragment.java and play some audio. Create an instance of your AudioPlayer
class and then set listeners on the buttons to play and stop.
Listing 13.9Hook up Play button (HelloMoonFragment.java)
public class HelloMoonFragment extends Fragment {
private AudioPlayer mPlayer = new AudioPlayer();
private Button mPlayButton;
private Button mStopButton;
@Override
public View onCreateView(LayoutInflater inflater, ViewGroup parent,
Bundle savedInstanceState) {
View v = inflater.inflate(R.layout.fragment_hello_moon, parent, false);
mPlayButton = (Button)v.findViewById(R.id.hellomoon_playButton);
mPlayButton.setOnClickListener(new View.OnClickListener() {
public void onClick(View v) {
mPlayer.play(getActivity());
}
});
mStopButton = (Button)v.findViewById(R.id.hellomoon_stopButton);
mStopButton.setOnClickListener(new View.OnClickListener() {
public void onClick(View v) {
mPlayer.stop();
}
});
return v;
}
}

ptg11078569
Chapter 13Audio Playback Using MediaPlayer
236
Run HelloMoon, press the Play button, and enjoy a piece of history.
You have only scratched the surface of using MediaPlayer in this chapter. For information on
what else MediaPlayer can do, read Android’s “MediaPlayer Developer Guide” at http://
developer.android.com/guide/topics/media/mediaplayer.html.
Challenge: Pausing Audio Playback
Give users the option to pause the audio playback. Head to the reference for the MediaPlayer class to
find the methods you will need to implement pausing.
For the More Curious: Playing Video
When it comes to playing video, you have a couple more options. One way to do it is to use
MediaPlayer, just like you have been. All you need to do is hook up a place to display the video.
Imagery that updates quickly (like video) is displayed in a SurfaceView on Android. Actually, it
is displayed on a Surface, which the SurfaceView hosts. You can get at the Surface by obtaining
the SurfaceView’s SurfaceHolder. You will learn about these things in detail in Chapter19. For
now, all you need to know is that you can hook up a SurfaceHolder to a MediaPlayer by calling
MediaPlayer.setDisplay(SurfaceHolder).
Often, it is easier to play video using an instance of the VideoView class. VideoView does not interface
with MediaPlayer like SurfaceView does. It does interface with MediaController, though, which
means that it is easy to provide a playback interface.
The only tricky part about using VideoView is that it does not accept resource IDs. It only accepts
filepaths or Uri objects. To create a Uri that points to an Android resource, use code like this:
Uri resourceUri = Uri.parse("android.resource://" +
"com.bignerdranch.android.hellomoon/raw/apollo_17_stroll");
Create a URI with the android.resource scheme, your package name for the hostname, and the type
and name of your resource for the path. This can then be passed to your VideoView.
Challenge: Playing Video in HelloMoon
Modify HelloMoon so that it can also play video. If you did not fetch the apollo_17_stroll.mpg file
earlier, go back to the solutions file and copy it from this chapter’s project into your res/raw directory.
Then play it using one of the methods described above.

ptg11078569
237
14
Retained Fragments
Currently, HelloMoon does not handle rotation gracefully. Run HelloMoon, play the audio, and then
rotate the device. The audio will stop abruptly.
Here is the problem: On rotation, the HelloMoonActivity is destroyed. As this is happening, the
FragmentManager is responsible for destroying the HelloMoonFragment. The FragmentManager
calls the fragment’s waning lifecycle methods: onPause(), onStop(), and onDestroy(). In
HelloMoonFragment.onDestroy(), you release the MediaPlayer, which stops the playback.
Back in Chapter3, you fixed a rotation-handling issue in GeoQuiz by overriding
Activity.onSaveInstanceState(Bundle). You saved out the data and had the new activity read it
back in. Fragment has an onSaveInstanceState(Bundle) method that works the same way. However,
saving out the state of the MediaPlayer object and restoring it later will still interrupt playback and
annoy your users.
Retaining a Fragment
Fortunately, fragments have a feature that you can use to keep the MediaPlayer instance alive across a
configuration change. Override HelloMoonFragment.onCreate(…) and set a property of the fragment.
Listing 14.1Calling setRetainInstance(true) (HelloMoonFragment.java)
...
private Button mPlayButton;
private Button mStopButton;
@Override
public void onCreate(Bundle savedInstanceState) {
super.onCreate(savedInstanceState);
setRetainInstance(true);
}
@Override
public View onCreateView(LayoutInflater inflater, ViewGroup parent,
Bundle savedInstanceState) {
...
By default, the retainInstance property of a fragment is false. This means it is not retained,
and it is destroyed and recreated on rotation along with the activity that hosts it. Calling
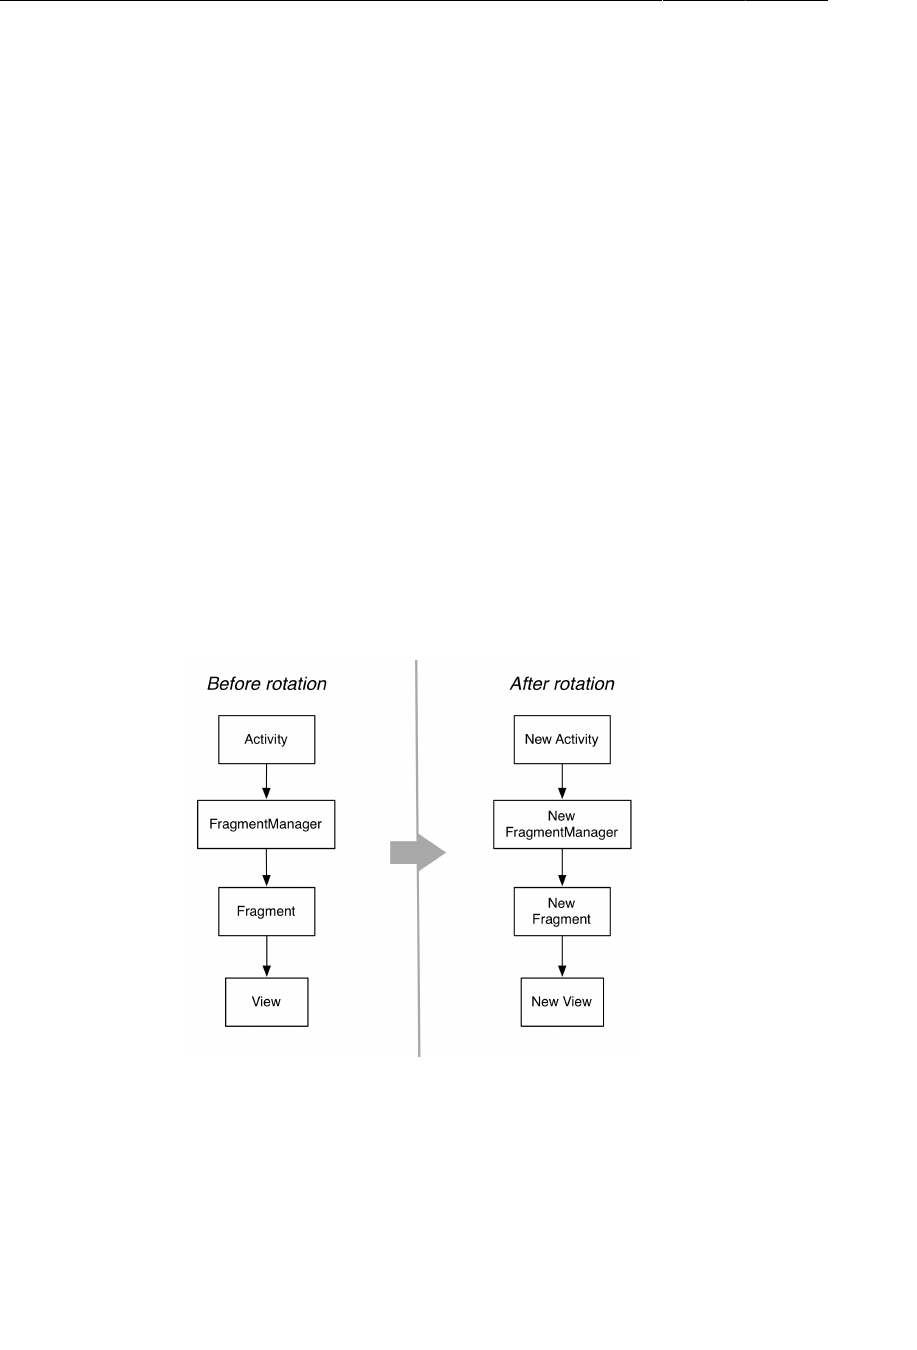
ptg11078569
Chapter 14Retained Fragments
238
setRetainInstance(true) retains the fragment. When a fragment is retained, the fragment is not
destroyed with the activity. Instead, it is preserved and passed along intact to the new activity.
When you retain a fragment, you can count on all of its instance variables (like mPlayButton, mPlayer,
and mStopButton) to keep the same values. When you reach for them, they are simply there.
Run HelloMoon again. Play the audio, rotate the device, and confirm that playback continues
unimpeded.
Rotation and Retained Fragments
Let’s take a closer look at how retained fragments work. Retained fragments take advantage of the fact
that a fragment’s view can be destroyed and recreated without having to destroy the fragment itself.
During a configuration change, the FragmentManager first destroys the views of the fragments in its
list. Fragment views always get destroyed and recreated on a configuration change for the same reasons
that activity views are destroyed and recreated: If you have a new configuration, then you might need
new resources. Just in case better matching resources are now available, you rebuild the view from
scratch.
Next, the FragmentManager checks the retainInstance property of each fragment. If it is false, which
it is by default, then the FragmentManager destroys the fragment instance. The fragment and its view
will be recreated by the new FragmentManager of the new activity “on the other side.”
Figure 14.1Default rotation with a UI fragment
On the other hand, if retainInstance is true, then the fragment’s view is destroyed, but the fragment
itself is not. When the new activity is created, the new FragmentManager finds the retained fragment
and recreates its view.
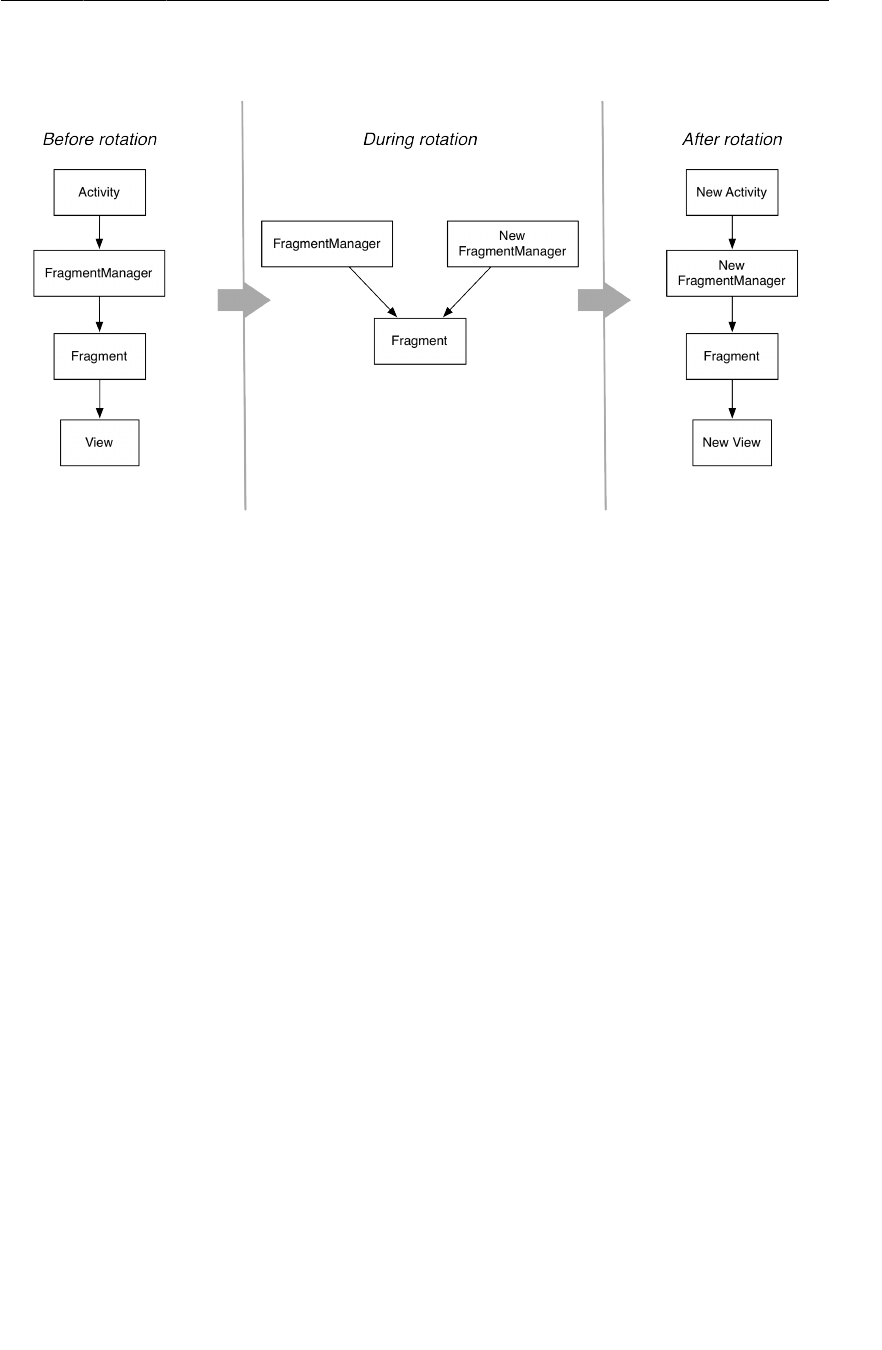
ptg11078569
Rotation and Retained Fragments
239
Figure 14.2Rotation with a retained UI fragment
A retained fragment is not destroyed, but it is detached from the dying activity. This puts the fragment
in a retained state. The fragment still exists, but it is not hosted by any activity.

ptg11078569
Chapter 14Retained Fragments
240
Figure 14.3Fragment lifecycle
The retained state is only entered into when two conditions are met:
•setRetainInstance(true) has been called on the fragment.
• The hosting activity is being destroyed for a configuration change (typically rotation).
A fragment is only in the retained state for an extremely brief interval – the time between being
detached from the old activity and being reattached to the new activity that is immediately created.
Retained Fragments: As Nice as All That?
Retained fragments: pretty nifty, right? Yes! They are indeed nifty. They appear to solve all the
problems that pop up from activities and fragments being destroyed on rotation. When the device
configuration changes, you get the most appropriate resources by creating a brand-new view, and you
have an easy way to retain data and objects.
You may wonder why you would not retain every fragment or why fragments are not retained by
default. At times, Android seems to discourage retaining fragments with user interfaces. We are not

ptg11078569
Rotation Handling and onSaveInstanceState(Bundle)
241
sure why that is the case, but it may end up causing problems in the future if the Android team thinks
little of this feature.
Keep in mind, however, that retained fragments are only kept alive when an activity is destroyed for a
configuration change. If your activity is destroyed because the OS needs to reclaim memory, then all
your retained fragments are destroyed, too.
Rotation Handling and onSaveInstanceState(Bundle)
The onSaveInstanceState(Bundle) is another tool you have used to handle rotation. In fact,
if your app does not have any problems with rotation, it is because the default behavior of
onSaveInstanceState(…) is working.
Your CriminalIntent app is a good example. CrimeFragment is not retained, but if you make changes to
the crime’s title or toggle the check box, the new states of these View objects are automatically saved
out and restored after rotation. This is what onSaveInstanceState(…) was designed to do – save out
and restore the UI state of your app.
The major difference between overriding Fragment.onSaveInstanceState(…) and retaining the
fragment is how long the preserved data lasts. If it needs to last long enough to survive configuration
changes, then retaining the fragment is much less work. This is especially true when preserving an
object; you do not have to worry about whether the object implements Serializable.
However, if you need the data to last longer, retaining the fragment is no help. If an activity is
destroyed to reclaim memory after the user has been away for a while, then any retained fragments are
destroyed just like their unretained brethren.
To make this difference clearer, think back to your GeoQuiz app. The rotation problem you faced was
that the question index was being reset to zero on rotation. No matter what question the user was on,
rotating the device sent them back to the first question. You saved out the index data and then read it
back in to ensure the user would see the right question.
GeoQuiz did not use fragments, but imagine a redesigned GeoQuiz with a QuizFragment hosted by
QuizActivity. Should you override Fragment.onSaveInstanceState(…) to save out the index or
retain QuizFragment and keep the variable alive?
Figure14.4 shows the three different lifetimes you have to work with: the life of the activity object
(and its unretained fragments), the life of a retained fragment, and the life of the activity record.
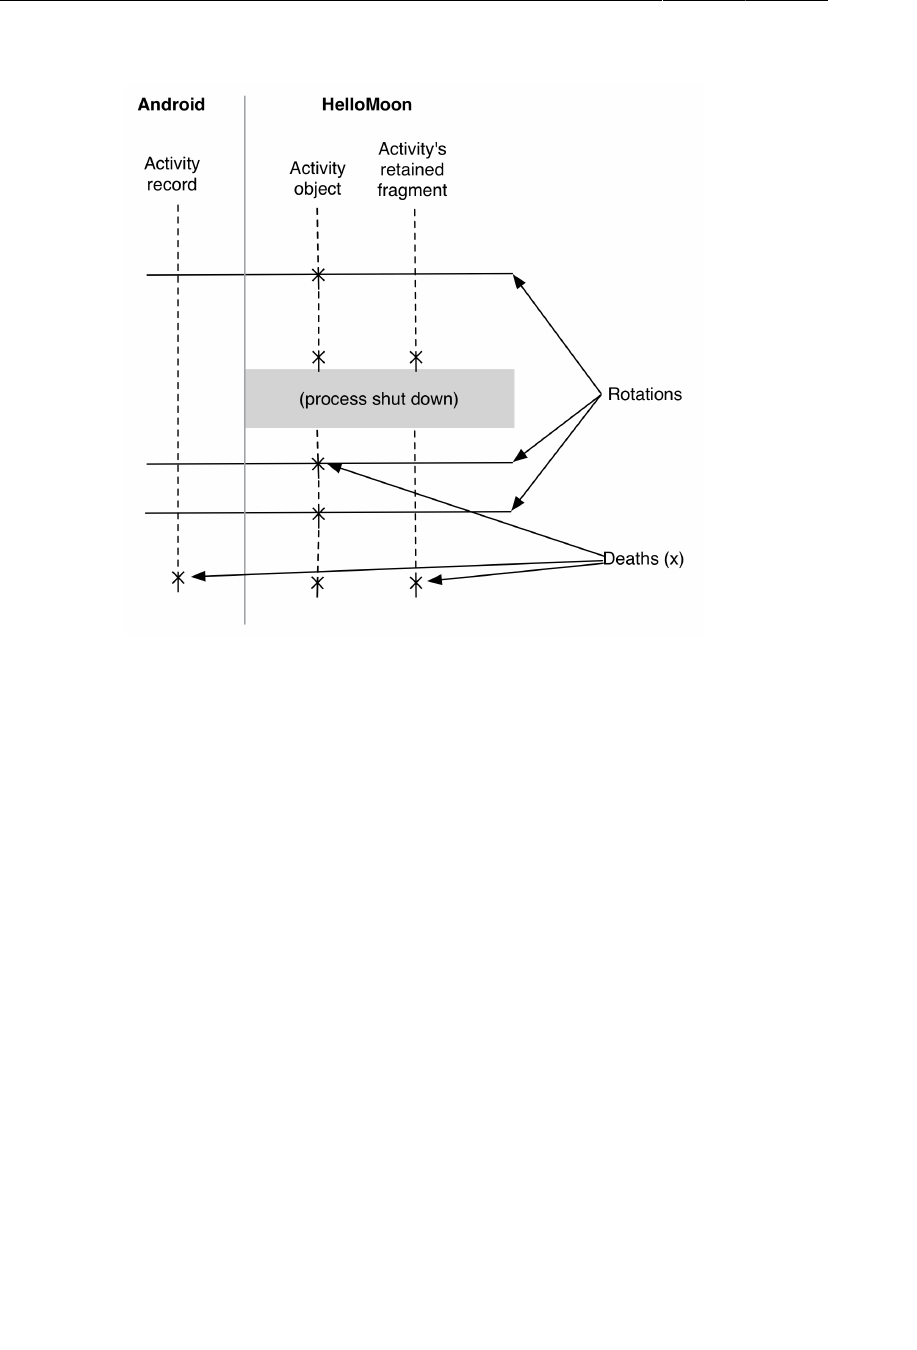
ptg11078569
Chapter 14Retained Fragments
242
Figure 14.4Three lifetimes
The lifetime of the activity object is too short. That is the source of the rotation problem. The index
definitely needs to outlive the activity object.
If you retain QuizFragment, then the index will exist for the lifetime of this retained fragment. When
GeoQuiz has only five questions, retaining QuizFragment is the easier choice and requires less code.
You would initialize the index as a member variable and then call setRetainInstance(true) in
QuizFragment.onCreate(…).
Listing 14.2Retaining of hypothetical QuizFragment
public class QuizFragment extends Fragment {
...
private int mCurrentIndex = 0;
...
@Override
public void onCreate(Bundle savedInstanceState) {
super.onCreate(savedInstanceState);
setRetainInstance(true);
}
...
}

ptg11078569
For the More Curious: Rotation Before Fragments
243
By tying the index to the lifetime of the retained fragment, it survives the destruction of the activity
object and solves the problem of resetting the index on rotation. However, as you can see in
Figure14.4, retaining QuizFragment does not preserve the value of the index across a process shut
down, which may happen if the user leaves the app for a while and the activity and the retained
fragment are destroyed to reclaim memory.
For only five questions, having users start over may be an acceptable choice. But what if GeoQuiz had
100 questions? Users would rightly be irritated at returning to the app and having to start again at the
first question. You need the state of the index to survive for the lifetime of the activity record. To make
this happen, you would save out the index in onSaveInstanceState(…). Then, if users left the app for
a while, they would always be able to pick up where they left off.
Therefore, if you have something in your activity or fragment that should last a long time, then you
should tie it to the activity record’s lifetime by overriding onSaveInstanceState(Bundle) to save its
state so that you can restore it later.
For the More Curious: Rotation Before Fragments
Fragments were introduced in Honeycomb and were only available for phones with Ice Cream
Sandwich. Rotation problems, on the other hand, have been around since the beginning.
To appreciate the charm of retained fragments, it helps to have an idea of what life was like before they
existed. It was like being poked in the eye with a sharp stick:
• You want to retain an object across configuration changes? This requires a method called
onRetainNonConfigurationInstance(). You override onRetainNonConfigurationInstance()
to return the object you want to retain. When you want it back later, you call
getLastNonConfigurationInstance(). Poke.
• You want to retain more than one object in an activity? Too bad. Each activity can only retain one.
If you need more than that, you have to find some other way to package those objects up. Poke
poke.
• Got an object like MediaPlayer that needs to be cleaned up when your activity has kicked the
bucket for the last time? You have to detect that onRetainNonConfigurationInstance() was not
called so that you can do the right thing in onDestroy(). Poke. Poke poke poke poke poke.
The onRetainNonConfigurationInstance() method is now deprecated, so passing an existing
object across rotation is now always done with a retained fragment. If you are comfortable with using
fragments, you will find that it is much more pleasant than the old way.

ptg11078569
This page intentionally left blank
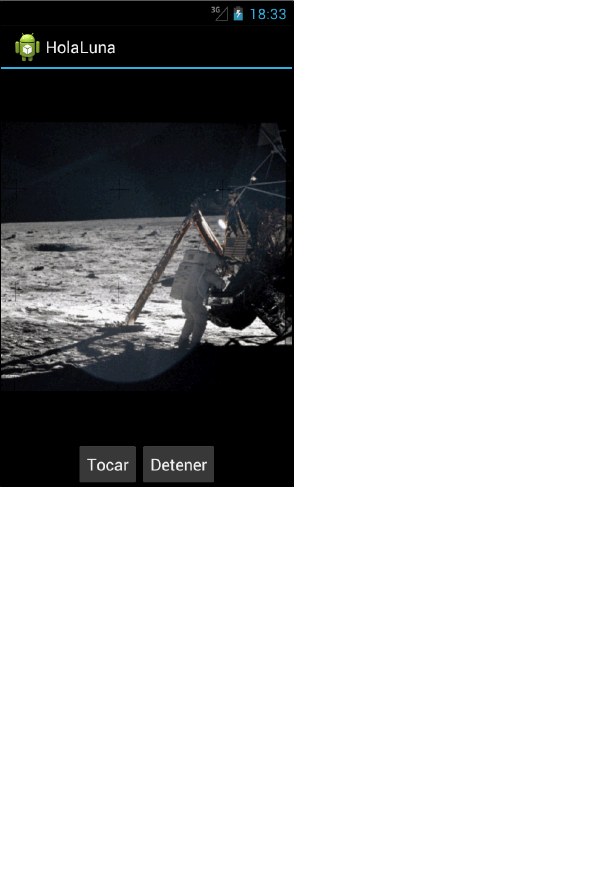
ptg11078569
245
15
Localization
Localization is the process of providing the appropriate resources for your app based on the device’s
language settings. In this chapter, you are going to localize HelloMoon. In particular, you will provide
Spanish versions of the audio file and the strings file. When a device’s language is set to Spanish,
Android will find and use the Spanish resources.
Figure 15.1¡Hola, Luna!
Localizing Resources
Language settings are part of the device’s configuration, and Android provides configuration qualifiers
for different languages. This makes localization simple: you create resource subdirectories with
the desired language configuration qualifier and put the alternative resources in them. The Android
resource system does the rest.
The language configuration qualifiers are taken from ISO 639-1 codes. For Spanish, the qualifier is -
es. In your HelloMoon project, create two new res subdirectories: res/raw-es/ and res/values-es/.

ptg11078569
Chapter 15Localization
246
The Spanish resources you need are available in the solutions file for this book (http://
www.bignerdranch.com/solutions/AndroidProgramming.zip). Within this file, locate
•15_Localization/HelloMoon/res/raw-es/one_small_step.wav
•15_Localization/HelloMoon/res/values-es/strings.xml
Copy these files into the corresponding directories that you just created.
That is all you have to do to provide localized resources for your app. To confirm, change your device’s
settings to Spanish by opening Settings and finding the language settings. Depending on your version
of Android, these settings will be labeled Language�and�input, Language�and�Keyboard, or something
similar.
When you get to a list of language options, choose a setting for Español. The region (España or
Estados�Unidos) will not matter because you qualified your resource directories with -es, which will
match both.
(You can qualify a resource directory with a language-plus-region qualifier that targets resources even
more specifically. For instance, the qualifier for Spanish spoken in Spain is -es-rES, where the r
denotes a region qualifier and ES is the ISO 3166-1-alpha-2 code for Spain. Note that configuration
qualifiers are not case-sensitive, but it is good to follow Android’s convention here: use a lowercase
language code and an uppercase region code prefixed with a lowercase r.
Run HelloMoon, press Tocar and listen to the Spanish translation of Neil Armstrong’s famous words.
Default resources
The configuration qualifier for English is -en. In a fit of localization, you might think to rename your
existing raw and values directories raw-en/ and values-en/.
That is not a good idea. These resources are your default resources. Default resources are resources
in unqualified directories. It is important to provide a default resource. If there is no default to fall
back on, then your app will crash if Android looks for a resource and cannot find one that matches the
device configuration.
For instance, if you had a strings.xml file in values-en/ and in values-es/ but not in values/,
then HelloMoon would crash when run on a device set to any language other than Spanish or English.
Providing default resources keeps your app safe regardless of the device configuration.
Screen density works differently
The one exception to providing default resources is for screen density. A project’s drawable directories
are typically qualified for screen density with -mdpi, -hdpi, and -xhdpi. However, Android’s decision
about which drawable resource to use is not a simple matter of matching the device’s screen density or
defaulting to the unqualified directory if there is no match.
The choice is based on a combination of screen size and density, and Android may choose a drawable
from a directory that is qualified with a lower or higher density than the device and then scale the
drawable. There are more details in the docs at http://developer.android.com/guide/practices/
screens_support.html, but the important point is that putting default drawable resources in res/
drawable/ is not necessary.

ptg11078569
Configuration Qualifiers
247
Configuration Qualifiers
You have now seen and used several configuration qualifiers for providing alternative resources:
language (e.g., values-es/), screen orientation (e.g., layout-land/), screen density (e.g., drawable-
mdpi/), and API level (e.g., values-v11/).
Table15.1 lists the characteristics of the device configuration that have configuration qualifiers that the
Android system recognizes for targeting resources.
Table 15.1Characteristics with configuration qualifiers
1. Mobile country code (MCC), optionally followed by mobile network code (MNC)
2. Language code, optionally followed by region code
3. Layout direction
4. Smallest width
5. Available width
6. Available height
7. Screen size
8. Screen aspect
9. Screen orientation
10.UI mode
11.Night mode
12.Screen density (dpi)
13.Touchscreen type
14.Keyboard availability
15.Primary text input
16.Navigation key availability
17.Primary non-text navigation method
18.API level
You can find descriptions of these characteristics and examples of specific configuration
qualifiers at http://developer.android.com/guide/topics/resources/providing-
resources.html#AlternativeResources.
Prioritizing alternative resources
Given the many types of configuration qualifiers for targeting resources, there may be times when the
device configuration will match more than one alternative resource. When this happens, qualifiers are
given precedence based on the order shown in Table15.1.
To see this prioritizing in action, let’s add another alternative resource to HelloMoon – a landscape
version of the app_name string resource. The app_name resource is used as the activity’s title – what
you see in the action bar. In landscape orientation, there is room for more text. Instead of just saying
hello to the moon, you could try to engage it in conversation.
Create a values-land directory and copy the default strings file into it.
The only string resource you want to be different in landscape orientation is app_name. Remove the
other string resources and modify app_name to the value shown in Listing 15.1.
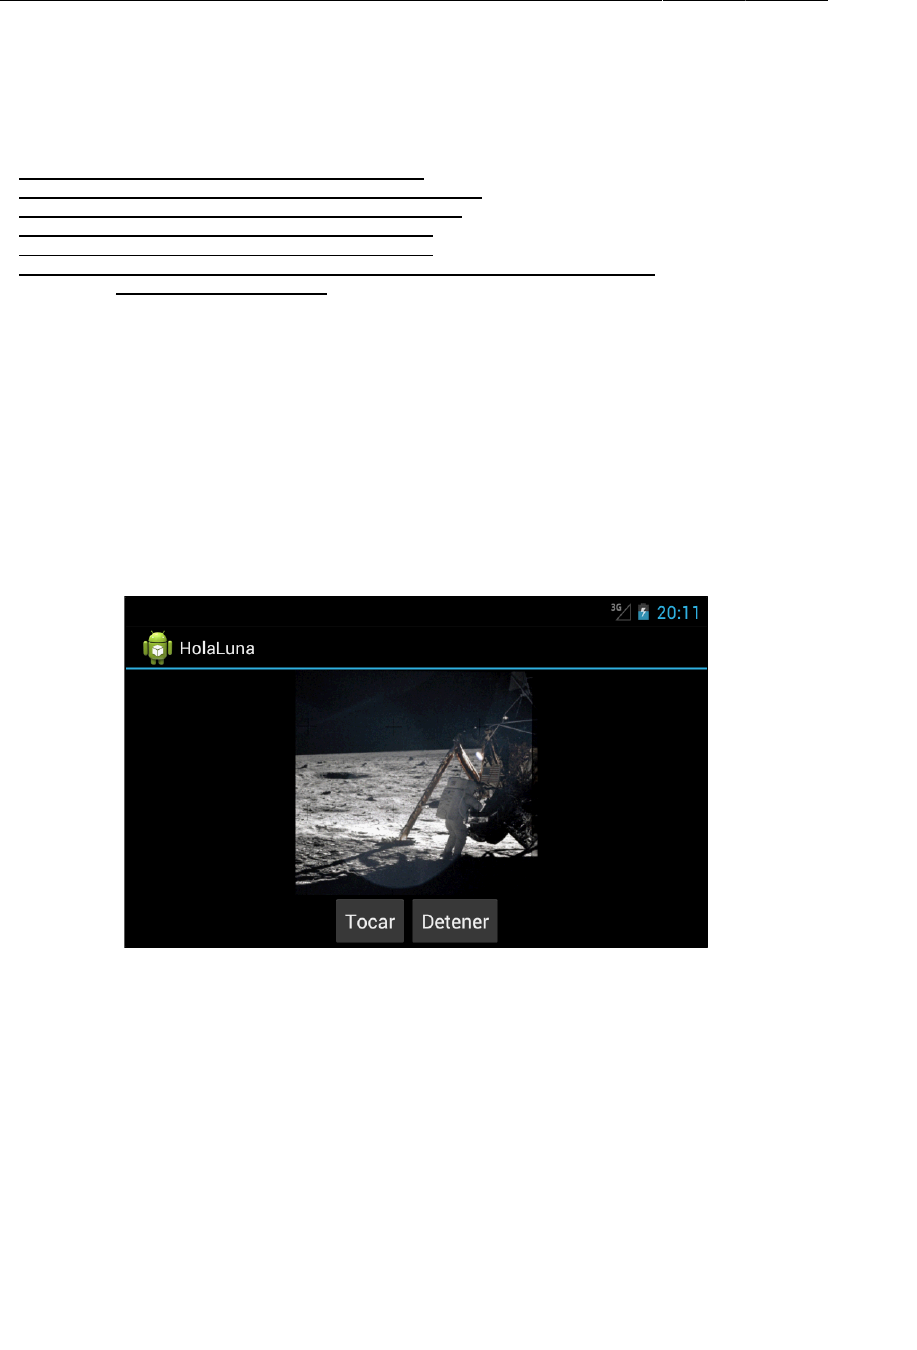
ptg11078569
Chapter 15Localization
248
Listing 15.1Creating a landscape alternative string resource (values-land/
strings.xml)
<?xml version="1.0" encoding="utf-8"?>
<resources>
<string name="app_name">Hello, Moon! How are you? Is it cold up there?</string>
<string name="app_name">HelloMoon</string>
<string name="hello_world">Hello world!</string>
<string name="menu_settings">Settings</string>
<string name="hellomoon_play">Play</string>
<string name="hellomoon_stop">Stop</string>
<string name="hellomoon_image_description">Neil Armstrong stepping
onto the moon</string>
</resources>
Alternatives for string resources (and other values resources) are provided on a per-string basis, so
you do not need to duplicate strings when they are the same. Those duplicated strings will only end up
being a maintenance hassle down the road.
Now you have three versions of app_name: a default version in values/strings.xml, a Spanish
alternative in values-es/strings.xml, and a landscape alternative in values-land/strings.xml.
With your device’s language set to Spanish, run HelloMoon and rotate to landscape. The Spanish
language alternative has precedence, so you see the string from values-es/strings.xml.
Figure 15.2Android prioritizes language over screen orientation
If you like, you can change your settings back to English and run again to confirm that the alternative
landscape string appears as expected. To get back to English, look for Ajustes or Configuración
(Settings) in the launcher and find the setting that includes idioma (language).
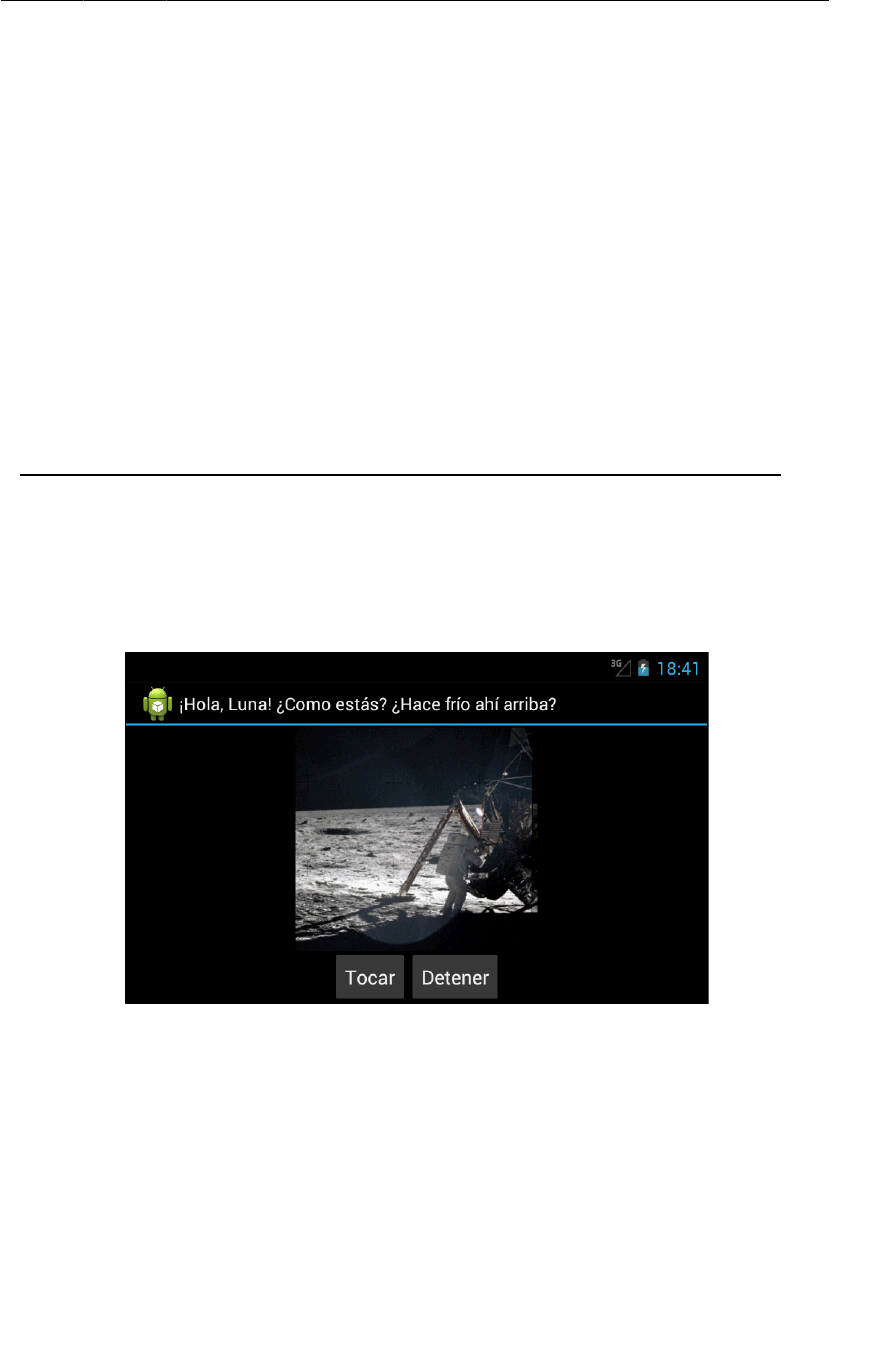
ptg11078569
Multiple qualifiers
249
Multiple qualifiers
You can put more than one qualifier on a resource directory. Create a directory named values-es-land
to give HelloMoon a landscape string in Spanish.
When using multiple qualifiers on directories, you must put them in the order of their precedence.
Thus, values-es-land is a valid directory name, but values-land-es is not.
(Note that a language-region qualifier, such as -es-rES, may look like two distinct configuration
qualifiers that have been combined, but it is just one. The region part is not a valid qualifier on its
own.)
Copy the values-land/strings.xml file into values-es-land/ and make the change shown in Listing
15.2. Or copy res/values-es-land/strings.xml from the solutions project, if you prefer.
Listing 15.2Creating a Spanish landscape string resource (values-es-land/
strings.xml)
<?xml version="1.0" encoding="utf-8"?>
<resources>
<string name="app_name">Hello, Moon! How are you? Is it cold up there?</string>
<string name="app_name">¡Hola, Luna! ¿Como estás? ¿Hace frío ahí arriba?</string>
</resources>
With your language set to Spanish, run HelloMoon to confirm your new alternative resource appears
on cue.
Figure 15.3Spanish landscape string resource appears

ptg11078569
Chapter 15Localization
250
Finding the best-matching resources
Let’s walk through how Android determined which version of app_name to display in this run. First,
consider the three alternatives for the string resource named app_name:
•values-es/strings.xml
•values-land/strings.xml
•values-es-land/strings.xml
Next, consider the device’s configuration. Currently, it includes Spanish language and a landscape
screen orientation.
Ruling out incompatible directories
The first step that Android takes to find the best resource is rule out any resource directory that is
incompatible with the current configuration.
None of the three choices is incompatible with the current configuration. If you rotated the device to
portrait, the configuration would change, and the resource directories values-land/ and values-es-
land/ would be incompatible and thus ruled out.
Some qualifiers are not as black and white when it comes to configuration compatibility. For example,
API level is not a strict match. The qualifier -v11 is compatible with devices running an API level of
11 or higher.
Some qualifiers were added in later API levels. For instance, layout direction qualifiers were
introduced in API level 17. The two options are -ldltr (left-to-right) and -ldrtl (right-to-left). Newer
qualifiers come with an implicit API level qualifier, so -ldltr can be thought of as -ldltr-v17. (The
addition of these hidden qualifiers is another excellent reason to have default resources included just in
case.)
Screen density is handled differently, and compatibility does not apply. Android will choose
the resource it thinks is best for the configuration, which may or may not be the resource whose
qualifier(s) match the configuration.
Stepping through the precedence table
After the incompatible resource directories have been ruled out, Android starts working through the
precedence table (Table15.1) starting with the highest priority qualifier, MCC. If there is any resource
directory with an MCC qualifier, then all resource directories that do not have an MCC qualifier are
ruled out. If there is still more than one matching directory, then Android considers the next highest-
precedence qualifier and continues until only one directory remains.
In our example, no directories contain an MCC qualifier, so no directories are ruled out, and Android
moves down the list to the language qualifier. Two directories (values-es/ and values-es-land/)
contain language qualifiers. One directory (values-land/) does not and is ruled out.
Android keeps stepping down the qualifier list. When it reaches screen orientation, it will find one
directory with a screen orientation qualifier and one with out. It rules out values-es/, and values-es-
land/ is the only directory remaining. Thus, Android uses the resource in values-es-land/.

ptg11078569
More Resource Rules and Regulations
251
More Resource Rules and Regulations
Now that you are more familiar with the Android resource system, here are some system requirements
you should know about when it comes time to build your own apps.
Resource naming
Resource names must be lowercase and must not have any spaces – one_small_step.wav, app_name,
armstrong_on_moon.jpg.
Whether you reference a resource in XML or code, the reference does not include the file
extension. For example, you refer to @drawable/armstrong_on_moon in your layout files and
R.drawable.armstrong_on_moon in your code. This means that you cannot rely on extensions to
distinguish identically named resource files in the same subdirectory.
Resource directory structure
Resources must be saved in a subdirectory of res/. You cannot save resources in the root of res/.
Doing so will cause build errors.
The names of the res subdirectories are directly tied to the Android build process and cannot be
changed. You have already seen drawable/, layout/, menu/, raw/, and values/. You can see a
complete list of supported (unqualified) res subdirectories at http://developer.android.com/
guide/topics/resources/providing-resources.html#ResourceTypes.
Any additional subdirectories you create in res/ will be ignored. Creating res/my_stuff may not
cause an error, but Android will not use any resources you place in there.
In addition, you cannot create additional levels of subdirectories in res/. This restriction can make life
difficult. Real projects can have hundreds of drawable resources, and it is natural to want to organize
them in subdirectories. But you cannot do this. The only way to help yourself in this situation is with
careful naming of resources so that the resources sort in a way that makes it easier to find a particular
file.
Android’s naming convention for layout files is an example of a sorting strategy. Layout files begin
with the type of view that the layout defines, like activity_, dialog_, or list_item_. For instance, in
CriminalIntent’s res/layout/, you have activity_crime_pager, activity_fragment, dialog_date,
fragment_crime, and list_item_crime. Your activity layouts sort together, which theoretically makes
them easier to find.
Testing Alternative Resources
It is important to test your layouts and other resources. Testing layouts will tell you how many
alternatives you need for different screen sizes, orientations, and more. You can test on devices both
real and virtual. You can also use the graphical layout tool.
The graphical layout tool has many options for previewing how a layout will appear in different
configurations. You can preview the layout on different screen sizes, device types, API levels,
languages, and more.
To see these options, open fragment_hello_moon.xml in the graphical layout tool. Then try some of
the settings indicated in the following figure.
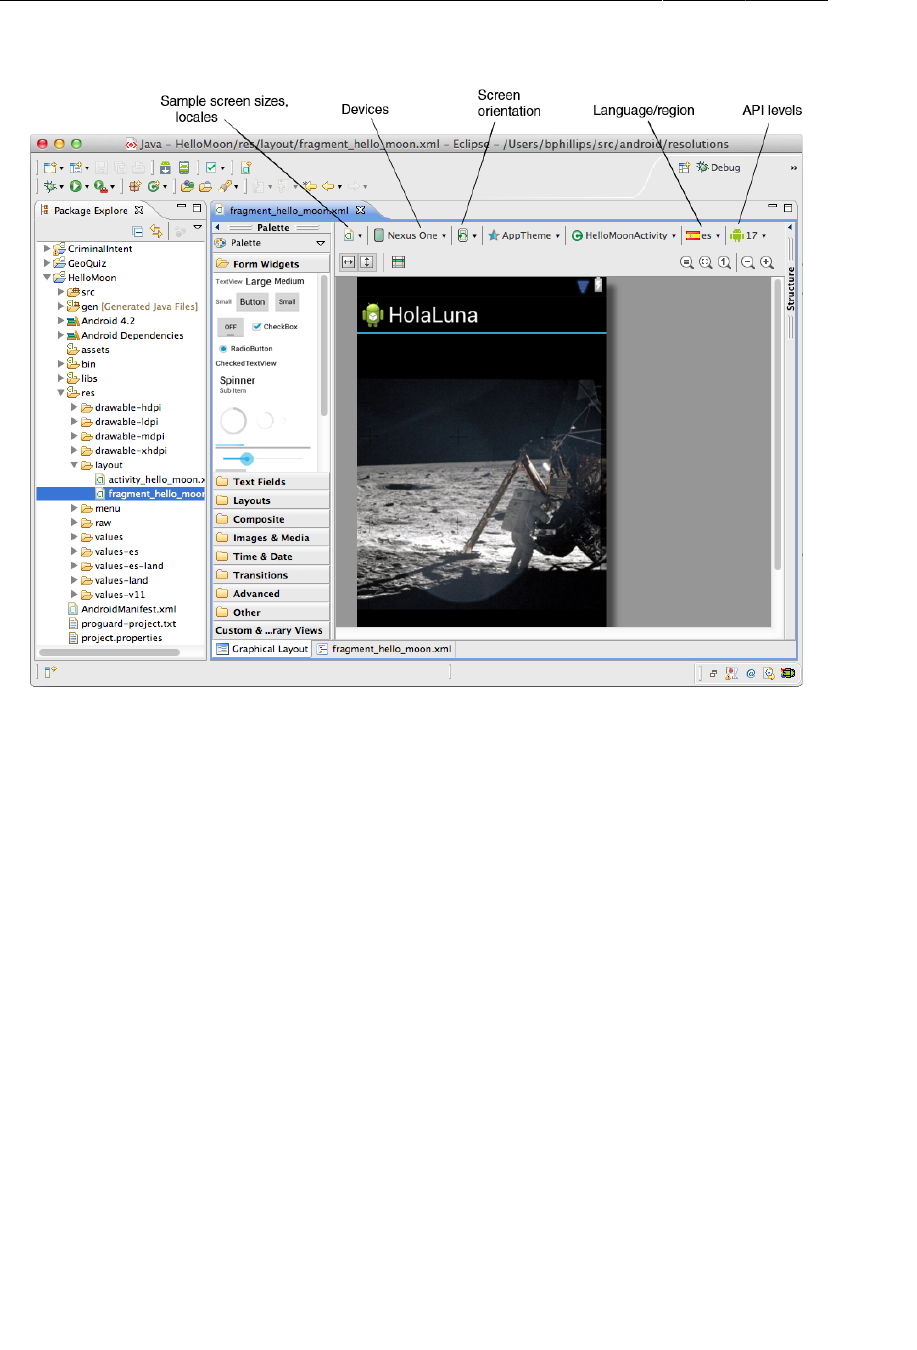
ptg11078569
Chapter 15Localization
252
Figure 15.4Using graphical layout tool to preview resources
You can ensure that you have included all of your necessary default resources by setting a device to
a language that you have not localized any resources for. Run your app and put it through its paces.
Visit all of the views and rotate them. If the app crashes, check LogCat for a “Resource not found...”
message to track down the missing default resource.
Before continuing to the next chapter, you may want to change your device’s language back from
Spanish. To find the language setting, look for Ajustes or Configuración (Settings) in the launcher and
find the setting that includes idioma (language).
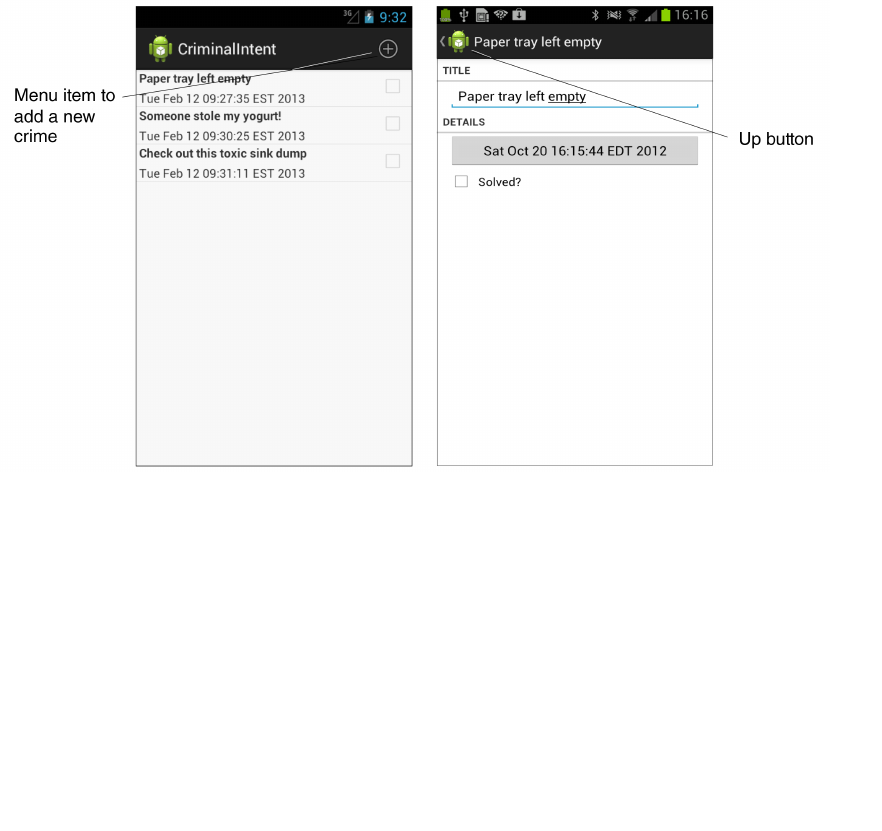
ptg11078569
253
16
The Action Bar
The action bar was introduced in Honeycomb. It replaced the old-school title bar, but it does more than
just display a title and an app icon. The action bar can also house menu items, and its app icon can be
used as a navigation button.
In this chapter, you will create a menu for CriminalIntent. This menu will have a menu item that lets
users add a new crime. You will also enable the app icon to be an Up button.
Figure 16.1Creating the options menu file
Options Menus
The menu that can appear on the action bar is called the options menu. An options menu presents
users with choices that refer to the entire screen or the app as a whole. Adding a new crime is a good
example. On the other hand, deleting a crime from the list is an action is better suited to a context
menu. This action is contextual because it requires knowing which crime to delete. You will learn about
context menus in Chapter18.
ptg11078569
Chapter 16The Action Bar
254
Your options menu will require a few string resources. Your context menu in Chapter18 will need one,
too. Add the string resources for both chapters to strings.xml (Listing 16.1). These strings may seem
mysterious right now, but it is good to get them taken care of. When you need them later, they will
already be in place, and you will not have to stop what you are doing.
Listing 16.1Adding strings for menus (res/values/strings.xml)
...
<string name="crimes_title">Crimes</string>
<string name="date_picker_title">Date of crime:</string>
<string name="new_crime">New Crime</string>
<string name="show_subtitle">Show Subtitle</string>
<string name="hide_subtitle">Hide Subtitle</string>
<string name="subtitle">If you see something, say something.</string>
<string name="delete_crime">Delete</string>
</resources>
The action bar as the home for options menus is new, but options menus themselves have been around
since the beginning of Android.
Figure 16.2Pre-Honeycomb options menus
Luckily, there are very few compatibility problems with options menus. The code is the same, and
each device handles how to present the options menu depending on its level of Android. We will revisit
issues surrounding compatibility, options menus, and the action bar throughout this chapter.
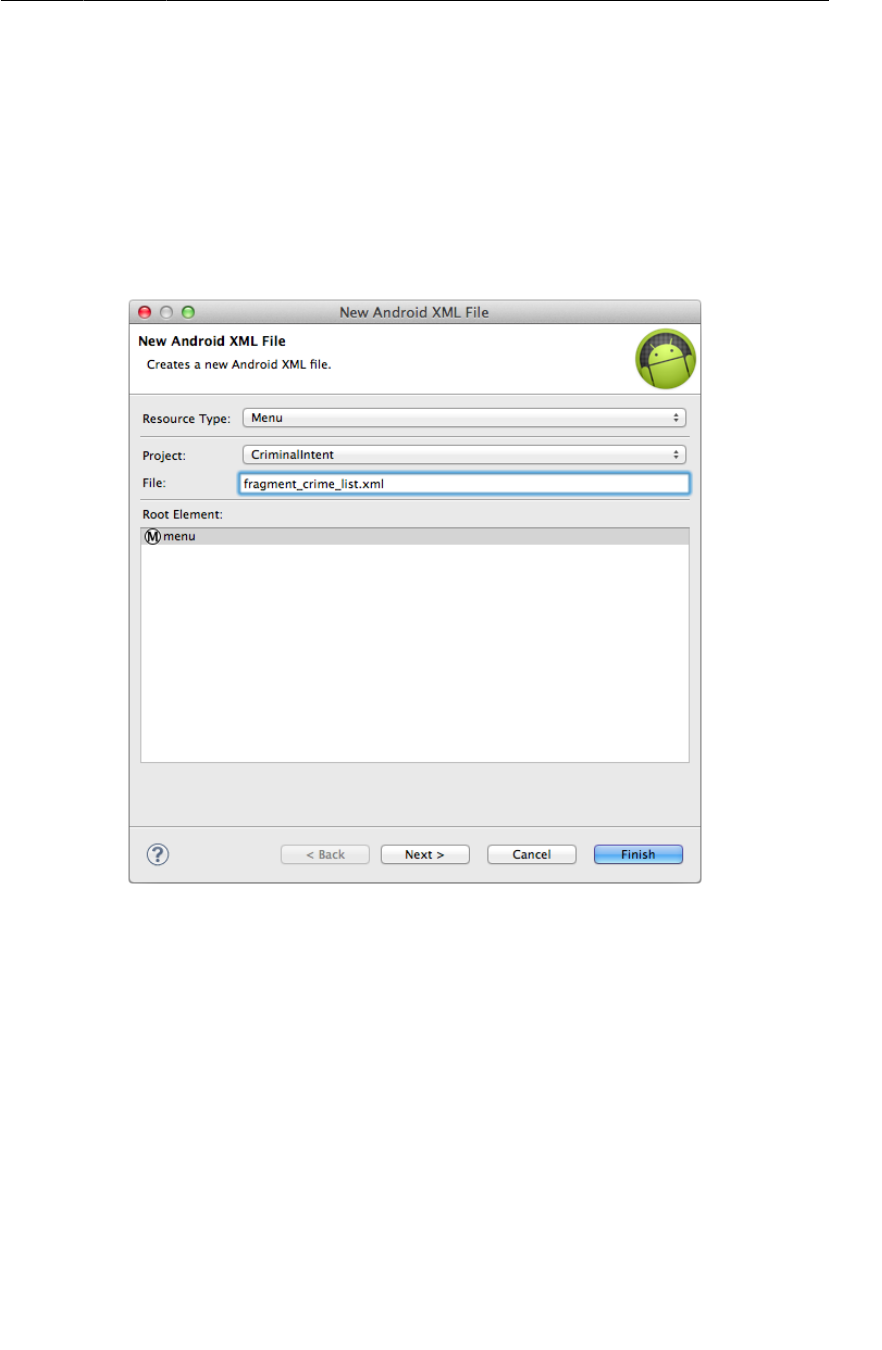
ptg11078569
Defining an options menu in XML
255
Defining an options menu in XML
Menus are a type of resource similar to layouts. You create an XML description of a menu and place
the file in the res/menu directory of your project. Android generates a resource ID for the menu file
that you then use to inflate the menu in code.
In the package explorer, create a menu subdirectory within res/. Then right-click on this new directory
and choose New → Android�XML�File. Ensure that the resource type of the file you are creating is
Menu, and name the file fragment_crime_list.xml.
Figure 16.3Creating the options menu file
Open fragment_crime_list.xml and navigate to the XML. Add an item element as shown in Listing
16.2.
Listing 16.2Creating a menu resource CrimeListFragment
(fragment_crime_list.xml)
<?xml version="1.0" encoding="utf-8"?>
<menu
xmlns:android="http://schemas.android.com/apk/res/android">
<item android:id="@+id/menu_item_new_crime"
android:icon="@android:drawable/ic_menu_add"
android:title="@string/new_crime"
android:showAsAction="ifRoom|withText"/>
</menu>
ptg11078569
Chapter 16The Action Bar
256
The showAsAction attribute refers to whether the item will appear on the action bar itself or in the
overflow menu. You have piped together two values, ifRoom and withText, so the item’s icon and text
will appear on the action bar if there is room. If there is room for the icon but not the text, then only the
icon will be visible. If there is no room for either, then the item will be relegated to the overflow menu.
How you access the overflow menu depends on the device. If the device has a hardware menu key,
then you must press it to see the overflow menu. Most newer devices do not have hardware menu keys,
and the overflow menu is accessed by the three dots on the far right side of the action bar, as seen in
Figure16.4.
Figure 16.4Overflow menu in the action bar
Other options for showAsAction include always and never. Using always is not recommended; it is
better to use ifRoom and let the OS decide. Using never is a good choice for less common actions.
In general, you should only put menu items that users will use frequently on the action bar to avoid
visually cluttering the screen.
Note that Android Lint does not complain about the android:showAsAction attribute that was
introduced in API level 11. There is no need to safeguard XML attributes as you do with Java code.
XML from the future is simply ignored on earlier APIs.
In the android:icon attribute, the value @android:drawable/ic_menu_add references a system icon. A
system icon is one that is found on the device rather than in your project’s resources.
Using system icons
In a prototype, referencing a system icon works fine. However, in an app that will be released, it is
better to be sure of what your user will see instead of leaving it up to each device. System icons can

ptg11078569
Creating the options menu
257
change drastically across devices and OS versions, and some devices might have system icons that do
not fit with the rest of your app’s design.
One alternative is to create your own icons. You will need to prepare versions for each screen
density and possibly for other device configurations. For more information, visit Android’s Icon
Design Guidelines at http://developer.android.com/guide/practices/ui_guidelines/
icon_design.html.
A second alternative is to find system icons that meet your app’s needs and copy them directly into
your project’s drawable resources. This is an easy way to get familiar and consistent icons packaged
with your app.
To find system icons, head to where you installed the Android SDKs and look for a path like your-
android-SDK-home/platforms/android-API level/data/res. For example, the directory for
Android 4.2 on one of our Macs is /Developer/android-sdk-mac_86/platforms/android-17/data/
res.
Browse through the system icons for the different SDKs. Or search for ic_menu_add. You can copy any
of these into the appropriate drawable folder in your project’s resources. Then, in your layout file, your
icon attribute would be android:icon="@drawable/ic_menu_add" to pull from your project resources
instead of the device’s system icons.
Creating the options menu
In code, options menus are managed by callbacks from the Activity class. When the options menu is
needed, Android calls the Activity method onCreateOptionsMenu(Menu).
Your design, however, calls for code to be implemented in a fragment, not an activity. Fragment comes
with its own set of options menu callbacks, which you will implement in CrimeListFragment. The
methods for creating the options menu and responding to the selection of a menu item are
public void onCreateOptionsMenu(Menu menu, MenuInflater inflater)
public boolean onOptionsItemSelected(MenuItem item)
In CrimeListFragment.java, override onCreateOptionsMenu(Menu, MenuInflater) to inflate the
menu defined in fragment_crime_list.xml.
Listing 16.3Inflating an options menu (CrimeListFragment.java)
@Override
public void onResume() {
super.onResume();
((CrimeAdapter)getListAdapter()).notifyDataSetChanged();
}
@Override
public void onCreateOptionsMenu(Menu menu, MenuInflater inflater) {
super.onCreateOptionsMenu(menu, inflater);
inflater.inflate(R.menu.fragment_crime_list, menu);
}
Within this method, you call MenuInflater.inflate(int, Menu) and pass in the resource ID of your
menu file. This populates the Menu instance with the items defined in your file.
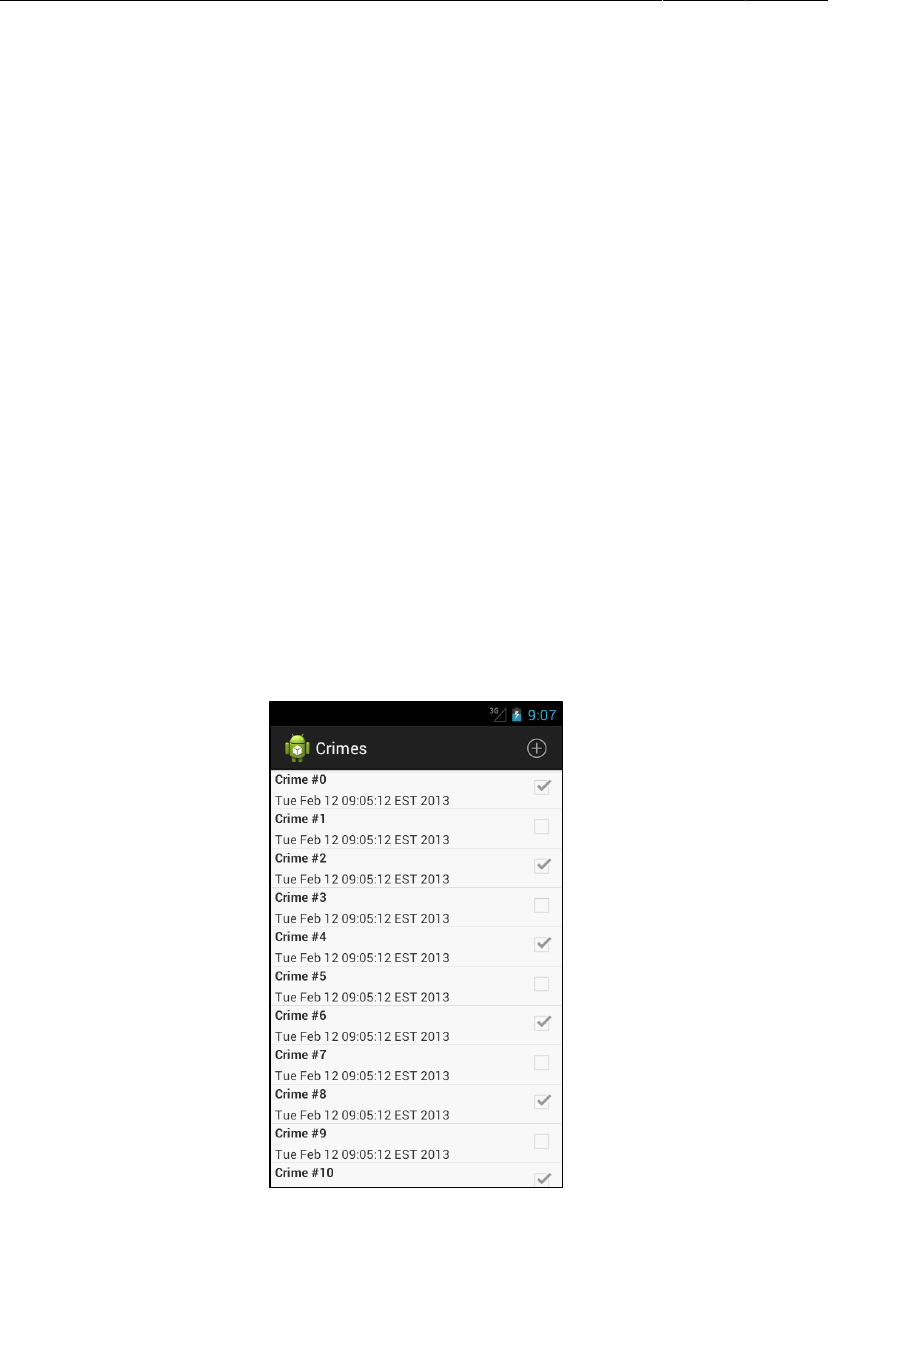
ptg11078569
Chapter 16The Action Bar
258
Notice that you call through to the superclass implementation of onCreateOptionsMenu(…). This is
not required, but we recommend calling through as a matter of convention. That way, any options
menu functionality defined by the superclass will still work. It is only a convention, though – the base
Fragment implementation of this method does nothing.
The FragmentManager is responsible for calling Fragment.onCreateOptionsMenu(Menu,
MenuInflater) when the activity receives its onCreateOptionsMenu(…) callback from the
OS. You must explicitly tell the FragmentManager that your fragment should receive a call to
onCreateOptionsMenu(…). You do this by calling the following method:
public void setHasOptionsMenu(boolean hasMenu)
In CrimeListFragment.onCreate(…), let the FragmentManager know that CrimeListFragment needs
to receive options menu callbacks.
Listing 16.4Set hasOptionsMenu (CrimeListFragment.java)
@Override
public void onCreate(Bundle savedInstanceState) {
super.onCreate(savedInstanceState);
setHasOptionsMenu(true);
getActivity().setTitle(R.string.crimes_title);
...
You can run CriminalIntent now to see your options menu (Figure16.5).
Figure 16.5Icon for menu item directly on action bar

ptg11078569
Creating the options menu
259
Where is the menu item’s text? Most phones only have enough room for the icon in portrait orientation.
You can long-press an icon on the action bar to reveal its title.
Figure 16.6Long-pressing icon on action bar shows title
In landscape orientation, there is room on the action bar for the icon and text (Figure16.7).
Figure 16.7Icon and text on action bar
If you are running CriminalIntent on a pre-Honeycomb device, you must press the menu key built into
the device to see the options menu. It will appear at the bottom of the screen. Figure16.8 shows the
same code running on a Gingerbread device.
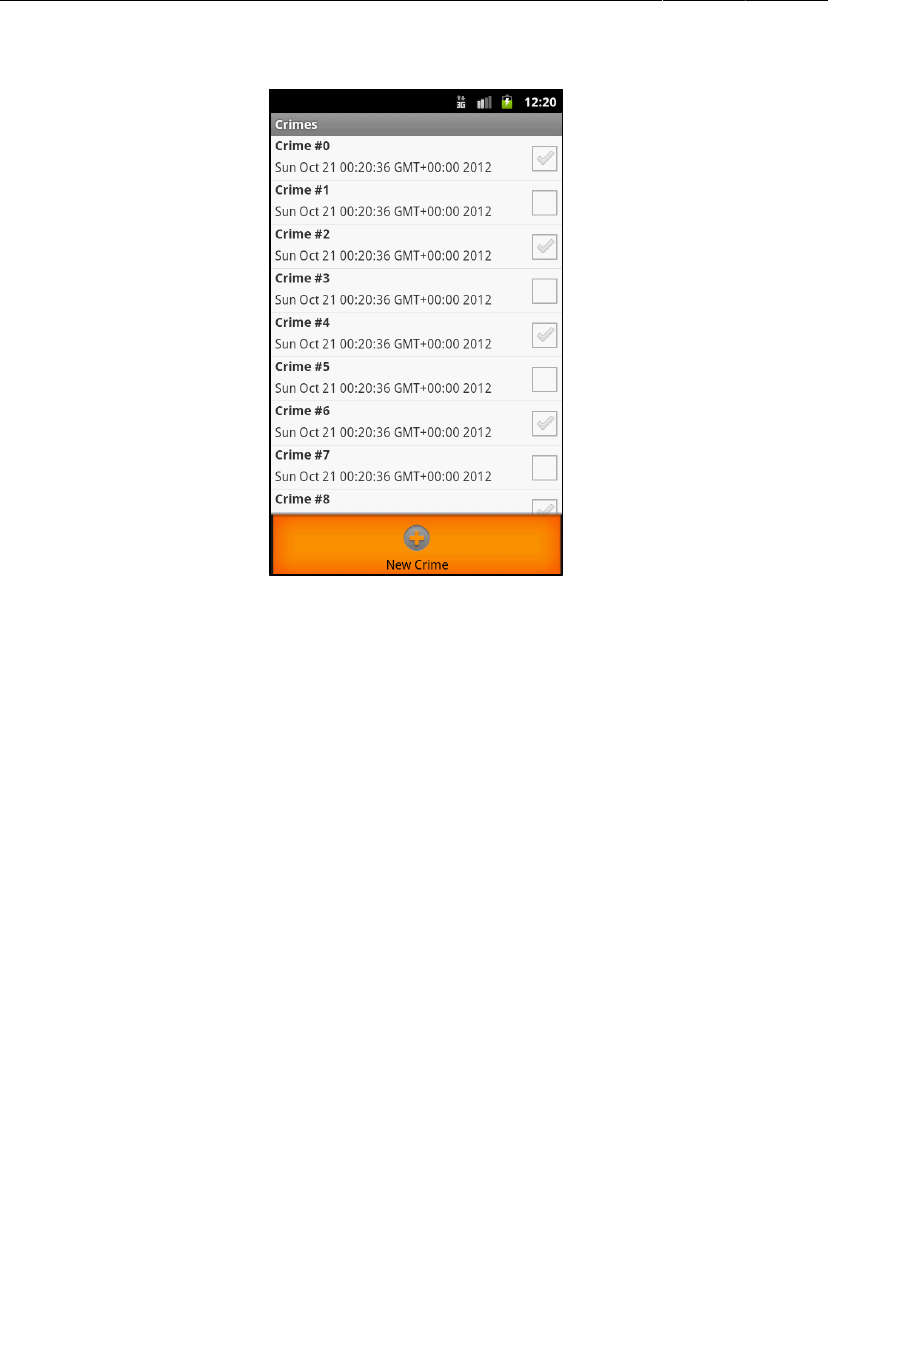
ptg11078569
Chapter 16The Action Bar
260
Figure 16.8Options menu on Gingerbread
Your options menu code works fine on older and newer devices without wrapping and safeguarding
any code. There is, however, a small difference in option menus behavior between older and newer
SDKs. On devices running Honeycomb and later, onCreateOptionsMenu(…) is called and the
options menu is created when the activity is started. It is necessary to have the menu prepared at the
beginning of the activity’s life so that the menu items can appear on the action bar. On older devices,
onCreateOptionsMenu(…) is called and the options menu is created when the user first presses the
menu key.
(You may have seen older devices running apps with action bars. These apps typically use a third-party
library named ActionBarSherlock to duplicate action bar features for earlier API levels. We will talk
more about ActionBarSherlock at the end of Chapter18.)
Responding to options menu selections
To respond to the user pressing the New�Crime item, you need a way to add a new Crime to your list of
crimes. In CrimeLab.java, add the following method that adds a Crime to the array list.

ptg11078569
Responding to options menu selections
261
Listing 16.5Adding a new crime (CrimeLab.java)
...
public void addCrime(Crime c) {
mCrimes.add(c);
}
public ArrayList<Crime> getCrimes() {
return mCrimes;
}
...
In this brave new world where you will be able to add crimes yourself, the 100 programmatically
generated crimes are no longer necessary. In CrimeLab.java, remove the code that generates these
crimes.
Listing 16.6Goodbye, random crimes! (CrimeLab.java)
public CrimeLab(Context appContext) {
mAppContext = appContext;
mCrimes = new ArrayList<Crime>();
for (int i = 0; i < 100; i++) {
Crime c = new Crime();
c.setTitle("Crime #" + i);
c.setDate(new Date());
c.setSolved(i % 2 == 0); // Every other one
mCrimes.add(c);
}
}
When the user presses a menu item in the options menu, your fragment receives a callback to the
method onOptionsItemSelected(MenuItem). This method receives an instance of MenuItem that
describes the user’s selection.
Although your menu only contains one item, menus often have more than one. You can determine
which menu item has been selected by checking the ID of the menu item and then respond
appropriately. This ID corresponds to the ID you assigned the menu item in your menu file.
In CrimeListFragment.java, implement onOptionsItemSelected(MenuItem) to respond to selection
of the menu item. You will create a new Crime, add it to CrimeLab, and then start an instance of
CrimePagerActivity to edit the new Crime.

ptg11078569
Chapter 16The Action Bar
262
Listing 16.7Responding to menu selection (CrimeListFragment.java)
@Override
public void onCreateOptionsMenu(Menu menu, MenuInflater inflater) {
super.onCreateOptionsMenu(menu, inflater);
inflater.inflate(R.menu.fragment_crime_list, menu);
}
@Override
public boolean onOptionsItemSelected(MenuItem item) {
switch (item.getItemId()) {
case R.id.menu_item_new_crime:
Crime crime = new Crime();
CrimeLab.get(getActivity()).addCrime(crime);
Intent i = new Intent(getActivity(), CrimePagerActivity.class);
i.putExtra(CrimeFragment.EXTRA_CRIME_ID, crime.getId());
startActivityForResult(i, 0);
return true;
default:
return super.onOptionsItemSelected(item);
}
}
Notice that this method returns a boolean value. Once you have handled the menu item, you should
return true to indicate that no further processing is necessary. The default case calls the superclass
implementation if the menu item ID is not in your implementation.
Run CriminalIntent and try out your new options menu. Add a few crimes and edit them afterwards.
(The empty list that you see before you add any crimes can be disconcerting. The challenge at the end
of this chapter is to present a helpful clue when the list is empty.)
Enabling Ancestral Navigation
So far, CriminalIntent relies heavily on the Back button to navigate around the app. Using the Back
button is temporal navigation. It takes you to where you were last. Ancestral navigation, on the other
hand, takes you up the app hierarchy. (It is sometimes called hierarchical navigation.)
Android makes it easy to use the app icon on the action bar for ancestral navigation. You can
implement it to go “home” – all the way up the hierarchy to the app’s initial screen. In fact, the
icon was originally called the app’s “Home” button. However, Android now recommends that you
implement the app icon to go “up” just one level to the parent of the current activity. When you do this,
the icon becomes the “Up” button.
In this section, you will implement the app icon on CrimePagerActivity’s action bar to be the “Up”
button. Pressing the icon will return the user to the list of crimes.
Enabling the app icon
Typically, you let users know that the app icon is enabled as an Up button by displaying a left-pointing
caret to the left of the app icon like the one in Figure16.9.
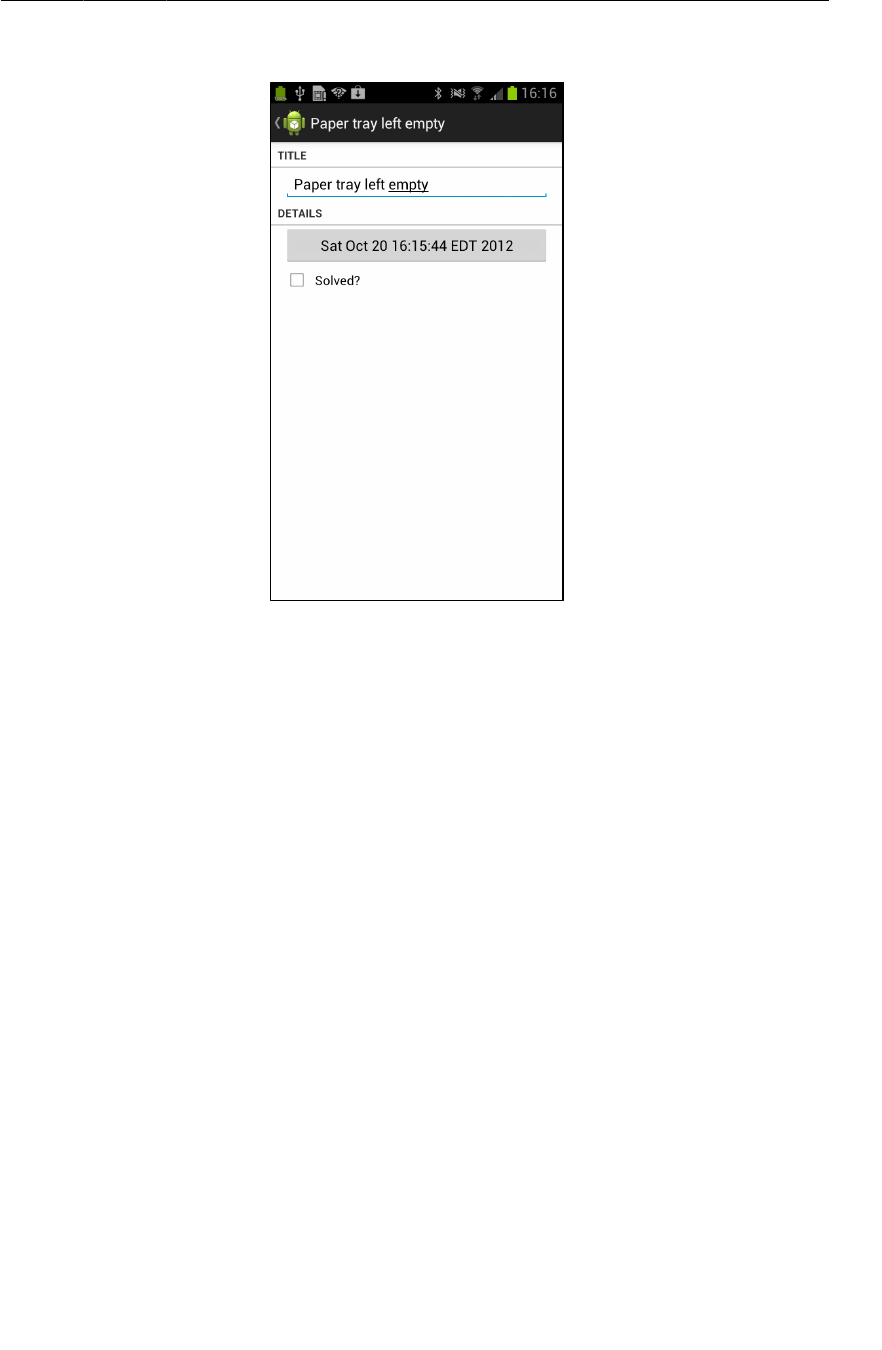
ptg11078569
Enabling the app icon
263
Figure 16.9Action bar with Up button enabled
To enable the app icon to work as a button and get the caret to appear in the fragment’s view, you must
set a property on the fragment by calling the following method:
public abstract void setDisplayHomeAsUpEnabled(boolean showHomeAsUp)
This method is from API level 11, so you need to wrap it to keep the app Froyo- and Gingerbread-safe
and annotate the method to wave off Android Lint.
In CrimeFragment.onCreateView(…), call setDisplayHomeAsUpEnabled(true).
Listing 16.8Turn on Up button (CrimeFragment.java)
@TargetApi(11)
@Override
public View onCreateView(LayoutInflater inflater, ViewGroup parent,
Bundle savedInstanceState) {
View v = inflater.inflate(R.layout.fragment_crime, parent, false);
if (Build.VERSION.SDK_INT >= Build.VERSION_CODES.HONEYCOMB) {
getActivity().getActionBar().setDisplayHomeAsUpEnabled(true);
}
...
}
Note that setting this property does not wire the button to go “up.” It only enables the icon to
be some kind of button and displays the caret. You have to do the wiring yourself. For apps
targeting API levels 11-13, the icon is enabled as a button by default, but you still need to call
setDisplayHomeAsUpEnabled(true) to get the caret to appear.

ptg11078569
Chapter 16The Action Bar
264
In Listing 16.8, you add the @TargetApi annotation on onCreateView(…). You could annotate only
the call to setDisplayHomeAsUpEnabled(true). However, onCreateView(…) will soon be full of API-
specific code, so you are annotating the entire method implementation instead.
Run CriminalIntent, navigate to a crime detail screen, and check out the new caret next to your app
icon.
Responding to the Up button
You respond to the enabled app icon as if it were an existing options menu item – by overriding
onOptionsItemSelected(MenuItem). So the first thing to do is to tell the FragmentManager
that CrimeFragment will be implementing options menu callbacks on behalf of the activity.
In CrimeFragment.onCreate(…), call setHasOptionsMenu(true), like you did earlier for
CrimeListFragment.
Listing 16.9Turn on options menu handling (CrimeFragment.java)
@Override
public void onCreate(Bundle savedInstanceState) {
...
setHasOptionsMenu(true);
}
You do not need to define or inflate the app icon menu item in an XML file. It comes
with a ready-made resource ID: android.R.id.home. In CrimeFragment.java, override
onOptionsItemSelected(MenuItem) to respond to this menu item.
Listing 16.10Responding to the app icon (Home) menu item
(CrimeFragment.java)
@Override
public boolean onOptionsItemSelected(MenuItem item) {
switch (item.getItemId()) {
case android.R.id.home:
// To be implemented next
return true;
default:
return super.onOptionsItemSelected(item);
}
}
You want this button to return the user to the list of crimes, so you might think to create an intent and
start the instance of CrimePagerActivity like this:
Intent intent = new Intent(getActivity(), CrimeListActivity.class);
intent.addFlags(Intent.FLAG_ACTIVITY_CLEAR_TOP);
startActivity(intent);
finish();
FLAG_ACTIVITY_CLEAR_TOP tells Android to look for an existing instance of the activity in the stack,
and if there is one, pop every other activity off the stack so that the activity being started will be top-
most.
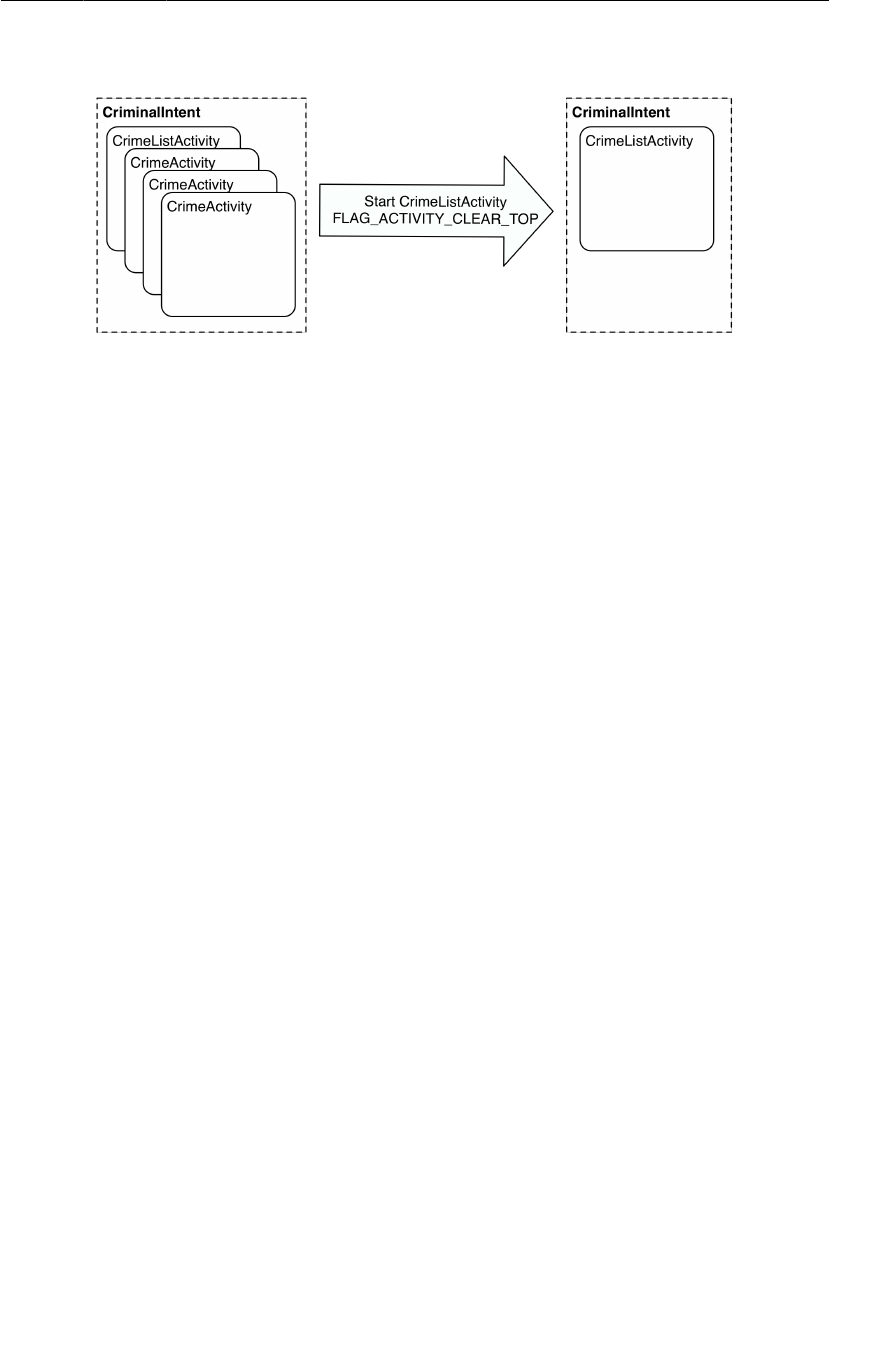
ptg11078569
Responding to the Up button
265
Figure 16.10FLAG_ACTIVITY_CLEAR_TOP at work
However, there is a better way to implement ancestral navigation: use a convenience class named
NavUtils plus some metadata in the manifest.
Let’s start with the metadata. Open AndroidManifest.xml. Add the following attribute to the
declaration of CrimePagerActivity to name CrimeListActivity as its parent.
Listing 16.11Add parent activity metadata (AndroidManifest.xml)
<activity android:name=".CrimePagerActivity"
android:label="@string/app_name">
<meta-data android:name="android.support.PARENT_ACTIVITY"
android:value=".CrimeListActivity"/>
</activity>
...
Think of a metadata tag as a post-it note on your activity. Notes like this are kept in the system
PackageManager, and anyone can pull out a value from a post-it note if they have the name of the note.
You can create your own name-value pairs and fetch them as needed. This particular pair is defined by
the NavUtils class so that it can learn the parent of a given activity. It is especially useful combined
with the following NavUtils class method:
public static void navigateUpFromSameTask(Activity sourceActivity)
In CrimeFragment.onOptionsItemSelected(…), first check to see if there is a parent activity
named in the metadata by calling NavUtils.getParentActivityName(Activity). If there is, call
navigateUpFromSameTask(Activity) to navigate to the parent activity.
Listing 16.12Using NavUtils (CrimeFragment.java)
@Override
public boolean onOptionsItemSelected(MenuItem item) {
switch (item.getItemId()) {
case android.R.id.home:
if (NavUtils.getParentActivityName(getActivity()) != null) {
NavUtils.navigateUpFromSameTask(getActivity());
}
return true;
default:
return super.onOptionsItemSelected(item);
}
}

ptg11078569
Chapter 16The Action Bar
266
If there is no parent named in the metadata, then you do not want to display the up caret. Back in
onCreateView(…), check for a parent before calling setDisplayHomeAsUpEnabled(true).
Listing 16.13No parent, no caret (CrimeFragment.java)
@TargetApi(11)
@Override
public View onCreateView(LayoutInflater inflater, ViewGroup parent,
Bundle savedInstanceState) {
View v = inflater.inflate(R.layout.fragment_crime, parent, false);
if (Build.VERSION.SDK_INT >= Build.VERSION_CODES.HONEYCOMB) {
if (NavUtils.getParentActivityName(getActivity()) != null) {
getActivity().getActionBar().setDisplayHomeAsUpEnabled(true);
}
}
...
}
Why is using NavUtils better than starting the activity yourself? First, the NavUtils code is short and
sweet. Using NavUtils also centralizes the relationships between your activities in the manifest. If
those relationships change, you only have to change a line in your manifest rather than mucking about
in your Java code.
Another nice thing about it is that the ancestral relationship is kept separate from the code in your
fragment. You can use CrimeFragment in a variety of activities, each of which may have a different
parent, but CrimeFragment will still do the right thing.
Run CriminalIntent. Create a crime and then press the app icon to return to the list of crimes. It is hard
to tell with CriminalIntent’s puny two-level hierarchy, but navigateUpFromSameTask(Activity) is
implementing “up” and sending the user up one level to CrimePagerActivity’s parent.
An Alternative Menu Item
In this section, you will use what you have learned about menus, compatibility, and alternative
resources to add a menu item that lets users show and hide the subtitle of CrimeListActivity’s action
bar.
Creating an alternative menu file
A menu item that applies the action bar should not be visible to users without an action bar. So the first
step is to create an alternative menu resource. Create a menu-v11 folder in your project’s res directory.
Then copy and paste fragment_crime_list.xml into this folder.
In res/menu-v11/fragment_crime_list.xml, add a menu item that will read Show�Subtitle and will
appear on the action bar if there is room.

ptg11078569
Toggling the menu item title
267
Listing 16.14Adding Show Subtitle menu item (res/menu-v11/
fragment_crime_list.xml)
<?xml version="1.0" encoding="utf-8"?>
<menu
xmlns:android="http://schemas.android.com/apk/res/android">
<item android:id="@+id/menu_item_new_crime"
android:icon="@android:drawable/ic_menu_add"
android:title="@string/new_crime"
android:showAsAction="ifRoom|withText"/>
<item android:id="@+id/menu_item_show_subtitle"
android:title="@string/show_subtitle"
android:showAsAction="ifRoom"/>
</menu>
In onOptionsItemSelected(…), respond to this menu item by setting the action bar’s subtitle.
Listing 16.15Responding to Show Subtitle menu item
(CrimeListFragment.java)
@TargetApi(11)
@Override
public boolean onOptionsItemSelected(MenuItem item) {
switch (item.getItemId()) {
case R.id.menu_item_new_crime:
...
return true;
case R.id.menu_item_show_subtitle:
getActivity().getActionBar().setSubtitle(R.string.subtitle);
return true;
default:
return super.onOptionsItemSelected(item);
}
}
Notice that you only warn off Android Lint; you do not have to wrap your action bar code.
Wrapping is not necessary because this code cannot be called on earlier devices because the
R.id.menu_item_show_subtitle menu item will not be presented.
Run CriminalIntent on a newer device and show the subtitle. Then run on a Froyo or Gingerbread
device (real or virtual). Press the menu key to confirm that the Show�Subtitle item does not appear. Add
a new crime to confirm that the app behaves as before.
Toggling the menu item title
Now the subtitle is visible, but the menu item still reads Show�Subtitle. It would be better if the menu
item toggled its title and function to show or hide the subtitle.
In onOptionsItemSelected(…), check for the presence of a subtitle when this menu item is selected
and take appropriate action.

ptg11078569
Chapter 16The Action Bar
268
Listing 16.16Responding based on subtitle’s presence
(CrimeListFragment.java)
@TargetApi(11)
@Override
public boolean onOptionsItemSelected(MenuItem item) {
switch (item.getItemId()) {
case R.id.menu_item_new_crime:
...
return true;
case R.id.menu_item_show_subtitle:
if (getActivity().getActionBar().getSubtitle() == null) {
getActivity().getActionBar().setSubtitle(R.string.subtitle);
item.setTitle(R.string.hide_subtitle);
} else {
getActivity().getActionBar().setSubtitle(null);
item.setTitle(R.string.show_subtitle);
}
return true;
default:
return super.onOptionsItemSelected(item);
}
}
If your action bar does not have a subtitle, then you set the subtitle and toggle the menu item title so
that it reads Hide�Subtitle. If the subtitle is already visible, then you set it back to null and change the
menu item title back to Show�Subtitle.
Run CriminalIntent and confirm that you can show and hide the subtitle as appropriate.
“Just one more thing...”
Programming in Android is often like being questioned by the TV detective Columbo. You think you
have the angles covered and are home free. But Android always turns at the door and says, “Just one
more thing...”
Here that thing is handling rotation. If you show the subtitle and then rotate, the subtitle will disappear
when the interface is created from scratch. To fix this, you need an instance variable that tracks the
subtitle’s visibility and you need to retain CrimeListFragment so that the value of this variable will
survive rotation.
In CrimeListFragment.java, add a boolean member variable and, in onCreate(…), retain
CrimeListFragment and initialize the variable.

ptg11078569
“Just one more thing...”
269
Listing 16.17Initialize variable and retain CrimeListFragment
(CrimeListFragment.java)
public class CrimeListFragment extends ListFragment {
private ArrayList<Crime> mCrimes;
private boolean mSubtitleVisible;
private final String TAG = "CrimeListFragment";
@Override
public void onCreate(Bundle savedInstanceState) {
super.onCreate(savedInstanceState);
...
setRetainInstance(true);
mSubtitleVisible = false;
}
Then, in onOptionsItemSelected(…), set this variable when you respond to the menu item selection.
Listing 16.18Set subtitleVisible in menu item response
(CrimeListFragment.java)
@TargetApi(11)
@Override
public boolean onOptionsItemSelected(MenuItem item) {
switch (item.getItemId()) {
case R.id.menu_item_new_crime:
...
return true;
case R.id.menu_item_show_subtitle:
if (getActivity().getActionBar().getSubtitle() == null) {
getActivity().getActionBar().setSubtitle(R.string.subtitle);
mSubtitleVisible = true;
item.setTitle(R.string.hide_subtitle);
}
else {
getActivity().getActionBar().setSubtitle(null);
mSubtitleVisible = false;
item.setTitle(R.string.show_subtitle);
}
return true;
default:
return super.onOptionsItemSelected(item);
}
}
Now you need to check to see if the subtitle should be shown. In CrimeListFragment.java, override
onCreateView(…) and set the subtitle if mSubtitleVisible is true.

ptg11078569
Chapter 16The Action Bar
270
Listing 16.19Set subtitle if mSubtitleVisible is true
(CrimeListFragment.java)
@TargetApi(11)
@Override
public View onCreateView(LayoutInflater inflater, ViewGroup parent,
Bundle savedInstanceState) {
View v = super.onCreateView(inflater, parent, savedInstanceState);
if (Build.VERSION.SDK_INT >= Build.VERSION_CODES.HONEYCOMB) {
if (mSubtitleVisible) {
getActivity().getActionBar().setSubtitle(R.string.subtitle);
}
}
return v;
}
You also need to check the subtitle’s state in onCreateOptionsMenu(…) to make sure you are
displaying the correct menu item title.
Listing 16.20Set menu item title based on mSubtitleVisible is true
(CrimeListFragment.java)
@Override
public void onCreateOptionsMenu(Menu menu, MenuInflater inflater) {
super.onCreateOptionsMenu(menu, inflater);
inflater.inflate(R.menu.fragment_crime_list, menu);
MenuItem showSubtitle = menu.findItem(R.id.menu_item_show_subtitle);
if (mSubtitleVisible && showSubtitle != null) {
showSubtitle.setTitle(R.string.hide_subtitle);
}
}
Run CriminalIntent. Show the subtitle and then rotate. The subtitle should appear as expected in the re-
created view.
Challenge: An Empty View for the List
Currently, when CriminalIntent launches, it displays an empty list – a big black void. You should give
users something to interact with when there are no items in the list.
ListView, because it is a subclass of AdapterView, supports a special View called the “empty view” for
this very scenario. If you specify a view for the empty view, the ListView will automatically switch
between showing it when there are no items, and showing the list when there are some items.
You can specify the empty view in code using the following AdapterView method:
public void setEmptyView(View emptyView)
Or you can create a layout in XML that specifies both the ListView and the empty view. If you give
them resource IDs of @android:id/list and @android:id/empty respectively, you can tie into the
automatic switching feature.
The current implementation of CrimeListFragment does not inflate its own layout in
onCreateView(…), but in order to implement the empty view in a layout, it will need to. Create a layout

ptg11078569
Challenge: An Empty View for the List
271
XML resource for CrimeListFragment that uses a FrameLayout as its root container, with a ListView
and another View of some kind as the empty view.
Make the empty view display a message like “There are no crimes.” Add a button to the view that
will trigger the creation of a new crime so that, in this case, the user does not have to go to the options
menu or action bar.

ptg11078569
This page intentionally left blank

ptg11078569
273
17
Saving and Loading Local Files
Almost every application needs a place to save data. In this chapter, you will enable CriminalIntent to
save and load its data from a JSON file stored on the device’s filesystem.
Each application on an Android device has a directory in its sandbox. Keeping files in the sandbox
protects them from being accessed by other applications or even the prying eyes of users (unless the
device has been “rooted,” in which case the user can get to whatever he or she likes.)
Each application’s sandbox directory is a child of the device’s /data/data directory named after
the application package. For CriminalIntent, the full path to the sandbox directory is /data/data/
com.bignerdranch.android.criminalintent.
While good to know, you do not have to commit this location to memory; you will use convenience
methods in the API to retrieve the path when you need it.
In addition to the sandbox, your application can store files in external storage. Typically, this is an SD
card that may or may not be available on the device. Files and even whole applications can be stored on
an SD card, but there are security and programming implications to doing so. Most importantly, access
to files on external storage is not restricted to your application – anyone can read, write, and delete
them. This chapter will focus on using the internal (private) storage, but you can use the same API to
work with files on external storage if your application requires it. (In fact, the challenge at the end of
this chapter is to do just that.)
Saving and Loading Data in CriminalIntent
Adding persistent data storage to an app involves two processes: saving the data out to the filesystem
and loading that data back in when the application is launched. Each process has two stages. In saving,
you first transform the data into a storable format and then you write that data to a file. In loading,
the stages are reversed: you first read the formatted data from the file and then parse it into what the
application needs.
For CriminalIntent, the storable format will be JSON, and you will write and read files using I/O
methods from Android’s Context class. Figure17.1 is a general diagram of how you will implement
saving and loading application data in CriminalIntent.
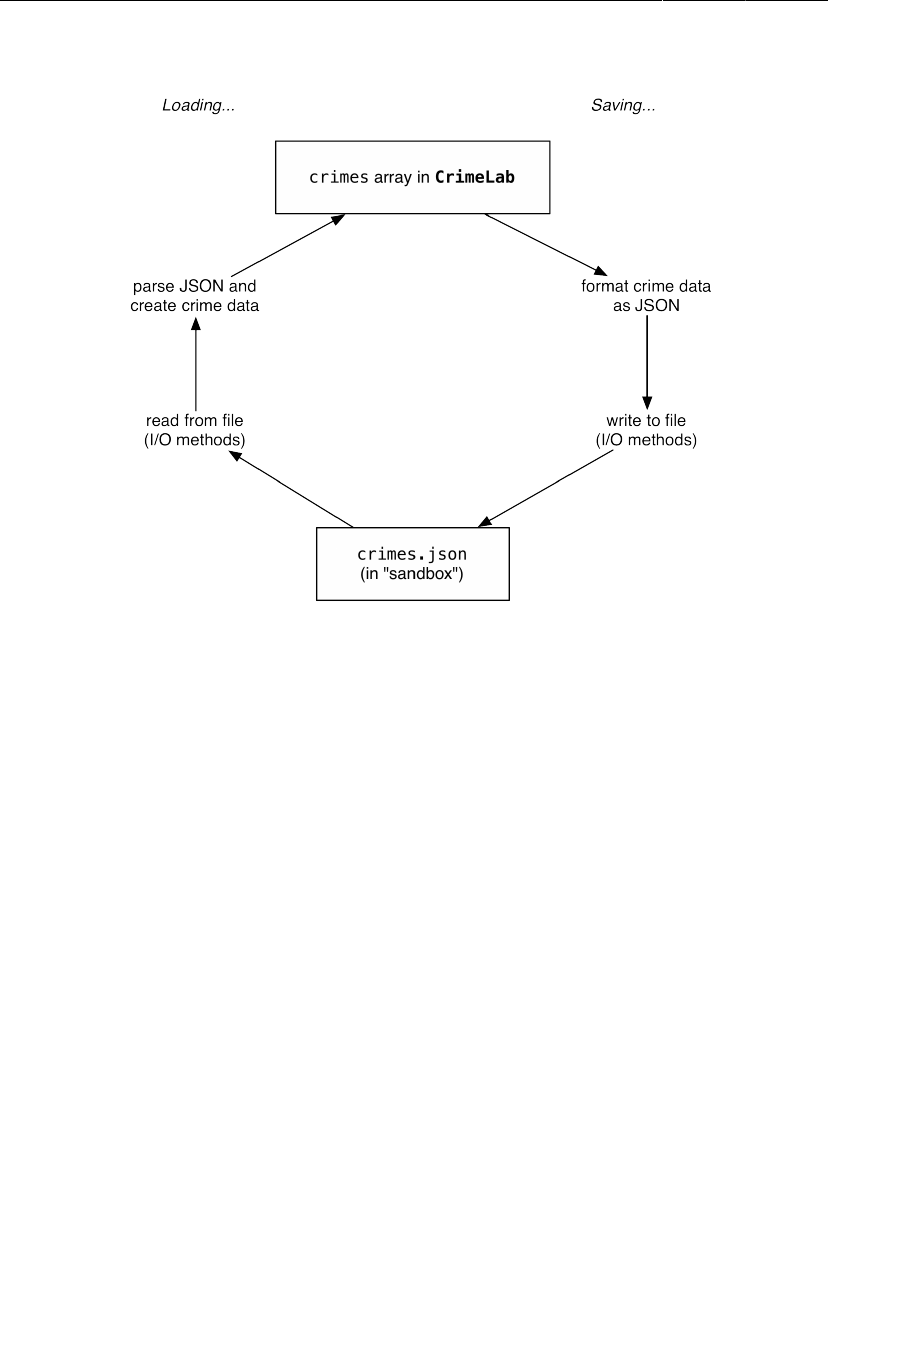
ptg11078569
Chapter 17Saving and Loading Local Files
274
Figure 17.1Saving and loading in CriminalIntent
JSON stands for JavaScript Object Notation, a format that has become popular in recent years,
particularly for web services. Android includes the standard org.json package, which has classes
that provide simple access to creating and parsing files in JSON format. The Android developer
documentation has information about org.json, and you can get more information about JSON as a
format at http://json.org.
(XML is another option for formatting data in order to write it to a file. Android provides classes
and methods that will work with XML, too. You will see how to use some of them to parse XML in
Chapter26.)
The most convenient way to access files available to your application is through I/O methods
provided by the Context class. (Context is the superclass of all of the key application components:
Application, Activity, and Service, in addition to a few others.) These methods return instances of
standard Java classes like java.io.File or java.io.FileInputStream.
Saving crime data to a JSON file
In CriminalIntent, the CrimeLab class will be responsible for triggering the saving and loading of data,
while the mechanics of creating and parsing the model objects as JSON will be delegated to a new
CriminalIntentJSONSerializer class and the existing Crime class.
Creating the CriminalIntentJSONSerializer class
The responsibility of taking the existing ArrayList of Crimes and writing it as JSON is delegated to a
class named CriminalIntentJSONSerializer.

ptg11078569
Saving crime data to a JSON file
275
Create this class in com.bignerdranch.android.criminalintent. Leave its superclass as
java.lang.Object.
Next, add the code shown in Listing 17.1. Remember to add import statements for the classes required
by the code using Eclipse’s Organize�Imports command.
Listing 17.1Implementing CriminalIntentJSONSerializer
public class CriminalIntentJSONSerializer {
private Context mContext;
private String mFilename;
public CriminalIntentJSONSerializer(Context c, String f) {
mContext = c;
mFilename = f;
}
public void saveCrimes(ArrayList<Crime> crimes)
throws JSONException, IOException {
// Build an array in JSON
JSONArray array = new JSONArray();
for (Crime c : crimes)
array.put(c.toJSON());
// Write the file to disk
Writer writer = null;
try {
OutputStream out = mContext
.openFileOutput(mFilename, Context.MODE_PRIVATE);
writer = new OutputStreamWriter(out);
writer.write(array.toString());
} finally {
if (writer != null)
writer.close();
}
}
}
While you could have put this serialization code directly into the CrimeLab class, tucking away the
logic of serializing to JSON in a self-contained unit has a number of advantages. The class is more
easily unit-tested because it does not depend on much else in the application do its work. In addition,
notice that the class’s constructor takes an instance of Context and a filename. This means that the
class can be reused in many places without changes because it just needs any implementation of
Context.
In the saveCrimes(ArrayList<Crime>) method, you create a JSONArray object. Then you call
a toJSON() method on each crime in the list and add the result to the JSONArray. (Currently, the
toJSON() method causes an error because you have not yet implemented it in Crime yet. You will do
that next.)
To open a file and write to it, you use Context.openFileOutput(…). This method takes in a filename
and a mode. It automatically prepends the filename you give it with the path to the file’s folder in your
app’s sandbox, creates the file, and opens it for writing. If you prefer to create and open those file paths
by hand, you can always call Context.getFilesDir() instead, but openFileOutput(…) is required if
you need to create it with different permissions.

ptg11078569
Chapter 17Saving and Loading Local Files
276
Once the file is opened, you write to it using standard Java interfaces. The Writer, OutputStream,
and OutputStreamWriter classes come from the java.io package. The OutputStream you get from
openFileOutput(…) is used to create a new OutputStreamWriter. OutputStreamWriter takes care of
converting between the Java Strings that are sent to it and the raw byte encoding that OutputStream
ends up writing to the file.
Making Crime class capable of JSON serialization
In order to save the mCrimes array in JSON format, you have to be able to save individual instances of
Crime in JSON format. In Crime.java, add the following constants and implementation of toJSON()
to save a Crime in JSON format and return an instance of the class JSONObject that can be put in a
JSONArray.
Listing 17.2Implementing JSON serialization (Crime.java)
public class Crime {
private static final String JSON_ID = "id";
private static final String JSON_TITLE = "title";
private static final String JSON_SOLVED = "solved";
private static final String JSON_DATE = "date";
private UUID mId;
private String mTitle;
private boolean mSolved;
private Date mDate = new Date();
public Crime() {
mId = UUID.randomUUID();
}
public JSONObject toJSON() throws JSONException {
JSONObject json = new JSONObject();
json.put(JSON_ID, mId.toString());
json.put(JSON_TITLE, mTitle);
json.put(JSON_SOLVED, mSolved);
json.put(JSON_DATE, mDate.getTime());
return json;
}
@Override
public String toString() {
return mTitle;
}
This code uses methods from the JSONObject class to handle the business of converting the data in a
Crime into something that can be written to a file as JSON.
Saving crimes in CrimeLab
With the addition of CriminalIntentJSONSerializer and the changes to Crime, you now have the
ability to write a list of crimes as JSON and save this data to a file on the device’s file system.
When is it appropriate to save your data? A good rule of thumb on mobile applications is: save as often
as possible, preferably as soon as changes are made by the user. The code is already routing the user’s
changes to the data through the CrimeLab class, so it makes the most sense to save to a file there as
well.

ptg11078569
Saving crime data to a JSON file
277
If you are saving often, then you should also take care not to slow the user down. Your code here
rewrites the entire file of crimes every time anything happens. CriminalIntent is a modest app, so this
does not take too long. For a more substantial piece of work, you will want to save one piece of data
without saving all the others, too, perhaps by using a SQLite database. You will learn how to use an
SQLite database in an Android app in Chapter34.
In CrimeLab.java, create an instance of CriminalIntentJSONSerializer in CrimeLab’s constructor.
Then create a saveCrimes() method that tries to serialize the crimes and returns a boolean indicating
success. Also, add log statements so that you can easily confirm the operation.
Listing 17.3Saving changes persistently in CrimeLab (CrimeLab.java)
public class CrimeLab {
private static final String TAG = "CrimeLab";
private static final String FILENAME = "crimes.json";
private ArrayList<Crime> mCrimes;
private CriminalIntentJSONSerializer mSerializer;
private static CrimeLab sCrimeLab;
private Context mAppContext;
private CrimeLab(Context appContext) {
mAppContext = appContext;
mCrimes = new ArrayList<Crime>();
mSerializer = new CriminalIntentJSONSerializer(mAppContext, FILENAME);
}
...
public void addCrime(Crime c) {
mCrimes.add(c);
}
public boolean saveCrimes() {
try {
mSerializer.saveCrimes(mCrimes);
Log.d(TAG, "crimes saved to file");
return true;
} catch (Exception e) {
Log.e(TAG, "Error saving crimes: ", e);
return false;
}
}
}
In this app, you are logging error information to the console for simplicity. In a real-world application,
you would want to alert the user if saving fails, for example, with a Toast or a dialog.
Saving application data in onPause()
Where should you call saveCrimes()? The onPause() lifecycle method is the safest choice. If you
wait until onStop() or onDestroy(), you might miss your chance to save. A paused activity will be
destroyed if the OS needs to reclaim memory, and you cannot count on onStop() or onDestroy()
being called in these circumstances.

ptg11078569
Chapter 17Saving and Loading Local Files
278
Listing 17.4Saving crimes to filesystem in onPause() (CrimeFragment.java)
...
@Override
public boolean onOptionsItemSelected(MenuItem item) {
switch (item.getItemId()) {
case android.R.id.home:
NavUtils.navigateUpFromSameTask(getActivity());
return true;
default:
return super.onOptionsItemSelected(item);
}
}
@Override
public void onPause() {
super.onPause();
CrimeLab.get(getActivity()).saveCrimes();
}
}
Run CriminalIntent. Add a crime or two and then press the device’s Home button to pause the activity
and save the list of crimes to the filesystem. Check LogCat to confirm your success.
Loading crimes from the filesystem
Now let’s turn the process on its head and have CriminalIntent load crimes from the filesystem when
the application is launched. First, in Crime.java, add a constructor that accepts a JSONObject.
Listing 17.5Implementing Crime(JSONObject) (Crime.java)
public class Crime {
...
public Crime() {
mId = UUID.randomUUID();
}
public Crime(JSONObject json) throws JSONException {
mId = UUID.fromString(json.getString(JSON_ID));
if (json.has(JSON_TITLE)) {
mTitle = json.getString(JSON_TITLE);
}
mSolved = json.getBoolean(JSON_SOLVED);
mDate = new Date(json.getLong(JSON_DATE));
}
public JSONObject toJSON() throws JSONException {
JSONObject json = new JSONObject();
json.put(JSON_ID, mId.toString());
json.put(JSON_TITLE, mTitle);
json.put(JSON_SOLVED, mSolved);
json.put(JSON_DATE, mDate.getTime());
return json;
}

ptg11078569
Loading crimes from the filesystem
279
Next, in CriminalIntentJSONSerializer.java, add a method to CriminalIntentJSONSerializer for
loading crimes from the filesystem.
Listing 17.6Implementing loadCrimes()
(CriminalIntentJSONSerializer.java)
public CriminalIntentJSONSerializer(Context c, String f) {
mContext = c;
mFilename = f;
}
public ArrayList<Crime> loadCrimes() throws IOException, JSONException {
ArrayList<Crime> crimes = new ArrayList<Crime>();
BufferedReader reader = null;
try {
// Open and read the file into a StringBuilder
InputStream in = mContext.openFileInput(mFilename);
reader = new BufferedReader(new InputStreamReader(in));
StringBuilder jsonString = new StringBuilder();
String line = null;
while ((line = reader.readLine()) != null) {
// Line breaks are omitted and irrelevant
jsonString.append(line);
}
// Parse the JSON using JSONTokener
JSONArray array = (JSONArray) new JSONTokener(jsonString.toString())
.nextValue();
// Build the array of crimes from JSONObjects
for (int i = 0; i < array.length(); i++) {
crimes.add(new Crime(array.getJSONObject(i)));
}
} catch (FileNotFoundException e) {
// Ignore this one; it happens when starting fresh
} finally {
if (reader != null)
reader.close();
}
return crimes;
}
public void saveCrimes(ArrayList<Crime> crimes) throws JSONException, IOException {
// Build an array in JSON
JSONArray array = new JSONArray();
for (Crime c : crimes)
array.put(c.toJSON());
...
Here you use a combination of Java and JSON classes along with the Context method
openFileInput(…) to read the data from the filesystem to a string and then parse that string of
JSONObjects into a JSONArray and on to an ArrayList, which gets returned.
Note that you call reader.close() in the finally block. This ensures that the underlying file handle
is freed up, even if an error occurs.
Finally, in CrimeLab’s constructor, these crimes need to be loaded into an ArrayList when the
singleton is first accessed rather than always creating a new empty one. In CrimeLab.java, make the
following changes.

ptg11078569
Chapter 17Saving and Loading Local Files
280
Listing 17.7Loading crimes (CrimeLab.java)
public CrimeLab(Context appContext) {
mAppContext = appContext;
mSerializer = new CriminalIntentJSONSerializer(mAppContext, FILENAME);
mCrimes = new ArrayList<Crime>();
try {
mCrimes = mSerializer.loadCrimes();
} catch (Exception e) {
mCrimes = new ArrayList<Crime>();
Log.e(TAG, "Error loading crimes: ", e);
}
}
public static CrimeLab get(Context c) {
...
}
...
Here you attempt to load crimes; if there are none, then you create a new empty list.
Now CriminalIntent can maintain its data between launches of the application. You can test this in a
number of ways. Run the app, add crimes, and make changes. Then navigate to some other application,
like the web browser. At this point, CriminalIntent will probably get shut down by the OS. Launch it
again, and see that your changes persist. You can also force it to stop and relaunch from Eclipse.
It is now safe to add a collection of the heinous crimes that occur in your office. Now that data persists
across runs, you can use these crimes as you continue adding to CriminalIntent, and you will not have
to add a new crime or two every time the application starts.
Challenge: Use External Storage
Saving files on internal storage is the right choice for most applications, especially when data privacy
is a concern. Some apps, however, might want to write to the device’s external storage if it is available.
This can be useful if you are storing data that you want to share with other apps or the user, like music,
photos or downloads from the web. External storage is almost always more plentiful, too, which makes
it the right choice for large media like videos.
To write to external storage, you need to do two things. First, check to ensure that the external storage
is available. The android.os.Environment class has several helpful methods and constants that you
can use to determine this. Second, get a handle on the external files directory (look for a method in
Context that can give this to you). The rest of the work is basically the same as what you are already
doing in CriminalIntentJSONSerializer.
For the More Curious: The Android Filesystem and
Java I/O
At the OS level, Android runs inside a Linux kernel. As a result, its filesystem is similar to other Linux
and Unix systems. Directory names are separated by forward slashes (/), files can have a broad set of
characters in their names, and everything is case-sensitive. Your application runs with a specific user
ID, taking advantage of the Linux security model.
ptg11078569
Accessing files and directories
281
Android uses an application’s Java package name to determine where it lives on the filesystem.
Applications themselves are bundled in an APK file for distribution and installation, which lives in the
/data/app directory with a name like com.bignerdranch.android.criminalintent-1.apk. Usually,
you will not need to know anything about this location, and on a typical device you will not be able to
access that location directly without rooting your device.
Accessing files and directories
The most convenient way to access files and directories available to your application is through
methods provided by the Context class. Context is the superclass of all of the key application
components: Application, Activity, and Service, in addition to a few others. This gives your
subclasses of these classes simple access to files using a number of methods, as outlined in Table17.1.
Table 17.1Basic file and directory methods in Context
Method Purpose
File getFilesDir() Returns a handle to the directory for private application files.
FileInputStream
openFileInput(String name)
Opens an existing file for input (relative to the files directory).
FileOutputStream
openFileOutput(String name,
int mode)
Opens a file for output, possibly creating it (relative to the files
directory).
File getDir(String name, int
mode)
Gets (and possibly creates) a subdirectory within the files
directory.
String[] fileList() Gets a list of file names in the main files directory, for use with
openFileInput(String), for example.
File getCacheDir() Returns a handle to a directory you can use specifically for
storing cache files. You should take care to keep this directory
tidy and use as little space as possible.
Notice that most of these methods return instances of standard Java classes like java.io.File or
java.io.FileInputStream. You can use many existing Java APIs that work with those classes just as
you would in other Java applications. Android also includes support for java.nio.* classes.

ptg11078569
This page intentionally left blank

ptg11078569
283
18
Context Menus and Contextual
Action Mode
In this chapter, you will enable users to delete crimes from the list by long-pressing a list item.
Deleting a crime is a contextual action: it is associated with a particular view on screen (a single list
item) rather than the entire screen.
On pre-Honeycomb devices, contextual actions are presented in a floating context menu. On later
devices, a contextual action bar is the recommended way to present contextual actions. The contextual
action bar appears on top of the activity’s action bar and presents actions to the user.
Figure 18.1Long-pressing a list item to delete a crime
With options menus, managing different API levels is simple: you define one menu resource and
implement one set of menu callbacks. The OS on each device determines how to display the menu
items.
With contextual actions, the situation is more complicated. You still define one menu resource, but
you implement two separate sets of callbacks – one for the contextual action bar and one for floating
context menus.

ptg11078569
Chapter 18Context Menus and Contextual Action Mode
284
In this chapter, you will implement a contextual action on devices running API level 11 and higher and
implement a floating context menu on Froyo and Gingerbread devices.
(You may have seen older devices running apps with contextual action bars. These apps typically use a
third-party library named ActionBarSherlock to duplicate action bar features for earlier API levels. We
will talk more about ActionBarSherlock at the end of this chapter.)
Defining a Context Menu Resource
In res/menu/, create a new Android XML file named crime_list_item_context.xml and give it a
menu root element. Then add the single item shown in Listing 18.1.
Listing 18.1The crime list context menu (crime_list_item_context.xml)
<?xml version="1.0" encoding="utf-8"?>
<menu
xmlns:android="http://schemas.android.com/apk/res/android">
<item android:id="@+id/menu_item_delete_crime"
android:icon="@android:drawable/ic_menu_delete"
android:title="@string/delete_crime" />
</menu>
You will use this menu resource for both implementations.
Implementing a Floating Context Menu
You are going to build the floating context menu first. The Fragment callbacks are similar to those you
used for the options menu in Chapter16. You inflate a context menu using the following method:
public void onCreateContextMenu(ContextMenu menu, View v,
ContextMenu.ContextMenuInfo menuInfo)
To respond to the user’s context menu selection, you implement this Fragment method:
public boolean onContextItemSelected(MenuItem item)
Creating the context menu
In CrimeListFragment.java, implement onCreateContextMenu(…) to inflate the menu resource and
use it to populate the context menu.
Listing 18.2Creating the context menu (CrimeListFragment.java)
@Override
public boolean onOptionsItemSelected(MenuItem item) {
switch (item.getItemId()) {
...
default:
return super.onOptionsItemSelected(item);
}
}
@Override
public void onCreateContextMenu(ContextMenu menu, View v, ContextMenuInfo menuInfo) {
getActivity().getMenuInflater().inflate(R.menu.crime_list_item_context, menu);
}

ptg11078569
Registering for the context menu
285
Unlike onCreateOptionsMenu(…), this menu callback does not pass in an instance of MenuInflater,
so you first get the MenuInflater associated with CrimeListActivity. When you call
MenuInflater.inflate(…) you pass in the resource ID of the menu resource and the instance of
ContextMenu to populate the menu instance with items defined in the menu file.
Currently, you only have one context menu resource, so you inflate that resource no matter which view
is long-pressed. If you had multiple context menu resources, you would determine which to inflate by
checking the ID of the View that was passed into onCreateContextMenu(…).
Registering for the context menu
By default, a long-press on a view does not trigger the creation of a context menu. You must register a
view for a floating context menu by calling the following Fragment method:
public void registerForContextMenu(View view)
and passing in the view in question.
In this case, you want the context menu to appear when any list item is clicked. Fortunately, you do
not have to register the view of each individual list item. Instead, you can register the ListView, which
automatically registers the list items.
In CrimeListFragment.onCreateView(…), get a reference to the ListView and register it.
Listing 18.3Registering the ListView for a context menu
(CrimeListFragment.java)
@Override
public View onCreateView(LayoutInflater inflater, ViewGroup parent,
Bundle savedInstanceState) {
View v = super.onCreateView(inflater, parent, savedInstanceState);
if (Build.VERSION.SDK_INT >= Build.VERSION_CODES.HONEYCOMB) {
if (mSubtitleVisible) {
getActivity().getActionBar().setSubtitle(R.string.subtitle);
}
}
ListView listView = (ListView)v.findViewById(android.R.id.list);
registerForContextMenu(listView);
return v;
}
The android.R.id.list resource ID is used to retrieve the ListView managed by ListFragment
within onCreateView(…). ListFragment also has a getListView() method, but you cannot use it
within onCreateView(…) because getListView() returns null until after onCreateView(…) returns.
Run CriminalIntent, long-press a list item, and confirm that the floating context menu with the Delete
Crime menu item appears.
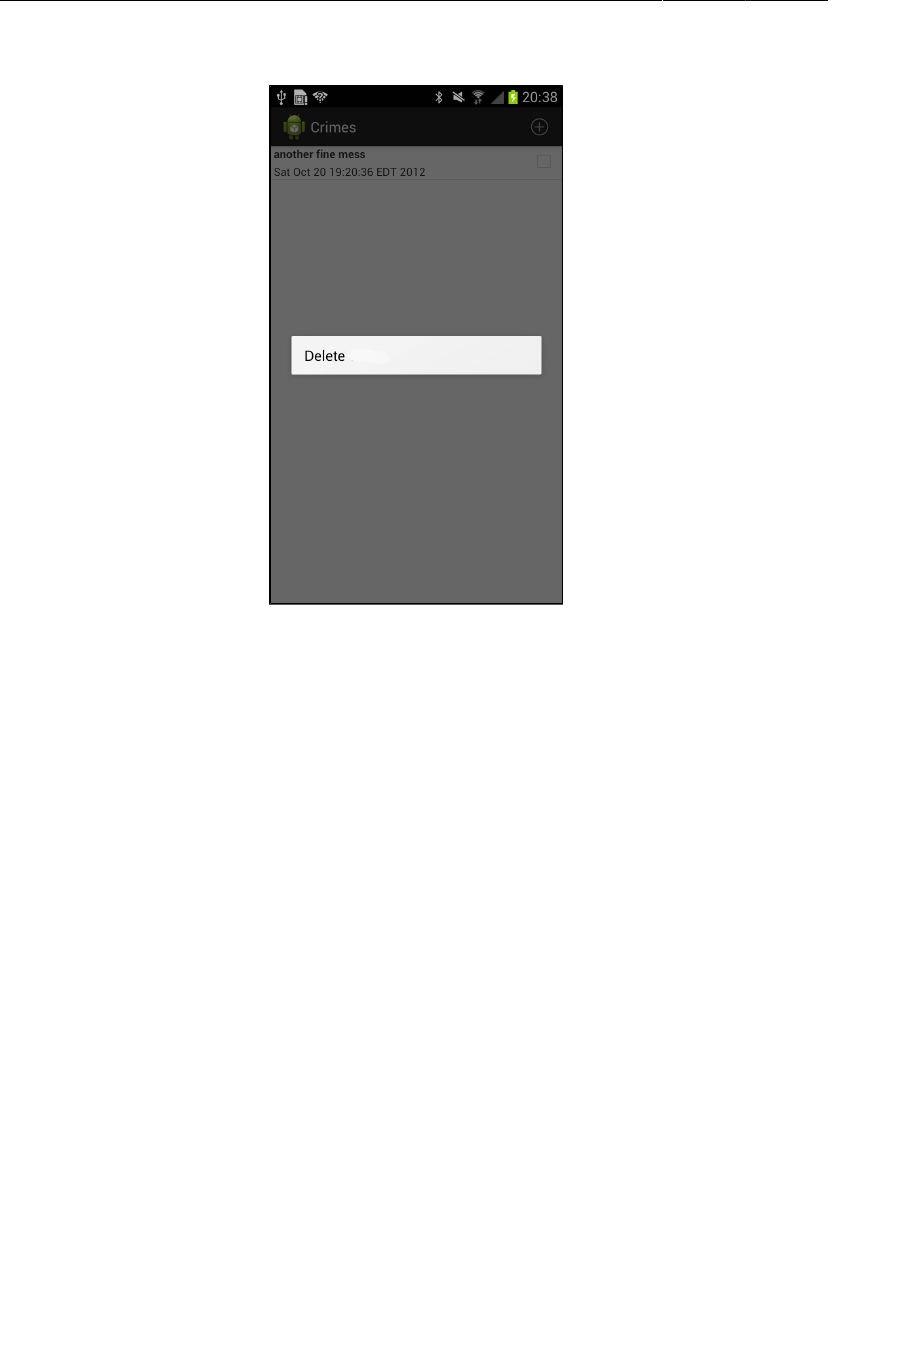
ptg11078569
Chapter 18Context Menus and Contextual Action Mode
286
Figure 18.2Context menu item appears on long-press
Responding to an action
To wire up the menu item, you need a method that can delete a crime from the model. In
CrimeLab.java, add a deleteCrime(Crime) method.
Listing 18.4Add a method to delete a crime (CrimeLab.java)
public void addCrime(Crime c) {
mCrimes.add(c);
}
public void deleteCrime(Crime c) {
mCrimes.remove(c);
}
The next step is to respond to the menu item selection in onContextItemSelected(MenuItem). The
MenuItem has an ID that represents the menu item that was selected. However, it is not enough to know
that the user wants to delete a crime. You also need to know which crime to delete.
You can get this information by calling getMenuInfo() on the MenuItem. This method returns an
instance of a class that implements ContextMenu.ContextMenuInfo.
In CrimeListFragment, add an implementation for onContextItemSelected(MenuItem) that uses the
menu info and the adapter to determine which Crime was long-pressed. Then delete that Crime from
the model.

ptg11078569
Implementing Contextual Action Mode
287
Listing 18.5Listening for context menu item selection
(CrimeListFragment.java)
@Override
public void onCreateContextMenu(ContextMenu menu, View v, ContextMenuInfo menuInfo) {
getActivity().getMenuInflater().inflate(R.menu.crime_list_item_context, menu);
}
@Override
public boolean onContextItemSelected(MenuItem item) {
AdapterContextMenuInfo info = (AdapterContextMenuInfo)item.getMenuInfo();
int position = info.position;
CrimeAdapter adapter = (CrimeAdapter)getListAdapter();
Crime crime = adapter.getItem(position);
switch (item.getItemId()) {
case R.id.menu_item_delete_crime:
CrimeLab.get(getActivity()).deleteCrime(crime);
adapter.notifyDataSetChanged();
return true;
}
return super.onContextItemSelected(item);
}
In Listing 18.5, getMenuInfo() returns an instance of AdapterView.AdapterContextMenuInfo
because ListView is a subclass of AdapterView. You cast the results of getMenuInfo() and get details
about the selected list item, including its position in the data set. Then you use the position to
retrieve the correct Crime.
Run CriminalIntent, add a new crime, then long-press to delete it. (To simulate a long-press on the
emulator, hold the left mouse button down until the menu appears.)
Implementing Contextual Action Mode
The code you have written for deleting a crime via a floating context menu will work on any Android
device. For instance, Figure18.2 shows the floating menu on a device running Jelly Bean.
However, the recommended way to present contextual actions on newer devices is to have a long-press
on a view put the screen into contextual action mode. When the screen is in contextual action mode,
the items defined in your context menu appear in a contextual action bar that overlays the action bar.
Contextual action bars are nice because they do not obscure the screen.
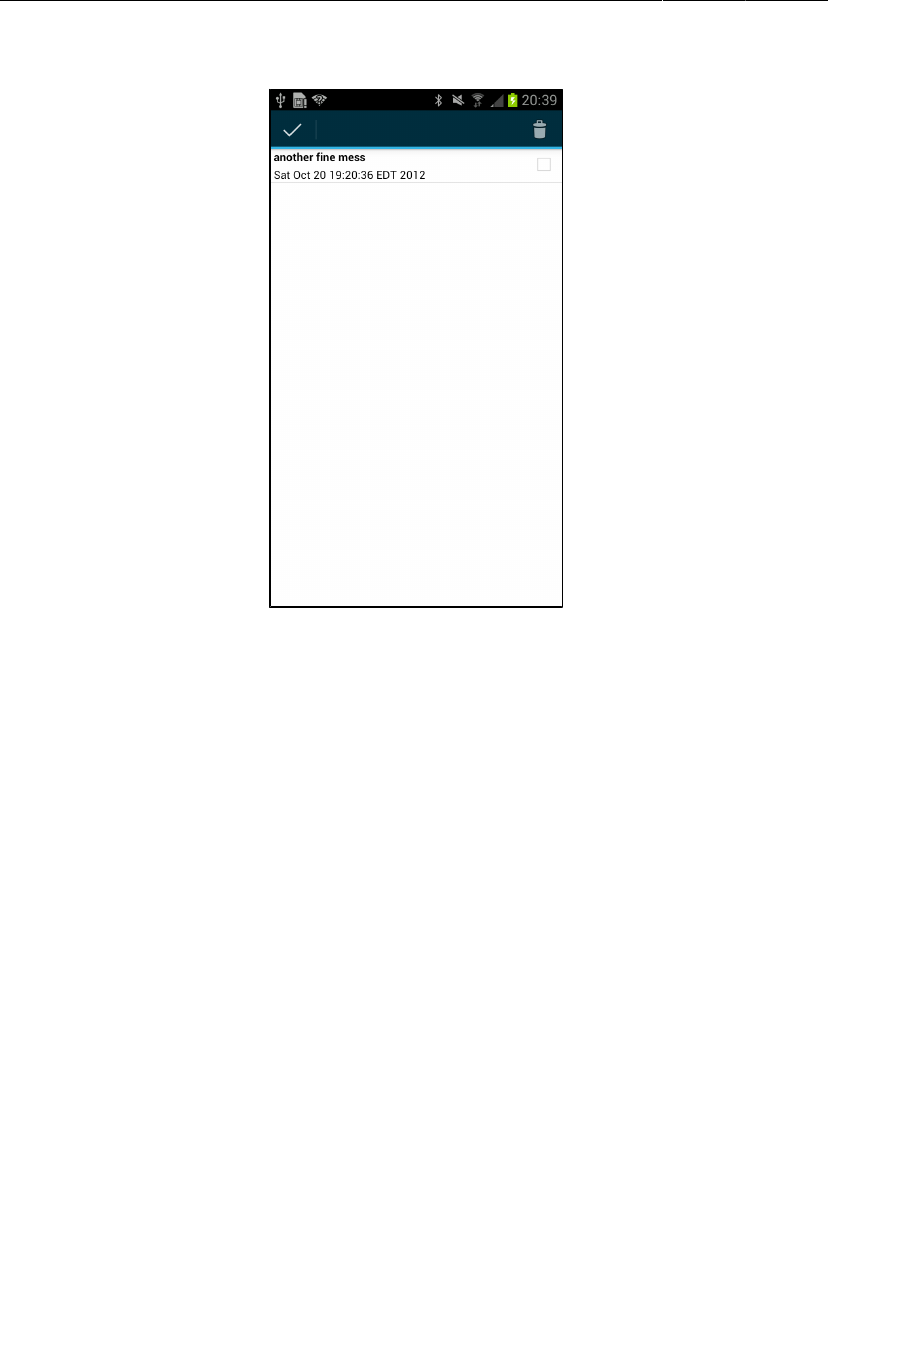
ptg11078569
Chapter 18Context Menus and Contextual Action Mode
288
Figure 18.3Contextual action bar appears on long-press
Implementing a contextual action bar requires a different set of code from a floating context menu. In
addition, the contextual action bar code contains classes and methods that are not available on Froyo or
Gingerbread, so you must ensure that the code that you write will not be called where it does not exist.
Enabling multiple selection
When a list view is in contextual action mode, you can enable selecting multiple list items at one time.
Any action chosen from the contextual action bar will apply to all of the views that have been selected.
In CrimeListFragment.onCreateView(…), set the list view’s choice mode to
CHOICE_MODE_MULTIPLE_MODAL. Use build version constants to separate the code that registers the
ListView from the code that sets the choice mode.
Listing 18.6Setting choice mode (CrimeListFragment.java)
@TargetApi(11)
@Override
public View onCreateView(LayoutInflater inflater, ViewGroup parent,
Bundle savedInstanceState) {
View v = super.onCreateView(inflater, parent, savedInstanceState);
...

ptg11078569
Action mode callbacks in a list view
289
ListView listView = (ListView)v.findViewById(android.R.id.list);
if (Build.VERSION.SDK_INT < Build.VERSION_CODES.HONEYCOMB) {
// Use floating context menus on Froyo and Gingerbread
registerForContextMenu(listView);
} else {
// Use contextual action bar on Honeycomb and higher
listView.setChoiceMode(ListView.CHOICE_MODE_MULTIPLE_MODAL);
}
return v;
}
Action mode callbacks in a list view
The next step is to set a listener on the ListView that implements
AbsListView.MultiChoiceModeListener. This interface contains the following method that calls back
when a view has been selected or deselected.
public abstract void onItemCheckedStateChanged(ActionMode mode, int position,
long id, boolean checked)
MultiChoiceModeListener implements another interface – ActionMode.Callback. When the screen
is put into contextual action mode, an instance of the ActionMode class is created, and the methods in
ActionMode.Callback call back at different points in the lifecycle of the ActionMode. There are four
required methods in ActionMode.Callback:
public abstract boolean onCreateActionMode(ActionMode mode, Menu menu)
called when the ActionMode is created. This is where you inflate the context menu resource to
be displayed in the contextual action bar.
public abstract boolean onPrepareActionMode(ActionMode mode, Menu menu)
called after onCreateActionMode(…) and whenever an existing contextual action bar needs to be
refreshed with new data.
public abstract boolean onActionItemClicked(ActionMode mode, MenuItem item)
called when the user selects an action. This is where you respond to contextual actions defined
in the menu resource.
public abstract void onDestroyActionMode(ActionMode mode)
called when the ActionMode is about to be destroyed because the user has canceled the action
mode or the selected action has been responded to. The default implementation results in the
view(s) being unselected. You can also update the fragment here with anything else it needs to
know about what happened while in contextual action mode.
In CrimeListFragment.onCreateView(…), set a listener that implements MultiChoiceModeListener
on the list view. You only need to take action in onCreateActionMode(…) and in
onActionItemClicked(ActionMode, MenuItem).

ptg11078569
Chapter 18Context Menus and Contextual Action Mode
290
Listing 18.7Setting the MultiChoiceModeListener
(CrimeListFragment.java)
...
} else {
// Use contextual action bar on Honeycomb and higher
listView.setChoiceMode(ListView.CHOICE_MODE_MULTIPLE_MODAL);
listView.setMultiChoiceModeListener(new MultiChoiceModeListener() {
public void onItemCheckedStateChanged(ActionMode mode, int position,
long id, boolean checked) {
// Required, but not used in this implementation
}
// ActionMode.Callback methods
public boolean onCreateActionMode(ActionMode mode, Menu menu) {
MenuInflater inflater = mode.getMenuInflater();
inflater.inflate(R.menu.crime_list_item_context, menu);
return true;
}
public boolean onPrepareActionMode(ActionMode mode, Menu menu) {
return false;
// Required, but not used in this implementation
}
public boolean onActionItemClicked(ActionMode mode, MenuItem item) {
switch (item.getItemId()) {
case R.id.menu_item_delete_crime:
CrimeAdapter adapter = (CrimeAdapter)getListAdapter();
CrimeLab crimeLab = CrimeLab.get(getActivity());
for (int i = adapter.getCount() - 1; i >= 0; i--) {
if (getListView().isItemChecked(i)) {
crimeLab.deleteCrime(adapter.getItem(i));
}
}
mode.finish();
adapter.notifyDataSetChanged();
return true;
default:
return false;
}
}
public void onDestroyActionMode(ActionMode mode) {
// Required, but not used in this implementation
}
});
}
return v;
}
If you used Eclipse’s auto-complete to create this interface, note that the stub created for
onCreateActionMode(…) returns false. Be sure to change it to true; returning false will abort the
creation of your action mode.
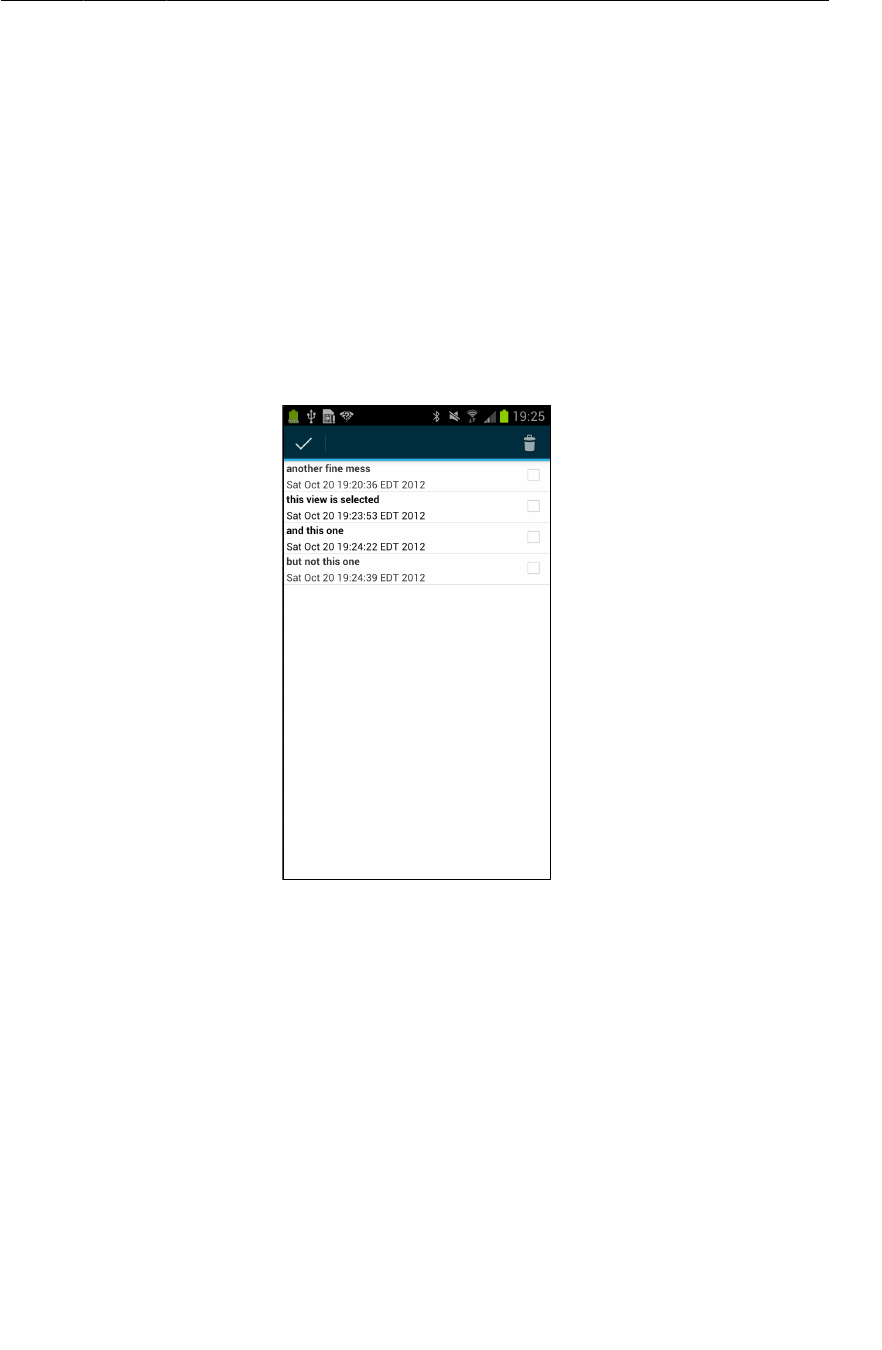
ptg11078569
Changing activated item backgrounds
291
In onCreateActionMode(…), notice that you get the MenuInflater from the action mode rather than
from the activity. The action mode has details for configuring the contextual action bar. For example,
you can call ActionMode.setTitle(…) to give the contextual action bar its own title. The activity’s
menu inflater would not know about this title.
The onActionItemClicked(…) method is where you delete one or more Crimes from CrimeLab and
then reload the list to reflect those changes. The call to ActionMode.finish() prepares the action
mode to be destroyed.
Run CriminalIntent. Long-press a list item to select it and enter contextual action mode. Select other
list items by (regular) pressing them. Unselect selected list items in the same way. Delete a couple of
crimes. Pressing the delete icon will finish the action mode and return you to the updated list of crimes.
Alternatively, you can cancel the action mode by pressing the icon on the far left of the contextual
action bar. This will finish the action mode and return you to the list without making any changes.
Figure 18.4Second and third items are selected
While this implementation works, it is difficult to tell which items have been selected. You can
improve this situation by changing the list item background when an item is selected.
Changing activated item backgrounds
Sometimes you need a view to appear differently depending on its state. In this case, you are interested
in changing the list item background when it is in the activated state. When a view is in the activated
state, it has been marked by the user as being something interesting.
You can change the background based on the view’s state using a state list drawable. A state list
drawable is an XML resource. Within this resource, you name a drawable (a bitmap or a color) and
then list which states this drawable should appear in. (You can find other states a view can be in on the
StateListDrawable reference page.)
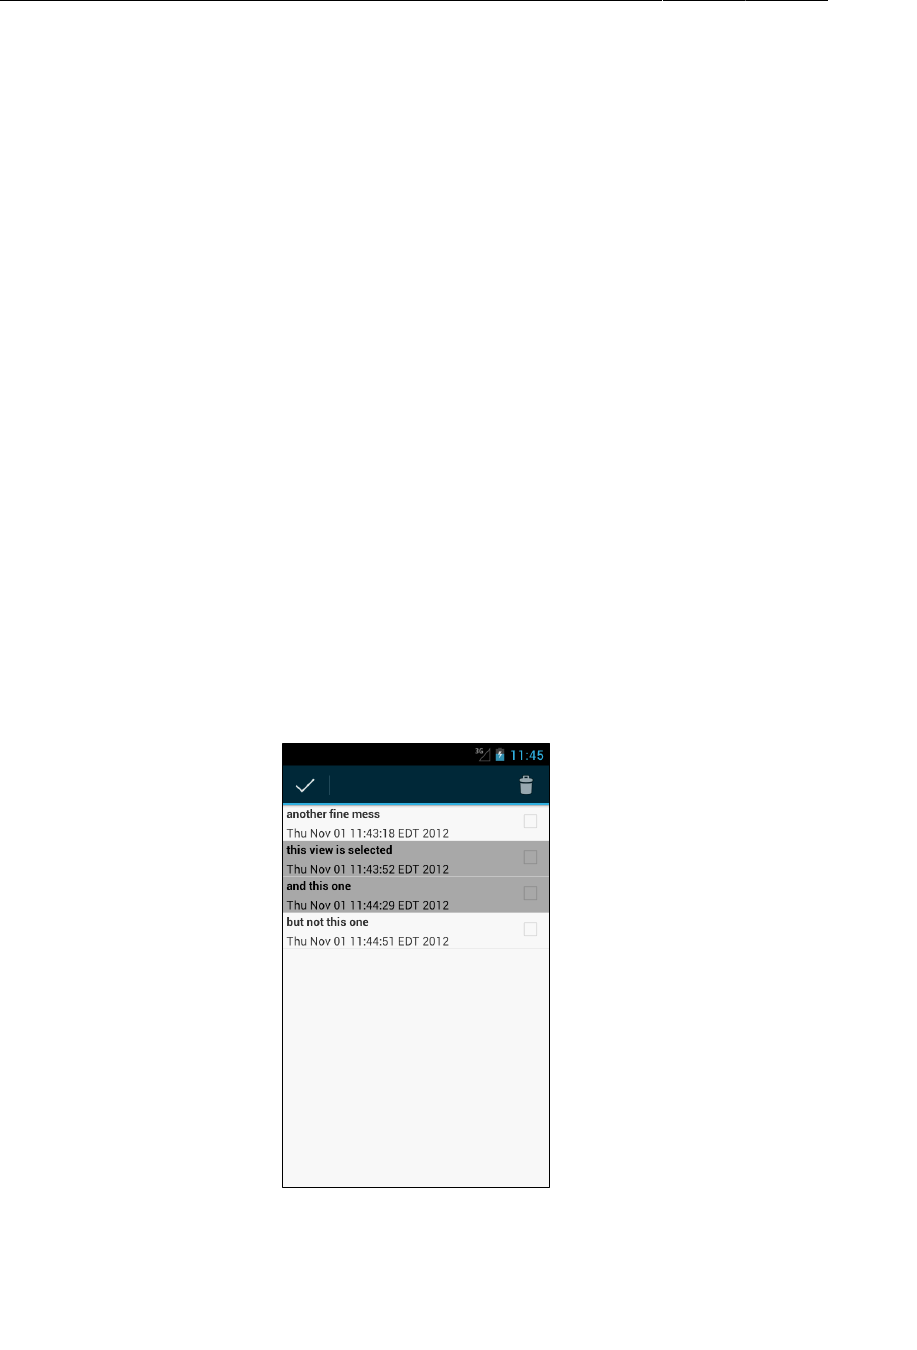
ptg11078569
Chapter 18Context Menus and Contextual Action Mode
292
Unlike other drawables, state list drawables are typically not associated with a pixel density and, thus,
live in the unqualified drawable directory. Create a res/drawable directory and a new XML file
named res/drawable/background_activated.xml. Give this file a root element of selector and add
the item shown in Listing 18.8.
Listing 18.8A simple state list drawable (res/drawable/
background_activated.xml)
<?xml version="1.0" encoding="utf-8"?>
<selector xmlns:android="http://schemas.android.com/apk/res/android" >
<item
android:state_activated="true"
android:drawable="@android:color/darker_gray"
/>
</selector>
This XML says, “When the view that references this drawable is in the activated state, use the value of
android:drawable. Otherwise, do nothing.” If you had given android:state_activated a value of
false, then the value would be used whenever the view was not in the activated state.
Modify res/layout/list_item_crime.xml to reference this drawable.
Listing 18.9Change list item background (res/layout/
list_item_crime.xml)
<RelativeLayout xmlns:android="http://schemas.android.com/apk/res/android"
android:layout_width="match_parent"
android:layout_height="wrap_content"
android:background="@drawable/background_activated">
...
</RelativeLayout>
Run CriminalIntent again. This time, your selected items will stand out clearly.
Figure 18.5Second and third items are more obviously selected

ptg11078569
Implementing contextual action mode in other views
293
You will learn more about state list drawables in Chapter25.
Implementing contextual action mode in other views
The contextual action bar implementation you have used in this chapter works great for a ListView. It
will also work for a GridView, an AdapterView subclass that you will use in Chapter26. But what if
you need a contextual action bar for a view that is not a ListView or a GridView?
First, you set a listener that implements View.OnLongClickListener. Within this listener’s
implementation, you create an instance of ActionMode by calling Activity.startActionMode(…).
(When using MultiChoiceModeListener, the ActionMode instance is created for you.)
The single parameter of startActionMode(…) is an object that implements the ActionMode.Callback
interface. You create an implementation of ActionMode.Callback including the four ActionMode
lifecycle methods that you implemented earlier:
•public abstract boolean onCreateActionMode(ActionMode mode, Menu menu)
•public abstract boolean onPrepareActionMode(ActionMode mode, Menu menu)
•public abstract boolean onActionItemClicked(ActionMode mode, MenuItem item)
•public abstract void onDestroyActionMode(ActionMode mode)
You can create an object that implements ActionMode.Callback and pass it in to startActionMode(…)
or pass an anonymous implementation directly in the call to startActionMode(…).
Compatibility: Fallback or Duplicate?
In this chapter, you have used a compatibility strategy known as graceful fallback. Graceful fallback
means that your app will use new features and code when run on newer platforms and fall back to
using older features on older ones. You did this by checking the SDK version at runtime.
Graceful fallback is not the only strategy. Instead of falling back on older platforms, you can use
an identical feature that mimics the features of newer platforms. We call this strategy duplication.
Duplication strategies fall into two groups: duplication-on-demand and duplicate replacement. In
duplication-on-demand, you use the replacement only on older platforms where the real thing is
unavailable. Duplicate replacement is using the replacement all the time, even on platforms that have
native support.
Using the support library to enable fragments is a duplicate replacement strategy. Your apps always use
the replacement class android.support.v4.app.Fragment – even when run on devices where the class
android.app.Fragment is available.
The support library does not include a duplicate action bar, but there are several third-party copies of
the action bar that you can use for compatibility with older devices. If you have an app with an action
bar running on your Gingerbread phone, it is using one of these third-party libraries. The best and
most popular is a library called ActionBarSherlock by Jake Wharton, which you can find at http://
www.actionbarsherlock.com. ActionBarSherlock is based on the latest Android sources and provides
duplication-on-demand support for action bar features on every previous version of Android. There is
more about ActionBarSherlock and how to implement it in the For The More Curious section and the
second challenge at the end of the chapter.

ptg11078569
Chapter 18Context Menus and Contextual Action Mode
294
(It is said by wise elders in session videos that soon the support library will have a duplicate action bar
as well. There will be great rejoicing on that day.)
Which strategy is better? Duplication strategies have real advantages. The main one is that they behave
the same no matter which version of Android the user is running. This especially applies to duplicate
replacement strategies, which run the exact same code on every version of Android. Designers often
find this reassuring because they only have to design one user experience. The same goes for testers,
who only have one set of interactions to verify. Finally, a duplication strategy allows your app to look
like a fresh new ICS or Jelly Bean app before your users have even upgraded. Duplication is the most
popular strategy in the Android world, and this is the most important reason why – stylish and new
apps almost always duplicate the newest library features to look up-to-date.
There are two major disadvantages to a duplication strategy. One is that to stay up-to-date, you have to
rely on third-party libraries. That is the reason this book uses a graceful fallback strategy for the action
bar. The other disadvantage is that your app may feel alien compared to the rest of the device. If your
app has a custom design, then this will not be a concern because your app will look different anyway.
If your intention is to fit in with the standard apps on the phone, though, your app will stick out like a
sore thumb.
Challenge: Deleting from CrimeFragment
Users might appreciate the ability to delete a crime from its detail view as well as from the list. In that
case, deleting would apply to the screen as a whole, so the action would belong in an options menu or
on the action bar. Implement a delete crime option in CrimeFragment.
For the More Curious: ActionBarSherlock
As critical as it is to understand the basic workings of Android’s standard libraries and how they
work on difference devices and OS versions, real-world developers often need to forget about those
compatibility worries. By far the biggest compatibility concern is the action bar, which you learned
about in this chapter and Chapter16.
ActionBarSherlock (or ABS, as it is more often called) is aimed squarely at this problem. It provides
a backported version of the action bar, plus a set of classes that will use the backported version when
necessary, or the native one if it is available. You can find it at http://www.actionbarsherlock.com.
It also provides backported versions of the newer Android themes that include the action bar.
If that makes ABS sound to you like a more feature-ful support library, then you are right. Unlike the
support library, though, ABS provides themes and resource IDs. This means that instead of being a
simple jar file, ABS is distributed as an Android library project. A library project is like a regular
Android project, but instead of creating an independent application, it builds a library for other
applications to use. This allows Android to build in any additional Android resources provided by the
library. Any library that needs to provide additional Android resources must be a library project, not a
jar file.
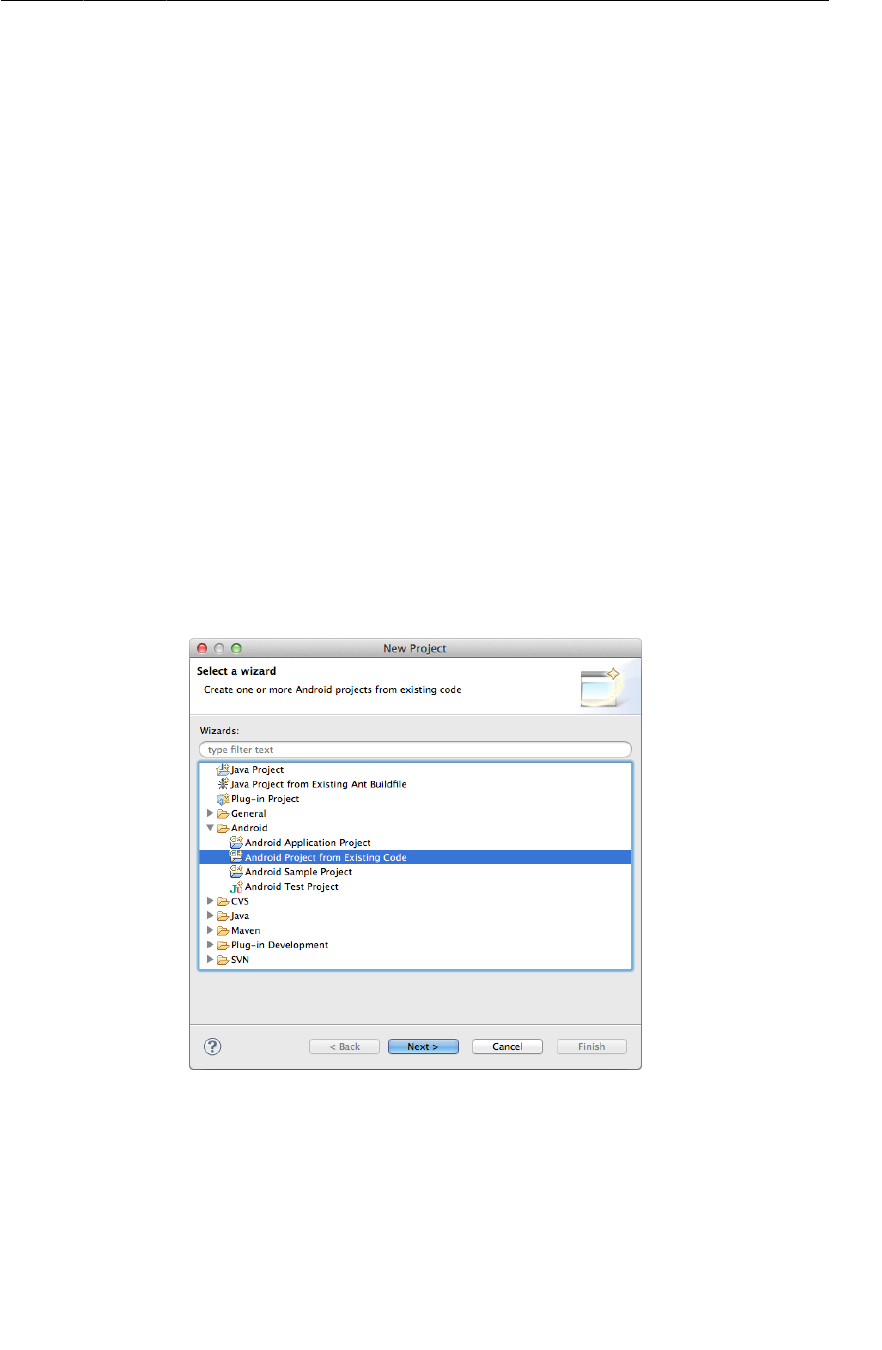
ptg11078569
For the More Curious: ActionBarSherlock
295
Since ABS is a library project, there are three steps required to integrate it into your project:
• download and unzip the source
• import the source into an Eclipse project called ActionBarSherlock
• add a reference to the new ActionBarSherlock project in CriminalIntent
• update CriminalIntent to use ActionBarSherlock’s support classes
(If you want to follow along with this short guide on integrating ActionBarSherlock, you should make
a copy of CriminalIntent right now. Having an ABS-free CriminalIntent will make it easier to continue
with the rest of the book.)
To download ABS, go to http://www.actionbarsherlock.com/download.html, click the link to
download either a zip or tgz compressed archive (it doesn’t matter which), and then unzip it.
Next, to create the new project. In Eclipse, right-click inside the package explorer and select New →
Project....
Instead of creating a fresh Android project, you will want to create a project that includes the source
that you downloaded. So select Android�Project�From�Existing�Code (Figure18.6).
Figure 18.6Create Android project from existing code
Inside this dialog, it will ask you to select a root directory to search for existing code. Click Browse...
and browse to the location where you downloaded ABS. The unzipped file has three subfolders:
library, samples, and website. Select library, click Open, and then click Finish.
ptg11078569
Chapter 18Context Menus and Contextual Action Mode
296
Figure 18.7Choosing the ABS library folder
When Eclipse creates your project, it will give it the name library. This is not an informative project
name, so right-click and select Refactor → Rename... to name the project ActionBarSherlock instead.
Now for the final step to add your ABS reference: add a library project reference from CriminalIntent.
Right-click CriminalIntent in the package explorer and select Properties... Click on Android. The
bottom area of the screen lists your Android library project references. You have none, so it is empty.
Figure 18.8Android library references
Click the Add... button. In the window that appears, double-click ActionBarSherlock to add the library
project reference.
Challenge: Using ActionBarSherlock
Now that you have added an ActionBarSherlock project reference, you are ready to integrate it into
CriminalIntent.
ABS works a lot like the support library – it provides alternative versions of core Android classes
like Activity, Fragment, and ActionBar. Most (not all) of the ABS class names are prefixed with
Sherlock-, though, which makes them a bit easier to distinguish than the support library classes.
That gives you some idea of what you need to do. The fragment and activity classes are all prefixed
with Sherlock-, but the menu-related classes are not.

ptg11078569
Basic ABS integration in CriminalIntent
297
Basic ABS integration in CriminalIntent
Here are the steps for the most basic ABS integration:
• Change CriminalIntent’s theme to Theme.Sherlock.Light.DarkActionBar.
• Change SingleFragmentActivity and CrimePagerActivity to inherit from
SherlockFragmentActivity instead of FragmentActivity.
• Change all your fragments to inherit from SherlockFragment, SherlockDialogFragment, or
SherlockListFragment instead of the support library versions of these classes.
• Change the appropriate Menu, MenuItem, and MenuInflater references to refer to their
corresponding implementations in com.actionbarsherlock.view instead.
The first step is important: You must change the theme for your app to one of the ABS themes
(Theme.Sherlock, Theme.Sherlock.Light, or Theme.Sherlock.Light.DarkActionBar) or to a
custom theme that inherits from one of those themes. Without this step, your app will not run on older
devices.
The second two steps are simple – just change the superclass names. Once you are done with that, you
will have a lot of errors in CrimeFragment and CrimeListFragment. To get rid of them, you will need
to perform the third step, which is more involved.
For CrimeFragment, the fix is easy: delete the menu related import statements up top, organize imports
with Command+Shift+O/Ctrl+Shift+O, and select the com.actionbarsherlock.view versions instead.
If you try this trick in CrimeListFragment, though, you will have problems. This is because
CrimeListFragment uses context menus and MultiChoiceModeListener. These require the original
Android library versions of the menu classes.
So how do you fix it? Instead of using the organize imports fix, you will need to fully qualify
the type references to MenuItem, Menu, and MenuInflater in onCreateOptionsMenu(…) and
onOptionsItemSelected(…). This means that instead of this:
@Override
public void onCreateOptionsMenu(Menu menu, MenuInflater inflater) {
...
}
You will have to write this:
@Override
public void onCreateOptionsMenu(com.actionbarsherlock.view.Menu menu,
com.actionbarsherlock.view.MenuInflater inflater) {
...
}
More advanced integration
If you completed the first challenge, you will have integrated ABS. To really use it, though,
you will want to use your ABS integration to get rid of compatibility code. To do this, call
getSherlockActivity().getSupportActionBar() instead of getActivity().getActionBar() in
your code. The SherlockActivity’s action bar is always available, so using it instead will allow you to

ptg11078569
Chapter 18Context Menus and Contextual Action Mode
298
delete some guard code. After that, you can move res/menu-v11/fragment_crime_list.xml file into
res/menu to eliminate configuration-level OS version switching.
Even more advanced integration
Feeling adventurous? The next step in making CriminalIntent behave identically across different
versions is to eliminate your usage of MultiChoiceModeListener and context menus. Deleting the
context menu code is easy, but replacing MultiChoiceModeListener will require replicating its
functionality.
How can you do that? The first tool that you can use is the old-style ListView choice mode:
ListView.CHOICE_MODE_MULTIPLE. In this chapter you used ListView.CHOICE_MODE_MULTIPLE_MODAL,
which only has an effect on new versions of Android. ListView.CHOICE_MODE_MULTIPLE does not
enable any fancy modal long-press behavior, but it does have the advantage that it works on all versions
of Android. Setting your ListView’s choice mode to ListView.CHOICE_MODE_MULTIPLE will enable
selection of multiple items. To disable selection, set it back to ListView.CHOICE_MODE_NONE.
The next thing you need to do is replicate the modal action bar behavior provided by
CHOICE_MODE_MULTIPLE_MODAL. You can do this in a cross-version fashion by calling
getSherlockActivity().startActionMode(). Make sure to use the version that takes in
com.actionbarsherlock.view.ActionMode.Callback, not the regular Android version.
Finally, you will need to detect long-presses like before. You can do that by providing an
OnItemLongClickListener to ListView.setOnItemLongClickListener(…).
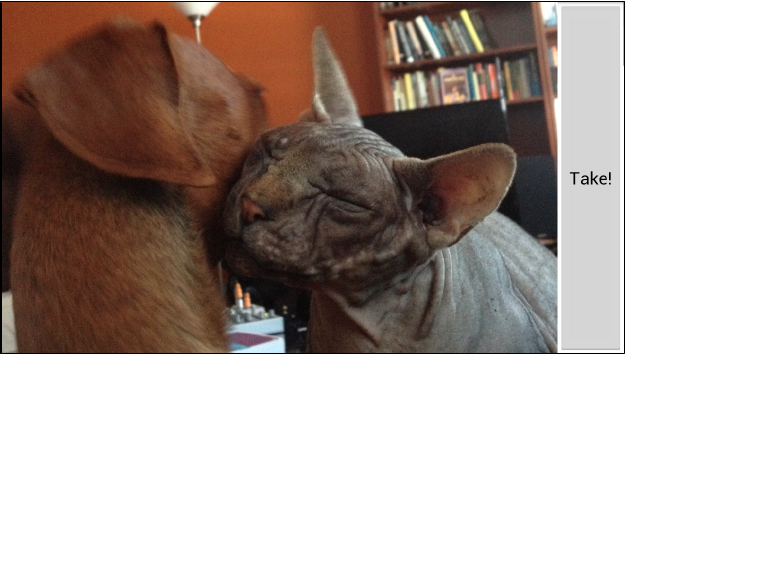
ptg11078569
299
19
Camera I: Viewfinder
When documenting a crime, it helps to have photographic evidence. In the next two chapters, you will
add the ability to take a photo of a crime using the camera API.
The camera API, while powerful, is not succinct or simple. You will be typing in a lot of code and, at
times, cage-fighting with concepts that seem like overkill. You may think, “I just need to snap a quick
photo. Isn’t there a standard interface for this?”
There is. You can interact with the camera via an implicit intent. Most Android devices
have a camera app installed, and the camera app listens for an intent created with
MediaStore.ACTION_IMAGE_CAPTURE. You will learn how to work with implicit intents in Chapter21.
Unfortunately, as of this writing, there is a bug in the implicit intent camera interface on a lot of
devices that makes it impossible to save a full-size version of the picture. If an app only requires
thumbnail images, then using an implicit intent will work fine. CriminalIntent, however, needs larger
crime scene photos, so you get to learn to use the camera API.
In this chapter, you will create a fragment-based activity and use the SurfaceView class and the camera
hardware to display a live video preview from the camera.
Figure 19.1Live camera preview in viewfinder
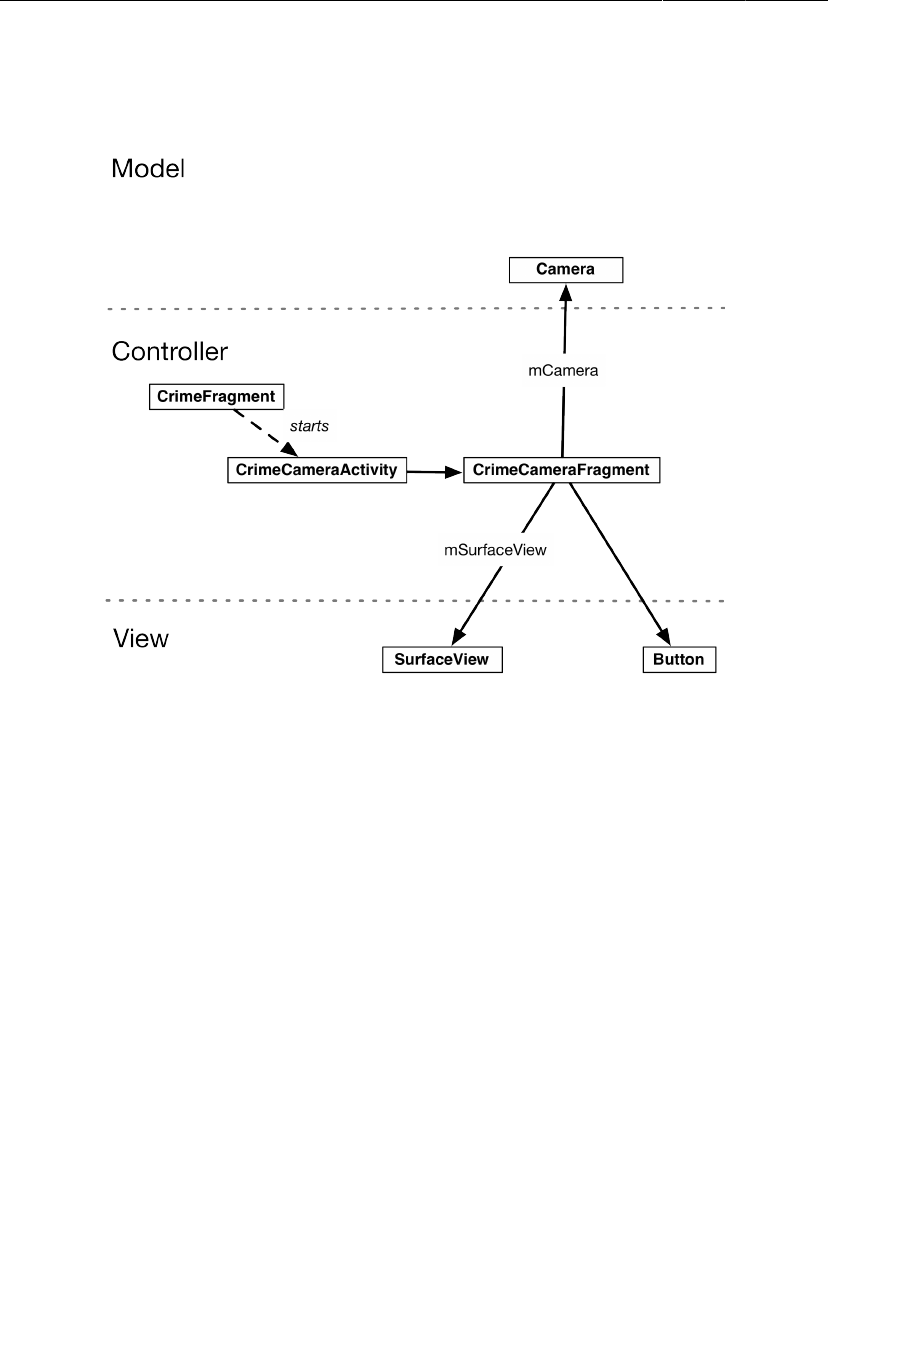
ptg11078569
Chapter 19Camera I: Viewfinder
300
Figure19.2 shows the new objects that you will create.
Figure 19.2Object diagram for camera portion of CriminalIntent
The instance of Camera provides hardware-level access to the device’s camera(s). A camera is an
exclusive-access resource: only one activity can access a camera at a time.
The instance of SurfaceView will be your viewfinder. A SurfaceView is a special view that lets you
render content directly to the screen.
You will start by creating the layout for CrimeCameraFragment’s view, the CrimeCameraFragment
class itself, and the CrimeCameraActivity class. Then you will create and manage a viewfinder
in CrimeCameraFragment. Finally, you will enable CrimeFragment to start an instance of
CrimeCameraActivity.
Creating the Fragment Layout
Create a new Android�XML�Layout file named fragment_crime_camera.xml and make its root element
a FrameLayout. Then add the widgets shown in Figure19.3.
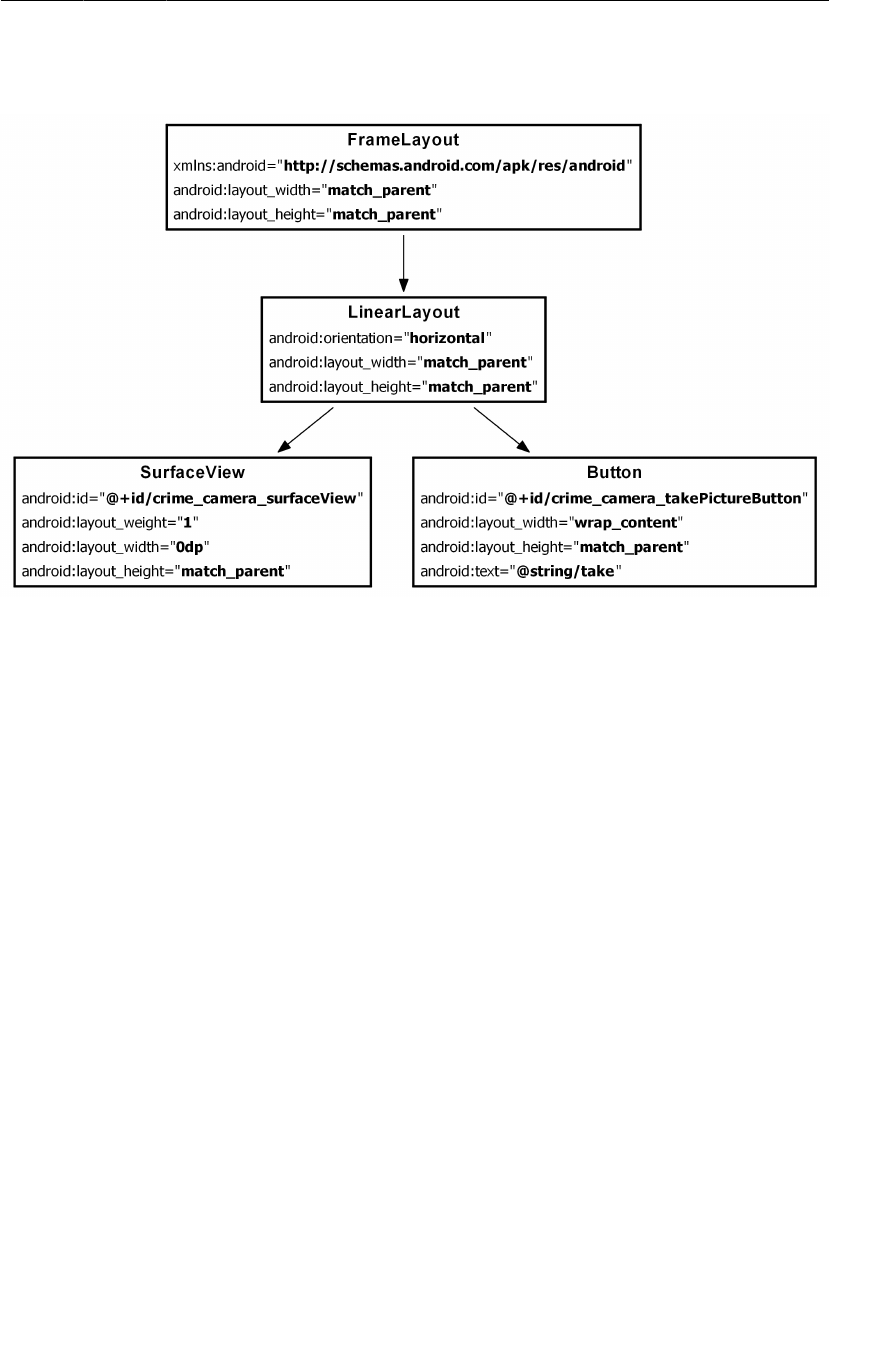
ptg11078569
Creating the Fragment Layout
301
Figure 19.3Layout for CrimeCameraFragment
(fragment_crime_camera.xml)
In this layout file, you have a LinearLayout as the only child of a FrameLayout, which causes a
warning about the LinearLayout being useless. Ignore this warning; you will give the FrameLayout a
second child view in Chapter20.
Within the LinearLayout, you use a combination of layout_width and layout_weight to arrange its
child views. The Button is given the space it needs due to its android:layout_width="wrap_content"
attribute, and the SurfaceView gets nothing (android:layout_width="0dp"). In terms of the space left
over, only the SurfaceView has a layout_weight attribute, so the SurfaceView gets all of the leftover
space.
Figure19.4 shows what this layout will look like.
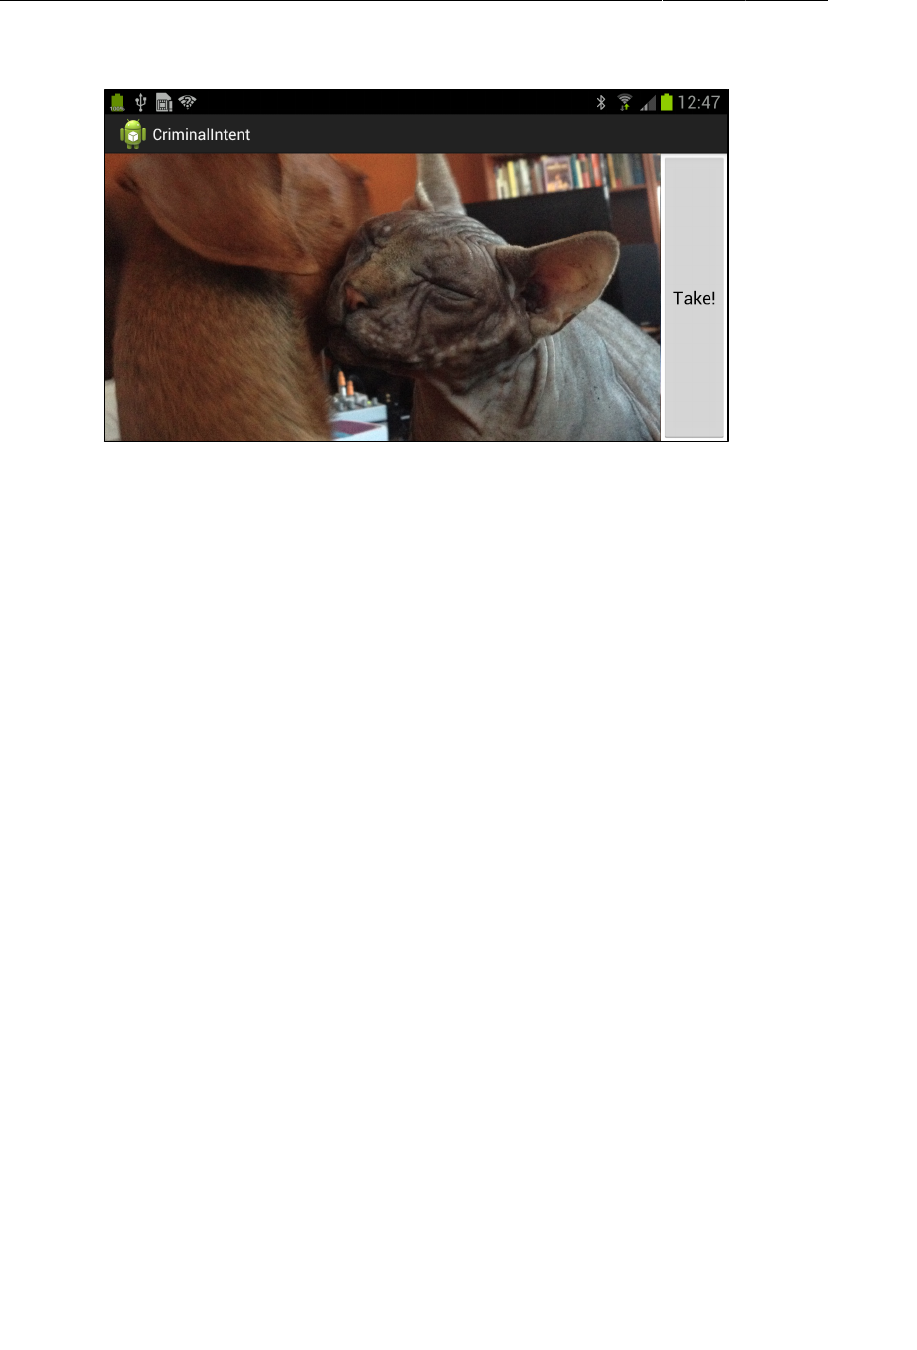
ptg11078569
Chapter 19Camera I: Viewfinder
302
Figure 19.4A viewfinder and button
In strings.xml, add a string resource for the button’s text.
Listing 19.1Adding string for camera button (strings.xml)
...
<string name="show_subtitle">Show Subtitle</string>
<string name="subtitle">Sometimes tolerance is not a virtue.</string>
<string name="take">Take!</string>
</resources>
Creating CrimeCameraFragment
Create a new class named CrimeCameraFragment and make its superclass
android.support.v4.app.Fragment. In CrimeCameraFragment.java, add the fields shown in Listing
19.2. Organize your imports, and when asked, import android.hardware.Camera. Then, override
onCreateView(…) to inflate the layout and get references to the widgets. For now, set a listener on the
button that simply finishes the hosting activity, which will return the user to the previous screen.

ptg11078569
Creating CrimeCameraActivity
303
Listing 19.2The initial camera fragment (CrimeCameraFragment.java)
public class CrimeCameraFragment extends Fragment {
private static final String TAG = "CrimeCameraFragment";
private Camera mCamera;
private SurfaceView mSurfaceView;
@Override
public View onCreateView(LayoutInflater inflater, ViewGroup parent,
Bundle savedInstanceState) {
View v = inflater.inflate(R.layout.fragment_crime_camera, parent, false);
Button takePictureButton = (Button)v
.findViewById(R.id.crime_camera_takePictureButton);
takePictureButton.setOnClickListener(new View.OnClickListener() {
public void onClick(View v) {
getActivity().finish();
}
});
mSurfaceView = (SurfaceView)v.findViewById(R.id.crime_camera_surfaceView);
return v;
}
}
Creating CrimeCameraActivity
Create a new SingleFragmentActivity subclass named CrimeCameraActivity and override
createFragment() to return a new CrimeCameraFragment.
Listing 19.3Create the camera activity (CrimeCameraActivity.java)
public class CrimeCameraActivity extends SingleFragmentActivity {
@Override
protected Fragment createFragment() {
return new CrimeCameraFragment();
}
}
Adding activity and camera permissions to the manifest
The next step is to declare CrimeCameraActivity in the manifest. In addition, you must ask permission
for your application to use the camera by adding a uses-permission element.
Update AndroidManifest.xml to reflect the changes in Listing 19.4.

ptg11078569
Chapter 19Camera I: Viewfinder
304
Listing 19.4Adding permissions and camera activity to manifest
(AndroidManifest.xml)
<?xml version="1.0" encoding="utf-8"?>
<manifest xmlns:android="http://schemas.android.com/apk/res/android"
package="com.bignerdranch.android.criminalintent"
android:versionCode="1"
android:versionName="1.0" >
<uses-sdk android:minSdkVersion="8" android:targetSdkVersion="16"/>
<uses-permission android:name="android.permission.CAMERA" />
<uses-feature android:name="android.hardware.camera" />
<application
...
<activity android:name=".CrimeCameraActivity"
android:screenOrientation="landscape"
android:label="@string/app_name">
</activity>
</application>
</manifest>
The uses-feature element specifies that your application uses a particular device feature. Adding the
android.hardware.camera feature ensures that when your app appears on Google Play, it will only be
offered to devices that have a camera.
Notice that in the activity declaration, you explicitly force the activity into landscape mode using the
android:screenOrientation attribute. This will keep the activity’s interface from changing on the
user as he or she is trying to get the right angle for a picture.
There are a surprising number of options for screenOrientation. For example, you can set your
activity to have the same orientation as its parent or to choose landscape orientation in either direction
depending on the hardware sensor. Check out the documentation for the <activity> element for more
info.
Using the Camera API
Up to this point, you have been doing basic activity-creating. Now it is time to take on camera-specific
concepts and classes.
Opening and releasing the camera
First, let’s handle the management of the camera resource. You have given CrimeCameraFragment an
instance of Camera. The camera is an important system-wide resource, so it is critical to obtain it only
when you need it and release it as soon as you are done. Otherwise, the camera will be unavailable to
other applications until the device is rebooted.
Here are the Camera methods you will use to manage the Camera instance:
public static Camera open(int cameraId)
public static Camera open()
public final void release()

ptg11078569
Opening and releasing the camera
305
The open(int) method was introduced in API level 9, so the parameter-less open() method is required
on API level 8.
The callbacks in CrimeCameraFragment’s lifecycle where you should open and release the camera are
onResume() and onPause(). These two methods mark the boundaries of when the user can interact
with the fragment’s view, and the camera is only useful when the user can interact with it. (Note that
onResume() is called even when the fragment is coming on screen for the first time.)
In CrimeCameraFragment.onResume(), you are going to initialize the camera using the static method
Camera.open(int) and pass in 0 to open the first camera available on the device. Usually this is the
rear-facing camera, but if the device does not have one (e.g. the Nexus 7), then it will open its front-
facing camera.
For API level 8, you need to call the parameter-less Camera.open() instead. Safeguard your code for
Froyo by checking the device’s build version and calling Camera.open() on API level 8.
Listing 19.5Opening the camera in onResume()
(CrimeCameraFragment.java)
@TargetApi(9)
@Override
public void onResume() {
super.onResume();
if (Build.VERSION.SDK_INT >= Build.VERSION_CODES.GINGERBREAD) {
mCamera = Camera.open(0);
} else {
mCamera = Camera.open();
}
}
(Android Lint may give you warnings about opening the camera on the main thread. These are
legitimate warnings, but you are going to have to ignore them until you learn about multi-threading in
Chapter26.)
When the fragment is going offscreen, you need to release the camera resource so that it is available to
other apps. Be a good citizen and override onPause() to release the camera.
Listing 19.6Implementing lifecycle methods (CrimeCameraFragment.java)
public void onResume() {
super.onResume();
if (Build.VERSION.SDK_INT >= Build.VERSION_CODES.GINGERBREAD) {
mCamera = Camera.open(0);
} else {
mCamera = Camera.open();
}
}
@Override
public void onPause() {
super.onPause();
if (mCamera != null) {
mCamera.release();
mCamera = null;
}
}

ptg11078569
Chapter 19Camera I: Viewfinder
306
Notice that you make sure you have a camera instance before calling release(). You should always
check before calling code on the camera. Even though you asked permission to use it, the camera may
not be available. Another activity may be using it, or a virtual device may not have a camera at all. If
for any reason the camera instance does not exist, null-checking will keep your app from crashing.
SurfaceView, SurfaceHolder, and Surface
SurfaceView provides an implementation of the SurfaceHolder interface. In
CrimeCameraFragment.java, add the following code to get your SurfaceView’s SurfaceHolder.
Listing 19.7Getting the SurfaceHolder (CrimeCameraFragment.java)
@Override
@SuppressWarnings("deprecation")
public View onCreateView(LayoutInflater inflater, ViewGroup parent,
Bundle savedInstanceState) {
...
mSurfaceView = (SurfaceView)v.findViewById(R.id.crime_camera_surfaceView);
SurfaceHolder holder = mSurfaceView.getHolder();
// setType() and SURFACE_TYPE_PUSH_BUFFERS are both deprecated,
// but are required for Camera preview to work on pre-3.0 devices.
holder.setType(SurfaceHolder.SURFACE_TYPE_PUSH_BUFFERS);
return v;
}
The setType(…) method and the SURFACE_TYPE_PUSH_BUFFERS constant are both deprecated, and
the compiler will produce warnings for deprecated code. Eclipse shows you that these methods are
deprecated by striking through them.
Why are we asking you to use deprecated code? The setType(…) method and
SURFACE_TYPE_PUSH_BUFFERS are required for the camera preview to work on pre-Honeycomb devices.
In Listing 19.7, you make these warnings go away with the @SuppressWarnings annotation. This may
seem cavalier, but it is the best option for handling deprecation and compatibility in Android. There is
more discussion of deprecation in Android at the end of Chapter20.
A SurfaceHolder is your connection to another object – Surface. A Surface represents a buffer of
raw pixel data.
A Surface has a lifecycle: it is created for you when the SurfaceView appears on screen and it is
destroyed when the SurfaceView is no longer visible. You have to make sure nothing is drawn to the
Surface when it does not exist.
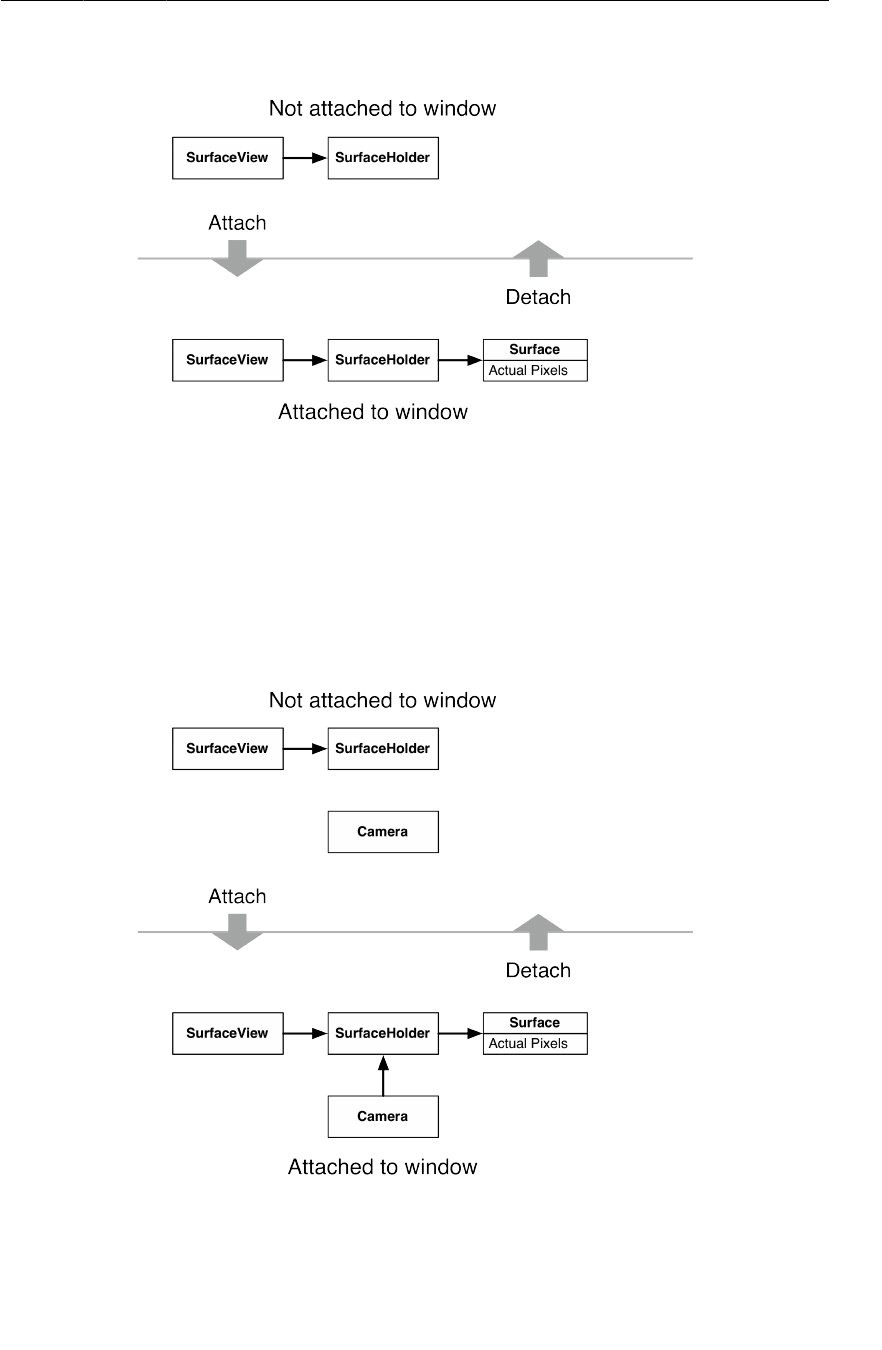
ptg11078569
SurfaceView, SurfaceHolder, and Surface
307
Figure 19.5SurfaceView, SurfaceHolder, and Surface
Unlike other View objects, neither SurfaceView nor any of its teammates draw anything
into themselves. A Surface’s client is whatever object wants to draw into its buffer. In
CrimeCameraFragment, the client is the Camera instance.
Remember, you have to make sure that nothing is drawn to the Surface when it is not there. To achieve
the desired state of affairs in Figure19.6, you will need to attach the Camera to your SurfaceHolder
when the Surface is created, and detach it when the Surface is destroyed.
Figure 19.6The desired state of affairs

ptg11078569
Chapter 19Camera I: Viewfinder
308
SurfaceHolder provides another interface that will let you do this – SurfaceHolder.Callback. This
interface listens for events in the lifecycle of a Surface so that you can coordinate the Surface with its
client.
Here are the three methods of SurfaceHolder.Callback:
public abstract void surfaceCreated(SurfaceHolder holder)
This method is called when the view hierarchy that the SurfaceView belongs to is put on screen.
This is where you connect the Surface with its client.
public abstract void surfaceChanged(SurfaceHolder holder, int format, int width,
int height)
When the surface is being displayed for the first time, the surfaceChanged(…) method will be
called. This method informs you of the pixel format and the width and height of the surface.
Within this method, you tell your Surface’s client how big the drawing area will be.
public abstract void surfaceDestroyed(SurfaceHolder holder)
When the SurfaceView is removed from the screen, the Surface is destroyed. This will be
where you tell your Surface’s client to stop using the Surface.
Here are the Camera methods you will use to respond to events in the lifecycle of the Surface:
public final void setPreviewDisplay(SurfaceHolder holder)
This method connects the camera with your Surface. You will call it in surfaceCreated().
public final void startPreview()
This method starts drawing frames on the Surface. You will call it in surfaceChanged(…).
public final void stopPreview()
This method stops drawing frames on the Surface. You will call it in surfaceDestroyed().
In CrimeCameraFragment.java, add an implementation of SurfaceHolder.Callback to coordinate the
lifecycle of the Surface with the camera’s preview.

ptg11078569
SurfaceView, SurfaceHolder, and Surface
309
Listing 19.8Implementing SurfaceHolder.Callback
(CrimeCameraFragment.java)
...
SurfaceHolder holder = mSurfaceView.getHolder();
// setType() and SURFACE_TYPE_PUSH_BUFFERS are both deprecated,
// but are required for Camera preview to work on pre-3.0 devices.
holder.setType(SurfaceHolder.SURFACE_TYPE_PUSH_BUFFERS);
holder.addCallback(new SurfaceHolder.Callback() {
public void surfaceCreated(SurfaceHolder holder) {
// Tell the camera to use this surface as its preview area
try {
if (mCamera != null) {
mCamera.setPreviewDisplay(holder);
}
} catch (IOException exception) {
Log.e(TAG, "Error setting up preview display", exception);
}
}
public void surfaceDestroyed(SurfaceHolder holder) {
// We can no longer display on this surface, so stop the preview.
if (mCamera != null) {
mCamera.stopPreview();
}
}
public void surfaceChanged(SurfaceHolder holder, int format, int w, int h) {
if (mCamera == null) return;
// The surface has changed size; update the camera preview size
Camera.Parameters parameters = mCamera.getParameters();
Size s = null; // To be reset in the next section
parameters.setPreviewSize(s.width, s.height);
mCamera.setParameters(parameters);
try {
mCamera.startPreview();
} catch (Exception e) {
Log.e(TAG, "Could not start preview", e);
mCamera.release();
mCamera = null;
}
}
});
return v;
}
Notice that you release the camera if the preview cannot be started. Whenever you open the camera,
you must release it – even in the case of an exception.
In the implementation of surfaceChanged(…), you set the camera’s preview size to null. This is a
temporary assignment until you can determine an acceptable preview size. You cannot set this size to
just any value. Exceptions will be thrown if the value is unacceptable.

ptg11078569
Chapter 19Camera I: Viewfinder
310
Determining preview size
The first step is to get a list of the camera’s allowable preview sizes from the nested
Camera.Parameters class. This class includes the following method:
public List<Camera.Size> getSupportedPreviewSizes()
This method returns a list of instances of the android.hardware.Camera.Size class, which wraps the
width and height dimensions of an image.
You can then compare the sizes in the list with the width and height of the Surface passed into
surfaceChanged(…) to find a preview size that will work with your Surface.
In CrimeCameraFragment, add the following method that accepts a list of sizes and then selects the size
with the largest number of pixels. It is not beautiful code, but it will work fine for our purposes.
Listing 19.9Find the best supported size (CrimeCameraFragment.java)
/** A simple algorithm to get the largest size available. For a more
* robust version, see CameraPreview.java in the ApiDemos
* sample app from Android. */
private Size getBestSupportedSize(List<Size> sizes, int width, int height) {
Size bestSize = sizes.get(0);
int largestArea = bestSize.width * bestSize.height;
for (Size s : sizes) {
int area = s.width * s.height;
if (area > largestArea) {
bestSize = s;
largestArea = area;
}
}
return bestSize;
}
Now call this method to set the preview size in surfaceChanged(…).
Listing 19.10Calling getBestSupportedSize(…)
(CrimeCameraFragment.java)
...
holder.addCallback(new SurfaceHolder.Callback() {
...
public void surfaceChanged(SurfaceHolder holder, int format, int w, int h) {
// The surface has changed size; update the camera preview size
Camera.Parameters parameters = mCamera.getParameters();
Size s = null;
Size s = getBestSupportedSize(parameters.getSupportedPreviewSizes(), w, h);
parameters.setPreviewSize(s.width, s.height);
mCamera.setParameters(parameters);
try {
mCamera.startPreview();
} catch (Exception e) {
Log.e(TAG, "Could not start preview", e);
mCamera.release();
mCamera = null;
}
}
});

ptg11078569
Starting CrimeCameraActivity from CrimeFragment
311
Starting CrimeCameraActivity from CrimeFragment
To get your viewfinder up and running, you are going to add a button to CrimeFragment. When this
button is pressed, CrimeFragment will start an instance of CrimeCameraActivity. Here’s what you
want CrimeFragment’s view to look like.
Figure 19.7CrimeFragment with camera button and rearranged widgets
To get the widgets rearranged as shown in Figure19.7, you need to add three LinearLayouts and an
ImageButton. Figure19.8 shows the changes to make to CrimeFragment’s default layout.
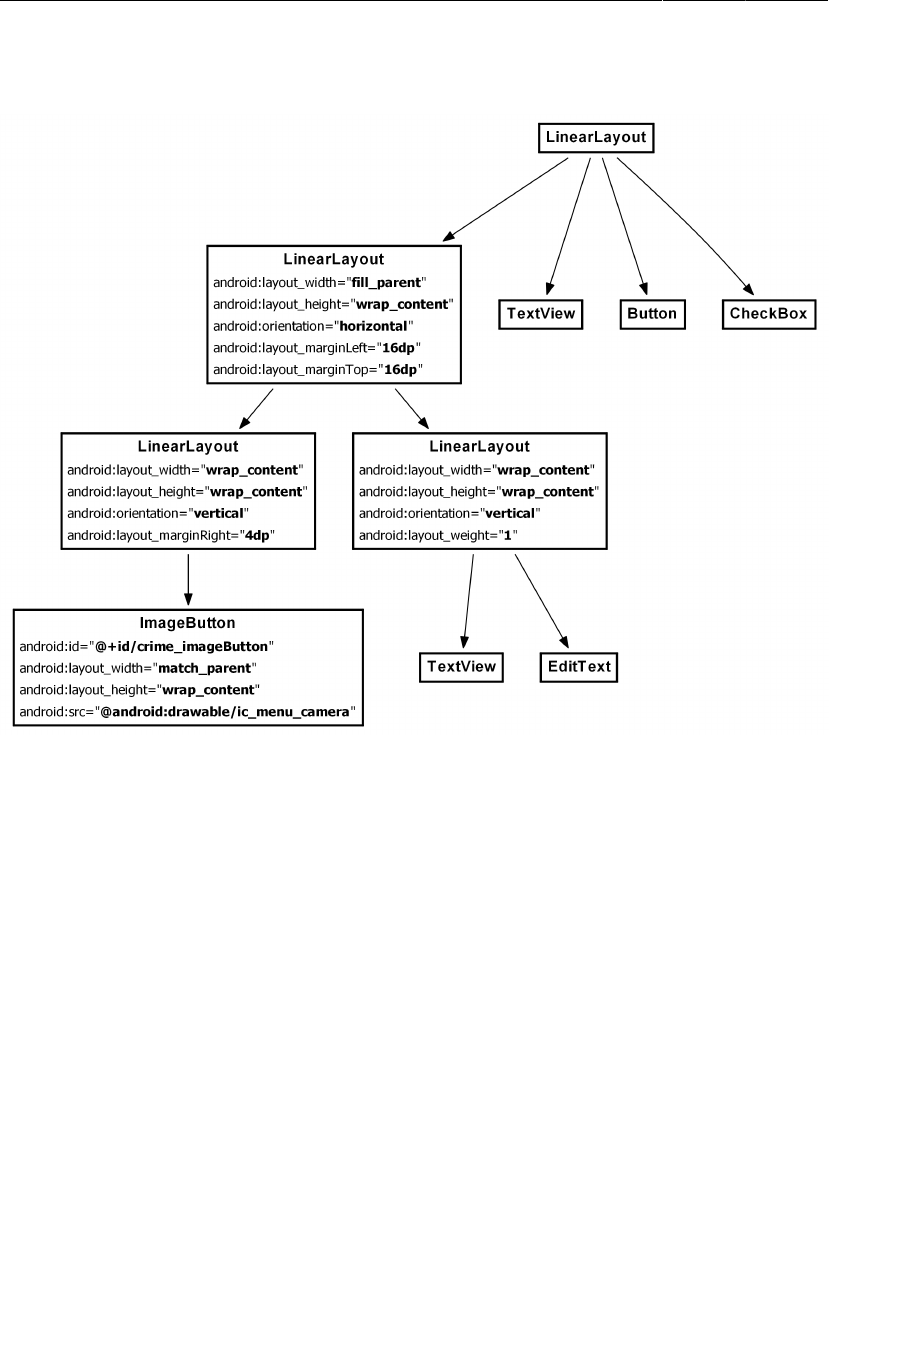
ptg11078569
Chapter 19Camera I: Viewfinder
312
Figure 19.8Adding camera button and more organizing (layout/
fragment_crime.xml)
Make similar changes in the landscape layout.
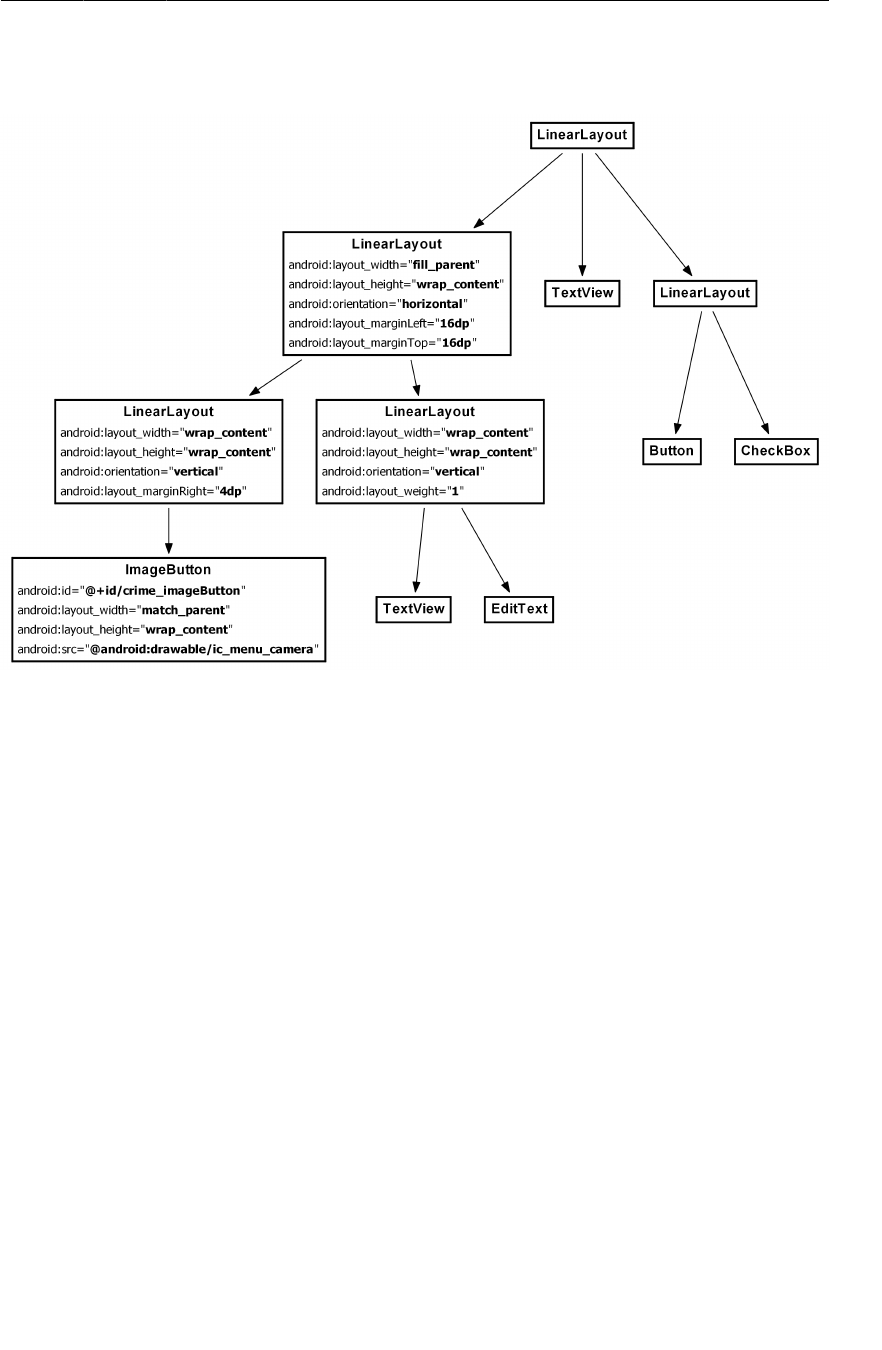
ptg11078569
Starting CrimeCameraActivity from CrimeFragment
313
Figure 19.9Adding camera button and more organizing (layout-land/
fragment_crime.xml)
In CrimeFragment, add a member variable for the image button, get a reference to it, and set an
OnClickListener that starts CrimeCameraActivity.

ptg11078569
Chapter 19Camera I: Viewfinder
314
Listing 19.11Starting CrimeCameraActivity (CrimeFragment.java)
public class CrimeFragment extends Fragment {
...
private ImageButton mPhotoButton;
...
public View onCreateView(LayoutInflater inflater, ViewGroup parent,
Bundle savedInstanceState) {
View v = inflater.inflate(R.layout.fragment_crime, parent, false);
...
mPhotoButton = (ImageButton)v.findViewById(R.id.crime_imageButton);
mPhotoButton.setOnClickListener(new View.OnClickListener() {
@Override
public void onClick(View v) {
Intent i = new Intent(getActivity(), CrimeCameraActivity.class);
startActivity(i);
}
});
return v;
}
If the device has no camera, then mPhotoButton should be disabled. You can check for the presence of
a camera by querying the PackageManager. Add the following code to onCreateView(…) to disable the
ImageButton if the device does not have a camera.
Listing 19.12Checking for a camera (CrimeFragment.java)
@Override
public View onCreateView(LayoutInflater inflater, ViewGroup parent,
Bundle savedInstanceState) {
View v = inflater.inflate(R.layout.fragment_crime, parent, false);
...
mPhotoButton = (ImageButton)v.findViewById(R.id.crime_imageButton);
mPhotoButton.setOnClickListener(new View.OnClickListener() {
...
});
// If camera is not available, disable camera functionality
PackageManager pm = getActivity().getPackageManager();
boolean hasACamera = pm.hasSystemFeature(PackageManager.FEATURE_CAMERA) ||
pm.hasSystemFeature(PackageManager.FEATURE_CAMERA_FRONT) ||
(Build.Version.SDK_INT >= Build.VERSION_CODES.GINGERBREAD &&
Camera.getNumberOfCameras() > 0);
if (!hasACamera) {
mPhotoButton.setEnabled(false);
}
...
}
After getting the PackageManager, you need to perform the check to see if you have a camera. On pre-
Gingerbread devices, you check this by calling hasSystemFeature(String), passing constants for the
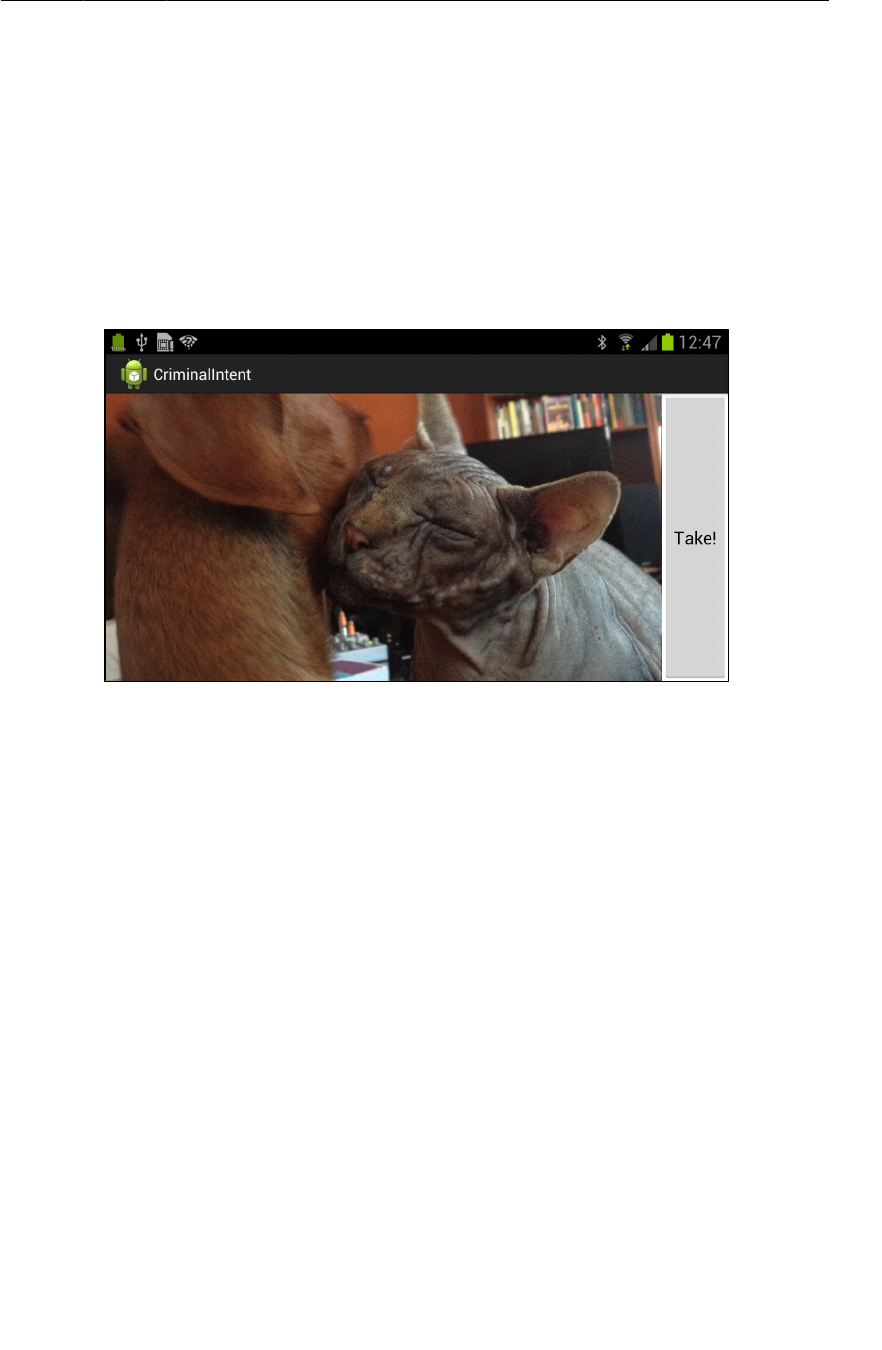
ptg11078569
Starting CrimeCameraActivity from CrimeFragment
315
device camera features you are interested in. If either of these checks returns true, you should have a
camera available. However, some emulators will return true even if there is no camera available.
To fix this, you implement an alternative check. Gingerbread introduces the getNumberOfCameras()
API call. If this is greater than 0, you are guaranteed to have a camera available. If the device does not
have a camera, you set the enabled property of the ImageButton to false.
Run CriminalIntent. View a crime and then press the camera button. You should see the live camera
preview. Pressing the Take! button will return you to the CrimeFragment’s view.
Figure 19.10Live preview from camera
You can see the results of forcing the activity to appear in landscape in the manifest. Even if the device
is in portrait orientation, the button’s text is locked to landscape.
Hiding the status bar and action bar
In Figure19.10, the activity’s action bar and the status bar obscure part of the viewfinder. Users will
spend only a brief time in this activity and will be focused on the viewfinder, so these elements are not
useful and get in the way. It would be better to hide them in this activity’s view.
Interestingly, you cannot hide the status bar and action bar from CrimeCameraFragment; you must
do this in CrimeCameraActivity. Open CrimeCameraActivity.java and add the following code to
onCreate(Bundle).
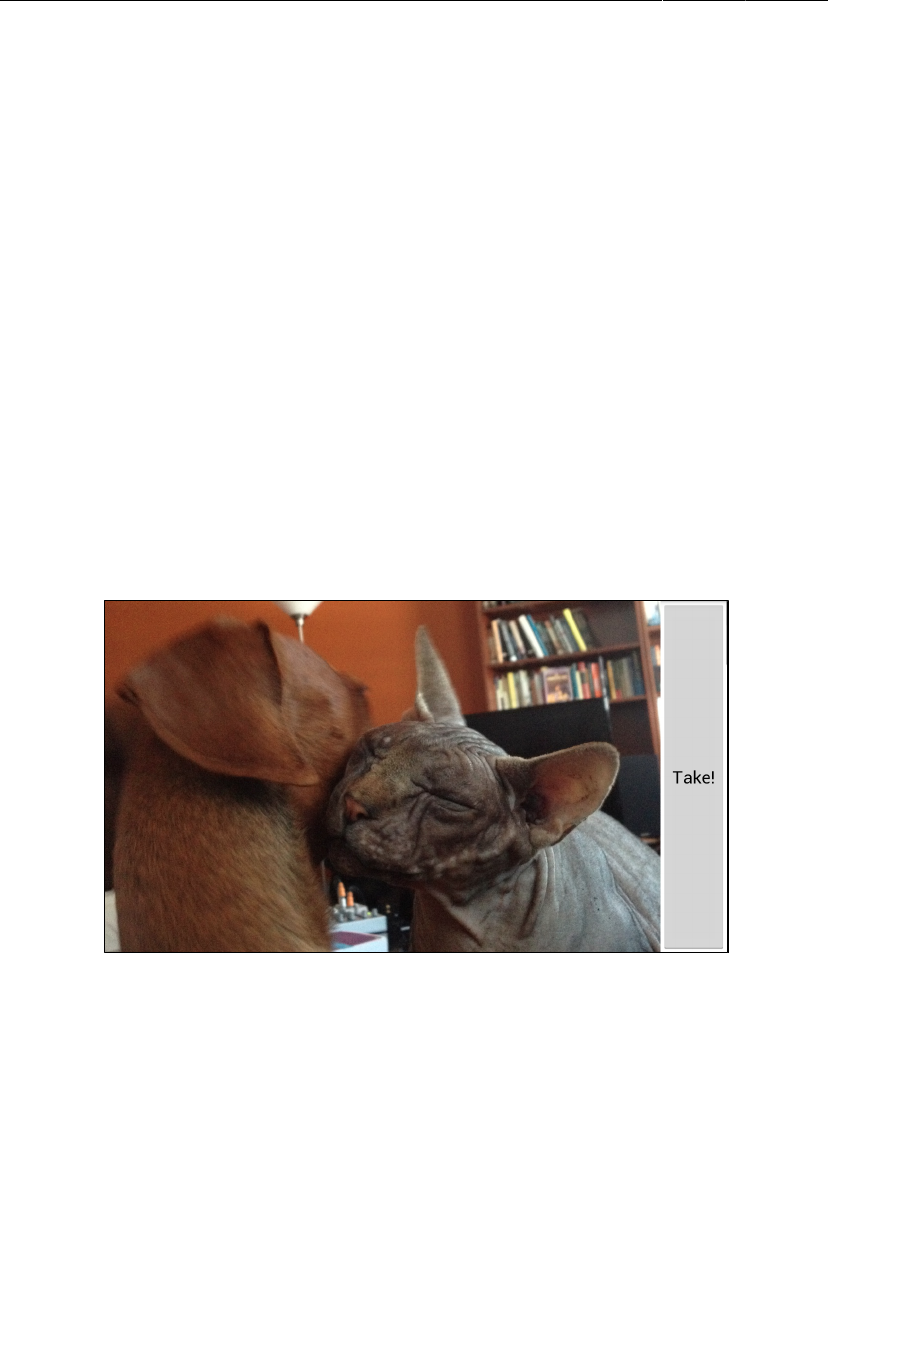
ptg11078569
Chapter 19Camera I: Viewfinder
316
Listing 19.13Configuring activity (CrimeCameraActivity.java)
public class CrimeCameraActivity extends SingleFragmentActivity {
@Override
public void onCreate(Bundle savedInstanceState) {
// Hide the window title.
requestWindowFeature(Window.FEATURE_NO_TITLE);
// Hide the status bar and other OS-level chrome
getWindow().addFlags(WindowManager.LayoutParams.FLAG_FULLSCREEN);
super.onCreate(savedInstanceState);
}
@Override
protected Fragment createFragment() {
return new CrimeCameraFragment();
}
}
Why must this be done in the activity? The calls to requestWindowFeature(…) and addFlags(…)
must be made before the activity’s view is created in Activity.setContentView(…), which, in
CrimeCameraActivity, is called in the superclass’s implementation of onCreate(Bundle). A fragment
cannot be added before its hosting activity’s view is created. Thus, you have to call these methods from
within your Activity.
Run CriminalIntent again and enjoy your unobstructed viewfinder.
Figure 19.11Activity without status bar or action bar
In the next chapter, you will see more of the camera API, save an image locally, and display it in
CrimeFragment’s view.
For the More Curious: Running Activities from the
Command Line
In this chapter, you were able to test your camera code fairly quickly by adding a button to
CrimeFragment and starting CrimeCameraActivity. Sometimes, however, you will want to test code in
a new activity before you have hooked it up to the rest of your app.

ptg11078569
For the More Curious: Running Activities from the Command Line
317
One quick-and-dirty way to do this is to switch the launcher intent filter in the manifest from the
declaration of the app’s intended launcher activity to the activity you want to test. Then, when the app
is launched, your activity will appear. On the downside, you may be unable to reach other parts of your
app until order has been restored in the manifest.
This launcher intent switcheroo is not always appropriate – like, for example, when you are working on
an app with five other people. Then it can be a nasty trick indeed. In this case, there is a better option:
you can use adb to start your activity from the command line.

ptg11078569
Chapter 19Camera I: Viewfinder
318
The first step is to export your activity. Add the following attribute to CrimeCameraActivity’s
declaration in AndroidManifest.xml:
<activity android:name=".CrimeCameraActivity"
android:exported="true"
android:screenOrientation="landscape"
android:label="@string/app_name">
</activity>
By default, your activities may only be started from within your own app. Setting exported to true
tells Android that other apps can start this activity, too. (The exported attribute is automatically set to
true when you add an intent filter to the activity’s declaration.)
Next, find the adb tool in the platform-tools subfolder within your Android SDK installation. We
recommend adding the platform-tools and tools subfolders to your command-line shell’s path.
If you are a command-line junkie, you are going to be all over adb, the Android Debug Bridge. adb can
be used for a lot of the same things you have been using Eclipse for. You can monitor LogCat, open a
shell on the device, browse the file system, upload and download files, list connected devices, reset adb
– it is a wonderful thing.
You can use adb with multiple devices, but it is easier to use when only one device is running. Shut
down or disconnect any additional emulators or devices and run CriminalIntent on a test device like
normal. Then use the following incantation to start CrimeCameraActivity from the command line:
$ adb shell am start -n com.bignerdranch.android.criminalintent/.CrimeCameraActivity
Starting: Intent { cmp=com.bignerdranch.android.criminalintent/.CrimeCameraActivity }
Run the command, and you should see CrimeCameraActivity running on your emulator or device.
This command is a shortcut that runs a command in a shell on the device. It does the same thing as this:
$ adb shell
shell@android:/ $ am start -n com.bignerdranch.android.criminalintent/.CrimeCameraAct\
ivity
The am command is a program on your device called the activity manager. It allows you to start and
stop Android components and send intents from the command line. Run adb shell am to see all the
other things you can do with the am tool.
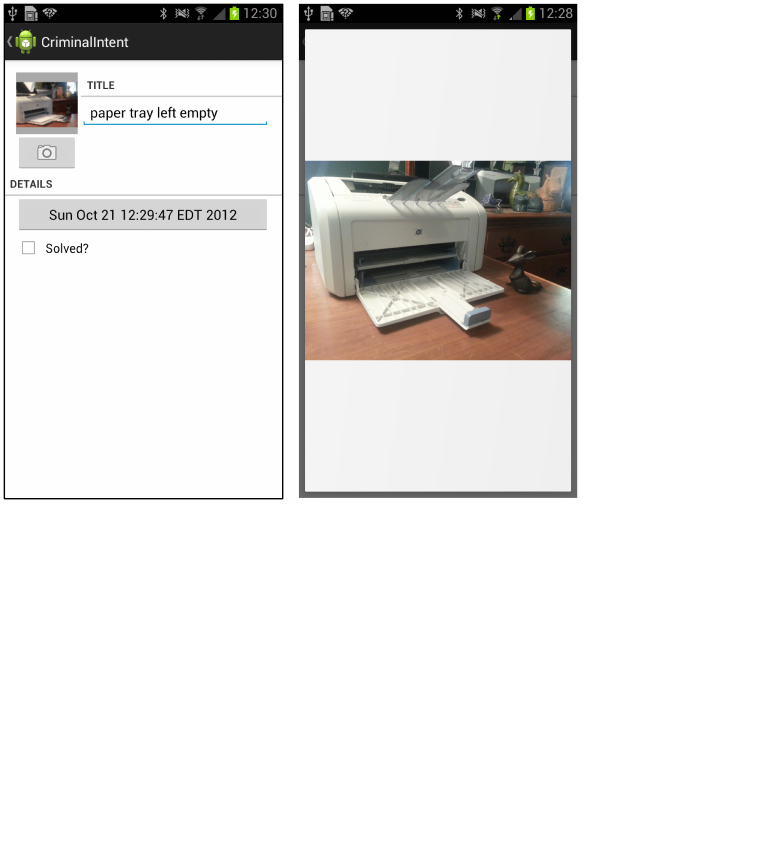
ptg11078569
319
20
Camera II: Taking Pictures and
Handling Images
In this chapter, you will capture an image from the camera’s preview and save it as a JPEG on the
filesystem. Then you will associate that JPEG with a Crime and display it in CrimeFragment’s view.
You will also offer the user the option to view a larger version of the image in a DialogFragment.
Figure 20.1Crime photo thumbnail and larger-size images
Taking a Picture
First, you are going to update CrimeCameraFragment’s layout to include a progress indicator.
Sometimes the picture-taking process can take a while, and you do not want users getting antsy.
In layout/fragment_crime_camera.xml, add the FrameLayout and ProgressBar widgets shown in
Figure20.2.
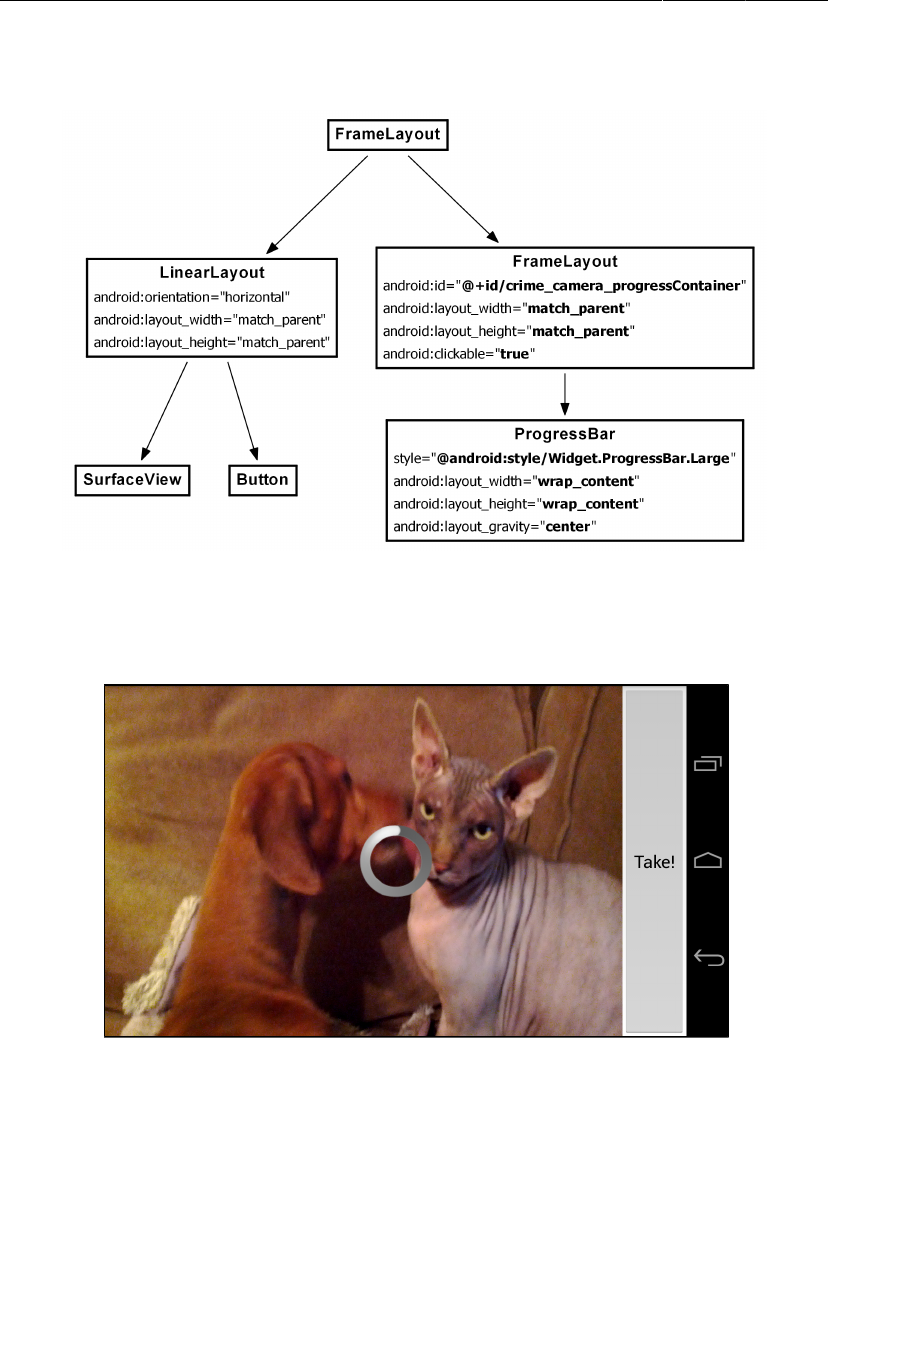
ptg11078569
Chapter 20Camera II: Taking Pictures and Handling Images
320
Figure 20.2Adding FrameLayout and ProgressBar widgets
(fragment_crime_camera.xml)
The @android:style/Widget.ProgressBar.Large style will create a large, round indeterminate
spinner rather than the large, progress-indicating bar that the name implies.
Figure 20.3Spinning progress bar
You will set the FrameLayout (and its child ProgressBar) to be invisible at first. You will only make it
visible after the user presses the Take! button and the picture-taking process begins.
Note that the FrameLayout has a height and width of match_parent. The root FrameLayout will
stack its child views on top of each other in the order that they are defined. Thus, the ProgressBar-
containing FrameLayout will completely cover its sibling LinearLayout.

ptg11078569
Implementing Camera callbacks
321
When the FrameLayout becomes visible, the user will still be able to see almost everything in the
LinearLayout. Only the ProgressBar will actually obscure anything. However, by defining the
FrameLayout’s height and width as match_parent and by setting android:clickable="true", you
ensure that the FrameLayout will intercept (and do nothing with) any touch events. This prevents the
user from interacting with anything in the LinearLayout and, in particular, from pressing the Take!
button again.
Return to CrimeCameraFragment.java, Add a member variable for the FrameLayout, get a reference to
it, and mark it as invisible.
Listing 20.1Wiring up the FrameLayout (CrimeCameraFragment.java)
public class CrimeCameraFragment extends Fragment {
...
private View mProgressContainer;
@Override
public View onCreateView(LayoutInflater inflater, ViewGroup parent,
Bundle savedInstanceState) {
View v = inflater.inflate(R.layout.fragment_crime_camera, parent, false);
mProgressContainer = v.findViewById(R.id.crime_camera_progressContainer);
mProgressContainer.setVisibility(View.INVISIBLE);
...
return v;
}
...
}
Implementing Camera callbacks
Now that you have the progress indicator ready to go, let’s turn to capturing a frame from the live
preview and saving it as JPEG. To take a picture, you call the following aptly-named Camera method:
public final void takePicture(Camera.ShutterCallback shutter,
Camera.PictureCallback raw,
Camera.PictureCallback jpeg)
The ShutterCallback occurs when the camera captures the picture but before the image data is
processed and available. The first PictureCallback occurs when the raw image data is available.
This callback is typically used when processing the raw image before saving it. The second
PictureCallback occurs when a JPEG version of the image is available.
You can write implementations of these interfaces and pass them into takePicture(…). You can pass
null for any of takePicture(…)’s parameters if you are not interested in implementing a callback.
In CriminalIntent, you are going to implement the shutter callback and the JPEG picture callback.
Figure20.4 summarizes the interactions between your objects.
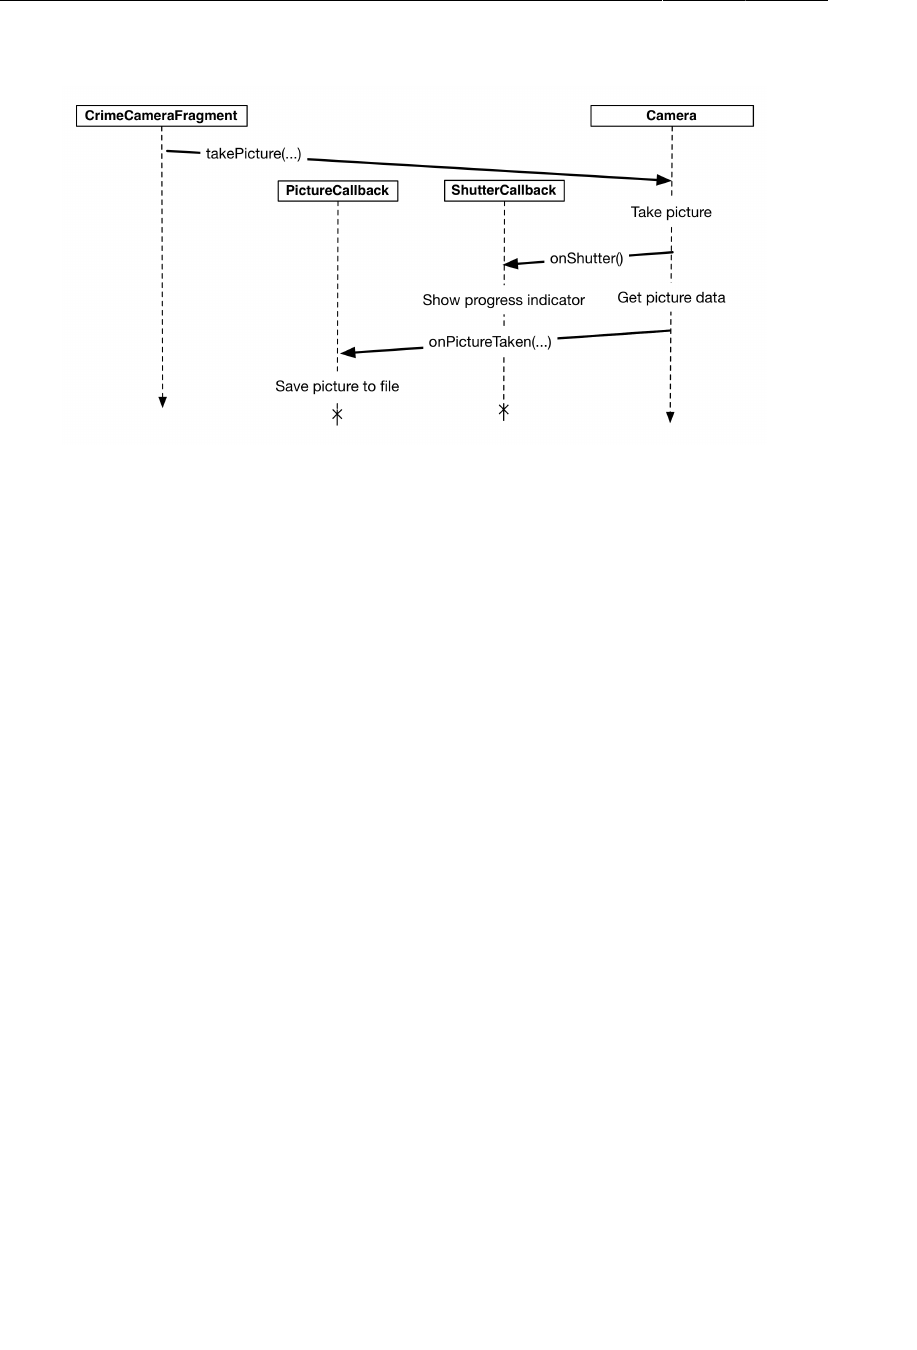
ptg11078569
Chapter 20Camera II: Taking Pictures and Handling Images
322
Figure 20.4Taking a picture in CrimeCameraFragment
Here are the two interfaces. Each contains a single method.
public static interface Camera.ShutterCallback {
public abstract void onShutter();
}
public static interface Camera.PictureCallback {
public abstract void onPictureTaken (byte[] data, Camera camera);
}
In CrimeCameraFragment.java, add a Camera.ShutterCallback implementation that makes
mProgressContainer visible and a Camera.PictureCallback implementation that handles naming and
saving the JPEG file.
Listing 20.2Implementing callbacks for takePicture(…)
(CrimeCameraFragment.java)
...
private View mProgressContainer;
private Camera.ShutterCallback mShutterCallback = new Camera.ShutterCallback() {
public void onShutter() {
// Display the progress indicator
mProgressContainer.setVisibility(View.VISIBLE);
}
};
private Camera.PictureCallback mJpegCallback = new Camera.PictureCallback() {
public void onPictureTaken(byte[] data, Camera camera) {
// Create a filename
String filename = UUID.randomUUID().toString() + ".jpg";
// Save the jpeg data to disk
FileOutputStream os = null;
boolean success = true;

ptg11078569
Implementing Camera callbacks
323
try {
os = getActivity().openFileOutput(filename, Context.MODE_PRIVATE);
os.write(data);
} catch (Exception e) {
Log.e(TAG, "Error writing to file " + filename, e);
success = false;
} finally {
try {
if (os != null)
os.close();
} catch (Exception e) {
Log.e(TAG, "Error closing file " + filename, e);
success = false;
}
}
if (success) {
Log.i(TAG, "JPEG saved at " + filename);
}
getActivity().finish();
}
};
...
In the onPictureTaken(…) method, you create a unique string to use as a filename. Then, you use Java
I/O classes to open an output stream and write the JPEG data that was passed in from the Camera. If
this operation goes well, you get a log statement confirming its success.
Note that you do not set mProgressContainer back to invisible anywhere. This is not necessary
because the activity is finished in the picture callback and the view is destroyed.
Now that you have your callbacks ready, modify the listener for the Take! button to call
takePicture(…). Pass null for the raw data picture callback that you did not implement.
Listing 20.3Implementing takePicture(…) on button click
(CrimeCameraFragment.java)
@Override
@SuppressWarnings("deprecation")
public View onCreateView(LayoutInflater inflater, ViewGroup parent,
Bundle savedInstanceState) {
...
takePictureButton.setOnClickListener(new View.OnClickListener() {
public void onClick(View v) {
getActivity().finish();
if (mCamera != null) {
mCamera.takePicture(mShutterCallback, null, mJpegCallback);
}
}
});
...
return v;
}

ptg11078569
Chapter 20Camera II: Taking Pictures and Handling Images
324
Setting the picture size
The camera needs to know what size picture to create. Setting the picture size works the same
as setting the preview size. You can get a list of acceptable picture sizes by calling the following
Camera.Parameters method:
public List<Camera.Size> getSupportedPictureSizes()
In surfaceChanged(…), use your getBestSupportedSize(…) method to find a supported picture size
that will work with your Surface. Then set the camera’s picture size.
Listing 20.4Calling getBestSupportedSize(…) to set picture size
(CrimeCameraFragment.java)
...
public void surfaceChanged(SurfaceHolder holder, int format, int w, int h) {
if (mCamera == null) return;
// The surface has changed size; update the camera preview size
Camera.Parameters parameters = mCamera.getParameters();
Size s = getBestSupportedSize(parameters.getSupportedPreviewSizes(), w, h);
parameters.setPreviewSize(s.width, s.height);
s = getBestSupportedSize(parameters.getSupportedPictureSizes(), w, h);
parameters.setPictureSize(s.width, s.height);
mCamera.setParameters(parameters);
...
}
});
Run CriminalIntent and press the Take! button. In LogCat, create a filter with a CrimeCameraFragment
tag to see where your picture landed.
At this point, CrimeCameraFragment lets the user take a picture and save it. Your work with the camera
API is done. In the rest of this chapter, you will focus on CrimeFragment and integrating the photo into
the rest of the application.
Passing Data Back to CrimeFragment
To give CrimeFragment access to the photo, you are going to pass the filename back from
CrimeCameraFragment. Figure20.5 shows the sequence of events between CrimeFragment and
CrimeCameraFragment.
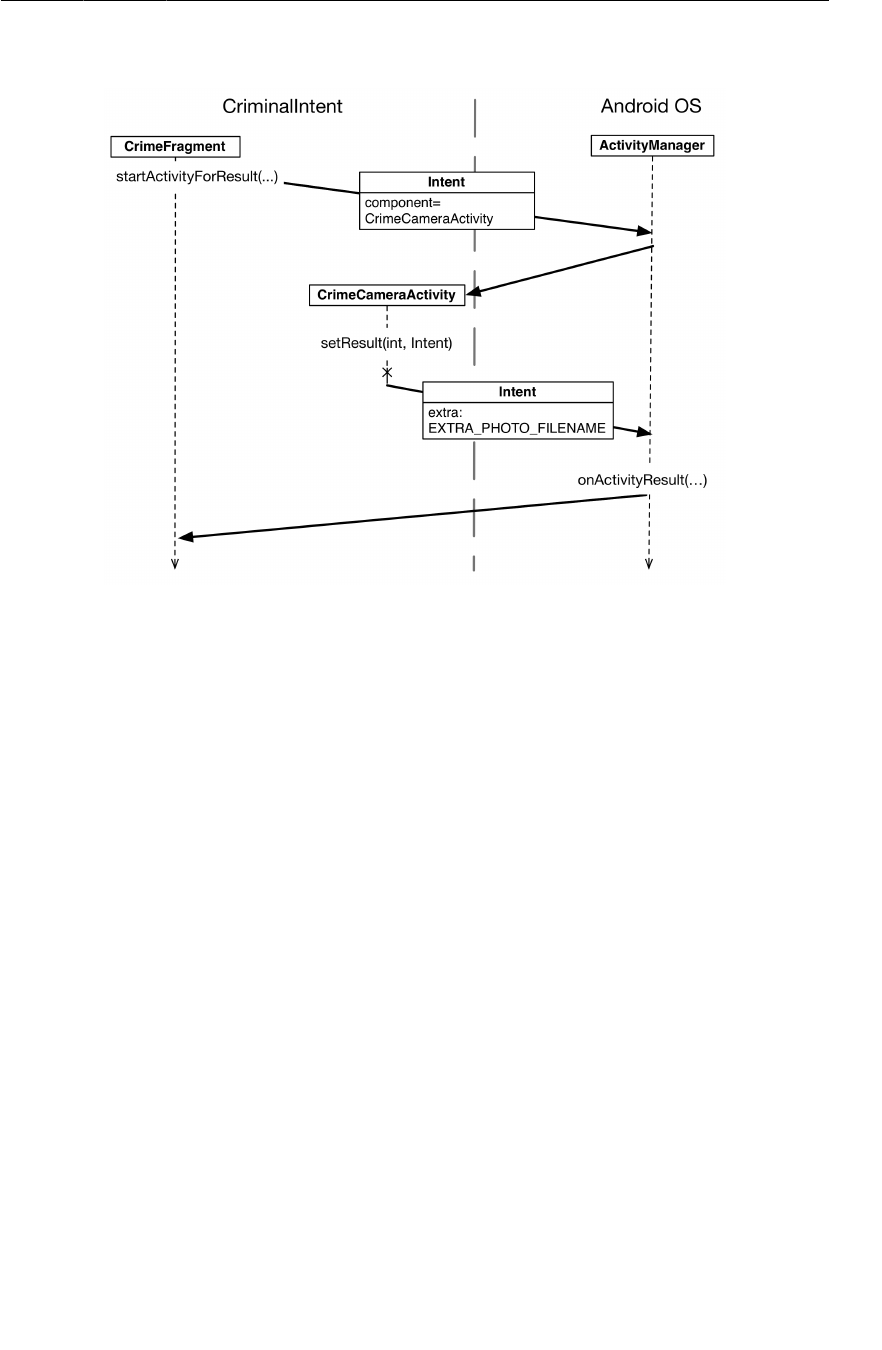
ptg11078569
Starting CrimeCameraActivity for a result
325
Figure 20.5CrimeCameraActivity sets a result and an extra
First, CrimeFragment will start CrimeCameraActivity for a result. When a picture is taken,
CrimeCameraFragment will create an intent with the filename as an extra and call setResult(…).
The ActivityManager will forward the intent to CrimePagerActivity in onActivityResult(…).
CrimePagerActivity’s FragmentManager will then forward the intent to CrimeFragment in
CrimeFragment.onActivityResult(…).
Starting CrimeCameraActivity for a result
Currently, CrimeFragment just starts CrimeCameraActivity. In CrimeFragment.java, add a constant
for a request code and then modify the camera button’s listener to start CrimeCameraActivity for a
result.

ptg11078569
Chapter 20Camera II: Taking Pictures and Handling Images
326
Listing 20.5Starting CrimeCameraActivity for a result
(CrimeFragment.java)
public class CrimeFragment extends Fragment {
...
private static final int REQUEST_DATE = 0;
private static final int REQUEST_PHOTO = 1;
...
@Override
public View onCreateView(LayoutInflater inflater, ViewGroup parent,
Bundle savedInstanceState) {
...
mPhotoButton.setOnClickListener(new View.OnClickListener() {
public void onClick(View v) {
// Launch the camera activity
Intent i = new Intent(getActivity(), CrimeCameraActivity.class);
startActivity(i);
startActivityForResult(i, REQUEST_PHOTO);
}
});
...
}
Setting a result in CrimeCameraFragment
CrimeCameraFragment will put the filename in an intent extra and pass it into
CrimeCameraActivity.setResult(int, Intent). In CrimeCameraFragment.java, add a constant
for the extra. Then, in the picture callback, create an intent and set the result code to RESULT_OK if the
image was saved or RESULT_CANCELED if something went wrong.

ptg11078569
Retrieving filename in CrimeFragment
327
Listing 20.6Adding an extra for photo filename (CrimeCameraFragment.java)
public class CrimeCameraFragment extends Fragment {
private static final String TAG = "CrimeCameraFragment";
public static final String EXTRA_PHOTO_FILENAME =
"com.bignerdranch.android.criminalintent.photo_filename";
...
private Camera.PictureCallback mJpegCallback = new Camera.PictureCallback() {
public void onPictureTaken(byte[] data, Camera camera) {
...
try {
...
} catch (Exception e) {
...
} finally {
...
}
Log.i(TAG, "JPEG saved at " + filename);
// Set the photo filename on the result intent
if (success) {
Intent i = new Intent();
i.putExtra(EXTRA_PHOTO_FILENAME, filename);
getActivity().setResult(Activity.RESULT_OK, i);
} else {
getActivity().setResult(Activity.RESULT_CANCELED);
}
getActivity().finish();
}
};
...
}
Retrieving filename in CrimeFragment
Eventually, CrimeFragment will use the filename to update CriminalIntent’s model and view layers.
For now, in CrimeFragment.java, simply override onActivityResult(…) to check the result, retrieve
the filename, and log a message. You will also need a TAG for CrimeFragment to aid in logging the
result.

ptg11078569
Chapter 20Camera II: Taking Pictures and Handling Images
328
Listing 20.7Retrieving filename (CrimeFragment.java)
public class CrimeFragment extends Fragment {
private static final String TAG = "CrimeFragment"
public static final String EXTRA_CRIME_ID =
"com.bignerdranch.android.criminalintent.crime_id";
...
@Override
public void onActivityResult(int requestCode, int resultCode, Intent data) {
if (resultCode != Activity.RESULT_OK) return;
if (requestCode == REQUEST_DATE) {
Date date = (Date)data
.getSerializableExtra(DatePickerFragment.EXTRA_DATE);
mCrime.setDate(date);
updateDate();
} else if (requestCode == REQUEST_PHOTO) {
// Create a new Photo object and attach it to the crime
String filename = data
.getStringExtra(CrimeCameraFragment.EXTRA_PHOTO_FILENAME);
if (filename != null) {
Log.i(TAG, "filename: " + filename);
}
}
}
Run CriminalIntent. Take a picture in CrimeCameraActivity. Check LogCat to confirm that
CrimeFragment retrieved a filename.
Now that CrimeFragment has the filename, there is a lot to be done with it:
• To update the model layer, you will write a Photo class that wraps the filename of an image. You
will also give Crime an mPhoto property of type Photo. CrimeFragment will use the filename to
create a Photo object and set Crime’s mPhoto property.
• To update CrimeFragment’s view, you will add an ImageView to CrimeFragment’s layout and
display a thumbnail of the Crime’s photo on this ImageView.
• To present a larger version of the image, you will create a DialogFragment subclass named
ImageFragment and pass it the path of the photo to display.
Updating the Model Layer
Figure20.6 shows the relationship between CrimeFragment, Crime, and Photo.
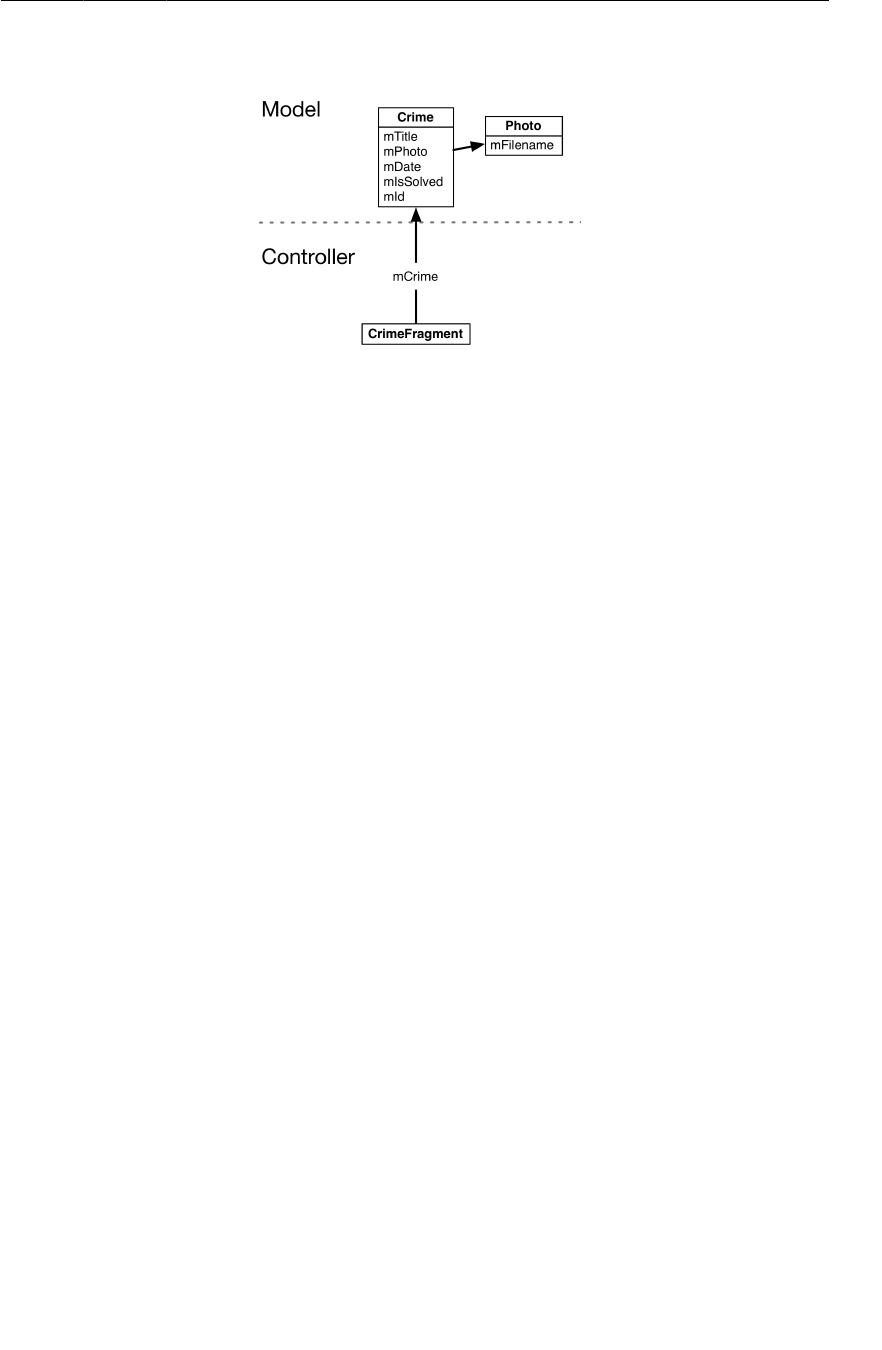
ptg11078569
Adding a Photo class
329
Figure 20.6Model objects and CrimeFragment
Adding a Photo class
Create a new class in the com.bignerdranch.android.criminalintent package. Name it Photo and
leave its superclass as java.lang.Object.
In Photo.java, add the fields and methods shown in Listing 20.8.
Listing 20.8The Photo class (Photo.java)
...
public class Photo {
private static final String JSON_FILENAME = "filename";
private String mFilename;
/** Create a Photo representing an existing file on disk */
public Photo(String filename) {
mFilename = filename;
}
public Photo(JSONObject json) throws JSONException {
mFilename = json.getString(JSON_FILENAME);
}
public JSONObject toJSON() throws JSONException {
JSONObject json = new JSONObject();
json.put(JSON_FILENAME, mFilename);
return json;
}
public String getFilename() {
return mFilename;
}
}
Notice that the Photo class has two constructors. The first constructor creates a Photo from a given
filename. The second is a JSON serialization method that Crime will use when saving and loading its
property of type Photo.

ptg11078569
Chapter 20Camera II: Taking Pictures and Handling Images
330
Giving Crime a photo property
Next, update the Crime class to hold a Photo object and serialize it to JSON (Listing 20.9).
Listing 20.9A Photo for the Crime (Crime.java)
public class Crime {
...
private static final String JSON_DATE = "date";
private static final String JSON_PHOTO = "photo";
...
private Date mDate = new Date();
private Photo mPhoto;
...
public Crime(JSONObject json) throws JSONException {
...
mDate = new Date(json.getLong(JSON_DATE));
if (json.has(JSON_PHOTO))
mPhoto = new Photo(json.getJSONObject(JSON_PHOTO));
}
public JSONObject toJSON() throws JSONException {
JSONObject json = new JSONObject();
...
json.put(JSON_DATE, mDate.getTime());
if (mPhoto != null)
json.put(JSON_PHOTO, mPhoto.toJSON());
return json;
}
...
public Photo getPhoto() {
return mPhoto;
}
public void setPhoto(Photo p) {
mPhoto = p;
}
}
Setting the photo property
In CrimeFragment.java, modify onActivityResult(…) to create a new Photo and set it on the current
Crime.

ptg11078569
Updating CrimeFragment’s View
331
Listing 20.10Handling a new Photo (CrimeFragment.java)
@Override
public void onActivityResult(int requestCode, int resultCode, Intent data) {
if (resultCode != Activity.RESULT_OK) return;
if (requestCode == REQUEST_DATE) {
Date date = (Date)data
.getSerializableExtra(DatePickerFragment.EXTRA_DATE);
mCrime.setDate(date);
updateDate();
} else if (requestCode == REQUEST_PHOTO) {
// Create a new Photo object and attach it to the crime
String filename = data
.getStringExtra(CrimeCameraFragment.EXTRA_PHOTO_FILENAME);
if (filename != null) {
Log.i(TAG, "filename: " + filename);
Photo p = new Photo(filename);
mCrime.setPhoto(p);
Log.i(TAG, "Crime: " + mCrime.getTitle() + " has a photo");
}
}
}
Run CriminalIntent and take a picture. Check LogCat to confirm that the Crime has a photo.
You may be wondering why you created a Photo class instead of simply adding a filename property to
Crime. The latter would work in this situation, but there are other things you might need a Photo to do,
like display a caption or handle a touch event. In that case, you would need a separate class.
Updating CrimeFragment’s View
Now that the model layer is updated, you can turn to updating the view layer. In particular,
CrimeFragment will display a thumbnail-sized photo in an ImageView.
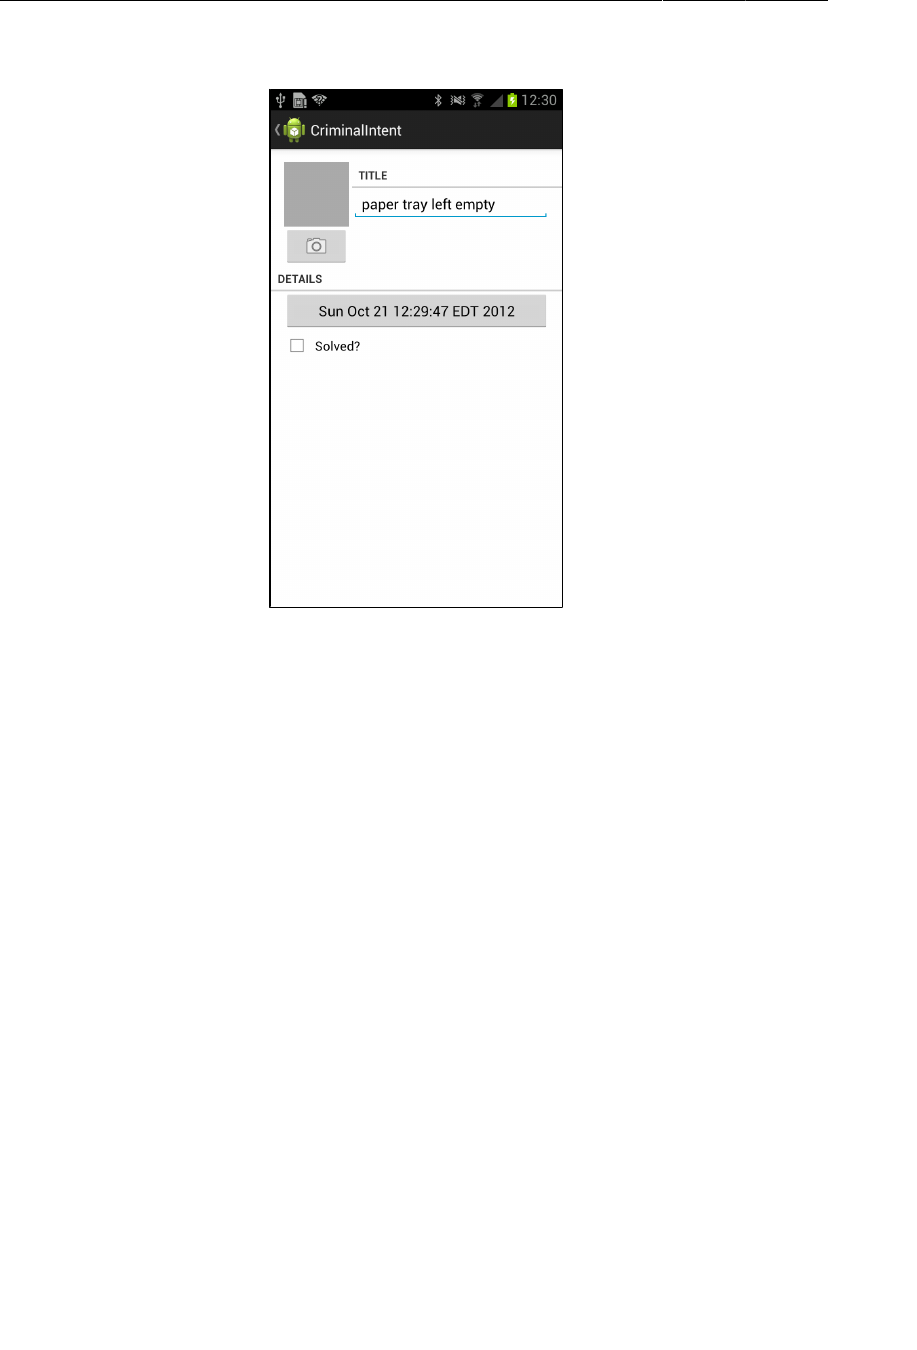
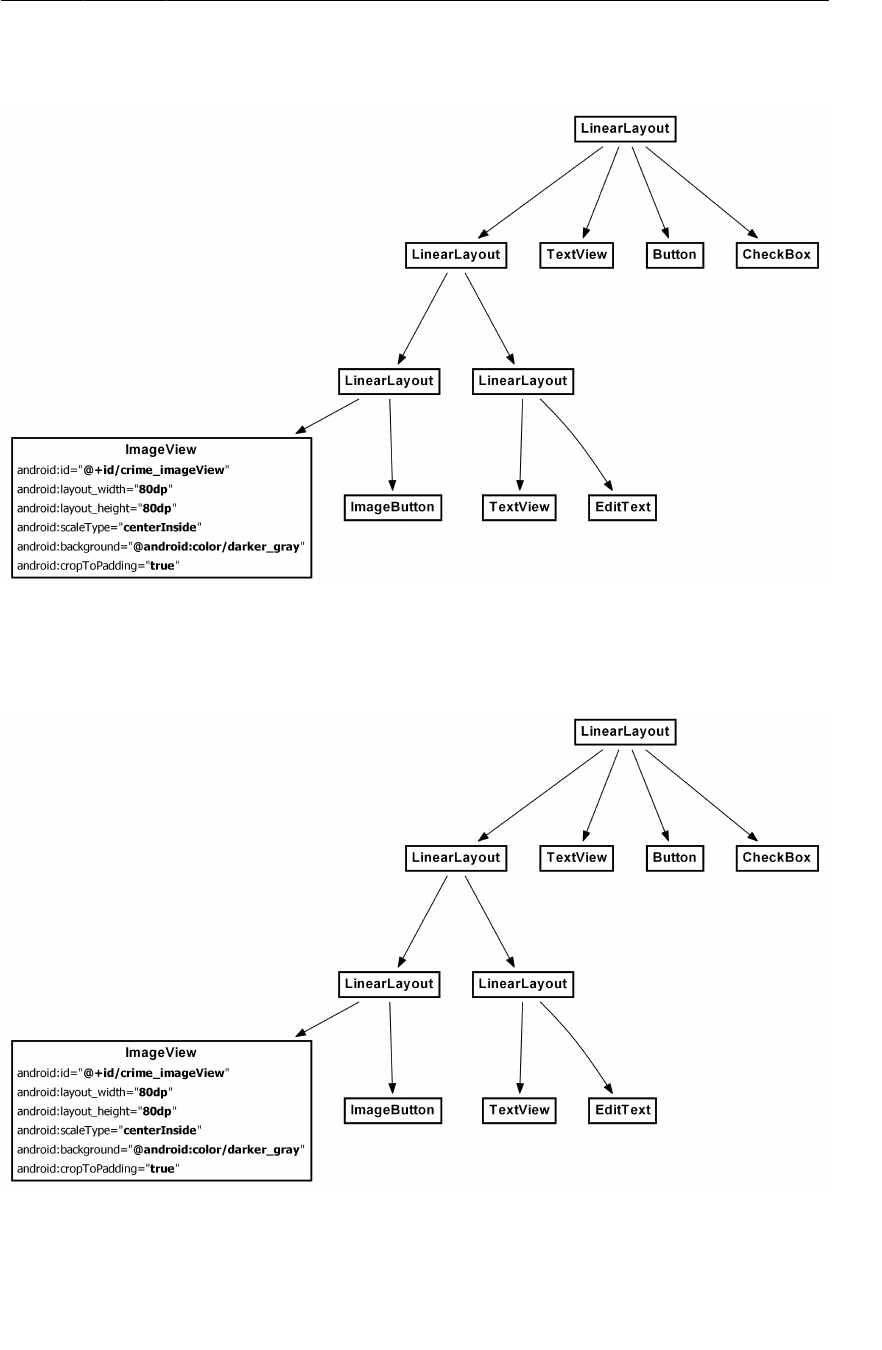

ptg11078569
Chapter 20Camera II: Taking Pictures and Handling Images
334
In CrimeFragment.java, create a member variable and get a reference to the ImageView in
onCreateView(…).
Listing 20.11Configuring the ImageButton (CrimeFragment.java)
public class CrimeFragment extends Fragment {
...
private ImageButton mPhotoButton;
private ImageView mPhotoView;
...
@Override
public View onCreateView(LayoutInflater inflater, ViewGroup parent,
Bundle savedInstanceState) {
...
mPhotoButton.setOnClickListener(new View.OnClickListener() {
public void onClick(View v) {
// Launch the camera activity
Intent i = new Intent(getActivity(), CrimeCameraActivity.class);
startActivityForResult(i, REQUEST_PHOTO);
}
});
mPhotoView = (ImageView)v.findViewById(R.id.crime_imageView);
...
}
Preview the layout or run CriminalIntent to confirm that the ImageView is in place.
Image handling
Displaying the image on the ImageView requires some image handling first because the file that came
from the camera could be exceptionally large. Phone manufacturers include bigger and better cameras
in their phones every year. As a user, this is swell, but as a programmer, it can be a pain.
As of this writing, top-of-the-line Android phones are armed with 8-megapixel cameras. Pictures that
large will easily blow out your app’s memory budget, so you need some code to scale the image before
loading it and some code to clean up when the image is no longer needed.
Adding scaled photo to the image view
In the com.bignerdranch.android.criminalintent package, create a new class named
PictureUtils. In PictureUtils.java, add the following method that scales an image to the size of
the default display for the device.

ptg11078569
Image handling
335
Listing 20.12Add PictureUtils class (PictureUtils.java)
public class PictureUtils {
/**
* Get a BitmapDrawable from a local file that is scaled down
* to fit the current Window size.
*/
@SuppressWarnings("deprecation")
public static BitmapDrawable getScaledDrawable(Activity a, String path) {
Display display = a.getWindowManager().getDefaultDisplay();
float destWidth = display.getWidth();
float destHeight = display.getHeight();
// Read in the dimensions of the image on disk
BitmapFactory.Options options = new BitmapFactory.Options();
options.inJustDecodeBounds = true;
BitmapFactory.decodeFile(path, options);
float srcWidth = options.outWidth;
float srcHeight = options.outHeight;
int inSampleSize = 1;
if (srcHeight > destHeight || srcWidth > destWidth) {
if (srcWidth > srcHeight) {
inSampleSize = Math.round(srcHeight / destHeight);
} else {
inSampleSize = Math.round(srcWidth / destWidth);
}
}
options = new BitmapFactory.Options();
options.inSampleSize = inSampleSize;
Bitmap bitmap = BitmapFactory.decodeFile(path, options);
return new BitmapDrawable(a.getResources(), bitmap);
}
}
The Display.getWidth() and Display.getHeight() methods are deprecated. You will learn more
about deprecation at the end of this chapter.
It would be best to scale the image so that it fits the ImageView perfectly. However, the size of the
view in which the image will be displayed is often not available when you need it. For example, inside
onCreateView(…), you cannot get the size of the ImageView. As a safe guess, you scale the image to
the size of the default display for the device, which is available anytime. The view where the image
will eventually appear may be smaller than the default display size, but it cannot be larger.
Next, in CrimeFragment, add a private method that sets a scaled image on the ImageView.

ptg11078569
Chapter 20Camera II: Taking Pictures and Handling Images
336
Listing 20.13Adding showPhoto() (CrimeFragment.java)
@Override
public View onCreateView(LayoutInflater inflater, ViewGroup parent,
Bundle savedInstanceState) {
...
}
private void showPhoto() {
// (Re)set the image button's image based on our photo
Photo p = mCrime.getPhoto();
BitmapDrawable b = null;
if (p != null) {
String path = getActivity()
.getFileStreamPath(p.getFilename()).getAbsolutePath();
b = PictureUtils.getScaledDrawable(getActivity(), path);
}
mPhotoView.setImageDrawable(b);
}
In CrimeFragment.java, add an implementation of onStart() that calls showPhoto() to have the
photo ready as soon as CrimeFragment’s view becomes visible to the user.
Listing 20.14Loading the image (CrimeFragment.java)
...
private void showPhoto() {
// (Re)set the image button's image based on our photo
Photo p = mCrime.getPhoto();
BitmapDrawable b = null;
if (p != null) {
String path = getActivity()
.getFileStreamPath(p.getFilename()).getAbsolutePath();
b = PictureUtils.getScaledDrawable(getActivity(), path);
}
mPhotoButton.setImageDrawable(b);
}
@Override
public void onStart() {
super.onStart();
showPhoto();
}
In CrimeFragment.onActivityResult(…), call showPhoto() to ensure that the image will be visible
when the user returns from CrimeCameraActivity.

ptg11078569
Image handling
337
Listing 20.15Calling showPhoto() in onActivityResult(…)
(CrimeFragment.java)
@Override
public void onActivityResult(int requestCode, int resultCode, Intent data) {
if (resultCode != Activity.RESULT_OK) return;
if (requestCode == REQUEST_PHOTO) {
// Create a new Photo object and attach it to the crime
String filename = data
.getStringExtra(CrimeCameraFragment.EXTRA_PHOTO_FILENAME);
if (filename != null) {
Photo p = new Photo(filename);
mCrime.setPhoto(p);
showPhoto();
Log.i(TAG, "Crime: " + mCrime.getTitle() + "has a photo");
}
}
}
Unloading the image
In the PictureUtils class, add a method to clean up an ImageView’s BitmapDrawable, if it has one.
Listing 20.16Cleanup work (PictureUtils.java)
public class PictureUtils {
/**
* ...
*/
@SuppressWarnings("deprecation")
public static BitmapDrawable getScaledDrawable(Activity a, String path) {
...
}
public static void cleanImageView(ImageView imageView) {
if (!(imageView.getDrawable() instanceof BitmapDrawable))
return;
// Clean up the view's image for the sake of memory
BitmapDrawable b = (BitmapDrawable)imageView.getDrawable();
b.getBitmap().recycle();
imageView.setImageDrawable(null);
}
}
The call to Bitmap.recycle() bears some explanation. The documentation implies that calling this
method is not necessary, but it is. So here is a technical explanation.
Bitmap.recycle() frees the native storage for your bitmap. This is most of the meat of your bitmap
object. (The native storage can be a smaller or larger amount of data depending on your version of
Android. Before Honeycomb, it stored all of the data for your Java Bitmap.)
If you do not free this memory explicitly by calling recycle(), then the memory will still be cleaned
up. However, it will be cleaned up at some future point in a finalizer, not when the bitmap itself is

ptg11078569
Chapter 20Camera II: Taking Pictures and Handling Images
338
garbage-collected. This means that there is a chance that you will run out of memory before the
finalizer is called.
Finalizer execution is a fuzzy phenomenon, so this kind of bug can be difficult to track down or
reproduce. So, if your images are large (as they are here), it is better to call recycle() to prevent the
possibility of ugly memory bugs.
In CrimeFragment, add an implementation of onStop() that calls cleanImageView(…).
Listing 20.17Unloading the image (CrimeFragment.java)
@Override
public void onStart() {
super.onStart();
showPhoto();
}
@Override
public void onStop() {
super.onStop();
PictureUtils.cleanImageView(mPhotoView);
}
Loading images in onStart() and unloading them in onStop() is a good practice. These methods
mark the points where your activity can be seen by the user. If you loaded and unloaded in onResume()
and onPause() instead, the results could be disconcerting to the user.
A paused activity can still be partly visible if, say, an activity not covering the entire screen opens
on top of it. If you were using onResume() and onPause(), then your images would vanish and then
reappear in such cases. It is better to load images as soon as your activity is visible and wait to unload
them until you know that your activity can no longer be seen.
Run CriminalIntent. Take a picture of a crime and confirm that it appears in the ImageView. Exit
CriminalIntent and then relaunch. Confirm that the photo is displayed as you expect when you return to
the same crime.
CrimeCameraActivity’s orientation encourages users to take the picture in landscape. However, if you
take a picture in portrait orientation, the image may not be correctly oriented on the button. Fix this in
the first challenge!
Showing Larger Image in a DialogFragment
The final step for your camera implementation is to offer users a larger version of the Crime’s photo.
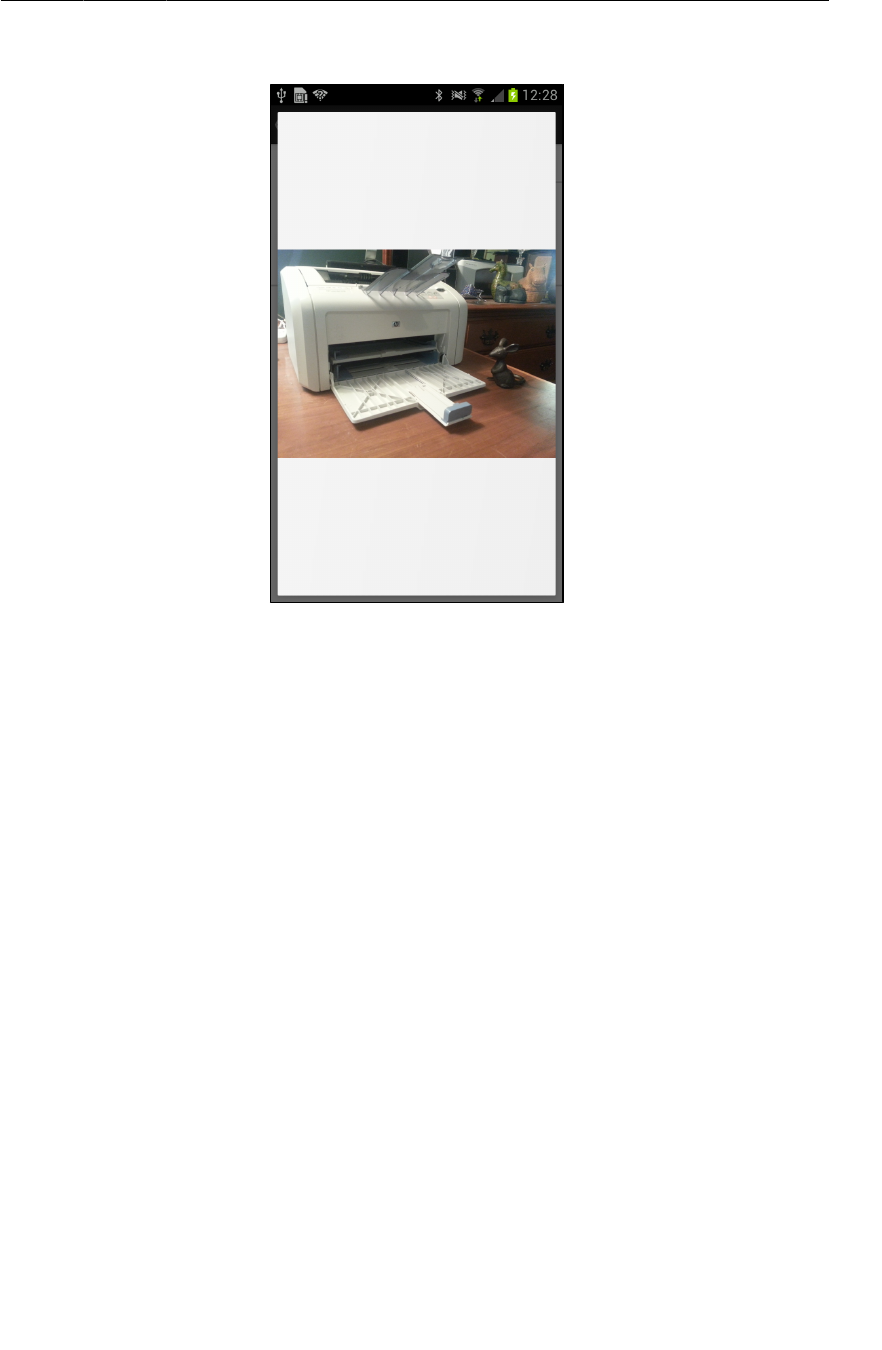
ptg11078569
Showing Larger Image in a DialogFragment
339
Figure 20.10A DialogFragment displaying a larger image
Create a new class in the com.bignerdranch.android.criminalintent package. Name the class
ImageFragment; make it a subclass of DialogFragment.
ImageFragment will need the filepath of the Crime’s photo in its fragment arguments. In
ImageFragment.java, add a newInstance(String) method that accepts a filepath and puts it in the
arguments bundle, as shown in Listing 20.18.
Listing 20.18Create ImageFragment (ImageFragment.java)
public class ImageFragment extends DialogFragment {
public static final String EXTRA_IMAGE_PATH =
"com.bignerdranch.android.criminalintent.image_path";
public static ImageFragment newInstance(String imagePath) {
Bundle args = new Bundle();
args.putSerializable(EXTRA_IMAGE_PATH, imagePath);
ImageFragment fragment = new ImageFragment();
fragment.setArguments(args);
fragment.setStyle(DialogFragment.STYLE_NO_TITLE, 0);
return fragment;
}
}
You set the fragment’s style to DialogFragment.STYLE_NO_TITLE to achieve a minimalist look shown
in Figure20.10.

ptg11078569
Chapter 20Camera II: Taking Pictures and Handling Images
340
ImageFragment will not need the title or the buttons provided by AlertDialog. If your fragment can
do without these, then it is cleaner, quicker, and more flexible to override onCreateView(…) and use a
simple View than override onCreateDialog(…) and use a Dialog.
In ImageFragment.java, override onCreateView(…) to create an ImageView from scratch and retrieve
the path from its arguments. Then get a scaled version of the image and set it on the ImageView.
Override onDestroyView() to free up memory once the image is no longer needed.
Listing 20.19Create ImageFragment (ImageFragment.java)
public class ImageFragment extends DialogFragment {
public static final String EXTRA_IMAGE_PATH =
"com.bignerdranch.android.criminalintent.image_path";
public static ImageFragment newInstance(String imagePath) {
...
}
private ImageView mImageView;
@Override
public View onCreateView(LayoutInflater inflater,
ViewGroup parent, Bundle savedInstanceState) {
mImageView = new ImageView(getActivity());
String path = (String)getArguments().getSerializable(EXTRA_IMAGE_PATH);
BitmapDrawable image = PictureUtils.getScaledDrawable(getActivity(), path);
mImageView.setImageDrawable(image);
return mImageView;
}
@Override
public void onDestroyView() {
super.onDestroyView();
PictureUtils.cleanImageView(mImageView);
}
}
Finally, you need to show this dialog from CrimeFragment. In CrimeFragment.java, add a listener
to mPhotoView. Within its implementation, create an instance of ImageFragment and add it to
CrimePagerActivity’s FragmentManager by calling show(…) on the ImageFragment. You will also
need a string constant to identify the ImageFragment in the FragmentManager.

ptg11078569
Challenge: Crime Image Orientation
341
Listing 20.20Show ImageFragment (CrimeFragment.java)
public class CrimeFragment extends Fragment {
...
private static final String DIALOG_IMAGE = "image";
...
@Override
@TargetApi(11)
public View onCreateView(LayoutInflater inflater, ViewGroup parent,
Bundle savedInstanceState) {
...
mPhotoView = (ImageView)v.findViewById(R.id.crime_imageView);
mPhotoView.setOnClickListener(new View.OnClickListener() {
public void onClick(View v) {
Photo p = mCrime.getPhoto();
if (p == null)
return;
FragmentManager fm = getActivity()
.getSupportFragmentManager();
String path = getActivity()
.getFileStreamPath(p.getFilename()).getAbsolutePath();
ImageFragment.newInstance(path)
.show(fm, DIALOG_IMAGE);
}
});
...
}
Run CriminalIntent. Take a picture and confirm that you can view the crime scene photo in all its gory.
Challenge: Crime Image Orientation
Sometimes, the user will choose to take a picture in portrait orientation. Search the API documentation
for a way to detect the orientation. Stash the correct orientation in your Photo and use it to rotate the
picture appropriately in CrimeFragment and ImageFragment.
Challenge: Deleting Photos
Right now, you can replace a Crime’s photo, but the old file will continue to take up space on disk. Add
code to CrimeFragment’s onActivityResult(int, int, Intent) method to check the crime for an
existing photo and delete that file from disk.
For another challenge, give users the power to delete a photo without having to replace it. Implement a
context menu and/or a contextual action mode in CrimeFragment that is triggered by long-pressing the
thumbnail image. Offer a Delete�Photo menu item that deletes the photo from the disk, the model, and
the ImageView.

ptg11078569
Chapter 20Camera II: Taking Pictures and Handling Images
342
For the More Curious: Deprecation in Android
In Chapter19, when you were setting the camera’s preview size, we directed you to use a deprecated
method and a deprecated constant. In this chapter, you used deprecated methods A curious reader may
wonder: “What is up with that?”
What is up, indeed. Let’s start with what it means when a part of an API is deprecated. If something
is deprecated, that means that it is no longer necessary. Sometimes deprecation occurs because the
operation it performed is no longer required. That is the case with the SurfaceHolder.setType(int)
method and the SurfaceHolder.SURFACE_TYPE_PUSH_BUFFERS constant that you added in Chapter19.
On older versions of Android, SurfaceHolder needed to be configured appropriately for how you were
using it. That is no longer the case, so setType(…) isn’t useful anymore.
Other times, it means that it has been replaced with a newer method that is better for some reason.
For instance, BitmapDrawable has a deprecated constructor BitmapDrawable(Bitmap) that is
prone to bugs. Other times, it may just be that the new method is cleaner from a design standpoint
– for instance, the View.setBackgroundDrawable(Drawable) method. Another example is
Display.getWidth() and Display.getHeight(), which you used earlier. They have since been
replaced with a single method getSize(Point), helping to fix some bugs that can occur when calling
getWidth() and getHeight() in sequence.
Deprecation is handled differently depending on the platform you’re working on. The two extremes can
be characterized by two very different towns you may be familiar with – Microsoftville and Appleburg.
In Microsoftville, APIs are deprecated, but they are never removed. This is because, for the mayor
of Microsoftville, nothing is more important than having as many programs as possible run on any
version of their OS. Once a public API is introduced in Microsoftville, it is always supported. They
will even go so far as to preserve buggy, undocumented behavior to maintain backwards compatibility.
This makes Microsoftville a strange place to live sometimes.
In Appleburg, on the other hand, APIs are actually removed from the OS not long after they are
deprecated. The mayor of Appleburg is obsessed with having a clean, beautiful OS. He doesn’t care
how many APIs he has to kill to do it. As a result, Appleburg is very clean and tidy, but older programs
soon find that they no longer work if they are not actively updated.
In Appleburg, if you wanted to support both old and new operating systems you would do something
like this:
float destWidth;
float destHeight;
if (Build.VERSION.SDK_INT > Build.VERSION_CODES.HONEYCOMB_MR2) {
Point size;
display.getSize(size);
destWidth = size.x;
destHeight = size.y;
} else {
destWidth = display.getWidth();
destHeight = display.getHeight();
}
This is because in Appleburg, getWidth() and getHeight() will probably disappear soon, so you have
to be careful not to call them.

ptg11078569
For the More Curious: Deprecation in Android
343
Android isn’t exactly Microsoftville, but it is close. Each Android SDK is mostly backwards
compatible with the previous SDK release, which means that API methods are almost never deleted. So
you do not have to be so careful about calling old methods. In our text, we will use deprecated methods
where necessary and suppress deprecation warnings with annotations. You should still be careful not to
use a deprecated API if you do not have to, though. That will keep your code clean and stylish.

ptg11078569
This page intentionally left blank
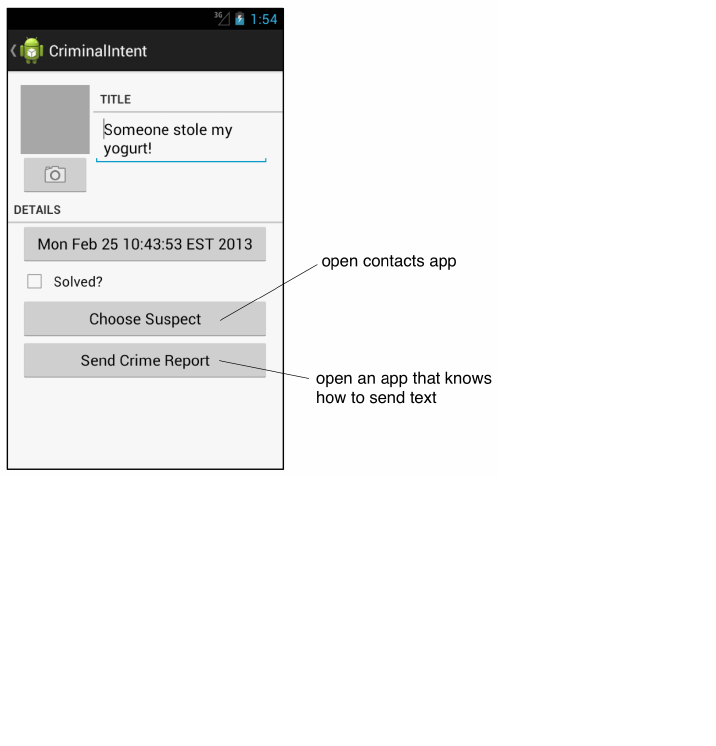
ptg11078569
345
21
Implicit Intents
In Android, you can start an activity in another application on the device using an implicit intent. In an
explicit intent, you specify the class of the activity to start, and the OS will start it. In an implicit intent,
you describe the job that you need done, and the OS will start an activity in an appropriate application
for you.
In CriminalIntent, you will use implicit intents to enable picking a suspect for a Crime from the
user’s list of contacts and sending a text-based report of a crime. The user will choose a suspect from
whatever contacts app is installed on the device and will be offered a choice of apps to send the crime
report.
Figure 21.1Opening contacts app and a text-sending app
Using implicit intents to harness other applications is far easier than writing your own implementations
for common tasks. Users also appreciate being able to use apps they already know and like in
conjunction with your app.
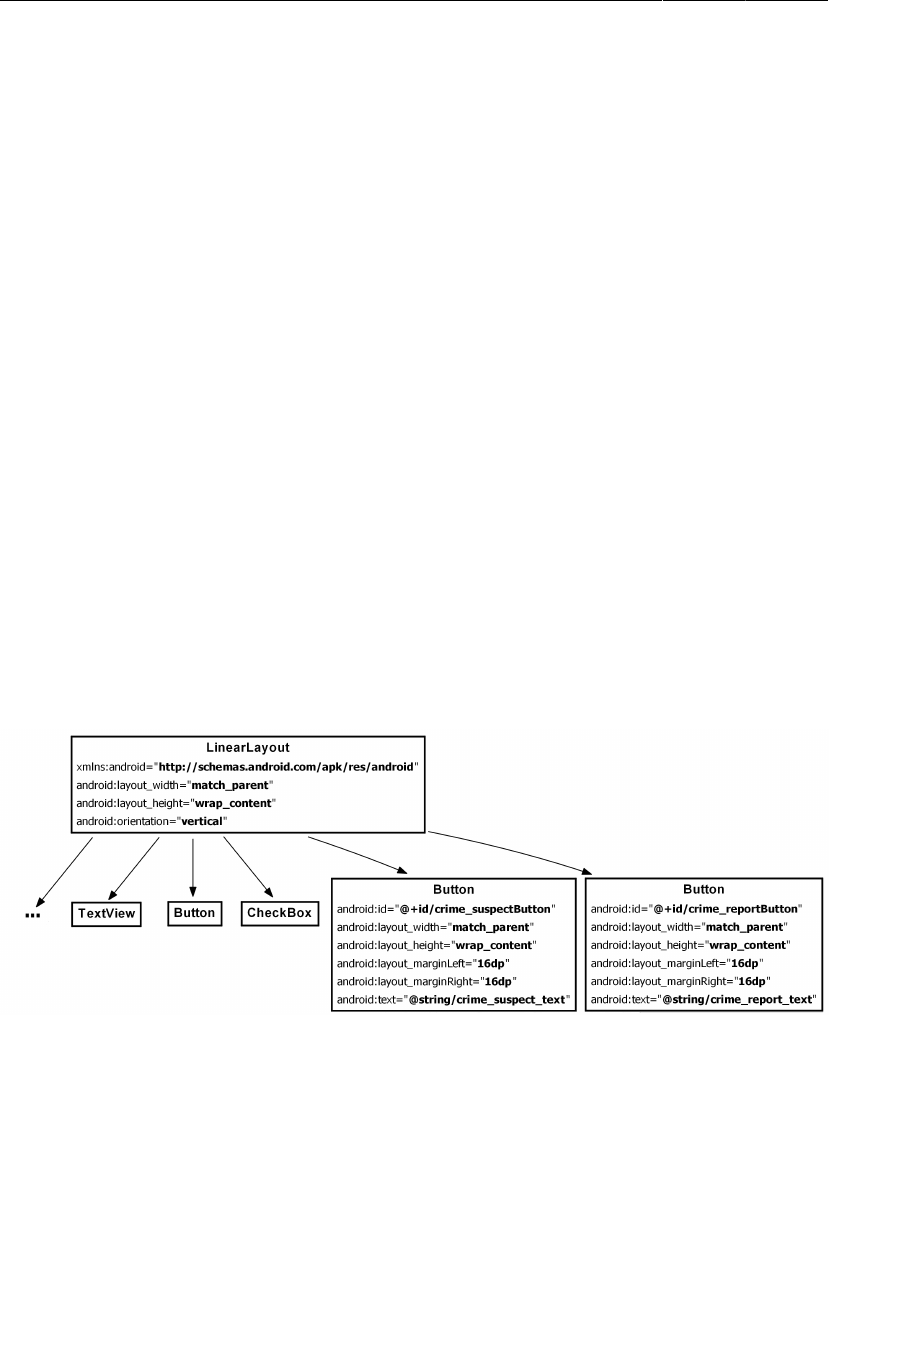
ptg11078569
Chapter 21Implicit Intents
346
Before you can create these implicit intents, there is some set-up to do in CriminalIntent:
• add Choose�Suspect and Send�Crime�Report buttons to CrimeFragment’s layouts
• add an mSuspect field to the Crime class that will hold the name of a suspect
• create a crime report using a set of format resource strings
Adding Buttons
First, you are going to update CrimeFragment’s layouts to include new buttons for accusation and
tattling. First, add the strings that these buttons will display.
Listing 21.1Adding button strings (strings.xml)
<string name="take">Take!</string>
<string name="crime_suspect_text">Choose Suspect</string>
<string name="crime_report_text">Send Crime Report</string>
</resources>
In layout/fragment_crime.xml, add two button widgets, as shown in Figure21.2. Notice that in this
diagram, we are not showing the first LinearLayout and all of its children so that you can focus on the
new and interesting parts of the diagram.
Figure 21.2Adding suspect and crime report buttons (layout/
fragment_crime.xml)
In the landscape layout, you are going to make these new buttons children of a new horizontal
LinearLayout below the one that contains the date button and the check box.
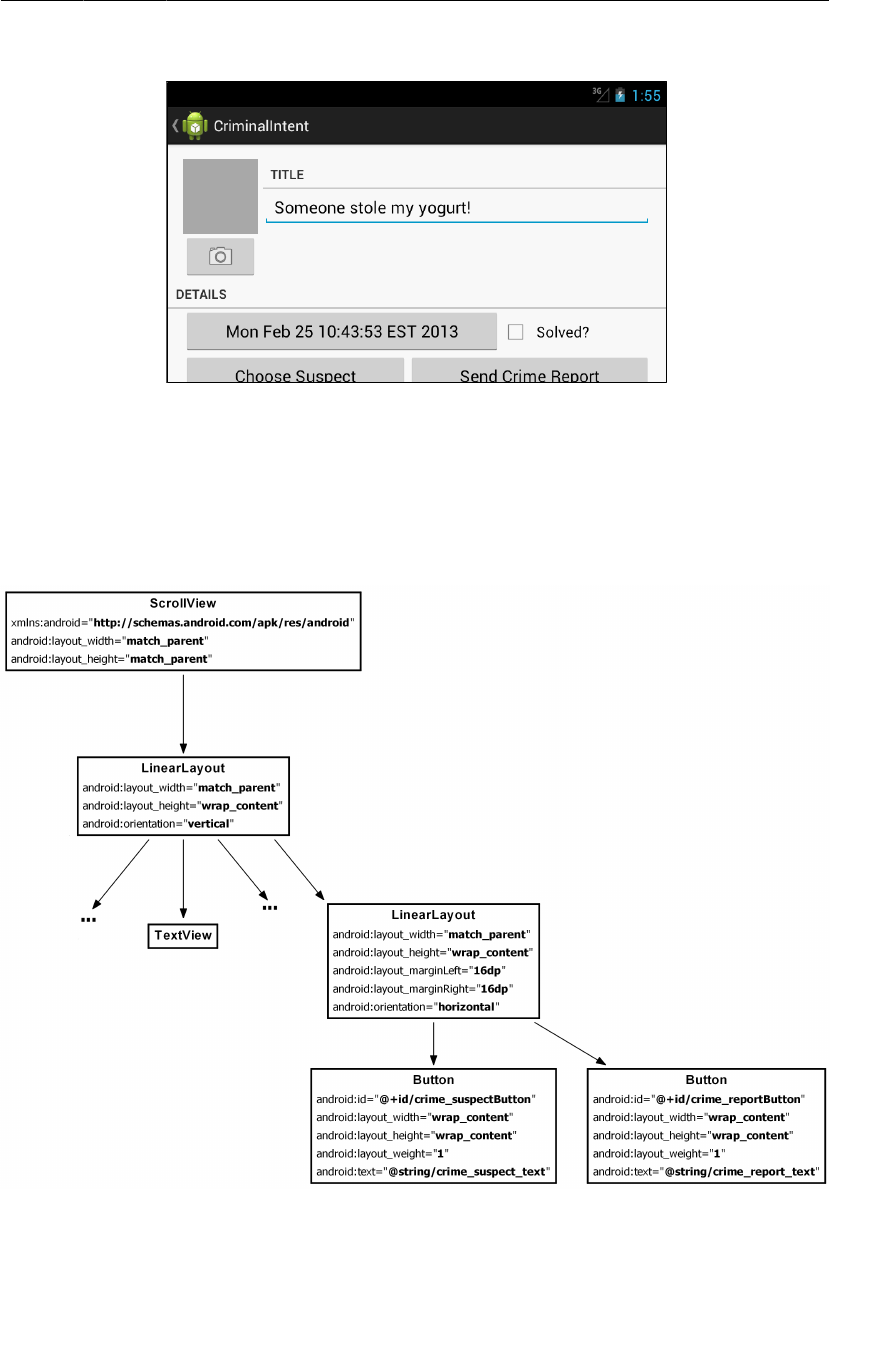
ptg11078569
Adding Buttons
347
Figure 21.3New buttons not entirely visible in landscape
As you can see in Figure21.3, on smaller screens, the new buttons will not be entirely visible. To
address this problem, you are going to wrap the entire landscape layout in a ScrollView.
Figure21.4 shows the new layout. Because your root element will now be the ScrollView, be sure to
move the namespace from the previous root element to the ScrollView.
Figure 21.4Add suspect and crime report buttons (layout-land/
fragment_crime.xml)

ptg11078569
Chapter 21Implicit Intents
348
At this point, you can preview the layouts or run CriminalIntent to confirm that your new buttons are in
place.
Adding a Suspect to the Model Layer
Next, return to Crime.java and add a new JSON constant and a member variable to give Crime a field
that will hold the name of a suspect. Also, modify the JSON methods to serialize the suspect into and
out of JSON code and add new accessor methods.
Listing 21.2Adding suspect field (Crime.java)
public class Crime {
...
private static final String JSON_PHOTO = "photo";
private static final String JSON_SUSPECT = "suspect";
...
private Photo mPhoto;
private String mSuspect;
public Crime(JSONObject json) throws JSONException {
mId = UUID.fromString(json.getString(JSON_ID));
...
if (json.has(JSON_PHOTO))
mPhoto = new Photo(json.getJSONObject(JSON_PHOTO));
if (json.has(JSON_SUSPECT))
mSuspect = json.getString(JSON_SUSPECT);
}
public JSONObject toJSON() throws JSONException {
JSONObject json = new JSONObject();
...
if (mPhoto != null)
json.put(JSON_PHOTO, mPhoto.toJSON());
json.put(JSON_SUSPECT, mSuspect);
return json;
}
public void setPhoto(Photo p) {
mPhoto = p;
}
public String getSuspect() {
return mSuspect;
}
public void setSuspect(String suspect) {
mSuspect = suspect;
}
}
Using a Format String
The last preliminary is to create a template crime report that can be configured with the specific
crime’s details. Because you will not know a crime’s details until runtime, you must use a format string
with placeholders that can be replaced at runtime. Here is the format string you will use:

ptg11078569
Using a Format String
349
<string name="crime_report">%1$s! The crime was discovered on %2$s. %3$s, and %4$s
The %1$s, %2$s, etc. are placeholders that expect string arguments. In code, you will call getString(…)
and pass in the format string and four other strings in the order in which they should replace the
placeholders.
First, in strings.xml, add the strings shown in Listing 21.3.
Listing 21.3Add string resources (strings.xml)
<string name="crime_suspect_text">Choose Suspect</string>
<string name="crime_report_text">Send Crime Report</string>
<string name="crime_report">%1$s!
The crime was discovered on %2$s. %3$s, and %4$s
</string>
<string name="crime_report_solved">The case is solved</string>
<string name="crime_report_unsolved">The case is not solved</string>
<string name="crime_report_no_suspect">There is no suspect.</string>
<string name="crime_report_suspect">The suspect is %s.</string>
<string name="crime_report_subject">CriminalIntent Crime Report</string>
<string name="send_report">Send crime report via</string>
</resources>
In CrimeFragment.java, add a method that creates four strings and then pieces them together and
returns a complete report.
Listing 21.4Add getCrimeReport() method (CrimeFragment.java)
private String getCrimeReport() {
String solvedString = null;
if (mCrime.isSolved()) {
solvedString = getString(R.string.crime_report_solved);
} else {
solvedString = getString(R.string.crime_report_unsolved);
}
String dateFormat = "EEE, MMM dd";
String dateString = DateFormat.format(dateFormat, mCrime.getDate()).toString();
String suspect = mCrime.getSuspect();
if (suspect == null) {
suspect = getString(R.string.crime_report_no_suspect);
} else {
suspect = getString(R.string.crime_report_suspect, suspect);
}
String report = getString(R.string.crime_report,
mCrime.getTitle(), dateString, solvedString, suspect);
return report;
}
Now the preliminaries are complete, and you can turn to implicit intents.

ptg11078569
Chapter 21Implicit Intents
350
Using Implicit Intents
An Intent is an object that describes to the OS something that you want it to do. With the explicit
intents that you have created thus far, you explicitly name the activity that you want the OS to start.
Intent i = new Intent(getActivity(), CrimeCameraActivity.class);
startActivity(i);
With an implicit intent, you describe to the OS the job that you want done. The OS then starts the
activity that has advertised itself as capable of doing that job. If the OS finds more than one capable
activity, then the user is offered a choice.
Parts of an implicit intent
Here are the critical parts of an intent that you can use to define the job you want done:
the action that you are trying to perform
These are typically constants from the Intent class. If you want to view a URL, you can use
Intent.ACTION_VIEW for your action. To send something, you use Intent.ACTION_SEND.
the location of any data
This can be something outside the device, like the URL of a web page, but it can also be a URI
to a file or a content URI pointing to a record in a ContentProvider.
the type of data that the action is for
This is a MIME type, like text/html or audio/mpeg3. If an intent includes a location for data,
then the type can usually be inferred from that data.
optional categories
If the action is used to describe what to do, the category usually describes
where, when, or how you are trying to use an activity. Android uses the category
android.intent.category.LAUNCHER to indicate that an activity should be displayed in the top-
level app launcher. The android.intent.category.INFO category, on the other hand, indicates
an activity that shows information about a package to the user but should not show up in the
launcher.
A simple implicit intent for viewing a website would include an action of Intent.ACTION_VIEW and a
data Uri that is the URL of a website.
Based on this information, the OS will launch the appropriate activity of an appropriate application. (If
it finds more than one candidate, the user gets a choice.)
An activity would advertise itself as an appropriate activity for ACTION_VIEW via an intent filter in the
manifest. If you wanted to write a browser app, for instance, you would include the following intent
filter in the declaration of the activity that should respond to ACTION_VIEW.

ptg11078569
Sending a crime report
351
<activity
android:name=".BrowserActivity"
android:label="@string/app_name" >
<intent-filter>
<action android:name="android.intent.action.VIEW" />
<category android:name="android.intent.category.DEFAULT" />
<data android:scheme="http" android:host="www.bignerdranch.com" />
</intent-filter>
</activity>
The DEFAULT category must be set explicitly in intent filters. The action element in the intent filter
tells the OS that the activity is capable of performing the job, and the DEFAULT category tells the OS
that it wants to be considered for the job. This DEFAULT category is implicitly added to almost every
implicit intent. (The sole exception is the LAUNCHER category, which you will work with in Chapter23.)
Implicit intents can also include extras just like explicit intents. Any extras on an implicit intent,
however, are not used by the OS to find an appropriate activity.
Note that the action and data parts of an intent can also be used in conjunction with an explicit intent.
That would be the equivalent of telling a specific activity to do something particular.
Sending a crime report
Let’s see how this works by creating an implicit intent to send a crime report in CriminalIntent. The
job you want done is sending plain text; the crime report is a string. So the implicit intent’s action will
be ACTION_SEND. It will not point to any data or have any categories, but it will specify a type of text/
plain.
In CrimeFragment.onCreateView(…), get a reference to the Send�Crime�Report and set a
listener on it. Within the listener’s implementation, create an implicit intent and pass it into
startActivity(Intent).
Listing 21.5Sending a crime report (CrimeFragment.java)
...
Button reportButton = (Button)v.findViewById(R.id.crime_reportButton);
reportButton.setOnClickListener(new View.OnClickListener() {
public void onClick(View v) {
Intent i = new Intent(Intent.ACTION_SEND);
i.setType("text/plain");
i.putExtra(Intent.EXTRA_TEXT, getCrimeReport());
i.putExtra(Intent.EXTRA_SUBJECT,
getString(R.string.crime_report_subject));
startActivity(i);
}
});
return v;
}
Here you use the Intent constructor that accepts a string that is a constant defining the action. There
are other constructors that you can use depending on what kind of implicit intent you need to create.
You can find them all on the Intent reference page in the documentation. There is no constructor that
accepts a type, so you set it explicitly.
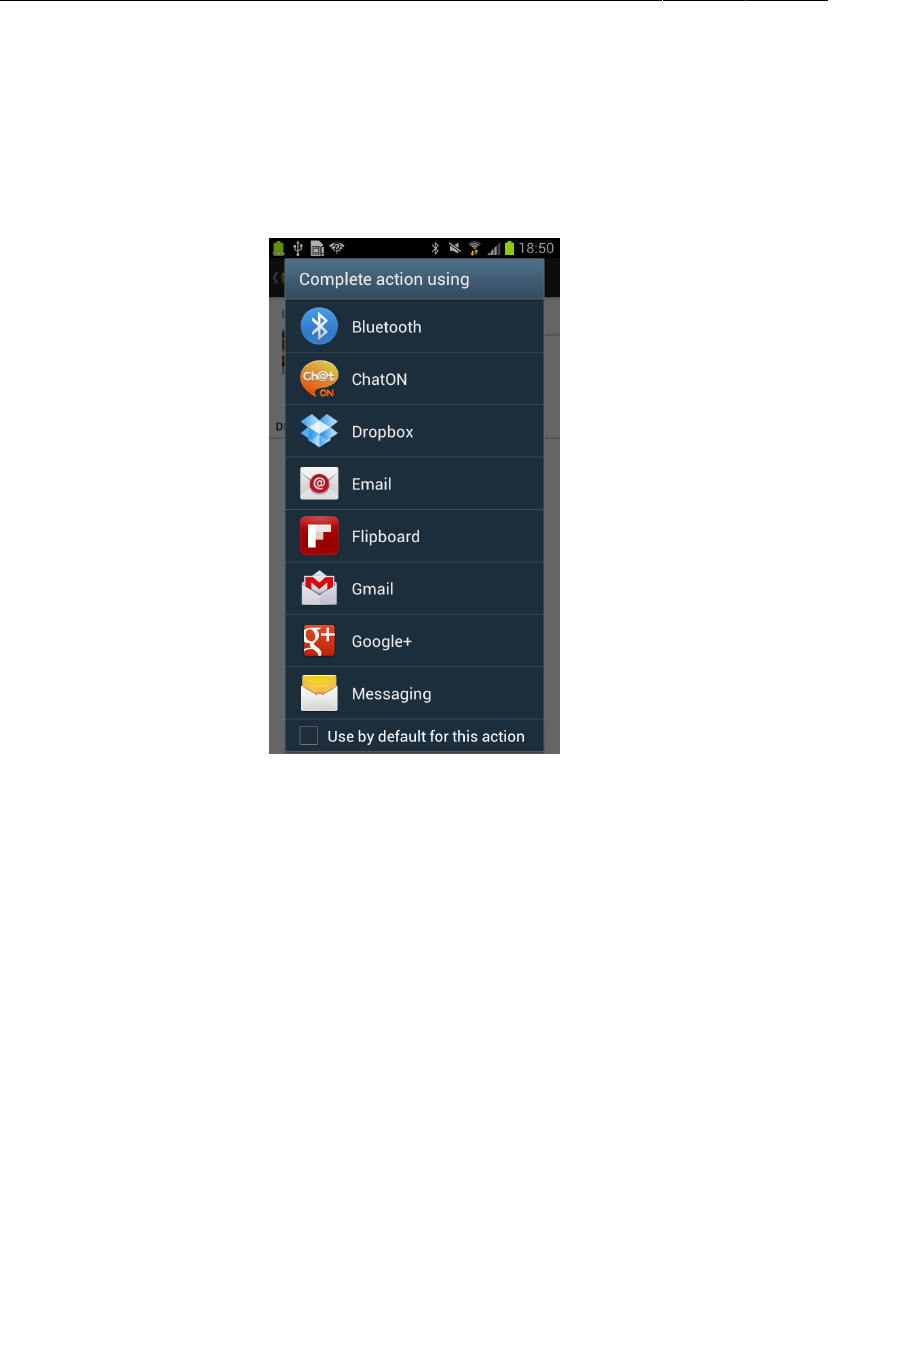
ptg11078569
Chapter 21Implicit Intents
352
You include the text of the report and the string for the subject of the report as extras. Note that these
extras use constants defined in the Intent class. Any activity responding to this intent will know these
constants and what to do with the associated values.
Run CriminalIntent and press the Send�Crime�Report button. Because this intent will likely match
many activities on the device, you will probably see a list of activities presented in a chooser:
Figure 21.5Activities volunteering to send your crime report
If you are offered a choice, make a selection. You will see your crime report loaded into the app that
you chose. All you have to do is address and send it.
If, on the other hand, you do not see a chooser, that means one of two things. Either you have already
set a default app for an identical implicit intent, or your device has only a single activity that can
respond to this intent.
Often, it is best to go with the user’s default app for an action. In CriminalIntent, however, you always
want the user to have a choice for ACTION_SEND. Today a user might want to be discreet and email the
crime report, but tomorrow he or she may prefer public shaming via Twitter.
You can create a chooser to be shown every time an implicit intent is used to start an activity. After
you create your implicit intent as before, you call the following Intent method and pass in the implicit
intent and a string for the chooser’s title:
public static Intent createChooser(Intent target, String title)
Then you pass the intent returned from createChooser(…) into startActivity(…).
In CrimeFragment.java, create a chooser to display the activities that respond to your implicit intent.
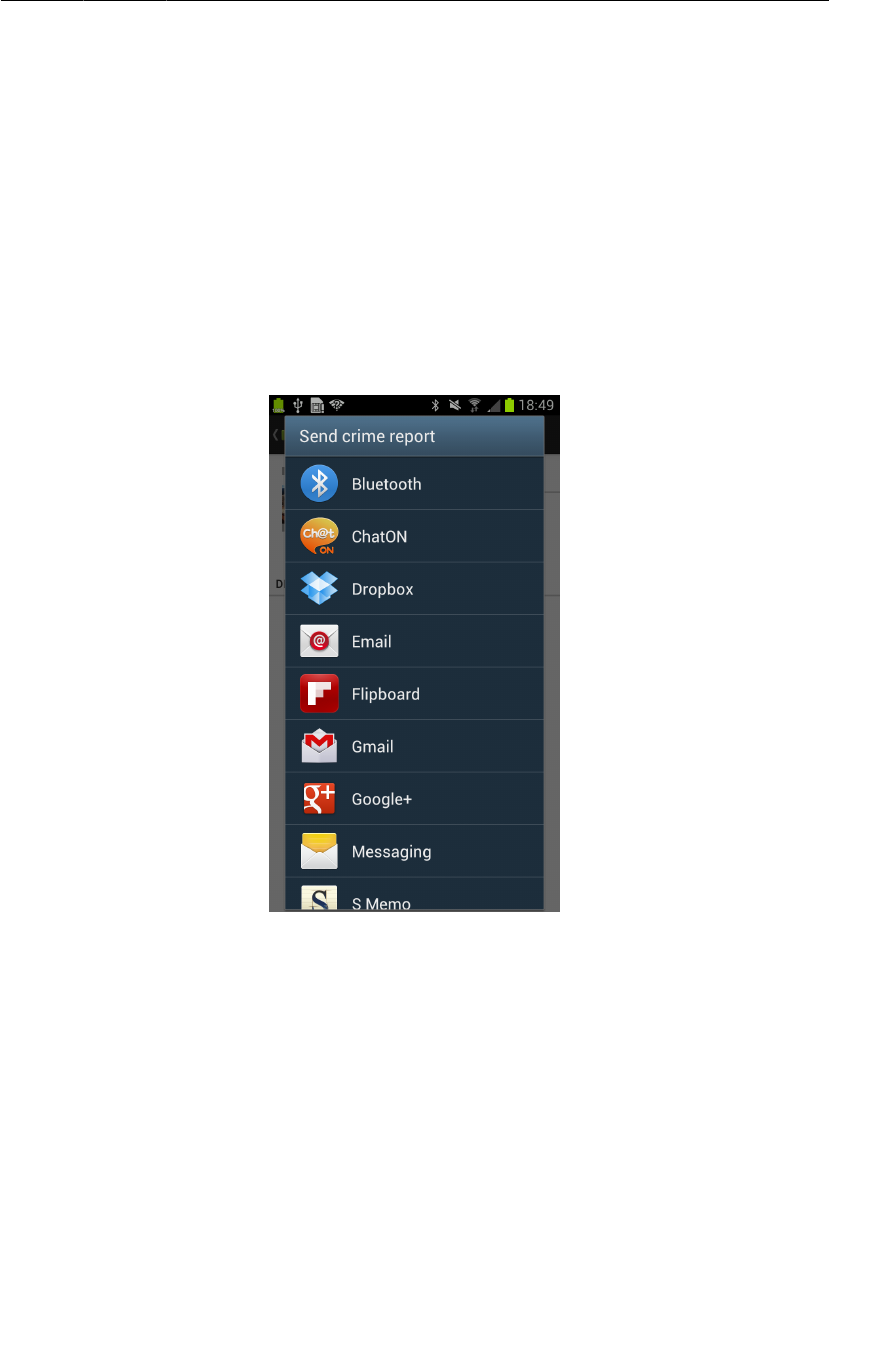
ptg11078569
Asking Android for a contact
353
Listing 21.6Use a chooser (CrimeFragment.java)
public void onClick(View v) {
Intent i = new Intent(Intent.ACTION_SEND);
i.setType("text/plain");
i.putExtra(Intent.EXTRA_TEXT, getCrimeReport());
i.putExtra(Intent.EXTRA_SUBJECT,
getString(R.string.crime_report_subject));
i = Intent.createChooser(i, getString(R.string.send_report));
startActivity(i);
}
Run CriminalIntent and press the Send�Crime�Report button. As long as you have more than one
activity that can handle your intent, you will be offered a list to choose from.
Figure 21.6Sending text with a chooser
Asking Android for a contact
Now you are going to create another implicit intent that enables users to choose a suspect
from their contacts. This implicit intent will have an action and a location where the relevant
data can be found. The action will be Intent.ACTION_PICK. The data for contacts is at
ContactsContract.Contacts.CONTENT_URI. In short, you are asking Android to help pick an item in
the Contacts database.
You expect a result back from the started activity, so you will pass the intent via
startActivityForResult(…) along with a request code. In CrimeFragment.java, add a constant for
the request code and a member variable for the button.

ptg11078569
Chapter 21Implicit Intents
354
Listing 21.7Adding field for suspect button (CrimeFragment.java)
...
private static final int REQUEST_PHOTO = 1;
private static final int REQUEST_CONTACT = 2;
...
private ImageButton mPhotoButton;
private Button mSuspectButton;
...
At the end of onCreateView(…), get a reference to the button and set a listener on it. Within the
listener’s implementation, create the implicit intent and pass it into startActivityForResult(…). Also
show the suspect’s name on the button, if the Crime has one.
Listing 21.8Sending an implicit intent (CrimeFragment.java)
...
mSuspectButton = (Button)v.findViewById(R.id.crime_suspectButton);
mSuspectButton.setOnClickListener(new View.OnClickListener() {
public void onClick(View v) {
Intent i = new Intent(Intent.ACTION_PICK,
ContactsContract.Contacts.CONTENT_URI);
startActivityForResult(i, REQUEST_CONTACT);
}
});
if (mCrime.getSuspect() != null) {
mSuspectButton.setText(mCrime.getSuspect());
}
return v;
}
Run CriminalIntent and press the Choose�Suspect button. You should now see a list of contacts:
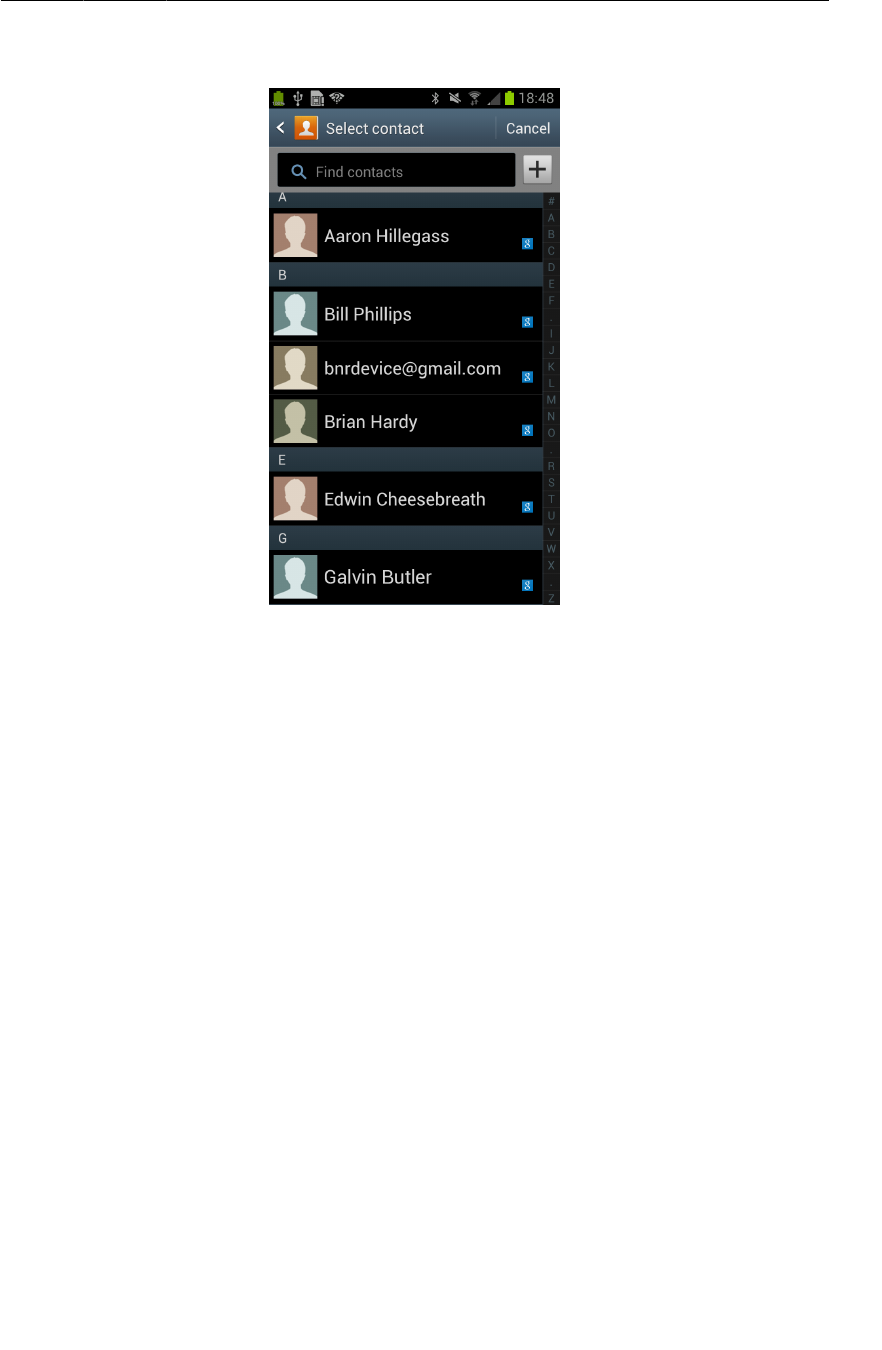
ptg11078569
Asking Android for a contact
355
Figure 21.7A list of possible suspects
If you have a different contacts app installed, your screen will look different. Again, this is one of the
benefits of implicit intents. You do not have to know the name of the contacts application to use it from
your app. So users can install whatever app they like best, and the OS will find and launch it.
Getting the data from the contact list
Now you need to get a result back from the contacts application. Contacts information is shared
by many applications, so Android provides an in-depth API for working with contacts information
through a ContentProvider. Instances of this class wrap databases and make it available to other
applications. You can access a ContentProvider through a ContentResolver.
Because you started the activity for a result with ACTION_PICK, you will receive an intent via
onActivityResult(…). This intent includes a data URI. This URI is a locator that points at the single
contact the user picked.
In CrimeFragment.java, add the following code to your onActivityResult(…) implementation in
CrimeFragment:

ptg11078569
Chapter 21Implicit Intents
356
Listing 21.9Pull contact name out (CrimeFragment.java)
@Override
public void onActivityResult(int requestCode, int resultCode, Intent data) {
if (resultCode != Activity.RESULT_OK) return;
if (requestCode == REQUEST_DATE) {
...
} else if (requestCode == REQUEST_PHOTO) {
...
} else if (requestCode == REQUEST_CONTACT) {
Uri contactUri = data.getData();
// Specify which fields you want your query to return
// values for.
String[] queryFields = new String[] {
ContactsContract.Contacts.DISPLAY_NAME
};
// Perform your query - the contactUri is like a "where"
// clause here
Cursor c = getActivity().getContentResolver()
.query(contactUri, queryFields, null, null, null);
// Double-check that you actually got results
if (c.getCount() == 0) {
c.close();
return;
}
// Pull out the first column of the first row of data -
// that is your suspect's name.
c.moveToFirst();
String suspect = c.getString(0);
mCrime.setSuspect(suspect);
mSuspectButton.setText(suspect);
c.close();
}
}
In Listing 21.9, you create a query that asks for all the display names of the contacts in the returned
data. Then you query the contacts database and get a Cursor object to work with. Because you know
that the cursor only contains one item, you move to the first item and get it as a string. This string will
be the name of the suspect, and you use it to set the Crime’s suspect and the text of the Choose�Suspect
button.
(The Contacts database is a large topic in itself. We will not cover it here. If you would like to know
more, read the Contacts Provider API guide: http://developer.android.com/guide/topics/
providers/contacts-provider.html.)
Contacts permissions
How are you getting permission to read from the contacts database? The contacts app is extending
its permissions to you. The contacts app has full permissions to the contacts database. When
the contacts app returns a data URI in an Intent to the parent activity, it also adds the flag
Intent.FLAG_GRANT_READ_URI_PERMISSION. This flag signals to Android that the parent activity in
CriminalIntent should be allowed to use this data one time. This works well because you do not really
need access to the entire contacts database. You only need access to one contact inside that database.

ptg11078569
Checking for responding activities
357
Checking for responding activities
The two implicit intents you have created in this chapter will always be responded to. An Android
device is guaranteed to have an email app and a contacts app of one kind or another. But what if you
were creating a different implicit intent for which a device might or might not have any matching
activities? If the OS cannot find a matching activity, then the app will crash.
The answer is to check with part of the OS called the PackageManager first. The code looks like this:
PackageManager pm = getPackageManager();
List<ResolveInfo> activities = pm.queryIntentActivities(yourIntent, 0);
boolean isIntentSafe = activities.size() > 0;
You pass your intent into the PackageManager’s queryIntentActivities(…) method. This method
returns a list of objects containing metadata about activities that responded to the passed-in intent. You
just need to confirm that there is at least one item in this list – at least one activity on the device that
will respond to the intent.
You can run this check in onCreateView(…) to disable options that the device will not be able to
respond to.
Challenge: Another Implicit Intent
Instead of sending a crime report, an angry user may prefer a phone confrontation with the suspect.
Add a new button that calls the named suspect.
You will need the phone number out of the contacts database. Then you can create an implicit intent
with a URI of the telephone:
Uri number = Uri.parse("tel:5551234");
The action can be Intent.ACTION_DIAL or Intent.ACTION_CALL. ACTION_CALL pulls up the phone app
and immediately calls the number sent in the intent; ACTION_DIAL just dials the number and waits for
the user to initiate the call.
We recommend using ACTION_DIAL. ACTION_CALL may be restricted and will definitely require a
permission. Your user may also appreciate the chance to cool down before pressing the Call button.

ptg11078569
This page intentionally left blank
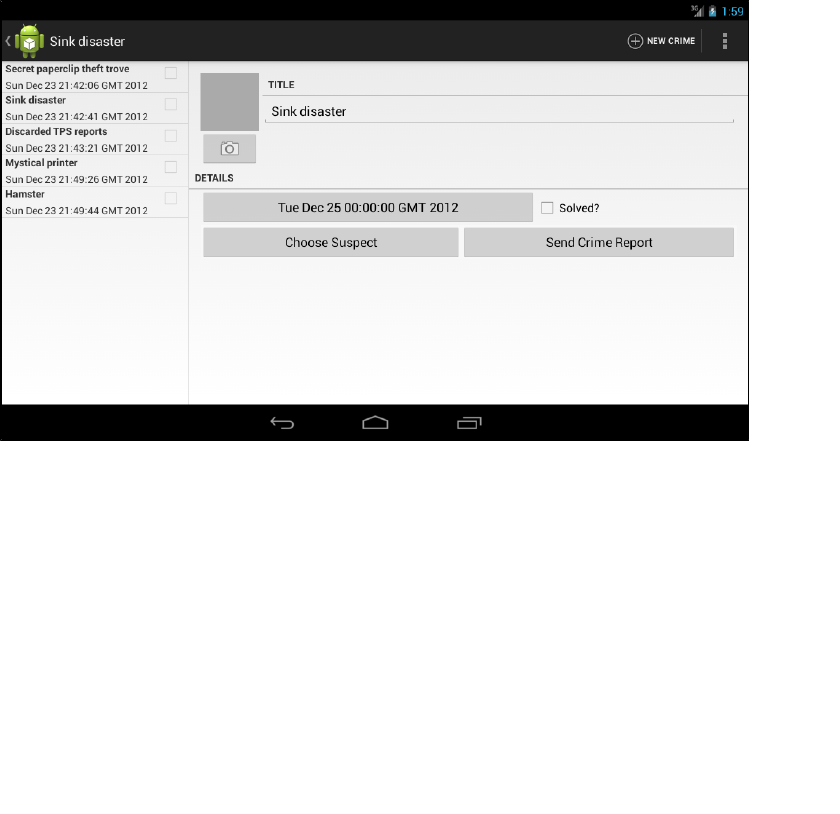
ptg11078569
359
22
Two-Pane Master-Detail
Interfaces
In this chapter, you will create a tablet interface for CriminalIntent that allows users to see and interact
with the list of crimes and the detail of an individual crime at the same time. Figure22.1 shows this
list-detail interface, which is also commonly referred to as a master-detail interface.
Figure 22.1Master and detail sharing the spotlight
You will need a tablet device or AVD for testing in this chapter. To create a tablet AVD, select Window
→ Android�Virtual�Device�Manager. Click New and set this AVD’s Device to one of the two selections
highlighted below. Then set the AVD’s Target to API level 17.
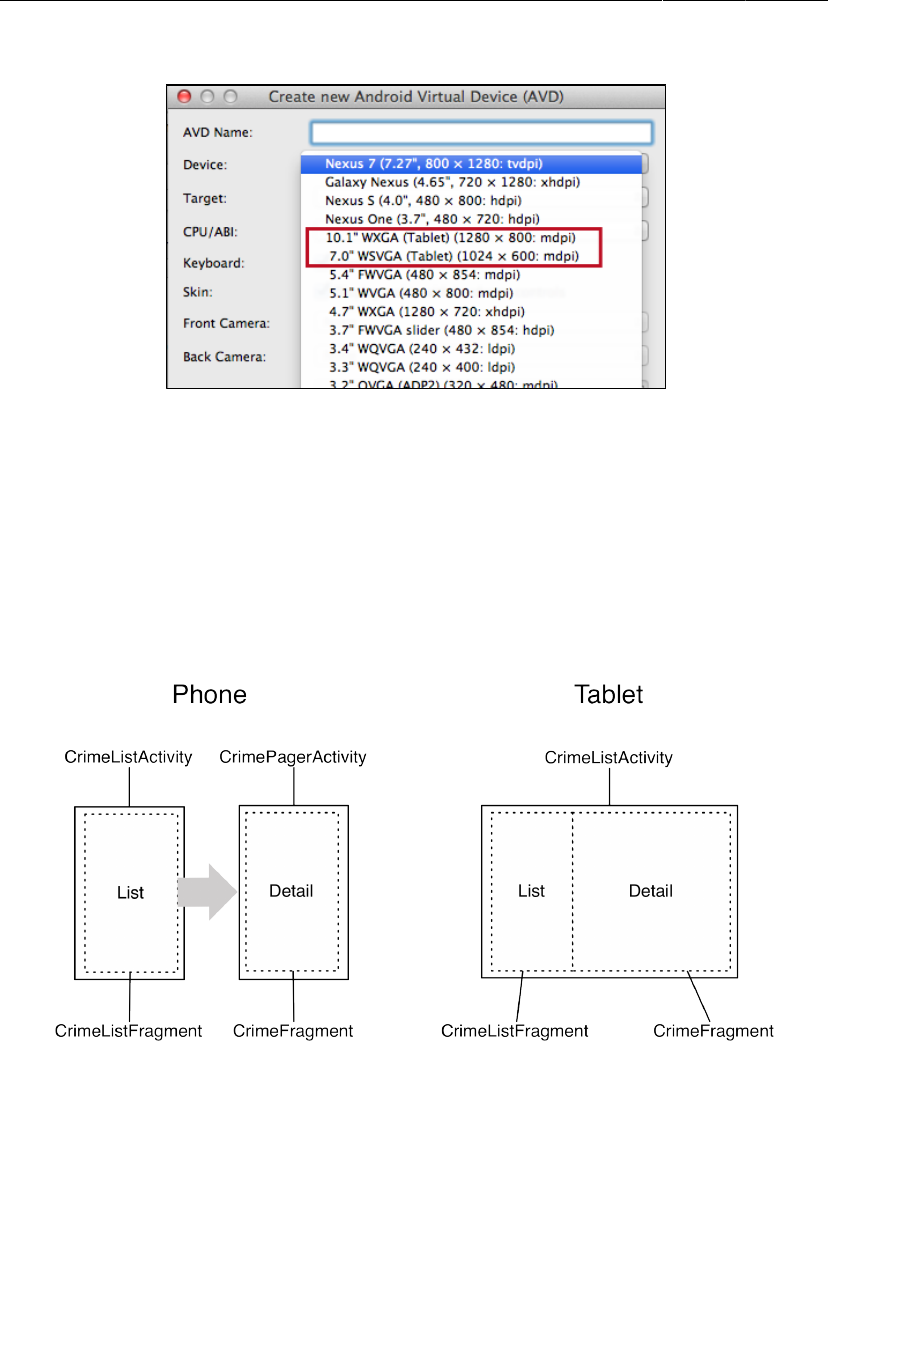
ptg11078569
Chapter 22Two-Pane Master-Detail Interfaces
360
Figure 22.2Device selections for a tablet AVD
Adding Layout Flexibility
On a phone, you want CrimeListActivity to inflate the single-pane layout as it does currently. On a
tablet, you want it to inflate a two-pane layout that is capable of displaying the master and detail views
at the same time.
In the two-pane layout, CrimeListActivity will host both a CrimeListFragment and a
CrimeFragment as shown in Figure22.3.
Figure 22.3Different types of layouts

ptg11078569
Modifying SingleFragmentActivity
361
To make this happen, you are going to:
• modify SingleFragmentActivity so that the layout that gets inflated is not hard-coded
• create a new layout that consists of two fragment containers
• modify CrimeListActivity so that it will inflate a single-container layout on phones and a two-
container layout on tablets
Modifying SingleFragmentActivity
CrimeListActivity is a subclass of SingleFragmentActivity. Currently, SingleFragmentActivity
is set up to always inflate activity_fragment.xml. To make SingleFragmentActivity more flexible,
you are going to enable a subclass to provide its own resource ID for the layout instead.
In SingleFragmentActivity.java, add a protected method that returns the ID of the layout that the
activity will inflate.
Listing 22.1Making SingleFragmentActivity flexible
(SingleFragmentActivity.java)
public abstract class SingleFragmentActivity extends FragmentActivity {
protected abstract Fragment createFragment();
protected int getLayoutResId() {
return R.layout.activity_fragment;
}
@Override
public void onCreate(Bundle savedInstanceState) {
super.onCreate(savedInstanceState);
setContentView(R.layout.activity_fragment);
setContentView(getLayoutResId());
FragmentManager fm = getSupportFragmentManager();
Fragment fragment = fm.findFragmentById(R.id.fragmentContainer);
if (fragment == null) {
fragment = createFragment();
fm.beginTransaction()
.add(R.id.fragmentContainer, fragment)
.commit();
}
}
}
The default implementation of SingleFragmentActivity will work the same as before, but
now its subclasses can choose to override getLayoutResId() to return a layout other than
activity_fragment.xml.
Creating a layout with two fragment containers
In the package explorer, right-click res/layout/ and create a new Android XML file. Ensure that
the resource type is Layout, name the file activity_twopane.xml, and give it a LinearLayout root
element.
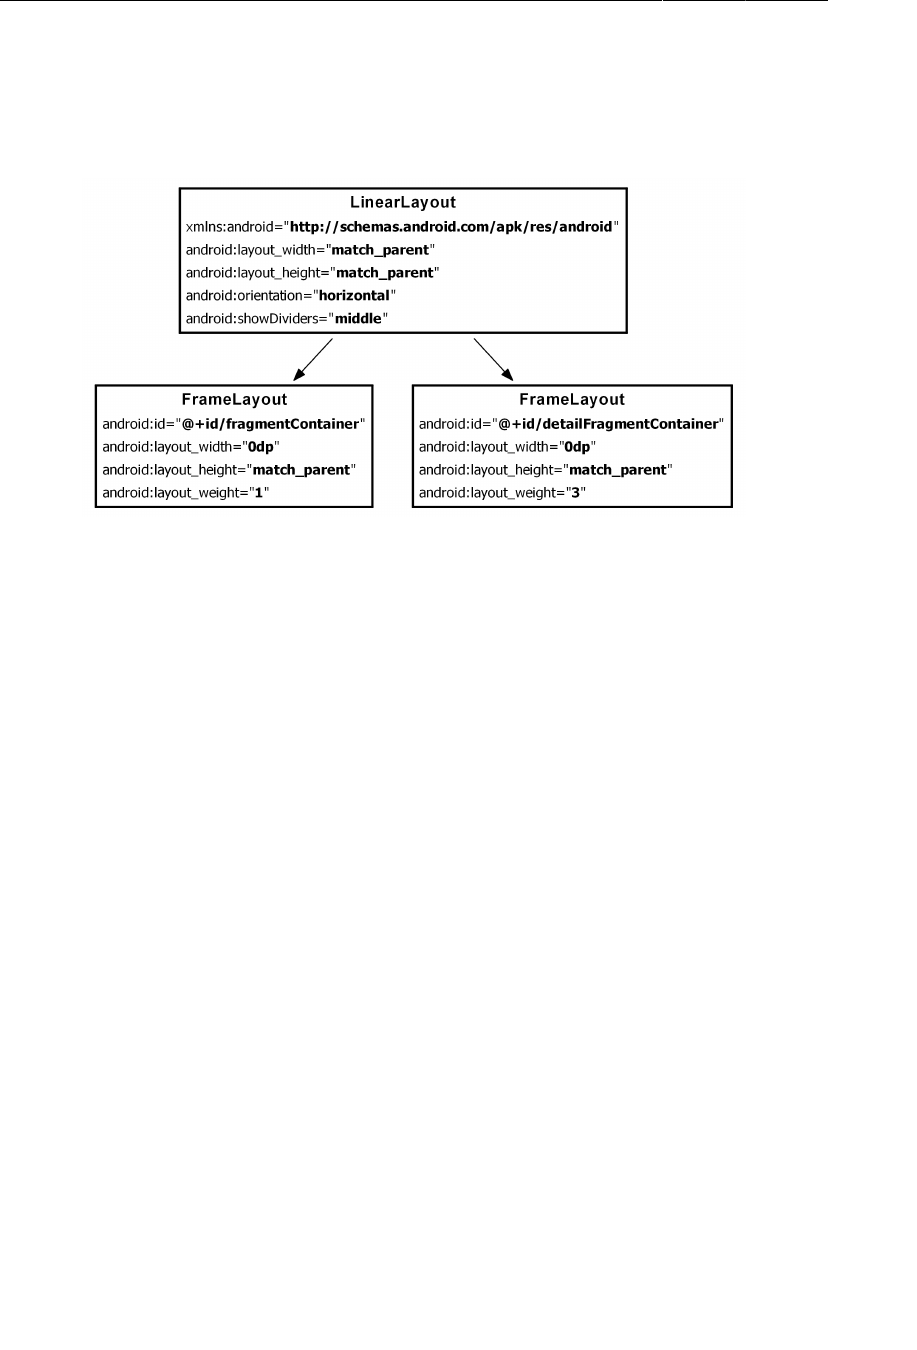
ptg11078569
Chapter 22Two-Pane Master-Detail Interfaces
362
Use Figure22.4 to write the XML for the two-pane layout.
Figure 22.4A layout with two fragment containers (layout/
activity_twopane.xml)
Note that the first FrameLayout has a fragmentContainer layout ID, so the code in
SingleFragmentActivity.onCreate(…) can work as before. When the activity is created, the fragment
that is returned in createFragment() will appear in the lefthand pane.
Test this layout in CrimeListActivity by overriding getLayoutResId() to return
R.layout.activity_twopane.
Listing 22.2Change to two-pane layout file (CrimeListActivity.java)
public class CrimeListActivity extends SingleFragmentActivity {
@Override
protected Fragment createFragment() {
return new CrimeListFragment();
}
@Override
protected int getLayoutResId() {
return R.layout.activity_twopane;
}
}
Run CriminalIntent on a tablet device and confirm that you have two panes (Figure22.5). Note that
the larger detail pane is empty and that pressing a list item will not display the crime’s details. You will
hook up the detail container later in the chapter.
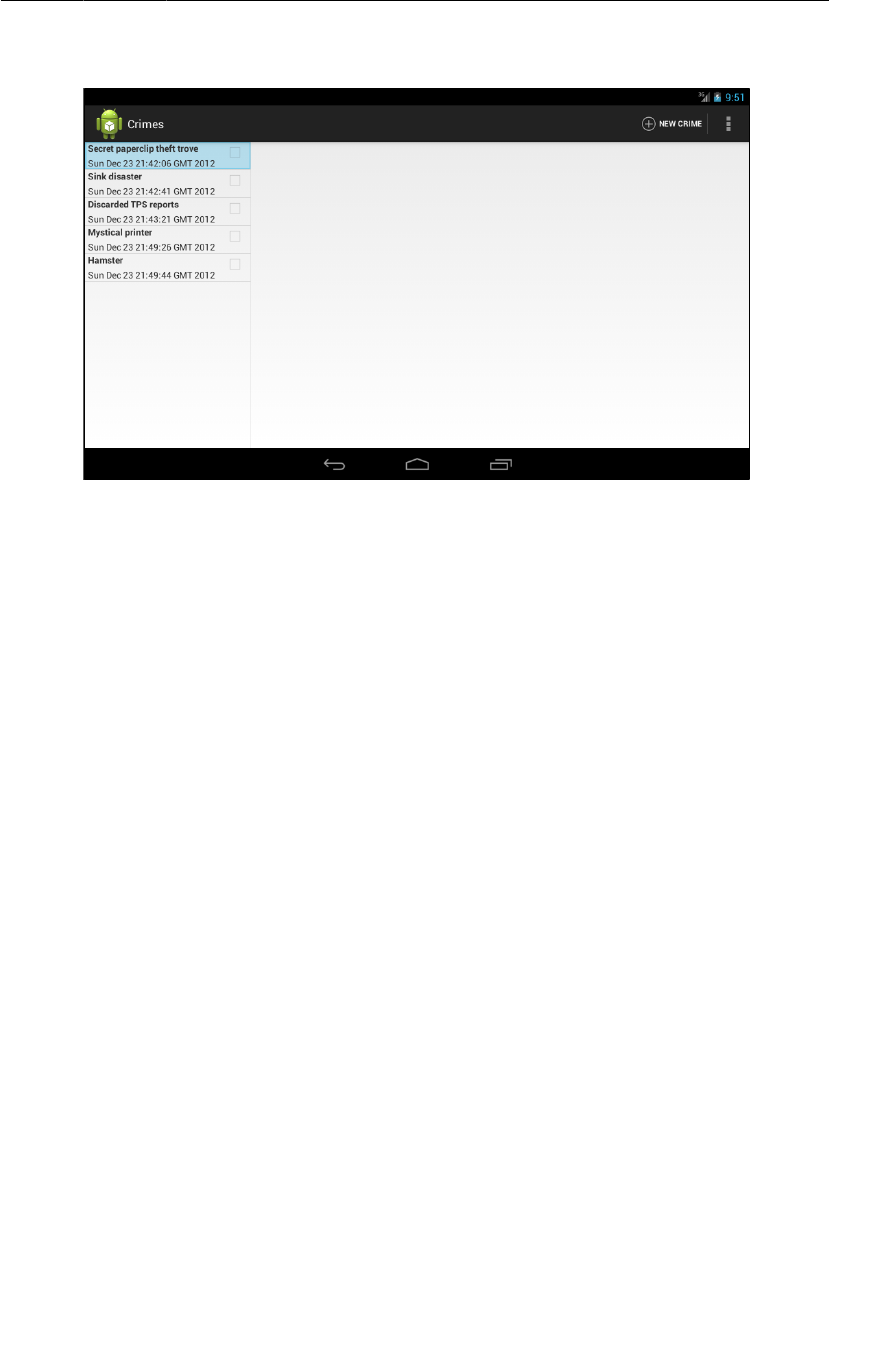
ptg11078569
Using an alias resource
363
Figure 22.5Two-pane layout on a tablet
As currently written, CrimeListActivity will also inflate the two-pane interface when running on a
phone. In the next section, you will fix that using an alias resource.
Using an alias resource
An alias resource is a resource that points to another resource. Alias resources live in res/values/
and, by convention, are defined in a refs.xml file.
In this section, you will create an alias resource that points to the activity_fragment.xml layout on
phones and the activity_twopane.xml layout on tablets.
In the package explorer, right-click the res/values directory and create a new Android XML file.
Ensure that the resource type is Values and name the file refs.xml. Give it a resources root element
and click Finish. Then add the item shown in Listing 22.3.
Listing 22.3Create a default alias resource value (res/values/refs.xml)
<resources>
<item name="activity_masterdetail" type="layout">@layout/activity_fragment</item>
</resources>
This resource’s value is a reference to the single-pane layout. It also has a resource ID:
R.layout.activity_masterdetail. Note that the alias’s type attribute is what determines the inner
class of the ID. Even though the alias itself is in res/values/, its ID is in R.layout.
You can now use this resource ID in place of R.layout.activity_fragment. Make that change in
CrimeListActivity.

ptg11078569
Chapter 22Two-Pane Master-Detail Interfaces
364
Listing 22.4Switch layout again (CrimeListActivity.java)
@Override
protected int getLayoutResId() {
return R.layout.activity_twopane;
return R.layout.activity_masterdetail;
}
Run CriminalIntent to confirm that your alias is working properly. CrimeListActivity should inflate
the single-pane layout again.
Creating tablet alternatives
Because your alias is in res/values/, it is the default alias. So, by default, CrimeListActivity
inflates the single-pane layout.
Now you are going to create an alternative resource so that the activity_masterdetail alias will
point to activity_twopane.xml on larger devices.
In the package explorer, right-click res/ and create a new folder named values-sw600dp. Copy the
res/values/refs.xml file into res/values-sw600dp/. Then change the layout that the alias points to.
Listing 22.5Alternative alias for larger devices (res/values-sw600dp/
refs.xml)
<resources>
<item name="activity_masterdetail" type="layout">@layout/activity_fragment</item>
<item name="activity_masterdetail" type="layout">@layout/activity_twopane</item>
</resources>
What does the -sw600dp configuration qualifier mean? The sw stands for “smallest width,” but refers to
the screen’s smallest dimension, and thus is independent of the device’s current orientation.
With a -sw600dp qualifier, you are saying, “Use this resource on any device whose smallest dimension
is 600dp or greater.” This is a good rule of thumb for specifying a tablet-sized screen.
There is one more thing. The smallest width configuration qualifier was introduced in Android 3.2.
This means that a tablet-sized device running Android 3.0 and 3.1 will not recognize it.
To address this problem, you can add another alternative resource that uses the deprecated screen size
qualifier -xlarge.
Right-click res/ and create a new folder named values-xlarge. Then copy the res/values-sw600dp/
refs.xml file into res/values-xlarge/. Now you have another alternative resource that looks like
Listing 22.6.
Listing 22.6Alternative alias for pre-3.2 larger devices (res/values-xlarge/
refs.xml)
<resources>
<item name="activity_masterdetail" type="layout">@layout/activity_twopane</item>
</resources>

ptg11078569
Activity: Fragment Boss
365
The -xlarge qualifier contains resources to use on devices with a minimum size of 720x960dp. This
qualifier will only be used for devices running versions earlier than Android 3.2. Later versions will
find and use the -sw600dp.
Run CriminalIntent on a phone and on a tablet. Confirm that the single- and two-pane layouts appear
where you expect them.
Activity: Fragment Boss
Now that your layouts are behaving properly, you can turn to adding a CrimeFragment to the detail
fragment container when CrimeListActivity is sporting a two-pane layout.
You might think to simply write an alternative implementation of
CrimeListFragment.onListItemClick(…) for tablets. Instead of starting a new CrimePagerActivity,
onListItemClick(…) would get CrimeListActivity’s FragmentManager and commit a fragment
transaction that adds a CrimeFragment to the detail fragment container.
The code would look like this:
public void onListItemClick(ListView l, View v, int position, long id) {
// Get the Crime from the adapter
Crime crime = ((CrimeAdapter)getListAdapter()).getItem(position);
// Stick a new CrimeFragment in the activity's layout
Fragment fragment = CrimeFragment.newInstance(crime.getId());
FragmentManager fm = getActivity().getSupportFragmentManager();
fm.beginTransaction()
.add(R.id.detailFragmentContainer, fragment)
.commit();
}
This works, but it is not how stylish Android programmers do things. Fragments are intended
to be standalone, composable units. If you write a fragment that adds fragments to the activity’s
FragmentManager, then that fragment is making assumptions about how the hosting activity works, and
your fragment is no longer a standalone, composable unit.
For example, in the code above CrimeListFragment adds a CrimeFragment to CrimeListActivity and
assumes that CrimeListActivity has a detailFragmentContainer in its layout. This is business that
should be handled by CrimeListFragment’s hosting activity instead of CrimeListFragment.
To maintain the independence of your fragments, you will delegate work back to the hosting activity by
defining callback interfaces in your fragments. The hosting activities will implement these interfaces to
perform fragment-bossing duties and layout-dependent behavior.
Fragment callback interfaces
To delegate functionality back to the hosting activity, a fragment typically defines a callback interface
named Callbacks. This interface defines work that the fragment needs done by its boss, the hosting
activity. Any activity that will host the fragment must implement this interface.
With a callback interface, a fragment is able to call methods on its hosting activity without having to
know anything about which activity is hosting it.
Implementing CrimeListFragment.Callbacks
To implement a Callbacks interface, you first define a member variable that holds an object that
implements Callbacks. Then you cast the hosting activity to Callbacks and assign it to that variable.

ptg11078569
Chapter 22Two-Pane Master-Detail Interfaces
366
You assign the activity in the Fragment lifecycle method:
public void onAttach(Activity activity)
This method is called when a fragment is attached to an activity, whether it was retained or not.
Similarly, you will set the variable to null in the corresponding waning lifecycle method:
public void onDetach()
You set the variable to null here because afterwards you cannot access the activity or count on the
activity continuing to exist.
In CrimeListFragment.java, add a Callbacks interface to CrimeListFragment. Also add an
mCallbacks variable and override onAttach(Activity) and onDetach() to set and unset it.
Listing 22.7Add callback interface (CrimeListFragment.java)
public class CrimeListFragment extends ListFragment {
private ArrayList<Crime> mCrimes;
private boolean mSubtitleVisible;
private Callbacks mCallbacks;
/**
* Required interface for hosting activities.
*/
public interface Callbacks {
void onCrimeSelected(Crime crime);
}
@Override
public void onAttach(Activity activity) {
super.onAttach(activity);
mCallbacks = (Callbacks)activity;
}
@Override
public void onDetach() {
super.onDetach();
mCallbacks = null;
}
Now CrimeListFragment has a way to call methods on its hosting activity. It does not matter which
activity is doing the hosting. As long as the activity implements CrimeListFragment.Callbacks,
everything in CrimeListFragment can work the same.
Note that CrimeListFragment performs an unchecked cast of its activity to
CrimeListFragment.Callbacks. This means that the hosting activity must implement
CrimeListFragment.Callbacks. That is not a bad dependency to have, but it is important to document
it.
Next, in CrimeListActivity, implement CrimeListFragment.Callbacks. Leave
onCrimeSelected(Crime) empty for now.

ptg11078569
Fragment callback interfaces
367
Listing 22.8Implement callbacks (CrimeListActivity.java)
public class CrimeListActivity extends SingleFragmentActivity
implements CrimeListFragment.Callbacks {
@Override
protected Fragment createFragment() {
return new CrimeListFragment();
}
@Override
protected int getLayoutResId() {
return R.layout.activity_masterdetail;
}
public void onCrimeSelected(Crime crime) {
}
}
Eventually, CrimeListFragment will call this method in onListItemClick(…) and also when the user
chooses to create a new crime. First, let’s figure out CrimeListActivity.onCrimeSelected(Crime)’s
implementation.
When onCrimeSelected(Crime) is called, CrimeListActivity needs to do one of two things:
• if using the phone interface, start a new CrimePagerActivity
• if using the tablet interface, put a CrimeFragment in detailFragmentContainer
To determine which interface was inflated, you could check for a certain layout ID. But it is better to
check whether the layout has a detailFragmentContainer. Checking a layout’s capabilities is a more
precise test of what you need. Filenames can change, and you don’t really care what file the layout
was inflated from; you just need to know whether it has a detailFragmentContainer to put your
CrimeFragment in.
If the layout does have a detailFragmentContainer, then you are going to create a fragment
transaction that removes the existing CrimeFragment from detailFragmentContainer (if there is one
in there) and adds the CrimeFragment that you want to see.
In CrimeListActivity.java, implement onCrimeSelected(Crime) to handle the selection of a crime
in either interface.

ptg11078569
Chapter 22Two-Pane Master-Detail Interfaces
368
Listing 22.9Conditional CrimeFragment startup (CrimeListActivity.java)
public void onCrimeSelected(Crime crime) {
if (findViewById(R.id.detailFragmentContainer) == null) {
// Start an instance of CrimePagerActivity
Intent i = new Intent(this, CrimePagerActivity.class);
i.putExtra(CrimeFragment.EXTRA_CRIME_ID, crime.getId());
startActivity(i);
} else {
FragmentManager fm = getSupportFragmentManager();
FragmentTransaction ft = fm.beginTransaction();
Fragment oldDetail = fm.findFragmentById(R.id.detailFragmentContainer);
Fragment newDetail = CrimeFragment.newInstance(crime.getId());
if (oldDetail != null) {
ft.remove(oldDetail);
}
ft.add(R.id.detailFragmentContainer, newDetail);
ft.commit();
}
}
Finally, in CrimeListFragment, you are going to call onCrimeSelected(Crime) in the places where
you currently start a new CrimePagerActivity.
In CrimeListFragment.java, modify onListItemClick(…) and onOptionsItemSelected(MenuItem)
to call Callbacks.onCrimeSelected(Crime).
Listing 22.10Calling all callbacks! (CrimeListFragment.java)
public void onListItemClick(ListView l, View v, int position, long id) {
// Get the Crime from the adapter
Crime c = ((CrimeAdapter)getListAdapter()).getItem(position);
// Start an instance of CrimePagerActivity
Intent i = new Intent(getActivity(), CrimePagerActivity.class);
i.putExtra(CrimeFragment.EXTRA_CRIME_ID, c.getId());
startActivity(i);
mCallbacks.onCrimeSelected(c);
}
...
@TargetApi(11)
@Override
public boolean onOptionsItemSelected(MenuItem item) {
switch (item.getItemId()) {
case R.id.menu_item_new_crime:
Crime crime = new Crime();
CrimeLab.get(getActivity()).addCrime(crime);
Intent i = new Intent(getActivity(), CrimePagerActivity.class);
i.putExtra(CrimeFragment.EXTRA_CRIME_ID, crime.getId());
startActivity(i);
((CrimeAdapter)getListAdapter()).notifyDataSetChanged();
mCallbacks.onCrimeSelected(crime);
return true;
...
}
}
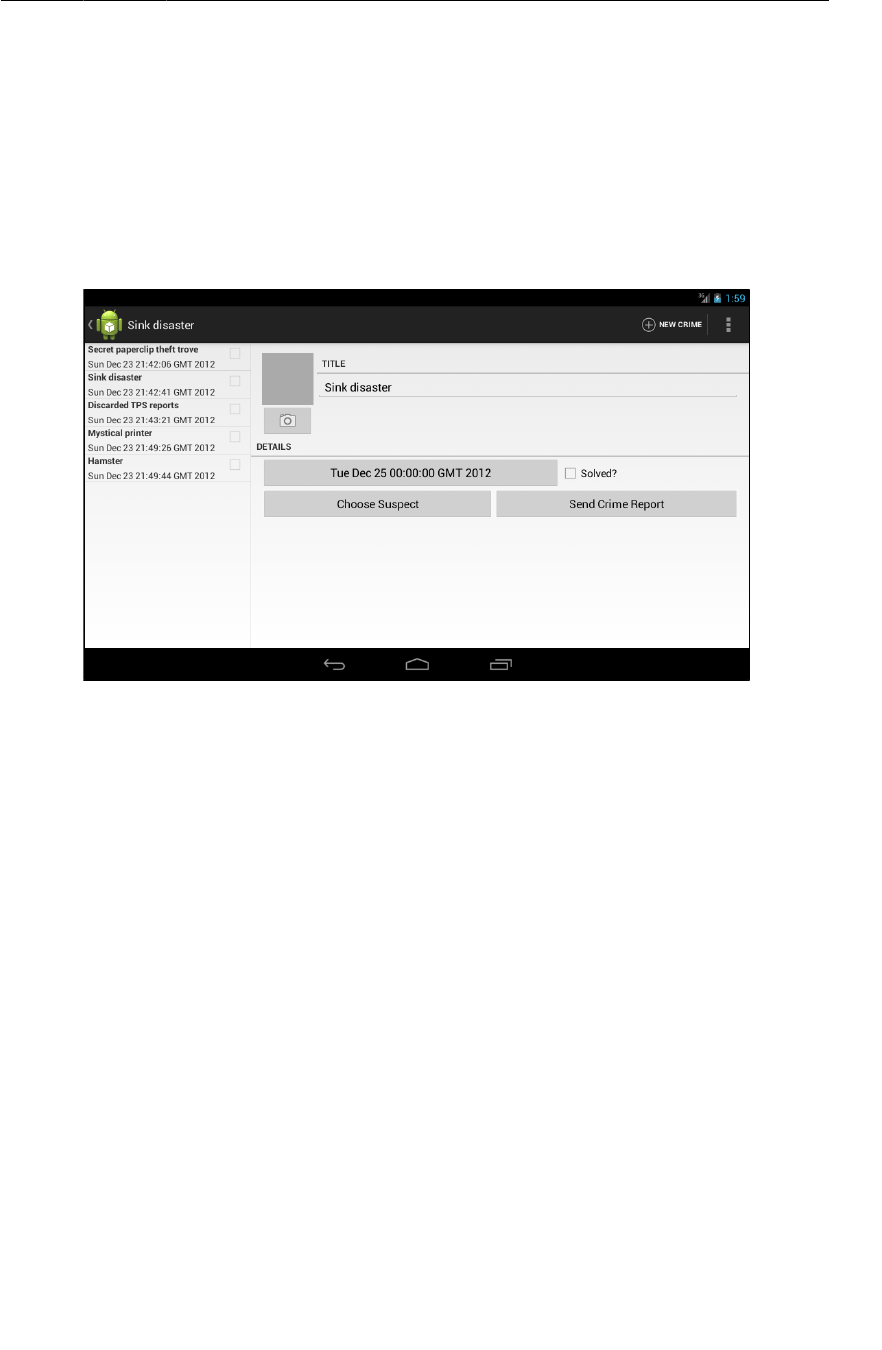
ptg11078569
Fragment callback interfaces
369
When you call back in onOptionsItemSelected(…), you also reload the list immediately upon adding
a new crime. This is necessary because, on tablets, the list will remain visible after adding a new crime.
Before, you were guaranteed that the detail screen would appear in front of it.
Run CriminalIntent on a tablet. Create a new crime, and a CrimeFragment will be added and shown in
the detailFragmentContainer. Then view an old crime to see the CrimeFragment being swapped out
for a new one.
Figure 22.6Master and detail now wired up
However, if you make changes to a crime, the list will not update to reflect them. Right now, you only
reload the list immediately after adding a crime and in CrimeListFragment.onResume(). But on a
tablet, CrimeListFragment will stay visible alongside the CrimeFragment. The CrimeListFragment is
not paused when the CrimeFragment appears, so it is never resumed. Thus, the list is not reloaded.
You can fix this problem with another callback interface – this one in CrimeFragment.
Implementing CrimeFragment.Callbacks
CrimeFragment will define the following interface:
public interface Callbacks {
void onCrimeUpdated(Crime crime);
}
CrimeFragment will call onCrimeUpdated(Crime) on its hosting activity whenever changes are
saved to the Crime. CrimeListActivity will implement onCrimeUpdated(Crime) to reload
CrimeListFragment’s list.
Before you start with CrimeFragment’s interface, add a method to CrimeListFragment that can be
called to reload CrimeListFragment’s list.

ptg11078569
Chapter 22Two-Pane Master-Detail Interfaces
370
Listing 22.11Add updateUI() method (CrimeListFragment.java)
public class CrimeListFragment extends ListFragment {
...
public void updateUI() {
((CrimeAdapter)getListAdapter()).notifyDataSetChanged();
}
Then, in CrimeFragment.java, add the callback interface along with an mCallbacks variable and
implementations of onAttach(…) and onDetach().
Listing 22.12Add CrimeFragment callbacks (CrimeFragment.java)
...
private ImageView mPhotoView;
private Button mSuspectButton;
private Callbacks mCallbacks;
/**
* Required interface for hosting activities.
*/
public interface Callbacks {
void onCrimeUpdated(Crime crime);
}
@Override
public void onAttach(Activity activity) {
super.onAttach(activity);
mCallbacks = (Callbacks)activity;
}
@Override
public void onDetach() {
super.onDetach();
mCallbacks = null;
}
public static CrimeFragment newInstance(UUID crimeId) {
...
}
Then implement CrimeFragment.Callbacks in CrimeListActivity to reload the list in
onCrimeUpdated(Crime).
Listing 22.13Refresh crime list (CrimeListActivity.java)
public class CrimeListActivity extends SingleFragmentActivity
implements CrimeListFragment.Callbacks, CrimeFragment.Callbacks {
...
public void onCrimeUpdated(Crime crime) {
FragmentManager fm = getSupportFragmentManager();
CrimeListFragment listFragment = (CrimeListFragment)
fm.findFragmentById(R.id.fragmentContainer);
listFragment.updateUI();
}
}

ptg11078569
Fragment callback interfaces
371
In CrimeFragment.java, add calls to onCrimeUpdated(Crime) when a Crime’s title or solved status
has changed.
Listing 22.14Call onCrimeUpdated(Crime) (CrimeFragment.java)
@Override
@TargetApi(11)
public View onCreateView(LayoutInflater inflater, ViewGroup parent,
Bundle savedInstanceState) {
View v = inflater.inflate(R.layout.fragment_crime, parent, false);
...
mTitleField = (EditText)v.findViewById(R.id.crime_title);
mTitleField.setText(mCrime.getTitle());
mTitleField.addTextChangedListener(new TextWatcher() {
public void onTextChanged(CharSequence c, int start, int before, int count) {
mCrime.setTitle(c.toString());
mCallbacks.onCrimeUpdated(mCrime);
getActivity().setTitle(mCrime.getTitle());
}
...
});
mSolvedCheckBox = (CheckBox)v.findViewById(R.id.crime_solved);
mSolvedCheckBox.setChecked(mCrime.isSolved());
mSolvedCheckBox.setOnCheckedChangeListener(new OnCheckedChangeListener() {
public void onCheckedChanged(CompoundButton buttonView, boolean isChecked) {
// Set the crime's solved property
mCrime.setSolved(isChecked);
mCallbacks.onCrimeUpdated(mCrime);
}
});
...
return v;
}
You also need to call onCrimeUpdated(Crime) in onActivityResult(…), where the Crime’s date,
photo, and suspect can be changed. Currently, the photo and suspect do not appear in the list item’s
view, but CrimeFragment should still be neighborly and report those updates.

ptg11078569
Chapter 22Two-Pane Master-Detail Interfaces
372
Listing 22.15Call onCrimeUpdated(Crime) (#2) (CrimeFragment.java)
@Override
public void onActivityResult(int requestCode, int resultCode, Intent data) {
if (resultCode != Activity.RESULT_OK) return;
if (requestCode == REQUEST_DATE) {
Date date = (Date)data.getSerializableExtra(DatePickerFragment.EXTRA_DATE);
mCrime.setDate(date);
mCallbacks.onCrimeUpdated(mCrime);
updateDate();
} else if (requestCode == REQUEST_PHOTO) {
// Create a new Photo object and attach it to the crime
String filename = data
.getStringExtra(CrimeCameraFragment.EXTRA_PHOTO_FILENAME);
if (filename != null) {
Photo p = new Photo(filename);
mCrime.setPhoto(p);
mCallbacks.onCrimeUpdated(mCrime);
showPhoto();
}
} else if (requestCode == REQUEST_CONTACT) {
...
c.moveToFirst();
String suspect = c.getString(0);
mCrime.setSuspect(suspect);
mCallbacks.onCrimeUpdated(mCrime);
mSuspectButton.setText(suspect);
c.close();
}
}
CrimeListActivity now has a nice implementation for CrimeFragment.Callbacks. However, if
you run CriminalIntent on a phone, it will crash. Remember, any activity that hosts CrimeFragment
must implement CrimeFragment.Callbacks. You need to implement CrimeFragment.Callbacks in
CrimePagerActivity.
For CrimePagerActivity, all you need is an empty implementation where onCrimeUpdated(Crime)
does nothing. When CrimePagerActivity is hosting CrimeFragment, the only reloading of the list that
is necessary is already done in onResume().
Listing 22.16An empty implementation of CrimeFragment.Callbacks
(CrimePagerActivity.java)
public class CrimePagerActivity extends FragmentActivity
implements CrimeFragment.Callbacks {
...
public void onCrimeUpdated(Crime crime) {
}
}
Run CriminalIntent on a tablet and confirm that your ListView updates when changes are made in
CrimeFragment. Then run on a phone to confirm that the app works continues to work as before.
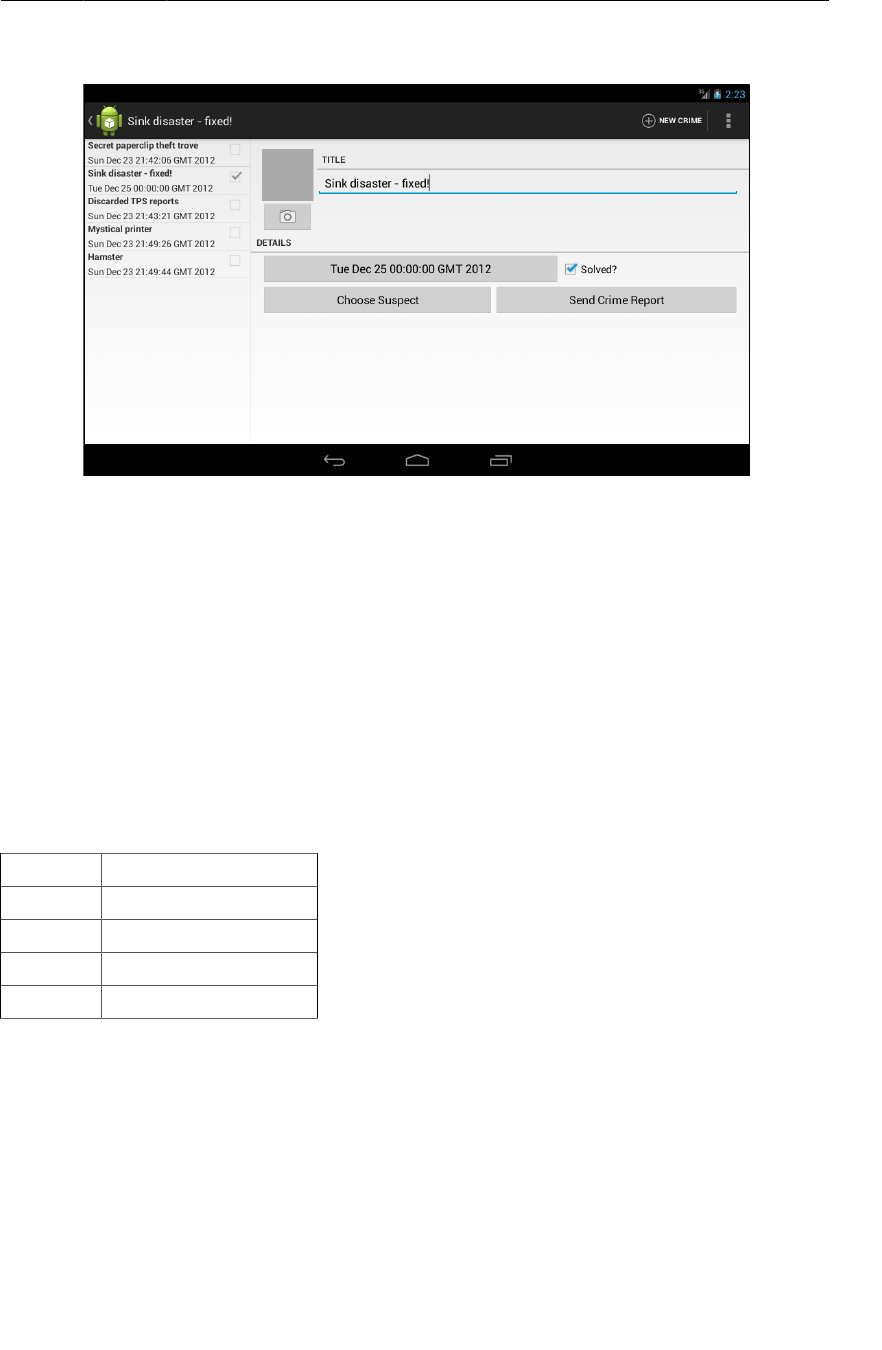
ptg11078569
For the More Curious: More on Determining Device Size
373
Figure 22.7List reflects changes made in detail
You have reached the end of your time with CriminalIntent. In thirteen chapters, you created a complex
application that uses fragments, talks to other apps, takes pictures, and stores data. Why not celebrate
with a piece of cake? Just be sure to clean up after yourself. You never know who might be watching.
For the More Curious: More on Determining Device
Size
Before Android 3.2, the screen size qualifier was used to provide alternative resources based the size
of a device. Screen size is a qualifier that groups different devices into four broad categories – small,
normal, large, and xlarge.
Table22.1 shows the minimum screen sizes for each qualifier:
Table 22.1Screen size qualifiers
Name Minimum screen size
small 320x426dp
normal 320x470dp
large 480x640dp
xlarge 720x960dp
Screen size qualifiers were deprecated in Android 3.2 in favor of qualifiers that allow you test for the
dimensions of the device. Table22.2 shows these new qualifiers.

ptg11078569
Chapter 22Two-Pane Master-Detail Interfaces
374
Table 22.2Discrete screen dimension qualifiers
Qualifier
format
description
wXXXdp Available width: width is greater than or equal to XXX dp
hXXXdp Available height: height greater than or equal to XXX dp
swXXXdp Smallest width: width or height (whichever is smaller) greater than or equal to XXX dp
Let’s say that you wanted to specify a layout that would only be used if the display were at least 300dp
wide. In that case, you could use an available width qualifier and put your layout file in res/layout-
w300dp (the “w” is for “width”). You can do the same thing for height by using an “h” (for “height”).
The height and width may swap depending on the orientation of the device, though. To detect a
particular size of screen, you can use sw, which stands for smallest width. This specifies the smallest
dimension of your screen. Depending on the device’s orientation, this can be either width or height. If
the screen is 1024x800, then sw is 800. If the screen is 800x1024, sw is still 800.
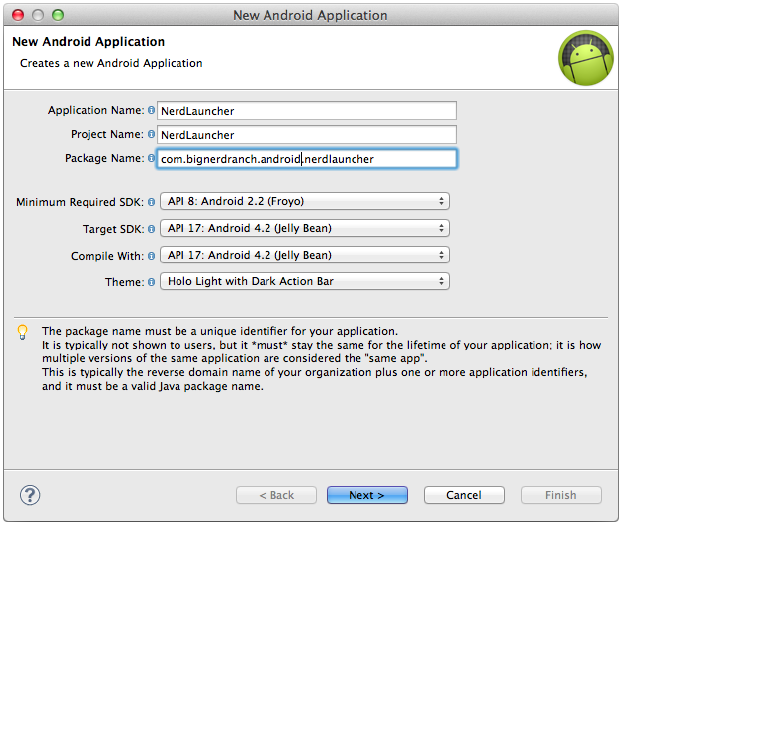
ptg11078569
375
23
More About Intents and Tasks
In this chapter, you will use implicit intents to create a launcher app to replace Android’s default
launcher app. To get it working correctly, you will deepen your understanding of intents, intent filters,
and how applications interact in the Android environment.
Setting Up NerdLauncher
Create a new project (New → Android�Application�Project) with the same settings you used
for CriminalIntent (Figure23.1). Name this project NerdLauncher and create it in the
com.bignerdranch.android.nerdlauncher package.
Figure 23.1Creating NerdLauncher project
Create an activity but not a custom launcher icon. Choose to create a new blank activity. Name the
activity NerdLauncherActivity and click Finish.

ptg11078569
Chapter 23More About Intents and Tasks
376
NerdLauncherActivity should be a subclass of SingleFragmentActivity, so you need to add that
class to the project. In the package explorer, find SingleFragmentActivity.java in the CriminalIntent
package. Copy this file into the com.bignerdranch.android.nerdlauncher package. When you copy
files, Eclipse takes care of updating the package declarations.
You will also need the activity_fragment.xml layout. Copy res/layout/activity_fragment.xml to
the res/layout directory in the NerdLauncher project.
NerdLauncher will display a list of apps on the device. The user can press a list item to launch the app.
Here are the objects involved.
NerdLauncherFragment will be a ListFragment subclass, and its view will be the default ListView
that comes with ListFragment.
Create a new class named NerdLauncherFragment and make its superclass
android.support.v4.app.ListFragment. Leave this class empty for now.
Open NerdLauncherActivity.java and change NerdLauncherActivity’s superclass to
SingleFragmentActivity. Remove the template’s code and override createFragment() to return a
NerdLauncherFragment.
Listing 23.1Another SingleFragmentActivity
(NerdLauncherActivity.java)
public class NerdLauncherActivity extends Activity SingleFragmentActivity {
@Override
public void onCreate(Bundle savedInstanceState) {
super.onCreate(savedInstanceState);
setContentView(R.layout.activity_nerd_launcher);
}
@Override
public boolean onCreateOptionsMenu(Menu menu) {
getMenuInflater().inflate(R.menu.activity_nerd_launcher, menu);
return true;
}
@Override
public Fragment createFragment() {
return new NerdLauncherFragment();
}
}
Resolving an Implicit Intent
NerdLauncher will show the user a list of apps on the device. To do so, it will send an implicit intent
that every application’s main activity will respond to. The intent will include a MAIN action and a
LAUNCHER category. You have seen this intent filter in your projects:
<intent-filter>
<action android:name="android.intent.action.MAIN" />
<category android:name="android.intent.category.LAUNCHER" />
</intent-filter>
In NerdLauncherFragment.java, override onCreate(Bundle) to create an implicit intent. Then get
a list of activities that match the intent from the PackageManager. For now, just log the number of
activities that the PackageManager returns.

ptg11078569
Resolving an Implicit Intent
377
Listing 23.2Querying the PackageManager (NerdLauncherFragment.java)
public class NerdLauncherFragment extends ListFragment {
private static final String TAG = "NerdLauncherFragment";
@Override
public void onCreate(Bundle savedInstanceState) {
super.onCreate(savedInstanceState);
Intent startupIntent = new Intent(Intent.ACTION_MAIN);
startupIntent.addCategory(Intent.CATEGORY_LAUNCHER);
PackageManager pm = getActivity().getPackageManager();
List<ResolveInfo> activities = pm.queryIntentActivities(startupIntent, 0);
Log.i(TAG, "I've found " + activities.size() + " activities.");
}
}
Run NerdLauncher and check LogCat to see how many apps the PackageManager returned.
In CriminalIntent, you used an implicit intent to send a crime report. You presented an activity
chooser by creating an implicit intent, wrapping it in a chooser intent, and sending it to the OS with
startActivity(Intent):
Intent i = new Intent(Intent.ACTION_SEND);
... // Create and put intent extras
i = Intent.createChooser(i, getString(R.string.send_report));
startActivity(i);
You may be wondering why you are not using that approach here. The short explanation is that the
MAIN/LAUNCHER intent filter may or may not match a MAIN/LAUNCHER implicit intent that is sent via
startActivity(…).
It turns out that startActivity(Intent) does not mean “Start an activity matching this implicit
intent.” It means “Start the default activity matching this implicit intent.” When you send an
implicit intent via startActivity(…) (or startActivityForResult(…)), the OS secretly adds the
Intent.CATEGORY_DEFAULT category to the intent.
Thus, if you want an intent filter to match implicit intents sent via startActivity(…), you must
include the DEFAULT category in that intent filter.
An activity that has the MAIN/LAUNCHER intent filter is the main entry point for the app that it belongs
to. It only wants the job of main entry point for that application. It typically does not care about being
the “default” main entry point, so it does not have to include the CATEGORY_DEFAULT category.
Because MAIN/LAUNCHER intent filters may not include CATEGORY_DEFAULT, you cannot reliably match
them to an implicit intent sent via startActivity(…). So, instead you use the intent to query the
PackageManager directly for activities with the MAIN/LAUNCHER intent filter.
The next step is to display the labels of these activities in NerdLauncherFragment’s ListView. An
activity’s label is its display name – something the user should recognize. Given that these activities
are launcher activities, the label is most likely the application name.
You can find the labels for the activities, along with other metadata, in the ResolveInfo objects that the
PackageManager returned.

ptg11078569
Chapter 23More About Intents and Tasks
378
First, add the following code to sort the ResolveInfo objects returned from the PackageManager
alphabetically by label using the ResolveInfo.loadLabel(…) method.
Listing 23.3Sorting alphabetically (NerdLauncherFragment.java)
...
Log.i("NerdLauncher", "I've found " + activities.size() + " activities.");
Collections.sort(activities, new Comparator<ResolveInfo>() {
public int compare(ResolveInfo a, ResolveInfo b) {
PackageManager pm = getActivity().getPackageManager();
return String.CASE_INSENSITIVE_ORDER.compare(
a.loadLabel(pm).toString(),
b.loadLabel(pm).toString());
}
});
Then create an ArrayAdapter that will create simple list item views that display the label of an activity
and set this adapter on the ListView.
Listing 23.4Creating an adapter (NerdLauncherFragment.java)
...
Collections.sort(activities, new Comparator<ResolveInfo></ResolveInfo>() {
...
}
});
ArrayAdapter<ResolveInfo> adapter = new ArrayAdapter<ResolveInfo>(
getActivity(), android.R.layout.simple_list_item_1, activities) {
public View getView(int pos, View convertView, ViewGroup parent) {
PackageManager pm = getActivity().getPackageManager();
View v = super.getView(pos, convertView, parent);
// Documentation says that simple_list_item_1 is a TextView,
// so cast it so that you can set its text value
TextView tv = (TextView)v;
ResolveInfo ri = getItem(pos);
tv.setText(ri.loadLabel(pm));
return v;
}
};
setListAdapter(adapter);
Run NerdLauncher, and you will see a ListView populated with activity labels.
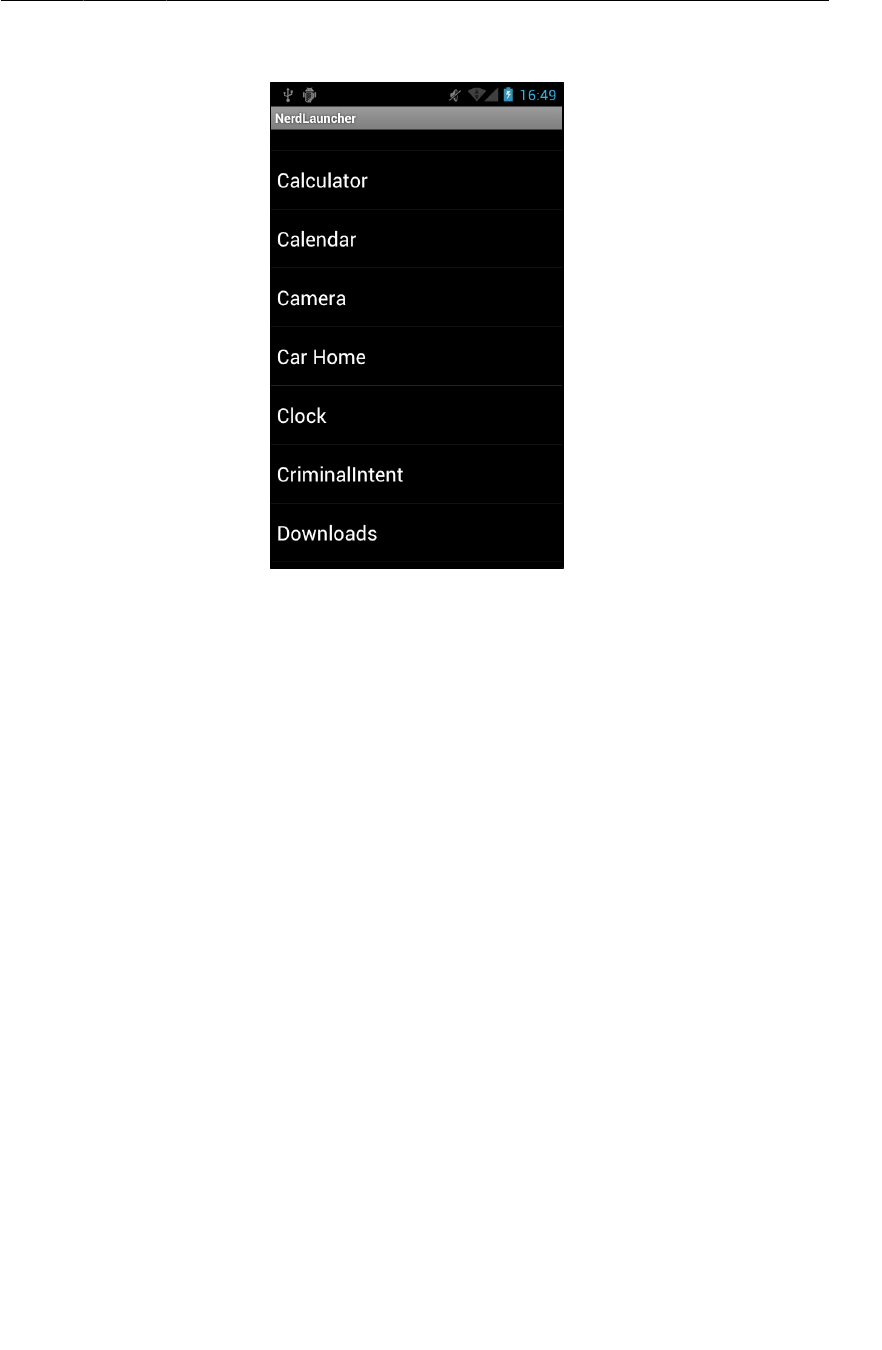
ptg11078569
Creating Explicit Intents at Runtime
379
Figure 23.2All your activities are belong to us
Creating Explicit Intents at Runtime
You used an implicit intent to gather the desired activities and present them in a list. The next step is to
start the selected activity when the user presses its list item. You will start the activity using an explicit
intent.
To create the explicit intent, you need more data from the ResolveInfo. In particular, you need
the activity’s package name and class name. You can get this data from a part of the ResolveInfo
called ActivityInfo. (You can learn what data is available in different parts of ResolveInfo from its
reference page.)
In NerdLauncherFragment.java, override onListItemClick(…) to get the ActivityInfo for the list
item. Then use its data to create an explicit intent that will start the activity.
Listing 23.5Implement onListItemClick(…)
(NerdLauncherFragment.java)
@Override
public void onListItemClick(ListView l, View v, int position, long id) {
ResolveInfo resolveInfo = (ResolveInfo)l.getAdapter().getItem(position);
ActivityInfo activityInfo = resolveInfo.activityInfo;
if (activityInfo == null) return;
Intent i = new Intent(Intent.ACTION_MAIN);
i.setClassName(activityInfo.applicationInfo.packageName, activityInfo.name);
startActivity(i);
}

ptg11078569
Chapter 23More About Intents and Tasks
380
Notice that in this intent you are sending an action as part of an explicit intent. Most apps will behave
the same whether you include the action or not. However, some may change their behavior. The same
activity can display different interfaces depending on how it is started. As a programmer, it is best to
declare your intentions clearly and let the activities you start do what they will.
In Listing 23.5, you get the package name and class name from the metadata and use them to create an
explicit intent using the Intent method:
public Intent setClassName(String packageName, String className)
This is different from how you have created explicit intents in the past. Before, you have used an
Intent constructor that accepts a Context and a Class object:
public Intent(Context packageContext, Class<?> cls)
This constructor uses its parameters to get what the Intent really needs – a ComponentName. A
ComponentName is a package name and a class name stuck together. When you pass in an Activity
and a Class to create an Intent, the constructor determines the fully-qualified package name from the
Activity.
You could also create a ComponentName yourself from the package and class names and use the
following Intent method to create an explicit intent:
public Intent setComponent(ComponentName component)
However, it is less code to use setClassName(…), which creates the component name behind the
scenes.
Run NerdLauncher and launch some apps.
Tasks and the Back Stack
Android uses tasks to keep track of the user’s state within each running application. A task is a stack
of activities that the user is concerned with. The activity at the bottom of the stack is called the base
activity, and whatever activity is on top is the activity that the user sees. When you press the Back
button, you are popping the top activity off of this stack. If you are looking at the base activity and hit
the Back button, it will send you to the home screen.
Using the task manager, you can switch between tasks without affecting each task’s state. For instance,
if you start entering a new contact and switch to checking your Twitter feed, you will have two tasks
started. If you switch back to editing contacts, your place in both tasks will be saved.
Sometimes, when you start an activity, you want the activity added to the current task. Other times, you
want it started in a new task that is independent of the activity that started it.
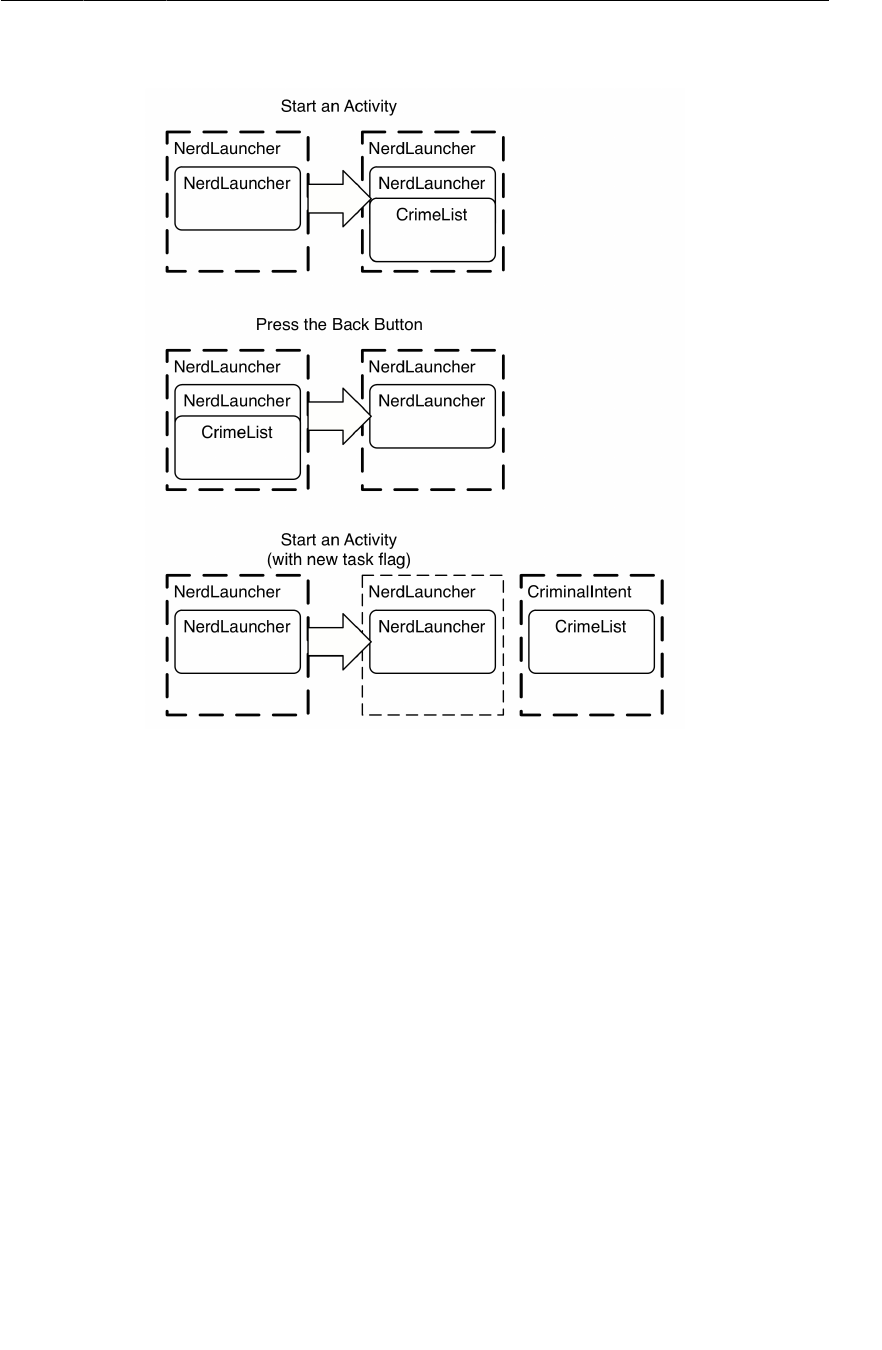
ptg11078569
Tasks and the Back Stack
381
Figure 23.3Tasks and the back stack
By default, new activities are started in the current task. In CriminalIntent, whenever you started a new
activity that activity was added to the current task. This was true even if the activity was not part of
the CriminalIntent application, like when you started an activity to send a crime report. The benefit of
adding an activity to the current task is that the user can navigate back through the task instead of the
application hierarchy.
Right now, any activity started from NerdLauncher is added to NerdLaucher’s task. You can
confirm this by starting CriminalIntent from NerdLauncher and then pulling up the task manager.
(Press the Recents button if the device has one. Otherwise, long-press the Home button.) You
will not see CriminalIntent listed anywhere. When CrimeListActivity was started, it was added
the NerdLauncher’s task. If you press the NerdLauncher task, you will be returned to whatever
CriminalIntent screen you were looking at before starting the task manager.
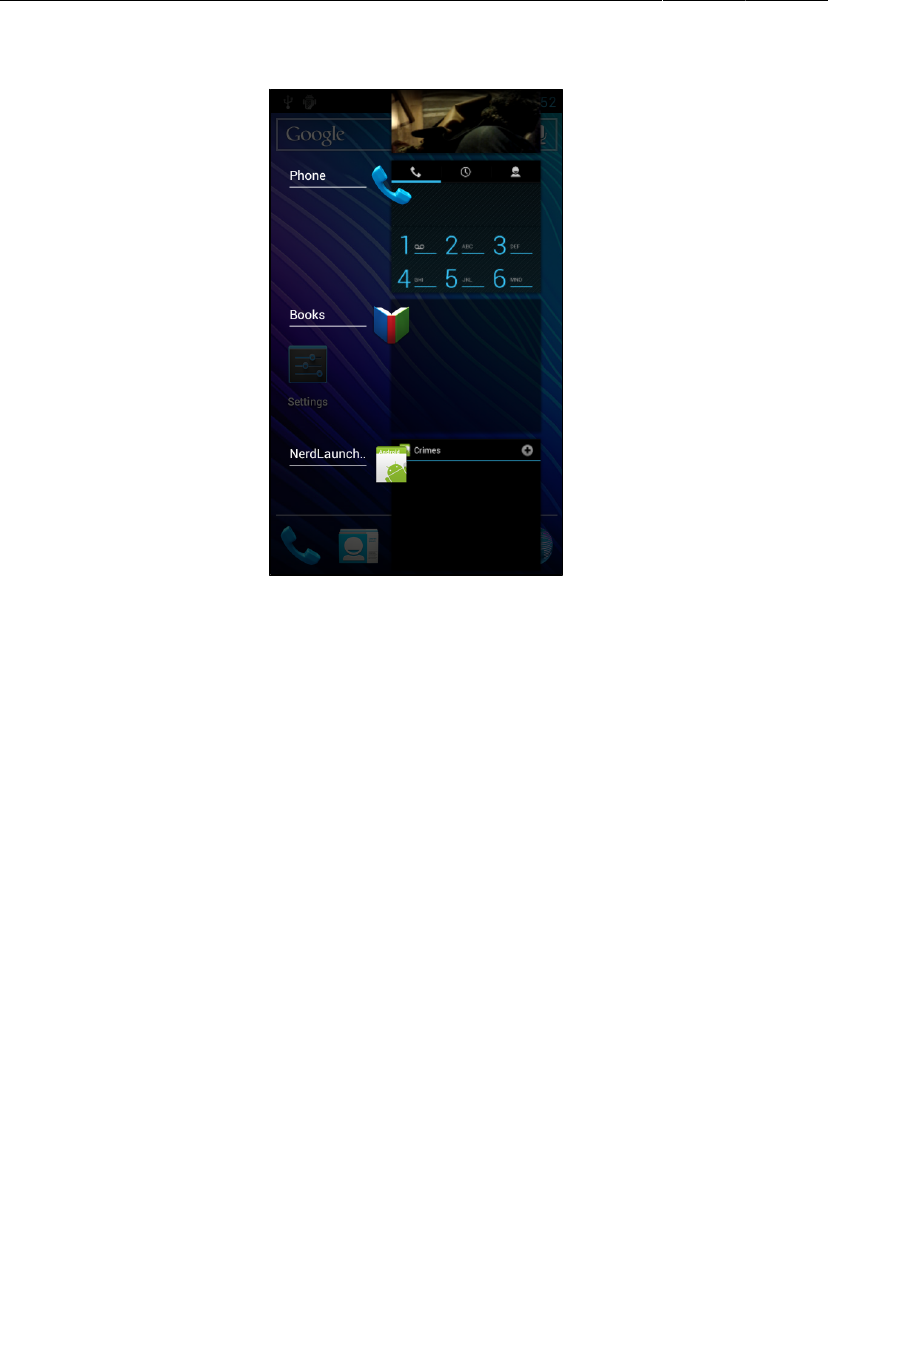
ptg11078569
Chapter 23More About Intents and Tasks
382
Figure 23.4CriminalIntent not in its own task
You want NerdLauncher to start activities in new tasks. Then users can switch between running
applications as they like. To start a new task when you start a new activity, you add a flag to the intent:
Listing 23.6Add new task flag to intent (NerdLauncherFragment.java)
Intent i = new Intent(Intent.ACTION_MAIN);
i.setClassName(activityInfo.applicationInfo.packageName, activityInfo.name);
i.addFlags(Intent.FLAG_ACTIVITY_NEW_TASK);
startActivity(i);
Run NerdLauncher and start CriminalIntent. This time, when you pull up the task manager you will see
a separate task for CriminalIntent.

ptg11078569
Using NerdLauncher as a Home Screen
383
Figure 23.5CriminalIntent now in its own task
If you start CriminalIntent from NerdLauncher again, you will not create a second CriminalIntent task.
The FLAG_ACTIVITY_NEW_TASK flag by itself creates one task per activity. CrimeListActivity
already has a task running, so Android will switch to that task instead of starting a new one.
Using NerdLauncher as a Home Screen
Who wants to start an app to start other apps? It would make more sense to offer NerdLauncher as a
replacement for the device’s home screen. Open NerdLauncher’s AndroidManifest.xml and add to its
main intent filter:
Listing 23.7Change NerdLauncher’s categories (AndroidManifest.xml)
<intent-filter>
<action android:name="android.intent.action.MAIN" />
<category android:name="android.intent.category.LAUNCHER" />
<category android:name="android.intent.category.HOME" />
<category android:name="android.intent.category.DEFAULT" />
</intent-filter>
By adding the HOME and DEFAULT categories, NerdLauncher activity is asking to be offered as an option
for the home screen. Press the Home button, and NerdLauncher will be offered as an option.
(If you make NerdLauncher the home screen and later want to change it back, go to Settings →
Applications → Manage�Applications. Select All to find NerdLauncher and then scroll down to Launch

ptg11078569
Chapter 23More About Intents and Tasks
384
by�default to clear the defaults. The next time you press the Home button, you will be offered a choice
and can select another default.)
Challenge: Icons, Reordering Tasks
You used ResolveInfo.loadLabel(…) in this chapter to present useful names in your launcher.
ResolveInfo provides a similar method called loadIcon() that retrieves an icon to display for each
application. For a small challenge, add an icon for each application to NerdLauncher.
If you are interested in doing more, you can add another activity to NerdLauncher that switches
between running tasks. To do this, use the ActivityManager system service, which provides
information about currently running activities, tasks, and applications. Unlike PackageManager,
Activity provides no getActivityManager() convenience method for getting at this system service.
Instead, call Activity.getSystemService() with the Activity.ACTIVITY_SERVICE constant as a
parameter to retrieve ActivityManager. Call getRunningTasks() on ActivityManager to get a list of
running tasks in order from most to least recently run. To switch one of those tasks to the foreground,
call moveTaskToFront(). Make sure to check out Android’s reference documentation here – to switch
between tasks, you will need to add another permission to your manifest.
For the More Curious: Processes vs. Tasks
All objects need memory and a virtual machine to live in. A process is a place created by the OS for
your application’s objects to live and for your application to run.
Processes may own resources managed by the OS like memory, network sockets, and open files.
Processes also have at least one, possibly many, threads of execution. On Android, your process will
also always have exactly one Dalvik virtual machine running.
While there are some obscure exceptions, in general every application component in Android is
associated with exactly one process. Your application is created with its own process, and this is the
default process for all components in your application.
You can assign individual components to different processes, but we recommend sticking to the default
process. If you think you need something running in a different process, you can usually achieve the
same ends with multi-threading, which is more straightforward to program in Android than using
multiple processes.
Every activity instance lives in exactly one process and in exactly one task. That is where the
similarities end, though. Tasks only contain activities and often consist of activities from different
applications. Processes, on the other hand, contain all running code and objects in an application.
It can be easy to confuse processes and tasks because there is some overlap between the two
ideas and both are often referred to by an application name. For instance, when you launched
CriminalIntent from NerdLauncher, the OS created a CriminalIntent process and a new task for which
CrimeListActivity is the base activity. In the task manager, this task is labeled CriminalIntent.
The task that an activity lives in can be different from the process it lives in. When you launched the
contacts application to choose a suspect in CriminalIntent, it was launched into the CriminalIntent task.
However, it was running in the contacts application’s process.
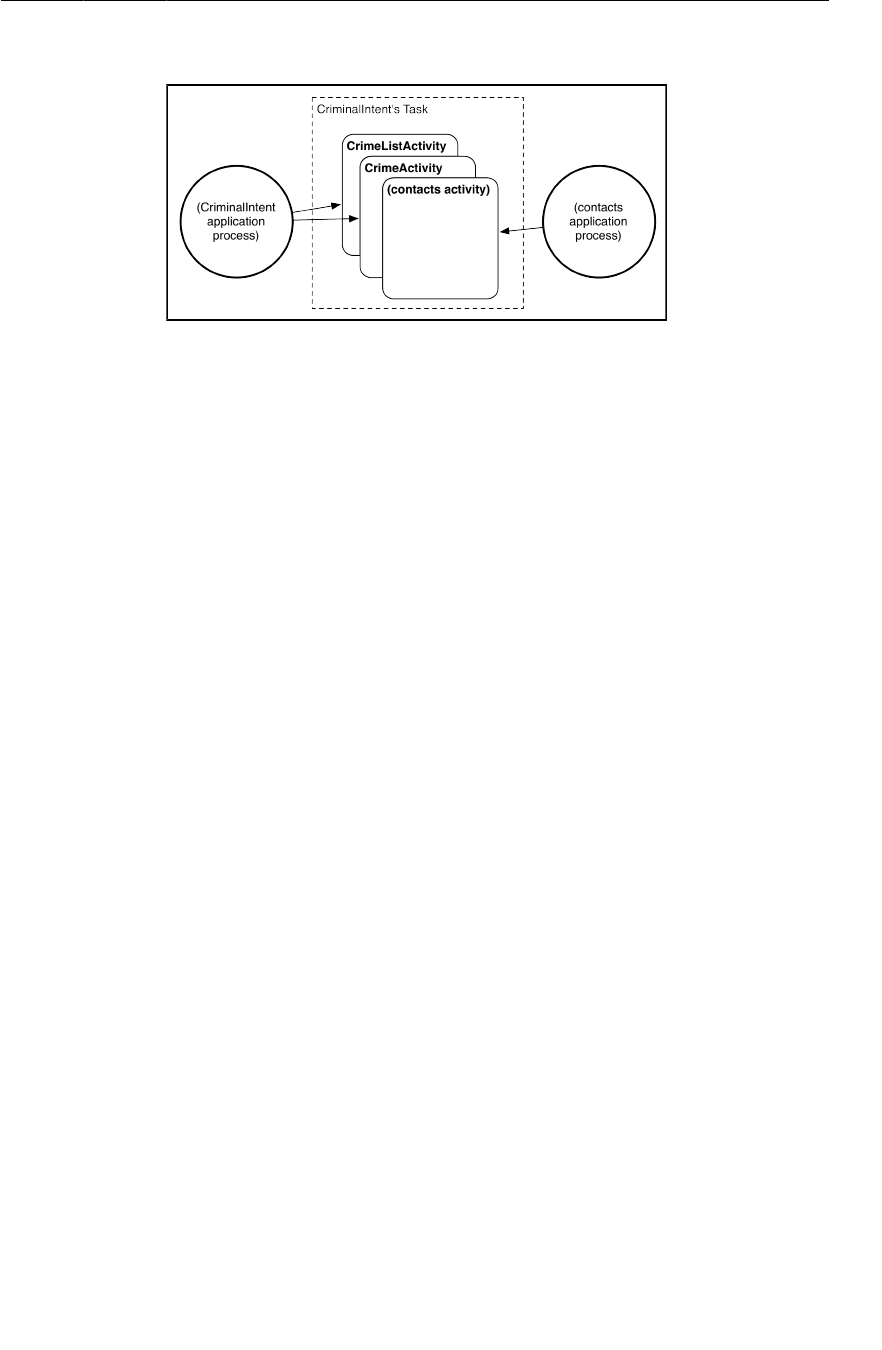
ptg11078569
For the More Curious: Processes vs. Tasks
385
Figure 23.6Tasks and processes
This means that when your user presses the Back button to navigate between different activities, he or
she may be unknowingly switching between processes. Which is nifty.
In this chapter, you created tasks and switched between them. What about killing tasks or replacing
Android’s default task manager? Unfortunately, Android doesn’t provide any way to do either of these
things. A long press on the Home button is hard-wired to the default task manager, and tasks cannot
be killed. Processes, on the other hand, can be killed. Apps advertised on the Google Play store as task
killers are, in fact, process killers.

ptg11078569
This page intentionally left blank
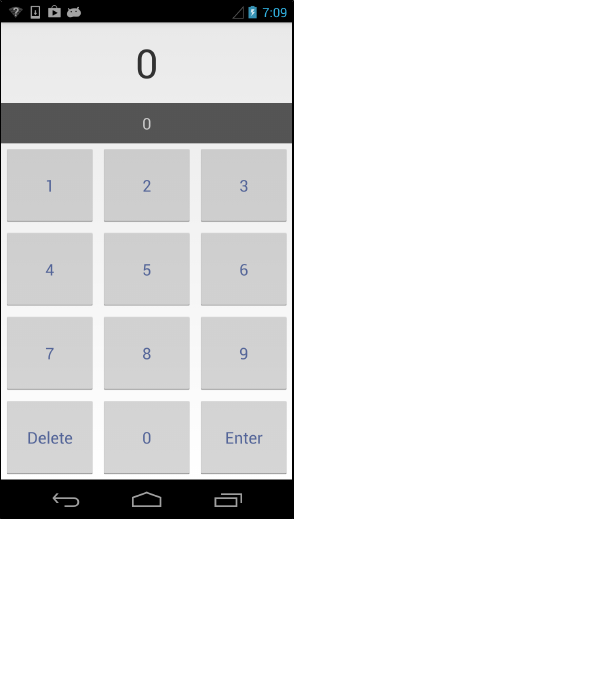
ptg11078569
387
24
Styles And Includes
While your first priority is making your app function well, you also have to pay attention to how it
looks and how it feels to use. The app marketplace is huge and you can distinguish your app with a
nice UI.
Even if a specialist designs the UI, you will have to implement it. So in this chapter you will become
familiar with some tools that you can use to quickly prototype a design on your own. When you do
work with a graphic designer, you will know what to ask for, and how to use the resources that they
create.
In these two chapters, you will create a television remote control app. However, it will not actually
control anything; it is just a playground for practicing using design tools. In this chapter, you will use
styles and includes to create the remote shown in Figure24.1.
Figure 24.1RemoteControl
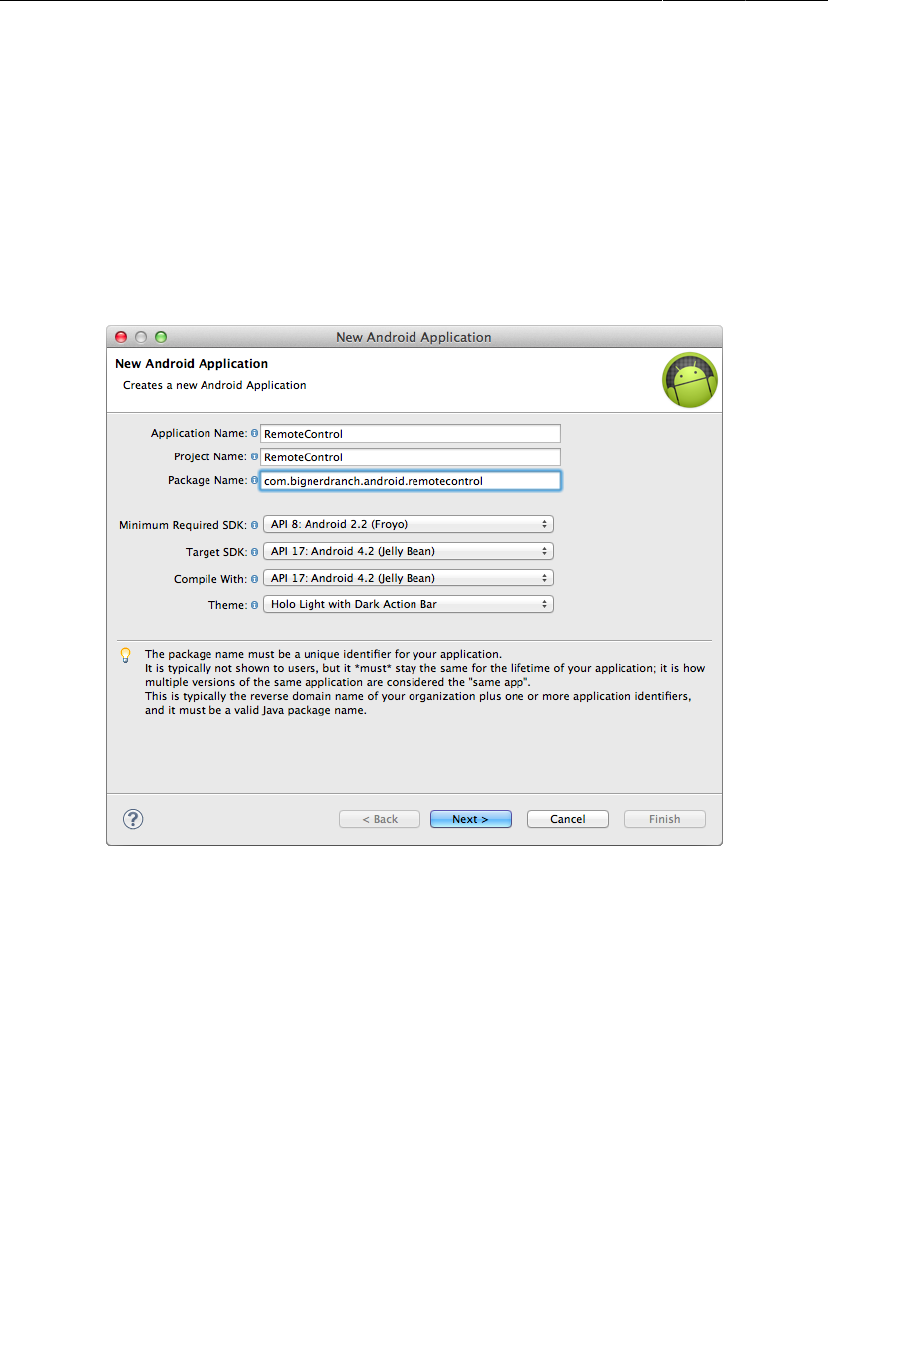
ptg11078569
Chapter 24Styles And Includes
388
RemoteControl will have the single activity seen above. The area at the top will display the current
channel. The area underneath will display a new channel as it is being entered. Pressing Delete will
clear out the channel entry display. Pressing Enter will change the channel, updating the current
channel display and clearing the channel entry display.
Setting Up the RemoteControl Project
Create a new Android Application project and begin configuring it as shown in Figure24.2.
Figure 24.2RemoteControl
Then have the wizard create a blank activity named RemoteControlActivity.
Setting up RemoteControlActivity
RemoteControlActivity will be a SingleFragmentActivity subclass,
so copy SingleFragmentActivity.java from CriminalIntent into the
com.bignerdranch.android.remotecontrol package. Then copy activity_fragment.xml into
RemoteControl’s res/layout directory.
Open RemoteControlActivity.java. Make RemoteControlActivity a subclass of
SingleFragmentActivity that creates a RemoteControlFragment. (You will create that fragment class
in just a moment.) Finally, override RemoteControlActivity.onCreate(…) to hide the activity’s action
or title bar.

ptg11078569
Setting up RemoteControlFragment
389
Listing 24.1RemoteControlActivity set-up
(RemoteControlActivity.java)
public class RemoteControlActivity extends Activity SingleFragmentActivity {
@Override
public void onCreate(Bundle savedInstanceState) {
super.onCreate(savedInstanceState);
setContentView(R.layout.activity_remote_control);
}
@Override
public boolean onCreateOptionsMenu(Menu menu) {
getMenuInflater().inflate(R.menu.activity_remote_control, menu);
return true;
}
@Override
protected Fragment createFragment() {
return new RemoteControlFragment();
}
@Override
public void onCreate(Bundle savedInstanceState) {
requestWindowFeature(Window.FEATURE_NO_TITLE);
super.onCreate(savedInstanceState);
}
}
Next, open AndroidManifest.xml and limit this activity to portrait orientation:
Listing 24.2Lock to portrait orientation (AndroidManifest.xml)
<activity
android:name="com.bignerdranch.android.remotecontrol.RemoteControlActivity"
android:label="@string/app_name"
android:screenOrientation="portrait">
<intent-filter>
<action android:name="android.intent.action.MAIN" />
<category android:name="android.intent.category.LAUNCHER" />
</intent-filter>
</activity>
Setting up RemoteControlFragment
In the package explorer, rename activity_remote_control.xml to fragment_remote_control.xml.
At first, you are going to create a three-button remote control to keep things simple. Replace the
contents of fragment_remote_control.xml with the XML shown in Listing 24.3.
Listing 24.3Initial three-button layout (layout/
fragment_remote_control.xml)
<RelativeLayout xmlns:android="http://schemas.android.com/apk/res/android"

ptg11078569
Chapter 24Styles And Includes
390
xmlns:tools="http://schemas.android.com/tools"
android:layout_width="match_parent"
android:layout_height="match_parent"
tools:context=".RemoteControlActivity" >
<TextView
android:layout_width="wrap_content"
android:layout_height="wrap_content"
android:layout_centerHorizontal="true"
android:layout_centerVertical="true"
android:text="@string/hello_world" />
</RelativeLayout>
<TableLayout xmlns:android="http://schemas.android.com/apk/res/android"
android:id="@+id/fragment_remote_control_tableLayout"
android:layout_width="match_parent"
android:layout_height="match_parent"
android:stretchColumns="*" >
<TextView
android:id="@+id/fragment_remote_control_selectedTextView"
android:layout_width="match_parent"
android:layout_height="0dp"
android:layout_weight="2"
android:gravity="center"
android:text="0"
android:textSize="50dp" />
<TextView
android:id="@+id/fragment_remote_control_workingTextView"
android:layout_width="match_parent"
android:layout_height="0dp"
android:layout_weight="1"
android:layout_margin="15dp"
android:background="#555555"
android:gravity="center"
android:text="0"
android:textColor="#cccccc"
android:textSize="20dp" />
<TableRow android:layout_weight="1" >
<Button
android:id="@+id/fragment_remote_control_zeroButton"
android:layout_width="0dp"
android:layout_height="match_parent"
android:text="0" />
<Button
android:id="@+id/fragment_remote_control_oneButton"
android:layout_width="0dp"
android:layout_height="match_parent"
android:text="1" />
<Button
android:id="@+id/fragment_remote_control_enterButton"
android:layout_width="0dp"
android:layout_height="match_parent"
android:text="Enter" />
</TableRow>
</TableLayout>
Note that android:stretchColumns="*" ensures that your columns will be the same width. Also, you
are using dp units for your text size instead of sp. This means the text will be the same size regardless
of the user’s settings.

ptg11078569
Setting up RemoteControlFragment
391
Finally, create a new class named RemoteControlFragment. Make its superclass
android.support.v4.app.Fragment. In RemoteControlFragment.java, override onCreateView(…) to
wire up the buttons.
Listing 24.4RemoteControlFragment set-up
(RemoteControlFragment.java)
public class RemoteControlFragment extends Fragment {
private TextView mSelectedTextView;
private TextView mWorkingTextView;
@Override
public View onCreateView(LayoutInflater inflater, ViewGroup parent,
Bundle savedInstanceState) {
View v = inflater.inflate(R.layout.fragment_remote_control, parent, false);
mSelectedTextView = (TextView)v
.findViewById(R.id.fragment_remote_control_selectedTextView);
mWorkingTextView = (TextView)v
.findViewById(R.id.fragment_remote_control_workingTextView);
View.OnClickListener numberButtonListener = new View.OnClickListener() {
public void onClick(View v) {
TextView textView = (TextView)v;
String working = mWorkingTextView.getText().toString();
String text = textView.getText().toString();
if (working.equals("0")) {
mWorkingTextView.setText(text);
} else {
mWorkingTextView.setText(working + text);
}
}
};
Button zeroButton = (Button)v
.findViewById(R.id.fragment_remote_control_zeroButton);
zeroButton.setOnClickListener(numberButtonListener);
Button oneButton = (Button)v
.findViewById(R.id.fragment_remote_control_oneButton);
oneButton.setOnClickListener(numberButtonListener);
Button enterButton = (Button) v
.findViewById(R.id.fragment_remote_control_enterButton);
enterButton.setOnClickListener(new View.OnClickListener() {
public void onClick(View v) {
CharSequence working = mWorkingTextView.getText();
if (working.length() > 0)
mSelectedTextView.setText(working);
mWorkingTextView.setText("0");
}
});
return v;
}
}
While you have three buttons here, you only need two click listeners. That is because you can use the
same click listener for both number buttons. When you click a number button, you either add another
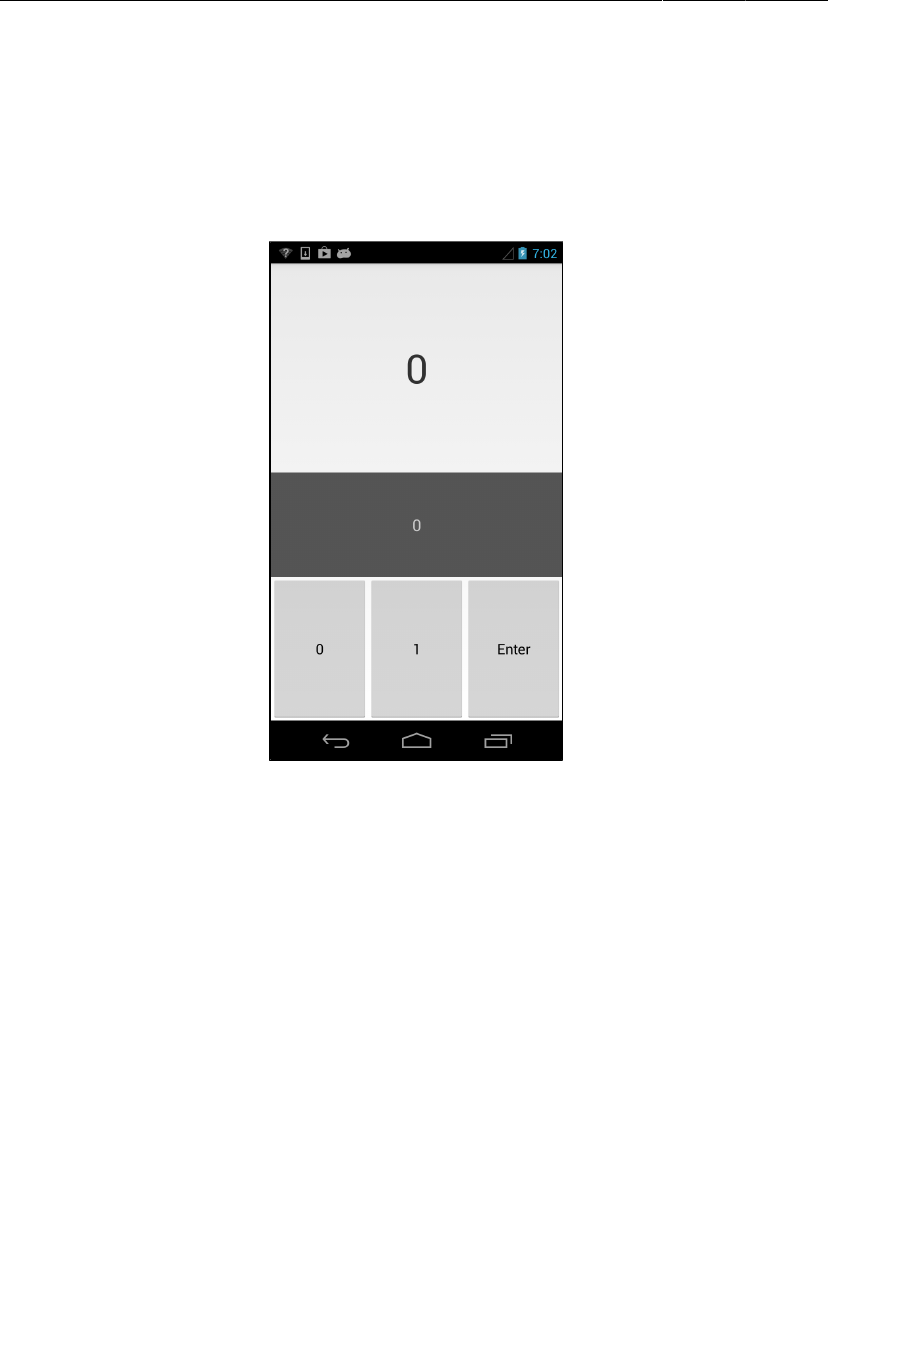
ptg11078569
Chapter 24Styles And Includes
392
number to the working text view or replace it with the number you clicked, depending on whether 0
is the current entered text. Then when you press Enter, the working text is moved to the selected text
view and cleared out.
Run RemoteControl. You should see a simple three-button remote control app with a binary interface.
Who needs more than two buttons, anyway?
Figure 24.3If it was good enough for Philo T. Farnsworth...
Cleaning Up with Styles
Now that you have a working project, take a look at your layout XML. Each button is identical. That
is fine for now, but if you want to add an attribute to a button, you will have to repeat your work three
times. And what about when you have twelve buttons?
Happily, Android has UI styles, which are meant to eliminate that repetition. Style resources are
similar to CSS styles. Each style defines a set of XML attribute-value pairs. Styles can be organized
into a hierarchy: a child has the same attributes and values as its parent, but may override them or add
additional values.
Like string resources, styles are defined inside of a <resources> tag in an XML file in your res/
values folder. Also like strings, the filename is unimportant, but by convention styles are put in
styles.xml.
The Android project wizard has created a styles.xml file for you already. (Notice that this file already
defines the RemoteControl app’s theme – a stock Android one – which sets the look of the buttons,
backgrounds, and other common elements.)

ptg11078569
Cleaning Up with Styles
393
You are now going to move the attributes that are common to all your buttons out of the individual
buttons and into a new RemoteButton style. Add your new style to the style file as shown below.
Listing 24.5Initial RemoteControl styles (values/styles.xml)
<resources>
<style name="AppTheme" parent="android:Theme.Light" />
<style name="RemoteButton">
<item name="android:layout_width">0dp</item>
<item name="android:layout_height">match_parent</item>
</style>
</resources>
Each style is defined by a <style> element with one or more <item> elements. Each item has a name,
which is the name of an XML attribute, and the text inside the element is the value to apply to the
attribute.
You only have one style here, called RemoteButton, and it does not do much. Just wait, this style soon
will have you styling.
To use a style, you refer to it in a style attribute on a view in your layout. Modify
fragment_remote_control.xml to delete your old attributes and use your new style instead:
Listing 24.6Applying styles (layout/fragment_remote_control.xml)
<TableLayout xmlns:android="http://schemas.android.com/apk/res/android"
...
>
...
<TableRow android:layout_weight="1" >
<Button
android:id="@+id/fragment_remote_control_zeroButton"
android:layout_width="0dp"
android:layout_height="match_parent"
style="@style/RemoteButton"
android:text="0" />
<Button
android:id="@+id/fragment_remote_control_oneButton"
android:layout_width="0dp"
android:layout_height="match_parent"
style="@style/RemoteButton"
android:text="1" />
<Button
android:id="@+id/fragment_remote_control_enterButton"
android:layout_width="0dp"
android:layout_height="match_parent"
style="@style/RemoteButton"
android:text="Enter" />
</TableRow>
</TableLayout>
Run RemoteControl. Your remote looks exactly the same as it did before. But your layout looks
cleaner and you are repeating yourself less.

ptg11078569
Chapter 24Styles And Includes
394
Finishing the Layout
Now that you have your styles set up, you can save some serious time. Let’s flesh out the remote
control interface to a full, luxurious 12-key version, complete with ten deluxe decimal digits.
Now you need to create a 3 x 4 array of nearly identical buttons. But there’s no need to code them all
individually. You can create one row of three buttons and then use it four times. Create a new file called
res/layout/button_row.xml and move the row of buttons you have already defined into it.
Listing 24.7A row of three buttons (layout/button_row.xml)
<?xml version="1.0" encoding="utf-8"?>
<TableRow xmlns:android="http://schemas.android.com/apk/res/android" >
<Button style="@style/RemoteButton" />
<Button style="@style/RemoteButton" />
<Button style="@style/RemoteButton" />
</TableRow>
Now, you just need to “include” this row into the layout four times. How do you do that? With the
include tag:
Listing 24.8Including the button rows in the main layout (layout/
fragment_remote_control.xml)
<TableRow android:layout_weight="1" >
<Button
android:id="@+id/fragment_remote_control_zeroButton"
style="@style/RemoteButton"
android:text="0" />
<Button
android:id="@+id/fragment_remote_control_oneButton"
style="@style/RemoteButton"
android:text="1" />
<Button
android:id="@+id/fragment_remote_control_enterButton"
style="@style/RemoteButton"
android:text="Enter" />
</TableRow>
<include
android:layout_weight="1"
layout="@layout/button_row" />
<include
android:layout_weight="1"
layout="@layout/button_row" />
<include
android:layout_weight="1"
layout="@layout/button_row" />
<include
android:layout_weight="1"
layout="@layout/button_row" />
You may have noticed that the three buttons you defined in layout/button_row.xml did not have ids.
Since you included this button row four times, if you had given the buttons ids, then they would not be
unique. Similarly, the buttons do not have any text defined. It’s okay, you can handle it all in code. Now
rewire the buttons and set their text using this code.

ptg11078569
Finishing the Layout
395
Listing 24.9Wiring up the number buttons (RemoteControlFragment.java)
View.OnClickListener numberButtonListener = new View.OnClickListener() {
...
};
Button zeroButton = (Button)v.findViewById(R.id.fragment_remote_control_zeroButton);
zeroButton.setOnClickListener(numberButtonListener);
Button oneButton = (Button)v.findViewById(R.id.fragment_remote_control_oneButton);
oneButton.setOnClickListener(numberButtonListener);
TableLayout tableLayout = (TableLayout)v
.findViewById(R.id.fragment_remote_control_tableLayout);
int number = 1;
for (int i = 2; i < tableLayout.getChildCount() - 1; i++) {
TableRow row = (TableRow)tableLayout.getChildAt(i);
for (int j = 0; j < row.getChildCount(); j++) {
Button button = (Button)row.getChildAt(j);
button.setText("" + number);
button.setOnClickListener(numberButtonListener);
number++;
}
}
The for loop starts at index 2 to skip the two text views and then steps through each button in the first
three rows. For each button, it sets the same numberButtonListener you created earlier and sets the
text to a string of the appropriate number.
That takes care of three rows of buttons. The last row is trickier: you have to deal with the special cases
of the Delete and Enter buttons. Finish things up:
Listing 24.10Wiring up the last row (RemoteControlFragment.java)
for (int i = 2; i < tableLayout.getChildCount() - 1; i++) {
...
}
TableRow bottomRow = (TableRow)tableLayout
.getChildAt(tableLayout.getChildCount() - 1);
Button deleteButton = (Button)bottomRow.getChildAt(0);
deleteButton.setText("Delete");
deleteButton.setOnClickListener(new View.OnClickListener() {
public void onClick(View v) {
mWorkingTextView.setText("0");
}
});
Button zeroButton = (Button)bottomRow.getChildAt(1);
zeroButton.setText("0");
zeroButton.setOnClickListener(numberButtonListener);
Button enterButton = (Button)
v.findViewById(R.id.fragment_remote_control_enterButton);
Button enterButton = (Button)bottomRow.getChildAt(2);
enterButton.setText("Enter");
enterButton.setOnClickListener(new View.OnClickListener() {
...
});
ptg11078569
Chapter 24Styles And Includes
396
You have a fully functioning non-functional remote. Run your app and play with it. We leave the work
of connecting wirelessly to an actual television as an exercise for the reader.
Figure 24.4The channel that gives meaning to life
Now that you have your buttons styled, you can change their look in one fell swoop. Add these three
lines to your RemoteButton style:
Listing 24.11Tweaking your style a little bit (values/styles.xml)
<style name="RemoteButton">
<item name="android:layout_width">0dp</item>
<item name="android:layout_height">match_parent</item>
<item name="android:textColor">#556699</item>
<item name="android:textSize">20dp</item>
<item name="android:layout_margin">3dp</item>
</style>
Bazam – you are the button king.
ptg11078569
For the More Curious: include and merge
397
Figure 24.5They all look the same!
For the More Curious: include and merge
Earlier in the chapter you used the include tag to include a row of RemoteButtons multiple times (into
the same layout). It works in the obvious way:
<include layout="@layout/some_partial_layout"/>
The above include will include the contents of the layout file whose resource ID is @layout/
some_partial_layout.
You can use include to reduce duplication in a single layout, as you did earlier in this chapter, or you
can use it to reduce duplication between layouts. If you have some chunk of a layout that occurs in two
or more layouts, you can just create that chunk as a layout and include it wherever it is needed. Then
when you need to update it, you only have to do it in a single place.
There are two more things you should know about include. First, the layout that you include will
go through the normal resource search based on the current device configuration. So you can use
configuration qualifiers just like with any layout. Second, you can override the android:id and
any android:layout_* attributes of the root element of the included layout by specifying them on
the include tag itself. This allows you to include the same layout multiple times and use different
attributes each time you include it.
The merge element works with the include element. merge can be used as the root element of an
included layout instead of an actual widget. When one layout includes another layout that has merge as
its root element, the children of the merge element are directly included – they become children of the
parent of the include element and the merge element is discarded.

ptg11078569
Chapter 24Styles And Includes
398
This is simpler than it sounds. If it is confusing, just remember that the merge element is discarded. It is
only there to satisfy the XML requirement that there be a single instance of the root element.
Challenge: Style Inheritance
Your Delete and Enter buttons are sitting modestly at the bottom of the screen with the same style as all
the number buttons. These “action” buttons need a bolder style.
For this small challenge, make those buttons look special. Create a new button style that inherits from
your RemoteButton style and sets a bold text style attribute. Then make your bottom row use your new
style for the first and third buttons.
Creating a style that inherits from another is simple. There are two ways to do it. One is to set the
parent attribute of your style to the name of the style you want to inherit from. The easier way is to
just prefix your style name with your parent’s style, then a dot – e.g., ParentStyleName.MyStyleName.
ptg11078569
399
25
XML Drawables And 9-Patches
In the last chapter, you quickly built a TV remote control interface using advanced layout tips and
tricks. It looks okay, but maybe a little drab because it uses the stock Android look and feel for all of its
buttons. In this chapter, you will use two new tools to give it a completely unique look and feel.
Figure 25.1RemoteControl makeover
Both of these tools are drawables. Android calls anything that is intended to be drawn to the screen a
drawable, whether it is an abstract shape, a clever bit of code that subclasses the Drawable class, or a
bitmap image. You have already seen one kind of drawable: BitmapDrawable, which wraps an image.
In this chapter, you will see a few more kinds of drawables: state list drawables, shape drawables,
layer list drawables, and nine patch drawables. Since the first three are usually defined in XML files,
we group them together in the broader category of XML drawables.
ptg11078569
Chapter 25XML Drawables And 9-Patches
400
XML Drawables
Before you tackle any XML drawables, try this: use the android:background attribute to change the
background color of your buttons.
Listing 25.1An attempt at changing the button’s color (values/styles.xml)
<style name="RemoteButton">
<item name="android:layout_width">0dp</item>
<item name="android:layout_height">match_parent</item>
<item name="android:textColor">#556699</item>
<item name="android:textSize">20dp</item>
<item name="android:layout_margin">3dp</item>
<item name="android:background">#ccd7ee</item>
</style>
You should see something like this:
Figure 25.2What happened?
The 3-dimensional look of the buttons is gone. If you press one of them, you will find that it no longer
changes its appearance when you press it, either.
Why did all that happen from one innocent attribute change? The Button class is not much more than
a View with a default style applied to it. The style comes from whatever theme you have selected, and

ptg11078569
XML Drawables
401
sets a Drawable as the background. That background drawable was responsible for the 3-D look and
the appearance change. By the end of this chapter, you will know how to make your own drawables
that are just as capable.
You will start by creating colored shapes with ShapeDrawables in XML. Since XML drawables are not
density specific, they are usually placed in the default drawable folder instead of a density-specific one.
In the package explorer, create a default res/drawable directory. In this directory, create a new XML
file named button_shape_normal.xml. Make its root element shape. (Why is this one “normal”?
Because soon it will have a not-so-normal friend.)
Listing 25.2Making a shape drawable button (drawable/
button_shape_normal.xml)
<?xml version="1.0" encoding="utf-8"?>
<shape xmlns:android="http://schemas.android.com/apk/res/android"
android:shape="rectangle" >
<corners android:radius="3dp" />
<gradient
android:angle="90"
android:endColor="#cccccc"
android:startColor="#acacac" />
</shape>
This file defines a rounded rectangle. The corners element specifies the corner radius for your rounded
rectangle, and the gradient elements specify the direction and the start and end colors for a color
gradient.
You can use shape to create other shapes, such as ovals, lines, and rings, and give them different
looks. Check out the documentation at http://developer.android.com/guide/topics/resources/
drawable-resource.html for details.
In styles.xml, update your Button style to use your new Drawable as a background.
Listing 25.3Update button style (values/styles.xml)
<style name="RemoteButton">
<item name="android:layout_width">0dp</item>
<item name="android:layout_height">match_parent</item>
<item name="android:textColor">#556699</item>
<item name="android:textSize">20dp</item>
<item name="android:layout_margin">3dp</item>
<item name="android:background">#ccd7ee</item>
<item name="android:background">@drawable/button_shape_normal</item>
</style>
Run RemoteControl and see the difference.
ptg11078569
Chapter 25XML Drawables And 9-Patches
402
Figure 25.3Now with rounded-corner buttons
State List Drawables
As good as they look, these buttons are still static. Under the covers, the old Button background was
using a state list drawable. State list drawables allow you to display a different drawable for each state
its associated View is in. (You previously used a state list drawable to change the background of list
items in Chapter18.) There are a lot of different states, but here you are only interested in whether the
button is being pressed or not.
Start off by creating the look for your pressed button. This look will be same as the normal button look
except for the color.
In the package explorer, make a copy of button_shape_normal.xml and name it
button_shape_pressed.xml. Open button_shape_pressed.xml and add 180 degrees to the angle to
switch the direction of the gradient:

ptg11078569
State List Drawables
403
Listing 25.4Creating the shape for a pressed button (drawable/
button_shape_pressed.xml)
<?xml version="1.0" encoding="utf-8"?>
<shape xmlns:android="http://schemas.android.com/apk/res/android"
android:shape="rectangle" >
<corners android:radius="3dp" />
<gradient
android:angle="90"
android:angle="270"
android:endColor="#cccccc"
android:startColor="#acacac" />
</shape>
Next you need a state list drawable. A state list drawable must have a selector root element and one
or more item elements that describe different states. Right-click res/drawable/, create a new XML
file named button_shape.xml, and give it a selector root element.
Listing 25.5Creating an interactive button shape (drawable/
button_shape.xml)
<?xml version="1.0" encoding="utf-8"?>
<selector xmlns:android="http://schemas.android.com/apk/res/android">
<item android:drawable="@drawable/button_shape_normal"
android:state_pressed="false"/>
<item android:drawable="@drawable/button_shape_pressed"
android:state_pressed="true"/>
</selector>
The unpressed button has dark text, which used to work well against a light background. Now that the
background is darker, a light color will look better when the button is unpressed, and you can use the
dark color with the pressed background. You can create state list colors as well as state list shapes, so
this is easy to do.
Right-click res/drawable/ and create another state list drawable named button_text_color.xml.
Listing 25.6State-sensitive button text color (drawable/
button_text_color.xml)
<?xml version="1.0" encoding="utf-8"?>
<selector xmlns:android="http://schemas.android.com/apk/res/android">
<item android:state_pressed="false" android:color="#ffffff"/>
<item android:state_pressed="true" android:color="#556699"/>
</selector>
Now, in styles.xml, change your Button style to point to your new background drawable and your
new text color.
ptg11078569
Chapter 25XML Drawables And 9-Patches
404
Listing 25.7Updating the button style (values/styles.xml)
<style name="RemoteButton">
<item name="android:layout_width">0dp</item>
<item name="android:layout_height">match_parent</item>
<item name="android:textColor">#556699</item>
<item name="android:textSize">20dp</item>
<item name="android:layout_margin">3dp</item>
<item name="android:background">@drawable/button_shape_normal</item>
<item name="android:background">@drawable/button_shape</item>
<item name="android:textColor">@drawable/button_text_color</item>
</style>
Run RemoteControl. Check out the new look of your pressed button.
Figure 25.4A pressed button
Layer List and Inset Drawables
The stock Android buttons you saw in the initial version of your app had a shadow effect.
Unfortunately, shape drawables have no shadow property. But you can make the shadow effect yourself
using two other XML drawable types: layer list drawables and inset drawables.
Here is how you will do it. First, you will create a shadow with the same shape as your current button
drawable. Then you will combine it with the current button using layer-list, and offset the bottom
edge of the button a tad using inset so that the shadow becomes visible underneath.

ptg11078569
Layer List and Inset Drawables
405
Create a new XML file in res/drawable/. Name it button_shape_shadowed.xml and make its root
element layer-list.
Listing 25.8Normal button shadows (drawable/
button_shape_shadowed.xml)
<?xml version="1.0" encoding="utf-8"?>
<layer-list xmlns:android="http://schemas.android.com/apk/res/android" >
<item>
<shape android:shape="rectangle" >
<corners android:radius="5dp" />
<gradient
android:angle="90"
android:centerColor="#303339"
android:centerY="0.05"
android:endColor="#000000"
android:startColor="#00000000" />
</shape>
</item>
<item>
<inset
android:drawable="@drawable/button_shape"
android:insetBottom="5dp" />
</item>
</layer-list>
The layer list contains multiple Drawables, ordered from back to front as they will be drawn on the
screen. The second drawable in your list is an inset drawable. All it does is inset the bottom of the
drawable you already created by 5dp, so that it sits above the shadow you created.
Notice also that instead of using separate files for your shadow drawable, you directly embedded it in
the layer list. This technique works just as well for other drawables, too, like your state list drawable
above. Whether to nest your drawables or break them out into their own files as you did earlier is a
judgment call. Breaking them out can reduce code duplication and simplify each file, but it also litters
your drawable/ folder with additional files. Write whatever you find easiest to read and understand.
In styles.xml, change your button style to point at the new shadowed drawable.
Listing 25.9Change button style one last time (values/styles.xml)
<style name="RemoteButton">
<item name="android:layout_width">0dp</item>
<item name="android:layout_height">match_parent</item>
<item name="android:textSize">20dp</item>
<item name="android:layout_margin">3dp</item>
<item name="android:background">@drawable/button_shape</item>
<item name="android:background">@drawable/button_shape_shadowed</item>
<item name="android:textColor">@drawable/button_text_color</item>
</style>
One last change: create a gradient drawable for the entire main view, for a subtle lighting effect.
Create a new drawable file named remote_background.xml with a shape root element. Then add the
following to it. (Note: if a shape is not specified, rectangle is assumed.)

ptg11078569
Chapter 25XML Drawables And 9-Patches
406
Listing 25.10New background drawable for the root view (drawable/
remote_background.xml)
<?xml version="1.0" encoding="utf-8"?>
<shape xmlns:android="http://schemas.android.com/apk/res/android" >
<gradient
android:centerY="0.05"
android:endColor="#dbdbdb"
android:gradientRadius="500"
android:startColor="#f4f4e9"
android:type="radial" />
</shape>
Edit the fragment_remote_control.xml file to include the new drawable.
Listing 25.11Applying the drawable to the layout (layout/
fragment_remote_control.xml)
<TableLayout xmlns:android="http://schemas.android.com/apk/res/android"
xmlns:tools="http://schemas.android.com/tools"
android:id="@+id/fragment_remote_control_tableLayout"
android:layout_width="match_parent"
android:layout_height="match_parent"
android:background="@drawable/remote_background"
android:stretchColumns="*" >
Throughout all of these changes, you haven’t done anything to the fragment layout file. (Except for that
last change, and of course you could have made a new style for the TableLayout itself.) This is good,
since you aren’t changing the content of the layout, but its presentation. Adding new buttons or moving
things around would require you to update the layout file, but changes to the look you can do in the
style instead.
Using 9-Patch Images
If you enlist a professional designer to craft your UI, what they give you may not be achievable with
XML drawables. It may still be possible to reuse the rendered asset in multiple places, though. For
stretchable UI elements like button backgrounds, Android provides a tool called the 9-patch.
Your next task is to fix up the two TextViews at the top of the screen. You will keep your button layout
the same, but use stretchable drawables for their backgrounds. Both of them are much narrower than
your TextViews, so that they do not take up much space. The first one, window.png, is a stretchable
background designed to give your TextView a tasteful fade, along with some border space on the
edges.
ptg11078569
Using 9-Patch Images
407
Figure 25.5Channel display window
The other, bar.png, gives a small shadow at the bottom and a thin border at the top. We have zoomed
in on it quite a bit – it is pretty small.
Figure 25.6Channel entry area
You can find these images in the solutions file in the 25_XMLDrawables/RemoteControl/res/
drawable-hdpi directory. Copy them into RemoteControl’s /res/drawable-hdpi folder.
Modify the fragment_remote_control.xml file to include these images as backgrounds for the
appropriate views. Change the text colors to something more appropriate to the new backgrounds, too
– switch the top one to white, and switch the bottom one back to the default, black. And then set the
bottom TextView to italics, because it looks neat.

ptg11078569
Chapter 25XML Drawables And 9-Patches
408
Listing 25.12Adding the drawables to the styles (layout/
fragment_remote_control.xml)
<TableLayout xmlns:android="http://schemas.android.com/apk/res/android"
... >
<TextView
android:id="@+id/fragment_remote_control_selectedTextView"
android:layout_width="match_parent"
android:layout_height="0dp"
android:layout_weight="2"
android:background="@drawable/window"
android:gravity="center"
android:text="0"
android:textColor="#ffffff"
android:textSize="50dp" />
<TextView
android:id="@+id/fragment_remote_control_workingTextView"
android:layout_width="match_parent"
android:layout_height="0dp"
android:layout_margin="15dp"
android:layout_weight="1"
android:background="#555555"
android:background="@drawable/bar"
android:gravity="center"
android:text="0"
android:textColor="#cccccc"
android:textStyle="italic"
android:textSize="20dp" />
...
</TableLayout>
Check out what happens when you run the app:
ptg11078569
Using 9-Patch Images
409
Figure 25.7Shattered dreams
Each image was evenly stretched in all dimensions to fill the view. In some cases that is exactly what
you want, but not here. Your images are all fuzzed out, and your bottom TextView’s digits are not
properly centered.
You can use 9-patch images to fix this problem. A 9-patch image file is specially formatted so that
Android knows which portions can and cannot be scaled. Done properly, this ensures that the edges
and corners of your background remain consistent with the image as it was created.
Why are they called 9-patches? A 9-patch breaks your image into a 3 x 3 grid – a grid with 9 sections,
or patches. The corners of the grid remain unscaled, the sides are only scaled in one dimension, and the
center is scaled in both dimensions.
Figure 25.8What a 9-patch does

ptg11078569
Chapter 25XML Drawables And 9-Patches
410
A 9-patch image is like a regular png image in everything except two aspects: its filename ends with
.9.png, and it has an additional one pixel border around the edge. This border is used to specify the
location of the center square of the nine patch. Border pixels are drawn black to indicate the center and
transparent to indicate the edges.
You can create a 9-patch using any image editor, but it is easier to use the draw9patch tool provided
as part of the Android SDK. You can find it in the tools directory of your SDK installation. Once it’s
running, you can drag files into it or open them from the File menu.
Once the file is open, fill in black pixels on the top and left borders to mark the stretchable regions of
the image. Add pixels to window.png as seen below.
Figure 25.9Channel display window 9-patch
The top and left borders mark the stretchable region of the image. What about the bottom and right
borders? They define an optional drawable region for the 9-patch image. The drawable region is
the area where content (usually text) should be rendered. If you do not include a drawable region,
it defaults to be the same as your stretchable region. This is what you want here, so you omit the
drawable region.
When you are done, save your results to a file called window_patch.9.png. Be careful that your 9-
patch files do not conflict with your other images – your application would fail to build if you had one
file named window.9.png and another named window.png.
Next, edit a 9-patch for bar.png. Use the drawable region here to center your text properly vertically
and horizontally, as well as provide for a 4 pixel margin on all sides.
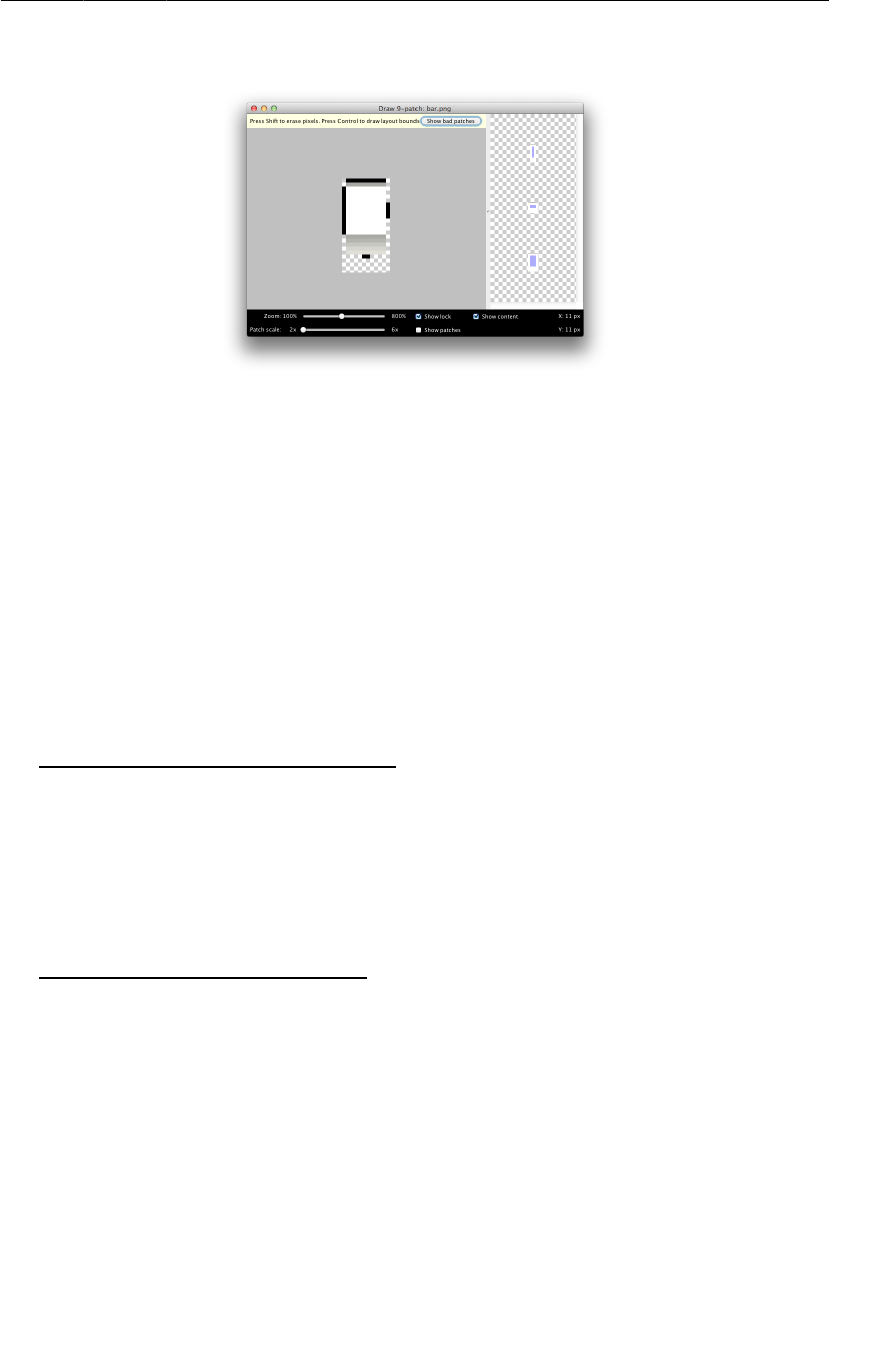
ptg11078569
Using 9-Patch Images
411
Figure 25.10Channel entry area 9-patch
When you finish, save out to bar_patch.9.png.
Next, right-click your res/ folder and click Refresh. Eclipse lives in its own little world, and Refresh
reminds it to wake up and look at the file system again.
Finally, switch your two TextViews over to use your 9-patch drawables instead of the plain old images.
Listing 25.13Switch to use 9-patches (layout/
fragment_remote_control.xml)
<TableLayout xmlns:android="http://schemas.android.com/apk/res/android"
... >
<TextView
android:id="@+id/fragment_remote_control_selectedTextView"
android:layout_width="match_parent"
android:layout_height="0dp"
android:layout_weight="2"
android:background="@drawable/window"
android:background="@drawable/window_patch"
android:gravity="center"
android:text="0"
android:textSize="50dp" />
<TextView
android:id="@+id/fragment_remote_control_workingTextView"
android:layout_width="match_parent"
android:layout_height="0dp"
android:layout_margin="15dp"
android:layout_weight="1"
android:background="@drawable/bar"
android:background="@drawable/bar_patch"
android:gravity="center"
android:text="0"
android:textColor="#cccccc"
android:textSize="20dp" />
...
</TableLayout>
Run your app. Voilà! You now have working image backgrounds. Remember how plain your initial
interface looked? It didn’t take a whole lot of time to create something far more interesting. Imagine
ptg11078569
Chapter 25XML Drawables And 9-Patches
412
what you will be able to do with superior design work. Making your app a pleasure to look at makes it
feel fine to use, and that will pay off in popularity.
Figure 25.11RemoteControl made over
ptg11078569
413
26
HTTP & Background Tasks
The apps that dominate the brains of users are networked apps. Those people fiddling with their phones
instead of talking to each other at dinner? They are maniacally checking their newsfeeds, responding to
text messages, or playing networked games.
To get started with networking in Android, you are going to create a new app called PhotoGallery.
PhotoGallery is a client for the photo-sharing site Flickr. It will fetch and display the most recent
public photos uploaded to Flickr. Figure26.1 gives you an idea of what the app will look like.
Figure 26.1Complete PhotoGallery
(Figure26.1 shows photos that are ours instead of public photos from Flickr. The photos on Flickr are
the property of the person who posted them and may not be re-used without that person’s permission.
To read more about permissions for using third-party content that you retrieve from Flickr, visit
http://pressroom.yahoo.net/pr/ycorp/permissions.aspx.)
ptg11078569
Chapter 26HTTP & Background Tasks
414
You will spend six chapters with PhotoGallery. It will take two chapters for you to get the basics
of downloading and parsing XML and displaying images up and running. Once that is done, in
subsequent chapters you will add on additional features that explore search, services, notifications,
broadcast receivers, and web views.
In this chapter, you will learn how to use Android’s high-level HTTP networking. Almost all day-to-
day programming of web services these days is based on the HTTP networking protocol. By the end of
the chapter, you will be fetching, parsing, and displaying photo captions from Flickr. (Retrieving and
displaying photos will happen in Chapter27.)
Figure 26.2PhotoGallery at the end of the chapter
Creating PhotoGallery
Create a new Android application project. Configure the app as shown in Figure26.3.
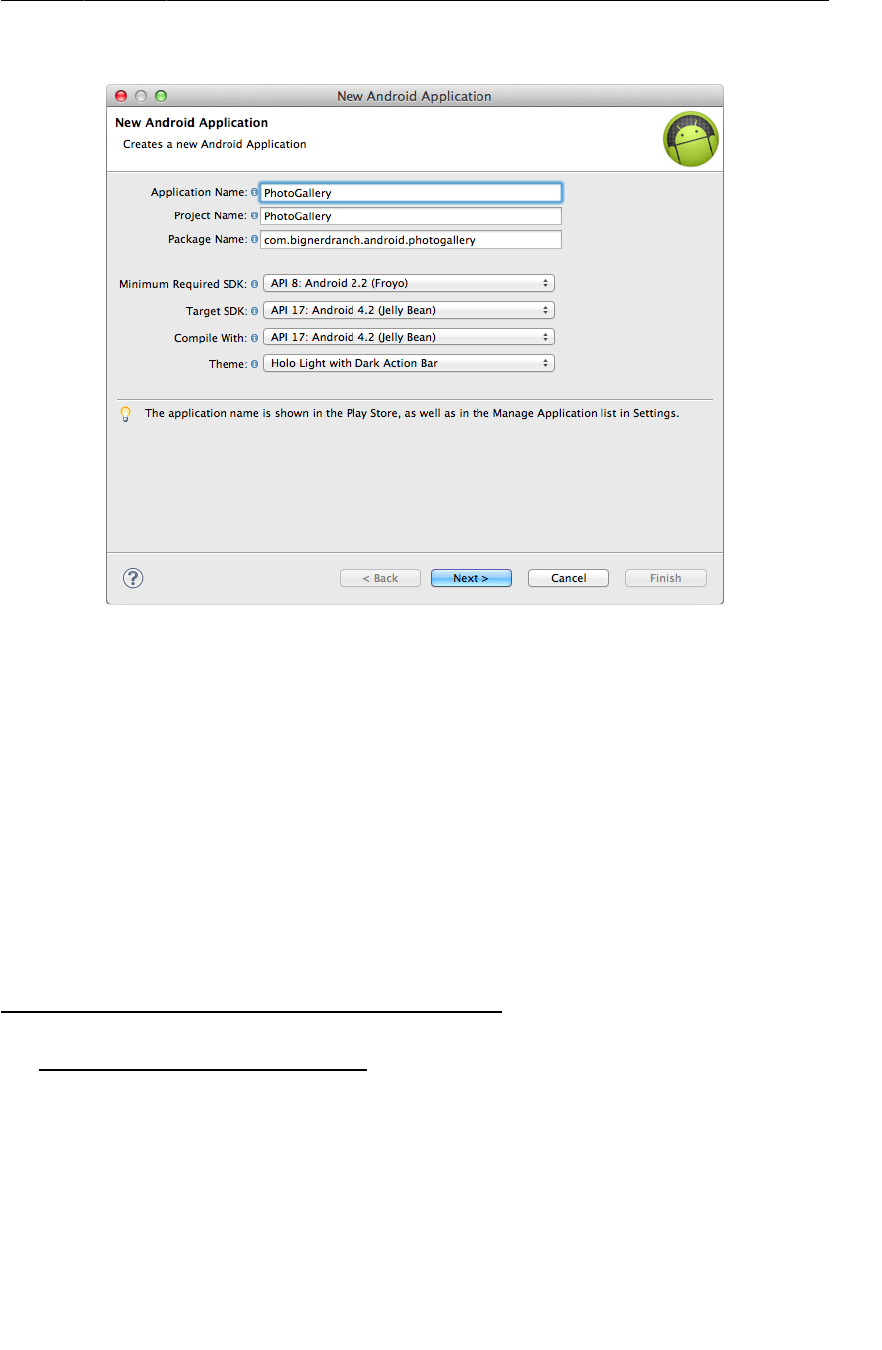
ptg11078569
Creating PhotoGallery
415
Figure 26.3Creating PhotoGallery
Then have the wizard create a blank activity named PhotoGalleryActivity.
PhotoGallery will follow the same architecture you have been using so far. PhotoGalleryActivity
will be a SingleFragmentActivity subclass and its view will be the container view defined
in activity_fragment.xml. This activity will host a fragment – in particular, an instance of
PhotoGalleryFragment, which you will create shortly.
Copy SingleFragmentActivity.java and activity_fragment.xml into your project from a previous
project.
In PhotoGalleryActivity.java, set up PhotoGalleryActivity as a SingleFragmentActivity
by deleting the code that the template generated and replacing it with an implementation of
createFragment(). Have createFragment() return an instance of PhotoGalleryFragment.
(Bear with the error that this code will cause for the moment. It will go away after you create the
PhotoGalleryFragment class.)
Listing 26.1Activity setup (PhotoGalleryActivity.java)
public class PhotoGalleryActivity extends Activity {
public class PhotoGalleryActivity extends SingleFragmentActivity {
/* Auto-generated template code */
@Override
public Fragment createFragment() {
return new PhotoGalleryFragment();
}
}
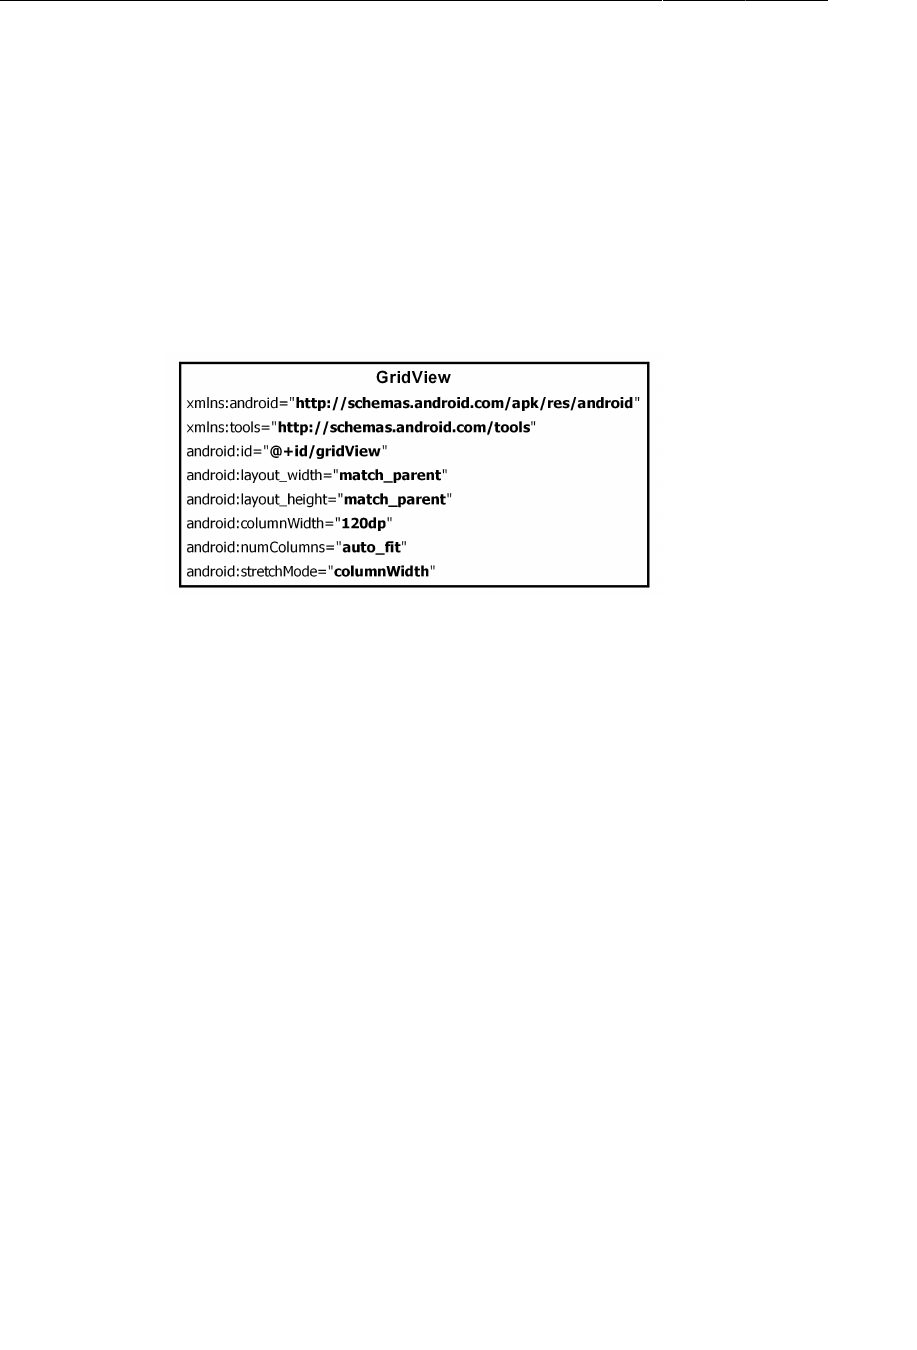
ptg11078569
Chapter 26HTTP & Background Tasks
416
PhotoGallery will display its results in a GridView. This GridView will comprise the view for
PhotoGalleryFragment.
GridView is an AdapterView, so it works much like ListView. However, unlike ListView, GridView
has no handy dandy GridFragment to wire everything up for you. Which means that you will need to
create a layout file and inflate it in PhotoGalleryFragment. Later in the chapter, you will wire up an
adapter in PhotoGalleryFragment to feed the GridView photo captions to display.
To create a layout for the fragment, rename layout/activity_photo_gallery.xml to layout/
fragment_photo_gallery.xml. Then replace its contents with the GridView shown in Figure26.4.
Figure 26.4A GridView (layout/fragment_photo_gallery.xml)
Here you set the width of the columns to 120dp and instruct the GridView to create as many columns
as will fit on the screen. If there is a leftover chunk of space less than 120dp, the stretchMode attribute
tells the GridView to divide the extra space equally among the columns.
Finally, create the PhotoGalleryFragment class. Retain the fragment, inflate the layout you just
created, and get a reference to the GridView (Listing 26.2).

ptg11078569
Networking Basics
417
Listing 26.2Some skeleton code (PhotoGalleryFragment.java)
package com.bignerdranch.android.photogallery;
...
public class PhotoGalleryFragment extends Fragment {
GridView mGridView;
@Override
public void onCreate(Bundle savedInstanceState) {
super.onCreate(savedInstanceState);
setRetainInstance(true);
}
@Override
public View onCreateView(LayoutInflater inflater, ViewGroup container,
Bundle savedInstanceState) {
View v = inflater.inflate(R.layout.fragment_photo_gallery, container, false);
mGridView = (GridView)v.findViewById(R.id.gridView);
return v;
}
}
Fire up PhotoGallery to make sure everything is wired up correctly before moving on. If all is well,
you will be the proud owner of a blank screen.
Networking Basics
You are going to have one class handle the networking in PhotoGallery. Create a new Java class. Since
you will be connecting to Flickr, name this class FlickrFetchr.
FlickrFetchr will start off small with only two methods: getUrlBytes(String) and getUrl(String).
The getUrlBytes(String) method fetches raw data from a URL and returns it as an array of bytes.
The getUrl(String) method converts the result from getUrlBytes(String) to a String.
In FlickrFetchr.java, add implementations for getUrlBytes(String) and getUrl(String) (Listing
26.3).

ptg11078569
Chapter 26HTTP & Background Tasks
418
Listing 26.3Basic networking code (FlickrFetchr.java)
package com.bignerdranch.android.photogallery;
...
public class FlickrFetchr {
byte[] getUrlBytes(String urlSpec) throws IOException {
URL url = new URL(urlSpec);
HttpURLConnection connection = (HttpURLConnection)url.openConnection();
try {
ByteArrayOutputStream out = new ByteArrayOutputStream();
InputStream in = connection.getInputStream();
if (connection.getResponseCode() != HttpURLConnection.HTTP_OK) {
return null;
}
int bytesRead = 0;
byte[] buffer = new byte[1024];
while ((bytesRead = in.read(buffer)) > 0) {
out.write(buffer, 0, bytesRead);
}
out.close();
return out.toByteArray();
} finally {
connection.disconnect();
}
}
public String getUrl(String urlSpec) throws IOException {
return new String(getUrlBytes(urlSpec));
}
}
This code creates a URL object from a string – like, say, http://www.google.com. Then it calls
openConnection() to create a connection object pointed at the URL. URL.openConnection() returns a
URLConnection, but since you are connecting to an http URL, you can cast it to HttpURLConnection.
This gives you HTTP-specific interfaces for working with request methods, response codes, streaming
methods, and more.
HttpURLConnection represents a connection, but it will not actually connect to your endpoint until you
call getInputStream() (or getOutputStream() for POST calls). Until then, you cannot get a valid
response code.
Once you create your URL and open a connection, you call read() repeatedly until your connection
runs out of data. The InputStream will yield bytes as they are available. When you are done, you close
it and spit out your ByteArrayOutputStream’s byte array.
While getUrlBytes(String) does the heavy lifting, getUrl(String) is what you will actually use in
this chapter. It converts the bytes fetched by getUrlBytes(String) into a String. Right now, it may
seem strange to split this work into two methods. However, having two methods will be useful in the
next chapter when you start downloading image data.

ptg11078569
Asking permission to network
419
Asking permission to network
One other thing is required to get networking up and running: you have to ask permission. Just as users
would not want you secretly taking their pictures, they also do not want you to secretly download
pictures of ASCII farm animals.
To ask permission to network, add the following permission to your AndroidManifest.xml.
Listing 26.4Add networking permission to manifest (AndroidManifest.xml)
<manifest xmlns:android="http://schemas.android.com/apk/res/android"
package="com.bignerdranch.android.photogallery"
android:versionCode="1"
android:versionName="1.0" >
<uses-sdk
android:minSdkVersion="8"
android:targetSdkVersion="15" />
<uses-permission android:name="android.permission.INTERNET" />
...
</manifest>
Using AsyncTask to Run on a Background Thread
The next step is to call and test the networking code you just added. However, you cannot simply call
FlickrFetchr.getURL(String) directly in PhotoGalleryFragment. Instead, you need to create a
background thread and run your code there.
The easiest way to work with a background thread is with a utility class called AsyncTask. AsyncTask
creates a background thread for you and runs the code in the doInBackground(…) method on that
thread.
In PhotoGalleryFragment.java, add a new inner class called FetchItemsTask at the bottom of
PhotoGalleryFragment. Override AsyncTask.doInBackground(…) to get data from a website and log
it. Then use the new class inside of PhotoGalleryFragment.onCreate(…).
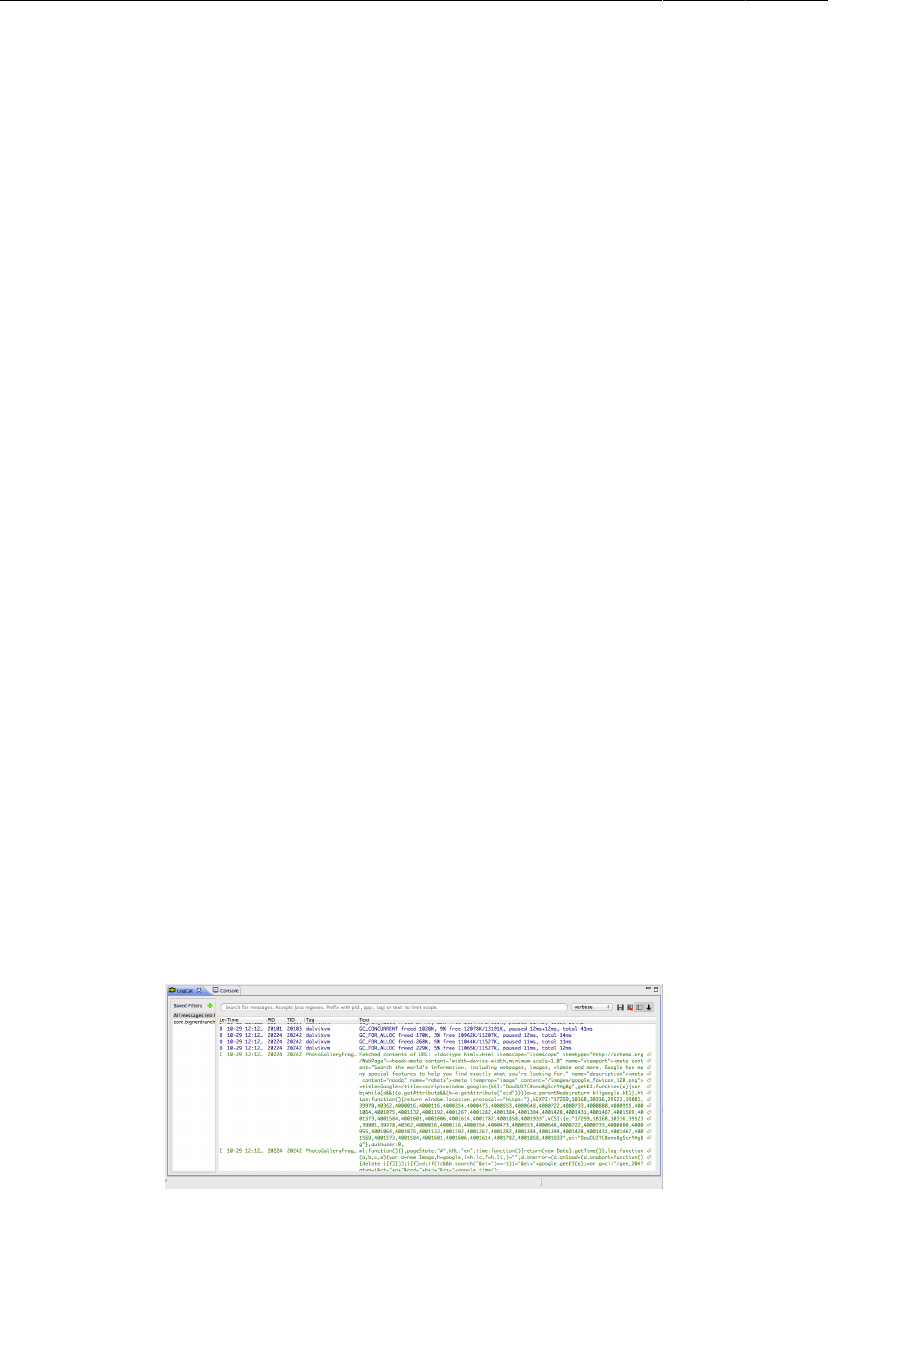
ptg11078569
Chapter 26HTTP & Background Tasks
420
Listing 26.5Writing an AsyncTask (PhotoGalleryFragment.java)
public class PhotoGalleryFragment extends Fragment {
private static final String TAG = "PhotoGalleryFragment";
GridView mGridView;
...
private class FetchItemsTask extends AsyncTask<Void,Void,Void> {
@Override
protected Void doInBackground(Void... params) {
try {
String result = new FlickrFetchr().getUrl("http://www.google.com");
Log.i(TAG, "Fetched contents of URL: " + result);
} catch (IOException ioe) {
Log.e(TAG, "Failed to fetch URL: ", ioe);
}
return null;
}
}
}
Now, in PhotoGalleryFragment.onCreate(…), call execute() on a new instance of FetchItemsTask.
Listing 26.6Writing an AsyncTask (PhotoGalleryFragment.java)
public class PhotoGalleryFragment extends Fragment {
private static final String TAG = "PhotoGalleryFragment";
GridView mGridView;
@Override
public void onCreate(Bundle savedInstanceState) {
super.onCreate(savedInstanceState);
setRetainInstance(true);
new FetchItemsTask().execute();
}
...
}
The call to execute() will start your AsyncTask, which will then fire up its background thread and call
doInBackground(…). Run your code and you should see Google’s Javascriptlicious home page HTML
pop up in LogCat, looking something like Figure26.5:
Figure 26.5Google HTML in LogCat
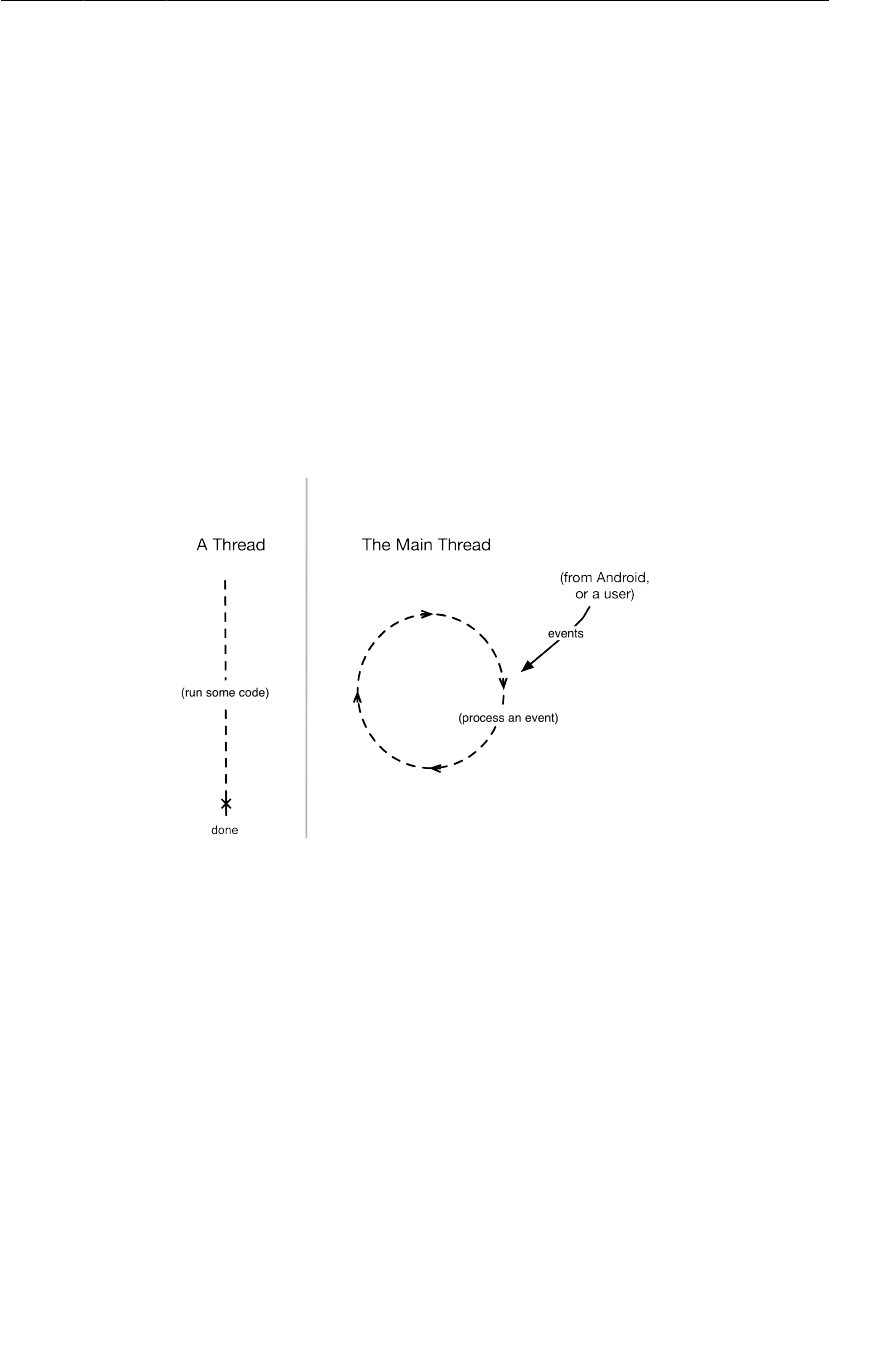
ptg11078569
You and Your Main Thread
421
Now that you have created a background thread and run some networking code on it, let’s take a closer
look at threads in Android.
You and Your Main Thread
Networking does not happen immediately. A web server may take as long as a second or two to
respond, and a file download can taken even longer than that. Because networking can take so long,
Android disallows all networking on the main thread in Honeycomb and later versions of Android. If
you try to do it, Android will throw a NetworkOnMainThreadException. Why? To understand that, you
need to understand what a thread is, what the main thread is, and what the main thread does.
A thread is a single sequence of execution. Code running within a single thread will execute one step
after another. Every Android app starts life with a main thread. The main thread, however, isn’t a
preordained list of steps. Instead, it sits in an infinite loop and waits for events initiated by the user or
the system. Then it executes code in response to those events as they occur.
Figure 26.6Regular threads vs. the main thread
Imagine that your app is an enormous shoe store, and that you only have one employee – The Flash.
(Who hasn’t dreamed of that?) There are a lot of things to do in a store to keep the customers happy
– arranging the merchandise, fetching shoes for customers, wielding the Brannock device. With The
Flash as your salesperson, everyone is taken care of in a timely fashion, even though there is only one
guy doing all the work.
For this situation to work, The Flash cannot spend too much time doing any one thing. What if a
shipment of shoes goes missing? Someone will have to spend a lot of time on the phone straightening it
out. Your customers will get mighty impatient waiting for shoes while The Flash is on hold.
The Flash is like the main thread in your application. It runs all the code that updates the UI. This
includes the code executed in response to different UI-related events – activity startup, button presses,
and so on. (Because the events are all related to the user interface in some way, the main thread is
sometimes called the UI thread.)
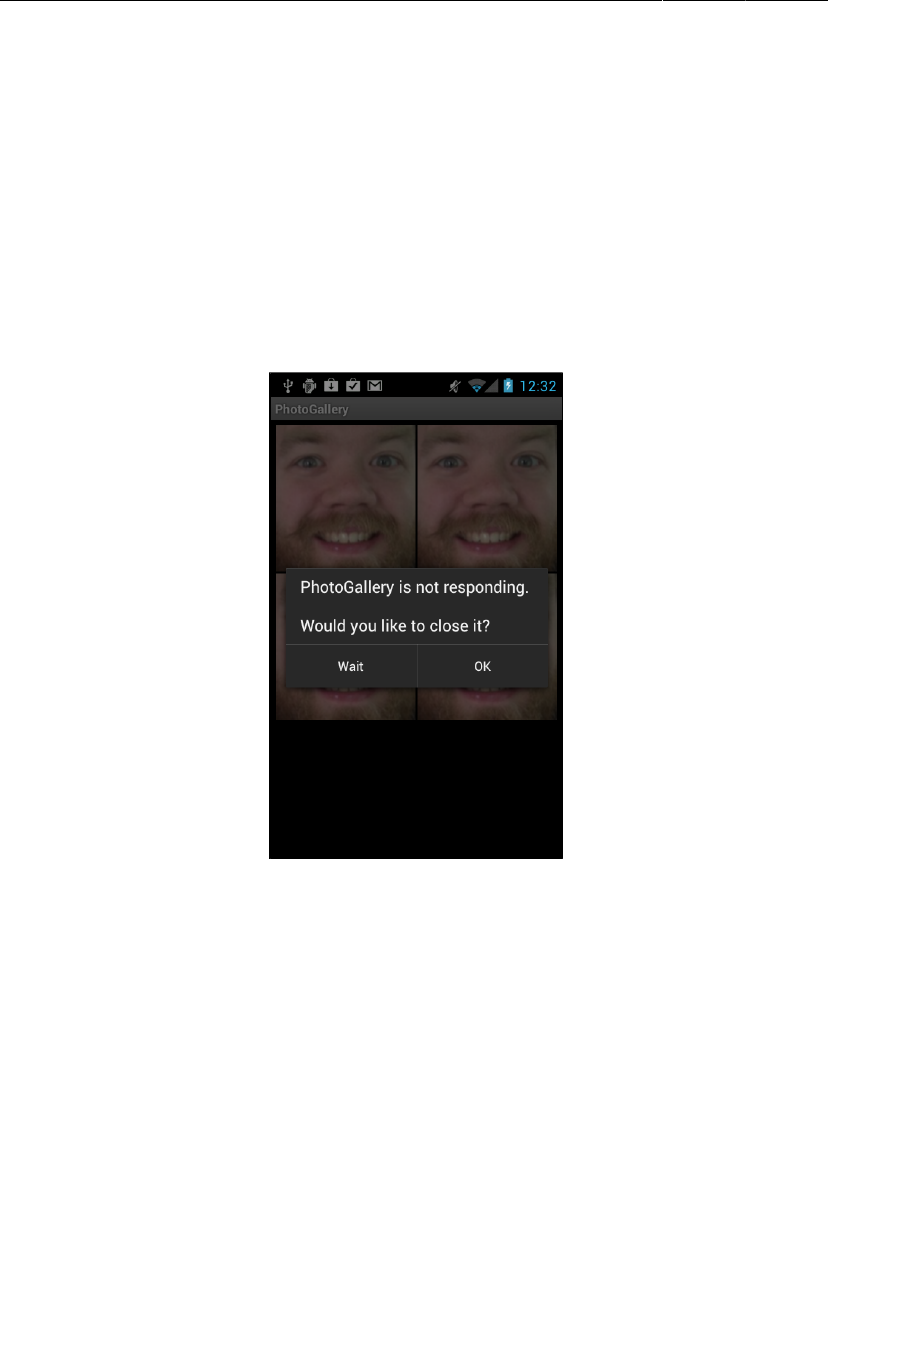
ptg11078569
Chapter 26HTTP & Background Tasks
422
The event loop keeps the UI code in sequence. It makes sure that none of these operations step on each
other while still ensuring that the code is executed in a timely fashion. So far, all of the code you have
written (except for the code you just wrote with AsyncTask) has been executed on the main thread.
Beyond the main thread
Networking is a lot like a phone call to your shoe distributor: it takes a long time compared to other
tasks. During that time, the user interface will be completely unresponsive, which might result in an
application not responding, or ANR.
An ANR occurs when Android’s watchdog determines that the main thread has failed to respond to an
important event, like pressing the back button. To the user, it looks like this:
Figure 26.7Application not responding
This is why Android disallowed network operations on the main thread starting with Honeycomb.
In your store, you would solve the problem by (naturally) hiring a second Flash to call the shoe
distributor. In Android, you do something similar – you create a background thread and access the
network from there.
And what is the easiest way to work with a background thread? Why, AsyncTask.
You will get to see other things AsyncTask can do later this chapter. Before you do that, you will want
to do some real work with your networking code.
Fetching XML From Flickr
Flickr offers a fine XML API. All the details you need are available in the documentation at
www.flickr.com/services/api/. Pull it up in your favorite web browser, and then find the list

ptg11078569
Fetching XML From Flickr
423
of Request�Formats. You will be using the simplest – REST. This tells us that the API endpoint is
http://api.flickr.com/services/rest/. You can invoke the methods Flickr provides on this
endpoint.
Back on the main page of the API documentation, find the list of API�Methods. Scroll down to
the photos section and locate flickr.photos.getRecent. Click on flickr.photos.getRecent, and the
documentation will report that this method “Returns a list of the latest public photos uploaded to
flickr.” That is exactly what you need for PhotoGallery.
The only required parameter for the getRecent method is an API key. To get an API key, return to
http://www.flickr.com/services/api/ and follow the link for API�keys. You will need a Yahoo ID
to login. Once you are logged in, request a new, non-commercial API key. This usually only takes a
moment. Your API key will look something like 4f721bgafa75bf6d2cb9af54f937bb70.
Once you have a key, you have all you need to make a request to the Flickr web service.
This request will be a GET request to http://api.flickr.com/services/rest/?
method=flickr.photos.getRecent&api_key=xxx.
Time to start coding. First, add some constants to FlickrFetchr.
Listing 26.7Add constants (FlickrFetchr.java)
public class FlickrFetchr {
public static final String TAG = "FlickrFetchr";
private static final String ENDPOINT = "http://api.flickr.com/services/rest/";
private static final String API_KEY = "yourApiKeyHere";
private static final String METHOD_GET_RECENT = "flickr.photos.getRecent";
private static final String PARAM_EXTRAS = "extras";
private static final String EXTRA_SMALL_URL = "url_s";
These constants define the endpoint, the method name, the API key, and one extra parameter called
extras, with a value of url_s. Specifying the url_s extra tells Flickr to include the URL for the small
version of the picture if it is available.
Now use the constants to write a method that builds an appropriate request URL and fetches its
contents.

ptg11078569
Chapter 26HTTP & Background Tasks
424
Listing 26.8Add fetchItems() method (FlickrFetchr.java)
public class FlickrFetchr {
...
String getUrl(String urlSpec) throws IOException {
return new String(getUrlBytes(urlSpec));
}
public void fetchItems() {
try {
String url = Uri.parse(ENDPOINT).buildUpon()
.appendQueryParameter("method", METHOD_GET_RECENT)
.appendQueryParameter("api_key", API_KEY)
.appendQueryParameter(PARAM_EXTRAS, EXTRA_SMALL_URL)
.build().toString();
String xmlString = getUrl(url);
Log.i(TAG, "Received xml: " + xmlString);
} catch (IOException ioe) {
Log.e(TAG, "Failed to fetch items", ioe);
}
}
}
Here you use a Uri.Builder to build the complete URL for your Flickr API request.
Uri.Builder is a convenience class for creating properly escaped parameterized URLs.
Uri.Builder.appendQueryParameter(String,String) will automatically escape query strings for
you.
Finally, modify the AsyncTask in PhotoGalleryFragment to call the new fetchItems() method.
Listing 26.9Call fetchItems() (PhotoGalleryFragment.java)
private class FetchItemsTask extends AsyncTask<Void,Void,Void> {
@Override
protected Void doInBackground(Void... params) {
try {
String result = new FlickrFetchr().getUrl("http://www.google.com");
Log.i(TAG, "Fetched contents of URL: " + result);
} catch (IOException ioe) {
Log.e(TAG, "Failed to fetch URL: ", ioe);
}
new FlickrFetchr().fetchItems();
return null;
}
}
Run PhotoGallery and you should see rich, fertile Flickr XML in LogCat.
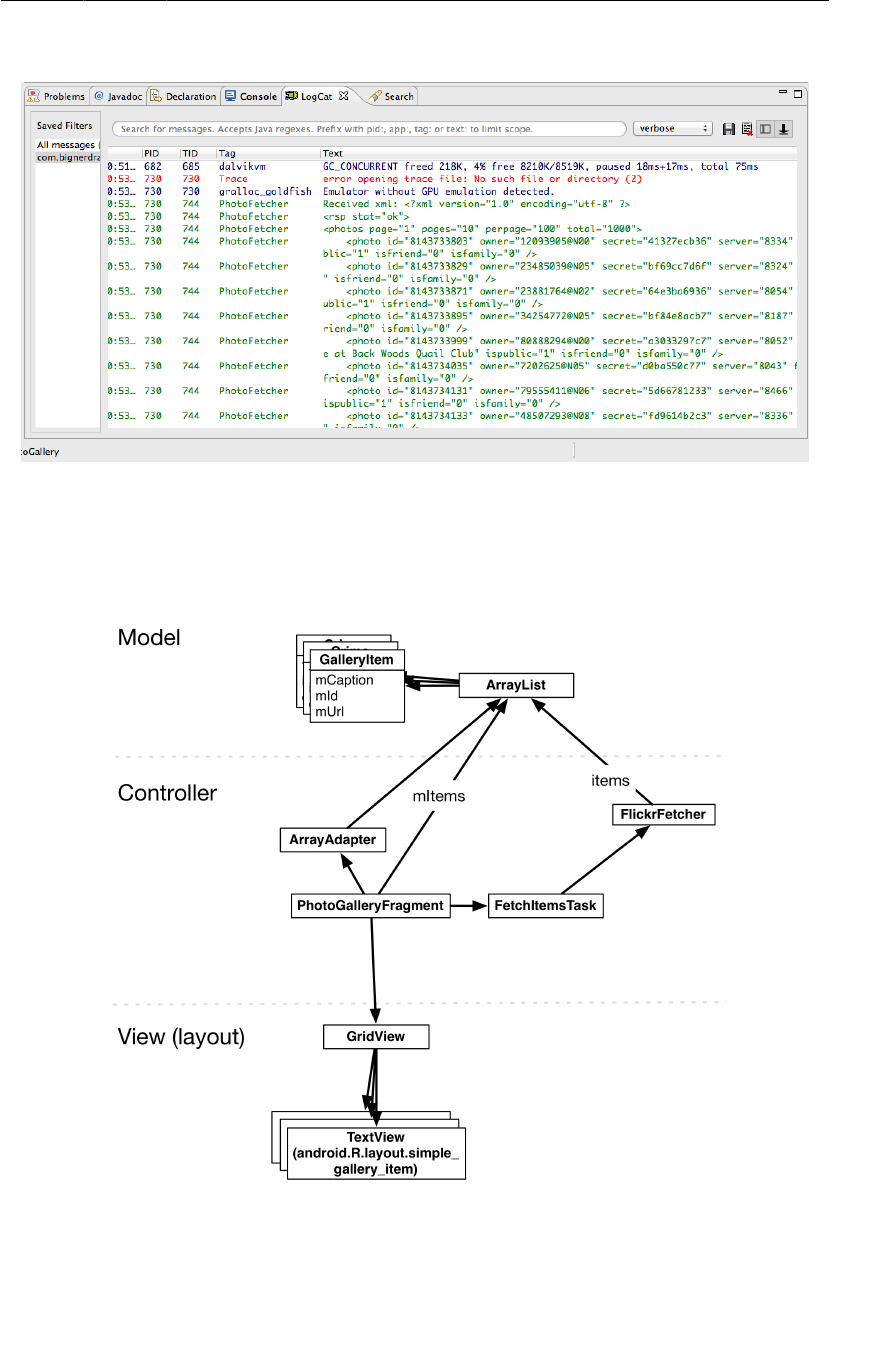
ptg11078569
Fetching XML From Flickr
425
Figure 26.8Flickr XML
Now that you have such fine XML from Flickr, what should you do with it? You do what you do with
all data – put it in one or more model objects. The model class you are going to create for PhotoGallery
is called GalleryItem. Figure26.9 shows an object diagram of PhotoGallery.
Figure 26.9Object diagram of PhotoGallery

ptg11078569
Chapter 26HTTP & Background Tasks
426
Note that Figure26.9 does not show the hosting activity so that it can focus on the fragment and the
networking code.
Create the GalleryItem class and add the following code:
Listing 26.10Create model object class (GalleryItem.java)
package com.bignerdranch.android.photogallery;
public class GalleryItem {
private String mCaption;
private String mId;
private String mUrl;
public String toString() {
return mCaption;
}
}
Have Eclipse generate getters and setters for mId, mCaption, and mUrl.
Now that you have made model objects, it is time to fill them with data from the XML you got from
Flickr. To get the data from the XML, you will use the XmlPullParser interface.
Using XmlPullParser
XmlPullParser is an interface you can use to pull parse events off of a stream of XML.
XmlPullParser is used internally by Android to inflate your layout files. It will work just as well to
parse your GalleryItem objects.
In FlickrFetchr add a constant that specifies the name of the photo XML element. Then write a
method that uses XmlPullParser to identify each photo in the XML. Make a GalleryItem for each
photo and add it to an ArrayList:

ptg11078569
Using XmlPullParser
427
Listing 26.11Parse Flickr photos (FlickrFetchr.java)
public class FlickrFetchr {
public static final String TAG = "FlickrFetchr";
private static final String ENDPOINT = "http://api.flickr.com/services/rest/";
private static final String API_KEY = "your API key";
private static final String METHOD_GET_RECENT = "flickr.photos.getRecent";
private static final String XML_PHOTO = "photo";
...
public void fetchItems() {
...
}
void parseItems(ArrayList<GalleryItem> items, XmlPullParser parser)
throws XmlPullParserException, IOException {
int eventType = parser.next();
while (eventType != XmlPullParser.END_DOCUMENT) {
if (eventType == XmlPullParser.START_TAG &&
XML_PHOTO.equals(parser.getName())) {
String id = parser.getAttributeValue(null, "id");
String caption = parser.getAttributeValue(null, "title");
String smallUrl = parser.getAttributeValue(null, EXTRA_SMALL_URL);
GalleryItem item = new GalleryItem();
item.setId(id);
item.setCaption(caption);
item.setUrl(smallUrl);
items.add(item);
}
eventType = parser.next();
}
}
}
You can imagine XmlPullParser as having its finger on your XML document, walking step by step
through different events like START_TAG, END_TAG, and END_DOCUMENT. At each step, you can call
methods like getText(), getName(), or getAttributeValue(…) to answer any questions you have
about the event XmlPullParser currently has its finger on. To move the finger to the next interesting
event in the XML, call next(). Conveniently, this method also returns the type of event it just moved
to.
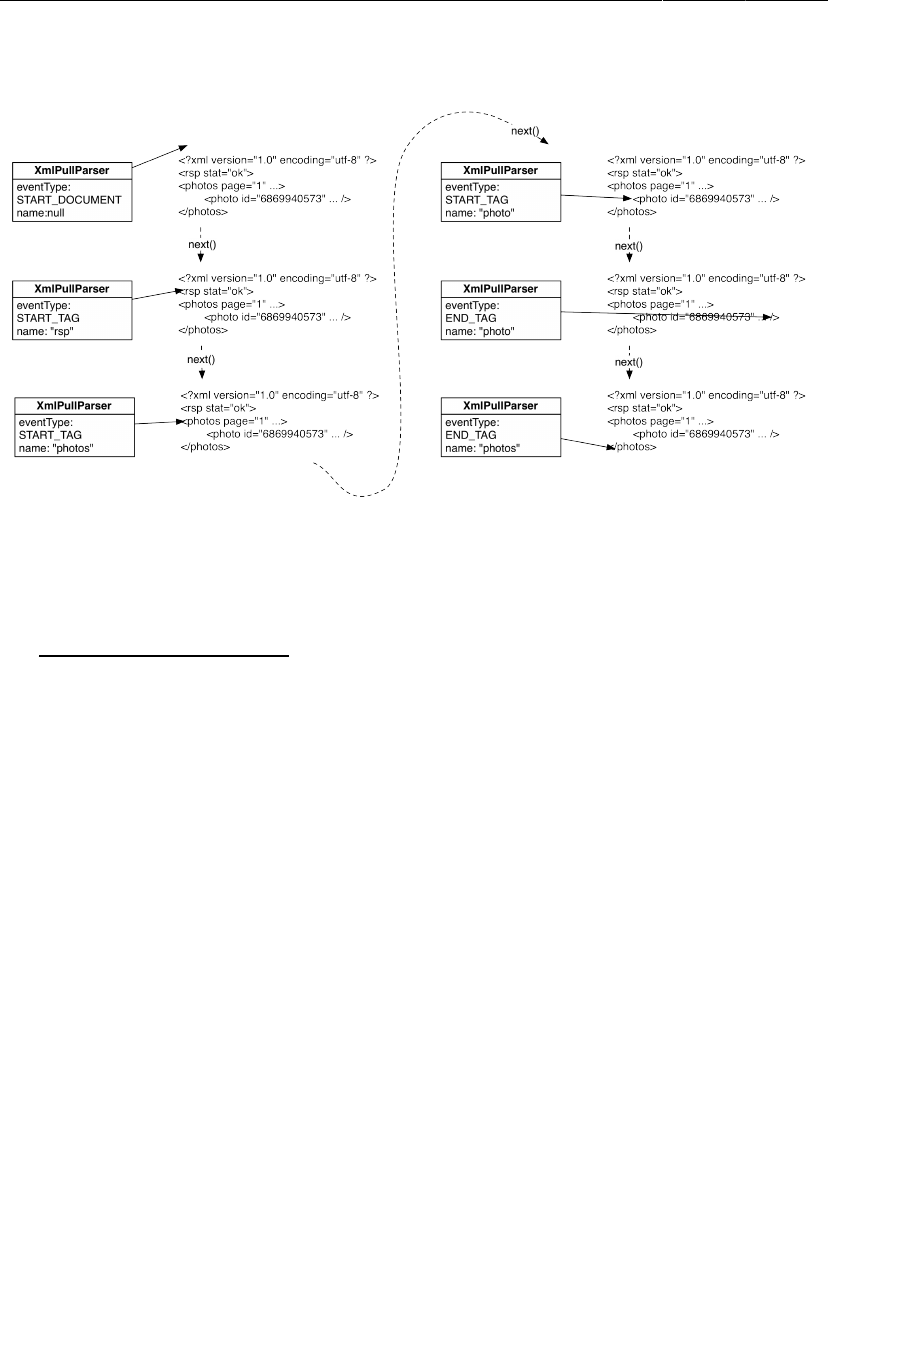
ptg11078569
Chapter 26HTTP & Background Tasks
428
Figure 26.10How XmlPullParser works
Your parseItems(…) method needs an XmlPullParser and an ArrayList. Get a parser instance and
feed it the xmlString from Flickr. Then call parseItems(…) with the primed parser and empty array.
Listing 26.12Call parseItems(…) (FlickrFetchr.java)
public void fetchItems() {
public ArrayList<GalleryItem> fetchItems() {
ArrayList<GalleryItem> items = new ArrayList<GalleryItem>();
try {
String url = Uri.parse(ENDPOINT).buildUpon()
.appendQueryParameter("method", METHOD_GET_RECENT)
.appendQueryParameter("api_key", API_KEY)
.appendQueryParameter(PARAM_EXTRAS, EXTRA_SMALL_URL)
.build().toString();
String xmlString = getUrl(url);
Log.i(TAG, "Received xml: " + xmlString);
XmlPullParserFactory factory = XmlPullParserFactory.newInstance();
XmlPullParser parser = factory.newPullParser();
parser.setInput(new StringReader(xmlString));
parseItems(items, parser);
} catch (IOException ioe) {
Log.e(TAG, "Failed to fetch items", ioe);
} catch (XmlPullParserException xppe) {
Log.e(TAG, "Failed to parse items", xppe);
}
return items;
}
Run PhotoGallery to test your XML parsing code. PhotoGallery has no way of reporting the contents
of your ArrayList right now, so you will need to set a breakpoint and use the debugger if you want to
make sure everything worked correctly.

ptg11078569
From AsyncTask Back to the Main Thread
429
From AsyncTask Back to the Main Thread
To finish off, let’s return to the view layer and get PhotoGalleryFragment’s GridView to display some
captions.
GridView is an AdapterView, like ListView, so it needs an adapter to feed it views to display.
In PhotoGalleryFragment.java, add an ArrayList of GalleryItems and then set up an ArrayAdapter
that uses a simple layout provided by Android.
Listing 26.13Implement setupAdapter() (PhotoGalleryFragment.java)
public class PhotoGalleryFragment extends Fragment {
private static final String TAG = "PhotoGalleryFragment";
GridView mGridView;
ArrayList<GalleryItem> mItems;
...
@Override
public View onCreateView(LayoutInflater inflater, ViewGroup container,
Bundle savedInstanceState) {
View v = inflater.inflate(R.layout.fragment_photo_gallery, container, false);
mGridView = (GridView)v.findViewById(R.id.gridView);
setupAdapter();
return v;
}
void setupAdapter() {
if (getActivity() == null || mGridView == null) return;
if (mItems != null) {
mGridView.setAdapter(new ArrayAdapter<GalleryItem>(getActivity(),
android.R.layout.simple_gallery_item, mItems));
} else {
mGridView.setAdapter(null);
}
}
Because GridView has no handy GridFragment class, you have to build your own adapter management
code. One way of doing this is to use a method like the setupAdapter() method you just added. This
method looks at the current model state and configures the adapter appropriately on your GridView.
You want to call this in onCreateView(…), so that every time a new GridView is created on rotation,
it is reconfigured with an appropriate adapter. You also want to call it every time your set of model
objects changes.
The android.R.layout.simple_gallery_item layout consists of a TextView element. Recall that in
GalleryItem, you overrode toString() to return the object’s mCaption. So passing the array list of
GalleryItems and this layout to the adapter is all you need for the GridView display captions.
Notice that you check to see whether getActivity() is null before setting the adapter. Remember that
fragments can exist unattached from any activity. Before now, this possibility has not come up because

ptg11078569
Chapter 26HTTP & Background Tasks
430
your method calls have been driven by callbacks from the framework. If a fragment is receiving
callbacks, then it definitely is attached to an activity. No activity, no callbacks.
Now that you are using an AsyncTask, you are triggering some things yourself, and you cannot assume
that the fragment is attached to an activity. So you must check to make sure that your fragment is still
attached. If it is not, then operations that rely on the that activity (like creating your ArrayAdapter)
will fail.
Now you need to call setupAdapter() after data has been fetched from Flickr. Your first instinct might
be to call setupAdapter() at the end of FetchItemsTask’s doInBackground(…). This is not a good
idea. Remember that you have two Flashes in the store now – one helping multiple customers, and one
on the phone with Flickr. What will happen if the second Flash tries to help customers after hanging up
the phone? Odds are good that the two Flashes will step on each other’s toes.
On a computer, this toe-stepping-on results in objects in memory becoming corrupted. Because of this,
you are not allowed to update the UI from a background thread, nor is it safe or advisable to do so.
What to do? AsyncTask has another method you can override called onPostExecute(…).
onPostExecute(…) is run after doInBackground(…) completes. In addition, onPostExecute(…) is run
on the main thread, not the background thread, so it is safe to update the UI within it.
Modify FetchItemsTask to update mItems and call setupAdapter() after fetching your photos.
Listing 26.14Add adapter update code (PhotoGalleryFragment.java)
private class FetchItemsTask extends AsyncTask<Void,Void,Void> {
private class FetchItemsTask extends AsyncTask<Void,Void,ArrayList<GalleryItem>> {
@Override
protected Void doInBackground(Void... params) {
protected ArrayList<GalleryItem> doInBackground(Void... params) {
new FlickrFetchr().fetchItems();
return new FlickrFetchr().fetchItems();
return null;
}
@Override
protected void onPostExecute(ArrayList<GalleryItem> items) {
mItems = items;
setupAdapter();
}
}
You made three changes here. First, you changed the type of the FetchItemsTask’s third generic
parameter. This parameter is the type of result produced by your AsyncTask. It sets the type of value
returned by doInBackground(…), as well as the type of onPostExecute(…)’s input parameter.
Second, you modified doInBackground(…) to return your list of GalleryItems. By doing this you fix
your code so that it compiles properly. You also pass your list of items off so that it may be used from
within onPostExecute(…).
Finally, you added an implementation of onPostExecute(…). This method accepts the list you fetched
inside doInBackground(…), puts it in mItems, and updates your GridView’s adapter.
With that, your work for this chapter is complete. Run, and you should see text displayed for each
GalleryItem you downloaded.
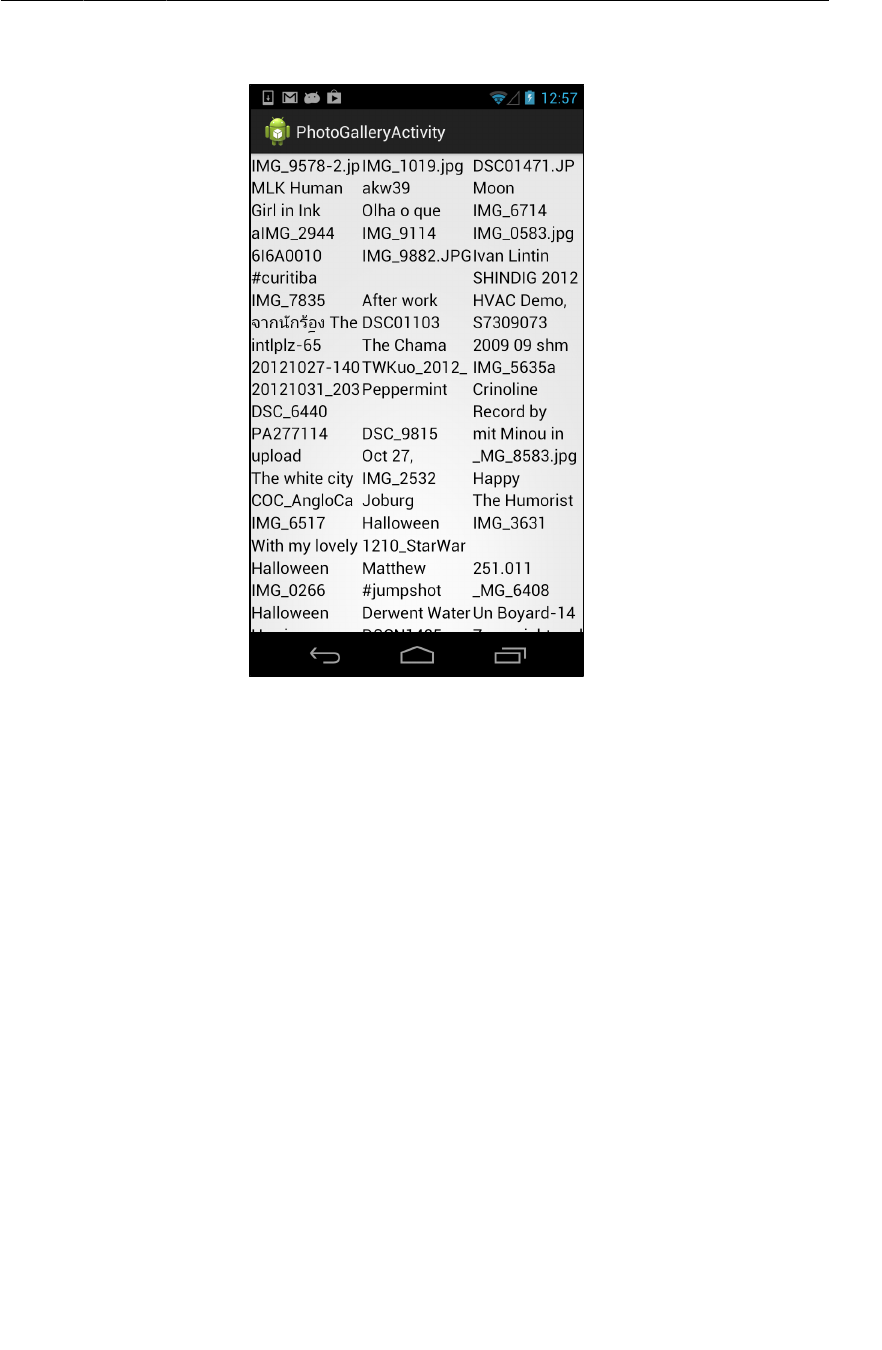
ptg11078569
For the More Curious: More on AsyncTask
431
Figure 26.11Your Flickr item captions
For the More Curious: More on AsyncTask
In this chapter you saw how to use the last type parameter on AsyncTask, which specifies the return
type. What about the other two?
The first type parameter allows you to specify the type of your input parameters. You would use it in
the following way:
AsyncTask<String,Void,Void> task = new AsyncTask<String,Void,Void>() {
public Void doInBackground(String... params) {
for (String parameter : params) {
Log.i(TAG, "Received parameter: " + parameter);
}
return null;
}
};
task.execute("First parameter", "Second parameter", "Etc.");
Input parameters are passed in to the execute(…) method, which takes in a variable number of
arguments. Those variable arguments are then passed on to doInBackground(…).

ptg11078569
Chapter 26HTTP & Background Tasks
432
The second type parameter allows you to specify the type for sending progress updates. Here is what
that looks like:
final ProgressBar progressBar = /* A determinate progress bar */;
progressBar.setMax(100);
AsyncTask<Integer,Integer,Void> task = new AsyncTask<Integer,Integer,Void>() {
public Void doInBackground(Integer... params) {
for (Integer progress : params) {
publishProgress(progress);
Thread.sleep(1000);
}
}
public void onProgressUpdate(Integer... params) {
int progress = params[0];
progressBar.setProgress(progress);
}
};
task.execute(25, 50, 75, 100);
Progress updates usually happen in the middle of an ongoing background process. The problem is that
you cannot make the necessary UI updates inside that background process. So AsyncTask provides
publishProgress(…) and onProgressUpdate(…).
Here is how it works: you call publishProgress(…) from doInBackground(…) in the background
thread. This will make onProgressUpdate(…) be called on the UI thread. So you can do
your UI updates in onProgressUpdate(…), but control them from doInBackground(…) with
publishProgress(…).
Cleaning Up AsyncTasks
In this chapter, your AsyncTask was carefully structured so that you would not have to keep track of
it. In other situations, though, you will need to keep a handle on your AsyncTasks, even canceling and
rerunning them at times.
For these more complicated uses, you will want to assign your AsyncTask to an instance variable. Once
you have a handle on it, you can call AsyncTask.cancel(boolean). This method allows you to cancel
an ongoing AsyncTask.,
AsyncTask.cancel(boolean) can work in a more rude or less rude fashion. If you call
cancel(false), it will be polite and simply set isCancelled() to true. The AsyncTask can then
check isCancelled() inside of doInBackground(…) and elect to finish prematurely.
If you call cancel(true), however, it will be impolite and interrupt the thread doInBackground(…)
is on, if it is currently running. AsyncTask.cancel(true) is a more severe way of stopping the
AsyncTask. If you can avoid it, you should.

ptg11078569
Challenge: Paging
433
Challenge: Paging
By default, getRecent returns one page of 100 results. There is an additional parameter you can use
called page that will let you return page two, three, and so on.
For this challenge, add code to your adapter that detects when you are at the end of your array of items
and replaces the current page with the next page of results. For a slightly harder challenge, append
subsequent pages to your results.

ptg11078569
This page intentionally left blank
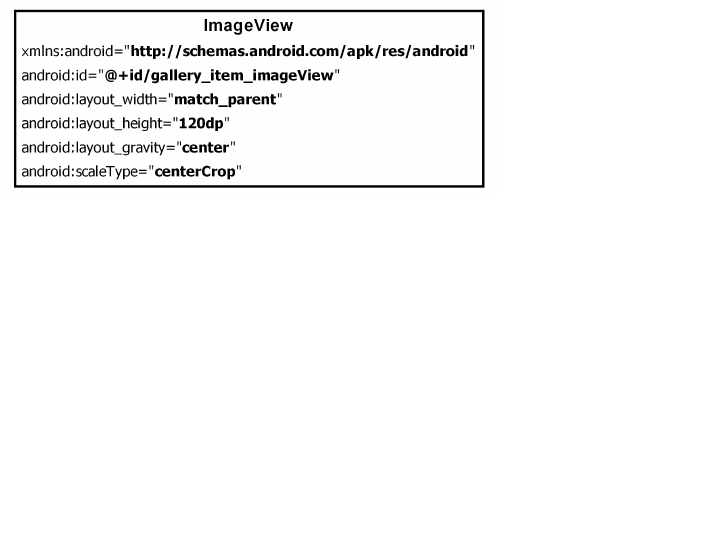
ptg11078569
435
27
Loopers, Handlers, and
HandlerThread
Now that you have downloaded and parsed XML from Flickr, your next task is to download and
display images. In this chapter, you will learn how to use Looper, Handler, and HandlerThread to
dynamically download and display photos in PhotoGallery.
Preparing GridView for Displaying Images
The current adapter in PhotoGalleryFragment simply provides TextViews for the GridView to display.
Each TextView displays the caption of a GalleryItem.
To display photos, you need a custom adapter that provides ImageViews instead. Eventually, each
ImageView will display a photo downloaded from the mUrl of a GalleryItem.
Start by creating a new layout file for your gallery items called gallery_item.xml. This layout will
consist of a single ImageView (Figure27.1).
Figure 27.1Gallery item layout (res/layout/gallery_item.xml)
These ImageViews will be managed by GridView, which means that their width will vary. Their height
will remain fixed, though. To make the most of the ImageView’s space, you have set its scaleType to
centerCrop. This setting centers the image and then scales it up so that the smaller dimension is equal
to the view and the larger one is cropped on both sides.
Next, you will need a placeholder image for each ImageView to display until you download an image to
replace it. Find brian_up_close.jpg in the solutions file and put it in res/drawable-hdpi.

ptg11078569
Chapter 27Loopers, Handlers, and HandlerThread
436
In PhotoGalleryFragment, replace the basic ArrayAdapter implementation with a custom
ArrayAdapter whose getView(…) implementation returns an ImageView that displays the placeholder
image.
Listing 27.1Create GalleryItemAdapter (PhotoGalleryFragment.java)
public class PhotoGalleryFragment extends Fragment {
...
void setupAdapter() {
if (getActivity() == null || mGridView == null) return;
if (mItems != null) {
mGridView.setAdapter(new ArrayAdapter<GalleryItem>(getActivity(),
android.R.layout.simple_gallery_item, mItems));
mGridView.setAdapter(new GalleryItemAdapter(mItems));
} else {
mGridView.setAdapter(null);
}
}
private class FetchItemsTask extends AsyncTask<Void,Void,ArrayList<GalleryItem>> {
...
}
private class GalleryItemAdapter extends ArrayAdapter<GalleryItem> {
public GalleryItemAdapter(ArrayList<GalleryItem> items) {
super(getActivity(), 0, items);
}
@Override
public View getView(int position, View convertView, ViewGroup parent) {
if (convertView == null) {
convertView = getActivity().getLayoutInflater()
.inflate(R.layout.gallery_item, parent, false);
}
ImageView imageView = (ImageView)convertView
.findViewById(R.id.gallery_item_imageView);
imageView.setImageResource(R.drawable.brian_up_close);
return convertView;
}
}
}
Remember that the AdapterView (the GridView, in this case) calls getView(…) on its adapter for every
individual view it needs.
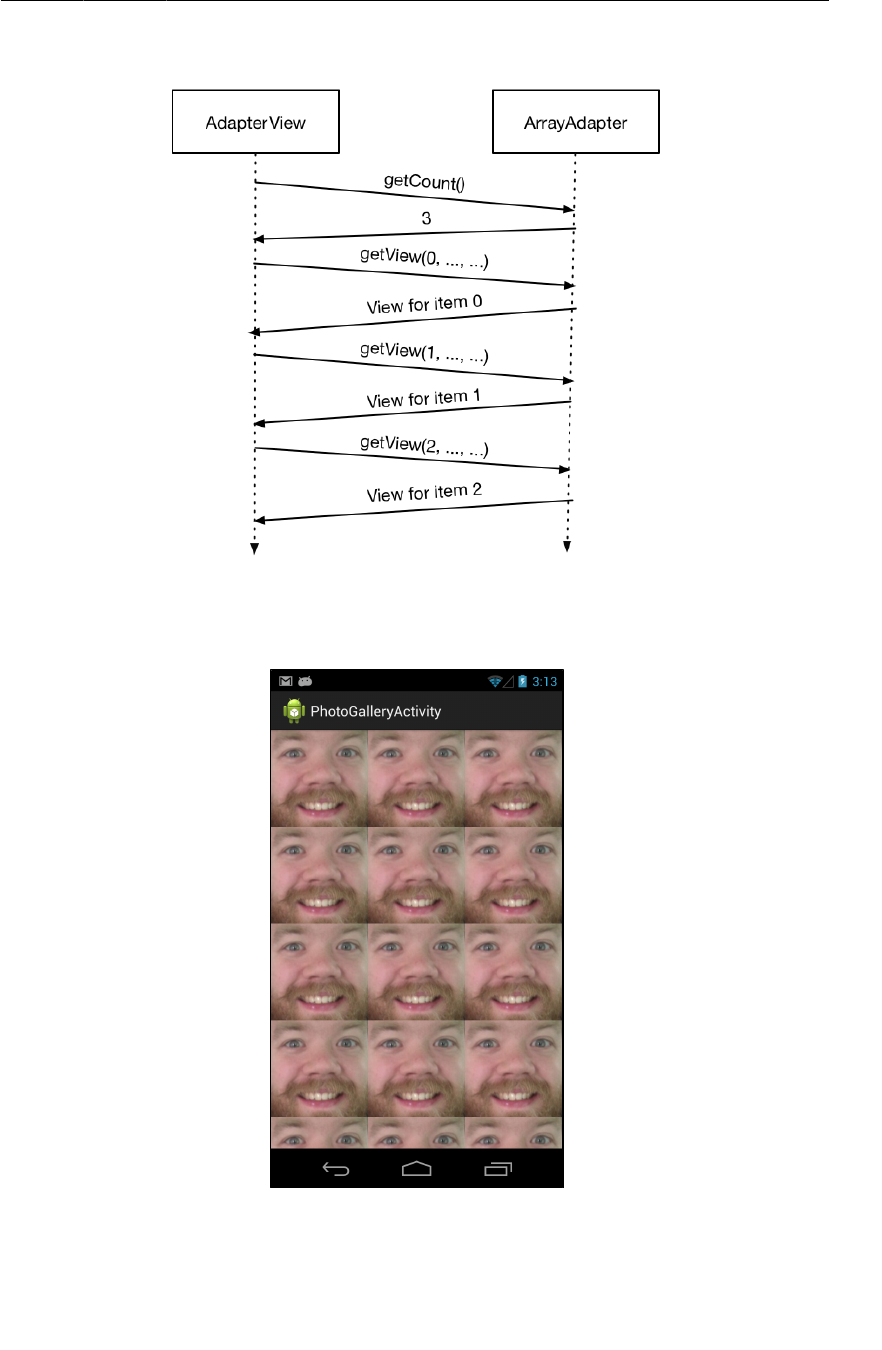
ptg11078569
Preparing GridView for Displaying Images
437
Figure 27.2AdapterView-ArrayAdapter pong
Run PhotoGallery, and you should see an array of close-up Brians:
Figure 27.3A Briansplosion

ptg11078569
Chapter 27Loopers, Handlers, and HandlerThread
438
Downloading Lots of Small Things
Currently, PhotoGallery’s networking works like this: PhotoGalleryFragment executes an AsyncTask
that retrieves the XML from Flickr on a background thread and parses the XML into an array of
GalleryItems. Each GalleryItem now has a URL where a thumbnail-size photo lives.
The next step is to go and get those thumbnails. You might think that this additional networking code
could simply be added to FetchItemsTask’s doInBackground() method. Your GalleryItem array has
100 URLs to download from. You would download the images one after the other until you had all
100. When onPostExecute(…) executed, they would be displayed en masse in the GridView.
However, downloading the thumbnails all at once causes two problems. The first is that it could take
a while, and the UI would not be updated until the downloading was complete. On a slow connection,
users would be staring at a wall of Brians for a long time.
The second problem is the cost of having to store the entire set of images. One hundred thumbnails will
fit into memory easily. But what if it were 1000? What if you wanted to implement infinite scrolling?
Eventually, you would run out of space.
Given these problems, real world apps often choose to download images only when they need to be
displayed on screen. Downloading on demand puts the responsibility on the GridView and its adapter.
The adapter will trigger the image downloading as part of its getView(…) implementation.
AsyncTask is the easiest way to get a background thread, but it is fundamentally ill-suited for repetitive
and long-running work. (You can read why in the For The More Curious section at the end of this
chapter.)
Instead of using an AsyncTask, you are going to create a dedicated background thread. This is the most
common way to implement downloading on an as-needed basis.
Communicating with the Main Thread
Your dedicated thread will download photos, but how will it work with the GridView’s adapter to
display them when it cannot directly access the main thread?
Think back to the shoe store with two Flashes. Background Flash has wrapped up his phone call to
the distributor. He needs to tell Main Flash that the shoes are back in stock. If Main Flash is busy,
Background Flash cannot do this right away. He would have to wait by the register to catch Main Flash
at a spare moment. This would work, but it is not very efficient.
The better solution is to give each Flash an inbox. Background Flash writes a message about the shoes
being in stock and puts it on top of Main Flash’s inbox. Main Flash does the same thing when he wants
to tell Background Flash that the stock of shoes has run out.
The inbox idea turns out to be really handy. The Flash may have something that needs to be done soon,
but not right at the moment. In that case, he can put a message in his own inbox and then handle it
when he has time.
In Android, the inbox that threads use is called a message queue. A thread that works by using a
message queue is called a message loop; it loops again and again looking for new messages on its
queue (Figure27.4).
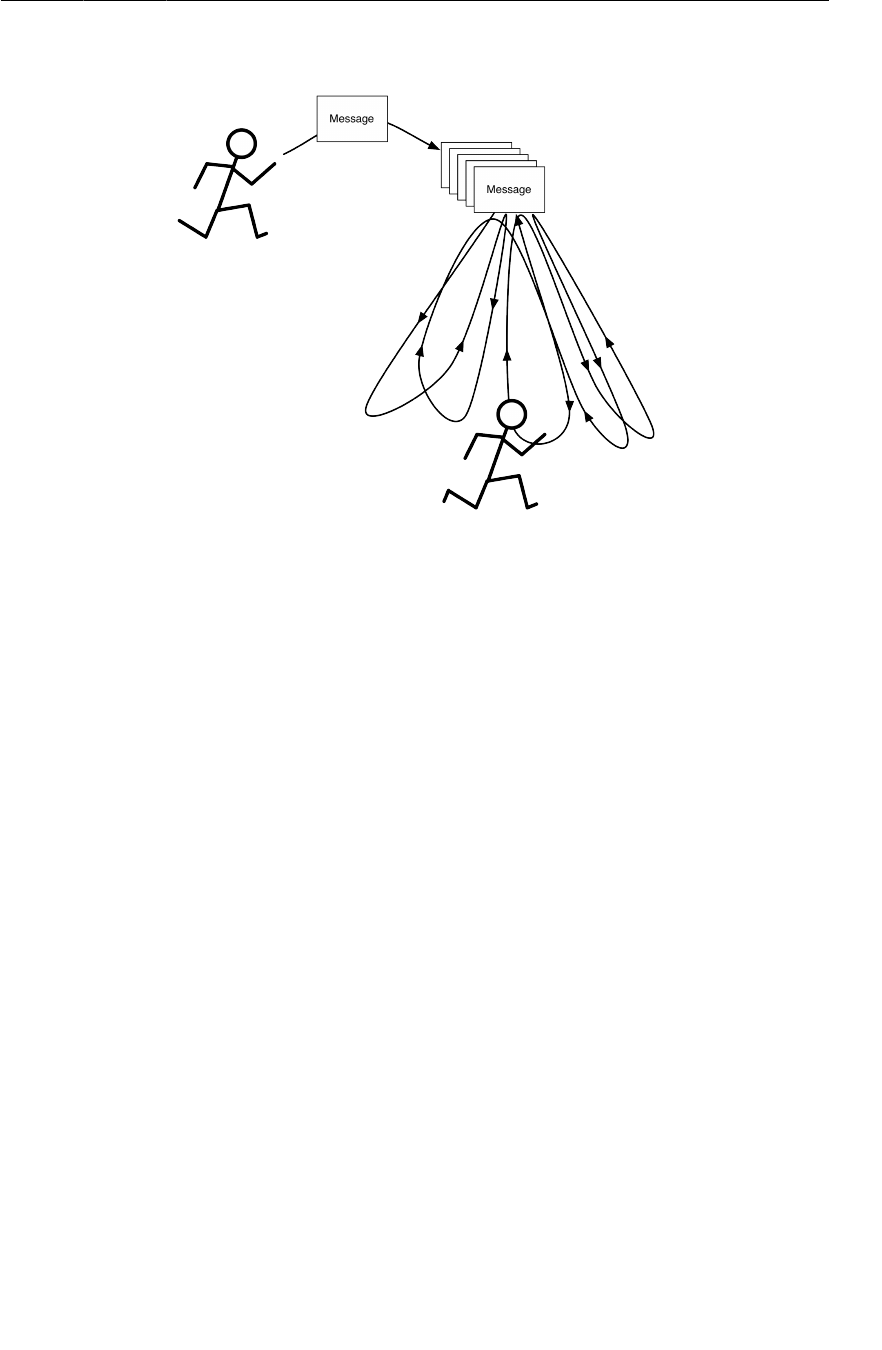
ptg11078569
Assembling a Background Thread
439
Figure 27.4Flash dance
A message loop consists of a thread and a looper. The Looper is the object that manages a thread’s
message queue.
The main thread is a message loop and has a looper. Everything your main thread does is performed by
its looper, which grabs messages off of its message queue and performs the task it specifies.
You are going to create a background thread that is a message loop, too. You will use a class called
HandlerThread that prepares a Looper for you.
Assembling a Background Thread
Create a new class called ThumbnailDownloader that extends HandlerThread. Your
ThumbnailDownloader’s user will need to use some object to identify each download, so give it one
generic argument called Token by naming it ThumbnailDownloader<Token> in the class creation
dialog. Then give it a constructor and a stub implementation of a method called queueThumbnail()
(Listing 27.2).
Listing 27.2Initial thread code (ThumbnailDownloader.java)
public class ThumbnailDownloader<Token> extends HandlerThread {
private static final String TAG = "ThumbnailDownloader";
public ThumbnailDownloader() {
super(TAG);
}
public void queueThumbnail(Token token, String url) {
Log.i(TAG, "Got an URL: " + url);
}
}

ptg11078569
Chapter 27Loopers, Handlers, and HandlerThread
440
Notice that queueThumbnail() expects a Token and a String. This is the method you will have
GalleryItemAdapter call in its getView(…) implementation.
Open PhotoGalleryFragment.java. Give PhotoGalleryFragment a ThumbnailDownloader member
variable. You can use any object as a token for ThumbnailDownloader. In this case, the ImageView
makes for a convenient token, since that is where the downloaded images will eventually go. In
onCreate(…), create the thread and start it. Override onDestroy() to quit the thread.
Listing 27.3Create ThumbnailDownloader (PhotoGalleryFragment.java)
public class PhotoGalleryFragment extends Fragment {
private static final String TAG = "PhotoGalleryFragment";
GridView mGridView;
ArrayList<GalleryItem> mItems;
ThumbnailDownloader<ImageView> mThumbnailThread;
@Override
public void onCreate(Bundle savedInstanceState) {
super.onCreate(savedInstanceState);
setRetainInstance(true);
new FetchItemsTask().execute();
mThumbnailThread = new ThumbnailDownloader<ImageView>();
mThumbnailThread.start();
mThumbnailThread.getLooper();
Log.i(TAG, "Background thread started");
}
@Override
public View onCreateView(LayoutInflater inflater, ViewGroup container,
Bundle savedInstanceState) {
...
}
@Override
public void onDestroy() {
super.onDestroy();
mThumbnailThread.quit();
Log.i(TAG, "Background thread destroyed");
}
...
}
(A couple of safety notes: one, notice that you call getLooper() after calling start() on your
ThumbnailDownloader. This is a way to ensure that the thread’s guts are ready before proceeding (you
will learn more about the Looper in a moment). And two, you call quit() to terminate the thread
inside onDestroy(). This is critical. If you do not quit your HandlerThreads, they will never die. Like
zombies. Or rock and roll. Or rocks.)
Finally, within GalleryItemAdapter.getView(…), retrieve the correct GalleryItem using the
position parameter, call the thread’s queueThumbnail() method, and pass in the ImageView and the
item’s URL.

ptg11078569
Messages and Message Handlers
441
Listing 27.4Hook up ThumbnailDownloader (PhotoGalleryFragment.java)
private class GalleryItemAdapter extends ArrayAdapter<GalleryItem> {
...
@Override
public View getView(int position, View convertView, ViewGroup parent) {
...
ImageView imageView = (ImageView)convertView
.findViewById(R.id.gallery_item_imageView);
imageView.setImageResource(R.drawable.brian_up_close);
GalleryItem item = getItem(position);
mThumbnailThread.queueThumbnail(imageView, item.getUrl());
return convertView;
}
}
Run PhotoGallery and check out LogCat. When you scroll around the GridView, you should see lines
in LogCat signaling that ThumbnailDownloader is getting each one of your download requests.
Now that you have a HandlerThread up and running, the next step is to create a message with the
information passed in to queueThumbnail() and put that message on the ThumbnailDownloader’s
message queue.
Messages and Message Handlers
Before you create a message, you need to understand what a Message is, and the relationship it has
with its Handler, or message handler.
Message anatomy
Let’s start by looking closely at messages. The messages that a Flash might put in an inbox (its own
inbox or that of another Flash) are not supportive notes, like "You run very fast, Flash." They are tasks
that need to be handled.
A message is an instance of Message and contains several fields. Three are relevant to your
implementation:
what a user-defined int that describes the message
obj a user-specified object to be sent with the message
target the Handler that will handle the message
The target of a Message is an instance of Handler. You can think of the name Handler as being short
for “message handler.” When you create a Message, it will automatically be attached to a Handler. And
when your Message is ready to be processed, Handler will be the object in charge of making it happen.
Handler anatomy
So to do any real work with messages, you will need an instance of the target message Handler first. A
Handler is not just a target for processing your Messages. A Handler is your interface for creating and
posting Messages, too.
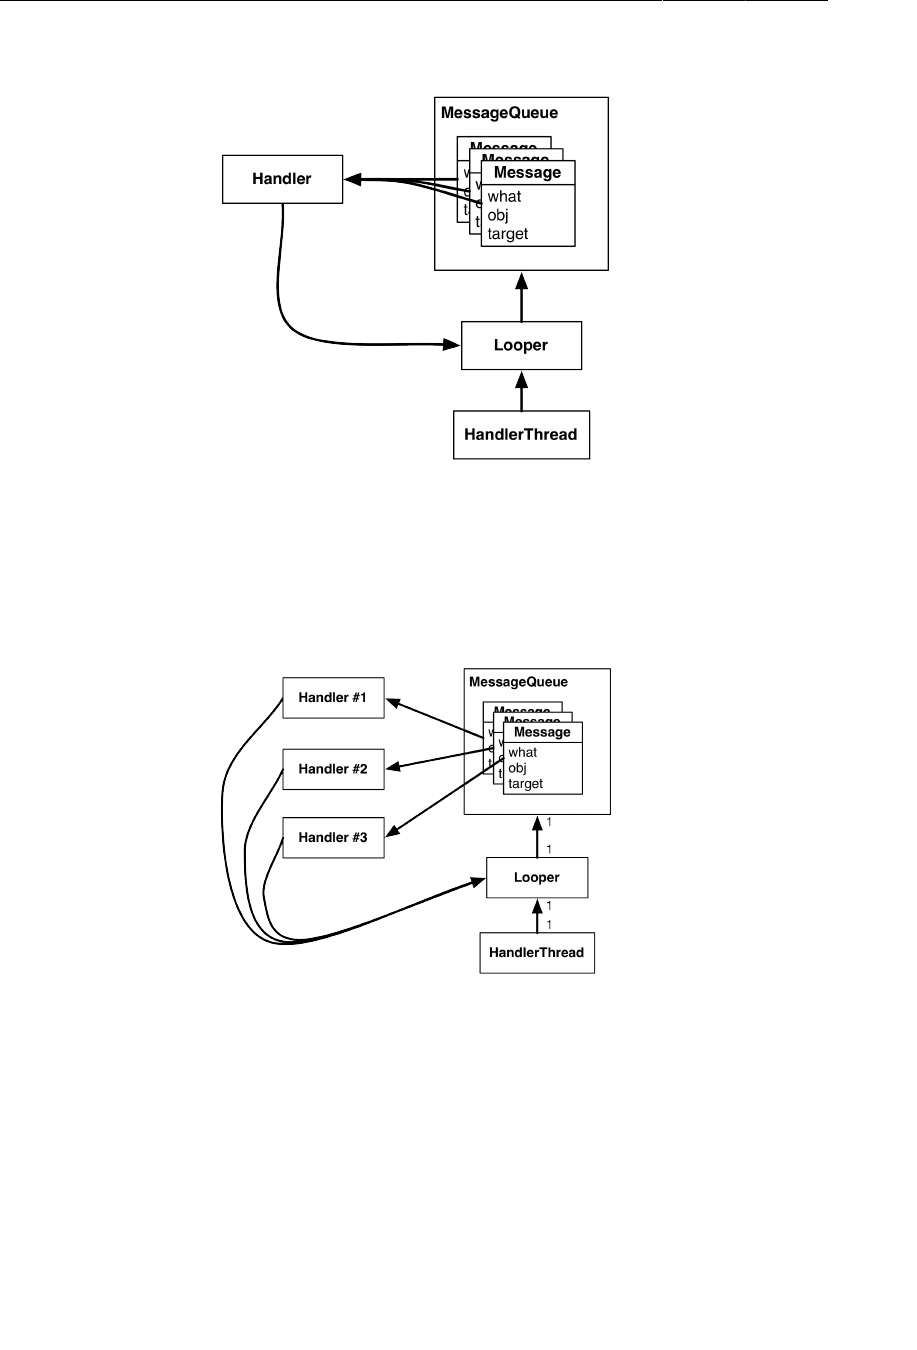
ptg11078569
Chapter 27Loopers, Handlers, and HandlerThread
442
Figure 27.5Looper, Handler, HandlerThread, and Message
Messages must be posted and consumed on a Looper, because Looper owns the inbox of Message
objects. So Handler always has a reference to its coworker, the Looper.
A Handler is attached to exactly one Looper, and a Message is attached to exactly one target Handler,
called its target. A Looper has a whole queue of Messages.
Figure 27.6Multiple Handlers, one Looper
Multiple Handlers can be attached to one Looper. This means that your Handler’s Messages may be
living side by side with another Handler’s messages.
Using handlers
Usually, you do not set a message’s target Handler by hand. It is better to build the message by calling
Handler.obtainMessage(…). You pass the other message fields into this method, and it automatically
sets the target for you.

ptg11078569
Using handlers
443
Handler.obtainMessage(…) pulls from a common recycling pool to avoid creating new Message
objects, so it is also more efficient than creating new instances.
Once you have obtained a Message, you then call sendToTarget() to send the Message to its Handler.
The Handler will then put the Message on the end of Looper’s message queue.
In this case, you are going to obtain a message and send it to its target within the implementation of
queueThumbnail(). The message’s what will be a constant defined as MESSAGE_DOWNLOAD. The obj will
be the Token – in this case, the ImageView that the adapter passed in to queueThumbnail().
When the looper gets to a particular message in the queue, it gives the message to the
message’s target to handle. Typically, the message is handled in the target’s implementation of
Handler.handleMessage(…).
Figure 27.7Creating a Message and sending it
In this case, your implementation of handleMessage(…) will use FlickrFetchr to download bytes
from the URL and then turn these bytes into a bitmap. Add the code shown in Listing 27.5.

ptg11078569
Chapter 27Loopers, Handlers, and HandlerThread
444
Listing 27.5Obtaining, sending, and handling a message
(ThumbnailDownloader.java)
public class ThumbnailDownloader<Token> extends HandlerThread {
private static final String TAG = "ThumbnailDownloader";
private static final int MESSAGE_DOWNLOAD = 0;
Handler mHandler;
Map<Token, String> requestMap =
Collections.synchronizedMap(new HashMap<Token, String>());
public ThumbnailDownloader() {
super(TAG);
}
@SuppressLint("HandlerLeak")
@Override
protected void onLooperPrepared() {
mHandler = new Handler() {
@Override
public void handleMessage(Message msg) {
if (msg.what == MESSAGE_DOWNLOAD) {
@SuppressWarnings("unchecked")
Token token = (Token)msg.obj;
Log.i(TAG, "Got a request for url: " + requestMap.get(token));
handleRequest(token);
}
}
};
}
public void queueThumbnail(Token token, String url) {
Log.i(TAG, "Got a URL: " + url");
requestMap.put(token, url);
mHandler
.obtainMessage(MESSAGE_DOWNLOAD, token)
.sendToTarget();
}
private void handleRequest(final Token token) {
try {
final String url = requestMap.get(token);
if (url == null)
return;
byte[] bitmapBytes = new FlickrFetchr().getUrlBytes(url);
final Bitmap bitmap = BitmapFactory
.decodeByteArray(bitmapBytes, 0, bitmapBytes.length);
Log.i(TAG, "Bitmap created");
} catch (IOException ioe) {
Log.e(TAG, "Error downloading image", ioe);
}
}
First, let’s talk about that annotation at the top of onLooperPrepared(),
@SuppressLint("HandlerLeak"). Here, Android Lint will warn you about subclassing Handler. Your

ptg11078569
Passing handlers
445
Handler will be kept alive by its Looper. So if your Handler is an anonymous inner class, it is easy to
leak memory accidentally through an implicit object reference. Here, though, everything is tied to your
HandlerThread, so there is no danger of leaking anything.
The other annotation, @SuppressWarnings("unchecked"), is more run of the mill. This is necessary
because Token is a generic class argument, but Message.obj is an Object. Due to type erasure, it is not
possible to actually make this cast. If you would like to know more about why, read up on type erasure
– this chapter will stay focused on Android stuff.
The requestMap variable is a synchronized HashMap. Here, using the Token as a key, you can store and
retrieve the URL associated with a particular Token.
In queueThumbnail(), you add the passed-in Token-URL pair to the map. Then you obtain a message,
give it the Token as its obj, and send it off to be put on the message queue.
You implemented Handler.handleMessage(…) in your Handler subclass within onLooperPrepared().
HandlerThread.onLooperPrepared() is called before the Looper checks the queue for the first time.
This makes it a good place to create your Handler implementation.
Within Handler.handleMessage(…), you check the message type, retrieve the Token and then pass it to
handleRequest(…).
The handleRequest() method is where the downloading happens. Here you check for the existence of
a URL. Then you pass the URL to a new instance of your old friend FlickrFetchr. In particular, you
use the FlickrFetchr.getUrlBytes(…) method that you created with such foresight in the last chapter.
Finally, you use BitmapFactory to construct a bitmap with the array of bytes returned from
getUrlBytes(…).
Run PhotoGallery and check LogCat for your confirming log statements.
Of course, the request will not be completely handled until you set the bitmap on the ImageView that
originally came from GalleryItemAdapter. However, this is UI work, so it must be done on the main
thread.
Everything you have seen so far is using handlers and messages on a single thread – putting messages
in your own inbox. In the next section, you will see how ThumbnailDownloader can use a Handler to
access the main thread.
Passing handlers
One way that a HandlerThread can get work done on the main thread is to have the main thread pass
its own Handler to the HandlerThread.
The main thread is a message loop with handlers and a Looper. When you create a Handler in the
main thread, it will be associated with the main thread’s Looper. You can then pass that Handler to
another thread. The passed Handler maintains its loyalty to the Looper of the thread that created it.
Any messages the Handler is responsible for will be handled on the main thread’s queue.
So just like you were able to schedule work on the background thread from the main thread using
ThumbnailDownloader’s Handler.
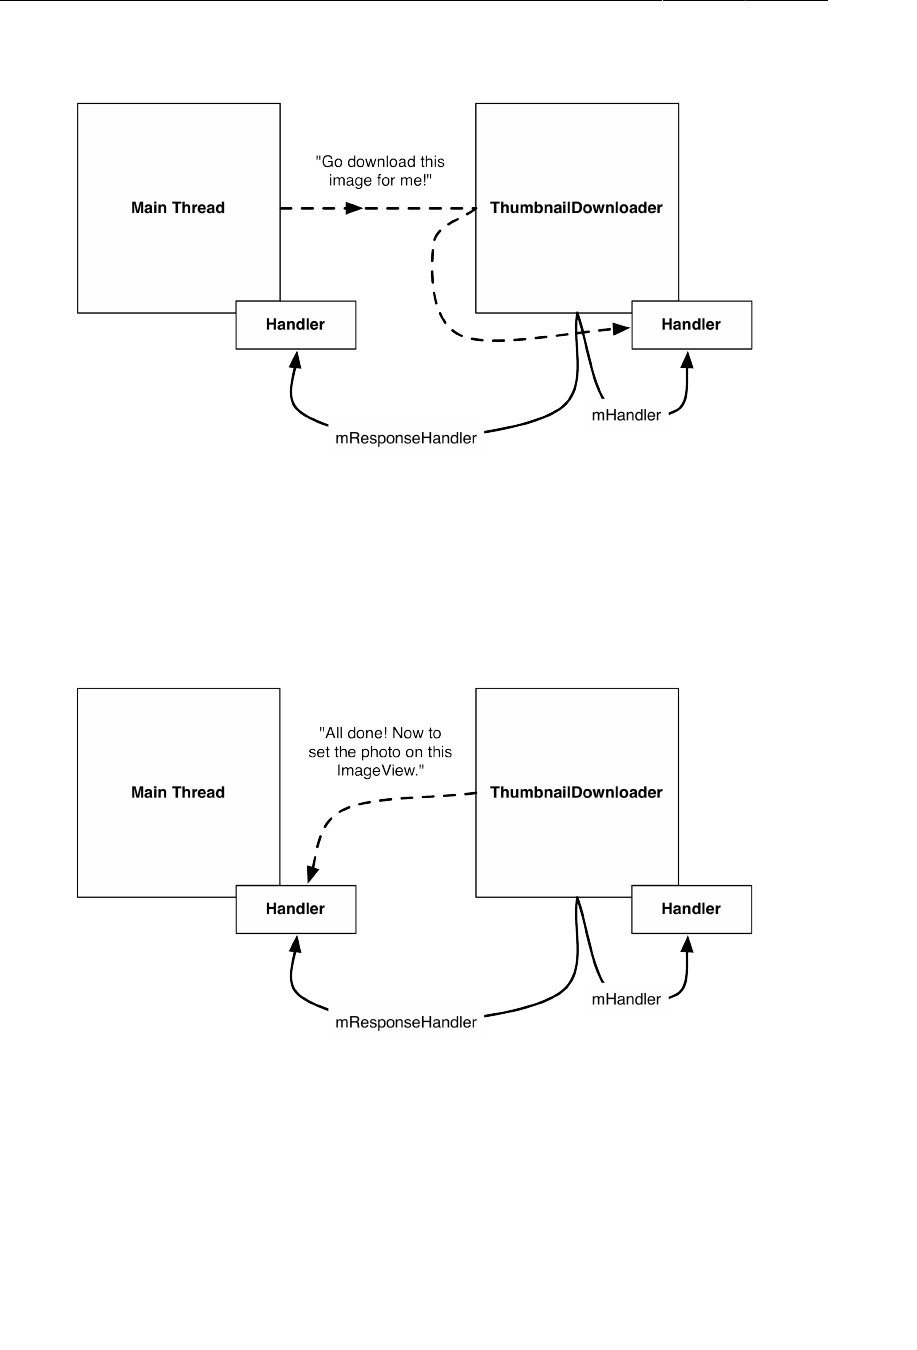
ptg11078569
Chapter 27Loopers, Handlers, and HandlerThread
446
Figure 27.8Scheduling work on ThumbnailDownloader from the main thread
You can also schedule work on the main thread from the background thread using a Handler attached
to the main thread:
Figure 27.9Scheduling work on the main thread from ThumbnailDownloader’s
thread
In ThumbnailDownloader.java, add the mResponseHandler variable seen above to hold a Handler
passed from the main thread. Then replace the constructor with one that accepts a Handler and sets the
variable, and add a listener interface to communicate the responses with.

ptg11078569
Passing handlers
447
Listing 27.6Add response Handler (ThumbnailDownloader.java)
public class ThumbnailDownloader<Token> extends HandlerThread {
private static final String TAG = "ThumbnailDownloader";
private static final int MESSAGE_DOWNLOAD = 0;
Handler mHandler;
Map<Token,String> requestMap =
Collections.synchronizedMap(new HashMap<Token,String>());
Handler mResponseHandler;
Listener<Token> mListener;
public interface Listener<Token> {
void onThumbnailDownloaded(Token token, Bitmap thumbnail);
}
public void setListener(Listener<Token> listener) {
mListener = listener;
}
public ThumbnailDownloader() {
super(TAG);
public ThumbnailDownloader(Handler responseHandler) {
super(TAG);
mResponseHandler = responseHandler;
}
Then modify PhotoGalleryFragment to pass a Handler to ThumbnailDownloader, as well as a
Listener to set the returning Bitmaps on the ImageView handles. Remember that by default, the
Handler will attach itself to the Looper for the current thread. Since this Handler is created in
onCreate(…), it will be attached to the main thread’s Looper.
Listing 27.7Hook up to response Handler (PhotoGalleryFragment.java)
@Override
public void onCreate(Bundle savedInstanceState) {
super.onCreate(savedInstanceState);
setRetainInstance(true);
new FetchItemsTask().execute();
mThumbnailThread = new ThumbnailDownloader();
mThumbnailThread = new ThumbnailDownloader<ImageView>(new Handler());
mThumbnailThread.setListener(new ThumbnailDownloader.Listener<ImageView>() {
public void onThumbnailDownloaded(ImageView imageView, Bitmap thumbnail) {
if (isVisible()) {
imageView.setImageBitmap(thumbnail);
}
}
});
mThumbnailThread.start();
mThumbnailThread.getLooper();
Log.i(TAG, "Background thread started");
}
Now ThumbnailDownloader has access via mResponseHandler to a Handler that is tied to the main
thread’s Looper. It also has your Listener to do the UI work with the returning Bitmaps. Note that you

ptg11078569
Chapter 27Loopers, Handlers, and HandlerThread
448
guard your call to imageView.setImageBitmap(Bitmap) with a call to Fragment.isVisible(). This
ensures that you are not setting the image on a stale ImageView.
You could send a custom Message back to the main thread this way. This would require another
subclass of Handler, with an override of handleMessage(…). Instead, let’s use another handy Handler
method – post(Runnable).
Handler.post(Runnable) is a convenience method for posting Messages that look like this:
Runnable myRunnable = new Runnable() {
public void run() {
/* Your code here */
}
};
Message m = mHandler.obtainMessage();
m.callback = myRunnable;
When a Message has its callback field set, instead of being run by its Handler target, the Runnable in
callback is run instead.
In ThumbnailDownloader.handleRequest(), add the following code.
Listing 27.8Downloading and displaying (ThumbnailDownloader.java)
...
private void handleRequest(final Token token) {
try {
final String url = requestMap.get(token);
if (url == null)
return;
byte[] bitmapBytes = new FlickrFetchr().getUrlBytes(url);
final Bitmap bitmap = BitmapFactory
.decodeByteArray(bitmapBytes, 0, bitmapBytes.length);
Log.i(TAG, "Bitmap created");
mResponseHandler.post(new Runnable() {
public void run() {
if (requestMap.get(token) != url)
return;
requestMap.remove(token);
mListener.onThumbnailDownloaded(token, bitmap);
}
});
} catch (IOException ioe) {
Log.e(TAG, "Error downloading image", ioe);
}
}
And because mResponseHandler is associated with the main thread’s Looper, this UI update code will
be run on the main thread.
So what does this code do? First, it double-checks the requestMap. This is necessary because the
GridView recycles its views. By the time ThumbnailDownloader finishes downloading the Bitmap,

ptg11078569
For the More Curious: AsyncTask vs. Threads
449
GridView may have recycled the ImageView and requested a different URL for it. This check ensures
that each Token gets the correct image, even if another request has been made in the meantime.
Finally, you remove the Token from the requestMap and set the bitmap on the Token.
Before running and seeing your hard-won images, there is one last danger you need to account for.
If the user rotates the screen, ThumbnailDownloader may be hanging on to invalid ImageViews. Bad
things will happen if those ImageViews get pressed.
Write the following method to clean all the requests out of your queue.
Listing 27.9Add cleanup method (ThumbnailDownloader.java)
public void clearQueue() {
mHandler.removeMessages(MESSAGE_DOWNLOAD);
requestMap.clear();
}
Then clean out your downloader in PhotoGalleryFragment when your view is destroyed.
Listing 27.10Call cleanup method (PhotoGalleryFragment.java)
@Override
public void onDestroyView() {
super.onDestroyView();
mThumbnailThread.clearQueue();
}
With that, your work on this chapter is complete. Run PhotoGallery. Scroll around to see images
dynamically loading.
PhotoGallery has achieved its basic goal of displaying images from Flickr. In the next few chapters,
you will add more functionality like searching for photos and opening each photo’s Flickr page in a
web view.
For the More Curious: AsyncTask vs. Threads
Now that you understand Handler and Looper, AsyncTask may not seem quite so magical. It is still
less work than what you have done here. So why not use AsyncTask instead of a HandlerThread?
There are a few reasons. The most fundamental one is that AsyncTask is not designed for it. It is
intended for work that is short lived and not repeated too often. Your code in the previous chapter is a
place where AsyncTask shines. If you are creating a lot of AsyncTasks, though, or having them run for
a long time, you are probably using the wrong class.
A more compelling technical reason is that in Android 3.2 AsyncTask changed its implementation in
a significant way. Starting with Android 3.2, AsyncTask does not create a thread for each instance of
AsyncTask. Instead, it uses something called an Executor to run background work for all AsyncTasks
on a single background thread. That means that each AsyncTask will run one after the other. A long-
running AsyncTask will poison the well, preventing other AsyncTasks from getting any CPU time.
It is possible to safely run AsyncTask in parallel by using a thread pool executor instead, but we do not
recommend doing so. If you are considering doing this, it is usually better to do your own threading
instead, using Handlers to communicate back to the main thread when necessary.

ptg11078569
Chapter 27Loopers, Handlers, and HandlerThread
450
Challenge: Preloading and Caching
Users accept that not everything can be instantaneous. (Well, most users.) Even so, programmers strive
towards perfection.
To approach instantaneity, most real world apps augment the code you have here in two ways:
• adding a caching layer
• preloading images
A cache is a place to stash a certain number of Bitmap objects so that they stick around even when you
are done using them. A cache can only hold so many items, so you need a strategy to decide what to
keep when your cache runs out of room. Many caches use a strategy called LRU, or “least recently
used.” When you are out of room, the cache gets rid of the least recently-used item.
The Android support library has a class called LruCache that implements an LRU strategy. For the first
challenge, use LruCache to add a simple cache to ThumbnailDownloader. Whenever you download the
Bitmap for an URL, you will stick it in the cache. Then, when you are about to download a new image,
you will check the cache first to see if you already have it around.
Once you have built a cache, you can preload things into it. Preloading is loading items in the cache
before you actually need them. That way, there is no delay for Bitmaps to download before displaying
them.
Preloading is tricky to implement well, but it makes a huge difference for the user. For a second, harder
challenge, for every GalleryItem you display, preload Bitmaps for the previous ten and the next ten
GalleryItems.

ptg11078569
451
28
Search
Your next task with PhotoGallery is to search photos on Flickr. In this chapter, you will learn how to
integrate search into your app the Android way.
Or the Android ways, as it turns out. Search has been integrated into Android from the very beginning,
but (much like the menu button), it has changed a lot since then. Like menus, the new code for search
was built on the existing APIs. So when you build search in the older style, you are preparing to
implement the full-featured modern Jelly Bean search.
Searching Flickr
Let’s begin with the Flickr side of things. To search Flickr, you call the flickr.photos.search
method. Here is what a flickr.photos.search method invocation to look for the text “red” looks like:
http://api.flickr.com/services/rest/?method=flickr.photos.search
&api_key=XXX&extras=url_s&text=red
This method takes in some new and different parameters to specify what the search terms are, like a
text query parameter. The good news is that parsing the XML you get back into GalleryItems works
exactly the same.
Make the changes in Listing 28.1 to add a new search request method to FlickrFetchr. Since both
search and getRecent parse GalleryItems in the same way, you will refactor some of your old code
from fetchItems() into a new method called downloadGalleryItems(String). Pay close attention –
the old fetchItems() URL code is cut and pasted into a new version of the fetchItems() method, not
deleted.

ptg11078569
Chapter 28Search
452
Listing 28.1Add Flickr search method (FlickrFetchr.java)
public class FlickrFetchr {
public static final String TAG = "PhotoFetcher";
private static final String ENDPOINT = "http://api.flickr.com/services/rest/";
private static final String API_KEY = "4f721bbafa75bf6d2cb5af54f937bb70";
private static final String METHOD_GET_RECENT = "flickr.photos.getRecent";
private static final String METHOD_SEARCH = "flickr.photos.search";
private static final String PARAM_EXTRAS = "extras";
private static final String PARAM_TEXT = "text";
...
public ArrayList<GalleryItem> fetchItems() {
public ArrayList<GalleryItem> downloadGalleryItems(String url) {
ArrayList<GalleryItem> items = new ArrayList<GalleryItem>();
try {
String url = Uri.parse(ENDPOINT).buildUpon()
.appendQueryParameter("method", METHOD_GET_RECENT)
.appendQueryParameter("api_key", API_KEY)
.appendQueryParameter(PARAM_EXTRAS, EXTRA_SMALL_URL)
.build().toString();
String xmlString = getUrl(url);
Log.i(TAG, "Received xml: " + xmlString);
XmlPullParserFactory factory = XmlPullParserFactory.newInstance();
XmlPullParser parser = factory.newPullParser();
parser.setInput(new StringReader(xmlString));
parseItems(items, parser);
} catch (IOException ioe) {
Log.e(TAG, "Failed to fetch items", ioe);
} catch (XmlPullParserException xppe) {
Log.e(TAG, "Failed to parse items", xppe);
}
return items;
}
public ArrayList<GalleryItem> fetchItems() {
// Move code here from above
String url = Uri.parse(ENDPOINT).buildUpon()
.appendQueryParameter("method", METHOD_GET_RECENT)
.appendQueryParameter("api_key", API_KEY)
.appendQueryParameter(PARAM_EXTRAS, EXTRA_SMALL_URL)
.build().toString();
return downloadGalleryItems(url);
}
public ArrayList<GalleryItem> search(String query) {
String url = Uri.parse(ENDPOINT).buildUpon()
.appendQueryParameter("method", METHOD_SEARCH)
.appendQueryParameter("api_key", API_KEY)
.appendQueryParameter(PARAM_EXTRAS, EXTRA_SMALL_URL)
.appendQueryParameter(PARAM_TEXT, query)
.build().toString();
return downloadGalleryItems(url);
}
}

ptg11078569
The Search Dialog
453
The downloadGalleryItems(String) method is used twice because the code to download and parse
the URL is the same for both search and getRecent. Searching is simply a matter of hitting the new
search method, flickr.photos.search, passing in the encoded query string as the text parameter.
Next, hook up some test code to call your search code inside
PhotoGalleryFragment.FetchItemsTask. For now, you will hardwire a search query just to make sure
that it works.
Listing 28.2Hardwired search query code (PhotoGalleryFragment.java)
private class FetchItemsTask extends AsyncTask<Void,Void,ArrayList<GalleryItem>> {
@Override
protected ArrayList<GalleryItem> doInBackground(Void... params) {
String query = "android"; // Just for testing
if (query != null) {
return new FlickrFetchr().search(query);
} else {
return new FlickrFetchr().fetchItems();
}
}
@Override
protected void onPostExecute(ArrayList<GalleryItem> items) {
...
}
}
...
}
The default will be to use the old getRecent code. If there is a non-null search query (which for now is
always the case), then FetchItemsTask will fetch search results instead.
Run PhotoGallery and see what you get. Hopefully, you will see an Andy or two.
The Search Dialog
In this section, you will implement Android’s search interface in PhotoGallery. You will start with the
old style dialog interface.
Creating a search interface
In Honeycomb, the Android folks got rid of hardware search buttons. Even before that, though, there
was no guarantee of having a search button. Modern Android apps that rely on search must always
have a search button somewhere in the app if they are targeting pre-3.0 devices.
Implementing this is not difficult. Simply call Activity.onSearchRequested(). This method performs
the exact same operation as pressing the search button.
Add a menu XML file for PhotoGallery in res/menu/fragment_photo_gallery.xml. Your app will
also need an interface to clear the search query, so add a clear button as well.

ptg11078569
Chapter 28Search
454
Listing 28.3Add search menu items (res/menu/
fragment_photo_gallery.xml)
<menu xmlns:android="http://schemas.android.com/apk/res/android">
<item android:id="@+id/menu_item_search"
android:title="@string/search"
android:icon="@android:drawable/ic_menu_search"
android:showAsAction="ifRoom"
/>
<item android:id="@+id/menu_item_clear"
android:title="@string/clear_search"
android:icon="@android:drawable/ic_menu_close_clear_cancel"
android:showAsAction="ifRoom"
/>
</menu>
You are missing a couple of strings now, so go ahead and add them to strings.xml. (Later on, you will
need a search hint string, so add that as well.)
Listing 28.4Add search strings (res/values/strings.xml)
<resources>
...
<string name="title_activity_photo_gallery">PhotoGalleryActivity</string>
<string name="search_hint">Search Flickr</string>
<string name="search">Search</string>
<string name="clear_search">Clear Search</string>
</resources>
Then hook up your options menu callbacks. For the search button, you will call onSearchRequested()
as described above. For the cancel button, for now you will do nothing.
Listing 28.5Options menu callbacks (PhotoGalleryFragment.java)
@Override
public void onCreate(Bundle savedInstanceState) {
super.onCreate(savedInstanceState);
setRetainInstance(true);
setHasOptionsMenu(true);
...
}
...
@Override
public void onDestroyView() {
...
}
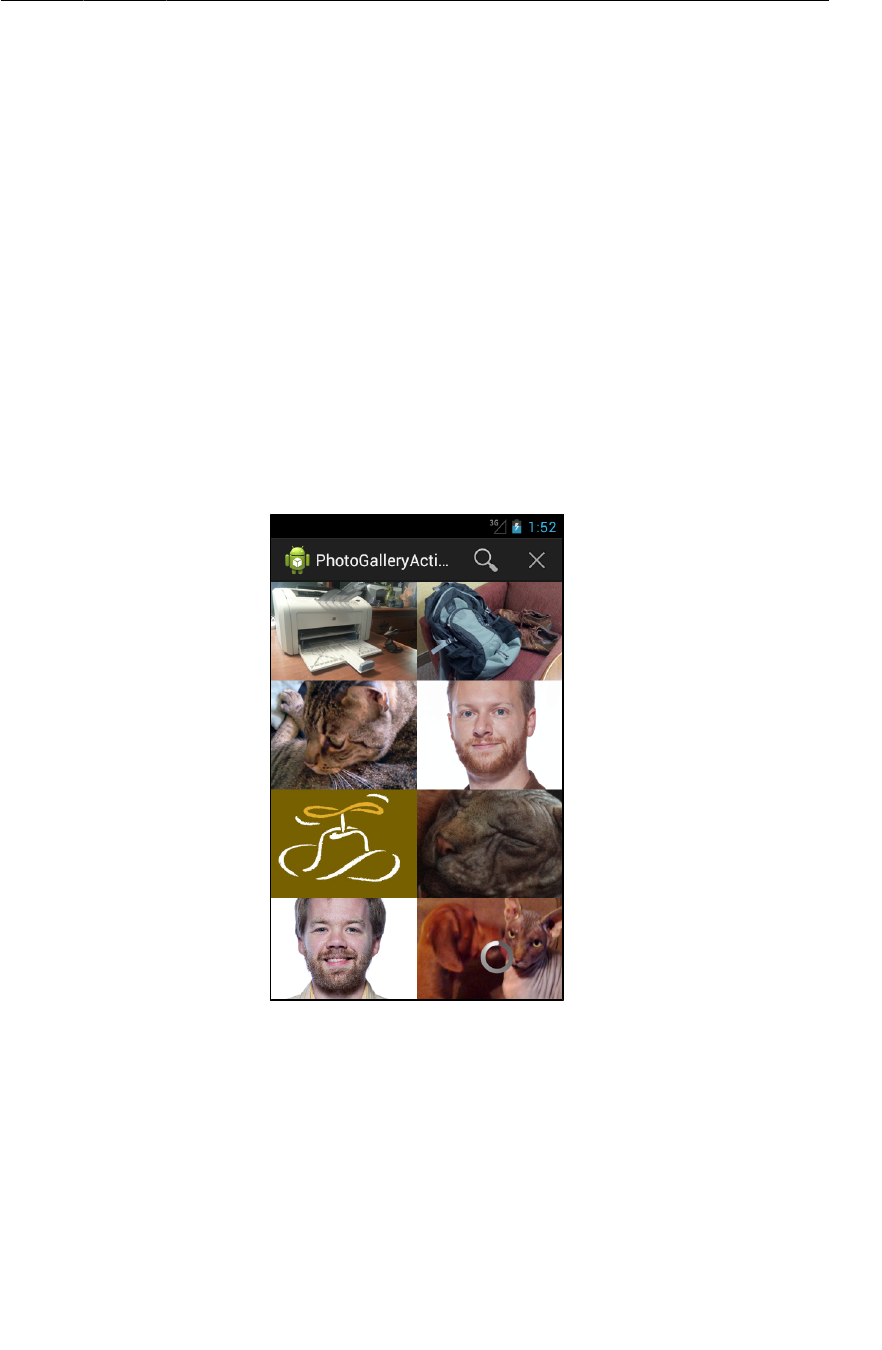
ptg11078569
Searchable activities
455
@Override
public void onCreateOptionsMenu(Menu menu, MenuInflater inflater) {
super.onCreateOptionsMenu(menu, inflater);
inflater.inflate(R.menu.fragment_photo_gallery, menu);
}
@Override
public boolean onOptionsItemSelected(MenuItem item) {
switch (item.getItemId()) {
case R.id.menu_item_search:
getActivity().onSearchRequested();
return true;
case R.id.menu_item_clear:
return true;
default:
return super.onOptionsItemSelected(item);
}
}
Run your new menu interface to see that it displays correctly.
Figure 28.1Your search interface
Pressing the search button will not do anything right now, though. For onSearchRequested() to work,
you must make PhotoGalleryActivity into a searchable activity.
Searchable activities
There are two moving pieces that make an activity searchable. The first is an XML file. This XML file
contains an element called searchable that describes how the search dialog that you will show later

ptg11078569
Chapter 28Search
456
should display itself. Create a new folder called res/xml and then create a new XML file in that folder
called searchable.xml. Fill the file’s innards with a simple version of a searchable element:
Listing 28.6Search configuration (res/xml/searchable.xml)
<?xml version="1.0" encoding="utf-8"?>
<searchable xmlns:android="http://schemas.android.com/apk/res/android"
android:label="@string/app_name"
android:hint="@string/search_hint"
/>
This XML is called a search configuration. In your case, all your search configuration needs to do is
provide a hint string and the name of your application.
In a fancier application, this file can become fat with instructions. Search suggestions, voice search,
global search configuration, action key configurations, and input types all go here. Even in the simplest
implementation, though, a basic search configuration is required.
The next pieces of the puzzle go in AndroidManifest.xml. You need to change the launch
mode of your app, and you need to declare an additional intent filter and a piece of metadata for
PhotoGalleryActivity. The intent filter advertises that you can listen to search intents, and the
metadata is to attach the XML you just wrote to your activity.
All of this advertisement work is required to tell Android’s SearchManager that your activity is capable
of handling searches and to give it your search configuration. SearchManager is an OS-level service
that is responsible for presenting the search dialog and managing its interactions.
Crack open AndroidManifest.xml and add the two elements and the android:launchMode attribute
shown in Listing 28.7.
Listing 28.7Add intent filter and metadata (AndroidManifest.xml)
<manifest xmlns:android="http://schemas.android.com/apk/res/android"
... >
...
<application
... >
<activity
android:name=".PhotoGalleryActivity"
android:launchMode="singleTop"
android:label="@string/title_activity_photo_gallery" >
<intent-filter>
<action android:name="android.intent.action.MAIN" />
<category android:name="android.intent.category.LAUNCHER" />
</intent-filter>
<intent-filter>
<action android:name="android.intent.action.SEARCH" />
</intent-filter>
<meta-data android:name="android.app.searchable"
android:resource="@xml/searchable"/>
</activity>
</application>
</manifest>
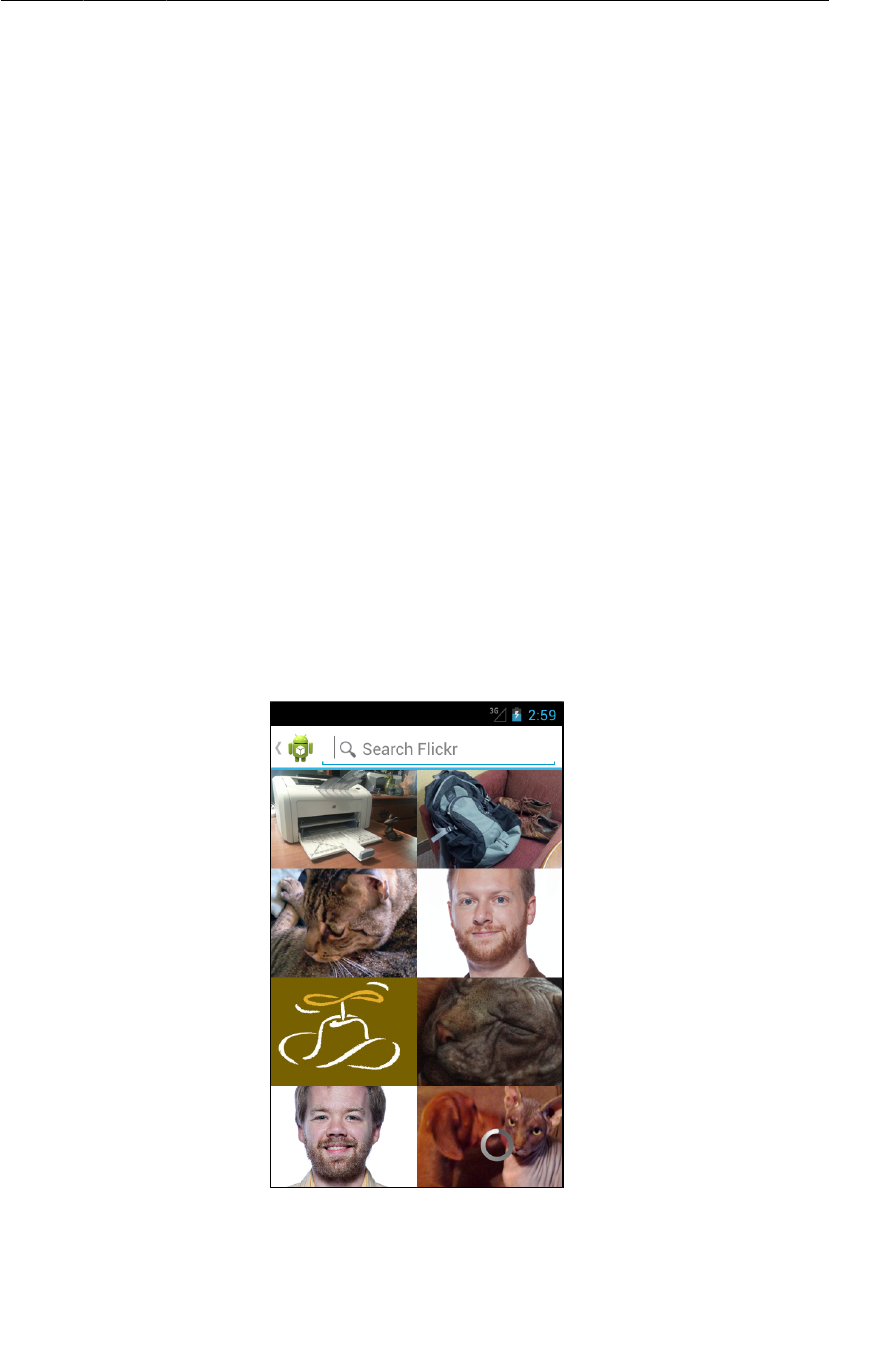
ptg11078569
Searchable activities
457
Let’s talk about the last two elements first. The first addition is a familiar intent filter definition.
Search results are communicated by calling startActivity(…) with an intent that has an action of
android.intent.action.SEARCH. The search query is put on the intent as an extra. So to indicate
that your activity can handle search results, you define a filter for the action.intent.action.SEARCH
intent.
The second addition is another metadata tag. You used metadata earlier in Chapter16, but this tag is
slightly different. Instead of android:value, it uses android:resource. Here is an example to show
you the difference. Let’s say that you referred to the same string resource in two different metadata
tags:
<meta-data android:name="metadata.value"
android:value="@string/app_name" />
<meta-data android:name="metadata.resource"
android:resource="@string/app_name" />
If you were to pull out the value for metadata.value, you would find that it contained the string
“PhotoGallery”, which is the value stored in @string/app_name. The value for metadata.resource,
though, would be the integer ID of that resource. In other words, the value of metadata.resource is
the value in code of R.string.app_name.
Back in reality, the SearchManager requires the integer ID of searchable.xml, not the string value of
that XML file. So you use android:resource and give the SearchManager the file’s resource ID.
What about the android:launchMode attribute on your activity tag? This is the activity’s launch
mode. You will learn about this in a moment when you write the code to receive the search query.
With that, you should be able to fire up a search dialog. Run PhotoGallery and tap your menu search
button.
Figure 28.2The search dialog
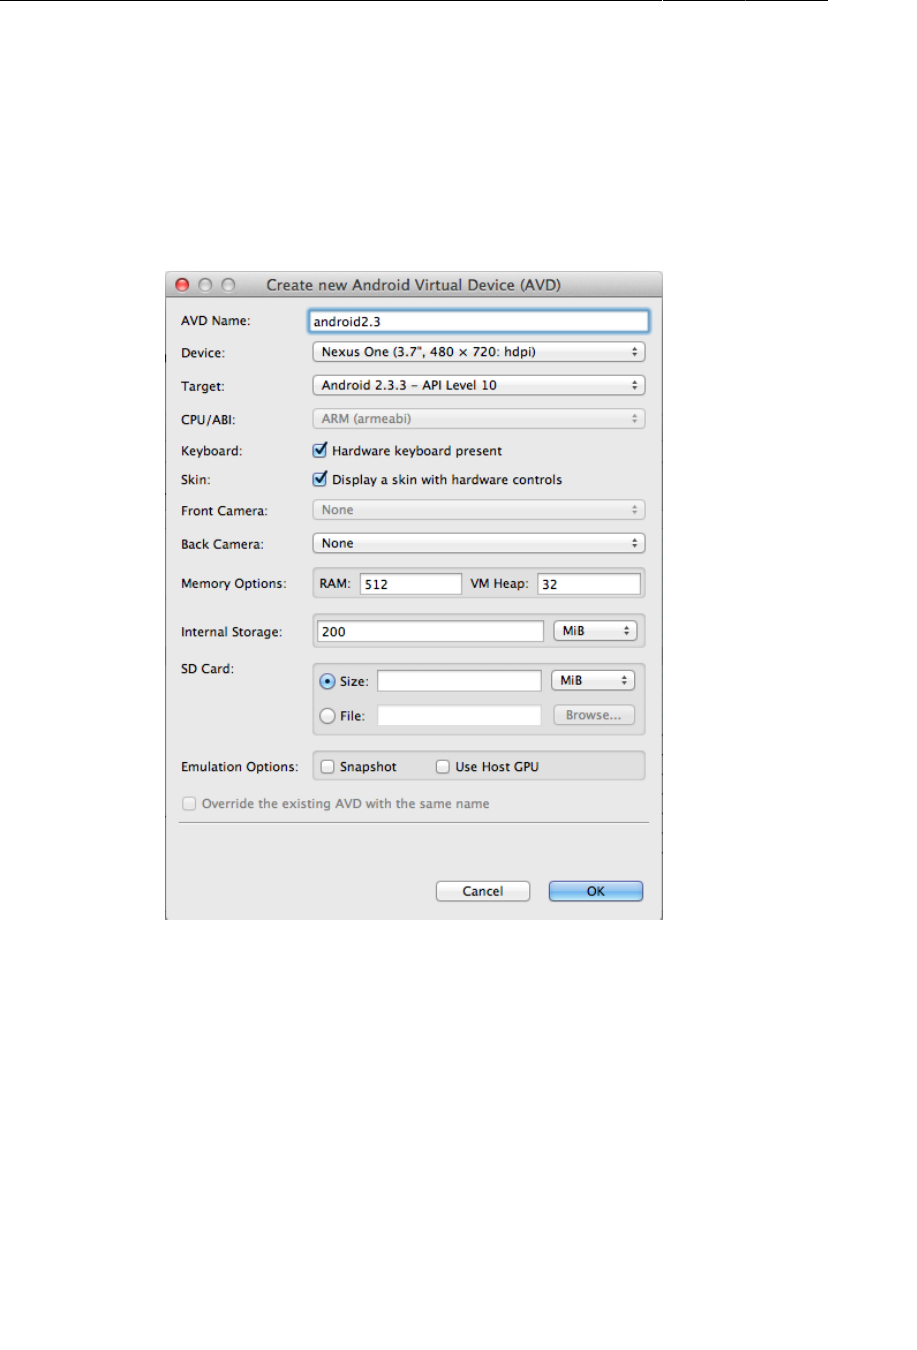
ptg11078569
Chapter 28Search
458
Hardware search button
The same code that is invoked when you call onSearchRequested() by hand will be run when you
press the hardware search button on older devices. If you would like to verify for yourself that this
works, you can modify any pre-3.0 emulator to have a hardware search button by configuring your
emulator to use the hardware keyboard, like so:
Figure 28.3Add hardware keyboard support
How Search works
The main idea behind search in Android is the concept mentioned briefly earlier, the searchable
activity. A searchable activity is defined by the two things you just created: a search intent filter and a
search configuration metadata entry.
With the hardware search button, every search interaction up until the search intent itself is handled by
the system. It checks your AndroidManifest.xml to see if your activity is searchable. If it is, it then
shows a search dialog activity on top of your activity. That activity then triggers search by sending you
a new intent.
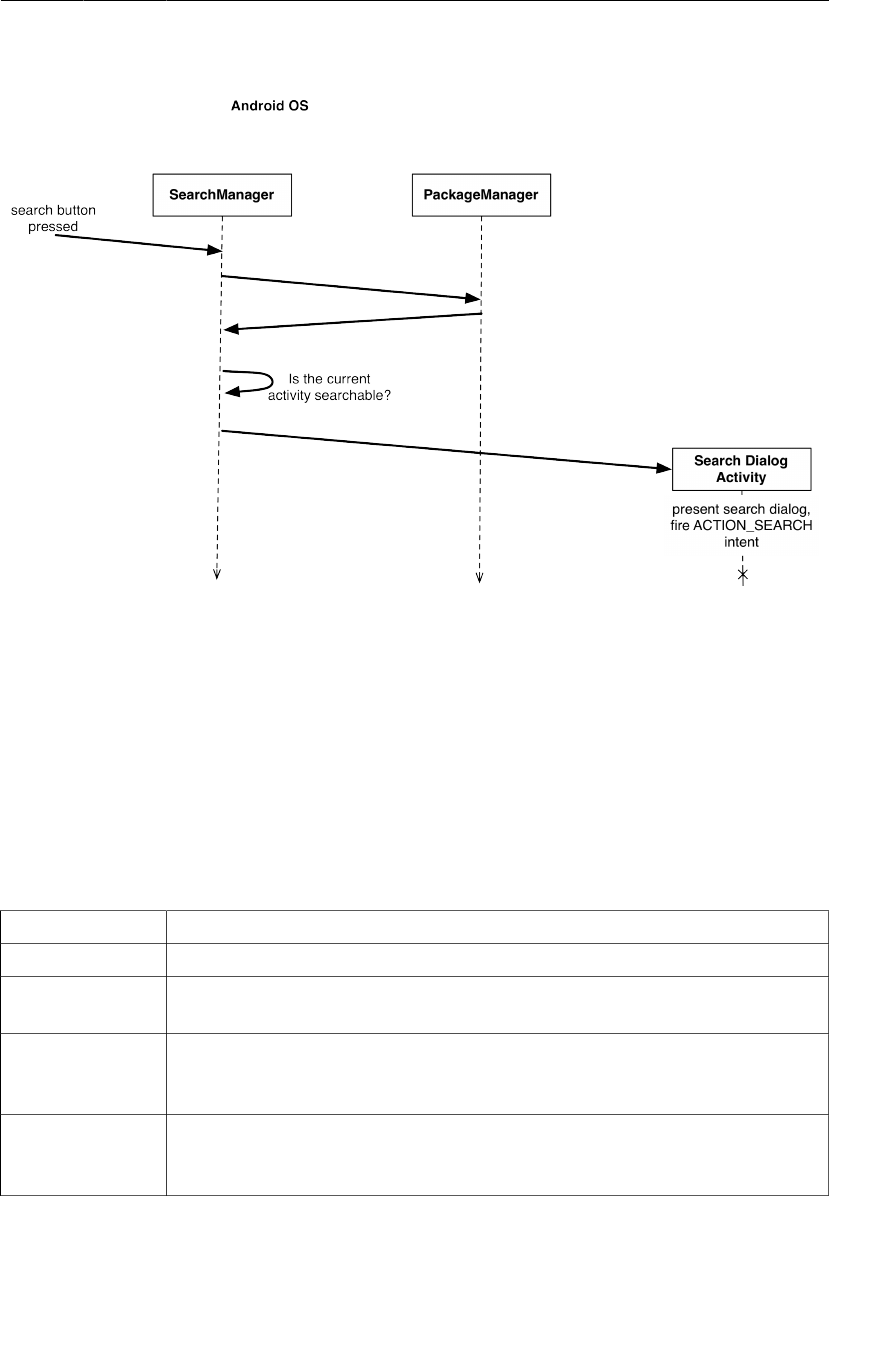
ptg11078569
Launch modes and new intents
459
Figure 28.4System search
Which means that, normally, pressing the search button will start a new activity. In your case, though, it
does not. Why? Because you added android:launchMode="singleTop" (Listing 28.7), which changes
your launch mode.
Launch modes and new intents
What is a launch mode? Launch modes determine how your activity starts up when it receives a new
intent, and sometimes how it behaves when it fires an intent to start another activity.
Table 28.1The different kinds of launch modes
Launch mode Behavior
standard The default behavior – start up a new activity for every new intent received.
singleTop If an instance of this activity is already at the top of the back stack, direct the new
intent at the existing activity instead of creating a new one.
singleTask Launch this activity into its own task. If the activity already exists in the task,
clear out any activities above it in the back stack and direct the new intent at the
existing activity.
singleInstance Launch this activity into its own task. It is the only activity in its task – if any
other activities are started from this task, they are launched into their own tasks.
If the activity already exists, direct the new intent at the existing activity.

ptg11078569
Chapter 28Search
460
Every activity you have written so far has used the standard launch mode. This behavior is familiar:
when an intent resolves to an activity with the standard launch mode, a new instance of that activity is
created and added to the back stack.
This behavior will not fly for PhotoGalleryActivity in all cases. (We will discuss why when we talk
about SearchView and Honeycomb search later.) Instead, you specify the singleTop launch mode.
This means that instead of starting a new activity, the search intent you receive will go to your already
running PhotoGalleryActivity on top of the back stack.
You receive that new intent by overriding onNewIntent(Intent) inside an Activity. Whenever you
receive a new intent, you will want to refresh the items in PhotoGalleryFragment.
Refactor PhotoGalleryFragment to include an updateItems() method that runs FetchItemsTask to
refresh your current items.
Listing 28.8Add update method (PhotoGalleryFragment.java)
@Override
public void onCreate(Bundle savedInstanceState) {
super.onCreate(savedInstanceState);
setRetainInstance(true);
new FetchItemsTask().execute();
updateItems();
mThumbnailThread = new ThumbnailDownloader<ImageView>(new Handler());
mThumbnailThread.setListener(new ThumbnailDownloader.Listener<ImageView>() {
...
});
mThumbnailThread.start();
mThumbnailThread.getLooper();
}
public void updateItems() {
new FetchItemsTask().execute();
}
Then add your onNewIntent(Intent) override in PhotoGalleryActivity to receive the new intent and
refresh your PhotoGalleryFragment’s items:
Listing 28.9Override onNewIntent(…) (PhotoGalleryActivity.java)
public class PhotoGalleryActivity extends SingleFragmentActivity {
private static final String TAG = "PhotoGalleryActivity";
@Override
public Fragment createFragment() {
return new PhotoGalleryFragment();
}

ptg11078569
Simple persistence with shared preferences
461
@Override
public void onNewIntent(Intent intent) {
PhotoGalleryFragment fragment = (PhotoGalleryFragment)
getSupportFragmentManager().findFragmentById(R.id.fragmentContainer);
if (Intent.ACTION_SEARCH.equals(intent.getAction())) {
String query = intent.getStringExtra(SearchManager.QUERY);
Log.i(TAG, "Received a new search query: " + query);
}
fragment.updateItems();
}
}
You should be able to see PhotoGalleryActivity receiving the new intent now in LogCat when you
run a search. You should also see the items in PhotoGallery revert to Brian faces and then refresh.
One important thing to note about onNewIntent(Intent): if you need the new intent value, make sure
to save it someplace. The value you get from getIntent() will have the old intent, not the new one.
This is because getIntent() is intended to return the intent that started this activity, not the most
recent intent it received.
Next up is to integrate that search query into your app. You will be implementing search so that there is
only a single search query at any given time. It would be nice if that query were persistent...
Simple persistence with shared preferences
You could persist this data by serializing objects to flash storage like you did in Chapter17. For simple
values, though, shared preferences are simpler to implement and better behaved.
Shared preferences are files on your file system that you read and edit using the SharedPreferences
class. An instance of SharedPreferences acts like a key-value store, much like Bundle, except that it
is backed by persistent storage. The keys are strings, and the values are atomic data types. If you look
at them you will see that the files are simple XML, but SharedPreferences makes it easy to ignore
that implementation detail.
To start using a simple string value in shared preferences, just add a constant to use as the key for your
preference value. Add your constant to FlickrFetchr:
Listing 28.10Shared preferences constant (FlickrFetchr.java)
public class FlickrFetchr {
public static final String TAG = "FlickrFetchr";
public static final String PREF_SEARCH_QUERY = "searchQuery";
private static final String ENDPOINT = "http://api.flickr.com/services/rest/";
...
To get a specific instance of SharedPreferences, you can use the
Context.getSharedPreferences(String,int) method. However, in practice, you will often not care
too much about the specific instance, just that it is shared across the entire app. In that case, it is better
to use the PreferenceManager.getDefaultSharedPreferences(Context) method, which returns an
instance with a default name and private permissions.

ptg11078569
Chapter 28Search
462
Acquire the default SharedPreferences and write your query out in PhotoGalleryActivity.
Listing 28.11Save out search query (PhotoGalleryActivity.java)
@Override
public void onNewIntent(Intent intent) {
PhotoGalleryFragment fragment = (PhotoGalleryFragment)getSupportFragmentManager()
.findFragmentById(R.id.fragmentContainer);
if (Intent.ACTION_SEARCH.equals(intent.getAction())) {
String query = intent.getStringExtra(SearchManager.QUERY);
Log.i(TAG, "Received a new search query: " + query);
PreferenceManager.getDefaultSharedPreferences(this)
.edit()
.putString(FlickrFetchr.PREF_SEARCH_QUERY, query)
.commit();
}
fragment.updateItems();
}
In your code above, you call SharedPreferences.edit() to get an instance of
SharedPreferences.Editor. This is the class you use to stash values in your SharedPreferences.
It allows you to group sets of changes together in transactions, much like you do with
FragmentTransaction. If you have a lot of changes, this will allow you to group them together into a
single storage write operation.
Once you are done making all of your changes, you call commit() on your editor to make them visible
to other users of that SharedPreferences file.
Getting a value you previously stored is as simple as calling SharedPreferences.getString(…),
getInt(…), or whichever method is appropriate for your data type. Add code to
PhotoGalleryFragment to fetch your search query from the default SharedPreferences.
Listing 28.12Grab search query preference (PhotoGalleryFragment.java)
private class FetchItemsTask extends AsyncTask<Void,Void,ArrayList<GalleryItem>> {
@Override
protected ArrayList<GalleryItem> doInBackground(Void... params) {
String query = "android"; // just for testing
Activity activity = getActivity();
if (activity == null)
return new ArrayList<GalleryItem>();
String query = PreferenceManager.getDefaultSharedPreferences(activity)
.getString(FlickrFetchr.PREF_SEARCH_QUERY, null);
if (query != null) {
return new FlickrFetchr().search(query);
} else {
return new FlickrFetchr().fetchItems();
}
}
@Override
protected void onPostExecute(ArrayList<GalleryItem> items) {
...
}
}

ptg11078569
Using SearchView on Post-Android 3.0
463
Preferences is your entire persistence engine for PhotoGallery. (Much easier than serializing JSON,
right?)
Search should now work. Run PhotoGallery, try searching for something, and see what you get.
To implement canceling a search, clear out your search term from your shared preferences and call
updateItems() again:
Listing 28.13Implement cancel (PhotoGalleryFragment.java)
@Override
public boolean onOptionsItemSelected(MenuItem item) {
switch (item.getItemId()) {
...
case R.id.menu_item_clear:
PreferenceManager.getDefaultSharedPreferences(getActivity())
.edit()
.putString(FlickrFetchr.PREF_SEARCH_QUERY, null)
.commit();
updateItems();
return true;
default:
return super.onOptionsItemSelected(item);
}
}
Using SearchView on Post-Android 3.0
Now you have a search interface that works everywhere. However, it does not work in a Honeycomb-
approved fashion.
Honeycomb added a new class called SearchView. SearchView is an action view – a view that may be
included within the action bar. SearchView allows your entire search interface to take place within your
activity’s action bar, instead of inside a dialog superimposed on your activity. That means that it has the
same styling and theming as your application, which is a good and fine thing.
Using an action view is as simple as adding an android:actionViewClass attribute to your menu item
tag, like so:
Listing 28.14Add an action view to your menu (res/menu/
fragment_photo_gallery.xml)
<menu xmlns:android="http://schemas.android.com/apk/res/android">
<item android:id="@+id/menu_item_search"
android:title="@string/search"
android:icon="@android:drawable/ic_menu_search"
android:showAsAction="ifRoom"
android:actionViewClass="android.widget.SearchView"
/>
<item android:id="@+id/menu_item_clear"
...
/>
</menu>
When you specify an action view, you are saying “Hey Android, instead of using the regular view
guts for this item in the action bar, use this view class instead.” Usually this also means that you get

ptg11078569
Chapter 28Search
464
different behavior. Case in point: SearchView does not generate any onOptionsItemSelected(…)
callbacks. This is a good thing because it means you can leave those callbacks in place for older
devices that do not support action views.
(Speaking of older devices, you may have spotted SearchViewCompat in the support library.
Unfortunately, this is not what it appears to be – SearchViewCompat is not a version of SearchView
that you can use on older devices. Instead, it contains a couple of static methods that make it easier to
electively insert SearchView where it is available. It does not solve your problem here.)
If you want, you can fire up PhotoGallery and see what SearchView looks like. It will not do anything,
though. SearchView needs to know what your search configuration is before it will send you any
search intents. You need to add some code to onCreateOptionsMenu(…) that pulls out your search
configuration and sends it to SearchView.
With the help of the SearchManager system service, this is not as hard as it sounds. SearchManager has
a method called getSearchableInfo(ComponentName) that will root around in your manifest, package
up the relevant information, and return it as a SearchableInfo object. Then you just have to forward
your SearchableInfo along to your SearchView instance. Do this by writing the code in Listing 28.15.
Listing 28.15Configure SearchView (PhotoGalleryFragment.java)
@Override
@TargetApi(11)
public void onCreateOptionsMenu(Menu menu, MenuInflater inflater) {
super.onCreateOptionsMenu(menu, inflater);
inflater.inflate(R.menu.fragment_photo_gallery, menu);
if (Build.VERSION.SDK_INT >= Build.VERSION_CODES.HONEYCOMB) {
// Pull out the SearchView
MenuItem searchItem = menu.findItem(R.id.menu_item_search);
SearchView searchView = (SearchView)searchItem.getActionView();
// Get the data from our searchable.xml as a SearchableInfo
SearchManager searchManager = (SearchManager)getActivity()
.getSystemService(Context.SEARCH_SERVICE);
ComponentName name = getActivity().getComponentName();
SearchableInfo searchInfo = searchManager.getSearchableInfo(name);
searchView.setSearchableInfo(searchInfo);
}
}
Your first step here is simply to find your SearchView. You can do that by finding the search MenuItem
by its ID, and then getting its action view by calling getActionView().
Next, you ask SearchManager for your search configuration. SearchManager is a system service that
is responsible for all things search related. Earlier, it was SearchManager acting behind the scenes to
pull out your search configuration and display the search interface. All the information about a search,
including the name of the activity that should get the intent and everything in your searchable.xml, is
stashed in the SearchableInfo object you get by calling getSearchableInfo(ComponentName) here.
Once you have your SearchableInfo, you tell SearchView about it by calling
setSearchableInfo(SearchableInfo). And now your SearchView is totally wired. Run and search on
a post-3.0 device to see it work.
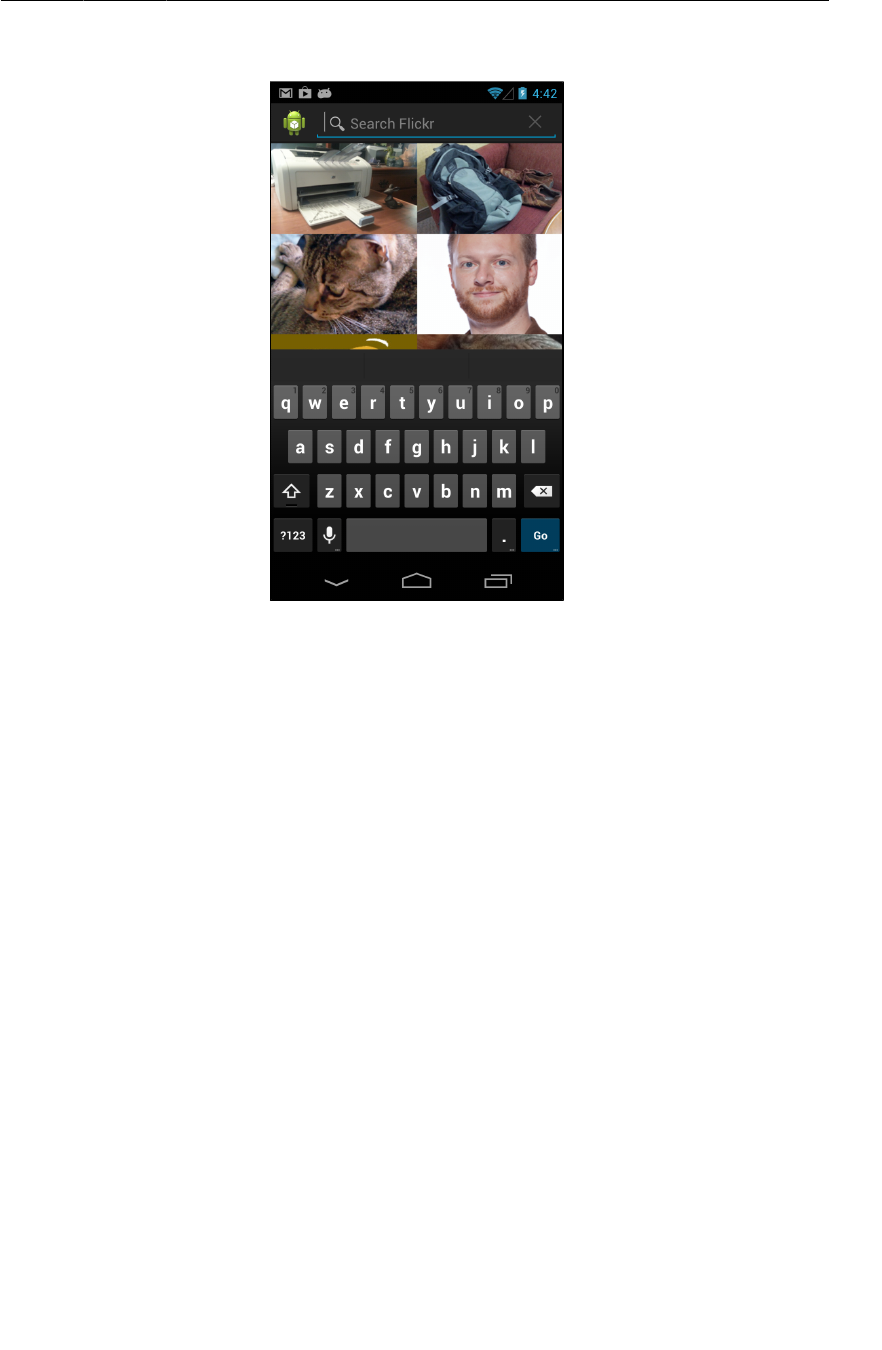
ptg11078569
Challenges
465
Figure 28.5The search within your own activity
Once SearchView is properly configured, it behaves exactly like your earlier searches did.
Except for one minor detail: if you try this using the hardware keyboard on an emulator, you will see
the search executed two times, one after the other.
It turns out that there is a small bug in SearchView. If you hit the enter key on a hardware keyboard,
it will trigger the search intent twice. In activities with a default launch mode, this would result in two
identical activities starting for one search.
You were preparing for this bug earlier when you set the launch mode to singleTop. You insured that
intents would be sent first to an existing activity, so a new activity is not started when the duplicate
search intent is sent. The duplicate intent still, annoyingly, causes the search to run twice in a row, but
that is far better than having two identical activities start up for one search.
Challenges
Your challenges in this chapter are not too difficult. The first one is to use the
Activity.startSearch(…) method.
Under the hood, onSearchRequested() calls through to Activity.startSearch(…), a more detailed
way of starting the search dialog. With startSearch(…), you can specify the initial query shown in the
EditText where the user enters a search, add a bonus Bundle of data to send to the recipient searchable
activity in the intent extras, or request a global web search dialog like you would see if you pressed the
search button on the home screen.
For your first small challenge, use Activity.startSearch(…) to fill in the search dialog with the
current search query and highlight it.

ptg11078569
Chapter 28Search
466
The second challenge is to display the total number of search results available in a Toast when a new
search is invoked. To do this, you will need to look at the XML you are getting from Flickr. There will
be a top level element attribute that tells you how many search results were returned.

ptg11078569
467
29
Background Services
All the code you have written so far has been hooked up to an activity, which means that it is
associated with some screen for the user to look at.
What if you do not need a screen, though? What if you need to do something out of sight and out of
mind, like play music or check for new blog posts on an RSS feed? For this, you need a service.
In this chapter, you will add a new feature to PhotoGallery that will allow users to poll for new search
results in the background. Whenever a new search result is available, the user will receive a notification
in the status bar.
Creating an IntentService
Let’s start by creating your service. In this chapter, you will use an IntentService. IntentService
is not the only kind of service there is, but it is probably the most common. Create a subclass of
IntentService called PollService. This will be the service you use to poll for search results.
PollService’s onHandleIntent(Intent) method will be automatically stubbed out for you. Fill
onHandleIntent(Intent) out with a log statement, add a log tag, and define a default constructor.
Listing 29.1Create PollService (PollService.java)
public class PollService extends IntentService {
private static final String TAG = "PollService";
public PollService() {
super(TAG);
}
@Override
protected void onHandleIntent(Intent intent) {
Log.i(TAG, "Received an intent: " + intent);
}
}
This is a very basic IntentService. What does it do? Well, it is sort of like an activity. It is
a context (Service is a subclass of Context), and it responds to intents (as you can see in
onHandleIntent(Intent)).
A service’s intents are called commands. Each command is an instruction to the service to do
something. Depending on the kind of service, that command could be serviced in a variety of ways.
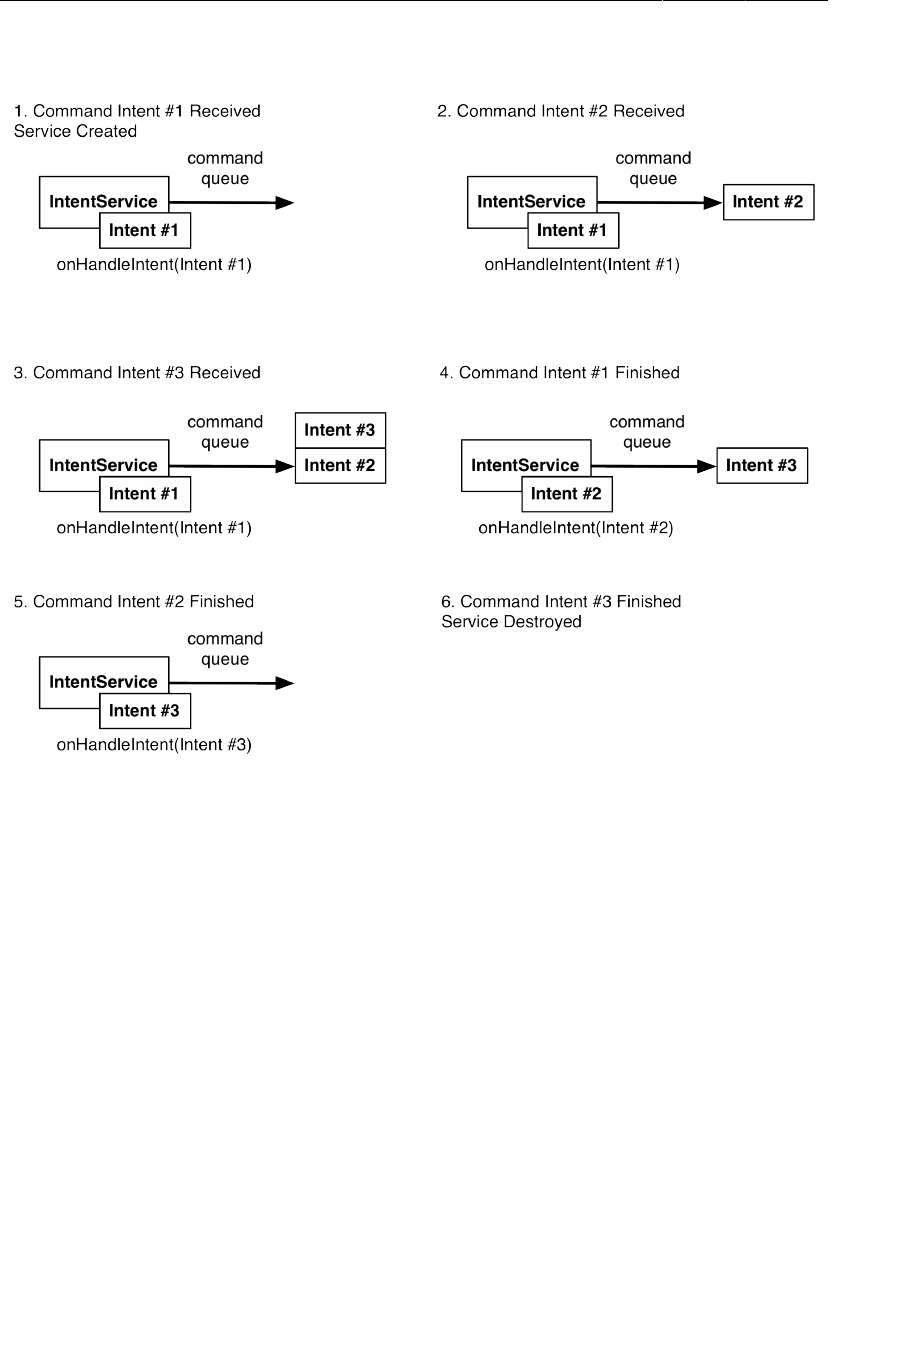
ptg11078569
Chapter 29Background Services
468
Figure 29.1How IntentService services commands
An IntentService services commands off of a queue. When it receives its first command, the
IntentService starts up, fires up a background thread, and puts the command on a queue.
The IntentService then proceeds to service each command in sequence, calling
onHandleIntent(Intent) on its background thread for each command. New commands that come in
go to the back of the queue. When there are no commands left in the queue, the service stops and is
destroyed.
This description only applies to IntentService. Later in the chapter, we will discuss the broader world
of services and how commands work.
You might infer from what you just learned about how IntentService works that services respond to
intents. That is true! And since services, like activities, respond to intents, they must also be declared in
your AndroidManifest.xml. Add an element for PollService to your manifest.
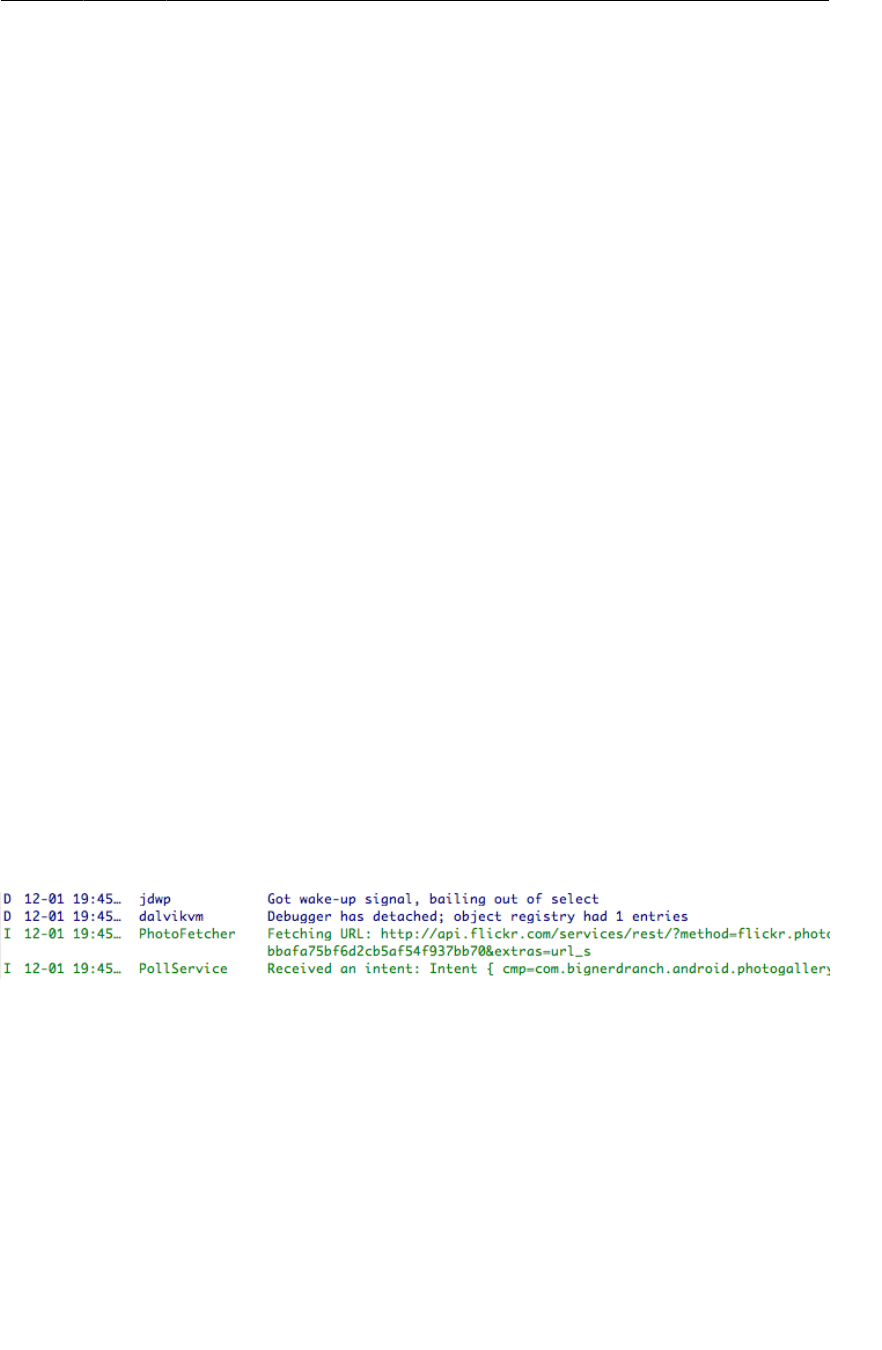
ptg11078569
Creating an IntentService
469
Listing 29.2Add service to manifest (AndroidManifest.xml)
<manifest xmlns:android="http://schemas.android.com/apk/res/android"
... >
...
<application
... >
<activity
android:name=".PhotoGalleryActivity"
... >
...
</activity>
<service android:name=".PollService" />
</application>
</manifest>
Then add code to start your service inside PhotoGalleryFragment.
Listing 29.3Add service startup code (PhotoGalleryFragment.java)
@Override
public void onCreate(Bundle savedInstanceState) {
super.onCreate(savedInstanceState);
setRetainInstance(true);
setHasOptionsMenu(true);
updateItems();
Intent i = new Intent(getActivity(), PollService.class);
getActivity().startService(i);
mThumbnailThread = new ThumbnailDownloader<ImageView>(new Handler());
...
}
Fire this up and see what you get. You should see something like this:
Figure 29.2Your service’s first steps

ptg11078569
Chapter 29Background Services
470
What Services Are For
Okay, we admit it: looking at those LogCat statements was boring. But this code is really exciting!
Why? What can you do with it?
Time to go back the land of make believe, where we are no longer programmers, where we work in
retail shoe sales with superheroes who do our bidding.
Your workers can work in two kinds of places in a store: the front of the store, where workers talk to
customers, and the back of the store, where they do not. The back of the store may be larger or smaller,
depending on the store.
So far, all of your code has run in activities. Activities are your Android app’s storefront. All this code
is focused on a pleasant visual experience for your user, your customer.
Services are the back end of your Android app. Things can happen there that the user never needs to
know about. Work can go on there long after the storefront has closed, when your activities are long
gone.
Okay, enough about stores. What can you do with a service that you cannot do with an activity? Well,
for one, you can run a service while the user is occupied elsewhere.
Safe background networking
Your service is going to poll Flickr in the background. To perform networking in the background
safely, some additional code is required. Android provides the ability for a user to turn off networking
for backgrounded applications. If you have a lot of power hungry applications, this can be a big
performance improvement.
This does mean, however, that if you are doing networking in the background, you need to
verify with the ConnectivityManager that the network is available. Because the API has
changed around historically, this requires two checks, not one. The first check is to verify that
ConnectivityManager.getBackgroundDataSetting() is true, and the second is to verify that
ConnectivityManager.getActiveNetworkInfo() is not null.
Add the code in Listing 29.4 to perform these checks, and we will get into the gory details once you
are done.
Listing 29.4Check for background network availability (PollService.java)
@Override
public void onHandleIntent(Intent intent) {
ConnectivityManager cm = (ConnectivityManager)
getSystemService(Context.CONNECTIVITY_SERVICE);
@SuppressWarnings("deprecation")
boolean isNetworkAvailable = cm.getBackgroundDataSetting() &&
cm.getActiveNetworkInfo() != null;
if (!isNetworkAvailable) return;
Log.i(TAG, "Received an intent: " + intent);
}
Now for why you need two checks. In older versions of Android, you were supposed to check
getBackgroundDataSetting() and bail out if it returned false. If you did not check it, then you could

ptg11078569
Looking for New Results
471
use background data all you wanted. This did not work very well. It was just too easy to ignore the
check entirely, or inadvertently forget it.
In Android 4.0, Ice Cream Sandwich, this was changed so that the background data setting simply
disabled the network entirely. Which is why you check to see whether getActiveNetworkInfo()
returns null. If it is null, then the networking does not work at all. This is good for the user, because it
means that the background data settings always do what they expect. Of course it is a little more work
for you, the developer.
To use getActiveNetworkInfo(), you also need to acquire the ACCESS_NETWORK_STATE permission.
Listing 29.5Acquire network state permission (AndroidManifest.xml)
<manifest xmlns:android="http://schemas.android.com/apk/res/android"
package="com.bignerdranch.android.photogallery"
android:versionCode="1"
android:versionName="1.0" >
<uses-sdk
android:minSdkVersion="8"
android:targetSdkVersion="17" />
<uses-permission android:name="android.permission.INTERNET" />
<uses-permission android:name="android.permission.ACCESS_NETWORK_STATE" />
<application
android:allowBackup="true"
android:icon="@drawable/ic_launcher"
android:label="@string/app_name"
android:theme="@style/AppTheme" >
...
</application>
</manifest>
Looking for New Results
Your service will be polling for new results, so it will need to know what the last result fetched was.
This is a perfect job for another SharedPreferences entry. Add another constant to FlickrFetchr to
store the ID of the most recently fetched photo.
Listing 29.6Add recent ID preference constant (FlickrFetchr.java)
public class FlickrFetchr {
public static final String TAG = "PhotoFetcher";
public static final String PREF_SEARCH_QUERY = "searchQuery";
public static final String PREF_LAST_RESULT_ID = "lastResultId";
private static final String ENDPOINT = "http://api.flickr.com/services/rest/";
private static final String API_KEY = "xxx";
...

ptg11078569
Chapter 29Background Services
472
The next step is to fill out your service. Here is what you need to do:
1. Pull out the current query and the last result ID from the default SharedPreferences.
2. Fetch the latest result set with FlickrFetchr.
3. If there are results, grab the first one.
4. Check to see if it is different from the last result ID.
5. Store the first result back in SharedPreferences.
Return to PollService.java and put this plan into action. Listing 29.7 shows a long swath of code,
but it uses nothing you have not seen before.
Listing 29.7Checking for new results (PollService.java)
@Override
protected void onHandleIntent(Intent intent) {
...
if (!isNetworkAvailable) return;
SharedPreferences prefs = PreferenceManager.getDefaultSharedPreferences(this);
String query = prefs.getString(FlickrFetchr.PREF_SEARCH_QUERY, null);
String lastResultId = prefs.getString(FlickrFetchr.PREF_LAST_RESULT_ID, null);
ArrayList<GalleryItem> items;
if (query != null) {
items = new FlickrFetchr().search(query);
} else {
items = new FlickrFetchr().fetchItems();
}
if (items.size() == 0)
return;
String resultId = items.get(0).getId();
if (!resultId.equals(lastResultId)) {
Log.i(TAG, "Got a new result: " + resultId);
} else {
Log.i(TAG, "Got an old result: " + resultId);
}
prefs.edit()
.putString(FlickrFetchr.PREF_LAST_RESULT_ID, resultId)
.commit();
}
See each part we discussed above? Good. Run PhotoGallery, and you should see your app getting
new results initially. If you have a search query selected, you will probably see stale results when you
subsequently start up the app.
Delayed Execution with AlarmManager
To actually use your service in the background, you will need some way to make things happen when
none of your activities are running. Say, by making a timer that goes off every five minutes or so.

ptg11078569
Delayed Execution with AlarmManager
473
You could do this with a Handler by calling Handler.sendMessageDelayed(…) or
Handler.postDelayed(…). This solution will probably fail if the user navigates away from all your
activities, though. The process will shut down, and your Handler messages will go kaput with it.
So instead of Handler, you will use AlarmManager. AlarmManager is a system service that can send
Intents for you.
How do you tell AlarmManager what intents to send? You use a PendingIntent. You can use
PendingIntent to package up a wish: “I want to start PollService.” You can then send that wish to
other components on the system, like AlarmManager.
Write a new method called setServiceAlarm(Context,boolean) inside PollService that turns an
alarm on and off for you. You will write it as a static method. That keeps your alarm code with the
other code in PollService that it is related to, but allows other components to invoke it. You will
usually want to turn it on and off from front end code in a fragment or other controller.
Listing 29.8Add alarm method (PollService.java)
public class PollService extends IntentService {
private static final String TAG = "PollService";
private static final int POLL_INTERVAL = 1000 * 15; // 15 seconds
public PollService() {
super(TAG);
}
@Override
public void onHandleIntent(Intent intent) {
...
}
public static void setServiceAlarm(Context context, boolean isOn) {
Intent i = new Intent(context, PollService.class);
PendingIntent pi = PendingIntent.getService(
context, 0, i, 0);
AlarmManager alarmManager = (AlarmManager)
context.getSystemService(Context.ALARM_SERVICE);
if (isOn) {
alarmManager.setRepeating(AlarmManager.RTC,
System.currentTimeMillis(), POLL_INTERVAL, pi);
} else {
alarmManager.cancel(pi);
pi.cancel();
}
}
}
The first thing you do in your method is construct your PendingIntent that starts PollService. You
do this by calling PendingIntent.getService(…). PendingIntent.getService(…) packages up an
invocation of Context.startService(Intent). It takes in four parameters: a Context with which
to send the intent, a request code that you can use to distinguish this PendingIntent from others, the
Intent object to send, and finally a set of flags that you can use to tweak how the PendingIntent is
created. (You will use one of these in a moment).

ptg11078569
Chapter 29Background Services
474
After that, you need to either set the alarm or cancel it. To set the alarm, you call
AlarmManager.setRepeating(…). This method also takes four parameters: a constant to describe the
time basis for the alarm (about which more in a moment), the time at which to start the alarm, the time
interval at which to repeat the alarm, and finally a PendingIntent to fire when the alarm goes off.
Canceling the alarm is done by calling AlarmManager.cancel(PendingIntent). You will also usually
want to cancel the PendingIntent, too. In a moment, you will see how canceling the PendingIntent
also helps us track the status of the alarm.
Add some quick test code to run it from within PhotoGalleryFragment.
Listing 29.9Add alarm startup code (PhotoGalleryFragment.java)
@Override
public void onCreate(Bundle savedInstanceState) {
super.onCreate(savedInstanceState);
setRetainInstance(true);
setHasOptionsMenu(true);
updateItems();
Intent i = new Intent(getActivity(), PollService.class);
getActivity().startService(i);
PollService.setServiceAlarm(getActivity(), true);
mThumbnailThread = new ThumbnailDownloader<ImageView>(new Handler());
...
}
Finish typing in this code and run PhotoGallery. Then immediately hit the back button and exit out of
the app.
Notice anything in LogCat? PollService is faithfully chugging along, running again every 15 seconds.
This is what AlarmManager is designed to do. Even if your process gets shut down, AlarmManager will
keep on firing intents to start PollService again and again.
(This behavior is, of course, extremely annoying. You may want to uninstall the app until we get it all
straightened out.)
PendingIntent
Let’s talk a little bit more about PendingIntent. A PendingIntent is a token object. When you get
one here by calling PendingIntent.getService(…), you say to the OS, “Please remember that I want
to send this intent with startService(Intent).” Later on you can call send() on your PendingIntent
token, and the OS will send the intent you originally wrapped up in exactly the way you asked.
The really nice thing about this is that when you give that PendingIntent token to someone else and
they use it, it sends that token as your application. Also, since the PendingIntent itself lives in the OS,
not in the token, you maintain control of it. If you wanted to be cruel, you could give someone else a
PendingIntent object and then immediately cancel it, so that send() does nothing.
If you request a PendingIntent twice with the same intent, you will get the same PendingIntent.
You can use this to test whether a PendingIntent already exists or to cancel a previously issued
PendingIntent.

ptg11078569
Managing alarms with PendingIntent
475
Managing alarms with PendingIntent
You can only register one alarm for each PendingIntent. That is how
setServiceAlarm(Context,boolean) works when isOn is false: it calls
AlarmManager.cancel(PendingIntent) to cancel the alarm for your PendingIntent, and then cancels
your PendingIntent.
Since the PendingIntent is also cleaned up when the alarm is canceled, you can check whether that
PendingIntent exists or not to see whether the alarm is active or not. This is done by passing in the
PendingIntent.FLAG_NO_CREATE flag to PendingIntent.getService(…). This flag says that if the
PendingIntent does not already exist, return null instead of creating it.
Write a new method called isServiceAlarmOn(Context) that uses PendingIntent.FLAG_NO_CREATE
to tell whether the alarm is on or not.
Listing 29.10Add isServiceAlarmOn() method (PollService.java)
public static void setServiceAlarm(Context context, boolean isOn) {
...
}
public static boolean isServiceAlarmOn(Context context) {
Intent i = new Intent(context, PollService.class);
PendingIntent pi = PendingIntent.getService(
context, 0, i, PendingIntent.FLAG_NO_CREATE);
return pi != null;
}
Since this PendingIntent is only used for setting your alarm, a null PendingIntent here means that
your alarm is not set.
Controlling Your Alarm
Now that you can turn your alarm on and off (as well as tell whether it is on or off), let’s add an
interface to turn this thing on and off. Add another menu item to menu/fragment_photo_gallery.xml.
Listing 29.11Add service toggle (menu/fragment_photo_gallery.xml)
<menu xmlns:android="http://schemas.android.com/apk/res/android">
<item android:id="@+id/menu_item_search"
android:title="@string/search"
android:icon="@android:drawable/ic_menu_search"
android:showAsAction="ifRoom"
android:actionViewClass="android.widget.SearchView"
/>
<item android:id="@+id/menu_item_clear"
android:title="@string/clear_search"
android:icon="@android:drawable/ic_menu_close_clear_cancel"
android:showAsAction="ifRoom"
/>
<item android:id="@+id/menu_item_toggle_polling"
android:title="@string/start_polling"
android:showAsAction="ifRoom"
/>
</menu>

ptg11078569
Chapter 29Background Services
476
Then you need to add a few new strings – one to start polling, and one to stop polling. (You will need a
couple of other ones later, too, for a status bar notification. Go ahead and add those as well.)
Listing 29.12Add polling strings (res/values/strings.xml)
<resources>
...
<string name="search">Search</string>
<string name="clear_search">Clear Search</string>
<string name="start_polling">Poll for new pictures</string>
<string name="stop_polling">Stop polling</string>
<string name="new_pictures_title">New PhotoGallery Pictures</string>
<string name="new_pictures_text">You have new pictures in PhotoGallery.</string>
</resources>
Now delete your old debug code for starting the alarm, and add an implementation for the menu item.
Listing 29.13Toggle menu item implementation
(PhotoGalleryFragment.java)
@Override
public void onCreate(Bundle savedInstanceState) {
super.onCreate(savedInstanceState);
setRetainInstance(true);
setHasOptionsMenu(true);
updateItems();
PollService.setServiceAlarm(getActivity(), true);
mThumbnailThread = new ThumbnailDownloader<ImageView>(new Handler());
...
}
...
@Override
@TargetApi(11)
public boolean onOptionsItemSelected(MenuItem item) {
switch (item.getItemId()) {
case R.id.menu_item_search:
...
case R.id.menu_item_clear:
...
updateItems();
return true;
case R.id.menu_item_toggle_polling:
boolean shouldStartAlarm = !PollService.isServiceAlarmOn(getActivity());
PollService.setServiceAlarm(getActivity(), shouldStartAlarm);
return true;
default:
return super.onOptionsItemSelected(item);
}
}

ptg11078569
Updating options menu items
477
With that, you should be able to toggle your alarm on and off.
How to update your menu item, though? Well!
Updating options menu items
Usually, all you have to do is inflate an options menu. Sometimes, though, you need to update the
options menu to reflect the state of your application.
Now, options menus are not inflated every time they are used, even on old style options menus.
If you need to update the contents of an options menu item, you should instead put that code in
onPrepareOptionsMenu(Menu). This method is called every single time the menu needs to be
configured, not just when it is created the first time.
Add an implementation of onPrepareOptionsMenu(Menu) that checks to see whether the alarm is on,
and then changes the text of menu_item_toggle_polling to show the appropriate feedback to the user.
Listing 29.14Add onPrepareOptionsMenu(Menu)
(PhotoGalleryFragment.java)
@Override
public boolean onOptionsItemSelected(MenuItem item) {
...
}
@Override
public void onPrepareOptionsMenu(Menu menu) {
super.onPrepareOptionsMenu(menu);
MenuItem toggleItem = menu.findItem(R.id.menu_item_toggle_polling);
if (PollService.isServiceAlarmOn(getActivity())) {
toggleItem.setTitle(R.string.stop_polling);
} else {
toggleItem.setTitle(R.string.start_polling);
}
}
In pre-3.0 devices, this method is called every time the menu is displayed, which ensures that your
menu item always shows the right text. Run PhotoGallery on a pre-3.0 emulator if you would like to
check this yourself.
After 3.0, though, this is not enough. The action bar does not automatically update itself. You
have to manually tell it to call onPrepareOptionsMenu(Menu) and refresh its items by calling
Activity.invalidateOptionsMenu().
Add the following code to onOptionsItemSelected(MenuItem) to tell post-3.0 devices to update their
action bars:

ptg11078569
Chapter 29Background Services
478
Listing 29.15Invalidate your options menu (PhotoGalleryFragment.java)
@Override
@TargetApi(11)
public boolean onOptionsItemSelected(MenuItem item) {
switch (item.getItemId()) {
...
case R.id.menu_item_toggle_polling:
boolean shouldStartAlarm = !PollService.isServiceAlarmOn(getActivity());
PollService.setServiceAlarm(getActivity(), shouldStartAlarm);
if (Build.VERSION.SDK_INT >= Build.VERSION_CODES.HONEYCOMB)
getActivity().invalidateOptionsMenu();
return true;
default:
return super.onOptionsItemSelected(item);
}
}
With that, your code should work great on a new 4.2 emulator, too.
And yet. There is something missing.
Notifications
Your service is now running and doing its thing in the background. The user never knows a thing about
it, though, so it is not worth much.
When your service needs to communicate something to the user, the proper tool is almost always a
notification. Notifications are items that appear in the notifications drawer, which the user can access
by dragging it down from the top of the screen.
To post a notification, you first need to create a Notification object. Notifications are created by
using a builder object, much like AlertDialog was in Chapter12. At a minimum, your Notification
should have:
•ticker text to display in the status bar when the notification is first shown
• an icon to show in the status bar after the ticker text goes away
• a view to show in the notification drawer to represent the notification itself
• a PendingIntent to fire when the user presses the notification in the drawer
Once you have created a Notification object, you can post it by calling notify(int, Notification)
on the NotificationManager system service.
Make PollService notify the user that a new result is ready by adding the code in Listing 29.16,
which creates a Notification and calls NotificationManager.notify(int, Notification).

ptg11078569
Notifications
479
Listing 29.16Add a notification (PollService.java)
@Override
public void onHandleIntent(Intent intent) {
...
String resultId = items.get(0).getId();
if (!resultId.equals(lastResultId)) {
Log.i(TAG, "Got a new result: " + resultId);
Resources r = getResources();
PendingIntent pi = PendingIntent
.getActivity(this, 0, new Intent(this, PhotoGalleryActivity.class), 0);
Notification notification = new NotificationCompat.Builder(this)
.setTicker(r.getString(R.string.new_pictures_title))
.setSmallIcon(android.R.drawable.ic_menu_report_image)
.setContentTitle(r.getString(R.string.new_pictures_title))
.setContentText(r.getString(R.string.new_pictures_text))
.setContentIntent(pi)
.setAutoCancel(true)
.build();
NotificationManager notificationManager = (NotificationManager)
getSystemService(NOTIFICATION_SERVICE);
notificationManager.notify(0, notification);
}
prefs.edit()
.putString(FlickrFetchr.PREF_LAST_RESULT_ID, resultId)
.commit();
}
Let’s go over this from top to bottom. First, you configure the ticker text and small icon by calling
setTicker(CharSequence) and setSmallIcon(int).
After that, you configure the appearance of your Notification in the drawer itself. It is
possible to create a completely custom look and feel, but it is easier to use the standard look
for a notification, which features an icon, a title, and a text area. It will use the value from
setSmallIcon(int) for the icon. To set the title and text, you call setContentTitle(CharSequence)
and setContentText(CharSequence), respectively.
Next, you must specify what happens when the user presses your Notification. Like
AlarmManager, this is done using a PendingIntent. The PendingIntent you pass in to
setContentIntent(PendingIntent) will be fired when the user presses your Notification in the
drawer. Calling setAutoCancel(true) tweaks that behavior a little bit. With setAutoCancel(true)
set, your notification will also be deleted from the notification drawer when the user presses it.
Finally, there is the call to NotificationManager.notify(…). The integer parameter you pass in is
an identifier for your notification. It should be unique across your application. If you post a second
notification with this same ID, it will replace the last notification you posted with that ID. This is how
you would implement a progress bar or other dynamic visuals.
And that is it. Your entire backgrounded user interface! After you are satisfied that everything is
working correctly, change your alarm constant to be something more sensible:

ptg11078569
Chapter 29Background Services
480
Listing 29.17Change to a sensible alarm constant (PollService.java)
public class PollService extends IntentService {
private static final String TAG = "PollService";
public static final int POLL_INTERVAL = 1000 * 15; // 15 seconds
public static final int POLL_INTERVAL = 1000 * 60 * 5; // 5 minutes
public PollService() {
super(TAG);
}
For the More Curious: Service Details
We recommend using IntentService for most service tasks. If the IntentService pattern does not
suit your architecture, though, you will need to understand more about services to implement your
own. Prepare for an infobomb, though – there are a lot of details and ins and outs to using services.
What service does (and does not) do
A service is an application component that provides lifecycle callbacks, just like an activity. Those
callbacks are even performed on the main UI thread for you, just like in an activity.
A service does not run any code on a background thread out of the box. This is the #1 reason we
recommend IntentService. Most non-trivial services will require a background thread of some kind,
and IntentService automatically manages the boilerplate code you need to accomplish that.
Let’s look and see what lifecycle callbacks a service has.
A service’s lifecycle
For a service started with startService(Intent), life is fairly simple. There are four lifecycle
callbacks.
•onCreate(…) – called when the service is created.
•onStartCommand(Intent,int,int) – called once each time a component starts the service with
startService(Intent). The two integer parameters are a set of flags and a start ID. The flags are
used to signify whether this intent delivery is an attempt to redeliver an intent, or if it is an attempt
to retry a delivery which never made it to or returned from onStartCommand(Intent,int,int).
The start ID will be different for every call to onStartCommand(Intent,int,int), so it may be
used to distinguish this command from others.
•onDestroy() – called when the service no longer needs to be alive. Often this will be after the
service is stopped.
One question remains: how does the service stop? This can happen in different ways, depending on
what type of service you have written. The type of service is determined by the value returned from
onStartCommand(…), which may be Service.START_NOT_STICKY, START_REDELIVER_INTENT, or
START_STICKY.

ptg11078569
Non-sticky services
481
Non-sticky services
IntentService is a non-sticky service, so let’s start there. A non-sticky service stops when the
service itself says it is done. To make your service non-sticky, return either START_NOT_STICKY or
START_REDELIVER_INTENT.
You tell Android that you are done by calling either stopSelf() or stopSelf(int). The first
method, stopSelf(), is unconditional. It will always stop your service, no matter how many times
onStartCommand(…) has been called.
IntentService uses stopSelf(int) instead. This method takes in the start ID received in
onStartCommand(…). This method will only stop your service if this was the most recent start ID
received. (This is how IntentService works under the hood.)
So what is the difference between returning START_NOT_STICKY and START_REDELIVER_INTENT? The
difference is in how your service behaves if the system needs to shut it down before it is done. A
START_NOT_STICKY service will die and disappear into the void. START_REDELIVER_INTENT, on the
other hand, will attempt to start up the service again later, when resources are less constrained.
Choosing between START_NOT_STICKY and START_REDELIVER_INTENT is a matter of deciding how
important that operation is to your application. If the service is not critical, choose START_NOT_STICKY.
In PhotoGallery, your service is being run repeatedly on an alarm. If one invocation falls through the
cracks, it is not a big deal, so: START_NOT_STICKY. This is the default behavior for IntentService. To
switch to using START_REDELIVER_INTENT, call IntentService.setIntentRedelivery(true).
Sticky services
A sticky service stays started until something outside the service tells it to stop by calling
Context.stopService(Intent). To make your service sticky, return START_STICKY.
Once a sticky service is started it is “on” until a component calls Context.stopService(Intent). If
the service needs to be killed for some reason, it will be restarted again with a null intent passed in to
onStartCommand(…).
A sticky service may be appropriate for a long-running service, like a music player, which needs to
stick around until the user tells it to stop. Even then, it is worth considering an alternative architecture
using non-sticky services. Sticky service management is inconvenient, because it is difficult to tell
whether the service is already started.
Bound services
In addition to all this, it is possible to bind to a service by using the
bindService(Intent,ServiceConnection,int) method. Service binding is a way to
connect to a service and call methods on it directly. You bind to a service by calling
bindService(Intent,ServiceConnection,int). ServiceConnection is an object that represents your
service binding and receives all binding callbacks.

ptg11078569
Chapter 29Background Services
482
In a fragment, your binding code would look something like this:
private ServiceConnection mServiceConnection = new ServiceConnection() {
public void onServiceConnected(ComponentName className,
IBinder service) {
// Used to communicate with the service
MyBinder binder = (MyBinder)service;
}
public void onServiceDisconnected(ComponentName className) {
}
};
@Override
public void onCreate(Bundle savedInstanceState) {
super.onCreate(savedInstanceState);
Intent i = new Intent(c, MyService.class);
c.bindService(i, mServiceConnection, 0);
}
@Override
public void onDestroy() {
super.onDestroy();
getActivity().getApplicationContext().unbindService(mServiceConnection);
}
On the service’s side, binding introduces two additional lifecycle callbacks:
•onBind(Intent) – called every time the service is bound to. Returns the IBinder object received
in ServiceConnection.onServiceConnected(ComponentName,IBinder).
•onUnbind(Intent) – called when a service’s binding is terminated.
Local service binding
So what does MyBinder look like? If the service is a local service, then it may be a simple Java object
that lives in your local process. Usually this is used to provide a handle to directly call methods on your
service:
private class MyBinder extends IBinder {
public MyService getService() {
return MyService.this;
}
}
@Override
public void onBind(Intent intent) {
return new MyBinder();
}
This pattern looks exciting. It is the only place in Android that enables one Android component to
directly talk to another. We do not recommend it, though. Since services are effectively singletons,
using them this way provides no major benefits over just using a singleton instead.

ptg11078569
Bound services
483
Remote service binding
Binding is more useful for remote services, because they give applications in other processes the ability
to invoke methods on your service. Creating a remote service binder is an advanced topic and beyond
the scope of this book. Check out AIDL or the Messenger class for more details.

ptg11078569
This page intentionally left blank
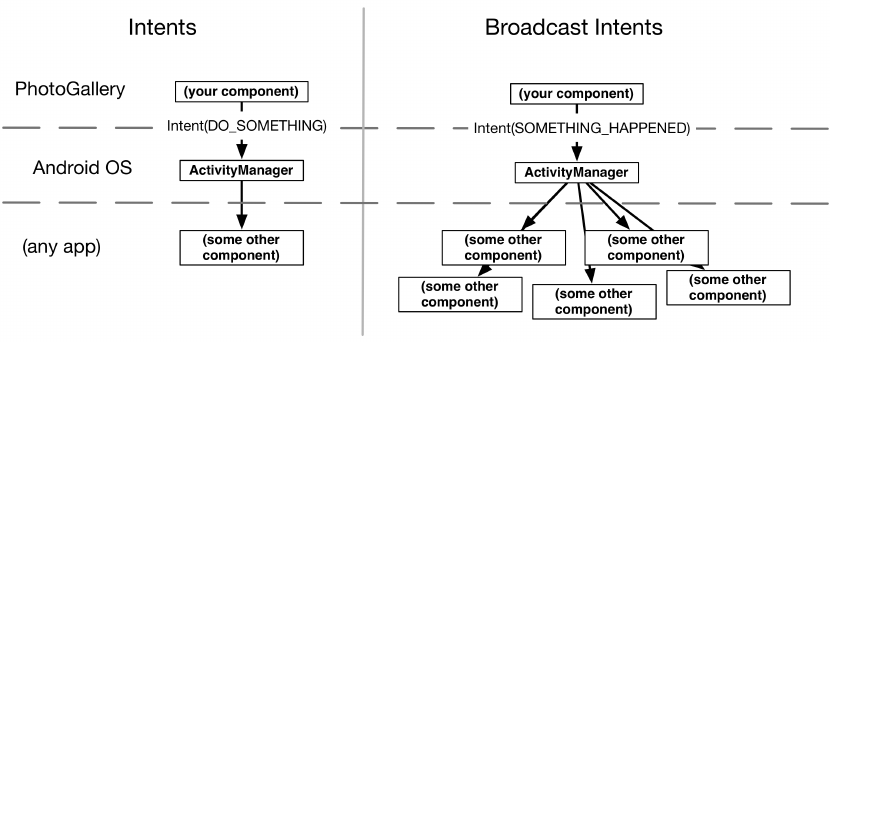
ptg11078569
485
30
Broadcast Intents
Things are happening all the time on an Android device. WiFi is going in and out of range, packages
are getting installed, phone calls and text messages are coming in.
When many components on the system need to know that some event has occurred, Android uses a
broadcast intent to tell everyone about it. Broadcast intents work similarly to the intents you already
know and love, except that they can be received by multiple components at the same time. Broadcast
intents are received by broadcast receivers.
Figure 30.1Regular intents vs. broadcast intents
In this chapter, you will learn how to listen to broadcast intents from the system, as well as how
to dynamically send and receive them within your app at runtime. You will start by listening for a
broadcast that informs you that the device has booted up, and then later you will send and receive your
own broadcast intent.
Waking Up on Boot
PhotoGallery’s background alarm works, but it is not perfect. If the user reboots their phone, the alarm
will be forgotten.
Apps that perform an ongoing process for the user usually need to wake themselves up after the
device is booted. You can detect when boot is completed by listening for a broadcast intent with the
BOOT_COMPLETED action.

ptg11078569
Chapter 30Broadcast Intents
486
Broadcast receivers in the manifest
Time to write a broadcast receiver. Start by creating a new Java class called StartupReceiver that is
a subclass of android.content.BroadcastReceiver. Eclipse will implement one abstract method for
you called onReceive(Context,Intent). Fill out your class like so:
Listing 30.1Your first broadcast receiver (StartupReceiver.java)
package com.bignerdranch.android.photogallery;
...
public class StartupReceiver extends BroadcastReceiver {
private static final String TAG = "StartupReceiver";
@Override
public void onReceive(Context context, Intent intent) {
Log.i(TAG, "Received broadcast intent: " + intent.getAction());
}
}
This is your broadcast receiver. A broadcast receiver is a component that receives intents, just like
a service or an activity. And just like services and activities, broadcast receivers must be registered
with the system in order to do anything useful. That does not always mean that they need to be in your
manifest. This particular receiver does, though.
Hooking up a receiver works just like hooking up a service or activity. You use the receiver tag with
appropriate intent-filters within. StartupReceiver will be listening for the BOOT_COMPLETED
action. This action also requires a permission, so you will need to include an appropriate uses-
permission tag as well.
Open AndroidManifest.xml and hook up StartupReceiver.
Listing 30.2Adding your receiver to the manifest (AndroidManifest.xml)
<manifest xmlns:android="http://schemas.android.com/apk/res/android"
package="com.bignerdranch.android.photogallery"
android:versionCode="1"
android:versionName="1.0" >
<uses-sdk
android:minSdkVersion="8"
android:targetSdkVersion="17" />
<uses-permission android:name="android.permission.INTERNET" />
<uses-permission android:name="android.permission.ACCESS_NETWORK_STATE" />
<uses-permission android:name="android.permission.RECEIVE_BOOT_COMPLETED" />
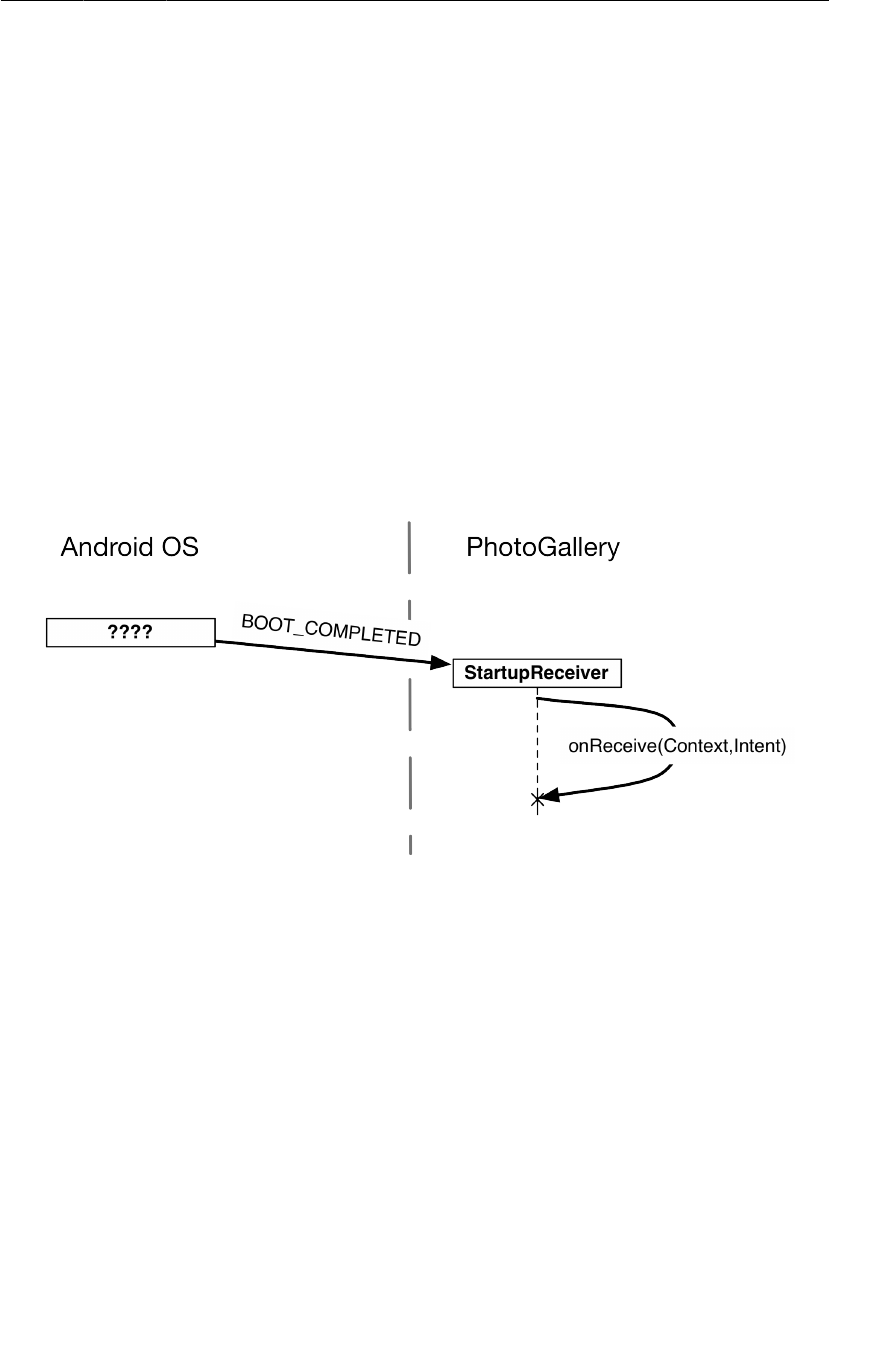
ptg11078569
Broadcast receivers in the manifest
487
<application
... >
<activity
... >
...
</activity>
<service android:name=".PollService" />
<receiver android:name=".StartupReceiver">
<intent-filter>
<action android:name="android.intent.action.BOOT_COMPLETED" />
</intent-filter>
</receiver>
</application>
</manifest>
Unlike activities and services, broadcast receivers declared in the manifest almost always declare intent
filters. The entire reason broadcast intents exist is to send information to more than one listener, but
explicit intents only have one receiver. As a result, the explicit broadcast intent is a rare bird.
Figure 30.2Receiving BOOT_COMPLETED
With your broadcast receiver declared in your manifest, it will wake up anytime a matching broadcast
intent is sent – even if your app is not currently running. Upon waking up, the ephemeral broadcast
receiver’s onReceive(Context,Intent) method will be run, and then it will die.
Run PhotoGallery, reboot your device or emulator and switch over to DDMS. You should see a LogCat
statement showing that your receiver ran. If you check your device in the Devices tab, though, you will
probably not see a process for PhotoGallery. Your process came to life just long enough to run your
broadcast receiver, and then it died again.

ptg11078569
Chapter 30Broadcast Intents
488
How to use receivers
The fact that broadcast receivers live such short lives restricts the things you can do with them. You
cannot use any asynchronous APIs, for example, or register any listeners, because your receiver will
not be alive any longer than the length of onReceive(Context,Intent). onReceive(Context,Intent)
runs on your main thread, too, so you cannot do any heavy lifting inside it. That means no networking
or heavy work with permanent storage.
This does not make receivers useless, though. They are invaluable for all kinds of little plumbing code.
Your recurring alarm needs to be reset when the system finishes starting. This is a small enough task
that a broadcast receiver is perfect for the job.
Your receiver will need to know whether the alarm should be on or off. Add a preference constant to
PollService to store this information.
Listing 30.3Add alarm status preference (PollService.java)
public class PollService extends IntentService {
private static final String TAG = "PollService";
private static final int POLL_INTERVAL = 1000 * 60 * 5; // 5 minutes
public static final String PREF_IS_ALARM_ON = "isAlarmOn";
public PollService() {
super(TAG);
}
...
public static void setServiceAlarm(Context context, boolean isOn) {
Intent i = new Intent(context, PollService.class);
PendingIntent pi = PendingIntent.getService(
context, 0, i, 0);
AlarmManager alarmManager = (AlarmManager)
context.getSystemService(Context.ALARM_SERVICE);
if (isOn) {
alarmManager.setRepeating(AlarmManager.RTC,
System.currentTimeMillis(), POLL_INTERVAL, pi);
} else {
alarmManager.cancel(pi);
pi.cancel();
}
PreferenceManager.getDefaultSharedPreferences(context)
.edit()
.putBoolean(PollService.PREF_IS_ALARM_ON, isOn)
.commit();
}
Then your StartupReceiver can use it to turn the alarm on at boot.

ptg11078569
Filtering Foreground Notifications
489
Listing 30.4Start alarm on boot (StartupReceiver.java)
@Override
public void onReceive(Context context, Intent intent) {
Log.i(TAG, "Received broadcast intent: " + intent.getAction());
SharedPreferences prefs = PreferenceManager.getDefaultSharedPreferences(context);
boolean isOn = prefs.getBoolean(PollService.PREF_IS_ALARM_ON, false);
PollService.setServiceAlarm(context, isOn);
}
Run PhotoGallery again. This time, your background polling should be restarted after you reboot your
phone, tablet, or emulator.
Filtering Foreground Notifications
With that sharp corner filed down a bit, we turn to another imperfection in PhotoGallery. Your
notifications work great, but they are sent even when the user already has the application open.
You can fix this problem with broadcast intents, too. But they will work in a completely different way.
Sending broadcast intents
This is the easiest part of the solution: sending your own broadcast intent. To send a broadcast
intent, just create an intent and pass it in to sendBroadcast(Intent). In this case, you will want it to
broadcast an action you define, so define an action constant as well. Add the following bits of code to
PollService.

ptg11078569
Chapter 30Broadcast Intents
490
Listing 30.5Sending a broadcast intent (PollService.java)
public class PollService extends IntentService {
private static final String TAG = "PollService";
private static final int POLL_INTERVAL = 1000 * 60 * 5; // 5 minutes
public static final String PREF_IS_ALARM_ON = "isAlarmOn";
public static final String ACTION_SHOW_NOTIFICATION =
"com.bignerdranch.android.photogallery.SHOW_NOTIFICATION";
public PollService() {
super(TAG);
}
@Override
public void onHandleIntent(Intent intent) {
...
if (!resultId.equals(lastResultId)) {
...
NotificationManager notificationManager = (NotificationManager)
getSystemService(NOTIFICATION_SERVICE);
notificationManager.notify(0, notification);
sendBroadcast(new Intent(ACTION_SHOW_NOTIFICATION));
}
prefs.edit()
.putString(FlickrFetchr.PREF_LAST_RESULT_ID, resultId)
.commit();
}
Dynamic broadcast receivers
Next up is to receive your broadcast intent. You could write a broadcast receiver like StartupReceiver
registered in the manifest to handle this. But that would not do the right thing in your case. Here, you
really want PhotoGalleryFragment to receive the intent only while it is alive. A standalone receiver
declared in the manifest would not do that job easily. It would always receive the intent, and would
need some other way of knowing that PhotoGalleryFragment is alive.
The solution is to use a dynamic broadcast receiver. A dynamic receiver is registered in code, not
in the manifest. You register the receiver by calling registerReceiver(BroadcastReceiver,
IntentFilter) and unregister it by calling unregisterReceiver(BroadcastReceiver). The receiver
itself is typically defined as an inner instance, like a button-click listener. However, since you need
the same instance in registerReceiver(…) and unregisterReceiver(…), you will need to assign the
receiver to an instance variable.
Create a new abstract class called VisibleFragment, with Fragment as its superclass. This class will
be a generic fragment that hides foreground notifications. (You will write another fragment like this in
Chapter31.)

ptg11078569
Dynamic broadcast receivers
491
Listing 30.6A receiver of VisibleFragment’s own (VisibleFragment.java)
package com.bignerdranch.android.photogallery;
...
public abstract class VisibleFragment extends Fragment {
public static final String TAG = "VisibleFragment";
private BroadcastReceiver mOnShowNotification = new BroadcastReceiver() {
@Override
public void onReceive(Context context, Intent intent) {
Toast.makeText(getActivity(),
"Got a broadcast:" + intent.getAction(),
Toast.LENGTH_LONG)
.show();
}
};
@Override
public void onResume() {
super.onResume();
IntentFilter filter = new IntentFilter(PollService.ACTION_SHOW_NOTIFICATION);
getActivity().registerReceiver(mOnShowNotification, filter);
}
@Override
public void onPause() {
super.onPause();
getActivity().unregisterReceiver(mOnShowNotification);
}
}
Note that to pass in an IntentFilter, you have to create one in code. Your IntentFilter here is
identical to the filter specified by the following XML:
<intent-filter>
<action android:name="com.bignerdranch.android.photogallery.SHOW_NOTIFICATION" />
</intent-filter>
Any IntentFilter you can express in XML can also be expressed in code this way. Just call
addCategory(String), addAction(String), addDataPath(String), and so on to configure your filter.
Dynamically registered broadcast receivers must also take care to clean themselves
up. Typically, if you register a receiver in a startup lifecycle method, you will call
Context.unregisterReceiver(BroadcastReceiver) in the corresponding shutdown method. So here
you register inside onResume(), and unregister inside onPause(). Similarly, if you registered inside
onActivityCreated(…), you would unregister inside onActivityDestroyed().
(Be careful with onCreate(…) and onDestroy() in retained fragments, by the way. getActivity()
will return different values in onCreate(…) and onDestroy() if the screen has rotated. If you
want to register/unregister in Fragment.onCreate(Bundle) and Fragment.onDestroy(), use
getActivity().getApplicationContext() instead.)
Modify PhotoGalleryFragment to be a subclass of your new VisibleFragment.
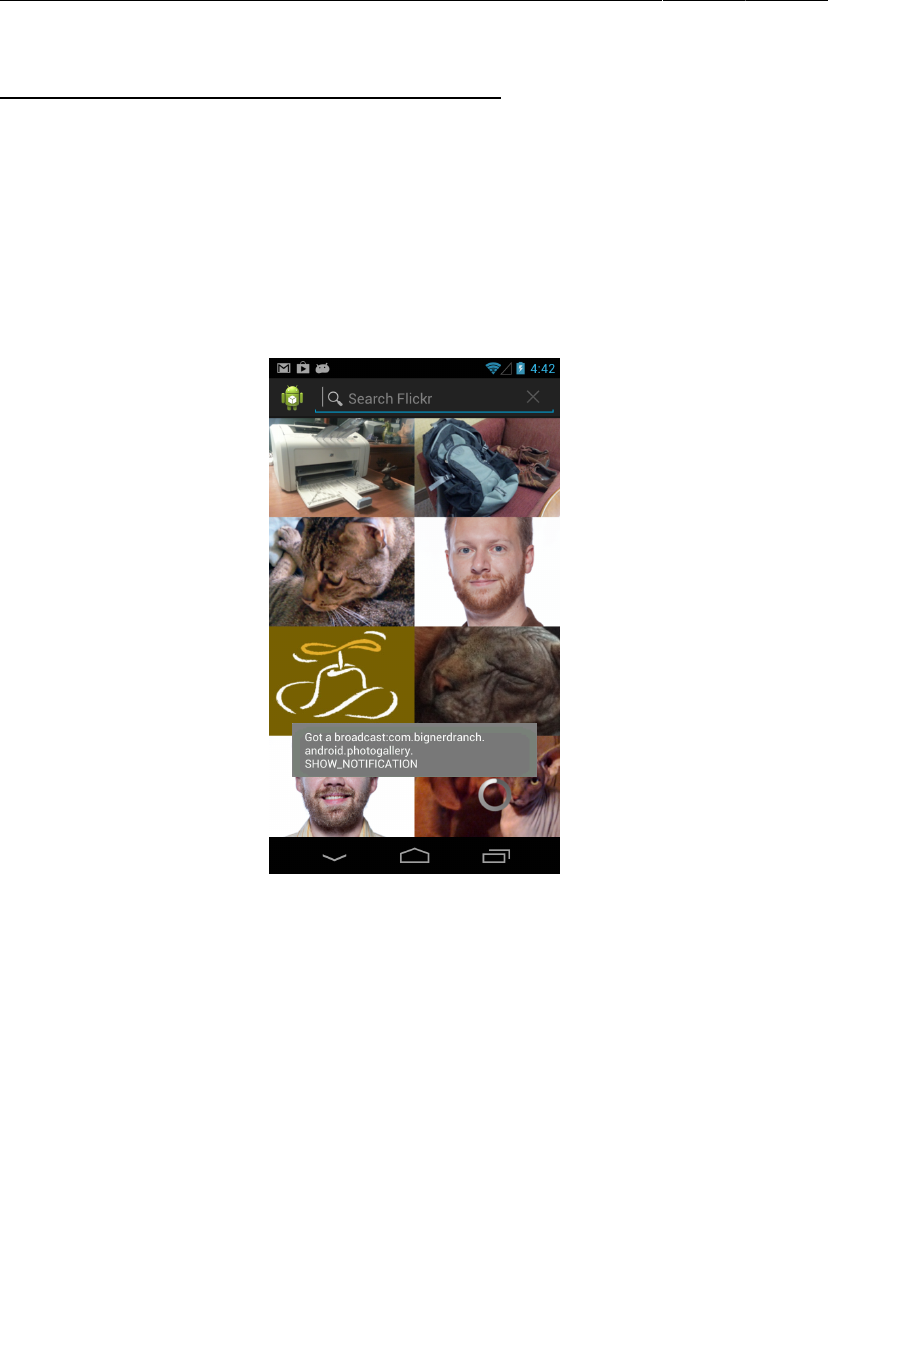
ptg11078569
Chapter 30Broadcast Intents
492
Listing 30.7Make your fragment visible (PhotoGalleryFragment.java)
public class PhotoGalleryFragment extends Fragment {
public class PhotoGalleryFragment extends VisibleFragment {
GridView mGridView;
ArrayList<GalleryItem> mItems;
ThumbnailDownloader<ImageView> mThumbnailThread;
Run PhotoGallery and toggle background polling a couple of times. You will see a nice toast pop up in
addition to your notification ticker up top.
Figure 30.3Proof that your broadcast exists
Using private permissions
One problem with using a broadcast like this is that anyone on the system can listen to it or trigger your
receivers. You are usually not going to want either of those things to happen.
You can preclude these unauthorized intrusions into your personal business in a couple of
ways. If the receiver is declared in your manifest and is internal to your app, you can add an
android:exported="false" attribute to your receiver tag. This will prevent it from being visible to
other applications on the system. In other circumstances, you can create your own permission. This is
done by adding a permission tag to your AndroidManifest.xml.
Add the following XML to AndroidManifest.xml to declare and acquire your own permission.

ptg11078569
Using private permissions
493
Listing 30.8Add a private permission (AndroidManifest.xml)
<manifest xmlns:android="http://schemas.android.com/apk/res/android"
package="com.bignerdranch.android.photogallery"
android:versionCode="1"
android:versionName="1.0" >
<uses-sdk
android:minSdkVersion="8"
android:targetSdkVersion="17" />
<permission android:name="com.bignerdranch.android.photogallery.PRIVATE"
android:protectionLevel="signature" />
<uses-permission android:name="android.permission.INTERNET" />
<uses-permission android:name="android.permission.ACCESS_NETWORK_STATE" />
<uses-permission android:name="android.permission.RECEIVE_BOOT_COMPLETED" />
<uses-permission android:name="com.bignerdranch.android.photogallery.PRIVATE" />
<application
... >
...
</application>
</manifest>
In this code, you defined your own custom permission with a protection level of signature. You
will learn more about protection levels in just a moment. The permission itself is a simple string, just
like intent actions, categories, and system permissions you have used. You must always acquire a
permission to use it, even when you defined it yourself. Them’s the rules.
Take note of the shaded constant value above, by the way. This string needs to appear in three different
places, and must be identical in each place. You would be wise to copy and paste it rather than typing it
out by hand.
Next, use your permission by defining a corresponding constant in code and then passing it in to your
sendBroadcast(…) call.

ptg11078569
Chapter 30Broadcast Intents
494
Listing 30.9Sending with a permission (PollService.java)
public class PollService extends IntentService {
private static final String TAG = "PollService";
private static final int POLL_INTERVAL = 1000 * 60 * 5; // 5 minutes
public static final String PREF_IS_ALARM_ON = "isAlarmOn";
public static final String ACTION_SHOW_NOTIFICATION =
"com.bignerdranch.android.photogallery.SHOW_NOTIFICATION";
public static final String PERM_PRIVATE =
"com.bignerdranch.android.photogallery.PRIVATE";
public PollService() {
super(TAG);
}
@Override
public void onHandleIntent(Intent intent) {
...
if (!resultId.equals(lastResultId)) {
...
NotificationManager notificationManager = (NotificationManager)
getSystemService(NOTIFICATION_SERVICE);
notificationManager.notify(0, notification);
sendBroadcast(new Intent(ACTION_SHOW_NOTIFICATION));
sendBroadcast(new Intent(ACTION_SHOW_NOTIFICATION), PERM_PRIVATE);
}
prefs.edit()
.putString(FlickrFetchr.PREF_LAST_RESULT_ID, resultId)
.commit();
}
To use your permission, you pass it as a parameter to sendBroadcast(…). Using the permission here
makes it so that any application must use that same permission to receive the intent you are sending.
What about your broadcast receiver? Someone could create their own broadcast intent to trigger it. You
can fix that by passing in your permission in registerReceiver(…), too.
Listing 30.10Permissions on a broadcast receiver (VisibleFragment.java)
@Override
public void onResume() {
super.onResume();
IntentFilter filter = new IntentFilter(PollService.ACTION_SHOW_NOTIFICATION);
getActivity().registerReceiver(mOnShowNotification, filter);
getActivity().registerReceiver(mOnShowNotification, filter,
PollService.PERM_PRIVATE, null);
}
Now, your app is the only app that can trigger that receiver.
ptg11078569
Receiving results with ordered broadcasts
495
More about protection levels
Every custom permission has to specify a value for android:protectionLevel. Your permission’s
protectionLevel tells Android how it should be used. In your case, you used a protectionLevel
of signature. The signature protection level means that if another application wants to use your
permission, it has to be signed with the same key as your application. This is usually the right choice
for permissions you use internally in your application. Since other developers don’t have your key, they
can’t get access to anything this permission protects. Plus, since you do have your own key, you can
use this permission in any other app you decide to write later.
Table 30.1Values for protectionLevel
Value Description
normal This is for protecting app functionality that won’t do anything dangerous, like
access secure personal data or send data to the internet. The user can see the
permission before choosing to install the app, but they aren’t explicitly asked to
grant it. android.permission.RECEIVE_BOOT_COMPLETED uses this permission
level, and so does the permission to let you vibrate your phone. Think of this as
things that aren’t dangerous, but you’d want the user to know that you might do
them anyway.
dangerous This is for everything we said you would not use normal for – for accessing
personal data, sending and receiving things from network interfaces, for
accessing hardware that might be used to spy on you, or anything that could
cause real problems for the user. The internet permission, camera permission,
and contacts permission all fall under this category. Android may ask the user
for an explicit go ahead before approving a dangerous permission.
signature The system grants this permission if the app is signed with the same certificate
as the declaring application, and denies it otherwise. If the permission is
granted, the user isn’t notified. This is what you would use for functionality
that is internal to your own app – since you have the certificate, and only apps
signed with the same certificate can use the permission, you have control over
who uses the permission. Here, you have used it to lock down anyone else from
seeing your broadcasts, but if you wanted to you could write another app that
listens to them, too.
signatureOrSystem This is like signature, but it also grants permission to all packages in the
Android system image. This is used to communicate with apps built into the
system image, so you probably don’t need to worry about it.
Receiving results with ordered broadcasts
Time to finally bring this baby home. You are sending your own personal private broadcast, but so far
you only have one-way communication.
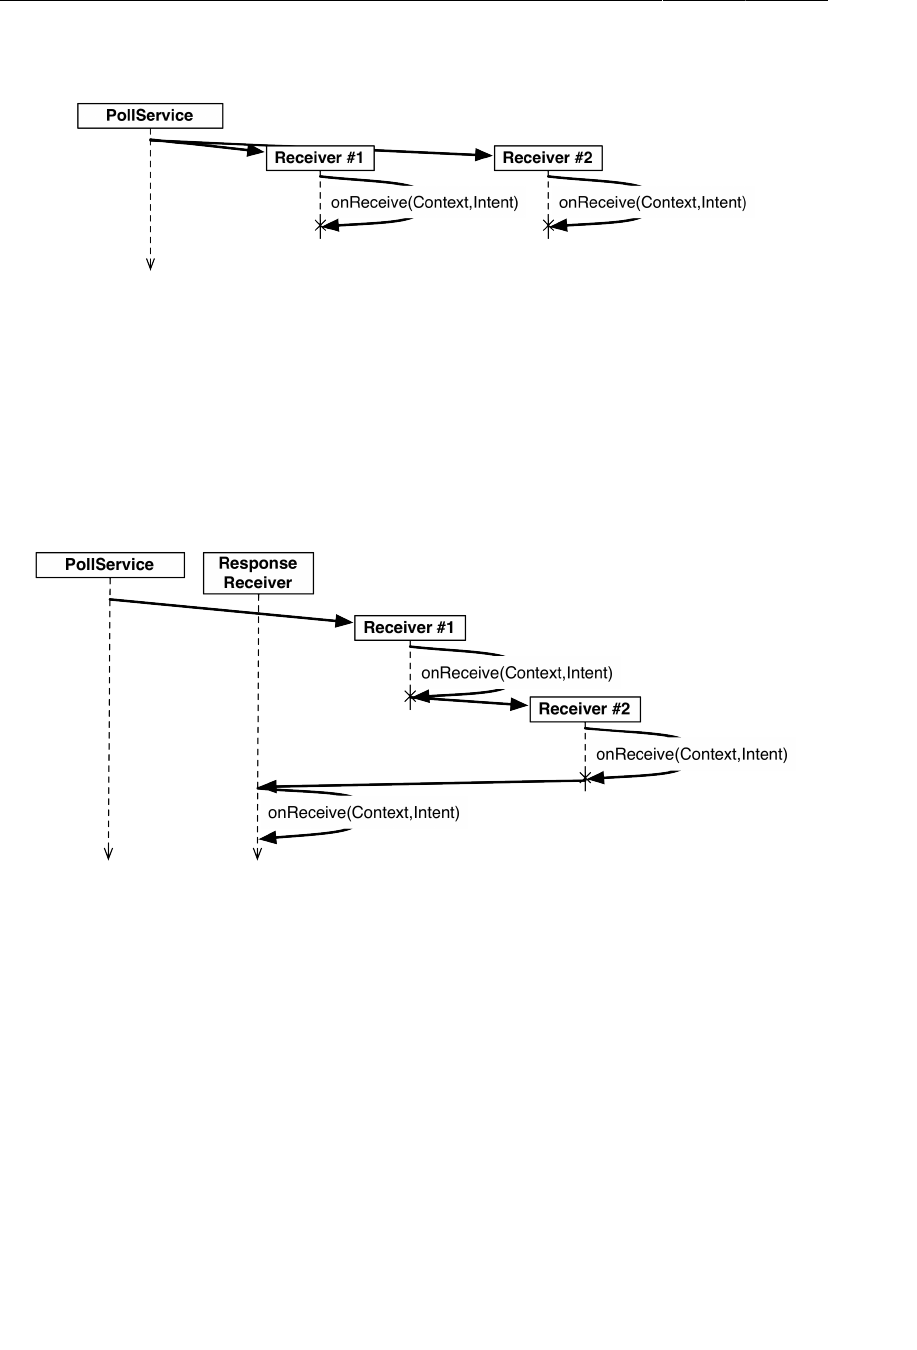
ptg11078569
Chapter 30Broadcast Intents
496
Figure 30.4Regular broadcast intents
This is because a regular broadcast intent is conceptually received by everyone at the same time. Now,
onReceive(…) is called on the main thread, so in practice your receivers are not actually executed
concurrently. It is not possible to rely on their being executed in any particular order, though, or to
know when they have all completed execution. As a result, it is a hassle for the broadcast receivers to
communicate with each other, or for the sender of the intent to receive information from the receivers.
Figure 30.5Ordered broadcast intents
You can implement two-way communication using an ordered broadcast intent. Ordered broadcasts
allow a sequence of broadcast receivers to process a broadcast intent in order. They also allow the
sender of a broadcast to receive results from the broadcast’s recipients by passing in a special broadcast
receiver, called the result receiver.
On the receiving side, this looks mostly the same as a regular broadcast. You get an additional tool,
though: a set of methods used to change the return value of your receiver. Here, you want to cancel
the notification. This can be communicated by use of a simple integer result code. So you use the
setResultCode(int) method to set the result code to Activity.RESULT_CANCELED.
Modify VisibleFragment to send some information back to the sender of SHOW_NOTIFICATION.

ptg11078569
Receiving results with ordered broadcasts
497
Listing 30.11Send a simple result back (VisibleFragment.java)
private BroadcastReceiver mOnShowNotification = new BroadcastReceiver() {
@Override
public void onReceive(Context context, Intent intent) {
Toast.makeText(getActivity(),
"Got a broadcast:" + intent.getAction(),
Toast.LENGTH_LONG)
.show();
// If we receive this, we're visible, so cancel
// the notification
Log.i(TAG, "canceling notification");
setResultCode(Activity.RESULT_CANCELED);
}
};
Since all you need to do is signal yes or no here, you only need the result code. If you need to return
more complicated data, you can use setResultData(String) or setResultExtras(Bundle). And
if you want to set all three values, you can call setResult(int,String,Bundle). Once your return
values are set here, every subsequent receiver will be able to see or modify them.
For those methods to do anything useful, your broadcast needs to be ordered. Write a new method
to send an ordered broadcast in PollService. This method will package up a Notification
invocation and send it out as a broadcast. A result receiver will be specified to send out the packaged
Notification (provided it has not been canceled).
Listing 30.12Send an ordered broadcast (PollService.java)
void showBackgroundNotification(int requestCode, Notification notification) {
Intent i = new Intent(ACTION_SHOW_NOTIFICATION);
i.putExtra("REQUEST_CODE", requestCode);
i.putExtra("NOTIFICATION", notification);
sendOrderedBroadcast(i, PERM_PRIVATE, null, null,
Activity.RESULT_OK, null, null);
}
Context.sendOrderedBroadcast(Intent,String,BroadcastReceiver,Handler,int,String,Bundle)
has five additional parameters beyond the ones you used in sendBroadcast(Intent,String). They
are, in order: a result receiver, a Handler to run the result receiver on, and then initial values for the
result code, result data, and result extras for the ordered broadcast.
The result receiver is a special receiver that will run after all the other recipients of your ordered
broadcast intent. In other circumstances, you would be able to use the result receiver here to receive the
broadcast and post the notification object. Here, though, that will not work. This broadcast intent will
often be sent right before PollService dies. That means that your broadcast receiver might be dead,
too.
Thus, your final broadcast receiver will need to be standalone. Create a new BroadcastReceiver
subclass called NotificationReceiver. Implement it as follows:

ptg11078569
Chapter 30Broadcast Intents
498
Listing 30.13Implement your result receiver (NotificationReceiver.java)
public class NotificationReceiver extends BroadcastReceiver {
private static final String TAG = "NotificationReceiver";
@Override
public void onReceive(Context c, Intent i) {
Log.i(TAG, "received result: " + getResultCode());
if (getResultCode() != Activity.RESULT_OK)
// A foreground activity cancelled the broadcast
return;
int requestCode = i.getIntExtra("REQUEST_CODE", 0);
Notification notification = (Notification)
i.getParcelableExtra("NOTIFICATION");
NotificationManager notificationManager = (NotificationManager)
c.getSystemService(Context.NOTIFICATION_SERVICE);
notificationManager.notify(requestCode, notification);
}
}
Finally, register your new receiver. Since it sends the notification, receiving the result set by the other
receivers, it should run after everything else. That means that you will need to set a low priority for
your receiver. Since your receiver should run last, give it a priority of -999 (-1000 and below are
reserved).
And since this receiver is only used internally by your application, you do not need it to be externally
visible. Set android:exported="false" to keep this receiver to yourself.
Listing 30.14Register notification receiver (AndroidManifest.xml)
<manifest xmlns:android="http://schemas.android.com/apk/res/android"
... >
...
<application
... >
...
<receiver android:name=".StartupReceiver">
<intent-filter>
<action android:name="android.intent.action.BOOT_COMPLETED" />
</intent-filter>
</receiver>
<receiver android:name=".NotificationReceiver"
android:exported="false">
<intent-filter
android:priority="-999">
<action
android:name="com.bignerdranch.android.photogallery.SHOW_NOTIFICATION" />
</intent-filter>
</receiver>
</application>
</manifest>
Now use your new method instead of NotificationManager to post your notification.

ptg11078569
Receivers and Long-running Tasks
499
Listing 30.15Finish it up (PollService.java)
@Override
public void onHandleIntent(Intent intent) {
...
if (!resultId.equals(lastResultId)) {
...
Notification notification = new NotificationCompat.Builder(this)
...
.build();
NotificationManager notificationManager = (NotificationManager)
getSystemService(NOTIFICATION_SERVICE);
notificationManager.notify(0, notification);
sendBroadcast(new Intent(ACTION_SHOW_NOTIFICATION), PERM_PRIVATE);
showBackgroundNotification(0, notification);
}
prefs.edit()
.putString(FlickrFetchr.PREF_LAST_RESULT_ID, resultId)
.commit();
}
Run PhotoGallery and toggle background polling a couple of times. You should see that
notifications no longer appear. To verify that notifications still work in the background, set
PollService.POLL_INTERVAL to five seconds again so that you do not have to wait five whole minutes.
Receivers and Long-running Tasks
So what do you do if you want a broadcast intent to kick off a longer-running task than the restrictions
of the main run loop allow?
You have two options. The first is to put that work into a service instead, and start the service in your
broadcast receiver’s small window of opportunity. This is the method we recommend. A service can
take as long as it needs to take to service a request. It can queue up multiple requests and service them
in order, or otherwise manage requests as it sees fit.
The second is to use the BroadcastReceiver.goAsync() method. This method returns a
BroadcastReceiver.PendingResult object, which can be used to provide a result at a later time. So
you could give that PendingResult to an AsyncTask to perform some longer running work, and then
respond to the broadcast by calling methods on PendingResult.
There are two downsides to this method. One is that it is not available on old devices. The other is that
it is less flexible: you still have to service the broadcast within ten seconds or so, and you have few
architectural options like you do with a service.
Of course, goAsync() has one huge advantage: you can set results for ordered broadcasts with them. If
you really need that, nothing else will do. Just make sure not to take too long.

ptg11078569
This page intentionally left blank

ptg11078569
501
31
Browsing The Web & WebView
Each photo you get from Flickr has a page associated with it. In this chapter, you are going to make it
so that users can press a photo in PhotoGallery to browse its photo page. You will learn two different
ways to integrate web content into your apps. The first works with the device’s browser app, and the
second uses the WebView class to display web content within PhotoGallery.
One Last Bit of Flickr Data
For both ways, you need to get the URL for a photo’s Flickr page. If you look at the XML you are
currently receiving for each photo, you can see that the photo page is not part of those results.
<photo id="8232706407" owner="70490293@N03" secret="9662732625"
server="8343" farm="9" title="111_8Q1B2033" ispublic="1"
isfriend="0" isfamily="0"
url_s="http://farm9.staticflickr.com/8343/8232706407_9662732625_m.jpg"
height_s="240" width_s="163" />
So you might think that you are in for some more XML request writing. Fortunately, that is not the
case. If you look at the Web Page URLs section at Flickr’s documentation at http://www.flickr.com/
services/api/misc.urls.html, you can see that you can create the URL for an individual photo’s
page like so:
http://www.flickr.com/photos/user-id/photo-id
The photo-id seen here is the same as the value of the id attribute from your XML. You are already
stashing that in mId in GalleryItem. What about user-id? If you poke around the documentation, you
will find that the owner attribute in your XML is a user ID. So if you pull out the owner attribute, you
should be able to build the URL from your photo XML attributes:
http://www.flickr.com/photos/owner/id
Add the following code to GalleryItem to put this plan into action.

ptg11078569
Chapter 31Browsing The Web & WebView
502
Listing 31.1Add code for photo page (GalleryItem.java)
public class GalleryItem {
private String mCaption;
private String mId;
private String mUrl;
private String mOwner;
...
public void setUrl(String url) {
mUrl = url;
}
public String getOwner() {
return mOwner;
}
public void setOwner(String owner) {
mOwner = owner;
}
public String getPhotoPageUrl() {
return "http://www.flickr.com/photos/" + mOwner + "/" + mId;
}
public String toString() {
return mCaption;
}
}
You created a new mOwner property here, and added a short method called getPhotoPageUrl() to
generate photo page URLs as discussed above.
Now change parseItems(…) to read in the owner attribute.
Listing 31.2Read in owner attribute (FlickrFetchr.java)
void parseItems(ArrayList<GalleryItem> items, XmlPullParser parser)
throws XmlPullParserException, IOException {
int eventType = parser.next();
while (eventType != XmlPullParser.END_DOCUMENT) {
if (eventType == XmlPullParser.START_TAG &&
XML_PHOTO.equals(parser.getName())) {
String id = parser.getAttributeValue(null, "id");
String caption = parser.getAttributeValue(null, "title");
String smallUrl = parser.getAttributeValue(null, EXTRA_SMALL_URL);
String owner = parser.getAttributeValue(null, "owner");
GalleryItem item = new GalleryItem();
item.setUrl(smallUrl);
item.setOwner(owner);
items.add(item);
}
eventType = parser.next();
}
}

ptg11078569
The Easy Way: Implicit Intents
503
Easy peasy. Now to have fun with your new photo page URL.
The Easy Way: Implicit Intents
You will browse to this URL first by using your old friend the implicit intent. This intent will start up
the browser with your photo URL.
The first step here is to make your app listen to presses on GridView items. This is another place
where your code will look slightly different from your code in Chapter9, since there is no matching
GridFragment. Instead of overriding the onListItemClick(…) method in your fragment, you will hook
it up more like a button click listener by calling the setOnItemClickListener(…) method on your
GridView.
After doing that, it is a simple matter of creating and firing an implicit intent. Add the following code
to PhotoGalleryFragment:
Listing 31.3Web browsing with implicit intents (PhotoGalleryFragment.java)
@Override
public View onCreateView(LayoutInflater inflater, ViewGroup container,
Bundle savedInstanceState) {
View v = inflater.inflate(R.layout.fragment_photo_gallery, container, false);
mGridView = (GridView)v.findViewById(R.id.gridView);
setupAdapter();
mGridView.setOnItemClickListener(new OnItemClickListener() {
@Override
public void onItemClick(AdapterView<?> gridView, View view, int pos,
long id) {
GalleryItem item = mItems.get(pos);
Uri photoPageUri = Uri.parse(item.getPhotoPageUrl());
Intent i = new Intent(Intent.ACTION_VIEW, photoPageUri);
startActivity(i);
}
});
return v;
}
That should be it. Start up PhotoGallery and press on a photo. You should see your progress indicator
briefly, and then your browser app should pop up.
The Harder Way: WebView
Oftentimes, though, you want to display web content within your own activities instead of heading off
to the browser. You may want to display HTML that you generate yourself, or you may want to lock
down the browser somehow. For apps that include help documentation, it is common to implement it
as a web page so that it is easy to update. Opening a web browser to a help web page does not look
professional, though, and it prevents you from customizing behavior or integrating that web page into
your own user interface.
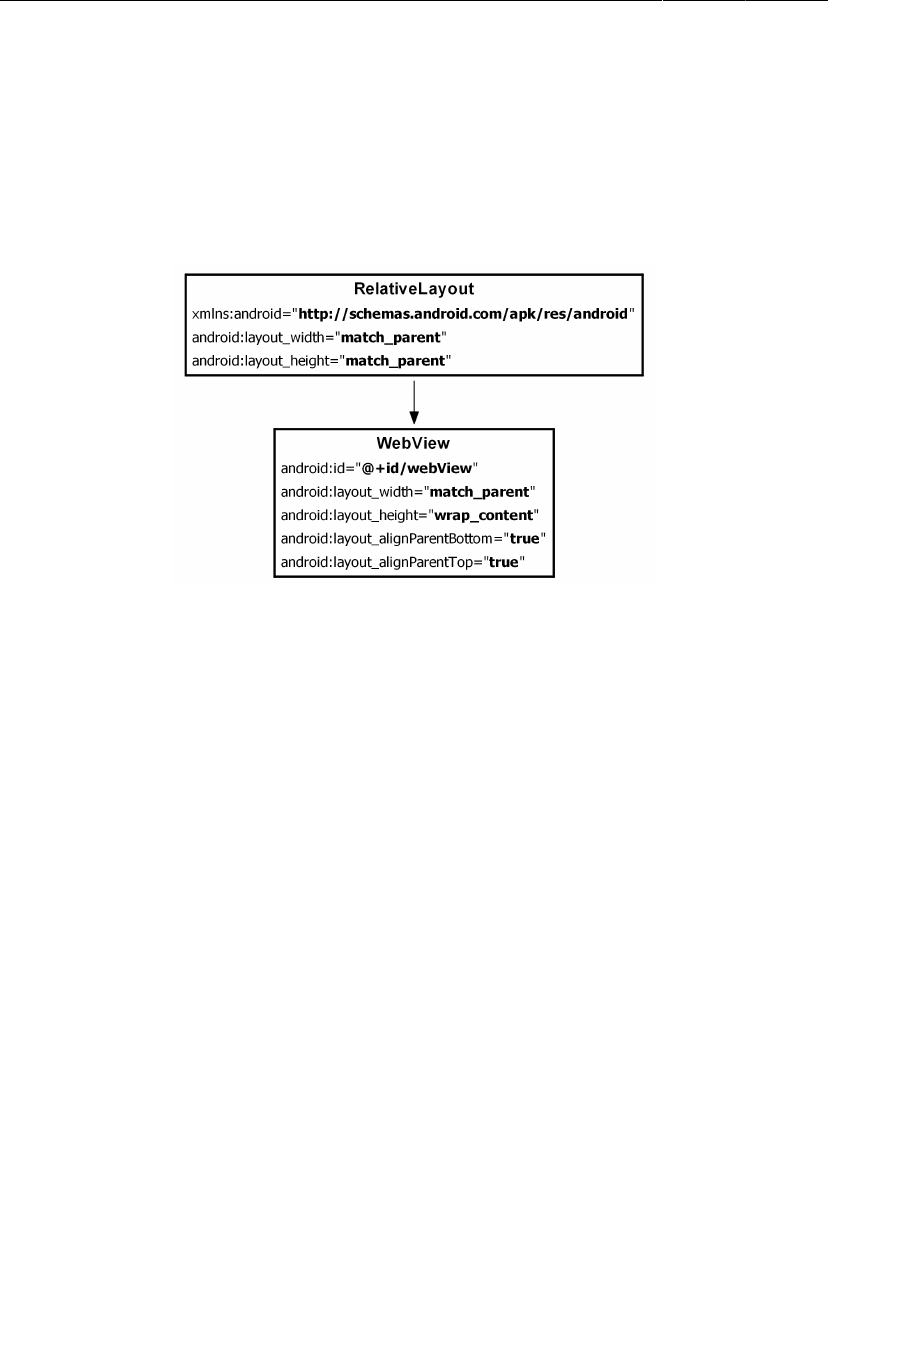
ptg11078569
Chapter 31Browsing The Web & WebView
504
When you want to present web content within your own user interface, you use the WebView class. We
are calling this the “harder” way here, but it is pretty darned easy. (Anything is hard compared to using
implicit intents.)
The first step will be to create a new activity and fragment to display the WebView in. Start, as usual, by
defining a layout file.
Figure 31.1Initial layout (res/layout/fragment_photo_page.xml)
You may think, “That RelativeLayout is pretty useless.” True enough – you will fill it out later in the
chapter, though, with additional “chrome”.
Next, get the rudiments of your fragment setup. Create PhotoPageFragment as a subclass of the
VisibleFragment class you created in the last chapter. You will need to inflate your layout file, extract
your WebView from it, and forward along the URL in your intent’s data.

ptg11078569
The Harder Way: WebView
505
Listing 31.4Setting up your web browser fragment (PhotoPageFragment.java)
package com.bignerdranch.android.photogallery;
...
public class PhotoPageFragment extends VisibleFragment {
private String mUrl;
private WebView mWebView;
@Override
public void onCreate(Bundle savedInstanceState) {
super.onCreate(savedInstanceState);
setRetainInstance(true);
mUrl = getActivity().getIntent().getData().toString();
}
@Override
public View onCreateView(LayoutInflater inflater, ViewGroup parent,
Bundle savedInstanceState) {
View v = inflater.inflate(R.layout.fragment_photo_page, parent, false);
mWebView = (WebView)v.findViewById(R.id.webView);
return v;
}
}
For now, this is just a skeleton, but leave it as it is – you will fill it out a bit more in a moment. Next,
create the containing PhotoPageActivity class using good old SingleFragmentActivity.
Listing 31.5Create web activity (PhotoPageActivity.java)
package com.bignerdranch.android.photogallery;
...
public class PhotoPageActivity extends SingleFragmentActivity {
@Override
public Fragment createFragment() {
return new PhotoPageFragment();
}
}
Switch up your code in PhotoGalleryFragment to call into your new activity instead of the implicit
intent.

ptg11078569
Chapter 31Browsing The Web & WebView
506
Listing 31.6Switch to call your activity (PhotoGalleryFragment.java)
@Override
public View onCreateView(LayoutInflater inflater, ViewGroup container,
Bundle savedInstanceState) {
...
mGridView.setOnItemClickListener(new OnItemClickListener() {
@Override
public void onItemClick(AdapterView<?> gridView, View view, int pos,
long id) {
GalleryItem item = mItems.get(pos);
Uri photoPageUri = Uri.parse(item.getPhotoPageUrl());
Intent i = new Intent(Intent.ACTION_VIEW, photoPageUri);
Intent i = new Intent(getActivity(), PhotoPageActivity.class);
i.setData(photoPageUri);
startActivity(i);
}
});
return v;
}
And, finally, add your new activity to the manifest.
Listing 31.7Add activity to manifest (AndroidManifest.xml)
<manifest xmlns:android="http://schemas.android.com/apk/res/android"
package="com.bignerdranch.android.photogallery"
android:versionCode="1"
android:versionName="1.0" >
...
<application
android:allowBackup="true"
android:icon="@drawable/ic_launcher"
android:label="@string/app_name"
android:theme="@style/AppTheme" >
<activity
android:name=".PhotoGalleryActivity"
android:launchMode="singleTop"
android:label="@string/title_activity_photo_gallery" >
...
</activity>
<activity
android:name=".PhotoPageActivity" />
<service android:name=".PollService" />
<receiver android:name=".StartupReceiver">
...
</receiver>
</application>
</manifest>
Run PhotoGallery and press on a picture. You should see a new empty activity pop up.

ptg11078569
The Harder Way: WebView
507
Okay, now to get to the meat and actually make your fragment do something. You need to do three
things to make your WebView successfully display a Flickr photo page. The first one is straightforward
– you need to tell it what URL to load.
The second thing you need to do is enable JavaScript. By default, JavaScript is off. You do not always
need to have it on, but for Flickr, you do. Android Lint gives you a warning for doing this (it is worried
about cross-site scripting attacks), so you also need to suppress Lint warnings.
Finally, you need to override one method on a class called WebViewClient,
shouldOverrideUrlLoading(WebView,String), and return false. We will discuss this class a bit
more after you type in the code.
Listing 31.8Add even more instance variables (PhotoPageFragment.java)
@SuppressLint("SetJavaScriptEnabled")
@Override
public View onCreateView(LayoutInflater inflater, ViewGroup parent,
Bundle savedInstanceState) {
View v = inflater.inflate(R.layout.fragment_photo_page, parent, false);
mWebView = (WebView)v.findViewById(R.id.webView);
mWebView.getSettings().setJavaScriptEnabled(true);
mWebView.setWebViewClient(new WebViewClient() {
public boolean shouldOverrideUrlLoading(WebView view, String url) {
return false;
}
});
mWebView.loadUrl(mUrl);
return v;
}
Loading the URL has to be done after configuring the WebView, so you do that last. Before that,
you turn JavaScript on by calling getSettings() to get an instance of WebSettings, and calling
WebSettings.setJavaScriptEnabled(true). WebSettings is the first of the three ways you can
modify your WebView. It has various properties you can set, like the user agent string and text size.
After that, you configure your WebViewClient. WebViewClient is an event interface. By providing your
own implementation of WebViewClient, you can respond to rendering events. For example, you could
detect when the renderer starts loading an image from a particular URL or decide whether to resubmit
a POST request to the server.
WebViewClient has many methods you can override, most of which you will not
deal with. You do need to replace the default WebViewClient’s implementation of
shouldOverrideUrlLoading(WebView,String), though. This method says what to do when a new
URL is loaded in the WebView, like by pressing a link. If you return true, you are saying, “Do not
handle this URL, I am handling it myself.” If you return false, you are saying, “Go ahead and load
this URL, WebView, I’m not doing anything with it.”
The default implementation fires an implicit intent with the URL, just like you did earlier this chapter.
For your photo page, this is a severe problem. The first thing Flickr does is redirect you to the mobile
version of the web site. With the default WebViewClient, that means that you are immediately sent to
the user’s default web browser. Not ideal.
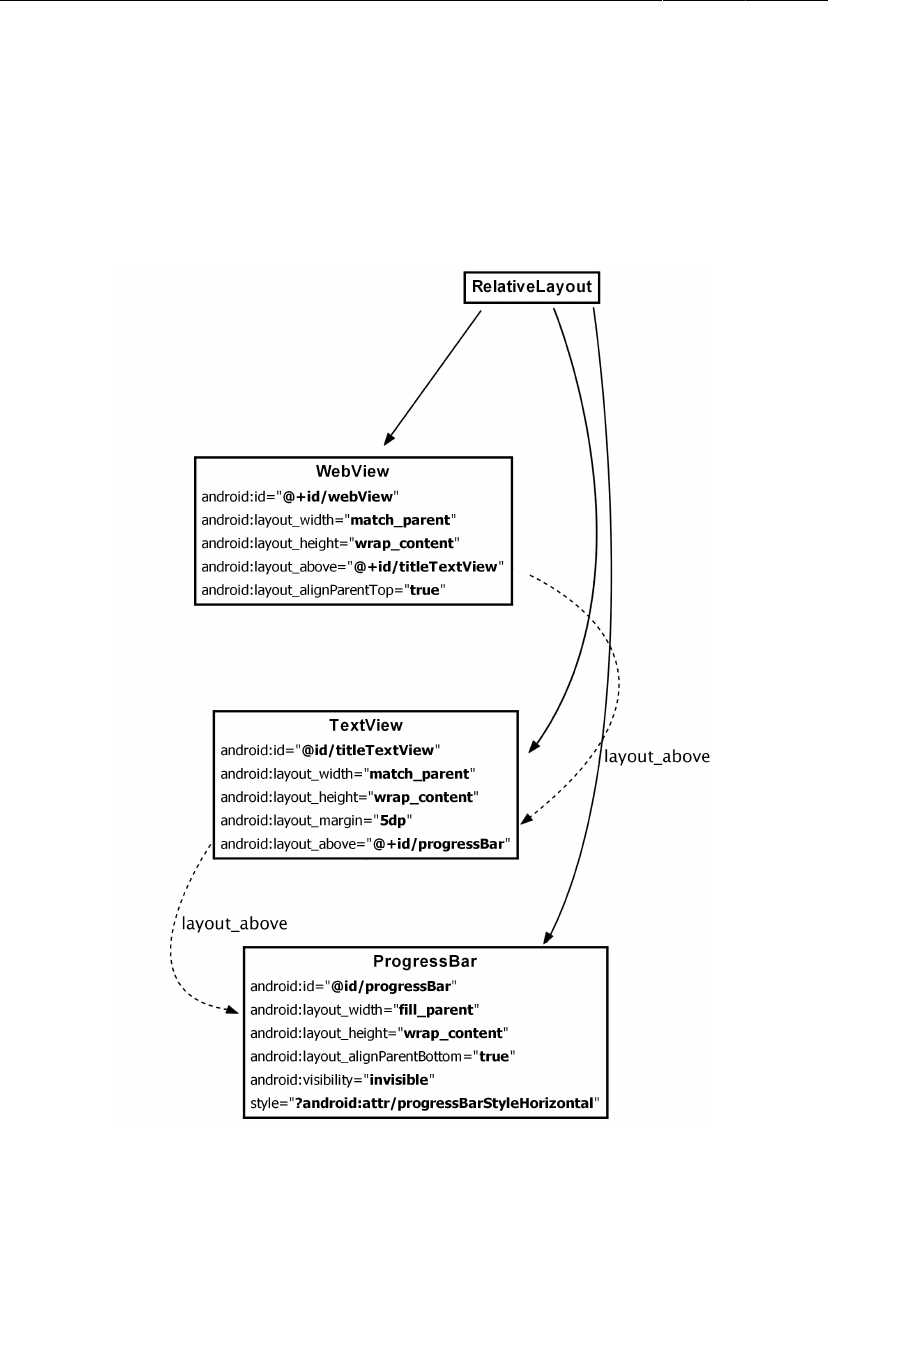
ptg11078569
Chapter 31Browsing The Web & WebView
508
The fix is simple – just override the default implementation and return false.
Run PhotoGallery, and you should see your WebView.
Using WebChromeClient to spruce things up
Since you are taking the time to create your own WebView, let’s spruce it up a bit by adding a title view
and a progress bar. Crack open fragment_photo_page.xml and make the following changes:
Figure 31.2Add title and progress (fragment_photo_page.xml)
Pulling out the ProgressBar and TextView will be a piece of cake. To hook them up, though, you will
need to use the second callback on WebView: WebChromeClient. If WebViewClient is an interface for

ptg11078569
Proper rotation with WebView
509
responding to rendering events, then WebChromeClient is an event interface for reacting to events that
should change elements of chrome around the browser. This includes JavaScript alerts, favicons, and of
course updates for loading progress and the title of the current page.
Hook it up in onCreateView(…) like so:
Listing 31.9Using WebChromeClient (PhotoPageFragment.java)
@SuppressLint("SetJavaScriptEnabled")
@Override
public View onCreateView(LayoutInflater inflater, ViewGroup parent,
Bundle savedInstanceState) {
View v = inflater.inflate(R.layout.fragment_photo_page, parent, false);
final ProgressBar progressBar = (ProgressBar)v.findViewById(R.id.progressBar);
progressBar.setMax(100); // WebChromeClient reports in range 0-100
final TextView titleTextView = (TextView)v.findViewById(R.id.titleTextView);
mWebView = (WebView)v.findViewById(R.id.webView);
mWebView.getSettings().setJavaScriptEnabled(true);
mWebView.setWebViewClient(new WebViewClient() {
...
});
mWebView.setWebChromeClient(new WebChromeClient() {
public void onProgressChanged(WebView webView, int progress) {
if (progress == 100) {
progressBar.setVisibility(View.INVISIBLE);
} else {
progressBar.setVisibility(View.VISIBLE);
progressBar.setProgress(progress);
}
}
public void onReceivedTitle(WebView webView, String title) {
titleTextView.setText(title);
}
});
mWebView.loadUrl(mUrl);
return v;
}
Progress updates and title updates each have their own callback method,
onProgressChanged(WebView,int) and onReceivedTitle(WebView,String). The progress you
receive from onProgressChanged(WebView,int) is an integer from 0 to 100. If it is 100, you know
that the page is done loading, so you hide the ProgressBar by setting its visibility to View.INVISIBLE.
Run PhotoGallery to test your changes.
Proper rotation with WebView
Try rotating your screen. While it does work correctly, you will notice that the WebView has to
completely reload the web page. This is because WebView has too much data to save it all out inside
onSaveInstanceState(…). It has to start from scratch each time it is recreated on rotation.

ptg11078569
Chapter 31Browsing The Web & WebView
510
For some classes like this (VideoView is another one), the Android documentation recommends that
you allow the activity to handle the configuration change itself. This means that instead of the activity
being destroyed, it simply moves its views around to fit the new screen size. As a result, WebView does
not have to reload all of its data.
(Why not do this all the time, you ask? It does not work correctly with all views. If it did, life would be
so much easier, but alas.)
To tell PhotoPageActivity to handle its own darned configuration changes, make the following tweak
to AndroidManifest.xml.
Listing 31.10Handle configuration changes yourself (AndroidManifest.xml)
<manifest xmlns:android="http://schemas.android.com/apk/res/android"
package="com.bignerdranch.android.photogallery"
android:versionCode="1"
android:versionName="1.0" >
...
<application
android:allowBackup="true"
android:icon="@drawable/ic_launcher"
android:label="@string/app_name"
android:theme="@style/AppTheme" >
...
<activity
android:name=".PhotoPageActivity"
android:configChanges="keyboardHidden|orientation|screenSize" />
...
</application>
</manifest>
This attribute says that if the configuration changes because the keyboard was opened or closed, due to
an orientation change or due to the screen size changing (which also happens when switching between
portrait and landscape after Android 3.2), then the activity should handle the change itself.
And that is it. Try rotation again, and this time everything should be hunky dory.
For the More Curious: Injecting JavaScript Objects
We saw how to use WebViewClient and WebChromeClient to respond to specific events that happen
in your WebView. However, it is possible to do even more than that by injecting arbitrary JavaScript
objects into the document contained in the WebView itself. Check out the documentation at http://
developer.android.com/reference/android/webkit/WebView.html and scroll down to the
addJavascriptInterface(Object,String) method. Using this, you can inject an arbitrary object into
the document with a name you specify.
mWebView.addJavascriptInterface(new Object() {
public void send(String message) {
Log.i(TAG, "Received message: " + message);
}
}, "androidObject");
And then invoke it like so:

ptg11078569
For the More Curious: Injecting JavaScript Objects
511
<input type="button" value="In WebView!"
onClick="sendToAndroid('In Android land')" />
<script type="text/javascript">
function sendToAndroid(message) {
androidObject.send(message);
}
</script>
This could be dangerous – you’re letting some potentially strange web page fiddle with your program.
So to be safe, it’s a good idea to make sure you own the HTML in question – either that, or be
extremely conservative with the interface you expose.

ptg11078569
This page intentionally left blank
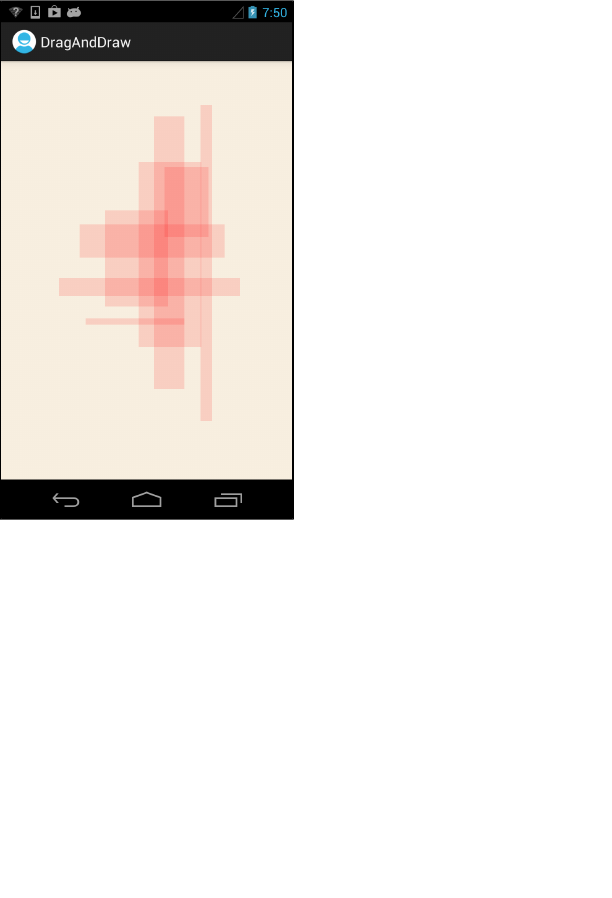
ptg11078569
513
32
Custom Views and Touch Events
In this chapter, you will learn how to handle touch events by writing a custom subclass of View named
BoxDrawingView. This View will draw boxes in response to the user touching the screen and dragging.
Figure 32.1Boxes drawn in many shapes and sizes
Setting Up the DragAndDraw Project
The BoxDrawingView class will be the star of a new project named DragAndDraw. Select New →
Android�Application�Project. Configure the project as shown in Figure32.2. Then create a blank activity
named DragAndDrawActivity.
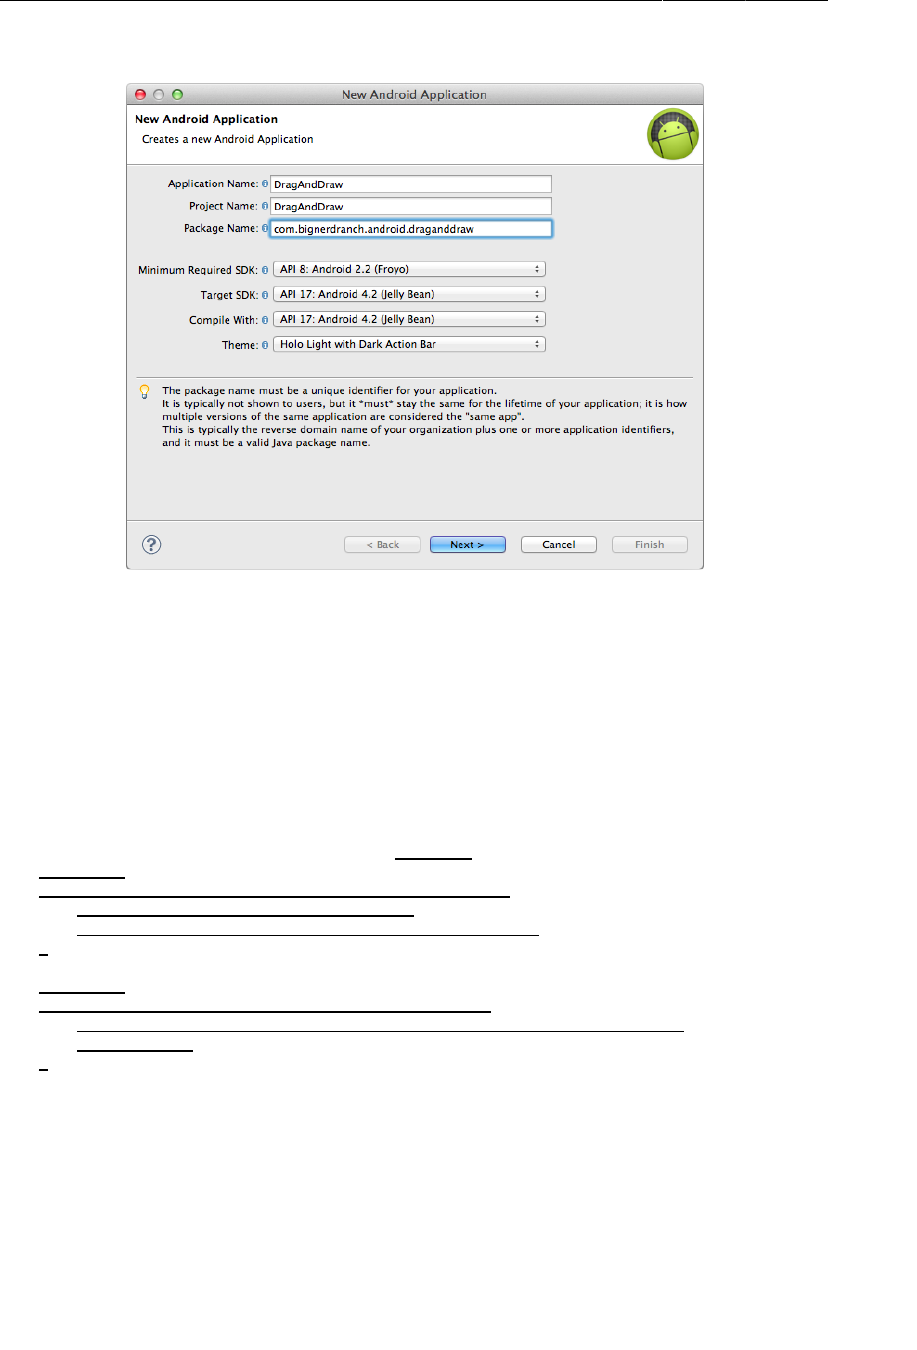
ptg11078569
Chapter 32Custom Views and Touch Events
514
Figure 32.2Creating DragAndDraw
Setting up DragAndDrawActivity
DragAndDrawActivity will be a subclass of SingleFragmentActivity that inflates the usual single-
fragment-containing layout. In the package explorer, copy SingleFragmentActivity.java into
the com.bignerdranch.android.draganddraw package. Then copy activity_fragment.xml into
DragAndDraw’s res/layout directory.
In DragAndDrawActivity.java, make DragAndDrawActivity a SingleFragmentActivity that creates
a DragAndDrawFragment (a class that you will create next).
Listing 32.1Modify the activity (DragAndDrawActivity.java)
public class DragAndDrawActivity extends Activity SingleFragmentActivity {
@Override
public void onCreate(Bundle savedInstanceState) {
super.onCreate(savedInstanceState);
setContentView(R.layout.activity_drag_and_draw);
}
@Override
public boolean onCreateOptionsMenu(Menu menu) {
getMenuInflater().inflate(R.menu.activity_drag_and_draw, menu);
return true;
}
@Override
public Fragment createFragment() {
return new DragAndDrawFragment();
}
}
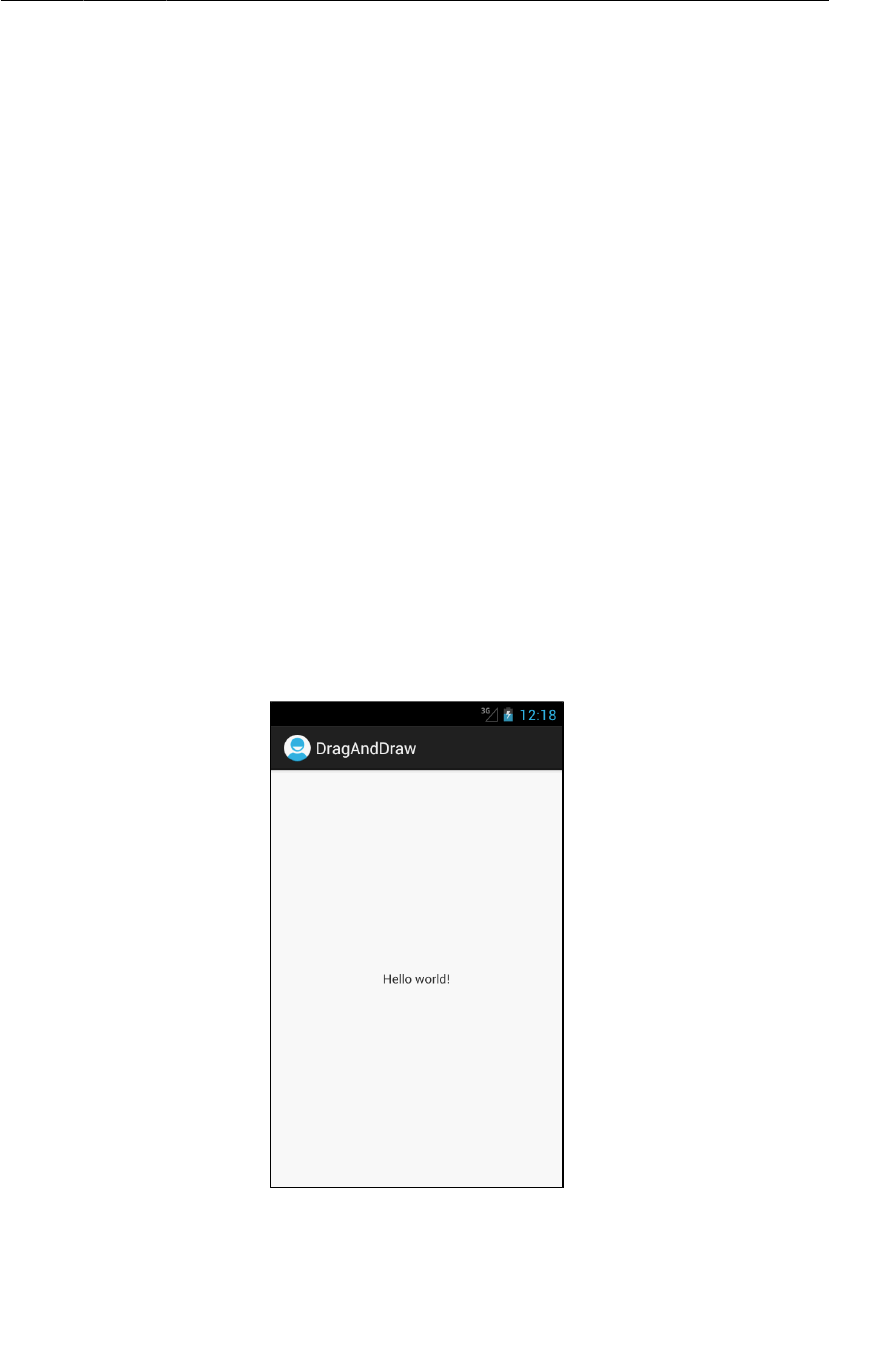
ptg11078569
Setting up DragAndDrawFragment
515
Setting up DragAndDrawFragment
To prepare a layout for DragAndDrawFragment, rename the activity_drag_and_draw.xml layout file
to fragment_drag_and_draw.xml.
DragAndDrawFragment’s layout will eventually consist of a BoxDrawingView, the custom view
that you are going to write. All of the drawing and touch-event handling will be implemented in
BoxDrawingView.
Create a new class named DragAndDrawFragment and make its superclass
android.support.v4.app.Fragment. Override onCreateView(…) to inflate
fragment_drag_and_draw.xml.
Listing 32.2Create the fragment (DragAndDrawFragment.java)
public class DragAndDrawFragment extends Fragment {
@Override
public View onCreateView(LayoutInflater inflater, ViewGroup parent,
Bundle savedInstanceState) {
View v = inflater.inflate(R.layout.fragment_drag_and_draw, parent, false);
return v;
}
}
You can run DragAndDraw to confirm that your app is set up properly.
Figure 32.3DragAndDraw with default layout

ptg11078569
Chapter 32Custom Views and Touch Events
516
Creating a Custom View
Android provides many excellent standard views and widgets, but sometimes you need a custom view
that presents visuals that are totally unique to your app.
While there are all kinds of custom views, you can shoehorn them into two broad categories:
simple A simple view may be complicated inside; what makes it simple is that it has no
child views. A simple view will almost always perform custom rendering as well.
composite Composite views are composed of other view objects. Composite views typically
manage child views but do not perform custom rendering. Instead, rendering is
delegated to each child view.
Here are three steps to follow when creating a custom view:
• Pick a superclass. For a simple custom view, View is a blank canvas, so it is the most common
choice. For a composite custom view, choose an appropriate layout class.
• Subclass this class and override at least one constructor from the superclass. Or create your own
constructor that calls one of the superclass’s constructors.
• Override other key methods to customize behavior.
Creating BoxDrawingView
BoxDrawingView will be a simple view and a direct subclass of View.
Create a new class named BoxDrawingView and make View its superclass. In BoxDrawingView.java,
add two constructors.
Listing 32.3Initial implementation for BoxDrawingView
(BoxDrawingView.java)
public class BoxDrawingView extends View {
// Used when creating the view in code
public BoxDrawingView(Context context) {
this(context, null);
}
// Used when inflating the view from XML
public BoxDrawingView(Context context, AttributeSet attrs) {
super(context, attrs);
}
}
You write two constructors because your view could be instantiated in code or from a layout file. Views
instantiated from a layout file receive an instance of AttributeSet containing the XML attributes
that were specified in XML. Even if you do not plan on using both constructors, it is good practice to
include them.
Next, update your fragment_drag_and_draw.xml layout file to use your new view.

ptg11078569
Creating BoxDrawingView
517
Listing 32.4Add BoxDrawingView to layout (fragment_drag_and_draw.xml)
<RelativeLayout xmlns:android="http://schemas.android.com/apk/res/android"
xmlns:tools="http://schemas.android.com/tools"
android:layout_width="match_parent"
android:layout_height="match_parent"
>
<TextView
android:layout_width="wrap_content"
android:layout_height="wrap_content"
android:layout_centerHorizontal="true"
android:layout_centerVertical="true"
android:text="@string/hello_world" />
</RelativeLayout>
<com.bignerdranch.android.draganddraw.BoxDrawingView
xmlns:android="http://schemas.android.com/apk/res/android"
android:layout_width="match_parent"
android:layout_height="match_parent"
/>
You must use BoxDrawingView’s fully qualified class name so that the layout inflater can find it. The
inflater works through a layout file creating View instances. If the element name is an unqualified class
name, then the inflater looks for a class with that name in the android.view and android.widget
packages. If the class lives somewhere else, then the layout inflater will not find it, and your app will
crash. So for custom classes and other classes that live outside of android.view and android.widget,
you must always specify the fully qualified class name.
Run DragAndDraw to confirm that all the connections are correct. All you will see is an empty view.
ptg11078569
Chapter 32Custom Views and Touch Events
518
Figure 32.4BoxDrawingView with no boxes
The next step is to get BoxDrawingView listening for touch events and using the information they
contain to draw boxes on the screen.
Handling Touch Events
One way to listen for touch events is to set a touch event listener using the following View method:
public void setOnTouchListener(View.OnTouchListener l)
This method works the same way as setOnClickListener(View.OnClickListener). You provide an
implementation of View.OnTouchListener, and your listener will be called every time a touch event
happens.
However, because you are subclassing View, you can take a shortcut and override this View method:
public boolean onTouchEvent(MotionEvent event)
This method receives an instance of MotionEvent, a class that describes the touch event, including its
location and its action. The action describes the stage of the event.
action
constants
description
ACTION_DOWN user’s finger touches the screen
ACTION_MOVE user moves finger on the screen
ACTION_UP user lifts finger off the screen

ptg11078569
Tracking across motion events
519
action
constants
description
ACTION_CANCEL a parent view has intercepted your touch event
In your implementation of onTouchEvent(…), you can check the value of the action by calling the
MotionEvent method:
public final int getAction()
In BoxDrawingView.java, add a log tag and then an implementation of onTouchEvent(…) that logs a
message in the case of each of the four different actions.
Listing 32.5Implementing BoxDrawingView (BoxDrawingView.java)
public class BoxDrawingView extends View {
public static final String TAG = "BoxDrawingView";
...
public boolean onTouchEvent(MotionEvent event) {
PointF curr = new PointF(event.getX(), event.getY());
Log.i(TAG, "Received event at x=" + curr.x +
", y=" + curr.y + ":");
switch (event.getAction()) {
case MotionEvent.ACTION_DOWN:
Log.i(TAG, " ACTION_DOWN");
break;
case MotionEvent.ACTION_MOVE:
Log.i(TAG, " ACTION_MOVE");
break;
case MotionEvent.ACTION_UP:
Log.i(TAG, " ACTION_UP");
break;
case MotionEvent.ACTION_CANCEL:
Log.i(TAG, " ACTION_CANCEL");
break;
}
return true;
}
}
Notice that you package your X and Y coordinates in a PointF object. You will be wanting to pass
these two values together as you go through the rest of the chapter. PointF is a container class provided
by Android that does this for you.
Run DragAndDraw and pull up LogCat. Touch the screen and drag your finger. You should see a report
of the X and Y coordinate of every touch action that BoxDrawingView receives.
Tracking across motion events
BoxDrawingView is intended to draw boxes on the screen, not just log coordinates. There are a few
problems to solve to get there.
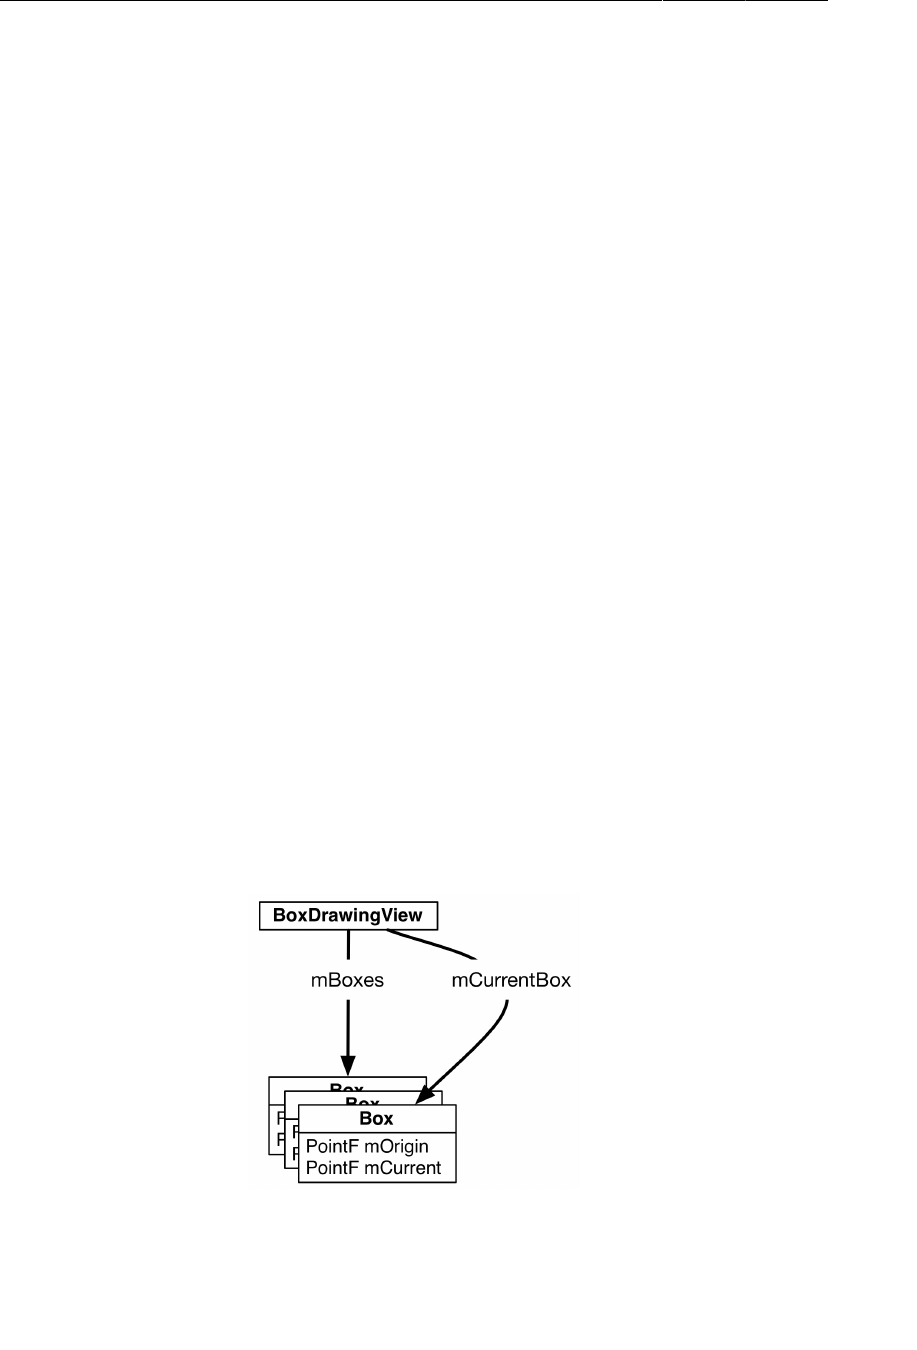
ptg11078569
Chapter 32Custom Views and Touch Events
520
First, to define a box, you need two things:
• the origin point (where the finger was initially placed)
• the current point (where the finger currently is)
To define a box, then, requires keeping track of data from more than one MotionEvent. You will store
this data in a Box object.
Create a class named Box to represent the data that defines a single box.
Listing 32.6Add Box (Box.java)
public class Box {
private PointF mOrigin;
private PointF mCurrent;
public Box(PointF origin) {
mOrigin = mCurrent = origin;
}
public PointF getCurrent() {
return mCurrent;
}
public void setCurrent(PointF current) {
mCurrent = current;
}
public PointF getOrigin() {
return mOrigin;
}
}
When the user touches BoxDrawingView, a new Box will be created and added to an array of existing
boxes (Figure32.5).
Figure 32.5Objects in DragAndDraw

ptg11078569
Tracking across motion events
521
Back in BoxDrawingView, add some code that uses your new Box object to track your drawing state.
Listing 32.7Add drag lifecycle methods (BoxDrawingView.java)
public class BoxDrawingView extends View {
public static final String TAG = "BoxDrawingView";
private Box mCurrentBox;
private ArrayList<Box> mBoxes = new ArrayList<Box>();
...
public boolean onTouchEvent(MotionEvent event) {
PointF curr = new PointF(event.getX(), event.getY());
switch (event.getAction()) {
case MotionEvent.ACTION_DOWN:
Log.i(TAG, " ACTION_DOWN");
// Reset drawing state
mCurrentBox = new Box(curr);
mBoxes.add(mCurrentBox);
break;
case MotionEvent.ACTION_MOVE:
Log.i(TAG, " ACTION_MOVE");
if (mCurrentBox != null) {
mCurrentBox.setCurrent(curr);
invalidate();
}
break;
case MotionEvent.ACTION_UP:
Log.i(TAG, " ACTION_UP");
mCurrentBox = null;
break;
case MotionEvent.ACTION_CANCEL:
Log.i(TAG, " ACTION_CANCEL");
mCurrentBox = null;
break;
}
return true;
}
}
Any time an ACTION_DOWN motion event is received, you set mCurrentBox to be a new Box with its
origin as the event’s location. This new Box is added to the array of boxes. (In the next section, when
you implement custom drawing, BoxDrawingView will draw every Box within this array to the screen.)
As the user’s finger moves around the screen, you update mCurrentBox.mCurrent. Then, when the
touch is canceled or when the user’s finger leaves the screen, you null out mCurrentBox to end your
draw motion. The Box is complete; it is stored safely in the array but will no longer be updated about
motion events.
Notice the call to invalidate() in the case of ACTION_MOVE. This forces BoxDrawingView to redraw
itself so that the user can see the box while dragging across the screen. Which brings you to the next
step: drawing the boxes to the screen.

ptg11078569
Chapter 32Custom Views and Touch Events
522
Rendering Inside onDraw(…)
When your application is launched, all of its views are invalid. This means that they have not drawn
anything to the screen. To fix this situation, Android calls the top-level View’s draw() method. This
causes that view to draw itself, which causes its children to draw themselves. Those children’s children
then draw themselves, and so on down the hierarchy. When all the views in the hierarchy have drawn
themselves, then the top-level View is no longer invalid.
To hook into this drawing, you override the following View method:
protected void onDraw(Canvas canvas)
The call to invalidate() that you make in response to ACTION_MOVE in onTouchEvent(…) makes the
BoxDrawingView invalid again. This causes it to redraw itself and will cause onDraw(…) to be called
again.
Now let’s consider the Canvas parameter. Canvas and Paint are the two main drawing classes in
Android:
• The Canvas class has all the drawing operations you perform. The methods you call on Canvas
determine where and what you draw – a line, a circle, a word, or a rectangle.
• The Paint class determines how these operations are done. The methods you call on Paint
specify characteristics – whether shapes are filled, which font text is drawn in, and what color
lines are.
In BoxDrawingView.java, create two Paint in BoxDrawingView’s XML constructor.
Listing 32.8Create your paint (BoxDrawingView.java)
public class BoxDrawingView extends View {
private static final String TAG = "BoxDrawingView";
private ArrayList<Box> mBoxes = new ArrayList<Box>();
private Box mCurrentBox;
private Paint mBoxPaint;
private Paint mBackgroundPaint;
...
// Used when inflating the view from XML
public BoxDrawingView(Context context, AttributeSet attrs) {
super(context, attrs);
// Paint the boxes a nice semitransparent red (ARGB)
mBoxPaint = new Paint();
mBoxPaint.setColor(0x22ff0000);
// Paint the background off-white
mBackgroundPaint = new Paint();
mBackgroundPaint.setColor(0xfff8efe0);
}
}
Armed with paint, you can now draw your boxes to the screen.
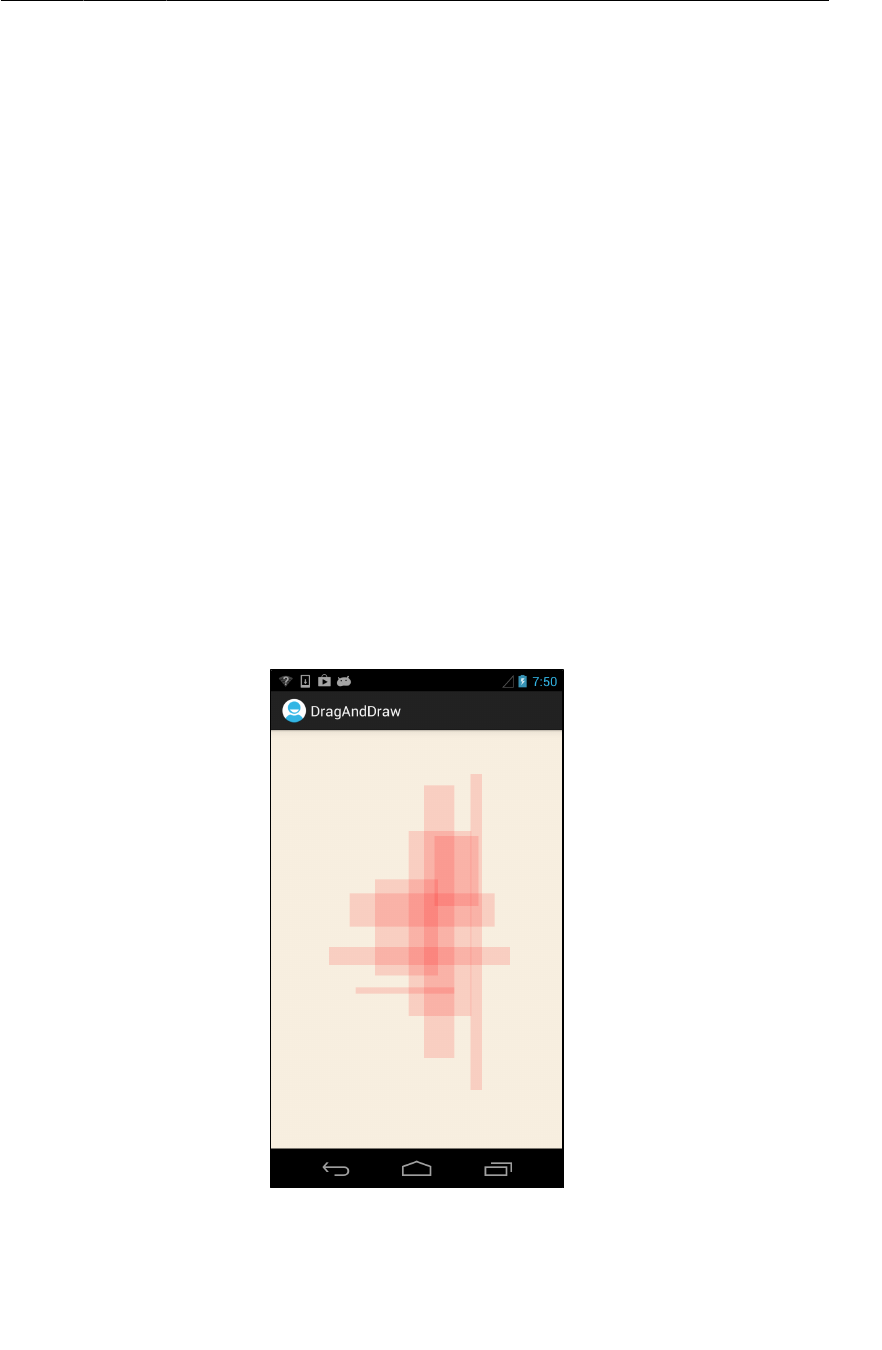
ptg11078569
Rendering Inside onDraw(…)
523
Listing 32.9Overriding onDraw(Canvas) (BoxDrawingView.java)
@Override
protected void onDraw(Canvas canvas) {
// Fill the background
canvas.drawPaint(mBackgroundPaint);
for (Box box : mBoxes) {
float left = Math.min(box.getOrigin().x, box.getCurrent().x);
float right = Math.max(box.getOrigin().x, box.getCurrent().x);
float top = Math.min(box.getOrigin().y, box.getCurrent().y);
float bottom = Math.max(box.getOrigin().y, box.getCurrent().y);
canvas.drawRect(left, top, right, bottom, mBoxPaint);
}
}
The first part of this code is straightforward: using your off-white background paint, you fill the canvas
with a backdrop for your boxes.
Then, for each box in your list of boxes, you determine what the left, right, top, and bottom of the box
should be by looking at the two points for the box. The left and top values will be the minimum values,
and the bottom and right will be the maximum values.
After calculating these values, you call Canvas.drawRect(…) to draw a red rectangle onto the screen.
Run DragAndDraw and draw some red rectangles.
Figure 32.6An expression of programmerly emotion

ptg11078569
Chapter 32Custom Views and Touch Events
524
Challenge: Rotations
Figure out how to persist your boxes across orientation changes from within your View. This can be
done with the following View methods:
protected Parcelable onSaveInstanceState()
protected void onRestoreInstanceState(Parcelable state)
These methods do not work like Activity and Fragment’s onSaveInstanceState(Bundle). First,
they will only be called if your View has an id. Second, instead of taking in a Bundle, they return and
process an object that implements the Parcelable interface. We recommend using a Bundle as the
Parcelable instead of implementing a Parcelable class yourself. (Implementing the Parcelable
interface is complicated. It is better to avoid doing so when possible.)
For a harder challenge, make it so that you can use a second finger to rotate your rectangles. To do this,
you will need to handle multiple pointers in your MotionEvent handling code. You will also need to
rotate your canvas.
When dealing with multiple touches, you need these extra ideas:
pointer index tells you which pointer in the current set of pointers the event is for
pointer ID gives you a unique ID for a specific finger in a gesture
The pointer index may change, but the pointer ID will not.
For more details, check out the documentation for the following MotionEvent methods:
public final int getActionMasked()
public final int getActionIndex()
public final int getPointerId(int pointerIndex)
public final float getX(int pointerIndex)
public final float getY(int pointerIndex)
Also look at the documentation for the ACTION_POINTER_UP and ACTION_POINTER_DOWN constants.
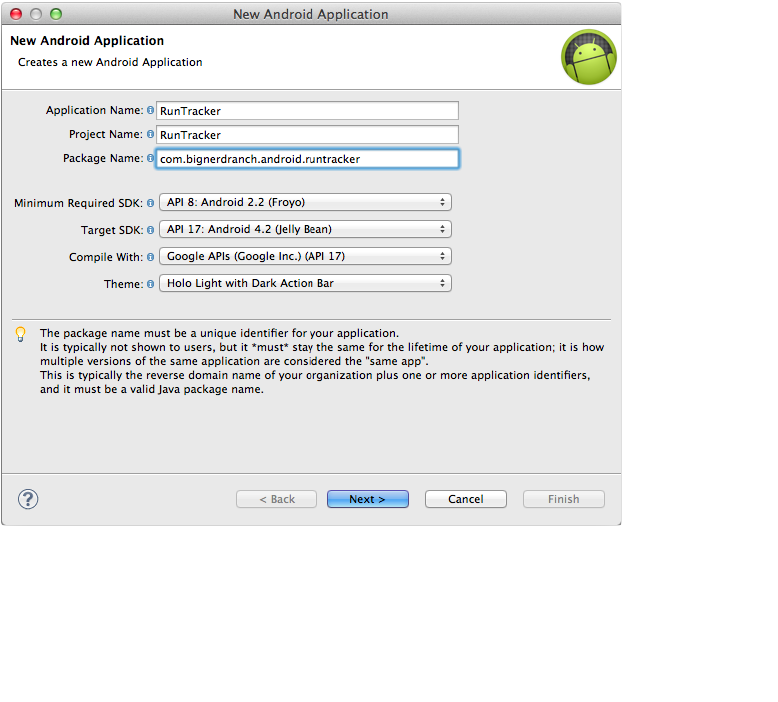
ptg11078569
525
33
Tracking the Device’s Location
In this chapter, you will create a new application called RunTracker. RunTracker works with a device’s
GPS to record and display the user’s travels. Those travels may be a walk in the woods at Big Nerd
Ranch Bootcamp, a car ride, or an ocean voyage. RunTracker is designed to keep a record of them all.
The first version of RunTracker will simply get location updates from the GPS and display the device’s
current location on screen. Eventually, RunTracker will show a map that follows the user in real time.
Getting Started with RunTracker
Create a new Android application with the following configuration:
Figure 33.1Creating RunTracker
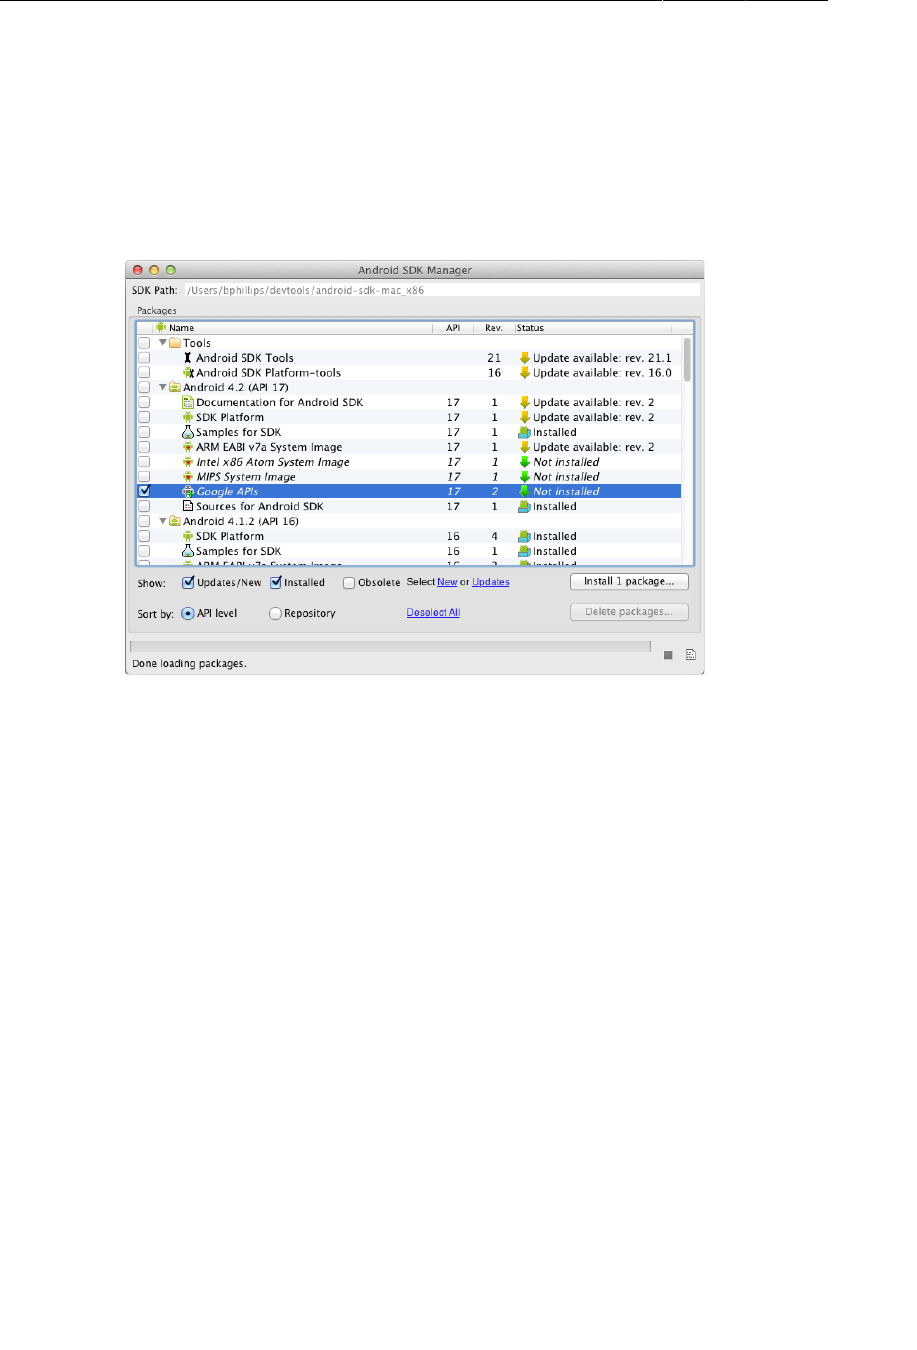
ptg11078569
Chapter 33Tracking the Device’s Location
526
Notice two differences from previous projects. First, you are raising the minimum SDK version to API
9. Second, you are building to the latest Google APIs rather than the Android version. You need the
Google APIs to use maps.
If you do not see a Google APIs version of the latest target listed, you can download it from the
Android SDK Manager. Select Window → Android�SDK�Manager to pull up your SDK manager and
then select the Google APIs, as shown in Figure33.2. Then click Install�1�package.
Figure 33.2Installing Google APIs for SDK 4.2
Once installation is complete, you should see the Google APIs as an option in your SDK version
selector.
As with your other projects, have the wizard create a blank activity. Name it RunActivity.
Setting up RunActivity
RunActivity (and other activities in RunTracker) will use the SingleFragmentActivity class. Copy
SingleFragmentActivity.java into the com.bignerdranch.android.runtracker package and
activity_fragment.xml into res/layout/.
Then, open RunActivity.java and change RunActivity to be a subclass of SingleFragmentActivity
that hosts an instance of RunFragment. RunFragment does not exist yet, but you will create it shortly.
Listing 33.1Initial RunActivity (RunActivity.java)
public class RunActivity extends SingleFragmentActivity {
@Override
protected Fragment createFragment() {
return new RunFragment();
}
}
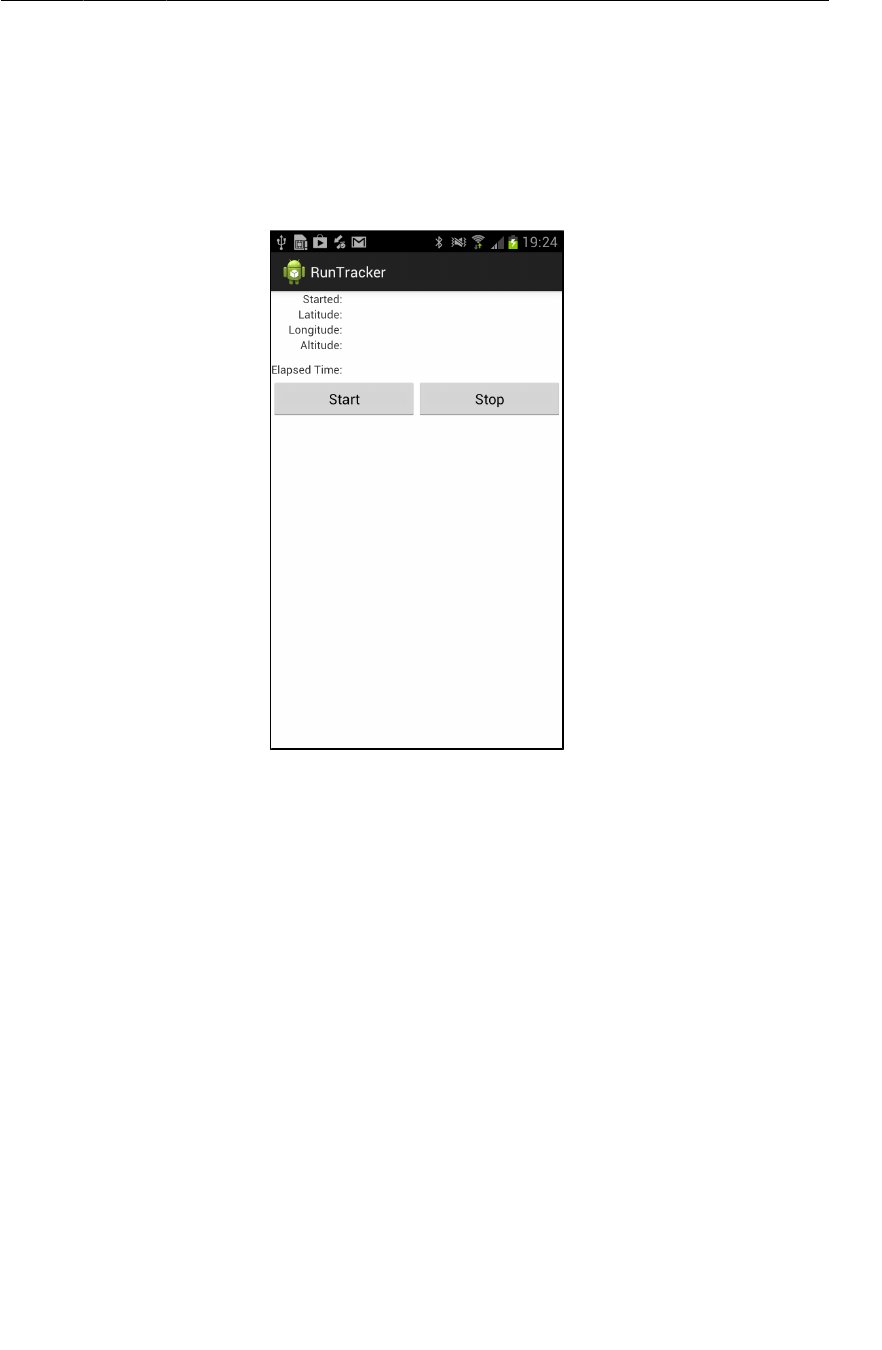
ptg11078569
Setting up RunFragment
527
Setting up RunFragment
The next steps are to create the user interface and the initial version of RunFragment. The UI for
RunFragment (Figure33.3) will be responsible for displaying simple data about the current “run” and
its location. It will have buttons to start and stop tracking the current run.
Figure 33.3Initial RunTracker UI
Adding strings
First, let’s add resources for the strings shown in Figure33.3. In res/values/strings.xml, add the
following strings, including three that you will need later in the chapter.
Listing 33.2RunTracker strings (strings.xml)
<resources>
<string name="app_name">RunTracker</string>
<string name="started">Started:</string>
<string name="latitude">Latitude:</string>
<string name="longitude">Longitude:</string>
<string name="altitude">Altitude:</string>
<string name="elapsed_time">Elapsed Time:</string>
<string name="start">Start</string>
<string name="stop">Stop</string>
<string name="gps_enabled">GPS Enabled</string>
<string name="gps_disabled">GPS Disabled</string>
<string name="cell_text">Run at %1$s</string>
</resources>

ptg11078569
Chapter 33Tracking the Device’s Location
528
Obtaining the layout file
For the layout, you will use a TableLayout to keep everything tidy. The TableLayout will have five
TableRows and one LinearLayout. Each TableRow will have two TextViews: the first is a label, and the
second will be populated with data at runtime. The LinearLayout will contain two Buttons.
This layout has nothing in it that you have not worked with before. Rather than create it from
scratch, get this layout from the solutions file (http://www.bignerdranch.com/solutions/
AndroidProgramming.zip). Find 33_Location/RunTracker/res/layout/fragment_run.xml and
copy it into your project’s res/layout directory.
Creating the RunFragment class
Now let’s create the RunFragment class itself. The initial version will just get the UI on the screen and
provide access to its widgets.
Listing 33.3Skeleton of RunFragment (RunFragment.java)
public class RunFragment extends Fragment {
private Button mStartButton, mStopButton;
private TextView mStartedTextView, mLatitudeTextView,
mLongitudeTextView, mAltitudeTextView, mDurationTextView;
@Override
public void onCreate(Bundle savedInstanceState) {
super.onCreate(savedInstanceState);
setRetainInstance(true);
}
@Override
public View onCreateView(LayoutInflater inflater, ViewGroup container,
Bundle savedInstanceState) {
View view = inflater.inflate(R.layout.fragment_run, container, false);
mStartedTextView = (TextView)view.findViewById(R.id.run_startedTextView);
mLatitudeTextView = (TextView)view.findViewById(R.id.run_latitudeTextView);
mLongitudeTextView = (TextView)view.findViewById(R.id.run_longitudeTextView);
mAltitudeTextView = (TextView)view.findViewById(R.id.run_altitudeTextView);
mDurationTextView = (TextView)view.findViewById(R.id.run_durationTextView);
mStartButton = (Button)view.findViewById(R.id.run_startButton);
mStopButton = (Button)view.findViewById(R.id.run_stopButton);
return view;
}
}
Run the app and confirm that it looks like Figure33.3.
Locations and the LocationManager
With the foundation in place, now you can get to work on the inside of the house. Location data in
Android is provided by the LocationManager system service. This service provides location updates to
all applications who are interested in them, and it delivers those updates in one of two ways.

ptg11078569
Locations and the LocationManager
529
The first, and perhaps most straightforward, way is via the LocationListener interface. This interface
gives you information about location updates (via onLocationChanged(Location)) as well as status
updates and notifications that the provider has been enabled or disabled.
Using LocationListener to get updates is a fine thing to do when you only need the location data to
come to a single component in your application. For example, if you only wanted to display location
updates within RunFragment, you could provide a LocationListener implementation to a call to one
of LocationManager’s requestLocationUpdates(…) or requestSingleUpdate(…) methods and be
done.
In this case, however, you have bigger plans. The goal for RunTracker is to keep tracking the user’s
location regardless of the state (or presence) of the user interface. You could do this using a sticky
Service, but that brings its own headaches and is a bit heavyweight for this example. Instead, you will
use the PendingIntent API introduced in Android 2.3 (Gingerbread).
By requesting location updates with a PendingIntent, you are asking the LocationManager to send
some kind of Intent for you in the future. So, your application components, and indeed your entire
process, can die, and LocationManager will still deliver your intents until you tell it to stop, starting
new components to respond to them as needed. You will take advantage of this to keep your app from
consuming too many resources even while it is actively tracking the device’s location.
To manage the communication with LocationManager, and eventually more details about the current
run, create a singleton class called RunManager as shown in Listing 33.4.
Listing 33.4Skeleton of RunManager, a singleton (RunManager.java)
public class RunManager {
private static final String TAG = "RunManager";
public static final String ACTION_LOCATION =
"com.bignerdranch.android.runtracker.ACTION_LOCATION";
private static RunManager sRunManager;
private Context mAppContext;
private LocationManager mLocationManager;
// The private constructor forces users to use RunManager.get(Context)
private RunManager(Context appContext) {
mAppContext = appContext;
mLocationManager = (LocationManager)mAppContext
.getSystemService(Context.LOCATION_SERVICE);
}
public static RunManager get(Context c) {
if (sRunManager == null) {
// Use the application context to avoid leaking activities
sRunManager = new RunManager(c.getApplicationContext());
}
return sRunManager;
}

ptg11078569
Chapter 33Tracking the Device’s Location
530
private PendingIntent getLocationPendingIntent(boolean shouldCreate) {
Intent broadcast = new Intent(ACTION_LOCATION);
int flags = shouldCreate ? 0 : PendingIntent.FLAG_NO_CREATE;
return PendingIntent.getBroadcast(mAppContext, 0, broadcast, flags);
}
public void startLocationUpdates() {
String provider = LocationManager.GPS_PROVIDER;
// Start updates from the location manager
PendingIntent pi = getLocationPendingIntent(true);
mLocationManager.requestLocationUpdates(provider, 0, 0, pi);
}
public void stopLocationUpdates() {
PendingIntent pi = getLocationPendingIntent(false);
if (pi != null) {
mLocationManager.removeUpdates(pi);
pi.cancel();
}
}
public boolean isTrackingRun() {
return getLocationPendingIntent(false) != null;
}
}
Notice that RunManager has three public instance methods. These are its basic API. It can start location
updates, stop them, and tell you if it is currently tracking a run (which merely means that updates are
currently registered with the LocationManager).
In startLocationUpdates(), you specifically tell LocationManager to give you location updates via
the GPS provider as frequently as possible. The requestLocationUpdates(String, long, float,
PendingIntent) method expects parameters for the minimum time to wait (in milliseconds) and
minimum distance to cover (in meters) before sending the next update.
These parameters should be tuned to the maximum value you can withstand and still have your app
provide a good user experience. For RunTracker, your user will want to know exactly where they are,
and exactly where they have been, with as much accuracy as possible. This is why we hard-code the
GPS provider and request updates as often as possible.
On the other hand, for an app that is only vaguely interested in where a user is, larger values will do
just fine and will save the device’s battery from melting into hot slag.
The private getLocationPendingIntent(boolean) method creates an Intent to be broadcast when
location updates happen. You use a custom action name to identify the event within our app, and the
shouldCreate argument to tell PendingIntent.getBroadcast(…) (via flags) whether it should create
a new PendingIntent in the system or not.
Calling getLocationPendingIntent(false) and null-checking the result is therefore a way of
determining whether the PendingIntent is registered with the OS, and is therefore the implementation
of the isTrackingRun() method.

ptg11078569
Receiving Broadcast Location Updates
531
Receiving Broadcast Location Updates
Now that you have code to request location updates as broadcast Intents, you need to have a way to
receive them. RunTracker will need to be able to receive them whether or not any UI components,
or even the application process, are running, so the best place to handle it is with a standalone
BroadcastReceiver registered in the manifest.
To keep things simple, create LocationReceiver to log out the locations it receives.
Listing 33.5Basic LocationReceiver (LocationReceiver.java)
public class LocationReceiver extends BroadcastReceiver {
private static final String TAG = "LocationReceiver";
@Override
public void onReceive(Context context, Intent intent) {
// If you got a Location extra, use it
Location loc = (Location)intent
.getParcelableExtra(LocationManager.KEY_LOCATION_CHANGED);
if (loc != null) {
onLocationReceived(context, loc);
return;
}
// If you get here, something else has happened
if (intent.hasExtra(LocationManager.KEY_PROVIDER_ENABLED)) {
boolean enabled = intent
.getBooleanExtra(LocationManager.KEY_PROVIDER_ENABLED, false);
onProviderEnabledChanged(enabled);
}
}
protected void onLocationReceived(Context context, Location loc) {
Log.d(TAG, this + " Got location from " + loc.getProvider() + ": "
+ loc.getLatitude() + ", " + loc.getLongitude());
}
protected void onProviderEnabledChanged(boolean enabled) {
Log.d(TAG, "Provider " + (enabled ? "enabled" : "disabled"));
}
}
As you can see in the implementation of onReceive(Context, Intent), the LocationManager
will pack the intent with some extras of interest. The LocationManager.KEY_LOCATION_CHANGED
key may specify a Location instance that represents the latest update. If it returns one, then call
the onLocationReceived(Context, Location) method to log out the provider name, latitude, and
longitude.
LocationManager may also pass a boolean extra with the KEY_PROVIDER_ENABLED key, and if it
does, call the onProviderEnabled(boolean) method to log about that. Eventually, you will subclass
LocationReceiver to make these two methods do more useful things.
Add an entry for LocationReceiver in the manifest for RunTracker. While you’re at it, add the
ACCESS_FINE_LOCATION permission and a uses-feature element for the GPS hardware.

ptg11078569
Chapter 33Tracking the Device’s Location
532
Listing 33.6Adding location permission (AndroidManifest.xml)
<manifest xmlns:android="http://schemas.android.com/apk/res/android"
package="com.bignerdranch.android.runtracker"
android:versionCode="1"
android:versionName="1.0">
<uses-sdk android:minSdkVersion="9" android:targetSdkVersion="15" />
<uses-permission android:name="android.permission.ACCESS_FINE_LOCATION"/>
<uses-feature android:required="true"
android:name="android.hardware.location.gps"/>
<application android:label="@string/app_name"
android:allowBackup="true"
android:icon="@drawable/ic_launcher"
android:theme="@style/AppTheme">
<activity android:name=".RunActivity"
android:label="@string/app_name">
<intent-filter>
<action android:name="android.intent.action.MAIN" />
<category android:name="android.intent.category.LAUNCHER" />
</intent-filter>
</activity>
<receiver android:name=".LocationReceiver"
android:exported="false">
<intent-filter>
<action android:name="com.bignerdranch.android.runtracker.ACTION_LOCATION"/>
</intent-filter>
</receiver>
</application>
</manifest>
Now you have enough plumbing in place to request and receive location updates, and all that remains
is to provide some user interface to start, stop, and display them.
Updating the UI with Location Data
Just to verify that things are working as expected, add click listeners to the Start and Stop buttons in
RunFragment that communicate with RunManager. Also add calls to a simple updateUI() method.
Listing 33.7Starting and stopping location updates (RunFragment.java)
public class RunFragment extends Fragment {
private RunManager mRunManager;
private Button mStartButton, mStopButton;
private TextView mStartedTextView, mLatitudeTextView,
mLongitudeTextView, mAltitudeTextView, mDurationTextView;

ptg11078569
Updating the UI with Location Data
533
@Override
public void onCreate(Bundle savedInstanceState) {
super.onCreate(savedInstanceState);
setRetainInstance(true);
mRunManager = RunManager.get(getActivity());
}
@Override
public View onCreateView(LayoutInflater inflater, ViewGroup container,
Bundle savedInstanceState) {
...
mStartButton = (Button)view.findViewById(R.id.run_startButton);
mStartButton.setOnClickListener(new View.OnClickListener() {
@Override
public void onClick(View v) {
mRunManager.startLocationUpdates();
updateUI();
}
});
mStopButton = (Button)view.findViewById(R.id.run_stopButton);
mStopButton.setOnClickListener(new View.OnClickListener() {
@Override
public void onClick(View v) {
mRunManager.stopLocationUpdates();
updateUI();
}
});
updateUI();
return view;
}
private void updateUI() {
boolean started = mRunManager.isTrackingRun();
mStartButton.setEnabled(!started);
mStopButton.setEnabled(started);
}
}
With these additions, you can run RunTracker again and see location updates coming in via LogCat.
For best results, use the Emulator Control window in DDMS to send fake updates to an emulator, or
take your device outside and wait for a GPS fix. It can take several minutes to get the first update. Skip
ahead a couple of pages for more details on providing test locations if you’re impatient or locked inside
your secret underground programming bunker.
Logging to LogCat is not a very user-friendly way of reporting locations. To get something on the
screen, you can implement a subclass of LocationReceiver in RunFragment that will stash away the
Location and update the UI. With a bit more data, stored in a new Run instance, you can display the
start date and duration of the current run. Start by implementing a simple Run class that holds its start
date and knows how to calculate its duration and format it as a string.

ptg11078569
Chapter 33Tracking the Device’s Location
534
Listing 33.8Your basic Run (Run.java)
public class Run {
private Date mStartDate;
public Run() {
mStartDate = new Date();
}
public Date getStartDate() {
return mStartDate;
}
public void setStartDate(Date startDate) {
mStartDate = startDate;
}
public int getDurationSeconds(long endMillis) {
return (int)((endMillis - mStartDate.getTime()) / 1000);
}
public static String formatDuration(int durationSeconds) {
int seconds = durationSeconds % 60;
int minutes = ((durationSeconds - seconds) / 60) % 60;
int hours = (durationSeconds - (minutes * 60) - seconds) / 3600;
return String.format("%02d:%02d:%02d", hours, minutes, seconds);
}
}
Now make use of the Run class with some updates to RunFragment.
Listing 33.9Displaying location updates (RunFragment.java)
public class RunFragment extends Fragment {
private BroadcastReceiver mLocationReceiver = new LocationReceiver() {
@Override
protected void onLocationReceived(Context context, Location loc) {
mLastLocation = loc;
if (isVisible())
updateUI();
}
@Override
protected void onProviderEnabledChanged(boolean enabled) {
int toastText = enabled ? R.string.gps_enabled : R.string.gps_disabled;
Toast.makeText(getActivity(), toastText, Toast.LENGTH_LONG).show();
}
};
private RunManager mRunManager;
private Run mRun;
private Location mLastLocation;

ptg11078569
Updating the UI with Location Data
535
private Button mStartButton, mStopButton;
...
@Override
public View onCreateView(LayoutInflater inflater, ViewGroup container,
Bundle savedInstanceState) {
...
mStartButton = (Button)view.findViewById(R.id.run_startButton);
mStartButton.setOnClickListener(new View.OnClickListener() {
@Override
public void onClick(View v) {
mRunManager.startLocationUpdates();
mRun = new Run();
updateUI();
}
});
...
}
@Override
public void onStart() {
super.onStart();
getActivity().registerReceiver(mLocationReceiver,
new IntentFilter(RunManager.ACTION_LOCATION));
}
@Override
public void onStop() {
getActivity().unregisterReceiver(mLocationReceiver);
super.onStop();
}
private void updateUI() {
boolean started = mRunManager.isTrackingRun();
if (mRun != null)
mStartedTextView.setText(mRun.getStartDate().toString());
int durationSeconds = 0;
if (mRun != null && mLastLocation != null) {
durationSeconds = mRun.getDurationSeconds(mLastLocation.getTime());
mLatitudeTextView.setText(Double.toString(mLastLocation.getLatitude()));
mLongitudeTextView.setText(Double.toString(mLastLocation.getLongitude()));
mAltitudeTextView.setText(Double.toString(mLastLocation.getAltitude()));
}
mDurationTextView.setText(Run.formatDuration(durationSeconds));
mStartButton.setEnabled(!started);
mStopButton.setEnabled(started);
}
}
There are a few things happening here. Foremost, there are new instance variables for a Run and
the last Location received. These are the data that back up the user interface updates performed in
updateUI(). The Run gets initialized as soon as you start location updates.

ptg11078569
Chapter 33Tracking the Device’s Location
536
You create an anonymous LocationReceiver class and stash it in mLocationReceiver to save the
location received and update the UI. You also display a Toast when the GPS provider is enabled or
disabled.
Finally, the implementations of the onStart() and onStop() methods are used to register and
unregister the receiver in conjunction with the fragment being visible to the user. It would also be
sensible to do this work in onCreate(Bundle) and onDestroy(), so that the mLastLocation variable
would always contain the latest location update, even if the fragment was offscreen while it was
received.
Run RunTracker again, and you should now see actual location details populating the user interface.
Faster Answers: the Last Known Location
There are times when your users do not want to sit and wait for several minutes for their device to
communicate with mysterious satellites in space just to find out where they are. Fortunately, with
a little more work, you can prevent them from having to wait by using the LocationManager’s last
known location for any location provider.
Since you are using the GPS provider only, it makes the most sense to ask for its last known
location, and doing so is rather straightforward. The only other trick is getting that location back
to the user interface, and for that you can simply broadcast an Intent just as though you were the
LocationManager.
Listing 33.10Getting the last known location (RunManager.java)
public void startLocationUpdates() {
String provider = LocationManager.GPS_PROVIDER;
// Get the last known location and broadcast it if you have one
Location lastKnown = mLocationManager.getLastKnownLocation(provider);
if (lastKnown != null) {
// Reset the time to now
lastKnown.setTime(System.currentTimeMillis());
broadcastLocation(lastKnown);
}
// Start updates from the location manager
PendingIntent pi = getLocationPendingIntent(true);
mLocationManager.requestLocationUpdates(provider, 0, 0, pi);
}
private void broadcastLocation(Location location) {
Intent broadcast = new Intent(ACTION_LOCATION);
broadcast.putExtra(LocationManager.KEY_LOCATION_CHANGED, location);
mAppContext.sendBroadcast(broadcast);
}
Notice that you are resetting the timestamp of the location you get from the GPS provider. This may or
may not be what the user expects, and determining that is left as an exercise to the reader.
It is also possible to ask the LocationManager for the last known location from any provider it is aware
of. You can even ask it what providers it knows about using the getAllProviders() method. If you do

ptg11078569
Testing Locations on Real and Virtual Devices
537
iterate over the last known locations, you should check them for accuracy and see that their timestamp
is within the recent past. If they are not fresh, you may not want to use them.
Testing Locations on Real and Virtual Devices
Testing an app like RunTracker can be challenging, even for an avid outdoors-programmer. You want
to ensure that the locations you receive from the system are being appropriately tracked and stored.
This can be difficult to do if you are moving around, even at the low speeds achieved by having your
friend haul you and your development setup around the neighborhood on a bicycle trailer.
To get around situations like this, you can send test locations to the LocationManager that will allow
your device to pretend that it is somewhere else.
The simplest way to make this happen is using the Emulator Control window within DDMS. This only
works with virtual devices, but it allows you to specify new locations either manually, one at a time, or
with a GPX or KML file representing a series of locations visited over time.
For testing locations on a real device, you have a bit more work to do, but it is entirely possible. The
basic process looks like this:
1. Request the ACCESS_MOCK_LOCATION permission.
2. Add a test provider via LocationManager.addTestProvider(…).
3. Enable the provider using setTestProviderEnabled(…).
4. Set its initial status with setTestProviderStatus(…).
5. Publish locations with setTestProviderLocation(…).
6. Remove your test provider using removeTestProvider(…).
Fortunately, we have already done all the hard work for you. Big Nerd Ranch has a simple
TestProvider project that you can download, install to your device, and run to manage the test provider
and make it run.
Download the Android Course Resources repository from Github at https://github.com/
bignerdranch/AndroidCourseResources and import the TestProvider directory as a project in
Eclipse.
You will need to add some code to RunTracker to use the new test provider instead of GPS. Update
RunManager as shown below to make that possible.

ptg11078569
Chapter 33Tracking the Device’s Location
538
Listing 33.11Using a test provider (RunManager.java)
public class RunManager {
private static final String TAG = "RunManager";
public static final String ACTION_LOCATION =
"com.bignerdranch.android.runtracker.ACTION_LOCATION";
private static final String TEST_PROVIDER = "TEST_PROVIDER";
private static RunManager sRunManager;
private Context mAppContext;
private LocationManager mLocationManager;
...
public void startLocationUpdates() {
String provider = LocationManager.GPS_PROVIDER;
// If you have the test provider and it's enabled, use it
if (mLocationManager.getProvider(TEST_PROVIDER) != null &&
mLocationManager.isProviderEnabled(TEST_PROVIDER)) {
provider = TEST_PROVIDER;
}
Log.d(TAG, "Using provider " + provider);
// get the last known location and broadcast it if you have one
Location lastKnown = mLocationManager.getLastKnownLocation(provider);
if (lastKnown != null) {
// Reset the time to now
lastKnown.setTime(System.currentTimeMillis());
broadcastLocation(lastKnown);
}
In order for TestProvider to work, you may need to turn on the Allow�mock�locations setting in the
Developer�options menu from within the Settings application. See Figure33.4.
With that out of the way, run the TestProvider app on your device and press the button to start fake
location updates.
Then you can run RunTracker and see your faked data coming through. (Hint: it’s in Atlanta, Georgia,
USA.) Once you are finished testing, it is best to turn off the test location provider so that your device
is not confused about where it is.
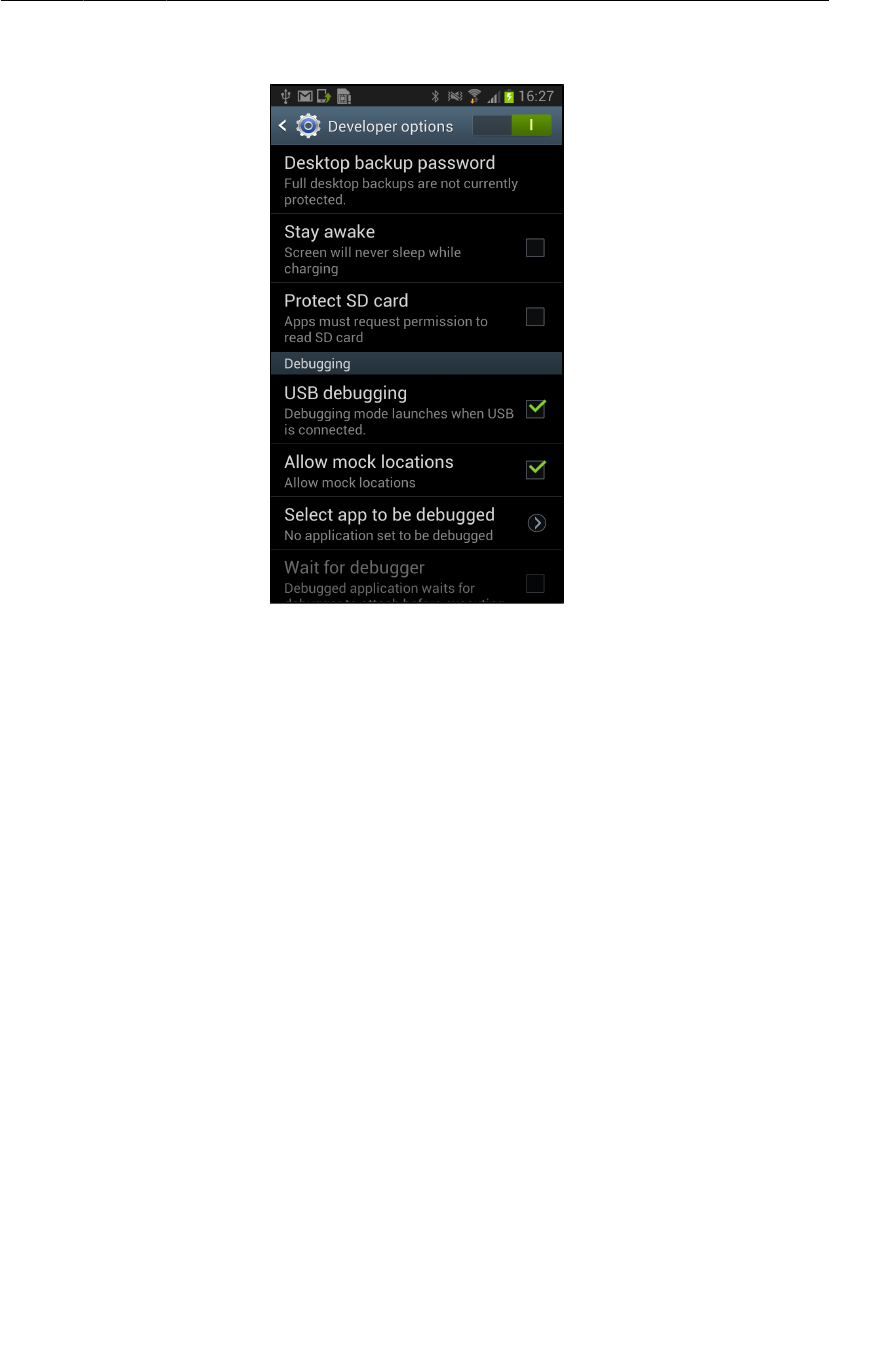
ptg11078569
Testing Locations on Real and Virtual Devices
539
Figure 33.4Allow mock locations

ptg11078569
This page intentionally left blank

ptg11078569
541
34
Local Databases with SQLite
Applications with large or complex data sets often need more power than you can get from simple file
formats like JSON. In RunTracker, the user can continue tracking his or her location forever, which can
generate a lot of data. The logical choice for such data sets in Android is a SQLite database. SQLite
is an open source, multi-platform library that gives you access to a powerful, relational database API
backed by a single file on disk.
Android includes a Java front-end to SQLite through the SQLiteDatabase class, which provides result
sets as Cursor instances. In this chapter you will create a storage mechanism for RunTracker that uses
a database to store data about runs and their locations. You will also create a new run list activity and
fragment that allow the user to create and track multiple runs.
Storing Runs and Locations in a Database
In order to store anything in a database, first you need to define the structure of the database and open
it. Since this is such a common task in Android, a helper class exists. SQLiteOpenHelper encapsulates
the chore of creating, opening, and updating databases for storing your application data.
In RunTracker, you will create a subclass of SQLiteOpenHelper called RunDatabaseHelper. The
RunManager will hold on to a private instance of RunDatabaseHelper and provide the rest of the
application with an API for inserting, querying, and otherwise managing the data in the database.
RunDatabaseHelper will provide methods that RunManager will call to implement most of its API.
When designing an application’s database storage API, you typically create one subclass of
SQLiteOpenHelper for each type of database you need to create and manage. You then create one
instance of your subclass for each distinct SQLite database file you need to access. Most applications,
including RunTracker, will have just one subclass of SQLiteOpenHelper and share a single instance of
it with the rest of the application components.
Now that you know you need to create a database, consider the structure of it. In object oriented
programming, the most common pattern for database design is to use one database table for each class
in your application’s data model. For RunTracker, there are two classes to store: Run and Location.
This example will therefore create two tables: run and location. A Run can have many Locations,
so the location table will have a run_id foreign key column referencing the run table’s _id column.
Figure34.1 shows the structure of the tables.
ptg11078569
Chapter 34Local Databases with SQLite
542
Figure 34.1RunTracker database schema
Create the RunDatabaseHelper class by adding the code shown in Listing 34.1.
Listing 34.1Basic RunDatabaseHelper (RunDatabaseHelper.java
public class RunDatabaseHelper extends SQLiteOpenHelper {
private static final String DB_NAME = "runs.sqlite";
private static final int VERSION = 1;
private static final String TABLE_RUN = "run";
private static final String COLUMN_RUN_START_DATE = "start_date";
public RunDatabaseHelper(Context context) {
super(context, DB_NAME, null, VERSION);
}
@Override
public void onCreate(SQLiteDatabase db) {
// Create the "run" table
db.execSQL("create table run (" +
"_id integer primary key autoincrement, start_date integer)");
// Create the "location" table
db.execSQL("create table location (" +
" timestamp integer, latitude real, longitude real, altitude real," +
" provider varchar(100), run_id integer references run(_id))");
}
@Override
public void onUpgrade(SQLiteDatabase db, int oldVersion, int newVersion) {
// Implement schema changes and data massage here when upgrading
}
public long insertRun(Run run) {
ContentValues cv = new ContentValues();
cv.put(COLUMN_RUN_START_DATE, run.getStartDate().getTime());
return getWritableDatabase().insert(TABLE_RUN, null, cv);
}
}

ptg11078569
Storing Runs and Locations in a Database
543
Implementing a subclass of SQLiteOpenHelper requires you to override two methods:
onCreate(SQLiteDatabase) and onUpgrade(SQLiteDatabase, int, int). In onCreate(…) your job
is to establish the schema for a newly created database. In onUpgrade(…) you have the opportunity to
execute migration code to move from one version of the database schema to another.
It is also common to implement a simplified constructor that fills in some of the arguments required by
the superclass version. In this example, you pass a constant name for the database file, a null value for
the optional CursorFactory, and a constant integer version number.
While it will not be necessary for the RunTracker example, SQLiteOpenHelper supports the ability
to manage different versions of a database schema. It expects the version number to be an increasing
integer value starting at one. In a real application, each time you made changes to your database
schema, you would increment the version constant and write code in the onUpgrade(…) method to
handle any schema or data changes that were necessary between versions.
Here, you have implemented onCreate(…) to execute two CREATE TABLE SQL statements on the
freshly-created database. You also implemented the insertRun(Run) method to insert a new row in
the run table and return its ID. Runs have a single data field, their start date, and here you are storing
the long value of it in the database using a ContentValues object to represent the mapping of column
names to values.
SQLiteOpenHelper has two methods that will give you access to an instance of SQLiteDatabase:
getWritableDatabase() and getReadableDatabase(). The pattern used in this example uses
getWritableDatabase() when a writable database is needed, and getReadableDatabase() when only
read access is required. In practice, the implementations of these methods will return the same instance
of SQLiteDatabase for a given instance of SQLiteOpenHelper, but in certain rare situations, like a full
disk, you can get a readable database when you might not be able to get a writable one.
To support querying one or more runs from the database, and distinguishing them in the app, you will
need to add an ID property to the Run class. Update it with the changes shown in Listing 34.2.
Listing 34.2Adding an ID to Run (Run.java)
public class Run {
private long mId;
private Date mStartDate;
public Run() {
mId = -1;
mStartDate = new Date();
}
public long getId() {
return mId;
}
public void setId(long id) {
mId = id;
}
public Date getStartDate() {
return mStartDate;
}

ptg11078569
Chapter 34Local Databases with SQLite
544
Next, you need to make some enhancements to RunManager that make use of the new database. This
will be the API that the rest of the application uses to store and retrieve data. To start, add just enough
code to get Run storage working.
Listing 34.3Managing the current run (RunManager.java)
public class RunManager {
private static final String TAG = "RunManager";
private static final String PREFS_FILE = "runs";
private static final String PREF_CURRENT_RUN_ID = "RunManager.currentRunId";
public static final String ACTION_LOCATION =
"com.bignerdranch.android.runtracker.ACTION_LOCATION";
private static final String TEST_PROVIDER = "TEST_PROVIDER";
private static RunManager sRunManager;
private Context mAppContext;
private LocationManager mLocationManager;
private RunDatabaseHelper mHelper;
private SharedPreferences mPrefs;
private long mCurrentRunId;
private RunManager(Context appContext) {
mAppContext = appContext;
mLocationManager = (LocationManager)mAppContext
.getSystemService(Context.LOCATION_SERVICE);
mHelper = new RunDatabaseHelper(mAppContext);
mPrefs = mAppContext.getSharedPreferences(PREFS_FILE, Context.MODE_PRIVATE);
mCurrentRunId = mPrefs.getLong(PREF_CURRENT_RUN_ID, -1);
}
...
private void broadcastLocation(Location location) {
Intent broadcast = new Intent(ACTION_LOCATION);
broadcast.putExtra(LocationManager.KEY_LOCATION_CHANGED, location);
mAppContext.sendBroadcast(broadcast);
}
public Run startNewRun() {
// Insert a run into the db
Run run = insertRun();
// Start tracking the run
startTrackingRun(run);
return run;
}
public void startTrackingRun(Run run) {
// Keep the ID
mCurrentRunId = run.getId();
// Store it in shared preferences
mPrefs.edit().putLong(PREF_CURRENT_RUN_ID, mCurrentRunId).commit();
// Start location updates
startLocationUpdates();
}

ptg11078569
Storing Runs and Locations in a Database
545
public void stopRun() {
stopLocationUpdates();
mCurrentRunId = -1;
mPrefs.edit().remove(PREF_CURRENT_RUN_ID).commit();
}
private Run insertRun() {
Run run = new Run();
run.setId(mHelper.insertRun(run));
return run;
}
}
Take a look at the new methods you just added to RunManager. The startNewRun() method calls
insertRun() to create and insert a new Run into the database, passes it to startTrackingRun(Run)
to begin tracking it, and finally returns it to the caller. You will use this method in RunFragment in
response to the Start button when there is no existing run to work with.
RunFragment will also use startTrackingRun(Run) directly when it restarts tracking on an existing
run. This method saves the ID of the Run passed to it in both an instance variable and in shared
preferences. Storing it this way allows it to be retrieved later, even if the app is killed completely; the
RunManager constructor will do this work in that event.
Finally, the stopRun() method stops location updates and clears out the ID of the current run.
RunFragment will use this method to implement the Stop button.
Speaking of RunFragment, now is a good time to make use of the new RunManager methods there.
Make the changes in Listing 34.4.

ptg11078569
Chapter 34Local Databases with SQLite
546
Listing 34.4Updating the starting and stopping code (RunFragment.java)
@Override
public View onCreateView(LayoutInflater inflater, ViewGroup container,
Bundle savedInstanceState) {
View view = inflater.inflate(R.layout.fragment_run, container, false);
...
mStartButton = (Button)view.findViewById(R.id.run_startButton);
mStartButton.setOnClickListener(new View.OnClickListener() {
@Override
public void onClick(View v) {
mRunManager.startLocationUpdates();
mRun = new Run();
mRun = mRunManager.startNewRun();
updateUI();
}
});
mStopButton = (Button)view.findViewById(R.id.run_stopButton);
mStopButton.setOnClickListener(new View.OnClickListener() {
@Override
public void onClick(View v) {
mRunManager.stopLocationUpdates();
mRunManager.stopRun();
updateUI();
}
});
updateUI();
return view;
}
Next, you need the power to insert Location objects into the database in response to updates from the
LocationManager. Similar to inserting Runs, you will add a method to both RunDatabaseHelper and
RunManager to insert a location for the current run. Unlike inserting a Run, however, RunTracker needs
to be able to insert locations as updates arrive regardless of whether the user interface is visible or the
application is running. To handle this requirement, a standalone BroadcastReceiver is the best option.
First, add the insertLocation(long, Location) method in RunDatabaseHelper:

ptg11078569
Storing Runs and Locations in a Database
547
Listing 34.5Inserting locations in the database (RunDatabaseHelper.java)
public class RunDatabaseHelper extends SQLiteOpenHelper {
private static final String DB_NAME = "runs.sqlite";
private static final int VERSION = 1;
private static final String TABLE_RUN = "run";
private static final String COLUMN_RUN_START_DATE = "start_date";
private static final String TABLE_LOCATION = "location";
private static final String COLUMN_LOCATION_LATITUDE = "latitude";
private static final String COLUMN_LOCATION_LONGITUDE = "longitude";
private static final String COLUMN_LOCATION_ALTITUDE = "altitude";
private static final String COLUMN_LOCATION_TIMESTAMP = "timestamp";
private static final String COLUMN_LOCATION_PROVIDER = "provider";
private static final String COLUMN_LOCATION_RUN_ID = "run_id";
...
public long insertLocation(long runId, Location location) {
ContentValues cv = new ContentValues();
cv.put(COLUMN_LOCATION_LATITUDE, location.getLatitude());
cv.put(COLUMN_LOCATION_LONGITUDE, location.getLongitude());
cv.put(COLUMN_LOCATION_ALTITUDE, location.getAltitude());
cv.put(COLUMN_LOCATION_TIMESTAMP, location.getTime());
cv.put(COLUMN_LOCATION_PROVIDER, location.getProvider());
cv.put(COLUMN_LOCATION_RUN_ID, runId);
return getWritableDatabase().insert(TABLE_LOCATION, null, cv);
}
Now, add code to RunManager to insert a location for the currently tracking run.
Listing 34.6Inserting a location for the current run (RunManager.java)
private Run insertRun() {
Run run = new Run();
run.setId(mHelper.insertRun(run));
return run;
}
public void insertLocation(Location loc) {
if (mCurrentRunId != -1) {
mHelper.insertLocation(mCurrentRunId, loc);
} else {
Log.e(TAG, "Location received with no tracking run; ignoring.");
}
}
}
Lastly, you need a good place to call the new insertLocation(Location) method. By using a
standalone BroadcastReceiver for this work, you can guarantee that your location intents will
be handled no matter whether the rest of RunTracker is up and running. This requires creating a
customized subclass of LocationReceiver called TrackingLocationReceiver and registering it using
an intent filter in the manifest.
Create TrackingLocationReceiver as a top-level class using the following code:

ptg11078569
Chapter 34Local Databases with SQLite
548
Listing 34.7Simple, yet elegant TrackingLocationReceiver
(TrackingLocationReceiver.java)
public class TrackingLocationReceiver extends LocationReceiver {
@Override
protected void onLocationReceived(Context c, Location loc) {
RunManager.get(c).insertLocation(loc);
}
}
Now register it in the manifest to make it execute in response to the custom ACTION_LOCATION.
Listing 34.8Enabling TrackingLocationReceiver (AndroidManifest.xml)
<application
android:allowBackup="true"
android:icon="@drawable/ic_launcher"
android:label="@string/app_name"
android:theme="@style/AppTheme">
...
<receiver android:name=".LocationReceiver"
<receiver android:name=".TrackingLocationReceiver"
android:exported="false">
<intent-filter>
<action android:name="com.bignerdranch.android.runtracker.ACTION_LOCATION"/>
</intent-filter>
</receiver>
</application>
After so many changes, you deserve to run the application and see your hard work pay off. RunTracker
is now capable of tracking a run until you tell it to stop, even if the app is killed or exited. You
can verify that things are working as expected by adding a log statement to the success path of
TrackingLocationReceiver’s onLocationReceived(…) method, starting a run, then killing or leaving
the app while continuing to watch LogCat.
Querying a List of Runs From the Database
RunTracker can now insert new runs and locations for them into the database, but as written,
RunFragment will create a new run each time you press the Start button. In this section, you will add
a new activity and fragment to display a list of runs and to allow the user to create new runs and view
existing runs. This is a similar interface to what you implemented in CriminalIntent for the list of
crimes, except that the data backing the list will be coming from a database instead of RunTracker’s
memory and file data storage mechanism.
Querying a SQLiteDatabase returns an instance of Cursor describing the results. The Cursor API is
simple and flexible enough to support any kind of result from any query. Cursors treat their results as a
series of rows and columns, and only support Strings and primitive types for values.

ptg11078569
Querying a List of Runs From the Database
549
As Java programmers, however, we are used to working with objects to encapsulate our data model,
such as Run and Location. Since you already have database tables that represent your objects, it would
be ideal if you could get instances of those objects from a Cursor.
A pattern you will use in this chapter takes advantage of a built-in subclass of Cursor called
CursorWrapper. CursorWrapper is designed to wrap an existing Cursor and forward along all of the
method calls to it. On its own, it is not very useful; but as a superclass, it can provide you with a good
foundation on which to build your own custom cursor implementations specific for your model objects.
Update RunDatabaseHelper to include a new queryRuns() method that returns a RunCursor listing all
the runs in order by date - an example of the CursorWrapper pattern.
Listing 34.9Querying runs (RunDatabaseHelper.java)
public class RunDatabaseHelper extends SQLiteOpenHelper {
private static final String DB_NAME = "runs.sqlite";
private static final int VERSION = 1;
private static final String TABLE_RUN = "run";
private static final String COLUMN_RUN_ID = "_id";
private static final String COLUMN_RUN_START_DATE = "start_date";
...
public RunCursor queryRuns() {
// Equivalent to "select * from run order by start_date asc"
Cursor wrapped = getReadableDatabase().query(TABLE_RUN,
null, null, null, null, null, COLUMN_RUN_START_DATE + " asc");
return new RunCursor(wrapped);
}
/**
* A convenience class to wrap a cursor that returns rows from the "run" table.
* The {@link getRun()} method will give you a Run instance representing
* the current row.
*/
public static class RunCursor extends CursorWrapper {
public RunCursor(Cursor c) {
super(c);
}
/**
* Returns a Run object configured for the current row,
* or null if the current row is invalid.
*/
public Run getRun() {
if (isBeforeFirst() || isAfterLast())
return null;
Run run = new Run();
long runId = getLong(getColumnIndex(COLUMN_RUN_ID));
run.setId(runId);
long startDate = getLong(getColumnIndex(COLUMN_RUN_START_DATE));
run.setStartDate(new Date(startDate));
return run;
}
}
}

ptg11078569
Chapter 34Local Databases with SQLite
550
RunCursor defines only two methods: a simple constructor and getRun(). The getRun() method
checks to ensure that the cursor is within its bounds and then creates and configures an instance of Run
based on the values of the current row’s columns. A user of RunCursor would iterate over the rows in
the result set and call getRun() for each row to get a nice object instead of a bunch of nasty primitives.
Thus, RunCursor’s main purpose is to encapsulate the grunt work of turning a row in the run table into
an instance of Run, marshaling and massaging the data as needed.
The queryRuns() method does the work of executing the SQL query and providing the plain cursor
to a new RunCursor, which it returns to the caller. Now you can make use of this new method in
RunManager and eventually RunListFragment.
Listing 34.10Proxying run queries (RunManager.java)
private Run insertRun() {
Run run = new Run();
run.setId(mHelper.insertRun(run));
return run;
}
public RunCursor queryRuns() {
return mHelper.queryRuns();
}
public void insertLocation(Location loc) {
if (mCurrentRunId != -1) {
mHelper.insertLocation(mCurrentRunId, loc);
} else {
Log.e(TAG, "Location received with no tracking run; ignoring.");
}
}
Displaying a List of Runs Using CursorAdapter
To set the ground work for a user interface listing the runs, create a new default activity for the
app called RunListActivity and set it as the default in the manifest. Ignore the error about
RunListFragment for the moment.
Listing 34.11The great and powerful RunListActivity
(RunListActivity.java)
public class RunListActivity extends SingleFragmentActivity {
@Override
protected Fragment createFragment() {
return new RunListFragment();
}
}

ptg11078569
Displaying a List of Runs Using CursorAdapter
551
Listing 34.12Configuring RunListActivity (AndroidManifest.xml)
<application
android:allowBackup="true"
android:icon="@drawable/ic_launcher"
android:label="@string/app_name"
android:theme="@style/AppTheme">
<activity android:name=".RunActivity"
<activity android:name=".RunListActivity"
android:label="@string/app_name">
<intent-filter>
<action android:name="android.intent.action.MAIN" />
<category android:name="android.intent.category.LAUNCHER" />
</intent-filter>
</activity>
<activity android:name=".RunActivity"
android:label="@string/app_name" />
<receiver android:name=".TrackingLocationReceiver"
android:exported="false">
<intent-filter>
Now you can create the basic skeleton of RunListFragment. For now, you are loading the cursor in
onCreate(Bundle) and closing it in onDestroy(), but this is not a good pattern to follow, because
it forces the database query to happen on the main (UI) thread and in extreme cases could cause a
dreaded ANR to appear. In the next chapter, you will swap out the native implementation for one that
uses a Loader to move the work to the background.
Listing 34.13Basic RunListFragment (RunListFragment.java)
public class RunListFragment extends ListFragment {
private RunCursor mCursor;
@Override
public void onCreate(Bundle savedInstanceState) {
super.onCreate(savedInstanceState);
// Query the list of runs
mCursor = RunManager.get(getActivity()).queryRuns();
}
@Override
public void onDestroy() {
mCursor.close();
super.onDestroy();
}
}
A RunCursor is no good without a way to provide its data to the ListView associated with
RunListFragment. Included in the Android API (and the support library) is a class called
CursorAdapter that fits the bill nicely. All you need to do is subclass it and provide implementations
of a couple of methods. CursorAdapter handles the logic of creating and reusing views, so you don’t
have to.
Update RunListFragment to implement RunCursorAdapter now.

ptg11078569
Chapter 34Local Databases with SQLite
552
Listing 34.14Implementing RunCursorAdapter (RunListFragment.java)
public class RunListFragment extends ListFragment {
private RunCursor mCursor;
@Override
public void onCreate(Bundle savedInstanceState) {
super.onCreate(savedInstanceState);
// Query the list of runs
mCursor = RunManager.get(getActivity()).queryRuns();
// Create an adapter to point at this cursor
RunCursorAdapter adapter = new RunCursorAdapter(getActivity(), mCursor);
setListAdapter(adapter);
}
@Override
public void onDestroy() {
mCursor.close();
super.onDestroy();
}
private static class RunCursorAdapter extends CursorAdapter {
private RunCursor mRunCursor;
public RunCursorAdapter(Context context, RunCursor cursor) {
super(context, cursor, 0);
mRunCursor = cursor;
}
@Override
public View newView(Context context, Cursor cursor, ViewGroup parent) {
// Use a layout inflater to get a row view
LayoutInflater inflater = (LayoutInflater)context
.getSystemService(Context.LAYOUT_INFLATER_SERVICE);
return inflater
.inflate(android.R.layout.simple_list_item_1, parent, false);
}
@Override
public void bindView(View view, Context context, Cursor cursor) {
// Get the run for the current row
Run run = mRunCursor.getRun();
// Set up the start date text view
TextView startDateTextView = (TextView)view;
String cellText =
context.getString(R.string.cell_text, run.getStartDate());
startDateTextView.setText(cellText);
}
}
}
The constructor for CursorAdapter takes a Context, a Cursor, and an integer of flags. Most of the
flags are now deprecated or questionable in favor of using loaders, so here you pass zero. You also
stash the RunCursor in an instance variable to avoid having to cast it later.

ptg11078569
Creating New Runs
553
Next, you implement newView(Context, Cursor, ViewGroup) to return a View to
represent the current row in the cursor. This example inflates the system resource
android.R.layout.simple_list_item_1, which is a plain TextView. Since all of the views in the list
will look the same, that is all the logic you need here.
The bindView(View, Context, Cursor) method will be called by CursorAdapter when it wants you
to configure a view to hold data for a row in the cursor. This will always be called with a View that has
been previously returned from newView(…).
Implementing bindView(…) is relatively simple. First, you ask the RunCursor for the Run at the current
row (the cursor will have already been positioned by CursorAdapter). Next, you assume that the view
passed in is a TextView and configure it to display a simple description of the Run.
With these changes in place, run RunTracker; you should see a list of the runs you have previously
created, assuming you ran it and started a run after implementing the database insert code earlier in the
chapter. If you don’t yet have any runs, fear not: the next section has you add UI to create a new one.
Creating New Runs
Adding a user interface to allow creation of new runs is easy using an options/action bar menu item,
just as you did with CriminalIntent. Start by creating a resource for the menu.
Listing 34.15Options menu for the run list (run_list_options.xml)
<?xml version="1.0" encoding="utf-8"?>
<menu xmlns:android="http://schemas.android.com/apk/res/android" >
<item android:id="@+id/menu_item_new_run"
android:showAsAction="always"
android:icon="@android:drawable/ic_menu_add"
android:title="@string/new_run"/>
</menu>
This menu refers to a string, so add that to the strings file.
Listing 34.16Adding a New Run string (strings.xml)
<string name="stop">Stop</string>
<string name="gps_enabled">GPS Enabled</string>
<string name="gps_disabled">GPS Disabled</string>
<string name="cell_text">Run at %1$s</string>
<string name="new_run">New Run</string>
</resources>
Now, add code to RunListFragment to create the options menu and respond to item selection, as shown
below.

ptg11078569
Chapter 34Local Databases with SQLite
554
Listing 34.17New runs via the options menu (RunListFragment.java)
public class RunListFragment extends ListFragment {
private static final int REQUEST_NEW_RUN = 0;
private RunCursor mCursor;
@Override
public void onCreate(Bundle savedInstanceState) {
super.onCreate(savedInstanceState);
setHasOptionsMenu(true);
// Query the list of runs
mCursor = RunManager.get(getActivity()).queryRuns();
// Create an adapter to point at this cursor
RunCursorAdapter adapter = new RunCursorAdapter(getActivity(), mCursor);
setListAdapter(adapter);
}
...
@Override
public void onCreateOptionsMenu(Menu menu, MenuInflater inflater) {
super.onCreateOptionsMenu(menu, inflater);
inflater.inflate(R.menu.run_list_options, menu);
}
@Override
public boolean onOptionsItemSelected(MenuItem item) {
switch (item.getItemId()) {
case R.id.menu_item_new_run:
Intent i = new Intent(getActivity(), RunActivity.class);
startActivityForResult(i, REQUEST_NEW_RUN);
return true;
default:
return super.onOptionsItemSelected(item);
}
}
@Override
public void onActivityResult(int requestCode, int resultCode, Intent data) {
if (REQUEST_NEW_RUN == requestCode) {
mCursor.requery();
((RunCursorAdapter)getListAdapter()).notifyDataSetChanged();
}
}
private static class RunCursorAdapter extends CursorAdapter {
private RunCursor mRunCursor;
The only thing new and interesting about this approach is that you use onActivityResult(…) to force
the list to reload once the user returns to it after navigating elsewhere. Again, requerying the cursor as
shown here, on the main thread, is not great. You will replace it with a Loader in the following chapter.

ptg11078569
Working with Existing Runs
555
Working with Existing Runs
The next logical thing to do is allow the user to navigate from the list of runs to the details of a specific
run. In order for this to work well, RunFragment needs some support for passing a run ID as an
argument. Since you host RunFragment in RunActivity, it too needs an extra for the run ID.
First, add the argument to RunFragment and a newInstance(long) method to make it easier to use.
Listing 34.18Adding a run ID argument (RunFragment.java)
public class RunFragment extends Fragment {
private static final String TAG = "RunFragment";
private static final String ARG_RUN_ID = "RUN_ID";
...
private TextView mStartedTextView, mLatitudeTextView,
mLongitudeTextView, mAltitudeTextView, mDurationTextView;
public static RunFragment newInstance(long runId) {
Bundle args = new Bundle();
args.putLong(ARG_RUN_ID, runId);
RunFragment rf = new RunFragment();
rf.setArguments(args);
return rf;
}
@Override
public void onCreate(Bundle savedInstanceState) {
super.onCreate(savedInstanceState);
Now, make use of the new fragment convention in RunActivity. If the intent has a RUN_ID extra, create
the RunFragment using newInstance(long). If not, just use the default constructor as before.
Listing 34.19Adding a run ID extra (RunActivity.java)
public class RunActivity extends SingleFragmentActivity {
/** A key for passing a run ID as a long */
public static final String EXTRA_RUN_ID =
"com.bignerdranch.android.runtracker.run_id";
@Override
protected Fragment createFragment() {
return new RunFragment();
long runId = getIntent().getLongExtra(EXTRA_RUN_ID, -1);
if (runId != -1) {
return RunFragment.newInstance(runId);
} else {
return new RunFragment();
}
}
}
The last bit of glue to put in place is to respond to list item selection in RunListFragment by starting
RunActivity with the ID of the selected run.

ptg11078569
Chapter 34Local Databases with SQLite
556
Listing 34.20Launching existing runs via onListItemClick(…)
(RunListFragment.java)
@Override
public void onListItemClick(ListView l, View v, int position, long id) {
// The id argument will be the Run ID; CursorAdapter gives us this for free
Intent i = new Intent(getActivity(), RunActivity.class);
i.putExtra(RunActivity.EXTRA_RUN_ID, id);
startActivity(i);
}
private static class RunCursorAdapter extends CursorAdapter {
There is a small bit of magic in play here. Because you named the ID column in the run table _id,
CursorAdapter has detected it and passed it as the id argument to onListItemClick(…). You can
therefore pass it straight along as an extra to RunActivity. How convenient!
Sadly, that is where the convenience ends. Simply starting RunFragment with an ID argument is not
enough to get it to display anything useful about an existing run. You need to query the database for the
details of the existing run, including its last recorded location, in order to populate the user interface.
Fortunately, this is quite similar to work you just did. The logical place to start is in
RunDatabaseHelper, where you’ll create add a new queryRun(long) method to return a RunCursor for
a single run given its ID.
Listing 34.21Querying a single run (RunDatabaseHelper.java)
public RunCursor queryRun(long id) {
Cursor wrapped = getReadableDatabase().query(TABLE_RUN,
null, // All columns
COLUMN_RUN_ID + " = ?", // Look for a run ID
new String[]{ String.valueOf(id) }, // with this value
null, // group by
null, // order by
null, // having
"1"); // limit 1 row
return new RunCursor(wrapped);
}
The many arguments to the query(…) method are made plain here. You are fetching all columns from
TABLE_RUN, filtering them by the ID column, which is passed as an argument to the “where” clause
using a single-element string array. You limit the query to returning only one row, wrap the result in a
RunCursor, and return it.
Next, you will add a getRun(long) method to RunManager that wraps the results of the
queryRun(long) method that you just created and pulls a Run out of the first row, if it has one. Also
add an isTrackingRun(Run) method.

ptg11078569
Working with Existing Runs
557
Listing 34.22Implementing two methods (RunManager.java)
public Run getRun(long id) {
Run run = null;
RunCursor cursor = mHelper.queryRun(id);
cursor.moveToFirst();
// If you got a row, get a run
if (!cursor.isAfterLast())
run = cursor.getRun();
cursor.close();
return run;
}
public boolean isTrackingRun(Run run) {
return run != null && run.getId() == mCurrentRunId;
}
The getRun(long) method attempts to pull a Run out of the first row of the RunCursor retrieved from
queryRun(long). It first tells the RunCursor to move to the first row in the results. If there are any
results at all, isAfterLast() will return false, and you can safely ask for a Run for this row. Since the
caller of this new method will not have access to the RunCursor, you must be careful to call close()
on it before returning, so that the database can release any resources associated with the cursor from
memory as soon as possible.
That work complete, you can now make some changes to RunFragment to work with existing runs.
Make the changes shown in Listing 34.23.
Listing 34.23Working with existing runs (RunFragment.java)
public class RunFragment extends Fragment {
private static final String TAG = "RunFragment";
private static final String ARG_RUN_ID = "RUN_ID";
private BroadcastReceiver mLocationReceiver = new LocationReceiver() {
@Override
protected void onLocationReceived(Context context, Location loc) {
if (!mRunManager.isTrackingRun(mRun))
return;
mLastLocation = loc;
if (isVisible())
updateUI();
}
@Override
protected void onProviderEnabledChanged(boolean enabled) {
int toastText = enabled ? R.string.gps_enabled : R.string.gps_disabled;
Toast.makeText(getActivity(), toastText, Toast.LENGTH_LONG).show();
}
};
...
@Override
public void onCreate(Bundle savedInstanceState) {
super.onCreate(savedInstanceState);
setRetainInstance(true);

ptg11078569
Chapter 34Local Databases with SQLite
558
mRunManager = RunManager.get(getActivity());<
// Check for a Run ID as an argument, and find the run
Bundle args = getArguments();
if (args != null) {
long runId = args.getLong(ARG_RUN_ID, -1);
if (runId != -1) {
mRun = mRunManager.getRun(runId);
}
}
}
@Override
public View onCreateView(LayoutInflater inflater, ViewGroup container,
Bundle savedInstanceState) {
View view = inflater.inflate(R.layout.fragment_run, container, false);
...
mStartButton = (Button)view.findViewById(R.id.run_startButton);
mStartButton.setOnClickListener(new View.OnClickListener() {
@Override
public void onClick(View v) {
mRun = mRunManager.startNewRun();
if (mRun == null) {
mRun = mRunManager.startNewRun();
} else {
mRunManager.startTrackingRun(mRun);
}
updateUI();
}
});
...
return view;
}
...
private void updateUI() {
boolean started = mRunManager.isTrackingRun();
boolean trackingThisRun = mRunManager.isTrackingRun(mRun);
if (mRun != null)
mStartedTextView.setText(mRun.getStartDate().toString());
int durationSeconds = 0;
if (mRun != null && mLastLocation != null) {
durationSeconds = mRun.getDurationSeconds(mLastLocation.getTime());
mLatitudeTextView.setText(Double.toString(mLastLocation.getLatitude()));
mLongitudeTextView.setText(Double.toString(mLastLocation.getLongitude()));
mAltitudeTextView.setText(Double.toString(mLastLocation.getAltitude()));
}
mDurationTextView.setText(Run.formatDuration(durationSeconds));
mStartButton.setEnabled(!started);
mStopButton.setEnabled(started);
mStopButton.setEnabled(started && trackingThisRun);
}
}

ptg11078569
Working with Existing Runs
559
As a last kindness to your humble user, you can make RunFragment load the last location for the
current run from the database. This will be very similar to loading the Run, but you will create a new
LocationCursor to work with Location objects along the way.
Begin by adding a method to query the last location for a run and the LocationCursor inner class in
RunDatabaseHelper.
Listing 34.24Querying the last location for a run (RunDatabaseHelper.java)
public LocationCursor queryLastLocationForRun(long runId) {
Cursor wrapped = getReadableDatabase().query(TABLE_LOCATION,
null, // All columns
COLUMN_LOCATION_RUN_ID + " = ?", // limit to the given run
new String[]{ String.valueOf(runId) },
null, // group by
null, // having
COLUMN_LOCATION_TIMESTAMP + " desc", // order by latest first
"1"); // limit 1
return new LocationCursor(wrapped);
}
// ... After RunCursor ...
public static class LocationCursor extends CursorWrapper {
public LocationCursor(Cursor c) {
super(c);
}
public Location getLocation() {
if (isBeforeFirst() || isAfterLast())
return null;
// First get the provider out so you can use the constructor
String provider = getString(getColumnIndex(COLUMN_LOCATION_PROVIDER));
Location loc = new Location(provider);
// Populate the remaining properties
loc.setLongitude(getDouble(getColumnIndex(COLUMN_LOCATION_LONGITUDE)));
loc.setLatitude(getDouble(getColumnIndex(COLUMN_LOCATION_LATITUDE)));
loc.setAltitude(getDouble(getColumnIndex(COLUMN_LOCATION_ALTITUDE)));
loc.setTime(getLong(getColumnIndex(COLUMN_LOCATION_TIMESTAMP)));
return loc;
}
}
LocationCursor serves the same purpose as RunCursor, except that it wraps a cursor intended to
return rows from the location table and converts their various fields into properties on the Location
object. One subtlety of this implementation is that Location’s constructor requires the provider name,
so you first pull that out of the current row before setting up the rest of the properties.
The queryLastLocationForRun(long) method is very similar to queryRun(long), except that it looks
for the latest single location associated with a given run and wraps the result in a LocationCursor.
Just as with queryRun(long), you should create a method in RunManager to wrap it and return a
Location from the one row in the cursor.

ptg11078569
Chapter 34Local Databases with SQLite
560
Listing 34.25Getting the last location for a run (RunManager.java)
public Location getLastLocationForRun(long runId) {
Location location = null;
LocationCursor cursor = mHelper.queryLastLocationForRun(runId);
cursor.moveToFirst();
// If you got a row, get a location
if (!cursor.isAfterLast())
location = cursor.getLocation();
cursor.close();
return location;
}
Now you can use this new method in RunFragment to fetch the last location for the current run when
the fragment is created.
Listing 34.26Getting the last location for the current run (RunFragment.java)
@Override
public void onCreate(Bundle savedInstanceState) {
super.onCreate(savedInstanceState);
setRetainInstance(true);
mRunManager = RunManager.get(getActivity());
// Check for a Run ID as an argument, and find the run
Bundle args = getArguments();
if (args != null) {
long runId = args.getLong(ARG_RUN_ID, -1);
if (runId != -1) {
mRun = mRunManager.getRun(runId);
mLastLocation = mRunManager.getLastLocationForRun(runId);
}
}
}
Now, after much ado, you should have a RunTracker that is capable of creating and tracking as many
runs as your device’s disk (and battery) can withstand and displaying them to the user in a logical
fashion. Happy tracking!
Challenge: Identifying the Current Run
As implemented, the only way to identify which run is being tracked is to manually visit it from the
list and see that the start and stop buttons are enabled appropriately. It would be great if the user had an
easier way to access the current run.
For a simple challenge, give the list row for the current run a different treatment in the UI, like an icon
or color change.
For a harder challenge, use an ongoing notification to let the user know that you are tracking them, and
launch the RunActivity when it is pressed.

ptg11078569
561
35
Loading Asynchronous Data
With Loaders
In Chapter34 you implemented data storage in RunTracker using SQLite and used Cursors on the
main thread of the application. This was a cop-out, however: it’s a best practice to keep database work
off of the main thread as much as possible.
In this chapter, you will use Loaders to pull data for runs and locations from the database on a
background thread. The loader API was introduced in Android 3.0 (Honeycomb) and is also available
in the support library, so there is no reason not to use them in a modern application.
Loaders and the LoaderManager
A loader is designed to load some kind of data (an object) from some source. The source could be disk,
a database, a ContentProvider, the network, or another process. The loader will do the job of fetching
the data without blocking the main thread and delivering the results to whomever is interested.
There are three built-in types of loaders: Loader, AsyncTaskLoader, and CursorLoader (Figure35.1).
Loader is the base class, and not very useful on its own. It defines the API that the LoaderManager uses
to communicate with all loaders.
AsyncTaskLoader is an abstract Loader that uses an AsyncTask to move the work of loading data to
another thread. Almost all useful loader classes you create will be a subclass of AsyncTaskLoader.
Finally, CursorLoader extends AsyncTaskLoader to load a Cursor from a ContentProvider via the
ContentResolver. Unfortunately for RunTracker, there is no way to use CursorLoader with cursors
that come from a SQLiteDatabase.
ptg11078569
Chapter 35Loading Asynchronous Data With Loaders
562
Figure 35.1The Loader class hierarchy
All communication with loaders is handled by the LoaderManager. This class is responsible for
starting, stopping, and maintaining the lifecycle of any Loaders associated with your component.
Within a Fragment or Activity, you can use the getLoaderManager() method to return an
implementation to work with.
Use the initLoader(int, Bundle, LoaderCallbacks<D>) method to trigger the initialization of a
Loader. The first argument is an integer identifier for the loader, the second is a Bundle of arguments
(which can be null), and the final argument is an implementation of the LoaderCallbacks<D> interface.
As you will see in the following sections, there are multiple ways to implement LoaderCallbacks, but
the most common is to have your Fragment implement it directly.
You can use the restartLoader(int, Bundle, LoaderCallbacks<D>) method to force an existing
loader to restart. This is commonly used to reload data that you know (or suspect) is stale.
The LoaderCallbacks<D> interface has three methods: onCreateLoader(…), onLoadFinished(…)
and onLoaderReset(…). You will look at each of these in more detail as you implement them in
RunTracker.
Why would you use a loader instead of, say, an AsyncTask directly? Well, the most compelling reason
to do so is that the LoaderManager will keep your component’s loaders alive, along with their data,
between configuration changes like rotation.
If you use an AsyncTask to load data, you are responsible for managing its lifecycle during
configuration changes and stashing its data somewhere that lives through them. Often, this is simplified
by using setRetainInstance(true) on a Fragment and storing the data there, but there are still
situations where you have to intervene and code you have to write in order to ensure that everything
happens correctly.
Loaders are designed to take some (but not all) of this pain off your hands. If, after a configuration
change, you initialize a loader that has already finished loading its data, it can deliver that data
immediately rather than trying to fetch it again. This works whether your fragment is retained or not,

ptg11078569
Using Loaders in RunTracker
563
which can make your life easier since you don’t have to consider the lifecycle complications that
retained fragments can introduce.
Using Loaders in RunTracker
RunTracker currently loads three chunks of data: the list of runs (a RunCursor), an individual Run, and
that run’s latest Location. Each of these comes from the SQLite database, and should therefore be
moved to a Loader to create a smooth user experience.
In the following sections, you will create two abstract subclasses of AsyncTaskLoader. The first,
SQLiteCursorLoader, is a simplified version of the framework’s CursorLoader that will work with a
Cursor coming from any source. The second is DataLoader<D>, which is capable of loading any kind
of data and simplifies the use of AsyncTaskLoader for subclasses.
Loading the List of Runs
The current implementation of RunListFragment asks the RunManager directly for the RunCursor
representing the list of runs in onCreate(Bundle). In this section, you will introduce a loader to
indirectly execute this query on another thread. The RunListFragment will tell the LoaderManager to
start (and restart) the loader and implement the LoaderCallbacks to know when the data is ready.
To simplify the code within the RunListFragment (and elsewhere, later), first create an abstract
AsyncTaskLoader subclass called SQLiteCursorLoader as in Listing 35.1. This class mimics most of
the code in CursorLoader, without the requirement of using a ContentProvider.
Listing 35.1A loader for SQLite cursors (SQLiteCursorLoader.java)
public abstract class SQLiteCursorLoader extends AsyncTaskLoader<Cursor> {
private Cursor mCursor;
public SQLiteCursorLoader(Context context) {
super(context);
}
protected abstract Cursor loadCursor();
@Override
public Cursor loadInBackground() {
Cursor cursor = loadCursor();
if (cursor != null) {
// Ensure that the content window is filled
cursor.getCount();
}
return cursor;
}
@Override
public void deliverResult(Cursor data) {
Cursor oldCursor = mCursor;
mCursor = data;

ptg11078569
Chapter 35Loading Asynchronous Data With Loaders
564
if (isStarted()) {
super.deliverResult(data);
}
if (oldCursor != null && oldCursor != data && !oldCursor.isClosed()) {
oldCursor.close();
}
}
@Override
protected void onStartLoading() {
if (mCursor != null) {
deliverResult(mCursor);
}
if (takeContentChanged() || mCursor == null) {
forceLoad();
}
}
@Override
protected void onStopLoading() {
// Attempt to cancel the current load task if possible.
cancelLoad();
}
@Override
public void onCanceled(Cursor cursor) {
if (cursor != null && !cursor.isClosed()) {
cursor.close();
}
}
@Override
protected void onReset() {
super.onReset();
// Ensure the loader is stopped
onStopLoading();
if (mCursor != null && !mCursor.isClosed()) {
mCursor.close();
}
mCursor = null;
}
}
SQLiteCursorLoader implements the AsyncTaskLoader API to efficiently load and hold a Cursor
in the mCursor instance variable. The loadInBackground() method calls the abstract loadCursor()
method to get the Cursor and calls the getCount() method on the cursor to ensure that the data is
available in memory once it is passed over to the main thread.
The deliverResult(Cursor) method takes care of two things. If the loader is started (which means
the data can be delivered), the superclass implementation of deliverResult(…) is called. If the old
cursor is no longer needed, it is closed to free up its resources. Because an existing cursor may be
cached and redelivered, it is important to make sure that the old cursor and the new cursor are not the
same before the old cursor is closed.

ptg11078569
Loading the List of Runs
565
The remaining method implementations are not critical to understand for the purposes of RunTracker,
but you can find more details in the API documentation for AsyncTaskLoader.
With this base class implemented, you can now implement a very simple subclass,
RunListCursorLoader, in RunListFragment as an inner class.
Listing 35.2Implementing RunListCursorLoader (RunListFragment.java)
@Override
public void onListItemClick(ListView l, View v, int position, long id) {
// The id argument will be the Run ID; CursorAdapter gives us this for free
Intent i = new Intent(getActivity(), RunActivity.class);
i.putExtra(RunActivity.EXTRA_RUN_ID, id);
startActivity(i);
}
private static class RunListCursorLoader extends SQLiteCursorLoader {
public RunListCursorLoader(Context context) {
super(context);
}
@Override
protected Cursor loadCursor() {
// Query the list of runs
return RunManager.get(getContext()).queryRuns();
}
}
private static class RunCursorAdapter extends CursorAdapter {
Now you can update the RunListFragment to implement the LoaderCallbacks interface for a Cursor.
Add the methods below and update the class declaration to declare that it implements the callbacks.

ptg11078569
Chapter 35Loading Asynchronous Data With Loaders
566
Listing 35.3Implementing LoaderCallbacks<Cursor>
(RunListFragment.java)
public class RunListFragment extends ListFragment implements LoaderCallbacks<Cursor> {
...
@Override
public Loader<Cursor> onCreateLoader(int id, Bundle args) {
// You only ever load the runs, so assume this is the case
return new RunListCursorLoader(getActivity());
}
@Override
public void onLoadFinished(Loader<Cursor> loader, Cursor cursor) {
// Create an adapter to point at this cursor
RunCursorAdapter adapter =
new RunCursorAdapter(getActivity(), (RunCursor)cursor);
setListAdapter(adapter);
}
@Override
public void onLoaderReset(Loader<Cursor> loader) {
// Stop using the cursor (via the adapter)
setListAdapter(null);
}
The onCreateLoader(int, Bundle) method is called by the LoaderManager when it needs you
to create the loader. The id argument is useful if you have more than one loader of the same type
and you need to distinguish them, and the Bundle holds any arguments that were passed in. This
implementation does not use either argument, and simply creates a new RunListCursorLoader
pointing at the current Activity for context.
The onLoadFinished(Loader<Cursor>, Cursor) method will be called on the main thread once the
data has been loaded in the background. In this version, you reset the adapter on the ListView to a
RunCursorAdapter pointing at the new cursor.
Finally, the onLoaderReset(Loader<Cursor>) method will be called in the event that the data is no
longer available. To be on the safe side, stop using the cursor by setting the list adapter to null.
Now that you have support for the callbacks in place, you can tell the LoaderManager to do its thing.
You can also remove the mCursor instance variable and the onDestroy() method that cleaned it up.

ptg11078569
Loading a Single Run
567
Listing 35.4Using the Loader (RunListFragment.java)
public class RunListFragment extends ListFragment implements LoaderCallbacks<Cursor> {
private static final int REQUEST_NEW_RUN = 0;
private RunCursor mCursor;
@Override
public void onCreate(Bundle savedInstanceState) {
super.onCreate(savedInstanceState);
setHasOptionsMenu(true);
// Query the list of runs
mCursor = RunManager.get(getActivity()).queryRuns();
// Create an adapter to point at this cursor
RunCursorAdapter adapter = new RunCursorAdapter(getActivity(), mCursor);
setListAdapter(adapter);
// Initialize the loader to load the list of runs
getLoaderManager().initLoader(0, null, this);
}
...
@Override
public void onDestroy() {
mCursor.close();
super.onDestroy();
}
...
@Override
public void onActivityResult(int requestCode, int resultCode, Intent data) {
if (REQUEST_NEW_RUN == requestCode) {
mCursor.requery();
((RunCursorAdapter)getListAdapter()).notifyDataSetChanged();
// Restart the loader to get any new run available
getLoaderManager().restartLoader(0, null, this);
}
}
With these changes done, run the app and observe that the data in the list is populated just as it was
before. If you are observant, you may see that the list briefly shows a spinning progress view while the
data is being loaded in the background. ListFragment provides this functionality for you automatically
if the adapter is set to null.
Loading a Single Run
The new SQLiteCursorLoader class is fine for loading data that you want to remain in a cursor (such
as a list of things), but in the RunFragment, you are loading two individual objects and the cursor is
hidden by the RunManager. To best handle loading arbitrary data, you need a more generic loader.
In this section, you will create a new DataLoader class that is a subclass of AsyncTaskLoader.
DataLoader will take care of some simple tasks that any subclass of AsyncTaskLoader should, leaving
only the implementation of loadInBackground() to its own subclasses.

ptg11078569
Chapter 35Loading Asynchronous Data With Loaders
568
Create DataLoader using the code in Listing 35.5.
Listing 35.5A simple loader for data (DataLoader.java)
public abstract class DataLoader<D> extends AsyncTaskLoader<D> {
private D mData;
public DataLoader(Context context) {
super(context);
}
@Override
protected void onStartLoading() {
if (mData != null) {
deliverResult(mData);
} else {
forceLoad();
}
}
@Override
public void deliverResult(D data) {
mData = data;
if (isStarted())
super.deliverResult(data);
}
}
DataLoader uses a generic type D to hold an instance of whatever data it is loading. In
onStartLoading() it checks for the presence of this data, and if it is available, delivers it immediately.
Otherwise, it calls the superclass’s forceLoad() method to go and fetch it.
The deliverResult(D) method is implemented to stash away the new data object and, if the loader is
started, call the superclass implementation to make the delivery.
To make use of this new class, implement RunLoader, a subclass, for use in RunFragment.
Listing 35.6A loader for a run (RunLoader.java)
public class RunLoader extends DataLoader<Run> {
private long mRunId;
public RunLoader(Context context, long runId) {
super(context);
mRunId = runId;
}
@Override
public Run loadInBackground() {
return RunManager.get(getContext()).getRun(mRunId);
}
}
The RunLoader constructor expects a Context (an Activity) and a long representing the ID of the run
to load. The loadInBackground() method asks the singleton RunManager for a run with that ID and
returns it.

ptg11078569
Loading a Single Run
569
With this in place, you can now use RunLoader in RunFragment instead of talking directly with the
RunManager on the main thread. There is one difference, however, in the implementation you use here.
Since RunFragment loads two different types of data, a run and a location, the design of
LoaderCallbacks<D> coupled with limitations of Java generics prevents you from implementing the
interface directly as methods within RunFragment. Instead, you can work around the limitations by
creating inner classes that implement LoaderCallbacks<D> for Run and Location separately, and pass
an instance of each of them to a call to LoaderManager’s initLoader(…) method.
To make the integration, first add an inner class RunLoaderCallbacks to RunFragment.
Listing 35.7RunLoaderCallbacks (RunFragment.java)
private class RunLoaderCallbacks implements LoaderCallbacks<Run> {
@Override
public Loader<Run> onCreateLoader(int id, Bundle args) {
return new RunLoader(getActivity(), args.getLong(ARG_RUN_ID));
}
@Override
public void onLoadFinished(Loader<Run> loader, Run run) {
mRun = run;
updateUI();
}
@Override
public void onLoaderReset(Loader<Run> loader) {
// Do nothing
}
}
In onCreateLoader(int, Bundle), a new RunLoader is returned pointing at the fragment’s current
activity and the run ID pulled from the arguments bundle. You will pass this arguments bundle along in
onCreate(Bundle).
The implementation of onLoadFinished(…) stashes away the loaded run in the fragment’s mRun
instance variable and calls the updateUI() method so that the UI will reflect the updated data.
onLoaderReset(…) is not needed in this case since the Run instance is completely in memory.
Next, use the new callbacks implementation with LoaderManager in RunFragment’s onCreate(Bundle)
method. You will also add a constant called LOAD_RUN to use as the ID for the loader, which
distinguishes it within the LoaderManager’s collection of loaders for RunFragment.

ptg11078569
Chapter 35Loading Asynchronous Data With Loaders
570
Listing 35.8Loading the run (RunFragment.java)
public class RunFragment extends Fragment {
private static final String TAG = "RunFragment";
private static final String ARG_RUN_ID = "RUN_ID";
private static final int LOAD_RUN = 0;
...
@Override
public void onCreate(Bundle savedInstanceState) {
super.onCreate(savedInstanceState);
setRetainInstance(true);
mRunManager = RunManager.get(getActivity());
// Check for a Run ID as an argument, and find the run
Bundle args = getArguments();
if (args != null) {
long runId = args.getLong(ARG_RUN_ID, -1);
if (runId != -1) {
mRun = mRunManager.getRun(runId);
LoaderManager lm = getLoaderManager();
lm.initLoader(LOAD_RUN, args, new RunLoaderCallbacks());
mLastLocation = mRunManager.getLastLocationForRun(runId);
}
}
}
Now you can run RunTracker again and see that it works just as it did before, only now the run data is
loaded on another thread. If you are very quick (or your emulator is very slow), you might see the UI
initially populate without the run date and then update to include it.
Loading the Last Location for a Run
For your last trick, you need to get the loading of the last location off of the main thread. This work
will be almost identical to what you just did for loading the run, except that you will work with the
run’s last location as the data. First, create the LastLocationLoader class to do the work.
Listing 35.9LastLocationLoader (LastLocationLoader.java)
public class LastLocationLoader extends DataLoader<Location> {
private long mRunId;
public LastLocationLoader(Context context, long runId) {
super(context);
mRunId = runId;
}
@Override
public Location loadInBackground() {
return RunManager.get(getContext()).getLastLocationForRun(mRunId);
}
}
This class is almost exactly like RunLoader, except that it calls RunManager’s
getLastLocationForRun(long) method with the run ID.

ptg11078569
Loading the Last Location for a Run
571
Next, implement the LocationLoaderCallbacks inner class in RunFragment.
Listing 35.10LocationLoaderCallbacks (RunFragment.java)
private class LocationLoaderCallbacks implements LoaderCallbacks<Location> {
@Override
public Loader<Location> onCreateLoader(int id, Bundle args) {
return new LastLocationLoader(getActivity(), args.getLong(ARG_RUN_ID));
}
@Override
public void onLoadFinished(Loader<Location> loader, Location location) {
mLastLocation = location;
updateUI();
}
@Override
public void onLoaderReset(Loader<Location> loader) {
// Do nothing
}
}
Again, this class is almost just like RunLoaderCallbacks, except that it updates the mLastLocation
instance variable before refreshing the UI. All that remains now is to use the new loader instead of a
direct call to RunManager in onCreate(Bundle), using a new loader ID LOAD_LOCATION.
Listing 35.11Loading the last location (RunFragment.java)
public class RunFragment extends Fragment {
private static final String TAG = "RunFragment";
private static final String ARG_RUN_ID = "RUN_ID";
private static final int LOAD_RUN = 0;
private static final int LOAD_LOCATION = 1;
...
@Override
public void onCreate(Bundle savedInstanceState) {
super.onCreate(savedInstanceState);
setRetainInstance(true);
mRunManager = RunManager.get(getActivity());
// Check for a Run ID as an argument, and find the run
Bundle args = getArguments();
if (args != null) {
long runId = args.getLong(ARG_RUN_ID, -1);
if (runId != -1) {
LoaderManager lm = getLoaderManager();
lm.initLoader(LOAD_RUN, args, new RunLoaderCallbacks());
mLastLocation = mRunManager.getLastLocationForRun(runId);
lm.initLoader(LOAD_LOCATION, args, new LocationLoaderCallbacks());
}
}
}
Now RunTracker is capable of loading all of its important data on a background thread, thanks to
loaders. Run it now and verify that everything works as before.

ptg11078569
This page intentionally left blank

ptg11078569
573
36
Using Maps
The next logical step for RunTracker is to show the user a map of his or her travels. Using the
new Google Maps API (version 2), this is an easy task. In this chapter, you will create a new
RunMapFragment class to display a map showing the track of the user’s run and interactive markers that
indicate the start and end of the journey.
Before starting with the fun stuff, however, you must set up your project to use the Maps API.
Adding the Maps API to RunTracker
The Maps API (version 2) is provided by the Google Play services SDK, and has several requirements
for both your development environment and your application.
Use a real device to test maps
The Google Play services SDK (and thus the Maps API) requires a real device running at least Android
2.2 with the Google Play store installed. Running on an emulator is not supported.
Install and use the Google Play services SDK
To make the Maps API available to your project, you first need to install the Google Play services SDK
add-on and configure its library project to work with your application. The following steps should
get you there, but the latest details should always be available at http://developer.android.com/
google/play-services/
1. From the Android SDK Manager, install the Google�Play�services add-on from the Extras
section. This will be installed within your Android SDK directory under extras/google/
google_play_services.
2. In Eclipse, import a copy of the library project into your workspace using File → Import... →
Existing�Android�Code�Into�Workspace. The library project is within the Google Play services
extra directory under libproject/google-play-services_lib. Be sure to choose Copy�projects
into�workspace from the import wizard so that you are working with your own copy of the
project.
3. Open the RunTracker project’s Properties window and add a reference to the library project under
Android, Library. Click the Add... button and select the google-play-services_lib project.

ptg11078569
Chapter 36Using Maps
574
Obtain a Google Maps API key
In order to use the Maps API, you need to create an API key for your application. This process requires
several steps, and Google has better documentation than we can provide here. Check out https://
developers.google.com/maps/documentation/android/start and follow the instructions there to
obtain your key.
Update RunTracker’s manifest
In order for the Google Play services and Maps API to work, you need to add several permissions
and requirements to your application manifest, in addition to the API key you just obtained. Add the
highlighted XML to the RunTracker manifest now. Take care to ensure that the permission that ends in
MAPS_RECEIVE begins with RunTracker’s package name.
While you’re there, go ahead and add an activity entry for the forthcoming RunMapActivity.
Listing 36.1Maps API requirements (AndroidManifest.xml)
<manifest xmlns:android="http://schemas.android.com/apk/res/android"
package="com.bignerdranch.android.runtracker"
android:versionCode="1"
android:versionName="1.0">
<uses-sdk android:minSdkVersion="9" android:targetSdkVersion="15" />
<permission
android:name="com.bignerdranch.android.runtracker.permission.MAPS_RECEIVE"
android:protectionLevel="signature"/>
<uses-permission
android:name="com.bignerdranch.android.runtracker.permission.MAPS_RECEIVE"/>
<uses-permission android:name="android.permission.INTERNET"/>
<uses-permission android:name="android.permission.WRITE_EXTERNAL_STORAGE"/>
<uses-permission
android:name="com.google.android.providers.gsf.permission.READ_GSERVICES"/>
<uses-permission android:name="android.permission.ACCESS_COARSE_LOCATION"/>
<uses-permission android:name="android.permission.ACCESS_FINE_LOCATION"/>
<uses-feature android:required="true"
android:name="android.hardware.location.gps" />
<uses-feature
android:required="true"
android:glEsVersion="0x00020000"/>
<application
android:allowBackup="true"
android:icon="@drawable/ic_launcher"
android:label="@string/app_name"
android:theme="@style/AppTheme">
<activity android:name=".RunListActivity"
android:label="@string/app_name">
<intent-filter>
<action android:name="android.intent.action.MAIN" />
<category android:name="android.intent.category.LAUNCHER" />
</intent-filter>
</activity>

ptg11078569
Showing the User’s Location on a Map
575
<activity android:name=".RunActivity"
android:label="@string/app_name" />
<activity android:name=".RunMapActivity"
android:label="@string/app_name" />
<receiver android:name=".TrackingLocationReceiver"
android:exported="false">
<intent-filter>
<action
android:name="com.bignerdranch.android.runtracker.ACTION_LOCATION"/>
</intent-filter>
</receiver>
<meta-data
android:name="com.google.android.maps.v2.API_KEY"
android:value="your-maps-API-key-here"/>
</application>
</manifest>
Showing the User’s Location on a Map
With the requirements behind you, now it is time to enjoy the fruits of your labor and show the user
a map. The Maps API includes MapFragment and SupportMapFragment that you can subclass to
conveniently handle the work of setting up the MapView and its associated model object, GoogleMap.
Create RunMapFragment, a subclass of SupportMapFragment, in a new file using the code below.
Listing 36.2Basic RunMapFragment (RunMapFragment.java)
public class RunMapFragment extends SupportMapFragment {
private static final String ARG_RUN_ID = "RUN_ID";
private GoogleMap mGoogleMap;
public static RunMapFragment newInstance(long runId) {
Bundle args = new Bundle();
args.putLong(ARG_RUN_ID, runId);
RunMapFragment rf = new RunMapFragment();
rf.setArguments(args);
return rf;
}
@Override
public View onCreateView(LayoutInflater inflater, ViewGroup parent,
Bundle savedInstanceState) {
View v = super.onCreateView(inflater, parent, savedInstanceState);
// Stash a reference to the GoogleMap
mGoogleMap = getMap();
// Show the user's location
mGoogleMap.setMyLocationEnabled(true);
return v;
}
}

ptg11078569
Chapter 36Using Maps
576
RunMapFragment’s newInstance(long) method takes a run ID and sets up the arguments to a new
instance of the fragment, just as the code in RunFragment does. You will use this argument shortly
when fetching a list of locations.
The implementation of onCreateView(…) calls the superclass implementation to get and return a view,
but it relies on the fact that doing so will initialize the fragment’s GoogleMap instance. GoogleMap is
the model object that is tied to the MapView and you will use it to configure the various additions to the
map. In this initial version of the fragment, simply call setMyLocationEnabled(boolean) to allow the
user to see and navigate to his or her location on the map.
To host the new RunMapFragment, create a simple RunMapActivity class using the following code.
Remember that you already added the reference to this class in the manifest earlier.
Listing 36.3An activity to host a fragment (RunMapActivity.java)
public class RunMapActivity extends SingleFragmentActivity {
/** A key for passing a run ID as a long */
public static final String EXTRA_RUN_ID =
"com.bignerdranch.android.runtracker.run_id";
@Override
protected Fragment createFragment() {
long runId = getIntent().getLongExtra(EXTRA_RUN_ID, -1);
if (runId != -1) {
return RunMapFragment.newInstance(runId);
} else {
return new RunMapFragment();
}
}
}
Now you will need code to launch RunMapActivity from RunFragment when a run is available. To do
this, add a button to the layout that will trigger the map. But first, as usual, add a few new strings to
support this button and the work for the rest of the chapter.
Listing 36.4Strings for the UI (res/values/strings.xml)
<string name="new_run">New Run</string>
<string name="map">Map</string>
<string name="run_start">Run Start</string>
<string name="run_started_at_format">Run started at %s</string>
<string name="run_finish">Run Finish</string>
<string name="run_finished_at_format">Run finished at %s</string>
</resources>
Now update RunFragment’s layout to include the new Map button.

ptg11078569
Showing the User’s Location on a Map
577
Listing 36.5Adding a Map button (fragment_run.xml)
<Button android:id="@+id/run_stopButton"
android:layout_width="0dp"
android:layout_height="wrap_content"
android:layout_weight="1"
android:text="@string/stop"
/>
<Button android:id="@+id/run_mapButton"
android:layout_width="0dp"
android:layout_height="wrap_content"
android:layout_weight="1"
android:text="@string/map"
/>
</LinearLayout>
</TableLayout>
RunFragment can now be wired up to support this new button and ensure that it is enabled at the
appropriate time.
Listing 36.6Wiring up the Map button (RunFragment.java)
public class RunFragment extends Fragment {
...
private RunManager mRunManager;
private Run mRun;
private Location mLastLocation;
private Button mStartButton, mStopButton, mMapButton;
private TextView mStartedTextView, mLatitudeTextView,
mLongitudeTextView, mAltitudeTextView, mDurationTextView;
...
@Override
public View onCreateView(LayoutInflater inflater, ViewGroup container,
Bundle savedInstanceState) {
...
mMapButton = (Button)view.findViewById(R.id.run_mapButton);
mMapButton.setOnClickListener(new View.OnClickListener() {
@Override
public void onClick(View v) {
Intent i = new Intent(getActivity(), RunMapActivity.class);
i.putExtra(RunMapActivity.EXTRA_RUN_ID, mRun.getId());
startActivity(i);
}
});
updateUI();
return view;
}
...
ptg11078569
Chapter 36Using Maps
578
private void updateUI() {
boolean started = mRunManager.isTrackingRun();
boolean trackingThisRun = mRunManager.isTrackingRun(mRun);
if (mRun != null)
mStartedTextView.setText(mRun.getStartDate().toString());
int durationSeconds = 0;
if (mRun != null && mLastLocation != null) {
durationSeconds = mRun.getDurationSeconds(mLastLocation.getTime());
mLatitudeTextView.setText(Double.toString(mLastLocation.getLatitude()));
mLongitudeTextView.setText(Double.toString(mLastLocation.getLongitude()));
mAltitudeTextView.setText(Double.toString(mLastLocation.getAltitude()));
mMapButton.setEnabled(true);
} else {
mMapButton.setEnabled(false);
}
mDurationTextView.setText(Run.formatDuration(durationSeconds));
mStartButton.setEnabled(!started);
mStopButton.setEnabled(started && trackingThisRun);
}
With this, RunTracker can now show you a map and your location on it. Run the app, load up a run,
and press the Map button. You should see something like Figure36.1, provided you have Internet
access and you are near the Big Nerd Ranch office.
Figure 36.1RunTracker knows where you are

ptg11078569
Displaying a Run’s Path
579
Displaying a Run’s Path
Your next task is to show the user a line that follows his or her run. The Maps API makes this trivial,
but you need to fetch the list of locations so you know how to build the line. Add a method to both
RunDatabaseHelper and RunManager to provide a LocationCursor with this data.
Listing 36.7Querying a run’s locations (RunDatabaseHelper.java)
public LocationCursor queryLocationsForRun(long runId) {
Cursor wrapped = getReadableDatabase().query(TABLE_LOCATION,
null,
COLUMN_LOCATION_RUN_ID + " = ?", // Limit to the given run
new String[]{ String.valueOf(runId) },
null, // group by
null, // having
COLUMN_LOCATION_TIMESTAMP + " asc"); // order by timestamp
return new LocationCursor(wrapped);
}
The queryLocationsForRun(long) method is very similar to the queryLastLocationForRun(long)
method from the SQLite chapter, but it orders them in ascending order and returns them all.
You can use this method in RunManager to give a nice façade to RunMapFragment.
Listing 36.8Querying a run’s locations, part II (RunManager.java)
public LocationCursor queryLocationsForRun(long runId) {
return mHelper.queryLocationsForRun(runId);
}
RunMapFragment can now use this new method to load the locations. Naturally, you will want to use a
Loader to keep the database query off the main thread. Create LocationListCursorLoader as a new
class to handle the job.
Listing 36.9A loader for locations (LocationListCursorLoader.java)
public class LocationListCursorLoader extends SQLiteCursorLoader {
private long mRunId;
public LocationListCursorLoader(Context c, long runId) {
super(c);
mRunId = runId;
}
@Override
protected Cursor loadCursor() {
return RunManager.get(getContext()).queryLocationsForRun(mRunId);
}
}

ptg11078569
Chapter 36Using Maps
580
Make use of this new loader in RunMapFragment to load the locations.
Listing 36.10Loading locations in RunMapFragment (RunMapFragment.java)
public class RunMapFragment extends SupportMapFragment
implements LoaderCallbacks<Cursor> {
private static final String ARG_RUN_ID = "RUN_ID";
private static final int LOAD_LOCATIONS = 0;
private GoogleMap mGoogleMap;
private LocationCursor mLocationCursor;
...
@Override
public void onCreate(Bundle savedInstanceState) {
super.onCreate(savedInstanceState);
// Check for a Run ID as an argument, and find the run
Bundle args = getArguments();
if (args != null) {
long runId = args.getLong(ARG_RUN_ID, -1);
if (runId != -1) {
LoaderManager lm = getLoaderManager();
lm.initLoader(LOAD_LOCATIONS, args, this);
}
}
}
...
@Override
public Loader<Cursor> onCreateLoader(int id, Bundle args) {
long runId = args.getLong(ARG_RUN_ID, -1);
return new LocationListCursorLoader(getActivity(), runId);
}
@Override
public void onLoadFinished(Loader<Cursor> loader, Cursor cursor) {
mLocationCursor = (LocationCursor)cursor;
}
@Override
public void onLoaderReset(Loader<Cursor> loader) {
// Stop using the data
mLocationCursor.close();
mLocationCursor = null;
}
}
RunMapFragment can now stash a LocationCursor to hold on to the list of locations. It will use this to
populate the map with the route.
The implementation of onLoaderReset(Loader<Cursor>) takes care of closing and dereferencing the
cursor when it is no longer available. Under normal circumstances, this method will be called when
the LoaderManager is shutting the loader down after the user navigates away from the map fragment.

ptg11078569
Displaying a Run’s Path
581
This will keep things nice and tidy, but one thing it won’t do is close the cursor during rotation. This is
exactly what you want.
Now you need to get to the meat of the chapter: displaying some things on the GoogleMap. Add an
updateUI() method to set up the run track, and call that method in onLoadFinished(…).
Listing 36.11Putting the run on the map (RunMapFragment.java)
private void updateUI() {
if (mGoogleMap == null || mLocationCursor == null)
return;
// Set up an overlay on the map for this run's locations
// Create a polyline with all of the points
PolylineOptions line = new PolylineOptions();
// Also create a LatLngBounds so you can zoom to fit
LatLngBounds.Builder latLngBuilder = new LatLngBounds.Builder();
// Iterate over the locations
mLocationCursor.moveToFirst();
while (!mLocationCursor.isAfterLast()) {
Location loc = mLocationCursor.getLocation();
LatLng latLng = new LatLng(loc.getLatitude(), loc.getLongitude());
line.add(latLng);
latLngBuilder.include(latLng);
mLocationCursor.moveToNext();
}
// Add the polyline to the map
mGoogleMap.addPolyline(line);
// Make the map zoom to show the track, with some padding
// Use the size of the current display in pixels as a bounding box
Display display = getActivity().getWindowManager().getDefaultDisplay();
// Construct a movement instruction for the map camera
LatLngBounds latLngBounds = latLngBuilder.build();
CameraUpdate movement = CameraUpdateFactory.newLatLngBounds(latLngBounds,
display.getWidth(), display.getHeight(), 15);
mGoogleMap.moveCamera(movement);
}
@Override
public Loader<Cursor> onCreateLoader(int id, Bundle args) {
long runId = args.getLong(ARG_RUN_ID, -1);
return new LocationListCursorLoader(getActivity(), runId);
}
@Override
public void onLoadFinished(Loader<Cursor> loader, Cursor cursor) {
mLocationCursor = (LocationCursor)cursor;
updateUI();
}
This new method uses several bits of the Maps API. First, it creates an instance of PolylineOptions
that will be used to build up the line to draw on the map and an instance of LatLngBounds.Builder to
create a bounding box to zoom the map to when everything is collected.
Next, it iterates over the LocationCursor, and for each Location creates a LatLng using the
coordinates. It adds this LatLng to the PolylineOptions and includes it in the LatLngBounds before
moving to the next row in the cursor.

ptg11078569
Chapter 36Using Maps
582
After consuming all of the locations, it calls addPolyline(PolylineOptions) on the GoogleMap,
adding the line to the map.
The next task is to make the map zoom to show the entire line. Moving around the map is the job of
the “camera,” and the camera is adjusted using commands packaged in instances of CameraUpdate and
passed to moveCamera(CameraUpdate). Creating an instance to move the camera to the bounds of the
line you just added is the job of the CameraUpdateFactory’s newLatLngBounds(LatLngBounds, int,
int, int) method.
Here you pass the dimensions of the current screen as an approximation of the size of the
map in pixels, and specify a few pixels of padding to make things fit nicely. There is a simpler
version of the method, newLatLngBounds(LatLngBounds, int), but that version will throw an
IllegalStateException if you call it before the MapView has completed sizing itself via the layout
process. Since you cannot guarantee that has happened by the time updateUI() is called, you have to
make your best guess using the display dimensions.
With these changes in place, you can run RunTracker again and see a beautiful black line tracing your
route. Perhaps now would be a good time to investigate the rest of the PolylineOptions class and try
to make it prettier.
Adding Markers for Run Start and Finish
Now that you have everything else in place, it is relatively trivial to add markers to the map that show
the start and finish locations of the run. You can also add some text along with those markers that will
show up in an info window when you touch them.
Add the code highlighted below to updateUI().
Listing 36.12Start and end markers with info (RunMapFragment.java)
private void updateUI() {
if (mGoogleMap == null || mLocationCursor == null)
return;
// Set up an overlay on the map for this run's locations
// Create a polyline with all of the points
PolylineOptions line = new PolylineOptions();
// Also create a LatLngBounds so you can zoom to fit
LatLngBounds.Builder latLngBuilder = new LatLngBounds.Builder();
// Iterate over the locations
mLocationCursor.moveToFirst();
while (!mLocationCursor.isAfterLast()) {
Location loc = mLocationCursor.getLocation();
LatLng latLng = new LatLng(loc.getLatitude(), loc.getLongitude());
Resources r = getResources();
// If this is the first location, add a marker for it
if (mLocationCursor.isFirst()) {
String startDate = new Date(loc.getTime()).toString();
MarkerOptions startMarkerOptions = new MarkerOptions()
.position(latLng)
.title(r.getString(R.string.run_start))
.snippet(r.getString(R.string.run_started_at_format, startDate));
mGoogleMap.addMarker(startMarkerOptions);

ptg11078569
Challenge: Live Updates
583
} else if (mLocationCursor.isLast()) {
// If this is the last location, and not also the first, add a marker
String endDate = new Date(loc.getTime()).toString();
MarkerOptions finishMarkerOptions = new MarkerOptions()
.position(latLng)
.title(r.getString(R.string.run_finish))
.snippet(r.getString(R.string.run_finished_at_format, endDate));
mGoogleMap.addMarker(finishMarkerOptions);
}
line.add(latLng);
latLngBuilder.include(latLng);
mLocationCursor.moveToNext();
}
// Add the polyline to the map
mGoogleMap.addPolyline(line);
For each of the first and last locations, this code creates an instance of MarkerOptions to hold the
position, title, and snippet text. The title and snippet text are displayed in a simple info window when
the user presses the marker.
In this code, you are relying on the default marker icon to be used, but you could use the
icon(BitmapDescriptor) method and a BitmapDescriptorFactory to create a marker of a different
color or even with your own custom graphics. There are many standard colors (or hues, as they are
called) to choose from.
Run RunTracker and test it out on your next trip. Happy travels!
Challenge: Live Updates
At this point, RunMapFragment is capable of displaying a map of the run’s locations frozen in time, as
they were when the user navigated there. A proper run-tracking app should show updates to the track
in a live fashion. Using a LocationReceiver subclass in RunMapFragment, respond to new locations
by redrawing the map adornments. Remember to clear any previous track overlay and markers before
adding new ones.

ptg11078569
This page intentionally left blank

ptg11078569
585
37
Afterword
Congratulations! You are at the end of this guide. Not everyone has the discipline to do what you have
done, to learn what you have learned. Take a quick moment and give yourself a pat on the back.
This hard work has paid off: you are now an Android developer.
The Final Challenge
We have one last challenge for you: become a good Android developer. Good developers are each good
in their own way, so you must find your own path from here on out.
Where might you start, then? Here are some places we recommend:
Write code. Now. You will quickly forget what you have learned here if you do not apply it. Contribute
to a project, or write a simple application of your own. Whatever you do, waste no time: write code.
Learn. You have learned a little bit about a lot of things in this book. Did any of them spark
your imagination? Write some code to play around with your favorite thing. Find and read more
documentation about it, or an entire book if there is one.
Meet people. Lots of top-notch Android developers hang out in #android-dev on irc.freenode.net.
Android Developer Office Hours (https://plus.google.com/+AndroidDevelopers/posts) are good
to stay connected with the Android development team and other interested developers. Local meetups
can also be a good place to meet like-minded developers.
Explore the open source community. Android development is exploding on http://www.github.com.
When you find a cool library, see what other projects its contributors are committing to. Share your
own code, too – you never know who will find it useful or interesting.
Shameless Plugs
You can find both of us on Twitter. Bill is @billjings, and Brian is @lyricsboy.
If you enjoyed this book, check out other Big Nerd Ranch Guides at http://www.bignerdranch.com/
books. We also have a broad selection of week-long courses for developers, where we make it
easy to learn this amount of stuff in only a week of time. And of course, if you just need someone
to write great code, we do contract programming, too. For more, go to our website at http://
www.bignerdranch.com.
Thank You
Without readers like you, our work would not exist. Thank you for buying and reading our book.

ptg11078569
This page intentionally left blank

ptg11078569
587
Index
Symbols
9-patch images, 409, 410
@+id, 18, 187
@Override, 56
@SuppressLint("HandlerLeak"), 444
@SuppressWarnings("deprecation"), 306
@SuppressWarnings("unchecked"), 445
@TargetApi annotation, 119
A
aapt (Android Asset Packing tool), 27
AbsListView.MultiChoiceModeListener
interface, 289
action bar
action view in, 463
android:showAsAction, 256
compatibility and, 294
contextual (see contextual action bar)
features, 253
hiding, 315
options menu, 253
overflow menu, 256
ActionBar
onCreateOptionsMenu(…), 257
setDisplayHomeAsUpEnabled(…), 263
ActionBarSherlock library, 294-298
ActionMode, 289, 293
ActionMode.Callback interface, 289-291, 293
activities
(see also Activity, fragments)
abstract fragment-hosting activity, 172
adding to project, 89-112
as controller, 36
back stack of, 110-112, 380
base, 380
child, 90, 104
defined, 2
fragment transactions and, 365
handling configuration changes in, 510
hosting fragments, 128, 134-137, 232, 233
label (display name), 377
launcher, 109, 317
lifecycle and fragments, 146
lifecycle diagram, 67
lifecycle of, 53, 61, 67, 68
managing fragments, 365-373
metadata for, 265
overriding methods, 54
passing data between, 101-109
record, 67
rotation and, 61-65
running from command line, 317
searchable, 455, 458
starting from fragment, 191
starting in current task, 381
starting in new task, 382
states of, 53, 67
tasks and, 380
UI flexibility and, 126
Activity
as Context subclass, 23
FragmentActivity, 131
getIntent(), 103, 193
invalidateOptionsMenu(), 477
lifecycle methods, 53-61
onActivityResult(…), 106
onCreate(…), 16, 53, 55
onDestroy(), 53
onPause(), 53
onResume(), 53, 197
onSaveInstanceState(…), 65-67, 241, 243
onSearchRequested(), 453
onStart(), 53
onStop(), 53
setContentView(…), 16
setResult(…), 106
SingleFragmentActivity, 172, 174-176, 361
startActivity(…), 99
startActivityForResult(…), 104
startSearch(…), 465
activity record, 67
ActivityInfo, 379
ActivityManager
back stack, 110, 112
starting activities, 99, 101, 102, 106, 107
ActivityNotFoundException, 101
Adapter interface, 179
adapters
adapter views and, 179
creating custom, 187
defined, 179
implementing, 180

ptg11078569
Index
588
AdapterView
(see also ListView, GridView)
setEmptyView(…), 270
adb (Android Debug Bridge), 44
resetting, 45, 75
running activities with, 317, 318
add(…) (FragmentTransaction), 144
addFlags(…) (Intent), 382
ADT (Android Developer Tools)
installing, xx
updating, xxii
AlarmManager, 473-475
AlertDialog, 211-215
AlertDialog.Builder, 213
constructor, 213
create(), 214
setPositiveButton(…), 213
setTitle(…), 213
setView(…), 215
alias resources, 363-365
am (activity manager) tool, 318
ancestral navigation, 262-266
Android Asset Packing tool, 27
Android Debug Bridge (see adb (Android Debug
Bridge))
Android developer documentation, 120-122
Android firmware versions, 113
Android Lint
@SuppressLint("HandlerLeak"), 444
@TargetApi annotation, 119
as static analyzer, 85
compatibility and, 118-120
running, 86
suppressing compatibility errors, 119
Android SDK Manager, xxi
Android versions (see SDK versions)
Android Virtual Device Manager, 24
Android XML namespace, 12
android.os.Environment, 280
android.support.v4.app.Fragment, 231
android.text.format.DateFormat, 166
android.util.Log (see Log)
android:actionViewClass, 463
android:background, 401
android:configChanges, 510
android:contentDescription, 51
android:drawable, 292
android:drawablePadding, 48
android:drawableRight, 48
android:focusable, 189
android:icon, 256
android:layout_gravity, 63
android:layout_height, 13
android:layout_weight, 164, 301
android:layout_width, 13, 301
android:minSdkVersion, 115, 116
android:orientation, 13
android:padding, 156
android:protectionLevel, 495
android:resource, 457
android:screenOrientation, 304
android:showAsAction, 256
android:state_activated, 292
android:state_pressed, 403
android:stretchColumns, 390
android:stretchMode, 416
android:targetSdkVersion, 115, 116
android:theme, 231
AndroidManifest.xml (see manifest)
anonymous inner classes, xix, 20-22
API levels (see SDK versions)
.apk file, 26, 281
app data
loading, 278
saving in onPause(), 277
saving to JSON file, 274
when to save, 276
app icon, 262-264
appendQueryParameter(…) (Uri.Builder), 424
application context, 169
arguments bundle, 195, 196
ArrayAdapter<T>, 179, 180
ArrayList, 168
AsyncTask
cancel(…), 432
doInBackground(…), 419
for running on background thread, 419
vs. HandlerThread, 449
onPostExecute(…), 430
onProgressUpdate(…), 432
publishProgress(…), 432
AsyncTaskLoader, 561
AttributeSet, 516
audio playback, 227, 233-236
auto-complete, using, 23, 24
AVDs (Android Virtual Devices)

ptg11078569
Index
589
creating, 24
for tablets, 359
B
Back button, 59, 60, 380
back stack, 110
background threads
dedicated, 438
updating UI from, 430
using AsyncTask for, 419, 422
beginTransaction() (FragmentTransaction),
143
Bitmap.recycle(), 337
breakpoints
(see also debugging)
exception, 83, 84
removing, 83
setting, 80-83
broadcast intents
defined, 485
ordered, 495-499
permissions and, 493-495
registered in code, 490-492
sending, 489, 490
broadcast receivers
defined, 485, 486
dynamic, 490-492
implementing, 486, 487
intent filters and, 487
location updates and, 546-548
long-running tasks and, 499
permissions and, 492-495
registering, 486
uses for, 488, 489
build errors
(see also debugging)
debugging, 87
missing imports, 19
build process, 26
build SDK version, 116
build target, 116
Build.VERSION.SDK_INT, 119
Bundle
for fragment arguments, 195, 196
in onCreate(…), 66
in onSaveInstanceState(…), 65
putCharSequence(…);, 195
putInt(…);, 195
putSerializable(…), 195
Button
adding icon to, 48
example, 9
v. ImageButton, 50
inheritance, 50
button
adding ID, 18
buttons, 50
C
caching, 450
Calendar, 219
Callbacks interface, 365-373
camera
accessing, 304-306
checking for, 306, 314, 315
compatibility and, 305
different types of, 305, 314
as exclusive-access resource, 300, 304
image file sizes and, 299
image handling and, 334-338
implicit intent for, 299
parameters of, 310, 324
permissions for, 303
setting picture size, 324
setting preview size, 310
as Surface client, 307-309
taking pictures, 321-323
Camera
getSupportedPictureSizes(), 324
getSupportedPreviewSizes(), 310
open(…), 304
Parameters inner class, 310, 324
PictureCallback interface, 321-323
release(), 304
setPreviewDisplay(…), 308
ShutterCallback interface, 321-323
startPreview(), 308
stopPreview(), 308
takePicture(…), 321, 323
cancel(…) (AlarmManager), 474, 475
cancel(…) (AsyncTask), 432
Canvas, 522
CheckBox, 151
focusable, 189

ptg11078569
Index
590
CHOICE_MODE_MULTIPLE_MODAL, 288
choosers, creating, 352
codenames, version, 113
commands (IntentService), 467
compatibility
action bar and, 294
with ActionBarSherlock library, 294-298
ActionBarSherlock library, 296
Android Lint and, 118-120
camera and, 305
context actions and, 283
for ListFragment, 170
fragments and, 131, 132
importance of, xix, 113-115
issues, 114
layout attributes and, 256
minimum SDK version and, 116
options menus and, 283
strategies, 293, 294
with support library, 131, 132
using conditional code for, 118
wrapping code for, 118-120
ComponentName, 380
components, 100
configuration changes, 61, 65, 238
configuration qualifiers
defined, 62
for language, 245
listed, 247
multiple, 249, 250
precedence of, 247-250
for screen density, 46, 246
for screen orientation, 62
for screen size, 364, 373, 374
ConnectivityManager, 470
contacts
getting data from, 355
permissions for, 356
container views, 136, 144
content assist, using, 23, 24
ContentProvider, 355
ContentResolver, 355
Context
application-wide, 169
explicit intents and, 100
getSharedPreferences(…), 461
for I/O, 274, 281
resource IDs and, 23
singletons and, 169
context menus
compatibility and, 283
defining menu, 284
determining selected item, 287
example of, 283
implementing, 284-287
ContextMenu.ContextMenuInfo interface, 286
contextual action bar, 283, 287
(see also contextual action mode)
contextual action mode
callbacks, 289
defined, 287
defining menu, 284
enabling multiple selection, 288
implementing in ListView, 288-291
implementing in other views, 293
contextual actions, 253, 283
controller objects, 36
conventions
class naming, 6
extra naming, 102
package naming, 3
variable naming, 19, 33
corner (drawable), 401
create() (AlertDialog.Builder), 214
create(…) (MediaPlayer), 234
createChooser(…) (Intent), 352
Cursor, 541, 548
CursorAdapter, 551
CursorLoader, 561
CursorWrapper, 549
D
Dalvik Debug Monitor Service (see DDMS)
Dalvik virtual machine, 384
/data/app directory, 281
/data/data directory, 273
databases, 541-554
Date, 219
DatePicker, 215
DatePickerDialog, 211
DDMS (Dalvik Debug Monitor Service), 75
DDMS perspective, 75
Debug view, 80
debugging
(see also Android Lint)

ptg11078569
Index
591
build errors, 87
crash, 76
crash on unconnected device, 77
misbehaviors, 77
online help for, 88
R, 87
running app with debugger, 80
stopping debugger, 82
DEFAULT (Intent), 383
default resources, 246
delayed execution, 472, 473
density-independent pixel (see dip)
deprecation
in Android, 342
using deprecated methods, 306, 342
detach(…) (FragmentTransaction), 208
Dev Tools, 70
developer documentation, 120-122
devices
configuration changes and, 61
configuring language settings, 245
hardware, 24
virtual, 24, 359
Devices view, 44, 75
Dialog, 211
DialogFragment, 211
onCreateDialog(…), 213
show(…), 214
showing image in, 338
dialogs, 211-217
dip (density-independent pixel), 155
documentation, 120-122
doInBackground(…) (AsyncTask), 419
dp (density-independent pixel), 155
draw() (View), 522
draw9patch tool, 410
drawables, 399, 401
9-patch images, 409
corner, 401
documentation, 401
gradient, 401, 405
inset, 404, 405
layer-list, 404, 405
referencing, 48
state list, 291, 402, 403
stretchable, 406
drawing
Canvas, 522
in onDraw(…), 522
Paint, 522
to Surface, 306-309
E
Eclipse
auto-complete, 23, 24
build process, 26
code style preferences, 33
content assist, 23, 24
creating new classes, 32
debugger, 80, 81
(see also debugging)
editor, 7
generating getter and setter methods, 33, 34,
133
graphical layout tool, 157, 251
installing, xx
organizing imports, 19, 24
package explorer, 7
panes, resizing, 57
preferences, 33
res/values directory, 14
src directory, 15
tab group, 7
views, 75
Debug view, 80
Devices view, 44, 75
Lint Warnings view, 86
moving, 7, 56
Variables view, 81
workbench window, 7
EditText, 137
emulator
(see also virtual devices)
rotating, 48
running on, 24
system images for, xxi
for tablets, 359
errors
(see also debugging)
missing imports, 19
escape sequence (in string), 39
exception breakpoints, 83, 84
exceptions, 76
explicit intents
creating, 100

ptg11078569
Index
592
creating at runtime, 380
purpose, 101
external storage
checking for, 280
defined, 273
using, 280
extras
defined, 102
fragments retrieving from activity, 193
as key-value pairs, 102
naming, 102
putting, 102, 103
retrieving, 103
structure of, 102
F
file explorer, 84
file I/O, 273-280
fill_parent, 13
finalizer execution, 337
Flickr API, 422
floating context menus (see context menus)
fluent interface, 143
format string, 348
Fragment
from native libraries, 147
from support library, 131
getActivity(), 171, 191, 193
getArguments(…), 196
getTargetFragment(), 221
getTargetRequestCode(), 221
newInstance(…), 195
onActivityResult(…), 217
onContextItemSelected(…), 284, 286
onCreate(Bundle), 140
onCreateContextMenu(…), 284
onCreateOptionsMenu(…), 257, 258
onCreateView(…), 140
onOptionsItemSelected(…), 261
onPrepareOptionsMenu(…), 477
onSaveInstanceState(…), 140, 237
registerForContextMenu(…), 285
setArguments(…), 195
setHasOptionsMenu(…), 258
setRetainInstance(…), 237
setTargetFragment(…), 221
startActivityForResult(…), 199
fragment arguments, 193, 195, 196
fragment transactions, 143-145, 365, 367, 368
(see also FragmentTransaction)
FragmentActivity (from support library), 131
FragmentManager
adding fragments to, 142-145
fragment lifecycle and, 145-147
layout fragments and, 232
onResume(), 197
responsibilities, 142
role in rotation, 237
FragmentPagerAdapter, 208
fragments
(see also fragment transactions,
FragmentManager)
accessing extra in activity’s intent, 193
v. activities, 126
activity lifecycle and, 146
adding in code, 136
adding to FragmentManager, 142-147
arguments of, 195, 196
as composable units, 126, 365
Callbacks interface, 365-373
compatibility and, 131, 132
container views for, 136, 361
creating, 137
creating from support library, 139
defined, 126
delegating functionality to activity, 365
handling activity functions, 171
hosting, 128, 134-137, 232, 233
hosting options, 135
implementing lifecycle methods, 139
inflating layouts for, 140
layout, 135, 232, 233
lifecycle diagram, 146
lifecycle methods, 146
lifecycle of, 134, 135, 145-147, 233
maintaining independence of, 195, 365
passing data between (same activity), 217
passing data with fragment arguments, 218
reasons for, 126, 127, 147
retaining, 237-243
rotation and, 238-240, 243
setting a result from, 326-328
setting listeners in, 141
starting activities from, 191
support library and, 131, 132

ptg11078569
Index
593
without support library, 147
UI flexibility and, 126
widgets and, 141
FragmentStatePagerAdapter, 204
getCount(), 204, 205
getItem(…), 204, 205
setOffscreenPageLimit(…), 206
FragmentTransaction
add(…), 144
beginTransaction(), 143
detach(…), 208
remove(…), 208
FrameLayout
as container view for fragments, 136, 361
described, 63
replacing with merge, 87
G
Gallery, 209
gen directory, 16
getAction() (MotionEvent), 518
getActiveNetworkInfo()
(ConnectivityManager), 470
getActivity() (Fragment), 171, 191, 193
getArguments(…) (Fragment), 196
getBackgroundDataSetting()
(ConnectivityManager), 470
getBooleanExtra(…) (Intent), 103
getBroadcast(…) (PendingIntent), 530
getCount() (FragmentStatePagerAdapter), 204,
205
getDefaultSharedPreferences(…)
(PreferenceManager), 461
getInputStream() (HttpURLConnection), 418
getIntent() (Activity), 103, 193
getItem(…) (FragmentStatePagerAdapter), 204,
205
getListAdapter() (ListFragment), 184
getLoaderManager() (LoaderManager), 562
getMenuInfo() (MenuItem), 286
getOutputStream() (HttpURLConnection), 418
getReadableDatabase() (SQLiteOpenHelper),
543
getSearchableInfo(…) (SearchView), 464
getService(…) (PendingIntent), 473
getSharedPreferences(…) (Context), 461
getTargetFragment() (Fragment), 221
getTargetRequestCode() (Fragment), 221
getter and setter methods, generating, 33, 34, 133
getWritableDatabase() (SQLiteOpenHelper),
543
Google APIs, 117, 526
Google Maps API, 573, 574
Google Play services SDK, 573
GPS
adding ACCESS_FINE_LOCATION permission,
531
adding ACCESS_MOCK_LOCATION permission,
537
adding uses-feature, 531
gradient (drawable), 401, 405
graphical layout tool, 157-165, 251
GridView
(see also AdapterView, ListView)
for display columns, 416
setOnItemClickListener(…), 503
H
Handler, 441, 445
handlers, 441-449
HandlerThread
vs. AsyncTask, 449
handling downloads, 439
hardware devices, 24
hardware menu key, 256
-hdpi suffix, 46
hierarchical navigation, 262
HOME (Intent), 383
Home button, 60
home screen, 383
Honeycomb, 114
HTTP networking, 414, 417-419, 422
HttpURLConnection
class, 418
getInputStream(), 418
getOutputStream(), 418
I
icons, 256, 257
image handling, 334-338
ImageButton, 50
ImageView, 331
implicit intents
action, 350, 376

ptg11078569
Index
594
ACTION_CALL category, 357
ACTION_DIAL category, 357
ACTION_PICK category, 353
ACTION_SEND category, 351
benefits of using, 345
for camera, 299
categories, 350, 376
CATEGORY_DEFAULT, 377
data, 350
v. explicit intent, 350
parts of, 350
sending with AlarmManager, 473
type, 350
include (layout), 394
inflating layouts, 16, 140
initLoader(…) (LoaderManager), 562
InputStream
for delivering bytes, 418
read(), 418
inset (drawable), 404, 405
Intent
addFlags(…), 382
constructors, 100
createChooser(…), 352
getBooleanExtra(…), 103
putExtra(…), 102, 193
setClassName(…), 380
setComponent(…), 380
intent filters
BOOT_COMPLETED, 486
explained, 350
MAIN, 109
SEARCH, 457
SHOW_NOTIFICATION, 491
intent services
processing commands, 468
purpose, 467
intents
(see also broadcast intents, explicit intents,
extras, implicit intents, Intent)
communicating with, 100, 101
implicit v. explicit, 345
IntentService, 467
internal storage, 273
invalidate() (View), 521
invalidateOptionsMenu() (Activity), 477
is prefix for variable names, 33
J
JavaScript Object Notation (see JSON)
JavaScript, enabling, 507
Javascript, injecting objects, 510
JSON (JavaScript Object Notation)
defined, 274
loading, 278-280
saving app data as, 274-277
serialization, 276
v. SQLite, 541
toJSON(), 275
JSONArray, 275
JSONObject, 276
L
-land qualifier, 62
language settings, 245
launch mode
for search, 456
types, 459
launcher activities, 109
LAUNCHER category, 109, 377
layer-list (drawable), 404, 405
layout attributes
android:contentDescription, 51
android:drawable, 292
android:drawablePadding, 48
android:drawableRight, 48
android:focusable, 189
android:icon, 256
android:layout_gravity, 63
android:layout_height, 13
android:layout_weight, 164, 301
android:layout_width, 13, 301
android:orientation, 13
android:padding, 156
android:stretchColumns, 390
android:stretchMode, 416
compatibility and, 256
layout fragments, 232, 233
layout parameters (layout_), 156
LayoutInflater, 27, 141
layouts
(see also graphical layout tool, layout
attributes, widgets)
alternative, 62-64
creating new, 91

ptg11078569
Index
595
defined, 2
defining in XML, 11-13
design documentation, 155
include, 394
inflating, 16, 140
landscape, 62-64
managing multiple, 165
merge, 397
naming, 6, 92
previewing, 14, 94, 251
root element, 12
testing, 251
view hierarchy and, 12
layout_weight attribute
Android attribute, 164
-ldpi suffix, 46
library projects, 294
LinearLayout, 9, 12
lint (see Android Lint)
Lint Warnings view, 86
list items
activated state, 291
changing background, 291
customizing display of, 184
handling selection, 183, 288, 291
setting text of, 182
list-detail interfaces, 125, 201, 359-369
listeners
defined, 20
as interfaces, 20
setting in fragments, 141
setting up, 20-24
ListFragment
compatibility and, 170
creating, 170, 171
defined, 168
getListAdapter(), 184
ListView and, 171
onListItemClick(…), 183
setListAdapter(…), 181
support library class, 170
lists
(see also adapters, ListFragment, ListView)
basic mechanics of, 178-184
displaying, 167
getting item data, 179
getting the adapter, 184
setting adapter, 181
ListView
(see also AdapterView)
basic operations of, 178
default implementation, 171
enabling multiple selection, 288
setChoiceMode(…), 288
setEmptyView(…), 270
Loader, 561
LoaderCallbacks, 562
onCreateLoader(…), 566
onLoaderReset(…), 566
onLoadFinished(…), 566
LoaderManager, 562
loaders, 561-571
loadLabel(…) (ResolveInfo), 378
local files (see app data)
localization, 245, 246
location updates
(see also GPS)
delivery mechanisms, 529
last known location, 536
receiving broadcast updates, 531
testing, 533
testing real device with a TestProvider, 537
testing virtual device with DDMS, 537
LocationListener, 529
LocationManager, 528-530
Log, 54
Log.d(…), 78
LogCat, 56-61
(see also logging)
logging
levels, 70
Log.d(…), 78
messages, 54
methods, 70
of exceptions, 78
of stack traces, 78
TAG constant, 54
long-press, simulating on emulator, 287
Looper, 439, 442
LRU (least recently used) caching strategy, 450
LRUCache, 450
M
m prefix for variable names, 19
MAIN category, 109, 377

ptg11078569
Index
596
main thread, 421
makeText(…) (Toast), 23
manifest
(see also manifest attributes)
adding camera permissions to, 303
adding GPS permissions to, 531
adding network permissions to, 419
adding service to, 468
adding uses-feature GPS to, 531
adding uses-permission INTERNET, 419
Android versions in, 115
build process and, 26
declaring Activity in, 97
defined, 97
uses-feature, 304
uses-permission, 303
uses-sdk, 115
manifest attributes
android:configChanges, 510
android:protectionLevel, 495
android:resource, 457
android:screenOrientation, 304
android:theme, 231
maps
adding live updates to, 583
adding markers to, 582
displaying, 575
displaying a path on, 579
master-detail interfaces, 125, 201, 359-369
match_parent, 13
-mdpi suffix, 46
MediaPlayer, 227
create(…), 234
documentation, 236
on different thread, 235
release(), 234
stop(), 234
video playback, 236
MenuItem, 261, 286
menus
(see also action bar, context menus, options
menus)
android:actionViewClass, 463
creating XML file for, 255
defining in XML, 255
as resources, 255
search and, 463
merge (layout), 87, 397
Message, 441
message handlers, 441-449
message loop, 438
message queue, 438
messages, 441-449
meta-data
parent activity, 265
searchable, 457
minimum required SDK, 115
minSdkVersion, 115, 116
model layer, 35
model objects, 35
motion events, handling, 518-521
MotionEvent
actions, 518
class, 518
getAction(), 518
MVC (Model-View-Controller), 35-37
N
namespace, Android XML, 12
navigateUpFromSameTask(…) (NavUtils), 265
navigation
types of, 262
NavUtils
for ancestral navigation, 265
navigateUpFromSameTask(…), 265
network, checking availability of, 470
networking (HTTP), 414, 417-419, 422
NetworkOnMainThreadException, 421
newInstance(…) (Fragment), 195
9-patch images, 409, 410
Notification, 478
NotificationManager, 478
notifications, 478, 479
notify(…) (NotificationManager), 478
NullPointerException, 76
O
onActionItemClicked(…)
(ActionMode.Callback), 289
onActivityResult(…) (Activity), 106
onActivityResult(…) (Fragment), 217
OnCheckedChangeListener interface, 153
onClick(View) (onClickListener), 21
OnClickListener interface, 21

ptg11078569
Index
597
onContextItemSelected(…) (Fragment), 284,
286
onCreate(Bundle) (Activity), 16, 53-55
onCreate(…) (Fragment), 140
onCreate(…) (SQLiteOpenHelper), 543
onCreateActionMode(…)
(ActionMode.Callback), 289
onCreateContextMenu(…) (Fragment), 284
onCreateDialog(…) (DialogFragment), 213
onCreateLoader(…) (LoaderCallbacks), 566
onCreateOptionsMenu(…) (Action), 257
onCreateOptionsMenu(…) (Fragment), 257, 258
onCreateView(…) (Fragment), 140
onDestroy() (Activity), 53
onDestroyActionMode(…)
(ActionMode.Callback), 289
onDraw(…) (View), 522
onHandleIntent(…) (IntentService), 467
onItemCheckedStateChanged(…)
(MultiChoiceModeListener), 289
onListItemClick(…) (ListFragment), 183
onLoaderReset(…) (LoaderCallbacks), 566
onLoadFinished(…) (LoaderCallbacks), 566
onLocationChanged(…) (LocationListener),
529
onOptionsItemSelected(…) (Fragment), 261
OnPageChangeListener interface (ViewPager),
207
onPageScrolled(…) (ViewPager), 208
onPageScrollStateChanged(…) (ViewPager),
208
onPageSelected(…) (ViewPager), 208
onPause() (Activity), 53
onPostExecute(…) (AsyncTask), 430
onPrepareActionMode(…)
(ActionMode.Callback), 289
onPrepareOptionsMenu(…) (Fragment), 477
onProgressChanged(…) (WebChromeClient), 509
onProgressUpdate(…) (AsyncTask), 432
onReceivedTitle(…) (WebChromeClient), 509
onRestoreStateInstance(…) (View), 524
onResume() (Activity), 53, 197
onResume() (FragmentManager), 197
onSaveInstanceState(…), 241, 243
onSaveInstanceState(…) (Activity, 65-67, 69,
70
onSaveInstanceState(…) (Fragment), 140, 237
onSaveStateInstance() (View), 524
onSearchRequested() (Activity), 453
onStart() (Activity), 53
onStop() (Activity), 53
onTextChanged(…) (TextWatcher), 141
onTouchEvent(…) (View), 518
OnTouchListener (View), 518
onUpgrade(…) (SQLiteOpenHelper), 543
open(…) (Camera), 304
openConnection() (URL), 418
openFileOutput(…), 279
options menus
accessing on pre-Honeycomb, 259
android:showAsAction, 256
compatibility and, 283
creating, 257
defined, 253
determining selected item, 261
populating with items, 257
pre/post-Honeycomb behavior, 260
responding to selections, 260
updating dynamically, 477
updating dynamically (post Honeycomb), 477
organizing imports, 19, 24
OutputStream, 276
OutputStreamWriter, 276
overflow menu, 256
@Override, 56
P
PackageManager
class, 357
metadata and, 265
queryIntentActivities(…), 357
packages, naming, 3
padding, 156
Paint, 522
Parcelable, 524
parsing XML, 426
PendingIntent
details, 474
getBroadcast(…), 530
getService(…), 473
location updates and, 529
persistent data
with JSON, 273
using shared preferences, 461
perspectives

ptg11078569
Index
598
DDMS perspective, 75
Debug perspective, 80
defined, 75
Java perspective, 75
resetting, 75
switching between, 75
PointF, 519
post(…) (Handler), 448
PreferenceManager
getDefaultSharedPreferences(…), 461
preferences (Eclipse), 33
preloading, 450
processes, 384, 385
progress indicator
hiding, 509
spinner type, 320
updating from background thread, 432
ProgressBar, 320
projects
adding resources, 46
configure, 3
creating, 3-6
gen directory, 16
layout, 6
library, 294
res/layout directory, 16
res/menu directory, 255
res/raw directory, 228
res/values directory, 16
setting package name, 3
setting project name, 3
src directory, 15
protection level values, 495
publishProgress(…) (AsyncTask), 432
putCharSequence(…); (Bundle), 195
putExtra(…) (Intent), 193
putInt(…); (Bundle), 195
putSerializable(…) (Bundle), 195
Q
queryIntentActivities(…) (PackageManager),
357
R
R, 16
randomUUID(), 133
read() (InputStream), 418
Recents button, 60
recycle() (Bitmap), 337
registerForContextMenu(…) (Fragment), 285
RelativeLayout, 185, 186
release key, 26
release() (Camera), 304
release() (MediaPlayer), 234
remove(…) (FragmentTransaction), 208
request code (Activity), 104
requestLocationUpdates(…)
(LocationManager), 530
res/layout directory, 16
res/menu directory, 255
res/raw directory, 228
res/values directory, 14, 16
ResolveInfo, 377, 378
resource IDs, 16-18
+ prefix in, 18, 187
multiple layouts and, 165
syntax, 187
resources
(see also configuration qualifiers, drawables,
layouts, menus, strings)
adding, 46
alias, 363-365
alternative, 247-250
default, 246
defined, 16
directory structure, 251
localizing, 245, 246
location of, 16
naming requirements, 251
referencing in XML, 47
string, 13, 14
styles, 392, 393
restartLoader(…) (LoaderManager), 562
result code (Activity), 105
retained fragments, 237-243
retainInstance property (Fragment), 237, 238
rotation
activity lifecycle and, 61-65
before fragments, 243
onSaveInstanceState(…) and, 241, 243
preventing, 304
saving data across, 65-67
running on device, 44, 45

ptg11078569
Index
599
S
s prefix for variable names, 33
scale-independent pixel (see sp)
screen orientation, 62
forcing, 304
screen pixel density, 46, 154, 246
screen size, determining, 373, 374
ScrollView, 347
SD card, 273
SDK versions
(see also compatibility)
build target, 116
codenames, 113
installing, xxi
listed, 113
minimum required, 115
target, 115
updating, xxii
search
configuration, 456
configuring emulator for, 458
coordinating with SearchManager service, 456
hardware button, 453
how it works, 458
integrating into app, 451
intent filter, 457
metadata, 457
post Honeycomb, 463
program-initiated, 453
specifying details of, 465
searchable activity, 458
searchable.xml, 455
SearchView
bug, 465
class, 463
getSearchableInfo(…), 464
selector (XML element), 292
services
adding to manifest, 468
bound, 481
lifecycle of, 480
locally bound, 482
non-sticky, 481
notifying user, 478
purpose of, 467
remotely bound, 483
sticky, 481
setArguments(…) (Fragment), 195
setChoiceMode(…) (ListView), 288
setClassName(…) (Intent), 380
setComponent(…) (Intent), 380
setContentView(…) (Activity), 16
setDisplayHomeAsUpEnabled(…) (ActionBar),
263
setEmptyView(…) (AdapterView), 270
setHasOptionsMenu(…) (Fragment), 258
setJavaScriptEnabled(…) (WebSettings), 507
setListAdapter(…) (ListFragment), 181
setOffscreenPageLimit(…)
(FragmentStatePagerAdapter), 206
setOnClickListener(…), 21
setOnItemClickListener(…) (GridView), 503
setOnTouchListener(…) (View), 518
setPositiveButton(…) (AlertDialog.Builder),
213
setPreviewDisplay(…) (Camera), 308
setRepeating(…) (AlarmManager), 474
setResult(…) (Activity), 105, 106, 199
setRetainInstance(…) (Fragment), 237
setTargetFragment(…) (Fragment), 221
setter methods (see getter and setter methods)
setText(…) (TextView), 104
setTitle(…) (AlertDialog.Builder), 213
setType(…) (SurfaceHolder), 306
setView(…) (AlertDialog.Builder), 215
shadow effect (adding), 404
shape drawables, 401
shared preferences, 461, 462
SharedPreferences, 461
SharedPreferences.Editor, 462
shouldOverrideUrlLoading(…)
(WebViewClient), 507
show() (Toast), 23
show(…) (DialogFragment), 214
simulator (see emulator)
SingleFragmentActivity, 172, 174-176, 361
singletons, 169
solutions file, 45
sp (scale-independent pixel), 155
SQLite, 541-560
SQLiteDatabase, 541, 556
SQLiteDatabase query(…) (SQLiteDatabase),
556
SQLiteOpenHelper, 541, 543
src directory, 15

ptg11078569
Index
600
stack traces
in LogCat, 76
logging of, 78
startActionMode(…) (Activity, 293
startActivity(…) (Activity), 99
startActivityForResult(…) (Activity), 104
startActivityForResult(…) (Fragment), 199
startPreview() (Camera), 308
startSearch(…) (Activity), 465
state list (drawable), 402-404
, 291, 402-404
status bar, hiding, 315
stop() (MediaPlayer), 234
stopPreview() (Camera), 308
stretchable (drawable), 406
string resources
creating, 14
defined, 13
referencing, 48
strings file
default, 14
defined, 13
strings.xml, 14
styles, 392, 393, 401, 404
defined, 153
inheritance, 398
themes and, 154
styles.xml, 392
support library, 131, 132
SupportMapFragment, 575
@SuppressLint("HandlerLeak"), 444
@SuppressWarnings("deprecation"), 306
@SuppressWarnings("unchecked"), 445
Surface
client, 306
defined, 306
lifecycle of, 306
SurfaceHolder interface
setType(…), 306
using, 306-309
SurfaceHolder.Callback interface, 308
SurfaceView
defined, 300
getHolder(), 306
SurfaceHolder and, 306-309
-sw600dp suffix, 364
system icons, 256, 257
T
TableLayout, 230
TableRow, 230
tablets
creating virtual devices for, 359
user interfaces for, 359-369
TAG constant, 54
target fragment, 221
target SDK version, 115
@TargetApi annotation, 119
targetSdkVersion, 115, 116
task manager, 60, 380
tasks
and Back button, 380
defined, 380
v. processes, 384, 385
temporal navigation, 262
TextView
example, 9
inheritance, 50
setText(…), 104
TextWatcher interface, 141
themes, 154, 231
threads
background (see background threads)
main, 421
message queue, 438
processes and, 384
as sequence of execution, 421
UI, 421
Toast, 23
toasts, 22-24
touch events
handling, 518-521
intercepting, 321
U
UI fragments (see fragments)
UI thread, 421
Up button, 262-264
Uri.Builder
appendQueryParameter(…), 424
for escaping query strings, 424
URL
for making URL from string, 418
openConnection(), 418
URLConnection, 418

ptg11078569
Index
601
user interfaces
defined by layout, 2
for tablets, 359-369
laying out, 8-15
styles for, 392, 393
themes, 231
uses-feature, 304
uses-permission, 303
uses-sdk, 115
UUID.randomUUID(), 133
V
variable names
conventions for, 33
prefixes for, 33
Variables view, 81
versions (Android SDK) (see SDK versions)
versions (firmware), 113
video playback, 227, 236
VideoView, 236
View
(see also views, widgets)
draw(), 522
invalidate(), 521
OnClickListener interface, 20
onDraw(…), 522
onRestoreStateInstance(…), 524
onSaveStateInstance(), 524
onTouchEvent(…), 518
setOnTouchListener(…), 518
subclasses, 8, 50
view layer, 35
view objects, 35
ViewGroup, 12, 63
ViewPager, 201-210
in support library, 204
internals of, 209
OnPageChangeListener, 207
onPageScrolled(…), 208
onPageScrollStateChanged(…), 208
onPageSelected(…), 208
views
(see also widgets, layouts)
creating, 516
custom, 516-518
persisting, 524
simple v. composite, 516
touch events and, 518-521
using fully-qualified name in layout, 517
virtual devices
(see also emulator)
creating, 24
for tablets, 359
testing low-memory handling, 69
W
web content
browsing via implicit intent, 503
displaying in browser, 501
displaying in WebView, 501
displaying within an activity, 503
enabling JavaScript, 507
web rendering events, responding to, 507
WebChromeClient
for enhancing appearance of WebView, 508
interface, 508
onProgressChanged(…), 509
onReceivedTitle(…), 509
WebSettings, 507
WebView
for presenting web content, 504
handling rotation, 509
WebViewClient, 507
widgets
attributes of, 11, 156
Button, 9, 50
CheckBox, 151
DatePicker, 215
defined, 8
defining in XML, 11-13
EditText, 137
FrameLayout, 63
ImageButton, 50
LinearLayout, 9, 12
padding, 156
references, 20
ScrollView, 347
TableLayout, 230
TableRow, 230
TextView, 9
in view hierarchy, 12
as view layer, 35
wiring in fragments, 141
wiring up, 19

