Arousor Manual Rev2 V1
User Manual: arousor manual rev2 v1
Open the PDF directly: View PDF ![]() .
.
Page Count: 11

CLASSIC KNEE COMPRESSOR PLUG-IN
REV 2.0 INDEX
2 Features & Specs
3 What Is the AROUSOR?
What is an Audio Compressor/Limiter?
3 What’s New In Rev 2.0
4 Rev 2.0 Bullet Points
5 Block Diagram
5 Section Details
Compressor - In Att Rel Out, Ratio, Bargraph Display
AtMod
Soft Clipper
Blend
Det HP
Det Paremetric EQ
8 Example Settings
9 Saving and Sharing Presets Across Platforms
10 FAQs - Frequently Asked Questions
Technology for the Artist.
MANUAL IN PROGRESS
www.EmpiricalLabs.com

BACK TO INDEX
2
Rev 2.0
Back to Index
Features and Specs
Classic Empirical Labs SoftKnee Compression like you never heard in a software Plug in. Heavily
influenced by our own Distressor.
10 Ratios including our famous brick wall ratio, called RIVET in the AROUSOR.
New 1.5:1 and 2:1 ratios - Gentle and great for buss compression and glue
Our Huge White Knobs with high resolution numbering - For easy readability and repeatable settings.
Custom Direct Entry Knobs - Double Click in the middle of the knob and Enter an exact value. Allows
ease, accuracy, and speed when adjusting. You'll love it. Real world Parameter readout within the knobs
Unique Attack Shape. You will notice a carefully crafted sound on the AROUSOR's attack. Very analog
sounding without the choking often found in other Plug-ins.
Attack Modification circuit - Taylor the very front edge with this new & unique AtMod control.
Wide range of Attack and Release, with easy adjustability
Unique“Soft Clipping” Section - Soft saturate the peaks of waveforms to warm things up, and have even
greater control on the front edge of transient signals.
Crafted Odd and Even harmonics that enhances low and high level signals.
Saturation Meter - You will find this is one of the most useful displays, and helps keep the user aware of
how much crunch and smush is being applied to the peaks.
A “BAD!” Hard Clip Indicator – A “Bad” Clip LED that lets user know he is within .5dB of hard clipping on
the output. Usually if this comes on, turning down the output knob will fix it.
Giant Bargraph, high resolution, providing a very analog look and feel.
Idealized controls - Many of the same controls as the Distressor but Compressor Curves, pots curves and
many other things have been made closer to what we consider ideal. Users will benefit from this with speedy
adjustments. However, the exact same settings on the Distressor will usally not result in the same sound.
Stereo and Multi Mono versions - The unit can be a linked Stereo version, or a Muliti-Mono (Dual Mono)
version in Pro Tools when inserted on Stereo Tracks.
Infinite headroom internally - Almost impossible to clip, but we do monitor the output in case your DAW is
not floating point.
Zero Latency - One sample in, One sample out.
Supports All Sample Rates from 44.1KHz to 192KHz.
Evolutional Technology - First Empirical Labs software product offering "Evolutional Technology". More
unique and amazing features will be coming your way over the years. For instance, Rev 2.0 didn't only fix
things and extend support for AAX-DSP, but if offered totally new features like Text-based Preset Sharing
and our first Expert Panel, offering a new control for the BLEND section.
AAX-DSP Support - AAX instance counts per DSP as of AROUSOR 2.0
Sample Rate
Mono: Multichannel Stereo
48K: 7 3
96K: 3 1
192K: 1 0
Note: One can run multi-mono stereo at 192k, which will take up 2 DSPs (one for each channel). There is zero additional processing
latency beyond the normal DSP insert latency.
Specs
Freq. Response is sample rate dependant, but 10Hz - 20KHz +- .2dB is assured.
Distortion Ranges between .004% and 30% depending on mode and settings.
Attack Ranges is 50uS – 40mS.
Release range is 50mS – 3000mS (3 Sec).
Empirical Labs - Technology for the Artist

3
What is the AROUSOR?
The AROUSOR is a software plug-in audio Compressor, that was designed to finally offer the sound and features from our
own award winning compressors, most notably, the Distressor. For over 20 years, producers and engineers have been
yearning for a Distressor-In-The-Box. At least 5 other companies have tried to capitalize on this huge market "vacancy",
but with the AROUSOR, Empirical Labs will satisfy the need for an In-the-Box compressor that starts where the Distressor
left off. We modeled the Distressors detector circuits on a component basis, to get the magic gain control that tens of
thousands have enjoyed for decades. But we did NOT limit ourselves to the features of our award winning product.
As this plugin does all kinds of non-linear stuff, we had to employ a variety of techniques to minimize common digital
artifacts found in almost all digital compressors/limiters etc. Unfortunately, these techniques are costly as far as
processing, and one has to streamline certain DSP processes for less CPU load without sacrificing any audio quality.
Ironically, sometimes stuff that is hard in Analog is easy in Digital, and sometimes stuff that is hard (or impossible) in Digital
is easy in Analog.
The first implementation of this plugin imitates the look and feel of real world stuff. In this case, it is the look and feel of our
own Empirical Labs hardware. But in Digital, a whole universe opens up with interfaces. Suddenly things you could never
do in the hardware world become simple. It’s a wonderland.
The best part of getting this plugin now is an immediate improvement of your mixes, and increased speed in your workflow.
But it is just the beginning. More great features are coming, including new processing and interface upgrades, with more
awesome presets to lock n' load. Rev 2.0 is our first delivery of the many planned upgrades, and lights the way for the
AROUSOR's long evolution.
What is an Audio Compressor or Limiter?
A compressor/limiter is a device or software that does musical, automatic volume control. For those unfamiliar with what an
audio compressor is, imagine a little guy that turns the volume up when a signal gets too soft, and turns it down when it gets
too loud. And he does it very fast and automatically. In engineering terms, it is called an Automatic Gain Control (AGC).
But when these devices are used for enhancing music, they are called audio Compressors OR Limiters, and the way they
turn things up and down becomes absolutely critical. Audio Compressors can be done with hardware, that is with resistors,
caps, and transistors, etc, or they can be done mathematically in software. When a software compressor is done in a
standard format for open use with computer music production, it is called a Compressor "Plugin", and this… is our
AROUSOR Plugin.
Whats New in the Latest Revision
Back to Index
Rev 2.0 is the first of a few evolutional updates for the AROUSOR. Below we detail the major new features and
differences in the latest Revision, and give a brief description of the various improvements. See the next page for
the Bullet Point list of all changes.
Rev 2.0 Enhancement Details
AAX-DSP Support - This has been promised from the start, and we now have it working on the MAC Platform.
Windows will follow shortly, once copy protection is re-established.
Preset Sharing System - Under the HELP menu, you will find a new button to copy or paste text-based presets of
the AROUSOR. Using common text for the presets allows users to copy and paste settings to emails, websites,
documents etc, and likewise, to paste someone elses settings to the current AROUSOR instance. Note that the
name of the preset is not saved nor loaded in this system. So it is often useful to note the names of outside
presets and after pasting to the AROUSOR, save the preset under the original name so you know where it came
from.
Dry Level Matching for the BLEND Control - We introduce When using the original blend control, there could be
significant differences between the Dry signal (CCW) and the Compressed signal (Full CW). Because this is a
BACK TO INDEX
BACK TO INDEX

4
true feedback compressor able to work radically, we now allow the user to match the two signals by ear to
whatever degree they desire. By nature, a compressor will make the level different and the waveform more
dense, making it have a different RMS and "apparent" level to the original Input signal. In reality, one cannot
match the compressed and dry level throughout an entire dynamic track. It will change from section to section
and be a bit subjective. But using our ears, the new Dry Trim control allows the user to adjust the dry level up or
down to match the compressed level to their complete satisfaction. This Dry Trim level gets saved with presets.
Much Faster Bargraph - The Rev 1 Bargraph could miss many peaks. On drums and transient material, the Gain
Reduction Meter accuracy could be off by more than 10dB. The new bargraph is much faster and acts a lot more
like an analog bargraph. You will generally see a lot more gain reduction on your meters than with Rev 1. This
also makes it easier to match our Distressor settings visually. Rev 1 usually looked like it had a lot less gain
reduction than the Distressor to get the same sound.
Much more efficient code for Pro Tools - To implement AAX-DSP, much of the processing code was re-written
and streamlined. Great care was taken not to disturb the sound, but increase the speed by up to 4 times, allowing
many more instances to be used on a Pro Tools system.
Controller & Automation fixes - There were a number of automation and controller functions with problems in
Rev 1, and many of these have been addressed. Several DAWs are affected.
New Graphics User Interface - We added a little more resolution, and depth to the interface graphics, and
improved some displays and controls. We added our first Expert Button in the Blend Section.
What's New in Rev 2.0 - Bullet Points
Back to Index
oAAX-DSP for the MAC. Windows version to follow shortly, pending copy protection repair.
oGreater efficiency, especially in Pro Tools AAX. 1/3rd of the CPU usage!
oGreatly increased Bargraph accuracy. You will find it makes matching a Distressor sound much
easier.
oPreset Sharing Function - Works across all platforms and makes it easy to share, even with emails.
oBackwards Compatible with Rev 1.0. Won't "break" your past mixes.
oGraphic and Interface Improvements - New colors, and 3d Depth
oOur first "Expert" Button appears for the BLEND Section. See below. These hidden Expert panels
are going to thrill AROUSOR users many times, over the next few years.
oThe BLEND section now has an Expert Panel that brings up a panel with a new control to allow perfect
matching of levels between Compressed and Dry (un-compressed) signals.
oNew Presets from Famous Engineers
oNew markings for matching Distressor Detector settings. New Blue Marks on Det HP Freq, Det BP
Gain
oHigher resolution readout on Det BP BW. Reads to .01 places.
oBetter support for Control Surfaces, including the older Avid D-Command
oMany bug fixes for various DAWs, and operational improvements
oMAC only for now, Windows support coming soon, when copy protection is re-established.
BACK TO INDEX
5
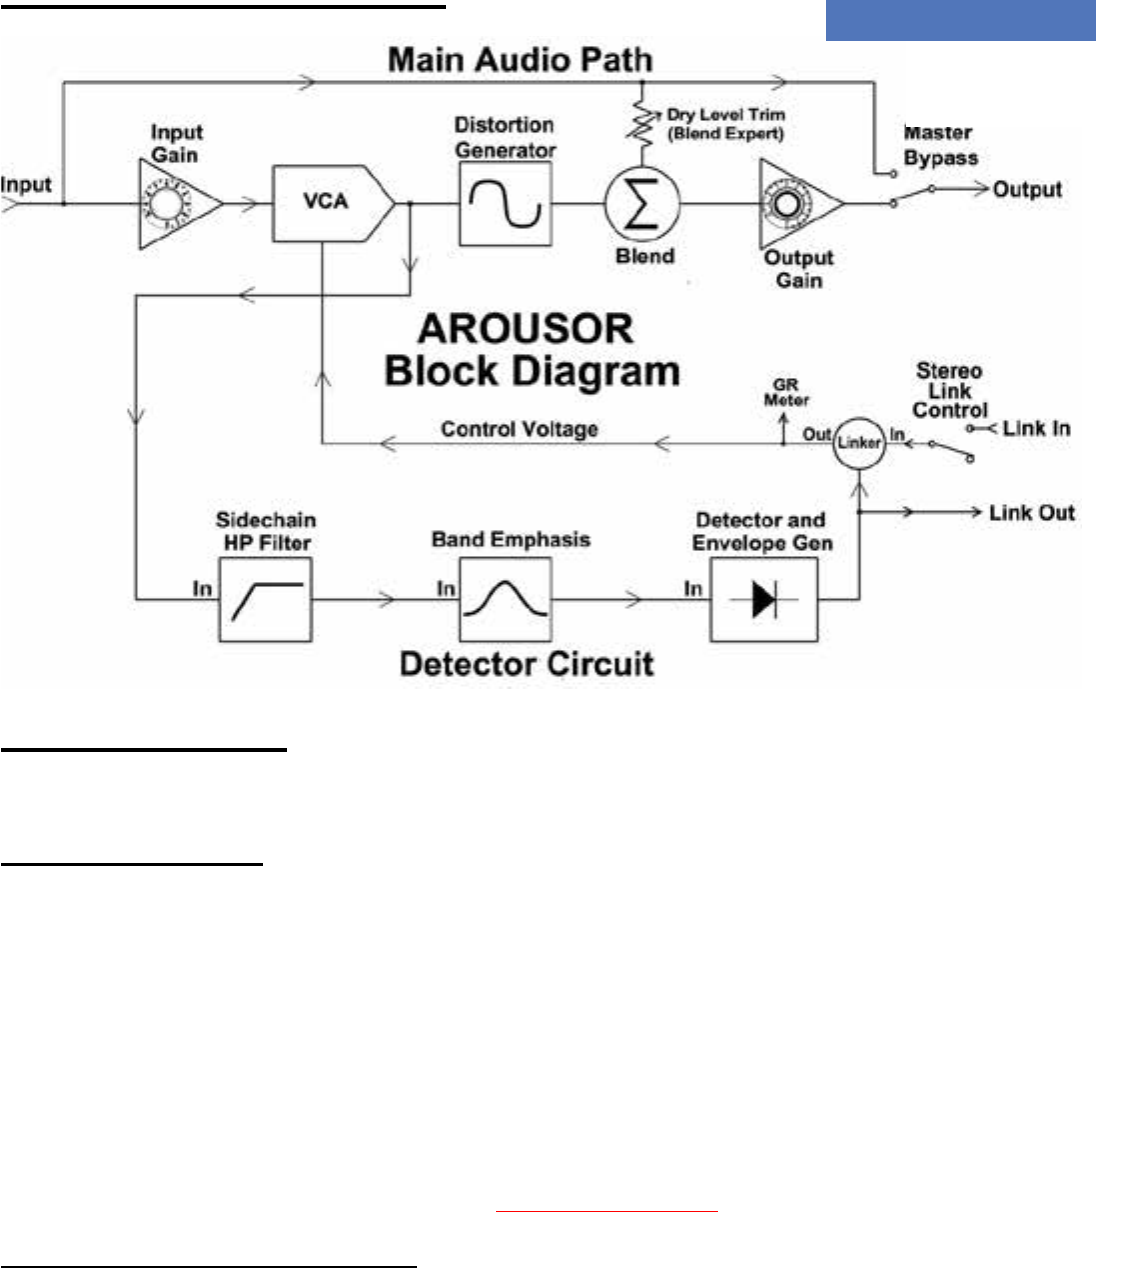
AROUSOR BLOCK DIAGRAM
Back to Index
SECTION DETAILS
Below, we go into a little more detail about each Major Section of the AROUSOR. We have broken this subject
into 6 Main Sections: 1) The Compressor, 2) AtMod 3) Saturation 4) Blend 5) Det HP 6) Det Band EQ
THE COMPRESSOR - This is the main section of the AROUSOR and is comprised of the five Big White
Knobs and the Ratio Select. We separate this here from the other sections, as they can be thought of as
enhancements to the basic Compressor. The compressor in the AROUSOR is the most critical in sound, and the
processing which separates Empirical Labs from the crowd.
Modeled after our most famous compressor on the component level, it's five main controls are the INPUT,
ATTACK, RELEASE, OUTPUT Knobs, and the RATIO select. The User who masters these five controls will
have classic compression at their beck and call, in the box, and have a tool capable of producing top notch
recordings. For new comers to compression, the AROUSOR is going to be a revelation, making Compression
easy and fun to learn. The design of these five main compressor controls have such a range, and such an effect,
that within a couple hours of playing around, most any novice will have a good understanding of basic
compression. Plus, we have many great presets for all kinds of sources.
If you are unfamiliar with what compression is, see What is a Compressor?
The Five Standard Compressor Controls
IN - Input - This Big White Knob controls how much compression is used. If you want more compression,
turn this up (CW) and drive into the compressor, and vice versa to lower compression. This arrangement
BACK TO INDEX

6
supplants the "Threshold" control found on many compressors. Because of the knees in almost all of our
ratios, above about 6dB of peak compression, the output will start to flatten out, so often, when you turn up
the INPUT to increase compression, the output will hardly change. We think this is an advantage over
adjusting the "Threshold" control of other compressors, which can cause the output level to change
unpredictably, until you really know the unit. Usually once you set the output level with our compression
applied, you can make minor adjustments of the input without adjusting the output, except on the lowest
ratios. This method also has less interaction with other controls like AtMod and Soft Clipping. We hate
unnecessary control interaction.
ATT - Attack control. This controls how fast it turns down and compresses a signal. The slower it is, the
more transients and dynamics a signal will have. When it is faster, more transients are grabbed and the less
dynamics, and less overshoot you will have. When you want to add attack to something, add Attack by
turning it clockwise (up), making it slower. On percussives, this creates overshoot, and can really add power
and whack to the source. Extremely fast attacks (below 1mS)can cause problems, like modulation distortion
on bass stuff, and produce a squashed, clamped sound. But it can also be beautiful on plucked instruments
and percussives, if adjusted judiciously. Attack Range is 50uS to 40mS.
REL - Release Control. This tells the compressor how quickly to recover and turn the signal back up after it
has been lowered by compression. With a fast release, a signal will have more body and ambience, as it
brings up the lower level stuff quickly. With a slower release, the more overshoot, less ambience you will
add. The AROUSOR gives you great control over the Attack and Release, and their "shape" is probably one
of the main components that give our compressors their classic sound, and ease of use. Release Range is
50mS to 3 Sec.
OUT - This adjusts the final output level. This will be the control one uses to match the Bypassed volume, or
tweak an overall track level. The Output control is after the "BLEND" mixer, so it does not affect the "Dry"
to "Comp" (Compressed) signal ratio. If the BAD! Led comes on, lowering this OUT control will usually
stop it. However, on floating point DAWs, there is not actual clipping happening even when BAD! lights up.
RATIO - This is the control that selects how severe or how steep the compression is. The lower the ratio, the
less the AROUSOR will change the dynamic range. The higher the ratio, the more the dynamic range will be
squeezed smaller, or limited. We have added new ratios here, ones not found on our Distressor. Most
notable are the new low ratios 1.5:1 and 2:1. Among other things, these are excellent for master buss
compression to help fit and glue things together, but they can invisibly compress almost anything.
Note: If you wish to match a favorite Distressor Ratio, select the next higher ratio on the AROUSOR. IE 6:1
Distressor equals the 8:1 on the AROUSOR.
Back to Index
ATTACK MODIFICATION - AtMod - This section is actually part of the Compressor envelope circuit,
but as it is a new and totally unique control, we are discussing it separately. AtMod works in conjunction with
the standard Attack control, and slows up the initial slope of the attack, especially on transient material. Many
older analog compressors exhibit a non-linear initial attack when used heavily on transient material, and the
original AtMod intent was to make this interesting effect available AND controllable on the AROUSOR. For
this type of treatment, small amounts of AtMod are best. Just turning on the first Green LED of the AtMod
indicator will often do. As often happens, users have found all kinds of uses for AtMod beyond subtlety, and
some examples can be found in factory presets.
When AtMod is used to extreme, the user will eventually start limiting the total gain reduction amount. The
amount the Gain Reduction is limited to depends on the Ratio mostly, but also the time constants.
BACK TO INDEX
Attack Range is 50uS to 40mS.

7
SOFT CLIPPER - This is a musical saturation "circuit" and is the second biggest factor in the Arousers
sound. It can gently reduce and round the peaks of waveforms, similar to tubes or analog Tape. We have
tweaked the math of this Soft Clipper to contain both Even and Odd harmonics, so at low levels, the 2nd
harmonic becomes dominant, while at higher levels, the Odd harmonics dominate, flattening both the top and
bottom of the waveforms. There is actually a Class A circuit inside. This has caused a fair amount of problems
in modern DAWs because it has a bias point that requires stabilization time at first instancing. Because we
experimented with topologies to minimize digital artifacts, allow easy control, yet maintain Zero Latency, you
will find you can add tremendous amounts of saturation to signals and not hear it as actual distortion. This allows
you to soften transients, bring up the RMS level, add LF Harmonics, and generally make the AROUSOR sound
very analog.
Because of these smooth analog harmonics, early on we realized we needed a visual guide for Soft Clipping to
keep users out of trouble. Because of the topology, Empirical Labs was able to introduce a unique distortion
readout. There is a four LED bargraph in the Soft Clipping section, and it quite accurately shows you the
percentage of THD (Total Harmonic Distortion) being added to a signal. With this display, you will see that you
can add 8% or even 14% on transients and hardly be able to hear any difference, but on metering following the
AROUSOR, you will see some substantial decreases in levels, as the peaks are flattened out instantly. Try the
following to get a better grasp on the AROUSOR's Soft Clipping:
Put the AROUSOR on a stereo track (mono is fine too) like a Drum Buss or Master Buss or something that is
always going. Set it to some decent compressed sound, but initially keep Saturation at 0 (OFF). On a DAW
meter following the AROUSOR, set some nice meter levels at some kind of hi-res point on them.
Now, while listening, watch the meters, and slowly start turning up the Saturator. Initially, the meters will drop a
dB but both channels will still peak differently. Now increase the Saturation and watch the meters drop more, and
notice it is STILL difficult to hear the Soft Clipping as actual saturation. On transient peaks, you can hit 8% THD
and have a lot of trouble hearing it.
As you increase the Saturation, at some point the two channels will peak at the same place, and you will be
dropping peak levels by 3 - 4dB from the original unsaturated level. At this point, you may hear the Saturation as
Distortion, especially when it starts affecting more than just the transients. The Display may well be showing
you are hitting 14% THD! You will find this Saturation display to be a re-assuring reference as you become an
expert at using our Soft Clipper. Distort responsibly.
BLEND - This is your usual Wet/Dry control, sweeping from the input of the AROUSOR (Dry), to the
Compressor-Saturator Output (Comp). See Block Diagram. You may often have a significant level difference
between the Dry and Compressed levels, as this is a feedback compressor, and does not use a Threshold control.
The level match will initially be determined by the recorded level of the track being treated. However…
Rev 2.0 now allows the dry level to be manually trimmed by hitting the "e switch", which brings up the Expert
Panel and additional control for the BLEND section. Use the new Dry Level Trim knob to match the "Dry" level
to the compressed level (Blend full CW). Sweep between the two extremes on the BLEND control and get an
idea of their relative levels, and with quick adjustment, match the dry level to your compressed level, as close as
your ear can determine. The actual mixer between the Wet (compressed) and Dry is just before the OUTPUT
knob, so as you adjust your Output, the blend between Dry and Compressed stays perfectly the same, unlike
many other software compressors.
DETECTOR HP - The Detector High-pass keeps low frequencies from affecting the compressor and can
prevent bass drums and other low frequency sources from pumping and modulating the signal. Detector high-
pass filters have become quite standard since the Distressor offered one of the first controllable Det HP back in
BACK TO INDEX

8
1994. This is a gentle 6dB per octave filter, and when turned up high on some sources like vocals, can help bring
out lower register notes. On full BW material, it can keep LF material like Kick Drums from "pumping"
everything. The Audio itself is NOT directly affected or filtered with these Detector sidechain filters, but only
the signal going to the detector, which determines how things get turned down and compressed.
DETECTOR PARAMETRIC EQ - Like the Det HP, this is filtering that affects what frequencies the
Detector "sees", and therefore what frequencies the Compressor is most sensitive too, or what it ignores. This
has many uses, and is wildly variable. Sometimes it's effects can be counter-intuitive, so be careful with this
control, especially at first. With a +-30dB range, it can allow even frequencies with low levels to affect the
compressor. For instance, if you are dealing with musical passages that get harsh in the 3Khz-5Khz range,
boosting a wide band there by 10dB or more will help ride those problem areas lower. You can even build an
effective De-Esser out of the AROUSOR using the sidechain EQ sections. We include at least one De-Esser
setting in our Factory Presets, along with many other examples of Detector Parametric EQ use.
Back to Index
EXAMPLE SETTINGS
As this is a plug-in that comes with presets which allows quick sharing and recall of specific settings, this
document will not go into source specific detailed settings like Empirical Labs other product manuals do. But
below, we give some helpful hints for general musical treatment of sources. See our preset sharing bulletin board
at http://www.empiricallabs.com/arousorpresets.html.
Treating the Front Edge of Sources
One of the things that is the hallmark of Analog Vs Digital sound is how a spikey front edge of a signal gets
handled.
The AROUSOR gives the users a few options. If you are treating percussives and want more attack, more front
edge, you can slow the attack OR use the AtMod to let the first millisecond or two to come through a little
harder. This is the "Smacking Attack" that may separate the AROUSOR from other software compressors. I
honestly cannot imagine someone saying they cannot get enough "Attack and Punch" on a source with the
AROUSOR, when so desired.
Going in the other direction, one can soften the front edge using a fast attack OR, by using the AROUSOR's
Saturator. Digitally recorded snares and cymbals are often very peaky on the front edge, and need treatment. By
listening to the pointy source, slowly turn up the saturator and listen to the "point" slowly get transformed,
softened and crunched down. Too much and you end up with too "soft" a snare or cymbal, without definition and
punch. You will be over 14% THD at this point, which would sound distorted on a sustained pitch instrument.
But a Snare goes by pretty quick.
One of the favorite uses for the Saturator is on guitars. Especially spiky guitars like a semi-clean strat, or a single
coil guitar solo in the higher range. Depending on the sustain needed, apply between 3dB and 10dB of
compression. The front edge can really "Clack out" and become even more annoying. But with electric guitars,
already being heavily distorted, one can apply both a faster attack, AND a LOT more saturation before it is heard
disparagingly, especially compared to other sources. You will probably want to keep the AtMod off to minimize
any overshoot on the front edge.
We have a preset called Clean Fat Strat with which you can start, in this experiment. On a kind of screechy solo
guitar track, try a really fast attack (around 1mS or less), and turn the saturator up til you are pretty consistently
hitting 8% THD on the Saturation meter. Match the bypassed and compressed signal, then go back and forth to
BACK TO INDEX

9
test the edge-softening effect of the Saturator, as the soft clipping is increased. Between the compressor attack
time, and the Saturator, you can often take a pointy piercing guitar solo, etc, and turn it into a creamy, connected
sound with judicious use of the AROUSORS processing.
BTW, this same thinking can be applied to keyboards. Anything from bright grand pianos, to spiky electric
pianos, to radical synthesizer sounds. Getting rid of the "points" is often key (pun intended) to getting these
sources sit well in a mix.
Finally, the user has a parametric EQ in the sidechain at his fingertips. By emphasizing the harsh frequencies
here, 1K - 8K, you can have the compressor push back passages with excessive energy in this range. I have
successfully had guitar solos (and even vocals) ride themselves by boosting a wide band around 2K (2oct?), and
rolling off up to 250Hz on the DET HP so the lower warm passages are a little louder.
Back to Index
Saving, Loading and Sharing Presets
Starting with Revision 2.0, the AROUSOR incorporates a universal preset sharing system that is independent of
all platforms. We also have a preset sharing board on our website.
The AROUSOR Preset Sharing Page: http://www.empiricallabs.com/arousorpresets.html
To save a preset outside of a specific DAW, click on the Blue Help Button in the lower right corner of the
AROUSOR interface. At the bottom you will click on "Share Presets with others", and then select "Copy settings
to clipboard". It is now stored on the Computers clipboard and you can go to an email and paste. To paste on a
MAC, you can use the shortcut keys Command/v, and to paste on Windows machines, Ctrl/v. The "paragraph"
of preset text should now be pasted in your email. Or you can paste to any text editor or word processor and save
in a document.
If the preset had a name, it is often useful to put a note on the email or pasted preset text that says what the preset
was originally named, for future reference. The preset name does NOT get saved or loaded with the text based
preset.
To Load and recall a preset from outside into a running DAW, select the preset text from an email or saved
document, copy to the clipboard (Command C on Macs, Ctrl C on Windows), then go to the AROUSOR instance
where you want the preset to end up. Click on the Blue Help button in the lower right corner, then hit "Share
Presets with others" at the bottom of the help menu, and click on "Paste settings from clipboard". The
AROUSOR settings should change to the saved preset you just pasted. As stated above, it is often beneficial to
name and save the preset at this point, so it can be recalled in other sessions.
One should close the Preset Sharing and Help panel to go back to normal session operation.
BACK TO INDEX

10
FAQs - Frequently Asked Questions
Back to Index
oHow will I know when a new AROUSOR revision is out? You can join our mailing list, or check our
website from time to time. We send only a few newsletters a year, but we always send notification of new
revisions. Included will be a bullet list of the neat new features.
oHow do you install a new revision? You basically do the same install process as you did on purchase. Go
to the EmpiricalLabs.com website, click on software on the menu bar and select the AROUSOR page.
Navigate to the Buy It page and find the correct installer. There is one installer for MACs and one for
Windows. You can also click on Demo since the demo is the same as the purchased AROUSOR, and it will
take you to the installers.
oHow do I match some of my favorite Distressor settings? There is a HELP button on the AROUSOR itself
in the lower right corner. This tells you if you wish to match a favorite Distressor Ratio, select the next
higher ratio on the AROUSOR. IE 6:1 Distressor equals the 8:1 on the AROUSOR. There are many blue
markings on the knobs, with the round dots showing default settings. The small blue arrows show matching
for when the Distressor Detector Bandpass is engaged, among other things. The Attack and Release knobs
are close to the Distressors, but smoother and more idealized. We may publish a map of Distressor values to
AROUSOR Attack/Release values in the near future. But they are already pretty close.
oWill you have an Opto mode like the Distressor? Yes, it is in an upcoming revision.
oWill the AROUSOR have Brit Mode like the Distressor? We have provided for this.
oWhat does it mean when the “BAD!” Hard Clip light comes on – The “Bad” Clip LED lets user know
they are within .5dB of hard clipping on the output. Usually if this comes on, turning down the Output knob
will fix it. However, most DAWs now are floating point and virtually impossible to clip internally.
oHow come there is no Threshold control on the AROUSOR? - A Threshold control would interact with all
kinds of things: The Input control, the amount of compression, the Output level, the Saturation, and the
AtMod amount. If you liked everything but the amount of compression, a threshold control would require you
to re-adjust all of those to keep them the same. This became obvious when we played with a threshold trim
on the earliest revs. We quickly decided it really complicated things.
oCan I sidechain the control signal to another channel - Unfortunately you cannot at this time. Because of
the vintage topology, it is very difficult to sidechain and have the AROUSOR controlled in a predictable
fashion. Also DAWs seem to handle this differently with some not supporting it at all.
oI/O Compensation - Can the AROUSOR adjust the Output as the Input and amount of compression
are adjusted? This would try to keep the output level the same as you adjusted the Input. No, it is
pretty much impossible to do a decent job of this I/O compensation with a vintage compressor topology. But
as it is a knee compressor increasing the input once you are above 5 - 8 dB of compression will hardly affect
the peak output level at all. We strive for simplicity and ease of use, and automatic adjustments often just
complicate things.
BACK TO INDEX
Technology for the Artist.
www.EmpiricalLabs.com
ELI, WHY DID YOU DO THIS TO ME?
Reviewer: Jonathan Burnside from Petaluma, CA United States
I’ve owned a stereo pair w/ Brit mod and link mod and found them to be amazing room mic pairs. So I demo this Arouser, and damnit, it’s way
BETTER than the other 100 I already own (UAD, Slate, Plugin Alliances, et al). But priced over $300, I thought I’d wait. THEN you lowered the
price for a limited time... THEN you kick $100 to the Puerto Rico relief fund for every purchase. What could I do but buy it? It’s the “toughest”
plugin compressor I’ve used. It does such a punchy midrange when dialed in right, something I oen have to go to my hardware 1176 Blues-
tripe or hardware Shadow Hills Mastering compressor to get. I’m also surprised by how much I like it on the 2 bus and for mastering. For those
chores, I prefer it over a stereo pair of Distressors as it is way more exible. Now I wish I had the time to sell most of these other plugin compres-
sors I have, as they are just going to be gathering digital dust. jonathanburnside.com
PRETTY HECKIN€™ GREAT
Reviewer: Sam Guaiana from Toronto, ON Canada
First thing I did when I bought the plugin was do an entire mix with it as the only compressor. I have to say, the Arousor does everything my
Distressors do and more. e attack mod and extra saturation eliminate like 2-3 plugins on my snare chain and using it as a parallel comp is a
dream come true. Plus it has that room mic spank and perfect bass mix glue. Seriously feels like I’m cheating sometimes.
LOVE THIS PLUGIN!
Reviewer: Raymond from Aledo, TX United States
Smooth process from ordering to downloading. From an initial test of putting it on a raw vocal, it is CLEAR that this one plugin will replace
several others!!! e sonic “weight” of this compressor can really be felt from the beginning, and the possibilities can only go up from there.
Great job ELI!!
MUCH MORE THAN I’D HOPED FOR
Reviewer: Brett Hughes from Burlington, VT United States
I bought the Arouser to use on tracks I recorded in Nashville for a new album. I’ve been using the UA plug-in comps for some time, and own
hardware (1176, LA-2A) versions, but as much as I love what the Distressor does, I don’t own one (although it seems I may now need to buy a
pair...soon). I love what this plug-in does on drums and guitars, from subtle to super-aggressive. So far, absolutely satised/thrilled. anks for
creating a classic, must-have plug-in.
WONDERFUL PLUG
Reviewer: Matt Condon, ftstudio from Ickenham, Middx United Kingdom
Christ , i don’t know where to begin, it just does whatever you want it to. Never use a single instance on one mix, in general i always engage satu-
ration above 60% unless the dynamic consatina, you’ll not want to use a more limited tool once you try it
