EMC® Avamar® 7.0 Product Security Guide Avamar
avamar-7.0-security-guide
avamar-7.0-security-guide
avamar-7.0-security-guide
User Manual:
Open the PDF directly: View PDF ![]() .
.
Page Count: 162 [warning: Documents this large are best viewed by clicking the View PDF Link!]
- Preface
- Introduction
- User Authentication and Authorization
- Client/Server Access and Authentication
- Network access control
- Client/server authentication
- One-way authentication
- Requesting signed certificates using a Certificate Signing Request
- Requesting signed certificates using an enrollment form
- Signed certificates from a private CA
- Installing certificates in Avamar
- Configuring Avamar to use server authentication
- Configure clients to accept the server certificates
- Enforcing encrypted client/server communications
- Two-way authentication
- Requesting client certificates using a Certificate Signing Request
- Requesting client certificates using an enrollment form
- Use a private CA to sign client certificates
- Configuring Avamar for client authentication
- Installing a client certificate on a Windows client
- Installing a client certificate on a UNIX-like client
- Verify client/server authentication
- Web browser authentication using Apache
- Tomcat server authentication
- SSH authentication with Data Domain
- Data Security and Integrity
- System Monitoring, Auditing, and Logging
- Server Security Hardening
- Overview
- Level-1 security hardening
- Advanced Intrusion Detection Environment (AIDE)
- Auditing service (auditd)
- sudo implementation
- Command logging
- Locking down single-user mode on RHEL servers
- Disabling Samba
- Remove weak ciphers from Apache web server
- Force strong encryption for Java and Tomcat connections
- Removing suid bit from non-essential system binaries on RHEL
- Preventing unauthorized access to GRUB configuration
- Level-2 security hardening
- Level-3 security hardening
- Level-3 prerequisite
- Level-3 tasks
- Disabling Apache web server
- Disabling Avamar Enterprise Manager
- Disabling Dell OpenManage web server
- Disabling Avamar Desktop/Laptop
- Disabling SSLv2 and weak ciphers on all nodes
- Updating SSH
- Disabling snmpd
- Disabling RPC
- Preventing access to port 9443
- Changing file permissions
- Preparing for a system upgrade
- Port and Network Requirements
- Enterprise Authentication
- IAO Information
- Index

EMC® Avamar® 7.0
Product Security Guide
P/N 300-015-223
REV 03
EMC Avamar 7.0 Product Security Guide
2
Copyright © 2001
-
2013 EMC Corporation. All rights reserved. Published in the USA.
Published November, 2013
EMC believes the information in this publication is accurate as of its publication date. The information is subject to change without
notice.
The information in this publication is provided as is. EMC Corporation makes no representations or warranties of any kind with respect
to the information in this publication, and specifically disclaims implied warranties of merchantability or fitness for a particular
purpose. Use, copying, and distribution of any EMC software described in this publication requires an applicable software license.
EMC2, EMC, and the EMC logo are registered trademarks or trademarks of EMC Corporation in the United States and other countries.
All other trademarks used herein are the property of their respective owners.
For the most up-to-date regulatory document for your product line, go to the technical documentation and advisories section on the
EMC online support website.

EMC Avamar 7.0 Product Security Guide
3
CONTENTS
Preface
Chapter 1 Introduction
Overview..................................................................................................... 14
Security patches ......................................................................................... 14
Periodic security updates for multiple components ............................... 14
Separately installed updates................................................................. 15
Email home notification using ConnectEMC................................................. 15
Remote access............................................................................................ 15
Chapter 2 User Authentication and Authorization
Domain and client users ............................................................................. 18
Username ............................................................................................. 18
Authentication system .......................................................................... 18
Roles..................................................................................................... 19
Managing domain and client users........................................................ 22
Default user accounts ................................................................................. 23
Default passwords ................................................................................ 23
Password encryption............................................................................. 24
Changing passwords for default user accounts...................................... 24
Manually updating MCCLI passwords .................................................... 25
Changing the root password on a proxy virtual machine ........................ 27
SSH keys for operating system user accounts........................................ 27
Password best practices.............................................................................. 30
Best practices for creating passwords ................................................... 30
Password protection best practices:...................................................... 31
Chapter 3 Client/Server Access and Authentication
Network access control ............................................................................... 34
Subnet and gateway assignments......................................................... 34
DNS requirements................................................................................. 34
Remote access control .......................................................................... 34
SNMP access configuration................................................................... 34
Client/server authentication ....................................................................... 35
Certificate acceptance workflow ............................................................ 36
One-way authentication .............................................................................. 36
Requesting signed certificates using a Certificate Signing Request........ 37
Requesting signed certificates using an enrollment form....................... 39
Signed certificates from a private CA ..................................................... 40
Installing certificates in Avamar............................................................. 47
Configuring Avamar to use server authentication................................... 48
Configure clients to accept the server certificates.................................. 48
Enforcing encrypted client/server communications ............................... 50
Two-way authentication .............................................................................. 50
Requesting client certificates using a Certificate Signing Request.......... 51
Requesting client certificates using an enrollment form......................... 53
Use a private CA to sign client certificates ............................................. 53
4
EMC Avamar 7.0 Product Security Guide
Contents
Configuring Avamar for client authentication......................................... 58
Installing a client certificate on a Windows client .................................. 59
Installing a client certificate on a UNIX-like client .................................. 61
Verify client/server authentication .............................................................. 61
Verifying authentication with the avtar command.................................. 61
Verifying authentication with Avamar Administrator .............................. 61
Web browser authentication using Apache.................................................. 62
Alternative authentication method ........................................................ 62
Support for Subject Alternative Names .................................................. 62
Create a private key............................................................................... 63
Generating a certificate signing request ................................................ 65
Requesting a public key certificate ........................................................ 66
Configuring Apache to use the key and certificates................................ 67
Tomcat server authentication ...................................................................... 69
SSL/TLS through Apache....................................................................... 70
SSL/TLS through Tomcat ....................................................................... 70
Install a trusted public key certificate.................................................... 71
Changing the root keystore password.................................................... 77
SSH authentication with Data Domain......................................................... 78
Providing authentication to Data Domain .............................................. 79
Chapter 4 Data Security and Integrity
Encrypting data........................................................................................... 82
Client/server “in-flight” encryption........................................................ 82
Client/server encryption behavior ......................................................... 83
Increasing cipher strength used by Avamar servers ............................... 83
“At-rest” encryption .............................................................................. 84
Data integrity .............................................................................................. 85
Data erasure ............................................................................................... 85
Requirements to securely delete backups ............................................. 86
How to securely delete backups ............................................................ 87
Chapter 5 System Monitoring, Auditing, and Logging
Client activity monitoring ............................................................................ 92
Server monitoring ....................................................................................... 92
Monitoring server status........................................................................ 92
Monitoring system events ..................................................................... 92
Email home notification .............................................................................. 94
Auditing...................................................................................................... 94
Logs............................................................................................................ 95
Single-node server ................................................................................ 95
Utility node ........................................................................................... 97
Storage node ........................................................................................ 99
Spare node ........................................................................................... 99
Avamar NDMP Accelerator..................................................................... 99
Access node........................................................................................ 100
Avamar Administrator client network host ........................................... 100
Backup client network host ................................................................. 100
Chapter 6 Server Security Hardening
Overview................................................................................................... 102
STIG compliance ................................................................................. 102
EMC Avamar 7.0 Product Security Guide
5
Contents
Server security hardening levels.......................................................... 102
Level-1 security hardening ........................................................................ 102
Advanced Intrusion Detection Environment (AIDE)............................... 103
Auditing service (auditd) ..................................................................... 103
sudo implementation.......................................................................... 104
Command logging ............................................................................... 105
Locking down single-user mode on RHEL servers................................. 105
Disabling Samba................................................................................. 106
Remove weak ciphers from Apache web server.................................... 107
Force strong encryption for Java and Tomcat connections .................... 108
Removing suid bit from non-essential system binaries on RHEL........... 111
Preventing unauthorized access to GRUB configuration....................... 112
Level-2 security hardening ........................................................................ 113
Additional operating system hardening............................................... 113
Additional password hardening........................................................... 114
Additional firewall hardening (avfirewall) ............................................ 116
Installation of level-2 security hardening features ............................... 117
Uninstalling level-2 hardening features ............................................... 121
Level-3 security hardening ........................................................................ 122
Level-3 prerequisite ............................................................................ 122
Level-3 tasks....................................................................................... 122
Disabling Apache web server .............................................................. 123
Disabling Avamar Enterprise Manager................................................. 124
Disabling Dell OpenManage web server .............................................. 125
Disabling Avamar Desktop/Laptop...................................................... 126
Disabling SSLv2 and weak ciphers on all nodes .................................. 126
Updating SSH...................................................................................... 129
Disabling snmpd................................................................................. 130
Disabling RPC...................................................................................... 131
Preventing access to port 9443 ........................................................... 132
Changing file permissions................................................................... 133
Preparing for a system upgrade................................................................. 134
Enabling the Apache web server.......................................................... 134
Enabling Avamar Enterprise Manager .................................................. 135
Appendix A Port and Network Requirements
Required ports .......................................................................................... 138
Avamar utility node required ports ...................................................... 138
Avamar storage node required ports.................................................... 141
Avamar client required port................................................................. 141
Avamar Downloader Service required port........................................... 141
Optional ports........................................................................................... 142
Avamar utility node optional ports....................................................... 142
Network requirements............................................................................... 142
Avamar utility node network requirements .......................................... 142
Avamar storage node network requirements........................................ 144
Avamar client network requirements ................................................... 144
Avamar Downloader Service network requirements ............................. 145
Port and network requirements for Data Domain ....................................... 145
Appendix B Enterprise Authentication
Enterprise authentication.......................................................................... 148
Supported components and systems .................................................. 148
Configuring enterprise authentication ....................................................... 149
6
EMC Avamar 7.0 Product Security Guide
Contents
Configuring the LDAP interface ............................................................ 149
Configuring the NIS interface............................................................... 152
Appendix C IAO Information
SGID/SUID bit ........................................................................................... 158
System-level accounts .............................................................................. 158
Index
EMC Avamar 7.0 Product Security Guide
7
Title Page
TABLES
1 Revision history ............................................................................................................ 9
2 Default user accounts ................................................................................................. 23
3 SSH keys for operating system user accounts.............................................................. 27
4 SSH key files for the admin user account..................................................................... 28
5 dpn user account SSH keys ......................................................................................... 29
6 root user account SSH keys......................................................................................... 30
7 Server certificate information ...................................................................................... 38
8 Requirements for commercial SAN certificate for servers ............................................. 39
9 Root certificate with openssl req information............................................................... 41
10 Server certificate information ...................................................................................... 44
11 Client certificate information ....................................................................................... 52
12 Requirements for commercial SAN certificate for clients .............................................. 53
13 Server certificate information ...................................................................................... 55
14 Certificate signing request distinguished name information ........................................ 65
15 Tomcat key fully qualified domain name information................................................... 72
16 Single-node server log files ......................................................................................... 95
17 Utility node log files .................................................................................................... 97
18 Storage node log files ................................................................................................. 99
19 Spare node log files .................................................................................................... 99
20 Avamar NDMP Accelerator log files.............................................................................. 99
21 Access node log files................................................................................................. 100
22 Avamar Administrator client network host log files .................................................... 100
23 Backup client network host log files .......................................................................... 100
24 STIG requirements satisfied by AIDE.......................................................................... 103
25 STIG requirements satisfied by the auditd service ..................................................... 103
26 STIG requirements satisfied by the implementation of sudo ...................................... 104
27 STIG requirements satisfied by the additional OS hardening package ....................... 114
28 STIG requirements satisfied by additional password hardening................................. 115
29 Required ports on an Avamar utility node or single node server................................. 138
30 Required ports on an Avamar storage node ............................................................... 141
31 Required port on Avamar client computers ................................................................ 141
32 Required port on an Avamar Downloader Service Windows host computer ................ 141
33 Optional ports for Avamar utility node or single node server...................................... 142
34 Network requirements for Avamar utility node and single-node server....................... 142
35 Network requirements for an Avamar storage node ................................................... 144
36 Network requirements for Avamar client computers................................................... 144
37 Network requirements for Avamar Downloader Service.............................................. 145
38 Supported external authentication systems .............................................................. 148
39 Information required to configure LDAP ..................................................................... 149

Preface
9
PREFACE
As part of an effort to improve its product lines, EMC periodically releases revisions of its
software and hardware. Therefore, some functions described in this document might not
be supported by all versions of the software or hardware currently in use. The product
release notes provide the most up-to-date information on product features.
Contact your EMC Customer Support professional if a product does not function properly
or does not function as described in this document.
Note: This document was accurate at publication time. Go to EMC Online Support
(https://support.emc.com) to ensure that you are using the latest version of this
document.
Purpose
This publication discusses various aspects of EMC Avamar product security.
Audience
This publication is primarily intended for EMC Field Engineers, contracted representatives,
and business partners who are responsible for configuring, troubleshooting, and
upgrading Avamar systems at customer sites, as well as system administrators or
application integrators who are responsible for installing software, maintaining servers
and clients on a network, and ensuring network security.
Revision history
The following table presents the revision history of this document.
Related documentation
The following EMC publications provide additional information:
◆
EMC Avamar Release Notes
◆
EMC Avamar Administration Guide
◆
EMC Avamar Operational Best Practices
Table 1 Revision history
Revision Date Description
03 September 16, 2013 Revised “Installation of level-2 security hardening
features” on page 117 to correct minor errata.
02 August 31, 2013 Changed Appendix A, “Port and Network
Requirements,” to add port 7443 and port 61617 to the
utility node’s outgoing network port list.
01 July 10, 2013 Initial release of Avamar 7.0.

10
EMC Avamar 7.0 Product Security Guide
Preface
Conventions used in this document
EMC uses the following conventions for special notices:
NOTICE is used to address practices not related to personal injury.
Note: A note presents information that is important, but not hazard-related.
IMPORTANT
An important notice contains information essential to software or hardware operation.
Typographical conventions
EMC uses the following type style conventions in this document:
Where to get help
The Avamar support page provides access to licensing information, product
documentation, advisories, and downloads, as well as how-to and troubleshooting
information. This information may enable you to resolve a product issue before you
contact EMC Customer Support.
To access the Avamar support page:
1. Go to https://support.EMC.com/products.
2. Type a product name in the Find a Product box.
3. Select the product from the list that appears.
4. Click the arrow next to the Find a Product box.
5. (Optional) Add the product to the My Products list by clicking Add to my products in
the top right corner of the Support by Product page.
Bold Use for names of interface elements, such as names of windows, dialog
boxes, buttons, fields, tab names, key names, and menu paths (what the
user specifically selects or clicks)
Italic
Use for full titles of publications referenced in text
Monospace Use for:
• System output, such as an error message or script
•System code
• Pathnames, file names, prompts, and syntax
• Commands and options
Monospace italic Use for variables.
Monospace bold Use for user input.
[ ] Square brackets enclose optional values
|Vertical bar indicates alternate selections — the bar means “or”
{ } Braces enclose content that the user must specify, such as x or y or z
... Ellipses indicate nonessential information omitted from the example

11
Preface
Documentation
The Avamar product documentation provides a comprehensive set of feature overview,
operational task, and technical reference information. Review the following documents in
addition to product administration and user guides:
◆Release notes provide an overview of new features and known limitations for a
release.
◆Technical notes provide technical details about specific product features, including
step-by-step tasks, where necessary.
◆White papers provide an in-depth technical perspective of a product or products as
applied to critical business issues or requirements.
Knowledgebase
The EMC Knowledgebase contains applicable solutions that you can search for either by
solution number (for example, esgxxxxxx) or by keyword.
To search the EMC Knowledgebase:
1. Click the Search link at the top of the page.
2. Type either the solution number or keywords in the search box.
3. (Optional) Limit the search to specific products by typing a product name in the Scope
by product box and then selecting the product from the list that appears.
4. Select Knowledgebase from the Scope by resource list.
5. (Optional) Specify advanced options by clicking Advanced options and specifying
values in the available fields.
6. Click the search button.
Online communities
Visit EMC Community Network (https://community.EMC.com) for peer contacts,
conversations, and content on product support and solutions. Interactively engage online
with customers, partners, and certified professionals for all EMC products.
Live chat
To engage EMC Customer Support by using live interactive chat, click Join Live Chat on the
Service Center panel of the Avamar support page.
Service Requests
For in-depth help from EMC Customer Support, submit a service request by clicking Create
Service Requests on the Service Center panel of the Avamar support page.
Note: To open a service request, you must have a valid support agreement. Contact your
EMC sales representative for details about obtaining a valid support agreement or with
questions about your account.
To review an open service request, click the Service Center link on the Service Center
panel, and then click View and manage service requests.
12
EMC Avamar 7.0 Product Security Guide
Preface
Facilitating support
EMC recommends that you enable ConnectEMC and Email Home on all Avamar systems:
◆ConnectEMC automatically generates service requests for high priority events.
◆Email Home emails configuration, capacity, and general system information to EMC
Customer Support.
Your comments
Your suggestions help us to continue to improve the accuracy, organization, and overall
quality of the user publications. Send your opinions of this document to:
BSGDocumentation@emc.com
Please include the following information:
◆Product name and version
◆Document name, part number, and revision (for example, 01)
◆Page numbers
◆Other details that will help us address the documentation issue

Introduction
13
CHAPTER 1
Introduction
The following topics introduce and describe Avamar security:
◆Overview................................................................................................................. 14
◆Security patches ..................................................................................................... 14
◆Email home notification using ConnectEMC............................................................. 15
◆Remote access........................................................................................................ 15
14
EMC Avamar 7.0 Product Security Guide
Introduction
Overview
EMC® Avamar® is backup and recovery software with integrated data deduplication
technology. This Product Security Guide provides an overview of the settings and security
provisions that are available in Avamar to ensure secure operation of the product. Security
settings are split into the following categories:
◆“User Authentication and Authorization” on page 17 provides an overview of Avamar
user accounts and the authentication and authorization mechanisms available for
those accounts.
◆“Client/Server Access and Authentication” on page 33 describes settings available to
limit access by client components.
◆“Data Security and Integrity” on page 81 describes settings available to ensure
protection of the data that Avamar manages.
◆“System Monitoring, Auditing, and Logging” on page 91 provides an overview of the
features available to monitor events in the Avamar environment and to audit the
operations performed. It also provides a list of log files that are available for each
feature on each component in the system.
◆“Server Security Hardening” on page 101 describes changes you can make to increase
the security of the Avamar system.
◆“Port and Network Requirements” on page 137 lists the ports and protocols that
Avamar uses for client/server communication for all applicable firewalls.
Security patches
Each Avamar release is available with a set of up-to-date security patches.
Periodic security updates for multiple components
EMC periodically provides a security update for components of the Avamar system’s host
operating system. These periodic updates combine patches and updates released by the
operating system’s company (Red Hat or SuSE) since the previous Avamar periodic
security update, and include relevant kernel-level and OS-level security patches and
changes.
The periodic updates are cumulative. Install each periodic update issued for your Avamar
system in order of release, starting with the first periodic update issued after the release
of your Avamar system software.
EMC announces each periodic update through an EMC Security Advisory (ESA). The ESA
provides details about the contents of the periodic update and installation instructions.
Open the following location in a web browser to view these advisories and to register for
email notifications:
https://support.emc.com/products/759_Avamar-Server
EMC provides the periodic updates as Avamar update packages that can normally be
installed through Avamar Enterprise Manager.

Email home notification using ConnectEMC
15
Introduction
Separately installed updates
If you separately install other security patches or security applications that are found to be
incompatible with Avamar:
1. Remove the separately installed patches or applications.
2. Restore the Avamar system to its previous working configuration
3. File a support case with EMC support that includes a specific description of the
separately installed patches or applications.
It is the responsibility of the customer to ensure that the Avamar system is configured to
protect against unauthorized access. Back up all important files before you apply new
security patches, applications, or updates.
Email home notification using ConnectEMC
When configured and enabled, the “email home” feature automatically emails
configuration, capacity, and general system information to EMC Customer Support using
ConnectEMC. Summary emails are sent once daily; critical alerts are sent in near-real time
on an as needed basis.
The
EMC Avamar Administration Guide
provides details on how to enable the email home
feature.
Remote access
If EMC Customer Support must connect to a customer system to perform analysis or
maintenance, the customer can initiate a web conference using a web-based conferencing
application such as WebEx.
Additionally, beginning with version 6.0, customers can install an EMC Secure Remote
Support (ESRS) gateway to allow EMC Customer Support to access their systems without
WebEx.

User Authentication and Authorization
17
CHAPTER 2
User Authentication and Authorization
The following topics provide an overview of Avamar user accounts and the authentication
and authorization mechanisms available for those accounts:
◆Domain and client users ......................................................................................... 18
◆Default user accounts ............................................................................................. 23
18
EMC Avamar 7.0 Product Security Guide
User Authentication and Authorization
Domain and client users
In the Avamar system, user accounts can be added to Avamar domains or individual
Avamar clients. The privileges of Avamar domain users extend to the Avamar domain to
which they belong and any Avamar domains beneath it. Individual Avamar client users
perform backups and restores of the Avamar client to which they belong and access
backups in the system that belong to that Avamar client.
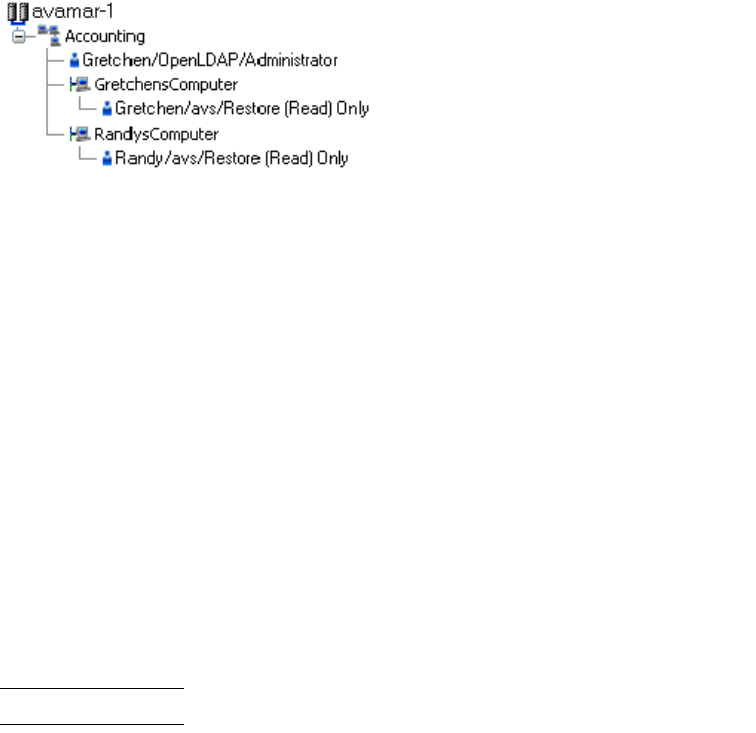
In Avamar, user accounts are not reusable objects; they are simply entries in a domain or
client access list. When you add a new user account to the Avamar system, you actually
add a new entry to the Avamar domain or Avamar client user access list. Consider the
following example:
User “Gretchen” has been added to both the Accounting domain and her computer.
However, the authentication system (OpenLDAP in the Accounting domain and avs on the
computer) and role (Administrator in the Accounting domain and Restore [Read] Only on
the computer) are different. These are in fact two completely separate user accounts that
happen to have the same username.
Avamar user accounts comprise the following pieces of information:
◆Username
◆Authentication system
◆Role
Username
The username for an Avamar domain user account or an Avamar client user account must
be in the format that the selected authentication system accepts. For example, the
internal Avamar authentication system uses case-sensitive usernames, whereas Windows
Active Directory usernames are case-insensitive.
Note: Usernames cannot be longer than 31 characters.
Authentication system
An authentication system is a username/password system that is used to grant domain
and client users access to the Avamar server. Avamar supports its own internal
authentication system (“Avamar authentication” or “avs”), as well as directory service
authentication. Directory service authentication uses an existing LDAP v.3 directory
service or an existing Network Information Service (NIS) to provide authentication.
Domain and client users
19
User Authentication and Authorization
The
EMC Avamar Administration Guide
describes Avamar authentication and directory
service authentication. Appendix B, “Enterprise Authentication” describes a deprecated
authentication method, Enterprise authentication, for backwards compatibility with
previous versions of Avamar.
Roles
Roles define various allowable operations for each user account. There are three basic
categories of roles:
◆Administrator roles
◆Operator roles
◆User roles
Administrator roles
Administrators are generally responsible for maintaining the system.
The role of administrator can only be assigned to Avamar user accounts at an Avamar
domain level; this role cannot be assigned to Avamar user accounts at a client level. The
role of administrator can be assigned to Avamar user accounts at the top-level (root)
Avamar domain, or any domain beneath.
Root administrators
Administrators at the top-level (root) Avamar domain have full control of the system. They
are sometimes referred to as “root administrators.”
Domain administrators
Administrators at lower level Avamar domains (other than root) generally have access to
most features, but typically can only view or operate on objects (backups, policy objects,
and so forth) within that domain. Any activity that might allow an Avamar domain
administrator to view data outside that domain is disallowed. Therefore, access to server
features of a global nature (for example, suspending or resuming scheduled operations,
changing run times for maintenance activities, and so forth) is disallowed.
Furthermore, Avamar domain administrators:
◆Cannot add or edit other domain administrators
◆Cannot change their assigned role
◆Can change their password
Operator roles
Operator roles are generally implemented to allow limited access to certain areas of the
Avamar system to perform backups and restores, or obtain status and run reports. These
roles allow greater freedom in assigning backup, restore, and reporting tasks to persons
other than administrators.
As with administrator roles, operator roles can only be assigned to Avamar user accounts
at the Avamar domain level; these roles cannot be assigned to user accounts at the
Avamar client level. Furthermore, to add the user account to subdomains, you must have
administrator privileges on the parent domain or above.
20
EMC Avamar 7.0 Product Security Guide
User Authentication and Authorization
There are four operator roles:
◆Restore only operator
◆Backup only operator
◆Backup/restore operator
◆Activity operator
Users who have been assigned an operator role do not have access to the entire Avamar
Administrator application. Instead, following login, they are presented with a single
window that provides easy access to the features that they are allowed to use.
Restore only operator
Restore only operators are generally only allowed to perform restores and to monitor those
activities to determine when they complete and if they complete without errors.
As with roles assigned to other Avamar domain user accounts, restore only operators at
the top-level (root) Avamar domain can perform restores for any client in the system;
restore only operators at lower level domains (other than root) can only perform restores
for clients within that domain.
To enforce these constraints, restore only operators do not have access to the full Avamar
Administrator application. Instead, following login, restore only operators are presented
with a window that provides easy access to the features that they are allowed to use.
Restore only operators can perform the following tasks within the allowable domain:
◆Perform a restore
◆Monitor activities
Backup only operator
Backup only operators are generally only allowed to perform backups and to monitor
those activities to determine when they complete and if they complete without errors.
As with roles assigned to other Avamar domain user accounts, backup only operators at
the top-level (root) Avamar domain can perform backups for any client or group in the
system; backup only operators at lower level domains (other than root) can only perform
backups for clients or groups within that domain.
To enforce these constraints, backup only operators do not have access to the full Avamar
Administrator application. Instead, following login, backup only operators are presented
with a window that provides easy access to the features that they are allowed to use.
Backup only operators can perform the following tasks within the allowable domain:
◆Perform on-demand client backups
◆Initiate on-demand group backups
◆Monitor activities
Domain and client users
21
User Authentication and Authorization
Backup/restore operator
Backup/restore operators are generally only allowed to perform backups or restores, and
to monitor those activities to determine when they complete and if they complete without
errors.
As with roles assigned to other Avamar domain user accounts, backup/restore operators
at the top-level (root) Avamar domain can perform backups and restores for any client or
group in the system; backup/restore operators at lower level domains (other than root)
can only perform backups and restores for clients or groups within that domain.
To enforce these constraints, backup/restore operators do not have access to the full
Avamar Administrator application. Instead, following login, backup/restore operators are
presented with a window that provides easy access to the features that they are allowed to
use.
Backup/restore operators can perform the following tasks within the allowable domain:
◆Perform on-demand client backups
◆Initiate on-demand group backups
◆Monitor activities
◆Perform a restore
Activity operator
Activity operators are generally only allowed to monitor backup and restore activities and
create certain reports.
Activity operators at the top-level (root) Avamar domain can view or create reports for
backup and restore activities within the entire system (all domains and subdomains);
activity operators at lower level domains (other than root) can only view or create reports
for backup and restore activities within that domain.
To enforce these constraints, activity operators do not have access to the full Avamar
Administrator application. Instead, following login, activity operators are presented with a
window that provides easy access to the features that they are allowed to use.
Activity operators can perform the following tasks within the allowable domain:
◆Monitor activities
◆View the group status summary
◆View the activity report
◆View the replication report
22
EMC Avamar 7.0 Product Security Guide
User Authentication and Authorization
User roles
User roles are always assigned to an Avamar user account for a specific Avamar client. As
such, allowable operations are inherently constrained to that specific Avamar client.
Users assigned any of the Avamar user roles cannot log in to Avamar Administrator.
There are four user roles:
◆Backup only user
Users with this role can initiate backups directly from the client using the avtar
command line.
◆Restore (read) only user
Users with this role can initiate restores directly from the client using the avtar
command line or Avamar Web Services.
◆Backup/Restore user
Users with this role can initiate backups and restores directly from the client using the
avtar command line or Avamar Web Services.
◆Restore (read) only/ignore file permissions
This role is similar to the Restore (Read) Only User role except that operating system
file permissions are ignored during restores, thereby effectively allowing this user to
restore any file stored for that Avamar client.
This role is only available when you use internal authentication.
Windows client user accounts should be assigned this role to ensure trouble-free
restores, only if both of the following are true:
• Users are authenticated using Avamar internal authentication.
• The user will not access the Avamar client web UI.
Managing domain and client users
You can add a new user to an Avamar client or to an Avamar domain, edit user information,
or delete a user by using the Account Management tab on the Administration window in
Avamar Administrator. The
EMC Avamar Administration Guide
provides details.

Default user accounts
23
User Authentication and Authorization
Default user accounts
The Avamar system uses the following default user accounts and default passwords.
Default passwords
EMC sets default passwords for the default user accounts when it builds the Avamar
software. Default passwords are a security concern.
New install of Avamar server version 7.0 or later
Successful completion of a new install of Avamar server version 7.0 or later requires that
you create passwords for the following essential Avamar and OS accounts:
◆MCUser
◆replonly
◆root (Avamar server account)
◆admin (Linux OS account)
Table 2 Default user accounts
User account Default password Description
Avamar server Linux OS
root changeme Linux OS root account on all Avamar nodes.
admin changeme Linux OS account for Avamar administrative user.
dpn changeme Linux OS account for Avamar maintenance user.
Avamar server software
root 8RttoTriz Avamar server software root user account.
Avamar Administrator
MCUser MCUser1 Default Avamar Administrator administrative user account.
backuponly backuponly1 Account for internal use by the MCS.
restoreonly restoreonly1 Account for internal use by the MCS.
backuprestore backuprestore1 Account for internal use by the MCS.
replonly 9RttoTriz Account for internal use by the MCS for replication.
MCS PostgreSQL database
admin No password, logged in on local node only.
viewuser viewuser1 Administrator server database view account.
EMS PostgreSQL database
admin No password, logged in on local node only.
Proxy virtual machine Linux OS
root avam@r Linux OS root account on all proxies deployed using the
Avamar proxy appliance. This account is for internal use only.

24
EMC Avamar 7.0 Product Security Guide
User Authentication and Authorization
◆dpn (Linux OS account)
◆root (Linux OS account)
Upgrade to Avamar server version 7.0 or later
Upgrading to Avamar server version 7.0 or later does not require any password changes.
After the upgrade, EMC recommends that you change the password of any of the essential
Avamar and OS accounts that uses a default password.
Avamar server version 6.x and earlier
In Avamar server versions 6.x and earlier, it is possible to install the software with default
passwords for the essential Avamar and OS accounts. EMC recommends that you change
those passwords.
Password encryption
Although Avamar passwords are typically entered as plain text, they are stored on each
respective host file system in encrypted form.
All Avamar clients and utilities automatically detect whether a supplied password is plain
text or encrypted. Either plain text or encrypted format will work.
The avtar --encodepassword command can be used to process a plain text password and
output the correct encrypted string to stdout.
Encrypted passwords are host-specific. A password encrypted and stored on one host
cannot be copied and used on another host.
Changing passwords for default user accounts
The change-passwords utility enables you to change passwords for the following default
user accounts:
◆The admin, dpn, and root operating system user accounts
◆The root and MCUser Avamar server user accounts
The change-passwords utility also enables you to create new admin and dpnid OpenSSH
keys.
IMPORTANT
After using this utility to change the password for the MCUser account, use dpnctl to
restart the Avamar Desktop/Laptop service, dtlt, as described in the
EMC Avamar
Administration Guide
. If the dtlt service is not restarted, Avamar client users will encounter
session expired messages when they log in to the web UI.
To start the change-passwords utility:
1. Open a command shell and log in:
• (Single-node) Log in to the server as dpn.
• (Multi-node) Log in to the utility node as dpn.

Default user accounts
25
User Authentication and Authorization
2. Type:
change-passwords
The utility prompts you to change the operating system and Avamar server user
accounts, as well as to create new admin and dpnid OpenSSH keys, if desired.
You can choose to perform one or all of these tasks on all nodes including optional
node types, or on utility node and storage nodes only.
Keep in mind the following points about the utility:
• If you are administering a multi-node server, you can choose whether to change
the passwords on all nodes or only on selected nodes.
• To change the password for either the MCUser or root Avamar server user accounts,
you must specify the current password for the root account.
• After changing the MCUser password using change-passwords, notify owners of
hosts external to the Avamar server to update their Avamar Management Console
Command Line Interface (MCCLI) configurations, as discussed in “Manually
updating MCCLI passwords” on page 25.
• If there were custom public keys in the authorized_keys2 files for the admin, dpn,
or root operating system user accounts, then you may need to re-add the custom
keys. The authorized_keys2 files are detailed in “SSH keys for operating system
user accounts” on page 27.
• Remember to resume all schedules by using Avamar Administrator.
Manually updating MCCLI passwords
The change-passwords utility changes the internal Avamar server MCUser password for
the Avamar Management Console Command Line Interface (MCCLI). However,
change-passwords will not update any MCCLI configuration files located externally to the
utility node. Therefore, any external MCCLI configuration files will need to be manually
updated.
IMPORTANT
Use of change-passwords to change the internal Avamar server MCUser password disables
the MCCLI.
Edit the following files to manually update the MCUser password:
◆~admin/.avamardata/var/mc/cli_data/prefs/mcclimcs.xml
◆~dpn/.avamardata/var/mc/cli_data/prefs/mcclimcs.xml
◆~root/.avamardata/var/mc/cli_data/prefs/mcclimcs.xml
To edit the mcclimcs.xml files for admin, dpn, and root to use the new MCUser password:
1. Open a command shell and log in:
• If logging into a single-node server, log in to the server as admin.
• If logging into a multi-node server, log in to the utility node as admin.

26
EMC Avamar 7.0 Product Security Guide
User Authentication and Authorization
2. Open ~admin/.avamardata/var/mc/cli_data/prefs/mcclimcs.xml in a UNIX text editor
such as vi or emacs.
3. Locate the following entries:
<MCSConfig>
<MCS
mcsprofile="local"
mcsaddr="AVAMARSERVER"
mcsport="7778"
mcsuserid="MCUser"
mcspasswd="PASSWORD"
/>
<!-- add more profiles if needed here and set default to select
default -->
</MCSConfig>
Note: This example has been simplified for clarity.
4. Change the mcspasswd=”PASSWORD” entry to the new password that you set with
the change-passwords utility.
5. Save the changes.
6. Switch user to the dpn user account by typing:
su - dpn
7. When prompted for a password, type the dpn password and press Enter.
8. Load the dpn OpenSSH key by typing:
ssh-agent bash
ssh-add ~dpn/.ssh/dpnid
9. Open ~dpn/.avamardata/var/mc/cli_data/prefs/mcclimcs.xml in a UNIX text editor.
10. Repeat steps 3–5.
11. Switch back to the admin user account by typing:
exit
exit
12. Switch user to root by typing:
su -
13. When prompted for a password, type the root password and press Enter.
14. Open ~root/.avamardata/var/mc/cli_data/prefs/mcclimcs.xml in a UNIX text editor.
Note: The ~root/.avamardata/var/mc/cli_data/prefs/mcclimcs.xml file might not be
present on all servers. If this is the case, skip steps 14–15.
15. Repeat steps 3–5.
16. Switch back to the admin user account by typing:
exit

Default user accounts
27
User Authentication and Authorization
Changing the root password on a proxy virtual machine
Change the Linux operating system’s root password on a proxy virtual machine. This
applies to all proxies deployed using the Avamar proxy appliance.
1. Open a command shell and log in as root.
2. Type:
passwd
The following appears in the command shell:
Current Password:
3. Type the current proxy operating system root password and press Enter.
The following appears in the command shell:
New Password:
4. Type the new proxy operating system root password and press Enter.
The following appears in the command shell:
Confirm New Password:
5. Type the same password entered in step 4 and press Enter.
SSH keys for operating system user accounts
Access to the admin, dpn and root operating system user accounts is available through
SSH login. SSH uses public and private encrypted keys to authenticate users logging in to
those accounts. SSH login access can be obtained by supplying operating system account
passwords or using either of two pre-authorized private keys, as described in the following
table.
On an Avamar server, use the change-passwords utility, discussed in “Changing
passwords for default user accounts” on page 24, to coordinate changes to private keys
and corresponding authorizations across all nodes.
Table 3 SSH keys for operating system user accounts
Private key
file name
Matching public
key file name
Default
passphrase Authorizes access to Location
admin_key admin_key.pub P3t3rPan Operating system admin account ~admin/.ssh/
dpnid dpn_key.pub Operating system admin and
root accounts
~admin/.ssh
~dpn/.ssh/

28
EMC Avamar 7.0 Product Security Guide
User Authentication and Authorization
admin user account
The admin user account SSH v2 key configuration is controlled by the following files and
directories in the home directory for admin.
Any files not listed in the previous table can be ignored.
Use of the admin key requires a passphrase. The only method to change or remove a
passphrase is to generate a new private/public key pair and modify the appropriate
authorized_keys2 files accordingly. To ensure proper operation of the Avamar server, the
admin user must authorize SSH access by way of the dpnid private key. This is
accomplished by including the matching public key (dpn_key.pub) in the
authorized_keys2 file for the admin user. The dpnid private key must not require a
passphrase.
Table 4 SSH key files for the admin user account
File/directory Description
~admin/.ssh/ Private SSH directory. This directory must be fully protected and
owned as follows:
drwx------ 2 admin admin
~admin/.ssh/config SSH configuration file. This file must contain the following
entry:
StrictHostKeyChecking=no
This file must be fully protected and owned as follows:
-r-------- 1 admin admin
~admin/.ssh/admin_key Private RSA OpenSSH key file. This file must be fully protected
and owned as follows:
-r-------- 1 admin admin
The admin user account SSH private and public keys must be
named admin_key and admin_key.pub, respectively.
~admin/.ssh/admin_key.pub Public RSA OpenSSH key file. This file is public and does not
need to be protected.
-r--r--r-- 1 admin admin
~admin/.ssh/dpnid Private DSA OpenSSH key file. This file must be fully protected
and owned as follows:
-r-------- 1 admin admin
~admin/.ssh/id_rsa Symbolic link to ~admin/.ssh/admin_key.
~admin/.ssh/authorized_keys2 Contains a list of public keys for users allowed to log in to the
admin user account.
This file must be fully protected and owned as follows:
-r-------- 1 admin admin
This file must contain public key entries for the admin and dpn
user accounts:
• The admin public key entry is an RSA key, prefixed with
“ssh-rsa” and appended with the comment
“dpn_admin_key.”
• The dpn public key entry is a DSA key, prefixed with
“ssh-dss” and appended with the comment “dpn@dpn41s.”

Default user accounts
29
User Authentication and Authorization
dpn user account
The dpn user account SSH v2 key configuration is controlled by the following files and
directories.
Any other files can be ignored.
The only way to log in as user dpn is to know the operating system dpn password. To
ensure proper operation of the Avamar server, the public key for dpn must be in both the
.ssh/authorized_keys2 file for both root and admin.
Table 5 dpn user account SSH keys
File/directory Description
~dpn/.ssh/ Private SSH directory. This directory must be fully protected and
owned as follows:
drwx------ 2 dpn admin
- or -
drwx------ 2 dpn dpn
~dpn/.ssh/config SSH configuration file. This file must contain the following entry:
StrictHostKeyChecking=no
This file must be fully protected and owned as follows:
-r-------- 1 dpn admin
- or -
-r-------- 1 dpn dpn
~dpn/.ssh/dpnid Private DSA OpenSSH key file. This file must be fully protected
and owned as follows:
-r-------- 1 dpn admin
- or -
-r-------- 1 dpn dpn
The dpn user account SSH private and public keys must be
named dpnid and dpn_key.pub, respectively.
~dpn/.ssh/dpn_key.pub Public DSA OpenSSH key file. This file is public and does not need
to be protected.
-r--r--r-- 1 dpn admin
- or -
-r--r--r-- 1 dpn dpn
~dpn/.ssh/id_rsa Symbolic link to ~dpn/.ssh/dpnid.
~dpn/.ssh/authorized_keys2 Contains a list of public keys for users allowed to log in to the
admin user account.
This file must be fully protected and owned as follows:
-r-------- 1 dpn admin
- or -
-r-------- 1 dpn dpn
This file is deliberately left empty to ensure that no one can log in
as user dpn using SSH keys.

30
EMC Avamar 7.0 Product Security Guide
User Authentication and Authorization
root user account
The root user account SSH v2 key configuration is controlled by the following files and
directories.
Any files not listed in the previous table can be ignored.
To log in as the root user requires the password for the root account or use of the
pre-authorized dpnid private key. To ensure proper operation of the Avamar server, the
root user must authorize SSH access by way of the dpnid private key. This is accomplished
by including the matching public key (dpn_key.pub) in the authorized_keys2 file for the
root user. The dpnid private key must not require a passphrase.
Password best practices
This section provides recommendations for password best practices.
Best practices for creating passwords
This section provides best information about creating passwords.
Personal Identifiable Information
Do not use Personal Identifiable Information (PII) in your password such as:
◆Your name
◆Your user name
◆Your birthday
◆Names of pets
◆Names of your children
◆The name of your alma mater
◆Keywords associated with your hobbies
Table 6 root user account SSH keys
File/directory Description
.ssh/ Private SSH directory. This directory must be fully protected and owned
as follows:
drwx------ 2 root root
.ssh/config SSH configuration file. This file must contain the following entry:
StrictHostKeyChecking=no
This file must be fully protected and owned as follows:
-r-------- 1 root root
.ssh/authorized_keys2 Contains a list of public keys for users allowed to log in to the root user
account.
This file must be fully protected and owned as follows:
-r-------- 1 root root
This file must contain a public key entry for the dpn user accounts. As
currently shipped, the dpn public key entry is a DSA key, prefixed with
“ssh-dss” and appended with the comment “dpn@dpn41s.”
Password best practices
31
User Authentication and Authorization
Using words from the dictionary
Do not use any word that can be found in the dictionary as your full password.
Using strong passwords
Always use strong passwords when creating passwords. Strong passwords include:
◆At least eight characters
◆Special characters such as a percent sign or ampersand
◆Non-alphabetic characters
◆Upper and lower case characters
Use different passwords for user accounts
Always use a different password for each user account.
Changing your password
Recommendations for changing your password:
◆Change your most critical passwords on a regular basis.
◆Change your passwords at least every 6 months.
◆Avoid using variations of a previous password.
◆Immediately change your password if you expect another person has access to your
account, or knows your password.
◆Always change your password as soon as you receive an account.
Password protection best practices:
You should always create a password that you can remember without needing to store it.
However, if the password must be stored, follow these recommendations:
◆Use a password vault application to protect and help manage your passwords.
◆If passwords must be written down on a piece of paper, store the paper in a secure
place and destroy it when it is no longer needed.
◆Do not put your username and password on a post-it note under your keyboard.
◆Do not write down your username and password in the same place.
◆Use caution regarding where passwords are saved on computers. Some dialog boxes,
such as those for remote access and other telephone connections, present an option
to save or remember a password. Selecting this option poses a potential security
threat.
◆Never share your passwords with anyone and do not give your password to anyone
over the phone.

Client/Server Access and Authentication
33
CHAPTER 3
Client/Server Access and Authentication
The following topics provide details about access and authentication between Avamar
clients and Avamar servers:
◆Network access control ........................................................................................... 34
◆Client/server authentication ................................................................................... 35
◆One-way authentication .......................................................................................... 36
◆Two-way authentication .......................................................................................... 50
◆Verify client/server authentication .......................................................................... 61
◆Web browser authentication using Apache.............................................................. 62
◆Tomcat server authentication .................................................................................. 69
◆SSH authentication with Data Domain..................................................................... 78
34
EMC Avamar 7.0 Product Security Guide
Client/Server Access and Authentication
Network access control
The following topics provide details on network access control in an Avamar environment:
◆“Subnet and gateway assignments” on page 34
◆“DNS requirements” on page 34
◆“Remote access control” on page 34
◆“SNMP access configuration” on page 34
Subnet and gateway assignments
Avamar client machines must be able to connect to every node in the Avamar environment
directly, and each node in the environment must be able to connect to the client
machines.
Assign a default gateway to the router in the Avamar environment.
DNS requirements
The Avamar environment requires a Domain Name System (DNS) server.
If you have a single-node Avamar server, then assign a forward mapping and optionally a
reverse mapping to the server.
If you have a multi-node Avamar server, then assign a forward mapping and optionally a
reverse mapping to the utility node.
An example of a forward mapping entry is as follows in a Berkeley Internet Name Domain
(BIND) environment:
avamar-1 A 10.0.5.5
A corresponding optional reverse mapping for a zone serving the 5.0.10.in-addr.arpa
subnet in a BIND environment is as follows:
5 PTR avamar-1.example.com.
Remote access control
Protect all nodes and the switch in the Avamar server against unauthorized access. To
access Avamar server from a remote location, use a Virtual Private Network (VPN) system.
SNMP access configuration
Avamar supports system monitoring and event notification through the Simple Network
Management Protocol (SNMP), as discussed in “Event notification mechanisms” on
page 93.

Client/server authentication
35
Client/Server Access and Authentication
Client/server authentication
Avamar clients and Avamar servers use Transport Layer Security (TLS) certificates and
Public Key Infrastructure (PKI) for authentication and optional encryption of data in transit.
Avamar supports the X.509 v3 standard for formatting digital certificates. To sign the
certificates, you can:
◆Use a commercial certification authority (CA), such as Verisign.
◆Generate a root certificate and set up a private CA.
◆Self-sign (not recommended in production environments and not discussed in detail
in this guide).
Note: Installing Avamar server automatically generates a public/private key pair and a
self-signed certificate in the /data01/home/admin directory on each Avamar server
storage node and in the /usr/local/avamar/etc directory on the utility node. Use these
only for installation and testing. EMC does not recommend the use of self-signed
certificates in production environments.
You can configure the Avamar environment for one-way or two-way authentication
between Avamar clients and the Avamar server:
◆With one-way authentication, the Avamar client requests authentication from the
Avamar server, and the server sends a certificate to the client. The client then
validates the certificate. This is also called server-to-client authentication in this
guide.
◆With two-way authentication, the client requests authentication from the Avamar
server, and the Avamar server also requests authentication from the client. Set up
client-to-server authentication with server-to-client authentication to provide a
stronger level of security.
One-way authentication typically provides sufficient security. To provide additional
security, set up two-way authentication.
Both configurations provide encryption of network data. “Encrypting data” on page 82
describes encryption.
The following topics provide details about client/server authentication:
◆“Certificate acceptance workflow” on page 36
◆“One-way authentication” on page 36
◆“Two-way authentication” on page 50
◆“Verify client/server authentication” on page 61
36
EMC Avamar 7.0 Product Security Guide
Client/Server Access and Authentication
Certificate acceptance workflow
Avamar uses the following workflow when determining whether to accept a computer’s
certificate. Avamar uses this workflow when a client validates a server’s certificate, and
when a server validates a client’s certificate.
1. Obtain the computer’s fully qualified domain name (FQDN).
When connected to a computer through the computer’s IP address, use reverse-DNS
to determine the computer’s FQDN.
2. Compare the computer’s FQDN to the value specified in the Common Name (CN) field
of the certificate.
• When the FQDN matches the value specified in the CN field, accept that the
certificate validates the computer.
• When the FQDN does not match, continue the workflow.
3. If the certificate has a wildcard character (*) in the hostname portion of the value
specified in the CN field, perform a simple wildcard match of the computer’s FQDN to
the CN value.
• When the wildcard match is successful, accept that the certificate validates the
computer.
• When the match is unsuccessful, continue the workflow.
For example, the value “r*.example.com” in the CN field of the certificate would match
a FQDN such as: “real.example.com”, “right.example.com”, or “reality.example.com”;
but would not match “alright.example.com”.
4. Compare the IP address of the computer to each IP address listed in the Subject
Alternative Name (SAN) field of the certificate.
• When the IP address of the computer matches an IP address in the SAN field,
accept that the certificate validates the computer.
• When the match is unsuccessful, reject the certificate and terminate the
connection.
One-way authentication
With one-way authentication, the Avamar client requests authentication from the Avamar
server, and the server sends the appropriate certificate to the client. The client then
validates the certificate, using the certificate acceptance workflow.
Obtain the certificates required by one-way authentication through one of the following
alternative methods:
◆“Requesting signed certificates using a Certificate Signing Request” on page 37
This method does not normally result in a certificate that contains multiple IP
addresses in the SAN field. To obtain certificates that include the SAN field, use one of
the other methods.
◆“Requesting signed certificates using an enrollment form” on page 39
◆“Signed certificates from a private CA” on page 40

One-way authentication
37
Client/Server Access and Authentication
After obtaining signed certificates, complete the following tasks:
◆“Installing certificates in Avamar” on page 47
◆“Configuring Avamar to use server authentication” on page 48
◆“Configure clients to accept the server certificates” on page 48
◆“Enforcing encrypted client/server communications” on page 50
Requesting signed certificates using a Certificate Signing Request
A Certificate Signing Request (CSR) contains the basic information that a commercial CA
uses to issue a certificate. Create separate CSRs for the utility node and for each storage
node. Alternatively, create a single CSR that references several nodes through the CN field.
1. Download and install OpenSSL on the system that will generate the CSRs.
OpenSSL is available for Linux, Windows, OpenBSD, and other operating systems. For
maximum security, use the OpenBSD operating system as the host for the OpenSSL
key and certificate utilities.
Note: Space limitations in this guide cause the command in the next step to continue
(wrap) to more than one line. Type the command on a single line (no line feeds or
returns allowed).
2. Using an account with write permission for the current working directory, type the
following command:
openssl req -new -newkey rsa:3072 -keyform PEM -keyout
avamar-1key.pem -nodes -outform PEM -out avamar-1req.pem
where:
•
avamar-1
is the Avamar server name.
•
avamar-1key.pem
is the file name for the key.
•
avamar-1req.pem
is the file name for the CSR.
The OpenSSL web site at www.openssl.org provides information about the openssl
req command.
The following information appears in the command shell:
Loading 'screen' into random state - done
Generating a 3072 bit RSA private key
.++++++
...++++++
writing new private key to 'avamar-1key.pem'
-----
3. At each prompt, type the information described in the following table. Press Enter after
each entry.
For optional fields, you can provide an empty value by typing a period (.) and pressing
Enter.

38
EMC Avamar 7.0 Product Security Guide
Client/Server Access and Authentication
The information that you specify is incorporated into the CSR.
OpenSSL creates the CSR and key in the current working directory.
The output from avamar-1req.pem is similar to the following:
-----BEGIN CERTIFICATE REQUEST-----
ABCDEF...
...XYZ=
-----END CERTIFICATE REQUEST-----
Table 7 Server certificate information
Field Description
Country Name The two-letter ISO abbreviation for the country.
For example:
US
The list of abbreviations is available on the ISO web site at
www.iso.org.
State or Province Name In countries where it is applicable, the state or province
where the organization is located.
For example:
California
This entry cannot be abbreviated.
Locality Name City where the organization is located.
For example:
Los Angeles
Organization Name The exact legal name of the company.
For example:
Example, Inc.
This entry cannot be abbreviated.
Organizational Unit Name Optional entry for additional organization information, such
as a department name.
Common Name (CN) FQDN of server, or wild card FQDN for several servers. The
wild card character (*) must only appear once, and only in
the hostname portion of the FQDN value.
Example for single server:
node-1.example.com
Example wild card FQDN for several servers:
node-*.example.com
Email Address Primary email address for this server.
For example:
avamar-1-admin@example.com
Challenge password A password that must be provided before the certificate can
be revoked by the CA. The password is only required if your
certificate is compromised.
This is an optional field. To skip this field, enter a period
character.
Company name Name for your company. The exact legal name is not
required.
This is an optional field. To skip this field, enter a period
character.

One-way authentication
39
Client/Server Access and Authentication
The output from avamar-1key.pem is similar to the following:
-----BEGIN RSA PRIVATE KEY-----
ABCDEF...
...XYZ=
-----END RSA PRIVATE KEY-----
4. Repeat these steps for another Avamar server node, or group of nodes sharing the CN
field.
5. Submit the resulting CSRs to a commercial CA for signing.
Requesting signed certificates using an enrollment form
Many commercial CAs provide signed certificates that include x509 v3 extensions, such as
the Subject Alternative Name (SAN) field. When several IP addresses are included in the
SAN field of a certificate, Avamar can use that certificate to authenticate:
◆A multi-homed server, by using any one of its IP addresses.
◆Several servers that share the certificate, by parsing the list of IP addresses.
The certificate request procedures used by commercial CAs vary. For Avamar server
authentication, the certificate you receive must meet the format requirements shown in
the following table.
Table 8 Requirements for commercial SAN certificate for servers
Attribute Requirement
Key format RSA
Key size 3072 bits
Output format PEM
Private key format (keyout) PEM
Private key format (nodes) Not encrypted
File Name extension .pem
Common Name (CN) FQDN of server, or wild card FQDN for several servers. The wild
card character (*) must only appear once, and only in the
hostname portion of the FQDN value.
Subject Alternative Name (SAN) List of several IP addresses for a multi-homed server, or a list of
IP addresses for several servers sharing the certificate.
A CIDR notation value can be used to refer to a range of IP
addresses.
40
EMC Avamar 7.0 Product Security Guide
Client/Server Access and Authentication
Signed certificates from a private CA
A private CA can be used to sign certificates. A private CA is set up within your
organization.
This section uses OpenSSL to set up a private CA. This is one of several methods for
setting up a private CA.
To set up a private CA and sign certificates, complete the following tasks:
◆“Generating a private CA root certificate and key” on page 40.
◆“Creating a custom OpenSSL configuration file” on page 42
◆“Creating a CSR for Avamar nodes” on page 43
◆“Using the private CA to sign certificates” on page 45.
Generating a private CA root certificate and key
Generate a root certificate and key by using OpenSSL.
When creating and signing certificates, EMC recommends that you:
◆Properly secure the private key associated with the root certificate.
◆Use an air-gapped network in a high-risk environment for signing operations and
creating keys, CSRs, and other security-related artifacts. (An air-gapped network is
completely physically, electrically, and electromagnetically isolated.)
◆Use a hardware Random-number Generator (RNG) to efficiently and quickly generate
random numbers with adequate characteristics for cryptographic use.
◆For maximum security, use the OpenBSD operating system as the host for the
OpenSSL key and certificate utilities.
To generate a root certificate and key:
1. Download and install OpenSSL and a Perl interpreter on the private CA computer.
OpenSSL and Perl interpreters are available for Linux, Microsoft Windows, OpenBSD,
and other operating systems.
2. Log in to the private CA computer as root.
3. Change the working directory to the location where you want to store the private CA
root certificate and key.
For example, /etc/ssl/private.

One-way authentication
41
Client/Server Access and Authentication
Note: Space limitations in this guide cause the command in the next step to continue
(wrap) to more than one line. Type the command on a single line (no line feeds or
returns allowed).
4. Type:
openssl req -new -x509 -newkey rsa:3072 -keyform PEM
-keyout privateCAkey.pem -extensions v3_ca -outform PEM
-out privateCAcert.pem -days 3654
where:
•
privateCAkey.pem
is the file name of the private CA key
•
privateCAcert.pem
is the file name of the private CA certificate
•
3654
is the number of days the certificate is valid, here it is 3,654 days
Additional details on the openssl req command can be found on the OpenSSL web
site at www.openssl.org.
The following prompt appears:
Enter PEM pass phrase
5. Enter a passphrase for the key.
The passphrase should be memorable. It cannot be retrieved.
The following prompt appears:
Verifying - Enter PEM pass phrase
6. Re-enter the passphrase for the key.
7. At each prompt, type the information described in the following table. Press Enter after
each entry.
For optional fields, you can provide an empty value by typing a period (.) and pressing
Enter.
Table 9 Root certificate with openssl req information (page 1 of 2)
Field Description
Country Name The two-letter ISO abbreviation for the country.
For example:
US
The list of abbreviations is available on the ISO web site at
www.iso.org.
State or Province Name In countries where it is applicable, the state or province
where the organization is located.
For example:
California
This entry cannot be abbreviated.
Locality Name City where the organization is located. For example:
Los Angeles

42
EMC Avamar 7.0 Product Security Guide
Client/Server Access and Authentication
OpenSSL creates the private CA certificate and key in the current working directory.
8. Create back up copies of privateCAcert.pem and privateCAkey.pem.
Creating a custom OpenSSL configuration file
Modify openssl.cnf to meet your organization’s requirements:
1. Log in to the private CA computer as root.
2. Open /etc/ssl/openssl.cnf in a plain text editor.
3. For server and server-as-client certificates, add the following at the end of openssl.cnf:
[ server_ext ]
basicConstraints = CA:false
keyUsage = critical, digitalSignature, keyEncipherment
nsCertType = server,client
extendedKeyUsage = serverAuth, clientAuth
nsComment = "OpenSSL-generated server certificate"
subjectKeyIdentifier = hash
authorityKeyIdentifier = keyid:always, issuer:always
subjectAltName = @alt_names
[alt_names]
IP.0 = NNN.NNN.NNN.NNN
# add ip for multihomed server or NAT
#IP.1 = MMM.MMM.MMM.MMM
DNS.0 = avamar00.example.com
#add hostnames for multihomed server or NAT
#DNS.1 = natavds.example.com
where:
•
NNN.NNN.NNN.NNN
represents an IP address for the server.
•
avamar00.example.com
represents the FQDN of the server. An asterisk wildcard
character can be used in the hostname portion of the FQDN to represent the
hostnames of several computers.
Organization Name The exact legal name of the company.
For example:
Example, Inc.
This entry cannot be abbreviated.
Organizational Unit Name Optional entry for additional organization information, such
as a department name.
Common Name (CN) The display name for the root certificate.
For example:
example.com Certificate Authority
Email Address Contact email address for all CA-related issues.
For example:
CA-admin@example.com
Table 9 Root certificate with openssl req information (page 2 of 2)
Field Description
One-way authentication
43
Client/Server Access and Authentication
4. (Optional) Add additional IP keys and IP addresses to the [alt_names] section, using
the following methods:
• Uncomment the IP.1 key and replace
MMM.MMM.MMM.MMM
with an IP address.
Use this format to add additional keys and IP addresses as required.
For example:
[alt_names]
IP.0 = 192.168.100.21
IP.1 = 192.168.100.22
IP.2 = 192.168.99.16
• For any key, IP.0 through IP.
n
, use a CIDR notation value to refer to a range of IP
addresses.
For example:
[alt_names]
IP.0 = 192.168.100.21
IP.1 = 192.168.100.22
IP.2 = 192.168.99.16
IP.3 = 192.168.101.0/29
5. (Optional) Uncomment the DNS.1 key to add an additional FQDN entry, or wildcard
FQDN entry, to the [alt_names] section.
Use this format to add additional keys and FQDN entries as required.
For example:
[alt_names]
...
DNS.0 = avamar0*.example0.com
DNS.1 = avamar0*.example1.com
DNS.2 = test.example.com
DNS.3 = node*.home.com
where the ellipsis represents IP keys not relevant to the example.
6. Save and close the file.
Creating a CSR for Avamar nodes
A Certificate Signing Request (CSR) contains the basic information included in the
certificate. Create a CSR for the utility node, and a CSR for each storage node.
Alternatively, create a single CSR that references several nodes through the CN field, the
SAN field, or both fields.
1. Log in to the private CA computer as root.
2. Change the working directory to the location where you want to store the CSRs.
For example, /etc/ssl/private.

44
EMC Avamar 7.0 Product Security Guide
Client/Server Access and Authentication
Note: Space limitations in this guide cause the command in the next step to continue
(wrap) to more than one line. Type the command on a single line (no line feeds or
returns allowed).
3. Type the following, on a single command line:
openssl req -new -newkey rsa:3072 -keyform PEM -keyout
avamar-1key.pem -nodes -outform PEM -out avamar-1req.pem
where:
•
avamar-1
is the Avamar server name
•
avamar-1key.pem
is the file name for the key
•
avamar-1req.pem
is the file name for the CSR
The following information appears in the command shell:
Loading 'screen' into random state - done
Generating a 3072 bit RSA private key
.++++++
...++++++
writing new private key to 'avamar-1key.pem'
-----
4. At each prompt, type the information described in the following table. Press Enter after
each entry.
For optional fields, you can provide an empty value by typing a period (.) and pressing
Enter.
The information that you specify is incorporated into the CSR.
Table 10 Server certificate information (page 1 of 2)
Field Description
Country Name The two-letter ISO abbreviation for the country.
For example:
US
The list of abbreviations is available on the ISO web site at
www.iso.org.
State or Province Name In countries where it is applicable, the state or province
where the organization is located.
For example:
California
This entry cannot be abbreviated.
Locality Name City where the organization is located.
For example:
Los Angeles
Organization Name The exact legal name of the company.
For example:
Example, Inc.
This entry cannot be abbreviated.
Organizational Unit Name Optional entry for additional organization information, such
as a department name.

One-way authentication
45
Client/Server Access and Authentication
OpenSSL creates the CSR and key in the current working directory.
The output from avamar-1req.pem is similar to the following:
-----BEGIN CERTIFICATE REQUEST-----
ABCDEF...
...XYZ=
-----END CERTIFICATE REQUEST-----
The output from avamar-1key.pem is similar to the following:
-----BEGIN RSA PRIVATE KEY-----
ABCDEF...
...XYZ=
-----END RSA PRIVATE KEY-----
5. Repeat these steps to create a CSR for another Avamar server node, or group of nodes.
Using the private CA to sign certificates
Create private CA-signed X.509 certificates for servers.
Before starting this task generate a root certificate and key, create a custom OpenSSL
configuration file, and create a CSR for each Avamar node.
The procedure assumes the following:
◆The CA certificate is in privateCAcert.pem.
◆The key for the CA certificate is in privateCAkey.pem.
◆The privateCA.srl serial number seed file does not already exist.
◆The default openssl.cnf file that is provided with OpenSSL is modified to include
information specific to your organization.
Common Name (CN) FQDN of server, or wild card FQDN for several servers. The
wild card character (*) must only appear once, and only in
the hostname portion of the FQDN value.
Example for single server:
node-1.example.com
Example wild card FQDN for several servers:
node-*.example.com
Email Address Primary email address for this server.
For example:
avamar-1-admin@example.com
Challenge password A password that must be provided before the certificate can
be revoked by the CA. The password is only required if your
certificate is compromised.
This is an optional field. To skip this field enter a period
character.
Company name Name for your company. The exact legal name is not
required.
This is an optional field. To skip this field enter a period
character.
Table 10 Server certificate information (page 2 of 2)
Field Description

46
EMC Avamar 7.0 Product Security Guide
Client/Server Access and Authentication
To sign a server and server-as-client certificate request and generate the signed
certificate:
1. Log in to the private CA computer as root.
Note: Space limitations in this guide cause the command in the next step to continue
(wrap) to more than one line. Type the command on a single command line (no line
feeds or returns allowed).
2. Type the following command on a single line:
openssl x509 -CA privateCAcert.pem -CAkey privateCAkey.pem
-req -in avamar-1req.pem -extensions server_ext
-extfile openssl.cnf -outform PEM -out avamar-1cert.pem
-days 3654 -CAserial privateCA.srl -CAcreateserial
where:
•
privateCAcert.pem
is the full or relative path to the private CA certificate
•
privateCAkey.pem
is the full or relative path to the private CA certificate key
•
avamar-1req.pem
is the file name of the CSR
•
openssl.cnf
is the full or relative path to the OpenSSL configuration file
•
avamar-1cert.pem
is the file name of the resulting signed certificate
•
3654
is the number of days the certificate is valid, here it is 3,654 days
•
privateCA.srl
is a temporary serial number seed file
The following information appears in the command shell:
Loading 'screen' into random state - done
Signature ok
subject=/C=US/ST=California/L=Los Angeles/O=Example,
Inc./OU=Dept55/CN=avamar-1.example.com/emailAddress=avamar-1-admin@
example.com
Getting CA Private Key
Enter pass phrase for privateCAkey.pem:
3. Type the passphrase for the certificate key and press Enter.
OpenSSL creates the signed certificate in the current working directory.
The content of the signed certificate looks similar to the following output:
-----BEGIN CERTIFICATE-----
ABCDEF...
...XYZ=
-----END CERTIFICATE-----
4. (Optional) Display the certificate content in text format by typing:
openssl x509 -in avamar-1cert.pem -noout -text
One-way authentication
47
Client/Server Access and Authentication
Installing certificates in Avamar
Copy certificates to the Avamar system’s nodes.
Before you begin, obtain certificates from a commercial CA or from your private CA.
1. Open a command shell and log in using one of the following methods:
• To log in to a single-node server, log in to the server as admin.
• To log in to a multi-node server, log in to the utility node as admin.
2. Copy the certificate to the specified locations.
• Single-node system
–Copy to:
/data01/home/admin/cert.pem
–Copy to:
/usr/local/avamar/etc/cert.pem
•Multi-node system
– On each storage node, copy the certificate generated for that node to:
/data01/home/admin/cert.pem
– On the utility node, copy the certificate generated for that node to:
/usr/local/avamar/etc/cert.pem
3. Copy the key associated with the certificate to the specified locations.
• Single-node system
–Copy to:
/data01/home/admin/key.pem
–Copy to:
/usr/local/avamar/etc/key.pem
•Multi-node system
– On each storage node, copy the key generated for that node to:
/data01/home/admin/key.pem
– On the utility node, copy the key generated for that node to:
/usr/local/avamar/etc/key.pem
4. Stop and restart the Avamar server by typing the following commands:
dpnctl stop gsan
dpnctl start
48
EMC Avamar 7.0 Product Security Guide
Client/Server Access and Authentication
Configuring Avamar to use server authentication
Configure the Management Console Server (mcs) to use server authentication.
Before you begin, obtain certificates from a commercial CA or from your private CA, and
install the certificates on the Avamar system’s nodes.
1. Open a command shell and log in using one of the following methods:
• To log in to a single-node server, log in to the server as admin.
• To log in to a multi-node server, log in to the utility node as admin.
2. Open /usr/local/avamar/var/mc/server_data/prefs/mcserver.xml in a plain-text
editor.
3. Locate the encrypt_server_authenticate preference and change it as follows:
encrypt_server_authenticate=true
4. Save and close the file.
5. Restart the MCS by typing:
dpnctl stop mcs
dpnctl start mcs
6. Select either a Medium or High encryption level for future client communication:
When you create and edit groups with Avamar Administrator, select Medium or High
from the Encryption method list.
The
EMC Avamar Administration Guide
describes how to override the group encryption
method for a specific client, for a specific backup, and for a specific restore.
7. When you use the avtar command, include the --encrypt=tls-sa option and either the
--encrypt-strength=medium option or the --encrypt-strength=high option.
Configure clients to accept the server certificates
Client computers validate server certificates based on a chain of trust between the
certificate and a known valid certificate that exists on the client.
A server certificate issued by a commercial CA is normally accepted by a Windows client
because a chain of trust exists between the server certificate and trusted certificates
installed on the Windows client. When a public key certificate is not trusted by a Windows
client, update the Windows client’s trusted certificates store.
A chain of trust does not normally exist on a Linux client. To permit the client to validate
the server certificate, import the server’s public key certificate to the Linux client.
A chain of trust also does not normally exist when the server certificate is generated by a
private CA. Import the server’s public key certificate to both Linux and Windows clients.

One-way authentication
49
Client/Server Access and Authentication
Importing the CA root certificate to a UNIX-like client
Allow a UNIX-like client to authenticate an Avamar server’s certificate by copying the root
certificate of the CA that signed the Avamar server’s certificate to the UNIX-like client.
Note: Determine the value of the client’s SYSDIR environment variable. If that value is not
/usr/local/avamar/etc, then replace /usr/local/avamar/etc with the value of SYSDIR in
the following task.
1. Create the file chain.pem.
• When the root certificate is several files that form a certificate chain, use cat with
the redirect and append operators to combine the certificates by typing:
cat chain-cert-1 > chain.pem
cat chain-cert-2 >> chain.pem
cat chain-cert-3 >> chain.pem
where
chain-cert-1
,
chain-cert-2
, and
chain-cert-3
represent the path to each
certificate in the certificate chain.
The combined file must be named chain.pem.
• When the root certificate is a single file, copy it to chain.pem.
2. Copy chain.pem to the UNIX-like client, in the following location:
/usr/local/avamar/etc/chain.pem
Importing a private CA signed root certificate to a Windows client
Allow a Windows client to trust a private CA signed root certificate by importing the root
certificate of the CA that signed the Avamar server’s certificate into the Windows client’s
certificate store.
1. Copy the root certificate to the client machine.
2. In Internet Explorer on the Windows client, click Tools > Internet Options.
The Internet Options dialog box appears.
3. On the Content tab, click Certificates.
The Certificates dialog box appears.
4. On the Trusted Root Certification Authorities tab, click Import.
The Certificate Import Wizard appears.
5. Click Next.
The File to Import screen appears.
6. Click Browse.
In the Open dialog box, in the list next to the File name field, select the correct
extension type for the certificate, or choose All Files.
7. Find and select the certificate file.
8. Click Open.
50
EMC Avamar 7.0 Product Security Guide
Client/Server Access and Authentication
9. On the File to Import screen, click Next.
10. On the Certificate Store screen, select Place all certificates in the following store, and
click Browse.
The Select Certificate Store dialog box appears.
11. Choose Trusted Root Certification Authorities, and click OK.
12. On the Certificate Store screen, click Next.
13. Click Finish.
Windows imports the private CA signed root certificate into client’s Trusted Root
Certification Authorities store.
Enforcing encrypted client/server communications
To configure the MCS to refuse unencrypted (plain-text) client messages, perform the
following:
1. Open a command shell and log in using one of the following methods:
• To log in to a single-node server, log in to the server as admin.
• To log in to a multi-node server, log in to the utility node as admin.
2. Open /usr/local/avamar/var/mc/server_data/prefs/mcserver.xml in a plain-text
editor such as vi.
3. Locate the enforce_client_msg_encryption preference and change it as follows:
enforce_client_msg_encryption=true
4. Save and close the file.
5. Restart the MCS by typing the following commands:
dpnctl stop mcs
dpnctl start mcs
Two-way authentication
With two-way authentication:
◆The Avamar client requests authentication from the Avamar server, and the server
sends the appropriate certificate to the client. The client then validates the certificate,
using the certificate acceptance workflow.
◆The Avamar server requests authentication from the Avamar client, and the client
sends the appropriate certificate to the server. The server then validates the
certificate, using the certificate acceptance workflow.
Before beginning these tasks, enable one-way authentication as described in “One-way
authentication” on page 36.
Two-way authentication
51
Client/Server Access and Authentication
Obtain the client certificates required for two-way authentication through one of the
following alternative methods:
◆“Requesting client certificates using a Certificate Signing Request” on page 51
This method does not result in a certificate that contains multiple IP addresses in the
SAN field. To obtain certificates that include the SAN field, use one of the other
methods.
◆“Requesting client certificates using an enrollment form” on page 53
◆“Use a private CA to sign client certificates” on page 53
After obtaining signed certificates, complete the following tasks:
◆“Configuring Avamar for client authentication” on page 58
◆“Installing a client certificate on a Windows client” on page 59
◆“Installing a client certificate on a UNIX-like client” on page 61
Requesting client certificates using a Certificate Signing Request
A Certificate Signing Request (CSR) contains the basic information that a commercial CA
uses to issue a client certificate. Create a blanket CSR for all clients by using a wild card
FQDN in the CN field. To enhance security, create separate CSRs for each client.
1. Using an account with write permission for the current working directory, type the
following on a single command line:
openssl req -new -newkey rsa:3072 -keyform PEM -keyout
avamarclientkey.pem -nodes -outform PEM -out avamarclientreq.pem
where:
•
avamarclientkey.pem
is the file name for the key.
•
avamarclientreq.pem
is the file name for the CSR.
The following information appears in the command shell:
Loading 'screen' into random state - done
Generating a 3072 bit RSA private key
.++++++
...++++++
writing new private key to 'avamarclientkey.pem'
-----
2. At each prompt, type the information described in the following table. Press Enter after
each entry.
For optional fields, you can provide an empty value by typing a period (.) and pressing
Enter.

52
EMC Avamar 7.0 Product Security Guide
Client/Server Access and Authentication
The information that you specify is incorporated into the CSR.
OpenSSL creates the CSR and key in the current working directory.
3. (Optional) When obtaining certificates for several groups of clients or for several
clients, repeat these steps for each required certificate.
4. Submit the resulting CSRs to a commercial CA for signing.
Table 11 Client certificate information
Field Description
Country Name The two-letter ISO abbreviation for the country.
For example:
US
The list of abbreviations is available on the ISO web site at
www.iso.org.
State or Province Name In countries where it is applicable, the state or province
where the organization is located.
For example:
California
This entry cannot be abbreviated.
Locality Name City where the organization is located.
For example:
Los Angeles
Organization Name The exact legal name of the company.
For example:
Example, Inc.
This entry cannot be abbreviated.
Organizational Unit Name Optional entry for additional organization information, such
as a department name.
Common Name (CN) FQDN of client, or wild card FQDN for a group of clients. The
wild card character (*) must only appear once, and only in
the hostname portion of the FQDN value.
Example for single client:
avamarclient-001.example.com
Example wild card FQDN for a group of clients:
avamarclient-*.example.com
Email Address Primary email address for the administrator of the client
computers.
For example:
admin@example.com
Challenge password A password that must be provided before the certificate can
be revoked by the CA. The password is only required if your
certificate is compromised.
This is an optional field. To skip this field enter a period
character.
Company name Name for your company. The exact legal name is not
required.
This is an optional field. To skip this field enter a period
character.

Two-way authentication
53
Client/Server Access and Authentication
Requesting client certificates using an enrollment form
Many commercial CAs provide signed certificates that include x509 v3 extensions, such as
the Subject Alternative Name (SAN) field. When several IP addresses are included in the
SAN field of a certificate Avamar can use that certificate to authenticate several clients
that share the certificate, by parsing the list of IP addresses.
The certificate request procedures used by commercial CAs vary. For Avamar client
authentication, the certificate you receive must meet the format requirements shown in
the following table.
Use a private CA to sign client certificates
A private CA can be used to sign client certificates.
Before you begin, generate a private CA root certificate and key as described in
“Generating a private CA root certificate and key” on page 40.
To use a private CA to sign client certificates, complete the following tasks:
◆“Creating a custom OpenSSL configuration file for clients” on page 53
◆“Creating a CSR for clients” on page 54
◆“Signing client certificates by using a private CA” on page 56.
Creating a custom OpenSSL configuration file for clients
Modify openssl.cnf to meet your organization’s requirements:
1. Log in to the private CA computer as root.
2. Open /etc/ssl/openssl.cnf in a plain text editor.
Table 12 Requirements for commercial SAN certificate for clients
Attribute Requirement
Key format RSA
Key size 3072 bits
Output format PEM
Private key format (keyout) PEM
Private key format (nodes) Not encrypted
File Name extension .pem
Common Name (CN) FQDN of client, or wild card FQDN for a group of clients. The wild
card character (*) must only appear once, and only in the
hostname portion of the FQDN value.
Subject Alternative Name (SAN) List of IP addresses for several clients sharing the certificate.
A CIDR notation value can be used to refer to a range of IP
addresses.

54
EMC Avamar 7.0 Product Security Guide
Client/Server Access and Authentication
3. For client certificates, add the following at the end of openssl.cnf (after the server
entry):
[ client_ext ]
basicConstraints = CA:false
keyUsage = critical, digitalSignature, keyEncipherment
nsCertType = client
extendedKeyUsage = clientAuth
nsComment = "OpenSSL-generated client certificate"
subjectKeyIdentifier = hash
authorityKeyIdentifier = keyid:always, issuer:always
subjectAltName = @alt_names
[alt_names]
IP.0 = NNN.NNN.NNN.NNN
# add ip for multihomed server or NAT
#IP.1 = MMM.MMM.MMM.MMM
DNS.0 = client00.example.com
#add hostnames for multihomed server or NAT
#DNS.1 = natavds.example.com
where:
•
NNN.NNN.NNN.NNN
represents an IP address for the client.
•
client00.example.com
represents the FQDN of the client. An asterisk wildcard
character can be used in the hostname portion of the FQDN to represent the
hostnames of several computers.
4. (Optional) Add additional IP addresses to the [alt_names] section, using the following
methods:
• Uncomment the IP.1 key and replacing
MMM.MMM.MMM.MMM
with an IP
address. Use this format to add additional keys and IP addresses as required.
• For any key, IP.0 through IP.n, use a CIDR notation value to refer to a range of IP
addresses.
5. (Optional) Uncomment the DNS.1 key to add an additional FQDN entry, or wildcard
FQDN entry, to the [alt_names] section.
Use this format to add additional keys and FQDN entries as required.
6. Save and close the file.
Creating a CSR for clients
A Certificate Signing Request (CSR) contains the basic information included in the
certificate. Create a single CSR that references a group of clients through the CN field, the
SAN field, or both fields. Alternatively, create a separate CSR for each client.
1. Log in to the private CA computer as root.
2. Change the working directory to the location where you want to store the CSRs.
For example, /etc/ssl/private.
Note: Space limitations in this guide cause the command in the next step to continue
(wrap) to more than one line. Type the command on a single line (no line feeds or
returns allowed).

Two-way authentication
55
Client/Server Access and Authentication
3. Type the following command:
openssl req -new -newkey rsa:3072 -keyform PEM -keyout
avamarclientkey.pem -nodes -outform PEM -out avamarclientreq.pem
where:
•
avamarclientkey.pem
is the file name for the key.
•
avamarclientreq.pem
is the file name for the CSR.
The following information appears in the command shell:
Loading 'screen' into random state - done
Generating a 3072 bit RSA private key
.++++++
...++++++
writing new private key to 'avamarclientkey.pem'
-----
4. At each prompt, type the information described in the following table. Press Enter after
each entry.
For optional fields, you can provide an empty value by typing a period (.) and pressing
Enter.
The information that you specify is incorporated into the CSR.
Table 13 Server certificate information (page 1 of 2)
Field Description
Country Name The two-letter ISO abbreviation for the country.
For example:
US
The list of abbreviations is available on the ISO web site at
www.iso.org.
State or Province Name In countries where it is applicable, the state or province
where the organization is located.
For example:
California
This entry cannot be abbreviated.
Locality Name City where the organization is located.
For example:
Los Angeles
Organization Name The exact legal name of the company.
For example:
Example, Inc.
This entry cannot be abbreviated.
Organizational Unit Name Optional entry for additional organization information, such
as a department name.
Common Name (CN) FQDN of client, or wild card FQDN for a group of clients. The
wild card character (*) must only appear once, and only in
the hostname portion of the FQDN value.
Example for single client:
avamarclient-001.example.com
Example wild card FQDN for a group of clients:
avamarclient-*.example.com

56
EMC Avamar 7.0 Product Security Guide
Client/Server Access and Authentication
OpenSSL creates the CSR and key in the current working directory.
The output from avamarclientreq.pem is similar to the following:
-----BEGIN CERTIFICATE REQUEST-----
ABCDEF...
...XYZ=
-----END CERTIFICATE REQUEST-----
The output from avamarclientkey.pem is similar to the following:
-----BEGIN RSA PRIVATE KEY-----
ABCDEF...
...XYZ=
-----END RSA PRIVATE KEY-----
5. Repeat these steps to create additional a CSR for additional clients, or groups of
clients.
Signing client certificates by using a private CA
Create private CA-signed X.509 certificates for clients.
Before starting this task, generate a private CA root certificate and key, create a custom
OpenSSL configuration file for clients, and create a CSR for each client or group of clients.
The procedure assumes the following:
◆The CA certificate is in privateCAcert.pem.
◆The key for the CA certificate is in privateCAkey.pem.
◆The privateCA.srl serial number seed file does not already exist.
◆The default openssl.cnf file that is provided with OpenSSL is modified to include
information specific to your organization.
Email Address Primary email address for the administrator of the client
computers.
For example:
admin@example.com
Challenge password A password that must be provided before the certificate can
be revoked by the CA. The password is only required if your
certificate is compromised.
This is an optional field. To skip this field enter a period
character.
Company name Name for your company. The exact legal name is not
required.
This is an optional field. To skip this field enter a period
character.
Table 13 Server certificate information (page 2 of 2)
Field Description

Two-way authentication
57
Client/Server Access and Authentication
To sign a client certificate request and generate the signed certificate:
1. Log in to the private CA computer as root.
Note: Space limitations in this guide cause the command in the next step to continue
(wrap) to more than one line. Type the command on a single command line (no line
feeds or returns allowed).
2. Type the following command:
openssl x509 -CA privateCAcert.pem -CAkey privateCAkey.pem
-req -in avamarclientreq.pem -extensions client_ext
-extfile openssl.cnf -outform PEM -out avamarclientcert.pem
-days 3654 -CAserial privateCA.srl -CAcreateserial
where:
•
privateCAcert.pem
is the full or relative path to the private CA certificate
•
privateCAkey.pem
is the full or relative path to the private CA certificate key
•
avamarclientreq.pem
is the file name of the CSR
•
openssl.cnf
is the full or relative path to the OpenSSL configuration file
•
avamarclientcert.pem
is the file name of the resulting signed certificate
•
3654
is the number of days the certificate is valid, here it is 3,654 days
•
privateCA.srl
is a temporary serial number seed file
The following information appears in the command shell:
Loading 'screen' into random state - done
Signature ok
subject=/C=US/ST=California/L=Los Angeles/O=Example,
Inc./OU=Dept55/CN=client0.example.com/emailAddress=client0-admin@ex
ample.com
Getting CA Private Key
Enter pass phrase for privateCAkey.pem:
3. Type the passphrase for the certificate key and press Enter.
OpenSSL creates the signed certificate in the current working directory.
The content of the signed certificate looks similar to the following output:
-----BEGIN CERTIFICATE-----
ABCDEF...
...XYZ=
-----END CERTIFICATE-----
4. (Optional) Display the certificate content in text format by typing:
openssl x509 -in avamarclientcert.pem -noout -text
58
EMC Avamar 7.0 Product Security Guide
Client/Server Access and Authentication
Configuring Avamar for client authentication
Configure Avamar to authenticate client certificates.
Before you begin, obtain signed client certificates, and the signing authority’s root
certificate. The root certificate comes from either a commercial CA or your private CA.
1. Open a command shell and log in using one of the following methods:
• To log in to a single-node server:
a. Log in to the server as admin.
b. Switch user to root by typing:
su -
• To log in to a multi-node server:
a. Log in to the utility node as admin, then load the dpnid OpenSSH key by typing:
ssh-agent bash
ssh-add ~admin/.ssh/dpnid
b. When prompted, type the dpnid passphrase and press Enter.
2. Stop the Avamar server by typing:
dpnctl stop gsan
3. Determine if the file chain.pem exists in the following locations:
• Single-node system
/data01/home/admin/chain.pem
/usr/local/avamar/etc/chain.pem
•Multi-node system
– On each storage node:
/data01/home/admin/chain.pem
– On the utility node:
/usr/local/avamar/etc/chain.pem
4. Based on whether the file exists, perform one of the following for each location:
• When the file already exists, append the signing authority’s root certificate:
cat path_to_root_cert >> path_to_chain.pem
• When the file does not exist, copy the signing authority’s root certificate:
cp path_to_root_cert path_to_chain.pem
where:
•
path_to_root_cert
is the full or relative path to the signing authority’s root
certificate.
•
path_to_chain.pem
is the full or relative path to the specified location of
chain.pem.

Two-way authentication
59
Client/Server Access and Authentication
5. Restart the Avamar server by typing:
dpnctl start
6. Enable client authentication by typing:
avmaint config verifypeer=yes --avamaronly
Installing a client certificate on a Windows client
Install a client certificate on a Windows client to use when authenticating with an Avamar
server.
Before you begin, configure the Avamar server to accept the client certificate.
Note: Space limitations in this guide cause the command in the following step to continue
(wrap) to more than one line. Type the command on a single line (no line feeds or returns
allowed).
To install a client authentication certificate on a Windows client:
1. Combine the key and signed client certificate into a PKCS #12 format file suitable for
importing into a Microsoft Certificate Store by typing:
openssl pkcs12 -in avamarclientcert.pem
-inkey avamarclientkey.pem -export -out avamarclientcert.p12
-name "Avamar Trusted Client"
where:
•
avamarclientcert.pem
is the file name of the signed certificate
•
avamarclientkey.pem
is the file name of the key
•
avamarclientcert.p12
is the file name of the resulting PKCS #12 file
The following information appears in the command shell:
Enter Export Password:
2. Enter a password for the PKCS #12 file.
The prompt appears:
Verifying - Enter Export Password:
3. Enter the same password.
OpenSSL creates the PKCS #12 file in the current working directory.
4. Copy the PKCS #12 file to a temporary location on the Windows client computer.
5. Log in to the Windows client computer with an account that has local administrator
privileges.
60
EMC Avamar 7.0 Product Security Guide
Client/Server Access and Authentication
6. Open the Microsoft Management Console:
a. Open the Windows Start menu and select Run.
The Run dialog box appears.
b. Type mmc and press Enter.
The Microsoft Management Console appears.
7. From the File menu, select Add/Remove Snap-in.
On Windows 7, the Add or Remove Snap-ins dialog box appears. On Windows XP and
Windows Vista, the Add/Remove Snap-in dialog box appears.
8. (Windows XP and Windows Vista only) On the Standalone tab, click Add.
(Windows Vista only) Perform the following additional steps:
a. Select Computer Account and press Enter twice.
b. Click OK.
The Add Standalone Snap-in dialog box appears.
9. From the Available snap-ins list, select Certificates, and click Add.
The Certificates snap-in dialog box appears.
10. Select Computer account, and click Next.
The Select Computer dialog box appears.
11. Select Local computer, and click Finish.
12. (Windows XP and Windows Vista only) On the Add Standalone Snap-in dialog box,
click Close.
13. On the Add or Remove Snap-ins dialog box, or the Add/Remove Snap-in dialog box,
click OK.
The Certificates (Local Computer) Management console is visible in the tree.
14. Open the Certificate Import Wizard:
•(Windows 7 only):
a. In the console tree, expand the following nodes: Certificates (Local Computer) >
Personal > Certificates.
b. Right-click the Certificates node and select All tasks > Import.
• (Windows XP and Windows Vista only):
a. In the console tree, expand the Certificates (Local Computer) node.
b. Right-click the Personal node, and select All Tasks > Import.
The Certificate Import Wizard appears.
15. Click Next, and then click Browse.
16. Navigate to the location of the PKCS #12 file and click Open.
17. Click Next and proceed through the remainder of the wizard.

Verify client/server authentication
61
Client/Server Access and Authentication
Installing a client certificate on a UNIX-like client
Install a client certificate on a UNIX-like client to use when authenticating with an Avamar
server.
Before you begin, configure the Avamar server to accept the client certificate.
Note: Determine the value of the client’s SYSDIR environment variable. If that value is not
/usr/local/avamar/etc, then replace /usr/local/avamar/etc with the value of SYSDIR in
the following task.
To install a signed client certificate on a UNIX-like client:
1. Obtain a signed certificate and private key file for the client.
2. Copy the client’s certificate to the following location:
/usr/local/avamar/etc/cert.pem
The file must be named cert.pem.
3. Copy the private key file for the client’s certificate to the following location:
/usr/local/avamar/etc/key.pem
The file must be named key.pem.
Verify client/server authentication
To verify authentication, run a test backup with server authentication enabled. Use either
avtar from the command line, or Avamar Administrator.
Verifying authentication with the avtar command
Use the avtar command to verify client/server authentication by running a backup and
including the server authentication option:
--encrypt=tls-sa
The server authentication option requires authentication of the Avamar server based on
the trusted certificates installed on the Avamar client.
Verifying authentication with Avamar Administrator
To verify client/server authentication with Avamar Administrator, run a backup and select
medium or high from the Encryption method list. The Encryption method list appears on
both the On Demand Backup Options dialog box and the Restore Options dialog box.
The
EMC Avamar Administration Guide
provides more information on how to run a backup
with the Avamar Administrator.
62
EMC Avamar 7.0 Product Security Guide
Client/Server Access and Authentication
Web browser authentication using Apache
Avamar Enterprise Manager, Avamar client web UI, and Avamar Web Restore use the
Apache web server to provide a secure web browser-based user interface. Web browser
connections for these applications use secure socket layer/transport layer security
(SSL/TLS) to provide authentication and data security.
When a web browser accesses a secure web page from an unauthenticated web server,
the SSL/TLS protocol causes it to display an authentication warning. An unauthenticated
web server is one that does not authenticate itself using a trusted public key certificate.
The Apache web server provided with Avamar is installed with a self-signed certificate, not
a trusted public key certificate. The self-signed certificate is sufficient to establish an
encrypted channel between web browsers and the server, but it cannot be used for
authentication.
To provide server authentication, and thereby prevent web browser warnings, complete
the following tasks:
◆“Create a private key” on page 63
◆“Generating a certificate signing request” on page 65
The tools used in these tasks are part of the OpenSSL toolkit. OpenSSL is provided with
Avamar.
Alternative authentication method
Authentication of the Tomcat server used by Avamar Enterprise Manager should normally
be handled by Apache as described in this section. Then the Tomcat server is not required
to provide server authentication and does not require a separate trusted public key
certificate.
However, the Tomcat server listens on port 8543 and is configured to provide SSL/TLS
authentication on that port. If your organization connects to Avamar Enterprise Manager
directly on port 8543, you may want to install a trusted public key certificate for the
Tomcat server.
“Tomcat server authentication” on page 69 describes how to replace the Tomcat server’s
default self-signed certificate with a trusted public key certificate.
Support for Subject Alternative Names
The Apache web server and the Tomcat servers support the X509 Version 3 (RFC 2459,
section 4.2.1.7) extension for certificates that include the Subject Alternative Name (SAN)
field. When several IP addresses are included in the SAN field of a certificate, Apache and
Tomcat can use that certificate to provide authentication for:
◆A multi-homed server, by using any one of its IP addresses.
◆Several servers that share the certificate, by parsing the list of IP addresses.
Not all browser and OS combinations support Subject Alternative Names. Test a SAN
certificate with the browser and OS combinations used by your company before installing
such a certificate on a production system.
Web browser authentication using Apache
63
Client/Server Access and Authentication
Create a private key
A private key can be generated with passphrase protection and without passphrase
protection. It can also be generated using a random key generation algorithm. Use the
method that is appropriate for the level of security required by your organization.
When a password protected private key is used, Apache prompts for the passphrase at
startup. The configuration setting SSLPassPhraseDialog can be used to obtain the
passphrase from a script. For more information, refer to Apache documentation available
through the Apache web site at www.apache.org.
Creating a private key
To create a private key without a passphrase and without additional randomness:
1. Open a command shell and log in using one of the following methods:
• To log in to a single-node server:
a. Log in to the server as admin.
b. Switch user to root by typing:
su -
• To log in to a multi-node server:
a. Log in to the utility node as admin, then load the dpnid OpenSSH key by typing:
ssh-agent bash
ssh-add ~admin/.ssh/dpnid
b. When prompted, type the dpnid passphrase and press Enter.
2. Create the private key by typing:
openssl genrsa -out server.key 3072
where
server.key
is a name you provide for the private key.
The private key is created in the current working directory.
Creating a private key with randomness
To create a private key using a random key generation algorithm:
1. Open a command shell and log in using one of the following methods:
• To log in to a single-node server:
a. Log in to the server as admin.
b. Switch user to root by typing:
su -
• To log in to a multi-node server:
a. Log in to the utility node as admin, then load the dpnid OpenSSH key by typing:
ssh-agent bash
ssh-add ~admin/.ssh/dpnid
b. When prompted, type the dpnid passphrase and press Enter.
64
EMC Avamar 7.0 Product Security Guide
Client/Server Access and Authentication
2. Create the private key by typing:
openssl genrsa -rand binary-files -out server.key 3072
where
binary-files
is a colon-separated list of paths to two or more binary files and
server.key
is a name you provide for the private key.
The private key is created in the current working directory.
Creating a passphrase protected private key
To create a passphrase protected private key:
1. Open a command shell and log in using one of the following methods:
• To log in to a single-node server:
a. Log in to the server as admin.
b. Switch user to root by typing:
su -
• To log in to a multi-node server:
a. Log in to the utility node as admin, then load the dpnid OpenSSH key by typing:
ssh-agent bash
ssh-add ~admin/.ssh/dpnid
b. When prompted, type the dpnid passphrase and press Enter.
2. Create the private key by typing:
openssl genrsa -aes128 -out server.key 3072
where
server.key
is a name you provide for the private key.
The following prompt appears:
Enter pass phrase for server.key:
3. Type a passphrase and press Enter.
The following prompt appears:
Verifying - Enter pass phrase for server.key:
4. Retype the passphrase and press Enter.
The private key is created in the current working directory.

Web browser authentication using Apache
65
Client/Server Access and Authentication
Generating a certificate signing request
Apply for a public key certificate from a Commercial CA, by sending the CA a certificate
signing request (CSR).
To generate a CSR:
1. Open a command shell and log in using one of the following methods:
• To log in to a single-node server:
a. Log in to the server as admin.
b. Switch user to root by typing:
su -
• To log in to a multi-node server:
a. Log in to the utility node as admin, then load the dpnid OpenSSH key by typing:
ssh-agent bash
ssh-add ~admin/.ssh/dpnid
b. When prompted, type the dpnid passphrase and press Enter.
2. Generate the CSR by typing:
openssl req -new -key server.key -out server.csr
where:
•
server.key
is a name you provide for the private key.
•
server.csr
is a name you provide for the CSR.
3. (Passphrase protected private key only) Type the passphrase for the private key and
press Enter.
4. Provide the Distinguished Name (DN) information as requested and press Enter.
The tool prompts for DN information. At each prompt, type the information described
in the following table, and press Enter.
To leave an entry blank, type a period (.) and press Enter.
Table 14 Certificate signing request distinguished name information (page 1 of 2)
Field Description
Country Name The two-letter ISO abbreviation for the country.
For example:
US
The list of abbreviations is available on the ISO web
site at www.iso.org.
State or Province Name In countries where it is applicable, the state or province
where the organization is located.
For example:
California
This entry cannot be abbreviated.

66
EMC Avamar 7.0 Product Security Guide
Client/Server Access and Authentication
The following prompt appears:
Please enter the following 'extra' attributes
to be sent with your certificate request
A challenge password []:
5. Type a password or type . and press Enter.
A password is optional. If provided, the certificate cannot be revoked without first
entering the password. To skip this step type . and press Enter.
The following prompt appears:
An optional company name []:
6. Type an alternative form of the company name or type . and press Enter.
The CSR is created in the current working directory.
Requesting a public key certificate
Request a public key certificate from a commercial CA. Include the CSR as part of the
request.
After its criteria are met, the CA provides a public key certificate in the form of an
electronic file, usually with the .crt file name extension.
The CA may also provide a certificate chain. A certificate chain is a series of certificates
that link the public key certificate you receive to a trusted root CA certificate. Combine the
certificate chain into a single file.
Locality Name City where the organization is located.
For example:
Los Angeles
Organization Name The exact legal name of the company.
For example:
Example, Inc.
This entry cannot be abbreviated.
Organizational Unit Name Optional entry for additional organization information,
such as a department name.
Common Name The fully qualified domain name of the Avamar server
(single-node) or utility node (multi-node).
For example:
avamar-1.example.com
Email Address Primary email address for this server.
For example:
avamar-1-admin@example.com
Table 14 Certificate signing request distinguished name information (page 2 of 2)
Field Description
Web browser authentication using Apache
67
Client/Server Access and Authentication
To combine the certificate chain into a single file:
1. Open a command shell and log in using one of the following methods:
• To log in to a single-node server:
a. Log in to the server as admin.
b. Switch user to root by typing:
su -
• To log in to a multi-node server:
a. Log in to the utility node as admin, then load the dpnid OpenSSH key by typing:
ssh-agent bash
ssh-add ~admin/.ssh/dpnid
b. When prompted, type the dpnid passphrase and press Enter.
2. Use cat with the redirect and append operators to combine the certificates by typing:
cat chain-cert-1 > cachain.crt
cat chain-cert-2 >> cachain.crt
cat chain-cert-3 >> cachain.crt
cat chain-cert-4 >> cachain.crt
cat chain-cert-5 >> cachain.crt
where
chain-cert-1
through
chain-cert-5
represent the path to each certificate in the
certificate chain and
cachain.crt
is a name you provide for the combined file.
Configuring Apache to use the key and certificates
Configure Apache to use the private key, public key certificate, and the certificate chain
file. Then restart Apache.
To configure Apache to use the certificate, key, and certificate chain file:
1. Open a command shell and log in using one of the following methods:
• To log in to a single-node server:
a. Log in to the server as admin.
b. Switch user to root by typing:
su -
• To log in to a multi-node server:
a. Log in to the utility node as admin, then load the dpnid OpenSSH key by typing:
ssh-agent bash
ssh-add ~admin/.ssh/dpnid
b. When prompted, type the dpnid passphrase and press Enter.
2. Change the working directory to the temporary location of the certificate, key, and
certificate chain file.
3. Move the certificate, key, and certificate chain file to the default location.

68
EMC Avamar 7.0 Product Security Guide
Client/Server Access and Authentication
Note: To use another location, see “Using custom locations for Apache SSL key,
certificate, and chain file” on page 68.
• On Red Hat Enterprise Linux:
mv server.crt /etc/httpd/conf/ssl.crt/server.crt
mv server.key /etc/httpd/conf/ssl.key/server.key
mv cachain.crt /etc/httpd/conf/ssl.crt/ca.crt
• On SUSE Enterprise Linux Server:
mv server.crt /etc/apache2/ssl.crt/server.crt
mv server.key /etc/apache2/ssl.key/server.key
mv cachain.crt /etc/apache2/ssl.crt/ca.crt
4. Restart Apache by typing:
website restart
Using custom locations for Apache SSL key, certificate, and chain file
The Apache SSL configuration file is overwritten during Avamar system upgrades. This also
overwrites custom paths for the certificate, key, and certificate chain file. To use custom
paths restore the Apache SSL configuration file from the backup copy made during the
upgrade.
1. Open a command shell and log in using one of the following methods:
• To log in to a single-node server:
a. Log in to the server as admin.
b. Switch user to root by typing:
su -
• To log in to a multi-node server:
a. Log in to the utility node as admin, then load the dpnid OpenSSH key by typing:
ssh-agent bash
ssh-add ~admin/.ssh/dpnid
b. When prompted, type the dpnid passphrase and press Enter.
2. Back up the latest version of the Apache SSL configuration file.
• On SLES, type:
cd /etc/apache2/vhosts.d/
cp vhost-ssl.conf vhost-ssl.conf.orig
• On RHEL, type:
cd /etc/httpd/conf.d/
cp ssl.conf ssl.conf.orig

Tomcat server authentication
69
Client/Server Access and Authentication
Note: Space limitations in this guide cause the commands in the following step to
continue (wrap) to more than one line. Type each command on a single line (no line feeds
or returns allowed).
3. Change the working directory.
• On SLES, type:
cd
/usr/local/avamar/var/avi/server_data/package_data/UPGRADE_FROM_
VERSION/ConfigureApacheSsl/
• On RHEL, type:
cd
/usr/local/avamar/var/avi/server_data/package_data/UPGRADE_FROM_
VERSION/ConfigureApacheSsl/
where
UPGRADE_FROM_VERSION
is the name of the directory created during the
latest upgrade.
4. Extract the previous version backup copy by typing:
tar -xzf node_0.s_*.*.*.tgz -C /
5. Restart Apache by typing:
website restart
Tomcat server authentication
Two Avamar web-based services use Apache Tomcat servlet containers (Tomcat servers) to
handle SSL/TLS sockets. By default these Avamar services share a self-signed certificate
for the SSL/TLS sockets. A self-signed certificate is sufficient for encrypted data channels
but does not provide adequate server authentication.
When a web browser accesses a secure web page that is served by an unauthenticated
web server, the SSL/TLS protocol causes the browser to display an authentication
warning. An unauthenticated web server is one that does not provide a trusted public key
certificate for authentication.
The Avamar services that share a certificate for their Tomcat servers are:
◆Avamar Enterprise Manager
◆Avamar Web Restore
To provide authentication of the Tomcat server for these services, install a trusted public
key certificate as described in “Install a trusted public key certificate” on page 71.
A trusted public key certificate is installed and stored with other certificates in the root
keystore. This keystore is protected by a password, but the default password is commonly
known and insecure. To protect the integrity of the keystore, change the password, as
described in “Changing the root keystore password” on page 77.

70
EMC Avamar 7.0 Product Security Guide
Client/Server Access and Authentication
SSL/TLS through Apache
Normally, the SSL/TLS sockets for Avamar Enterprise Manager and for Avamar Web Restore
are handled by Apache HTTP Server (Apache). This occurs when a connection is made
using web addresses of the form:
◆Avamar Enterprise Manager
http://AVAMARSERVER/em
◆Avamar Web Restore
http://AVAMARSERVER
where
AVAMARSERVER
is the resolvable hostname or IP address of the utility node or
single-node server.
Apache redirects these connection requests to an SSL/TLS socket and handles that
socket.
Server authentication is provided by installing a trusted public key certificate for Apache.
Installing a trusted public key certificate for Apache is described in “Web browser
authentication using Apache” on page 62.
SSL/TLS through Tomcat
The Tomcat servers for Avamar Enterprise Manager and for Avamar Web Restore can also
be directly accessed using web addresses of the form:
◆Avamar Enterprise Manager
https://AVAMARSERVER:8543/cas
◆Avamar Web Restore
https://AVAMARSERVER:8444/dtlt/home.html
where
AVAMARSERVER
is the resolvable hostname or IP address of the utility node or
single-node server.
When these addresses are used, SSL/TLS sockets are handled by a Tomcat server instead
of Apache.
To provide server authentication when directly accessing the Tomcat servers, obtain and
install a trusted public key certificate as described in “Install a trusted public key
certificate” on page 71. Using a trusted public key certificate provides valid
authentication of the Tomcat servers and prevents web browser warnings.
Note: These procedures are not required for Avamar Enterprise Manager or for Avamar
Web Restore when accessed through Apache as described in “SSL/TLS through Apache”
on page 70.

Tomcat server authentication
71
Client/Server Access and Authentication
Install a trusted public key certificate
Install a trusted public key certificate to provide authentication of the Tomcat servers. This
certificate is shared by the Tomcat servers.
The tasks involved in installing a trusted public key certificate are:
1. “Deleting the default key entry” on page 71
2. “Creating a new key entry” on page 72
3. “Generating a certificate signing request” on page 73
4. “Obtaining a public key certificate” on page 74
5. “Importing chained or root certificates” on page 74
6. “Importing the public key certificate” on page 76
Deleting the default key entry
You must delete the default tomcat key entry from the keystore before you can create a
new key entry that contains your company’s information.
1. Open a command shell and log in using one of the following methods:
• To log in to a single-node server:
a. Log in to the server as admin.
b. Switch user to root by typing:
su -
• To log in to a multi-node server:
a. Log in to the utility node as admin, then load the dpnid OpenSSH key by typing:
ssh-agent bash
ssh-add ~admin/.ssh/dpnid
b. When prompted, type the dpnid passphrase and press Enter.
2. Run the keytool -delete command by typing:
$JAVA_HOME/bin/keytool -delete -alias tomcat
3. At the password prompt, type the keystore password and press Enter:
Enter keystore password: PASSWORD
where PASSWORD is the keystore password. The default is “changeit”.
IMPORTANT
After the trusted public key certificate is installed, change the default keystore password,
as described in “Changing the root keystore password” on page 77.

72
EMC Avamar 7.0 Product Security Guide
Client/Server Access and Authentication
Creating a new key entry
After you delete the default tomcat key entry, create a new one that contains your
company’s information.
1. Open a command shell and log in using one of the following methods:
• To log in to a single-node server:
a. Log in to the server as admin.
b. Switch user to root by typing:
su -
• To log in to a multi-node server:
a. Log in to the utility node as admin, then load the dpnid OpenSSH key by typing:
ssh-agent bash
ssh-add ~admin/.ssh/dpnid
b. When prompted, type the dpnid passphrase and press Enter.
Note: Space limitations in this guide cause the command in the next step to continue
(wrap) to more than one line. Type the command on a single command line (no line
feeds or returns allowed).
2. Run the keytool -genkeypair command by typing the following on a single command
line:
$JAVA_HOME/bin/keytool -genkeypair -keysize 1024 -alias tomcat
-keyalg RSA
3. At the password prompt, type the keystore password and press Enter:
Enter keystore password: PASSWORD
where PASSWORD is the keystore password. The default is “changeit”.
4. At each prompt, type the information described in the following table, and press Enter
after each entry.
Note: To accommodate individuals, the keytool -genkeypair command prompts for
first and last name. However, in a corporate environment, this prompt should be
answered with the fully qualified domain name (FQDN) of the Avamar utility node.
Table 15 Tomcat key fully qualified domain name information (page 1 of 2)
Field Description
First and last name Fully qualified domain name of the Avamar utility node.
Organizational unit Organizational unit within the company that has authority
over the host.
Organization Name of the company.

Tomcat server authentication
73
Client/Server Access and Authentication
Generating a certificate signing request
To generate a certificate signing request (CSR) to send to a public certification authority
(CA):
1. Open a command shell and log in using one of the following methods:
• To log in to a single-node server:
a. Log in to the server as admin.
b. Switch user to root by typing:
su -
• To log in to a multi-node server:
a. Log in to the utility node as admin, then load the dpnid OpenSSH key by typing:
ssh-agent bash
ssh-add ~admin/.ssh/dpnid
b. When prompted, type the dpnid passphrase and press Enter.
Note: Space limitations in this guide cause the command in the next step to continue
(wrap) to more than one line. Type the command on a single command line (no line
feeds or returns allowed).
2. Create the CSR by typing the following command on a single command line:
$JAVA_HOME/bin/keytool -certreq -keyalg RSA -alias tomcat -file
tomcat.certrequest
3. At the password prompt, type the keystore password and press Enter:
Enter keystore password: PASSWORD
where PASSWORD is the keystore password. The default is “changeit”.
A CSR named tomcat.certrequest is created in root’s home directory.
The contents of tomcat.certrequest appear similar to the following excerpted example:
-----BEGIN NEW CERTIFICATE REQUEST-----
JIICpDCCAawCAQAwfzELMAkGA1UEBhMCVVMxETAPBgNVBAgTCENvbG9yYWRvMRMwEQY
DVQQHEwpM
...
3WRXIX2XDco8S0Lyf+Od5pASaRTc8SGWS6p8KSbqKrmdPVH5y0GonJp13va1iuY9vNN
SQYM22+po
rdVX0O/ULtuz9lJ2OA+9wAtYqN5Q8CEe18Vwlg==
-----END NEW CERTIFICATE REQUEST-----
City City in which the host is located.
State State in which the host is located.
Country Country in which the host is located.
Table 15 Tomcat key fully qualified domain name information (page 2 of 2)
Field Description

74
EMC Avamar 7.0 Product Security Guide
Client/Server Access and Authentication
Obtaining a public key certificate
To apply for a public key certificate through a CA:
1. Contact a CA and apply for the public key certificate.
The CA requests a copy of the CSR (tomcat.certrequest). The CA also requires the
approval of the domain registrant listed for the Avamar utility node’s domain. The
domain registrant can be determined by using a domain lookup tool on the web.
After you complete the CA application requirements, the CA provides a public key
certificate that looks similar to the following excerpted example:
-----BEGIN CERTIFICATE-----
JIIEJDCCA42gAwIBAgIRAOiW1j5MGIPZ8zeLbNdSUPgwDQYJKoZIhvcNAQEFBQAw
...
GorkhdbcBR5NVGq5UHB7sbKiDvbMuEf6Gwbier0mps7oEOMU8uh8v2rMTsXEuhtK
csWTe/IxkOk=
-----END CERTIFICATE-----
2. Open a command shell and log in using one of the following methods:
• To log in to a single-node server:
a. Log in to the server as admin.
b. Switch user to root by typing:
su -
• To log in to a multi-node server:
a. Log in to the utility node as admin, then load the dpnid OpenSSH key by typing:
ssh-agent bash
ssh-add ~admin/.ssh/dpnid
b. When prompted, type the dpnid passphrase and press Enter.
3. Save the public key certificate in root’s home directory as tomcat.cert.
Importing chained or root certificates
You normally receive a chained or root certificate file along with the public key certificate.
Note: If you do not receive a chained or root certificate file with the public key certificate,
skip this topic and proceed to “Importing the public key certificate” on page 76.
To import the chained or root certificate:
1. Open a command shell and log in using one of the following methods:
• To log in to a single-node server:
a. Log in to the server as admin.
b. Switch user to root by typing:
su -

Tomcat server authentication
75
Client/Server Access and Authentication
• To log in to a multi-node server:
a. Log in to the utility node as admin, then load the dpnid OpenSSH key by typing:
ssh-agent bash
ssh-add ~admin/.ssh/dpnid
b. When prompted, type the dpnid passphrase and press Enter.
2. Open the chained or root certificate file in a text editor.
The file contents are similar to the following excerpt of a chained certificate file, which
contains two certificates:
-----BEGIN CERTIFICATE-----
MIIDdDCCAt2gAwIBAgIQJyzRkL6Balz4Y8X3iFwiFjANBgkqhkiG9w0BAQUFADCB
...
69F7NxNQMf658Mkkx3Vv6+orEvHFqIw/Hx4uqmdBRpHy/cckaBcEqhJfew7IUFS+
4KRrACEZFnBeaZQlTH8J7UqTThT7By2x
-----END CERTIFICATE-----
-----BEGIN CERTIFICATE-----
MIIC5zCCAlACAQEwDQYJKoZIhvcNAQEFBQAwgbsxJDAiBgNVBAcTG1ZhbGlDZXJ0
...
n0WuPIqpsHEzXcjFV9+vqDWzf4mH6eglkrh/hXqu1rweN1gqZ8mRzyqBPu3GOd/A
PhmcGcwTTYJBtYze4D1gCCAPRX5ron+jjBXu
-----END CERTIFICATE-----
3. Separate the chained or root certificate into individual certificate files using the BEGIN
CERTIFICATE and END CERTIFICATE designations as the boundaries of each certificate.
Save each with a distinguishing file name in root’s home directory.
For example, split the chained certificate shown in the previous step into two files,
tomcat_chain1 and tomcat_chain2, and save each file in root’s home directory.
Note: Space limitations in this guide cause the command in the next step to continue
(wrap) to more than one line. Type the command on a single command line (no line
feeds or returns allowed).
4. Import the certificate by typing the following command on a single command line:
$JAVA_HOME/bin/keytool -importcert -trustcacerts -noprompt -file
~/chained_certN -alias chained_certN
where
chained_certN
is a certificate file saved from the chained or root certificate that
was received from the CA and
N
represents an integer identifier indicating that more
than one certificate file was saved from the chained or root certificate.
5. At the password prompt, type the keystore password and press Enter:
Enter keystore password: PASSWORD
where PASSWORD is the keystore password. The default is “changeit”.
A message appears:
Certificate was added to keystore
6. Repeat step 4 and step 5 for each individual certificate file derived from the chained
or root certificate file.

76
EMC Avamar 7.0 Product Security Guide
Client/Server Access and Authentication
Importing the public key certificate
To import the public key certificate that was saved as a result of the task “Obtaining a
public key certificate” on page 74:
1. Open a command shell and log in using one of the following methods:
• To log in to a single-node server:
a. Log in to the server as admin.
b. Switch user to root by typing:
su -
• To log in to a multi-node server:
a. Log in to the utility node as admin, then load the dpnid OpenSSH key by typing:
ssh-agent bash
ssh-add ~admin/.ssh/dpnid
b. When prompted, type the dpnid passphrase and press Enter.
Note: Space limitations in this guide cause the command in the next step to continue
(wrap) to more than one line. Type the command on a single command line (no line
feeds or returns allowed).
2. Import the certificate by typing the following command on a single command line:
$JAVA_HOME/bin/keytool -importcert -trustcacerts -noprompt -file
~/tomcat.cert -alias tomcat
3. At the password prompt, type the keystore password and press Enter:
Enter keystore password: PASSWORD
where PASSWORD is the keystore password. The default is “changeit”.
A message appears:
Certificate reply was installed in keystore
The trusted public key certificate is incorporated into the private key entry shared by the
Tomcat servers of the Avamar services. It can be referenced using the “tomcat” alias.
Restarting services
Restart the services to make the public key certificate available for browser requests.
1. Open a command shell and log in using one of the following methods:
• To log in to a single-node server:
a. Log in to the server as admin.
b. Switch user to root by typing:
su -

Tomcat server authentication
77
Client/Server Access and Authentication
• To log in to a multi-node server:
a. Log in to the utility node as admin, then load the dpnid OpenSSH key by typing:
ssh-agent bash
ssh-add ~admin/.ssh/dpnid
b. When prompted, type the dpnid passphrase and press Enter.
2. Restart the services by typing:
dpnctl stop ems
dpnctl start ems
dpnctl stop dtlt
dpnctl start dtlt
Changing the root keystore password
The default password of the root keystore is “changeit” and is commonly known. To secure
the keystore and preserve the integrity of its keys, the keystore password should be
changed.
The password for a Tomcat server’s private key entry must be identical to the keystore
password. After changing the root keystore password, the password for the Tomcat server
private key entry, created in “Install a trusted public key certificate” on page 71, should
be changed to match the root keystore password.
1. Open a command shell and log in using one of the following methods:
• To log in to a single-node server:
a. Log in to the server as admin.
b. Switch user to root by typing:
su -
• To log in to a multi-node server:
a. Log in to the utility node as admin, then load the dpnid OpenSSH key by typing:
ssh-agent bash
ssh-add ~admin/.ssh/dpnid
b. When prompted, type the dpnid passphrase and press Enter.
2. Change the root keystore password by typing the following command on a single
command line:
$JAVA_HOME/bin/keytool -storepasswd
3. When prompted, type the old password and then the new password twice.
4. Change the Tomcat server private key entry’s password by typing the following
command on a single command line:
$JAVA_HOME/bin/keytool -keypasswd -alias tomcat
IMPORTANT
The new key entry password must be identical to the keystore password.
78
EMC Avamar 7.0 Product Security Guide
Client/Server Access and Authentication
5. When prompted, type the old password, and then twice type the new password.
6. Set the Tomcat server for Avamar Enterprise Manager to use the new password.
a. Open /usr/local/avamar-tomcat/conf/server.xml in a plain-text editor.
b. Find the Connector that contains the following attribute:
port=”8543”
c. In that Connector, add the keystorePass attribute with the new password:
keystorePass=”newpassword”
where
newpassword
is the same password used for the root keystore and the
Tomcat server key entry.
For example:
<Connector ... port=”8543” ... keystorePass=”newpassword”/>
where the ellipses represent other attributes in the Connector.
d. Save and close the file.
7. Set the Tomcat server for Avamar Web Restore to use the new password.
a. Open /usr/local/avamar-dtlt-tomcat/conf/server.xml in a plain-text editor.
b. Find the Connector that contains the following attribute:
port=”8444”
c. In that Connector, add the keystorePass attribute with the new password:
keystorePass=”newpassword”
where
newpassword
is the same password used for the root keystore and the
Tomcat server key entry.
d. Save and close the file.
8. Restart the services by typing:
dpnctl stop ems
dpnctl start ems
dpnctl stop dtlt
dpnctl start dtlt
SSH authentication with Data Domain
If you store Avamar client backups on a Data Domain system, the Avamar Management
Console Server (MCS) issues commands to a Data Domain system by using Secure Shell
(SSH) commands. The commands retrieve information about the system, including serial
number, disk capacity, CPU utilization, and so on.
The Data Domain system includes an SSH interface named DDSSH that allows commands
to be issued remotely. DDSSH requires login credentials to establish a secure connection.
You can avoid the caching of a username and password for DDSSH by creating
public/private keys on the Avamar server and exchanging the keys between the Data
Domain system and the Avamar server for use by the MCS.
SSH authentication with Data Domain
79
Client/Server Access and Authentication
Providing authentication to Data Domain
To generate an SSH public/private key pair and send the public key to the Data Domain
system:
1. Open a command shell and log in to the utility node of the Avamar server as admin.
2. Change to the .ssh directory by typing:
cd ~/.ssh
3. Generate a public/private key pair by typing:
ssh-keygen -b 3072 -t rsa -N "" -f DDR_KEY
where
DDR_KEY
is the file name for the key. There is no passphrase for the key.
4. Log in to the Data Domain system by typing:
ssh AVAMAR_USER@DD_SYSTEM
where:
•
AVAMAR_USER
is the name of the Avamar user on the Data Domain system.
•
DD_SYSTEM
is the name of the Data Domain system.
5. Add the SSH public key to the SSH authorized keys file on the Data Domain system by
typing:
sysadmin@DD_SYSTEM# adminaccess add ssh-keys user AVAMAR_USER
where:
•
DD_SYSTEM
is the name of the Data Domain system.
•
AVAMAR_USER
is the name of the Avamar user on the Data Domain system.
6. Copy and paste the public key, which is the contents of the file ddr_key.pub, in
/home/admin/.ssh:
a. Open a second command shell and log in to the utility node of the Avamar server
as admin.
b. Change to the .ssh directory by typing:
cd ~/.ssh
c. Display the ddr_key.pub file by typing:
cat ddr_key.pub
d. Select and copy the contents of the file.
e. Return to the first command shell window.
f. Paste the contents of the file in /home/admin/.ssh.
7. Enter the key by pressing Ctrl+D.
8. Log in to the Avamar server as root.
9. Change directory to /usr/local/avamar/lib by typing:
cd /usr/local/avamar/lib/
80
EMC Avamar 7.0 Product Security Guide
Client/Server Access and Authentication
10. Copy the private key to /home/admin/.ssh/ddr_key, which is the path and name
specified by ddr_ssh_key_path_name in the mcserver.xml file, by typing:
cp /home/admin/.ssh/DDR_KEY .
where
DDR_KEY
is the file name for the key.
11. Change the ownership of the key to the admin group by typing:
chown root:admin DDR_KEY
where
DDR_KEY
is the file name for the key.
12. Change the permissions for the key to 440 by typing:
chmod 440 DDR_KEY
where
DDR_KEY
is the file name for the key.
13. Modify the symmetric in-flight SSH traffic cipher to use a 128-bit key:
ssh -c aes128-cbc host_name@domain_name
where
host_name
is the hostname of the Data Domain system and
domain_name
is
the domain name of the Data Domain system.
14. Test that you can log in to the Data Domain system without providing a password by
typing:
ssh -i PATH/DDR_KEY AVAMAR_USER@DD_SYSTEM
where:
•
PATH/DDR_KEY
is the path and file name of the key.
•
AVAMAR_USER
is the name of the Avamar user on the Data Domain system.
•
DD_SYSTEM
is the name of the Data Domain system.

Data Security and Integrity
81
CHAPTER 4
Data Security and Integrity
The following topics provide details on the options to provide security and ensure the
integrity of data in the Avamar system:
◆Encrypting data....................................................................................................... 82
◆Data integrity .......................................................................................................... 85
◆Data erasure ........................................................................................................... 85

82
EMC Avamar 7.0 Product Security Guide
Data Security and Integrity
Encrypting data
Avamar can encrypt all data sent between clients and the server “in flight.” Each
individual Avamar server can also be configured to encrypt data stored on the server “at
rest.”
Client/server “in-flight” encryption
To provide enhanced security during client/server data transfers, Avamar supports two
levels of “in-flight” encryption: Medium and High. The exact encryption technology and bit
strength used for any given client/server connection depends on a number of factors,
including the client platform and Avamar server version. “Client/server encryption
behavior” on page 83 provides details.
You specify the default encryption method to use for client/server data transfers (None,
Medium, or High) when you create and edit groups. You also can override the group
encryption method for a specific client on the Client Properties tab of the Edit Client dialog
box, for a specific backup on the On Demand Backup Options dialog box, or for a specific
restore on the Restore Options dialog box. The
EMC Avamar Administration Guide
provides details.
To enable encryption of data in transit, the Avamar server data nodes each require a
unique public/private key pair and a signed X.509 certificate that is associated with the
public key.
When the Avamar server is installed, a public/private key pair and a self-signed certificate
are generated automatically in the /data01/home/admin directory on each Avamar server
storage node and in the /usr/local/avamar/etc directory on the utility node. However,
because self-signing is not recommended in production environments, you should
generate and install a key and signed certificate from either a commercial or private CA.
“Client/Server Access and Authentication” on page 33 provides instructions on how to do
this, as well as how to configure both Windows and UNIX clients to validate the certificates
from the Avamar server.
Note: You can also configure Avamar for two-way authentication, where the client requests
authentication from the Avamar server, and then the Avamar server also requests
authentication from the client. One-way, or server-to-client, authentication typically
provides sufficient security. However, in some cases, two-way authentication is required
or preferred.
The following steps detail the encryption and authentication process for client/server data
transfers in a server-to-client authentication environment:
1. The Avamar client requests authentication from the Avamar server.
2. The server sends the appropriate certificate to the client. The certificate contains the
public key.
3. The client verifies the server certificate and generates a random key, which is
encrypted using the public key, and sends the encrypted message to the server.

Encrypting data
83
Data Security and Integrity
4. The server decrypts the message by using its private key and reads the key generated
by the client.
5. This random key is then used by both sides to negotiate on a set of temporary
symmetric keys to perform the encryption. The set of temporary encryption keys is
refreshed at a regular interval during the backup session.
IMPORTANT
If you store Avamar client backups on a Data Domain system, the connection between the
Avamar client and the Data Domain system is not encrypted. The Data Domain Distributed
Deduplication Bandwidth Optimized OST (DDBOOST) SDK, which Avamar uses to access
the Data Domain system, does not support data encryption between the client and the
Data Domain system.
Client/server encryption behavior
Client/server encryption functional behavior in any given circumstance is dependent on a
number of factors, including the mcserver.xml encrypt_server_authenticate value, and the
avtar encryption settings used during that activity.
The encrypt_server_authenticate value is set to true when you configure server-to-client
authentication, as discussed in “Client/Server Access and Authentication” on page 33.
During backup and restore activities, you control client/server encryption by specifying an
option flag pair: --encrypt and --encrypt-strength. The --encrypt-strength option takes one
of three values: None, Medium, or High.
Increasing cipher strength used by Avamar servers
By default, the Management Console and Enterprise Manager servers support cipher
strengths up to 128-bit. You can increase the cipher strength used by these servers to
256-bit for communications on the following ports:
◆Ports 7778 and 7779 for the Management Console.
◆Ports 8778 and 8779 for the Enterprise Manager.
◆Port 9443 for the Management Console Web Services.
Increasing cipher strength for the Management Console
To increase the cipher strength used by the Management Console, do the following:
1. Set the rmi_cipher_strength parameter to high in the
/usr/local/avamar/var/mc/server_data/prefs/mcserver.xml file:
rmi_cipher_strength=high
2. Download and install the Java Cryptography Extension (JCE) Unlimited Strength
Jurisdiction Policy Files 6:
a. In a web browser, go to http://java.sun.com.
b. Search for “Java Cryptography Extension.”
c. Download the file associated with Java Cryptography Extension (JCE) Unlimited
Strength Jurisdiction Policy Files 6 (jce_policy-6.zip).
84
EMC Avamar 7.0 Product Security Guide
Data Security and Integrity
d. Unzip the jce_policy-6.zip file in a temporary folder and follow the instructions in
the README.txt file to install.
3. Restart the Management Console Server by typing:
dpnctl stop mcs
dpnctl start
Increasing cipher strength for the Enterprise Manager
To increase the cipher strength used by the Enterprise Manager, do the following:
1. Set the rmi_cipher_strength parameter to high in the
/usr/local/avamar/var/mc/server_data/prefs/emserver.xml file:
rmi_cipher_strength=high
2. Download and install the Java Cryptography Extension (JCE) Unlimited Strength
Jurisdiction Policy Files 6:
a. In a web browser, go to http://java.sun.com.
b. Search for “Java Cryptography Extension.”
c. Download the file associated with Java Cryptography Extension (JCE) Unlimited
Strength Jurisdiction Policy Files 6 (jce_policy-6.zip).
d. Unzip the jce_policy-6.zip file in a temporary folder and follow the instructions in
the README.txt file to install.
3. Restart the Enterprise Manager Server by typing:
dpnctl stop ems
dpnctl start ems
“At-rest” encryption
In addition to encrypting client/server data transfers, each server can be configured to
encrypt data stored residing on it. This is called “at-rest” encryption.
When encryption is enabled, the server accepts a user-defined salt that is then used to
generate an encryption key. The salt is stored on the Avamar server for subsequent
encryption/decryption activities.
Key management is completely automatic:
◆Old encryption keys are automatically stored in a secure manner so that data stripes
encrypted with previous keys can always be decrypted and read.
◆During server maintenance, crunched stripes will over time be converted to use the
most current key.
Note that since any reads/writes from disk require encryption processing with this feature
enabled, there is a performance impact to the Avamar server of approximately 33 percent.
Beginning with version 6.1, encryption is performed using AES 128 CFB. Older systems
can continue to use 128-bit Blowfish until the salt is changed.
Data integrity
85
Data Security and Integrity
Data integrity
Checkpoints
are system-wide backups taken for the express purpose of assisting with
disaster recovery. Checkpoints are typically scheduled twice daily and validated once daily
(during the maintenance window). You also can create and validate additional server
checkpoints on an on-demand basis. The
EMC Avamar Administration Guide
provides
details on creating, validating, and and deleting server checkpoints.
Checkpoint validation, which is also called an Avamar Hash Filesystem check (HFS check),
is an internal operation that validates the integrity of a specific checkpoint. Once a
checkpoint has passed an HFS check, it can be considered reliable enough to be used for
a system rollback.
The actual process that performs HFS checks is hfscheck; it is similar to the UNIX fsck
command.
You can schedule HFS checks by using Avamar Administrator. You also can manually
initiate an HFS check by running avmaint hfscheck directly from a command shell.
An HFS check might take several hours depending on the amount of data on the Avamar
server. For this reason, each validation operation can be individually configured to
perform all checks (full validation) or perform a partial "rolling" check which fully validates
all new and modified stripes, then partially checks a subset of unmodified stripes.
Initiating an HFS check requires significant amounts of system resources. To reduce
contention with normal server operation, an HFS check can be throttled.
Additionally, during this time, the server is placed in read-only mode. Once the check has
been initiated, normal server access is resumed. You can also optionally suspend
command dispatches during this time, although this is not typically done.
If HFS check detects errors in one or more stripes, it automatically attempts to repair them.
Data erasure
When you manually delete a backup using Avamar Administrator or you automatically delete
a backup when its retention policy expires and garbage collection runs, data is marked as
deleted but is left on disk.
You can permanently and securely delete backups from an Avamar server in a manner that
satisfies stringent security requirements by overwriting the data that is unique to a backup
with random data. The following topics provide details on securely deleting backups from
an Avamar server:
◆“Requirements to securely delete backups” on page 86
◆“How to securely delete backups” on page 87
86
EMC Avamar 7.0 Product Security Guide
Data Security and Integrity
Requirements to securely delete backups
Consider the following requirements for secure deletion of backups:
◆You must be familiar with basic- to intermediate-level Avamar server terminology and
command-line administration.
◆Some steps to securely delete backups might require the use of third party tools such
as the open-source srm or GNU shred utilities. The documentation for those utilities
provides additional information regarding proper use, capabilities, and limitations of
those utilities.
◆Use of any non-certified storage hardware, including RAID controllers and disk storage
arrays, might impact the effectiveness of the secure backup deletion. Consult the
manufacturers of those devices for information about disabling or clearing write
caches, or about any other features that impact data transfer to the storage media.
◆The following conditions must be met in the Avamar environment:
• All nodes must be in the ONLINE state, and no stripes should be in the OFFLINE
state. This can be checked using the status.dpn command.
• The most recent checkpoint must have been successfully validated.
• Pending garbage collection operations can increase the time needed to complete
the secure deletion process, or can cause extra data to be overwritten. Therefore,
you should run garbage collection until all pending non-secure deletions have
successfully completed. No errors should be reported by the garbage collection
process.
• The server should be idle:
– There should be no backups in progress, nor should the server be running
garbage collection or HFS checks.
– The backup scheduler and maintenance windows scheduler should be stopped
for the duration of the secure deletion process, so that no new backups or
maintenance activities are initiated.
• Avamar storage node ext3 file systems should not be configured to operate in
data=journal mode. If this is the case, data might persist on the disk after the
secure deletion process has completed.

Data erasure
87
Data Security and Integrity
How to securely delete backups
The securedelete program enables you to securely erase selected backups on the Avamar
server.
This procedure can be used in conjunction with the existing procedures at a company to
securely delete data from other parts of the operating system or hardware. Contact EMC
Customer Support for any questions regarding the effect of company procedures on the
Avamar server software.
1. Open a command shell and log in:
• If logging into a single-node server, log in to the server as admin.
• If logging into a multi-node server, log in to the utility node as admin, then load the
admin OpenSSH key by typing:
ssh-agent bash
ssh-add ~admin/.ssh/admin_key
When prompted, type the admin_key passphrase and press Enter.
Note: Space limitations in this guide cause the command in the next step to continue
(wrap) to more than one line. Type the command on a single command line (no line
feeds or returns allowed).
2. Locate the backups to securely delete by typing the following command:
securedelete getb --id=USER@AUTH --password=PASSWORD
--account=DOMAIN/CLIENT
where:
•
USER
is the Avamar username.
•
AUTH
is the authentication system used by that user (the default internal
authentication domain is “avamar”).
•
PASSWORD
is the password for the --id=
USER
@
AUTH
account.
•
DOMAIN/CLIENT
is the full location of the client machine.
3. Locate the backup to delete in the list, and note the date in the created field.
Note: Space limitations in this guide cause the command in the next step to continue
(wrap) to more than one line. Type the command on a single command line (no line
feeds or returns allowed).
IMPORTANT
Do not interrupt the following securedelete delb command. If interrupted, all data will
not be securely deleted.
88
EMC Avamar 7.0 Product Security Guide
Data Security and Integrity
4. Securely delete the backup by typing the following command:
securedelete delb --account=LOCATION --date=DATE --id=USER@AUTH
--password=PASSWORD
where:
•LOCATION
is the location of the backup, expressed as a file path relative to the
current working directory. However, if the first character is a slash (/), the value is
treated as an absolute file path.
•
DATE
is the backup date noted in step 3.
•
USER
is the Avamar username.
•
AUTH
is the authentication system used by that user (the default internal
authentication domain is “avamar”).
•
PASSWORD
is the password for the --id=
USER
@
AUTH
account.
This operation typically takes several minutes to complete while the server securely
overwrites data.
If successful, the securedelete delb command returns the following response:
1 Request succeeded
If unsuccessful, the securedelete delb command returns the following response:
0 ERROR! Exit code 0: Request failed.
5. If an error is encountered:
• Search the knowledge base on EMC Online Support, for the specific error code.
• If the required information is not found, engage EMC Customer Support using Live
Chat, or create a Service Request as described in “Where to get help” on page 10.
6. Repeat step 2 – step 5 for all other backups that are to be securely deleted.
7. Check the server logs for any ERROR or WARN messages that might indicate a failure of
the secure deletion operation by typing:
mapall --noerror 'grep "ERROR\|WARN" /data01/cur/gsan.log*'
8. If any such messages are present:
• Search the knowledge base on EMC Online Support, for the specific error code.
• If the required information is not found, engage EMC Customer Support using Live
Chat, or create a Service Request as described in “Where to get help” on page 10.
If any stripes on the system have been repaired or rebuilt due to data corruption, then
the bad versions remain on disk. Overwrite or securely delete these files by using an
appropriate third-party tool.
Data erasure
89
Data Security and Integrity
9. Locate these stripes by typing:
mapall --noerror 'ls /data??/cur/*.bad*'
Information similar to the following appears in the command shell:
/data06/cur/0000000300000016.0000000300000016.bad1240015157
/data06/cur/0000000300000016.cdt.bad1240015157
/data06/cur/0000000300000016.chd.bad1240015157
/data06/cur/0000000300000016.wlg.bad1240015157
10. If backups were performed before the most recent checkpoint was taken, roll the
server back to the most recent checkpoint, and repeat steps 2–9.
11. Repeat step 10 for all applicable checkpoints.
12. Repeat this entire procedure on all other Avamar servers to which this Avamar server
replicates backups.

System Monitoring, Auditing, and Logging
91
CHAPTER 5
System Monitoring, Auditing, and Logging
The following topics discuss the features available to monitor the Avamar environment
and audit the operations performed. It also provides a list of log files that are available for
each feature on each component in the system:
◆Client activity monitoring ........................................................................................ 92
◆Server monitoring ................................................................................................... 92
◆Email home notification .......................................................................................... 94
◆Auditing.................................................................................................................. 94
◆Logs........................................................................................................................ 95
92
EMC Avamar 7.0 Product Security Guide
System Monitoring, Auditing, and Logging
Client activity monitoring
You can monitor client backup, restore, and validation activity to verify backups are
successfully completing and that no abnormal activity is occurring.
The Activity Monitor tab on the Activity window in Avamar Administrator provides details
on client activity, including the type, status, start and end time, error code (if applicable),
and other details for each client activity.
The
EMC Avamar Administration Guide
provides details on how to access the Activity
Monitor tab and filter the activities that appear in the tab.
Server monitoring
There are several features available to assist you in monitoring the Avamar environment,
including server status and system events.
Monitoring server status
You can monitor the status of the following items on the Avamar server:
◆Overall Avamar server status
◆Capacity usage
◆Modules
◆Nodes
◆Partitions
◆Checkpoints
◆Garbage collection
◆Maintenance activities
If you use a Data Domain system as storage for Avamar client backups, you also can
monitor CPU, disk activity, and network activity for each node on the Data Domain system.
This status information is provided on the tabs in the Avamar Server window in Avamar
Administrator. The
EMC Avamar Administration Guide
provides details on how to access
the Avamar Server window and the information available on each tab.
Monitoring system events
All Avamar system activity and operational status is reported as various events to the
MCS. Examples of various Avamar events include client registration and activation,
successful and failed backups, hard disk status, and others.
Events are listed in the Event Management tab in the Administration window of Avamar
Administrator. The
EMC Avamar Administration Guide
provides details on how to access
the Event Management tab and filter the events that appear in the tab.

Server monitoring
93
System Monitoring, Auditing, and Logging
Event notification mechanisms
You can also configure Avamar to notify you when events occur. There are several features
and functions available.
Pop-up alerts
Events can be configured on an event-by-event basis to generate a graphical pop-up alert
each time one of those events occurs. One significant limitation of this feature is that
Avamar Administrator software must be running in order for the pop-up alerts to be
displayed.
Acknowledgement required list
Events can be configured on an event-by-event basis such that when events of this type
occur, an entry is added to a list of events that requires interactive acknowledgement by
the Avamar system administrator.
Email messages
Events can be configured on an event-by-event basis to send an email message to a
designated list of recipients. Email notifications can be sent immediately or in batches at
regularly scheduled times.
Syslog support
Events can be configured on an event-by-event basis to log information to local or remote
syslog files based on filtering rules configured for the syslog daemon receiving the events.
Third-party monitoring tools and utilities capable of examining log entries can access the
syslog files and process them to integrate Avamar event information into larger site
activity and status reports.
For maximum security, EMC recommends implementing remote syslog monitoring as
described in the
EMC Avamar Administration Guide
.
SNMP support
Simple Network Management Protocol (SNMP) is a protocol for communicating monitoring
and event notification information between an application, hardware device or software
application, and any number of monitoring applications or devices. The Avamar SNMP
implementation provides two distinct ways to access Avamar server events and activity
completion status:
◆SNMP requests provide a mechanism for SNMP management applications to “pull”
information from a remote SNMP-enabled client (in this case, the Avamar server).
◆SNMP traps provide a mechanism for the Avamar server to “push” information to
SNMP management applications whenever designated Avamar events occur. Events
can be configured on an event-by-event basis to output SNMP traps.
Avamar also can collect and display data for health monitoring, system alerts, and
capacity reporting on a configured Data Domain system by using SNMP. The
EMC Avamar
and EMC Data Domain System Integration Guide
provides details on how to configure
SNMP for Avamar with Data Domain.
94
EMC Avamar 7.0 Product Security Guide
System Monitoring, Auditing, and Logging
ConnectEMC support
Events can be configured on an event-by-event basis to send a notification message
directly to EMC Customer Support using ConnectEMC.
The
EMC Avamar Administration Guide
provides details on how to configure each of these
notification mechanisms.
Event notification profiles
Profiles are a notification management feature that are used to logically group certain
event codes together and specify which notifications should be generated when these
events occur. You can create custom profiles to organize system events and generate the
desired notifications when any of those events occur. The
EMC Avamar Administration
Guide
provides details on how to create and manage profiles.
Email home notification
When fully configured and enabled, the “email home” feature automatically emails the
following information to EMC Customer Support twice daily:
◆Status of the daily data integrity check
◆Selected Avamar server warnings and information messages
◆Any Avamar server errors
◆Any RAID errors (single-node servers only)
By default, these email messages are sent at 6 a.m. and 3 p.m. each day (based on the
local time on the Avamar server). The timing of these messages is controlled by the
Notification Schedule.
The
EMC Avamar Administration Guide
provides details on how to enable and schedule
the email home feature.
Auditing
The Avamar Audit Log provides details on the operations initiated by users in the Avamar
system. The data in this log allows enterprises that deploy Avamar to enforce security
policies, detect security breaches or deviation from policies, and hold appropriate users
accountable for those actions. The audit log includes the following information for each
operation:
◆The date and time the action occurred
◆The event code number associated with the action
◆The ID and role of the user that initiated the action
◆The product and component from which the action was initiated
◆The severity of the action
◆The domain in which the action occurred

Logs
95
System Monitoring, Auditing, and Logging
The Audit Log is available in Avamar Administrator as a subtab of the Event Management
tab in the Administration window. The
EMC Avamar Administration Guide
provides details
on how to access the Audit Log and filter the events that appear in the log.
Gen4 and later Avamar Data Stores running the SUSE Linux Enterprise Server (SLES)
operating system implement improved auditing features, such as Advanced Intrusion
Detection Environment (AIDE) and the auditd service. “Many Level-1 security hardening
features are part of the base SUSE Enterprise Linux Server (SLES) operating system on
Gen4 and later Avamar Data Stores.” on page 102 and “Auditing service (auditd)” on
page 103 provide detailed information about those features.
Logs
Avamar software includes log files for server and client components, maintenance tasks,
various utilities, and backup clients. These log files enable you to examine various
aspects of the Avamar system.
The following sections includes log file information organized in tables for each Avamar
component. For additional information on log files, refer to the Avamar guide for the
specific component.
Single-node server
The following table lists single-node server log files.
Table 16 Single-node server log files (page 1 of 3)
Feature/function Log file locations
Avamar Administrator server /usr/local/avamar/var/mc/server_log/flush.log
/usr/local/avamar/var/mc/server_log/restore.log
/usr/local/avamar/var/mc/server_log/mcserver.log.#
/usr/local/avamar/var/mc/server_log/mcserver.out
/usr/local/avamar/var/mc/server_log/pgsql.log
/usr/local/avamar/var/mc/server_data/postgres/data/pg_log/
postgresql-DATE_TIME.log
/usr/local/avamar/var/mc/server_data/mcs_data_dump.sql
Avamar Enterprise Manager
(Tomcat)
/usr/local/avamar/var/em/webapp_log/admin.DATE.log
/usr/local/avamar/var/em/webapp_log/catalina.DATE.log
/usr/local/avamar/var/em/webapp_log/catalina.out
/usr/local/avamar/var/em/webapp_log/host-manager.DATE.log
/usr/local/avamar/var/em/webapp_log/localhost.DATE.log
/usr/local/avamar/var/em/webapp_log/manager.DATE.log

96
EMC Avamar 7.0 Product Security Guide
System Monitoring, Auditing, and Logging
Avamar Enterprise Manager
(Server)
/usr/local/avamar/var/em/server_log/flush.log
/usr/local/avamar/var/em/server_log/restore.log
/usr/local/avamar/var/em/server_log/emserver.log.#
/usr/local/avamar/var/em/server_log/emserver.out
/usr/local/avamar/var/em/server_log/pgsql.log
/usr/local/avamar/var/em/server_data/postgres/data/pg_log/
postgresql-DATE_TIME.log
/usr/local/avamar/var/em/server_data/ems_data_dump.sql
Maintenance tasks /usr/local/avamar/var/cron/clean_emdb.log
/usr/local/avamar/var/cron/dpn_crontab.log
/usr/local/avamar/var/cron/cp.log
/usr/local/avamar/var/cron/gc.log
/usr/local/avamar/var/cron/hfscheck.log
/usr/local/avamar/var/cron/ntpd_keepalive_cron.log
/usr/local/avamar/var/cron/ntpd_keepalive_cron.log.#
/usr/local/avamar/var/cron/suspend.log
avw_install utility /usr/local/avamar/var/avw_cleanup.log
/usr/local/avamar/var/avw_install.log
/usr/local/avamar/var/avw-time.log
/usr/local/avamar/var/log/dpnavwinstall-VERSION.log
axion_install utility /usr/local/avamar/var/axion_install_DATE_TIME.log
Avamar File System (AvFS) /usr/local/avamar/var/axionfs.log
change-passwords utility /usr/local/avamar/var/change-passwords.log
ddrmaint utility /usr/local/avamar/var/log/ddrmaint.log
dpnctl utility /usr/local/avamar/var/log/dpnctl.log
dpnnetutil utility /usr/local/avamar/var/log/dpnnetutil-version.log
/usr/local/avamar/var/log/dpnnetutil.log*
/usr/local/avamar/var/log/dpnnetutilbgaux.log
/usr/local/avamar/var/log/dpnnetutilbgaux-stdout-stderr.log
permctl utility /usr/local/avamar/var/log/permctl.log
Table 16 Single-node server log files (page 2 of 3)
Feature/function Log file locations

Logs
97
System Monitoring, Auditing, and Logging
Utility node
The following table lists utility node log files.
resite utility /usr/local/avamar/var/dpnresite-version.log
/usr/local/avamar/var/mcspref.log
/usr/local/avamar/var/nataddr.log
/usr/local/avamar/var/smtphost.log
timedist utility /usr/local/avamar/var/timedist.log
timesyncmon program /usr/local/avamar/var/timesysncmon.log
Avamar Replicator /usr/local/avamar/var/cron/replicate.log
Avamar license server /usr/local/avamar/var/ascd-PORT.log
Storage server log /data01/cur/err.log
/data01/cur/gsan.log
Table 16 Single-node server log files (page 3 of 3)
Feature/function Log file locations
Table 17 Utility node log files (page 1 of 3)
Feature/function Log file locations
Avamar Administrator server /usr/local/avamar/var/mc/server_log/flush.log
/usr/local/avamar/var/mc/server_log/restore.log
/usr/local/avamar/var/mc/server_log/mcddrssh.log
/usr/local/avamar/var/mc/server_log/mcddrsnmp.out
/usr/local/avamar/var/mc/server_log/mcddrsnmp.log
/usr/local/avamar/var/mc/server_log/mcserver.log.#
/usr/local/avamar/var/mc/server_log/mcserver.out
/usr/local/avamar/var/mc/server_log/pgsql.log
/usr/local/avamar/var/mc/server_data/postgres/data/pg_log/
postgresql-DATE_TIME.log
/usr/local/avamar/var/mc/server_data/mcs_data_dump.sql
Avamar Enterprise Manager
(Tomcat)
/usr/local/avamar/var/em/webapp_log/admin.DATE.log
/usr/local/avamar/var/em/webapp_log/catalina.DATE.log
/usr/local/avamar/var/em/webapp_log/catalina.out
/usr/local/avamar/var/em/webapp_log/host-manager.DATE.log
/usr/local/avamar/var/em/webapp_log/localhost.DATE.log
/usr/local/avamar/var/em/webapp_log/manager.DATE.log

98
EMC Avamar 7.0 Product Security Guide
System Monitoring, Auditing, and Logging
Avamar Enterprise Manager
(Server)
/usr/local/avamar/var/em/server_log/flush.log
/usr/local/avamar/var/em/server_log/restore.log
/usr/local/avamar/var/em/server_log/emserver.log.#
/usr/local/avamar/var/em/server_log/emserver.out
/usr/local/avamar/var/em/server_log/pgsql.log
/usr/local/avamar/var/em/server_data/postgres/data/pg_log/
postgresql-DATE_TIME.log
/usr/local/avamar/var/em/server_data/ems_data_dump.sql
Maintenance tasks /usr/local/avamar/var/cron/clean_emdb.log
/usr/local/avamar/var/cron/dpn_crontab.log
/usr/local/avamar/var/cron/cp.log
/usr/local/avamar/var/cron/gc.log
/usr/local/avamar/var/cron/hfscheck.log
/usr/local/avamar/var/cron/ntpd_keepalive_cron.log
/usr/local/avamar/var/cron/ntpd_keepalive_cron.log.#
/usr/local/avamar/var/cron/suspend.log
avw_install utility /usr/local/avamar/var/avw_cleanup.log
/usr/local/avamar/var/avw_install.log
/usr/local/avamar/var/avw-time.log
/usr/local/avamar/var/log/dpnavwinstall-VERSION.log
axion_install utility /usr/local/avamar/var/axion_install_DATE_TIME.log
Avamar File System (AvFS) /usr/local/avamar/var/axionfs.log
change-passwords utility /usr/local/avamar/var/change-passwords.log
ddrmaint utility /usr/local/avamar/var/log/ddrmaint.log
dpnctl utility /usr/local/avamar/var/log/dpnctl.log
dpnnetutil utility /usr/local/avamar/var/log/dpnnetutil-version.log
/usr/local/avamar/var/log/dpnnetutil.log*
/usr/local/avamar/var/log/dpnnetutilbgaux.log
/usr/local/avamar/var/log/dpnnetutilbgaux-stdout-stderr.log
permctl utility /usr/local/avamar/var/log/permctl.log
timedist utility /usr/local/avamar/var/timedist.log
timesyncmon program /usr/local/avamar/var/timesysncmon.log
Table 17 Utility node log files (page 2 of 3)
Feature/function Log file locations

Logs
99
System Monitoring, Auditing, and Logging
Storage node
The following table lists storage node log files.
Spare node
The following table lists spare node log files.
Avamar NDMP Accelerator
The following table lists Avamar NDMP Accelerator log files.
Avamar Replicator /usr/local/avamar/var/cron/replicate.log
Avamar license server /usr/local/avamar/var/ascd-PORT.log
switch_monitoring utility /usr/local/avamar/var/log/switch_monitoring.log
Table 17 Utility node log files (page 3 of 3)
Feature/function Log file locations
Table 18 Storage node log files
Feature/function Log file locations
Storage server log /data01/cur/err.log
/data01/cur/gsan.log
dpnnetutil utility /usr/local/avamar/var/log/dpnnetutilbgaux-stdout-stderr.log
/usr/local/avamar/var/log/dpnnetutilbgaux.log
Maintenance tasks /usr/local/avamar/var/ntpd_keepalive_cron.log*
timesyncmon program /usr/local/avamar/var/timesyncmon.log*
Table 19 Spare node log files
Feature/function Log file locations
dpnnetutil utility /usr/local/avamar/var/log/dpnnetutilbgaux-stdout-stderr.log
/usr/local/avamar/var/log/dpnnetutilbgaux.log
Table 20 Avamar NDMP Accelerator log files
Feature/function Log file locations
avndmp log /usr/local/avamar/var/{FILER-NAME}/*.avndmp.log
dpnnetutil utility /usr/local/avamar/var/log/dpnnetutilbgaux-stdout-stderr.log
/usr/local/avamar/var/log/dpnnetutilbgaux.log

100
EMC Avamar 7.0 Product Security Guide
System Monitoring, Auditing, and Logging
Access node
The following table lists access node log files.
Avamar Administrator client network host
The following table lists Avamar Administrator client network host log files.
Backup client network host
The following table lists backup client network host log files.
Table 21 Access node log files
Feature/function Log file locations
dpnnetutil utility /usr/local/avamar/var/log/dpnnetutilbgaux-stdout-stderr.log
/usr/local/avamar/var/log/dpnnetutilbgaux.log
Table 22 Avamar Administrator client network host log files
Feature/function
Operating
system Log file locations
Avamar Administrator
management console
Windows 7 C:\Users\USERNAME\.avamardata\var\mc\gui_log
Windows Vista
Windows XP
C:\Documents and
Settings\USERNAME\.avamardata\var\mc\gui_log
Linux $HOME/.avamardata/var/mc/gui_log/mcclient.log.0
Avamar Administrator
management console
command line interface
UNIX $HOME/.avamardata/var/mc/gui_log/mccli.log.0
Table 23 Backup client network host log files
Feature/function Log file locations
Client avagent process (all clients) C:\Program Files\avs\var\avagent.log
Client avtar process (all clients) C:\Program Files\avs\var\{WORKORDER-ID}.alg
C:\Program Files\avs\var\{WORKORDER-ID}.log
Avamar Client for Windows tray applet C:\Program Files\avs\var\avscc.log
Avamar Plug-in for DB2 /usr/local/avamar/var/{WORKORDER-ID}.log
Avamar Exchange Client /usr/local/avamar/var/{WORKORDER-ID}.log
Avamar NDMP Accelerator /usr/local/avamar/var/{WORKORDER-ID}.log
Avamar Client for NetWare /usr/local/avamar/var/{WORKORDER-ID}.log
Avamar Plug-in for Oracle /usr/local/avamar/var/{WORKORDER-ID}.log
Avamar Plug-in for SQL Server /usr/local/avamar/var/{WORKORDER-ID}.log

Server Security Hardening
101
CHAPTER 6
Server Security Hardening
The following topics describe various server security hardening features, which are
available for Avamar 6.0 and later servers running the SUSE Linux Enterprise Server (SLES)
operating system:
◆Overview............................................................................................................... 102
◆Level-1 security hardening .................................................................................... 102
◆Level-2 security hardening .................................................................................... 113
◆Level-3 security hardening .................................................................................... 122
◆Preparing for a system upgrade............................................................................. 134
102
EMC Avamar 7.0 Product Security Guide
Server Security Hardening
Overview
STIG compliance
Beginning with version 6.0, Avamar servers running the SLES operating system offer a
number of improved security features, which are primarily targeted for customers needing
to comply with US Department of Defense (DoD)
Security Technical Implementation Guide
(STIG) for Unix
requirements.
In addition, Appendix C, “IAO Information” provides STIG mandated information for
Information Assurance Officers.
Server security hardening levels
The server security hardening features are grouped in increasingly more secure levels.
Select a level of security appropriate for your organization, and make the changes in that
level and any level beneath it. For example, level-3 security requires all changes described
in level-1 and level-2 in addition to those described in level-3.
Level-1 security hardening
Many Level-1 security hardening features are part of the base SUSE Enterprise Linux
Server (SLES) operating system on Gen4 and later Avamar Data Stores.
Level-1 features included in the base SUSE Enterprise Linux Server (SLES) operating
system on Gen4 and later Avamar Data Stores:
◆“Advanced Intrusion Detection Environment (AIDE)” on page 103
◆“Auditing service (auditd)” on page 103
◆“sudo implementation” on page 104
◆“Command logging” on page 105
Additional level-1 security hardening tasks:
◆“Locking down single-user mode on RHEL servers” on page 105
◆“Disabling Samba” on page 106
◆“Remove weak ciphers from Apache web server” on page 107
◆“Force strong encryption for Java and Tomcat connections” on page 108
◆“Removing suid bit from non-essential system binaries on RHEL” on page 111
◆“Preventing unauthorized access to GRUB configuration” on page 112

Level-1 security hardening
103
Server Security Hardening
Advanced Intrusion Detection Environment (AIDE)
The Advanced Intrusion Detection Environment (AIDE) is a SLES feature that is used to take
a snapshot of an Avamar server configuration for purposes of establishing a reliable
system baseline reference.
AIDE is a level-1 hardening feature that is implemented as part of the base SLES operating
system on Gen4 and later Avamar Data Stores.
AIDE satisfies the STIG requirements in the following table.
The system baseline snapshot is stored in /var/lib/aide/aide.db.
AIDE reports are run weekly as part of the /etc/cron/weekly cron job.
AIDE output is logged to /var/log/secure.
Auditing service (auditd)
The auditd service is a SLES feature that implements a CAPP-compliant (Controlled Access
Protection Profiles) auditing feature, which continually monitors the server for any
changes that could affect the server’s ability to perform as intended. The auditd service
writes log output in /var/log/audit/audit.log.
The auditd service is a level-1 hardening feature that is implemented as part of the base
SLES operating system on Gen4 and later Avamar Data Stores.
The auditd service feature satisfies the STIG requirements in the following table.
Table 24 STIG requirements satisfied by AIDE
Requirement ID Requirement title
GEN000140 Create and maintain system baseline
GEN000220 System baseline for system libraries and binaries checking
GEN002260 System baseline for device files checking
GEN002380 SUID files baseline
GEN002400 System baseline for SUID files checking
GEN002440 SGID files baseline
GEN002460 System baseline for SGID files checking
Table 25 STIG requirements satisfied by the auditd service (page 1 of 2)
Requirement ID Requirement title
GEN002660 Configure and implement auditing
GEN002680 Audit logs accessibility
GEN002700 Audit Logs Permissions
GEN002720 Audit Failed File and Program Access Attempts
GEN002740 Audit File and Program Deletion
GEN002760 Audit Administrative, Privileged, and Security Actions

104
EMC Avamar 7.0 Product Security Guide
Server Security Hardening
sudo implementation
The sudo command is an alternative to direct root login. On Gen4 and later Avamar Data
Stores, the admin and dpn user accounts are automatically added to the sudoers file. This
enables admin and dpn users to execute commands that would otherwise require
operating system root permission.
Implementation of the sudo command for admin and dpn users is a level-1 hardening
feature that is implemented as part of the base SLES operating system on Gen4 and later
Avamar Data Stores.
Implementation of the sudo command for admin and dpn users satisfies the STIG
requirements in the following table.
Prefixing commands with “sudo”
Instead of switching user to root with the su command, admin and dpn users can directly
issue commands normally requiring root permissions by prefixing each command with
sudo. For example, the following command installs MyPackage.rpm:
sudo rpm -ivh MyPackage.rpm
If prompted for a password, type the password and press Enter.
You might be periodically prompted to retype your admin or dpn password when prefixing
other commands with sudo. This is normal.
GEN002800 Audit Login, Logout, and Session Initiation
GEN002820 Audit Discretionary Access Control Permission Modifications
GEN002860 Audit Logs Rotation
Table 25 STIG requirements satisfied by the auditd service (page 2 of 2)
Requirement ID Requirement title
Table 26 STIG requirements satisfied by the implementation of sudo
Requirement ID Requirement title
GEN000260 Shared Account Documentation
GEN000280 Shared Account Direct Logon
GEN001100 Encrypting Root Access
GEN001120 Encrypting Root Access
Level-1 security hardening
105
Server Security Hardening
Spawning a sudo Bash subshell
If you need to execute several commands normally requiring root permissions, you can
also spawn a persistent sudo Bash subshell by typing sudo bash.
Commands normally requiring root permissions can now be typed directly with no
additional modifications to the command line syntax. For example:
sudo bash
rpm -ivh MyPackage1.rpm
rpm -ivh MyPackage2.rpm
rpm -ivh MyPackage3.rpm
exit
Command logging
Gen4 and later Avamar Data Stores log all Bash shell commands issued by any user.
Bash command logging is a level-1 hardening feature that is implemented as part of the
base SLES operating system on Gen4 and later Avamar Data Stores.
Bash command logging does not satisfy any particular STIG requirements. It is intended to
be used as a generalized debugging and forensics tool.
Locking down single-user mode on RHEL servers
For RHEL servers, limit access in single-user mode to the root user. This task is not
required on SLES servers.
1. Open a command shell and log in using one of the following methods:
• To log in to a single-node server:
a. Log in to the server as admin.
b. Switch user to root by typing:
su -
• To log in to a multi-node server:
a. Log in to the utility node as admin, then load the dpnid OpenSSH key by typing:
ssh-agent bash
ssh-add ~admin/.ssh/dpnid
b. When prompted, type the dpnid passphrase and press Enter.
2. Create a backup copy of /etc/inittab.
• Single-node server:
cp -p /etc/inittab /etc/inittab.backup
• Multi-node server:
mapall --all --user=root "cp /etc/inittab /etc/inittab.backup"
3. Open /etc/inittab in a plain text editor.
106
EMC Avamar 7.0 Product Security Guide
Server Security Hardening
4. Add the following line in the sequence shown.
Change:
# System initialization.
si::sysinit:/etc/rc.d/rc.sysinit
To:
# System initialization.
si::sysinit:/etc/rc.d/rc.sysinit
ss:S:respawn:/sbin/sulogin
5. Save and quit the file.
6. (Multi-node system only) Copy the changes made to /etc/inittab to all nodes.
cd /etc
mapall --all --user=root copy inittab
mapall --all --user=root "cp /root/inittab /etc/inittab"
mapall --all --user=root "rm -f /root/inittab"
Disabling Samba
For RHEL servers, and SLES servers with the optional Samba packages installed, disable
Samba. This prevents the use of Samba commands to obtain valid local and domain
usernames and to obtain the Avamar server’s browse list. The browse list is a list of the
computers nearest to the Avamar server.
1. Open a command shell and log in using one of the following methods:
• To log in to a single-node server:
a. Log in to the server as admin.
b. Switch user to root by typing:
su -
• To log in to a multi-node server:
a. Log in to the utility node as admin, then load the dpnid OpenSSH key by typing:
ssh-agent bash
ssh-add ~admin/.ssh/dpnid
b. When prompted, type the dpnid passphrase and press Enter.
2. Disable Samba.
• Single-node system:
service smb stop
chkconfig smb off
•Multi-node system:
mapall --all --user=root "service smb stop"
mapall --all --user=root "chkconfig smb off"
Samba is disabled and will not start when the Avamar system boots.

Level-1 security hardening
107
Server Security Hardening
Remove weak ciphers from Apache web server
Modify the cipher suite used by the Apache web server to remove weak ciphers.
Removing weak ciphers on SLES computers
1. Open a command shell and log in using one of the following methods:
• To log in to a single-node server:
a. Log in to the server as admin.
b. Switch user to root by typing:
su -
• To log in to a multi-node server:
a. Log in to the utility node as admin, then load the dpnid OpenSSH key by typing:
ssh-agent bash
ssh-add ~admin/.ssh/dpnid
b. When prompted, type the dpnid passphrase and press Enter.
2. In a plain-text editor, edit /etc/apache2/vhosts.d/vhost-ssl.conf.
Note: Space limitations in this guide cause the entries in the next step to continue
(wrap) to more than one line. Type the replacement entry on a single line (no line feeds
or returns allowed).
3. Change the following line as shown here.
Change:
SSLCipherSuite
HIGH:MEDIUM:!ADH:!EXPORT56:RC4+RSA:+SSLv2:+EXP:+eNULL:!MD5:!
CAMELLIA
To:
SSLCipherSuite
ALL:!aNULL:!ADH:!eNULL:!LOW:!EXP:RC4+RSA:+HIGH:+MEDIUM
4. Save and close the file.
5. Type the following commands to restart the Apache web server:
/etc/init.d/apache2 stop
/etc/init.d/apache2 start
Removing weak ciphers on RHEL computers
1. Open a command shell and log in using one of the following methods:
• To log in to a single-node server:
a. Log in to the server as admin.
b. Switch user to root by typing:
su -

108
EMC Avamar 7.0 Product Security Guide
Server Security Hardening
• To log in to a multi-node server:
a. Log in to the utility node as admin, then load the dpnid OpenSSH key by typing:
ssh-agent bash
ssh-add ~admin/.ssh/dpnid
b. When prompted, type the dpnid passphrase and press Enter.
2. In a plain text editor, edit /etc/httpd/conf.d/ssl.conf.
Note: Space limitations in this guide cause the entries in the next step to continue
(wrap) to more than one line. Type the replacement entry on a single line (no line feeds
or returns allowed).
3. Change the following line as shown here.
Change:
SSLCipherSuite HIGH:MEDIUM:!NULL:+SHA1:+MD5:+HIGH:+MEDIUM:!MD5:!ADH
To:
SSLCipherSuite
ALL:!aNULL:!ADH:!eNULL:!LOW:!EXP:RC4+RSA:+HIGH:+MEDIUM
4. Save and close the file.
5. Type the following commands to restart the Apache web server:
/etc/init.d/httpd stop
/etc/init.d/httpd start
Force strong encryption for Java and Tomcat connections
Web browser connections made to Avamar’s Java and Apache Tomcat servers normally
accept the SSL 2.0 protocol. This permits web browsers that use SSL 2.0 to make an HTTPS
connection. By default, Internet Explorer 8 (IE8) uses SSL 2.0 for HTTPS connections.
The SSL 2.0 protocol is flawed and is a security risk. Eliminate this risk by configuring
Avamar’s Java and Apache Tomcat servers to require all connections to use SSL 3.0
protocols and the TLS 1.0, 1.1, and 1.2 protocols.
After changes are made to prohibit SSL 2.0 connections, web browsers such as IE8 must
be configured to use only SSL 3.0 protocols and the TLS 1.0, 1.1, and 1.2 protocols. This
change can be accomplished by pushing out a new domain Group Policy or by manually
changing the setting in each web browser.
Removing SSL_DHE_DSS_WITH_3DES_EDE_CBC_SHA encryption prevents strict
compliance with the TLS protocol. However, removing this encryption is required in order
to enforce a minimum encryption strength of 128 bits.

Level-1 security hardening
109
Server Security Hardening
Forcing strong encryption for Java connections
1. Open a command shell and log in using one of the following methods:
• To log in to a single-node server, log in to the server as admin.
• To log in to a multi-node server, log in to the utility node as admin.
2. Stop the Java component by typing:
mcserver.sh --stop
3. Open /usr/local/avamar/var/mc/server_data/prefs/mcserver.xml in a plain text
editor.
Note: Space limitations in this guide cause the entries in the next step to continue
(wrap) to more than one line. Type the replacement entry on a single line (no line feeds
or returns allowed).
4. Change the value of the cipher_suite_128 key.
Change:
<entry key="cipher_suite_128"
value="TLS_RSA_WITH_AES_128_CBC_SHA,TLS_DHE_RSA_WITH_AES_128_CBC_SH
A,TLS_DHE_DSS_WITH_AES_128_CBC_SHA,SSL_RSA_WITH_3DES_EDE_CBC_SHA,SS
L_DHE_RSA_WITH_3DES_EDE_CBC_SHA,SSL_DHE_DSS_WITH_3DES_EDE_CBC_SHA"
/>
To:
<entry key="cipher_suite_128"
value="TLS_RSA_WITH_AES_128_CBC_SHA,TLS_DHE_RSA_WITH_AES_128_CBC_SH
A,TLS_DHE_DSS_WITH_AES_128_CBC_SHA " />
5. Save and close the file.
6. Restart the Java component by typing:
mcserver.sh --start
Forcing strong encryption for Apache Tomcat connections
1. Open a command shell and log in using one of the following methods:
• To log in to a single-node server:
a. Log in to the server as admin.
b. Switch user to root by typing:
su -
• To log in to a multi-node server:
a. Log in to the utility node as admin, then load the dpnid OpenSSH key by typing:
ssh-agent bash
ssh-add ~admin/.ssh/dpnid
b. When prompted, type the dpnid passphrase and press Enter.

110
EMC Avamar 7.0 Product Security Guide
Server Security Hardening
2. Stop the emwebapp Tomcat components by typing:
emwebapp.sh --stop
3. Open /usr/local/avamar-tomcat/conf/server.xml in a plain text editor.
Note: Space limitations in this guide cause the entries in the next step to continue
(wrap) to more than one line. Type the replacement entry on a single line (no line feeds
or returns allowed).
4. Change value of the SSL connector as shown.
Change:
<Connector SSLEnabled="true" Server="Avamar"
ciphers="SSL_RSA_WITH_RC4_128_MD5,SSL_RSA_WITH_RC4_128_SHA,TLS_RSA_
WITH_AES_128_CBC_SHA,TLS_DHE_RSA_WITH_AES_128_CBC_SHA,TLS_DHE_DSS_W
ITH_AES_128_CBC_SHA,SSL_RSA_WITH_3DES_EDE_CBC_SHA,SSL_DHE_RSA_WITH_
3DES_EDE_CBC_SHA,SSL_DHE_DSS_WITH_3DES_EDE_CBC_SHA,TLS_KRB5_WITH_RC
4_128_SHA,TLS_KRB5_WITH_RC4_128_MD5,TLS_KRB5_WITH_3DES_EDE_CBC_SHA,
TLS_KRB5_WITH_3DES_EDE_CBC_MD5" clientAuth="false"
maxKeepAliveRequests="1" maxThreads="150" port="8543"
protocol="org.apache.coyote.http11.Http11NioProtocol"
scheme="https" secure="true" sslProtocol="TLS"/>
To:
<Connector SSLEnabled="true" Server="Avamar" ciphers="
TLS_RSA_WITH_AES_128_CBC_SHA,TLS_DHE_RSA_WITH_AES_128_CBC_SHA,TLS_D
HE_DSS_WITH_AES_128_CBC_SHA" clientAuth="false"
maxKeepAliveRequests="1" maxThreads="150" port="8543"
protocol="org.apache.coyote.http11.Http11NioProtocol"
scheme="https" secure="true" sslProtocol="TLS"/>
5. Save and close the file.
6. Restart the emwebapp Tomcat components by typing:
emwebapp.sh --start
7. Return the active account to admin by typing:
su admin
8. Stop the emserver Tomcat components by typing:
emserver.sh --stop
9. Open /usr/local/avamar/var/em/server_data/prefs/emserver.xml in a plain text
editor.
Note: Space limitations in this guide cause the entries in the next step to continue
(wrap) to more than one line. Type the replacement entry on a single line (no line feeds
or returns allowed).
Level-1 security hardening
111
Server Security Hardening
10. Change value of the cipher_suite_128 key as shown.
Change:
<entry key="cipher_suite_128"
value="SSL_RSA_WITH_RC4_128_MD5,SSL_RSA_WITH_RC4_128_SHA,TLS_RSA_WI
TH_AES_128_CBC_SHA,TLS_DHE_RSA_WITH_AES_128_CBC_SHA,TLS_DHE_DSS_WIT
H_AES_128_CBC_SHA,SSL_RSA_WITH_3DES_EDE_CBC_SHA,SSL_DHE_RSA_WITH_3D
ES_EDE_CBC_SHA,SSL_DHE_DSS_WITH_3DES_EDE_CBC_SHA,TLS_KRB5_WITH_RC4_
128_SHA,TLS_KRB5_WITH_RC4_128_MD5,TLS_KRB5_WITH_3DES_EDE_CBC_SHA,TL
S_KRB5_WITH_3DES_EDE_CBC_MD5" />
To:
<entry key="cipher_suite_128"
value="TLS_RSA_WITH_AES_128_CBC_SHA,TLS_DHE_RSA_WITH_AES_128_CBC_SH
A,TLS_DHE_DSS_WITH_AES_128_CBC_SHA " />
11. Save and close the file.
12. Restart the emserver Tomcat components by typing:
emserver.sh --start
Configuring IE8 to use strong encryption
1. Start IE8.
2. On the menu bar, click Tools > Internet Options.
3. Select the Advanced tab.
4. Clear Use SSL 2.0.
5. Select Use SSL 3.0.
6. Select Use TLS 1.0.
7. Select Use TLS 1.1.
8. Select Use TLS 1.2.
9. Click OK.
Removing suid bit from non-essential system binaries on RHEL
Remove the suid bit from non-essential system binaries to prevent them from running with
elevated permissions.
1. Open a command shell and log in using one of the following methods:
• To log in to a single-node server:
a. Log in to the server as admin.
b. Switch user to root by typing:
su -
112
EMC Avamar 7.0 Product Security Guide
Server Security Hardening
• To log in to a multi-node server:
a. Log in to the utility node as admin, then load the dpnid OpenSSH key by typing:
ssh-agent bash
ssh-add ~admin/.ssh/dpnid
b. When prompted, type the dpnid passphrase and press Enter.
2. Type the following commands:
chmod u-s /sbin/pam_timestamp_check
chmod u-s /opt/dell/srvadmin/oma/bin/omcliproxy
chmod u-s /usr/lib64/squid/pam_auth
Preventing unauthorized access to GRUB configuration
Changes to the configuration file of GNU GRUB bootloader (GRUB) can change the startup
configuration of the Avamar system. Install an encrypted password to prevent
unauthorized changes to this file.
1. Open a command shell and log in using one of the following methods:
• To log in to a single-node server:
a. Log in to the server as admin.
b. Switch user to root by typing:
su -
• To log in to a multi-node server:
a. Log in to the utility node as admin, then load the dpnid OpenSSH key by typing:
ssh-agent bash
ssh-add ~admin/.ssh/dpnid
b. When prompted, type the dpnid passphrase and press Enter.
2. Start the encryption application.
• On RHEL:
/sbin/grub-md5-crypt
•On SLES:
/usr/sbin/grub-md5-crypt
3. When prompted, type the password for GRUB.
The MD5 hash of the password appears.
4. Copy and save the MD5 hash.
5. In a plain text editor, edit /boot/grub/menu.1st.
6. Below the timeout line in the file, add:
password --md5 PASSWORD-HASH
where PASSWORD-HASH is the MD5 hash from step 3.
7. Save and close the file.
Level-2 security hardening
113
Server Security Hardening
8. (Multi-node system only) Push the change to the storage nodes by typing the following
commands.
cd /boot/grub
mapall --all --user=root copy menu.1st
mapall --all --user=root "cp /root/menu.1st /boot/grub/menu.1st"
mapall --all --user=root "rm -f /root/menu.1st"
Level-2 security hardening
Level-2 security hardening features can be installed on a feature-by-feature basis.
The level-2 features are:
◆“Additional operating system hardening” on page 113
◆“Additional password hardening” on page 114
◆“Additional firewall hardening (avfirewall)” on page 116
All level-2 security hardening features can be installed on Avamar 6.0 and later servers
running supported versions of SLES.
Additional password and firewall hardening can be installed on supported versions of Red
Hat Enterprise Linux (RHEL).
“Installation of level-2 security hardening features” on page 117 provides details about
installing, configuring, and uninstalling Level-2 security hardening features.
Additional operating system hardening
The additional Operating System (OS) hardening package provides the following
capabilities for Avamar 6.0 and later servers running supported versions of SLES:
◆Setting terminal timeout at 15 minutes
◆Applying read-only permission to root home directory
◆Removal of world read permissions on log files
◆Removal of world read permissions on cron files
◆Lockdown of some important /etc system configuration files
◆Removal of world read permissions from admin, dpn, and gsan home directories
◆Removal of unnecessary default accounts and groups
◆Disabling of SSH v1 protocol
◆Removal of unnecessary tomcat directories
◆Changing system and user umask settings to 077
◆Removing unowned files
◆Enabling cron logging in syslog
The additional OS hardening package is a level-2 hardening feature that can be installed
during Avamar server software installation, or manually after server software installation.

114
EMC Avamar 7.0 Product Security Guide
Server Security Hardening
The additional OS hardening package satisfies the STIG requirements in the following
table.
Additional password hardening
Avamar 6.0 and later servers running supported versions of SLES and RHEL operating
systems can be configured to provide additional password hardening features such as:
◆Aging — how long a password can be used before it must be changed
◆Complexity — required number and type of characters in passwords
◆Reuse — number of previously used passwords that can be recycled
◆Lockout — denial of login after a specified number of unsuccessful login attempts
◆Account lockout after 35 days without a login
Table 27 STIG requirements satisfied by the additional OS hardening package
Requirement ID Requirement title
GEN000460 Unsuccessful Login Attempts - Account Disabled
GEN000480 Unsuccessful Login Attempts - Fail Delay
GEN000500 Terminal Lockout
GEN000980 Root Console Access
GEN001000 Remote Consoles Defined
GEN001020 Direct Root Login
GEN001120 Encrypting Root Access
GEN001160 Unowned Files
GEN001240 System Files, Programs, and Directories Group Ownership
GEN001260 Log File Permissions
GEN001480 User Home Directory Permissions
GEN001500 Home Directory Permissions
GEN001260 Log File Permissions
GEN001560 Home Directories Files Permissions
GEN002420 User Filesystems Not Mounted With NoSUID
GEN002580 Permissive umask Documentation
GEN003160 Cron Logging
GEN003180 Cronlog Permissions

Level-2 security hardening
115
Server Security Hardening
Password hardening is not appropriate for all customers. Successful implementation of
this feature requires structures and policies that enforce changes to all operating system
user accounts every 60 days, and require users to log into those accounts at least once
every 35 days. Failure to implement proper structures and policies before installing the
password hardening feature might cause you to be locked out of your Avamar server.
Additional password hardening is a level-2 hardening feature that can be installed during
Avamar server software installation, or manually after server software installation.
Additional password hardening satisfies the STIG requirements in the following table.
Following successful installation and configuration, the following rules are enforced for all
local Avamar server operating system user accounts and passwords:
◆Account lockout
◆Password aging
◆Password complexity, length, and reuse
Table 28 STIG requirements satisfied by additional password hardening
Requirement ID Requirement title
GEN000540 Password Change 24 Hours
GEN000560 Password Protect Enabled Accounts
GEN000580 Password Length
GEN000600 Password Character Mix
GEN000620 Password Character Mix
GEN000640 Password Character Mix
GEN000660 Password Contents
GEN000680 Password Contents
GEN000700 Password Change Every 60 Days
GEN000740 Password Change Every Year
GEN000760 Inactive Accounts are not locked
GEN000780 Easily Guessed Passwords
GEN000800 Password Reuse
GEN000820 Global Password Configuration Files
GEN000840 Root Account Access

116
EMC Avamar 7.0 Product Security Guide
Server Security Hardening
Account lockout
All local Avamar server operating system accounts must log in at least once every 35 days.
Furthermore, after three unsuccessful login attempts, that account will be administratively
locked out.
The SLES operating system allows expired root passwords to be used for logins until a new
password is set. This is done to prevent inadvertent root lockouts. This is a feature of the
SLES operating system and cannot be overridden.
Password aging
All local Avamar server operating system accounts must have their passwords changed
every 60 days. Once a password is changed, it cannot be changed again for at least 24
hours.
Password complexity, length, and reuse
All local Avamar server operating accounts are required to have passwords with the
following characteristics:
◆Password complexity requires that you use at least three of the following four
character sets:
• Two or more lowercase characters
• Two or more uppercase characters
• Two or more numeric characters
• Two or more special (non-alphanumeric) characters
◆Minimum length is determined by complexity:
• If you use any three character sets, the password must be at least 14 characters.
• If you use all four character sets, the password must be at least 11 characters.
◆Passwords must contain at least three characters that are different from the last
password.
◆The previous 10 passwords cannot be reused.
Additional firewall hardening (avfirewall)
Avamar 6.0 and later servers running supported versions of SLES and RHEL operating
systems can be configured to use Linux IPTABLES.
Additional firewall hardening is a level-2 hardening feature that can be installed during
Avamar server software installation, or manually after server software installation.
Additional server firewall hardening satisfies the GEN006580 - Access Control Program
STIG requirements.
This feature is implemented by way of the avfirewall service.

Level-2 security hardening
117
Server Security Hardening
The output for avfirewall is logged to /var/log/firewall on SLES servers only. The
/var/log/firewall file is not available on RHEL servers. However, firewall logging can be
implemented using syslog on RHEL servers. The
EMC Avamar Administration Guide
provides details about implementing syslog.
Note: If you are backing up a Hyper-V or Microsoft SQL plug-in to a server running the
avfirewall service and the encryption method for the backup is set to None, the backup
will fail with errors indicating a problem connecting to the server. Set the encryption
method to Medium or High.
Installation of level-2 security hardening features
Level-2 security hardening features can be installed during Avamar server software
installation. The
Avamar SLES Installation Workflow Guide
provides information about
installing and enabling security hardening features. This guide is available during
installation when you click the help icon in Avamar Installation Manager.
If you did not install level-2 security hardening features during Avamar server software
installation, you can manually install them as described in the following topics.
Manually installing level-2 hardening packages on SLES
To install level-2 hardening packages on SLES:
1. Open a command shell and log in using one of the following methods:
• To log in to a single-node server:
a. Log in to the server as admin.
b. Switch user to root by typing:
su -
• To log in to a multi-node server:
a. Log in to the utility node as admin,
b. Switch user to root by typing:
su -
c. Load the dpnid OpenSSH key by typing:
ssh-agent bash
ssh-add ~admin/.ssh/dpnid
d. When prompted, type the dpnid passphrase and press Enter.
2. Change directory to where the install packages reside by typing:
cd /usr/local/avamar/src/SLES11_64/
3. If installing on a multi-node server, copy one or more level-2 hardening packages to all
other server nodes by typing:
mapall --all+ --user=root copy avhardening-VERSION.x86_64.rpm
mapall --all+ --user=root copy avpasswd-VERSION.x86_64.rpm
mapall --all+ --user=root copy avfwb-VERSION.x86_64.rpm
where VERSION is the specific version you are installing.
118
EMC Avamar 7.0 Product Security Guide
Server Security Hardening
If you are not installing a particular level-2 hardening feature, omit the command to
copy that install package.
4. Install each hardening package by doing one of the following:
• If installing on a single-node server, type:
rpm -Uvh avhardening-VERSION.x86_64.rpm
rpm -Uvh avpasswd-VERSION.x86_64.rpm
rpm -Uvh avfwb-VERSION.x86_64.rpm
• If installing on a multi-node server, type:
mapall --all+ --user=root "rpm -Uvh
avhardening-VERSION.x86_64.rpm"
mapall --all+ --user=root "rpm -Uvh avpasswd-VERSION.x86_64.rpm"
mapall --all+ --user=root "rpm -Uvh avfwb-VERSION.x86_64.rpm"
where VERSION is the specific version you are installing.
If you are not installing a particular level-2 hardening feature, omit the command to
install that package.
5. If installing on a multi-node server, delete the packages you copied in step 3 by
typing:
mapall --user=root "rm -f avhardening*"
mapall --user=root "rm -f avpasswd*"
mapall --user=root "rm -f avfwb*"
If you did not copy a particular install package in step 3, omit the command to delete
that package.
Manually installing level-2 hardening packages on RHEL
To install level-2 password and firewall hardening packages on RHEL:
1. Open a command shell and log in using one of the following methods:
• To log in to a single-node server:
a. Log in to the server as admin.
b. Switch user to root by typing:
su -
• To log in to a multi-node server:
a. Log in to the utility node as admin,
b. Switch user to root by typing:
su -
c. Load the dpnid OpenSSH key by typing:
ssh-agent bash
ssh-add ~admin/.ssh/dpnid
d. When prompted, type the dpnid passphrase and press Enter.
2. Change directory to where the install packages reside by typing:
cd /usr/local/avamar/src/RHEL4_64/
Level-2 security hardening
119
Server Security Hardening
3. If installing on a multi-node server, copy one or more level-2 hardening packages to all
other server nodes by typing:
mapall --all+ --user=root copy avpasswd-VERSION.x86_64.rpm
mapall --all+ --user=root copy avfwb-VERSION.x86_64.rpm
where VERSION is the specific version you are installing.
4. Install each hardening package by doing one of the following:
• If installing on a single-node server, type:
rpm -Uvh avpasswd-VERSION.x86_64.rpm
rpm -Uvh avfwb-VERSION.x86_64.rpm
• If installing on a multi-node server, type:
mapall --all+ --user=root "rpm -Uvh avpasswd-VERSION.x86_64.rpm"
mapall --all+ --user=root "rpm -Uvh avfwb-VERSION.x86_64.rpm"
where VERSION is the specific version you are installing.
If you are not installing a particular level-2 hardening feature, omit the command to
install that package.
5. If installing on a multi-node server, delete the packages you copied in step 3 by
typing:
mapall --user=root "rm -f avpasswd*"
mapall --user=root "rm -f avfwb*"
Additional firewall configuration to support replication
Installing the level-2 firewall hardening package will cause replication to fail until the
following additional configuration is performed:
1. Open a command shell and log in using one of the following methods:
• To log in to a single-node server, log in to the server as admin.
• To log in to a multi-node server, log in to the utility node as admin.
2. Open /usr/local/avamar/etc/repl_cron.cfg in a plain text editor.
3. Add the following entries:
--dstavmgr=--encrypt=tls
--dstavmaint=--encrypt=tls
4. Save your changes.
120
EMC Avamar 7.0 Product Security Guide
Server Security Hardening
Additional firewall configuration to support Avamar Client Manager
Installing the level-2 firewall hardening package will block the ability of Avamar Client
Manager to manage the clients associated with the firewall protected server. To permit
management access for Avamar Client Manager, complete the following additional
configuration:
1. Open a command shell and log in using one of the following methods:
• To log in to a single-node server:
a. Log in to the server as admin.
b. Switch user to root by typing:
su -
• To log in to a multi-node server:
a. Log in to the utility node as admin,
b. Switch user to root by typing:
su -
c. Load the dpnid OpenSSH key by typing:
ssh-agent bash
ssh-add ~admin/.ssh/dpnid
d. When prompted, type the dpnid passphrase and press Enter.
2. Open /etc/firewall.base in a plain text editor.
3. Add a line to /etc/firewall.base to define a range of IP addresses as M_SUBNET, by
typing:
M_SUBNET=IP-address
where
IP-address
consists of the IP addresses that are allowed to access port 5555,
and
IP-address
is formatted using one of the following methods:
• A single IP address.
For example: 192.25.113.29
• A comma-separated list of IP addresses.
For example: 192.25.113.29,192.25.113.50
• A CIDR notation address range.
For example: 192.25.113.0/24
4. Beneath the line defining the value of M_SUBNET, add the following if/then statement
to allow the IP addresses defined by M_SUBNET to have access to port 5555.
if [ $THISNODE == "$UTILITY" ]; then
$IPT -A INPUT -p tcp -m multiport --dport 5555 -s $M_SUBNET -j ACCEPT
fi
5. Save and close the file.
Level-2 security hardening
121
Server Security Hardening
6. Restart the firewall by typing:
service avfirewall stop
service avfirewall start
7. (Multi-node system only) Log in to each storage node as root and complete step 2
through step 6 on that node.
Uninstalling level-2 hardening features
To manually uninstall a level-2 security hardening feature (operating system, password, or
firewall):
1. Open a command shell and log in using one of the following methods:
• To log in to a single-node server:
a. Log in to the server as admin.
b. Switch user to root by typing:
su -
• To log in to a multi-node server:
a. Log in to the utility node as admin,
b. Switch user to root by typing:
su -
c. Load the dpnid OpenSSH key by typing:
ssh-agent bash
ssh-add ~admin/.ssh/dpnid
d. When prompted, type the dpnid passphrase and press Enter.
2. Uninstall each hardening package by doing one of the following:
• If uninstalling a package on a single-node server, type:
rpm -e PACKAGENAME
• If uninstalling a package on a multi-node server, type:
mapall --user=root --all+ "rpm -e PACKAGENAME"
where PACKAGENAME is:
–avhardening*.rpm for the operating system hardening package.
–avpasswd*.rpm for the password hardening package.
–avfwb*.rpm for the firewall hardening package.
3. Repeat step 2 to uninstall additional level-2 security hardening packages.

122
EMC Avamar 7.0 Product Security Guide
Server Security Hardening
Level-3 security hardening
Level-3 security hardening features disable all web-based services and reduce other
services to the minimum required to manage and use the Avamar system. Level-3 security
hardening features can be applied to a running, fully functional Avamar system.
After level-3 security hardening, the following services are unavailable:
◆Apache web server, including:
• Web-based restore
• Web-based document download
• Web-based software download
◆Enterprise Management Server (EMS) web server, including:
• Avamar Enterprise Manager (EM)
• Web access to the Avamar Management Console
• Avamar Client Manager
◆Avamar Desktop/Laptop web server, including:
• Web-based backup and restore, and other Avamar Desktop/Laptop features
◆Dell OpenManage web server
◆SNMP
◆RPC
Some of the Level-3 security hardening tasks block services and processes that are
required during system upgrades. Before beginning a system upgrade, complete the tasks
described in “Preparing for a system upgrade” on page 134.
Level-3 prerequisite
Before starting the level-3 security hardening tasks complete all level-1 and level-2 tasks.
Level-3 tasks
Complete each of the following tasks to implement level-3 security hardening:
◆“Disabling Apache web server” on page 123
◆“Disabling Avamar Enterprise Manager” on page 124
◆“Disabling Dell OpenManage web server” on page 125
◆“Disabling Avamar Desktop/Laptop” on page 126
◆“Disabling SSLv2 and weak ciphers on all nodes” on page 126
◆“Updating SSH” on page 129
◆“Disabling snmpd” on page 130
Level-3 security hardening
123
Server Security Hardening
◆“Disabling RPC” on page 131
◆“Preventing access to port 9443” on page 132
◆“Changing file permissions” on page 133
Disabling Apache web server
Stopping and disabling the Apache web server prevents access to that service.
1. Open a command shell and log in using one of the following methods:
• To log in to a single-node server:
a. Log in to the server as admin.
b. Switch user to root by typing:
su -
• To log in to a multi-node server:
a. Log in to the utility node as admin, then load the dpnid OpenSSH key by typing:
ssh-agent bash
ssh-add ~admin/.ssh/dpnid
b. When prompted, type the dpnid passphrase and press Enter.
2. Type the following command to turn off the Apache web server:
website stop
3. Type the following command to disable the Apache web server:
chkconfig apache2 off
The Apache web server is disabled and will not automatically run when the computer is
restarted.

124
EMC Avamar 7.0 Product Security Guide
Server Security Hardening
Disabling Avamar Enterprise Manager
Stopping Avamar Enterprise Manager prevents access to that service. On a single-node
system only, disabling Avamar Enterprise Manager prevents the service from starting
when the computer is restarted.
1. Open a command shell and log in using one of the following methods:
• To log in to a single-node server:
a. Log in to the server as admin.
b. Switch user to root by typing:
su -
• To log in to a multi-node server:
a. Log in to the utility node as admin, then load the dpnid OpenSSH key by typing:
ssh-agent bash
ssh-add ~admin/.ssh/dpnid
b. When prompted, type the dpnid passphrase and press Enter.
2. Type the following command to stop Avamar Enterprise Manager:
dpnctl stop ems
Avamar Enterprise Manager stops. It will restart when the computer is restarted.
Note: On a multi-node system, this step must be repeated each time that the
computer is restarted.
3. (Single-node system only) Type the following command to disable Avamar Enterprise
Manager:
dpnctl disable ems
Avamar Enterprise Manager is disabled and it does not restart when the computer is
restarted.
Level-3 security hardening
125
Server Security Hardening
Disabling Dell OpenManage web server
Disabling the web server for Dell OpenManage prevents web browser access to that
service. The Dell OpenManage services remain available at the console.
1. Open a command shell and log in using one of the following methods:
• To log in to a single-node server:
a. Log in to the server as admin.
b. Switch user to root by typing:
su -
• To log in to a multi-node server:
a. Log in to the utility node as admin, then load the dpnid OpenSSH key by typing:
ssh-agent bash
ssh-add ~admin/.ssh/dpnid
b. When prompted, type the dpnid passphrase and press Enter.
2. Type the following command to stop the Dell OpenManage web server:
•Multi-node system:
mapall --all+ --user=root "service dsm_om_connsvc stop"
• Single-node system:
service dsm_om_connsvc stop
3. Type the following command to disable the Dell OpenManage web server:
•Multi-node system:
mapall --all+ --user=root "chkconfig dsm_om_connsvc off"
• Single-node system:
chkconfig dsm_om_connsvc off
4. (Optional) Type the following command to verify the web server is not running:
•Multi-node system:
mapall --all+ --user=root "chkconfig dsm_om_connsvc --list"
• Single-node system:
chkconfig dsm_om_connsvc -list

126
EMC Avamar 7.0 Product Security Guide
Server Security Hardening
Disabling Avamar Desktop/Laptop
Stopping Avamar Desktop/Laptop prevents access to that service. On a single-node
system only, disabling Avamar Desktop/Laptop prevents the service from starting when
the computer is restarted.
1. Open a command shell and log in using one of the following methods:
• To log in to a single-node server:
a. Log in to the server as admin.
b. Switch user to root by typing:
su -
• To log in to a multi-node server:
a. Log in to the utility node as admin, then load the dpnid OpenSSH key by typing:
ssh-agent bash
ssh-add ~admin/.ssh/dpnid
b. When prompted, type the dpnid passphrase and press Enter.
2. Type the following command to stop Avamar Desktop/Laptop:
dpnctl stop dtlt
Avamar Desktop/Laptop stops. It will restart when the computer is restarted.
Note: On a multi-node system, this step must be repeated each time that the
computer is restarted.
3. (Single-node system only) Type the following command to disable Avamar
Desktop/Laptop:
dpnctl disable dtlt
Avamar Desktop/Laptop is disabled and it does not restart when the computer is
restarted.
Disabling SSLv2 and weak ciphers on all nodes
Prevent GSAN from using SSL v.2 and weak ciphers in communication between nodes and
clients. This task requires different steps depending on the Avamar system version.
To use NDMP with this security hardening feature, make the additional configuration
changes described in “Configuring to use NDMP” on page 128.
To use replication with this security hardening feature, make the additional configuration
changes described in“Configuring to support replication” on page 128.

Level-3 security hardening
127
Server Security Hardening
This procedure enforces the use of strong ciphers and prevents clients that do not support
strong ciphers from connecting with GSAN. For example, clients running any of the
following OS versions do not support strong ciphers and are blocked by this procedure:
Microsoft Windows NT, Microsoft Windows 2000, and Microsoft Windows 2003 (without
strong cipher patches).
Avamar system versions 6.0 through 6.0.1
1. Open a command shell and log in using one of the following methods:
• To log in to a single-node server:
a. Log in to the server as admin.
b. Switch user to root by typing:
su -
• To log in to a multi-node server:
a. Log in to the utility node as admin, then load the dpnid OpenSSH key by typing:
ssh-agent bash
ssh-add ~admin/.ssh/dpnid
b. When prompted, type the dpnid passphrase and press Enter.
2. In a plain text editor, edit /usr/local/avamar/etc/stunnel/stunnel.conf.
Change:
foreground = no
client = no
cert = /usr/local/avamar/etc/stunnel/stunnel.pem
pid = /usr/local/avamar/var/stunnel.pid
[axionssl]
accept = 29000
connect = 27000
To:
foreground = no
client = no
cert = /usr/local/avamar/etc/stunnel/stunnel.pem
pid = /usr/local/avamar/var/stunnel.pid
options = NO_SSLv2
ciphers = ALL:+HIGH:!LOW:!EXP
[axionssl]
accept = 29000
connect = 27000
3. Stop and start stunnel:
stunctl stop
stunctl start

128
EMC Avamar 7.0 Product Security Guide
Server Security Hardening
Avamar system versions 6.1 and later
1. Open a command shell and log in using one of the following methods:
• To log in to a single-node server:
a. Log in to the server as admin.
b. Switch user to root by typing:
su -
• To log in to a multi-node server:
a. Log in to the utility node as admin, then load the dpnid OpenSSH key by typing:
ssh-agent bash
ssh-add ~admin/.ssh/dpnid
b. When prompted, type the dpnid passphrase and press Enter.
Note: Space limitations in this guide cause the command in the next step to continue
(wrap) to more than one line. Type the command on a single line (no line feeds or
returns allowed).
2. Type the following command:
avmaint config --ava
sslciphers='TLSv1+HIGH:!SSLv2:!aNULL:!eNULL:@STRENGTH'
3. Repeat these steps on each node.
Configuring to use NDMP
1. Open a command shell and log in to the accelerator as admin.
2. Switch user to root by typing:
su -
3. Open /usr/local/avamar/var/avtar.cmd in a plain text editor.
If the file does not exist, create it.
4. Add the following lines to the file:
--encrypt=tls
--encrypt-strength=high
5. Save and close the file.
Configuring to support replication
1. Open a command shell and log in using one of the following methods:
• To log in to a single-node server, log in to the server as admin.
• To log in to a multi-node server, log in to the utility node as admin.
2. Open /usr/local/avamar/etc/repl_cron.cfg in a plain text editor.
Level-3 security hardening
129
Server Security Hardening
3. Add the following lines to the file:
--avtar=--encrypt=tls
--avtar=--encrypt:1=tls
--dstavmgr=--encrypt=tls
--dstavmaint=--encrypt=tls
--encrypt-strength=high
4. Save and close the file.
Updating SSH
Update to the latest version of OpenSSH. Configure sshd to:
◆Deny empty passwords
◆Log at INFO level
◆Use protocol 2
1. Contact your EMC Customer Support professional to obtain and install the latest
Avamar platform security rollup package.
The platform security rollup package installs the latest version of OpenSSH.
2. Open a command shell and log in using one of the following methods:
• To log in to a single-node server:
a. Log in to the server as admin.
b. Switch user to root by typing:
su -
• To log in to a multi-node server:
a. Log in to the utility node as admin, then load the dpnid OpenSSH key by typing:
ssh-agent bash
ssh-add ~admin/.ssh/dpnid
b. When prompted, type the dpnid passphrase and press Enter.
3. Open /etc/ssh/sshd_config in a plain text editor.
4. Add the following lines to the file:
PermitEmptyPasswords no
LogLevel INFO
Protocol 2
5. Save and close the file.
6. Restart sshd by typing:
service sshd restart
Restarting sshd can cause current SSH sessions to terminate.
130
EMC Avamar 7.0 Product Security Guide
Server Security Hardening
Disabling snmpd
1. Open a command shell and log in using one of the following methods:
• To log in to a single-node server:
a. Log in to the server as admin.
b. Switch user to root by typing:
su -
• To log in to a multi-node server:
a. Log in to the utility node as admin, then load the dpnid OpenSSH key by typing:
ssh-agent bash
ssh-add ~admin/.ssh/dpnid
b. When prompted, type the dpnid passphrase and press Enter.
2. Type the following command to stop snmpd:
service snmpd stop
3. Type the following command to disable snmpd:
chckonfig snmpd off
This prevents snmpd from starting when the computer is restarted.
4. In a plain-text editor, edit /etc/init.d/dataeng.
Change:
OS_SNMP_SVCNAME="snmpd"
To:
OS_SNMP_SVCNAME=""
5. Reboot the system by typing:
reboot
6. (Optional) After the system is up, search /var/log/messages for the following warning:
dataeng: warning: not started. must be started to manage this system
using SNMP
This warning means that snmpd is disabled.
Level-3 security hardening
131
Server Security Hardening
Disabling RPC
Disable the remote procedure call (RPC) service on all nodes.
1. Open a command shell and log in using one of the following methods:
• To log in to a single-node server:
a. Log in to the server as admin.
b. Switch user to root by typing:
su -
• To log in to a multi-node server:
a. Log in to the utility node as admin, then load the dpnid OpenSSH key by typing:
ssh-agent bash
ssh-add ~admin/.ssh/dpnid
b. When prompted, type the dpnid passphrase and press Enter.
2. Type the following to stop the RPC service:
•On SLES computers:
service rpcbind stop
• On RHEL computers:
service portmap stop
3. Type the following to disable the RPC service:
•On SLES computers:
chkconfig nfs off
chkconfig rpcbind off
• On RHEL computers:
chkconfig portmap off
4. Repeat these steps on each node.
132
EMC Avamar 7.0 Product Security Guide
Server Security Hardening
Preventing access to port 9443
Avamar Management Console Web Services normally use Port 9443 for Java Remote
Method Invocation (RMI). Configure iptables to block port 9443.
1. Open a command shell and log in using one of the following methods:
• To log in to a single-node server:
a. Log in to the server as admin.
b. Switch user to root by typing:
su -
• To log in to a multi-node server:
a. Log in to the utility node as admin, then load the dpnid OpenSSH key by typing:
ssh-agent bash
ssh-add ~admin/.ssh/dpnid
b. When prompted, type the dpnid passphrase and press Enter.
2. In a plain text editor, edit /etc/firewall.default to add the following lines:
$IPT -A INPUT -p tcp -m tcp --dport 9443 -j DROP
$IPT -A INPUT -p udp -m udp --dport 9443 -j DROP
3. Save and close the file.
Level-3 security hardening
133
Server Security Hardening
Changing file permissions
Use chmod o-w to prevent users in the Others group from writing to specific folders and
files.
1. Open a command shell and log in using one of the following methods:
• To log in to a single-node server:
a. Log in to the server as admin.
b. Switch user to root by typing:
su -
• To log in to a multi-node server:
a. Log in to the utility node as admin, then load the dpnid OpenSSH key by typing:
ssh-agent bash
ssh-add ~admin/.ssh/dpnid
b. When prompted, type the dpnid passphrase and press Enter.
2. Type the following commands:
chmod o-w -R /etc/openldap
chmod o-w -R /root/
chmod o-w /data01/avamar/var
chmod o-w /data01/avamar/var/change-passwords.log
chmod o-w /data01/avamar/var/local
chmod o-w /data01/avamar/var/local/ziptemp
chmod o-w /data01/avamar/var/p_*dat
chmod o-w /opt/dell/srvadmin/iws/config/keystore.db.bak
chmod o-w /tmp/replicate
chmod o-w /usr/local/avamar/bin/benchmark
chmod o-w /.avamardata/var/mc/cli_data/prefs/mcclimcs.xml
chmod o-w /.avamardata/var/mc/cli_data/prefs/mccli_logging.properties
chmod o-w /.avamardata/var/mc/cli_data/prefs/prefs.tmp
chmod o-w /.avamardata/var/mc/cli_data/prefs/mccli.xml
chmod o-w /data01/home/admin/.avamardata/var/mc/cli_data/prefs/mccli.xml
chmod o-w /data01/home/admin/.avamardata/var/mc/cli_data/prefs/mcclimcs.xml
chmod o-w /data01/home/admin/.avamardata/var/mc/cli_data/prefs/mccli_logging.properties
chmod o-w /data01/home/admin/.avamardata/var/mc/cli_data/prefs/prefs.tmp
chmod o-w /data01/home/dpn/.avamardata/var/mc/cli_data/prefs/mccli.xml
chmod o-w /data01/home/dpn/.avamardata/var/mc/cli_data/prefs/mcclimcs.xml
chmod o-w /data01/home/dpn/.avamardata/var/mc/cli_data/prefs/mccli_logging.properties
chmod o-w /data01/home/dpn/.avamardata/var/mc/cli_data/prefs/prefs.tmp
chmod o-w /data01/avamar/var/mc/server_log/mcddrsnmp.out
134
EMC Avamar 7.0 Product Security Guide
Server Security Hardening
Preparing for a system upgrade
To permit a successful system upgrade, some of the level-3 security hardening changes
must be temporarily reversed. After the system upgrade is complete, reapply those
changes.
Complete the following tasks before starting a system upgrade:
◆“Enabling the Apache web server” on page 134
◆“Enabling Avamar Enterprise Manager” on page 135
Enabling the Apache web server
1. Open a command shell and log in using one of the following methods:
• To log in to a single-node server:
a. Log in to the server as admin.
b. Switch user to root by typing:
su -
• To log in to a multi-node server:
a. Log in to the utility node as admin, then load the dpnid OpenSSH key by typing:
ssh-agent bash
ssh-add ~admin/.ssh/dpnid
b. When prompted, type the dpnid passphrase and press Enter.
2. Type the following command to enable the Apache web server:
chkconfig --add apache2
3. Type the following command to start the Apache web server:
website start
The Apache web server starts. After completion of the system upgrade, disable the Apache
web server as described in “Disabling Apache web server” on page 123.
Preparing for a system upgrade
135
Server Security Hardening
Enabling Avamar Enterprise Manager
1. Open a command shell and log in using one of the following methods:
• To log in to a single-node server:
a. Log in to the server as admin.
b. Switch user to root by typing:
su -
• To log in to a multi-node server:
a. Log in to the utility node as admin, then load the dpnid OpenSSH key by typing:
ssh-agent bash
ssh-add ~admin/.ssh/dpnid
b. When prompted, type the dpnid passphrase and press Enter.
2. (Single-node system only) Type the following command to enable Avamar Enterprise
Manager:
dpnctl enable ems
3. Type the following command to start Avamar Enterprise Manager:
dpnctl start ems
Avamar Enterprise Manager starts. After completion of the system upgrade, disable
Avamar Enterprise Manager as described in “Disabling Avamar Enterprise Manager”
on page 124.

Port and Network Requirements
137
APPENDIX A
Port and Network Requirements
This appendix lists port and network requirements for the Avamar system, and provides
additional information about using a Data Domain system to store Avamar backups.
◆Required ports ...................................................................................................... 138
◆Optional ports....................................................................................................... 142
◆Network requirements........................................................................................... 142
◆Port and network requirements for Data Domain ................................................... 145

138
EMC Avamar 7.0 Product Security Guide
Port and Network Requirements
Required ports
This section describes the listening ports that must be open on each of the following
components of an Avamar deployment:
◆Avamar utility node (or single node server)
◆Avamar storage node
◆Avamar client
◆Avamar Downloader Service Windows host
A listening port is a network port on the specified Avamar component computer that has a
service bound to it. The service handles the network packets that are sent to the computer
at that port.
Each required port must be open to receive packets addressed to that port from the
computer listed in the source column. Relevant routers, switches, and firewalls must allow
the packets to reach the port. Functionality is reduced when a process listening on a
required port cannot receive packets from a source computer.
As part of the hardening of an Avamar server, some of the required ports are intentionally
closed. This results in an increase in security in exchange for a loss of some functionality.
To increase security without a loss of functionality, filter network traffic and allow only
packets of the protocol listed in Protocol and from the computers listed in Source to reach
the designated port.
Avamar utility node required ports
The following table describes the listening ports that must be open on an Avamar utility
node or single-node server. For each row in Table 29, the listed port on the utility node or
single-node server is the destination.
Table 29 Required ports on an Avamar utility node or single node server (page 1 of 3)
Port Protocol Service name Source Additional information
22 TCP SSH • Administrator
computers
•Other Avamar
server nodes
Secure shell access.
69 TCP TFTP Internal switch
80 TCP HTTP • Web browser clients
• Reverse proxy web
server
• AvInstaller
• Avamar Downloader
Service host
Provides web browser access to Avamar services. A reverse proxy
web server can be used to limit access to this port.
137 UDP NETBIOS Name
Service
Avamar proxy Used for Avamar proxy communication.
138 UDP NETBIOS
Datagram
Service
Avamar proxy Used for Avamar proxy communication.

Required ports
139
Port and Network Requirements
139 TCP NETBIOS
Session Service
Avamar proxy Used for Avamar proxy communication.
161 TCP SNMP Data Domain system This is the getter/setter port for SNMP objects from a Data Domain
system. Required when storing Avamar client backups on a Data
Domain system.
443 TCP HTTP protocol
over TLS/SSL
• Web browser clients
• Reverse proxy web
server
• AvInstaller
• Avamar Downloader
Service host
Provides web browsers with HTTPS access to Avamar services. A
reverse proxy web server can be used to limit access to this port.
700 TCP/UDP Login Manager • Web browser clients
• Reverse proxy web
server
1080 TCP 3ware RAID
management
Web browser clients All nodes with legacy Axion-M or Axion-E hardware only.
Only allow access from trusted administrator computers.
1234 TCP Avamar
installation
utility HTTPS
Web browser clients Only open this port for installation of the Avamar software. Only
permit access from trusted administrator computers used during
software installation.
Notice: Close this port when installation of the Avamar software is
complete. Avamar services do not listen on port 1234.
5555 TCP PostgreSQL
administrator
server
• Utility node running
Avamar Client
Manager
•PostgreSQL
administrator client
computers
Only open this port if you manage the Avamar server using
Avamar Client Manager or if you must manage the PostgreSQL
database from a remote computer.
Limit access to trusted administrator computers.
7778 TCP RMI Avamar Administrator
management console
Limit access to trusted administrator computers.
7779 TCP RMI Avamar Administrator
management console
Limit access to trusted administrator computers.
7780 TCP RMI Avamar Administrator
management console
Limit access to trusted administrator computers.
7781 TCP RMI Avamar Administrator
management console
Limit access to trusted administrator computers.
8105 TCP Tomcat Avamar client
computers
Used by Avamar Desktop/Laptop.
8109 TCP Tomcat Avamar client
computers
Used by Avamar Desktop/Laptop.
8181 TCP Tomcat Avamar client
computers
Connections from Avamar client computers and from AvInstaller
hosts are redirected to this port.
8444 TCP Tomcat Web browser clients Web browser connections from Avamar Desktop/Laptop client
computers are redirected to this port.
Table 29 Required ports on an Avamar utility node or single node server (page 2 of 3)
Port Protocol Service name Source Additional information

140
EMC Avamar 7.0 Product Security Guide
Port and Network Requirements
8505 TCP Tomcat Utility node or
single-node server
Avamar Desktop/Laptop uses this port to send a shutdown
command to its Apache Tomcat server.
Limit access to the utility node or single-node server.
8543 TCP Tomcat HTTPS Web browser clients Web browser clients use this port to create HTTPS conections to
Avamar Enterprise Manager and Avamar Installation Manager.
Limit access to trusted administrator computers.
8580 TCP AvInstaller Web browser clients Used for conections from Avamar Downloader Service computer,
and for access to AvInstaller from other web browser clients.
8778 TCP RMI - Avamar
Enterprise
Manager
Utility node or
single-node server
Any utility node that has Avamar Enterprise Manager installed.
Limit access to to the utility node or single-node server.
8779 TCP RMI - Avamar
Enterprise
Manager
login_server
Utility node or
single-node server
Any utility node with Avamar Enterprise Manager installed.
Limit access to to the utility node or single-node server.
8780 TCP RMI - Avamar
Enterprise
Manager
service_context
Utility node or
single-node server
Any utility node with Avamar Enterprise Manager installed.
Limit access to to the utility node or single-node server.
8781 TCP RMI - Avamar
Enterprise
Manager
node_context
Utility node or
single-node server
Any utility node with Avamar Enterprise Manager installed.
Limit access to to the utility node or single-node server.
9443 TCP RMI - Avamar
Management
Console web
services
Web browser clients
19000-
19500
TCP/UDP GSAN Avamar server nodes GSAN communication.
20000-
20500
TCP/UDP GSAN Avamar server nodes GSAN communication.
25000-
25500
TCP/UDP GSAN Avamar server nodes GSAN communication.
26000-
26500
TCP/UDP GSAN Avamar server nodes GSAN communication.
27000-
27500
TCP Avamar server • Avamar client
computers
• Avamar server
nodes
•Avamar nodes
acting as a
replicator source
GSAN communication.
28001 TCP Avamar server
CLI
Avamar client
computers
CLI commands from client computers.
29000 TCP Avamar server
SSL
Avamar client
computers
GSAN communication.
Table 29 Required ports on an Avamar utility node or single node server (page 3 of 3)
Port Protocol Service name Source Additional information

Required ports
141
Port and Network Requirements
Avamar storage node required ports
The following table describes the listening ports that must be open on an Avamar storage
node. For each row in Table 30, the listed port on the storage node is the destination.
Avamar client required port
The following table describes the listening port that must be open on Avamar client
computers. In Table 31, the listed port on Avamar client computers is the destination.
Avamar Downloader Service required port
The following table describes the listening port that must be open on the Avamar
Downloader Service Windows host computer. In Table 32, the listed port on Avamar
Downloader Service Windows host computers is the destination.
Table 30 Required ports on an Avamar storage node
Port Protocol Service name Source Additional information
22 TCP SSH • Administrator
computers
•Other Avamar
server nodes
Secure shell access.
1080 TCP 3ware RAID
management
Web browser clients Nodes with legacy Axion-M or Axion-E hardware only.
Only allow access from trusted administrator computers.
19000-
19500
TCP/UDP GSAN Avamar server nodes GSAN communication.
20000-
20500
TCP/UDP GSAN Avamar server nodes GSAN communication.
25000-
25500
TCP/UDP GSAN Avamar server nodes GSAN communication.
26000-
26500
TCP/UDP GSAN Avamar server nodes GSAN communication.
27000 TCP Avamar server • Avamar client
computers
•Avamar nodes
acting as a
replicator source
GSAN communication.
29000 TCP Avamar server
SSL
Avamar client
computers
GSAN communication.
Table 31 Required port on Avamar client computers
Port Protocol Service name Source Additional information
28002 TCP avagent Avamar server Provides management functionality from Avamar Administrator.
Table 32 Required port on an Avamar Downloader Service Windows host computer
Port Protocol Service name Source Additional information
8580 TCP Avamar
Downloader
Service
Avamar server Avamar server connects to this port to access the Avamar
Downloader Service.

142
EMC Avamar 7.0 Product Security Guide
Port and Network Requirements
Optional ports
In addition to the required ports, it is recommended that other ports be open to provide
added functionality.
Avamar utility node optional ports
The following table describes the optional, but recommended, listening ports for an
Avamar utility node or single-node server. For each row in Table 33, the listed port on the
utility node or single-node server is the destination.
Network requirements
To provide full-featured functionality, Avamar component computers must communicate
with various network resources. Packets sent from an Avamar component computer must
be permitted to reach the specified destination computer, at a specified port, and using
the specified protocol.
Network routers, switches, firewalls, and destination computers must be configured to
allow this communication.
Avamar utility node network requirements
The following table describes the network requirements for an Avamar utility node or
single-node server. For each row in Table 34, the Avamar utility node or single-node server
is the source and must have access to the listed port on the listed destination.
Table 33 Optional ports for Avamar utility node or single node server
Port Protocol Service name Source Additional information
514 UDP syslog Utility node or
single-node server
Avamar server connects to this port to communicate events to
syslog.
5556 TCP PostgreSQL PostgreSQL client
computer
Avamar server node running Avamar Enterprise Manager.
Limit access to computers that require access to the Avamar
Enterprise Manager database.
5557 TCP PostgreSQL Avamar Enterprise
Manager host
computer
Avamar server node with metadata search feature installed.
Facilitates metadata search in Avamar Enterprise Manager.
8509 TCP Tomcat Utility node or
single-node server
The Apache JServ Protocol (AJP) uses port 8509 to balance the work
load for multiple instances of Tomcat.
Table 34 Network requirements for Avamar utility node and single-node server (page 1 of 2)
Port Protocol Destination Additional information
7 TCP Data Domain system Outgoing port is required to permit registration of a Data Domain system.
25 TCP EMC Customer Support Outgoing port is required to allow the ConnectEMC service to contact EMC Customer
Support.
53 TCP/UDP DNS Required for name resolution and DNS zone transfers.
TCP connection to DNS is required by VMware proxy nodes.

Network requirements
143
Port and Network Requirements
88 Key Distribution
Center (KDC)
Required for access to Kerberos authentication system.
111 TCP/UDP RPC port mapper
service on Data
Domain system
Only required when backups are stored on a Data Domain system.
Access to RPC and NFS port mapper functionality on a Data Domain system.
123 TCP/UDP NTP time servers Provides clock synchronization from network time protocol servers.
163 TCP SNMP service on Data
Domain system
Only required when backups are stored on a Data Domain system.
389 TCP/UDP LDAP Provides access to directory services.
443 TCP VMware vCenter proxy
service
464 Key Distribution
Center (KDC)
Required for access to Kerberos Change/Set password.
902 TCP VMware ESX server
proxy service
2049 TCP/UDP NFS daemon on Data
Domain system
Only required when backups are stored on a Data Domain system.
2052 TCP NFS mountd process
on Data Domain
system
Only required when backups are stored on a Data Domain system.
7443 TCP Media Access node
that hosts Avamar
Extended Retention
Only required when using the Avamar Extended Retention feature.
19000-
19500
TCP/UDP Avamar server nodes GSAN communication.
20000-
20500
TCP/UDP Avamar server nodes GSAN communication.
25000-
25500
TCP/UDP Avamar server nodes GSAN communication.
26000-
26500
TCP/UDP Avamar server nodes GSAN communication.
27000 TCP Avamar server nodes GSAN communication.
61617 TCP Media Access node
that hosts Avamar
Extended Retention
Only required when using the Avamar Extended Retention feature.
Table 34 Network requirements for Avamar utility node and single-node server (page 2 of 2)
Port Protocol Destination Additional information

144
EMC Avamar 7.0 Product Security Guide
Port and Network Requirements
Avamar storage node network requirements
The following table describes the network requirements for an Avamar storage node. For
each row in Table 35, the Avamar storage node is the source and must have access to the
listed port on the listed destination.
Avamar client network requirements
The following table describes the network requirements for Avamar client computers. For
each row in Table 36, the Avamar client computer is the source and must have access to
the listed port on the listed destination.
Table 35 Network requirements for an Avamar storage node
Port Protocol Destination Additional information
53 TCP/UDP DNS Required for name resolution and DNS zone transfers.
TCP connection to DNS is required by VMware proxy nodes.
123 TCP/UDP NTP time servers Provides clock synchronization from network time protocol servers.
19000-
19500
TCP/UDP Avamar server nodes GSAN communication.
20000-
20500
TCP/UDP Avamar server nodes GSAN communication.
25000-
25500
TCP/UDP Avamar server nodes GSAN communication.
26000-
26500
TCP/UDP Avamar server nodes GSAN communication.
27000 TCP Avamar server nodes GSAN communication.
Table 36 Network requirements for Avamar client computers (page 1 of 2)
Port Protocol Destination Additional information
53 TCP/UDP DNS Required for name resolution and DNS zone transfers.
80 TCP Avamar server HTTP
service
Required to use the web browser UI of Avamar Desktop/Laptop and the web browser
UI of Avamar Web Restore.
123 UDP NTP time servers Provides clock synchronization from network time protocol servers.
443 TCP Avamar server HTTPS
service
Required to use the web browser UI of Avamar Desktop/Laptop and the web browser
UI of Avamar Web Restore.
3008 TCP Active archive service
on Data Domain
system
Only required when backups are stored on a Data Domain system, and the active
archive feature is enabled.
8105 TCP Avamar server Used by Avamar Desktop/Laptop.
8109 TCP Avamar server Used by Avamar Desktop/Laptop.
8181 TCP Avamar server HTTP
redirect port
Required to use the web browser UI of Avamar Desktop/Laptop and the web browser
UI of Avamar Web Restore.
8444 TCP Avamar server HTTPS
redirect port
Required to use the web browser UI of Avamar Desktop/Laptop and the web browser
UI of Avamar Web Restore.

Port and network requirements for Data Domain
145
Port and Network Requirements
Avamar Downloader Service network requirements
The following table describes the network requirements for an Avamar Downloader
Service Windows host computer. For each row in Table 37, the Avamar Downloader Service
Windows host computer is the source and must have access to the listed port on the listed
destination.
Port and network requirements for Data Domain
The Avamar server listening ports that are required when Avamar backups are stored on a
Data Domain system appear in “Required ports” on page 138.
The Avamar server network requirements when Avamar backups are stored on a Data
Domain system appear in “Network requirements” on page 142.
In addition to the requirements in these section, implement the port and network
requirements for the Data Domain system, as described in in “Port Requirements for
Allowing Access to Data Domain System Through a Firewall”, available from the Data
Domain Support Portal at: https://my.datadomain.com.
27000-
27500
TCP Avamar server GSAN communication.
28001 TCP Avamar server CLI commands from client computers.
29000 TCP Avamar server GSAN communication.
Table 36 Network requirements for Avamar client computers (page 2 of 2)
Port Protocol Destination Additional information
Table 37 Network requirements for Avamar Downloader Service
Port Protocol Destination Additional information
21 TCP EMC FTP server Provides the Avamar Downloader Service with FTP access to updates, security rollup
packages, hotfixes, and patches provided by EMC.
53 TCP/UDP DNS Required for name resolution and DNS zone transfers.
80 TCP Avamar server HTTP
service
Provides HTTP access to the AvInstaller service.
123 UDP NTP time servers Provides clock synchronization from network time protocol servers.
443 TCP Avamar server HTTPS
service
Provides HTTPS access to the AvInstaller service.

Enterprise Authentication
147
APPENDIX B
Enterprise Authentication
For backwards compatibility, this appendix preserves information about the deprecated
Enterprise authentication method. The functionality of this method is replaced, and
improved upon, by the directory service authentication method. Information about the
directory service authentication method is available in the
EMC Avamar Administration
Guide
. This appendix provides the following sections:
◆Enterprise authentication...................................................................................... 148
◆Configuring enterprise authentication ................................................................... 149

148
EMC Avamar 7.0 Product Security Guide
Enterprise Authentication
Enterprise authentication
Enterprise (or external) authentication enables users to use the same user ID and
password to log in to multiple systems. The Avamar external authentication feature is not
a single user ID/password login, fully integrated into an external authentication system on
which users are created and managed. Instead, the same user ID must be created on both
Avamar and external systems while the password is set and managed externally.
Avamar Login Manager provides access to the external authentication databases through
the standard Pluggable Authentication Module (PAM) library of the Linux operating
system.
Login Manager runs on the utility node and is installed and started during Avamar server
installation and upgrade. It uses the domains configuration file to identify the supported
domains.
Supported components and systems
External authentication is only available for specific Avamar components and two external
systems.
Avamar components
Avamar Administrator, Avamar Enterprise Manager, and Avamar Web Access support
external authentication for user accounts.
External authentication is
not
available for Avamar server-level administration user
accounts, including:
◆root, admin, and dpn operating system user accounts
◆Special Avamar system administrative users like MCUser and root
External systems
Avamar supports the following categories of external authentication systems.
Table 38 Supported external authentication systems
Category Description
Lightweight Directory
Access Protocol (LDAP)
Hierarchical directory structure X.500 standard system such as:
• Microsoft Active Directory Service (MS ADS)
• Novell NDS and eDirectory
Network Information
Service (NIS)
SUN Yellow Pages (YP)
Flat workgroup-based database structure of user IDs, passwords, and
other system parameters comparable to Microsoft Windows NT such as:
• Master NIS Server - Primary Domain Controller (PDC)
• Slave NIS Servers - Backup Domain Controllers (BDC)

Configuring enterprise authentication
149
Enterprise Authentication
Configuring enterprise authentication
To configure Avamar external authentication:
1. Back up the current configuration files.
2. Configure the LDAP or NIS interface, as discussed in “Configuring the LDAP interface”
on page 149 or “Configuring the NIS interface” on page 152.
3. Use Avamar Administrator to create the users who require login access to Avamar. The
EMC Avamar Administration Guide
provides detailed instructions.
The username must match exactly the user ID on the LDAP or NIS server. Create
external users in the proper LDAP or NIS server domain location (for example, the root
“/” or other directory like “/clients/”). When creating users, the external domain
appears in the Authentication System list.
4. Confirm the creation of the external users by logging in to Avamar Administrator or
Avamar Enterprise Manager as the external user.
Log in according to the following rules:
a. User ID followed by @DOMAIN.
Where DOMAIN is the LDAP or NIS server domain that you specified when you
edited the /etc/avamar/domains.cfg file while configuring the LDAP or NIS
interface.
For example: SueV@example.com
b. User password same as entered in the external LDAP or NIS system.
c. Domain path where external users reside (for example, “/clients/”).
5. Back up the configuration files again.
Also, the best practice is to back up configuration files before installing software
upgrades because the process might overwrite the configuration files with default
values.
Configuring the LDAP interface
1. Collect the following server information and utilities.
Table 39 Information required to configure LDAP (page 1 of 2)
Category Item
Information about
external LDAP system
LDAP domain name
IP address or fully qualified domain/hostname of the LDAP
authentication server
Distinguished name (DN) of the user for LDAP queries
Password of DN used for LDAP queries
Information about the
Avamar server
Linux operating system root user password
Linux operating system admin user password
Avamar system admin username and password

150
EMC Avamar 7.0 Product Security Guide
Enterprise Authentication
2. Open a command shell and log in:
• If logging into a single-node server, log in to the server as root.
• If logging into a multi-node server, log in to the utility node as root.
3. Open /etc/avamar/domains.cfg in a UNIX text editor, such as vi or emacs.
4. Add the following entry in the Customer Specific Domains section, and then save the
file:
DOMAIN=ID
where:
•DOMAIN (format: example.com) is a unique customer-specific LDAP domain used
for addressing PAM.
• ID is an integer larger than 1. IDs 0 and 1 are reserved for Avamar internal use.
Note: Step 5 requires the creation of a symbolic link for this entry. Instead of
DOMAIN=ID, an existing ldap=3 is available for use (by uncommenting the line). If
ldap=3 is used, skip step 5 because the symbolic link already exists.
The DOMAIN part of the entry (either ldap or a unique LDAP domain) appears in the
Avamar Administrator Authentication System list. Entering a unique DOMAIN clarifies
which LDAP domain is used for external authentication.
5. Create a unique lm_ldap file and symbolically link to it by typing:
ln -sf /etc/pam.d/lm_ldap /etc/pam.d/lm_NUMBER
where NUMBER is the LDAP domain ID in step 4.
6. Log in to the server as admin.
7. Load the admin OpenSSH key by typing:
ssh-agent bash
ssh-add ~admin/.ssh/admin_key
8. When prompted, type the admin user account passphrase and press Enter.
9. Confirm that the systemname and lmaddr are set up correctly by typing:
avmaint config --avamaronly | grep systemname
avmaint config --avamaronly | grep lmaddr
These commands display the hostname and IP address of the utility node,
respectively.
Utilities for testing and
troubleshooting
ldapbrowser
GetMyDN (Windows utility from Softerra)
ldapsearch (/usr/bin directory)
Table 39 Information required to configure LDAP (page 2 of 2)
Category Item
Configuring enterprise authentication
151
Enterprise Authentication
10. As root, create a symbolic link from ldap.conf to ldap.conf.winad by typing:
ln -sf /etc/ldap.conf.winad /etc/ldap.conf
11. Set correct group ownership and file permissions for ldap.conf by typing:
chown root:root /etc/ldap.conf
chmod 0600 /etc/ldap.conf
12. Confirm the symbolic link by typing:
ls -l /etc/ldap.conf
The following information appears in the command shell:
/etc/ldap.conf -> /etc/ldap.conf.winad
13. In a UNIX text editor, open /etc/ldap.conf.
14. Modify the following entries, and then save the file:
host HN-IPADD
where HN-IPADD is the fully qualified hostname or IP address of the LDAP server.
base dc=DOMAIN, dc=com
where DOMAIN is the first part of the LDAP domain name. For example: example.com
would be displayed as dc=example, dc=com.
binddn cn=PROXYUSER, ou=PROXYUNIT, ou=PROXYORG, dc=DOMAIN, dc=com
where PROXYUSER, PROXYUNIT, PROXYORG, and DOMAIN comprise parts of the
distinguished name of the user used to bind with the LDAP server. Components
include:
• cn - common name
• ou - organizational or unit name
•dc - domain
For example: Distinguished name avamaruser.users.avamar.emc.com
Components: cn=avamaruser, ou=users, ou=avamar, dc=emc, dc=com
bindpw PWD
where PWD is the password of the user used to bind with the LDAP server.
15. Restart Login Manager by typing:
service lm restart
16. Confirm that configuration changes were accepted by typing:
avmgr lstd
All domains used in Avamar authentication are listed.

152
EMC Avamar 7.0 Product Security Guide
Enterprise Authentication
Note: Space limitations in this guide cause the commands in the next step to continue
(wrap) to more than one line. Each command must be entered on a single command
line (no line feeds or returns allowed).
17. Confirm that the LDAP server can be queried by typing the following command:
ldapsearch -x -W -h HOSTNAME -b dc=DISTINGUISHED_NAME -D
cn=VALID_USERNAME, cn=users,dc=DISTINGUISHED_NAME
where:
• HOSTNAME is the hostname or IP address of the LDAP server.
• dc=DISTINGUISHED_NAME is the domain part of the distinguished name (the two
"dc" components).
• VALID_USERNAME is a valid user in the LDAP server domain.
A success message or referral result should appear. A communication or
authentication failure is a problem indication.
For example:
ldapsearch -x -W -h 10.0.100.21 -b dc=aelab01,dc=com -D
cn=administrator,cn=users,dc=aelab01,dc=com
Configuring the NIS interface
1. Open a command shell and log in:
• If logging into a single-node server, log in to the server as root.
• If logging into a multi-node server, log in to the utility node as root.
2. Open /etc/avamar/domains.cfg in a UNIX text editor.
3. Add the following entry in the Customer Specific Domains section, and then save the
file:
DOMAIN=ID
where:
• DOMAIN (format: example.com) is a unique customer-specific NIS domain used for
addressing PAM
• ID is an integer larger than 1. IDs 0 and 1 are reserved for Avamar internal use.
Note: Step 4 requires the creation of a symbolic link for this entry. Instead of
DOMAIN=ID, an existing nis=2 is available for use (by uncommenting the line). If
nis=2 is used, skip step 4 because the symbolic link already exists.
The DOMAIN part of the entry (either nis or a unique NIS domain) appears in the
Avamar Administrator Authentication System list. Typing a unique DOMAIN clarifies
which NIS domain is used for external authentication.
Configuring enterprise authentication
153
Enterprise Authentication
4. Create a unique lm_nis file and symbolically link to it by typing:
ln -sf /etc/pam.d/lm_nis /etc/pam.d/lm_NUMBER
where NUMBER is the NIS domain ID in step 3.
5. Set correct group ownership and file permissions for the lm_nis file by typing:
chown root:root /etc/pam.d/lm_NUMBER
chmod 0600 /etc/pam.d/lm_NUMBER
where NUMBER is the NIS domain ID in step 3.
6. Confirm the symbolic link by typing:
ls -l /etc/pam.d/lm_NUMBER
where lm_NUMBER is the file created in step 4.
The following information appears in the command shell:
/etc/pam.d/lm_NUMBER -> lm_nis
7. In a UNIX text editor, open lm_NUMBER (created in step 4).
8. Modify the following entries, and then save the file:
auth required /lib/security/pam_nis.so domain=NISDOMAIN
account required /lib/security/pam_nis.so domain=NISDOMAIN
where NISDOMAIN is the NIS domain in step 3.
9. Log in to the server as admin.
10. Load the admin OpenSSH key by typing:
ssh-agent bash
ssh-add ~admin/.ssh/admin_key
11. When prompted, type the admin user account passphrase and press Enter.
12. Confirm the systemname and lmaddr are set up correctly by typing:
avmaint config --avamaronly | grep systemname
avmaint config --avamaronly | grep lmaddr
These commands display the hostname and IP address of the utility node,
respectively.
13. As root, restart Login Manager by typing:
service lm restart
14. With keys loaded, confirm that configuration changes were accepted by typing:
avmgr lstd
All domains used in Avamar authentication are listed.
15. Open /etc/sysconfig/network in a UNIX text editor.
16. Add the following entry, and then save the file:
NISDOMAIN=DOMAINNAME
where DOMAINNAME is the NIS domain in step 3.

154
EMC Avamar 7.0 Product Security Guide
Enterprise Authentication
17. Open /etc/yp.conf in a UNIX text editor.
18. Add the following entry:
domain NISDOMAIN server NISSERVERNAME_IP
where:
• NISDOMAIN is the NIS domain in step 3.
• NISSERVERNAME_IP is the NIS server hostname or IP address.
Examples:
domain hq server 122.138.190.3
domain hq server unit.example.com
19. Set ypbind to automatically start by typing:
/sbin/chkconfig ypbind on
20. Confirm the previous settings by typing:
/sbin/chkconfig --list ypbind
The following information appears in the command shell:
ypbind 0:off 1:off 2:off 3:on 4:on 5:on 6:off
Numbers 3, 4, and 5 should be “on”. If not, type:
/sbin/chkconfig --level NUMBERS ypbind on
where NUMBERS is a comma-separated list of the numbers to set "on" (for example,
/sbin/chkconfig --level 3,4 ypbind on).
21. Start the ypbind daemon by typing:
service ypbind restart
The following information appears in the command shell:
Shutting down NIS services: [ OK or FAIL ]
Binding to the NIS domain: [ OK ]
Listening for NIS domain server:
Note: Shutting down NIS services can fail if it has not started already. In that case,
listening for the NIS domain server should fail because the default NIS domain has not
yet been set up.
A delay in the start() section is usually required between the ypbind and ypwhich (in
next step) commands.
Configuring enterprise authentication
155
Enterprise Authentication
22. Confirm NIS configuration by typing:
ypwhich
This command displays the IP address or the fully qualified domain name of the NIS
server.
ypcat -d NISDOMAIN passwd | grep USER-ID
where:
• NISDOMAIN is the NIS domain in step 3.
• USER-ID is the partial or whole name of a user registered in the external
authentication system.
These commands verify that data can be retrieved from the NIS domain server by
returning user login data from the NIS server.

IAO Information
157
APPENDIX C
IAO Information
US Department of Defense (DoD)
Security Technical Implementation Guide (STIG) for Unix
mandates information that should be disclosed to an Information Assurance Officer (IAO).
This appendix provides that information in the following sections:
◆SGID/SUID bit ....................................................................................................... 158
◆System-level accounts........................................................................................... 158
158
EMC Avamar 7.0 Product Security Guide
IAO Information
SGID/SUID bit
Pursuant to the disclosure requirements of STIG compliance rule GEN002440, the
following files have the SGID/SUID bit set:
/data01/connectemc/archive
/data01/connectemc/failed
/data01/connectemc/history
/data01/connectemc/logs
/data01/connectemc/output
/data01/connectemc/poll
/data01/connectemc/queue
/data01/connectemc/recycle
/lib64/dbus-1/dbus-daemon-launch-helper
/opt/dell/srvadmin/oma/bin/omcliproxy
/usr/bin/lockfile
/usr/bin/slocate
/usr/bin/ssh-agent
/usr/bin/vlock
/usr/bin/wall
/usr/bin/write
/usr/lib/PolicyKit/polkit-explicit-grant-helper
/usr/lib/PolicyKit/polkit-grant-helper
/usr/lib/PolicyKit/polkit-grant-helper-pam
/usr/lib/PolicyKit/polkit-read-auth-helper
/usr/lib/PolicyKit/polkit-revoke-helper
/usr/lib/PolicyKit/polkit-set-default-helper
/usr/lib/vte/gnome-pty-helper
/usr/sbin/lockdev
/usr/sbin/postdrop
/usr/sbin/postqueue
/usr/sbin/sendmail.sendmail
/usr/sbin/utempter
/usr/sbin/zypp-refresh-wrapper
System-level accounts
Pursuant to the disclosure requirements of STIG compliance rule GEN000360, the
following accounts are system-level accounts and are not privileged user accounts:
at
mysql
admin
dnsmasq
messagebus
polkituser
suse-ncc
uuidd
wwwrun
stunnel

EMC Avamar 7.0 Product Security Guide
159
Symbols
.iso files 38, 41, 44, 52, 55, 65
.log files 88, 95, 96, 97, 98, 99, 100, 103
.rpm files 104, 105
A
access node, Avamar server 100
account
default users 23
passwords, changing 24
activation
client, with Avamar server 92
activites
maintenance 19, 60, 78, 83, 85, 86, 92, 100
Activity monitor 92
activity operator role 20, 21
admin
EMS database user account 23
MCS database user account 23
server operating system account 23
admin_key SSH private key 27
admin_key.pub SSH public key 27
administrator role 19
Advanced Intrusion Detection Environment (AIDE) 95, 102,
103
agents, Avamar 26, 87, 150, 153
alerts 93
Apache Tomcat web server 62, 69, 70, 71, 72, 73, 74, 75, 76,
77, 78, 95, 97, 113, 142
audit logging 94, 95
auditd service 95, 103
authentication
avs internal authentication system 18
certificates 35, 36, 37, 38, 40, 41, 42, 44, 45, 46, 49,
50, 52, 54, 55, 56, 57, 59, 60, 61, 62, 65, 66,
67, 69, 70, 71, 73, 74, 75, 76, 82
client/server 35
client-to-server 35
external 148
LDAP directories 148, 149, 150, 151, 152
Microsoft Windows Active Directory 18, 148
NIS directories 148, 149, 152, 153, 154, 155
one-way 35
OpenLDAP directories 18
roles 18, 19, 20, 22, 94
activity operator 20, 21
administrator 19
backup only operator 20, 22
backup/restore operator 20, 21
backup/restore user 22
operator 19
restore (read) only user 22
user 19, 22
server-to-client 35
SUN YP directories 148
system 18, 87, 88, 148, 149, 150, 152, 155
two-way 35
verifying 61
avagent program 100
Avamar Administrator
Activity monitor 92
domains 18, 19, 20, 21, 22, 34, 66, 72, 74, 87, 88, 94,
148, 149, 150, 151, 152, 153, 154, 155
encryption setting 48, 61, 82
event profiles 94
events 34, 92, 93, 94, 95
acknowledgement of 93
Restore Options dialog box 61, 82
retention policies 85
schedules 85, 94
Avamar Client for Linux
installing 27
Avamar Data Store (ADS) 148
Avamar Enterprise Manager 69, 83, 84
Avamar Login Manager 148, 151, 153
Avamar server 24, 25, 34, 35, 37, 44, 47, 58, 59, 78, 79, 82,
84, 85, 87, 92, 94
access node 100
authentication 18, 87, 88, 148, 149, 150, 152, 155
capacity 15, 78, 92, 93
checkpoints 85, 86, 89
data replication 21, 23
EMS subsystem 23, 77, 78, 84, 96, 98
garbage collection 85, 86, 92
HFS check 85
hfscheck process 85
maintenance window 85
MCS 23, 26, 48, 50, 78, 84, 92
MCS subsystem 23, 26, 48, 50, 78, 84, 92, 95, 97
multi-node 25, 34, 66, 87, 150, 152
read-only state 85
single-node 25, 34, 66, 70, 87, 94, 95, 150, 152
storage node 35, 82, 86, 99
utility node 24, 25, 34, 35, 66, 70, 72, 74, 79, 82, 87,
97, 148, 150, 152, 153
avfirewall service 116, 117
avndmp program 99
avs authentication system 18
avtar program 22, 24, 48, 61, 83, 100
B
backup only Avamar Administrator user account 23
backup only operator role 20, 22
backup/restore operator role 20, 21
backup/restore user role 22
backuprestore Avamar Administrator user account 23
INDEX
Index
160
EMC Avamar 7.0 Product Security Guide
C
capacity
server 15, 78, 92, 93
Certificate Signing Request (CSR) 37, 38, 44, 46, 51, 52, 55,
57, 65, 66, 73, 74
certificates 35, 36, 37, 38, 40, 41, 42, 44, 45, 46, 49, 50, 52,
54, 55, 56, 57, 59, 60, 61, 62, 65, 66, 67, 69, 70,
71, 73, 74, 75, 76, 82
installing on Microsoft Windows 59
installing on UNIX 61
OpenSSL 40
root 40
self-signing 35
signing 35, 45, 56
TLS 35, 48, 61
X.509 35, 45, 56, 82
Certification Authority (CA) 35, 40, 41, 42, 45, 46, 53, 54, 56,
57, 65, 66, 73, 74, 75, 82
change-passwords program 24, 25, 26, 27, 96, 98
checkpoints, Avamar server 85, 86, 89
clients
activation with Avamar server 92
authentication with server 35
connection to Avamar nodes 34
data encryption 82
encryption setting 48, 61, 82
log files 100
registration with Avamar server 92
commands
See also
programs
mapall 88, 89
status.dpn 86
sudo 104, 105
ConnectEMC 15, 94
Controlled Access Protection Profiles (CAPP) 103
D
data
encryption 82
erasure 85
hash 85
integrity 85
port 62, 78, 83, 97, 99, 137, 142
replication 21, 23
Data Domain Distributed Deduplication Bandwidth Optimized
OST (DDBOOST) 83
Data Domain Secure Shell (DDSSH) 78
Data Domain systems 78, 79, 80, 83, 92, 93, 139
data port 62, 78, 83, 97, 99, 137, 142
deduplication, data 14
default gateway 34
deleting backup data 85
disaster recovery 85
domain administrators 19
Domain Name System (DNS) 34, 42, 54
domains 18, 19, 20, 21, 22, 34, 66, 72, 74, 87, 88, 94, 148,
149, 150, 151, 152, 153, 154, 155
dpn server operating system account 23
dpn_key.pub SSH public key 27
dpnctl program 47, 48, 50, 58, 59, 77, 78, 84, 96, 98
dpnid SSH private key 27
E
eDirectory 148
email home 15, 94
email notifications 15, 93, 94
EMC Online Support 88
EMC Secure Remote Support (ESRS) gateway 15
encryption
client communication 48
data 82
value on MCS 47
encryption setting, client socket 48, 61, 82
Enterprise Manager Server (EMS) 23, 77, 78, 84, 96, 98
erasing data 85
events 34, 92, 93, 94, 95
acknowledgement of 93
external authentication 148
F
files
.iso 38, 41, 44, 52, 55, 65
.log 88, 95, 96, 97, 98, 99, 100, 103
.rpm 104, 105
log 14, 22, 24, 25, 28, 29, 30, 59, 63, 64, 65, 67, 71, 72,
73, 74, 76, 77, 79, 80, 87, 91, 93, 94, 95, 96,
97, 98, 99, 100, 105, 113, 115, 148, 149, 150,
152, 153
mcserver.xml 80, 83
syslog 93, 113
firewalls 116
avfirewall service 116, 117
G
garbage collection 85, 86, 92
gateway assignments 34
gsan process 47, 58, 113
H
hash, data 85
HFS check 85
hfscheck process 85
hostnames 42, 54, 70, 150, 151, 152, 153, 154
I
installing Avamar Client software
Linux 27
IP address 42, 54, 70, 149, 150, 151, 152, 153, 154, 155
ISO images 38, 41, 44, 52, 55, 65
J
Java
Cryptography Extension (JCE) 83, 84
keytool program 71, 72
Remote Method Invocation (RMI) 69, 83, 84
IndexIndex
EMC Avamar 7.0 Product Security Guide
161
K
keys
combining with certificate 59
custom public 25
OpenSSH 24, 25, 26, 28, 29, 87, 150, 153
OpenSSL 40
private for client 51
private for server 39, 45, 56
root 40
keytool program 71, 72
L
Lightweight Directory Access Protocol (LDAP) 148, 149, 150,
151, 152
Linux RPM files 104, 105
log files 14, 22, 24, 25, 28, 29, 30, 59, 63, 64, 65, 67, 71, 72,
73, 74, 76, 77, 79, 80, 87, 88, 91, 93, 94, 95, 96,
97, 98, 99, 100, 103, 105, 113, 115, 148, 149, 150,
152, 153
client 100
server 95
syslog 93, 113
Login Manager, Avamar 148, 151, 153
M
maintenance
activities 19, 60, 78, 83, 85, 86, 92, 100
maintenance window 85
management console
See
Avamar Administrator
Management Console Command Line Interface (MCCLI) 100
Management Console Server (MCS) 23, 26, 48, 50, 78, 84,
92, 95, 97
mapall command 88, 89
mcserver.xml file 80, 83
MCUser account 23, 24, 25, 26, 148
multi-node Avamar server 25, 34, 66, 87, 150, 152
N
Network Information Service (NIS) 148, 149, 152, 153, 154,
155
networks/networking
avfirewall service 116, 117
default gateway 34
DNS 34, 42, 54
firewalls 116
hostnames 42, 54, 70, 150, 151, 152, 153, 154
IP address 42, 54, 70, 149, 150, 151, 152, 153, 154,
155
managing with SNMP 34, 93
SSL encryption 62, 69, 70
nodes, Avamar server
access 100
storage 35, 82, 86, 99
utility 24, 25, 34, 35, 66, 70, 72, 74, 79, 82, 87, 97,
148, 150, 152, 153
notification of events 93
Novell NDS 148
O
OpenBSD 37, 40
OpenLDAP 18
OpenSSH keys 24, 25, 26, 28, 29, 87, 150, 153
OpenSSL 37, 40, 41, 42, 44, 45, 46, 51, 53, 54, 55, 56, 57,
59, 62, 63, 64, 65
operating systems
Microsoft Windows 40, 148
OpenBSD 37, 40
SUSE Linux 95, 101
SUSE Linux Enterprise Server (SLES) 95, 101, 102, 103,
104, 105, 113, 114, 116
operator role 19
P
passwords, changing 24
patches, security 14
Perl 40
pkcs#12 certificate files 59
pop-up alerts 93
port, data 62, 78, 83, 97, 99, 137, 142
processes
See also
services
gsan 47, 58, 113
hfscheck 85
profiles 94
programs
See also
commands
avagent 100
avndmp 99
avtar 22, 24, 48, 61, 83, 100
change-passwords 24, 25, 26, 27, 96, 98
dpnctl 47, 48, 50, 58, 59, 77, 78, 84, 96, 98
keytool 71, 72
Perl 40
securedelete 87, 88
Public Key Infrastructure (PKI) 35
R
RAID (Redundant Array of Independent Disks) 86
read-only server state 85
Redundant Array of Independent Disks (RAID) 86, 94
registration, client with Avamar server 92
Remote Method Invocation (RMI), Java 69, 83, 84
replication 21, 23
report 21
replonly Avamar Administrator user account 23
restore (read) only user role 22
restore (read) only/ignore file permissions user role 22
restore only Avamar Administrator user account 23
restore only operator role 20
Restore Options dialog box 61, 82
retention policies 85
roles 18, 19, 20, 22, 94
activity operator 20, 21
administrator 19
backup only operator 20, 22
backup/restore operator 20, 21
backup/restore user 22
Index
162
EMC Avamar 7.0 Product Security Guide
operator 19
restore (read) only user 22
restore (read) only/ignore file permissions user 22
restore only operator 20
user 19, 22
root
Avamar Administrator user account 23, 24
certificates 40
server operating system user account 23, 24, 30
root administrators 19
root image proxy user account 23
router gateway assignment 34
S
schedules 85, 94
Secure Shell (SSH) 26, 27, 28, 29, 30, 78, 79, 80, 87, 113,
150, 153
Secure Socket Layer (SSL) 62, 69, 70
securedelete program 87, 88
security patches, application 14
Security Technical Implementation Guide (STIG) 102, 103,
104, 105, 114, 115, 116, 157
self-signing certificates 35
server
authentication with clients 35
data encryption 82
log files 95
server, Avamar
See
Avamar server
services
See also
processes
auditd 95, 103, 116, 117
avfirewall 116, 117
signing certificates 35, 45, 56
Simple Network Management Protocol (SNMP) 34, 93
single-node Avamar server 25, 34, 66, 70, 87, 94, 95, 150,
152
SNMP
configuration 34
requests and traps 93
status 92
status.dpn command 86
storage node, Avamar server 35, 82, 86, 99
subnet requirements 34
sudo command 104, 105
SUN Yellow Pages (YP) 148
SUSE Linux 95, 101, 102, 103, 104, 105, 113, 114, 116
SuSE Linux Enterprise Server (SLES) 95, 101, 103, 104, 105,
113
syslog files 93, 113
T
Transport Layer Security (TLS)
certificates 61
Transport Layer Security certificates 35, 48
U
user accounts 18, 78, 87, 88, 100, 149, 152
admin
EMS database 23
MCS database 23
server operating system 23
backup only Avamar Administrator 23
backuprestore Avamar Administrator 23
default 23
MCUser Avamar Administrator 23, 24, 25, 26, 148
replonly Avamar Administrator 23
restore only Avamar Administrator 23
root
Avamar Administrator 23, 24
image proxy 23
server operating system 23, 24, 30
viewuser MCS database 23
user authentication
avs internal authentication system 18
certificates 35, 36, 37, 38, 40, 41, 42, 44, 45, 46, 49,
50, 52, 54, 55, 56, 57, 59, 60, 61, 62, 65, 66,
67, 69, 70, 71, 73, 74, 75, 76, 82
external 148
LDAP directories 148, 149, 150, 151, 152
Microsoft Windows Active Directory 18, 148
NIS directories 148, 149, 152, 153, 154, 155
OpenLDAP directories 18
roles 18, 19, 20, 22, 94
activity operator 20, 21
administrator 19
backup only operator 20, 22
backup/restore operator 20, 21
backup/restore user 22
operator 19
restore (read) only user 22
restore (read) only/ignore file permissions user 22
restore only operator 20
user 19, 22
SUN YP directories 148
user role 19, 22
usernames 18, 78, 87, 88, 100, 149, 152
See also
user accounts
utility node, Avamar server 24, 25, 34, 35, 66, 70, 72, 74, 79,
82, 87, 97, 148, 150, 152, 153
V
validation, data 85
viewuser MCS database user account 23
Virtual Private Network (VPN) 34
VPN 34
W
Windows Active Directory 18, 148
Windows operating system 40, 148
X
X.509 certificates 35, 45, 56, 82
