Avere Fxt Admin Smb Acl Guide
avere_fxt_admin_smb_acl_guide-2016
User Manual:
Open the PDF directly: View PDF ![]() .
.
Page Count: 4

FXT Admin SMB/CIFS ACLs Guide
Overview
ThisdocumentistoenableStorageAdministratorstoproperlyconfigureanAvereFXTclustertoprovide
SMB/CIFSACLenforcedaccesstoanNTFSsecuritystyleshareforWindowsclients.Aftercompletingthe
stepsinthisguide,theprocesscontinuesintheADAdministratorCIFSACLsGuide.
FXT Checklist
1. ConsultwithyourADAdministratorandverifythecorefiler’sfullyqualifiedServicePrincipalName
resolvesviaDNS.RefertotheADAdministratorguideformoreinformation.
2. Confirmajunctionisconfigured,alongwiththepathtotheCIFSshareonthecorefiler.
3. Adddirectoryservicesinformation,typicallybothActiveDirectoryandLDAP.
4. ProvideanADdomain.
5. CreateanADMachineaccountfortheFXTVServerandenableCIFSontheVServer.
6. CreateaCIFSsharefortheFXTVServerthatmapstotheCIFSshareonthecorefiler.
Configuring the Avere FXT Cluster
ThereareseveralareaswithintheAvereFXTcontrolpanelthatmustbeconfiguredtoenableCIFSACL
accessforWindowsclients.Configurationincludes:DNS,corefilers,VServers,junctions,directory
services(LDAP),binding,CIFSshares,ActiveDirectory,andmachineaccounts.
ConfirmDNS,CoreFiler,GNSVServer,andjunctionsareallconfigured.
1. ConfigureDNS(OpsGuideCh.2):Settings>Cluster>AdministrativeNetwork
2. AddcorefilerwithFQDN(OpsGuideCh.3):Settings>CoreFiler>ManageCoreFilers>Create
button>useFQDNinsteadofIP
3. Create(oruseexisting)GNSVServer(OpsGuideCh.4):Settings>VServer>ManageVServers
>Createbutton
4. AddajunctionwithadditionalinformationtosupportCIFSACLs(OpsGuideCh.4):Settings>
VServer>Namespace>AddNewJunction
a. CheckAdvanced
b. CIFSaccesscontrol:CIFSACLs
c. EntertheCIFSsharename,nottheNFSexportpathinthe“Corefilersharename”field.”
Forexample,ifthecorefilerexportis/vol/cifsdemoandtheCIFSsharenameis
cifsdemo,thenyouwouldentercifsdemo.
Copyright©20092016AvereSystems,Inc.Allrightsreserved.Specificationssubjecttochangewithoutnotice.
Adddirectoryservicesinformationforclientauthentication.Providelocationandcredentialsfordirectory
services.MostCIFSACLsinstallationsrelyonLDAPfortheUNIXidentityinformation.TheLDAPsetup
processisdescribedbelow.IfusingNISoraflatfile,refertochapter2oftheAvereOSOperationsGuide.
ThedirectoryservicecanbesetintheAvereControlpanelbynavigatingtotheSettingstab>Cluster>
DirectoryServices.
ConfigureLDAPfordirectoryservices.
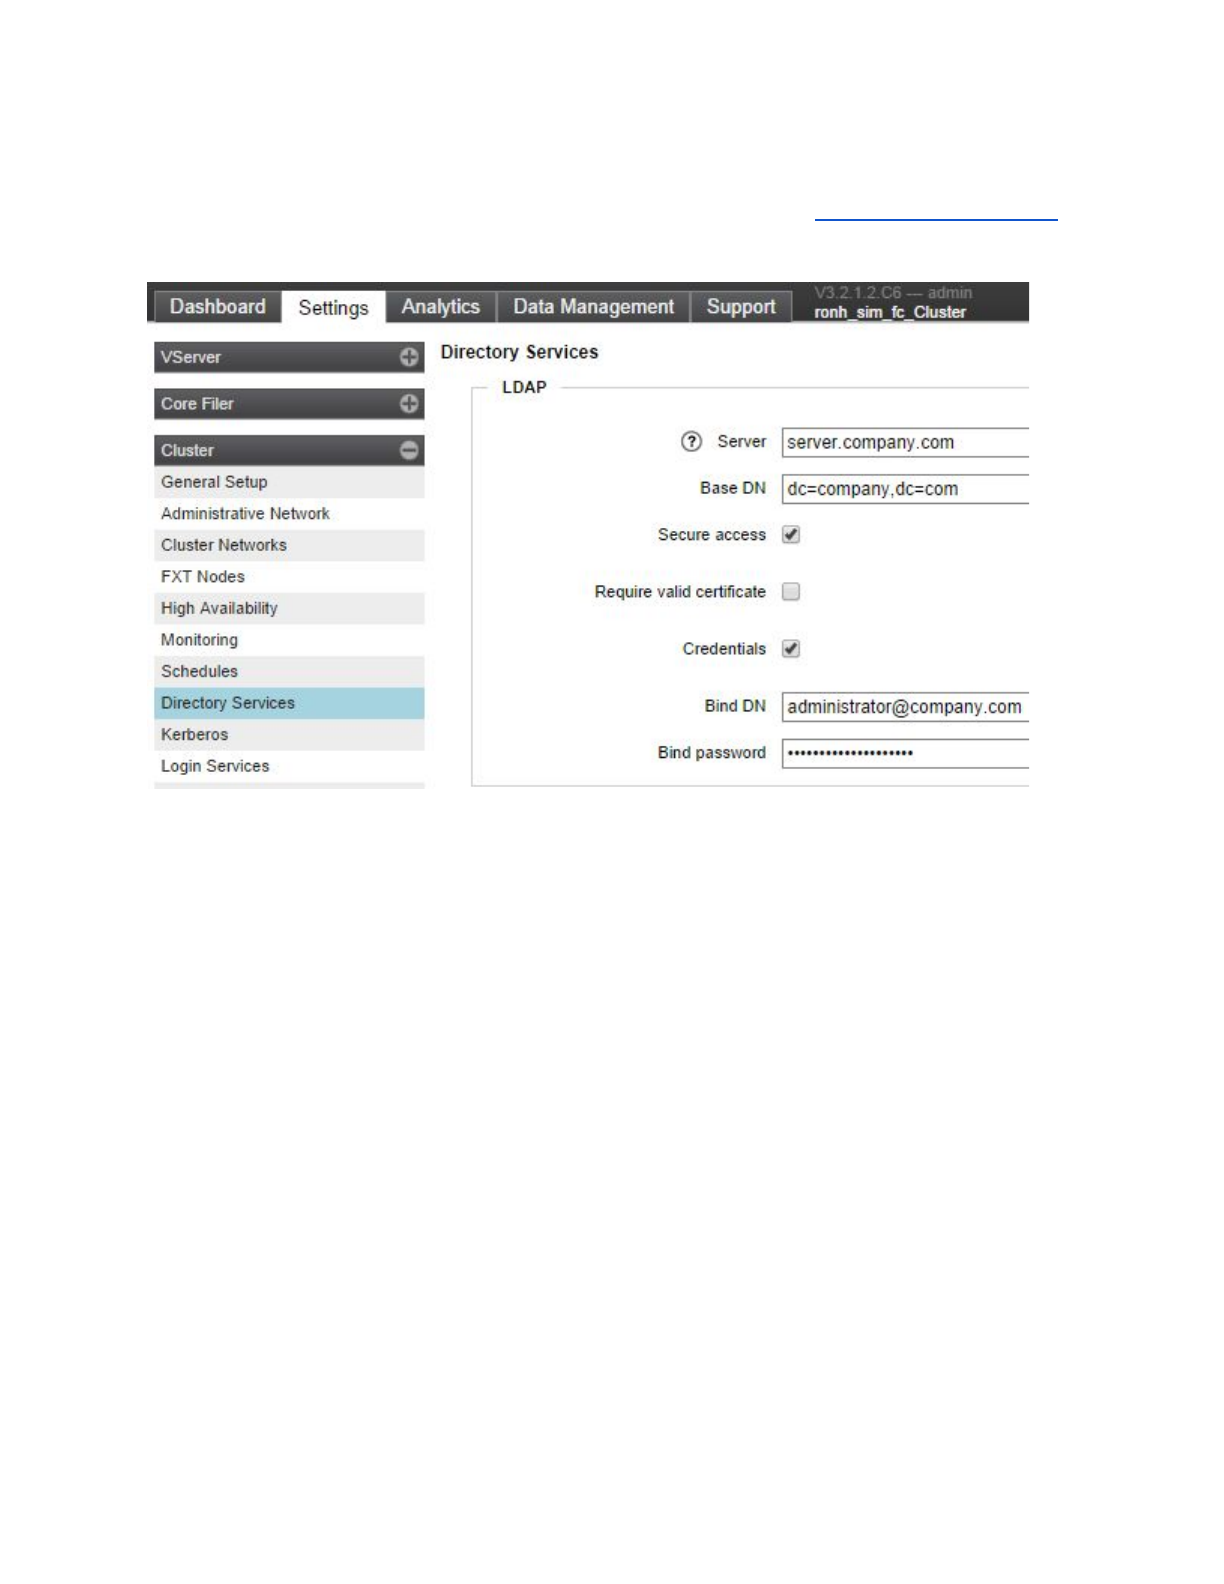
1. NavigatetotheSettingstab>Clustersection>DirectoryServices.
2. IntheLDAPsection,entertheservername(s)inIPaddressorFQDNformat.Example:10.0.0.7or
server.company.com
3. EntertheBaseDN,thebasenameoftheLDAPdomain,indistinguishedname(DN)format.
Example:dc=company,dc=com
4. CheckCredentialsbox.The“BindDN”and“BindPassword”fieldsappear.Thisenablessecure
exchangeofauthenticationinformationbetweentheLDAPandFXTservers.
5. IntheBindDNfield,provideanaccountthatcansecurelypollLDAPinformation(suchas
administrator)intheusername@domainoradistinguishedname(DN)format.Examples:
user@company.comorCN=user,DC=company,DC=com
6. EntertheBindpasswordforthataccount.
7. ClicktheSubmitbuttonatthebottomofthepage.
8. Optional:ValidatecredentialsbychangingtheSourceintheUserNamesectiontoLDAPand
clickingthePollNowbutton.ThelastpolldateshouldchangefromDec31,1969totoday’sdate.
ProvideanADdomain.
1. NavigatetotheSettingstab>Cluster>DirectoryServices
2. EntertheFQDNfortheADdomain.Forexample,domain.company.com.
3. ClicktheSubmitbutton.Otherfieldswillbecompletedautomatically.
Copyright©20092016AvereSystems,Inc.Allrightsreserved.Specificationssubjecttochangewithoutnotice.
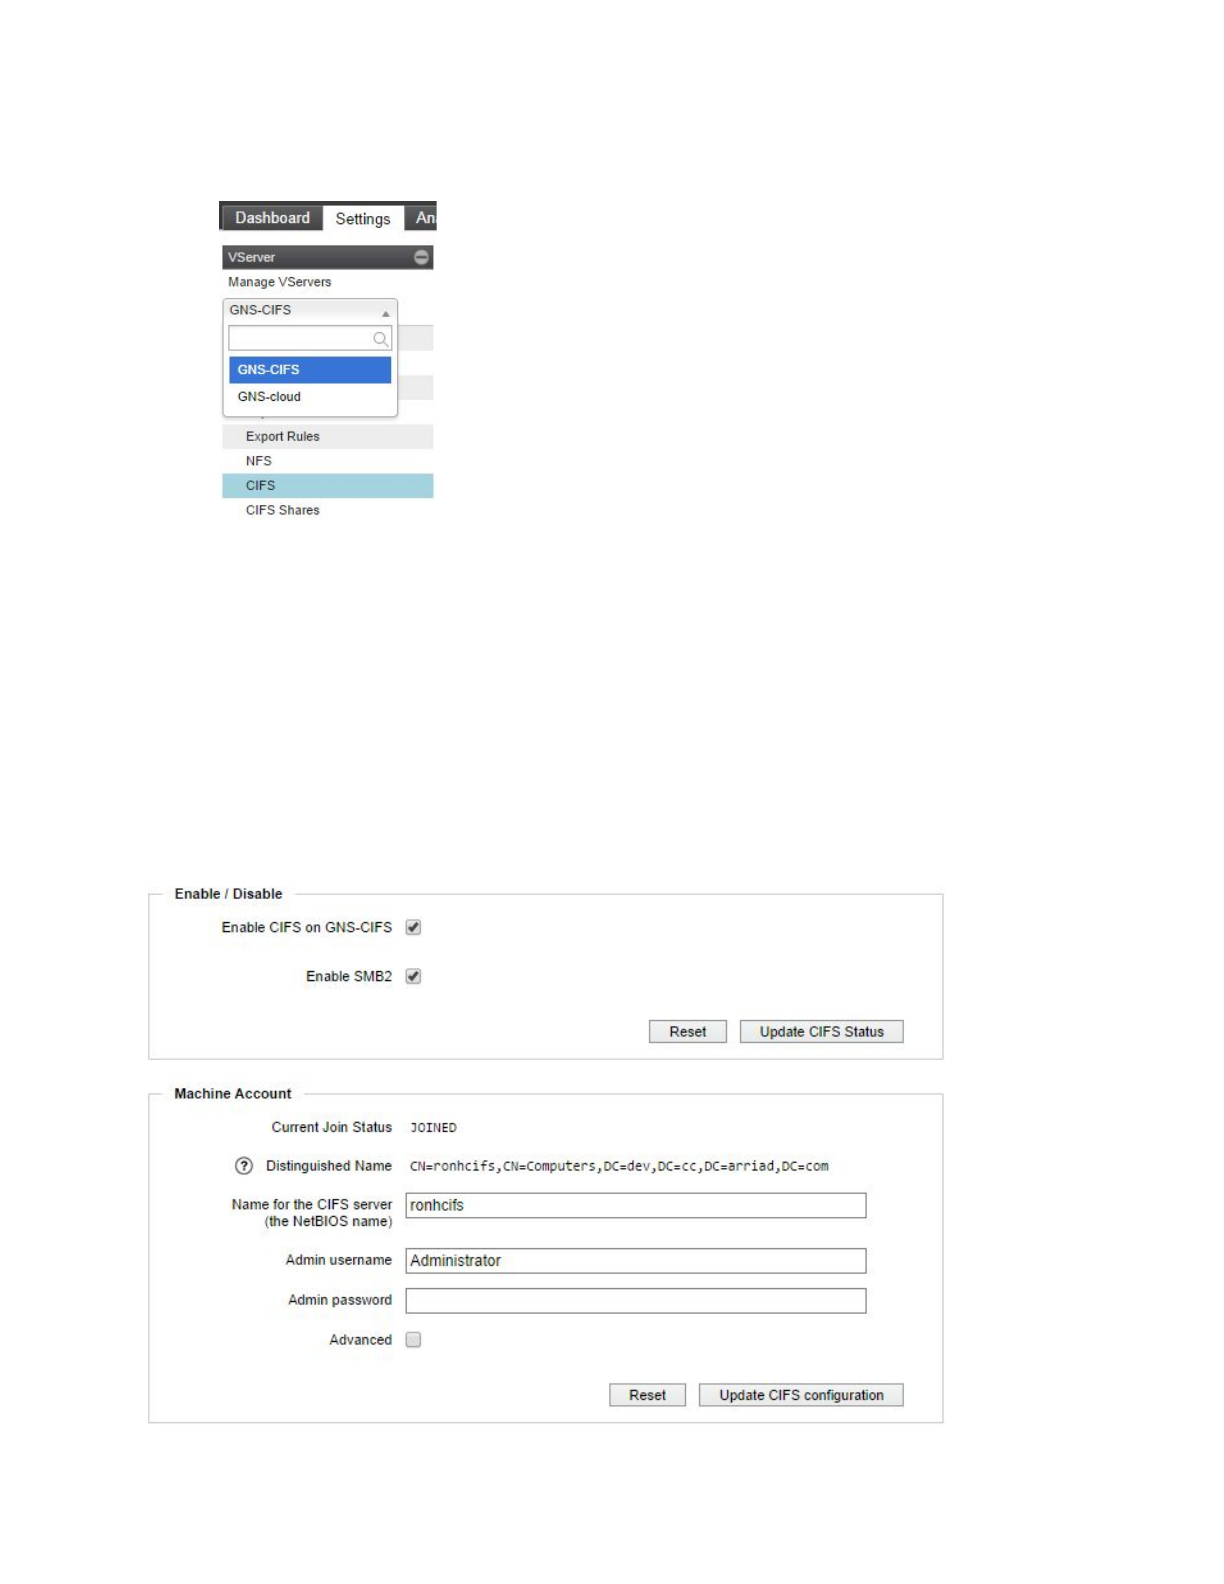
EnableCIFSontheVServer.
1. NavigatetotheSettingstab>selectVServerundertheManageVServerssection>CIFS.
2. UndertheMachineAccountsection,entertheNamefortheCIFSserver.ThisistheNetBIOS
nameofthemachineaccountthatwillappearintheComputersOUinActiveDirectory.NetBIOS
namescannotexceed15charactersandmustbealphanumeric(nospecialsymbolsexcept
hyphens).
3. EntertheActiveDirectoryAdminusername.ThisisthenameofanActiveDirectoryWindowsuser
whohaspermissiontocreatethemachineaccountintheComputersOUintheActiveDirectory
domain.
4. EntertheADadminpasswordfortheADadminaccount.
5. Optional:IfthedesireistohavethemachineaccountinanOUotherthanComputers,checkthe
AdvancedbuttonandspecifythealternativeOU.
6. Click“UpdateCIFSConfiguration”button.ThepagewillreloadandtheCurrentJoinStatusshould
changeto“JOINED”afterafewseconds.
7. Inthe“Enable/Disable”section,checktheboxtoEnableCIFSontheVServer.
Copyright©20092016AvereSystems,Inc.Allrightsreserved.Specificationssubjecttochangewithoutnotice.

CreateaCIFSsharefortheFXTVServerthatmapstotheGNSjunctionthatwasconfiguredforCIFSACLs
access.Thisjunctionshouldhavethe“advanced”informationpopulatedwiththeCIFSsharenameonthe
corefiler.
1. NavigatetotheSettingstab>selectVServerundertheManageVServerssection>CIFSShares.
2. LeavetheSharetypeasRegularunlesscreatingahomeshareasharewithsubfoldersforeach
user,likevol/home/%Uwhichwouldcreatevol/home/jdoeforuserJohnDoe.
3. EnteranameforthenewshareintheCIFSsharenamefield.Thenamemustbeunique,not
containspecialcharacters,andiscasesensitive.
4. ForGNSVServers(recommended),thereisnoneedtoselectanNFSexport.ForSimple
VServers,clicktheNFSexportdropdownboxtoselecttheexport.
5. Optional:IfthecorefilerCIFSshareispointingtoasubdirectoryoftheNFSexport,thenenterthat
subdirectoryoftheexporthere.Forexample,iftheCIFSsharedefinedonthecorefilerispointing
to/vol/cifsdemo/dev,buttheNFSexportonthecorefileris“/vol/cifsdemo,”thenenter“dev”inthis
field.
6. ClicktheCreatebutton.
Copyright©20092016AvereSystems,Inc.Allrightsreserved.Specificationssubjecttochangewithoutnotice.
