Oracle Application Server Adapter For IMS/TM User’s Guide B31003 01
User Manual: B31003-01
Open the PDF directly: View PDF ![]() .
.
Page Count: 112 [warning: Documents this large are best viewed by clicking the View PDF Link!]
- Contents
- Preface
- 1 Introduction
- 2 Integrating OracleAS Adapter for IMS/TM with OC4J
- 3 Troubleshooting OracleAS Adapter for IMS/TM
- 4 Integrating OracleAS Adapters for IMS/TM with Oracle BPEL Process Manager
- 5 Advanced Features of OracleAS Adapter for IMS/TM
- 6 Installing and Configuring OracleAS Adapter for IMS/TM
- Preinstallation Tasks
- Installing Oracle Connect on an IBM OS/390 or z/OS Series Platform
- Updating an Existing Oracle Connect Installation with IMS/TM
- Installing Oracle Studio
- Configuring Oracle Connect
- A Advanced Tuning of the Metadata
- B Back-end Adapter Data Type Support
- C Advanced Tuning of the Daemon
- D Globalization Settings
- Index

Oracle® Application Server
Adapter for IMS/TM User’s Guide
10g Release 3 (10.1.3.1.0)
B31003-01
January 2007
Oracle Application Server Adapter for IMS/TM User’s Guide, 10g Release 3 (10.1.3.1.0)
B31003-01
Copyright © 2006, 2007, Oracle. All rights reserved.
Primary Author: Jeanne Wiegelmann
Contributing Authors: Yishai Hadas, Dror Harari, Adeeb Massad, Meera Srinivasan, Bo Stern, Shashi
Suravarapu, Costi Zaboura, Sheela Vasudevan, Marian Jones
The Programs (which include both the software and documentation) contain proprietary information; they
are provided under a license agreement containing restrictions on use and disclosure and are also protected
by copyright, patent, and other intellectual and industrial property laws. Reverse engineering, disassembly,
or decompilation of the Programs, except to the extent required to obtain interoperability with other
independently created software or as specified by law, is prohibited.
The information contained in this document is subject to change without notice. If you find any problems in
the documentation, please report them to us in writing. This document is not warranted to be error-free.
Except as may be expressly permitted in your license agreement for these Programs, no part of these
Programs may be reproduced or transmitted in any form or by any means, electronic or mechanical, for any
purpose.
If the Programs are delivered to the United States Government or anyone licensing or using the Programs on
behalf of the United States Government, the following notice is applicable:
U.S. GOVERNMENT RIGHTS Programs, software, databases, and related documentation and technical data
delivered to U.S. Government customers are "commercial computer software" or "commercial technical data"
pursuant to the applicable Federal Acquisition Regulation and agency-specific supplemental regulations. As
such, use, duplication, disclosure, modification, and adaptation of the Programs, including documentation
and technical data, shall be subject to the licensing restrictions set forth in the applicable Oracle license
agreement, and, to the extent applicable, the additional rights set forth in FAR 52.227-19, Commercial
Computer Software--Restricted Rights (June 1987). Oracle USA, Inc., 500 Oracle Parkway, Redwood City, CA
94065.
The Programs are not intended for use in any nuclear, aviation, mass transit, medical, or other inherently
dangerous applications. It shall be the licensee's responsibility to take all appropriate fail-safe, backup,
redundancy and other measures to ensure the safe use of such applications if the Programs are used for such
purposes, and we disclaim liability for any damages caused by such use of the Programs.
Oracle, JD Edwards, PeopleSoft, and Siebel are registered trademarks of Oracle Corporation and/or its
affiliates. Other names may be trademarks of their respective owners.
The Programs may provide links to Web sites and access to content, products, and services from third
parties. Oracle is not responsible for the availability of, or any content provided on, third-party Web sites.
You bear all risks associated with the use of such content. If you choose to purchase any products or services
from a third party, the relationship is directly between you and the third party. Oracle is not responsible for:
(a) the quality of third-party products or services; or (b) fulfilling any of the terms of the agreement with the
third party, including delivery of products or services and warranty obligations related to purchased
products or services. Oracle is not responsible for any loss or damage of any sort that you may incur from
dealing with any third party.

iii
Contents
Preface ................................................................................................................................................................ vii
Audience...................................................................................................................................................... vii
Documentation Accessibility.................................................................................................................... vii
Related Documents ................................................................................................................................... viii
Conventions ............................................................................................................................................... viii
1 Introduction
OracleAS Adapter for IMS/TM Overview .......................................................................................... 1-1
OracleAS Adapter for IMS/TM Architecture...................................................................................... 1-2
Integration Flow from Oracle Application Server to a Legacy Application ............................. 1-2
2 Integrating OracleAS Adapter for IMS/TM with OC4J
Integrating OracleAS Adapter for IMS/TM with OC4J.................................................................... 2-1
Configuring the J2CA 1.5 IMS/TM Adapter ....................................................................................... 2-2
Using the CCI API to Develop Applications ...................................................................................... 2-3
Configuring Multiple Adapters ............................................................................................................ 2-4
Updating Configuration Information .................................................................................................. 2-4
3 Troubleshooting OracleAS Adapter for IMS/TM
Troubleshooting the Daemon ................................................................................................................ 3-1
Starting the Daemon .......................................................................................................................... 3-1
Task: Starting the Daemon ........................................................................................................ 3-2
Shutting Down the Daemon............................................................................................................. 3-2
Monitoring the Daemon During Run Time.................................................................................... 3-2
Daemon (Computer) Options ................................................................................................... 3-2
Workspace Options .................................................................................................................... 3-3
Server Options............................................................................................................................. 3-4
Daemon Logs ...................................................................................................................................... 3-4
The Daemon Log Monitor ......................................................................................................... 3-5
The Workspace Log Monitor..................................................................................................... 3-5
The Server Log Monitor............................................................................................................. 3-5
Resolving Communication Errors......................................................................................................... 3-5
Resolving Specific Errors........................................................................................................................ 3-6
iv
4
Integrating OracleAS Adapters for IMS/TM with Oracle BPEL Process Manager
Overview of Integrating OracleAS Adapters for IMS/TM with Oracle BPEL Process Manager .....
4-1
Configuring Oracle BPEL Process Manager to interact with the OracleAS Adapter for IMS/TM ..
4-2
Setting up the Connection to the Oracle Connect Server ............................................................. 4-2
Checking Metadata Availability Using Oracle JDeveloper ......................................................... 4-2
Configuring the WSDL for Outbound Applications .................................................................... 4-2
5 Advanced Features of OracleAS Adapter for IMS/TM
Configuring the Daemon for High Availability ................................................................................ 5-1
Adding a New Daemon Workspace Configuration...................................................................... 5-1
Editing the Workspace ...................................................................................................................... 5-2
Configuring the Server Mode........................................................................................................... 5-3
Configuring a Binding Environment ................................................................................................... 5-5
comm Category .................................................................................................................................. 5-6
debug Category .................................................................................................................................. 5-6
miscellaneous Category .................................................................................................................... 5-7
odbc Category..................................................................................................................................... 5-8
oledb Category ................................................................................................................................... 5-8
optimizer Category ............................................................................................................................ 5-8
queryProcessor Category.................................................................................................................. 5-8
transactions Category ........................................................................................................................ 5-8
tuning Category.................................................................................................................................. 5-9
Migration Considerations....................................................................................................................... 5-9
Security Considerations ....................................................................................................................... 5-10
Setting Design Time Security ........................................................................................................ 5-10
Setting Run-time Security .............................................................................................................. 5-10
Transaction Support.............................................................................................................................. 5-11
6 Installing and Configuring OracleAS Adapter for IMS/TM
Preinstallation Tasks................................................................................................................................ 6-1
IBM OS/390 or z/OS Hardware and Software Requirements.................................................... 6-1
Hardware Requirements ........................................................................................................... 6-1
Software Requirements ............................................................................................................. 6-2
Windows Hardware and Software Requirements ........................................................................ 6-2
Hardware Requirements............................................................................................................ 6-2
Software Requirements .............................................................................................................. 6-2
Installing Oracle Connect on an IBM OS/390 or z/OS Series Platform......................................... 6-3
Installation Worksheet....................................................................................................................... 6-3
Preinstallation Instructions............................................................................................................... 6-4
Installing the Kit ................................................................................................................................. 6-5
Installation Instructions..................................................................................................................... 6-5
Postinstallation Instructions ............................................................................................................. 6-8
Postinstallation Procedures ....................................................................................................... 6-8
v
Starting the Daemon................................................................................................................ 6-10
Setting Up Oracle Connect to Work Under IMS/TM......................................................... 6-10
Setting Up Oracle Connect for Reentrancy .......................................................................... 6-11
Updating an Existing Oracle Connect Installation with IMS/TM............................................... 6-12
Installing Oracle Studio....................................................................................................................... 6-13
Installing Oracle Studio from the CD-ROM................................................................................ 6-14
Configuring Oracle Connect ............................................................................................................... 6-14
Setting Up the IBM OS/390 or z/OS Platform in Oracle Studio ............................................. 6-14
Securing Access to Oracle Connect .............................................................................................. 6-15
Setting Password Access to Oracle Studio ........................................................................... 6-15
Specifying Users with Administrative Rights ..................................................................... 6-17
Setting Up Run-time User Access to the IBM OS/390 or z/OS Platform ....................... 6-18
Modeling Interactions for OracleAS Adapter for IMS/TM...................................................... 6-19
Setting Up an Oracle Connect Adapter ................................................................................ 6-19
Generating Outbound Interactions ....................................................................................... 6-21
Viewing the XML Schema.............................................................................................................. 6-26
Creating XML Schemas .................................................................................................................. 6-27
A Advanced Tuning of the Metadata
Metadata for the Back-end Adapter..................................................................................................... A-1
General Tab ........................................................................................................................................ A-1
Interaction Tab................................................................................................................................... A-2
Schema General Tab ......................................................................................................................... A-3
Schema Record Tab........................................................................................................................... A-5
Source Tab .......................................................................................................................................... A-7
B Back-end Adapter Data Type Support
Data Type Mapping ................................................................................................................................ B-1
C Advanced Tuning of the Daemon
Daemon Control ...................................................................................................................................... C-1
Daemon Logging ..................................................................................................................................... C-3
Daemon Security ..................................................................................................................................... C-5
Workspaces ............................................................................................................................................... C-7
WS Info. .............................................................................................................................................. C-7
WS Server ........................................................................................................................................... C-9
WS Logging...................................................................................................................................... C-13
WS Security ..................................................................................................................................... C-16
D Globalization Settings
Defining the Language and Codepage................................................................................................ D-1
Index
vi

vii
Preface
This guide is the primary source of user and reference information on OracleAS
Adapters for IMS/TM, which enables client applications to access transactions
running under IMS/TM through the Sun J2EE Connector Architecture (J2CA) API.
This document describes the features of OracleAS Adapters for IMS/TM that apply to
the UNIX, Windows 2000, Windows XP, and Windows Server 2003 operating systems.
This preface covers the following topics:
■Audience
■Documentation Accessibility
■Related Documents
■Conventions
Audience
This manual is intended for Oracle integration administrators who perform the
following tasks:
■Installing and configuring OracleAS Adapters for IMS/TM
■Diagnosing errors
■Using OracleAS to access IMS/TM transactions
Documentation Accessibility
Our goal is to make Oracle products, services, and supporting documentation
accessible, with good usability, to the disabled community. To that end, our
documentation includes features that make information available to users of assistive
technology. This documentation is available in HTML format, and contains markup to
facilitate access by the disabled community. Accessibility standards will continue to
evolve over time, and Oracle is actively engaged with other market-leading
technology vendors to address technical obstacles so that our documentation can be
accessible to all of our customers. For more information, visit the Oracle Accessibility
Program Web site at
Note: You should understand the fundamentals of OracleAS,
OC4J, the UNIX and Microsoft Windows operating system before
using this guide to install or administer OracleAS Adapters for
IMS/TM.

viii
http://www.oracle.com/accessibility/
Accessibility of Code Examples in Documentation
Screen readers may not always correctly read the code examples in this document. The
conventions for writing code require that closing braces should appear on an
otherwise empty line; however, some screen readers may not always read a line of text
that consists solely of a bracket or brace.
Accessibility of Links to External Web Sites in Documentation
This documentation may contain links to Web sites of other companies or
organizations that Oracle does not own or control. Oracle neither evaluates nor makes
any representations regarding the accessibility of these Web sites.
TTY Access to Oracle Support Services
Oracle provides dedicated Text Telephone (TTY) access to Oracle Support Services
within the United States of America 24 hours a day, seven days a week. For TTY
support, call 800.446.2398.
Related Documents
For more information, see the following documents in the Oracle Other Product One
Release 7.0 documentation set or in the Oracle Other Product Two Release 6.1
documentation set:
■Oracle Application Server Adapter Concepts Guide
■Oracle Application Server Adapter Installation Guide
■Oracle Application Server Adapter Concepts Guide
■Oracle Application Server Containers for J2EE User’s Guide
■Oracle Application Server Containers for J2EE Services Guide
■Oracle Application Server Containers for J2EE Security Guide
Conventions
The following text conventions are used in this document:
Convention Meaning
boldface Boldface type indicates graphical user interface elements associated
with an action, or terms defined in text or the glossary.
italic Italic type indicates book titles, emphasis, or placeholder variables for
which you supply particular values.
monospace Monospace type indicates commands within a paragraph, URLs, code
in examples, text that appears on the screen, or text that you enter.

Introduction 1-1
1
Introduction
Oracle Application Server Adapter for IMS/TM (OracleAS Adapter for IMS/TM)
enables you to connect Oracle Application Server to an Information Management
System-Transaction Management (IMS/TM) system. This section provides an
overview of the features and architecture of OracleAS Adapter for IMS/TM.
This section contains the following topics:
■OracleAS Adapter for IMS/TM Overview
■OracleAS Adapter for IMS/TM Architecture
OracleAS Adapter for IMS/TM Overview
IMS/TM is a high-performance transaction management system that is part of the IBM
IMS product family.
The application components in IMS/TM are executable programs called transactions.
These programs are typically written in COBOL but may possibly be written in other
languages, such as PL/I, C and even Java. There are several types of IMS/TM
programs including MPPs (Message Processing Programs) and BMP (Batch Message
Processing Programs).
IMS/TM transaction are invoked using an API called OTMA (Open Transaction
Manager Access) as well as through 3270 terminals. IMS/TM transactions are built
around an input message-output message concept with a special layer (MFS)
translating the message to the screen and back, for a user interface.
In addition to OTMA, there is also an IMS/TM transaction gateway that enables
TCP/IP access to IMS/TM transactions.
OracleAS Adapter for IMS/TM includes the following features:
■Captures and maintains a metadata schema for IMS/TM by importing COBOL
copybooks and transforming them into mapping definitions for Oracle Connect on
the OS/390 or z/OS Series platform and by associating the data structures with
specific physical files.
■Utilizes an enterprise application integration (EAI) model. Users of a requesting
application can model the interactions that they want implemented, specifying
what each interaction does, when it occurs, and the inputs and outputs expected
for each interaction.
■Provides access to MPP based IMS/TM transactions. Each OracleAS Adapter for
IMS/TM outbound interaction is mapped to a specific IMS/TM transaction.
■Maps data structures for facilitating access to IMS/TM transactions from within
OracleAS.
OracleAS Adapter for IMS/TM Architecture
1-2 Oracle Application Server Adapter for IMS/TM User’s Guide
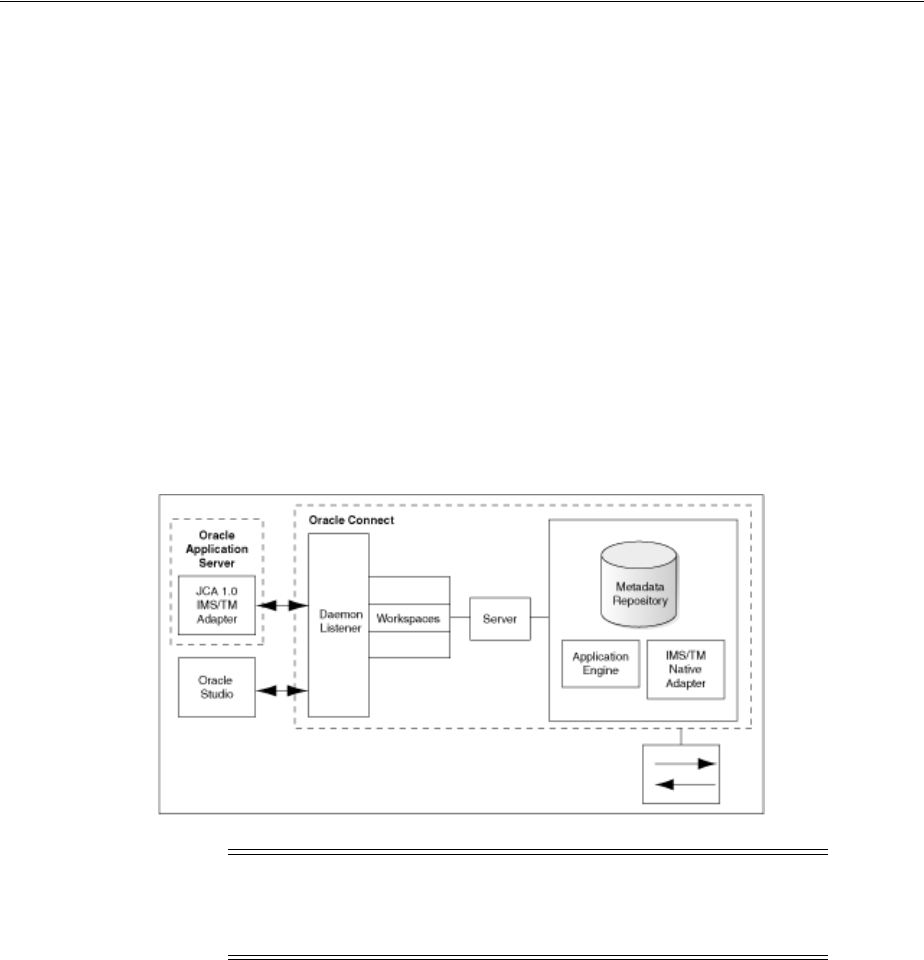
OracleAS Adapter for IMS/TM Architecture
OracleAS adapter includes the following components:
■J2CA 1.5 IMS/TM adapter: The J2CA IMS/TM adapter is a standard resource
adapter that is compliant with J2EE Connector Architecture, providing J2EE
components connectivity.
■Oracle Connect: Oracale Connect runs on the legacy system and handles requests
from the J2CA 1.5 IMS/TM adapter, that runs within Oracle Application Server
Containers for J2EE (OC4J).
■Oracle Studio: Oracle Studio is the configuration tool for Oracle Connect.
Configuration tasks using Oracle Studio are performed on a Windows platform.
Oracle Studio uses perspectives that enables you to generate specific information
necessary to model OracleAS Adapter for IMS/TM.
The following figure illustrates the components of OracleAS Adapter for IMS/TM:
Figure 1–1 Adapter Architecture
Integration Flow from Oracle Application Server to a Legacy Application
The J2CA 1.5 IMS/TM adapter converts the J2CA interaction invocation received from
an application client to the XML format and passes the XML format to Oracle Connect
on the legacy server. The daemon listens for the request coming from the J2CA 1.5
IMS/TM adapter client and assigns a server process to handle the request. The
properties of the server process, such as connection pooling requirements, are defined
by a workspace definition within the daemon. The server process includes an instance
of the application engine, which converts the XML format into native structures
understandable by IMS/TM and passes the converted XML to the back-end adapter.
The back-end adapter builds an interaction based on the metadata for the back-end
adapter stored in the repository and the incoming converted XML, and passes it to the
legacy application to be executed. The results of the execution are passed back to the
application engine, using the back-end adapter, where these results are converted to
XML and passed back to the client.
Note: For a comprehensive description of the integration adapter
architecture, see the following Oracle documentation:
Oracle Application Server Adapter Concepts Guide

Integrating OracleAS Adapter for IMS/TM with OC4J 2-1
2
Integrating OracleAS Adapter for IMS/TM
with OC4J
To deploy and integrate OracleAS Adapter for IMS/TM with Oracle Application
Server Containers for J2EE (OC4J), you need to configure the J2CA 1.5 IMS/TM
adapter.
This section includes the following topics:
■Integrating OracleAS Adapter for IMS/TM with OC4J
■Configuring the J2CA 1.5 IMS/TM Adapter
■Using the CCI API to Develop Applications
■Configuring Multiple Adapters
■Updating Configuration Information
Integrating OracleAS Adapter for IMS/TM with OC4J
Oracle Application Server provides a complete Java 2 Enterprise Edition (J2EE)
environment that executes on the Java Virtual Machine (JVM) of the standard Java
Development Kit (JDK). OC4J is J2EE certified and provides all the J2EE specific
containers, APIs, and services. OC4J supports the J2CA 1.5 standard.
J2CA defines standard Java interfaces for simplifying the integration of applications
with the EIS. OracleAS adapters are deployed as a Resource Adapter (RA) within the
OC4J container.
The contract between the OC4J client application and the resource adapter is defined
by the common client interface (CCI). The contract between the OC4J container and
the resource adapter is defined by the service provider interface (SPI). The SPI API
addresses the connection management, transaction management and the security
management.
Connection management enables application components to connect to an EIS and
leverage any connection pooling provided by the application server.
Transaction management enables an application server to use a transaction manager to
manage transactions across multiple resource managers. Security management
provides authentication, authorization, and secure communication between the J2EE
server and the EIS.
Lifecycle management contracts enable an application server to initialize a resource
adapter instance during the deployment of the adapter or application server startup.
In addition, it enables the application server to notify the resource adapter instance
during server shutdown or undeployment of the adapter.

Configuring the J2CA 1.5 IMS/TM Adapter
2-2 Oracle Application Server Adapter for IMS/TM User’s Guide
The lifecycle contract provides the mechanism for the application server to manage the
lifecycle of the resource adapter instance.
Work management contracts enable the resource adapter to carry out its logic by using
threads dispatched by an application server, rather than creating threads on its own.
The handshake is done through a Work instance submission. This makes the
application server threads management more efficient, providing better control over
their execution contexts (like security and transaction).
Configuring the J2CA 1.5 IMS/TM Adapter
To connect to the J2CA 1.5 IMS/TM adapter under Oracle Application Server, perform
the following steps:
1. Edit the oc4j-ra.xml file, which is located at the following path:
root\j2ee\home\application-deployment\default\oracle\oc4j-ra.xml
Where root is the Oracle Application Server root directory.
2. Set the following settings for each connection:
<oc4j-connector-factories>
<connector-factory location=" " connector-name="Oracle Legacy Adapter">
<config-property name="userName" value=" "/>
<config-property name="password" value=" "/>
<config-property name="eisName" value=" "/>
<config-property name="serverName" value=" "/>
<config-property name="workspace" value=" "/>
<config-property name="portNumber" value=" "/>
<config-property name="persistentConnection" value=" "/>
<config-property name="keepAlive" value=" "/>
<config-property name="firewallProtocol" value=""/>
<config-property name="connectTimeout" value=""/>
<config-property name="encryptionProtocol" value=""/>
<config-property name="encryptionKeyName" value=""/>
<config-property name="encryptionKeyValue" value=""/>
</connector-factory>
</oc4j-connector-factories>
The following table lists the properties that must be specified, and optional
properties:
See Also: Oracle Application Server Adapter Concepts Guide, Oracle
Application Server Containers for J2EE User’s Guide, Oracle Application Server
Containers for J2EE Services Guide, and Oracle Application Server Containers for
J2EE Security Guide.
Table 2–1 OC4J Connection Properties
Property Description
location Specifies the JNDI location where Oracle Application Server
should bind the connection factory instance for application
components.
eisName Sets the name of the adapter to use. The adapter is defined in the
Oracle Connect server using Oracle Studio, as described in
"Setting Up an Oracle Connect Adapter" on page 6-19.

Using the CCI API to Develop Applications
Integrating OracleAS Adapter for IMS/TM with OC4J 2-3
Using the CCI API to Develop Applications
You can develop applications to run adapter interactions using the Common Client
Interface (CCI) API.
Perform the following steps to use the CCI API with the J2CA 1.5 IMS/TM adapter:
1. Select a ConnectionFactory for the J2CA 1.5 IMS/TM adapter.
serverName Sets the TCP/IP address or host name where the Oracle Connect
daemon is running. The daemon runs on the computer specified
at the beginning of "Setting Up the IBM OS/390 or z/OS Platform
in Oracle Studio" on page 6-14.
See Also: Appendix C, "Advanced Tuning of the Daemon" for
details about the daemon.
workspace Specifies the name of an Oracle Connect server workspace to use.
The default workspace is Navigator.
See Also: "Workspaces" on page C-7 for details about workspaces.
portNumber Specifies the TCP/IP port where the Oracle Connect daemon is
running on the server. The default port is 2552.
userName
(optional)
Specifies a user who can access the Oracle Connect server. The
user is defined in the Oracle Connect daemon configuration.
See Also: "Daemon Security" on page C-5 and "WS Security" on
page C-16 for details about users allowed to access an Oracle
Connect server.
password
(optional)
Specifies a valid password for the user..
persistentConnecti
on
(optional)
Set to true or false. When set to true, connections can persist
across multiple requests or connection context changes. It is
recommended to set this property to true.
keepAlive
(optional)
Set to true or false. When set to true, the socket used for the
connection is always kept open. It is recommended to set this
property to true.
firewallProtocol
(optional)
Specifies the firewall protocol used: either none or fixedNat (the
Nat protocol using a fixed address for the daemon). The default
value is none.
connectTimeout
(optional)
Specifies the connection timeout in seconds. The default is 0,
meaning that there is no connection timeout.
encryptionProtocol
(optional)
Specifies the name of encryption protocol to use. The default is
null. The RC4 protocol is supported.
encryptionKeyName
(optional)
Specifies the name of the symmetric encryption key to use.
encryptionKeyValue
(optional)
Specifies the value of the symmetric encryption key to use.
fakeXa Set to true of false. When set to true, the XA APIs are
internally converted to local transaction APIs.
Table 2–1 (Cont.) OC4J Connection Properties
Property Description

Configuring Multiple Adapters
2-4 Oracle Application Server Adapter for IMS/TM User’s Guide
2. Create a Connection object using the selected ConnectionFactory. A
Connection is a handle to the underlying network connection to the EIS, which
is identified in the oc4j-ra.xml file by the serverName property.
3. Create a Connection object using the selected ConnectionFactory. Specify
the interaction properties using an AttuInteractionSpec object. The
AttuInteractionSpec object has the following format:
AttuInteractionSpec(java.lang.String name, int verb, int timeOut)
The following table describes the properties that can be specified:
The following is an InteractionSpec sample:
AttuInteractionSpec iSpeq = new AttuInteractionSpec("query",
javax.resource.cci.InteractionSpec.SYNC_RECEIVE, 60
);
javax.resource.cci.RecordFactory rf = new AttuRecordFactory(con,
mcf.getLogger());
javax.resource.cci.MappedRecord queryRecord = rf.createMappedRecord("query"),
queryRecord.put("##text", "select * from disam:nation");
javax.resource.cci.Record oRec = interaction.execute(iSpec, queryRecord);
4. Invoke the execute method on the interaction to initiate a call to the EIS. Pass
any data for the interaction as input and output records.
5. Once the interactions have been processed, close the Interaction and
Connection objects.
Configuring Multiple Adapters
Each J2CA 1.5 IMS/TM adapter requires an entry in the oc4j-ra.xml file as
described in on page 2-2.
Updating Configuration Information
You can change the configuration settings for a resource adapter by editing the
relevant connector-factory entry in the oc4j-ra.xml file. For these changes to
take effect, you need to stop and restart Oracle Application Server.
Table 2–2 Interaction Spec Properties
Property Description
name Specifies the interaction name to be executed.
verb Specifies the mode for the interaction: SYNC_SEND, SYNC_
SEND_RECEIVE, or SYNC_RECEIVE.
timeOut Specifies the time (in milliseconds) to wait for an EIS to
run the specified interaction.
See Also: Oracle Application Server Adapter Concepts Guide

Troubleshooting OracleAS Adapter for IMS/TM 3-1
3
Troubleshooting OracleAS Adapter for
IMS/TM
Troubleshooting Oracle AS Adapter for IMS/TM involves checking various definitions
and properties in Oracle Connect, including daemon status, workspace options, server
parameters, and various system logs.
This section contains the following topics:
■Troubleshooting the Daemon
■Resolving Communication Errors
■Resolving Specific Errors
Troubleshooting the Daemon
Troubleshooting the daemon and the communication between Oracle Application
Server and OracleAS Adapter for IMS/TM is performed using Oracle Studio. It is used
to monitor the daemon and server activity and control what happens to the daemon
and server processes.
This section contains the following topics:
■Starting the Daemon
■Shutting Down the Daemon
■Monitoring the Daemon During Run Time
■Daemon Logs
Starting the Daemon
The daemon is started when OracleAS Adapter for IMS/TM is installed. In case you
have shut down the daemon, as described in "Shutting Down the Daemon" on
page 3-2, you can restart the daemon as described in the following task.
See Also: Appendix C, "Advanced Tuning of the Daemon" for
details about the configuration settings.
Note: The daemon is started on the IBM OS/390 or z/OS
platform. It cannot be started remotely using Oracle Studio.

Troubleshooting the Daemon
3-2 Oracle Application Server Adapter for IMS/TM User’s Guide
Task: Starting the Daemon
Activate INSTROOT.USERLIB(ATTDAEMN) as a started task to invoke the daemon.
For example, in the SDSF screen enter the following:
'/s ATTDAEMN'
WhereINSTROOT is the high-level qualifier where Oracle Connect is installed.
Shutting Down the Daemon
To shut down the daemon, use Oracle Studio, as follows:
1. From the Start menu, select Programs, Oracle, and then select Studio.
2. Select the required computer in the Configuration Explorer.
3. Right-click the computer and select Open Runtime Perspective.
4. In the Runtime Explorer, right-click the computer, and select Shutdown Daemon.
Monitoring the Daemon During Run Time
Use the Runtime Manager perspective of Oracle Studio to monitor the daemon during
run time.
1. From the Start menu, select Programs, Oracle, and then select Studio.
2. Right-click the required computer in the Configuration Explorer and select Open
Runtime Perspective.
You can manage the daemon by expanding the relevant node, daemon, workspace or
server process, and choosing the relevant option, as described in the following
sections.
Daemon (Computer) Options
Right-click the daemon to display the options available for it, including the ability to
display the daemon log.
The following table lists the avaiable options:
See Also: "Starting the Daemon" on page 6-10 for details about
the ATTDAEMN JCL.
Table 3–1 Daemon Options
Option Description
Edit Daemon
Configuration
Opens the daemon editor, enabling you to reconfigure the
daemon.
See Also: Appendix C, "Advanced Tuning of the Daemon"
for details about the configuration settings.
Status Checks the status of the daemon. The information about
the daemon includes the daemon name, configuration
used, the active client sessions, and logging information.
Reload Configuration Reloads the configuration after any changes. Any servers
currently started are not affected by the changed
configuration.
See Also: Appendix C, "Advanced Tuning of the Daemon"
for details about the configuration settings.

Troubleshooting the Daemon
Troubleshooting OracleAS Adapter for IMS/TM 3-3
Workspace Options
Right-click a workspace to display the options available for the workspace, including
the ability to display the workspace log.
The following table lists the available options:
View Log Displays the daemon log. For details see "Daemon Logs"
on page 3-4.
View Events Displays the daemon events log.
Daemon Properties Displays information about the computer where the
daemon is running, such as the physical address and any
username and password needed to access the computer.
Shutdown Daemon Shuts down the daemon on the computer.
Recycle servers Closes all unused servers and prepares all active servers to
close when the client disconnects. New connection
requests are allocated with new servers.
Kill servers Immediately closes all active and unused servers.
Note: It is recommended to use this option with caution,
as it may lead to data loss.
Rename Enables to change the name of the daemon displayed in
the Runtime Explorer.
Remove Removes the daemon from the Runtime Explorer.
Refresh Refreshes the display.
Table 3–2 Workspace Options
Option Description
Edit Workspace
Configuration
Opens the daemon editor to enable you to reconfigure the
workspace.
See Also: Appendix C, "Advanced Tuning of the Daemon"
for details about the configuration settings.
Status Checks the status of the workspace, whether it is available
or not.
View Log Displays the log for all servers for the workspace. For
details see "Daemon Logs" on page 3-4.
View Events Displays the workspace events log.
Recycle Servers Closes all unused servers and prepares all active servers to
close when the client disconnects. New connection
requests are allocated with new servers.
Kill Servers Immediately closes all active and unused servers.
Note: It is recommended to use this option with caution,
as it may lead to data loss.
Remove Removes the selected workspace from the Runtime
Explorer.
Disable Disables the selected workspace.
Refresh Refreshes the display.
Table 3–1 (Cont.) Daemon Options
Option Description
Troubleshooting the Daemon
3-4 Oracle Application Server Adapter for IMS/TM User’s Guide
Server Options
Right-click a server to display the options available for the server, including the ability
to display the server log.
The following table lists the available options:
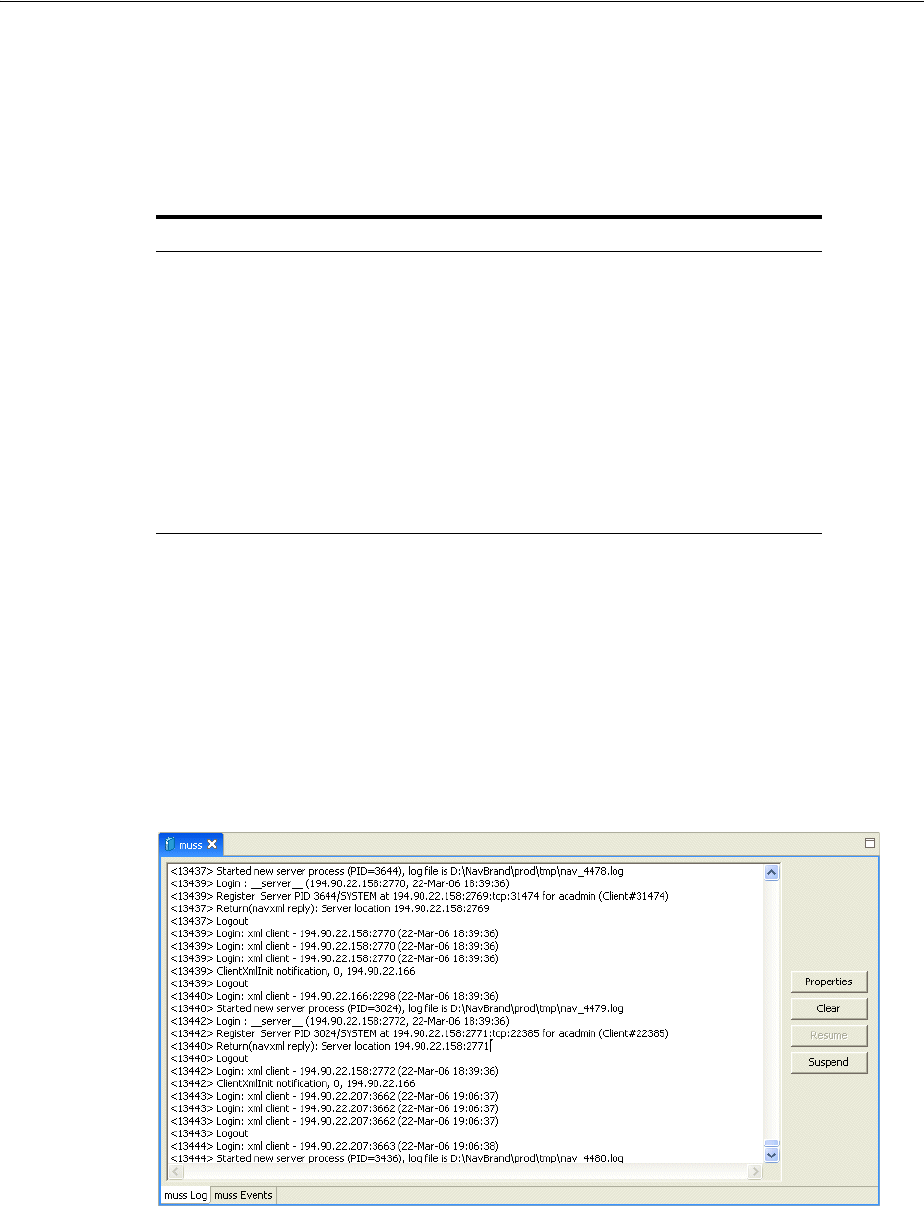
Daemon Logs
Oracle Connect produces a number of logs that you can use to troubleshoot problems.
The daemon manages the following logs:
■The daemon log
■The workspace log
■The server process log
The Runtime Manager perspective of Oracle Studio provides a monitor for these logs,
as shown in the following figure:
Display the required log by right-clicking the level you want (daemon, workspace or
server) and selecting View Log. Each log is displayed in a different tab. You can flick
between logs by clicking the required tab.
Table 3–3 Server Options
Option Description
Status Checks the status of the server. The information about the
server includes the server mode and the number of active
client sessions for the server.
View Log Displays the server log. For details see "Daemon Logs" on
page 3-4.
View Events Displays the the server events log.
Kill server Ends the server process, regardless of its activity status.
Note: It is recommended to use this option with caution,
as it may lead to data loss.
Refresh Refreshes the display.

Resolving Communication Errors
Troubleshooting OracleAS Adapter for IMS/TM 3-5
The Daemon Log Monitor
The daemon log displays activity between clients and the daemon, including clients
logging in and logging out from the daemon. You can change the level of logging by
clicking Properties. The following levels of logging are available:
■none: The log displays who has logged in and out from the daemon.
■error: The log displays who has logged in and out from the daemon and any
errors that have been generated.
■debug: The log displays who has logged in and out from the daemon, any errors
that have been generated, and any tracing that has been specified in the daemon
configuration.
The Workspace Log Monitor
The workspace log displays information about the workspace being used by the client.
You can change the level of logging by clicking Properties. The following levels of
logging are available:
■none: The log displays who has connected and disconnected from the server
process.
■error: The log displays who has connected and disconnected from the server
process and any errors that have been generated.
■debug: The log displays who has connected and disconnected from the server
process, any errors that have been generated, and any tracing that has been
specified in the daemon configuration.
The Server Log Monitor
The server log displays activity between clients and the server process used by that
client to handle the client request. You can change the level of logging by clicking
Properties. The following levels of logging are available:
■none: The log displays who has connected and disconnected from the server
process.
■error: The log displays who has connected and disconnected from the server
process and any errors that have been generated.
■debug: The log displays who has connected and disconnected from the server
process, any errors that have been generated, and any tracing that has been
specified in the daemon configuration.
Resolving Communication Errors
When Oracle Studio disconnects from the IBM OS/390 or z/OS computer, the
computer is displayed in Oracle Studio with an X in a red circle. If this situation
occurs, try to access the computer later.
The following table describes the various scenarios that may exist when OracleAS
disconnects from the IBM OS/390 or z/OS computer.
See Also: "Daemon Logging" on page C-3.
See Also: "WS Logging" on page C-13.
See Also: "WS Logging" on page C-13.
Resolving Specific Errors
3-6 Oracle Application Server Adapter for IMS/TM User’s Guide
To troubleshoot client/server communication problems, you need to be familiar with
the following:
■Daemon configuration settings.
■Oracle Connect security.
■TCP/IP subsystem. OracleAS Adapter for IMS/TM uses TPC/IP for internal
intermachine communications.
■System details, such as the account name and password of the administrator
account, the IP address of the computers involved and whether a portmapper is
being used.
Resolving Specific Errors
The following error messages relate to errors received from Oracle Connect.
C007: Server initialization failed.
Cause: The daemon failed to start its network service.
Action: Check the processes being run on the system to see whether another
daemon or program is using the port specified in the oc4j-ra.xml file for the
adapter.
Action: Check the TCP/IP subsystem on the current computer by trying to ping it
or run FTP or Telnet to or from it.
Action: Check whether the daemon has privileges to use the TCP/IP services on
the current computer with the port specified in the oc4j-ra.xml file for the
adapter.
C008: Setting server event handler failed.
Cause: Internal error.
Action: Contact Oracle Support Services.
Table 3–4 Scenarios When a Client Is Disconnected
Scenario
Idle (Not Processing a Client
Request) Processing a Client Request
Explicit Disconnect
(client explicitly
closes connection
or client program
terminates)
The server is immediately notified of
the disconnect and either becomes
available for use by another client or
terminates (if it is not reusable).
The server does not know that the client has
disconnected and continues processing. When
processing completes, the server tries to reply to
the client and immediately gets an error that the
connection was lost. The server either becomes
available for use by another client or terminates (if
it is not reusable).
Abrupt Disconnect
(client closed
without proper
shutdown or client
system hanged
and
communication
disconnected)
The server does not know that the
client has disconnected and remains
in the idle state.
After timing out based on whichever
comes first of the value for the client
idle timeout daemon workspace
parameter or the TCP/IP KEEPALIVE
parameter, the server is notified of the
disconnect and either becomes
available for use by another client or
terminates (if it is not reusable).
The server does not know that the client has
disconnected and continues processing. When
processing completes, the server tries to reply to
the client. After an interval (typically several
minutes, depending on the TCP/IP configuration),
during which the TCP/IP subsystem retries
sending the message to the client, the server
assumes that the client has terminated and notifies
the server that the connection has been closed. The
server either becomes available for use by another
client or terminates (if it is not reusable).

Resolving Specific Errors
Troubleshooting OracleAS Adapter for IMS/TM 3-7
C009: IRPCD process has been terminated by user request.
Cause: This message is informational only. The daemon successfully shut down.
Action: No action required.
C00A: Application %s not found.
Cause: The requested workspace does not exist.
Action: Check that the workspace defined in the oc4j-ra.xml file is also
defined in the daemon configuration on the IBM OS/390 or z/OS platform. Use
the Status option in the Runtime Manager perspective.
C00B: Invalid IRPCD client context.
Cause: A non-Oracle Connect program is trying to connect to the daemon.
Action: Check the processes and kill the relevant process with a system
command.
C00C: Daemon request requires a server login.
Cause: A non-Oracle Connect server or program was trying to use a daemon
service reserved for Oracle Connect servers.
Action: Check the processes and kill the relevant process with a system
command.
C00D: Daemon request requires a client login.
Cause: The requested daemon requires a valid client login, which was not
supplied.
Action: Reissue the command and specify a username and password.
Action: Edit the user profile in Oracle Studio to specify a valid username and
password for the IBM OS/390 or z/OS platform.
C00E: Daemon request requires an administrator login.
Cause: The requested daemon service requires an administrative login.
Action: Edit the daemon security in Oracle Studio to specify a valid administrator
username and password.
C00F: Anonymous client logins are not allowed.
Cause: The daemon is configured to require a valid username and password,
which were not supplied.
Action: Enable anonymous client access in daemon security in Oracle Studio.
Action: Edit the user profile in Oracle Studio to specify a valid username and
password for the IBM OS/390 or z/OS platform.
See Also: "Setting Up Run-time User Access to the IBM OS/390
or z/OS Platform" on page 6-18.
See Also: "Daemon Security" on page C-5.
See Also: "Daemon Security" on page C-5.
See Also: "Setting Up Run-time User Access to the IBM OS/390
or z/OS Platform" on page 6-18.

Resolving Specific Errors
3-8 Oracle Application Server Adapter for IMS/TM User’s Guide
C010: Anonymous server logins are not allowed.
Cause: Internal error.
Action: Contact Oracle Support Services.
C011: Client has already timed out.
Cause: A server process was started on behalf of a client and the client has timed
out before the server completed its startup.
Action: Increase the Connect timeout value for the server workspace in the WS
Info. section of the daemon configuration.
C012: Invalid username/password.
Cause: Invalid username/password supplied when logging on to the daemon.
Action: See the daemon log file for the reason that the username/password were
not accepted.
Action: Edit the user profile in Oracle Studio to specify a valid username and
password for the IBM OS/390 or z/OS platform.
Action: Make sure the daemon is started from an APF-authorized account that is
allowed to check for system usernames and passwords.
C014: Client connection limit reached - try later.
Cause: The maximum number of server processes for the workspace has been
reached, and none of the active servers could accept the client connection.
Action: Increase the value of the Number of sub-tasks in the WS Server
section of the daemon configuration.
Action: Try running the command later.
C015: Failed to start server process.
Cause: The Oracle Connect daemon failed to start a server process or the started
server failed upon starting up.
Action: See the daemon and server logs for the reason the server did not start. For
example, you might receive an message with a reason specified in the log file
similar to the following: [C015] Failed to start NAVIGATOR server
process: No server account name defined for anonymous client;
code: -1601: SQL code: 0
Action: If you use impersonation, check the user profile on the client. Also see
C069.
See Also: "WS Info." on page C-7.
See Also: "Setting Up Run-time User Access to the IBM OS/390
or z/OS Platform" on page 6-18.
See Also: "WS Server" on page C-9.

Resolving Specific Errors
Troubleshooting OracleAS Adapter for IMS/TM 3-9
C016: Unexpected server state.
Cause: Internal error.
Action: Contact Oracle Support Services.
C017: Active daemon clients exist. Shutdown canceled.
Cause: One or more clients are still connected to the daemon.
Action: Wait until all the clients log off the daemon and then retry the shutdown
operation.
C019: Request is not granted because someone else is locking it.
Cause: A request to lock a resource managed by the daemon was denied because
another user has locked the resource.
Action: Wait for the other user to release the resource.
C01A: Lock %s not found.
Cause: A request to free a resource was denied because the caller did not lock that
resource (for example, another user shut down the daemon you are working with).
Action: Contact Oracle Support Services.
C01B: Unexpected error in %s.
Cause: Internal error.
Action: Contact Oracle Support Services.
C01C: Cannot update configuration without _APPLICATIONS lock.
Cause: Internal error.
Action: Contact Oracle Support Services.
C01D: Need to lock the application first.
Cause: Internal error.
Action: Contact Oracle Support Services.
C01F: Cannot set configuration of a deleted application.
Cause: Internal error.
Action: Contact Oracle Support Services.
C020: Failed in looking up host name (gethostname())
Cause: Cannot connect to the remote computer.
Action: Check that the name specified for the computer in the oc4j-ra.xml file
is correct.
Action: Check that a domain name server (DNS) is available to look up the host
name.
To set impersonation: APF authorize all the steplibs in the server
script on OS/390 computer.
In the WS Security tab of the Navigator workspace under the
daemon node in the Configuration Explorer, check the Use specific
workspace account and clear the Workspace account field of all
values.

Resolving Specific Errors
3-10 Oracle Application Server Adapter for IMS/TM User’s Guide
Action: Check the TCP/IP subsystem on the computer by trying to ping it or run
FTP or Telnet to or from it.
C021: Required variable %s not found
Cause: An environment variable required by the Oracle Connect server was not
defined when the server started up.
Action: Check whether the startup script makes any changes to the environment
variables used by Oracle Connect.
Action: Check whether the system-defined environment size is sufficiently large
for Oracle Connect.
C022: Server failed to connect and register with the daemon.
Cause: An Oracle Connect server started by the daemon was not able to connect
or register back with the daemon.
Action: Try to connect again.
Action: Increase the Connect timeout value for the server workspace in the WS
Info. section of the daemon configuration.
Action: Check that the startup script for the workspace launches the correct
version of Oracle Connect.
Action: Increase the value of the Set maximum number of servers and/or
Maximum parameter for the Clients per server limit in the WS Server
section of the daemon configuration.
C023: Call made to unregistered module %d.
Cause: Internal error.
Action: Contact Oracle Support Services.
C024: Failed to create a socket.
Cause: An error occurred within the TCP/IP subsystem.
Action: Check whether you have sufficient system privileges.
Action: Check the TCP/IP subsystem on the computer by trying to ping it or run
FTP or Telnet to or from it.
C025: Failed to set socket option %s
Cause: An error occurred within the TCP/IP subsystem.
Action: Check whether you have sufficient system privileges.
Action: Check the TCP/IP subsystem on the computer by trying to ping it or run
FTP or Telnet to or from it.
C026: Failed to bind server to port %s
Cause: An Oracle Connect server or daemon was not able to bind to the specified
port.
Action: Check whether another program is holding the port that was specified in
the oc4j-ra-xml file for the adapter.
See Also: "WS Info." on page C-7.
See Also: "WS Server" on page C-9.

Resolving Specific Errors
Troubleshooting OracleAS Adapter for IMS/TM 3-11
Action: Check whether you have sufficient system privileges.
C027: Cannot create TCP service for %s
Cause: An error occurred within the TCP/IP subsystem
Action: Check the TCP/IP subsystem on the computer by trying to ping it or run
FTP or Telnet to or from it.
C028: Unable to register (%s, %d, tcp)
Cause: This error may happen when a portmapper is used (host:a) but the
portmapper is not available.
Action: Enable the portmapper.
Action: Avoid using the portmapper (by not using :a when starting the daemon).
C029: Failed to create a server thread
Cause: Internal error.
Action: Contact Oracle Support Services.
C02A: Server thread failed to start
Cause: Internal error.
Action: Contact Oracle Support Services.
C02B: Stopping the %s server - no client
Cause: A server that was started by the Oracle Connect daemon to service a client
did not get a client connection request within one minute. The server terminates.
Action: In most cases, the client was terminated by a user request, so no specific
action is required.
Action: If no client can connect to the server, it may be that the server has multiple
network cards and the Oracle Connect daemon is not aware of this. In this case,
start the daemon with an IP address.
C02C: Unexpected event - a termination signal intercepted
Cause: Internal error.
Action: Contact Oracle Support Services.
C02D: Modified transport, context unknown/lost
Cause: Internal error.
Action: Contact Oracle Support Services.
C02F: Corrupted arguments passed to procedure
Cause: Internal error.
Action: Contact Oracle Support Services.
C030: Unable to free arguments for %s() of %s
Cause: Internal error.
Action: Contact Oracle Support Services.
C031: Cannot register a non-module RPC %s
Cause: Internal error.
Action: Contact Oracle Support Services.

Resolving Specific Errors
3-12 Oracle Application Server Adapter for IMS/TM User’s Guide
C032: An IRPCD program is required
Cause: Internal error.
Action: Contact Oracle Support Services.
C033: An IRPCD super-server is required for module events
Cause: Internal error.
Action: Contact Oracle Support Services.
C034: An invalid super-server module ID was specified, %d
Cause: Internal error.
Action: Contact Oracle Support Services.
C035: Out of memory
Cause: Not enough memory to service a client request.
Action: Increase process memory quota or add memory to the system.
C036: Failed to register RPC procedure module %s
Cause: Internal error.
Action: Contact Oracle Support Services.
C037: Failed to register an invalid RPC procedure number %x
Cause: Internal error.
Action: Contact Oracle Support Services.
C038: Cannot re-register RPC procedure number %x
Cause: Internal error.
Action: Contact Oracle Support Services.
C042: Remote call to %s failed; %s
Cause: Remote call to API failed.
Action: Check the daemon log file.
Action: If necessary, change the level of detail written to the log file to help
resolve the problem.
C043: Failed to connect to host %s;%s
Cause: The remote host is not correctly defined to Oracle Connect or is not
working.
Action: Check the remote computer definition in the oc4j-ra.xml file for the
adapter.
Action: Check that the daemon is up on the IBM OS/390 or z/OS platform. Use
the Status option in the Runtime Manager perspective.
Action: Check the network connection by trying to ping the host computer or run
FTP or Telnet to or from it.
C045: Failed to create a service thread
Cause: The server failed to create a thread to service a client request.
See Also: "Daemon Logging" on page C-3.

Resolving Specific Errors
Troubleshooting OracleAS Adapter for IMS/TM 3-13
Action: A system or process quota limit has been exceeded. Either increase the
quota or lower the Clients per server limit field value in the WS Info. section of
the daemon configuration.
C047: %s out of memory
Cause: Not enough memory was available to Oracle Connect to complete a
requested operation.
Action: Terminate unnecessary processes running on the server.
Action: Add more memory to the system.
Action: Allow the process to use more memory.
Action: Limit the number of processes the daemon may start. If the demand for
servers exceeds the number of available servers, clients get a message telling them
the maximum number of servers has been reached and asking them to try again
later.
C066: Communication error with the server%s
Cause: Connection to the Oracle Connect daemon or server failed, or an
established session with a server has failed.
Action: Check the remote computer definition in the oc4j-ra-xml file.
Action: Check that the daemon is up on the IBM OS/390 or z/OS platform. Use
the Status option in the Runtime Manager perspective.
Action: In case of a network problem, check the network connection by trying to
ping the host computer or run FTP or Telnet to or from it.
C067: Unexpected error occurred in server function %s
Cause: One of the server functions has exited with an exception, such as an
Abend, or Invalid Instruction.
Action: Contact Oracle Support Services.
C068: Fail to login daemon
Cause: The daemon is not running on the server computer.
Action: Use the Status in Oracle Studio Runtime Manager perspective to check
whether a daemon is running on the server
Action: Have the system administrator reinstall Oracle Connect on the server.
C069: Fail to get server
Cause: The Oracle Connect daemon on the server computer could not start a
server process to serve the client. A separate message provides more detail on why
the server process could not start.
Action: There are many possible causes of this error. If the cause is not clear from
the related message, see the Oracle Connect daemon log file on the server
Action: The resolution to this error is highly dependent on the particular cause.
The following are some typical causes and resolutions.
Action: Some process creation quota was exceeded. Either try again later or
increase the quota or the other relevant system resources.
See Also: "WS Info." on page C-7.

Resolving Specific Errors
3-14 Oracle Application Server Adapter for IMS/TM User’s Guide
Action: The server startup script failed.
Action: The username given is not allowed to use the requested server. Use an
authorized username.
Action: A limit on concurrent clients for a server has been reached. Try again later.
Action: If you use impersonation, then check the user profile on the client. Also
see C015.
C06A: Failed to connect to server
Cause: The server assigned to the client did not accept the client connection. A
separate message provides more detail about why the server process did not
accept the connection.
Action: See the daemon and server log files for the reason that the server was not
available to accept its assigned client.
C06B: Disconnecting from server
Cause: A network failure, server failure or server program failure caused the
connection to stop. The currently active transaction is stopped as well.
Action: Oracle Connect automatically tries to reestablish a connection with a
server upon the next SQL command issued against the server. Once the network
or computer failure is corrected, the connection to the daemon is reestablished
automatically.
C070: Server failed to send reply to the client
Cause: Server terminated unexpectedly.
Action: Unless the client was intentionally stopped (for example, using
Control-C), contact Oracle Support Services.
C071: Connection to server %s was disconnected. Cursors state was lost.
Cause: Either a network failure, server failure, or a server program failure caused
the connection to stop. The currently active transaction is stopped as well.
Action: Normally, Oracle Connect automatically tries to create a new session with
the server upon the next attempt to access the server. If the network and server are
accessible, the next operation should succeed. Otherwise, the network or server
should be fixed before connection can be resumed.
Action: In case of a server crash not related to callable user code, contact Oracle
Support Services.
C072: Reconnect to server %s
Cause: This is an informational message only. The client has reestablished its
connection with the server.
Action: No action is required.
C073: The parameters passed to the admin server are invalid: %s
Cause: Internal error.
Action: Contact Oracle Support Services.
C074: No authorization to perform the requested operation (%s)
Cause: User/account has insufficient privileges.

Resolving Specific Errors
Troubleshooting OracleAS Adapter for IMS/TM 3-15
Action: Grant administrative privileges to the user/account using the
Administrator parameter of the Daemon Security or WS Security sections in the
daemon configuration.
C075: Failed to register daemon in the TCP/IP service table
Cause: Registration of the daemon in the TCP/IP services file has failed.
Action: Check that the account running the daemon has the permissions to
update the TCP/IP services file.
E001: Failed in lock/release operation
Cause: A lock or release operation of a global resource has failed. A separate
message provides more details. The separate message specifies the cause of this
error.
Action: There are various causes for this error, including lack of sufficient
privileges or a system resource shortage.
J0006: Operation on already closed connection was requested
Cause: A request using a connection that was closed was attempted.
Action: Reopen the connection and try again.
J0028: Internal Error: Unknown XML tag %s
Cause: Internal error.
Action: Contact Oracle Support Services.
J0030: Internal Error: Method %s needs to be overwritten
Cause: Internal error.
Action: Contact Oracle Support Services.
J0031: Internal Error: Required attribute %s not found in %s verb
Cause: Internal error.
Action: Contact Oracle Support Services.
J0032: Internal Error: %s ACP object was returned instead of %s as expected
Cause: Internal error.
Action: Contact Oracle Support Services.
J0033: Internal Error: Attempt to work with closed socket
Cause: Internal error.
Action: Contact Oracle Support Services.
J0034: Internal Error: corrupted message; %s bytes read instead of %s as expected
Cause: XML sent from the client to the server has become corrupted.
Action: Check compression settings for XML transferred from the client to the
server. If the setting are correct, retry sending the request from the client to the
server.
J0035: Internal Error: Invalid redirection address %s returned by daemon
Cause: Internal error.
Action: Contact Oracle Support Services.
See Also: "Daemon Security" on page C-5 or "WS Security" on
page C-16.

Resolving Specific Errors
3-16 Oracle Application Server Adapter for IMS/TM User’s Guide
J0036: %s: %s
Cause: One of the following errors was received from the server: 0 -
server.internalError, 1 - client.xmlError, 2 - client.requestError, 3 -
client.noActiveConnection, 4 - server.resourceLimit, 5 - server.redirect, 6 -
client.noSuchResource, 7 - client.authenticationError, 8 - client.noSuchInteraction,
9 - client.noSuchConnection, 10 - server.notImplemented, 11 -
server.xaProtocolError, 12 - server.xaUnknownXID, 13 - server.xaDuplicateXID, 14
- server.xaInvalidArgument, 15 - client.autogenRejected, 16 -
server.xaTransactionTooFresh, 17 - server.resourceNotAvailable, 18 -
client.authorizationError, 19 - server.configurationError
Action: Review the server log file to determine the problem.
J0037: Internal Error: No ACP response when %s was expected
Cause: Internal error.
Action: Contact Oracle Support Services.
J0039: Internal Error: ACP root is not found in the XML
Cause: Internal error.
Action: Contact Oracle Support Services.
J0040: Internal Error: Input record is required for interaction %s execution
Cause: Internal error.
Action: Contact Oracle Support Services.
J0048: Invalid metadata type %s is passed to %s function
Cause: A request for metadata was not fulfilled.
Action: Check the validity of the request.
J0050: Key of the put method must be of type string
Cause: In either a GET or PUT operation, the key must be a string.
Action: Change the key used in the operation to a valid key.
J0059: Value %s is invalid for attribute %s
Cause: A request for metadata was not fulfilled.
Action: Check the validity of the request.
J0068: Value must be of type string
Cause: In a PUT operation, the value must be a string.
Action: Change the value used in the operation to a valid value.
J0069: Value must be of type MappedRecord
Cause: In a PUT operation, the value must be a mapped record.
Action: Change the value used in the operation to a valid value.
J0070: Value must be of type MappedRecord[]
Cause: In a PUT operation, the value must be mapped record array.
Action: Change the value used in the operation to a valid value.
J0071: Bad key for mapped record, #element or #element[] is required
Cause: In a PUT operation, the value must be mapped record array.
Action: Change the key used in the record to a valid key.

Resolving Specific Errors
Troubleshooting OracleAS Adapter for IMS/TM 3-17
J0072: Value must be of type Object[]
Cause: In a PUT operation, the value must be mapped record array.
Action: Change the value used in the operation to a valid value.
J0078: In nonpersistent connection and non keep alive encryption is not supported -
ignored
Cause: Encryption is not supported for nonpersistent connections.
Action: There is no action to take. This warning can be ignored.
J0079: Invalid argument passed to %s - Argument: %s, Value: %s
Cause: The value pass.
Action: Change the argument used to a number.

Resolving Specific Errors
3-18 Oracle Application Server Adapter for IMS/TM User’s Guide

Integrating OracleAS Adapters for IMS/TM with Oracle BPEL Process Manager 4-1
4
Integrating OracleAS Adapters for IMS/TM
with Oracle BPEL Process Manager
To deploy and integrate OracleAS Adapters for IMS/TM with Oracle BPEL Process
Manager, you need to configure BPEL Process Manager.
This section includes the following topics:
■Overview of Integrating OracleAS Adapters for IMS/TM with Oracle BPEL
Process Manager
■Configuring Oracle BPEL Process Manager to interact with the OracleAS Adapter
for IMS/TM
Overview of Integrating OracleAS Adapters for IMS/TM with Oracle BPEL
Process Manager
Oracle BPEL Process Manager provides a comprehensive solution for creating,
deploying, and managing BPEL business processes. Oracle BPEL Process Manager is
based on the Service Oriented Architecture (SOA) to provide enterprises with
flexibility, interoperability, reusability, extensibility, and rapid implementation of Web
services and business processes. It reduces the overall costs of management,
modification, extension, and redeployment of existing business processes. Each
business activity is a self-contained, self-describing, and modular application whose
interface is defined by the WSDL, and the business process is modeled as a Web
Service.
A Web Service is first published and then composed or orchestrated into business
flows. Publishing a service is implemented by taking a function within an existing
application or system and making it available in a standard way, while orchestration is
implemented by composing multiple services into an end-to-end business process. The
interactions that are defined as part of the configuration of the OracleAS Adapter for
IMS/TM are integrated into the orchestration as PartnerLinks. Every PartnerLink is
linked to a WSDL that describes the Web service.
To integrating the OracleAS Adapter for IMS/TM with Oracle BPEL Process Manager,
you must perform the following tasks in the specified order:
1. Installing and Configuring OracleAS Adapter for IMS/TM
2. Integrating OracleAS Adapter for IMS/TM with OC4J
3. Configuring Oracle BPEL Process Manager to interact with the OracleAS Adapter
for IMS/TM
See Also: Oracle Application Server Adapter Concepts Guide.

Configuring Oracle BPEL Process Manager to interact with the OracleAS Adapter for IMS/TM
4-2 Oracle Application Server Adapter for IMS/TM User’s Guide
Configuring Oracle BPEL Process Manager to interact with the OracleAS
Adapter for IMS/TM
This section includes the following topics:
■Setting up the Connection to the Oracle Connect Server
■Checking Metadata Availability Using Oracle JDeveloper
■Configuring the WSDL for Outbound Applications
Setting up the Connection to the Oracle Connect Server
Perform the following steps to set up the connection to the Oracle Connect server:
1. Open the Oracle BPEL Admin window.
2. On the Server tab, on the Configuration tab, specify the following:
■LegacyServer: The IP address of the server where Oracle Connect is
installed. For a single server, the default is localhost.
■LegacyPort: The port number of the server where Oracle Connect is
installed. For a single port, the default is 2551.
3. Repeat the previous step for each Oracle Connect server to be used by Oracle
BPEL Process Manager. Use a comma as a separator between the different servers
and ports.
4. Click Apply.
5. Restart the server where Oracle BPEL Process Manager is installed.
Checking Metadata Availability Using Oracle JDeveloper
Perform the following steps to verify that the metadata of the Oracle Connect server is
available in Oracle BPEL Process Manager:
1. Open Oracle JDeveloper.
2. On the Connections tab, expand the Integration Server node to view the list of
OC4J servers.
3. Expand the node of the OC4J server on which you configured the JCA 1.5
IMS/TM adapter (see Integrating OracleAS Adapter for IMS/TM with OC4J).
4. Under the Adapters node, expand the Legacy node to view a list of the Oracle
Connect servers that you defined by using the Oracle BPEL Admin window.
5. Under the node of the Oracle Connect server whose metadata you want to check,
expand the node of the daemon (IRPCDINI) to view a list of workspaces.
6. Under the node of the workspace that contains the adapter that you want to work
with, expand the node of the relevant adapter to view a list of interactions.
7. Double-click an interaction to view the WSDL.
Configuring the WSDL for Outbound Applications
When you build an outbound application, Oracle BPEL Process Manager
automatically creates the WSDL that corresponds to the interaction. The WSDL
specifies the name of the adapter’s connection factory as the value of the
adapterInstanceJndi attribute of the <jca:address> element in the
<service> section. This name is generated automatically. You need to verify that a

Configuring Oracle BPEL Process Manager to interact with the OracleAS Adapter for IMS/TM
Integrating OracleAS Adapters for IMS/TM with Oracle BPEL Process Manager 4-3
connection factory with this name exists on the OC4J server. If it does not, you need to
create it, or change the name of the connection factory to the name of a connection
factory that exists.
The following is an example of a WSDL for outbound applications:
<?xml version = '1.0' encoding = 'UTF-8'?>
<definitions name="add" targetNamespace="http://xmlns.oracle.com/pcbpel/calc/add"
xmlns="http://schemas.xmlsoap.org/wsdl/" xmlns:legacyReq="noNamespace://calc"
xmlns:tns="http://xmlns.oracle.com/pcbpel/calc/add"
xmlns:plt="http://schemas.xmlsoap.org/ws/2003/05/partner-link/"
xmlns:jca="http://xmlns.oracle.com/pcbpel/wsdl/jca/"
xmlns:pc="http://xmlns.oracle.com/pcbpel/" xmlns:legacyRes="noNamespace://calc">
<types>
<xsd:schema xmlns:xsd="http://www.w3.org/2001/XMLSchema"
xmlns="noNamespace://calc" targetNamespace="noNamespace://calc"
elementFormDefault="qualified" attributeFormDefault="unqualified">
<xsd:element name="binput" type="binput"/>
<xsd:complexType name="binput">
<xsd:attribute name="p1" type="xsd:int"/>
<xsd:attribute name="p2" type="xsd:int"/>
</xsd:complexType>
</xsd:schema>
<xsd:schema xmlns:xsd="http://www.w3.org/2001/XMLSchema"
xmlns="noNamespace://calc" targetNamespace="noNamespace://calc"
elementFormDefault="qualified" attributeFormDefault="unqualified">
<xsd:element name="output" type="output"/>
<xsd:complexType name="output">
<xsd:attribute name="result" type="xsd:int"/>
</xsd:complexType>
</xsd:schema>
</types>
<message name="request">
<part name="input_add" element="legacyReq:binput"/>
</message>
<message name="response">
<part name="output_add" element="legacyReq:output"/>
</message>
<portType name="addPortType">
<operation name="add">
<input name="Input_add" message="tns:request"/>
<output name="Output_add" message="tns:response"/>
</operation>
</portType>
<binding name="addJCABinding" type="tns:addPortType">
<jca:binding
XMLRecordConverterCallout="oracle.tip.adapter.fw.record.attunity.AttuXMLRecordConv
erterImpl"/>
<operation name="add">
<jca:operation FunctionName="add"
InteractionSpec="com.attunity.adapter.AttuInteractionSpec"
ExecutionTimeout="120"/>
<input/>
<output/>
</operation>
</binding>
<service name="addService">
<port name="addPort" binding="tns:addJCABinding">
<jca:address adapterInstanceJndi="eis/legacy/calc"/>
</port>
</service>

Configuring Oracle BPEL Process Manager to interact with the OracleAS Adapter for IMS/TM
4-4 Oracle Application Server Adapter for IMS/TM User’s Guide
<plt:partnerLinkType name="addPartnerLinkType">
<plt:role name="addRole">
<plt:portType name="tns:addPortType"/>
</plt:role>
</plt:partnerLinkType>
/definitions>

Advanced Features of OracleAS Adapter for IMS/TM 5-1
5
Advanced Features of OracleAS Adapter for
IMS/TM
Oracle Connect includes a number of tuning parameters that can improve
performance. Specifically, the daemon can be configured to optimize communication
between the IBM OS/390 or z/OS platform and a client. In addition, the binding
environment can be tuned to optimize request handling.
This section contains the following topics:
■Configuring the Daemon for High Availability
■Configuring a Binding Environment
■Migration Considerations
■Security Considerations
■Transaction Support
Configuring the Daemon for High Availability
The daemon workspace is responsible for allocating server processes to clients. You
can configure a workspace to use a pool of server processes so that a server process is
always available for a client request. Use Oracle Studio to maintain daemon and
daemon workspace parameters to control the allocation of server processes and their
management in a pool.
You can also have a number of daemon workspace configurations. Therefore, you can
create individual workspaces for use with different adapters.
Adding a New Daemon Workspace Configuration
Use Oracle Studio to add a new daemon configuration. You can set up different
daemon configurations for different situations.
Perform the following steps to add a new daemon workspace configuration:
1. From the Start menu, select Programs, Oracle, and then select Studio.
2. In the Configuration Explorer, expand the node of the required computer.
3. Expand the Daemons node. The available daemon configurations are listed.
4. Right-click IRPCD and select New Workspace. The New Daemon Workspace
screen is displayed, as shown in the following figure:
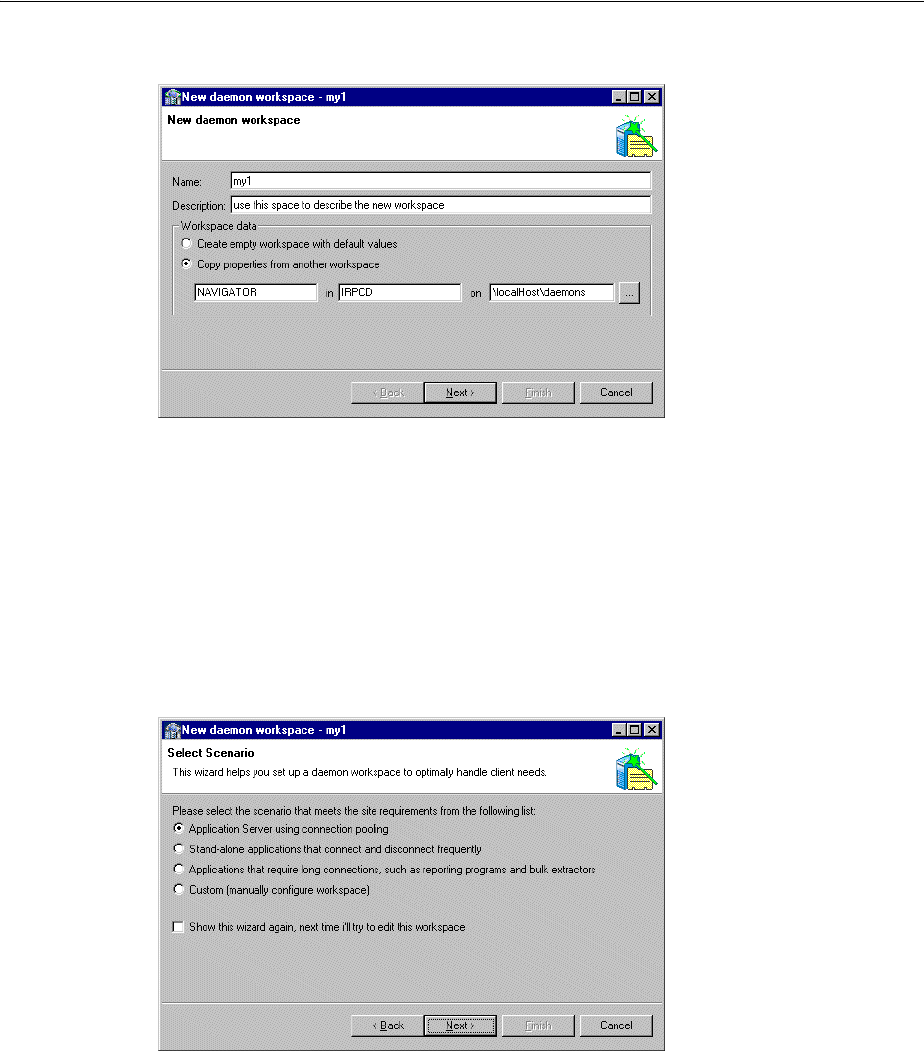
Configuring the Daemon for High Availability
5-2 Oracle Application Server Adapter for IMS/TM User’s Guide
Figure 5–1 The New Daemon Workspace screen
5. Specify a name for the new workspace and optionally provide a description.
6. Specify whether you want default settings or copy the properties of an existing
workspace.
To copy the properties of an existing workspace, click Ellipsis and select the
workspace which properties you want to copy.
7. Click Next. The Select Scenario screen is displayed, as shown in the following
figure:
Figure 5–2 The Select Scenario screen
8. Select Application Server using connection pooling and click Next.
9. Continue through the wizard and specify the required values for the workspace.
10. To complete the workspace definition, click Finish.
The new workspace is displayed under the IRPCD daemon node.
Editing the Workspace
You edit a workspace by using the tabs described in the following table:

Configuring the Daemon for High Availability
Advanced Features of OracleAS Adapter for IMS/TM 5-3
Perform the following steps to access these tabs:
1. From the Start menu, select Programs, Oracle, and then select Studio.
2. In the Configuration Explorer, expand the the computer defined in "Setting Up the
IBM OS/390 or z/OS Platform in Oracle Studio" on page 6-14.
3. Expand the Daemons node. The daemon configurations available on this
computer are listed.
4. Expand the IRPCD node. The daemon workspaces are listed.
5. Right-click the required workspace and select Edit Workspace.
6. Click the tab, which contains the information you want to edit. For full details of
the tabs and the fields in these tabs, refer to "Workspaces" on page C-7.
7. After editing the workspace, click Save.
Configuring the Server Mode
The server mode determines how the daemon starts up new processes. The daemon
supports the following server modes:
■singleClient: Each client receives a dedicated server process. The account in which
a server process runs is determined either by the client login information or by the
specific server workspace.
■This mode enables servers to run under a particular user account and isolates
clients from each other (because each receives its own process). However, this
server mode incurs a high overhead due to process startup times and may use a
lot of server resources (because it requires as many server processes as concurrent
clients). The number of clients that share a process is determined by the Clients per
server limit (the maximum number of concurrent clients a server process for the
current workspace accepts).
■reusable: This is an extension of the single client mode. Once the client processing
finishes, the server process does not die and can be used by another client,
reducing startup times and application startup overhead. This mode does not have
the high overhead of single client mode because the servers are already initialized.
However, this server mode may use a lot of server resources (because it requires as
many server processes as concurrent clients).
Table 5–1 Worspace Property tabs
Tab Description
WS Info Specifies general information including the server type, the
command procedure used to start the workspace, the binding
configuration associated with this workspace and the timeout
parameters.
WS Server Mode Specifies workspace server information including features that
control the operation of the servers started up by the workspace
and allocated to clients.
WS Logging Specifies parameters for logging and the format to use for a log file.
WS Security Specifies administration privileges, user access, ports available to
access the workspace and workspace account specifications.
WS Governing This tab is not applicable for use with OracleAS Adapter for
IMS/TM.
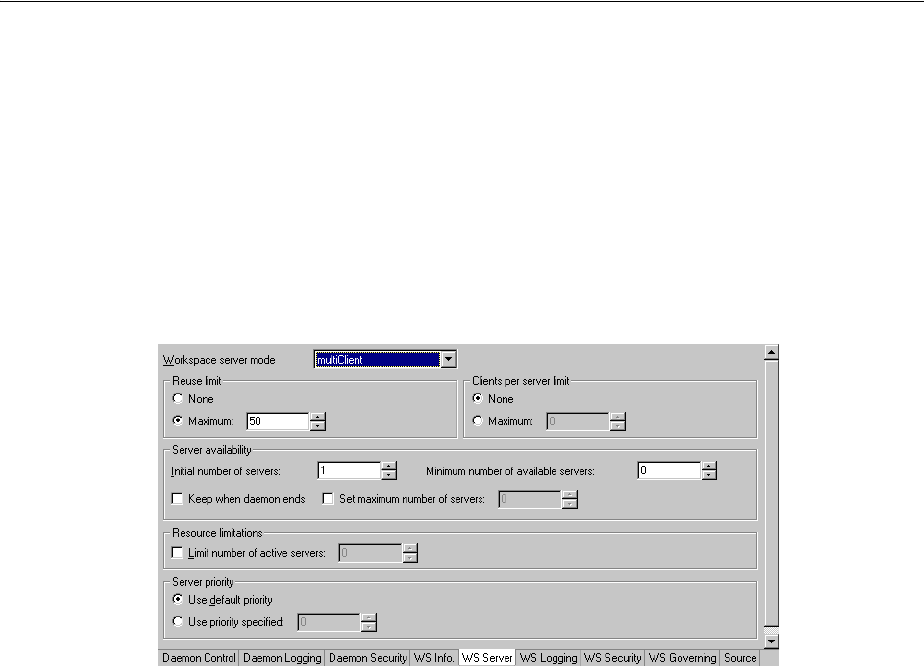
Configuring the Daemon for High Availability
5-4 Oracle Application Server Adapter for IMS/TM User’s Guide
■The other modes can be set so that the server processes are reusable by setting the
number of times a process can be reused with the Reuse limit value (the maximum
number of times a particular server process can be reused or how many clients it
can serve before it is retired). Reuse of servers enhances performance because it
eliminates the need to repeat initializations. However, reuse runs a risk of higher
memory leakage over time. The default for the Reuse limit field value is None,
indicating that no reuse limit is enforced.
Set the server mode in the WS Server tab of the daemon workspace editor, as shown in
the following figure:
Figure 5–3 The WS Server tab
When using any of the server modes you can specify a pool of server processes. These
server processes are started when the daemon starts and are maintained in a pool. The
server processes are available for use by new client requests from the pool, saving
initialization time.
Instead of starting a new server process each time one is requested by a client, the
client receives a process immediately from the pool of available processes. When the
client finishes processing, this server process either dies, or if reusable servers have
been specified, it is returned to the pool.
You set up a pool of server processes by specifying the following parameters in the WS
Server tab.
■Initial number of servers: The number of server processes that are prestarted for
this workspace when the daemon starts up. These are available for use by new
client processes with minimal initialization time. Instead of starting a new server
process each time one is requested by a client, the daemon immediately allocates
(to the client) a server from a pool of available servers. When the number of
available server processes drops lower than the value specified in the Minimum
number of available servers field, the daemon again starts server processes until
the specified number of available servers is reached. The default for this parameter
is 0, meaning that no servers are prestarted for this workspace.
■Minimum number of available servers: The minimum number of server processes
in the prestarted server's pool before the Oracle Connect daemon resumes creating
new server processes (up to the number specified in the Initial number of servers
field value, described earlier). If this parameter is set to a value greater than that of
the Initial number of servers field value, the daemon considers the value to be the
same as the value specified in the Initial number of servers field. In this case, a
new server process is started and added to the pool each time a server process is
Configuring a Binding Environment
Advanced Features of OracleAS Adapter for IMS/TM 5-5
removed from the pool and allocated to a client). The default for this parameter is
0, meaning that new servers are created only when there are no other available
servers.
■Set maximum number of servers: The maximum number of available server
processes pooled for this workspace. If the server is reusable, once a client
disconnects from the server, the daemon returns the server to the pool of available
servers. If the limit is reached, excess server processes are discarded.
■Number of sub-tasks: The number of sub-tasks for a server that are prestarted for
this workspace when the daemon starts up. In addition to setting up a pool of
server processes as described earlier, you can set additional server processes as
sub-tasks by specifying this parameter. Thus, setting 10 servers and 10 prestarted
sub-tasks results in 100 tasks started (10 sub-tasks for each process).
Configuring a Binding Environment
Each binding configuration includes the following:
■Environment settings, which are used to configure the environment used by any of
the adapters defined in the binding.
■Application adapters on the current computer.
Perform the following steps to configure the environment settings:
1. From the Start menu, select Programs, Oracle, and then select Studio.
2. In the Configuration Explorer, expand the node of the computer defined in
"Setting Up the IBM OS/390 or z/OS Platform in Oracle Studio" on page 6-14.
3. Expand the Bindings node. The available binding configurations are listed.
4. Right-click NAV and select Edit Binding.
5. In the Properties tab, edit the required environment settings as needed. To edit an
environment setting, click the property category node, and then click the required
value to edit.
The binding Properties tab is shown in the following figure:
Figure 5–4 The Binding Properties tab
The binding environment is divided into the following categories:
■comm Category
■debug Category

Configuring a Binding Environment
5-6 Oracle Application Server Adapter for IMS/TM User’s Guide
■miscellaneous Category
■odbc Category
■oledb Category
■optimizer Category
■queryProcessor Category
■transactions Category
■tuning Category
comm Category
The following table lists the parameters that define the communication buffers:
debug Category
The following table lists the parameters that define debugging and logging operations.
Table 5–2 comm Category Parameters
Parameter Description
comCacheBufferSize Specifies the size of a memory buffer on a client, which is
used by the Oracle Connect client/server to store
read-ahead data. The default is 200000 bytes.
comMaxSocketSize Specifies the maximum bytes that can be written in one
chunk on a socket. The default is -1 (no limitation).
comMaxXmlInMemory Specifies the maximum size of an XML document held in
memory. The default is 65535 bytes.
comMaxXmlSize Specifies the maximum size of an XML document passed
to another computer. The default is 65535 bytes.
Table 5–3 debug Category Parameters
Parameter Description
acxTrace When set to true, the input xml sent to the back-end
adapter and the output xml returned by the back-end
adapter, are written to the log.
analyzerQueryPlan This parameter is not applicable for use with OracleAS
Adapter for IMS/TM.
gdbTrace This parameter is not applicable for use with OracleAS
Adapter for IMS/TM.
generalTrace When set to true, logs general trace information. The
default writes only error messages to the log.
logFile The high-level qualifier of the log file for messages. The
following types of message are written to the log:
Error messages.
Trace information and information about the query
optimization strategy if generalTrace is set to true.
oledbTrace This parameter is not applicable for use with OracleAS
Adapter for IMS/TM.
optimizerTrace This parameter is not applicable for use with OracleAS
Adapter for IMS/TM.

Configuring a Binding Environment
Advanced Features of OracleAS Adapter for IMS/TM 5-7
miscellaneous Category
The following parameters define miscellaneous operations, including globalization
support and the directory where temporary files are written.
queryWarnings This parameter is not applicable for use with OracleAS
Adapter for IMS/TM.
traceDir This parameter is not applicable for use with OracleAS
Adapter for IMS/TM.
Table 5–4 misc Category Parameters
Parameter Description
codepage For use with globalization support to identify the
codepage for the workspace. See also: Appendix D,
"Globalization Settings".
cvtSeverityLevel The data type conversion policy when a conversion error
occurs:
■0 (Default): The data in the output column will be a
null or empty value.
■1: The data in the output column will be a null or
empty value and the error is reported to the log.
■2: An error is reported and processing stops.
edit This parameter is not applicable for use with OracleAS
Adapter for IMS/TM.
language Identifies the application language. A default codepage is
selected based om the value specified for this parameter.
See also: Appendix D, "Globalization Settings".
nlsString Specifies the codepage used by a field whose data type is
defined as nlsString. Use this for a field whose
codepage is other than that of the computer codepage.
This parameter includes the following values:
■The name of the codepage.
■Whether the character set reads from right to left (as
in middle eastern character sets). The default is
false.
tempDir The directory where temporary files are written, including
the temporary files created for use by hash joins and for
sorting files. The default is the current high-level qualifier.
Table 5–3 (Cont.) debug Category Parameters
Parameter Description

Configuring a Binding Environment
5-8 Oracle Application Server Adapter for IMS/TM User’s Guide
odbc Category
The odbc parameters are not applicable for use with OracleAS Adapter for IMS/TM.
oledb Category
The oledb parameters are not applicable for use with OracleAS Adapter for IMS/TM.
optimizer Category
The optimizer parameters are not applicable for use with OracleAS Adapter for
IMS/TM.
queryProcessor Category
The queryProcessor parameters are not applicable for use with OracleAS Adapter for
IMS/TM.
transactions Category
The following table lists the parameters that define the transaction support:
year2000Policy Determines the way 2-digit years are converted into
4-digit years. When the parameter year2000Policy is
not set, or when it is set to a value outside the range of
values defined for the policy, as described in the following
paragraphs, a default value of 5 and the Sliding Base Year
policy is used.
Two policies are provided:
■Fixed Base Year: year2000Policy is set to a value
greater than, or equal to 1900. In this case, the value of
year2000Policy is the first 4-digit year after 1900
that can be represented by a 2-digit year. For example,
if year2000Policy is set to 1905, the years
2000->2004 will be represented by 00->04. All other
2-digits will map to 19xx.
This solution is most required if there is live data at
the low end (close to the year 1900), which the user
wants to keep with the current 2-digit format.
The user will probably change the base date only after
ensuring that these old dates have been deleted from
the data source.
■Sliding Base Year: year2000Policy is set to a
positive value less than 100. In this case, the value of
year2000Policy represents the number of years
ahead of the current year that can be represented by a
2-digit number. With each passing year the earliest
year that can be represented by a 2-digit number
changes to a year later.
Table 5–4 (Cont.) misc Category Parameters
Parameter Description

Migration Considerations
Advanced Features of OracleAS Adapter for IMS/TM 5-9
tuning Category
The tuning parameters are not applicable for use with OracleAS Adapter for IMS/TM.
Migration Considerations
You can migrate an adapter configuration from one platform to another. The
configuration information is stored in the Oracle Connect repository on the source
platform and is exported to an XML file which can then be imported to the target
platform.
Note that when migrating a configuration, any file names and paths that are specific to
the source platform must be changed to valid files on the target platform.
Perform the following steps to migrate an adapter configuration:
1. From the Start menu, select Programs, Oracle, and then select Studio.
2. In the Configuration Explorer, right-click the required computer and select Export
XML definitions.
3. Specify the path and name of the XML file, which stores the XML representation
and complete configuration.
4. Edit any paths in the XML definition to the paths required on the target platform.
For example, the setting for the serverLogFile parameter might need changing,
depending on the platform.
5. Set up the target platform in Oracle Studio in the same way you set up the source
platform, as described in "Setting Up the IBM OS/390 or z/OS Platform in Oracle
Studio" on page 6-14.
6. In the Configuration Explorer, right-click the target computer and select Import
XML definitions.
7. Import the XML file to the target platform.
Table 5–5 transactions Category Parameters
Parameter Description
convertAllToDistributed When set to true, converts all simple transactions into
distributed transactions.
convertAllToSimple When set to true, converts all distributed transactions
into simple transactions.
disable2PC Set to true to disable global-transaction capabilities.
logFile The high-level qualifier and name of the log file that logs
activity when using transactions. The logfile parameter
can also include the keyword NORRS after a comma (so
that the format is log,NORRS) when RRS is not running
on the OS/390 or z/OS platform.
recoveryDelay The number of minutes from the start of a transaction
before any recovery operation on that transaction can be
attempted. The default is 15 minutes.
useCommitConfirmTable This parameter is not applicable for use with OracleAS
Adapter for IMS/TM.

Security Considerations
5-10 Oracle Application Server Adapter for IMS/TM User’s Guide
Security Considerations
Oracle Connect works within the confines of the platform security system. For
example, on an OS/390 computer with RACF installed, and with the workspace server
mode set to multi-tasking, a RACROUTE VERIFY is performed for each task in the
address space, according to the client connection.
In addition, Oracle Connect provides the following security:
■A binary XML encryption mechanism, which is activated as follows:
1. The client’s first message to the server includes a pre-defined shared key,
includeing the key name and value in the connection string. The server gets
the key value for the key name passed from the client from the native object
store (NOS).
2. The server generates a random 128-bit RC4 session key which is returned
encrypted to the client, using the shared key. If no predefined shared key is
provided, then a predefined, hardcoded key is used (this key is hardcoded on
the client and on the server).
3. Passwords are always encrypted when passed over the wire, using an RC4,
128-bit session key, regardless of whether the entire session is encrypted or
not.
4. If a predefined shared key was provided, then the entire session is encrypted.
Otherwise, only the password exchange is encrypted (using the hardcoded
key).
■Credentials: Passwords and usernames exchanged over the network are encrypted
using a pre-defined, hardcoded, 128-bit RC4 session key.
■Design Time: Security within Oracle Studio to grant access to Oracle Studio itself
and to grant access to computers, user profiles and workspaces.
■Run time: Security used to access IMS/TM, including controlling the daemon for
the access.
Setting Design Time Security
Setting design time security is described in the following sections:
■Securing access to Oracle Studio is described in "Setting Password Access to
Oracle Studio" on page 6-15.
■Securing rights to configure a computer in Oracle Studio is described in
"Specifying Users with Administrative Rights" on page 6-17.
■Securing access to user profiles is accomplished by right-clicking the relevant user
profile in Oracle Studio and selecting Change Master Password. In the dialog box
that is displayed, specify a password that must be provided in the future to edit
the specific user profile.
■Securing access to workspaces is accomplished by right-clicking the relevant
workspace in Oracle Studio and selecting Set Authorization. In the dialog box that
is displayed, specify a valid user and password that must be provided in the
future to edit the specific workspace.
Setting Run-time Security
During run time, security considerations are implemented as follows:

Transaction Support
Advanced Features of OracleAS Adapter for IMS/TM 5-11
■When the client request accesses the legacy platform through the daemon, either
anonymous access is allowed or a valid user name and password must be
provided for the computer in the user profile. The userName and password
properties in the J2CA 1.5 IMS/TM adapter are used at this stage to access the
daemon.
■Access by the client must be through a valid port, according to the list of ports
specified in the Workspace Access section of the WS Security tab in Oracle Studio.
For details of the WS Security tab, refer to "WS Security" on page C-16.
■To be allocated a server process, the client must be granted anonymous access to
the workspace or be listed in the Workspace Users section of the WS Security tab
in Oracle Studio. For details of the WS Security tab, refer to "WS Security" on
page C-16.
■The ability to run commands on the daemon, such as starting or stopping a
daemon or ending server processes is available only to administrators who have
been registered in Oracle Connect as a daemon administrator. A client is registered
as a valid daemon administrator in the Daemon Security tab in Oracle Studio, as
described in "Daemon Security" on page C-5.
Transaction Support
OracleAS Adapter for IMS/TM does not support global transactions.
Note: The user name used to access the daemon must also be the
name of a user profile used.
Note: Access to the legacy platform through a firewall using the
NAT protocol is specified when the computer is added to Oracle
Studio.
Note: You can also specify administrators who can run commands
only at the level of the workspace. Specify these administrators in
the WS Security tab, as described in "WS Security" on page C-16.

Transaction Support
5-12 Oracle Application Server Adapter for IMS/TM User’s Guide

Installing and Configuring OracleAS Adapter for IMS/TM 6-1
6
Installing and Configuring OracleAS Adapter
for IMS/TM
This section describes how to install Oracle Connect and Oracle Studio from the
CD-ROM and how to configure Oracle Connect using Oracle Studio.
This section includes the following topics:
■Preinstallation Tasks
■Installing Oracle Connect on an IBM OS/390 or z/OS Series Platform
■Updating an Existing Oracle Connect Installation with IMS/TM
■Installing Oracle Studio
■Configuring Oracle Connect
Preinstallation Tasks
Before installing OracleAS Adapter for IMS/TM, ensure that your computer meets the
following requirements:
■IBM OS/390 or z/OS Hardware and Software Requirements
■Windows Hardware and Software Requirements
IBM OS/390 or z/OS Hardware and Software Requirements
This section describes the following requirements for installing Oracle Connect on an
IBM OS/390 or z/OS platform:
■Hardware Requirements
■Software Requirements
Hardware Requirements
The following table summarizes the hardware requirements for Oracle Connect.
Note: In addition to the installation procedures described in this
section, the J2CA 1.5 IMS/TM adapter must be installed with
Oracle Application Server. Installing the J2CA 1.5 IMS/TM adapter
is described in Oracle Application Server Adapter Installation Guide.

Preinstallation Tasks
6-2 Oracle Application Server Adapter for IMS/TM User’s Guide
Software Requirements
The following table summarizes the software requirements for Oracle Connect.
Windows Hardware and Software Requirements
This section describes the following requirements for installing Oracle Studio:
■Hardware Requirements
■Software Requirements
Hardware Requirements
The following table summarizes the hardware requirements for Oracle Studio.
Software Requirements
The following table summarizes the software requirements for Oracle Studio.
Table 6–1 Oracle Connect Hardware Requirements
Hardware Component Requirements
Processor An IBM S/390 computer
Memory The minimum requirement is 4 MB for each connection. A
connection is defined as a connection to a server process or
daemon. The actual memory requirement depends on such
things as the size of the database and the number of databases
accessed.
CD-ROM Drive An internal or external CD-ROM drive
Disk Space (3380 and
3390 disks)
150 cylinders
Table 6–2 Oracle Connect Software Requirements
Software Component Requirements
Operating System IBM OS/390 V2R5 or higher
Or
IBM z/OS Series V1R0 or higher
IMS/TM TP Monitor V6R1 or higher
Oracle Application
Server
Oracle Application Server 10g (10.1.2.0.1)
Table 6–3 Oracle Studio Hardware Requirements
Hardware Component Requirements
Processor An Intel or 100% compatible personal computer (PC), based
on a Pentium processor
Memory 256 MB RAM
CD-ROM Drive An internal or external CD-ROM drive
Disk Space for Oracle Studio 100 MB free disk space

Installing Oracle Connect on an IBM OS/390 or z/OS Series Platform
Installing and Configuring OracleAS Adapter for IMS/TM 6-3
Installing Oracle Connect on an IBM OS/390 or z/OS Series Platform
This section explains how to install Oracle Connect from the CD-ROM. This section
includes the following:
■Installation Worksheet
■Preinstallation Instructions
■Installing the Kit
■Installation Instructions
■Postinstallation Instructions
Installation Worksheet
Verify that you have all the information detailed in the following installation
worksheets, so you can refer to it during the configuration process.
Table 6–4 Oracle Studio Software Requirements
Software Component Requirements
Operating System Microsoft Windows 2000 with service pack 2 or higher, or
Microsoft Windows XP, or Microsoft Windows 2003
Microsoft Network transport protocol software, TCP/IP, included with
Microsoft Windows
Note: If you have an Oracle Connect back-end adapter already
installed on the IBM OS/390 or z/OS platform, then follow the
instructions described in "Updating an Existing Oracle Connect
Installation with IMS/TM" on page 6-12.
The other back-end adapters that run on an IBM OS/390 or z/OS
platform are:
■OracleAS Adapter for CICS
■OracleAS Adapter for IMS/DB
■OracleAS Adapter for VSAM
Table 6–5 Preinstallation Information
Topic Required Information Default Comment
General Operating system -OS/390 V2R5 or higher, or z/OS Series
V1R0 or higher
-Disk space -150 cylinders
-Memory -The minimum requirement is 4 MB for each
connection. A connection is defined as a
connection to a server process or daemon.
The actual memory requirement depends on
such things as the size of the database and
the number of databases accessed.
-Installation high-level
qualifier
OCL1012 -
-Volum e - -

Installing Oracle Connect on an IBM OS/390 or z/OS Series Platform
6-4 Oracle Application Server Adapter for IMS/TM User’s Guide
Preinstallation Instructions
Before starting the installation, ensure that the following information is available:
■The output class for the installation output if you do not want to use the default
value, which is A.
■The unit where SMS resides. If you use SMS to manage all datasets, then you
cannot provide unit and volume information.
Before starting the installation, ensure that you have the following permissions:
■Permission to define an APF-authorized library.
■Permission to write to an active proclib, such as user.proclib.
■Permission to update the security manager, such as RACF.
-Unit 3390 SMS only: unit where SMS resides.
-Output class A -
-JCL job card -An optional card (up to 6 lines) to replace
the prefix job (entered as it will appear in
the job)
-ISPF load library name ISP.SISPLOAD -
Table 6–6 Required Permissions
Permission
Permission to define an APF-authorized library
Permission to write to an active proclib, such as user.proclib
Permission to update the security manager, such as RACF
Optionally, permission to specify an output class for Oracle Connect output
Table 6–7 Installation Checklist
Step Comment/Outputs
tso profile prefix Ensures that the user name is not used as part of
the dataset name allocated in the next steps
Allocate dataset: {HLQ}.TRANSMIT.KIT 130 tracks (3390), format=FB, record length=80,
block size=3120
Allocate dataset: {HLQ}.TRANSMIT.LOAD 420 tracks (3390), format=FB, record length=80,
block size=3120
Copy files to OS/390 (or z/OS) FTP using binary mode
RECEIVE INDSNAME('{HLQ}.TRANSMIT.KIT') -
da('{HLQ}.TRANSMIT.LIB') UNIT(unit) VOLUME(volume) -
EX {HLQ}.TRANSMIT.LIB(PREPARE) Successful MAXCC is 0, 4 or 8
BUILDKIT.SRC and BUILDKIT.LOAD created
EX {HLQ}.BUILDKIT.SRC(NAVINST) Successful MAXCC is 0 or 4
Table 6–5 (Cont.) Preinstallation Information
Topic Required Information Default Comment

Installing Oracle Connect on an IBM OS/390 or z/OS Series Platform
Installing and Configuring OracleAS Adapter for IMS/TM 6-5
Oracle Connect for the IBM OS/390 or z/OS platform is contained in the following
datasets:
■OCL1012.TRANSMIT.KIT
■OCL1012.TRANSMIT.LOAD
These datasets are provided on a CD-ROM in the following directory:
Oracle_Connect\IMSTM_Legacy_Adapter
Installing the Kit
Perform the following steps on the Mainframe:
1. Run the following command:
tso profile noprefix
The user name will not be used as part of the dataset name. On some systems this
is the default.
2. Allocate datasets with the following space for each of these files:
■OCL1012.TRANSMIT.KIT = 130 tracks (3380 and 3390 disks)
■OCL1012.TRANSMIT.LOAD = 420 tracks (3380 and 3390 disks)
For each dataset: RECFM=FB and LRECL=80. The block size is 3120.
3. Using FTP, copy OCL1012.TRANSMIT.KIT and OCL1012.TRANSMIT.LOAD in
the binary mode from the installation CD to the mainframe. You can replace the
OCL1012 high-level qualifier to any qualifier you want.
Installation Instructions
Perform the following steps to install Oracle Connect:
1. Run the following command at the TSO prompt:
RECEIVE INDSNAME('nnn.TRANSMIT.KIT')
Where nnn represents the high-level qualifier you want to assign for the Oracle
Connect installation. Assign the high-level qualifier you specified in step 7 of the
preinstallation procedure. The default value is OCL1012.
2. Enter the following when prompted for the restore parameters:
Note: Optionally, ensure that you have permission to specify an
output class for Oracle Connect output. Assigning a device that is
set on HOLD prevents the loss of log information when Oracle
Connect started tasks finish.
Note: You can use more than one high-level qualifier (such as
ACME.DEV.OCL1012) with the following conditions:
■The total length must be less than or equal to twenty characters.
■The words transmit and buildkit cannot be used as high-level
qualifiers.

Installing Oracle Connect on an IBM OS/390 or z/OS Series Platform
6-6 Oracle Application Server Adapter for IMS/TM User’s Guide
da('nnn.TRANSMIT.LIB') [UNIT(unit) VOLUME(volume)]
This extracts the nnn.TRANSMIT.LIB library from the nnn.TRANSMIT.KIT kit
to the specified unit and volume. If a unit and volume are not specified, then the
library is extracted to the current unit and volume.
3. Run the PREPARE member of the nn.TRANSMIT.LIB library:
ex PREPARE
Follow the instructions in the Response column in Table 6–8 for each entry in the
Screen column.
The following libraries are generated:
nnn.BUILDKIT.LOAD
nnn.BUILDKIT.SRC
nnn.BUILDKIT.GENDEMO
Where nnn is the high-level qualifiers you assigned in step 1.
4. In the nnn.BUILDKIT.SRC library, run the NAVINST member:
ex NAVINST
Follow the instructions in the Response column in Table 6–9 for each entry in the
Screen column.
Table 6–8 Installation Prepare Job Prompts and Responses
Screen Response
DO YOU WANT TO USE SMS MANAGED
STORAGE FOR THIS INSTALLATION Y/N [N]:
If you want to manage the storage using SMS, then answer
Y, otherwise answer N.
ENTER THE STORCLASS FOR INSTALLATION
TEMP DATASETS [ ]:
This prompt is displayed only if SMS is used to manage the
installation (you answered Y to the first prompt).
Enter the storage class
ENTER THE UNIT NAME FOR INSTALLATION
TEMP DATASETS [3390]:
If a storage class is not specified, then enter the unit name
for temporary datasets used during the installation
procedure
ENTER THE VOLUME NAME FOR
INSTALLATION TEMP DATASETS:
This prompt is displayed only if SMS is not used to manage
the installation (you answered N to the first prompt).
The volume name for temporary datasets used during the
installation procedure
ENTER THE OUTPUT CLASS FOR
INSTALLATION OUTPUT [A] :
Enter the output class only if you do not want the default
class used (the default is A)
DO YOU WANT TO USE THE DEFAULT JOB
CARD Y/N [Y]
A job card is displayed. If you want to use a replacement
card, then it must be entered as it will appear in the job. You
can enter up to six lines. Enter a blank card to end input.
If you do not enter a card, then the Oracle Connect default
card is used.
DO YOU WANT TO PERFORM A MANUAL
(M) OR AUTOMATIC (A) INSTALLATION [A]:
If you want to review the JCL used to install Oracle Connect,
before it is submitted, then respond M for a manual
installation.
PLEASE REVIEW AND SUBMIT FOR
EXECUTION THE
HLQ.TRANSMIT.LIB(INSTJO)
This prompt is displayed only if a manual installation is
requested (you answered M to the previous prompt).

Installing Oracle Connect on an IBM OS/390 or z/OS Series Platform
Installing and Configuring OracleAS Adapter for IMS/TM 6-7
5. In the nnn.BUILDKIT.SRC library, run the IMSTM member:
ex IMSTM
6. Follow the instructions in the Response column in Table 6–10 for each entry in the
Screen column.
Table 6–9 Installation Prompts and Responses
Screen Response
DO YOU WANT TO USE SMS MANAGED
STORAGE FOR THIS INSTALLATION Y/N [N]:
If you want to manage the storage using SMS, then answer
Y, otherwise answer N.
THE SOFTWARE WILL BE INSTALLED UNDER
THE HIGH LEVEL QUALIFIER THAT YOU
WILL CHOOSE.
ENTER THE HIGH LEVEL QUALIFIER
["QUALIFIER"]:
The high-level qualifier for the installation (referred to as
INSTROOT throughout this guide)
You can use more than one high-level qualifier (such as
ACME.DEV.VA10). The total length must be less than or
equal to twenty characters. The qualifiers can be the same
as the ones used for the installation (see step 1).
The words transmit and buildkit cannot be used as
high-level qualifiers.
ENTER THE STORCLASS FOR TEMP DATASETS
['STORCLASS']:
This prompt is displayed only if SMS is used to manage the
installation (you answered Y to the first prompt).
Enter the storage class
ENTER THE UNIT NAME FOR INSTALLATION
TEMP DATASETS [3390]:
The unit name for temporary datasets used during the
installation procedure.
ENTER THE VOLUME NAME FOR
INSTALLATION TEMP DATASETS
This prompt is displayed only if SMS is not used to manage
the installation (you answered N to the first prompt).
The volume name for temporary datasets used during the
installation procedure
PLEASE CONFIRM (YES/NO/QUIT) [YES]: Confirm the entered details
ENTER THE OUTPUT CLASS FOR
INSTALLATION OUTPUT [A :
Enter the output class for Oracle Connect output. Assigning
a device that is set on HOLD prevents the loss of log
information when the Oracle Connect started tasks finish
(the default is A).
DO YOU WANT TO USE THE DEFAULT JOB
CARD Y/N [Y]
A job card is displayed. If you want to use a replacement
card, then it must be entered as it will appear in the job. You
can enter up to six lines. Enter a blank card to end input.
If you do not enter a card, then the Oracle Connect default
card is used.
ADDING AND UPDATING ORACLE
CONNECT FOR IMS/TM CONFIGURATION
ON THIS MACHINE, FROM A REMOTE
ORACLE ADMINISTRATION CONSOLE, CAN
ONLY BE DONE BY SOMEONE DEFINED AS
AN ADMINISTRATOR FOR ORACLE
CONNECT ON THIS MACHINE.
ENTER A VALID USER NAME FOR AN
ORACLE CONNECT ADMINISTRATOR [ALL]:
To manage Oracle Connect on this computer from Oracle
Studio, you need to enter a user account of a user who will
have administrative authorization, or press Enter to enable
any user to administer Oracle Connect on this computer.
The administrative rights can be changed from within
Oracle Studio after the installation.
DO YOU WANT TO PERFORM A MANUAL (M)
OR AUTOMATIC (A) INSTALLATION [A]:
If you want to review the JCL used to install Oracle
Connect, before it is submitted, then respond M for a
manual installation.
PLEASE REVIEW AND SUBMIT FOR
EXECUTION THE DSN1 (INSTJBOR)
This prompt is displayed only if a manual installation is
requested (you answered M to the previous prompt).
DSN1 is the dataset name where INSTJBOR is located.
Installing Oracle Connect on an IBM OS/390 or z/OS Series Platform
6-8 Oracle Application Server Adapter for IMS/TM User’s Guide
The installation is completed. All JCL jobs and REXX procedures are written to the
INSTROOT.USERLIB library. INSTROOT is the high-level qualifier for the installation.
Postinstallation Instructions
The following postinstallation tasks must be done to work with Oracle Connect:
■Postinstallation Procedures
■Starting the Daemon
■Setting Up Oracle Connect for Reentrancy
Postinstallation Procedures
Perform the following procedures after completing the installation to configure Oracle
Connect.
■Allocate a dataset for INSTROOT.DEF.BRANDBIN, using 1 track and with
RECFM=VB and LRECL=256. The block size is 6233.
INSTROOT is the high-level qualifier where Oracle Connect is installed.
■Using FTP, copy the BRANDBIN file, in binary mode, from the
Oracle Connect\IMSTM Legacy Adapter directory in the installation CD to
the mainframe, to INSTROOT.DEF.BRANDBIN.
■Define the LOADAUT library as an APF-authorized library.
Table 6–10 IMS/TM Adapter-Specific Installation Prompts and Responses
Screen Response
ENTER THE ISPF LOAD LIBRARY NAME
[ISP.SISPLOAD] :
Enter the ISPF load library name only if you do not want the
default
PLEASE CONFIRM (YES/NO/QUIT) [YES] : Confirm the entered details
ENTER THE OUTPUT CLASS FOR
INSTALLATION OUTPUT [A] :
Enter the output class for Oracle Connect output. Assigning
a device that is set on HOLD prevents the loss of log
information when the Oracle Connect started tasks finish
(the default is A).
DO YOU WANT TO USE THE DEFAULT JOB
CARD Y/N [Y]
A job card is displayed. If you want to use a replacement
card, then it must be entered as it will appear in the job. You
can enter up to six lines. Enter a blank card to end input.
If you do not enter a card, then the Oracle Connect default
card is used.

Installing Oracle Connect on an IBM OS/390 or z/OS Series Platform
Installing and Configuring OracleAS Adapter for IMS/TM 6-9
■Move the INSTROOT.USERLIB(ATTDAEMN) and
INSTROOT.USERLIB(ATTSRVR) members to any active proclib, such as
user.proclib. ATTDAEMN and ATTSRVR members are run as started tasks.
If you decide to change the name of the ATTSRVR member when you move it to a
general high-level qualifier, then change the name specified in the StartupScript
parameter in the daemon configuration to the new name:
■Run INSTROOT.USERLIB(NAVCMD) and enter EDIT DAEMON IRPCDINI at
the prompt.
■Change the startupScript parameter from ATTSRVR to the new name for
the server:
<Workspace name="Navigator"
startupScript="NEW_NAME"
serverMode="reusable"
... />
■Exit and save the changes.
■Change the following line in the ATTDAEMN script to include the IP address and
port of the IBM OS/390 or z/OS platform.
For example, before:
// PARM='-B START IRPCDINI'
After:
// PARM='-B -L ip_address:2252 START IRPCDINI'
Where ip_address is ip address of the computer, 2552 is the default port for
starting the daemon and IRPCDINI is the default daemon configuration.
■The ATTDAEMN and ATTSRVR started tasks need permission to use an Open
Edition TCP/IP stack. The owner must be a user with OMVS segment defined and
the OMVS UID=0000000000.
■In the security manager, such as RACF, define ATTDAEMN and ATTSRVR with a
started task class and a general profile that enables the following:
■Permission to issue master console commands.
■START authority for the ATTSRVR job.
Note: To define a DSN as APF-authorized, in the SDSF screen
enter the following command:
"/setprog apf,add,dsn=INSTROOT.loadaut,volume=vol002"
Where vol002 is the volume where you installed Oracle Connect
and INSTROOT is the high-level qualifier where Oracle Connect is
installed.
If the site uses SMS, then when defining APF-authorization in the
SDSF screen, enter the following command:
"/setprog apf,add,dsn=INSTROOT.loadaut,SMS"
Ensure that the library is APF-authorized, even after an IPL (restart)
of the computer.

Installing Oracle Connect on an IBM OS/390 or z/OS Series Platform
6-10 Oracle Application Server Adapter for IMS/TM User’s Guide
■Access to an Open OS/390 segment (that defines access to TCP/IP OA
sockets).
■ALTER authority on datasets under INSTROOT to access to read, write, allocate
and delete datasets under INSTROOT.
■The installation includes a PS, INSTROOT.DEF.GBLPARMS, that contains global
environment information. This PS is read at startup and the correct software
version is used, based on the details provided in the startup task.
If you change the location of this member, then you must also change the relevant
cards in the following jobs to the new locations:
■ATTSRVR: Located in an active proclib, such as user.proclib
■ATTDAEMN: Located in an active proclib, such as user.proclib
■NAVSQL: Located in INSTROOT.USERLIB
■The input during the installation procedure is written to
nnn.BUILDKIT.SRC(PARS). You can use this file to provide the same inputs if
you rerun the installation, where nnn is the high-level qualifier you assign for the
installation.
■For information about specifying Oracle Connect as the service using port 2552 in
the TCP/IP network services file, refer to the TCP/IP documentation.
Starting the Daemon
Activate INSTROOT.USERLIB(ATTDAEMN) as a started task to invoke the daemon.
For example, in the SDSF screen enter the following:
'/s ATTDAEMN'
Where INSTROOT is the high-level qualifier where Oracle Connect is installed.
To submit the daemon as a job, remove comments from the first two lines of the
ATTDAEMN JCL, change the PARM line as described earlier, and run the job using the
sub command. The following is a sample ATTDAEMN JCL.
//*ATTDAEMN JOB 'RR','TTT',MSGLEVEL=(1,1),CLASS=A,
//* MSGCLASS=A,NOTIFY=&SYSUID,REGION=8M
//STEP1 EXEC PGM=IRPCD,
// PARM='-B START IRPCDINI'
//* PARM='-B -L :8883 START'
//STEPLIB DD DSN=INSTROOT.LOADAUT,DISP=SHR
//SYSPRINT DD SYSOUT=A
//GBLPARMS DD DSN=INSTROOT.DEF.GBLPARMS,DISP=SHR
// EXEC PGM=IRPCD,COND=((1,EQ,STEP1),(2,EQ,STEP1)),
// PARM='-KATTDAEMN START ''INSTROOT.DEF.IRPCDINI'''
//STEPLIB DD DSN=INSTROOT.LOADAUT,DISP=SHR
//SYSPRINT DD SYSOUT=A
//GBLPARMS DD DSN=INSTROOT.DEF.GBLPARMS,DISP=SHR
//SYSDUMP DD DUMMY
Setting Up Oracle Connect to Work Under IMS/TM
To run an IMS transaction, set OTMA (Open Transaction Manager Access), as follows:
1. Install OTMA with OTMA C/I where IMS resides, as OTMA is not automatically
installed using the IMS INSTALL/IVP Dialog.
2. During IMS system definition, set the startup parameter in the IMS procedure to
OTMA=YES. In addition, set additional OTMA-related parameters such as

Installing Oracle Connect on an IBM OS/390 or z/OS Series Platform
Installing and Configuring OracleAS Adapter for IMS/TM 6-11
GRNAME for the XCF group name and OTMANM for the IMS member name in that
XCF group, as in the following example:
EDIT IMS.PROCLIB(DFSPBIV1) - 01.03
command ===>
000082 AOIS =,
000083 GRNAME=IMSATT01,
000084 OTMA=YES,
000085 MAXPST=
000086 OTMANM=
3. Start the OTMA Callable Interface (C/I).
Add an entry in the program properties table (PPT) for the OTMA C/I
initialization program as follows:
a. Edit the SCHEDxx member of the SYS1.PARMLIB data set by adding the
following entry:
PPT PGMNAME(DFSYSVI0) /*PROGRAM NAME =DFSYSVI0 */
CANCEL /*PROGRAM CAN BE CANCELED */
KEY(7) /*PROTECT KEY ASSIGNED IS 7 */
SWAP /*PROGRAM IS SWAPPABLE */
NOPRIV /*PROGRAM IS NOT PRIVILEGED */
DSI /*REQUIRES DATA SET INTEGRITY */
PASS /*CANNOT BYPASS PASSWORD PROTECTION */
SYST /*PROGRAM IS A SYSTEM TASK */
AFF(NONE) /*NO CPU AFFINITY */
NOPREF /*NO PREFERRED STORAGE FRAMES */
b. To make the SCHEDxx changes take effect, perform one of the following tasks:
–Re-IPL the system.
–Issue the SET SCH= command.
c. Edit and submit the following JCL procedure to run DFSYSVI0:
//OTMAINIT PROC RGN=3000K,SOUT=A,
/PARM1=
//*
//IEFPROC EXEC PGM=DFSYSVI0,
//REGION=&RGN
//*
//STEPLIB DD DISP=SHR,UNIT=SYSDA,
//DSN=IMSVS.RESLIB
//*
//SYSPRINT DD SYSOUT=&SOUT
//SYSUDUMP DD SYSOUT=&SOUT
//*
4. Run DFSYSVI0 after the IPL, to initialize the OTMA C/I.
5. Copy INSTROOT.LOAD(ATYDBDC)to an IMS/TM program library, such as
IMS.PGMLIB.
Setting Up Oracle Connect for Reentrancy
All Oracle Connect load modules are reentrant to enable subtasking. Therefore, move
INSTROOT.LOAD to the Link Pack Area (LPA).
WhereINSTROOT is the high-level qualifier where Oracle Connect is installed.

Updating an Existing Oracle Connect Installation with IMS/TM
6-12 Oracle Application Server Adapter for IMS/TM User’s Guide
Using the LPA reduces real storage usage, because everyone shares the LPA copy, and
fetch time.
Updating an Existing Oracle Connect Installation with IMS/TM
Verify that you have all the information detailed in the following installation
worksheets. You can refer to it during the configuration process.
In the nnn.BUILDKIT.SRC library, run the CUSTOCL member:
ex CUSTOCL
Follow the instructions in the Response column in Table 6–13 for each entry in the
Screen column.
Note: If you intend using impersonation, so that you can run in a
security context that is different than the context of the process that
owns the server, then do the following:
■Place the INSTROOT.LOAD(ATYSVCW) member in an
APF-authorized library outside the LPA.
■Change the ATTSRVR member (located in the active proclib), by
adding the following to the STEPLIB list:
// DD DSN=apf_library,DISP=SHR
Where apf_library is the APF-authorized library outside the
LPA directory where the ATYSCVW member was moved.
Table 6–11 Preinstallation Information
Topic Required Information Default Comment
CICS CICS EXCI load library name CICS.CICS.SDFHEXCL To access IMS/DB or VSAM data under
CICS
Table 6–12 Required Permissions
Permission
Permission to read the CICS EXCI library (when accessing IMS/DB or VSAM data under CICS)
Table 6–13 IMS/TM Adapter Installation Prompts and Responses
Screen Response
DO YOU WANT ORACLE CONNECT FOR
LEGACY ADAPTER TO WORK WITH IMS/DB
(YES/NO) [YES] :
Answer YES to this prompt if you have Oracle Connect for
IMS/DB already installed.
ENTER DBD LIBRARY NAME [IMS.DBDLIB] : If you responded YES to working with IMS/DB, then enter
the library where database definition (DBD) files are located.
ENTER PSB LIBRARY NAME [IMS.PSBLIB] : If you responded YES to working with IMS/DB, then enter
the library where Program Specification Blocks (PSBs) are
located.
ENTER YOUR PSB NAME [HOSPPSB] : If you responded YES to working with IMS/DB, then enter
the name of the PSB file to use.
PLEASE CONFIRM (YES/NO/QUIT) [YES]: If you responded YES to working with IMS/DB, then
confirm the entered details.

Installing Oracle Studio
Installing and Configuring OracleAS Adapter for IMS/TM 6-13
The installation is completed. All JCL jobs and REXX procedures are written to the
INSTROOT.USERLIB library. INSTROOT is the high-level qualifier for the installation.
After completing the installation, perform postinstallation tasks, as described in
"Postinstallation Instructions" on page 6-8.
Installing Oracle Studio
This section explains how to install Oracle Studio from the CD-ROM.
DO YOU WANT ORACLE CONNECT FOR
LEGACY ADAPTER TO WORK WITH IMS/DB
UNDER CICS (YES/NO) [NO]:
If you want to access IMS/DB data under CICS, using
OracleAS Adapter for IMS/DB, then respond YES.
ENTER THE CICS EXCI LOAD LIBRARY NAME
[CICSTS13.CICS.SDFHEXCI]:
If you responded YES to working with IMS/DB under CICS,
then enter the CICS EXCI load library name only if you do
not want the default.
PLEASE CONFIRM (YES/NO/QUIT) [YES]: If you responded YES to working with IMS/DB under CICS,
then confirm the entered details.
DO YOU WANT ORACLE CONNECT FOR
LEGACY ADAPTER TO WORK WITH CICS
APP ADAPTER (YES/NO) [YES]:
Answer YES to this prompt
ENTER THE CICS EXCI LOAD LIBRARY NAME
[CICSTS13.CICS.SDFHEXCI]:
Enter the CICS EXCI load library name only if you do not
want the default.
PLEASE CONFIRM (YES/NO/QUIT) [YES] Confirm the entered details
THE VSAM DRIVER IS INSTALLED
AUTOMATICALLY. DO YOU ALSO WANT
ORACLE CONNECT FOR LEGACY ADAPTER
TO WORK WITH VSAM UNDER CICS
(YES/NO) [NO]:
Answer YES to this prompt if you have Oracle Connect for
VSAM already installed and you want to access VSAM data
under CICS.
ENTER THE CICS EXCI LOAD LIBRARY NAME
[CICSTS13.CICS.SDFHEXCI]:
If you responded YES to working with VSAM under CICS,
then enter the CICS EXCI load library name only if you do
not want the default.
PLEASE CONFIRM (YES/NO/QUIT) [YES]: If you responded YES to working with VSAM under CICS,
then confirm the entered details.
ENTER THE ISPF LOAD LIBRARY NAME
[ISP.SISPLOAD]:
Enter the ISPF load library name only if you do not want the
default.
PLEASE CONFIRM (YES/NO/QUIT) [YES]: Confirm the entered details
ENTER THE OUTPUT CLASS FOR
INSTALLATION OUTPUT [A]:
Enter the output class for Oracle Connect output. Assigning
a device that is set on HOLD prevents the loss of log
information when the Oracle Connect started tasks finish
(the default is A).
DO YOU WANT TO USE THE DEFAULT JOB
CARD Y/N [Y]
A job card is displayed. If you want to use a replacement
card, then it must be entered as it will appear in the job. You
can enter up to six lines. Enter a blank card to end input.
If you do not enter a card, then the Oracle Connect default
card is used.
Table 6–13 (Cont.) IMS/TM Adapter Installation Prompts and Responses
Screen Response

Configuring Oracle Connect
6-14 Oracle Application Server Adapter for IMS/TM User’s Guide
Installing Oracle Studio from the CD-ROM
Assuming that the CD-ROM drive is D:, the installation file is located in the
D:\Oracle_Studio directory. Install Oracle Studio from the CD-ROM by running
the self-extracting executable installation file, OSL904-win32.exe.
Configuring Oracle Connect
All modeling of Oracle Connect is performed using Oracle Studio. To use Oracle
Studio, you first configure it to enable access to the IBM OS/390 or z/OS platform
where IMS/TM runs.
To configure Oracle Connect, refer to the following sections:
■Setting Up the IBM OS/390 or z/OS Platform in Oracle Studio
■Securing Access to Oracle Connect
■Modeling Interactions for OracleAS Adapter for IMS/TM
■Viewing the XML Schema
■Creating XML Schemas
Setting Up the IBM OS/390 or z/OS Platform in Oracle Studio
Perform the following steps to configure the IBM OS/390 or z/OS, using Oracle
Studio:
1. From the Start menu, select Programs, Oracle, and then select Studio.
2. Right-click Machines in the Configuration Explorer and select Add Machine The
Add Machine screen is displayed (see Figure 6–1).
Note: If Oracle Studio is already installed because you are also
using another legacy adapter, then you do not need to reinstall it.
The other legacy adapters are:
■OracleAS Adapter for Tuxedo
■OracleAS Adapter for CICS
■OracleAS Adapter for IMS/DB
■OracleAS Adapter for VSAM
Note: If you are installing Oracle Studio on a Windows XP
computer, you cannot specify a logical drive as the Destination
folder for the installation.
Note: The following tasks assume you have permission to access
the IBM OS/390 or z/OS platform and that the Oracle Connect
daemon is running on this computer.
Check with the system administrator to ensure these requirements
are fulfilled.
Configuring Oracle Connect
Installing and Configuring OracleAS Adapter for IMS/TM 6-15
3. Enter the name of the computer you want to connect to, or click Browse to select
the computer from the list of computers that is displayed and which use the
default port (2552).
4. Specify the username and password of the user who was specified as the
administrator when Oracle Connect was installed.
The Add Machine screen is shown in the following figure:
Figure 6–1 The Add Machine screen
5. Click Finish.
The computer is displayed in the Configuration Explorer.
Securing Access to Oracle Connect
Oracle Studio includes mechanisms to secure access to Oracle Connect both during
modeling and during run time.
During modeling, the following security mechanisms can be applied:
■Setting Password Access to Oracle Studio
■Specifying Users with Administrative Rights
During run-time, client access to Oracle Connect is provided by the user profile:
■Setting Up Run-time User Access to the IBM OS/390 or z/OS Platform
Setting Password Access to Oracle Studio
Initially, any operation performed using Oracle Studio does not require a password.
You can set a password so that the first operation that involves accessing the server
from Oracle Studio requires a password to be entered.
Perform the following steps:
Note: Selecting Anonymous connection enables anyone having
access to the computer to be an administrator.
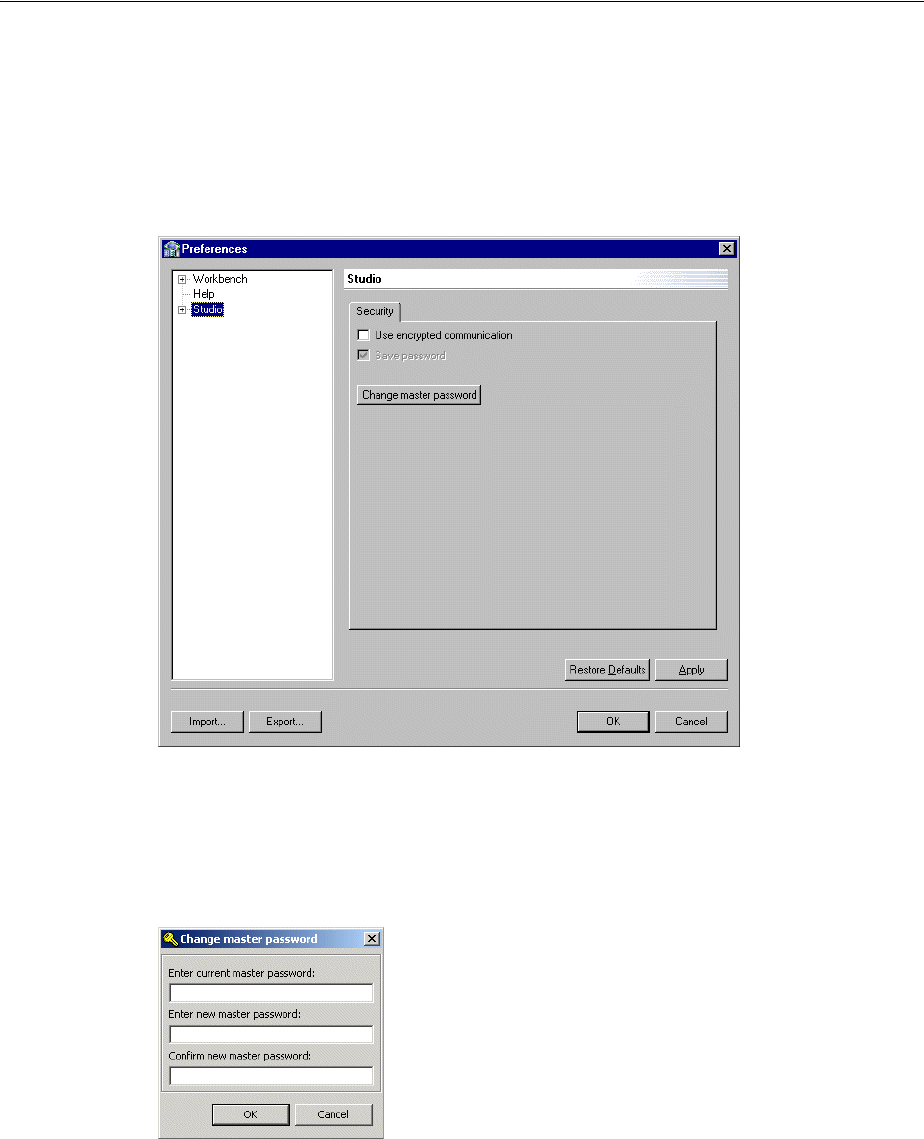
Configuring Oracle Connect
6-16 Oracle Application Server Adapter for IMS/TM User’s Guide
1. From the Start menu, select Programs, Oracle and then select Studio. Oracle
Studio opens.
2. Select Window from the menu bar and then select Preferences.
The Preferences screen is displayed, as shown in the following figure:
Figure 6–2 The Preferences screen
3. Select the Studio node.
4. Click Change master password. The Change Master Password screen is displayed,
as shown in the following figure:
Figure 6–3 The Change Master Password screen
5. Leave the Enter current master password field empty and type a new master
password.
6. Confirm the password.
7. Click OK.
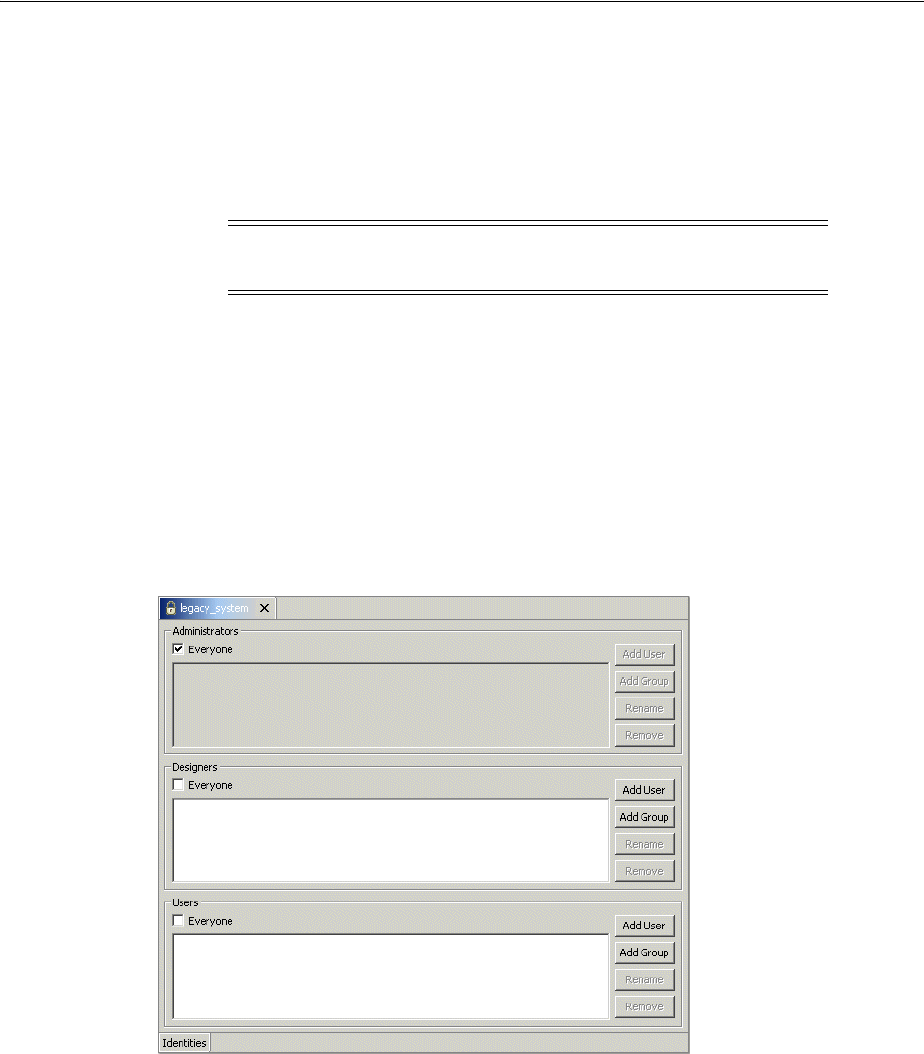
Configuring Oracle Connect
Installing and Configuring OracleAS Adapter for IMS/TM 6-17
Specifying Users with Administrative Rights
By default, only the user who was specified during the installation as an administrator
has the authorization to modify settings on that computer from Oracle Studio. This
user can then authorize other users to make changes or to view the definitions for a
selected computer. Adding a computer to Oracle Studio is described in "Setting Up the
IBM OS/390 or z/OS Platform in Oracle Studio" on page 6-14.
Perform the following steps to specify a user with administrative rights:
1. From theStart menu, select Programs, Oracle, and then select Studio. Oracle
Studio opens, displaying the Design perspective.
2. Right-click the required computer in the Configuration Explorer and select
Administration Authorization.
The Administration Authorization screen is displayed, as shown in the following
figure:
Figure 6–4 The Administration Authorization screen
The screen has the following sections:
Administrators: Administrators can view and modify all the definitions in Oracle
Studio for the selected computer. On initial entry to Oracle Studio, every user is
defined as a system administrator.
Designers: Designers can view all the definitions for the computer in Oracle Studio
and can modify any of the definitions under the Bindings and Users nodes for the
selected computer. For example, Oracle Studio database administrator can add
new data sources and adapters and can change metadata definitions for a table in
a data source.
Users: Users can view all the definitions for the computer in Oracle Studio for the
selected computer. Regular users cannot modify any of the definitions.
Note: The default during installation is to enable all users to be
administrators.
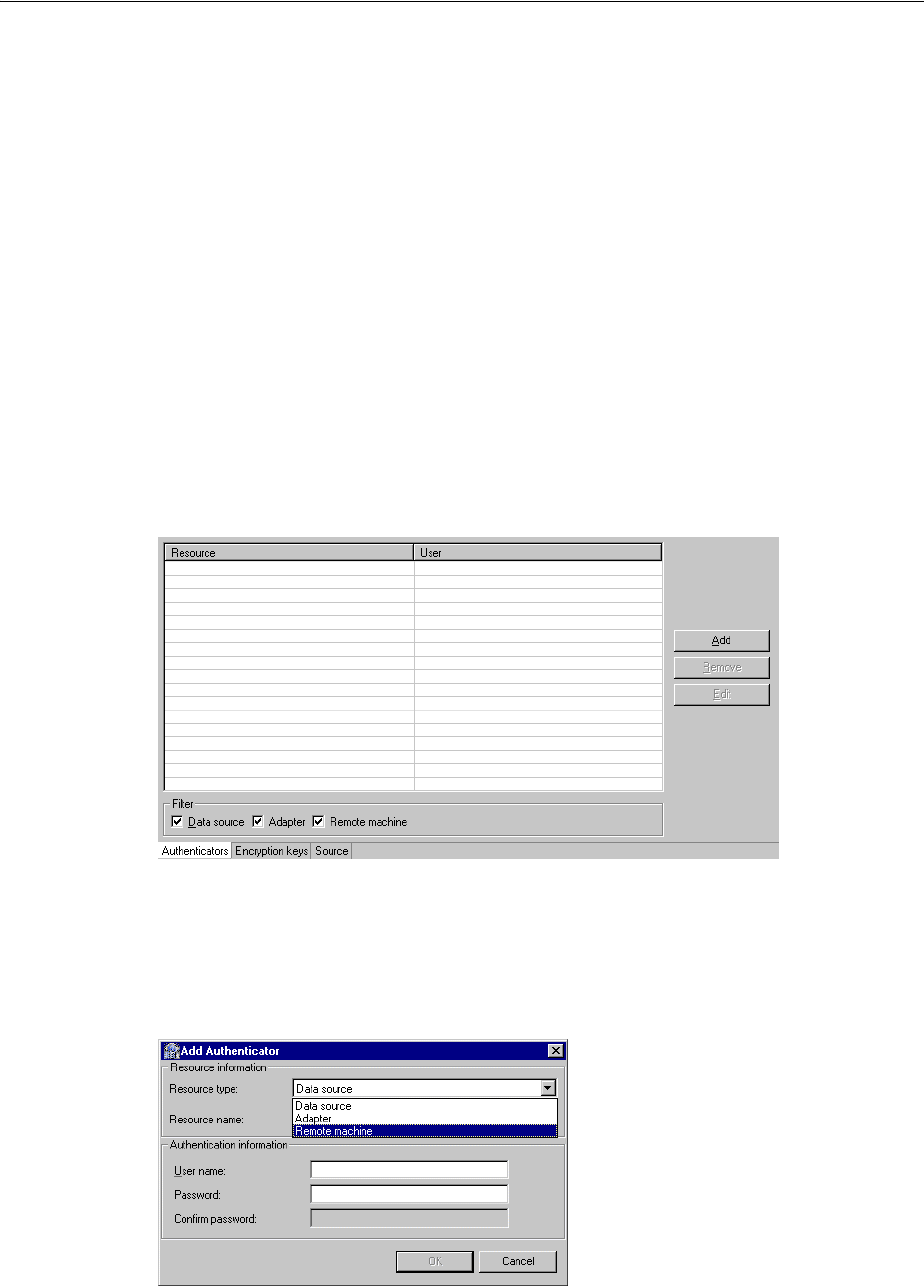
Configuring Oracle Connect
6-18 Oracle Application Server Adapter for IMS/TM User’s Guide
3. Add users or groups of users by clicking Add User or Add Group for the relevant
sections. The user or group that is added must be recognized as a valid user or
group for the computer.
Once a name has been added to a section, only the user or group who logs on with
that user name has the relevant authorization.
Setting Up Run-time User Access to the IBM OS/390 or z/OS Platform
During run time, client access to Oracle Connect is provided by the user profile. A user
profile contains name and password pairs that are used to access a computer, data
source or application at run time, when anonymous access is not allowed.
1. In the Configuration Explorer, expand the node of the computer for which you
want to set the user name and password.
2. Expand the Users node.
3. Right-click the NAV user profile and select Edit User. The User Editor pane is
displayed, as shown in the following figure:
Figure 6–5 The User Editor pane
4. In the User editor, click Add to display the Add Authenticator screen.
5. Select Remote Machine from the Resource type list, as shown in the following
figure:
Figure 6–6 The Add Authenticator screen
6. Enter the name of the IBM OS/390 or z/OS computer defined in Oracle Studio.

Configuring Oracle Connect
Installing and Configuring OracleAS Adapter for IMS/TM 6-19
7. Enter the name and password used to access the computer and confirm the
password.
8. Click OK.
Modeling Interactions for OracleAS Adapter for IMS/TM
Modeling interactions for OracleAS Adapter for IMS/TM involves defining an Oracle
Connect back-end adapter using Oracle Studio. All the definitions specified in Oracle
Studio are written to the IBM OS/390 or z/OS platform.
This section contains the following topics:
■Setting Up an Oracle Connect Adapter
■Generating Outbound Interactions
Setting Up an Oracle Connect Adapter
To work with the Oracle Connect, you need to set up an adapter definition on the IBM
OS/390 or z/OS platform to handle the interactions to and from an IMS/TM
transaction. You use Oracle Studio to specify these definitions.
Perform the following steps:
1. From the Start menu, select Programs, Oracle, and then select Studio.
2. In the Configuration Explorer, expand the node of the computer defined in
"Setting Up the IBM OS/390 or z/OS Platform in Oracle Studio" on page 6-14.
3. Expand the Bindings node. The binding configurations available on this computer
are listed.
4. Expand the NAV binding node. The NAV binding configuration includes branches
for data sources and adapters that are located on the computer.
5. Right-click Adapters and select New Adapter to open the New Adapter wizard.
6. Enter a name for the back-end adapter.
7. Select IMS/TM as the back-end adapter type from the Type list as shown in the
following figure:
Note: The word event is a reserved word and cannot be used
when naming an adapter.
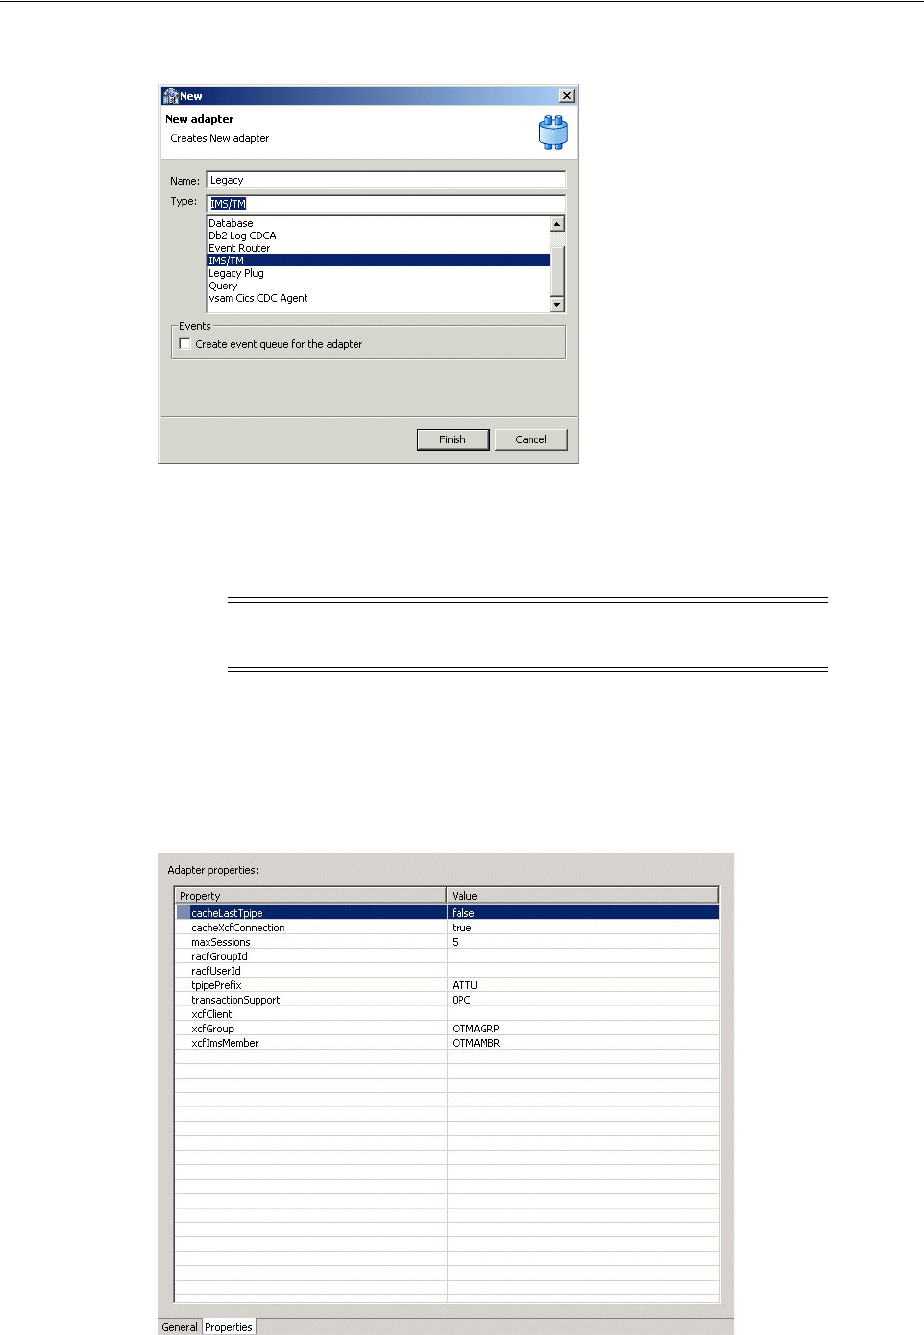
Configuring Oracle Connect
6-20 Oracle Application Server Adapter for IMS/TM User’s Guide
Figure 6–7 The New Adapter screen
8. Select Events.
9. Click Finish. The back-end adapter is added to the list and the definition opens for
editing.
10. Select the Properties tab and change any of the properties for the adapter, as
required.
The Properties tab is shown in the following figure:
Figure 6–8 The Adapter Properties tab
Note: Other adapters that are displayed in the Type list are not
supported with the version of Oracle Connect installed at the site.

Configuring Oracle Connect
Installing and Configuring OracleAS Adapter for IMS/TM 6-21
The Properties tab comprises fields, as listed in the following table:
Generating Outbound Interactions
Oracle Connect requires metadata describing the adapter interactions, including the
structures used to pass information to and from the adapter.
If COBOL copybooks describing the adapter input and output structures are available,
then you can import the adapter definition using the Metadata Import wizard in
Oracle Studio Design perspective to generate interaction metadata. If the metadata is
provided in a number of COBOL copybooks, with different filter settings (such as
whether the first six columns are ignored or not), then you first import the metadata
from copybooks with the same settings and later import the metadata from the other
copybooks.
If COBOL copybooks describing the input and output structures are not available,
then you need to manually define the metadata.
The following information is required during the import procedure:
■The COBOL copybooks: These are copied to the computer running Oracle Studio
as part of the import procedure.
■The names of the IMS/TM transactions to be executed through the application
adapter.
Use the Metadata Import procedure to generate interaction metadata, as follows:
1. In the Configuration explorer, right-click the IMS/TM back-end adapter defined in
"Setting Up an Oracle Connect Adapter" on page 6-19.
2. Select Edit metadata, to display the Metadata tab, with the IMS/TM back-end
adapter displayed under the Adapters list.
3. Right-click the Imports node and select New Import. The New Metadata Import
screen is displayed.
4. Enter a name for the import. The name can contain letters and numbers and the
underscore character only.
Table 6–14 Adapter Properties
Property Description
cachLastTpipe Cache the last transaction pipe used.
cacheXcfConnection Cache the XCF connection information.
maxSessions The maximum number of sessions allowed. The default
value is 5.
racfGroupId The RACF facility group identification.
racfUserId The RACF facility user identification.
tpipePrefix The transaction pipe prefix used to associate between the
transaction and the transaction pipe it is using. The default
is ATTU.
xcfClient The Cross System Coupling Facility client name.
xcfGroup The Cross System Coupling Facility collection of XCF
members to which the connection belongs. A group may
consist of up to eight characters, and may span between
multiple systems.
xcfImsMember The Cross System Coupling Facility group member.
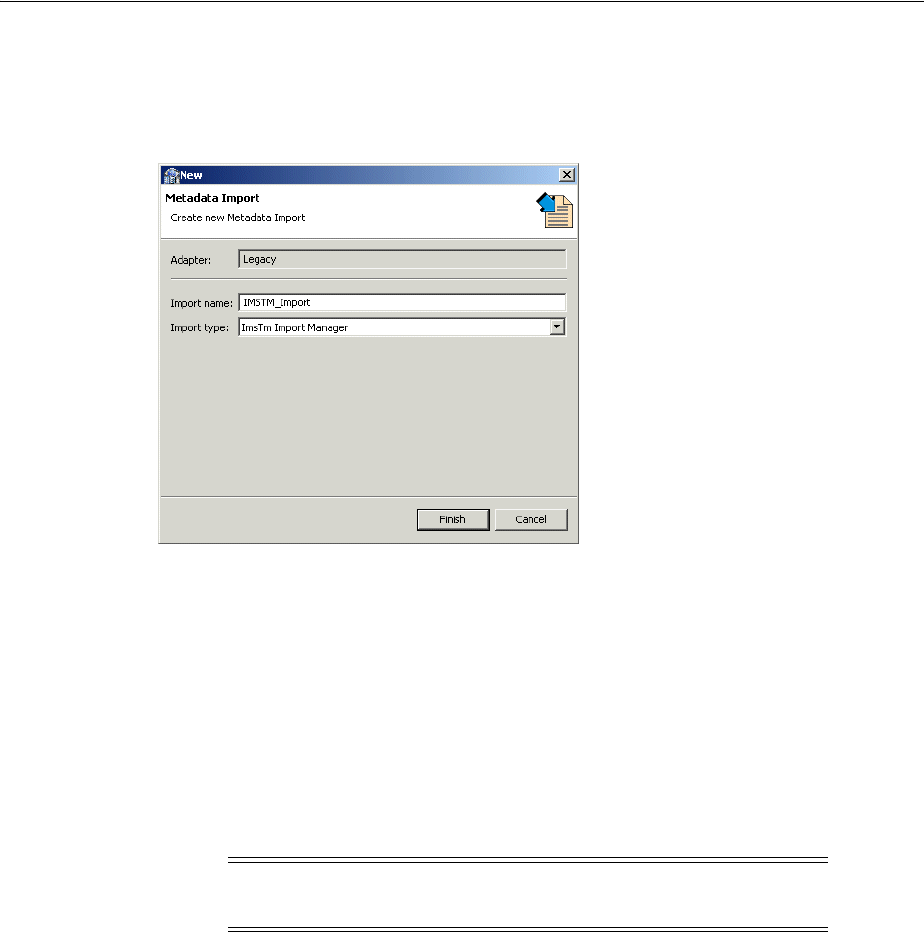
Configuring Oracle Connect
6-22 Oracle Application Server Adapter for IMS/TM User’s Guide
5. Select ImsTm Import Manager from the Import type list as shown in the following
figure:
Figure 6–9 The New Metadata Import screen
6. Click Finish. The Metadata Import wizard is displayed.
7. Click Add. The Add Resources screen is displayed, which provides the option to
select files from the local computer or copy the files from another computer.
8. If the files are on another computer, then right-click My FTP Sites and select Add.
Optionally, double-click Add FTP site. The Add FTP Site screen is displayed.
9. Enter the server name or IP address where the COBOL copybooks reside and enter
a valid username and password to access the computer (if anonymous access is
used, then click Anonymous connection) then click OK.
The FTP site is added to the list of available sites as shown in the following figure:
Note: The selected server is accessed using the username as the
high-level qualifier, enabling you to browse and transfer files.
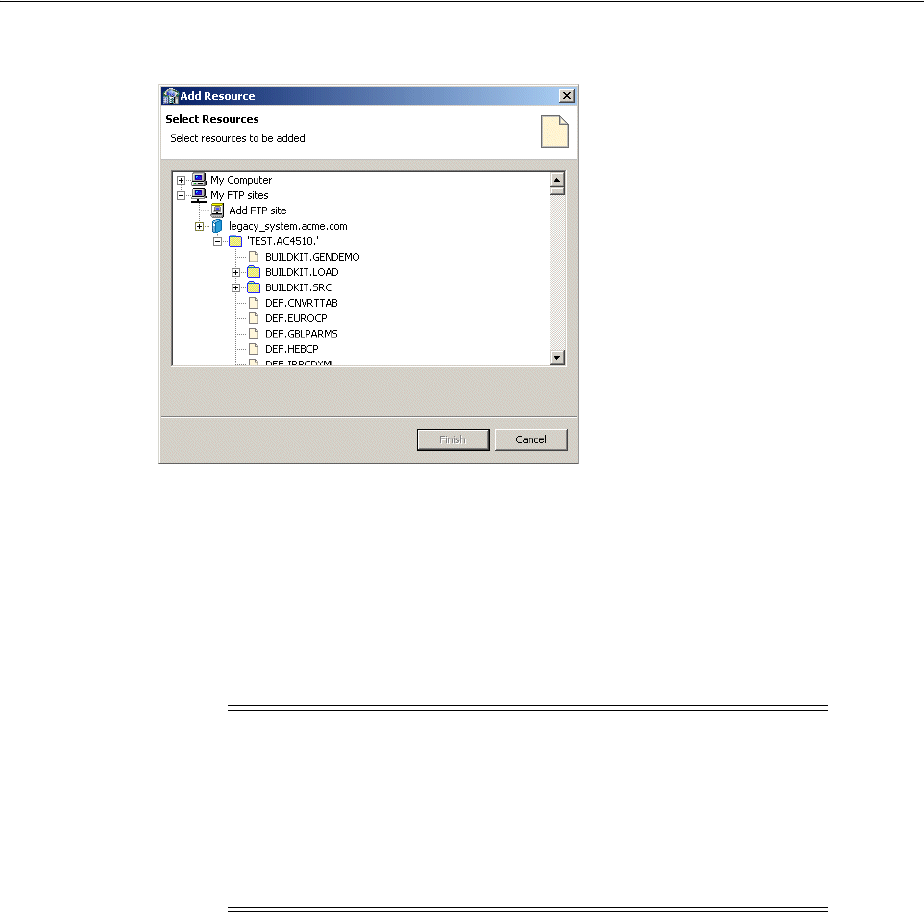
Configuring Oracle Connect
Installing and Configuring OracleAS Adapter for IMS/TM 6-23
Figure 6–10 The Add Resources screen
10. Right-click the computer and select Set Transfer Type. Enter the transfer type
(ASCII or BINARY) and click OK.
11. Expand the list of the added site until you find the necessary COBOL files. To
change the high-level qualifier, right-click the computer and select Change Root
Directory. Enter the new high-level qualifier enclosed in quotes, and click OK.
12. Select the required COBOL copybook file or files and click Finish. The selected file
or files are displayed in the Metadata Import wizard.
13. Click Next. The Apply Filters screen is displayed, as shown in the following
figure:
Note: You can import the metadata from one COBOL copybook
and later add to this metadata by repeating the import procedure
using different COBOL copybooks.
The format of the COBOL copybooks must be identical. That is, you
cannot import a COBOL copybook that uses the first six columns
with a COBOL copybook that ignores the first six columns. In this
type of case you must repeat the import procedure.

Configuring Oracle Connect
6-24 Oracle Application Server Adapter for IMS/TM User’s Guide
Figure 6–11 The Apply Filters screen
14. Apply filters to the copybooks, as needed.
The following table lists the available filters:
Table 6–15 Available Filters
Filter Description
COMP_6 switch The MicroFocus COMP-6 compiler directive. Specify
either COMP-6’1’ to treat COMP-6 as a COMP data type
or COMP-6’2’ to treat COMP-6 as a COMP-3 data type.
Compiler source The compiler vendor.
Storage mode The MicroFocus Integer Storage Mode. Specify either
NOIBMCOMP for byte storage mode or IBMCOMP is for
word storage mode.
Ignore after column
72
Ignores columns 73 to 80 in the COBOL copybook.
IgnoreFirst6 Ignores the first six columns in the COBOL copybook.
Replace hyphens (-)
in record and field
names with
underscores (_)
Replaces all hyphens in either the record or field names in
the metadata generated from the COBOL with underscore
characters.
Prefix nested
columns
Prefix all nested columns with the previous level heading.
Case sensitive Specifies whether to be sensitive to the search string case.
Find Searches for the specified value.
Replace with Replaces the value specified for Find with the value
specified here
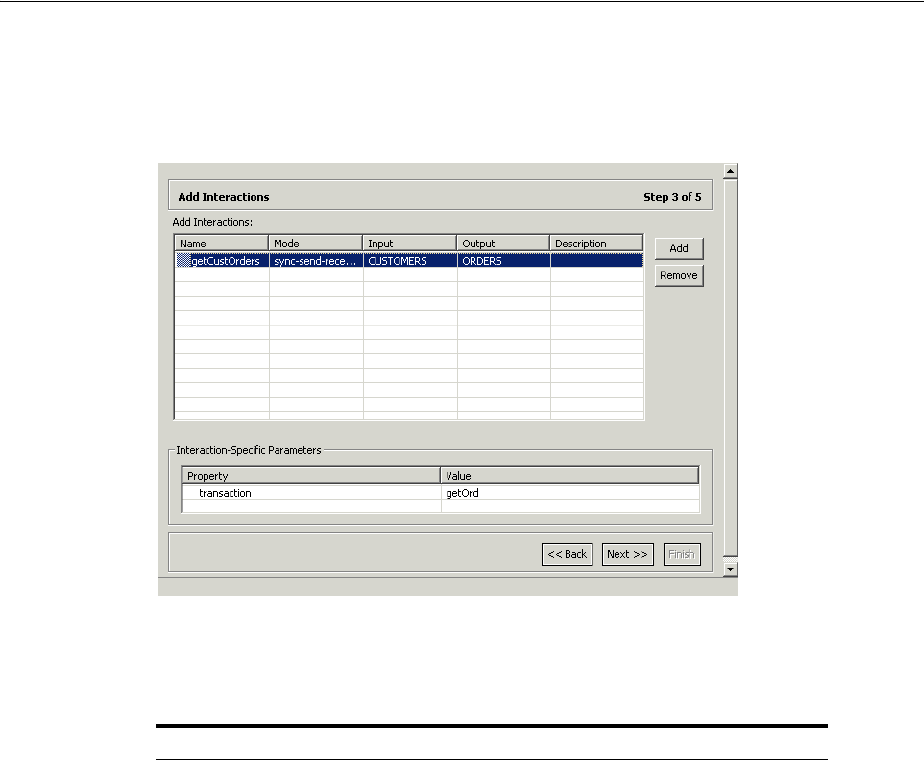
Configuring Oracle Connect
Installing and Configuring OracleAS Adapter for IMS/TM 6-25
15. In the import wizard, click Next. The Add Interactions screen is displayed, as
shown in the following figure:
Figure 6–12 The Add Interactions screen
16. Click Add to add an interaction for the IMS/TM adapter. Provide the information,
as listed in the following table:
Table 6–16 Interaction Parameters
Parameter Description
Name The name of the interaction. You can change the default
name specified.
Mode The interaction mode. You can select one of the following:
sync-send-receive: The interaction sends a request and
expects to receive a response. This is the default mode.
sync-receive: The interaction expects to receive a response
sync-send: The interaction sends a request and does not
expect to receive a response.
Input Identifies an input record. The input record is the data
structure for the interaction. The records generated from
the COBOL files specified at the beginning of the
procedure are listed. Select the relevant record for the
interaction.
Note: You must specify an input record for each
interaction before you can click Next. If the interaction
does not require an input record, then the record specified
here is ignored.
Output Identifies an output record. The output record is the data
structure for the results of the interaction. The records
generated from the files specified at the beginning of the
procedure are listed. Select the relevant record for the
interaction.
Note: You must specify an output record for the
interaction if the mode is set to sync-send-receive or
sync-receive, before you can click Next.

Configuring Oracle Connect
6-26 Oracle Application Server Adapter for IMS/TM User’s Guide
17. Add as many interactions as necessary and click Next to generate the metadata
definitions for the adapter.
18. Specify that you want to transfer the metadata from the Windows computer to the
IBM OS/390 or z/OS platform and click Finish.
The metadata is imported based on the options specified and it is stored on the IBM
OS/390 or z/OS platform. An XML representation of the metadata is also generated.
After performing the import, you can view the metadata in Oracle Studio Design
perspective Metadata tab. You can also make any fine adjustments to the metadata and
maintain it, as necessary.
Viewing the XML Schema
The XML describing the adapter interactions can be viewed in Oracle Studio Design
perspective Metadata Source tab.
A sample Source tab is shown in the following figure:
Description Free text describing the interaction.
Interaction-Specific
Parameters
IMS/TM specific parameters:
c: The interaction commit mode.
maxSegmentSize: The maximum size of the segment. The
default value is 32768 (bytes).
transaction: The name of the transaction that is executed
when the interaction is executed. You must specify a
transaction name for each interaction.
The maxSegmentSize parameter enables dynamically
splitting large messages into smaller segments. Although
the default value can be changed, the logic of IMS/TM
transaction must correspond accordingly. The transaction
must perform a GU call followed by a series of GN calls in
order to compile the entire input message. A transaction
output message, larger than 32K, is handled by the OTMS
C/I interface which performs the task of assembling the
output segments into a single buffer.
See Also: Appendix A, "Advanced Tuning of the Metadata" for
details about fine tuning the adapter metadata
Table 6–16 (Cont.) Interaction Parameters
Parameter Description
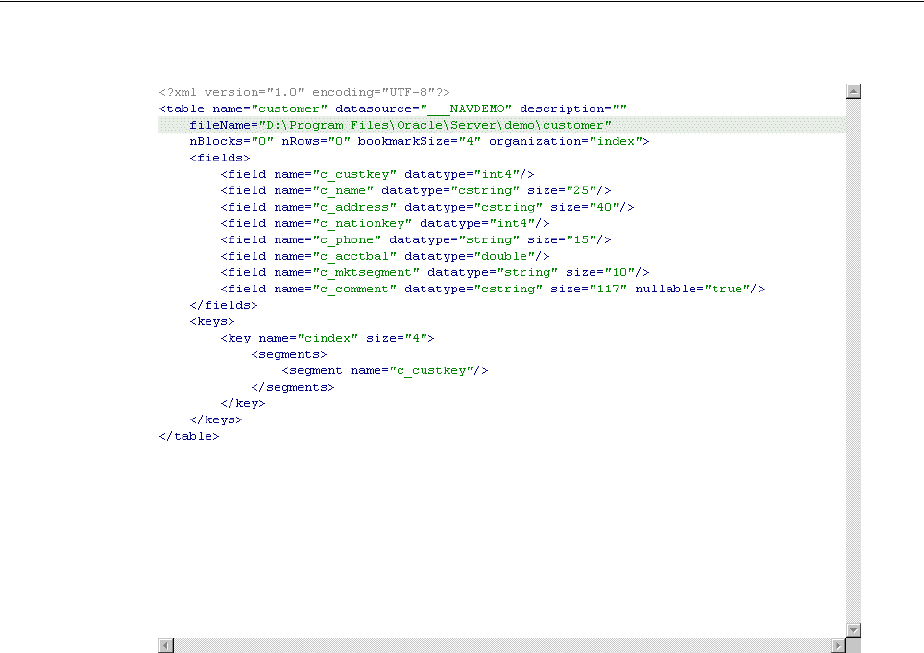
Configuring Oracle Connect
Installing and Configuring OracleAS Adapter for IMS/TM 6-27
Figure 6–13 The Source tab
Creating XML Schemas
The XML schema describing the adapter interactions and the input and output records
for these interactions are created automatically during the import procedure, as
described in "Generating Outbound Interactions" on page 6-21.

Configuring Oracle Connect
6-28 Oracle Application Server Adapter for IMS/TM User’s Guide

Advanced Tuning of the Metadata A-1
A
Advanced Tuning of the Metadata
Oracle Studio enables you to define outbound adapter interactions. In addition, Oracle
Studio defines input and output structures used for these interactions. The interactions
and input and output structures are maintained as metadata in the Metadata tab of
Oracle Studio.
Metadata for the Back-end Adapter
Using Oracle Studio, perform the following steps to maintain the metadata for
OracleAS Adapter for IMS/TM.
1. From the Start menu, select Programs, Oracle, and then select Studio.
2. Expnad the node of the required computer in the Configuration Explorer.
3. Expand the Bindings node.
4. Expand the NAV binding node.
5. Expand the Adapters node to display the adapters.
6. Right-click the IMS/TM adapter in and select Edit Metadata to display the
Metadata tab.
7. Right-click the required interaction in the Metadata Explorer, and select Edit.
The metadata editor opens, displaying the General tab, with general table details. The
following tabs are used to view and edit the metadata:
■General Tab
■Interaction Tab
■Schema General Tab
■Schema Record Tab
■Source Tab
General Tab
Use the General tab to maintain information describing the adapter and the
connection to the adapter.
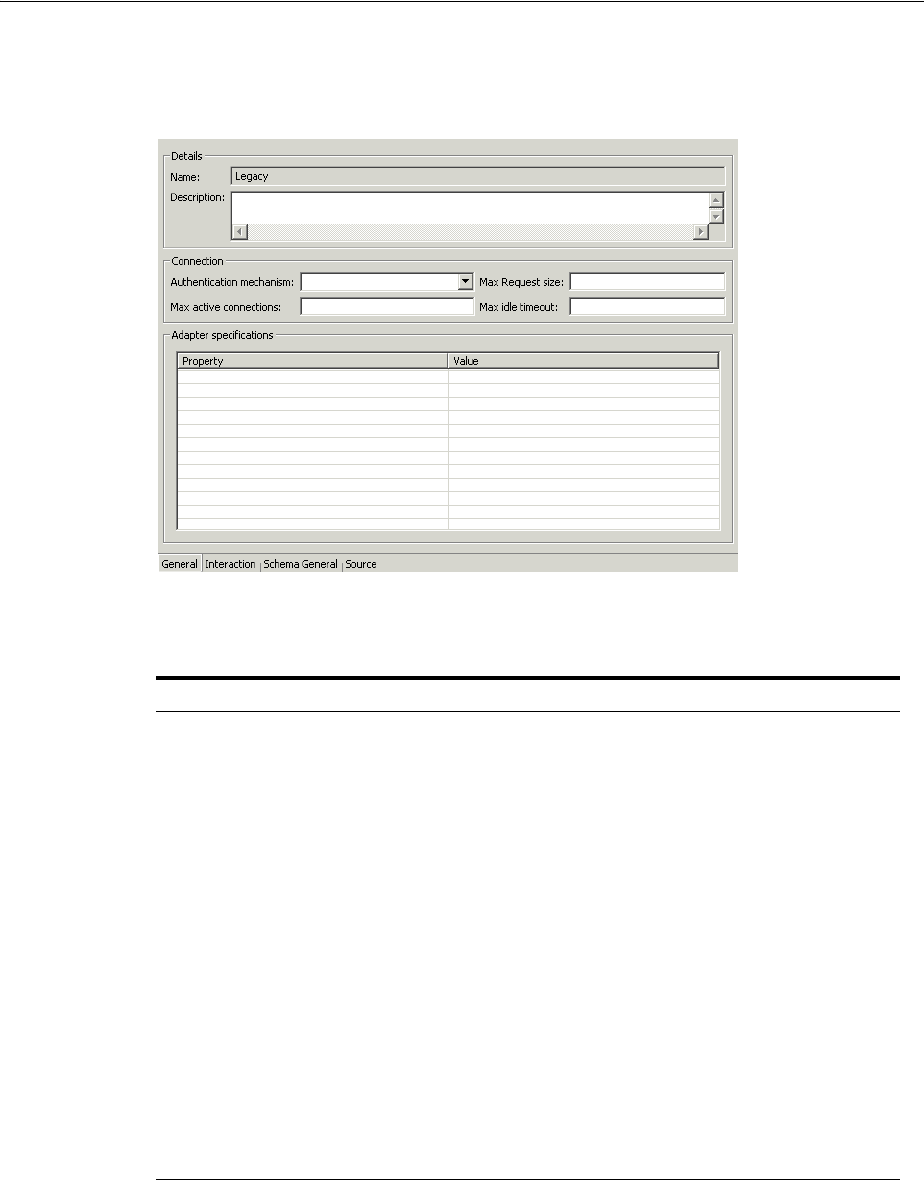
Metadata for the Back-end Adapter
A-2 Oracle Application Server Adapter for IMS/TM User’s Guide
The General tab is shown in the following figure:
Figure A–1 The General tab
The General tab comprises fields, as listed in the following table:
Interaction Tab
Use the Interaction tab to define the general details of the interaction in addition to its
input and output definitions.
The Interactions tab is shown in the following figure:
Table A–1 General tab Components
Field Description
Adapter definition name Specifies the name of the adapter definition.
Description Specifies an identifying description of the adapter.
Authentication mechanism Specifies the authentication method used to access the
adapter. The available mechanisms are:
■kerbv5
■none
■basic password
Max request size Specifies the maximum size in bytes for an XML request or
reply. Larger messages are rejected with an error.
Max active connections Specifies the maximum number of simultaneous
connections for an adapter (per process).
Max idle timeout Specifies the maximum time, in seconds, that an active
connection can stay idle. After that time, the connection is
closed.
Adapter Specifications Specifies the adapter-specific properties for an interaction.
The IMS/TM back-end adapter does not have any
adapter-specific properties.
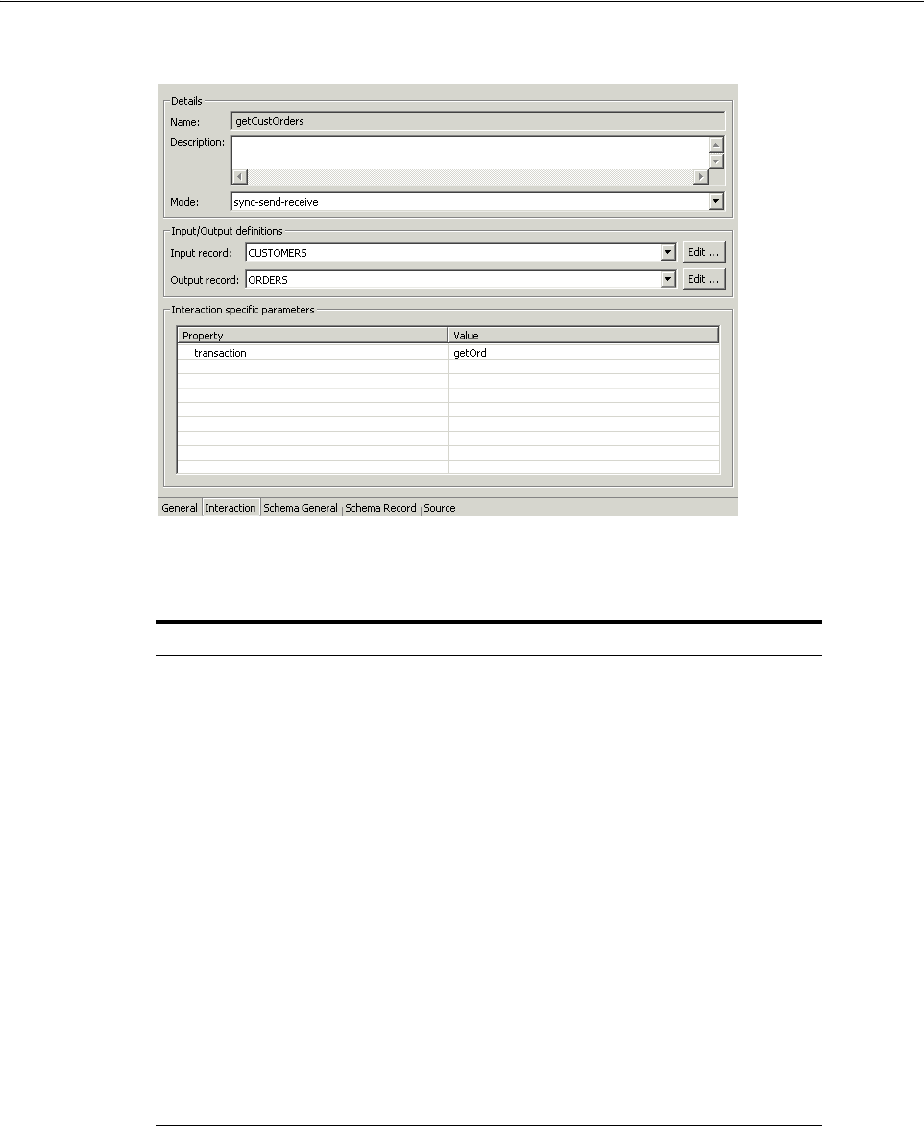
Metadata for the Back-end Adapter
Advanced Tuning of the Metadata A-3
Figure A–2 The Interactions tab
The Interaction tab comprises fields, as listed in the following table:
Schema General Tab
Use the Schema General tab to define the general details of the input and output
record structures for the interaction.
Table A–2 Interaction tab Components
Field Description
Interaction name Specifies the name of the interaction.
Description Provides a descriptive identifier for the interaction.
Mode Determines the interaction mode. The following
interaction modes are available:
■sync-send-receive: The interaction sends a request and
expects to receive a response.
■sync-send: The interaction sends a request and does
not expect to receive a response.
■sync-receive: The interaction expects to receive a
response.
■async-send: Not applicable
Input record Identifies an input record.
Output record Identifies an output record for the results of an interaction.
Interaction Specific
Parameters
Defines the properties and values of parameters specific to
an interaction. The transaction property is available,
which specifies the IMS/TM transaction that is called
when the interaction is executed.
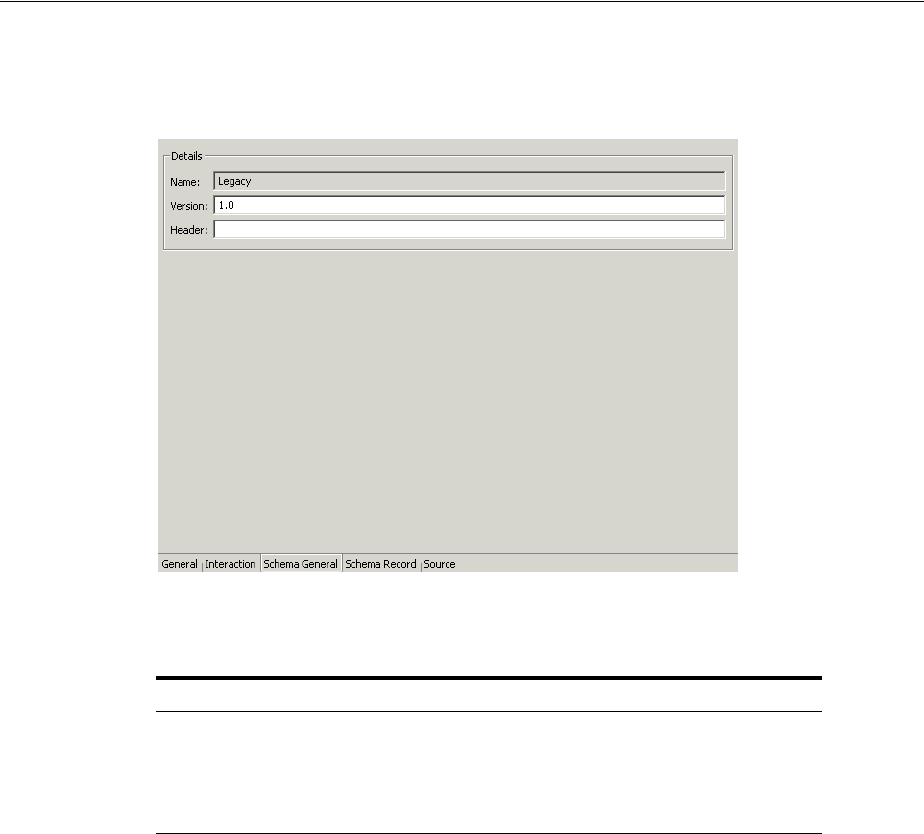
Metadata for the Back-end Adapter
A-4 Oracle Application Server Adapter for IMS/TM User’s Guide
The Schema General tab is shown in the following figure:
Figure A–3 The Schema General tab
The Schema General tab comprises fields, as listed in the following table:
Table A–3 Schema General tab Components
Field Description
Schema name The name of the adapter.
Ver s ion The schema version.
Header A C header file to map between the data structure and the
adapter.
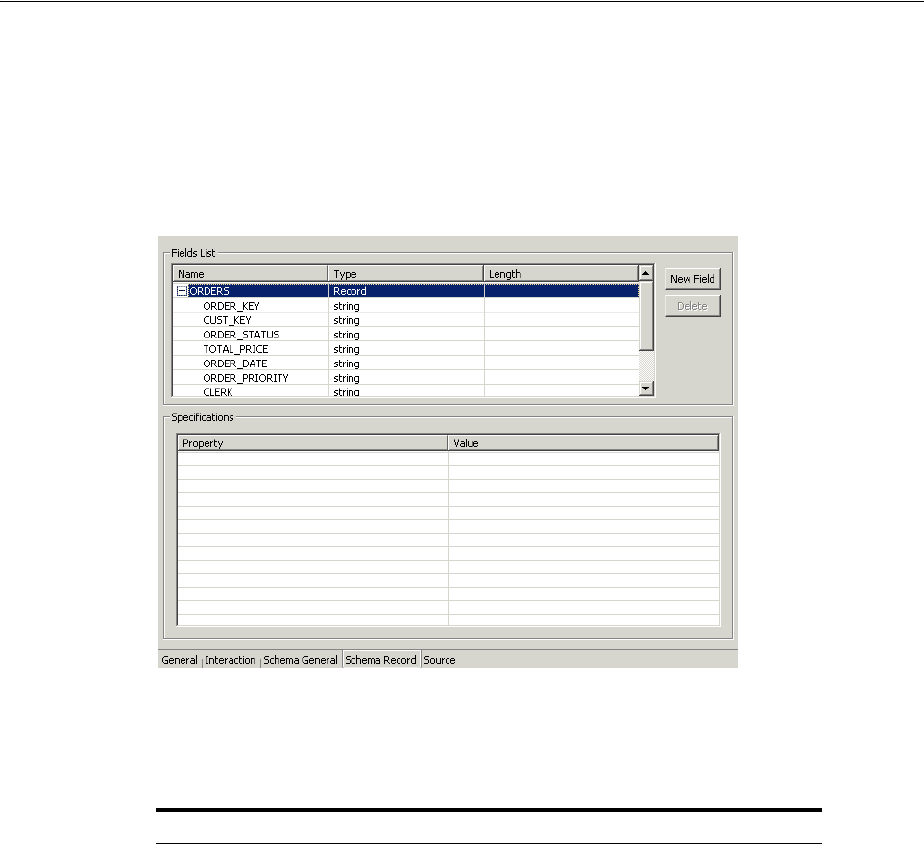
Metadata for the Back-end Adapter
Advanced Tuning of the Metadata A-5
Schema Record Tab
Use the Schema Record tab to define the input and output record structures for the
interaction.
The Schema Record tab is shown in the following figure:
Figure A–4 The Schema Record tab
The Schema Record tab comprises fields, as listed in the following table:
Use the Fields List area to define single data items within a record.
Table A–4 Schema Record tab Components
Field Description
Name Specifies the name of the field.

Metadata for the Back-end Adapter
A-6 Oracle Application Server Adapter for IMS/TM User’s Guide
Type The data type of the field. The following are valid data
types:
■Binary
■Boolean
■Date
■Double
■Float
■Int
■Long
■Numeric
■Short
■String
■Time
■Timestamp
■XML
See Also: Appendix B, "Back-end Adapter Data Type
Support" for details about the mapping from COBOL data
types to IMS/TM back-end adapter data types.
Length The size of the field including a null terminator, when the
data type supports null termination.
Note: Use the Specifications box to specify field properties.
See Also: Appendix B, "Back-end Adapter Data Type Support"
for details about the mapping from COBOL data types to Oracle
Connect data types.
Table A–4 (Cont.) Schema Record tab Components
Field Description
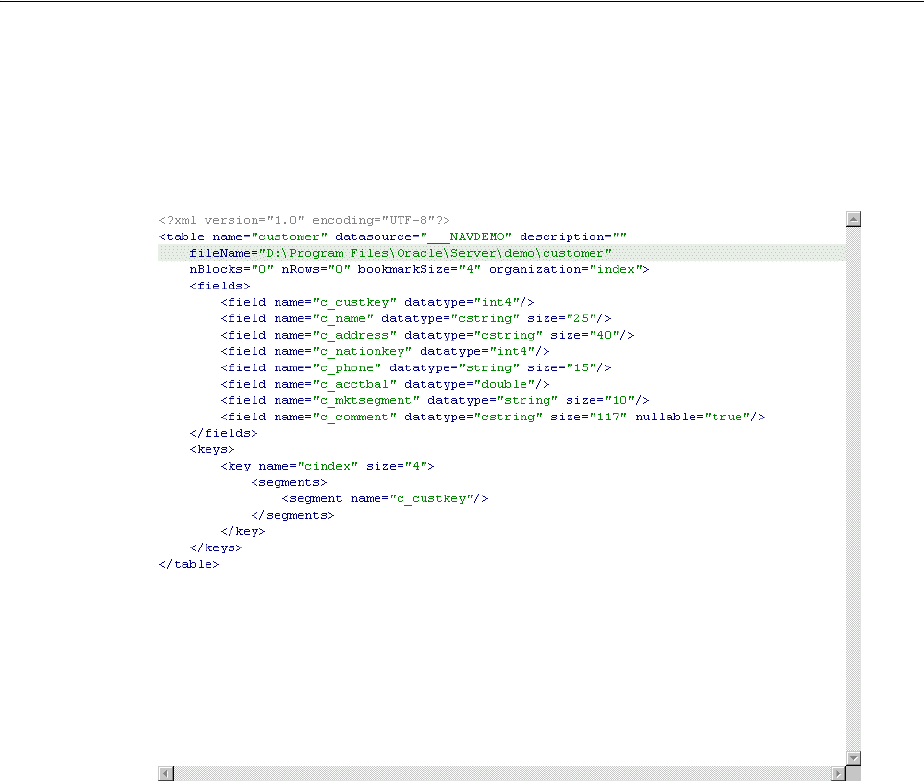
Metadata for the Back-end Adapter
Advanced Tuning of the Metadata A-7
Source Tab
The Source tab displays the XML representation of the adapter metadata.
A sample Source tab is displayed in the following figure:
Figure A–5 The Source tab

Metadata for the Back-end Adapter
A-8 Oracle Application Server Adapter for IMS/TM User’s Guide

Back-end Adapter Data Type Support B-1
B
Back-end Adapter Data Type Support
OracleAS Adapters for IMS/TM supports a number of data types that are used when
defining metadata in Oracle Studio. The data types are mapped from the COBOL data
types during the import procedure.
Data Type Mapping
The COBOL data type COMP, in the table is an abbreviation for, and synonymous with,
COMPUTATIONAL. Square brackets ([ ]) denote optional qualifiers for some COBOL
compilers, which may not be allowed for other COBOL compilers.
Note: The mapping of data types between OracleAS Adapters for
IMS/TM and Oracle Application Server is performed internally by
Oracle Connect.
Table 6–17 Data Type Mapping: COBOL and Oracle Connect Back-end Adapter
COBOL Data Type Oracle Connect Data Type
BINARY (with fractional data) string
BINARY (without fractional data) int
COMP (with fractional data) string
COMP (without fractional data) int
COMP-2 double
COMP-3 string
COMP-4 (with fractional data) string
COMP-4 (without fractional data) int
COMP-5 (with fractional data) string
COMP-5 (without fractional data) int
COMP-X (with fractional data) string
COMP-X (without fractional data) int
INDEX int
[SIGN [IS]] LEADING string
[SIGN [IS]] LEADING SEPARATE
[CHARACTER]
string
NATIVE-2 int

Data Type Mapping
B-2 Oracle Application Server Adapter for IMS/TM User’s Guide
NATIVE-4 int
NATIVE-8 string
PACKED-DECIMAL string
POINTER int
[SIGN [IS]] TRAILING string
[SIGN [IS]] TRAILING SEPARATE
[CHARACTER]
string
Table 6–17 (Cont.) Data Type Mapping: COBOL and Oracle Connect Back-end Adapter
COBOL Data Type Oracle Connect Data Type

Advanced Tuning of the Daemon C-1
C
Advanced Tuning of the Daemon
The daemon configuration is managed using Oracle Studio. Daemon configuration is
divided into the following groups:
■Daemon Control
■Daemon Logging
■Daemon Security
■Workspaces
Daemon Control
Using the Daemon Control tab, you define various daemon control options. The
Daemon Control tab is accessed as follows:
1. From the Start menu, select Programs, Oracle, and then select Studio.
2. Select the required computer from the Configuration Explorer.
3. Right-click the computer and select Open Runtime Perspective.
4. Right-click the required daemon in the Runtime Explorer and select Edit Daemon
Configuration. The Daemon Control tab is displayed.
5. After making changes to the daemon, right-click the daemon and select Reload
Configuration.
The Daemon Control tab is shown in the following figure:
Note: You can also change daemon settings using the
Configuration Explorer, by selecting a computer and scrolling the
list to the required daemon. Right-click the daemon and select Edit
Daemon.
Changes made to the daemon configuration are only implemented
after the configuration is reloaded using the Reload Configuration
option in the Runtime Manager perspective.
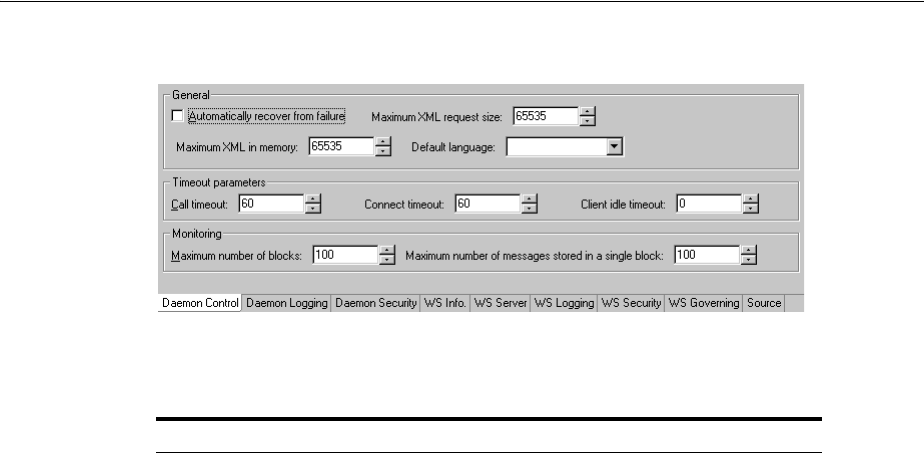
Daemon Control
C-2 Oracle Application Server Adapter for IMS/TM User’s Guide
Figure 6–14 The Daemon Control tab
The Daemon Control tab comprises fields, as listed in the following table:
Table 6–18 Daemon Control tab Components
Field Description
Automatically
recover from failure
The daemon restarts automatically if it fails for any reason
(any error that causes the daemon process to terminate,
such as network process lost or the CPU running the
daemon crashes and the backup daemon is defined on
another CPU). All available and unconnected servers are
terminated and any connected servers are marked and
terminated on release. Also the backup starts a backup for
itself. The backup appends a new log file to the log of the
original daemon, adding a line indicating that a backup
daemon was started.
Maximum XML
request size
The maximum number of bytes that the daemon handles
for an XML document.
Maximum XML in
memory
The maximum amount of space reserved for the XML in
memory.
Default language The language that the daemon supports. This setting is
used when working with a client with a code page
different from the server code page.
Call timeout The timeout period for short calls for all daemons. The
definition of a short call is a call that should be completed
in a few seconds. For example, most calls to a database
such as DESCRIBE should be completed in a few seconds
as opposed to call like a GETROWS call, which can take a
long time. In heavily loaded or otherwise slow systems,
even short calls such as calls to open a file, may take a
significant amount of time. If a short call takes more than
the specified time to complete, then the connection is
stopped. The default value for this parameter is 60
seconds. Values of less than 60 seconds are considered to
be 60 seconds.
Specifying the timeout in a workspace overrides the value
set in this field for that workspace.

Daemon Logging
Advanced Tuning of the Daemon C-3
Daemon Logging
Using the Daemon Logging tab, you define the daemon log file settings, the log file
structure and the location where the log is saved. In addition, use it to define the data
that is logged and traced in the file.
The Daemon Logging tab is accessed as follows:
1. From the Start menu, select Programs, Oracle, and then select Studio.
2. Select the required computer from the Configuration Explorer.
3. Right-click the computer and select Open Runtime Perspective.
4. Right-click the daemon in the Runtime Explorer and select Edit Daemon
Configuration.
5. Click the Daemon Logging tab.
6. After making changes to the daemon, right-click the daemon and select Reload
Configuration.
7. Right-click the daemon and select End Unused Servers. Any servers in the
connection pool are closed and new servers start with the new configuration.
The Daemon Logging tab is shown in the following figure:
Connect timeout The time the client waits for a daemon server to start. If
the daemon server does not start within this period, then
the client is notified that the server did not respond. The
value specified for this parameter serves as the default
timeout for all the workspaces listed in the daemon
configuration. The default value for this parameter is 60
seconds.
Notes:
■Entering the timeout in a workspace overrides the
value set in this field for that workspace.
■Even if the XML source does not list this parameter in
the workspace section, the workspace gets it using the
default value. If you want to prevent a workspace
from using the default value, you must enter a value
of zero for this parameter in the workspace section.
Client idle timeout The maximum amount of time any daemon client may be
idle before the connection with the server is closed.
Specifying the timeout in a Workspace overrides this
setting for that workspace.
Note: You can also change daemon settings using the
Configuration Explorer, by selecting a computer and scrolling the
list to the required daemon. Right-click the daemon and select Edit
Daemon.
Changes made to the daemon configuration are only implemented
after the configuration is reloaded using the Reload Configuration
option in the Runtime Manager perspective.
Table 6–18 (Cont.) Daemon Control tab Components
Field Description
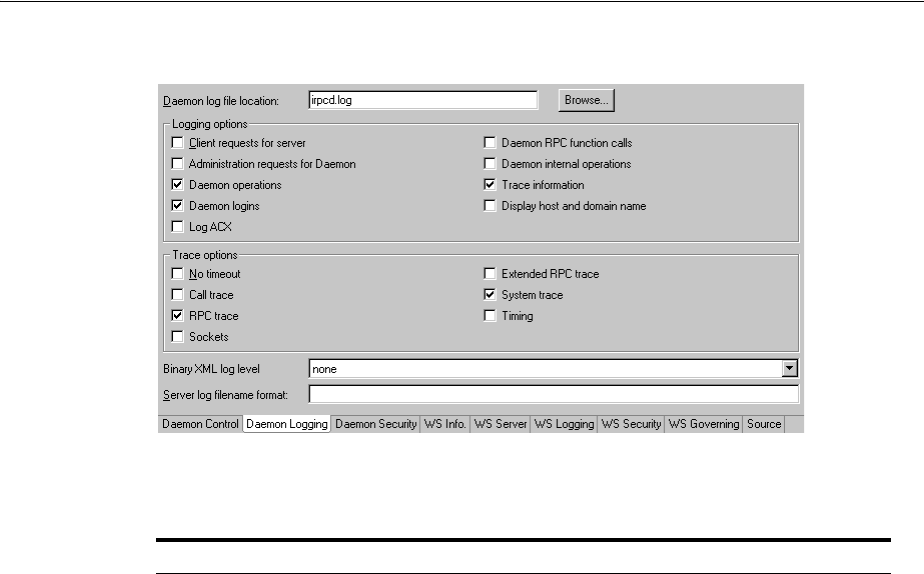
Daemon Logging
C-4 Oracle Application Server Adapter for IMS/TM User’s Guide
Figure 6–15 The Daemon Logging tab
The Daemon Logging tab comprises fields, as listed in the following table:
Table 6–19 Daemon Logging tab Components
Field Description
Daemon log file location Specifies the daemon produces its log data. The full path
must be specified.
Logging options Specifies what tracing is performed.
Client requests for server Logs client requests for server activations; this provides
logging of the process IDs of the started servers along with
the location of the log files.
Administration requests for
daemon
Logs all of the administration requests for the daemon.
Daemon operations Logs all of the daemon operations.
Daemon logins Logs daemon logins.
Daemon RPC function calls Logs all daemon RPC function calls.
Daemon internal operations Logs daemon internal operations.
Log trace information Logs low-level RPC operations.
Display host and client
domain name
Specifies whether the client host and domain name are
logged rather than the client IP address. The default is
false.
Trace options Specifies the type of tracing being performed.
No timeout Disables the standard RPC timeouts, setting them to a long
duration (approximately an hour) to facilitate debugging.
Call trace Generates a message in the server log file for each RPC
function called. This is useful for troubleshooting the
server.
RPC trace Enables debugging messages on the server.
Sockets Generates a message in the server log file for each socket
operation.
Extended RPC trace Generates a verbose message in the server log file for each
low-level RPC function called. This is useful for
troubleshooting the server.

Daemon Security
Advanced Tuning of the Daemon C-5
The following tokens can appear in the log file template and will be replaced
accordingly:
■%A: workspace name
■%D: date (yymmdd)
■%I: instance number of the given workspace server
■%L: server account login directory
■%P: server process ID
■%T: time (hhmmss)
■%U: server account name (username)
For example, %L/server_%A%I.log may produce a log file such as:
/usr/smith/server_sales15.log.
The default log file template is %L/server_%A%I.log.
Daemon Security
The Daemon Security tab is used to:
■Grant administration rights for the daemon.
■Determine access to the computer.
The Daemon Security tab is accessed as follows:
1. From the Start menu, select Programs, Oracle, and then select Studio.
2. Select the required computer from the Configuration Explorer.
3. Right-click the computer and select Open Runtime Perspective.
4. Right-click the daemon in the Runtime Explorer and select Edit Daemon
Configuration.
5. Click the Daemon Security tab.
6. After making changes to the daemon, right-click the daemon and select Reload
Configuration.
System trace Generates system-specific tracing of various operations.
Timing Generates a timestamp for every entry to the server log
file.
Binary XML log level Sets the binary XML log level. Your options are:
■debug
■none (the default)
■api
■info
Server log filename format Defines the name and location of the server log file. The
field must specify the full path name. If no directory
information is provided for the log file, then it will be
located in the login directory of the account running
Oracle Connect workstation.
Table 6–19 (Cont.) Daemon Logging tab Components
Field Description
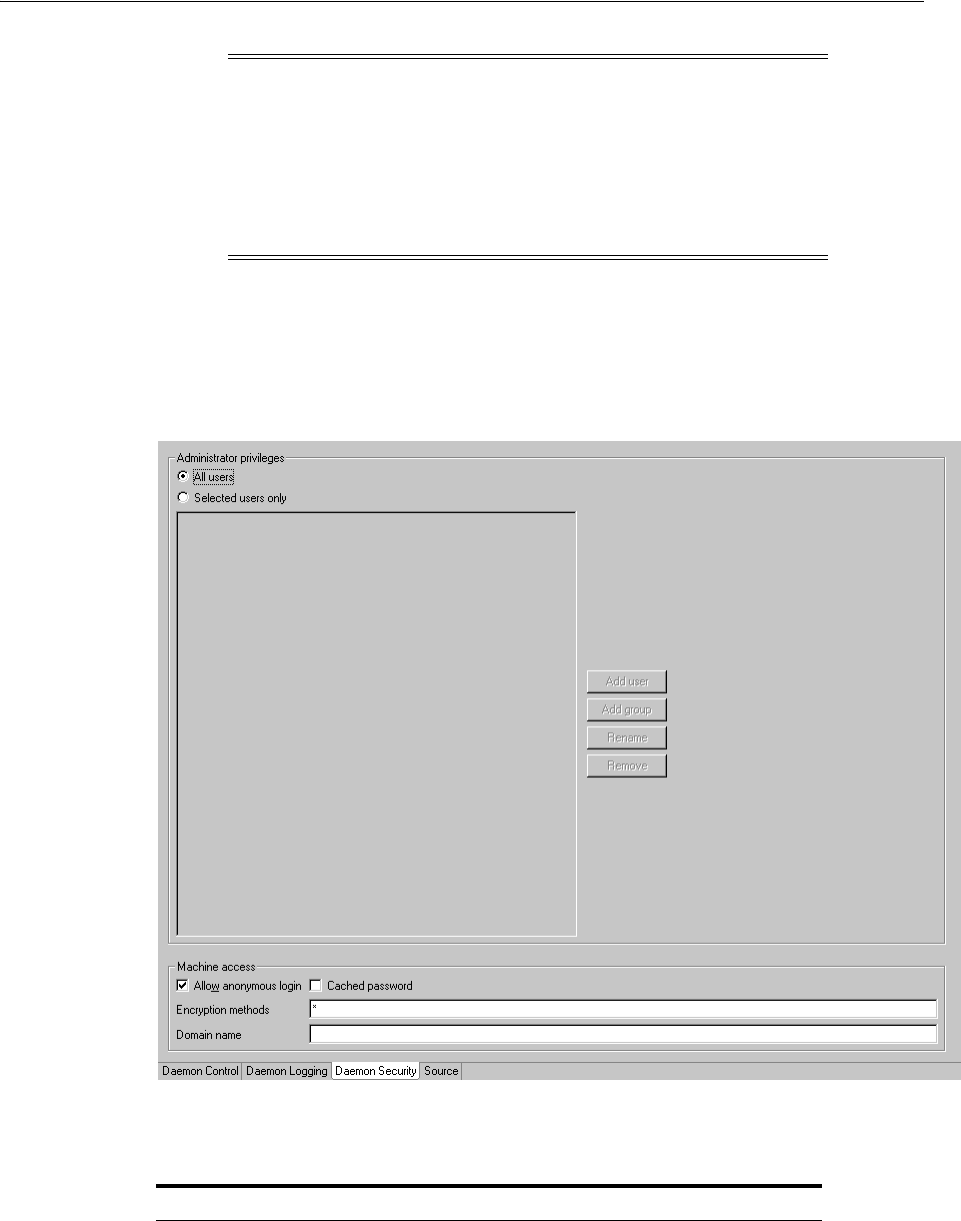
Daemon Security
C-6 Oracle Application Server Adapter for IMS/TM User’s Guide
7. Right-click the daemon and select End Unused Servers. Any servers in the
connection pool are closed and new servers start with the new configuration.
The Daemon Security tab is shown in the following figure:
Figure 6–16 The Daemon Security tab
The Daemon Security tab comprises fields, as listed in the following table:
Note: You can also change daemon settings using the
Configuration Explorer, by selecting a computer and scrolling the
list to the required daemon. Right-click the daemon and select Edit
Daemon.
Changes made to the daemon configuration are not implemented.
They are only implemented after the configuration is reloaded
using the Reload Configuration option in the Runtime Manager.
Table 6–20 Daemon Security tab Components
Field Description
Administrators
privileges
Identifies the users (accounts) allowed to perform
administrative tasks (tasks that require administrative
login).
All users Enables all users to access the daemon and change the
settings.

Workspaces
Advanced Tuning of the Daemon C-7
Workspaces
A daemon can include a number of workspaces. A workspace defines the server
processes and environment that are used for the communication between the client
and the server for the duration of the client request. Each workspace has its own
definition. The workspace definition is divided into the following groups:
■WS Info.
■WS Server
■WS Logging
■WS Security
■WS Governing: This tab is not applicable for use with OracleAS Adapters for
IMS/TM
WS Info.
Using the WS Info. tab, you specify the features that control the operation of the
workspace, such as the server type, the command procedure used to start the
workspace and the binding configuration associated with this workspace.
The WS Info. tab is accessed as follows:
1. From the Start menu, select Programs, Oracle, and then select Studio.
2. Select the required computer from the Configuration Explorer.
3. Right-click the computer and select Open Runtime Perspective.
Selected users only Identifies the names of users (accounts) and groups that
can be administrators.1
If a user is not specified, the account from which the
daemon was started is considered the administrator. Note
that the daemon does not require the user to log in to the
account on the system, but to log in to the daemon using
the account name and password.
Machine access Manages access to the computer.
Allow anonymous
login
Whether workspaces allow anonymous logins (without
user name/password entries). For the optimal level of
security, keep this option unchecked and define a
username for the Daemon Administrators parameter. If
unchecked, then no workspace can have an anonymous
client. If checked, then a particular workspace allows
anonymous clients.
Cached password Enables login passwords to be cached. This enhances
performance by reducing login times for future
connections from the same client in a session.
Encryption methods Specifies the encryption method used to send information
across the network. The default is an asterisk (*), meaning
that all methods are acceptable. If an encryption method is
specified, it must be used. The RC4 and DES3 protocols
are currently supported.
1The name is prefixed with ’@’, to utilize the operating system GROUP feature.
Table 6–20 (Cont.) Daemon Security tab Components
Field Description
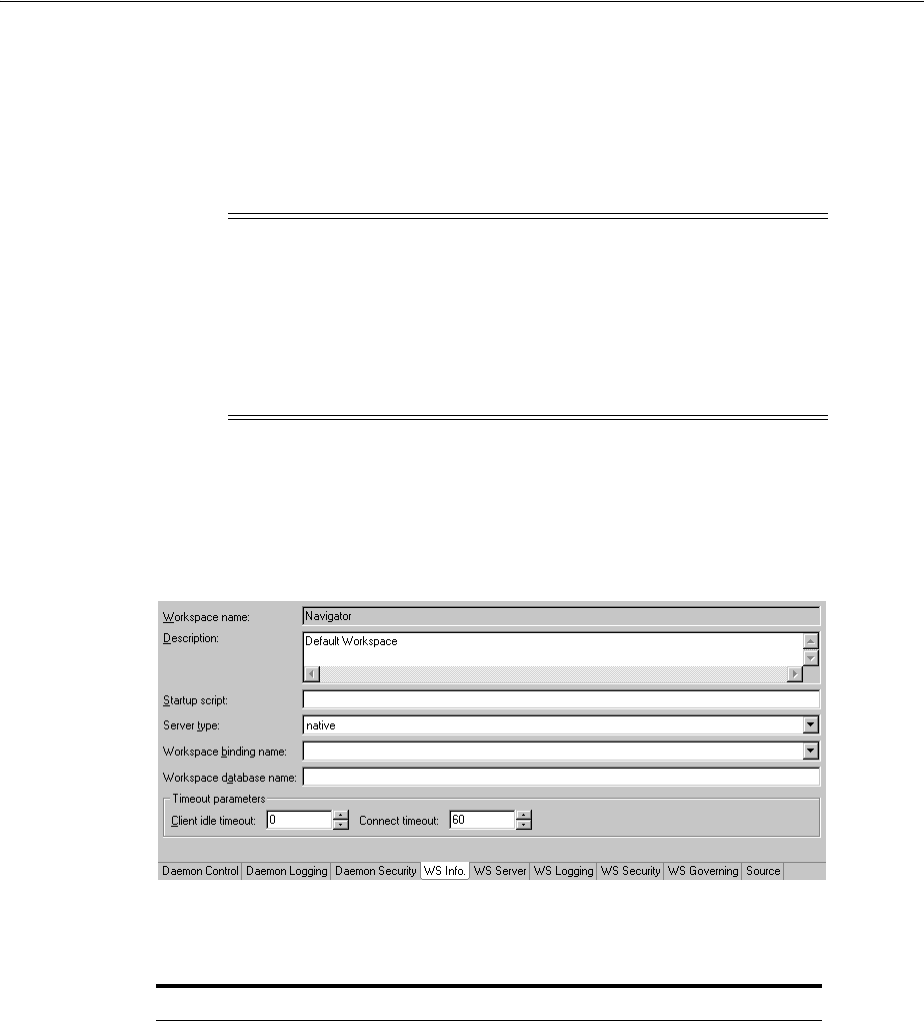
Workspaces
C-8 Oracle Application Server Adapter for IMS/TM User’s Guide
4. Expand the Daemons node to display the workspaces in the Runtime Explorer.
5. Right-click the workspace and select Edit Workspace Configuration. The WS Info.
tab opens.
6. After making changes to the workspace, right-click the daemon and select Reload
Configuration.
7. Right-click the daemon and select End Unused Servers. Any servers in the
connection pool are closed and new servers start with the new configuration.
The WS Info. tab is shown in the following figure:
Figure 6–17 The WS Info tab
The WS Info. tab comprises fields, as listed in the following table:
Note: You can also change daemon settings using the
Configuration Explorer, by selecting a computer and scrolling the
list to the required daemon. Right-click the daemon and select Edit
Daemon.
Changes made to the daemon configuration are not implemented.
They are only implemented after the configuration is reloaded
using the Reload Configuration option in the Runtime Manager.
Table 6–21 WS Info tab Components
Field Description
Workspace name The name used to identify the workspace.
Note: The default configuration includes the default
Navigator workspace. This workspace is automatically
used if a workspace is not specified as part of the
connection settings.
Description A description of the workspace.
Startup script The full path name of the script that starts the workspace
server processes. The script specified here must always
activate the nav_login procedure and then run the
server program (svc). If you do not specify the directory,
the startup procedure is taken from the directory where
the daemon resides. Oracle Connect includes a default
startup script, which it is recommended to use.

Workspaces
Advanced Tuning of the Daemon C-9
WS Server
Using the WS Server tab, you specify the features that control the operation of the
servers started up by the workspace and allocated to clients.
For example, you can configure the workspace to start up a number of servers for
future use, prior to any client request, instead of starting each server when a request is
received from a client.
The WS Server tab is accessed as follows:
1. From the Start menu, select Programs, Oracle, and then select Studio.
2. Select the required computer from the Configuration Explorer.
3. Right-click the computer and select Open Runtime Perspective.
4. Expand the Daemons node to display the workspaces in the Runtime Explorer.
5. Right-click the workspace and select Edit Workspace Configuration.
6. Click the WS Server tab.
7. After making changes to the workspace, right-click the daemon and select Reload
Configuration.
Server type This field is not applicable for use with OracleAS Adapters
for IMS/TM.
Workspace binding
name
This field is not applicable for use with OracleAS Adapters
for IMS/TM.
Timeout parameters The time the client waits for the workspace server to start.
If the workspace server does not start within this period,
then the client is notified that the server did not respond.
Specifying the timeout here overrides the default setting,
specified in the Control section.
See Also: "Daemon Control" on page C-1 for details about
the Daemon Control section.
Client idle timeout The maximum amount of time a workspace client can be
idle before the connection with the server is closed.
Connect timeout The time the client waits for a workspace server to start. If
the workspace server does not start within this period,
then the client is notified that the server did not respond.
Notes:
■You can also change daemon settings using the Configuration
Explorer, by selecting a computer and scrolling the list to the
required daemon. Right-click the daemon and select Edit
Daemon.
■Changes made to the daemon configuration are not
implemented. They are only implemented after the
configuration is reloaded using the Reload Configuration
option in the Runtime Manager.
Table 6–21 (Cont.) WS Info tab Components
Field Description
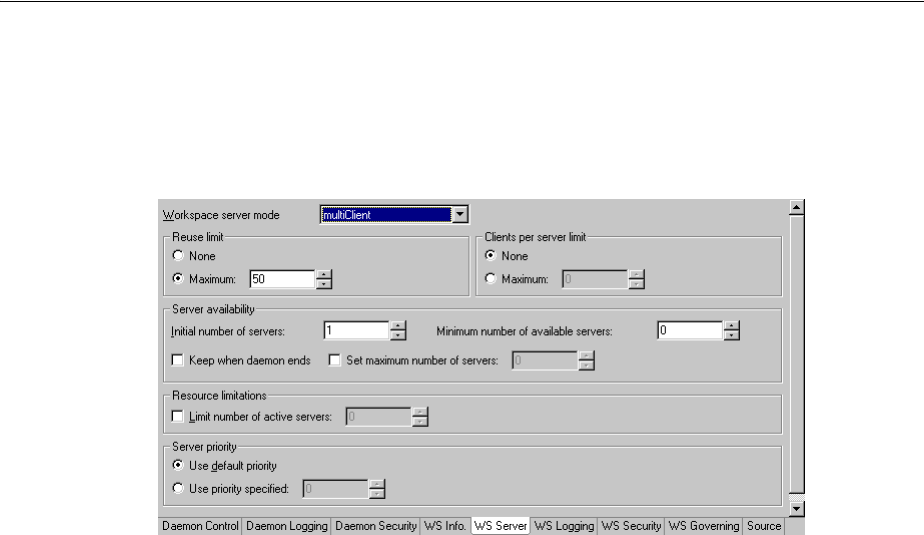
Workspaces
C-10 Oracle Application Server Adapter for IMS/TM User’s Guide
8. Right-click the daemon and select End Unused Servers. Any servers in the
connection pool are closed and new servers start with the new configuration.
The WS Server tab is shown in the following figure:
Figure 6–18 The WS Server tab
The WS Server tab comprises fields, as listed in the following table:

Workspaces
Advanced Tuning of the Daemon C-11
Table 6–22 WS Server tab Components
Field Description
Workspace server
mode
Specifies the type of new server processes that the daemon
starts up. The daemon supports the following server
modes:
■singleClient: Each client receives a dedicated
server process. The account in which a server process
runs is determined either by the client login
information or by the specific server workspace.
This mode enables servers to run under a particular
user account and isolates clients from each other, as
each receives its own process. However, this server
mode incurs a high overhead due to process startup
times and can use a lot of server resources as it
requires as many server processes as concurrent
clients.
■multiClient: Clients share a server process and are
processed serially. This mode has low overhead
because the server processes are already initialized.
However, because clients share the same process, they
can impact one another, especially if they issue
lengthy queries. The number of clients that share a
process is determined by the Clients per server limit
field.
■multiThreaded: This mode is not applicable for use
with OracleAS Adapter for IMS/TM.
■reusable: An extension of single-client mode. Once
the client processing finishes, the server process does
not die and can be used by another client, reducing
startup times and application startup overhead.
This mode does not have the high overhead of
single-client mode because the servers are already
initialized. However, this server mode can use a lot of
server resources as it requires as many server
processes as concurrent clients.
Note: The other modes can be set so that the server
processes are reusable. The number of times a process
can be reused is controlled by the Reuse limit field
value.
Reuse limit Sets the maximum number of times a particular server can
be reused. A one-client server can be reused after its
(single) client has disconnected. Reuse of servers enhances
startup performance because it avoids the need to repeat
initialization. The default for this field is none (0),
indicating that server reuse is unlimited. This parameter is
disabled only if the server mode value is singleClient.
Clients per server
limit
Sets the maximum number of clients a server process for
the current workspace accepts. The default for this field is
none (0), indicating that the number of clients for each
server is unlimited. This field is enabled only if the server
mode value is multiClient or multiThreaded.

Workspaces
C-12 Oracle Application Server Adapter for IMS/TM User’s Guide
Server availability Specifies the number of servers in a pool of servers,
available to be assigned to a client.
The following options are available:
■Initial number of servers: The number of server
processes that are prestarted for this workspace when
the daemon starts up. When the number of available
server processes drops lower than the value specified
in the Minimum number field, the daemon again
starts server processes until this number of available
server processes is reached. The default for this field
is 0.
■Minimum number: The minimum number of server
processes in the prestarted pool before the daemon
resumes creating new server processes (to the value
specified in the Initial number of servers field). If this
field is set to a value higher than the Initial number of
servers field, the daemon uses the value specified in
the Initial number of servers field. The default for this
field is 0.
■Keep when daemon ends: When a daemon is
shutdown, all the servers started by that daemon are
also killed, even if they are active. Set this field to
true if you want the servers for the workspace to
remain active, even after the daemon has been shut
down. If this field is set to true, it is the
responsibility of the system operator or manager to
ensure that the servers are eventually killed. This
must be done at the system level.
■Set maximum number of servers: The maximum
number of available server processes. Once this
number is reached, no new nonactive server processes
are created for the particular workspace. For example,
if a number of server processes are released at the
same time, so that there are more available server
processes than specified by this field, the additional
server processes higher than this value are
terminated. The default for this field is zero, meaning
that there is no maximum.
Table 6–22 (Cont.) WS Server tab Components
Field Description

Workspaces
Advanced Tuning of the Daemon C-13
WS Logging
Using the WS Logging tab, you specify parameters to log, that occur with the
workspace server process.
The WS Logging tab is accessed as follows:
1. From the Start menu, select Programs, Oracle, and then select Studio.
2. Select the required computer from the Configuration Explorer.
3. Right-click the computer and select Open Runtime Perspective.
4. Expand the Daemons node to display the workspaces in the Runtime Explorer.
5. Right-click the workspace and select Edit Workspace Configuration.
6. Click the WS Logging tab.
7. After making changes to the workspace, right-click the daemon and select Reload
Configuration.
resource limitations Specifies the number of servers that can be in use at any
one time. The more servers used, the greater the system
resources that are used.
The following options are available:
■Number of subtasks: The number of subtasks for a
server that are prestarted for this workspace when the
daemon starts up. Thus, setting 10 prestarted servers
and 10 subtasks results in 100 tasks started (10
subtasks for each process).
■Limit number of active servers: The maximum
number of active server processes (either available or
in use). Once reached, no new server processes will be
created for the particular workspace and client
connections would be rejected if there is no available
server to accept them. Once the number of active
servers drops below the maximum (for example, a
client disconnects from a server and the server
terminates), new servers can again be started. If the
value of this field is set to a nonzero value lower than
the value for the Initial number of servers field, the
daemon assumes it is set to the same value as the
Initial number of servers field. The default for this
field is 0, meaning that no maximum is enforced.
Server Priority The priority for servers. For example, a workspace for
applications with online transaction processing can be
assigned a higher priority than a workspace that requires
only query processing.
The following priority options are available:
■Use default priority: Sets the priority as 0. There is no
specific priority for this workspace.
■Use priority: Enables setting the priority.
Table 6–22 (Cont.) WS Server tab Components
Field Description
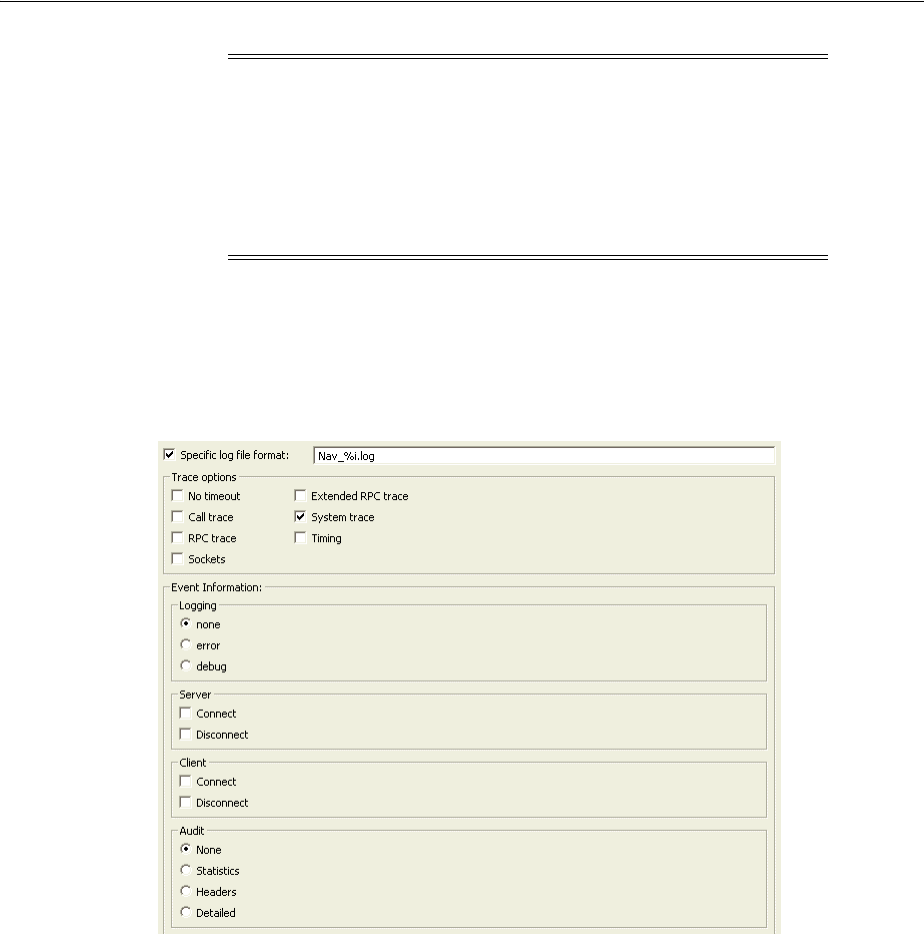
Workspaces
C-14 Oracle Application Server Adapter for IMS/TM User’s Guide
8. Right-click the daemon and select End Unused Servers. Any servers in the
connection pool are closed and new servers start with the new configuration.
The WS Logging tab is shown in the following figure:
Figure 6–19 The WS Logging tab
The WS Logging tab comprises fields, as listed in the following table:
Note: You can also change daemon settings using the
Configuration Explorer, by selecting a computer and scrolling the
list to the required daemon. Right-click the daemon and select Edit
Daemon.
Changes made to the daemon configuration are not implemented.
They are only implemented after the configuration is reloaded
using the Reload Configuration option in the Runtime Manager.

Workspaces
Advanced Tuning of the Daemon C-15
Table 6–23 WS Logging tab Components
Field Description
Specific log file
format
Defines the name and location of the server log file if you
want the data written to a file instead of SYSOUT for the
server process. The parameter must specify the name and
the high level qualifier.
The following tokens can appear in the log file template
and will be replaced accordingly:
■%A: workspace name
■%D: date (yymmdd)
■%I: instance number of the given workspace server
■%L: server account's login directory
■%P: server's process ID
■%T: time (hhmmss)
■%U: server's account name (username)
Trace options Specifies the type of tracing to be performed. The
following tracing options are available:
■No timeout: Disables the standard RPC timeouts,
setting them to a long duration (approximately an
hour) to facilitate debugging.
■Call trace: Generates a message in the server log file
for each RPC function called. This is useful for
troubleshooting the server.
■RPC trace: Enables debugging messages on the server.
■Sockets: Generates a message in the server log file for
each socket operation. This is useful for
troubleshooting client/server communication -
providing a detailed trace of every client/server
communication.
■Extended RPC trace: Generates a verbose message in
the server log file for each low-level RPC function
called. This is useful for troubleshooting the server.
■System trace: Generates operating system-specific
tracing.
■Timing: Generates a timestamp for every entry to the
server log file.
Logging Specifies the level of events that are logged for the
workspace. The following event levels are available:
■none: The event log only displays the IP addresses of
client that have logged in and out from the
workspace.
■error: The event log displays the IP addresses of
client that have logged in and out from the workspace
as well as any errors that have been generated.
■debug: The event log displays the IP addresses of
client that have logged in and out from the workspace
as well as any errors that have been generated and all
trace results that were specified in the Daemon
Logging tab.

Workspaces
C-16 Oracle Application Server Adapter for IMS/TM User’s Guide
WS Security
Using the WS Security tab, you specify the level of security at the workspace level, as
opposed to the daemon level, which is set in the Daemon Security tab.
The WS Security tab is used to:
■Grant administration rights for the workspace
■Determine access to the workspace by a client
The WS Security tab is accessed as follows:
1. From the Start menu, select Programs, Oracle, and then select Studio.
2. Select the required computer from the Configuration Explorer.
3. Right-click the computer and select Open Runtime Perspective.
4. Expand the Daemons node to display the workspaces in the Runtime Explorer.
5. Right-click the workspace and select Edit Workspace Configuration.
6. Click the WS Security tab.
7. After making changes to the workspace, right-click the daemon and select Reload
Configuration.
Server Specifies the server connection events to log. The
following server events are available:
■Connect: The event log displays the server connection
events.
■Disconnect: The event log displays the server
disconnect events.
Client Specifies the type of tracing performed. The following
client events are available:
■Connect: The event log displays the client connection
events.
■Disconnect: The event log displays the client
disconnect events.
Audit This group is not applicable for use with OracleAS
Adapter for IMS/TM.
See Also: "Daemon Security" on page C-5 for details about
security.
Note: You can also change daemon settings using the
Configuration Explorer, by selecting a computer and scrolling the
list to the required daemon. Right-click the daemon and select Edit
Daemon.
Changes made to the daemon configuration are not implemented.
They are only implemented after the configuration is reloaded
using the Reload Configuration option in the Runtime Manager.
Table 6–23 (Cont.) WS Logging tab Components
Field Description
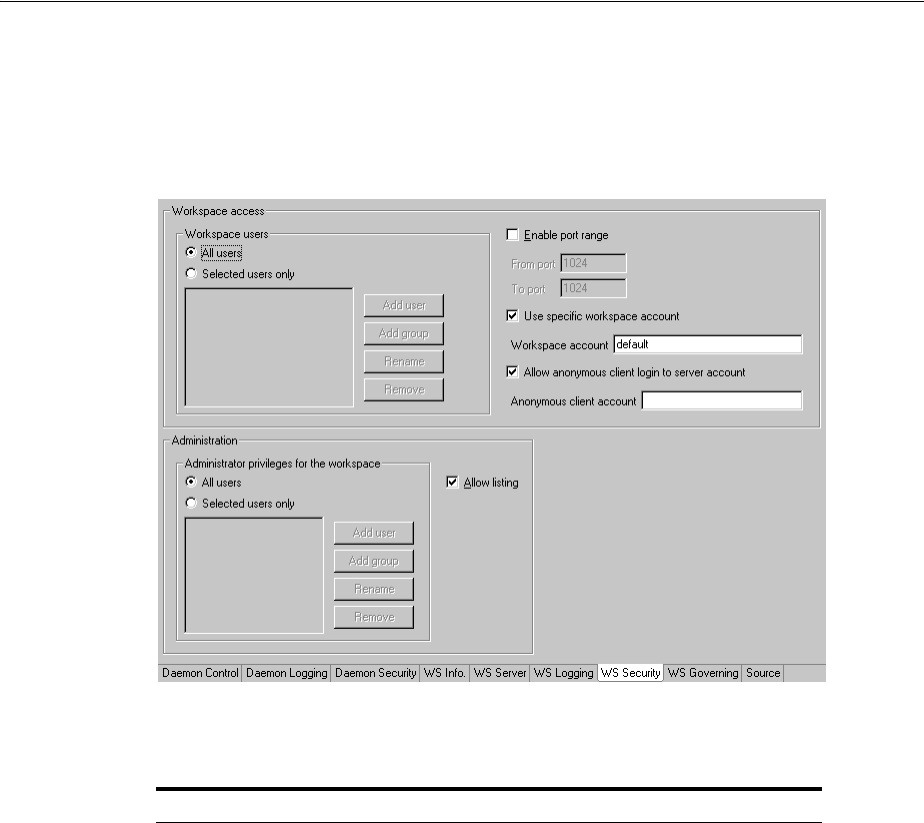
Workspaces
Advanced Tuning of the Daemon C-17
8. Right-click the daemon and select End Unused Servers. Any servers in the
connection pool are closed and new servers start with the new configuration.
The WS Security tab is shown in the following figure:
Figure 6–20 The WS Security tab
The WS Security tab comprises fields, as listed in the following table:
Table 6–24 WS Security tab Components
Field Description
Administration Defines the users (accounts) allowed to perform
administrative tasks (tasks that require administrative
login) on this workspace.
Administrator
privileges
Identifies the users (accounts) with administrator
privileges. The following options are available:
■All users: Indicates that anyone can access the
workspace and change the settings.
■Selected users only: The names of users (accounts)
and groups that can be administrators.
Note: If a user is not specified here, the user specified
in the Workspace users area will have administrator
rights for this workspace. In this case, if all users are
selected for the Workspace users area, then all users
have administrator rights for this workspace.
■Allow Listing: Determines whether this workspace
appears in the list of workspaces.
Workspace account Defines the users (accounts) allowed to access the
workspace, firewall access ports, workspace account, and
anonymous login permissions.

Workspaces
C-18 Oracle Application Server Adapter for IMS/TM User’s Guide
Workspace users Lists the users who are allowed to use the workspace.
■All users: Indicates that any user who has logged on
to the daemon can use the workspace.
■Selected users only: Specifies users (accounts) and
groups that can use the workspace.
Note: If a user is not specified, any user who has
logged on to the daemon can use the workspace.
■Enable ports range: Defines the firewall ports through
which you access the workspace. Specifies the range
of ports available for this workspace when starting
server processes. Use this option when you want to
control the port number, so that Oracle Connect can
be accessed through a firewall.
■Use specific workspace account: Defines the operating
system account used for the workspace. If not
specified, the account name that was provided by the
client is used.
■Allow anonymous client login to server account:
Defines whether this workspace can be accessed
without authentication (user name/password). If
anonymous login is allowed, specify the server
account name to use. If this field is not specified, then
the value in the Workspace account field is used.
Table 6–24 (Cont.) WS Security tab Components
Field Description

Globalization Settings D-1
D
Globalization Settings
OracleAS Adapters for IMS/TM provides the globalization support for the following
languages:
■Arabic
■English (the default)
■French
■German
■Greek
■Hebrew
■Italian
■Japanese
■Korean
■Portuguses
■Simple Chinese
■Spanish
■Traditional Chinese
■Turkish
This appendix describes how to define the language support.
Defining the Language and Codepage
The language and codepage parameters are accessed from the computer where Oracle
Studio is installed.
Perform the following steps to define the required language and codepage:
1. From the Start menu, select Programs, Oracle, and then select Studio.
2. Select and expand the required computer node from the Configuration Explorer.
3. Expand the Binding node.
4. Right-click NAV and select Edit Binding.
5. In the binding Properties tab, expand the misc node.
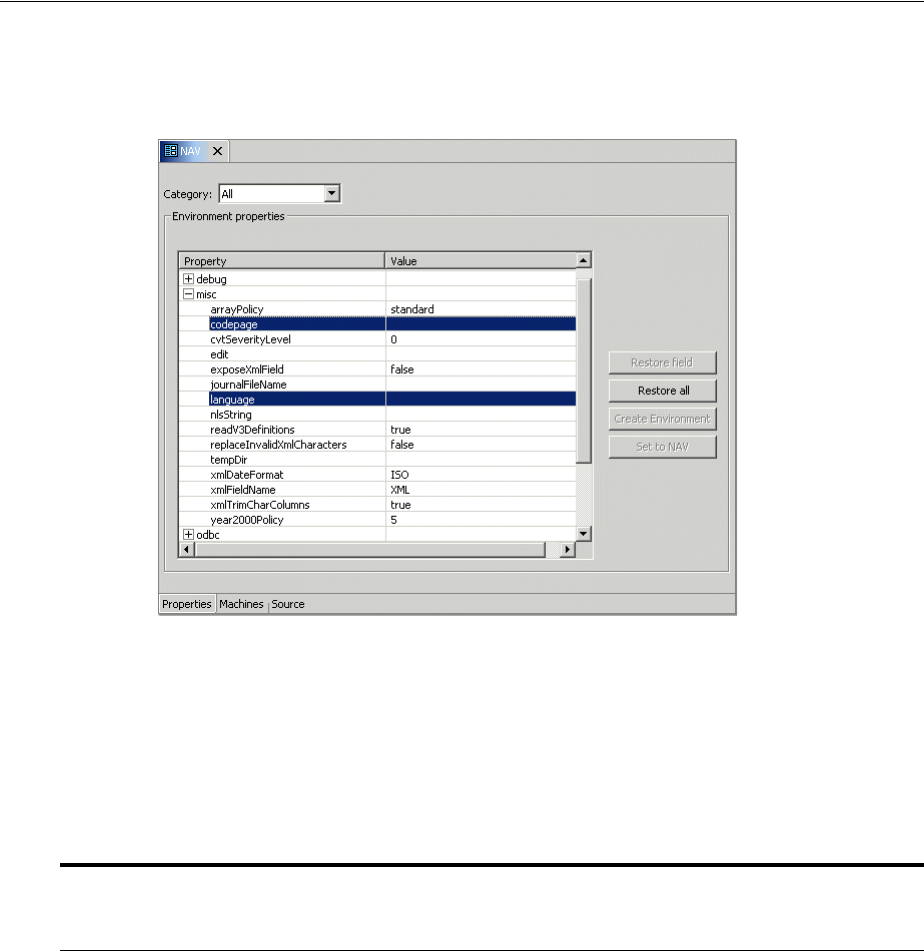
Defining the Language and Codepage
D-2 Oracle Application Server Adapter for IMS/TM User’s Guide
The NAV binding Properties tab is shown in the following figure:
Figure 6–21 The Properties tab
6. Enter a valid value for the language. See NLS Language Codes
7. Optionally, in the codepage field, specify the codepage required.
You can skip this step, and specify a language (see the previous step). In this case,
a default codepage is used.
The following table lists the codepages:
Table 6–25 NLS Language Codes
Language
Name
Language
Code
ASCII
Platforms
(Default)
EBCDIC
Platforms
(Default)
Alternative Codepages
(EBCDIC based unless noted
otherwise)
Arabic ARA ISO-8859-6 IBM420 Windows-1256 (ASCII based)
Chinese -
Simplified
SCHI GB2312 IBM935 -
Chinese -
Traditional
TCHI BIG5 IBM937 -
English UK ENUK ISO-8859-15 IBM1146 IBM037, IBM500, IBM1140,
IBM1148
ISO-8859-1 (ASCII based)
English US ENUS ISO-8859-15 IBM1140 IBM500, IBM1148
ISO-8859-1 (ASCII based)
French FRE ISO-8859-15 IBM1147 IBM037, IBM500, IBM1140,
IBM1148
ISO-8859-1 (ASCII based)

Defining the Language and Codepage
Globalization Settings D-3
German GER ISO-8859-15 IBM1141 IBM037, IBM500, IBM1140,
IBM1148
ISO-8859-1 (ASCII based)
Greek GRK ISO-8859-7 IBM875 -
Hebrew HEB ISO-8859-8 IBM424 -
Italian ITL ISO-8859-15 IBM1144 IBM037, IBM500, IBM1140,
IBM1148
ISO-8859-1 (ASCII based)
Japanese JPN SJIS
EUC (Solaris)
VMS-JP (VMS)
IBM939 -
Korean KOR KSC5601
MS949 (Win)
IBM933 MS949, EUC-KR
(both ASCII based)
Latin
International
LAT ISO-8859-15 IBM1148 IBM037, IBM1140
ISO-8859-1 (ASCII based)
Portuguese POR ISO-8859-15 IBM1140 IBM500, IBM1148
ISO-8859-1 (ASCII based)
Russian RUS ISO-8859-5 IBM1154 -
Spanish SPA ISO-8859-15 IBM1145 IBM037, IBM500, IBM1140,
IBM1148
ISO-8859-1 (ASCII based)
Turkish TUR ISO-8859-9 IBM1155 IBM857
Table 6–25 (Cont.) NLS Language Codes
Language
Name
Language
Code
ASCII
Platforms
(Default)
EBCDIC
Platforms
(Default)
Alternative Codepages
(EBCDIC based unless noted
otherwise)

Defining the Language and Codepage
D-4 Oracle Application Server Adapter for IMS/TM User’s Guide

Index-1
Index
A
acxTrace parameter, 5-6
analyzerQueryPlan parameter, 5-6
application language parameter, 5-7
B
buffer size, comCacheBufferSize parameter, 5-6
C
CD-ROM drive requirements
IBM S/390, 6-2
PC, 6-2
codepage parameter, 5-7
comCacheBufferSize parameter, 5-6
comm parameters
comCacheBufferSize, 5-6
comMaxSocketSize, 5-6
comMaxXmlSize, 5-6
comMaxSocketSize parameter, 5-6
comMaxXmlSize parameter, 5-6
cvtSeverityLevel parameter, 5-7
D
daemon
logging, C-3
security, C-5
server modes, 5-3
shutting down, 3-2
starting, 3-1
timeout, 3-6
data types
atomic metadata, B-1
cvtSeverityLevel parameter, 5-7
nlsString parameter, 5-7
debug parameters
acxTrace, 5-6
analyzerqueryPlan, 5-6
environment, 5-6
generalTrace, 5-6
logFile, 5-6
oledbTrace, 5-6
optimizerTrace, 5-6
queryWarnings, 5-7
traceDir, 5-7
disk space requirements
IBM S/390, 6-2
PC, 6-2
E
edit parameter, 5-7
environment parameters
acxTrace, 5-6
analyzerQueryPlan, 5-6
codepage, 5-7
comCacheBufferSize parameter, 5-6
comMaxSocketSize, 5-6
comMaxXmlSize, 5-6
cvtSeverityLevel, 5-7
debug, 5-6
edit, 5-7
generalTrace, 5-6
language, 5-7
logFile, 5-6
miscellaneous, 5-7
nlsString, 5-7
odbc, 5-8
oledb, 5-8
oledbTrace, 5-6
optimizer, 5-8
optimizerTrace, 5-6
queryProcessor, 5-8
queryWarnings, 5-7
tempDir, 5-7
traceDir, 5-7
transactions, 5-8
tuning, 5-9
year2000Policy, 5-8
error log, logFile parameter, 5-6
G
generalTrace parameter, 5-6
H
hardware requirements
IBM S/390 CD-ROM drive, 6-2
IBM S/390 disk space, 6-2

Index-2
IBM S/390 memory, 6-2
PC CD-ROM drive, 6-2
PC disk space, 6-2
PC memory, 6-2
PC processor, 6-2
UNIX, 6-2
I
IBM S/390
installing, 6-5
postinstallation, 6-8
preinstallation, 6-4
installing
IBM S/390, 6-5
Windows, 6-14
interactions, modeling, 6-19
L
language parameter, 5-7
log files
daemon options, C-3
logFile parameter, 5-6
logFile parameter, 5-6
logging
daemon configuration, C-3
optimizer strategy, 5-6
trace information, 5-6
M
maximum size, XML documents, 5-6
memory requirements
IBM S/390, 6-2
PC, 6-2
metadata, atomic data types, B-1
Microsoft software requirements, 6-3
miscellaneous parameters
codepage, 5-7
cvtSeverityLevel, 5-7
edit, 5-7
environment, 5-7
language, 5-7
nlsString, 5-7
tempDir, 5-7
year2000Policy, 5-8
modeling interactions, 6-19
N
NAV_UTIL, text editor, 5-7
nlsString parameter, 5-7
O
odbc environment parameters, 5-8
oledb environment parameters, 5-8
oledbTrace parameter, 5-6
operating system requirements
PC, 6-3
UNIX, 6-2
optimizer
environment parameters, 5-8
traceDir parameter, 5-7
writing plan to file, 5-6
optimizerTrace parameter, 5-6
Oracle Application Server requirements, 6-2
P
postinstallation, IBM S/390, 6-8
preinstallation, IBM S/390, 6-4
processor requirements
PC, 6-2
UNIX, 6-2
Q
query optimizer
logging strategy, 5-6
traceDir parameter, 5-7
writing plan to file, 5-6
queryProcessor environment parameters, 5-8
queryWarnings parameter, 5-7
R
requirements
PC hardware requirements, 6-2
PC software requirements, 6-2
UNIX hardware requirements, 6-1
UNIX software requirements, 6-2
runtime user access, setting up, 6-18
S
security
daemon configuration, C-5
servers
configuring modes, 5-3
reusable, 5-4
Reuse limit daemon parameter, C-11
ReuseLimit daemon parameter, 5-4
setting up runtime user access, 6-18
SMS
See system managed storage
sockets, comMaxSocketSize parameter, 5-6
software requirements
Microsoft, 6-3
Oracle Application Server, 6-2
PC operating system, 6-3
UNIX operating system, 6-2
system managed storage, 6-4
T
tempDir parameter, 5-7
temporary files, 5-7
timeout
client idle, 3-6
daemon, 3-6

Index-4
