Analytics S Developer Guide Bi Dev Wave
User Manual:
Open the PDF directly: View PDF ![]() .
.
Page Count: 110 [warning: Documents this large are best viewed by clicking the View PDF Link!]
- Introducing Analytics Templates
- Quick Start
- Step 1: Create (or update) the WaveTemplate Object
- Step 2: Retrieve (Export) the WaveTemplate Object
- Step 3: Edit the JSON Files
- Step 4: Deploy the WaveTemplate Object
- Step 5: Test the Template
- Step 6: Share the Template
- Step 7: Create New (Downstream) Apps from the Template
- Features Not Supported in This Release
- Appendix
- template-info.json Example
- template-info.json Attributes
- ui.json Attributes
- variables.json Attributes
- folder.json Attributes
- rules.json Example
- rules.json Attributes
- Rules Function Documentation
- Rules Macros in Depth
- Ant Migration Tool Usage Examples
- Analytics Template Apex Callback Class
- VisualForce Events for Customizing the Wizard UI

© Copyright 2000–2018 salesforce.com, inc. All rights reserved. Salesforce is a registered trademark of salesforce.com, inc.,
as are other names and marks. Other marks appearing herein may be trademarks of their respective owners.

CONTENTS
INTRODUCING ANALYTICS TEMPLATES ..............................1
Template at a High Level .................................................1
Template Dissected ....................................................2
The Process at a Glance .................................................4
Template Dependencies .................................................6
Customizing Downstream Apps Prohibits Upgrades ..............................6
QUICK START .....................................................8
Prerequisites .........................................................8
STEP 1: CREATE (OR UPDATE) THE WAVETEMPLATE OBJECT ...........10
STEP 2: RETRIEVE (EXPORT) THE WAVETEMPLATE OBJECT .............14
Using the Lightning Platform EclipsePlugin to Export ..............................14
Using the Ant Migration to Export ..........................................14
Template Folder Structure ................................................15
STEP 3: EDIT THE JSON FILES .......................................17
Best Practices ........................................................18
Edit template-info.json ..................................................18
Edit folder.json .......................................................21
Edit variables.json ....................................................22
Edit ui.json .........................................................33
Edit rules.json .......................................................40
STEP 4: DEPLOY THE WAVETEMPLATE OBJECT ......................58
Using the Eclipse Lightning Platform Plugin to Deploy .............................58
Using the Ant Migration Tool to Deploy ......................................58
STEP 5: TEST THE TEMPLATE .......................................59
STEP 6: SHARE THE TEMPLATE .....................................60
STEP 7: CREATE NEW (DOWNSTREAM) APPS FROM THE TEMPLATE ....61
FEATURES NOT SUPPORTED IN THIS RELEASE .......................62
APPENDIX .......................................................63
template-info.json Example ..............................................63
template-info.json Attributes .............................................65
ui.json Attributes .....................................................68
variables.json Attributes ................................................69
folder.json Attributes ...................................................70
rules.json Example ....................................................70
rules.json Attributes ...................................................73
Rules Function Documentation ............................................74
Rules Macros in Depth .................................................77
Ant Migration Tool Usage Examples ........................................84
Analytics Template Apex Callback Class ......................................91
VisualForce Events for Customizing the Wizard UI ...............................99
Contents

INTRODUCING ANALYTICS TEMPLATES
A template is a prototype of an app that others can use to create apps.
Note: The word “app” is used so often in this context, that we want to distinguish its two meanings right away.
There is the app you start with, the one on which you want to base your template. To avoid confusion going forward, we will call
this the master app, and we’ll say that you templatize this master app by making a template out of it.
Then there are the apps that users will create based on your template. We’ll call these the downstream apps.
Template at a High Level
You design an app based on your ideas about the best way to visualize a specific type of content. Creating an app from scratch
requires a fair amount of know-how: you have to load and transform the data, create lenses from the data, and design the dashboards.
To spare other users that trouble, you can share the app you designed, and others can benefit from its datasets, lenses, and dashboards
built with your existing Salesforce data.
Template Dissected
At a more detailed level, two types of components make up a WaveTemplate object.
The Process at a Glance
The template creation process follows seven major stages, which form the structure of this document.
Template Dependencies
A template is dependent on its master app; if the master app is deleted, so is the folderSource, and any PUT calls to the
Metadata API to update the template will fail. Likewise, the resulting apps built using the template depend on that template. The
template cannot be deleted as long as downstream apps that were built from it still exist.
Customizing Downstream Apps Prohibits Upgrades
If the master app is altered in any way, making an API PUT call to the
/services/data/v39.0/wave/templates/<templateId or APIName> endpoint propagates the changes to
the template. The template is saved with a new version (for example, the version is incremented from 1.0 to 2.0). Users running apps
based on that template are prompted to update their apps.
Template at a High Level
You design an app based on your ideas about the best way to visualize a specific type of content. Creating an app from scratch requires
a fair amount of know-how: you have to load and transform the data, create lenses from the data, and design the dashboards. To spare
other users that trouble, you can share the app you designed, and others can benefit from its datasets, lenses, and dashboards built with
your existing Salesforce data.
However, if the app would be useful to others as long as they could point it at different data (their data instead of yours, typically) and
make customizations, the solution is to templatize the app, and share the template with others. When you create a template, you
determine the superset of information available in any resulting app, as well as its look and feel. The users of your template will build
apps from it, and they will determine the apps’ content and other specifics, depending on the flexibility you build into your template.
The app you templatize is the master app. The only difference between it and apps you create from the template is that only the master
app can be used to update the template. There can be only one master app per template per org. The same template can, however,
1

have another master app in a different org. This allows more than one developer to work on a template at the same time. The following
figure depicts an example of this collaboration.
Template Dissected
At a more detailed level, two types of components make up a WaveTemplate object.
•Analytics app UI assets: These are all the assets that make up an Analytics app. They include dashboards, lenses, datasets, and,
optionally, dataflows. Every template must have at least one dashboard, and at least one dataset (whether internal or external).
Having a dataflow is optional, but common for anything but the simplest template.
2
Template DissectedIntroducing Analytics Templates

Each of these assets has a corresponding JSON file. You manipulate these assets in the UI, and do not have to worry about their
associated JSON files, except to know that they exist and are referenced in the template-info.json file (one of the Analytics
Template assets).
•Analytics Template assets: These consist of four files that control the templatization of your master app. They include
template-info.json file, which manages all elements of your template and the tokenized assets from the master app;
variables.json, which contains all the variables used by the remaining JSON files; ui.json, which manages the configuration
wizard that drives the users' app creation; any number of rules.json files; and a folder.json file, used to feature assets
on dashboards.
Full Inventory of a WaveTemplate Object
You design an app based on your ideas about the best way to visualize a specific type of content. Creating an app from scratch
requires a fair amount of know-how: you have to load and transform the data, create lenses from the data, and design the dashboards.
To spare other users that trouble, you can share the app you designed, and others can benefit from its datasets, lenses, and dashboards
built with your existing Salesforce data.
Full Inventory of a WaveTemplate Object
You design an app based on your ideas about the best way to visualize a specific type of content. Creating an app from scratch requires
a fair amount of know-how: you have to load and transform the data, create lenses from the data, and design the dashboards. To spare
other users that trouble, you can share the app you designed, and others can benefit from its datasets, lenses, and dashboards built with
your existing Salesforce data.
DescriptionRequired?File
This file contains metadata information about the template, as well as
lists of objects defining dashboards and lenses. It references every asset
Requiredtemplate-info.json
of the WaveTemplate object, including the remaining JSON files in this
list.
This file contains all the variables used in the template.Optionalvariables.json
This file defines the configuration wizard that will drive the users' app
creation. Any questions the configuration wizard asks of the user are
Optionalui.json
defined in this file. Questions can be displayed or hidden based on
conditions that are defined in the variables.json file.
A rules file defines the rules that enable you to alter any part of a
dashboard or lens.
Optionalrules files (JSON)
There are typically multiple rules files. These can define rules from the
master app to the template (app-to-template) and rules from the template
to downstream apps (template-to-app).
The order of these rules files is important. The last file can reference items
inside the first, but the first file cannot reference the last.
There is one JSON file for each dashboard in the master app, with the
same name as its corresponding dashboard.
Optionaldashboard_name.json
3
Full Inventory of a WaveTemplate ObjectIntroducing Analytics Templates

DescriptionRequired?File
There is one JSON file for each lens in the master app, with the same
name as its corresponding lens.
Optionallens_name.json
Every template requires at least one dataset. Dataset files can be internal
or external, so we are calling each of them optional, but you must have
one or the other.
Optionaldataset files
•internal datasets
–internal dataset files
If you have internal datasets, and if those datasets have User XMD defined,
it is all picked up by the template.
–user xmd.json
•external datasets External dataset files refer to CSV datasets such as dataset.csv, but
also include dataset_schema.json, and extended metadata (user
XMD) files, such as xmd.json.
–dataset.csv
–dataset_schema.json
–user xmd.json You must have one CSV file for every external dataset in the master app;
without it, there will be no external files in the template.
The dataset_schema.json and user xmd.json files are
optional.
You will need dataflow files if you are using one or more internal datasets
and need to extract and process them to make the data useful. Very
Optionaldataflow files
simple apps can manage without a dataflow, but you'll find that most
apps need one.
You will have image files if images have been used in any of the
dashboards in the master app. There is one image file per image in the
dashboards.
Optionalimage files (JSON)
This file contains information about the featuredAssetsfor the
application. It enables you to set the order of assets in a dashboard instead
of keeping them in alphabetical order.
Optionalfolder.json
Refer to the "Template Folder Structure" section for the directory structure of these files when you've exported them from the Metadata
API.
The Process at a Glance
The template creation process follows seven major stages, which form the structure of this document.
4
The Process at a GlanceIntroducing Analytics Templates
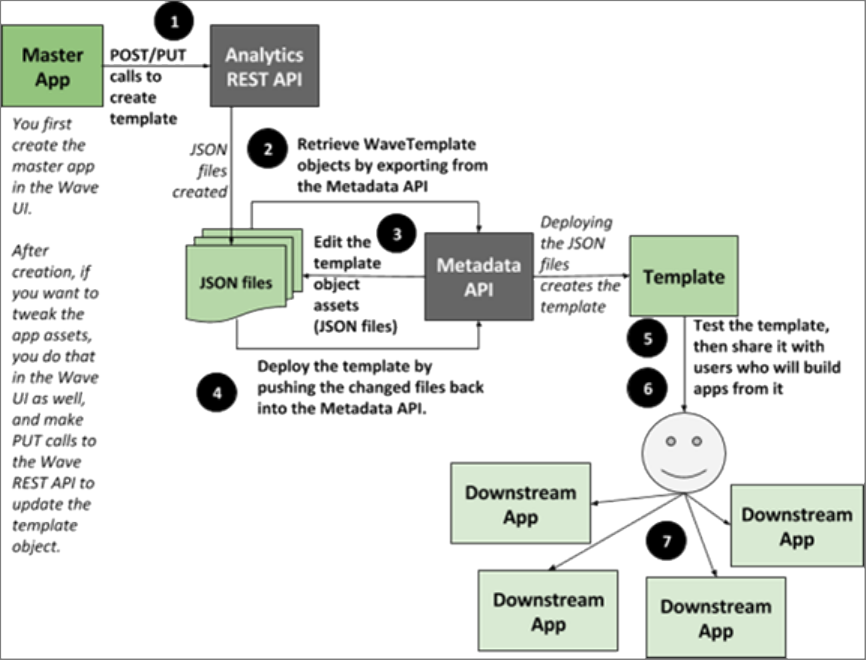
Start with an app you want to templatize. This master app is your prototype.
1. Create (or update) the WaveTemplate object:
•Create the object for the first time: Create the object by making an API POST call to the
/services/data/v39.0/wave/templates endpoint of the Analytics REST API. A number of JSON files are created;
these are instrumental to your template. But they are not editable until their content is retrieved from the database in the next
step.
•Update an existing template object: If you have updated the master app (by altering its assets in Analytics Builder) after this
step, you must update the corresponding template object. Do this by making an API PUT call to the
/services/data/v39.0/wave/templates/<templateId or APIName> endpoint of the Analytics REST
API. The JSON files are updated, and the template version number is automatically incremented.
2. Retrieve (export) the WaveTemplate object: You will do this by exporting from the Metadata API; the object is retrieved as JSON
files that you will edit.
3. Edit the JSON files: This is how you harness the power and flexibility of templates. Build the configuration wizard user interface,
variables, conditions, and rules into your template by editing the JSON files. This step is where the power of the template feature is
unleashed. You can make as few as zero edits, which will create a template that is identical to the master app (useful for testing that
a template object was created correctly); or you can add countless user options to maximize flexibility.
4. Deploy the WaveTemplate object: Push the changed files back into the database with calls to the Metdata API to deploy the
template. Remember to push your JSON file changes every time you edit them on your file system; otherwise, your next Metadata
API export will overwrite all the work work you’ve done.
5
The Process at a GlanceIntroducing Analytics Templates

5. Test the template: Testers and other contributors to the template can now retrieve the object from the Metadata API (as described
in Step 2), make their own edits (Step 3 on page 5), and re-deploy (Step 4 on page 5). It’s an iterative cycle, and every time you
make changes to the JSON files, deploy your template and build apps from it to test it.
6. Share it with users who will build apps from it.
7. Create new (downstream) apps from the template.
SEE ALSO:
Create an App
Template Dependencies
A template is dependent on its master app; if the master app is deleted, so is the folderSource, and any PUT calls to the Metadata
API to update the template will fail. Likewise, the resulting apps built using the template depend on that template. The template cannot
be deleted as long as downstream apps that were built from it still exist.
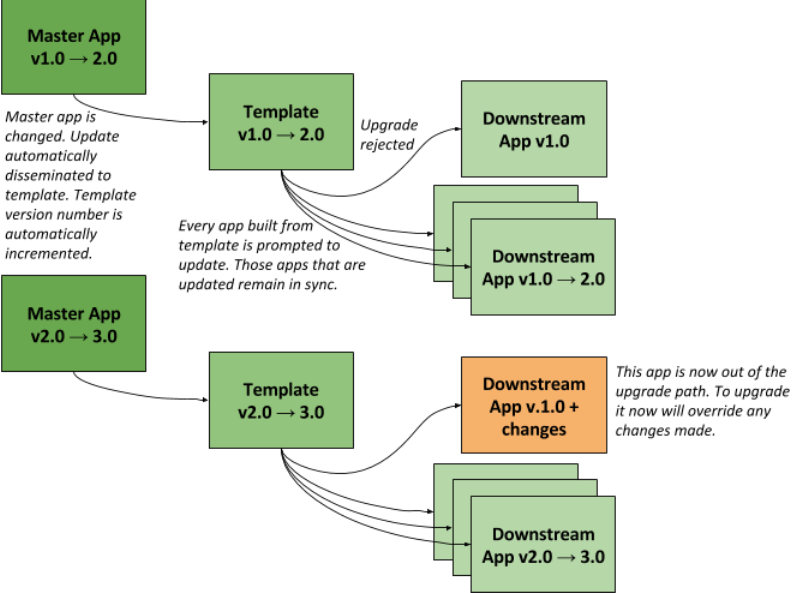
Customizing Downstream Apps Prohibits Upgrades
If the master app is altered in any way, making an API PUT call to the
/services/data/v39.0/wave/templates/<templateId or APIName> endpoint propagates the changes to the
template. The template is saved with a new version (for example, the version is incremented from 1.0 to 2.0). Users running apps based
on that template are prompted to update their apps.
Avoid customizations of dashboards, lenses, and dataflows in downstream apps. Those customizations will be lost in app upgrades
whenever the template is updated. Try to account for users' likely customizations by addressing them in the template wizard; this keeps
the app flexible in the upgrade process.
Accepting the upgrade prompt keeps apps on the upgrade path from the master app to the template to the downstream app. Rejecting
the prompt takes an app out of the upgrade path (refer to Figure 3). This non-upgraded app may continue to evolve as it is edited;
however, the master app, along with the template, are likely to evolve at the same time. When users are again prompted to upgrade
their downstream apps, the app that has strayed from the upgrade path will lose those independently-made edits if the user accepts
the upgrade. To keep the edits made out of the upgrade path, the user must reject the upgrade and miss out on any improvements
made to the master app and template.
6
Template DependenciesIntroducing Analytics Templates
7
Customizing Downstream Apps Prohibits UpgradesIntroducing Analytics Templates

QUICK START
Make sure you're all set with these five prerequisites before you go forth and create templates.
Prerequisites
Make sure you're all set with these five prerequisites before you go forth and create templates.
Prerequisites
Make sure you're all set with these five prerequisites before you go forth and create templates.
Permission set licenses
Most likely you already have an Analytics platform license for your org (either one InsightsStarter or one Analytics platform license
will do the job). The license is required to create dashboards, lenses, and datasets.
•Assign the following permission set licenses:
–Analytics Builder
•Assign the following permission sets:
–Use Templated App
–Manage Templated App
–Manage Analytics
Org preferences
Set your Org Preferences to enable Analytics Templates. In the Admin Setup page, under Settings, select Enable Analytics
Templates. You'll need this to create Analytics Template assets in the form of JSON files.
Developer Edition Org Namespace
Set up a namespace for your DE org to enable the use of Managed Packages. It is recommended that you do this before creating
any Analytics assets.
Analytics REST API access
Refer to the documentation on Authentication to the Analytics REST API to access and use the API.
Metadata API access
Refer to the Metadata API Developer's Guide to access and use the Metadata API.
Master app and its ID
Typically, you build an app and it becomes a master app when you decide to templatize it. However, if you have a template but no
master app in your org, you may find yourself making a master app from a template.
Create the app you plan to templatize:
1. Build an app with lenses, dashboards, datasets, and the default Salesforce dataflow.
2. Note the app ID in the URL; it becomes the folderId you will use as you work with the WaveTemplate object.
Create a master app from a template if you don't have a master app for your org:
8

1. Create an app from the template using the wizard.
You can also create an app from the template by using a direct Analytics REST API call. Use this option if the wizard doesn't
expose all the variables, and you need to answer them differently to create all the app's assets.
2. Turn this app into the master app by updating the template with a PUT call with the following syntax:
PUT: /services/data/v39.0/wave/templates/0Nkxx00000002OPCAY
Request Body:
{"folderSource" : {"id" : "00lxx000000ftItAAI"}}
This updates the template's folderSourceId to the master app's folder. This constitutes assigning the master app.
Note: You can only have one master app per org, so you can only do this for one app.
9
PrerequisitesQuick Start

STEP 1: CREATE (OR UPDATE) THE WAVETEMPLATE OBJECT
Your master app is complete and you are ready to templatize it. You will need its app ID, which you can find both in the URL for this app,
and in the app's folder structure in the Analytics REST Explorer.
This step explains how to create the WaveTemplate object when you first templatize a master app. This step also explains how to update
the WaveTemplate object if you have made changes to dashboards, lenses, datasets, or dataflows in the master app. The two actions
are almost identical: you make a request with the same contents in the JSON body. The only difference is that creating the template
object for the first time requires a POST request to the /services/data/v39.0/wave/templates endpoint, whereas
updating the template object to reflect subsequent changes you've made to the master app requires a PUT request to the
/services/data/v39.0/wave/templates/<templateId or APIName> endpoint.
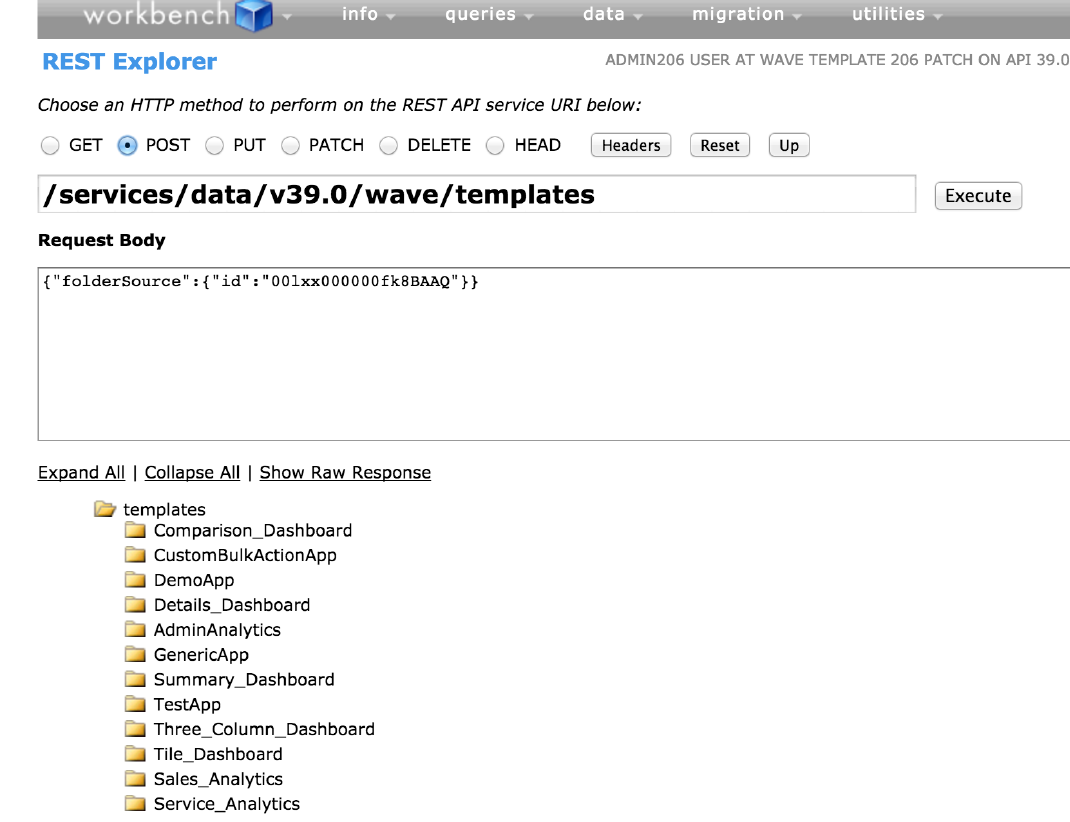
Access the Analytics REST API through your Developerforce Workbench REST Explorer. Use REST Explorer to build your POST, PUT, and
(if necessary) DELETE requests:
1. Begin by going to https://workbench.developerforce.com/ and logging in to your org.
2. Select Utilities Rest Explorer.
A GET call to the /services/data/v39.0/wave/templates endpoint returns all the templates to which you have access.
3. Select POST (this method is called on the /services/data/v39.0/wave/templates collection URL).
Use this method to create a brand new template object the first time you templatize a master app.
10
If you have updated the master app and are now updating the already-created template object, you must first click into the URL of
your existing template, and then select the PUT method instead of POST.
11
Step 1: Create (or update) the WaveTemplate Object
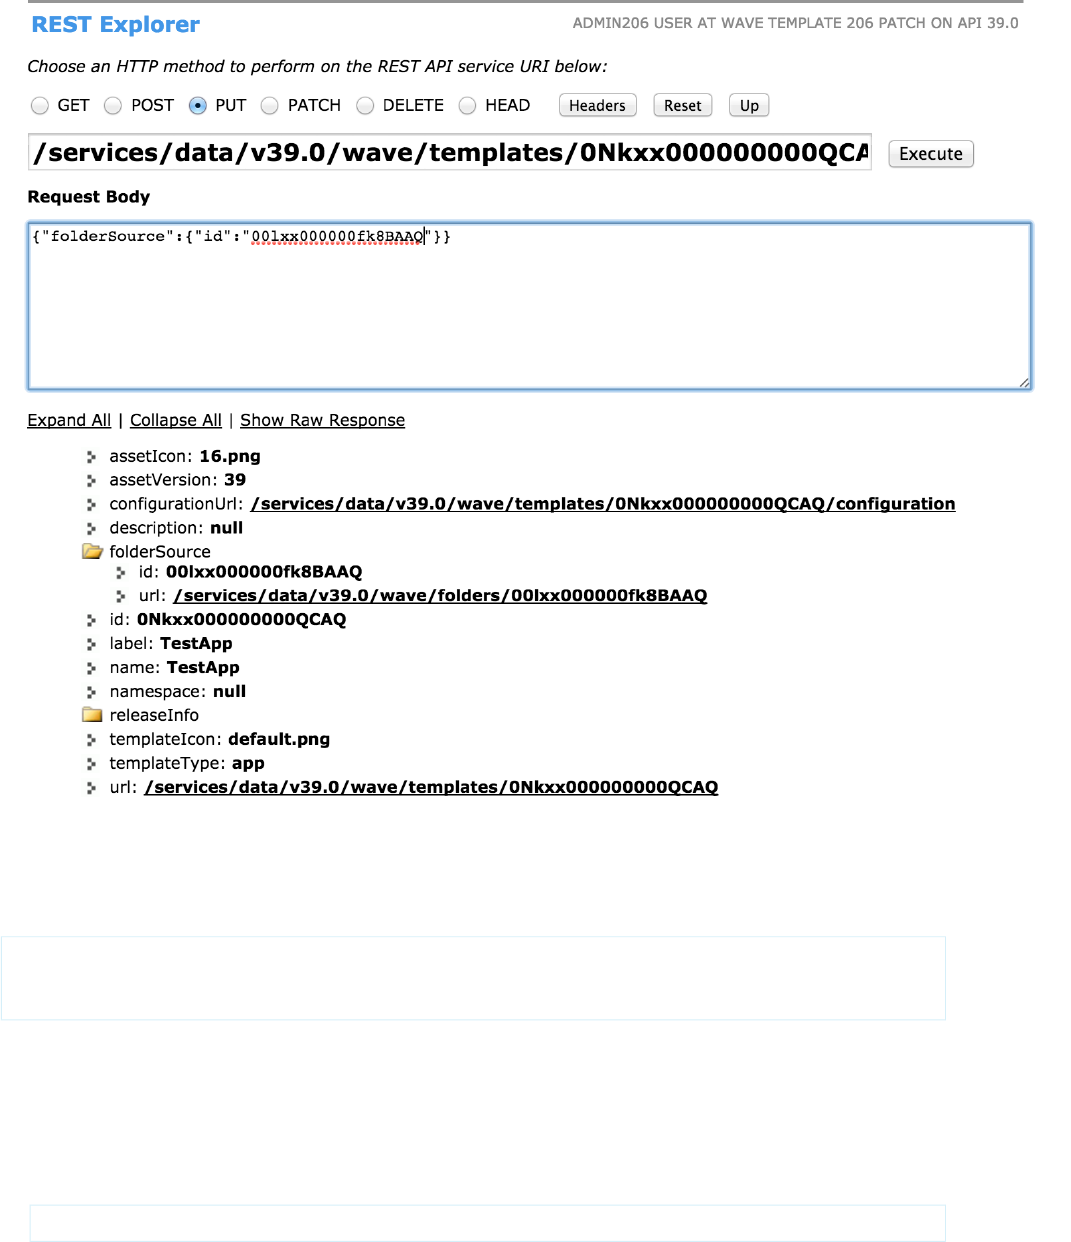
4. Referring to the REST Explorer images in the previous step, enter the JSON Request Body, using the app ID from the app's URL as
the folderId:
{
"folderSource" : { "id" : "<folderId>"}
}
The master app assets are contained in a folder. The folderSource attribute attaches a template to this folder.
Add dataflow information from the next step to your request body before executing the request.
5. Add dataflow information to your request body if necessary (read on to determine when it's necessary).
•Syntax for adding the ID: If you have built (or altered) a default dataflow, include its ID in the request by adding dataflow
information as follows:
"dataflow" : {"id" : "<dataflowId>"}
12
Step 1: Create (or update) the WaveTemplate Object

•Finding out the ID: You can find the dataflow ID either by using the REST Explorer in Workbench to make a GET call to the
/services/data/v39.0/wave/dataflows endpoint (provided that your WaveDataflowAPI org permission is
enabled), or by navigating to the Data Manager in your browser and using the Chrome Developer Tools to inspect some of the
XHR Network payloads. To facilitate your search, note that dataflow IDs start with '02K', while folder IDs start with '00I'.
•You don't need to enter a dataflow ID if the POST call can figure it out automatically, as in these cases:
–Your master app is made up of assets that do not use a dataflow. In this case, the POST call to create the template will not
generate a dataflow template file or dataflow reference in the template-info.json file.
–The master app does contain a dataflow that has been created for the application and has the same name as the app. In this
case, the POST call will automatically generate a dataflow template file from it and add a dataflow reference in the
template-info.json file. In both of these instances, you don't need to enter a dataflow ID.
•You do need to enter a dataflow ID if the POST call can't figure it out automatically, as in these cases:
–Your master app is made up of assets that do not use a dataflow, but you want to use one.
–Your master app is made up of assets that use more than one dataflow. In this case, you must specify which one to use.
•You need to do an extra cleanup step if your master app is using the default dataflow to create datasets for the app, you
must add it manually as shown. The POST call will then generate a dataflow template file from your default dataflow, in addition
to generating a unique dataflow for the master app and adding a dataflow reference in the template-info.json file. You
will need to clean up the duplicate dataflow information in the default dataflow after template creation. Do not use the unique
dataflow for any master app updates; this way, it will be the template dataflow file that receives any updates from PUT calls, and
the master app can be cleanly deleted if necessary.
6. Click Execute. If everything executes correctly, you receive no notifications. You should still perform the testing recommended in
the next step.
Note: If a master app is referencing datasets that are not contained in the master app, the template creation process will fail.
7. Test if your template creation was successful before proceeding to edit the template files by checking that it has yielded all the
following results:
•Executing creates a WaveTemplate object that contains all of the template information.
•The server responds with template details and configuration URLs.
•The response to the GET wave/templates call now includes your new template.
•In Analytics Builder, selecting Create -->App now includes your new template in the list (provided that template permissions
are enabled).
•If you have updated assets in the master app and made this API call using the PUT method, your changes are reflected in the
corresponding files in the WaveTemplate object. (To see the updated files, call Metadata API export on WaveTemplateBundle,
as we describe in the next step, where you retrieve (export) the WaveTemplate object.
Note: To execute POST, PUT, and DELETE calls using the Ant Migration Tool instead of Workbench, refer to the reference
section “Examples of Using the Ant Migration Tool.”
13
Step 1: Create (or update) the WaveTemplate Object
STEP 2: RETRIEVE (EXPORT) THE WAVETEMPLATE OBJECT
Analytics templates are no different than any other metadata (such as Visualforce pages and Apex classes). You can retrieve and deploy
them using the Metadata API, and store the files in a configuration management system such as Git. The MDAPI export command extracts
the WaveTemplate object from its org and packages it into a zip file (including the JSON files that define the template object), which
you download and explore on your workstation using either the Lightning Platform Eclipse Plugin or the Ant Migration tool.
Note: Performing this step overwrites your template object folder contents. If you have edited JSON files (such as making changes
to your rules.json files), make sure you have first pushed those changes back to the Metadata API by making an MDAPI
deploy call as described in "Step 4: Deploy the WaveTemplate Object."
Using the Lightning Platform EclipsePlugin to Export
Follow these steps to set up the Eclipse project:
Using the Ant Migration to Export
Follow these steps to export the template using the Ant Migration Tool:
Template Folder Structure
Decompressing the exported template file exposes the following folder structure:
Using the Lightning Platform EclipsePlugin to Export
Follow these steps to set up the Eclipse project:
1. Install the Lightning Platform eclipse plugin and create a new project (refer to the Force.com IDE Developer Guide for instructions).
2. Update package.xml to include WaveTemplate by adding:
<types>
<members>*</members>
<name>WaveTemplateBundle</name>
</types>
3. Right-click on the project and select Lightning Platform Refresh from Server.
4. Create and install the package by following the instructions in our Packaging documentation. Specify WaveTemplate as the
component type.
Using the Ant Migration to Export
Follow these steps to export the template using the Ant Migration Tool:
1. Refer to this guide's reference section, “Examples of Using the Ant Migration Tool.” It provides you with two sample files for running
an MDAPI export template call and deploy template call from ANT.
Refer to the Ant Migration Tool Guide for additional information on using this tool.
2. Run ant exportTemplate, which retrieves the template artifacts via the Metadata API for editing.
3. Run ant deployTemplate to update the template on the server with any template edits.
14
4. To validate a successful export, first check that the unzipped file has all the components described in the "Template Folder Structure"
section that follows, and that there are JSON files to represent each asset in the master app.
Then create an app from the template by following the instructions in this guide's "Step 7: Create New (Downstream) Apps from
the Template" to validate that all template dashboards, datasets, and dataflow are in place and working. To expedite this step, you
can do this without editing the ui.json file that creates the wizard. Your test downstream app should then be identical to the
master app.
Template Folder Structure
Decompressing the exported template file exposes the following folder structure:
•
<TemplateName>
(top directory)
–
template-info.json
(do not change the name of this file; processing depends on it)
–
variables.json
–
ui.json
–
template-to-app-rules.json
(we recommend this naming convention to manage your rules files most easily)
–
app-to-template-rules.json
(we recommend this naming convention to manage your rules files most easily)
–
releaseNotes.html
–
dashboards
(subdirectory containing one or more dashboard JSON files corresponding to each dashboard in the master app; this subdirectory
does not exist if the master app has no dashboards)
–
lenses
(subdirectory containing one or more lens JSON files corresponding to each lens in the master app; this subdirectory does not
exist if the master app has no lenses)
–
dataflows
(subdirectory containing one or more dataflow JSON files corresponding to each dataflow in the master app; this subdirectory
does not exist if the master app has no dataflows)
15
Template Folder StructureStep 2: Retrieve (Export) the WaveTemplate Object

–
external_files
(subdirectory containing one or more CSV dataset and related JSON files, such as schema and user XMD files, corresponding to
each dataset in the master app; this subdirectory does not exist if the master app has no CSV datasets)
–
dataset_files
(subdirectory containing User XMD files for SFDC datasets; this subdirectory does not exist if there are no SFDC datasets with
User XMD defined)
–
images
(subdirectory containing one or more image files; this subdirectory does not exist if the master app has no images)
–
folder.json
16
Template Folder StructureStep 2: Retrieve (Export) the WaveTemplate Object

STEP 3: EDIT THE JSON FILES
Your master app looks fantastic, with all the shiny widgets rendered beautifully in their dashboards. Now you want the same user
experience in the configuration wizard that will dictate the creation of all downstream apps. The wizard is how you ask your future
template user to decide which dimensions in a dataset to include and which to exclude, what name a new dashboard, or how to label
a field in a chart. You control all this by editing the four types of JSON files discussed in this step (template-info.json, ui.json,
variables.json, and any number of rules.json), which constitute the template assets. These JSON files open a world of
flexibility and power in the template creation universe.
The files interact as follows:
•The ui.json file uses the variables in the variables.json file to dictate what goes on the each page of the wizard. The
ui.json file can contain conditionals that dictate which questions or pages are displayed in the wizard.
•The template-info.json file identifies all the template components, including the references to the rules, variables, and UI
files. The template-info.json file can contain conditionals that dictate whether assets should be generated in the downstream
app.
•The rules.json files can use variables to set constants, and then use rules to set values that dictate how assets within the
downstream app should be generated. The most common uses for rules include adding and removing dashboard widgets and
dataflow actions.
•The folder.json file enables you to set a preferred order of the dashboards in the downstream app (as opposed to leaving
them alphabetized).
And yet, editing these JSON files is really an optional step. A template is complete even without your touching any of these files; such a
minimal template simply yields apps that mirror the master app without straying or flexibility. This is good to remember for testing your
template when all you want is to make sure the creation worked.
The four template assets discussed here are not to be confused with the JSON files representing the master app assets (for example,
dashboard_name.json and lens_name.json), which are also exported as part of the Metadata API retrieval. We recommend
that you alter app assets and widgets in Analytics Builder (remembering, of course, to update the template object with a PUT call to the
Analytics REST API), and leave their corresponding JSON files untouched.
Best Practices
Consider these recommendations as possible user experience guidelines:
Edit template-info.json
The template-info.json file is the main file that describes the template. It includes or references all the information required
to create a downstream app.
Edit folder.json
The folder.json file describes the featuredAssets for the application.
Edit variables.json
The variables.json file describes all the variables used in the template-info.json, ui.json, and the different
rules.json files. Variables enable the customization of apps; without them, everything is hard-coded. Variables allow the
framework to replace tokenized data with customer-specific data.
Edit ui.json
The ui.json file defines your template's configuration wizard. Without a configuration wizard, the user creating a downstream
ap is only asked to name the app, and an exact replica of the master app is created.
17

Edit rules.json
Customizing the installation of an Analytics application is crucial. Why? Because not all customers’ orgs are the same, and a "one
size fits all" application simply doesn’t work.
Best Practices
Consider these recommendations as possible user experience guidelines:
•Try to strike a balance between too few questions and too many. Too few questions fail leave less flexibility for the user creating the
app; too many can be daunting.
•Consider using an Apex callback class to create a Smart Wizard that can automatically detect certain information, thus sparing the
user unnecessary questions. For example, a Smart Wizard can detect whether an org has a Product dimension, and that's one less
question for the user to bother with. Call the Smart Wizard from the template-info.json file. It's a very powerful tool. Refer to the
reference information about the Apex callback class at the end of this guide.
You can call the Smart Wizard just as the template configuration wizard is loading, and use the Smart Wizard's results to either hide
questions from the configuration wizard, display the detected information and disable the answer, or display the detected answers
but enable the user to overwrite them.
You can also call the Smart Wizard when the user clicks Create App after completing the template configuration wizard. This time,
you can use the Smart Wizard to validate their answers, sparing them from encountering errors down the line. You can customize
the Smart Wizard per page using VisualForce pages and a JavaScript library.
•Try to strike a balance between number of questions on each wizard page and number of pages in the wizard. Too many questions
on each wizard page requires the user to scroll down, a practice best avoided; at the same time, a wizard with too many pages is
cumbersome. We find that a page containing between five and eight questions is best.
•Group wizard questions by theme (for example, questions about quotas on one page; questions about products on another).
•Use templates without a configuration wizard for testing the creation of the template object.
•Organize like variables together (for instance, group variables about the Product dimension together).
Edit template-info.json
The template-info.json file is the main file that describes the template. It includes or references all the information required
to create a downstream app.
In addition to the required content for a template to work, the template-info.json file can also contain conditionals. For example,
the master app can have a dashboard with a superset of widgets in it, and you can include conditionals in the template-info.json
file to remove specific widgets upon creation.
You can also call a Smart Wizard from this file (backing it up with an Apex callback class) to perform computations or detection on the
user's data. You can call the Smart Wizard before the configuration wizard runs or after, when the app is being created. Refer to the "Best
Practices" section for more about the Smart Wizard.
The template-info.json file has multiple parts:
•Metadata information for the template: name, developer name, description, template icon and asset icon
"name": "Wave-Analytics.edu Training Materials",
"developerName" : "wave_analytics_edu",
"description": "An example template to generate datasets, dashboards and lenses for the
Analytics introduction course.",
"assetVersion": 39,
18
Best PracticesStep 3: Edit the JSON Files

"templateType": "app",
"templateIcon": "default.png"
"assetIcon" : "17.png"
–name attribute defines the template ID; changing it creates a brand new template
–templateIcon is the icon that appears in the UI template wizard when selecting the template
–assetIcon is the icon displayed in the created app
•Template version information: The templateVersion is a string validated as “#.#”. The notesFile, when present, must
be an HTML file. If releaseInfo is present, an app created from the template can be reset or upgraded via the UI.
"releaseInfo":{
"templateVersion": "1.0",
"notesFile": "releaseNotes.html"
}
•Reference to the variables file: The file that contains all the variables used in the template is variables.json.
"variableDefinition":"variables.json",
•Reference to the configuration wizard file: The file that defines the wizard the user will fill out, answering questions to set
variables, is ui.json.
"uiDefinition":"ui.json",
•Reference to the rules file(s): The file or files defining any rules to be applied to the template assets is rules.json.
"rules" : [ {
"type" : "templateToApp",
"file" : "template-to-app-rules.json"
}, {
"type" : "appToTemplate",
"file" : "app-to-template-rules.json"
} ],
The templateToApp rules file defines rules that run when a downstream app is created or updated from a template; these are
the rules you are most likely to edit.
The appToTemplate rules file defines rules that run when a template is created or updated from a master app; these are the
rules created by the framework code, you are not likely to edit them.
•List of objects defining dashboards and lenses: A dashboard or lens entry can contain a conditional statement to determine
whether the asset is added at app creation time based on a given variable. This can be an empty list (“[]”).
"dashboards": [
{
"file": "dashboards/Elections_2012_Dashboard.json",
"name": "Elections Dashboard",
"condition" : "${Variables.StringValueInclude == 'Yes'}"
}
],
"lenses":[
{
"file": "lenses/Election_Breakdown_By_State.json",
"name": "Election Breakdown By State"
19
Edit template-info.jsonStep 3: Edit the JSON Files

}
],
•Reference to external datasets: List of files that define external datasets (CSVs) to create, can include XMD. Each dataset entry
may contain an entry for a conditional statement, allowing for decisions to be made by variables on whether a dataset asset should
be added at App creation time. This can be an empty list (“[]”).
"externalFiles":[
{
"type" : "CSV",
"name" : "State_Codes",
"file" : "external_files/StateCode.csv",
"schema" : "external_files/StateCode_schema.json"
},
{
"type" : "CSV",
"name" : "Election_2012",
"file" : "external_files/Election_2012.csv",
"schema" : "external_files/Election_2012_schema.json", (optional)
“userXmd” : "external_files/Election_2012_XMD.json" (optional)
}
],
•References to datasets: These are datasets created by the SFDC dataset builder.
"datasetFiles": [
{
"name": "Election_1980",
"label": "Election 1980",
"userXmd": "dataset_files/Election_1980_XMD.json
},
{
"name": "Election_2012",
"label": "Election 2012"
}
],
User XMD is NOT required. If it is present, there will be an XMD JSON file in the dataset_files directory; otherwise, no XMD
JSON file will be present. If User XMD exists, it must be v2.0.
The dataflow file must contain a reference to the dataset (Extract and Register steps) in order for the dataset to be recreated in the
creation process of any downstream app.
•Reference to the dataflow file: The file that contains the dataflow is dataflow.json. This can be an empty list (“[]”).
"eltDataflows": [
{
“file”: "dataflow/dataflow.json",
“name”: “Dataflow”
}
]
20
Edit template-info.jsonStep 3: Edit the JSON Files
•Reference to the images: These are the images associated with the app and used in dashboard files. Each image may contain an
entry for a conditional statement, enabling decisions to be made by variables on whether an image should be added at app creation
time.
"imageFiles" : [ {
"name" : "image1",
"condition" : "${Variables.ShowImage1}",
"file" : "images/image1.png"
},
{
"name" : "image2",
"file" : "images/image2.png"
}]
•Reference to the folder file: The file that contains the folder information for featuredAssets is folder.json.
"folderDefinition":"folder.json",
Edit folder.json
The folder.json file describes the featuredAssets for the application.
Template developers can use it to specify the order of the dashboards in the application instead of accepting the default behavior of
alphabetizing by dashboard label.
Example:
{
"featuredAssets": {
"default": {
"assets": [
{"id": "${App.Dashboards['ZDashboard'].Id}"},
{"id": "${App.Dashboards['BDashboard'].Id}"},
{"id": "${App.Dashboards['ADashboard'].Id}"}
]
}
}
}
The above example tells the application to display the "ZDashboard" first, as the most prominent dashboard, rather than the default
of A, B, then Z. If a dashboard has a conditional attribute in template-info.json that resolves so that the dashboard is not
added at app creation time, a rule must be added to the template-to-app-rules.json to remove the dashboard from
the folder.json file. This rule will remove that dashboard entry from the featuredAssets list at runtime and prevent
the app creation from failing with a "Dashboard not found" error. The rule looks like this:
{
"name": "RemoveDashboardZFromFolderJson",
"condition": "${!Variables.HasDashboardZ}",
"appliesTo": [
{
"type": "folder",
"name": "*"
21
Edit folder.jsonStep 3: Edit the JSON Files

}
],
"actions": [
{
"action": "delete",
"description": "Remove conditional dashboard",
"path": "$.featuredAssets.default.assets..[?(@.id=~ /^.DashboardZ.$/i)]"
}
]
}
Edit variables.json
The variables.json file describes all the variables used in the template-info.json, ui.json, and the different
rules.json files. Variables enable the customization of apps; without them, everything is hard-coded. Variables allow the framework
to replace tokenized data with customer-specific data.
The best practice for defining variables is to declare the SOAP data type within the variableType object. It is not required, but adds
more validation when the default field is unavailable. Use the types described in this document for the dataType.
•Example string:
"stringExample":{
"label":"What's the value of the string?",
"description":"The String.",
"defaultValue":null,
"variableType": {
"type":"StringType",
"enums":["foo","bar","baz"]
}
}
•Example number:
"numberExampleByTens": {
"label":"What's the maximum number to use for the offset?",
"description":"",
"defaultValue": 80,
"required":true,
"variableType": {
"type":"NumberType",
"min" : 0,
"max" : 100,
"enums":[10,20,30,40,50,60,70,80,90,100]
}
},
•Example boolean:
"booleanExample" :{
"label":"Please define the boolean parameter?",
"description":"Some boolean value.",
22
Edit variables.jsonStep 3: Edit the JSON Files

"defaultValue": false,
"required" : true,
"variableType":{
"type":"BooleanType",
}
}
•Example array sobject-field:
"sobjectFieldArrayExample" : {
"label":"Select the user name fields?",
"description":"The user fields to use.",
"defaultValue": [
{"sobjectName":"User","fieldName":"FirstName"},
{"sobjectName":"User","fieldName":"LastName"},
],
"required" : true,
"variableType":{
"type":"array",
"itemsType" : {
"type" : "SobjectFieldType"
}
}
}
•Then, if you want to use this variable, you need to call it as:
${Variables.sobjectFieldArrayExample[0].sobjectName}
${Variables.sobjectFieldArrayExample[0].fieldName}
${Variables.sobjectFieldArrayExample[0]}
Refer to the section on array functions in rules (for multi-select and looping) to learn how to use array functions in rules.json.
Config Syntax for variables.json
The config syntax for variables.json follows:
Values Hash for variables.json
The values hash for variables.json follows:
Variable Definition Structure for variables.json
The variable definition structure for variables.json follows:
Simple Variable Types for variables.json
We call the following variable types “simple” because they are standard, predefined datatypes.
Complex Variable Types for variables.json
Unlike the simple variable types, these complex types are specific to Salesforce (for example, sobject, sobjectField) and
are used to query the org for access to Salesforce objects, which you can then pull out as different datatypes.
Array Variable Type for variables.json
An array type produces a multi-select in the wizard. With it, a user can make multiple choices out of a presented list, and you can
define a minimum and maximum for how many items the user can choose.
23
Edit variables.jsonStep 3: Edit the JSON Files

Variable Value Reference Use Case and Syntax for variables.json
A template can contain questions to select one or more sObjects and one or more sObjectFields. There are individual
questions for sObjectFields. On a page, the first question is to select an sObject, and when a user does so, the template
UI must use the selected sObject to show sObjectFields for the subsequent questions/pickers.
Config Syntax for variables.json
The config syntax for variables.json follows:
Example:
{
"variables":{
"userObjectName":{
"label":"What's the object name where User information is stored?",
"description":"",
"variableType":{"type": "SobjectType"},
"defaultValue":{"sobjectName": "User"}
},
"userObjectUsernameField":{
"label":"What's the object name and field name where Username information
is stored?",
"description":"",
"variableType":{"type": "SobjectFieldType"},
"defaultValue":{
"sobjectName": "User",
"fieldName": "Username"
}
},
"maxAllowedOffset": {
"label":"What's the maximum number to use for the offset?",
"description":"",
"variableType": {"type": "NumberType","min": 100, "max": 2000},
"defaultValue": 1500,
"required":true
24
Config Syntax for variables.jsonStep 3: Edit the JSON Files

},
"userRoleFields" :{
"label":"What are the User Role fields and their value type (dim or date)
to use?",
"description":"",
"variableType":{
"type":"ArrayType",
"items": {
"type":"StringType"
}
},
"defaultValue":[
{
"name": "Id",
"type": "dim"
},
{
"name": "Name",
"type": "dim"
},
{
"name": "ParentRoleId",
"type": "dim"
},
{
"name": "RollupDescription",
"type": "dim"
25
Config Syntax for variables.jsonStep 3: Edit the JSON Files

},
{
"name": "OpportunityAccessForAccountOwner",
"type": "dim"
},
{
"name": "CaseAccessForAccountOwner",
"type": "dim"
}
]
}
}
}
Values Hash for variables.json
The values hash for variables.json follows:
Example:
{
"values":{
"userObjectName":{sobjectName:"User" },
"userObjectUsernameField":{sobjectName:"User" , fieldName:"Username" },
"maxAllowedOffset":1200,
"userRoleFields":[
{
"name": "Id",
"type": "dim"
},
{
"name": "Name",
"type": "dim"
},
{
"name": "ParentRoleId",
"type": "dim"
},
{
"name": "RollupDescription",
"type": "dim"
},
26
Values Hash for variables.jsonStep 3: Edit the JSON Files

{
"name": "OpportunityAccessForAccountOwner",
"type": "dim"
},
{
"name": "CaseAccessForAccountOwner",
"type": "dim"
},
{
"name": "ContactAccessForAccountOwner",
"type": "dim"
},
{
"name": "ForecastUserId",
"type": "dim"
},
{
"name": "MayForecastManagerShare",
"type": "dim"
},
{
"name": "LastModifiedDate",
"type": "date"
},
{
"name": "LastModifiedById",
"type": "dim"
},
{
"name": "SystemModstamp",
"type": "date"
},
{
"name": "DeveloperName",
"type": "dim"
},
{
"name": "PortalAccountId",
"type": "dim"
},
{
"name": "PortalType",
"type": "dim"
},
{
"name": "PortalAccountOwnerId",
"type": "dim"
}
]
}
}
27
Values Hash for variables.jsonStep 3: Edit the JSON Files

Variable Definition Structure for variables.json
The variable definition structure for variables.json follows:
Example:
"<Name of a variable>":{
"label":"<Question to display>",
"description":"<Text to help user to select/provide the right value>",
"variableType":{"type": "SobjectType"},
"defaultValue":{"sobjectName": "User"},
"required":true|false, <Default is false>
"excludes":[<list of comma-separated devNames or regex tokens, it can have
both devNames and regex tokens (to not show in a picker or not accept)> ],
"excludeSelected":true|false <If there are two or more pickers with same
source and variable type and this field is true for both, they'll exclude (from the
list of options) the selected option in the other picker>
}
"excludes" attribute
Regex Token Definition: "/<regex pattern>/flags"
Flags are characters that Javascript RegEx global object takes, for example: g, i, m, u, etc. Refer to the RegEx Object API
documentation for details.
Example excludes:
1. ["caseId", "/{{\s*[\w\.]+\s*}}/g", "caseName"]
2. "["Name", "/^(Billing).+/"] --> To exclude "Name" field and all the fields that start with "Billing"
3. ["/^(?!Billing)^(?!Shipping).+/"] --> To exclude all the fields except those that start with "Billing" or
"Shipping"
4. ["/.+(_kav)$/"] --> To exclude all the fields that end with "_kav"
5. ["/^(?:(?!_kav).)*$/"] --> To exclude all the fields except those that end with "_kav"
6. ["/(?!^Case$|^Account$)(^.*$)/"] --> To exclude all the objects except Case and Account
Note: The defaultValue CANNOT include a value that will be excluded here, or an error will be displayed to the user.
"excludeSelected" attribute
In the following example, once a user picks an option for Dim1, that option is not shown in Dim2's picker.
"SObjectField1": {
"label": "Select a field from account",
"description": "First account field.",
"defaultValue": {
"sobjectName": "Account",
"fieldName": ""
},
28
Variable Definition Structure for variables.jsonStep 3: Edit the JSON Files

"required": true,
"excludeSelected": true,
"variableType": {
"type": "SobjectFieldType"
}
}
"SObjectField2": {
"label": "Select another field from account",
"description": "Second account field.",
"defaultValue": {
"sobjectName": "Account",
"fieldName": ""
},
"required": true,
"excludeSelected": true,
"variableType": {
"type": "SObjectFieldtype"
}
}
Simple Variable Types for variables.json
We call the following variable types “simple” because they are standard, predefined datatypes.
Type DeclarationType Name
"variableType":{"type": "BooleanType"}BooleanType
"variableType":{"type": "StringType"}StringType
"variableType":{"type": "NumberType"}NumberType
"variableType":{"type": "NumberType", "min":0, "max":100}NumberType (Range)
Complex Variable Types for variables.json
Unlike the simple variable types, these complex types are specific to Salesforce (for example, sobject, sobjectField) and are
used to query the org for access to Salesforce objects, which you can then pull out as different datatypes.
Example ValueType DeclarationType DefinitionType Name
{
"sobjectName":
"variableType": {
"type":
{
"type":
SobjectType
"Account"
}
"SobjectType"
}
"ObjectType",
"properties": {
"sobjectName":{"type":
"StringType"}
}
}
29
Simple Variable Types for variables.jsonStep 3: Edit the JSON Files

Example ValueType DeclarationType DefinitionType Name
{
"sobjectName":
"variableType": {
"type":
{
"type":
SobjectFieldType
"Account","SobjectFieldType","ObjectType",
"dataType":"xsd:double"
"fieldName":
}
"properties":{
"sobjectName":{"type":"StringType"},
"CompanyName"
}
Refer here for more values for
dataType.
"fieldName":{"type":"StringType"}
}
}
{
"datasetId":
"variableType": {
"type":
{
"type":
DatasetType
"Dataset01","DatasetType"
}
"ObjectType",
"properties":{
"datasetAlias":
"datasetId":{"type":"StringType"}, "Airlines Dataset"
}
"datasetAlias":{"type":"StringType"}
}
}
{
"datasetId":
"variableType": {
"type":
{
"type":
DatasetDimensionType
"DS0001","DatasetDimensionType""ObjectType",
}
"fieldName":{"properties":{
"Width""datasetId":
}
"DS0001",
"fieldName":
"datasetId":{"type":"StringType"},
"Width""fieldName":{"type":"StringType"}
}
}
{
"datasetId":
"variableType": {
"type":
{
"type":
DatasetMeasureType
"DS0001","DatasetMeasureType"
}
"ObjectType",
"properties":{ "fieldName":
"Count"
30
Complex Variable Types for variables.jsonStep 3: Edit the JSON Files

Example ValueType DeclarationType DefinitionType Name
}
"datasetId":{"type":"StringType"},
"fieldName":{"type":"StringType"}
}
}
{
"datasetId":
"variableType": {
"type":
{
"type":
DatasetDateType
"DS0001","DatasetDateType"
}
"ObjectType",
"properties":{ "dateAlias":
"Close_Date"
"datasetId":{"type":"StringType"},
}
"dateAlias":{"type":"StringType"}
}
}
Array Variable Type for variables.json
An array type produces a multi-select in the wizard. With it, a user can make multiple choices out of a presented list, and you can define
a minimum and maximum for how many items the user can choose.
"variableType": {
"type": "ArrayType",
"itemsType": {
"type": "NumberType"
}
"sizeLimit":{
"min": minimum number of elements
"max": maximum number of elements
}
}
Example for enum ArrayType:
"required" : false,
"variableType" :
{
"type":
"ArrayType",
"itemsType":
{
"type": "StringType",
"enums" : [
"Leads",
31
Array Variable Type for variables.jsonStep 3: Edit the JSON Files
"Campaigns",
"Campaign Members"
]
},
"sizeLimit": {
"max": 3
}
}
},
Variable Value Reference Use Case and Syntax for variables.json
A template can contain questions to select one or more sObjects and one or more sObjectFields. There are individual questions
for sObjectFields. On a page, the first question is to select an sObject, and when a user does so, the template UI must use the
selected sObject to show sObjectFields for the subsequent questions/pickers.
For example, the sObject picker on top and sObjectField picker are connected, as shown in the image below.
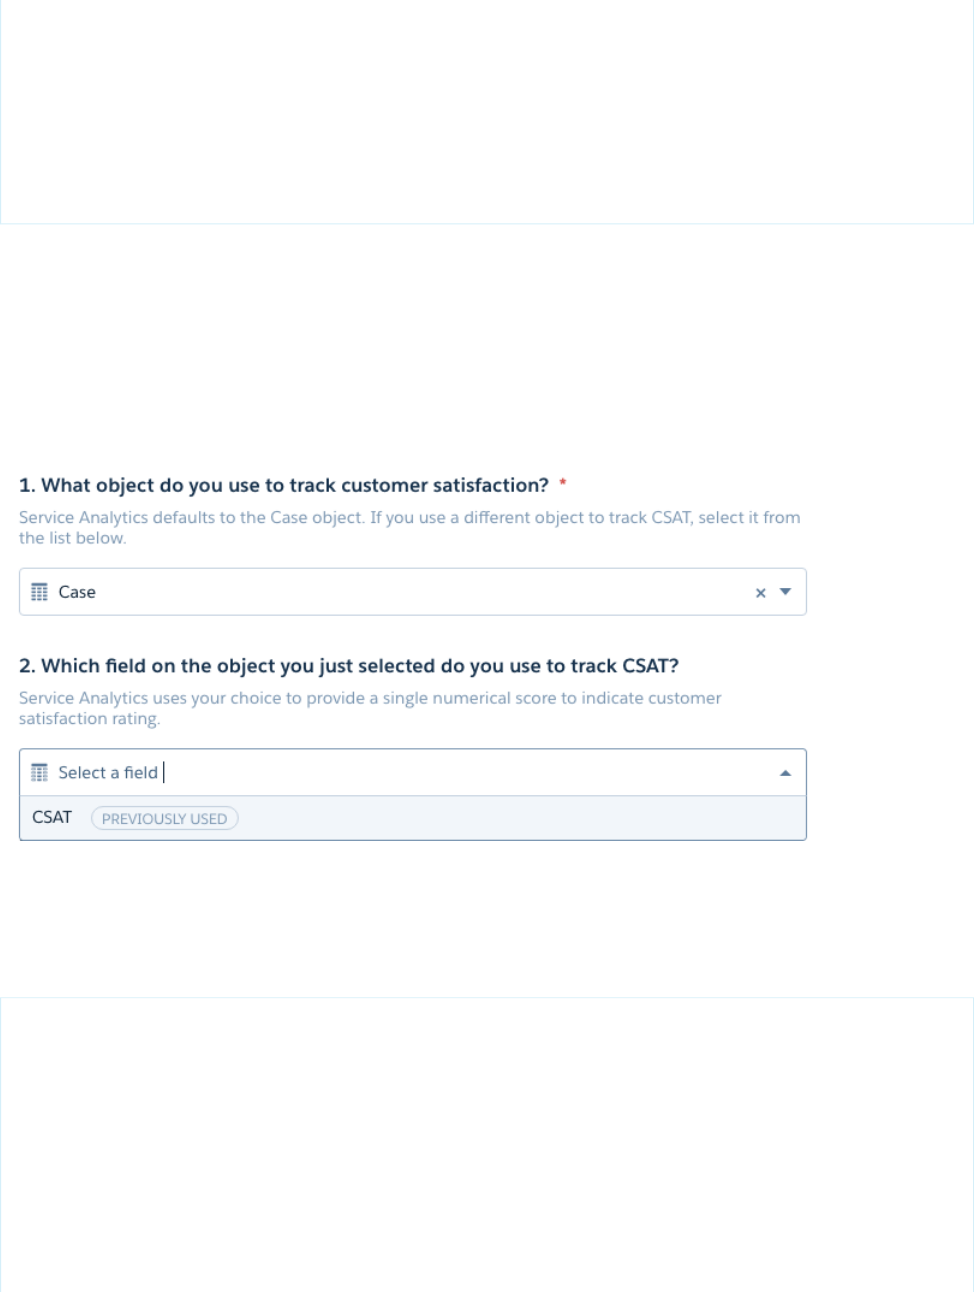
Following is template JSON used to render the above UI. In the variables section, notice CSATField variable's type info: the
defaultValue contains a reference to the variable's value CSATObj and the syntax is
{{Variables.CSATObj.sobjectName}}. The intention here is to replace {{Variables.CSATObj.sobjectName}}
with the value that user picked for the variable CSATObj.
{
"ui": {
"pages": [
{
"title": "Page1",
"variables": [
{
"name": "CSATObj"
},
{
"name": "CSATField"
}
32
Variable Value Reference Use Case and Syntax for
variables.json
Step 3: Edit the JSON Files

]
}
]
},
"variables": {
"CSATObj": {
"description": "Service Analytics defaults to the Case object. If you use a different
object to track CSAT, select it from the list below",
"label": "1. What object do you use to track customer satisfaction?",
"required": true,
"variableType": {
"type": "SObjectType"
},
"defaultValue": {
"sobjectName": "Case"
}
},
"CSATField": {
"description": "Service Analytics uses your choice to provide a single numerical
score to indicate customer satisfaction rating.",
"label": "2. Which field on the object you just selected do you use to track CSAT?",
"defaultValue": {
"datasetId": "{{Variables.CSATObj.sobjectName}}",
"fieldName": ""
},
"required": true,
"excludeSelected": true,
"variableType": {
"type": "SobjectFieldType",
"datatype": "xsd:double"
}
}
}
}
Variable Value Reference Syntax
"{{Variables.Dataset1.datasetId}}
{{Variables.<SObjectVariableName>.sobjectName}}"
Refer to the mustache.js documentation for more detail.
Edit ui.json
The ui.json file defines your template's configuration wizard. Without a configuration wizard, the user creating a downstream ap
is only asked to name the app, and an exact replica of the master app is created.
The UI file describes the wizard page layout. It informs the display of the variables described in variables.json and looks like this:
{
"ui" :{
33
Edit ui.jsonStep 3: Edit the JSON Files

"pages": [
{
"title":"Customization Questions",
"variables":[
{"name": "customizeUserObjectInfo"}
]
}
{
"title":"User Object Information",
// Only show this page if the user checked the "customizeUserObjectInfo"
checkbox.
"condition":"{{Variables.customizeUserObjectInfo == 'Yes'}}",
"variables":[
{"name": "userObjectUsernameField"},
{"name": "userObjectName"},
{"name": "pageConditionVariable"},
{"name": "showBoolean"}
],
"helpUrl":"https://salesforce.com/wave/salesapp/page1/help.html"
},
{
"title":"Job Information",
"variables":[
{"name": "maxAllowedOffset"},
{"name": "booleanExample", "visibility": "{{Variables.showBoolean ?
'Visible' : 'Hidden'}}"},
],
"helpUrl":"https://salesforce.com/wave/salesapp/page2/help.html"
}
],
"displayMessages": [
{
"text":"When we're done creating the app, we'll send you an email.",
"location": "AppLandingPage"
}
]
}
}
34
Edit ui.jsonStep 3: Edit the JSON Files
Page Condition Syntax for ui.json
You can make a page's appearance conditional on the value of a variable. For example, if the user answers “No” when asked if there
is a Products dimension, you can use a conditional to ensure that no Products-related page displays in the wizard. Adding page
conditions enables wizard page flow. If the condition is met, then the page with the condition will display; if the condition is not
met, the page will not display. Use the following syntax to instruct which conditionals control the display of pages.
Variables Array in ui.json
Use a variables array to display a question to users conditionally. You can optionally display a question as disabled in the case
where an answer has been found or computed using Apex Class. To accommodate variable condition and other fields, the
variables array must be an array of objects instead of an array of variable names.
Creating Custom UI Wizard Pages Using VisualForce
You can use VisualForce and a JavaScript library to enhance the wizard display if you want to improve the user experience beyond
the default interface.
Page Condition Syntax for ui.json
You can make a page's appearance conditional on the value of a variable. For example, if the user answers “No” when asked if there is
a Products dimension, you can use a conditional to ensure that no Products-related page displays in the wizard. Adding page conditions
enables wizard page flow. If the condition is met, then the page with the condition will display; if the condition is not met, the page will
not display. Use the following syntax to instruct which conditionals control the display of pages.
ExampleSupported OperationsVariable Type
{{Variables.x == 'Yes'}}==, !=
StringType
{{Variables.x == true}}==, !=
BooleanType
{{Variables.x == 5}}==, !=, <, <=, >, >=
NumberType
{{Variables.x.sobjectName ==
'x'}}
==, !=
SobjectType
{{Variables.x.fieldName ==
'x'}}
==, !=
SobjectFieldType
{{Variables.x contains
'x'`123}}
contains
ArrayType --> StringType
{{Variables.x contains 5}}contains
ArrayType --> NumberType
35
Page Condition Syntax for ui.jsonStep 3: Edit the JSON Files

Variables Array in ui.json
Use a variables array to display a question to users conditionally. You can optionally display a question as disabled in the case
where an answer has been found or computed using Apex Class. To accommodate variable condition and other fields, the variables
array must be an array of objects instead of an array of variable names.
Variable Object
A variable object can have following fields:
{
"name": "userObjectUsernameField",
"visibility": "{{Variables.orgHasUserObject == 'Yes'}}"
}
Value DescriptionRequiredKey
Name of the variable.Yesname
Novisibility •Display condition:
–If the condition is evaluated to
'true', then this variable
(question+input control) is
displayed.
–If evaluated to 'false', this
variable won't be displayed.
–If evaluated to 'disabled', this
variable is grayed out.
•This is evaluated on the client side.
•Valid values 'Disabled' |
'Visible' | 'Hidden'
•Example Expressions:
–"{{Variables.booleanType
? 'Visible' :
'Hidden'}}"
–"{{Variables.orgHasUserObject
== 'Yes' ? 'Visible' :
'Hidden'}}"
–"{{Variables.orgHasUserObject
== 'Yes' ? 'Disabled'
: 'Visible' }}"
36
Variables Array in ui.jsonStep 3: Edit the JSON Files

Example: Example of variable object:
{
"ui" :{
"pages": [
{
"title":"User Object Information",
// Only show this page if the user checked the "Customize" button.
"condition":"{{Variables.customizeOpportunities == 'Yes'}}",
"variables":[
{
"name": "userObjectUsernameField",
"visibility": "{{Variables.orgHasUserObject == 'Yes' ? 'Visible'
: 'Hidden'}}"
},
{
"name": "userObjectName",
"visibility": "{{Variables.orgHasUserObject == 'Yes' ? 'Visible'
: 'Hidden'}}"
}
],
"helpUrl":"https://salesforce.com/wave/salesapp/page1/help.html"
},
{
"title":"Job Information",
"variables":[
"maxAllowedOffset"
],
"helpUrl":"https://salesforce.com/wave/salesapp/page2/help.html"
}
],
"displayMessages": [
{
"text":"When we're done creating the app, we'll send you an email.
Before you access the dashboards, you need to wait for the dataflow for the app to
finish running. After that, refresh this page and start exploring.",
"location": "AppLandingPage"
}
]
}
}
37
Variables Array in ui.jsonStep 3: Edit the JSON Files

Creating Custom UI Wizard Pages Using VisualForce
You can use VisualForce and a JavaScript library to enhance the wizard display if you want to improve the user experience beyond the
default interface.
The wizard you create is run prior to application generation and consists of a set of pages, each of which contains a set of questions. All
of this is declaratively configured in ui.json. The framework also enables you to run a custom APEX class before and after the wizard,
allowing the application developer to answer questions automatically or validate the org to ensure it has the minimum set of requirements
to install the application. You can accept the default format of the error messages generated by the validation process by ignoring the
rest of this section. Or you can use VisualForce and a JavaScript library to enhance the display if you want to improve the user experience
or include links for making configuration changes.
Using VisualForce, you can replace any or all of the autogenerated wizard pages with a custom VisualForce page, where you can display
anything you want. Refer to the illustration below for an example of how you can integrate a custom VisualForce page into the wizard
flow.
The VisualForce page is responsible for rendering everything inside the red lines in the figure below and interacts with the wizard through
a JavaScript SDK.
38
Creating Custom UI Wizard Pages Using VisualForceStep 3: Edit the JSON Files

The JavaScript SDK is essentially be a pub/sub eventing mechanism with a set of well defined events fired and consumed during a well
defined lifecycle. The SDK is versioned and can be included in any VisualForce page as follows:
<script type="text/javascript"
src="/analytics/wave/sdk/js/40.0/wizard.js"></script>
Example code:
// Subscribe to event that gets fired when the page first loads
Wave.wizard.publish(
{name : 'wizard.ready', "payload" : {}, callback : function (response) {
var payload = response.payload;
var metadata = {
page : payload.page,
variableDefinitions : payload.variableDefinitions,
values : payload.initialValues
}
}});
// Update and validate a single answer to a question
39
Creating Custom UI Wizard Pages Using VisualForceStep 3: Edit the JSON Files

Wave.wizard.publish({
name: "wizard.update",
payload: {name: "Fiscal_Month", value: "01 - January"},
function(response) {
var errors = response.payload;
}
});
Declaring the VisualForce Page in ui.json
In order to replace the default rendering of a wizard page the application developer will simply specify the visualforce name in ui.json
page as follows:
"pages" : [
{
"title": "These questions focus on how Analytics displays data for Accounts”,
"variables": [
{ "name": "Customer" },
{ "name": "Customer_L2" },
{ "name": "Source" },
{ "name": "Geo_Maps" },
{ "name": "Geography" },
{ "name": "Geography_L2" }
],
"helpUrl":"https://help.salesforce.com/HTViewHelpDoc?id=bi_app_sales_wave.htm",
"vfPage":{
"namespace": "<visualforce_namespace>",
"name": "<visualforce_page_name>"
}
}]
Refer to the "VisualForce Events for Customizing the Wizard UI" reference section at the end of this guide for details on the events to
which you can subscribe or publish.
Edit rules.json
Customizing the installation of an Analytics application is crucial. Why? Because not all customers’ orgs are the same, and a "one size fits
all" application simply doesn’t work.
Not all customers have enabled the same features. Not all customers store the data in the same place. Not all customers close on the
same date. Not all customers have the same colors or logos. You get the idea.
There are a couple of different ways to customize the installation of an Analytics application from a template. One method is to use EL
expressions in-lined in the JSON, but these are typically reserved for certain IDs and developer names. Another method is to use conditional
expressions in the template-info.json to conditionally include or exclude certain assets. But by far the most powerful way to
morph the JSON so that it is completely customized to the customer organization is through rules. Rules are a very powerful way to
express changes to the template's JSON during app creation.
Rules can be complex, but are also optional, and with the help of macros and constants can be greatly simplified. Rules are used in
combination with variables (answers from the wizard), and, when combined, can alter your template's JSON in any way you see fit.
40
Edit rules.jsonStep 3: Edit the JSON Files

There are two type of rules: app-to-template rules and template-to-app rules. They are syntactically identical; the only difference is when
they get applied. App-to-template rules are less common, but can be used to convert your master app back to template form.
Template-to-app rules are more common and are powered by the answers from the wizard.
Rules are made up of these parts:
•Action: The action designates what CRUD operation to perform.
•Path: A JSON path to where in the document to perform the action.
•AppliesTo: Consists of a name and type and denotes to which asset files to apply the rules.
Rules can also be broken out into multiple files for convenience. The order in which they are declared in template-info.json
is the order in which they are executed.
Here is a simple sample rule for changing the title text on a dashboard:
{
"name": "Update dashboard title",
"appliesTo": [
{
"type": "dashboard",
"name": "DashboardOne"
}
],
"actions": [
{
"action": "set",
"description": "change the title text of the dashboard",
"path": "$.state.widgets.title_text.parameters.text",
"value": "${Variables.DashboardTitle}"
}
]
}
Template-to-App Rules
Template-to-app rules dictate which parts of the app are generated, and which are excluded. They run when the wizard has been
completed and the assets for the app are being built. For example, rules can say “If the user answered 'No' to the Product dimension
(based on variables), delete Product pages from the wizard; in this case, rules are used to pull unwanted parts of dashboards and
dataflows out when the app is being built (otherwise, dataflow builds will fail and dashboards will display blank portions if they don't
fail). Rules can also say “Take the content of this text box and place it here.”
App-to-Template Rules
You can also apply rules to the app-to-template process, which is the process of templatizing the master app. These rules run when
the master app has been updated and you update the template object with a PUT call to the Analytics REST API. For example, you
may choose to to tokenize all the asset files every time they are pulled out of the master app. Use an app-to-template rules file for
this.
The need for app-to-template rules is far less common. Most of this discussion addresses template-to-app rules.
Actions and Constants in Rules
The component that defines rules is actions. To facilitate your use of this functionality, we have also provided constants, which are
similar to variables, and completely optional.
Multiple Rules Files
The order of rules files is important. When we write rules into our system on deploy, they are processed in order. This means that
rules1.json cannot have a constant based on a conditional in rules5.json.
41
Edit rules.jsonStep 3: Edit the JSON Files
Rules Syntax
The rules object may contain any number of rule objects. A rule object is made up of:
Actions Syntax for Rules
The actions syntax for rules is:
String Functions in Rules
You can manipulate string functions using rules. For instance, you can replace all occurrences of one string with another or convert
strings from uppercase to lowercase. If a user enters a dashboard title in the wizard using all lowercase letters, for example, you can
use functions to change that to sentence case when the asset is actually being generated in the downstream app. In conjunction
with string functions, we also introduced a new built property,"Rules.CurrentNode". This property contains the last results
of the JSON 'path' argument you supplied in the action of your rule.
Array Functions in Rules (for Multi-Select and Looping)
To create a multi-select widget in the Template Wizard, add a variable of “ArrayType”.
Macros in Rules
Template rules play an important role in the transformation of assets within a template. Rule definitions can grow at an unmanageable
pace (depending on the complexity of the template), and the same type of rules are executed repetitively, but are executed on
different JSON node paths. (After reading this section, refer to the macros portion of the reference section in this guide.)
Actions and Constants in Rules
The component that defines rules is actions. To facilitate your use of this functionality, we have also provided constants, which are similar
to variables, and completely optional.
Actions
Actions are edits you want to perform on a set of JSON documents. The valid actions are 'delete', 'put', 'set', and 'add'.
•delete: deletes a node in the document
•put: adds a node to an object
•set: sets the value of an existing node in the document
•add: adds an element to an array
Each action has a path attribute. This path is a JsonPath pointing to the node in the document. JsonPath is for JSON like XPath is for
XML. You can practice it here.
Actions can be conditionally applied to a document. You can set the condition on a set of actions or on a collection of actions.
The rules file is referenced from the template-info.json.
Constants
Constants are like variables, but are not passed in or declared in the UI. The idea is to create shortcuts for longer expressions to reduce
typing and cut and paste errors. Constants can be references in the document via the normal expression language
${Constants.<constantName>}.
Multiple Rules Files
The order of rules files is important. When we write rules into our system on deploy, they are processed in order. This means that
rules1.json cannot have a constant based on a conditional in rules5.json.
Rules can grow to be numerous and rules files hard to read. We recommend the following best practices for organizating your rules:
•Have one rules file for all your constants, and another for all your actions.
42
Actions and Constants in RulesStep 3: Edit the JSON Files

•When the actions grow to be more than 500 lines, consider breaking them up into; for example, a dashboard rules file and a a
dataflow rules file.
•Because the rules file order is important, we recommend putting content that all the rules files are going to use in the first file.
Rules Syntax
The rules object may contain any number of rule objects. A rule object is made up of:
NotesRequiredExampleTypeAttribute
Yes
"name":
"ruleName"
Stringname
Use freemarker
conditions to apply the
No
"condition":
"${Variables.foo
== "Yes"}"
Stringcondition
rule (same syntax as
conditions used in
template-info.json)
Use "type": "*" to
apply to all JSON assets.
Yes
{
"type":
ArrayappliesTo
Other valid values are
"dashboard",
"dashboard" ,
"name":
"lens",
"dashboardOne"
}"workflow",
"schema", and
"xmd"
The "name" string
allows specific JSON
assets to be referenced
The "name" can take
"*" as well, to apply to
all of one asset type or a
group of one asset type
Note:
NOTE: for workflow type,
name has to be "*"
4 actions types: add,
put, set, and
delete
Can have as many actions
as needed in array
Yes
{
"action":
"set",
"description"
: "A desc",
Arrayactions
"path":
"$.json.path",
"value":
43
Rules SyntaxStep 3: Edit the JSON Files

NotesRequiredExampleTypeAttribute
"setValue"
}
Actions Syntax for Rules
The actions syntax for rules is:
NotesExampleAction
Adds an entry to an existing array
Needs "index" and "value"
{
"action": "add",
add
"description" : "Add "index" should be 0 for first element in
array, any number after that for middle of
array
desc",
"path":
"$.json.path.to.existing.json,array",
If "index" is larger than array size, value
will be added to end of array
"index": 0,
"value": "value to add"
}
Add an attribute and value to an existing
JSON value
Needs "key" and "value"
{
"action": "put",
"description" : "Put
desc",
put
"value" can be a string or an array
"path":
"$.json.path.to.existing.json",
"key":
"jsonAttributeName",
"value": "new value"
}
Set a value on an existing JSON attribute
Needs "value"
{
"action": "set",
"description" : "Set
set
desc",
"path":
"$.json.path.to.attribute",
"value": "setValue"
}
Remove a node in the existing JSON tree
{
"action": "delete",
delete
"description" : "Delete
desc",
"path":
44
Actions Syntax for RulesStep 3: Edit the JSON Files

NotesExampleAction
"$.json.path.to.delete"
}
Evaluate the expression specified in
'value' and assign results to the context
[
eval
variable specified by 'key' (if set).
{Context attribute can be referenced using
the expression:
${Rules.Eval.<variable_name>}.
Scope of the eval variable is either:
"action": "eval",
"key": "helloResult",
•The entire document if performed in a
rule, or
"value":
"${myMacros:sayHello('Hello')}" •The macro if performed within a macro
},
{
"action": "set",
"path":
"$.path.json.node",
"value":
"${Rules.Eval.helloResult}"
}
]
String Functions in Rules
You can manipulate string functions using rules. For instance, you can replace all occurrences of one string with another or convert
strings from uppercase to lowercase. If a user enters a dashboard title in the wizard using all lowercase letters, for example, you can use
functions to change that to sentence case when the asset is actually being generated in the downstream app. In conjunction with string
functions, we also introduced a new built property,"Rules.CurrentNode". This property contains the last results of the JSON
'path' argument you supplied in the action of your rule.
The EL Expression Language allows for custom functions to be invoked in an expression. Functions can appear in the static text of an EL
expression. For example:
"name" : "my name in lowercase is
${string:toLowerCase(Variables.myName)}",
Function Quick Reference
To use rules for manipulating string functions, use this list for a quick reference:
45
String Functions in RulesStep 3: Edit the JSON Files

Function Quick Reference
To use rules for manipulating string functions, use this list for a quick reference:
DescriptionNameNamespace
Converts all of the characters in this Object
to uppercase.
toUpperCasestring
Converts all of the characters in this Object
to lowercase.
toLowerCasestring
Returns a new object resulting from
replacing all occurrences of oldStr in
this object with newStr.
replacestring
Replaces each substring of this string that
matches the given regular expression with
the given replacement.
replaceAllstring
Replaces the first substring of this string that
matches the given regular expression with
the given replacement.
replaceFirststring
Parses a string and slices it into an array
defined by the specified delimiter.
${string:split(<string>,
<delimiter>)}
splitstring
For example:
${string:split('one:two:three',
':')}
Results in array of strings:
['one','two','three']
If more complex regular expression
matching is required, see
string:match below.
Performs more complex regular expression
matching and returns an array of matching
matchstring
results. For example, to capture items
surrounded by square single quote and
square brackets:
${string:match('['foo']['bar']['baz']',
'\\\\[\\'(.*?)\\'\\\\]')
Returns the following array, containing:
foo
46
String Functions in RulesStep 3: Edit the JSON Files
DescriptionNameNamespace
bar
baz
Creates a string from an array of strings and
separates each item by the specified
delimiter.
${string:split(<string>,
<delimiter>)}
joinstring
Evaluate returnValue as an EL expression for
each item in the given array and collects
each eval result in an array and returns it.
forEacharray
Returns an array after concatenating the
given array1 and array2.
concatarray
Returns an array with unique items.uniquearray
Note: There are two versions of this
function; for differences, refer to the
reference section for function
documentation.
Returns a combined array array of unique
items which is an union of array1 and array2.
unionarray
Note: There are two versions of this
function; for differences, refer to the
reference section for function
documentation.
Returns the number of items in the array. If
the array is null or empty, 0 will be returned.
sizearray
Returns the last item in an array. If the array
is null or empty, null will be returned.
lastarray
Searches the current JSON document and
returns matching fully qualified JSON paths.
searchPathsjson
If no results are found, an empty array will
be returned. If more than one item is found,
an array of JSON paths will be returned. For
example:
${json:searchPaths('$.path.to.json.object')}
If this function is called outside of rules
execution, an error will be thrown.
47
String Functions in RulesStep 3: Edit the JSON Files
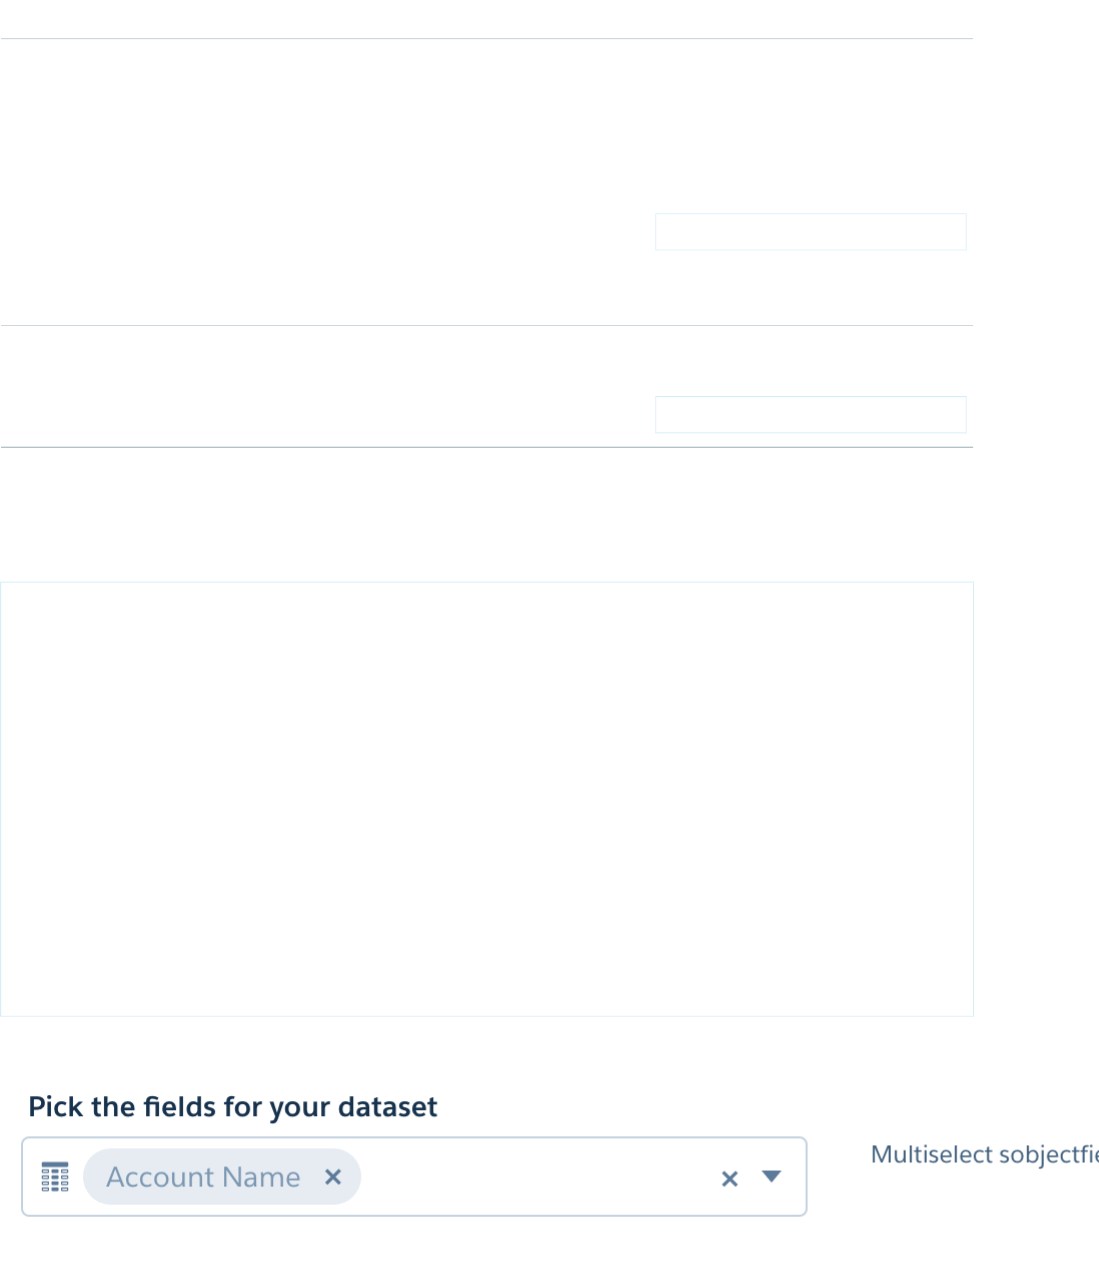
DescriptionNameNamespace
Searches the current JSON document and
returns values of the matching nodes. If no
searchValuesjson
results are found, an empty array will be
returned. If more than one item is found, an
array of objects will be returned. For
example:
${json:searchValues('$.path.to.json.object')}
If this function is called outside of rules
execution, an error will be thrown.
Converts a string in JSON form to a JSON
object.
${json:toJsonObject(<stringified_object>)}
toJsonObjectjson
Array Functions in Rules (for Multi-Select and Looping)
To create a multi-select widget in the Template Wizard, add a variable of “ArrayType”.
"Account_Fields": {
"label": "Pick the fields for your dataset",
"description": "Multiselect sobjectfield test",
"defaultValue": [
{
"sobjectName": "Account",
"fieldName": "Name"
}
],
"required": false,
"variableType": {
"type": "ArrayType",
"itemsType": {
"type": "SobjectFieldType"
}
},
"excludeSelected": true
}
48
Array Functions in Rules (for Multi-Select and Looping)Step 3: Edit the JSON Files
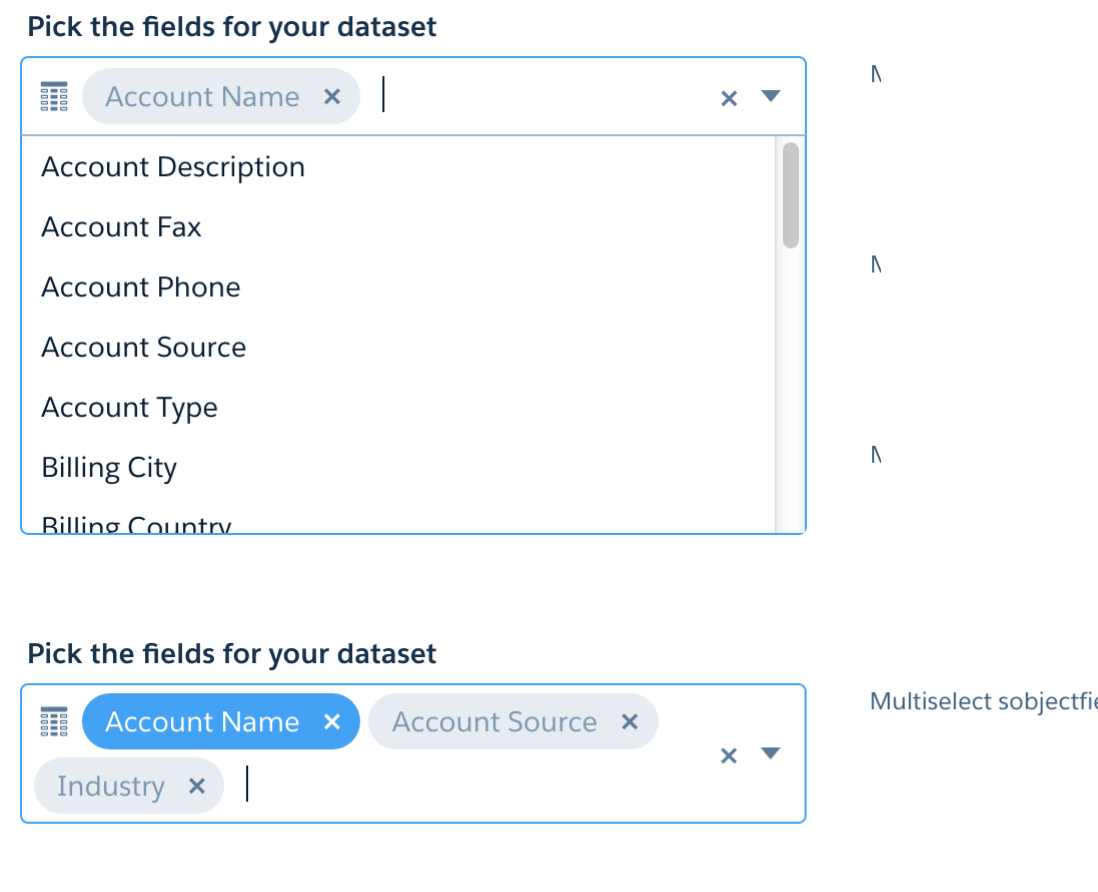
The ArrayType variable contains an itemsType attribute, which can be:
•SObjectType
•SObjectFieldType
•DatasetType
•DatasetDateType
•DatasetDimensionType
•DatasetMeasureType
•StringType, or
•NumberType
Selections in the widget are placed into an array as shown:
49
Array Functions in Rules (for Multi-Select and Looping)Step 3: Edit the JSON Files

Items in the array can be referenced by index. Arrays of StringType and NumberType are easy to work with, but arrays of
SObjectType and SObjectFieldType contain multiple attributes for each item in the array:
Array of SobjectFieldType:
•${Variables.Account_Fields[0]} returns (sobjectName=Account, fieldName=Name,
sobjectLabel=Account, fieldLabel=Account Name)
•${Variables.Account_Fields[0].fieldName} returns Name
•${Variables.Account_Fields[0].fieldLabel} returns Account Name
•fieldName is required for dataflow
The selection values from the widget are stored in the variable and there are two ways to access them in the template files (rules,
dashboards, workflow):
•Use array values from SobjectFieldType without looping, accessing by index
"fields":[
{"name":"${Variables.Account_Fields[0].fieldName}"},
{"name":"${Variables.Account_Fields[1].fieldName}"},
{"name":"${Variables.Account_Fields[2].fieldName}"},
{"name":"${Variables.Account_Fields[3].fieldName}"},
{"name":"${Variables.Account_Fields[4].fieldName}"}
]
This example, without looping, would be tricky to use, because there would always need to be at least five items in the array. Any
fewer would fail, and anything over five would not be used.
•Use array values from SobjectFieldType with looping via the array:forEach function. In this example, a “set”
action is going to loop through the SObjectFieldTypes in the array and add them to the “fields” attribute in the
Extract_Account step of the workflow. Each entry in “fields” will need “name” and “var.fieldName”.
•rules.json
"name": "AddAccountFilesToDataflow",
"appliesTo": [
–
{
"type": "workflow",
"name": "*"
}
],
"actions": [
{
"action": "set",
"description": "use selected values for sfdcDigest in dataflow",
"path": "$.workflowDefinition.Extract_Account.parameters.fields",
"value": "${array:forEach(Variables.Account_Fields, '{\"name\":
\"${var.fieldName}\"}')}"
}
]
–dataflow.json
"Extract_Account":{
"action":"sfdcDigest",
"parameters":{
50
Array Functions in Rules (for Multi-Select and Looping)Step 3: Edit the JSON Files

"fields":[],
"object":"Account"
}
}
–Results after processing if Account Name, Account Source, and Industry are selected
"Extract_Account":{
"action":"sfdcDigest",
"parameters":{
"fields":[
{"name":"Name"},
{"name":"AccountSource"},
{"name":"Industry"}
]
}
]
Here are more ways to work with arrays that extend the power of the array:forEach function:
•array:union (only uses unique values, so no duplicated values)
"value": "${array:union(array:forEach(Variables.Account_Fields,
'{\"name\": \"${var.fieldName}\"}'),array:forEach(Variables.Account_Fields2,
'{\"name\": \"${var.fieldName}\"}'))}"
•array:concat (2 new arrays)
"value": "${array:concat(array:forEach(Variables.Account_Fields,
'{\"name\": \"${var.fieldName}\"}'),array:forEach(Variables.Account_Fields2,
'{\"name\": \"${var.fieldName}\"}'))}"
•array:concat (1 new array with existing array)
"value":"${array:concat(Rules.CurrentNode,
array:forEach(Variables.Account_Fields,
'{\"name\":\"${var.fieldName}\"}'))}"
•You can use array functions in the “set” and “put” actions, but not in the “add” or “delete”.
–In “add”, the value is being added to an existing array, so the result is an array inside an array, which is not well-formed json.
To add more array values to an existing array, use “set” with the array:concat function
–For “delete”, value is not used
•Use array values from StringType (same for NumberType)
–variables.json
"Account_Fields_String": {
"label": "Pick string fields for your dataset",
"description": "Multiselect string test",
"defaultValue": ["Name"],
"required": true,
"variableType": {
"type": "ArrayType",
"itemsType": {
51
Array Functions in Rules (for Multi-Select and Looping)Step 3: Edit the JSON Files
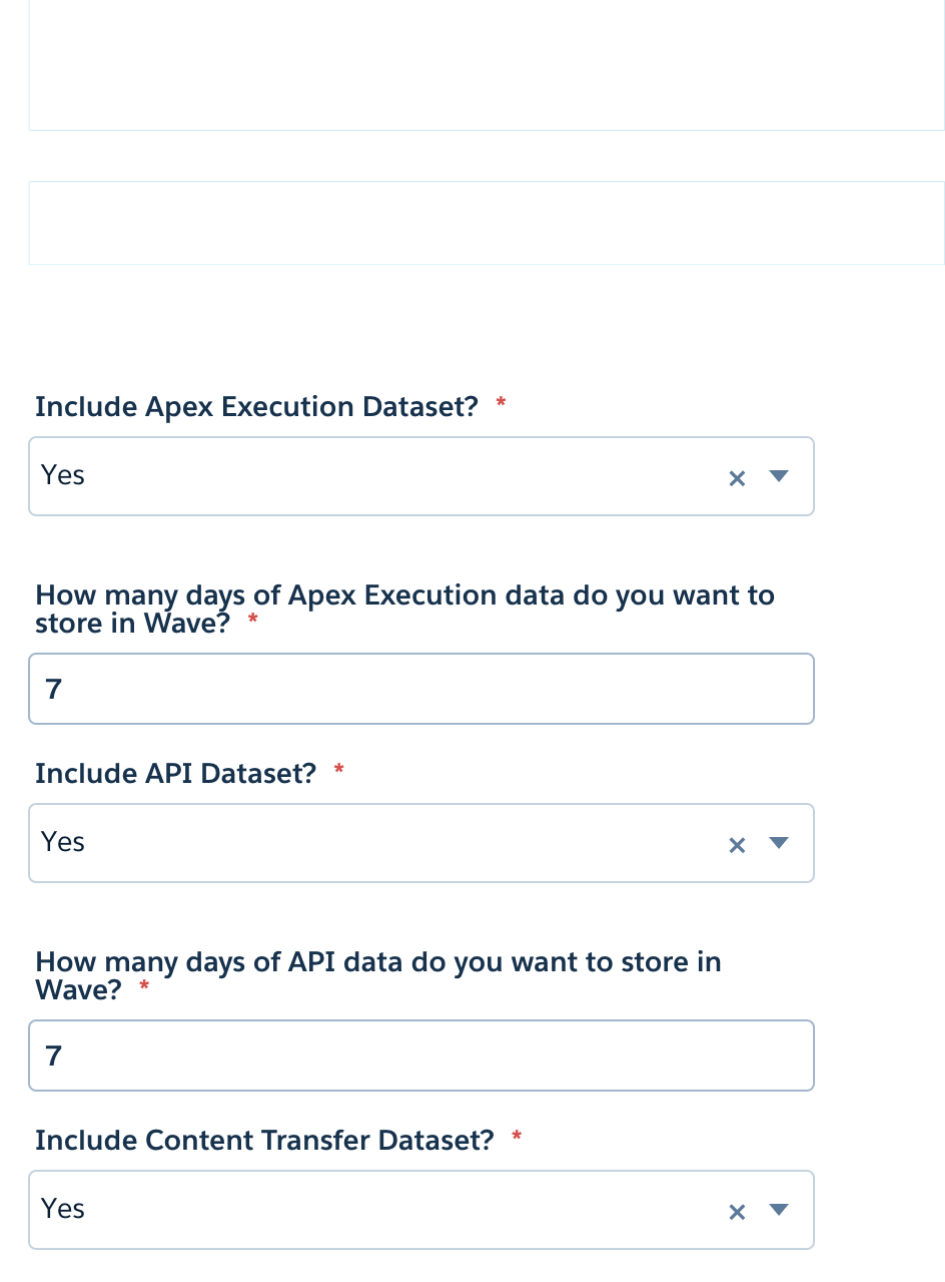
"type": "StringType",
"enums": ["Name", "AccountSource", "Industry", "Type"]
}
}
}
–rules.json
"value": "${array:forEach(Variables.Account_Fields_String,
'{\"name\":
\"${var}\"}')}"
•You can also use the multiselect widget to replace the current use of multiple StringType widgets with “Yes” and “No”
selections. The following is an example using three StringType widgets on one wizard page:
52
Array Functions in Rules (for Multi-Select and Looping)Step 3: Edit the JSON Files
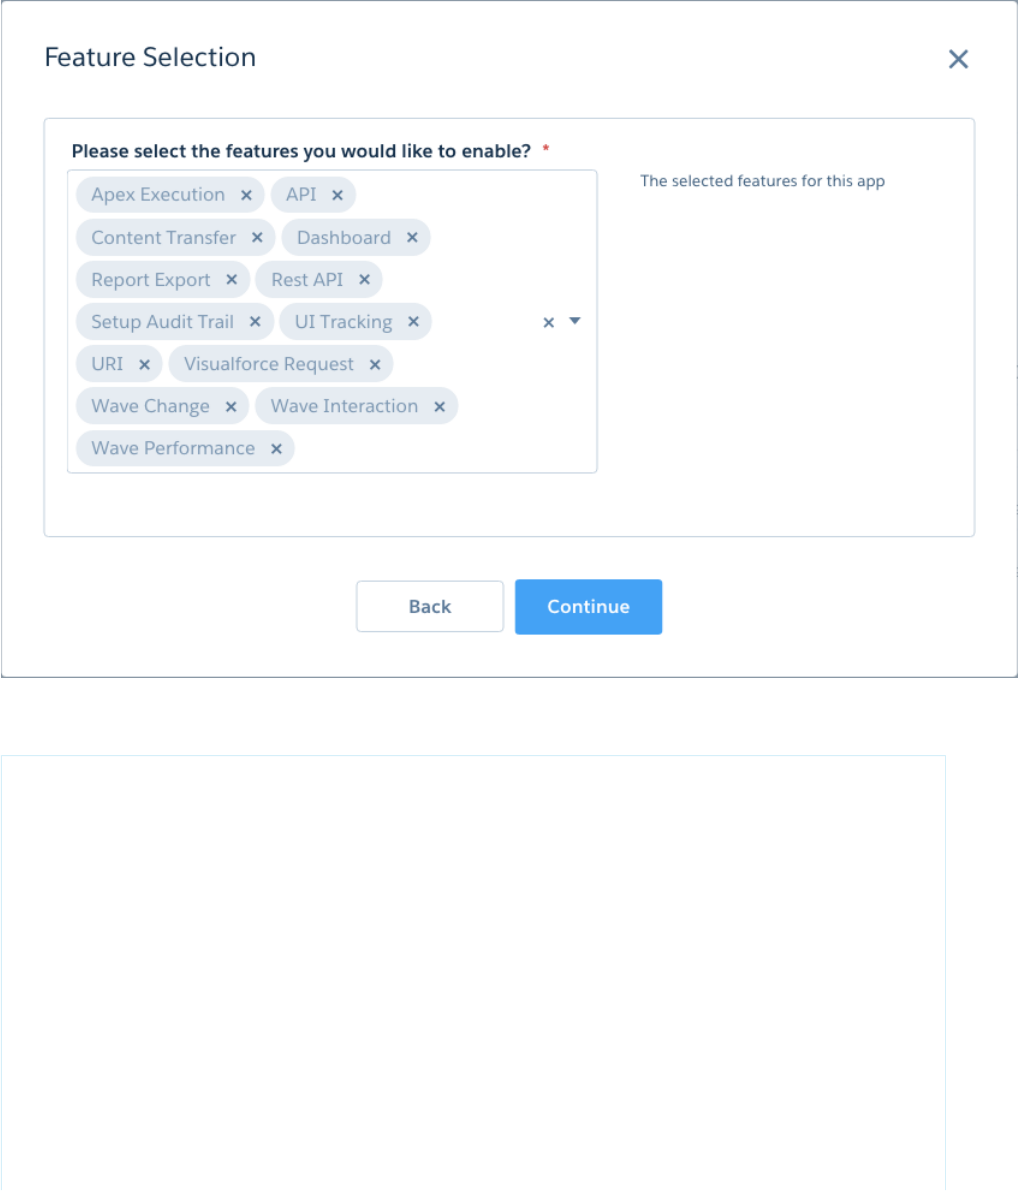
You can replace this with a single ArrayType widget:
The JSON for this variable is:
"SelectedFeatures": {
"label": "Please select the features you would like to enable?",
"description": "The selected features for this app",
"defaultValue": [
"Apex Execution"
],
"variableType": {
"type": "ArrayType",
"itemsType" : {
"type" : "StringType",
"enums" : [
"Apex Execution",
"API",
"Content Transfer",
"Dashboard",
"Login",
"Report Export",
"Rest API",
53
Array Functions in Rules (for Multi-Select and Looping)Step 3: Edit the JSON Files

"Setup Audit Trail",
"UI Tracking",
"URI",
"Visualforce Request",
"Wave Change",
"Wave Interaction",
"Wave Performance"
]
}
},
"required": true
}
You can use the selected values to set constants in rules.json, which you can then reference in conditionals for actions or in
template-info.json.
"constants" : [
{"name":"hasApexExecution", "value": "${array:contains(Variables.SelectedFeatures,
'Apex Execution')}"},
{"name":"hasAPI", "value": "${array:contains(Variables.SelectedFeatures, 'API')}"},
{"name":"hasContentTransfer", "value": "${array:contains(Variables.SelectedFeatures,
'Content Transfer')}"},
{"name":"hasDashboard", "value": "${array:contains(Variables.SelectedFeatures,
'Dashboard')}"},
{"name":"hasLogin", "value": "${array:contains(Variables.SelectedFeatures, 'Login')}"},
{"name":"hasReport", "value": "${array:contains(Variables.SelectedFeatures, 'Report
Export')}"},
{"name":"hasRestApi", "value": "${array:contains(Variables.SelectedFeatures, 'Rest
API')}"}
]
Macros in Rules
Template rules play an important role in the transformation of assets within a template. Rule definitions can grow at an unmanageable
pace (depending on the complexity of the template), and the same type of rules are executed repetitively, but are executed on different
JSON node paths. (After reading this section, refer to the macros portion of the reference section in this guide.)
Rule macros enable template developers to define repeatable, well-tested rule code units that can be called within the context of any
JSON transformation, simplifying and making the rule definition source easier to maintain. Two examples follow:
•The following example calls a macro with namespace 'myNS' and macro name 'getSomething' defined with no parameters.
Results of the macro are stored in the template context, and can be referenced using this expression:
${Rules.Eval.macroResults}.
{
"action": "eval",
"key": "macroResults",
"value": "${myNS:getSomething()}"
}
54
Macros in RulesStep 3: Edit the JSON Files

•This example sets the JSON node at path $.path.to.json.node with the result of macro myNS:getJsonValue defined with no
parameters. This action will only be called if the macro myNS:shouldExecute (defined with one parameter) returns true.
{
"action": "set",
"condition": "${myNS:shouldExecute(true)}",
"path": "$.path.to.json.node",
"value": "${myNS:getJsonValue()}"
}
Macro Syntax
Use the following example of macro syntax:
RuleMacro Attributes
A RuleMacro is an object that contains a collection of MacroDefinition objects. A RuleMacro is defined with the
following attributes:
MacroDefinition Attributes
A MacroDefinition is an object that defines the actual logic of the macro and its return value.
Parameters
Macros can define a collection of parameters that are expected as part of the macro function call. The number of parameters passed
in the function must match the number of parameters defined in the macro, and are passed in the order defined in the macro
definition. You are allowed to specify up to 10 parameters per macro.
Macro Syntax
Use the following example of macro syntax:
"macros":
[
{
"namespace": "myMacroNamespace",
"definitions": [
{
"name": "multiplyTwoNumbers",
"parameters": [
"firstNumber",
"secondNumber"
],
"returns": "${p.firstNumber * p.secondNumber}"
},
55
Macros in RulesStep 3: Edit the JSON Files

{
"name": "deleteWidget",
"description": "Deletes a widget and any references to the widget.",
"parameters": [
"widgetName"
],
"actions": [
{
"action": "eval",
"key": "results",
"path": "${json:searchPaths(\”$.state.widget['p.widgetName']\”)}”
},
{
"condition": "${!empty results}",
"action": "delete",
"path": "$.state.widgets['${p.widgetName}']"
},
{
"condition": "${!empty results}",
"action": "delete",
"path":
"$.state.gridLayouts..pages..widgets[?(@.name=='${p.widgetName}')]"
}
]
}
]
}
56
Macros in RulesStep 3: Edit the JSON Files

],
"constants": [...],
"rules": [...]
}
RuleMacro Attributes
A RuleMacro is an object that contains a collection of MacroDefinition objects. A RuleMacro is defined with the following
attributes:
•namespace: Required. A unique string identifier (to the template) used to scope the collection of macro definitions.
•definitions: Array of MacroDefinition objects defined within the RuleMacro.
MacroDefinition Attributes
A MacroDefinition is an object that defines the actual logic of the macro and its return value.
A MacroDefinition is described using:
•name: Required. The name of the macro.
•description: A string that describes what the macro does..
•parameters: An array of zero or more parameter names that the macro expects. Maximum number of 10 parameters.
•actions: An array of zero or more rule actions to perform as part of the macro.
•returns: An expression or literal value to be returned from the macro.
Parameters
Macros can define a collection of parameters that are expected as part of the macro function call. The number of parameters passed in
the function must match the number of parameters defined in the macro, and are passed in the order defined in the macro definition.
You are allowed to specify up to 10 parameters per macro.
Parameters can be referenced in the body of the macro using standard expression syntax: ${p.<parameter_name>}. Parameters
can be referenced in any action that accepts expressions. Special support has been added (in macros only) for action “path” statements
so that expressions can be used for more dynamic JSON path handling (see example above).
Parameters are scoped to the execution of the macro call and any references to ${p.<parameter_name>) will fail outside the
scope of the macro.
57
Macros in RulesStep 3: Edit the JSON Files

STEP 4: DEPLOY THE WAVETEMPLATE OBJECT
The MDAPI deploy command updates all your template assets in the database. Without it, any edits you've made exist only in your file
system. Deploying updates the template object and enables your collaborators to test the template and work off your changes.
If you're thinking of retrieving (MDAPI export) the latest template object from the Metadata API, know that performing this step overwrites
your template object folder contents. So deploying to it first is a must if you've made any edits to the assets on your workstation.
Using the Eclipse Lightning Platform Plugin to Deploy
After you have finished editing the files, one of the two ways you can deploy the WaveTemplate object is by using the Eclipse
Lightning Platform plugin.
Using the Ant Migration Tool to Deploy
To export the template using the Ant Migration Tool, refer to the reference section “Examples of Using the Ant Migration Tool.” It
provides you with two sample files for running an MDAPI export template call and deploy template call from ANT.
Using the Eclipse Lightning Platform Plugin to Deploy
After you have finished editing the files, one of the two ways you can deploy the WaveTemplate object is by using the Eclipse Lightning
Platform plugin.
Refer to the Force.com IDE Developer Guide for additional information on the plugin.
1. Once you are done editing the files, right-click on the project and select Lightning Platform Refresh from Server.
2. Create and install the package by following the instructions in our Packaging documentation. Specify WaveTemplate as the
component type.
Using the Ant Migration Tool to Deploy
To export the template using the Ant Migration Tool, refer to the reference section “Examples of Using the Ant Migration Tool.” It provides
you with two sample files for running an MDAPI export template call and deploy template call from ANT.
58

STEP 5: TEST THE TEMPLATE
The template dev process is iterative. The typical cycle has testing opportunities in several steps.
1. Create the master app.
2. Create the template object by POSTing to the Analytics REST API.
Test 1: Create an app from the unmodified template simply to make sure everything works.
3. Retrieve the template object using the MDAPI export call.
4. Edit the JSON files to update the template assets.
5. Deploy the updates to the Metadata API.
Test 2: Create an app from the updated template to evaluate the wizard and the app assets it creates.
6. Most likely you will make many changes, mostly to the template assets, but sometimes also to the master app itself.
a. Make changes in the master app to the dashboards, lenses, or dataset.Update the template object by making a PUT call to the
Analytics REST API.This probably requires changes to the wizard or other template assets, so export from the Metadata API again
and make edits to the JSON files. Update the template object by deploying to the Metadata API again.
Test 2 again.
OR
b. Make changes in the template to the wizard, rules, or variables.Update the template object by deploying to the Metadata API
again.
Test 2 again.
7. If you are using Smart Wizard functionality, then test the Apex class once you have a fully functional template wizard. Test it to make
sure the Apex class is working as expected; that is, giving variables programmatically assigned values, hiding/changing visibility of
variables and/or UI pages, giving feedback to the user, and so forth.
Save your template in the source control system of your choice, such as GitHub.
59

STEP 6: SHARE THE TEMPLATE
Deploying to the Metadata API is how you distribute the template to others in your org, or other orgs. With the correct permission sets
(refer to the "Prerequisites" section earlier in this document), collaborators can retrieve the template object from the Metadata API and
make their own contributions.
60

STEP 7: CREATE NEW (DOWNSTREAM) APPS FROM THE
TEMPLATE
Users can now create apps using your template as follows:
1. In Analytics Builder, select Create-->App.
2. Select the template you have shared in the drop-down menu of templates.
3. Follow the configuration wizard!
Anytime the user opens their downstream app, there will be a prompt to upgrade it if there have been changes to the template
since the app's last use. It's important to accept this prompt in order to keep their downstream apps on the upgrade path and in
sync with the master app and the template.
61

FEATURES NOT SUPPORTED IN THIS RELEASE
The following features are not available in this release of Analytics Templates:
•Custom Maps and Charts
•Data Recipes
•Remote Connected Datasets (only with replication)
62

APPENDIX
The reference section of this document contains detailed examples, attribute lists and descriptions, and other in-depth reference materials
that build on the concepts we have discussed up to this point.
template-info.json Example
Refer to this example of the template-info.json file.
template-info.json Attributes
The template-info.json file is the main file that describes the template. It includes or references all the information required
to create a downstream app.
ui.json Attributes
The ui.json file attributes are:
variables.json Attributes
Named nodes, each representing a single variable. Each node contains the following attributes:
folder.json Attributes
The folder.json file attributes are:
rules.json Example
Refer to this example of the rules.json file.
rules.json Attributes
The rules.json file attributes are:
Rules Function Documentation
This section expands on the functions portion of the rules.json file.
Rules Macros in Depth
Macros are specifically designed to run during asset transformation; that is to say, when rules are invoked. Any other references or
calls to macros (such as references in constants, or expressions within template-info.json) will result in an invalid function
error.
Ant Migration Tool Usage Examples
The sample-build.xml file uses ant-util.xml. These files also contain examples of using ANT tasks to make REST
POST/PUT/DELETE calls instead of using Workbench.
Analytics Template Apex Callback Class
This appendix describes all the classes and interfaces in the Analytics Template Apex callback class.
VisualForce Events for Customizing the Wizard UI
This reference section explains the details of using VisualForce for customizing the Wizard user interface.
template-info.json Example
Refer to this example of the template-info.json file.
63

Example:
{
"name": "my_unique_template_developer_name",
"label" : "My Template Label",
"description": "A short description about this template.",
"assetIcon": "10.png",
"templateIcon": "default.png",
"assetVersion": 39,
"releaseInfo" : {
"templateVersion": “1.12”, // Has to be a String in #.# format, with a limit of 20
chars
"notesFile" : "releaseNotes.html" // HTML support with server-side cleaning for
security
}
“rules” : [
{ “type” : “appToTemplate”, “file” : “appToTemplateRules.json”},
{ “type” : “templateToApp”, “file” : “templateToAppRules.json”}
],
"templateType": "app",
"uiDefinition": "ui.json",
"variableDefinition": "variables.json",
"apexCallback": {
"namespace": “my_ns”,
"name": “MyWaveTemplateCallback”
},
"dashboards": [
{
"condition": "${Variables.Has_Product == 'No'}",
"file": "dashboard/Sales_Wave_-_Customer_Analysis.json",
"label": "Sales Wave - Customer Analysis"
},
{
"condition": "${Variables.Has_Product == 'Yes'}",
"file": "dashboard/Sales_Wave_-_Customer_Analysis_w_Product.json",
"label": "Sales Wave - Customer Analysis w/ Product"
}
],
"lenses": [
{
"file": "lenses/lensOne.json",
"label": "lensOne"
}
],
"eltDataflows": [
{
"condition": "${Variables.Use_Eltflow1 == 'Yes'}",
"file": "elt-flow1.json"
},
{
"condition": "${Variables.Use_Eltflow1 == 'No'}",
"file": "elt-flow2.json"
},
],
64
template-info.json ExampleAppendix

"externalFiles": [
{
"condition": "${Variables.Has_Tasks == 'Yes'}",
"file": "external_files/task.csv",
"name": "task",
"overwriteOnUpgrade": "${Variables.forceUpgrade ? 'Always' : 'IfDifferent'}",
"schema": "external_files/task.json",
"type": "CSV",
"userXmd": "external_files/task_XMD_template.json"
}
],
"datasetFiles": [
{
"name": "DatasetFile1",
"label": "DatasetFile1",
"userXmd": "dataset_files/DatasetFile1.json" (optional)
},
{
"name": "DatasetFile2",
"label": "DatasetFile2",
"imageFiles" : [ {
"name" : "image1",
"file" : "images/image1.png"
}
],
"folderDefinition" : "folder.json"
}
]
template-info.json Attributes
The template-info.json file is the main file that describes the template. It includes or references all the information required
to create a downstream app.
DescriptionRequiredAttribute
The unique developer name of the template. If this is changed, it creates a new
template; if it is changed to an existing template devName, it overwrites the
existing template.
Yes"name"
The template name that is visible to users.Yes"label"
The template description - appears in the “Create App” template list to tell users
about the app they will be creating using the template.
No"description"
Sets the app icon at creation. There are 20 app icons stored as .png files in
Analytics, which are numbered 1-20.
No"assetIcon"
If not specified, system will use default icon 1.png, for the app.
65
template-info.json AttributesAppendix

DescriptionRequiredAttribute
Sets the template icon to display in the “Create-->App” template list. If not
specified, system will use default icon for the template (default.png). Currently,
default.png is the only icon ISVs can use.
No"templateIcon"
This refers to the API version to use in processing Analytics assets (dashboards,
datasets, XMDs, dataflows). 39 is the version for 206 (Spring ‘17). Older versions
YesassetVersion
(36, 37, 38) can be used, but will not make use of the most current features. With
every SFDC release, this assetVersion needs to be updated if newer features need
to be used.
Container attribute only.YesreleaseInfo
The version of the template, tracked for the upgrade process. Calling
wave/templates PUT will automatically increment this number, but it can be
changed manually as well. The format is ##.##, although it is a string.
YesreleaseInfo
templateVersion
A template dev defined HTML file to describe new release details. Basic HTML
formatting is supported, but not links or javascript. Defaults to using the template
description as release notes if file is not specified.
NoreleaseInfo
notesFile
Container attribute only - can contain 1 or more rule file definitions (loaded 1st
to last and order matters for dependencies).
Norules
appToTemplate - rules to apply when updating the template from the master
app (Rest API PUT call).
Yesrules type
templateToApp - rules to apply when creating a new app from a template.
Path to the rules file.Yesrules file
Always “app”.YestemplateType
Path the ui.json file.NouiDefinition
Path to the variables.json file.NovariableDefinition
Path to the folder.json file.NofolderDefinition
Container attribute only - this is for registering an APEX class that can run 1) on
wizard load 2) on app create 3) on app upgrade. The Apex class is created by
NoapexCallback
the template dev to examine the org programmatically and set variable values
as needed. (For example, the Sales Analytics app has an Apex class that checks
whether the org has Products set up, and if it doesn’t, sets the “Has_Product”
variable to “No”).
The SFDC namespace for the org.YesapexCallback
namespace
The name of the Apex class to be used.YesapexCallback
name
Container attribute only - array of dashboard json files to be used, can be empty
if there are no dashboard files.
Yesdashboards
66
template-info.json AttributesAppendix

DescriptionRequiredAttribute
Path to dashboard file.Yesdashboards file
The dashboard label which MUST match the “label” attribute in the dashboard
file
Yesdashboards label
The dashboard name which MUST match the “name” attribute in the dashboard
file.
Nodashboards name
If condition is met, then the dashboard will be created in the app; if the condition
is not met, the dashboard will not be created..
Nodashboards
conditional
Container attribute only - array of dashboard JSON files to be used, can be empty
if there are no dashboard files.
Yeslenses
Path to lens file.Yeslenses file
The lens label which MUST match the “label” attribute in the lens file.Yeslenses label
The lens name which MUST match the “name” attribute in the lens file.Nolenses name
If the condition is met, then the lens will be created in the app; if the condition
is not met, the dashboard will not be created.
Nolenses
conditional
Container attribute only - array of dataflow JSON files to be used, can be empty
if there are no dataflow files. Typically, there is only 1 dataflow file unless
conditionals are used.
YeseltDataflows
Path to dataflow file.YeseltDataflows
file
The dataflow label, which MUST match the “MasterLabel” attribute in the dataflow
file.
YeseltDataflows
label
The dataflow name, which MUST match the “name” attribute in the dataflow
file.
YeseltDataflows
name
If condition is met, then the dataflow will be created in the app; if the condition
is not met, the dataflow will not be created.
NoeltDataflows
conditional
Container attribute only - array of external files, CSV and descriptive files, to be
used, can be empty if there are no external files.
YesexternalFiles
Path to the CSV file.NoexternalFiles
file
The externalFile name, which MUST match the “name” attribute in the schema
file.
YesexternalFiles
name
Path to the schema file (describes the format of the data)NoexternalFiles
schema
Path to the user XMD file (describes the display format of the data).NoexternalFiles
userXmd
67
template-info.json AttributesAppendix

DescriptionRequiredAttribute
Needs to be “CSV”.YesexternalFiles
type
If condition is met, then the external file will be created in the app; if the condition
is not met, the external file will not be created.
NoexternalFiles
conditional
Container attribute only - array of SFDC dataset to be used, can be empty if there
are no SFDC dataset.
NodatasetFiles
Path to user XMD file, if it exists.NodatasetFiles
userXmd
The dataset label.YesdatasetFiles
label
The dataset name.YesdatasetFiles
name
If condition is met, then the dataset will be created in the app; if the condition
is not met, the dataset will not be created.
NodatasetFiles
conditional
Container attribute only: array of app images to be used, this can be empty if
there are no app images.
NoimageFiles
The image name.YesimageFiles name
If the condition is met, then the image will be uploaded into the app; if the
condition is not met, the image will not be uploaded.
NoimageFiles
conditional
ui.json Attributes
The ui.json file attributes are:
DescriptionRequiredAttribute
Container attribute only - array of UI pages
to be displayed, 1 page is necessary if
“pages” is used.
Nopages
String title to be displayed at the top of the
page.
Yespages title
Array of variables to display on a page, 1
variable is necessary.
Yespages variables
Variable name, must match name of variable
defined in variables.json.
Yespages variables name
Variable visibility (visible, disabled, hidden)
defined by conditional.
Nopages variables visibility
68
ui.json AttributesAppendix

DescriptionRequiredAttribute
If condition is met, then the page will
display; if the condition is not met, the page
will not display.
Nopages condition
URL provided by template dev to additional
content to help user with creating app.
Nopages helpUrl
Container attribute only: defines the
VisualForce Page to customize this page.
Nopages vfPage
The name of VisualForce class to use.Yespages vfPage name
The namespace for the VisualForce class.Yespages vfPage name namespace
Container attribute only - array of custom
display message, currently only 1
displayMessage is supported.
NodisplayMessages
Text to display on the app creation landing
page (coffee-cup page).
YesdisplayMessages text
“AppLandingPage” is only supported
location.
YesdisplayMessages location
variables.json Attributes
Named nodes, each representing a single variable. Each node contains the following attributes:
DescriptionRequiredAttribute
Visible label for the variable in the UI wizard
(typically a question like “Do you use
product?”)
Yeslabel
Additional text that appears under the label
for more information.
Nodescription
The default value for the variable, if the user
does not change the value in the wizard.
NodefaultValue
Can be the most likely value a user would
use.
Makes the variable value required in the UI.
The default if not includes is “false”.
Norequired
The type of the variable (StringType,
BooleanType, NumberType,
YesvariableType
SObjectType, SObjectFieldType,
ArrayType).
69
variables.json AttributesAppendix
DescriptionRequiredAttribute
For a picker like SObjectType or
SObjectFieldType, this will remove
NoexcludeSelected
already selected values from appearing in
the picker. Default is “false”.
Allows specific values to be excluded from
the picker selections (lots of doc on this in
Template Config Syntax)
Noexcludes
folder.json Attributes
The folder.json file attributes are:
DescriptionRequiredAttribute
Container for assets; this can be empty if no
featuredAssets are present.
YesfeaturedAssets
Container for assets.NofeaturedAssets default
Container for array of assets.NofeaturedAssets default
assets
Tokenized ID of dashboard asset.NofeaturedAssets default
assets id element
rules.json Example
Refer to this example of the rules.json file.
Example:
{ "constants": [
{
"name": "ChartType",
"value": "pie"
}
],
"rules": [
{
"name": "rule1",
"appliesTo": [
"type": "dashboard",
"name": "dashboardOne",
],
"actions": [
{
"action": "put",
70
folder.json AttributesAppendix

"description": "Put a section back in, but with different attributes",
"path": "$.state.widgets.chart_1",
"key": "pos",
"value": {
"w": "501",
"y": "41",
"h": "121",
"x": "51"
}
},
{
"action": "delete",
"description": "Delete a section",
"path": "$.state.widgets.chart_2"
}
]
}
]
}
The corresponding dashboardOne.json file that uses the above rules files looks like:
{
"_type": "dashboardTemplate",
"name": "Dashboard From Template With Rules",
"edgemarts": {
"${Variables.Dataset1.datasetAlias}": {
"_type": "edgemart",
"_uid": "${Variables.Dataset1.datasetId}"
},
"${Variables.Dataset2.datasetAlias}": {
"_type": "edgemart",
"_uid": "${Variables.Dataset2.datasetId}"
}
},
"folder": {
"_type": "folder",
"_uid": "${App.Folder.Id}"
},
"tags": [
],
"state": {
"widgets": {
"chart_1": {
"params": {
"chartType": "${Constants.ChartType}",
"minColumnWidth": 30,
"maxColumnWidth": 200,
"legend": false,
"selectMode": "single",
"sqrt": false,
"legendHideHeader": false,
"legendWidth": 145,
"step": "step_1"
71
rules.json ExampleAppendix

},
"type": "ChartWidget",
"pos": {
"w": "500",
"y": 60,
"h": "120",
"x": 40
}
},
"chart_2": {
"params": {
"chartType": "${Constants.ChartType}",
"minColumnWidth": 30,
"maxColumnWidth": 200,
"legend": false,
"selectMode": "single",
"sqrt": false,
"legendHideHeader": false,
"legendWidth": 145,
"step": "step_2"
},
"type": "ChartWidget",data
"pos": {
"w": "500",
"y": 190,
"h": "120",
"x": 40
}
}
},
"steps": {
"step_1": {
"isFacet": true,
"start": null,
"query": {
"measures": [
[
"count",
"*"
]
]
},
"selectMode": "single",
"useGlobal": true,
"em": "${Variables.Dataset1.datasetId}",
"type": "aggregate",
"isGlobal": false
},
"step_2": {
"isFacet": true,
"start": null,
"query": {
"measures": [
[
72
rules.json ExampleAppendix

"count",
"*"
]
]
},
"selectMode": "single",
"useGlobal": true,
"em": "${Variables.Dataset2.datasetId}",
"type": "aggregate",
"isGlobal": false
}
},
"type": "hbar"
}
}
When the rules are applied to the dashboard, the chart_1 widget will have a chartType of “pie” and the “pos” will be updated
to w=501, y=41, h=121, and x=51. The chart_2 widget will be removed.
rules.json Attributes
The rules.json file attributes are:
DescriptionRequiredAttribute
Container attribute only - array of constants
to be defined, can be empty if no constants
are needed
Yesconstants
Unique name for a constant, used to
reference the constant in other places
Yesconstants --> name
Value of the constantYesconstants --> value
Container attribute only - array of rules to
be defined, can be empty if no rules are
needed
Yesrules
Unique name for a ruleYesrules --> name
If condition is met, then the rule will run, if
the condition is not met, the rule will not
run.
Norules --> condition
Container attribute only - array of assets the
rule should be be applied to (dashboards,
dataflow, schemas, XMDs)
Yesrules --> appliesTo
Name of asset (can be * in case of
dashboards for all dashboards); must match
Yesrules --> appliesTo --> name
the “name” defined in the template-info for
the asset
73
rules.json AttributesAppendix

DescriptionRequiredAttribute
Type of asset (dashboard, dataflow, lens,
schema, xmd)
Yesrules --> appliesTo --> type
Container attribute only - array of actions
the rule should invoke (one or more action
is necessary)
Yesrules --> actions
Type of action - set, add, delete, putYesrules --> actions --> action
Description of the rule action - for
maintainability
Norules --> actions -->
description
JSONPath to take the action onYesrules --> actions --> path
Value needed for set/add/put, defines the
value to put in the JSONPath
Norules --> actions --> value
Index needed for add action onlyNorules --> actions --> index
Key needed for put action onlyNorules --> actions --> key
Rules Function Documentation
This section expands on the functions portion of the rules.json file.
Function Name: toUpperCase
Namespace: string
Parameters: Object
Return: Object
Recursive: supported
Description: Converts all of the characters in this Object to uppercase. The object can be a single string or a JSON object that contains
multiple strings
Example: Given the JSON:
"objecttest" : {
"obj" : {
"greeting1" : "hello world",
"greeting2" : "salut world",
"greeting3" : "hallo world"
},
"list" : ["hello world", "salut world", "hallo world"]
},
and the rule:
{
"action": "set",
"description": "Convert all strings to upper case",
74
Rules Function DocumentationAppendix

"path": "$.objecttest",
"value" : "${string:toUpperCase(Rules.CurrentNode)}"
}
would produce:
"objecttest" : {
"obj" : {
"greeting1" : "HELLO WORLD",
"greeting2" : "SALUT WORLD",
"greeting3" : "HALLO WORLD"
},
"list" : ["HELLO WORLD", "SALUT WORLD", "HALLO WORLD"]
},
Function Name: toLowerCase
Namespace: string
Parameters: object
Return: Object
Recursive: supported
Description: Converts all of the characters in this String to lowercase.
Function Name: replace
Namespace: string
Parameters: Object obj, String oldStr, String newStr
Return: Object
Recursive: supported
Description: Returns a new object resulting from replacing all occurrences of oldStr in this object with newStr
Function Name: replaceAll
Namespace: string
Parameters: Object obj, String regex, String newStr
Return: Object
Recursive: supported
Description: Replaces each substring of this Object that matches the given regular expression with the given replacement
Function Name: forEach
Namespace: array
Parameters: Collection<Object> array, String returnValue
Return: Collection<Object>
75
Rules Function DocumentationAppendix

Recursive: not supported
Description: Evaluates returnValue as an EL expression for each item in the given array and collects each eval result in an array and
returns it.
Example: Given JSON template:
{
"fields": "${array:forEach(Variables.myArray, '{\"name\": \"${var}\"}')}"
}
Would produce:
{
"fields": [{"name": "ProductName"},
{"name": "Amount"},
{"name": "CompanyName"},
{"name": "Revenue"}]
};
Function Name: concat
Namespace: array
Parameters: Collection<Object> array1, Collection<Object> array2
Return: Collection<Object>
Recursive: not supported
Description: Returns an array after concatenating the given array1 and array2.
Function Name: unique
Namespace: array
Parameters: Collection<String> array
Return: Collection<String>
Recursive: not supported
Description: Returns an array with unique items, it expects items to be of type String
Function Name: unique
Namespace: array
Parameters: String byFieldName, Collection<Object> array
Return: Collection<Object>
Recursive: not supported
Description: Returns an array with unique items, it expects items to be of type Object and uniqueness is determined by comparing the
value of a field identified by the given byFieldName.
76
Rules Function DocumentationAppendix

Function Name: union
Namespace: array
Parameters: Collection<String> array1, Collection<String> array2
Return: Collection<String>
Recursive: not supported
Description: Returns a combined array array of unique items which is an union of array1 and array2. It expects the arrays to be of type
String.
Function Name: union
Namespace: array
Parameters: String byFieldName, Collection<Object> array1, Collection<Object> array2
Return: Collection<Object>
Recursive: not supported
Description: Returns an array which is an union of array1 and array2 items. it expects items to be of type Object and uniqueness is
determined by comparing the value of a field identified by the given byFieldName.
Rules Macros in Depth
Macros are specifically designed to run during asset transformation; that is to say, when rules are invoked. Any other references or calls
to macros (such as references in constants, or expressions within template-info.json) will result in an invalid function error.
Macros are invoked using standard function syntax and can be referenced anywhere a traditional expression is resolved within a rule
action. For example, given the following rule macro and definitions:
{
"namespace": "testMacroNamespace",
"definitions": [
{
"name": "multiplyTwoNumbers",
"parameters": [
"firstNumber",
"secondNumber"
],
"returns": "${p.firstNumber * p.secondNumber}"
},
{
"name": "shouldExecuteAction",
"returns": true
}
]
}
Macros can be invoked like the actions in this set of rules:
{
"rules": [
{
77
Rules Macros in DepthAppendix

"name": "Testing of example macro",
"actions": [
{
"action": "set",
"key": "macroResult",
"path": "$.path.to.a.number",
"value": "${testMacroNamespace:multiplyTwoNumbers(3,3)}"
},
{
"action": "put",
"condition": "${testMacroNamespace:shouldExecuteAction()}",
"path": "$.my.json.path",
"value": {
"foo": "bar",
"anotherNumber": “${testMacroNamespace:multiplyTwoNumbers(5,5)}”
}
}
]
}
]
}
Nested Macro Calls and Recursion
Macros can call other macros (nested macros) and macro recursion is supported. If the macro stack depth gets too deep (depth of 10
for the initial release), an overflow error will occur and app creation will fail.
Sample Use Case: Recursive Operations
As a template developer, I want to delete an sfdcDigest node and I should be able to write/perform a recursive macro to
cascade delete the digest node and all other nodes that depend on that node.
Sample Use Case: Delete Workflow Nodes
As a developer, I'd like to delete multiple nodes from the workflow, and not have to write the same code over and over.
Sample Use Case: Add an Array of SObject Names to Extract Workflow
As a user, I'd like to take an array of sObjects and add their field names to the extract workflow.
Sample Use Case: Recursive Operations
As a template developer, I want to delete an sfdcDigest node and I should be able to write/perform a recursive macro to cascade
delete the digest node and all other nodes that depend on that node.
To perform this use case, we need to delete the specified node and be able to dynamically query the json document and delete each
dependency of those nodes.
Consider the simplified JSON below. If we wanted to delete 'node3' and its dependencies, the result should delete: node3, node4, node5
(depends on node4), node6 (depends on node5), node7, node8, node9.
Example: Example JSON
{
"node1": { },
"node2": {
78
Sample Use Case: Recursive OperationsAppendix

"dependsOn": "node1"
},
"node3": {
"dependsOn": "node2"
},
"node4": {
"dependsOn": "node3"
},
"node5": {
"dependsOn": "node4"
},
"node6": {
"dependsOn": "node5"
},
"node7": {
"dependsOn": "node3"
},
"node8": {
"dependsOn": "node3"
},
"node9": {
"dependsOn": "node3"
}
}
Example: Without Macros
Prior to macros (and associated enhancements), these nodes would have to be deleted individually.
{
"actions": [
{
"action": "delete",
"path": "$.node3"
},
{
"action": "delete",
"path": "$.node4"
},
{
"action": "delete",
"path": "$.node5"
},
{
"action": "delete",
"path": "$.node6"
},
{
"action": "delete",
"path": "$.node7"
},
{
"action": "delete",
"path": "$.node8"
79
Sample Use Case: Recursive OperationsAppendix

},
{
"action": "delete",
"path": "$.node9"
}
]
}
This code is very rigid and difficult to maintain because rules would need to be modified as node dependencies are added and
removed from the JSON payload.
Example: Macro Source
{
"namespace": "macroRecursion",
"definitions": [
{
"name": "deleteNodeAndDependencies",
"description": "Delete a node and its dependencies. Returns an array of
json paths of all the nodes that were deleted.",
"parameters": [
"nodeName"
],
"actions": [
{"action": "eval", "key": "fullNodePath", "value": "$.${p.nodeName}"
},
{"action": "eval", "key": "dependencies", "value":
"${macroRecursion:getDependents(p.nodeName)}"},
{
"action": "eval",
"value": "${array:forEach(Rules.Eval.dependencies,
'${macroRecursion:deleteNodeAndDependencies(macroRecursion:deleteSingleNodeByFullJsonPath(var))}')}"
},
{
"action": "eval",
80
Sample Use Case: Recursive OperationsAppendix

"value":
"${macroRecursion:deleteSingleNodeByFullJsonPath(Rules.Eval.fullNodePath)}"
}
]
},
{
"name": "deleteSingleNodeByFullJsonPath",
"description": "Deletes a node by full json path.",
"parameters": [
"fullJsonPath"
],
"actions": [
{"action": "eval", "key": "pathSegments",
"value": "${string:match(p.fullJsonPath,'\\\\[\\'(.*?)\\'\\\\]')}"},
{ "action": "delete", "path": "${p.fullJsonPath}"}
],
"returns": "${array:last(Rules.Eval.pathSegments)}"
},
{
"name": "getDependents",
"description": "Returns the full json path to search results",
"parameters": [
"nodeName"
],
"actions": [
{ "action": "eval", "key": "searchString", "value":
"$.*[?(@.dependsOn=='${p.nodeName}')]"},
{ "action": "eval", "key": "paths", "value":
"${json:searchPaths(Rules.Eval.searchString)}"}
81
Sample Use Case: Recursive OperationsAppendix

],
"returns": "${Rules.Eval.paths}"
}
]
}
Example: Rule Calling the Macro
{
"rules": [
{
"name": "Recursively delete node3 and dependencies",
"actions": [
{"action": "eval", "value":
"${macroRecursion:deleteNodeAndDependencies('node3')}" }
]
}
]
}
Sample Use Case: Delete Workflow Nodes
As a developer, I'd like to delete multiple nodes from the workflow, and not have to write the same code over and over.
Example: Macro
{
"name": "deleteWorkflowNode",
"description": "Deletes a workflow node.",
"parameters": [
"nodeName"
],
"actions": [
{ "action": "delete", "path": "$.workflowDefinition.${p.nodeName}"}
]
},
{
"name": "deleteArrayOfWorkflowNodes",
"description": "Deletes a set of workflow nodes.",
"parameters": [
"nodeNameArray"
],
"actions": [
{ "action": "eval",
"value": "${array:forEach(p.nodeNameArray,
'${macros:deleteWorkflowNode(var)}')}"}
]
}
82
Sample Use Case: Delete Workflow NodesAppendix

Example: Rule Calling the Macro
{"action":"eval","key" :
"myArray","value":["Extract_Queue","Add_Fields_To_Queue","Append_Queue_User"]},
{
"action": "eval",
"description": "remove multiple nodes in dataflow",
"value": "${macros:deleteArrayOfWorkflowNodes(Rules.Eval.myArray)}"
}
Sample Use Case: Add an Array of SObject Names to Extract Workflow
As a user, I'd like to take an array of sObjects and add their field names to the extract workflow.
Example: Macro
{
"name" : "concatArrayFieldName",
"description" : "Concatenates field names from an sobject array node",
"parameters" :
[
"variable"
],
"returns": "${array:concat(Rules.CurrentNode,
array:forEach(p.variable,'{\"name\":\"${var.fieldName}\"}'))}"
},
{
"name" : "addToExtractCaseWorkflow",
"description" : "Adds array fields to Extract Case node",
"parameters" :
[
"variable"
],
"actions": [
{
"action": "set",
"description": "put selected values for sfdcDigest in dataflow",
"path": "$.workflowDefinition.Extract_Case.parameters.fields",
"value" : "${macros:concatArrayFieldName(p.variable)}"
}
]
}
Example: Rule Calling the Macro
{
"action": "eval",
"description": "put selected values for sfdcDigest in dataflow",
"value": "${macros:addToExtractCaseWorkflow(Variables.CaseMoreDims)}"
}
83
Sample Use Case: Add an Array of SObject Names to Extract
Workflow
Appendix

Ant Migration Tool Usage Examples
The sample-build.xml file uses ant-util.xml. These files also contain examples of using ANT tasks to make REST
POST/PUT/DELETE calls instead of using Workbench.
Sample ant-util.xml
Refer to this example of the ant-util.xml file.
Sample build.xml
Refer to this example of the build.xml file.
Sample ant-util.xml
Refer to this example of the ant-util.xml file.
Example:
<project name="ant-util">
<taskdef resource="com/salesforce/antlib.xml" uri="antlib:com.salesforce">
<classpath>
<pathelement location="./lib/ant-salesforce.jar" />
</classpath>
</taskdef>
<taskdef name="http" classname="org.missinglink.ant.task.http.HttpClientTask">
<classpath>
<pathelement location="./lib/ml-ant-http-1.1.3.jar" />
</classpath>
</taskdef>
<taskdef name="xmltask" classname="com.oopsconsultancy.xmltask.ant.XmlTask">
<classpath>
<pathelement location="./lib/xmltask.jar"/>
</classpath>
</taskdef>
<taskdef resource="net/sf/antcontrib/antlib.xml">
<classpath>
<pathelement location="./lib/ant-contrib.jar" />
</classpath>
</taskdef>
<!--
Turns down logging around the specified body.
-->
<macrodef name="quiet">
<element name="body" implicit="yes"/>
<sequential>
<script language="javascript">
project.getBuildListeners().firstElement().setMessageOutputLevel(0);
</script>
84
Ant Migration Tool Usage ExamplesAppendix

<body/>
<script language="javascript">
project.getBuildListeners().firstElement().setMessageOutputLevel(2);
</script>
</sequential>
</macrodef>
<!--
Creates a template based on the specified folder source
-->
<macrodef name="createTemplate">
<attribute name="serverUrl"/>
<attribute name="sessionId"/>
<attribute name="folderSourceId"/>
<sequential>
<fail message="No server URL specified. s">
<condition>
<equals arg1="@{serverUrl}" arg2=""/>
</condition>
</fail>
<fail message="No session ID provided. You must login and provide a valid session
ID.">
<condition>
<equals arg1="@{sessionId}" arg2=""/>
</condition>
</fail>
<fail message="No folderSource ID provided. ">
<condition>
<equals arg1="@{folderSourceId}" arg2=""/>
</condition>
</fail>
<local name="createTemplateBody"/>
<property name="createTemplateBody">
{
"folderSource": {"id": "@{folderSourceId}"}
}
</property>
<length string="${createTemplateBody}" property="body.length" />
<http url="@{serverUrl}/services/data/v${apiVersion}/wave/templates" method="POST"
printrequest="false" printrequestheaders="false" printresponse="false"
printresponseheaders="false" failonunexpected="false" expected="201"
entityProperty="postResponse" statusProperty="postResponseStatus">
<headers>
<header name="Authorization" value="OAuth ${sessionId}"/>
<header name="Content-Type" value="application/json"/>
<header name="Content-Length" value="${body.length}"/>
</headers>
<entity binary="false" value="${createTemplateBody}">\n</entity>
</http>
<if>
<not><equals arg1="${postResponseStatus}" arg2="201"/></not>
<then>
<fail>
Received unexpected response from server: ${postResponseStatus}
85
Sample ant-util.xmlAppendix

${postResponse}
</fail>
</then>
</if>
</sequential>
</macrodef>
<!--
Updates a template based on the specified template id and folder source
-->
<macrodef name="updateTemplate">
<attribute name="serverUrl"/>
<attribute name="sessionId"/>
<attribute name="templateId"/>
<attribute name="folderSourceId"/>
<sequential>
<fail message="No server URL specified. s">
<condition>
<equals arg1="@{serverUrl}" arg2=""/>
</condition>
</fail>
<fail message="No session ID provided. You must login and provide a valid session
ID.">
<condition>
<equals arg1="@{sessionId}" arg2=""/>
</condition>
</fail>
<fail message="No template id specified.">
<condition>
<equals arg1="@{templateId}" arg2=""/>
</condition>
</fail>
<fail message="No folderSource id specified.">
<condition>
<equals arg1="@{folderSourceId}" arg2=""/>
</condition>
</fail>
<local name="updateTemplateBody"/>
<property name="updateTemplateBody">
{
"folderSource": {"id": "@{folderSourceId}"}
}
</property>
<length string="${updateTemplateBody}" property="body.length" />
<http url="@{serverUrl}/services/data/v${apiVersion}/wave/templates/${templateId}"
method="PUT" printrequest="false" printrequestheaders="false" printresponse="false"
printresponseheaders="false" failonunexpected="false" expected="201"
entityProperty="putResponse" statusProperty="putResponseStatus">
<headers>
<header name="Authorization" value="OAuth ${sessionId}"/>
<header name="Content-Type" value="application/json"/>
<header name="Content-Length" value="${body.length}"/>
</headers>
86
Sample ant-util.xmlAppendix

<entity binary="false" value="${updateTemplateBody}">\n</entity>
</http>
<if>
<not><equals arg1="${putResponseStatus}" arg2="200"/></not>
<then>
<fail>
Received unexpected response from server: ${putResponseStatus}
${putResponse}
</fail>
</then>
</if>
</sequential>
</macrodef>
<!--
deletes a template based on the specified template id
-->
<macrodef name="deleteTemplate">
<attribute name="serverUrl"/>
<attribute name="sessionId"/>
<attribute name="templateId"/>
<sequential>
<fail message="No server URL specified. s">
<condition>
<equals arg1="@{serverUrl}" arg2=""/>
</condition>
</fail>
<fail message="No session ID provided. You must login and provide a valid session
ID.">
<condition>
<equals arg1="@{sessionId}" arg2=""/>
</condition>
</fail>
<fail message="No template id specified.">
<condition>
<equals arg1="@{templateId}" arg2=""/>
</condition>
</fail>
<http url="@{serverUrl}/services/data/v${apiVersion}/wave/templates/${templateId}"
method="DELETE" printrequest="false" printrequestheaders="false" printresponse="false"
printresponseheaders="false" failonunexpected="false" expected="201"
entityProperty="deleteResponse" statusProperty="deleteResponseStatus">
<headers>
<header name="Authorization" value="OAuth ${sessionId}"/>
</headers>
</http>
<if>
<not><equals arg1="${deleteResponseStatus}" arg2="204"/></not>
<then>
<fail>
Received unexpected response from server: ${deleteResponseStatus}
${deleteResponse}
</fail>
87
Sample ant-util.xmlAppendix

</then>
</if>
</sequential>
</macrodef>
<!--
Login to the specified server url and retrieve a valid session ID.
-->
<macrodef name="login">
<attribute name="username" description="Salesforce user name."/>
<attribute name="password" description="Salesforce password."/>
<attribute name="serverurl" description="Server Url property."/>
<sequential>
<!-- Obtain Session Id via Login SOAP service -->
<echo>Retrieving session from server ${sf.serverurl}</echo>
<quiet>
<http url="@{serverurl}/services/Soap/c/${apiVersion}" method="POST"
failonunexpected="false" entityProperty="loginResponse"
statusProperty="loginResponseStatus">
<headers>
<header name="Content-Type" value="text/xml"/>
<header name="SOAPAction" value="login"/>
</headers>
<entity>
<![CDATA[
<env:Envelope xmlns:xsd='http://www.w3.org/2001/XMLSchema'
xmlns:xsi='http://www.w3.org/2001/XMLSchema-instance'
xmlns:env='http://schemas.xmlsoap.org/soap/envelope/'>
<env:Body>
<sf:login xmlns:sf='urn:enterprise.soap.sforce.com'>
<sf:username>@{username}</sf:username>
<sf:password>@{password}</sf:password>
</sf:login>
</env:Body>
</env:Envelope>
]]>
</entity>
</http>
<!-- Parse response -->
<xmltask destbuffer="loginResponseBuffer">
<insert path="/">${loginResponse}</insert>
</xmltask>
<if>
<!-- Success? -->
<equals arg1="${loginResponseStatus}" arg2="200"/>
<then>
<!-- Parse sessionId and serverUrl -->
<xmltask sourcebuffer="loginResponseBuffer" failWithoutMatch="true">
<copy
path="/*[local-name()='Envelope']/*[local-name()='Body']/:loginResponse/:result/:sessionId/text()"
property="sessionId"/>
<copy
path="/*[local-name()='Envelope']/*[local-name()='Body']/:loginResponse/:result/:serverUrl/text()"
property="serverNode"/>
88
Sample ant-util.xmlAppendix

</xmltask>
</then>
<else>
<!-- Parse login error message and fail build -->
<xmltask sourcebuffer="loginResponseBuffer" failWithoutMatch="true">
<copy
path="/*[local-name()='Envelope']/*[local-name()='Body']/*[local-name()='Fault']/*[local-name()='faultstring']/text()"
property="faultString"/>
</xmltask>
<fail message="${faultString}"/>
</else>
</if>
</quiet>
<echo>SessionId: ${sessionId}</echo>
</sequential>
</macrodef>
</project>
Sample build.xml
Refer to this example of the build.xml file.
Example:
<project name="Sample usage of Salesforce Ant tasks" default="usage" basedir="."
xmlns:sf="antlib:com.salesforce">
<property file="build.properties"/>
<property environment="env"/>
<import file="./ant-util.xml"/>
<!-- Setting default value for username, password and session id properties to empty
string
so unset values are treated as empty. Without this, ant expressions such as
${sf.username}
will be treated literally.
-->
<condition property="sf.username" value=""> <not> <isset property="sf.username"/>
</not> </condition>
<condition property="sf.password" value=""> <not> <isset property="sf.password"/>
</not> </condition>
<condition property="sf.sessionId" value=""> <not> <isset property="sf.sessionId"/>
</not> </condition>
<condition property="wave.sfdcVersion" value="206"> <not> <isset
property="wave.sfdcVersion"/> </not> </condition>
<condition property="apiVersion" value="39.0"> <not> <isset property="apiVersion"/>
</not> </condition>
<!-- MDAPI targets -->
<target name="deployTemplate" description="Deploy version ${wave.sfdcVersion} to
${sf.serverurl}">
<condition property="noDeployRoot"><not><isset
property="wave.deployRoot"/></not></condition>
89
Sample build.xmlAppendix

<fail message="No deployRoot specified in request (wave.deployRoot)."
if="noDeployRoot"/>
<sf:deploy username="${sf.username}" password="${sf.password}"
sessionId="${sf.sessionId}" serverurl="${sf.serverurl}" maxPoll="${sf.maxPoll}"
deployRoot="${wave.deployRoot}" rollbackOnError="true"/>
</target>
<target name="exportTemplate" description="Export version ${wave.sfdcVersion} to
${sf.serverurl}">
<condition property="noDeployRoot"><not><isset
property="wave.deployRoot"/></not></condition>
<fail message="No deployRoot specified in request (wave.deployRoot)."
if="noDeployRoot"/>
<sf:bulkRetrieve username="${sf.username}" password="${sf.password}"
sessionId="${sf.sessionId}" serverurl="${sf.serverurl}" metadataType="WaveTemplateBundle"
apiVersion="${apiVersion}" retrieveTarget="${wave.deployRoot}"/>
</target>
<target name="exportSingleTemplate" description="Export version ${wave.sfdcVersion}
to ${sf.serverurl}">
<condition property="noDeployRoot"><not><isset
property="wave.deployRoot"/></not></condition>
<fail message="No deployRoot specified in request (wave.deployRoot)."
if="noDeployRoot"/>
<sf:retrieve username="${sf.username}" password="${sf.password}"
sessionId="${sf.sessionId}" serverurl="${sf.serverurl}"
unpackaged="${wave.deployRoot}/package.xml" apiVersion="${apiVersion}"
retrieveTarget="${wave.deployRoot}"/>
</target>
<!-- REST API Targets -->
<!-- Requires the 18 digit SFDC folder id as folderSourceId -->
<target name="createTemplate" description="Create an Analytics template from an
existing app. After creation, call exportTemplate or exportSingleTemplate to download
and edit template files">
<login username="${sf.username}" password="${sf.password}"
serverurl="${sf.serverurl}"/>
<condition property="folderSourceId" value=""><not><isset
property="folderSourceId"/></not></condition>
<createTemplate serverurl="${sf.serverurl}" sessionid="${sessionId}"
folderSourceId="${folderSourceId}"/>
</target>
<!-- Requires the 18 digit SFDC template id as templateId and the 18 digit SFDC folder
id as folderSourceId -->
<target name="updateTemplate" description="Update an Analytics template from an
existing app. After updating, call exportTemplate or exportSingleTemplate to get
updated template files">
<login username="${sf.username}" password="${sf.password}"
serverurl="${sf.serverurl}"/>
<condition property="folderSourceId" value=""><not><isset
property="folderSourceId"/></not></condition>
<condition property="templateId" value=""><not><isset
90
Sample build.xmlAppendix

property="templateId"/></not></condition>
<updateTemplate serverurl="${sf.serverurl}" sessionid="${sessionId}"
templateId="${templateId}" folderSourceId="${folderSourceId}"/>
</target>
<!-- Requires the 18 digit SFDC template id as templateId -->
<target name="deleteTemplate" description="Delete an Analytics template">
<login username="${sf.username}" password="${sf.password}"
serverurl="${sf.serverurl}"/>
<condition property="templateId" value=""><not><isset
property="templateId"/></not></condition>
<deleteTemplate serverurl="${sf.serverurl}" sessionid="${sessionId}"
templateId="${templateId}"/>
</target>
</project>
Analytics Template Apex Callback Class
This appendix describes all the classes and interfaces in the Analytics Template Apex callback class.
The main class is WaveTemplateConfigurationModifier, with the following supporting classes:
•WaveTemplate
•Page
•UI
•Answers
•Variable
•VariableDefinition
•VariableType
•VariableTypeEnum
•VisibilityTypeEnum
The idea is to replicate the JSON files as much as possible, because the same author will be working with both.
/**
* Template authors extend this class, override the methods and register their class in
* the template-info.json file.
*/
global abstract class WaveTemplateConfigurationModifier {
/**
* This callback method gets called before Analytics template configuration data is
retrieved from
* the UI. It allows for overrides on certain configuration values. Specifically one
can set
* computedValue, visibility, enums, ...
*/
void onConfigurationRetrieval(WaveTemplateInfo waveTemplate) {
}
/**
91
Analytics Template Apex Callback ClassAppendix

* This callback method gets called after the completion of each page. It allows for
* overrides on certain configuration values.
*/
// @Future - additional work needed in ui, and new Connect API endpoint
//WaveTemplate onPageComplete(WaveTemplateInfo waveTemplate, Answer answers, Integer
page) {
// return waveTemplate;
//}
/**
* This callback method is called right before app creation. It allows for Answer
overrides
* on the final answers supplied by the user.
*/
void beforeAppCreate(WaveTemplateInfo waveTemplate, Answers answers) {
}
/**
* This callback method is called right before app is upgraded or reset. It allows for
Answer
* overrides on the final answers supplied by the user.
*/
void beforeAppUpdate(WaveTemplateInfo waveTemplate, String previousAppVersion, Answers
answers) {
}
}
global interface WaveTemplateInfo {
// private constructor
/**
* Gets release information about the Analytics template
*/
ReleaseInfo getReleaseInfo();
/**
* Get the UI information about the template.
*/
UI getUI();
/**
* Get all the variable definitions.
*/
Map<String, VariableDefinition> getVariables();
}
global interface ReleaseInfo {
/**
* Get all the variable definitions.
*/
String getTemplateVersion();
92
Analytics Template Apex Callback ClassAppendix

}
global interface UIPage {
/**
* Retrieve the title of this page
*/
String getTitle();
/**
* Get the condition expression for this page
*/
String getCondition();
/**
* Get all the variables (Questions) associated with this page
*/
Map<String, Variable> getVariables();
/**
* Set the title for this page
*/
void setTitle(String title);
/**
* set the variables for this page
*/
// @future can't add questions to a page yet
//void setVariables(Set<Variable> variables);
}
global interface UI {
/**
* Get a list of all the pages for the wizard.
*/
List<UIPage> getPages();
/**
* Set the pages to be contained within the wizard
*/
// @Future can't add pages to the wizard yet
//void setPages(Set<Pages> pages);
}
/**
* This class contains a collection of all the answers to the variables.
*/
global interface Answers {
/**
* Get the value (answer) of a particular variable (question).
93
Analytics Template Apex Callback ClassAppendix

*/
Object get(String name);
/**
* Override a value (answer) to a particular variable (question).
*/
void put(String name, Object obj);
}
global interface Variable {
/**
* Get the name of the variable definition referenced here.
*/
String getName();
/**
* Get the visibility of this question. Note: returns a string because it can contain
a ternary operator
*/
String getVisibility();
/**
* Set the visibility for this variable (question).
*/
void setVisibility(VisibilityEnum visibility);
}
global interface VariableDefinition {
/**
* Get the unique name for this variable
*/
String getName();
/**
* Return the label for this variable
*/
String getLabel();
/**
* Return the description for this variable
*/
String getDescription();
/**
* Return the default value for this variable
*/
Object getDefaultValue();
/**
* Get the variable type information about this variable definition.
*/
VariableType getVariableType();
94
Analytics Template Apex Callback ClassAppendix

/**
* Is this variable required
*/
Boolean isRequired();
/**
* Is this variable exclude select
*/
Boolean isExcludeSelected();
/**
* Return a list of variable values to be excluded from the pick list. This can be a
single regex.
*/
Set<String> getExcludes();
/**
* Override the label for this variable
*/
void setLabel(String label);
/**
* Override the description for this variable
*/
void setDescription(String description);
/**
* Set the 'Computed' values for this Answer, This will be displayed instead of
defaultValue.
*/
void setComputedValue(String Object);
/**
* Override isRequired
*/
void setRequired(Boolean required);
/**
* Override the list of excludes.
*/
void setExcludes(Set<String> excludes);
}
global interface VariableType {
/**
* Get the VariableTypeEnum of this variable
*/
VariableTypeEnum getType();
/**
* Get the soap datatype of the SObjectFieldType
95
Analytics Template Apex Callback ClassAppendix

* valid values: xsd:int, xsd:string, xsd:datetime, xsd:boolean, xsd:any
*/
String getDataType();
/**
* Get an set of valid valued for this variable definition
*/
Set<Object> getEnums();
/**
* Override the set of valid values for this variable definition.
*/
void setEnums(Set<Object> enums);
}
global enum VariableTypeEnum {
BooleanType,
StringType,
NumberType,
ArrayType,
DateTimeType,
ObjectType,
SobjectType,
SobjectFieldType,
DatasetType,
DatasetDimensionType,
DatasetMeaseType,
DatasetDateTpe
}
global enum VisibilityEnum {
Visible,
Disabled,
Hidden
}
Apex Examples
Examples include setting computed values for questions, hiding a question, managing enum values, working with array type variables,
and more.
Checking the Analytics Integration User Access
Dataflows fail if they reference an sobject field that is hidden to the Integration User.
Apex Examples
Examples include setting computed values for questions, hiding a question, managing enum values, working with array type variables,
and more.
Example: Set the computed value for one of the questions:
WaveTemplate onConfigurationRetrieval(WaveTemplate waveTemplate) {
Map<String, VariableDefinition> variables = waveTemplate.getVariables();
96
Apex ExamplesAppendix

VariableDefinition hasProduct = variables.get("Has_Product");
hasProduct.setComputedValue("No");
return waveTemplate;
}
Example: Hide one of the questions:
WaveTemplate onConfigurationRetrieval(WaveTemplate waveTemplate) {
Set<Page> pages = waveTemplate.getUI().getPages();
Page firstPage = Pages.get(0);
Map<String Variable> variables = firstPage.getVariables();
Variable variable = variables.get("Has_Product");
variable.setVisibility(VisibilityEnum.Hidden);
}
Example: Reduce the number of enum values in the drop-down list box:
WaveTemplate onConfigurationRetrieval(WaveTemplate waveTemplate) {
Map<String, VariableDefinition> variables = waveTemplate.getVariables();
VariableDefinition hasProduct = variables.get("Has_Product");
VariableType variableType = hasProduct.getVariableType();
Set<Object> enums = variableType.getEnums();
enums.remove('Yes');
}
Example: Populate the enum values in the drop-down list box (StringType variable):
global override void onConfigurationRetrieval(WaveTemplateInfo template){
Map<String, VariableDefinition> variables = template.getVariables();
VariableDefinition caseRecordTypes = variables.get('IncludeCaseRecordTypes');
VariableType variableType = caseRecordTypes.getVariableType();
Set<Object> enums = variableType.getEnums();
RecordType [] results = [SELECT Name FROM RecordType where sobjectType = 'Case'];
for (RecordType record : results){
//adds the record type names to the drop down list
enums.add((String)record.get('Name'));
}
variableType.setEnums(enums);
}
Example: Given the following ArrayType variable, you can set its enums as well:
"OpptyRecordType": {
"label": "Select OpptyRecordTypes that you want to bring in to Salesforce",
"description": "Choose OpptyRecordTypes that you want to bring in to Salesforce.",
"required": false,
"variableType": {
"type": "ArrayType",
"itemsType":
{
"type": "StringType",
97
Apex ExamplesAppendix

"enums": ["Test", "Test2"]
}
}
}
Using:
Map<String, wavetemplate.VariableDefinition> variables = template.getVariables();
wavetemplate.VariableDefinition enumsTest = variables.get('OpptyRecordType');
List<Object> enums = enumsTest.getVariableType().getItemsType().getEnums(); //create
an empty list if you want to overwrite the original enums.
RecordType [] results = [SELECT Name FROM RecordType where sobjectType = 'Opportunity'
AND IsActive = true];
for ( RecordType record : results ) {
enums.add((string)record.get('Name'));
}
enumsTest.getVariableType().getItemsType().setEnums(enums);
Reduce the possible answers via the excludes:
WaveTemplate onConfigurationRetrieval(WaveTemplate waveTemplate) {
Map<String, VariableDefinition> variables = waveTemplate.getVariables();
VariableDefinition hasProduct = variables.get("Has_Product");
Set<String> excludes = new Set<String>();
excludes.add("Foo");
excludes.add("Bar");
hasProduct.setExcludes(excludes);
return waveTemplate;
}
Checking the Analytics Integration User Access
Dataflows fail if they reference an sobject field that is hidden to the Integration User.
To determine if that user has access to a specific field, use the wavetemplate.Access Apex class and call the
integUserHasAccessToSObjectField or checkIntegUserAccessToArrayOfSObjectFields method. Call
these methods either before the wizard is displayed or before app creation/upgrade.
In the onConfigurationRetrieval method, use integUserHasAccessToSObjectField(String sObjectName,
String fieldName), which returns a boolean:
public override void onConfigurationRetrieval(wavetemplate.WaveTemplateInfo template) {
if (!wavetemplate.Access.integUserHasAccessToSObjectField('Account', 'Industry')) {
//do something….
template.getVariables().get('stringExample').setComputedValue('NoAccess');
}
}
In the beforeAppCreate method, use either:
98
Checking the Analytics Integration User AccessAppendix

•integUserHasAccessToSObjectField (String variableName, WaveTemplateInfo template,
Answers answers), which returns a boolean, to check access to an SObject or SObject Field variable type, or
•checkIntegUserAccessToArrayOfSObjectFields (String variableName, WaveTemplateInfo
template, Answers answers), which returns an array of fieldName strings to which the user does not have access,
to check access to an Array variable type that contains SObjects or SObject fields.
public override void beforeAppCreate(wavetemplate.WaveTemplateInfo template,
wavetemplate.Answers answers) {
//Check access to a single sobjectFieldType answer:
Boolean access =
wavetemplate.Access.integUserHasAccessToSObjectField('sobjectFieldExample',template,
answers);
//Do something based on the result...
answers.put('booleanExample', !access);
//Check access to all the answers in an sobjectField Array Type answer:
List<String> badItems =
wavetemplate.Access.checkIntegUserAccessToArrayOfSObjectFields('sobjectFieldArrayExample',
template, answers);
//Do something based on the result...
if(!badItems.isEmpty()){
answers.put('stringExample', badItems.get(0));
}
}
VisualForce Events for Customizing the Wizard UI
This reference section explains the details of using VisualForce for customizing the Wizard user interface.
Table 1: List of Events to Which You Can Subscribe or Publish
ResponseDescriptionSubscribe/PublishEvent Name
Response contains all the
metadata: page,
Fired from client indicating they
are ready to receive events.
publishready
variableDefinitions, initialValues
needed to render the questions
and possible answers for the
page.
Variables with errors messages.Fired from client when ready to
update one or more variables.
publishupdate
Variables and their visibility
enum.
Fired from client to check
‘visibility’ of one or more
questions.
publishvisibility
The values of all variables in the
entire wizard.
Fired from client to request the
most up-to-date values of each
question.
publishvalues
99
VisualForce Events for Customizing the Wizard UIAppendix

ResponseDescriptionSubscribe/PublishEvent Name
A list of variables that are
required with no values.
Fired from parent when use
clicks “continue” button. May or
may not advance the page. If
subscribenext
there are errors in the variable
values, the page will not
advance.
None.Fired from client to change the
size of the VisualForce page.
publishresize
List will be filtered for
“queryable,” “excludes,” “exclude
Fired from client to get a list of
‘options’ for filling in drop-down
list boxes.
publishoptions
selected.” “Tags” will be applied
to indicate which option values
are “default,” “recommended,”
or “previous” values.
You can use this for sObjects,
sObjectFields, string enums, and
number enums.
Variables with success or error
messages.
Fired from client to set the
computed (suggested) values
for a variable.
publishcomputed
None.Fired from client to close the
wizard. No actions are taken as
part of the close.
publishclose
Change the text of the Back and
Next button. Can also enable or
disable the Back or Next button.
publishbuttons
The status of the POST call.
Success if app creation is kicked
Fired from the client to create an
app before the final screen. Calls
publishcreate
off successfully (not final app
status), otherwise Fail.
POST /wave/folder and
returns results.
Coming soon; not currently
supported in this release. We
DatasetCOMING SOONdataset
intend to implement this as an
‘options’ event.
Coming soon; not currently
supported in this release. We
Dimensions, Measures tied to
parent datasets
COMING SOONdataset fields
intend to implement this as an
‘options’ event.
100
VisualForce Events for Customizing the Wizard UIAppendix

Event: wizard.ready
•Subscribe/Publish: publish
•Input/Multiple: optional
–Size: small, medium, large
–Banner: visible, title, progress
Note: for VisualForce pages, the banner is hidden by default.
•Response: Yes
•Normalized Input: N/A
•Input Examples:
–{}
–{size : “large” }
–{banner : visible : true, title : “My Custom title”, progress : “Almost done”}}
–{size : “small”, banner : {visible : false}}
•Output Example:
{
"page": {
"condition": null,
"helpUrl": null,
"title": "Page 1",
"variables": [
{
"name": "stringExample",
"visibility": "Visible"
},
{
"name": "visibilityControl"
"visibility": "Visible"
},
{
"name": "visibilityTest",
"visibility": "Hidden"
}
]
},
"variableDefinitions": {
"stringExample": {
"label": "What is the value of the string?",
"description": "The String.",
"defaultValue": null,
"variableType": {
"type": "StringType",
"enums": [
"foo",
"bar",
"baz",
"testStr"
]
101
VisualForce Events for Customizing the Wizard UIAppendix

}
},
"stringExample2": {
"label": "What is the value of this string?",
"description": "The String2.",
"defaultValue": null,
"variableType": {
"type": "StringType"
}
},
"visibilityControl": {
"label": "Do you want to answer more questions?",
"description": "Check to test visibility",
"variableType": {
"type": "BooleanType"
},
"defaultValue": false,
"required": true
},
"visibilityTest": {
"label": "I should only be visible when visibilityControl is checked",
"variableType": {
"type": "StringType",
"enums": [
"aaa",
"bbb",
"ccc"
]
}
},
"visibilityTest2": {
"label": "I should only be enabled when visibilityControl is checked",
"variableType": {
"type": "StringType"
}
},
"datasetExample": {
"label": "Pick a dataset",
"description": "Interesting dataset",
"variableType": {
"type": "DatasetType"
}
},
"dimensionExample": {
"label": "Pick a dimension",
"description": "Dim testing",
"defaultValue": {
"datasetId": "{{Variables.datasetExample.datasetId}}",
"fieldName": "test"
},
"variableType": {
"type": "DatasetDimensionType"
},
"required": false
102
VisualForce Events for Customizing the Wizard UIAppendix

}
},
"initialValues": {
"stringExample": null,
"stringExample2": null,
"visibilityControl": false,
"dimensionExample": {
"datasetId": "{{Variables.datasetExample.datasetId}}",
"fieldName": "test"
}
}
}
Event: wizard.update
•Subscribe/Publish: publish
•Input/Multiple: yes
•Response: yes
•Normalized Input: yes
•Input Examples:
–{name : “myVariable”, value : “some value” }
–[{name : “myVariable”, value : “some value” }]
–[{name : “myVariable”, value : “some value” }, {name : “myNumber”, value : 123}]
–{myVariable : “some value”, myNumber: 123, myBoolean : true}
–{name : “mySObject”, value : {sobjectName : “Account”}}
•Output Example: always an array
[
{name : “myVariable”: value : “some value”, valid : true },
{name : “myNumber”: value : null, valid : false, errorMessage : “Not a valid value”}
{name : “mySObject”: value : {sobjectName : “Account”}, valid : true}
]
Event: wizard.visibility
•Subscribe/Publish: publish
•Input/Multiple: yes
•Response: yes
•Normalized Input: yes
•Input Examples:
–[“myVariable”, “myNumber”]
–[{name : “myVariable”}]
–{name : “myVariable”}
103
VisualForce Events for Customizing the Wizard UIAppendix

–“myVariable”
•Output Example: always an array
[
{name : “myVariable”: visibility : “Hidden”},
{name : “myNumber”: visibility : “Visible”},
{name : “myOtherVariable”: visibility : “Disabled”}
]
Event: wizard.values
•Subscribe/Publish: publish
•Input/Multiple: n/a
•Response: yes
•Normalized Input: n/a
•Input Examples:
–{}
•Output Example:
{
values : {
myVariable: “foo”,
myNumber: 123,
myBoolean: true,
myDimension: {fieldName : “days”}
}
}
Event: wizard.next
•Subscribe/Publish: subscribe
•Input/Multiple: n/a
•Response: yes
•Normalized Input: n/a
•Output Example: Page will not advance if required fields are not met.
104
VisualForce Events for Customizing the Wizard UIAppendix

{
“myVariable”: {
–
errorMessage: “Not a valid value”,
isRequired : true,
variableName : “myVariable”
}
}
–{}
Event: wizard.resize
•Subscribe/Publish: publish
•Input/Multiple: n/a
•Response: no
•Normalized Input: n/a
•Input Examples:
–{size : “small”}
–{size : “medium”}
–{size : “large”}
Event: wizard.options
•Subscribe/Publish: publish
•Input/Multiple: no
•Response: yes
•Normalized Input: n/a
•Input Examples:
–{name : “mySObjectVariableName”}
–{name : “mySObjectFieldVariableName”}
–{name : “myStringVariableName”}
–{name : “myNumbertVariableName”}
•Output Example:
{
"options": [
{
"label": "Account",
"value": "Account",
"tags": [
{
"tag": "Default",
"toolTip": "Default answer"
}
]
105
VisualForce Events for Customizing the Wizard UIAppendix

},
{
"label": "Oppty",
"value": "Opportunities"
}
]
}
Event: wizard.buttons
•Subscribe/Publish: publish
•Input/Multiple: n/a
•Response: no
•Normalized Input: n/a
•Input Examples:
–{buttons : {
next : {disabled : true, text : “Fix error before continue”},
back : {disabled : false, text : “Go Back”}
}
}
–{ buttons : {
back : {disabled : true}
}
}
–{ buttons : {
next: {“text” : “Proceed at Own Risk”}
}
}
•Output Example:
None. Buttons should update accordingly.
Event: wizard.create
•Subscribe/Publish: publish
•Input/Multiple: no
•Response: yes
•Normalized Input: yes
•Input Examples:
–{folder : {label : "vfTest", description : "my desc"}}
106
VisualForce Events for Customizing the Wizard UIAppendix
