Bluefruit Nrf52 Feather Learning Guide
User Manual:
Open the PDF directly: View PDF ![]() .
.
Page Count: 159 [warning: Documents this large are best viewed by clicking the View PDF Link!]
- Guide Contents
- Introduction
- nRF52832 Technical Details
- nRF51 or nRF52 Bluefruit Devices?
- Device Pinout
- Special Notes
- Power Pins
- Analog Inputs
- PWM Outputs
- I2C Pins
- Assembly
- Header Options!
- Soldering in Plain Headers
- Soldering on Female Header
- Arduino BSP Setup
- 1. BSP Installation
- 2. Third Party Tool Installation
- 3. Advanced Option: Manually Install the BSP via 'git'
- BSP FAQs
- Windows Related
- OS X Related
- I can compile and link sketches on OS X, but nrfutil gives me the following error: 'AttributeError: 'int' object has no attribute 'value''?
- Linux Related
- On Linux I'm getting 'arm-none-eabi-g++: no such file or directory', even though 'arm-none-eabi-g++' exists in the path specified. What should I do?
- Arduino Board Setup
- 1. Select the Board Target
- 2. Select the USB CDC Serial Port
- 3. Run a Test Sketch
- Using the Bootloader
- Forcing Serial Boot Mode
- Factory Reset
- Advanced: OTA DFU Bootloader
- Advanced: Upgrading an Existing Bootloader
- Flashing the Bootloader
- Third Party Tool Requirements
- Burning the Bootloader from the Arduino IDE
- Manually Burning the Bootloader via nrfjprog
- Manually Burning the Bootloader via AdaLink
- Examples
- Example Source Code
- Documented Examples
- Advertising: Beacon
- Complete Code
- Output
- BLE UART: Controller
- Setup
- Complete Code
- Custom: HRM
- HRM Service Definition
- Implementing the HRM Service and Characteristics
- Full Sample Code
- BLE Pin I/O
- Setup
- Complete Code
- Central BLEUART
- Client Services
- Scanner
- Central Role
- Full Sample Code
- Dual Roles BLEUART
- Server & Client Service Setup
- Peripheral Role
- Central Role
- Advertising and Scanner
- Full Sample Code
- Bluefruit nRF52 API
- AdafruitBluefruit
- API
- Examples
- BLEGap
- BLEAdvertising
- API
- Related Information
- Example
- BLEScanner
- API
- setRxCallback(rx_callback_t fp)
- void useActiveScan(bool enable);
- void filterRssi(int8_t min_rssi); void filterMSD(uint16_t manuf_id); void filterUuid(BLEUuid ble_uuid); void filterUuid(BLEUuid ble_uuid1, BLEUuid ble_uuid2); void filterUuid(BLEUuid ble_uuid1, BLEUuid ble_uuid2, BLEUuid ble_uuid3); void filterUuid(BLEUuid ble_uuid1, BLEUuid ble_uuid2, BLEUuid ble_uuid3, BLEUuid ble_uuid4); void filterUuid(BLEUuid ble_uuid[], uint8_t count);
- void clearFilters(void);
- bool start(uint16_t timeout = 0); bool stop(void);
- void restartOnDisconnect(bool enable);
- Examples
- BLEService
- Basic Usage
- Order of Operations (Important!)
- API
- Example
- BLECharacteristic
- Basic Usage
- Order of Operations (Important!)
- API
- Example
- BLEDiscovery
- API
- BLEDis
- API
- Example
- Output
- BLEUart
- API
- Example
- BLEClientUart
- API
- Examples
- BLEBeacon
- API
- Example
- Testing
- BLEMidi
- BLEHidAdafruit
- API
- Example Sketches
- Bonding HID Devices
- BLEAncs
- API
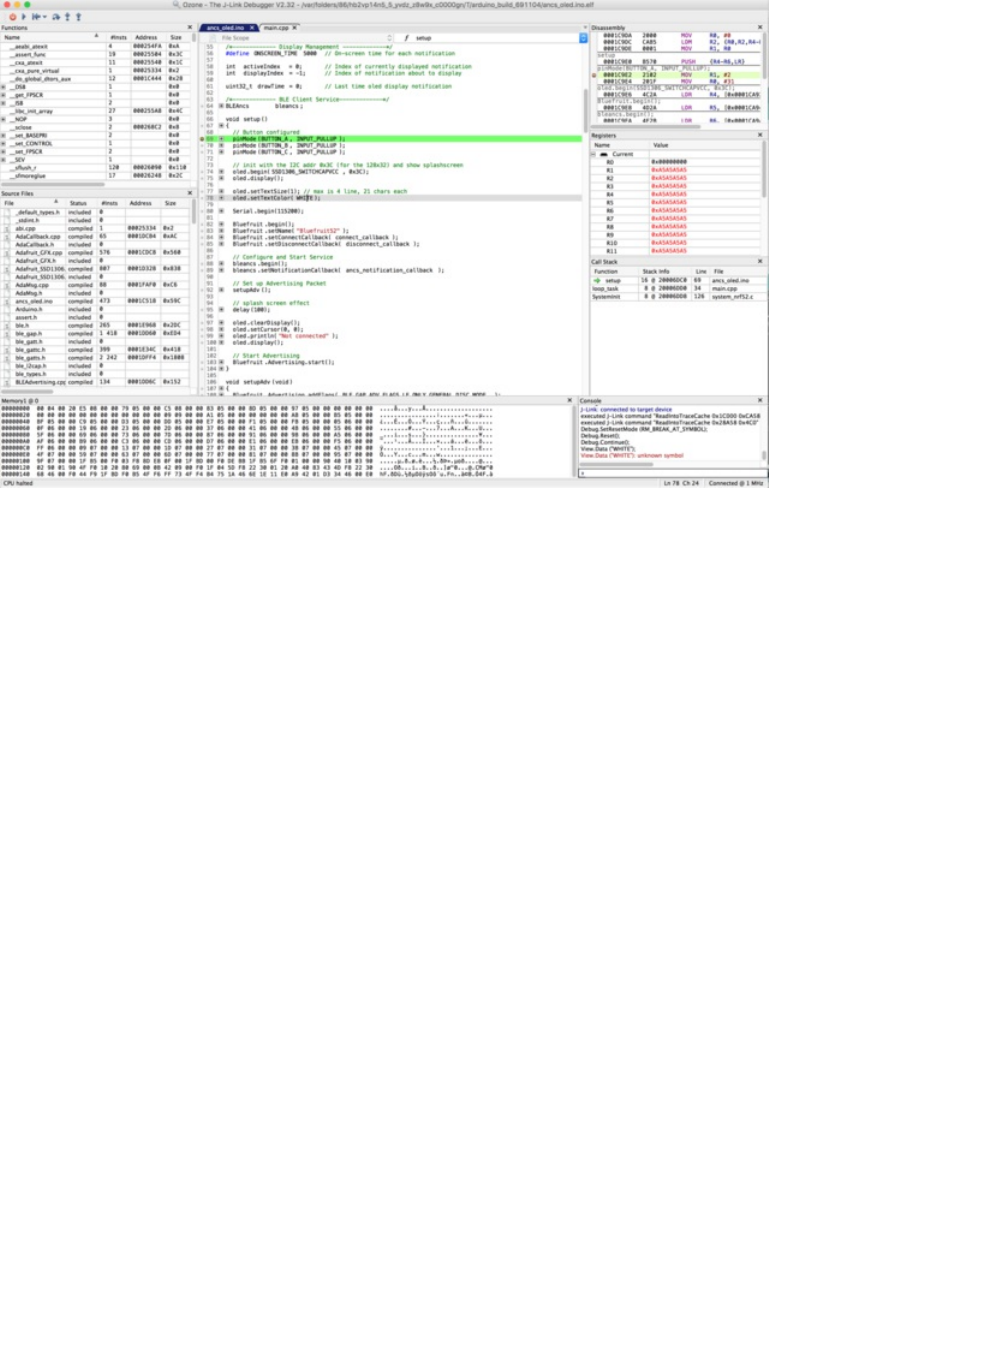
- ANCS OLED Example
- BLEClientCts
- API
- Client CTS OLED Example
- BLECentral
- nRF52 ADC
- Analog Reference Voltage
- Analog Resolution
- Default ADC Example (10-bit, 3.6V Reference)
- Advanced Example (12-bit, 3.0V Reference)
- Memory Map
- Flash Memory
- SRAM Layout
- Software Resources
- Bluefruit LE Client Apps and Libraries
- Bluefruit LE Connect for OS X (Swift)
- Bluefruit LE Command Line Updater for OS X (Swift)
- Debug Tools
- Downloads
- Module Details
- Schematic
- FAQs
- What are the differences between the nRF51 and nRF52 Bluefruit boards? Which one should I be using?
- Can I run nRF51 Bluefruit sketches on the nRF52?
- Can I use the nRF52 as a Central to connect to other BLE peripherals?
- How are Arduino sketches executed on the nRF52832? Can I do hard real time processing (bit-banging NeoPixels, etc.)?
- Can I use GDB to debug my nR52832?
- Are there any other cross platform or free debugging options other than GDB?
Bluefruit nRF52 Feather Learning Guide
Created by Kevin Townsend
Last updated on 2018-01-05 07:00:48 AM UTC

2
7
7
8
9
10
10
11
11
11
12
12
15
15
16
16
18
18
18
20
22
22
22
23
23
24
24
24
24
25
25
25
25
26
26
26
26
26
26
28
28
Guide Contents
Guide Contents
Introduction
nRF52832 Technical Details
nRF51 or nRF52 Bluefruit Devices?
Device Pinout
Special Notes
Power Pins
Analog Inputs
PWM Outputs
I2C Pins
Assembly
Header Options!
Soldering in Plain Headers
Prepare the header strip:
Add the breakout board:
And Solder!
Soldering on Female Header
Tape In Place
Flip & Tack Solder
And Solder!
Arduino BSP Setup
1. BSP Installation
Recommended: Installing the BSP via the Board Manager
2. Third Party Tool Installation
nrfutil (OS X and Linux Only)
3. Advanced Option: Manually Install the BSP via 'git'
Adafruit nRF52 BSP via git (for core development and PRs only)
BSP FAQs
Windows Related
OS X Related
I can compile and link sketches on OS X, but nrfutil gives me the following error: 'AttributeError: 'int' object has
no attribute 'value''?
Linux Related
On Linux I'm getting 'arm-none-eabi-g++: no such file or directory', even though 'arm-none-eabi-g++' exists in the
path specified. What should I do?
Arduino Board Setup
1. Select the Board Target
2. Select the USB CDC Serial Port
Non OS X Operating Systems
OS X Only
3. Run a Test Sketch
Using the Bootloader
Forcing Serial Boot Mode
© Adafruit Industries https://learn.adafruit.com/bluefruit-nrf52-feather-learning-guide Page 2 of 158

28
29
29
31
31
31
31
32
33
34
34
34
35
35
37
38
38
39
45
45
45
46
48
53
53
53
70
70
70
71
72
76
76
77
77
78
78
83
84
84
85
86
Factory Reset
Advanced: OTA DFU Bootloader
Advanced: Upgrading an Existing Bootloader
Flashing the Bootloader
Third Party Tool Requirements
JLink Drivers and Tools
Burning the Bootloader from the Arduino IDE
Manually Burning the Bootloader via nrfjprog
Manually Burning the Bootloader via AdaLink
Examples
Example Source Code
Documented Examples
Advertising: Beacon
Complete Code
Output
BLE UART: Controller
Setup
Complete Code
Custom: HRM
HRM Service Definition
Implementing the HRM Service and Characteristics
Service + Characteristic Setup Code Analysis
Full Sample Code
BLE Pin I/O
Setup
Complete Code
Central BLEUART
Client Services
Scanner
Central Role
Full Sample Code
Dual Roles BLEUART
Server & Client Service Setup
Peripheral Role
Central Role
Advertising and Scanner
Full Sample Code
Bluefruit nRF52 API
AdafruitBluefruit
API
Examples
BLEGap
© Adafruit Industries https://learn.adafruit.com/bluefruit-nrf52-feather-learning-guide Page 3 of 158

87
87
89
89
91
91
92
93
94
94
94
95
95
96
96
96
96
97
99
99
100
100
101
104
104
105
105
106
107
108
108
108
111
111
111
115
115
115
117
118
BLEAdvertising
API
Related Information
Example
BLEScanner
API
setRxCallback(rx_callback_t fp)
void useActiveScan(bool enable);
void filterRssi(int8_t min_rssi); void filterMSD(uint16_t manuf_id); void filterUuid(BLEUuid ble_uuid); void
filterUuid(BLEUuid ble_uuid1, BLEUuid ble_uuid2); void filterUuid(BLEUuid ble_uuid1, BLEUuid ble_uuid2,
BLEUuid ble_uuid3); void filterUuid(BLEUuid ble_uuid1, BLEUuid ble_uuid2, BLEUuid ble_uuid3, BLEUuid
ble_uuid4); void filterUuid(BLEUuid ble_uuid[], uint8_t count);
void clearFilters(void);
bool start(uint16_t timeout = 0); bool stop(void);
void restartOnDisconnect(bool enable);
Examples
BLEService
Basic Usage
Order of Operations (Important!)
API
Example
BLECharacteristic
Basic Usage
Order of Operations (Important!)
API
Example
BLEDiscovery
API
BLEDis
API
Example
Output
BLEUart
API
Example
BLEClientUart
API
Examples
BLEBeacon
API
Example
Testing
BLEMidi
© Adafruit Industries https://learn.adafruit.com/bluefruit-nrf52-feather-learning-guide Page 4 of 158

118
118
119
122
123
123
123
124
124
125
126
128
128
128
128
128
129
131
133
133
133
133
134
134
135
137
138
138
138
138
139
142
142
142
142
143
143
146
146
146
146
147
147
148
148
149
API
Installing the Arduino MIDI Library
Example
Usage
BLEHidAdafruit
API
Example Sketches
Bonding HID Devices
Setting up your Bluefruit device for bonding
Bonding on iOS
Testing the HID Keyboard and Bonding
BLEAncs
API
ANCS OLED Example
Sketch Requirements
Loading the Sketch
Pairing to your Mobile Device
Wait for Alerts
BLEClientCts
API
Client CTS OLED Example
Sketch Requirements
Loading the Sketch
Pairing to your Mobile Device
Wait for Time Data
BLECentral
nRF52 ADC
Analog Reference Voltage
Analog Resolution
Default ADC Example (10-bit, 3.6V Reference)
Advanced Example (12-bit, 3.0V Reference)
Memory Map
Flash Memory
Bootloader v5.1.0 with S132 v5.x.x Dual and Single Bank
Bootloader v0.5.0 with S132 v2.x.x Dual banks
SRAM Layout
Functions affecting SoftDevice SRAM usage
Software Resources
Bluefruit LE Client Apps and Libraries
Bluefruit LE Connect (Android/Java)
Bluefruit LE Connect (iOS/Swift)
Bluefruit LE Connect for OS X (Swift)
Bluefruit LE Command Line Updater for OS X (Swift)
Deprecated: Bluefruit Buddy (OS X)
ABLE (Cross Platform/Node+Electron)
Bluefruit LE Python Wrapper
© Adafruit Industries https://learn.adafruit.com/bluefruit-nrf52-feather-learning-guide Page 5 of 158

149
150
150
152
152
152
153
153
153
153
153
153
154
Debug Tools
AdaLink (Python)
Adafruit nRF51822 Flasher (Python)
Downloads
Module Details
Schematic
FAQs
What are the differences between the nRF51 and nRF52 Bluefruit boards? Which one should I be using?
Can I run nRF51 Bluefruit sketches on the nRF52?
Can I use the nRF52 as a Central to connect to other BLE peripherals?
How are Arduino sketches executed on the nRF52832? Can I do hard real time processing (bit-banging
NeoPixels, etc.)?
Can I use GDB to debug my nR52832?
Are there any other cross platform or free debugging options other than GDB?
© Adafruit Industries https://learn.adafruit.com/bluefruit-nrf52-feather-learning-guide Page 6 of 158
Introduction
The Adafruit Feather nRF52 Bluefruit is our latest easy-to-use all-in-one Bluetooth Low Energy board, with a native-
bluetooth chip, the nRF52832! It's our take on an 'all-in-one' Arduino-compatible + Bluetooth Low Energy with built in
USB and battery charging.
This chip has twice the flash, SRAM and performance of the earlier nRF51-based Bluefruit modules. Best of all it has
Arduino IDE support so there is no 'helper' chip like the ATmega32u4 or ATSAMD21. Instead, this chip is programmed
directly! It's got tons of awesome peripherals: plenty of GPIO, analog inputs, PWM, timers, etc. Leaving out the extra
microcontroller means the price, complexity and power-usage are all lower/better. It allows you to run code directly on
the nRF52832, straight from the Arduino IDE as you would with any other MCU or Arduino compatible device. A single
MCU means better performance, lower overall power consumption, and lower production costs if you ever want to
design your own hardware based on your Bluefruit nRF52 Feather project!
The chips are pre-programed with an auto-resetting bootloader so you can upload quickly in the Arduino IDE with no
button-pressing. Want to program the chip directly? You can use our command line tools with your favorite editor and
toolchain.
And to get you up and running quickly, we've done all the heavy lifting of getting the low level BLE stack into shape so
that you can focus on your project from day one!
nRF52832 Technical Details
ARM Cortex M4F (with HW floating point acceleration) running at 64MHz
512KB flash and 64KB SRAM
Built in USB Serial converter for fast and efficient programming and debugging
Bluetooth Low Energy compatible 2.4GHz radio (Details available in the nRF52832 product specification)
FCC / IC / TELEC certified module
Up to +4dBm output power
1.7v to 3.3v operation with internal linear and DC/DC voltage regulators
19 GPIO, 8 x 12-bit ADC pins, up to 12 PWM outputs (3 PWM modules with 4 outputs each)
Pin #17 red LED for general purpose blinking
Power/enable pin
Measures 2.0" x 0.9" x 0.28" (51mm x 23mm x 8mm) without headers soldered in
Light as a (large?) feather - 5.7 grams
4 mounting holes
Reset button
Optional SWD connector for debugging
Works out of the box with just about all of our Adafruit FeatherWings! (Wings that require the UART like the GPS
FeatherWing won't work)
Further technical details available in the nRF52832 product specification.
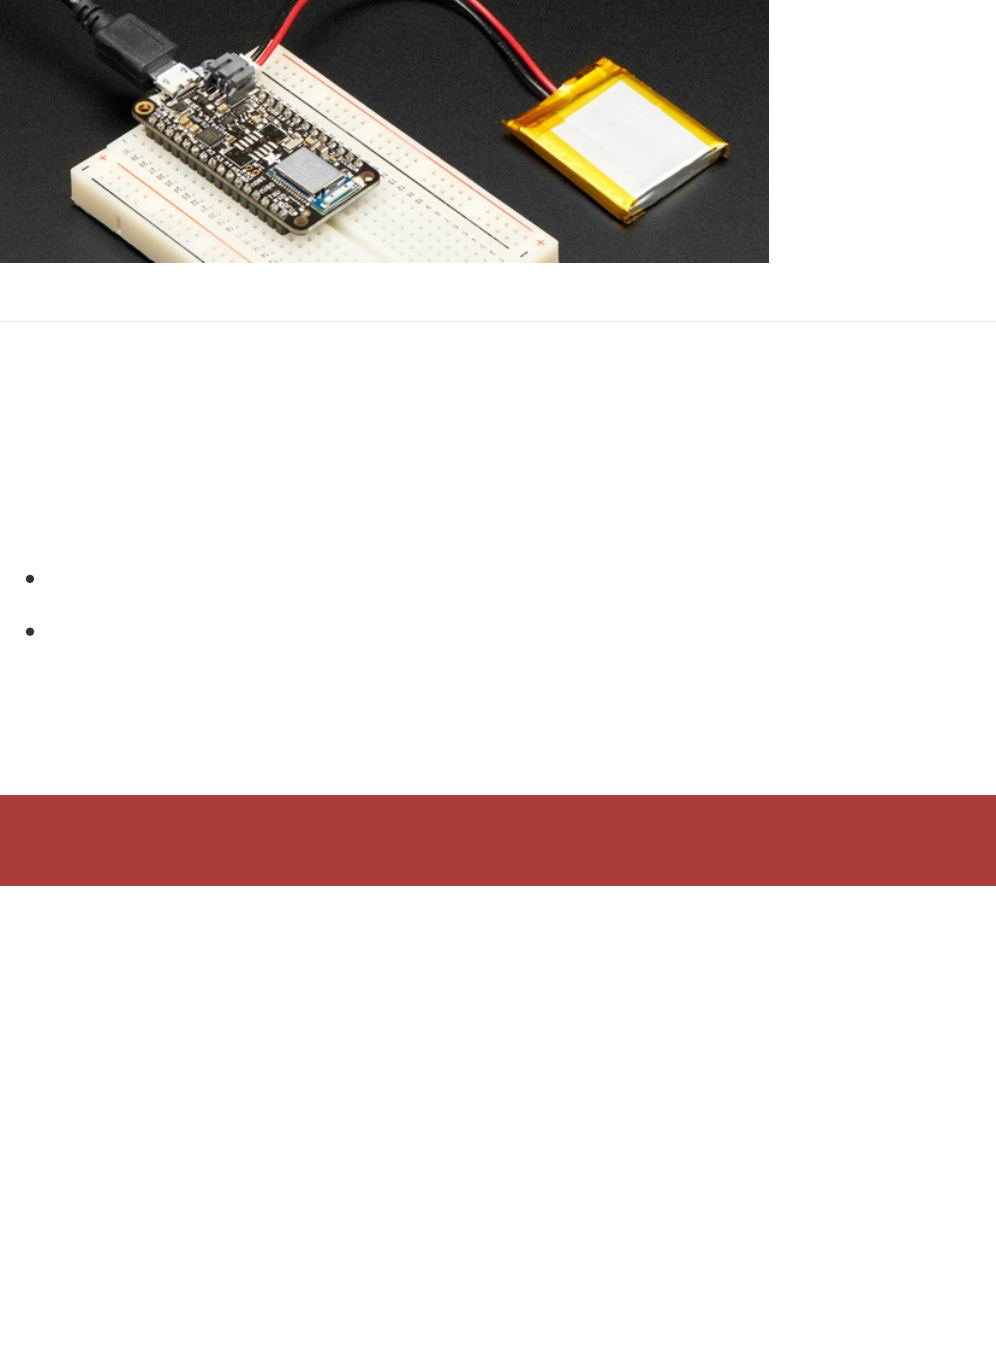
Like all of our Feather boards, the Bluefruit nRF52 Feather includes on board USB-based LIPO charging, and
has a standard LIPO battery connector to make your wireless projects genuinely 'wireless' at no additional
cost (aside from the LIPO cell itself).
© Adafruit Industries https://learn.adafruit.com/bluefruit-nrf52-feather-learning-guide Page 7 of 158
nRF51 or nRF52 Bluefruit Devices?
The Bluefruit nRF52 Feather (based on the nRF52832 SoC) is quite different from the earlier nRF51822 based Bluefruit
products (Bluefruit M0 Feather, etc.), both of which will continue to exist.
From a hardware perspective, the nRF52 Feather is based on a much more powerful ARM Cortex M4F processor, with
512KB flash, 64KB SRAM and hardware floating point acceleration ... whereas the earlier nRF51822 is based on the
smaller ARM Cortex M0 core (fewer internal instructions), with 256KB flash and either 16KB or 32KB SRAM.
More importantly, the design approach that we took with the nRF52 is completely different:
nRF51 based Bluefruit boards run as modules that you connect to via an external MCU (typically an Atmel 32u4 or
a SAMD21), sending AT style commands over SPI or UART.
With the nRF52, you run all of your code directly on the nRF52832 and no external MCU is used or required!
This change of design helps keep the overall costs lower, allows for far better performance since you aren't limited by
the SPI or UART transport channel, and can help improve overall power consumption.
As a tradeoff, it also means a completely different API and development process, though!
nRF51 Bluefruit sketches won't run on nRF52 Bluefruit hardware without modification! The two device families
have different APIs and programming models, and aim to solve your wireless problems in two different ways.
© Adafruit Industries https://learn.adafruit.com/bluefruit-nrf52-feather-learning-guide Page 8 of 158

Device Pinout
© Adafruit Industries https://learn.adafruit.com/bluefruit-nrf52-feather-learning-guide Page 9 of 158
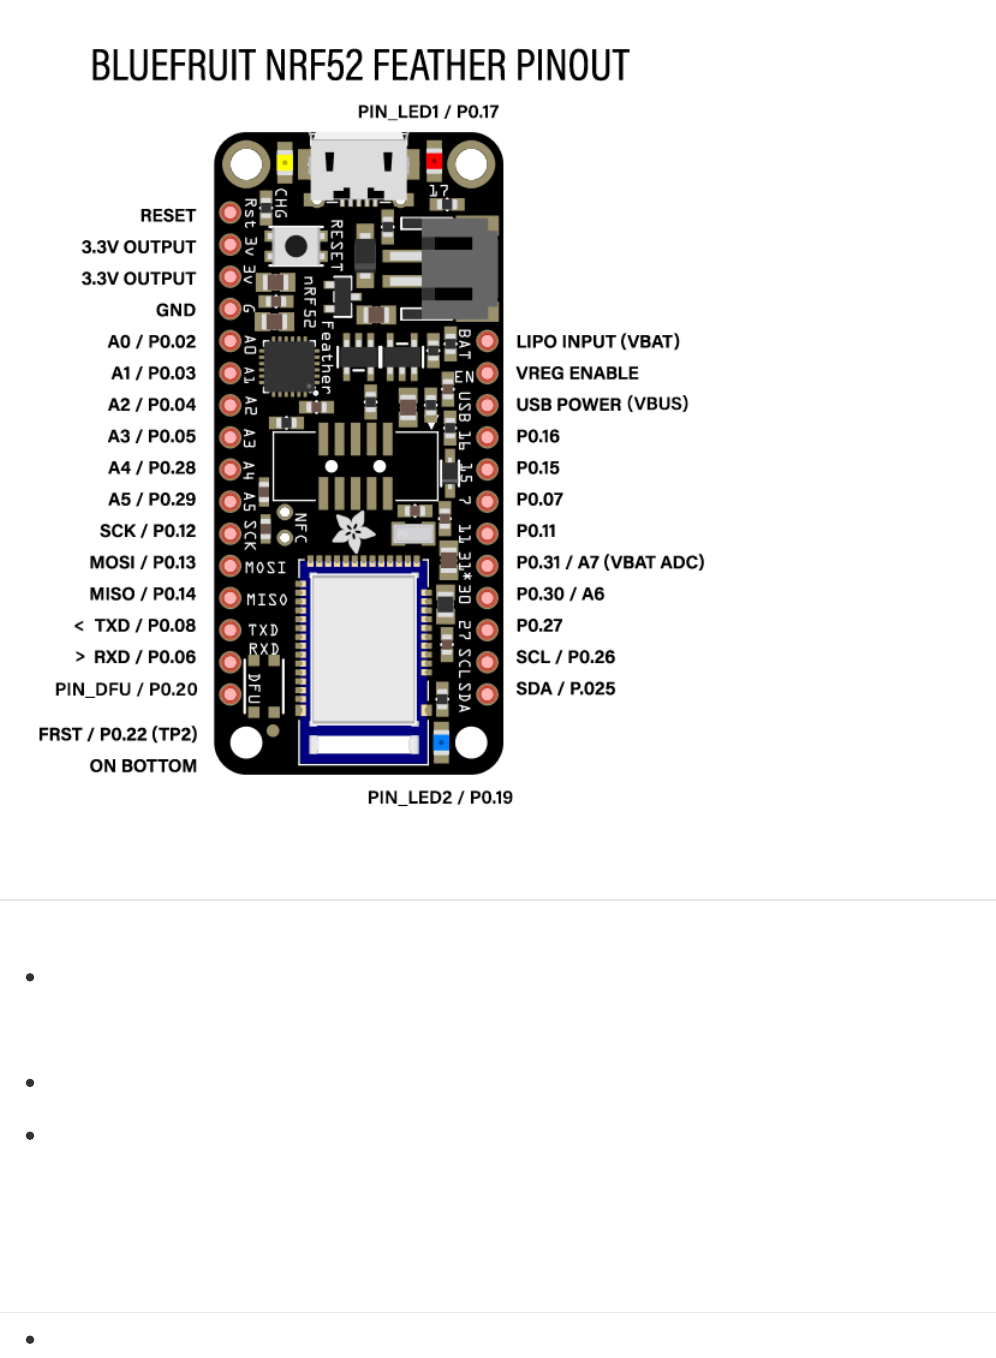
Special Notes
The following pins have some restrictions that need to be taken into account when using them:
PIN_DFU / P0.20: If this pin is detected to be at GND level at startup, the board will enter a special serial
bootloader mode and will not execute any user code, going straight into bootloader mode. If you wish to use this
pin as a standard GPIO, make sure that it is pulled high with a pullup resistor so that your code will execute
normally when the MCU starts up.
P0.31 / A7: This pin is hard wired to a voltage-divider on the LIPO battery input, allow you to safely measure the
LIPO battery level on your device. If possible, you should avoid using this pin directly.
FRST/P0.22: Setting this pin to GND at startup will cause the device to perform a factory reset at startup, erasing
and config data as well as the user sketch. At the next reset, you should enter serial bootloader mode by default,
since no user sketch will be present. You can use this to recover 'bricked' boards, but if you don't wish to do this
be careful not to have FRST low at startup. By default, a weak internal pull-up resistor is enabled on this pin
during the bootloader phase.
Power Pins
3.3V Output: This two pins are connected to the output of the on board 3.3V regulator. They can be used to
© Adafruit Industries https://learn.adafruit.com/bluefruit-nrf52-feather-learning-guide Page 10 of 158

supply 3.3V power to external sensors, breakouts or Feather Wings.
LIPO Input (VBAT): This is the voltage supply off the optional LIPO cell that can be connected via the JST PH
connector. It is nominally ~3.5-4.2V.
VREG Enable: This pin can be set to GND to disable the 3.3V output from the on board voltage regulator. By
default it is set high via a pullup resistor.
USB Power (VBUS): This is the voltage supply off USB connector, nominally 4.5-5.2V.
Analog Inputs
The 8 available analog inputs can be configured to generate 8, 10 or 12-bit data (or 14-bits with over-sampling), at
speeds up to 200kHz (depending on the bit-width of the values generated), based on either an internal 0.6V reference
or the external supply.
The following default values are used:
Default voltage range: 0-3.6V (uses the internal 0.6V reference with 1/6 gain)
Default resolution: 10-bit (0..4095)
PWM Outputs
Any GPIO pin can be configured as a PWM output, using the dedicated PWM block.
Three PWM modules can provide up to 12 PWM channels with individual frequency control in groups of up to four
channels.
I2C Pins
I2C pins on the nRF52832 require external pullup resistors to function, which are not present on the Adafruit nRF52
Feather by default. You will need to supply external pullups to use these. All Adafruit I2C breakouts have appropriate
pullups on them already, so this normally won't be an issue for you.
Unlike digital functions, which can be remapped to any GPIO/digital pin, the ADC functionality is tied to
specified pins, labelled as A* in the image above (A0, A1, etc.).
Please note that DMA based PWM output is still a work in progress in the initial release of the nR52 BSP, and
further improvements are planned here.
© Adafruit Industries https://learn.adafruit.com/bluefruit-nrf52-feather-learning-guide Page 11 of 158
Assembly
We ship Feathers fully tested but without headers attached - this gives you the most flexibility on choosing how to use
and configure your Feather
Header Options!
Before you go gung-ho on soldering, there's a few options to consider!
The first option is soldering in plain male headers, this
lets you plug in the Feather into a solderless
breadboard
© Adafruit Industries https://learn.adafruit.com/bluefruit-nrf52-feather-learning-guide Page 12 of 158


Finally, there's the "Stacking Header" option. This one is
sort of the best-of-both-worlds. You get the ability to
plug into a solderless breadboard
and
plug a
featherwing on top. But its a little bulky
Soldering in Plain Headers
© Adafruit Industries https://learn.adafruit.com/bluefruit-nrf52-feather-learning-guide Page 15 of 158

Add the breakout board:
Place the breakout board over the pins so that the short
pins poke through the breakout pads
And Solder!
Be sure to solder all pins for reliable electrical contact.
(For tips on soldering, be sure to check out our Guide to
Excellent Soldering
(https://adafru.it/aTk)
).
© Adafruit Industries https://learn.adafruit.com/bluefruit-nrf52-feather-learning-guide Page 17 of 158


You're done! Check your solder joints visually and
continue onto the next steps
Soldering on Female Header
Tape In Place
For sockets you'll want to tape them in place so when
you flip over the board they don't fall out
© Adafruit Industries https://learn.adafruit.com/bluefruit-nrf52-feather-learning-guide Page 19 of 158


Arduino BSP Setup
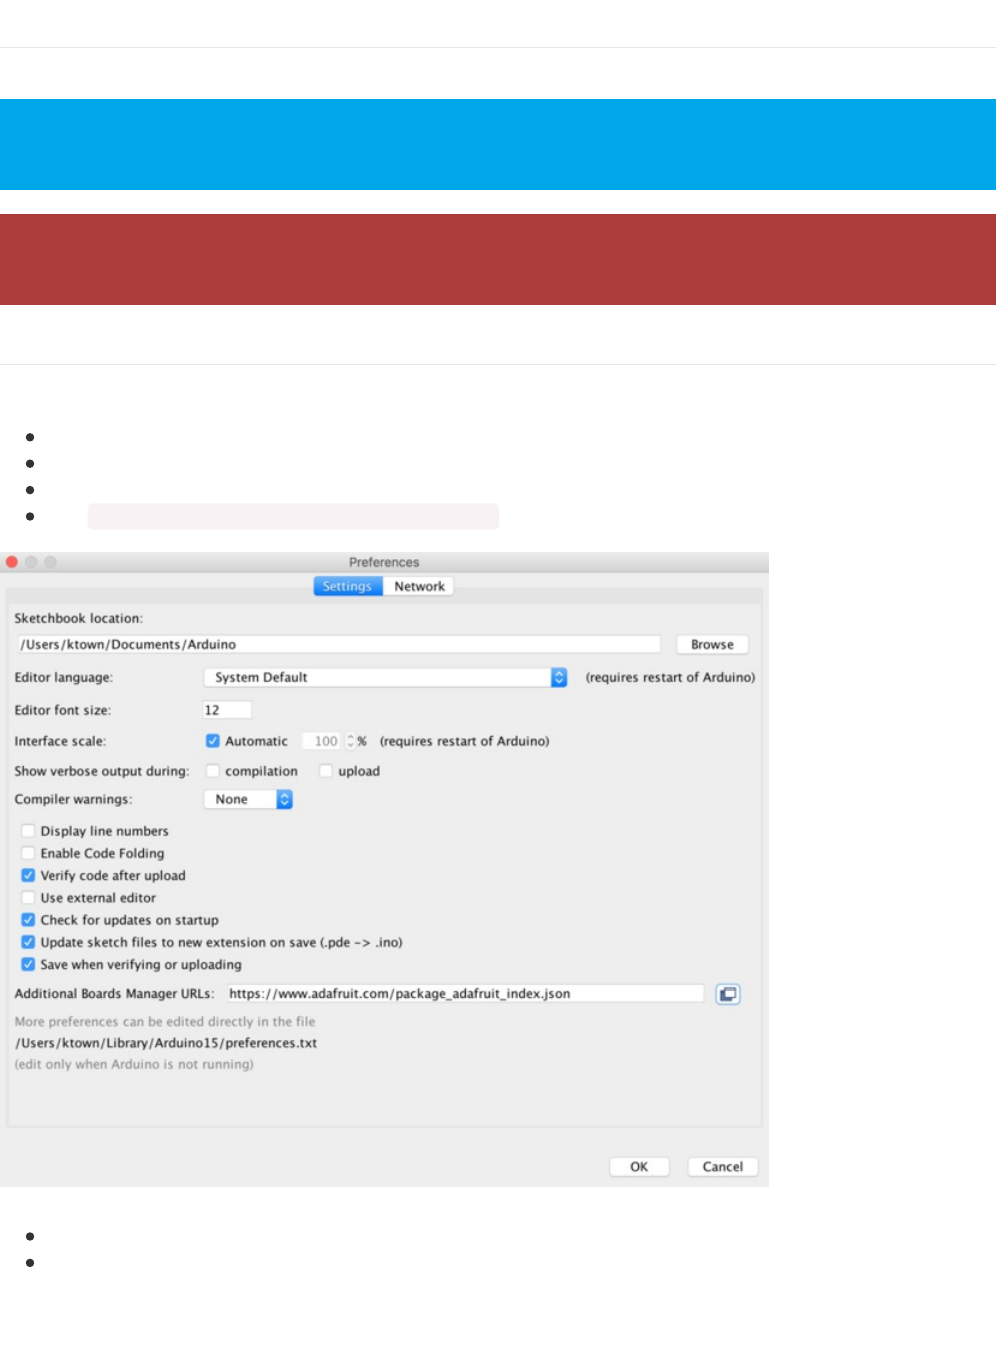
You can install the Adafruit Bluefruit nRF52 BSP in two steps:
1. BSP Installation
Recommended: Installing the BSP via the Board Manager
Download and install the Arduino IDE (At least v1.6.12)
Start the Arduino IDE
Go into Preferences
Add https://www.adafruit.com/package_adafruit_index.json as an 'Additional Board Manager URL' (see image below)
Restart the Arduino IDE
Open the Boards Manager option from the Tools -> Board menu and install 'Adafruit nRF52 by Adafruit' (see
image below)
nRF52 support requires at least Arduino IDE version 1.6.12! Please make sure you have an up to date version
before proceeding with this guide!
Please consult the FAQ section at the bottom of this page if you run into any problems installing or using this
BSP!
© Adafruit Industries https://learn.adafruit.com/bluefruit-nrf52-feather-learning-guide Page 23 of 158
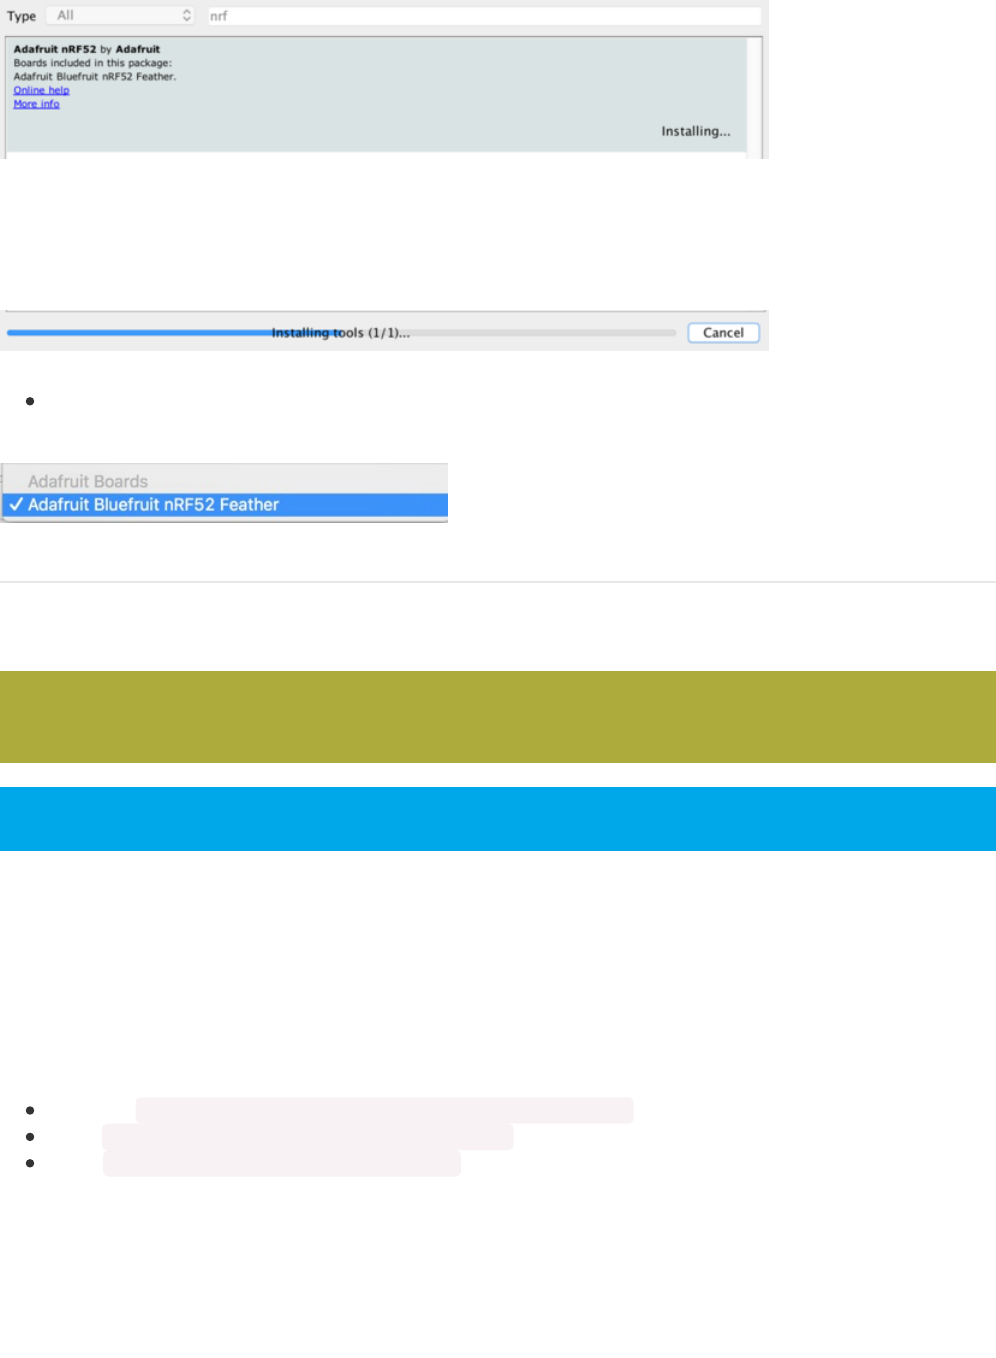
It will take up to a few minutes to finish installing the cross-compiling toolchain and tools associated with this BSP.
The delay during the installation stage shown in the image below is normal, please be patient and let the installation
terminate normally:
Once the BSP is installed, select 'Adafruit Bluefruit nRF52 Feather' from the Tools -> Board menu, which will
update your system config to use the right compiler and settings for the nRF52:
2. Third Party Tool Installation
The following third party tools must also be installed on your system to allow you to work with the Bluefruit nRF52
Feather:
nrfutil (OS X and Linux Only)
This is a python wrapper for Nordic's nrfutil, which is used to flash boards using the built in serial bootloader.
To install this tool, open a terminal or command prompty window and go into the folder where the BSP was installed in
step one above.
Depending on your operating system. The BSP should be located in one of the following paths:
Windows: %APPDATA%\Local\Arduino15\packages\adafruit\hardware\nrf52
OS X: ~/Library/Arduino15/packages/adafruit/hardware/nrf52
Linux: ~/.arduino15/packages/adafruit/hardware/nrf52
The path above will also include a sub-folder with the version number (ex. `0.6.0`). Be sure to enter that sub-folder as
well, for example:
This step is only required on OS X and Linux. If you are using Windows, a pre-built 32-bit binary of nrfutil is
already included in the BSP that should work out of the box for most setups.
You will need to have both Python and pip available on your system to use the tools below!
© Adafruit Industries https://learn.adafruit.com/bluefruit-nrf52-feather-learning-guide Page 24 of 158
Next go into the tools/nrfutil-0.5.2 folder in the path above, and run the following commands to make nrfutil available to
the Arduino IDE:
3. Advanced Option: Manually Install the BSP via 'git'
If you wish to do any development against the core codebase (generate pull requests, etc.), you can also optionally
install the Adafruit nRF52 BSP manually using 'git', as decribed below:
Adafruit nRF52 BSP via git (for core development and PRs only)
1. Install BSP via Board Manager as above to install compiler & tools.
2. Delete the core folder nrf52 installed by Board Manager in Adruino15, depending on your OS. It could be
OS X: ~/Library/Arduino15/packages/adafruit/hardware/nrf52
Linux: ~/.arduino15/packages/adafruit/hardware/nrf52
Windows: %APPDATA%\Local\Arduino15\packages\adafruit\hardware\nrf52
3. Go to the sketchbook folder on your command line, which should be one of the following:
OS X: ~/Documents/Arduino
Linux: ~/Arduino
Windows: ~/Documents/Arduino
4. Create a folder named hardware/Adafruit , if it does not exist, and change directories into it.
5. Clone the Adafruit_nRF52_Arduino repo in the folder described in step 2:
git clone git@github.com:adafruit/Adafruit_nRF52_Arduino.git
6. This should result in a final folder name like ' ~/Documents/Arduino/hardware/Adafruit/Adafruit_nRF52_Arduino ' (OS X).
7. Restart the Arduino IDE
BSP FAQs
The following FAQs may be useful if you run into any problems:
Windows Related
$ cd ~/Library/Arduino15/packages/adafruit/hardware/nrf52
$ ls
0.6.0/
$ cd 0.6.0
$ cd tools/nrfutil-0.5.2
$ sudo pip install -r requirements.txt
$ sudo python setup.py install
Don't install nrfutil from the pip package (ex. `sudo pip install nrfutil`). The latest nrfutil does not support DFU
via Serial, and you should install the local copy of 0.5.2 included with the BSP via the `python setup.py install`
command above.
If you get a 'sudo: pip: command not found' error running 'sudo pip install', you can install pip via 'sudo
easy_install pip'
© Adafruit Industries https://learn.adafruit.com/bluefruit-nrf52-feather-learning-guide Page 25 of 158

If you are using BSP 0.6.0 or greater, there are no known issues with the BSP installation process on Windows. Please
update to the latest version if you currently have an earlier release.
OS X Related
I can compile and link sketches on OS X, but nrfutil gives me the following error: 'AttributeError: 'int' object has no
attribute 'value''?
Depending on your system setup and Python version, you may need to make a manual adjustment to a file in nrfutil,
which is used when compiling and flashing files from the Arduino IDE.
Open the following file (please note that the BSP version number in the path may be different!):
~/Library/Arduino15/packages/adafruit/hardware/nrf52/0.5.1/tools/nrfutil-0.5.2/nordicsemi/dfu/init_packet.py ... and make the
following changes:
Linux Related
On Linux I'm getting 'arm-none-eabi-g++: no such file or directory', even though 'arm-none-eabi-g++' exists in the
path specified. What should I do?
This is probably caused by a conflict between 32-bit and 64-bit versions of the compiler, libc and the IDE. The
compiler uses 32-bit binaries, so you also need to have a 32-bit version of libc installed on your system (details). Try
running the following commands from the command line to resolve this:
@@ -79,7 +79,7 @@
- for key in sorted(self.init_packet_fields.keys(), key=lambda x: x.value):
+ for key in sorted(self.init_packet_fields.keys(), key=lambda x: x):
@@ -94,7 +94,8 @@
- for key in sorted(self.init_packet_fields.keys(), key=lambda x: x.value):
+ for key in sorted(self.init_packet_fields.keys(), key=lambda x: x):
sudo dpkg --add-architecture i386
sudo apt-get update
sudo apt-get install libc6:i386
© Adafruit Industries https://learn.adafruit.com/bluefruit-nrf52-feather-learning-guide Page 26 of 158
Arduino Board Setup
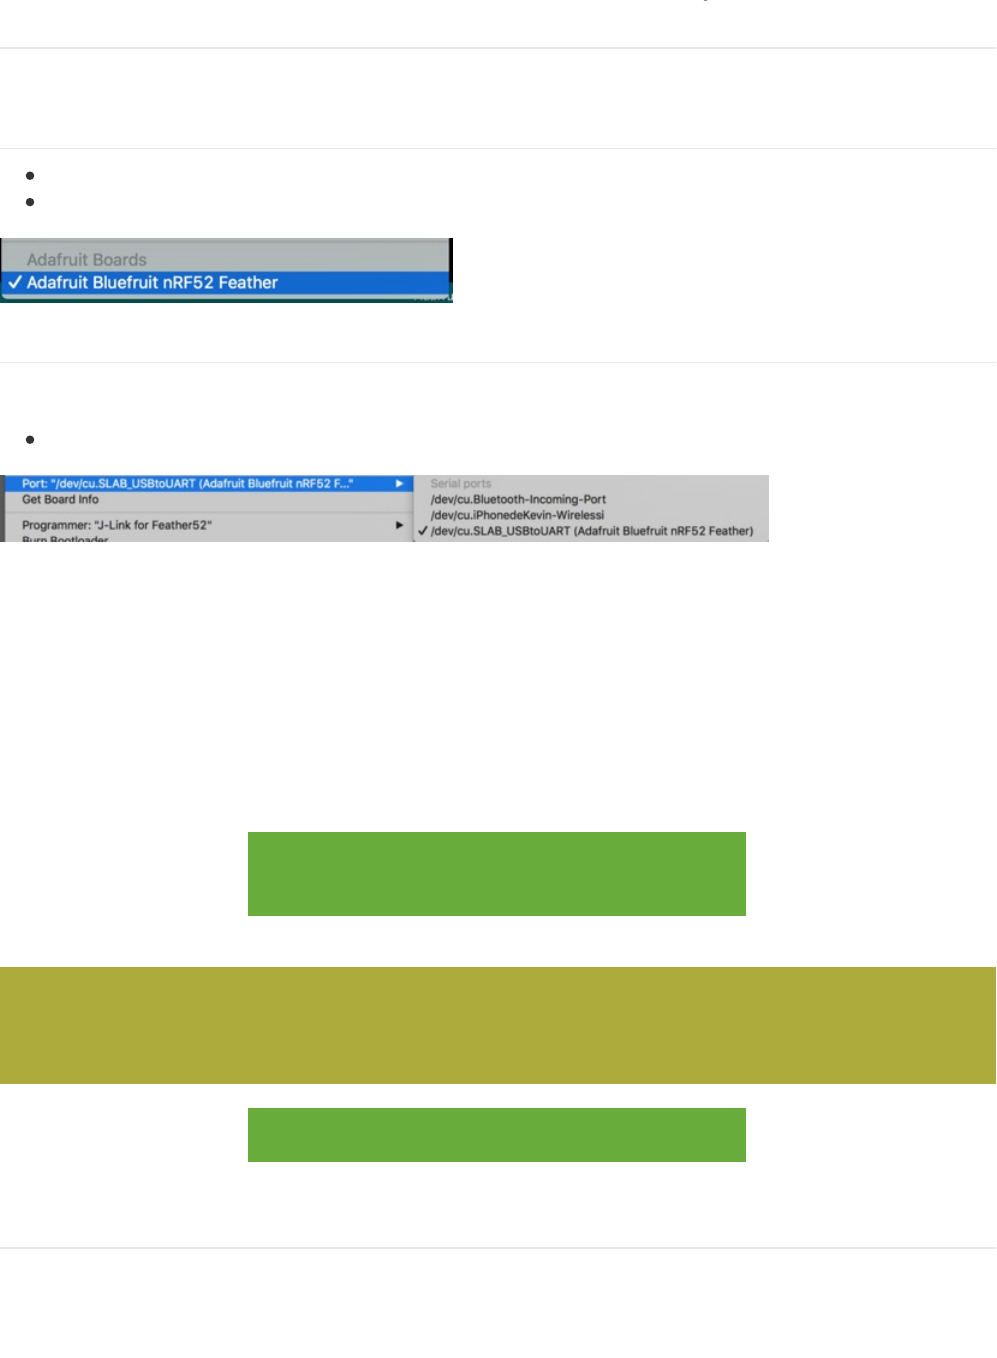
Once you have the Bluefruit nRF52 BSP setup on your system, you need to select the appropriate board, which will
determine the compiler and expose some new menus options:
1. Select the Board Target
Go to the Tools menu
Select Tools > Board > Adafruit Bluefruit nRF52 Feather
2. Select the USB CDC Serial Port
Finally, you need to set the serial port used by Serial Monitor and the serial bootloader:
Go to Tools > Port and select the appropriate SiLabs device
Non OS X Operating Systems
If you don't see the SiLabs device listed, you may need to install the SiLabs CP2104 driver on your system.
OS X Only
Depending on the version of OS X you are running, you may need to select a different driver. See the link below for
details:
Click here to download the CP2104 USB Driver
for OS X
https://adafru.it/yna
Download the CP2104 Legacy USB Driver
https://adafru.it/ymF
3. Run a Test Sketch
At this point, you should be able to run a test sketch from the Examples folder, or just flash the following blinky code
from the Arduino IDE:
If you are using Mac OS 10.12.6 (Sierra) and you cannot upload with the latest Mac OS VCP driver, please try
the legacy v4 driver below. Note you will need to uninstall the v5 driver using uninstall.sh (in the driver
package)
© Adafruit Industries https://learn.adafruit.com/bluefruit-nrf52-feather-learning-guide Page 27 of 158

This will blink the pin #17 red LED on the Feather
void setup() {
pinMode(LED_BUILTIN, OUTPUT);
}
void loop() {
digitalWrite(LED_BUILTIN, HIGH); // turn the LED on (HIGH is the voltage level)
delay(1000); // wait for a second
digitalWrite(LED_BUILTIN, LOW); // turn the LED off by making the voltage LOW
delay(1000); // wait for a second
}
© Adafruit Industries https://learn.adafruit.com/bluefruit-nrf52-feather-learning-guide Page 28 of 158
Using the Bootloader
The Bluefruit nRF52 Feather includes a customized version of the Nordic bootloader that enables serial support, over
the air (OTA) DFU support, and various fail safe features like factory reset when the FRST pin is grounded at startup.
The bootloader that all Bluefruit nRF52 Feathers ships with allows you to flash user sketches to the nRF52832 using
only the CP2104 USB to serial adapter populated on the board.
Forcing Serial Boot Mode
The Bluefruit nRF52 Feather is designed to briefly enter serial bootloader mode for a short delay every time the device
comes out of reset, and the DTR line on the CP2104 USB to Serial adapter will trigger a reset every time the Serial
Monitor is opened. This means that you can normally flash a user sketch to the nRF52 with no manual intervention on
your part at a HW level.
If you need to force the serial bootloader mode, however, you can connect the DFU pin to GND at startup, which will
force you to enter serial bootloader mode and stay in that mode until you reset or power cycle the board.
This can be used to recover bricked boards where a bad user sketch has been uploaded, since you will enter serial
bootloader mode without executing the user sketch, and you can flash a new sketch directly from the Arduino IDE.
Factory Reset
This page is for information purposes only. Normally the bootloader will work transparently and automatically
from the Arduino IDE, requiring no manual intervention on your behalf.
Forcing the serial bootloader can often be used to recover bricked devices.
© Adafruit Industries https://learn.adafruit.com/bluefruit-nrf52-feather-learning-guide Page 29 of 158
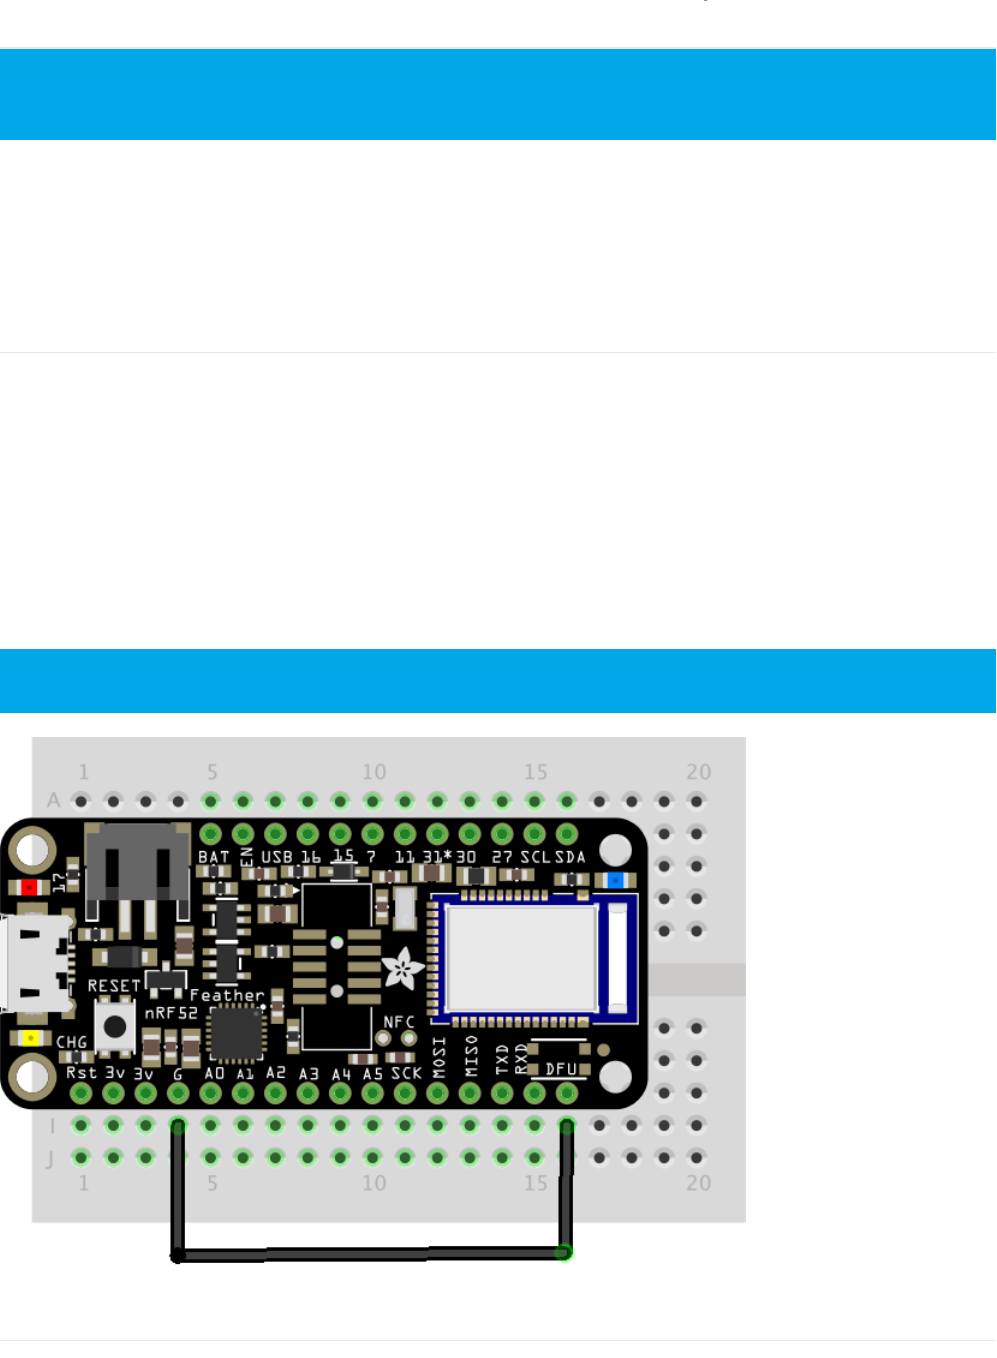
The Bluefruit nRF52 Feather has an optional FRST pad on the bottom of the PCB.
If you brick your device, you can solder a wire to the FRST pad, connecting it to GND. When a GND state is detected at
power up the following actions will be performed:
The user application flash section will be erased
The user 'App Data' section that stores non volatile config data will be erased
This will cause the device to enter serial bootloader mode at startup, and the user sketch or config data that caused
the device to stop responding should be removed.
Advanced: OTA DFU Bootloader
While this is only recommended for advanced users, you can also force OTA (Over The Air) DFU bootloader mode to
enable OTA updates using BLE and Nordic's proprietary update protocol (which is support by both Nordic mobile apps,
and out own Bluefruit LE Connect).
To force OTA DFU mode, set both FRST and DFU to GND at startup. Power cycling the board will cause the device to
boot up into OTA DFU mode.
Advanced: Upgrading an Existing Bootloader
The Adafruit Feather nRF52 Bootloader binary contains not only the DFU code, but also the Bluetooth stack
(a.k.a SoftDevice) to make sure they work together reliably. To get the latest and greatest features from the stack such
as Bluetooth 5.0 with higher throughput, increased broadcast capacities or larger MTU it is necessary to upgrade
Bootloader to get the latest stack.
Luckily the Bluefruit nRF52 Bootloader can be upgraded/downgraded without any additional hardware, and we can
even do that right in Arduino IDE without at risk of typos or common user errors.
First select the Bootloader version that you want to upgrade under Tools->Bootloader. Then select "Bootloader DFU
for Bluefruit nRF52"
Be sure to disconnect the pin from GND after a successful factory reset!
This option is not actively support nor recommended by Adafruit, and we are still working on making this as
safe as possible for users via our Bluefruit LE Connect application. Use OTA DFU at your own risk knowing
you can brick your device and may need a Segger J-Link or similar device to regain control of it!
Upgrading the Bootloader is only possible from BSP release 0.8.0 and higher.
Once you click "Burn Bootloader", you shouldn't close the Arduino IDE, unplug the Feather, or abort the
process. There is a high chance it will brick your device! Do this with care and caution.
© Adafruit Industries https://learn.adafruit.com/bluefruit-nrf52-feather-learning-guide Page 30 of 158

Select Tools->Burn Bootloader to start the upgrade. After receiving the new Bootloader over the serial connection, the
old Bootloader will erase itself! The new bootloader will then be flashed. The process typically takes 30-60 seconds to
complete. Make sure you see the "Device programmed" in the output log before launching Serial monitor or
uploadinga new sketch.
© Adafruit Industries https://learn.adafruit.com/bluefruit-nrf52-feather-learning-guide Page 31 of 158
Flashing the Bootloader
All Bluefruit nRF52 Feather boards and Bluefruit nRF52 modules ship with the serial bootloader pre-flashed, so this
page is normally not required when setting your device and system up.
The information provided here is only intended for for rare cases where you may want or need to reflash the
bootloader yourself, and have access to the HW required to do so.
Third Party Tool Requirements
To burn the bootloader from within the Arduino IDE, you will need the following tools installed
on your system and available in the system path:
JLink Drivers and Tools
Download and install the JLink Software and Documentation Pack from Segger, which will also install a set of
command line tools.
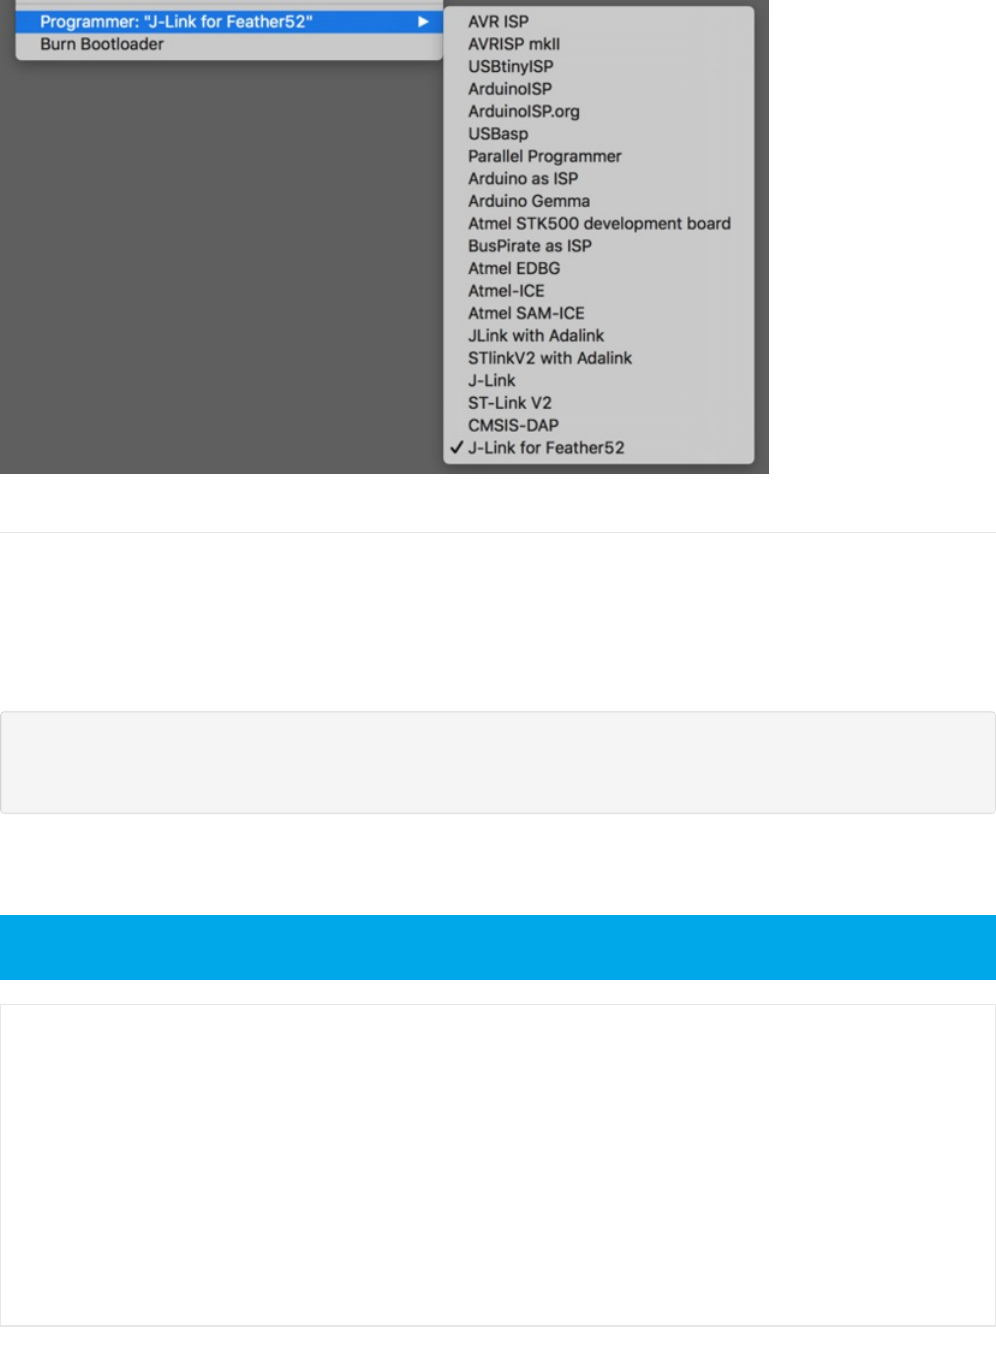
Burning the Bootloader from the Arduino IDE
Once the tools above have been installed and added to your system path, from the Arduino IDE:
Select `Tools > Board > Adafruit Bluefruit Feather52`
Select `Tools > Programmer > J-Link for Feather52`
Select `Tools > Burn Bootloader` with the board and J-Link connected
The appropriate Programmer target and Burn Bootloader button can be seen below:
All Adafruit nRF52 boards chip with the bootloader pre-flashed. This page is provided for information
purposes only!
You will need a Segger J-Link to flash the bootloader to the nRF52832 SoC!
© Adafruit Industries https://learn.adafruit.com/bluefruit-nrf52-feather-learning-guide Page 32 of 158
Manually Burning the Bootloader via nrfjprog
You can also manually burn the bootloader from the command line, using `nrfjprog` from Nordic.
You can either download nRF5x-Command-Line-Tools for OSX/Linux/Win32, or use the version that ships with the BSP
in the tools/nrf5x-command-line-tools folder.
Run the folllwing commands, updating the path to the .hex file as appropriate:
$ nrfjprog -e -f nrf52
$ nrfjprog --program bootloader_with_s132.hex -f nrf52
$ nrfjprog --reset -f nrf52
You should see something similar to the following output, followed by a fast blinky on the status LED to indicate that
you are in DFU/bootloader mode since no user sketch was found after the device reset:
All commands below were run from 'tools/nrf5x-command-line-tools/osx/nrfjprog'
$ ./nrfjprog -e -f nrf52
Erasing code and UICR flash areas.
Applying system reset.
$ ./nrfjprog --program ../../../../bin/bootloader/bootloader_v050_s132_v201.hex -f nrf52
Parsing hex file.
Reading flash area to program to guarantee it is erased.
Checking that the area to write is not protected.
Programing device.
$ ./nrfjprog --reset -f nrf52
Applying system reset.
Run.
© Adafruit Industries https://learn.adafruit.com/bluefruit-nrf52-feather-learning-guide Page 33 of 158

OS X Note: You may need to create a symlink in `/usr/local/bin` to the
`nrfjprog` tool wherever you have added it. You can run the following command, for example:
$ ln -s $HOME/prog/nordic/nrfjprog/nrfjprog /usr/local/bin/nrfjprog
Manually Burning the Bootloader via AdaLink
Alternatively, you can use AdaLink to flash the bootloader with a Segger J-Link:
# First erase the device's flash contents
$ adalink nrf52832 -p jlink -w
# Then flash the bootloader and SoftDevice .hex file
$ adalink nrf52832 -p jlink -h feather52_bootloader_v050_s132_v201.hex
© Adafruit Industries https://learn.adafruit.com/bluefruit-nrf52-feather-learning-guide Page 34 of 158
Examples
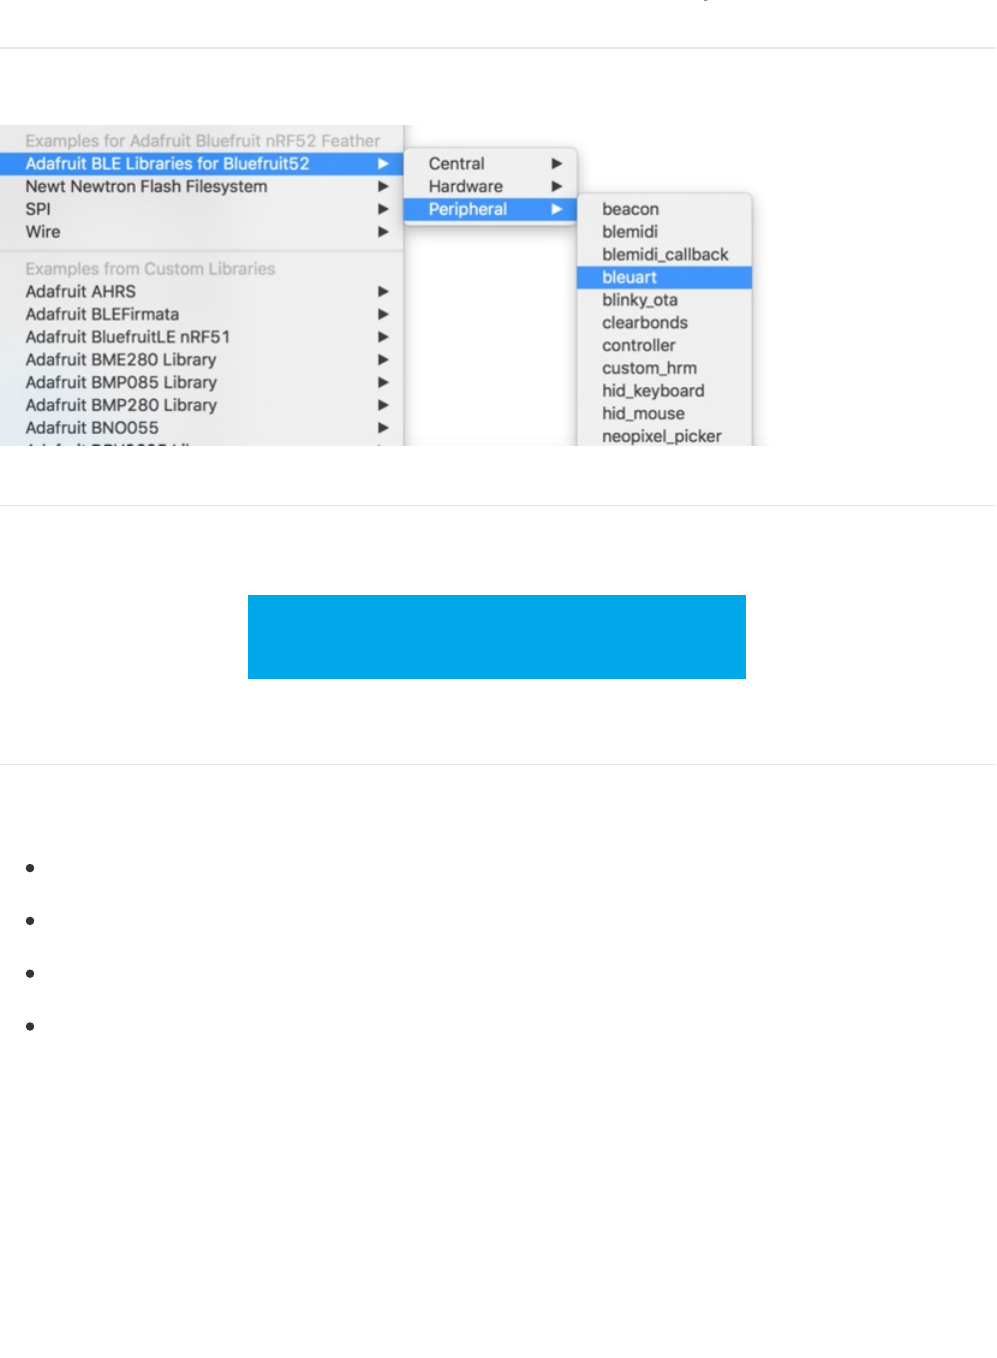
There are numerous examples available for the Bluefruit nRF52 Feather in the Examples menu of the nRF52 BSP, and
these are always up to date. You're first stop looking for example code should be there:
Example Source Code
The latest example source code is always available and visible on Github, and the public git repository should be
considered the definitive source of example code for this board.
Click here to browse the example source code
on Github
https://adafru.it/vaK
Documented Examples
To help explain some common use cases for the nRF52 BLE API, feel free to consult the example documentation in
this section of the learning guide:
Advertising: Beacon - Shows how to use the BLEBeacon helper class to configure your Bleufruit nRF52 Feather
as a beacon
BLE UART: Controller - Shows how to use the Controller utility in our Bluefruit LE Connect apps to send basic
data between your peripheral and your phone or tablet.
Custom: HRM - Shows how to defined and work with a custom GATT Service and Characteristic, using the
officially adopted Heart Rate Monitor (HRM) service as an example.
BLE Pin I/O (StandardFirmataBLE) Shows how to control Pin I/O of nRF52 with Firmata protocol
© Adafruit Industries https://learn.adafruit.com/bluefruit-nrf52-feather-learning-guide Page 35 of 158

Advertising: Beacon
This example shows how you can use the BLEBeacon helper class and advertising API to configure your Bluefruit
nRF52 board as a 'Beacon'.
Complete Code
The latest version of this code is available on Github and in the Examples menu.
The code below may be out of sync with the latest examples on Github. You should always consult Github for
the latest version.
© Adafruit Industries https://learn.adafruit.com/bluefruit-nrf52-feather-learning-guide Page 36 of 158

#include <bluefruit.h>
// Beacon uses the Manufacturer Specific Data field in the advertising
// packet, which means you must provide a valid Manufacturer ID. Update
// the field below to an appropriate value. For a list of valid IDs see:
// https://www.bluetooth.com/specifications/assigned-numbers/company-identifiers
// 0x004C is Apple (for example)
#define MANUFACTURER_ID 0x004C
// AirLocate UUID: E2C56DB5-DFFB-48D2-B060-D0F5A71096E0
uint8_t beaconUuid[16] =
{
0xE2, 0xC5, 0x6D, 0xB5, 0xDF, 0xFB, 0x48, 0xD2,
0xB0, 0x60, 0xD0, 0xF5, 0xA7, 0x10, 0x96, 0xE0,
};
// A valid Beacon packet consists of the following information:
// UUID, Major, Minor, RSSI @ 1M
BLEBeacon beacon(beaconUuid, 0x0001, 0x0000, -54);
void setup()
{
Serial.begin(115200);
Serial.println("Bluefruit52 Beacon Example");
Bluefruit.begin();
Bluefruit.setName("Bluefruit52");
// Manufacturer ID is required for Manufacturer Specific Data
beacon.setManufacturer(MANUFACTURER_ID);
// Setup the advertising packet
setupAdv();
// Start advertising
Bluefruit.Advertising.start();
}
void setupAdv(void)
{
// Set the beacon payload using the BLEBeacon class populated
// earlier in this example
Bluefruit.Advertising.setBeacon(beacon);
// char* adv = Bluefruit.Advertising.getData();
// There is no room left for 'Name' in the advertising packet
// Use the optinal secondary Scan Response packet for 'Name' instead
Bluefruit.ScanResponse.addName();
}
void loop()
{
// Toggle both LEDs every second
digitalToggle(LED_BUILTIN);
delay(1000);
}
© Adafruit Industries https://learn.adafruit.com/bluefruit-nrf52-feather-learning-guide Page 37 of 158
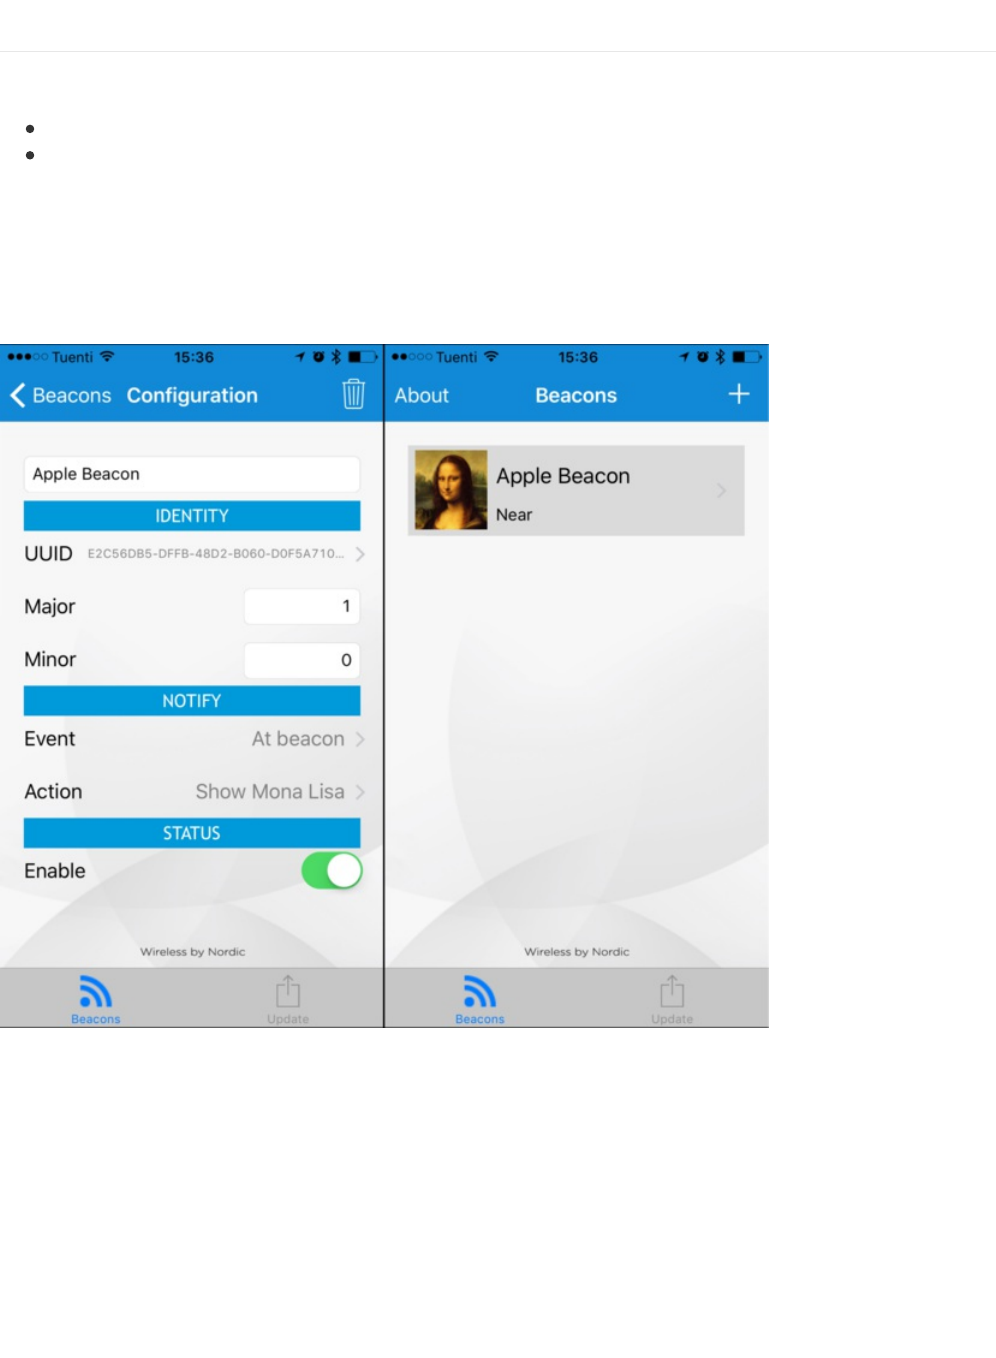
Output
You can use the nRF Beacons application from Nordic Semiconductors to test this sketch:
nRF Beacons for iOS
nRF Beacons for Android
Make sure that you set the UUID, Major and Minor values to match the sketch above, and then run the sketch at the
same time as the nRF Beacons application.
With the default setup you should see a Mona Lisa icon when the beacon is detected. If you don't see this, double
check the UUID, Major and Minor values to be sure they match exactly.
© Adafruit Industries https://learn.adafruit.com/bluefruit-nrf52-feather-learning-guide Page 38 of 158

BLE UART: Controller
This examples shows you you can use the BLEUart helper class and the Bluefruit LE Connect applications to send
based keypad and sensor data to your nRF52.
Setup
In order to use this sketch, you will need to open Bluefruit LE Connect on your mobile device using our free iOS,
Android or OS X applications.
Load the Controller example sketch in the Arduino IDE
Compile the sketch and flash it to your nRF52 based Feather
Once you are done uploading, open the Serial Monitor (Tools > Serial Monitor)
Open the Bluefruit LE Connect application on your mobile device
Connect to the appropriate target (probably 'Bluefruit52')
Once connected switch to the Controller application inside the app
Enable an appropriate control surface. The Color Picker control surface is shown below, for example (screen shot
taken from the iOS application):
© Adafruit Industries https://learn.adafruit.com/bluefruit-nrf52-feather-learning-guide Page 39 of 158

As you change the color (or as other data becomes available) you should receive the data on the nRF52, and see it in
the Serial Monitor output:
Complete Code
The latest version of this code is always available on Github, and in the Examples folder of the nRF52 BSP.
The code below is provided for convenience sake, but may be out of date! See the link above for the latest
code.
#include <bluefruit.h>
BLEUart bleuart;
// Function prototypes for packetparser.cpp
uint8_t readPacket (BLEUart *ble_uart, uint16_t timeout);
float parsefloat (uint8_t *buffer);
void printHex (const uint8_t * data, const uint32_t numBytes);
// Packet buffer
extern uint8_t packetbuffer[];
void setup(void)
{
Serial.begin(115200);
Serial.println(F("Adafruit Bluefruit52 Controller App Example"));
Serial.println(F("-------------------------------------------"));
Bluefruit.begin();
Bluefruit.setName("Bluefruit52");
// Configure and start the BLE Uart service
bleuart.begin();
// Set up the advertising packet
setupAdv();
// Start advertising
Bluefruit.Advertising.start();
}
void setupAdv(void)
{
Bluefruit.Advertising.addFlags(BLE_GAP_ADV_FLAGS_LE_ONLY_GENERAL_DISC_MODE);
Bluefruit.Advertising.addTxPower();
// Include the BLE UART (AKA 'NUS') 128-bit UUID
Bluefruit.Advertising.addService(bleuart);
// There is no room for 'Name' in the Advertising packet
© Adafruit Industries https://learn.adafruit.com/bluefruit-nrf52-feather-learning-guide Page 40 of 158

// There is no room for 'Name' in the Advertising packet
// Use the optional secondary Scan Response packet for 'Name' instead
Bluefruit.ScanResponse.addName();
}
/**************************************************************************/
/*!
@brief Constantly poll for new command or response data
*/
/**************************************************************************/
void loop(void)
{
// Wait for new data to arrive
uint8_t len = readPacket(&bleuart, 500);
if (len == 0) return;
// Got a packet!
// printHex(packetbuffer, len);
// Color
if (packetbuffer[1] == 'C') {
uint8_t red = packetbuffer[2];
uint8_t green = packetbuffer[3];
uint8_t blue = packetbuffer[4];
Serial.print ("RGB #");
if (red < 0x10) Serial.print("0");
Serial.print(red, HEX);
if (green < 0x10) Serial.print("0");
Serial.print(green, HEX);
if (blue < 0x10) Serial.print("0");
Serial.println(blue, HEX);
}
// Buttons
if (packetbuffer[1] == 'B') {
uint8_t buttnum = packetbuffer[2] - '0';
boolean pressed = packetbuffer[3] - '0';
Serial.print ("Button "); Serial.print(buttnum);
if (pressed) {
Serial.println(" pressed");
} else {
Serial.println(" released");
}
}
// GPS Location
if (packetbuffer[1] == 'L') {
float lat, lon, alt;
lat = parsefloat(packetbuffer+2);
lon = parsefloat(packetbuffer+6);
alt = parsefloat(packetbuffer+10);
Serial.print("GPS Location\t");
Serial.print("Lat: "); Serial.print(lat, 4); // 4 digits of precision!
Serial.print('\t');
Serial.print("Lon: "); Serial.print(lon, 4); // 4 digits of precision!
Serial.print('\t');
Serial.print(alt, 4); Serial.println(" meters");
}
// Accelerometer
© Adafruit Industries https://learn.adafruit.com/bluefruit-nrf52-feather-learning-guide Page 41 of 158

You will also need the following helper class in a file called packetParser.cpp:
// Accelerometer
if (packetbuffer[1] == 'A') {
float x, y, z;
x = parsefloat(packetbuffer+2);
y = parsefloat(packetbuffer+6);
z = parsefloat(packetbuffer+10);
Serial.print("Accel\t");
Serial.print(x); Serial.print('\t');
Serial.print(y); Serial.print('\t');
Serial.print(z); Serial.println();
}
// Magnetometer
if (packetbuffer[1] == 'M') {
float x, y, z;
x = parsefloat(packetbuffer+2);
y = parsefloat(packetbuffer+6);
z = parsefloat(packetbuffer+10);
Serial.print("Mag\t");
Serial.print(x); Serial.print('\t');
Serial.print(y); Serial.print('\t');
Serial.print(z); Serial.println();
}
// Gyroscope
if (packetbuffer[1] == 'G') {
float x, y, z;
x = parsefloat(packetbuffer+2);
y = parsefloat(packetbuffer+6);
z = parsefloat(packetbuffer+10);
Serial.print("Gyro\t");
Serial.print(x); Serial.print('\t');
Serial.print(y); Serial.print('\t');
Serial.print(z); Serial.println();
}
// Quaternions
if (packetbuffer[1] == 'Q') {
float x, y, z, w;
x = parsefloat(packetbuffer+2);
y = parsefloat(packetbuffer+6);
z = parsefloat(packetbuffer+10);
w = parsefloat(packetbuffer+14);
Serial.print("Quat\t");
Serial.print(x); Serial.print('\t');
Serial.print(y); Serial.print('\t');
Serial.print(z); Serial.print('\t');
Serial.print(w); Serial.println();
}
}
#include <string.h>
#include <Arduino.h>
#include <bluefruit.h>
#define PACKET_ACC_LEN (15)
© Adafruit Industries https://learn.adafruit.com/bluefruit-nrf52-feather-learning-guide Page 42 of 158

#define PACKET_ACC_LEN (15)
#define PACKET_GYRO_LEN (15)
#define PACKET_MAG_LEN (15)
#define PACKET_QUAT_LEN (19)
#define PACKET_BUTTON_LEN (5)
#define PACKET_COLOR_LEN (6)
#define PACKET_LOCATION_LEN (15)
// READ_BUFSIZE Size of the read buffer for incoming packets
#define READ_BUFSIZE (20)
/* Buffer to hold incoming characters */
uint8_t packetbuffer[READ_BUFSIZE+1];
/**************************************************************************/
/*!
@brief Casts the four bytes at the specified address to a float
*/
/**************************************************************************/
float parsefloat(uint8_t *buffer)
{
float f;
memcpy(&f, buffer, 4);
return f;
}
/**************************************************************************/
/*!
@brief Prints a hexadecimal value in plain characters
@param data Pointer to the byte data
@param numBytes Data length in bytes
*/
/**************************************************************************/
void printHex(const uint8_t * data, const uint32_t numBytes)
{
uint32_t szPos;
for (szPos=0; szPos < numBytes; szPos++)
{
Serial.print(F("0x"));
// Append leading 0 for small values
if (data[szPos] <= 0xF)
{
Serial.print(F("0"));
Serial.print(data[szPos] & 0xf, HEX);
}
else
{
Serial.print(data[szPos] & 0xff, HEX);
}
// Add a trailing space if appropriate
if ((numBytes > 1) && (szPos != numBytes - 1))
{
Serial.print(F(" "));
}
}
Serial.println();
}
/**************************************************************************/
/*!
© Adafruit Industries https://learn.adafruit.com/bluefruit-nrf52-feather-learning-guide Page 43 of 158

/*!
@brief Waits for incoming data and parses it
*/
/**************************************************************************/
uint8_t readPacket(BLEUart *ble_uart, uint16_t timeout)
{
uint16_t origtimeout = timeout, replyidx = 0;
memset(packetbuffer, 0, READ_BUFSIZE);
while (timeout--) {
if (replyidx >= 20) break;
if ((packetbuffer[1] == 'A') && (replyidx == PACKET_ACC_LEN))
break;
if ((packetbuffer[1] == 'G') && (replyidx == PACKET_GYRO_LEN))
break;
if ((packetbuffer[1] == 'M') && (replyidx == PACKET_MAG_LEN))
break;
if ((packetbuffer[1] == 'Q') && (replyidx == PACKET_QUAT_LEN))
break;
if ((packetbuffer[1] == 'B') && (replyidx == PACKET_BUTTON_LEN))
break;
if ((packetbuffer[1] == 'C') && (replyidx == PACKET_COLOR_LEN))
break;
if ((packetbuffer[1] == 'L') && (replyidx == PACKET_LOCATION_LEN))
break;
while (ble_uart->available()) {
char c = ble_uart->read();
if (c == '!') {
replyidx = 0;
}
packetbuffer[replyidx] = c;
replyidx++;
timeout = origtimeout;
}
if (timeout == 0) break;
delay(1);
}
packetbuffer[replyidx] = 0; // null term
if (!replyidx) // no data or timeout
return 0;
if (packetbuffer[0] != '!') // doesn't start with '!' packet beginning
return 0;
// check checksum!
uint8_t xsum = 0;
uint8_t checksum = packetbuffer[replyidx-1];
for (uint8_t i=0; i<replyidx-1; i++) {
xsum += packetbuffer[i];
}
xsum = ~xsum;
// Throw an error message if the checksum's don't match
if (xsum != checksum)
{
© Adafruit Industries https://learn.adafruit.com/bluefruit-nrf52-feather-learning-guide Page 44 of 158

Serial.print("Checksum mismatch in packet : ");
printHex(packetbuffer, replyidx+1);
return 0;
}
// checksum passed!
return replyidx;
}
© Adafruit Industries https://learn.adafruit.com/bluefruit-nrf52-feather-learning-guide Page 45 of 158

Custom: HRM
The BLEService and BLECharacteristic classes can be used to implement any custom or officially adopted BLE service
of characteristic using a set of basic properties and callback handlers.
The example below shows how to use these classes to implement the Heart Rate Monitor service, as defined by the
Bluetooth SIG.
HRM Service Definition
UUID: 0x180D
Only the first characteristic is mandatory, but we will also implement the optional Body Sensor Location characteristic.
Heart Rate Control Point won't be used in this example to keep things simple.
Implementing the HRM Service and Characteristics
The core service and the first two characteristics can be implemented with the following code:
First, define the BLEService and BLECharacteristic variables that will be used in your project:
Then you need to 'populate' those variables with appropriate values. For simplicity sake, you can define a custom
function for your service where all of the code is placed, and then just call this function once in the 'setup' function:
Characteristic Name
Heart Rate Measurement
Body Sensor Location
Heart Rate Control Point
UUID
0x2A37
0x2A38
0x2A39
Requirement
Mandatory
Optional
Conditional
Properties
Notify
Read
Write
/* HRM Service Definitions
* Heart Rate Monitor Service: 0x180D
* Heart Rate Measurement Char: 0x2A37
* Body Sensor Location Char: 0x2A38
*/
BLEService hrms = BLEService(UUID16_SVC_HEART_RATE);
BLECharacteristic hrmc = BLECharacteristic(UUID16_CHR_HEART_RATE_MEASUREMENT);
BLECharacteristic bslc = BLECharacteristic(UUID16_CHR_BODY_SENSOR_LOCATION);
void setupHRM(void)
{
// Configure the Heart Rate Monitor service
// See: https://www.bluetooth.com/specifications/gatt/viewer?attributeXmlFile=org.bluetooth.service.heart_rate.xml
// Supported Characteristics:
// Name UUID Requirement Properties
// ---------------------------- ------ ----------- ----------
// Heart Rate Measurement 0x2A37 Mandatory Notify
// Body Sensor Location 0x2A38 Optional Read
// Heart Rate Control Point 0x2A39 Conditional Write <-- Not used here
hrms.begin();
// Note: You must call .begin() on the BLEService before calling .begin() on
// any characteristic(s) within that service definition.. Calling .begin() on
// a BLECharacteristic will cause it to be added to the last BLEService that
// was 'begin()'ed!
© Adafruit Industries https://learn.adafruit.com/bluefruit-nrf52-feather-learning-guide Page 46 of 158

Service + Characteristic Setup Code Analysis
1. The first thing to do is to call .begin() on the BLEService (hrms above). Since the UUID is set in the object declaration
at the top of the sketch, there is normally nothing else to do with the BLEService instance.
2. Next, you can configure the Heart Rate Measurement characteristic (hrmc above). The values that you set for this
// was 'begin()'ed!
// Configure the Heart Rate Measurement characteristic
// See: https://www.bluetooth.com/specifications/gatt/viewer?attributeXmlFile=org.bluetooth.characteristic.heart_rate_measurement.xml
// Permission = Notify
// Min Len = 1
// Max Len = 8
// B0 = UINT8 - Flag (MANDATORY)
// b5:7 = Reserved
// b4 = RR-Internal (0 = Not present, 1 = Present)
// b3 = Energy expended status (0 = Not present, 1 = Present)
// b1:2 = Sensor contact status (0+1 = Not supported, 2 = Supported but contact not detected, 3 = Supported and detected)
// b0 = Value format (0 = UINT8, 1 = UINT16)
// B1 = UINT8 - 8-bit heart rate measurement value in BPM
// B2:3 = UINT16 - 16-bit heart rate measurement value in BPM
// B4:5 = UINT16 - Energy expended in joules
// B6:7 = UINT16 - RR Internal (1/1024 second resolution)
hrmc.setProperties(CHR_PROPS_NOTIFY);
hrmc.setPermission(SECMODE_OPEN, SECMODE_NO_ACCESS);
hrmc.setFixedLen(2);
hrmc.setCccdWriteCallback(cccd_callback); // Optionally capture CCCD updates
hrmc.begin();
uint8_t hrmdata[2] = { 0b00000110, 0x40 }; // Set the characteristic to use 8-bit values, with the sensor connected and detected
hrmc.notify(hrmdata, 2); // Use .notify instead of .write!
// Configure the Body Sensor Location characteristic
// See: https://www.bluetooth.com/specifications/gatt/viewer?attributeXmlFile=org.bluetooth.characteristic.body_sensor_location.xml
// Permission = Read
// Min Len = 1
// Max Len = 1
// B0 = UINT8 - Body Sensor Location
// 0 = Other
// 1 = Chest
// 2 = Wrist
// 3 = Finger
// 4 = Hand
// 5 = Ear Lobe
// 6 = Foot
// 7:255 = Reserved
bslc.setProperties(CHR_PROPS_READ);
bslc.setPermission(SECMODE_OPEN, SECMODE_NO_ACCESS);
bslc.setFixedLen(1);
bslc.begin();
bslc.write8(2); // Set the characteristic to 'Wrist' (2)
}
You MUST call .begin() on the BLEService before adding any BLECharacteristics. Any BLECharacteristic will
automatically be added to the last BLEService that was `begin()'ed!
© Adafruit Industries https://learn.adafruit.com/bluefruit-nrf52-feather-learning-guide Page 47 of 158

will depend on the characteristic definition, but for convenience sake we've documented the key information in the
comments in the code above.
'hrmc.setProperties(CHR_PROPS_NOTIFY); ' - This sets the PROPERTIES value for the characteristic, which
determines how the characteristic can be accessed. In this case, the Bluetooth SIG has defined the characteristic
as Notify, which means that the peripheral will receive a request ('notification') from the Central when the Central
wants to receive data using this characteristic.
`hrmc.setPermission(SECMODE_OPEN, SECMODE_NO_ACCESS); ` - This sets the security for the characteristic, and
should normally be set to the values used in this example.
`hrmc.setFixedLen(2); ` - This tells the Bluetooth stack how many bytes the characteristic contains (normally a value
between 1 and 20). In this case, we will use a fixed size of two bytes, so we call .setFixedLen. If the characteristic
has a variable length, you would need to set the max size via .setMaxLen.
'hrmc.setCccdWriteCallback(cccd_callback); ' - This optional code sets the callback that will be fired when the CCCD
record is updated by the central. This is relevant because the characteristic is setup with the NOTIFY property.
When the Central sets to 'Notify' bit, it will write to the CCCD record, and you can capture this write even in the
CCCD callback and turn the sensor on, for example, allowing you to save power by only turning the sensor on
(and back off) when it is or isn't actually being used. For the implementation of the CCCD callback handler, see
the full sample code at the bottom of this page.
'hrmc.begin(); ' Once all of the properties have been set, you must call .begin() which will add the characteristic
definition to the last BLEService that was '.begin()ed'.
3. Optionally set an initial value for the characteristic(s), such as the following code that populates 'hrmc' with a correct
values, indicating that we are providing 8-bit heart rate monitor values, that the Body Sensor Location characteristic is
present, and setting the first heart rate value to 0x04:
The CCCD callback handler has the following signature:
Note that we use .notify() in the example above instead of .write(), since this characteristic is setup with the
NOTIFY property which needs to be handled in a slightly different manner than other characteristics.
// Set the characteristic to use 8-bit values, with the sensor connected and detected
uint8_t hrmdata[2] = { 0b00000110, 0x40 };
// Use .notify instead of .write!
hrmc.notify(hrmdata, 2);
© Adafruit Industries https://learn.adafruit.com/bluefruit-nrf52-feather-learning-guide Page 48 of 158

4. Repeat the same procedure for any other BLECharacteristics in your service.
Full Sample Code
The full sample code for this example can be seen below, but this maybe be out of sync with the latest code available
on Github. Please consult the Github code if you have any problems with the code below.
void cccd_callback(BLECharacteristic& chr, uint16_t cccd_value)
{
// Display the raw request packet
Serial.print("CCCD Updated: ");
Serial.print(cccd_value);
Serial.println("");
// Check the characteristic this CCCD update is associated with in case
// this handler is used for multiple CCCD records.
if (chr.uuid == hrmc.uuid) {
if (chr.notifyEnabled()) {
Serial.println("Heart Rate Measurement 'Notify' enabled");
} else {
Serial.println("Heart Rate Measurement 'Notify' disabled");
}
}
}
#include <bluefruit.h>
#define STATUS_LED (17)
#define BLINKY_MS (2000)
/* HRM Service Definitions
* Heart Rate Monitor Service: 0x180D
* Heart Rate Measurement Char: 0x2A37
* Body Sensor Location Char: 0x2A38
*/
BLEService hrms = BLEService(UUID16_SVC_HEART_RATE);
BLECharacteristic hrmc = BLECharacteristic(UUID16_CHR_HEART_RATE_MEASUREMENT);
BLECharacteristic bslc = BLECharacteristic(UUID16_CHR_BODY_SENSOR_LOCATION);
BLEDis bledis; // DIS (Device Information Service) helper class instance
BLEBas blebas; // BAS (Battery Service) helper class instance
uint32_t blinkyms;
uint8_t bps = 0;
// Advanced function prototypes
void setupAdv(void);
void setupHRM(void);
void connect_callback(void);
void disconnect_callback(uint8_t reason);
void cccd_callback(BLECharacteristic& chr, ble_gatts_evt_write_t* request);
void setup()
{
Serial.begin(115200);
Serial.println("Bluefruit52 HRM Example");
Serial.println("-----------------------");
© Adafruit Industries https://learn.adafruit.com/bluefruit-nrf52-feather-learning-guide Page 49 of 158

// Setup LED pins and reset blinky counter
pinMode(STATUS_LED, OUTPUT);
blinkyms = millis();
// Initialise the Bluefruit module
Serial.println("Initialise the Bluefruit nRF52 module");
Bluefruit.begin();
// Set the advertised device name (keep it short!)
Serial.println("Setting Device Name to 'Feather52 HRM'");
Bluefruit.setName("Feather52 HRM");
// Set the connect/disconnect callback handlers
Bluefruit.setConnectCallback(connect_callback);
Bluefruit.setDisconnectCallback(disconnect_callback);
// Configure and Start the Device Information Service
Serial.println("Configuring the Device Information Service");
bledis.setManufacturer("Adafruit Industries");
bledis.setModel("Bluefruit Feather52");
bledis.begin();
// Start the BLE Battery Service and set it to 100%
Serial.println("Configuring the Battery Service");
blebas.begin();
blebas.update(100);
// Setup the Heart Rate Monitor service using
// BLEService and BLECharacteristic classes
Serial.println("Configuring the Heart Rate Monitor Service");
setupHRM();
// Setup the advertising packet(s)
Serial.println("Setting up the advertising payload(s)");
setupAdv();
// Start Advertising
Serial.println("Ready Player One!!!");
Serial.println("\nAdvertising");
Bluefruit.Advertising.start();
}
void setupAdv(void)
{
Bluefruit.Advertising.addFlags(BLE_GAP_ADV_FLAGS_LE_ONLY_GENERAL_DISC_MODE);
Bluefruit.Advertising.addTxPower();
// Include HRM Service UUID
Bluefruit.Advertising.addService(hrms);
// There isn't enough room in the advertising packet for the
// name so we'll place it on the secondary Scan Response packet
Bluefruit.ScanResponse.addName();
}
void setupHRM(void)
{
// Configure the Heart Rate Monitor service
// See: https://www.bluetooth.com/specifications/gatt/viewer?attributeXmlFile=org.bluetooth.service.heart_rate.xml
© Adafruit Industries https://learn.adafruit.com/bluefruit-nrf52-feather-learning-guide Page 50 of 158

// See: https://www.bluetooth.com/specifications/gatt/viewer?attributeXmlFile=org.bluetooth.service.heart_rate.xml
// Supported Characteristics:
// Name UUID Requirement Properties
// ---------------------------- ------ ----------- ----------
// Heart Rate Measurement 0x2A37 Mandatory Notify
// Body Sensor Location 0x2A38 Optional Read
// Heart Rate Control Point 0x2A39 Conditional Write <-- Not used here
hrms.begin();
// Note: You must call .begin() on the BLEService before calling .begin() on
// any characteristic(s) within that service definition.. Calling .begin() on
// a BLECharacteristic will cause it to be added to the last BLEService that
// was 'begin()'ed!
// Configure the Heart Rate Measurement characteristic
// See: https://www.bluetooth.com/specifications/gatt/viewer?attributeXmlFile=org.bluetooth.characteristic.heart_rate_measurement.xml
// Permission = Notify
// Min Len = 1
// Max Len = 8
// B0 = UINT8 - Flag (MANDATORY)
// b5:7 = Reserved
// b4 = RR-Internal (0 = Not present, 1 = Present)
// b3 = Energy expended status (0 = Not present, 1 = Present)
// b1:2 = Sensor contact status (0+1 = Not supported, 2 = Supported but contact not detected, 3 = Supported and detected)
// b0 = Value format (0 = UINT8, 1 = UINT16)
// B1 = UINT8 - 8-bit heart rate measurement value in BPM
// B2:3 = UINT16 - 16-bit heart rate measurement value in BPM
// B4:5 = UINT16 - Energy expended in joules
// B6:7 = UINT16 - RR Internal (1/1024 second resolution)
hrmc.setProperties(CHR_PROPS_NOTIFY);
hrmc.setPermission(SECMODE_OPEN, SECMODE_NO_ACCESS);
hrmc.setFixedLen(2);
hrmc.setCccdWriteCallback(cccd_callback); // Optionally capture CCCD updates
hrmc.begin();
uint8_t hrmdata[2] = { 0b00000110, 0x40 }; // Set the characteristic to use 8-bit values, with the sensor connected and detected
hrmc.notify(hrmdata, 2); // Use .notify instead of .write!
// Configure the Body Sensor Location characteristic
// See: https://www.bluetooth.com/specifications/gatt/viewer?attributeXmlFile=org.bluetooth.characteristic.body_sensor_location.xml
// Permission = Read
// Min Len = 1
// Max Len = 1
// B0 = UINT8 - Body Sensor Location
// 0 = Other
// 1 = Chest
// 2 = Wrist
// 3 = Finger
// 4 = Hand
// 5 = Ear Lobe
// 6 = Foot
// 7:255 = Reserved
bslc.setProperties(CHR_PROPS_READ);
bslc.setPermission(SECMODE_OPEN, SECMODE_NO_ACCESS);
bslc.setFixedLen(1);
bslc.begin();
bslc.write8(2); // Set the characteristic to 'Wrist' (2)
}
void connect_callback(void)
{
© Adafruit Industries https://learn.adafruit.com/bluefruit-nrf52-feather-learning-guide Page 51 of 158

Serial.println("Connected");
}
void disconnect_callback(uint8_t reason)
{
(void) reason;
Serial.println("Disconnected");
Serial.println("Advertising!");
}
void cccd_callback(BLECharacteristic& chr, uint16_t cccd_value)
{
// Display the raw request packet
Serial.print("CCCD Updated: ");
//Serial.printBuffer(request->data, request->len);
Serial.print(cccd_value);
Serial.println("");
// Check the characteristic this CCCD update is associated with in case
// this handler is used for multiple CCCD records.
if (chr.uuid == hrmc.uuid) {
if (chr.notifyEnabled()) {
Serial.println("Heart Rate Measurement 'Notify' enabled");
} else {
Serial.println("Heart Rate Measurement 'Notify' disabled");
}
}
}
void loop()
{
// Blinky!
if (blinkyms+BLINKY_MS < millis()) {
blinkyms = millis();
digitalToggle(STATUS_LED);
if (Bluefruit.connected()) {
uint8_t hrmdata[2] = { 0b00000110, bps++ }; // Sensor connected, increment BPS value
err_t resp = hrmc.notify(hrmdata, sizeof(hrmdata)); // Note: We use .notify instead of .write!
// This isn't strictly necessary, but you can check the result
// of the .notify() attempt to see if it was successful or not
switch (resp) {
case ERROR_NONE:
// Value was written correctly!
Serial.print("Heart Rate Measurement updated to: "); Serial.println(bps);
break;
case NRF_ERROR_INVALID_PARAM:
// Characteristic property not set to 'Notify'
Serial.println("ERROR: Characteristic 'Property' not set to Notify!");
break;
case NRF_ERROR_INVALID_STATE:
// Notify bit not set in the CCCD or not connected
Serial.println("ERROR: Notify not set in the CCCD or not connected!");
break;
default:
// Unhandled error code
Serial.print("ERROR: Ox"); Serial.println(resp, HEX);
break;
© Adafruit Industries https://learn.adafruit.com/bluefruit-nrf52-feather-learning-guide Page 52 of 158

break;
}
}
}
}
© Adafruit Industries https://learn.adafruit.com/bluefruit-nrf52-feather-learning-guide Page 53 of 158
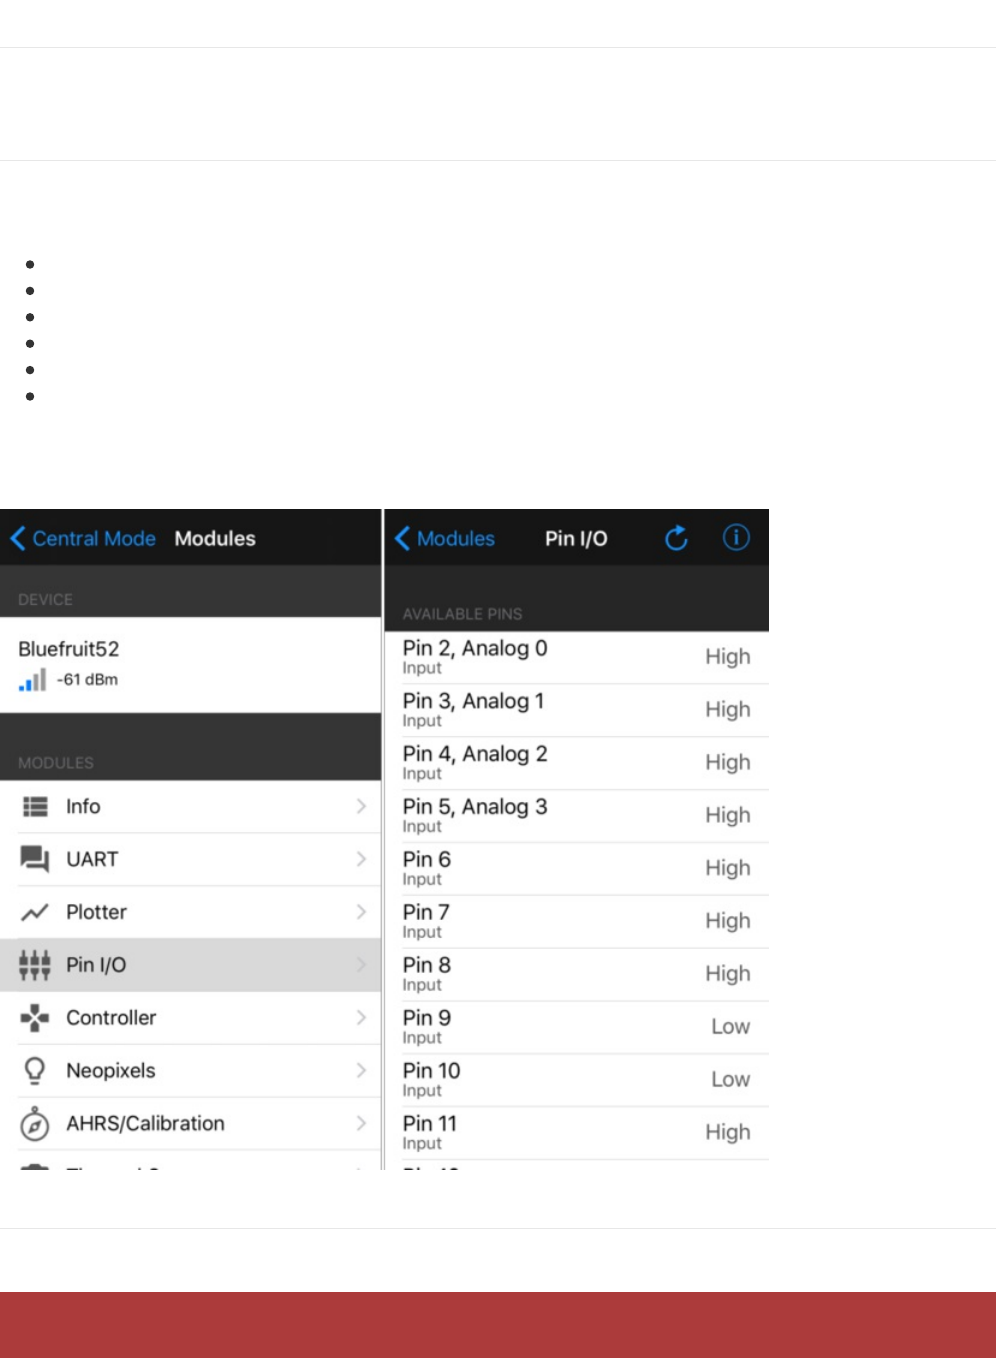
BLE Pin I/O
Firmata is a generic protocol for communicating with microcontrollers and controlling the board's pins such as setting
the GPIO outputs and inputs, PWM output, analog reads, etc....
Setup
In order to run this demo, you will need to open Bluefruit LE Connect on your mobile device using our free iOS,
Android or OS X applications.
Load the StandardFirmataBLE example sketch in the Arduino IDE
Compile the sketch and flash it to your nRF52 based Feather
Once you are done uploading, open the Serial Monitor (Tools > Serial Monitor)
Open the Bluefruit LE Connect application on your mobile device
Connect to the appropriate target (probably 'Bluefruit52')
Once connected switch to the Pin I/O application inside the app
For more information using Pin I/O module, you could check out this tutorial here https://learn.adafruit.com/bluefruit-le-
connect-for-ios/pin-i-o
Complete Code
The latest version of this code is always available on Github, and in the Examples folder of the nRF52 BSP.
The code below is provided for convenience sake, but may be out of date! See the link above for the latest
© Adafruit Industries https://learn.adafruit.com/bluefruit-nrf52-feather-learning-guide Page 54 of 158

code.
// Adafruit nRF52 Boards require Firmata at least 2.5.7
#include <bluefruit.h>
#include <Servo.h>
#include <Wire.h>
#include <Firmata.h>
#define I2C_WRITE B00000000
#define I2C_READ B00001000
#define I2C_READ_CONTINUOUSLY B00010000
#define I2C_STOP_READING B00011000
#define I2C_READ_WRITE_MODE_MASK B00011000
#define I2C_10BIT_ADDRESS_MODE_MASK B00100000
#define I2C_END_TX_MASK B01000000
#define I2C_STOP_TX 1
#define I2C_RESTART_TX 0
#define I2C_MAX_QUERIES 8
#define I2C_REGISTER_NOT_SPECIFIED -1
// the minimum interval for sampling analog input
#define MINIMUM_SAMPLING_INTERVAL 1
// Adafruit
uint8_t ANALOG_TO_PIN(uint8_t n)
{
switch (n)
{
case 0 : return PIN_A0;
case 1 : return PIN_A1;
case 2 : return PIN_A2;
case 3 : return PIN_A3;
case 4 : return PIN_A4;
case 5 : return PIN_A5;
case 6 : return PIN_A6;
case 7 : return PIN_A7;
}
return 127;
}
/*==============================================================================
* GLOBAL VARIABLES
*============================================================================*/
#ifdef FIRMATA_SERIAL_FEATURE
SerialFirmata serialFeature;
#endif
BLEUart bleuart;
/* analog inputs */
int analogInputsToReport = 0; // bitwise array to store pin reporting
/* digital input ports */
byte reportPINs[TOTAL_PORTS]; // 1 = report this port, 0 = silence
© Adafruit Industries https://learn.adafruit.com/bluefruit-nrf52-feather-learning-guide Page 55 of 158

byte previousPINs[TOTAL_PORTS]; // previous 8 bits sent
/* pins configuration */
byte portConfigInputs[TOTAL_PORTS]; // each bit: 1 = pin in INPUT, 0 = anything else
/* timer variables */
unsigned long currentMillis; // store the current value from millis()
unsigned long previousMillis; // for comparison with currentMillis
unsigned int samplingInterval = 19; // how often to run the main loop (in ms)
/* i2c data */
struct i2c_device_info {
byte addr;
int reg;
byte bytes;
byte stopTX;
};
/* for i2c read continuous more */
i2c_device_info query[I2C_MAX_QUERIES];
byte i2cRxData[64];
boolean isI2CEnabled = false;
signed char queryIndex = -1;
// default delay time between i2c read request and Wire.requestFrom()
unsigned int i2cReadDelayTime = 0;
Servo servos[MAX_SERVOS];
byte servoPinMap[TOTAL_PINS];
byte detachedServos[MAX_SERVOS];
byte detachedServoCount = 0;
byte servoCount = 0;
boolean isResetting = false;
// Forward declare a few functions to avoid compiler errors with older versions
// of the Arduino IDE.
void setPinModeCallback(byte, int);
void reportAnalogCallback(byte analogPin, int value);
void sysexCallback(byte, byte, byte*);
/* utility functions */
void wireWrite(byte data)
{
#if ARDUINO >= 100
Wire.write((byte)data);
#else
Wire.send(data);
#endif
}
byte wireRead(void)
{
#if ARDUINO >= 100
return Wire.read();
#else
return Wire.receive();
#endif
}
© Adafruit Industries https://learn.adafruit.com/bluefruit-nrf52-feather-learning-guide Page 56 of 158

/*==============================================================================
* FUNCTIONS
*============================================================================*/
void attachServo(byte pin, int minPulse, int maxPulse)
{
if (servoCount < MAX_SERVOS) {
// reuse indexes of detached servos until all have been reallocated
if (detachedServoCount > 0) {
servoPinMap[pin] = detachedServos[detachedServoCount - 1];
if (detachedServoCount > 0) detachedServoCount--;
} else {
servoPinMap[pin] = servoCount;
servoCount++;
}
if (minPulse > 0 && maxPulse > 0) {
servos[servoPinMap[pin]].attach(PIN_TO_DIGITAL(pin), minPulse, maxPulse);
} else {
servos[servoPinMap[pin]].attach(PIN_TO_DIGITAL(pin));
}
} else {
Firmata.sendString("Max servos attached");
}
}
void detachServo(byte pin)
{
servos[servoPinMap[pin]].detach();
// if we're detaching the last servo, decrement the count
// otherwise store the index of the detached servo
if (servoPinMap[pin] == servoCount && servoCount > 0) {
servoCount--;
} else if (servoCount > 0) {
// keep track of detached servos because we want to reuse their indexes
// before incrementing the count of attached servos
detachedServoCount++;
detachedServos[detachedServoCount - 1] = servoPinMap[pin];
}
servoPinMap[pin] = 255;
}
void enableI2CPins()
{
byte i;
// is there a faster way to do this? would probaby require importing
// Arduino.h to get SCL and SDA pins
for (i = 0; i < TOTAL_PINS; i++) {
if (IS_PIN_I2C(i)) {
// mark pins as i2c so they are ignore in non i2c data requests
setPinModeCallback(i, PIN_MODE_I2C);
}
}
isI2CEnabled = true;
Wire.begin();
}
© Adafruit Industries https://learn.adafruit.com/bluefruit-nrf52-feather-learning-guide Page 57 of 158

/* disable the i2c pins so they can be used for other functions */
void disableI2CPins() {
isI2CEnabled = false;
// disable read continuous mode for all devices
queryIndex = -1;
}
void readAndReportData(byte address, int theRegister, byte numBytes, byte stopTX) {
// allow I2C requests that don't require a register read
// for example, some devices using an interrupt pin to signify new data available
// do not always require the register read so upon interrupt you call Wire.requestFrom()
if (theRegister != I2C_REGISTER_NOT_SPECIFIED) {
Wire.beginTransmission(address);
wireWrite((byte)theRegister);
Wire.endTransmission(stopTX); // default = true
// do not set a value of 0
if (i2cReadDelayTime > 0) {
// delay is necessary for some devices such as WiiNunchuck
delayMicroseconds(i2cReadDelayTime);
}
} else {
theRegister = 0; // fill the register with a dummy value
}
Wire.requestFrom(address, numBytes); // all bytes are returned in requestFrom
// check to be sure correct number of bytes were returned by slave
if (numBytes < Wire.available()) {
Firmata.sendString("I2C: Too many bytes received");
} else if (numBytes > Wire.available()) {
Firmata.sendString("I2C: Too few bytes received");
}
i2cRxData[0] = address;
i2cRxData[1] = theRegister;
for (int i = 0; i < numBytes && Wire.available(); i++) {
i2cRxData[2 + i] = wireRead();
}
// send slave address, register and received bytes
Firmata.sendSysex(SYSEX_I2C_REPLY, numBytes + 2, i2cRxData);
}
void outputPort(byte portNumber, byte portValue, byte forceSend)
{
// pins not configured as INPUT are cleared to zeros
portValue = portValue & portConfigInputs[portNumber];
// only send if the value is different than previously sent
if (forceSend || previousPINs[portNumber] != portValue) {
Firmata.sendDigitalPort(portNumber, portValue);
previousPINs[portNumber] = portValue;
}
}
/* -----------------------------------------------------------------------------
* check all the active digital inputs for change of state, then add any events
* to the Serial output queue using Serial.print() */
void checkDigitalInputs(void)
{
© Adafruit Industries https://learn.adafruit.com/bluefruit-nrf52-feather-learning-guide Page 58 of 158

{
/* Using non-looping code allows constants to be given to readPort().
* The compiler will apply substantial optimizations if the inputs
* to readPort() are compile-time constants. */
if (TOTAL_PORTS > 0 && reportPINs[0]) outputPort(0, readPort(0, portConfigInputs[0]), false);
if (TOTAL_PORTS > 1 && reportPINs[1]) outputPort(1, readPort(1, portConfigInputs[1]), false);
if (TOTAL_PORTS > 2 && reportPINs[2]) outputPort(2, readPort(2, portConfigInputs[2]), false);
if (TOTAL_PORTS > 3 && reportPINs[3]) outputPort(3, readPort(3, portConfigInputs[3]), false);
if (TOTAL_PORTS > 4 && reportPINs[4]) outputPort(4, readPort(4, portConfigInputs[4]), false);
if (TOTAL_PORTS > 5 && reportPINs[5]) outputPort(5, readPort(5, portConfigInputs[5]), false);
if (TOTAL_PORTS > 6 && reportPINs[6]) outputPort(6, readPort(6, portConfigInputs[6]), false);
if (TOTAL_PORTS > 7 && reportPINs[7]) outputPort(7, readPort(7, portConfigInputs[7]), false);
if (TOTAL_PORTS > 8 && reportPINs[8]) outputPort(8, readPort(8, portConfigInputs[8]), false);
if (TOTAL_PORTS > 9 && reportPINs[9]) outputPort(9, readPort(9, portConfigInputs[9]), false);
if (TOTAL_PORTS > 10 && reportPINs[10]) outputPort(10, readPort(10, portConfigInputs[10]), false);
if (TOTAL_PORTS > 11 && reportPINs[11]) outputPort(11, readPort(11, portConfigInputs[11]), false);
if (TOTAL_PORTS > 12 && reportPINs[12]) outputPort(12, readPort(12, portConfigInputs[12]), false);
if (TOTAL_PORTS > 13 && reportPINs[13]) outputPort(13, readPort(13, portConfigInputs[13]), false);
if (TOTAL_PORTS > 14 && reportPINs[14]) outputPort(14, readPort(14, portConfigInputs[14]), false);
if (TOTAL_PORTS > 15 && reportPINs[15]) outputPort(15, readPort(15, portConfigInputs[15]), false);
}
// -----------------------------------------------------------------------------
/* sets the pin mode to the correct state and sets the relevant bits in the
* two bit-arrays that track Digital I/O and PWM status
*/
void setPinModeCallback(byte pin, int mode)
{
if (Firmata.getPinMode(pin) == PIN_MODE_IGNORE)
return;
if (Firmata.getPinMode(pin) == PIN_MODE_I2C && isI2CEnabled && mode != PIN_MODE_I2C) {
// disable i2c so pins can be used for other functions
// the following if statements should reconfigure the pins properly
disableI2CPins();
}
if (IS_PIN_DIGITAL(pin) && mode != PIN_MODE_SERVO) {
if (servoPinMap[pin] < MAX_SERVOS && servos[servoPinMap[pin]].attached()) {
detachServo(pin);
}
}
if (IS_PIN_ANALOG(pin)) {
reportAnalogCallback(PIN_TO_ANALOG(pin), mode == PIN_MODE_ANALOG ? 1 : 0); // turn on/off reporting
}
if (IS_PIN_DIGITAL(pin)) {
if (mode == INPUT || mode == PIN_MODE_PULLUP) {
portConfigInputs[pin / 8] |= (1 << (pin & 7));
} else {
portConfigInputs[pin / 8] &= ~(1 << (pin & 7));
}
}
Firmata.setPinState(pin, 0);
switch (mode) {
case PIN_MODE_ANALOG:
if (IS_PIN_ANALOG(pin)) {
if (IS_PIN_DIGITAL(pin)) {
pinMode(PIN_TO_DIGITAL(pin), INPUT); // disable output driver
#if ARDUINO <= 100
// deprecated since Arduino 1.0.1 - TODO: drop support in Firmata 2.6
digitalWrite(PIN_TO_DIGITAL(pin), LOW); // disable internal pull-ups
© Adafruit Industries https://learn.adafruit.com/bluefruit-nrf52-feather-learning-guide Page 59 of 158

#endif
}
Firmata.setPinMode(pin, PIN_MODE_ANALOG);
}
break;
case INPUT:
// Adafruit: Input without pull up cause pin state changes randomly --> lots of transmission data
// if (IS_PIN_DIGITAL(pin)) {
// pinMode(PIN_TO_DIGITAL(pin), INPUT); // disable output driver
//#if ARDUINO <= 100
// // deprecated since Arduino 1.0.1 - TODO: drop support in Firmata 2.6
// digitalWrite(PIN_TO_DIGITAL(pin), LOW); // disable internal pull-ups
//#endif
// Firmata.setPinMode(pin, INPUT);
// }
// break;
case PIN_MODE_PULLUP:
if (IS_PIN_DIGITAL(pin)) {
pinMode(PIN_TO_DIGITAL(pin), INPUT_PULLUP);
Firmata.setPinMode(pin, PIN_MODE_PULLUP);
Firmata.setPinState(pin, 1);
}
break;
case OUTPUT:
if (IS_PIN_DIGITAL(pin)) {
if (Firmata.getPinMode(pin) == PIN_MODE_PWM) {
// Disable PWM if pin mode was previously set to PWM.
digitalWrite(PIN_TO_DIGITAL(pin), LOW);
}
pinMode(PIN_TO_DIGITAL(pin), OUTPUT);
Firmata.setPinMode(pin, OUTPUT);
}
break;
case PIN_MODE_PWM:
if (IS_PIN_PWM(pin)) {
pinMode(PIN_TO_PWM(pin), OUTPUT);
analogWrite(PIN_TO_PWM(pin), 0);
Firmata.setPinMode(pin, PIN_MODE_PWM);
}
break;
case PIN_MODE_SERVO:
if (IS_PIN_DIGITAL(pin)) {
Firmata.setPinMode(pin, PIN_MODE_SERVO);
if (servoPinMap[pin] == 255 || !servos[servoPinMap[pin]].attached()) {
// pass -1 for min and max pulse values to use default values set
// by Servo library
attachServo(pin, -1, -1);
}
}
break;
case PIN_MODE_I2C:
if (IS_PIN_I2C(pin)) {
// mark the pin as i2c
// the user must call I2C_CONFIG to enable I2C for a device
Firmata.setPinMode(pin, PIN_MODE_I2C);
}
break;
case PIN_MODE_SERIAL:
#ifdef FIRMATA_SERIAL_FEATURE
serialFeature.handlePinMode(pin, PIN_MODE_SERIAL);
© Adafruit Industries https://learn.adafruit.com/bluefruit-nrf52-feather-learning-guide Page 60 of 158

serialFeature.handlePinMode(pin, PIN_MODE_SERIAL);
#endif
break;
default:
Firmata.sendString("Unknown pin mode"); // TODO: put error msgs in EEPROM
}
// TODO: save status to EEPROM here, if changed
}
/*
* Sets the value of an individual pin. Useful if you want to set a pin value but
* are not tracking the digital port state.
* Can only be used on pins configured as OUTPUT.
* Cannot be used to enable pull-ups on Digital INPUT pins.
*/
void setPinValueCallback(byte pin, int value)
{
if (pin < TOTAL_PINS && IS_PIN_DIGITAL(pin)) {
if (Firmata.getPinMode(pin) == OUTPUT) {
Firmata.setPinState(pin, value);
digitalWrite(PIN_TO_DIGITAL(pin), value);
}
}
}
void analogWriteCallback(byte pin, int value)
{
if (pin < TOTAL_PINS) {
switch (Firmata.getPinMode(pin)) {
case PIN_MODE_SERVO:
if (IS_PIN_DIGITAL(pin))
servos[servoPinMap[pin]].write(value);
Firmata.setPinState(pin, value);
break;
case PIN_MODE_PWM:
if (IS_PIN_PWM(pin))
analogWrite(PIN_TO_PWM(pin), value);
Firmata.setPinState(pin, value);
break;
}
}
}
void digitalWriteCallback(byte port, int value)
{
byte pin, lastPin, pinValue, mask = 1, pinWriteMask = 0;
if (port < TOTAL_PORTS) {
// create a mask of the pins on this port that are writable.
lastPin = port * 8 + 8;
if (lastPin > TOTAL_PINS) lastPin = TOTAL_PINS;
for (pin = port * 8; pin < lastPin; pin++) {
// do not disturb non-digital pins (eg, Rx & Tx)
if (IS_PIN_DIGITAL(pin)) {
// do not touch pins in PWM, ANALOG, SERVO or other modes
if (Firmata.getPinMode(pin) == OUTPUT || Firmata.getPinMode(pin) == INPUT) {
pinValue = ((byte)value & mask) ? 1 : 0;
if (Firmata.getPinMode(pin) == OUTPUT) {
pinWriteMask |= mask;
} else if (Firmata.getPinMode(pin) == INPUT && pinValue == 1 && Firmata.getPinState(pin) != 1)
© Adafruit Industries https://learn.adafruit.com/bluefruit-nrf52-feather-learning-guide Page 61 of 158

// only handle INPUT here for backwards compatibility
#if ARDUINO > 100
pinMode(pin, INPUT_PULLUP);
#else
// only write to the INPUT pin to enable pullups if Arduino v1.0.0 or earlier
pinWriteMask |= mask;
#endif
}
Firmata.setPinState(pin, pinValue);
}
}
mask = mask << 1;
}
writePort(port, (byte)value, pinWriteMask);
}
}
// -----------------------------------------------------------------------------
/* sets bits in a bit array (int) to toggle the reporting of the analogIns
*/
//void FirmataClass::setAnalogPinReporting(byte pin, byte state) {
//}
void reportAnalogCallback(byte analogPin, int value)
{
if (analogPin < TOTAL_ANALOG_PINS) {
if (value == 0) {
analogInputsToReport = analogInputsToReport & ~ (1 << analogPin);
} else {
analogInputsToReport = analogInputsToReport | (1 << analogPin);
// prevent during system reset or all analog pin values will be reported
// which may report noise for unconnected analog pins
if (!isResetting) {
// Send pin value immediately. This is helpful when connected via
// ethernet, wi-fi or bluetooth so pin states can be known upon
// reconnecting.
Firmata.sendAnalog(analogPin, analogRead( ANALOG_TO_PIN(analogPin) ) );
}
}
}
// TODO: save status to EEPROM here, if changed
}
void reportDigitalCallback(byte port, int value)
{
if (port < TOTAL_PORTS) {
reportPINs[port] = (byte)value;
// Send port value immediately. This is helpful when connected via
// ethernet, wi-fi or bluetooth so pin states can be known upon
// reconnecting.
if (value) outputPort(port, readPort(port, portConfigInputs[port]), true);
}
// do not disable analog reporting on these 8 pins, to allow some
// pins used for digital, others analog. Instead, allow both types
// of reporting to be enabled, but check if the pin is configured
// as analog when sampling the analog inputs. Likewise, while
// scanning digital pins, portConfigInputs will mask off values from any
// pins configured as analog
}
© Adafruit Industries https://learn.adafruit.com/bluefruit-nrf52-feather-learning-guide Page 62 of 158

/*==============================================================================
* SYSEX-BASED commands
*============================================================================*/
void sysexCallback(byte command, byte argc, byte *argv)
{
byte mode;
byte stopTX;
byte slaveAddress;
byte data;
int slaveRegister;
unsigned int delayTime;
switch (command) {
case I2C_REQUEST:
mode = argv[1] & I2C_READ_WRITE_MODE_MASK;
if (argv[1] & I2C_10BIT_ADDRESS_MODE_MASK) {
Firmata.sendString("10-bit addressing not supported");
return;
}
else {
slaveAddress = argv[0];
}
// need to invert the logic here since 0 will be default for client
// libraries that have not updated to add support for restart tx
if (argv[1] & I2C_END_TX_MASK) {
stopTX = I2C_RESTART_TX;
}
else {
stopTX = I2C_STOP_TX; // default
}
switch (mode) {
case I2C_WRITE:
Wire.beginTransmission(slaveAddress);
for (byte i = 2; i < argc; i += 2) {
data = argv[i] + (argv[i + 1] << 7);
wireWrite(data);
}
Wire.endTransmission();
delayMicroseconds(70);
break;
case I2C_READ:
if (argc == 6) {
// a slave register is specified
slaveRegister = argv[2] + (argv[3] << 7);
data = argv[4] + (argv[5] << 7); // bytes to read
}
else {
// a slave register is NOT specified
slaveRegister = I2C_REGISTER_NOT_SPECIFIED;
data = argv[2] + (argv[3] << 7); // bytes to read
}
readAndReportData(slaveAddress, (int)slaveRegister, data, stopTX);
break;
case I2C_READ_CONTINUOUSLY:
if ((queryIndex + 1) >= I2C_MAX_QUERIES) {
// too many queries, just ignore
© Adafruit Industries https://learn.adafruit.com/bluefruit-nrf52-feather-learning-guide Page 63 of 158

Firmata.sendString("too many queries");
break;
}
if (argc == 6) {
// a slave register is specified
slaveRegister = argv[2] + (argv[3] << 7);
data = argv[4] + (argv[5] << 7); // bytes to read
}
else {
// a slave register is NOT specified
slaveRegister = (int)I2C_REGISTER_NOT_SPECIFIED;
data = argv[2] + (argv[3] << 7); // bytes to read
}
queryIndex++;
query[queryIndex].addr = slaveAddress;
query[queryIndex].reg = slaveRegister;
query[queryIndex].bytes = data;
query[queryIndex].stopTX = stopTX;
break;
case I2C_STOP_READING:
byte queryIndexToSkip;
// if read continuous mode is enabled for only 1 i2c device, disable
// read continuous reporting for that device
if (queryIndex <= 0) {
queryIndex = -1;
} else {
queryIndexToSkip = 0;
// if read continuous mode is enabled for multiple devices,
// determine which device to stop reading and remove it's data from
// the array, shifiting other array data to fill the space
for (byte i = 0; i < queryIndex + 1; i++) {
if (query[i].addr == slaveAddress) {
queryIndexToSkip = i;
break;
}
}
for (byte i = queryIndexToSkip; i < queryIndex + 1; i++) {
if (i < I2C_MAX_QUERIES) {
query[i].addr = query[i + 1].addr;
query[i].reg = query[i + 1].reg;
query[i].bytes = query[i + 1].bytes;
query[i].stopTX = query[i + 1].stopTX;
}
}
queryIndex--;
}
break;
default:
break;
}
break;
case I2C_CONFIG:
delayTime = (argv[0] + (argv[1] << 7));
if (delayTime > 0) {
i2cReadDelayTime = delayTime;
}
if (!isI2CEnabled) {
© Adafruit Industries https://learn.adafruit.com/bluefruit-nrf52-feather-learning-guide Page 64 of 158

if (!isI2CEnabled) {
enableI2CPins();
}
break;
case SERVO_CONFIG:
if (argc > 4) {
// these vars are here for clarity, they'll optimized away by the compiler
byte pin = argv[0];
int minPulse = argv[1] + (argv[2] << 7);
int maxPulse = argv[3] + (argv[4] << 7);
if (IS_PIN_DIGITAL(pin)) {
if (servoPinMap[pin] < MAX_SERVOS && servos[servoPinMap[pin]].attached()) {
detachServo(pin);
}
attachServo(pin, minPulse, maxPulse);
setPinModeCallback(pin, PIN_MODE_SERVO);
}
}
break;
case SAMPLING_INTERVAL:
if (argc > 1) {
samplingInterval = argv[0] + (argv[1] << 7);
if (samplingInterval < MINIMUM_SAMPLING_INTERVAL) {
samplingInterval = MINIMUM_SAMPLING_INTERVAL;
}
} else {
//Firmata.sendString("Not enough data");
}
break;
case EXTENDED_ANALOG:
if (argc > 1) {
int val = argv[1];
if (argc > 2) val |= (argv[2] << 7);
if (argc > 3) val |= (argv[3] << 14);
analogWriteCallback(argv[0], val);
}
break;
case CAPABILITY_QUERY:
Firmata.write(START_SYSEX);
Firmata.write(CAPABILITY_RESPONSE);
for (byte pin = 0; pin < TOTAL_PINS; pin++) {
if (IS_PIN_DIGITAL(pin)) {
Firmata.write((byte)INPUT);
Firmata.write(1);
Firmata.write((byte)PIN_MODE_PULLUP);
Firmata.write(1);
Firmata.write((byte)OUTPUT);
Firmata.write(1);
}
if (IS_PIN_ANALOG(pin)) {
Firmata.write(PIN_MODE_ANALOG);
Firmata.write(10); // 10 = 10-bit resolution
}
if (IS_PIN_PWM(pin)) {
Firmata.write(PIN_MODE_PWM);
Firmata.write(DEFAULT_PWM_RESOLUTION);
}
if (IS_PIN_DIGITAL(pin)) {
Firmata.write(PIN_MODE_SERVO);
© Adafruit Industries https://learn.adafruit.com/bluefruit-nrf52-feather-learning-guide Page 65 of 158

Firmata.write(PIN_MODE_SERVO);
Firmata.write(14);
}
if (IS_PIN_I2C(pin)) {
Firmata.write(PIN_MODE_I2C);
Firmata.write(1); // TODO: could assign a number to map to SCL or SDA
}
#ifdef FIRMATA_SERIAL_FEATURE
serialFeature.handleCapability(pin);
#endif
Firmata.write(127);
}
Firmata.write(END_SYSEX);
break;
case PIN_STATE_QUERY:
if (argc > 0) {
byte pin = argv[0];
Firmata.write(START_SYSEX);
Firmata.write(PIN_STATE_RESPONSE);
Firmata.write(pin);
if (pin < TOTAL_PINS) {
Firmata.write(Firmata.getPinMode(pin));
Firmata.write((byte)Firmata.getPinState(pin) & 0x7F);
if (Firmata.getPinState(pin) & 0xFF80) Firmata.write((byte)(Firmata.getPinState(pin) >> 7) & 0x7F
if (Firmata.getPinState(pin) & 0xC000) Firmata.write((byte)(Firmata.getPinState(pin) >> 14) & 0x7F
}
Firmata.write(END_SYSEX);
}
break;
case ANALOG_MAPPING_QUERY:
Firmata.write(START_SYSEX);
Firmata.write(ANALOG_MAPPING_RESPONSE);
for (byte pin = 0; pin < TOTAL_PINS; pin++) {
Firmata.write(IS_PIN_ANALOG(pin) ? PIN_TO_ANALOG(pin) : 127);
}
Firmata.write(END_SYSEX);
break;
case SERIAL_MESSAGE:
#ifdef FIRMATA_SERIAL_FEATURE
serialFeature.handleSysex(command, argc, argv);
#endif
break;
}
}
/*==============================================================================
* SETUP()
*============================================================================*/
void systemResetCallback()
{
isResetting = true;
// initialize a defalt state
// TODO: option to load config from EEPROM instead of default
#ifdef FIRMATA_SERIAL_FEATURE
serialFeature.reset();
#endif
© Adafruit Industries https://learn.adafruit.com/bluefruit-nrf52-feather-learning-guide Page 66 of 158

#endif
if (isI2CEnabled) {
disableI2CPins();
}
for (byte i = 0; i < TOTAL_PORTS; i++) {
reportPINs[i] = false; // by default, reporting off
portConfigInputs[i] = 0; // until activated
previousPINs[i] = 0;
}
for (byte i = 0; i < TOTAL_PINS; i++) {
// pins with analog capability default to analog input
// otherwise, pins default to digital output
if (IS_PIN_ANALOG(i)) {
// turns off pullup, configures everything
setPinModeCallback(i, PIN_MODE_ANALOG);
} else if (IS_PIN_DIGITAL(i)) {
// sets the output to 0, configures portConfigInputs
setPinModeCallback(i, OUTPUT);
}
servoPinMap[i] = 255;
}
// by default, do not report any analog inputs
analogInputsToReport = 0;
detachedServoCount = 0;
servoCount = 0;
/* send digital inputs to set the initial state on the host computer,
* since once in the loop(), this firmware will only send on change */
/*
TODO: this can never execute, since no pins default to digital input
but it will be needed when/if we support EEPROM stored config
for (byte i=0; i < TOTAL_PORTS; i++) {
outputPort(i, readPort(i, portConfigInputs[i]), true);
}
*/
isResetting = false;
}
void setup()
{
Serial.begin(115200);
Serial.println("Bluefruit52 Standard Firmata via BLEUART Example");
Serial.println("------------------------------------------------\n");
// Config the peripheral connection with maximum bandwidth
// more SRAM required by SoftDevice
Bluefruit.configPrphBandwidth(BANDWIDTH_MAX);
Bluefruit.begin();
Bluefruit.setName("Bluefruit52");
// Set max power. Accepted values are: -40, -30, -20, -16, -12, -8, -4, 0, 4
Bluefruit.setTxPower(4);
// try to go as fast as possible, could be rejected by some central, increase it if needed
// iOS won't negotitate and will mostly use 30ms
© Adafruit Industries https://learn.adafruit.com/bluefruit-nrf52-feather-learning-guide Page 67 of 158

// iOS won't negotitate and will mostly use 30ms
Bluefruit.setConnInterval(9, 24); // min = 9*1.25=11.25 ms, max = 23*1.25=30ms
// Configure and Start BLE Uart Service
// Firmata use several small write(1) --> buffering TXD is required to run smoothly
// Enable buffering TXD
bleuart.begin();
bleuart.bufferTXD(true);
Firmata.setFirmwareVersion(FIRMATA_FIRMWARE_MAJOR_VERSION, FIRMATA_FIRMWARE_MINOR_VERSION);
Firmata.attach(ANALOG_MESSAGE, analogWriteCallback);
Firmata.attach(DIGITAL_MESSAGE, digitalWriteCallback);
Firmata.attach(REPORT_ANALOG, reportAnalogCallback);
Firmata.attach(REPORT_DIGITAL, reportDigitalCallback);
Firmata.attach(SET_PIN_MODE, setPinModeCallback);
Firmata.attach(SET_DIGITAL_PIN_VALUE, setPinValueCallback);
Firmata.attach(START_SYSEX, sysexCallback);
Firmata.attach(SYSTEM_RESET, systemResetCallback);
// use bleuart as transportation layer
Firmata.begin(bleuart);
// to use a port other than Serial, such as Serial1 on an Arduino Leonardo or Mega,
// Call begin(baud) on the alternate serial port and pass it to Firmata to begin like this:
// Serial1.begin(57600);
// Firmata.begin(Serial1);
// However do not do this if you are using SERIAL_MESSAGE
//Firmata.begin(57600);
//while (!Serial) {
// ; // wait for serial port to connect. Needed for ATmega32u4-based boards and Arduino 101
//}
systemResetCallback(); // reset to default config
// Set up and start advertising
startAdv();
}
void startAdv(void)
{
// Advertising packet
Bluefruit.Advertising.addFlags(BLE_GAP_ADV_FLAGS_LE_ONLY_GENERAL_DISC_MODE);
Bluefruit.Advertising.addTxPower();
// Include bleuart 128-bit uuid
Bluefruit.Advertising.addService(bleuart);
// Secondary Scan Response packet (optional)
// Since there is no room for 'Name' in Advertising packet
Bluefruit.ScanResponse.addName();
/* Start Advertising
* - Enable auto advertising if disconnected
* - Interval: fast mode = 20 ms, slow mode = 152.5 ms
* - Timeout for fast mode is 30 seconds
* - Start(timeout) with timeout = 0 will advertise forever (until connected)
*
* For recommended advertising interval
© Adafruit Industries https://learn.adafruit.com/bluefruit-nrf52-feather-learning-guide Page 68 of 158

* For recommended advertising interval
* https://developer.apple.com/library/content/qa/qa1931/_index.html
*/
Bluefruit.Advertising.restartOnDisconnect(true);
Bluefruit.Advertising.setInterval(32, 244); // in unit of 0.625 ms
Bluefruit.Advertising.setFastTimeout(30); // number of seconds in fast mode
Bluefruit.Advertising.start(0); // 0 = Don't stop advertising after n seconds
}
/*==============================================================================
* LOOP()
*============================================================================*/
void loop()
{
// Skip if not connected and bleuart notification is enabled
if ( !(Bluefruit.connected() && bleuart.notifyEnabled()) )
{
// go to low power mode since there is nothing to do
waitForEvent();
return;
}
byte pin, analogPin;
/* DIGITALREAD - as fast as possible, check for changes and output them to the
* FTDI buffer using Serial.print() */
checkDigitalInputs();
/* STREAMREAD - processing incoming messagse as soon as possible, while still
* checking digital inputs. */
while (Firmata.available())
Firmata.processInput();
// TODO - ensure that Stream buffer doesn't go over 60 bytes
currentMillis = millis();
if (currentMillis - previousMillis > samplingInterval) {
previousMillis += samplingInterval;
/* ANALOGREAD - do all analogReads() at the configured sampling interval */
for (pin = 0; pin < TOTAL_PINS; pin++) {
if (IS_PIN_ANALOG(pin) && Firmata.getPinMode(pin) == PIN_MODE_ANALOG) {
analogPin = PIN_TO_ANALOG(pin);
if (analogInputsToReport & (1 << analogPin)) {
Firmata.sendAnalog(analogPin, analogRead( ANALOG_TO_PIN(analogPin) ));
}
}
}
// report i2c data for all device with read continuous mode enabled
if (queryIndex > -1) {
for (byte i = 0; i < queryIndex + 1; i++) {
readAndReportData(query[i].addr, query[i].reg, query[i].bytes, query[i].stopTX);
}
}
}
#ifdef FIRMATA_SERIAL_FEATURE
serialFeature.update();
#endif
}
© Adafruit Industries https://learn.adafruit.com/bluefruit-nrf52-feather-learning-guide Page 69 of 158

© Adafruit Industries https://learn.adafruit.com/bluefruit-nrf52-feather-learning-guide Page 70 of 158

Central BLEUART
This example show you how to use Feather nRF52 as a Central to talk to other Bluefruit (nRF52 or nRF51) peripherals
exposing the bleuart (AKA 'NUS') service.
Client Services
Since the Central role accesses the GATT server on the peripheral, we first need to declare a client bleuart instance
using the BLEClientUart helper class. We can also conveniently read Device Information if BLEClientDis is also used.
Before we can configure client services, Bluefruit.begin() must be called with at least 1 for the number of concurrent
connections supported in central mode. Since we won't be running the nRF52 as a peripheral in this instance, we will
set the peripheral count to 0:
Afterward this, the client service(s) must be initialized by calling their begin() function, and you can setup any callbacks
that you wish to use from the helper class:
Scanner
Let's start the advertising scanner to find a peripheral.
We'll hook up the scan result callback with setRxCallback().
Whenever advertising data is found by the scanner, it will be passed to this callback handler, and we can examine the
advertising data there, and only connect to peripheral(s) that advertise the bleuart service.
Note: If the peripheral has multiple services and bleuart is not included in the UUID list in the advertising packet, you
could optionally use another check such as matching the MAC address, name checking, using "another service", etc.
Once we find a peripheral that we wish to communicate with, call Bluefruit.Central.connect() to establish connection with
it:
BLEClientDis clientDis;
BLEClientUart clientUart;
// Initialize Bluefruit with maximum connections as Peripheral = 0, Central = 1
Bluefruit.begin(0, 1);
// Configure DIS client
clientDis.begin();
// Init BLE Central Uart Serivce
clientUart.begin();
clientUart.setRxCallback(bleuart_rx_callback);
© Adafruit Industries https://learn.adafruit.com/bluefruit-nrf52-feather-learning-guide Page 71 of 158

Central Role
You normally need to setup the Central mode device's connect callback, which fires when a connection is
established/disconnected with a peripheral device. Alternatively you could poll the connection status with connected(),
but callbacks help to simplify the code significantly:
In the connect callback, we will try to discover the bleuart service by browsing the GATT table of the peripheral. This
will help to determine the handle values for characteristics (e.g TXD, RXD, etc.). This is all done by BLEClientUart's
.discover() . Once the service is found, enable the TXD characteristic's CCCD to allow the peripheral to send data, and
we are ready to send data back and forth between the devices:
void setup()
{
// Other set up .....
/* Start Central Scanning
* - Enable auto scan if disconnected
* - Interval = 100 ms, window = 80 ms
* - Don't use active scan
* - Start(timeout) with timeout = 0 will scan forever (until connected)
*/
Bluefruit.Scanner.setRxCallback(scan_callback);
Bluefruit.Scanner.restartOnDisconnect(true);
Bluefruit.Scanner.setInterval(160, 80); // in unit of 0.625 ms
Bluefruit.Scanner.useActiveScan(false);
Bluefruit.Scanner.start(0); // // 0 = Don't stop scanning after n seconds
}
/**
* Callback invoked when scanner pick up an advertising data
* @param report Structural advertising data
*/
void scan_callback(ble_gap_evt_adv_report_t* report)
{
// Check if advertising contain BleUart service
if ( Bluefruit.Scanner.checkReportForService(report, clientUart) )
{
Serial.print("BLE UART service detected. Connecting ... ");
// Connect to device with bleuart service in advertising
Bluefruit.Central.connect(report);
}
}
// Callbacks for Central
Bluefruit.Central.setConnectCallback(connect_callback);
Bluefruit.Central.setDisconnectCallback(disconnect_callback);
© Adafruit Industries https://learn.adafruit.com/bluefruit-nrf52-feather-learning-guide Page 72 of 158

Full Sample Code
The full sample code for this example can be seen below, but this maybe be out of sync with the latest code available
on Github. Please consult the Github code if you have any problems with the code below.
void connect_callback(uint16_t conn_handle)
{
Serial.println("Connected");
Serial.print("Dicovering DIS ... ");
if ( clientDis.discover(conn_handle) )
{
Serial.println("Found it");
char buffer[32+1];
// read and print out Manufacturer
memset(buffer, 0, sizeof(buffer));
if ( clientDis.getManufacturer(buffer, sizeof(buffer)) )
{
Serial.print("Manufacturer: ");
Serial.println(buffer);
}
// read and print out Model Number
memset(buffer, 0, sizeof(buffer));
if ( clientDis.getModel(buffer, sizeof(buffer)) )
{
Serial.print("Model: ");
Serial.println(buffer);
}
Serial.println();
}
Serial.print("Discovering BLE Uart Service ... ");
if ( clientUart.discover(conn_handle) )
{
Serial.println("Found it");
Serial.println("Enable TXD's notify");
clientUart.enableTXD();
Serial.println("Ready to receive from peripheral");
}else
{
Serial.println("Found NONE");
// disconect since we couldn't find bleuart service
Bluefruit.Central.disconnect(conn_handle);
}
}
#include <bluefruit.h>
BLEClientDis clientDis;
BLEClientUart clientUart;
© Adafruit Industries https://learn.adafruit.com/bluefruit-nrf52-feather-learning-guide Page 73 of 158

void setup()
{
Serial.begin(115200);
Serial.println("Bluefruit52 Central BLEUART Example");
Serial.println("-----------------------------------\n");
// Initialize Bluefruit with maximum connections as Peripheral = 0, Central = 1
// SRAM usage required by SoftDevice will increase dramatically with number of connections
Bluefruit.begin(0, 1);
Bluefruit.setName("Bluefruit52 Central");
// Configure DIS client
clientDis.begin();
// Init BLE Central Uart Serivce
clientUart.begin();
clientUart.setRxCallback(bleuart_rx_callback);
// Increase Blink rate to different from PrPh advertising mode
Bluefruit.setConnLedInterval(250);
// Callbacks for Central
Bluefruit.Central.setConnectCallback(connect_callback);
Bluefruit.Central.setDisconnectCallback(disconnect_callback);
/* Start Central Scanning
* - Enable auto scan if disconnected
* - Interval = 100 ms, window = 80 ms
* - Don't use active scan
* - Start(timeout) with timeout = 0 will scan forever (until connected)
*/
Bluefruit.Scanner.setRxCallback(scan_callback);
Bluefruit.Scanner.restartOnDisconnect(true);
Bluefruit.Scanner.setInterval(160, 80); // in unit of 0.625 ms
Bluefruit.Scanner.useActiveScan(false);
Bluefruit.Scanner.start(0); // // 0 = Don't stop scanning after n seconds
}
/**
* Callback invoked when scanner pick up an advertising data
* @param report Structural advertising data
*/
void scan_callback(ble_gap_evt_adv_report_t* report)
{
// Check if advertising contain BleUart service
if ( Bluefruit.Scanner.checkReportForService(report, clientUart) )
{
Serial.print("BLE UART service detected. Connecting ... ");
// Connect to device with bleuart service in advertising
Bluefruit.Central.connect(report);
}
}
/**
* Callback invoked when an connection is established
* @param conn_handle
© Adafruit Industries https://learn.adafruit.com/bluefruit-nrf52-feather-learning-guide Page 74 of 158

* @param conn_handle
*/
void connect_callback(uint16_t conn_handle)
{
Serial.println("Connected");
Serial.print("Dicovering DIS ... ");
if ( clientDis.discover(conn_handle) )
{
Serial.println("Found it");
char buffer[32+1];
// read and print out Manufacturer
memset(buffer, 0, sizeof(buffer));
if ( clientDis.getManufacturer(buffer, sizeof(buffer)) )
{
Serial.print("Manufacturer: ");
Serial.println(buffer);
}
// read and print out Model Number
memset(buffer, 0, sizeof(buffer));
if ( clientDis.getModel(buffer, sizeof(buffer)) )
{
Serial.print("Model: ");
Serial.println(buffer);
}
Serial.println();
}
Serial.print("Discovering BLE Uart Service ... ");
if ( clientUart.discover(conn_handle) )
{
Serial.println("Found it");
Serial.println("Enable TXD's notify");
clientUart.enableTXD();
Serial.println("Ready to receive from peripheral");
}else
{
Serial.println("Found NONE");
// disconect since we couldn't find bleuart service
Bluefruit.Central.disconnect(conn_handle);
}
}
/**
* Callback invoked when a connection is dropped
* @param conn_handle
* @param reason
*/
void disconnect_callback(uint16_t conn_handle, uint8_t reason)
{
(void) conn_handle;
(void) reason;
Serial.println("Disconnected");
© Adafruit Industries https://learn.adafruit.com/bluefruit-nrf52-feather-learning-guide Page 75 of 158

Serial.println("Disconnected");
}
/**
* Callback invoked when uart received data
* @param uart_svc Reference object to the service where the data
* arrived. In this example it is clientUart
*/
void bleuart_rx_callback(BLEClientUart& uart_svc)
{
Serial.print("[RX]: ");
while ( uart_svc.available() )
{
Serial.print( (char) uart_svc.read() );
}
Serial.println();
}
void loop()
{
if ( Bluefruit.Central.connected() )
{
// Not discovered yet
if ( clientUart.discovered() )
{
// Discovered means in working state
// Get Serial input and send to Peripheral
if ( Serial.available() )
{
delay(2); // delay a bit for all characters to arrive
char str[20+1] = { 0 };
Serial.readBytes(str, 20);
clientUart.print( str );
}
}
}
}
© Adafruit Industries https://learn.adafruit.com/bluefruit-nrf52-feather-learning-guide Page 76 of 158
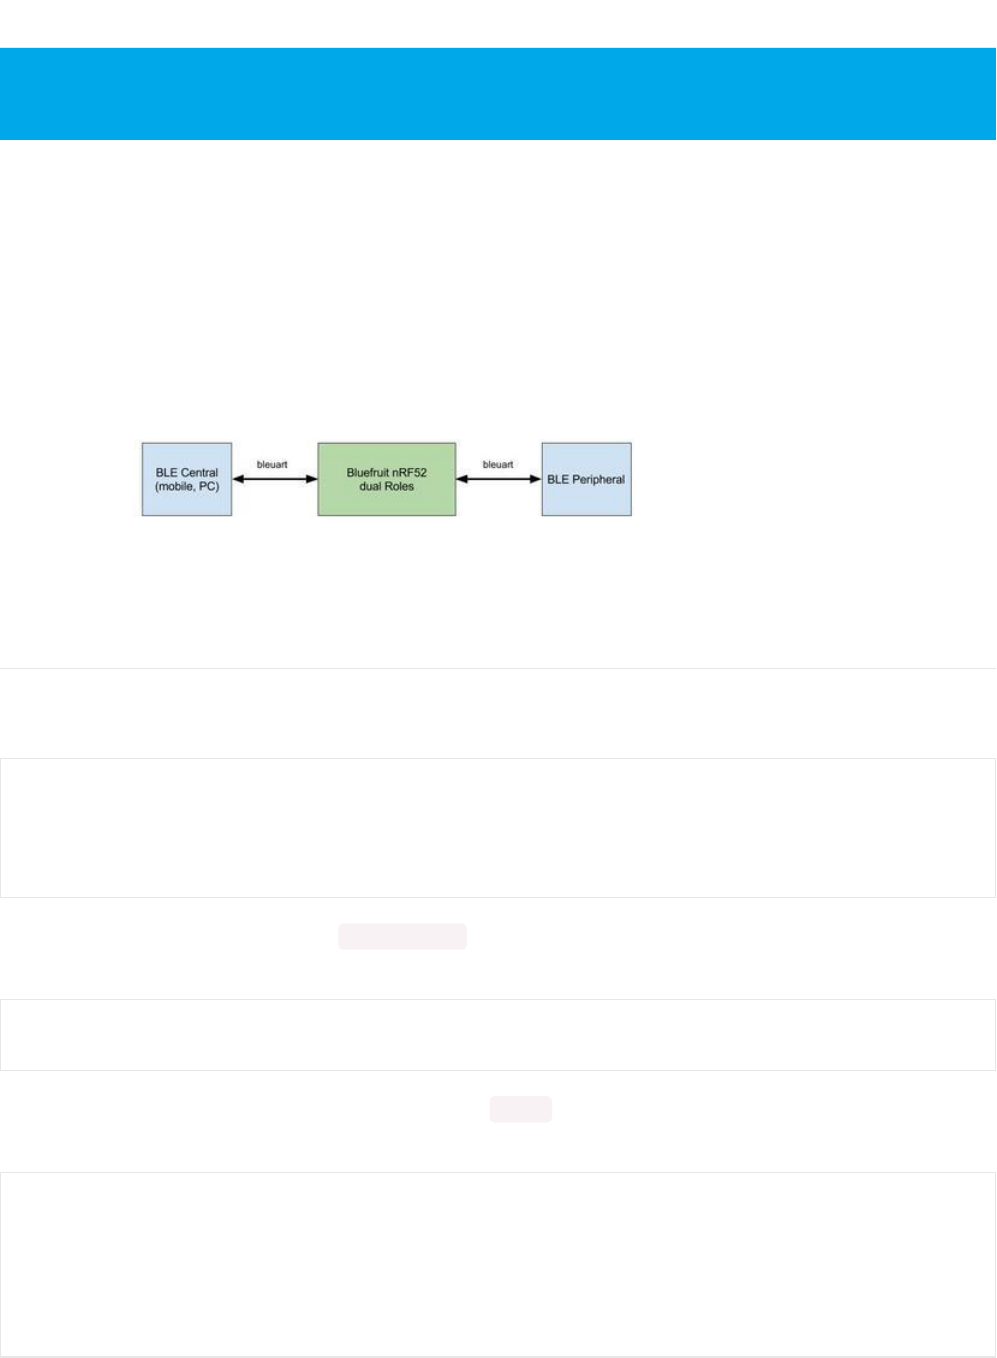
Dual Roles BLEUART
This example demonstrates how you can use a Feather nRF52 to connect to two other Bluefruit or BLE devices using
the bleuart (AKA 'NUS') service concurrently, with the device running at both a peripheral and a central at the same
time.
This dual role example acts as a BLE bridge that sits between a central and a peripheral forwarding bleuart messages
back and forth, as shown in the image below:
Server & Client Service Setup
Since the Bluefruit device will act as both a central and a peripheral, we will need to declare both server and client
instance of the bleuart helper class:
Before we can configure client services, Bluefruit.begin() must be called with at least 1 for the number of concurrent
connection for both peripheral and central mode:
After this, client services must be initialized by calling their begin() function, followed by any callbacks that you wish to
wire up as well:
If you are not familiar with Central Role, it is advised to look at the "Central BLEUART" example first then
continue with this afterwards.
// Peripheral uart service
BLEUart bleuart;
// Central uart client
BLEClientUart clientUart;
// Initialize Bluefruit with max concurrent connections as Peripheral = 1, Central = 1
Bluefruit.begin(1, 1);
// Configure and Start BLE Uart Service
bleuart.begin();
bleuart.setRxCallback(prph_bleuart_rx_callback);
// Init BLE Central Uart Serivce
clientUart.begin();
clientUart.setRxCallback(cent_bleuart_rx_callback);
© Adafruit Industries https://learn.adafruit.com/bluefruit-nrf52-feather-learning-guide Page 77 of 158

We are then ready to forward data from central to peripheral and vice versa using callbacks:
Peripheral Role
The first thing to do for the peripheral part of our code is to setup the connect callback, which fires when a connection
is established/disconnected with the central. Alternatively you could poll the connection status with connected(), but
callbacks helps to simplify the code significantly:
Central Role
Next we setup the Central mode connect callback, which fires when a connection is established/disconnected with a
peripheral device:
void cent_bleuart_rx_callback(BLEClientUart& cent_uart)
{
char str[20+1] = { 0 };
cent_uart.read(str, 20);
Serial.print("[Cent] RX: ");
Serial.println(str);
if ( bleuart.notifyEnabled() )
{
// Forward data from our peripheral to Mobile
bleuart.print( str );
}else
{
// response with no prph message
clientUart.println("[Cent] Peripheral role not connected");
}
}
void prph_bleuart_rx_callback(void)
{
// Forward data from Mobile to our peripheral
char str[20+1] = { 0 };
bleuart.read(str, 20);
Serial.print("[Prph] RX: ");
Serial.println(str);
if ( clientUart.discovered() )
{
clientUart.print(str);
}else
{
bleuart.println("[Prph] Central role not connected");
}
}
// Callbacks for Peripheral
Bluefruit.setConnectCallback(prph_connect_callback);
Bluefruit.setDisconnectCallback(prph_disconnect_callback);
© Adafruit Industries https://learn.adafruit.com/bluefruit-nrf52-feather-learning-guide Page 78 of 158

Advertising and Scanner
It is possible to start both the scanner and advertising at the same time so that we can discover and be discovered by
other BLE devices. For the scanner, we use a filter that only fires the callback if a specific UUID is found in the
advertising data of the peer device:
Full Sample Code
The full sample code for this example can be seen below, but this maybe be out of sync with the latest code available
on Github. Please consult the Github code if you have any problems with the code below.
// Callbacks for Central
Bluefruit.Central.setConnectCallback(cent_connect_callback);
Bluefruit.Central.setDisconnectCallback(cent_disconnect_callback);
/* Start Central Scanning
* - Enable auto scan if disconnected
* - Interval = 100 ms, window = 80 ms
* - Filter only accept bleuart service
* - Don't use active scan
* - Start(timeout) with timeout = 0 will scan forever (until connected)
*/
Bluefruit.Scanner.setRxCallback(scan_callback);
Bluefruit.Scanner.restartOnDisconnect(true);
Bluefruit.Scanner.setInterval(160, 80); // in unit of 0.625 ms
Bluefruit.Scanner.filterUuid(bleuart.uuid);
Bluefruit.Scanner.useActiveScan(false);
Bluefruit.Scanner.start(0); // 0 = Don't stop scanning after n seconds
// Advertising packet
Bluefruit.Advertising.addFlags(BLE_GAP_ADV_FLAGS_LE_ONLY_GENERAL_DISC_MODE);
Bluefruit.Advertising.addTxPower();
// Include bleuart 128-bit uuid
Bluefruit.Advertising.addService(bleuart);
// Secondary Scan Response packet (optional)
// Since there is no room for 'Name' in Advertising packet
Bluefruit.ScanResponse.addName();
/* Start Advertising
* - Enable auto advertising if disconnected
* - Interval: fast mode = 20 ms, slow mode = 152.5 ms
* - Timeout for fast mode is 30 seconds
* - Start(timeout) with timeout = 0 will advertise forever (until connected)
*
* For recommended advertising interval
* https://developer.apple.com/library/content/qa/qa1931/_index.html
*/
Bluefruit.Advertising.restartOnDisconnect(true);
Bluefruit.Advertising.setInterval(32, 244); // in unit of 0.625 ms
Bluefruit.Advertising.setFastTimeout(30); // number of seconds in fast mode
Bluefruit.Advertising.start(0); // 0 = Don't stop advertising after n seconds
#include <bluefruit.h>
© Adafruit Industries https://learn.adafruit.com/bluefruit-nrf52-feather-learning-guide Page 79 of 158

// Peripheral uart service
BLEUart bleuart;
// Central uart client
BLEClientUart clientUart;
void setup()
{
Serial.begin(115200);
Serial.println("Bluefruit52 Dual Role BLEUART Example");
Serial.println("-------------------------------------\n");
// Initialize Bluefruit with max concurrent connections as Peripheral = 1, Central = 1
// SRAM usage required by SoftDevice will increase with number of connections
Bluefruit.begin(1, 1);
// Set max power. Accepted values are: -40, -30, -20, -16, -12, -8, -4, 0, 4
Bluefruit.setTxPower(4);
Bluefruit.setName("Bluefruit52 duo");
// Callbacks for Peripheral
Bluefruit.setConnectCallback(prph_connect_callback);
Bluefruit.setDisconnectCallback(prph_disconnect_callback);
// Callbacks for Central
Bluefruit.Central.setConnectCallback(cent_connect_callback);
Bluefruit.Central.setDisconnectCallback(cent_disconnect_callback);
// Configure and Start BLE Uart Service
bleuart.begin();
bleuart.setRxCallback(prph_bleuart_rx_callback);
// Init BLE Central Uart Serivce
clientUart.begin();
clientUart.setRxCallback(cent_bleuart_rx_callback);
/* Start Central Scanning
* - Enable auto scan if disconnected
* - Interval = 100 ms, window = 80 ms
* - Filter only accept bleuart service
* - Don't use active scan
* - Start(timeout) with timeout = 0 will scan forever (until connected)
*/
Bluefruit.Scanner.setRxCallback(scan_callback);
Bluefruit.Scanner.restartOnDisconnect(true);
Bluefruit.Scanner.setInterval(160, 80); // in unit of 0.625 ms
Bluefruit.Scanner.filterUuid(bleuart.uuid);
Bluefruit.Scanner.useActiveScan(false);
Bluefruit.Scanner.start(0); // 0 = Don't stop scanning after n seconds
// Set up and start advertising
startAdv();
}
void startAdv(void)
{
// Advertising packet
Bluefruit.Advertising.addFlags(BLE_GAP_ADV_FLAGS_LE_ONLY_GENERAL_DISC_MODE);
© Adafruit Industries https://learn.adafruit.com/bluefruit-nrf52-feather-learning-guide Page 80 of 158

Bluefruit.Advertising.addTxPower();
// Include bleuart 128-bit uuid
Bluefruit.Advertising.addService(bleuart);
// Secondary Scan Response packet (optional)
// Since there is no room for 'Name' in Advertising packet
Bluefruit.ScanResponse.addName();
/* Start Advertising
* - Enable auto advertising if disconnected
* - Interval: fast mode = 20 ms, slow mode = 152.5 ms
* - Timeout for fast mode is 30 seconds
* - Start(timeout) with timeout = 0 will advertise forever (until connected)
*
* For recommended advertising interval
* https://developer.apple.com/library/content/qa/qa1931/_index.html
*/
Bluefruit.Advertising.restartOnDisconnect(true);
Bluefruit.Advertising.setInterval(32, 244); // in unit of 0.625 ms
Bluefruit.Advertising.setFastTimeout(30); // number of seconds in fast mode
Bluefruit.Advertising.start(0); // 0 = Don't stop advertising after n seconds
}
void loop()
{
// do nothing, all the work is done in callback
}
/*------------------------------------------------------------------*/
/* Peripheral
*------------------------------------------------------------------*/
void prph_connect_callback(uint16_t conn_handle)
{
char peer_name[32] = { 0 };
Bluefruit.Gap.getPeerName(conn_handle, peer_name, sizeof(peer_name));
Serial.print("[Prph] Connected to ");
Serial.println(peer_name);
}
void prph_disconnect_callback(uint16_t conn_handle, uint8_t reason)
{
(void) conn_handle;
(void) reason;
Serial.println();
Serial.println("[Prph] Disconnected");
}
void prph_bleuart_rx_callback(void)
{
// Forward data from Mobile to our peripheral
char str[20+1] = { 0 };
bleuart.read(str, 20);
Serial.print("[Prph] RX: ");
Serial.println(str);
if ( clientUart.discovered() )
© Adafruit Industries https://learn.adafruit.com/bluefruit-nrf52-feather-learning-guide Page 81 of 158

if ( clientUart.discovered() )
{
clientUart.print(str);
}else
{
bleuart.println("[Prph] Central role not connected");
}
}
/*------------------------------------------------------------------*/
/* Central
*------------------------------------------------------------------*/
void scan_callback(ble_gap_evt_adv_report_t* report)
{
// Check if advertising contain BleUart service
if ( Bluefruit.Scanner.checkReportForService(report, clientUart) )
{
Serial.println("BLE UART service detected. Connecting ... ");
// Connect to device with bleuart service in advertising
Bluefruit.Central.connect(report);
}
}
void cent_connect_callback(uint16_t conn_handle)
{
char peer_name[32] = { 0 };
Bluefruit.Gap.getPeerName(conn_handle, peer_name, sizeof(peer_name));
Serial.print("[Cent] Connected to ");
Serial.println(peer_name);;
if ( clientUart.discover(conn_handle) )
{
// Enable TXD's notify
clientUart.enableTXD();
}else
{
// disconect since we couldn't find bleuart service
Bluefruit.Central.disconnect(conn_handle);
}
}
void cent_disconnect_callback(uint16_t conn_handle, uint8_t reason)
{
(void) conn_handle;
(void) reason;
Serial.println("[Cent] Disconnected");
}
/**
* Callback invoked when uart received data
* @param cent_uart Reference object to the service where the data
* arrived. In this example it is clientUart
*/
void cent_bleuart_rx_callback(BLEClientUart& cent_uart)
{
char str[20+1] = { 0 };
cent_uart.read(str, 20);
© Adafruit Industries https://learn.adafruit.com/bluefruit-nrf52-feather-learning-guide Page 82 of 158

Serial.print("[Cent] RX: ");
Serial.println(str);
if ( bleuart.notifyEnabled() )
{
// Forward data from our peripheral to Mobile
bleuart.print( str );
}else
{
// response with no prph message
clientUart.println("[Cent] Peripheral role not connected");
}
}
© Adafruit Industries https://learn.adafruit.com/bluefruit-nrf52-feather-learning-guide Page 83 of 158

Bluefruit nRF52 API
The Adafruit nRF52 core defines a number of custom classes that aim to make it easy to work with BLE in your
projects.
The key classes are listed below, and examined in more detail elsewhere in this learning guide:
AdafruitBluefruit is the main entry point to the Adafruit Bluefruit nRF52 API. This class exposes a number of
essential functions and classes, such as advertising, the list of GATT services and characteristics defined on your
device, and connection status.
BLEService is a wrapper class for BLE GATT service records, and can be used to define custom service
definitions, or acts as the base class for any service helper classes.
BLECharacteristic is a wrapper class for a BLE GATT characteristic record, and can be used to define custom
characteristics, or acts as the base class for any characteristic helper classes.
BLEDis is a helper class for the DIS or 'Device Information Service'.
BLEUart is a helper class for the NUS or 'Nordic UART Service'.
BLEBeacon is a helper class to configure your nRF52 as a beacon using the advertising packet to send out
properly formatted beacon data.
BLEMidi is a helper class to work with MIDI data over BLE.
BLEHidAdafruit is a helper class to emulate an HID mouse or keyboard over BLE.
Details on each of these helper classes are found further in this learning guide.
© Adafruit Industries https://learn.adafruit.com/bluefruit-nrf52-feather-learning-guide Page 84 of 158

AdafruitBluefruit
This base class is the main entry point to the Adafruit Bluefruit nRF52 API, and exposes most of the helper classes and
functions that you use to configure your device.
API
AdafruitBluefruit has the following public API:
The Bluefruit nRF52 Feather codebase is in an early BETA stage and is undergoing active development
based on customer feedback and testing. As such, the class documentation here is incomplete, and you
should consult the Github repo for the latest code and API developments: https://goo.gl/LdEx62
// Constructor
AdafruitBluefruit(void);
/*------------------------------------------------------------------*/
/* Lower Level Classes (Bluefruit.Advertising.*, etc.)
*------------------------------------------------------------------*/
BLEGap Gap;
BLEGatt Gatt;
BLEAdvertising Advertising;
BLEAdvertisingData ScanResponse;
BLEScanner Scanner;
BLECentral Central;
BLEDiscovery Discovery;
/*------------------------------------------------------------------*/
/* SoftDevice Configure Functions, must call before begin().
* These function affect the SRAM consumed by SoftDevice.
*------------------------------------------------------------------*/
void configServiceChanged (bool changed);
void configUuid128Count (uint8_t uuid128_max);
void configAttrTableSize (uint32_t attr_table_size);
// Config Bandwidth for connections
void configPrphConn (uint16_t mtu_max, uint8_t event_len, uint8_t hvn_qsize, uint8_t wrcmd_qsize
void configCentralConn (uint16_t mtu_max, uint8_t event_len, uint8_t hvn_qsize, uint8_t wrcmd_qsize
// Convenient function to config connection
void configPrphBandwidth (uint8_t bw);
void configCentralBandwidth(uint8_t bw);
err_t begin(uint8_t prph_count = 1, uint8_t central_count = 0);
/*------------------------------------------------------------------*/
/* General Functions
*------------------------------------------------------------------*/
void setName (const char* str);
uint8_t getName (char* name, uint16_t bufsize);
bool setTxPower (int8_t power);
int8_t getTxPower (void);
bool setApperance (uint16_t appear);
© Adafruit Industries https://learn.adafruit.com/bluefruit-nrf52-feather-learning-guide Page 85 of 158
These functions are generally available via 'Bluefruit.*'. For example, to check the connection status in your sketch you
could run ' if (Bluefruit.connected()) { ... } '.
Examples
For examples of how to work with the parent Bluefruit class, see the Examples section later in this guide. It's better to
examine this class in the context of a real world use case.
You can also browse the latest example code online via Github:
Browse the latest example code on Github
https://adafru.it/vaK
uint16_t getApperance (void);
void autoConnLed (bool enabled);
void setConnLedInterval (uint32_t ms);
/*------------------------------------------------------------------*/
/* GAP, Connections and Bonding
*------------------------------------------------------------------*/
bool connected (void);
bool disconnect (void);
bool setConnInterval (uint16_t min, uint16_t max);
bool setConnIntervalMS (uint16_t min_ms, uint16_t max_ms);
uint16_t connHandle (void);
bool connPaired (void);
uint16_t connInterval (void);
bool requestPairing (void);
void clearBonds (void);
ble_gap_addr_t getPeerAddr (void);
uint8_t getPeerAddr (uint8_t addr[6]);
void printInfo(void);
/*------------------------------------------------------------------*/
/* Callbacks
*------------------------------------------------------------------*/
void setConnectCallback ( BLEGap::connect_callback_t fp);
void setDisconnectCallback( BLEGap::disconnect_callback_t fp);
© Adafruit Industries https://learn.adafruit.com/bluefruit-nrf52-feather-learning-guide Page 86 of 158

BLEGap
This GAP API for Bluefruit is accessible via Bluefruit.Gap.*** and has the following public functions:
This page is a work in progress as the API is changing as we migrate to S132v5 and add better Central mode
support.
typedef void (*connect_callback_t ) (uint16_t conn_handle);
typedef void (*disconnect_callback_t ) (uint16_t conn_handle, uint8_t reason);
uint8_t getAddr (uint8_t mac[6]);
bool setAddr (uint8_t mac[6], uint8_t type);
bool connected (uint16_t conn_handle);
uint8_t getRole (uint16_t conn_handle);
uint8_t getPeerAddr (uint16_t conn_handle, uint8_t addr[6]);
ble_gap_addr_t getPeerAddr (uint16_t conn_handle);
uint16_t getPeerName (uint16_t conn_handle, char* buf, uint16_t bufsize);
uint16_t getMTU (uint16_t conn_handle);
uint16_t getMaxMtuByConnCfg (uint8_t conn_cfg);
uint16_t getMaxMtu (uint8_t conn_handle);
© Adafruit Industries https://learn.adafruit.com/bluefruit-nrf52-feather-learning-guide Page 87 of 158

BLEAdvertising
'Advertising' is what makes your Bluetooth Low Energy devices visible to other devices in listening range. The radio
sends out specially formatter advertising packets that contain information like the device name, whether you can
connect to the device (or if it only advertises), etc.
You can also include custom data in the advertising packet, which is essential how beacons work.
The
BLEAdvertisingData and BLEAdvertising
classes exposes a number of helper functions to make it easier to create
well-formatted advertising packets, as well as to use the Scan Response option, which is an optional secondary
advertising packet that can be requested by a Central device. (This gives you another 27 bytes of advertising data, but
isn't sent out automatically like the main advertising packet.).
This two advertising packets are accessible via the parent AdafruitBluefruit class, calling ' Bluefruit.Advertising.* ' and
'Bluefruit.ScanResponse.* ' from your user sketches.
For examples of using these helper classes, see any of the examples later on in this guide, since all devices will
advertise as part of the startup process.
API
The BLEAdvertisingData class has the following public API:
The Bluefruit nRF52 Feather codebase is in an early BETA stage and is undergoing active development
based on customer feedback and testing. As such, the class documentation here is incomplete, and you
should consult the Github repo for the latest code and API developments: https://goo.gl/LdEx62
© Adafruit Industries https://learn.adafruit.com/bluefruit-nrf52-feather-learning-guide Page 88 of 158
In addition to API from BLEAdvertisingData, The BLEAdvertising class also has functions that dictate the behavior of
advertising such as slow/fast timeout, adv intervals, and callbacks etc...
/*------------- Adv Data -------------*/
bool addData(uint8_t type, const void* data, uint8_t len);
bool addFlags(uint8_t flags);
bool addTxPower(void);
bool addName(void);
bool addAppearance(uint16_t appearance);
bool addManufacturerData(const void* data, uint8_t count);
/*------------- UUID -------------*/
bool addUuid(BLEUuid bleuuid);
bool addUuid(BLEUuid bleuuid1, BLEUuid bleuuid2);
bool addUuid(BLEUuid bleuuid1, BLEUuid bleuuid2, BLEUuid bleuuid3);
bool addUuid(BLEUuid bleuuid1, BLEUuid bleuuid2, BLEUuid bleuuid3, BLEUuid bleuuid4);
bool addUuid(BLEUuid bleuuid[], uint8_t count);
/*------------- Service -------------*/
bool addService(BLEService& service);
bool addService(BLEService& service1, BLEService& service2);
bool addService(BLEService& service1, BLEService& service2, BLEService& service3);
bool addService(BLEService& service1, BLEService& service2, BLEService& service3, BLEService& service4);
/*------------- Client Service -------------*/
bool addService(BLEClientService& service);
// Functions to work with the raw advertising packet
uint8_t count(void);
uint8_t* getData(void);
bool setData(const uint8_t* data, uint8_t count);
void clearData(void);
bool setData(Advertisable& adv_able) { return adv_able.setAdv(*this); }
© Adafruit Industries https://learn.adafruit.com/bluefruit-nrf52-feather-learning-guide Page 89 of 158

Related Information
Generic Access Profile: This page contains the official list of assigned numbers for the 'Data' type field. Data is
inserted into the advertising packet by supplying a valid 'data' type, optionally followed by a properly formatted
payload corresponding to the selected value.
Example
For practical example code, see the Examples section later on in this guide. The snippet below is provided for
illustration purposes, but advertising should be examined in the context of a real use case since it varies from one
setup to the next!
typedef void (*stop_callback_t) (void);
typedef void (*slow_callback_t) (void);
void setType(uint8_t adv_type);
void setFastTimeout(uint16_t sec);
void setSlowCallback(slow_callback_t fp);
void setStopCallback(stop_callback_t fp);
void setInterval (uint16_t fast, uint16_t slow);
void setIntervalMS(uint16_t fast, uint16_t slow);
uint16_t getInterval(void);
bool setBeacon(BLEBeacon& beacon);
bool setBeacon(EddyStoneUrl& eddy_url);
bool isRunning(void);
void restartOnDisconnect(bool enable);
bool start(uint16_t timeout = 0);
bool stop (void);
© Adafruit Industries https://learn.adafruit.com/bluefruit-nrf52-feather-learning-guide Page 90 of 158

void setup(void)
{
// Other startup code here
// ...
// Set up Advertising Packet
setupAdv();
// Start Advertising
Bluefruit.Advertising.start();
}
void startAdv(void)
{
// Advertising packet
Bluefruit.Advertising.addFlags(BLE_GAP_ADV_FLAGS_LE_ONLY_GENERAL_DISC_MODE);
Bluefruit.Advertising.addTxPower();
// Include bleuart 128-bit uuid
Bluefruit.Advertising.addService(bleuart);
// Secondary Scan Response packet (optional)
// Since there is no room for 'Name' in Advertising packet
Bluefruit.ScanResponse.addName();
/* Start Advertising
* - Enable auto advertising if disconnected
* - Interval: fast mode = 20 ms, slow mode = 152.5 ms
* - Timeout for fast mode is 30 seconds
* - Start(timeout) with timeout = 0 will advertise forever (until connected)
*
* For recommended advertising interval
* https://developer.apple.com/library/content/qa/qa1931/_index.html
*/
Bluefruit.Advertising.restartOnDisconnect(true);
Bluefruit.Advertising.setInterval(32, 244); // in unit of 0.625 ms
Bluefruit.Advertising.setFastTimeout(30); // number of seconds in fast mode
Bluefruit.Advertising.start(0); // 0 = Don't stop advertising after n seconds
}
© Adafruit Industries https://learn.adafruit.com/bluefruit-nrf52-feather-learning-guide Page 91 of 158

BLEScanner
The BLEScanner class is used in Central Mode, and facilitates scanning for BLE peripherals in range and parsing the
advertising data that is being sent out by the peripherals.
The BLEScanner class is normally accessed via the Bluefruit class (instantiated at startup), as shown below:
API
BLEScanner has the following public API:
The Bluefruit nRF52 Feather codebase is in an early BETA stage and is undergoing active development
based on customer feedback and testing. As such, the class documentation here is incomplete, and you
should consult the Github repo for the latest code and API developments: https://goo.gl/LdEx62
This documentation is based on BSP 0.7.0 and higher. Please make sure you have an up to date version
before using the code below.
/* Start Central Scanning
* - Enable auto scan if disconnected
* - Filter for devices with a min RSSI of -80 dBm
* - Interval = 100 ms, window = 50 ms
* - Use active scan (requests the optional scan response packet)
* - Start(0) = will scan forever since no timeout is given
*/
Bluefruit.Scanner.setRxCallback(scan_callback);
Bluefruit.Scanner.restartOnDisconnect(true);
Bluefruit.Scanner.filterRssi(-80); // Only invoke callback when RSSI >= -80 dBm
Bluefruit.Scanner.setInterval(160, 80); // in units of 0.625 ms
Bluefruit.Scanner.useActiveScan(true); // Request scan response data
Bluefruit.Scanner.start(0); // 0 = Don't stop scanning after n seconds
© Adafruit Industries https://learn.adafruit.com/bluefruit-nrf52-feather-learning-guide Page 92 of 158
setRxCallback(rx_callback_t fp)
Whenever a valid advertising packet is detected (based on any optional filters that are applied in the BLEScanner
class), a dedicated callback function (see rx_callback_t ) will be called.
The callback function has the following signature:
NOTE: ble_gap_evt_adv_report_t is part of the Nordic nRF52 SDK and is defined in ble_gap.h.
typedef void (*rx_callback_t) (ble_gap_evt_adv_report_t*);
typedef void (*stop_callback_t) (void);
BLEScanner(void);
ble_gap_scan_params_t* getParams(void);
bool isRunning(void);
void useActiveScan(bool enable);
void setInterval(uint16_t interval, uint16_t window);
void setIntervalMS(uint16_t interval, uint16_t window);
void restartOnDisconnect(bool enable);
void filterRssi(int8_t min_rssi);
void filterMSD(uint16_t manuf_id);
void filterUuid(BLEUuid ble_uuid);
void filterUuid(BLEUuid ble_uuid1, BLEUuid ble_uuid2);
void filterUuid(BLEUuid ble_uuid1, BLEUuid ble_uuid2, BLEUuid ble_uuid3);
void filterUuid(BLEUuid ble_uuid1, BLEUuid ble_uuid2, BLEUuid ble_uuid3, BLEUuid ble_uuid4);
void filterUuid(BLEUuid ble_uuid[], uint8_t count);
void clearFilters(void);
bool start(uint16_t timeout = 0);
bool stop(void);
/*------------- Callbacks -------------*/
void setRxCallback(rx_callback_t fp);
void setStopCallback(stop_callback_t fp);
/*------------- Data Parser -------------*/
uint8_t parseReportByType(const uint8_t* scandata, uint8_t scanlen, uint8_t type, uint8_t* buf, uint8_t bufsize
uint8_t parseReportByType(const ble_gap_evt_adv_report_t* report, uint8_t type, uint8_t* buf, uint8_t bufsize
bool checkReportForUuid(const ble_gap_evt_adv_report_t* report, BLEUuid ble_uuid);
bool checkReportForService(const ble_gap_evt_adv_report_t* report, BLEClientService svc);
bool checkReportForService(const ble_gap_evt_adv_report_t* report, BLEService svc);
void scan_callback(ble_gap_evt_adv_report_t* report)
{
/* Display the timestamp and device address */
if (report->scan_rsp)
{
/* This is a Scan Response packet */
Serial.printf("[SR%10d] Packet received from ", millis());
}
© Adafruit Industries https://learn.adafruit.com/bluefruit-nrf52-feather-learning-guide Page 93 of 158

void useActiveScan(bool enable);
Enabling 'Active Scan' by setting the enable parameter to 1 will cause the device to request the optional Scan
Response advertising packet, which is a second 31 byte advertising packet that can be used to transmit additional
}
else
{
/* This is a normal advertising packet */
Serial.printf("[ADV%9d] Packet received from ", millis());
}
Serial.printBuffer(report->peer_addr.addr, 6, ':');
Serial.print("\n");
/* Raw buffer contents */
Serial.printf("%14s %d bytes\n", "PAYLOAD", report->dlen);
if (report->dlen)
{
Serial.printf("%15s", " ");
Serial.printBuffer(report->data, report->dlen, '-');
Serial.println();
}
/* RSSI value */
Serial.printf("%14s %d dBm\n", "RSSI", report->rssi);
/* Adv Type */
Serial.printf("%14s ", "ADV TYPE");
switch (report->type)
{
case BLE_GAP_ADV_TYPE_ADV_IND:
Serial.printf("Connectable undirected\n");
break;
case BLE_GAP_ADV_TYPE_ADV_DIRECT_IND:
Serial.printf("Connectable directed\n");
break;
case BLE_GAP_ADV_TYPE_ADV_SCAN_IND:
Serial.printf("Scannable undirected\n");
break;
case BLE_GAP_ADV_TYPE_ADV_NONCONN_IND:
Serial.printf("Non-connectable undirected\n");
break;
}
/* Check for BLE UART UUID */
if ( Bluefruit.Scanner.checkReportForUuid(report, BLEUART_UUID_SERVICE) )
{
Serial.printf("%14s %s\n", "BLE UART", "UUID Found!");
}
/* Check for DIS UUID */
if ( Bluefruit.Scanner.checkReportForUuid(report, UUID16_SVC_DEVICE_INFORMATION) )
{
Serial.printf("%14s %s\n", "DIS", "UUID Found!");
}
Serial.println();
}
© Adafruit Industries https://learn.adafruit.com/bluefruit-nrf52-feather-learning-guide Page 94 of 158

information.
By default active scanning is disabled, so no Scan Response packets will be received by BLEScanner unless this
function is called and set to 1 before calling Bluefruit.Scanner.start(0) .
void filterRssi(int8_t min_rssi);
void filterMSD(uint16_t manuf_id);
void filterUuid(BLEUuid ble_uuid);
void filterUuid(BLEUuid ble_uuid1, BLEUuid ble_uuid2);
void filterUuid(BLEUuid ble_uuid1, BLEUuid ble_uuid2, BLEUuid ble_uuid3);
void filterUuid(BLEUuid ble_uuid1, BLEUuid ble_uuid2, BLEUuid ble_uuid3, BLEUuid
ble_uuid4);
void filterUuid(BLEUuid ble_uuid[], uint8_t count);
Filters can be applied to BLEScanner to narrow down the data sent to the callback handler, and make processing
advertising packets easier for you.
As of BSP 0.7.0 the following three filters are present:
filterRssi(int8_t min_rssi) : Filters advertising results to devices with at least the specified RSSI value, which allows
you to ignore devices that are too far away or whose signal is too weak. The higher the number, the strong the
signal so -90 is a very weak signal, and -60 is a much stronger one.
filterUuid(BLEUuid ble_uuid) : Filters advertising results to devices that advertise themselves as having the
specified service UUID. If multiple UUIDs are entered, they will be filtered with boolean OR logic, meaning any
single UUID present will be considered a match.
void filterMSD(uint16_t manuf_id) : Fitlers advertising results to devices that contain a Manufacturer Specific Data
data type, and who use the specifed Bluetooth Customer ID ( manuf_id) . This can be useful to filter iBeacon
versus Eddystone devices, for example, which both used the MSD field, or to look for custom MSD data
matching your own CID.
void clearFilters(void);
This function clears and filter values set using the functions above.
bool start(uint16_t timeout = 0);
bool stop(void);
The .start and .stop functions can be used to start and stop scanning, and should be called after all of the main
parameters (timing, filters, etc.) have been set.
The .start function has a single parameter called timeout, which sets the number of seconds to scan for advertising
packets. Setting this to '0' (the default value) will cause the device to scan forever.
When multiple UUIDs are added via one of the .filterUuid(...) functions, they UUIDs will be filtered using
boolean 'OR' logic, meaning that the callback will fire when ANY of the specified UUIDs are detected in the
advertising packet.
Make sure you set any filters of BLEScanner parameters before calling .start!
© Adafruit Industries https://learn.adafruit.com/bluefruit-nrf52-feather-learning-guide Page 95 of 158

void restartOnDisconnect(bool enable);
Setting this function to '1' will cause the scanning process to start again as soon as you disconnect from a peripheral
device. The default behaviour is to automatically restart scanning on disconnect.
Examples
For an example that uses almost all of the BLEScanner and advertising API in Central mode, see
central_scan_advanced.ino in the Central examples folder.
central_scan_advanced.ino on Github
https://adafru.it/y5a
This example is only available in BSP 0.7.0 and higher!
© Adafruit Industries https://learn.adafruit.com/bluefruit-nrf52-feather-learning-guide Page 96 of 158
BLEService
This base class is used when defining custom BLE Gatt Services, such as the various service helper classes that make
up the Adafruit Bluefruit nRF52 API described here.
Unless you are implementing a custom GATT service and characteristic, you normally won't use this base class
directly, and would instantiate and call a higher level helper service or characteristic included in the Bluefruit nRF52
API.
Basic Usage
There are normally only two operation required to use the BLEService class:
You need to declare and instantiate the class with an appropriate 16-bit or 128-bit UUID in the constructor:
You then need to call the .begin() method on the instance before adding any BLECharacteristics to it (via the
BLECharacteristic's respective .begin() function call):
Order of Operations (Important!)
One very important thing to take into consideration when working with BLEService and BLECharacteristic, is that any
BLECharacteristic will automatically be added to the last BLEService that had it's `.begin()` function called. As such, you
must call yourService.begin() before adding any characteristics!
See the example at the bottom of this page for a concrete example of how this works in practice.
API
BLEService has the following overall class structure:
The Bluefruit nRF52 Feather codebase is in an early BETA stage and is undergoing active development
based on customer feedback and testing. As such, the class documentation here is incomplete, and you
should consult the Github repo for the latest code and API developments: https://goo.gl/LdEx62
BLEService myService = BLEService(0x1234);
myService.begin();
This documentation may be slightly out of date as bugs are fixed, and the API develops. You should always
consult the Github repo for the definitive latest code release and class definitions!
© Adafruit Industries https://learn.adafruit.com/bluefruit-nrf52-feather-learning-guide Page 97 of 158

Example
The following example declares a HRM (Heart Rate Monitor) service, and assigns some characteristics to it:
BLEUuid uuid;
static BLEService* lastService;
BLEService(void);
BLEService(uint16_t uuid16);
BLEService(uint8_t const uuid128[]);
void setUuid(uint16_t uuid16);
void setUuid(uint8_t const uuid128[]);
virtual err_t begin(void);
Note that this example code is incomplete. For the full example open the 'custom_hrm' example that is part
of the nRF52 BSP! The code below is for illustration purposes only.
/* HRM Service Definitions
* Heart Rate Monitor Service: 0x180D
* Heart Rate Measurement Char: 0x2A37
* Body Sensor Location Char: 0x2A38
*/
BLEService hrms = BLEService(UUID16_SVC_HEART_RATE);
BLECharacteristic hrmc = BLECharacteristic(UUID16_CHR_HEART_RATE_MEASUREMENT);
BLECharacteristic bslc = BLECharacteristic(UUID16_CHR_BODY_SENSOR_LOCATION);
void setupHRM(void)
{
// Configure the Heart Rate Monitor service
// See: https://www.bluetooth.com/specifications/gatt/viewer?attributeXmlFile=org.bluetooth.service.heart_rate.xml
// Supported Characteristics:
// Name UUID Requirement Properties
// ---------------------------- ------ ----------- ----------
// Heart Rate Measurement 0x2A37 Mandatory Notify
// Body Sensor Location 0x2A38 Optional Read
// Heart Rate Control Point 0x2A39 Conditional Write <-- Not used here
hrms.begin();
// Note: You must call .begin() on the BLEService before calling .begin() on
// any characteristic(s) within that service definition.. Calling .begin() on
// a BLECharacteristic will cause it to be added to the last BLEService that
// was 'begin()'ed!
// Configure the Heart Rate Measurement characteristic
// See: https://www.bluetooth.com/specifications/gatt/viewer?attributeXmlFile=org.bluetooth.characteristic.heart_rate_measurement.xml
// Permission = Notify
// Min Len = 1
// Max Len = 8
// B0 = UINT8 - Flag (MANDATORY)
// b5:7 = Reserved
// b4 = RR-Internal (0 = Not present, 1 = Present)
// b3 = Energy expended status (0 = Not present, 1 = Present)
// b1:2 = Sensor contact status (0+1 = Not supported, 2 = Supported but contact not detected, 3 = Supported and detected)
© Adafruit Industries https://learn.adafruit.com/bluefruit-nrf52-feather-learning-guide Page 98 of 158

// b1:2 = Sensor contact status (0+1 = Not supported, 2 = Supported but contact not detected, 3 = Supported and detected)
// b0 = Value format (0 = UINT8, 1 = UINT16)
// B1 = UINT8 - 8-bit heart rate measurement value in BPM
// B2:3 = UINT16 - 16-bit heart rate measurement value in BPM
// B4:5 = UINT16 - Energy expended in joules
// B6:7 = UINT16 - RR Internal (1/1024 second resolution)
hrmc.setProperties(CHR_PROPS_NOTIFY);
hrmc.setPermission(SECMODE_OPEN, SECMODE_NO_ACCESS);
hrmc.setFixedLen(2);
hrmc.setCccdWriteCallback(cccd_callback); // Optionally capture CCCD updates
hrmc.begin();
uint8_t hrmdata[2] = { 0b00000110, 0x40 }; // Set the characteristic to use 8-bit values, with the sensor connected and detected
hrmc.notify(hrmdata, 2); // Use .notify instead of .write!
// Configure the Body Sensor Location characteristic
// See: https://www.bluetooth.com/specifications/gatt/viewer?attributeXmlFile=org.bluetooth.characteristic.body_sensor_location.xml
// Permission = Read
// Min Len = 1
// Max Len = 1
// B0 = UINT8 - Body Sensor Location
// 0 = Other
// 1 = Chest
// 2 = Wrist
// 3 = Finger
// 4 = Hand
// 5 = Ear Lobe
// 6 = Foot
// 7:255 = Reserved
bslc.setProperties(CHR_PROPS_READ);
bslc.setPermission(SECMODE_OPEN, SECMODE_NO_ACCESS);
bslc.setFixedLen(1);
bslc.begin();
bslc.write8(2); // Set the characteristic to 'Wrist' (2)
}
void cccd_callback(BLECharacteristic& chr, uint16_t cccd_value)
{
// Display the raw request packet
Serial.print("CCCD Updated: ");
//Serial.printBuffer(request->data, request->len);
Serial.print(cccd_value);
Serial.println("");
// Check the characteristic this CCCD update is associated with in case
// this handler is used for multiple CCCD records.
if (chr.uuid == hrmc.uuid) {
if (chr.notifyEnabled()) {
Serial.println("Heart Rate Measurement 'Notify' enabled");
} else {
Serial.println("Heart Rate Measurement 'Notify' disabled");
}
}
}
© Adafruit Industries https://learn.adafruit.com/bluefruit-nrf52-feather-learning-guide Page 99 of 158

BLECharacteristic
This base class is used when defining custom BLE GATT characteristics, and is used throughput the Adafruit Bluefruit
nRF52 API and helper classes.
Unless you are implementing a custom GATT service and characteristic, you normally won't use this base class
directly, and would instantiate and call a higher level helper service or characteristic included in the Bluefruit nRF52
API.
Basic Usage
There are two main steps to using the BLECharacteristic class.
First, you need to declare and instantiate your BLECharacteristic class with a 16-bit or 128-bit UUID:
Then you need to set the relevant properties for the characteristic, with the following values at minimum:
.setProperties can be set to one or more of the following macros, which correspond to a single bit in the eight bit
'properties' field for the characteristic definition:
CHR_PROPS_BROADCAST = bit(0),
CHR_PROPS_READ = bit(1),
CHR_PROPS_WRITE_WO_RESP = bit(2),
CHR_PROPS_WRITE = bit(3),
CHR_PROPS_NOTIFY = bit(4),
CHR_PROPS_INDICATE = bit(5)
.setPermission sets the security level for the characteristic, where the first value sets the read permissions, and
the second value sets the write permissions, where both fields can have one of the following values:
SECMODE_NO_ACCESS = 0x00,
SECMODE_OPEN = 0x11,
SECMODE_ENC_NO_MITM = 0x21,
SECMODE_ENC_WITH_MITM = 0x31,
SECMODE_SIGNED_NO_MITM = 0x12,
SECMODE_SIGNED_WITH_MITM = 0x22
.setFixedLen() indicates how many bytes this characteristic has. For characteristics that use 'notify' or 'indicate'
this value can be from 1..20, other characteristic types can be set from 1..512 and values >20 bytes will be sent
across multiple 20 byte packets. If the characteristic has a variable len, you set the .setMaxLen() value to the
The Bluefruit nRF52 Feather codebase is in an early BETA stage and is undergoing active development
based on customer feedback and testing. As such, the class documentation here is incomplete, and you
should consult the Github repo for the latest code and API developments: https://goo.gl/LdEx62
BLECharacteristic myChar = BLECharacteristic(0xABCD);
myChar.setProperties(CHR_PROPS_READ);
myChar.setPermission(SECMODE_OPEN, SECMODE_NO_ACCESS);
myChar.setFixedLen(1); // Alternatively .setMaxLen(uint16_t len)
myChar.begin();
© Adafruit Industries https://learn.adafruit.com/bluefruit-nrf52-feather-learning-guide Page 100 of 158

maximum value it will hold (up to 20 bytes).
.begin() will cause this characteristic to be added to the last BLEService that had it's .begin() method called.
Order of Operations (Important!)
One very important thing to take into consideration when working with BLEService and BLECharacteristic, is that any
BLECharacteristic will automatically be added to the last BLEService that had it's `.begin()` function called. As such, you
must call yourService.begin() before adding any characteristics!
See the example at the bottom of this page for a concrete example of how this works in practice.
API
BLECharacteristic has the following overall class structure:
This documentation may be slightly out of date as bugs are fixed, and the API develops. You should always
consult the Github repo for the definitive latest code release and class definitions!
/*--------- Callback Signatures ----------*/
typedef void (*read_authorize_cb_t) (BLECharacteristic& chr, ble_gatts_evt_read_t * request);
typedef void (*write_authorize_cb_t) (BLECharacteristic& chr, ble_gatts_evt_write_t* request);
typedef void (*write_cb_t) (BLECharacteristic& chr, uint8_t* data, uint16_t len, uint16_t offset
typedef void (*write_cccd_cb_t) (BLECharacteristic& chr, uint16_t value);
BLEUuid uuid;
// Constructors
BLECharacteristic(void);
BLECharacteristic(BLEUuid bleuuid);
// Destructor
virtual ~BLECharacteristic();
BLEService& parentService(void);
void setTempMemory(void);
/*------------- Configure -------------*/
void setUuid(BLEUuid bleuuid);
void setProperties(uint8_t prop);
void setPermission(BleSecurityMode read_perm, BleSecurityMode write_perm);
void setMaxLen(uint16_t max_len);
void setFixedLen(uint16_t fixed_len);
/*------------- Descriptors -------------*/
void setUserDescriptor(const char* descriptor); // aka user descriptor
void setReportRefDescriptor(uint8_t id, uint8_t type); // TODO refactor to use addDescriptor()
void setPresentationFormatDescriptor(uint8_t type, int8_t exponent, uint16_t unit, uint8_t name_space = 1
/*------------- Callbacks -------------*/
void setWriteCallback (write_cb_t fp);
void setCccdWriteCallback (write_cccd_cb_t fp);
void setReadAuthorizeCallback(read_authorize_cb_t fp);
void setWriteAuthorizeCallbak(write_authorize_cb_t fp);
virtual err_t begin(void);
© Adafruit Industries https://learn.adafruit.com/bluefruit-nrf52-feather-learning-guide Page 101 of 158
Example
The following example configures an instance of the Heart Rate Monitor (HRM) Service and it's related characteristics:
virtual err_t begin(void);
// Add Descriptor function must be called right after begin()
err_t addDescriptor(BLEUuid bleuuid, void const * content, uint16_t len, BleSecurityMode read_perm = SECMODE_OPEN
ble_gatts_char_handles_t handles(void);
/*------------- Write -------------*/
uint16_t write(const void* data, uint16_t len);
uint16_t write(const char* str);
uint16_t write8 (uint8_t num);
uint16_t write16 (uint16_t num);
uint16_t write32 (uint32_t num);
uint16_t write32 (int num);
/*------------- Read -------------*/
uint16_t read(void* buffer, uint16_t bufsize);
uint8_t read8 (void);
uint16_t read16(void);
uint32_t read32(void);
/*------------- Notify -------------*/
bool notifyEnabled(void);
bool notify(const void* data, uint16_t len);
bool notify(const char* str);
bool notify8 (uint8_t num);
bool notify16 (uint16_t num);
bool notify32 (uint32_t num);
bool notify32 (int num);
Note that this example code is incomplete. For the full example open the 'custom_hrm' example that is part
of the nRF52 BSP! The code below is for illustration purposes only.
/* HRM Service Definitions
* Heart Rate Monitor Service: 0x180D
* Heart Rate Measurement Char: 0x2A37
* Body Sensor Location Char: 0x2A38
*/
BLEService hrms = BLEService(UUID16_SVC_HEART_RATE);
BLECharacteristic hrmc = BLECharacteristic(UUID16_CHR_HEART_RATE_MEASUREMENT);
BLECharacteristic bslc = BLECharacteristic(UUID16_CHR_BODY_SENSOR_LOCATION);
void setupHRM(void)
{
// Configure the Heart Rate Monitor service
// See: https://www.bluetooth.com/specifications/gatt/viewer?attributeXmlFile=org.bluetooth.service.heart_rate.xml
// Supported Characteristics:
© Adafruit Industries https://learn.adafruit.com/bluefruit-nrf52-feather-learning-guide Page 102 of 158

// Supported Characteristics:
// Name UUID Requirement Properties
// ---------------------------- ------ ----------- ----------
// Heart Rate Measurement 0x2A37 Mandatory Notify
// Body Sensor Location 0x2A38 Optional Read
// Heart Rate Control Point 0x2A39 Conditional Write <-- Not used here
hrms.begin();
// Note: You must call .begin() on the BLEService before calling .begin() on
// any characteristic(s) within that service definition.. Calling .begin() on
// a BLECharacteristic will cause it to be added to the last BLEService that
// was 'begin()'ed!
// Configure the Heart Rate Measurement characteristic
// See: https://www.bluetooth.com/specifications/gatt/viewer?attributeXmlFile=org.bluetooth.characteristic.heart_rate_measurement.xml
// Permission = Notify
// Min Len = 1
// Max Len = 8
// B0 = UINT8 - Flag (MANDATORY)
// b5:7 = Reserved
// b4 = RR-Internal (0 = Not present, 1 = Present)
// b3 = Energy expended status (0 = Not present, 1 = Present)
// b1:2 = Sensor contact status (0+1 = Not supported, 2 = Supported but contact not detected, 3 = Supported and detected)
// b0 = Value format (0 = UINT8, 1 = UINT16)
// B1 = UINT8 - 8-bit heart rate measurement value in BPM
// B2:3 = UINT16 - 16-bit heart rate measurement value in BPM
// B4:5 = UINT16 - Energy expended in joules
// B6:7 = UINT16 - RR Internal (1/1024 second resolution)
hrmc.setProperties(CHR_PROPS_NOTIFY);
hrmc.setPermission(SECMODE_OPEN, SECMODE_NO_ACCESS);
hrmc.setFixedLen(2);
hrmc.setCccdWriteCallback(cccd_callback); // Optionally capture CCCD updates
hrmc.begin();
uint8_t hrmdata[2] = { 0b00000110, 0x40 }; // Set the characteristic to use 8-bit values, with the sensor connected and detected
hrmc.notify(hrmdata, 2); // Use .notify instead of .write!
// Configure the Body Sensor Location characteristic
// See: https://www.bluetooth.com/specifications/gatt/viewer?attributeXmlFile=org.bluetooth.characteristic.body_sensor_location.xml
// Permission = Read
// Min Len = 1
// Max Len = 1
// B0 = UINT8 - Body Sensor Location
// 0 = Other
// 1 = Chest
// 2 = Wrist
// 3 = Finger
// 4 = Hand
// 5 = Ear Lobe
// 6 = Foot
// 7:255 = Reserved
bslc.setProperties(CHR_PROPS_READ);
bslc.setPermission(SECMODE_OPEN, SECMODE_NO_ACCESS);
bslc.setFixedLen(1);
bslc.begin();
bslc.write8(2); // Set the characteristic to 'Wrist' (2)
}
void cccd_callback(BLECharacteristic& chr, uint16_t cccd_value)
{
// Display the raw request packet
© Adafruit Industries https://learn.adafruit.com/bluefruit-nrf52-feather-learning-guide Page 103 of 158
Serial.print("CCCD Updated: ");
//Serial.printBuffer(request->data, request->len);
Serial.print(cccd_value);
Serial.println("");
// Check the characteristic this CCCD update is associated with in case
// this handler is used for multiple CCCD records.
if (chr.uuid == hrmc.uuid) {
if (chr.notifyEnabled()) {
Serial.println("Heart Rate Measurement 'Notify' enabled");
} else {
Serial.println("Heart Rate Measurement 'Notify' disabled");
}
}
}
© Adafruit Industries https://learn.adafruit.com/bluefruit-nrf52-feather-learning-guide Page 104 of 158
BLEDiscovery
BLEDiscovery is a helper class to make finding characteristics on a Gatt server (hosted on a BLE peripheral) easier. For
service discovery, the BLEClientService's discover() API must be used, as shown below:
API
This page is a work in progress as the API is changing as we migrate to S132v5 and add better Central mode
support.
BLEDiscovery(void); // Constructor
void begin(void);
bool begun(void);
void setHandleRange(ble_gattc_handle_range_t handle_range);
ble_gattc_handle_range_t getHandleRange(void);
uint8_t discoverCharacteristic(uint16_t conn_handle, BLEClientCharacteristic* chr[], uint8_t count);
uint8_t discoverCharacteristic(uint16_t conn_handle, BLEClientCharacteristic& chr1);
uint8_t discoverCharacteristic(uint16_t conn_handle, BLEClientCharacteristic& chr1, BLEClientCharacteristic
uint8_t discoverCharacteristic(uint16_t conn_handle, BLEClientCharacteristic& chr1, BLEClientCharacteristic
uint8_t discoverCharacteristic(uint16_t conn_handle, BLEClientCharacteristic& chr1, BLEClientCharacteristic
uint8_t discoverCharacteristic(uint16_t conn_handle, BLEClientCharacteristic& chr1, BLEClientCharacteristic
For concrete examples of how to use this API see the 'Central' folder in the examples that are part of the
BSP.
© Adafruit Industries https://learn.adafruit.com/bluefruit-nrf52-feather-learning-guide Page 105 of 158
BLEDis
This helper class acts as a wrapper for the Bluetooth Device Information Service (0x180A). This official GATT service
allows you to publish basic information about your device in a generic manner.
The Bluefruit BLEDis helper class exposes the following characteristics:
Model Number String (0x2A24), exposed via .setModel(const char*)
Serial Number String (0x2A25), private
Firmware Revision String (0x2A26), private
Hardware Revision String (0x2A27), exposed via .setHardwareRev(const char*)
Software Revision String (0x2A28), exposed via .setSoftwareRev(const char*)
Manufacturer Name String (0x2A29), exposed via .setManufacturer(const char*)
The Serial Number String is private and is populated with a unique device ID that nRF52832 SoCs are programmed
with during manufacturing.
The Firmware Revision String is also private and is populated with the following fields (to help us track issues and offer
better feedback in the support forums):
Softdevice Name (Sxxx)
Softdevice Version (x.x.x)
Bootloader Version (x.x.x)
The remaining characteristics are all public and can be set to an value (up to 20 chars in length) using the appropriate
helper function, but they have the following default values:
Model Number String: Bluefruit Feather 52
Hardware Revision String: NULL
Software Revision String: The nRF52 BSP version number
Manufacturer Name String: Adafruit Industries
Setting a public value to NULL will prevent the characteristic from being present in the DIS service.
API
The following functions and constructors are defined in the BLEDis class:
The Bluefruit nRF52 Feather codebase is in an early BETA stage and is undergoing active development
based on customer feedback and testing. As such, the class documentation here is incomplete, and you
should consult the Github repo for the latest code and API developments: https://goo.gl/LdEx62
Note: The Softdevice and Bootloader fields are separated by a single comma, meaning the final output will
resemble the following string: 'S132 2.0.1, 0.5.0'
© Adafruit Industries https://learn.adafruit.com/bluefruit-nrf52-feather-learning-guide Page 106 of 158

The individual characteristic values are set via the .set*() functions above, and when all values have been set you call
the .begin() function to add the service to the device's internal GATT registry.
Example
The following bare bones examples show how to setup the device information service with user-configurable strings
for values:
BLEDis(void);
void setModel(const char* model);
void setHardwareRev(const char* hw_rev);
void setSoftwareRev(const char* sw_rev);
void setManufacturer(const char* manufacturer);
err_t begin(void);
#include <bluefruit.h>
BLEDis bledis;
void setup()
{
Serial.begin(115200);
Serial.println("Bluefruit52 DIS Example");
Bluefruit.begin();
Bluefruit.setName("Bluefruit52");
// Configure and Start Device Information Service
bledis.setManufacturer("Adafruit Industries");
bledis.setModel("Bluefruit Feather52");
bledis.begin();
// Set up Advertising Packet
setupAdv();
// Start Advertising
Bluefruit.Advertising.start();
}
void setupAdv(void)
{
Bluefruit.Advertising.addFlags(BLE_GAP_ADV_FLAGS_LE_ONLY_GENERAL_DISC_MODE);
Bluefruit.Advertising.addTxPower();
// There isn't enough room in the advertising packet for the
// name so we'll place it on the secondary Scan Response packet
Bluefruit.ScanResponse.addName();
}
void loop()
{
}
© Adafruit Industries https://learn.adafruit.com/bluefruit-nrf52-feather-learning-guide Page 107 of 158


BLEUart
BLEUart is a wrapper class for NUS (Nordic UART Service), which is a proprietary service defined by Nordic
Semiconductors that we use as a baseline transport mechanism between Bluefruit modules and our mobile and
desktop Bluefruit LE Connect applications. You can use it to easily send ASCII or binary data in both directions,
between the peripheral and the central device.
API
BLEUart has the following public API:
Example
The following example shows how to use the BLEUart helper class.
This example may be out of date, and you should always consult the latest example code in the nRF52 BSP!
The Bluefruit nRF52 Feather codebase is in an early BETA stage and is undergoing active development
based on customer feedback and testing. As such, the class documentation here is incomplete, and you
should consult the Github repo for the latest code and API developments: https://goo.gl/LdEx62
// RX Callback signature (fires when data was written by the central)
typedef void (*rx_callback_t) (void);
// Constructor
BLEUart(uint16_t fifo_depth = BLE_UART_DEFAULT_FIFO_DEPTH);
virtual err_t begin(void);
bool notifyEnabled(void);
void setRxCallback( rx_callback_t fp);
// Stream API
virtual int read ( void );
virtual int read ( uint8_t * buf, size_t size );
virtual size_t write ( uint8_t b );
virtual size_t write ( const uint8_t *content, size_t len );
virtual int available ( void );
virtual int peek ( void );
virtual void flush ( void );
// Pull in write(str) and write(buf, size) from Print
using Print::write;
#include <bluefruit.h>
BLEDis bledis;
BLEUart bleuart;
BLEBas blebas;
#define STATUS_LED (17)
#define BLINKY_MS (2000)
© Adafruit Industries https://learn.adafruit.com/bluefruit-nrf52-feather-learning-guide Page 109 of 158

uint32_t blinkyms;
void setup()
{
Serial.begin(115200);
Serial.println("Bluefruit52 BLEUART Example");
// Setup LED pins and reset blinky counter
pinMode(STATUS_LED, OUTPUT);
blinkyms = millis();
// Setup the BLE LED to be enabled on CONNECT
// Note: This is actually the default behaviour, but provided
// here in case you want to control this manually via PIN 19
Bluefruit.autoConnLed(true);
Bluefruit.begin();
Bluefruit.setName("Bluefruit52");
Bluefruit.setConnectCallback(connect_callback);
Bluefruit.setDisconnectCallback(disconnect_callback);
// Configure and Start Device Information Service
bledis.setManufacturer("Adafruit Industries");
bledis.setModel("Bluefruit Feather52");
bledis.begin();
// Configure and Start BLE Uart Service
bleuart.begin();
// Start BLE Battery Service
blebas.begin();
blebas.update(100);
// Set up Advertising Packet
setupAdv();
// Start Advertising
Bluefruit.Advertising.start();
}
void setupAdv(void)
{
Bluefruit.Advertising.addFlags(BLE_GAP_ADV_FLAGS_LE_ONLY_GENERAL_DISC_MODE);
Bluefruit.Advertising.addTxPower();
// Include bleuart 128-bit uuid
Bluefruit.Advertising.addService(bleuart);
// There is no room for Name in Advertising packet
// Use Scan response for Name
Bluefruit.ScanResponse.addName();
}
void loop()
{
// Blinky!
if (blinkyms+BLINKY_MS < millis()) {
blinkyms = millis();
digitalToggle(STATUS_LED);
© Adafruit Industries https://learn.adafruit.com/bluefruit-nrf52-feather-learning-guide Page 110 of 158

digitalToggle(STATUS_LED);
}
// Forward from Serial to BLEUART
if (Serial.available())
{
// Delay to get enough input data since we have a
// limited amount of space in the transmit buffer
delay(2);
uint8_t buf[64];
int count = Serial.readBytes(buf, sizeof(buf));
bleuart.write( buf, count );
}
// Forward from BLEUART to Serial
if ( bleuart.available() )
{
uint8_t ch;
ch = (uint8_t) bleuart.read();
Serial.write(ch);
}
}
void connect_callback(void)
{
Serial.println("Connected");
}
void disconnect_callback(uint8_t reason)
{
(void) reason;
Serial.println();
Serial.println("Disconnected");
Serial.println("Bluefruit will start advertising again");
}
© Adafruit Industries https://learn.adafruit.com/bluefruit-nrf52-feather-learning-guide Page 111 of 158

BLEClientUart
BLEClientUart is a wrapper class for the client side of the NUS or 'Nordic UART Service' (aka 'BLE UART'). It is only
required when your Bluefruit nRF52 board is acting as Central communicating to other BLE peripherals that expose
the BLEUart service.
API
BLEClientUart has the following public API:
Examples
The following example shows how to use the BLEClientUart helper class.
The Bluefruit nRF52 Feather codebase is in an early BETA stage and is undergoing active development
based on customer feedback and testing. As such, the class documentation here is incomplete, and you
should consult the Github repo for the latest code and API developments: https://goo.gl/LdEx62
// Callback Signatures
typedef void (*rx_callback_t) (BLEClientUart& svc);
BLEClientUart(uint16_t fifo_depth = BLE_UART_DEFAULT_FIFO_DEPTH);
virtual bool begin(void);
virtual bool discover(uint16_t conn_handle);
void setRxCallback( rx_callback_t fp);
bool enableTXD(void);
bool disableTXD(void);
// Stream API
virtual int read ( void );
virtual int read ( uint8_t * buf, size_t size );
int read ( char * buf, size_t size ) { return read( (uint8_t*) buf, size); }
virtual size_t write ( uint8_t b );
virtual size_t write ( const uint8_t *content, size_t len );
virtual int available ( void );
virtual int peek ( void );
virtual void flush ( void );
#include <bluefruit.h>
BLEClientDis clientDis;
BLEClientUart clientUart;
void setup()
{
Serial.begin(115200);
Serial.println("Bluefruit52 Central BLEUART Example");
Serial.println("-----------------------------------\n");
// Initialize Bluefruit with maximum connections as Peripheral = 0, Central = 1
// SRAM usage required by SoftDevice will increase dramatically with number of connections
© Adafruit Industries https://learn.adafruit.com/bluefruit-nrf52-feather-learning-guide Page 112 of 158

// SRAM usage required by SoftDevice will increase dramatically with number of connections
Bluefruit.begin(0, 1);
Bluefruit.setName("Bluefruit52 Central");
// Configure DIS client
clientDis.begin();
// Init BLE Central Uart Serivce
clientUart.begin();
clientUart.setRxCallback(bleuart_rx_callback);
// Increase Blink rate to different from PrPh advertising mode
Bluefruit.setConnLedInterval(250);
// Callbacks for Central
Bluefruit.Central.setConnectCallback(connect_callback);
Bluefruit.Central.setDisconnectCallback(disconnect_callback);
/* Start Central Scanning
* - Enable auto scan if disconnected
* - Interval = 100 ms, window = 80 ms
* - Don't use active scan
* - Start(timeout) with timeout = 0 will scan forever (until connected)
*/
Bluefruit.Scanner.setRxCallback(scan_callback);
Bluefruit.Scanner.restartOnDisconnect(true);
Bluefruit.Scanner.setInterval(160, 80); // in unit of 0.625 ms
Bluefruit.Scanner.useActiveScan(false);
Bluefruit.Scanner.start(0); // // 0 = Don't stop scanning after n seconds
}
/**
* Callback invoked when scanner pick up an advertising data
* @param report Structural advertising data
*/
void scan_callback(ble_gap_evt_adv_report_t* report)
{
// Check if advertising contain BleUart service
if ( Bluefruit.Scanner.checkReportForService(report, clientUart) )
{
Serial.print("BLE UART service detected. Connecting ... ");
// Connect to device with bleuart service in advertising
Bluefruit.Central.connect(report);
}
}
/**
* Callback invoked when an connection is established
* @param conn_handle
*/
void connect_callback(uint16_t conn_handle)
{
Serial.println("Connected");
Serial.print("Dicovering DIS ... ");
if ( clientDis.discover(conn_handle) )
{
Serial.println("Found it");
© Adafruit Industries https://learn.adafruit.com/bluefruit-nrf52-feather-learning-guide Page 113 of 158

Serial.println("Found it");
char buffer[32+1];
// read and print out Manufacturer
memset(buffer, 0, sizeof(buffer));
if ( clientDis.getManufacturer(buffer, sizeof(buffer)) )
{
Serial.print("Manufacturer: ");
Serial.println(buffer);
}
// read and print out Model Number
memset(buffer, 0, sizeof(buffer));
if ( clientDis.getModel(buffer, sizeof(buffer)) )
{
Serial.print("Model: ");
Serial.println(buffer);
}
Serial.println();
}
Serial.print("Discovering BLE Uart Service ... ");
if ( clientUart.discover(conn_handle) )
{
Serial.println("Found it");
Serial.println("Enable TXD's notify");
clientUart.enableTXD();
Serial.println("Ready to receive from peripheral");
}else
{
Serial.println("Found NONE");
// disconect since we couldn't find bleuart service
Bluefruit.Central.disconnect(conn_handle);
}
}
/**
* Callback invoked when a connection is dropped
* @param conn_handle
* @param reason
*/
void disconnect_callback(uint16_t conn_handle, uint8_t reason)
{
(void) conn_handle;
(void) reason;
Serial.println("Disconnected");
}
/**
* Callback invoked when uart received data
* @param uart_svc Reference object to the service where the data
* arrived. In this example it is clientUart
*/
void bleuart_rx_callback(BLEClientUart& uart_svc)
{
© Adafruit Industries https://learn.adafruit.com/bluefruit-nrf52-feather-learning-guide Page 114 of 158

{
Serial.print("[RX]: ");
while ( uart_svc.available() )
{
Serial.print( (char) uart_svc.read() );
}
Serial.println();
}
void loop()
{
if ( Bluefruit.Central.connected() )
{
// Not discovered yet
if ( clientUart.discovered() )
{
// Discovered means in working state
// Get Serial input and send to Peripheral
if ( Serial.available() )
{
delay(2); // delay a bit for all characters to arrive
char str[20+1] = { 0 };
Serial.readBytes(str, 20);
clientUart.print( str );
}
}
}
}
© Adafruit Industries https://learn.adafruit.com/bluefruit-nrf52-feather-learning-guide Page 115 of 158

BLEBeacon
The BLEBeacon helper class allows you to easily configure the nRF52 as a 'Beacon', which uses the advertising packet
to send out a specifically format chunk of data to any devices in listening range.
The following values must be set in order to generate a valid 'Beacon' packet:
Manufacturer ID: A 16-bit value (registered with the Bluetooth SIG!) that identifies the manufacturer.
Major: A 16-bit 'Major' number, used to differentiate beacon nodes.
Minor: A 16-bit 'Minor' number, used to differentiate beacon nodes.
RSSI @ 1M: A signed 8-bit value (int8_t) indicating the RSSI measurement at 1m distance from the node, used to
estimate distance to the beacon itself.
These values can either be set in the constructor, or via the individual functions exposed as part of this helper class.
API
BLEBeacon has the following public API:
In addition to these functions, the BLEAdvertising class (accessible via `Bluefruit.Advertising.*`) exposes the following
function to assign Beacon payload to the advertising payload:
See the example below for a concrete usage example.
Example
The following example will configure the nRF52 to advertise a 'Beacon' payload:
The Bluefruit nRF52 Feather codebase is in an early BETA stage and is undergoing active development
based on customer feedback and testing. As such, the class documentation here is incomplete, and you
should consult the Github repo for the latest code and API developments: https://goo.gl/LdEx62
// Constructors
BLEBeacon(void);
BLEBeacon(uint8_t const uuid128[16]);
BLEBeacon(uint8_t const uuid128[16], uint16_t major, uint16_t minor, int8_t rssi);
// Set the beacon payload values
void setManufacturer(uint16_t manfacturer);
void setUuid(uint8_t const uuid128[16]);
void setMajorMinor(uint16_t major, uint16_t minor);
void setRssiAt1m(int8_t rssi);
// Start advertising
bool start(void);
bool start(BLEAdvertising& adv);
bool setBeacon(BLEBeacon& beacon);
© Adafruit Industries https://learn.adafruit.com/bluefruit-nrf52-feather-learning-guide Page 116 of 158

#include <bluefruit.h>
// Beacon uses the Manufacturer Specific Data field in the advertising
// packet, which means you must provide a valid Manufacturer ID. Update
// the field below to an appropriate value. For a list of valid IDs see:
// https://www.bluetooth.com/specifications/assigned-numbers/company-identifiers
// 0x004C is Apple (for example)
#define MANUFACTURER_ID 0x004C
// AirLocate UUID: E2C56DB5-DFFB-48D2-B060-D0F5A71096E0
uint8_t beaconUuid[16] =
{
0xE2, 0xC5, 0x6D, 0xB5, 0xDF, 0xFB, 0x48, 0xD2,
0xB0, 0x60, 0xD0, 0xF5, 0xA7, 0x10, 0x96, 0xE0,
};
// A valid Beacon packet consists of the following information:
// UUID, Major, Minor, RSSI @ 1M
BLEBeacon beacon(beaconUuid, 0x0001, 0x0000, -54);
void setup()
{
Serial.begin(115200);
Serial.println("Bluefruit52 Beacon Example");
Bluefruit.begin();
Bluefruit.setName("Bluefruit52");
// Manufacturer ID is required for Manufacturer Specific Data
beacon.setManufacturer(MANUFACTURER_ID);
// Setup the advertising packet
setupAdv();
// Start advertising
Bluefruit.Advertising.start();
}
void setupAdv(void)
{
// Set the beacon payload using the BLEBeacon class populated
// earlier in this example
Bluefruit.Advertising.setBeacon(beacon);
// char* adv = Bluefruit.Advertising.getData();
// There is no room left for 'Name' in the advertising packet
// Use the optinal secondary Scan Response packet for 'Name' instead
Bluefruit.ScanResponse.addName();
}
void loop()
{
// Toggle both LEDs every second
digitalToggle(LED_BUILTIN);
delay(1000);
}
© Adafruit Industries https://learn.adafruit.com/bluefruit-nrf52-feather-learning-guide Page 117 of 158
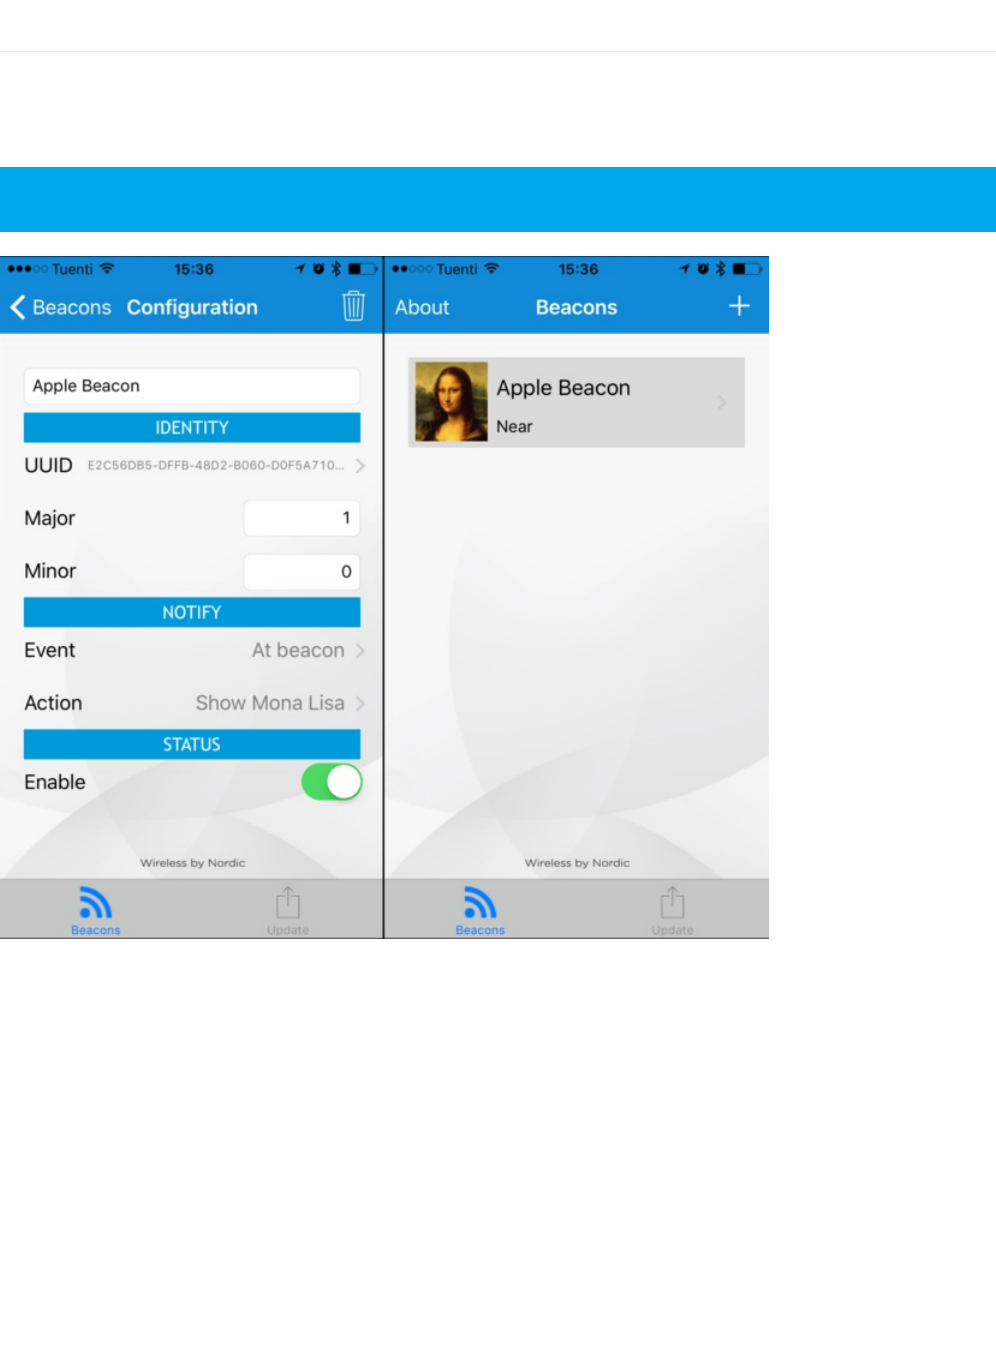
Testing
If you test with the nRF Beacons application (iOS or Android) you can configure the app to look for the UUID,
Manufacturer ID, Major and Minor values you provided, and you should be able to see the beacon, as shown in the two
screenshots below:
Make sure that the UUID, Major and Minor values match or the application won't detect your beacon node!
© Adafruit Industries https://learn.adafruit.com/bluefruit-nrf52-feather-learning-guide Page 118 of 158
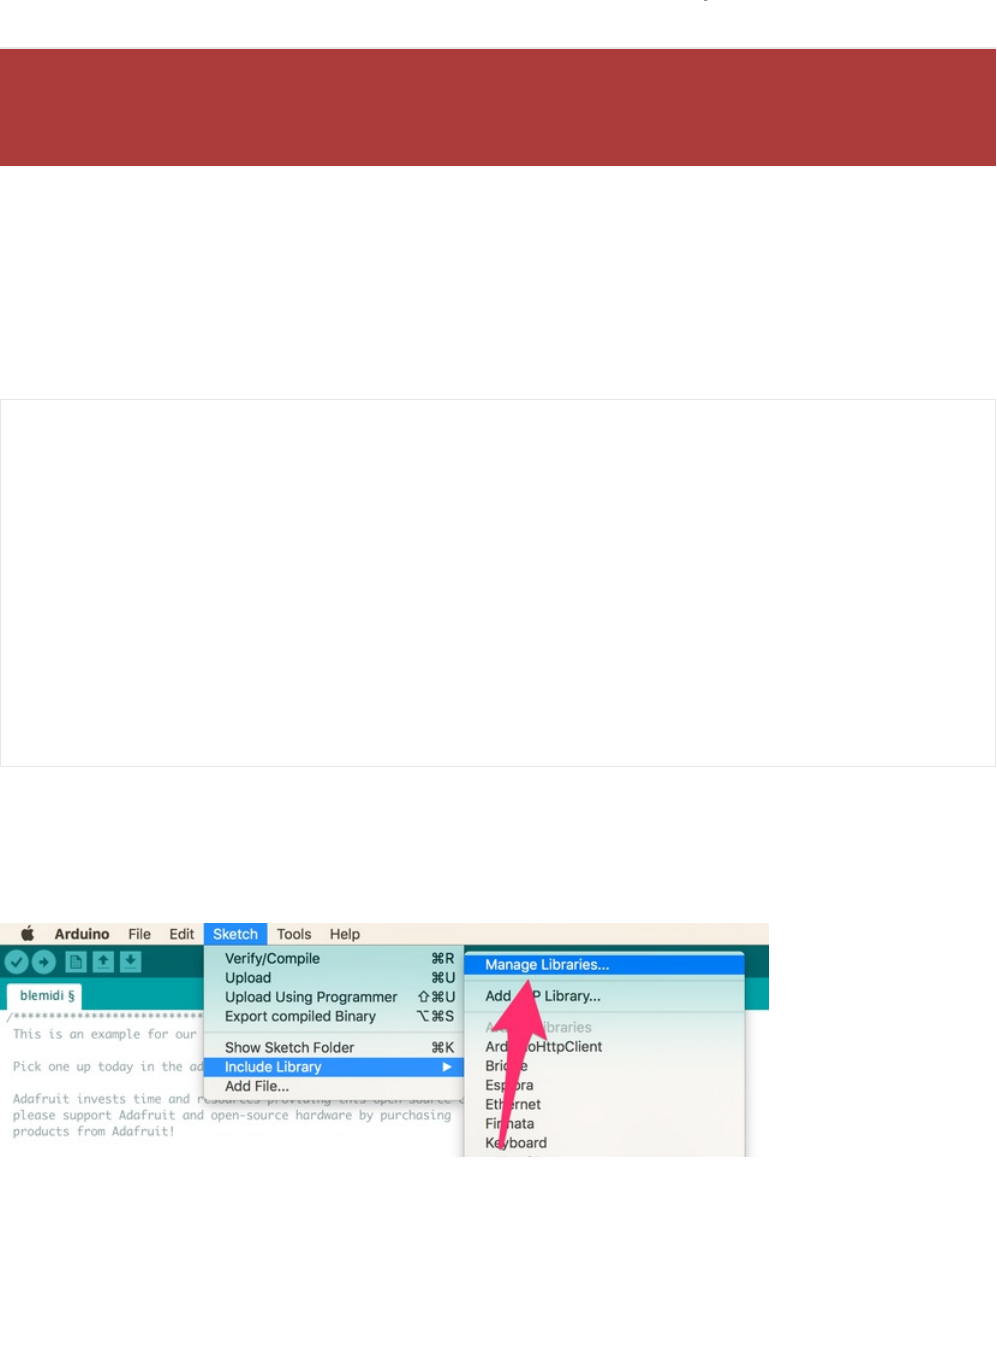
BLEMidi
BLEMidi is a helper class that adds support for sending and receiving MIDI Messages using the MIDI over Bluetooth LE
specification. BLEMidi supports the full standard MIDI protocol (including SysEx messages), and it also can act as the
hardware interface for the Arduino MIDI Library.
API
BLEMidi has the following public API.
Installing the Arduino MIDI Library
BLEMidi is easiest to use when combined with the Arduino MIDI Library. You will need version 4.3.0 or higher installed
before continuing with the example code.
Next, select Communication from the topic dropdown, and enter MIDI Library into the search box. Click the Install
button to install version 4.3.0 or higher of the MIDI Library.
The Bluefruit nRF52 Feather codebase is in an early BETA stage and is undergoing active development
based on customer feedback and testing. As such, the class documentation here is incomplete, and you
should consult the Github repo for the latest code and API developments: https://goo.gl/LdEx62
// Constructor
BLEMidi(uint16_t fifo_depth = 128);
err_t begin (void);
bool notifyEnabled (void);
// Stream API for Arduino MIDI Library Interface
int read (void);
size_t write (uint8_t b);
int available (void);
int peek (void);
void flush (void);
size_t write (const char *str);
size_t write (const uint8_t *buffer, size_t size);
© Adafruit Industries https://learn.adafruit.com/bluefruit-nrf52-feather-learning-guide Page 119 of 158
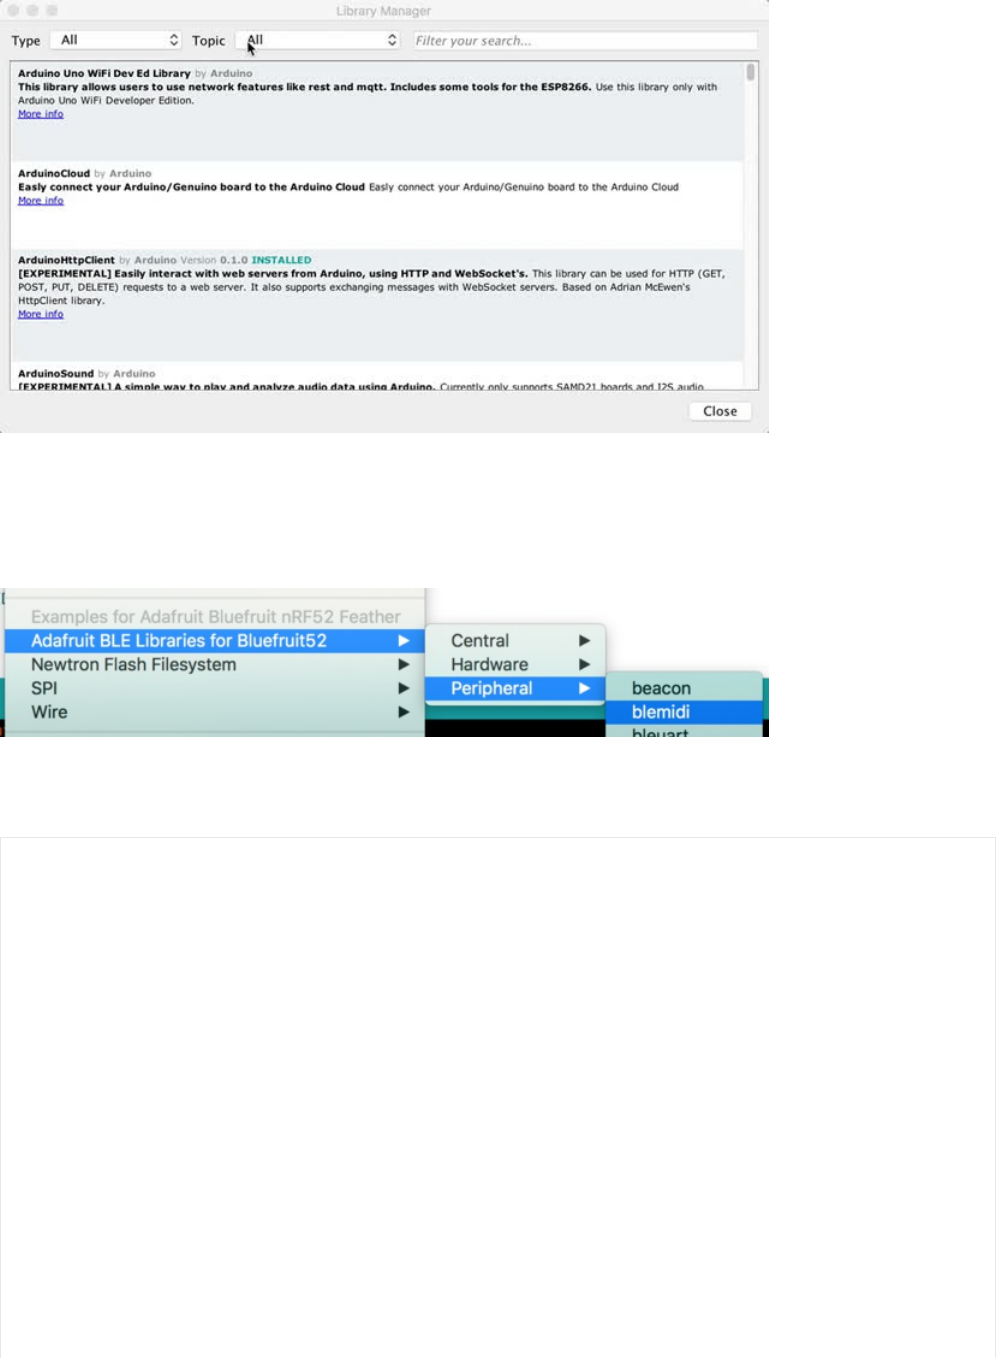
Example
The blemidi example demonstrates how to use the BLEMidi helper class with the Arduino MIDI Library. The example
sends a looping arpeggio, and prints any incoming MIDI note on and note off messages to the Arduino Serial Monitor.
This example may be out of date, and you should always consult the latest example code in the Bluefruit52 example
folder!
/*********************************************************************
This is an example for our nRF52 based Bluefruit LE modules
Pick one up today in the adafruit shop!
Adafruit invests time and resources providing this open source code,
please support Adafruit and open-source hardware by purchasing
products from Adafruit!
MIT license, check LICENSE for more information
All text above, and the splash screen below must be included in
any redistribution
*********************************************************************/
#include <bluefruit.h>
#include <MIDI.h>
BLEDis bledis;
BLEMidi blemidi;
// Create a new instance of the Arduino MIDI Library,
// and attach BluefruitLE MIDI as the transport.
MIDI_CREATE_BLE_INSTANCE(blemidi);
© Adafruit Industries https://learn.adafruit.com/bluefruit-nrf52-feather-learning-guide Page 120 of 158

// Variable that holds the current position in the sequence.
int position = 0;
// Store example melody as an array of note values
byte note_sequence[] = {
74,78,81,86,90,93,98,102,57,61,66,69,73,78,81,85,88,92,97,100,97,92,88,85,81,78,
74,69,66,62,57,62,66,69,74,78,81,86,90,93,97,102,97,93,90,85,81,78,73,68,64,61,
56,61,64,68,74,78,81,86,90,93,98,102
};
void setup()
{
Serial.begin(115200);
Serial.println("Adafruit Bluefruit52 MIDI over Bluetooth LE Example");
Bluefruit.begin();
Bluefruit.setName("Bluefruit52 MIDI");
// Setup the on board blue LED to be enabled on CONNECT
Bluefruit.autoConnLed(true);
// Configure and Start Device Information Service
bledis.setManufacturer("Adafruit Industries");
bledis.setModel("Bluefruit Feather52");
bledis.begin();
// Initialize MIDI, and listen to all MIDI channels
// This will also call blemidi service's begin()
MIDI.begin(MIDI_CHANNEL_OMNI);
// Attach the handleNoteOn function to the MIDI Library. It will
// be called whenever the Bluefruit receives MIDI Note On messages.
MIDI.setHandleNoteOn(handleNoteOn);
// Do the same for MIDI Note Off messages.
MIDI.setHandleNoteOff(handleNoteOff);
// Set General Discoverable Mode flag
Bluefruit.Advertising.addFlags(BLE_GAP_ADV_FLAGS_LE_ONLY_GENERAL_DISC_MODE);
// Advertise TX Power
Bluefruit.Advertising.addTxPower();
// Advertise BLE MIDI Service
Bluefruit.Advertising.addService(blemidi);
// Advertise device name in the Scan Response
Bluefruit.ScanResponse.addName();
// Start Advertising
Bluefruit.Advertising.start();
// Start MIDI read loop
Scheduler.startLoop(midiRead);
}
void handleNoteOn(byte channel, byte pitch, byte velocity)
{
// Log when a note is pressed.
© Adafruit Industries https://learn.adafruit.com/bluefruit-nrf52-feather-learning-guide Page 121 of 158

// Log when a note is pressed.
Serial.printf("Note on: channel = %d, pitch = %d, velocity - %d", channel, pitch, velocity);
Serial.println();
}
void handleNoteOff(byte channel, byte pitch, byte velocity)
{
// Log when a note is released.
Serial.printf("Note off: channel = %d, pitch = %d, velocity - %d", channel, pitch, velocity);
Serial.println();
}
void loop()
{
// Don't continue if we aren't connected.
if (! Bluefruit.connected()) {
return;
}
// Don't continue if the connected device isn't ready to receive messages.
if (! blemidi.notifyEnabled()) {
return;
}
// Setup variables for the current and previous
// positions in the note sequence.
int current = position;
int previous = position - 1;
// If we currently are at position 0, set the
// previous position to the last note in the sequence.
if (previous < 0) {
previous = sizeof(note_sequence) - 1;
}
// Send Note On for current position at full velocity (127) on channel 1.
MIDI.sendNoteOn(note_sequence[current], 127, 1);
// Send Note Off for previous note.
MIDI.sendNoteOff(note_sequence[previous], 0, 1);
// Increment position
position++;
// If we are at the end of the sequence, start over.
if (position >= sizeof(note_sequence)) {
position = 0;
}
delay(286);
}
void midiRead()
{
// Don't continue if we aren't connected.
if (! Bluefruit.connected()) {
return;
}
// Don't continue if the connected device isn't ready to receive messages.
© Adafruit Industries https://learn.adafruit.com/bluefruit-nrf52-feather-learning-guide Page 122 of 158

Usage
You will need to do a small bit of setup on your selected platform to connect to the BLE MIDI enabled Bluefruit52.
Click on a platform below to view BLE MIDI setup instructions for your device:
macOS (OS X)
iOS
Android
Windows
The arpeggio should automatically play once the Bluefruit52 is connected to your software synth. The video below
shows the Bluefruit52 connected to Moog's Animoog on iOS.
// Don't continue if the connected device isn't ready to receive messages.
if (! blemidi.notifyEnabled()) {
return;
}
// read any new MIDI messages
MIDI.read();
}
Note: The board used in the video was a pre-release prototype. The production boards are standard Adafruit
Black.
© Adafruit Industries https://learn.adafruit.com/bluefruit-nrf52-feather-learning-guide Page 123 of 158

BLEHidAdafruit
BLEHidAdafruit allows you to simulate a mouse or keyboard using the HID (Human Interface Device) profile that is part
of the Bluetooth Low Energy standard.
Most modern mobile devices with Bluetooth Low Energy support, and the latest operating systems generally support
Bluetooth Low Energy mice and keyboards out of the box, once you pair your Bluefruit nRF52 Feather and run an
appropriate sketch.
API
The BLEHidAdafruit helper class has the following public API:
Example Sketches
There are a variety of example sketches showing how to use the BLEHidAdafruit class. You can browse the latest
source code on Github with the following links:
The Bluefruit nRF52 Feather codebase is in an early BETA stage and is undergoing active development
based on customer feedback and testing. As such, the class documentation here is incomplete, and you
should consult the Github repo for the latest code and API developments: https://goo.gl/LdEx62
// Constructor
BLEHidAdafruit(void);
// Call this once to start the HID service
virtual err_t begin(void);
// Keyboard
err_t keyboardReport(hid_keyboard_report_t* report);
err_t keyboardReport(uint8_t modifier, uint8_t keycode[6]);
err_t keyboardReport(uint8_t modifier, uint8_t keycode0, uint8_t keycode1=0, uint8_t keycode2=0, uint8_t keycode3
err_t keyPress(char ch);
err_t keyRelease(void);
err_t keySequence(const char* str, int interal=5);
// Consumer Media Keys
err_t consumerReport(uint16_t usage_code);
err_t consumerKeyPress(uint16_t usage_code);
err_t consumerKeyRelease(void);
// Mouse
err_t mouseReport(hid_mouse_report_t* report);
err_t mouseReport(uint8_t buttons, int8_t x, int8_t y, int8_t wheel=0, int8_t pan=0);
err_t mouseButtonPress(uint8_t buttons);
err_t mouseButtonRelease(void);
err_t mouseMove(int8_t x, int8_t y);
err_t mouseScroll(int8_t scroll);
err_t mousePan(int8_t pan);
© Adafruit Industries https://learn.adafruit.com/bluefruit-nrf52-feather-learning-guide Page 124 of 158
hid_keyboard: This example will simulate an HID keyboard, waiting for data to arrive via the nRF52's serial port
(via USB serial), and send that data over the air to the bonded Central device.
hid_mouse: This example will simulate an HID mouse. To use it run the sketch and open the Serial Monitor, then
enter the appropriate characters to move the mouse or trigger/release the mouse buttons.
Bonding HID Devices
In order to use your HID mouse or keyboard, you will first need to bond the two devices. The bonding process involves
the following steps:
The two devices will connect to each other normally
A set of security keys are exchanged between the two devices, and stores in non-volatile memory on each side.
This is to ensure that each side is reasonably confident it is talking to the device it thinks it is for future
connections, and to encrypt over the air communication between the devices (so that people can 'sniff' your
keyboard data, etc.).
On the nRF52 side this key data will be stored in a section of flash memory reserved for this purpose using an
internal file system.
The process of storing these security keys is referred to as bonding, and allows bonded devices to securely
communicate without user interaction in the future.
To cancel the bonding agreement, you can simply delete the keys on the nRF52 via the clearbonds sketch, or
delete the bonding data on your mobile device of computer.
Setting up your Bluefruit device for bonding
To bond an device, run an appropriate HID sketch on the nRF52 to emulate either an HID mouse or an HID keyboard.
In the event that you use the HID mouse example you may need to open the Serial Monitor to use it.
In this example we'll run the hid_keyboard example sketch, flashing it to the nRF52, which should give you the
following results:
If you run into any bonding problems, try running the clearbonds sketch to remove and old bonding data from
local non-volatile memory!
© Adafruit Industries https://learn.adafruit.com/bluefruit-nrf52-feather-learning-guide Page 125 of 158
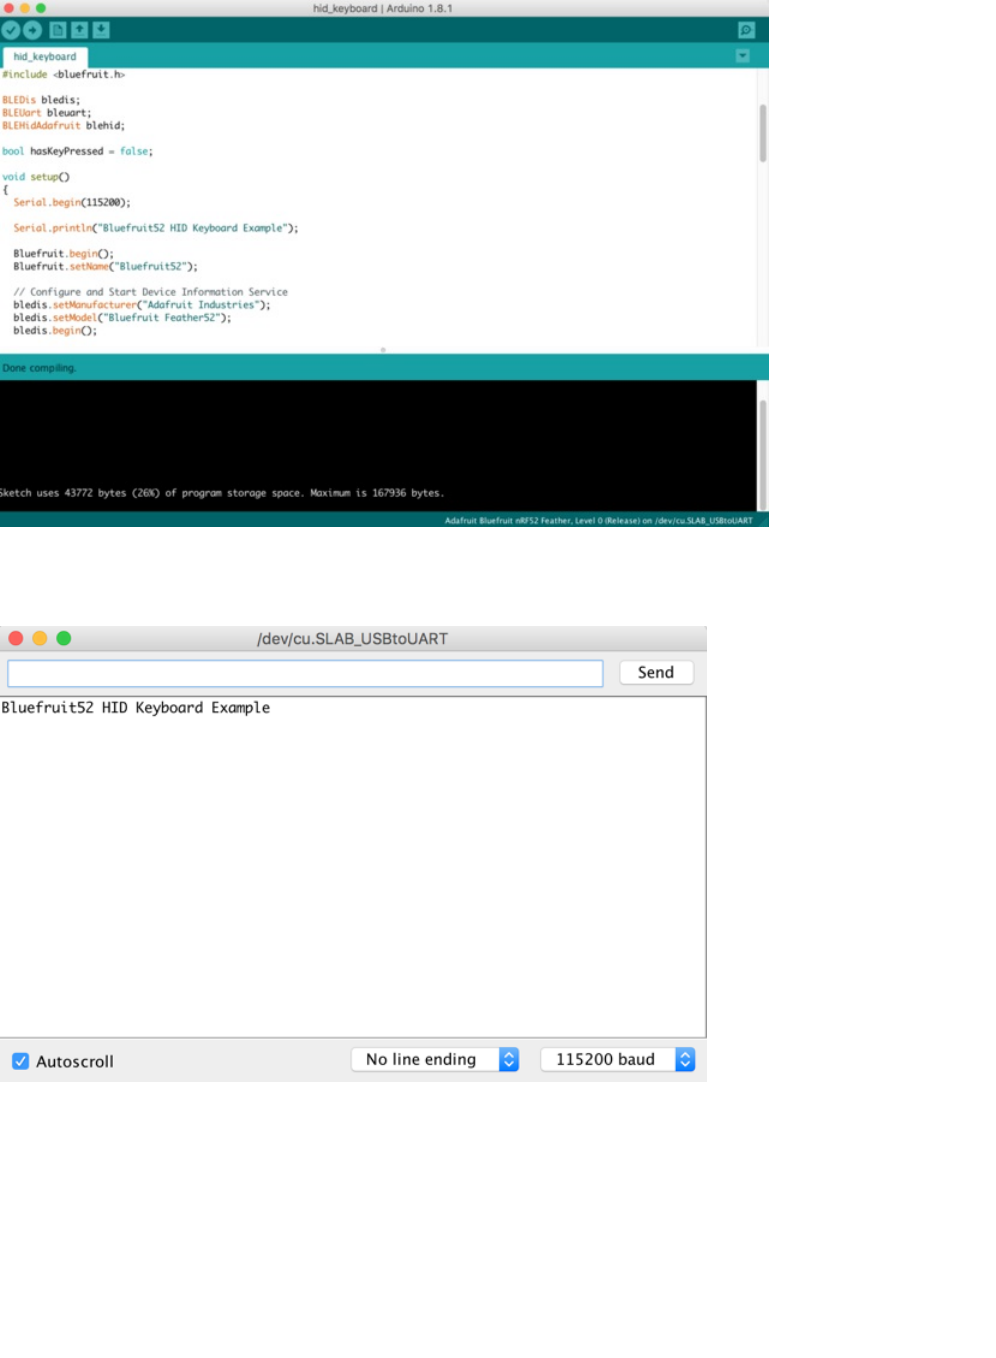
Opening the Serial Monitor will give you the following output (though it may differ depending on the debug level you
have selected):
Bonding on iOS
To bond to an iOS device, make sure the sketch is running (as described above) and go into your Settings app and
Select Bluetooth.
You should see a device at the bottom of this page called Bluefruit52 (this may vary depending on the version of the
sketch you are using!):
© Adafruit Industries https://learn.adafruit.com/bluefruit-nrf52-feather-learning-guide Page 126 of 158
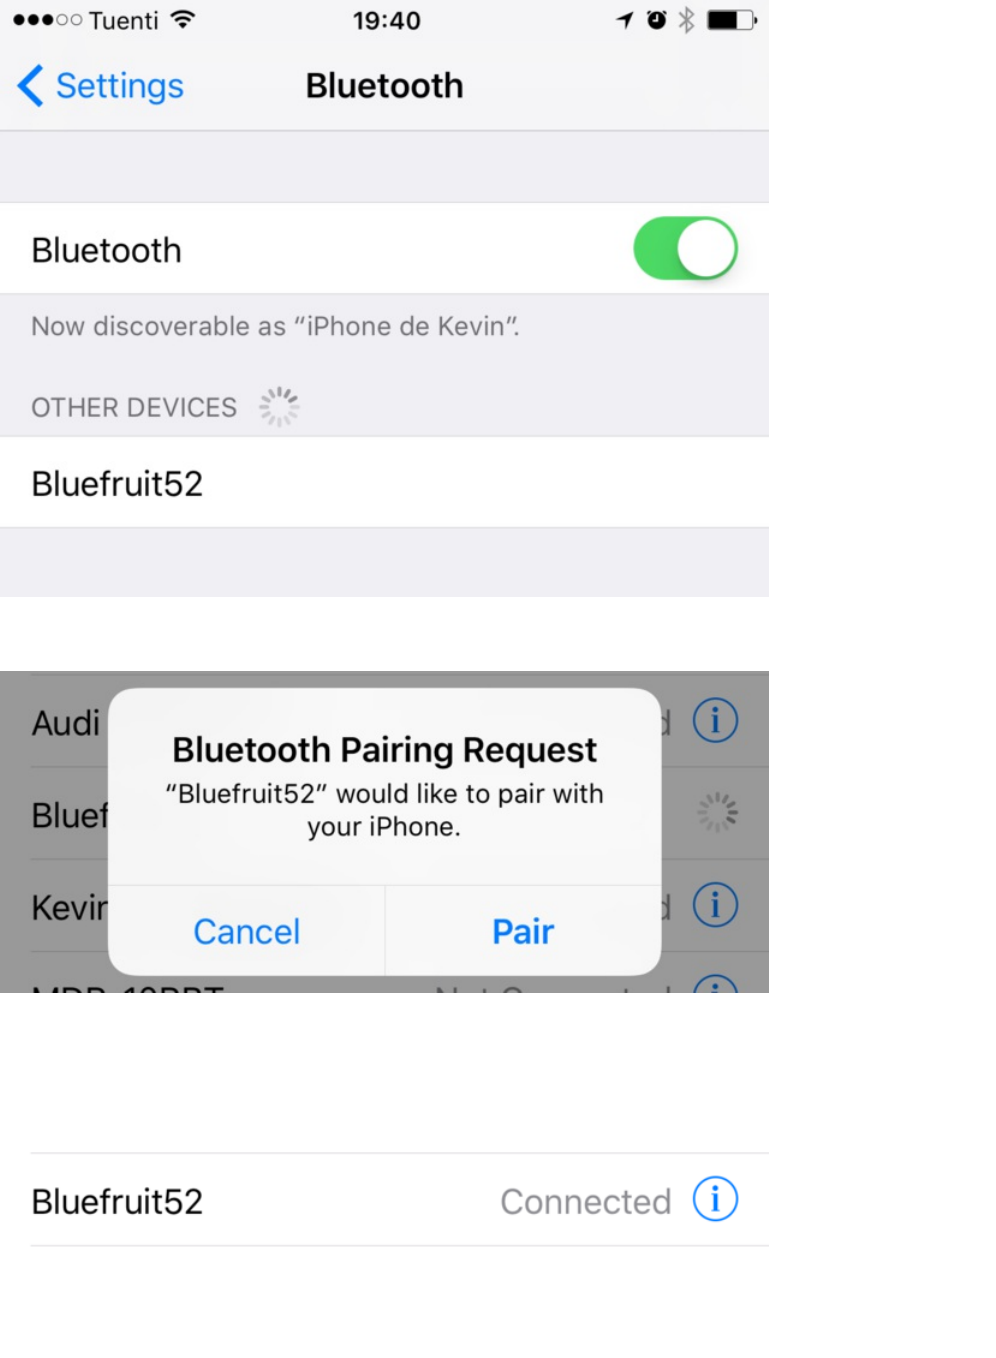
Click the device, and you will get a pairing request like this:
Click the Pair button, and the devices will be paired and bonded, and will automatically connect to each other in the
future.
If everything went will, you will see the device in your MY DEVICES list, as follows:
Testing the HID Keyboard and Bonding
© Adafruit Industries https://learn.adafruit.com/bluefruit-nrf52-feather-learning-guide Page 127 of 158

To test the HID keyboard sketch and bonding process, open the Serial Monitor (or your favorite terminal emulator),
enter some text, and if you are using the Serial Monitor click the Send button. This will send some text over the air to
whatever textbox or text control has focus in your app.
The text will then appear in your mobile app or bonded device.
If the characters don't match exactly what you send, be sure to check your keyboard language settings, since you may
be sending data to a device with a different keyboard setup!
© Adafruit Industries https://learn.adafruit.com/bluefruit-nrf52-feather-learning-guide Page 128 of 158
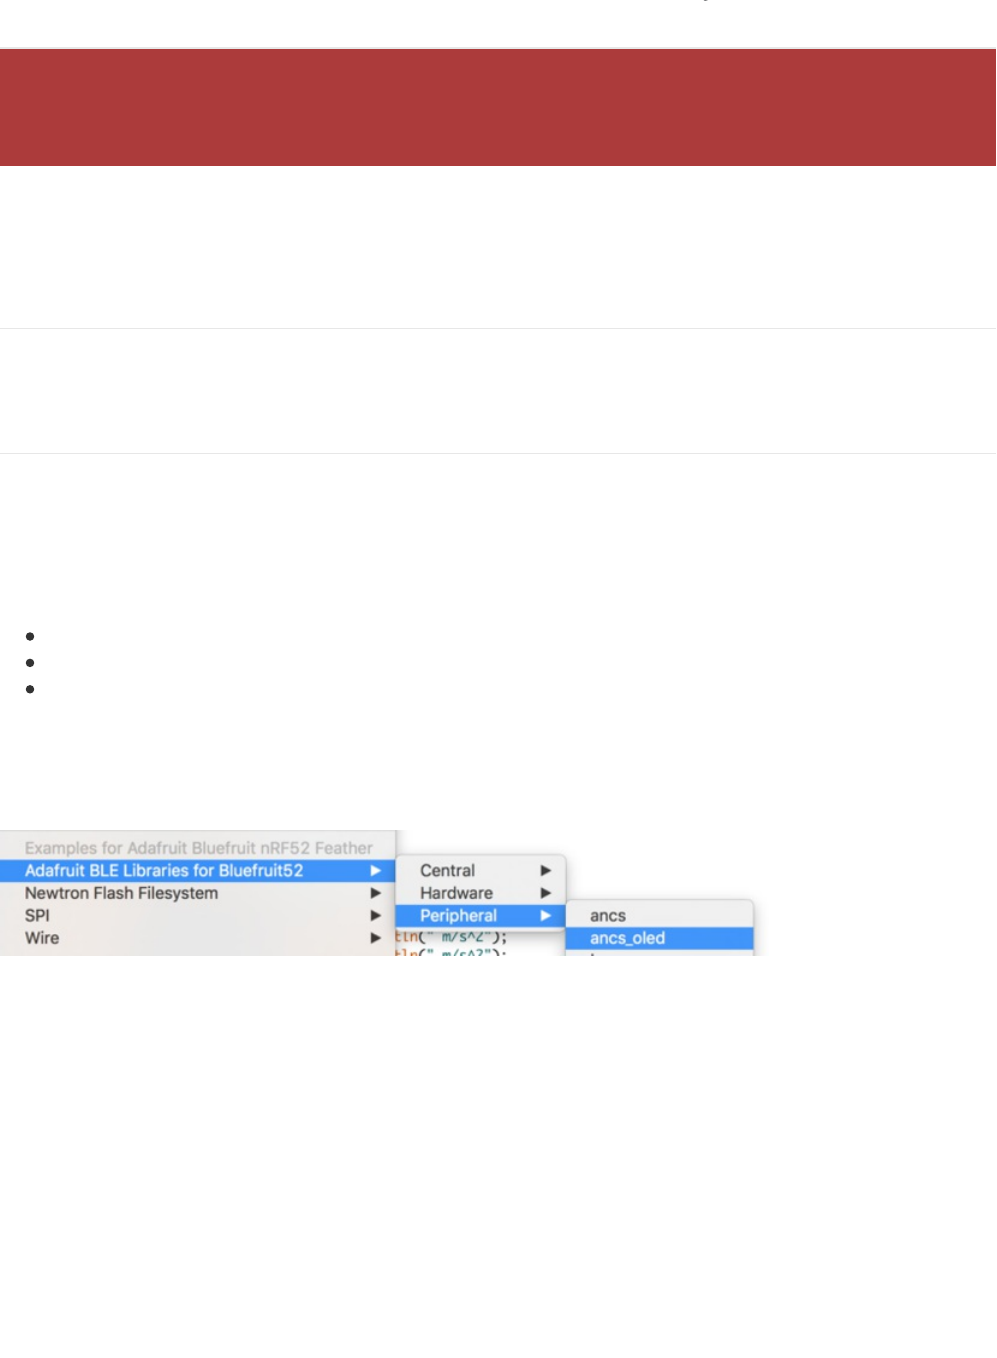
BLEAncs
BLEAncs is a helper class that enables you to receive notifications from the Apple Notification Center Service from
devices such as an iPhone or iPad. It can be used to receive alerts such as incoming or missed calls, email messages,
or most alerts that appear on the mobile device's screen when locked.
API
Because the BLEAncs class is a work in progress, the latest public API for the BLEAncs helper class should be
viewed here.
ANCS OLED Example
The ancs_oled example uses the Adafruit FeatherWing OLED to display any incoming alerts.
Sketch Requirements
In order to use this example sketch the following libraries must be installed on your system:
Adafruit_GFX (Github source)
Adafruit_SSD1306 (Github source)
Version 0.6.0 or higher of the Bluefruit nRF52 BSP
Loading the Sketch
The ancs_oled sketch can be loaded via the examples menu under Peripheral > ancs_oled:
With the sketch loaded, you can build the firmware and then flash it to your device via the Upload button or menu
option:
The Bluefruit nRF52 Feather codebase is in an early BETA stage and is undergoing active development
based on customer feedback and testing. As such, the class documentation here is incomplete, and you
should consult the Github repo for the latest code and API developments: https://goo.gl/LdEx62
© Adafruit Industries https://learn.adafruit.com/bluefruit-nrf52-feather-learning-guide Page 129 of 158

Once the sketch is running on the nRF52 Feather you can proceed with the one-time pairing process, described
below.
Pairing to your Mobile Device
Before you can start receiving notifications, you will need to 'pair' the nRF52 Feather and the mobile device.
The pairing process causes a set of keys to be exchanged and stored on the two devices so that each side knows it is
talking to the same device it originally bonded with, and preventing any devices in the middle from eavesdropping on
potentially sensitive data.
The one-time pairing process is described below, and assumes you are already running the ancs_oled sketch on your
nRF52 device.
1. In the Settings app go to Bluetooth:
Make sure that the Adafruit_SSD1306.h file has the 'SSD1306_128_32' macro enabled. Running the sketch
with 'SSD1306_128_64' set will cause corrupted data to appear on the OLED display.
© Adafruit Industries https://learn.adafruit.com/bluefruit-nrf52-feather-learning-guide Page 130 of 158
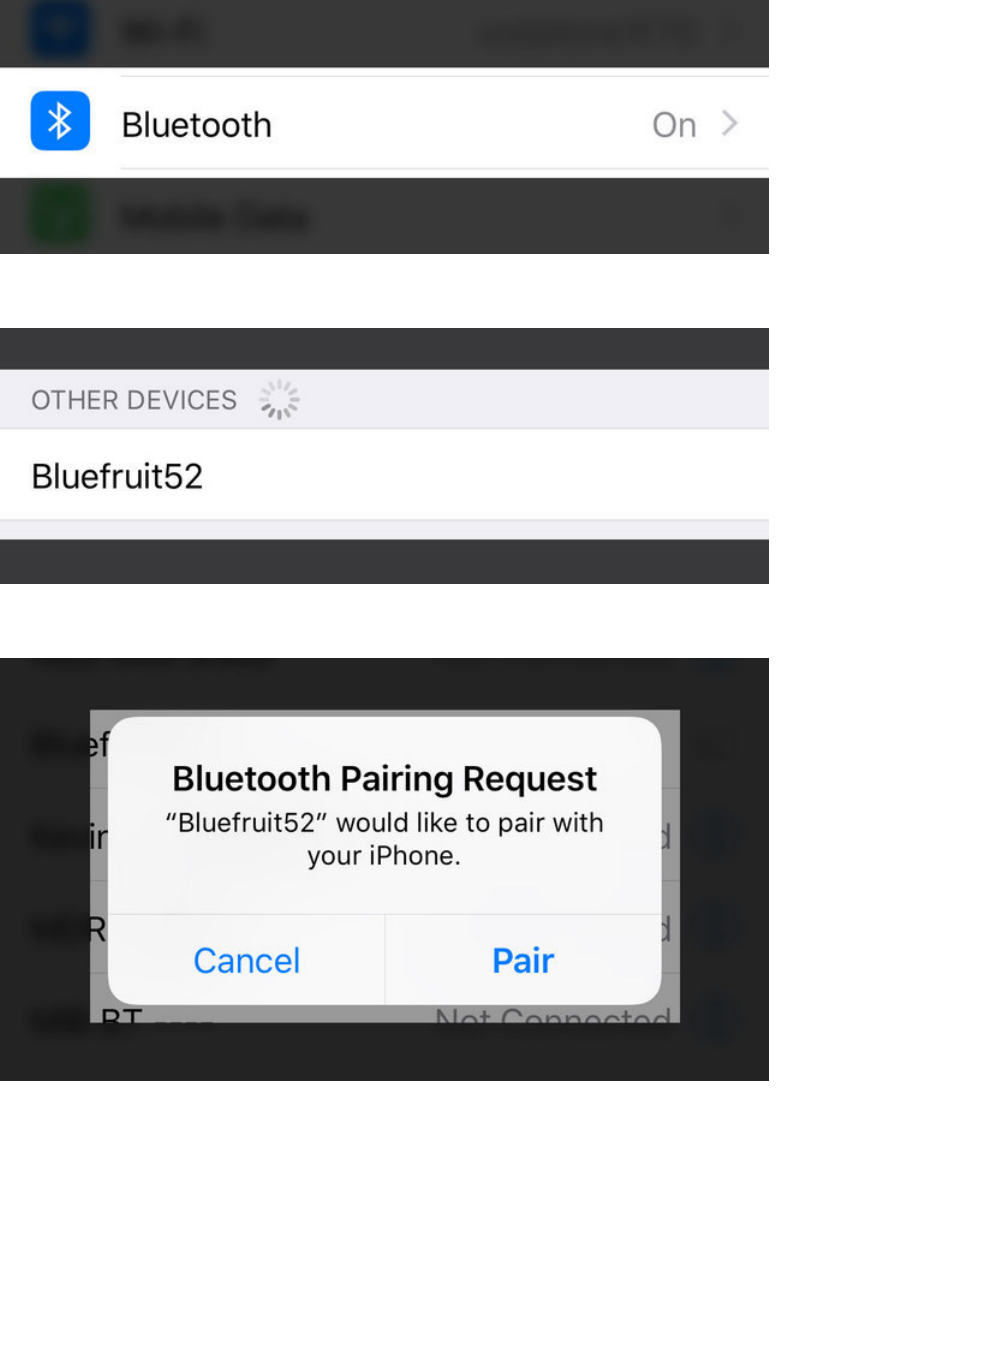
2. Scroll to the bottom of the list of 'My Devices' and click on Bluefruit52 under Other Devices:
3. When the pairing dialog box comes up, click the Pair button:
4. Wait for the pairing process to complete, at which point Bluefruit52 should appear in the My Devices list with
the Connected status:
© Adafruit Industries https://learn.adafruit.com/bluefruit-nrf52-feather-learning-guide Page 131 of 158
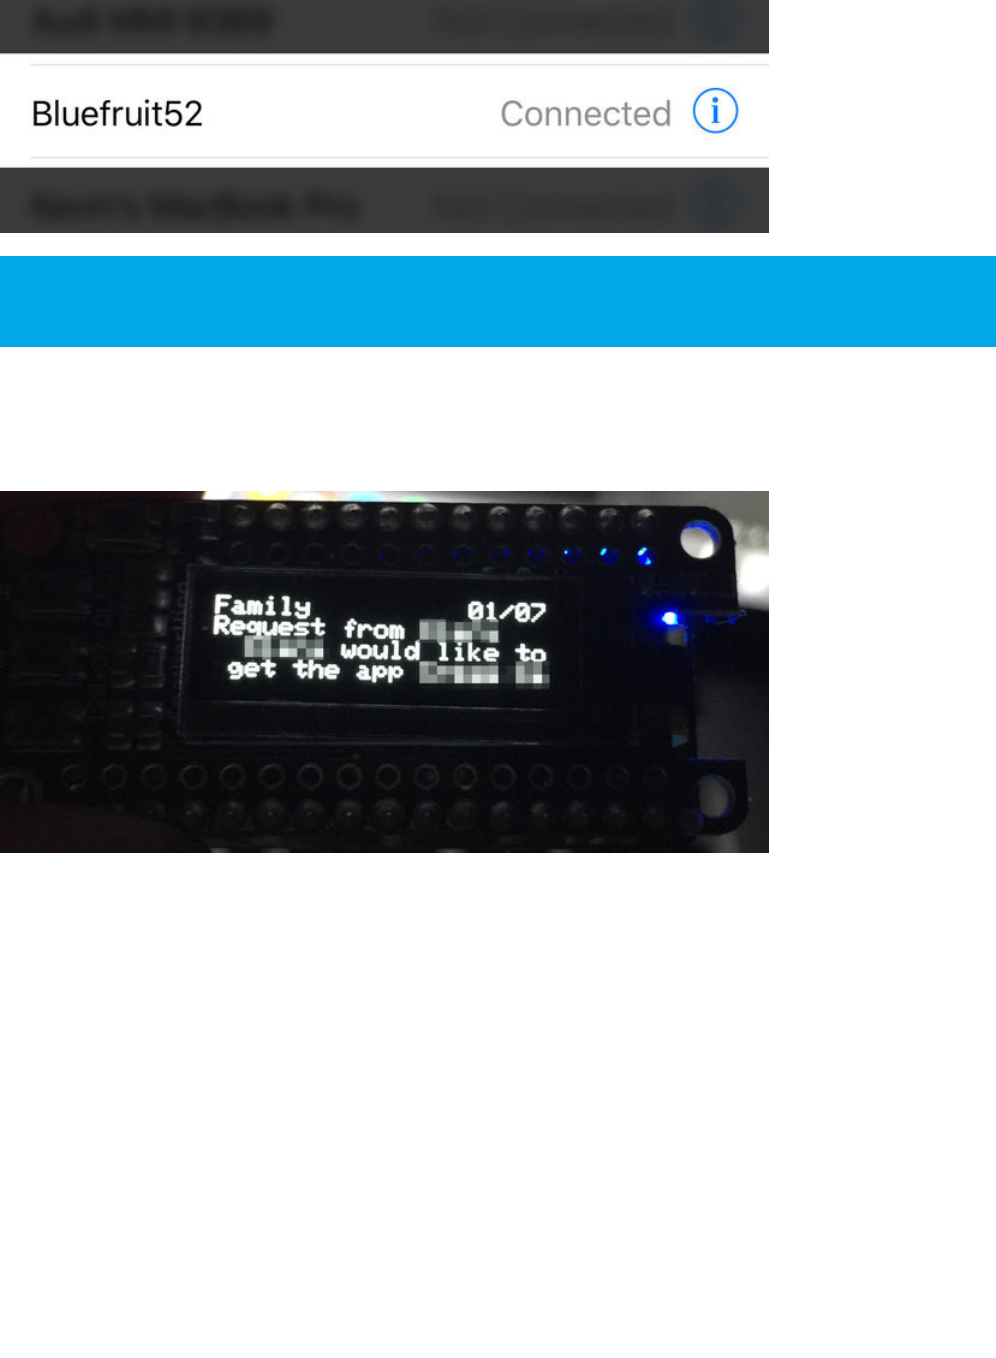
Wait for Alerts
At this point, any alerts that the mobile device generates will be displayed on the OLED display along with the
notification category and date:
Certain alerts (such as incoming calls) can also have actions associated with them, making use of the three buttons on
the left-hand side of the display to decide which action to take.
In the ancs_oled example, we have a special section of code for incoming calls where you can accept or decline a call
with an appropriate button press:
Once two devices have been paired, they will automatically reconnect to each other whenever they are in
range and have their Bluetooth radios enabled.
© Adafruit Industries https://learn.adafruit.com/bluefruit-nrf52-feather-learning-guide Page 132 of 158

// Check buttons
uint32_t presedButtons = readPressedButtons();
if ( myNotifs[activeIndex].ntf.categoryID == ANCS_CAT_INCOMING_CALL )
{
/* Incoming call event
* - Button A to accept call
* - Button C to decline call
*/
if ( presedButtons & bit(BUTTON_A) )
{
bleancs.actPositive(myNotifs[activeIndex].ntf.uid);
}
if ( presedButtons & bit(BUTTON_C) )
{
bleancs.actNegative(myNotifs[activeIndex].ntf.uid);
}
}
© Adafruit Industries https://learn.adafruit.com/bluefruit-nrf52-feather-learning-guide Page 133 of 158

BLEClientCts
BLEClientCts is a helper class that implements adopted Current Time Service , which enables you to receive time from
devices such as an iPhone or iPad.
API
Client CTS OLED Example
The client_cts_oled example uses the Adafruit FeatherWing OLED to display received time.
Sketch Requirements
In order to use this example sketch the following libraries must be installed on your system:
Adafruit_GFX (Github source)
The Bluefruit nRF52 Feather codebase is in an early BETA stage and is undergoing active development
based on customer feedback and testing. As such, the class documentation here is incomplete, and you
should consult the Github repo for the latest code and API developments: https://goo.gl/LdEx62
// Callback Signatures
typedef void (*adjust_callback_t) (uint8_t reason);
BLEClientCts(void);
virtual bool begin(void);
virtual bool discover(uint16_t conn_handle);
bool getCurrentTime(void);
bool getLocalTimeInfo(void);
bool enableAdjust(void);
void setAdjustCallback(adjust_callback_t fp);
// https://www.bluetooth.com/specifications/gatt/viewer?attributeXmlFile=org.bluetooth.characteristic.current_time.xml
struct ATTR_PACKED {
uint16_t year;
uint8_t month;
uint8_t day;
uint8_t hour;
uint8_t minute;
uint8_t second;
uint8_t weekday;
uint8_t subsecond;
uint8_t adjust_reason;
} Time;
// https://www.bluetooth.com/specifications/gatt/viewer?attributeXmlFile=org.bluetooth.characteristic.local_time_information.xml
struct ATTR_PACKED {
int8_t timezone;
uint8_t dst_offset;
}LocalInfo;
© Adafruit Industries https://learn.adafruit.com/bluefruit-nrf52-feather-learning-guide Page 134 of 158
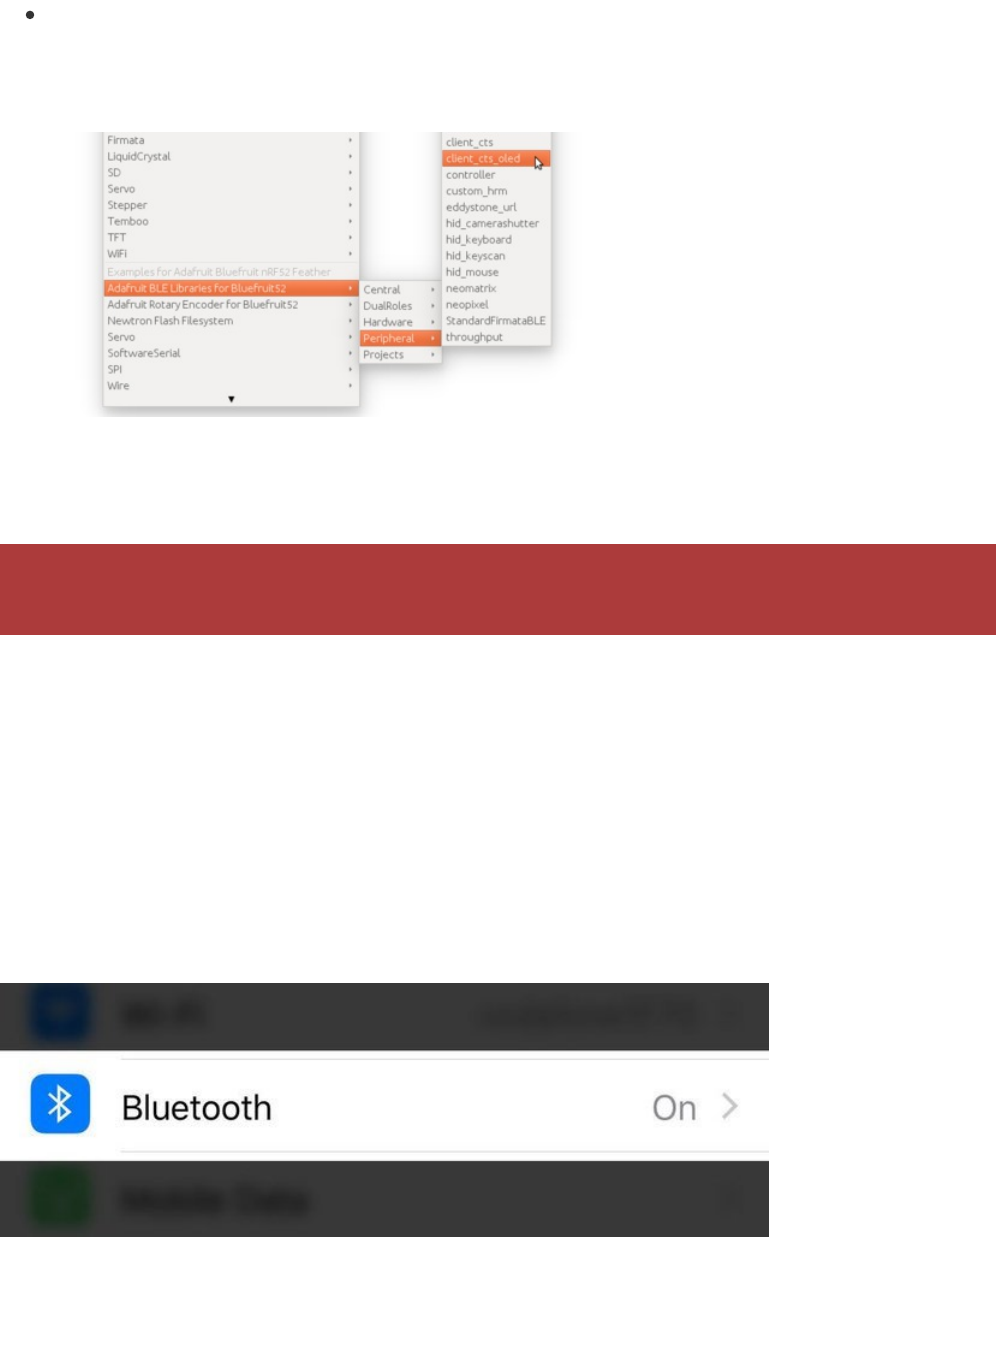
Adafruit_SSD1306 (Github source)
Loading the Sketch
The client_cts_oled sketch can be loaded via the examples menu under Peripheral > client_cts_oled:
With the sketch loaded, you can build the firmware and then flash it to your device via the Upload button or menu
option. Once the sketch is running on the nRF52 Feather you can proceed with the one-time pairing process,
described below.
Pairing to your Mobile Device
Before you can start receiving notifications, you will need to 'pair' the nRF52 Feather and the mobile device.
The pairing process causes a set of keys to be exchanged and stored on the two devices so that each side knows it is
talking to the same device it originally bonded with, and preventing any devices in the middle from eavesdropping on
potentially sensitive data.
The one-time pairing process is described below, and assumes you are already running the ancs_oled sketch on your
nRF52 device.
1. In the Settings app go to Bluetooth:
2. Scroll to the bottom of the list of 'My Devices' and click on Bluefruit52 under Other Devices:
Make sure that the Adafruit_SSD1306.h file has the 'SSD1306_128_32' macro enabled. Running the sketch
with 'SSD1306_128_64' set will cause corrupted data to appear on the OLED display.
© Adafruit Industries https://learn.adafruit.com/bluefruit-nrf52-feather-learning-guide Page 135 of 158
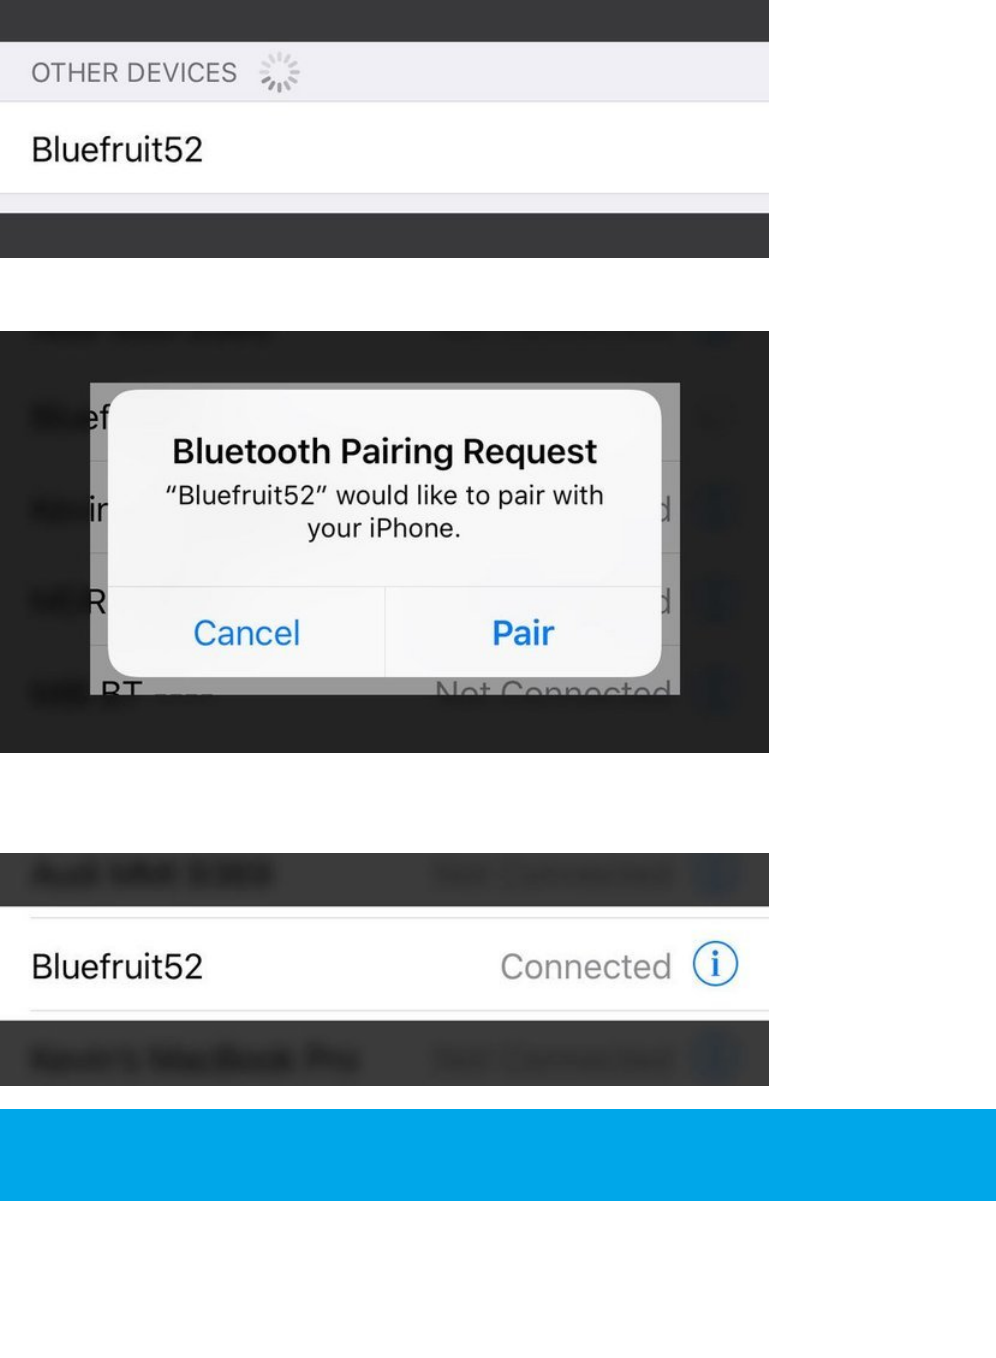
3. When the pairing dialog box comes up, click the Pair button:
4. Wait for the pairing process to complete, at which point Bluefruit52 should appear in the My Devices list with
the Connected status:
Wait for Time Data
At this point, time data from the mobile device will be read and display on the the OLED. For demo purpose the sketch
will read time data from mobile once every second. However, in reality, nRF52 should have an internal timer that keep
track of second, and only read/sync with mobile after several hours or days, similar to how IP device got time from NTP
Once two devices have been paired, they will automatically reconnect to each other whenever they are in
range and have their Bluetooth radios enabled.
© Adafruit Industries https://learn.adafruit.com/bluefruit-nrf52-feather-learning-guide Page 136 of 158
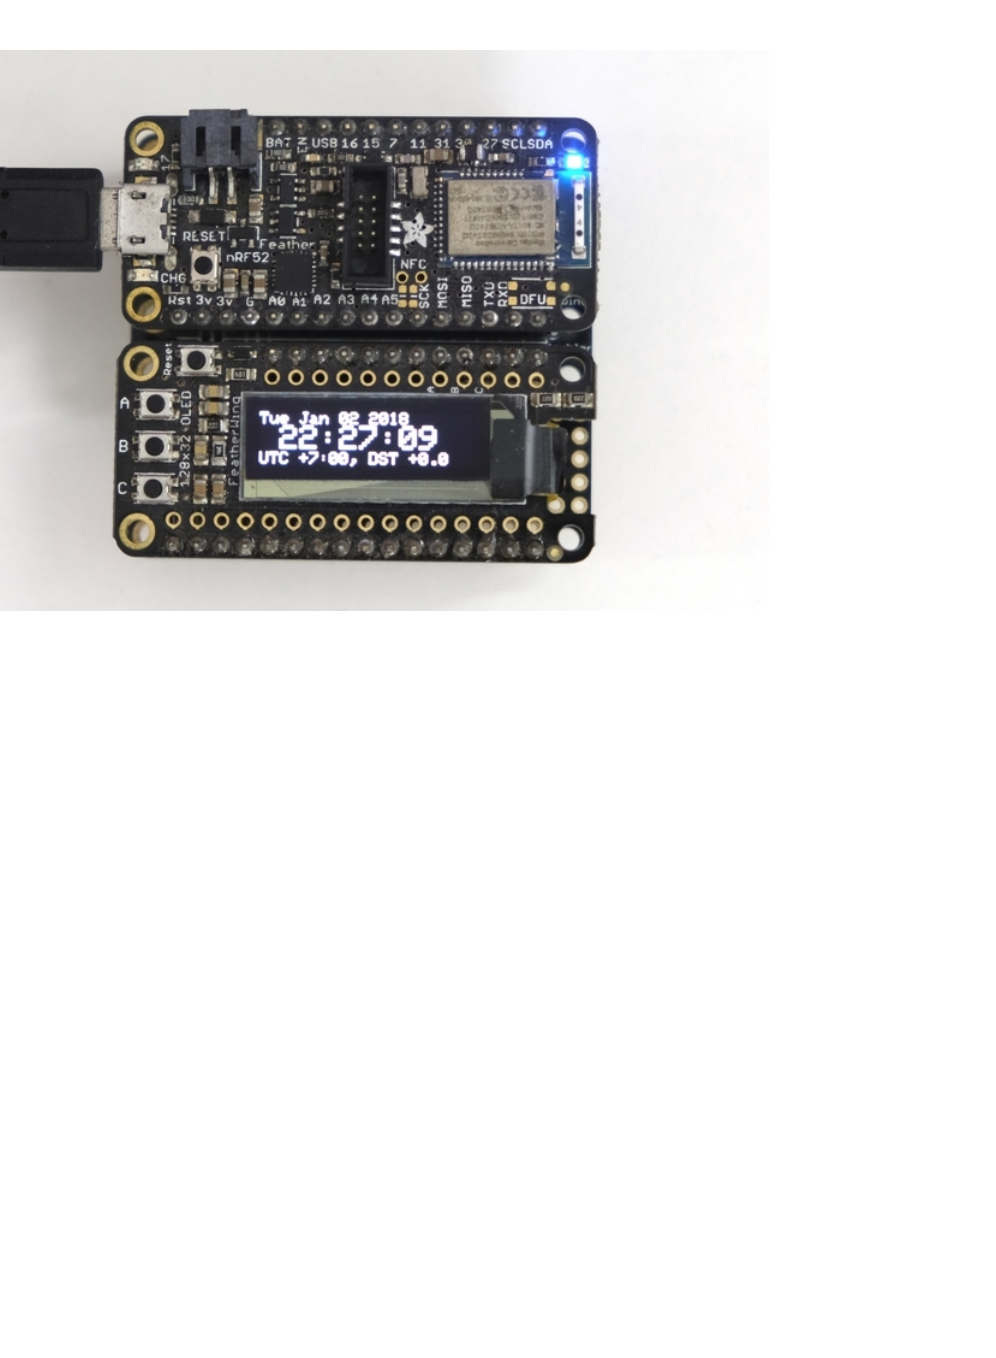
server.
© Adafruit Industries https://learn.adafruit.com/bluefruit-nrf52-feather-learning-guide Page 137 of 158

BLECentral
The Central mode API is accessible via Bluefruit.Central.* and has the following public functions:
For examples of how to use the Central mode API, see the Central examples folder.
This page is a work in progress as the API is changing as we migrate to S132v5 and add better Central mode
support.
void begin(void);
/*------------------------------------------------------------------*/
/* GAP
*------------------------------------------------------------------*/
bool setConnInterval(uint16_t min, uint16_t max);
bool setConnIntervalMS (uint16_t min_ms, uint16_t max_ms);
bool connect(const ble_gap_evt_adv_report_t* adv_report);
bool connect(const ble_gap_addr_t *peer_addr);
bool disconnect(uint16_t conn_handle);
bool connected (uint16_t conn_handle); // If connected to a specific peripheral
bool connected (void); // If connected to any peripherals
/*------------- Callbacks -------------*/
void setConnectCallback ( BLEGap::connect_callback_t fp);
void setDisconnectCallback( BLEGap::disconnect_callback_t fp);
© Adafruit Industries https://learn.adafruit.com/bluefruit-nrf52-feather-learning-guide Page 138 of 158

nRF52 ADC
The nRF52832 includes an adjustable 'successive-approximation ADC' which can be configured to convert data with
up to 14-bit resolution (0..16383), and the reference voltage can be adjusted up to 3.6V internally.
The default values for the ADC are 10-bit resolution (0..1023) with a 3.6V reference voltage, meaning every digit
returned from the ADC = 3600mV/1024 = 3.515625mV.
Analog Reference Voltage
The internal reference voltage is 0.6V with a variable gain setting, and can be adjust via the analogReference(...)
function, providing one of the following values:
AR_INTERNAL (0.6V Ref * 6 = 0..3.6V) <-- DEFAULT
AR_INTERNAL_3_0 (0.6V Ref * 5 = 0..3.0V)
AR_INTERNAL_2_4 (0.6V Ref * 4 = 0..2.4V)
AR_INTERNAL_1_8 (0.6V Ref * 3 = 0..1.8V)
AR_INTERNAL_1_2 (0.6V Ref * 2 = 0..1.6V)
AR_VDD4 (VDD/4 REF * 4 = 0..VDD)
For example:
Analog Resolution
The ADC resolution can be set to 8, 10, 12 or 14 bits using the analogReadResolution(...) function, with the default value
being 10-bit:
Default ADC Example (10-bit, 3.6V Reference)
The original source for this code is included in the nRF52 BSP and can be viewed online here.
// Set the analog reference to 3.0V (default = 3.6V)
analogReference(AR_INTERNAL_3_0);
// Set the resolution to 12-bit (0..4095)
analogReadResolution(12); // Can be 8, 10, 12 or 14
© Adafruit Industries https://learn.adafruit.com/bluefruit-nrf52-feather-learning-guide Page 139 of 158

Advanced Example (12-bit, 3.0V Reference)
The original source for this code is included in the nRF52 BSP and can be viewed online here.
int adcin = A5;
int adcvalue = 0;
float mv_per_lsb = 3600.0F/1024.0F; // 10-bit ADC with 3.6V input range
void setup() {
Serial.begin(115200);
}
void loop() {
// Get a fresh ADC value
adcvalue = analogRead(adcin);
// Display the results
Serial.print(adcvalue);
Serial.print(" [");
Serial.print((float)adcvalue * mv_per_lsb);
Serial.println(" mV]");
delay(100);
}
#define VBAT_PIN (A7)
#define VBAT_MV_PER_LSB (0.73242188F) // 3.0V ADC range and 12-bit ADC resolution = 3000mV/4096
#define VBAT_DIVIDER (0.71275837F) // 2M + 0.806M voltage divider on VBAT = (2M / (0.806M + 2M))
#define VBAT_DIVIDER_COMP (1.403F) // Compensation factor for the VBAT divider
int readVBAT(void) {
int raw;
// Set the analog reference to 3.0V (default = 3.6V)
analogReference(AR_INTERNAL_3_0);
// Set the resolution to 12-bit (0..4095)
analogReadResolution(12); // Can be 8, 10, 12 or 14
// Let the ADC settle
delay(1);
// Get the raw 12-bit, 0..3000mV ADC value
raw = analogRead(VBAT_PIN);
// Set the ADC back to the default settings
analogReference(AR_DEFAULT);
analogReadResolution(10);
return raw;
}
uint8_t mvToPercent(float mvolts) {
uint8_t battery_level;
if (mvolts >= 3000)
{
battery_level = 100;
© Adafruit Industries https://learn.adafruit.com/bluefruit-nrf52-feather-learning-guide Page 140 of 158

battery_level = 100;
}
else if (mvolts > 2900)
{
battery_level = 100 - ((3000 - mvolts) * 58) / 100;
}
else if (mvolts > 2740)
{
battery_level = 42 - ((2900 - mvolts) * 24) / 160;
}
else if (mvolts > 2440)
{
battery_level = 18 - ((2740 - mvolts) * 12) / 300;
}
else if (mvolts > 2100)
{
battery_level = 6 - ((2440 - mvolts) * 6) / 340;
}
else
{
battery_level = 0;
}
return battery_level;
}
void setup() {
Serial.begin(115200);
// Get a single ADC sample and throw it away
readVBAT();
}
void loop() {
// Get a raw ADC reading
int vbat_raw = readVBAT();
// Convert from raw mv to percentage (based on LIPO chemistry)
uint8_t vbat_per = mvToPercent(vbat_raw * VBAT_MV_PER_LSB);
// Convert the raw value to compensated mv, taking the resistor-
// divider into account (providing the actual LIPO voltage)
// ADC range is 0..3000mV and resolution is 12-bit (0..4095),
// VBAT voltage divider is 2M + 0.806M, which needs to be added back
float vbat_mv = (float)vbat_raw * VBAT_MV_PER_LSB * VBAT_DIVIDER_COMP;
// Display the results
Serial.print("ADC = ");
Serial.print(vbat_raw * VBAT_MV_PER_LSB);
Serial.print(" mV (");
Serial.print(vbat_raw);
Serial.print(") ");
Serial.print("LIPO = ");
Serial.print(vbat_mv);
Serial.print(" mV (");
Serial.print(vbat_per);
Serial.println("%)");
delay(1000);
}
© Adafruit Industries https://learn.adafruit.com/bluefruit-nrf52-feather-learning-guide Page 141 of 158

© Adafruit Industries https://learn.adafruit.com/bluefruit-nrf52-feather-learning-guide Page 142 of 158
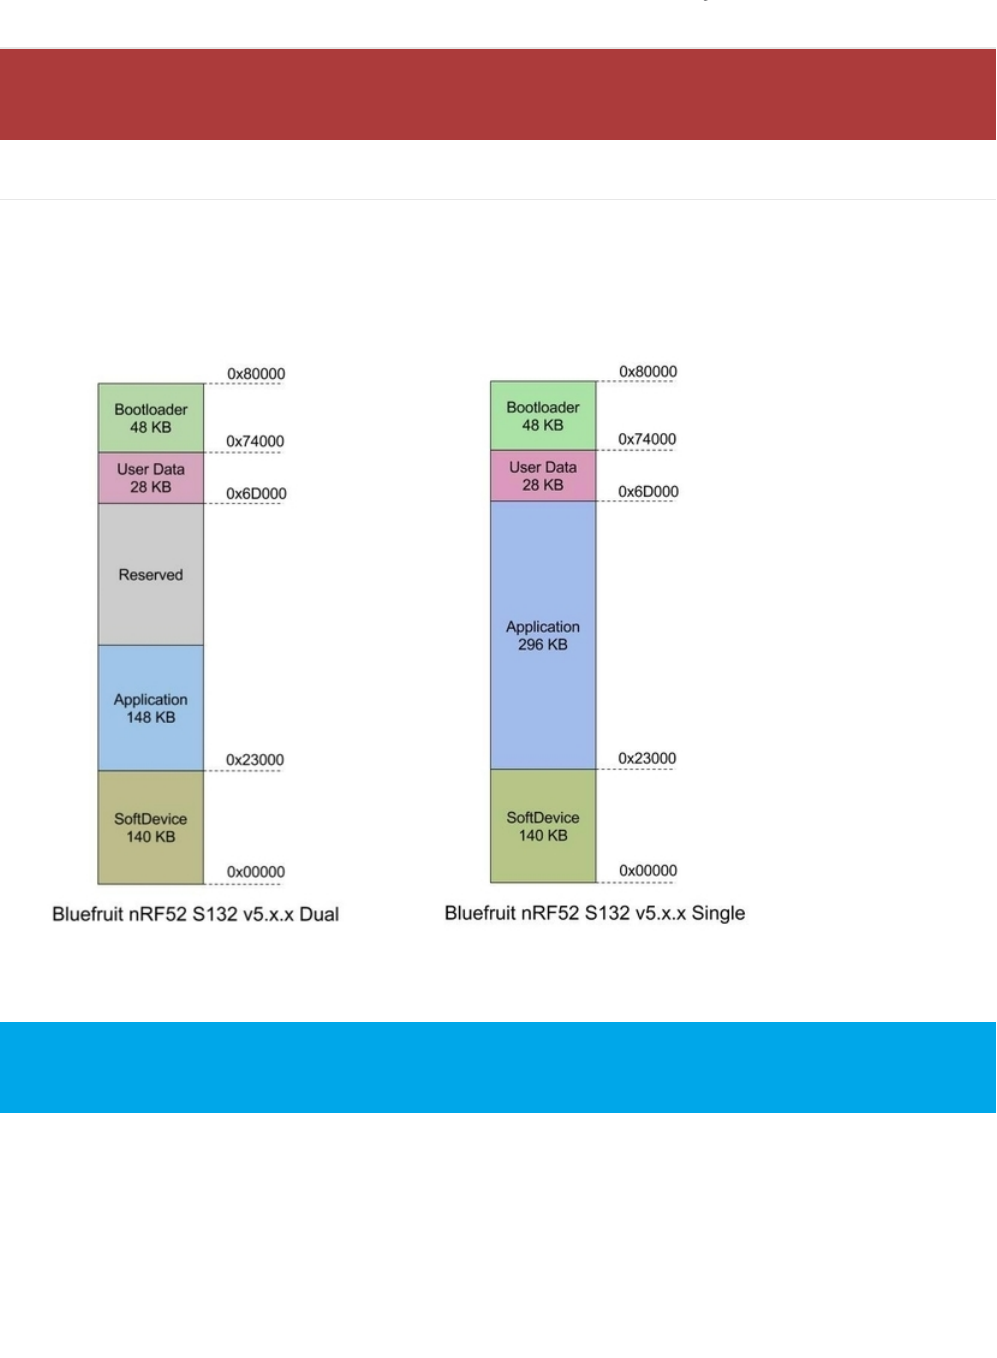
Memory Map
Flash Memory
The nRF52832 has 512KB flash memory. The flash layout varies depending on the version of the softdevice (S132v2 or
S132v5) and/or bootloader (single/dual bank) used as follows:
Bootloader v5.1.0 with S132 v5.x.x Dual and Single Bank
Bootloader v0.5.0 with S132 v2.x.x Dual banks
This page applies to BSP 0.8.0 and higher, which introduced bootloader v5.1.0 and S132 v5.x.x. For earlier
releases (BSP release < 0.8.0) see bootloader v0.5.0 and S132 v2.x.x at the bottom of this page.
Bootloader 0.5.0 with S132 v2.0.1 is obsolete. 0.8.x is last release that will support it. Check the "Using the
Bootloader" page for instructions on how to upgrade the bootloader.
© Adafruit Industries https://learn.adafruit.com/bluefruit-nrf52-feather-learning-guide Page 143 of 158
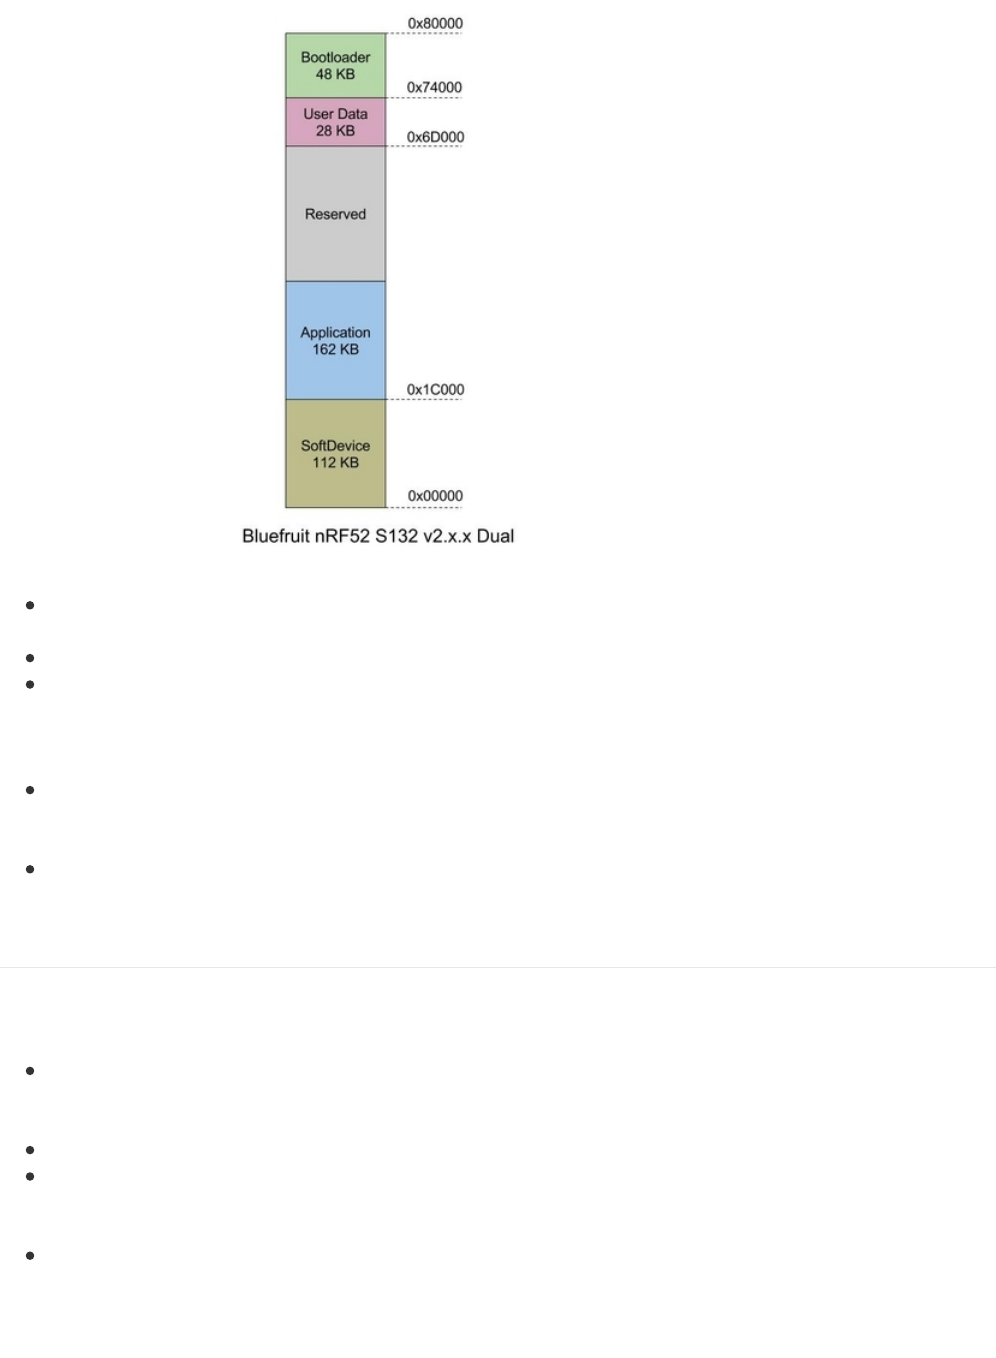
SoftDevice: This section of flash memory contains the Soft Device, which is Nordic's black box Bluetooth Low
Energy stack.
Application: This section of flash memory stores the user sketches that you compile in the Arduino IDE.
Reserved: This section of flash memory is kept empty to enable dual banks safe firmware updates. Whenever
you try to update the Application are, the new application data will first be written to the free memory section,
and the verified before it is swapped out with the current application code. This is to ensure that DFU complete
successfully and that the entire image is safely store on the device to avoid losing the application code.
User Data: This 28KB section of flash memory is reserved for config settings. It uses an open source file system
called the Newtron Flash File System, which is part of the OpenSource Mynewt operating system. Bonding data
is stored here, for example, when you bond the nRF52 with another Central device.
DFU Bootloader: This section of flash memory stores the actual bootloader code that will be executed by the
MBR described earlier.
SRAM Layout
The nRF52832 has 64KB of SRAM available, and actual memory use will depend on your project, although the stack
and heap memory locations are described below:
Soft Device: amount of SRAM exclusive allocated for SoftDevice by Linker script. The size is subject to change
and varies by releases. For BSP release 0.8.0 it is 12.5 KB. However, the actual memory required by the
SoftDevice depends on the run-time configuration determined by Bluefruit's configNNN() API.
Sketch BSS: static and global data used by your sketch.
Heap Memory: The largest memory region, this is used for allocating the real time operating systems (RTOS)
thread stack, malloc() etc. The size, based on the variables shown below, is Y = 64 - 12.5 - X - 2 ( KB ), where
12.5KB will vary depending on the SoftDevice used.
Stack Memory: Used by non RTOS thread code, this is mostly for Interrupt Service Routines (ISRs) and
SoftDevice API calls. The current size is 2 KB.
Functions affecting SoftDevice SRAM usage
© Adafruit Industries https://learn.adafruit.com/bluefruit-nrf52-feather-learning-guide Page 144 of 158
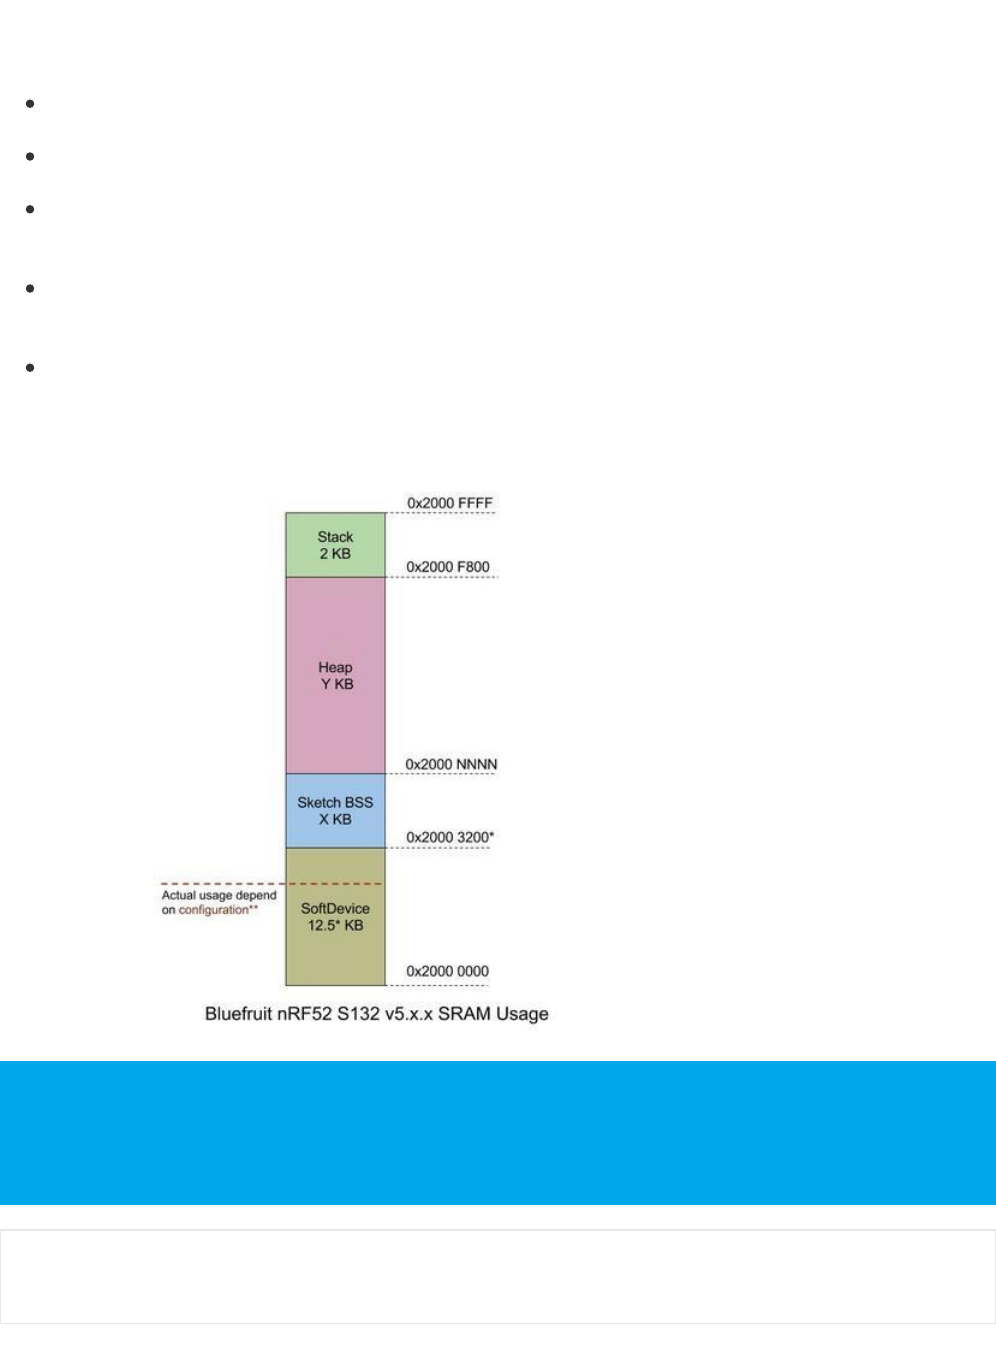
The Bluefruit nRF52 configNNN() functions set the behavior of SoftDevice, thus determining the total SRAM usage.
These functions must be called before begin().
configUuid128Count() : Defines the number of UUID128 entries that the SoftDevice supports, e.g Bleuart,
BleMidi, or other services and characteristics. Default value is 10.
configAttrTableSize(): The total size of the attribute table, which holds services and characteristics. If your
application needs lots of characteristics you may need to increase this. Default value is 2048 bytes.
configPrphConn(), configPrphBandwidth(): These function set the parameters that determine the bandwidth for
peripheral's connections. configPrphBandwidth() is a convenient helper that calls configPrphConn() with
appropriate parameters.
configCentralConn(), configCentralBandwidth(): These functions set the parameters that determine the
bandwidth for central mode connections. configCentralBandwidth() is a convenient helper that calls
configCentralConn() with appropriate parameters.
begin(): Bluefruit nRF52's begin() function also affects the bandwidth since it takes 2 (optional) parameters. The
first one is the number of concurrent connections for peripheral links (to mobile phones, your computer, etc.), the
second one is the number of central links (to BLE accessories, or another feather52 running in peripheral mode).
The maximum number of concurrent connections for SoftDevice v5.x is 20.
If you run into an error message saying "SoftDevice require more SRAM than provided by linker", try altering
your system config -- for ex. lower bandwidth, fewer connection or a smaller attribute table size. Another
advanced option is to modify the linker script, but this should be done with care and knowledge of what you
are changing.
[CFG] SoftDevice config requires more SRAM than provided by the linker.
App Ram Start must be at least 0x20004180 (provided 0x20003200).
Please update linker file or re-config SoftDevice.
© Adafruit Industries https://learn.adafruit.com/bluefruit-nrf52-feather-learning-guide Page 145 of 158

© Adafruit Industries https://learn.adafruit.com/bluefruit-nrf52-feather-learning-guide Page 146 of 158
Software Resources
To help you get your Bluefruit LE module talking to other Central devices, we've put together a number of open source
tools for most of the major platforms supporting Bluetooth Low Energy.
Bluefruit LE Client Apps and Libraries
Adafruit has put together the following mobile or desktop apps and libraries to make it as easy as possible to get your
Bluefruit LE module talking to your mobile device or laptop, with full source available where possible:
Bluefruit LE Connect (Android/Java)
Bluetooth Low Energy support was added to Android starting with Android 4.3 (though it was only really stable starting
with 4.4), and we've already released Bluefruit LE Connect to the Play Store.
The full source code for Bluefruit LE Connect for Android is also available on Github to help you get started with your
own Android apps. You'll need a recent version of Android Studio to use this project.
Bluefruit LE Connect (iOS/Swift)
Apple was very early to adopt Bluetooth Low Energy, and we also have an iOS version of the Bluefruit LE Connect app
available in Apple's app store.
The full swift source code for Bluefruit LE Connect for iOS is also available on Github. You'll need XCode and access to
Apple's developper program to use this project:
Version 1.x source code: https://github.com/adafruit/Bluefruit_LE_Connect
Version 2.x source code: https://github.com/adafruit/Bluefruit_LE_Connect_v2
Version 2.x of the app is a complete rewrite that includes iOS, OS X GUI and OS X command-line tools in a
single codebase.
© Adafruit Industries https://learn.adafruit.com/bluefruit-nrf52-feather-learning-guide Page 147 of 158
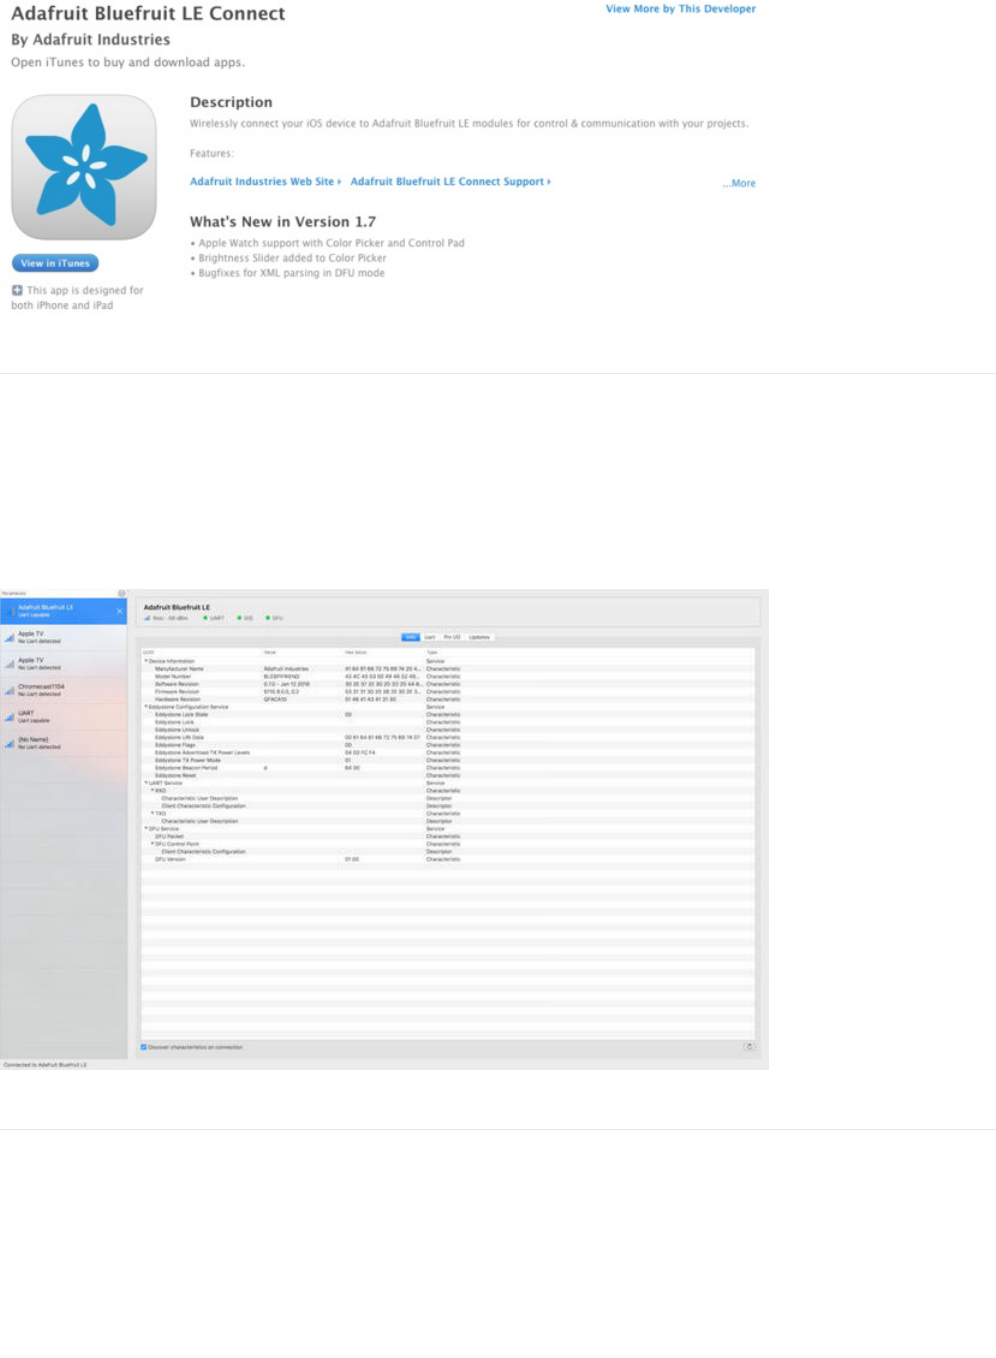
Bluefruit LE Connect for OS X (Swift)
This OS X desktop application is based on the same V2.x codebase as the iOS app, and gives you access to BLE
UART, basic Pin I/O and OTA DFU firmware updates from the convenience of your laptop or mac.
This is a great choice for logging sensor data locally and exporting it as a CSV, JSON or XML file for parsing in another
application, and uses the native hardware on your computer so no BLE dongle is required on any recent mac.
The full source is also available on Github.
Bluefruit LE Command Line Updater for OS X (Swift)
This experimental command line tool is unsupported and provided purely as a proof of concept, but can be used to
allow firmware updates for Bluefruit devices from the command line.
This utility performs automatic firmware updates similar to the way that the GUI application does, by checking the
firmware version on your Bluefruit device (via the Device Information Service), and comparing this against the firmware
versions available online, downloading files in the background if appropriate.
Simply install the pre-compiled tool via the DMG file and place it somewhere in the system path, or run the file locally
© Adafruit Industries https://learn.adafruit.com/bluefruit-nrf52-feather-learning-guide Page 148 of 158
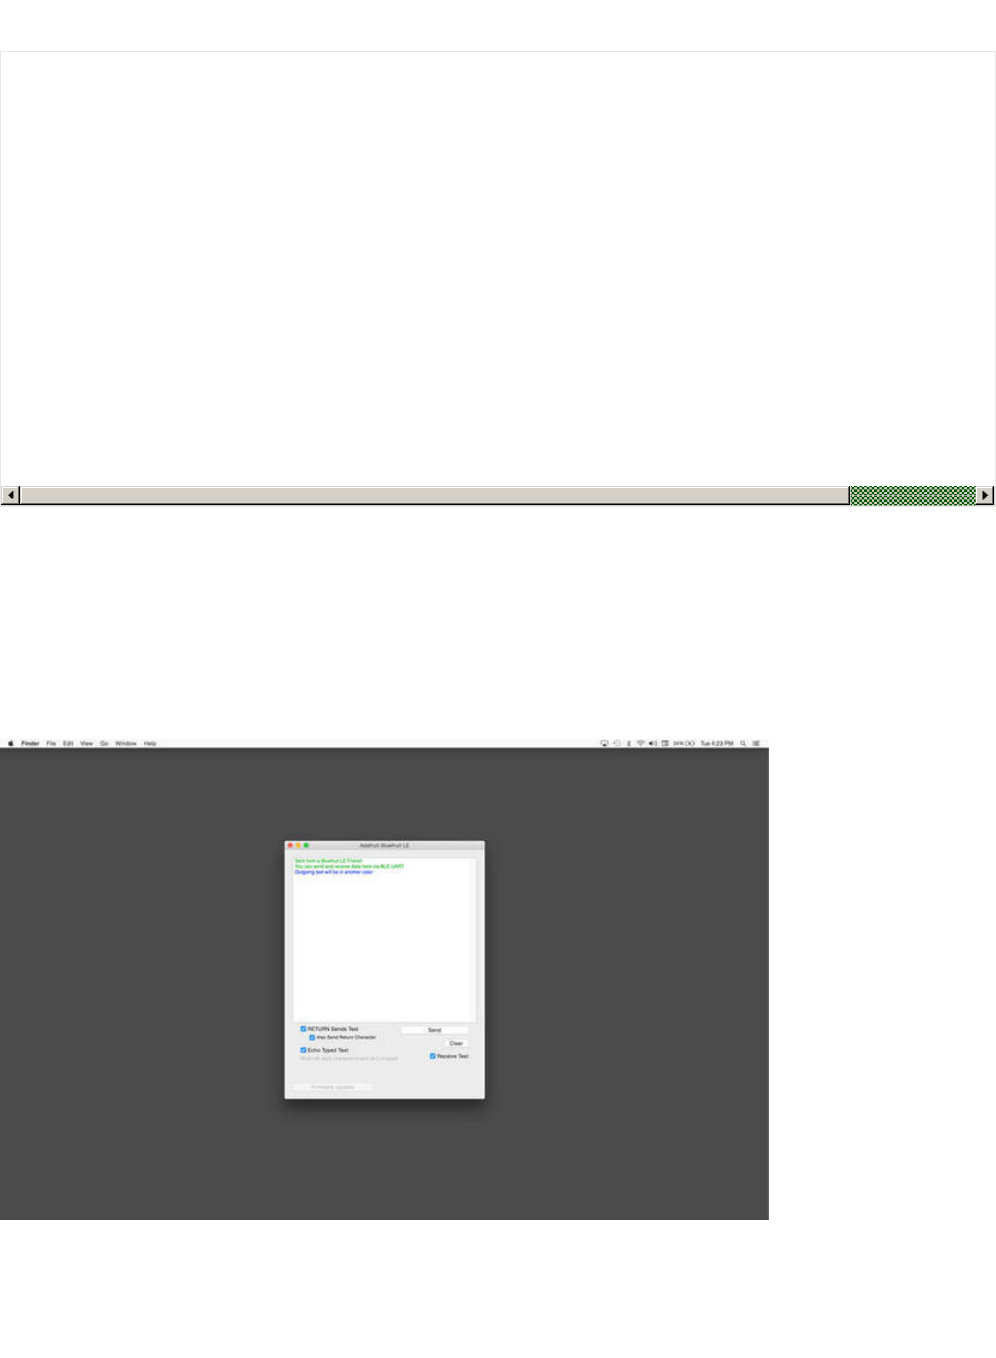
via './bluefruit' to see the help menu:
Deprecated: Bluefruit Buddy (OS X)
This native OS X application is a basic proof of concept app that allows you to connect to your Bluefruit LE module
using most recent macbooks or iMacs. You can get basic information about the modules and use the UART service to
send and receive data.
The full source for the application is available in the github repo at Adafruit_BluefruitLE_OSX.
ABLE (Cross Platform/Node+Electron)
ABLE (Adafruit Bluefruit LE Desktop) is a cross-platform desktop application based on Sandeep Misty's noble
library and the Electron project from Github (used by Atom).
$ ./bluefruit
bluefruit v0.3
Usage:
bluefruit <command> [options...]
Commands:
Scan peripherals: scan
Automatic update: update [--enable-beta] [--uuid <uuid>]
Custom firmware: dfu --hex <filename> [--init <filename>] [--uuid <uuid>]
Show this screen: --help
Show version: --version
Options:
--uuid <uuid> If present the peripheral with that uuid is used. If not present a list of peripherals
--enable-beta If not present only stable versions are used
Short syntax:
-u = --uuid, -b = --enable-beta, -h = --hex, -i = --init, -v = --version, -? = --help
© Adafruit Industries https://learn.adafruit.com/bluefruit-nrf52-feather-learning-guide Page 149 of 158
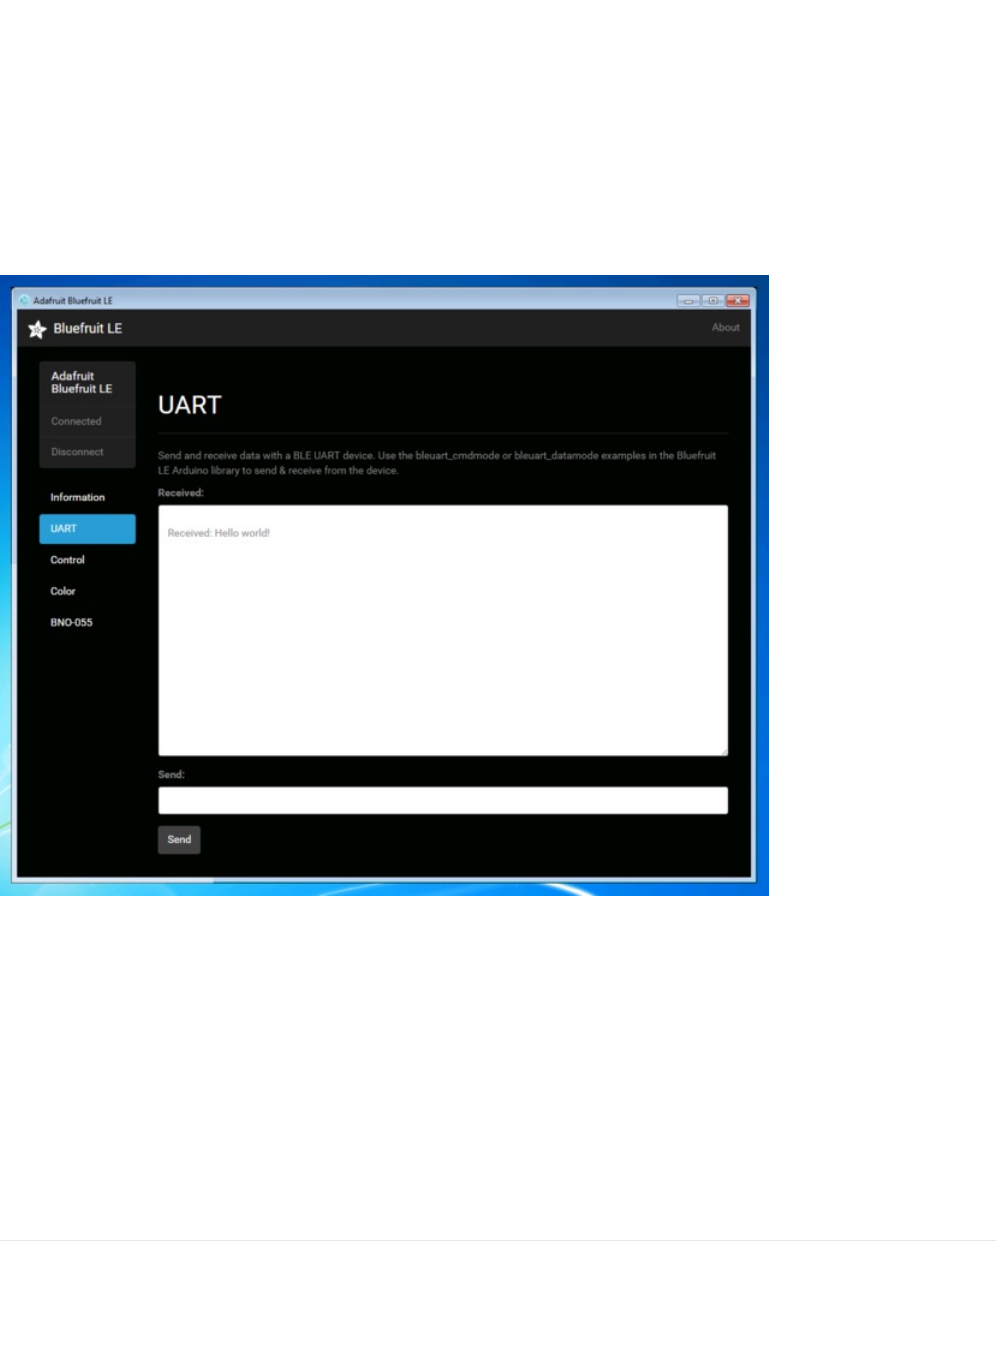
It runs on OS X, Windows 7+ and select flavours of Linux (Ubuntu tested locally). Windows 7 support is particularly
interesting since Windows 7 has no native support for Bluetooth Low Energy but the noble library talks directly to
supported Bluetooth 4.0 USB dongles to emulate BLE on the system (though at this stage it's still in early BETA and
drops the connection and takes more care to work with).
This app allows you to collect sensor data or perform many of the same functionality offered by the mobile Bluefruit LE
Connect apps, but on the desktop.
The app is still in BETA, but full source is available in addition to the easy to use pre-compiled binaries.
Bluefruit LE Python Wrapper
As a proof of concept, we've played around a bit with getting Python working with the native Bluetooth APIs on OS X
and the latest version of Bluez on certain Linux targets.
There are currently example sketches showing how to retreive BLE UART data as well as some basic details from the
Device Information Service (DIS).
This isn't an actively support project and was more of an experiment, but if you have a recent Macbook or a Raspberry
Pi and know Python, you might want to look at Adafruit_Python_BluefruitLE in our github account.
Debug Tools
If your sense of adventure gets the better of you, and your Bluefruit LE module goes off into the weeds, the following
tools might be useful to get it back from unknown lands.
© Adafruit Industries https://learn.adafruit.com/bluefruit-nrf52-feather-learning-guide Page 150 of 158
AdaLink (Python)
This command line tool is a python-based wrapper for programming ARM MCUs using either a Segger J-Link or an
STLink/V2. You can use it to reflash your Bluefruit LE module using the latest firmware from the Bluefruit LE firmware
repo.
Details on how to use the tool are available in the readme.md file on the main Adafruit_Adalink repo on Github.
Completely reprogramming a Bluefruit LE module with AdaLink would require four files, and would look something like
this (using a JLink):
You can also use the AdaLink tool to get some basic information about your module, such as which SoftDevice is
currently programmed or the IC revision (16KB SRAM or 32KB SRAM) via the --info command:
Adafruit nRF51822 Flasher (Python)
Adafruit's nRF51822 Flasher is an internal Python tool we use in production to flash boards as they go through the test
procedures and off the assembly line, or just testing against different firmware releases when debugging.
It relies on AdaLink or OpenOCD beneath the surface (see above), but you can use this command line tool to flash
your nRF51822 with a specific SoftDevice, Bootloader and Bluefruit firmware combination.
It currently supports using either a Segger J-Link or STLink/V2 via AdaLink, or GPIO on a Raspberry Pi if you don't have
access to a traditional ARM SWD debugger. (A pre-built version of OpenOCD for the RPi is included in the repo since
building it from scratch takes a long time on the original RPi.)
We don't provide active support for this tool since it's purely an internal project, but made it public just in case it might
help an adventurous customer debrick a board on their own.
These debug tools are provided purely as a convenience for advanced users for device recovery purposes,
and are not recommended unless you're OK with potentially bricking your board. Use them at your own risk.
adalink nrf51822 --programmer jlink --wipe
--program-hex "Adafruit_BluefruitLE_Firmware/softdevice/s110_nrf51_8.0.0_softdevice.hex"
--program-hex "Adafruit_BluefruitLE_Firmware/bootloader/bootloader_0002.hex"
--program-hex "Adafruit_BluefruitLE_Firmware/0.6.7/blefriend32/blefriend32_s110_xxac_0_6_7_150917_blefriend32.hex"
--program-hex "Adafruit_BluefruitLE_Firmware/0.6.7/blefriend32/blefriend32_s110_xxac_0_6_7_150917_blefriend32_signature.hex"
$ adalink nrf51822 -p jlink --info
Hardware ID : QFACA10 (32KB)
Segger ID : nRF51822_xxAC
SD Version : S110 8.0.0
Device Addr : **:**:**:**:**:**
Device ID : ****************
© Adafruit Industries https://learn.adafruit.com/bluefruit-nrf52-feather-learning-guide Page 151 of 158

$ python flash.py --jtag=jlink --board=blefriend32 --softdevice=8.0.0 --bootloader=2 --firmware=0.6.7
jtag : jlink
softdevice : 8.0.0
bootloader : 2
board : blefriend32
firmware : 0.6.7
Writing Softdevice + DFU bootloader + Application to flash memory
adalink -v nrf51822 --programmer jlink --wipe --program-hex "Adafruit_BluefruitLE_Firmware/softdevice/s110_nrf51_8.0.0_softdevice.hex"
...
© Adafruit Industries https://learn.adafruit.com/bluefruit-nrf52-feather-learning-guide Page 152 of 158
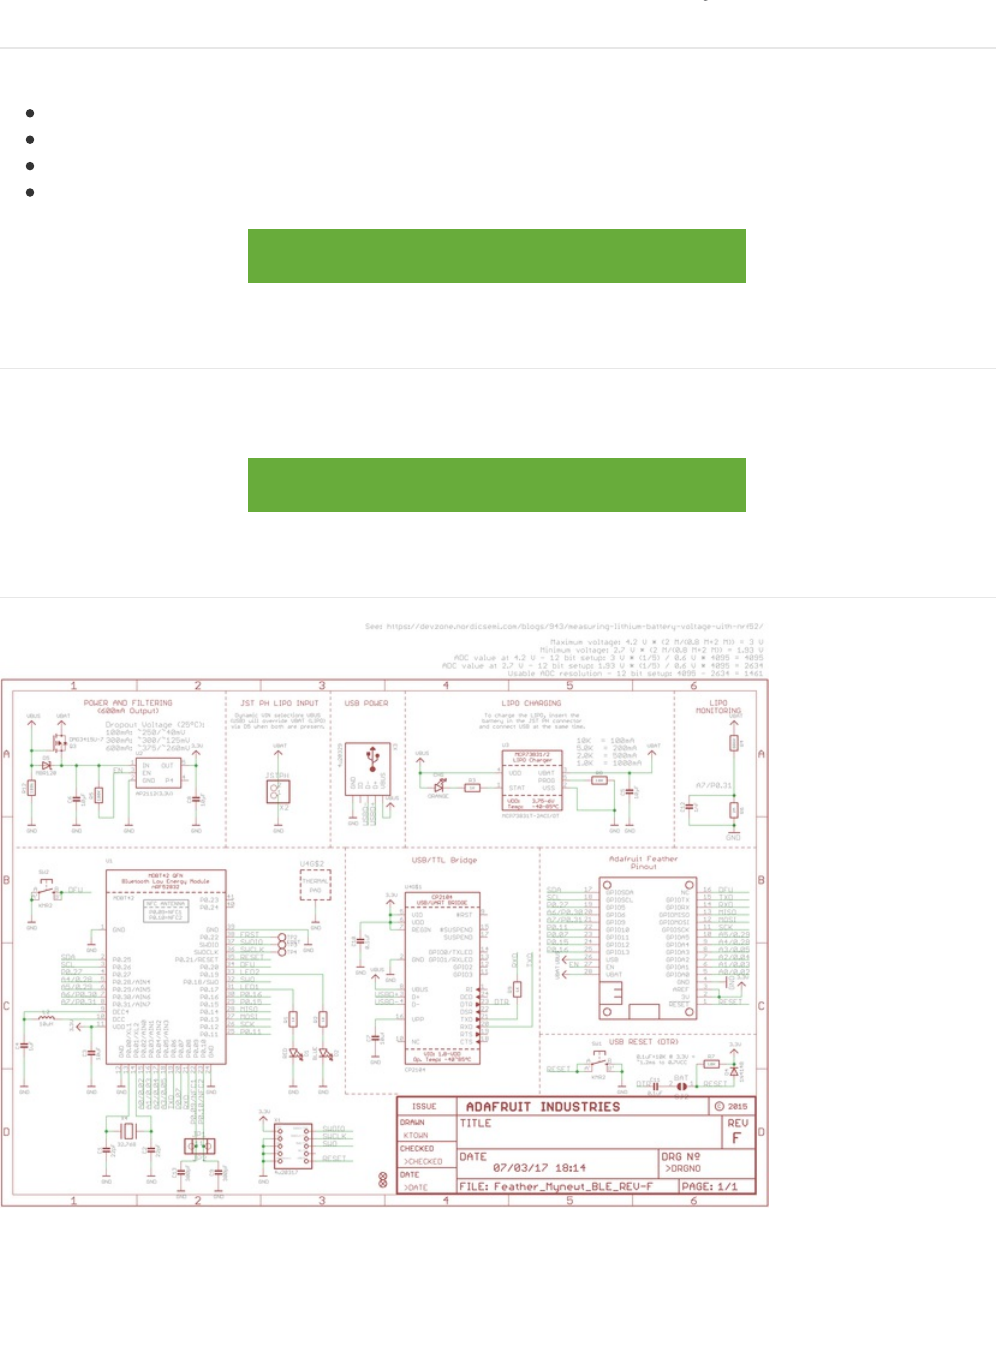
Downloads
The following resources may be useful working with the Bluefruit nRF52 Feather:
Adafruit_nRF52_Arduino: The core code for this device (hosted on Github)
nRF52 Example Sketches: Browse the example code from the core repo on Github
nRF52832 Product Specification: Key technical documentation for the nRF52832 SoC
EagleCAD PCB files on GitHub
Feather Bluefruit NRF52 Pinout Diagram
https://adafru.it/z4c
Module Details
The Bluefruit nRF52 Feather uses the MDBT42Q module from Raytac. Details on the module, including FCC and other
certifications are available in the document below:
MDBT42Q-Version_B.pdf
https://adafru.it/vbb
Schematic
© Adafruit Industries https://learn.adafruit.com/bluefruit-nrf52-feather-learning-guide Page 153 of 158

FAQs
NOTE: For FAQs relating to the BSP, see the dedicated BSP FAQ list.
What are the differences between the nRF51 and nRF52 Bluefruit boards? Which one should I be using?
The two board families take very different design approaches.
All of the nRF51 based modules are based on an AT command set (over UART or SPI), and require two MCUs to run:
the nRF51 hosting the AT command parser, and an external MCU sending AT style commands.
The nRF52 boards run code directly on the nRF52, executing natively and calling the Nordic S132 SoftDevice (their
proprietary Bluetooth Low Energy stack) directly. This allows for more efficient code since there is no intermediate
AT layer or transport, and also allows for lower overall power consumption since only a single device is involved.
The nRF52 will generally give you better performance, but for situation where you need to use an MCU with a
feature the nRF52 doesn't have (such as USB), the nRF51 based boards will still be the preferable solution.
Can I run nRF51 Bluefruit sketches on the nRF52?
No. The two board families are fundamentally different, and have entirely separate APIs and programming models. If
you are migrating from the nRF51 to the nRF52, you will need to redesign your sketches to use the newer API,
enabling you to build code that runs natively on the nRF52832 MCU.
Can I use the nRF52 as a Central to connect to other BLE peripherals?
The S132 Soft Device and the nRF52832 HW support Central mode, so yes this is
possible.
At this early
development stage, though, there is only bare bones support for Central mode in the Adafruit nRF52 codebase,
simply to test the HW and S132 and make sure that everything is configured properly. An example is provided of
listening for incoming advertising packets, printing the packet contents and meta-data out to the Serial Monitor. We
hope to add further Central mode examples in the future, but priority has been given to the Peripheral API and
examples for the initial release.
How are Arduino sketches executed on the nRF52832? Can I do hard real time processing (bit-banging NeoPixels,
etc.)?
In order to run Arduino code on the nRF52 at the same time as the low level Bluetooth Low Energy stack, the
Bluefruit nRF52 Feather uses FreeRTOS as a task scheduler. The scheduler will automatically switch between tasks,
assigning clock cycles to the highest priority task at a given moment. This process is generally transparent to you,
although it can have implications if you have hard real time requirements. There is no guarantee on the nRF52832
to meet hard timing requirements when the radio is enabled an being actively used for Bluetooth Low Energy. This
isn't possible on the nRF52832 even without FreeRTOS, though, since the SoftDevice (Nordic's propietary binary
blob stack) has higher priority than any user code, including control over interrupt handlers.
Can I use GDB to debug my nR52832?
You can, yes, but it will require a Segger J-Link (that's what we've tested against anyway, other options exist), and
it's an advanced operation. But if you're asking about it, you probably know that.
Assuming you have the Segger J-Link drivers installed, you can start Segger's GDB Server from the command line
as follows (OSX/Linux used here):
$ JLinkGDBServer -device nrf52832_xxaa -if swd -speed auto
Then open a new terminal window, making sure that you have access to gcc-arm-none-eabi-gdb from the command
© Adafruit Industries https://learn.adafruit.com/bluefruit-nrf52-feather-learning-guide Page 154 of 158

line, and enter the following command:
$ ./arm-none-eabi-gdb something.ino.elf
`something.ino.elf ` is the name of the .elf file generated when you built your sketch. You can find this by enabling
'Show verbose output during: [x] compilation' in the Arduino IDE preferences. You CAN run GDB without the .elf file,
but pointing to the .elf file will give you all of the meta data like displaying the actual source code at a specific
address, etc.
Once you have the (gdb) prompt, enter the following command to connect to the Segger GDB server (updating
your IP address accordingly, since the HW isn't necessarily local!):
(gdb) target remote 127.0.0.1:2331
If everything went well, you should see the current line of code where the device is halted (normally execution on
the nRF52 will halt as soon as you start the Segger GDB Server).
At this point, you can send GDB debug commands, which is a tutorial in itself! As a crash course, though:
To continue execution, type ' monitor go ' then ' continue '
To stop execution (to read register values, for example.), type ' monitor halt '
To display the current stack trace (when halted) enter ' bt '
To get information on the current stack frame (normally the currently executing function), try these:
info frame : Display info on the current stack frame
info args : Display info on the arguments passed into the stack frame
info locals : Display local variables in the stack frame
info registers : Dump the core ARM register values, which can be useful for debugging specific fault
conditions
Are there any other cross platform or free debugging options other than GDB?
If you have a Segger J-Link, you can also use Segger's OZone debugger GUI to interact with the device, though
check the license terms since there are usage restrictions depending on the J-Link module you have.
You will need to connect your nRF52 to the J-Link via the SWD and SWCLK pins on the bottom of the PCB, or if you
are OK with fine pitch soldering via the SWD header.
You can either solder on a standard 2x5 SWD header on the pad available in the board, or you can solder wires to
the SWD and SWCLK pads on the bottom of the PCB and use an SWD Cable Breakout Board, or just connect cables
directly to your J-Link via some other means.
You will also need to connect the VTRef pin on the JLink to 3.3V on the Feather to let the J-Link know what voltage
level the target has, and share a common GND by connecting the GND pins on each device.
Before you can start to debug, you will need to get the .elf file that contains all the debug info for your sketch. You
can find this file by enabling Show Verbose Output During: compilation in the Arduino Preferences dialogue box.
When you build your sketch, you need to look at the log output, and find the .elf file, which will resemble something
like this (it will vary depending on the OS
used): /var/folders/86/hb2vp14n5_5_yvdz_z8w9x_c0000gn/T/arduino_build_118496/ancs_oled.ino.elf
In the OZone New Project Wizard, when prompted to select a target device in OZone select nRF52832_xxAA, then
make sure that you have set the Target Interface for the debugger to SWD, and finally point to the .elf file above:
© Adafruit Industries https://learn.adafruit.com/bluefruit-nrf52-feather-learning-guide Page 155 of 158

Next select the Attach to running program option in the top-left hand corner, or via the menu system, which will cause
the debugger to connect to the nRF52 over SWD:
© Adafruit Industries https://learn.adafruit.com/bluefruit-nrf52-feather-learning-guide Page 156 of 158
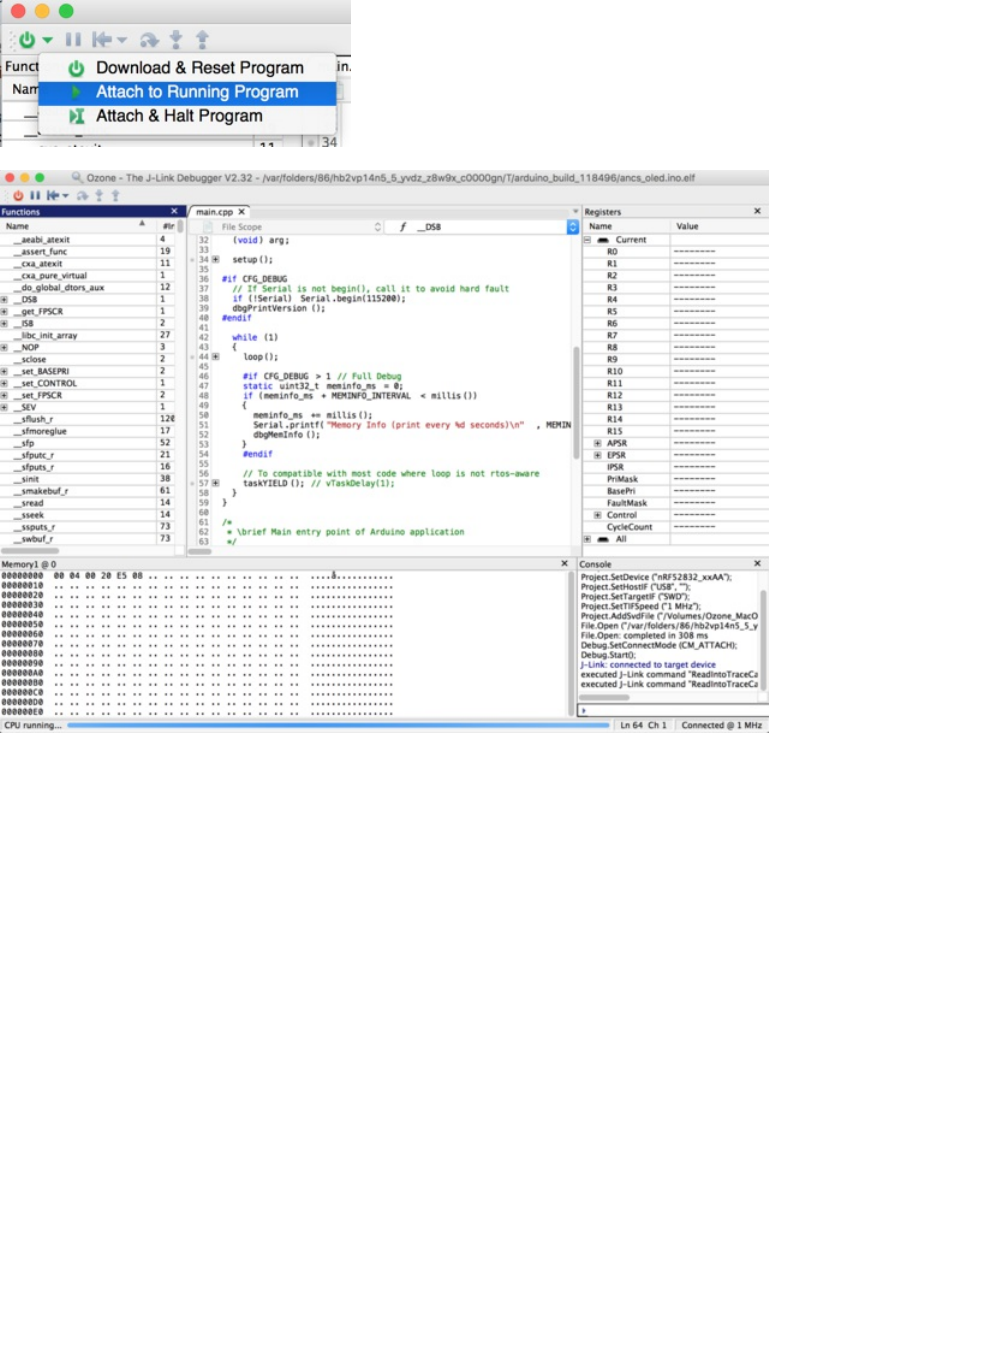
At this point, you can click the PAUSE icon to stop program execution, and then analyze variables, or set breakpoints
at appropriate locations in your program execution, and debug as you would with most other embedded IDEs!
© Adafruit Industries https://learn.adafruit.com/bluefruit-nrf52-feather-learning-guide Page 157 of 158
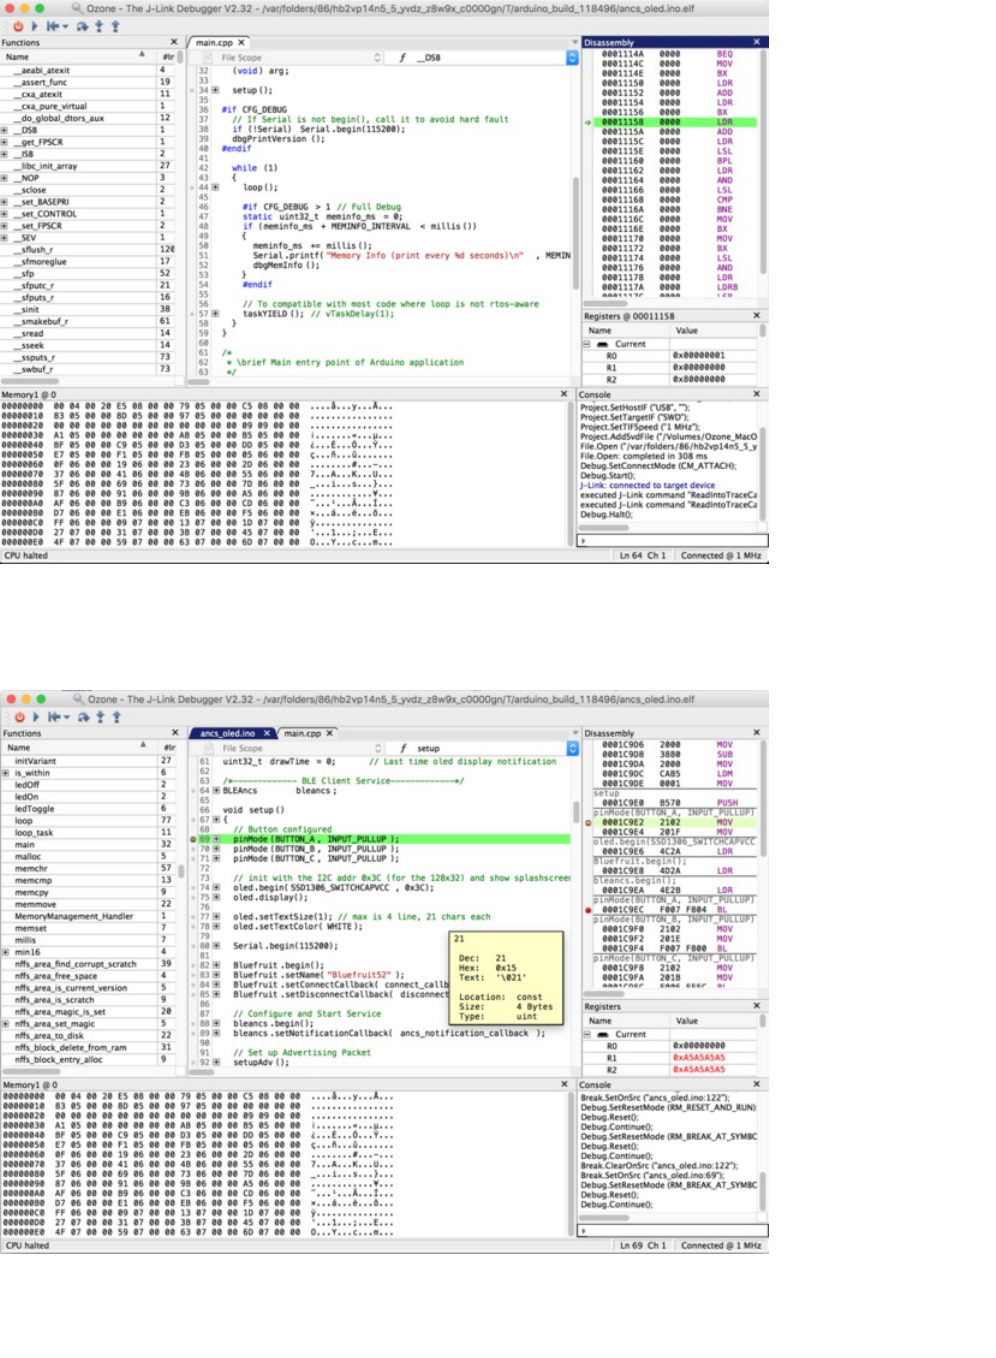
Clicking on the left-hand side of the text editor will set a breakpoint on line 69 in the image below, for example, and
the selecting Debug > Reset > Reset & Run from the menu or icon will cause the board to reset, and you should stop
at the breakpoint you set:
You can experiment with adding some of the other debug windows and options via the View menu item, such as
the Call Stack which will show you all of the functions that were called before arriving at the current breakpoint:
© Adafruit Industries Last Updated: 2018-01-05 07:00:48 AM UTC Page 158 of 158