Book Of Pf A No Nonsense Guide To The Open Bsd Firewall
User Manual:
Open the PDF directly: View PDF ![]() .
.
Page Count: 250 [warning: Documents this large are best viewed by clicking the View PDF Link!]
- Praise for The Book of PF
- Foreword
- Acknowledgments
- Introduction
- Chapter 1: Building the Network You Need
- Chapter 2: PF Configuration Basics
- Chapter 3: Into the Real World
- Chapter 4: Wireless Networks Made Easy
- A Little IEEE 802.11 Background
- MAC Address Filtering
- WEP
- WPA
- The Right Hardware for the Task
- Setting Up a Simple Wireless Network
- An OpenBSD WPA Access Point
- A FreeBSD WPA Access Point
- The Access Point’s PF Rule Set
- Access Points with Three or More Interfaces
- Handling IPSec, VPN Solutions
- The Client Side
- OpenBSD Setup
- FreeBSD Setup
- Guarding Your Wireless Network with authpf
- A Basic Authenticating Gateway
- Wide Open but Actually Shut
- A Little IEEE 802.11 Background
- Chapter 5: Bigger or Trickier Networks
- Chapter 6: Turning the Tables for Proactive Defense
- Chapter 7: Traffic Shaping with Queues and Priorities
- Chapter 8: Redundancy and Resource Availability
- Chapter 9: Logging, Monitoring,
and Statistics
- PF Logs: The Basics
- Logging the Packet's Path Through Your Rule Set: log (matches)
- Logging All Packets: log (all)
- Logging to Several pflog Interfaces
- Logging to syslog, Local or Remote
- Tracking Statistics for Each Rule with Labels
- Additional Tools for PF Logs and Statistics
- Keeping an Eye on Things with systat
- Keeping an Eye on Things with pftop
- Graphing Your Traffic with pfstat
- Collecting NetFlow Data with pflow(4)
- Collecting NetFlow Data with pfflowd
- SNMP Tools and PF-Related SNMP MIBs
- Log Data as the Basis for Effective Debugging
- PF Logs: The Basics
- Chapter 10: Getting Your Setup Just Right
- Appendix A: Resources
- Appendix B: A Note on Hardware Support
- Index
- Updates

www.nostarch.com
THE FINEST IN GEEK ENTERTAINMENT™
SHELVE IN:
OPERATING SYSTEMS/UNIX
$34.95 ($36.95 CDN)
BUILD A
MORE SECURE
NETWORK
WITH PF
BUILD A
MORE SECURE
NETWORK
WITH PF
OpenBSD’s stateful packet filter, PF, is the heart of
the OpenBSD firewall. With more and more services
placing high demands on bandwidth and an increas-
ingly hostile Internet environment, no sysadmin can
afford to be without PF expertise.
The third edition of The Book of PF covers the most
up-to-date developments in PF, including new content
on IPv6, dual stack configurations, the “queues and
priorities” traffic-shaping system, NAT and redirection,
wireless networking, spam fighting, failover provision-
ing, logging, and more.
You’ll also learn how to:
• Create rule sets for all kinds of network traffic, whether
crossing a simple LAN, hiding behind NAT, traversing
DMZs, or spanning bridges or wider networks
• Set up wireless networks with access points, and
lock them down using authpf and special access
restrictions
• Maximize flexibility and service availability via CARP,
relayd, and redirection
• Build adaptive firewalls to proactively defend against
attackers and spammers
• Harness OpenBSD’s latest traffic-shaping system
to keep your network responsive, and convert your
existing ALTQ configurations to the new system
• Stay in control of your traffic with monitoring and
visualization tools (including NetFlow)
The Book of PF is the essential guide to building a secure
network with PF. With a little effort and this book, you’ll
be well prepared to unlock PF’s full potential.
ABOUT THE AUTHOR
Peter N.M. Hansteen is a consultant, writer, and
sysadmin based in Bergen, Norway. A longtime
Freenix advocate, Hansteen is a frequent lecturer
on OpenBSD and FreeBSD topics, an occasional
contributor to BSD Magazine, and the author of an
often-slashdotted blog (http://bsdly.blogspot.com/ ).
Hansteen was a participant in the original RFC 1149
implementation team. The Book of PF is an expanded
follow-up to his very popular online PF tutorial (h t t p://
home.nuug.no/~peter/pf/ ).
Covers OpenBSD 5.6,
FreeBSD 10.x, and
NetBSD 6.x
PETER N.M. HANSTEEN
THE BOOK
OF PF
THE BOOK
OF PF
A NO-NONSENSE GUIDE TO THE
OPENBSD FIREWALL
3RD
EDITION
THE BOOK OF PF
THE BOOK OF PF
3RD
EDITION HANSTEEN
“I L I E FL AT.”
This book uses a durable binding that won’t snap shut.
PRAISE FOR The Book of Pf
“The definitive hardcopy guide to deployment and configuration of PF firewalls,
written in clear, exacting style. Its coverage is outstanding.”
—Chad Perrin, TeCh rePubliC
“This book is for everyone who uses PF. Regardless of operating system and
skill level, this book will teach you something new and interesting.”
—bSd Magazine
“With Mr. Hansteen paying close attention to important topics like state
inspection, SPAM, black/grey listing, and many others, this must-have
reference for BSD users can go a long way to helping you fine-tune the
who/what/where/when/how of access control on your BSD box.”
—infoWorld
“A must-have resource for anyone who deals with firewall configurations. If
you’ve heard good things about PF and have been thinking of giving it a go,
this book is definitely for you. Start at the beginning and before you know it
you’ll be through the book and quite the PF guru. Even if you’re already a PF
guru, this is still a good book to keep on the shelf to refer to in thorny situa-
tions or to lend to colleagues.”
—dru lavigne, auThor of BSD HackS and THe DefiniTive GuiDe To Pc-BSD
“The book is a great resource and has me eager to rewrite my aging rulesets.”
—;login:
“This book is a super easy read. I loved it! This book easily makes my Top 5
Books list.”
—daeMon neWS

THE BOOK OF PF
3RD EDITION
A No-Nonsense Guide
to the OpenBSD Firewall
by Peter N.M. Hansteen
San Francisco
THE BOOK OF PF, 3RD EDITION. Copyright © 2015 by Peter N.M. Hansteen.
All rights reserved. No part of this work may be reproduced or transmitted in any form or by any means,
electronic or mechanical, including photocopying, recording, or by any information storage or retrieval
system, without the prior written permission of the copyright owner and the publisher.
Printed in USA
First printing
18 17 16 15 14 1 2 3 4 5 6 7 8 9
ISBN-10: 1-59327-589-7
ISBN-13: 978-1-59327-589-1
Publisher: William Pollock
Production Editor: Serena Yang
Cover and Interior Design: Octopod Studios
Developmental Editor: William Pollock
Technical Reviewer: Henning Brauer
Copyeditor: Julianne Jigour
Compositor: Susan Glinert Stevens
Proofreader: Paula L. Fleming
Indexer: BIM Indexing and Proofreading Services
For information on distribution, translations, or bulk sales, please contact No Starch Press, Inc. directly:
No Starch Press, Inc.
245 8th Street, San Francisco, CA 94103
phone: 415.863.9900; info@nostarch.com
www.nostarch.com
The Library of Congress has catalogued the first edition as follows:
Hansteen, Peter N. M.
The book of PF : a no-nonsense guide to the OpenBSD firewall / Peter N.M. Hansteen.
p. cm.
Includes index.
ISBN-13: 978-1-59327-165-7
ISBN-10: 1-59327-165-4
1. OpenBSD (Electronic resource) 2. TCP/IP (Computer network protocol) 3. Firewalls (Computer
security) I. Title.
TK5105.585.H385 2008
005.8--dc22
2007042929
No Starch Press and the No Starch Press logo are registered trademarks of No Starch Press, Inc. Other
product and company names mentioned herein may be the trademarks of their respective owners. Rather
than use a trademark symbol with every occurrence of a trademarked name, we are using the names only
in an editorial fashion and to the benefit of the trademark owner, with no intention of infringement of the
trademark.
The information in this book is distributed on an “As Is” basis, without warranty. While every precaution
has been taken in the preparation of this work, neither the author nor No Starch Press, Inc. shall have any
liability to any person or entity with respect to any loss or damage caused or alleged to be caused directly or
indirectly by the information contained in it.
To Gene Scharmann,
who all those years ago nudged me
in the direction of free software
BRIEF CONTENTS
Foreword by Bob Beck (from the first edition).................................. xv
Acknowledgments ....................................................xvii
Introduction .........................................................xix
Chapter 1: Building the Network You Need ...................................1
Chapter 2: PF Configuration Basics ........................................11
Chapter 3: Into the Real World ...........................................25
Chapter 4: Wireless Networks Made Easy ...................................45
Chapter 5: Bigger or Trickier Networks......................................65
Chapter 6: Turning the Tables for Proactive Defense.............................95
Chapter 7: Traffic Shaping with Queues and Priorities ..........................117
Chapter 8: Redundancy and Resource Availability .............................147
Chapter 9: Logging, Monitoring, and Statistics ...............................161
Chapter 10: Getting Your Setup Just Right...................................185
Appendix A: Resources................................................201
Appendix B: A Note on Hardware Support..................................207
Index ............................................................211
CONTENTS IN DETAIL
FOREWORD by Bob Beck (from the first edition) xv
ACKNOWLEDGMENTS xvii
INTRODUCTION xix
This Is Not a HOWTO ...............................................xx
What This Book Covers ..............................................xx
1
BUILDING THE NETWORK YOU NEED 1
Your Network: High Performance, Low Maintenance, and Secure ................. 1
Where the Packet Filter Fits In .......................................... 3
The Rise of PF ..................................................... 3
If You Came from Elsewhere ........................................... 6
Pointers for Linux Users ........................................ 6
Frequently Answered Questions About PF............................ 7
A Little Encouragement: A PF Haiku ...................................... 9
2
PF CONFIGURATION BASICS 11
The First Step: Enabling PF ........................................... 12
Setting Up PF on OpenBSD .................................... 12
Setting Up PF on FreeBSD ..................................... 13
Setting Up PF on NetBSD ...................................... 15
A Simple PF Rule Set: A Single, Stand-Alone Machine ........................ 16
A Minimal Rule Set .......................................... 16
Testing the Rule Set . . . . . . . . . . . . . . . . . . . . . . . . . . . . . . . . . . . . . . . . . . 18
Slightly Stricter: Using Lists and Macros for Readability........................ 18
A Stricter Baseline Rule Set..................................... 19
Reloading the Rule Set and Looking for Errors........................ 20
Checking Your Rules ......................................... 21
Testing the Changed Rule Set ................................... 22
Displaying Information About Your System ................................ 22
Looking Ahead ................................................... 24
3
INTO THE REAL WORLD 25
A Simple Gateway................................................. 25
Keep It Simple: Avoid the Pitfalls of in, out, and on .................... 26
Network Address Translation vs. IPv6 ............................. 27
Final Preparations: Defining Your Local Network...................... 29
Setting Up a Gateway ........................................ 29
Testing Your Rule Set ......................................... 34
x Contents in Detail
That Sad Old FTP Thing ............................................. 35
If We Must: ftp-proxy with Divert or Redirect......................... 36
Variations on the ftp-proxy Setup................................. 37
Making Your Network Troubleshooting-Friendly ............................. 37
Do We Let It All Through? ..................................... 38
The Easy Way Out: The Buck Stops Here........................... 39
Letting ping Through ......................................... 39
Helping traceroute .......................................... 40
Path MTU Discovery ......................................... 40
Tables Make Your Life Easier.......................................... 42
4
WIRELESS NETWORKS MADE EASY 45
A Little IEEE 802.11 Background ....................................... 46
MAC Address Filtering........................................ 46
WEP .................................................... 47
WPA .................................................... 47
The Right Hardware for the Task ................................. 48
Setting Up a Simple Wireless Network ............................ 48
An OpenBSD WPA Access Point................................. 51
A FreeBSD WPA Access Point................................... 52
The Access Point’s PF Rule Set................................... 53
Access Points with Three or More Interfaces ......................... 54
Handling IPSec, VPN Solutions .................................. 55
The Client Side ............................................. 55
OpenBSD Setup ............................................ 56
FreeBSD Setup ............................................. 58
Guarding Your Wireless Network with authpf........................ 59
A Basic Authenticating Gateway................................. 60
Wide Open but Actually Shut ................................... 62
5
BIGGER OR TRICKIER NETWORKS 65
A Web Server and Mail Server on the Inside: Routable IPv4 Addresses ............ 66
A Degree of Separation: Introducing the DMZ ....................... 70
Sharing the Load: Redirecting to a Pool of Addresses .................. 72
Getting Load Balancing Right with relayd........................... 73
A Web Server and Mail Server on the Inside—The NAT Version ................. 79
DMZ with NAT ............................................. 80
Redirection for Load Balancing .................................. 81
Back to the Single NATed Network ............................... 81
Filtering on Interface Groups .......................................... 84
The Power of Tags ................................................. 85
The Bridging Firewall ............................................... 86
Basic Bridge Setup on OpenBSD................................. 87
Basic Bridge Setup on FreeBSD.................................. 88
Basic Bridge Setup on NetBSD . . . . . . . . . . . . . . . . . . . . . . . . . . . . . . . . . . 89
The Bridge Rule Set .......................................... 90
Contents in Detail xi
Handling Nonroutable IPv4 Addresses from Elsewhere ........................ 91
Establishing Global Rules ...................................... 91
Restructuring Your Rule Set with Anchors ........................... 91
How Complicated Is Your Network?—Revisited ............................. 94
6
TURNING THE TABLES FOR PROACTIVE DEFENSE 95
Turning Away the Brutes ............................................. 96
SSH Brute-Force Attacks ....................................... 96
Setting Up an Adaptive Firewall ................................. 97
Tidying Your Tables with pfctl ................................... 99
Giving Spammers a Hard Time with spamd............................... 100
Network-Level Behavior Analysis and Blacklisting .................... 100
Greylisting: My Admin Told Me Not to Talk to Strangers ............... 104
Tracking Your Real Mail Connections: spamlogd .................... 108
Greytrapping ............................................. 109
Managing Lists with spamdb .................................. 111
Detecting Out-of-Order MX Use................................. 113
Handling Sites That Do Not Play Well with Greylisting ................ 113
Spam-Fighting Tips ................................................ 115
7
TRAFFIC SHAPING WITH QUEUES AND PRIORITIES 117
Always-On Priority and Queues for Traffic Shaping ......................... 118
Shaping by Setting Traffic Priorities .............................. 119
Introducing Queues for Bandwidth Allocation ....................... 121
Using Queues to Handle Unwanted Traffic ......................... 130
Transitioning from ALTQ to Priorities and Queues........................... 131
Directing Traffic with ALTQ .......................................... 133
Basic ALTQ Concepts ....................................... 134
Queue Schedulers, aka Queue Disciplines ......................... 134
Setting Up ALTQ ........................................... 135
Priority-Based Queues.............................................. 136
Using ALTQ Priority Queues to Improve Performance.................. 136
Using a match Rule for Queue Assignment ......................... 137
Class-Based Bandwidth Allocation for Small Networks................. 139
A Basic HFSC Traffic Shaper .................................. 140
Queuing for Servers in a DMZ ................................. 142
Using ALTQ to Handle Unwanted Traffic .......................... 144
Conclusion: Traffic Shaping for Fun, and Perhaps Even Profit................... 145
8
REDUNDANCY AND RESOURCE AVAILABILITY 147
Redundancy and Failover: CARP and pfsync .............................. 148
The Project Specification: A Redundant Pair of Gateways............... 148
Setting Up CARP........................................... 150
Keeping States Synchronized: Adding pfsync ....................... 154
Putting Together a Rule Set .................................... 155
CARP for Load Balancing..................................... 157
xii Contents in Detail
9
LOGGING, MONITORING,
AND STATISTICS 161
PF Logs: The Basics................................................ 162
Logging the Packet's Path Through Your Rule Set: log (matches) .......... 164
Logging All Packets: log (all)................................... 165
Logging to Several pflog Interfaces .............................. 167
Logging to syslog, Local or Remote .............................. 167
Tracking Statistics for Each Rule with Labels ........................ 169
Additional Tools for PF Logs and Statistics ......................... 171
Keeping an Eye on Things with systat ............................ 171
Keeping an Eye on Things with pftop............................. 173
Graphing Your Traffic with pfstat ............................... 173
Collecting NetFlow Data with pflow(4)............................ 176
Collecting NetFlow Data with pfflowd ............................ 182
SNMP Tools and PF-Related SNMP MIBs .......................... 182
Log Data as the Basis for Effective Debugging ............................. 183
10
GETTING YOUR SETUP JUST RIGHT 185
Things You Can Tweak and What You Probably Should Leave Alone ............. 185
Block Policy .............................................. 186
Skip Interfaces ............................................ 187
State Policy .............................................. 187
State Defaults ............................................. 188
Timeouts ................................................ 188
Limits ................................................... 189
Debug .................................................. 190
Rule Set Optimization ....................................... 191
Optimization ............................................. 192
Fragment Reassembly ....................................... 192
Cleaning Up Your Traffic ........................................... 193
Packet Normalization with scrub: OpenBSD 4.5 and Earlier ............ 193
Packet Normalization with scrub: OpenBSD 4.6 Onward .............. 193
Protecting Against Spoofing with antispoof......................... 194
Testing Your Setup ................................................ 195
Debugging Your Rule Set ........................................... 197
Know Your Network and Stay in Control................................. 199
A
RESOURCES 201
General Networking and BSD Resources on the Internet ...................... 201
Sample Configurations and Related Musings .............................. 203
PF on Other BSD Systems ........................................... 204
BSD and Networking Books ......................................... 204
Wireless Networking Resources ....................................... 205
spamd and Greylisting-Related Resources ................................ 205
Book-Related Web Resources......................................... 206
Buy OpenBSD CDs and Donate! ...................................... 206
FOREWORD
from the first edition
OpenBSD’s PF packet filter has enjoyed a lot of
success and attention since it was first released in
OpenBSD 3.0 in late 2001. While you’ll find out
more about PF’s history in this book, in a nutshell,
PF happened because it was needed by the developers and users of
OpenBSD. Since the original release, PF has evolved greatly and has
become the most powerful free tool available for firewalling, load balanc-
ing, and traffic managing. When PF is combined with CARP and pfsync,
PF lets system administrators not only protect their services from attack,
but it makes those services more reliable by allowing for redundancy,
and it makes them faster by scaling them using pools of servers managed
through PF and relayd.
While I have been involved with PF’s development, I am first and fore-
most a large-scale user of PF. I use PF for security, to manage threats both
internal and external, and to help me run large pieces of critical infra-
structure in a redundant and scalable manner. This saves my employer
xvi Foreword
(the University of Alberta, where I wear the head sysadmin hat by day)
money, both in terms of downtime and in terms of hardware and software.
You can use PF to do the same.
With these features comes the necessary evil of complexity. For some-
one well versed in TCP/IP and OpenBSD, PF’s system documentation is
quite extensive and usable all on its own. But in spite of extensive examples
in the system documentation, it is never quite possible to put all the things
you can do with PF and its related set of tools front and center without mak-
ing the system documentation so large that it ceases to be useful for those
experienced people who need to use it as a reference.
This book bridges the gap. If you are a relative newcomer, it can get
you up to speed on OpenBSD and PF. If you are a more experienced user,
this book can show you some examples of the more complex applications
that help people with problems beyond the scope of the typical. For sev-
eral years, Peter N.M. Hansteen has been an excellent resource for people
learning how to apply PF in more than just the “How do I make a firewall?”
sense, and this book extends his tradition of sharing that knowledge with
others. Firewalls are now ubiquitous enough that most people have one, or
several. But this book is not simply about building a firewall, it is about learn-
ing techniques for manipulating your network traffic and understanding
those techniques enough to make your life as a system and network admin-
istrator a lot easier. A simple firewall is easy to build or buy off the shelf, but
a firewall you can live with and manage yourself is somewhat more complex.
This book goes a long way toward flattening out the learning curve and get-
ting you thinking not only about how to build a firewall, but how PF works
and where its strengths can help you. This book is an investment to save you
time. It will get you up and running the right way—faster, with fewer false
starts and less time experimenting.
Bob Beck
Director, The OpenBSD Foundation
http://www.openbsdfoundation.org/
Edmonton, Alberta, Canada
ACKNOWLEDGMENTS
This manuscript started out as a user group lecture,
first presented at the January 27, 2005 meeting of
the Bergen [BSD and] Linux User Group (BLUG).
After I had translated the manuscript into English
and expanded it slightly, Greg Lehey suggested that I should stretch it a
little further and present it as a half day tutorial for the AUUG 2005 con-
ference. After a series of tutorial revisions, I finally started working on
what was to become the book version in early 2007.
The next two paragraphs are salvaged from the tutorial manuscript
and still apply to this book:
This manuscript is a slightly further developed version of a manu-
script prepared for a lecture which was announced as (translated
from Norwegian):
“This lecture is about firewalls and related functions, with
examples from real life with the OpenBSD project’s PF (Packet
Filter). PF offers firewalling, NAT, traffic control, and bandwidth
management in a single, flexible, and sysadmin-friendly system.
Peter hopes that the lecture will give you some ideas about how
xviii Acknowledgments
to control your network traffic the way you want—keeping some
things outside your network, directing traffic to specified hosts
or services, and of course, giving spammers a hard time.”
Some portions of content from the tutorial (and certainly all the really
useful topics) made it into this book in some form. People who have offered
significant and useful input regarding early versions of this manuscript
include Eystein Roll Aarseth, David Snyder, Peter Postma, Henrik Kramshøj,
Vegard Engen, Greg Lehey, Ian Darwin, Daniel Hartmeier, Mark Uemura,
Hallvor Engen, and probably a few who will remain lost in my mail archive
until I can grep them out of there.
I would like to thank the following organizations for their kind support:
the NUUG Foundation for a travel grant, which partly financed my AUUG
2005 appearance; the AUUG, UKUUG, SANE, BSDCan, AsiaBSDCon,
NUUG, BLUG and BSD-DK organizations for inviting me to speak at their
events; and the FreeBSD Foundation for sponsoring my trips to BSDCan
2006 and EuroBSDCon 2006.
Much like the first, the second edition was written mainly at night and
on weekends, as well as during other stolen moments at odd hours. I would
like to thank my former colleagues at FreeCode for easing the load for a
while by allowing me some chunks of time to work on the second edition in
between other projects during the early months of 2010. I would also like to
thank several customers, who have asked that their names not be published,
for their interesting and challenging projects, which inspired some of the
configurations offered here. You know who you are.
The reason this third edition exists is that OpenBSD 5.5 introduced a
new traffic shaping system that replaced ALTQ. Fortunately Bill Pollock and
his team at No Starch Press agreed that this new functionality combined
with several other improvements since the second edition were adequate
reason to start work on the third edition during the second half of 2013.
Finally, during the process of turning the manuscript into a book, sev-
eral people did amazing things that helped this book become a lot better. I
am indebted to Bill Pollock and Adam Wright for excellent developmental
editing; I would like to thank Henning Brauer for excellent technical review;
heartfelt thanks go to Eystein Roll Aarseth, Jakob Breivik Grimstveit, Hallvor
Engen, Christer Solskogen, Ian Darwin, Jeff Martin, and Lars Noodén for
valuable input on various parts of the manuscript; and, finally, warm thanks
to Megan Dunchak and Linda Recktenwald for their efforts in getting the
first edition of the book into its final shape and to Serena Yang for guiding
the second and third editions to completion. Special thanks are due to Dru
Lavigne for making the introductions which led to this book getting written
in the first place, instead of just hanging around as an online tutorial and
occasional conference material.
Last but not least, I would like to thank my dear wife, Birthe, and my
daughter, Nora, for all their love and support, before and during the book
writing process as well as throughout the rather intense work periods that
yielded the second and edition. This would not have been possible with-
out you.

INTRODUCTION
This is a book about building the network
you need. We’ll dip into the topics of fire-
walls and related functions, starting from
a little theory. You’ll see plenty of examples
of filtering and other ways to direct network traf-
fic. I’ll assume that you have a basic to intermediate
command of TCP/IP networking concepts and Unix
administration.
All the information in this book comes with a warning: As in many
endeavors, the solutions we discuss can be done in more than one way.
And, of course, the software world is always changing and the best way to
do things may have changed since this book was printed. This book was
tested with OpenBSD version 5.6, FreeBSD 10.0, and NetBSD 6.1, and any
patches available in late July 2014.

xx Introduction
This Is Not a HOWTO
The book is a direct descendant of my popular PF tutorial, and the third
edition of the manuscript in book form. With all the work that’s gone into
making this book a useful one over the years, I am fairly confident you will
find it useful, and I hope you will find it an enjoyable read, too. But please
keep in mind that this document is not intended as a precooked recipe for
cutting and pasting.
Just to hammer this in, repeat after me:
//The Pledge of the Network Admin//
This is my network.
It is mine,
or technically, my employer's.
It is my responsibility,
and I care for it with all my heart.
There are many other networks a lot like mine,
but none are just like it.
I solemnly swear
that I will not mindlessly paste from HOWTOs.
The point is that while I have tested all of the configurations in this
book, they’re almost certainly at least a little wrong for your network as writ-
ten. Please keep in mind that this book is intended to show you a few useful
techniques and inspire you to achieve good things.
Strive to understand your network and what you need to do to make it
better and please do not paste blindly from this document or any other.
What This Book Covers
The book is intended to be a stand-alone document to enable you to work
on your machines with only short forays into man pages and occasional
reference to the online and printed resources listed in Appendix A.
Your system probably comes with a prewritten pf.conf file containing
some commented-out suggestions for useful configurations, as well as
a few examples in the documentation directories such as /usr/share/pf/.
These examples are useful as a reference, but we won’t use them directly
in this book. Instead, you’ll learn how to construct a pf.conf from scratch,
step by step.
Here is a brief rundown of what you will find in this book:
• Chapter 1, “Building the Network You Need,” walks through basic net-
working concepts, gives a short overview of PF’s history, and provides
Introduction xxi
some pointers on how to adjust to the BSD way if you are new to this
family of operating systems. Read this chapter first to get a sense of how
to work with BSD systems.
• Chapter 2, “PF Configuration Basics,” shows how to enable PF on your
system and covers a very basic rule set for a single machine. This chap-
ter is fairly crucial, since all the later configurations are based on the
one we build here.
• Chapter 3, “Into the Real World,” builds on the single-machine con-
figuration in Chapter 2 and leads you through the basics of setting up a
gateway to serve as a point of contact between separate networks. By the
end of Chapter 3, you will have built a configuration that is fairly typi-
cal for a home or small office network, and have some tricks up your
sleeve to make network management easier. You’ll also get an early taste
of how to handle services with odd requirements such as FTP, as well
as some tips on how to make your network troubleshooting-friendly by
catering to some of the frequently less understood Internet protocols
and services.
• Chapter 4, “Wireless Networks Made Easy,” walks you through adding
wireless networking to your setup. The wireless environment presents
some security challenges, and by the end of this chapter, you may find
yourself with a wireless network with access control and authentication
via authpf. Some of the information is likely to be useful in wired envi-
ronments, too.
• Chapter 5, “Bigger or Trickier Networks,” tackles the situation where
you introduce servers and services that need to be accessible from
outside your own network. By the end of this chapter, you may have a
network with one or several separate subnets and DMZs, and you will
have tried your hand at a couple of different load-balancing schemes
via redirections and relayd in order to improve service quality for your
users.
• Chapter 6, “Turning the Tables for Proactive Defense,” introduces some
of the tools in the PF tool chest for dealing with attempts at undesirable
activity, and shows how to use them productively. We deal with brute-
force password-guessing attempts and other network flooding, as well
as the antispam tool spamd, the OpenBSD spam deferral daemon. This
chapter should make your network a more pleasant one for legitimate
users and less welcoming to those with less than good intentions.
• Chapter 7, “Traffic Shaping with Queues,” introduces traffic shaping
via the priorities and queues systems introduced in OpenBSD 5.5. This
chapter also contains tips on how to convert earlier ALTQ-based setups
to the new system, as well as information on setting up and maintaining
ALTQ on operating systems where the newer queueing system is not
available. This chapter should leave you with better resource utilization
by adapting traffic shaping to your network needs.
xxii Introduction
• Chapter 8, “Redundancy and Resource Availability,” shows how to
create redun dant configurations, with CARP configurations for both
failover and load balancing. This chapter should give you insight into
how to create and maintain a highly available, redundant, CARP-based
configuration.
• Chapter 9, “Logging, Monitoring, and Statistics,” explains PF logs.
You’ll learn how to extract and process log and statistics data from
your PF configuration with tools in the base system as well as optional
packages. We’ll also discuss NetFlow and SNMP-based tools.
• Chapter 10, “Getting Your Setup Just Right,” walks through various
options that will help you tune your setup. It ties together the knowl-
edge you have gained from the previous chapters with a rule set debug-
ging tutorial.
• Appendix A, “Resources,” is an annotated list of print and online litera-
ture and other resources you may find useful as you expand your knowl-
edge of PF and networking topics.
• Appendix B, “A Note on Hardware Support,” gives an overview of some
of the issues involved in creating a first-rate tool as free software.
Each chapter in this book builds on the previous one. While as a free
being you can certainly skip around, it may be useful to read through chap-
ters in sequence.
For a number of reasons, OpenBSD is my favorite operating system.
My main environment for writing this book is dominated by OpenBSD
systems running either recent snapshots, the odd -stable system and every
now and then a locally built -current. This means that the main perspective
in the book is the world as seen from the command line in OpenBSD 5.6.
However, I keep enough of the other BSDs around that this book should
be useful even if your choice of platform is FreeBSD, NetBSD or DragonFly
BSD. There are areas of network configuration and PF setup where those
systems are noticeably different from the OpenBSD baseline, and in those
cases you will find notes on the differences as well as platform-specific
advice on how to build a useful configuration for your environment.

1
BUILDING THE
NETWORK YOU NEED
PF, the OpenBSD Packet Filter subsystem, is
in my opinion the finest tool available for
taking control of your network. Before div-
ing into the specifics of how to make your net-
work the fine-tuned machinery of your dreams, please
read this chapter. It introduces basic networking ter-
minology and concepts, provides some PF history, and
gives you an overview of what you can expect to find
in this book.
Your Network: High Performance, Low Maintenance,
and Secure
If this heading accurately describes your network, you’re most likely read-
ing this book for pure entertainment, and I hope you’ll enjoy the rest of it.

2 Chapter 1
If, on the other hand, you’re still learning how to build networks or you’re
not quite confident of your skills yet, a short recap of basic network security
concepts can be useful.
Information technology (IT) security is a large, complex, and some-
times confusing subject. Even if we limit ourselves to thinking only in terms
of network security, it may seem that we haven’t narrowed down the field
much or eliminated enough of the inherently confusing terminology. Matters
became significantly worse some years ago when personal computers started
joining the networked world, equipped with system software and applica-
tions that clearly weren’t designed for a networked environment.
The result was predictable. Even before the small computers became
networked, they’d become home to malicious software, such as viruses
(semiautonomous software that is able to “infect” other files in order to
deliver its payload and make further copies of itself) and trojans (originally
trojan horses, software or documents with code embedded that, if activated,
would cause the victim’s computer to perform actions the user didn’t intend).
When the small computers became networked, they were introduced to yet
another kind of malicious software called a worm, a class of software that
uses the network to propagate its payload.1 Along the way, the networked
versions of various kinds of frauds made it onto the network security hori-
zon as well, and today a significant part of computer security activity (pos-
sibly the largest segment of the industry) centers on threat management,
with emphasis on fighting and cataloging malicious software, or malware.
The futility of enumerating badness has been argued convincingly
elsewhere (see Appendix A for references, such as Marcus Ranum’s excel-
lent essay “The Six Dumbest Ideas in Computer Security”). The OpenBSD
approach is to design and code properly in the first place. However, even
smart people make mistakes every now and then, producing bugs, so make
sure to design the system to allow any such failure to have the least possible
impact security-wise. Then, if you later discover mistakes and the bugs turn
out to be exploitable, fix those bugs wherever similar code turns up in the
tree, even if it could mean a radical overhaul of the design and, at worst, a
loss of backward compatibility.2
In PF, and by extension in this book, the focus is narrower, concen-
trated on network traffic at the network level. The introduction of divert(4)
sockets in OpenBSD 4.7 made it incrementally easier to set up a system
where PF contributes to deep packet inspection, much like some fiercely mar-
keted products. However, the interface is not yet widely used in free soft-
ware for that purpose, although exceptions exist. Therefore, we’ll instead
1. The famous worms before the Windows era were the IBM Christmas Tree EXEC worm
(1987) and the first Internet worm, the Morris worm (1988). A wealth of information about
both is within easy reach of your favorite search engine. The Windows era of networked
worms is considered to have started with the ILOVEYOU worm in May 2000.
2. Several presentations on OpenBSD’s approach to security can be found via the collection
at http://www.openbsd.org/papers/. Some of my favorites are Theo de Raadt’s “Exploit Mitigation
Techniques” (as well as the 2013 follow-up, “Security Mitigation Techniques: An Update After
10 Years”), Damien Miller’s “Security Measures in OpenSSH,” and Henning Brauer and Sven
Dehmlow’s “Puffy at Work—Getting Code Right and Secure, the OpenBSD Way.”

Building the Network You Need 3
focus on some techniques based on pure network-level behavior, which are
most evident in the example configurations in Chapter 6. These techniques
will help ease the load on content-inspecting products if you have them in
place. As you’ll see in the following chapters, the network level offers a lot
of fun and excitement, in addition to the blocking or passing packets.
Where the Packet Filter Fits In
The packet filter’s main function is, as the name suggests, to filter network
packets by matching the properties of individual packets and the network
connections built from those packets against the filtering criteria defined in
its configuration files. The packet filter is responsible for deciding what to
do with those packets. This could mean passing them through or rejecting
them, or it could mean triggering events that other parts of the operating
system or external applications are set up to handle.
PF lets you write custom filtering criteria to control network traffic
based on essentially any packet or connection property, including address
family, source and destination address, interface, protocol, port, and direc-
tion. Based on these criteria, the packet filter performs the action you spec-
ify. One of the simplest and most common actions is to block traffic.
A packet filter can keep unwanted traffic out of your network. It can
also help contain network traffic inside your own network. Both these func-
tions are important to the firewall concept, but blocking is far from the only
useful or interesting feature of a functional packet filter. As you’ll see in
this book, you can use filtering criteria to direct certain kinds of network
traffic to specific hosts, assign classes of traffic to queues, perform traffic
shaping, and even hand off selected kinds of traffic to other software for
special treatment.
All this processing happens at the network level, based on packet and
connection properties. PF is part of the network stack, firmly embedded
in the operating system kernel. While there have been examples of packet
filtering implemented in user space, in most operating systems, the filtering
functions are performed in the kernel because it’s faster to do so.
The Rise of PF
If you have a taste for history, you probably already know that OpenBSD
and the other BSDs3 are direct descendants of the BSD system (sometimes
referred to as BSD Unix), the operating system that contained the original
reference implementation of the TCP/IP Internet protocols in the early 1980s.
3. If BSD doesn’t sound familiar, here is a short explanation: The acronym expands to Berkeley
Software Distribution and originally referred to a collection of useful software developed for
the Unix operating system by staff and students at the University of California, Berkeley. Over
time, the collection expanded into a complete operating system, which in turn became the
forerunner of a family of systems, including OpenBSD, FreeBSD, NetBSD, DragonFly BSD,
and, by some definitions, even Apple’s Mac OS X. For a very readable explanation of what
BSD is, see Greg Lehey’s “Explaining BSD” at http://www.freebsd.org/doc/en/articles/explaining-bsd/
(and, of course, the projects’ websites).

4 Chapter 1
As the research project behind BSD development started winding down
in the early 1990s, the code was liberated for further development by small
groups of enthusiasts around the world. Some of these enthusiasts were
responsible for keeping vital parts of the emerging Internet’s infrastructure
running reliably, and BSD development continued along parallel lines in
several groups. The OpenBSD group became known as the most security-
oriented of the BSDs. For its packet-filtering needs, it used a subsystem
called IPFilter, written mainly by Darren Reed. During these early years,
OpenBSD quickly earned a positive reputation as “THE firewall OS,” and
it’s still quite common for people to believe that OpenBSD was developed
specifically for that purpose.
It shocked the OpenBSD community when Reed announced in
early 2001 that IPFilter, which at that point was intimately integrated with
OpenBSD, wasn’t covered under the BSD license. Instead, it used almost a
word-for-word copy of the license, omitting only the right to make changes
to the code and distribute the result. The problem was that the OpenBSD
version of IPFilter contained several changes and customizations that, as
it turned out, were not allowed under the license. As a result, IPFilter was
deleted from the OpenBSD source tree on May 29, 2001, and for a few
weeks, the development version of OpenBSD (-current) didn’t include
any packet filter software.
Fortunately, at this time, in Switzerland, Daniel Hartmeier had been
performing some limited experiments involving kernel hacking in the net-
working code. He began by hooking a small function of his own into the
networking stack and then making packets pass through it. Then, he began
thinking about filtering. When the license crisis happened, PF was already
under development on a small scale. The first commit of the PF code was on
Sunday, June 24, 2001, at 19:48:58 UTC. A few months of intense activity by
many developers followed, and the resulting version of PF was launched as
a default part of the OpenBSD 3.0 base system in December of 2001.4 This
version contained an implementation of packet filtering, including network
address translation, with a configuration language that was similar enough
to IPFilter’s that migrating to the new OpenBSD version did not pose major
problems.5
4. The IPFilter copyright episode spurred the OpenBSD team to perform a license audit of
the entire source tree in order to avoid similar situations in the future. Several potential prob-
lems were resolved over the months that followed, resulting in the removal of a number of
potential license pitfalls for everyone involved in free software development. Theo de Raadt
summed up the effort in a message to the openbsd-misc mailing list on February 20, 2003. The
initial drama of the license crisis had blown over, and the net gain was a new packet-filtering
system under a free license, with the best code quality available, as well as better free licenses
for a large body of code in OpenBSD itself and in other widely used free software.
5. Compatibility with IPFilter configurations was an early design goal for the PF developers,
but it stopped being a priority once it could be safely assumed that all OpenBSD users had
moved to PF (around the time OpenBSD 3.2 was released, if not earlier). You shouldn’t assume
that an existing IPFilter configuration will work without changes with any version of PF. With
the syntax changes introduced in OpenBSD 4.7, even upgrades from earlier PF versions will
involve some conversion work.

Building the Network You Need 5
PF proved to be well-developed software. In 2002, Hartmeier presented
a USENIX paper with performance tests showing that the OpenBSD 3.1
PF performed equally well or better under stress than either IPFilter on
Open BSD 3.1 or iptables on Linux. In addition, tests run on the original
PF from OpenBSD 3.0 showed mainly that the code had gained in effi-
ciency from version 3.0 to version 3.1.6
The OpenBSD PF code, with a fresh packet-filtering engine written by
experienced and security-oriented developers, naturally generated inter-
est in the sister BSDs as well. The FreeBSD project gradually adopted PF,
first as a package and then, from version 5.3 on, in the base system as one
of three packet-filtering systems. PF has also been included in NetBSD and
DragonFly BSD.7
This book focuses on the PF version available in OpenBSD 5.5. I’ll note
significant differences between that version and the ones integrated in
other systems as appropriate.
If you’re ready to dive into PF configuration, you can jump to Chapter 2
to get started. If you want to spend a little more time getting your bearings
in unfamiliar BSD territory, continue reading this chapter.
6. The article that provides the details of these tests is available from Daniel Hartmeier’s web-
site. See http://www.benzedrine.cx/pf-paper.html.
7. At one point, there even existed a personal firewall product running on Microsoft Windows,
named Core Force, that was based on a port of PF. By early 2010, Core Security, the company
that developed Core Force (http://force.coresecurity.com/), seemed to have shifted focus to other
security areas, such as penetration testing, but the product was still available for download.
NEWER PF RELEASES PERFORM BETTER
Like the rest of the computing world, OpenBSD and PF have been affected by
rapid changes in hardware and network conditions. I haven’t seen tests compa-
rable to the ones in Daniel Hartmeier’s USENIX paper performed recently, but
PF users have found that the filtering overhead is modest.
As an example (mainly to illustrate that even unexciting hardware configu-
rations can be useful), the machine that gateways between one small office net-
work in my care and the world is a Pentium III 450MHz with 384MB of RAM.
When I’ve remembered to check, I’ve never seen the machine at less than
96 percent idle according to the output from the top(1) command.
It’s also worth noting that the current PF developers, mainly Henning Brauer
and Ryan McBride, with contributions from several others, rewrote large por-
tions of OpenBSD’s PF code with improved performance as a stated main goal
during recent releases, making each release from 4.4 through 5.6 perform
noticeably better than its predecessors.
6 Chapter 1
If You Came from Elsewhere
If you’re reading this because you’re considering moving your setup to PF
from some other system, this section is for you.
If you want to use PF, you need to install and run a BSD system, such as
OpenBSD, FreeBSD, NetBSD, or DragonFly BSD. These are all fine operat-
ing systems, but my personal favorite is OpenBSD, mainly because that’s the
operating system where essentially all PF development happens. I also find
the no-nonsense approach of the developers and the system refreshing.
Occasionally, minor changes and bug fixes trickle back to the main PF
code base from the PF implementations on other systems, but the newest,
most up-to-date PF code is always to be found on OpenBSD. Some of the
features described in this book are available only in the most recent ver-
sions of OpenBSD. The other BSDs have tended to port the latest released
PF version from OpenBSD to their code bases in time for their next release,
but synchronized updates are far from guaranteed, and the lag is some-
times considerable.
If you’re planning to run PF on FreeBSD, NetBSD, DragonFly BSD,
or another system, you should check your system’s release notes and other
documentation for information about which version of PF is included.
Pointers for Linux Users
The differences and similarities between Linux and BSD are potentially a
large topic if you probe deeply, but if you have a reasonable command of
the basics, it shouldn’t take too long for you to feel right at home with the
BSD way of doing things. In the rest of this book, I’ll assume you can find
your way around the basics of BSD network configuration. So, if you’re
more familiar with configuring Linux or other systems than you are with
BSD, it’s worth noting a few points about BSD configuration:
• Linux and BSD use different conventions for naming network inter-
faces. The Linux convention is to label all the network interfaces on
a given machine in the sequence eth0, eth1, and so on (although with
some Linux versions and driver combinations, you also see wlan0, wlan1,
and so on for wireless interfaces).
On the BSDs, interfaces are assigned names that equal the driver
name plus a sequence number. For example, older 3Com cards using
the ep driver appear as ep0, ep1, and so on; Intel Gigabit cards are likely
to end up as em0, em1, and so on. Some SMC cards are listed as sn0, sn1,
and so on. This system is quite logical and makes it easier to find the
documentation for the specifics of that interface. If your kernel reports
(at boot time or in ifconfig output) that you have an interface called
em0, you need only type man em at a shell command-line prompt to find
out what speeds it supports—whether there are any eccentricities to be
aware of, whether any firmware download is needed, and so on.

Building the Network You Need 7
• You should be aware that in BSDs, the configuration is /etc/rc.conf-centric.
In general, the BSDs are organized to read the configuration from the
file /etc/rc.conf, which is read by the /etc/rc script at startup. OpenBSD
recommends using /etc/rc.conf.local for local customizations because
rc.conf contains the default values. FreeBSD uses /etc/defaults/rc.conf to
store the default settings, making /etc/rc.conf the correct place to make
changes. In addition, OpenBSD uses per-interface configuration files
called hostname.<if>, where <if> is replaced with the interface name.
• For the purpose of learning PF, you’ll need to concentrate on an
/etc/pf.conf file, which will be largely your own creation.
If you need a broader and more thorough introduction to your BSD of
choice, look up the operating system’s documentation, including FAQs and
guides, at the project’s website. You can also find some suggestions for fur-
ther reading in Appendix A.
Frequently Answered Questions About PF
This section is based on questions I’ve been asked via email or at meetings
and conferences as well as some that have popped up in mailing lists and
other discussion forums. Some of the more common questions are covered
here in a FAQ-style8 format.
Can I run PF on my Linux machine?
In a word, no. Over the years, announcements have appeared on the PF
mailing list from someone claiming to have started a Linux port of PF, but
at the time of this writing, no one has yet claimed to have completed the
task. The main reason for this is probably that PF is developed primarily
as a deeply integrated part of the OpenBSD networking stack. Even after
more than a decade of parallel development, the OpenBSD code still shares
enough fundamentals with the other BSDs to make porting possible, but
porting PF to a non-BSD system would require rewriting large chunks of
PF itself as well as whatever integration is needed at the target side.
For some basic orientation tips for Linux users to find their way in BSD
network configurations, see “Pointers for Linux Users” on page 6.
Can you recommend a GUI tool for managing my PF rule set?
This book is mainly oriented toward users who edit their rule sets in their
favorite text editor. The sample rule sets in this book are simple enough
that you probably wouldn’t get a noticeable benefit from any of the visual-
ization options the various GUI tools are known to offer.
A common claim is that the PF configuration files are generally read-
able enough that a graphic visualization tool isn’t really necessary. There
are, however, several GUI tools available that can edit and/or generate PF
8. The three-letter abbreviation FAQ expands to either frequently asked questions or frequently
answered questions—both equally valid.
8 Chapter 1
configurations, including a complete, customized build of FreeBSD called
pfSense (http://www.pfsense.org/), which includes a sophisticated GUI rule
editor.
I recommend that you work through the parts of this book that apply to
your situation and then decide whether you need to use a GUI tool to feel
comfortable running and maintaining the systems you build.
Is there a tool I can use to convert my OtherProduct® setup to a PF configuration?
The best strategy when converting network setups, including firewall setups,
from one product to another is to go back to the specifications or policies
for your network or firewall configuration and then implement the policies
using the new tool.
Other products will inevitably have a slightly different feature set, and
the existing configuration you created for OtherProduct® is likely to mirror
slightly different approaches to specific problems, which do not map easily,
or at all, to features in PF and related tools.
Having a documented policy, and taking care to update it as your needs
change, will make your life easier. This documentation should contain a com-
plete prose specification of what your setup is meant to achieve. (You might
start out by putting comments in your configuration file to explain the pur-
pose of your rules.) This makes it possible to verify whether the configura-
tion you’re running actually implements the design goals. In some corpo-
rate settings, there may even be a formal requirement for a written policy.
The impulse to look for a way to automate your conversion is quite
understandable and perhaps expected in a system administrator. I urge
you to resist the impulse and to perform your conversion after reevaluating
your business and technical needs and (preferably) after creating or updat-
ing a formal specification or policy in the process.
Some of the GUI tools that serve as administration frontends claim
the ability to output configuration files for several firewall products and
could conceivably be used as conversion tools. However, this has the effect
of inserting another layer of abstraction between you and your rule set,
and it puts you at the mercy of the tool author’s understanding of how PF
rule sets work. I recommend working through at least the relevant parts
of this book before spending serious time on considering an automated
conversion.
I heard PF is based on IPFilter, which I know from working with Solaris. Can I just copy my
IPFilter configuration across and have a working setup right away?
If people claim that PF is “based on” IPFilter, they are saying something
that isn’t true. PF was written from scratch to be a replacement for the
newly deleted IPFilter code. For that first version of PF, one of the design
goals was to keep the syntax fairly compatible with the older software so
the transition to OpenBSD 3.0 would be as painless as possible and not
break existing setups too badly or in unpredictable ways.
Building the Network You Need 9
However, a version or two down the road, it was reasonable to believe
that no OpenBSD users were still likely to upgrade from a version that con-
tained IPFilter, so staying compatible with the older system fell off the list of
priorities. Some syntax similarities remain, even after 25 OpenBSD releases
and more than 12 years of active development. Trying to load one system’s
configuration on the other—for example, copying across an IPFilter con-
figuration to an OpenBSD system and trying to load it there or copying
a modern PF configuration to a Solaris system and trying to load it as an
IPFilter configuration—is guaranteed to fail in almost all cases, except
for a few specially crafted but still quite trivial and, in fact, rather useless
configurations.
Why did the PF rule syntax change all of a sudden?
The world changed, and PF changed with it. More specifically, the OpenBSD
developers have a very active and pragmatically critical relationship to their
code, and like all parts of OpenBSD, the PF code is under constant review.
The lessons learned over more than a decade of PF development and
use led to internal changes in the code that eventually made it clear to
the developers that changing the syntax slightly would make sense. The
changes would make the PF syntax more consistent and make life easier for
users in the long run at the price of some light edits of configuration files.
The result for you, the user, is that PF is now even easier to use and that it
performs better than the earlier versions. If you’re upgrading your system
to OpenBSD 4.7 or newer, you’re in for a real treat.
And with OpenBSD 5.5, you’ll find another good reason to upgrade:
the new queuing system for traffic shaping, which is intended to replace the
venerable ALTQ system. ALTQ is still part of OpenBSD 5.5, although in
slightly modified form, but it has already been removed from the OpenBSD
kernel in time for the OpenBSD 5.6 release. Chapter 7 contains a section
specifically about migrating to the new traffic-shaping system.
Where can I find out more?
There are several good sources of information about PF and the systems
on which it runs. You’ve already found one in this book. You can find refer-
ences to a number of printed and online resources in Appendix A.
If you have a BSD system with PF installed, consult the online manual
pages, or man pages, for information about your exact release of the soft-
ware. Unless otherwise indicated, the information in this book refers to the
world as it looks from the command line on an OpenBSD 5.5 system.
A Little Encouragement: A PF Haiku
If you’re not quite convinced yet, or even if you are, a little encouragement
may be in order. Over the years, a good many people have said and written
their bit about PF—sometimes odd, sometimes wonderful, and sometimes
just downright strange.

10 Chapter 1
The poem quoted here is a good indication of the level of feeling PF
sometimes inspires in its users. This poem appeared on the PF mailing list,
in a thread that started with a message with the subject “Things pf can’t
do?” in May 2004. The message was written by someone who didn’t have
a lot of firewall experience and who consequently found it hard to get the
desired setup.
This, of course, led to some discussion, with several participants
saying that if PF was hard on a newbie, the alternatives weren’t any better.
The thread ended in the following haiku of praise from Jason Dixon, dated
May 20, 2004.
Compared to working with iptables, PF is like this haiku:
A breath of fresh air,
floating on white rose petals,
eating strawberries.
Now I'm getting carried away:
Hartmeier codes now,
Henning knows not why it fails,
fails only for n00b.
Tables load my lists,
tarpit for the asshole spammer,
death to his mail store.
CARP due to Cisco,
redundant blessed packets,
licensed free for me.
Some of the concepts Dixon mentions here may sound a bit unfamiliar,
but if you read on, it’ll all make sense soon.

2
PF CONFIGURATION BASICS
In this chapter, we’ll create a very simple
setup with PF. We’ll begin with the simplest
configuration possible: a single machine
configured to communicate with a single net-
work. This network could very well be the Internet.
Your two main tools for configuring PF are your favorite text editor and
the pfctl command-line administration tool. PF configurations, usually
stored in /etc/pf.conf, are called rule sets because each line in the configura-
tion file is a rule that helps determine what the packet-filtering subsystem
should do with the network traffic it sees. In ordinary, day-to-day admin-
istration, you edit your configuration in the /etc/pf.conf file and then load
your changes using pfctl. There are Web interfaces for PF administration
tasks, but they’re not part of the base system. The PF developers aren’t
hostile toward these options, but they’ve yet to see a graphical interface
for configuring PF that’s clearly preferable to editing pf.conf and using pfctl
commands.

12 Chapter 2
The First Step: Enabling PF
Before you can get started on the fun parts of shaping your network with PF
and related tools, you need to make sure that PF is available and enabled.
The details depend on your specific operating system: OpenBSD, FreeBSD,
or NetBSD. Check your setup by following the instructions for your operat-
ing system and then move on to “A Simple PF Rule Set: A Single, Stand-
Alone Machine” on page 16.
The pfctl command is a program that requires higher privilege than
the default for ordinary users. In the rest of this book, you’ll see commands
that require extra privilege prefixed with sudo. If you haven’t started using
sudo yet, you should. sudo is in the base system on OpenBSD. On FreeBSD,
DragonFly BSD, and NetBSD, it’s within easy reach via the ports system or
pkgsrc system, respectively, as security/sudo.
Here are a couple general notes regarding using pfctl:
• The command to disable PF is pfctl -d. Once you’ve entered that com-
mand, all PF-based filtering that may have been in place will be dis-
abled, and all traffic will be allowed to pass.
• For convenience, pfctl can handle several operations on a single com-
mand line. To enable PF and load the rule set in a single command,
enter the following:
$ sudo pfctl -ef /etc/pf.conf
Setting Up PF on OpenBSD
In OpenBSD 4.6 and later, you don’t need to enable PF because it’s enabled
by default with a minimal configuration in place.1 If you were watching the
system console closely while the system was starting up, you may have noticed
the pf enabled message appear soon after the kernel messages completed.
If you didn’t see the pf enabled message on the console at startup, you
have several options to check that PF is indeed enabled. One simple way to
check is to enter the command you would otherwise use to enable PF from
the command line:
$ sudo pfctl -e
If PF is already enabled, the system responds with this message:
pfctl: pf already enabled
1. If you’re setting up your first PF configuration on an OpenBSD version earlier than this,
the best advice is to upgrade to the most recent stable version. If for some reason you must
stay with the older version, it might be useful to consult the first edition of this book as well
as the man pages and other documentation for the specific version you’re using.

PF Configuration Basics 13
If PF isn’t enabled, the pfctl -e command will enable PF and display this:
pf enabled
In versions prior to OpenBSD 4.6, PF wasn’t enabled by default. You
can override the default by editing your /etc/rc.conf.local file (or creating the
file, if it doesn’t exist). Although it isn’t necessary on recent OpenBSD ver-
sions, it doesn’t hurt to add this line to your /etc/rc.conf.local file:
pf=YES # enable PF
If you take a look at the /etc/pf.conf file in a fresh OpenBSD installation,
you get your first exposure to a working rule set.
The default OpenBSD pf.conf file starts off with a set skip on lo rule to
make sure traffic on the loopback interface group isn’t filtered in any way.
The next active line is a simple pass default to let your network traffic pass
by default. Finally, an explicit block rule blocks remote X11 traffic to your
machine.
As you probably noticed, the default pf.conf file also contains a few com-
ment lines starting with a hash mark (#). In those comments, you’ll find
suggested rules that hint at useful configurations, such as FTP passthrough
via ftp-proxy (see Chapter 3) and spamd, the OpenBSD spam-deferral daemon
(see Chapter 6). These items are potentially useful in various real-world sce-
narios, but because they may not be relevant in all configurations, they are
commented out in the file by default.
If you look for PF-related settings in your /etc/rc.conf file, you’ll find the
setting pf_rules=. In principle, this lets you specify that your configuration is
in a file other than the default /etc/pf.conf. However, changing this setting
is probably not worth the trouble. Using the default setting lets you take
advantage of a number of automatic housekeeping features, such as auto-
matic nightly backup of your configuration to /var/backups.
On OpenBSD, the /etc/rc script has a built-in mechanism to help you
out if you reboot with either no pf.conf file or one that contains an invalid
rule set. Before enabling any network interfaces, the rc script loads a rule set
that allows a few basic services: SSH from anywhere, basic name resolution,
and NFS mounts. This allows you to log in and correct any errors in your
rule set, load the corrected rule set, and then go on working from there.
Setting Up PF on FreeBSD
Good code travels well, and FreeBSD users will tell you that good code from
elsewhere tends to find its way into FreeBSD sooner or later. PF is no excep-
tion, and from FreeBSD 5.2.1 and the 4.x series onward, PF and related
tools became part of FreeBSD.

14 Chapter 2
If you read through the previous section on setting up PF on OpenBSD,
you saw that on OpenBSD, PF is enabled by default. That isn’t the case on
FreeBSD, where PF is one of three possible packet-filtering options. Here,
you need to take explicit steps to enable PF, and compared to OpenBSD, it
seems that you need a little more magic in your /etc/rc.conf. A look at your
/etc/defaults/rc.conf file shows that the FreeBSD default values for PF-related
settings are as follows:
pf_enable="NO" # Set to YES to enable packet filter (PF)
pf_rules="/etc/pf.conf" # rules definition file for PF
pf_program="/sbin/pfctl" # where pfctl lives
pf_flags="" # additional flags for pfctl
pflog_enable="NO" # set to YES to enable packet filter logging
pflog_logfile="/var/log/pflog" # where pflogd should store the logfile
pflog_program="/sbin/pflogd" # where pflogd lives
pflog_flags="" # additional flags for pflogd
pfsync_enable="NO" # expose pf state to other hosts for syncing
pfsync_syncdev="" # interface for pfsync to work through
pfsync_ifconfig="" # additional options to ifconfig(8) for pfsync
Fortunately, you can safely ignore most of these—at least for now. The
following are the only options that you need to add to your /etc/rc.conf
configuration:
pf_enable="YES" # Enable PF (load module if required)
pflog_enable="YES" # start pflogd(8)
There are some differences between FreeBSD releases with respect
to PF. Refer to the FreeBSD Handbook available from http://www.freebsd.org/
—specifically the PF section of the “Firewalls” chapter—to see which infor-
mation applies in your case. The PF code in FreeBSD 9 and 10 is equivalent
to the code in OpenBSD 4.5 with some bug fixes. The instructions in this
book assume that you’re running FreeBSD 9.0 or newer.
On FreeBSD, PF is compiled as a kernel-loadable module by default.
If your FreeBSD setup runs with a GENERIC kernel, you should be able to
start PF with the following:
$ sudo kldload pf
$ sudo pfctl -e
Assuming you have put the lines just mentioned in your /etc/rc.conf and
created an /etc/pf.conf file, you could also use the PF rc script to run PF. The
following enables PF:
$ sudo /etc/rc.d/pf start
And this disables the packet filter:
$ sudo /etc/rc.d/pf stop

PF Configuration Basics 15
NOTE On FreeBSD, the /etc/rc.d/pf script requires at least a line in /etc/rc.conf that
reads pf_enable="YES" and a valid /etc/pf.conf file. If either of these requirements
isn’t met, the script will exit with an error message. There is no /etc/pf.conf file in
a default FreeBSD installation, so you’ll need to create one before you reboot the system
with PF enabled. For our purposes, creating an empty /etc/pf.conf with touch will
do, but you could also work from a copy of the /usr/share/examples/pf/pf.conf
file supplied by the system.
The supplied sample file /usr/share/examples/pf/pf.conf contains no active
settings. It has only comment lines starting with a # character and commented-
out rules, but it does give you a preview of what a working rule set will look
like. For example, if you remove the # sign before the line that says set skip
on lo to uncomment the line and then save the file as your /etc/pf.conf, your
loopback interface group will not be filtered once you enable PF and load
the rule set. However, even if PF is enabled on your FreeBSD system, we
haven’t gotten around to writing an actual rule set, so PF isn’t doing much
of anything and all packets will pass.
As of this writing (August 2014), the FreeBSD rc scripts don’t set up a
default rule set as a fallback if the configuration read from /etc/pf.conf fails
to load. This means that enabling PF with no rule set or with pf.conf content
that is syntactically invalid will leave the packet filter enabled with a default
pass all rule set.
Setting Up PF on NetBSD
On NetBSD 2.0, PF became available as a loadable kernel module that
could be installed via packages (security/pflkm) or compiled into a static
kernel configuration. In NetBSD 3.0 and later, PF is part of the base system.
On NetBSD, PF is one of several possible packet-filtering systems, and you
need to take explicit action to enable it.
Some details of PF configuration have changed between NetBSD
releases. This book assumes you are using NetBSD 6.0 or later.2
To use the loadable PF module for NetBSD, add the following lines to
your /etc/rc.conf to enable loadable kernel modules, PF, and the PF log inter-
face, respectively.
lkm="YES" # do load kernel modules
pf=YES
pflogd=YES
To load the pf module manually and enable PF, enter this:
$ sudo modload /usr/lkm/pf.o
$ sudo pfctl -e
2. For instructions on using PF in earlier releases, see the documentation for your release and
look up supporting literature listed in Appendix A of this book.

16 Chapter 2
Alternatively, you can run the rc.d scripts to enable PF and logging, as
follows:
$ sudo /etc/rc.d/pf start
$ sudo /etc/rc.d/pflogd start
To load the module automatically at startup, add the following line to
/etc/lkm.conf:
/usr/lkm/pf.o - - - - BEFORENET
If your /usr filesystem is on a separate partition, add this line to your
/etc/rc.conf:
critical_filesystems_local="${critical_filesystems_local} /usr"
If there are no errors at this point, you have enabled PF on your system,
and you’re ready to move on to creating a complete configuration.
The supplied /etc/pf.conf file contains no active settings; it has only
comment lines starting with a hash mark (#) and commented-out rules.
However, it does give you a preview of what a working rule set will look like.
For example, if you remove the hash mark before the line that says set skip
on lo to uncomment it and then save the file, your loopback interface will
not be filtered once you enable PF and load the rule set. However, even if
PF is enabled on your NetBSD system, we haven’t gotten around to writing
an actual rule set, so PF isn’t doing much of anything but passing packets.
NetBSD implements a default or fallback rule set via the file /etc/defaults/
pf.boot.conf. This rule set is intended only to let your system complete its boot
process in case the /etc/pf.conf file doesn’t exist or contains an invalid rule
set. You can override the default rules by putting your own customizations
in /etc/pf.boot.conf.
A Simple PF Rule Set: A Single, Stand-Alone Machine
Mainly to have a common, minimal baseline, we will start building rule sets
from the simplest possible configuration.
A Minimal Rule Set
The simplest possible PF setup is on a single machine that will not run any
services and talks to only one network, which may be the Internet.
We’ll begin with an /etc/pf.conf file that looks like this:
block in all
pass out all keep state

PF Configuration Basics 17
This rule set denies all incoming traffic, allows traffic we send, and
retains state information on our connections. PF reads rules from top to
bottom; the last rule in a rule set that matches a packet or connection is the
one that is applied.
Here, any connection coming into our system from anywhere else will
match the block in all rule. Even with this tentative result, the rule evalua-
tion will continue to the next rule (pass out all keep state), but the traffic
will not even match the first criterion (the out direction) in this rule. With
no more rules to evaluate, the status will not change, and the traffic will be
blocked. In a similar manner, any connection initiated from the machine
with this rule set will not match the first rule (once again, the wrong direc-
tion) but will match the second rule, which is a pass rule, and the connec-
tion is allowed to pass.
We’ll examine the way that PF evaluates rules and how ordering mat-
ters in a bit more detail in Chapter 3, in the context of a slightly longer
rule set.
For any rule that has a keep state part, PF keeps information about
the connection, including various counters and sequence numbers, as an
entry in the state table. The state table is where PF keeps information about
existing connections that have already matched a rule, and new packets
that arrive are compared to existing state table entries to find a match first.
Only when a packet doesn’t match any existing state will PF move on to a
full rule set evaluation, checking whether the packet matches a rule in the
loaded rule set. We can also instruct PF to act on state information in vari-
ous ways, but in a simple case like this, our main goal is to allow return traf-
fic for connections we initiate to return to us.
Note that on OpenBSD 4.1 and later, the default for pass rules is to keep
state information,3 and we no longer need to specify keep state explicitly in
a simple case like this. This means the rule set could be written like this:
# minimal rule set, OpenBSD 4.1 onward keeps state by default
block in all
pass out all
In fact, you could even leave out the all keyword here if you like.
The other BSDs have mostly caught up with this change by now, and
for the rest of this book, we’ll stick to the newer rules, with an occasional
reminder in case you are using an older system.
It goes pretty much without saying that passing all traffic generated by a
specific host implies that the host in question is, in fact, trustworthy. This is
something you do only if this is a machine you know you can trust.
3. In fact, the new default corresponds to keep state flags S/SA, ensuring that only initial SYN
packets during connection setup create state, eliminating some puzzling error scenarios. To
filter statelessly, you can specify no state for the rules where you don’t want to record or keep
state information. On FreeBSD, OpenBSD 4.1–equivalent PF code was merged into version 7.0.
If you’re using a PF version old enough that it does not have this default, it is a very strong
indicator that you should consider upgrading your operating system as soon as feasible.

18 Chapter 2
When you’re ready to use this rule set, load it with the following:
$ sudo pfctl -ef /etc/pf.conf
The rule set should load without any error messages or warnings. On all
but the slowest systems, you should be returned to the $ prompt immediately.
Testing the Rule Set
It’s always a good idea to test your rule sets to make sure they work as
expected. Proper testing will become essential once you move on to more
complicated configurations.
To test the simple rule set, see whether it can perform domain name
resolution. For example, you could see whether $ host nostarch.com returns
information, such as the IP address of the host nostarch.com and the host-
names of that domain’s mail exchangers. Or just see whether you can surf
the Web. If you can connect to external websites by name, the rule set
allows your system to perform domain name resolution. Basically, any ser-
vice you try to access from your own system should work, and any service
you try to access on your system from another machine should produce
a Connection refused message.
Slightly Stricter: Using Lists and Macros for Readability
The rule set in the previous section is an extremely simple one—probably
too simplistic for practical use. But it’s a useful starting point to build from
to create a slightly more structured and complete setup. We’ll start by deny-
ing all services and protocols and then allow only those we know that we
need,4 using lists and macros for better readability and control.
A list is simply two or more objects of the same type that you can refer
to in a rule set, such as this:
pass proto tcp to port { 22 80 443 }
Here, { 22 80 443 } is a list.
A macro is a pure readability tool. If you have objects that you’ll refer to
more than once in your configuration, such as an IP address for an impor-
tant host, it could be useful to define a macro instead. For example, you
might define this macro early in your rule set:
external_mail = 192.0.2.12
4. Why write the rule set to default deny? The short answer is that it gives you better control.
The point of packet filtering is to take control, not to play catch-up with what the bad guys do.
Marcus Ranum has written a very entertaining and informative article about this called “The
Six Dumbest Ideas in Computer Security” (http://www.ranum.com/security/computer_security/
editorials/dumb/index.html).

PF Configuration Basics 19
Then you could refer to that host as $external_mail later in the rule set:
pass proto tcp to $external_mail port 25
These two techniques have great potential for keeping your rule sets
readable, and as such, they are important factors that contribute to the
overall goal of keeping you in control of your network.
A Stricter Baseline Rule Set
Up to this point, we’ve been rather permissive with regard to any traffic we
generate ourselves. A permissive rule set can be very useful while we check
that basic connectivity is in place or we check whether filtering is part of a
problem we’re seeing. Once the “Do we have connectivity?” phase is over,
it’s time to start tightening up to create a baseline that keeps us in control.
To begin, add the following rule to /etc/pf.conf:
block all
This rule is completely restrictive and will block all traffic in all direc-
tions. This is the initial baseline filtering rule that we’ll use in all complete
rule sets over the next few chapters. We basically start from zero, with a con-
figuration where nothing is allowed to pass. Later on, we’ll add rules that cut
our traffic more slack, but we’ll do so incrementally and in a way that keeps
us firmly in control.
Next, we’ll define a few macros for later use in the rule set:
tcp_services = “{ ssh, smtp, domain, www, pop3, auth, https, pop3s }”
udp_services = “{ domain }”
Here, you can see how the combination of lists and macros can be turned
to our advantage. Macros can be lists, and as demonstrated in the example,
PF understands rules that use the names of services as well as port numbers,
as listed in your /etc/services file. We’ll take care to use all these elements
and some further readability tricks as we tackle complex situations that
require more elaborate rule sets.
Having defined these macros, we can use them in our rules, which we’ll
now edit slightly to look like this:
block all
pass out proto tcp to port $tcp_services
pass proto udp to port $udp_services
The strings $tcp_services and $udp_services are macro references.
Macros that appear in a rule set are expanded in place when the rule set
loads, and the running rule set will have the full lists inserted where the
macros are referenced. Depending on the exact nature of the macros, they
may cause single rules with macro references to expand into several rules.
Even in a small rule set like this, the use of macros makes the rules easier

20 Chapter 2
to grasp and maintain. The amount of information that needs to appear
in the rule set shrinks, and with sensible macro names, the logic becomes
clearer. To follow the logic in a typical rule set, more often than not, we
don’t need to see full lists of IP addresses or port numbers in place of
every macro reference.
From a practical rule set maintenance perspective, it’s important to
keep in mind which services to allow on which protocol in order to keep
a comfortably tight regime. Keeping separate lists of allowed services
according to protocol is likely to be useful in keeping your rule set both
functional and readable.
Reloading the Rule Set and Looking for Errors
After we’ve changed our pf.conf file, we need to load the new rules as
follows:
$ sudo pfctl -f /etc/pf.conf
If there are no syntax errors, pfctl shouldn’t display any messages dur-
ing the rule load.
If you prefer to display verbose output, use the -v flag:
$ sudo pfctl -vf /etc/pf.conf
TCP VS. UDP
We’ve taken care to separate out UDP services from TCP services. Several
services run primarily on well-known port numbers on either TCP or UDP, and
a few alternate between using TCP and UDP according to specific conditions.
The two protocols are quite different in several respects. TCP is connection
oriented and reliable, a perfect candidate for stateful filtering. In contrast, UDP
is stateless and connectionless, but PF creates and maintains data equivalent to
state information for UDP traffic in order to ensure UDP return traffic is allowed
back if it matches an existing state.
One common example where state information for UDP is useful is when
handling name resolution. When you ask a name server to resolve a domain
name to an IP address or to resolve an IP address back to a hostname, it’s rea-
sonable to assume that you want to receive the answer. Retaining state informa-
tion, or the functional equivalent about your UDP traffic, makes this possible.

PF Configuration Basics 21
When you use verbose mode, pfctl should expand your macros into their
separate rules before returning you to the command-line prompt, as follows:
$ sudo pfctl -vf /etc/pf.conf
tcp_services = "{ ssh, smtp, domain, www, pop3, auth, https, pop3s }"
udp_services = "{ domain }"
block drop all
pass out proto tcp from any to any port = ssh flags S/SA keep state
pass out proto tcp from any to any port = smtp flags S/SA keep state
pass out proto tcp from any to any port = domain flags S/SA keep state
pass out proto tcp from any to any port = www flags S/SA keep state
pass out proto tcp from any to any port = pop3 flags S/SA keep state
pass out proto tcp from any to any port = auth flags S/SA keep state
pass out proto tcp from any to any port = https flags S/SA keep state
pass out proto tcp from any to any port = pop3s flags S/SA keep state
pass proto udp from any to any port = domain keep state
$ _
Compare this output to the content of the /etc/pf.conf file you actually
wrote. Our single TCP services rule is expanded into eight different ones:
one for each service in the list. The single UDP rule takes care of only one
service, and it expands from what we wrote to include the default options.
Notice that the rules are displayed in full, with default values such as flags
S/SA keep state applied in place of any options you do not specify explicitly.
This is the configuration as it’s actually loaded.
Checking Your Rules
If you’ve made extensive changes to your rule set, check them before attempt-
ing to load the rule set by using the following:
$ pfctl -nf /etc/pf.conf
The -n option tells PF to parse the rules only, without loading them—
more or less as a dry run and to allow you to review and correct any errors.
If pfctl finds any syntax errors in your rule set, it’ll exit with an error mes-
sage that points to the line number where the error occurred.
Some firewall guides advise you to make sure that your old configuration is
truly gone, or you’ll run into trouble—your firewall might be in some kind
of intermediate state that doesn’t match either the before or after state.
That’s simply not true when you’re using PF. The last valid rule set loaded is
active until you either disable PF or load a new rule set. pfctl checks the syn-
tax and then loads your new rule set completely before switching over to the
new one. This is often referred to as atomic rule set load and means that once
a valid rule set has been loaded, there’s no intermediate state with a partial
rule set or no rules loaded. One consequence is that traffic that matches
states that are valid in both the old and new rule set will not be disrupted.
22 Chapter 2
Unless you’ve actually followed the advice from some of those old
guides and flushed your existing rules (that is possible, using pfctl -F all
or similar) before attempting to load a new one from your configuration
file, the last valid configuration will remain loaded. In fact, flushing the
rule set is rarely a good idea because it effectively puts your packet filter in
a pass all mode, which in turn both opens the door to any comers and runs
the risk of disrupting useful traffic while you’re getting ready to load your
rules.
Testing the Changed Rule Set
Once you have a rule set that pfctl loads without any errors, it’s time to see
whether the rules you’ve written behave as expected. Testing name resolu-
tion with a command such as $ host nostarch.com, as we did earlier, should
still work. However, it’s better to choose a domain you haven’t accessed
recently, such as one for a political party you wouldn’t consider voting for,
to be sure that you’re not pulling DNS information from the cache.
You should be able to surf the Web and use several mail-related services,
but due to the nature of this updated rule set, attempts to access TCP services
other than the ones defined—SSH, SMTP, and so forth—on any remote sys-
tem should fail. And, as with our simple rule set, your system should refuse
all connections that don’t match existing state table entries; only return traffic
for connections initiated by this machine will be allowed in.
Displaying Information About Your System
The tests you’ve performed on your rule sets should have shown that PF is
running and that your rules are behaving as expected. There are several
ways to keep track of what happens in your running system. One of the
more straightforward ways of extracting information about PF is to use the
already familiar pfctl program.
Once PF is enabled and running, the system updates various counters
and statistics in response to network activity. To confirm that PF is run-
ning and to view statistics about its activity, you can use pfctl -s, followed
by the type of information you want to display. A long list of information
types is available (see man 8 pfctl and look for the -s options). We’ll get back
to some of those display options in Chapter 9 and go into further detail
about some of the statistics they provide in Chapter 10, when we use the
data to optimize the configuration we’re building.
The following shows an example of just the top part of the output of
pfctl -s info (taken from my home gateway). The high-level information
that indicates the system actually passes traffic can be found in this upper part.

PF Configuration Basics 23
$ sudo pfctl -s info
Status: Enabled for 24 days 12:11:27 Debug: err
Interface Stats for nfe0 IPv4 IPv6
Bytes In 43846385394 0
Bytes Out 20023639992 64
Packets In
Passed 49380289 0
Blocked 49530 0
Packets Out
Passed 45701100 1
Blocked 1034 0
State Table Total Rate
current entries 319
searches 178598618 84.3/s
inserts 4965347 2.3/s
removals 4965028 2.3/s
The first line of the pfctl output indicates that PF is enabled and has
been running for a little more than three weeks, which is equal to the time
since I last performed a system upgrade that required a reboot.
The Interface Stats part of the display is an indication that the system’s
administrator has chosen one interface (here, nfe0) as the log interface for
the system and shows the bytes in and out handled by the interface. If no
log interface has been chosen, the display is slightly different. Now would
be a good time to check what output your system produces. The next few
items are likely to be more interesting in our context, showing the number
of packets blocked or passed in each direction. This is where we find an early
indication of whether the filtering rules we wrote are catching any traffic.
In this case, either the rule set matches expected traffic well, or we have
fairly well-behaved users and guests, with the number of packets passed
being overwhelmingly larger than the number of packets blocked in both
directions.
The next important indicator of a working system that’s processing
traffic is the block of State Table statistics. The state table current entries
line shows that there are 319 active states or connections, while the state
table has been searched (searches) for matches to existing states on average
a little more than 84 times per second, for a total of just over 178 million
times since the counters were reset. The inserts and removals counters show
the number of times states have been created and removed, respectively. As
expected, the number of insertions and removals differs by the number of
currently active states, and the rate counters show that for the time since
the counters were last reset, the rate of states created and removed matches
exactly up to the resolution of this display.
24 Chapter 2
The information here is roughly in line with the statistics you should
expect to see on a gateway for a small network configured for IPv4 only.
There’s no reason to be alarmed by the packet passed in the IPv6 column.
OpenBSD comes with IPv6 built in. During network interface configura-
tion, by default, the TCP/IP stack sends IPv6 neighbor solicitation requests
for the link local address. In a normal IPv4-only configuration, only the
first few packets actually pass, and by the time the PF rule set from /etc/
pf.conf is fully loaded, IPv6 packets are blocked by the block all default rule.
(In this example, they don’t show up in nfe0’s statistics because IPv6 is tun-
neled over a different interface.)
Looking Ahead
You should now have a machine that can communicate with other Internet-
connected machines, using a very basic rule set that serves as a starting point
for controlling your network traffic. As you progress through this book,
you’ll learn how to add rules that do various useful things. In Chapter 3, we’ll
extend the configuration to act as a gateway for a small network. Serving
the needs of several computers has some consequences, and we’ll look
at how to let at least some ICMP and UDP traffic through—for your own
trouble shooting needs if nothing else.
In Chapter 3, we’ll also consider network services that have conse-
quences for your security, like FTP. Using packet filtering intelligently to
handle services that are demanding, security-wise, is a recurring theme in
this book.

3
INTO THE REAL WORLD
The previous chapter demonstrated the
configuration for basic packet filtering on
a single machine. In this chapter, we’ll build
on that basic setup but move into more conven-
tional territory: the packet-filtering gateway. Although
most of the items in this chapter are potentially useful in a single-machine
setup, our main focus is to set up a gateway that forwards a selection of
network traffic and handles common network services for a basic local
network.
A Simple Gateway
We’ll start with building what you probably associate with the term firewall:
a machine that acts as a gateway for at least one other machine. In addition
to forwarding packets between its various networks, this machine’s mission
will be to improve the signal-to-noise ratio in the network traffic it handles.
That’s where our PF configuration comes in.

26 Chapter 3
But before diving into the practical configuration details, we need to
dip into some theory and flesh out some concepts. Bear with me; this will
end up saving you some headaches I’ve seen on mailing lists, newsgroups,
and Web forums all too often.
Keep It Simple: Avoid the Pitfalls of in, out, and on
In the single-machine setup, life is relatively simple. Traffic you create
should either pass out to the rest of the world or be blocked by your filter-
ing rules, and you get to decide what you want to let in from elsewhere.
When you set up a gateway, your perspective changes. You go from the
“It’s me versus the network out there” mindset to “I’m the one who decides
what to pass to or from all the networks I’m connected to.” The machine
has several, or at least two, network interfaces, each connected to a separate
network, and its primary function (or at least the one we’re interested in
here) is to forward network traffic between networks. Conceptually, the net-
work would look something like Figure 3-1.
The Internet
Switch
Clients
Our bridge,
the PF firewall
$int_if$ext_if
Figure 3-1: Network with a single gateway
It’s very reasonable to think that if you want traffic to pass from the net-
work connected to re1 to hosts on the network connected to re0, you’ll need
a rule like the following:1
pass in proto tcp on re1 from re1:network to re0:network \
port $ports keep state
However, one of the most common and most complained-about mis-
takes in firewall configuration is not realizing that the to keyword doesn’t
1. In fact, the keep state part denotes the default behavior and is redundant if you’re working
with a PF version taken from OpenBSD 4.1 or later. However, there’s generally no need to
remove the specification from existing rules you come across when upgrading from earlier
versions. To ease the transition, the examples in this book will make this distinction when
needed.

Into the Real World 27
in itself guarantee passage to the end point. The to keyword here means
only that a packet or connection must have a destination address that
matches those criteria in order to match the rule. The rule we just wrote
lets the traffic pass in to just the gateway itself and on the specific interface
named in the rule. To allow the packets in a bit further and to move on to
the next network, we need a matching rule that says something like this:
pass out proto tcp on re0 from re1:network to re0:network \
port $ports keep state
But please stop and take a moment to read those rules one more time.
This last rule allows only packets with a destination in the network directly
connected to re0 to pass, and nothing else. If that’s exactly what you want,
fine. In other contexts, such rules are, while perfectly valid, more specific
than the situation calls for. It’s very easy to let yourself dive deeply into spe-
cific details and lose the higher-level view of the configuration’s purpose—
and maybe earn yourself a few extra rounds of debugging in the process.
If there are good reasons for writing very specific rules, like the preced-
ing ones, you probably already know that you need them and why. By the
time you have finished this book (if not a bit earlier), you should be able to
articulate the circumstances when more specific rules are needed. However,
for the basic gateway configurations in this chapter, it’s likely that you’ll want
to write rules that are not interface-specific. In fact, in some cases, it isn’t
useful to specify the direction either; you’d simply use a rule like the follow-
ing to let your local network access the Internet:
pass proto tcp from re1:network to port $ports keep state
For simple setups, interface-bound in and out rules are likely to add
more clutter to your rule sets than they’re worth. For a busy network admin,
a readable rule set is a safer one. (And we’ll look at some additional safety
measures, like antispoof, in Chapter 10.)
For the remainder of this book, with some exceptions, we’ll keep the
rules as simple as possible for readability.
Network Address Translation vs. IPv6
Once we start handling traffic between separate networks, it’s useful to look
at how network addresses work and why you’re likely to come across several
different addressing schemes. The subject of network addresses has been a
rich source of both confusion and buzzwords over the years. The underly-
ing facts are sometimes hard to establish, unless you go to the source and
wade through a series of RFCs. Over the next few paragraphs, I’ll make an
effort to clear up some of the confusion.
For example, a widely held belief is that if you have an internal network
that uses a totally different address range from the one assigned to the
interface attached to the Internet, you’re safe, and no one from the outside

28 Chapter 3
can get at your network resources. This belief is closely related to the idea
that the IP address of your firewall in the local network must be either
192.168.0.1 or 10.0.0.1.
There’s an element of truth in both notions, and those addresses are
common defaults. But the real story is that it’s possible to sniff one’s way
past network address translation, although PF offers some tricks that make
that task harder.
The real reason we use a specific set of internal address ranges and a
different set of addresses for unique external address ranges isn’t primar-
ily to address security concerns. Rather, it’s the easiest way to work around
a design problem in the Internet protocols: a limited range of possible
addresses.
In the 1980s, when the Internet protocols were formulated, most com-
puters on the Internet (or ARPANET, as it was known at the time) were large
machines with anything from several dozen to several thousand users each.
At the time, a 32-bit address space with more than four billion addresses
seemed quite sufficient, but several factors have conspired to prove that
assumption wrong. One factor is that the address-allocation process led
to a situation where the largest chunks of the available address space were
already allocated before some of the world’s more populous nations even
connected to the Internet. The other, and perhaps more significant, factor
was that by the early 1990s, the Internet was no longer a research project,
but rather a commercially available resource with consumers and compa-
nies of all sizes consuming IP address space at an alarming rate.
The long-term solution was to redefine the Internet to use a larger
address space. In 1998, the specification for IPv6, with 128 bits of address
space for a total of 2128 addresses, was published as RFC 2460. But while
we were waiting for IPv6 to become generally available, we needed a stop-
gap solution. That solution came as a series of RFCs that specified how a
gateway could forward traffic with IP addresses translated so that a large
local network would look like just one computer to the rest of the Internet.
Certain previously unallocated IP address ranges were set aside for these
private networks. These were free for anyone to use, on the condition that
traffic in those ranges wouldn’t be allowed out on the Internet untrans-
lated. Thus, network address translation (NAT) was born in the mid-1990s and
quickly became the default way to handle addressing in local networks.2
PF supports IPv6 as well as the various IPv4 address translation tricks.
(In fact, the BSDs were among the earliest IPv6 adopters, thanks to the
efforts of the KAME project.3) All systems that have PF also support both
the IPv4 and the IPv6 address families. If your IPv4 network needs a NAT
2. RFC 1631, “The IP Network Address Translator (NAT),” dated May 1994, and RFC 1918,
“Address Allocation for Private Internets,” dated February 1996, provide the details about NAT.
3. To quote the project home page at http://www.kame.net/, “The KAME project was a joint
effort of six companies in Japan to provide a free stack of IPv6, IPsec, and Mobile IPv6 for
BSD variants.” The main research and development activities were considered complete in
March 2006, with only maintenance activity continuing now that the important parts have
been incorporated into the relevant systems.

Into the Real World 29
configuration, you can integrate the translation as needed in your PF rule
set. In other words, if you’re using a system that supports PF, you can be rea-
sonably sure that your IPv6 needs have been taken care of, at least on the
operating-system level. However, some operating systems with a PF port use
older versions of the code, and it’s important to be aware that the general
rule that newer PF code is better applies equally to the IPv6 context.
The examples in this book use mainly IPv4 addresses and NAT where
appropriate, but most of the material is equally relevant to networks that
have implemented IPv6.
Final Preparations: Defining Your Local Network
In Chapter 2, we set up a configuration for a single, standalone machine.
We’re about to extend that configuration to a gateway version, and it’s useful
to define a few more macros to help readability and to conceptually sepa-
rate the local networks where you have a certain measure of control from
everything else. So how do you define your “local” network in PF terms?
Earlier in this chapter, you saw the interface:network notation. This is
a nice piece of shorthand, but you can make your rule set even more read-
able and easier to maintain by taking the macro a bit further. For example,
you could define a $localnet macro as the network directly attached to
your internal interface (re1:network in our examples). Or you could change
the definition of $localnet to an IP address/netmask notation to denote a
network, such as 192.168.100.0/24 for a subnet of private IPv4 addresses or
2001:db8:dead:beef::/64 for an IPv6 range.
If your network environment requires it, you could define your $localnet
as a list of networks. For example, a sensible $localnet definition combined
with pass rules that use the macro, such as the following, could end up sav-
ing you a few headaches:
pass proto { tcp, udp } from $localnet to port $ports
We’ll stick to the convention of using macros such as $localnet for read-
ability from here on.
Setting Up a Gateway
We’ll take the single-machine configuration we built from the ground up in
the previous chapter as our starting point for building our packet-filtering
gateway. We assume that the machine has acquired another network card
(or that you have set up a network connection from your local network to
one or more other networks via Ethernet, PPP, or other means).
In our context, it isn’t too interesting to look at the details of how the
interfaces are configured. We just need to know that the interfaces are up
and running.

30 Chapter 3
For the following discussion and examples, only the interface names
will differ between a PPP setup and an Ethernet one, and we’ll do our best
to get rid of the actual interface names as quickly as possible.
First, because packet forwarding is off by default in all BSDs, we need
to turn it on in order to let the machine forward the network traffic it
receives on one interface to other networks via one or more separate inter-
faces. Initially, we’ll do this on the command line with a sysctl command
for traditional IPv4:
# sysctl net.inet.ip.forwarding=1
If we need to forward IPv6 traffic, we use this sysctl command:
# sysctl net.inet6.ip6.forwarding=1
This is fine for now. However, in order for this to work once you reboot
the computer at some time in the future, you need to enter these settings
into the relevant configuration files.
In OpenBSD and NetBSD, you do this by editing /etc/sysctl.conf and add-
ing IP-forwarding lines to the end of the file so the last lines look like this:
net.inet.ip.forwarding=1
net.inet6.ip6.forwarding=1
In FreeBSD, make the change by putting these lines in your /etc/rc.conf:
gateway_enable="YES" #for ipv4
ipv6_gateway_enable="YES" #for ipv6
The net effect is identical; the FreeBSD rc script sets the two values via
sysctl commands. However, a larger part of the FreeBSD configuration is
centralized into the rc.conf file.
Now it’s time to check whether all of the interfaces you intend to use
are up and running. Use ifconfig -a or ifconfig interface_name to find out.
The output of ifconfig -a on one of my systems looks like this:
$ ifconfig -a
lo0: flags=8049<UP,LOOPBACK,RUNNING,MULTICAST> mtu 33224
groups: lo
inet 127.0.0.1 netmask 0xff000000
inet6 ::1 prefixlen 128
inet6 fe80::1%lo0 prefixlen 64 scopeid 0x5
xl0: flags=8843<UP,BROADCAST,RUNNING,SIMPLEX,MULTICAST> mtu 1500
lladdr 00:60:97:83:4a:01
groups: egress
media: Ethernet autoselect (100baseTX full-duplex)
status: active
inet 194.54.107.18 netmask 0xfffffff8 broadcast 194.54.107.23
inet6 fe80::260:97ff:fe83:4a01%xl0 prefixlen 64 scopeid 0x1

Into the Real World 31
fxp0: flags=8843<UP,BROADCAST,RUNNING,SIMPLEX,MULTICAST> mtu 1500
lladdr 00:30:05:03:fc:41
media: Ethernet autoselect (100baseTX full-duplex)
status: active
inet 194.54.103.65 netmask 0xffffffc0 broadcast 194.54.103.127
inet6 fe80::230:5ff:fe03:fc41%fxp0 prefixlen 64 scopeid 0x2
pflog0: flags=141<UP,RUNNING,PROMISC> mtu 33224
enc0: flags=0<> mtu 1536
Your setup is most likely somewhat different. Here, the physical interfaces
on the gateway are xl0 and fxp0. The logical interfaces lo0 (the loopback
interface), enc0 (the encapsulation interface for IPSEC use), and pflog0 (the
PF logging device) are probably on your system, too.
If you’re on a dial-up connection, you probably use some variant of PPP
for the Internet connection, and your external interface is the tun0 pseudo-
device. If your connection is via some sort of broadband connection, you
may have an Ethernet interface to play with. However, if you’re in the signif-
icant subset of ADSL users who use PPP over Ethernet (PPPoE), the correct
external interface will be one of the pseudo-devices tun0 or pppoe0 (depend-
ing on whether you use userland pppoe(8) or kernel mode pppoe(4)), not the
physical Ethernet interface.
Depending on your specific setup, you may need to do some other
device-specific configuration for your interfaces. After you have that set
up, you can move on to the TCP/IP level and deal with the packet-filtering
configuration.
If you still intend to allow any traffic initiated by machines on the inside,
your /etc/pf.conf for your initial gateway setup could look roughly like this:
ext_if = "re0" # macro for external interface - use tun0 or pppoe0 for PPPoE
int_if = "re1" # macro for internal interface
localnet = $int_if:network
# ext_if IPv4 address could be dynamic, hence ($ext_if)
match out on $ext_if inet from $localnet nat-to ($ext_if) # NAT, match IPv4 only
block all
pass from { self, $localnet }
Note the use of macros to assign logical names to the network inter-
faces. Here, Realtek Ethernet cards are used, but this is the last time we’ll
find this of any interest whatsoever in our context.
In truly simple setups like this one, we may not gain very much by using
macros like these, but once the rule sets grow a little larger, you’ll learn to
appreciate the readability they add.
One possible refinement to this rule set would be to remove the macro
ext_if and replace the $ext_if references with the string egress, which is the
name of the interface group that contains the interface that has the default
route. Interface groups are not macros, so you would write the name egress
without a leading $ character.
Also note the match rule with nat-to. This is where you handle NAT
from the nonroutable address inside your local network to the sole offi-
cial address assigned to you. If your network uses official, routable IPv4

32 Chapter 3
addresses, you simply leave this line out of your configuration. The match
rules, which were introduced in OpenBSD 4.6, can be used to apply actions
when a connection matches the criteria without deciding whether a connec-
tion should be blocked or passed.
The parentheses surrounding the last part of the match rule ($ext_if)
are there to compensate for the possibility that the IP address of the exter-
nal interface may be dynamically assigned. This detail will ensure that your
network traffic runs without serious interruptions, even if the interface’s IP
address changes.
It’s time to sum up the rule set we’ve built so far: (1) We block all traffic
originating outside our own network. (2) We make sure all IPv4 traffic initi-
ated by hosts in our local network will pass into the outside world only with
the source address rewritten to the routable address assigned to the gate-
way’s external interface. (3) Finally, we let all traffic from our local network
(IPv4 and IPv6 both) and from the gateway itself pass. The keyword self in
the final pass rule is a macro-ish reserved word in PF syntax that denotes all
addresses assigned to all interfaces on the local host.
If your operating system runs a pre-OpenBSD 4.7 PF version, your first
gateway rule set would look something like this:
ext_if = "re0" # macro for external interface - use tun0 or pppoe0 for PPPoE
int_if = "re1" # macro for internal interface
localnet = $int_if:network
# ext_if IP address could be dynamic, hence ($ext_if)
nat on $ext_if inet from $localnet to any -> ($ext_if) # NAT, match IPv4 only
block all
pass from { self, $localnet } to any keep state
The nat rule here handles the translation much as does the match rule
with nat-to in the previous example.
On the other hand, this rule set probably allows more traffic than you
actually want to pass out of your network. In one of the networks where I’ve
done a bit of work, the main part of the rule set is based on a macro called
client_out:
client_out = "{ ftp-data, ftp, ssh, domain, pop3, auth, nntp, http,\
https, 446, cvspserver, 2628, 5999, 8000, 8080 }"
It has this pass rule:
pass proto tcp from $localnet to port $client_out
This may be a somewhat peculiar selection of ports, but it’s exactly what
my colleagues there needed at the time. Some of the numbered ports were
needed for systems that were set up for specific purposes at other sites. Your
needs probably differ at least in some details, but this should cover some of
the more useful services.

Into the Real World 33
Here’s another pass rule that is useful to those who want the ability to
administer machines from elsewhere:
pass in proto tcp to port ssh
Or use this form, if you prefer:
pass in proto tcp to $ext_if port ssh
When you leave out the from part entirely, the default is from any, which
is quite permissive. It lets you log in from anywhere, which is great if you
travel a lot and need SSH access from unknown locations around the world.
If you’re not all that mobile—say you haven’t quite developed the taste for
conferences in far-flung locations, or you feel your colleagues can fend for
themselves while you’re on vacation—you may want to tighten up with a from
part that includes only the places where you and other administrators are
likely to log in from for legitimate reasons.
Our very basic rule set is still not complete. Next, we need to make the
name service work for our clients. We start with another macro at the start
of our rule set:
udp_services = "{ domain, ntp }"
This is supplemented with a rule that passes the traffic we want through
our firewall:
pass quick proto { tcp, udp } to port $udp_services
Note the quick keyword in this rule. We’ve started writing rule sets that
consist of several rules, and it’s time to revisit the relationships and interac-
tions between them.
As noted in the previous chapter, the rules are evaluated from top to
bottom in the sequence they’re written in the configuration file. For each
packet or connection evaluated by PF, the last matching rule in the rule set is
the one that’s applied.
The quick keyword offers an escape from the ordinary sequence. When
a packet matches a quick rule, the packet is treated according to the present
rule. The rule processing stops without considering any further rules that
might have matched the packet. As your rule sets grow longer and more
complicated, you’ll find this quite handy. For example, it’s useful when you
need a few isolated exceptions to your general rules.
This quick rule also takes care of NTP, which is used for time synchroni-
zation. Common to both the name service and time synchronization proto-
cols is that they may, under certain circumstances, communicate alternately
over TCP and UDP.

34 Chapter 3
Testing Your Rule Set
You may not have gotten around to writing that formal test suite for your
rule sets just yet, but there’s every reason to test that your configuration
works as expected.
The same basic tests in the standalone example from the previous chap-
ter still apply. But now you need to test from the other hosts in your network
as well as from your packet-filtering gateway. For each of the services you
specified in your pass rules, test that machines in your local network get
meaningful results. From any machine in your local network, enter a com-
mand like this:
$ host nostarch.com
It should return exactly the same results as when you tested the stand-
alone rule set in the previous chapter, and traffic for the services you have
specified should pass.4
You may not think it’s necessary, but it doesn’t hurt to check that the
rule set works as expected from outside your gateway as well. If you’ve done
exactly what this chapter says so far, it shouldn’t be possible to contact
machines in your local network from the outside.
4. This is true unless, of course, the information changed in the meantime. Some sysadmins
are fond of practical jokes, but most of the time changes in DNS zone information are due to
real-world needs in that particular organization or network.
WHY ONLY IP ADDRESSES—
NOT HOSTNAMES OR DOMAIN NAMES?
Looking at the examples up to this point, you’ve probably noticed that the rule
sets all have macros that expand into IP addresses or address ranges but never
into hostnames or domain names. You’re probably wondering why. After all,
you’ve seen that PF lets you use service names in your rule set, so why not
include hostnames or domain names?
The answer is that if you used domain names and hostnames in your
rule set, the rule set would be valid only after the name service was running
and accessible. In the default configuration, PF is loaded before any net-
work services are running. This means that if you want to use domain names
and hostnames in your PF configuration, you’ll need to change the system’s
startup sequence (by editing /etc/rc.local, perhaps) to load the name service–
dependent rule set only after the name service is available. If you have only a
limited number of hostnames or domain names you want to reference in your
PF configuration, it’s likely at least as useful to add those as IP addresses to
name-mapping entries in your /etc/hosts file and leave the rc scripts alone.

Into the Real World 35
That Sad Old FTP Thing
The short list of real-life TCP ports we looked at a few moments back con-
tained, among other things, FTP, the classic file transfer protocol. FTP is a relic
of the early Internet, when experiments were the norm and security was not
really on the horizon in any modern sense. FTP actually predates TCP/IP,5
and it’s possible to track the protocol’s development through more than
50 RFCs. After more than 30 years, FTP is both a sad old thing and a prob-
lem child—emphatically so for anyone trying to combine FTP and firewalls.
FTP is an old and weird protocol with a lot to dislike. Here are the most
common points against it:
• Passwords are transferred in the clear.6
• The protocol demands the use of at least two TCP connections (control
and data) on separate ports.
• When a session is established, data is communicated via ports usually
selected at random.
All of these points make for challenges security-wise, even before con-
sidering any potential weaknesses in client or server software that may lead to
security issues. As any network graybeard will tell you, these things tend to
crop up when you need them the least.
Under any circumstances, other more modern and more secure options
for file transfer exist, such as SFTP and SCP, which feature both authentica-
tion and data transfer via encrypted connections. Competent IT profession-
als should have a preference for some form of file transfer other than FTP.
Regardless of our professionalism and preferences, we sometimes must
deal with things we would prefer not to use at all. In the case of FTP through
firewalls, we can combat problems by redirecting the traffic to a small pro-
gram that’s written specifically for this purpose. The upside for us is that
handling FTP offers us a chance to look at two fairly advanced PF features:
redirection and anchors.
The easiest way to handle FTP in a default-to-block scenario such as
ours is to have PF redirect the traffic for that service to an external applica-
tion that acts as a proxy for the service. The proxy maintains its own named
sub–rule set (an anchor in PF terminology), where it inserts or deletes rules as
needed for the FTP traffic. The combination of redirection and the anchor
provides a clean, well-defined interface between the packet-filtering sub-
system and the proxy.
5. The earliest RFC describing the FTP protocol is RFC 114, dated April 10, 1971. The switch
to TCP/IP happened with FTP version 5, as defined in RFCs 765 and 775, dated June and
December 1980, respectively.
6. An encrypted version of the protocol, dubbed FTPS, is specified in RFC4217, but support
remains somewhat spotty.

36 Chapter 3
If We Must: ftp-proxy with Divert or Redirect
Enabling FTP transfers through your gateway is amazingly simple, thanks
to the FTP-proxy program included in the OpenBSD base system. The pro-
gram is called—you guessed it—ftp-proxy.
To enable ftp-proxy, you need to add this line to your /etc/rc.conf.local
file on OpenBSD:
ftpproxy_flags=""
On FreeBSD, /etc/rc.conf needs to contain at least the first of these two
lines:
ftpproxy_enable="YES"
ftpproxy_flags="" # and put any command line options here
If you need to specify any command-line options to ftp-proxy, you put
them in the ftpproxy_flags variable.
You can start the proxy manually by running /usr/sbin/ftp-proxy if you
like (or even better, use the /etc/rc.d/ftp-proxy script with the start option on
OpenBSD), and you may want to do this in order to check that the changes
to the PF configuration you’re about to make have the intended effect.
For a basic configuration, you need to add only three elements to your
/etc/pf.conf: the anchor and two pass rules. The anchor declaration looks
like this:
anchor "ftp-proxy/*"
In pre-OpenBSD 4.7 versions, two anchor declarations were needed:
nat-anchor "ftp-proxy/*"
rdr-anchor "ftp-proxy/*"
The proxy will insert the rules it generates for the FTP sessions here.
Then, you also need a pass rule to let FTP traffic into the proxy:
pass in quick inet proto tcp to port ftp divert-to 127.0.0.1 port 8021
Note the divert-to part. This redirects the traffic to the local port,
where the proxy listens via the highly efficient, local-connections-only
divert(4) interface. In OpenBSD versions 4.9 and older, the traffic diversion
happened via an rdr-to. If you’re upgrading an existing pre-OpenBSD 5.0
configuration, you’ll need to update your rdr-to rules for the FTP proxy to
use divert-to instead.
If your operating system uses a pre-OpenBSD 4.7 PF version, you need
this version of the redirection rule:
rdr pass on $int_if inet proto tcp from any to any port ftp -> 127.0.0.1 port 8021

Into the Real World 37
Finally, make sure your rule set contains a pass rule to let the packets
pass from the proxy to the rest of the world, where $proxy expands to the
address to which the proxy daemon is bound:
pass out inet proto tcp from $proxy to any port ftp
Reload your PF configuration:
$ sudo pfctl -f /etc/pf.conf
Before you know it, your users will thank you for making FTP work.
Variations on the ftp-proxy Setup
The preceding example covers a basic setup where the clients in your local
network need to contact FTP servers elsewhere. This configuration should
work well with most combinations of FTP clients and servers.
You can change the proxy’s behavior in various ways by adding options
to the ftpproxy_flags= line. You may bump into clients or servers with specific
quirks that you need to compensate for in your configuration, or you may
want to integrate the proxy in your setup in specific ways, such as assigning
FTP traffic to a specific queue. For these and other finer points of ftp-proxy
configuration, your best bet is to start by studying the man page.
If you’re interested in ways to run an FTP server protected by PF and
ftp-proxy, you could look into running a separate ftp-proxy in reverse mode
(using the -R option) on a separate port with its own redirecting pass rule.
It’s even possible to set up the proxy to run in IPv6 mode, but if you’re ahead
of the pack in running the modern protocol, you’re less likely to bother with
FTP as your main file transfer protocol.
NOTE If your PF version predates the ones described here, you’re running on an outdated,
unsupported operating system. I strongly urge you to schedule an operating system
upgrade as soon as possible. If an upgrade is for some reason not an option, please
look up the first edition of this book and study the documentation for your operating
system for information on how to use some earlier FTP proxies.
Making Your Network Troubleshooting-Friendly
Making your network troubleshooting-friendly is a potentially large subject.
Generally, the debugging- or troubleshooting-friendliness of your TCP/IP
network depends on how you treat the Internet protocol that was designed
specifically with debugging in mind: ICMP.
ICMP is the protocol for sending and receiving control messages between
hosts and gateways, mainly to provide feedback to a sender about any
unusual or difficult conditions en route to the target host.
There’s a lot of ICMP traffic, which usually happens in the background
while you are surfing the Web, reading mail, or transferring files. Routers

38 Chapter 3
(remember, you're building one) use ICMP to negotiate packet sizes and
other transmission parameters in a process often referred to as path MTU
discovery.
You may have heard admins refer to ICMP as either “evil” or, if their
understanding runs a little deeper, “a necessary evil.” The reason for this
attitude is purely historical. A few years back, it was discovered that the net-
working stacks of several operating systems contained code that could make
the machine crash if it were sent a sufficiently large ICMP request.
One of the companies that was hit hard by this was Microsoft, and you
can find a lot of material on the ping of death bug by using your favorite
search engine. However, this all happened in the second half of the 1990s,
and all modern operating systems have thoroughly sanitized their network
code since then (at least, that’s what we’re led to believe).
One of the early work-arounds was to simply block either ICMP echo
(ping) requests or even all ICMP traffic. That measure almost certainly led
to poor performance and hard-to-debug network problems. In some places,
however, these rule sets have been around for almost two decades, and the
people who put them there are still scared. There’s most likely little to no
reason to worry about destructive ICMP traffic anymore, but here we’ll look
at how to manage just what ICMP traffic passes to or from your network.
In modern IPv6 networks, the updated icmp6 protocol plays a more cru-
cial role than ever in parameter passing and even host configuration, and
network admins are playing a high-stakes game while learning the finer
points of blocking or passing icmp6 traffic. To a large extent, issues that are
relevant for IPv4 ICMP generally apply to IPv6 ICMP6 as well, but in addi-
tion, ICMP6 is used for several mechanisms that were handled differently
in IPv4. We’ll dip into some of these issues after walking through the issues
that are relevant for both IP protocol versions.
Do We Let It All Through?
The obvious question becomes, “If ICMP is such a good and useful thing,
shouldn’t we let it all through all the time?” The answer is that it depends.
Letting diagnostic traffic pass unconditionally makes debugging easier,
of course, but it also makes it relatively easy for others to extract informa-
tion about your network. So, a rule like the following might not be optimal
if you want to cloak the internal workings of your IPv4 network:
pass inet proto icmp
If you want the same free flow of messages for your IPv6 traffic, the cor-
responding rule is this:
pass inet6 proto icmp6
In all fairness, it should also be said that you might find some ICMP and
ICMP6 traffic quite harmlessly riding piggyback on your keep state rules.

Into the Real World 39
The Easy Way Out: The Buck Stops Here
The easiest solution could very well be to allow all ICMP and ICMP6 traffic
from your local network through and to let probes from elsewhere stop at
your gateway:
pass inet proto icmp icmp-type $icmp_types from $localnet
pass inet6 proto icmp6 icmp6-type $icmp6_types from $localnet
pass inet proto icmp icmp-type $icmp_types to $ext_if
pass inet6 proto icmp6 icmp6-type $icmp6_types to $ext_if
This is assuming, of course that you’ve identified the list of desirable
ICMP and ICMP6 types to fill out your macro definitions. We’ll get back to
those shortly. Stopping probes at the gateway might be an attractive option
anyway, but let’s look at a few other options that’ll demonstrate some of PF’s
flexibility.
Letting ping Through
The rule set we have developed so far in this chapter has one clear disad-
vantage: Common troubleshooting commands, such as ping and traceroute
(and their IPv6 equivalents, ping6 and traceroute6), will not work. That may
not matter too much to your users, and because it was the ping command that
scared people into filtering or blocking ICMP traffic in the first place, there
are apparently some people who feel we’re better off without it. However,
you’ll find these troubleshooting tools useful. And with a couple of small
additions to the rule set, they will be available to you.
The diagnostic commands ping and ping6 rely on the ICMP and ICMP6
echo request (and the matching echo reply) types, and in order to keep our
rule set tidy, we start by defining another set of macros:
icmp_types = "echoreq"
icmp6_types = "echoreq"
Then, we add rules that use the definitions:
pass inet proto icmp icmp-type $icmp_types
pass inet6 proto icmp6 icmp6-type $icmp6_types
The macros and the rules mean that ICMP and ICMP6 packets with
type echo request will be allowed through and matching echo replies will be
allowed to pass back due to PF’s stateful nature. This is all the ping and
ping6 commands need in order to produce their expected results.
If you need more or other types of ICMP or ICMP6 packets to go
through, you can expand icmp_types and icmp6_types to lists of those packet
types you want to allow.

40 Chapter 3
Helping traceroute
The traceroute command (and the IPv6 variant traceroute6) is useful when
your users claim that the Internet isn’t working. By default, Unix traceroute
uses UDP connections according to a set formula based on destination. The
following rules work with the traceroute and traceroute6 commands on all
forms of Unix I’ve had access to, including GNU/Linux:
# allow out the default range for traceroute(8):
# "base+nhops*nqueries-1" (33434+64*3-1)
pass out on egress inet proto udp to port 33433:33626 # For IPv4
pass out on egress inet6 proto udp to port 33433:33626 # For IPv6
This also gives you a first taste of what port ranges look like. They’re
quite useful in some contexts.
Experience so far indicates that traceroute and traceroute6 implementa-
tions on other operating systems work roughly the same way. One notable
exception is Microsoft Windows. On that platform, the tracert.exe program
and its IPv6 sister tracert6.exe use ICMP echo requests for this purpose. So if
you want to let Windows traceroutes through, you need only the first rule,
much as when letting ping through. The Unix traceroute program can be
instructed to use other protocols as well and will behave remarkably like
its Microsoft counterpart if you use its -I command-line option. You can
check the traceroute man page (or its source code, for that matter) for all
the details.
This solution is based on a sample rule I found in an openbsd-misc post.
I’ve found that list, and the searchable list archives (accessible among other
places from http://marc.info/), to be a valuable resource whenever you need
OpenBSD or PF-related information.
Path MTU Discovery
The last bit I’ll remind you about when it comes to troubleshooting is the path
MTU discovery. Internet protocols are designed to be device-independent,
and one consequence of device independence is that you cannot always
predict reliably what the optimal packet size is for a given connection. The
main constraint on your packet size is called the maximum transmission unit,
or MTU, which sets the upper limit on the packet size for an interface. The
ifconfig command will show you the MTU for your network interfaces.
Modern TCP/IP implementations expect to be able to determine the
correct packet size for a connection through a process that simply involves
sending packets of varying sizes within the MTU of the local link with the
“do not fragment” flag set. If a packet then exceeds the MTU somewhere
along the way to the destination, the host with the lower MTU will return
an ICMP packet indicating “type 3, code 4” and quoting its local MTU
when the local upper limit has been reached. Now, you don’t need to dive
for the RFCs right away. Type 3 means destination unreachable, and code 4

Into the Real World 41
is short for fragmentation needed, but the “do not fragment” flag is set. So if your
connections to other networks, which may have MTUs that differ from
your own, seem suboptimal, you could try changing your list of ICMP types
slightly to let the IPv4 destination-unreachable packets through:
icmp_types = "{ echoreq, unreach }"
As you can see, this means you do not need to change the pass rule
itself:
pass inet proto icmp icmp-type $icmp_types
Now I’ll let you in on a little secret: In almost all cases, these rules aren’t
necessary for purposes of path MTU discovery (but they don’t hurt either).
However, even though the default PF keep state behavior takes care of most
of the ICMP traffic you’ll need, PF does let you filter on all variations of ICMP
types and codes. For IPv6, you’d probably want to let the more common
ICMP6 diagnostics through, such as the following:
icmp6_types = "{ echoreq unreach timex paramprob }"
This means that we let echo requests and destination unreachable, time
exceeded, and parameter problem messages pass for IPv6 traffic. Thanks to
the macro definitions, you don’t need to touch the pass rule for the ICMP6
case either:
pass inet6 proto icmp6 icmp6-type $icmp6_types
But it’s worth keeping in mind that IPv6 hosts rely on ICMP6 messages
for automatic configuration-related tasks, and you may want to explicitly
filter in order to allow or deny specific ICMP6 types at various points in
your network.
For example, you’ll want to let a router and its clients exchange router
solicitation and router advertisement messages (ICMP6 type routeradv
and routersol, respectively), while you may want to make sure that neigh-
bor advertisements and neighbor solicitations (ICMP6 type neighbradv
and neighbrsol, respectively) stay confined within their directly connected
networks.
If you want to delve into more detail, the list of possible types and codes
are documented in the icmp(4) and icmp6(4) man pages. The background
information is available in the RFCs.7
7. The main RFCs describing ICMP and some related techniques are 792, 950, 1191, 1256,
2521, and 6145. ICMP updates for IPv6 are in RFC 3542 and RFC 4443. These documents
are available in a number of places on the Web, such as http://www.ietf.org/ and http://www
.faqs.org/, and probably also via your package system.

42 Chapter 3
Tables Make Your Life Easier
By now, you may be thinking that this setup gets awfully static and
rigid. There will, after all, be some kinds of data relevant to filtering
and redirection at a given time, but they don’t deserve to be put into a con-
figuration file! Quite right, and PF offers mechanisms for handling those
situations.
Tables are one such feature. They’re useful as lists of IP addresses that
can be manipulated without reloading the entire rule set and also when fast
lookups are desirable.
Table names are always enclosed in < >, like this:
table <clients> persist { 192.168.2.0/24, !192.168.2.5 }
Here, the network 192.168.2.0/24 is part of the table with one exception:
The address 192.168.2.5 is excluded using the ! operator (logical NOT). The
keyword persist makes sure the table itself will exist, even if no rules cur-
rently refer to it.
It’s also possible to load tables from files where each item is on a sepa-
rate line, such as the file /etc/clients:
192.168.2.0/24
!192.168.2.5
This, in turn, is used to initialize the table in /etc/pf.conf:
table <clients> persist file "/etc/clients"
So, for example, you can change one of our earlier rules to read like
this to manage outgoing traffic from your client computers:
pass inet proto tcp from <clients> to any port $client_out
With this in hand, you can manipulate the table’s contents live, like this:
$ sudo pfctl -t clients -T add 192.168.1/16
Note that this changes the in-memory copy of the table only, mean-
ing that the change will not survive a power failure or reboot, unless you
arrange to store your changes.
You might opt to maintain the on-disk copy of the table with a cron job
that dumps the table content to disk at regular intervals, using a command
such as the following:
$ sudo pfctl -t clients -T show >/etc/clients

Into the Real World 43
Alternatively, you could edit the /etc/clients file and replace the in-mem-
ory table contents with the file data:
$ sudo pfctl -t clients -T replace -f /etc/clients
For operations you’ll be performing frequently, sooner or later, you’ll
end up writing shell scripts. It’s likely that routine operations on tables,
such as inserting or removing items or replacing table contents, will be part
of your housekeeping scripts in the near future.
One common example is to enforce network access restrictions via cron
jobs that replace the contents of the tables referenced as from addresses in
the pass rules at specific times. In some networks, you may even need differ-
ent access rules for different days of the week. The only real limitations lie
in your own needs and your creativity.
We’ll be returning to some handy uses of tables frequently over the
next chapters, and we’ll look at a few programs that interact with tables in
useful ways.

4
WIRELESS NETWORKS MADE EASY
It’s rather tempting to say that on BSD—
and OpenBSD, in particular—there’s no
need to “make wireless networking easy”
because it already is. Getting a wireless net-
work running isn’t very different from getting a wired
one up and running, but there are some issues that
turn up simply because we’re dealing with radio waves and not wires. We’ll
look briefly at some of the issues before moving on to the practical steps
involved in creating a usable setup.
Once we have covered the basics of getting a wireless network up and
running, we’ll turn to some of the options for making your wireless network
more interesting and harder to break.

46 Chapter 4
A Little IEEE 802.11 Background
Setting up any network interface, in principle, is a two-step process: You
establish a link, and then you move on to configuring the interface for
TCP/IP traffic.
In the case of wired Ethernet-type interfaces, establishing the link usu-
ally consists of plugging in a cable and seeing the link indicator light up.
However, some interfaces require extra steps. Networking over dial-up con-
nections, for example, requires telephony steps, such as dialing a number to
get a carrier signal.
In the case of IEEE 802.11–style wireless networks, getting the carrier
signal involves quite a few steps at the lowest level. First, you need to select
the proper channel in the assigned frequency spectrum. Once you find a
signal, you need to set a few link-level network identification parameters.
Finally, if the station you want to link to uses some form of link-level encryp-
tion, you need to set the correct kind and probably negotiate some addi-
tional parameters.
Fortunately, on OpenBSD systems, all configuration of wireless network
devices happens via ifconfig commands and options, as with any other net-
work interface. While most network configuration happens via ifconfig on
other BSDs, too, on some systems, specific features require other configu-
ration.1 Still, because we’re introducing wireless networks here, we need
to look at security at various levels in the networking stack from this new
perspective.
There are basically three kinds of popular and simple IEEE 802.11 pri-
vacy mechanisms, and we’ll discuss them briefly over the next sections.
NOTE For a more complete overview of issues surrounding security in wireless networks, see
Professor Kjell Jørgen Hole’s articles and slides at http://www.kjhole.com/ and
http://www.nowires.org/.
MAC Address Filtering
The short version of the story about PF and MAC address filtering is that
we don’t do it. A number of consumer-grade, off-the-shelf wireless access
points offer MAC address filtering, but contrary to common belief, they
don’t really add much security. The marketing succeeds largely because
most consumers are unaware that it’s possible to change the MAC address
of essentially any wireless network adapter on the market today.2
1. On some systems, the older, device-specific programs, such as wicontrol and ancontrol, are
still around, but for the most part, they are deprecated and have long been replaced with
ifconfig functionality. On OpenBSD, the consolidation into ifconfig has been completed.
2. A quick man page lookup on OpenBSD will tell you that the command to change the MAC
address for the interface rum0 is simply ifconfig rum0 lladdr 00:ba:ad:f0:0d:11.

Wireless Networks Made Easy 47
NOTE If you really want to try MAC address filtering, you could look into using the bridge(4)
facility and the bridge-related rule options in ifconfig(8) on OpenBSD 4.7 and
later. We’ll look at bridges and some of the more useful ways to use them with packet
filtering in Chapter 5. Note that you can use the bridge filtering without really run-
ning a bridge by just adding one interface to the bridge.
WEP
One consequence of using radio waves instead of wires to move data is that
it’s comparatively easier for outsiders to capture data in transit over radio
waves. The designers of the 802.11 family of wireless network standards
seem to have been aware of this fact, and they came up with a solution that
they went on to market under the name Wired Equivalent Privacy, or WEP.
Unfortunately, the WEP designers came up with their wired equivalent
encryption without actually reading up on recent research or consulting
active researchers in the field. So the link-level encryption scheme they rec-
ommended is considered a pretty primitive homebrew among cryptography
professionals. It was no great surprise when WEP encryption was reverse-
engineered and cracked within a few months after the first products were
released.
Even though you can download free tools to descramble WEP-encoded
traffic in a matter of minutes, for a variety of reasons, WEP is still widely
supported and used. Essentially, all IEEE 802.11 equipment available today
has support for at least WEP, and a surprising number offer MAC address
filtering, too.
You should consider network traffic protected only by WEP to be just
marginally more secure than data broadcast in the clear. Then again, the
token effort needed to crack into a WEP network may be sufficient to deter
lazy and unsophisticated attackers.
WPA
It dawned on the 802.11 designers fairly quickly that their WEP system
wasn’t quite what it was cracked up to be, so they came up with a revised and
slightly more comprehensive solution called Wi-Fi Protected Access, or WPA.
WPA looks better than WEP, at least on paper, but the specification is
complicated enough that its widespread implementation was delayed. In
addition, WPA has attracted its share of criticism over design issues and
bugs that have produced occasional interoperability problems. Combined
with the familiar issues of access to documentation and hardware, free soft-
ware support varies. Most free systems have WPA support, and even though
you may find that it’s not available for all devices, the situation has been
improving over time. If your project specification includes WPA, look care-
fully at your operating system and driver documentation.

48 Chapter 4
And, of course, it goes almost without saying that you’ll need further
security measures, such as SSH or SSL encryption, to maintain any signifi-
cant level of confidentiality for your data stream.
The Right Hardware for the Task
Picking the right hardware is not necessarily a daunting task. On a BSD sys-
tem, the following simple command is all you need to enter to see a listing
of all manual pages with the word wireless in their subject lines.3
$ apropos wireless
Even on a freshly installed system, this command will give you a com-
plete list of all wireless network drivers available in the operating system.
The next step is to read the driver manual pages and compare the
lists of compatible devices with what is available as parts or built into the
systems you’re considering. Take some time to think through your specific
requirements. For test purposes, low-end rum or ural USB dongles (or the
newer urtwn and run) will work and are quite convenient. Later, when you’re
about to build a more permanent infrastructure, you may want to look into
higher-end gear, although you may find that the inexpensive test gear will
perform quite well. Some wireless chipsets require firmware that for legal
reasons can’t be distributed on the OpenBSD install media. In most cases,
the fw_update script will be able to fetch the required firmware on first boot
after a successful install, as long as a network connection is available. If
you install the units in an already configured system, you can try running
fw_update manually. You may also want to read Appendix B of this book for
some further discussion.
Setting Up a Simple Wireless Network
For our first wireless network, it makes sense to use the basic gateway con-
figuration from the previous chapter as our starting point. In your network
design, it’s likely that the wireless network isn’t directly attached to the
Internet at large but that the wireless network will require a gateway of
some sort. For that reason, it makes sense to reuse the working gateway
setup for this wireless access point, with some minor modifications intro-
duced over the next few paragraphs. After all, doing so is more convenient
than starting a new configuration from scratch.
NOTE We’re in infrastructure-building mode here, and we’ll be setting up the access point
first. If you prefer to look at the client setup first, see “The Client Side” on page 55.
The first step is to make sure you have a supported card and to check
that the driver loads and initializes the card properly. The boot-time system
messages scroll by on the console, but they’re also recorded in the file
3. In addition, it’s possible to look up man pages on the Web. Check http://www.openbsd.org/
and the other project websites. They offer keyword-based man page searching.

Wireless Networks Made Easy 49
/var/run/dmesg.boot. You can view the file itself or use the dmesg command to
see these messages. With a successfully configured PCI card, you should see
something like this:
ral0 at pci1 dev 10 function 0 "Ralink RT2561S" rev 0x00: apic 2 int 11 (irq
11), address 00:25:9c:72:cf:60
ral0: MAC/BBP RT2561C, RF RT2527
If the interface you want to configure is a hot-pluggable type, such as a
USB or PC Card device, you can see the kernel messages by viewing the
/var/log/messages file—for example, by running tail -f on the file before
you plug in the device.
Next, you need to configure the interface: first to enable the link and,
finally, to configure the system for TCP/IP. You can do this from the com-
mand line, like this:
$ sudo ifconfig ral0 up mediaopt hostap mode 11g chan 1 nwid unwiredbsd nwkey 0x1deadbeef9
This command does several things at once. It configures the ral0 inter-
face, enables the interface with the up parameter, and specifies that the
interface is an access point for a wireless network with mediaopt hostap. Then,
it explicitly sets the operating mode to 11g and the channel to 11. Finally, it
uses the nwid parameter to set the network name to unwiredbsd, with the
WEP key (nwkey) set to the hexadecimal string 0x1deadbeef9.
Use ifconfig to check that the command successfully configured the
interface:
$ ifconfig ral0
ral0: flags=8843<UP,BROADCAST,RUNNING,SIMPLEX,MULTICAST> mtu 1500
lladdr 00:25:9c:72:cf:60
priority: 4
groups: wlan
media: IEEE802.11 autoselect mode 11g hostap
status: active
ieee80211: nwid unwiredbsd chan 1 bssid 00:25:9c:72:cf:60 nwkey <not displayed> 100dBm
inet6 fe80::225:9cff:fe72:cf60%ral0 prefixlen 64 scopeid 0x2
Note the contents of the media and ieee80211 lines. The information dis-
played here should match what you entered on the ifconfig command line.
With the link part of your wireless network operational, you can assign
an IP address to the interface. First, set an IPv4 address:
$ sudo ifconfig ral0 10.50.90.1 255.255.255.0
Setting an IPv6 is equally straightforward:
$ sudo ifconfig alias ral0 2001:db8::baad:f00d:1 64

50 Chapter 4
On OpenBSD, you can combine both steps into one by creating a
/etc/hostname.ral0 file, roughly like this:
up mediaopt hostap mode 11g chan 1 nwid unwiredbsd nwkey 0x1deadbeef9
inet6 alias 2001:db8::baad:f00d:1 64
Then, run sh /etc/netstart ral0 (as root) or wait patiently for your next
boot to complete.
Notice that the preceding configuration is divided over several lines.
The first line generates an ifconfig command that sets up the interface with
the correct parameters for the physical wireless network. The second line
generates the command that sets the IPv4 address after the first command
completes, followed by setting an IPv6 address for a dual-stack configura-
tion. Because this is our access point, we set the channel explicitly, and we
enable weak WEP encryption by setting the nwkey parameter.
On NetBSD, you can normally combine all of these parameters in one
rc.conf setting:
ifconfig_ral0="mediaopt hostap mode 11g chan 1 nwid unwiredbsd nwkey
0x1deadbeef inet 10.50.90.1 netmask 255.255.255.0 inet6 2001:db8::baad:f00d:1
prefixlen 64 alias"
FreeBSD 8 and newer versions take a slightly different approach, tying
wireless network devices to the unified wlan(4) driver. Depending on your
kernel configuration, you may need to add the relevant module load lines
to /boot/loader.conf. On one of my test systems, /boot/loader.conf looks like this:
if_rum_load="YES"
wlan_scan_ap_load="YES"
wlan_scan_sta_load="YES"
wlan_wep_load="YES"
wlan_ccmp_load="YES"
wlan_tkip_load="YES"
With the relevant modules loaded, setup is a multicommand affair, best
handled by a start_if.if file for your wireless network. Here is an example of
an /etc/start_if.rum0 file for a WEP access point on FreeBSD 8:
wlans_rum0="wlan0"
create_args_wlan0="wlandev rum0 wlanmode hostap"
ifconfig_wlan0="inet 10.50.90.1 netmask 255.255.255.0 ssid unwiredbsd \
wepmode on wepkey 0x1deadbeef9 mode 11g"
ifconfig_wlan0_ipv6="2001:db8::baad:f00d:1 prefixlen 64"
After a successful configuration, your ifconfig output should show both
the physical interface and the wlan interface up and running:
rum0: flags=8843<UP,BROADCAST,RUNNING,SIMPLEX,MULTICAST> metric 0 mtu 2290
ether 00:24:1d:9a:bf:67

Wireless Networks Made Easy 51
media: IEEE 802.11 Wireless Ethernet autoselect mode 11g <hostap>
status: running
wlan0: flags=8843<UP,BROADCAST,RUNNING,SIMPLEX,MULTICAST> metric 0 mtu 1500
ether 00:24:1d:9a:bf:67
inet 10.50.90.1 netmask 0xffffff00 broadcast 10.50.90.255
inet6 2001:db8::baad:f00d:1 prefixlen 64
media: IEEE 802.11 Wireless Ethernet autoselect mode 11g <hostap>
status: running
ssid unwiredbsd channel 6 (2437 Mhz 11g) bssid 00:24:1d:9a:bf:67
country US authmode OPEN privacy ON deftxkey UNDEF wepkey 1:40-bit
txpower 0 scanvalid 60 protmode CTS dtimperiod 1 -dfs
The line status: running means that you’re up and running, at least on
the link level.
NOTE Be sure to check the most up-to-date ifconfig man page for other options that may be
more appropriate for your configuration.
An OpenBSD WPA Access Point
WPA support was introduced in OpenBSD 4.4, with extensions to most
wireless network drivers, and all basic WPA keying functionality was merged
into ifconfig(8) in OpenBSD 4.9.
NOTE There may still be wireless network drivers that don’t have WPA support, so check
the driver’s man page to see whether WPA is supported before you try to configure
your network to use it. You can combine 802.1x key management with an external
authentication server for “enterprise” mode via the security/wpa_supplicant package,
but we’ll stick to the simpler preshared key setup for our purposes.
The procedure for setting up an access point with WPA is quite simi-
lar to the one we followed for WEP. For a WPA setup with a preshared key
(sometimes referred to as a network password), you would typically write a
hostname.if file like this:
up media autoselect mediaopt hostap mode 11g chan 1 nwid unwiredbsd wpakey 0x1deadbeef9
inet6 alias 2001:db8::baad:f00d:1 64
If you’re already running the WEP setup described earlier, disable
those settings with the following:
$ sudo ifconfig ral0 -nwid -nwkey
Then, enable the new settings with this command:
$ sudo sh /etc/netstart ral0

52 Chapter 4
You can check that the access point is up and running with ifconfig:
$ ifconfig ral0
ral0: flags=8843<UP,BROADCAST,RUNNING,SIMPLEX,MULTICAST> mtu 1500
lladdr 00:25:9c:72:cf:60
priority: 4
groups: wlan
media: IEEE802.11 autoselect mode 11g hostap
status: active
ieee80211: nwid unwiredbsd chan 1 bssid 00:25:9c:72:cf:60 wpapsk <not displayed>
wpaprotos wpa1,wpa2 wpaakms psk wpaciphers tkip,ccmp wpagroupcipher tkip 100dBm
inet6 fe80::225:9cff:fe72:cf60%ral0 prefixlen 64 scopeid 0x2
inet6 2001:db8::baad:f00d:1 prefixlen 64
inet 10.50.90.1 netmask 0xff000000 broadcast 10.255.255.255
Note the status: active indication and that the WPA options we didn’t
set explicitly are shown with their sensible default values.
A FreeBSD WPA Access Point
Moving from the WEP access point we configured earlier to a somewhat
safer WPA setup is straightforward. WPA support on FreeBSD comes in the
form of hostapd (a program that is somewhat similar to OpenBSD’s hostapd
but not identical). We start by editing the /etc/start_if.rum0 file to remove the
authentication information. The edited file should look something like this:
wlans_rum0="wlan0"
create_args_wlan0="wlandev rum0 wlanmode hostap"
ifconfig_wlan0="inet 10.50.90.1 netmask 255.255.255.0 ssid unwiredbsd mode 11g"
ifconfig_wlan0_ipv6="2001:db8::baad:f00d:1 prefixlen 64"
Next, we add the enable line for hostapd in /etc/rc.conf:
hostapd_enable="YES"
And finally, hostapd will need some configuration of its own, in /etc/
hostapd.conf:
interface=wlan0
debug=1
ctrl_interface=/var/run/hostapd
ctrl_interface_group=wheel
ssid=unwiredbsd
wpa=1
wpa_passphrase=0x1deadbeef9
wpa_key_mgmt=WPA-PSK
wpa_pairwise=CCMP TKIP
Here, the interface specification is rather self-explanatory, while the debug
value is set to produce minimal messages. The range is 0 through 4, where 0
is no debug messages at all. You shouldn’t need to change the ctrl_interface*
settings unless you’re developing hostapd. The first of the next five lines

Wireless Networks Made Easy 53
sets the network identifier. The subsequent lines enable WPA and set the
passphrase. The final two lines specify accepted key-management algo-
rithms and encryption schemes. (For the finer details and updates, see the
hostapd(8) and hostapd.conf(5) man pages.)
After a successful configuration (running sudo /etc/rc.d/hostapd force-
start comes to mind), ifconfig should produce output about the two inter-
faces similar to this:
rum0: flags=8843<UP,BROADCAST,RUNNING,SIMPLEX,MULTICAST> metric 0 mtu 2290
ether 00:24:1d:9a:bf:67
media: IEEE 802.11 Wireless Ethernet autoselect mode 11g <hostap>
status: running
wlan0: flags=8843<UP,BROADCAST,RUNNING,SIMPLEX,MULTICAST> metric 0 mtu 1500
ether 00:24:1d:9a:bf:67
inet 10.50.90.1 netmask 0xffffff00 broadcast 10.50.90.255
inet6 2001:db8::baad:f00d:1 prefixlen 64
media: IEEE 802.11 Wireless Ethernet autoselect mode 11g <hostap>
status: running
ssid unwiredbsd channel 6 (2437 Mhz 11g) bssid 00:24:1d:9a:bf:67
country US authmode WPA privacy MIXED deftxkey 2 TKIP 2:128-bit
txpower 0 scanvalid 60 protmode CTS dtimperiod 1 -dfs
The line status: running means that you’re up and running, at least on
the link level.
The Access Point’s PF Rule Set
With the interfaces configured, it’s time to start configuring the access
point as a packet-filtering gateway. You can start by copying the basic gate-
way setup from Chapter 3. Enable gatewaying via the appropriate entries in
the access point’s sysctl.conf or rc.conf file and then copy across the pf.conf file.
Depending on the parts of the previous chapter that were most useful to
you, the pf.conf file may look something like this:
ext_if = "re0" # macro for external interface - use tun0 or pppoe0 for PPPoE
int_if = "re1" # macro for internal interface
localnet = $int_if:network
# nat_address = 203.0.113.5 # Set addess for nat-to
client_out = "{ ssh, domain, pop3, auth, nntp, http,\
https, cvspserver, 2628, 5999, 8000, 8080 }"
udp_services = "{ domain, ntp }"
icmp_types = "{ echoreq, unreach }"
# if IPv6, some ICMP6 accommodation is needed
icmp6_types = "{ echoreq unreach timex paramprob }"
# If ext_if IPv4 address is dynamic, ($ext_if) otherwise nat to specific address, ie
# match out on $ext_if inet from $localnet nat-to $nat_address
match out on $ext_if inet from $localnet nat-to ($ext_if)
block all
pass quick inet proto { tcp, udp } from $localnet to port $udp_services
pass log inet proto icmp icmp-type $icmp_types
pass inet6 proto icmp6 icmp6-type $icmp6_types
pass inet proto tcp from $localnet port $client_out
54 Chapter 4
If you’re running a PF version equal to OpenBSD 4.6 or earlier, the
match rule with nat-to instead becomes this (assuming the external interface
has one address, dynamically assigned):
nat on $ext_if from $localnet to any -> ($ext_if)
The only difference that’s strictly necessary for your access point to
work is the definition of int_if. You must change the definition of int_if to
match the wireless interface. In our example, this means the line should
now read as follows:
int_if = "ral0" # macro for internal interface
More than likely, you’ll also want to set up dhcpd to serve addresses and
other relevant network information to IPv4 clients after they’ve associated
with your access point. For IPv6 networks, you probably want to set up rtadvd
(or even a DHCP6 daemon) to aid your IPv6 clients in their autoconfigura-
tion. Setting up dhcpd and rtadvd is fairly straightforward if you read the
man pages.
That’s all there is to it. This configuration gives you a functional BSD
access point, with at least token security (actually more like a Keep Out!
sign) via WEP encryption or a slightly more robust link-level encryption
with WPA. If you need to support FTP, copy the ftp-proxy configuration
from the machine you set up in Chapter 3 and make changes similar to
those you made for the rest of the rule set.
Access Points with Three or More Interfaces
If your network design dictates that your access point is also the gateway for
a wired local network, or even several wireless networks, you need to make
some minor changes to your rule set. Instead of just changing the value of
the int_if macro, you might want to add another (descriptive) definition
for the wireless interface, such as the following:
air_if = "ral0"
Your wireless interfaces are likely to be on separate subnets, so it might
be useful to have a separate rule for each of them to handle any IPv4 NAT
configuration. Here’s an example for OpenBSD 4.7 and newer systems:
match out on $ext_if from $air_if:network nat-to ($ext_if)
And here’s one on pre–OpenBSD 4.7 PF versions:
nat on $ext_if from $air_if:network to any -> ($ext_if) static-port

Wireless Networks Made Easy 55
Depending on your policy, you might also want to adjust your localnet
definition, or at least include $air_if in your pass rules where appropriate.
And once again, if you need to support FTP, a separate pass with divert or
redirection for the wireless network to ftp-proxy may be in order.
Handling IPSec, VPN Solutions
You can set up virtual private networks (VPNs) using built-in IPsec tools,
OpenSSH, or other tools. However, due to the perceived poor security pro-
file of wireless networks in general or for other reasons, you’re likely to want
to set up some additional security.
The options fall roughly into three categories:
SSH If your VPN is based on SSH tunnels, the baseline rule set already
contains all the filtering you need. Your tunneled traffic will be indis-
tinguishable from other SSH traffic to the packet filter.
IPsec with UDP key exchange (IKE/ISAKMP) Several IPsec vari-
ants depend critically on key exchange via proto udp port 500 and use
proto udp port 4500 for NAT Traversal (NAT-T). You need to let this traffic
through in order to let the flows become established. Almost all imple-
mentations also depend critically on letting ESP protocol traffic (proto-
col number 50) pass between the hosts with the following:
pass proto esp from $source to $target
Filtering on IPsec encapsulation interfaces With a properly config-
ured IPsec setup, you can set up PF to filter on the encapsulation inter-
face enc0 itself with the following:4
pass on enc0 proto ipencap from $source to $target keep state (if-bound)
See Appendix A for references to some of the more useful literature on
the subject.
The Client Side
As long as you have BSD clients, setup is extremely easy. The steps involved
in connecting a BSD machine to a wireless network are quite similar to the
ones we just went through to set up a wireless access point. On OpenBSD,
the configuration centers on the hostname.if file for the wireless interface.
On FreeBSD, the configuration centers on rc.conf but will most likely involve
a few other files, depending on your exact configuration.
4. In OpenBSD 4.8, the encapsulation interface became a cloneable interface, and you
can configure several separate enc interfaces. All enc interfaces become members of the
enc interface group.

56 Chapter 4
OpenBSD Setup
Starting with the OpenBSD case, in order to connect to the WEP access
point we just configured, your OpenBSD clients need a hostname.if (for
example, /etc/hostname.ral0) configuration file with these lines:
up media autoselect mode 11g chan 1 nwid unwiredbsd nwkey 0x1deadbeef9
dhcp
rtsol
The first line sets the link-level parameters in more detail than usually
required. Only up and the nwid and nwkey parameters are strictly necessary.
In almost all cases, the driver will associate with the access point on the
appropriate channel and in the best available mode. The second line calls
for a DHCP configuration and, in practice, causes the system to run a
dhclient command to retrieve TCP/IP configuration information. The final
line invokes rtsol(8) to initiate IPv6 configuration.
If you choose to go with the WPA configuration, the file will look like
this instead:
up media autoselect mode 11g chan 1 nwid unwiredbsd wpakey 0x1deadbeef9
dhcp
rtsol
Again, the first line sets the link-level parameters, where the crucial
ones are the network selection and encryption parameters nwid and wpakey.
You can try omitting the mode and chan parameters; in almost all cases, the
driver will associate with the access point on the appropriate channel and
in the best available mode.
If you want to try out the configuration commands from the command
line before committing the configuration to your /etc/hostname.if file, the
command to set up a client for the WEP network is as follows:
$ sudo ifconfig ral0 up mode 11g chan 1 nwid unwiredbsd nwkey 0x1deadbeef9
The ifconfig command should complete without any output. You can
then use ifconfig to check that the interface was successfully configured.
The output should look something like this:
$ ifconfig ral0
ral0: flags=8843<UP,BROADCAST,RUNNING,SIMPLEX,MULTICAST> mtu 1500
lladdr 00:25:9c:72:cf:60
priority: 4
groups: wlan
media: IEEE802.11 autoselect (OFDM54 mode 11g)
status: active
ieee80211: nwid unwiredbsd chan 1 bssid 00:25:9c:72:cf:60 nwkey <not displayed> 100dBm
inet6 fe80::225:9cff:fe72:cf60%ral0 prefixlen 64 scopeid 0x2

Wireless Networks Made Easy 57
Note that the ieee80211: line displays the network name and channel,
along with a few other parameters. The information displayed here should
match what you entered on the ifconfig command line.
Here is the command to configure your OpenBSD client to connect to
the WPA network:
$ sudo ifconfig ral0 nwid unwiredbsd wpakey 0x1deadbeef9
The command should complete without any output. If you use ifconfig
again to check the interface status, the output will look something like this:
$ ifconfig ral0
ral0: flags=8843<UP,BROADCAST,RUNNING,SIMPLEX,MULTICAST> mtu 1500
lladdr 00:25:9c:72:cf:60
priority: 4
groups: wlan
media: IEEE802.11 autoselect (OFDM54 mode 11g)
status: active
ieee80211: nwid unwiredbsd chan 1 bssid 00:25:9c:72:cf:60 wpapsk <not
displayed> wpaprotos wpa1,wpa2 wpaakms psk wpaciphers tkip,ccmp wpagroupcipher
tkip 100dBm
inet6 fe80::225:9cff:fe72:cf60%ral0 prefixlen 64 scopeid 0x2
Check that the ieee80211: line displays the correct network name and
sensible WPA parameters.
Once you are satisfied that the interface is configured at the link level,
use the dhclient command to configure the interface for TCP/IP, like this:
$ sudo dhclient ral0
The dhclient command should print a summary of its dialogue with the
DHCP server that looks something like this:
DHCPREQUEST on ral0 to 255.255.255.255 port 67
DHCPREQUEST on ral0 to 255.255.255.255 port 67
DHCPACK from 10.50.90.1 (00:25:9c:72:cf:60)
bound to 10.50.90.11 -- renewal in 1800 seconds.
To initialize the interface for IPv6, enter the following:
$ sudo rtsol ral0
The rtsol command normally completes without any messages. Check
the interface configuration with ifconfig to see that the interface did in fact
receive an IPv6 configuration.

58 Chapter 4
FreeBSD Setup
On FreeBSD, you may need to do a bit more work than is necessary with
OpenBSD. Depending on your kernel configuration, you may need to add
the relevant module load lines to /boot/loader.conf. On one of my test systems,
/boot/loader.conf looks like this:
if_rum_load="YES"
wlan_scan_ap_load="YES"
wlan_scan_sta_load="YES"
wlan_wep_load="YES"
wlan_ccmp_load="YES"
wlan_tkip_load="YES"
With the relevant modules loaded, you can join the WEP network we
configured earlier by issuing the following command:
$ sudo ifconfig wlan create wlandev rum0 ssid unwiredbsd wepmode on wepkey 0x1deadbeef9 up
Then, issue this command to get an IPv4 configuration for the
interface:
$ sudo dhclient wlan0
To initialize the interface for IPv6, enter the following:
$ sudo rtsol ral0
The rtsol command normally completes without any messages. Check
the interface configuration with ifconfig to see that the interface did in fact
receive an IPv6 configuration.
For a more permanent configuration, create a start_if.rum0 file (replace
rum0 with the name of the physical interface if it differs) with content like this:
wlans_rum0="wlan0"
create_args_wlan0="wlandev rum0 ssid unwiredbsd wepmode on wepkey 0x1deadbeef9 up"
ifconfig_wlan0="DHCP"
ifconfig_wlan0_ipv6="inet6 accept_rtadv"
If you want to join the WPA network, you need to set up wpa_supplicant
and change your network interface settings slightly. For the WPA access
point, connect with the following configuration in your start_if.rum0 file:
wlans_rum0="wlan0"
create_args_wlan0="wlandev rum0"
ifconfig_wlan0="WPA"

Wireless Networks Made Easy 59
You also need an /etc/wpa_supplicant.conf file that contains the following:
network={
ssid="unwiredbsd"
psk="0x1deadbeef9"
}
Finally, add a second ifconfig_wlan0 line in rc.conf to ensure that dhclient
runs correctly.
ifconfig_wlan0="DHCP"
For the IPv6 configuration, add the following line to rc.conf:
ifconfig_wlan0_ipv6="inet6 accept_rtadv"
Other WPA networks may require additional options. After a successful
configuration, the ifconfig output should display something like this:
rum0: flags=8843<UP,BROADCAST,RUNNING,SIMPLEX,MULTICAST> metric 0 mtu 2290
ether 00:24:1d:9a:bf:67
media: IEEE 802.11 Wireless Ethernet autoselect mode 11g
status: associated
wlan0: flags=8843<UP,BROADCAST,RUNNING,SIMPLEX,MULTICAST> metric 0 mtu 1500
ether 00:24:1d:9a:bf:67
inet 10.50.90.16 netmask 0xffffff00 broadcast 10.50.90.255
inet6 2001:db8::baad:f00d:1635 prefixlen 64
media: IEEE 802.11 Wireless Ethernet OFDM/36Mbps mode 11g
status: associated
ssid unwiredbsd channel 1 (2412 Mhz 11g) bssid 00:25:9c:72:cf:60
country US authmode WPA2/802.11i privacy ON deftxkey UNDEF
TKIP 2:128-bit txpower 0 bmiss 7 scanvalid 450 bgscan bgscanintvl 300
bgscanidle 250 roam:rssi 7 roam:rate 5 protmode CTS roaming MANUAL
Guarding Your Wireless Network with authpf
Security professionals tend to agree that even though WEP encryption
offers little protection, it’s just barely enough to signal to would-be attack-
ers that you don’t intend to let all and sundry use your network resources.
Using WPA increases security significantly, at the cost of some complexity
in contexts that require the “enterprise”-grade options.
The configurations we’ve built so far in this chapter are functional.
Both the WEP and WPA configurations will let all reasonably configured
wireless clients connect, and that may be a problem in itself because that
configuration doesn’t have any real support built in for letting you decide
who uses your network.

60 Chapter 4
As mentioned earlier, MAC address filtering is not really a solid defense
against attackers because changing a MAC address is just too easy. The Open-
BSD developers chose a radically different approach to this problem when
they introduced authpf in OpenBSD version 3.1. Instead of tying access to a
hardware identifier, such as the network card’s MAC address, they decided
that the robust and highly flexible user authentication mechanisms already
in place were more appropriate for the task. The user shell authpf lets the
system load PF rules on a per-user basis, effectively deciding which user gets
to do what.
To use authpf, you create users with the authpf program as their shell. In
order to get network access, the user logs in to the gateway using SSH. Once
the user successfully completes SSH authentication, authpf loads the rules
you have defined for the user or the relevant class of users.
These rules, which usually are written to apply only to the IP address
the user logged in from, stay loaded and in force for as long as the user stays
logged in via the SSH connection. Once the SSH session is terminated, the
rules are unloaded, and in most scenarios, all non-SSH traffic from the
user’s IP address is denied. With a reasonable setup, only traffic originated
by authenticated users will be let through.
NOTE On OpenBSD, authpf is one of the login classes offered by default, as you’ll notice the
next time you create a user with adduser.
For systems where the authpf login class isn’t available by default, you
may need to add the following lines to your /etc/login.conf file:
authpf:\
:welcome=/etc/motd.authpf:\
:shell=/usr/sbin/authpf:\
:tc=default:
The next couple of sections contain a few examples that may or may not
fit your situation directly but that I hope will give you ideas you can use.
A Basic Authenticating Gateway
Setting up an authenticating gateway with authpf involves creating and
maintaining a few files besides your basic pf.conf. The main addition is
authpf.rules. The other files are fairly static entities that you won’t be spend-
ing much time on once they’ve been created.
Start by creating an empty /etc/authpf/authpf.conf file. This file needs to
be there in order for authpf to work, but it doesn’t actually need any content,
so creating an empty file with touch is appropriate.
The other relevant bits of /etc/pf.conf follow. First, here are the interface
macros:
ext_if = "re0"
int_if = "athn0"

Wireless Networks Made Easy 61
In addition, if you define a table called <authpf_users>, authpf will add
the IP addresses of authenticated users to the table:
table <authpf_users> persist
If you need to run NAT, the rules that take care of the translation
could just as easily go in authpf.rules, but keeping them in the pf.conf file
doesn’t hurt in a simple setup like this:
pass out on $ext_if inet from $localnet nat-to ($ext_if)
Here’s pre–OpenBSD 4.7 syntax:
nat on $ext_if inet from $localnet to any -> ($ext_if)
Next, we create the authpf anchor, where rules from authpf.rules are
loaded once the user authenticates:
anchor "authpf/*"
For pre–OpenBSD 4.7 authpf versions, several anchors were required, so
the corresponding section would be as follows:
nat-anchor "authpf/*"
rdr-anchor "authpf/*"
binat-anchor "authpf/*"
anchor "authpf/*"
This brings us to the end of the required parts of a pf.conf file for an
authpf setup.
For the filtering part, we start with the block all default and then add
the pass rules we need. The only essential item at this point is to let SSH
traffic pass on the internal network:
pass quick on $int_if proto { tcp, udp } to $int_if port ssh
From here on out, it really is up to you. Do you want to let your clients
have name resolution before they authenticate? If so, put the pass rules for
the TCP and UDP service domain in your pf.conf file, too.
For a relatively simple and egalitarian setup, you could include the rest
of our baseline rule set, changing the pass rules to allow traffic from the
addresses in the <authpf_users> table, rather than any address in your local
network:
pass quick proto { tcp, udp } from <authpf_users> to port $udp_services
pass proto tcp from <authpf_users> to port $client_out

62 Chapter 4
For a more differentiated setup, you could put the rest of your rule set
in /etc/authpf/authpf.rules or per-user rules in customized authpf.rules files in
each user’s directory under /etc/authpf/users/. If your users generally need
some protection, your general /etc/authpf/authpf.rules could have content
like this:
client_out = "{ ssh, domain, pop3, auth, nntp, http, https }"
udp_services = "{ domain, ntp }"
pass quick proto { tcp, udp } from $user_ip to port $udp_services
pass proto tcp from $user_ip to port $client_out
The macro user_ip is built into authpf and expands to the IP address
from which the user authenticated. These rules will apply to any user who
completes authentication at your gateway.
A nice and relatively easy addition to implement is special-case rules
for users with different requirements than your general user population. If
an authpf.rules file exists in the user’s directory under /etc/authpf/users/, the
rules in that file will be loaded for the user. This means that your naive user
Peter who only needs to surf the Web and have access to a service that runs
on a high port on a specific machine could get what he needs with a /etc/
authpf/users/peter/authpf.rules file like this:
client_out = "{ domain, http, https }"
pass inet from $user_ip to 192.168.103.84 port 9000
pass quick inet proto { tcp, udp } from $user_ip to port $client_out
On the other hand, Peter’s colleague Christina runs OpenBSD and
generally knows what she’s doing, even if she sometimes generates traffic
to and from odd ports. You could give her free rein by putting this in
/etc/authpf/users/christina/authpf.rules:
pass from $user_ip os = "OpenBSD" to any
This means Christina can do pretty much anything she likes over
TCP/IP as long as she authenticates from her OpenBSD machines.
Wide Open but Actually Shut
In some settings, it makes sense to set up your network to be open and
unencrypted at the link level, while enforcing some restrictions via authpf.
The next example is very similar to Wi-Fi zones you may encounter in
airports or other public spaces, where anyone can associate to the access
points and get an IP address, but any attempt at accessing the Web will be
redirected to one specific Web page until the user has cleared some sort of
authentication.5
5. Thanks to Vegard Engen for the idea and for showing me his configuration, which is pre-
served here in spirit, if not in all its details.

Wireless Networks Made Easy 63
This pf.conf file is again built on our baseline, with two important addi-
tions to the basic authpf setup—a macro and a redirection:
ext_if = "re0"
int_if = "ath0"
auth_web="192.168.27.20"
dhcp_services = "{ bootps, bootpc }" # DHCP server + client
table <authpf_users> persist
pass in quick on $int_if proto tcp from ! <authpf_users> to port http rdr-to $auth_web
match out on $ext_if from $int_if:network nat-to ($ext_if)
anchor "authpf/*"
block all
pass quick on $int_if inet proto { tcp, udp } to $int_if port $dhcp_services
pass quick inet proto { tcp, udp } from $int_if:network to any port domain
pass quick on $int_if inet proto { tcp, udp } to $int_if port ssh
For older authpf versions, use this file instead:
ext_if = "re0"
int_if = "ath0"
auth_web="192.168.27.20"
dhcp_services = "{ bootps, bootpc }" # DHCP server + client
table <authpf_users> persist
rdr pass on $int_if proto tcp from ! <authpf_users> to any port http -> $auth_web
nat on $ext_if from $localnet to any -> ($ext_if)
nat-anchor "authpf/*"
rdr-anchor "authpf/*"
binat-anchor "authpf/*"
anchor "authpf/*"
block all
pass quick on $int_if inet proto { tcp, udp } to $int_if port $dhcp_services
pass quick inet proto { tcp, udp } from $int_if:network to port domain
pass quick on $int_if inet proto { tcp, udp } to $int_if port ssh
The auth_web macro and the redirection make sure all Web traffic from
addresses that are not in the <authpf_users> table leads all nonauthenticated
users to a specific address. At that address, you set up a Web server that
serves up whatever you need. This could range from a single page with
instructions on whom to contact in order to get access to the network all the
way up to a system that accepts credit cards and handles user creation.
Note that in this setup, name resolution will work, but all surfing attempts
will end up at the auth_web address. Once the users clear authentication, you
can add general rules or user-specific ones to the authpf.rules files as appro-
priate for your situation.

5
BIGGER OR TRICKIER NETWORKS
In this chapter, we’ll build on the material
in previous chapters to meet the real-life
challenges of both large and small networks
with relatively demanding applications or
users. The sample configurations in this chapter are
based on the assumption that your packet-filtering
setups will need to accommodate services you run on your local network.
We’ll mainly look at this challenge from a Unix perspective, focusing on
SSH, email, and Web services (with some pointers on how to take care of
other services).
This chapter is about the things to do when you need to combine packet
filtering with services that must be accessible outside your local network.
How much this complicates your rule sets will depend on your network
design and, to a certain extent, on the number of routable addresses you
have available. We’ll begin with configurations for official, routable IPv4
addresses as well as the generally roomier IPv6 address ranges. Then, we’ll
move on to situations with as few as one routable IPv4 address and the
PF-based work-arounds that make the services usable even under these
restrictions.

66 Chapter 5
A Web Server and Mail Server on the Inside:
Routable IPv4 Addresses
How complicated is your network? How complicated does it need to be?
We’ll start with the baseline scenario of the sample clients from
Chapter 3. We set up the clients behind a basic PF firewall and give them
access to a range of services hosted elsewhere but no services running on
the local network. These clients get three new neighbors: a mail server,
a Web server, and a file server. In this scenario, we use official, routable
IPv4 addresses because it makes life a little easier. Another advantage of
this approach is that with routable addresses, we can let two of the new
machines run DNS for our example.com domain: one as the master and the
other as an authoritative slave.1 And as you’ll see, adding IPv6 addresses
and running a dual-stack network won’t necessarily make your rule set
noticeably more complicated.
NOTE For DNS, it always makes sense to have at least one authoritative slave server some-
where outside your own network (in fact, some top-level domains won’t let you register
a domain without it). You may also want to arrange for a backup mail server to be
hosted elsewhere. Keep these things in mind as you build your network.
At this stage, we keep the physical network layout fairly simple. We put
the new servers in the same local network as the clients—possibly in a sepa-
rate server room but certainly on the same network segment or switch as
the clients. Conceptually, the new network looks something like Figure 5-1.
With the basic parameters for the network in place, we can start setting
up a sensible rule set for handling the services we need. Once again, we
start from the baseline rule set and add a few macros for readability.
The macros we need come rather naturally from the specifications:
• Web server:
webserver = "{ 192.0.2.227, 2001:db8::baad:f00d:f17 }"
• Web server services:
webports = "{ http, https }"
• Mail server:
emailserver = "{ 192.0.2.225, 2001:db8::baad:f00d:f117 }"
1. In fact, the example.com network here lives in the 192.0.2.0/24 block, which is reserved in
RFC 3330 for example and documentation use. We use this address range mainly to differ-
entiate from the NAT examples elsewhere in this book, which use addresses in the “private”
RFC 1918 address space.
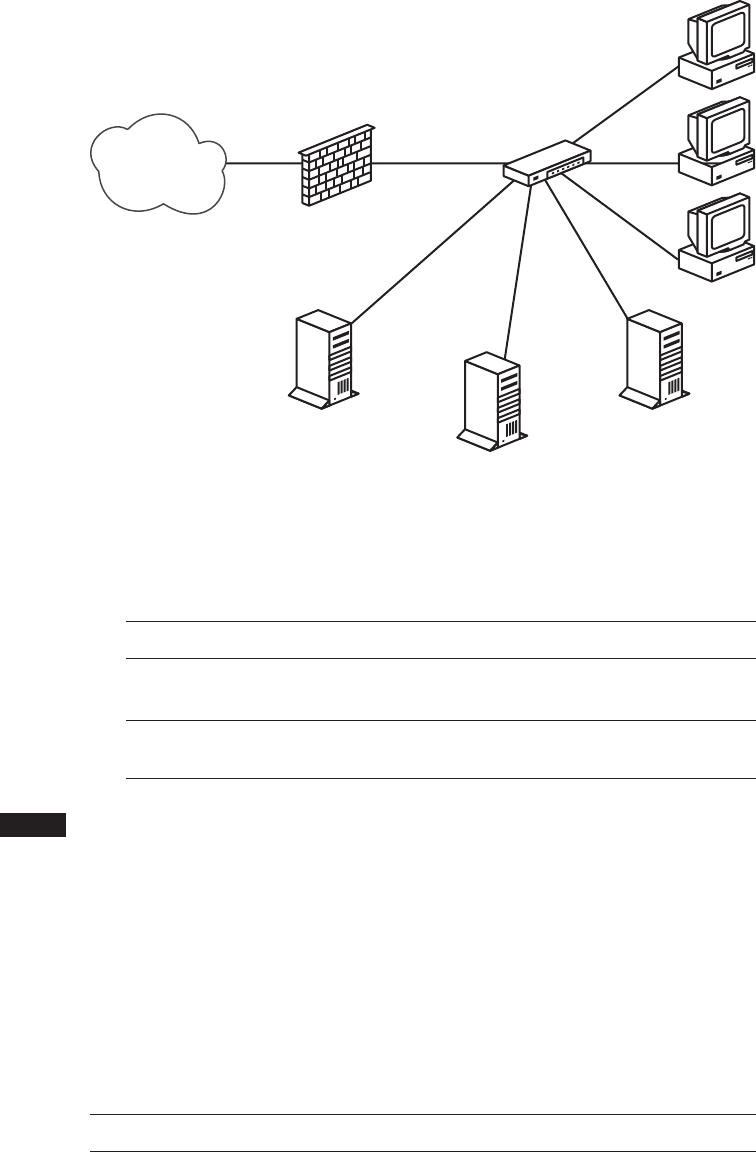
Bigger or Trickier Networks 67
The Internet
Switch
Clients
$emailserver
192.0.2.225
2001:db8::baad:f00d:f117 $webserver
192.0.2.227
2001:db8::baad:f00d:f17
$nameserver
192.0.2.221
2001:db8::baad:f00d:fbaa
Our gateway,
the PF firewall
$int_if
192.0.2.0/24
2001:db8::1
$ext_if
Figure 5-1: A basic network with servers and clients on the inside
• Mail server services:
email = "{ smtp, pop3, imap, imap3, imaps, pop3s }"
• Name servers:
nameservers = "{ 192.0.2.221, 192.0.2.223 , \
2001:db8::baad:f00d:fbaa, 2001:db8::baad:f00d:ff00 }"
NOTE At this point, you’ve probably noticed that both the IPv4 and IPv6 addresses for our
servers are placed fairly close together within their respective address ranges. Some
schools of thought hold that in the case of IPv6, each interface should be allocated
at least a /64 range if your total allocation can bear it. Others have advocated more
modest allocations. The IETF’s current best practice document on the matter is
RFC6177, available from the IETF website (http://www.ietf.org).
We assume that the file server doesn’t need to be accessible to the out-
side world, unless we choose to set it up with a service that needs to be vis-
ible outside the local network, such as an authoritative slave name server for
our domain. Then, with the macros in hand, we add the pass rules. Starting
with the Web server, we make it accessible to the world with the following:
pass proto tcp to $webserver port $webports

68 Chapter 5
On a similar note, we let the world talk to the mail server:
pass proto tcp to $emailserver port $email
This lets clients anywhere have the same access as the ones in your local
network, including a few mail-retrieval protocols that may run without
encryption. That’s common enough in the real world, but you might want
to consider your options if you’re setting up a new network.
For the mail server to be useful, it needs to be able to send mail to hosts
outside the local network, too:
pass log proto tcp from $emailserver to port smtp
IS SYNPROXY WORTH THE TROUBLE?
Over the years, the synproxy state option has received a lot of attention as a
possible bulwark against ill-intentioned traffic from the outside. Specifically,
the synproxy state option was intended to protect against SYN-flood attacks
that could lead to resource exhaustion at the back end.
It works like this: When a new connection is created, PF normally lets
the communication partners handle the connection setup themselves, simply
passing the packets on if they match a pass rule. With synproxy enabled, PF
handles the initial connection setup and hands over the connection to the com-
munication partners only once it’s properly established, essentially creating
a buffer between the communication partners. The SYN proxying is slightly
more expensive than the default keep state, but not necessarily noticeably so
on reasonably scaled equipment.
The potential downsides become apparent in load-balancing setups
where a SYN-proxying PF could accept connections that the backend isn’t
ready to accept, in some cases short-circuiting the redundancy by setting up
connections to hosts other than those the load-balancing logic would have
selected. The classic example here is a pool of HTTP servers with round-robin
DNS. But the problem becomes especially apparent in protocols like SMTP,
where the built-in redundancy dictates (by convention, at least—the actual
RFC is a bit ambiguous) that if a primary mail exchanger isn’t accepting con-
nections, you should try a secondary instead.
When considering a setup where synproxy seems attractive, keep these
issues in mind and analyze the potential impact on your setup that would
come from adding synproxy to the mix. If you conclude that SYN proxying
is needed, simply tack on synproxy state at the end of the rules that need
the option. The rule of thumb is, if you are under active attack, inserting the
synproxy option may be useful as a temporary measure. Under normal circum-
stances, it isn’t needed as a permanent part of your configuration.

Bigger or Trickier Networks 69
Keep in mind that the rule set starts with a block all rule, which means
that only the mail server is allowed to initiate SMTP traffic from the local
network to the rest of the world. If any of the other hosts on the network
need to send email to or receive email from the outside world, they need
to use the designated mail server. This could be a good way to ensure, for
example, that you make it as hard as possible for any spam-sending zombie
machines that might turn up in your network to deliver their payloads.
Finally, the name servers need to be accessible to clients outside our
network who look up the information about example.com and any other
domains for which we answer authoritatively:
pass proto { tcp, udp } to $nameservers port domain
Having integrated all the services that need to be accessible from the
outside world, our rule set ends up looking roughly like this:
ext_if = "ep0" # macro for external interface - use tun0 or pppoe0 for PPPoE
int_if = "ep1" # macro for internal interface
localnet = $int_if:network
webserver = "{ 192.0.2.227, 2001:db8::baad:f00d:f17 }"
webports = "{ http, https }"
emailserver = "{ 192.0.2.225, 2001:db8::baad:f00d:f117 }"
email = "{ smtp, pop3, imap, imap3, imaps, pop3s }"
nameservers = "{ 192.0.2.221, 192.0.2.223, \
2001:db8::baad:f00d:fbaa, 2001:db8::baad:f00d:ff00 }"
client_out = "{ ssh, domain, pop3, auth, nntp, http,\
https, cvspserver, 2628, 5999, 8000, 8080 }"
udp_services = "{ domain, ntp }"
icmp_types = "{ echoreq, unreach }"
icmp6_types = "{ echoreq unreach timex paramprob }"
block all
pass quick proto { tcp, udp } from $localnet to port $udp_services
pass log inet proto icmp all icmp-type $icmp_types
pass inet6 proto icmp6 icmp6-type $icmp6_types
pass proto tcp from $localnet to port $client_out
pass proto { tcp, udp } to $nameservers port domain
pass proto tcp to $webserver port $webports
pass log proto tcp to $emailserver port $email
pass log proto tcp from $emailserver to port smtp
This is still a fairly simple setup, but unfortunately, it has one poten-
tially troubling security disadvantage. The way this network is designed, the
servers that offer services to the world at large are all in the same local network
as your clients, and you’d need to restrict any internal services to only local
access. In principle, this means that an attacker would need to compromise
only one host in your local network to gain access to any resource there,
putting the miscreant on equal footing with any user in your local network.
Depending on how well each machine and resource are protected from
unauthorized access, this could be anything from a minor annoyance to a
major headache.

70 Chapter 5
In the next section, we’ll look at some options for segregating the ser-
vices that need to interact with the world at large from the local network.
A Degree of Separation: Introducing the DMZ
In the previous section, you saw how to set up services on your local net-
work and make them selectively available to the outside world through
a sensible PF rule set. For more fine-grained control over access to your
internal network, as well as the services you need to make it visible to the
rest of the world, add a degree of physical separation. Even a separate virtual
local area network (VLAN) will do nicely.
Achieving the physical and logical separation is fairly easy: Simply
move the machines that run the public services to a separate network that’s
attached to a separate interface on the gateway. The net effect is a separate
network that isn’t quite part of your local network but isn’t entirely in the
public part of the Internet either. Conceptually, the segregated network
looks like Figure 5-2.
The Internet
Switch
Clients
$emailserver
192.0.2.225
2001:db8:baad:f00d:f117
$webserver
192.0.2.227
2001:db8::baad:f00d:f17
$nameserver
192.0.2.221
2001:db8::baad:f00d:fbaa
Our gateway,
the PF firewall
$int_if
192.0.2.0/24
2001:db8::1
$ext_if
Switch
$dmz_if
192.0.2.128/25
2001:db8::baad:f00d:1
Figure 5-2: A network with the servers in a DMZ
NOTE Think of this little network as a zone of relative calm between the territories of hos-
tile factions. It’s no great surprise that a few years back, someone coined the phrase
demilitarized zone (DMZ) to describe this type of configuration.

Bigger or Trickier Networks 71
For address allocation, you can segment off an appropriately sized chunk
of your official address space for the new DMZ network. Alternatively, you
can move those parts of your network that don’t have a specific need to run
with publicly accessible and routable IPv4 addresses into a NAT environment.
Either way, you end up with at least one more interface in your filtering con-
figuration. As you’ll see later, if you’re really short of official IPv4 addresses,
it’s possible to run a DMZ setup in all-NAT environments as well.
The adjustments to the rule set itself don’t need to be extensive. If nec-
essary, you can change the configuration for each interface. The basic rule-
set logic remains, but you may need to adjust the definitions of the macros
(webserver, mailserver, nameservers, and possibly others) to reflect your new
network layout.
In our example, we could choose to segment off the part of our address
ranges where we’ve already placed our servers. If we leave some room for
growth, we can set up the IPv4 range for the new dmz_if on a /25 subnet with
a network address and netmask of 192.0.2.128/255.255.255.128. This leaves
us with 192.0.2.129 through 192.0.2.254 as the usable address range for hosts
in the DMZ. As we’ve already placed our servers in the 2001:db8::baad:f00d:
0/112 network (with a measly 65,536 addresses to play with), the easiest way
forward for the IPv6 range is to segment off that network, too, and assign
the interface facing the network an appropriate IPv6 address, like the one
in Figure 5-2.
With that configuration and no changes in the IP addresses assigned to
the servers, you don’t really need to touch the rule set at all for the packet
filtering to work after setting up a physically segregated DMZ. That’s a nice
side effect, which could be due to either laziness or excellent long-range
planning. Either way, it underlines the importance of having a sensible
address-allocation policy in place.
It might be useful to tighten up your rule set by editing your pass rules
so the traffic to and from your servers is allowed to pass only on the inter-
faces that are actually relevant to the services:
pass in on $ext_if proto { tcp, udp } to $nameservers port domain
pass in on $int_if proto { tcp, udp } from $localnet to $nameservers \
port domain
pass out on $dmz_if proto { tcp, udp } to $nameservers port domain
pass in on $ext_if proto tcp to $webserver port $webports
pass in on $int_if proto tcp from $localnet to $webserver port $webports
pass out on $dmz_if proto tcp to $webserver port $webports
pass in log on $ext_if proto tcp to $mailserver port smtp
pass in log on $int_if proto tcp from $localnet to $mailserver \
port $email
pass out log on $dmz_if proto tcp to $mailserver port smtp
pass in on $dmz_if from $mailserver to port smtp
pass out log on $ext_if proto tcp from $mailserver to port smtp
You could choose to make the other pass rules that reference your local
network interface-specific, too, but if you leave them intact, they’ll continue
to work.

72 Chapter 5
Sharing the Load: Redirecting to a Pool of Addresses
Once you’ve set up services to be accessible to the world at large, one likely
scenario is that over time, one or more of your services will grow more
sophisticated and resource-hungry or simply attract more traffic than you
feel comfortable serving from a single server.
There are a number of ways to make several machines share the load
of running a service, including ways to fine-tune the service itself. For the
network-level load balancing, PF offers the basic functionality you need via
redirection to tables or address pools. In fact, you can implement a form of
load balancing without even touching your pass rules, at least if your envi-
ronment is not yet dual-stack.
Take the Web server in our example. We already have the macro that
represents a service, our Web server. For reasons that will become obvious
in a moment, we need to reduce that macro to represent only the public
IPv4 address (webserver = "192.0.2.227"), which, in turn, is associated with
the hostname that your users have bookmarked, possibly www.example.com.
When the time comes to share the load, set up the required number of
identical, or at least equivalent, servers and then alter your rule set slightly
to introduce the redirection. First, define a table that holds the addresses
for your Web server pool’s IPv4 addresses:
table <webpool> persist { 192.0.2.214, 192.0.2.215, 192.0.2.216, 192.0.2.217 }
Then, perform the redirection:
match in on $ext_if protp tcp to $webserver port $webports \
rdr-to <webpool> round-robin
Unlike the redirections in earlier examples, such as the FTP proxy in
Chapter 3, this rule sets up all members of the webpool table as potential
redirection targets for incoming connections intended for the webports ports
on the webserver address. Each incoming connection that matches this rule
is redirected to one of the addresses in the table, spreading the load across
several hosts. You may choose to retire the original Web server once the
switch to this redirection is complete, or you may let it be absorbed in the
new Web server pool.
On PF versions earlier than OpenBSD 4.7, the equivalent rule is as follows:
rdr on $ext_if proto tcp to $webserver port $webports -> <webpool> round-robin
In both cases, the round-robin option means that PF shares the load
between the machines in the pool by cycling through the table of redirec-
tion addresses sequentially.
Some applications expect accesses from each individual source address
to always go to the same host in the backend (for example, there are ser-
vices that depend on client- or session-specific parameters that will be lost
if new connections hit a different host in the backend). If your configura-
tion needs to cater to such services, you can add the sticky-address option

Bigger or Trickier Networks 73
to make sure that new connections from a client are always redirected to
the same machine behind the redirection as the initial connection. The
downside to this option is that PF needs to maintain source-tracking data
for each client, and the default value for maximum source nodes tracked is
set at 10,000, which may be a limiting factor. (See Chapter 10 for advice on
adjusting this and similar limit values.)
When even load distribution isn’t an absolute requirement, selecting
the redirection address at random may be appropriate:
match in on $ext_if proto tcp to $webserver port $webports \
rdr-to <webpool> random
NOTE On pre–OpenBSD 4.7 PF versions, the random option isn’t supported for redirection to
tables or lists of addresses.
Even organizations with large pools of official, routable IPv4 addresses
have opted to introduce NAT between their load-balanced server pools and the
Internet at large. This technique works equally well in various NAT-based set-
ups, but moving to NAT offers some additional possibilities and challenges.
In order to accommodate an IPv4 and IPv6 dual-stack environment in
this way, you’ll need to set up separate tables for address pools and separate
pass or match rules with redirections for IPv4 and IPv6. A single table of both
IPv4 and IPv6 addresses may sound like an elegant idea at first, but the
simple redirection rules outlined here aren’t intelligent enough to make
correct redirection decisions based on the address family of individual
table entries.
Getting Load Balancing Right with relayd
After you’ve been running for a while with load balancing via round-robin
redirection, you may notice that the redirection doesn’t automatically adapt
to external conditions. For example, unless special steps are taken, if a host
in the list of redirection targets goes down, traffic will still be redirected to
the IP addresses in the list of possibilities.
Clearly, a monitoring solution is needed. Fortunately, the OpenBSD
base system provides one. The relay daemon relayd2 interacts with your PF
configuration, providing the ability to weed out nonfunctioning hosts from
your pool. Introducing relayd into your setup, however, may require some
minor changes to your rule set.
The relayd daemon works in terms of two main classes of services that it
refers to as redirects and relays. It expects to be able to add or subtract hosts’
IP addresses to or from the PF tables it controls. The daemon interacts
2. Originally introduced in OpenBSD 4.1 under the name hoststated, the daemon has seen
active development (mainly by Reyk Floeter and Pierre-Yves Ritschard) over several years,
including a few important changes to the configuration syntax, and it was renamed relayd in
time for the OpenBSD 4.3 release.

74 Chapter 5
with your rule set through a special-purpose anchor named relayd (and in
pre–OpenBSD 4.7 versions, also a redirection anchor, rdr-anchor, with the
same name).
To see how we can make our sample configuration work a little better by
using relayd, we’ll look back at the load-balancing rule set. Starting from the
top of your pf.conf file, add the anchor for relayd to insert rules as needed:
anchor "relayd/*"
On pre–OpenBSD 4.7 versions, you also need the redirection anchor:
rdr-anchor "relayd/*"
anchor "relayd/*"
In the load-balancing rule set, we had the following definition for our
Web server pool:
table webpool persist { 192.0.2.214, 192.0.2.215, 192.0.2.216, 192.0.2.217 }
It has this match rule to set up the redirection:
match in on $ext_if proto tcp to $webserver port $webports \
rdr-to <webpool> round-robin
Or on pre–OpenBSD 4.7 versions, you’d use the following:
rdr on $ext_if proto tcp to $webserver port $webports -> <webpool> round-robin
To make this configuration work slightly better, we remove the redi-
rection and the table (remember to take care of both sets in a dual-stack
configuration), and we let relayd handle the redirection or redirections by
setting up its own versions inside the anchor. (Don’t remove the pass rule,
however, because your rule set will still need to have a pass rule that lets
traffic flow to the IP addresses in relayd’s tables. If you had separate rules
for your inet and inet6 traffic, you may be able to merge those rules back
into one.)
Once the pf.conf parts have been taken care of, we turn to relayd’s own
relayd.conf configuration file. The syntax in this configuration file is similar
enough to pf.conf to make it fairly easy to read and understand. First, we add
the macro definitions we’ll be using later:
web1="192.0.2.214"
web2="192.0.2.215"
web3="192.0.2.216"
web4="192.0.2.217"
webserver="192.0.2.227"
sorry_server="192.0.2.200"

Bigger or Trickier Networks 75
All of these correspond to definitions we could have put in a pf.conf file.
The default checking interval in relayd is 10 seconds, which means that a
host could be down for almost 10 seconds before it’s taken offline. Being
cautious, we’ll set the checking interval to 5 seconds to minimize visible
downtime, with the following line:
interval 5 # check hosts every 5 seconds
Now, we make a table called webpool that uses most of the macros:
table <webpool> { $web1, $web2, $web3, $web4 }
For reasons we’ll return to shortly, we define one other table:
table <sorry> { $sorry_server }
At this point, we’re ready to set up the redirect:
redirect www {
listen on $webserver port 80 sticky-address
tag relayd
forward to <webpool> check http "/status.html" code 200 timeout 300
forward to <sorry> timeout 300 check icmp
}
This redirect says that connections to port 80 should be redirected to
the members of the webpool table. The sticky-address option has the same
effect here as the rdr-to in PF rules: New connections from the same source
IP address (within the time interval defined by the timeout value) are redi-
rected to the same host in the backend pool as the previous ones.
The relayd daemon should check to see whether a host is available by
asking it for the file /status.html, using the protocol HTTP, and expecting
the return code to be equal to 200. This is the expected result for a client
asking a running Web server for a file it has available.
No big surprises so far, right? The relayd daemon will take care of
excluding hosts from the table if they go down. But what if all the hosts in
the webpool table go down? Fortunately, the developers thought of that, too,
and introduced the concept of backup tables for services. This is the last
part of the definition for the www service, with the table sorry as the backup
table: The hosts in the sorry table take over if the webpool table becomes
empty. This means that you need to configure a service that’s able to offer
a “Sorry, we’re down” message in case all the hosts in your webpool fail.
If you’re running an IPv6-only service, you should, of course, substi-
tute your IPv6 addresses for the ones given in the example earlier. If you’re
running a dual-stack setup, you should probably set up the load-balancing
mechanism separately for each protocol, where the configurations differ
only in names (append a 4 or 6, for example, to the IPv4 and IPv6 sets of
names, respectively) and the addresses themselves.

76 Chapter 5
With all of the elements of a valid relayd configuration in place, you can
enable your new configuration.
Before you actually start relayd, add an empty set of relayd_flags to your
/etc/rc.conf.local to enable:
relayd_flags="" # for normal use: ""
Reload your PF rule set and then start relayd. If you want to check your
configuration before actually starting relayd, you can use the -n command-
line option to relayd:
$ sudo relayd -n
If your configuration is correct, relayd displays the message configuration
OK and exits.
To actually start the daemon, you could start relayd without any command-
line flags, but as with most daemons, it’s better to start it via its rc script
wrapper stored in /etc/rc.d/, so the following sequence reloads your edited
PF configuration and enables relayd.
$ sudo pfctl -f /etc/pf.conf
$ sudo sh /etc/rc.d/relayd start
With a correct configuration, both commands will silently start, without
displaying any messages. (If you prefer more verbose messages, both pfctl
and relayd offer the -v flag. For relayd, you may want to add the -v flag to
the rc.conf.local entry.) You can check that relayd is running with top or ps.
In both cases, you’ll find three relayd processes, roughly like this:
$ ps waux | grep relayd
_relayd 9153 0.0 0.1 776 1424 ?? S 7:28PM 0:00.01 relayd: pf update engine
(relayd)
_relayd 6144 0.0 0.1 776 1440 ?? S 7:28PM 0:00.02 relayd: host check engine
(relayd)
root 3217 0.0 0.1 776 1416 ?? Is 7:28PM 0:00.01 relayd: parent (relayd)
And as we mentioned earlier, with an empty set of relayd_flags in your
rc.conf.local file, relayd is enabled at startup. However, once the configura-
tion is enabled, most of your interaction with relayd will happen through
the relayctl administration program. In addition to letting you monitor
status, relayctl lets you reload the relayd configuration and selectively dis-
able or enable hosts, tables, and services. You can even view service status
interactively, as follows:
$ sudo relayctl show summary
Id Type Name Avlblty Status
1 redirect www active
1 table webpool:80 active (2 hosts)
1 host 192.0.2.214 100.00% up
2 host 192.0.2.215 0.00% down

Bigger or Trickier Networks 77
3 host 192.0.2.216 100.00% up
4 host 192.0.2.217 0.00% down
2 table sorry:80 active (1 hosts)
5 host 127.0.0.1 100.00% up
In this example, the webpool is seriously degraded, with only two of four
hosts up and running. Fortunately, the backup table is still functioning, and
hopefully it’ll still be up if the last two servers fail as well. For now, all tables
are active with at least one host up. For tables that no longer have any mem-
bers, the Status column changes to empty. Asking relayctl for host informa-
tion shows the status information in a host-centered format:
$ sudo relayctl show hosts
Id Type Name Avlblty Status
1 table webpool:80 active (3 hosts)
1 host 192.0.2.214 100.00% up
total: 11340/11340 checks
2 host 192.0.2.215 0.00% down
total: 0/11340 checks, error: tcp connect failed
3 host 192.0.2.216 100.00% up
total: 11340/11340 checks
4 host 192.0.2.217 0.00% down
total: 0/11340 checks, error: tcp connect failed
2 table sorry:80 active (1 hosts)
5 host 127.0.0.1 100.00% up
total: 11340/11340 checks
If you need to take a host out of the pool for maintenance (or any time-
consuming operation), you can use relayctl to disable it, as follows:
$ sudo relayctl host disable 192.0.2.217
In most cases, the operation will display command succeeded to indicate
that the operation completed successfully. Once you’ve completed mainte-
nance and put the machine online, you can reenable it as part of relayd’s
pool with this command:
$ sudo relayctl host enable 192.0.2.217
Again, you should see the message command succeeded almost immediately
to indicate that the operation was successful.
In addition to the basic load balancing demonstrated here, relayd has
been extended in recent OpenBSD versions to offer several features that
make it attractive in more complex settings. For example, it can now handle
Layer 7 proxying or relaying functions for HTTP and HTTPS, including
protocol handling with header append and rewrite, URL-path append and
rewrite, and even session and cookie handling. The protocol handling needs
to be tailored to your application. For example, the following is a simple
HTTPS relay for load balancing the encrypted Web traffic from clients to
the Web servers.

78 Chapter 5
http protocol "httpssl" {
header append "$REMOTE_ADDR" to "X-Forwarded-For"
header append "$SERVER_ADDR:$SERVER_PORT" to "X-Forwarded-By"
header change "Keep-Alive" to "$TIMEOUT"
query hash "sessid"
cookie hash "sessid"
path filter "*command=*" from "/cgi-bin/index.cgi"
ssl { sslv2, ciphers "MEDIUM:HIGH" }
tcp { nodelay, sack, socket buffer 65536, backlog 128 }
}
This protocol handler definition demonstrates a range of simple opera-
tions on the HTTP headers and sets both SSL parameters and specific TCP
parameters to optimize connection handling. The header options operate on
the protocol headers, inserting the values of the variables by either append-
ing to existing headers (append) or changing the content to a new value (change).
The URL and cookie hashes are used by the load balancer to select to
which host in the target pool the request is forwarded. The path filter
specifies that any get request, including the first quoted string as a sub-
string of the second, is to be dropped. The ssl options specify that only
SSL version 2 ciphers are accepted, with key lengths in the medium-to-high
range—in other words, 128 bits or more.3 Finally, the tcp options specify
nodelay to minimize delays, specify the use of the selective acknowledgment
method (RFC 2018), and set the socket buffer size and the maximum allowed
number of pending connections the load balancer keeps track of. These
options are examples only; in most cases, your application will perform
well with these settings at their default values.
The relay definition using the protocol handler follows a pattern that
should be familiar given the earlier definition of the www service:
relay wwwssl {
# Run as a SSL accelerator
listen on $webserver port 443 ssl
protocol "httpssl"
table <webhosts> loadbalance check ssl
}
Still, your SSL-enabled Web applications will likely benefit from a
slightly different set of parameters.
NOTE We’ve added a check ssl, assuming that each member of the webhosts table is prop-
erly configured to complete an SSL handshake. Depending on your application, it
may be useful to look into keeping all SSL processing in relayd, thus offloading the
encryption-handling tasks from the backends.
3. See the OpenSSL man page for further explanation of cipher-related options.

Bigger or Trickier Networks 79
Finally, for CARP-based failover of the hosts running relayd on your
network (see Chapter 8 for information about CARP), relayd can be config-
ured to support CARP interaction by setting the CARP demotion counter
for the specified interface groups at shutdown or startup.
Like all others parts of the OpenBSD system, relayd comes with infor-
mative man pages. For the angles and options not covered here (there are a
few), dive into the man pages for relayd, relayd.conf, and relayctl and start
experimenting to find just the configuration you need.
A Web Server and Mail Server on the Inside—The NAT Version
Let’s backtrack a little and begin again with the baseline scenario where the
sample clients from Chapter 3 get three new neighbors: a mail server, a Web
server, and a file server. This time around, externally visible IPv4 addresses
are either not available or too expensive, and running several other services
on a machine that’s primarily a firewall isn’t desirable. This means we’re
back to the situation where we do our NAT at the gateway. Fortunately, the
redirection mechanisms in PF make it relatively easy to keep servers on the
inside of a gateway that performs NAT.
The network specifications are the same as for the example.com setup we
just worked through: We need to run a Web server that serves up data in
cleartext (http) and encrypted (https) form, and we want a mail server that
sends and receives email while letting clients inside and outside the local
network use a number of well-known submission and retrieval protocols. In
short, we want pretty much the same features as in the setup from the previ-
ous section, but with only one routable address.
Of the three servers, only the Web server and the mail server need to
be visible to the outside world, so we add macros for their IP addresses and
services to the Chapter 3 rule set:
webserver = "192.168.2.7"
webports = "{ http, https }"
emailserver = "192.168.2.5"
email = "{ smtp, pop3, imap, imap3, imaps, pop3s }"
With only one routable address and the servers hidden in NATed
address space, we need to set up rules at the gateway that redirect the traf-
fic we want our servers to handle. We could define a set of match rules to set
up the redirection and then address the block or pass question in a separate
set of rules later, like this:
match in on $ext_if proto tcp to $ext_if port $webports rdr-to $webserver
match in on $ext_if proto tcp to $ext_if port $email rdr-to $emailserver
pass proto tcp to $webserver port $webports
pass proto tcp to $emailserver port $email
pass proto tcp from $emailserver to port smtp

80 Chapter 5
This combination of match and pass rules is very close to the way things
were done in pre–OpenBSD 4.7 PF versions, and if you’re upgrading from a
previous version, this is the kind of quick edit that could bridge the syntax
gap quickly. But you could also opt to go for the new style and write this
slightly more compact version instead:
pass in on $ext_if inet proto tcp to $ext_if port $webports rdr-to $webserver tag RDR
pass in on $ext_if inet proto tcp to $ext_if port $email rdr-to $mailserver tag RDR
pass on $int_if inet tagged RDR
Note the use of pass rules with rdr-to. This combination of filtering and
redirection will help make things easier in a little while, so try this combina-
tion for now.
On pre–OpenBSD 4.7 PF, the rule set will be quite similar, except in
the way that we handle the redirections.
webserver = "192.168.2.7"
webports = "{ http, https }"
emailserver = "192.168.2.5"
email = "{ smtp, pop3, imap, imap3, imaps, pop3s }"
rdr on $ext_if proto tcp to $ext_if port $webports -> $webserver
rdr on $ext_if proto tcp to $ext_if port $email -> $emailserver
pass proto tcp to $webserver port $webports
pass proto tcp to $emailserver port $email
pass proto tcp from $emailserver to any port smtp
DMZ with NAT
With an all-NAT setup, the pool of available addresses to allocate for a DMZ
is likely to be larger than in our previous example, but the same principles
apply. When you move the servers off to a physically separate network, you’ll
need to check that your rule set’s macro definitions are sane and adjust the
values if necessary.
Just as in the routable-addresses case, it might be useful to tighten
up your rule set by editing your pass rules so the traffic to and from your
servers is allowed to pass on only the interfaces that are actually relevant
to the services:
pass in on $ext_if inet proto tcp to $ext_if port $webports rdr-to $webserver
pass in on $int_if inet proto tcp from $localnet to $webserver port $webports
pass out on $dmz_if proto tcp to $webserver port $webports
pass in log on $ext_if inet proto tcp to $ext_if port $email rdr-to $mailserver
pass in log on $int_if proto tcp from $localnet to $mailserver port $email
pass out log on $dmz_if proto tcp to $mailserver port smtp
pass in on $dmz_if from $mailserver to port smtp
pass out log on $ext_if proto tcp from $mailserver to port smtp

Bigger or Trickier Networks 81
The version for pre–OpenBSD 4.7 PF differs in some details, with the
redirection still in separate rules:
pass in on $ext_if proto tcp to $webserver port $webports
pass in on $int_if proto tcp from $localnet to $webserver port $webports
pass out on $dmz_if proto tcp to $webserver port $webports
pass in log on $ext_if proto tcp to $mailserver port smtp
pass in log on $int_if proto tcp from $localnet to $mailserver port $email
pass out log on $dmz_if proto tcp to $mailserver port smtp
pass in on $dmz_if from $mailserver to port smtp
pass out log on $ext_if proto tcp from $mailserver to port smtp
You could create specific pass rules that reference your local network
interface, but if you leave the existing pass rules intact, they’ll continue to work.
Redirection for Load Balancing
The redirection-based load-balancing rules from the previous example work
equally well in a NAT regime, where the public address is the gateway’s exter-
nal interface and the redirection addresses are in a private range.
Here’s the webpool definition:
table <webpool> persist { 192.168.2.7, 192.168.2.8, 192.168.2.9, 192.168.2.10 }
The main difference between the routable-address case and the NAT
version is that after you’ve added the webpool definition, you edit the existing
pass rule with redirection, which then becomes this:
pass in on $ext_if inet proto tcp to $ext_if port $webports rdr-to <webpool> round-robin
Or for pre–OpenBSD 4.7 PF versions, use this:
rdr on $ext_if proto tcp to $ext_if port $webports -> <webpool> round-robin
From that point on, your NATed DMZ behaves much like the one with
official, routable addresses.
NOTE You can configure a valid IPv6 setup to coexist with a NATed IPv4 setup like this
one, but if you choose to do so, be sure to treat inet and inet6 traffic separately in
your PF rules. And contrary to popular belief, rules with nat-to and rdr-to options
work in IPv6 configurations the same as in IPv4.
Back to the Single NATed Network
It may surprise you to hear that there are cases where setting up a small
network is more difficult than working with a large one. For example,
returning to the situation where the servers are on the same physical

82 Chapter 5
network as the clients, the basic NATed configuration works very well—up
to a point. In fact, everything works brilliantly as long as all you’re inter-
ested in is getting traffic from hosts outside your local network to reach
your servers.
Here’s the full configuration:
ext_if = "re0" # macro for external interface - use tun0 or pppoe0 for PPPoE
int_if = "re1" # macro for internal interface
localnet = $int_if:network
# for ftp-proxy
proxy = "127.0.0.1"
icmp_types = "{ echoreq, unreach }"
client_out = "{ ssh, domain, pop3, auth, nntp, http, https, \
446, cvspserver, 2628, 5999, 8000, 8080 }"
udp_services = "{ domain, ntp }"
webserver = "192.168.2.7"
webports = "{ http, https }"
emailserver = "192.168.2.5"
email = "{ smtp, pop3, imap, imap3, imaps, pop3s }"
# NAT: ext_if IP address could be dynamic, hence ($ext_if)
match out on $ext_if from $localnet nat-to ($ext_if)
block all
# for ftp-proxy: Remember to put the following line, uncommented, in your
# /etc/rc.conf.local to enable ftp-proxy:
# ftpproxy_flags=""
anchor "ftp-proxy/*"
pass in quick proto tcp to port ftp rdr-to $proxy port 8021
pass out proto tcp from $proxy to port ftp
pass quick inet proto { tcp, udp } to port $udp_services
pass proto tcp to port $client_out
# allow out the default range for traceroute(8):
# "base+nhops*nqueries-1" (33434+64*3-1)
pass out on $ext_if inet proto udp to port 33433 >< 33626 keep state
# make sure icmp passes unfettered
pass inet proto icmp icmp-type $icmp_types from $localnet
pass inet proto icmp icmp-type $icmp_types to $ext_if
pass in on $ext_if inet proto tcp to $ext_if port $webports rdr-to $webserver
pass in on $ext_if inet proto tcp to $ext_if port $email rdr-to $mailserver
pass on $int_if inet proto tcp to $webserver port $webports
pass on $int_if inet proto tcp to $mailserver port $email
The last four rules here are the ones that interest us the most. If you
try to reach the services on the official address from hosts in your own
network, you’ll soon see that the requests for the redirected services from
machines in your local network most likely never reach the external inter-
face. This is because all the redirection and translation happens on the
external interface. The gateway receives the packets from your local network
on the internal interface, with the destination address set to the external
interface’s address. The gateway recognizes the address as one of its own
and tries to handle the request as if it were directed at a local service; as a
consequence, the redirections don’t quite work from the inside.

Bigger or Trickier Networks 83
The equivalent part to those last four lines of the preceding rule set for
pre–OpenBSD 4.7 systems looks like this:
rdr on $ext_if proto tcp to $ext_if port $webports -> $webserver
rdr on $ext_if proto tcp to $ext_if port $email -> $emailserver
pass proto tcp to $webserver port $webports
pass proto tcp to $emailserver port $email
pass proto tcp from $emailserver to any port smtp
Fortunately, several work-arounds for this particular problem are pos-
sible. The problem is common enough that the PF User Guide lists four
different solutions to the problem,4 including moving your servers to a DMZ,
as described earlier. Because this is a PF book, we’ll concentrate on a PF-
based solution (actually a pretty terrible work-around), which consists of
treating the local network as a special case for our redirection and NAT
rules.
We need to intercept the network packets originating in the local net-
work and handle those connections correctly, making sure that any return
traffic is directed to the communication partner who actually originated
the connection. This means that in order for the redirections to work as
expected from the local network, we need to add special-case redirection
rules that mirror the ones designed to handle requests from the outside.
First, here are the pass rules with redirections for OpenBSD 4.7 and newer:
pass in on $ext_if inet proto tcp to $ext_if port $webports rdr-to $webserver
pass in on $ext_if inet proto tcp to $ext_if port $email rdr-to $mailserver
pass in log on $int_if inet proto tcp from $int_if:network to $ext_if \
port $webports rdr-to $webserver
pass in log on $int_if inet proto tcp from $int_if:network to $ext_if \
port $email rdr-to $mailserver
match out log on $int_if proto tcp from $int_if:network to $webserver \
port $webports nat-to $int_if
pass on $int_if inet proto tcp to $webserver port $webports
match out log on $int_if proto tcp from $int_if:network to $mailserver \
port $email nat-to $int_if
pass on $int_if inet proto tcp to $mailserver port $email
The first two rules are identical to the original ones. The next two
intercept the traffic from the local network, and the rdr-to actions in both
rewrite the destination address, much as the corresponding rules do for the
traffic that originates elsewhere. The pass on $int_if rules serve the same
purpose as in the earlier version.
The match rules with nat-to are there as a routing work-around. Without
them, the webserver and mailserver hosts would route return traffic for the
redirected connections directly back to the hosts in the local network, where
the traffic wouldn’t match any outgoing connection. With the nat-to in
4. See the “Redirection and Reflection” section in the PF User Guide (http://www.openbsd.org/
faq/pf/rdr.html#reflect).

84 Chapter 5
place, the servers consider the gateway as the source of the traffic and will
direct return traffic back the same path it came originally. The gateway
matches the return traffic to the states created by connections from the cli-
ents in the local network and applies the appropriate actions to return the
traffic to the correct clients.
The equivalent rules for pre–OpenBSD 4.7 versions are at first sight a
bit more confusing, but the end result is the same.
rdr on $int_if proto tcp from $localnet to $ext_if port $webports -> $webserver
rdr on $int_if proto tcp from $localnet to $ext_if port $email -> $emailserver
no nat on $int_if proto tcp from $int_if to $localnet
nat on $int_if proto tcp from $localnet to $webserver port $webports -> $int_if
nat on $int_if proto tcp from $localnet to $emailserver port $email -> $int_if
This way, we twist the redirections and the address translation logic to
do what we need, and we don’t need to touch the pass rules at all. (I’ve had
the good fortune to witness via email and IRC the reactions of several net-
work admins at the moment when the truth about this five-line reconfigura-
tion sank in.)
Filtering on Interface Groups
Your network could have several subnets that may never need to interact with
your local network except for some common services, like email, Web, file,
and print. How you handle the traffic from and to such subnets depends
on how your network is designed. One useful approach is to treat each less-
privileged network as a separate local network attached to its own separate
interface on a common filtering gateway and then to give it a rule set that
allows only the desired direct interaction with the neighboring networks
attached to the main gateway.
You can make your PF configuration more manageable and readable by
grouping logically similar interfaces into interface groups and by applying
filtering rules to the groups rather than the individual interfaces. Interface
groups, as implemented via the ifconfig group option, originally appeared in
OpenBSD 3.6 and have been adopted in FreeBSD 7.0 onward.
All configured network interfaces can be configured to belong to one
or more groups. Some interfaces automatically belong to one of the default
groups. For example, all IEEE 802.11 wireless network interfaces belong to
the wlan group, while interfaces associated with the default routes belong
to the egress group. Fortunately, an interface can be a member of several
groups, and you can add interfaces to interface groups via the appropriate
ifconfig command, as in this example:
# ifconfig sis2 group untrusted
For a permanent configuration, the equivalent under OpenBSD would
be in the hostname.sis2 file or the ifconfig_sis2= line in the rc.conf file on
FreeBSD 7.0 or later.

Bigger or Trickier Networks 85
Where it makes sense, you can then treat the interface group much the
same as you would handle a single interface in filtering rules:
pass in on untrusted to any port $webports
pass out on egress to any port $webports
If by now you’re thinking that in most, if not all, the rule-set examples
up to this point, it would be possible to filter on the group egress instead of
the macro $ext_if, you’ve grasped an important point. It could be a useful
exercise to go through any existing rule sets you have and see what using
interface groups can do to help readability even further. Remember that
an interface group can have one or more members.
Note that filtering on interface groups makes it possible to write essen-
tially hardware-independent rule sets. As long as your hostname.if files or
ifconfig_if= lines put the interfaces in the correct groups, rule sets that con-
sistently filter on interface groups will be fully portable between machines
that may or may not have identical hardware configurations.
On systems where the interface group feature isn’t available, you may be
able to achieve some of the same effects via creative use of macros, as follows:
untrusted = "{ ath0 ath1 wi0 ep0 }"
egress = "sk0"
The Power of Tags
In some networks, the decision of where a packet should be allowed to pass
can’t be made to map easily to criteria like subnet and service. The fine-
grained control the site’s policy demands could make the rule set compli-
cated and potentially hard to maintain.
Fortunately, PF offers yet another mechanism for classification and
filtering in the form of packet tagging. The useful way to implement packet
tagging is to tag incoming packets that match a specific pass rule and then
let the packets pass elsewhere based on which identifiers the packet is tagged
with. In OpenBSD 4.6 and later, it’s even possible to have separate match
rules that tag according to the match criteria, leaving decisions on passing,
redirecting, or taking other actions to rules later in the rule set.
One example could be the wireless access points we set up in Chapter 4,
which we could reasonably expect to inject traffic into the local network
with an apparent source address equal to the access point’s $ext_if address.
In that scenario, a useful addition to the rule set of a gateway with several of
these access points might be the following (assuming, of course, that defini-
tions of the wifi_allowed and wifi_ports macros fit the site’s requirements):
wifi = "{ 10.0.0.115, 10.0.0.125, 10.0.0.135, 10.0.0.145 }"
pass in on $int_if from $wifi to $wifi_allowed port $wifi_ports tag wifigood
pass out on $ext_if tagged wifigood

86 Chapter 5
As the complexity of the rule set grows, consider using tag in incoming
match and pass rules to make your rule set readable and easier to maintain.
Tags are sticky, and once a packet has been tagged by a matching rule,
the tag stays, which means that a packet can have a tag even if it wasn’t
applied by the last matching rule. However, a packet can have only one tag
at any time. If a packet matches several rules that apply tags, the tag will be
overwritten with a new one by each new matching tag rule.
For example, you could set several tags on incoming traffic via a set of
match or pass rules, supplemented by a set of pass rules that determine where
packets pass out based on the tags set on the incoming traffic.
The Bridging Firewall
An Ethernet bridge consists of two or more interfaces that are configured
to forward Ethernet frames transparently and that aren’t directly visible to
the upper layers, such as the TCP/IP stack. In a filtering context, the bridge
configuration is often considered attractive because it means that the filter-
ing can be performed on a machine that doesn’t have its own IP addresses.
If the machine in question runs OpenBSD or a similarly capable operating
system, it can still filter and redirect traffic.
The main advantage of such a setup is that attacking the firewall itself
is more difficult.5 The disadvantage is that all admin tasks must be per-
formed at the firewall’s console, unless you configure a network interface
that’s reachable via a secured network of some kind or even a serial console.
It also follows that bridges with no IP address configured can’t be set as the
gateway for a network and can’t run any services on the bridged interfaces.
Rather, you can think of a bridge as an intelligent bulge on the network
cable, which can filter and redirect.
A few general caveats apply to using firewalls implemented as bridges:
• The interfaces are placed in promiscuous mode, which means that they’ll
receive (and to some extent process) every packet on the network.
• Bridges operate on the Ethernet level and, by default, forward all types
of packets, not just TCP/IP.
• The lack of IP addresses on the interfaces makes some of the more
effective redundancy features, such as CARP, unavailable.
The method for configuring bridges differs among operating systems
in some details. The following examples are very basic and don’t cover all
possible wrinkles, but they should be enough to get you started.
5. How much security this actually adds is a matter of occasional heated debate on mailing
lists such as openbsd-misc and other networking-oriented lists. Reading up on the pros and
cons as perceived by core OpenBSD developers can be entertaining as well as enlightening.

Bigger or Trickier Networks 87
Basic Bridge Setup on OpenBSD
The OpenBSD GENERIC kernel contains all the necessary code to con-
figure bridges and filter on them. Unless you’ve compiled a custom kernel
without the bridge code, the setup is quite straightforward.
NOTE On OpenBSD 4.7 and newer, the brconfig command no longer exists. All bridge con-
figuration and related functionality was merged into ifconfig for the OpenBSD 4.7
release. If you’re running on an OpenBSD release where brconfig is available, you’re
running an out-of-date, unsupported configuration. Please upgrade to a more recent
version as soon as feasible.
To set up a bridge with two interfaces on the command line, you first
create the bridge device. The first device of a kind is conventionally given
the sequence number 0, so we create the bridge0 device with the following
command:
$ sudo ifconfig bridge0 create
Before the next ifconfig command, use ifconfig to check that the pro-
spective member interfaces (in our case, ep0 and ep1) are up, but not assigned
IP addresses. Next, configure the bridge by entering the following:
$ sudo ifconfig bridge0 add ep0 add ep1 blocknonip ep0 blocknonip ep1 up
The OpenBSD ifconfig command contains a fair bit of filtering code
itself. In this example, we use the blocknonip option for each interface to
block all non-IP traffic.
NOTE The OpenBSD ifconfig command offers its own set of filtering options in addition to
other configuration options. The bridge(4) and ifconfig(8) man pages provide fur-
ther information. Because it operates on the Ethernet level, it’s possible to use ifconfig
to specify filtering rules that let the bridge filter on MAC addresses. Using these filter-
ing capabilities, it’s also possible to let the bridge tag packets for further processing
in your PF rule set via the tagged keyword. For tagging purposes, a bridge with one
member interface will do.
To make the configuration permanent, create or edit /etc/hostname.ep0
and enter the following line:
up
For the other interface, /etc/hostname.ep1 should contain the same line:
up

88 Chapter 5
Finally, enter the bridge setup in /etc/hostname.bridge0:
add ep0 add ep1 blocknonip ep0 blocknonip ep1 up
Your bridge should now be up, and you can go on to create the PF fil-
ter rules.
Basic Bridge Setup on FreeBSD
For FreeBSD, the procedure is a little more involved than on OpenBSD.
In order to be able to use bridging, your running kernel must include the
if_bridge module. The default kernel configurations build this module, so
under ordinary circumstances, you can go directly to creating the interface.
To compile the bridge device into the kernel, add the following line in the
kernel configuration file:
device if_bridge
You can also load the device at boot time by putting the following line
in the /etc/loader.conf file.
if_bridge_load="YES"
Create the bridge by entering this:
$ sudo ifconfig bridge0 create
Creating the bridge0 interface also creates a set of bridge-related sysctl
values:
$ sudo sysctl net.link.bridge
net.link.bridge.ipfw: 0
net.link.bridge.pfil_member: 1
net.link.bridge.pfil_bridge: 1
net.link.bridge.ipfw_arp: 0
net.link.bridge.pfil_onlyip: 1
It’s worth checking that these sysctl values are available. If they are, it’s
confirmation that the bridge has been enabled. If they’re not, go back and
see what went wrong and why.
NOTE These values apply to filtering on the bridge interface itself. You don’t need to touch
them because IP-level filtering on the member interfaces (the ends of the pipe) is
enabled by default.
Before the next ifconfig command, check that the prospective member
interfaces (in our case, ep0 and ep1) are up but haven’t been assigned IP
addresses. Then configure the bridge by entering this:
$ sudo ifconfig bridge0 addm ep0 addm ep1 up

Bigger or Trickier Networks 89
To make the configuration permanent, add the following lines to /etc/
rc.conf:
ifconfig_ep0="up"
ifconfig_ep1="up"
cloned_interfaces="bridge0"
ifconfig_bridge0="addm ep0 addm ep1 up"
This means your bridge is up and you can go on to create the PF filter
rules. See the if_bridge(4) man page for further FreeBSD-specific bridge
information.
Basic Bridge Setup on NetBSD
On NetBSD, the default kernel configuration doesn’t have the filtering
bridge support compiled in. You need to compile a custom kernel with the
following option added to the kernel configuration file. Once you have the
new kernel with the bridge code in place, the setup is straightforward.
options BRIDGE_IPF # bridge uses IP/IPv6 pfil hooks too
To create a bridge with two interfaces on the command line, first create
the bridge0 device:
$ sudo ifconfig bridge0 create
Before the next brconfig command, use ifconfig to check that the pro-
spective member interfaces (in our case, ep0 and ep1) are up but haven’t
been assigned IP addresses. Then, configure the bridge by entering this:
$ sudo brconfig bridge0 add ep0 add ep1 up
Next, enable the filtering on the bridge0 device:
$ sudo brconfig bridge0 ipf
To make the configuration permanent, create or edit /etc/ifconfig.ep0
and enter the following line:
up
For the other interface, /etc/ifconfig.ep1 should contain the same line:
up
Finally, enter the bridge setup in /etc/ifconfig.bridge0 :
create
!add ep0 add ep1 up
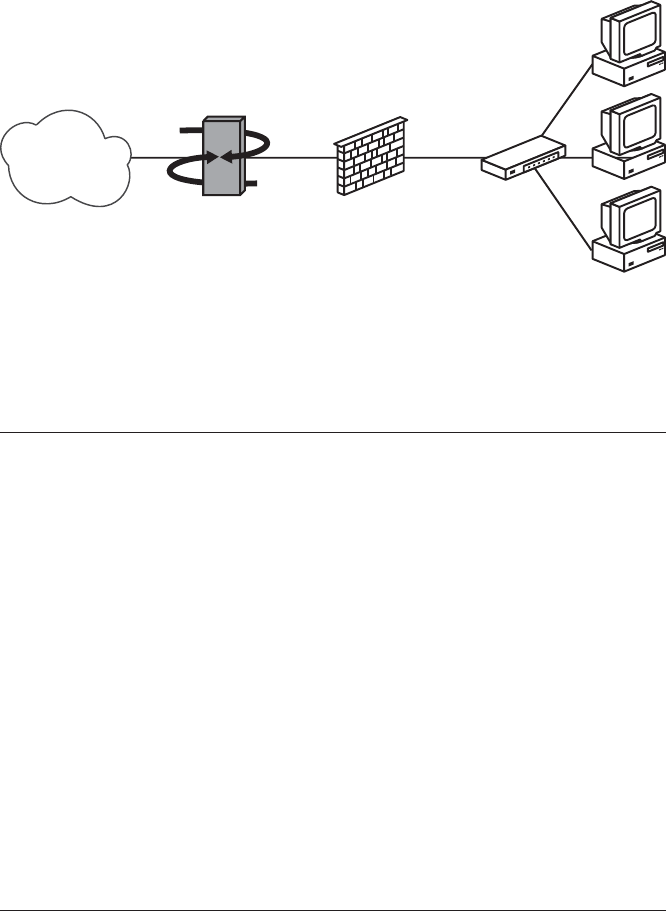
90 Chapter 5
Your bridge should now be up, and you can go on to create the PF filter
rules. For further information, see the PF on NetBSD documentation at
http://www.netbsd.org/Documentation/network/pf.html.
The Bridge Rule Set
Figure 5-3 shows the pf.conf file for a bulge-in-the-wire version of the base-
line rule set we started in this chapter. As you can see, the network changes
slightly.
The Internet
Switch
Clients
Our bridge,
the PF firewall
$int_if$ext_if
The clients’
default gateway
Figure 5-3: A network with a bridge firewall
The machines in the local network share a common default gateway,
which isn’t the bridge but could be placed either inside or outside the bridge.
ext_if = ep0
int_if = ep1
localnet= "192.0.2.0/24"
webserver = "192.0.2.227"
webports = "{ http, https }"
emailserver = "192.0.2.225"
email = "{ smtp, pop3, imap, imap3, imaps, pop3s }"
nameservers = "{ 192.0.2.221, 192.0.2.223 }"
client_out = "{ ssh, domain, pop3, auth, nntp, http, https, \
446, cvspserver, 2628, 5999, 8000, 8080 }"
udp_services = "{ domain, ntp }"
icmp_types = "{ echoreq, unreach }"
set skip on $int_if
block all
pass quick on $ext_if inet proto { tcp, udp } from $localnet \
to port $udp_services
pass log on $ext_if inet proto icmp all icmp-type $icmp_types
pass on $ext_if inet proto tcp from $localnet to port $client_out
pass on $ext_if inet proto { tcp, udp } to $nameservers port domain
pass on $ext_if proto tcp to $webserver port $webports
pass log on $ext_if proto tcp to $emailserver port $email
pass log on $ext_if proto tcp from $emailserver to port smtp

Bigger or Trickier Networks 91
Significantly more complicated setups are possible. But remember that
while redirections will work, you won’t be able to run services on any of the
interfaces without IP addresses.
Handling Nonroutable IPv4 Addresses from Elsewhere
Even with a properly configured gateway to handle filtering and potentially
NAT for your own network, you may find yourself in the unenviable posi-
tion of needing to compensate for other people’s misconfigurations.
Establishing Global Rules
One depressingly common class of misconfigurations is the kind that lets
traffic with nonroutable addresses out to the Internet. Traffic from non-
routable IPv4 addresses plays a part in several denial-of-service (DoS) attack
techniques, so it’s worth considering explicitly blocking traffic from non-
routable addresses from entering your network. One possible solution is
outlined here. For good measure, it also blocks any attempt to initiate con-
tact to nonroutable addresses through the gateway’s external interface.
martians = "{ 127.0.0.0/8, 192.168.0.0/16, 172.16.0.0/12, \
10.0.0.0/8, 169.254.0.0/16, 192.0.2.0/24, \
0.0.0.0/8, 240.0.0.0/4 }"
block in quick on $ext_if from $martians to any
block out quick on $ext_if from any to $martians
Here, the martians macro denotes the RFC 1918 addresses and a few
other ranges mandated by various RFCs not to be in circulation on the
open Internet. Traffic to and from such addresses is quietly dropped on the
gateway’s external interface.
NOTE The martians macro could easily be implemented as a table instead, with all of the
table advantages as an added bonus for your rule set. In fact, if you view the loaded
rules in a rule set that contains this combination of macro and rules, you’ll see that
macro expansion and rule-set optimization most likely replaced your list with one
table per rule. However, if you roll your own table, you’ll get to pick a nicer name for
it yourself.
The specific details of how to implement this kind of protection will
vary according to your network configuration and may be part of a wider set
of network security measures. Your network design might also dictate that
you include or exclude address ranges other than these.
Restructuring Your Rule Set with Anchors
We’ve mentioned anchors a few times already, in the context of applications
such as FTP-proxy or relayd that use anchors to interact with a running PF
configuration. Anchors are named sub–rule sets where it’s possible to insert
or remove rules as needed without reloading the whole rule set.

92 Chapter 5
Once you have a rule set where an otherwise unused anchor is defined,
you can even manipulate anchor contents from the command line using
pfctl’s -a switch, like this:
echo "block drop all" | pfctl -a baddies -f -
Here, a rule is inserted into the existing anchor baddies, overwriting any
previous content.
You can even load rules from a separate file into an anchor:
pfctl -a baddies -f /etc/anchor-baddies
Or you can list the current contents of an anchor:
pfctl -a baddies -s rules
NOTE There are a few more pfctl options that you’ll find useful for handling anchors. See
the pfctl man page for inspiration.
You can also split your configuration by putting the contents of anchors
into separate files to be loaded at rule-set load time. That way it becomes
possible to edit the rules in the anchors separately, reload the edited anchor,
and, of course, do any other manipulation like the ones described above. To
do this, first add a line like this to pf.conf:
anchor ssh-good load anchor ssh-good from "/etc/anchor-ssh-good"
This references the file /etc/anchor-ssh-good, which could look like this:
table <sshbuddies> file "/etc/sshbuddies"
pass inet proto tcp from <sshbuddies> to any port ssh
Perhaps simply to make it possible to delegate the responsibility for the
table sshbuddies to a junior admin, the anchor loads the table from the file
/etc/sshbuddies, which could look like this:
192.168.103.84
10.11.12.13
This way, you can manipulate the contents of the anchor in the follow-
ing ways: Add rules by editing the file and reloading the anchor, replace the
rules by feeding other rules from the command line via standard input (as
shown in the earlier example), or change the behavior of the rules inside
the anchor by manipulating the contents of the table they reference.
NOTE For more extensive anchors, like the ones discussed in the following paragraphs, it’s
probably more useful to use include clauses in your pf.conf if you want to maintain
the anchors as separate files.

Bigger or Trickier Networks 93
The concept hinted at previously (specifying a set of common criteria
that apply to all actions within an anchor) is appealing in situations where
your configuration is large enough to need a few extra structuring aids.
For example, “on interface” could be a useful common criterion for traffic
arriving on a specific interface because that traffic tends to have certain
similarities. For example, look at the following:
anchor "dmz" on $dmz_if {
pass in proto { tcp udp } to $nameservers port domain
pass in proto tcp to $webservers port { www https }
pass in proto tcp to $mailserver port smtp
pass in log (all, to pflog1) in proto tcp from $mailserver \
to any port smtp
}
A separate anchor ext would serve the egress interface group:
anchor ext on egress {
match out proto tcp to port { www https } set queue (qweb, qpri) set prio (5,6)
match out proto { tcp udp } to port domain set queue (qdns, qpri) set prio (6,7)
match out proto icmp set queue (q_dns, q_pri) set prio (7,6)
pass in log proto tcp to port smtp rdr-to 127.0.0.1 port spamd queue spamd
pass in log proto tcp from <nospamd> to port smtp
pass in log proto tcp from <spamd-white> to port smtp
pass out log proto tcp to port smtp
pass log (all) proto { tcp, udp } to port ssh keep state (max-src-conn 15, \
max-src-conn-rate 7/3, overload <bruteforce> flush global)
}
Another obvious logical optimization if you group rules in anchors
based on interface affinity is to lump in tags to help policy-routing deci-
sions. A simple but effective example could look like this:
anchor "dmz" on $dmz_if {
pass in proto { tcp udp } to $nameservers port domain tag GOOD
pass in proto tcp to $webservers port { www https } tag GOOD
pass in proto tcp to $mailserver port smtp tag GOOD
pass in log (all, to pflog1) in proto tcp from $mailserver
to any port smtp tag GOOD
block log quick ! tagged GOOD
}
Even if the anchor examples here have all included a blocking decision
inside the anchor, the decision to block or pass based on tag information
doesn’t have to happen inside the anchor.
After this whirlwind tour of anchors as a structuring tool, it may be
tempting to try to convert your entire rule set to an anchors-based struc-
ture. If you try to do so, you’ll probably find ways to make the internal logic
clearer. But don’t be surprised if certain rules need to be global, outside of
94 Chapter 5
anchors tied to common criteria. And you’ll almost certainly find that what
turns out to be useful in your environment is at least a little different from
what inspired the scenarios I’ve presented here.
How Complicated Is Your Network?—Revisited
Early on in this chapter, we posed the questions “How complicated is your
network?” and “How complicated does it need to be?” Over the subsections
of this chapter, we’ve presented a number of tools and techniques that make
it possible to build complex infrastructure with PF and related tools and that
help manage that complexity while keeping the network administrator sane.
If you’re in charge of one site where you need to apply all or most of the
techniques we’ve mentioned in this chapter, I feel your pain. On the other
hand, if you’re in charge of a network that diverse, the subsequent chapters
on traffic shaping and managing resource availability are likely to be useful
to you as well.
The rest of this book deals mainly with optimizing your setup for per-
formance and resource availability, with the exception of one chapter where
we deviate slightly and take on a lighter tone. Before we dive into how to
optimize performance and ensure high availability, it’s time to take a look
at how to make your infrastructure unavailable or hard to reach for selected
groups or individuals. The next chapter deals exclusively with making life
harder for the unwashed masses—or perhaps even well-organized crimi-
nals—who try to abuse services in your care.

6
TURNING THE TABLES FOR
PROACTIVE DEFENSE
In the previous chapter, you saw how you
might need to spend considerable time and
energy making sure that the services you
want to offer will be available even when you
have strict packet filtering in place. Now, with your
working setup in place, you’ll soon notice that some
services tend to attract a little more unwanted atten-
tion than others.
Here’s the scenario: You have a network with packet filtering to match
your site’s needs, including some services that need to be accessible to users
from elsewhere. Unfortunately, when services are available, there’s a risk
that someone will want to exploit them for some sort of mischief.
You’ll almost certainly have remote login via SSH (Secure Shell), as
well as SMTP email running on your network—both are tempting targets.
In this chapter, we’ll look at ways to make it harder to gain unauthorized
access via SSH, and then we’ll turn to some of the more effective ways to
deny spammers use of your servers.

96 Chapter 6
Turning Away the Brutes
The Secure Shell service, commonly referred to as SSH, is a fairly crucial
service for Unix administrators. It’s frequently the main interface to the
machine and a favorite target of script kiddie attacks.
SSH Brute-Force Attacks
If you run an SSH login service that’s accessible from the Internet, you’ve
probably seen entries like this in your authentication logs:
Sep 26 03:12:34 skapet sshd[25771]: Failed password for root from 200.72.41.31 port 40992 ssh2
Sep 26 03:12:34 skapet sshd[5279]: Failed password for root from 200.72.41.31 port 40992 ssh2
Sep 26 03:12:35 skapet sshd[5279]: Received disconnect from 200.72.41.31: 11: Bye Bye
Sep 26 03:12:44 skapet sshd[29635]: Invalid user admin from 200.72.41.31
Sep 26 03:12:44 skapet sshd[24703]: input_userauth_request: invalid user admin
Sep 26 03:12:44 skapet sshd[24703]: Failed password for invalid user admin from 200.72.41.31
port 41484 ssh2
Sep 26 03:12:44 skapet sshd[29635]: Failed password for invalid user admin from 200.72.41.31
port 41484 ssh2
Sep 26 03:12:45 skapet sshd[24703]: Connection closed by 200.72.41.31
Sep 26 03:13:10 skapet sshd[11459]: Failed password for root from 200.72.41.31 port 43344 ssh2
Sep 26 03:13:10 skapet sshd[7635]: Failed password for root from 200.72.41.31 port 43344 ssh2
Sep 26 03:13:10 skapet sshd[11459]: Received disconnect from 200.72.41.31: 11: Bye Bye
Sep 26 03:13:15 skapet sshd[31357]: Invalid user admin from 200.72.41.31
Sep 26 03:13:15 skapet sshd[10543]: input_userauth_request: invalid user admin
Sep 26 03:13:15 skapet sshd[10543]: Failed password for invalid user admin from 200.72.41.31
port 43811 ssh2
Sep 26 03:13:15 skapet sshd[31357]: Failed password for invalid user admin from 200.72.41.31
port 43811 ssh2
Sep 26 03:13:15 skapet sshd[10543]: Received disconnect from 200.72.41.31: 11: Bye Bye
Sep 26 03:13:25 skapet sshd[6526]: Connection closed by 200.72.41.31
This is what a brute-force attack looks like. Someone or something is try-
ing by brute force to find a username and password combination that lets
them get into your system.
The simplest response would be to write a pf.conf rule that blocks all
access, but that leads to another class of problems, including how to let
people with legitimate business on your system access it. Setting up your
sshd to accept only key-based authentication would help but most likely
would not stop the kiddies from trying. You might consider moving the ser-
vice to another port, but then again, the ones flooding you on port 22 would
probably be able to scan their way to port 22222 for a repeat performance.1
Since OpenBSD 3.7 (and equivalents), PF has offered a slightly more
elegant solution.
1. At the time this chapter was first written, this was purely theoretical; I hadn’t yet had
any credible reports that this was happening. That changed during 2012 when reliable
sources started reporting the appearance of brute-force sequences at odd ports. See
http://bsdly.blogspot.com/2013/02/theres-no-protection-in-high-ports.html for more.

Turning the Tables for Proactive Defense 97
Setting Up an Adaptive Firewall
To thwart brute-force attacks, you can write your pass rules so they maintain
certain limits on what connecting hosts can do. For good measure, you can
banish violators to a table of addresses to which you deny some or all access.
You can even choose to drop all existing connections from machines that
overreach your limits. To enable this feature, first set up the table by adding
the following line to your configuration before any filtering rules:
table <bruteforce> persist
Then, early in your rule set, block brute forcers, as shown here:
block quick from <bruteforce>
Finally, add your pass rule:
pass proto tcp to $localnet port $tcp_services \
keep state (max-src-conn 100, max-src-conn-rate 15/5, \
overload <bruteforce> flush global)
This rule is very similar to what you’ve seen in earlier examples. The
interesting part in this context is the contents of the parentheses, called
state-tracking options:
• max-src-conn is the number of simultaneous connections allowed from
one host. In this example, it’s set to 100. You may want a slightly higher
or lower value, depending on your network’s traffic patterns.
• max-src-conn-rate is the rate of new connections allowed from any single
host. Here, it’s set to 15 connections per 5 seconds, denoted as 15/5.
Choose a rate that suits your setup.
• overload <bruteforce> means that the address of any host that exceeds
the preceding limits is added to the table bruteforce. Our rule set blocks
all traffic from addresses in the bruteforce table. Once a host exceeds
any of these limits and is put in the overload table, the rule no longer
matches traffic from that host. Make sure that overloaders are handled,
if only by a default block rule or similar.
• flush global says that when a host reaches the limit, all states for its con-
nections are terminated (flushed). The global option means that for
good measure, flush applies to all states created by traffic from that
host, no matter which rule created a state.
As you can imagine, the effect of this tiny addition to the rule set
is dramatic. After a few tries, brute forcers end up in the bruteforce table.
That means that all their existing connections are terminated (flushed)
and any new attempts will be blocked, most likely with Fatal: timeout before
authentication messages at their end. You have created an adaptive firewall
that adjusts automatically to conditions in your network and acts on unde-
sirable activity.

98 Chapter 6
NOTE These adaptive rules are effective only for protection against the traditional, rapid-fire
type of brute-force attempts. The low-intensity, distributed password-guessing attempts
that were first identified as such in 2008 and have been recurring ever since (known
among other names as The Hail Mary Cloud2) don’t produce traffic that will match
these rules.
It’s likely that you will want some flexibility in your rule set and want to
allow a larger number of connections for some services, but you also might
like to be a little more tight-fisted when it comes to SSH. In that case, you
could supplement the general-purpose pass rule with something like the
following one early in your rule set:
pass quick proto { tcp, udp } to port ssh \
keep state (max-src-conn 15, max-src-conn-rate 5/3, \
overload <bruteforce> flush global)
You should be able to find the set of parameters that’s just right for
your situation by reading the relevant man pages and the PF User Guide (see
Appendix A).
NOTE Remember that these sample rules are intended as illustrations and your network’s
needs may be better served by different rules. Setting the number of simultaneous
connections or the rate of connections too low may block legitimate traffic. There’s a
potential risk of self-inflicted denial of service when the configuration includes many
hosts behind a common NATing gateway and the users on the NATed hosts have
legitimate business on the other side of a gateway with strict overload rules.
The state-tracking options and the overload mechanism don’t need to
apply exclusively to the SSH service, and blocking all traffic from offenders
isn’t always desired. You could, for example, use a rule like this:
pass proto { tcp, udp } to port $mail_services \
keep state (max 1500, max-src-conn 100)
Here, max specifies the maximum number of states that can be created
for each rule with no overload to protect a mail or Web service from receiv-
ing more connections than it can handle (keep in mind that the number of
rules loaded depends on what the $mail_services macro expands to). Once
the max limit is reached, new connections will not match this rule until the
old ones terminate. Alternatively, you could remove the max restriction, add
an overload part to the rule, and assign offenders to a queue with a minimal
bandwidth allocation (see the discussion of traffic shaping in Chapter 7 for
details on setting up queues).
2. For an overview of the Hail Mary Cloud sequence of brute-force attempts, see the article
“The Hail Mary Cloud and the Lessons Learned” at http://bsdly.blogspot.com/2013/10/the-hail-
mary-cloud-and-lessons-learned.html. More resources are referenced there and in Appendix A.

Turning the Tables for Proactive Defense 99
Some sites use overload to implement a multitiered system, where hosts
that trip one overload rule are transferred to one or more intermediate
“probation” tables for special treatment. It can be useful in Web contexts
not to block traffic from hosts in the overload tables outright but rather to
redirect all HTTP requests from these hosts to specific Web pages (as in
the authpf example near the end of Chapter 4).
Tidying Your Tables with pfctl
With the overload rules from the previous section in place, you now have an
adaptive firewall that automatically detects undesirable behavior and adds
offenders’ IP addresses to tables. Watching the logs and the tables can be fun
in the short run, but because those rules only add to the tables, we run into
the next challenge: keeping the content of the tables up-to-date and relevant.
When you’ve run a configuration with an adaptive rule set for a while,
at some point, you’ll discover that an IP address one of your overload
rules blocked last week due to a brute-force attack was actually a dynami-
cally assigned address, which is now assigned to a different ISP customer
with a legitimate reason to communicate with hosts in your network.3 If
your adaptive rules catch a lot of traffic on a busy network, you may also
find that the overload tables will grow over time to take up an increasing
amount of memory.
The solution is to expire table entries—to remove entries after a certain
amount of time. In OpenBSD 4.1, pfctl acquired the ability to expire table
entries based on the time since their statistics were last reset.4 (In almost
all instances, this reset time is equal to the time since the table entry was
added.) The keyword is expire, and the table entry’s age is specified in sec-
onds. Here’s an example:
$ sudo pfctl -t bruteforce -T expire 86400
This command will remove bruteforce table entries that had their statis-
tics reset more than 86,400 seconds (24 hours) ago.
NOTE The choice of 24 hours as the expiry time is a fairly arbitrary one. You should choose
a value that you feel is a reasonable amount of time for any problem at the other end
to be noticed and fixed. If you have adaptive rules in place, it’s a good idea to set up
crontab entries to run table expiry at regular intervals with a command much like the
preceding one to make sure your tables are kept up-to-date.
3. From a longer-term perspective, it’s fairly normal for entire networks and larger ranges of
IP addresses to be reassigned to new owners in response to events in the physical, business-
oriented world.
4. Before pfctl acquired the ability to expire table entries, table expiry was more likely than
not handled by the special-purpose utility expiretable. If your pfctl doesn’t have the expire
option, you should seriously consider upgrading to a newer system. If upgrading is for some
reason not practical, look for expiretable in your package system.

100 Chapter 6
Giving Spammers a Hard Time with spamd
Email is a fairly essential service that needs special attention due to the
large volume of unwanted messages, or spam. The volume of unsolicited
commercial messages was already a painful problem when malware mak-
ers discovered that email-borne worms would work and started using email
to spread their payload. During the early 2000s, the combined volume of
spam and email-borne malware had increased to the point where running
an SMTP mail service without some sort of spam countermeasures had
become almost unthinkable.
Spam-fighting measures are almost as old as the spam problem itself.
The early efforts focused on analysis of the messages’ contents (known
as content filtering) and to some extent on interpretation of the messages’
rather trivially forgeable headers, such as the purported sender address
(From:) or the store and forward paths of intermediate deliveries recorded
in the Received: headers.
When the OpenBSD team designed its spam-fighting solution spamd,
first introduced with OpenBSD 3.3 in 2003, the developers instead focused
on the network level and the immediate communication partner in the
SMTP conversations along with any available information about hosts that
tried to deliver messages. The developers set out to create a small, simple,
and secure program. The early implementation was based almost entirely
on creative use of PF tables combined with data from trusted external sources.
NOTE In addition to the OpenBSD spam-deferral daemon, the content-filtering-based
antispam package SpamAssassin (http://spamassassin.apache.org/) features a
program called spamd. Both programs are designed to help fight spam, but they take
very different approaches to the underlying problem and don’t interoperate directly.
However, when both programs are correctly configured and running, they comple-
ment each other well.
Network-Level Behavior Analysis and Blacklisting
The original spamd design is based on the observation that spammers send a
lot of mail and the incredibly small likelihood of you being the first person
to receive a particular message. In addition, spam is sent via a few spammer-
friendly networks and numerous hijacked machines. Both the individual
messages and the machines that send them will be reported to blacklist
maintainers quickly, and the blacklist data consisting of known spam
senders’ IP addresses forms the basis for spamd’s processing.
When dealing with blacklisted hosts, spamd employs a method called
tarpitting. When the daemon receives an SMTP connection, it presents its
banner and immediately switches to a mode where it answers SMTP traffic
at the rate of 1 byte per second, using a tiny selection of SMTP commands
designed to make sure that mail is never delivered but rather rejected back
into the sender’s queue once the message headers have been transferred.
The intention is to waste as much time as possible on the sending end

Turning the Tables for Proactive Defense 101
while costing the receiver pretty much nothing. This specific tarpitting
implementation with 1-byte SMTP replies is often referred to as stuttering.
Blacklist-based tarpitting with stuttering was the default mode for spamd up
to and including OpenBSD 4.0.
NOTE On FreeBSD and NetBSD, spamd is not part of the base system but is available
through ports and packages as mail/spamd. If you’re running PF on FreeBSD or
NetBSD, you need to install the port or package before following the instructions
over the next few pages.
Setting Up spamd in Blacklisting Mode
To set up spamd to run in traditional, blacklisting-only mode, you first put a
special-purpose table and a matching redirection in pf.conf and then turn
your attention to spamd’s own spamd.conf. spamd then hooks into the PF rule
set via the table and the redirection.
The following are the pf.conf lines for this configuration:
table <spamd> persist
pass in on $ext_if inet proto tcp from <spamd> to \
{ $ext_if, $localnet } port smtp rdr-to 127.0.0.1 port 8025
And here is the pre–OpenBSD 4.7 syntax:
table <spamd> persist
rdr pass on $ext_if inet proto tcp from <spamd> to \
{ $ext_if, $localnet } port smtp -> 127.0.0.1 port 8025
The table, <spamd>, is there to store the IP addresses you import from
trusted blacklist sources. The redirection takes care of all SMTP attempts
from hosts that are already in the blacklist. spamd listens on port 8025 and
responds s-l-o-w-l-y (1 byte per second) to all SMTP connections it receives
as a result of the redirection. Later on in the rule set, you would have a rule
that makes sure legitimate SMTP traffic passes to the mail server.
spamd.conf is where you specify the sources of your blacklist data and
any exceptions or local overrides you want.
NOTE On OpenBSD 4.0 and earlier (and by extension, ports based on versions prior to
OpenBSD 4.1), spamd.conf was in /etc. Beginning with OpenBSD 4.1, spamd.
conf is found in /etc/mail instead. The FreeBSD port installs a sample configura-
tion in /usr/local/etc/spamd/spamd.conf.sample.
Near the beginning of spamd.conf, you’ll notice a line without a # com-
ment sign that looks like all:\. This line specifies the blacklists you’ll use.
Here is an example:
all:\
:uatraps:whitelist:

102 Chapter 6
Add all blacklists that you want to use below the all:\ line, separating
each with a colon (:). To use whitelists to subtract addresses from your black-
list, add the name of the whitelist immediately after the name of each
blacklist, as in :blacklist:whitelist:
Next is the blacklist definition:
uatraps:\
:black:\
:msg="SPAM. Your address %A has sent spam within the last 24 hours":\
:method=http:\
:file=www.openbsd.org/spamd/traplist.gz
Following the name (uatraps), the first data field specifies the list type—
in this case, black. The msg field contains the message to be displayed to
blacklisted senders during the SMTP dialogue. The method field specifies
how spamd-setup fetches the list data—in this case, via HTTP. Other pos-
sibilities include fetching via FTP (ftp), from a file in a mounted filesystem
(file), or via execution of an external program (exec). Finally, the file field
specifies the name of the file spamd expects to receive.
The definition of a whitelist follows much the same pattern but omits
the message parameter:
whitelist:\
:white:\
:method=file:\
:file=/etc/mail/whitelist.txt
NOTE The suggested blacklists in the current default spamd.conf are actively maintained
and have rarely, if ever, contained false positives. However, earlier versions of that
file also suggested lists that excluded large blocks of the Internet, including several
address ranges that claim to cover entire countries. If your site expects to exchange
legitimate mail with any of the countries in question, those lists may not be optimal
for your setup. Other popular lists have been known to list entire /16 ranges as spam
sources, and it’s well worth reviewing the details of the list’s maintenance policy before
putting a blacklist into production.
Put the lines for spamd and the startup parameters you want in your /etc/
rc.conf.local on OpenBSD or in /etc/rc.conf on FreeBSD or NetBSD. Here’s
an example:
spamd_flags="-v -b" # for normal use: "" and see spamd-setup(8)
Here, we enable spamd and set it to run in blacklisting mode with the
-b flag. In addition, the -v flag enables verbose logging, which is useful for
keeping track of spamd’s activity for debugging purposes.

Turning the Tables for Proactive Defense 103
On FreeBSD, the /etc/rc.conf settings that control spamd’s behavior are
obspamd_enable, which should be set to "YES" in order to enable spamd, and
obspamd_flags, where you fill in any command-line options for spamd:
obspamd_enable="YES"
obspamd_flags="-v -b" # for normal use: "" and see spamd-setup(8)
NOTE To have spamd run in pure blacklist mode on OpenBSD 4.1 or newer, you can achieve
the same effect by setting the spamd_black variable to "YES" and then restarting spamd.
Once you’ve finished editing the setup, start spamd with the options you
want and complete the configuration with spamd-setup. Finally, create a cron
job that calls spamd-setup to update the blacklist at reasonable intervals. In
pure blacklist mode, you can view and manipulate the table contents using
pfctl table commands.
spamd Logging
By default, spamd logs to your general system logs. To send the spamd log mes-
sages to a separate log file, add an entry like this to syslog.conf :
!!spamd
daemon.err;daemon.warn;daemon.info;daemon.debug /var/log/spamd
Once you’re satisfied that spamd is running and doing what it’s supposed
to do, you’ll probably want to add the spamd log file to your log rotations,
too. After you’ve run spamd-setup and the tables are filled, you can view the
table contents using pfctl.
NOTE In the sample pf.conf fragment at the beginning of this section, the redirection
(rdr-to) rule is also a pass rule. If you opted for a match rule instead (or if you’re
using an older PF version and chose to write a rdr rule that doesn’t include a pass
part), be sure to set up a pass rule to let traffic through to your redirection. You may
also need to set up rules to let legitimate email through. However, if you’re already
running an email service on your network, you can probably go on using your old
SMTP pass rules.
Given a set of reliable and well-maintained blacklists, spamd in pure black-
listing mode does a good job of reducing spam. However, with pure blacklist-
ing, you catch traffic only from hosts that have already tried to deliver spam
elsewhere, and you put your trust in external data sources to determine
which hosts deserve to be tarpitted. For a setup that provides a more imme-
diate response to network-level behavior and offers some real gains in spam
prevention, consider greylisting, which is a crucial part of how the modern
spamd works.

104 Chapter 6
Greylisting: My Admin Told Me Not to Talk to Strangers
Greylisting consists mainly of interpreting the current SMTP standards and
adding a little white lie to make life easier.
Spammers tend to use other people’s equipment to send their mes-
sages, and the software they install without the legal owner’s permission
needs to be relatively lightweight in order to run undetected. Unlike legiti-
mate mail senders, spammers typically don’t consider any individual mes-
sage they send to be important. Taken together, this means that typical
spam and malware sender software aren’t set up to interpret SMTP status
codes correctly. This is a fact that we can use to our advantage, as Evan
Harris proposed in his 2003 paper titled “The Next Step in the Spam
Control War: Greylisting.”
5
As Harris noted, when a compromised machine is used to send spam,
the sender application tends to try delivery only once, without checking for
any results or return codes. Real SMTP implementations interpret SMTP
return codes and act on them, and real mail servers retry if the initial
attempt fails with any kind of temporary error.
In his paper, Harris outlined a practical approach:
• On first SMTP contact from a previously unknown communication
partner, do not receive email on the first delivery attempt, but instead,
respond with a status code that indicates a temporary local problem,
and store the sender IP address for future reference.
• If the sender retries immediately, reply as before with the temporary
failure status code.
• If the sender retries after a set minimum amount of time (1 hour, for
example) but not more than a maximum waiting period (4 hours,
for example), accept the message for delivery and record the sender
IP address in your whitelist.
This is the essence of greylisting. And fortunately, you can set up and
maintain a greylisting spamd on your PF-equipped gateway.
Setting Up spamd in Greylisting Mode
OpenBSD’s spamd acquired its ability to greylist in OpenBSD 3.5. Beginning
with OpenBSD 4.1, spamd runs in greylisting mode by default.
In the default greylisting mode, the spamd table used for blacklisting, as
described in the previous section, becomes superfluous. You can still use black-
lists, but spamd will use a combination of private data structures for blacklist
data and the spamdb database to store greylisting-related data. A typical set
of rules for spamd in default mode looks like this:
table <spamd-white> persist
table <nospamd> persist file "/etc/mail/nospamd"
5. The original Harris paper and a number of other useful articles and resources can be
found at http://www.greylisting.org/.

Turning the Tables for Proactive Defense 105
pass in log on egress proto tcp to port smtp \
rdr-to 127.0.0.1 port spamd
pass in log on egress proto tcp from <nospamd> to port smtp
pass in log on egress proto tcp from <spamd-white> to port smtp
pass out log on egress proto tcp to port smtp
This includes the necessary pass rules to let legitimate email flow to the
intended destinations from your own network. The <spamd-white> table is
the whitelist, maintained by spamd. The hosts in the <spamd-white> table have
passed the greylisting hurdle, and mail from these machines is allowed to
pass to the real mail servers or their content-filtering frontends. In addi-
tion, the nospamd table is there for you to load addresses of hosts that you
don’t want to expose to spamd processing, and the matching pass rule makes
sure SMTP traffic from those hosts passes.
In your network, you may want to tighten those rules to pass SMTP
traffic only to and from hosts that are allowed to send and receive email via
SMTP. We’ll get back to the nospamd table in “Handling Sites That Do Not
Play Well with Greylisting” on page 113.
The following are the equivalent rules in pre–OpenBSD 4.7 syntax:
table <spamd-white> persist
table <nospamd> persist file "/etc/mail/nospamd"
rdr pass in log on egress proto tcp to port smtp \
-> 127.0.0.1 port spamd
pass in log on egress proto tcp from <nospamd> to port smtp
pass in log on egress proto tcp from <spamd-white> to port smtp
pass out log on egress proto tcp to port smtp
On FreeBSD, in order to use spamd in greylisting mode, you need a file
descriptor filesystem (see man 5 fdescfs) mounted at /dev/fd/. To implement
this, add the following line to /etc/fstab and make sure the fdescfs code is in
your kernel, either compiled in or by loading the module via the appropri-
ate kldload command.
fdescfs /dev/fd fdescfs rw 0 0
To begin configuring spamd, place the lines for spamd and the startup
parameters you want in /etc/rc.conf.local. Here’s an example:
spamd_flags="-v -G 2:4:864" # for normal use: "" and see spamd-setup(8)
On FreeBSD, the equivalent line should go in /etc/rc.conf:
obspamd_flags="-v -G 2:4:864" # for normal use: "" and see spamd-setup(8)
You can fine-tune several of the greylisting-related parameters via spamd
command-line parameters trailing the -G option.

106 Chapter 6
WHY GREYLISTING WORKS
A significant amount of design and development effort has been put into mak-
ing essential services, such as SMTP email transmission, fault-tolerant. In practi-
cal terms, this means that the best effort of a service such as SMTP is as close
as you can get to having a perfect record for delivering messages. That’s why
we can rely on greylisting to eventually let us receive email from proper mail
servers.
The current standard for Internet email transmission is defined in RFC
5321.* The following are several excerpts from Section 4.5.4.1, “Sending
Strategy”:
“In a typical system, the program that composes a message
has some method for requesting immediate attention for a new
piece of outgoing mail, while mail that cannot be transmitted
immediately MUST be queued and periodically retried by the
sender. . . .
“The sender MUST delay retrying a particular destina-
tion after one attempt has failed. In general, the retry interval
SHOULD be at least 30 minutes; however, more sophisticated
and variable strategies will be beneficial when the SMTP client
can determine the reason for non-delivery.
“Retries continue until the message is transmitted or the
sender gives up; the give-up time generally needs to be at
least 4–5 days.”
Delivering email is a collaborative, best-effort process, and the RFC clearly
states that if the site you are trying to send mail to reports that it can’t receive
at the moment, it is your duty (a must requirement) to try again later, giving the
receiving server a chance to recover from its problem.
The clever wrinkle to greylisting is that it’s a convenient white lie. When
we claim to have a temporary local problem, that problem is really the equiva-
lent of “My admin told me not to talk to strangers.” Well-behaved senders with
valid messages will call again, but spammers won’t wait around for the chance
to retry, since doing so increases their cost of delivering messages. This is why
greylisting still works, and since it’s based on strict adherence to accepted stan-
dards,† false positives are rare.
* The relevant parts of RFC 5321 are identical to the corresponding parts of RFC 2821, which
is obsolete. Some of us were more than a little disappointed that the IETF didn’t clarify these
chunks of the text, now moving forward on the standards track. My reaction (actually, it’s quite
a rant) is at http://bsdly.blogspot.com/2008/10/ietf-failed-to-account-for-greylisting.html.
† The relevant RFCs are mainly RFC 1123 and RFC 5321, which made obsolete the earlier RFC
2821. Remember that temporary rejection is an SMTP fault-tolerance feature.

Turning the Tables for Proactive Defense 107
The colon-separated list 2:4:864 represents the values passtime, greyexp,
and whiteexp:
• passtime denotes the minimum number of minutes spamd considers a
reasonable time before retry. The default is 25 minutes, but here we’ve
reduced it to 2 minutes.
• greyexp is the number of hours an entry stays in the greylisted state
before it’s removed from the database.
• whiteexp determines the number of hours a whitelisted entry is kept.
The default values for greyexp and whiteexp are 4 hours and 864 hours
(just over 1 month), respectively.
Greylisting in Practice
Users and administrators at sites that implement greylisting tend to agree
that greylisting gets rid of most of their spam, with a significant drop in the
load on any content filtering they have in place for their mail. We’ll start by
looking at what spamd’s greylisting looks like according to log files and then
return with some data.
If you start spamd with the -v command-line option for verbose logging,
your logs will include a few more items of information in addition to IP
addresses. With verbose logging, a typical log excerpt looks like this:
Oct 2 19:53:21 delilah spamd[26905]: 65.210.185.131: connected (1/1), lists: spews1
Oct 2 19:55:04 delilah spamd[26905]: 83.23.213.115: connected (2/1)
Oct 2 19:55:05 delilah spamd[26905]: (GREY) 83.23.213.115: <gilbert@keyholes.net> ->
<wkitp98zpu.fsf@datadok.no>
Oct 2 19:55:05 delilah spamd[26905]: 83.23.213.115: disconnected after 0 seconds.
Oct 2 19:55:05 delilah spamd[26905]: 83.23.213.115: connected (2/1)
Oct 2 19:55:06 delilah spamd[26905]: (GREY) 83.23.213.115: <gilbert@keyholes.net> ->
<wkitp98zpu.fsf@datadok.no>
Oct 2 19:55:06 delilah spamd[26905]: 83.23.213.115: disconnected after 1 seconds.
Oct 2 19:57:07 delilah spamd[26905]: (BLACK) 65.210.185.131: <bounce-3C7E40A4B3@branch15.
summer-bargainz.com> -> <adm@dataped.no>
Oct 2 19:58:50 delilah spamd[26905]: 65.210.185.131: From: Auto lnsurance Savings <noreply@
branch15.summer-bargainz.com>
Oct 2 19:58:50 delilah spamd[26905]: 65.210.185.131: Subject: Start SAVlNG M0NEY on Auto
lnsurance
Oct 2 19:58:50 delilah spamd[26905]: 65.210.185.131: To: adm@dataped.no
Oct 2 20:00:05 delilah spamd[26905]: 65.210.185.131: disconnected after 404 seconds. lists:
spews1
Oct 2 20:03:48 delilah spamd[26905]: 222.240.6.118: connected (1/0)
Oct 2 20:03:48 delilah spamd[26905]: 222.240.6.118: disconnected after 0 seconds.
Oct 2 20:06:51 delilah spamd[26905]: 24.71.110.10: connected (1/1), lists: spews1
Oct 2 20:07:00 delilah spamd[26905]: 221.196.37.249: connected (2/1)
Oct 2 20:07:00 delilah spamd[26905]: 221.196.37.249: disconnected after 0 seconds.
Oct 2 20:07:12 delilah spamd[26905]: 24.71.110.10: disconnected after 21 seconds. lists:
spews1

108 Chapter 6
The first line is the beginning of a connection from a machine in the
spews1 blacklist. The next six lines show the complete records of two connec-
tion attempts from another machine, which each time connects as the second
active connection. This second machine isn’t yet in any blacklist, so it’s grey-
listed. Note the rather curious delivery address (wkitp98zpu.fsf@ datadok.no)
in the message that the greylisted machine tries to deliver. There’s a use-
ful trick that we’ll look at in “Greytrapping” on page 109. The (GREY) and
(BLACK) before the addresses indicate greylisting or blacklisting status. Then
there’s more activity from the blacklisted host, and a little later we see that
after 404 seconds (or 6 minutes and 44 seconds), the blacklisted host gives
up without completing the delivery.
The remaining lines show a few very short connections, including one
from a machine already on a blacklist. This time, though, the machine dis-
connects too quickly to see any (BLACK) flag at the beginning of the SMTP
dialogue, but we see a reference to the list name (spews1) at the end.
Roughly 400 seconds is about the amount of time that naive blacklisted
spammers hang around (according to data from various sites) and about
the time it takes (at the rate of 1 byte per second) to complete the EHLO ...
dialogue until spamd rejects the message. However, while peeking at the logs,
you’re likely to find some spammers that hang around significantly longer.
For example, in the data from our office gateway, one log entry stood out:
Dec 11 23:57:24 delilah spamd[32048]: 69.6.40.26: connected (1/1), lists:
spamhaus spews1 spews2
Dec 12 00:30:08 delilah spamd[32048]: 69.6.40.26: disconnected after 1964
seconds. lists: spamhaus spews1 spews2
This particular machine was already on several blacklists when it made
13 attempts at delivery from December 9 through December 12. The last
attempt lasted 32 minutes and 44 seconds, without completing the delivery.
Relatively intelligent spam senders drop the connection during the first few
seconds, like the ones in the first log fragment. Others give up after around
400 seconds. A few hang on for hours. (The most extreme case we’ve recorded
hung on for 42,673 seconds, which is almost 12 hours.)
Tracking Your Real Mail Connections: spamlogd
Behind the scenes, rarely mentioned and barely documented, is one of
spamd’s most important helper programs: the spamlogd whitelist updater. As
the name suggests, spamlogd works quietly in the background, logging con-
nections to and from your mail servers to keep your whitelist updated. The
idea is to make sure that valid mail sent between hosts you communicate
with regularly goes through with a minimum of fuss.
NOTE If you’ve followed the discussion up to this point, spamlogd has probably been started
automatically already. However, if your initial spamd configuration didn’t include
greylisting, spamlogd may not have been started, and you may experience strange symp-
toms, like the greylist and whitelist not being updated properly. Restarting spamd after
you’ve enabled greylisting should ensure that spamlogd is loaded and available, too.

Turning the Tables for Proactive Defense 109
In order to perform its job properly, spamlogd needs you to log SMTP
connections to and from your mail servers, just as we did in the sample rule
sets in Chapter 5:
emailserver = "192.0.2.225"
pass log proto tcp to $emailserver port $email
pass log proto tcp from $emailserver to port smtp
On OpenBSD 4.1 and higher (and equivalents), you can create several
pflog interfaces and specify where rules should be logged. Here’s how to
separate the data spamlogd needs to read from the rest of your PF logs:
1. Create a separate pflog1 interface using ifconfig pflog1 create, or create
a hostname.pflog1 file with just the line up.
2. Change the rules to the following:
pass log (to pflog1) proto tcp to $emailserver port $email
pass log (to pflog1) proto tcp from $emailserver to port smtp
3. Add -l pflog1 to spamlogd’s startup parameters.
This separates the spamd-related logging from the rest. (See Chapter 9
for more about logging.)
With the preceding rules in place, spamlogd will add the IP addresses that
receive email you send to the whitelist. This isn’t an ironclad guarantee that
the reply will pass immediately, but in most configurations, it helps speed
things significantly.
Greytrapping
We know that spam senders rarely use a fully compliant SMTP implementa-
tion to send their messages, which is why greylisting works. We also know
that spammers rarely check that the addresses they feed to their hijacked
machines are actually deliverable. Combine these facts, and you see that if
a greylisted machine tries to send a message to an invalid address in your
domain, there’s a good chance that the message is spam or malware.
This realization led to the next evolutionary step in spamd development—
a technique dubbed greytrapping. When a greylisted host tries to deliver
mail to a known bad address in our domains, the host is added to a locally
maintained blacklist called spamd-greytrap. Members of the spamd-greytrap list
are treated to the same 1-byte-per-second tarpitting as members of other
blacklists.
Greytrapping as implemented in spamd is simple and elegant. The main
thing you need as a starting point is spamd running in greylisting mode.
The other crucial component is a list of addresses in domains your servers
handle email for, but only ones that you’re sure will never receive legiti-
mate email. The number of addresses in your list is unimportant, but there
must be at least one, and the upper limit is mainly defined by how many
addresses you wish to add.

110 Chapter 6
Next, you use spamdb to feed your list to the greytrapping feature and sit
back to watch. First, a sender tries to send email to an address on your grey-
trap list and is simply greylisted, as with any sender you haven’t exchanged
email with before. If the same machine tries again, either to the same, invalid
address or another address on your greytrapping list, the greytrap is trig-
gered, and the offender is put into spamd-greytrap for 24 hours. For the next
24 hours, any SMTP traffic from the greytrapped host will be stuttered,
with 1-byte-at-a-time replies.
That 24-hour period is short enough not to cause serious disruption
of legitimate traffic because real SMTP implementations will keep trying
to deliver for at least a few days. Experience from large-scale implementa-
tions of the technique shows that it rarely produces false positives. Machines
that continue spamming after 24 hours will make it back to the tarpit soon
enough.
To set up your traplist, use spamdb’s -T option. In my case, the strange
address6 I mentioned earlier in “Greylisting in Practice” on page 107 was
a natural candidate for inclusion:
$ sudo spamdb -T -a wkitp98zpu.fsf@datadok.no
The command I actually entered was $ sudo spamdb -T -a "<wkitp98zpu
.fsf@datadok.no>". In OpenBSD 4.1 and newer, spamdb doesn’t require the
angle brackets or quotes, but it will accept them.
Add as many addresses as you like. I tend to find new additions for my
local list of spamtrap addresses by looking in the greylist and mail server
logs for failed attempts to deliver delivery failure reports to nonexistent
addresses in my domains (yes, it really is as crazy as it sounds).
WARNING Make sure that the addresses you add to your spamtrap lists are invalid and will stay
invalid. There’s nothing quite like the embarrassment of discovering that you made a
valid address into a spamtrap, however temporarily.
The following log fragment shows how a spam-sending machine is grey-
listed at first contact and then comes back and clumsily tries to deliver
messages to the curious address I added to my traplist, only to end up in
the spamd-greytrap blacklist after a few minutes. We know what it will be doing
for the next 20-odd hours.
Nov 6 09:50:25 delilah spamd[23576]: 210.214.12.57: connected (1/0)
Nov 6 09:50:32 delilah spamd[23576]: 210.214.12.57: connected (2/0)
Nov 6 09:50:40 delilah spamd[23576]: (GREY) 210.214.12.57: <gilbert@keyholes.net> ->
<wkitp98zpu.fsf@datadok.no>
Nov 6 09:50:40 delilah spamd[23576]: 210.214.12.57: disconnected after 15 seconds.
Nov 6 09:50:42 delilah spamd[23576]: 210.214.12.57: connected (2/0)
6. Of course, this address is totally bogus. It looks like the kind of message ID the GNUS
email and news client generates, and it was probably lifted from a news spool or some unfor-
tunate malware victim’s mailbox.

Turning the Tables for Proactive Defense 111
Nov 6 09:50:45 delilah spamd[23576]: (GREY) 210.214.12.57: <bounce-3C7E40A4B3@branch15.summer-
bargainz.com> -> <adm@dataped.no>
Nov 6 09:50:45 delilah spamd[23576]: 210.214.12.57: disconnected after 13 seconds.
Nov 6 09:50:50 delilah spamd[23576]: 210.214.12.57: connected (2/0)
Nov 6 09:51:00 delilah spamd[23576]: (GREY) 210.214.12.57: <gilbert@keyholes.net> ->
<wkitp98zpu.fsf@datadok.no>
Nov 6 09:51:00 delilah spamd[23576]: 210.214.12.57: disconnected after 18 seconds.
Nov 6 09:51:02 delilah spamd[23576]: 210.214.12.57: connected (2/0)
Nov 6 09:51:02 delilah spamd[23576]: 210.214.12.57: disconnected after 12 seconds.
Nov 6 09:51:02 delilah spamd[23576]: 210.214.12.57: connected (2/0)
Nov 6 09:51:18 delilah spamd[23576]: (GREY) 210.214.12.57: <gilbert@keyholes.net> ->
<wkitp98zpu.fsf@datadok.no>
Nov 6 09:51:18 delilah spamd[23576]: 210.214.12.57: disconnected after 16 seconds.
Nov 6 09:51:18 delilah spamd[23576]: (GREY) 210.214.12.57: <bounce-3C7E40A4B3@branch15.summer-
bargainz.com> -> <adm@dataped.no>
Nov 6 09:51:18 delilah spamd[23576]: 210.214.12.57: disconnected after 16 seconds.
Nov 6 09:51:20 delilah spamd[23576]: 210.214.12.57: connected (1/1), lists: spamd-greytrap
Nov 6 09:51:23 delilah spamd[23576]: 210.214.12.57: connected (2/2), lists: spamd-greytrap
Nov 6 09:55:33 delilah spamd[23576]: (BLACK) 210.214.12.57: <gilbert@keyholes.net> ->
<wkitp98zpu.fsf@datadok.no>
Nov 6 09:55:34 delilah spamd[23576]: (BLACK) 210.214.12.57: <bounce-3C7E40A4B3@branch15.
summer-bargainz.com> -> <adm@dataped.no>
As a side note, it looks like even though the spammer moved to send
from a different machine, both the From: and To: addresses stayed the same.
The fact that he’s still trying to send to an address that’s never been deliver-
able is a strong indicator that this spammer doesn’t check his lists frequently.
Managing Lists with spamdb
There may be times when you need to view or change the contents of black-
lists, whitelists, and greylists. These records are located in the /var/db/spamdb
database, and an administrator’s main interface to managing those lists is
spamdb.
Early versions of spamdb simply offered options to add whitelist entries to
the database or update existing ones (spamdb -a nn.mm.nn.mm). You could delete
whitelist entries (spamdb -d nn.mm.nn.mm) to compensate for shortcomings in
either the blacklists used or the effects of the greylisting algorithms. Recent
versions of spamdb offer some interesting features to support greytrapping.
Updating Lists
If you run spamdb without any parameters, it lists the contents of your spamdb
database, and it lets you add or delete both spamtrap addresses and traplist
entries. You can also add whitelist entries on the fly.
If you want to add a host to your whitelist without adding it to your per-
manent nospamd file and reloading your rule set or the table, you could do it
from the command line instead, like this:
$ sudo spamdb -a 213.187.179.198

112 Chapter 6
If a spam sender managed to get a message delivered despite your best
efforts, you could correct the situation by adding the spam sender to the
spamd-greytrap list like this:
$ sudo spamdb -a -t 192.168.2.128
Adding a new trap address is just as simple:
$ sudo spamdb -a -T _-medvetsky@ehtrib.org
If you want to reverse either of these decisions, you would simply substi-
tute -d for the -a option in both these commands.
Keeping spamd Greylists in Sync
Beginning with OpenBSD 4.1, spamd can keep greylisting databases in sync
across any number of cooperating greylisting gateways. The implementa-
tion is via a set of spamd command-line options:
• The -Y option specifies a sync target—that is, the IP address(es) of other
spamd-running gateways you want to inform of updates to your greylist-
ing information.
• On the receiving end, the -y option specifies a sync listener, which is the
address or interface where this spamd instance is prepared to receive
greylisting updates from other hosts.
For example, our main spamd gateway mainoffice-gw.example.com might
have the following options added to its startup command line to establish
a sync target and sync listener, respectively:
-Y minorbranch-gw.example.com -y mainoffice-gw.example.com
Conversely, minorbranch-gw.example.com at the branch office would have
the hostnames reversed:
-Y mainoffice-gw.example.com -y minorbranch-gw.example.com
The spamd daemon also supports shared-secret authentication between
the synchronization partners. Specifically, if you create the file /etc/mail/
spamd.key and distribute copies of it to all synchronization partners, it’ll be
used to calculate the necessary checksums for authentication. The spamd.key
file itself can be any kind of data, such as random data harvested from
/dev/arandom, as suggested by the spamd man page.

Turning the Tables for Proactive Defense 113
NOTE In situations where direct synchronization of spamd-related data isn’t practical or if
you simply want to share your spamd-greytrap with others, exporting the contents of
your list of locally trapped spam senders to a text file may be desirable. The list format
spamd-setup expects is one address per line, optionally with comment lines starting
with one or more # characters. Exporting your list of currently trapped addresses in a
usable format can be as simple as putting together a one-liner with spamdb, grep, and
a little imagination.
Detecting Out-of-Order MX Use
OpenBSD 4.1 gave spamd the ability to detect out-of-order MX use. Contacting
a secondary mail exchanger first instead of trying the main one is a fairly
well-known spammer trick and one that runs contrary to the behavior we
expect from ordinary email transfer agents. In other words, if someone
tries the email exchangers in the wrong order, we can be pretty sure that
they’re trying to deliver spam.
For our example.com domain with main mail server 192.0.2.225 and
backup 192.0.2.224, adding -M 192.0.2.224 to spamd’s startup options would
mean that any host that tries to contact 192.0.2.224 via SMTP before con-
tacting the main mail server at 192.0.2.225 will be added to the local spamd-
greytrap list for the next 24 hours.
Handling Sites That Do Not Play Well with Greylisting
Unfortunately, there are situations where you’ll need to compensate for the
peculiarities of other sites’ email setups.
The first email message sent from any site that hasn’t contacted you for
as long as the greylister keeps its data around will be delayed for some ran-
dom amount of time, which depends mainly on the sender’s retry interval.
There are times when even a minimal delay is undesirable. If, for example,
you have some infrequent customers who demand your immediate and
urgent attention to their business when they do contact you, an initial deliv-
ery delay of what could be up to several hours may not be optimal. In addi-
tion, you are bound to encounter misconfigured mail servers that either
don’t retry at all or retry too quickly, perhaps stopping delivery retries after
just one attempt.
Also, some sites are large enough to have several outgoing SMTP serv-
ers, and they don’t play well with greylisting because they’re not guaranteed
to retry delivery of any given message from the same IP address used with
the prior delivery attempt. Even though those sites comply with the retry
requirements, it’s obvious that this is one of the few remaining downsides
of greylisting.
114 Chapter 6
One way to compensate for such situations is to define a table for a local
whitelist to be fed from a file in case of reboots. To make sure SMTP traffic
from the addresses in the table is not fed to spamd, add a pass rule to allow
the traffic to pass:
table <nospamd> persist file "/etc/mail/nospamd"
pass in log on egress proto tcp from <nospamd> to port smtp
In pre–OpenBSD 4.7 syntax, add a no rdr rule at the top of your redi-
rection block and a matching pass rule to let SMTP traffic from the hosts in
your nospamd table through, as shown here:
no rdr proto tcp from <nospamd> to $mailservers port smtp
pass in log on egress proto tcp from <nospamd> to port smtp
Once you’ve made these changes to your rule set, enter the addresses
you need to protect from redirection into the /etc/mail/nospamd file. Then
reload your rule set using pfctl -f /etc/pf.conf. You can then use all the
expected table tricks on the <nospamd> table, including replacing its content
after editing the nospamd file. In fact, this approach is strongly hinted at in
both man pages and sample configuration files distributed with recent ver-
sions of spamd.
At least some sites with many outgoing SMTP servers publish information
about which hosts are allowed to send email for their domain via Sender
Policy Framework (SPF) records as part of the domain’s DNS information.7
To retrieve the SPF records for our example.com domain, use the host com-
mand’s -ttxt option as follows:
$ host -ttxt example.com
This command would produce an answer roughly like the following:
example.com descriptive text "v=spf1 ip4:192.0.2.128/25 -all"
Here, the text in quotes is the example.com domain’s SPF record. If you
want email from example.com to arrive quickly and you trust the people
there not to send or relay spam, choose the address range from the SPF
record, add it to your nospamd file, and reload the <nospamd> table contents
from the updated file.
7. SPF records are stored in DNS zones as TXT records. See http://www.openspf.org/ for details.
Turning the Tables for Proactive Defense 115
Spam-Fighting Tips
When used selectively, blacklists combined with spamd are powerful, precise,
and efficient spam-fighting tools. The load on the spamd machine is minimal.
On the other hand, spamd will never perform better than its weakest data
source, which means you’ll need to monitor your logs and use whitelisting
when necessary.
It’s also feasible to run spamd in a pure greylisting mode, with no black-
lists. In fact, some users report that a purely greylisting spamd configuration
is about as effective a spam-fighting tool as configurations with blacklists
and sometimes significantly more effective than content filtering. One such
report posted to openbsd-misc claimed that a pure greylisting configuration
immediately rid the company of approximately 95 percent of its spam load.
(This report is accessible via http://marc.info/, among other places; search
for the subject “Followup – spamd greylisting results.”)
I recommend two very good blacklists. One is Bob Beck’s traplist based
on “ghosts of usenet postings past.” Generated automatically by computers
running spamd at the University of Alberta, Bob’s setup is a regular spamd
system that removes trapped addresses automatically after 24 hours, which
means that you get an extremely low number of false positives. The number
of hosts varies widely and has been as high as 670,000. While still officially
in testing, the list was made public in January 2006. The list is available
from http://www.openbsd.org/spamd/traplist.gz. It’s part of recent sample
spamd.conf files as the uatraps blacklist.
The other list I recommend is heise.de’s nixspam, which has a 12-hour
automatic expiry and extremely good accuracy. It’s also in the sample
spamd.conf file. Detailed information about this list is available from http://
www.heise.de/ix/nixspam/dnsbl_en/.
Once you’re happy with your setup, try introducing local greytrapping.
This is likely to catch a few more undesirables, and it’s good, clean fun.
Some limited experiments—carried out while writing this chapter (chron-
icled at http://bsdly.blogspot.com/ in entries starting with http://bsdly.blogspot
.com/2007/07/hey-spammer-heres-list-for-you.html)—even suggest that harvest-
ing the invalid addresses spammers use from your mail server logs, from
spamd logs, or directly from your greylist to put in your traplist is extremely
efficient. Publishing the list on a moderately visible Web page appears to
ensure that the addresses you put there will be recorded over and over
again by address-harvesting robots and will provide you with even better
greytrapping material, as they’re then more likely to be kept on the spam-
mers’ list of known good addresses.

7
TRAFFIC SHAPING WITH QUEUES
AND PRIORITIES
In this chapter, we look at how to use traf-
fic shaping to allocate bandwidth resources
efficiently and according to a specified pol-
icy. If the term traffic shaping seems unfamiliar, rest
assured it means what you think it means: that you’ll
be altering the way your network allocates resources
in order to satisfy the requirements of your users and
their applications. With a proper understanding of your network traffic
and the applications and users that generate it, you can, in fact, go quite a
bit of distance toward “bigger, better, faster, more” just by optimizing your
network for the traffic that’s actually supposed to pass there.
A small but powerful arsenal of traffic-shaping tools is at your disposal;
all of them work by introducing nondefault behavior into your network setup
to bend the realities of your network according to your wishes. Traffic shap-
ing for PF contexts currently comes in two flavors: the once experimental

118 Chapter 7
ALTQ (short for alternate queuing) framework, now considered old-style after
some 15 years of service, and the newer OpenBSD priorities and queuing sys-
tem introduced in OpenBSD 5.5.
In the first part of the chapter, we introduce traffic shaping by look-
ing at the features of the new OpenBSD priority and queuing system. If
you’re about to set up on OpenBSD 5.5 or newer, you can jump right in,
starting with the next section, “Always-On Priority and Queues for Traffic
Shaping.” This is also where the main traffic-shaping concepts are intro-
duced with examples.
On OpenBSD 5.4 and earlier as well as other BSDs where the PF
code wasn’t current with OpenBSD 5.5, traffic shaping was the domain
of the ALTQ system. On OpenBSD, ALTQ was removed after one transi-
tional release, leaving only the newer traffic-shaping system in place from
OpenBSD 5.6 onward. If you’re interested in converting an existing ALTQ
setup to the new system, you’ll most likely find “Transitioning from ALTQ
to Priorities and Queues” on page 131 useful; this section highlights the
differences between the older ALTQ system and the new system.
If you’re working with an operating system where the queues system
introduced in OpenBSD 5.5 isn’t yet available, you’ll want to study the
ALTQ traffic-shaping subsystem, which is described in “Directing Traffic
with ALTQ” on page 133. If you’re learning traffic-shaping concepts and
want to apply them to an ALTQ setup, please read the first part of this
chapter before diving into ALTQ-specific configuration details.
Always-On Priority and Queues for Traffic Shaping
Managing your bandwidth has a lot in common with balancing your check-
book or handling other resources that are either scarce or available in finite
quantities. The resource is available in a constant supply with hard upper
limits, and you need to allocate the resource with maximum efficiency,
according to the priorities set out in your policy or specification.
OpenBSD 5.5 and newer offers several different options for managing
your bandwidth resources via classification mechanisms in our PF rule sets.
We’ll take a look at what you can do with pure traffic prioritization first and
then move on to how to subdivide your bandwidth resources by allocating
defined subsets of your traffic to queues.
NOTE The always-on priorities were introduced as a teaser of sorts in OpenBSD 5.0. After
several years in development and testing, the new queuing system was finally commit-
ted in time to be included in OpenBSD 5.5, which was released on May 1, 2014. If
you’re starting your traffic shaping from scratch on OpenBSD 5.5 or newer or you’re
considering doing so, this section is the right place to start. If you’re upgrading from
an earlier OpenBSD version or transitioning from another ALTQ system to a recent
OpenBSD, you’ll most likely find the following section, “Transitioning from ALTQ to
Priorities and Queues,” useful.

Traffic Shaping with Queues and Priorities 119
Shaping by Setting Traffic Priorities
If you’re mainly interested in pushing certain kinds of traffic ahead of
others, you may be able to achieve what you want by simply setting priori-
ties: assigning a higher priority to some items so that they receive attention
before others.
The prio Priority Scheme
Starting with OpenBSD 5.0, a priority scheme for classifying network traffic
on a per-rule basis is available. The range of priorities is from 0 to 7, where
0 is lowest priority. Items assigned priority 7 will skip ahead of everything
else, and the default value 3 is automatically assigned for most kinds of traf-
fic. The priority scheme, which you’ll most often hear referred to as prio
after the PF syntax keyword, is always enabled, and you can tweak your traf-
fic by setting priorities via your match or pass rules.
For example, to speed up your outgoing SSH traffic to the max, you
could put a rule like this in your configuration:
pass proto tcp to port ssh set prio 7
Then your SSH traffic would be served before anything else.
You could then examine the rest of your rule set and decide what traffic
is more or less important, what you would like always to reach its destina-
tion, and what parts of your traffic you feel matter less.
To push your Web traffic ahead of everything else and bump up the pri-
ority for network time and name services, you could amend your configura-
tion with rules like these:
pass proto tcp to port { www https } set prio 7
pass proto { udp tcp } to port { domain ntp } set prio 6
Or if you have a rule set that already includes rules that match criteria
other than just the port, you could achieve much the same effect by writing
your priority traffic shaping as match rules instead:
match proto tcp to port { www https } set prio 7
match proto { udp tcp } to port { domain ntp } set prio 6
In some networks, time-sensitive traffic, like Voice over Internet Protocol
(VoIP), may need special treatment. For VoIP, a priority setup like this may
improve phone conversation quality:
voip_ports="{ 2027 4569 5036 5060 10000:20000 }"
match proto udp to port $voip_ports set prio 7
But do check your VoIP application’s documentation for information
on what specific ports it uses. In any case, using match rules like these can
have a positive effect on your configuration in other ways, too: You can
use match rules like the ones in the examples here to separate filtering

120 Chapter 7
decisions—such as passing, blocking, or redirecting—from traffic-shaping
decisions, and with that separation in place, you’re likely to end up with a
more readable and maintainable configuration.
It’s also worth noting that parts of the OpenBSD network stack set
default priorities for certain types of traffic that the developers decided was
essential to a functional network. If you don’t set any priorities, anything
with proto carp and a few other management protocols and packet types will
go by priority 6, and all types of traffic that don’t receive a specific classifica-
tion with a set prio rule will have a default priority of 3.
The Two-Priority Speedup Trick
In the examples just shown, we set different priorities for different types of
traffic and managed to get specific types of traffic, such as VoIP and SSH,
to move faster than others. But thanks to the design of TCP, which carries
the bulk of your traffic, even a simple priority-shaping scheme has more to
offer with only minor tweaks to the rule set.
As readers of RFCs and a few practitioners have discovered, the
connection-oriented design of TCP means that for each packet sent, the
sender will expect to receive an acknowledgment (ACK) packet back within
a preset time or matching a defined “window” of sequence numbers. If the
sender doesn’t receive the acknowledgment within the expected limit, she
assumes the packet was lost in transit and arranges to resend the data.
One other important factor to consider is that by default, packets are
handled in the order they arrive. This is known as first in, first out (FIFO), and
it means that the essentially dataless ACK packets will be waiting their turn
in between the larger data packets. On a busy or congested link, which is
exactly where traffic shaping becomes interesting, waiting for ACKs and per-
forming retransmissions can eat measurably into effective bandwidth and
slow down all transfers. In fact, concurrent transfers in both directions
can slow each other significantly more than the value of their expected
data sizes.1
Fortunately, a simple and quite popular solution to this problem is at
hand: You can use priorities to make sure those smaller packets skip ahead.
If you assign two priorities in a match or pass rule, like this:
match out on egress set prio (5, 6)
The first priority will be assigned to the regular traffic, while ACK pack-
ets and other packets with a low delay type of service (ToS) will be assigned
the second priority and will be served faster than the regular packets.
When a packet arrives, PF detects the ACK packets and puts them on
the higher-priority queue. PF also inspects the ToS field on arriving packets.
Packets that have the ToS set to low delay to indicate that the sender wants
1. Daniel Hartmeier, one of the original PF developers, wrote a nice article about this prob-
lem, which is available at http://www.benzedrine.cx/ackpri.html. Daniel’s explanations use the
older ALTQ priority queues syntax but include data that clearly illustrates the effect of assign-
ing two different priorities to help ACKs along.

Traffic Shaping with Queues and Priorities 121
speedier delivery also get the high-priority treatment. When more than one
priority is indicated, as in the preceding rule, PF assigns priority accord-
ingly. Packets with other ToS values are processed in the order they arrive,
but with ACK packets arriving faster, the sender spends less time waiting for
ACKs and resending presumably lost data. The net result is that the avail-
able bandwidth is used more efficiently. (The match rule quoted here is the
first one I wrote in order to get a feel for the new prio feature—on a test sys-
tem, of course—soon after it was committed during the OpenBSD 5.0 devel-
opment cycle. If you put that single match rule on top of an existing rule set,
you’ll probably see that the link can take more traffic and more simultane-
ous connections before noticeable symptoms of congestion turn up.)
See whether you can come up with a way to measure throughout before
and after you introduce the two-priorities trick to your traffic shaping, and
note the difference before you proceed to the more complex traffic-shaping
options.
Introducing Queues for Bandwidth Allocation
We’ve seen that traffic shaping using only priorities can be quite effective,
but there will be times when a priorities-only scheme will fall short of your
goals. One such scenario occurs when you’re faced with requirements that
would be most usefully solved by assigning a higher priority, and perhaps
a larger bandwidth share, to some kinds of traffic, such as email and other
high-value services, and correspondingly less bandwidth to others. Another
such scenario would be when you simply want to apportion your available
bandwidth in different-sized chunks to specific services and perhaps set
hard upper limits for some types of traffic, while at the same time wanting
to ensure that all traffic that you care about gets at least its fair share of
available bandwidth. In cases like these, you leave the pure-priority scheme
behind, at least as the primary tool, and start doing actual traffic shaping
using queues.
Unlike with the priority levels, which are always available and can be
used without further preparations, in any rule, queues represent specific
parts of your available bandwidth and can be used only after you’ve defined
them in terms of available capacity. Queues are a kind of buffer for network
packets. Queues are defined with a specific amount of bandwidth, or as a
specific portion of available bandwidth, and you can allocate portions of
each queue’s bandwidth share to subqueues, or queues within queues,
which share the parent queue’s resources. The packets are held in a queue
until they’re either dropped or sent according to the queue’s criteria and
subject to the queue’s available bandwidth. Queues are attached to specific
interfaces, and bandwidth is managed on a per-interface basis, with avail-
able bandwidth on a given interface subdivided into the queues you define.
The basic syntax for defining a queue follows this pattern:
queue name on interface bandwidth number [ ,K,M,G]
queue name1 parent name bandwidth number[ ,K,M,G] default
queue name2 parent name bandwidth number[ ,K,M,G]
queue name3 parent name bandwidth number[ ,K,M,G]

122 Chapter 7
The letters following the bandwidth number denote the unit of mea-
surement: K denotes kilobits; M megabits; and G gigabits. When you write
only the bandwidth number, it’s interpreted as the number of bits per sec-
ond. It’s possible to tack on other options to this basic syntax, as we’ll see in
later examples.
NOTE Subqueue definitions name their parent queue, and one queue needs to be the default
queue that receives any traffic not specifically assigned to other queues.
Once queue definitions are in place, you integrate traffic shaping into
your rule set by rewriting your pass or match rules to assign traffic to a spe-
cific queue.
WHAT’S YOUR TOTAL USABLE BANDWIDTH?
Once we start working with defined parts of total bandwidth rather than pri-
orities that somehow share the whole, determining the exact value of your
total usable bandwidth becomes interesting. It can be difficult to determine
actual usable bandwidth on a specific interface for queuing. If you don’t
specify a total bandwidth, the total bandwidth available will be used to cal-
culate the allocations, but some types of interfaces cannot reliably report the
actual bandwidth value. One common example of this discrepancy is where
your gateway’s external interface is a 100 megabit (Mb) Ethernet interface,
attached to a DSL line that offers only 8Mb download and 1Mb upload.* The
Ethernet interface will then confidently report 100Mb bandwidth, not the actual
value of the Internet-facing connection.
For this reason, it usually makes sense to set the total bandwidth to a fixed
value. Unfortunately, the value to use may not be exactly what your bandwidth
supplier tells you is available because there will always be some overhead due
to various technologies and implementations. For example, in typical TCP/IP
over wired Ethernet, overhead can be as low as single-digit percentages, but
TCP/IP over ATM has been known to have overhead of almost 20 percent. If
your bandwidth supplier doesn’t provide the overhead information, you’ll need
to make an educated guess at the starting value. In any case, remember that
the total bandwidth available is never greater than the bandwidth of the weak-
est link in your network path.
Queues are supported only for outbound connections relative to the sys-
tem doing the queuing. When planning your bandwidth management, consider
the actual usable bandwidth to be equal to the weakest (lowest bandwidth) link
in the connection’s path, even if your queues are set up on a different interface.
* This really dates the book, I know. In a few years, these numbers will seem quaint.

Traffic Shaping with Queues and Priorities 123
The HFSC Algorithm
Underlying any queue system you define using the queue system in
OpenBSD 5.5 and later is the Hierarchical Fair Service Curve (HFSC) algo-
rithm. HFSC was designed to allocate resources fairly among queues in a
hierarchy. One of its interesting features is that it imposes no limits until
some part of the traffic reaches a volume that’s close to its preset limits.
The algorithm starts shaping just before the traffic reaches a point where
it deprives some other queue of its guaranteed minimum share.
NOTE All sample configurations we present in this book assign traffic to queues in the outgo-
ing direction because you can realistically control only traffic generated locally and,
once limits are reached, any traffic-shaping system will eventually resort to dropping
packets in order to make the endpoint back off. As we saw in the earlier examples, all
well-behaved TCP stacks will respond to lost ACKs with slower packet rates.
Now that you know at least the basics of the theory behind the OpenBSD
queue system, let’s see how queues work.
Splitting Your Bandwidth into Fixed-Size Chunks
You’ll often find that certain traffic should receive a higher priority than
other traffic. For example, you’ll often want important traffic, such as mail
and other vital services, to have a baseline amount of bandwidth available at
all times, while other services, such as peer-to-peer file sharing, shouldn’t be
allowed to consume more than a certain amount. To address these kinds of
issues, queues offer a wider range of options than the pure-priority scheme.
The first queue example builds on the rule sets from earlier chapters.
The scenario is that we have a small local network, and we want to let the
users on the local network connect to a predefined set of services outside
their own network while also letting users from outside the local network
access a Web server and an FTP server somewhere on the local network.
Queue Definition
In the following example, all queues are set up with the root queue, called
main, on the external, Internet-facing interface. This approach makes sense
mainly because bandwidth is more likely to be limited on the external link
than on the local network. In principle, however, allocating queues and
running traffic shaping can be done on any network interface.
This setup includes a queue for a total bandwidth of 20Mb with six
subqueues.
queue main on $ext_if bandwidth 20M
queue defq parent main bandwidth 3600K default
queue ftp parent main bandwidth 2000K
queue udp parent main bandwidth 6000K
queue web parent main bandwidth 4000K

124 Chapter 7
queue ssh parent main bandwidth 4000K
queue ssh_interactive parent ssh bandwidth 800K
queue ssh_bulk parent ssh bandwidth 3200K
queue icmp parent main bandwidth 400K
The subqueue defq, shown in the preceding example, has a bandwidth
allocation of 3600K, or 18 percent of the bandwidth, and is designated as
the default queue. This means any traffic that matches a pass rule but that
isn’t explicitly assigned to some other queue ends up here.
The other queues follow more or less the same pattern, up to subqueue
ssh, which itself has two subqueues (the two indented lines below it). Here,
we see a variation on the trick of using two separate priorities to speed up
ACK packets, and as we’ll see shortly, the rule that assigns traffic to the two
SSH subqueues assigns different priorities. Bulk SSH transfers, typically
SCP file transfers, are transmitted with a ToS indicating throughput, while
interactive SSH traffic has the ToS flag set to low delay and skips ahead
of the bulk transfers. The interactive traffic is likely to be less bandwidth
consuming and gets a smaller share of the bandwidth, but it receives pref-
erential treatment because of the higher-priority value assigned to it. This
scheme also helps the speed of SCP file transfers because the ACK packets
for the SCP transfers will be assigned a higher priority.
Finally, we have the icmp queue, which is reserved for the remaining
400K, or 2 percent, of the bandwidth from the top level. This guarantees a
minimum amount of bandwidth for ICMP traffic that we want to pass but that
doesn’t match the criteria that would have it assigned to the other queues.
Rule Set
To tie the queues into the rule set, we use the pass rules to indicate which
traffic is assigned to the queues and their criteria.
set skip on { lo, $int_if }
pass log quick on $ext_if proto tcp to port ssh \
queue (ssh_bulk, ssh_interactive) set prio (5,7)
pass in quick on $ext_if proto tcp to port ftp queue ftp
pass in quick on $ext_if proto tcp to port www queue http
pass out on $ext_if proto udp queue udp
pass out on $ext_if proto icmp queue icmp
pass out on $ext_if proto tcp from $localnet to port $client_out u
The rules for ssh, ftp, www, udp, and icmp assign traffic to their respective
queues, and we note again that the ssh queue’s subqueues are assigned traf-
fic with two different priorities. The last catchall rule u passes all other out-
going traffic from the local network, lumping it into the default defq queue.
You can always let a block of match rules do the queue assignment instead
in order to make the configuration even more flexible. With match rules in
place, you move the filtering decisions to block, pass, or even redirect to a
set of rules elsewhere.

Traffic Shaping with Queues and Priorities 125
match log quick on $ext_if proto tcp to port ssh \
queue (ssh_bulk, ssh_interactive) set prio (5,7)
match in quick on $ext_if proto tcp to port ftp queue ftp
match in quick on $ext_if proto tcp to port www queue http
match out on $ext_if proto udp queue udp
match out on $ext_if proto icmp queue icmp
Note that with match rules performing the queue assignment, there’s no
need for a final catchall to put the traffic that doesn’t match the other rules
into the default queue. Any traffic that doesn’t match these rules and that’s
allowed to pass will end up in the default queue.
Upper and Lower Bounds with Bursts
Fixed bandwidth allocations are nice, but network admins with traffic-
shaping ambitions tend to look for a little more flexibility once they’ve
gotten their feet wet. Wouldn’t it be nice if there were a regime with flex-
ible bandwidth allocation, offering guaranteed lower and upper bounds
for bandwidth available to each queue and variable allocations over time—
and one that starts shaping only when there’s an actual need to do so?
The good news is that the OpenBSD queues can do just that, courtesy
of the underlying HFSC algorithm discussed earlier. HFSC makes it pos-
sible to set up queuing regimes with guaranteed minimum allocations and
hard upper limits, and you can even have allocations that include burst val-
ues to let available capacity vary over time.
Queue Definition
Working from a typical gateway configuration like the ones we’ve altered
incrementally over the earlier chapters, we insert this queue definition early
in the pf.conf file:
queue rootq on $ext_if bandwidth 20M
queue main parent rootq bandwidth 20479K min 1M max 20479K qlimit 100
queue qdef parent main bandwidth 9600K min 6000K max 18M default
queue qweb parent main bandwidth 9600K min 6000K max 18M
queue qpri parent main bandwidth 700K min 100K max 1200K
queue qdns parent main bandwidth 200K min 12K burst 600K for 3000ms
queue spamd parent rootq bandwidth 1K min 0K max 1K qlimit 300
This definition has some characteristics that are markedly different
from the previous one on page 121. We start with this rather small hierar-
chy by splitting the top-level queue, rootq, into two. Next, we subdivide the
main queue into several subqueues, all of which have a min value set—the
guaranteed minimum bandwidth allocated to the queue. (The max value
would set a hard upper limit on the queue’s allocation.) The bandwidth
parameter also sets the allocation the queue will have available when it’s
backlogged—that is, when it’s started to eat into its qlimit, or queue limit,
allocation.

126 Chapter 7
The queue limit parameter works like this: In case of congestion, each
queue by default has a pool of 50 slots, the queue limit, to keep packets
around when they can’t be transmitted immediately. Here, the top-level
queues, main and spamd, both have larger-than-default pools set by their
qlimit setting: 100 for main and 300 for spamd. Cranking up these qlimit sizes
means we’re a little less likely to drop packets when the traffic approaches
the set limits, but it also means that when the traffic shaping kicks in, we’ll
see increased latency for connections that end up in these larger pools.
Rule Set
The next step is to tie the newly created queues into the rule set. If you have
a filtering regime in place already, the tie-in is simple—just add a few match
rules:
match out on $ext_if proto tcp to port { www https } \
set queue (qweb, qpri) set prio (5,6)
match out on $ext_if proto { tcp udp } to port domain \
set queue (qdns, qpri) set prio (6,7)
match out on $ext_if proto icmp \
set queue (qdns, qpri) set prio (6,7)
Here, the match rules once again do the ACK packet speedup trick with
the high- and low-priority queue assignment, just as we saw earlier in the
pure-priority-based system. The only exception is when we assign traffic
to our lowest-priority queue (with a slight modification to an existing pass
rule), where we really don’t want any speedup.
pass in log on egress proto tcp to port smtp \
rdr-to 127.0.0.1 port spamd set queue spamd set prio 0
Assigning the spamd traffic to a minimal-sized queue with 0 priority
here is intended to slow down the spammers on their way to our spamd.
(See Chapter 6 for more on spamd and related matters.)
With the queue assignment and priority setting in place, it should be
clear that the queue hierarchy here uses two familiar tricks to make effi-
cient use of available bandwidth. First, it uses a variation of the high- and
low-priority mix demonstrated in the earlier pure-priority example. Second,
we speed up almost all other traffic, especially the Web traffic, by allocating
a small but guaranteed portion of bandwidth for name service lookups. For
the qdns queue, we set the burst value with a time limit: After 3000 millisec-
onds, the allocation goes down to a minimum of 12K to fit within the total
200K quota. Short-lived burst values like this can be useful to speed connec-
tions that transfer most of their payload during the early phases.
It may not be immediately obvious from this example, but HFSC requires
that traffic be assigned only to leaf queues, or queues without subqueues. That
means it’s possible to assign traffic to main’s subqueues—qpri, qdef, qweb, and
qdns—as well as rootq’s subqueue—spamd—as we just did with the match and

Traffic Shaping with Queues and Priorities 127
pass rules, but not to rootq or main themselves. With all queue assignments in
place, we can use systat queues to show the queues and their traffic:
6 users Load 0.31 0.28 0.34 Tue May 19 21:31:54 2015
QUEUE BW SCH PR PKTS BYTES DROP_P DROP_B QLEN BORR SUSP P/S B/S
rootq 20M 0 0 0 0 0
main 20M 0 0 0 0 0
qdef 9M 48887 15M 0 0 0
qweb 9M 18553 8135K 0 0 0
qpri 600K 37549 2407K 0 0 0
qdns 200K 15716 1568K 0 0 0
spamd 1K 10590 661K 126 8772 47
The queues are shown indented to indicate their hierarchy, from root to
leaf queues. The main queue and its subqueues—qpri, qdef, qweb, and qdns—
are shown with their bandwidth allocations and number of bytes and packets
passed. The DROP_P and DROP_B columns, which show the number of packets
and bytes dropped, would appear if we had been forced to drop packets at
this stage. QLEN is the number of packets waiting for processing, while the
final two columns show live updates of packets and bytes per second.
For a more detailed view, use pfctl -vvsq to show the queues and their
traffic:
queue rootq on xl0 bandwidth 20M qlimit 50
[ pkts: 0 bytes: 0 dropped pkts: 0 bytes: 0 ]
[ qlength: 0/ 50 ]
[ measured: 0.0 packets/s, 0 b/s ]
queue main parent rootq on xl0 bandwidth 20M, min 1M, max 20M qlimit 100
[ pkts: 0 bytes: 0 dropped pkts: 0 bytes: 0 ]
[ qlength: 0/100 ]
[ measured: 0.0 packets/s, 0 b/s ]
queue qdef parent main on xl0 bandwidth 9M, min 6M, max 18M default qlimit 50
[ pkts: 1051 bytes: 302813 dropped pkts: 0 bytes: 0 ]
[ qlength: 0/ 50 ]
[ measured: 2.6 packets/s, 5.64Kb/s ]
queue qweb parent main on xl0 bandwidth 9M, min 6M, max 18M qlimit 50
[ pkts: 1937 bytes: 1214950 dropped pkts: 0 bytes: 0 ]
[ qlength: 0/ 50 ]
[ measured: 3.6 packets/s, 13.65Kb/s ]
queue qpri parent main on xl0 bandwidth 600K, max 1M qlimit 50
[ pkts: 2169 bytes: 143302 dropped pkts: 0 bytes: 0 ]
[ qlength: 0/ 50 ]
[ measured: 6.6 packets/s, 3.55Kb/s ]
queue qdns parent main on xl0 bandwidth 200K, min 12K burst 600K for 3000ms qlimit 50
[ pkts: 604 bytes: 65091 dropped pkts: 0 bytes: 0 ]
[ qlength: 0/ 50 ]
[ measured: 1.6 packets/s, 1.31Kb/s ]
queue spamd parent rootq on xl0 bandwidth 1K, max 1K qlimit 300
[ pkts: 884 bytes: 57388 dropped pkts: 0 bytes: 0 ]
[ qlength: 176/300 ]
[ measured: 1.9 packets/s, 1Kb/s ]
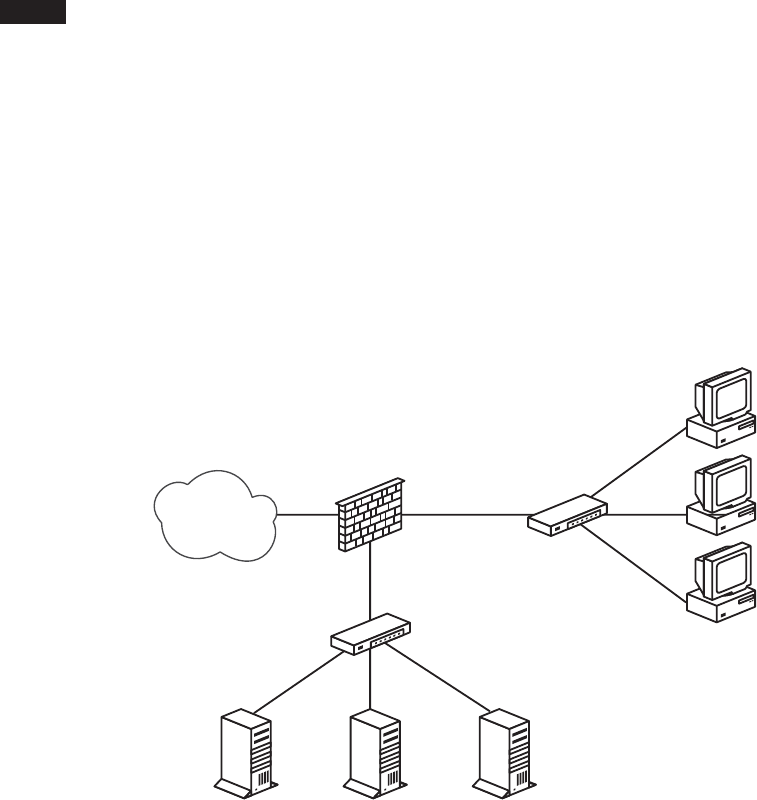
128 Chapter 7
This view shows that the queues receive traffic roughly as expected with
the site’s typical workload. Notice that only a few moments after the rule set
has been reloaded, the spamd queue is already backed up more than halfway
to its qlimit setting, which seems to indicate that the queues are reasonably
dimensioned to actual traffic.
NOTE Pay attention to each queue’s dropped packets (dropped pkts:) counter. If the number
of packets dropped is high or increasing, then that could mean that one of the band-
width allocation parameters needs adjusting or that some other network problem
needs to be investigated.
The DMZ Network, Now with Traffic Shaping
In Chapter 5, we set up a network with a single gateway and all externally
visible services configured on a separate DMZ (demilitarized zone) net-
work so that all traffic to the servers from both the Internet and the internal
network had to pass through the gateway. That network schematic, illus-
trated in Chapter 5, is shown again in Figure 7-1. Using the rule set from
Chapter 5 as the starting point, we’ll add some queuing in order to opti-
mize our network resources. The physical and logical layout of the network
will not change.
The Internet
Switch
Clients
$emailserver
192.0.2.225
2001:db8::baad:f00d:f117
$webserver
192.0.2.227
2001:db8::baad:f00d:f17
$nameserver
192.0.2.221
2001:db8:baad:f00d:fbaa
Our gateway,
the PF firewall
$int_if
192.0.2.0/24
2001:db8::1
$ext_if
Switch
$dmz_if
192.0.2.129/25
2001:db8::baad:f00d:1
Figure 7-1: Network with DMZ
The most likely bottleneck for this network is the bandwidth for the
connection between the gateway’s external interface and the Internet.
Although the bandwidth elsewhere in our setup isn’t infinite, of course,
the available bandwidth on any interface in the local network is likely to be

Traffic Shaping with Queues and Priorities 129
less limiting than the bandwidth actually available for communication with
the outside world. In order to make services available with the best possible
performance, we need to set up the queues so that the bandwidth available
at the site is made available to the traffic we want to allow. The interface
bandwidth on the DMZ interface is likely either 100Mb or 1Gb, while the
actual available bandwidth for connections from outside the local network is
considerably smaller. This consideration shows up in our queue definitions,
where the actual bandwidth available for external traffic is the main limita-
tion in the queue setup.
queue ext on $ext_if bandwidth 2M
queue ext_main parent ext bandwidth 500K default
queue ext_web parent ext bandwidth 500K
queue ext_udp parent ext bandwidth 400K
queue ext_mail parent ext bandwidth 600K
queue dmz on $dmz_if bandwidth 100M
queue ext_dmz parent dmz bandwidth 2M
queue ext_dmz_web parent ext_dmz bandwidth 800K default
queue ext_dmz_udp parent ext_dmz bandwidth 200K
queue ext_dmz_mail parent ext_dmz bandwidth 1M
queue dmz_main parent dmz bandwidth 25M
queue dmz_web parent dmz bandwidth 25M
queue dmz_udp parent dmz bandwidth 20M
queue dmz_mail parent dmz bandwidth 20M
Notice that for each interface, there’s a root queue with a bandwidth
limitation that determines the allocation for all queues attached to that
interface. In order to use the new queuing infrastructure, we need to make
some changes to the filtering rules, too.
NOTE Because any traffic not explicitly assigned to a specific queue is assigned to the default
queue for the interface, be sure to tune your filtering rules as well as your queue defi-
nitions to the actual traffic in your network.
The main part of the filtering rules could end up looking like this after
adding the queues:
pass in on $ext_if proto { tcp, udp } to $nameservers port domain \
set queue ext_udp set prio (6,5)
pass in on $int_if proto { tcp, udp } from $localnet to $nameservers \
port domain
pass out on $dmz_if proto { tcp, udp } to $nameservers port domain \
set queue ext_dmz_udp set prio (6,5)
pass out on $dmz_if proto { tcp, udp } from $localnet to $nameservers \
port domain set queue dmz_udp
pass in on $ext_if proto tcp to $webserver port $webports set queue ext_web
pass in on $int_if proto tcp from $localnet to $webserver port $webports
pass out on $dmz_if proto tcp to $webserver port $webports \
set queue ext_dmz_web
pass out on $dmz_if proto tcp from $localnet to $webserver port $webports \
set queue dmz_web

130 Chapter 7
pass in log on $ext_if proto tcp to $mailserver port smtp
pass in log on $ext_if proto tcp from $localnet to $mailserver port smtp
pass in log on $int_if proto tcp from $localnet to $mailserver port $email
pass out log on $dmz_if proto tcp to $mailserver port smtp set queue ext_mail
pass in on $dmz_if proto tcp from $mailserver to port smtp set queue dmz_mail
pass out log on $ext_if proto tcp from $mailserver to port smtp \
set queue ext_dmz_mail
Notice that only traffic that will pass either the DMZ or the external
interface is assigned to queues. In this configuration, with no externally
accessible services on the internal network, queuing on the internal inter-
face wouldn’t make much sense because that’s likely the part of the network
with the least restricted available bandwidth. Also, as in earlier examples,
there’s a case to be made for separating the queue assignments from the
filtering part of the rule set by making a block of match rules responsible
for queue assignment.
Using Queues to Handle Unwanted Traffic
So far, we’ve focused on queuing as a way to make sure specific kinds of traf-
fic are let through as efficiently as possible. Now, we’ll look at two examples
that present a slightly different way to identify and handle unwanted traffic
using various queuing-related tricks to keep miscreants in line.
Overloading to a Tiny Queue
In “Turning Away the Brutes” on page 94, we used a combination of
state-tracking options and overload rules to fill a table of addresses for spe-
cial treatment. The special treatment we demonstrated in Chapter 6 was
to cut all connections, but it’s equally possible to assign overload traffic to a
specific queue instead. For example, consider the rule from our first queue
example, shown here.
pass log quick on $ext_if proto tcp to port ssh flags S/SA \
keep state queue (ssh_bulk, ssh_interactive) set prio (5,7)
To create a variation of the overload table trick from Chapter 6, add
state-tracking options, like this:
pass log quick on $ext_if proto tcp to port ssh flags S/SA \
keep state (max-src-conn 15, max-src-conn-rate 5/3, \
overload <bruteforce> flush global) queue (ssh_bulk, ssh_interactive) \
set prio (5,7)
Then, make one of the queues slightly smaller:
queue smallpipe parent main bandwidth 512

Traffic Shaping with Queues and Priorities 131
And assign traffic from miscreants to the small-bandwidth queue with
this rule:
pass inet proto tcp from <bruteforce> to port $tcp_services queue smallpipe
As a result, the traffic from the bruteforcers would pass, but with a
hard upper limit of 512 bits per second. (It’s worth noting that tiny band-
width allocations may be hard to enforce on high-speed links due to the
network stack’s timer resolution. If the allocation is small enough relative
to the capacity of the link, packets that exceed the stated per-second maxi-
mum allocation may be transferred anyway, before the bandwidth limit
kicks in.) It might also be useful to supplement rules like these with table-
entry expiry, as described in “Tidying Your Tables with pfctl” on page 97.
Queue Assignments Based on Operating System Fingerprint
Chapter 6 covered several ways to use spamd to cut down on spam. If running
spamd isn’t an option in your environment, you can use a queue and rule set
based on the knowledge that machines that send spam are likely to run a
particular operating system. (Let’s call that operating system Windows.)
PF has a fairly reliable operating system fingerprinting mechanism,
which detects the operating system at the other end of a network connec-
tion based on characteristics of the initial SYN packets at connection setup.
The following may be a simple substitute for spamd if you’ve determined that
legitimate mail is highly unlikely to be delivered from systems that run that
particular operating system.
pass quick proto tcp from any os "Windows" to $ext_if \
port smtp set queue smallpipe
Here, email traffic originating from hosts that run a particular operat-
ing system get no more than 512 bits per second of your bandwidth.
Transitioning from ALTQ to Priorities and Queues
If you already have configurations that use ALTQ for traffic shaping and
you’re planning a switch to OpenBSD 5.5 or newer, this section contains
some pointers for how to manage the transition. The main points are these:
The rules after transition are likely simpler. The OpenBSD 5.5 and newer
traffic-shaping system has done away with the somewhat arcane ALTQ
syntax with its selection of queuing algorithms, and it distinguishes clearly
between queues and pure-priority shuffling. In most cases, your configura-
tion becomes significantly more readable and maintainable after a conver-
sion to the new traffic-shaping system.
For simple configurations, set prio is enough. The simplest queue disci-
pline in ALTQ was priq, or priority queues. The most common simple use

132 Chapter 7
case was the two-priority speedup trick first illustrated by Daniel Hartmeier
in the previously cited article. The basic two-priority configuration looks
like this:
ext_if="kue0"
altq on $ext_if priq bandwidth 100Kb queue { q_pri, q_def }
queue q_pri priority 7
queue q_def priority 1 priq(default)
pass out on $ext_if proto tcp from $ext_if queue (q_def, q_pri)
pass in on $ext_if proto tcp to $ext_if queue (q_def, q_pri)
In OpenBSD 5.5 and newer, the equivalent effect can be achieved with
no queue definitions. Instead, you assign two priorities in a match or pass
rule, like this:
match out on egress set prio (5, 6)
Here, the first priority will be assigned to regular traffic, while ACK and
other packets with a low-delay ToS will be assigned the second priority and
will be served faster than the regular packets. The effect is the same as in
the ALTQ example we just quoted, with the exception of defined band-
width limits and the somewhat dubious effect of traffic shaping on incom-
ing traffic.
Priority queues can for the most part be replaced by set prio constructs. For
pure-priority differentiation, applying set prio on a per pass or match rule
basis is simpler than defining queues and assigning traffic and affects only
the packet priority. ALTQ allowed you to define CBQ or HFSC queues that
also had a priority value as part of their definition. Under the new queuing
system, assigning priority happens only in match or pass rules, but if your
application calls for setting both priority and queue assignment in the same
rule, the new syntax allows for that, too:
pass log quick on $ext_if proto tcp to port ssh \
queue (ssh_bulk, ssh_interactive) set prio (5,7)
The effect is similar to the previous behavior shown in “Splitting Your
Bandwidth into Fixed-Size Chunks” on page 123, and this variant may be
particularly helpful during transition.
Priorities are now always important. Keep in mind that the default is 3.
It’s important to be aware that traffic priorities are always enabled since
OpenBSD 5.0, and they need to be taken into consideration even when
you’re not actively assigning priorities. In old-style configurations that
employed the two-priority trick to speed up ACKs and by extension all
traffic, the only thing that was important was that there were two dif-
ferent priorities in play. The low-delay packets would be assigned to the
higher-priority queue, and the net effect would be that traffic would likely
pass faster, with more efficient bandwidth use than with the default FIFO

Traffic Shaping with Queues and Priorities 133
queue. Now the default priority is 3, and setting the priority for a queue to
0, as a few older examples do, will mean that the traffic assigned that pri-
ority will be considered ready to pass only when there’s no higher-priority
traffic left to handle.
For actual bandwidth shaping, HFSC works behind the scenes. Once you’ve
determined that your specification calls for slicing available bandwidth into
chunks, the underlying algorithm is always HFSC. The variety of syntaxes
for different types of queues is gone. HFSC was chosen for its flexibility
as well as the fact that it starts actively shaping traffic only once the traffic
approaches one of the limits set by your queuing configuration. In addi-
tion, it’s possible to create CBQ-like configurations by limiting the queue
definitions to only bandwidth declarations. “Splitting Your Bandwidth into
Fixed-Size Chunks” on page 123 (mentioned earlier) demonstrates a static
configuration that implements CBQ as a subset of HFSC.
You can transition from ALTQ via the oldqueue mechanism. OpenBSD 5.5
supports legacy ALTQ configurations with only one minor change to con-
figurations: The queue keyword was needed as a reserved word for the new
queuing system, so ALTQ queues need to be declared as oldqueue instead.
Following that one change (a pure search and replace operation that you
can even perform just before starting your operating system upgrade), the
configuration will work as expected.
If your setup is sufficiently complicated, go back to specifications and reimple-
ment. The examples in this chapter are somewhat stylized and rather simple.
If you have running configurations that have been built up incrementally
over several years and have reached a complexity level, orders of magnitude
larger than those described here, the new syntax may present an opportu-
nity to define what your setup is for and produce a specification that is fit to
reimplement in a cleaner and more maintainable configuration.
Going the oldqueue route and tweaking from there will work to some
degree, but it may be easier to make the transition via a clean reimplemen-
tation from revised specification in a test environment where you can test
whether your accumulated assumptions hold up in a the context of the
new traffic-shaping system. Whatever route you choose for your transition,
you’re more or less certain to end up with a more readable and maintain-
able configuration after your switch to OpenBSD 5.5 or newer.
Directing Traffic with ALTQ
ALTQ is the very flexible legacy mechanism for network traffic shaping,
which was integrated into PF on OpenBSD2 in time for the OpenBSD 3.3
release by Henning Brauer, who’s also the main developer of the priori-
ties and queues system introduced in OpenBSD 5.5 (described in the
previous sections of this chapter). OpenBSD 3.3 onward moved all ALTQ
2. The original research on ALTQ was presented in a paper for the USENIX 1999 conference.
You can read Kenjiro Cho’s paper “Managing Traffic with ALTQ” online at http://www.usenix
.org/publications/library/proceedings/usenix99/cho.html. The code turned up in OpenBSD soon
after through the efforts of Cho and Chris Cappucio.

134 Chapter 7
configuration into pf.conf to ease the integration of traffic shaping and fil-
tering. PF ports to other BSDs were quick to adopt at least some optional
ALTQ integration.
NOTE OpenBSD 5.5 introduced a new queue system for traffic shaping with a radically
different (and more readable) syntax that complements the always-on priority system
introduced in OpenBSD 5.0. The new system is intended to replace ALTQ entirely
after one transitional release. The rest of this chapter is useful only if you’re interested
in learning about how to set up or maintain an ALTQ-based system.
Basic ALTQ Concepts
As the name suggests, ALTQ configurations are totally queue-centric. As in
the more recent traffic-shaping system, ALTQ queues are defined in terms
of bandwidth and attached to interfaces. Queues can be assigned priority,
and in some contexts, they can have subqueues that receive a share of the
parent queue’s bandwidth.
The general syntax for ALTQ queues looks like this:
altq on interface type [options ... ] main_queue { sub_q1, sub_q2 ..}
queue sub_q1 [ options ... ]
queue sub_q2 [ options ... ] { subA, subB, ... }
[...]
pass [ ... ] queue sub_q1
pass [ ... ] queue sub_q2
NOTE On OpenBSD 5.5 and newer, ALTQ queues are denoted oldqueue instead of queue
due to an irresolvable syntax conflict with the new queuing subsystem.
Once queue definitions are in place, you integrate traffic shaping into
your rule set by rewriting your pass or match rules to assign traffic to a spe-
cific queue. Any traffic that you don’t explicitly assign to a specific queue
gets lumped in with everything else in the default queue.
Queue Schedulers, aka Queue Disciplines
In the default networking setup, with no queuing, the TCP/IP stack and its
filtering subsystem process the packets according to the FIFO discipline.
ALTQ offers three queue-scheduler algorithms, or disciplines, that can
alter this behavior slightly. The types are priq, cbq, and hfsc. Of these, cbq
and hfsc queues can have several levels of subqueues. The priq queues are
essentially flat, with only one queue level. Each of the disciplines has its own
syntax specifics, and we’ll address those in the following sections.
priq
Priority-based queues are defined purely in terms of priority within the
total declared bandwidth. For priq queues, the allowed priority range is

Traffic Shaping with Queues and Priorities 135
0 through 15, where a higher value earns preferential treatment. Packets
that match the criteria for higher-priority queues are serviced before the
ones matching lower-priority queues.
cbq
Class-based queues are defined as constant-sized bandwidth allocations, as a
percentage of the total available or in units of kilobits, megabits, or giga-
bits per second. A cbq queue can be subdivided into queues that are also
assigned priorities in the range 0 to 7, and again, a higher priority means
preferential treatment.
hfsc
The hfsc discipline uses the HFSC algorithm to ensure a “fair” allocation of
bandwidth among the queues in a hierarchy. HFSC comes with the possibil-
ity of setting up queuing regimes with guaranteed minimum allocations
and hard upper limits. Allocations can even vary over time, and you can
even have fine-grained priority with a 0 to 7 range.
Because both the algorithm and the corresponding setup with ALTQ
are fairly complicated, with a number of tunable parameters, most ALTQ
practitioners tend to stick with the simpler queue types. Yet the ones who
claim to understand HFSC swear by it.
Setting Up ALTQ
Enabling ALTQ may require some extra steps, depending on your choice of
operating system.
ALTQ on OpenBSD
On OpenBSD 5.5, all supported queue disciplines are compiled into the
GENERIC and GENERIC.MP kernels. Check that your OpenBSD version
still supports ALTQ. If so, the only configuration you need to do involves
editing your pf.conf.
ALTQ on FreeBSD
On FreeBSD, make sure that your kernel has ALTQ and the ALTQ queue
discipline options compiled in. The default FreeBSD GENERIC kernel
doesn’t have ALTQ options enabled, as you may have noticed from the mes-
sages you saw when running the /etc/rc.d/pf script to enable PF. The relevant
options are as follows:
options ALTQ
options ALTQ_CBQ # Class Bases Queuing (CBQ)
options ALTQ_RED # Random Early Detection (RED)
options ALTQ_RIO # RED In/Out
options ALTQ_HFSC # Hierarchical Packet Scheduler (HFSC)
options ALTQ_PRIQ # Priority Queuing (PRIQ)
options ALTQ_NOPCC # Required for SMP build

136 Chapter 7
The ALTQ option is needed to enable ALTQ in the kernel, but on SMP
systems, you also need the ALTQ_NOPCC option. Depending on which types of
queues you’ll be using, you’ll need to enable at least one of these: ALTQ_CBQ,
ALTQ_PRIQ, or ALTQ_HFSC. Finally, you can enable the congestion-avoidance
techniques random early detection (RED) and RED In/Out with the ALTQ_RED
and ALTQ_RIO options, respectively. (See the FreeBSD Handbook for informa-
tion on how to compile and install a custom kernel with these options.)
ALTQ on NetBSD
ALTQ was integrated into the NetBSD 4.0 PF implementation and is
supported in NetBSD 4.0 and later releases. NetBSD’s default GENERIC
kernel configuration doesn’t include the ALTQ-related options, but the
GENERIC configuration file comes with all relevant options commented
out for easy inclusion. The main kernel options are these:
options ALTQ # Manipulate network interfaces' output queues
options ALTQ_CBQ # Class-Based queuing
options ALTQ_HFSC # Hierarchical Fair Service Curve
options ALTQ_PRIQ # Priority queuing
options ALTQ_RED # Random Early Detection
The ALTQ option is needed to enable ALTQ in the kernel. Depending on
the types of queues you’ll be using, you must enable at least one of these:
ALTQ_CBQ, ALTQ_PRIQ, or ALTQ_HFSC.
Using ALTQ requires you to compile PF into the kernel because the PF
loadable module doesn’t support ALTQ functionality. (See the NetBSD PF
documentation at http://www.netbsd.org/Documentation/network/pf.html for the
most up-to-date information.)
Priority-Based Queues
The basic concept behind priority-based queues (priq) is fairly straightfor-
ward. Within the total bandwidth allocated to the main queue, only traffic
priority matters. You assign queues a priority value in the range 0 through 15,
where a higher value means that the queue’s requests for traffic are serviced
sooner.
Using ALTQ Priority Queues to Improve Performance
Daniel Hartmeier discovered a simple yet effective way to improve the
throughput for his home network by using ALTQ priority queues. Like
many people, he had his home network on an asymmetric connection,
with total usable bandwidth low enough that he wanted better bandwidth
utilization. In addition, when the line was running at or near capacity, oddi-
ties started appearing. One symptom in particular seemed to suggest room
for improvement: Incoming traffic (downloads, incoming mail, and such)

Traffic Shaping with Queues and Priorities 137
slowed down disproportionately whenever outgoing traffic started—more
than could be explained by measuring the raw amount of data transferred.
It all came back to a basic feature of TCP.
When a TCP packet is sent, the sender expects acknowledgment (in
the form of an ACK packet) from the receiver and will wait a specified
time for it to arrive. If the ACK doesn’t arrive within that time, the sender
assumes that the packet hasn’t been received and resends it. And because
in a default setup, packets are serviced sequentially by the interface as they
arrive, ACK packets, with essentially no data payload, end up waiting in line
while the larger data packets are transferred.
If ACK packets could slip in between the larger data packets, the result
would be more efficient use of available bandwidth. The simplest practical
way to implement such a system with ALTQ is to set up two queues with dif-
ferent priorities and integrate them into the rule set. Here are the relevant
parts of the rule set.
ext_if="kue0"
altq on $ext_if priq bandwidth 100Kb queue { q_pri, q_def }
queue q_pri priority 7
queue q_def priority 1 priq(default)
pass out on $ext_if proto tcp from $ext_if queue (q_def, q_pri)
pass in on $ext_if proto tcp to $ext_if queue (q_def, q_pri)
Here, the priority-based queue is set up on the external interface with
two subordinate queues. The first subqueue, q_pri, has a high-priority value
of 7; the other subqueue, q_def, has a significantly lower-priority value of 1.
This seemingly simple rule set works by exploiting how ALTQ treats
queues with different priorities. Once a connection is set up, ALTQ inspects
each packet’s ToS field. ACK packets have the ToS delay bit set to low, which
indicates that the sender wanted the speediest delivery possible. When ALTQ
sees a low-delay packet and queues of differing priorities are available, it
assigns the packet to the higher-priority queue. This means that the ACK
packets skip ahead of the lower-priority queue and are delivered more
quickly, which in turn means that data packets are serviced more quickly.
The net result is better performance than a pure FIFO configuration with
the same hardware and available bandwidth. (Daniel Hartmeier’s article
about this version of his setup, cited previously, contains a more detailed
analysis.)
Using a match Rule for Queue Assignment
In the previous example, the rule set was constructed the traditional way,
with the queue assignment as part of the pass rules. However, this isn’t the
only way to do queue assignment. When you use match rules (available in
OpenBSD 4.6 and later), it’s incredibly easy to retrofit this simple priority-
queuing regime onto an existing rule set.

138 Chapter 7
If you worked through the examples in Chapters 3 and 4, your rule set
probably has a match rule that applies nat-to on your outgoing traffic. To
introduce priority-based queuing to your rule set, you first add the queue
definitions and make some minor adjustments to your outgoing match rule.
Start with the queue definition from the preceding example and adjust
the total bandwidth to local conditions, as shown in here.
altq on $ext_if priq bandwidth $ext_bw queue { q_pri, q_def }
queue q_pri priority 7
queue q_def priority 1 priq(default)
This gives the queues whatever bandwidth allocation you define with
the ext_bw macro.
The simplest and quickest way to integrate the queues into your rule set
is to edit your outgoing match rule to read something like this:
match out on $ext_if from $int_if:network nat-to ($ext_if) queue (q_def, q_pri)
Reload your rule set, and the priority-queuing regime is applied to all
traffic that’s initiated from your local network.
You can use the systat command to get a live view of how traffic is
assigned to your queues.
$ sudo systat queues
This will give you a live display that looks something like this:
2 users Load 0.39 0.27 0.30 Fri Apr 1 16:33:44 2015
QUEUE BW SCH PR PKTS BYTES DROP_P DROP_B QLEN BORRO SUSPE P/S B/S
q_pri priq 7 21705 1392K 0 0 0 12 803
q_def priq 12138 6759K 0 0 0 9 4620
Looking at the numbers in the PKTS (packets) and BYTES columns, you
see a clear indication that the queuing is working as intended.
The q_pri queue has processed a rather large number of packets in rela-
tion to the amount of data, just as we expected. The ACK packets don’t take
up a lot of space. On the other hand, the traffic assigned to the q_def queue
has more data in each packet, and the numbers show essentially the reverse
packet numbers–to–data size ratio as in to the q_pri queue.
NOTE systat is a rather capable program on all BSDs, and the OpenBSD version offers sev-
eral views that are relevant to PF and that aren’t found in the systat variants on the
other systems as of this writing. We’ll be looking at systat again in the next chapter.
In the meantime, read the man pages and play with the program. It’s a very useful
tool for getting to know your system.

Traffic Shaping with Queues and Priorities 139
Class-Based Bandwidth Allocation for Small Networks
Maximizing network performance generally feels nice. However, you may
find that your network has other needs. For example, it might be important
for some traffic—such as mail and other vital services—to have a baseline
amount of bandwidth available at all times, while other services—peer-to-
peer file sharing comes to mind—shouldn’t be allowed to consume more
than a certain amount. To address these kinds of requirements or concerns,
ALTQ offers the class-based queue (cbq) discipline with a slightly larger set
of options.
To illustrate how to use cbq, we’ll build on the rule sets from previous
chapters within a small local network. We want to let the users on the local
network connect to a predefined set of services outside their own network
and let users from outside the local network access a Web server and an
FTP server somewhere on the local network.
Queue Definition
All queues are set up on the external, Internet-facing interface. This approach
makes sense mainly because bandwidth is more likely to be limited on the
external link than on the local network. In principle, however, allocating
queues and running traffic shaping can be done on any network interface.
The example setup shown here includes a cbq queue for a total bandwidth
of 2Mb with six subqueues.
altq on $ext_if cbq bandwidth 2Mb queue { main, ftp, udp, web, ssh, icmp }
queue main bandwidth 18% cbq(default borrow red)
queue ftp bandwidth 10% cbq(borrow red)
queue udp bandwidth 30% cbq(borrow red)
queue web bandwidth 20% cbq(borrow red)
queue ssh bandwidth 20% cbq(borrow red) { ssh_interactive, ssh_bulk }
queue ssh_interactive priority 7 bandwidth 20%
queue ssh_bulk priority 5 bandwidth 80%
queue icmp bandwidth 2% cbq
The subqueue main has 18 percent of the bandwidth and is designated
as the default queue. This means any traffic that matches a pass rule but
isn’t explicitly assigned to some other queue ends up here. The borrow and
red keywords mean that the queue may “borrow” bandwidth from its parent
queue, while the system attempts to avoid congestion by applying the RED
algorithm.
The other queues follow more or less the same pattern up to the sub-
queue ssh, which itself has two subqueues with separate priorities. Here, we
see a variation on the ACK priority example. Bulk SSH transfers, typically
SCP file transfers, are transmitted with a ToS indicating throughput, while
interactive SSH traffic has the ToS flag set to low delay and skips ahead
of the bulk transfers. The interactive traffic is likely to be less bandwidth
consuming and gets a smaller share of the bandwidth, but it receives

140 Chapter 7
preferential treatment because of the higher-priority value assigned to
it. This scheme also helps the speed of SCP file transfers because the
ACK packets for the SCP transfers will be assigned to the higher-priority
subqueue.
Finally, we have the icmp queue, which is reserved for the remaining
2 percent of the bandwidth from the top level. This guarantees a minimum
amount of bandwidth for ICMP traffic that we want to pass but that doesn’t
match the criteria for being assigned to the other queues.
Rule Set
To make it all happen, we use these pass rules, which indicate which traffic
is assigned to the queues and their criteria:
set skip on { lo, $int_if }
pass log quick on $ext_if proto tcp to port ssh queue (ssh_bulk, ssh_
interactive)
pass in quick on $ext_if proto tcp to port ftp queue ftp
pass in quick on $ext_if proto tcp to port www queue http
pass out on $ext_if proto udp queue udp
pass out on $ext_if proto icmp queue icmp
pass out on $ext_if proto tcp from $localnet to port $client_out
The rules for ssh, ftp, www, udp, and icmp assign traffic to their respective
queues. The last catchall rule passes all other traffic from the local net-
work, lumping it into the default main queue.
A Basic HFSC Traffic Shaper
The simple schedulers we have looked at so far can make for efficient set-
ups, but network admins with traffic-shaping ambitions tend to look for a
little more flexibility than can be found in the pure-priority-based queues
or the simple class-based variety. The HFSC queuing algorithm (hfsc in
pf.conf terminology) offers flexible bandwidth allocation, guaranteed lower
and upper bounds for bandwidth available to each queue, and variable allo-
cations over time, and it only starts shaping when there’s an actual need.
However, the added flexibility comes at a price: The setup is a tad more
complex than the other ALTQ types, and tuning your setup for an optimal
result can be quite an interesting process.
Queue Definition
First, working from the same configuration we altered slightly earlier, we
insert this queue definition early in the pf.conf file:
altq on $ext_if bandwidth $ext_bw hfsc queue { main, spamd }
queue main bandwidth 99% priority 7 qlimit 100 hfsc (realtime 20%, linkshare 99%) \
{ q_pri, q_def, q_web, q_dns }
queue q_pri bandwidth 3% priority 7 hfsc (realtime 0, linkshare 3% red )
queue q_def bandwidth 47% priority 1 hfsc (default realtime 30% linkshare 47% red)
queue q_web bandwidth 47% priority 1 hfsc (realtime 30% linkshare 47% red)

Traffic Shaping with Queues and Priorities 141
queue q_dns bandwidth 3% priority 7 qlimit 100 hfsc (realtime (30Kb 3000 12Kb), \
linkshare 3%)
queue spamd bandwidth 0% priority 0 qlimit 300 hfsc (realtime 0, upperlimit 1%, \
linkshare 1%)
The hfsc queue definitions take slightly different parameters than the
simpler disciplines. We start off with this rather small hierarchy by splitting
the top-level queue into two. At the next level, we subdivide the main queue
into several subqueues, each with a defined priority. All the subqueues have
a realtime value set—the guaranteed minimum bandwidth allocated to
the queue. The optional upperlimit sets a hard upper limit on the queue’s
allocation. The linkshare parameter sets the allocation the queue will have
available when it’s backlogged—that is, when it’s started to eat into its qlimit
allocation.
In case of congestion, each queue by default has a pool of 50 slots, the
queue limit (qlimit), to keep packets around when they can’t be transmitted
immediately. In this example, the top-level queues main and spamd both have
larger-than-default pools set by their qlimit setting: 100 for main and 300 for
spamd. Cranking up queue sizes here means we’re a little less likely to drop
packets when the traffic approaches the set limits, but it also means that
when the traffic shaping kicks in, we’ll see increased latency for connec-
tions that end up in these larger than default pools.
The queue hierarchy here uses two familiar tricks to make efficient use
of available bandwidth:
• It uses a variation of the high- and low-priority mix demonstrated in the
earlier pure-priority example.
• We speed up almost all other traffic (and most certainly the Web traf-
fic that appears to be the main priority here) by allocating a small but
guaranteed portion of bandwidth for name service lookups. For the q_dns
queue, we set up the realtime value with a time limit—after 3000 millisec-
onds, the realtime allocation goes down to 12Kb. This can be useful to
speed connections that transfer most of their payload during the early
phases.
Rule Set
Next, we tie the newly created queues into the rule set. If you have a filter-
ing regime in place already, which we’ll assume you do, the tie-in becomes
amazingly simple, accomplished by adding a few match rules.
match out on $ext_if from $air_if:network nat-to ($ext_if) \
queue (q_def, q_pri)
match out on $ext_if from $int_if:network nat-to ($ext_if) \
queue (q_def, q_pri)
match out on $ext_if proto tcp to port { www https } queue (q_web, q_pri)
match out on $ext_if proto { tcp udp } to port domain queue (q_dns, q_pri)
match out on $ext_if proto icmp queue (q_dns, q_pri)

142 Chapter 7
Here, the match rules once again do the ACK packet speedup trick with
the high- and low-priority queue assignment, just as you saw earlier in the
pure-priority-based system. The only exception is when we assign traffic to our
lowest-priority queue, where we really don’t care to have any speedup at all.
pass in log on egress proto tcp to port smtp rdr-to 127.0.0.1 port spamd queue spamd
This rule is intended to slow down the spammers a little more on their
way to our spamd. With a hierarchical queue system in place, systat queues
shows the queues and their traffic as a hierarchy, too.
2 users Load 0.22 0.25 0.25 Fri Apr 3 16:43:37 2015
QUEUE BW SCH PRIO PKTS BYTES DROP_P DROP_B QLEN BORROW SUSPEN P/S B/S
root_nfe0 20M hfsc 0 0 0 0 0 0 0 0
main 19M hfsc 7 0 0 0 0 0 0 0
q_pri 594K hfsc 7 1360 82284 0 0 0 11 770
q_def 9306K hfsc 158 15816 0 0 0 0.2 11
q_web 9306K hfsc 914 709845 0 0 0 50 61010
q_dns 594K hfsc 7 196 17494 0 0 0 3 277
spamd 0 hfsc 0 431 24159 0 0 0 2 174
The root queue is shown as attached to the physical interface—as nfe0
and root_nfe0, in this case. main and its subqueues—q_pri, q_def, q_web, and
q_dns—are shown with their bandwidth allocations and number of bytes
and packets passed. The DROP_P and DROP_B columns are where number of
packets and bytes dropped, respectively, would appear if we had been forced
to drop packets at this stage. The final two columns show live updates of
packets per second and bytes per second.
Queuing for Servers in a DMZ
In Chapter 5, we set up a network with a single gateway but with all exter-
nally visible services configured on a separate DMZ network. That way, all
traffic to the servers from both the Internet and the internal network had
to pass through the gateway (see Figure 7-1).
With the rule set from Chapter 5 as our starting point, we’ll add some
queuing in order to optimize our network resources. The physical and
logical layout of the network will not change. The most likely bottleneck
for this network is the bandwidth for the connection between the gateway’s
external interface and the Internet at large. The bandwidth elsewhere in
our setup isn’t infinite, of course, but the available bandwidth on any inter-
face in the local network is likely to be less of a limiting factor than the
bandwidth actually available for communication with the outside world.
For services to be available with the best possible performance, we need to
set up the queues so the bandwidth available at the site is made available
to the traffic we want to allow.
In our example, it’s likely that the interface bandwidth on the DMZ
interface is either 100Mb or 1Gb, while the actual available bandwidth for
connections from outside the local network is considerably smaller. This

Traffic Shaping with Queues and Priorities 143
consideration shows up in our queue definitions, where you clearly see that
the bandwidth available for external traffic is the main limitation in the
queue setup.
total_ext = 2Mb
total_dmz = 100Mb
altq on $ext_if cbq bandwidth $total_ext queue { ext_main, ext_web, ext_udp, \
ext_mail, ext_ssh }
queue ext_main bandwidth 25% cbq(default borrow red) { ext_hi, ext_lo }
queue ext_hi priority 7 bandwidth 20%
queue ext_lo priority 0 bandwidth 80%
queue ext_web bandwidth 25% cbq(borrow red)
queue ext_udp bandwidth 20% cbq(borrow red)
queue ext_mail bandwidth 30% cbq(borrow red)
altq on $dmz_if cbq bandwidth $total_dmz queue { ext_dmz, dmz_main, dmz_web, \
dmz_udp, dmz_mail }
queue ext_dmz bandwidth $total_ext cbq(borrow red) queue { ext_dmz_web, \
ext_dmz_udp, ext_dmz_mail }
queue ext_dmz_web bandwidth 40% priority 5
queue ext_dmz_udp bandwidth 10% priority 7
queue ext_dmz_mail bandwidth 50% priority 3
queue dmz_main bandwidth 25Mb cbq(default borrow red) queue { dmz_main_hi, \
dmz_main_lo }
queue dmz_main_hi priority 7 bandwidth 20%
queue dmz_main_lo priority 0 bandwidth 80%
queue dmz_web bandwidth 25Mb cbq(borrow red)
queue dmz_udp bandwidth 20Mb cbq(borrow red)
queue dmz_mail bandwidth 20Mb cbq(borrow red)
Notice that the total_ext bandwidth limitation determines the alloca-
tion for all queues where the bandwidth for external connections is avail-
able. In order to use the new queuing infrastructure, we need to make some
changes to the filtering rules, too. Keep in mind that any traffic you don’t
explicitly assign to a specific queue is assigned to the default queue for the
interface. Thus, it’s important to tune your filtering rules as well as your
queue definitions to the actual traffic in your network.
With queue assignment, the main part of the filtering rules could end
up looking like this:
pass in on $ext_if proto { tcp, udp } to $nameservers port domain \
queue ext_udp
pass in on $int_if proto { tcp, udp } from $localnet to $nameservers \
port domain
pass out on $dmz_if proto { tcp, udp } to $nameservers port domain \
queue ext_dmz_udp
pass out on $dmz_if proto { tcp, udp } from $localnet to $nameservers \
port domain queue dmz_udp
pass in on $ext_if proto tcp to $webserver port $webports queue ext_web
pass in on $int_if proto tcp from $localnet to $webserver port $webports
pass out on $dmz_if proto tcp to $webserver port $webports queue ext_dmz_web
pass out on $dmz_if proto tcp from $localnet to $webserver port $webports \
queue dmz_web
pass in log on $ext_if proto tcp to $mailserver port smtp

144 Chapter 7
pass in log on $ext_if proto tcp from $localnet to $mailserver port smtp
pass in log on $int_if proto tcp from $localnet to $mailserver port $email
pass out log on $dmz_if proto tcp to $mailserver port smtp queue ext_mail
pass in on $dmz_if from $mailserver to port smtp queue dmz_mail
pass out log on $ext_if proto tcp from $mailserver to port smtp \
queue ext_dmz_mail
Notice that only traffic that will pass either the DMZ interface or the
external interface is assigned to queues. In this configuration, with no exter-
nally accessible services on the internal network, queuing on the internal
interface wouldn’t make much sense because it’s likely the part of our net-
work with the least restrictions on available bandwidth.
Using ALTQ to Handle Unwanted Traffic
So far, we’ve focused on queuing as a method to make sure specific kinds
of traffic are let through as efficiently as possible given the conditions that
exist in and around your network. Now, we’ll look at two examples that
present a slightly different approach to identify and handle unwanted traf-
fic in order to demonstrate some queuing-related tricks you can use to keep
miscreants in line.
Overloading to a Tiny Queue
Think back to “Turning Away the Brutes” on page 94, where we used
a combination of state-tracking options and overload rules to fill up a table
of addresses for special treatment. The special treatment we demonstrated
in Chapter 6 was to cut all connections, but it’s equally possible to assign
overload traffic to a specific queue instead.
Consider this rule from our class-based bandwidth example in “Class-
Based Bandwidth Allocation for Small Networks” on page 139.
pass log quick on $ext_if proto tcp to port ssh flags S/SA \
keep state queue (ssh_bulk, ssh_interactive)
We could add state-tracking options, as shown in here.
pass log quick on $ext_if proto tcp to port ssh flags S/SA \
keep state (max-src-conn 15, max-src-conn-rate 5/3, \
overload <bruteforce> flush global) queue (ssh_bulk, ssh_interactive)
Then, we could make one of the queues slightly smaller.
queue smallpipe bandwidth 1kb cbq
Next, we could assign traffic from miscreants to the small-bandwidth
queue with the following rule.
pass inet proto tcp from <bruteforce> to port $tcp_services queue smallpipe

Traffic Shaping with Queues and Priorities 145
It might also be useful to supplement rules like these with table-entry
expiry, as described in “Tidying Your Tables with pfctl” on page 97.
Queue Assignments Based on Operating System Fingerprint
Chapter 6 covered several ways to use spamd to cut down on spam. If running
spamd isn’t an option in your environment, you can use a queue and rule set
based on the common knowledge that machines that send spam are likely
to run a particular operating system.
PF has a fairly reliable operating system fingerprinting mechanism,
which detects the operating system at the other end of a network connec-
tion based on characteristics of the initial SYN packets at connection setup.
The following may be a simple substitute for spamd if you’ve determined that
legitimate mail is highly unlikely to be delivered from systems that run that
particular operating system.
pass quick proto tcp from any os "Windows" to $ext_if port smtp queue smallpipe
Here, email traffic originating from hosts that run a particular operat-
ing system get no more than 1KB of your bandwidth, with no borrowing.
Conclusion: Traffic Shaping for Fun, and Perhaps Even Profit
This chapter has dealt with traffic-shaping techniques that can make your
traffic move faster, or at least make preferred traffic pass more efficiently
and according to your specifications. By now you should have at least a basic
understanding of traffic-shaping concepts and how they apply to the traffic-
shaping tool set you’ll be using on your systems.
I hope that the somewhat stylized (but functional) examples in this
chapter have given you a taste of what’s possible with traffic shaping and
that the material has inspired you to play with some of your own ideas of
how you can use the traffic-shaping tools in your networks. If you pay atten-
tion to your network traffic and the underlying needs it expresses (see
Chapters 9 and 10 for more on studying network traffic in detail), you can
use the traffic-shaping tools to improve the way your network serves its
users. With a bit of luck, your users will appreciate your efforts and you
may even enjoy the experience.

8
REDUNDANCY AND RESOURCE
AVAILABILITY
High availability and uninterrupted service
have been both marketing buzzwords and
coveted goals for real-world IT professionals
and network administrators as long as most
of us can remember. To meet this perceived need and
solve a few related problems, CARP and pfsync were
added as two highly anticipated features in OpenBSD 3.5. With these tools,
OpenBSD and the other operating systems that adopted them came a long
way toward offering what other operating systems refer to as general pur-
pose clustering functionality. The terminology used by OpenBSD and its
sister BSDs differs from what other products use, but as you will see in this
chapter, CARP, pfsync, and related tools offer high availability functional-
ity equivalent to what a variety of proprietary systems tend to offer only as
costly optional extras.
This chapter covers how to use these tools as found in your base system
to manage resource availability—or, in other words, how to use them to
make sure resources and services in your care stay available even in adverse
conditions.

148 Chapter 8
Redundancy and Failover: CARP and pfsync
The Common Address Redundancy Protocol (CARP) was developed as
a non-patent-encumbered alternative to the Virtual Router Redundancy
Protocol (VRRP), which was far along the track to becoming an IETF-
sanctioned standard, even though possible patent issues haven’t been
resolved.1 One of the main purposes of CARP is to ensure that the net-
work will keep functioning as usual, even when a firewall or other ser-
vice goes down due to errors or planned maintenance activities, such as
upgrades. Not content to just make a clone of the patent-encumbered pro-
tocol, the OpenBSD developers decided to go one better on several fronts.
CARP features authenticated redundancy—it’s address-family independent
and comes with state synchronization features. Complementing CARP,
the pfsync protocol is designed to handle synchronization of PF states
between redundant packet-filtering nodes or gateways. Both protocols are
intended to ensure redundancy for essential network features with auto-
matic failover.
CARP is based on setting up a group of machines as one master and one
or more redundant backups, all equipped to handle a common IP address.
If the master goes down, one of the backups will inherit the IP address. The
handover from one CARP host to another may be authenticated, essentially
by setting a shared secret (in practice, much like a password).
In the case of PF firewalls, pfsync can be set up to handle the synchro-
nization, and if the synchronization via pfsync has been properly set up,
active connections will be handed over without noticeable interruption.
In essence, pfsync is a type of virtual network interface specially designed
to synchronize state information between PF firewalls. Its interfaces are
assigned to physical interfaces with ifconfig.
Even if it’s technically possible to lump pfsync traffic together with
other traffic on a regular interface, it’s strongly recommended that you set
up pfsync on a separate network, or even VLAN. pfsync does no authentica-
tion on its synchronization partners, so the only way to guarantee correct
synchronization is to use dedicated interfaces for your pfsync traffic.
The Project Specification: A Redundant Pair of Gateways
To illustrate a useful failover setup with CARP and pfsync, we’ll examine a
network with one gateway to the world. Our goals for the reconfigured net-
work are as follows:
• The network should keep functioning much the same way it did before
we introduced redundancy.
• We should have better availability without noticeable downtime.
• The network should experience graceful failover with no interruption
of active connections.
1. VRRP is described in RFC 2281 and RFC 3768. The patents involved are held by Cisco,
IBM, and Nokia. See the RFCs for details.
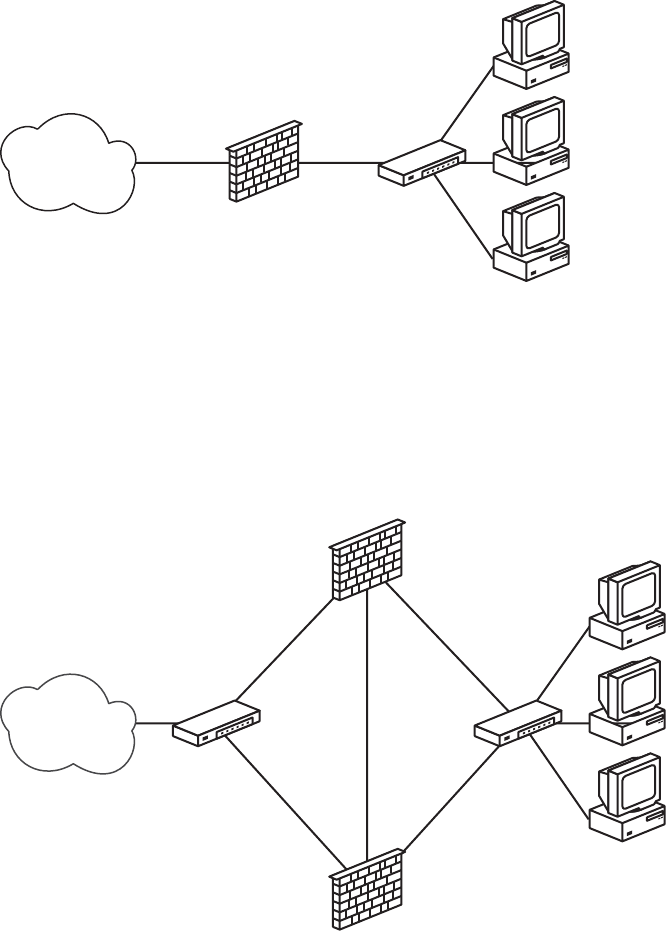
Redundancy and Resource Availability 149
We’ll begin with the relatively simple network from Chapter 3, as shown
in Figure 8-1.
The Internet
Switch
Clients
Our bridge,
the PF firewall
$int_if$ext_if
Figure 8-1: Network with a single gateway
We replace the single gateway with a redundant pair of gateways that
share a private network for state-information updates over pfsync. The
result is shown in Figure 8-2.
The Internet
Switch
Clients
$ext_if
192.0.2.18
ep0
carp0
192.0.2.19
$int_if
192.168.12.3
ep1
carp1
192.168.12.1
Switch
Crossover
cable
$int_if
192.168.12.2
ep1
carp1
192.168.12.1
$ext_if
192.0.2.17
ep0
carp0
192.0.2.19
pfsync0
10.0.12.17
ep2
pfsync0
10.0.12.16
ep2
Figure 8-2: Network with redundant gateways

150 Chapter 8
CARP addresses are virtual addresses, and unless you have console
access to all machines in your CARP group, you should almost always assign
an IP address to the physical interfaces. With a unique IP address for each
physical interface, you’ll be able to communicate with the host and be sure
of which machine you’re interacting with. Without IP addresses assigned to
physical interfaces, you could find yourself with a setup where the backup
gateways are unable to communicate (except with hosts in networks where
the physical interfaces have addresses assigned) until they become the mas-
ter in the redundancy group and take over the virtual IP addresses.
It’s reasonable to assume that the IP address assigned to the physical
interface will belong in the same subnet as the virtual, shared IP address.
It’s also important to be aware that this is, in fact, not a requirement—it’s
even possible to configure CARP where the physical interface hasn’t been
assigned an address. If you don’t specify a specific physical interface for the
CARP interface, the kernel will try to assign the CARP address to a physical
interface that’s already configured with an address in the same subnet as
the CARP address. Even if it may not be required in simpler configurations,
it’s generally useful to make the interface selection explicit via the carpdev
option in the ifconfig command string that you use to set up the CARP
interface.
WARNING If when you reconfigure your network, the default gateway address goes from fixed to
a specific interface and from host to a virtual address, it’s nearly impossible to avoid a
temporary loss of connectivity.
Setting Up CARP
Most CARP setup lies in cabling (according to the schematic for your
network), setting sysctl values, and issuing ifconfig commands. Also, on
some systems, you’ll need to make sure that your kernel is set up with the
required devices compiled in.
Checking Kernel Options
On OpenBSD, both the CARP and pfsync devices are in the default GENERIC
and GENERIC.MP kernel configurations. Unless you’re running a custom
kernel without these options, no kernel reconfiguration is necessary. If
you’re running FreeBSD, make sure that the kernel has the CARP and
pfsync devices compiled in because the default GENERIC kernel lacks
these options. (See the FreeBSD Handbook to learn how to compile and
install a custom kernel with these options.)
NetBSD should check that the kernel has pseudo-device CARP com-
piled in because NetBSD’s default GENERIC kernel configuration doesn’t
have it. (You’ll find the relevant line commented out in the GENERIC con-
figuration file.) As of this writing, NetBSD doesn’t support pfsync due to
claimed protocol-numbering issues.

Redundancy and Resource Availability 151
Setting sysctl Values
On all CARP-capable systems, the basic functions are governed by a hand-
ful of sysctl variables. The main one is net.inet.carp.allow, and it’s enabled
by default. On a typical OpenBSD system, you’ll see:
$ sysctl net.inet.carp.allow
net.inet.carp.allow=1
This means that your system comes equipped for CARP.
If your kernel isn’t configured with a CARP device, this command
should produce something like the following on FreeBSD:
sysctl: unknown oid 'net.inet.carp.allow'
Or it could produce something like this on NetBSD:
sysctl: third level name 'carp' in 'net.inet.carp.allow' is invalid
Use this sysctl command to view all CARP-related variables:
$ sysctl net.inet.carp
net.inet.carp.allow=1
net.inet.carp.preempt=0
net.inet.carp.log=2
NOTE On FreeBSD, you’ll also encounter the read-only status variable net.inet.carp
.suppress_preempt, which indicates whether preemption is possible. On systems
with CARP code based on OpenBSD 4.2 or earlier, you’ll also see net.inet.carp
.arpbalance, which is used to enable CARP ARP balancing to offer some limited
load balancing for hosts on a local network.
To enable the graceful failover between the gateways in our setup, we
need to set the net.inet.carp.preempt variable so that on hosts with more
than one network interface (like our gateways), all CARP interfaces will
move between master and backup status concurrently. This setting must be
identical on all hosts in the CARP group, and it should be repeated on all
hosts during setup.
$ sudo sysctl net.inet.carp.preempt=1
The net.inet.carp.log variable sets the debug level for CARP logging
between 0 and 7. The default of 2 means only CARP state changes are logged.
Setting Up Network Interfaces with ifconfig
Notice in the network diagram shown in Figure 8-2 that the local net-
work uses addresses in the 192.168.12.0 network, while the Internet-facing

152 Chapter 8
interface is in the 192.0.2.0 network. With these address ranges and the
CARP interface’s default behavior in mind, the commands for setting up
the virtual interfaces are actually quite straightforward.
In addition to the usual network parameters, CARP interfaces require
one additional parameter: the virtual host ID (vhid), which uniquely identi-
fies the interfaces that will share the virtual IP address.
WARNING The vhid is an 8-bit value that must be set uniquely within the network’s broadcast
domain. Setting the vhid to the wrong value can lead to network problems that can
be hard to debug, and there’s even anecdotal evidence that ID collisions with other-
wise unrelated systems can occur and cause disruption on redundancy and load-
balancing systems based on VRRP, which uses a virtual node identification scheme
similar to CARP’s.
Run these commands on the machine that will be the initial master for
the group:
$ sudo ifconfig carp0 192.0.2.19 vhid 1
$ sudo ifconfig carp1 192.168.1.1 vhid 2
We don’t need to explicitly set the physical interface because the carp0
and carp1 virtual interfaces will bind themselves to the physical interfaces
that are already configured with addresses in the same subnets as the
assigned CARP address.
NOTE On systems that offer the carpdev option to ifconfig, it’s recommended to use the carpdev
option for all CARP interface setups, even if it isn’t strictly required. The carpdev option
becomes indispensable in cases where the choice of physical network device for the
CARP interface isn’t obvious from the existing network configuration, and adding a
carpdev interface string to the ifconfig commands can make the difference between
a nonfunctional setup and a working one. This can be particularly useful in some
nonintuitive configurations and where the number of free IP addresses in the relevant
network is severely limited. The FreeBSD port of CARP offers the carpdev option start-
ing with FreeBSD 10.0.
Use ifconfig to make sure that each CARP interface is properly config-
ured and pay particular attention to the carp: line, which indicates MASTER
status, as shown here:
$ ifconfig carp0
carp0: flags=8843<UP,BROADCAST,RUNNING,SIMPLEX,MULTICAST> mtu 1500
lladdr 00:00:5e:00:01:01
carp: MASTER carpdev ep0 vhid 1 advbase 1 advskew 0
groups: carp
inet 192.0.2.19 netmask 0xffffff00 broadcast 192.0.2.255
inet6 fe80::200:5eff:fe00:101%carp0 prefixlen 64 scopeid 0x5

Redundancy and Resource Availability 153
The setup is almost identical on the backup except that you add the
advskew parameter, which indicates how much less preferred it is for the speci-
fied machine to take over than the current master.
$ sudo ifconfig carp0 192.0.2.19 vhid 1 advskew 100
$ sudo ifconfig carp1 192.168.1.1 vhid 2 advskew 100
The advskew parameter and its companion value, advbase, are used to cal-
culate the interval between the current host’s announcements of its master
status once it’s taken over. The default value for advbase is 1, and the default
for advskew is 0. In the preceding example, the master would announce every
second (1 + 0/256), while the backup would wait for 1 + 100/256 seconds.
With net.inet.carp.preempt=1 on all hosts in the failover group, when the
master stops announcing or announces that it isn’t available, the backups
take over, and the new master starts announcing at its configured rate.
Smaller advskew values mean shorter announcement intervals and a higher
likelihood that the host becomes the new master. If more hosts have the
same advskew, the one that’s already master will keep its master status.
On OpenBSD 4.1 and higher, one more factor in the equation deter-
mines which host takes over CARP master duty. The demotion counter is a
value each CARP host announces for its interface group as a measure of
readiness for its CARP interfaces. When the demotion counter value is 0,
the host is in complete readiness; higher values indicate measures of deg-
radation. You can set the demotion counter from the command line using
ifconfig -g, but the value is usually set by the system itself, with higher val-
ues typically during the boot process. All other things being equal, the host
with the lowest demotion counter will win the contest to take over as the
CAR P master.
NOTE As of this writing, FreeBSD CARP versions earlier than FreeBSD 10 don’t support
setting the demotion counter.
On the backup, use ifconfig once again to check that each CARP inter-
face is properly configured:
$ ifconfig carp0
carp0: flags=8843<UP,BROADCAST,RUNNING,SIMPLEX,MULTICAST> mtu 1500
lladdr 00:00:5e:00:01:01
carp: BACKUP carpdev ep0 vhid 1 advbase 1 advskew 100
groups: carp
inet 192.0.2.19 netmask 0xffffff00 broadcast 192.0.2.255
inet6 fe80::200:5eff:fe00:101%carp0 prefixlen 64 scopeid 0x5

154 Chapter 8
The output here is only slightly different from what you’ve just seen on
the master. Notice that the carp: line indicates BACKUP status along with the
advbase and advskew parameters.
For actual production use, you should add a measure of security against
unauthorized CARP activity by configuring the members of the CARP
group with a shared, secret passphrase, such as the following:2
$ sudo ifconfig carp0 pass mekmitasdigoat 192.0.2.19 vhid 1
$ sudo ifconfig carp1 pass mekmitasdigoat 192.168.1.1 vhid 2
NOTE As with any other password, the passphrase will become a required ingredient in all
CARP traffic in your setup. Be sure to configure all CARP interfaces in a failover
group with the same passphrase (or none).
Once you’ve figured out the appropriate settings, preserve them
through future system reboots by putting them in the proper files in /etc:
• On OpenBSD, put the proper ifconfig parameters into hostname.carp0
and hostname.carp1.
• On FreeBSD and NetBSD, put the relevant lines in your rc.conf file as
contents of the ifconfig_carp0= and ifconfig_carp1= variables.
Keeping States Synchronized: Adding pfsync
As the final piece of configuration, set up state-table synchronization
between the hosts in your redundancy group to prevent traffic disruption
during failover. This feat is accomplished through a set of pfsync interfaces.
(As noted earlier, as of this writing, NetBSD doesn’t support pfsync.)
Configuring pfsync interfaces requires planning and a few ifconfig
commands. You can set up pfsync on any configured network interface, but
it’s best to set up a separate network for the synchronization. The sample
configuration in Figure 8-2 shows a tiny network set aside for the purpose.
A crossover cable connects the two Ethernet interfaces, but in configura-
tions with more than two hosts in the failover group, you may want a setup
with a separate switch, hub, or VLAN. The interfaces to be used for the syn-
chronization have been assigned the IP addresses 10.0.12.16 and 10.0.12.17,
respectively.
With the basic TCP/IP configuration in place, the complete pfsync
setup for each synchronization partner interface is
$ sudo ifconfig pfsync0 syncdev ep2
2. This particular passphrase has a very specific meaning. A Web search will reveal its signifi-
cance and why it’s de rigeur for modern networking documentation. The definitive answer can
be found via the openbsd-misc mailing list archives.

Redundancy and Resource Availability 155
The pfsync protocol itself offers little in the way of security features:
It has no authentication mechanism and, by default, communicates via IP
multicast traffic. However, in cases where a physically separate network isn’t
feasible, you can tighten up your pfsync security by setting up pfsync to syn-
chronize only with a specified syncpeer:
$ sudo ifconfig pfsync0 syncpeer 10.0.12.16 syncdev ep2
This produces a configured interface that shows up in ifconfig output
like this:
pfsync0: flags=41<UP,RUNNING> mtu 1500
priority: 0
pfsync: syncdev: ep2 syncpeer: 10.0.12.16 maxupd: 128 defer: off
groups: carp pfsync
Another option is to set up an IPsec tunnel and use that to protect the
sync traffic. In this case, the ifconfig command is
$ sudo ifconfig pfsync0 syncpeer 10.0.12.16 syncdev enc0
This means that the syncdev device becomes the enc0 encapsulating
interface instead of the physical interface.
NOTE If possible, set up synchronization across a physically separate, dedicated network or a
separate VLAN because any lost pfsync updates could lead to less than clean failover.
One very useful way to check that your PF state synchronization is
running properly is to watch the state table on your synchronized hosts
using systat states on each machine. The command gives you a live dis-
play of states, showing updates happening in bulk on the sync targets.
Between the synchronizations, states should display identically on all hosts.
(Traffic counters—such as the number of packets and bytes passed—are the
exception; they display updates only on the host that handles the actual
connection.)
This takes us to the end of the basic network configuration for CARP-
based failover. In the next section, we’ll discuss what to keep in mind when
writing rule sets for redundant configurations.
Putting Together a Rule Set
After all the contortions we’ve been through in order to configure basic
networking, you may be wondering what it will take to migrate the rules
you use in your current pf.conf to the new setup. Fortunately, not much.
The main change we’ve introduced is essentially invisible to the rest of the
world, and a well-designed rule set for a single gateway configuration will
generally work well for a redundant setup, too.

156 Chapter 8
That said, we’ve introduced two additional protocols (CARP and
pfsync), and you’ll probably need to make some relatively minor changes
to your rule set in order for the failover to work properly. Basically, you
need to pass the CARP and pfsync traffic to the appropriate interfaces.
The simplest way to handle the CARP traffic is to introduce a macro defini-
tion for your carpdevs that includes all physical interfaces that will handle
CARP traffic. You’ll also introduce an accompanying pass rule, like the fol-
lowing one, in order to pass CARP traffic on the appropriate interfaces:
pass on $carpdevs proto carp
Similarly, for pfsync traffic, you can introduce a macro definition for
your syncdev and an accompanying pass rule:
pass on $syncdev proto pfsync
Skipping the pfsync interfaces entirely for filtering is cheaper perfor-
mance-wise than filtering and passing. To take the pfsync device out of the
filtering equation altogether, use this rule:
set skip on $syncdev
You should also consider the roles of the virtual CARP interface and its
address versus the physical interface. As far as PF is concerned, all traffic
will pass through the physical interfaces, but the traffic may have the CARP
interface’s IP addresses as source or destination addresses.
You may find that you have rules in your configuration that you don’t
want to bother to synchronize in case of a failover, such as connections to
services that run on the gateway itself. One prime example is the typical
rule to allow SSH in for the administrator:
pass in on $int_if from $ssh_allowed to self
For rules like these, you could use the state option no-sync to prevent
synchronizing state changes for connections that really aren’t relevant once
failover has occurred:
pass in on $int_if from $ssh_allowed to self keep state (no-sync)
With this configuration, you’ll be able to schedule operating system
upgrades and formerly downtime-producing activities on members of your
CARPed group of systems at times when they’re most convenient, with no
noticeable downtime for the users of your services.

Redundancy and Resource Availability 157
CARP for Load Balancing
Redundancy by failover is nice, but sometimes it’s less attractive to have
hardware sitting around in case of failure and better to create a configura-
tion that spreads the network load over several hosts.
In addition to ARP balancing (which works by calculating hashes based on
the source MAC address on incoming connections), CARP in OpenBSD 4.3
and higher supports several varieties of IP-based load balancing, with traffic
allocated based on hashes calculated from the connections’ source and des-
tination IP addresses. Because ARP balancing is based on the source MAC
address, it’ll work only for hosts in the directly connected network segment.
On the other hand, the IP-based methods are appropriate for load-balancing
connections to and from the Internet at large.
The choice of method for your application will depend on the specifica-
tions of the rest of the network equipment you need to work with. The basic
ip balancing mode uses a multicast MAC address to have the directly con-
nected switch forward traffic to all hosts in the load-balancing cluster.
IFSTATED, THE INTERFACE STATE DAEMON
In properly CARPed setups, basic networking functionality is well provided for,
but your setup may include elements that need special attention when the net-
work configuration changes on a host. For example, some services might need
to be started or stopped when a specific interface goes down or restarts, or
you may want to run specific commands or scripts in response to interface state
changes. If this sounds familiar, ifstated is for you.
The ifstated tool was introduced in OpenBSD 3.5 to trigger actions
based on changes in the state of network interfaces. You’ll find it in the base
system on OpenBSD and via the ports system as net/ifstated on FreeBSD. On
OpenBSD, the file /etc/ifstated.conf (or /usr/local/etc/ifstated.conf if you installed
the port on FreeBSD) contains an almost-ready-to-run configuration with a few
pointers on how to set up ifstated for a CARPed environment.
The main controlling objects are interfaces and their states—for example,
carp0.link.up is the state where the carp0 interface has become master—and
you perform actions in response to state changes.
The states and actions to perform whenever the state of an interface
changes are specified in a straightforward scripting language with basic fea-
tures like variables, macros, and simple logical conditionals. (See man ifstated
and man ifstated.conf as well as the default ifstated.conf sample file supplied
in your base system install for more on this topic and on implementing CARP-
based clustering features in your environment.)

158 Chapter 8
Unfortunately, the combination of a unicast IP address and a multicast
MAC address isn’t supported by some systems. In those cases, you may need
to configure your load balancing in ip-unicast mode, which uses a unicast
MAC address, and configure your switch to forward to the appropriate
hosts. Or you may need to configure your load balancing in ip-stealth mode,
which doesn’t use the multicast MAC address at all. As usual, the devil is in
the details, and the answers are found in man pages and other documenta-
tion, most likely with a bit of experimentation thrown in.
NOTE Traditionally, relayd has been used to do intelligent load balancing as the frontend
for servers that offer services to the rest of the world. In OpenBSD 4.7, relayd acquired
the ability to track available uplinks and alter the system’s routing tables based on link
health, with the functionality wrapped in a bundle with the router keyword. For setups
with several possible uplinks or various routing tables, you can set up relayd to choose
your uplink or, with a little help from the sysctl variables net.inet.ip.multipath
and net.inet6.ip6.multipath, perform load balancing across available routes and
uplinks. The specifics will vary with your networking environment. The relayd.conf
man page contains a complete example to get you started.
CARP in Load-Balancing Mode
In load-balancing mode, the CARP concept is extended by letting each
CARP interface be a member of multiple failover groups and as many
load-balancing groups as there are physical hosts that will share the virtual
address. In contrast with the failover case, where there can be only one
master, each node in a load-balancing cluster must be the master of its own
group so that it can receive traffic. The choice of group—and by extension,
physical host—that ends up handling a given connection is determined
by CARP via a hash value calculation. This calculation is based on the
connection’s source MAC address in the ARP-balancing case and on the
source and destination IP address in the IP-balancing case as well as actual
availability. The downside to this scheme is that each group consumes one
virtual host ID, so you’ll run out of these IDs quite a bit more quickly in a
load-balancing configuration than when using failover only. In fact, there’s
a hard upper limit to the number of CARP-based load-balancing clusters of
32 virtual host IDs.
The advskew parameter plays a similar role in load-balancing configura-
tions as in the failover ones, but the ifconfig (and hostname.carpN) syntax
for CARP load balancing is slightly different from that of the failover case.
Setting Up CARP Load Balancing
Changing the CARP failover group built over the previous sections to a
load-balancing cluster is as simple as editing the configuration files and
reloading. In the following example, we choose an IP load-balancing
scheme. If you choose a different scheme, the configuration itself differs
only in the keyword for mode selection.

Redundancy and Resource Availability 159
On the first host, we change /etc/hostname.carp0 to
pass mekmitasdigoat 192.0.2.19 balancing ip carpnodes 5:100,6:0
This says that on this host, the carp0 interface is a member of the group
with vhid 5 (with an advskew of 100) as well as the interface with vhid 6, where
it’s the prime candidate for becoming initial master (with an advskew set to 0).
Next, we change /etc/hostname.carp1 to this:
pass mekmitasdigoat 192.168.12.1 balancing ip carpnodes 3:100,4:0
For carp1, the memberships are vhids 3 and 4, with advskew values of 100
and 0, respectively.
For the other host, the advskew values are reversed, but the configura-
tion is otherwise predictably similar. Here, /etc/hostname.carp0 reads:
pass mekmitasdigoat 192.0.2.19 balancing ip carpnodes 5:0,6:100
This means that the carp0 interface is a member of vhid 5 with advskew 0
and a member of vhid 6 with advskew 100. Complementing this is the /etc/
hostname.carp1 file that reads:
pass mekmitasdigoat 192.168.12.1 balancing ip carpnodes 3:0,4:100
Again, carp1 is a member of vhid 3 and 4, with advskew 0 in the first and
100 in the other.
The ifconfig output for the carp interface group on the first host looks
like this:
$ ifconfig carp
carp0: flags=8843<UP,BROADCAST,RUNNING,SIMPLEX,MULTICAST> mtu 1500
lladdr 01:00:5e:00:01:05
priority: 0
carp: carpdev vr0 advbase 1 balancing ip
state MASTER vhid 5 advskew 0
state BACKUP vhid 6 advskew 100
groups: carp
inet 192.0.2.19 netmask 0xffffff00 broadcast 192.0.2.255
inet6 fe80::200:24ff:fecb:1c10%carp0 prefixlen 64 scopeid 0x7
carp1: flags=8843<UP,BROADCAST,RUNNING,SIMPLEX,MULTICAST> mtu 1500
lladdr 01:00:5e:00:01:03
priority: 0
carp: carpdev vr1 advbase 1 balancing ip
state MASTER vhid 3 advskew 0
state BACKUP vhid 4 advskew 100
groups: carp
inet 192.168.12.1 netmask 0xffffff00 broadcast 192.168.12.255
inet6 fe80::200:24ff:fecb:1c10%carp1 prefixlen 64 scopeid 0x8
pfsync0: flags=41<UP,RUNNING> mtu 1500
priority: 0
pfsync: syncdev: vr2 syncpeer: 10.0.12.17 maxupd: 128 defer: off
groups: carp pfsync

160 Chapter 8
The other host has this ifconfig output:
$ ifconfig carp
carp0: flags=8843<UP,BROADCAST,RUNNING,SIMPLEX,MULTICAST> mtu 1500
lladdr 01:00:5e:00:01:05
priority: 0
carp: carpdev vr0 advbase 1 balancing ip
state BACKUP vhid 5 advskew 100
state MASTER vhid 6 advskew 0
groups: carp
inet 192.0.2.19 netmask 0xffffff00 broadcast 192.0.2.255
inet6 fe80::200:24ff:fecb:1c18%carp0 prefixlen 64 scopeid 0x7
carp1: flags=8843<UP,BROADCAST,RUNNING,SIMPLEX,MULTICAST> mtu 1500
lladdr 01:00:5e:00:01:03
priority: 0
carp: carpdev vr1 advbase 1 balancing ip
state BACKUP vhid 3 advskew 100
state MASTER vhid 4 advskew 0
groups: carp
inet 192.168.12.1 netmask 0xffffff00 broadcast 192.168.12.255
inet6 fe80::200:24ff:fecb:1c18%carp1 prefixlen 64 scopeid 0x8
pfsync0: flags=41<UP,RUNNING> mtu 1500
priority: 0
pfsync: syncdev: vr2 syncpeer: 10.0.12.16 maxupd: 128 defer: off
groups: carp pfsync
If we had three nodes in our load-balancing scheme, each carp inter-
face would need to be a member of an additional group, for a total of three
groups. In short, for each physical host you introduce in the load-balancing
group, each carp interface becomes the member of an additional group.
Once you’ve set up the load-balancing cluster, check the flow of
connections by running systat states on each of the hosts in your load-
balancing cluster for a few minutes to make sure that the system works as
expected and to see that all the effort you put in has been worth it.

9
LOGGING, MONITORING,
AND STATISTICS
Exercising control over a network—
whether for your home networking needs
or in a professional context—is likely to be
a main objective for anyone who reads this
book. One necessary element of keeping control is
having access to all relevant information about what
happens in your network. Fortunately for us, PF—like
most components of Unix-like systems—is able to gen-
erate log data for network activity.
PF offers a wealth of options for setting the level of logging detail,
processing log files, and extracting specific kinds of data. You can already
do a lot with the tools that are in your base system, and several other tools
are available via your package system to collect, study, and view log data
in a number of useful ways. In this chapter, we take a closer look at PF
logs in general and some of the tools you can use to extract and present
information.

162 Chapter 9
PF Logs: The Basics
The information that PF logs and the level of logging detail are up to you,
as determined by your rule set. Basic logging is simple: For each rule that
you want to log data for, add the log keyword. When you load the rule set
with log added to one or more rules, any packet that starts a connection
matching the logging rule (blocked, passed, or matched) is copied to a
pflog device. The packet is logged as soon as it’s seen by PF and at the same time
that the logging rule is evaluated.
NOTE In complicated rule sets, a packet may go through several transformations due to
match or pass rules, and criteria that matched a packet when it entered the host
might not match after a transformation.
PF will also store certain additional data, such as the timestamp, inter-
face, original source and destination IP addresses, whether the packet was
blocked or passed, and the associated rule number from the loaded rule set.
PF log data is collected by the pflogd logging daemon, which starts by
default when PF is enabled at system startup. The default location for storing
the log data is /var/log/pflog. The log is written in a binary format, usually
called packet capture format (pcap), that’s intended to be read and processed
by tcpdump. We’ll discuss additional tools to extract and display information
from your log file later. The log file format is a well-documented and widely
supported binary format.
To get started, here’s a basic log example. Start with the rules you want
to log and add the log keyword:
block log
pass log quick proto { tcp, udp } to port ssh
Reload the rule set, and you should see the timestamp on your /var/log/
pflog file change as the file starts growing. To see what’s being stored there,
use tcpdump with the -r option to read the file.
If logging has been going on for a while, entering the following on a
command line can produce large amounts of output:
$ sudo tcpdump -n -ttt -r /var/log/pflog
For example, the following are just the first lines from a file several
screens long, with almost all lines long enough to wrap:
$ sudo tcpdump -n -ttt -r /var/log/pflog
tcpdump: WARNING: snaplen raised from 116 to 160
Sep 13 13:00:30.556038 rule 10/(match) pass in on epic0: 194.54.107.19.34834 >
194.54.103.66.113: S 3097635127:3097635127(0) win 16384 <mss 1460,nop,nop,sackOK,nop,wscale
0,[|tcp]> (DF)
Sep 13 13:00:30.556063 rule 10/(match) pass out on fxp0: 194.54.107.19.34834 >
194.54.103.66.113: S 3097635127:3097635127(0) win 16384 <mss 1460,nop,nop,sackOK,nop,wscale
0,[|tcp]> (DF)

Logging, Monitoring, and Statistics 163
Sep 13 13:01:07.796096 rule 10/(match) pass in on epic0: 194.54.107.19.29572 >
194.54.103.66.113: S 2345499144:2345499144(0) win 16384 <mss 1460,nop,nop,sackOK,nop,wscale
0,[|tcp]> (DF)
Sep 13 13:01:07.796120 rule 10/(match) pass out on fxp0: 194.54.107.19.29572 >
194.54.103.66.113: S 2345499144:2345499144(0) win 16384 <mss 1460,nop,nop,sackOK,nop,wscale
0,[|tcp]> (DF)
Sep 13 13:01:15.096643 rule 10/(match) pass in on epic0: 194.54.107.19.29774 >
194.54.103.65.53: 49442 [1au][|domain]
Sep 13 13:01:15.607619 rule 12/(match) pass in on epic0: 194.54.107.19.29774 >
194.54.107.18.53: 34932 [1au][|domain]
The tcpdump program is very flexible, especially when it comes to output,
and it offers a number of display choices. The format in this example fol-
lows from the options we fed to tcpdump. The program almost always displays
the date and time the packet arrived (the -ttt option specifies this long
format). Next, tcpdump lists the rule number in the loaded rule set, the inter-
face on which the packet appeared, the source and target address and ports
(the -n option tells tcpdump to display IP addresses, not hostnames), and the
various packet properties.
NOTE The rule numbers in your log files refer to the loaded, in-memory rule set. Your
rule set goes through some automatic steps during the loading process, such as macro
expansion and optimizations, which make it likely that the rule number as stored in
the logs will not quite match what you’d find by counting from the top of your pf.conf
file. If it isn’t immediately obvious to you which rule matched, use pfctl -vvs rules
and study the output.
In our tcpdump output example, we see that the tenth rule (rule 10) in
the loaded rule set seems to be a catchall that matches both IDENT requests
and domain name lookups. This is the kind of output you’ll find invalu-
able when debugging, and it’s essential to have this kind of data available in
order to stay on top of your network. With a little effort and careful reading
of the tcpdump man pages, you should be able to extract useful information
from your log data.
For a live display of the traffic you log, use tcpdump to read log information
directly from the log device. To do so, use the -i option to specify which
interface you want tcpdump to read from, as follows. (The -l option, which
enables line buffering on the output, is useful if you want to look at what
you’re capturing.)
$ sudo tcpdump -lnettti pflog0
Apr 29 22:07:36.097434 rule 16/(match) pass in on xl0: 85.19.150.98.53 > 213.187.179.198.41101:
63267*- 1/0/2 (68)
Apr 29 22:07:36.097760 rule def/(match) pass out on em0: 213.187.179.198.22 >
192.168.103.44.30827: P 1825500807:1825500883(76) ack 884130750 win 17520 [tos 0x10]
Apr 29 22:07:36.098386 rule def/(match) pass in on em0: 192.168.103.44.30827 >
213.187.179.198.22: . ack 76 win 16308 (DF) [tos 0x10]
Apr 29 22:07:36.099544 rule 442/(match) pass in on xl0: 93.57.15.161.4487 > 213.187.179.198.80:
P ack 3570451894 win 65535 <nop,nop,timestamp 4170023961 0>

164 Chapter 9
Apr 29 22:07:36.108037 rule 25/(match) pass out on xl0: 213.187.179.198.25 >
213.236.166.45.65106: P 2038177705:2038177719(14) ack 149019161 win 17424 (DF)
Apr 29 22:07:36.108240 rule def/(match) pass out on em0: 213.187.179.198.22 >
192.168.103.44.30827: P 76:232(156) ack 1 win 17520 [tos 0x10]
This sequence begins with a domain name lookup answer, followed
by two packets from an open SSH connection, which tells us that the site’s
administrator probably enabled log (all) on the matching rules (see
“Logging All Packets: log (all)” on page 165). The fourth packet belongs
to a website connection, the fifth is part of an outgoing SMTP connection,
and finally there’s another SSH packet. If you were to leave this command
running, the displayed lines would eventually scroll off the top of your
screen, but you could redirect the data to a file or to a separate program
for further processing.
NOTE Sometimes you’ll be interested mainly in traffic between specific hosts or in traffic
matching specific criteria. For these cases, tcpdump’s filtering features can be useful.
See man tcpdump for details.
Logging the Packet's Path Through Your Rule Set: log (matches)
Early versions of the PF logging code didn’t feature an easy way to track
all rules that a packet would match during rule-set traversal. This omis-
sion became more evident than before when match rules were introduced
in OpenBSD 4.6 and PF users were offered a more convenient and slightly
easier way to subject packets and connections to transformations, such as
address rewriting. match rules allow you to perform actions on a packet or
connection independently of the eventual pass or block decision. The specified
actions—such as nat-to, rdr-to, and a few others—are performed immedi-
ately. This can lead to situations in which a packet has been transformed by
a match rule and it no longer matches criteria in a filtering rule that appears
later in the rule set that it otherwise would have matched if the transforma-
tion hadn’t already occurred. One fairly basic example is a match rule that
applies nat-to on the external interface, placed before any pass rules in the
rule set. Once the nat-to action has been applied, any filtering criteria that
would have matched the packet’s original source address will no longer
match the packet.
This greater versatility made some rule sets harder to debug (typically
those with several match rules that perform transformations), and it became
clear that a new logging option was needed.
The PF developers had been eyeing the logging code for a rewrite
for some time, and by the time the logging system was rewritten for the
OpenBSD 4.9 release, the restructured code made it easy to introduce the
log option matches to help debug such rule sets and to help track a packet’s
path through rule sets where several sets of match or pass rules could trans-
form the packet.
Adding log (matches) to a rule forces the logging of all matched rules
once a packet matches a rule containing a log (matches) clause. Once such a

Logging, Monitoring, and Statistics 165
match occurs, all subsequent rules will also be logged. As a result, you can
use targeted log (matches) statements to trace a packet’s path through your
loaded rule set, making it much easier to untangle complicated rule sets.
For example, consider this simple rule set with NAT. The log (matches)
rule is as follows:
match in log (matches) on $int_if from $testhost tag localnet
Our test host is a workstation in the local network with the IP address
192.168.103.44. When the test host looks up a website somewhere on the
Internet, the logged information looks like this:
Apr 29 21:08:24.386474 rule 3/(match) match in on em0: 192.168.103.44.14054 > 81.93.163.115.80:
S 1381487359:1381487359(0) win 16384 <mss 1460,nop,nop,sackOK,nop,wscale 3,nop,nop,timestamp
735353043[|tcp]> (DF) u
Apr 29 21:08:24.386487 rule 11/(match) block in on em0: 192.168.103.44.14054 >
81.93.163.115.80: S 1381487359:1381487359(0) win 16384 <mss 1460,nop,nop,sackOK,nop,wscale
3,nop,nop,timestamp 735353043[|tcp]> (DF) v
Apr 29 21:08:24.386497 rule 17/(match) pass in on em0: 192.168.103.44.14054 > 81.93.163.115.80:
S 1381487359:1381487359(0) win 16384 <mss 1460,nop,nop,sackOK,nop,wscale 3,nop,nop,timestamp
735353043[|tcp]> (DF) w
Apr 29 21:08:24.386513 rule 17/(match) pass in on em0: 192.168.103.44.14054 > 81.93.163.115.80:
S 1381487359:1381487359(0) win 16384 <mss 1460,nop,nop,sackOK,nop,wscale 3,nop,nop,timestamp
735353043[|tcp]> (DF)
Apr 29 21:08:24.386553 rule 5/(match) match out on xl0: 213.187.179.198.14054 >
81.93.163.115.80: S 1381487359:1381487359(0) win 16384 <mss 1460,nop,nop,sackOK,nop,wscale
3,nop,nop,timestamp 735353043[|tcp]> (DF) x
Apr 29 21:08:24.386568 rule 16/(match) pass out on xl0: 213.187.179.198.14054 >
81.93.163.115.80: S 1381487359:1381487359(0) win 16384 <mss 1460,nop,nop,sackOK,nop,wscale
3,nop,nop,timestamp 735353043[|tcp]> (DF) y
The initial packet first matches rule 3, the match log (matches) rule
quoted above the log fragment u. The next match is rule 11 in our loaded
rule set v, the initial block all, but the packet also matches rule 17, which
lets it pass in on em0 w. The next matching rule 5 at x is apparently a match
rule that applies nat-to (note the changed source address). Finally, the
packet passes out on xl0 thanks to rule 16 y, a matching pass rule.
This example really has only one transformation (the nat-to), but the log
(matches) feature allows us to follow the connection’s initial packet through all
matching rules in the rule set, including the source address substitution.
Logging All Packets: log (all)
For most debugging and lightweight monitoring purposes, logging the first
packet in a connection provides enough information. However, sometimes
you may want to log all packets that match certain rules. To do so, use the
(all) logging option in the rules you want to monitor. After making this
change to our minimal rule set, we have the following:
block log (all)
pass log (all) quick proto tcp to port ssh keep state

166 Chapter 9
This option makes the logs quite a bit more verbose. To illustrate just how
much more data log (all) generates, we’ll use the following rule set fragment,
which passes domain name lookups and network time synchronizations:
udp_services = "{ domain, ntp }"
pass log (all) inet proto udp to port $udp_services
With these rules in place, here’s an example of what happens when a
Russian name server sends a domain name request to a server in our network:
$ sudo tcpdump -lnttti pflog0 port domain
tcpdump: WARNING: snaplen raised from 116 to 160
tcpdump: listening on pflog0, link-type PFLOG
Sep 30 14:27:41.260190 212.5.66.14.53 > 194.54.107.19.53:[|domain]
Sep 30 14:27:41.260253 212.5.66.14.53 > 194.54.107.19.53:[|domain]
Sep 30 14:27:41.260267 212.5.66.14.53 > 194.54.107.19.53:[|domain]
Sep 30 14:27:41.260638 194.54.107.19.53 > 212.5.66.14.53:[|domain]
Sep 30 14:27:41.260798 194.54.107.19.53 > 212.5.66.14.53:[|domain]
Sep 30 14:27:41.260923 194.54.107.19.53 > 212.5.66.14.53:[|domain]
We now have six entries instead of just one.
Even with all but port domain filtered out by tcpdump, adding log (all) to
one or more rules considerably increases the amount of data in your logs. If
you need to log all traffic but your gateway’s storage capacity is limited, you
may find yourself shopping for additional storage, and the added I/O activ-
ity may in fact have a negative impact on performance. Also, recording and
storing traffic logs with this level of detail is likely to have legal implications.
LOG RESPONSIBLY!
Creating logs of any kind could have surprising consequences, including some
legal implications. Once you start storing log data generated by your network
traffic, you’re creating a store of information about your users. There may be
good technical and business reasons to store logs for extended periods, but
logging just enough data and storing it for just the right amount of time can be
a fine art.
You probably have some idea of the practical issues related to generat-
ing log data, such as arranging for sufficient storage to retain enough log data
long enough to be useful. The legal implications will vary according to your
location. Some countries and territories have specific requirements for handling
log data, along with restrictions on how that data may be used and how long
logs can be retained. Others require service providers to retain traffic logs for
a specific period of time, in some cases with a requirement to deliver any such
data to law enforcement upon request. Make sure you understand the legal
issues before you build a logging infrastructure.

Logging, Monitoring, and Statistics 167
Logging to Several pflog Interfaces
Versions of PF newer than OpenBSD 4.1 make it possible to direct your log
data to more than one pflog interface. In OpenBSD 4.1, the pflog interface
became a cloneable device, meaning that you can use ifconfig commands to
create several pflog interfaces, in addition to the default pflog0. This makes
it possible to record the log data for different parts of your rule set to sepa-
rate pflog interfaces, and it makes it easier to process the resulting data
separately if necessary.
Moving from the default single pflog0 interface to several pflog inter-
faces requires some changes to your setup that are subtle but effective. To
log to several interfaces, make sure that all the log interfaces your rule set
uses are created. You don’t need to create the devices before the rule set is
loaded; if your rule set logs to a nonexistent interface, the log data is simply
discarded.
When tuning your setup to use several pflog interfaces, you’ll most likely
add the required interfaces from the command line, like so:
$ sudo ifconfig create pflog1
Specify the log device when you add the log keyword to your rule set,
as follows:
pass log (to pflog1) proto tcp to $emailserver port $email
pass log (to pflog1) proto tcp from $emailserver to port smtp
For a more permanent configuration on OpenBSD, create a hostname.
pflog1 file containing only up and similar hostname.pflogN files for any addi-
tional logging interfaces.
On FreeBSD, the configuration of the cloned pflog interfaces belongs
in your rc.conf file in the following form:
ifconfig_pflog1="up"
As of this writing, cloning pflog interfaces on NetBSD isn’t an option.
As you saw in Chapter 6, directing log information for different parts of
your rule set to separate interfaces makes it possible to feed different parts
of the log data PF produces to separate applications. This makes it easier
to have programs like spamlogd process only the relevant information, while
you feed other parts of your PF log data to other log-processing programs.
Logging to syslog, Local or Remote
One way to avoid storing PF log data on the gateway itself is to instruct
your gateway to log to another machine. If you already have a centralized
logging infrastructure in place, this is a fairly logical thing to do, even if
PF’s ordinary logging mechanisms weren’t really designed with traditional
syslog-style logging in mind.

168 Chapter 9
As any old BSD hand will tell you, the traditional syslog system log
facility is a bit naive about managing the data it receives over UDP from
other hosts, with denial-of-service attacks involving full disks one frequently
mentioned danger. There’s also the ever-present risk that log information
will be lost under high load on either individual systems or the network.
Therefore, consider setting up remote logging only if all hosts involved com-
municate over a well-secured and properly dimensioned network. On most
BSDs, syslogd isn’t set up by default to accept log data from other hosts. (See
the syslogd man page for information about how to enable listening for log
data from remote hosts if you plan to use remote syslog logging.)
If you’d still like to do your PF logging via syslog, the following is a
short recipe for how to accomplish this. In ordinary PF setups, pflogd copies
the log data to the log file. When you want to store the log data on a remote
system, you should disable pflog’s data accumulation by changing daemon’s
startup options in rc.conf.local (on OpenBSD), like so:
pflogd_flags="NO"
On FreeBSD and NetBSD, change the pflog_flats= setting line in rc.conf.
Then kill the pflogd process. Next, make sure that the log data, now no
longer collected by pflogd, is transmitted in a meaningful way to your log-
processing system instead. This step has two parts: First, set up your system
logger to transmit data to the log-processing system, and then use tcpdump
with logger to convert the data and inject it into the syslog system.
To set up syslogd to process the data, choose your log facility, log level,
and action and put the resulting line in /etc/syslog.conf. These concepts are
very well explained in man syslog.conf, which is required reading if you want
to understand system logs. The action part is usually a file in a local file-
system. For example, if you’ve already set up the system logger at loghost
.example.com to receive your data, choose log facility local2 with log level
info and enter this line:
local2.info @loghost.example.com
Once you’ve made this change, restart syslogd to make it read the new
settings.
Next, set tcpdump to convert the log data from the pflog device and feed
it to logger, which will then send it to the system logger. Here, we reuse the
tcpdump command from the basic examples earlier in this chapter, with some
useful additions:
$ sudo nohup tcpdump -lnettti pflog0 | logger -t pf -p local2.info &
The nohup command makes sure the process keeps running even if it
doesn’t have a controlling terminal or it’s put in the background (as we do
here with the trailing &). The -l option to the tcpdump command specifies
line-buffered output, which is useful for redirecting to other programs.

Logging, Monitoring, and Statistics 169
The logger option adds the tag pf to identify the PF data in the stream and
specifies log priority with the -p option as local2.info. The result is logged
to the file you specify on the logging host, with entries that will look some-
thing like this:
pf: Sep 21 14:05:11.492590 rule 93/(match) pass in on ath0:
10.168.103.11.15842 > 82.117.50.17.80: [|tcp] (DF)
pf: Sep 21 14:05:11.492648 rule 93/(match) pass out on xl0:
194.54.107.19.15842 > 82.117.50.17.80: [|tcp] (DF)
pf: Sep 21 14:05:11.506289 rule 93/(match) pass in on ath0:
10.168.103.11.27984 > 82.117.50.17.80: [|tcp] (DF)
pf: Sep 21 14:05:11.506330 rule 93/(match) pass out on xl0:
194.54.107.19.27984 > 82.117.50.17.80: [|tcp] (DF)
pf: Sep 21 14:05:11.573561 rule 136/(match) pass in on ath0:
10.168.103.11.6430 > 10.168.103.1.53:[|domain]
pf: Sep 21 14:05:11.574276 rule 136/(match) pass out on xl0:
194.54.107.19.26281 > 209.62.178.21.53:[|domain]
This log fragment shows mainly Web-browsing activities from a client in
a NATed local network, as seen from the gateway’s perspective, with accom-
panying domain name lookups.
Tracking Statistics for Each Rule with Labels
The sequential information you get from retrieving log data basically tracks
packet movements over time. In other contexts, the sequence or history of
connections is less important than aggregates, such as the number of pack-
ets or bytes that have matched a rule since the counters were last cleared.
At the end of Chapter 2, you saw how to use pfctl -s info to view the
global aggregate counters, along with other data. For a more detailed break-
down of the data, track traffic totals on a per-rule basis with a slightly dif-
ferent form of pfctl command, such as pfctl -vs rules, to display statistics
along with the rule, as shown here:
$ pfctl -vs rules
pass inet proto tcp from any to 192.0.2.225 port = smtp flags S/SA keep state label "mail-in"
[ Evaluations: 1664158 Packets: 1601986 Bytes: 763762591 States: 0 ]
[ Inserted: uid 0 pid 24490 ]
pass inet proto tcp from 192.0.2.225 to any port = smtp flags S/SA keep state label "mail-out"
[ Evaluations: 2814933 Packets: 2711211 Bytes: 492510664 States: 0 ]
[ Inserted: uid 0 pid 24490 ]
The format of this output is easy to read, and it’s obviously designed
for contexts in which you want to get an idea of what’s going on at a glance.
If you specify even more verbose output with pfctl -vvs rules, you’ll see
essentially the same display, with rule numbers added. On the other hand,
the output from this command isn’t very well suited for feeding to a script
or other program for further processing. To extract these statistics and a
few more items in a script-friendly format—and to make your own decisions
about which rules are worth tracking)—use rule labels.

170 Chapter 9
Labels do more than identify rules for processing specific kinds of
traffic; they also make it easier to extract the traffic statistics. By attach-
ing labels to rules, you can store certain extra data about parts of your
rule set. For example, you could use labeling to measure bandwidth use
for accounting purposes.
In the following example, we attach the labels mail-in and mail-out to
our pass rules for incoming and outgoing mail traffic, respectively.
pass log proto { tcp, udp } to $emailserver port smtp label "mail-in"
pass log proto { tcp, udp } from $emailserver to port smtp label "mail-out"
Once you’ve loaded the rule set with labels, check the data using pfctl -vsl:
$ sudo pfctl -vsl
u v w x y |
mail-in 1664158 1601986 763762591 887895 682427415 714091 81335176
mail-out 2814933 2711211 492510664 1407278 239776267 1303933 252734397
This output contains the following information:
u The label
v The number of times the rule has been evaluated
w The total number of packets passed
x The total number of bytes passed
y The number of packets passed in
The number of bytes passed in
The number of packets passed out
} The number of bytes passed out
The format of this list makes it very well suited for parsing by scripts
and applications.
The labels accumulate data from the time the rule set is loaded until
their counters are reset. And, in many contexts, it makes sense to set up a
cron job that reads label values at fixed intervals and then puts those values
into permanent storage.
If you choose to run the data collection at fixed intervals, consider col-
lecting the data using pfctl -vsl -z. The z option resets the counters once
pfctl has read them, with the result that your data collector will then fetch
periodic data, accumulated since the command or the script was last run.
NOTE Rules with macros and lists expand to several distinct rules. If your rule set contains
rules with lists and macros that have a label attached, the in-memory result will be a
number of rules, each with a separate, identically named label attached to it. While
this may lead to confusing sudo pfctl -vsl output, it shouldn’t be a problem as long
as the application or script that receives the data can interpret the data correctly by
adding up the totals for the identical labels.

Logging, Monitoring, and Statistics 171
If this type of data collection sounds useful to you, it’s also worth not-
ing that recent PF versions offer the option of collecting traffic metadata
as NetFlow or IPFIX data. See“Collecting NetFlow Data with pflow(4)” on
page 176 for details.
Additional Tools for PF Logs and Statistics
One other important component of staying in control of your network is
having the ability to keep an updated view of your system’s status. In this
section, we’ll examine a selection of monitoring tools that you may find use-
ful. All the tools presented here are available either in the base system or
via the package system on OpenBSD and FreeBSD (and, with some excep-
tions, on NetBSD).
Keeping an Eye on Things with systat
If you’re interested in seeing an instant snapshot of the traffic passing
through your systems right now, the systat program on OpenBSD offers
several useful views. In Chapter 7, we looked briefly at systat queues to see
how traffic was assigned to queues in our traffic-shaping rule sets. Here,
we’ll review some additional useful options.
The systat program is available on all BSD operating systems, in slightly
different versions. On all systems, systat offers views of system statistics,
with some minor variations in syntax and output. For example, the queues
view is one of several systat views available in recent OpenBSD versions, but
not in FreeBSD or NetBSD as of this writing.
For a more general view of the current state table than that offered by
queues, try systat states, which gives a listing very similar to the top(1) pro-
cess listing. Here’s an example of typical systat states output:
2 users Load 0.24 0.28 0.27 (1-16 of 895) Wed Apr 1 14:00:04 2015
PR D SRC DEST STATE AGE EXP PKTS BYTES RATE PEAK AVG RU G
udp O 192.168.103.1:56729 192.168.103.9:12345 1:0 8340m 25 372K 542M 1492 4774 1137 *
tcp I 10.168.103.15:47185 213.187.179.198:22 4:4 62377 86398 2954 613K 13264 23654 10 18
tcp I 10.168.103.15:2796 213.187.179.198:22 4:4 62368 86219 4014 679K 0 0 11 18
tcp I 10.168.103.15:15599 129.240.64.10:6667 4:4 61998 86375 9266 849K 0 58 14 *
tcp O 213.187.179.198:1559 129.240.64.10:6667 4:4 61998 86375 9266 849K 0 58 14 * 1
tcp I 10.168.103.15:8923 140.211.166.4:6667 4:4 61843 86385 15677 4794K 0 299 79 *
tcp O 213.187.179.198:8923 140.211.166.4:6667 4:4 61843 86385 15677 4794K 0 299 79 * 1
tcp I 10.168.103.15:47047 217.17.33.10:6667 4:4 61808 86385 7093 556K 0 88 9 *
tcp O 213.187.179.198:4704 217.17.33.10:6667 4:4 61808 86385 7093 556K 0 88 9 * 1
tcp I 10.168.103.15:30006 203.27.221.42:6667 4:4 61744 86375 6000 487K 0 49 8 *
tcp O 213.187.179.198:3000 203.27.221.42:6667 4:4 61744 86375 6000 487K 0 49 8 * 1
tcp I 10.168.103.15:31709 209.250.145.51:6667 4:4 61744 86385 6646 613K 0 114 10 *
tcp O 213.187.179.198:3170 209.250.145.51:6667 4:4 61744 86385 6646 613K 0 114 10 * 1
tcp I 192.168.103.254:5386 69.90.74.197:80 4:4 56718 29844 10 3282 0 0 0 *
tcp O 213.187.179.198:5386 69.90.74.197:80 4:4 56718 29844 10 3282 0 0 0 * 1
tcp I 10.168.103.15:33241 192.168.103.84:22 4:4 46916 82678 7555 897K 0 0 19 *
If your states don’t fit on one screen, just page through the live display.

172 Chapter 9
Similarly, systat rules displays a live view of packets, bytes, and other
statistics for your loaded rule set, as in this example:
2 users Load 1.25 0.87 0.52 (1-16 of 239) Fri Apr 3 14:01:59 2015
RUL ANCHOR A DIR L Q IF PR K PKTS BYTES STATE MAX INFO
0 M In 26M 12G 4946K all max-mss 1440
1 M Out nfe0 4853K 3162M 94858 inet from 10.0.0.0/8 to any queue(q_def
2 M Out nfe0 3318K 2430M 61672 inet from 192.168.103.0/24 to any queue
3 M Out nfe0 tcp 6404K 4341M 134K from any to any port = www queue(q_web,
4 M Out nfe0 tcp 84298 43M 1594 from any to any port = https queue(q_we
5 M Out nfe0 tcp 502 34677 63 from any to any port = domain queue(q_d
6 M Out nfe0 udp 512K 64M 257K from any to any port = domain queue(q_d
7 M Out nfe0 icmp 11 1008 3 all queue(q_dns, q_pri)
8 B Any L 14638 1346K 0 return all
9 B Any Q 95 5628 0 return from <bruteforce> to any
10 P Any 1139K 1005M 757 all flags any
11 P In Q tcp K 18538 1350K 708 inet from any to any port = ftp
12 P Out tcp K 0 0 0 inet from 127.0.0.1/32 to any port = ftp
13 P Any 1421 128K 134 all flags any
14 P In L egres tcp K 1830K 87M 18933 inet from any to any port = smtp queue
15 P In L egres tcp K 31 5240 2 from <nospamd> to any port = smtp
The systat rules view is especially useful because it offers a live view into
the fully parsed and loaded rule set. For example, if your rule set behaves
oddly, the rules view can point you in the right direction and show you the
flow of packets.
The systat program also offers a view that presents the same data you’d
get via pfctl -s status on the command line. The following example shows
part of the output of systat pf. The systat pf view offers more information
than will fit on most screens, but you can page through the live display of
the data.
2 users Load 0.34 0.64 0.47 (1-16 of 51) Fri Apr 3 14:04:04 2015
TYPE NAME VALUE RATE NOTES
pf Status Enabled
pf Since 139:05:08
pf Debug err
pf Hostid 0x82aea702
nfe0 Bytes In 6217042900 IPv4
nfe0 Bytes In 0 IPv6
nfe0 Bytes Out 5993394114 IPv4
nfe0 Bytes Out 64 IPv6
nfe0 Packets In 12782504 IPv4, Passed
nfe0 Packets In 0 IPv6, Passed
nfe0 Packets In 11096 IPv4, Blocked
nfe0 Packets In 0 IPv6, Blocked
nfe0 Packets Out 12551463 IPv4, Passed
nfe0 Packets Out 1 IPv6, Passed
nfe0 Packets Out 167 IPv4, Blocked

Logging, Monitoring, and Statistics 173
The systat program offers quite a few other views, including network-
related ones, such as netstat, vmstat for virtual memory statistics, and iostat
for input/output statistics by device. You can cycle through all systat views
using the left and right cursor keys. (See man systat for full details.)
Keeping an Eye on Things with pftop
If your system doesn’t have a systat version with the PF-related views, you
can still keep an eye on what’s passing into and out of your network in real
time using Can Erkin Acar’s pftop. This command shows a running snap-
shot of your traffic. pftop isn’t included in the base system, but it’s available
as a package—in ports on OpenBSD and FreeBSD as sysutils/pftop1 and on
NetBSD via pkgsrc as sysutils/pftop. Here’s an example of its output:
pfTop: Up State 1-17/771, View: default, Order: none, Cache: 10000 14:05:42
PR DIR SRC DEST STATE AGE EXP PKTS BYTES
udp Out 192.168.103.1:56729 192.168.103.9:12345 SINGLE:NO_TRAFFIC 8346m 22 373K 543M
tcp In 10.168.103.15:47185 213.187.179.198:22 ESTABLISHED:ESTABLISHED 62715 86395 3232 667K
tcp In 10.168.103.15:2796 213.187.179.198:22 ESTABLISHED:ESTABLISHED 62706 86369 4071 686K
tcp In 10.168.103.15:15599 129.240.64.10:6667 ESTABLISHED:ESTABLISHED 62336 86379 9318 854K
tcp Out 213.187.179.198:15599 129.240.64.10:6667 ESTABLISHED:ESTABLISHED 62336 86379 9318 854K
tcp In 10.168.103.15:8923 140.211.166.4:6667 ESTABLISHED:ESTABLISHED 62181 86380 15755 4821K
tcp Out 213.187.179.198:8923 140.211.166.4:6667 ESTABLISHED:ESTABLISHED 62181 86380 15755 4821K
tcp In 10.168.103.15:47047 217.17.33.10:6667 ESTABLISHED:ESTABLISHED 62146 86379 7132 559K
tcp Out 213.187.179.198:47047 217.17.33.10:6667 ESTABLISHED:ESTABLISHED 62146 86379 7132 559K
tcp In 10.168.103.15:30006 203.27.221.42:6667 ESTABLISHED:ESTABLISHED 62082 86380 6034 489K
tcp Out 213.187.179.198:30006 203.27.221.42:6667 ESTABLISHED:ESTABLISHED 62082 86380 6034 489K
tcp In 10.168.103.15:31709 209.250.145.51:6667 ESTABLISHED:ESTABLISHED 62082 86379 6685 617K
tcp Out 213.187.179.198:31709 209.250.145.51:6667 ESTABLISHED:ESTABLISHED 62082 86379 6685 617K
tcp In 192.168.103.254:53863 69.90.74.197:80 ESTABLISHED:ESTABLISHED 57056 29506 10 3282
tcp Out 213.187.179.198:53863 69.90.74.197:80 ESTABLISHED:ESTABLISHED 57056 29506 10 3282
tcp In 10.168.103.15:33241 192.168.103.84:22 ESTABLISHED:ESTABLISHED 47254 82340 7555 897K
tcp Out 10.168.103.15:33241 192.168.103.84:22 ESTABLISHED:ESTABLISHED 47254 82340 7555 897K
You can use pftop to sort your connections by a number of different crite-
ria, including by PF rule, volume, age, and source and destination addresses.
Graphing Your Traffic with pfstat
Once you have a system up and running and producing data, a graphical
representation of traffic data is a useful way to view and analyze your data.
One way to graph your PF data is with pfstat, a utility developed by Daniel
Hartmeier to extract and present the statistical data that’s automatically
generated by PF. The pfstat tool is available via the OpenBSD package sys-
tem or as the port net/pfstat, via the FreeBSD ports system as sysutils/pfstat,
and via NetBSD pkgsrc as sysutils/pfstat.
1. On OpenBSD, all pftop functionality is included in various systat views, as described in the
previous section.

174 Chapter 9
The pfstat program collects the data you specify in the configuration
file and presents that data as JPG or PNG graphics files. The data source
can be either PF running on the local system via the /dev/pf device or data
collected from a remote computer running the companion pfstatd daemon.
To set up pfstat, you simply decide which parts of your PF data you want
to graph and how, and then you write the configuration file and start cron
jobs to collect the data and generate your graphs. The program comes with
a well-annotated sample configuration file and a useful man page. The
sample configuration is a useful starting point for writing your own con-
figuration file. For example, the following pfstat.conf fragment is very close
to one you’ll find in the sample configuration:2
collect 8 = global states inserts diff
collect 9 = global states removals diff
collect 10 = global states searches diff
image "/var/www/users/peter/bsdly.net/pfstat-states.jpg" {
from 1 days to now
width 980 height 300
left
graph 8 "inserts" "states/s" color 0 192 0 filled,
graph 9 "removals" "states/s" color 0 0 255
right
graph 10 "searches" "states/s" color 255 0 0
}
The configuration here starts off with three collect statements, where
each of the data series is assigned a unique numeric identifier. Here, we
capture the number of insertions, removals, and searches in the state
table. Next up is the image definition, which specifies the data that is to be
graphed. The from line specifies the period to display (from 1 days to now
means that only data collected during the last 24 hours is to be displayed).
width and height specify the graph size measured in number of pixels in
each direction. The graph statements specify how the data series are dis-
played as well as the graph legends. Collecting state insertions, removals,
and searches once a minute and then graphing the data collected over one
day produces a graph roughly like the one in Figure 9-1.
2. The color values listed in the configuration example would give you a graph with red, blue,
and green lines. For the print version of this book, we changed the colors to grayscale values:
0 192 0 became 105 105 105, 0 0 255 became 192 192 192, and 255 0 0 became 0 0 0.

Logging, Monitoring, and Statistics 175
Figure 9-1: State table statistics, 24-hour time scale
The graph can be tweaked to provide a more detailed view of the same
data. For example, to see the data for the last hour in a slightly higher reso-
lution, change the period to from 1 hours to now and the dimensions to width
600 height 300. The result is something like the graph in Figure 9-2.
Figure 9-2: State table statistics, 1-hour time scale
The pfstat home page at http://www.benzedrine.cx/pfstat.html contains
several examples, with demonstrations in the form of live graphs of the data
from the benzedrine.cx domain’s gateways. By reading the examples and tap-
ping your own knowledge of your traffic, you should be able to create pfstat
configurations that are well suited to your site’s needs.
NOTE In addition to pfstat, other system-monitoring packages offer at least some PF-
monitoring features. One such package is the popular symon utility, which is usually
configured with the symon data gatherer on all monitored systems and at least one host
with symux and the optional syweb Web interface. Based on round-robin database tool
(RRDtool), symon has a useful interface for recording PF data and offers a useful
graphical interface for displaying PF statistics via the syweb Web interface. symon is
available as a port or package on OpenBSD and FreeBSD as sysutils/symon, and
the syweb Web interface is available as www/syweb.

176 Chapter 9
Collecting NetFlow Data with pflow(4)
NetFlow is a network data collection and analysis method that has spawned
many supporting tools for recording and analyzing data about TCP/IP
connections. NetFlow originated at Cisco and over time has become an
essential feature in various network equipment as a tool for network man-
agement and analysis.
The NetFlow data model defines a network flow as a unidirectional
sequence of packets with the same source and destination IP address and
protocol. For example, a TCP connection will appear in NetFlow data as
two flows: one in each direction.
PF data can be made available to NetFlow tools via the pflow(4) pseudo-
interface that was introduced in OpenBSD 4.5 along with the pflow state
option. Essentially, all the information you’d expect to find in a NetFlow-
style flow record is easily derived from the data PF keeps in the state table,
and the pflow interface offers a straightforward way to export PF state-table
data in this processing-friendly and well-documented format. As with other
logging, you enable NetFlow data collection in your PF rule set on a per-
rule basis.
A complete NetFlow-based network-monitoring system consists of sev-
eral distinct parts. The NetFlow data originates at one or more sensors that
generate data about network traffic. The sensors forward data about the
flows to a collector, which stores the data it receives. Finally, a reporting or
analysis system lets you extract and process the data.3
Setting Up the NetFlow Sensor
The NetFlow sensor requires two components: one or more configured
pflow(4) devices and at least one pass rule in your rule set with the pflow state
option enabled. The pflow interfaces are created with two required param-
eters: the flow source IP address and flow destination’s IP address and port.
Here’s an example of the ifconfig command for the /etc/hostname.pflow0 file:
flowsrc 192.0.2.1 flowdst 192.0.2.105:3001
From the command line, use this command:
$ sudo ifconfig pflow0 create flowsrc 192.0.2.1 flowdst 192.0.2.105:3001
In both cases, this command sets up the host to send NetFlow data with
a flow source address 192.0.2.1 to a collector that should listen for NetFlow
data at 192.0.2.105, UDP port 3001.
NOTE It’s possible to set up several pflow devices with separate flow destinations. It’s not
currently possible, however, to specify on a per-rule basis which pflow device should
receive the generated data.
3. For a more in-depth treatment of network analysis with NetFlow-based tools, see Network
Flow Analysis by Michael W. Lucas (No Starch Press, 2010).

Logging, Monitoring, and Statistics 177
After enabling the pflow device, specify in /etc/pf.conf which pass rules
should provide NetFlow data to the sensor. For example, if your main con-
cern is to collect data on your clients’ email traffic to IPv4 hosts, this rule
would set up the necessary sensor:
pass out log inet proto tcp from <client> to port $email \
label client-email keep state (pflow)
When pflow was first introduced to PF, the immediate reaction from
early adopters was that more likely than not, they’d want to add the pflow
option to most pass rules in their rule sets. This led PF developer Henning
Brauer to introduce another useful PF feature—the ability to set state defaults
that apply to all rules unless otherwise specified. For example, if you add
the following line at the start of your rule set, all pass rules in the configura-
tion will generate NetFlow data to be exported via the pflow device.
set state-defaults pflow
With at least one pflow device configured and at least one rule in your
pf.conf that generates data for export via the pflow device, you’re almost fin-
ished setting up the sensor. You may still need to add a rule, however, that
allows the UDP data to flow from the IP address you specified as the flow
data source to the collector’s IP address and target port at the flow destina-
tion. Once you’ve completed this last step, you should be ready to turn your
attention to collecting the data for further processing.
NetFlow Data Collecting, Reporting, and Analysis
If your site has a NetFlow-based collection and analysis infrastructure in
place, you may already have added the necessary configuration to feed
the PF-originated data into the data collection and analysis system. If
you haven’t yet set up a flow-analysis environment, there are a number of
options available.
The OpenBSD packages system offers three NetFlow collector and
analysis packages: flow-tools, flowd, and nfdump.4 All three systems have a
dedicated and competent developer and user community as well as various
add-ons, including graphical Web interfaces. flow-tools is the main compo-
nent in many sites’ flow-analysis setups. The nfdump fans point to the nfsen
analysis package that integrates the nfdump tools in a powerful and flexible
Web-based analysis frontend that will, among other things, display the
command-line equivalent of your GUI selections. You’ll find the command-
line display useful when you need to drill down further into the data than
the selections in the GUI allow. You can copy the command displayed in the
GUI and make any further adjustments you need on the nfdump command
line in a shell session or script to extract the exact data you want.
4. The actively maintained project home pages for flow-tools and nfdump are http://code.google.com/
p/flow-tools/ and http://nfdump.sourceforge.net/. (The older versions should still be available from
http://www.splintered.net/sw/flow-tools/.) The nfsen Web frontend has a project page at http://
nfsen.sourceforge.net/. For the latest information about flowd, visit http://www.mindrot.org/flowd.html.

178 Chapter 9
To illustrate some basic NetFlow collection and how to extract a subset
of the collected data for further analysis, we’ll use flowd, developed by long-
time OpenBSD developer Damien Miller and available via the package sys-
tems (on OpenBSD as net/flowd and on FreeBSD as net-mgmt/flowd).
I’ve chosen to use flowd here mainly because it was developed to be
small, simple, and secure. As you’ll see, flowd still manages to be quite use-
ful and flexible. Flow data operations with other tools will differ in some
details, but the underlying principles remain the same.
When compared to other NetFlow collector suites, flowd is very com-
pact, with only two executable programs—the collector daemon flowd and
the flow-filtering and presentation program flowd-reader—as well as the
supporting library and controlling configuration file. The documentation is
adequate, if a bit terse, and the sample /etc/flowd.conf file contains a gener-
ous number of comments. Based on the man pages and the comments in
the sample configuration file, it shouldn’t take you long to create a useful
collector configuration.
After stripping out any comment lines—using grep -v \# /etc/flowd.conf
or similar—a very basic flowd configuration could look like this:
logfile "/var/log/flowd"
listen on 192.0.2.105:3001
flow source 192.0.2.1
store ALL
CHOOSING A COLLECTOR
The choice of collector is somewhat tied to the choice of analysis package.
Perhaps because the collectors tend to store flow data in their own unique for-
mats, most reporting and analysis backends are developed with a distinctive
bias for one or the other collector.
Regardless of your choice of NetFlow collector, the familiar logging cave-
ats apply: Detailed traffic log information will require storage. In the case of
NetFlow, each flow will generate a record of fairly fixed size, and anecdotal evi-
dence indicates that even modest collection profiles on busy sites can generate
gigabytes of NetFlow data per day. The amount of storage you’ll need is directly
proportional to the number of connections and how long you keep the original
NetFlow data. Finally, recording and storing traffic logs with this level of detail is
likely to have legal implications.
Collectors generally offer filtering features that let you discard data
about specific hosts or networks or even discard some parts of the NetFlow
records themselves, either globally or for data about specific hosts or networks.

Logging, Monitoring, and Statistics 179
While this configuration barely contains more information than the
pflow interface’s configuration in the earlier description of setting up the
sensor, it does include two important items:
• The logfile line tells us where the collected data is to be stored (and
reveals that flowd tends to store all data in a single file).
• The final line tells us that flowd will store all fields in the data it receives
from the designated flow source.
With this configuration in place, start up the flowd daemon, and almost
immediately you should see the /var/log/flowd file grow as network traffic
passes through your gateway and flow records are collected. After a while,
you should be able to look at the data using flowd’s companion program
flowd-reader. For example, with all fields stored, the data for one name lookup
from a host on the NATed local network looks like this in flowd-reader’s
default view:
$ sudo flowd-reader /var/log/flowd
FLOW recv_time 2011-04-01T21:15:53.607179 proto 17 tcpflags 00 tos 00 agent
[213.187.179.198] src [192.0.2.254]:55108 dst [192.0.2.1]:53 packets 1 octets
62
FLOW recv_time 2011-04-01T21:15:53.607179 proto 17 tcpflags 00 tos 00 agent
[213.187.179.198] src [192.0.2.1]:53 dst [192.0.2.254]:55108 packets 1 octets
129
Notice that the lookup generates two flows: one in each direction.
The first flow is identified mainly by the time it was received, followed
by the protocol used (protocol 17 is UDP, as /etc/protocols will tell you). The
connection had both TCP and TOS flags unset, and the collector received
the data from our gateway at 192.0.2.1. The flow’s source address was
192.0.2.254, source port 55108, and the destination address was 192.0.2.1,
source port 53, conventionally the DNS port. The flow consisted of 1 packet
with a payload of 62 octets. The return flow was received by the collector
at the same time, and we see that this flow has the source and destination
reversed, with a slightly larger payload of 129 octets. flowd-reader’s output
format lends itself to parsing by regular expressions for postprocessing in
reporting tools or plotting software.
You might think that this data is all anyone would ever want to know
about any particular set of network flows, but it’s possible to extract even
more detailed information. For example, using the flowd-reader -v option
for verbose output, you might see something like this:
FLOW recv_time 2011-04-01T21:15:53.607179 proto 17 tcpflags 00 tos 00
agent [213.187.179.198] src [192.0.2.254]:55108 dst [192.0.2.1]:53 gateway
[0.0.0.0] packets 1 octets 62 in_if 0 out_if 0 sys_uptime_ms 1w5d19m59s.000
time_sec 2011-04-01T21:15:53 time_nanosec 103798508 netflow ver 5 flow_start
1w5d19m24s.000 flow_finish 1w5d19m29s.000 src_AS 0 src_masklen 0 dst_AS 0
dst_masklen 0 engine_type 10752 engine_id 10752 seq 5184351 source 0 crc32
759adcbd

180 Chapter 9
FLOW recv_time 2011-04-01T21:15:53.607179 proto 17 tcpflags 00 tos 00
agent [213.187.179.198] src [192.0.2.1]:53 dst [192.0.2.254]:55108 gateway
[0.0.0.0] packets 1 octets 129 in_if 0 out_if 0 sys_uptime_ms 1w5d19m59s.000
time_sec 2011-04-01T21:15:53 time_nanosec 103798508 netflow ver 5 flow_start
1w5d19m24s.000 flow_finish 1w5d19m29s.000 src_AS 0 src_masklen 0 dst_AS 0
dst_masklen 0 engine_type 10752 engine_id 10752 seq 5184351 source 0 crc32
f43cbb22
The gateway field indicates that the sensor itself served as the gateway
for this connection. You see a list of the interfaces involved (the in_if and
out_if values), the sensor’s system uptime (sys_uptime_ms), and a host of
other parameters—such as AS numbers (src_AS and dst_AS)—that may be
useful for statistics or filtering purposes in various contexts. Once again,
the output is ideally suited to filtering via regular expressions.
You don’t need to rely on external software for the initial filtering on
the data you collect from your pflow sensor. flowd itself offers a range of fil-
tering features that make it possible to store only the data you need. One
approach is to put the filtering expressions in the flowd.conf, as in the follow-
ing example (with the comments stripped to save space):
logfile "/var/log/flowd.compact"
listen on 192.0.2.105:3001
flow source 192.0.2.1
store SRC_ADDR
store DST_ADDR
store SRCDST_PORT
store PACKETS
store OCTETS
internalnet = "192.0.2.0/24"
unwired = "10.168.103.0/24"
discard src $internalnet
discard dst $internalnet
discard src $unwired
discard dst $unwired
You can choose to store only certain fields in the flow records. For
example, in configurations where there’s only one collector or agent, the
agent field serves no useful purpose and doesn’t need to be stored. In this
configuration, we choose to store only the source and destination address
and port, the number of packets, and the number of octets.
You can limit the data you store even further. The macros internalnet
and unwired expand to two NATed local networks, and the four discard lines
following the macro definitions mean that flowd discards any data it receives
about flows with either source or destination addresses in either of those
local networks. The result is a more compact set of data, tailored to your
specific needs, and you see only routable addresses and the address of the
sensor gateway’s external interface:
$ sudo flowd-reader /var/log/flowd.compact | head
FLOW src [193.213.112.71]:38468 dst [192.0.2.1]:53 packets 1 octets 79
FLOW src [192.0.2.1]:53 dst [193.213.112.71]:38468 packets 1 octets 126

Logging, Monitoring, and Statistics 181
FLOW src [200.91.75.5]:33773 dst [192.0.2.1]:53 packets 1 octets 66
FLOW src [192.0.2.1]:53 dst [200.91.75.5]:33773 packets 1 octets 245
FLOW src [200.91.75.5]:3310 dst [192.0.2.1]:53 packets 1 octets 75
FLOW src [192.0.2.1]:53 dst [200.91.75.5]:3310 packets 1 octets 199
FLOW src [200.91.75.5]:2874 dst [192.0.2.1]:53 packets 1 octets 75
FLOW src [192.0.2.1]:53 dst [200.91.75.5]:2874 packets 1 octets 122
FLOW src [192.0.2.1]:15393 dst [158.37.91.134]:123 packets 1 octets 76
FLOW src [158.37.91.134]:123 dst [192.0.2.1]:15393 packets 1 octets 76
Even with the verbose option, flowd-reader’s display reveals only what
you explicitly specify in the filtering configuration:
$ sudo flowd-reader -v /var/log/flowd.compact | head
LOGFILE /var/log/flowd.compact
FLOW src [193.213.112.71]:38468 dst [192.0.2.1]:53 packets 1 octets 79
FLOW src [192.0.2.1]:53 dst [193.213.112.71]:38468 packets 1 octets 126
FLOW src [200.91.75.5]:33773 dst [192.0.2.1]:53 packets 1 octets 66
FLOW src [192.0.2.1]:53 dst [200.91.75.5]:33773 packets 1 octets 245
FLOW src [200.91.75.5]:3310 dst [192.0.2.1]:53 packets 1 octets 75
FLOW src [192.0.2.1]:53 dst [200.91.75.5]:3310 packets 1 octets 199
FLOW src [200.91.75.5]:2874 dst [192.0.2.1]:53 packets 1 octets 75
FLOW src [192.0.2.1]:53 dst [200.91.75.5]:2874 packets 1 octets 122
FLOW src [192.0.2.1]:15393 dst [158.37.91.134]:123 packets 1 octets 76
Fortunately, flowd doesn’t force you to make all your filtering decisions
when your collector receives the flow data from the sensor. Using the -f flag,
you can specify a separate file with filtering statements to extract specific
data from a larger set of collected flow data. For example, to see HTTP traffic
to your Web server, you could write a filter that stores only flows with your
Web server’s address and TCP port 80 as the destination or flows with
your Web server and TCP port 80 as the source:
webserver = 192.0.2.227
discard all
accept dst $webserver port 80 proto tcp
accept src $webserver port 80 proto tcp
store RECV_TIME
store SRC_ADDR
store DST_ADDR
store PACKETS
store OCTETS
Assuming you stored the filter in towebserver.flowdfilter, you could then
extract traffic matching your filtering criteria from /var/log/flowd, like this:
$ sudo flowd-reader -v -f towebserver.flowdfilter /var/log/flowd | tail
FLOW recv_time 2011-04-01T21:13:15.505524 src [89.250.115.174] dst
[192.0.2.227] packets 6 octets 414
FLOW recv_time 2011-04-01T21:13:15.505524 src [192.0.2.227] dst
[89.250.115.174] packets 4 octets 725
FLOW recv_time 2011-04-01T21:13:49.605833 src [216.99.96.53] dst [192.0.2.227]
packets 141 octets 7481

182 Chapter 9
FLOW recv_time 2011-04-01T21:13:49.605833 src [192.0.2.227] dst [216.99.96.53]
packets 212 octets 308264
FLOW recv_time 2011-04-01T21:14:04.606002 src [91.121.94.14] dst [192.0.2.227]
packets 125 octets 6634
FLOW recv_time 2011-04-01T21:14:04.606002 src [192.0.2.227] dst [91.121.94.14]
packets 213 octets 308316
FLOW recv_time 2011-04-01T21:14:38.606384 src [207.46.199.44] dst
[192.0.2.227] packets 10 octets 642
FLOW recv_time 2011-04-01T21:14:38.606384 src [192.0.2.227] dst
[207.46.199.44] packets 13 octets 16438
FLOW recv_time 2011-04-01T21:15:14.606768 src [213.187.176.94] dst
[192.0.2.227] packets 141 octets 7469
FLOW recv_time 2011-04-01T21:15:14.606768 src [192.0.2.227] dst
[213.187.176.94] packets 213 octets 308278
In addition to the filtering options demonstrated here, the flowd filter-
ing functions take a number of other options. Some of those options will
be familiar from other filtering contexts such as PF, including a range of
network-oriented parameters; others are more oriented to extracting data
on flows originating at specific dates or time periods and other storage-
oriented parameters. The full story, as always, is found in man flowd.conf.
Once you’ve extracted the data you need, you have several tools avail-
able for processing and presenting your data.
Collecting NetFlow Data with pfflowd
For systems that don’t support NetFlow data export via pflow, NetFlow sup-
port is available via the pfflowd package. As we already saw in the previous
section, PF state table data maps very well to the NetFlow data model, and
pfflowd is intended to record state changes from the local system’s pfsync
device. Once enabled, pfflowd acts as a NetFlow sensor that converts pfsync
data to NetFlow format for transmission to a NetFlow collector on the network.
The pfflowd tool was written and is maintained by Damien Miller and
is available from http://www.mindrot.org/projects/pfflowd/ as well as through
the package systems on OpenBSD and FreeBSD as net/pfflowd. The lack of
pfsync support on NetBSD means that pfflowd isn’t available on that plat-
form as of this writing.
SNMP Tools and PF-Related SNMP MIBs
Simple Network Management Protocol (SNMP) was designed to let network
administrators collect and monitor key data about how their systems run
and change configurations on multiple network nodes from a centralized
system.5 The SNMP protocol comes with a well-defined interface and a
method for extending the management information base (MIB), which defines
the managed devices and objects.
5. The protocol debuted with RFC 1067 in August 1988 and is now in its third major version
as defined in RFCs 3411 through 3418.
Logging, Monitoring, and Statistics 183
Both proprietary and open source network management and monitor-
ing systems generally have SNMP support in one form or the other, and in
some products, it’s a core feature. On the BSDs, SNMP support has gener-
ally come in the form of the net-snmp package, which provides the tools you
need to retrieve SNMP data and to collect data for retrieval by manage-
ment systems. The package is available on OpenBSD as net/net-snmp, on
FreeBSD as net-mgmt/net-snmp, and on NetBSD as net/net-snmp. OpenBSD’s
snmpd (written mainly by Reyk Floeter) debuted as part of the base system
in OpenBSD 4.3 and implements all required SNMP functionality. (See
man snmpd and man snmpd.conf for details.)
There are MIBs to make PF data available to SNMP monitoring.
Joel Knight maintains the MIBs for retrieving data on PF, CARP, and
OpenBSD kernel sensors, and he offers them for download from http://
www.packetmischief.ca/openbsd/snmp/. The site also offers patches to the
net-snmp package to integrate the OpenBSD MIBs.
After installing the package and the extension, your SNMP-capable
monitoring systems will be able to watch PF data in any detail you desire.
(FreeBSD’s bsnmpd includes a PF module. See the bsnmpd man page for details.)
Log Data as the Basis for Effective Debugging
In this chapter, we walked through the basics of collecting, displaying, and
interpreting data about a running system with PF enabled. Knowing how to
find and use information about how your system behaves is useful for sev-
eral purposes.
Keeping track of the status of a running system is useful in itself, but
the ability to read and interpret log data is even more essential when testing
your setup. Another prime use for log data is to track the effect of changes
you make in the configuration, such as when tuning your system to give
optimal performance. In the next chapter, we’ll focus on checking your
configuration and tuning it for optimal performance, based on log data
and other observations.

10
GETTING YOUR SETUP JUST RIGHT
By now, you’ve spent significant time
designing your network and implement-
ing that design in your PF configuration.
Getting your setup just right—that is, remov-
ing any remaining setup bugs and inefficiencies—
can be quite challenging at times.
This chapter describes options and methods that will help you get the
setup you need. First, we’ll take a look at global options and settings that
can have a profound influence on how your configuration behaves.
Things You Can Tweak and What You Probably Should
Leave Alone
Network configurations are inherently very tweakable. While browsing the
pf.conf man page or other reference documentation, it’s easy to be over-
whelmed by the number of options and settings that you could conceivably
adjust in order to get that perfectly optimized setup.

186 Chapter 10
Keep in mind that for PF in general, the defaults are sane for most set-
ups. Some settings and variables lend themselves to tuning; others should
come with a big warning that they should be adjusted only in highly unusual
circumstances, if at all.
Here, we’ll look at some of the global settings that you should know
about, although you won’t need to change them in most circumstances.
These options are written as set option setting and go after any macro
definitions in your pf.conf file but before translation or filtering rules.
NOTE If you read the pf.conf man page, you’ll discover that a few other options are avail-
able. However, most of those aren’t relevant in a network-testing and performance-
tuning context.
Block Policy
The block-policy option determines which feedback, if any, PF will give
to hosts that try to create connections that are subsequently blocked. The
option has two possible values:
• drop drops blocked packets with no feedback.
• return returns with status codes, such as Connection refused or similar.
The correct strategy for block policies has been the subject of consider-
able discussion over the years. The default setting for block-policy is drop,
which means that the packet is silently dropped without any feedback.
Silently dropping packets, however, makes it likely that the sender will
resend the unacknowledged packets rather than drop the connection.
Thus, the sender may keep up the effort until the relevant timeout counter
expires. If you don’t want this behavior to be the default in your setup, set
the block policy to return:
set block-policy return
This setting means that the sender’s networking stack will receive an
unambiguous signal indicating that the connection was refused.
Whichever block-policy option you use will specify the global default
for your block policy. If necessary, however, you can still vary the block-
ing type for specific rules. For example, you could change the brute-force
protection rule set from Chapter 6 to set block-policy to return but also use
block drop quick from <bruteforce> to make the brute forcers waste time if
they stick around once they’ve been added to the <bruteforce> table. You
could also specify drop for traffic from nonroutable addresses coming in

Getting Your Setup Just Right 187
on your Internet-facing interface or other clearly nondesirable traffic, such
as attempts to enlist your gear in amplifying a distributed denial-of-service
(DDoS) attack.1
Skip Interfaces
The skip option lets you exclude specific interfaces from all PF process-
ing. The net effect is like a pass-all rule for the interface, but it actually
disables all PF processing on the interface. For example, you can use this
option to disable filtering on the loopback interface group, where filtering
in most configurations adds little in terms of security or convenience:
set skip on lo
In fact, filtering on the loopback interface is almost never useful, and it
can lead to odd results with a number of common programs and services.
The default is that skip is unset, which means that all configured interfaces
can take part in PF processing. In addition to making your rule set slightly
simpler, setting skip on interfaces where you don’t want to perform filtering
results in a slight performance gain.
State Policy
The state-policy option specifies how PF matches packets to the state table.
It has two possible values:
• With the default floating state policy, traffic can match state on all
interfaces, not just the one where the state was created.
• With an if-bound policy, traffic will match only on the interface where
the state is created; traffic on other interfaces will not match the exist-
ing state.
Like the block-policy option, this option specifies the global state-match-
ing policy, but you can override the state-matching policy on a per-rule basis
if needed. For example, in a rule set with the default floating policy, you
could have a rule like this:
pass out on egress inet proto tcp to any port $allowed modulate state (if-bound)
With this rule, any return traffic trying to pass back in would need to
pass on the same interface where the state was created in order to match
the state-table entry.
1. If you’ve yet to be hit by this particular kind of nastiness, you will be. Here’s a writeup about
a DDOS situation where the hamfistedness was about equally distributed between both sides—
the attacker and the attacked: http://bsdly.blogspot.com/2012/12/ddos-bots-are-people-or-manned-by
-some.html. Your attackers will likely be smarter and better equipped than these.

188 Chapter 10
The situations in which an if-bound policy is useful are rare enough that
you should leave this setting at the default.
State Defaults
Introduced in OpenBSD 4.5, the state-defaults option enables you to set
specific state options as the default options for all rules in the rule set—
unless those state options are specifically overridden by other options in
individual rules.
Here’s a common example:
set state-defaults pflow
This option sets up all pass rules in the configuration to generate
NetFlow data to be exported via a pflow device.
In some contexts, it makes sense to apply state-tracking options, such as
connection limits, as a global state default for the entire rule set. Here’s an
example:
set state-defaults max 1500, max-src-conn 100, source-track rule
This option sets the default maximum number of state entries per rule
to 1,500, with a maximum of 100 simultaneous connections from any one
host and with separate limits for each rule in the loaded rule set.
Any option that’s valid inside parentheses for keep state in an individ-
ual rule can also be included in a set state-defaults statement. Setting state
defaults in this way is useful if there are state options that aren’t already sys-
tem defaults that you want to apply to all rules in your configuration.
Timeouts
The timeout option sets the timeouts and related options for various interac-
tions with the state-table entries. The majority of the available parameters
are protocol-specific values stored in seconds and prefixed tcp., udp., icmp.,
and other.. However, adaptive.start and adaptive.end denote the number of
state-table entries.
The following timeout options affect state-table memory use and, to
some extent, lookup speed:
• The adaptive.start and adaptive.end values set the limits for scaling down
timeout values once the number of state entries reaches the adaptive.start
value. When the number of states reaches adaptive.end, all timeouts are
set to 0, essentially expiring all states immediately. The defaults are
6,000 and 12,000 (calculated as 60 percent and 120 percent of the state
limit, respectively). These settings are intimately related to the memory-
pool limit parameters you set via the limit option.
• The interval value denotes the number of seconds between purges of
expired states and fragments. The default is 10 seconds.

Getting Your Setup Just Right 189
• The frag value denotes the number of seconds a fragment will be kept
in an unassembled state before it’s discarded. The default is 30 seconds.
• When set, src.track denotes the number of seconds source-tracking
data will be kept after the last state has expired. The default is 0 seconds.
You can inspect the current settings for all timeout parameters with
pfctl -s timeouts. For example, the following display shows a system run-
ning with default values:
$ sudo pfctl -s timeouts
tcp.first 120s
tcp.opening 30s
tcp.established 86400s
tcp.closing 900s
tcp.finwait 45s
tcp.closed 90s
tcp.tsdiff 30s
udp.first 60s
udp.single 30s
udp.multiple 60s
icmp.first 20s
icmp.error 10s
other.first 60s
other.single 30s
other.multiple 60s
frag 30s
interval 10s
adaptive.start 6000 states
adaptive.end 12000 states
src.track 0s
These options can be used to tweak your setup for performance. How-
ever, changing the protocol-specific settings from the default values creates
a significant risk that valid but idle connections might be dropped pre-
maturely or blocked outright.
Limits
The limit option sets the size of the memory pools PF uses for state tables
and address tables. These are hard limits, so you may need to increase or
tune the values for various reasons. If your network is a busy one with larger
numbers than the default values allow for, or if your setup requires large
address tables or a large number of tables, then this section will be very rel-
evant to you.
Keep in mind that the total amount of memory available through mem-
ory pools is taken from the kernel memory space, and the total available is a
function of total available kernel memory. Kernel memory is to some extent
dynamic, but the amount of memory allocated to the kernel can never
equal or exceed all physical memory in the system. (If that happened, there
would be no space for user-mode programs to run.)

190 Chapter 10
The amount of available pool memory depends on which hardware plat-
form you use as well as on a number of hard-to-predict variables specific to
the local system. On the i386 architecture, the maximum kernel memory is
in the 768MB to 1GB range, depending on a number of factors, including
the number and kind of hardware devices in the system. The amount actu-
ally available for allocation to memory pools comes out of this total, again
depending on a number of system-specific variables.
To inspect the current limit settings, use pfctl -sm. Typical output looks
like this:
$ sudo pfctl -sm
states hard limit 10000
src-nodes hard limit 10000
frags hard limit 5000
tables hard limit 1000
table-entries hard limit 200000
To change these values, edit pf.conf to include one or more lines with
new limit values. For example, you could use the following lines to raise the
hard limit for the number of states to 25,000 and for the number of table
entries to 300,000:
set limit states 25000
set limit table-entries 300000
You can also set several limit parameters at the same time in a single
line by enclosing them in brackets:
set limit { states 25000, src-nodes 25000, table-entries 300000 }
In the end, other than possibly increasing these three parameters for
larger installations, you almost certainly shouldn’t change the limits at all.
If you do, however, it’s important to watch your system logs for any indica-
tion that your changed limits have undesirable side effects or don’t fit in
available memory. Setting the debug level to a higher value is potentially
quite useful for watching the effects of tuning limit parameters.
Debug
The debug option determines what, if any, error information PF will gener-
ate at the kern.debug log level. The default value is err, which means that
only serious errors will be logged. Since OpenBSD 4.7, the log levels here
correspond to the ordinary syslog levels, which range from emerg (panics are
logged), alert (correctable but very serious errors are logged), crit (critical
conditions are logged), and err (errors are logged) to warning (warnings are
logged), notice (unusual conditions are logged), info (informational mes-
sages are logged), and debug (full debugging information, likely only useful
to developers, is logged).

Getting Your Setup Just Right 191
NOTE In pre–OpenBSD 4.7 versions, PF used its own log-level system, with a default of
urgent (equivalent to err in the new system). The other possible settings were none (no
messages), misc (reporting slightly more than urgent), and loud (producing status
messages for most operations). The pfctl parser still accepts the older-style debug lev-
els for compatibility.
After one of my gateways ran at the debug level for a while, this is what a
typical chunk of the /var/log/messages file looked like:
$ tail -f /var/log/messages
Oct 4 11:41:11 skapet /bsd: pf_map_addr: selected address 194.54.107.19
Oct 4 11:41:15 skapet /bsd: pf: loose state match: TCP 194.54.107.19:25
194.54.107.19:25 158.36.191.135:62458 [lo=3178647045 high=3178664421 win=33304
modulator=0 wscale=1] [lo=3111401744 high=3111468309 win=17376 modulator=0
wscale=0] 9:9 R seq=3178647045 (3178647044) ack=3111401744 len=0 ackskew=0
pkts=9:12
Oct 4 11:41:15 skapet /bsd: pf: loose state match: TCP 194.54.107.19:25
194.54.107.19:25 158.36.191.135:62458 [lo=3178647045 high=3178664421 win=33304
modulator=0 wscale=1] [lo=3111401744 high=3111468309 win=17376 modulator=0
wscale=0] 10:10 R seq=3178647045 (3178647044) ack=3111401744 len=0 ackskew=0
pkts=10:12
Oct 4 11:42:24 skapet /bsd: pf_map_addr: selected address 194.54.107.19
At the debug level, PF repeatedly reports the IP address for the interface
it’s currently handling. In between the selected address messages, PF warns
twice for the same packet that the sequence number is at the very edge of
the expected range. This level of detail seems a bit overwhelming at first
glance, but in some circumstances, studying this kind of output is the best
way to diagnose a problem and later to check to see whether your solution
helped.
NOTE This option can be set from the command line with pfctl -x, followed by the debug
level you want. The command pfctl -x debug gives you maximum debugging infor-
mation; pfctl -x none turns off debug messages entirely.
Keep in mind that some debug settings can produce large amounts of
log data and, in extreme cases, could impact performance all the way to
self-denial-of-service level.
Rule Set Optimization
The ruleset-optimization option enables or sets the mode for the rule set
optimizer. The default setting for ruleset-optimization in OpenBSD 4.1 and
equivalents is none, which means that no rule set optimization is performed
at load time. From OpenBSD 4.2 onward, the default is basic, which means
that when the rule set loads, the optimizer performs the following actions:
• Removes duplicate rules
• Removes rules that are subsets of other rules

192 Chapter 10
• Merges rules into tables if appropriate (typical rule-to-table optimiza-
tions are rules that pass, redirect, or block based on identical criteria,
except source and/or target addresses)
• Changes the order of rules to improve performance
For example, say you have the macro tcp_services = { ssh, www, https }
combined with the rule pass proto tcp from any to self port $tcp_services.
Elsewhere in your rule set, you have a different rule that says pass proto tcp
from any to self port ssh. The second rule is clearly a subset of the first,
and they can be merged into one. Another common combination is having
a pass rule like pass proto tcp from any to int_if:network port $tcp_services
with otherwise identical pass rules, where the target addresses are all in the
int_if:network range.
With ruleset-optimization set to profile, the optimizer analyzes the
loaded rule set relative to network traffic in order to determine the optimal
order of quick rules.
You can also set the value of the optimization option from the com-
mand line with pfctl:
$ sudo pfctl -o basic
This example enables the rule set optimization in basic mode.
Because the optimization may remove or reorder rules, the meaning of
some statistics—mainly the number of evaluations per rule—may change in
ways that are hard to predict. In most cases, however, the effect is negligible.
Optimization
The optimization option specifies profiles for state-timeout handling. The
possible values are normal, high-latency, satellite, aggressive, and conservative.
The recommendation is to keep the default normal setting unless you have
very specific needs.
The values high-latency and satellite are synonyms; with these values,
states expire more slowly in order to compensate for potential high latency.
The aggressive setting expires states early in order to save memory. This
could, in principle, increase the risk of dropping idle-but-valid connections
if your system is already close to its load and traffic limits, but anecdotal
evidence indicates that the aggressive optimization setting rarely, if ever,
interferes with valid traffic.
The conservative setting goes to great lengths to preserve states and idle
connections, at the cost of some additional memory use.
Fragment Reassembly
The fragment reassembly options tied to scrub were significantly reworked
in OpenBSD 4.6, which introduced the new set reassemble option to turn
reassembly of fragmented packets on or off. If reassemble is set to off, frag-
mented packets are simply dropped unless they match a rule with the

Getting Your Setup Just Right 193
fragment option. The default is set reassemble on, which means that frag-
ments are reassembled and that reassembled packets in which the do-not-
fragment bit was set on individual fragments will have the bit cleared.
Cleaning Up Your Traffic
The next two features we’ll discuss, scrub and antispoof, share a common
theme: They provide automated protection against potentially danger-
ous clutter in your network traffic. Together, they’re commonly referred
to as tools for “network hygiene” because they sanitize your networking
considerably.
Packet Normalization with scrub: OpenBSD 4.5 and Earlier
In PF versions up to and including OpenBSD 4.5, the scrub keyword enables
network traffic normalization. With scrub, fragmented packets are reassem-
bled, and invalid fragments—such as overlapping fragments—are discarded,
so the resulting packet is complete and unambiguous.
Enabling scrub provides a measure of protection against certain kinds
of attacks based on incorrect handling of packet fragments.2 A number of
supplementing options are available, but the simplest form is suitable for
most configurations:
scrub in
In order for certain services to work with scrub, specific options must be set.
For example, some NFS implementations won’t work with scrub at all unless you
use the no-df parameter to clear the do-not-fragment bit on any packets that
have the bit set. Certain combinations of services, operating systems, and net-
work configurations may require some of the more exotic scrub options.
Packet Normalization with scrub: OpenBSD 4.6 Onward
In OpenBSD 4.6, scrub was demoted from stand-alone rule material to
become an action you could attach to pass or match rules (the introduction
of match rules being one of the main new PF features in OpenBSD 4.6). One
other important development in the same rewrite of the scrub code was that
the numerous packet-reassembly options were eliminated in favor of the
new reassemble option, which simply turns reassembly on or off.
With the new scrub syntax, you need to supply at least one option in
parentheses. The following works quite well for several networks in my care:
match in all scrub (no-df max-mss 1440)
2. Some notable attack techniques, including several historical denial-of-service setups,
have exploited bugs in fragment handling that could lead to out-of-memory conditions
or other resource exhaustion. One such exploit, which was aimed at Cisco’s PIX firewall
series, is described in the advisory at http://www.cisco.com/en/US/products/products_security_
advisory09186a008011e78d.shtml.
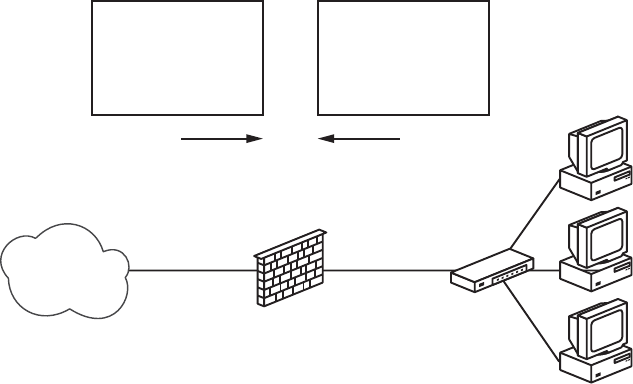
194 Chapter 10
This option clears the do-not-fragment bit and sets the maximum seg-
ment size to 1,440 bytes.
Other variations are possible, and even though the list of scrub options
shrank somewhat for the OpenBSD 4.6 version, you should be able to cater
to specific needs by consulting the man pages and doing some experimen-
tation. For most setups, a global match rule like the one quoted earlier is
appropriate, but keep in mind that you can vary scrub options on a per-rule
basis if needed.
If you find yourself needing to debug a scrub-related problem, study the
pf.conf man page and consult the gurus on the relevant mailing lists.
Protecting Against Spoofing with antispoof
Some very useful and common packet-handling actions could be written as
PF rules, but not without becoming long, complicated, and error-prone rule
set boilerplate. Thus, antispoof was implemented for a common special case
of filtering and blocking. This mechanism protects against activity from
spoofed or forged IP addresses, mainly by blocking packets that appear
on interfaces traveling in directions that aren’t logically possible.
With antispoof, you can specify that you want to weed out spoofed traf-
fic coming in from the rest of the world as well as any spoofed packets that
might originate in your own network. Figure 10-1 illustrates the concept.
The Internet
Switch
Clients
Our gateway,
the PF firewall
$ext_if
192.0.2.19
$int_if
192.168.12.1
src: 192.168.12.23
dst: 192.0.2.19:25
- - - - - - - - - - - - - - - - -
Data-data-data-data
src: 192.168.12.23
dst: 192.0.2.19:25
- - - - - - - - - - - - - - - - -
Data-data-data-data
This packet is spoofed;
it is blocked by antispoof.
This packet is not spoofed;
it passes.
Figure 10-1: antispoof drops packets that come in from the wrong network.
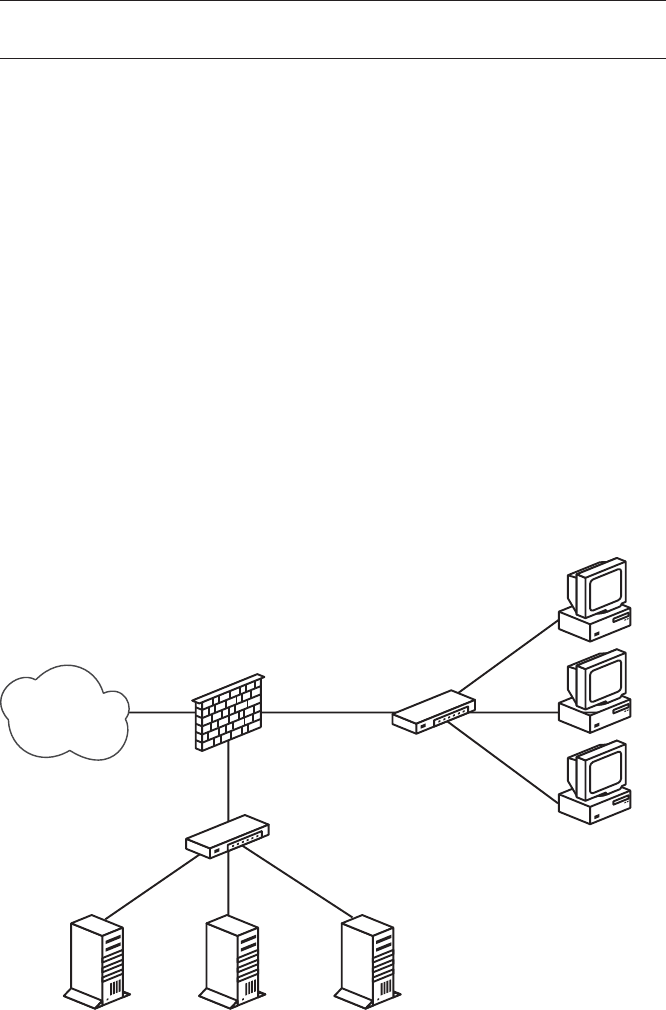
Getting Your Setup Just Right 195
To establish the kind of protection depicted in the diagram, specify
antispoof for both interfaces in the illustrated network with these two lines:
antispoof for $ext_if
antispoof for $int_if
These lines expand to complex rules. The first one blocks incoming
traffic when the source address appears to be part of the network directly
connected to the antispoofed interface but arrives on a different interface.
The second rule performs the same functions for the internal interface,
blocking any traffic with apparently local network addresses that arrive on
interfaces other than $int_if. Keep in mind, however, that antispoof isn’t
designed to detect address spoofing for remote networks that aren’t directly
connected to the machine running PF.
Testing Your Setup
Now it’s time to dust off the precise specification that describes how your
setup should work.
The physical layout of our sample network is centered on a gateway con-
nected to the Internet via $ext_if. Attached to the gateway via $int_if is a
local network with workstations and possibly one or more servers for local
use. Finally, we have a DMZ connected to $dmz_if, populated with servers
offering services to the local network and the Internet. Figure 10-2 shows
the logical layout of the network.
The Internet
Switch
Clients
$emailserver
192.0.2.225
$webserver
192.0.2.227
$nameserver
192.0.2.221
Our gateway,
the PF firewall
$int_if
192.0.2.0/25
$ext_if
Switch
$dmz_if
192.0.2.128/25
Figure 10-2: Network with servers in a DMZ

196 Chapter 10
The corresponding rule set specification looks something like this:
• Machines outside our network should have access to the services
offered by our servers in the DMZ and should not have access to the
local network.
• The machines in our local network, attached to $int_if, should have
access to the services offered by the servers in the DMZ and access to a
defined list of services outside our network.
• The machines in the DMZ should have access to some network services
in the outside world.
The task at hand is to make sure the rule set we have in place actually
implements the specification. We need to test the setup. A useful test would
be to try the sequence in Table 10-1.
Your configuration may call for other tests or could differ in some par-
ticulars, but your real-life test scenario should specify how packets and con-
nections should be logged. The main point is that you should decide what
the expected and desired result for each of your test cases should be before
you start testing.
In general, you should test using the applications you expect the typical
user to have, such as Web browsers or mail clients on various operating sys-
tems. The connections should simply succeed or fail, according to specifica-
tions. If one or more of your basic tests gives an unexpected result, move on
to debugging your rule set.
Table 10-1: Sample Rule Set Test Case Sequence
Test Action Expected Result
Try a connection from the local network to each
allowed port on the servers in the DMZ.
The connection should pass.
Try a connection from the local network to each
allowed port on servers outside your network.
The connection should pass.
Try a connection on any port from the DMZ to
the local network.
The connection should be blocked.
Try a connection from the DMZ to each allowed
port on servers outside your network.
The connection should pass.
Try a connection from outside your network
to $webserver in the DMZ on each port in
$webports.
The connection should pass.
Try a connection from outside your network to
$webserver in the DMZ on port 25 (SMTP).
The connection should be blocked.
Try a connection from outside your network to
$emailserver in the DMZ on port 80 (HTTP).
The connection should be blocked.
Try a connection from outside your network to
$emailserver in the DMZ on port 25 (SMTP).
The connection should pass.
Try a connection from outside your network to
one or more machines in the local network.
The connection should be blocked.

Getting Your Setup Just Right 197
Debugging Your Rule Set
When your configuration doesn’t behave as expected, there may be an
error in the rule set logic, so you need to find the error and correct it.
Tracking down logic errors in your rule set can be time-consuming and
could involve manually evaluating your rule set—both as it’s stored in
the pf.conf file and as the loaded version after macro expansions and any
optimizations.
Users often initially blame PF for issues that turn out to be basic network
problems. Network interfaces set to wrong duplex settings, bad netmasks,
and faulty network hardware are common culprits.
Before diving into the rule set itself, you can easily determine whether
the PF configuration is causing the problem. To do so, disable PF with pfctl -d
to see whether the problem disappears. If the problem persists when PF is
disabled, you should turn to debugging other parts of your network con-
figuration instead. If the problem disappears upon disabling PF and you’re
about to start adjusting your PF configuration, make sure that PF is enabled
and that your rule set is loaded with this command:
$ sudo pfctl -si | grep Status
Status: Enabled for 20 days 06:28:24 Debug: err
Status: Enabled tells us that PF is enabled, so we try viewing the loaded
rules with a different pfctl command:
$ sudo pfctl -sr
match in all scrub (no-df max-mss 1440)
block return log all
block return log quick from <bruteforce> to any
anchor "ftp-proxy/*" all
Here, pfctl -sr is equivalent to pfctl -s rules. The output is likely to be
a bit longer than that shown here, but this is a good example of what you
should expect to see when a rule set is loaded.
For debugging purposes, consider adding the -vv flag to the pfctl com-
mand line to see rule numbers and some additional debug information,
like this:
$ sudo pfctl -vvsr
@0 match in all scrub (no-df max-mss 1440)
[ Evaluations: 341770 Packets: 3417668 Bytes: 2112276585 States: 125 ]
[ Inserted: uid 0 pid 14717 State Creations: 92254 ]
@1 match out on nfe0 inet from 10.0.0.0/8 to any queue(q_def, q_pri) nat-to
(nfe0:1) round-robin static-port
[ Evaluations: 341770 Packets: 0 Bytes: 0 States: 0 ]
[ Inserted: uid 0 pid 14717 State Creations: 0 ]
@2 match out on nfe0 inet from 192.168.103.0/24 to any queue(q_def, q_pri)
nat-to (nfe0:1) round-robin static-port
[ Evaluations: 68623 Packets: 2138128 Bytes: 1431276138 States: 103 ]
[ Inserted: uid 0 pid 14717 State Creations: 39109 ]

198 Chapter 10
@3 block return log all
[ Evaluations: 341770 Packets: 114929 Bytes: 62705138 States: 0 ]
[ Inserted: uid 0 pid 14717 State Creations: 0 ]
@4 block return log (all) quick from <bruteforce:0> to any
[ Evaluations: 341770 Packets: 2 Bytes: 104 States: 0 ]
[ Inserted: uid 0 pid 14717 State Creations: 0 ]
@5 anchor "ftp-proxy/*" all
[ Evaluations: 341768 Packets: 319954 Bytes: 263432399 States: 0 ]
[ Inserted: uid 0 pid 14717 State Creations: 70 ]
Now you should perform a structured walk-through of the loaded rule
set. Find the rules that match the packets you’re investigating. What’s the
last matching rule? If more than one rule matches, is one of the matching
rules a quick rule? (As you probably recall from earlier chapters, when a
packet matches a quick rule, evaluation stops, and whatever the quick rule
specifies is what happens to the packet.) If so, you’ll need to trace the evalu-
ation until you hit the end of the rule set or the packet matches a quick rule,
which then ends the process. If your rule set walk-through ends somewhere
other than the rule you were expecting to match your packet, you’ve found
your logic error. Be sure to watch out for match rules. If you can’t determine
why a specific packet matched a particular block or pass rule, the reason
could be that a match rule applied an action that made the packet or connec-
tion match filtering criteria other than the expected ones.
Rule set logic errors tend to fall into three types:
• Your rule doesn’t match because it’s never evaluated. A quick rule ear-
lier in the rule set matched, and the evaluation stopped.
• Your rule is evaluated but doesn’t match the packet after all, due to the
rule’s criteria.
• Your rule is evaluated and the rule matches, but the packet also matches
another rule later in the rule set. The last matching rule is the one that
determines what happens to your connection.
Chapter 9 introduced tcpdump as a valuable tool for reading and inter-
preting PF logs. The program is also very well suited for viewing the traffic
that passes on a specific interface. What you learned about PF’s logs and
how to use tcpdump’s filtering features will come in handy when you want to
track down exactly which packets reach which interface.
Here’s an example of using tcpdump to watch for TCP traffic (but not
SSH or SMTP traffic) on the xl0 interface and to print the result in very ver-
bose mode (vvv):
$ sudo tcpdump -nvvvpi xl0 tcp and not port ssh and not port smtp
tcpdump: listening on xl0, link-type EN10MB
21:41:42.395178 194.54.107.19.22418 > 137.217.190.41.80: S [tcp sum ok]
3304153886:3304153886(0) win 16384 <mss 1460,nop,nop,sackOK,nop,wscale
0,nop,nop,timestamp 1308370594 0> (DF) (ttl 63, id 30934, len 64)
21:41:42.424368 137.217.190.41.80 > 194.54.107.19.22418: S [tcp sum ok]
1753576798:1753576798(0) ack 3304153887 win 5792 <mss 1460,sackOK,timestamp
168899231 1308370594,nop,wscale 9> (DF) (ttl 53, id 0, len 60)
Getting Your Setup Just Right 199
The connection shown here is a successful connection to a website.
There are more interesting things to look for, though, such as connec-
tions that fail when they shouldn’t according to your specifications or con-
nections that succeed when your specification says they clearly shouldn’t.
The test in these cases involves tracking the packets’ path through
your configuration. Once more, it’s useful to check whether PF is enabled
or whether disabling PF makes a difference. Building on the result from
that initial test, you then perform the same kind of analysis of the rule set
as described previously:
• Once you have a reasonable theory of how the packets should traverse
your rule set and your network interfaces, use tcpdump to see the traffic
on each of the interfaces in turn.
• Use tcpdump’s filtering features to extract only the information you
need—that is, to see only the packets that should match your specific
case, such as port smtp and dst 192.0.2.19.
• Find the place where your assumptions no longer match the reality of
your network traffic.
• Turn on logging for the rules that may be involved and turn tcpdump
loose on the relevant pflog interface to see which rule the packets actu-
ally match.
The main outline for the test procedure is fairly fixed. If you’ve nar-
rowed down the cause to your PF configuration, again, it’s a case of finding
out which rules match and which rule ends up determining whether the
packet passes or is blocked.
Know Your Network and Stay in Control
The recurring theme in this book has been how PF and related tools make
it relatively easy for you, as the network administrator, to take control of
your network and to make it behave the way you want it to behave—in other
words, how PF allows you to build the network you need.
Running a network can be fun, and I hope you’ve enjoyed this tour of
what I consider to be the best tool available for network security. In present-
ing PF, I made a conscious decision early on to introduce you to the methods
and ways of thinking via interesting and useful configurations, rather than
offering a full catalog of available features or, for that matter, making this
book the complete reference. The complete PF reference already exists in
the man pages, which are updated every six months with the new OpenBSD
releases. You can also find further information in the resources I’ve listed
in Appendix A.
Now that you have a broad, basic knowledge of what PF can do, you can
start building the network according to your own ideas of what you need.
You’ve reached the point where you can find your way around the man pages
and locate the exact information you need. This is when the fun part starts!

A
RESOURCES
Though I may have wanted to, it proved
impossible to cover all possible wrinkles
of PF configuration within these pages.
I hope that the resources listed here fill in
some details or present a slightly different perspective.
Some of them are even quite enjoyable reads for their
own sake.
General Networking and BSD Resources on the Internet
The following are the general web-accessible resources cited throughout
the book. It’s worth looking at the various BSD projects’ websites for the
most up-to-date information.
• Of particular interest for OpenBSD users is the online OpenBSD Journal
(http://undeadly.org/). It offers news and articles about OpenBSD and
related issues.
202 Appendix A
• OpenBSD’s website, http://www.openbsd.org/, is the main reference for
OpenBSD information. If you’re using OpenBSD, you’ll be visiting this
site every now and then.
• You’ll find a collection of presentations and papers by OpenBSD devel-
opers at http://www.openbsd.org/papers/. This site is a good source of
information about ongoing developments in OpenBSD.
• OpenBSD’s Frequently Asked Questions (http://www.openbsd.org/faq/index
.html) is more of a user guide than a traditional question-and-answer
document. This is where you’ll find a generous helping of background
information and step-by-step instructions on how to set up and run
your OpenBSD system.
• Henning Brauer’s presentation “Faster Packets—Performance Tun-
ing in the Network Stack and PF” (http://quigon.bsws.de/papers/2009/
eurobsdcon-faster_packets/) is the current main PF developer’s overview
of the work done in recent OpenBSD releases to improve network
performance, with PF as a main component.
• PF: The OpenBSD Packet Filter (http://www.openbsd.org/faq/pf/index.html),
also known as the PF User Guide or the PF FAQ , is the official PF docu-
mentation maintained by the OpenBSD team. This guide is updated
for each release, and it’s an extremely valuable reference resource for
PF practitioners.
• Bob Beck’s “pf. It’s not just for firewalls anymore” (http://www.ualberta.ca/
~beck/nycbug06/pf/) is an NYCBUG 2006 presentation that covers PF’s
redundancy and reliability features, illustrated by real-world examples
taken from the University of Alberta network.
• Daniel Hartmeier’s PF pages (http://www.benzedrine.cx/pf.html) are his
collection of PF-related material with links to resources around the Web.
• Daniel Hartmeier’s “Design and Performance of the OpenBSD Stateful
Packet Filter (pf)” (http://www.benzedrine.cx/pf-paper.html) is the paper he
presented at Usenix 2002. It describes the initial design and implemen-
tation of PF.
• Daniel Hartmeier’s three-part undeadly.org PF series includes “PF:
Firewall Ruleset Optimization” (http://undeadly.org/cgi?action=article&
sid=20060927091645), “PF: Testing Your Firewall (http://undeadly.org/
cgi?action=article&sid=20060928081238), and “PF: Firewall Management”
(http://undeadly.org/cgi?action=article&sid=20060929080943). The three
articles cover their respective subjects in great detail yet manage to be
quite readable.
• RFC 1631, The IP Network Address Translator (NAT), May 1994 (http://
www.ietf.org/rfc/rfc1631.txt, written by K. Egevang and P. Francis) is the
first part of the NAT specification, which has proved longer-lived than
the authors had apparently intended. While still an important resource
for understanding NAT, it has been largely superseded by the updated
RFC 3022 (http://www.ietf.org/rfc/rfc3022.txt, written by P. Srisuresh and
K. Egevang), dated January 2001.
Resources 203
• RFC 1918, Address Allocation for Private Internets, February 1996
(http://www.ietf.org/rfc/rfc1918.txt, written by Y. Rebhter, B. Moskowitz,
D. Karrenberg, G.J. de Groot, and E. Lear) is the second part of the
NAT and private address space puzzle. This RFC describes the moti-
vations for the allocation of private, nonroutable address space and
defines the address ranges. RFC 1918 has been designated a Best
Current Practice.
• If you’re looking for a text that gives you a thorough and detailed
treatment of network protocols with a clear slant toward the TCP/IP
worldview, Charles M. Kozierok’s The TCP/IP Guide (No Starch Press,
October 2005), available online with updates at http://www.tcpipguide.com/,
has few, if any, serious rivals. At more than 1,600 pages, it’s not exactly
a pocket guide, but it’s very useful to have on your desk or in a browser
window to set the record straight on any networking terms that you find
insufficiently explained in other texts.
Sample Configurations and Related Musings
A number of people have been kind enough to write up their experiences
and make sample configurations available on the Web. The following are
some of my favorites.
• Marcus Ranum’s “The Six Dumbest Ideas in Computer Security” (http://
www.ranum.com/security/computer_security/editorials/dumb/index.html),
from September 1, 2005, is a longtime favorite of mine. This article
explores some common misconceptions about security and their unfor-
tunate implications for real-world security efforts.
• Randal L. Schwartz’s “Monitoring Net Traffic with OpenBSD’s Packet
Filter” (http://www.stonehenge.com/merlyn/UnixReview/col51.html) shows
a real-life example of traffic monitoring and using labels for account-
ing. Some details about PF and labels have changed in the intervening
years, but the article is still quite readable and presents several impor-
tant concepts well.
• The Swedish user group Unix.se’s Brandvägg med OpenBSD (http://unix.se/
Brandv%E4gg_med_OpenBSD) and its sample configurations, such as
the basic ALTQ configurations, were quite useful to me early on. The
site serves as a nice reminder that volunteer efforts, such as local user
groups, can be excellent sources of information.
• The #pf IRC channel wiki (http://www.probsd.net/pf/) is a collection
of documentation, sample configurations, and other PF information
maintained by participants in the #pf IRC channel discussions. It’s
another example of a very worthwhile volunteer effort.
204 Appendix A
• Daniele Mazzocchio, an OpenBSD fan from Italy, maintains the website
Kernel Panic, which houses a collection of useful articles and tutorial-
like documents on various OpenBSD topics at http://www.kernel-panic.it/
openbsd.html (in English and Italian). It’s well worth the visit for a fresh
perspective on various interesting topics from someone who seems to
be dedicated to keeping the material up-to-date with the latest stable
OpenBSD versions.
• Kenjiro Cho’s “Managing Traffic with ALTQ” (http://www.usenix.org/
publications/library/proceedings/usenix99/cho.html) is the original paper
that describes the ALTQ design and early implementation on FreeBSD.
• Jason Dixon’s “Failover Firewalls with OpenBSD and CARP,” from
the May 2005 SysAdmin Magazine (http://planet.admon.org/howto/
failover-firewalls-with-openbsd-and-carp/) is an overview of CARP and
pfsync, with some practical examples.
• Theo de Raadt’s OpenCON 2006 presentation “Open Documentation
for Hardware: Why hardware documentation matters so much and why it
is so hard to get” (http://openbsd.org/papers/opencon06-docs/index.html) was
an important inspiration for the note in Appendix B about hardware
for free operating systems in general and for OpenBSD in particular.
PF on Other BSD Systems
PF has been ported from OpenBSD to the other BSDs, and while the stated
goal for these efforts naturally is to be as up-to-date as possible in relation
to the newest PF versions coming out of OpenBSD, it’s useful to keep track
of the PF projects in the other BSDs.
• The FreeBSD packet filter (pf) home page (http://pf4freebsd.love2party.net/)
describes the early work with PF on FreeBSD and the project goals. At
the moment, the page isn’t quite up-to-date with the latest develop-
ments, but it’ll hopefully spring to life again once Max Laier notices
that he’s referenced in a printed book.
• The NetBSD project maintains its PF pages at http://www.netbsd.org/docs/
network/pf.html, where you can find updated information about PF on
NetBSD.
BSD and Networking Books
In addition to what appears to be an ever-expanding number of online
resources, several books may be useful as companions or supplements to
this book.
• Michael W. Lucas, Absolute OpenBSD, 2nd edition (No Starch Press, 2013).
This volume offers a thorough walk-through of OpenBSD with a wealth
of hands-on, practical material.
Resources 205
• Michael W. Lucas, Network Flow Analysis (No Starch Press, 2010). One of
a select few books about network analysis and management using free
NetFlow-based tools, this book shows you the tools and methods to dis-
cover just what really happens in your network.
• Brandon Palmer and Jose Nazario, Secure Architectures with OpenBSD
(Addison-Wesley, 2004). This book provides an overview of OpenBSD’s
features with a marked slant toward building secure and reliable sys-
tems. The book references OpenBSD 3.4 as the then up-to-date version.
• Douglas R. Mauro and Kevin J. Schmidt, Essential SNMP, 2nd edition
(O’Reilly Media, 2005). As the title says, this is an essential reference
book about SNMP.
• Jeremy C. Reed (editor), The OpenBSD PF Packet Filter Book (Reed Media
Services, 2006). The book, based on the PF User Guide, extends to cover
PF on FreeBSD, NetBSD, and DragonFly BSD and includes some addi-
tional material on third-party tools that interoperate with PF.
• Christopher M. Buechler and Jim Pingle, pfSense: The Definitive Guide
(Reed Media Services, 2009). At some 515 pages, this is a comprehen-
sive guide to the FreeBSD- and PF-based firewall appliance distribution.
A revised edition is planned for 2014 publication as of this writing.
Wireless Networking Resources
Kjell Jørgen Hole’s Wi-Fi courseware (http://www.nowires.org/) is an excellent
resource for understanding wireless networks. The courseware is mainly
aimed at University of Bergen students who take Professor Hole’s courses,
but it’s freely available and well worth reading.
spamd and Greylisting-Related Resources
If handling email is part of your life (or is likely to be in the future), you’ve
probably enjoyed the descriptions of spamd, tarpitting, and greylisting in this
book. If you want a little more background information than what you find
in the relevant RFCs, the following documents and web resources provide it.
• Greylisting.org (http://www.greylisting.org/) has a useful collection of
greylisting-related articles and other information about greylisting and
SMTP in general.
• Evan Harris’s “The Next Step in the Spam Control War: Greylisting”
(http://greylisting.org/articles/whitepaper.shtml) is the original greylisting
paper.
• Bob Beck’s “OpenBSD spamd—greylisting and beyond” (http://www
.ualberta.ca/~beck/nycbug06/spamd/) is an NYCBUG presentation that
explains how spamd works, leading up to a description of spamd’s role in
University of Alberta’s infrastructure. (Note that much of the “future
work” mentioned in the presentation has already been implemented.)
206 Appendix A
• “Effective spam and malware countermeasures” (http://bsdly.blogspot
.com/2014/02/effective-spam-and-malware.html), originally my BSDCan
2007 paper with some updates, includes a best-practice description of
how to use greylisting, spamd, and various other free tools and OpenBSD
to successfully fight spam and malware in your network.
• A promising new development is Peter Hessler’s BGP-spamd project, which
abuses the BGP routing protocol slightly to distribute spamd data between
participating hosts. See the project’s website at http://bgp-spamd.net/ for
further information.
Book-Related Web Resources
For news and updates about this book, check the book’s home page at the
No Starch Press website (http://www.nostarch.com/pf3/). That page contains
links to pages on my personal web space, where various updates and book-
related resources will appear as they become available. I’ll post book-related
news and updates at http://www.bsdly.net/bookofpf/. Announcements relevant
to the book are likely to turn up via my blog at http://bsdly.blogspot.com/, too.
I maintain the tutorial manuscript “Firewalling with OpenBSD’s PF
packet filter,” which is the forerunner of this book. My policy is to make
updates when appropriate, usually as I become aware of changes or features
of PF and related software and while preparing for appearances at confer-
ences. The tutorial manuscript is available under a BSD license and can be
downloaded in several formats from my web space at http://home.nuug.no/
~peter/pf/. Updated versions will appear at that URL more or less in the
natural course of tinkering in between events.
Buy OpenBSD CDs and Donate!
If you’ve enjoyed this book or found it useful, please go to the OpenBSD.org
ordering page at http://www.openbsd.org/orders.html to buy CD sets, or for that
matter, go to the donations page at http://www.openbsd.org/donations.html to
support further development work by the OpenBSD project via a monetary
contribution.
If you’re the kind of entity that’s more comfortable with donating to
a corporation, you can contact the OpenBSD foundation, a Canadian
nonprofit corporation created in 2007 for that specific purpose. See the
OpenBSD Foundation website at http://www.openbsdfoundation.org/ for more
information.
If you’ve found this book at a conference, there might even be an
OpenBSD booth nearby where you can buy CDs, T-shirts, and other items.
Remember that even free software takes real work and real money to
develop and maintain.

B
A NOTE ON HARDWARE SUPPORT
“How’s the hardware support?” I tend to
hear that a lot, and my answer is usually,
“In my experience, OpenBSD and other
free systems tend to just work.”
But for some reason, there’s a general perception that going with free
software means that getting hardware components to work will be a seri-
ous struggle. In the past, there was some factual basis for this. I remember
struggling to install FreeBSD 2.0.5 on the hardware I had available. I was
able to boot off the installation CD, but the install never completed because
my CD drive wasn’t fully supported.
But that was back in June 1995, when PC CD drives usually came with an
almost-but-not-quite IDE interface attached to a sound card, and cheap PCs
didn’t come with networking hardware of any kind built in. Configuring
a machine for network use usually meant moving jumpers around on the
network interface card or the motherboard or running some weird propri-
etary setup software—if you had the good luck to be on a system that had
or could be fitted with an Ethernet interface.

208 Appendix B
Times have changed. Today, you can reasonably expect all important
components in your system to work with OpenBSD. Sure, some caution and
a bit of planning may be required for building the optimal setup, but that’s
not necessarily a bad thing.
Getting the Right Hardware
Getting the right hardware for your system is essentially a matter of check-
ing that your system meets the needs of your project and network:
• Check the online hardware compatibility lists.
• Check the man pages, or use apropos keyword commands (where keyword
is the type of device you’re looking for).
• Search the archives of relevant mailing lists if you want more back-
ground information.
• Use your favorite web search engine to find useful information about
how well a specific device works with your operating system.
In most cases, the hardware will work as expected. However, sometimes
otherwise functional hardware may come with odd restrictions.
Quite a number of devices are designed to depend on firmware that
must be loaded before the operating system can make use of the device.
The motivation for this design choice is almost always to lower the cost of
the device. When some manufacturers refuse to grant redistribution rights
for the firmware, the decision becomes a problem because it means that
operating systems like OpenBSD can’t package the firmware with their
releases.
Problems of this type have surfaced in connection with several types
of hardware. In many cases, the manufacturers have been persuaded to
change their minds and allow redistribution. However, this doesn’t happen
in all cases. One example is the Intel-based wireless networking hardware
that’s built into many popular laptop models. The hardware is supported
in many operating systems, including OpenBSD via the wpi and iwn driv-
ers. But even with those drivers in place, the hardware simply won’t work
unless the user has manually fetched and installed the required firmware
files. Once the install has completed and some sort of Internet connectivity
is available, OpenBSD users can run the command fw_update to fetch and
install or upgrade firmware for components the system recognizes as need-
ing firmware files.
NOTE Where supported hardware is restricted, the OpenBSD man pages usually note that
fact and may even include the email addresses of people who might be able to change
the manufacturer’s policy.

A Note on Hardware Support 209
It would take only a minor change in the manufacturer's licensing pol-
icy to make life easier for free software users everywhere and to boost sales.
It’s possible that most situations like these will be resolved by the time you
read this. Be sure to check the latest information online—and be prepared
to vote with your wallet if a particular company refuses to act sensibly.
If you shop online, keep the man pages available in another tab or
window. If you go to a physical store, make sure to tell the clerks you’ll be
using a BSD. If you’re not sure about the parts they’re trying to sell you, ask
to borrow a machine to browse the man pages and other documentation
online. You might even ask for permission to boot a machine with the hard-
ware you’re interested in from a CD or USB stick and study the dmesg output.
Telling shop staff up front about your project could make it easier to get a
refund if the part doesn’t work. And if the part does work, letting the ven-
dor know is good advocacy. Your request could very well be the first time
the seller has heard of your favorite operating system.
Issues Facing Hardware Support Developers
Systems such as OpenBSD and the other BSDs didn’t spring fully formed
from the forehead of a deity (although some will argue that the process was
not that different). Rather, they’re the result of years of effort by a number
of smart and dedicated developers.
BSD developers are all highly qualified and extremely dedicated people
who work tirelessly—the majority, in their spare time—to produce amazing
results. However, they don’t live in a bubble with access to everything they
need. The hardware itself or adequate documentation to support it is often
unavailable to them. Another common problem is that documentation is
often provided only under a nondisclosure agreement (NDA), which limits
how developers can use the information.1
Through reverse engineering, developers can write drivers to support
hardware even without proper documentation, but the process is a com-
plicated one that consists of educated guessing, coding, and testing until
results begin to emerge. Reverse engineering takes a long time and—for
reasons known only to lawmakers and lobbyists—it has legal consequences
in several jurisdictions around the world.
The good news is that you can help the developers get the hardware
and other material they need.
1. This is a frequent talk topic, too. For example, see Theo de Raadt’s OpenCON 2006 presen-
tation “Why hardware documentation matters so much and why it is so hard to get,” available
at http://www.openbsd.org/papers/opencon06-docs/index.html.
210 Appendix B
How to Help the Hardware Support Efforts
If you can contribute quality code, the BSD projects want to hear from
you. If you’re not a developer yourself, contributing code may not be an
option. Here are several other ways you can contribute:
• Buy your hardware from open source–friendly vendors. When making deci-
sions or recommendations regarding your organization’s equipment
purchases, tell suppliers that open source friendliness is a factor in your
purchasing decision.
• Let hardware vendors know what you think about their support (or lack thereof)
for your favorite operating system. Some hardware vendors have been quite
helpful, supplying both sample units and programmer documentation.
Others have been less forthcoming or downright hostile. Both kinds of
vendors, and the ones in between, need encouragement. Write to them
to tell them what you think they’re doing right and what they can do to
improve. If, for example, a vendor has refused to make programming
documentation available or will make it available only under an NDA, a
reasoned, well-formulated letter from a potential customer could make
the difference.
• Help test systems and check out the drivers for hardware you’re interested in. If a
driver exists or is being developed, the developers are always interested
in reports on how their code behaves on other people’s equipment.
Reports that the system is working fine are always appreciated, but bug
reports with detailed descriptions of what goes wrong are even more
essential to creating and maintaining a high-quality system.
• Donate hardware or money. The developers can always use hardware to
develop on, and money certainly helps with day-to-day needs as well. If
you can donate money or hardware, check out the project’s donations
page (http://www.openbsd.org/donations.html for OpenBSD) or items-
needed page (http://www.openbsd.org/want.html for OpenBSD). Cor po-
rate entities or others that prefer to donate to OpenBSD via a Canadian
nonprofit corporation may do so via the OpenBSD Foundation, whose
website can be found at http://www.openbsdfoundation.org/. Donations
to OpenBSD will most likely help PF development, but if you prefer to
donate to FreeBSD, NetBSD, or DragonFly BSD instead, you can find
information about how to do so at their websites.
Whatever your relationship with the BSDs and your hardware, I hope
that this appendix has helped you to make intelligent decisions about what
to buy and how to support the development of the BSDs. Your support will
contribute to making more and better quality free software available for
everyone.
Note: Pages numbers followed by f, n,
or t indicate figures, notes, and tables,
respectively.
Symbols
# (hash mark), 13, 15
! (logical NOT) operator, 42
A
Acar, Can Erkin, 173
ACK (acknowledgment) packets
class-based bandwidth allocation,
139 –140
HFSC algorithm, 124, 126, 142
priority queues, 132, 137–138
two-priority configuration,
120–121, 120n1
adaptive.end value, 188
adaptive firewalls, 97–99
adaptive.start value, 188
advbase parameter, 153–154
advskew parameter, 153–154, 158–159
aggressive value, 192
ALTQ (alternate queuing) framework,
9, 133–145, 133n2
basic concepts, 134
class-based bandwidth allocation,
139 –140
overview, 135
queue definition, 139–140
tying queues into rule set, 140
handling unwanted traffic, 144–145
operating system-based queue
assignments, 145
overloading to tiny queues,
144 –145
HFSC algorithm, 140 –142
overview, 135
queue definition, 140–141
tying queues into rule set,
141–142
priority-based queues, 136–145
match rule for queue assignment,
137–138
overview, 134–135
performance improvement,
136–137
queuing for servers in DMZ,
142–144
setting up, 135–136
on FreeBSD, 135–136
on NetBSD, 136
on OpenBSD, 135
transitioning to priority and
queuing system, 131–133
anchors, 35–36
authpf program, 61, 63
listing current contents of, 92
loading rules into, 92
manipulating contents, 92
relayd daemon, 74
restructuring rule set with, 91–94
tagging to help policy routing, 93
ancontrol command, 46n1
antispoof tool, 27, 193–195, 194f
ARP balancing, 151, 157–158
atomic rule set load, 21
authpf program, 59–63, 60
basic authenticating gateways,
60–62
public networks, 62–63
B
bandwidth
actual available, 142–143
class-based allocation of, 139–140
overview, 135
queue definition, 139–140
tying queues into rule set, 140
queues for allocation of, 121–122
DMZ network with traffic
shaping, 128–130
fixed, 123–125
INDEX
212 Index
bandwidth, queues for allocation of
(continued)
flexible, 125–128
HFSC algorithm, 123
total usable, 122
Beck, Bob, 115
Berkeley Software Distributions. See
BSDs (Berkeley Software
Distributions); FreeBSD;
NetBSD; OpenBSD
blacklisting, 101–103, 115
block all rule, 19, 24, 61, 69
block in all rule, 16 –17
blocknonip option, 87–88
block-policy option, 186–187
block rule, 13
Brauer, Henning, 5, 133, 177
brconfig command, 87, 89
bridges, 86–91, 86n5, 90f
defined, 86
pros and cons of, 86
rule set, 90–91
setting up
on FreeBSD, 88–89
on NetBSD, 89–90
on OpenBSD, 87–88
brute-force attacks, 96–99
defined, 96
expiring tables using pfctl, 99
overview, 96
setting up adaptive firewalls, 97–99
BSDs (Berkeley Software
Distributions), 3–4, 3n3.
See also FreeBSD; NetBSD;
OpenBSD
configuration files, 7
Linux versus, 6–7
network interface naming
conventions, 6
online resources, 201–203
print resources, 204–205
Bytes In/Out statistics, 23
C
CARP (Common Address Redundancy
Protocol), 79
failover, 150–154
kernel options, 150
network interface setup with
ifconfig, 151–154
sysctl values, 151
load balancing, 157
load-balancing mode, 158
setting up, 158–160
overview, 147–148
carpdev option, 150, 152
cbq (class-based) queues, 132–135
definition, 139–140
tying into rule set, 140
cloneable interfaces, 55n4, 167
command succeeded message, 77
Common Address Redundancy
Protocol. See CARP
complicated networks, 65–94
bridges, 86–91
FreeBSD setup, 88–89
NetBSD setup, 89–90
OpenBSD setup, 87–88
rule set, 90–91
interface groups, 84–85
NAT, 79 – 84
DMZ, 80–81
load balancing with
redirection, 81
single NATed network, 81–84
nonroutable IPv4 addresses, 91–94
establishing global rules, 91
restructuring rule set with
anchors, 91–94
packet tagging, 85–86
routable IPv4 addresses, 66–79, 67f
DMZ, 70–71, 70f
load balancing with redirection,
72–73
load balancing with relayd,
73–79
macros, 66–67
configuration files
FreeBSD, 7, 14–15
NetBSD, 15–16
OpenBSD, 7, 13
tools for managing, 7–8, 11
connection refused message, 18
content filtering, 100, 105, 107
Core Force project, 5n7
Core Security, 5n7
D
DDoS (distributed denial-of-service)
attacks, 187, 187n1
Index 213
debugging, 197–199. See also logging
debug option, 190–191
troubleshooting-friendly networks,
37–38
debug option, 52, 190–191
deep packet inspection, 2
demilitarized zone (DMZ). See DMZ
demotion counter, 79, 153
denial-of-service (DoS) attacks, 91,
168, 193n2
de Raadt, Theo, 4n4
dhclient command, 56–57, 59
dhcpd program, 54
distributed denial-of-service (DDoS)
attacks, 187, 187n1
divert(4) sockets, 2
dive r t-to component, 36
Dixon, Jason, 10
dmesg command, 48–49, 209
DMZ (demilitarized zone)
NAT, 80 –81
queuing for servers in, 142–144
routable IPv4 addresses, 70–71, 70f
testing rule set, 195–196, 195f
with traffic shaping, 128–130, 128f
DNS, 22, 34n4, 66, 68
documentation, 8
domain name lookups, 163–164,
166, 169
domain name resolution, 18, 20
domain names, 34
DoS (denial-of-service) attacks, 91,
168, 193n2
DragonFly BSD, 3n3, 5–6, 12
dropped packets, 128
drop value, 186
E
echo requests/replies, 38–41, 53, 69,
82, 90, 92
Engen, Vegard, 62n5
expiretable tool, 99n4
F
failover, 148–156
CARP, 79, 150
kernel options, 150
network interface setup with
ifconfig, 151–154
sysctl values, 151
load balancing versus, 158
pfsync protocol, 154–155
rule set, 155–156
false positives, 102, 106, 110, 115
FIFO (first in, first out), 120,
132–134, 137
file servers
NAT, 79
routable IPv4 addresses, 66–67
file transfer protocol. See FTP
firewalls, 3. See also bridges
adaptive, 97–99
simple gateways, 25–27
first in, first out (FIFO), 120,
132–134, 137
flags S/SA keep state rule, 21
floating state policy, 187
Floeter, Reyk, 183
flowd collector daemon, 177–182
flowd-reader program, 178 –181
flow-tools program, 177
flush global state-tracking option, 97
fragment reassembly options, 192–193
frag value, 188
FreeBSD, 3n3, 5
configuration files, 7
online resources, 204
pfSense, 8
setting up ALTQ framework on,
135–136
setting up bridges, 88–89
setting up PF on, 13–15
spamd spam-deferral daemon,
101, 105
wireless interface configuration, 50
wireless network setup, 58–59
WPA access points, 52–53
FreeBSD Handbook, 14
from keyword, 33
FTP (file transfer protocol), 35–37,
53–54
fetching list data via, 102
ftp-proxy with diversion or
redirection, 36–37
history of, 35, 35n5
security challenges, 35
variations on ftp-proxy setup, 37
ftp-proxy command, 13
enabling, 36
redirection, 36–37
reverse mode, 36–37
214 Index
ftpproxy_flags variable, 36–37
FTPS, 35n6
fw_update script, 48
G
grep program, 113, 178
greyexp value, 107
greylisting, 104–108
compensating for unusual
situations, 113–114
defined, 104
keeping lists in sync, 112–113
online resources, 205–206
in practice, 107–108
setting up, 104–105, 107
greytrapping, 109–111, 115
adding to list, 111–112
deleting from list, 112
H
Hail Mary Cloud sequence of brute-
force attempts, 98, 98n2
hardware, 5, 207–210
helping hardware support
efforts, 210
issues facing hardware support
developers, 209
pool memory, 190
selecting, 208–209
selecting for wireless networks, 48
Harris, Evan, 104
Hartmeier, Daniel, 4–5, 132, 136
hash mark (#), 13, 15
HFSC (Hierarchical Fair Service
Curve) algorithm, 123,
125–126, 134–135, 140–142
queue definition, 140–141
transitioning from ALTQ to
priority and queuing
system, 132–133
tying queues into rule set, 141–142
high-latency value, 192
hostapd command, 52–53
host command, 18, 22, 34
hostnames, 34
HTTP, 68, 75, 77–79, 99
fetching list data via, 102
NetFlow data collection, 181
HTTPS, 77, 79
I
IBM Christmas Tree EXEC worm, 2n1
ICMP, 37–41, 41n7, 124, 140
bandwidth allocation, 124
letting pass unconditionally, 38
letting pass while stopping probes
from elsewhere, 39
path MTU discovery, 40–41
ICMP6, 38
letting pass unconditionally, 38
letting pass while stopping probes
from elsewhere, 39
path MTU discovery, 41
if-bound policy, 187–188
if_bridge module, 88
ifconfig command, 46n1, 59, 109, 148
bridge setup, 87–89
interface groups, 84–85
logging, 167, 176
MTU, 40
redundancy and resource
availability, 150–155,
158 –160
running status of interfaces, 30
wireless networks, 49–53, 56–59
ifstated interface state daemon, 157
ILOVEYOU worm, 2n1
inserts statistic, 23
interface groups, 84–85
Interface Stats statistics, 23
interval value, 188
IP-based load balancing, 157–158
IPFilter subsystem, 4–5, 4n4, 4n5, 8–9
IPsec
filtering on encapsulation
interfaces, 55, 55n4
state synchronization, 155
with UDP key exchange, 55
IPv4, 23–24
network address translation,
28–29, 54
nonroutable addresses, 91–94
establishing global rules, 91
restructuring rule set with
anchors, 91–94
packet forwarding, 30
routable addresses, 31–32, 66–79
DMZ, 70–71
load balancing with relayd,
73–79
Index 215
load balancing with redirection,
72–73
wireless networks, 49–50, 54, 58
IPv6, 24, 30, 37–38, 41, 67, 71, 73, 75, 81
NAT versus, 28–29
release of, 28
wireless networks, 49–50, 54, 56–59
K
KAME project, 28, 28n3
keep state flags S/SA rule, 17n3
keep state rules, 16–17, 17n3, 21, 26,
26n1, 41, 68, 188
kernel memory, 189–190
Knight, Joel, 183
L
labels, 169–171
leaf queues, 126–127
limit option, 189
linkshare value, 140 –141
Linux
BSD versus, 6–7
network interface naming
conventions, 6
porting PF to Linux machines, 7
lists
defined, 18
usefulness of, 20
load balancing
CARP for, 157
load-balancing mode, 158
setting up, 158–160
redirection for
NAT, 81
routable IPv4 addresses, 72–73
with relayd daemon, 73–79
synproxy state option, 68
log (all) clause, 165–166
logger option, 169
logging, 161
all packets, 165 –166
basic concepts, 162–164
graphing traffic with pfstat,
173 –175
legal implications of, 166
monitoring with pftop, 173
monitoring with systat, 171–173
NetFlow data collection, 176–182
flowd collector daemon, 177–182
pfflowd tool, 182
setting up sensor, 176–177
packet path through rule set,
164 –165
to several pflog interfaces, 167
SNMP tools and MIBs, 182–183
to syslog, 167–169
tracking statistics for each rule with
labels, 169–171
logical NOT (!) operator, 42
log keyword, 162, 167
lo g (ma tc hes) clause, 164–165
M
MAC addresses
bridges, 87
filtering, 46–47, 46n2, 60
IP-based load balancing, 157–158
Mac OS X, 3n3
macros
defined, 18–19
defining, 18–19
defining local network, 29
expanding into separate rules,
20–21
usefulness of, 19–20
mail servers
NAT, 79
routable IPv4 addresses, 66–69
mail-in/mail-out labels, 170
management information bases
(MIBs), 182–183
man pages, 9
match rules, 31–32
debugging, 198
load balancing, 73–74, 79, 83
logging, 164–165
packet normalization, 193–194
spam, 103
tags, 85
traffic shaping, 119, 121–122, 124–
126, 130, 132, 134, 137–138,
141–142
wireless networks, 54
max-src-conn-rate state-tracking
option, 97
max-src-conn state-tracking option, 97
216 Index
max state-tracking option, 98
McBride, Ryan, 5
mekmitasdigoat passphrase, 154, 154n2
MIBs (management information
bases), 182–183
Miller, Damien, 178, 182
Morris worm, 2n1
N
NAT (network address translation), 31,
71, 73, 79–84, 165
IPv6 versus, 28–29
release of, 28
wireless networks, 54–55, 61
nat rule, 32
nat-to keyword, 31–32, 54, 81, 83–84,
138, 164 –165
neighbradv (neighbor advertisements), 41
neighbrsol (neighbor solicitations), 41
NetBSD, 3n3, 5
bridge setup, 89–90
configuring wireless interface, 50
online resources, 204
setting up ALTQ
framework on, 136
setting up PF on, 15–16
spamd spam-deferral daemon, 101
NetFlow, 176 –182
collectors
choosing, 178
defined, 176
data collection with pfflowd, 182
flowd collector daemon, 177–182
flow-tools program, 177
nfdump program, 177
sensors
defined, 176
setting up, 176 –177
net-sn mp package, 183
network address translation (NAT), 31,
71, 73, 79–84, 165
IPv6 versus, 28–29
release of, 28
wireless networks, 54–55, 61
nfdump tool, 177
nixspam blacklist, 115
nohup command, 168
no-sync option, 156
NTP, 33
nwid parameter, 49, 56
nwkey parameter, 50, 56
O
oldqueue keyword, 133
OpenBSD
approach to security, 2, 2n2
bridge setup, 87–88
configuration files, 7
configuring wireless interface, 50
history of, 3–5
purchasing, 205–206
setting up ALTQ framework on, 135
setting up PF on, 12–13, 12n1
wireless network setup, 56–57
WPA access points, 51–52
operating system-based queue
assignments
ALTQ framework, 145
priority and queuing system, 131
optimization option, 192
overload option, 97–99
ALTQ framework, 144–145
priority and queuing system,
130–131
P
packet-filtering gateways, 25
F TP, 35 –37
ftp-proxy with diversion or
redirection, 36–37
variations on ftp-proxy setup, 37
simple, 25–34, 26f
defining local network, 29
in/out rules, 26–27
NAT versus IPv6, 28–29
setting up, 29–33
testing rule set, 34
tables, 42–43
troubleshooting-friendly networks,
37–41
letting ICMP pass, 38–39
path MTU discovery, 40–41
ping command, 39
traceroute command, 40
Packet Filter subsystem. See PF (Packet
Filter) subsystem
packet forwarding, 30
Packets In/Out statistics, 23
packet tagging, 85–86
pass all rule, 15, 22
pass in rule, 26, 33
pass out rule, 16–17, 27
Index 217
passtime value, 107
path MTU (maximum transmission
unit) discovery, 38, 40–41
pf_rules= setting, 13
PF (Packet Filter) subsystem, 1–2
displaying system information,
22–24
history of, 4–5
IPFilter configuration
compatibility, 4n5, 8–9
migrating from other systems, 6–9
copying across IPFilter
configuration to OpenBSD,
8–9
Linux versus BSD, 6–7
porting to Linux machines, 7
rule syntax changes, 9
tools for configuration file
management, 7–8
tools for converting network
setups, 8
performance improvements, 5
purpose and function of, 3
rule set configuration
simple, 16–18
stricter, 18–22
setting up, 12–16
on FreeBSD, 13–15
on NetBSD, 15–16
on OpenBSD, 12–13
wireless access point rule set, 53–54
pfctl command-line administration
tool, 11–12
debug level, 191
disabling PF, 12, 197
displaying system information,
22–23, 189
displaying verbose output, 20–21
enabling PF, 12, 13
expiring table entries, 99
fetching periodic data, 170
flushing existing rules, 22
list current contents of anchors, 92
load rules into anchors, 92
manipulating anchor contents, 92
memory pool information, 190
parsing rules without loading, 21
traffic tracking totals on per-rule
basis, 169–170
viewing rule numbers and debug
information, 197–198
pfflowd tool, 182
pflogd logging daemon, 162
logging to several interfaces, 167
logging to syslog, 168
pflo w(4) interface, 176 –182
data collecting, reporting, and
analysis, 177–182
setting up sensor, 176–177
pfSense, 8
pfstat command, 173 –175, 175f
pfsync protocol, 154–155
pftop command
traffic monitoring, 173, 173n1
ping6 command, 39
ping command, 39
ping of death bug, 38
PPP, 31
PPP over Ethernet (PPPoE), 31
prio keyword, 119–121
priority and queuing system, 118–131
handling unwanted traffic, 130–131
operating system-based queue
assignments, 131
overloading to tiny queues,
130–131
queues for bandwidth allocation,
121–130
DMZ network with traffic
shaping, 128–130
fixed, 123–125
flexible, 125–128
HFSC algorithm, 123
setting traffic priorities, 119–121
assigning two priorities,
120–121
prio priority scheme, 119–120
transitioning from ALTQ to,
131–133
priq (priority) queues, 131–132,
134–138
match rule for queue assignment,
137–138
performance improvement,
136–137
proactive defense, 95–115
spam, 100 –114
blacklisting, 100–103
compensating for unusual
situations, 113–114
content filtering, 100
detecting out-of-order
MX use, 113
218 Index
proactive defense, spam (continued)
greylisting, 104–108
greytrapping, 109–111
list management with spamdb,
111–113
tips for fighting, 115
updating whitelists, 108–109
SSH brute-force attacks, 96–99
defined, 96
expiring tables using pfctl, 99
overview, 96
setting up adaptive firewalls,
97–99
Q
qlimit value, 125–126, 141
queues. See also priority and queuing
system
for bandwidth allocation, 121–122
DMZ network with traffic
shaping, 128–130
fixed, 123–125
flexible, 125–128
HFSC algorithm, 123
handling unwanted traffic
overloading to tiny queues,
130–131
queue assignments based
on operating system
fingerprint, 131
queue-scheduler algorithms
(disciplines), 134–135
class-based bandwidth allocation,
132–133, 135
queue definition, 139–140
tying queues into rule set, 140
HFSC algorithm, 123, 125–126,
132–135
queue definition, 140–141
tying queues into rule set,
141–142
priority-based queues, 131–132,
134–138
match rule for queue assignment,
137–138
performance improvement,
136–137
quick rules, 33, 192, 198
R
random early detection (RED), 137
random option, 72–73
rc script, 13–15, 30
rdr-a nch or anchor, 74
rdr-to keyword, 36, 75, 80, 83, 103, 164
realtime value, 141
reassemble option, 192–193
RED (random early detection), 137
redirection
F TP, 36
for load balancing
NAT, 81
routable IPv4 addresses, 72–73
public networks, 62–63
with relayd daemon, 73–75
redundancy and resource availability,
147–160
failover
CARP, 150–154
pfsync protocol, 154–155
rule set, 155–156
load balancing, 157–160
CARP in load-balancing
mode, 158
setting up CARP, 158–160
redundant pair of gateways,
148 –150, 149f
Reed, Darren, 4
relayctl administration program, 76–77
relayd daemon, 73–79, 73n2
CARP, 79
checking configuration before
starting, 76
checking interval, 75
HTTP, 77–78
SSL, 78
relays, 73–75
removals statistic, 23
return value, 186
round-robin option, 72
routeradv (router advertisements), 41
routersol (router solicitations), 41
rtadvd daemon, 54
rtsol command, 56, 58
ruleset-optimization option, 191
rule sets
atomic rule set load, 21
bridges, 90–91
defined, 11
evaluation of, 17
Index 219
queues for bandwidth allocation
fixed, 124–125
flexible, 126–128
restructuring with anchors, 91–94
simple, 16–18
overview, 16–18
testing, 18
stricter, 18–22
checking rules, 21–22
overview, 19–20
reloading and looking for
errors, 20–21
testing, 22
using domain names and
hostnames in, 34
wireless access point, 53–54
writing to default deny, 18n4
S
sample configurations, 203–204
satellite value, 192
SCP, 35, 124, 139–140
scrub keyword
fragment reassembly options,
192–193
packet normalization, 193
Secure Shell. See SSH
self keyword, 32
Sender Policy Framework (SPF)
records, 114, 114n7
set skip on lo rule, 13, 15–16
SFTP, 35
Simple Network Management Protocol
(SNMP), 182–183, 182n5
skip option, 187
SMTP, 22, 68–69, 95, 100–106,
108–110, 113–114, 164
SNMP (Simple Network Management
Protocol), 182–183, 182n5
Solaris, 8–9
spam, 100 –114
blacklisting, 100–103, 101–103
content filtering, 100
detecting out-of-order MX use, 113
greylisting
compensating for unusual
situations, 113–114
defined, 104
function of, 106
in practice, 107–108
setting up, 104–105, 107
greytrapping, 109–111
list management, 111–113
keeping greylists in sync,
112–113
updating lists, 111–112
logging, 103
stuttering, 100–101
tarpitting, 100–101
tips for fighting, 115
updating whitelists, 108–109
SpamAssassin, 100
spamdb tool
adding/deleting whitelist
entries, 111
greylisting, 104, 111–113
keeping lists in sync, 112–113
updating lists, 111–112
greytrapping, 110 –112
adding to list, 111–112
deleting from list, 112
spamd spam-deferral daemon, 13,
10 0 –114
blacklisting, setting up, 101–103
detecting out-of-order MX use, 113
greylisting, 104–108
compensating for unusual
situations, 113–114
defined, 104
function of, 106
in practice, 107–108
setting up, 104–105, 107
greytrapping, 109–111
list management with spamdb,
111–113
keeping greylists in sync,
112–113
updating lists, 111–112
logging, 103
online resources, 205–206
updating whitelist, 108–109
spamlogd whitelist updater, 108–109, 167
SPF (Sender Policy Framework)
records, 114, 114n7
spoofing, 194–195, 194f
SSH (Secure Shell), 33, 48, 156
authpf program, 60
bandwidth allocation, 124, 139
brute-force attacks, 96–99
defined, 96
expiring tables using pfctl, 99
overview, 96
setting up adaptive firewalls,
97–99
220 Index
SSH (Secure Shell) (continued)
traffic prioritizing, 119
VPNs, 55
SSL encryption, 48, 78
state defaults, 177, 188
state-defaults option, 188
state-policy option, 187–188
state tables, 22–23, 182, 187–189
defined, 17
logging, 171, 174, 175f, 176
synchronizing, 154–155
State Table statistics, 23
state-tracking options, 97
sticky-address option, 72–73, 75
stuttering, 100–101
sudo command, 12, 14–16
symon utility, 175
sync listeners, 112
sync targets, 112
SYN-flood attacks, 68
synproxy state option, 68
sysctl command, 88, 158
setting up CARP, 151
turning on packet forwarding, 30
syslogd logging daemon, 167–169
systat command
redundancy and resource
availability, 155, 160
traffic monitoring views, 171–173,
173n1
traffic shaping, 127, 138, 142
system information, displaying, 22–24
T
tables. See also state tables
brute-force attacks, 97, 99
expiring table entries, 99
loading, 42
manipulating contents of, 42–43
naming, 42
“probation”, 99
tagged keyword, 85, 87
tags, 85–86
tarpitting, 100–101
TCP
ALTQ priority queues, 137
NetFlow data collection, 176,
179, 181
ports, 35
protocol handler definitions, 78
strict rule sets, 21–22
tcpdump program, 198
two-priority configuration, 120
UDP versus, 20
tcpdump program, 162–163, 166, 168,
198–199
TCP/IP, 3
ATLQ, 134
bridges, 86
F TP, 35n5
NetFlow data collection, 176
network interface configuration, 24
packet filtering, 31
redundancy and resource
availability, 154
total usable bandwidth, 122
troubleshooting-friendly networks,
37, 40
wireless networks, 46, 49, 56–57, 62
testing, 195–196, 196t
timeout option, 188–189
to keyword, 26–27
traceroute6 command, 39
traceroute command, 39
traffic shaping, 117–145
ALTQ framework, 117–118,
133 –145
basic ALTQ concepts, 134
class-based bandwidth
allocation, 139–140
handling unwanted traffic,
144 –145
HFSC algorithm, 140 –142
priority-based queues, 136–145
queue-scheduler algorithms,
134–135
queuing for servers in DMZ,
142–144
setting up, 135–136
priority and queuing system,
118–131
handling unwanted traffic,
130–131
queues for bandwidth
allocation, 121–130
setting traffic priorities,
119–121
transitioning from ALTQ to,
131–133
trojans (trojan horses), 2
Index 221
troubleshooting-friendly networks,
37–41
letting ICMP pass
unconditionally, 38
while stopping probes from
elsewhere, 39
path MTU discovery, 40–41
ping command, 39
traceroute command, 40
two-priority configuration,
120–121, 132
U
UDP, 21, 33, 40, 61, 168
IPsec with UDP key exchange, 55
NetFlow data collection,
176 –177, 179
TCP versus, 20
up parameter, 49, 56
upperlimit value, 141
user_ip macro, 62
V
verbose output
flowd-reader program, 178 –179, 181
pfctl administration tool, 20–21
spamd spam-deferral daemon,
102, 107
vhid (virtual host ID) parameter, 152
virtual local area networks
(VLANs), 70f
virtual private networks (VPNs), 55
Virtual Router Redundancy Protocol
(VRRP), 148, 152
viruses, defined, 2
VLANs (virtual local area
networks), 70f
VoIP (Voice over Internet Protocol),
119–120
VPNs (virtual private networks), 55
VRRP (Virtual Router Redundancy
Protocol), 148, 152
W
web servers
NAT, 79
routable IPv4 addresses, 66–67, 72,
74–75, 77
WEP (Wired Equivalent Privacy), 47, 59
whiteexp value, 107
whitelists, 101–102, 105
adding/deleting entries, 111
keeping updated, 108–109
wicontrol command, 46n1
Wi-Fi Protected Access. See WPA
Wired Equivalent Privacy (WEP), 47, 59
wireless networks, 45–63, 205
guarding with authpf, 59–63
basic authenticating gateways,
60–62
public networks, 62–63
privacy mechanisms
MAC address filtering, 46–47
W EP, 47
WPA, 47–48
selecting hardware for, 48
setting up, 48–59
access point PF rule set, 53–54
access points with three or
more interfaces, 54–55
client side, 55
configuring interface, 49–51
FreeBSD setup, 58–59
FreeBSD WPA access points,
52–53
initializing card, 48–49
OpenBSD setup, 56–57
OpenBSD WPA access points,
51–52
VPNs, 55
worms, 2, 2n1
WPA (Wi-Fi Protected Access),
47–48, 59
FreeBSD access points, 52–53
OpenBSD access points, 51–52
wpakey parameter, 56

The OpenBSD FOunDaTiOn
A CAnAdiAn not-for-Profit CorPorAtion
oPenBSd · oPenSSH · oPenBGPd · oPenntPd · oPenCVS
The OpenBSD Foundation exists to support
OpenBSD—the home of pf—and related
projects. While the OpenBSD Foundation
works in close cooperation with the developers
of these wonderful free software projects, it is a
separate entity.
If you use pf in a corporate environment,
please point management to the URL below,
and encourage them to contribute financially
to the Foundation.
www.oPenbsdfoundAtion.orG


UPDATES
Visit http://nostarch.com/pf3/ for updates, errata, and other information.
phone:
800.420.7240 or
415.863.9900
email:
SaleS@noSTarCh.CoM
web:
WWW.noSTarCh.CoM
BLACK HAT PYTHON
Python Programming for
Hackers and Pentesters
by juSTin SeiTz
noveMber 2014, 216 PP., $34.95
iSbn 978-1-59327-590-7
ABSOLUTE OPENBSD,
2ND EDITION
Unix for the Practical Paranoid
by MiChael W. luCaS
aPril 2013, 536 PP., $59.95
iSbn 978-1-59327-476-4
THE LINUX COMMAND LINE
A Complete Introduction
by WilliaM e. ShoTTS, jr.
january 2012, 480 PP., $39.95
iSbn 978-1-59327-389-7
PRACTICAL PACKET ANALYSIS,
2ND EDITION
Using Wireshark to Solve Real-World
Network Problems
by ChriS SanderS
july 2011, 280 PP., $49.95
iSbn 978-1-59327-266-1
PENETRATION TESTING
A Hands-On Introduction to Hacking
by georgia WeidMan
june 2014, 528 PP., $49.95
iSbn 978-1-59327-564-8
THE PRACTICE OF NETWORK
SECURITY MONITORING
Understanding Incident Detection
and Response
by riChard bejTliCh
july 2013, 376 PP., $49.95
iSbn 978-1-59327-509-9
More no-nonsense books from NO STARCH PRESS

www.nostarch.com
THE FINEST IN GEEK ENTERTAINMENT™
SHELVE IN:
OPERATING SYSTEMS/UNIX
$34.95 ($36.95 CDN)
BUILD A
MORE SECURE
NETWORK
WITH PF
BUILD A
MORE SECURE
NETWORK
WITH PF
OpenBSD’s stateful packet filter, PF, is the heart of
the OpenBSD firewall. With more and more services
placing high demands on bandwidth and an increas-
ingly hostile Internet environment, no sysadmin can
afford to be without PF expertise.
The third edition of The Book of PF covers the most
up-to-date developments in PF, including new content
on IPv6, dual stack configurations, the “queues and
priorities” traffic-shaping system, NAT and redirection,
wireless networking, spam fighting, failover provision-
ing, logging, and more.
You’ll also learn how to:
• Create rule sets for all kinds of network traffic, whether
crossing a simple LAN, hiding behind NAT, traversing
DMZs, or spanning bridges or wider networks
• Set up wireless networks with access points, and
lock them down using authpf and special access
restrictions
• Maximize flexibility and service availability via CARP,
relayd, and redirection
• Build adaptive firewalls to proactively defend against
attackers and spammers
• Harness OpenBSD’s latest traffic-shaping system
to keep your network responsive, and convert your
existing ALTQ configurations to the new system
• Stay in control of your traffic with monitoring and
visualization tools (including NetFlow)
The Book of PF is the essential guide to building a secure
network with PF. With a little effort and this book, you’ll
be well prepared to unlock PF’s full potential.
ABOUT THE AUTHOR
Peter N.M. Hansteen is a consultant, writer, and
sysadmin based in Bergen, Norway. A longtime
Freenix advocate, Hansteen is a frequent lecturer
on OpenBSD and FreeBSD topics, an occasional
contributor to BSD Magazine, and the author of an
often-slashdotted blog (http://bsdly.blogspot.com/ ).
Hansteen was a participant in the original RFC 1149
implementation team. The Book of PF is an expanded
follow-up to his very popular online PF tutorial (h t t p://
home.nuug.no/~peter/pf/ ).
Covers OpenBSD 5.6,
FreeBSD 10.x, and
NetBSD 6.x
PETER N.M. HANSTEEN
THE BOOK
OF PF
THE BOOK
OF PF
A NO-NONSENSE GUIDE TO THE
OPENBSD FIREWALL
3RD
EDITION
THE BOOK OF PF
THE BOOK OF PF
3RD
EDITION HANSTEEN
“I L I E FL AT.”
This book uses a durable binding that won’t snap shut.
