Build Instructions 3D Printed
User Manual:
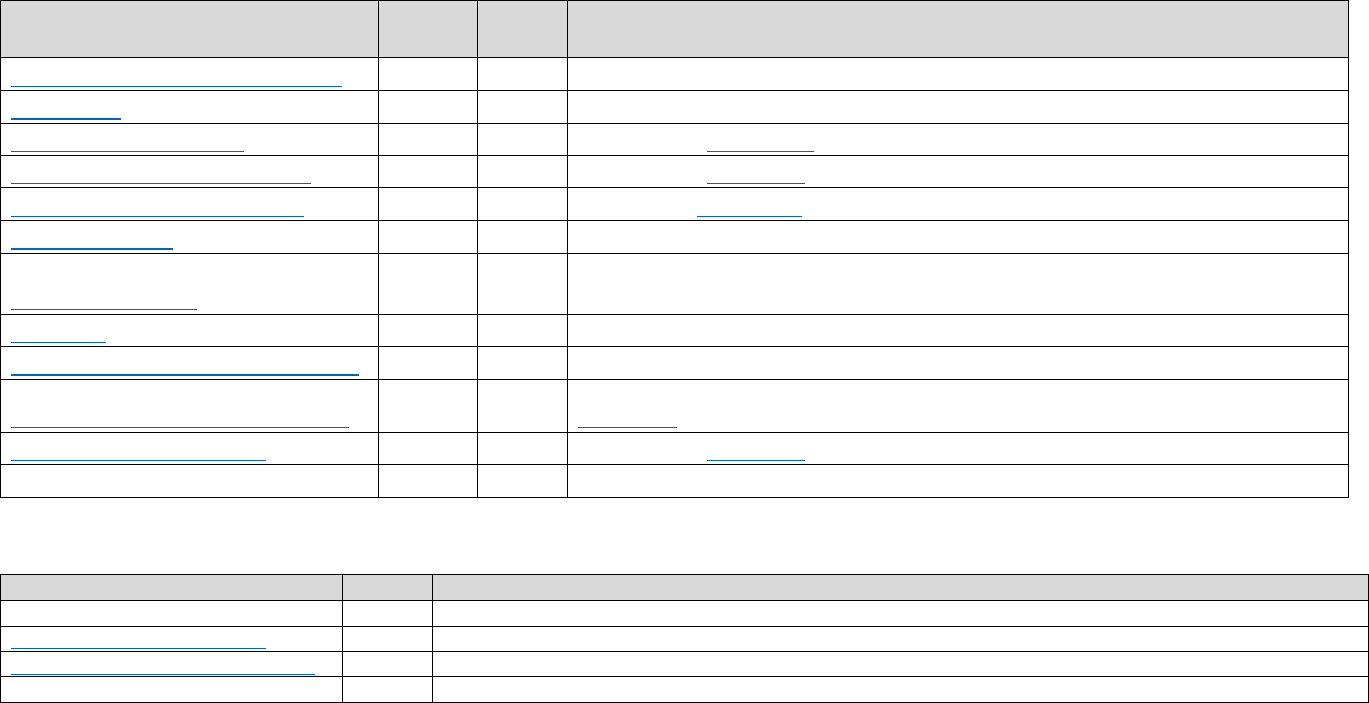
Open the PDF directly: View PDF ![]() .
.
Page Count: 25
1
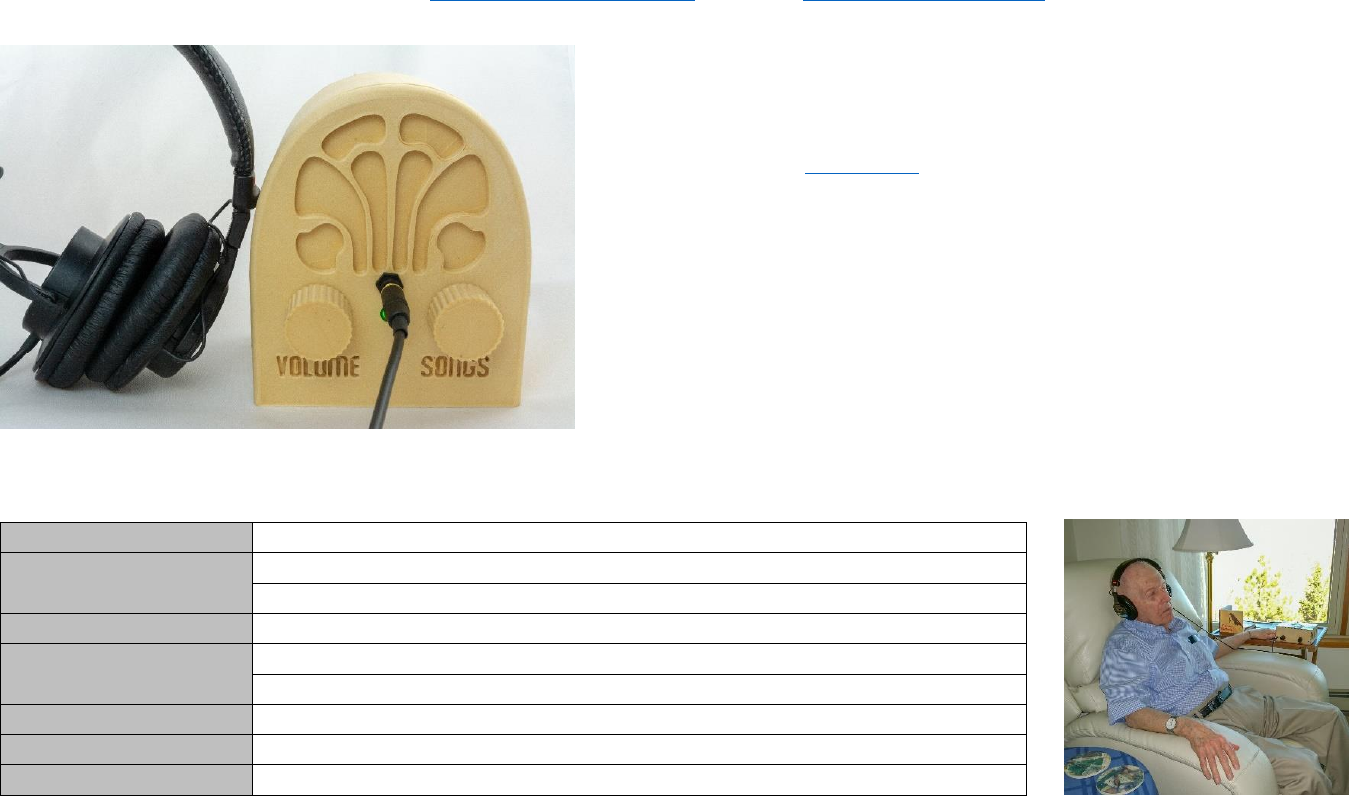
How to Build the Dementia Friendly Music Player
Using a 3D Printed Case
7 April 2019, http://DementiaMusicPlayer.org, Ross Porter rosswesleyporter@gmail.com
My Dad could not operate normal music players. But he could operate music
player like this because it operates like a familiar two-knob radio. I was inspired
by the documentary Alive Inside which shows the profound joy felt by some
people with dementia when listening to their favorite music. I designed the
insides and Trey Bagley designed the 3D printed case shown here.
It’s easier than you think to make one. Everything is open source. This document
contains all the information you need. Good project for kids. A 13 year old can
do this with minimal assistance. Younger kids with more assistance.
3D printed case designed by Trey Bagley
Parts cost
~$60 + tax + shipping
Music cost
Minimal as you should use the recipient’s existing music collection
Build time
About two hours, once you have the parts & music
Parts source
All parts can be mail ordered, links below
Soldering?
No
3D printer needed?
Yes, or work with a friend that has a 3D printer
3D printing time
About 24 hours
With a friend?
Good idea, especially if your friend has the basic tools required
Beverage?
I recommend a hoppy IPA while you are assembling
2
1 Preview of the build steps
1) Order parts
2) 3D print pieces
3) Stain the pieces (optional)
4) Assemble recipient’s favorite music
5) Copy software to micro SD card
6) Collect the parts & pieces
7) Add Pi
8) Install front panel components
9) Glue it
10) Wire it
11) Screw on back
12) Enjoy!
3
2 No warranty
USE THESE DQMUSICBOX PLANS AND SYSTEM AT YOUR OWN RISK. THE DQMUSICBOX PLANS ARE PROVIDED AS IS WITHOUT WARRANTY OF ANY KIND EITHER
EXPRESSED OR IMPLIED, INCLUDING, BUT NOT LIMITED TO, THE IMPLIED WARRANTIES OF MERCHANTABILITY AND FITNESS FOR A PARTICULAR PURPOSE. THE ENTIRE
RISK AS TO THE QUALITY AND PERFORMANCE OF THE PLANS AND SYSTEM IS WITH YOU. SHOULD THE PLANS OR SYSTEM PROVE DEFECTIVE, YOU ASSUME THE COST
OF ALL NECESSARY SERVICING, REPAIR OR CORRECTION. IN NO EVENT WILL ANY PARTY BE LIABLE TO YOU FOR DAMAGES, INCLUDING ANY GENERAL, SPECIAL,
INCIDENTAL OR CONSEQUENTIAL DAMAGES ARISING OUT OF THE USE OR INABILITY TO USE THE PLANS OR SYSTEM.
3 Acknowledgements
People were very generous with their time, and I really enjoyed the experience. This is certainly an incomplete list: Trey Bagley, Alex & Mike & others at Ada’s, the super
helpful crew at Seattle Makers, neighbor Randy, Stephen Christopher Phillips, Bob Rathbone, Stephen Rusk, Graham Hill, support at Ponoko, and my son.
4 What DQMusicBox does
4.1 For the person with dementia
Name
Description & implementation
Start song
Turning either of the knobs will start music playing.
Change song
Turn the songs knob.
Change volume
Turn the volume knob.
Pause
Tap the volume knob. Note that this also happens automatically – music pauses if there are no knob events in one hour.
4.2 For you
Name
Description & implementation
Shut down
Pull the power plug or long hold (15-30 seconds) on the volume knob.
Reboot
Pull the power plug and re-insert or long hold (15-30 seconds) on the songs knob.
Add/remove music
By adding/removing files on the USB memory stick.
4
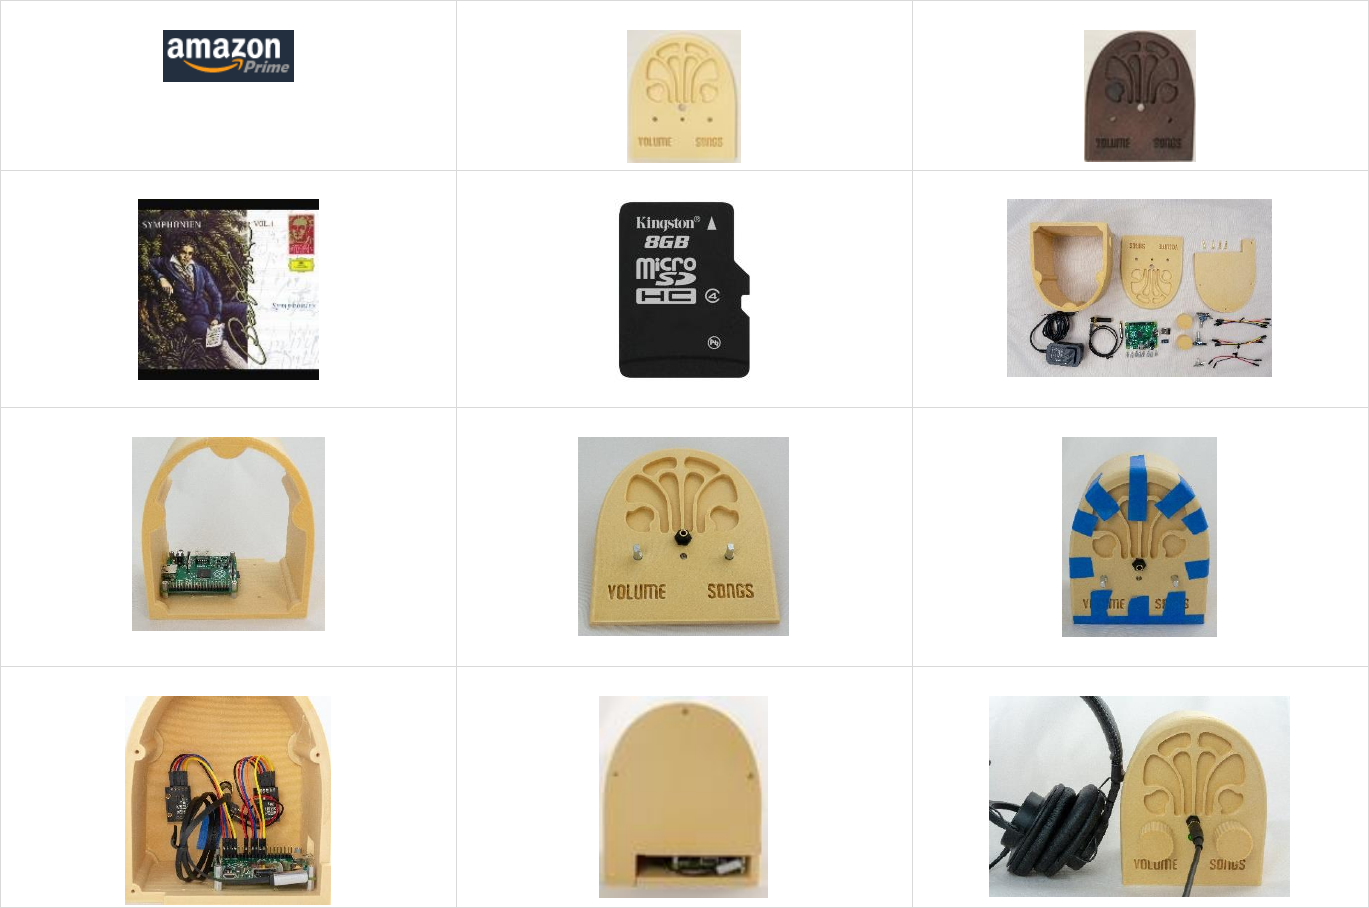
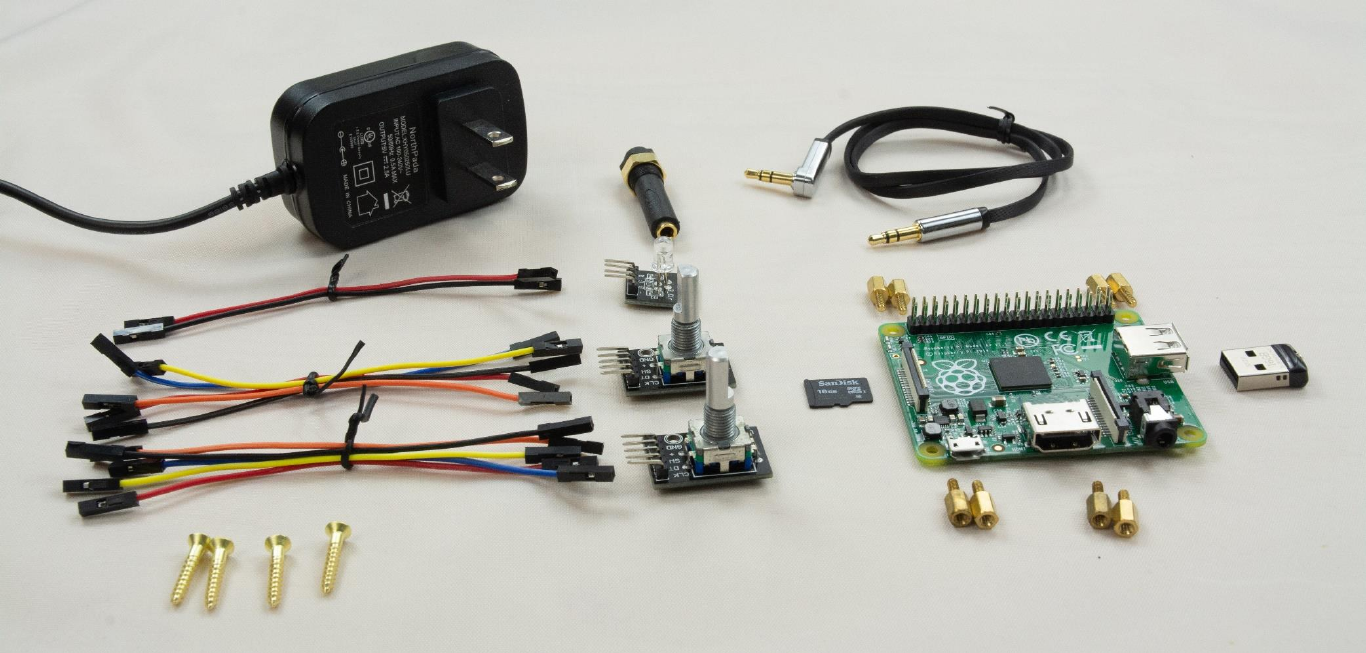
5 Order the parts
You will be ordering these parts:
5
5.1 Order the parts
Item
Supplier
Cost
(2018)
Notes & Alternatives
Raspberry Pi 1 A+ single board computer
Newark
$18.00
Tested with a Raspberry Pi 1A+, 2B, 3A+, 3B, 3B+. Do not use Pi Zero.
Power supply
Newark
$5.99
This is the US model. Any micro USB 2A or better supply will do.
Female-female jumper wires
Newark
$3.56
Or buy Amazon B01L5ULRUA
Panel mount 3.5mm headphone jack
Newark
$2.69
Or buy Amazon B004JX64FE
M2.5 standoffs (screws) – 8 of them
Newark
$3.84
Or by Amazon B06XXV8RTR
Micro SD card 32GB
Amazon
$5.99
Any brand name micro SD card that is 8GB or larger will do.
USB thumb drive 16GB
Amazon
$6.50
While nearly any USB thumb drive will work, I recommend one that is physically tiny so it
doesn't protrude much from the case.
Audio cable
Amazon
$5.88
Or find a short audio cable with a right angle bend.
#4 x 5/8” flat head wood screws (5 screws)
eBay
$1.49
Or buy at your local hardware store
KY-016 indicator LED (note shipping time)
eBay
$1.62
The linked seller ships from China, takes 2-3 weeks. Or order as one piece of this kit - Amazon
B013UL6LFS, which will arrive in a few days (assuming you live in the US).
KY-040 rotary encoders (knobs)
eBay
$6.36
Or buy Amazon B074TJ8RSX.
TOTAL
$62.12
Prices will vary. Does not include tax, shipping.
5.2 About headphones
Item
Cost
Notes and alternatives
The recipient’s existing headphone
$0.00
The best headphones are the headphones that the recipient is already used to.
Monoprice On-Ear headphones
$10.99
Very good sound.
Monoprice Over-the-Ear headphones
$15.99
Amazing sound. My musician son rates the sound as better than the ever-popular Sony MDR7506 headphones.
Other
Look for high sensitivity headphones, as the Pi’s output is a bit weak.
6
5.3 Tools & supplies
You probably have some of these tools & supplies. If you don’t, you have a spouse or child or friend that does. This project is exactly the sort of thing that a friend would
be happy to help you with.
Link to order item
Notes & alternatives
Elmer’s wood glue
Any wood glue will do
3/16th wrench or nut driver
Or needle-nosed pliers. Or really strong fingers
SD card reader/writer
Your computer may have an SD card reader/writer. If not, you probably have a friend that does. Or order a USB SD-
card reader for your computer.
Painter’s tape
Any tape that comes off easily will do. Painter’s tape is great. Regular masking tape is probably fine too. I haven’t tried
Scotch tape.
Light blocking tape or sticker
The unit’s LED is quite bright, so I prefer to block some of the light. You can use the tape above. Or order light
blocking stickers such as B009WSJNCW.
PLA wood filament (optional)
This document assumes that you have a 3D printer, or you have a friend with a 3D printer. So you already have some
regular PLA filament. I chose to use a PLA wood filament, specifically Monoprice PLA wood filament.
Wood stain (optional)
If you print with PLA wood filament, you can optionally apply wood stain. I used a pre-stain, a stain, and a protective
finish. I went to the local hardware store and purchased what they recommended: Minwax Pre-Stain Wood
Conditioner, Minwax Wood Finish Red Mahogany 225, Minwax Polycrylic Protective Finish.
Raspberry Pi 3 (optional)
This is in addition to the Pi that goes in the player. This is a completely optional step. If you are nerd like me, or you
have nerdly friend, see details in the appendix 1.
7
6 3D print pieces
The key assumption is that you have a 3D printer, or you have a friend with a 3D printer. Thus, this document is not intended as an introduction to 3D printing.
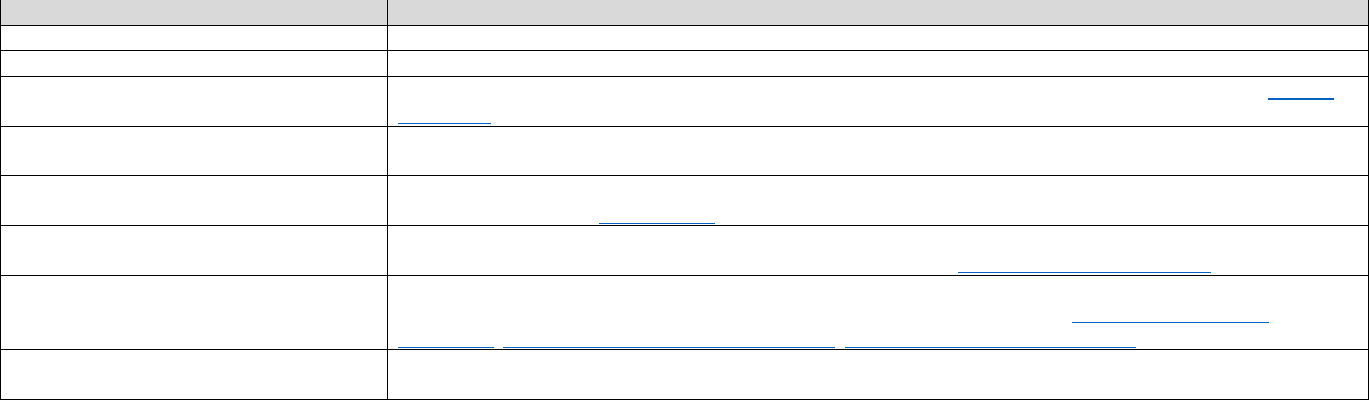
You will be printing the pieces that you see below. You should print in the orientation that you see below i.e. flat side down. On my basic 3D printer, the total print time
was about 18 hours.
3D printed case designed by Trey Bagley
6.1 General instructions
1. Download the stl files from Github.
2. 3D print the files.
6.2 My experience
Trey Bagley designed the case. I think he did a great job. But I’m a novice at 3D printing. Nonetheless here is what I did, and I’m happy with the result:
• Monoprice Maker Select v2 3D printer
• Monoprice PLA wood filament

8
• Cura slicing software
• Key settings
o Layer height: 0.3mm
o Initial layer height: 0.3mm
o Wall thickness: 0.8mm
o Top/bottom thickness: 0.8mm
o Infill: 10%
o Print temp: 188C (this low temperature reduced stringing issues)
o Build plate temp: 50C
o Diameter: 1.75mm
o Flow: 100%
o Enable retraction: yes
o Retraction distance: 10mm
o Retraction speed: 60mm/sec
o Print speed: 45mm/sec
o Infill speed: 50mm/sec
o Travel speed: 120mm/sec
o Initial layer speed: 5mm/sec
o Enable print cooling: yes
o Fan speed: 100%
o Minimum layer time: 5 sec
o Print sequence: all at once
• Post printing
o My prints came out fairly clean, but I did use a tiny knife to extract extraneous strands from the lettering.
9
7 Stain the pieces (optional)
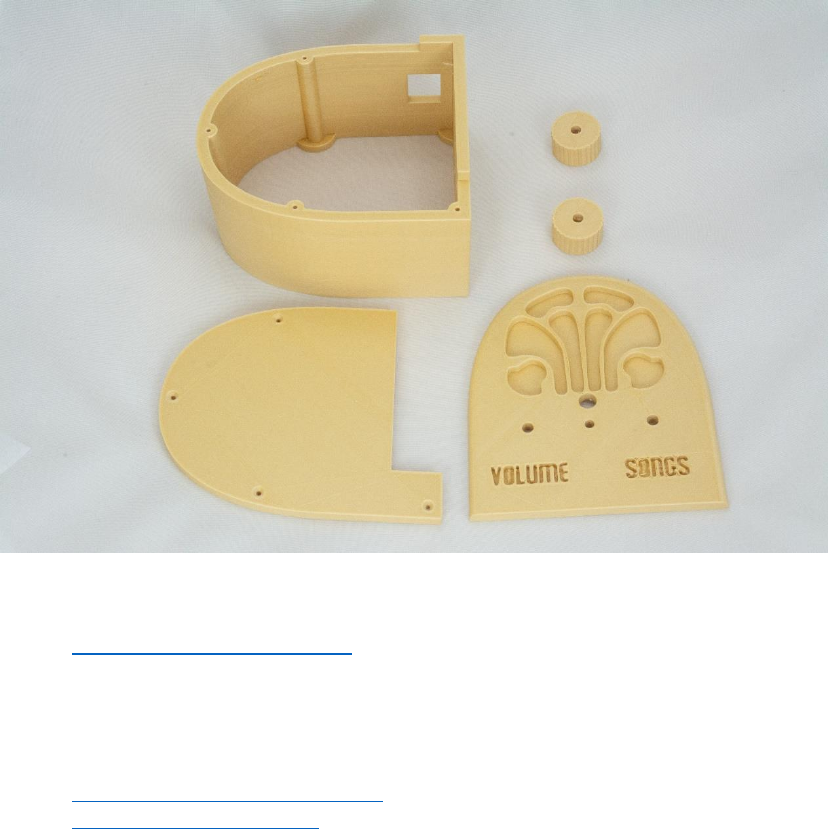
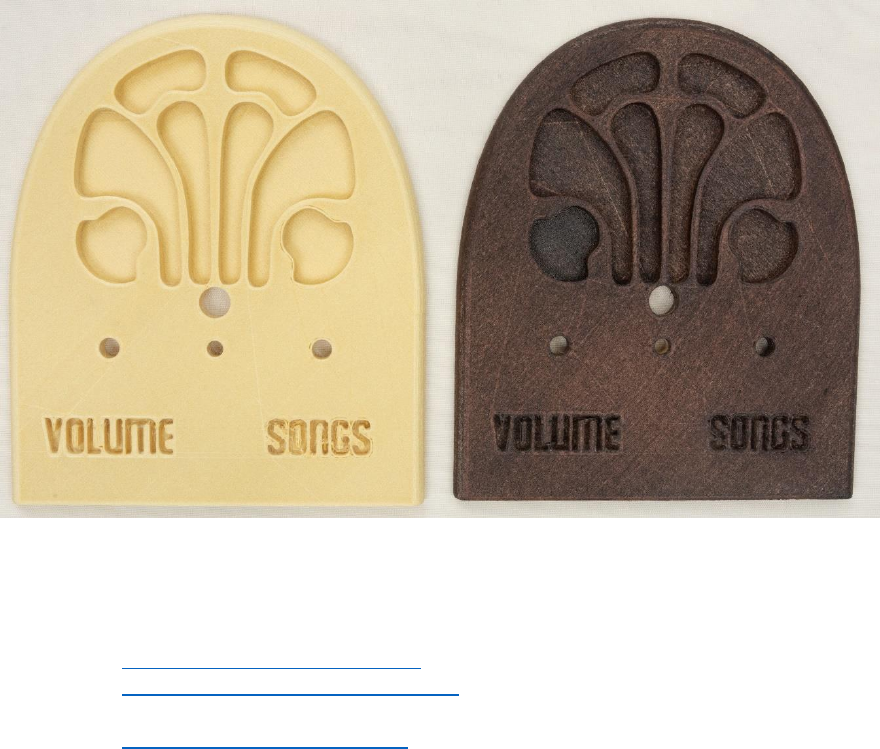
This step is optional. I wanted to make something that seems familiar to someone with dementia i.e. make something that looks very much like a radio from the 1930s.
These antique radios are made of wood and generally dark stained. Thus, I chose to print with a wood PLA filament and stain the print. You could choose to print with
regular PLA filament. Or print with wood PLA but not stain it.
Here is the before and after of staining the front face:
I’m not a woodworker. Nonetheless, this is the process that I used:
1. Sand the parts with a fine grit sandpaper.
2. Apply Minwax Pre-Stain Wood Conditioner, let dry. Or a similar product. Minwax is what my neighborhood hardware store has…
3. Apply Minwax Wood Finish, Red Mahogany 225. I applied a thin even coat. Minwax suggests waiting 15 minutes then wiping off the excess stain. I found this
removed too much of the stain. So I didn’t do any wiping off and just let it dry overnight.
4. Apply Minwax Polycrylic Protective Finish, let dry.
10
8 Assemble the personalized collection of music
8.1 Choosing the music – go for familiar favorites
This is the most important step. The personalized (familiar) music is the fundamental magic. You don’t need much music, perhaps 6-10 albums. But only familiar
favorites. In my case, my Mom mailed me my Dad’s favorite CDs. It will take two weeks for the parts above to arrive, so you have time to do this well. Though it is easy
to change the set of music later.
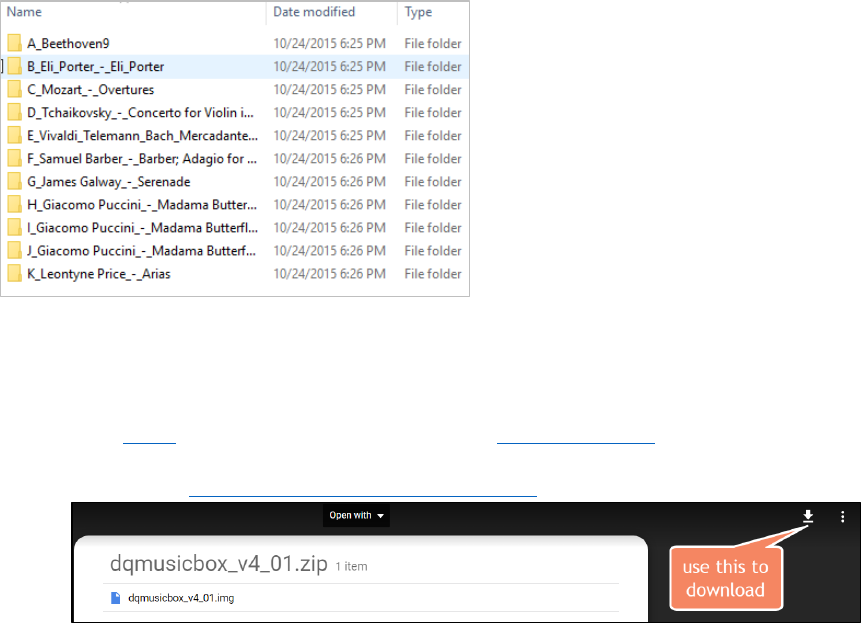
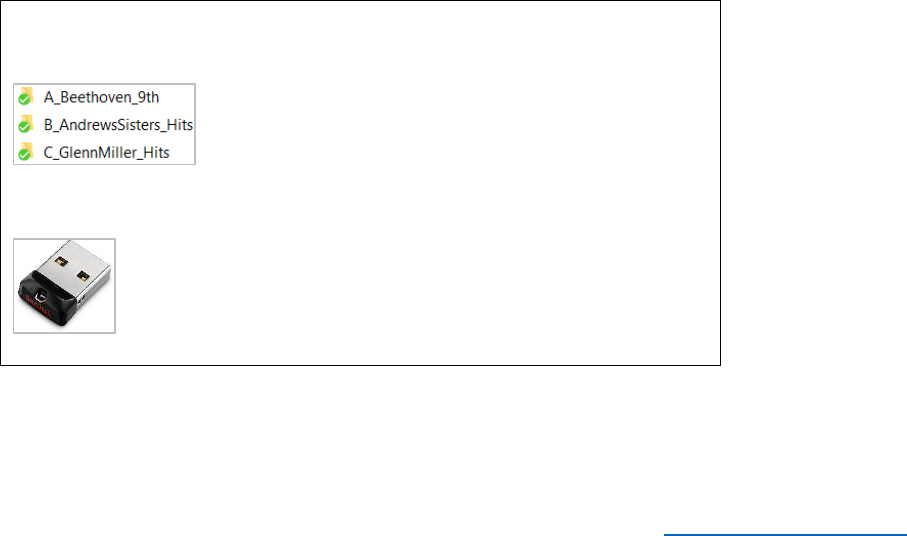
8.2 Put the music on the USB memory stick
Organize the digitized music into folders on the USB memory stick, one folder per album. MP3, iTunes, and FLAC files are supported i.e. files with extensions .mp3,
.m4a, .flac. In the end, you should have a set of folders that looks something like this:
9 Prepare the micro-SD memory card
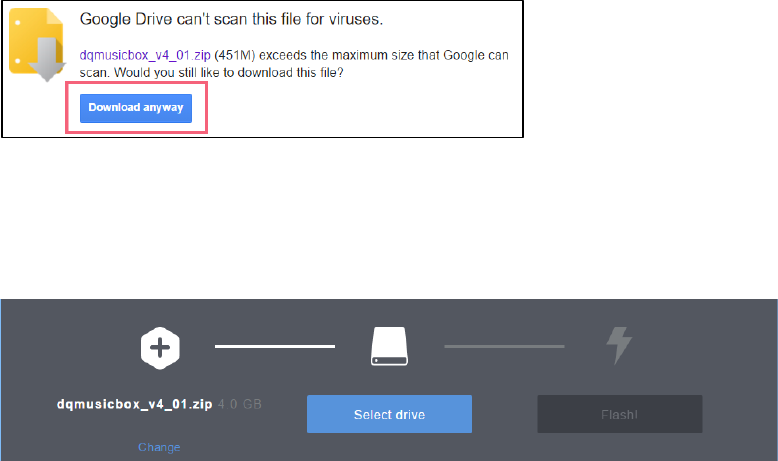
I prepared a disk image for you. It has all the required software. Your job is to download this disk image and then write it to the micro-SD card. The steps:
1. Install Etcher on your PC or Mac or Linux computer. Win32 Disk Imager also works.
2. Download the Dementia Friendly Music Player disk image.
11
3. Confirm download – “Download anyway”
4. Put the micro-SD memory card into the SD card adapter that it came with i.e. put the tiny card into the larger card.
5. Put the SD card adapter into the SD reader/writer in your computer.
6. Start Etcher, instruct it to write the image file to the SD card:
7. Wait for the writing to complete, ~10 minutes. This would be a good time to make a sandwich.
12
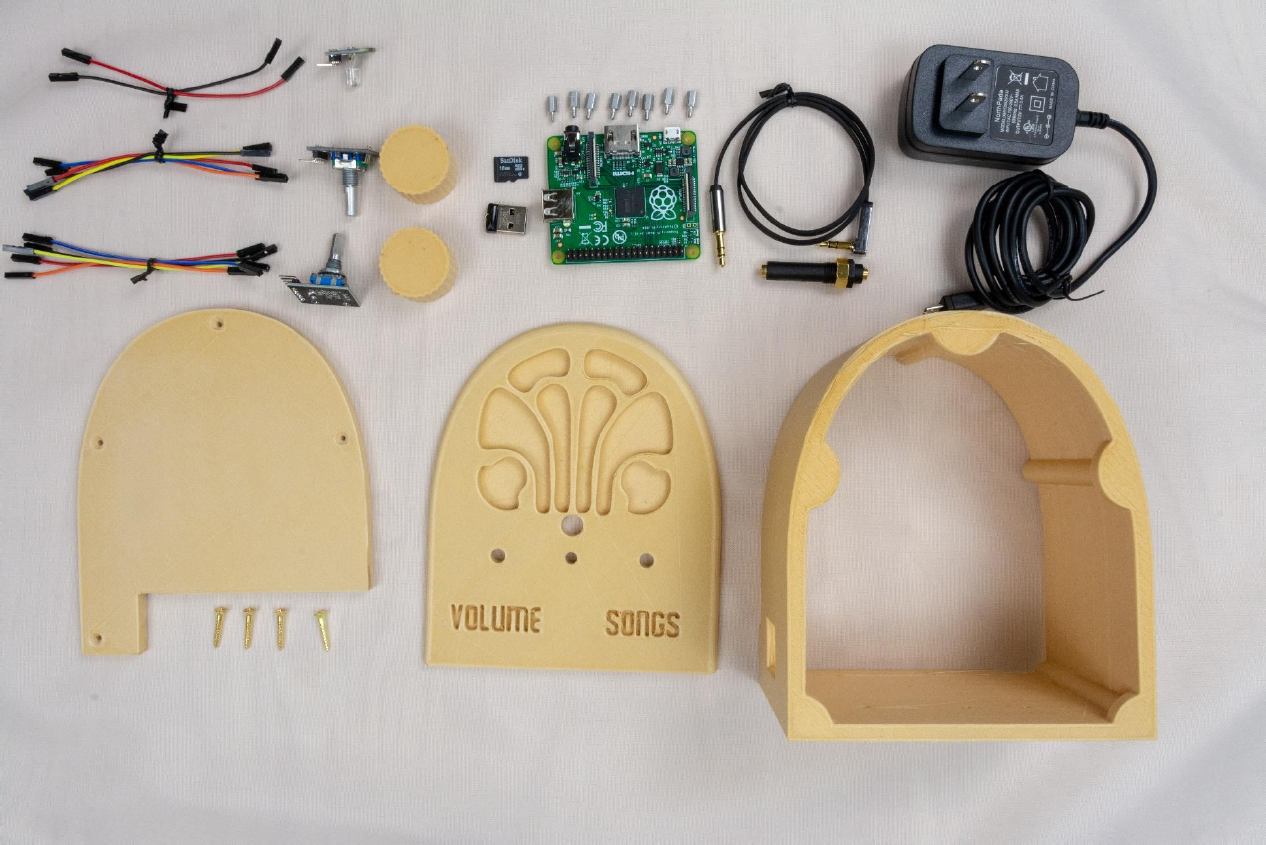
10 Collect the parts and pieces
You should now have the following:
13
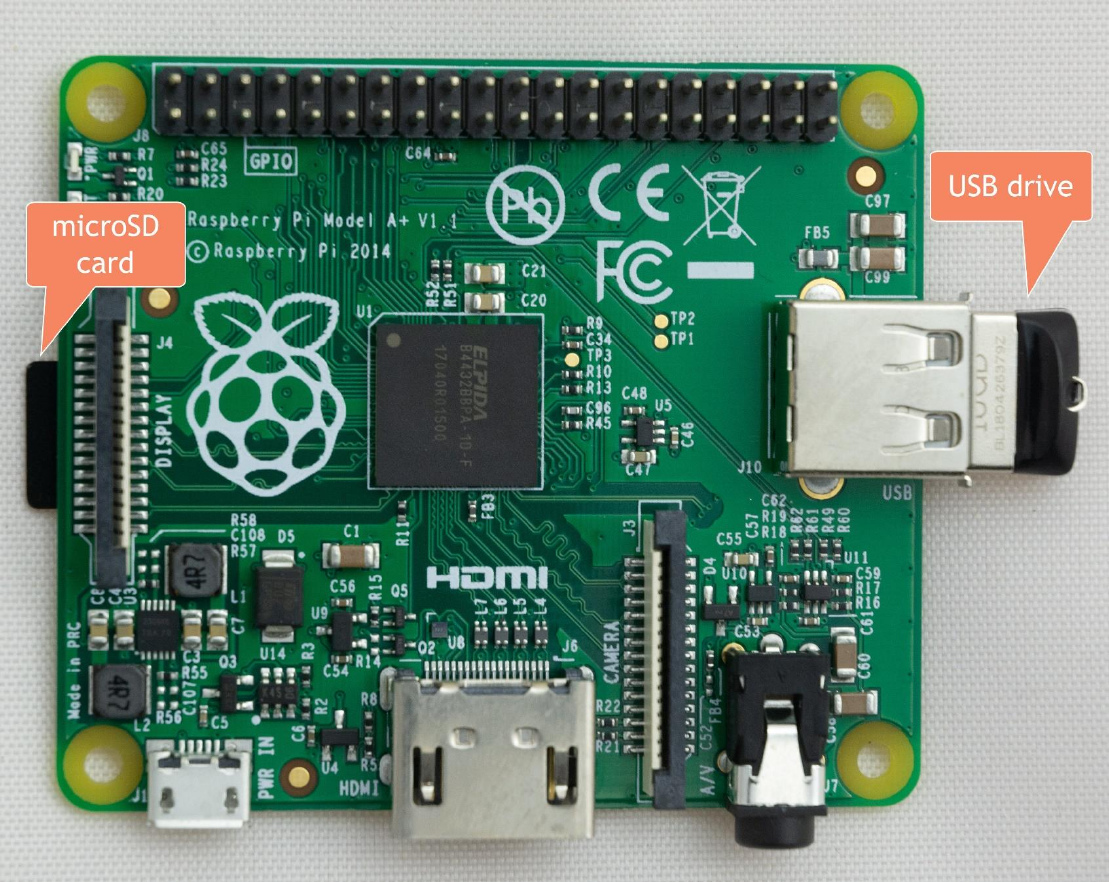
11 Add Pi
11.1 Put the MicroSD card and the USB drive into the Pi
14
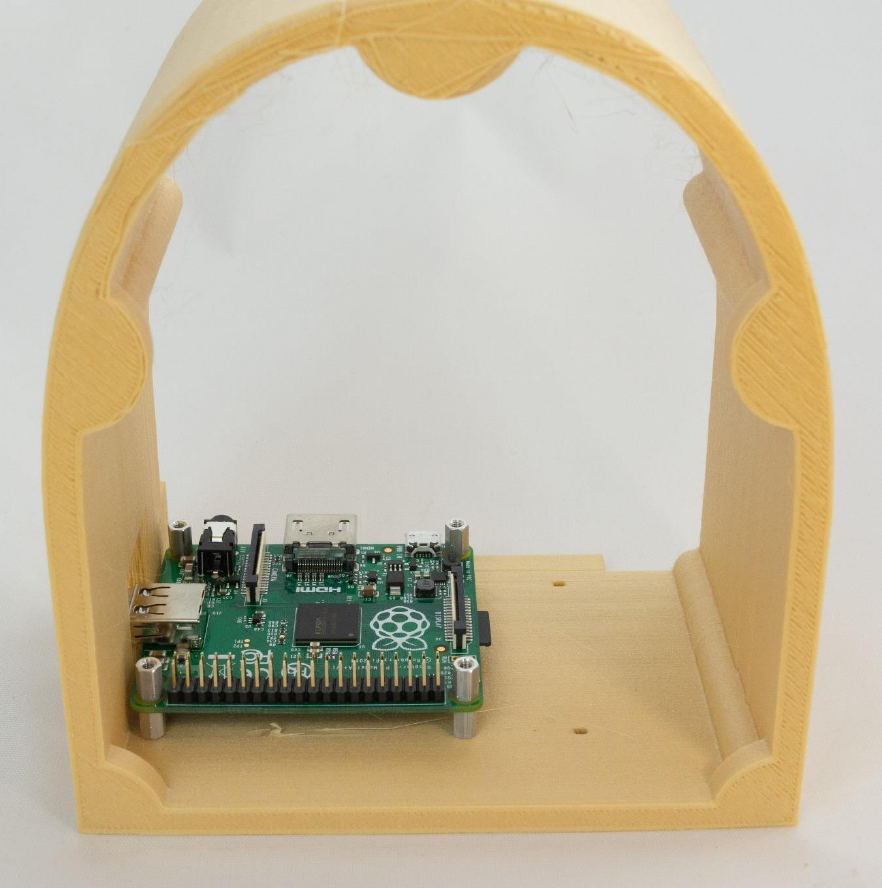
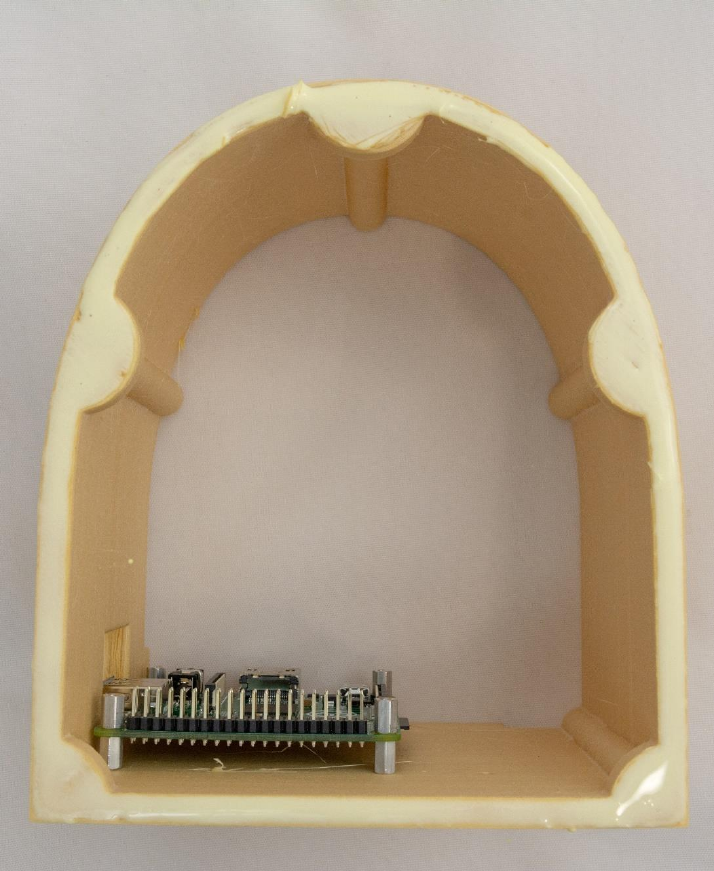
11.2 Mount the Pi
Using the standoffs, mount the Pi in the body piece:
15
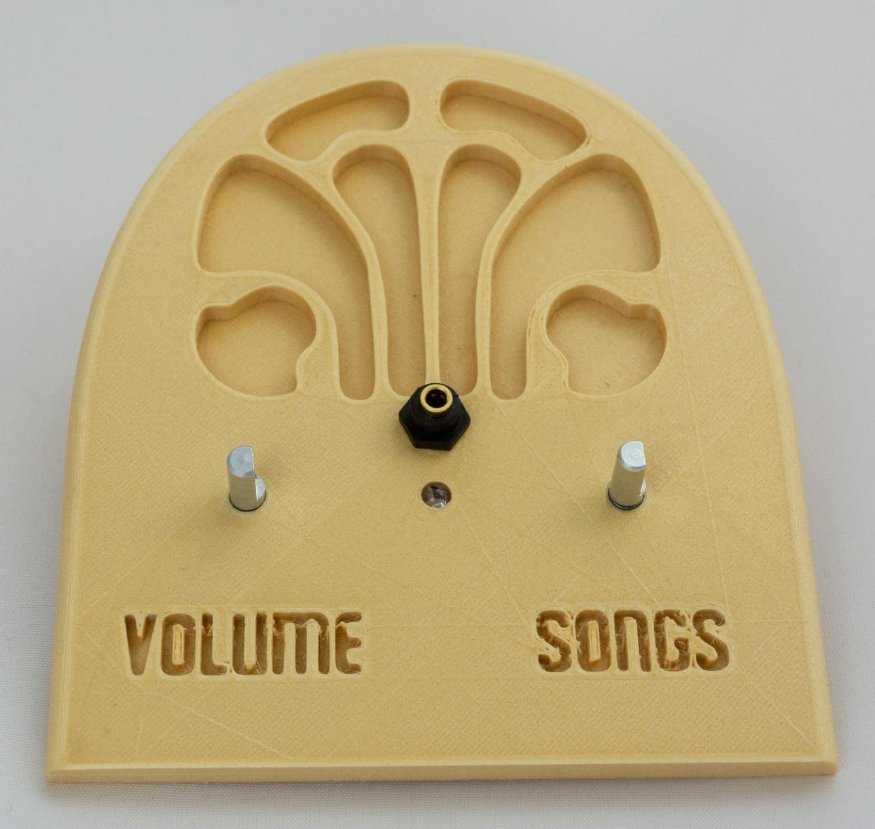
12 Install front panel components
Install the two rotary encoders (knobs), the LED, and the headphone jack. The rotary encoders need to be screwed in as far as they will go, or the button press won’t
work – test the rotary encoders to make sure they rebound from a button press.
16
13 Apply glue
Apply glue to the front of the body piece:
17
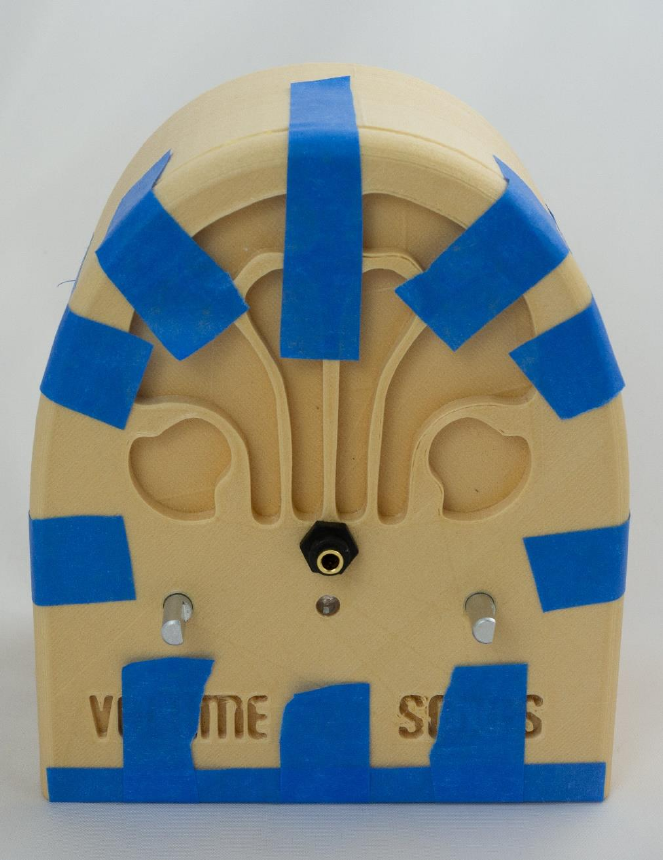
14 Glue on the face
Glue on the face, using painter’s tape to clamp:
18
15 Wire it
15.1 Wire the knobs & LED
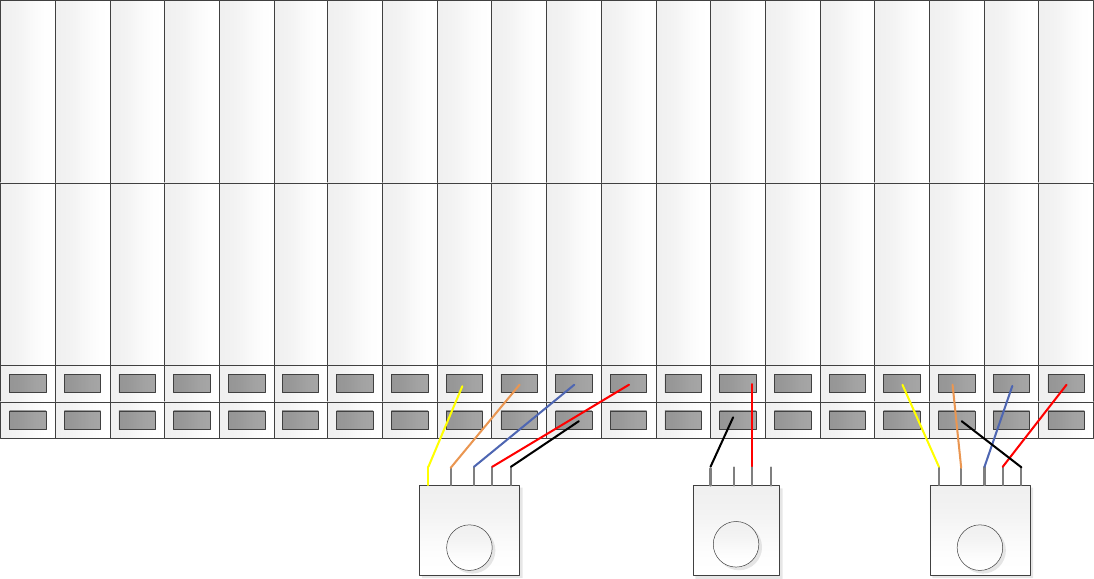
Attach wires from the knobs and the LED to the Raspberry Pi as per the diagram and photos below. No soldering required – just press the wires into place. This is where
most build errors happen, so please carefully check your work.
1 3v3 Power 2 5v Power
3 GPIO 2 (SDA) 4 5v Power
5 GPIO 3 (SCL) 6 Ground
7 GPIO 4 (GPCLKO) 8 GPIO 14 (TXD)
9 Ground 10 GPIO 15 (RXD)
Songs knob (rotary encoder)
11 GPIO 17 12 GPIO 18 (PCM_C)
13 GPIO 27 (PCM_D) 14 Ground
15 GPIO 22 16 GPIO 23
17 3v3 power 18 GPIO 24
19 GPIO 10 (MOSI) 20 Ground
21 GPIO 9 (MISO) 22 GPIO 25
23 GPIO 11 (SCKL) 24 GPIO 8 (CE0)
25 Ground 26 GPIO 7 (CE1)
27 ID_SD 28 ID_SC
29 GPIO 5 30 Ground
31 GPIO 6 32 GPIO 12
33 GPIO 13 34 Ground
35 GPIO 19 (MISO) 36 GPIO 16
37 GPIO 26 38 GPIO 20 (MOSI)
38 Ground 40 GPIO 21 (SCLK)
Volume knob (rotary encoder) On/off indicator LED
CLK
GND
+
SW
DT
CLK
GND
+
SW
DT
R
G
B
-
19
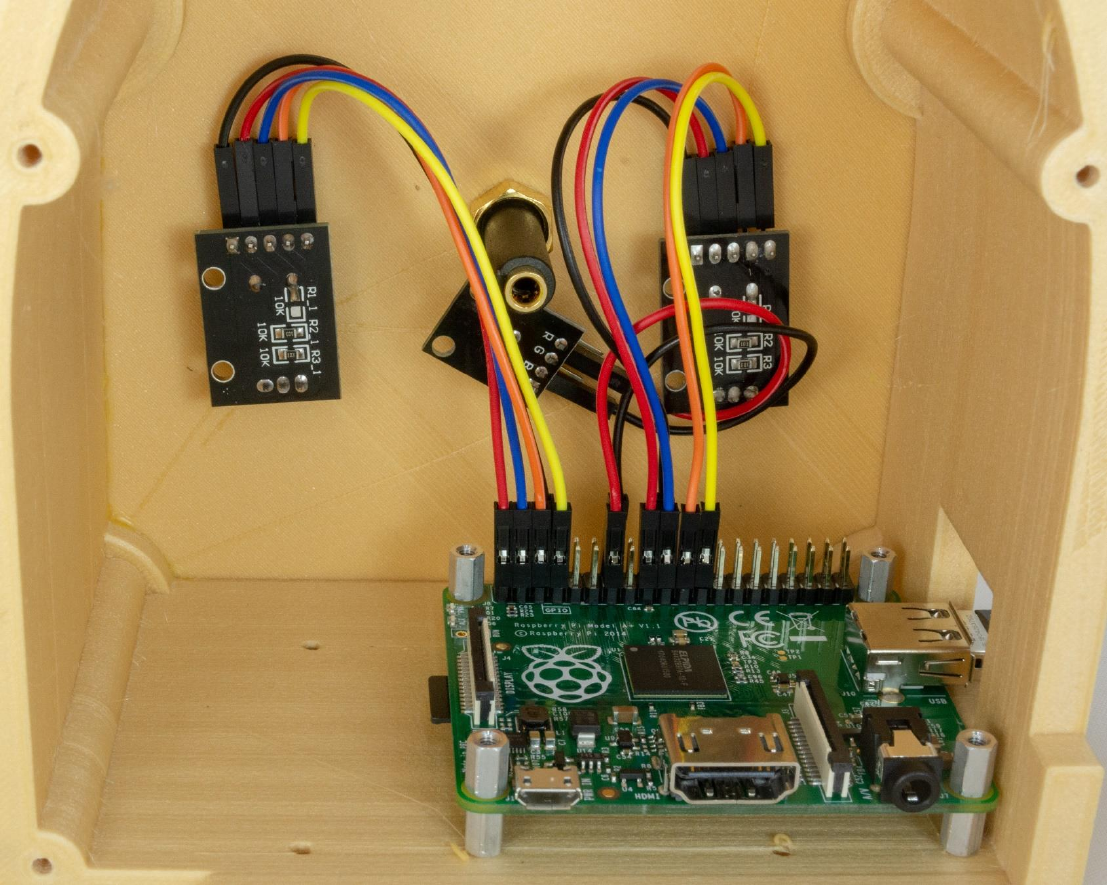
The result should be as you see it below. The front of the LED should be flush with the front of the face. If the LED is a bit loose, just use some glue.
20
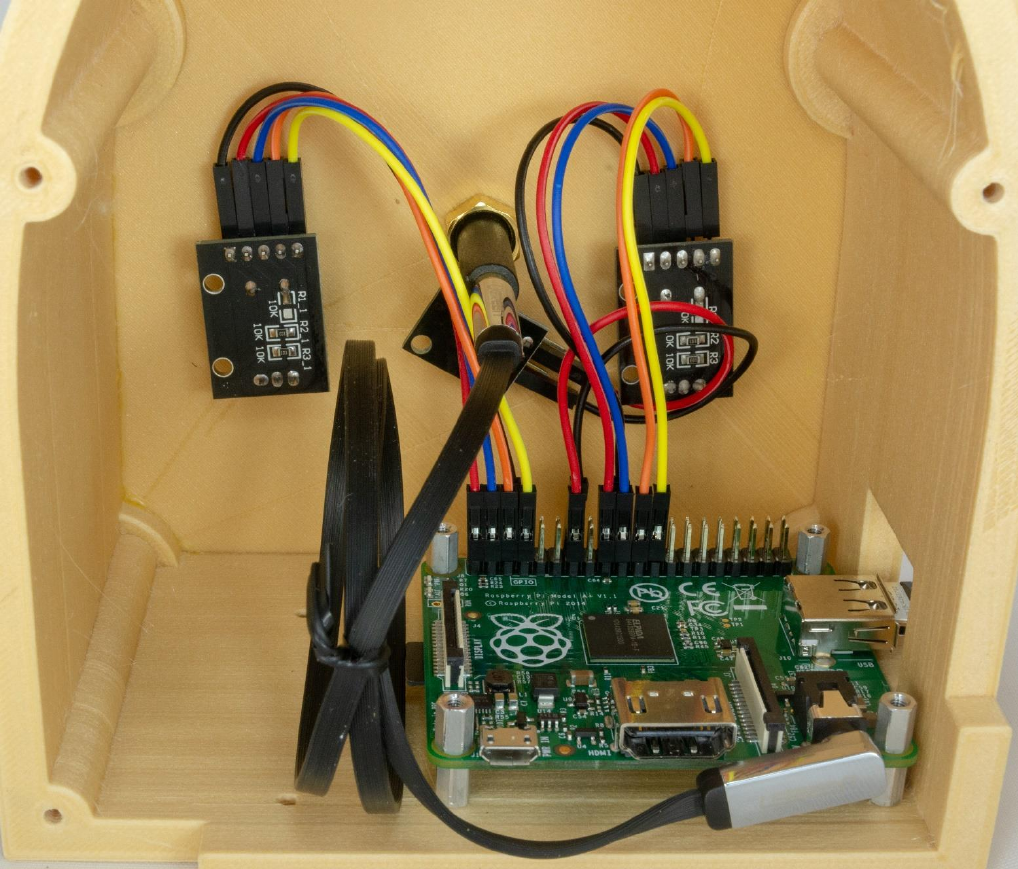
15.2 Add the audio cable
The audio cable goes from the back of the Pi to back of the front panel’s headphone jack:
21
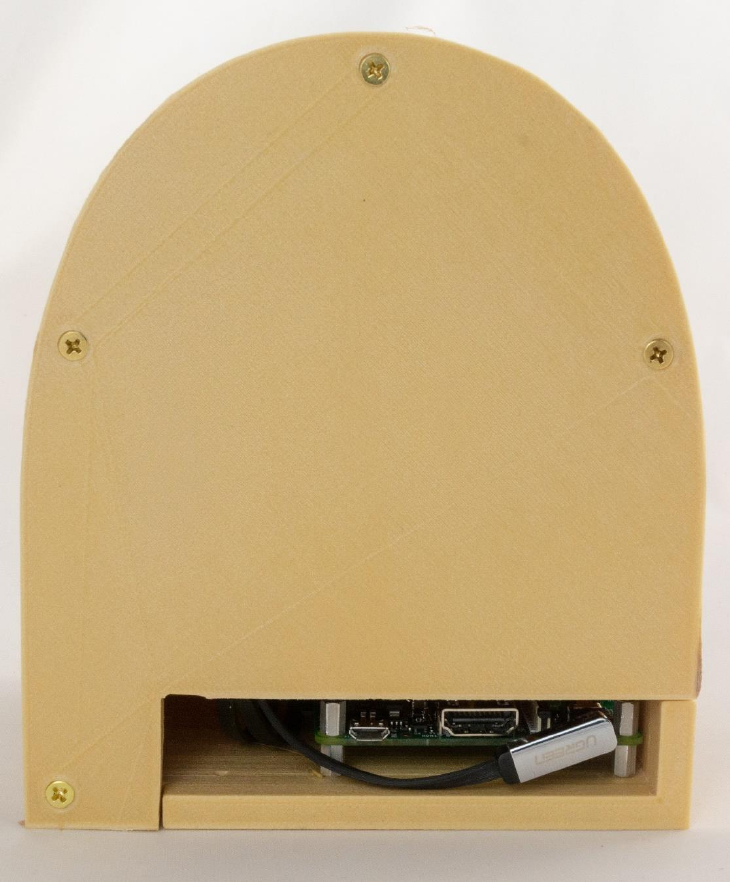
16 Screw on the back

22
17 Put the knobs on and enjoy!
If the knobs don’t easily slide on the metal shafts, just heat the knobs up with a heat gun or hair dryer or (last resort) boiling water. You can also put some grease or
cooking oil on the metal shafts.
23
17.1 Test it
Now that you have assembled everything, it is time to test.
Test
Description & Expectation
Light 20sec after power on
The indicator LED turns on when DQMusicBox is ready to play music, which is generally about 15 seconds after power on.
Start song
Turning either of the knobs will start music playing.
Change song
Turn the songs knob. If you go forward and backward through the song list as expected, then all is well.
Change volume
Turn the volume knob. If the volume goes up and down as expected, then all is well.
Pause
Tap the volume knob, song should pause. Tap the songs knob, this should also pause the song.
Unpause
Tap a knob
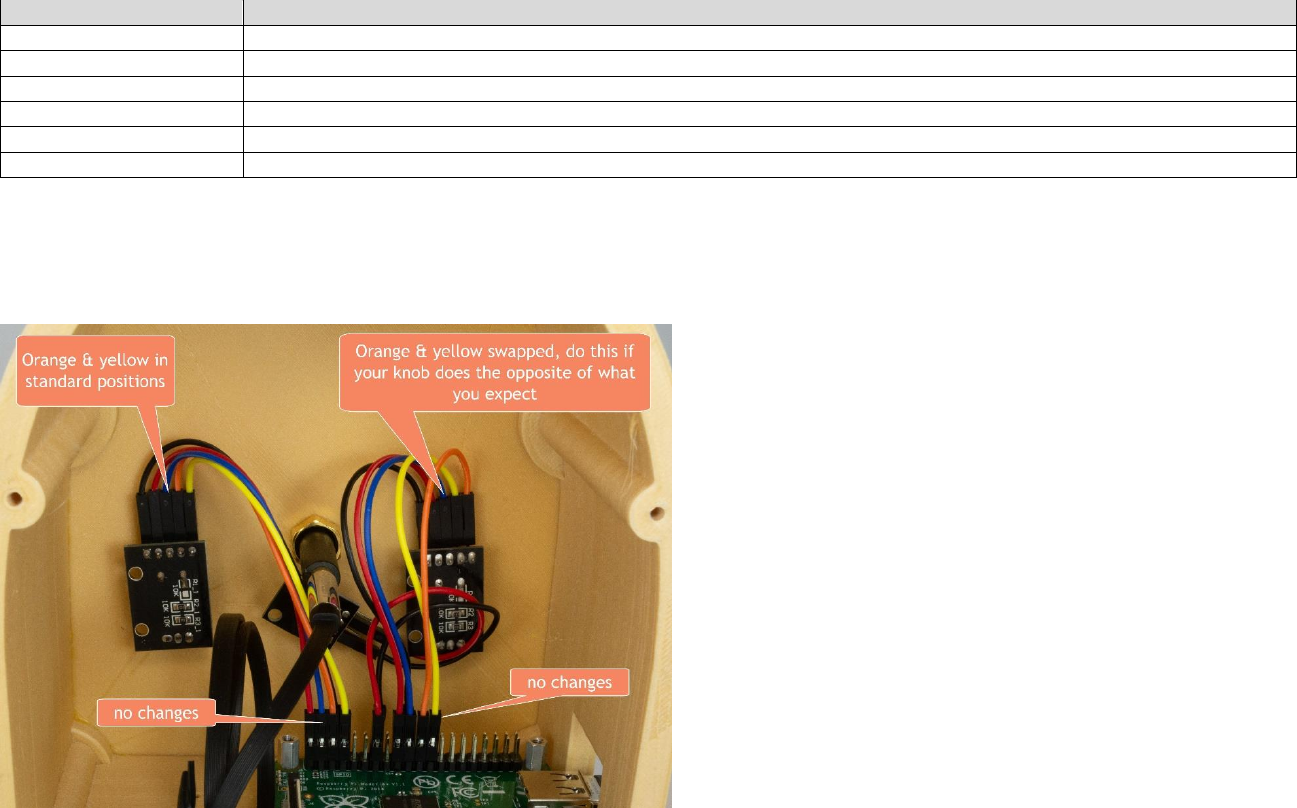
17.2 If one or both knows do the opposite of what you expect
Once assembled, you may find your knobs doing the opposite of what you expect e.g. a clockwise turn decreases the volume. This is because there are two kinds of
rotary encoders out there. Happy, the fix is easy, just switch the orange and yellow wires on the misbehaving knob(s) (don’t touch the Pi itself):
24
17.3 Tape instructions
Print this page and tape the instructions in the box below to the bottom of your new DQMusicBox:
To create personalized music
Organize the music on your computer
One folder per album. Use MP3 files, must have .mp3 file
extension. Or iTunes files (.m4a). Or FLAC files (.flac).
Optionally, use folder names prefixes to specify the play
order e.g. A_, B_
Copy the music to the USB thumb drive
1. Unplug your DQMusicBox.
2. Remove the USB thumb drive and place in your computer.
3. Copy music files from your computer to the USB thumb drive.
4. Put the USB thumb drive back in the DQMusicBox.
5. Plug in your DQMusicBox.
17.4 Congratulations
Congratulations! You should have a fully functional DQMusicBox.
17.5 Let me know how it went
I’d love to hear how your build process went and if it was useful for the recipient. rosswesleyporter@gmail.com

25
18 Appendix 1: Change log
v1, November 2015
Original release
v2, September 2016
• Changed music storage from a micro-SD memory card to a conventional USB memory stick.
• Changed the base Operating System from full Raspbian to DietPi – much smaller, so faster to boot, and less to go wrong.
v3, January 2017
• Changed from USB audio to Pi built-in audio, including a firmware update for excellent audio quality.
v4, May 2017
• Switched to bamboo for durability and use of standoffs.
• Switched to Pi A+ to lower cost.
• Made USB thumb drive externally accessible, to make it easier for the caregiver to organize music.
v4.01, 25 June 2017
• Minor edits.
v4.01_1, 20 July 2017
• Minor edits.
v4.01_2, 11 August 2017
• Added links for ordering parts in the UK.
• Added detailed instructions for write protecting a micro-SD card.
v4.01_3, 12 August 2017
• Minor edits
v4.01_4, 12 August 2017
• Minor edits
v4.01_5, 14 October 2017
• Edited text and updated photographs to reflect the change from an HDD-style LED to a KY-016 LED module.
v4.01_6, 26 February 2018
• Updated the links for purchasing the parts. No changes to the parts themselves, just the links.
• Minor change to the instructions, noting how the build can be accomplished in one sitting, if desired.
v4.1, 7 April 2018
• Reflects that the software has been updated to support the new Raspberry Pi 3 B+. No new software features.
v4.1_1, 23 April 2018
• Updated to reflect the new bamboo case design.
V4.1_1, 6 May 2018
• Adapted the existing instructions to match the new 3D printed case design.
27 January 2019
• Noted support for the Raspberry Pi 3A+.
v4.2, 1 March 2019
• Switched to pmount for USB drive auto mounting.
v4.2, 7 April 2019
• Removed instructions for write protecting the SD card – rarely used and may cause certain rare problems
