Classe 300 User Manual
User Manual: classe 300 user manual
Open the PDF directly: View PDF ![]() .
.
Page Count: 52
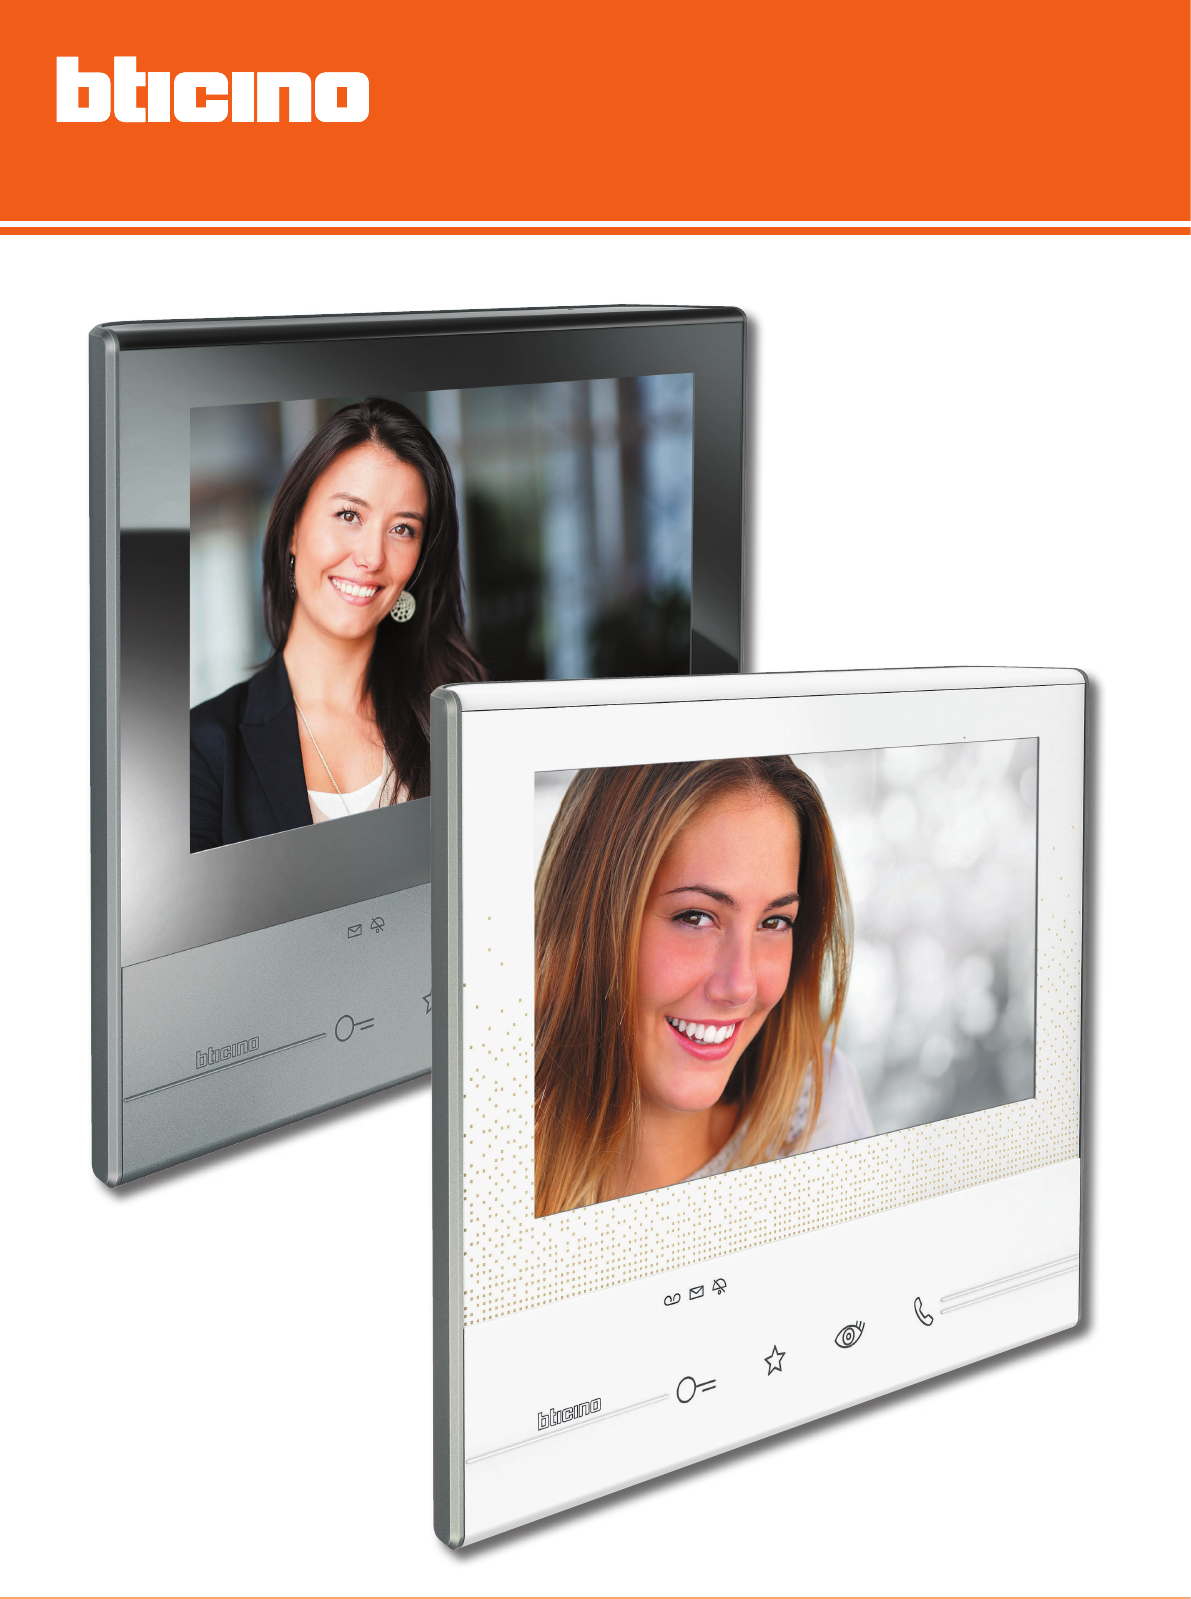
User manual
Classe 300
www.bticino.com
Classe 300
User manual

3
Classe 300
User manual
Your Classe 300 Video Internal Unit, use it now! 4
Answer a call 4
Listen to the answering machine (only models 344622) 6
Auto-switching on and camera scrolling 9
Write or record a memo 11
Call another room or apartment (Intercom) 15
General information 17
Function keys and status LEDs 17
Home page 18
Enabling functions 18
Quick actions 18
Functions 19
Functions 20
Answering machine (only models 344622) 21
Cameras 25
Memo 27
Text memo 29
Audio memo 30
Intercom 31
Activations 33
Quick actions 34
Settings 35
General settings 36
Time and date 36
Language 37
Information 37
Ringtones 38
Display 39
Clean monitor 39
Background 40
Calibration 40
Answering machine 41
Quick actions 43
Configuration 46
Services 47
Inductive loop 47
Door status 48
Office 49
Paging 50
Contents
Classe 300
User manual
4
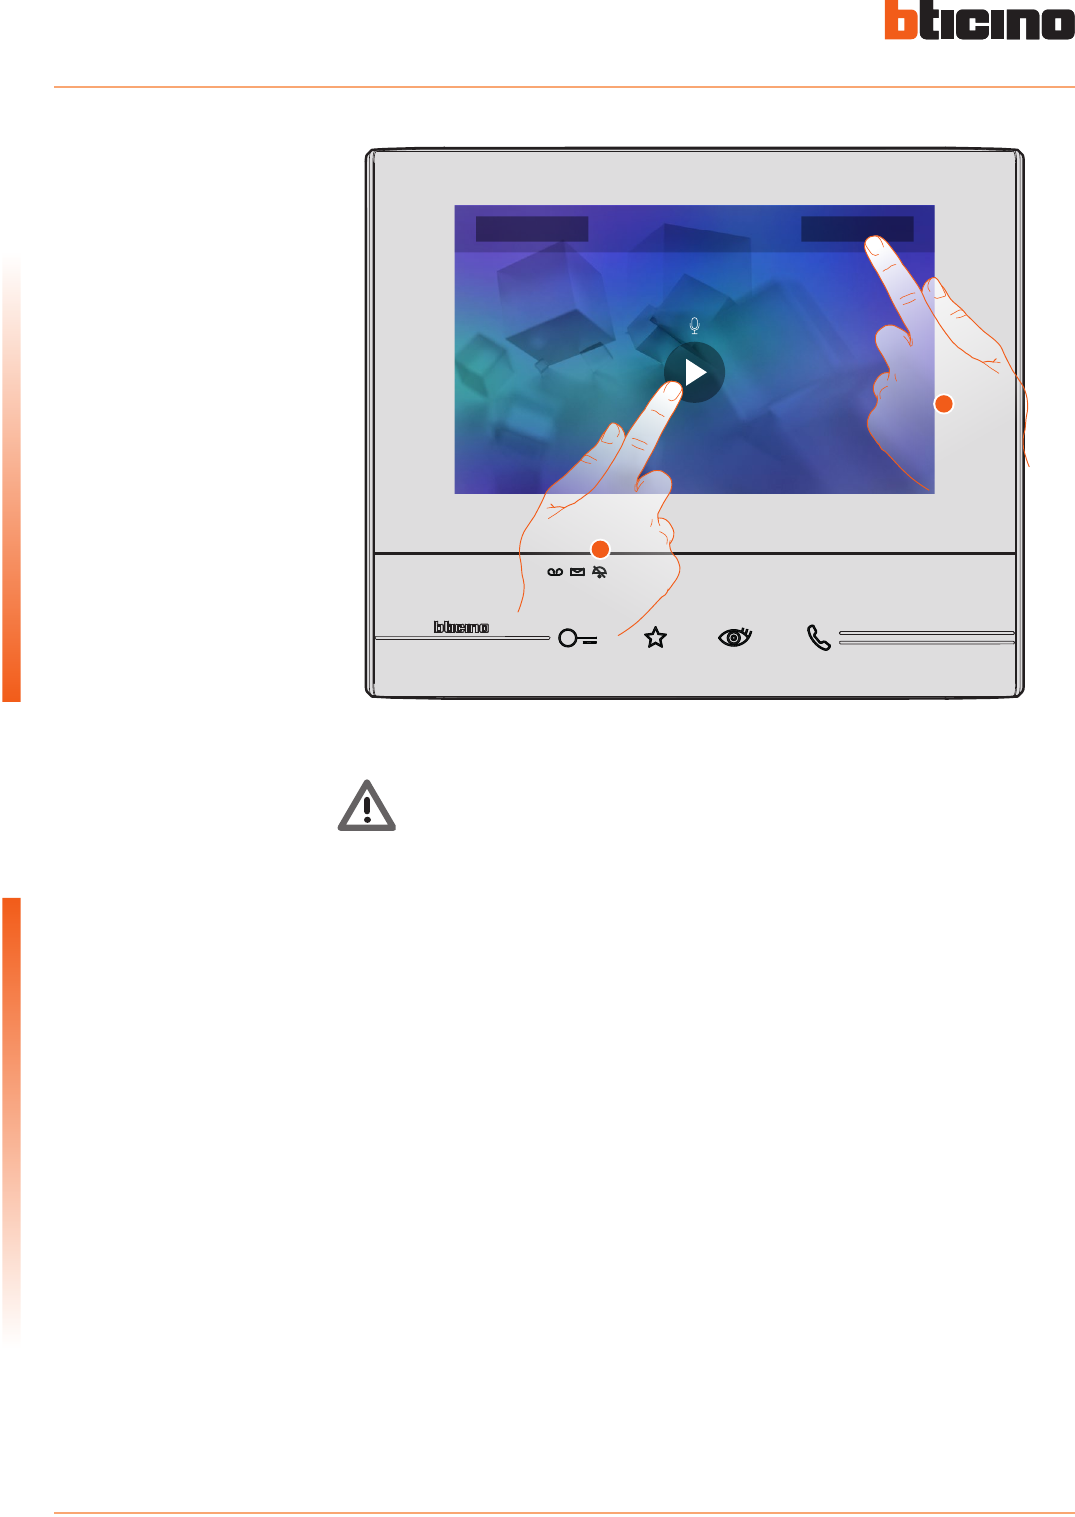
Quick guide
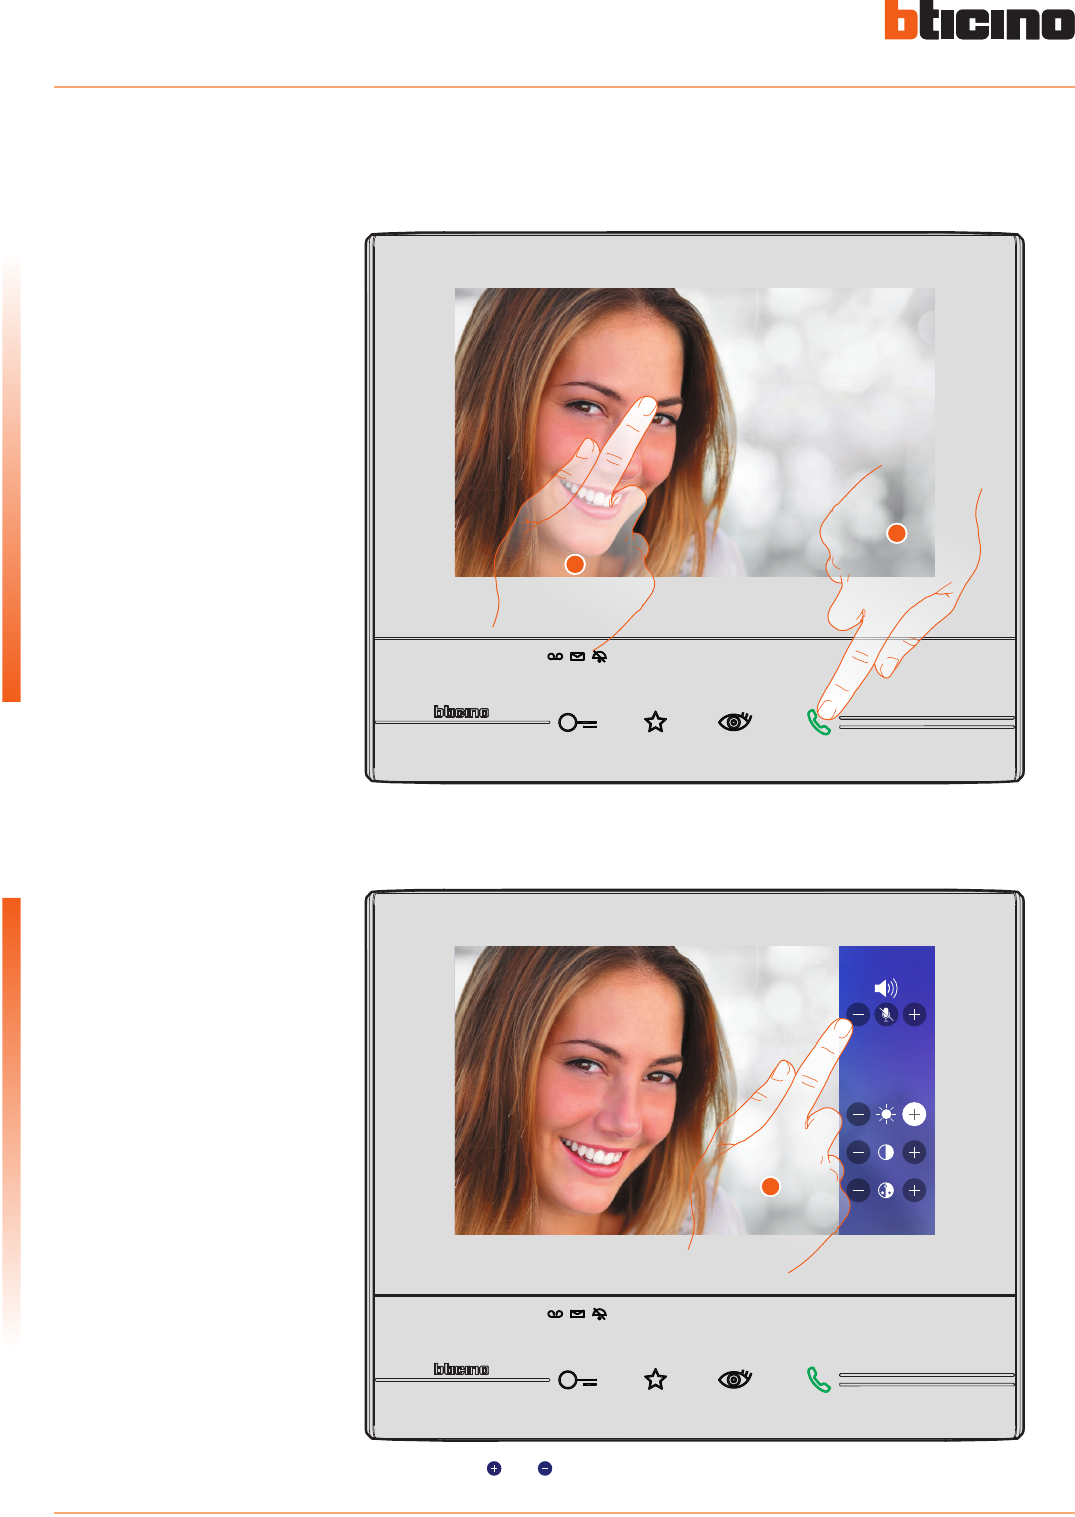
Answer a call
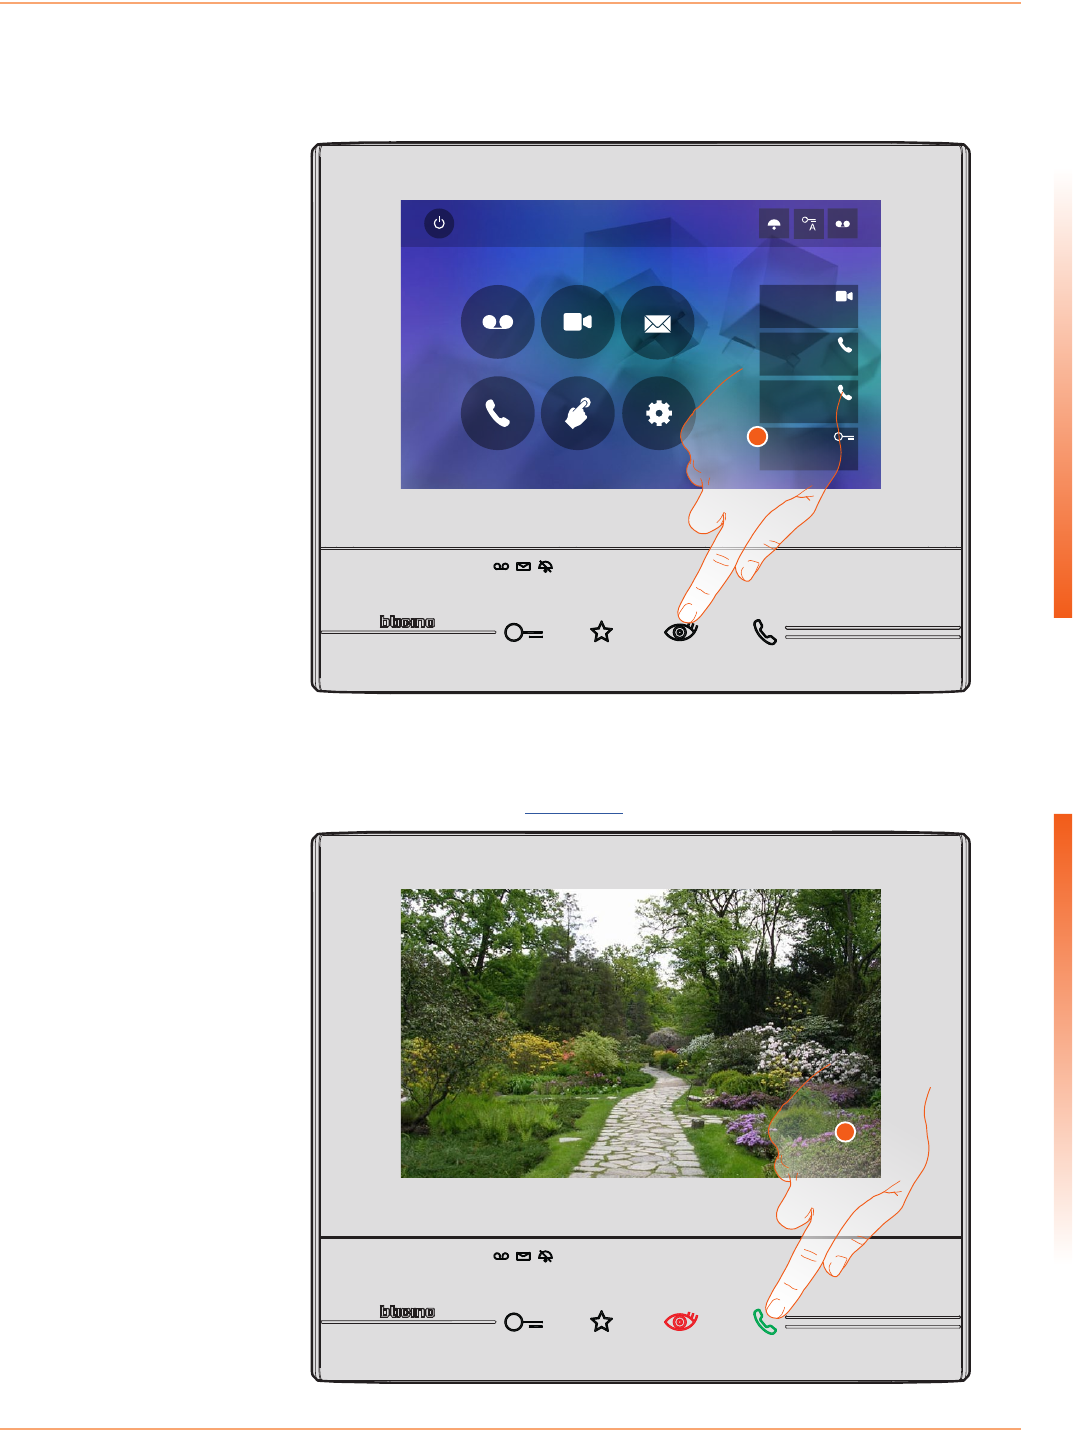
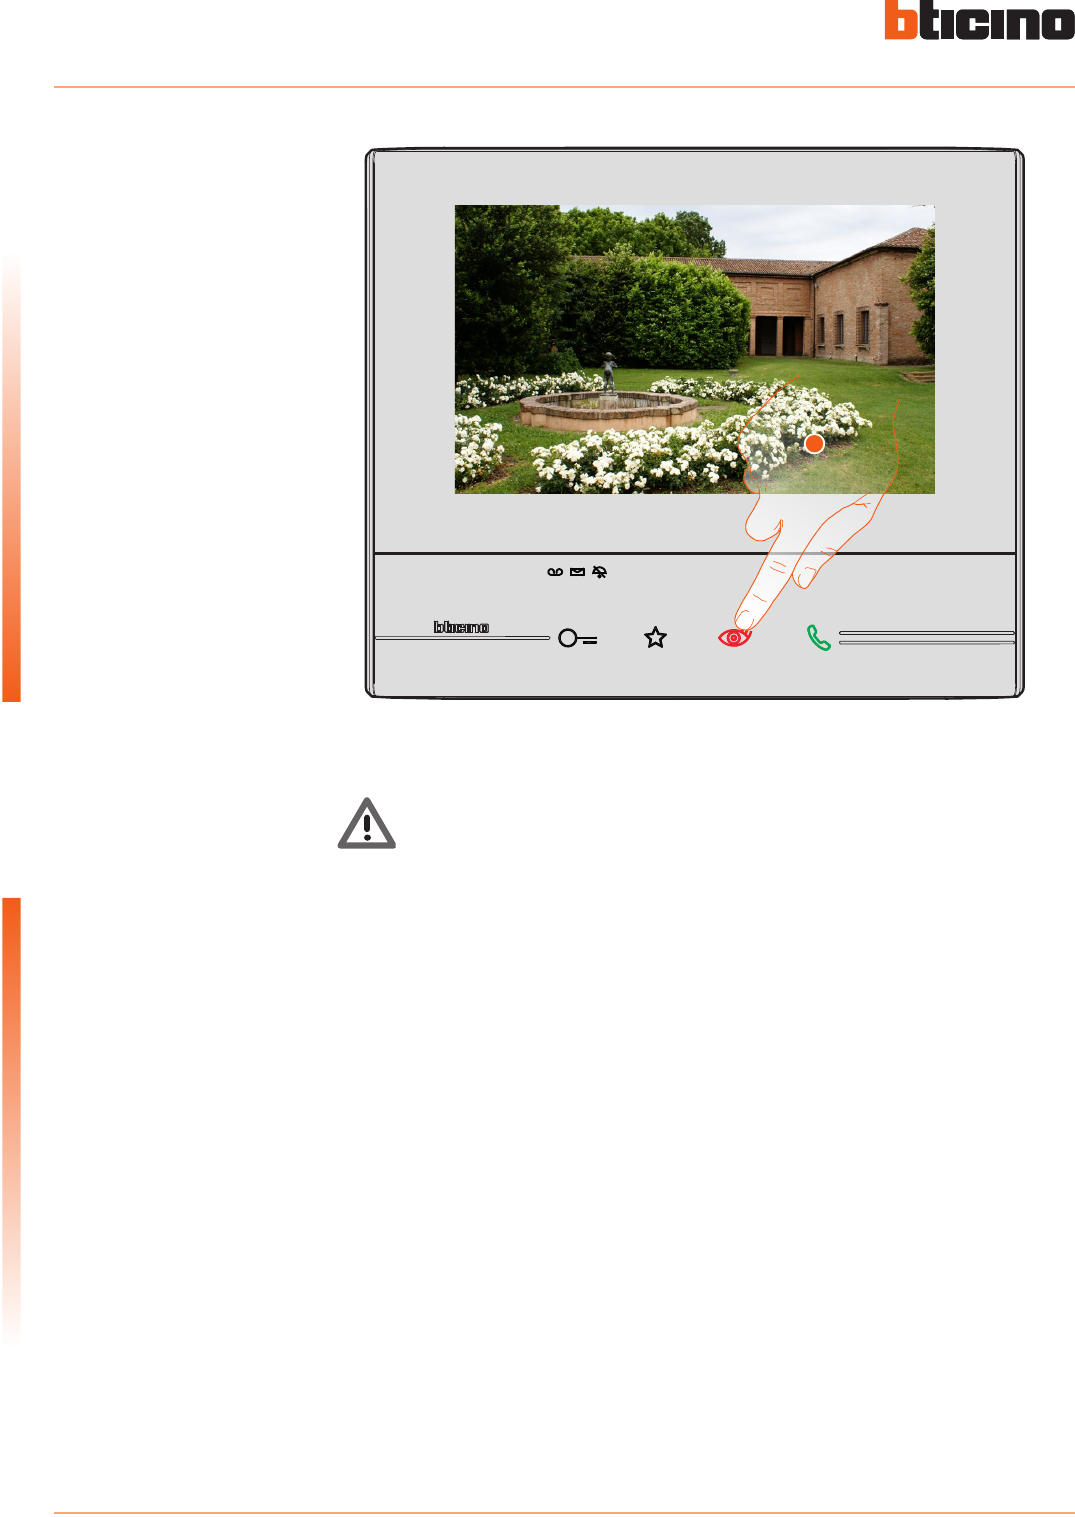
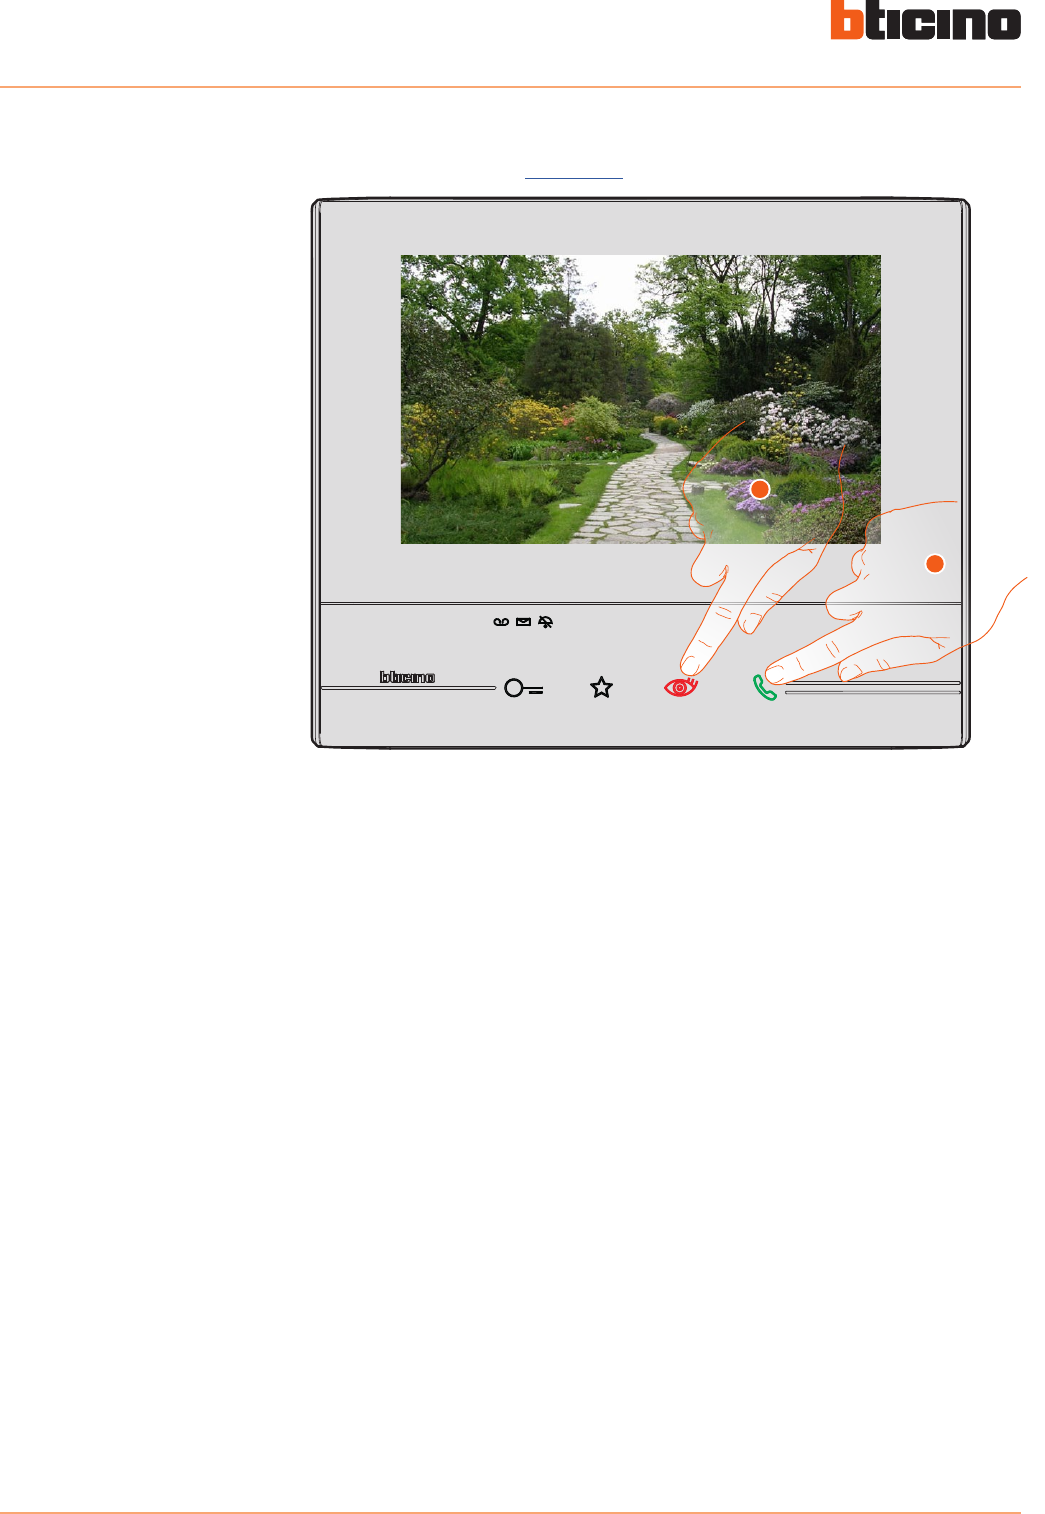
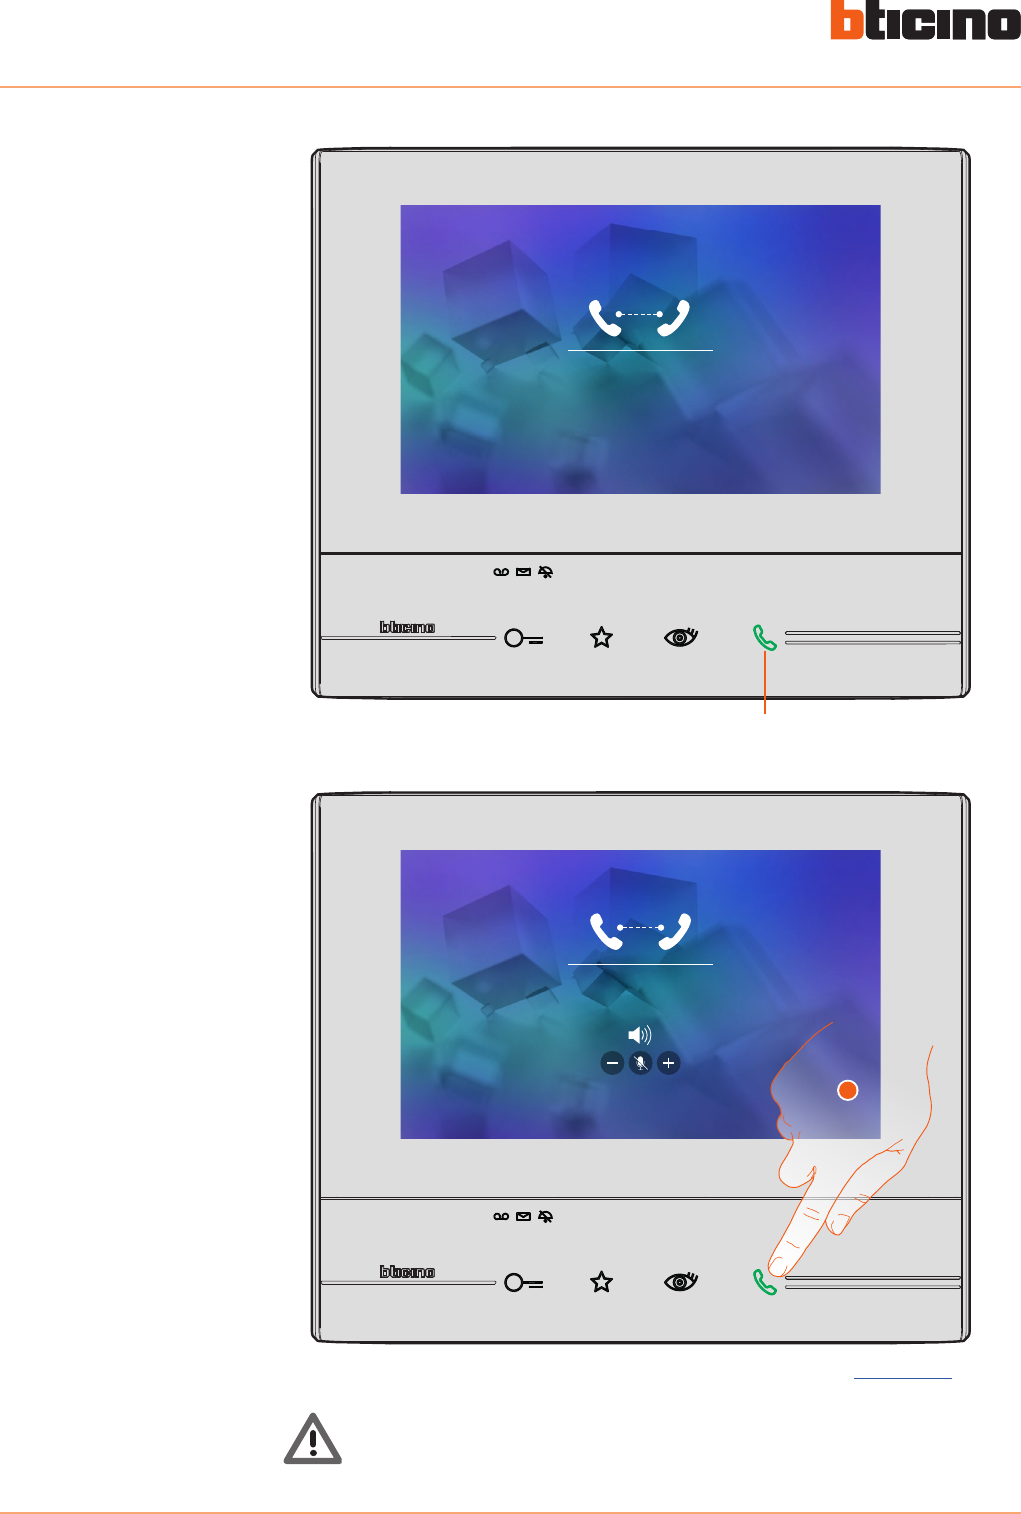
1. Touch to answer the call, the LED comes on steady. To end the call touch the connection key
again.
2. If necessary, during the call touch the screen to display the audio/video adjustment icons.
3. Touch the icons and to adjust the parameters.
1
2
3
Your Classe 300 Video Internal Unit, use it now!
Classe 300
User manual
5
Quick guide
B
A
C
D
E
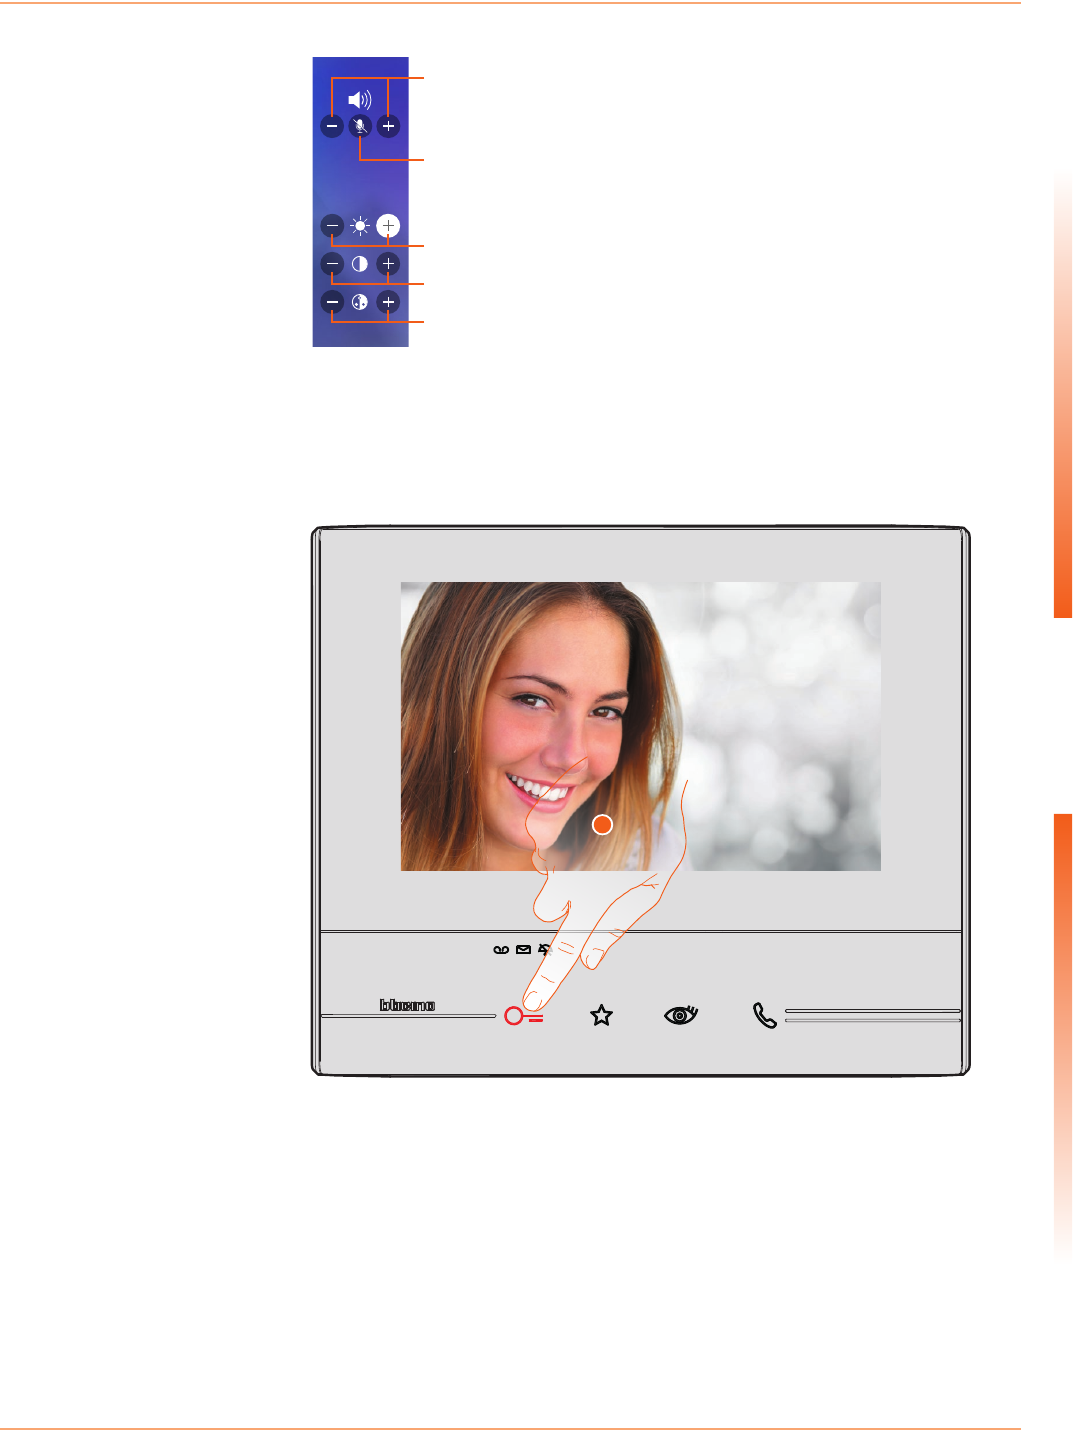
A. Adjust the volume.
B. Disable the microphone.
C. Adjust the image brightness.
D. Adjust the image contrast.
E. Adjust the image colour.
4
4. Touch to open the Entrance Panel door lock.
The door lock key lights up briefly, to indicate that the door lock has been released.
Classe 300
User manual
6
Quick guide
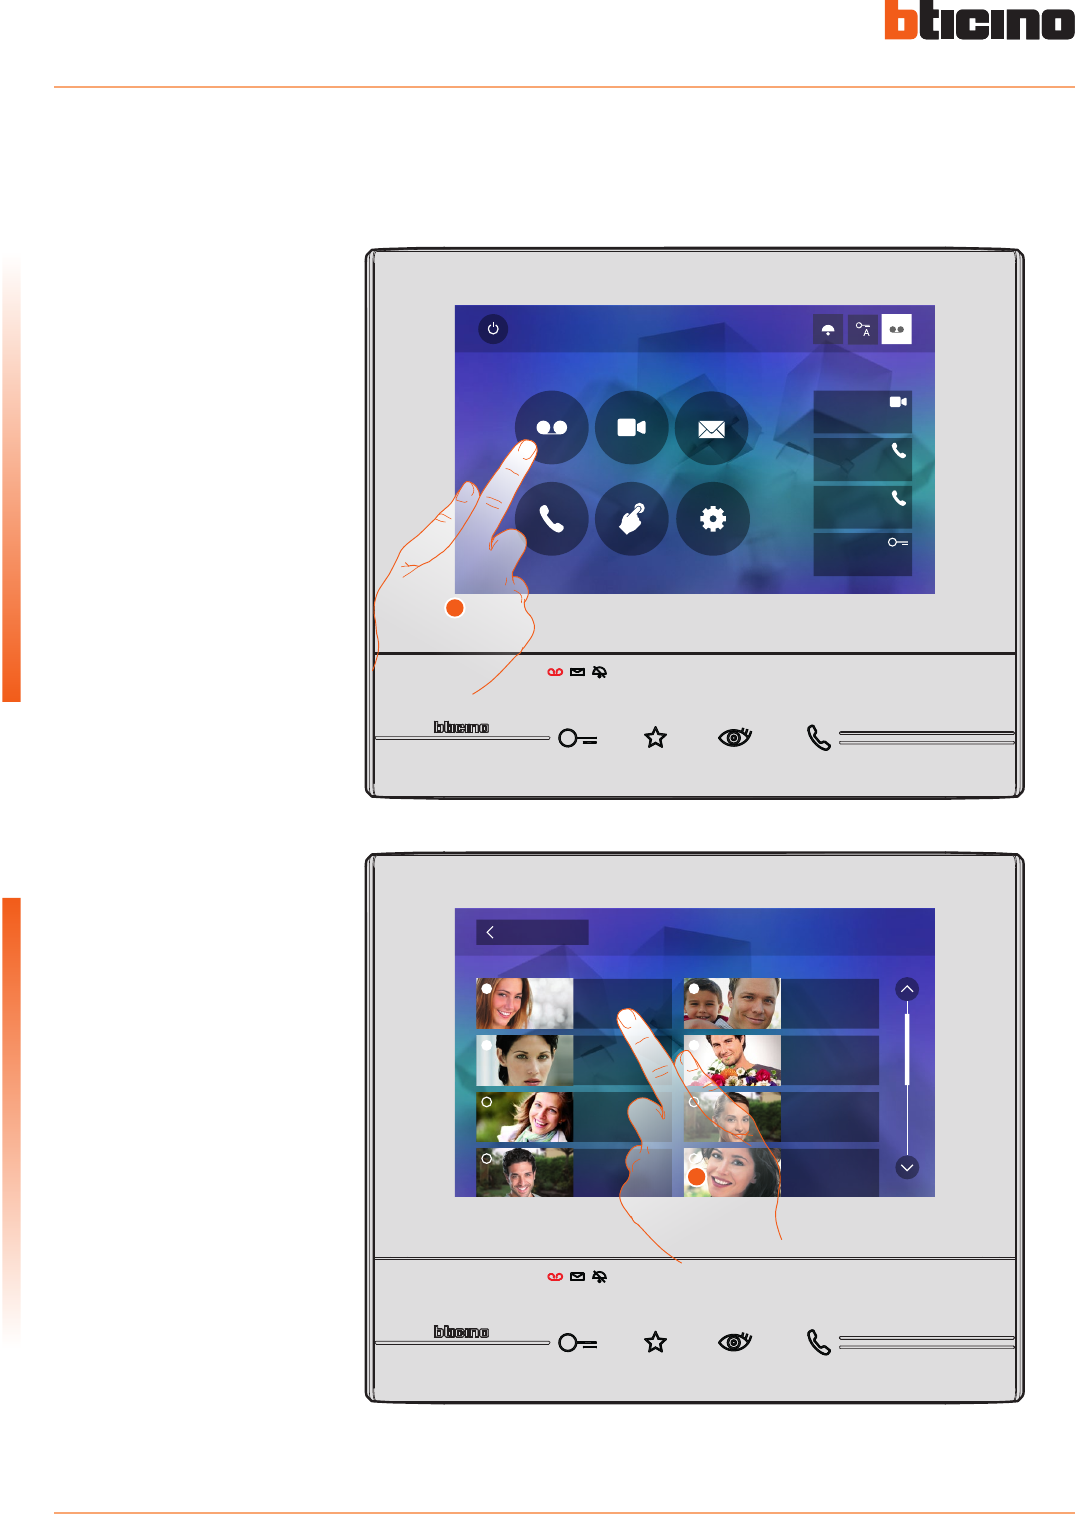
Listen to the answering machine (only models 344622)
1. Touch to enter the answering machine and display the message.
2. Touch to open the message.
Quick Actions
10:36
Tuesday, 22 April
Activations
Answering machine Cameras Memo
Settings
Intercom
Private camera
Lock
External intercom
Pager
1
1
When there are one or more unread messages in the answering machine, the home page that
opens when clicking the answering machine icon shows a numeric indication, and the answering
machine LED flashes.
Back Answering machine
22/10/2013
19:34
22/10/2013
16:30
22/10/2013
17:02
21/10/2013
11: 25
21/10/2013
15:00
20/10/2013
17:59
19/10/2013
14:20
15/10/2013
20:03
2
Classe 300
User manual
7
Quick guide
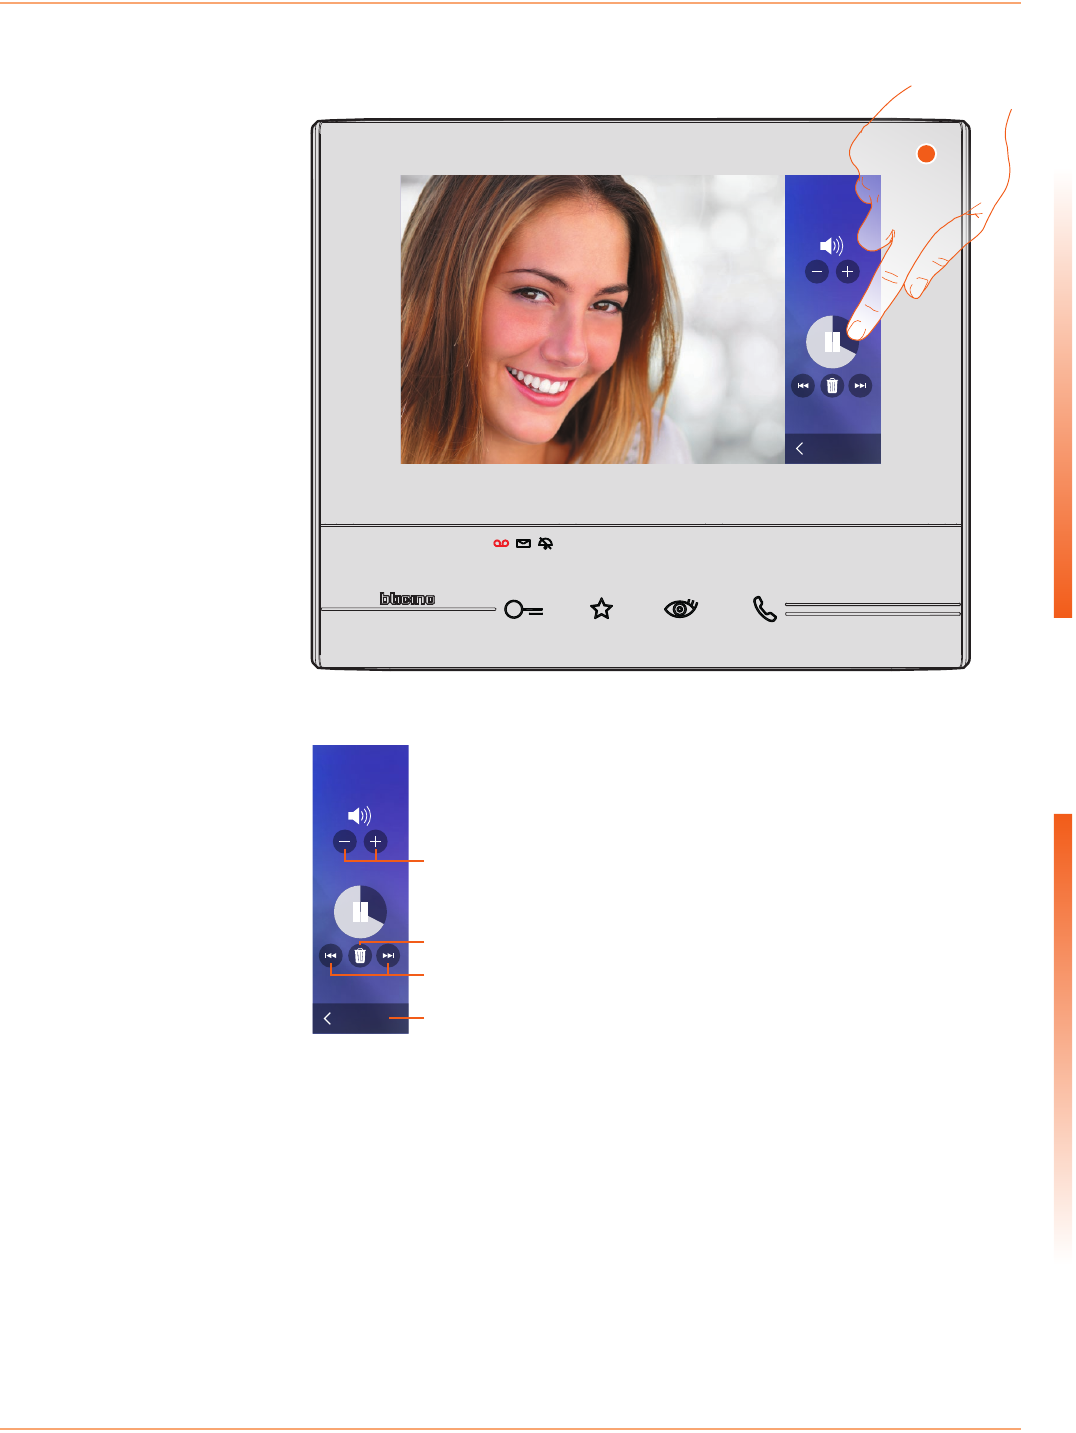
3. Touch to pause or restart playback.
The message is played back automatically
The message can be managed using the appropriate icons:
Back
Volume
22/10/2013
18:34
3
Back
Volume
22/10/2013
18:34
B
C
A
D
A. Adjust the volume.
B. Delete the message.
C. Beginning and end of message.
D. Return to the answering machine screen.
Classe 300
User manual
8
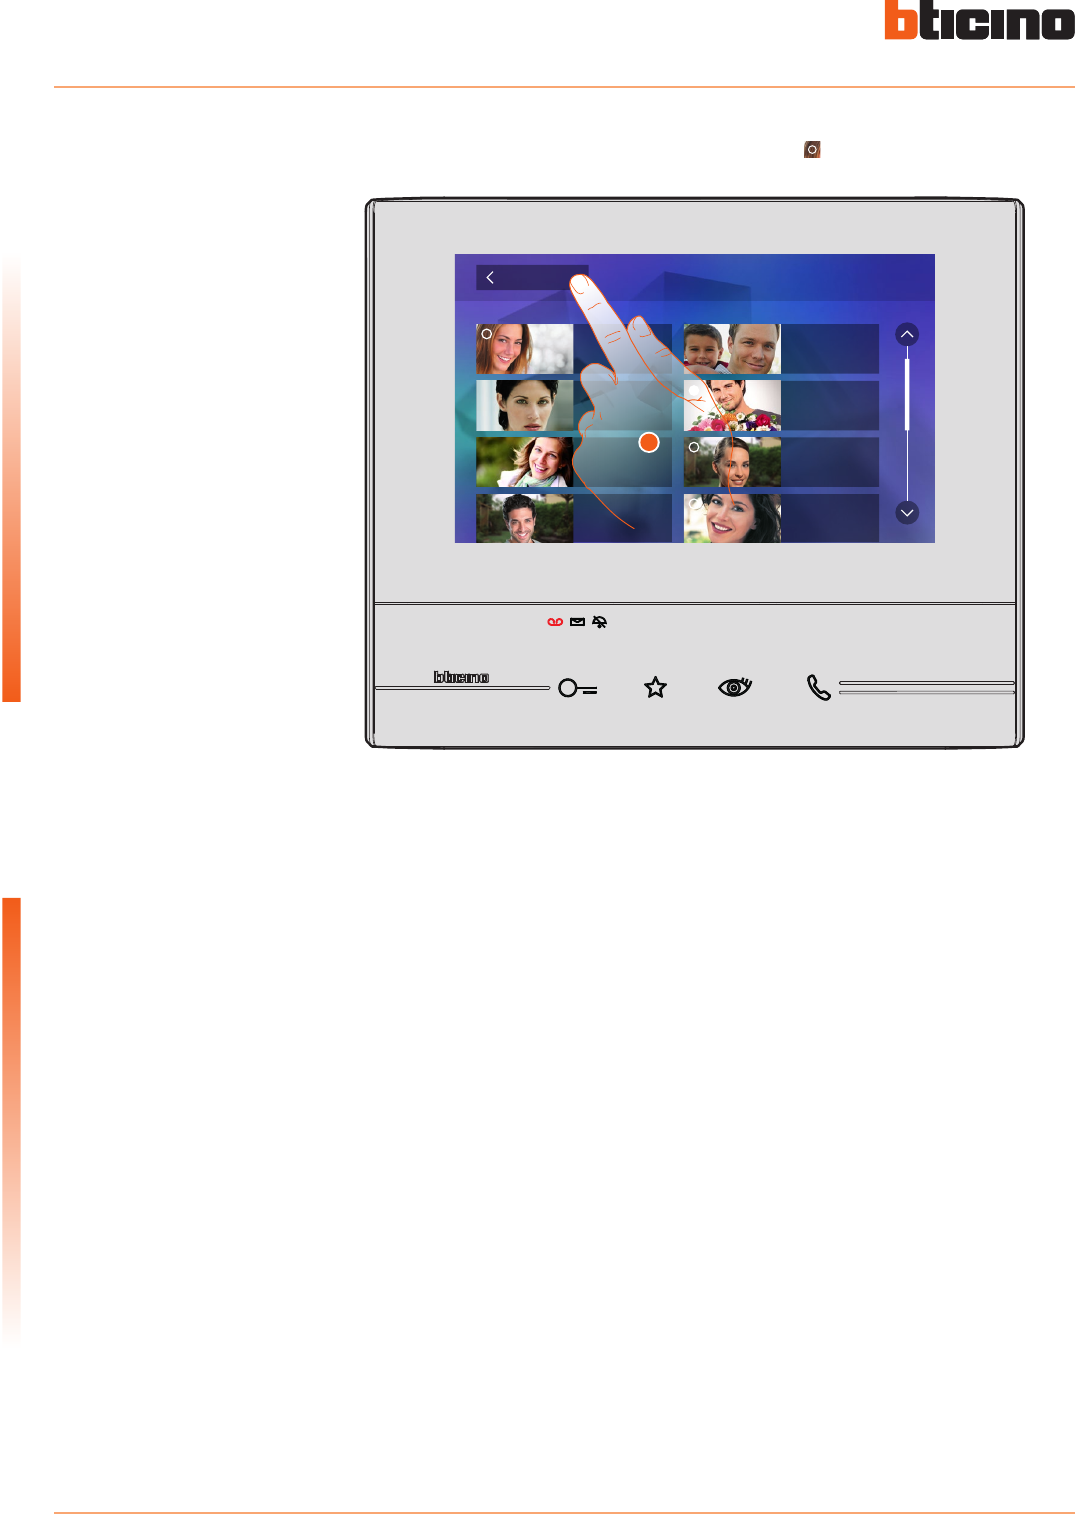
Quick guide
the message status indication automatically switches to “read” , and the numeric indication
disappears from the home page
5. Touch to return to the home page.
Back Answering machine
22/10/2013
16:30
22/10/2013
17:02
21/10/2013
11: 25
21/10/2013
15:00
20/10/2013
17:59
19/10/2013
14:20
15/10/2013
20:03
22/10/2013
18:34
5
Classe 300
User manual
9
Quick guide
Auto-switching on and camera scrolling
1. Touch to display the cameras in your system.
2. The connection key flashes; touch this key to enable audio communication.
Any cameras installed in the system can be accessed using the dedicated section, or using the
automatic switching on key.
The corresponding key comes on and the display shows the images recorded by the camera of the
associated Entrance Panel.
For the camera adjustments see Answer a call.
Quick Actions
10:36
Tuesday, 22 April
Activations
Answering machine Cameras Memo
Settings
Intercom
Private camera
Lock
External intercom
Pager
1
2
Classe 300
User manual
10
Quick guide
3. Touch to display another camera (scrolling). When switching from one camera to the next, the
key lights up.
To end camera display mode wait for the switching off time to elapse.
3
Note: switching from one camera to another is also possible without enabling the audio
Classe 300
User manual
11
Quick guide
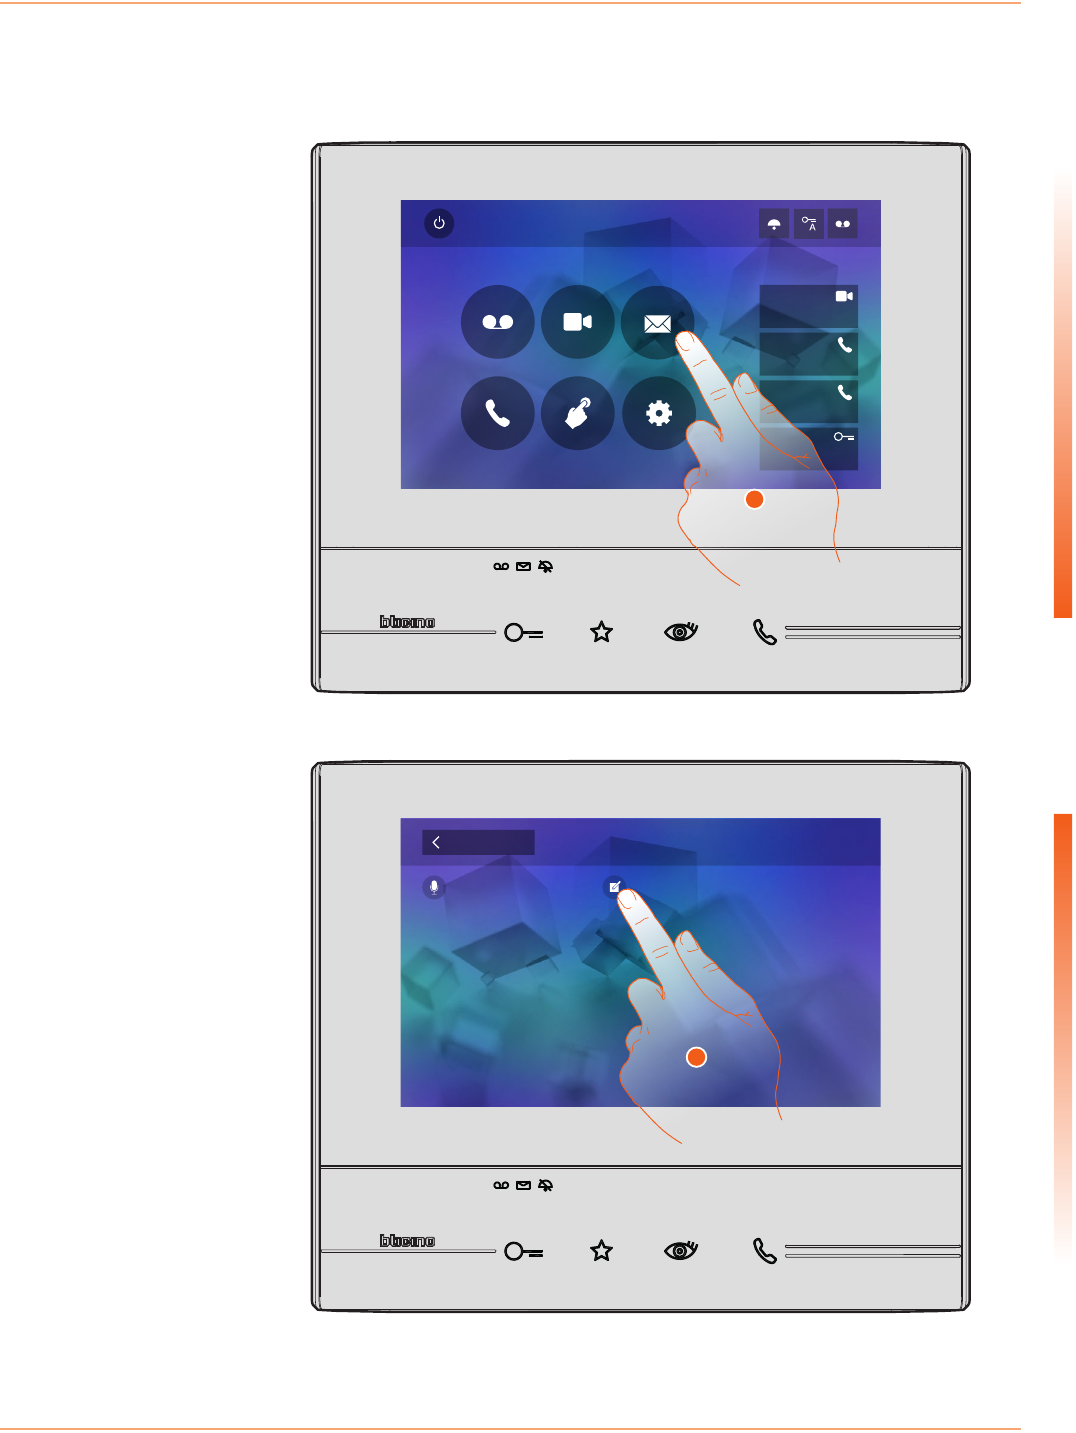
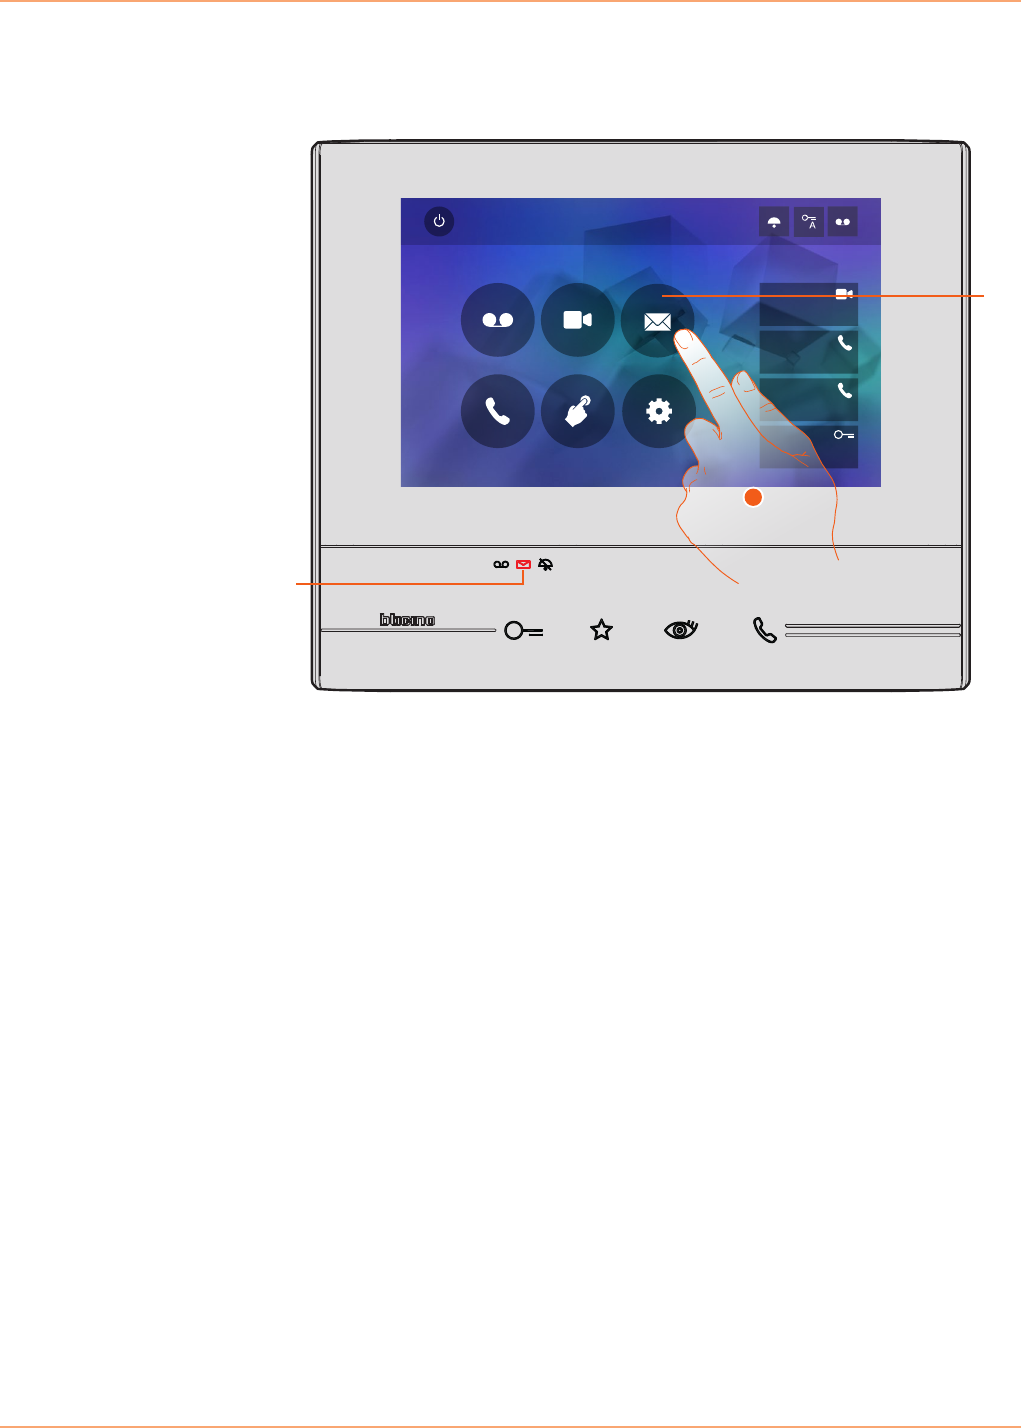
Write or record a memo
1. Touch to write and/or record a memo.
2. Touch to write a memo.
It is possible to type a memo, or record a voice message for another user.
Typed memos may then be modified by the recipient, or the same can enter a new one.
Quick Actions
10:36
Tuesday, 22 April
Activations
Answering machine Cameras Memo
Settings
Intercom
Private camera
Lock
External intercom
Pager
1
Memo
Audio memo recording Write memo
Back
2
Classe 300
User manual
12
Quick guide
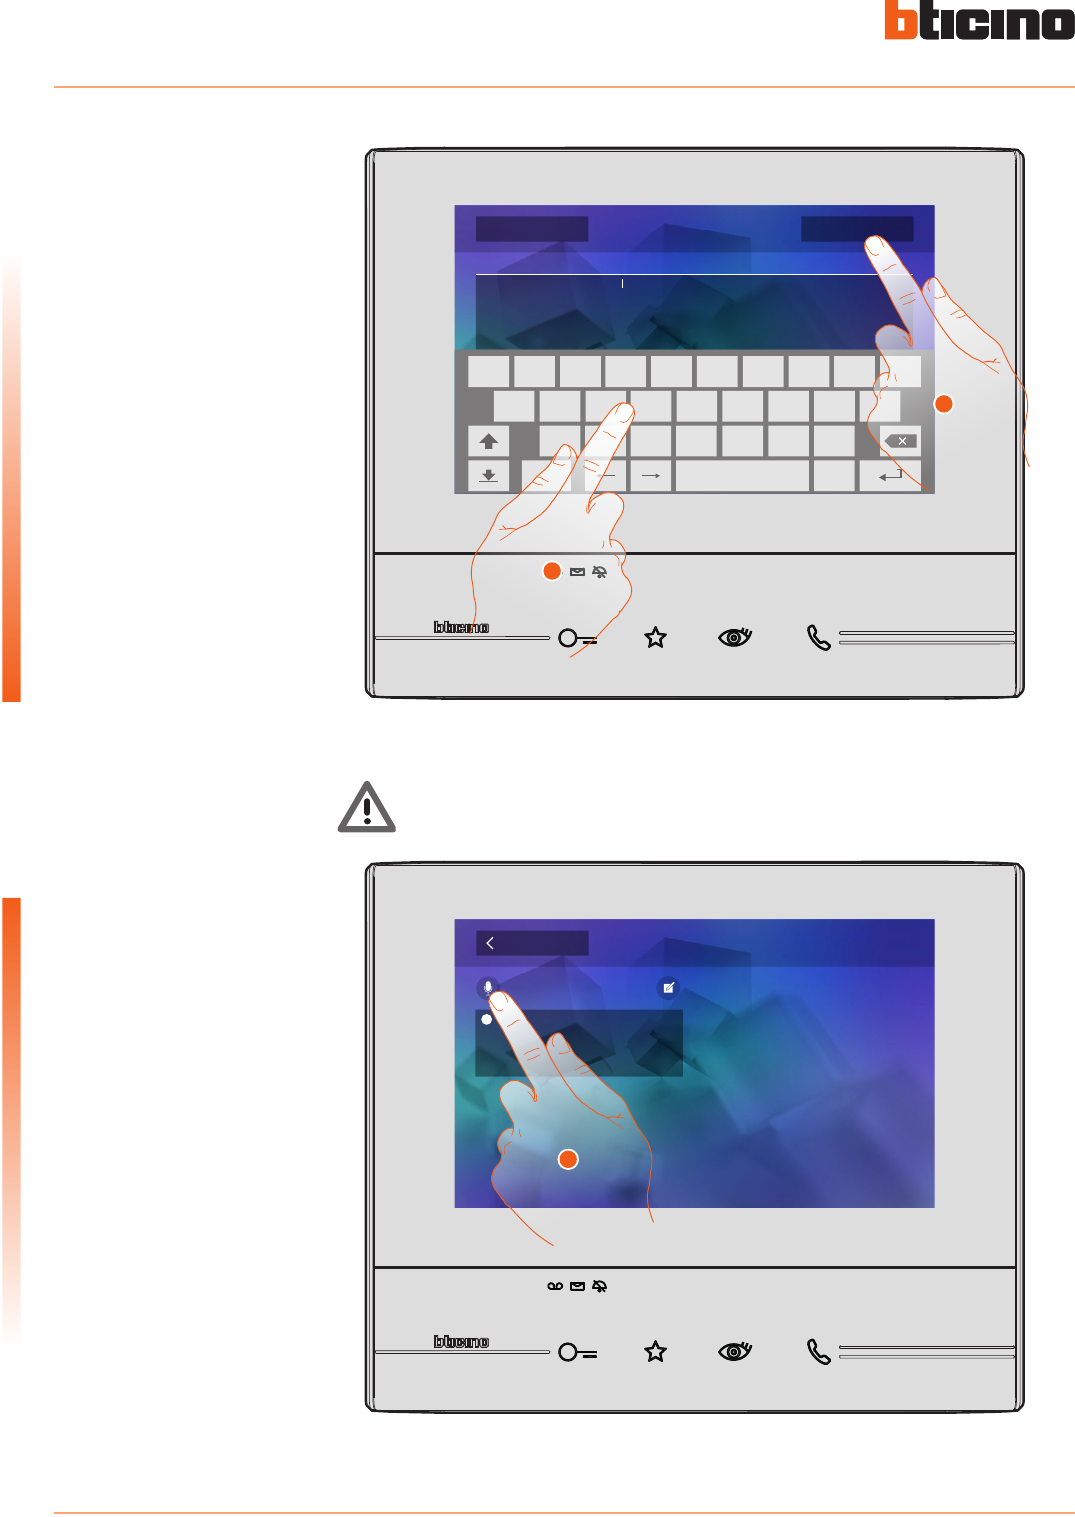
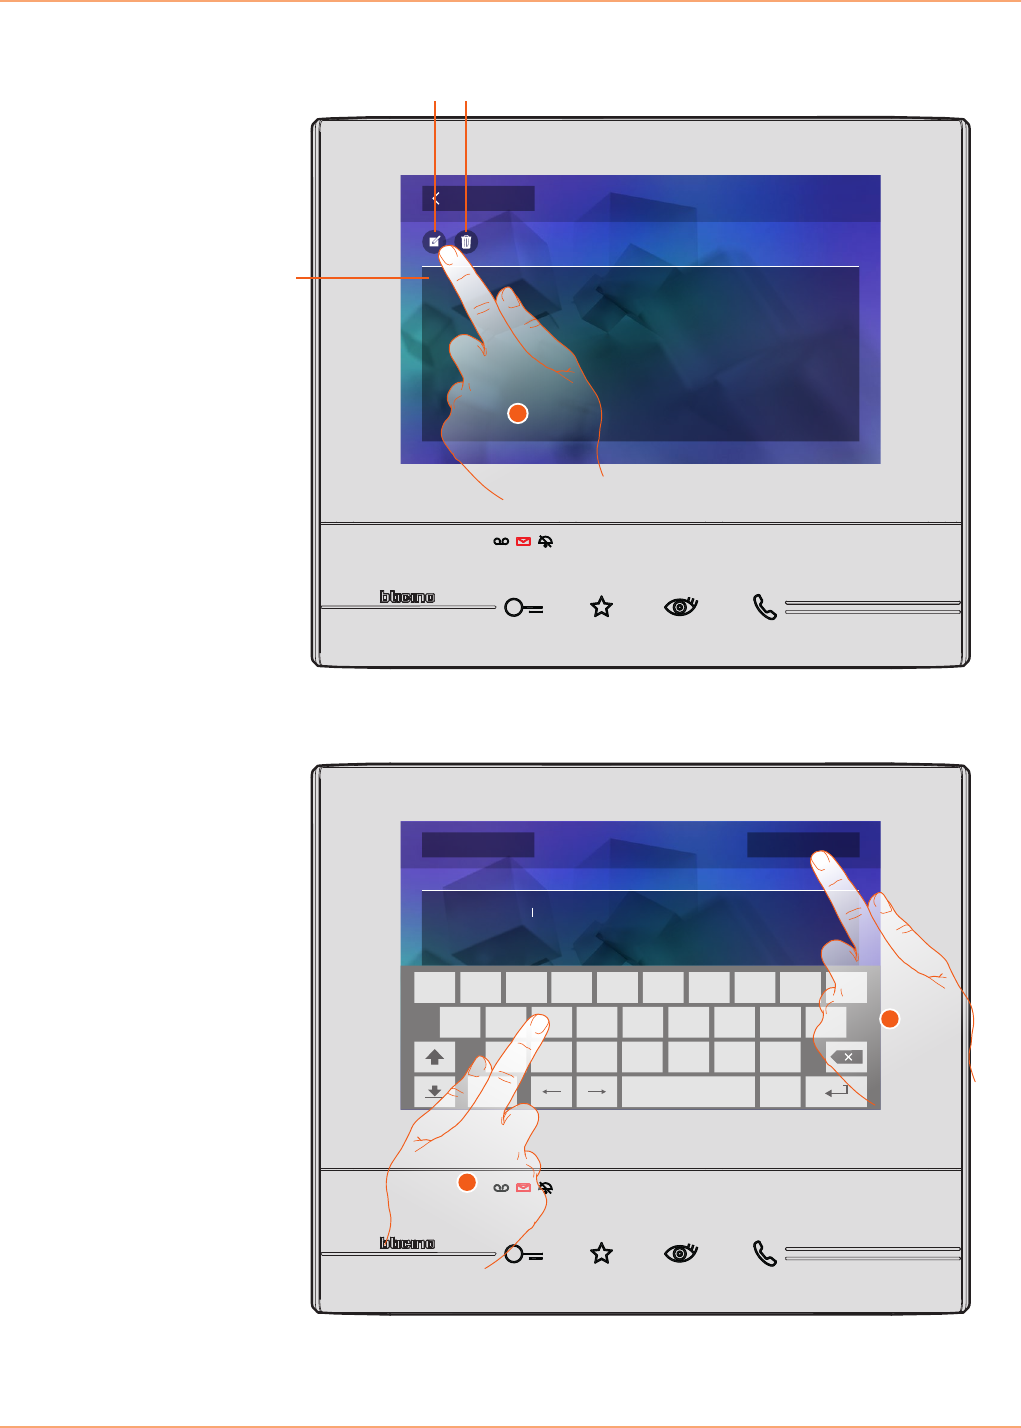
3. Use the keypad to write.
4. Touch to save the text memo.
5. Touch to record an audio memo.
Memo
Audio memo recording Write memo
Back
10 october, 18:34
To go to the grocery store
5
To go to the grocery store
Write memo
Cancel Save
.
q
a
z cx v b n m
s d f g h j k l
y u i o pw e r t
?123
3
4
Warning: any unsaved memos will be lost.
Classe 300
User manual
13
Quick guide
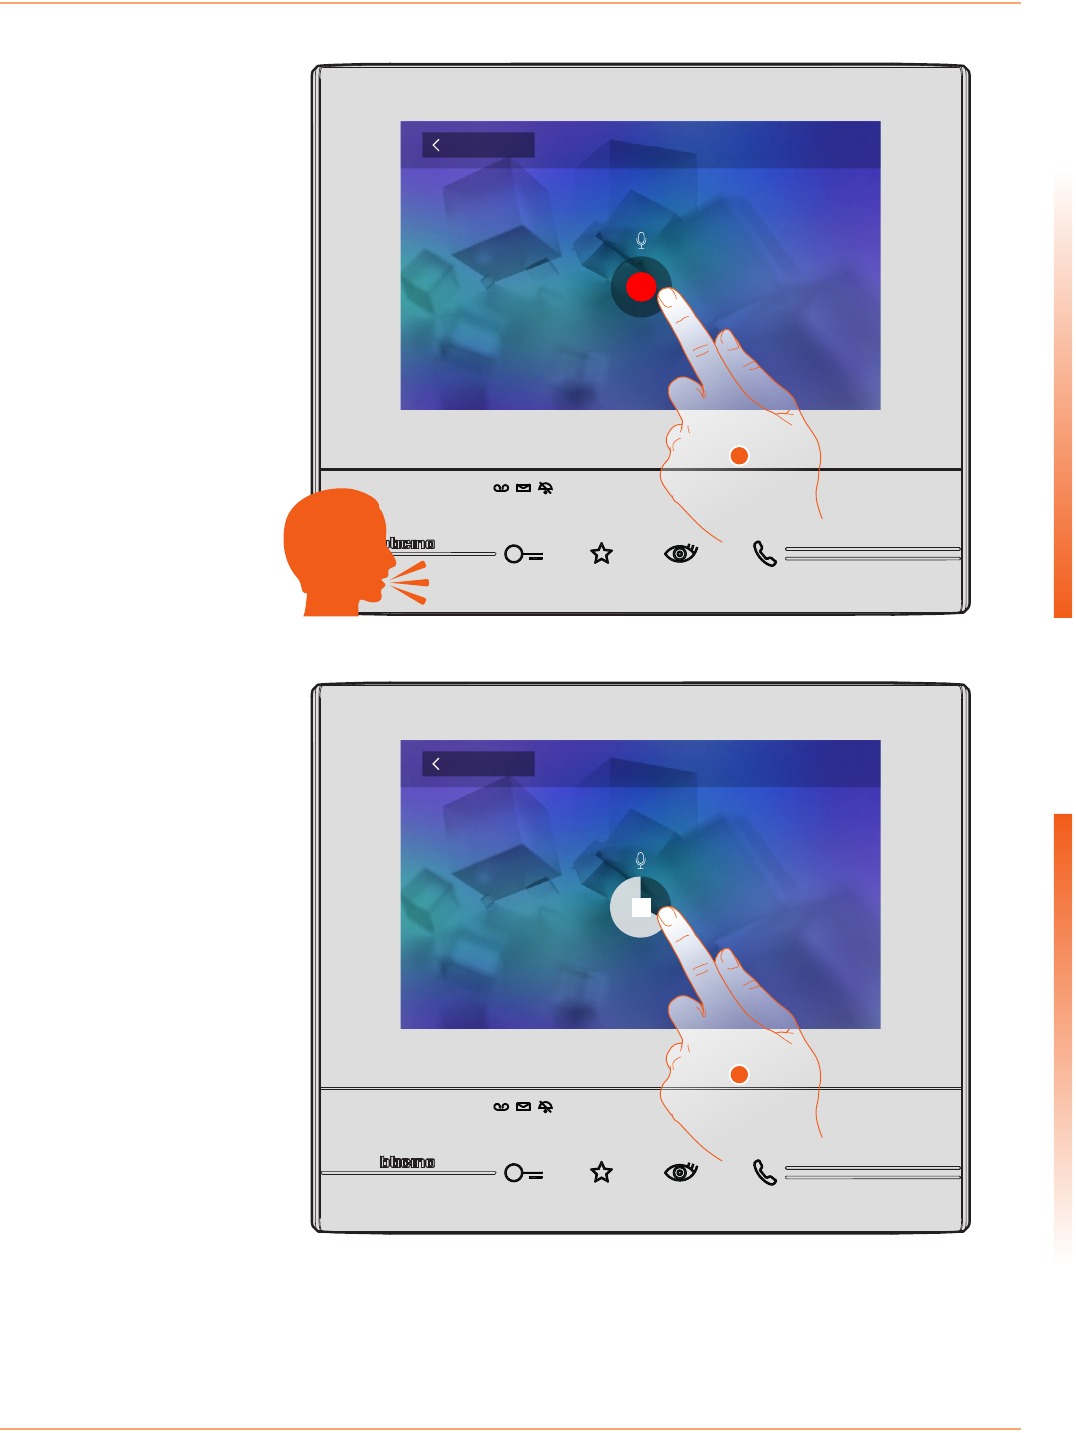
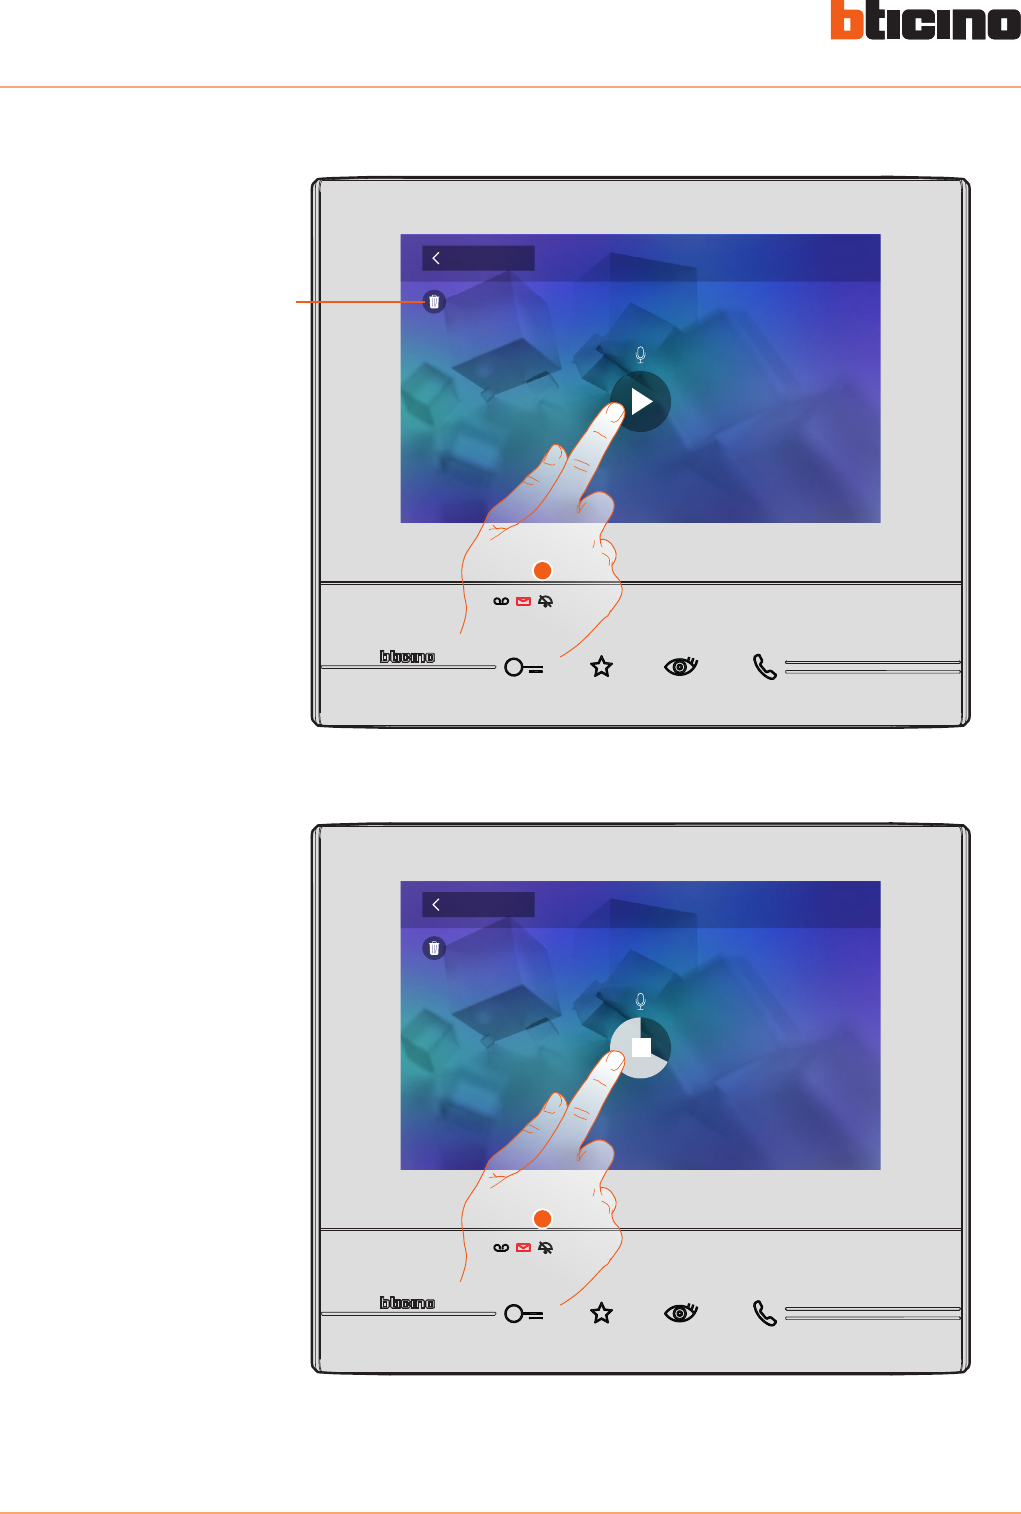
6. Press record and record the audio memo.
7. Touch to stop recording, or wait for the set time to elapse.
Audio memo recording
Back
0:22
Press to stop recording
7
Audio memo recording
Back
Press to record
6
Classe 300
User manual
14
Quick guide
8. Touch to listen to the audio memo.
9. Touch to save the audio memo.
Audio memo recording
0:08
Press to listen recording
Cancel Save
9
8
Warning: any unsaved memos will be lost.
Classe 300
User manual
15
Quick guide
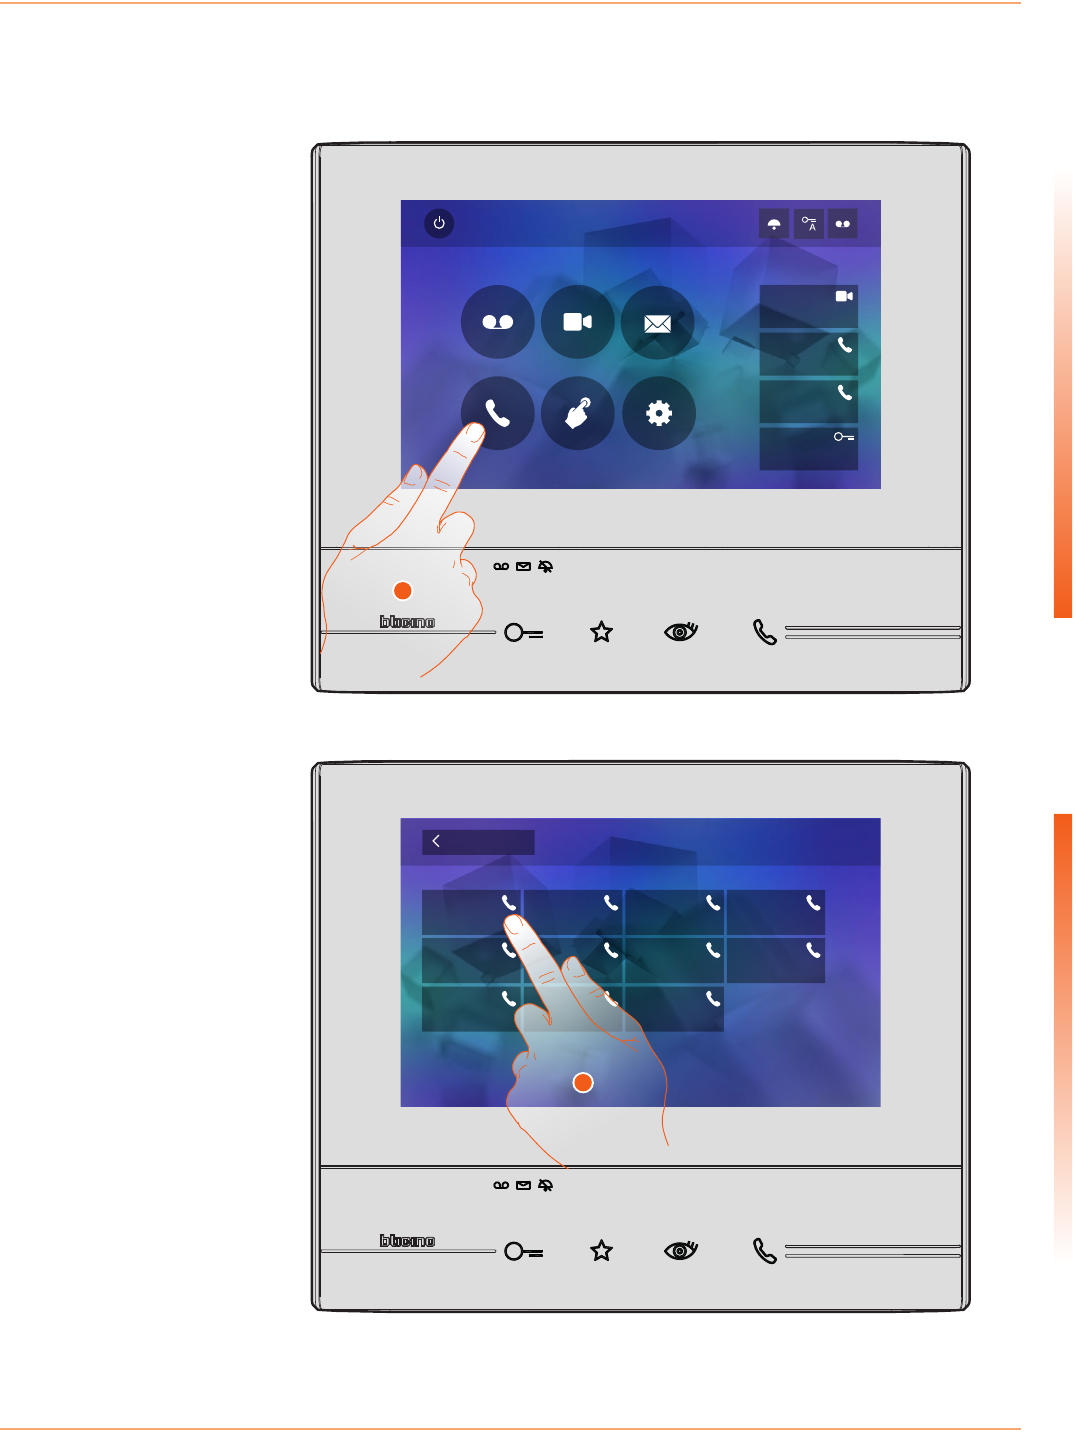
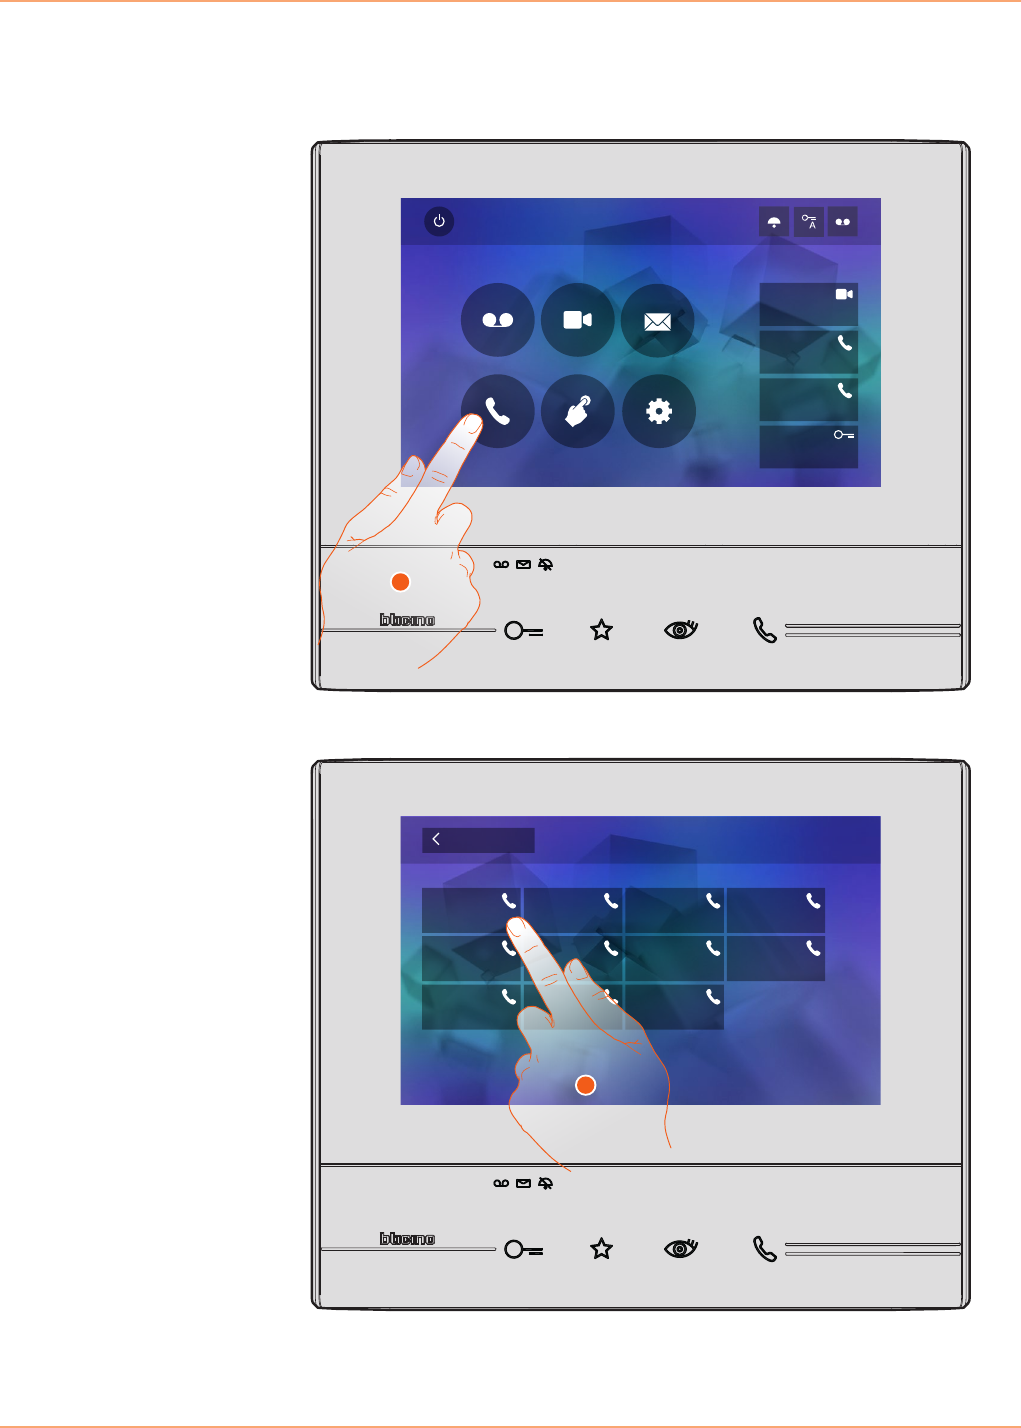
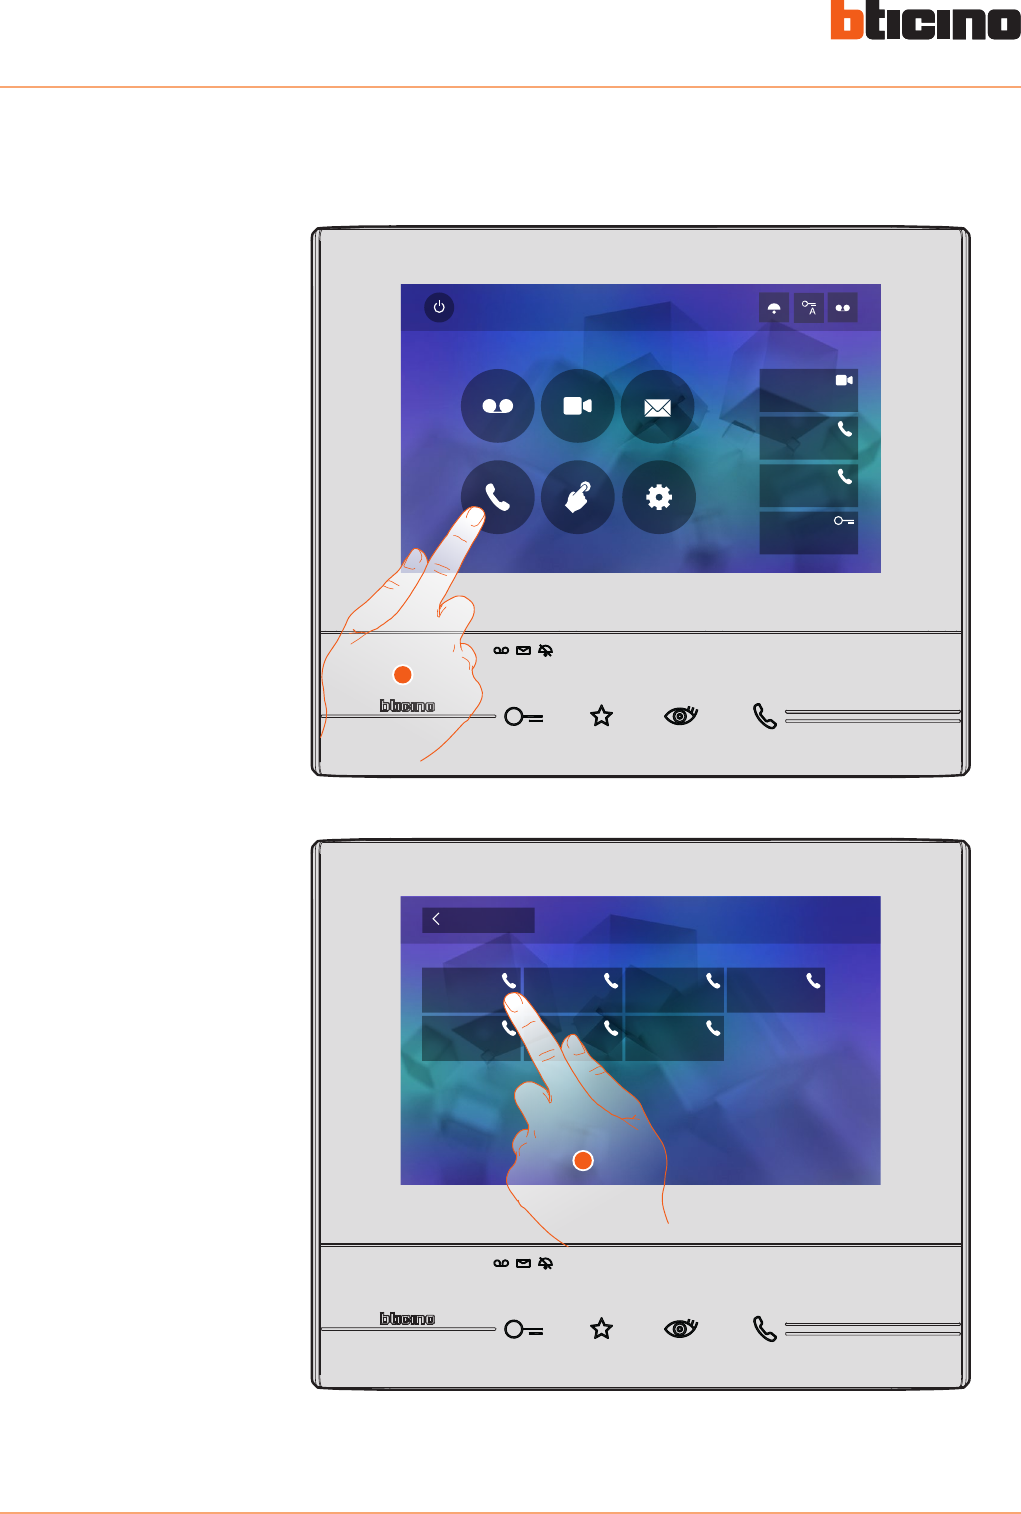
Call another room or apartment (Intercom)
1. Touch to display the available intercoms.
2. Touch to activate the communication with the desired intercom.
It is possible to communicate with another device installed in another room of the apartment or
with a device of another apartment.
Quick Actions
10:36
Tuesday, 22 April
Activations
Answering machine Cameras Memo
Settings
Intercom
Private camera
Lock
External intercom
Pager
1
Intercom
Back
External intercom Intercom 3
Intercom 7
Intercom 1
Intercom 5
Intercom 9
Intercom 2
Intercom 6
Intercom 10
Intercom 4
Intercom 8
2
Classe 300
User manual
16
Quick guide
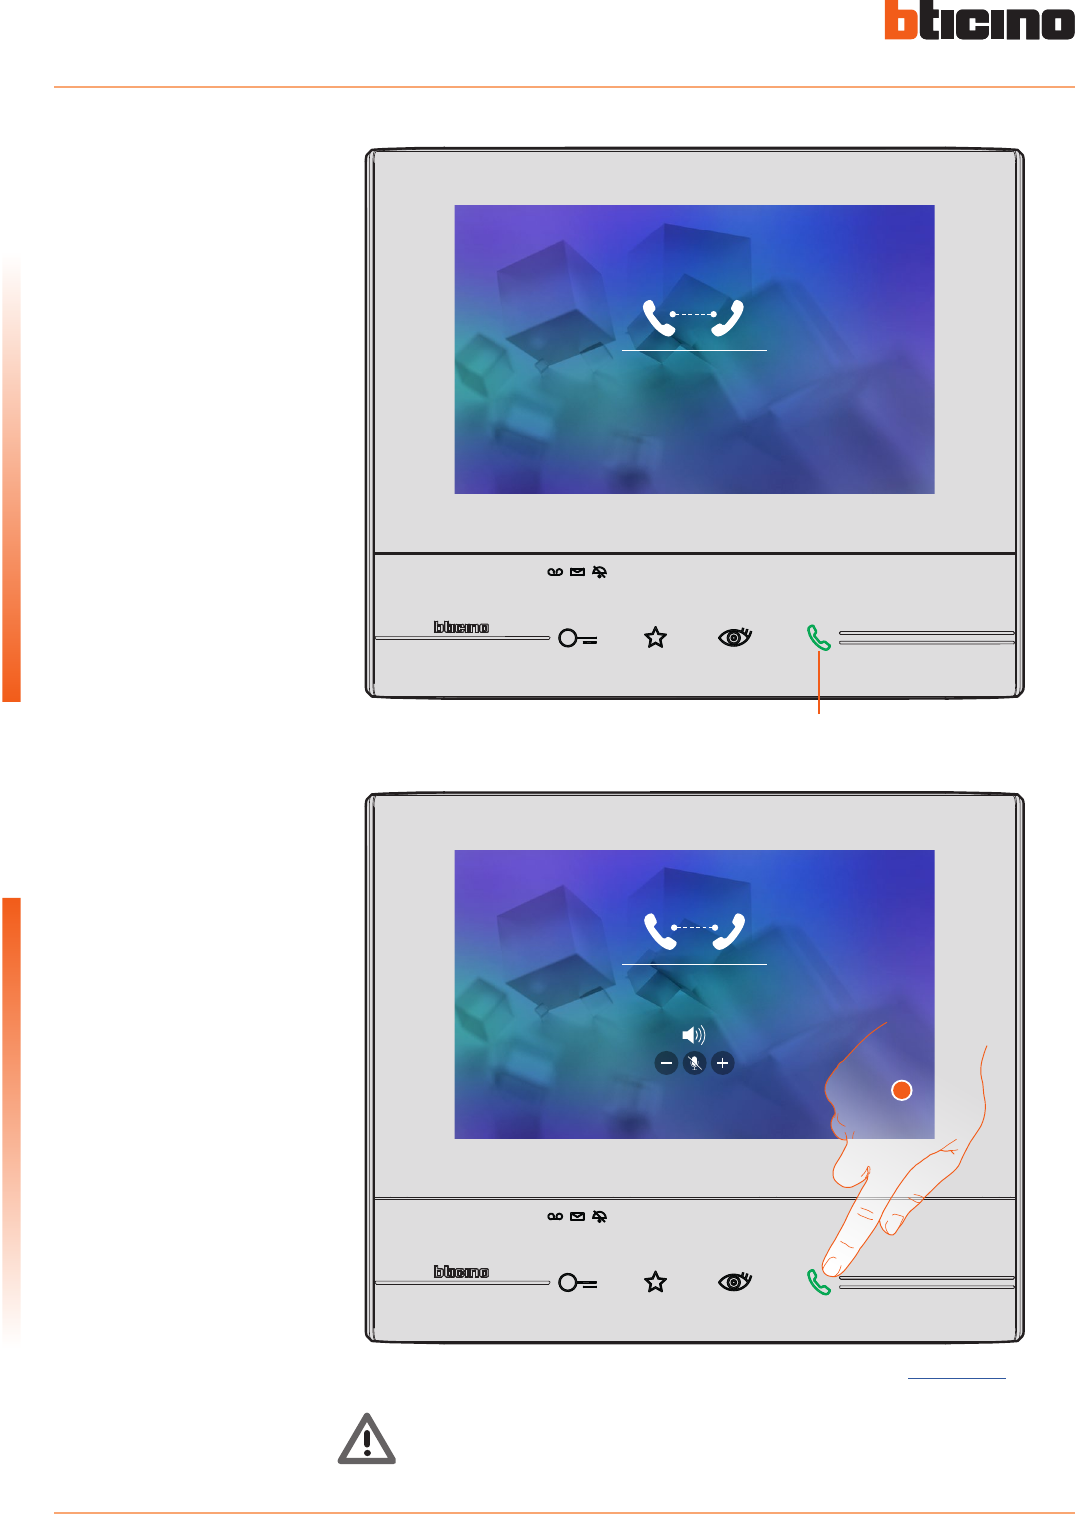
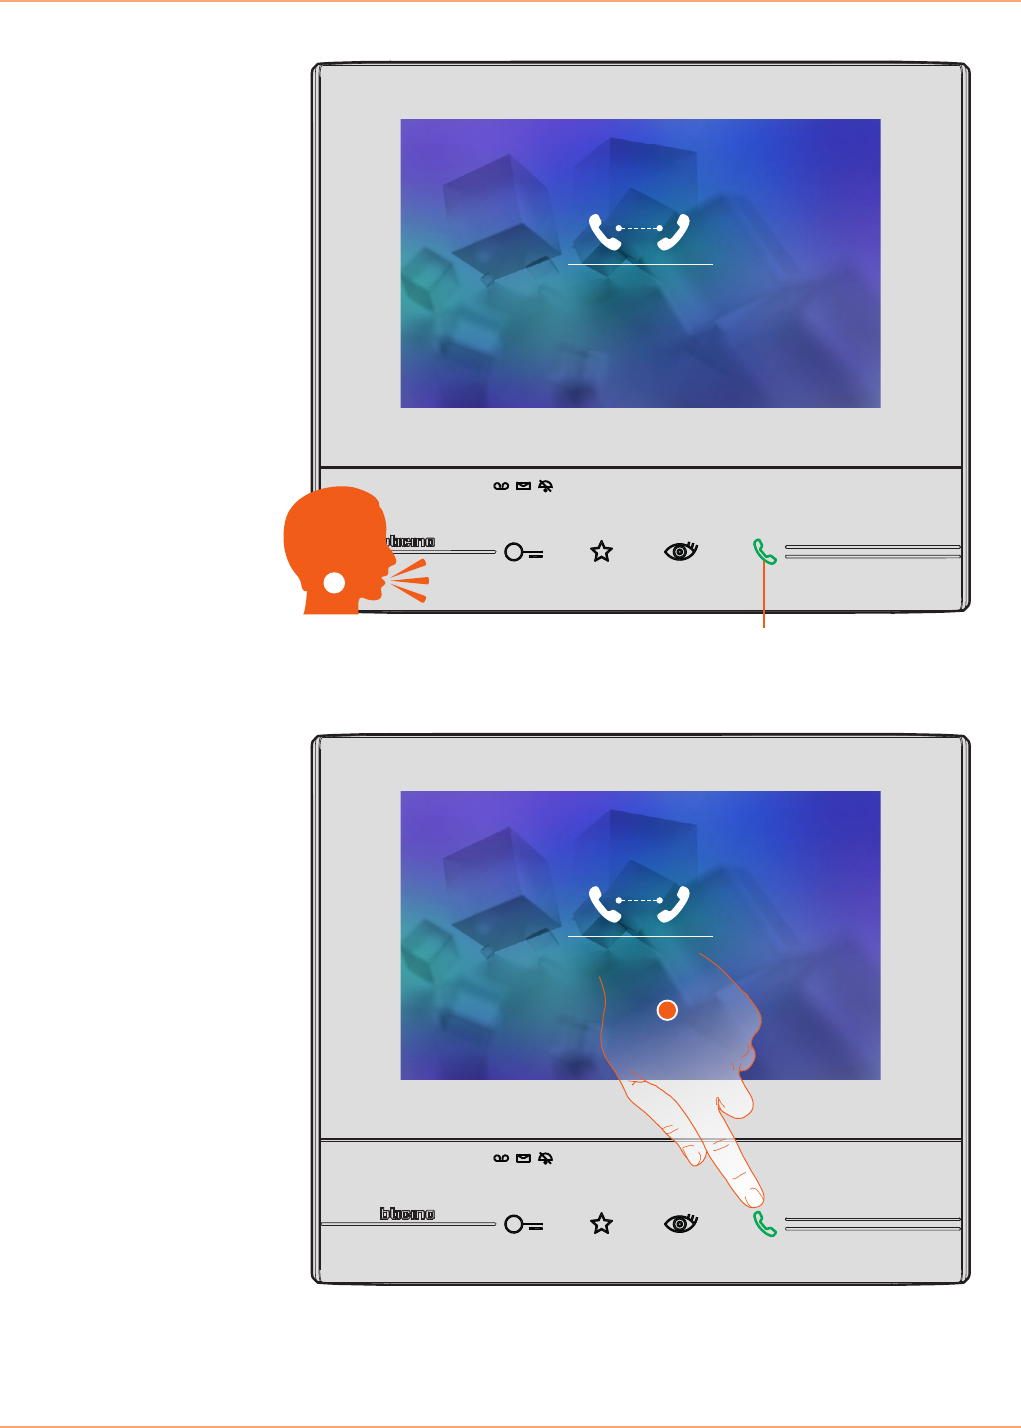
Call to
External intercom
A
3. Touch to end the call.
Call active
Volume
3
When the recipient answers the call, the audio adjustment icons appear; see Answer a call.
Warning: When a call is received from the Entrance Panel while the internal unit is in
“intercom” mode, the system follows the priority rules and ends the active call.
Key (A) lights up to indicate that the call is active.
Classe 300
User manual
17
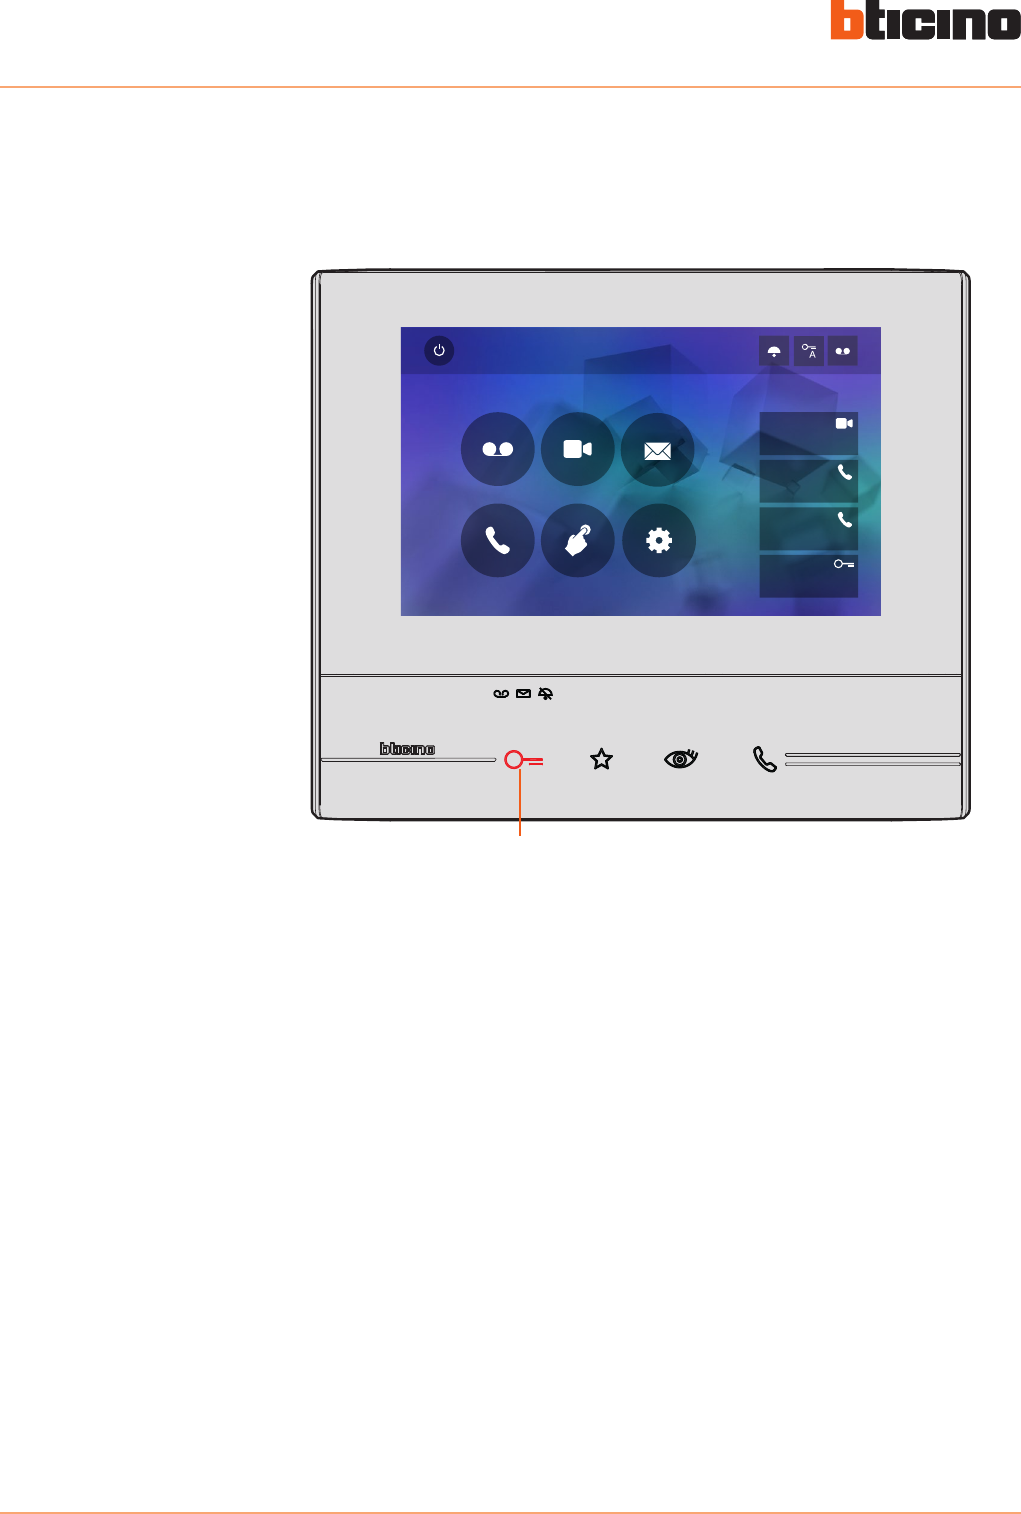
General information
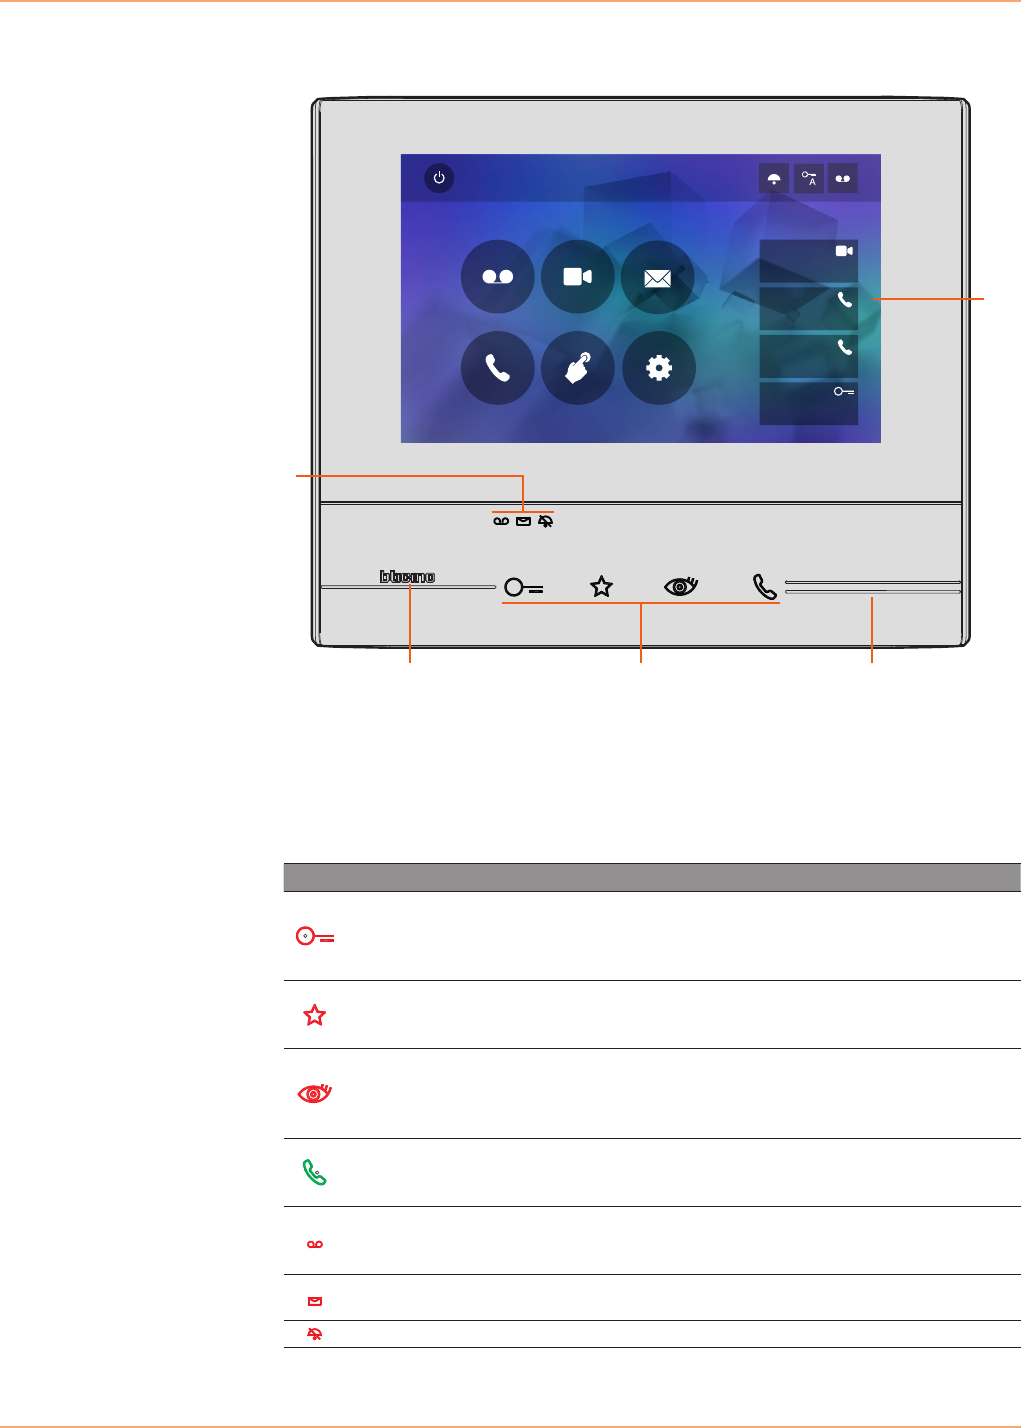
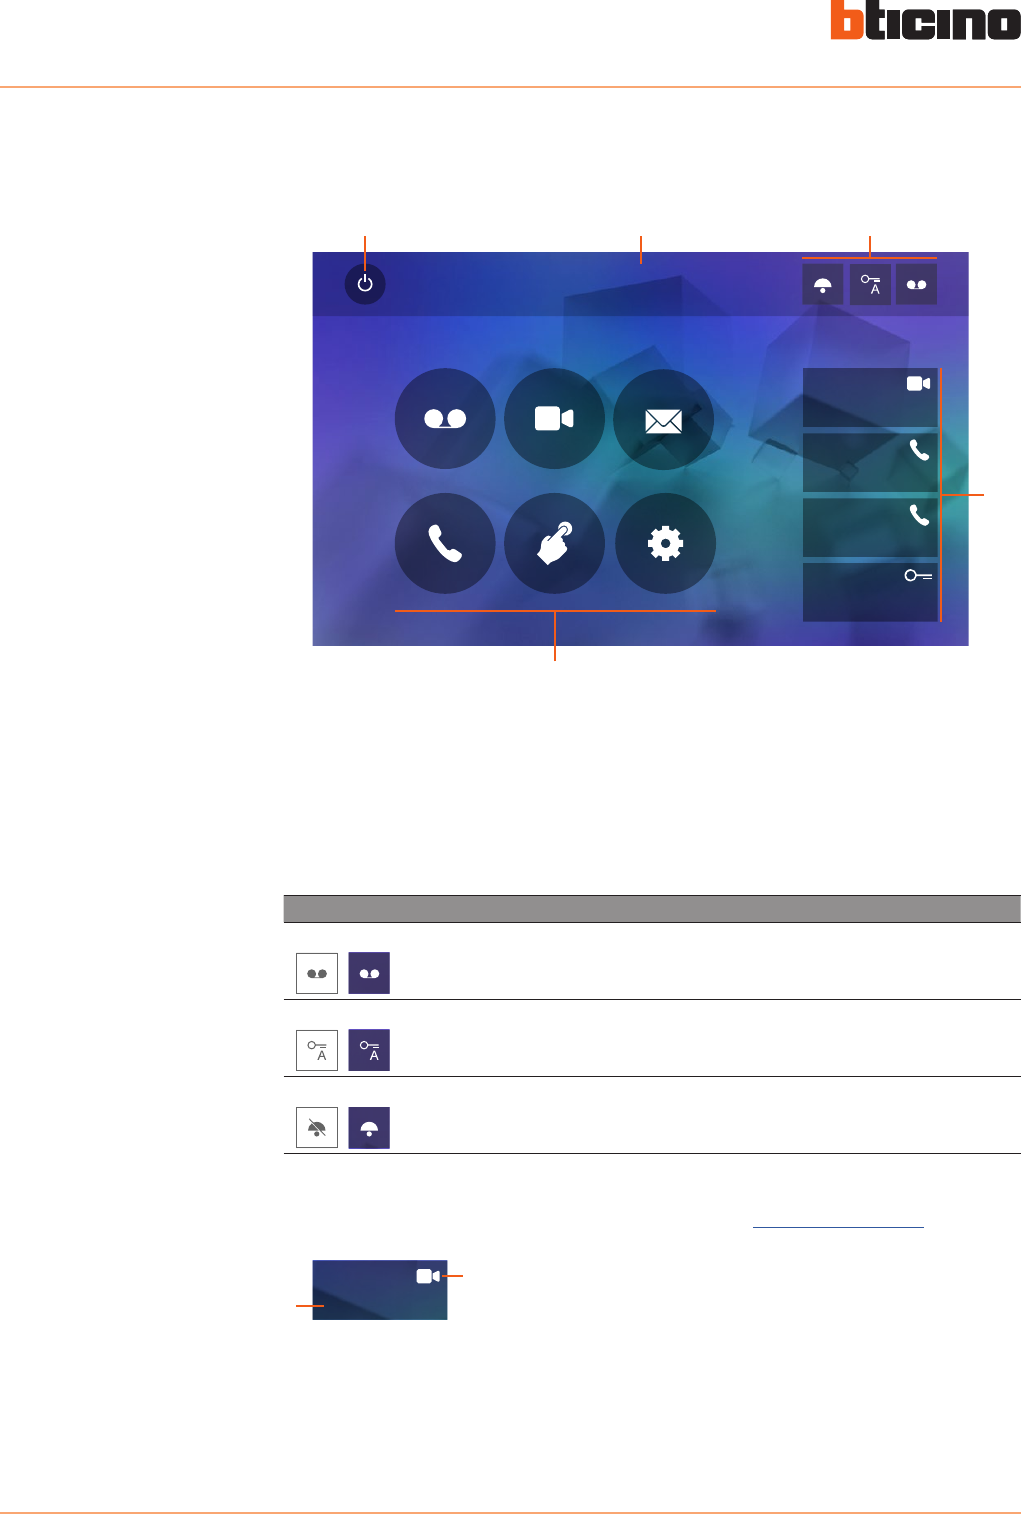
1. Home page
2. Tactile guides
3. Capacity keys for video door entry functions
4. Status LEDs
Quick Actions
10:36
Tuesday, 22 April
Activations
Answering machine Cameras Memo
Settings
Intercom
Private camera
Lock
External intercom
Pager
4
3
2 2
1
Function keys and status LEDs
Icon Meaning
Door lock key
During the connection with an Entrance Panel, use
this key to release the door lock of that Entrance
Panel, when idle, the same key releases the door lock
of the associated Entrance Panel.
Favorites key
Use this key to switch on the staircase light (basic
configuration; for the other configurations refer to
your installer).
Auto-switching on/scrolling key
This key has two functions: It can be used to switch
on the camera of the associated Entrance Panel, and
to scroll through the connected cameras and/or
entrance panels.
Connection key
Use this key to answer a call: when a call is received,
the key starts flashing, once the call is answered the
key light is on steady. Touch again to end the call.
Answering machine LED
When on steady, it indicates that the answering
machine is active; when flashing, it means that there
is an unread message in the answering machine.
Memo LED When flashing, it indicates that there are unread and/
or unlistened memos.
Call exclusion LED When on, it means that the call ringtone is disabled.
Classe 300
User manual
18
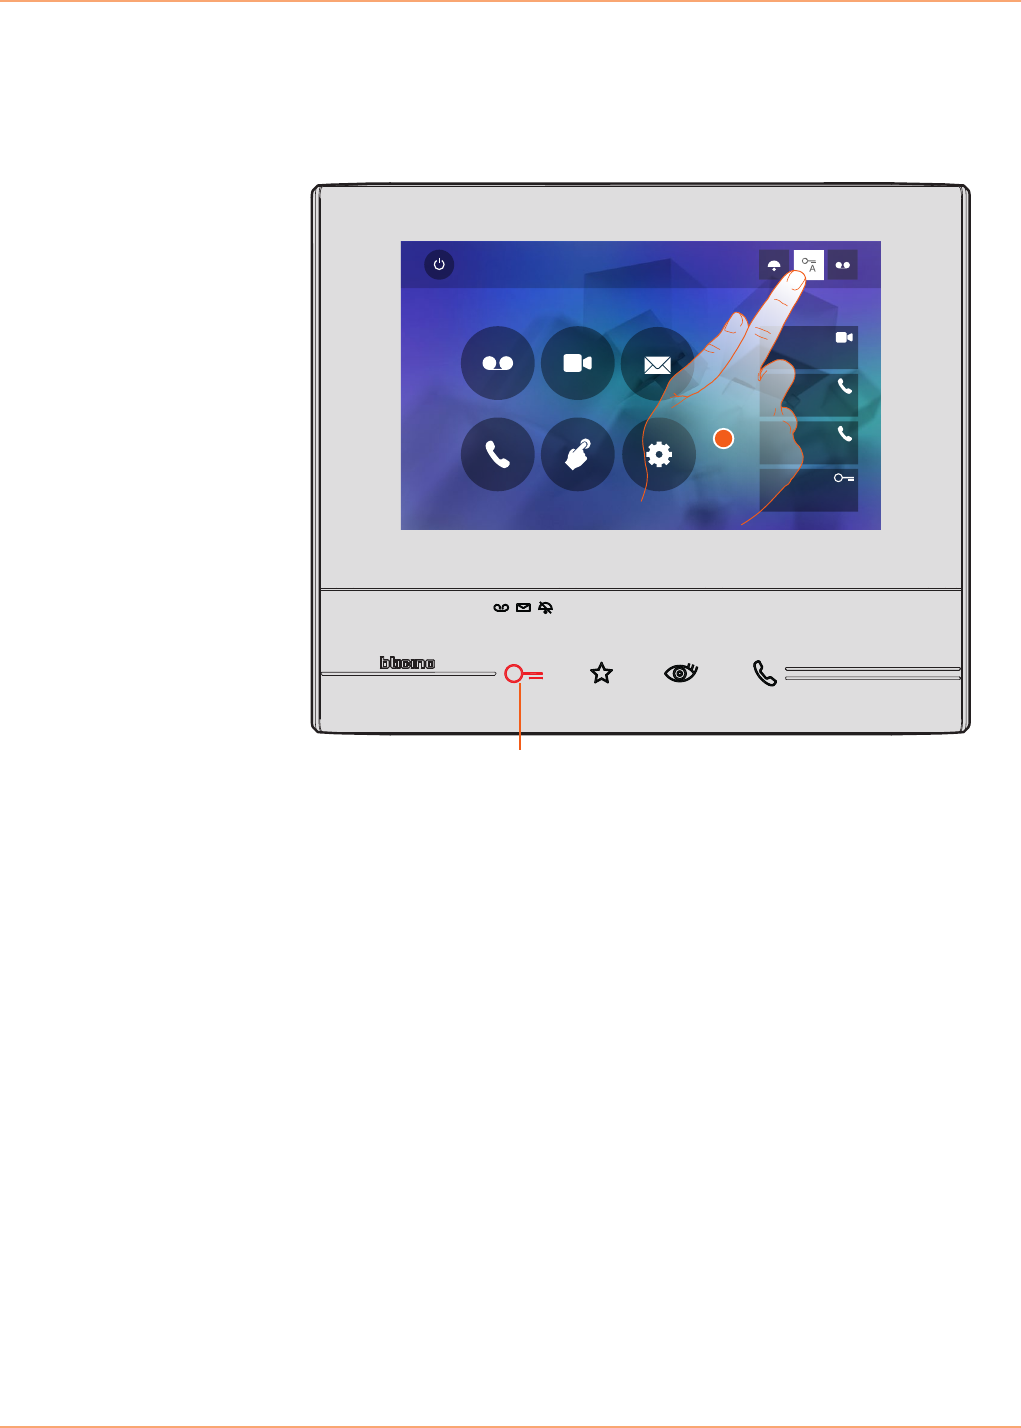
Home page
Enabling functions
Quick actions
This page can show different contents based on the configuration mode (physical or advanced)
and the device model. Below is the home page with all the functions enabled.
Quick Actions
10:36
Tuesday, 22 April
Activations
Answering machine Cameras Memo
Settings
Intercom
Private camera
Lock
External intercom
Pager
5
1 2 3
4
1. Screen off
2. Time and date
3. Enabling/disabling functions
4. Quick actions
5. Functions
Icon Meaning
ON OFF
Answering machine Enable this function to record a call from the
entrance panel (model 344622 only)
ON OFF
Office Enable this function to set the automatic opening of
the door lock in case of call from the Entrance Panel
ON OFF
Call exclusion Enable this function to mute the ringtone in case of
call
1Private camera
2
Touch this icon to directly enable the indicated function (set in Settings/Quick Actions).
1. Description
2. Type of function
Classe 300
User manual
19
Functions
Touch the icons shown below to display the screens for the selected functions.
The presence of these icons depends on the configuration of the system.
Icon Meaning
Answering machine
Touch to access the screen where it is possible
to display the video door entry system messages
recorded by the answering machine.
Cameras
Touch to access the screen for the activation of
the cameras of the system, and display the images
recorded by them.
Memo
Touch to access the screen used to write or record
a memos, or display and listen to any memos
present.
Intercom
Touch to access the screen used communicated
with other audio/video internal units installed in
your apartment or in other apartments.
Activations
Touch to access the screen where it is possible to
enable certain actuators (e.g. door locks, garden
light, etc.).
Settings
Touch to access the screen where it is possible to
customise the functions, to make the most of your
device.
Warning: the Cameras, Intercom, and Activations functions are only available if the device
has not been configured physically. To enable them contact the your installer.
Classe 300
User manual
20
Functions
The screens of the main functions can be directly accessed from the home page by touching the
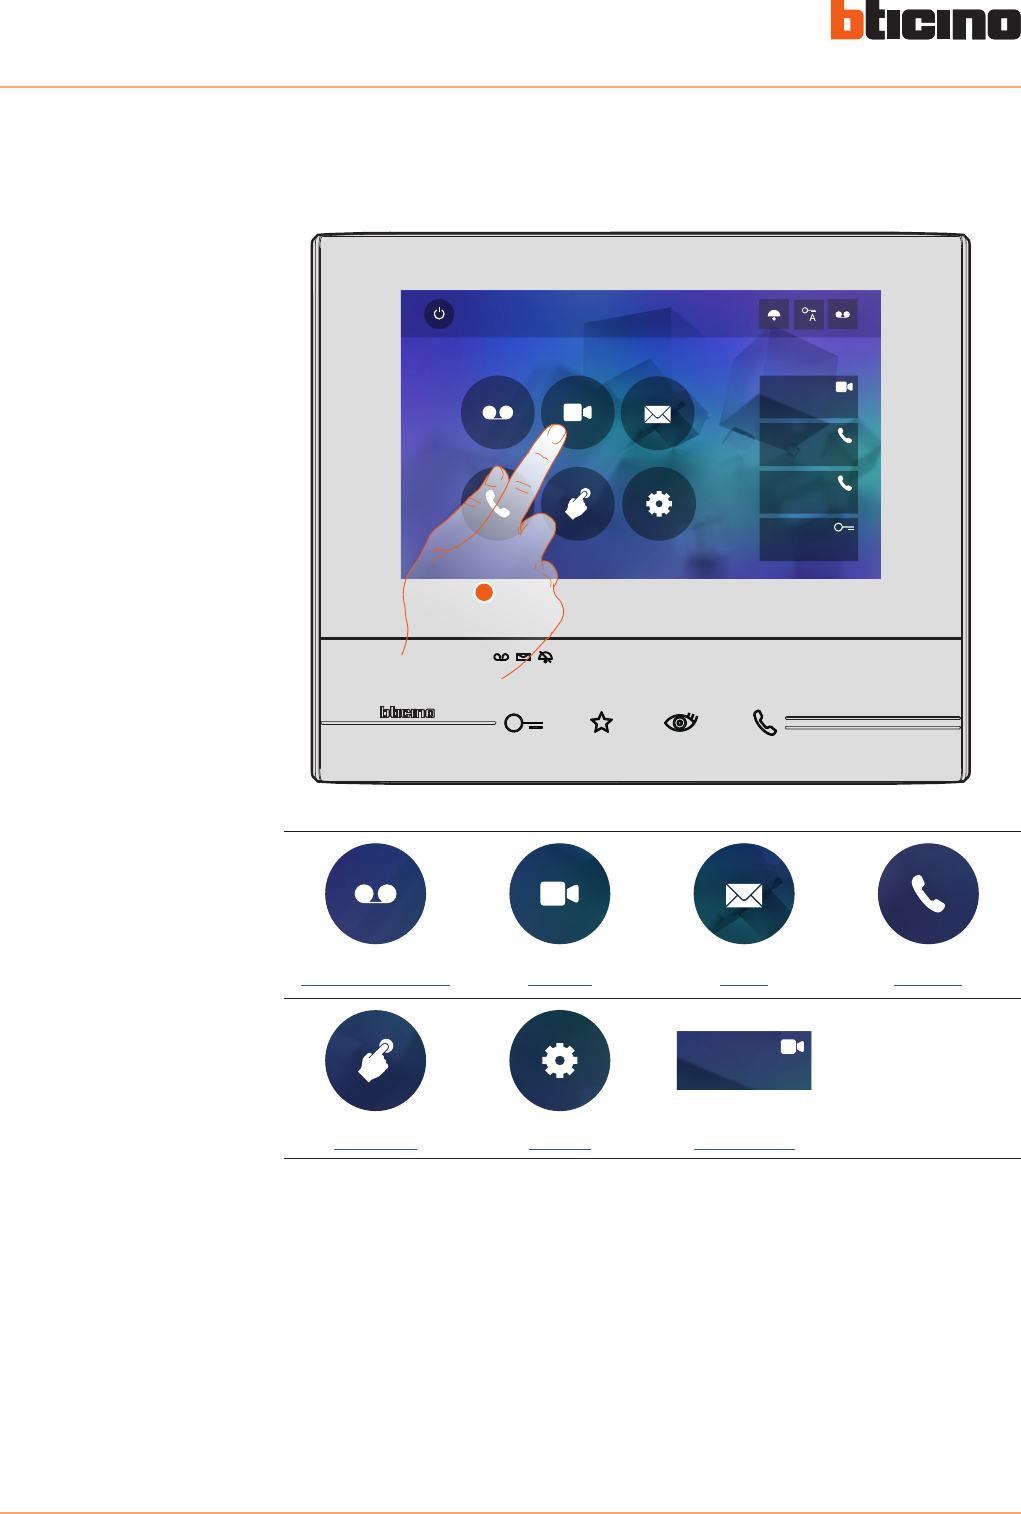
corresponding icons.
1. Touch the icon for the relevant function, choosing among.
Answering machine Cameras Memo Intercom
Private camera
Activations Settings Quick actions
Quick Actions
10:36
Tuesday, 22 April
Activations
Answering machine Cameras Memo
Settings
Intercom
Private camera
Lock
External intercom
Pager
1
Classe 300
User manual
21
Answering machine (only models 344622)
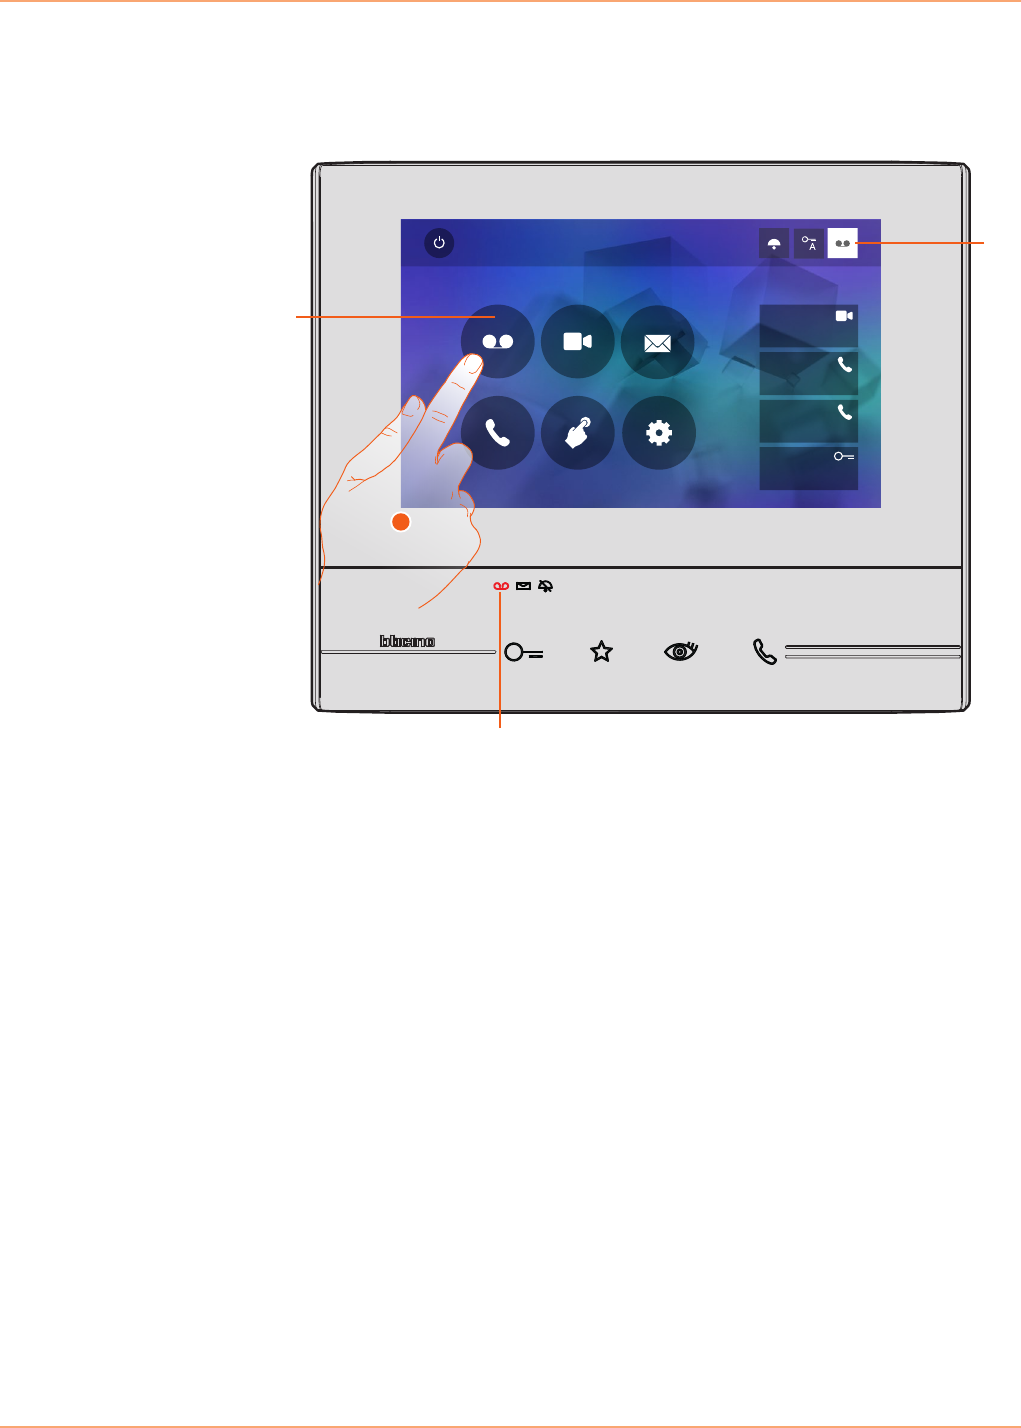
In this section it is possible to display the audio/video messages recorded from the Entrance Panel
in your absence. For this to work, it is necessary to activate the function by pressing the relevant
icon (A).
1. Touch to enter the answering machine.
Quick Actions
10:36
Tuesday, 22 April
Activations
Answering machine Cameras Memo
Settings
Intercom
Private camera
Lock
External intercom
Pager
1
C
B
1
A
When a message has been recorded in the answering machine, LED (B) flashes, and the function
icon shows a number indicating the new or unread messages (C).
Classe 300
User manual
22
A. Date/time of recording.
B. Preview.
C. Message status indicator:
unread message;
read message
2. Touch to open the message.
B
C
A
Back Answering machine
22/10/2013
19:34
22/10/2013
16:30
22/10/2013
17:02
21/10/2013
11: 25
21/10/2013
15:00
20/10/2013
17:59
19/10/2013
14:20
15/10/2013
20:03
2
Classe 300
User manual
23
3. Touch to pause playback.
4. Touch to close the display.
Back
Volume
22/10/2013
18:34
3
4
The message is played back automatically
The message can be managed using the appropriate icons:
Back
Volume
22/10/2013
18:34
B
C
A
D
A. Adjust the volume.
B. Delete the message.
C. Beginning and end of message.
D. Return to the answering machine screen.
Classe 300
User manual
24
5. Touch to return to the home page.
the message status indication automatically switches to “read” , and the numeric indication
disappears from the home page
Back Answering machine
22/10/2013
16:30
22/10/2013
17:02
21/10/2013
11: 25
21/10/2013
15:00
20/10/2013
17:59
19/10/2013
14:20
15/10/2013
20:03
22/10/2013
18:34
5
Classe 300
User manual
25
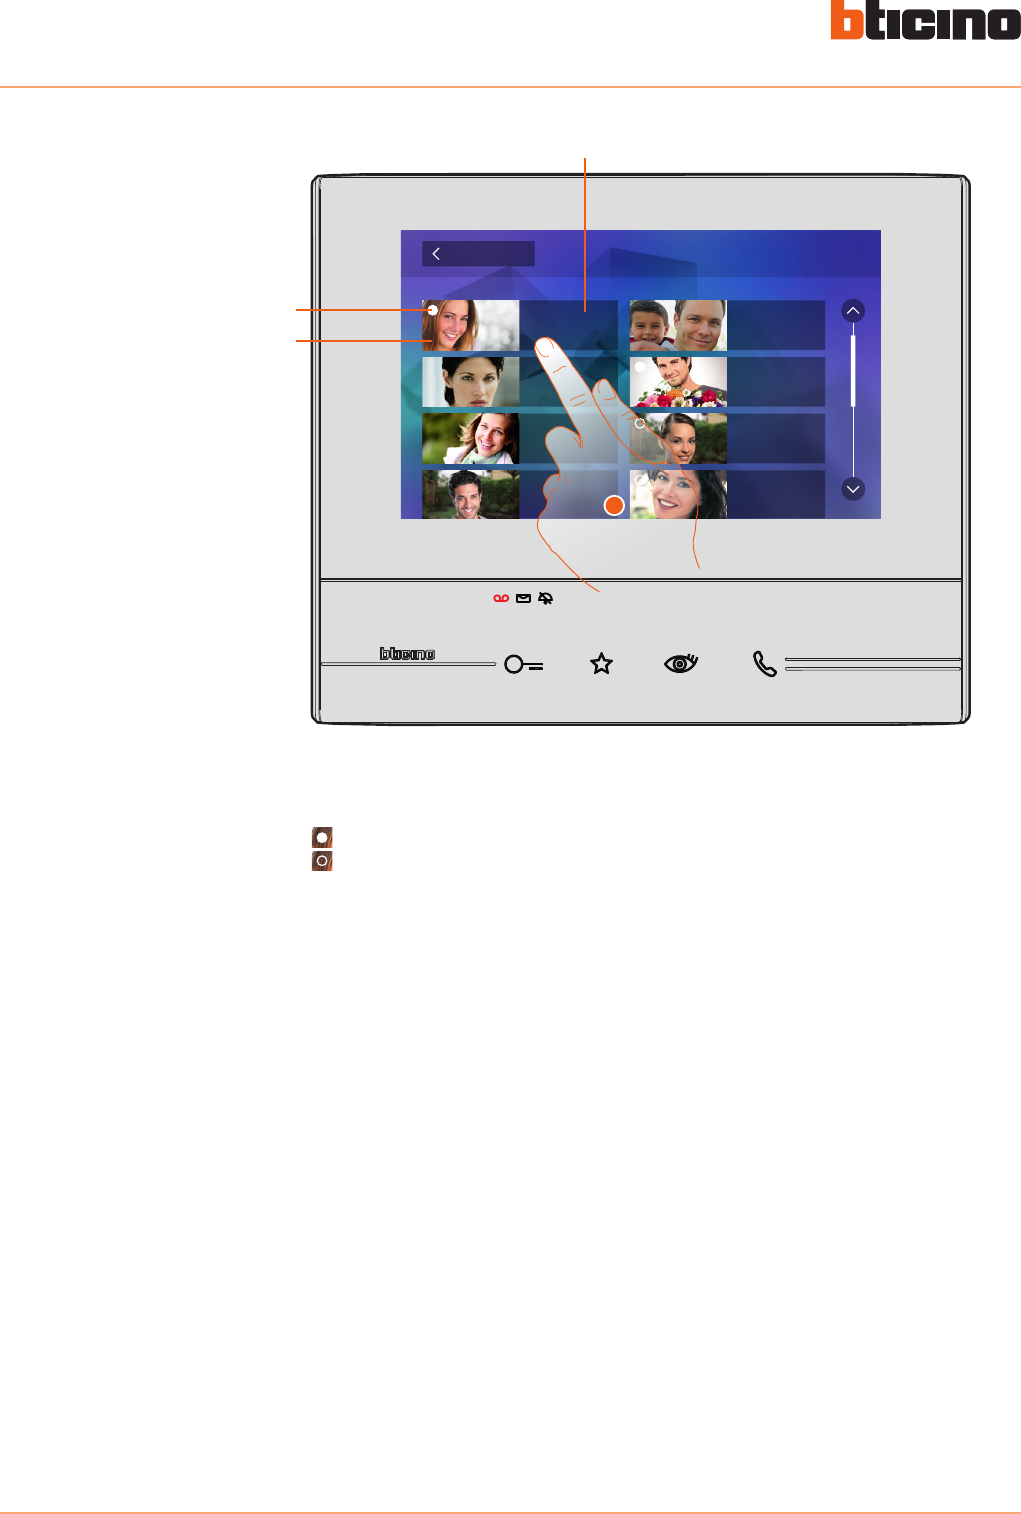
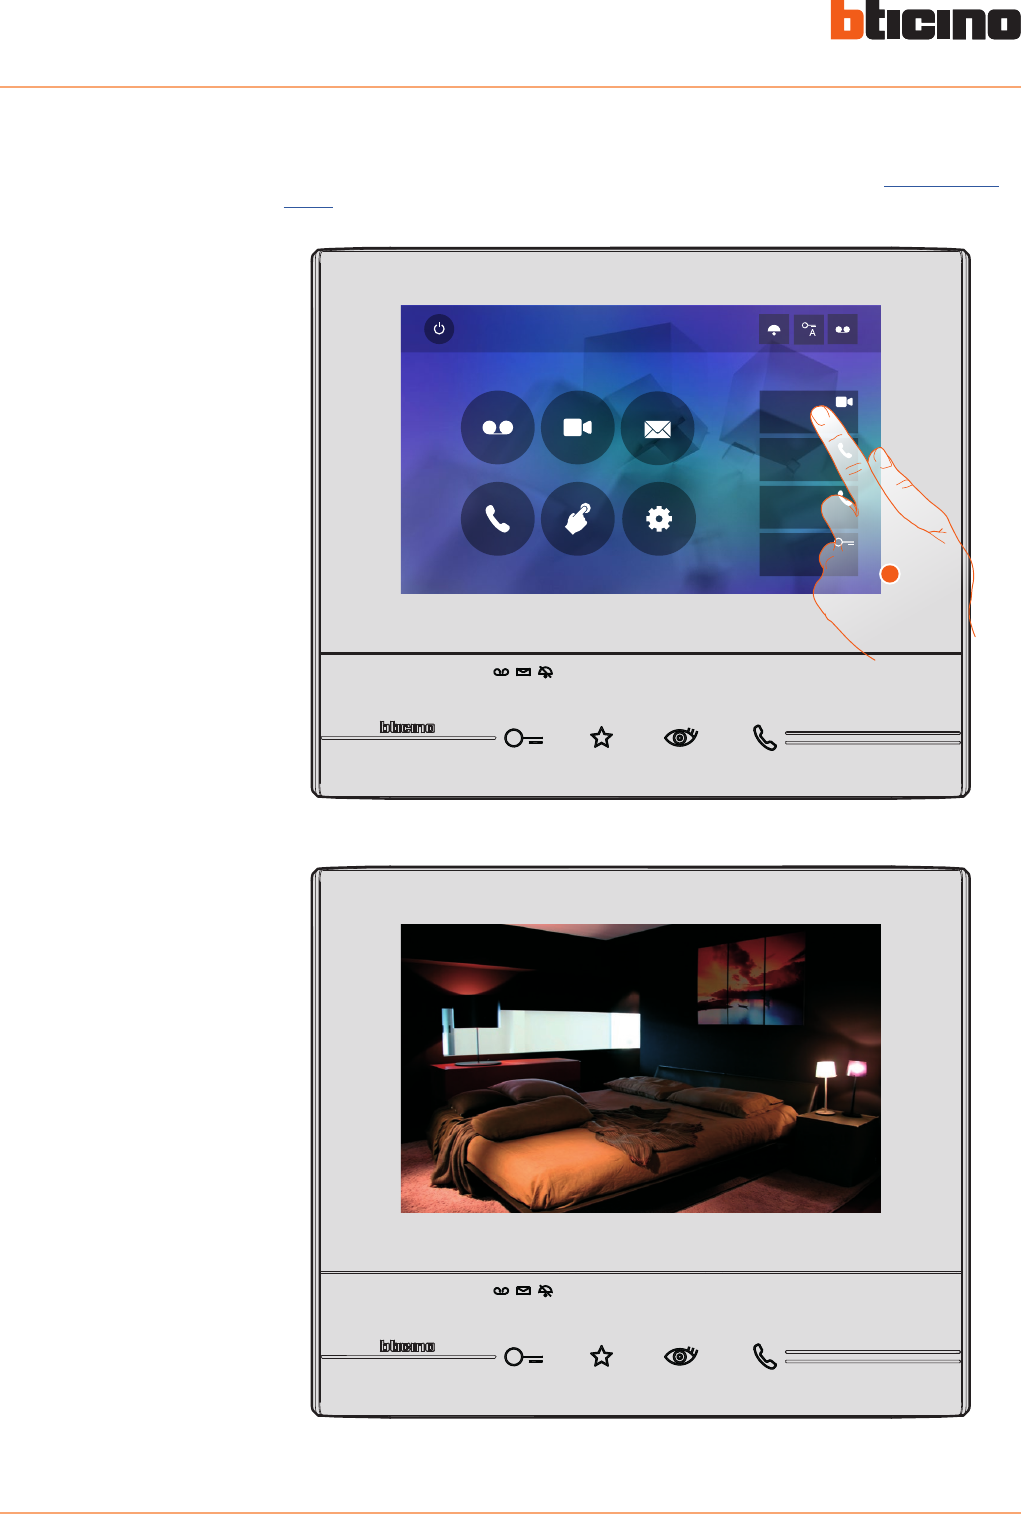
1. Touch to display the cameras in your system.
2. Touch to activate the desired camera.
Cameras
This section can be used to monitor your home by enabling one of the cameras inside the
apartment, the common areas (e.g. garages, garden), and at the entrance panels.
After enabling a camera, it is possible to “scroll” (display in sequence) the other cameras.
Quick Actions
10:36
Tuesday, 22 April
Activations
Answering machine Cameras Memo
Settings
Intercom
Private camera
Lock
External intercom
Pager
1
Public cameraPrivate camera
Cameras
Back
2
Classe 300
User manual
26
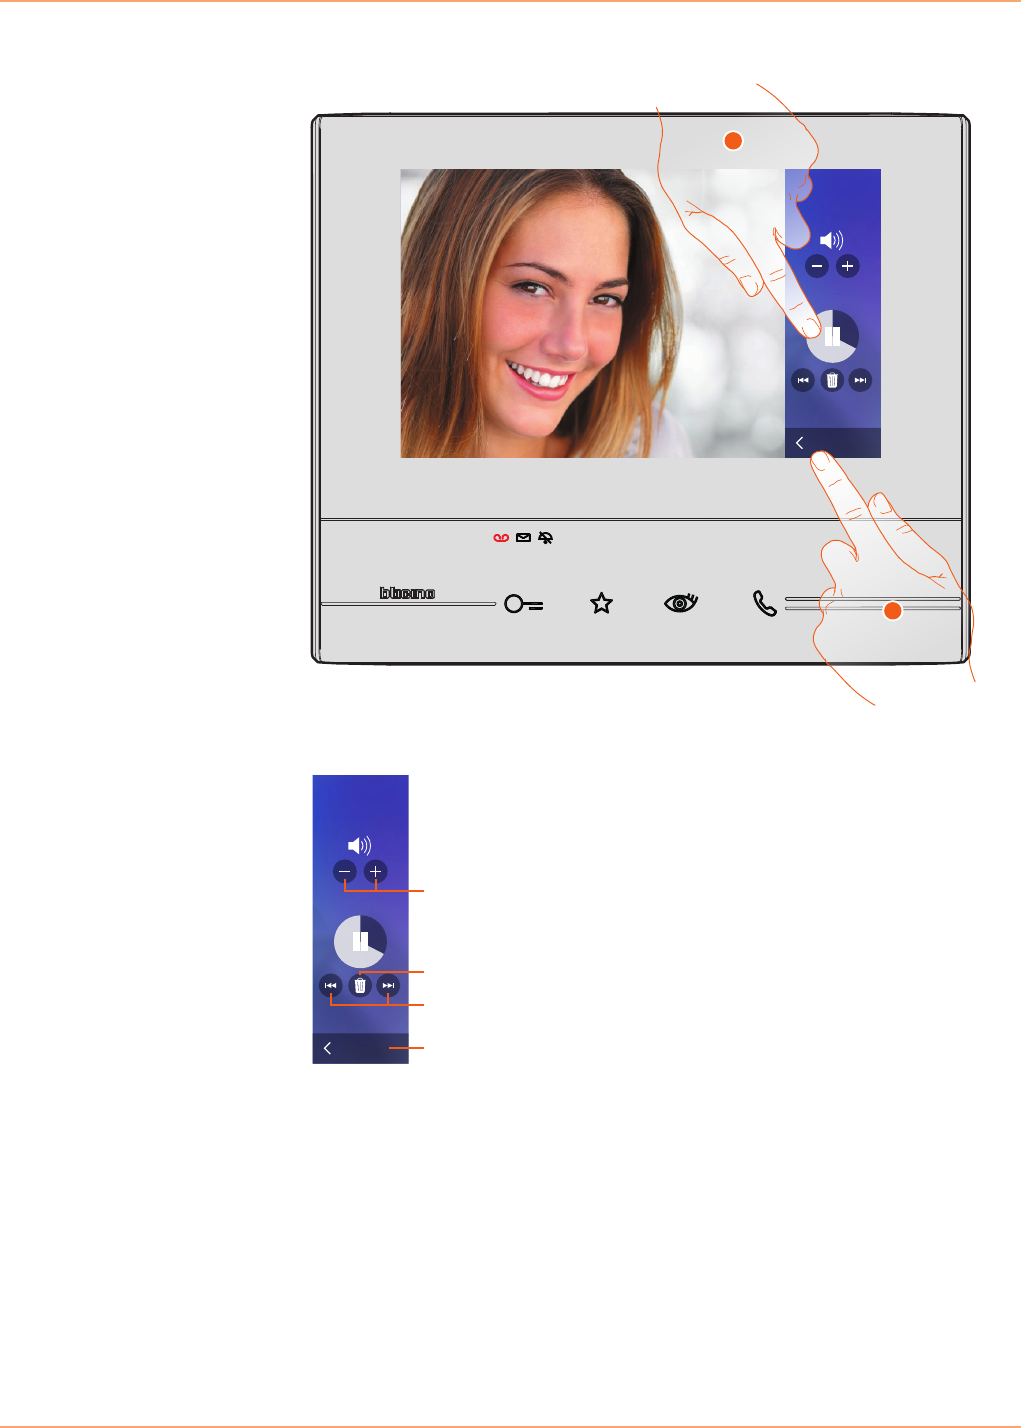
The display shows the images recorded by the active camera.
For the camera adjustments see Answer a call.
To end camera display mode wait for the switching off time to elapse.
3. Touch to display another camera (scrolling). When switching from one camera to the next, the
key lights up.
4. If the camera belongs to an Entrance Panel, the key flashes. Touch it to activate audio
communication.
3
4
Classe 300
User manual
27
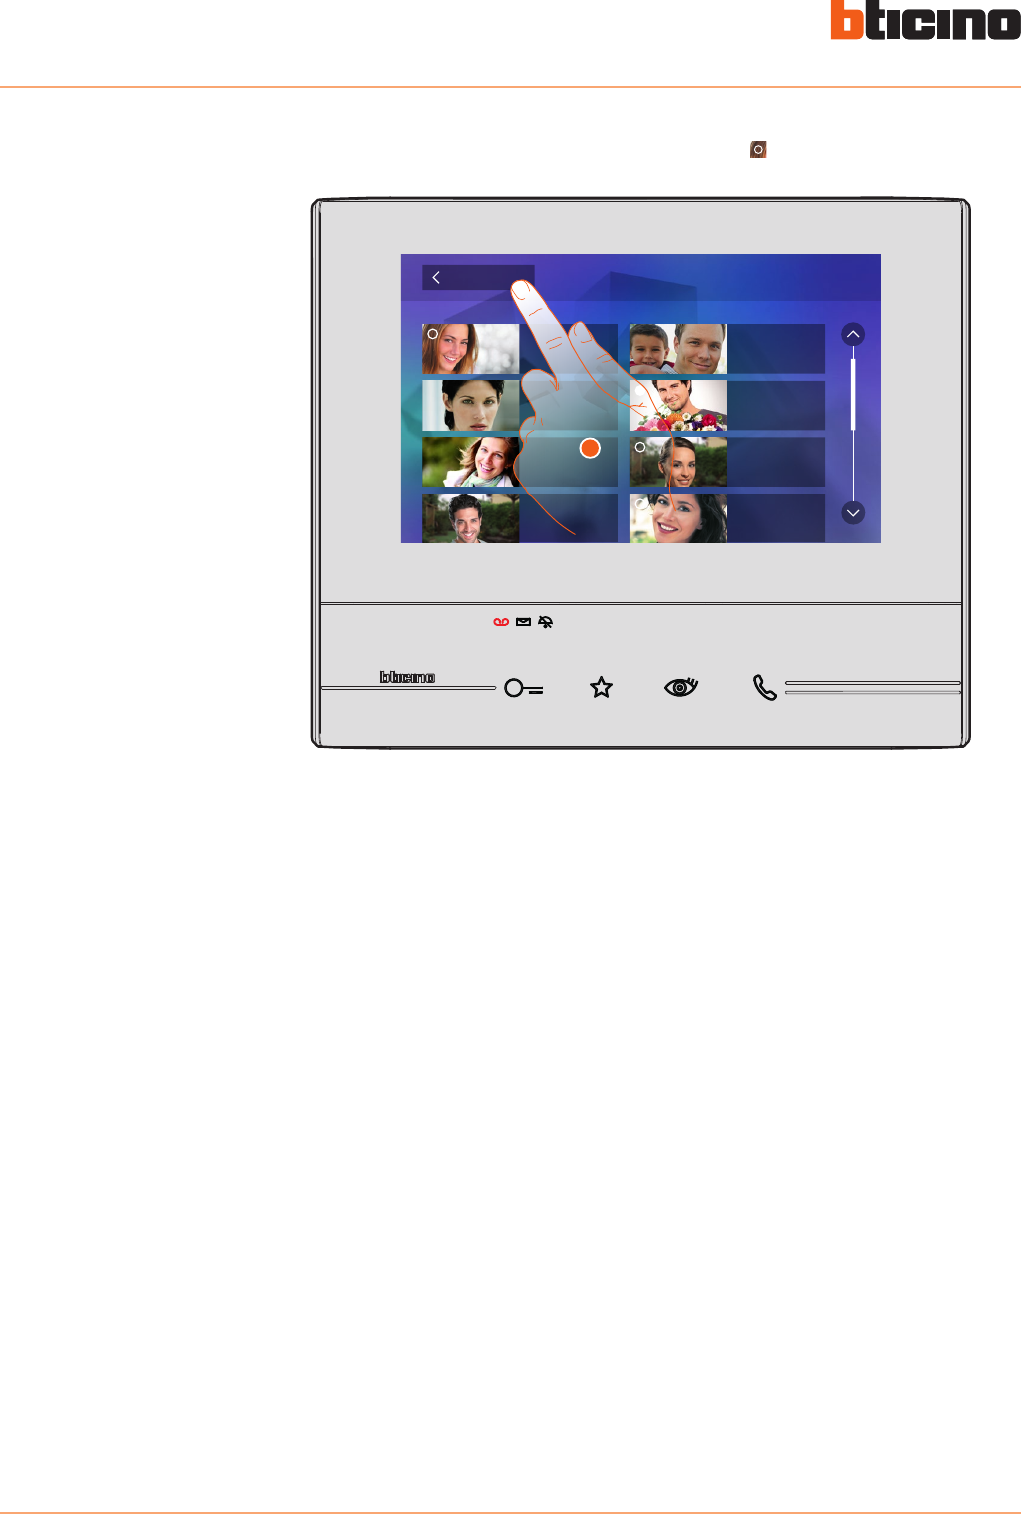
1. Touch to access the memos.
Memo
In this section it is possible to create memos, or display any memos left by other users, or by the
switchboard. There are two types of memos: written memos and voice messages.
Quick Actions
10:36
Tuesday, 22 April
Activations
Answering machine Cameras Memo
Settings
Intercom
Private camera
Lock
External intercom
Pager
3
1
B
A
When a memo has been recorded in the answering machine, LED (B) flashes, and the function icon
shows a number indicating the new or unread messages (A).

Classe 300
User manual
28
Memo
Audio memo recording Write memo
10 october, 18:34
This is a vocal memo
10 october, 15:00
Call the plumber
10 october, 07:22
To go to the grocery store
Back
2
E
D
A B C
A. Voice memo indication.
B. Date/time of recording.
C. Memo from the switchboard.
D. Written memo preview.
E. Memo status indicator:
unread memo;
read memo
2. Touch to open the memo.
Classe 300
User manual
29
Text memo
Read memo
To go to the grocery store
10 october, 18:34
Back
C
A B
3
3. Touch to modify the memo.
4. Use the keypad to modify the memo.
5. Touch to save the modification.
This screen can be used to display (C), modify (A) or delete (B) the memo text.
To go to the grocery store
OK I will go at 6 pm
Modify memo
Cancel Save
.
q
a
z cx v b n m
s d f g h j k l
y u i o pw e r t
?123
5
4
Classe 300
User manual
30
Audio memo
Memo playback
0:20
Press to listen recording
Back
3
A
3. Touch to listen to the recording.
4. Touch to stop playback.
This screen can be used to listen to the audio memo, or to delete it (A).
Memo playback
0:04
Press to stop the playback
Back
4
Classe 300
User manual
31
1. Touch to display the available intercoms.
2. Touch to activate the communication with the desired intercom.
Intercom
This section can be used to communicate with other video/audio internal units installed in your
home, or in other apartments.
Quick Actions
10:36
Tuesday, 22 April
Activations
Answering machine Cameras Memo
Settings
Intercom
Private camera
Lock
External intercom
Pager
1
External intercom
Intercom
Back
Intercom 3
Intercom 7
Intercom 1
Intercom 5
Intercom 9
Intercom 2
Intercom 6
Intercom 10
Intercom 4
Intercom 8
2
Classe 300
User manual
32
Call to
External intercom
A
Key (A) lights up to indicate that the call is active.
3. Touch to end the call.
Call active
Volume
3
When the recipient answers the call, the audio adjustment icons appear; see Answer a call.
Warning: When a call is received from the Entrance Panel while the internal unit is in
“intercom” mode, the system follows the priority rules and ends the active call.
Classe 300
User manual
33
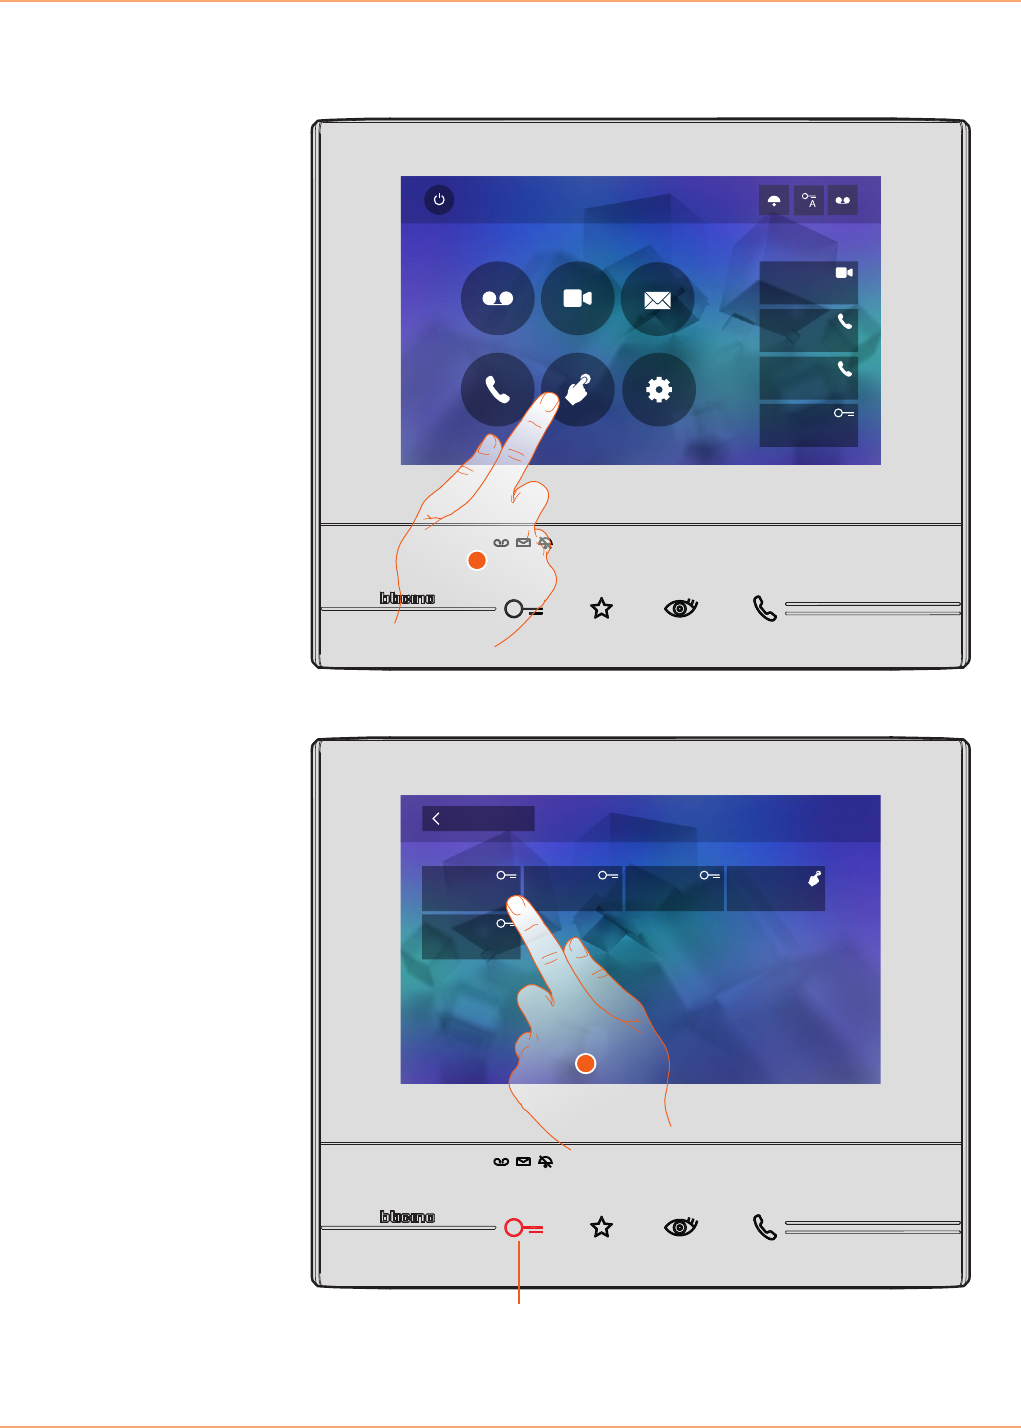
1. Touch to display the available activations.
2. Touch to activate the communication with the desired intercom.
Activations
This section can be used to enable certain actuators (e.g. door locks, garden light, etc.).
Quick Actions
10:36
Tuesday, 22 April
Activations
Answering machine Cameras Memo
Settings
Intercom
Private camera
Lock
External intercom
Pager
1
Key (A) lights up to indicate that the activation has been successful.
Activations
Back
Lock
A
Lock 1 Lock 2 Generic
Lock 3
2
Classe 300
User manual
34
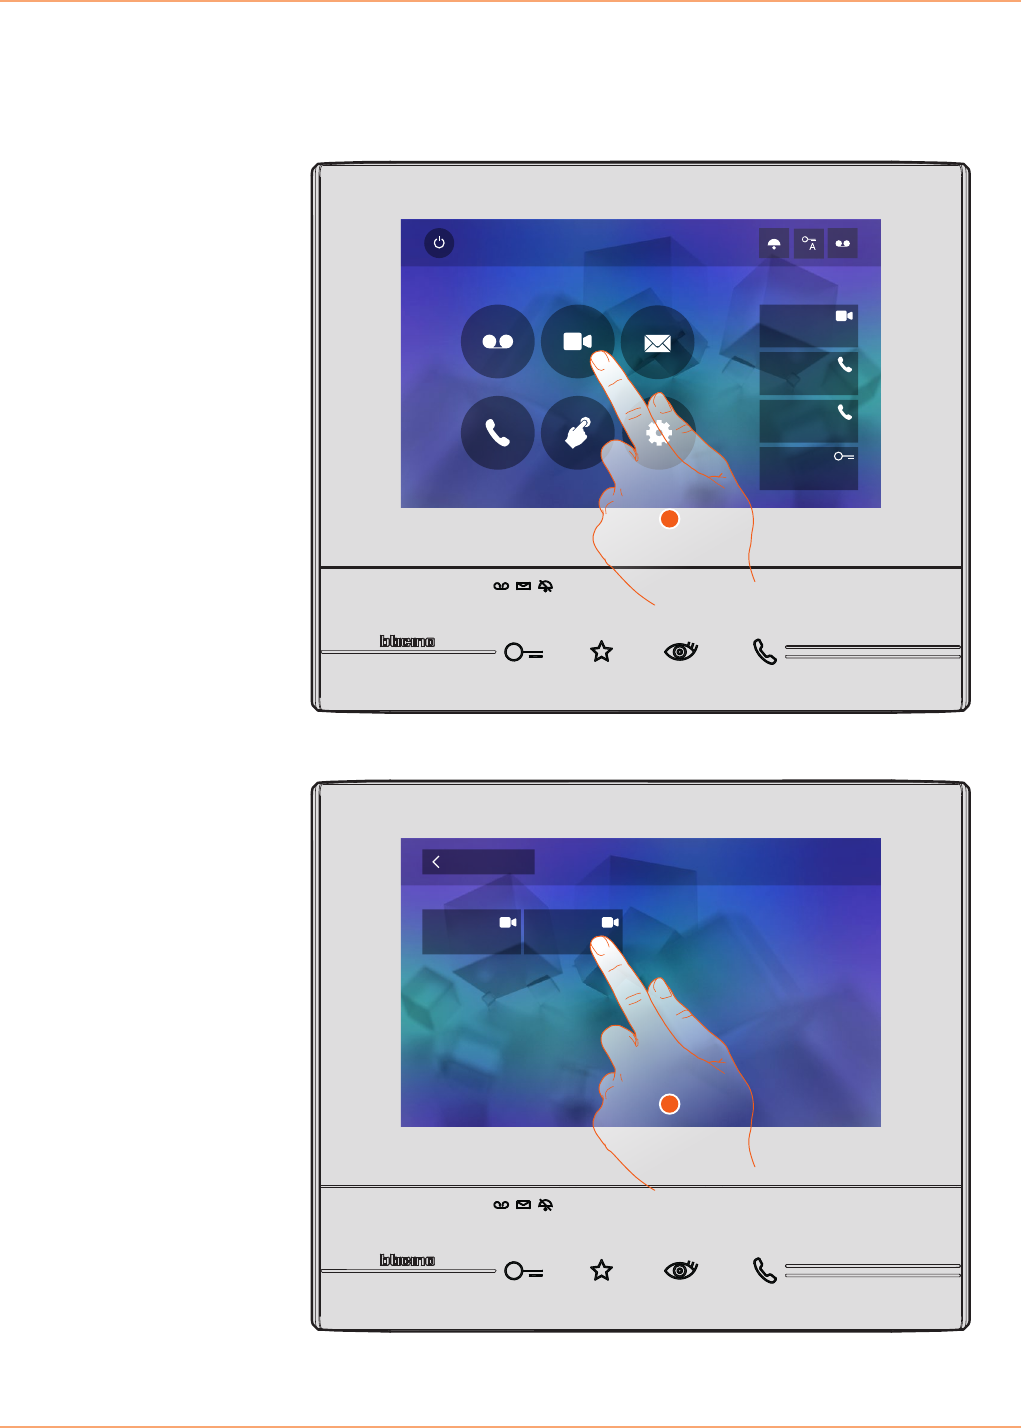
1. Touch to directly enable the function (e.g. camera).
Quick actions
On the right of the home page are the quick actions, if previously enabled in the Settings/Quick
Action section, or if physically configured (maximum 4).
Touch these icons to directly enable the function without opening the specific screen.
Quick Actions
10:36
Tuesday, 22 April
Activations
Answering machine Cameras Memo
Settings
Intercom
Private camera
Lock
External intercom
Pager
1
Classe 300
User manual
35
1. Touch to enter the settings section.
2. Touch the icon for the desired customisation, choosing among:
Settings
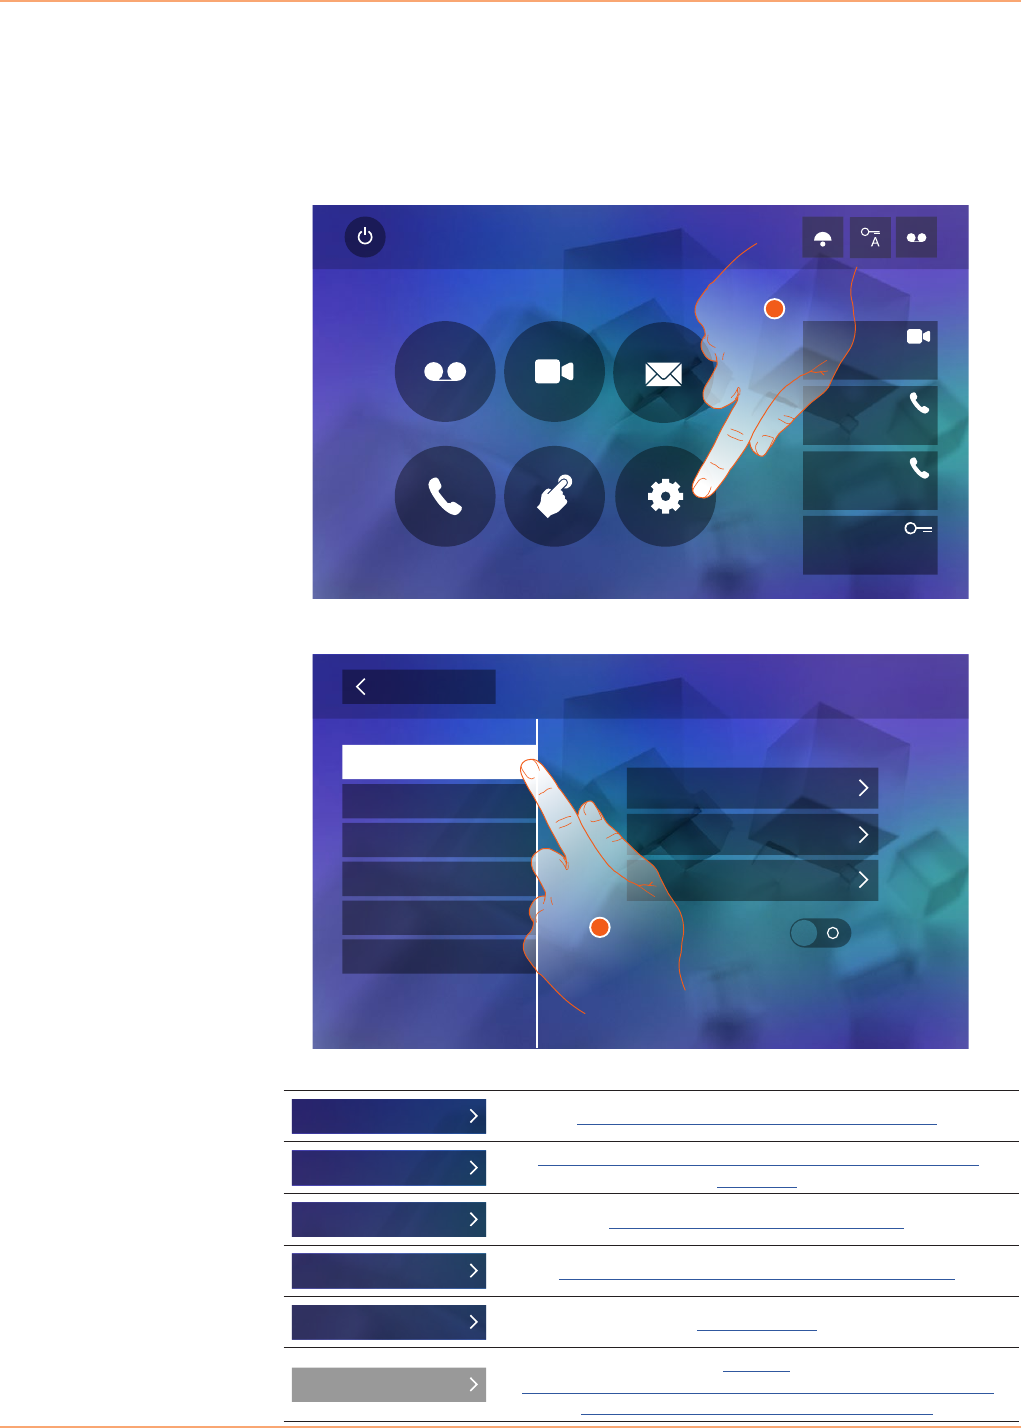
The home page always contains the “Settings” icon.
Touching it will give access to a wide range of customisations that will enable you to make the
most of your Classe 300.
Further settings are also available in the Configuration section (password protected). For this
section refer to your installer.
Quick Actions
10:36
Tuesday, 22 April
Activations
Answering machine Cameras Memo
Settings
Intercom
Private camera
Lock
External intercom
Pager
1
Quick Actions
Configuration
Answering machine
Display
Ringtones
Settings
Generals
Language
Time and date
Info
Back
Tone buttons
2
Generals Time and date - Language - Information - Key tone
Ringtones Volume - Intercom ringtone - Entrance Panel Ringtone - Other
ringtones...
Display Clean monitor - Background - Calibration
Answering machine
Recording Mode - Welcome Message - Record Message...
Quick Actions Add quick action
Configuration
WARNING
Access to the “Configuration” section is reserved for the installer; wrong
settings may compromise the operation of the device

Classe 300
User manual
36
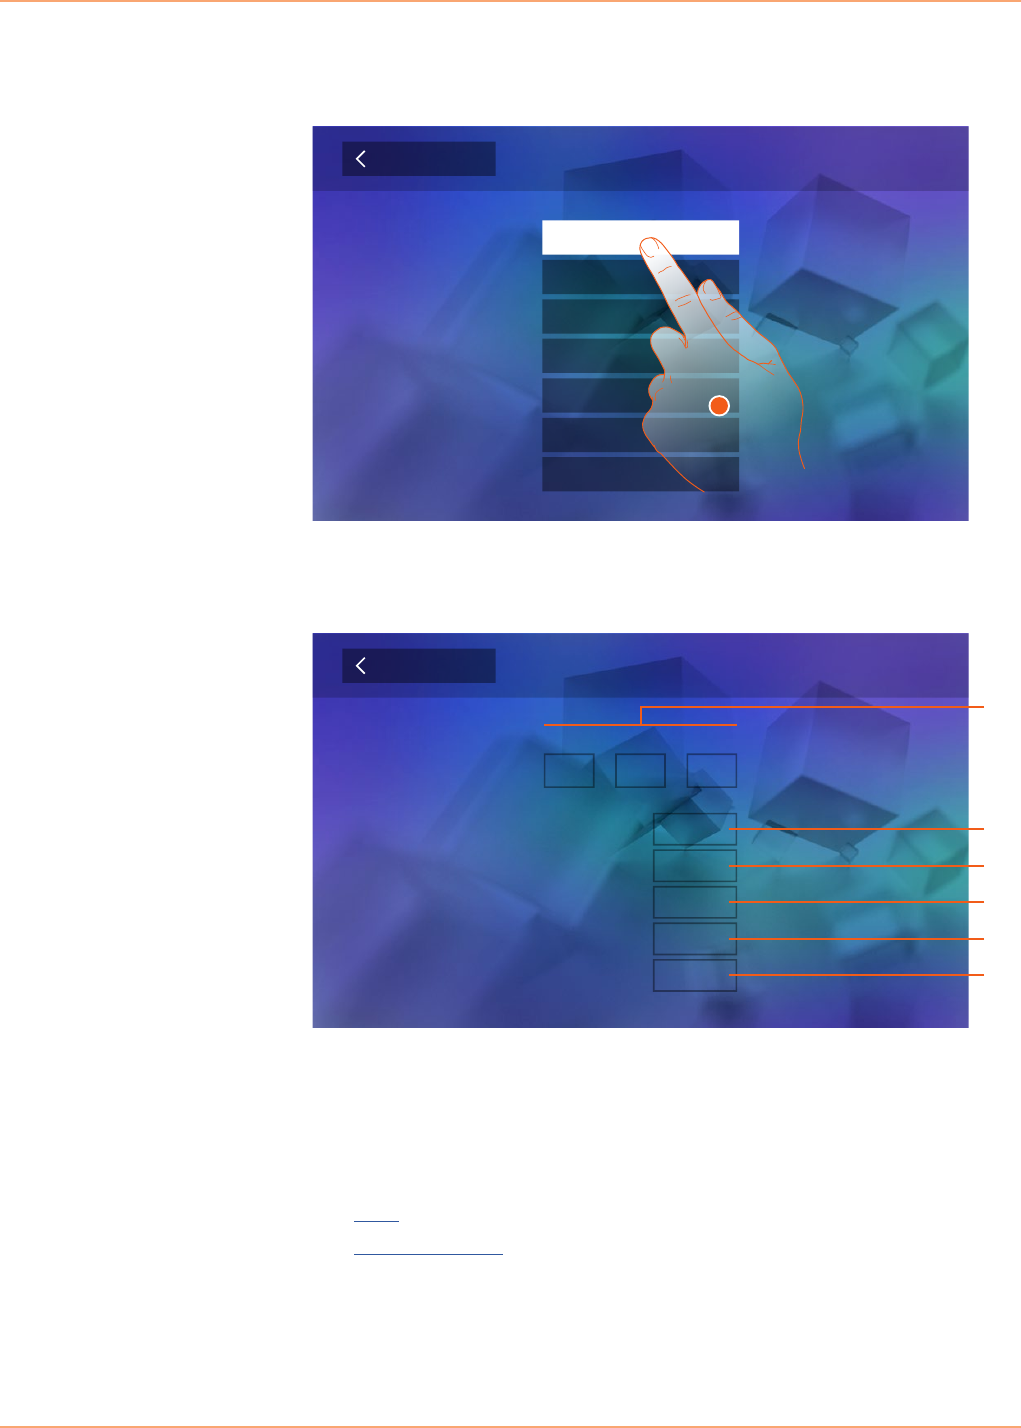
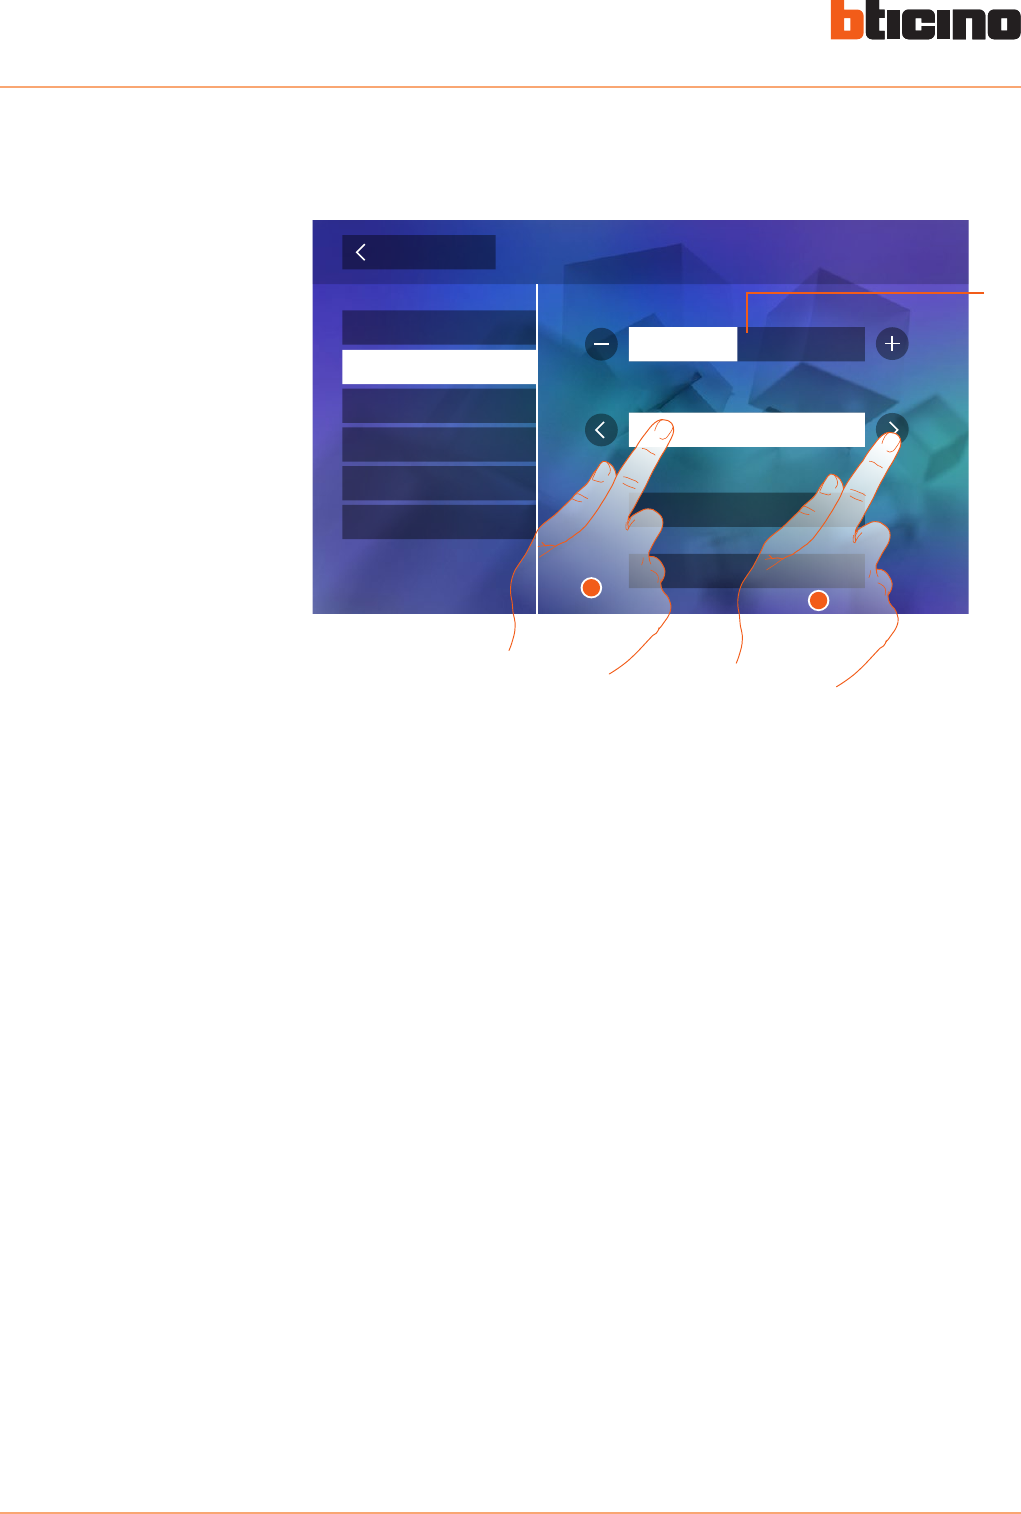
General settings
This section contains the general settings and device information.
Set the current time and date.
1. Enable/disable the sound when a key is pressed.
1. Touch the icon for the parameter to set; the icons to increase or decrease the value appear.
2. Touch to set it.
Quick Actions
Configuration
Answering machine
Display
Ringtones
Settings
Generals
Language
Time and date
Info
Back
Tone buttons
1
Time and date
11 201310
md y
11 42
m
Back Time and date
1
2
Classe 300
User manual
37
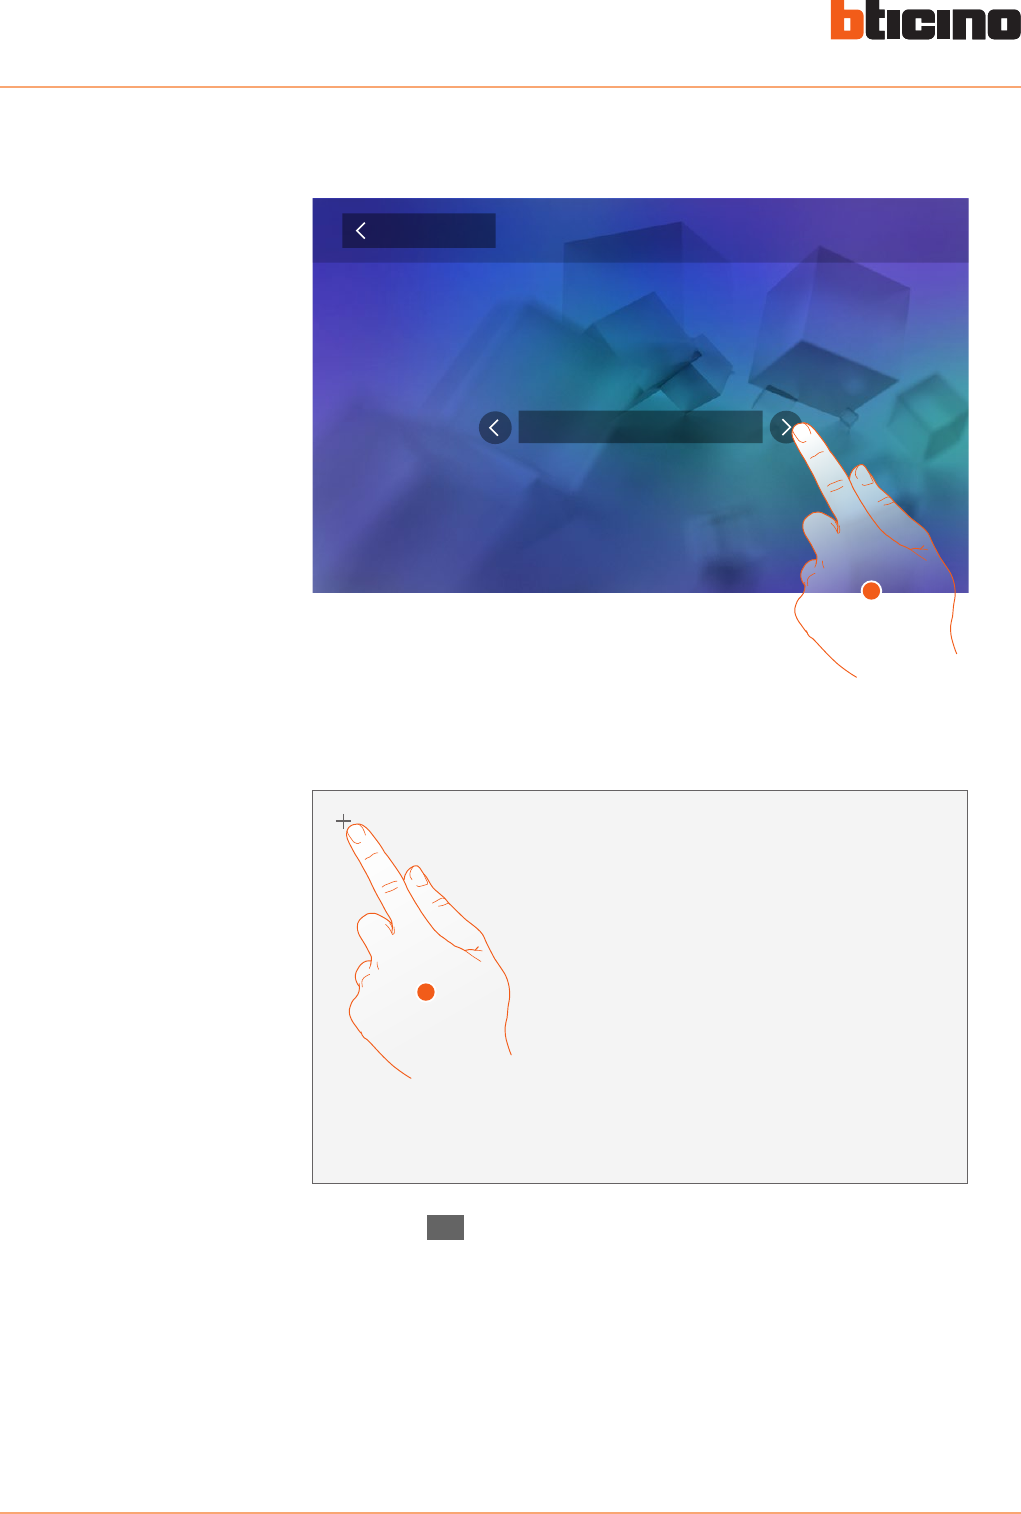
Set the device language.
It displays information concerning the configuration of the device.
1. Touch the icon for the desired language.
Display:
1. The configuration parameters.
2. If the device has been set as apartment master or slave.
3. If an additional power sully is present.
4. The firmware version of the device.
5. If the Office function is active.
6. If the Answering machine function is active.
Language
Information
Back Languages
Deutsch
Português
Español
Néerlandais
Français
Info
1.0.12
Firmware ver.
Power supply Disabled
Professional studio Enabled
Master/Slave Master
Answering machine Enabled
00
P
00
MN
00
Back
2
1
3
4
5
6
English
Italiano
1
Classe 300
User manual
38
Ringtones
This section can be used to associate specific ringtones to certain events, and to adjust their
volume.
Main Entrance Panel: call from the main Entrance Panel (S0)
Internal intercom: call from an intercom in your apartment.
Other ringtones...
S1, 2, 3 Entrance Panel: call from the SECONDARY Entrance Panel (S1; S2; S3)
External intercom: call from an intercom of another apartment.
Call to the floor: call from the pushbutton outside your entrance door.
Notifications: memo from the switchboard.
1. Touch the event to which to associate a specific ringtone; the selection icons appear.
2. Scroll through the available ringtones (16); they will be played back as you scroll through them.
Back Settings
1
Internal intercom
Main entrance panel
More ringtones...
Ringtones
Quick Actions
Configuration
Display
Answering machine
Generals Volume
16
1
2
A
A. Adjust the ringtone volume.
Events to which it is possible to associate ringtones:
Classe 300
User manual
39
Display
This section is used to calibrate and clean the monitor, and to change the background image.
Back Settings
Clean monitor
Calibration
Display
Quick Actions
Configuration
Answering machine
Generals
Ringtones
Background
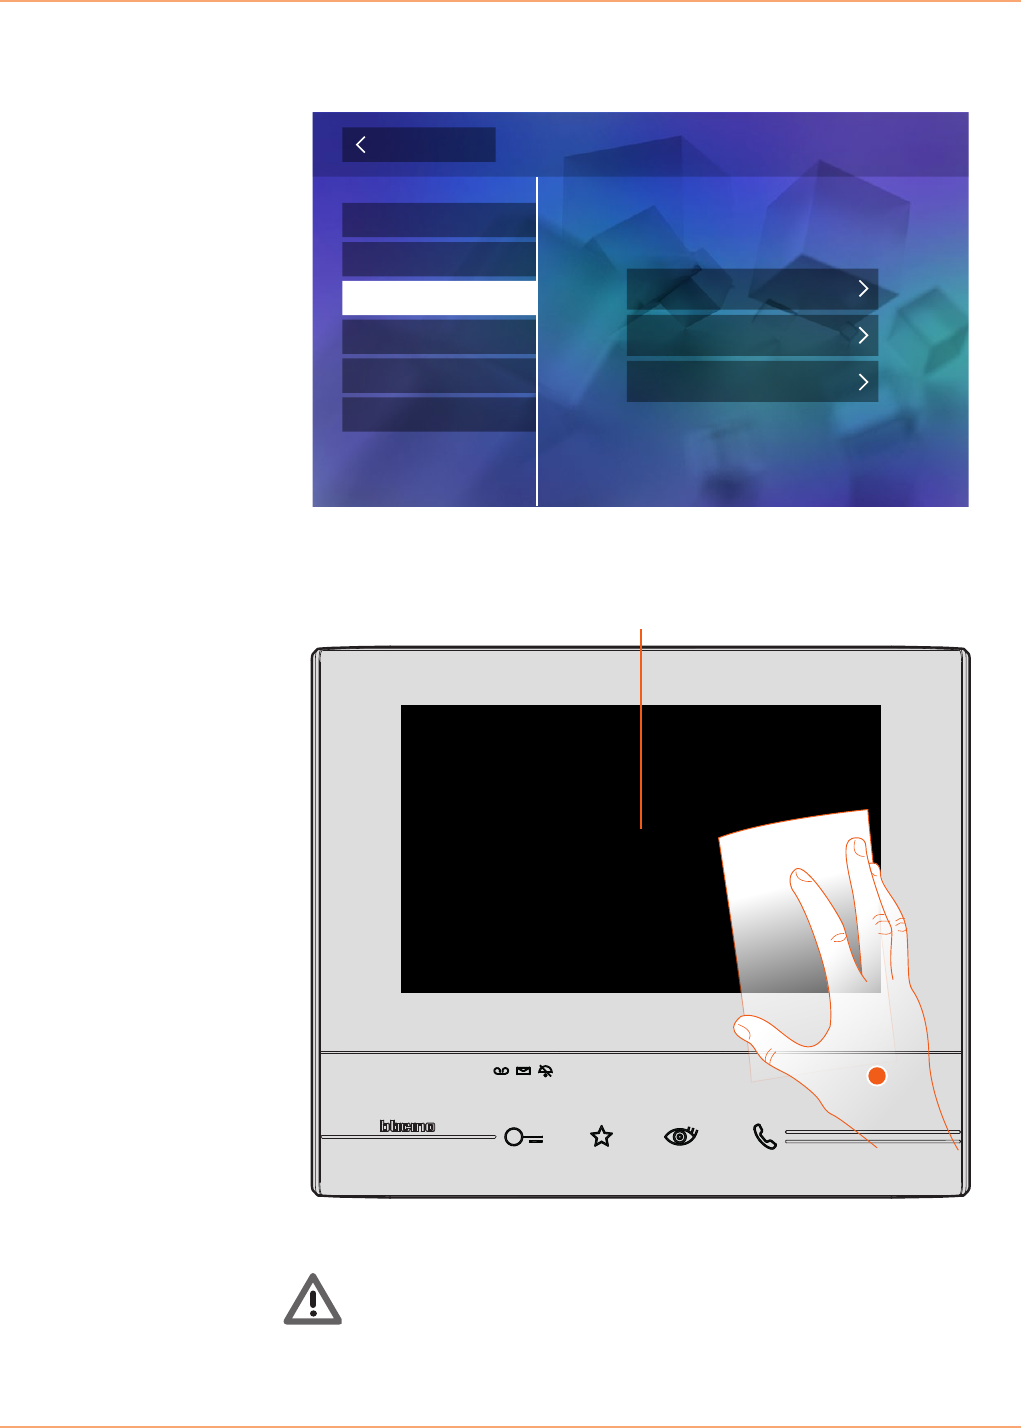
It’s used to disable the display and the keys for cleaning purposes, without the risk of sending
unwanted commands.
Clean monitor
A. After touching the corresponding icon, the display remains in stand-by for 10 seconds.
1. During this period, it is possible to clean the monitor and the keys.
10
A
1
Caution: do not clean with solvents, thinners etc. or abrasive products. Only use a soft cloth.
Classe 300
User manual
40
Background
Calibration
It gives the possibility to change the background image of the device.
It can be used to adjust the touch pressure for the display.
Back Background
home
1
Click the cross
1
1. Scroll through the available images to get a background preview.
1. Touch the “cross” symbol on the display as it moves to all 5 positions.
At the end, the Ok , icons appears at the corners of the display.
Touch it to complete the calibration procedure.
Classe 300
User manual
41
Answering machine
This page can be used to set the quality of the videos recorded by the answering machine, or to
record, enable, disable the welcome message.
1. Set if video messages must be recorded in high resolution (maximum 25 x 15 sec. messages),
or in low resolution (maximum 150 x 15 sec. messages).
2. Touch to record a welcome message.
A. Enable/disable the welcome message.
Back Settings
Answering machine
Quick Actions
Configuration
Display
Generals
Ringtones
Record message...
Video recording resolution
High
Welcome message
1
2A
Warning: the most recent message overwrites the oldest one.

Classe 300
User manual
42
3. Touch to start recording, and then record the message.
4. Touch to end the recording.
5. Touch to play the message back.
6. Touch to save it.
Back Record message
0:20
Press to stop recording
4
Back Record message
Press to record
3
Record message
0:20
Press to listen recording
Cancel Save
5
6
Classe 300
User manual
43
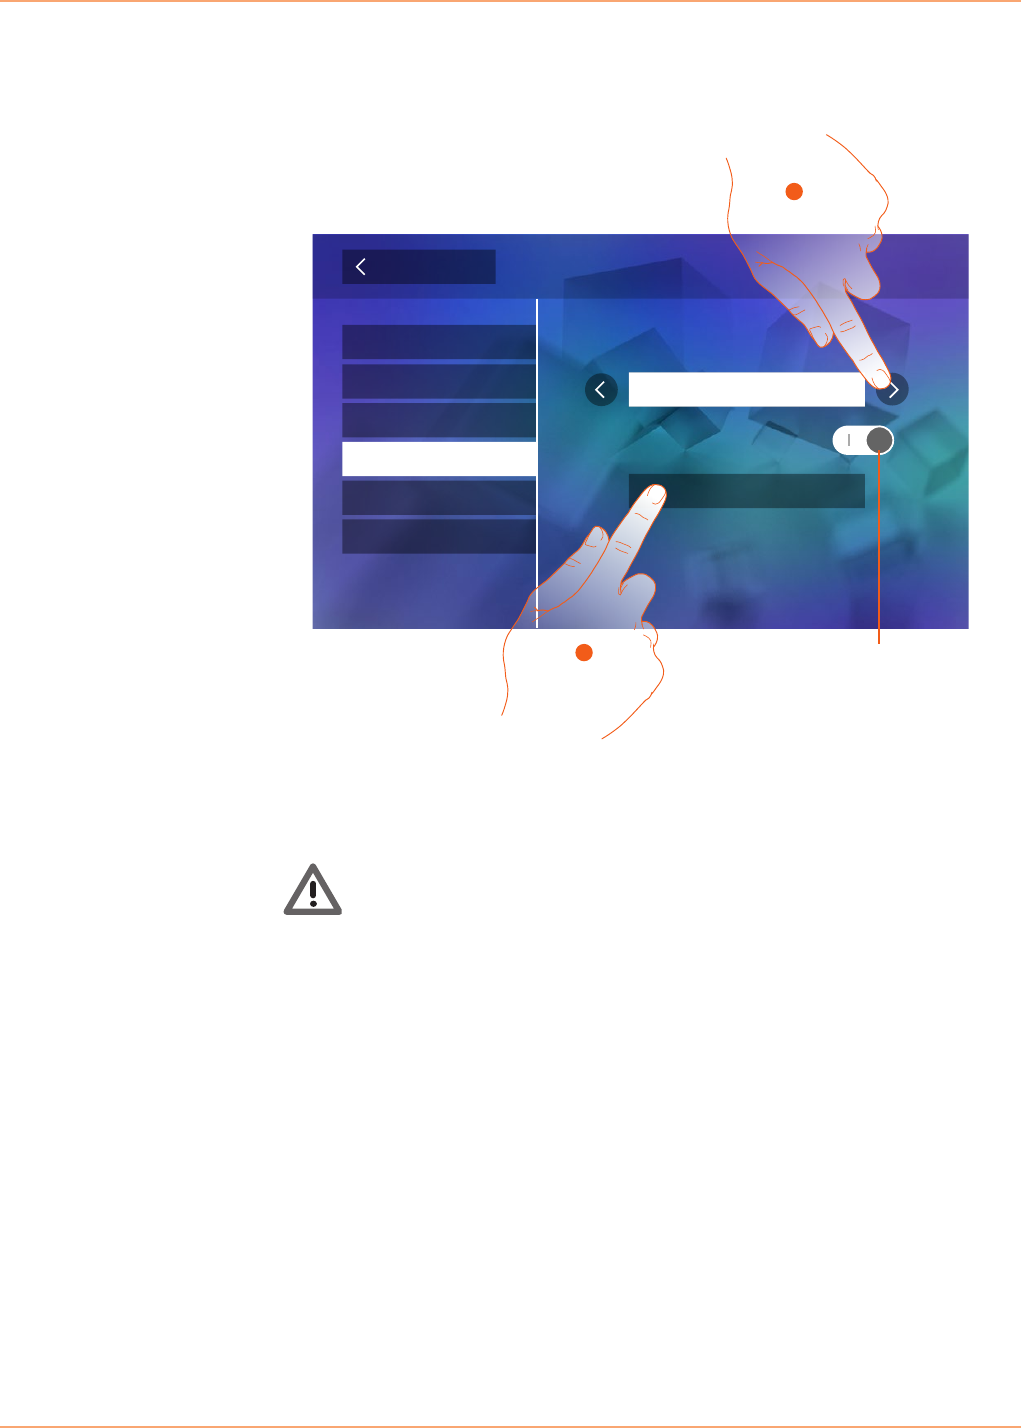
Quick actions
In this section it is possible to select the 4 quick actions that will appear on the home page and
customise their names.
A. Available quick action.
B. Quick action already included in the home page.
1. Touch to add a quick action.
A. Change the name of the quick action.
B. Remove the quick action from the home page.
2. Select the type of function for which you want to add a quick action.
3 Select the quick action among those available.
Back Settings
Quick Actions
Configuration
Display
Answering machine
Generals
Ringtones
Add quick action
Pager
Private camera
Lock
1
B
A
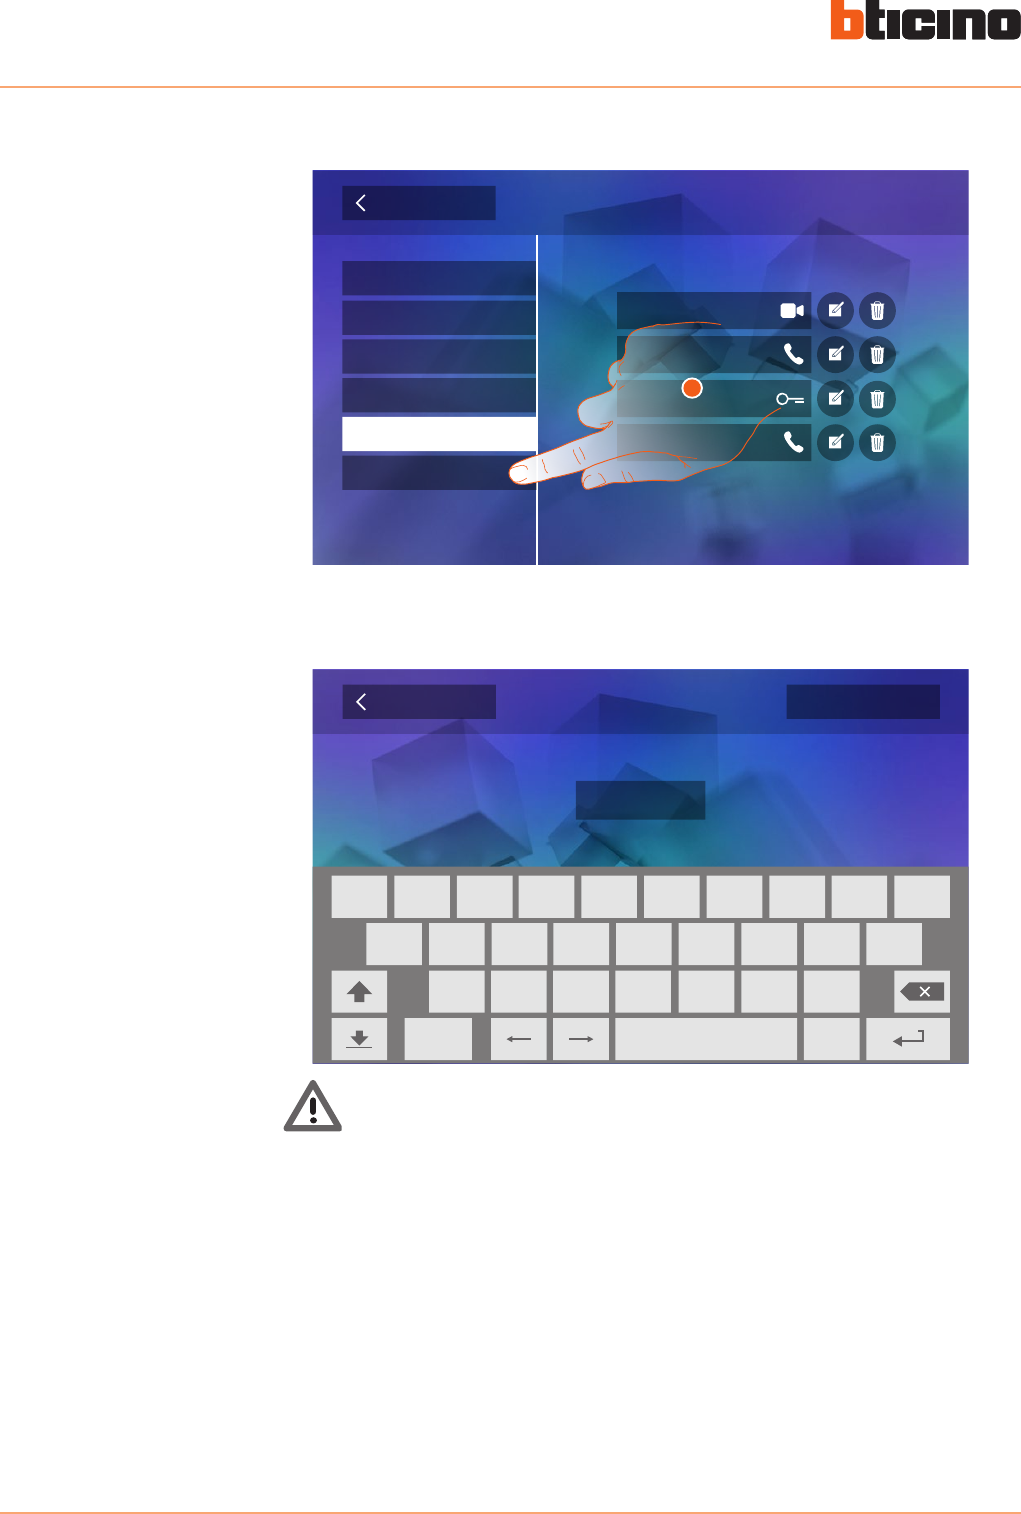
Back Add quick action
Activations
Cameras
Intercom B
A
2
External intercom
Pager
3
Classe 300
User manual
44
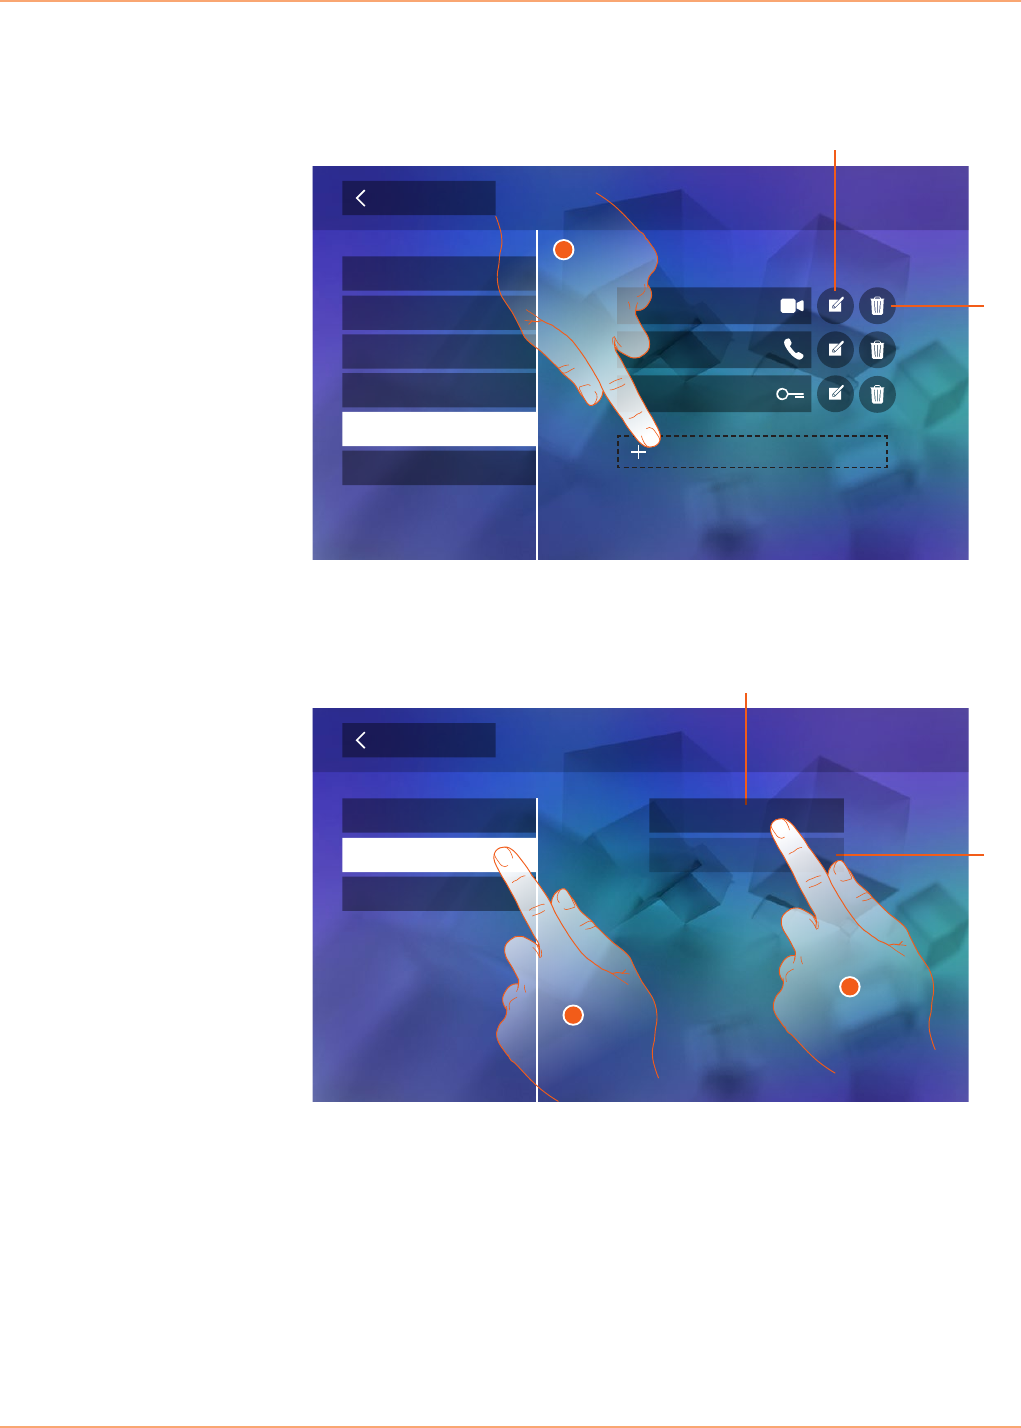
4. Touch to return to the quick action screen.
5. Touch to modify the name.
6. Enter the new name.
7. Touch to save it.
Back Settings
Quick Actions
Configuration
Display
Answering machine
Generals
Ringtones
Pager
Private camera
External intercom
Lock
5
External intercom 1
Confirm
Back
.
q
a
z cx v b n m
s d f g h j k l
y u i o pw e r t
?123
6
7
Back Add quick action
Activations
Cameras
Intercom
4
External intercom
Pager

Classe 300
User manual
45
Warning: if your device has been configured physically, it is only possible to change the
name, remove or use the quick actions already preconfigured by the installer.
Back Settings
Quick Actions
Configuration
Display
Answering machine
Generals
Ringtones
Pager
Private camera
External intercom 1
Lock
Classe 300
User manual
46
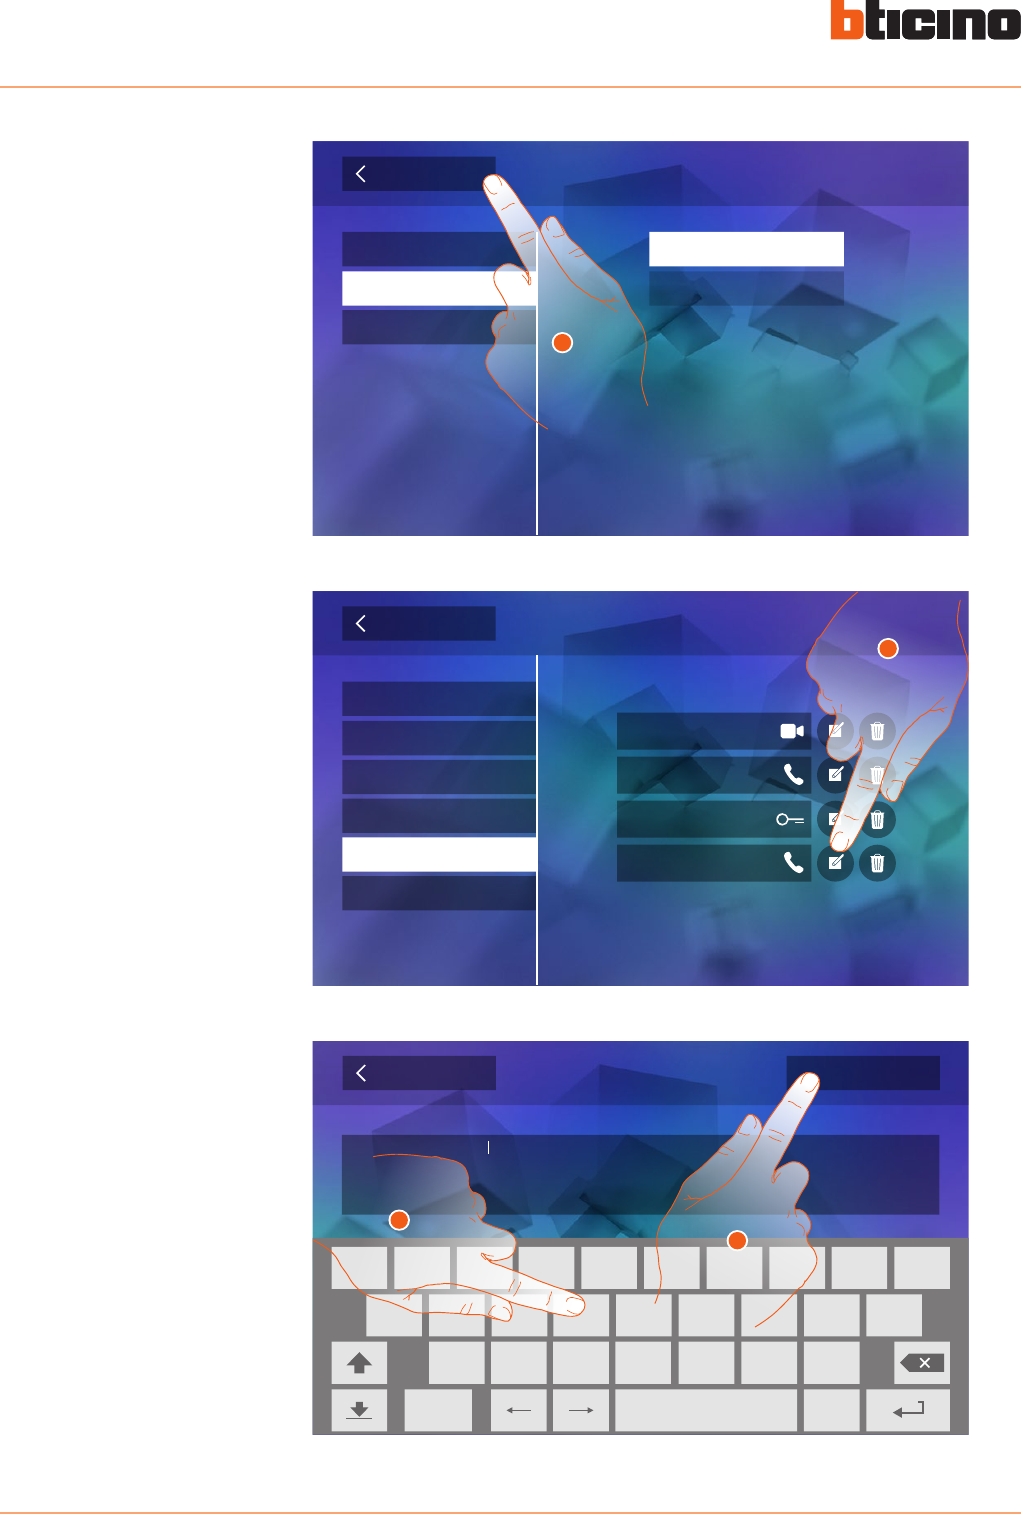
Configuration
This section, password protected, can be used to performed an advanced configuration of the
device.
Warning: access to the “Configuration” section is reserved for the installer; wrong settings
may compromise the operation of the device
Confirm
Back Configuration
Insert installer password
.
q
a
z cx v b n m
s d f g h j k l
y u i o pw e r t
?123
1. Touch to enter the configuration.
Back Settings
Quick Actions
Display
Answering machine
Generals
Ringtones
Pager
Private camera
External intercom 1
Lock
Configuration
1
Classe 300
User manual
47
25-35 cm
4
0
cm
Services
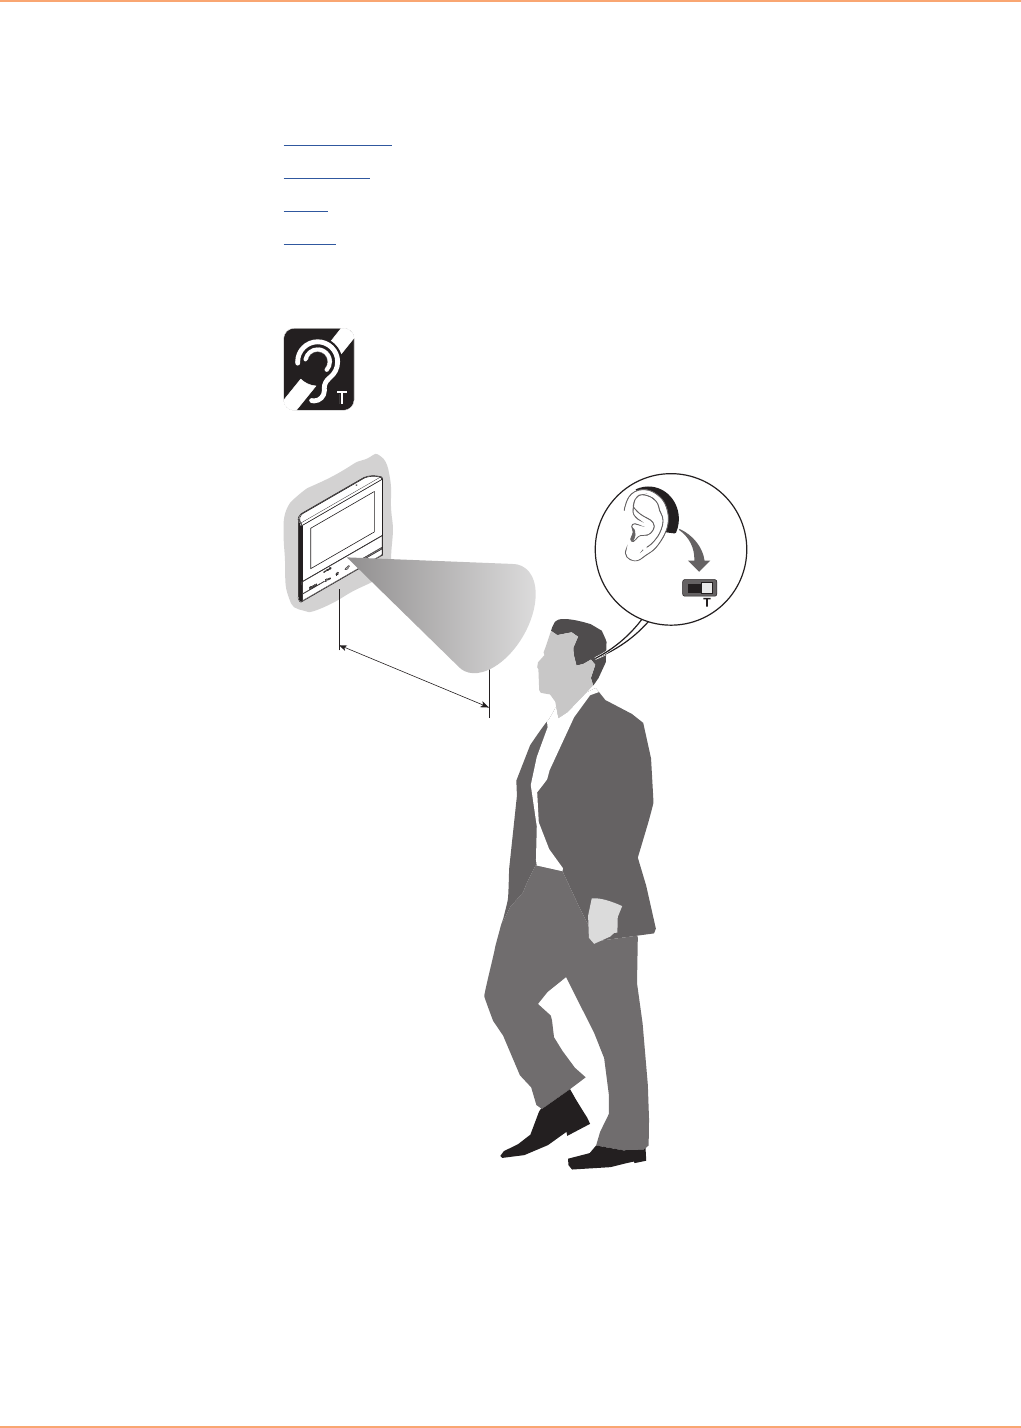
Inductive loop
Below are the services available using your Classe 300:
This function enables the device to be used by people wearing hearing aids.
Inductive loop
Door status
Office
Paging
To use this function, switch the acoustic device to the T position.
To ensure correct magnetic coupling between the IU and the acoustic device, we recommend a
position in front of the device, at a distance of 25-35cm.
It is reminded that the presence of metal and background noise generated by electric/electronic
devices (e.g. computer) may compromise the performance and the quality of the coupling device.
Classe 300
User manual
48
Door status
This function indicates the status of the door lock only for systems preset with appropriate
actuator.
If open the “door lock LED” flashes, and if closed, the LED stays off.
The function cannot be activated together with the Office function.
Quick Actions
10:36
Tuesday, 22 April
Activations
Answering machine Cameras Memo
Settings
Intercom
Private camera
Lock
External intercom
Pager
A
A. LED flashing = door lock open.
Classe 300
User manual
49
Office
This function gives the possibility of setting the automatic opening of the door lock in case of call
from the Entrance Panel.
Activation is possible after enabling by the installer in the configuration section, but is not possible
when using the “Door Status” function.
A. LED flashing = active function.
Quick Actions
10:36
Tuesday, 22 April
Activations
Answering machine Cameras Memo
Settings
Intercom
Private camera
Lock
External intercom
Pager
A
1
1. Touch to activate the function.
Classe 300
User manual
50
Paging
This function can be used to send voice messages using the microphone of the device through the
speakers of the Sound system.
1. Touch to enter the Intercom section.
2. Touch to activate the function.
Quick Actions
10:36
Tuesday, 22 April
Activations
Answering machine Cameras Memo
Settings
Intercom
Private camera
Lock
External intercom
Pager
1
Intercom
Back
Pager Pager 3Pager 1
Pager 5
Pager 2
Pager 6
Pager 4
2
Classe 300
User manual
51
A. Active connection.
3. Play the message.
4. Touch to close the connection.
Call to
A
3
Call to
4

BTicino SpA
Viale Borri, 231
21100 Varese
www.bticino.com
BTicino Spa reserves at any time the right to modify the contents of this booklet and to communicate, in any form and modality,
the changes brought to the same.
