AWS CloudHSM User Guide
User Manual:
Open the PDF directly: View PDF ![]() .
.
Page Count: 297 [warning: Documents this large are best viewed by clicking the View PDF Link!]
- AWS CloudHSM
- Table of Contents
- What Is AWS CloudHSM?
- Getting Started with AWS CloudHSM
- Create IAM Administrative Groups
- Create a Virtual Private Cloud (VPC)
- Create a Private Subnet
- Create a Cluster
- Launch an Amazon EC2 Client Instance
- Create an HSM
- Verify the Identity and Authenticity of Your Cluster's HSM (Optional)
- Initialize the Cluster
- Install and Configure the AWS CloudHSM Client (Linux)
- Install and Configure the AWS CloudHSM Client (Windows)
- Activate the Cluster
- Reconfigure SSL with a New Certificate and Private Key (Optional)
- Managing AWS CloudHSM Clusters
- Managing HSM Users and Keys in AWS CloudHSM
- Managing HSM Users in AWS CloudHSM
- Managing Keys in AWS CloudHSM
- Enforcing Quorum Authentication (M of N Access Control)
- AWS CloudHSM Command Line Tools
- cloudhsm_mgmt_util
- Getting Started with cloudhsm_mgmt_util
- cloudhsm_mgmt_util Command Reference
- key_mgmt_util
- Configure Tool
- cloudhsm_mgmt_util
- Using the AWS CloudHSM Software Libraries
- AWS CloudHSM Software Library for PKCS #11
- AWS CloudHSM Dynamic Engine for OpenSSL
- AWS CloudHSM Software Library for Java
- KSP and CNG Providers for Windows
- Integrating Third-Party Applications with AWS CloudHSM
- Improve Your Web Server's Security with SSL/TLS Offload in AWS CloudHSM
- How SSL/TLS Offload with AWS CloudHSM Works
- Tutorial: Using SSL/TLS Offload with AWS CloudHSM on Linux
- Tutorial: Using SSL/TLS Offload with AWS CloudHSM on Windows
- Configure Windows Server as a Certificate Authority (CA) with AWS CloudHSM
- Oracle Database Transparent Data Encryption (TDE) with AWS CloudHSM
- Improve Your Web Server's Security with SSL/TLS Offload in AWS CloudHSM
- Monitoring AWS CloudHSM Logs
- Getting Metrics
- Troubleshooting AWS CloudHSM
- AWS CloudHSM Client and Software Information
- Document History

AWS CloudHSM
User Guide

AWS CloudHSM User Guide
AWS CloudHSM: User Guide
Copyright © 2018 Amazon Web Services, Inc. and/or its affiliates. All rights reserved.
Amazon's trademarks and trade dress may not be used in connection with any product or service that is not Amazon's, in any manner
that is likely to cause confusion among customers, or in any manner that disparages or discredits Amazon. All other trademarks not
owned by Amazon are the property of their respective owners, who may or may not be affiliated with, connected to, or sponsored by
Amazon.

AWS CloudHSM User Guide
Table of Contents
What Is AWS CloudHSM? .................................................................................................................... 1
Use Cases .................................................................................................................................. 1
Offload the SSL/TLS Processing for Web Servers ................................................................... 1
Protect the Private Keys for an Issuing Certificate Authority (CA) .............................................. 2
Enable Transparent Data Encryption (TDE) for Oracle Databases .............................................. 2
Clusters ..................................................................................................................................... 2
Cluster Architecture ............................................................................................................ 3
Cluster Synchronization ...................................................................................................... 4
Cluster High Availability and Load Balancing ......................................................................... 5
Backups .................................................................................................................................... 6
Overview of Backups .......................................................................................................... 6
Security of Backups ............................................................................................................ 7
Durability of Backups ......................................................................................................... 8
Frequency of Backups ......................................................................................................... 8
Client Tools and Libraries ............................................................................................................ 8
AWS CloudHSM Client ........................................................................................................ 9
AWS CloudHSM Command Line Tools ................................................................................. 10
AWS CloudHSM Software Libraries ..................................................................................... 10
HSM Users ............................................................................................................................... 10
Precrypto Officer (PRECO) ................................................................................................. 11
Crypto Officer (CO) ........................................................................................................... 11
Crypto User (CU) .............................................................................................................. 11
Appliance User (AU) .......................................................................................................... 11
HSM User Permissions Table .............................................................................................. 11
Compliance .............................................................................................................................. 12
Pricing .................................................................................................................................... 13
Regions ................................................................................................................................... 13
Limits ..................................................................................................................................... 13
Getting Started ................................................................................................................................ 15
Create IAM Administrators ......................................................................................................... 15
Create an IAM User and Administrator Group ....................................................................... 16
Restrict User Permissions to What's Necessary for AWS CloudHSM .......................................... 17
Understanding Service-Linked Roles ................................................................................... 19
Create a VPC ........................................................................................................................... 20
Create a Private Subnet ............................................................................................................ 21
Create a Cluster ....................................................................................................................... 21
Launch an EC2 Client ................................................................................................................ 23
Launch an EC2 Client ........................................................................................................ 23
Create an HSM ......................................................................................................................... 24
Verify HSM Identity (Optional) ................................................................................................... 25
Overview ......................................................................................................................... 25
Get Certificates from the HSM ........................................................................................... 27
Get the Root Certificates ................................................................................................... 28
Verify Certificate Chains .................................................................................................... 29
Extract and Compare Public Keys ....................................................................................... 30
AWS CloudHSM Root Certificate ......................................................................................... 30
Initialize the Cluster .................................................................................................................. 31
Get the Cluster CSR .......................................................................................................... 32
Sign the CSR ................................................................................................................... 33
Initialize the Cluster .......................................................................................................... 34
Install the Client (Linux) ............................................................................................................ 35
Install the AWS CloudHSM Client and Command Line Tools ................................................... 35
Edit the Client Configuration ............................................................................................. 37
Install the Client (Windows) ....................................................................................................... 37
iii

AWS CloudHSM User Guide
Activate the Cluster .................................................................................................................. 38
Reconfigure SSL (Optional) ........................................................................................................ 40
Managing Clusters ............................................................................................................................ 42
Adding or Removing HSMs ........................................................................................................ 42
Adding an HSM ................................................................................................................ 42
Removing an HSM ............................................................................................................ 44
Copying a Backup Across Regions ............................................................................................... 45
Creating a Cluster From a Backup .............................................................................................. 46
Deleting and Restoring a Backup ................................................................................................ 47
Deleting a Cluster .................................................................................................................... 48
Tagging Resources .................................................................................................................... 49
Adding or Updating Tags .................................................................................................. 50
Listing Tags ..................................................................................................................... 51
Removing Tags ................................................................................................................. 52
Managing HSM Users and Keys .......................................................................................................... 53
Managing HSM Users ................................................................................................................ 53
Create Users .................................................................................................................... 53
List Users ........................................................................................................................ 54
Change a User's Password ................................................................................................. 55
Delete Users .................................................................................................................... 55
Managing Keys ......................................................................................................................... 56
Generate Keys .................................................................................................................. 56
Import Keys ..................................................................................................................... 57
Export Keys ..................................................................................................................... 59
Delete Keys ..................................................................................................................... 60
Share and Unshare Keys .................................................................................................... 60
Quorum Authentication (M of N) ................................................................................................ 61
Overview of Quorum Authentication .................................................................................. 61
Additional Details about Quorum Authentication .................................................................. 62
First Time Setup for Crypto Officers ................................................................................... 62
Quorum Authentication for Crypto Officers ......................................................................... 66
Change the Quorum Value for Crypto Officers ..................................................................... 72
Command Line Tools ........................................................................................................................ 74
cloudhsm_mgmt_util ................................................................................................................ 74
Getting Started ................................................................................................................ 75
Reference ........................................................................................................................ 80
key_mgmt_util ....................................................................................................................... 119
Getting Started .............................................................................................................. 119
Reference ...................................................................................................................... 122
Configure Tool ....................................................................................................................... 179
Syntax ........................................................................................................................... 179
Examples ....................................................................................................................... 179
Parameters .................................................................................................................... 180
Related Topics ................................................................................................................ 182
Using the Software Libraries ............................................................................................................ 183
PKCS #11 Library ................................................................................................................... 183
Installing the PKCS #11 Library ........................................................................................ 183
Authenticating to PKCS #11 ............................................................................................. 188
Supported PKCS #11 Key Types ....................................................................................... 189
Supported PKCS #11 Mechanisms ..................................................................................... 189
Supported PKCS #11 API operations ................................................................................. 190
OpenSSL Dynamic Engine ........................................................................................................ 192
Installing the OpenSSL Dynamic Engine ............................................................................ 192
Java Library ........................................................................................................................... 194
Installing the Java Library ............................................................................................... 195
Supported Mechanisms ................................................................................................... 199
Sample Prerequisites ....................................................................................................... 202
iv

AWS CloudHSM User Guide
Java Samples ................................................................................................................. 202
KSP and CNG Providers ........................................................................................................... 203
Install the Providers ........................................................................................................ 203
Prerequisites .................................................................................................................. 204
Code Sample ................................................................................................................. 204
Integrating Third-Party Applications ................................................................................................. 209
SSL/TLS Offload ..................................................................................................................... 209
How It Works ................................................................................................................. 209
SSL/TLS Offload on Linux ............................................................................................... 210
SSL/TLS Offload on Windows .......................................................................................... 224
Windows Server CA ................................................................................................................ 236
Set Up Prerequisites ....................................................................................................... 236
Create Windows Server CA .............................................................................................. 237
Sign a CSR ..................................................................................................................... 238
Oracle Database Encryption ..................................................................................................... 239
Set Up Prerequisites ....................................................................................................... 240
Configure the Database ................................................................................................... 241
Monitoring Logs ............................................................................................................................. 244
Getting Client Logs ................................................................................................................. 244
Logging AWS CloudHSM API Calls with AWS CloudTrail ............................................................... 245
AWS CloudHSM Information in CloudTrail .......................................................................... 245
Understanding AWS CloudHSM Log File Entries .................................................................. 246
Monitoring Audit Logs ............................................................................................................ 247
How Audit Logging Works ............................................................................................... 247
Viewing Audit Logs in CloudWatch Logs ............................................................................ 248
Interpreting HSM Audit Logs ............................................................................................ 250
Audit Log Reference ....................................................................................................... 260
Getting Metrics .............................................................................................................................. 262
Getting CloudWatch Metrics ..................................................................................................... 262
Troubleshooting ............................................................................................................................. 263
Known Issues ......................................................................................................................... 263
Known Issues for all HSM instances .................................................................................. 263
Known Issues for Amazon EC2 Instances Running Amazon Linux 2 ........................................ 265
Known Issues for the PKCS #11 SDK ................................................................................. 265
Known Issues for the JCE SDK .......................................................................................... 267
Known Issues for the OpenSSL SDK .................................................................................. 267
Lost Connection ..................................................................................................................... 268
Keep HSM Users In Sync .......................................................................................................... 270
Verify Performance ................................................................................................................. 270
Resolving Cluster Creation Failures ........................................................................................... 273
Add the Missing Permission ............................................................................................. 274
Create the Service-Linked Role Manually ........................................................................... 274
Use a Nonfederated User ................................................................................................ 274
Missing AWS CloudHSM Audit Logs in CloudWatch ..................................................................... 275
Client and Software Information ...................................................................................................... 276
Version History ....................................................................................................................... 276
Current Version: 1.1.2 ..................................................................................................... 276
Version: 1.1.1 ................................................................................................................. 278
Version: 1.1.0 ................................................................................................................. 281
Version: 1.0.18 ............................................................................................................... 283
Version 1.0.14 ................................................................................................................ 285
Version 1.0.11 ................................................................................................................ 285
Version 1.0.10 ................................................................................................................ 286
Version 1.0.8 .................................................................................................................. 286
Version 1.0.7 .................................................................................................................. 287
Version 1.0.0 .................................................................................................................. 287
Supported Platforms ............................................................................................................... 287
v


AWS CloudHSM User Guide
Use Cases
What Is AWS CloudHSM?
AWS CloudHSM provides hardware security modules in the AWS Cloud. A hardware security module
(HSM) is a computing device that processes cryptographic operations and provides secure storage for
cryptographic keys.
When you use an HSM from AWS CloudHSM, you can perform a variety of cryptographic tasks:
• Generate, store, import, export, and manage cryptographic keys, including symmetric keys and
asymmetric key pairs.
• Use symmetric and asymmetric algorithms to encrypt and decrypt data.
• Use cryptographic hash functions to compute message digests and hash-based message
authentication codes (HMACs).
• Cryptographically sign data (including code signing) and verify signatures.
• Generate cryptographically secure random data.
If you want a managed service for creating and controlling your encryption keys, but you don't want or
need to operate your own HSM, consider using AWS Key Management Service.
To learn more about what you can do with AWS CloudHSM, see the following topics. When you are ready
to get started with AWS CloudHSM, see Getting Started (p. 15).
Topics
•AWS CloudHSM Use Cases (p. 1)
•AWS CloudHSM Clusters (p. 2)
•AWS CloudHSM Cluster Backups (p. 6)
•AWS CloudHSM Client Tools and Software Libraries (p. 8)
•HSM Users (p. 10)
•Compliance (p. 12)
•Pricing (p. 13)
•Regions (p. 13)
•AWS CloudHSM Limits (p. 13)
AWS CloudHSM Use Cases
A hardware security module (HSM) in AWS CloudHSM can help you accomplish a variety of goals.
Topics
•Offload the SSL/TLS Processing for Web Servers (p. 1)
•Protect the Private Keys for an Issuing Certificate Authority (CA) (p. 2)
•Enable Transparent Data Encryption (TDE) for Oracle Databases (p. 2)
Offload the SSL/TLS Processing for Web Servers
Web servers and their clients (web browsers) can use Secure Sockets Layer (SSL) or Transport Layer
Security (TLS). These protocols confirm the identity of the web server and establish a secure connection
1

AWS CloudHSM User Guide
Protect the Private Keys for an
Issuing Certificate Authority (CA)
to send and receive webpages or other data over the internet. This is commonly known as HTTPS.
The web server uses a public–private key pair and an SSL/TLS public key certificate to establish an
HTTPS session with each client. This process involves a lot of computation for the web server, but you
can offload some of this to the HSMs in your AWS CloudHSM cluster. This is sometimes known as SSL
acceleration. Offloading reduces the computational burden on your web server and provides extra
security by storing the server's private key in the HSMs.
For information about setting up SSL/TLS offload with AWS CloudHSM, see SSL/TLS Offload (p. 209).
Protect the Private Keys for an Issuing Certificate
Authority (CA)
In a public key infrastructure (PKI), a certificate authority (CA) is a trusted entity that issues digital
certificates. These digital certificates bind a public key to an identity (a person or organization) by means
of public key cryptography and digital signatures. To operate a CA, you must maintain trust by protecting
the private key that signs the certificates issued by your CA. You can store the private key in the HSM in
your AWS CloudHSM cluster, and use the HSM to perform the cryptographic signing operations.
Enable Transparent Data Encryption (TDE) for Oracle
Databases
Some versions of Oracle's database software offer a feature called Transparent Data Encryption (TDE).
With TDE, the database software encrypts data before storing it on disk. The data in the database's table
columns or tablespaces is encrypted with a table key or tablespace key. These keys are encrypted with
the TDE master encryption key. You can store the TDE master encryption key in the HSMs in your AWS
CloudHSM cluster, which provides additional security.
For information about setting up Oracle TDE with AWS CloudHSM, see Oracle Database
Encryption (p. 239).
AWS CloudHSM Clusters
AWS CloudHSM provides hardware security modules (HSMs) in a cluster. A cluster is a collection of
individual HSMs that AWS CloudHSM keeps in sync. You can think of a cluster as one logical HSM. When
you perform a task or operation on one HSM in a cluster, the other HSMs in that cluster are automatically
kept up to date.
You can create a cluster that has from 1 to 28 HSMs (the default limit (p. 13) is 6 HSMs per AWS
account per AWS Region). You can place the HSMs in different Availability Zones in an AWS Region.
Adding more HSMs to a cluster provides higher performance. Spreading clusters across Availability Zones
provides redundancy and high availability.
Making individual HSMs work together in a synchronized, redundant, highly available cluster can be
difficult, but AWS CloudHSM does some of the undifferentiated heavy lifting for you. You can add and
remove HSMs in a cluster and let AWS CloudHSM keep the HSMs connected and in sync for you.
To create a cluster, see Getting Started (p. 15).
For more information about clusters, see the following topics.
Topics
•Cluster Architecture (p. 3)
2

AWS CloudHSM User Guide
Cluster Architecture
•Cluster Synchronization (p. 4)
•Cluster High Availability and Load Balancing (p. 5)
Cluster Architecture
When you create a cluster, you specify an Amazon Virtual Private Cloud (VPC) in your AWS account and
one or more subnets in that VPC. We recommend that you create one subnet in each Availability Zone
(AZ) in your chosen AWS Region. To learn how, see Create a Private Subnet (p. 21).
Each time you create an HSM, you specify the cluster and Availability Zone for the HSM. By putting the
HSMs in different Availability Zones, you achieve redundancy and high availability in case one Availability
Zone is unavailable.
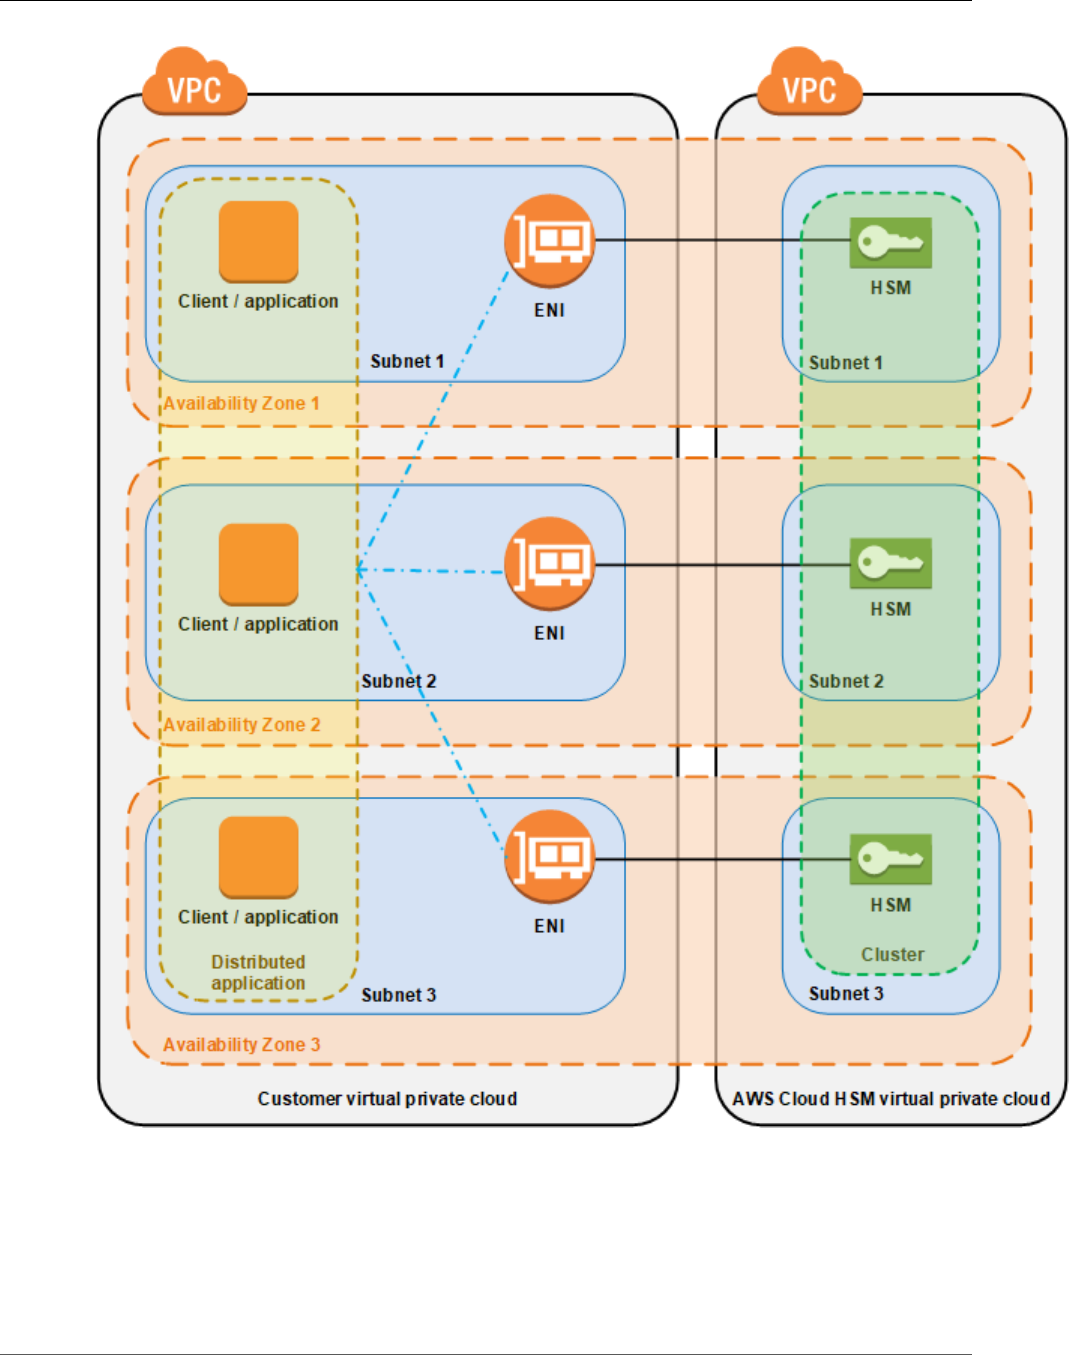
When you create an HSM, AWS CloudHSM puts an elastic network interface (ENI) in the specified subnet
in your AWS account. The elastic network interface is the interface for interacting with the HSM. The
HSM resides in a separate VPC in an AWS account that is owned by AWS CloudHSM. The HSM and its
corresponding network interface are in the same Availability Zone.
To interact with the HSMs in a cluster, you need the AWS CloudHSM client software. Typically you install
the client on Amazon EC2 instances, known as client instances, that reside in the same VPC as the HSM
ENIs, as shown in the following figure. That's not technically required though; you can install the client
on any compatible computer, as long as it can connect to the HSM ENIs. The client communicates with
the individual HSMs in your cluster through their ENIs.
The following figure represents an AWS CloudHSM cluster with three HSMs, each in a different
Availability Zone in the VPC.
3
AWS CloudHSM User Guide
Cluster Synchronization
Cluster Synchronization
In an AWS CloudHSM cluster, AWS CloudHSM keeps the keys on the individual HSMs in sync. You don't
need to do anything to synchronize the keys on your HSMs. To keep the users and policies on each HSM
in sync, update the AWS CloudHSM client configuration file before you manage HSM users (p. 53). For
more information, see Keep HSM Users In Sync (p. 270).
4
AWS CloudHSM User Guide
Cluster High Availability and Load Balancing
When you add a new HSM to a cluster, AWS CloudHSM makes a backup of all keys, users, and policies on
an existing HSM. It then restores that backup onto the new HSM. This keeps the two HSMs in sync.
If the HSMs in a cluster fall out of synchronization, AWS CloudHSM automatically resynchronizes them.
To enable this, AWS CloudHSM uses the credentials of the appliance user (p. 10). This user exists on all
HSMs provided by AWS CloudHSM and has limited permissions. It can get a hash of objects on the HSM
and can extract and insert masked (encrypted) objects. AWS cannot view or modify your users or keys
and cannot perform any cryptographic operations using those keys.
Cluster High Availability and Load Balancing
When you create an AWS CloudHSM cluster with more than one HSM, you automatically get load
balancing. Load balancing means that the AWS CloudHSM client (p. 8) distributes cryptographic
operations across all HSMs in the cluster based on each HSM's capacity for additional processing.
When you create the HSMs in different AWS Availability Zones, you automatically get high availability.
High availability means that you get higher reliability because no individual HSM is a single point
of failure. We recommend that you have a minimum of two HSMs in each cluster, with each HSM in
different Availability Zones within an AWS Region.
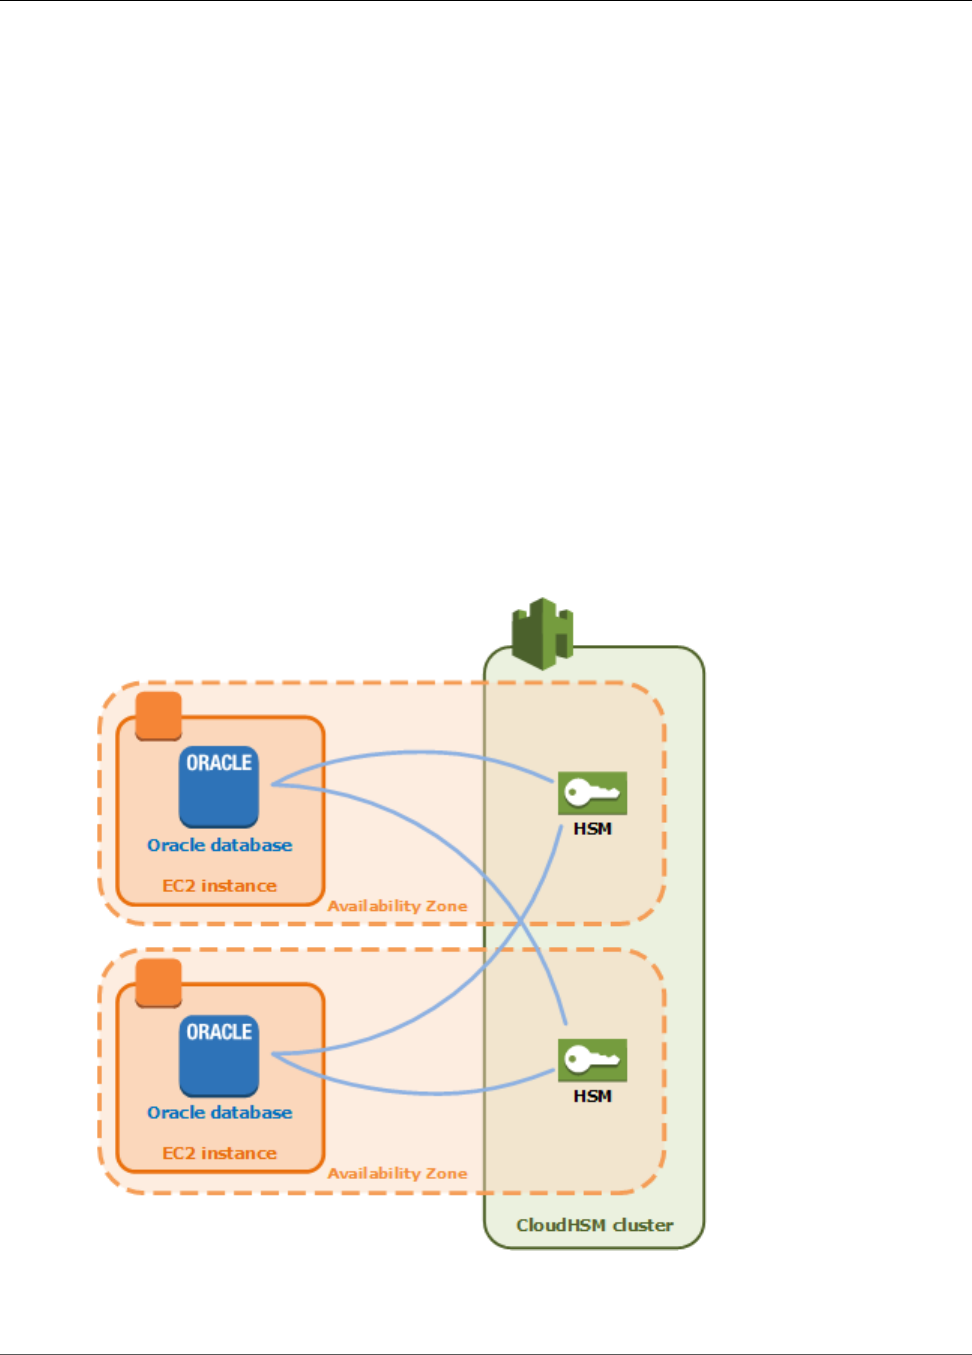
For example, the following figure shows an Oracle database application that is distributed to two
different Availability Zones. The database instances store their master keys in a cluster that includes an
HSM in each Availability Zone. AWS CloudHSM automatically synchronizes the keys to both HSMs so that
they are immediately accessible and redundant.
5

AWS CloudHSM User Guide
Backups
AWS CloudHSM Cluster Backups
AWS CloudHSM makes periodic backups of your cluster. You can't instruct AWS CloudHSM to make
backups anytime that you want, but you can take certain actions that result in AWS CloudHSM making a
backup. For more information, see the following topics.
When you add an HSM to a cluster that previously contained one or more active HSMs, AWS CloudHSM
restores the most recent backup onto the new HSM. This means that you can use AWS CloudHSM to
manage an HSM that you use infrequently. When you don't need to use the HSM, you can delete it, which
triggers a backup. Later, when you need to use the HSM again, you can create a new HSM in the same
cluster, effectively restoring your previous HSM.
You can also create a new cluster from an existing backup of a different cluster. You must create the new
cluster in the same AWS Region that contains the existing backup.
Topics
•Overview of Backups (p. 6)
•Security of Backups (p. 7)
•Durability of Backups (p. 8)
•Frequency of Backups (p. 8)
Overview of Backups
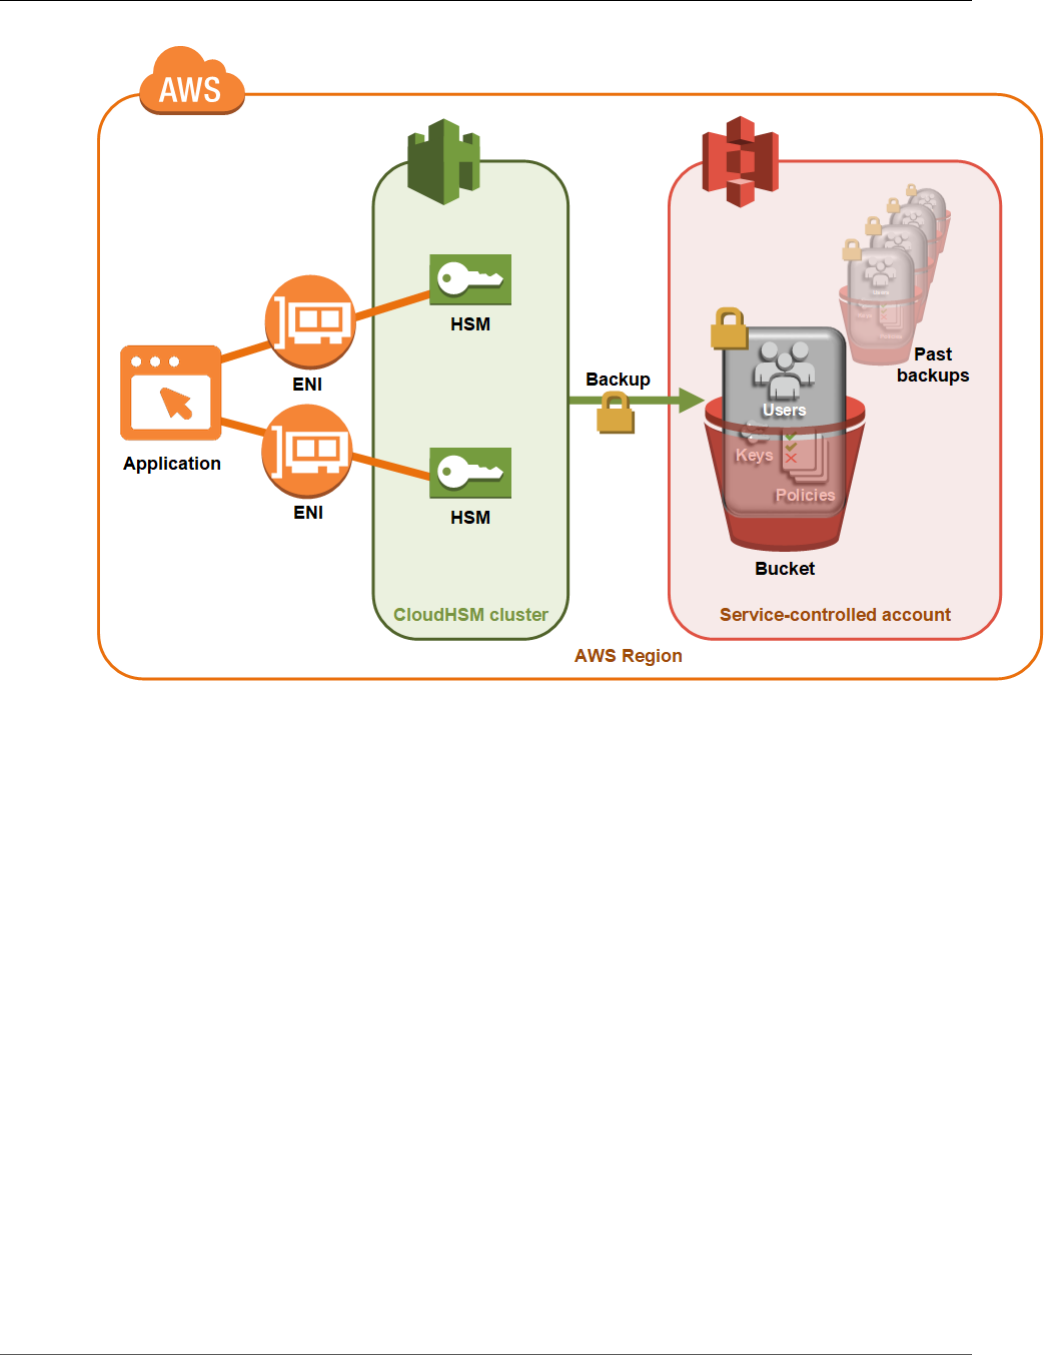
Each backup contains encrypted copies of the following data:
• All users (COs, CUs, and AUs) (p. 10) on the HSM.
• All key material and certificates on the HSM.
• The HSM's configuration and policies.
AWS CloudHSM stores the backups in a service-controlled Amazon Simple Storage Service (Amazon S3)
bucket in the same AWS Region as your cluster.
6
AWS CloudHSM User Guide
Security of Backups
Security of Backups
When AWS CloudHSM makes a backup from the HSM, the HSM encrypts all of its data before sending it
to AWS CloudHSM. The data never leaves the HSM in plaintext form.
To encrypt its data, the HSM uses a unique, ephemeral encryption key known as the ephemeral backup
key (EBK). The EBK is an AES 256-bit encryption key generated inside the HSM when AWS CloudHSM
makes a backup. The HSM generates the EBK, then uses it to encrypt the HSM's data with a FIPS-
approved AES key wrapping method that complies with NIST special publication 800-38F. Then the HSM
gives the encrypted data to AWS CloudHSM. The encrypted data includes an encrypted copy of the EBK.
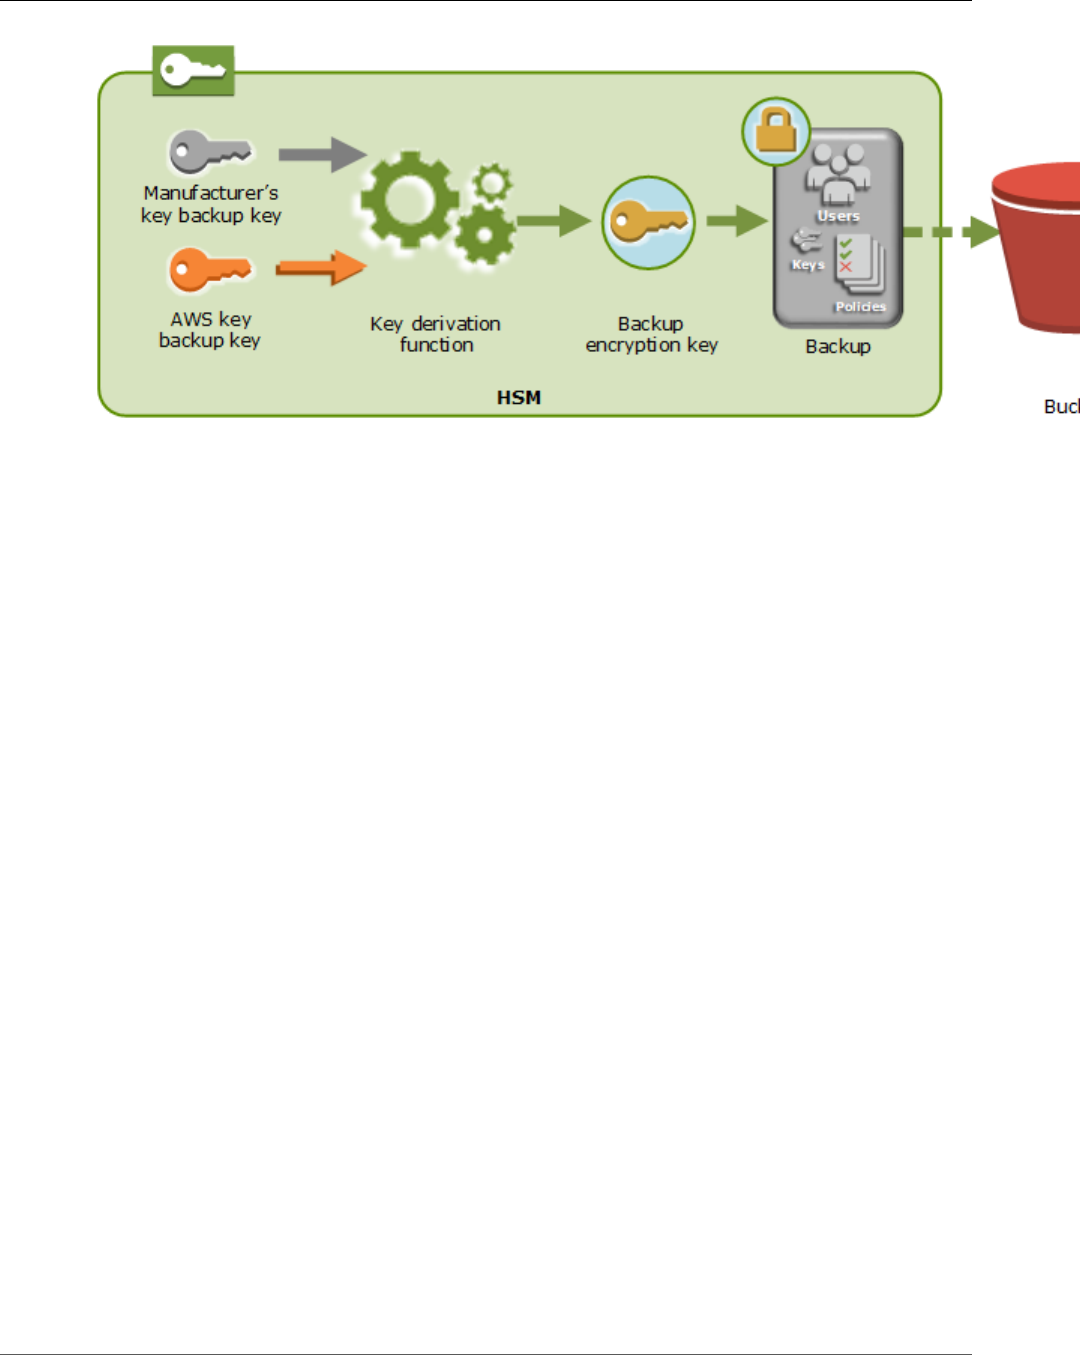
To encrypt the EBK, the HSM uses another encryption key known as the persistent backup key (PBK).
The PBK is also an AES 256-bit encryption key. To generate the PBK, the HSM uses a FIPS-approved key
derivation function (KDF) in counter mode that complies with NIST special publication 800-108. The
inputs to this KDF include the following:
• A manufacturer key backup key (MKBK), permanently embedded in the HSM hardware by the hardware
manufacturer.
• An AWS key backup key (AKBK), securely installed in the HSM when it's initially configured by AWS
CloudHSM.
The encryption processes are summarized in the following figure. The backup encryption key represents
the persistent backup key (PBK) and the ephemeral backup key (EBK).
7
AWS CloudHSM User Guide
Durability of Backups
AWS CloudHSM can restore backups onto only AWS-owned HSMs made by the same manufacturer.
Because each backup contains all users, keys, and configuration from the original HSM, the restored HSM
contains the same protections and access controls as the original. The restored data overwrites all other
data that might have been on the HSM prior to restoration.
A backup consists of only encrypted data. Before each backup is stored in Amazon S3, it's encrypted
again under an AWS Key Management Service (AWS KMS) customer master key (CMK).
Durability of Backups
AWS CloudHSM stores cluster backups in an Amazon S3 bucket in an AWS account that AWS CloudHSM
controls. The durability of backups is the same as any object stored in Amazon S3. Amazon S3 is
designed to deliver 99.999999999% durability.
Frequency of Backups
AWS CloudHSM makes a cluster backup at least once per 24 hours. In addition to recurring daily backups,
AWS CloudHSM makes a backup when you perform any of the following actions:
•Initialize the cluster (p. 31).
•Add an HSM to an initialized cluster (p. 42).
•Remove an HSM from a cluster (p. 44).
AWS CloudHSM Client Tools and Software
Libraries
To manage and use the HSMs in your cluster, you use the AWS CloudHSM client software. The client
software includes several components, as described in the following topics.
Topics
•AWS CloudHSM Client (p. 9)
•AWS CloudHSM Command Line Tools (p. 10)
•AWS CloudHSM Software Libraries (p. 10)
8
AWS CloudHSM User Guide
AWS CloudHSM Client
AWS CloudHSM Client
The AWS CloudHSM client is a daemon that you install and run on your application hosts. The client
establishes and maintains a secure, end-to-end encrypted connection with the HSMs in your AWS
CloudHSM cluster. The client provides the fundamental connection between your application hosts
and your HSMs. Most of the other AWS CloudHSM client software components rely on the client to
communicate with your HSMs. To get started with the AWS CloudHSM client if you are using Linux, see
Install the Client (Linux) (p. 35). If you are using Windows, see Install the Client (Windows) (p. 37).
AWS CloudHSM Client End-to-End Encryption
Communication between the AWS CloudHSM client and the HSMs in your cluster is encrypted from end
to end. Only your client and your HSMs can decrypt the communication.
The following process explains how the client establishes end-to-end encrypted communication with an
HSM.
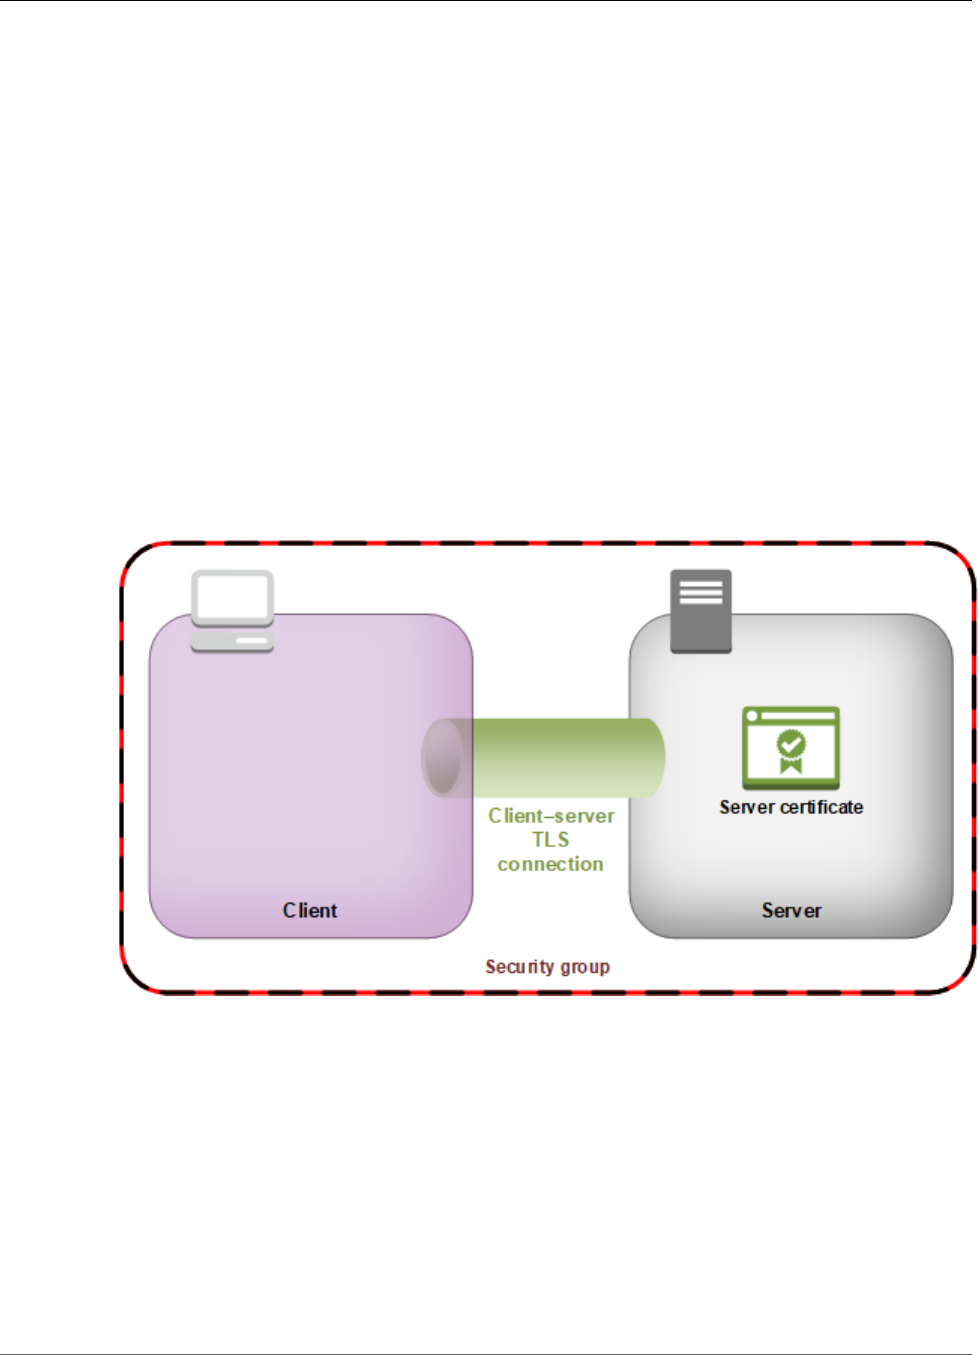
1. Your client establishes a Transport Layer Security (TLS) connection with the server that hosts your
HSM hardware. Your cluster's security group allows inbound traffic to the server only from client
instances in the security group. The client also checks the server's certificate to ensure that it's a
trusted server.
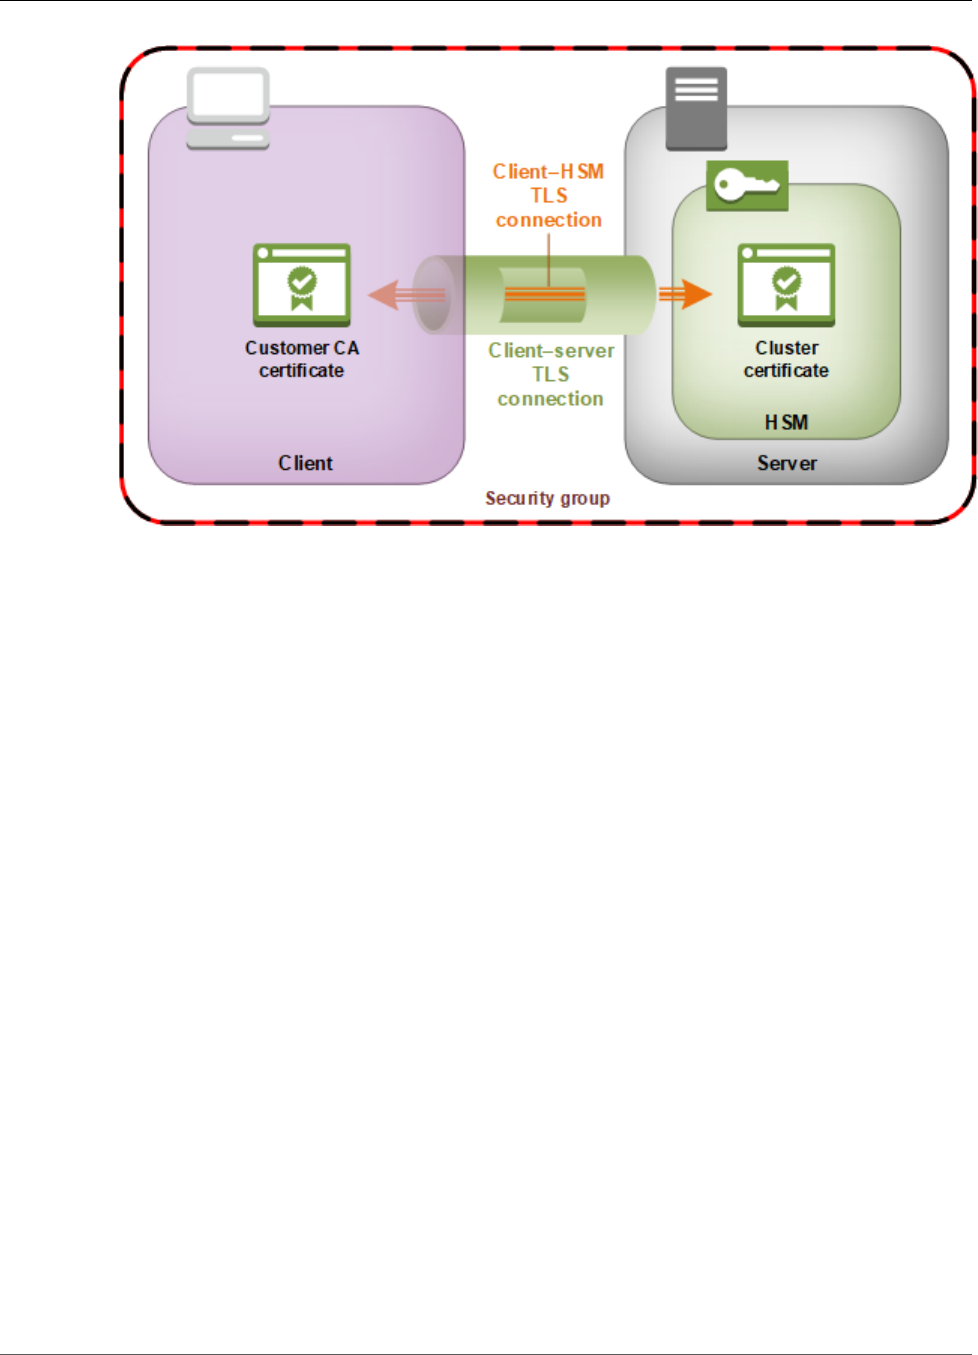
2. Next, the client establishes an encrypted connection with the HSM hardware. The HSM has the cluster
certificate that you signed with your own certificate authority (CA), and the client has the CA's root
certificate. Before the client–HSM encrypted connection is established, the client verifies the HSM's
cluster certificate against its root certificate. The connection is established only when the client
successfully verifies that the HSM is trusted. The client–HSM encrypted connection goes through the
client–server connection established previously.
9
AWS CloudHSM User Guide
AWS CloudHSM Command Line Tools
AWS CloudHSM Command Line Tools
The AWS CloudHSM client software includes two command line tools. You use the command line tools to
manage the users and keys on the HSMs. For example, you can create HSM users, change user passwords,
create keys, and more. For information about these tools, see Command Line Tools (p. 74).
AWS CloudHSM Software Libraries
You can use the AWS CloudHSM software libraries to integrate your applications with the HSMs in your
cluster and use them for cryptoprocessing. For more information about installing and using the different
libraries, see Using the Software Libraries (p. 183).
HSM Users
Most operations that you perform on the HSM require the credentials of an HSM user. The HSM
authenticates each HSM user by means of a user name and password.
Each HSM user has a type that determines which operations the user is allowed to perform on the HSM.
The following topics explain the types of HSM users.
Topics
•Precrypto Officer (PRECO) (p. 11)
•Crypto Officer (CO) (p. 11)
•Crypto User (CU) (p. 11)
•Appliance User (AU) (p. 11)
•HSM User Permissions Table (p. 11)
10

AWS CloudHSM User Guide
Precrypto Officer (PRECO)
Precrypto Officer (PRECO)
The precrypto officer (PRECO) is a temporary user that exists only on the first HSM in an AWS CloudHSM
cluster. The first HSM in a new cluster contains a PRECO user with a default user name and password.
To activate a cluster (p. 38), you log in to the HSM and change the PRECO user's password. When you
change the password, the PRECO user becomes a crypto officer (CO). The PRECO user can only change its
own password and perform read-only operations on the HSM.
Crypto Officer (CO)
A crypto officer (CO) can perform user management operations. For example, a CO can create and delete
users and change user passwords. For more information, see the HSM User Permissions Table (p. 11).
When you activate a new cluster (p. 38), the user changes from a Precrypto Officer (p. 11) (PRECO)
to a crypto officer (CO).
Crypto User (CU)
A crypto user (CU) can perform the following key management and cryptographic operations.
•Key management – Create, delete, share, import, and export cryptographic keys.
•Cryptographic operations – Use cryptographic keys for encryption, decryption, signing, verifying, and
more.
For more information, see the HSM User Permissions Table (p. 11).
Appliance User (AU)
The appliance user (AU) can perform cloning and synchronization operations. AWS CloudHSM uses
the AU to synchronize the HSMs in an AWS CloudHSM cluster. The AU exists on all HSMs provided by
AWS CloudHSM, and has limited permissions. For more information, see the HSM User Permissions
Table (p. 11).
AWS uses the AU to perform cloning and synchronization operations on your cluster's HSMs. AWS cannot
perform any operations on your HSMs except those granted to the AU and unauthenticated users. AWS
cannot view or modify your users or keys and cannot perform any cryptographic operations using those
keys.
HSM User Permissions Table
The following table lists HSM operations and whether each type of HSM user can perform them.
Crypto Officer
(CO)
Crypto User (CU) Appliance User
(AU)
Unauthenticated
User
Get basic cluster
info¹
Yes Yes Yes Yes
Zeroize an HSM² Yes Yes Yes Yes
Change own
password
Yes Yes Yes Not applicable
11

AWS CloudHSM User Guide
Compliance
Crypto Officer
(CO)
Crypto User (CU) Appliance User
(AU)
Unauthenticated
User
Change any user's
password
Yes No No No
Add, remove users Yes No No No
Get sync status³ Yes Yes Yes No
Extract, insert
masked objects⁴
Yes Yes Yes No
Create, share,
delete keys
No Yes No No
Encrypt, decrypt No Yes No No
Sign, verify No Yes No No
Generate digests
and HMACs
No Yes No No
¹Basic cluster information includes the number of HSMs in the cluster and each HSM's IP address, model,
serial number, device ID, firmware ID, etc.
²When an HSM is zeroized, all keys, certificates, and other data on the HSM is destroyed. You can use
your cluster's security group to prevent an unauthenticated user from zeroizing your HSM. For more
information, see Create a Cluster (p. 21).
³The user can get a set of digests (hashes) that correspond to the keys on the HSM. An application can
compare these sets of digests to understand the synchronization status of HSMs in a cluster.
⁴Masked objects are keys that are encrypted before they leave the HSM. They cannot be decrypted
outside of the HSM. They are only decrypted after they are inserted into an HSM that is in the same
cluster as the HSM from which they were extracted. An application can extract and insert masked objects
to synchronize the HSMs in a cluster.
Compliance
AWS and AWS Marketplace partners offer many solutions for protecting data in AWS. However, some
applications and data are subject to strict contractual or regulatory requirements for managing and
using cryptographic keys. Relying on a FIPS-validated HSM can help you meet corporate, contractual,
and regulatory compliance requirements for data security in the AWS Cloud. You can review the FIPS-
approved security policies for the HSMs provided by AWS CloudHSM below.
FIPS Validation for Hardware Used by CloudHSM
Certificate #3254 was issued on August 2, 2018.
Certificate #2850 was issued on February 27, 2017.
FIPS 140-2 Compliance
The Federal Information Processing Standard (FIPS) Publication 140-2 is a US government security
standard that specifies security requirements for cryptographic modules that protect sensitive
information. The HSMs provided by AWS CloudHSM comply with FIPS 140-2 level 3.
12

AWS CloudHSM User Guide
Pricing
PCI DSS Compliance
The Payment Card Industry Data Security Standard (PCI DSS) is a proprietary information security
standard administered by the PCI Security Standards Council. The HSMs provided by AWS CloudHSM
comply with PCI DSS.
Pricing
With AWS CloudHSM, you pay by the hour with no long-term commitments or upfront payments. For
more information, see AWS CloudHSM Pricing on the AWS website.
Regions
Visit AWS Regions and Endpoints in the AWS General Reference or the AWS Region Table to see the
regional and Availability Zone support for AWS CloudHSM.
Like most AWS resources, clusters and HSMs are used regionally. To create an HSM in more than one
region, you must first create a cluster in that region. You cannot reuse or extend a cluster across regions.
You must perform all the required steps listed in Getting Started with AWS CloudHSM (p. 15) to
create a new cluster in a new region.
Note
AWS CloudHSM may not be available across all Availability Zones in a given region. However,
this should not affect performance, as AWS CloudHSM automatically load balances across all
HSMs in a cluster.
AWS CloudHSM Limits
The following limits apply to your AWS CloudHSM resources per AWS Region and AWS account.
Service Limits
Item Default Limit Hard Limit
Clusters 4 N/A
HSMs 6 N/A
HSMs per cluster N/A 28
System Limits
Item Hard Limit
Keys per cluster 3500
Number of users per cluster 1024
Maximum length of a user name 31 characters
Required password length 7 to 32 characters
Maximum number of concurrent clients 1024
13


AWS CloudHSM User Guide
Create IAM Administrators
Getting Started with AWS CloudHSM
The following topics contain information to help you create, initialize, and activate an AWS CloudHSM
cluster. After you complete the instructions included in these topics, you'll be ready to manage users,
manage clusters, and perform cryptographic operations using the included software libraries.
To get started with AWS CloudHSM
1. Follow the steps in Create IAM Administrators (p. 15) to set up your IAM users and groups.
2. Follow the steps in Create a Cluster (p. 21).
3. Follow the steps in Create an HSM (p. 24).
4. (Optional) Follow the steps in Verify HSM Identity (Optional) (p. 25) to verify the identity and
authenticity of the cluster's HSM.
5. Follow the steps in Initialize the Cluster (p. 31).
6. (First time only) Follow the steps in Launch an EC2 Client (p. 23).
7. (First time only) Follow the steps in Install the Client (Linux) (p. 35) if you are using Linux or Install
the Client (Windows) (p. 37) if you are using Windows.
8. Follow the steps in Activate the Cluster (p. 38).
Topics
•Create IAM Administrative Groups (p. 15)
•Create a Virtual Private Cloud (VPC) (p. 20)
•Create a Private Subnet (p. 21)
•Create a Cluster (p. 21)
•Launch an Amazon EC2 Client Instance (p. 23)
•Create an HSM (p. 24)
•Verify the Identity and Authenticity of Your Cluster's HSM (Optional) (p. 25)
•Initialize the Cluster (p. 31)
•Install and Configure the AWS CloudHSM Client (Linux) (p. 35)
•Install and Configure the AWS CloudHSM Client (Windows) (p. 37)
•Activate the Cluster (p. 38)
•Reconfigure SSL with a New Certificate and Private Key (Optional) (p. 40)
Create IAM Administrative Groups
As a best practice, don't use your AWS account root user to interact with AWS, including AWS CloudHSM.
Instead, use AWS Identity and Access Management (IAM) to create an IAM user, IAM role, or federated
user. Follow the steps in the Create an IAM User and Administrator Group (p. 16) section to create an
administrator group and attach the AdministratorAccess policy to it. Then create a new administrator
user and add the user to the group. Add additional users to the group as needed. Each user you add
inherits the AdministratorAccess policy from the group.
Another best practice is to create an AWS CloudHSM administrator group that has only the permissions
required to run AWS CloudHSM. Add individual users to this group as needed. Each user inherits the
15

AWS CloudHSM User Guide
Create an IAM User and Administrator Group
limited permissions that are attached to the group rather than full AWS access. The Restrict User
Permissions to What's Necessary for AWS CloudHSM (p. 17) section that follows contains the policy
that you should attach to your AWS CloudHSM administrator group.
AWS CloudHSM defines an IAM service–linked role for your AWS account. The service–linked role
currently defines permissions that allow your account to log AWS CloudHSM events. The role can be
created automatically by AWS CloudHSM or manually by you. You cannot edit the role, but you can
delete it. For more information, see the Understanding Service-Linked Roles (p. 19) section that
follows.
Topics
•Create an IAM User and Administrator Group (p. 16)
•Restrict User Permissions to What's Necessary for AWS CloudHSM (p. 17)
•Understanding Service-Linked Roles (p. 19)
Create an IAM User and Administrator Group
Start by creating an IAM user along with an administrator group for that user.
To create an IAM user for yourself and add the user to an Administrators group
1. Use your AWS account email address and password to sign in as the AWS account root user to the
IAM console at https://console.aws.amazon.com/iam/.
Note
We strongly recommend that you adhere to the best practice of using the Administrator
IAM user below and securely lock away the root user credentials. Sign in as the root user
only to perform a few account and service management tasks.
2. In the navigation pane of the console, choose Users, and then choose Add user.
3. For User name, type Administrator.
4. Select the check box next to AWS Management Console access, select Custom password, and then
type the new user's password in the text box. You can optionally select Require password reset to
force the user to create a new password the next time the user signs in.
5. Choose Next: Permissions.
6. On the Set permissions page, choose Add user to group.
7. Choose Create group.
8. In the Create group dialog box, for Group name type Administrators.
9. For Filter policies, select the check box for AWS managed - job function.
10. In the policy list, select the check box for AdministratorAccess. Then choose Create group.
11. Back in the list of groups, select the check box for your new group. Choose Refresh if necessary to
see the group in the list.
12. Choose Next: Review to see the list of group memberships to be added to the new user. When you
are ready to proceed, choose Create user.
You can use this same process to create more groups and users, and to give your users access to your
AWS account resources. To learn about using policies to restrict users' permissions to specific AWS
resources, go to Access Management and Example Policies.
You can create multiple administrators in your account and add each to the Administrators group. To
sign in to the AWS Management Console, each user needs an AWS account ID or alias. To get these, see
Your AWS Account ID and Its Alias in the IAM User Guide.
16

AWS CloudHSM User Guide
Restrict User Permissions to What's
Necessary for AWS CloudHSM
Restrict User Permissions to What's Necessary for
AWS CloudHSM
We recommend that you create an IAM administrators group for AWS CloudHSM that contains only the
permissions required to run AWS CloudHSM. Attach the policy below to your group. Add IAM users to the
group as needed. Each user that you add inherits the policy from the group.
In addition to an IAM administrators group, we recommend that you create user groups with appropriate
permissions to ensure that only trusted users have access to critical API operations. For example,
you may want to create a read-only user group that permits access only to the DescribeClusters and
DescribeBackups. Make sure that the group does not allow a user to delete clusters or HSMs. This way,
you won't have to worry about an untrusted user affecting availability of a production workload.
As new AWS CloudHSM management features are added over time, you can ensure that only trusted
users are given immediate access. By assigning limited permissions to policies at creation, you can
manually assign new feature permissions to them later.
To create a customer managed policy
1. Sign in to the IAM console using the credentials of an AWS administrator.
2. In the navigation pane, choose Policies.
3. Choose Create policy.
4. Choose the JSON tab.
5. Copy one of the following policies and paste it into the JSON editor based on the type of user policy
you wish to make.
Read-Only User
{
"Version": "2012-10-17",
"Statement": {
"Effect": "Allow",
"Action": [
"cloudhsm:DescribeClusters",
"cloudhsm:DescribeBackups",
"cloudhsm:ListTags"
],
"Resource": "*"
}
}
The preceding policy allows access to the AWS CloudHSM DescribeClusters and
DescribeBackups API operations. It also includes additional permissions for select Amazon
Elastic Compute Cloud (Amazon EC2) actions. However, it does not allow the user to delete
clusters or HSMs.
Power User
{
"Version": "2012-10-17",
"Statement": {
"Effect": "Allow",
"Action": [
"cloudhsm:DescribeClusters",
"cloudhsm:DescribeBackups",
"cloudhsm:CreateCluster",
"cloudhsm:CreateHsm",
"cloudhsm:RestoreBackup",
17

AWS CloudHSM User Guide
Restrict User Permissions to What's
Necessary for AWS CloudHSM
"cloudhsm:CopyBackupToRegion",
"cloudhsm:InitializeCluster",
"cloudhsm:ListTags",
"cloudhsm:TagResource",
"cloudhsm:UntagResource",
"ec2:CreateNetworkInterface",
"ec2:DescribeNetworkInterfaces",
"ec2:DescribeNetworkInterfaceAttribute",
"ec2:DetachNetworkInterface",
"ec2:DeleteNetworkInterface",
"ec2:CreateSecurityGroup",
"ec2:AuthorizeSecurityGroupIngress",
"ec2:AuthorizeSecurityGroupEgress",
"ec2:RevokeSecurityGroupEgress",
"ec2:DescribeSecurityGroups",
"ec2:DeleteSecurityGroup",
"ec2:CreateTags",
"ec2:DescribeVpcs",
"ec2:DescribeSubnets",
"iam:CreateServiceLinkedRole"
],
"Resource": "*"
}
}
The preceding policy allows access to the AWS CloudHSM DescribeClusters,
DescribeBackups, CreateCluster, CreateHsm, RestoreBackup, CopyBackupToRegion,
InitializeCluster, ListTags, TagResources, and UntagResources API operations. It
also includes additional permissions for select Amazon Elastic Compute Cloud (Amazon EC2)
actions. However, it does not allow the user to delete clusters or HSMs.
Admin User
{
"Version":"2012-10-17",
"Statement":{
"Effect":"Allow",
"Action":[
"cloudhsm:*",
"ec2:CreateNetworkInterface",
"ec2:DescribeNetworkInterfaces",
"ec2:DescribeNetworkInterfaceAttribute",
"ec2:DetachNetworkInterface",
"ec2:DeleteNetworkInterface",
"ec2:CreateSecurityGroup",
"ec2:AuthorizeSecurityGroupIngress",
"ec2:AuthorizeSecurityGroupEgress",
"ec2:RevokeSecurityGroupEgress",
"ec2:DescribeSecurityGroups",
"ec2:DeleteSecurityGroup",
"ec2:CreateTags",
"ec2:DescribeVpcs",
"ec2:DescribeSubnets",
"iam:CreateServiceLinkedRole"
],
"Resource":"*"
}
}
The preceding policy allows access a AWS CloudHSM API operations, including the ability to
delete HSMs and clusters. It also includes additional permissions for select Amazon Elastic
Compute Cloud (Amazon EC2) actions.
6. Choose Review policy.
18

AWS CloudHSM User Guide
Understanding Service-Linked Roles
7. For Name, type a relevant policy name. For instance, if this is a policy for read-only users, you might
use CloudHsmReadOnlyUserPolicy.
8. (Optional) Type a description.
9. Choose Create policy.
The preceding policies include the iam:CreateServiceLinkedRole action. You must include this
action to allow AWS CloudHSM to automatically create the AWSServiceRoleForCloudHSM service-linked
role in your account. This role allows AWS CloudHSM to log events. See the following section for more
information about the AWSServiceRoleForCloudHSM service-linked role.
To create an AWS CloudHSM user group
1. Sign in to the IAM console using the credentials of an AWS administrator.
2. In the navigation pane, choose Groups.
3. Choose Create New Group.
4. For Group Name, type a relevant user group name, such as CloudHsmReadOnlyUsers.
5. For Policy Type, choose Customer Managed.
6. Select the check box for preferred user policy and choose Next Step.
7. Choose Create Group.
Note
When you use the AWS CloudHSM console or API, AWS CloudHSM takes additional actions on
your behalf to manage certain Amazon EC2 resources. This happens, for example, when you
create and delete clusters and HSMs.
Understanding Service-Linked Roles
The IAM policy that you created previously to Restrict User Permissions to What's Necessary for AWS
CloudHSM (p. 17) includes the iam:CreateServiceLinkedRole action. AWS CloudHSM defines a
service-linked role named AWSServiceRoleForCloudHSM. The role is predefined by AWS CloudHSM and
includes permissions that AWS CloudHSM requires to call other AWS services on your behalf. The role
makes setting up your service easier because you don’t need to manually add the role policy and trust
policy permissions.
The role policy allows AWS CloudHSM to create Amazon CloudWatch Logs log groups and log streams
and write log events on your behalf. You can view it below and in the IAM console.
{
"Version": "2018-06-12",
"Statement": [
{
"Effect": "Allow",
"Action": [
"logs:CreateLogGroup",
"logs:CreateLogStream",
"logs:PutLogEvents",
"logs:DescribeLogStreams"
],
"Resource": [
"arn:aws:logs:*:*:*"
]
}
]
}
19

AWS CloudHSM User Guide
Create a VPC
The trust policy for the AWSServiceRoleForCloudHSM role allows AWS CloudHSM to assume the role.
{
"Version": "2018-06-12",
"Statement": [
{
"Effect": "Allow",
"Principal": {
"Service": "cloudhsm.amazonaws.com"
},
"Action": "sts:AssumeRole"
}
]
}
Creating a Service-Linked Role (Automatic)
AWS CloudHSM creates the AWSServiceRoleForCloudHSM role when you create a cluster if you include
the iam:CreateServiceLinkedRole action in the permissions that you defined when you created
the AWS CloudHSM administrators group. See Restrict User Permissions to What's Necessary for AWS
CloudHSM (p. 17).
If you already have one or more clusters and just want to add the AWSServiceRoleForCloudHSM role,
you can use the console, the create-cluster command, or the CreateCluster API operation to create a
cluster. Then use the console, the delete-cluster command, or the DeleteCluster API operation to delete
it. Creating the new cluster creates the service-linked role and applies it to all clusters in your account.
Alternatively, you can create the role manually. See the following section for more information.
Note
You do not need to perform all of the steps outlined in Getting Started with
AWS CloudHSM (p. 15) to create a cluster if you are only creating it to add the
AWSServiceRoleForCloudHSM role.
Creating a Service-Linked Role (Manual)
You can use the IAM console, AWS CLI, or API to create the AWSServiceRoleForCloudHSM service-linked
role. For more information, see Creating a Service-Linked Role in the IAM User Guide.
Editing the Service-Linked Role
AWS CloudHSM does not allow you to edit the AWSServiceRoleForCloudHSM service-linked role. After
the role is created, for example, you cannot change its name because various entities might reference
the role by name. Also, you cannot change the role policy. You can, however, use IAM to edit the role
description. For more information, see Editing a Service–Linked Role in the IAM User Guide.
Deleting the Service-Linked Role
You cannot delete a service-linked role as long as a cluster to which it has been applied still exists. To
delete the role, you must first delete each HSM in your cluster and then delete the cluster. Every cluster
in your account must be deleted. You can then use the IAM console, AWS CLI, or API to delete the role.
For more information about deleting a cluster, see Deleting an AWS CloudHSM Cluster (p. 48). For
more information, about deleting a role, see Deleting a Service-Linked Role in the IAM User Guide.
Create a Virtual Private Cloud (VPC)
If you don't already have a virtual private cloud (VPC), create one now.
20

AWS CloudHSM User Guide
Create a Private Subnet
To create a VPC
1. Open the Amazon VPC console at https://console.aws.amazon.com/vpc/.
2. On the navigation bar, use the region selector to choose one of the AWS Regions where AWS
CloudHSM is currently supported.
3. Choose Start VPC Wizard.
4. Choose the first option, VPC with a Single Public Subnet. Then choose Select.
5. For VPC name:, type an identifiable name such as CloudHSM. For Subnet name:, type an identifiable
name such as CloudHSM public subnet. Leave all other options set to their defaults. Then
choose Create VPC. After the VPC is created, choose OK.
Create a Private Subnet
Create a private subnet (a subnet with no internet gateway attached) for each Availability Zone where
you want to create an HSM. Private subnets are available across all AWS Availability Zones. Even if AWS
CloudHSM is not supported in a certain Availability Zone, the HSM cluster still performs as expected
if support is added later. Creating a private subnet in each Availability Zone provides the most robust
configuration for high availability. Visit AWS Regions and Endpoints in the AWS General Reference or the
AWS Region Table to see the regional and zone availability for AWS CloudHSM.
To create the private subnets in your VPC
1. Open the Amazon VPC console at https://console.aws.amazon.com/vpc/.
2. In the navigation pane, choose Subnets. Then choose Create Subnet.
3. In the Create Subnet dialog box, do the following:
a. For Name tag, type an identifiable name such as CloudHSM private subnet.
b. For VPC, choose the VPC that you created previously.
c. For Availability Zone, choose the first Availability Zone in the list.
d. For CIDR block, type the CIDR block to use for the subnet. If you used the default values for the
VPC in the previous procedure, then type 10.0.1.0/28.
Choose Yes, Create.
4. Repeat steps 2 and 3 to create subnets for each remaining Availability Zone in the region. For the
subnet CIDR blocks, you can use 10.0.2.0/28, 10.0.3.0/28, and so on.
Create a Cluster
A cluster is a collection of individual HSMs. AWS CloudHSM synchronizes the HSMs in each cluster so that
they function as a logical unit.
Important
When you create a cluster, AWS CloudHSM creates a service-linked role named
AWSServiceRoleForCloudHSM. If AWS CloudHSM cannot create the role or the role does not
already exist, you may not be able to create a cluster. For more information, see Resolving
Cluster Creation Failures (p. 273). For more information about service–linked roles, see
Understanding Service-Linked Roles (p. 19).
When you create a cluster, AWS CloudHSM creates a security group for the cluster on your behalf. This
security group controls network access to the HSMs in the cluster. It allows inbound connections only
from Amazon Elastic Compute Cloud (Amazon EC2) instances that are in the security group. By default,
21

AWS CloudHSM User Guide
Create a Cluster
the security group doesn't contain any instances. Later, you launch a client instance (p. 23) and add it
to this security group.
Warning
The cluster's security group prevents unauthorized access to your HSMs. Anyone that can access
instances in the security group can access your HSMs. Most operations require a user to log in
to the HSM, but it's possible to zeroize HSMs without authentication, which destroys the key
material, certificates, and other data. If this happens, data created or modified after the most
recent backup is lost and unrecoverable. To prevent this, ensure that only trusted administrators
can access the instances in the cluster's security group or modify the security group.
You can create a cluster from the AWS CloudHSM console, the AWS Command Line Interface (AWS CLI),
or the AWS CloudHSM API.
To create a cluster (console)
1. Open the AWS CloudHSM console at https://console.aws.amazon.com/cloudhsm/.
2. On the navigation bar, use the region selector to choose one of the AWS Regions where AWS
CloudHSM is currently supported.
3. Choose Create cluster.
4. In the Cluster configuration section, do the following:
a. For VPC, select the VPC that you created.
b. For AZ(s), next to each Availability Zone, choose the private subnet that you created.
Note
Even if AWS CloudHSM is not supported in a given Availability Zone, performance
should not be affected, as AWS CloudHSM automatically load balances across all HSMs
in a cluster. See AWS CloudHSM Regions and Endpoints in the AWS General Reference to
see Availability Zone support for AWS CloudHSM.
5. Choose Next: Review.
6. Review your cluster configuration, and then choose Create cluster.
To create a cluster (AWS CLI)
• At a command prompt, run the create-cluster command. Specify the HSM instance type and the
subnet IDs of the subnets where you plan to create HSMs. Use the subnet IDs of the private subnets
that you created. Specify only one subnet per Availability Zone.
$ aws cloudhsmv2 create-cluster --hsm-type hsm1.medium --subnet-ids <subnet ID
1> <subnet ID 2> <subnet ID N>
{
"Cluster": {
"BackupPolicy": "DEFAULT",
"VpcId": "vpc-50ae0636",
"SubnetMapping": {
"us-west-2b": "subnet-49a1bc00",
"us-west-2c": "subnet-6f950334",
"us-west-2a": "subnet-fd54af9b"
},
"SecurityGroup": "sg-6cb2c216",
"HsmType": "hsm1.medium",
"Certificates": {},
"State": "CREATE_IN_PROGRESS",
"Hsms": [],
"ClusterId": "cluster-igklspoyj5v",
"CreateTimestamp": 1502423370.069
}
22

AWS CloudHSM User Guide
Launch an EC2 Client
}
To create a cluster (AWS CloudHSM API)
• Send a CreateCluster request. Specify the HSM instance type and the subnet IDs of the subnets
where you plan to create HSMs. Use the subnet IDs of the private subnets that you created. Specify
only one subnet per Availability Zone.
If your attempts to create a cluster fail, it might be related to problems with the AWS CloudHSM service-
linked roles. For help on resolving the failure, see Resolving Cluster Creation Failures (p. 273).
Launch an Amazon EC2 Client Instance
To interact with and manage your AWS CloudHSM cluster and HSM instances, you must be able to
communicate with the elastic network interfaces of your HSMs. The easiest way to do this is to use an
Amazon EC2 instance in the same VPC as your cluster (see below). You can also use the following AWS
resources to connect to your cluster:
•Amazon VPC Peering
•AWS Direct Connect
•VPN Connections
Launch an EC2 Client
The AWS CloudHSM documentation typically assumes that you are using an EC2 instance in the same
VPC and Availability Zone (AZ) in which you create your cluster.
To create an Amazon EC2 client instance
1. Open the Amazon EC2 console at https://console.aws.amazon.com/ec2/.
2. Choose Launch instance on the EC2 Dashboard.
3. Select an Amazon Machine Image (AMI). Choose a Linux AMI or a Windows Server AMI.
Note
If you are using an AMI that uses Amazon Linux 2, see Known Issues for Amazon EC2
Instances Running Amazon Linux 2 (p. 265) for additional setup instructions.
4. Choose an instance type and then choose Next: Configure Instance Details.
5. For Network, choose the VPC that you previously created for your cluster.
6. For Subnet, choose the public subnet that you created for the VPC.
7. For Auto-assign Public IP, choose Enable.
8. Choose Next: Add Storage and configure your storage.
9. Choose Next: Add Tags and add any name–value pairs that you want to associate with the instance.
We recommend that you at least add a name. Choose Add Tag and type a name for the Key and up
to 255 characters for the Value.
10. Choose Next: Configure Security Group.
11. Select the default security group that was created for you when you created your cluster.
Note
To connect to a Windows Server EC2 instance, you must set one of your Inbound Rules to
RDP(3389) to allow incoming TCP traffic on port 3389. To connect to a Linux EC2 instance,
you must set one of your Inbound Rules to SSH(22) to allow incoming TCP traffic on port
23

AWS CloudHSM User Guide
Create an HSM
22. Specify the source IP addresses that can connect to your instance. You should not
specify 0.0.0.0/0 because that will open your instance to access by anyone.
If you want your EC2 instance to be able to connect to the internet, set the Outbound Rules
on your security group to allow ALL Traffic on all ports to a destination of 0.0.0.0/0.
You cannot edit security groups on this page. To set inbound and outbound rules, create a
new security group or use the Amazon EC2 console to update your security group rules.
12. Choose Review and Launch.
13. On the Review Instance Launch page, choose Launch.
14. When prompted for a key pair, choose Create a new key pair, enter a name for the key pair, and
then choose Download Key Pair. This is the only chance for you to save the private key file, so
be sure to download it and store it in a safe place. You must provide the name of your key pair
when you launch an instance and the corresponding private key each time that you connect to the
instance. Then choose the key pair that you created when getting set up.
Alternatively, you can use an existing key pair. Choose Choose an existing key pair, and then choose
the desired key pair.
Warning
Don't choose Proceed without a key pair. If you launch your instance without a key pair,
you won't be able to connect to it.
When you are ready, select the acknowledgement check box, and then choose Launch Instances.
For more information about creating a Linux Amazon EC2 client, see Getting Started with Amazon EC2
Linux Instances. For information about connecting to the running client, see the following topics:
•Connecting to Your Linux Instance Using SSH
•Connecting to Your Linux Instance from Windows Using PuTTY
For more information about creating a Windows Amazon EC2 client, see Getting Started with Amazon
EC2 Windows Instances. For more information about connecting to your Windows client, see Connect to
Your Windows Instance.
Note that you can use your EC2 instance to run all of the AWS CLI commands contained in this guide. If
the AWS CLI is not installed, you can download it from AWS Command Line Interface. If you are using
Windows, you can download and run a 64-bit or 32-bit Windows installer. If you are using Linux or
macOS, you can install the CLI using pip.
To communicate with the HSMs in your cluster, you must install the AWS CloudHSM client software on
your instance. For more information if you are using Linux, see Install the Client (Linux) (p. 35). For
more information if you are using Windows, see Install the Client (Windows) (p. 37).
Create an HSM
After you create a cluster, you can create an HSM. However, before you can create an HSM in your
cluster, the cluster must be in the uninitialized state. To determine the cluster's state, view the clusters
page in the AWS CloudHSM console, use the AWS CLI to run the describe-clusters command, or send
a DescribeClusters request in the AWS CloudHSM API. You can create an HSM from the AWS CloudHSM
console, the AWS CLI, or the AWS CloudHSM API.
To create an HSM (console)
1. Open the AWS CloudHSM console at https://console.aws.amazon.com/cloudhsm/.
2. Choose Initialize next to the cluster that you created previously.
3. Choose an Availability Zone (AZ) for the HSM that you are creating. Then choose Create.
24

AWS CloudHSM User Guide
Verify HSM Identity (Optional)
To create an HSM (AWS CLI)
• At a command prompt, run the create-hsm command. Specify the cluster ID of the cluster that you
created previously and an Availability Zone for the HSM. Specify the Availability Zone in the form of
us-west-2a, us-west-2b, etc.
$ aws cloudhsmv2 create-hsm --cluster-id <cluster ID> --availability-zone <Availability
Zone>
{
"Hsm": {
"HsmId": "hsm-ted36yp5b2x",
"EniIp": "10.0.1.12",
"AvailabilityZone": "us-west-2a",
"ClusterId": "cluster-igklspoyj5v",
"EniId": "eni-5d7ade72",
"SubnetId": "subnet-fd54af9b",
"State": "CREATE_IN_PROGRESS"
}
}
To create an HSM (AWS CloudHSM API)
• Send a CreateHsm request. Specify the cluster ID of the cluster that you created previously and an
Availability Zone for the HSM.
After you create a cluster and HSM, you can optionally verify the identity of the HSM (p. 25), or
proceed directly to Initialize the Cluster (p. 31).
Verify the Identity and Authenticity of Your
Cluster's HSM (Optional)
To initialize your cluster, you sign a certificate signing request (CSR) generated by the cluster's first HSM.
Before you do this, you might want to verify the identity and authenticity of the HSM.
Note
This process is optional. However, it works only until a cluster is initialized. After the cluster is
initialized, you cannot use this process to get the certificates or verify the HSMs.
Topics
•Overview (p. 25)
•Get Certificates from the HSM (p. 27)
•Get the Root Certificates (p. 28)
•Verify Certificate Chains (p. 29)
•Extract and Compare Public Keys (p. 30)
•AWS CloudHSM Root Certificate (p. 30)
Overview
To verify the identity of your cluster's first HSM, complete the following steps:
25
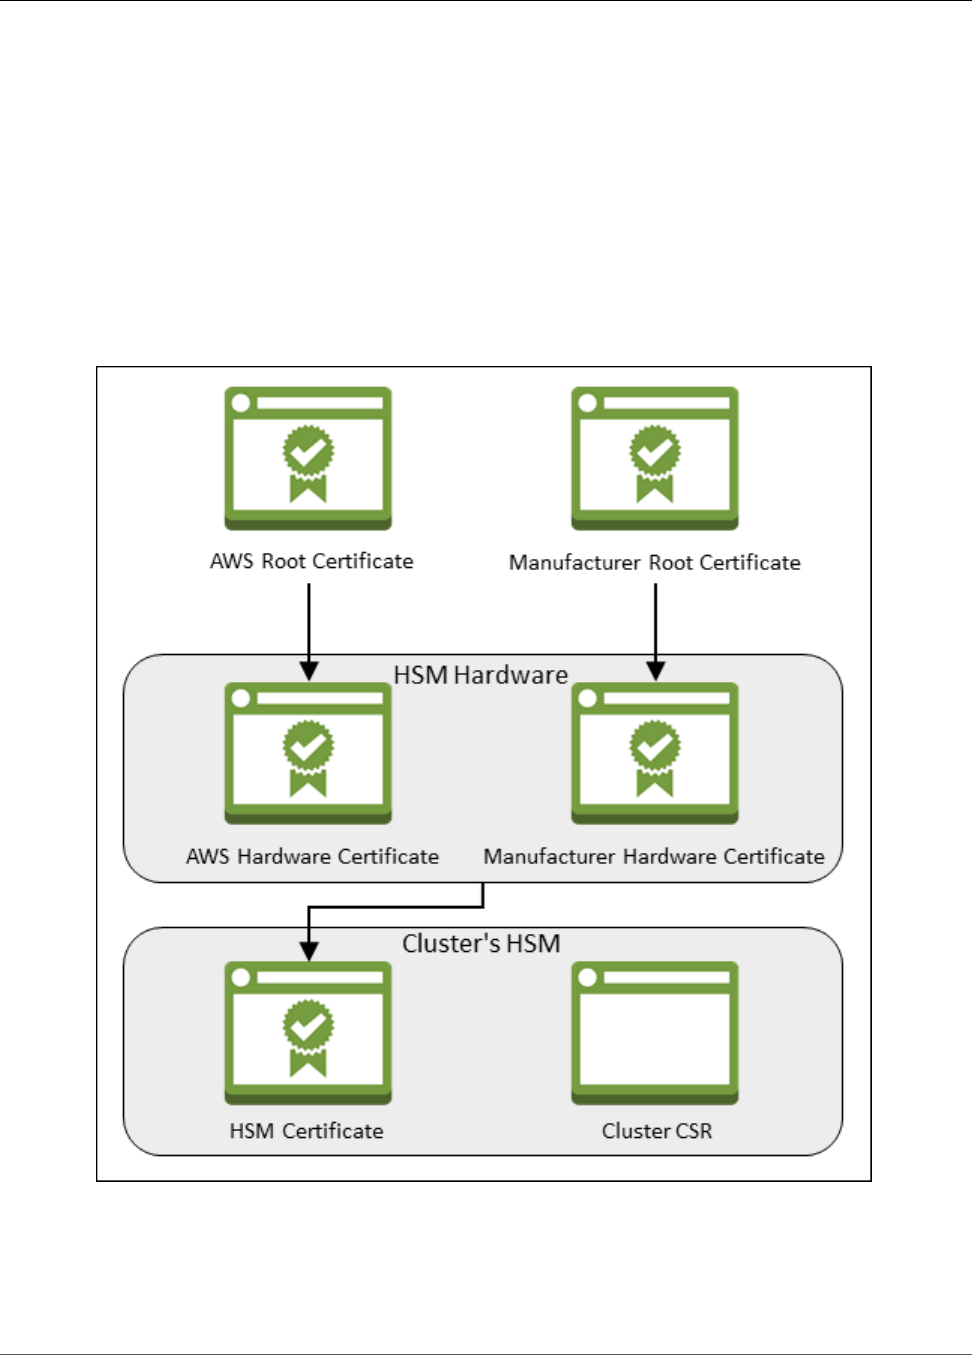
AWS CloudHSM User Guide
Overview
1. Get the certificates and CSR (p. 27) – In this step, you get three certificates and a CSR from the
HSM. You also get two root certificates, one from AWS CloudHSM and one from the HSM hardware
manufacturer.
2. Verify the certificate chains (p. 29) – In this step, you construct two certificate chains, one to the
AWS CloudHSM root certificate and one to the manufacturer root certificate. Then you verify the
HSM certificate with these certificate chains to determine that AWS CloudHSM and the hardware
manufacturer both attest to the identity and authenticity of the HSM.
3. Compare public keys (p. 30) – In this step, you extract and compare the public keys in the HSM
certificate and the cluster CSR, to ensure that they are the same. This should give you confidence that
the CSR was generated by an authentic, trusted HSM.
The following diagram shows the CSR, the certificates, and their relationship to each other. The
subsequent list defines each certificate.
AWS Root Certificate
This is AWS CloudHSM's root certificate. You can view and download this certificate at https://
docs.aws.amazon.com/cloudhsm/latest/userguide/root-certificate.html (p. 30).
26
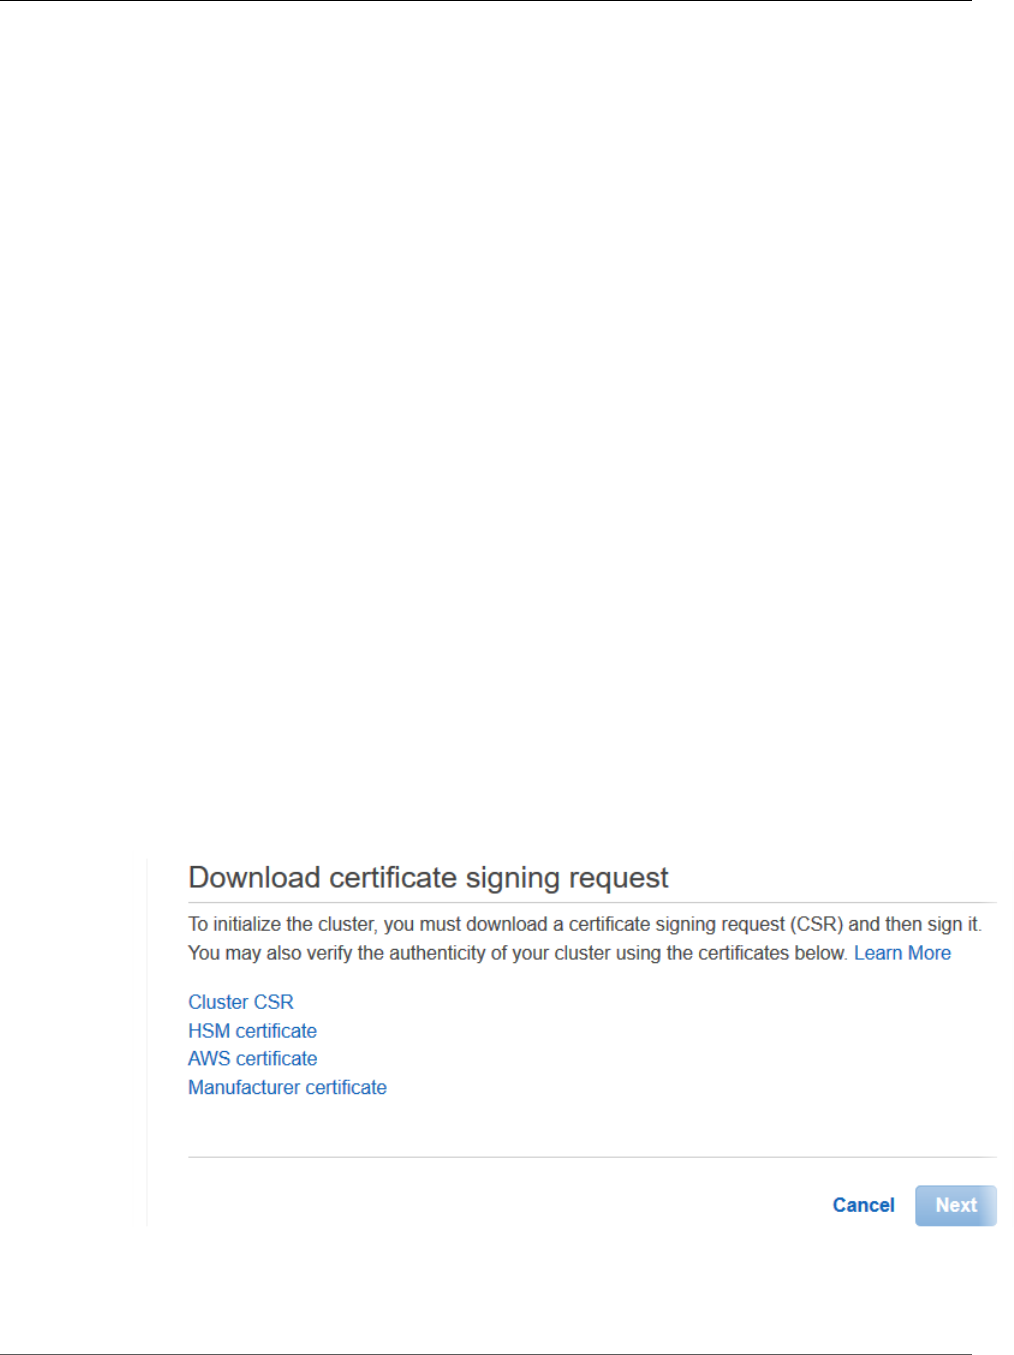
AWS CloudHSM User Guide
Get Certificates from the HSM
Manufacturer Root Certificate
This is the hardware manufacturer's root certificate. You can view and download this certificate at
https://www.cavium.com/LS/TAmanuCert/.
AWS Hardware Certificate
AWS CloudHSM created this certificate when it claimed the HSM hardware. This certificate asserts
that AWS CloudHSM owns the hardware.
Manufacturer Hardware Certificate
The HSM hardware manufacturer created this certificate when it manufactured the HSM hardware.
This certificate asserts that the manufacturer created the hardware.
HSM Certificate
The HSM certificate is generated by the FIPS-validated hardware when you create the first HSM in
the cluster. This certificate asserts that the HSM hardware created the HSM.
Cluster CSR
The first HSM creates the cluster CSR. When you sign the cluster CSR (p. 33), you claim the
cluster. Then, you can use the signed CSR to initialize the cluster (p. 34).
Get Certificates from the HSM
To verify the identity and authenticity of your HSM, start by getting a CSR and five certificates. You get
three of the certificates from the HSM, which you can do with the AWS CloudHSM console, the AWS
Command Line Interface (AWS CLI), or the AWS CloudHSM API.
To get the CSR and HSM certificates (console)
1. Open the AWS CloudHSM console at https://console.aws.amazon.com/cloudhsm/.
2. Choose Initialize next to the cluster that you created previously.
3. When the certificates and CSR are ready, you see links to download them.
Choose each link to download and save the CSR and certificates. To simplify the subsequent steps,
save all of the files to the same directory and use the default file names.
27

AWS CloudHSM User Guide
Get the Root Certificates
To get the CSR and HSM certificates (AWS CLI)
• At a command prompt, run the describe-clusters command four times, extracting the CSR and
different certificates each time and saving them to files.
a. Issue the following command to extract the cluster CSR. Replace <cluster ID> with the ID of
the cluster that you created previously.
$ aws cloudhsmv2 describe-clusters --filters clusterIds=<cluster ID> \
--output text \
--query 'Clusters[].Certificates.ClusterCsr' \
> <cluster ID>_ClusterCsr.csr
b. Issue the following command to extract the HSM certificate. Replace <cluster ID> with the
ID of the cluster that you created previously.
$ aws cloudhsmv2 describe-clusters --filters clusterIds=<cluster ID> \
--output text \
--query 'Clusters[].Certificates.HsmCertificate'
\
> <cluster ID>_HsmCertificate.crt
c. Issue the following command to extract the AWS hardware certificate. Replace <cluster ID>
with the ID of the cluster that you created previously.
$ aws cloudhsmv2 describe-clusters --filters clusterIds=<cluster ID> \
--output text \
--query
'Clusters[].Certificates.AwsHardwareCertificate' \
> <cluster ID>_AwsHardwareCertificate.crt
d. Issue the following command to extract the manufacturer hardware certificate. Replace
<cluster ID> with the ID of the cluster that you created previously.
$ aws cloudhsmv2 describe-clusters --filters clusterIds=<cluster ID> \
--output text \
--query
'Clusters[].Certificates.ManufacturerHardwareCertificate' \
> <cluster
ID>_ManufacturerHardwareCertificate.crt
To get the CSR and HSM certificates (AWS CloudHSM API)
• Send a DescribeClusters request, then extract and save the CSR and certificates from the response.
Get the Root Certificates
Follow these steps to get the root certificates for AWS CloudHSM and the manufacturer. Save the root
certificate files to the directory that contains the CSR and HSM certificate files.
To get the AWS CloudHSM and manufacturer root certificates
1. Go to https://docs.aws.amazon.com/cloudhsm/latest/userguide/root-certificate.html (p. 30), and
then choose AWS_CloudHSM_Root-G1.zip. After you download the file, extract (unzip) its contents.
2. Go to https://www.cavium.com/LS/TAmanuCert/, and then choose Download Certificate. You
might need to right-click the Download Certificate link and then choose Save Link As... to save the
certificate file.
28
AWS CloudHSM User Guide
Verify Certificate Chains
Verify Certificate Chains
In this step, you construct two certificate chains, one to the AWS CloudHSM root certificate and one to
the manufacturer root certificate. Then use OpenSSL to verify the HSM certificate with each certificate
chain.
To create the certificate chains, open a Linux shell. You need OpenSSL, which is available in most
Linux shells, and you need the root certificate (p. 28) and HSM certificate files (p. 27) that you
downloaded. However, you do not need the AWS CLI for this step, and the shell does not need to be
associated with your AWS account.
Note
To verify the certificate chain, use OpenSSL 1.0. Due to a change in OpenSSL certificate
verification, the following instructions do not work with OpenSSL 1.1.
To verify the HSM certificate with the AWS CloudHSM root certificate
1. Navigate to the directory where you saved the root certificate (p. 28) and HSM certificate
files (p. 27) that you downloaded. The following commands assume that all of the certificates are
in the current directory and use the default file names.
Use the following command to create a certificate chain that includes the AWS hardware certificate
and the AWS CloudHSM root certificate, in that order. Replace <cluster ID> with the ID of the
cluster that you created previously.
$ cat <cluster ID>_AwsHardwareCertificate.crt \
AWS_CloudHSM_Root-G1.crt \
> <cluster ID>_AWS_chain.crt
2. Use the following OpenSSL command to verify the HSM certificate with the AWS certificate chain.
Replace <cluster ID> with the ID of the cluster that you created previously.
$ openssl verify -CAfile <cluster ID>_AWS_chain.crt <cluster ID>_HsmCertificate.crt
<cluster ID>_HsmCertificate.crt: OK
To verify the HSM certificate with the manufacturer root certificate
1. Use the following command to create a certificate chain that includes the manufacturer hardware
certificate and the manufacturer root certificate, in that order. Replace <cluster ID> with the ID
of the cluster that you created previously.
$ cat <cluster ID>_ManufacturerHardwareCertificate.crt \
cavium_cert.crt \
> <cluster ID>_manufacturer_chain.crt
2. Use the following OpenSSL command to verify the HSM certificate with the manufacturer certificate
chain. Replace <cluster ID> with the ID of the cluster that you created previously.
$ openssl verify -CAfile <cluster ID>_manufacturer_chain.crt <cluster
ID>_HsmCertificate.crt
<cluster ID>_HsmCertificate.crt: OK
29
AWS CloudHSM User Guide
Extract and Compare Public Keys
Extract and Compare Public Keys
Use OpenSSL to extract and compare the public keys in the HSM certificate and the cluster CSR, to
ensure that they are the same.
To compare the public keys, use your Linux shell. You need OpenSSL, which is available in most Linux
shells, but you do not need the AWS CLI for this step The shell does not need to be associated with your
AWS account.
To extract and compare the public keys
1. Use the following command to extract the public key from the HSM certificate.
$ openssl x509 -in <cluster ID>_HsmCertificate.crt -pubkey -noout > <cluster
ID>_HsmCertificate.pub
2. Use the following command to extract the public key from the cluster CSR.
$ openssl req -in <cluster ID>_ClusterCsr.csr -pubkey -noout > <cluster
ID>_ClusterCsr.pub
3. Use the following command to compare the public keys. If the public keys are identical, the
following command produces no output.
$ diff <cluster ID>_HsmCertificate.pub <cluster ID>_ClusterCsr.pub
After you verify the identity and authenticity of the HSM, proceed to Initialize the Cluster (p. 31).
AWS CloudHSM Root Certificate
Download the AWS CloudHSM root certificate: AWS_CloudHSM_Root-G1.zip.
Certificate:
Data:
Version: 3 (0x2)
Serial Number: 17952736724058547791 (0xf924eeeecf9ea64f)
Signature Algorithm: sha256WithRSAEncryption
Issuer: C=US,
ST=Virginia,
L=Herndon,
O=Amazon Web Services INC.,
OU=CloudHSM,
CN=AWS CloudHSM Root G1
Validity
Not Before: Apr 28 08:37:46 2017 GMT
Not After : Apr 26 08:37:46 2027 GMT
Subject: C=US,
ST=Virginia,
L=Herndon,
O=Amazon Web Services INC.,
OU=CloudHSM,
CN=AWS CloudHSM Root G1
Subject Public Key Info:
Public Key Algorithm: rsaEncryption
Public-Key: (2048 bit)
Modulus:
00:c8:e3:f6:2a:e0:1f:1e:66:73:00:1e:57:dc:3e:
30

AWS CloudHSM User Guide
Initialize the Cluster
69:f1:9b:73:73:24:58:60:85:80:45:99:a2:85:3f:
e7:f9:67:41:9f:39:d2:e8:e1:88:ec:18:07:5c:38:
98:25:5a:45:5f:1f:c4:60:0e:29:e4:ac:65:f0:b6:
92:83:34:62:1a:e7:c6:ae:0f:40:66:52:bb:0b:6a:
c6:78:27:57:d6:32:3b:6c:0a:83:7d:a7:e9:a1:6c:
10:46:27:74:2c:6e:86:3a:fd:71:18:1f:84:8e:00:
84:bb:00:dc:57:d8:48:94:5c:13:7a:ff:3b:37:52:
60:cd:5a:64:57:35:95:df:67:68:39:e2:f9:85:ad:
59:ee:a6:9a:97:75:35:f4:e1:32:08:d3:0e:2f:bc:
33:04:f3:34:e8:c9:b5:18:fd:69:83:e0:b7:5a:b4:
3f:ce:1c:2f:b5:1e:0f:4f:15:f0:27:00:23:67:d5:
b8:2c:cb:d6:ef:eb:34:25:80:28:33:fa:e6:3a:31:
58:7a:0b:fd:4f:6d:d3:1c:64:10:47:8c:4f:ab:e3:
61:0c:a2:a9:0b:2d:e6:59:f4:1c:2c:92:2a:a4:f9:
a4:83:21:3a:66:dc:c7:75:06:15:fe:83:9d:f8:25:
7f:3b:66:e8:aa:9f:d1:e5:ba:1d:5a:c5:2e:21:ee:
52:61
Exponent: 65537 (0x10001)
X509v3 extensions:
X509v3 Subject Key Identifier:
27:00:6B:50:D5:4F:38:8A:35:21:38:D3:0D:A9:5E:D2:10:39:A4:EB
X509v3 Authority Key Identifier:
keyid:27:00:6B:50:D5:4F:38:8A:35:21:38:D3:0D:A9:5E:D2:10:39:A4:EB
X509v3 Basic Constraints:
CA:TRUE
Signature Algorithm: sha256WithRSAEncryption
71:ff:e5:46:27:9c:d0:85:97:5e:c0:82:9a:d4:1b:48:96:75:
2a:40:32:07:80:95:c5:eb:26:1b:46:37:7e:86:12:99:68:b1:
15:bb:f5:55:85:6f:a2:e4:28:70:47:73:07:84:fc:12:28:cc:
8b:3e:b8:f6:60:85:bb:23:6a:cb:6e:a7:ed:82:7e:ed:64:9c:
c1:df:c8:51:db:b9:a4:76:ee:ba:53:aa:e7:30:86:74:5e:be:
2f:1a:c1:88:30:c4:61:02:50:9f:c9:80:7b:7e:f5:1e:49:c8:
6c:1a:39:00:4d:98:1e:21:26:4a:02:f5:d5:3e:6c:47:d9:9c:
94:6f:d7:25:2e:1d:7c:a3:18:ee:8a:32:8a:15:f3:85:39:76:
c3:b9:ba:4e:58:0c:5b:65:44:2e:eb:ab:6c:27:9a:a6:67:df:
22:d4:81:02:2e:c6:34:1b:fe:55:31:8b:d5:73:57:d8:0e:0d:
5a:27:7d:ce:3d:3b:84:80:b3:32:00:e0:6a:f0:32:8a:85:2a:
f8:de:20:bf:65:f7:c9:a8:42:c9:cb:fa:03:d4:10:29:5e:25:
63:a5:71:06:2e:72:78:8a:05:c3:f9:56:e9:b1:e4:2b:6e:f7:
46:5d:b3:12:ed:14:2a:51:d4:56:56:48:ab:7d:fe:d6:49:af:
d6:8e:84:62
Initialize the Cluster
Complete the steps in the following topics to initialize your AWS CloudHSM cluster.
Note
Before you initialize the cluster, review the process by which you can verify the identity and
authenticity of the HSMs (p. 25). This process is optional and works only until a cluster is
initialized. After the cluster is initialized, you cannot use this process to get your certificates or
verify the HSMs.
Topics
•Get the Cluster CSR (p. 32)
•Sign the CSR (p. 33)
•Initialize the Cluster (p. 34)
31
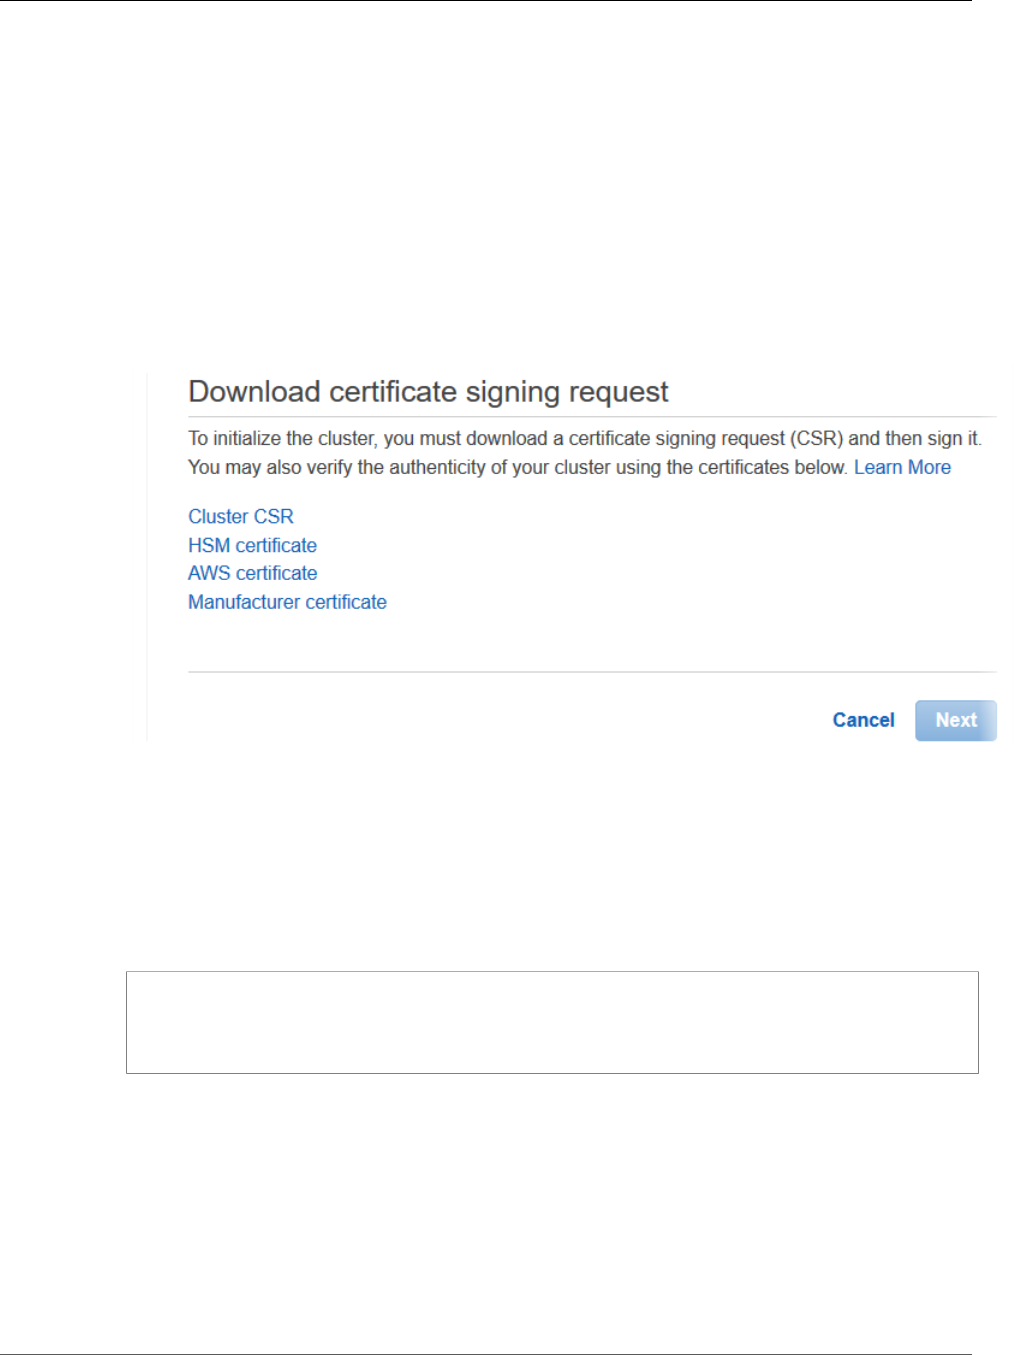
AWS CloudHSM User Guide
Get the Cluster CSR
Get the Cluster CSR
Before you can initialize the cluster, you must download and sign a certificate signing request (CSR) that
is generated by the cluster's first HSM. If you followed the steps to verify the identity of your cluster's
HSM (p. 25), you already have the CSR and you can sign it. Otherwise, get the CSR now by using the
AWS CloudHSM console, the AWS Command Line Interface (AWS CLI), or the AWS CloudHSM API.
To get the CSR (console)
1. Open the AWS CloudHSM console at https://console.aws.amazon.com/cloudhsm/.
2. Choose Initialize next to the cluster that you created previously (p. 21).
3. When the CSR is ready, you see a link to download it.
Choose Cluster CSR to download and save the CSR.
To get the CSR (AWS CLI)
• At a command prompt, run the following describe-clusters command, which extracts the
CSR and saves it to a file. Replace <cluster ID> with the ID of the cluster that you created
previously (p. 21).
$ aws cloudhsmv2 describe-clusters --filters clusterIds=<cluster ID> \
--output text \
--query 'Clusters[].Certificates.ClusterCsr' \
> <cluster ID>_ClusterCsr.csr
To get the CSR (AWS CloudHSM API)
1. Send a DescribeClusters request.
2. Extract and save the CSR from the response.
32

AWS CloudHSM User Guide
Sign the CSR
Sign the CSR
Currently, you must create a self-signed signing certificate and use it to sign the CSR for your cluster.
You do not need the AWS CLI for this step, and the shell does not need to be associated with your AWS
account. To sign the CSR, you must do the following:
1. Get the CSR (see Get the Cluster CSR (p. 32)).
2. Create a private key.
3. Use the private key to create a signing certificate.
4. Sign your cluster CSR.
Create a private key
Use the following command to create a private key. For a production cluster, the key should be created
in a secure manner using a trusted source of randomness. We recommend that you use a secured offsite
and offline HSM or the equivalent. Store the key safely. If you can demonstrate that you own the key, you
can also demonstrate that you own the cluster and the data it contains.
During development and test, you can use any convenient tool (such as OpenSSL) to create and sign the
cluster certificate. The following example shows you how to create a key. After you have used the key to
create a self-signed certificate (see below), you should store it in a safe manner. To sign into your AWS
CloudHSM instance, the certificate must be present, but the private key does not. You use the key only
for specific purposes such as restoring from a backup.
$ openssl genrsa -aes256 -out customerCA.key 2048
Generating RSA private key, 2048 bit long modulus
........+++
............+++
e is 65537 (0x10001)
Enter pass phrase for customerCA.key:
Verifying - Enter pass phrase for customerCA.key:
Use the private key to create a self-signed certificate
The trusted hardware that you use to create the private key for your production cluster should also
provide a software tool to generate a self-signed certificate using that key. The following example uses
OpenSSL and the private key that you created in the previous step to create a signing certificate. The
certificate is valid for 10 years (3652 days). Read the on-screen instructions and follow the prompts.
$ openssl req -new -x509 -days 3652 -key customerCA.key -out customerCA.crt
Enter pass phrase for customerCA.key:
You are about to be asked to enter information that will be incorporated
into your certificate request.
What you are about to enter is what is called a Distinguished Name or a DN.
There are quite a few fields but you can leave some blank
For some fields there will be a default value,
If you enter '.', the field will be left blank.
-----
Country Name (2 letter code) [AU]:
State or Province Name (full name) [Some-State]:
Locality Name (eg, city) []:
Organization Name (eg, company) [Internet Widgits Pty Ltd]:
Organizational Unit Name (eg, section) []:
Common Name (e.g. server FQDN or YOUR name) []:
Email Address []:
33

AWS CloudHSM User Guide
Initialize the Cluster
This command creates a certificate file named customerCA.crt. Put this certificate on every host from
which you will connect to your AWS CloudHSM cluster. If you give the file a different name or store it in a
path other than the root of your host, you should edit your client configuration file accordingly. Use the
certificate and the private key you just created to sign the cluster certificate signing request (CSR) in the
next step.
Sign the Cluster CSR
The trusted hardware that you use to create your private key for your production cluster should also
provide a tool to sign the CSR using that key. The following example uses OpenSSL to sign the cluster's
CSR. The example uses your private key and the self-signed certificate that you created in the previous
step.
$ openssl x509 -req -days 3652 -in <cluster ID>_ClusterCsr.csr \
-CA customerCA.crt \
-CAkey customerCA.key \
-CAcreateserial \
-out <cluster ID>_CustomerHsmCertificate.crt
Signature ok
subject=/C=US/ST=CA/O=Cavium/OU=N3FIPS/L=SanJose/CN=HSM:<HSM identifer>:PARTN:<partition
number>, for FIPS mode
Getting CA Private Key
Enter pass phrase for customerCA.key:
This command creates a file named <cluster ID>_CustomerHsmCertificate.crt. Use this file as
the signed certificate when you initialize the cluster.
Initialize the Cluster
Use your signed HSM certificate and your signing certificate to initialize your cluster. You can use the
AWS CloudHSM console, the AWS CLI, or the AWS CloudHSM API.
To initialize a cluster (console)
1. Open the AWS CloudHSM console at https://console.aws.amazon.com/cloudhsm/.
2. Choose Initialize next to the cluster that you created previously.
3. On the Download certificate signing request page, choose Next. If Next is not available, first
choose one of the CSR or certificate links. Then choose Next.
4. On the Sign certificate signing request (CSR) page, choose Next.
5. On the Upload the certificates page, do the following:
a. Next to Cluster certificate, choose Upload file. Then locate and select the HSM certificate that
you signed previously. If you completed the steps in the previous section, select the file named
<cluster ID>_CustomerHsmCertificate.crt.
b. Next to Issuing certificate, choose Upload file. Then select your signing certificate. If you
completed the steps in the previous section, select the file named customerCA.crt.
c. Choose Upload and initialize.
To initialize a cluster (AWS CLI)
• At a command prompt, run the initialize-cluster command. Provide the following:
• The ID of the cluster that you created previously.
• The HSM certificate that you signed previously. If you completed the steps in the previous section,
it's saved in a file named <cluster ID>_CustomerHsmCertificate.crt.
34

AWS CloudHSM User Guide
Install the Client (Linux)
• Your signing certificate. If you completed the steps in the previous section, the signing certificate
is saved in a file named customerCA.crt.
$ aws cloudhsmv2 initialize-cluster --cluster-id <cluster ID> \
--signed-cert file://<cluster
ID>_CustomerHsmCertificate.crt \
--trust-anchor file://customerCA.crt
{
"State": "INITIALIZE_IN_PROGRESS",
"StateMessage": "Cluster is initializing. State will change to INITIALIZED upon
completion."
}
To initialize a cluster (AWS CloudHSM API)
• Send an InitializeCluster request with the following:
• The ID of the cluster that you created previously.
• The HSM certificate that you signed previously.
• Your signing certificate.
Install and Configure the AWS CloudHSM Client
(Linux)
To interact with the HSM in your AWS CloudHSM cluster, you need the AWS CloudHSM client software
for Linux. You should install it on the Linux EC2 client instance that you created previously. You can
also install a client if you are using Windows. For more information, see Install and Configure the AWS
CloudHSM Client (Windows) (p. 37).
Topics
•Install the AWS CloudHSM Client and Command Line Tools (p. 35)
•Edit the Client Configuration (p. 37)
Install the AWS CloudHSM Client and Command Line
Tools
Complete the steps in the following procedure to install the AWS CloudHSM client and command line
tools.
To install (or update) the client and command line tools
1. Connect to your client instance.
2. Use the following commands to download and then install the client and command line tools.
Amazon Linux
wget https://s3.amazonaws.com/cloudhsmv2-software/CloudHsmClient/EL6/cloudhsm-
client-latest.el6.x86_64.rpm
35

AWS CloudHSM User Guide
Install the AWS CloudHSM Client and Command Line Tools
sudo yum install -y ./cloudhsm-client-latest.el6.x86_64.rpm
Amazon Linux 2
wget https://s3.amazonaws.com/cloudhsmv2-software/CloudHsmClient/EL7/cloudhsm-
client-latest.el7.x86_64.rpm
sudo yum install -y ./cloudhsm-client-latest.el7.x86_64.rpm
CentOS 6
sudo yum install wget
wget https://s3.amazonaws.com/cloudhsmv2-software/CloudHsmClient/EL6/cloudhsm-
client-latest.el6.x86_64.rpm
sudo yum install -y ./cloudhsm-client-latest.el6.x86_64.rpm
CentOS 7
sudo yum install wget
wget https://s3.amazonaws.com/cloudhsmv2-software/CloudHsmClient/EL7/cloudhsm-
client-latest.el7.x86_64.rpm
sudo yum install -y ./cloudhsm-client-latest.el7.x86_64.rpm
RHEL 6
wget https://s3.amazonaws.com/cloudhsmv2-software/CloudHsmClient/EL6/cloudhsm-
client-latest.el6.x86_64.rpm
sudo yum install -y ./cloudhsm-client-latest.el6.x86_64.rpm
RHEL 7
sudo yum install wget
wget https://s3.amazonaws.com/cloudhsmv2-software/CloudHsmClient/EL7/cloudhsm-
client-latest.el7.x86_64.rpm
sudo yum install -y ./cloudhsm-client-latest.el7.x86_64.rpm
Ubuntu 16.04 LTS
wget https://s3.amazonaws.com/cloudhsmv2-software/CloudHsmClient/Xenial/cloudhsm-
client_latest_amd64.deb
36
AWS CloudHSM User Guide
Edit the Client Configuration
sudo dpkg -i cloudhsm-client_latest_amd64.deb
Edit the Client Configuration
Before you can use the AWS CloudHSM client to connect to your cluster, you must edit the client
configuration.
To edit the client configuration
1. Copy your issuing certificate—the one that you used to sign the cluster's certificate (p. 33)—to
the following location on the client instance: /opt/cloudhsm/etc/customerCA.crt. You need
AWS account root user permissions on the client instance to copy your certificate to this location.
2. Use the following configure (p. 179) command to update the configuration files for the AWS
CloudHSM client and command line tools, specifying the IP address of the HSM in your cluster. To
get the HSM's IP address, view your cluster in the AWS CloudHSM console, or run the describe-
clusters AWS CLI command. In the command's output, the HSM's IP address is the value of the
EniIp field. If you have more than one HSM, choose the IP address for any of the HSMs; it doesn't
matter which one.
sudo /opt/cloudhsm/bin/configure -a <IP address>
Updating server config in /opt/cloudhsm/etc/cloudhsm_client.cfg
Updating server config in /opt/cloudhsm/etc/cloudhsm_mgmt_util.cfg
3. Go to Activate the Cluster (p. 38).
Install and Configure the AWS CloudHSM Client
(Windows)
To interact with an HSM in your AWS CloudHSM cluster, you need the AWS CloudHSM client software for
Windows. You should install it on the Windows Server instance that you created previously. You can also
install a client if you are using Linux. For more information, see Install and Configure the AWS CloudHSM
Client (Linux) (p. 35).
To install (or update) the latest client and command line tools
1. Connect to your Windows Server instance.
2. Download the AWSCloudHSMClient-latest.msi installer.
3. Go to your download location and run the AWSCloudHSMClient-latest.msi installer. Follow the
installer instructions.
Important
You must run the installer with administrative privileges.
The installer automatically registers the Cryptography API: Next Generation (CNG) and Key Storage
Providers (KSPs) for AWS CloudHSM. To uninstall the AWS CloudHSM client software for Windows,
run the installer again and follow the uninstall instructions.
4. Choose Close after the installer has finished.
The installer copies the following executable files into the C:\Program Files\Amazon\CloudHSM
folder:
37

AWS CloudHSM User Guide
Activate the Cluster
•cloudhsm_client.exe
•cloudhsm_mgmt_util.exe
•cng_config.exe
•configure.exe
•key_mgmt_util.exe
•ksp_config.exe
•pkpspeed_blocking.exe
The installer copies the following certificate and key files into the C:\ProgramData\Amazon
\CloudHSM folder:
•client.crt
•client.key
The installer copies the following configuration files into the C:\ProgramData\Amazon\CloudHSM
\data folder:
•application.cfg
•cloudhsm_client.cfg
•cloudhsm_mgmt_util.cfg
5. Copy your self-signed issuing certificate—the one that you used to sign the cluster
certificate (p. 33)—to the C:\ProgramData\Amazon\CloudHSM folder.
6. Run the following command to update your configuration files:
c:\Program Files\Amazon\CloudHSM>configure.exe -a <HSM IP address>
7. Go to Activate the Cluster (p. 38).
Activate the Cluster
When you activate an AWS CloudHSM cluster, the cluster's state changes from initialized to active. You
can then manage the HSM's users (p. 53) and use the HSM (p. 183).
To activate the cluster, log in to the HSM with the credentials of the precrypto officer (PRECO) (p. 10).
This a temporary user that exists only on the first HSM in an AWS CloudHSM cluster. The first HSM in
a new cluster contains a PRECO user with a default user name and password. When you change the
password, the PRECO user becomes a crypto officer (CO).
To activate a cluster
1. Connect to the client instance that you launched in previously. For more information, see Launch an
Amazon EC2 Client Instance (p. 23). You can launch a Linux instance or a Windows Server.
2. Use the following command to start the cloudhsm_mgmt_util command line utility.
Note
If you are using an AMI that uses Amazon Linux 2, see Known Issues for Amazon EC2
Instances Running Amazon Linux 2 (p. 265).
Amazon Linux
$ /opt/cloudhsm/bin/cloudhsm_mgmt_util /opt/cloudhsm/etc/cloudhsm_mgmt_util.cfg
38
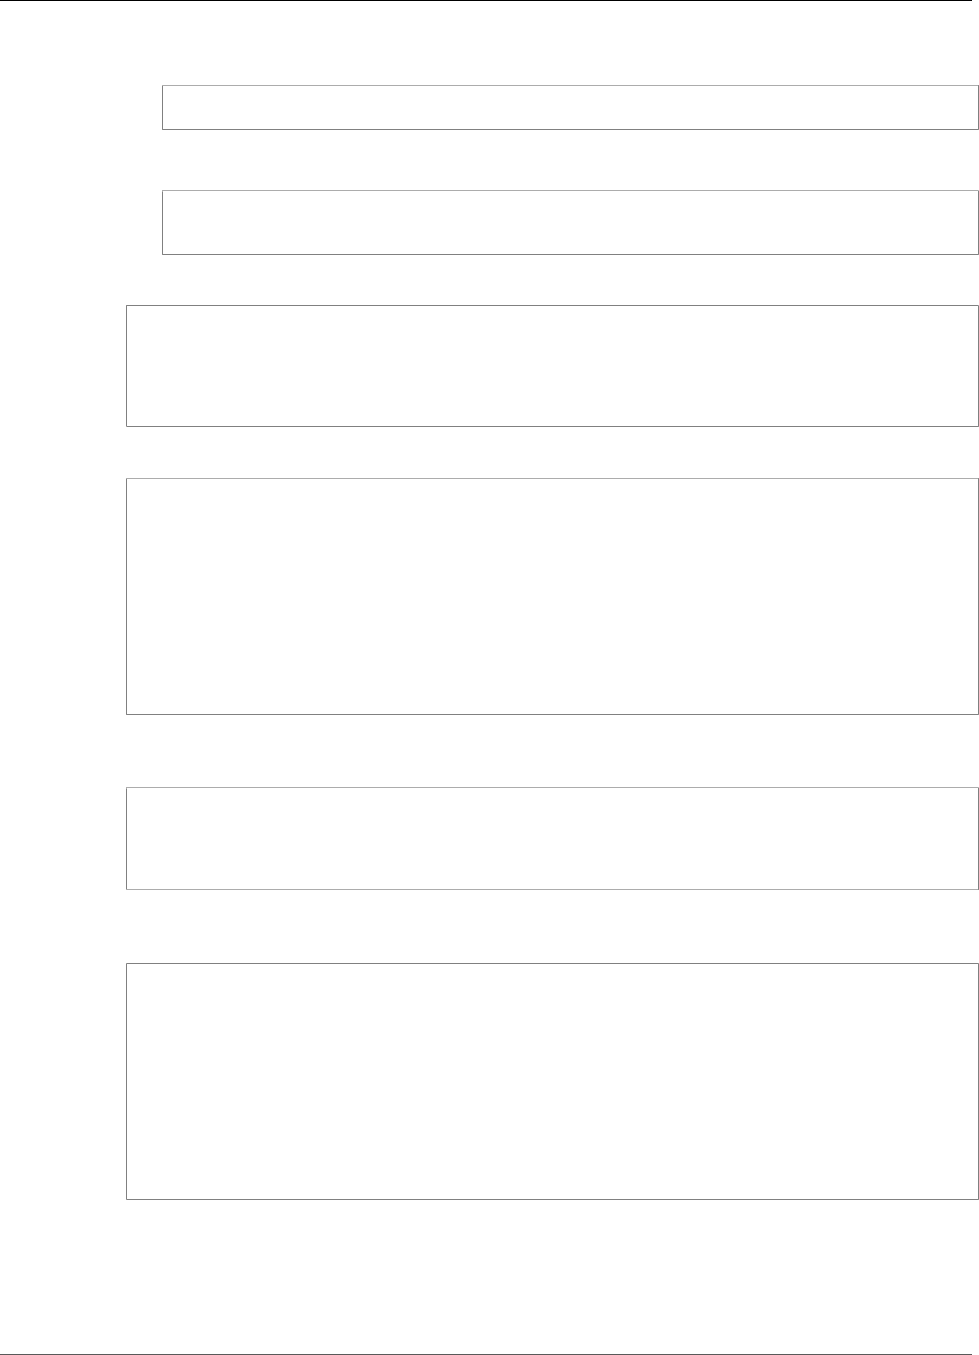
AWS CloudHSM User Guide
Activate the Cluster
Ubuntu
$ /opt/cloudhsm/bin/cloudhsm_mgmt_util /opt/cloudhsm/etc/cloudhsm_mgmt_util.cfg
Windows
c:\Program Files\Amazon\CloudHSM>cloudhsm_mgmt_util.exe c:\ProgramData\Amazon
\CloudHSM\data\cloudhsm_mgmt_util.cfg
3. Use the enable_e2e command to enable end-to-end encryption.
aws-cloudhsm>enable_e2e
E2E enabled on server 0(server1)
4. (Optional) Use the listUsers command to display the existing users.
aws-cloudhsm>listUsers
Users on server 0(server1):
Number of users found:2
User Id User Type User Name MofnPubKey
LoginFailureCnt 2FA
1 PRECO admin NO
0 NO
2 AU app_user NO
0 NO
5. Use the loginHSM command to log in to the HSM as the PRECO user. This is a temporary user that
exists on the first HSM in your cluster.
aws-cloudhsm>loginHSM PRECO admin password
loginHSM success on server 0(server1)
6. Use the changePswd command to change the password for the PRECO user. When you change the
password, the PRECO user becomes a crypto officer (CO).
aws-cloudhsm>changePswd PRECO admin <NewPassword>
*************************CAUTION********************************
This is a CRITICAL operation, should be done on all nodes in the
cluster. Cav server does NOT synchronize these changes with the
nodes on which this operation is not executed or failed, please
ensure this operation is executed on all nodes in the cluster.
****************************************************************
Do you want to continue(y/n)?y
Changing password for admin(PRECO) on 1 nodes
We recommend that you write down the new password on a password worksheet. Do not lose the
worksheet. We recommend that you print a copy of the password worksheet, use it to record your
critical HSM passwords, and then store it in a secure place. We also recommended that you store a
copy of this worksheet in secure off-site storage.
39

AWS CloudHSM User Guide
Reconfigure SSL (Optional)
7. (Optional) Use the listUsers command to verify that the user's type changed to crypto officer
(CO) (p. 11).
aws-cloudhsm>listUsers
Users on server 0(server1):
Number of users found:2
User Id User Type User Name MofnPubKey
LoginFailureCnt 2FA
1 CO admin NO
0 NO
2 AU app_user NO
0 NO
8. Use the quit command to stop the cloudhsm_mgmt_util tool.
aws-cloudhsm>quit
Reconfigure SSL with a New Certificate and Private
Key (Optional)
AWS CloudHSM uses an SSL certificate to establish a connection to an HSM. A default key and SSL
certificate are included when you install the client. You can, however, create and use your own.
Note that you will need the self–signed certificate (customerCA.crt) that you created when you
initialized (p. 33) your cluster.
To reconfigure SSL with a new certificate and private key
1. Create a private key using the following OpenSSL command:
openssl genrsa -out ssl-client.key 2048
Generating RSA private key, 2048 bit long modulus
........+++
............+++
e is 65537 (0x10001)
2. Use the following OpenSSL command to create a certificate signing request (CSR). You will be asked
a series of questions for your certificate.
openssl req -new -sha256 -key ssl-client.key -out ssl-client.csr
Enter pass phrase for ssl-client.key:
You are about to be asked to enter information that will be incorporated
into your certificate request.
What you are about to enter is what is called a Distinguished Name or a DN.
There are quite a few fields but you can leave some blank
For some fields there will be a default value,
If you enter '.', the field will be left blank.
-----
Country Name (2 letter code) [XX]:
State or Province Name (full name) []:
Locality Name (eg, city) [Default City]:
Organization Name (eg, company) [Default Company Ltd]:
Organizational Unit Name (eg, section) []:
Common Name (eg, your name or your server's hostname) []:
Email Address []:
40

AWS CloudHSM User Guide
Reconfigure SSL (Optional)
Please enter the following 'extra' attributes
to be sent with your certificate request
A challenge password []:
An optional company name []:
3. Sign the CSR with the customerCA.crt certificate that you created when you initialized your
cluster.
openssl x509 -req -days 3652 -in ssl-client.csr \
-CA customerCA.crt \
-CAkey customerCA.key \
-CAcreateserial \
-out ssl-client.crt
Signature ok
subject=/C=US/ST=WA/L=Seattle/O=Example Company/OU=sales
Getting CA Private Key
4. Copy your key and certificate to the appropriate directory. In Linux, use the following commands.
The configure --ssl option became available with version 1.0.14 of the AWS CloudHSM client.
sudo cp ssl-client.crt /opt/cloudhsm/etc/
sudo cp ssl-client.key /opt/cloudhsm/etc/
sudo /opt/cloudhsm/bin/configure --ssl --pkey /opt/cloudhsm/etc/ssl-client.key --cert /
opt/cloudhsm/etc/ssl-client.crt
5. Add the customerCA.crt certificate to the trust store. Create a hash of the certificate subject
name. This creates an index to allow the certificate to be looked up by that name. Create a file that
contains the certificate with the hash name.
openssl x509 -in /opt/cloudhsm/etc/customerCA.crt -hash | head -n 1
1234abcd
sudo cp /opt/cloudhsm/etc/customerCA.crt /opt/cloudhsm/etc/certs/1234abcd.0
41

AWS CloudHSM User Guide
Adding or Removing HSMs
Managing AWS CloudHSM Clusters
You can manage your AWS CloudHSM clusters from the AWS CloudHSM console or one of the AWS SDKs
or command line tools. For more information, see the following topics.
To create a cluster, see Getting Started (p. 15).
Topics
•Adding or Removing HSMs in an AWS CloudHSM Cluster (p. 42)
•Copying a Backup Across Regions (p. 45)
•Creating an AWS CloudHSM Cluster from a Previous Backup (p. 46)
•Deleting and Restoring an AWS CloudHSM Cluster Backup (p. 47)
•Deleting an AWS CloudHSM Cluster (p. 48)
•Tagging AWS CloudHSM Resources (p. 49)
Adding or Removing HSMs in an AWS CloudHSM
Cluster
To scale up or down your AWS CloudHSM cluster, add or remove HSMs by using the AWS CloudHSM
console or one of the AWS SDKs or command line tools.
Topics
•Adding an HSM (p. 42)
•Removing an HSM (p. 44)
Adding an HSM
The following figure illustrates the events that occur when you add an HSM to a cluster.
42
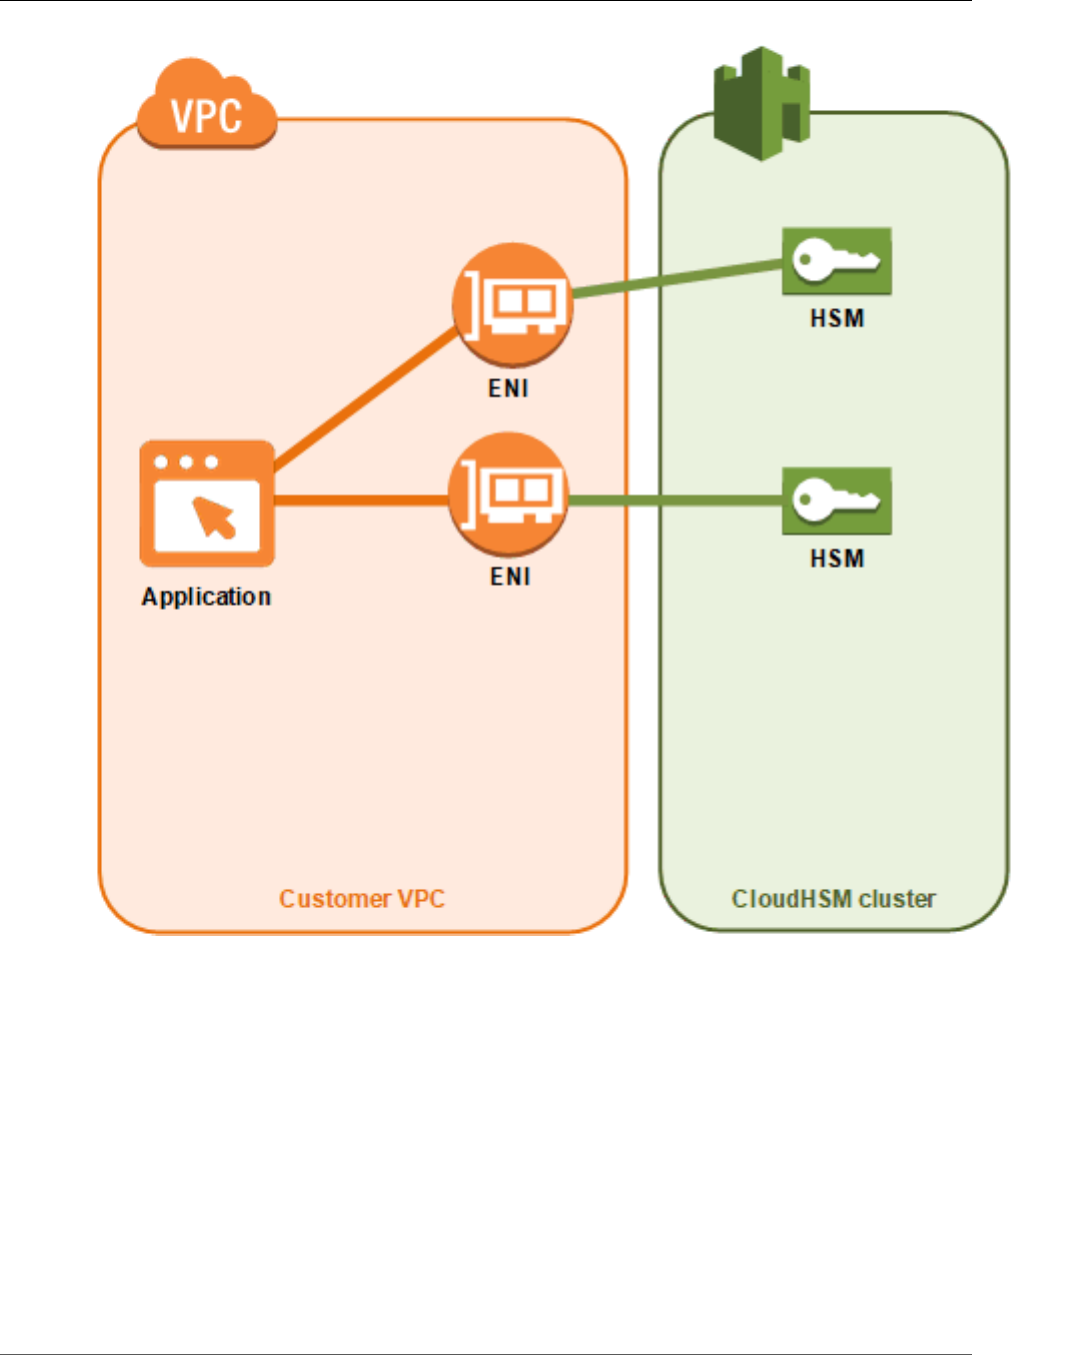
AWS CloudHSM User Guide
Adding an HSM
1. You add a new HSM to a cluster. The following procedures explain how to do this from the AWS
CloudHSM console, the AWS Command Line Interface (AWS CLI), and the AWS CloudHSM API.
This is the only action that you take. The remaining events occur automatically.
2. AWS CloudHSM makes a backup copy of an existing HSM in the cluster. For more information, see
Backups (p. 6).
3. AWS CloudHSM restores the backup onto the new HSM. This ensures that the HSM is in sync with the
others in the cluster.
4. The existing HSMs in the cluster notify the AWS CloudHSM client that there's a new HSM in the
cluster.
5. The client establishes a connection to the new HSM.
43

AWS CloudHSM User Guide
Removing an HSM
To add an HSM (console)
1. Open the AWS CloudHSM console at https://console.aws.amazon.com/cloudhsm/.
2. Choose a cluster for the HSM that you are adding.
3. On the HSMs tab, choose Create HSM.
4. Choose an Availability Zone (AZ) for the HSM that you are creating. Then choose Create.
To add an HSM (AWS CLI)
• At a command prompt, issue the create-hsm command, specifying a cluster ID and an Availability
Zone for the HSM that you are creating. If you don't know the cluster ID of your preferred cluster,
issue the describe-clusters command. Specify the Availability Zone in the form of us-east-2a, us-
east-2b, etc.
$ aws cloudhsmv2 create-hsm --cluster-id <cluster ID> --availability-zone <Availability
Zone>
{
"Hsm": {
"State": "CREATE_IN_PROGRESS",
"ClusterId": "cluster-5a73d5qzrdh",
"HsmId": "hsm-lgavqitns2a",
"SubnetId": "subnet-0e358c43",
"AvailabilityZone": "us-east-2c",
"EniId": "eni-bab18892",
"EniIp": "10.0.3.10"
}
}
To add an HSM (AWS CloudHSM API)
• Send a CreateHsm request, specifying the cluster ID and an Availability Zone for the HSM that you
are creating.
Removing an HSM
You can remove an HSM by using the AWS CloudHSM console, the AWS CLI, or the AWS CloudHSM API.
To remove an HSM (console)
1. Open the AWS CloudHSM console at https://console.aws.amazon.com/cloudhsm/.
2. Choose the cluster that contains the HSM that you are removing.
3. On the HSMs tab, choose the HSM that you are removing. Then choose Delete HSM.
4. Confirm that you want to delete the HSM. Then choose Delete.
To remove an HSM (AWS CLI)
• At a command prompt, issue the delete-hsm command. Pass the ID of the cluster that contains the
HSM that you are deleting and one of the following HSM identifiers:
• The HSM ID (--hsm-id)
• The HSM IP address (--eni-ip)
• The HSM's elastic network interface ID (--eni-id)
44

AWS CloudHSM User Guide
Copying a Backup Across Regions
If you don't know the values for these identifiers, issue the describe-clusters command.
$ aws cloudhsmv2 delete-hsm --cluster-id <cluster ID> --eni-ip <HSM IP address>
{
"HsmId": "hsm-lgavqitns2a"
}
To remove an HSM (AWS CloudHSM API)
• Send a DeleteHsm request, specifying the cluster ID and an identifier for the HSM that you are
deleting.
Copying a Backup Across Regions
AWS CloudHSM allows you to copy a backup of a cluster into a different region, where it can then
be used to create a new cluster as a clone of the original. AWS CloudHSM Cluster Backups (p. 6) are
packages of encrypted data that contain the elements of a particular cluster. In order to clone a
cluster into a different region, first copy the cluster backup to the destination region and then create
a new cluster from the copied backup. You may want to do this for a number of reasons, including
simplification of the disaster recovery process.
You can copy a cluster backup across regions from the AWS Command Line Interface (AWS CLI), or the
AWS CloudHSM API. Upon issuing the copy-backup-to-region command, the copied backup appears in
the destination region with a CREATE_IN_PROGRESS status. Upon successful completion, the status of
the copied backup is READY.
In the event that the copy-backup-to-region command cannot be successfully completed, the status
of the copied backup is DELETED. Check your input parameters for errors and ensure that the specified
source backup is not in a DELETED state before rerunning the operation.
For information on how to create a cluster from a backup, see Creating an AWS CloudHSM Cluster from a
Previous Backup (p. 46).
Important
Note the following:
• To copy a cluster backup to a destination region, your account must have the proper IAM
policy permissions. In order to copy the backup to a different region, your IAM policy must
allow access to the source region in which the backup is located. Once copied across regions,
your IAM policy must allow access to the destination region in order to interact with the
copied backup, which includes using the CreateCluster operation. For more information, see
Restrict User Permissions to What's Necessary for AWS CloudHSM (p. 15).
• The original cluster and the cluster that may be built from a backup in the destination region
are not linked. You must manage each of these clusters independently. For more information,
see Managing AWS CloudHSM Clusters (p. 42)
• Backups cannot be copied into or out of the AWS GovCloud (US), as it is a restricted region.
To copy a cluster backup to a different region (AWS CLI)
• At a command prompt, run the copy-backup-to-region command. Specify the destination region
and either the cluster ID of the source cluster or the backup ID of the source backup. If you specify
a backup ID, the associated backup is copied. If you specify a cluster ID, the most recent available
45

AWS CloudHSM User Guide
Creating a Cluster From a Backup
backup of the associated cluster is copied. If you provide both, the backup ID provided is used
by default. If you don't know the cluster ID or backup ID, run the describe-clusters or describe-
backups command respectively.
$ aws cloudhsmv2 copy-backup-to-region --destination-region <destination region> \
--backup-id <backup ID>
{
"DestinationBackup": {
"CreateTimestamp": 1531742400,
"SourceBackup": "backup-4kuraxsqetz",
"SourceCluster": "cluster-kzlczlspnho",
"SourceRegion": "us-east-1"
}
}
To copy a cluster backup to a different region (AWS CloudHSM API)
• Send a CopyBackupToRegion request. Specify the destination region and the cluster ID or most
recent backup ID of the cluster to be copied.
Creating an AWS CloudHSM Cluster from a
Previous Backup
To restore an AWS CloudHSM cluster from a previous backup, you create a new cluster and specify the
backup to restore. After you create the cluster, you don't need to initialize or activate it. You can just
add an HSM to the cluster. This HSM contains the same users, key material, certificates, configuration,
and policies that were in the backup that you restored. For more information about backups, see
Backups (p. 6).
You can restore a cluster from a backup from the AWS CloudHSM console, the AWS Command Line
Interface (AWS CLI), or the AWS CloudHSM API.
To create a cluster from a previous backup (console)
1. Open the AWS CloudHSM console at https://console.aws.amazon.com/cloudhsm/.
2. Choose Create cluster.
3. In the Cluster configuration section, do the following:
a. For VPC, choose a VPC for the cluster that you are creating.
b. For AZ(s), choose a private subnet for each Availability Zone that you are adding to the cluster.
4. In the Cluster source section, do the following:
a. Choose Restore cluster from existing backup.
b. Choose the backup that you are restoring.
5. Choose Next: Review.
6. Review your cluster configuration, then choose Create cluster.
To create a cluster from a previous backup (AWS CLI)
• At a command prompt, issue the create-cluster command. Specify the HSM instance type, the
subnet IDs of the subnets where you plan to create HSMs, and the backup ID of the backup that you
are restoring. If you don't know the backup ID, issue the describe-backups command.
46

AWS CloudHSM User Guide
Deleting and Restoring a Backup
$ aws cloudhsmv2 create-cluster --hsm-type hsm1.medium \
--subnet-ids <subnet ID 1> <subnet ID 2> <subnet ID N>
\
--source-backup-id <backup ID>
{
"Cluster": {
"HsmType": "hsm1.medium",
"VpcId": "vpc-641d3c0d",
"Hsms": [],
"State": "CREATE_IN_PROGRESS",
"SourceBackupId": "backup-rtq2dwi2gq6",
"BackupPolicy": "DEFAULT",
"SecurityGroup": "sg-640fab0c",
"CreateTimestamp": 1504907311.112,
"SubnetMapping": {
"us-east-2c": "subnet-0e358c43",
"us-east-2a": "subnet-f1d6e798",
"us-east-2b": "subnet-40ed9d3b"
},
"Certificates": {
"ClusterCertificate": "<certificate string>"
},
"ClusterId": "cluster-jxhlf7644ne"
}
}
To create a cluster from a previous backup (AWS CloudHSM API)
• Send a CreateCluster request. Specify the HSM instance type, the subnet IDs of the subnets where
you plan to create HSMs, and the backup ID of the backup that you are restoring.
To create an HSM that contains the same users, key material, certificates, configuration, and policies that
were in the backup that you restored, add an HSM (p. 42) to the cluster.
Deleting and Restoring an AWS CloudHSM Cluster
Backup
AWS CloudHSM Cluster Backups (p. 6) are packages of encrypted data that contain the elements of a
particular cluster. Backups are generated once a day, as well as whenever an HSM is added to a cluster.
You may want to remove certain cryptographic materials from your AWS environment, such as an
expired key or inactive user. In order to remove these materials, you first delete them from your HSMs. To
ensure that deleted information is not restored when initializing a new cluster with an old backup, you
must then delete all existing backups of the cluster. To do this, you use the AWS Command Line Interface
(AWS CLI), or the AWS CloudHSM API.
A backup must be in the READY state in order to be deleted. You can check the status of a backup by
using the describe-backups command from the AWS CLI, or with the DescribeBackups API call.
Upon successful deletion, a backup is in the PENDING_DELETION state for 7 days, during which time it
can be restored with the restore-backup command. After the deletion window has passed, the target
backup can no longer be restored.
47

AWS CloudHSM User Guide
Deleting a Cluster
To delete and restore a backup (AWS CLI)
1. At a command prompt, run the delete-backup command, passing the ID of the backup to be
deleted. If you don't know the backup ID, run the describe-backups command.
$ aws cloudhsmv2 delete-backup --backup-id <backup ID>
{
"Backup": {
"CreateTimestamp": 1534461854.64,
"ClusterId": "cluster-dygnwhmscg5",
"BackupId": "backup-ro5c4er4aac",
"BackupState": "PENDING_DELETION",
"DeleteTimestamp": 1536339805.522
}
}
2. To restore a backup, issue the restore-backup command, passing the ID of a backup that is in
the PENDING_DELETION state. You can check the status of a backup by issuing the describe-
backups command with the ID of the target backup. If you would like to see a list of all
backups in the PENDING_DELETION state, run the describe-backups command and include
states=PENDING_DELETION as a filter.
$ aws cloudhsmv2 describe-backups --filters states=PENDING_DELETION
{
"Backups": [
{
"BackupId": "backup-ro5c4er4aac",
"BackupState": "PENDING_DELETION",
"CreateTimestamp": 1534461854.64,
"ClusterId": "cluster-dygnwhmscg5",
"DeleteTimestap": 1536339805.522,
}
}
$ aws cloudhsmv2 restore-backup --backup-id <backup ID>
{
"Backup": {
"ClusterId": "cluster-dygnwhmscg5",
"CreateTimestamp": 1534461854.64,
"BackupState": "READY",
"BackupId": "backup-ro5c4er4aac"
}
}
To delete and restore a backup (AWS CloudHSM API):
1. To delete a backup, send a DeleteBackup request, specifying the ID of the backup to be deleted.
2. To restore a backup, send a RestoreBackup request, specifying the ID of the backup to be restored.
Deleting an AWS CloudHSM Cluster
Before you can delete a cluster, you must remove all HSMs from the cluster. For more information, see
Removing an HSM (p. 44).
After you remove all HSMs, you can delete a cluster by using the AWS CloudHSM console, the AWS
Command Line Interface (AWS CLI), or the AWS CloudHSM API.
48

AWS CloudHSM User Guide
Tagging Resources
To delete a cluster (console)
1. Open the AWS CloudHSM console at https://console.aws.amazon.com/cloudhsm/.
2. Choose the cluster that you are deleting. Then choose Delete cluster.
3. Confirm that you want to delete the cluster, then choose Delete.
To delete a cluster (AWS CLI)
• At a command prompt, issue the delete-cluster command, passing the ID of the cluster that you are
deleting. If you don't know the cluster ID, issue the describe-clusters command.
$ aws cloudhsmv2 delete-cluster --cluster-id <cluster ID>
{
"Cluster": {
"Certificates": {
"ClusterCertificate": "<certificate string>"
},
"SourceBackupId": "backup-rtq2dwi2gq6",
"SecurityGroup": "sg-40399d28",
"CreateTimestamp": 1504903546.035,
"SubnetMapping": {
"us-east-2a": "subnet-f1d6e798",
"us-east-2c": "subnet-0e358c43",
"us-east-2b": "subnet-40ed9d3b"
},
"ClusterId": "cluster-kdmrayrc7gi",
"VpcId": "vpc-641d3c0d",
"State": "DELETE_IN_PROGRESS",
"HsmType": "hsm1.medium",
"StateMessage": "The cluster is being deleted.",
"Hsms": [],
"BackupPolicy": "DEFAULT"
}
}
To delete a cluster (AWS CloudHSM API)
• Send a DeleteCluster request, specifying the ID of the cluster that you are deleting.
Tagging AWS CloudHSM Resources
A tag is a label that you assign to an AWS resource. You can assign tags to your AWS CloudHSM clusters.
Each tag consists of a tag key and a tag value, both of which you define. For example, the tag key might
be Cost Center and the tag value might be 12345. Tag keys must be unique for each cluster.
You can use tags for a variety of purposes. One common use is to categorize and track your AWS costs.
You can apply tags that represent business categories (such as cost centers, application names, or
owners) to organize your costs across multiple services. When you add tags to your AWS resources, AWS
generates a cost allocation report with usage and costs aggregated by tags. You can use this report
to view your AWS CloudHSM costs in terms of projects or applications, instead of viewing all AWS
CloudHSM costs as a single line item.
For more information about using tags for cost allocation, see Using Cost Allocation Tags in the AWS
Billing and Cost Management User Guide.
You can use the AWS CloudHSM console or one of the AWS SDKs or command line tools to add, update,
list, and remove tags.
49
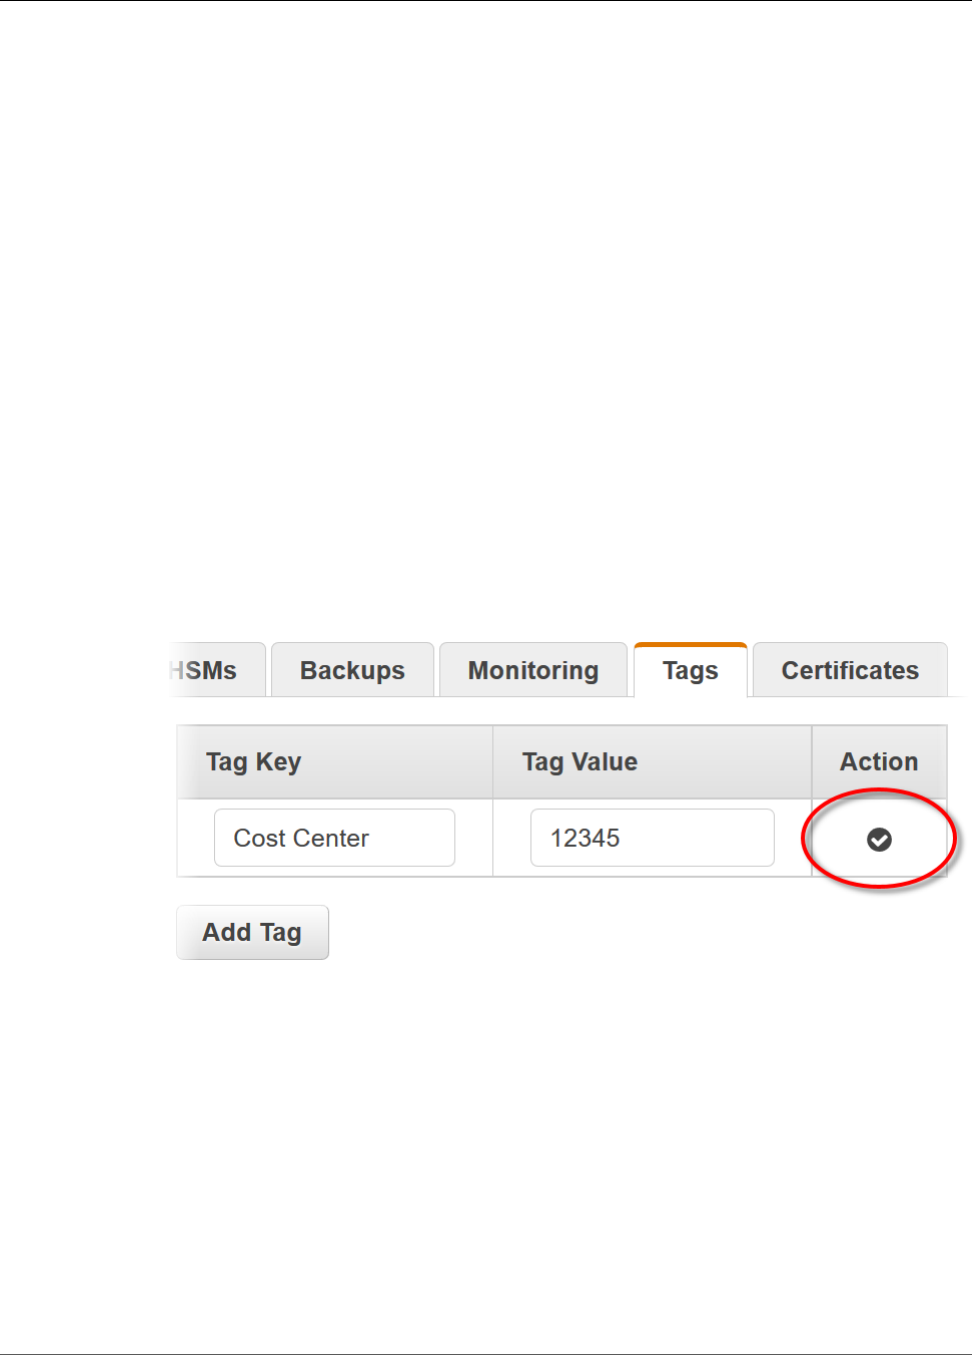
AWS CloudHSM User Guide
Adding or Updating Tags
Topics
•Adding or Updating Tags (p. 50)
•Listing Tags (p. 51)
•Removing Tags (p. 52)
Adding or Updating Tags
You can add or update tags from the AWS CloudHSM console, the AWS Command Line Interface (AWS
CLI), or the AWS CloudHSM API.
To add or update tags (console)
1. Open the AWS CloudHSM console at https://console.aws.amazon.com/cloudhsm/.
2. Choose the cluster that you are tagging.
3. Choose Tags.
4. To add a tag, do the following:
a. Choose Add Tag.
b. For Tag Key, type a key for the tag.
c. (Optional) For Tag Value, type a value for the tag.
d. Choose the action for adding a tag, as shown in the following image.
5. To update a tag, do the following:
a. Choose the tag value to update.
Note
If you update the tag key for an existing tag, the console deletes the existing tag and
creates a new one.
b. Type the new tag value. Then choose the action for updating a tag, as shown in the following
image.
50
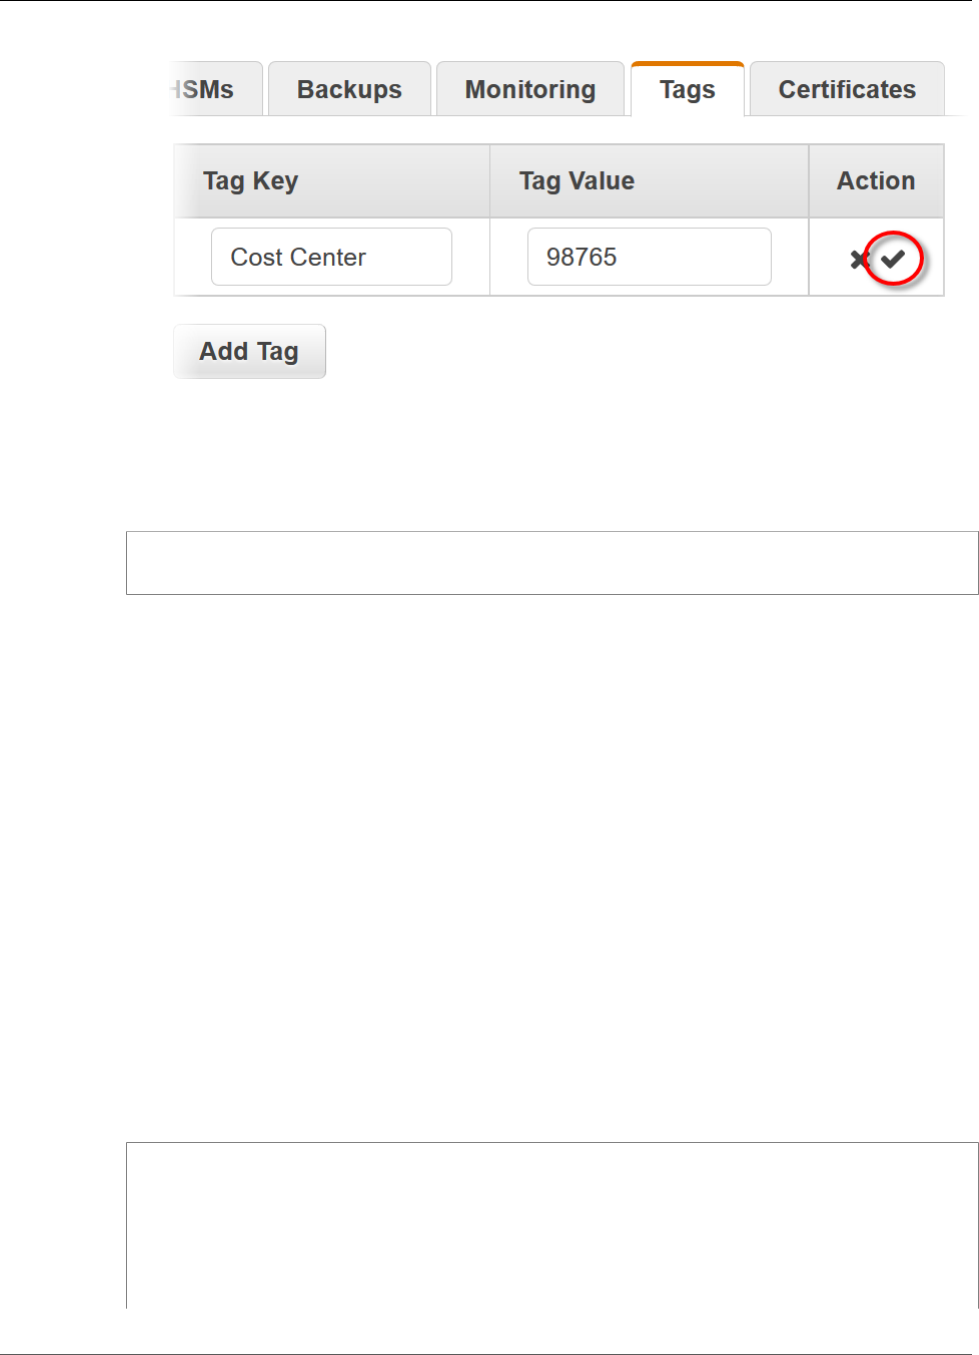
AWS CloudHSM User Guide
Listing Tags
To add or update tags (AWS CLI)
1. At a command prompt, issue the tag-resource command, specifying the tags and the ID of the
cluster that you are tagging. If you don't know the cluster ID, issue the describe-clusters command.
$ aws cloudhsmv2 tag-resource --resource-id <cluster ID> \
--tag-list Key="<tag key>",Value="<tag value>"
2. To update tags, use the same command but specify an existing tag key. When you specify a new tag
value for an existing tag, the tag is overwritten with the new value.
To add or update tags (AWS CloudHSM API)
• Send a TagResource request. Specify the tags and the ID of the cluster that you are tagging.
Listing Tags
You can list tags for a cluster from the AWS CloudHSM console, the AWS CLI, or the AWS CloudHSM API.
To list tags (console)
1. Open the AWS CloudHSM console at https://console.aws.amazon.com/cloudhsm/.
2. Choose the cluster whose tags you are listing.
3. Choose Tags.
To list tags (AWS CLI)
• At a command prompt, issue the list-tags command, specifying the ID of the cluster whose tags you
are listing. If you don't know the cluster ID, issue the describe-clusters command.
$ aws cloudhsmv2 list-tags --resource-id <cluster ID>
{
"TagList": [
{
"Key": "Cost Center",
"Value": "12345"
}
]
51
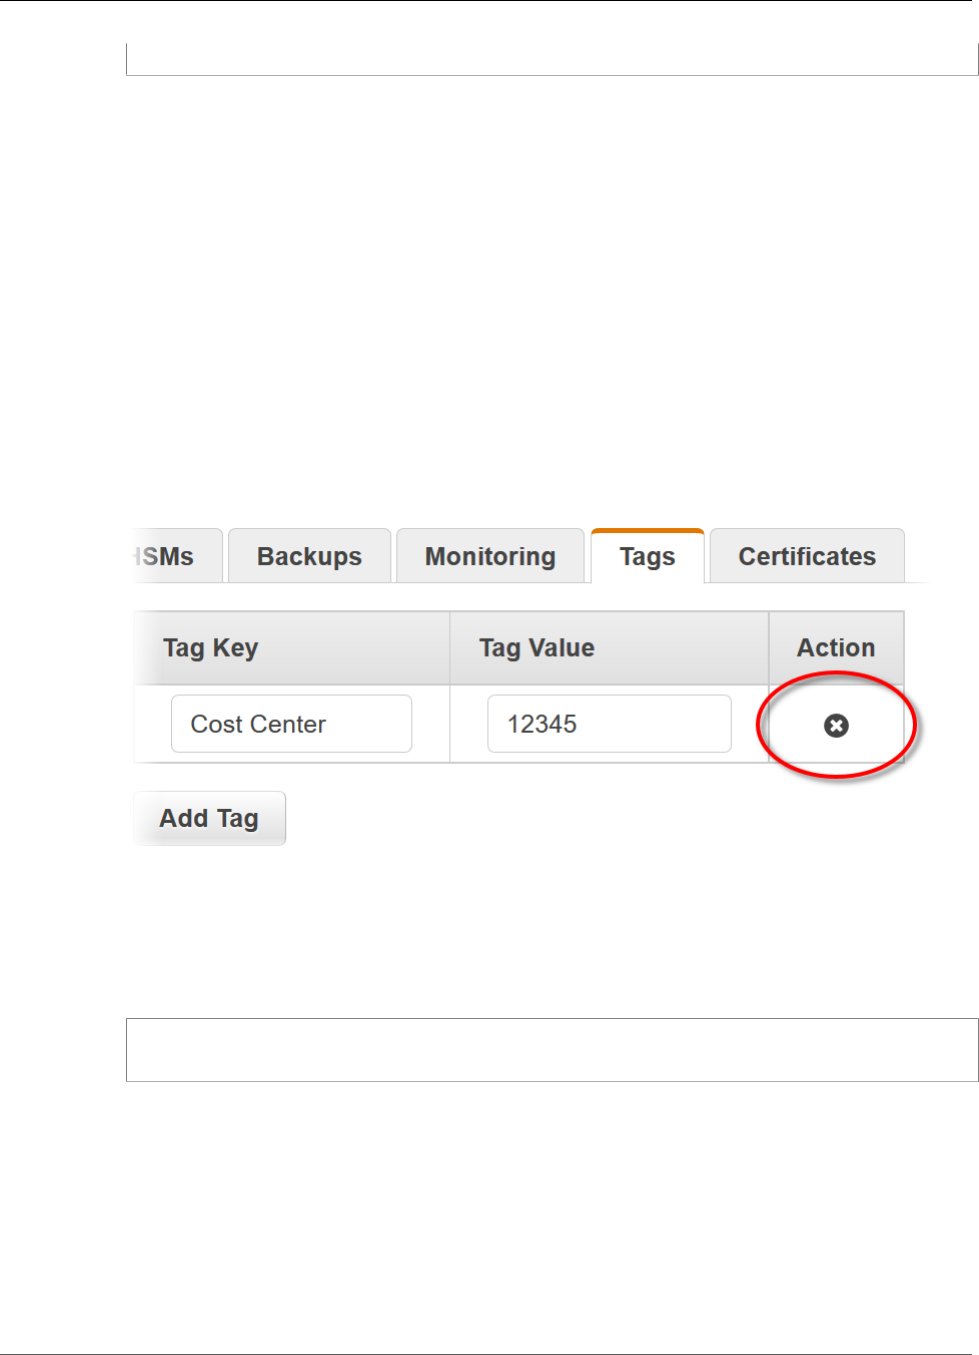
AWS CloudHSM User Guide
Removing Tags
}
To list tags (AWS CloudHSM API)
• Send a ListTags request, specifying the ID of the cluster whose tags you are listing.
Removing Tags
You can remove tags from a cluster by using the AWS CloudHSM console, the AWS CLI, or the AWS
CloudHSM API.
To remove tags (console)
1. Open the AWS CloudHSM console at https://console.aws.amazon.com/cloudhsm/.
2. Choose the cluster whose tags you are removing.
3. Choose Tags.
4. Next to the tag that you are removing, choose the action for deleting a tag, as shown in the
following image.
To remove tags (AWS CLI)
• At a command prompt, issue the untag-resource command, specifying the tag keys of the tags that
you are removing and the ID of the cluster whose tags you are removing. When you use the AWS CLI
to remove tags, specify only the tag keys, not the tag values.
$ aws cloudhsmv2 untag-resource --resource-id <cluster ID> \
--tag-key-list "<tag key>"
To remove tags (AWS CloudHSM API)
• Send an UntagResource request in the AWS CloudHSM API, specifying the ID of the cluster and the
tags that you are removing.
52

AWS CloudHSM User Guide
Managing HSM Users
Managing HSM Users and Keys in
AWS CloudHSM
Before you can use your AWS CloudHSM cluster for cryptoprocessing, you must create users and
keys on the HSMs in your cluster. See the following topics for more information about using the AWS
CloudHSM command line tools to manage HSM users and keys. You can also learn how to use quorum
authentication (also known as M of N access control).
Topics
•Managing HSM Users in AWS CloudHSM (p. 53)
•Managing Keys in AWS CloudHSM (p. 56)
•Enforcing Quorum Authentication (M of N Access Control) (p. 61)
Managing HSM Users in AWS CloudHSM
To manage users on the HSMs in your AWS CloudHSM cluster, use the AWS CloudHSM command
line tool known as cloudhsm_mgmt_util. Before you can manage users, you must start
cloudhsm_mgmt_util, enable end-to-end encryption, and log in to the HSMs. For more information, see
cloudhsm_mgmt_util (p. 74).
To manage HSM users, log in to the HSM with the user name and password of a cryptographic
officer (p. 11) (CO). Only COs can manage other users. The HSM contains a default CO named admin. You
set this user's password when you activated the cluster (p. 38).
Topics
•Create Users (p. 53)
•List Users (p. 54)
•Change a User's Password (p. 55)
•Delete Users (p. 55)
Create Users
Use the createUser (p. 85) command to create a user on the HSM. The following examples create new
CO and CU users, respectively. For information about user types, see HSM Users (p. 10).
aws-cloudhsm>createUser CO example_officer <password>
*************************CAUTION********************************
This is a CRITICAL operation, should be done on all nodes in the
cluster. Cav server does NOT synchronize these changes with the
nodes on which this operation is not executed or failed, please
ensure this operation is executed on all nodes in the cluster.
****************************************************************
Do you want to continue(y/n)?y
53

AWS CloudHSM User Guide
List Users
Creating User example_officer(CO) on 3 nodes
aws-cloudhsm>createUser CU example_user <password>
*************************CAUTION********************************
This is a CRITICAL operation, should be done on all nodes in the
cluster. Cav server does NOT synchronize these changes with the
nodes on which this operation is not executed or failed, please
ensure this operation is executed on all nodes in the cluster.
****************************************************************
Do you want to continue(y/n)?y
Creating User example_user(CU) on 3 nodes
The following shows the syntax for the createUser (p. 85) command. User types and passwords are
case-sensitive in cloudhsm_mgmt_util commands, but user names are not.
aws-cloudhsm>createUser <user type> <user name> <password>
List Users
Use the listUsers (p. 105) command to list the users on each HSM in the cluster. All HSM user
types (p. 10) can use this command; it's not restricted to COs.
The PCO is the first ("primary") CO created on each HSM. It has the same permissions on the HSM as any
other CO.
aws-cloudhsm>listUsers
Users on server 0(10.0.2.9):
Number of users found:4
User Id User Type User Name MofnPubKey
LoginFailureCnt 2FA
1 PCO admin NO
0 NO
2 AU app_user NO
0 NO
3 CO example_officer NO
0 NO
4 CU example_user NO
0 NO
Users on server 1(10.0.3.11):
Number of users found:4
User Id User Type User Name MofnPubKey
LoginFailureCnt 2FA
1 PCO admin NO
0 NO
2 AU app_user NO
0 NO
3 CO example_officer NO
0 NO
4 CU example_user NO
0 NO
Users on server 2(10.0.1.12):
Number of users found:4
User Id User Type User Name MofnPubKey
LoginFailureCnt 2FA
1 PCO admin NO
0 NO
54

AWS CloudHSM User Guide
Change a User's Password
2 AU app_user NO
0 NO
3 CO example_officer NO
0 NO
4 CU example_user NO
0 NO
Change a User's Password
Use the changePswd command to change the password for the any user. All HSM user types (p. 10)
can issue this command, but only COs can change the password for other users. Crypto users (CUs) and
appliance users (AUs) can change only their own password. The following examples change the password
for the CO and CU users that were created in the Create Users (p. 53) examples.
aws-cloudhsm>changePswd CO example_officer <new password>
*************************CAUTION********************************
This is a CRITICAL operation, should be done on all nodes in the
cluster. Cav server does NOT synchronize these changes with the
nodes on which this operation is not executed or failed, please
ensure this operation is executed on all nodes in the cluster.
****************************************************************
Do you want to continue(y/n)?y
Changing password for example_officer(CO) on 3 nodes
aws-cloudhsm>changePswd CU example_user <new password>
*************************CAUTION********************************
This is a CRITICAL operation, should be done on all nodes in the
cluster. Cav server does NOT synchronize these changes with the
nodes on which this operation is not executed or failed, please
ensure this operation is executed on all nodes in the cluster.
****************************************************************
Do you want to continue(y/n)?y
Changing password for example_user(CU) on 3 nodes
The following shows the syntax for the changePswd command. User types and passwords are case-
sensitive, but user names are not.
aws-cloudhsm>changePswd <user type> <user name> <new password>
Warning
The CO cannot change the password for a user (CO or CU) who is currently logged in.
Delete Users
Use the deleteUser command to delete a user. The following examples delete the CO and CU users that
were created in the Create Users (p. 53) examples.
aws-cloudhsm>deleteUser CO example_officer
Deleting user example_officer(CO) on 3 nodes
deleteUser success on server 0(10.0.2.9)
deleteUser success on server 1(10.0.3.11)
deleteUser success on server 2(10.0.1.12)
aws-cloudhsm>deleteUser CU example_user
55

AWS CloudHSM User Guide
Managing Keys
Deleting user example_user(CU) on 3 nodes
deleteUser success on server 0(10.0.2.9)
deleteUser success on server 1(10.0.3.11)
deleteUser success on server 2(10.0.1.12)
The following shows the syntax for the deleteUser command.
aws-cloudhsm>deleteUser <user type> <user name>
Warning
Deleting a CU user will orphan all of the keys owned by that CU and make them unusable. You
will not receive any warning that the user you are about to delete still owns keys in the cluster.
Managing Keys in AWS CloudHSM
To manage keys on the HSMs in your AWS CloudHSM cluster, use the key_mgmt_util (p. 119) command
line tool. Before you can manage keys, you must start the AWS CloudHSM client, start key_mgmt_util,
and log in to the HSMs.
To manage keys, log in to the HSM (p. 122) with the user name and password of a crypto user (CU).
Only CUs can create keys. Keys are inherently owned and managed by the CU who created them.
Topics
•Generate Keys (p. 56)
•Import Keys (p. 57)
•Export Keys (p. 59)
•Delete Keys (p. 60)
•Share and Unshare Keys (p. 60)
Generate Keys
To generate keys on the HSM, use the command that corresponds to the type of key that you want to
generate.
Generate Symmetric Keys
Use the genSymKey (p. 151) command to generate AES, triple DES, and other types of symmetric keys.
To see all available options, use the genSymKey -h command.
The following example creates a 256-bit AES key.
Command: genSymKey -t 31 -s 32 -l aes256
Cfm3GenerateSymmetricKey returned: 0x00 : HSM Return: SUCCESS
Symmetric Key Created. Key Handle: 524295
Cluster Error Status
Node id 0 and err state 0x00000000 : HSM Return: SUCCESS
Node id 1 and err state 0x00000000 : HSM Return: SUCCESS
Node id 2 and err state 0x00000000 : HSM Return: SUCCESS
56

AWS CloudHSM User Guide
Import Keys
Generate RSA Key Pairs
To generate an RSA key pair, use the genRSAKeyPair (p. 146) command. To see all available options, use
the genRSAKeyPair -h command.
The following example generates an RSA 2048-bit key pair.
Command: genRSAKeyPair -m 2048 -e 65537 -l rsa2048
Cfm3GenerateKeyPair returned: 0x00 : HSM Return: SUCCESS
Cfm3GenerateKeyPair: public key handle: 524294 private key handle: 524296
Cluster Error Status
Node id 0 and err state 0x00000000 : HSM Return: SUCCESS
Node id 1 and err state 0x00000000 : HSM Return: SUCCESS
Node id 2 and err state 0x00000000 : HSM Return: SUCCESS
Generate ECC (Elliptic Curve Cryptography) Key Pairs
To generate an ECC key pair, use the genECCKeyPair (p. 142) command. To see all available options,
including a list of the supported elliptic curves, use the genECCKeyPair -h command.
The following example generates an ECC key pair using the P-384 elliptic curve defined in NIST FIPS
publication 186-4.
Command: genECCKeyPair -i 14 -l ecc-p384
Cfm3GenerateKeyPair returned: 0x00 : HSM Return: SUCCESS
Cfm3GenerateKeyPair: public key handle: 524297 private key handle: 524298
Cluster Error Status
Node id 0 and err state 0x00000000 : HSM Return: SUCCESS
Node id 1 and err state 0x00000000 : HSM Return: SUCCESS
Node id 2 and err state 0x00000000 : HSM Return: SUCCESS
Import Keys
To import secret keys—that is, symmetric keys and asymmetric private keys—into the HSM, you must
first create a wrapping key on the HSM. You can import public keys directly without a wrapping key.
Import Secret Keys
Complete the following steps to import a secret key. Before you import a secret key, save it to a file. Save
symmetric keys as raw bytes, and asymmetric private keys in PEM format.
This example shows how to import a plaintext secret key from a file into the HSM. To import an
encrypted key from a file into the HSM, use the unWrapKey (p. 172) command.
To import a secret key
1. Use the genSymKey (p. 151) command to create a wrapping key. The following command creates
a 128-bit AES wrapping key that is valid only for the current session. You can use a session key or a
persistent key as a wrapping key.
Command: genSymKey -t 31 -s 16 -sess -l import-wrapping-key
Cfm3GenerateSymmetricKey returned: 0x00 : HSM Return: SUCCESS
Symmetric Key Created. Key Handle: 524299
57

AWS CloudHSM User Guide
Import Keys
Cluster Error Status
Node id 2 and err state 0x00000000 : HSM Return: SUCCESS
2. Use one of the following commands, depending on the type of secret key that you are importing.
• To import a symmetric key, use the imSymKey command. The following command imports an AES
key from a file named aes256.key using the wrapping key created in the previous step. To see all
available options, use the imSymKey -h command.
Command: imSymKey -f aes256.key -t 31 -l aes256-imported -w 524299
Cfm3WrapHostKey returned: 0x00 : HSM Return: SUCCESS
Cfm3CreateUnwrapTemplate returned: 0x00 : HSM Return: SUCCESS
Cfm3UnWrapKey returned: 0x00 : HSM Return: SUCCESS
Symmetric Key Unwrapped. Key Handle: 524300
Cluster Error Status
Node id 0 and err state 0x00000000 : HSM Return: SUCCESS
Node id 1 and err state 0x00000000 : HSM Return: SUCCESS
Node id 2 and err state 0x00000000 : HSM Return: SUCCESS
• To import an asymmetric private key, use the importPrivateKey command. The following
command imports a private key from a file named rsa2048.key using the wrapping key created
in the previous step. To see all available options, use the importPrivateKey -h command.
Command: importPrivateKey -f rsa2048.key -l rsa2048-imported -w 524299
BER encoded key length is 1216
Cfm3WrapHostKey returned: 0x00 : HSM Return: SUCCESS
Cfm3CreateUnwrapTemplate returned: 0x00 : HSM Return: SUCCESS
Cfm3UnWrapKey returned: 0x00 : HSM Return: SUCCESS
Private Key Unwrapped. Key Handle: 524301
Cluster Error Status
Node id 0 and err state 0x00000000 : HSM Return: SUCCESS
Node id 1 and err state 0x00000000 : HSM Return: SUCCESS
Node id 2 and err state 0x00000000 : HSM Return: SUCCESS
Import Public Keys
Use the importPubKey command to import a public key. To see all available options, use the
importPubKey -h command.
The following example imports an RSA public key from a file named rsa2048.pub.
Command: importPubKey -f rsa2048.pub -l rsa2048-public-imported
Cfm3CreatePublicKey returned: 0x00 : HSM Return: SUCCESS
Public Key Handle: 524302
Cluster Error Status
Node id 0 and err state 0x00000000 : HSM Return: SUCCESS
Node id 1 and err state 0x00000000 : HSM Return: SUCCESS
Node id 2 and err state 0x00000000 : HSM Return: SUCCESS
58

AWS CloudHSM User Guide
Export Keys
Export Keys
To export secret keys—that is, symmetric keys and asymmetric private keys—from the HSM, you must
first create a wrapping key. You can export public keys directly without a wrapping key.
Only the key owner can export a key. Users with whom the key is shared can use the key in cryptographic
operations, but they cannot export it. When running this example, be sure to export a key that you
created.
Important
The exSymKey (p. 129) command writes a plaintext (unencrypted) copy of the secret key to a
file. The export process requires a wrapping key, but the key in the file is not a wrapped key. To
export a wrapped (encrypted) copy of a key, use the wrapKey (p. 175) command.
Export Secret Keys
Complete the following steps to export a secret key.
To export a secret key
1. Use the genSymKey (p. 151) command to create a wrapping key. The following command creates a
128-bit AES wrapping key that is valid only for the current session.
Command: genSymKey -t 31 -s 16 -sess -l export-wrapping-key
Cfm3GenerateSymmetricKey returned: 0x00 : HSM Return: SUCCESS
Symmetric Key Created. Key Handle: 524304
Cluster Error Status
Node id 2 and err state 0x00000000 : HSM Return: SUCCESS
2. Use one of the following commands, depending on the type of secret key that you are exporting.
• To export a symmetric key, use the exSymKey (p. 129) command. The following command
exports an AES key to a file named aes256.key.exp. To see all available options, use the
exSymKey -h command.
Command: exSymKey -k 524295 -out aes256.key.exp -w 524304
Cfm3WrapKey returned: 0x00 : HSM Return: SUCCESS
Cfm3UnWrapHostKey returned: 0x00 : HSM Return: SUCCESS
Wrapped Symmetric Key written to file "aes256.key.exp"
Note
The command's output says that a "Wrapped Symmetric Key" is written to the output
file. However, the output file contains a plaintext (not wrapped) key. To export a wrapped
(encrypted) key to a file, use the wrapKey (p. 175) command.
• To export a private key, use the exportPrivateKey command. The following command
exports a private key to a file named rsa2048.key.exp. To see all available options, use the
exportPrivateKey -h command.
Command: exportPrivateKey -k 524296 -out rsa2048.key.exp -w 524304
Cfm3WrapKey returned: 0x00 : HSM Return: SUCCESS
Cfm3UnWrapHostKey returned: 0x00 : HSM Return: SUCCESS
59

AWS CloudHSM User Guide
Delete Keys
PEM formatted private key is written to rsa2048.key.exp
Export Public Keys
Use the exportPubKey command to export a public key. To see all available options, use the
exportPubKey -h command.
The following example exports an RSA public key to a file named rsa2048.pub.exp.
Command: exportPubKey -k 524294 -out rsa2048.pub.exp
PEM formatted public key is written to rsa2048.pub.key
Cfm3ExportPubKey returned: 0x00 : HSM Return: SUCCESS
Delete Keys
Use the deleteKey (p. 126) command to delete a key, as in the following example. Only the key owner
can delete a key.
Command: deleteKey -k 524300
Cfm3DeleteKey returned: 0x00 : HSM Return: SUCCESS
Cluster Error Status
Node id 0 and err state 0x00000000 : HSM Return: SUCCESS
Node id 1 and err state 0x00000000 : HSM Return: SUCCESS
Node id 2 and err state 0x00000000 : HSM Return: SUCCESS
Share and Unshare Keys
In AWS CloudHSM, the CU who creates the key owns it. The owner manages the key, can export and
delete it, and can use the key in cryptographic operations. The owner can also share the key with other
CU users. Users with whom the key is shared can use the key in cryptographic operations, but they
cannot export or delete the key, or share it with other users.
You can share keys with other CU users when you create the key, such as by using the -u parameter of
the genSymKey (p. 151) or genRSAKeyPair (p. 146) commands. To share existing keys with a different
HSM user, use the cloudhsm_mgmt_util (p. 74) command line tool. This is different from most of the
tasks documented in this section, which use the key_mgmt_util (p. 119) command line tool.
Before you can share a key, you must start cloudhsm_mgmt_util, enable end-to-end encryption, and
log in to the HSMs. To share a key, log in to the HSM as the crypto user (CU) that owns the key. Only key
owners can share a key.
Use the shareKey command to share or unshare a key, specifying the handle of the key and the IDs of
the user or users. To share or unshare with more than one user, specify a comma-separated list of user
IDs. To share a key, use 1 as the command's last parameter, as in the following example. To unshare, use
0.
aws-cloudhsm>shareKey 524295 4 1
*************************CAUTION********************************
This is a CRITICAL operation, should be done on all nodes in the
cluster. Cav server does NOT synchronize these changes with the
nodes on which this operation is not executed or failed, please
ensure this operation is executed on all nodes in the cluster.
****************************************************************
60

AWS CloudHSM User Guide
Quorum Authentication (M of N)
Do you want to continue(y/n)?y
shareKey success on server 0(10.0.2.9)
shareKey success on server 1(10.0.3.11)
shareKey success on server 2(10.0.1.12)
The following shows the syntax for the shareKey command.
aws-cloudhsm>shareKey <key handle> <user ID> <Boolean: 1 for share, 0 for unshare>
Enforcing Quorum Authentication (M of N Access
Control)
The HSMs in your AWS CloudHSM cluster support quorum authentication, which is also known as M of
N access control. With quorum authentication, no single user on the HSM can do quorum-controlled
operations on the HSM. Instead, a minimum number of HSM users (at least 2) must cooperate to do
these operations. With quorum authentication, you can add an extra layer of protection by requiring
approvals from more than one HSM user.
Quorum authentication can control the following operations:
• HSM user management by crypto officers (COs) (p. 11) – Creating and deleting HSM users, and
changing a different HSM user's password. For more information, see Using Quorum Authentication for
Crypto Officers (p. 66).
The following topics provide more information about quorum authentication in AWS CloudHSM.
Topics
•Overview of Quorum Authentication (p. 61)
•Additional Details about Quorum Authentication (p. 62)
•Using Quorum Authentication for Crypto Officers: First Time Setup (p. 62)
•Using Quorum Authentication for Crypto Officers (p. 66)
•Change the Quorum Minimum Value for Crypto Officers (p. 72)
Overview of Quorum Authentication
The following steps summarize the quorum authentication processes. For the specific steps and tools,
see Using Quorum Authentication for Crypto Officers (p. 66).
1. Each HSM user creates an asymmetric key for signing. He or she does this outside of the HSM, taking
care to protect the key appropriately.
2. Each HSM user logs in to the HSM and registers the public part of his or her signing key (the public
key) with the HSM.
3. When an HSM user wants to do a quorum-controlled operation, he or she logs in to the HSM and gets
a quorum token.
4. The HSM user gives the quorum token to one or more other HSM users and asks for their approval.
5. The other HSM users approve by using their keys to cryptographically sign the quorum token. This
occurs outside the HSM.
6. When the HSM user has the required number of approvals, he or she logs in to the HSM and gives the
quorum token and approvals (signatures) to the HSM.
61

AWS CloudHSM User Guide
Additional Details about Quorum Authentication
7. The HSM uses the registered public keys of each signer to verify the signatures. If the signatures are
valid, the HSM approves the token.
8. The HSM user can now do a quorum-controlled operation.
Additional Details about Quorum Authentication
Note the following additional information about using quorum authentication in AWS CloudHSM.
• An HSM user can sign his or her own quorum token—that is, the requesting user can provide one of
the required approvals for quorum authentication.
• You choose the minimum number of quorum approvers for quorum-controlled operations. The
smallest number you can choose is two (2). For HSM user management operations by COs, the largest
number you can choose is twenty (20).
• The HSM can store up to 1024 quorum tokens. If the HSM already has 1024 tokens when you try to
create a new one, the HSM purges one of the expired tokens. By default, tokens expire ten minutes
after their creation.
Using Quorum Authentication for Crypto Officers:
First Time Setup
The following topics describe the steps that you must complete to configure your HSM so that crypto
officers (COs) (p. 11) can use quorum authentication. You need to do these steps only once when you
first configure quorum authentication for COs. After you complete these steps, see Using Quorum
Authentication for Crypto Officers (p. 66).
Topics
•Prerequisites (p. 62)
•Create and Register a Key for Signing (p. 63)
•Set the Quorum Minimum Value on the HSM (p. 65)
Prerequisites
To understand this example, you should be familiar with the cloudhsm_mgmt_util command line
tool (p. 74). In this example, the AWS CloudHSM cluster has two HSMs, each with the same COs, as
shown in the following output from the listUsers command. For more information about creating users,
see Managing HSM Users (p. 53).
aws-cloudhsm>listUsers
Users on server 0(10.0.2.14):
Number of users found:7
User Id User Type User Name MofnPubKey
LoginFailureCnt 2FA
1 PCO admin NO
0 NO
2 AU app_user NO
0 NO
3 CO officer1 NO
0 NO
4 CO officer2 NO
0 NO
5 CO officer3 NO
0 NO
62

AWS CloudHSM User Guide
First Time Setup for Crypto Officers
6 CO officer4 NO
0 NO
7 CO officer5 NO
0 NO
Users on server 1(10.0.1.4):
Number of users found:7
User Id User Type User Name MofnPubKey
LoginFailureCnt 2FA
1 PCO admin NO
0 NO
2 AU app_user NO
0 NO
3 CO officer1 NO
0 NO
4 CO officer2 NO
0 NO
5 CO officer3 NO
0 NO
6 CO officer4 NO
0 NO
7 CO officer5 NO
0 NO
Create and Register a Key for Signing
To use quorum authentication, each CO must create an asymmetric key for signing (a signing key). This is
done outside of the HSM.
There are many different ways to create and protect a personal signing key. The following example
shows how to do it with OpenSSL.
Example – Create a personal signing key with OpenSSL
The following example demonstrates how to use OpenSSL to create a 2048-bit RSA key that is protected
by a pass phrase. To use this example, replace officer1.key with the name of the file where you want
to store the key.
$ openssl genrsa -out officer1.key -aes256 2048
Generating RSA private key, 2048 bit long modulus
.....................................+++
.+++
e is 65537 (0x10001)
Enter pass phrase for officer1.key:
Verifying - Enter pass phrase for officer1.key:
Each CO should create his or her own key.
After creating a key, the CO must register the public part of the key (the public key) with the HSM.
To register a public key with the HSM
1. Use the following command to start the cloudhsm_mgmt_util command line tool.
$ /opt/cloudhsm/bin/cloudhsm_mgmt_util /opt/cloudhsm/etc/cloudhsm_mgmt_util.cfg
2. Use the enable_e2e command to establish end-to-end encrypted communication.
3. Use the loginHSM command to log in to the HSM as a CO. For more information, see Log in to the
HSMs (p. 80).
63

AWS CloudHSM User Guide
First Time Setup for Crypto Officers
4. Use the registerMofnPubKey command to register the public key. For more information, see the
following example or use the help registerMofnPubKey command.
Example – Register a public key with the HSM
The following example shows how to use the registerMofnPubKey command in the
cloudhsm_mgmt_util command line tool to register a CO's public key with the HSM. To use this
command, the CO must be logged in to the HSM. Replace these values with your own:
•key_match_string – An arbitrary string that is used to match the public and private keys. You can
use any string for this value. The cloudhsm_mgmt_util command line tool encrypts this string with
the private key, and then sends the encrypted blob and the plaintext string to the HSM. The HSM uses
the public key to decrypt the encrypted blob, and then compares the decrypted string to the plaintext
string. If the strings match, the HSM registers the public key; otherwise it doesn't.
•officer1 – The user name of the CO who is registering the public key. This must be the same CO who
is logged in to the HSM and is running this command.
•officer1.key – The name of the file that contains the CO's key. This file must contain the complete
key (not just the public part) because the cloudhsm_mgmt_util command line tool uses the private key
to encrypt the key match string.
When prompted, type the pass phrase that protects the CO's key.
aws-cloudhsm>registerMofnPubKey CO key_match_string officer1 officer1.key
*************************CAUTION********************************
This is a CRITICAL operation, should be done on all nodes in the
cluster. Cav server does NOT synchronize these changes with the
nodes on which this operation is not executed or failed, please
ensure this operation is executed on all nodes in the cluster.
****************************************************************
Do you want to continue(y/n)?y
Enter PEM pass phrase:
registerMofnPubKey success on server 0(10.0.2.14)
registerMofnPubKey success on server 1(10.0.1.4)
Each CO must register his or her public key with the HSM. After all COs register their public keys, the
output from the listUsers command shows this in the MofnPubKey column, as shown in the following
example.
aws-cloudhsm>listUsers
Users on server 0(10.0.2.14):
Number of users found:7
User Id User Type User Name MofnPubKey
LoginFailureCnt 2FA
1 PCO admin NO
0 NO
2 AU app_user NO
0 NO
3 CO officer1 YES
0 NO
4 CO officer2 YES
0 NO
5 CO officer3 YES
0 NO
6 CO officer4 YES
0 NO
7 CO officer5 YES
0 NO
64

AWS CloudHSM User Guide
First Time Setup for Crypto Officers
Users on server 1(10.0.1.4):
Number of users found:7
User Id User Type User Name MofnPubKey
LoginFailureCnt 2FA
1 PCO admin NO
0 NO
2 AU app_user NO
0 NO
3 CO officer1 YES
0 NO
4 CO officer2 YES
0 NO
5 CO officer3 YES
0 NO
6 CO officer4 YES
0 NO
7 CO officer5 YES
0 NO
Set the Quorum Minimum Value on the HSM
To use quorum authentication for COs, a CO must log in to the HSM and then set the quorum minimum
value, also known as the m value. This is the minimum number of CO approvals that are required to
perform HSM user management operations. Any CO on the HSM can set the quorum minimum value,
including COs that have not registered a key for signing. You can change the quorum minimum value at
any time; for more information, see Change the Quorum Value for Crypto Officers (p. 72).
To set the quorum minimum value on the HSM
1. Use the following command to start the cloudhsm_mgmt_util command line tool.
$ /opt/cloudhsm/bin/cloudhsm_mgmt_util /opt/cloudhsm/etc/cloudhsm_mgmt_util.cfg
2. Use the enable_e2e command to establish end-to-end encrypted communication.
3. Use the loginHSM command to log in to the HSM as a CO. For more information, see Log in to the
HSMs (p. 80).
4. Use the setMValue command to set the quorum minimum value. For more information, see the
following example or use the help setMValue command.
Example – Set the quorum minimum value on the HSM
This example uses a quorum minimum value of two. You can choose any value from two to twenty, up
to the total number of COs on the HSM. In this example, the HSM has six COs (the PCO user (p. 11) is the
same as a CO), so the maximum possible value is six.
To use the following example command, replace the final number (2) with the preferred quorum
minimum value.
aws-cloudhsm>setMValue 3 2
*************************CAUTION********************************
This is a CRITICAL operation, should be done on all nodes in the
cluster. Cav server does NOT synchronize these changes with the
nodes on which this operation is not executed or failed, please
ensure this operation is executed on all nodes in the cluster.
****************************************************************
Do you want to continue(y/n)?y
Setting M Value(2) for 3 on 2 nodes
65

AWS CloudHSM User Guide
Quorum Authentication for Crypto Officers
In the preceding example, the first number (3) identifies the HSM service whose quorum minimum value
you are setting.
The following table lists the HSM service identifiers along with their names, descriptions, and the
commands that are included in the service.
Service Identifier Service Name Service Description HSM Commands
3USER_MGMT HSM user management • createUser
•deleteUser
•changePswd (applies
only when changing
the password of a
different HSM user)
4MISC_CO Miscellaneous CO
service
•setMValue
To get the quorum minimum value for a service, use the getMValue command, as in the following
example.
aws-cloudhsm>getMValue 3
MValue of service 3[USER_MGMT] on server 0 : [2]
MValue of service 3[USER_MGMT] on server 1 : [2]
The output from the preceding getMValue command shows that the quorum minimum value for HSM
user management operations (service 3) is now two.
After you complete these steps, see Using Quorum Authentication for Crypto Officers (p. 66).
Using Quorum Authentication for Crypto Officers
A crypto officer (CO) (p. 11) on the HSM can configure quorum authentication for the following
operations on the HSM:
• Creating HSM users
• Deleting HSM users
• Changing another HSM user's password
After the HSM is configured for quorum authentication, COs cannot perform HSM user management
operations on their own. The following example shows the output when a CO attempts to create a new
user on the HSM. The command fails with a RET_MXN_AUTH_FAILED error, which indicates that quorum
authentication failed.
aws-cloudhsm>createUser CU user1 password
*************************CAUTION********************************
This is a CRITICAL operation, should be done on all nodes in the
cluster. Cav server does NOT synchronize these changes with the
nodes on which this operation is not executed or failed, please
ensure this operation is executed on all nodes in the cluster.
****************************************************************
Do you want to continue(y/n)?y
Creating User user1(CU) on 2 nodes
66

AWS CloudHSM User Guide
Quorum Authentication for Crypto Officers
createUser failed: RET_MXN_AUTH_FAILED
creating user on server 0(10.0.2.14) failed
Retry/Ignore/Abort?(R/I/A):A
To perform an HSM user management operation, a CO must complete the following tasks:
1. Get a quorum token (p. 67).
2. Get approvals (signatures) from other COs (p. 68).
3. Approve the token on the HSM (p. 68).
4. Perform the HSM user management operation (p. 70).
If you have not yet configured the HSM for quorum authentication for COs, do that now. For more
information, see First Time Setup for Crypto Officers (p. 62).
Get a Quorum Token
First the CO must use the cloudhsm_mgmt_util command line tool to request a quorum token.
To get a quorum token
1. Use the following command to start the cloudhsm_mgmt_util command line tool.
$ /opt/cloudhsm/bin/cloudhsm_mgmt_util /opt/cloudhsm/etc/cloudhsm_mgmt_util.cfg
2. Use the enable_e2e command to establish end-to-end encrypted communication.
3. Use the loginHSM command to log in to the HSM as a CO. For more information, see Log in to the
HSMs (p. 80).
4. Use the getToken command to get a quorum token. For more information, see the following
example or use the help getToken command.
Example – Get a quorum token
This example gets a quorum token for the CO with user name officer1 and saves the token to a file
named officer1.token. To use the example command, replace these values with your own:
•officer1 – The name of the CO who is getting the token. This must be the same CO who is logged in
to the HSM and is running this command.
•officer1.token – The name of the file to use for storing the quorum token.
In the following command, 3 identifies the service for which you can use the token that you are getting.
In this case, the token is for HSM user management operations (service 3). For more information, see Set
the Quorum Minimum Value on the HSM (p. 65).
aws-cloudhsm>getToken 3 officer1 officer1.token
getToken success on server 0(10.0.2.14)
Token:
Id:1
Service:3
Node:1
Key Handle:0
User:officer1
getToken success on server 1(10.0.1.4)
Token:
67
AWS CloudHSM User Guide
Quorum Authentication for Crypto Officers
Id:1
Service:3
Node:0
Key Handle:0
User:officer1
Get Signatures from Approving COs
A CO who has a quorum token must get the token approved by other COs. To give their approval, the
other COs use their signing key to cryptographically sign the token. They do this outside the HSM.
There are many different ways to sign the token. The following example shows how to do it with
OpenSSL. To use a different signing tool, make sure that the tool uses the CO's private key (signing key)
to sign a SHA-256 digest of the token.
Example – Get signatures from approving COs
In this example, the CO that has the token (officer1) needs at least two approvals. The following example
commands show how two COs can use OpenSSL to cryptographically sign the token.
In the first command, officer1 signs his or her own token. To use the following example commands,
replace these values with your own:
•officer1.key and officer2.key – The name of the file that contains the CO's signing key.
•officer1.token.sig1 and officer1.token.sig2 – The name of the file to use for storing the
signature. Make sure to save each signature in a different file.
•officer1.token – The name of the file that contains the token that the CO is signing.
$ openssl dgst -sha256 -sign officer1.key -out officer1.token.sig1 officer1.token
Enter pass phrase for officer1.key:
In the following command, officer2 signs the same token.
$ openssl dgst -sha256 -sign officer2.key -out officer1.token.sig2 officer1.token
Enter pass phrase for officer2.key:
Approve the Signed Token on the HSM
After a CO gets the minimum number of approvals (signatures) from other COs, he or she must approve
the signed token on the HSM.
To approve the signed token on the HSM
1. Create a token approval file. For more information, see the following example.
2. Use the following command to start the cloudhsm_mgmt_util command line tool.
$ /opt/cloudhsm/bin/cloudhsm_mgmt_util /opt/cloudhsm/etc/cloudhsm_mgmt_util.cfg
3. Use the enable_e2e command to establish end-to-end encrypted communication.
4. Use the loginHSM command to log in to the HSM as a CO. For more information, see Log in to the
HSMs (p. 80).
5. Use the approveToken command to approve the signed token, passing the token approval file. For
more information, see the following example.
68

AWS CloudHSM User Guide
Quorum Authentication for Crypto Officers
Example – Create a token approval file and approve the signed token on the HSM
The token approval file is a text file in a particular format that the HSM requires. The file contains
information about the token, its approvers, and the approvers' signatures. The following shows an
example token approval file.
# For "Multi Token File Path", type the path to the file that contains
# the token. You can type the same value for "Token File Path", but
# that's not required. The "Token File Path" line is required in any
# case, regardless of whether you type a value.
Multi Token File Path = officer1.token;
Token File Path = ;
# Total number of approvals
Number of Approvals = 2;
# Approver 1
# Type the approver's type, name, and the path to the file that
# contains the approver's signature.
Approver Type = 2; # 2 for CO, 1 for CU
Approver Name = officer1;
Approval File = officer1.token.sig1;
# Approver 2
# Type the approver's type, name, and the path to the file that
# contains the approver's signature.
Approver Type = 2; # 2 for CO, 1 for CU
Approver Name = officer2;
Approval File = officer1.token.sig2;
After creating the token approval file, the CO uses the cloudhsm_mgmt_util command line tool to log
in to the HSM. The CO then uses the approveToken command to approve the token, as shown in the
following example. Replace approval.txt with the name of the token approval file.
aws-cloudhsm>approveToken approval.txt
approveToken success on server 0(10.0.2.14)
approveToken success on server 1(10.0.1.4)
When this command succeeds, the HSM has approved the quorum token. To check the status of a token,
use the listTokens command, as shown in the following example. The command's output shows that the
token has the required number of approvals.
The token validity time indicates how long the token is guaranteed to persist on the HSM. Even after the
token validity time elapses (zero seconds), you can still use the token.
aws-cloudhsm>listTokens
=====================
Server 0(10.0.2.14)
=====================
-------- Token - 0 ----------
Token:
Id:1
Service:3
Node:1
Key Handle:0
User:officer1
Token Validity: 506 sec
Required num of approvers : 2
Current num of approvals : 2
Approver-0: officer1
69

AWS CloudHSM User Guide
Quorum Authentication for Crypto Officers
Approver-1: officer2
Num of tokens = 1
=====================
Server 1(10.0.1.4)
=====================
-------- Token - 0 ----------
Token:
Id:1
Service:3
Node:0
Key Handle:0
User:officer1
Token Validity: 506 sec
Required num of approvers : 2
Current num of approvals : 2
Approver-0: officer1
Approver-1: officer2
Num of tokens = 1
listTokens success
Use the Token for User Management Operations
After a CO has a token with the required number of approvals, as shown in the previous section, the CO
can perform one of the following HSM user management operations:
• Create an HSM user with the createUser (p. 85) command
• Delete an HSM user with the deleteUser command
• Change a different HSM user's password with the changePswd command
For more information about using these commands, see Managing HSM Users (p. 53).
The CO can use the token for only one operation. When that operation succeeds, the token is no longer
valid. To do another HSM user management operation, the CO must get a new quorum token, get new
signatures from approvers, and approve the new token on the HSM.
In the following example command, the CO creates a new user on the HSM.
aws-cloudhsm>createUser CU user1 password
*************************CAUTION********************************
This is a CRITICAL operation, should be done on all nodes in the
cluster. Cav server does NOT synchronize these changes with the
nodes on which this operation is not executed or failed, please
ensure this operation is executed on all nodes in the cluster.
****************************************************************
Do you want to continue(y/n)?y
Creating User user1(CU) on 2 nodes
After the previous command succeeds, a subsequent listUsers command shows the new user.
aws-cloudhsm>listUsers
Users on server 0(10.0.2.14):
Number of users found:8
User Id User Type User Name MofnPubKey
LoginFailureCnt 2FA
1 PCO admin NO
0 NO
70

AWS CloudHSM User Guide
Quorum Authentication for Crypto Officers
2 AU app_user NO
0 NO
3 CO officer1 YES
0 NO
4 CO officer2 YES
0 NO
5 CO officer3 YES
0 NO
6 CO officer4 YES
0 NO
7 CO officer5 YES
0 NO
8 CU user1 NO
0 NO
Users on server 1(10.0.1.4):
Number of users found:8
User Id User Type User Name MofnPubKey
LoginFailureCnt 2FA
1 PCO admin NO
0 NO
2 AU app_user NO
0 NO
3 CO officer1 YES
0 NO
4 CO officer2 YES
0 NO
5 CO officer3 YES
0 NO
6 CO officer4 YES
0 NO
7 CO officer5 YES
0 NO
8 CU user1 NO
0 NO
If the CO tries to perform another HSM user management operation, it fails with a quorum
authentication error, as shown in the following example.
aws-cloudhsm>deleteUser CU user1
Deleting user user1(CU) on 2 nodes
deleteUser failed: RET_MXN_AUTH_FAILED
deleteUser failed on server 0(10.0.2.14)
Retry/rollBack/Ignore?(R/B/I):I
deleteUser failed: RET_MXN_AUTH_FAILED
deleteUser failed on server 1(10.0.1.4)
Retry/rollBack/Ignore?(R/B/I):I
The listTokens command shows that the CO has no approved tokens, as shown in the following example.
To perform another HSM user management operation, the CO must get a new quorum token, get new
signatures from approvers, and approve the new token on the HSM.
aws-cloudhsm>listTokens
=====================
Server 0(10.0.2.14)
=====================
Num of tokens = 0
=====================
Server 1(10.0.1.4)
71

AWS CloudHSM User Guide
Change the Quorum Value for Crypto Officers
=====================
Num of tokens = 0
listTokens success
Change the Quorum Minimum Value for Crypto
Officers
After you set the quorum minimum value (p. 65) so that crypto officers (COs) (p. 11) can use quorum
authentication, you might want to change the quorum minimum value. The HSM allows you to change
the quorum minimum value only when the number of approvers is the same or higher than the current
quorum minimum value. For example, if the quorum minimum value is two, at least two COs must
approve to change the quorum minimum value.
To get quorum approval to change the quorum minimum value, you need a quorum token for the
setMValue command (service 4). To get a quorum token for the setMValue command (service 4), the
quorum minimum value for service 4 must be higher than one. This means that before you can change
the quorum minimum value for COs (service 3), you might need to change the quorum minimum value
for service 4.
The following table lists the HSM service identifiers along with their names, descriptions, and the
commands that are included in the service.
Service Identifier Service Name Service Description HSM Commands
3USER_MGMT HSM user management • createUser
•deleteUser
•changePswd (applies
only when changing
the password of a
different HSM user)
4MISC_CO Miscellaneous CO
service
•setMValue
To change the quorum minimum value for crypto officers
1. Use the following command to start the cloudhsm_mgmt_util command line tool.
$ /opt/cloudhsm/bin/cloudhsm_mgmt_util /opt/cloudhsm/etc/cloudhsm_mgmt_util.cfg
2. Use the enable_e2e command to establish end-to-end encrypted communication.
3. Use the loginHSM command to log in to the HSM as a CO. For more information, see Log in to the
HSMs (p. 80).
4. Use the getMValue command to get the quorum minimum value for service 3. For more
information, see the following example.
5. Use the getMValue command to get the quorum minimum value for service 4. For more
information, see the following example.
6. If the quorum minimum value for service 4 is lower than the value for service 3, use the setMValue
command to change the value for service 4. Change the value for service 4 to one that is the same
or higher than the value for service 3. For more information, see the following example.
7. Get a quorum token (p. 67), taking care to specify service 4 as the service for which you can use
the token.
72
AWS CloudHSM User Guide
Change the Quorum Value for Crypto Officers
8. Get approvals (signatures) from other COs (p. 68).
9. Approve the token on the HSM (p. 68).
10. Use the setMValue command to change quorum minimum value for service 3 (user management
operations performed by COs).
Example – Get quorum minimum values and change the value for service 4
The following example command shows that the quorum minimum value for service 3 is currently two.
aws-cloudhsm>getMValue 3
MValue of service 3[USER_MGMT] on server 0 : [2]
MValue of service 3[USER_MGMT] on server 1 : [2]
The following example command shows that the quorum minimum value for service 4 is currently one.
aws-cloudhsm>getMValue 4
MValue of service 4[MISC_CO] on server 0 : [1]
MValue of service 4[MISC_CO] on server 1 : [1]
To change the quorum minimum value for service 4, use the setMValue command, setting a value that is
the same or higher than the value for service 3. The following example sets the quorum minimum value
for service 4 to two (2), the same value that is set for service 3.
aws-cloudhsm>setMValue 4 2
*************************CAUTION********************************
This is a CRITICAL operation, should be done on all nodes in the
cluster. Cav server does NOT synchronize these changes with the
nodes on which this operation is not executed or failed, please
ensure this operation is executed on all nodes in the cluster.
****************************************************************
Do you want to continue(y/n)?y
Setting M Value(2) for 4 on 2 nodes
The following commands show that the quorum minimum value is now two for service 3 and service 4.
aws-cloudhsm>getMValue 3
MValue of service 3[USER_MGMT] on server 0 : [2]
MValue of service 3[USER_MGMT] on server 1 : [2]
aws-cloudhsm>getMValue 4
MValue of service 4[MISC_CO] on server 0 : [2]
MValue of service 4[MISC_CO] on server 1 : [2]
73

AWS CloudHSM User Guide
cloudhsm_mgmt_util
AWS CloudHSM Command Line
Tools
AWS CloudHSM provides command line tools for managing and using AWS CloudHSM.
Topics
•cloudhsm_mgmt_util (p. 74)
•key_mgmt_util (p. 119)
•Configure Tool (p. 179)
Manage Clusters and HSMs
These tools get, create, delete, and tag AWS CloudHSM clusters and HSMs:
•CloudHSMv2 commands in AWS Command Line Interface (AWS CLI). To use these commands, you
need to install and configure AWS CLI.
• HSM2 PowerShell cmdlets in the AWSPowerShell module. These cmdlets are available in a
Windows PowerShell module and a cross-platform PowerShell Core module.
Manage Users
This tool creates and deletes HSM users, including implementing quorum authentication of user
management tasks:
•cloudhsm_mgmt_util (p. 74). This tool is included in the AWS CloudHSM client software.
Manage Keys
This tool creates, deletes, imports, and exports symmetric keys and asymmetric key pairs:
•key_mgmt_util (p. 119). This tool is included in the AWS CloudHSM client software.
Helper Tools
These tools help you to use the tools and software libraries.
•configure (p. 179) updates your CloudHSM client configuration files. This enables the AWS
CloudHSM to synchronize the HSMs in a cluster.
•pkpspeed (p. 270) measures the performance of your HSM hardware independent of software
libraries.
cloudhsm_mgmt_util
The cloudhsm_mgmt_util command line tool helps crypto officers manage users in the HSMs. It includes
tools that create, delete, and list users, and change user passwords.
cloudhsm_mgmt_util also includes commands that allow crypto users (CUs) to share keys and get and
set key attributes. These commands complement the key management commands in the primary key
management tool, key_mgmt_util (p. 119).
74

AWS CloudHSM User Guide
Getting Started
For a quick start, see Getting Started with cloudhsm_mgmt_util (p. 75). For detailed
information about the cloudhsm_mgmt_util commands and examples of using the commands, see
cloudhsm_mgmt_util Command Reference (p. 80).
Topics
•Getting Started with cloudhsm_mgmt_util (p. 75)
•cloudhsm_mgmt_util Command Reference (p. 80)
Getting Started with cloudhsm_mgmt_util
AWS CloudHSM includes two command line tools with the AWS CloudHSM client software (p. 35).
The cloudhsm_mgmt_util (p. 80) tool includes commands to manage HSM users. The
key_mgmt_util (p. 122) tool includes commands to manage keys. To get started with the
cloudhsm_mgmt_util command line tool, see the following topics.
Topics
•Prepare to run cloudhsm_mgmt_util (p. 75)
•Basic Usage of cloudhsm_mgmt_util (p. 78)
Prepare to run cloudhsm_mgmt_util
Complete the following steps before you use cloudhsm_mgmt_util. You need to do these steps the
first time you use cloudhsm_mgmt_util and after you add or remove HSMs in your cluster. The steps
update the HSM list in the configuration files that the AWS CloudHSM client and command line tools use.
Keeping these files updated helps AWS CloudHSM to synchronize data and maintain consistency across
all HSMs in the cluster.
Topics
•Step 1: Stop the AWS CloudHSM Client (p. 75)
•Step 2: Update the AWS CloudHSM Configuration Files (p. 76)
•Step 3: Start the AWS CloudHSM Client (p. 77)
•Step 4: Update the cloudhsm_mgmt_util Configuration File (p. 77)
Step 1: Stop the AWS CloudHSM Client
Before you update the configuration files that the AWS CloudHSM and command line tools use, stop the
AWS CloudHSM client. If the client is already stopped, running the stop command has no harmful effect.
Amazon Linux
$ sudo stop cloudhsm-client
Amazon Linux 2
$ sudo service cloudhsm-client stop
CentOS 6
$ sudo stop cloudhsm-client
75

AWS CloudHSM User Guide
Getting Started
CentOS 7
$ sudo service cloudhsm-client stop
RHEL 6
$ sudo stop cloudhsm-client
RHEL 7
$ sudo service cloudhsm-client stop
Ubuntu 16.04 LTS
$ sudo service cloudhsm-client stop
Windows
You can use Ctrl+C to stop the client.
Step 2: Update the AWS CloudHSM Configuration Files
This step uses the -a parameter of the Configure tool (p. 179) to add the elastic network interface (ENI)
IP address of one of the HSMs in the cluster to the configuration file.
Amazon Linux
$ sudo /opt/cloudhsm/bin/configure -a <HSM ENI IP>
Amazon Linux 2
$ sudo /opt/cloudhsm/bin/configure -a <HSM ENI IP>
CentOS 6
$ sudo /opt/cloudhsm/bin/configure -a <HSM ENI IP>
CentOS 7
$ sudo /opt/cloudhsm/bin/configure -a <HSM ENI IP>
RHEL 6
$ sudo /opt/cloudhsm/bin/configure -a <HSM ENI IP>
RHEL 7
$ sudo /opt/cloudhsm/bin/configure -a <HSM ENI IP>
Ubuntu 16.04 LTS
$ sudo /opt/cloudhsm/bin/configure -a <HSM ENI IP>
76

AWS CloudHSM User Guide
Getting Started
Windows
c:\Program Files\Amazon\CloudHSM>configure.exe -a <HSM ENI IP>
To get the ENI IP address of an HSM in your cluster, you can use the DescribeClusters command, the
describe-clusters CLI operation, or the Get-HSM2Cluster PowerShell cmdlet. Type only one ENI IP
address. It does not matter which ENI IP address you use.
Step 3: Start the AWS CloudHSM Client
Next, start or restart the AWS CloudHSM client. When the AWS CloudHSM client starts, it uses the ENI IP
address in its configuration file to query the cluster. Then it adds the ENI IP addresses of all HSMs in the
cluster to the cluster information file.
Amazon Linux
$ sudo start cloudhsm-client
Amazon Linux 2
$ sudo service cloudhsm-client start
CentOS 6
$ sudo start cloudhsm-client
CentOS 7
$ sudo service cloudhsm-client start
RHEL 6
$ sudo start cloudhsm-client
RHEL 7
$ sudo service cloudhsm-client start
Ubuntu 16.04 LTS
$ sudo service cloudhsm-client start
Windows
C:\Program Files\Amazon\CloudHSM>start "cloudhsm_client" cloudhsm_client.exe C:
\ProgramData\Amazon\CloudHSM\data\cloudhsm_client.cfg
Step 4: Update the cloudhsm_mgmt_util Configuration File
The final step uses the -m parameter of the Configuration tool (p. 179) to copy the updated ENI IP
addresses from the cluster information file to the configuration file that cloudhsm_mgmt_util uses. If
you skip this step, you might run into synchronization problems, such as inconsistent user data (p. 270)
in your cluster's HSMs.
77

AWS CloudHSM User Guide
Getting Started
Amazon Linux
$ sudo /opt/cloudhsm/bin/configure -m
Amazon Linux 2
$ sudo /opt/cloudhsm/bin/configure -m
CentOS 6
$ sudo /opt/cloudhsm/bin/configure -m
CentOS 7
$ sudo /opt/cloudhsm/bin/configure -m
RHEL 6
$ sudo /opt/cloudhsm/bin/configure -m
RHEL 7
$ sudo /opt/cloudhsm/bin/configure -m
Ubuntu 16.04 LTS
$ sudo /opt/cloudhsm/bin/configure -m
Windows
c:\Program Files\Amazon\CloudHSM>configure.exe -m
When this step is complete, you are ready to start cloudhsm_mgmt_util. If you add or delete HSMs at any
time, be sure to repeat this procedure before using cloudhsm_mgmt_util.
Basic Usage of cloudhsm_mgmt_util
See the following topics for the basic usage of the cloudhsm_mgmt_util tool.
Note
The cloudhsm_mgmt_util tool doesn't support autocompleting commands with the Tab key.
Don't use the Tab key with cloudhsm_mgmt_util, because that can make the tool unresponsive.
Topics
•Start cloudhsm_mgmt_util (p. 78)
•Enable End-to-End Encryption (p. 79)
•Log in to the HSMs (p. 80)
•Log Out from the HSMs (p. 80)
•Stop cloudhsm_mgmt_util (p. 80)
Start cloudhsm_mgmt_util
Use the following command to start cloudhsm_mgmt_util.
78
AWS CloudHSM User Guide
Getting Started
Amazon Linux
$ /opt/cloudhsm/bin/cloudhsm_mgmt_util /opt/cloudhsm/etc/cloudhsm_mgmt_util.cfg
Amazon Linux 2
$ /opt/cloudhsm/bin/cloudhsm_mgmt_util /opt/cloudhsm/etc/cloudhsm_mgmt_util.cfg
CentOS 6
$ /opt/cloudhsm/bin/cloudhsm_mgmt_util /opt/cloudhsm/etc/cloudhsm_mgmt_util.cfg
CentOS 7
$ /opt/cloudhsm/bin/cloudhsm_mgmt_util /opt/cloudhsm/etc/cloudhsm_mgmt_util.cfg
RHEL 6
$ /opt/cloudhsm/bin/cloudhsm_mgmt_util /opt/cloudhsm/etc/cloudhsm_mgmt_util.cfg
RHEL 7
$ /opt/cloudhsm/bin/cloudhsm_mgmt_util /opt/cloudhsm/etc/cloudhsm_mgmt_util.cfg
Ubuntu 16.04 LTS
$ /opt/cloudhsm/bin/cloudhsm_mgmt_util /opt/cloudhsm/etc/cloudhsm_mgmt_util.cfg
Windows
C:\Program Files\Amazon\CloudHSM>cloudhsm_mgmt_util.exe C:\ProgramData\Amazon\CloudHSM
\data\cloudhsm_mgmt_util.cfg
Output should be similar to the following depending on how many HSMs you have.
Connecting to the server(s), it may take time
depending on the server(s) load, please wait...
Connecting to server '10.0.2.9': hostname '10.0.2.9', port 2225...
Connected to server '10.0.2.9': hostname '10.0.2.9', port 2225.
Connecting to server '10.0.3.11': hostname '10.0.3.11', port 2225...
Connected to server '10.0.3.11': hostname '10.0.3.11', port 2225.
Connecting to server '10.0.1.12': hostname '10.0.1.12', port 2225...
Connected to server '10.0.1.12': hostname '10.0.1.12', port 2225.
The prompt changes to aws-cloudhsm> when cloudhsm_mgmt_util is running.
Enable End-to-End Encryption
Use the enable_e2e command to establish end-to-end encrypted communication between
cloudhsm_mgmt_util and the HSMs in your cluster. You should enable end-to-end encryption each time
you start cloudhsm_mgmt_util.
79
AWS CloudHSM User Guide
Reference
aws-cloudhsm>enable_e2e
E2E enabled on server 0(10.0.2.9)
E2E enabled on server 1(10.0.3.11)
E2E enabled on server 2(10.0.1.12)
Log in to the HSMs
Use the loginHSM command to log in to the HSMs. Any user of any type can use this command to log in
to the HSMs.
The command in the following example logs in admin, which is the default crypto officer (CO) (p. 10).
You set this user's password when you activated the cluster (p. 38). The output shows that the command
logged in the admin user to all of the HSMs in the cluster.
Warning
When you log in to cloudhsm_mgmt_util, verify that the ENI IP addresses in the success
messages exactly match the ENI IP addresses of all HSMs in the cluster. If they do not, stop
and run all steps in the the section called “Prepare to run cloudhsm_mgmt_util” (p. 75)
procedure.
To get the ENI IP addresses of the HSMs in your cluster, the DescribeClusters operation, the
describe-clusters command, or the Get-HSM2Cluster PowerShell cmdlet.
aws-cloudhsm>loginHSM CO admin <password>
loginHSM success on server 0(10.0.2.9)
loginHSM success on server 1(10.0.3.11)
loginHSM success on server 2(10.0.1.12)
The following shows the syntax for the loginHSM command.
aws-cloudhsm>loginHSM <user type> <user name> <password>
Log Out from the HSMs
Use the logoutHSM command to log out of the HSMs.
aws-cloudhsm>logoutHSM
logoutHSM success on server 0(10.0.2.9)
logoutHSM success on server 1(10.0.3.11)
logoutHSM success on server 2(10.0.1.12)
Stop cloudhsm_mgmt_util
Use the quit command to stop cloudhsm_mgmt_util.
aws-cloudhsm>quit
disconnecting from servers, please wait...
cloudhsm_mgmt_util Command Reference
The cloudhsm_mgmt_util command line tool helps crypto officers manage users in the HSMs. It also
includes commands that allow crypto users (CUs) to share keys, and get and set key attributes. These
commands complement the primary key management commands in the key_mgmt_util (p. 119)
command line tool.
80

AWS CloudHSM User Guide
Reference
For a quick start, see Getting Started with cloudhsm_mgmt_util (p. 75).
Before you run any cloudhsm_mgmt_util command, you must start cloudhsm_mgmt_util (p. 78),
enable end-to-end encryption (p. 79), and log in (p. 80) to the HSM. Be sure that you log in with
the user account type that can run the commands you plan to use.
To list all cloudhsm_mgmt_util commands, run the following command:
aws-cloudhsm> help
To get the syntax for a cloudhsm_mgmt_util command, run the following command:
aws-cloudhsm> help <command-name>
To run a command, enter the command name, or enough of the name to distinguish it from the names
of other cloudhsm_mgmt_util commands.
For example, to get a list of users on the HSMs, enter listUsers or listU.
aws-cloudhsm> listUsers
To end your cloudhsm_mgmt_util session, run the following command:
aws-cloudhsm> quit
For help interpreting the key attributes, see the Key Attribute Reference (p. 176).
The following topics describe commands in cloudhsm_mgmt_util.
Note
Some commands in key_mgmt_util and cloudhsm_mgmt_util have the same names. However,
the commands typically have different syntax, different output, and slightly different
functionality.
Command Description User Type
changePswd (p. 82) Changes the passwords of users
on the HSMs. Any user can
change their own password. COs
can change anyone's password.
CO
createUser (p. 85) Creates users of all types on the
HSMs.
CO
deleteUser (p. 88) Deletes users of all types from
the HSMs.
CO
findAllKeys (p. 91) Gets the keys that a user owns
or shares. Also gets a hash of the
key ownership and sharing data
for all keys on each HSM.
CO, AU
getAttribute (p. 94) Gets an attribute value for an
AWS CloudHSM key and writes
it to a file or stdout (standard
output).
CU
81

AWS CloudHSM User Guide
Reference
Command Description User Type
getCert (p. 96) Gets the certificate of a
particular HSM and saves it in a
desired certificate format.
All.
getHSMInfo (p. 98) Gets information about the
hardware on which an HSM is
running.
All. Login is not required.
getKeyInfo (p. 98) Gets owners, shared users, and
the quorum authentication
status of a key.
All. Login is not required.
info (p. 102) Gets information about an
HSM, including the IP address,
hostname, port, and current
user.
All. Login is not required.
listUsers (p. 105) Gets the users in each of the
HSMs, their user type and ID,
and other attributes.
All. Login is not required.
loginHSM and
logoutHSM (p. 106)
Log in and log out of an HSM. All.
quit (p. 112) Quits cloudhsm_mgmt_util. All. Login is not required.
server (p. 108) Enters and exits server mode on
an HSM.
All.
setAttribute (p. 109) Changes the values of the label,
encrypt, decrypt, wrap, and
unwrap attributes of an existing
key.
CU
shareKey (p. 112) Shares an existing key with other
users.
CU
syncKey (p. 115) Syncs a key across cloned AWS
CloudHSM clusters.
CU, CO
changePswd
The changePswd command in cloudhsm_mgmt_util changes the password of an existing user on the
HSMs in the cluster.
Any user can change their own password. Crypto officers (COs and PCOs) can also change the password
of any other user. You do not need to enter the current password to make the change. However, you
cannot change the password of a user who is logged into the AWS CloudHSM client or key_mgmt_util.
Before you run any cloudhsm_mgmt_util command, you must start cloudhsm_mgmt_util (p. 78)
and log in (p. 80) to the HSM. Be sure that you log in with the user account type that can run the
commands you plan to use.
If you add or delete HSMs, update the configuration files (p. 75) that the AWS CloudHSM client and
the command line tools use. Otherwise, the changes that you make might not be effective for all HSMs
in the cluster.
82

AWS CloudHSM User Guide
Reference
User Type
The following users can run this command.
• Crypto officers (CO)
• Crypto users (CU)
Syntax
Because this command does not have named parameters, you must enter the arguments in the order
specified in the syntax diagram.
changePswd <user-type> <user-name> <password>
Examples
These examples show how to use changePassword to create new users in your HSMs.
Example : Change Your Password
Any user on the HSMs can use changePswd to change their own password.
The first command uses info (p. 102) to get the current user. The output shows that the current user,
bob, is a crypto user (CU).
aws-cloudhsm> info server 0
Id Name Hostname Port State Partition
LoginState
0 10.0.3.10 10.0.3.10 2225 Connected hsm-aaaabbbbccc Logged
in as 'bob(CU)'
aws-cloudhsm> info server 1
Id Name Hostname Port State Partition
LoginState
0 10.0.3.10 10.0.3.10 2225 Connected hsm-ccccaaaabbb Logged
in as 'bob(CU)'
To change his password, bob runs changePswd with a new password, newPasswerd.
When the command completes, the password change is effective.
aws-cloudhsm> createUser CU bob newPasswerd
*************************CAUTION********************************
This is a CRITICAL operation, should be done on all nodes in the
cluster. Cav server does NOT synchronize these changes with the
nodes on which this operation is not executed or failed, please
ensure this operation is executed on all nodes in the cluster.
****************************************************************
Do you want to continue(y/n)?y
Changing password for bob(CU) on 2 nodes
Example : Change the Password of Another User
This example shows how to change the password of a different user. Any crypto officer (CO, PCO) can
change the password of any user on the HSMs without specifying the existing password.
83
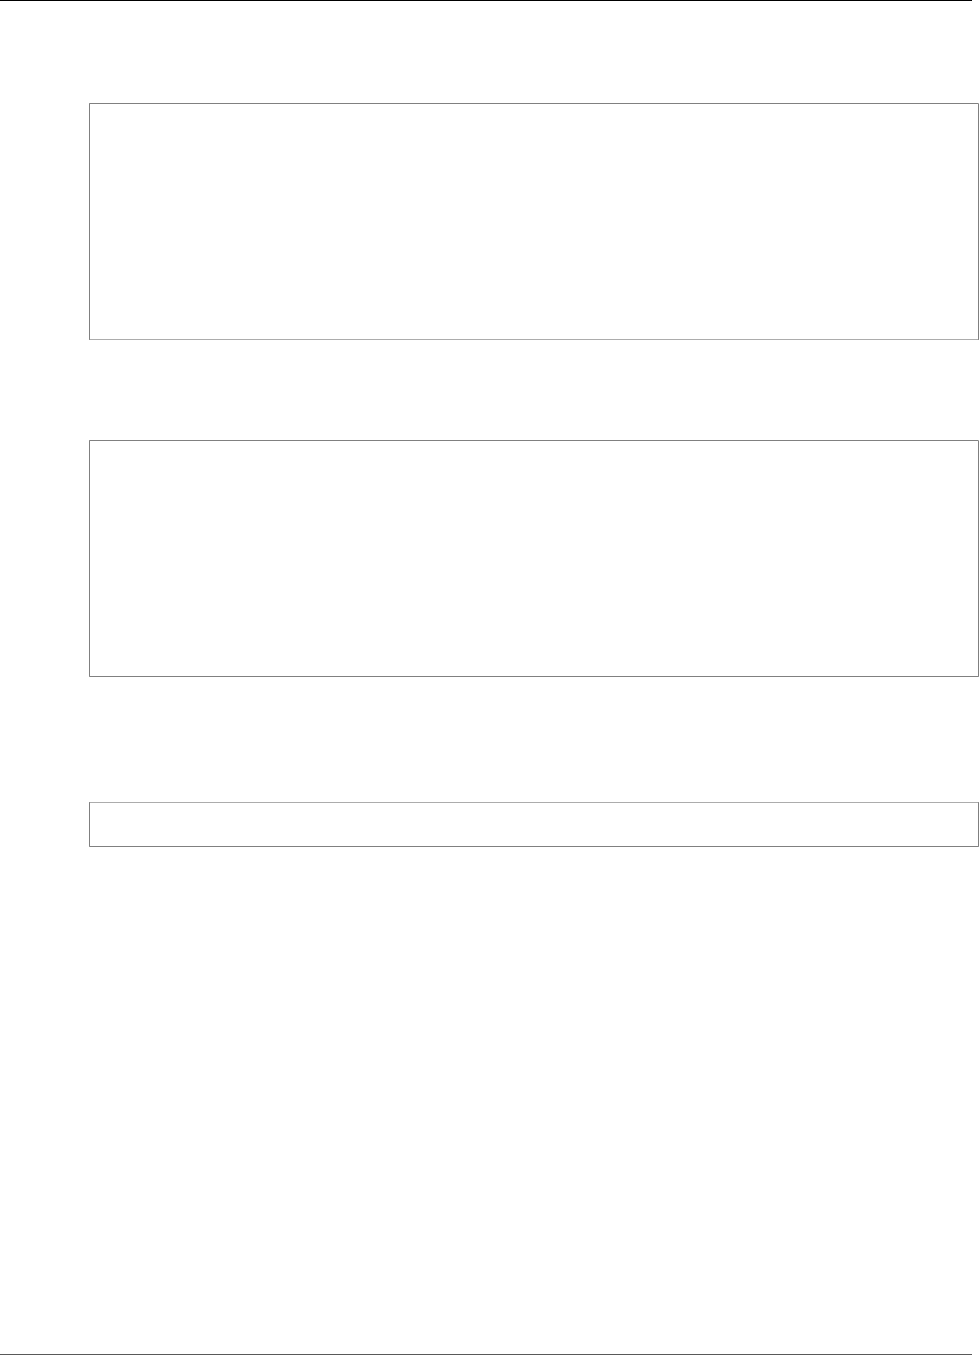
AWS CloudHSM User Guide
Reference
The first command uses info (p. 102) to confirm that alice, a CO, is logged into the HSMs in the
cluster.
aws-cloudhsm>info server 0
Id Name Hostname Port State Partition
LoginState
0 10.0.3.10 10.0.3.10 2225 Connected hsm-aaaabbbbccc Logged in
as 'alice(CO)'
aws-cloudhsm>info server 1
Id Name Hostname Port State Partition
LoginState
0 10.0.3.10 10.0.3.10 2225 Connected hsm-ccccaaaabbb Logged in
as 'alice(CO)'
This command uses changePswd to change the password of officer1, another CO on the HSMs. In
this case, the command resets the password to defaultPassword, the password that this fictitious
enterprise uses as its default. Later, officer1 can reset their password to a more secure value.
aws-cloudhsm>changePswd CO officer1 defaultPassword
*************************CAUTION********************************
This is a CRITICAL operation, should be done on all nodes in the
cluster. Cav server does NOT synchronize these changes with the
nodes on which this operation is not executed or failed, please
ensure this operation is executed on all nodes in the cluster.
****************************************************************
Do you want to continue(y/n)?y
Changing password for officer1(CO) on 2 nodes
Arguments
Because this command does not have named parameters, you must enter the arguments in the order
specified in the syntax diagram.
changePswd <user-type> <user-name> <password> [1FA | 2FA]
<user-type>
Specifies the current type of the user whose password you are changing. You cannot use
changePswd to change the user type.
Valid values are CO, CU, AU, PCO, and PRECO.
To get the user type, use listUsers (p. 105). For detailed information about the user types on an
HSM, see HSM Users (p. 10).
Required: Yes
<user-name>
Specifies the user's friendly name. This parameter is not case-sensitive. You cannot use changePswd
to change the user name.
Required: Yes
<password>
Specifies a new password for the user. Enter a string of 7 to 32 characters. This value is case
sensitive. The password appears in plaintext when you type it.
84

AWS CloudHSM User Guide
Reference
Required: Yes
1FA | 2FA
Enables or disables dual-factor authentication for the new user. Enter 1FA or 2FA.
This parameter is valid only when the cluster has been configured for dual-factor authentication.
Required: No
Default: 1FA. Dual factor authentication is not enabled.
Related Topics
•listUsers (p. 105)
•createUser (p. 85)
•deleteUser (p. 88)
createUser
The createUser command in cloudhsm_mgmt_util creates a user on the HSMs. Only crypto officers (COs
and PCOs) can run this command. When you create a user, you specify the user type (CO or CU), a user
name, and a password. When the command succeeds, it creates the user in all HSMs in the cluster.
However, if your HSM configuration is inaccurate, the user might not be created on all HSMs. To add the
user to any HSMs in which it is missing, use the createUser command only on the HSMs that are missing
that user. To prevent configuration errors, run the configure tool with the -m option.
Before you run any cloudhsm_mgmt_util command, you must start cloudhsm_mgmt_util (p. 78)
and log in (p. 80) to the HSM. Be sure that you log in with the user account type that can run the
commands you plan to use.
If you add or delete HSMs, update the configuration files (p. 75) that the AWS CloudHSM client and
the command line tools use. Otherwise, the changes that you make might not be effective for all HSMs
in the cluster.
User Type
The following types of users can run this command.
• Crypto officers (CO, PCO)
Syntax
Because this command does not have named parameters, you must enter the arguments in the order
specified in the syntax diagram.
User Type: Crypto officer (CO, PCO)
createUser <user-type> <user-name> <password> [1FA | 2FA]
Examples
These examples show how to use createUser to create new users in your HSMs.
85

AWS CloudHSM User Guide
Reference
Example : Create a Crypto Officer
This example creates a crypto officer (CO) on the HSMs in a cluster. The first command uses loginHSM to
log in to the HSM as a crypto officer.
aws-cloudhsm> loginHSM CO admin 735782961
loginHSM success on server 0(10.0.0.1)
loginHSM success on server 1(10.0.0.2)
loginHSM success on server 1(10.0.0.3)
The second command uses the createUser command to create alice, a new crypto officer on the HSM.
The caution message explains that the command creates users on all of the HSMs in the cluster. But, if
the command fails on any HSMs, the user will not exist on those HSMs. To continue, type y.
The output shows that the new user was created on all three HSMs in the cluster.
aws-cloudhsm> createUser CO alice 391019314
*************************CAUTION********************************
This is a CRITICAL operation, should be done on all nodes in the
cluster. Cav server does NOT synchronize these changes with the
nodes on which this operation is not executed or failed, please
ensure this operation is executed on all nodes in the cluster.
****************************************************************
Do you want to continue(y/n)?Invalid option, please type 'y' or 'n'
Do you want to continue(y/n)?y
Creating User alice(CO) on 3 nodes
When the command completes, alice has the same permissions on the HSM as the admin CO user,
including changing the password of any user on the HSMs.
The final command uses the listUsers (p. 105) command to verify that alice exists on all three HSMs
on the cluster. The output also shows that alice is assigned user ID 3.. You use the user ID to identify
alice in other commands, such as findAllKeys (p. 91).
aws-cloudhsm> listUsers
Users on server 0(10.0.0.1):
Number of users found:3
User Id User Type User Name MofnPubKey
LoginFailureCnt 2FA
1 PCO admin YES
0 NO
2 AU app_user NO
0 NO
3 CO alice NO
0 NO
Users on server 1(10.0.0.2):
Number of users found:3
User Id User Type User Name MofnPubKey
LoginFailureCnt 2FA
1 PCO admin YES
0 NO
2 AU app_user NO
0 NO
3 CO alice NO
0 NO
86

AWS CloudHSM User Guide
Reference
Users on server 1(10.0.0.3):
Number of users found:3
User Id User Type User Name MofnPubKey
LoginFailureCnt 2FA
1 PCO admin YES
0 NO
2 AU app_user NO
0 NO
3 CO alice NO
0 NO
Example : Create a Crypto User
This example creates a crypto user (CU), bob, on the HSM. Crypto users can create and manage keys, but
they cannot manage users.
After you type y to respond to the caution message, the output shows that bob was created on all three
HSMs in the cluster. The new CU can log in to the HSM to create and manage keys.
The command used a password value of defaultPassword. Later, bob or any CO can use the
changePswd (p. 82) command to change his password.
aws-cloudhsm> createUser CU bob defaultPassword
*************************CAUTION********************************
This is a CRITICAL operation, should be done on all nodes in the
cluster. Cav server does NOT synchronize these changes with the
nodes on which this operation is not executed or failed, please
ensure this operation is executed on all nodes in the cluster.
****************************************************************
Do you want to continue(y/n)?Invalid option, please type 'y' or 'n'
Do you want to continue(y/n)?y
Creating User bob(CU) on 3 nodes
Arguments
Because this command does not have named parameters, you must enter the arguments in the order
specified in the syntax diagram.
createUser <user-type> <user-name> <password> [ 1FA | 2FA ]
<user-type>
Specifies the type of user. This parameter is required.
For detailed information about the user types on an HSM, see HSM Users (p. 10).
Valid values:
•CO: Crypto officers can manage users, but they cannot manage keys.
•CU: Crypto users can create an manage keys and use keys in cryptographic operations.
•AU: Appliance users can clone and synchronize operations. One AU is created for you on each HSM
that you install.
PCO, PRECO, and preCO are also valid values, but they are rarely used. A PCO is functionally identical
to a CO user. A PRECO user is a temporary type that is created automatically on each HSM. The
PRECO is converted to a PCO when you assign a password during HSM activation (p. 38).
87

AWS CloudHSM User Guide
Reference
Required: Yes
<user-name>
Specifies a friendly name for the user. The maximum length is 31 characters. The only special
character permitted is an underscore ( _ ).
You cannot change the name of a user after it is created. In cloudhsm_mgmt_util commands, the
user type and password are case-sensitive, but the user name is not.
Required: Yes
<password>
Specifies a password for the user. Enter a string of 7 to 32 characters. This value is case-sensitive.
The password appears in plaintext when you type it.
To change a user password, use changePswd. Any HSM user can change their own password, but CO
users can change the password of any user (of any type) on the HSMs.
Required: Yes
1FA | 2FA
Enables or disables dual-factor authentication for the new user. Enter 1FA or 2FA.
This parameter is valid only when the cluster has been configured for dual-factor authentication.
Required: No
Default: 1FA: Dual factor authentication is not enabled.
Related Topics
•listUsers (p. 105)
•deleteUser (p. 88)
•changePswd (p. 82)
deleteUser
The deleteUser command in cloudhsm_mgmt_util deletes a user from the HSMs. Only crypto officers
(COs and PCOs) can run this command, but any CO user can delete any user of any type from the HSMs.
However, you cannot delete a user who is logged into the AWS CloudHSM client, key_mgmt_util, or
cloudhsm_mgmt_util.
Warning
When you delete a crypto user (CU), all keys that the user owned are deleted, even if the keys
were shared with other users. To make accidental or malicious deletion of users less likely, use
quorum authentication (p. 66).
Before you run any cloudhsm_mgmt_util command, you must start cloudhsm_mgmt_util (p. 78)
and log in (p. 80) to the HSM. Be sure that you log in with the user account type that can run the
commands you plan to use.
If you add or delete HSMs, update the configuration files (p. 75) that the AWS CloudHSM client and
the command line tools use. Otherwise, the changes that you make might not be effective for all HSMs
in the cluster.
User Type
The following types of users can run this command.
88

AWS CloudHSM User Guide
Reference
• Crypto officers (CO, PCO)
Syntax
Because this command does not have named parameters, you must enter the arguments in the order
specified in the syntax diagram.
deleteUser <user-type> <user-name>
Example
This example deletes a crypto officer (CO) from the HSMs in a cluster. The first command uses listUsers
to list all users on the HSMs.
The output shows that user 3, alice, is a CO on the HSMs.
aws-cloudhsm> listUsers
Users on server 0(10.0.0.1):
Number of users found:3
User Id User Type User Name MofnPubKey
LoginFailureCnt 2FA
1 PCO admin YES
0 NO
2 AU app_user NO
0 NO
3 CO alice NO
0 NO
Users on server 1(10.0.0.2):
Number of users found:3
User Id User Type User Name MofnPubKey
LoginFailureCnt 2FA
1 PCO admin YES
0 NO
2 AU app_user NO
0 NO
3 CO alice NO
0 NO
Users on server 1(10.0.0.3):
Number of users found:3
User Id User Type User Name MofnPubKey
LoginFailureCnt 2FA
1 PCO admin YES
0 NO
2 AU app_user NO
0 NO
3 CO alice NO
0 NO
The second command uses the deleteUser command to delete alice from the HSMs.
The output shows that the command succeeded on all three HSMs in the cluster.
aws-cloudhsm> deleteUser CO alice
Deleting user alice(CO) on 3 nodes
deleteUser success on server 0(10.0.0.1)
deleteUser success on server 0(10.0.0.2)
89

AWS CloudHSM User Guide
Reference
deleteUser success on server 0(10.0.0.3)
The final command uses the listUsers (p. 105) command to verify that alice is deleted from all three
of the HSMs on the cluster.
aws-cloudhsm> listUsers
Users on server 0(10.0.0.1):
Number of users found:2
User Id User Type User Name MofnPubKey
LoginFailureCnt 2FA
1 PCO admin YES
0 NO
2 AU app_user NO
0 NO
Users on server 1(10.0.0.2):
Number of users found:2
User Id User Type User Name MofnPubKey
LoginFailureCnt 2FA
1 PCO admin YES
0 NO
2 AU app_user NO
0 NO
Users on server 1(10.0.0.3):
Number of users found:2
User Id User Type User Name MofnPubKey
LoginFailureCnt 2FA
1 PCO admin YES
0 NO
2 AU app_user NO
0 NO
Arguments
Because this command does not have named parameters, you must enter the arguments in the order
specified in the syntax diagram.
deleteUser <user-type> <user-name>
<user-type>
Specifies the type of user. This parameter is required.
Warning
When you delete a crypto user (CU), all keys that the user owned are deleted, even if the
keys were shared with other users. To make accidental or malicious deletion of users less
likely, use quorum authentication (p. 66).
Valid values are CO, CU, AU, PCO, and PRECO.
To get the user type, use listUsers (p. 105). For detailed information about the user types on an
HSM, see HSM Users (p. 10).
Required: Yes
<user-name>
Specifies a friendly name for the user. The maximum length is 31 characters. The only special
character permitted is an underscore ( _ ).
90

AWS CloudHSM User Guide
Reference
You cannot change the name of a user after it is created. In cloudhsm_mgmt_util commands, the
user type and password are case-sensitive, but the user name is not.
Required: Yes
Related Topics
•listUsers (p. 105)
•createUser (p. 85)
• syncUser
•changePswd (p. 82)
findAllKeys
The findAllKeys command in cloudhsm_mgmt_util gets the keys that a specified crypto user (CU)
owns or shares. It also returns a hash of the user data on each of the HSMs. You can use the hash to
determine at a glance whether the users, key ownership, and key sharing data are the same on all HSMs
in the cluster.
findAllKeys returns public keys only when the specified CU owns the key, even though all CUs on the
HSM can use any public key. This behavior is different from findKey (p. 133) in key_mgmt_util, which
returns public keys for all CU users.
Only crypto officers (COs and PCOs) and appliance users (AUs) can run this command. Crypto users (CUs)
can run the following commands:
•listUsers (p. 105) to find all users
•findKey (p. 133) in key_mgmt_util to find the keys that they can use
•getKeyInfo (p. 159) in key_mgmt_util to find the owner and shared users of a particular key they own
or share
Before you run any cloudhsm_mgmt_util command, you must start cloudhsm_mgmt_util (p. 78)
and log in (p. 80) to the HSM. Be sure that you log in with the user account type that can run the
commands you plan to use.
If you add or delete HSMs, update the configuration files (p. 75) that the AWS CloudHSM client and
the command line tools use. Otherwise, the changes that you make might not be effective for all HSMs
in the cluster.
User Type
The following users can run this command.
• Crypto officers (CO, PCO)
• Appliance users (AU)
Syntax
Because this command does not have named parameters, you must enter the arguments in the order
specified in the syntax diagram.
findAllKeys <user id> <key hash (0/1)> [<output file>]
91

AWS CloudHSM User Guide
Reference
Examples
These examples show how to use findAllKeys to find all keys for a user and get a hash of key user
information on each of the HSMs.
Example : Find the Keys for a CU
This example uses findAllKeys to find the keys in the HSMs that user 4 owns and shares. The
command uses a value of 0 for the second argument to suppress the hash value. Because it omits the
optional file name, the command writes to stdout (standard output).
The output shows that user 4 can use 6 keys: 8, 9, 17, 262162, 19, and 31. The output uses an (s) to
indicate that keys 8, 9, and 262162 are explicitly shared, although it does not indicate whether user 4
owns or shares them. The keys that are not marked with (s) include symmetric and private keys that the
user 4 owns and does not share, and public keys that are available to all crypto users.
aws-cloudhsm> findAllKeys 4 0
Keys on server 0(10.0.0.1):
Number of keys found 6
number of keys matched from start index 0::6
8(s),9(s),17,262162(s),19,31
findAllKeys success on server 0(10.0.0.1)
Keys on server 1(10.0.0.2):
Number of keys found 6
number of keys matched from start index 0::6
8(s),9(s),17,262162(s),19,31
findAllKeys success on server 1(10.0.0.2)
Keys on server 1(10.0.0.3):
Number of keys found 6
number of keys matched from start index 0::6
8(s),9(s),17,262162(s),19,31
findAllKeys success on server 1(10.0.0.3)
Example : Verify That User Data Is Synchronized
This example uses findAllKeys to verify that all of the HSMs in the cluster contain the same users,
key ownership, and key sharing values. To do this, it gets a hash of the key user data on each HSM and
compares the hash values.
To get the key hash, the command uses a value of 1 in the second argument. The optional file name is
omitted, so the command writes the key hash to stdout.
The example specifies user 6, but the hash value will be the same for any user that owns or shares any of
the keys on the HSMs. If the specified user does not own or share any keys, such as a CO, the command
does not return a hash value.
The output shows that the key hash is identical to both of the HSMs in the cluster. If one of the HSM had
different users, different key owners, or different shared users, the key hash values would not be equal.
aws-cloudhsm> findAllKeys 6 1
Keys on server 0(10.0.0.1):
Number of keys found 3
number of keys matched from start index 0::3
8(s),9(s),11,17(s)
Key Hash:
55655676c95547fd4e82189a072ee1100eccfca6f10509077a0d6936a976bd49
findAllKeys success on server 0(10.0.0.1)
92

AWS CloudHSM User Guide
Reference
Keys on server 1(10.0.0.2):
Number of keys found 3
number of keys matched from start index 0::3
8(s),9(s),11,17(s)
Key Hash:
55655676c95547fd4e82189a072ee1100eccfca6f10509077a0d6936a976bd49
findAllKeys success on server 1(10.0.0.2)
This command demonstrates that the hash value represents the user data for all keys on the HSM. The
command uses the findAllKeys for user 3. Unlike user 6, who owns or shares just 3 keys, user 3 own or
shares 17 keys, but the key hash value is the same.
aws-cloudhsm> findAllKeys 3 1
Keys on server 0(10.0.0.1):
Number of keys found 17
number of keys matched from start index 0::17
6,7,8(s),11,12,14,262159,262160,17(s),262162(s),19(s),20,21,262177,262179,262180,262181
Key Hash:
55655676c95547fd4e82189a072ee1100eccfca6f10509077a0d6936a976bd49
findAllKeys success on server 0(10.0.0.1)
Keys on server 1(10.0.0.2):
Number of keys found 17
number of keys matched from start index 0::17
6,7,8(s),11,12,14,262159,262160,17(s),262162(s),19(s),20,21,262177,262179,262180,262181
Key Hash:
55655676c95547fd4e82189a072ee1100eccfca6f10509077a0d6936a976bd49
findAllKeys success on server 1(10.0.0.2)
Arguments
Because this command does not have named parameters, you must enter the arguments in the order
specified in the syntax diagram.
findAllKeys <user id> <key hash (0/1)> [<output file>]
<user id>
Gets all keys that the specified user owns or shares. Enter the user ID of a user on the HSMs. To find
the user IDs of all users, use listUsers (p. 105).
All user IDs are valid, but findAllKeys returns keys only for crypto users (CUs).
Required: Yes
<key hash>
Includes (1) or excludes (0) a hash of the user ownership and sharing data for all keys in each HSM.
When the user id argument represents a user who owns or shares keys, the key hash is populated.
The key hash value is identical for all users who own or share keys on the HSM, even though they
own and share different keys. However, when the user id represents a user who does not own or
share any keys, such as a CO, the hash value is not populated.
Required: Yes
<output file>
Writes the output to the specified file.
93

AWS CloudHSM User Guide
Reference
Required: No
Default: Stdout
Related Topics
•changePswd (p. 82)
•deleteUser (p. 88)
•listUsers (p. 105)
• syncUser
•findKey (p. 133) in key_mgmt_util
•getKeyInfo (p. 159) in key_mgmt_util
getAttribute
The getAttribute command in cloudhsm_mgmt_util gets one attribute value for a key from all HSMs
in the cluster and writes it to stdout (standard output) or to a file. Only crypto users (CUs) can run this
command.
Key attributes are properties of a key. They include characteristics, like the key type, class, label, and ID,
and values that represent actions that you can perform on the key, like encrypt, decrypt, wrap, sign, and
verify.
You can use getAttribute only on keys that you own and key that are shared with you. You can run
this command or the getAttribute (p. 94) command in key_mgmt_util, which writes one or all of the
attribute values of a key to a file.
To get a list of attributes and the constants that represent them, use the listAttributes (p. 168)
command. To change the attribute values of existing keys, use setAttribute (p. 170) in key_mgmt_util
and setAttribute (p. 109) in cloudhsm_mgmt_util. For help interpreting the key attributes, see the Key
Attribute Reference (p. 176).
Before you run any cloudhsm_mgmt_util command, you must start cloudhsm_mgmt_util (p. 78)
and log in (p. 80) to the HSM. Be sure that you log in with the user account type that can run the
commands you plan to use.
If you add or delete HSMs, update the configuration files (p. 75) that the AWS CloudHSM client and
the command line tools use. Otherwise, the changes that you make might not be effective for all HSMs
in the cluster.
User Type
The following users can run this command.
• Crypto users (CU)
Syntax
Because this command does not have named parameters, you must enter the arguments in the order
specified in the syntax diagram.
getAttribute <key handle> <attribute id> [<filename>]
94

AWS CloudHSM User Guide
Reference
Example
This example gets the value of the extractable attribute for a key in the HSMs. You can use a command
like this to determine whether you can export a key from the HSMs.
The first command uses listAttributes to find the constant that represents the extractable attribute.
The output shows that the constant for OBJ_ATTR_EXTRACTABLE is 354. You can also find this
information with descriptions of the attributes and their values in the Key Attribute Reference (p. 176).
aws-cloudhsm> listAttributes
Following are the possible attribute values for getAttribute:
OBJ_ATTR_CLASS = 0
OBJ_ATTR_TOKEN = 1
OBJ_ATTR_PRIVATE = 2
OBJ_ATTR_LABEL = 3
OBJ_ATTR_KEY_TYPE = 256
OBJ_ATTR_ENCRYPT = 260
OBJ_ATTR_DECRYPT = 261
OBJ_ATTR_WRAP = 262
OBJ_ATTR_UNWRAP = 263
OBJ_ATTR_SIGN = 264
OBJ_ATTR_VERIFY = 266
OBJ_ATTR_LOCAL = 355
OBJ_ATTR_MODULUS = 288
OBJ_ATTR_MODULUS_BITS = 289
OBJ_ATTR_PUBLIC_EXPONENT = 290
OBJ_ATTR_VALUE_LEN = 353
OBJ_ATTR_EXTRACTABLE = 354
OBJ_ATTR_KCV = 371
The second command uses getAttribute to get the value of the extractable attribute for the
key with key handle 262170 in the HSMs. To specify the extractable attribute, the command uses
354, the constant that represents the attribute. Because the command does not specify a file name,
getAttribute writes the output to stdout.
The output shows that the value of the extractable attribute is 1 on all of the HSM. This value indicates
that the owner of the key can export it. When the value is 0 (0x0), it cannot be exported from the HSMs.
You set the value of the extractable attribute when you create a key, but you cannot change it.
aws-cloudhsm> getAttribute 262170 354
Attribute Value on server 0(10.0.1.10):
OBJ_ATTR_EXTRACTABLE
0x00000001
Attribute Value on server 1(10.0.1.12):
OBJ_ATTR_EXTRACTABLE
0x00000001
Attribute Value on server 2(10.0.1.7):
OBJ_ATTR_EXTRACTABLE
0x00000001
Arguments
Because this command does not have named parameters, you must enter the arguments in the order
specified in the syntax diagram.
getAttribute <key handle> <attribute id> [<filename>]
95

AWS CloudHSM User Guide
Reference
<key-handle>
Specifies the key handle of the target key. You can specify only one key in each command. To get the
key handle of a key, use findKey (p. 133) in key_mgmt_util.
You must own the specified key or it must be shared with you. To find the users of a key, use
getKeyInfo (p. 159) in key_mgmt_util.
Required: Yes
<attribute id>
Identifies the attribute. Enter a constant that represents an attribute, or 512, which represents
all attributes. For example, to get the key type, enter 256, which is the constant for the
OBJ_ATTR_KEY_TYPE attribute.
To list the attributes and their constants, use listAttributes (p. 168). For help interpreting the key
attributes, see the Key Attribute Reference (p. 176).
Required: Yes
<filename>
Writes the output to the specified file. Enter a file path.
If the specified file exists, getAttribute overwrites the file without warning.
Required: No
Default: Stdout
Related Topics
•getAttribute (p. 156) in key_mgmt_util
•listAttributes (p. 103)
•setAttribute (p. 109) in cloudhsm_mgmt_util
•setAttribute (p. 170) in key_mgmt_util
•Key Attribute Reference (p. 176)
getCert
With the getCert command in cloudhsm_mgmt_util, you can retrieve the certificates of a particular
HSM in a cluster. When you run the command, you designate the type of certificate to retrieve. To do
that, you use one of the corresponding integers as described in the Arguments (p. 97) section below.
To learn about the role of each of these certificates, see Verify HSM Identity (p. 25).
Before you run any cloudhsm_mgmt_util command, you must start cloudhsm_mgmt_util (p. 78)
and log in (p. 80) to the HSM. Be sure that you log in with the user account type that can run the
commands you plan to use.
If you add or delete HSMs, update the configuration files (p. 75) that the AWS CloudHSM client and
the command line tools use. Otherwise, the changes that you make might not be effective for all HSMs
in the cluster.
User Type
The following users can run this command.
96
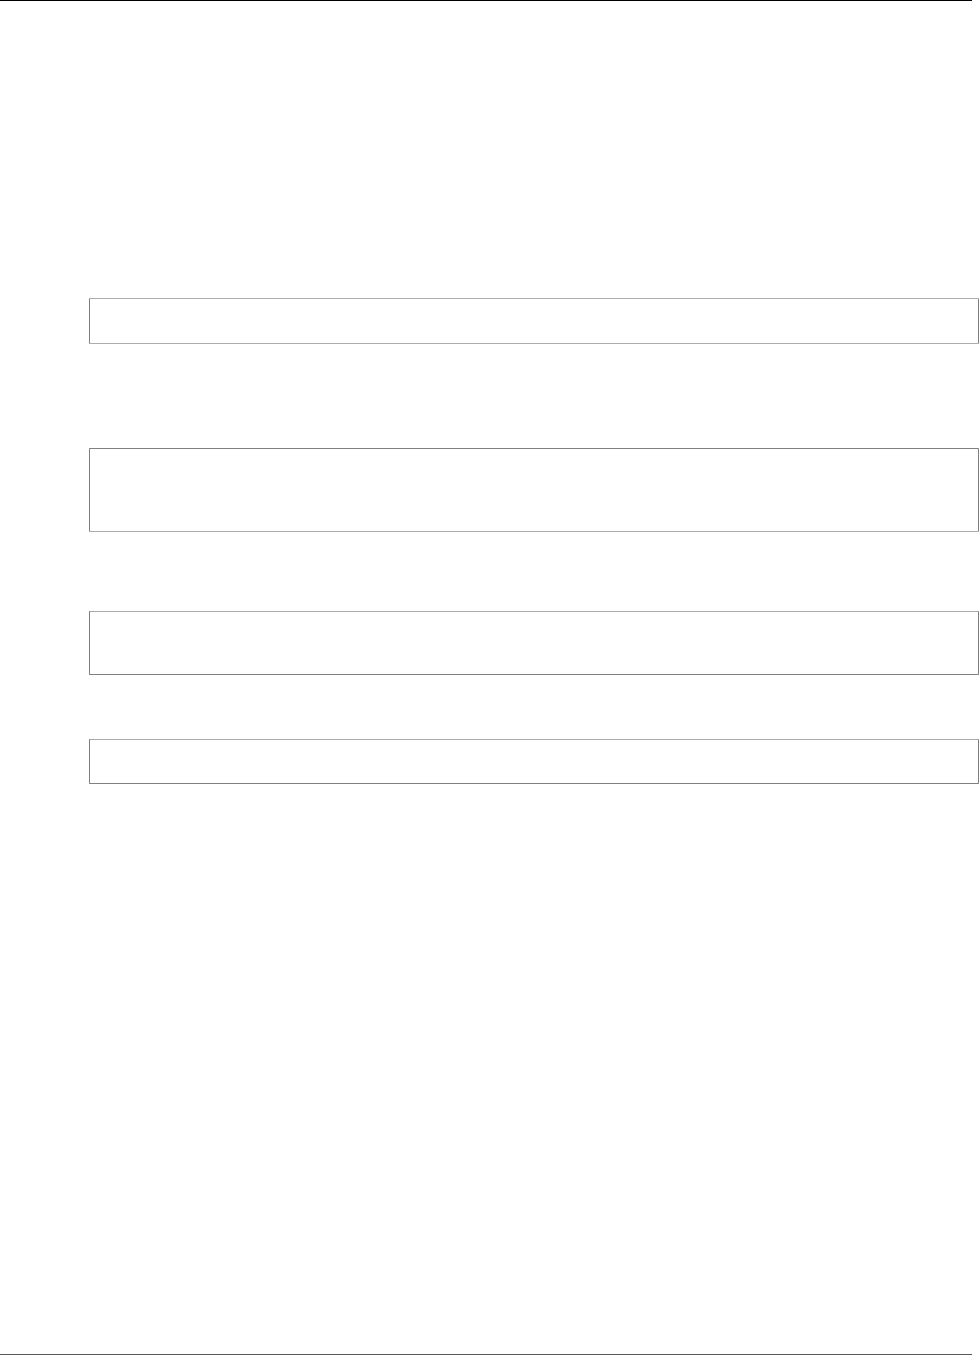
AWS CloudHSM User Guide
Reference
• All users.
Prerequisites
Before you begin, you must enter server mode on the target HSM. For more information, see
server (p. 108).
Syntax
To use the getCert command once in server mode:
server> getCert <file-name> <certificate-type>
Example
First, enter server mode. This command enters server mode on an HSM with server number 0.
aws-cloudhsm> server 0
Server is in 'E2' mode...
Then, use the getCert command. In this example, we use /tmp/PO.crt as the name of the file to
which the certificate will be saved and 4 (Customer Root Certificate) as the desired certificate type:
server0> getCert /tmp/PO.crt 4
getCert Success
Arguments
getCert <file-name> <certificate-type>
<file-name>
Specifies the name of the file to which the certificate is saved.
Required: Yes
<certificate-type>
An integer that specifies the type of certificate to retrieve. The integers and their corresponding
certificate types are as follows:
•1 – Manufacturer Root Certificate
•2 – Manufacturer Hardware Certificate
•4 – Customer Root Certificate
•8 – Cluster Certificate (signed by Customer Root Certificate)
•16 – Cluster Certificate (chained to the Manufacturer Root Certificate)
Required: Yes
Related Topics
•Start cloudhsm_mgmt_util (p. 78)
•server (p. 108)
97

AWS CloudHSM User Guide
Reference
getHSMInfo
The getHSMInfo command in cloudhsm_mgmt_util gets information about the hardware on which
each HSM runs, including the model, serial number, FIPS state, memory, temperature, and the
version numbers of the hardware and firmware. The information also includes the server ID that
cloudhsm_mgmt_util uses to refer to the HSM.
Before you run any cloudhsm_mgmt_util command, you must start cloudhsm_mgmt_util (p. 78)
and log in (p. 80) to the HSM. Be sure that you log in with the user account type that can run the
commands you plan to use.
If you add or delete HSMs, update the configuration files (p. 75) that the AWS CloudHSM client and
the command line tools use. Otherwise, the changes that you make might not be effective for all HSMs
in the cluster.
User Type
The following types of users can run this command.
• All users. You do not have to be logged in to run this command.
Syntax
This command has no parameters.
getHSMInfo
Example
This example uses getHSMInfo to get information about the HSMs in the cluster.
aws-cloudhsm> getHSMInfo
Getting HSM Info on 3 nodes
*** Server 0 HSM Info ***
Label :cavium
Model :NITROX-III CNN35XX-NFBE
Serial Number :3.0A0101-ICM000001
HSM Flags :0
FIPS state :2 [FIPS mode with single factor authentication]
Manufacturer ID :
Device ID :10
Class Code :100000
System vendor ID :177D
SubSystem ID :10
TotalPublicMemory :560596
FreePublicMemory :294568
TotalPrivateMemory :0
FreePrivateMemory :0
Hardware Major :3
Hardware Minor :0
Firmware Major :2
Firmware Minor :03
98

AWS CloudHSM User Guide
Reference
Temperature :56 C
Build Number :13
Firmware ID :xxxxxxxxxxxxxxx
...
Related Topics
•info (p. 102)
• loginHSM
getKeyInfo
The getKeyInfo command in the key_mgmt_util returns the HSM user IDs of users who can use the key,
including the owner and crypto users (CU) with whom the key is shared. When quorum authentication
is enabled on a key, getKeyInfo also returns the number of users who must approve cryptographic
operations that use the key. You can run getKeyInfo only on keys that you own and keys that are shared
with you.
When you run getKeyInfo on public keys, getKeyInfo returns only the key owner, even though
all users of the HSM can use the public key. To find the HSM user IDs of users in your HSMs, use
listUsers (p. 169). To find the keys for a particular user, use findKey (p. 133) -u in key_mgmt_util.
Crypto officers can use findAllKeys (p. 91) in cloudhsm_mgmt_util.
You own the keys that you create. You can share a key with other users when you create it. Then, to share
or unshare an existing key, use shareKey (p. 112) in cloudhsm_mgmt_util.
Before you run any cloudhsm_mgmt_util command, you must start cloudhsm_mgmt_util (p. 78)
and log in (p. 80) to the HSM. Be sure that you log in with the user account type that can run the
commands you plan to use.
If you add or delete HSMs, update the configuration files (p. 75) that the AWS CloudHSM client and
the command line tools use. Otherwise, the changes that you make might not be effective for all HSMs
in the cluster.
User Type
The following types of users can run this command.
• Crypto users (CU)
Syntax
getKeyInfo -k <key-handle> [<output file>]
Examples
These examples show how to use getKeyInfo to get information about the users of a key.
Example : Get the Users for an Asymmetric Key
This command gets the users who can use the AES (asymmetric) key with key handle 262162. The output
shows that user 3 owns the key and has shares it with users 4 and 6.
99

AWS CloudHSM User Guide
Reference
Only users 3, 4, and 6 can run getKeyInfo on key 262162.
aws-cloudhsm>getKeyInfo 262162
Key Info on server 0(10.0.0.1):
Token/Flash Key,
Owned by user 3
also, shared to following 2 user(s):
4
6
Key Info on server 1(10.0.0.2):
Token/Flash Key,
Owned by user 3
also, shared to following 2 user(s):
4
6
Example : Get the Users for a Symmetric Key Pair
These commands use getKeyInfo to get the users who can use the keys in an ECC (symmetric) key
pair (p. 151). The public key has key handle 262179. The private key has key handle 262177.
When you run getKeyInfo on the private key (262177), it returns the key owner (3) and crypto users
(CUs) 4, with whom the key is shared.
aws-cloudhsm>getKeyInfo -k 262177
Key Info on server 0(10.0.0.1):
Token/Flash Key,
Owned by user 3
also, shared to following 1 user(s):
4
Key Info on server 1(10.0.0.2):
Token/Flash Key,
Owned by user 3
also, shared to following 1 user(s):
4
When you run getKeyInfo on the public key (262179), it returns only the key owner, user 3.
aws-cloudhsm>getKeyInfo -k 262179
Key Info on server 0(10.0.3.10):
Token/Flash Key,
Owned by user 3
Key Info on server 1(10.0.3.6):
100

AWS CloudHSM User Guide
Reference
Token/Flash Key,
Owned by user 3
To confirm that user 4 can use the public key (and all public keys on the HSM), use the -u parameter of
findKey (p. 133) in key_mgmt_util.
The output shows that user 4 can use both the public (262179) and private (262177) key in the key pair.
User 4 can also use all other public keys and any private keys that they have created or that have been
shared with them.
Command: findKey -u 4
Total number of keys present 8
number of keys matched from start index 0::7
11, 12, 262159, 262161, 262162, 19, 20, 21, 262177, 262179
Cluster Error Status
Node id 0 and err state 0x00000000 : HSM Return: SUCCESS
Cfm3FindKey returned: 0x00 : HSM Return: SUCCESS
Example : Get the Quorum Authentication Value (m_value) for a Key
This example shows how to get the m_value for a key. The m_value is the number of users in the
quorum who must approve any cryptographic operations that use the key and operations to share the
unshare the key.
When quorum authentication is enabled on a key, a quorum of users must approve any cryptographic
operations that use the key. To enable quorum authentication and set the quorum size, use the -
m_value parameter when you create the key.
This command uses genSymKey (p. 151) to create a 256-bit AES key that is shared with user 4. It uses
the m_value parameter to enable quorum authentication and set the quorum size to two users. The
number of users must be large enough to provide the required approvals.
The output shows that the command created key 10.
Command: genSymKey -t 31 -s 32 -l aes256m2 -u 4 -m_value 2
Cfm3GenerateSymmetricKey returned: 0x00 : HSM Return: SUCCESS
Symmetric Key Created. Key Handle: 10
Cluster Error Status
Node id 1 and err state 0x00000000 : HSM Return: SUCCESS
Node id 0 and err state 0x00000000 : HSM Return: SUCCESS
This command uses getKeyInfo in cloudhsm_mgmt_util to get information about the users of key 10.
The output shows that the key is owned by user 3 and shared with user 4. It also shows that a quorum of
two users must approve every cryptographic operation that uses the key.
aws-cloudhsm>getKeyInfo 10
Key Info on server 0(10.0.0.1):
Token/Flash Key,
101

AWS CloudHSM User Guide
Reference
Owned by user 3
also, shared to following 1 user(s):
4
2 Users need to approve to use/manage this key
Key Info on server 1(10.0.0.2):
Token/Flash Key,
Owned by user 3
also, shared to following 1 user(s):
4
2 Users need to approve to use/manage this key
Arguments
Because this command does not have named parameters, you must enter the arguments in the order
specified in the syntax diagram.
getKeyInfo -k <key-handle> <output file>
<key-handle>
Specifies the key handle of one key in the HSM. Enter the key handle of a key that you own or share.
This parameter is required.
Required: Yes
<output file>
Writes the output to the specified file, instead of stdout. If the file exists, the command overwrites it
without warning.
Required: No
Default: stdout
Related Topics
•getKeyInfo (p. 159) in key_mgmt_util
•findKey (p. 133) in key_mgmt_util
•findAllKeys (p. 91) in cloudhsm_mgmt_util
•listUsers (p. 105)
•shareKey (p. 112)
info
The info command in cloudhsm_mgmt_util gets information about each of the HSMs in the cluster,
including the host name, port, IP address and the name and type of the user who is logged in to
cloudhsm_mgmt_util on the HSM.
Before you run any cloudhsm_mgmt_util command, you must start cloudhsm_mgmt_util (p. 78)
and log in (p. 80) to the HSM. Be sure that you log in with the user account type that can run the
commands you plan to use.
102
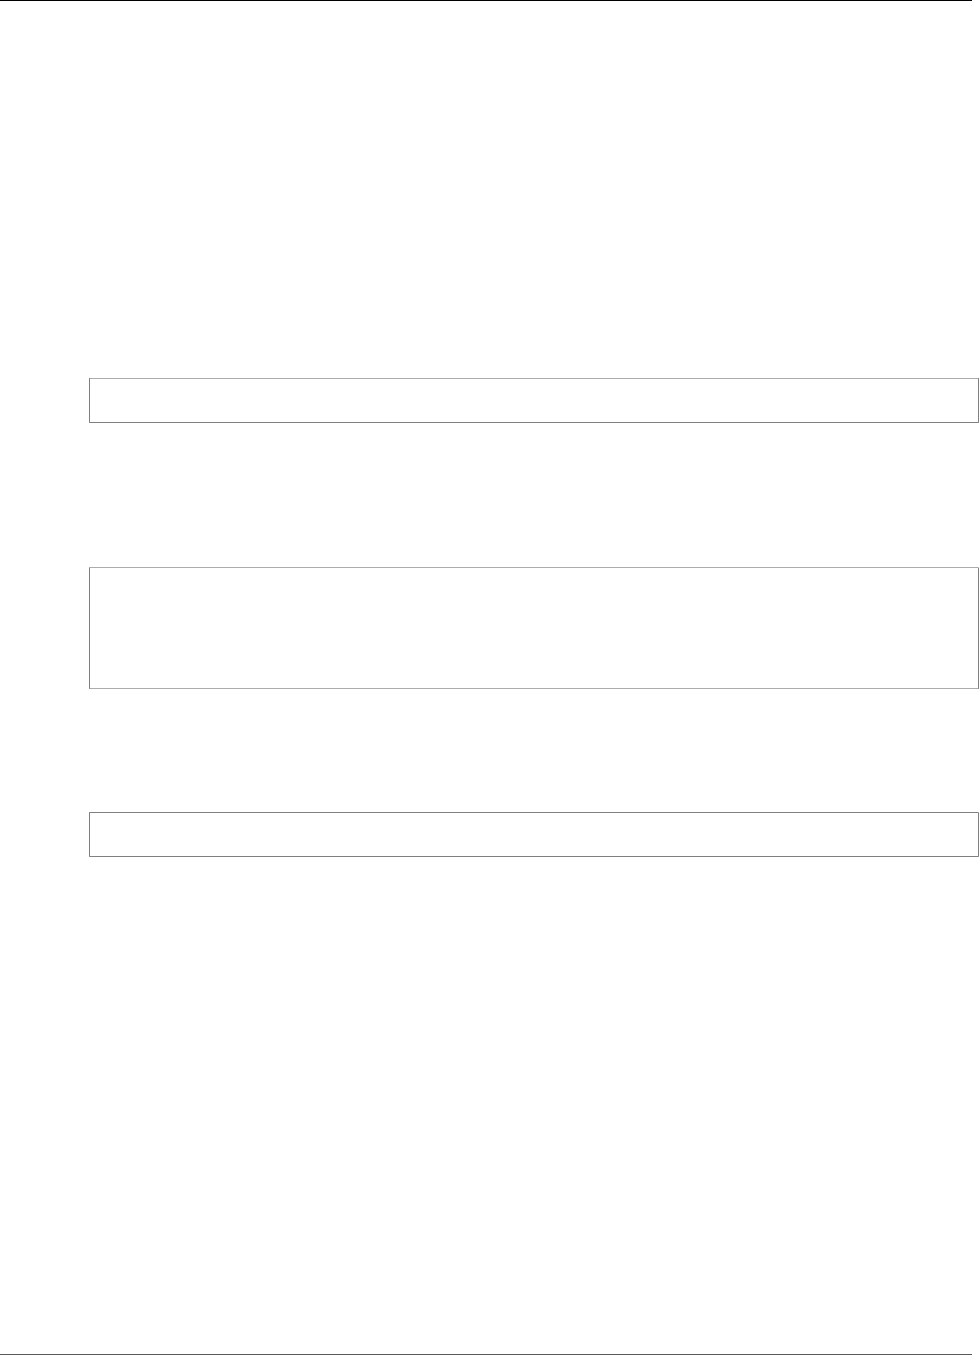
AWS CloudHSM User Guide
Reference
If you add or delete HSMs, update the configuration files (p. 75) that the AWS CloudHSM client and
the command line tools use. Otherwise, the changes that you make might not be effective for all HSMs
in the cluster.
User Type
The following types of users can run this command.
• All users. You do not have to be logged in to run this command.
Syntax
Because this command does not have named parameters, you must enter the arguments in the order
specified in the syntax diagram.
info server <server ID>
Example
This example uses info to get information about an HSM in the cluster. The command uses 0 to refer to
the first HSM in the cluster. The output shows the IP address, port, and the type and name of the current
user.
aws-cloudhsm> info server 0
Id Name Hostname Port State Partition
LoginState
0 10.0.0.1 10.0.0.1 2225 Connected hsm-udw0tkfg1ab
Logged in as 'testuser(CU)'
Arguments
Because this command does not have named parameters, you must enter the arguments in the order
specified in the syntax diagram.
info server <server ID>
<server id>
Specifies the server ID of the HSM. The HSMs are assigned ordinal numbers that represent the
order in which they are added to the cluster, beginning with 0. To find the server ID of an HSM, use
getHSMInfo.
Required: Yes
Related Topics
•getHSMInfo (p. 98)
•loginHSM and logoutHSM (p. 106)
listAttributes
The listAttributes command in cloudhsm_mgmt_util lists the attributes of an AWS CloudHSM
key and the constants that represent them. You use these constants to identify the attributes in
getAttribute (p. 94) and setAttribute (p. 109) commands.
103

AWS CloudHSM User Guide
Reference
For help interpreting the key attributes, see the Key Attribute Reference (p. 176).
Before you run any key_mgmt_util command, you must start key_mgmt_util (p. 121) and
login (p. 122) to the HSM as a crypto user (CU).
User Type
The following users can run this command.
• All users. You do not have to be logged in to run this command.
Syntax
listAttributes [-h]
Example
This command lists the key attributes that you can get and change in key_mgmt_util and the constants
that represent them. For help interpreting the key attributes, see the Key Attribute Reference (p. 176).
To represent all attributes, use 512.
Command: listAttributes
Description
===========
The following are all of the possible attribute values for getAttribute.
OBJ_ATTR_CLASS = 0
OBJ_ATTR_TOKEN = 1
OBJ_ATTR_PRIVATE = 2
OBJ_ATTR_LABEL = 3
OBJ_ATTR_KEY_TYPE = 256
OBJ_ATTR_ID = 258
OBJ_ATTR_SENSITIVE = 259
OBJ_ATTR_ENCRYPT = 260
OBJ_ATTR_DECRYPT = 261
OBJ_ATTR_WRAP = 262
OBJ_ATTR_UNWRAP = 263
OBJ_ATTR_SIGN = 264
OBJ_ATTR_VERIFY = 266
OBJ_ATTR_LOCAL = 355
OBJ_ATTR_MODULUS = 288
OBJ_ATTR_MODULUS_BITS = 289
OBJ_ATTR_PUBLIC_EXPONENT = 290
OBJ_ATTR_VALUE_LEN = 353
OBJ_ATTR_EXTRACTABLE = 354
OBJ_ATTR_KCV = 371
Parameters
-h
Displays help for the command.
Required: Yes
Related Topics
•getAttribute (p. 94)
104

AWS CloudHSM User Guide
Reference
•setAttribute (p. 109)
•Key Attribute Reference (p. 176)
listUsers
The listUsers command in the cloudhsm_mgmt_util gets the users in each of the HSMs, along with their
user type and other attributes. All types of users can run this command. You do not even need to be
logged in to cloudhsm_mgmt_util to run this command.
Before you run any cloudhsm_mgmt_util command, you must start cloudhsm_mgmt_util (p. 78)
and log in (p. 80) to the HSM. Be sure that you log in with the user account type that can run the
commands you plan to use.
If you add or delete HSMs, update the configuration files (p. 75) that the AWS CloudHSM client and
the command line tools use. Otherwise, the changes that you make might not be effective for all HSMs
in the cluster.
User Type
The following types of users can run this command.
• All users. You do not need to be logged in to run this command.
Syntax
This command has no parameters.
listUsers
Example
This command lists the users on each of the HSMs in the cluster and displays their attributes. You can
use the User ID attribute to identify users in other commands, such as deleteUser, changePswd, and
findAllKeys.
aws-cloudhsm> listUsers
Users on server 0(10.0.0.1):
Number of users found:6
User Id User Type User Name MofnPubKey LoginFailureCnt
2FA
1 PCO admin YES 0
NO
2 AU app_user NO 0
NO
3 CU crypto_user1 NO 0
NO
4 CU crypto_user2 NO 0
NO
5 CO officer1 YES 0
NO
6 CO officer2 NO 0
NO
Users on server 1(10.0.0.2):
Number of users found:5
User Id User Type User Name MofnPubKey LoginFailureCnt
2FA
105

AWS CloudHSM User Guide
Reference
1 PCO admin YES 0
NO
2 AU app_user NO 0
NO
3 CU crypto_user1 NO 0
NO
4 CU crypto_user2 NO 0
NO
5 CO officer1 YES 0
NO
The output includes the following user attributes:
•User ID: Identifies the user in key_mgmt_util and cloudhsm_mgmt_util (p. 74) commands.
•User type (p. 10): Determines the operations that the user can perform on the HSM.
•User Name: Displays the user-defined friendly name for the user.
•MofnPubKey: Indicates whether the user has registered a key pair for signing quorum authentication
tokens (p. 61).
•LoginFailureCnt: Indicates the number of times the user has unsuccessfully logged in.
•2FA: Indicates that the user has enabled multi-factor authentication.
Related Topics
•listUsers (p. 169) in key_mgmt_util
•createUser (p. 85)
•deleteUser (p. 88)
•changePswd (p. 82)
loginHSM and logoutHSM
You can use the loginHSM and logoutHSM commands in cloudhsm_mgmt_util to log in and out of each
HSM in a cluster. Any user of any type can use these commands.
Before you run these cloudhsm_mgmt_util commands, you must start cloudhsm_mgmt_util (p. 78).
If you add or delete HSMs, update the configuration files (p. 75) that the AWS CloudHSM client and
the command line tools use. Otherwise, the changes that you make might not be effective on all HSMs in
the cluster.
User Type
The following users can run these commands.
• Precrypto officer (PRECO)
• Crypto officer (CO)
• Crypto user (CU)
• Appliance user (AU)
Syntax
Because these commands do not have named parameters, you must enter the arguments in the order
specified in the syntax diagrams.
106
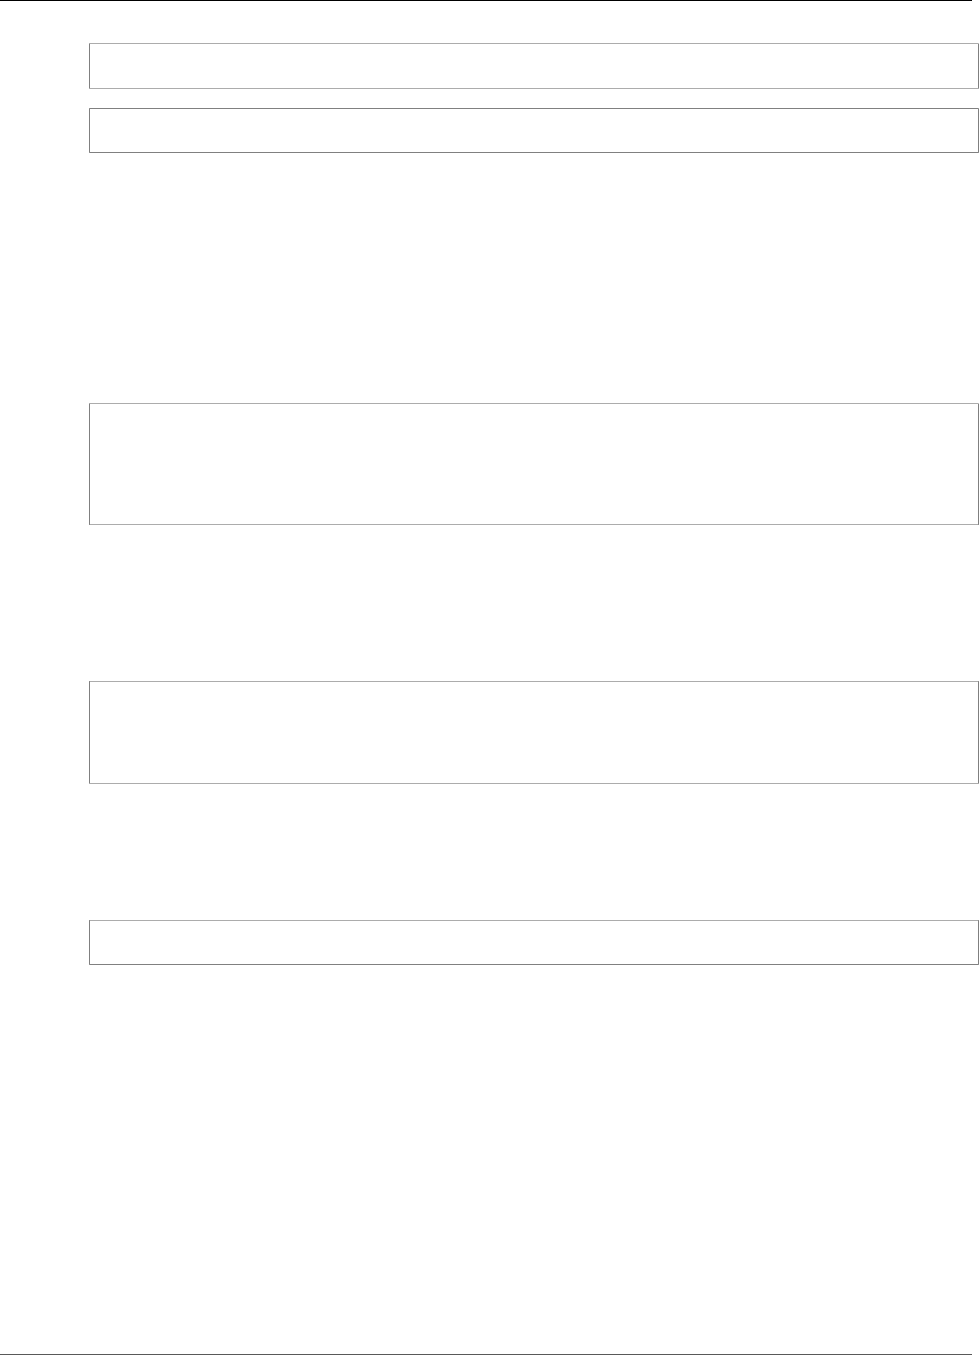
AWS CloudHSM User Guide
Reference
loginHSM <user type> <user name> <password>
logoutHSM
Examples
These examples show how to use loginHSM and logoutHSM to log in and out of all HSMs in a cluster.
Example : Log In to the HSMs in a Cluster
This command logs in to all HSMs in a cluster with the credentials of a CO user named admin and
a password of co12345. The output shows that the command was successful and that the user has
connected to the HSMs (which, in this case, are server 0 and server 1).
aws-cloudhsm>loginHSM CO admin co12345
loginHSM success on server 0(10.0.2.9)
loginHSM success on server 1(10.0.3.11)
Example : Log Out of an HSM
This command logs out of the HSMs that you are currently logged in to (which, in this case, are
server 0 and server 1). The output shows that the command was successful and that the user has
disconnected from the HSMs.
aws-cloudhsm>logoutHSM
logoutHSM success on server 0(10.0.2.9)
logoutHSM success on server 1(10.0.3.11)
Arguments
Because these commands do not have named parameters, you must enter the arguments in the order
specified in the syntax diagrams.
loginHSM <user type> <user name> <password>
<user type>
Specifies the type of user who is logging in to the HSMs. For more information, see User
Type (p. 106) above.
Required: Yes
<user name>
Specifies the user name of the user who is logging in to the HSMs.
Required: Yes
<password>
Specifies the password of the user who is logging in to the HSMs.
107

AWS CloudHSM User Guide
Reference
Required: Yes
Related Topics
•Getting Started with cloudhsm_mgmt_util (p. 75)
•Activate the Cluster (p. 38)
server
Normally, when you issue a command in cloudhsm_mgmt_util, the command effects all HSMs in the
designated cluster (global mode). However, there may be circumstances for which you need to issue
commands to a single HSM. For instance, in the event that automatic synchronization fails, you may
need to sync keys and users on an HSM in order to maintain consistency across the cluster. You can use
the server command in the cloudhsm_mgmt_util to enter server mode and interact directly with a
particular HSM instance.
Upon successful initiation, the aws-cloudhsm> command prompt is replaced with the server>
command prompt.
In order to exit server mode, use the exit command. Upon successful exit, you will be returned to the
cloudhsm_mgmt_util command prompt.
Before you run any cloudhsm_mgmt_util command, you must start cloudhsm_mgmt_util (p. 78).
User Type
The following users can run this command.
• All users.
Prerequisites
In order to enter server mode, you must first know the server number of the target HSM. Server numbers
are listed in the trace output generated by cloudhsm_mgmt_util upon initiation. Server numbers are
assigned in the same order that the HSMs appear in the configuration file. For this example, we assume
that server 0 is the server that corresponds to the desired HSM.
Syntax
To start server mode:
server <server-number>
To exit server mode:
server> exit
Example
This command enters server mode on an HSM with server number 0.
aws-cloudhsm> server 0
108
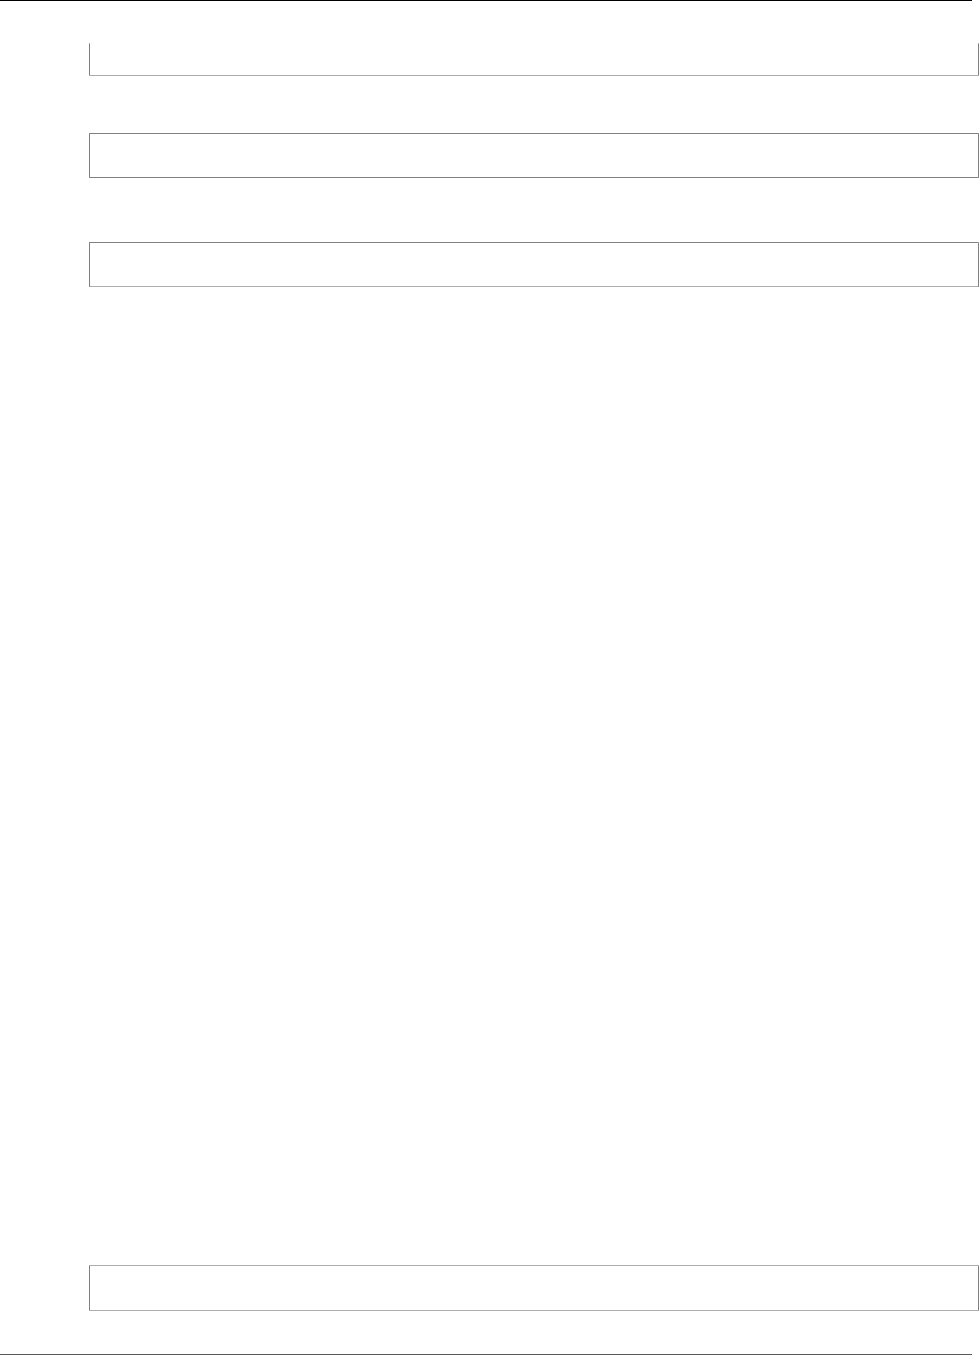
AWS CloudHSM User Guide
Reference
Server is in 'E2' mode...
In order to exit server mode, use the exit command.
server0> exit
Arguments
server <server-number>
<server-number>
Specifies the server number of the target HSM.
Required: Yes
There are no arguments for the exit command.
Related Topics
•Start cloudhsm_mgmt_util (p. 78)
•syncKey (p. 115)
•createUser (p. 85)
•deleteUser (p. 88)
setAttribute
The setAttribute command in cloudhsm_mgmt_util changes the value of the label, encrypt, decrypt,
wrap, and unwrap attributes of a key in the HSMs. You can also use the setAttribute (p. 170) command
in key_mgmt_util to convert a session key to a persistent key. You can only change the attributes of keys
that you own.
Before you run any cloudhsm_mgmt_util command, you must start cloudhsm_mgmt_util (p. 78)
and log in (p. 80) to the HSM. Be sure that you log in with the user account type that can run the
commands you plan to use.
If you add or delete HSMs, update the configuration files (p. 75) that the AWS CloudHSM client and
the command line tools use. Otherwise, the changes that you make might not be effective for all HSMs
in the cluster.
User Type
The following users can run this command.
• Crypto users (CU)
Syntax
Because this command does not have named parameters, you must enter the arguments in the order
specified in the syntax diagram.
setAttribute <key handle> <attribute id>
109

AWS CloudHSM User Guide
Reference
Example
This example shows how to disable the decrypt functionality of a symmetric key. You can use a command
like this one to configure a wrapping key, which should be able to wrap and unwrap other keys but not
encrypt or decrypt data.
The first step is to create the wrapping key. This command uses genSymKey (p. 151) in key_mgmt_util
to generate a 256-bit AES symmetric key. The output shows that the new key has key handle 14.
$ genSymKey -t 31 -s 32 -l aes256
Cfm3GenerateSymmetricKey returned: 0x00 : HSM Return: SUCCESS
Symmetric Key Created. Key Handle: 14
Cluster Error Status
Node id 0 and err state 0x00000000 : HSM Return: SUCCESS
Next, we want to confirm the current value of the decrypt attribute. To get the attribute ID of the
decrypt attribute, use listAttributes (p. 103). The output shows that the constant that represents the
OBJ_ATTR_DECRYPT attribute is 261. For help interpreting the key attributes, see the Key Attribute
Reference (p. 176).
aws-cloudhsm> listAttributes
Following are the possible attribute values for getAttribute:
OBJ_ATTR_CLASS = 0
OBJ_ATTR_TOKEN = 1
OBJ_ATTR_PRIVATE = 2
OBJ_ATTR_LABEL = 3
OBJ_ATTR_KEY_TYPE = 256
OBJ_ATTR_ENCRYPT = 260
OBJ_ATTR_DECRYPT = 261
OBJ_ATTR_WRAP = 262
OBJ_ATTR_UNWRAP = 263
OBJ_ATTR_SIGN = 264
OBJ_ATTR_VERIFY = 266
OBJ_ATTR_LOCAL = 355
OBJ_ATTR_MODULUS = 288
OBJ_ATTR_MODULUS_BITS = 289
OBJ_ATTR_PUBLIC_EXPONENT = 290
OBJ_ATTR_VALUE_LEN = 353
OBJ_ATTR_EXTRACTABLE = 354
OBJ_ATTR_KCV = 371
To get the current value of the decrypt attribute for key 14, the next command uses
getAttribute (p. 94) in cloudhsm_mgmt_util.
The output shows that the value of the decrypt attribute is true (1) on both HSMs in the cluster.
aws-cloudhsm> getAttribute 14 261
Attribute Value on server 0(10.0.0.1):
OBJ_ATTR_DECRYPT
0x00000001
Attribute Value on server 1(10.0.0.2):
OBJ_ATTR_DECRYPT
0x00000001
110
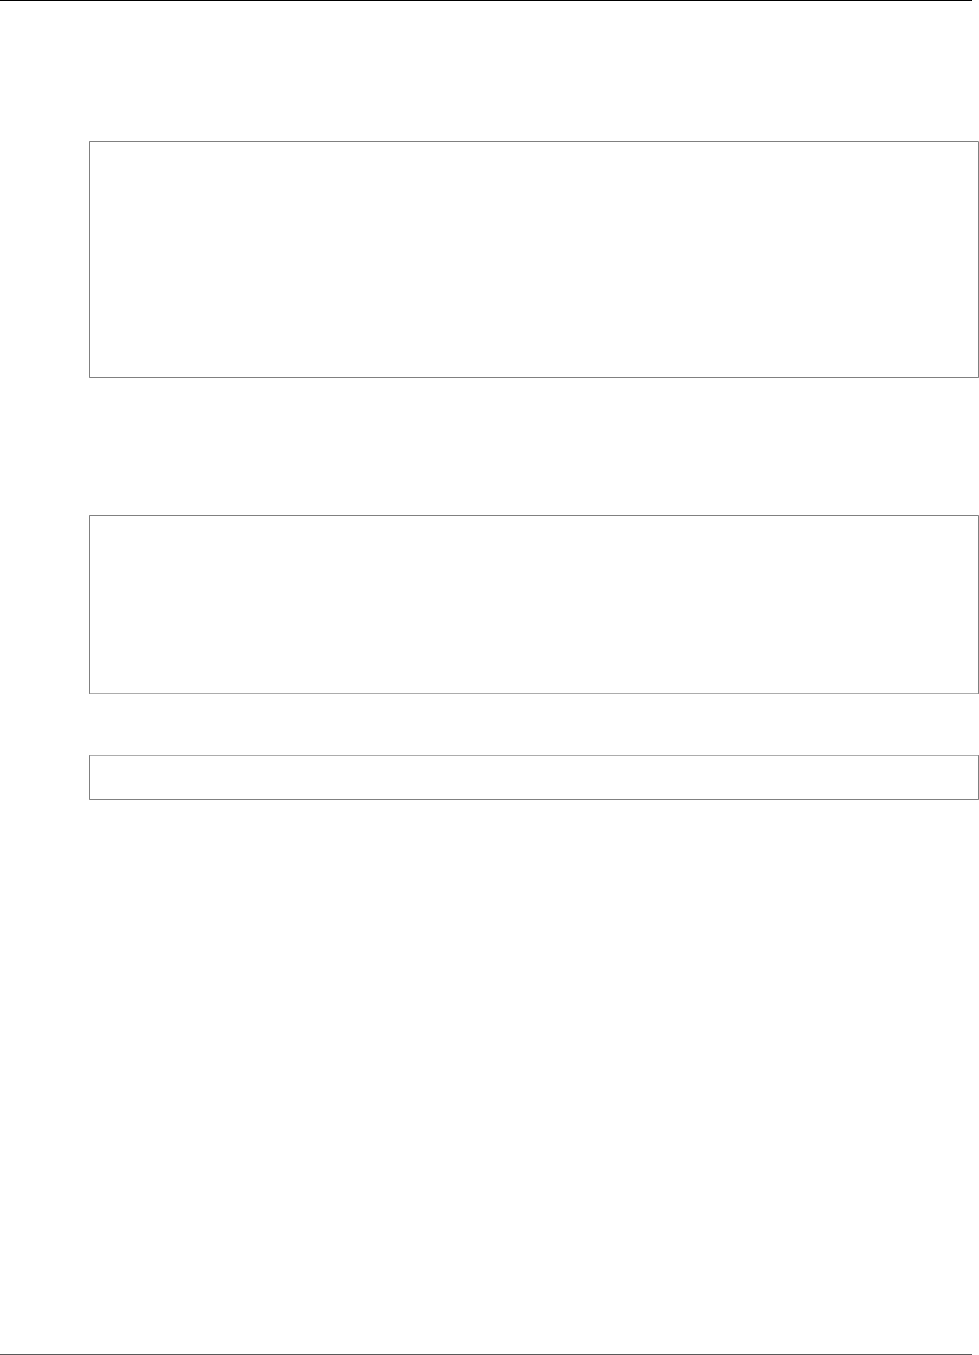
AWS CloudHSM User Guide
Reference
This command uses setAttribute to change the value of the decrypt attribute (attribute 261) of key
14 to 0. This disables the decrypt functionality on the key.
The output shows that the command succeeded on both HSMs in the cluster.
aws-cloudhsm> setAttribute 14 261 0
*************************CAUTION********************************
This is a CRITICAL operation, should be done on all nodes in the
cluster. Cav server does NOT synchronize these changes with the
nodes on which this operation is not executed or failed, please
ensure this operation is executed on all nodes in the cluster.
****************************************************************
Do you want to continue(y/n)? y
setAttribute success on server 0(10.0.0.1)
setAttribute success on server 1(10.0.0.2)
The final command repeats the getAttribute command. Again, it gets the decrypt attribute (attribute
261) of key 14.
This time, the output shows that the value of the decrypt attribute is false (0) on both HSMs in the
cluster.
aws-cloudhsm>getAttribute 14 261
Attribute Value on server 0(10.0.3.6):
OBJ_ATTR_DECRYPT
0x00000000
Attribute Value on server 1(10.0.1.7):
OBJ_ATTR_DECRYPT
0x00000000
Arguments
setAttribute <key handle> <attribute id>
<key-handle>
Specifies the key handle of a key that you own. You can specify only one key in each command. To
get the key handle of a key, use findKey (p. 133) in key_mgmt_util. To find the users of a key, use
getKeyInfo (p. 99).
Required: Yes
<attribute id>
Specifies the constant that represents the attribute that you want to change. You can
specify only one attribute in each command. To get the attributes and their integer values,
use listAttributes (p. 168). For help interpreting the key attributes, see the Key Attribute
Reference (p. 176).
Valid values:
•3 – OBJ_ATTR_LABEL.
•260 – OBJ_ATTR_ENCRYPT.
•261 – OBJ_ATTR_DECRYPT.
•262 – OBJ_ATTR_WRAP.
•263 – OBJ_ATTR_UNWRAP.
Required: Yes
111
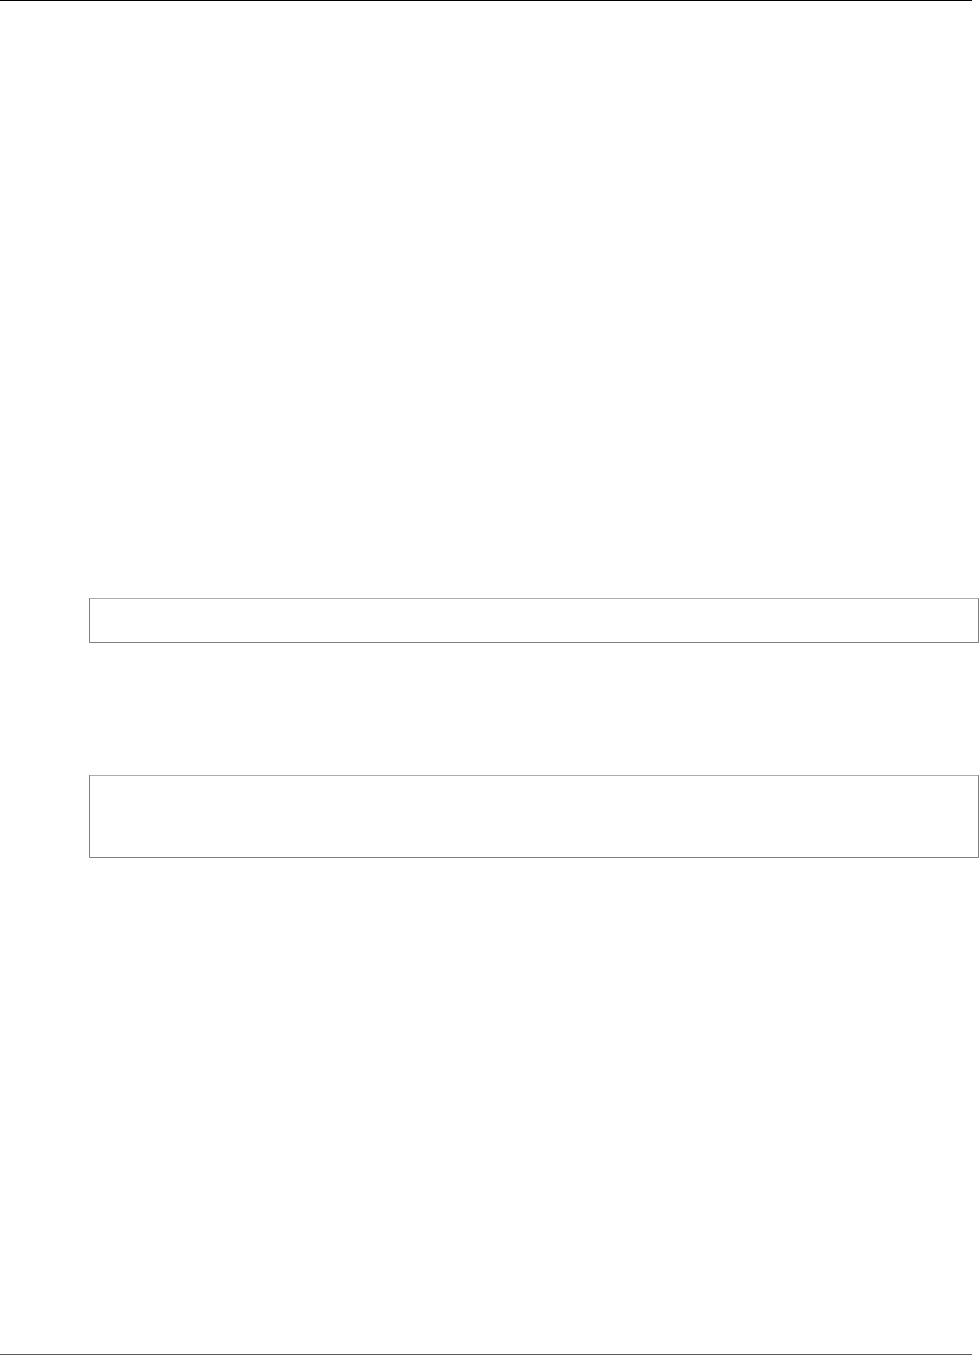
AWS CloudHSM User Guide
Reference
Related Topics
•setAttribute (p. 170) in key_mgmt_util
•getAttribute (p. 94)
•listAttributes (p. 103)
•Key Attribute Reference (p. 176)
quit
The quit command in the cloudhsm_mgmt_util exits the cloudhsm_mgmt_util. Any user of any type can
use this command.
Before you run any cloudhsm_mgmt_util command, you must start cloudhsm_mgmt_util (p. 78).
User Type
The following users can run this command.
• All users. You do not need to be logged in to run this command.
Syntax
quit
Example
This command exits cloudhsm_mgmt_util. Upon successful completion, you are returned to your regular
command line. This command has no output parameters.
aws-cloudhsm> quit
disconnecting from servers, please wait...
Related Topics
•Getting Started with cloudhsm_mgmt_util (p. 75)
•Start cloudhsm_mgmt_util (p. 78)
shareKey
The shareKey command in cloudhsm_mgmt_util shares and unshares keys that you own with other
crypto users. Only the key owner can share and unshare a key. You can also share a key when you create
it.
Users who share the key can use the key in cryptographic operations, but they cannot delete, export,
share, or unshare the key, or change its attributes. When quorum authentication is enabled on a key, the
quorum must approve any operations that share or unshare the key.
Before you run any cloudhsm_mgmt_util command, you must start cloudhsm_mgmt_util (p. 78)
and log in (p. 80) to the HSM. Be sure that you log in with the user account type that can run the
commands you plan to use.
112

AWS CloudHSM User Guide
Reference
If you add or delete HSMs, update the configuration files (p. 75) that the AWS CloudHSM client and
the command line tools use. Otherwise, the changes that you make might not be effective for all HSMs
in the cluster.
User Type
The following types of users can run this command.
• Crypto users (CU)
Syntax
Because this command does not have named parameters, you must enter the arguments in the order
specified in the syntax diagram.
User Type: Crypto user (CU)
shareKey <key handle> <user id> <(share/unshare key?) 1/0>
Example
The following examples show how to use shareKey to share and unshare keys that you own with other
crypto users.
Example : Share a Key
This example uses shareKey to share an ECC private key (p. 151) that the current user owns with
another crypto user on the HSMs. Public keys are available to all users of the HSM, so you cannot share
or unshare them.
The first command uses getKeyInfo (p. 99) to get the user information for key 262177, an ECC private
key on the HSMs.
The output shows that key 262177 is owned by user 3, but is not shared.
aws-cloudhsm>getKeyInfo 262177
Key Info on server 0(10.0.3.10):
Token/Flash Key,
Owned by user 3
Key Info on server 1(10.0.3.6):
Token/Flash Key,
Owned by user 3
This example uses shareKey to share key 262177 with user 4, another crypto user on the HSMs. The final
argument uses a value of 1 to indicate a share operation.
The output shows that the operation succeeded on both HSMs in the cluster.
aws-cloudhsm>shareKey 262177 4 1
*************************CAUTION********************************
This is a CRITICAL operation, should be done on all nodes in the
113

AWS CloudHSM User Guide
Reference
cluster. Cav server does NOT synchronize these changes with the
nodes on which this operation is not executed or failed, please
ensure this operation is executed on all nodes in the cluster.
****************************************************************
Do you want to continue(y/n)?y
shareKey success on server 0(10.0.3.10)
shareKey success on server 1(10.0.3.6)
To verify that the operation succeeded, the example repeats the first getKeyInfo command.
The output shows that key 262177 is now shared with user 4.
aws-cloudhsm>getKeyInfo 262177
Key Info on server 0(10.0.3.10):
Token/Flash Key,
Owned by user 3
also, shared to following 1 user(s):
4
Key Info on server 1(10.0.3.6):
Token/Flash Key,
Owned by user 3
also, shared to following 1 user(s):
4
Example : Unshare a Key
This example unshares a symmetric key, that is, it removes a crypto user from the list of shared users for
the key.
This command uses shareKey to remove user 4 from the list of shared users for key 6. The final argument
uses a value of 0 to indicate an unshare operation.
The output shows that the command succeeded on both HSMs. As a result, user 4 can no longer use key
6 in cryptographic operations.
aws-cloudhsm>shareKey 6 4 0
*************************CAUTION********************************
This is a CRITICAL operation, should be done on all nodes in the
cluster. Cav server does NOT synchronize these changes with the
nodes on which this operation is not executed or failed, please
ensure this operation is executed on all nodes in the cluster.
****************************************************************
Do you want to continue(y/n)?y
shareKey success on server 0(10.0.3.10)
shareKey success on server 1(10.0.3.6)
Arguments
Because this command does not have named parameters, you must enter the arguments in the order
specified in the syntax diagram.
114

AWS CloudHSM User Guide
Reference
shareKey <key handle> <user id> <(share/unshare key?) 1/0>
<key-handle>
Specifies the key handle of a key that you own. You can specify only one key in each command. To
get the key handle of a key, use findKey (p. 133) in key_mgmt_util. To verify that you own a key,
use getKeyInfo (p. 99).
Required: Yes
<user id>
Specifies the user ID the crypto user (CU) with whom you are sharing or unsharing the key. To find
the user ID of a user, use listUsers (p. 105).
Required: Yes
<share 1 or unshare 0>
To share the key with the specified user, type 1. To unshare the key, that is, to remove the specified
user from the list of shared users for the key, type 0.
Required: Yes
Related Topics
•getKeyInfo (p. 99)
syncKey
You can use the syncKey command in cloudhsm_mgmt_util to manually synchronize keys across HSM
instances within a cluster or across cloned clusters. In general, you will not need to use this command,
as HSM instances within a cluster sync keys automatically. However, key synchronization across cloned
clusters must be done manually. Cloned clusters are usually created in different AWS Regions in order to
simplify the global scaling and disaster recovery processes.
You cannot use syncKey to synchronize keys across arbitrary clusters: one of the clusters must have
been created from a backup of the other. Additionally, both clusters must have consistent CO and CU
credentials in order for the operation to be successful. For more information, see HSM Users (p. 10).
To use syncKey, you must first create an AWS CloudHSM configuration file that specifies one HSM from
the source cluster and one from the destination cluster. This will allow cloudhsm_mgmt_util to connect
to both HSM instances. Use this configuration file to start cloudhsm_mgmt_util (p. 78). Then log
in (p. 80) with the credentials of a CO or a CU who owns the keys you want to synchronize. For further
instructions on how to create this configuration file, see the configuration file instructions (p. 118)
below.
User Type
The following types of users can run this command.
• Crypto officers (CO)
• Crypto users (CU)
Note
COs can use syncKey on any keys, while CUs can only use this command on keys that they own.
For more information, see
115

AWS CloudHSM User Guide
Precrypto Officer (PRECO)
Most operations that you perform on the HSM require the credentials of an
HSM user. The HSM authenticates each HSM user by means of a user name
and password.
Each HSM user has a type that determines which operations the user is
allowed to perform on the HSM. The following topics explain the types of
HSM users.
Topics
• Precrypto Officer (PRECO) (p. 11)
• Crypto Officer (CO) (p. 11)
• Crypto User (CU) (p. 11)
• Appliance User (AU) (p. 11)
• HSM User Permissions Table (p. 11)
Precrypto Officer (PRECO)
The precrypto officer (PRECO) is a temporary user that exists only on the
first HSM in an AWS CloudHSM cluster. The first HSM in a new cluster
contains a PRECO user with a default user name and password. To activate
a cluster (p. 38), you log in to the HSM and change the PRECO user's
password. When you change the password, the PRECO user becomes a
crypto officer (CO). The PRECO user can only change its own password and
perform read-only operations on the HSM.
Crypto Officer (CO)
A crypto officer (CO) can perform user management operations. For
example, a CO can create and delete users and change user passwords.
For more information, see the HSM User Permissions Table (p. 11). When
you activate a new cluster (p. 38), the user changes from a Precrypto
Officer (p. 11) (PRECO) to a crypto officer (CO).
Crypto User (CU)
A crypto user (CU) can perform the following key management and
cryptographic operations.
•Key management – Create, delete, share, import, and export
cryptographic keys.
•Cryptographic operations – Use cryptographic keys for encryption,
decryption, signing, verifying, and more.
For more information, see the HSM User Permissions Table (p. 11).
Appliance User (AU)
The appliance user (AU) can perform cloning and synchronization
operations. AWS CloudHSM uses the AU to synchronize the HSMs in an AWS
CloudHSM cluster. The AU exists on all HSMs provided by AWS CloudHSM,
and has limited permissions. For more information, see the HSM User
Permissions Table (p. 11).
116

AWS CloudHSM User Guide
HSM User Permissions Table
AWS uses the AU to perform cloning and synchronization operations on
your cluster's HSMs. AWS cannot perform any operations on your HSMs
except those granted to the AU and unauthenticated users. AWS cannot
view or modify your users or keys and cannot perform any cryptographic
operations using those keys.
HSM User Permissions Table
The following table lists HSM operations and whether each type of HSM
user can perform them.
Get basic
cluster info¹
Yes Yes Yes Yes
Zeroize an
HSM²
Yes Yes Yes Yes
Change own
password
Yes Yes Yes Not
applicable
Change
any user's
password
Yes No No No
Add, remove
users
Yes No No No
Get sync
status³
Yes Yes Yes No
Extract,
insert
Yes Yes Yes No
masked
objects⁴
Create,
share, delete
keys
No Yes No No
Encrypt,
decrypt
No Yes No No
Sign, verify No Yes No No
Generate
digests and
HMACs
No Yes No No
Crypto
Officer (CO)
Crypto User
(CU)
Appliance
User (AU)
Unauthenticated
User
¹Basic cluster information includes the number of HSMs in the cluster and
each HSM's IP address, model, serial number, device ID, firmware ID, etc.
²When an HSM is zeroized, all keys, certificates, and other data on the
HSM is destroyed. You can use your cluster's security group to prevent an
unauthenticated user from zeroizing your HSM. For more information, see
Create a Cluster (p. 21).
117

AWS CloudHSM User Guide
HSM User Permissions Table
³The user can get a set of digests (hashes) that correspond to the keys on
the HSM. An application can compare these sets of digests to understand
the synchronization status of HSMs in a cluster.
⁴Masked objects are keys that are encrypted before they leave the HSM.
They cannot be decrypted outside of the HSM. They are only decrypted
after they are inserted into an HSM that is in the same cluster as the HSM
from which they were extracted. An application can extract and insert
masked objects to synchronize the HSMs in a cluster.
(p. 10).
Prerequisites
Before you begin, you must know the key handle of the key on the source HSM to be synchronized
with the destination HSM. To find the key handle, use the listUsers (p. 105) command to list all
identifiers for named users. Then, use the findAllKeys (p. 91) command to find all keys that belong to
a particular user. In this example, we assume that the key handle to be synchronized is 261251.
You also need to know the server IDs assigned to the source and destination HSMs, which are shown
in the trace output returned by cloudhsm_mgmt_util upon initiation. These are assigned in the same
order that the HSMs appear in the configuration file. For this example, we assume that server 0 is the
source HSM, and server 1 is the destination HSM.
Create a Configuration File for syncKey Across Cloned Clusters
Create a copy of your current config file (/opt/cloudhsm/etc/cloudhsm_mgmt_config.cfg). For
this example, change the copy's name to clustersync.cfg.
Edit clustersync.cfg to include the Elastic Network Interface (ENI) IPs of the two HSMs to be synced.
We recommend that you specify the source HSM first, followed by the destination HSM. To find the ENI
IP of an HSM, use the describe-clusters CLI command.
Initialize cloudhsm_mgmt_util with the new config file by issuing the following command:
aws-cloudhsm> /opt/cloudhsm/bin/cloudhsm_mgmt_util /opt/cloudhsm/etc/clustersync.cfg
Check the status messages returned to ensure that the cloudhsm_mgmt_util is connected to both
HSMs and determine which of the returned ENI IPs corresponds to each cluster. Then, enter server mode
on the source HSM by issuing the server command. In this example, server 0 is the HSM instance from
the source cluster, and server 1 is the HSM instance from the destination cluster.
Syntax
Note
To run syncKey, first enter server mode on the HSM, which contains the key to be synchronized.
Because this command does not have named parameters, you must enter the arguments in the order
specified in the syntax diagram.
User Type: Crypto user (CU)
syncKey <key handle> <destination hsm>
Example
Run the server command to log into the source HSM and enter server mode.
aws-cloudhsm> server 0
118

AWS CloudHSM User Guide
key_mgmt_util
Now run the syncKey command.
aws-cloudhsm> syncKey 261251 1
syncKey success
Arguments
Because this command does not have named parameters, you must enter the arguments in the order
specified in the syntax diagram.
syncKey <key handle> <destination hsm>
<key handle>
Specifies the key handle of the key to sync. You can specify only one key in each command. To get
the key handle of a key, use findAllKeys (p. 91) while logged in to an HSM server.
Required: Yes
<destination hsm>
Specifies the number of the server to which you are syncing a key.
Required: Yes
Related Topics
•listUsers (p. 105)
•findAllKeys (p. 91)
•describe-clusters in AWS CLI
key_mgmt_util
The key_mgmt_util command line tool helps Crypto Users (CU) manage keys in the HSMs. It includes
multiple commands that generate, delete, import, and export keys, get and set attributes, find keys, and
perform cryptographic operations.
For a quick start, see Getting Started with key_mgmt_util (p. 119). For detailed information about the
commands, see key_mgmt_util Command Reference (p. 122). For help interpreting the key attributes,
see the Key Attribute Reference (p. 176).
To use key_mgmt_util if you are using Linux, connect to your client instance and then see Install and
Configure the AWS CloudHSM Client (Linux) (p. 35). If you are using Windows, see Install and Configure
the AWS CloudHSM Client (Windows) (p. 37).
Topics
•Getting Started with key_mgmt_util (p. 119)
•key_mgmt_util Command Reference (p. 122)
Getting Started with key_mgmt_util
AWS CloudHSM includes two command line tools with the AWS CloudHSM client software (p. 35).
The cloudhsm_mgmt_util (p. 80) tool includes commands to manage HSM users. The
119

AWS CloudHSM User Guide
Getting Started
key_mgmt_util (p. 122)tool includes commands to manage keys. To get started with the
key_mgmt_util command line tool, see the following topics.
Topics
•Set Up key_mgmt_util (p. 120)
•Basic Usage of key_mgmt_util (p. 121)
If you encounter an error message or unexpected outcome for a command, see the Troubleshooting AWS
CloudHSM (p. 263) topics for help. For details about the key_mgmt_util commands, see key_mgmt_util
Command Reference (p. 122).
Set Up key_mgmt_util
Complete the following setup before you use key_mgmt_util.
Start the AWS CloudHSM Client
Before you use key_mgmt_util, you must start the AWS CloudHSM client. The client is a daemon that
establishes end-to-end encrypted communication with the HSMs in your cluster. The key_mgmt_util
tool uses the client connection to communicate with the HSMs in your cluster. Without it, key_mgmt_util
doesn't work.
To start the AWS CloudHSM client
Use the following command to start the AWS CloudHSM client.
Amazon Linux
$ sudo start cloudhsm-client
Amazon Linux 2
$ sudo service cloudhsm-client start
CentOS 6
$ sudo start cloudhsm-client
CentOS 7
$ sudo service cloudhsm-client start
RHEL 6
$ sudo start cloudhsm-client
RHEL 7
$ sudo service cloudhsm-client start
Ubuntu 16.04 LTS
$ sudo service cloudhsm-client start
120

AWS CloudHSM User Guide
Getting Started
Windows
C:\Program Files\Amazon\CloudHSM>start "cloudhsm_client" cloudhsm_client.exe C:
\ProgramData\Amazon\CloudHSM\data\cloudhsm_client.cfg
Start key_mgmt_util
After you start the AWS CloudHSM client, use the following command to start key_mgmt_util.
Amazon Linux
$ /opt/cloudhsm/bin/key_mgmt_util
Amazon Linux 2
$ /opt/cloudhsm/bin/key_mgmt_util
RHEL 6
$ /opt/cloudhsm/bin/key_mgmt_util
RHEL 7
$ /opt/cloudhsm/bin/key_mgmt_util
CentOS 6
$ /opt/cloudhsm/bin/key_mgmt_util
CentOS 7
$ /opt/cloudhsm/bin/key_mgmt_util
Ubuntu 16.04 LTS
$ /opt/cloudhsm/bin/key_mgmt_util
Windows
c:\Program Files\Amazon\CloudHSM>key_mgmt_util.exe
The prompt changes to Command: when key_mgmt_util is running.
If the command fails, such as returning a Daemon socket connection error message, try updating
your configuration file (p. 268).
Basic Usage of key_mgmt_util
See the following topics for the basic usage of the key_mgmt_util tool.
Topics
121
AWS CloudHSM User Guide
Reference
•Log In to the HSMs (p. 122)
•Log Out from the HSMs (p. 122)
•Stop key_mgmt_util (p. 122)
Log In to the HSMs
Use the loginHSM command to log in to the HSMs. The following command logs in as a crypto user
(CU) (p. 10) named example_user. The output indicates a successful login for all three HSMs in the
cluster.
Command: loginHSM -u CU -s example_user -p <password>
Cfm3LoginHSM returned: 0x00 : HSM Return: SUCCESS
Cluster Error Status
Node id 0 and err state 0x00000000 : HSM Return: SUCCESS
Node id 1 and err state 0x00000000 : HSM Return: SUCCESS
Node id 2 and err state 0x00000000 : HSM Return: SUCCESS
The following shows the syntax for the loginHSM command.
Command: loginHSM -u <user type> -s <username> -p <password>
Log Out from the HSMs
Use the logoutHSM command to log out from the HSMs.
Command: logoutHSM
Cfm3LogoutHSM returned: 0x00 : HSM Return: SUCCESS
Cluster Error Status
Node id 0 and err state 0x00000000 : HSM Return: SUCCESS
Node id 1 and err state 0x00000000 : HSM Return: SUCCESS
Node id 2 and err state 0x00000000 : HSM Return: SUCCESS
Stop key_mgmt_util
Use the exit command to stop key_mgmt_util.
Command: exit
key_mgmt_util Command Reference
The key_mgmt_util command line tool helps you to manage keys in the HSMs in your cluster, including
creating, deleting, and finding keys and their attributes. It includes multiple commands, each of which is
described in detail in this topic.
For a quick start, see Getting Started with key_mgmt_util (p. 119). For help interpreting the key
attributes, see the Key Attribute Reference (p. 176). For information about the cloudhsm_mgmt_util
command line tool, which includes commands to manage the HSM and users in your cluster, see
cloudhsm_mgmt_util (p. 74).
Before you run any key_mgmt_util command, you must start key_mgmt_util (p. 121) and
login (p. 122) to the HSM as a crypto user (CU).
122

AWS CloudHSM User Guide
Reference
To list all key_mgmt_util commands, type:
Command: help
To get help for a particular key_mgmt_util command, type:
Command: <command-name> -h
To end your key_mgmt_util session, type:
Command: exit
The following topics describe commands in key_mgmt_util.
Note
Some commands in key_mgmt_util and cloudhsm_mgmt_util have the same names. However,
the commands typically have different syntax, different output, and slightly different
functionality.
Command Description
aesWrapUnwrap (p. 124) Encrypts and decrypts the contents of a key in a
file on disk.
deleteKey (p. 126) Deletes a key from the HSMs.
Error2String (p. 128) Gets the error that corresponds to a
key_mgmt_util hexadecimal error code.
exSymKey (p. 129) Exports a plaintext copy of a symmetric key from
the HSMs to a file on disk.
findKey (p. 133) Search for keys by key attribute value.
findSingleKey (p. 137) Verifies that a key exists on all HSMs in the cluster.
genDSAKeyPair (p. 137) Generates a Digital Signing Algorithm (DSA) key
pair in your HSMs.
genECCKeyPair (p. 142) Generates an Elliptic Curve Cryptography (ECC)
key pair in your HSMs.
genPBEKey (p. 146) (This command is not supported on the FIPS-
validated HSMs.)
genRSAKeyPair (p. 146) Generates an RSA asymmetric key pair in your
HSMs.
genSymKey (p. 151) Generates a symmetric key in your HSMs
getAttribute (p. 156) Gets the attribute values for an AWS CloudHSM
key and writes them to a file.
getKeyInfo (p. 159) Gets the HSM user IDs of users who can use the
key.
If the key is quorum controlled, it gets the number
of users in the quorum.
123
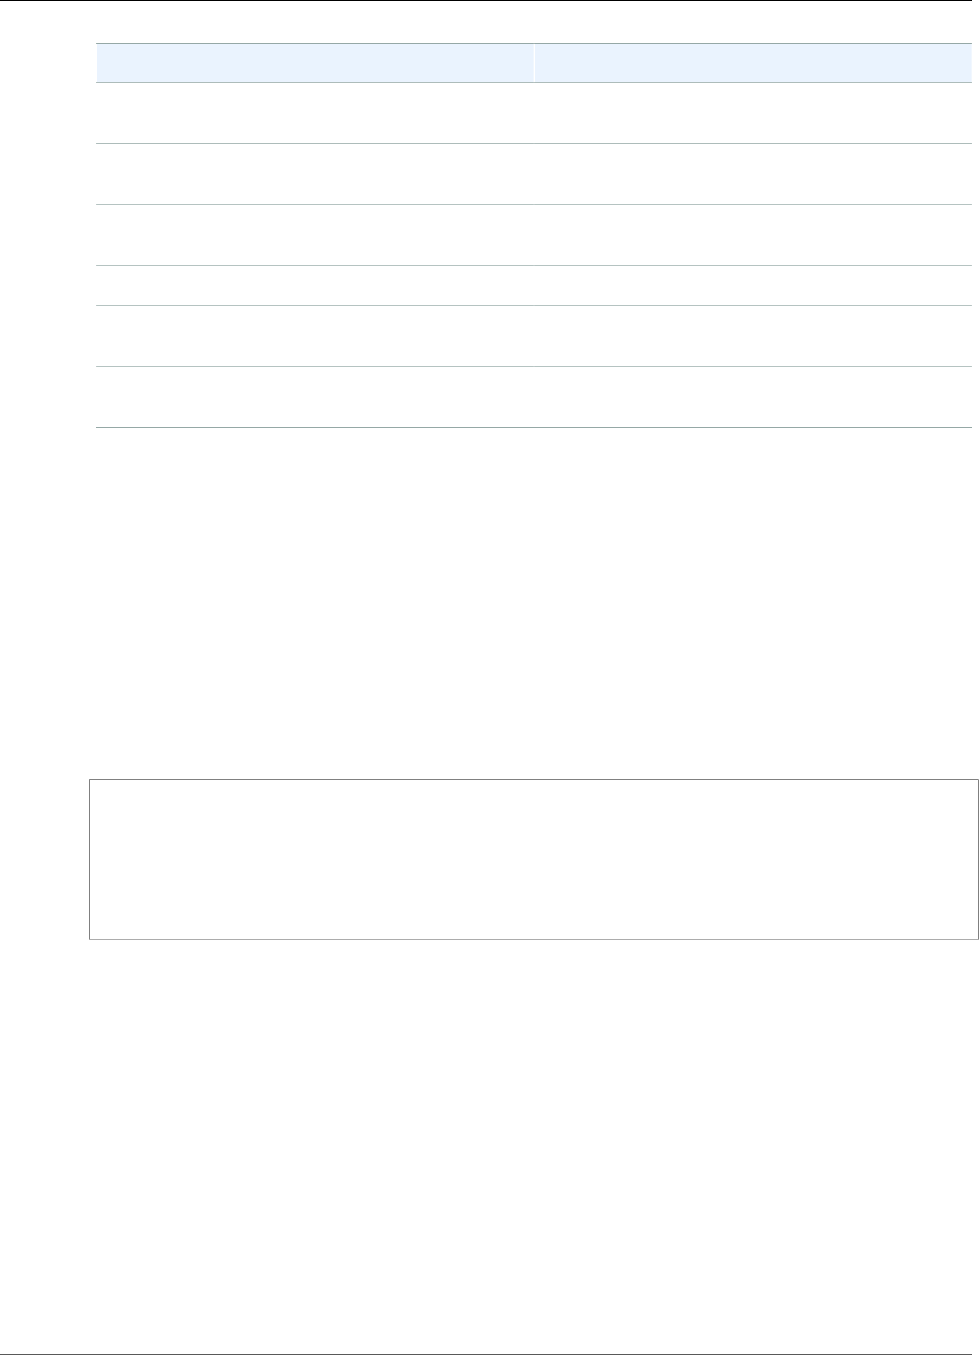
AWS CloudHSM User Guide
Reference
Command Description
imSymKey (p. 162) Imports a plaintext copy of a symmetric key from
a file into the HSM.
listAttributes (p. 168) Lists the attributes of an AWS CloudHSM key and
the constants that represent them.
listUsers (p. 169) Gets the users in the HSMs, their user type and ID,
and other attributes.
setAttribute (p. 170) Converts a session key to a persistent key.
unWrapKey (p. 172) Imports a wrapped (encrypted) key from a file into
the HSMs.
wrapKey (p. 175) Exports an encrypted copy of a key from the HSM
to a file on disk
aesWrapUnwrap
The aesWrapUnwrap command encrypts or decrypts the contents of a file on disk. This command is
designed to wrap and unwrap encryption keys, but you can use it on any file that contains less than 4 KB
(4096 bytes) of data.
aesWrapUnwrap uses AES Key Wrap. It uses an AES key on the HSM as the wrapping or unwrapping key.
Then it writes the result to another file on disk.
Before you run any key_mgmt_util command, you must start key_mgmt_util (p. 121) and
login (p. 122) to the HSM as a crypto user (CU).
Syntax
aesWrapUnwrap -h
aesWrapUnwrap -m <wrap-unwrap mode>
-f <file-to-wrap-unwrap>
-w <wrapping-key-handle>
[-i <wrapping-IV>]
[-out <output-file>]
Examples
These examples show how to use aesWrapUnwrap to encrypt and decrypt an encryption key in a file.
Example : Wrap an Encryption Key
This command uses aesWrapUnwrap to wrap a Triple DES symmetric key that was exported from the
HSM in plaintext (p. 129) into the 3DES.key file. You can use a similar command to wrap any key saved
in a file.
The command uses the -m parameter with a value of 1 to indicate wrap mode. It uses the -w parameter
to specify an AES key in the HSM (key handle 6) as the wrapping key. It writes the resulting wrapped key
to the 3DES.key.wrapped file.
The output shows that the command was successful and that the operation used the default IV, which is
preferred.
124

AWS CloudHSM User Guide
Reference
Command: aesWrapUnwrap -f 3DES.key -w 6 -m 1 -out 3DES.key.wrapped
Warning: IV (-i) is missing.
0xA6A6A6A6A6A6A6A6 is considered as default IV
result data:
49 49 E2 D0 11 C1 97 22
17 43 BD E3 4E F4 12 75
8D C1 34 CF 26 10 3A 8D
6D 0A 7B D5 D3 E8 4D C2
79 09 08 61 94 68 51 B7
result written to file 3DES.key.wrapped
Cfm3WrapHostKey returned: 0x00 : HSM Return: SUCCESS
Example : Unwrap an Encryption Key
This example shows how to use aesWrapUnwrap to unwrap (decrypt) a wrapped (encrypted) key in a file.
You might want to do an operation like this one before importing a key to the HSM. For example, if you
try to use the imSymKey (p. 162) command to import an encrypted key, it returns an error because the
encrypted key doesn't have the format that is required for a plaintext key of that type.
The command unwraps the key in the 3DES.key.wrapped file and writes the plaintext to the
3DES.key.unwrapped file. The command uses the -m parameter with a value of 0 to indicate unwrap
mode. It uses the -w parameter to specify an AES key in the HSM (key handle 6) as the wrapping key. It
writes the resulting wrapped key to the 3DES.key.unwrapped file.
Command: aesWrapUnwrap -m 0 -f 3DES.key.wrapped -w 6 -out 3DES.key.unwrapped
Warning: IV (-i) is missing.
0xA6A6A6A6A6A6A6A6 is considered as default IV
result data:
14 90 D7 AD D6 E4 F5 FA
A1 95 6F 24 89 79 F3 EE
37 21 E6 54 1F 3B 8D 62
result written to file 3DES.key.unwrapped
Cfm3UnWrapHostKey returned: 0x00 : HSM Return: SUCCESS
Parameters
-h
Displays help for the command.
Required: Yes
-m
Specifies the mode. To wrap (encrypt) the file content, type 1; to unwrap (decrypt) the file content,
type 0.
Required: Yes
-f
Specifies the file to wrap. Enter a file that contains less than 4 KB (4096 bytes) of data. This
operation is designed to wrap and unwrap encryption keys.
Required: Yes
125

AWS CloudHSM User Guide
Reference
-w
Specifies the wrapping key. Type the key handle of an AES key on the HSM. This parameter is
required. To find key handles, use the findKey (p. 133) command.
To create a wrapping key, use genSymKey (p. 151) to create an AES key (type 31). To verify
that a key can be used as a wrapping key, use getAttribute (p. 156) to get the value of the
OBJ_ATTR_WRAP attribute, which is represented by constant 262.
Note
Key handle 4 represents an unsupported internal key. We recommend that you use an AES
key that you create and manage as the wrapping key.
Required: Yes
-i
Specifies an alternate initial value (IV) for the algorithm. Use the default value unless you have a
special condition that requires an alternative.
Default: 0xA6A6A6A6A6A6A6A6. The default value is defined in the AES Key Wrap algorithm
specification.
Required: No
-out
Specifies an alternate name for the output file that contains the wrapped or unwrapped key. The
default is wrapped_key (for wrap operations) and unwrapped_key (for unwrap operations) in the
local directory.
If the file exists, the aesWrapUnwrap overwrites it without warning. If the command fails,
aesWrapUnwrap creates an output file with no contents.
Default: For wrap: wrapped_key. For unwrap: unwrapped_key.
Required: No
Related Topics
•exSymKey (p. 129)
•imSymKey (p. 162)
•unWrapKey (p. 172)
•wrapKey (p. 175)
deleteKey
The deleteKey command in key_mgmt_util deletes a key from the HSM. You can only delete one key at a
time. Deleting one key in a key pair has no effect on the other key in the pair.
Only the key owner can delete a key. Users who share the key can use it in cryptographic operations, but
not delete it.
Before you run any key_mgmt_util command, you must start key_mgmt_util (p. 121) and
login (p. 122) to the HSM as a crypto user (CU).
Syntax
deleteKey -h
126
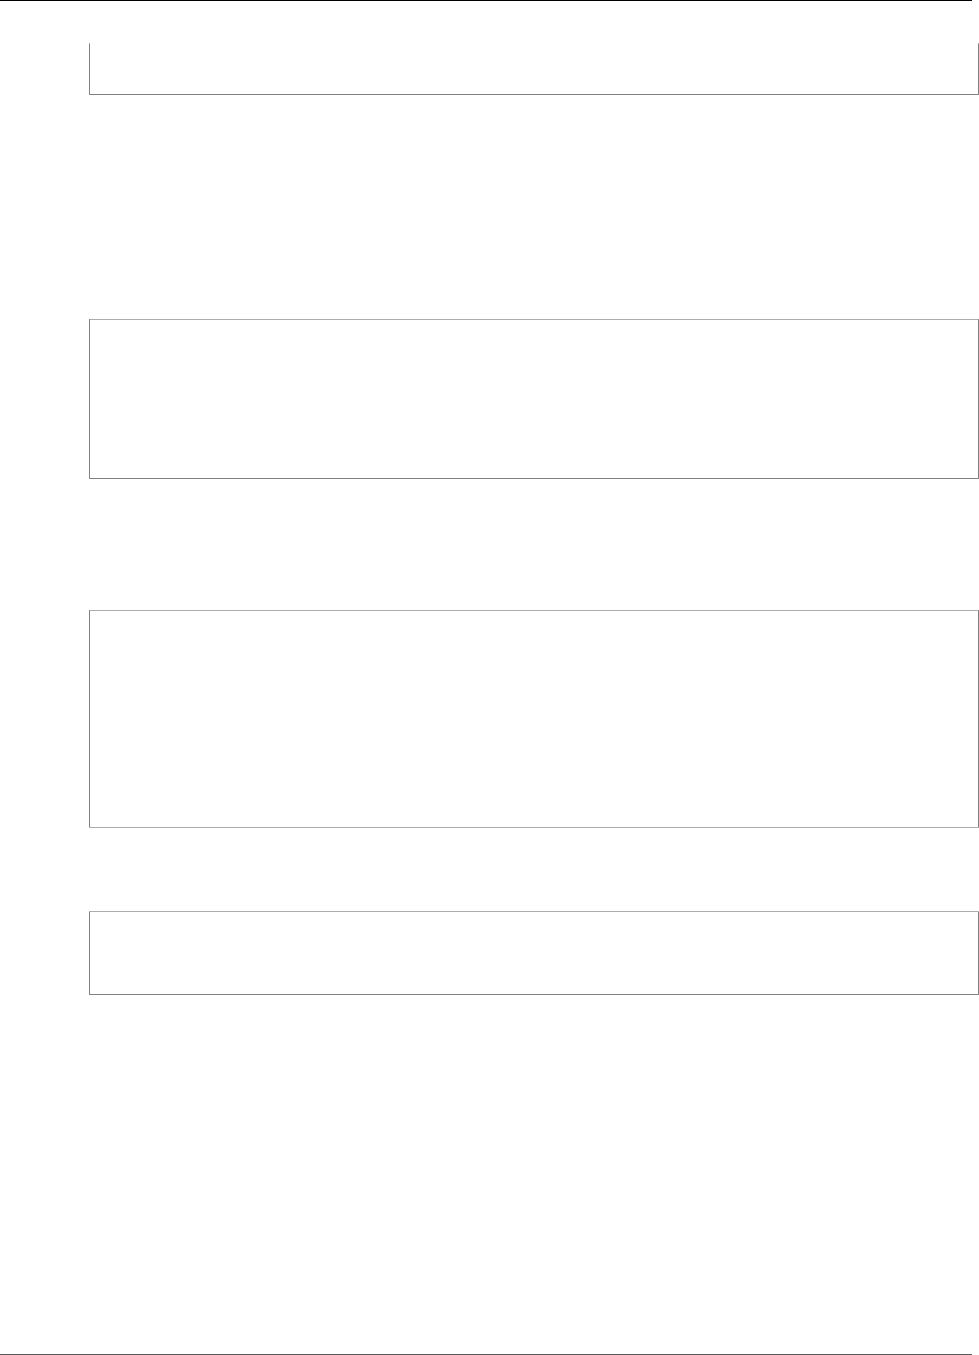
AWS CloudHSM User Guide
Reference
deleteKey -k
Examples
These examples show how to use deleteKey to delete keys from your HSMs.
Example : Delete a Key
This command deletes the key with key handle 6. When the command succeeds, deleteKey returns
success messages from each HSM in the cluster.
Command: deleteKey -k 6
Cfm3DeleteKey returned: 0x00 : HSM Return: SUCCESS
Cluster Error Status
Node id 1 and err state 0x00000000 : HSM Return: SUCCESS
Node id 2 and err state 0x00000000 : HSM Return: SUCCESS
Example : Delete a Key (Failure)
When the command fails because no key has the specified key handle, deleteKey returns an invalid
object handle error message.
Command: deleteKey -k 252126
Cfm3FindKey returned: 0xa8 : HSM Error: Invalid object handle is passed to this
operation
Cluster Error Status
Node id 1 and err state 0x000000a8 : HSM Error: Invalid object handle is passed to
this operation
Node id 2 and err state 0x000000a8 : HSM Error: Invalid object handle is passed to
this operation
When the command fails because the current user is not the owner of the key, the command returns an
access denied error.
Command: deleteKey -k 262152
Cfm3DeleteKey returned: 0xc6 : HSM Error: Key Access is denied.
Parameters
-h
Displays command line help for the command.
Required: Yes
-k
Specifies the key handle of the key to delete. To find the key handles of keys in the HSM, use
findKey (p. 133).
Required: Yes
127

AWS CloudHSM User Guide
Reference
Related Topics
•findKey (p. 133)
Error2String
The Error2String helper command in key_mgmt_util returns the error that corresponds to a
key_mgmt_util hexadecimal error code. You can use this command when troubleshooting your
commands and scripts.
Before you run any key_mgmt_util command, you must start key_mgmt_util (p. 121) and
login (p. 122) to the HSM as a crypto user (CU).
Syntax
Error2String -h
Error2String -r <response-code>
Examples
These examples show how to use Error2String to get the error string for a key_mgmt_util error code.
Example : Get an Error Description
This command gets the error description for the 0xdb error code. The description explains that an
attempt to log in to key_mgmt_util failed because the user has the wrong user type. Only crypto users
(CU) can log in to key_mgmt_util.
Command: Error2String -r 0xdb
Error Code db maps to HSM Error: Invalid User Type.
Example : Find the Error Code
This example shows where to find the error code in a key_mgmt_util error. The error code, 0xc6, appears
after the string: Cfm3command-name returned: .
In this example, getKeyInfo (p. 159) indicates that the current user (user 4) can use the key in
cryptographic operations. Nevertheless, when the user tries to use deleteKey (p. 126) to delete the key,
the command returns error code 0xc6.
Command: deleteKey -k 262162
Cfm3DeleteKey returned: 0xc6 : HSM Error: Key Access is denied
Cluster Error Status
Command: getKeyInfo -k 262162
Cfm3GetKey returned: 0x00 : HSM Return: SUCCESS
Owned by user 3
also, shared to following 1 user(s):
128
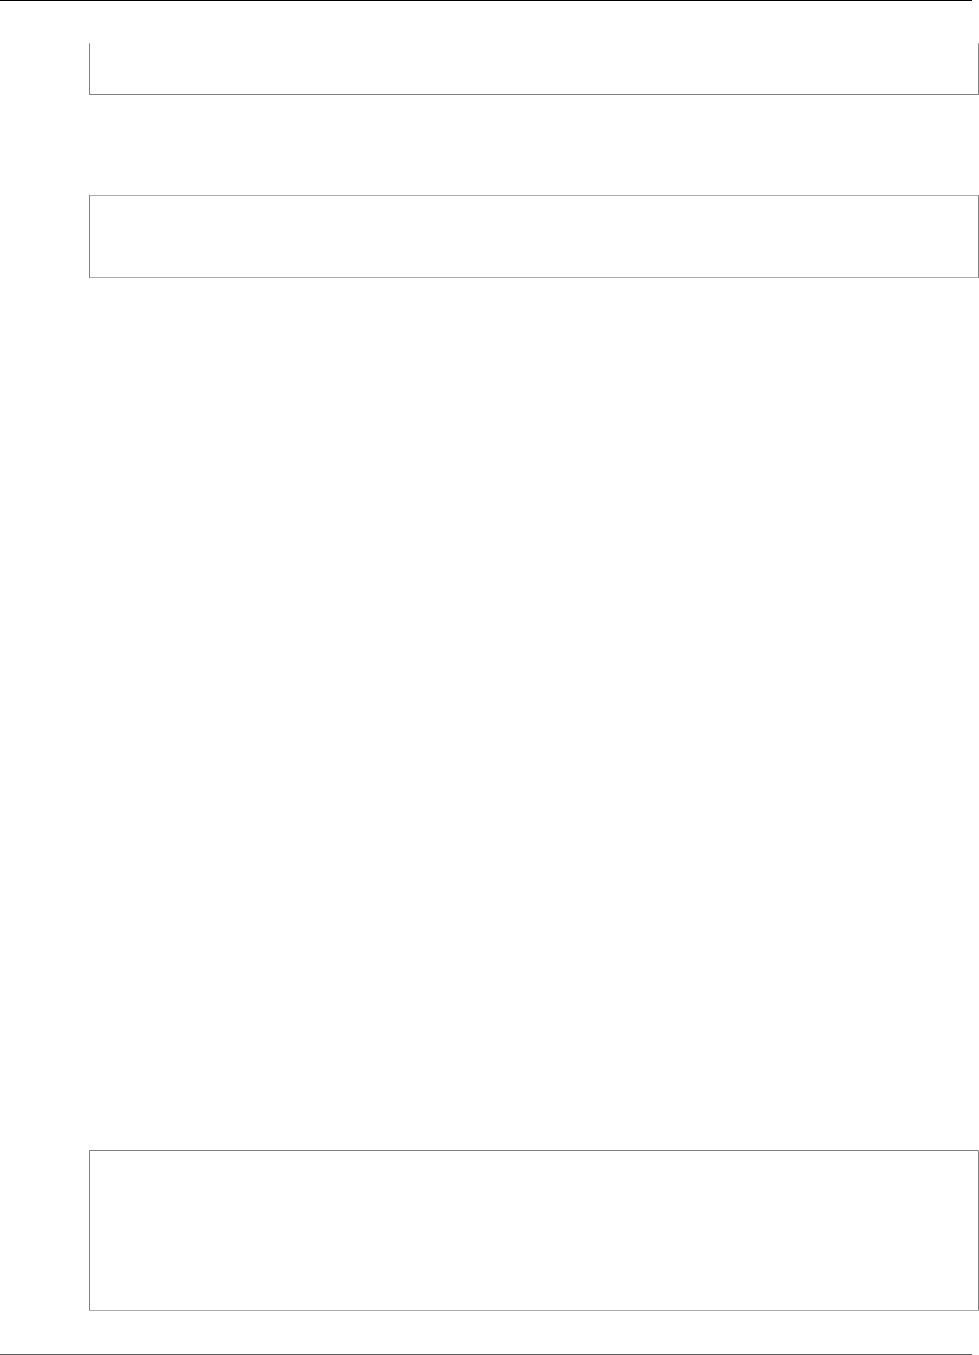
AWS CloudHSM User Guide
Reference
4
If the 0xc6 error is reported to you, you can use an Error2String command like this one to look up the
error. In this case, the deleteKey command failed with an access denied error because the key is shared
with the current user but owned by a different user. Only key owners have permission to delete a key.
Command: Error2String -r 0xa8
Error Code c6 maps to HSM Error: Key Access is denied
Parameters
-h
Displays help for the command.
Required: Yes
-r
Specifies a hexadecimal error code. The 0x hexadecimal indicator is required.
Required: Yes
exSymKey
The exSymKey command in the key_mgmt_util tool exports a plaintext copy of a symmetric
key from the HSM and saves it in a file on disk. To export an encrypted (wrapped) copy of a key,
use wrapKey (p. 175). To import a plaintext key, like the ones that exSymKey exports, use
imSymKey (p. 162).
During the export process, exSymKey uses an AES key that you specify (the wrapping key) to wrap
(encrypt) and then unwrap (decrypt) the key to be exported. However, the result of the export operation
is a plaintext (unwrapped) key on disk.
Only the owner of a key, that is, the CU user who created the key, can export it. Users who share the key
can use it in cryptographic operations, but they cannot export it.
The exSymKey operation copies the key material to a file that you specify, but it does not remove
the key from the HSM, change its key attributes (p. 176), or prevent you from using the key in
cryptographic operations. You can export the same key multiple times.
exSymKey exports only symmetric keys. To export public keys, use exPubKey. To export private keys, use
exportPrivateKey.
Before you run any key_mgmt_util command, you must start key_mgmt_util (p. 121) and
login (p. 122) to the HSM as a crypto user (CU).
Syntax
exSymKey -h
exSymKey -k <key-to-export>
-w <wrapping-key>
-out <key-file>
[-m 4]
[-wk <unwrapping-key-file> ]
129

AWS CloudHSM User Guide
Reference
Examples
These examples show how to use exSymKey to export symmetric keys that you own from your HSMs.
Example : Export a 3DES Symmetric Key
This command exports a Triple DES (3DES) symmetric key (key handle 7). It uses an existing AES key (key
handle 6) in the HSM as the wrapping key. Then it writes the plaintext of the 3DES key to the 3DES.key
file.
The output shows that key 7 (the 3DES key) was successfully wrapped and unwrapped, and then written
to the 3DES.key file.
Warning
Although the output says that a "Wrapped Symmetric Key" was written to the output file, the
output file contains a plaintext (unwrapped) key.
Command: exSymKey -k 7 -w 6 -out 3DES.key
Cfm3WrapKey returned: 0x00 : HSM Return: SUCCESS
Cfm3UnWrapHostKey returned: 0x00 : HSM Return: SUCCESS
Wrapped Symmetric Key written to file "3DES.key"
Example : Exporting with Session-Only Wrapping Key
This example shows how to use a key that exists only in the session as the wrapping key. Because the key
to be exported is wrapped, immediately unwrapped, and delivered as plaintext, there is no need to retain
the wrapping key.
This series of commands exports an AES key with key handle 8 from the HSM. It uses an AES session key
created especially for the purpose.
The first command uses genSymKey (p. 151) to create a 256-bit AES key. It uses the -sess parameter
to create a key that exists only in the current session.
The output shows that the HSM creates key 262168.
Command: genSymKey -t 31 -s 32 -l AES-wrapping-key -sess
Cfm3GenerateSymmetricKey returned: 0x00 : HSM Return: SUCCESS
Symmetric Key Created. Key Handle: 262168
Cluster Error Status
Node id 1 and err state 0x00000000 : HSM Return: SUCCESS
Next, the example verifies that key 8, the key to be exported, is a symmetric key that is extractable. It
also verifies that the wrapping key, key 262168, is an AES key that exists only in the session. You can use
the findKey (p. 133) command, but this example exports the attributes of both keys to files and then
uses grep to find the relevant attribute values in the file.
These commands use getAttribute with an -a value of 512 (all) to get all attributes for keys 8
and 262168. For information about the key attributes, see the the section called “Key Attribute
Reference” (p. 176).
getAttribute -o 8 -a 512 -out attributes/attr_8
getAttribute -o 262168 -a 512 -out attributes/attr_262168
130

AWS CloudHSM User Guide
Reference
These commands use grep to verify the attributes of the key to be exported (key 8) and the session-only
wrapping key (key 262168).
// Verify that the key to be exported is a symmetric key.
$ grep -A 1 "OBJ_ATTR_CLASS" attributes/attr_8
OBJ_ATTR_CLASS
0x04
// Verify that the key to be exported is extractable.
$ grep -A 1 "OBJ_ATTR_KEY_TYPE" attributes/attr_8
OBJ_ATTR_EXTRACTABLE
0x00000001
// Verify that the wrapping key is an AES key
$ grep -A 1 "OBJ_ATTR_KEY_TYPE" attributes/attr_262168
OBJ_ATTR_KEY_TYPE
0x1f
// Verify that the wrapping key is a session key
$ grep -A 1 "OBJ_ATTR_TOKEN" attributes/attr_262168
OBJ_ATTR_TOKEN
0x00
// Verify that the wrapping key can be used for wrapping
$ grep -A 1 "OBJ_ATTR_WRAP" attributes/attr_262168
OBJ_ATTR_WRAP
0x00000001
Finally, we use an exSymKey command to export key 8 using the session key (key 262168) as the
wrapping key.
When the session ends, key 262168 no longer exists.
Command: exSymKey -k 8 -w 262168 -out aes256_H8.key
Cfm3WrapKey returned: 0x00 : HSM Return: SUCCESS
Cfm3UnWrapHostKey returned: 0x00 : HSM Return: SUCCESS
Wrapped Symmetric Key written to file "aes256_H8.key"
Example : Use an External Unwrapping Key
This example shows how to use an external unwrapping key to export a key from the HSM.
When you export a key from the HSM, you specify an AES key on the HSM to be the wrapping key. By
default, that wrapping key is used to wrap and unwrap the key to be exported. However, you can use the
-wk parameter to tell exSymKey to use an external key in a file on disk for unwrapping. When you do,
the key specified by the -w parameter wraps the target key, and the key in the file specified by the -wk
parameter unwraps the key.
Because the wrapping key must be an AES key, which is symmetric, the wrapping key in the HSM and
unwrapping key on disk must be have the same key material. To do this, you must import the wrapping
key to the HSM or export the wrapping key from the HSM before the export operation.
This example creates a key outside of the HSM and imports it into the HSM. It uses the internal copy of
the key to wrap a symmetric key that is being exported, and the copy of key in the file to unwrap it.
The first command uses OpenSSL to generate a 256-bit AES key. It saves the key to the aes256-
forImport.key file. The OpenSSL command does not return any output, but you can use several
131

AWS CloudHSM User Guide
Reference
commands to confirm its success. This example uses the wc (wordcount) tool, which confirms that the file
that contains 32 bytes of data.
$ openssl rand -out keys/aes256-forImport.key 32
$ wc keys/aes256-forImport.key
0 2 32 keys/aes256-forImport.key
This command uses the imSymKey command to import the AES key from the aes256-forImport.key
file to the HSM. When the command completes, the key exists in the HSM with key handle 262167 and
in the aes256-forImport.key file.
Command: imSymKey -f keys/aes256-forImport.key -t 31 -l aes256-imported -w 6
Cfm3WrapHostKey returned: 0x00 : HSM Return: SUCCESS
Cfm3CreateUnwrapTemplate returned: 0x00 : HSM Return: SUCCESS
Cfm3UnWrapKey returned: 0x00 : HSM Return: SUCCESS
Symmetric Key Unwrapped. Key Handle: 262167
Cluster Error Status
Node id 1 and err state 0x00000000 : HSM Return: SUCCESS
Node id 0 and err state 0x00000000 : HSM Return: SUCCESS
This command uses the key in an export operation. The command uses exSymKey to export key 21,
a 192-bit AES key. To wrap the key, it uses key 262167, which is the copy that was imported into the
HSM. To unwrap the key, it uses the same key material in the aes256-forImport.key file. When the
command completes, key 21 is exported to the aes192_h21.key file.
Command: exSymKey -k 21 -w 262167 -out aes192_H21.key -wk aes256-forImport.key
Cfm3WrapKey returned: 0x00 : HSM Return: SUCCESS
Wrapped Symmetric Key written to file "aes192_H21.key"
Parameters
-h
Displays help for the command.
Required: Yes
-k
Specifies the key handle of the key to export. This parameter is required. Enter the key handle
of a symmetric key that you own. This parameter is required. To find key handles, use the
findKey (p. 133) command.
To verify that a key can be exported, use the getAttribute (p. 156) command to get the value of the
OBJ_ATTR_EXTRACTABLE attribute, which is represented by constant 354. Also, you can export only
keys that you own. To find the owner of a key, use the getKeyInfo (p. 159) command.
Required: Yes
-w
Specifies the key handle of the wrapping key. This parameter is required. To find key handles, use the
findKey (p. 133) command.
132

AWS CloudHSM User Guide
Reference
A wrapping key is a key in the HSM that is used to encrypt (wrap) and then decrypt (unwrap) the key
to be exported. Only AES keys can be used as wrapping keys.
You can use any AES key (of any size) as a wrapping key. Because the wrapping key wraps, and then
immediately unwraps, the target key, you can use as session-only AES key as a wrapping key. To
determine whether a key can be used as a wrapping key, use getAttribute (p. 156) to get the value
of the OBJ_ATTR_WRAP attribute, which is represented by the constant 262. To create a wrapping
key, use genSymKey (p. 151) to create an AES key (type 31).
If you use the -wk parameter to specify an external unwrapping key, the -w wrapping key is used to
wrap, but not to unwrap, the key during export.
Note
Key 4 represents an unsupported internal key. We recommend that you use an AES key that
you create and manage as the wrapping key.
Required: Yes
-out
Specifies the path and name of the output file. When the command succeeds, this file contains the
exported key in plaintext. If the file already exists, the command overwrites it without warning.
Required: Yes
-m
Specifies the wrapping mechanism. The only valid value is 4, which represents the NIST_AES_WRAP
mechanism.
Required: No
Default: 4
-wk
Use the AES key in the specified file to unwrap the key that is being exported. Enter the path and
name of a file that contains a plaintext AES key.
When you include this parameter. exSymKey uses the key in the HSM that is specified by the -w
parameter to wrap the key that is being exported and it uses the key in the -wk file to unwrap it. The
-w and -wk parameter values must resolve to the same plaintext key.
Required: No
Default: Use the wrapping key on the HSM to unwrap.
Related Topics
•genSymKey (p. 151)
•imSymKey (p. 162)
•wrapKey (p. 175)
findKey
Use the findKey command in key_mgmt_util to search for keys by the values of the key attributes. When
a key matches all the criteria that you set, findKey returns the key handle. With no parameters, findKey
returns the key handles of all the keys that you can use in the HSM. To find the attribute values of a
particular key, use getAttribute (p. 156).
133

AWS CloudHSM User Guide
Reference
Like all key_mgmt_util commands, findKey is user specific. It returns only the keys that the current user
can use in cryptographic operations. This includes keys that current user owns and keys that have been
shared with the current user.
Before you run any key_mgmt_util command, you must start key_mgmt_util (p. 121) and
login (p. 122) to the HSM as a crypto user (CU).
Syntax
findKey -h
findKey [-c <key class>]
[-t <key type>]
[-l <key label>]
[-id <key ID>]
[-sess (0 | 1)]
[-u <user-ids>]
[-m <modulus>]
[-kcv <key_check_value>]
Examples
These examples show how to use findKey to find and identify keys in your HSMs.
Example : Find All Keys
This command finds all keys for the current user in the HSM. The output includes keys that the user owns
and shares, and all public keys in the HSMs.
To get the attributes of a key with a particular key handle, use getAttribute (p. 156). To
determine whether the current user owns or shares a particular key, use getKeyInfo (p. 159) or
findAllKeys (p. 91) in cloudhsm_mgmt_util.
Command: findKey
Total number of keys present 13
number of keys matched from start index 0::12
6, 7, 524296, 9, 262154, 262155, 262156, 262157, 262158, 262159, 262160, 262161, 262162
Cluster Error Status
Node id 1 and err state 0x00000000 : HSM Return: SUCCESS
Node id 0 and err state 0x00000000 : HSM Return: SUCCESS
Cfm3FindKey returned: 0x00 : HSM Return: SUCCESS
Example : Find Keys by Type, User, and Session
This command finds persistent AES keys that the current user and user 3 can use. (User 3 might be able
to use other keys that the current user cannot see.)
Command: findKey -t 31 -sess 0 -u 3
Example : Find Keys by Class and Label
This command finds all public keys for the current user with the 2018-sept label.
Command: findKey -c 2 -l 2018-sept
134

AWS CloudHSM User Guide
Reference
Example : Find RSA Keys by Modulus
This command finds RSA keys (type 0) for the current user that were created by using the modulus in the
m4.txt file.
Command: findKey -t 0 -m m4.txt
Parameters
-h
Displays help for the command.
Required: Yes
-t
Finds keys of the specified type. Enter the constant that represents the key class. For example, to
find 3DES keys, type -t 21.
Valid values:
• 0: RSA
• 1: DSA
• 3: EC
• 16: GENERIC_SECRET
• 18: RC4
• 21: Triple DES (3DES)
• 31: AES
Required: No
-c
Finds keys in the specified class. Enter the constant that represents the key class. For example, to
find public keys, type -c 2.
Valid values for each key type:
• 2: Public. This class contains the public keys of public–private key pairs.
• 3: Private. This class contains the private keys of public–private key pairs.
• 4: Secret. This class contains all symmetric keys.
Required: No
-l
Finds keys with the specified label. Type the exact label. You cannot use wildcard characters or
regular expressions in the --l value.
Required: No
-id
Finds the key with the specified ID. Type the exact ID string. You cannot use wildcard characters or
regular expressions in the -id value.
Required: No
-sess
Finds keys by session status. To find keys that are valid only in the current session, type 1. To find
persistent keys, type 0.
135

AWS CloudHSM User Guide
Reference
Required: No
-u
Finds keys the specified users and the current user share. Type a comma-separated list of HSM user
IDs, such as -u 3 or -u 4,7. To find the IDs of users on an HSM, use listUsers (p. 169).
When you specify one user ID, findKey returns the keys for that user. When you specify multiple user
IDs, findKey returns the keys that all the specified users can use.
Because findKey only returns keys that the current user can use, the -u results are always identical
to or a subset of the current user's keys. To get all keys that are owned by or shared with any user,
crypto officers (COs) can use findAllKeys (p. 91) in cloudhsm_mgmt_util.
Required: No
-m
Finds keys that were created by using the RSA modulus in the specified file. Type the path to file that
stores the modulus.
Required: No
-kcv
Finds keys with the specified key check value.
The key check value (KCV) is an 8-byte hash or checksum of a key. The HSM calculates a KCV when it
generates the key. You can also calculate a KCV outside of the HSM, such as after you export a key.
You can then compare the KCV values to confirm the identity and integrity of the key. To get the KCV
of a key, use getAttribute (p. 156).
AWS CloudHSM uses the following standard method to generate a key check value:
•Symmetric keys: First 8 bytes of the result of encrypting 16 zero-filled bytes with the key.
•Asymmetric key pairs: First 8 bytes of the modulus hash.
Required: No
Output
The findKey output lists the total number of matching keys and their key handles.
Command: findKey
Total number of keys present 10
number of keys matched from start index 0::9
6, 7, 8, 9, 10, 11, 262156, 262157, 262158, 262159
Cluster Error Status
Node id 1 and err state 0x00000000 : HSM Return: SUCCESS
Node id 2 and err state 0x00000000 : HSM Return: SUCCESS
Cfm3FindKey returned: 0x00 : HSM Return: SUCCESS
Related Topics
•findSingleKey (p. 137)
•getKeyInfo (p. 159)
•getAttribute (p. 156)
•findAllKeys (p. 91) in cloudhsm_mgmt_util
136
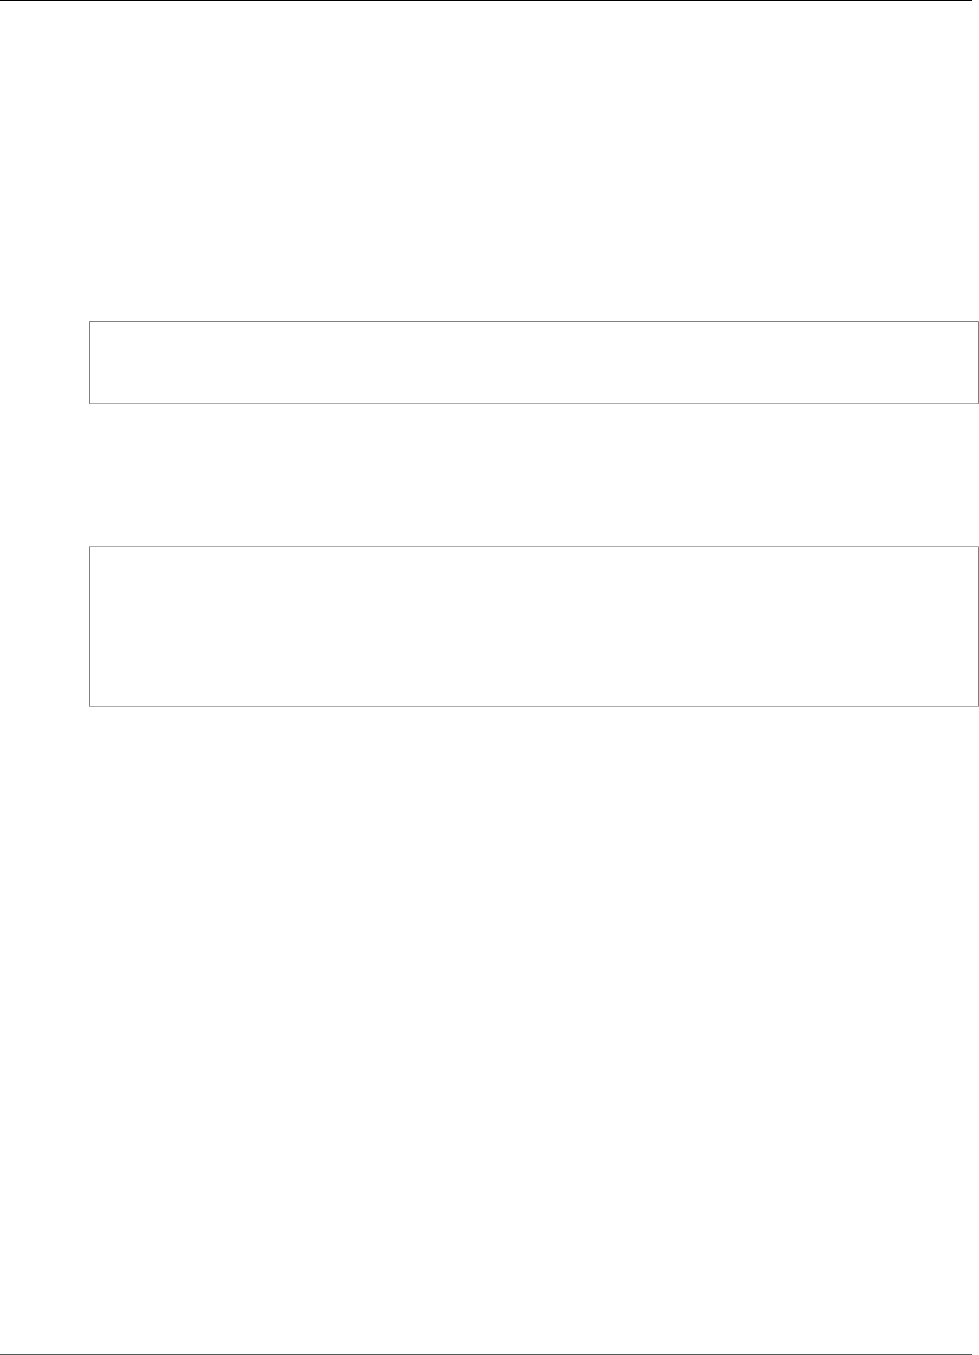
AWS CloudHSM User Guide
Reference
•Key Attribute Reference (p. 176)
findSingleKey
The findSingleKey command in the key_mgmt_util tool verifies that a key exists on all HSMs in the
cluster.
Before you run any key_mgmt_util command, you must start key_mgmt_util (p. 121) and
login (p. 122) to the HSM as a crypto user (CU).
Syntax
findSingleKey -h
findSingleKey -k <key-handle>
Example
Example
This command verifies that key 252136 exists on all three HSMs in the cluster.
Command: findSingleKey -k 252136
Cfm3FindKey returned: 0x00 : HSM Return: SUCCESS
Cluster Error Status
Node id 2 and err state 0x00000000 : HSM Return: SUCCESS
Node id 1 and err state 0x00000000 : HSM Return: SUCCESS
Node id 0 and err state 0x00000000 : HSM Return: SUCCESS
Parameters
-h
Displays help for the command.
Required: Yes
-k
Specifies the key handle of one key in the HSM. This parameter is required.
To find key handles, use the findKey (p. 169) command.
Required: Yes
Related Topics
•findKey (p. 169)
•getKeyInfo (p. 169)
•getAttribute (p. 133)
genDSAKeyPair
The genDSAKeyPair command in the key_mgmt_util tool generates a Digital Signing Algorithm (DSA)
key pair in your HSMs. You must specify the modulus length; the command generates the modulus value.
137

AWS CloudHSM User Guide
Reference
You can also assign an ID, share the key with other HSM users, create nonextractable keys, and create
keys that expire when the session ends. When the command succeeds, it returns the key handles that
the HSM assigns to the public and private keys. You can use the key handles to identify the keys to other
commands.
Before you run any key_mgmt_util command, you must start key_mgmt_util (p. 121) and
login (p. 122) to the HSM as a crypto user (CU).
Tip
To find the attributes of a key that you have created, such as the type, length, label, and ID, use
getAttribute (p. 156). To find the keys for a particular user, use getKeyInfo (p. 159). To find
keys based on their attribute values, use findKey (p. 133).
Syntax
genDSAKeyPair -h
genDSAKeyPair -m <modulus length>
-l <label>
[-id <key ID>]
[-min_srv <minimum number of servers>]
[-m_value <0..8>]
[-nex]
[-sess]
[-timeout <number of seconds> ]
[-u <user-ids>]
[-attest]
Examples
These examples show how to use genDSAKeyPair to create a DSA key pair.
Example : Create a DSA Key Pair
This command creates a DSA key pair with a DSA label. The output shows that the key handle of the
public key is 19 and the handle of the private key is 21.
Command: genDSAKeyPair -m 2048 -l DSA
Cfm3GenerateKeyPair: returned: 0x00 : HSM Return: SUCCESS
Cfm3GenerateKeyPair: public key handle: 19 private key handle: 21
Cluster Error Status
Node id 0 and err state 0x00000000 : HSM Return: SUCCESS
Example : Create a Session-Only DSA Key Pair
This command creates a DSA key pair that is valid only in the current session. The command assigns a
unique ID of DSA_temp_pair in addition to the required (nonunique) label. You might want to create
a key pair like this to sign and verify a session-only token. The output shows that the key handle of the
public key is 12 and the handle of the private key is 14.
Command: genDSAKeyPair -m 2048 -l DSA-temp -id DSA_temp_pair -sess
Cfm3GenerateKeyPair: returned: 0x00 : HSM Return: SUCCESS
Cfm3GenerateKeyPair: public key handle: 12 private key handle: 14
Cluster Error Status
138

AWS CloudHSM User Guide
Reference
Node id 0 and err state 0x00000000 : HSM Return: SUCCESS
To confirm that the key pair exists only in the session, use the -sess parameter of findKey (p. 133)
with a value of 1 (true).
Command: findKey -sess 1
Total number of keys present 2
number of keys matched from start index 0::1
12, 14
Cluster Error Status
Node id 0 and err state 0x00000000 : HSM Return: SUCCESS
Cfm3FindKey returned: 0x00 : HSM Return: SUCCESS
Example : Create a Shared, Nonextractable DSA Key Pair
This command creates a DSA key pair. The private key is shared with three other users, and it cannot be
exported from the HSM. Public keys can be used by any user and can always be extracted.
Command: genDSAKeyPair -m 2048 -l DSA -id DSA_shared_pair -nex -u 3,5,6
Cfm3GenerateKeyPair: returned: 0x00 : HSM Return: SUCCESS
Cfm3GenerateKeyPair: public key handle: 11 private key handle: 19
Cluster Error Status
Node id 0 and err state 0x00000000 : HSM Return: SUCCESS
Example : Create a Quorum-Controlled Key Pair
This command creates a DSA key pair with the label DSA-mV2. The command uses the -u parameter to
share the private key with user 4 and 6. It uses the -m_value parameter to require a quorum of at least
two approvals for any cryptographic operations that use the private key. The command also uses the -
attest parameter to verify the integrity of the firmware on which the key pair is generated.
The output shows that the command generates a public key with key handle 12 and a private key with
key handle 17, and that the attestation check on the cluster firmware passed.
Command: genDSAKeyPair -m 2048 -l DSA-mV2 -m_value 2 -u 4,6 -attest
Cfm3GenerateKeyPair: returned: 0x00 : HSM Return: SUCCESS
Cfm3GenerateKeyPair: public key handle: 12 private key handle: 17
Attestation Check : [PASS]
Cluster Error Status
Node id 1 and err state 0x00000000 : HSM Return: SUCCESS
Node id 0 and err state 0x00000000 : HSM Return: SUCCESS
This command uses getKeyInfo (p. 159) on the private key (key handle 17). The output confirms that
the key is owned by the current user (user 3) and that it is shared with users 4 and 6 (and no others). The
output also shows that quorum authentication is enabled and the quorum size is two.
139

AWS CloudHSM User Guide
Reference
Command: getKeyInfo -k 17
Cfm3GetKey returned: 0x00 : HSM Return: SUCCESS
Owned by user 3
also, shared to following 2 user(s):
4
6
2 Users need to approve to use/manage this key
Parameters
-h
Displays help for the command.
Required: Yes
-m
Specifies the length of the modulus in bits. The only valid value is 2048.
Required: Yes
-l
Specifies a user-defined label for the key pair. Type a string. The same label applies to both keys in
the pair
You can use any phrase that helps you to identify the key. Because the label does not have to be
unique, you can use it to group and categorize keys.
Required: Yes
-id
Specifies a user-defined identifier for the key pair. Type a string that is unique in the cluster. The
default is an empty string. The ID that you specify applies to both keys in the pair.
Default: No ID value.
Required: No
-min_srv
Specifies the minimum number of HSMs on which the key is synchronized before the value of the -
timeout parameter expires. If the key is not synchronized to the specified number of servers in the
time allotted, it is not created.
AWS CloudHSM automatically synchronizes every key to every HSM in the cluster. To speed up your
process, set the value of min_srv to less than the number of HSMs in the cluster and set a low
timeout value. Note, however, that some requests might not generate a key.
Default: 1
Required: No
-m_value
Specifies the number of users who must approve any cryptographic operation that uses the private
key in the pair. Type a value from 0 to 8.
140

AWS CloudHSM User Guide
Reference
This parameter establishes a quorum authentication requirement for the private key. The default
value, 0, disables the quorum authentication feature for the key. When quorum authentication is
enabled, the specified number of users must sign a token to approve cryptographic operations that
use the private key, and operations that share or unshare the private key.
To find the m_value of a key, use getKeyInfo (p. 159).
This parameter is valid only when the -u parameter in the command shares the key pair with
enough users to satisfy the m_value requirement.
Default: 0
Required: No
-nex
Makes the private key nonextractable. The private key that is generated cannot be exported from
the HSM (p. 59). Public keys are always extractable.
Default: Both the public and private keys in the key pair are extractable.
Required: No
-sess
Creates a key that exists only in the current session. The key cannot be recovered after the session
ends.
Use this parameter when you need a key only briefly, such as a wrapping key that encrypts, and
then quickly decrypts, another key. Do not use a session key to encrypt data that you might need to
decrypt after the session ends.
To change a session key to a persistent (token) key, use setAttribute (p. 170).
Default: The key is persistent.
Required: No
-timeout
Specifies how long (in seconds) the command waits for a key to be synchronized to the number of
HSMs specified by the min_srv parameter.
This parameter is valid only when the min_srv parameter is also used in the command.
Default: No timeout. The command waits indefinitely and returns only when the key is synchronized
to the minimum number of servers.
Required: No
-u
Shares the private key in the pair with the specified users. This parameter gives other HSM crypto
users (CUs) permission to use the private key in cryptographic operations. Public keys can be used by
any user without sharing.
Type a comma-separated list of HSM user IDs, such as -u 5,6. Do not include the HSM user ID of the
current user. To find HSM user IDs of CUs on the HSM, use listUsers (p. 169). To share and unshare
existing keys, use shareKey.
Default: Only the current user can use the private key.
Required: No
141

AWS CloudHSM User Guide
Reference
-attest
Runs an integrity check that verifies that the firmware on which the cluster runs has not been
tampered with.
Default: No attestation check.
Required: No
Related Topics
•genRSAKeyPair (p. 146)
•genSymKey (p. 151)
•genECCKeyPair (p. 142)
genECCKeyPair
The genECCKeyPair command in the key_mgmt_util tool generates an Elliptic Curve Cryptography
(ECC) key pair in your HSMs. You must specify the elliptic curve type and a label for the keys. You can
also share the private key with other CU users, create non-extractable keys, quorum-controlled keys, and
keys that expire when the session ends. When the command succeeds, it returns the key handles that the
HSM assigns to the public and private ECC keys. You can use the key handles to identify the keys to other
commands.
Before you run any key_mgmt_util command, you must start key_mgmt_util (p. 121) and
login (p. 122) to the HSM as a crypto user (CU).
Tip
To find the attributes of a key that you have created, such as the type, length, label, and ID, use
getAttribute (p. 156). To find the keys for a particular user, use getKeyInfo (p. 159). To find
keys based on their attribute values, use findKey (p. 133).
Syntax
genECCKeyPair -h
genECCKeyPair -i <EC curve id>
-l <label>
[-id <key ID>]
[-min_srv <minimum number of servers>]
[-m_value <0..8>]
[-nex]
[-sess]
[-timeout <number of seconds> ]
[-u <user-ids>]
[-attest]
Examples
These examples show how to use genECCKeyPair to create ECC key pairs in your HSMs.
Example : Create and Examine an ECC Key Pair
This command creates an ECC key pair using an NID_sect571r1 elliptic curve and an ecc12 label. The
output shows that the key handle of the private key is 262177 and the key handle of the public key is
262179. The label applies to both the public and private keys.
142

AWS CloudHSM User Guide
Reference
Command: genECCKeyPair -i 12 -l ecc12
Cfm3GenerateKeyPair returned: 0x00 : HSM Return: SUCCESS
Cfm3GenerateKeyPair: public key handle: 262179 private key handle: 262177
Cluster Error Status
Node id 2 and err state 0x00000000 : HSM Return: SUCCESS
Node id 1 and err state 0x00000000 : HSM Return: SUCCESS
Node id 0 and err state 0x00000000 : HSM Return: SUCCESS
After generating the key, you might want to examine its attributes. The next command uses
getAttribute (p. 156) to write all of the attributes (represented by the constant 512) of the new ECC
private key to the attr_262177 file.
Command: getAttribute -o 262177 -a 512 -out attr_262177
got all attributes of size 529 attr cnt 19
Attributes dumped into attr_262177
Cfm3GetAttribute returned: 0x00 : HSM Return: SUCCESS
This command gets the content of the attr_262177 attribute file. The output shows that the key is
an elliptic curve private key that can be used for signing, but not for encrypting, decrypting, wrapping,
unwrapping, or verifying. The key is persistent and exportable.
$ cat attr_262177
OBJ_ATTR_CLASS
0x03
OBJ_ATTR_KEY_TYPE
0x03
OBJ_ATTR_TOKEN
0x01
OBJ_ATTR_PRIVATE
0x01
OBJ_ATTR_ENCRYPT
0x00
OBJ_ATTR_DECRYPT
0x00
OBJ_ATTR_WRAP
0x00
OBJ_ATTR_UNWRAP
0x00
OBJ_ATTR_SIGN
0x01
OBJ_ATTR_VERIFY
0x00
OBJ_ATTR_LOCAL
0x01
OBJ_ATTR_SENSITIVE
0x01
OBJ_ATTR_EXTRACTABLE
0x01
OBJ_ATTR_LABEL
ecc2
OBJ_ATTR_ID
OBJ_ATTR_VALUE_LEN
0x0000008a
OBJ_ATTR_KCV
0xbbb32a
OBJ_ATTR_MODULUS
143

AWS CloudHSM User Guide
Reference
044a0f9d01d10f7437d9fa20995f0cc742552e5ba16d3d7e9a65a33e20ad3e569e68eb62477a9960a87911e6121d112b698e469a0329a665eba74ee5ac55eae9f5
OBJ_ATTR_MODULUS_BITS
0x0000019f
Example Using an Invalid EEC Curve
This command attempts to create an ECC key pair by using an NID_X9_62_prime192v1 curve. Because
this elliptic curve is not valid for FIPS-mode HSMs, the command fails. The message reports that a server
in the cluster is unavailable, but this does not typically indicate a problem with the HSMs in the cluster.
Command: genECCKeyPair -i 1 -l ecc1
Cfm3GenerateKeyPair returned: 0xb3 : HSM Error: This operation violates the current
configured/FIPS policies
Cluster Error Status
Node id 0 and err state 0x30000085 : HSM CLUSTER ERROR: Server in cluster is
unavailable
Parameters
-h
Displays help for the command.
Required: Yes
-i
Specifies the identifier for the elliptic curve. Enter an identifier (1 - 15).
Valid values:
•1: NID_X9_62_prime192v1
•2: NID_X9_62_prime256v1
•3: NID_sect163k1
•4: NID_sect163r2
•5: NID_sect233k1
•6: NID_sect233r1
•7: NID_sect283k1
•8: NID_sect283r1
•9: NID_sect409k1
•10: NID_sect409r1
•11:NID_sect571k1
•12: NID_sect571r1
•13: NID_secp224r1
•14:NID_secp384r1
•15: NID_secp521r1
Required: Yes
-l
Specifies a user-defined label for the key pair. Type a string. The same label applies to both keys in
the pair
You can use any phrase that helps you to identify the key. Because the label does not have to be
unique, you can use it to group and categorize keys.
144

AWS CloudHSM User Guide
Reference
Required: Yes
-id
Specifies a user-defined identifier for the key pair. Type a string that is unique in the cluster. The
default is an empty string. The ID that you specify applies to both keys in the pair.
Default: No ID value.
Required: No
-min_srv
Specifies the minimum number of HSMs on which the key is synchronized before the value of the -
timeout parameter expires. If the key is not synchronized to the specified number of servers in the
time allotted, it is not created.
AWS CloudHSM automatically synchronizes every key to every HSM in the cluster. To speed up your
process, set the value of min_srv to less than the number of HSMs in the cluster and set a low
timeout value. Note, however, that some requests might not generate a key.
Default: 1
Required: No
-m_value
Specifies the number of users who must approve any cryptographic operation that uses the private
key in the pair. Type a value from 0 to 8.
This parameter establishes a quorum authentication requirement for the private key. The default
value, 0, disables the quorum authentication feature for the key. When quorum authentication is
enabled, the specified number of users must sign a token to approve cryptographic operations that
use the private key, and operations that share or unshare the private key.
To find the m_value of a key, use getKeyInfo (p. 159).
This parameter is valid only when the -u parameter in the command shares the key pair with
enough users to satisfy the m_value requirement.
Default: 0
Required: No
-nex
Makes the private key nonextractable. The private key that is generated cannot be exported from
the HSM (p. 59). Public keys are always extractable.
Default: Both the public and private keys in the key pair are extractable.
Required: No
-sess
Creates a key that exists only in the current session. The key cannot be recovered after the session
ends.
Use this parameter when you need a key only briefly, such as a wrapping key that encrypts, and
then quickly decrypts, another key. Do not use a session key to encrypt data that you might need to
decrypt after the session ends.
To change a session key to a persistent (token) key, use setAttribute (p. 170).
Default: The key is persistent.
145

AWS CloudHSM User Guide
Reference
Required: No
-timeout
Specifies how long (in seconds) the command waits for a key to be synchronized to the number of
HSMs specified by the min_srv parameter.
This parameter is valid only when the min_srv parameter is also used in the command.
Default: No timeout. The command waits indefinitely and returns only when the key is synchronized
to the minimum number of servers.
Required: No
-u
Shares the private key in the pair with the specified users. This parameter gives other HSM crypto
users (CUs) permission to use the private key in cryptographic operations. Public keys can be used by
any user without sharing.
Type a comma-separated list of HSM user IDs, such as -u 5,6. Do not include the HSM user ID of the
current user. To find HSM user IDs of CUs on the HSM, use listUsers (p. 169). To share and unshare
existing keys, use shareKey.
Default: Only the current user can use the private key.
Required: No
-attest
Runs an integrity check that verifies that the firmware on which the cluster runs has not been
tampered with.
Default: No attestation check.
Required: No
Related Topics
•genSymKey (p. 151)
•genRSAKeyPair (p. 146)
•genDSAKeyPair (p. 137)
genPBEKey
The genPBEKey command in the key_mgmt_util tool generates a Triple DES (3DES) symmetric key
based on a password. This command is not supported on the FIPS-validated HSMs that AWS CloudHSM
provides.
To create symmetric keys, use genSymKey (p. 151). To create asymmetric key pairs, use
genRSAKeyPair (p. 146), genDSAKeyPair (p. 137), or genECCKeyPair (p. 142).
genRSAKeyPair
The genRSAKeyPair command in the key_mgmt_util tool generates an RSA asymmetric key pair. You
specify the key type, modulus length, and a public exponent. The command generates a modulus of
the specified length and creates the key pair. You can assign an ID, share the key with other HSM users,
create nonextractable keys and keys that expire when the session ends. When the command succeeds, it
returns a key handle that the HSM assigns to the key. You can use the key handle to identify the key to
other commands.
146

AWS CloudHSM User Guide
Reference
Before you run any key_mgmt_util command, you must start key_mgmt_util (p. 121) and
login (p. 122) to the HSM as a crypto user (CU).
Tip
To find the attributes of a key that you have created, such as the type, length, label, and ID, use
getAttribute (p. 156). To find the keys for a particular user, use getKeyInfo (p. 159). To find
keys based on their attribute values, use findKey (p. 133).
Syntax
genRSAKeyPair -h
genRSAKeyPair -m <modulus length>
-e <public exponent>
-l <label>
[-id <key ID>]
[-min_srv <minimum number of servers>]
[-m_value <0..8>]
[-nex]
[-sess]
[-timeout <number of seconds> ]
[-u <user-ids>]
[-attest]
Examples
These examples show how to use genRSAKeyPair to create asymmetric key pairs in your HSMs.
Example : Create and Examine an RSA Key Pair
This command creates an RSA key pair with a 2048-bit modulus and an exponent of 65541. The output
shows that the public key handle is 262159 and the private key handle is 262160.
Command: genRSAKeyPair -m 2048 -e 65541 -l rsa_test
Cfm3GenerateKeyPair returned: 0x00 : HSM Return: SUCCESS
Cfm3GenerateKeyPair: public key handle: 262159 private key handle: 262160
Cluster Error Status
Node id 1 and err state 0x00000000 : HSM Return: SUCCESS
Node id 0 and err state 0x00000000 : HSM Return: SUCCESS
The next command uses getAttribute (p. 133) to get the attributes of the public key that we just
created. It writes the output to the attr_262159 file. It is followed by a cat command that gets
the content of the attribute file. For help interpreting the key attributes, see the Key Attribute
Reference (p. 176).
The resulting hexadecimal values confirm that it is a public key (OBJ_ATTR_CLASS 0x02) with a type of
RSA (OBJ_ATTR_KEY_TYPE 0x00). You can use this public key to encrypt (OBJ_ATTR_ENCRYPT 0x01),
but not to decrypt (OBJ_ATTR_DECRYPT 0x00) or wrap (OBJ_ATTR_WRAP 0x00). The results also
include the key length (512, 0x200), the modulus, the modulus length (2048, 0x800), and the public
exponent (65541, 0x10005).
Command: getAttribute -o 262159 -a 512 -out attr_262159
got all attributes of size 731 attr cnt 20
Attributes dumped into attr_262159 file
Cfm3GetAttribute returned: 0x00 : HSM Return: SUCCESS
147

AWS CloudHSM User Guide
Reference
$ cat attr_262159
OBJ_ATTR_CLASS
0x02
OBJ_ATTR_KEY_TYPE
0x00
OBJ_ATTR_TOKEN
0x01
OBJ_ATTR_PRIVATE
0x00
OBJ_ATTR_ENCRYPT
0x01
OBJ_ATTR_DECRYPT
0x00
OBJ_ATTR_WRAP
0x00
OBJ_ATTR_UNWRAP
0x00
OBJ_ATTR_SIGN
0x00
OBJ_ATTR_VERIFY
0x01
OBJ_ATTR_LOCAL
0x01
OBJ_ATTR_SENSITIVE
0x00
OBJ_ATTR_EXTRACTABLE
0x01
OBJ_ATTR_LABEL
rsa_test
OBJ_ATTR_ID
OBJ_ATTR_VALUE_LEN
0x00000200
OBJ_ATTR_KCV
0x0a4364
OBJ_ATTR_MODULUS
9162b8d5d01d7b5b1179686d15e74d1dd38eaa5b6e64673195aaf951df8828deeca002c215d4209a
c0bf90a9587ddca7f6351d5d4df0f6201b65daccd9955e4f49a819c0d39cb6717623bfa33436facc
835c15961a58a63ca25bf0d2d4888d77418c571c190f8cc5a82483050658c00df4658dff248202bc
95e886b1b5c7a981f09b0eb4f606641efe09bf3881f63c90d4a4415219ba796df449862b9d9c2a78
d1c24fff56cf9b25f2b7dee44e200dd9550bd097a7044b22ca004033236bc708a0bad4a111533ed4
6d049e5ec0b449b4a3877e566b0ce9d0a60fd1c15352b131ccc234f1719bed3918df579a66e7fff2
9dc80dc5dbbf6e3d7d092d67c6abca7d
OBJ_ATTR_MODULUS_BITS
0x00000800
OBJ_ATTR_PUBLIC_EXPONENT
0x010005
Example : Generate a Shared RSA Key Pair
This command generates an RSA key pair and shares the private key with user 4, another CU on the HSM.
The command uses the m_value parameter to require at least two approvals before the private key in
the pair can be used in a cryptographic operation. When you use the m_value parameter, you must also
use -u in the command and the m_value cannot exceed the total number of users (number of values in
-u + owner).
Command: genRSAKeyPair -m 2048 -e 195193 -l rsa_mofn -id rsa_mv2 -u 4 -m_value 2
Cfm3GenerateKeyPair returned: 0x00 : HSM Return: SUCCESS
Cfm3GenerateKeyPair: public key handle: 27 private key handle: 28
Cluster Error Status
Node id 0 and err state 0x00000000 : HSM Return: SUCCESS
148

AWS CloudHSM User Guide
Reference
Node id 1 and err state 0x00000000 : HSM Return: SUCCESS
Parameters
-h
Displays help for the command.
Required: Yes
-m
Specifies the length of the modulus in bits. The minimum value is 2048.
Required: Yes
-e
Specifies the public exponent. The value must be an odd number greater than or equal to 65537.
Required: Yes
-l
Specifies a user-defined label for the key pair. Type a string. The same label applies to both keys in
the pair
You can use any phrase that helps you to identify the key. Because the label does not have to be
unique, you can use it to group and categorize keys.
Required: Yes
-id
Specifies a user-defined identifier for the key pair. Type a string that is unique in the cluster. The
default is an empty string. The ID that you specify applies to both keys in the pair.
Default: No ID value.
Required: No
-min_srv
Specifies the minimum number of HSMs on which the key is synchronized before the value of the -
timeout parameter expires. If the key is not synchronized to the specified number of servers in the
time allotted, it is not created.
AWS CloudHSM automatically synchronizes every key to every HSM in the cluster. To speed up your
process, set the value of min_srv to less than the number of HSMs in the cluster and set a low
timeout value. Note, however, that some requests might not generate a key.
Default: 1
Required: No
-m_value
Specifies the number of users who must approve any cryptographic operation that uses the private
key in the pair. Type a value from 0 to 8.
This parameter establishes a quorum authentication requirement for the private key. The default
value, 0, disables the quorum authentication feature for the key. When quorum authentication is
enabled, the specified number of users must sign a token to approve cryptographic operations that
use the private key, and operations that share or unshare the private key.
To find the m_value of a key, use getKeyInfo (p. 159).
149

AWS CloudHSM User Guide
Reference
This parameter is valid only when the -u parameter in the command shares the key pair with
enough users to satisfy the m_value requirement.
Default: 0
Required: No
-nex
Makes the private key nonextractable. The private key that is generated cannot be exported from
the HSM (p. 59). Public keys are always extractable.
Default: Both the public and private keys in the key pair are extractable.
Required: No
-sess
Creates a key that exists only in the current session. The key cannot be recovered after the session
ends.
Use this parameter when you need a key only briefly, such as a wrapping key that encrypts, and
then quickly decrypts, another key. Do not use a session key to encrypt data that you might need to
decrypt after the session ends.
To change a session key to a persistent (token) key, use setAttribute (p. 170).
Default: The key is persistent.
Required: No
-timeout
Specifies how long (in seconds) the command waits for a key to be synchronized to the number of
HSMs specified by the min_srv parameter.
This parameter is valid only when the min_srv parameter is also used in the command.
Default: No timeout. The command waits indefinitely and returns only when the key is synchronized
to the minimum number of servers.
Required: No
-u
Shares the private key in the pair with the specified users. This parameter gives other HSM crypto
users (CUs) permission to use the private key in cryptographic operations. Public keys can be used by
any user without sharing.
Type a comma-separated list of HSM user IDs, such as -u 5,6. Do not include the HSM user ID of the
current user. To find HSM user IDs of CUs on the HSM, use listUsers (p. 169). To share and unshare
existing keys, use shareKey.
Default: Only the current user can use the private key.
Required: No
-attest
Runs an integrity check that verifies that the firmware on which the cluster runs has not been
tampered with.
Default: No attestation check.
Required: No
150

AWS CloudHSM User Guide
Reference
Related Topics
•genSymKey (p. 151)
• createKeyPair
•genDSAKeyPair (p. 137)
•genECCKeyPair (p. 142)
genSymKey
The genSymKey command in the key_mgmt_util tool generates a symmetric key in your HSMs. You
can specify the key type and size, assign an ID and label, and share the key with other HSM users. You
can also create nonextractable keys and keys that expire when the session ends. When the command
succeeds, it returns a key handle that the HSM assigns to the key. You can use the key handle to identify
the key to other commands.
Before you run any key_mgmt_util command, you must start key_mgmt_util (p. 121) and
login (p. 122) to the HSM as a crypto user (CU).
Tip
To find the attributes of a key that you have created, such as the type, length, label, and ID, use
getAttribute (p. 156). To find the keys for a particular user, use getKeyInfo (p. 159). To find
keys based on their attribute values, use findKey (p. 133).
Syntax
genSymKey -h
genSymKey -t <key-type>
-s <key-size>
-l <label>
[-id <key-ID>]
[-min_srv <minimum-number-of-servers>]
[-m_value <0..8>]
[-nex]
[-sess]
[-timeout <number-of-seconds> ]
[-u <user-ids>]
[-attest]
Examples
These examples show how to use genSymKey to create symmetric keys in your HSMs.
Example : Generate an AES Key
This command creates a 256-bit AES key with an aes256 label. The output shows that the key handle of
the new key is 6.
Command: genSymKey -t 31 -s 32 -l aes256
Cfm3GenerateSymmetricKey returned: 0x00 : HSM Return: SUCCESS
Symmetric Key Created. Key Handle: 6
Cluster Error Status
Node id 0 and err state 0x00000000 : HSM Return: SUCCESS
151

AWS CloudHSM User Guide
Reference
Example : Create a Session Key
This command creates a nonextractable 192-bit AES key that is valid only in the current session. You
might want to create a key like this to wrap (and then immediately unwrap) a key that is being exported.
Command: genSymKey -t 31 -s 24 -l tmpAES -id wrap01 -nex -sess
Example : Return Quickly
This command creates a generic 512-byte key with a label of IT_test_key. The command does not
wait for the key to be synchronized to all HSMs in the cluster. Instead, it returns as soon as the key is
created on any one HSM (-min_srv 1) or in 1 second (-timeout 1), whichever is shorter. If the key
is not synchronized to the specified minimum number of HSMs before the timeout expires, it is not
generated. You might want to use a command like this in a script that creates numerous keys, like the
for loop in the following example.
Command: genSymKey -t 16 -s 512 -l IT_test_key -min_srv 1 -timeout 1
$ for i in {1..30};
do /opt/cloudhsm/bin/key_mgmt_util Cfm3Util singlecmd loginHSM -u CU -s example_user -
p example_pwd genSymKey -l aes -t 31 -s 32 -min_srv 1 -timeout 1;
done;
Example : Create a Quorum Authorized Generic Key
This command creates a 2048-bit generic secret key with the label generic-mV2. The command uses
the -u parameter to share the key with another CU, user 6. It uses the -m_value parameter to require a
quorum of at least two approvals for any cryptographic operations that use the key. The command also
uses the -attest parameter to verify the integrity of the firmware on which the key is generated.
The output shows that the command generated a key with key handle 9 and that the attestation check
on the cluster firmware passed.
Command: genSymKey -t 16 -s 2048 -l generic-mV2 -m_value 2 -u 6 -attest
Cfm3GenerateSymmetricKey returned: 0x00 : HSM Return: SUCCESS
Symmetric Key Created. Key Handle: 9
Attestation Check : [PASS]
Cluster Error Status
Node id 1 and err state 0x00000000 : HSM Return: SUCCESS
Node id 0 and err state 0x00000000 : HSM Return: SUCCESS
Example : Create and Examine a Key
This command creates a Triple DES key with a 3DES_shared label and an ID of IT-02. The key can be
used by the current user, and users 4 and 5. The command fails if the ID is not unique in the cluster or if
the current user is user 4 or 5.
The output shows that the new key has key handle 7.
Command: genSymKey -t 21 -s 24 -l 3DES_shared -id IT-02 -u 4,5
Cfm3GenerateSymmetricKey returned: 0x00 : HSM Return: SUCCESS
152

AWS CloudHSM User Guide
Reference
Symmetric Key Created. Key Handle: 7
Cluster Error Status
Node id 0 and err state 0x00000000 : HSM Return: SUCCESS
To verify that the new 3DES key is owned by the current user and shared with users 4 and 5, use
getKeyInfo (p. 159). The command uses the handle that was assigned to the new key (Key Handle:
7).
The output confirms that the key is owned by user 3 and shared with users 4 and 5.
Command: getKeyInfo -k 7
Cfm3GetKey returned: 0x00 : HSM Return: SUCCESS
Owned by user 3
also, shared to following 2 user(s):
4, 5
To confirm the other properties of the key, use getAttribute (p. 156). The first command uses
getAttribute to get all attributes (-a 512) of key handle 7 (-o 7). It writes them to the attr_7 file.
The second command uses cat to get the contents of the attr_7 file.
This command confirms that key 7 is a 192-bit (OBJ_ATTR_VALUE_LEN 0x00000018 or 24-byte) 3DES
(OBJ_ATTR_KEY_TYPE 0x15) symmetric key (OBJ_ATTR_CLASS 0x04) with a label of 3DES_shared
(OBJ_ATTR_LABEL 3DES_shared) and an ID of IT_02 (OBJ_ATTR_ID IT-02). The key is persistent
(OBJ_ATTR_TOKEN 0x01) and extractable (OBJ_ATTR_EXTRACTABLE 0x01) and can be used for
encryption, decryption, and wrapping.
For help interpreting the key attributes, see the Key Attribute Reference (p. 176).
Command: getAttribute -o 7 -a 512 -attr_7
got all attributes of size 444 attr cnt 17
Attributes dumped into attr_7 file
Cfm3GetAttribute returned: 0x00 : HSM Return: SUCCESS
$ cat attr_7
OBJ_ATTR_CLASS
0x04
OBJ_ATTR_KEY_TYPE
0x15
OBJ_ATTR_TOKEN
0x01
OBJ_ATTR_PRIVATE
0x01
OBJ_ATTR_ENCRYPT
0x01
OBJ_ATTR_DECRYPT
0x01
OBJ_ATTR_WRAP
0x00
OBJ_ATTR_UNWRAP
0x00
OBJ_ATTR_SIGN
0x00
OBJ_ATTR_VERIFY
153

AWS CloudHSM User Guide
Reference
0x00
OBJ_ATTR_LOCAL
0x01
OBJ_ATTR_SENSITIVE
0x01
OBJ_ATTR_EXTRACTABLE
0x01
OBJ_ATTR_LABEL
3DES_shared
OBJ_ATTR_ID
IT-02
OBJ_ATTR_VALUE_LEN
0x00000018
OBJ_ATTR_KCV
0x59a46e
Parameters
-h
Displays help for the command.
Required: Yes
-t
Specifies the type of the symmetric key. Enter the constant that represents the key type. For
example, to create an AES key, type -t 31.
Valid values:
• 16: GENERIC_SECRET. A generic secret key is a byte array that does not conform to any particular
standard, such as the requirements for an AES key.
• 18: RC4. RC4 keys are not valid on FIPS-mode HSMs
• 21: Triple DES (3DES).
• 31: AES
Required: Yes
-s
Specifies the key size in bytes. For example, to create a 192-bit key, type 24.
Valid values for each key type:
• AES: 16 (128 bits), 24 (192 bits), 32 (256 bits)
• 3DES: 24 (192 bits)
• RC4: <256 (2048 bits)
• Generic Secret: <3584 (28672 bits)
Required: Yes
-l
Specifies a user-defined label for the key. Type a string.
You can use any phrase that helps you to identify the key. Because the label does not have to be
unique, you can use it to group and categorize keys.
Required: Yes
-attest
Runs an integrity check that verifies that the firmware on which the cluster runs has not been
tampered with.
154

AWS CloudHSM User Guide
Reference
Default: No attestation check.
Required: No
-id
Specifies a user-defined identifier for the key. Type a string that is unique in the cluster. The default
is an empty string.
Default: No ID value.
Required: No
-min_srv
Specifies the minimum number of HSMs on which the key is synchronized before the value of the -
timeout parameter expires. If the key is not synchronized to the specified number of servers in the
time allotted, it is not created.
AWS CloudHSM automatically synchronizes every key to every HSM in the cluster. To speed up your
process, set the value of min_srv to less than the number of HSMs in the cluster and set a low
timeout value. Note, however, that some requests might not generate a key.
Default: 1
Required: No
-m_value
Specifies the number of users who must approve any cryptographic operation that uses the key.
Type a value from 0 to 8.
This parameter establishes a quorum authentication requirement for the key. The default value, 0,
disables the quorum authentication feature for the key. When quorum authentication is enabled, the
specified number of users must sign a token to approve cryptographic operations that use the key,
and operations that share or unshare the key.
To find the m_value of a key, use getKeyInfo (p. 159).
This parameter is valid only when the -u parameter in the command shares the key with enough
users to satisfy the m_value requirement.
Default: 0
Required: No
-nex
Makes the key nonextractable. The key that is generated cannot be exported from the HSM (p. 59).
Default: The key is extractable.
Required: No
-sess
Creates a key that exists only in the current session. The key cannot be recovered after the session
ends.
Use this parameter when you need a key only briefly, such as a wrapping key that encrypts, and
then quickly decrypts, another key. Do not use a session key to encrypt data that you might need to
decrypt after the session ends.
To change a session key to a persistent (token) key, use setAttribute (p. 170).
155

AWS CloudHSM User Guide
Reference
Default: The key is persistent.
Required: No
-timeout
Specifies how long (in seconds) the command waits for a key to be synchronized to the number of
HSMs specified by the min_srv parameter.
This parameter is valid only when the min_srv parameter is also used in the command.
Default: No timeout. The command waits indefinitely and returns only when the key is synchronized
to the minimum number of servers.
Required: No
-u
Shares the key with the specified users. This parameter gives other HSM crypto users (CUs)
permission to use this key in cryptographic operations.
Type a comma-separated list of HSM user IDs, such as -u 5,6. Do not include the HSM user ID of the
current user. To find HSM user IDs of CUs on the HSM, use listUsers (p. 169). To share and unshare
existing keys, use shareKey.
Default: Only the current user can use the key.
Required: No
Related Topics
•exSymKey (p. 129)
•genRSAKeyPair (p. 146)
•genDSAKeyPair (p. 137)
•genECCKeyPair (p. 142)
getAttribute
The getAttribute command in key_mgmt_util writes one or all of the attribute values for an AWS
CloudHSM key to a file. If the attribute you specify does not exist for the key type, such as the modulus
of an AES key, getAttribute returns an error.
Key attributes are properties of a key. They include characteristics, like the key type, class, label, and ID,
and values that represent actions that you can perform with the key, like encrypt, decrypt, wrap, sign,
and verify.
You can use getAttribute only on keys that you own and key that are shared with you. You can run this
command or the getAttribute (p. 94) command in cloudhsm_mgmt_util, which gets one attribute
value of a key from all HSMs in a cluster, and writes it to stdout or to a file.
To get a list of attributes and the constants that represent them, use the listAttributes (p. 168)
command. To change the attribute values of existing keys, use setAttribute (p. 170) in key_mgmt_util
and setAttribute (p. 109) in cloudhsm_mgmt_util. For help interpreting the key attributes, see the Key
Attribute Reference (p. 176).
Before you run any key_mgmt_util command, you must start key_mgmt_util (p. 121) and
login (p. 122) to the HSM as a crypto user (CU).
156
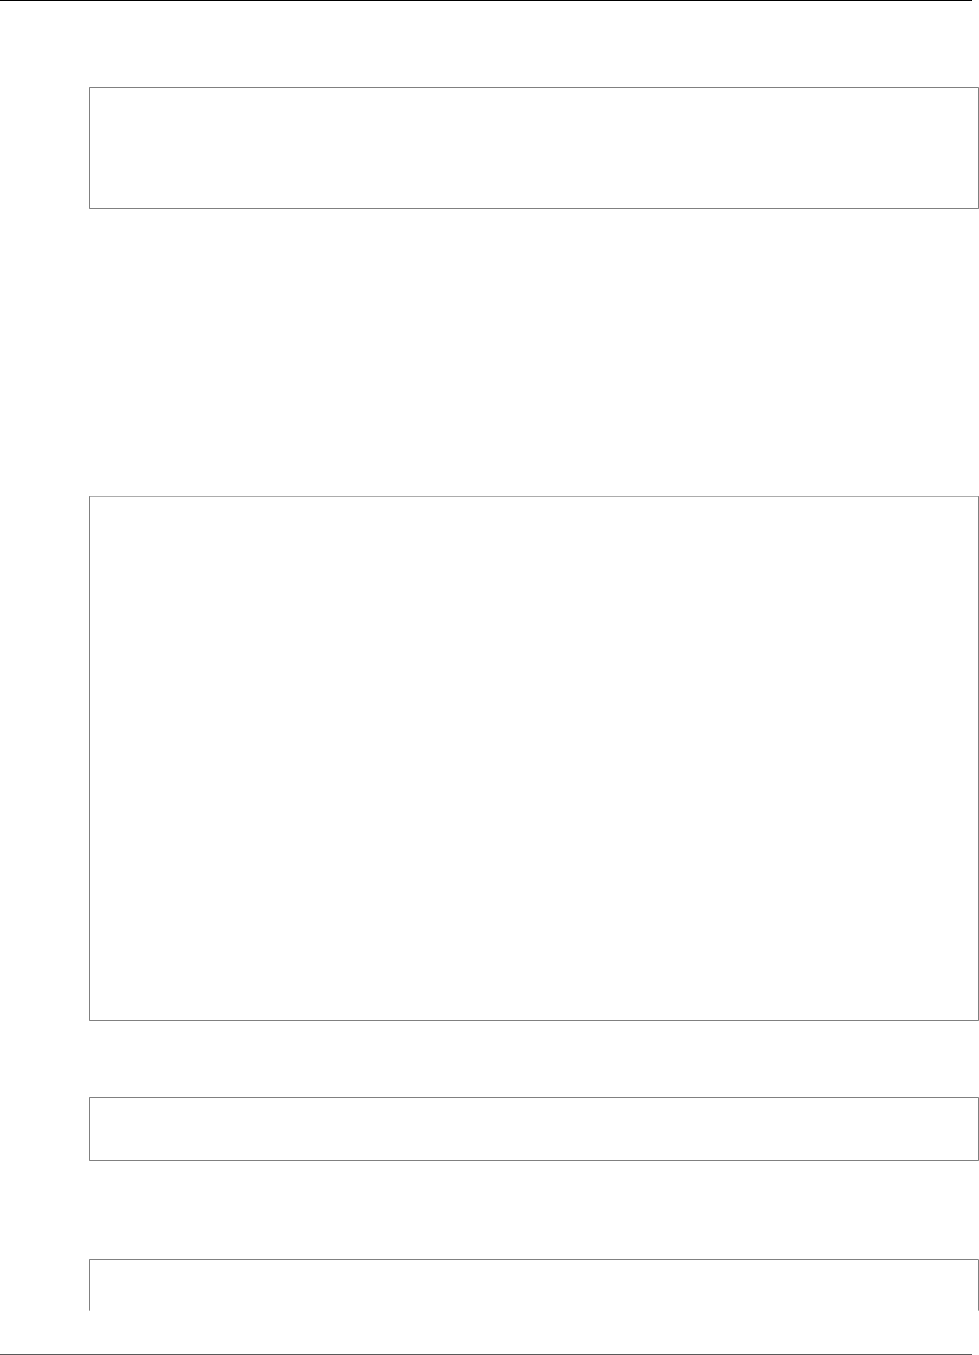
AWS CloudHSM User Guide
Reference
Syntax
getAttribute -h
getAttribute -o <key handle>
-a <attribute constant>
-out <file>
Examples
These examples show how to use getAttribute to get the attributes of keys in your HSMs.
Example : Get the Key Type
This example gets the type of the key, such an AES, 3DES, or generic key, or an RSA or elliptic curve key
pair.
The first command runs listAttributes (p. 168), which gets the key attributes and the constants that
represent them. The output shows that the constant for key type is 256. For help interpreting the key
attributes, see the Key Attribute Reference (p. 176).
Command: listAttributes
Description
===========
The following are all of the possible attribute values for getAttributes.
OBJ_ATTR_CLASS = 0
OBJ_ATTR_TOKEN = 1
OBJ_ATTR_PRIVATE = 2
OBJ_ATTR_LABEL = 3
OBJ_ATTR_KEY_TYPE = 256
OBJ_ATTR_ID = 258
OBJ_ATTR_SENSITIVE = 259
OBJ_ATTR_ENCRYPT = 260
OBJ_ATTR_DECRYPT = 261
OBJ_ATTR_WRAP = 262
OBJ_ATTR_UNWRAP = 263
OBJ_ATTR_SIGN = 264
OBJ_ATTR_VERIFY = 266
OBJ_ATTR_LOCAL = 355
OBJ_ATTR_MODULUS = 288
OBJ_ATTR_MODULUS_BITS = 289
OBJ_ATTR_PUBLIC_EXPONENT = 290
OBJ_ATTR_VALUE_LEN = 353
OBJ_ATTR_EXTRACTABLE = 354
OBJ_ATTR_KCV = 371
The second command runs getAttribute. It requests the key type (attribute 256) for key handle 524296
and writes it to the attribute.txt file.
Command: getAttribute -o 524296 -a 256 -out attribute.txt
Attributes dumped into attribute.txt file
The final command gets the content of the key file. The output reveals that the key type is 0x15 or
21, which is a Triple DES (3DES) key. For definitions of the class and type values, see the Key Attribute
Reference (p. 176).
$ cat attribute.txt
OBJ_ATTR_KEY_TYPE
157

AWS CloudHSM User Guide
Reference
0x00000015
Example : Get All Attributes of a Key
This command gets all attributes of the key with key handle 6 and writes them to the attr_6 file. It uses
an attribute value of 512, which represents all attributes.
Command: getAttribute -o 6 -a 512 -out attr_6
got all attributes of size 444 attr cnt 17
Attributes dumped into attribute.txt file
Cfm3GetAttribute returned: 0x00 : HSM Return: SUCCESS>
This command shows the content of a sample attribute file with all attribute values. Among the values, it
reports that key is a 256-bit AES key with an ID of test_01 and a label of aes256.The key is extractable
and persistent, that is, not a session-only key. For help interpreting the key attributes, see the Key
Attribute Reference (p. 176).
$ cat attribute.txt
OBJ_ATTR_CLASS
0x04
OBJ_ATTR_KEY_TYPE
0x15
OBJ_ATTR_TOKEN
0x01
OBJ_ATTR_PRIVATE
0x01
OBJ_ATTR_ENCRYPT
0x01
OBJ_ATTR_DECRYPT
0x01
OBJ_ATTR_WRAP
0x01
OBJ_ATTR_UNWRAP
0x01
OBJ_ATTR_SIGN
0x00
OBJ_ATTR_VERIFY
0x00
OBJ_ATTR_LOCAL
0x01
OBJ_ATTR_SENSITIVE
0x01
OBJ_ATTR_EXTRACTABLE
0x01
OBJ_ATTR_LABEL
aes256
OBJ_ATTR_ID
test_01
OBJ_ATTR_VALUE_LEN
0x00000020
OBJ_ATTR_KCV
0x1a4b31
Parameters
-h
Displays help for the command.
158

AWS CloudHSM User Guide
Reference
Required: Yes
-o
Specifies the key handle of the target key. You can specify only one key in each command. To get the
key handle of a key, use findKey (p. 133).
Also, you must own the specified key or it must be shared with you. To find the users of a key, use
getKeyInfo (p. 159).
Required: Yes
-a
Identifies the attribute. Enter a constant that represents an attribute, or 512, which represents
all attributes. For example, to get the key type, type 256, which is the constant for the
OBJ_ATTR_KEY_TYPE attribute.
To list the attributes and their constants, use listAttributes (p. 168). For help interpreting the key
attributes, see the Key Attribute Reference (p. 176).
Required: Yes
-out
Writes the output to the specified file. Type a file path. You cannot write the output to stdout.
If the specified file exists, getAttribute overwrites the file without warning.
Required: Yes
Related Topics
•getAttribute (p. 94) in cloudhsm_mgmt_util
•listAttributes (p. 168)
•setAttribute (p. 170)
•findKey (p. 133)
•Key Attribute Reference (p. 176)
getKeyInfo
The getKeyInfo command in the key_mgmt_util returns the HSM user IDs of users who can use the key,
including the owner and crypto users (CU) with whom the key is shared. When quorum authentication
is enabled on a key, getKeyInfo also returns the number of users who must approve cryptographic
operations that use the key. You can run getKeyInfo only on keys that you own and keys that are shared
with you.
When you run getKeyInfo on public keys, getKeyInfo returns only the key owner, even though
all users of the HSM can use the public key. To find the HSM user IDs of users in your HSMs, use
listUsers (p. 169). To find the keys for a particular user, use findKey (p. 133) -u.
You own the keys that you create. You can share a key with other users when you create it. Then, to share
or unshare an existing key, use shareKey (p. 112) in cloudhsm_mgmt_util.
Before you run any key_mgmt_util command, you must start key_mgmt_util (p. 121) and
login (p. 122) to the HSM as a crypto user (CU).
Syntax
getKeyInfo -h
159

AWS CloudHSM User Guide
Reference
getKeyInfo -k <key-handle>
Examples
These examples show how to use getKeyInfo to get information about the users of a key.
Example : Get the Users for a Symmetric Key
This command gets the users who can use the AES (symmetric) key with key handle 9. The output shows
that user 3 owns the key and has shared it with user 4.
Command: getKeyInfo -k 9
Cfm3GetKey returned: 0x00 : HSM Return: SUCCESS
Owned by user 3
also, shared to following 1 user(s):
4
Example : Get the Users for an Asymmetric Key Pair
These commands use getKeyInfo to get the users who can use the keys in an RSA (asymmetric) key pair.
The public key has key handle 21. The private key has key handle 20.
When you run getKeyInfo on the private key (20), it returns the key owner (3) and crypto users (CUs) 4
and 5, with whom the key is shared.
Command: getKeyInfo -k 20
Cfm3GetKey returned: 0x00 : HSM Return: SUCCESS
Owned by user 3
also, shared to following 2 user(s):
4
5
When you run getKeyInfo on the public key (21), it returns only the key owner (3).
Command: getKeyInfo -k 21
Cfm3GetKey returned: 0x00 : HSM Return: SUCCESS
Owned by user 3
To confirm that user 4 can use the public key (and all public keys on the HSM), use the -u parameter of
findKey (p. 133).
The output shows that user 4 can use both the public (21) and private (20) key in the key pair. User 4 can
also use all other public keys and any private keys that they have created or that have been shared with
them.
Command: findKey -u 4
Total number of keys present 8
number of keys matched from start index 0::7
160

AWS CloudHSM User Guide
Reference
11, 12, 262159, 262161, 262162, 19, 20, 21
Cluster Error Status
Node id 0 and err state 0x00000000 : HSM Return: SUCCESS
Cfm3FindKey returned: 0x00 : HSM Return: SUCCESS
Example : Get the Quorum Authentication Value (m_value) for a Key
This example shows how to get the m_value for a key, that is, the number of users in the quorum who
must approve any cryptographic operations that use the key.
When quorum authentication is enabled on a key, a quorum of users must approve any cryptographic
operations that use the key. To enable quorum authentication and set the quorum size, use the -
m_value parameter when you create the key.
This command uses genRSAKeyPair (p. 146) to create an RSA key pair that is shared with user 4. It
uses the m_value parameter to enable quorum authentication on the private key in the pair and set the
quorum size to two users. The number of users must be large enough to provide the required approvals.
The output shows that the command created public key 27 and private key 28.
Command: genRSAKeyPair -m 2048 -e 195193 -l rsa_mofn -id rsa_mv2 -u 4 -m_value 2
Cfm3GenerateKeyPair returned: 0x00 : HSM Return: SUCCESS
Cfm3GenerateKeyPair: public key handle: 27 private key handle: 28
Cluster Error Status
Node id 0 and err state 0x00000000 : HSM Return: SUCCESS
Node id 1 and err state 0x00000000 : HSM Return: SUCCESS
This command uses getKeyInfo to get information about the users of the private key. The output shows
that the key is owned by user 3 and shared with user 4. It also shows that a quorum of two users must
approve every cryptographic operation that uses the key.
Command: getKeyInfo -k 28
Cfm3GetKey returned: 0x00 : HSM Return: SUCCESS
Owned by user 3
also, shared to following 1 user(s):
4
2 Users need to approve to use/manage this key
Parameters
-h
Displays command line help for the command.
Required: Yes
-k
Specifies the key handle of one key in the HSM. Enter the key handle of a key that you own or share.
This parameter is required.
To find key handles, use the findKey (p. 169) command.
161

AWS CloudHSM User Guide
Reference
Required: Yes
Related Topics
•getKeyInfo (p. 99) in cloudhsm_mgmt_util
•listUsers (p. 169)
•findKey (p. 133)
•findAllKeys (p. 91) in cloudhsm_mgmt_util
imSymKey
The imSymKey command in the key_mgmt_util tool imports a plaintext copy of a symmetric key from a
file into the HSM. You can use it to import keys that you generate by any method outside of the HSM and
keys that were exported from an HSM, such as the keys that the exSymKey (p. 129), command writes to
a file.
During the import process, imSymKey uses an AES key that you select (the wrapping key) to wrap
(encrypt) and then unwrap (decrypt) the key to be imported. However, imSymKey works only on files
that contain plaintext keys. To export and import encrypted keys, use the wrapKey (p. 175) and
unWrapKey (p. 172) commands.
Also, the imSymKey command exports only symmetric keys. To import public keys, use importPubKey.
To import private keys, use importPrivateKey or wrapKey.
Imported keys work very much like keys generated in the HSM. However, the value of the
OBJ_ATTR_LOCAL attribute (p. 176) is zero, which indicates that it was not generated locally. You
can use the following command to share a symmetric key as you import it. You can use the shareKey
command in cloudhsm_mgmt_util (p. 74) to share the key after it is imported.
imSymKey -l aesShared -t 31 -f kms.key -w 3296 -u 5
After you import a key, be sure to mark or delete the key file. This command does not prevent you from
importing the same key material multiple times. The result, multiple keys with distinct key handles and
the same key material, make it difficult to track use of the key material and prevent it from exceeding its
cryptographic limits.
Before you run any key_mgmt_util command, you must start key_mgmt_util (p. 121) and
login (p. 122) to the HSM as a crypto user (CU).
Syntax
imSymKey -h
imSymKey -f <key-file>
-w <wrapping-key-handle>
-t <key-type>
-l <label>
[-id <key-ID>]
[-sess]
[-wk <wrapping-key-file> ]
[-attest]
[-min_srv <minimum-number-of-servers>]
[-timeout <number-of-seconds> ]
[-u <user-ids>]
162

AWS CloudHSM User Guide
Reference
Examples
These examples show how to use imSymKey to import symmetric keys into your HSMs.
Example : Import an AES Symmetric Key
This example uses imSymKey to import an AES symmetric key into the HSMs.
The first command uses OpenSSL to generate a random 256-bit AES symmetric key. It saves the key in
the aes256.key file.
$ openssl rand -out aes256-forImport.key 32
The second command uses imSymKey to import the AES key from the aes256.key file into the HSMs. It
uses key 20, an AES key in the HSM, as the wrapping key and it specifies a label of imported. Unlike the
ID, the label does not need to be unique in the cluster. The value of the -t (type) parameter is 31, which
represents AES.
The output shows that the key in the file was wrapped and unwrapped, then imported into the HSM,
where it was assigned the key handle 262180.
Command: imSymKey -f aes256.key -w 20 -t 31 -l imported
Cfm3WrapHostKey returned: 0x00 : HSM Return: SUCCESS
Cfm3CreateUnwrapTemplate returned: 0x00 : HSM Return: SUCCESS
Cfm3UnWrapKey returned: 0x00 : HSM Return: SUCCESS
Symmetric Key Unwrapped. Key Handle: 262180
Cluster Error Status
Node id 1 and err state 0x00000000 : HSM Return: SUCCESS
Node id 0 and err state 0x00000000 : HSM Return: SUCCESS
Node id 2 and err state 0x00000000 : HSM Return: SUCCESS
The next command uses getAttribute (p. 156) to get the OBJ_ATTR_LOCAL attribute (attribute
355 (p. 176)) of the newly imported key and writes it to the attr_262180 file.
Command: getAttribute -o 262180 -a 355 -out attributes/attr_262180
Attributes dumped into attributes/attr_262180_imported file
Cfm3GetAttribute returned: 0x00 : HSM Return: SUCCESS
When you examine the attribute file, you can see that the value of the OBJ_ATTR_LOCAL attribute is
zero, which indicates that the key material was not generated in the HSM.
$ cat attributes/attr_262180_local
OBJ_ATTR_LOCAL
0x00000000
Example : Move a Symmetric Key Between Clusters
This example shows how to use exSymKey and imSymKey to move a plaintext AES key between clusters.
You might use a process like this one to create an AES wrapping that exists on the HSMs both clusters.
Once the shared wrapping key is in place, you can use wrapKey (p. 175) and unWrapKey (p. 172) to
move encrypted keys between the clusters.
The CU user who performs this operation must have permission to log in to the HSMs on both clusters.
163

AWS CloudHSM User Guide
Reference
The first command uses exSymKey to export key 14, a 32-bit AES key, from the cluster 1 into the
aes.key file. It uses key 6, an AES key on the HSMs in cluster 1, as the wrapping key.
Command: exSymKey -k 14 -w 6 -out aes.key
Cfm3WrapKey returned: 0x00 : HSM Return: SUCCESS
Cfm3UnWrapHostKey returned: 0x00 : HSM Return: SUCCESS
Wrapped Symmetric Key written to file "aes.key"
The user then logs into key_mgmt_util in cluster 2 and runs an imSymKey command to import the key in
the aes.key file into the HSMs in cluster 2. This command uses key 252152, an AES key on the HSMs in
cluster 2, as the wrapping key.
Because the wrapping keys that exSymKey and imSymKey use wrap and immediately unwrap the target
keys, the wrapping keys on the different clusters need not be the same.
The output shows that the key was successfully imported into cluster 2 and assigned a key handle of 21.
Command: imSymKey -f aes.key -w 262152 -t 31 -l xcluster
Cfm3WrapHostKey returned: 0x00 : HSM Return: SUCCESS
Cfm3CreateUnwrapTemplate returned: 0x00 : HSM Return: SUCCESS
Cfm3UnWrapKey returned: 0x00 : HSM Return: SUCCESS
Symmetric Key Unwrapped. Key Handle: 21
Cluster Error Status
Node id 1 and err state 0x00000000 : HSM Return: SUCCESS
Node id 0 and err state 0x00000000 : HSM Return: SUCCESS
Node id 2 and err state 0x00000000 : HSM Return: SUCCESS
To prove that key 14 of cluster 1 and key 21 in cluster 2 have the same key material, get the key check
value (KCV) of each key. If the KCV values are the same, the key material is the same.
The following command uses getAttribute (p. 156) in cluster 1 to write the value of the KCV attribute
(attribute 371) of key 14 to the attr_14_kcv file. Then, it uses a cat command to get the content of the
attr_14_kcv file.
Command: getAttribute -o 14 -a 371 -out attr_14_kcv
Attributes dumped into attr_14_kcv file
$ cat attr_14_kcv
OBJ_ATTR_KCV
0xc33cbd
This similar command uses getAttribute (p. 156) in cluster 2 to write the value of the KCV attribute
(attribute 371) of key 21 to the attr_21_kcv file. Then, it uses a cat command to get the content of the
attr_21_kcv file.
Command: getAttribute -o 21 -a 371 -out attr_21_kcv
Attributes dumped into attr_21_kcv file
$ cat attr_21_kcv
OBJ_ATTR_KCV
0xc33cbd
164

AWS CloudHSM User Guide
Reference
The output shows that the KCV values of the two keys are the same, which proves that the key material is
the same.
Because the same key material exists in the HSMs of both clusters, you can now share encrypted keys
between the clusters without ever exposing the plaintext key. For example, you can use the wrapKey
command with wrapping key 14 to export an encrypted key from cluster 1, and then use unWrapKey
with wrapping key 21 to import the encrypted key into cluster 2.
Example : Import a Session Key
This command uses the -sess parameters of imSymKey to import a 192-bit Triple DES key that is valid
only in the current session.
The command uses the -f parameter to specify he file that contains the key to import, the -t parameter
to specify the key type, and the -w parameter to specify the wrapping key. It uses the -l parameter to
specify a label that categorizes the key and the -id parameter to create a friendly, but unique, identifier
for the key. It also uses the -attest parameter to verify the firmware that is importing the key.
The output shows that the key was successfully wrapped and unwrapped, imported into the HSM, and
assigned the key handle 37. Also, the attestation check passed, which indicates that the firmware has not
been tampered.
Command: imSymKey -f 3des192.key -w 6 -t 21 -l temp -id test01 -sess -attest
Cfm3WrapHostKey returned: 0x00 : HSM Return: SUCCESS
Cfm3CreateUnwrapTemplate returned: 0x00 : HSM Return: SUCCESS
Cfm3UnWrapKey returned: 0x00 : HSM Return: SUCCESS
Symmetric Key Unwrapped. Key Handle: 37
Attestation Check : [PASS]
Cluster Error Status
Node id 0 and err state 0x00000000 : HSM Return: SUCCESS
Next, you can use the getAttribute (p. 156) or findKey (p. 133) commands to verify the attributes of
the newly imported key. The following command uses findKey to verify that key 37 has the type, label,
and ID specified by the command, and that it is a session key. A shown on line 5 of the output, findKey
reports that the only key that matches all of the attributes is key 37.
Command: findKey -t 21 -l temp -id test01 -sess 1
Total number of keys present 1
number of keys matched from start index 0::0
37
Cluster Error Status
Node id 1 and err state 0x00000000 : HSM Return: SUCCESS
Node id 0 and err state 0x00000000 : HSM Return: SUCCESS
Node id 2 and err state 0x00000000 : HSM Return: SUCCESS
Cfm3FindKey returned: 0x00 : HSM Return: SUCCESS
Parameters
-attest
Runs an integrity check that verifies that the firmware on which the cluster runs has not been
tampered with.
165

AWS CloudHSM User Guide
Reference
Default: No attestation check.
Required: No
-f
Specifies the file that contains that key to import.
The file must contain a plaintext copy of an AES or Triple DES key of the specified length. RC4 and
DES keys are not valid on FIPS-mode HSMs.
•AES: 16, 24 or 32 bytes
•Triple DES (3DES): 24 bytes
Required: Yes
-h
Displays help for the command.
Required: Yes
-id
Specifies a user-defined identifier for the key. Type a string that is unique in the cluster. The default
is an empty string.
Default: No ID value.
Required: No
-l
Specifies a user-defined label for the key. Type a string.
You can use any phrase that helps you to identify the key. Because the label does not have to be
unique, you can use it to group and categorize keys.
Required: Yes
-min_srv
Specifies the minimum number of HSMs on which the key is synchronized before the value of the -
timeout parameter expires. If the key is not synchronized to the specified number of servers in the
time allotted, it is not created.
AWS CloudHSM automatically synchronizes every key to every HSM in the cluster. To speed up your
process, set the value of min_srv to less than the number of HSMs in the cluster and set a low
timeout value. Note, however, that some requests might not generate a key.
Default: 1
Required: No
-sess
Creates a key that exists only in the current session. The key cannot be recovered after the session
ends.
Use this parameter when you need a key only briefly, such as a wrapping key that encrypts, and
then quickly decrypts, another key. Do not use a session key to encrypt data that you might need to
decrypt after the session ends.
To change a session key to a persistent (token) key, use setAttribute (p. 170).
Default: The key is persistent.
166

AWS CloudHSM User Guide
Reference
Required: No
-timeout
Specifies how long (in seconds) the command waits for a key to be synchronized to the number of
HSMs specified by the min_srv parameter.
This parameter is valid only when the min_srv parameter is also used in the command.
Default: No timeout. The command waits indefinitely and returns only when the key is synchronized
to the minimum number of servers.
Required: No
-t
Specifies the type of the symmetric key. Enter the constant that represents the key type. For
example, to create an AES key, enter -t 31.
Valid values:
• 21: Triple DES (3DES).
• 31: AES
Required: Yes
-u
Shares the key you are importing with specified users. This parameter gives other HSM crypto users
(CUs) permission to use this key in cryptographic operations.
Type one ID or a comma-separated list of HSM user IDs, such as -u 5,6. Do not include the
HSM user ID of the current user. To find the an ID, you can use the listUsers command in the
cloudhsm_mgmt_util command line tool or the listUsers command in the key_mgmt_util command
line tool.
Required: No
-w
Specifies the key handle of the wrapping key. This parameter is required. To find key handles, use the
findKey (p. 133) command.
A wrapping key is a key in the HSM that is used to encrypt ("wrap") and then decrypt ("unwrap) the
key during the import process. Only AES keys can be used as wrapping keys.
You can use any AES key (of any size) as a wrapping key. Because the wrapping key wraps, and then
immediately unwraps, the target key, you can use as session-only AES key as a wrapping key. To
determine whether a key can be used as a wrapping key, use getAttribute (p. 156) to get the value
of the OBJ_ATTR_WRAP attribute (262). To create a wrapping key, use genSymKey (p. 151) to
create an AES key (type 31).
If you use the -wk parameter to specify an external wrapping key, the -w wrapping key is used to
unwrap, but not to wrap, the key that is being imported.
Note
Key 4 is an unsupported internal key. We recommend that you use an AES key that you
create and manage as the wrapping key.
Required: Yes
-wk
Use the AES key in the specified file to wrap the key that is being imported. Enter the path and name
of a file that contains a plaintext AES key.
167

AWS CloudHSM User Guide
Reference
When you include this parameter. imSymKey uses the key in the -wk file to wrap the key being
imported and it uses the key in the HSM that is specified by the -w parameter to unwrap it. The -w
and -wk parameter values must resolve to the same plaintext key.
Default: Use the wrapping key on the HSM to unwrap.
Required: No
Related Topics
•genSymKey (p. 151)
•exSymKey (p. 129)
•wrapKey (p. 175)
•unWrapKey (p. 172)
• exportPrivateKey
• exportPubKey
listAttributes
The listAttributes command in key_mgmt_util lists the attributes of an AWS CloudHSM key
and the constants that represent them. You use these constants to identify the attributes in
getAttribute (p. 156) and setAttribute (p. 170) commands. For help interpreting the key attributes,
see the Key Attribute Reference (p. 176).
Before you run any key_mgmt_util command, you must start key_mgmt_util (p. 121) and
login (p. 122) to the HSM as a crypto user (CU).
Syntax
This command has no parameters.
listAttributes
Example
This command lists the key attributes that you can get and change in key_mgmt_util and the constants
that represent them. For help interpreting the key attributes, see the Key Attribute Reference (p. 176).
To represent all attributes in the getAttribute (p. 156) command in key_mgmt_util, use 512.
Command: listAttributes
Following are the possible attribute values for getAttributes:
OBJ_ATTR_CLASS = 0
OBJ_ATTR_TOKEN = 1
OBJ_ATTR_PRIVATE = 2
OBJ_ATTR_LABEL = 3
OBJ_ATTR_KEY_TYPE = 256
OBJ_ATTR_ENCRYPT = 260
OBJ_ATTR_DECRYPT = 261
OBJ_ATTR_WRAP = 262
OBJ_ATTR_UNWRAP = 263
OBJ_ATTR_SIGN = 264
OBJ_ATTR_VERIFY = 266
OBJ_ATTR_LOCAL = 355
168

AWS CloudHSM User Guide
Reference
OBJ_ATTR_MODULUS = 288
OBJ_ATTR_MODULUS_BITS = 289
OBJ_ATTR_PUBLIC_EXPONENT = 290
OBJ_ATTR_VALUE_LEN = 353
OBJ_ATTR_EXTRACTABLE = 354
OBJ_ATTR_KCV = 371
Related Topics
•listAttributes (p. 103) in cloudhsm_mgmt_util
•getAttribute (p. 156)
•setAttribute (p. 170)
•Key Attribute Reference (p. 176)
listUsers
The listUsers command in the key_mgmt_util gets the users in the HSMs, along with their user type and
other attributes.
In key_mgmt_util, listUsers returns output that represents all HSMs in the cluster, even if they are not
consistent. To get information about the users in each HSM, use the listUsers (p. 169) command in
cloudhsm_mgmt_util.
The user commands in key_mgmt_util, listUsers and getKeyInfo, are read-only commands that
crypto users (CUs) have permission to run. The remaining user management commands are part of
cloudhsm_mgmt_util. They are run by crypto officers (CO) who have user management permissions.
Before you run any key_mgmt_util command, you must start key_mgmt_util (p. 121) and
login (p. 122) to the HSM as a crypto user (CU).
Syntax
listUsers
listUsers -h
Example
This command lists the users of HSMs in the cluster and their attributes. You can use the User ID
attribute to identify users in other commands, such as findKey (p. 133), getAttribute (p. 156), and
getKeyInfo (p. 159).
Command: listUsers
Number Of Users found 4
Index User ID User Type User Name MofnPubKey
LoginFailureCnt 2FA
1 1 PCO admin NO
0 NO
2 2 AU app_user NO
0 NO
3 3 CU alice YES
0 NO
4 4 CU bob NO
0 NO
5 5 CU trent YES
0 NO
169

AWS CloudHSM User Guide
Reference
Cfm3ListUsers returned: 0x00 : HSM Return: SUCCESS
The output includes the following user attributes:
•User ID: Identifies the user in key_mgmt_util and cloudhsm_mgmt_util (p. 74) commands.
•User type (p. 10): Determines the operations that the user can perform on the HSM.
•User Name: Displays the user-defined friendly name for the user.
•MofnPubKey: Indicates whether the user has registered a key pair for signing quorum authentication
tokens (p. 61).
•LoginFailureCnt:
•2FA: Indicates that the user has enabled multi-factor authentication.
Parameters
-h
Displays help for the command.
Required: Yes
Related Topics
•listUsers (p. 169) in cloudhsm_mgmt_util
•findKey (p. 133)
•getAttribute (p. 156)
•getKeyInfo (p. 159)
setAttribute
The setAttribute command in key_mgmt_util converts a key that is valid only in the current session to a
persistent key that exists until you delete it. It does this by changing the value of the token attribute of
the key (OBJ_ATTR_TOKEN) from false (0) to true (1). You can only change the attributes of keys that you
own.
You can also use the setAttribute command in cloudhsm_mgmt_util to change the label, wrap,
unwrap, encrypt, and decrypt attributes.
Before you run any key_mgmt_util command, you must start key_mgmt_util (p. 121) and
login (p. 122) to the HSM as a crypto user (CU).
Syntax
setAttribute -h
setAttribute -o <object handle>
-a 1
Example
This example shows how to convert a session key to a persistent key.
170

AWS CloudHSM User Guide
Reference
The first command uses the -sess parameter of genSymKey (p. 151) to create a 192-bit AES key
that is valid only in the current session. The output shows that the key handle of the new session key is
262154.
Command: genSymKey -t 31 -s 24 -l tmpAES -sess
Cfm3GenerateSymmetricKey returned: 0x00 : HSM Return: SUCCESS
Symmetric Key Created. Key Handle: 262154
Cluster Error Status
Node id 1 and err state 0x00000000 : HSM Return: SUCCESS
This command uses findKey (p. 133) to find the session keys in the current session. The output verifies
that key 262154 is a session key.
Command: findKey -sess 1
Total number of keys present 1
number of keys matched from start index 0::0
262154
Cluster Error Status
Node id 1 and err state 0x00000000 : HSM Return: SUCCESS
Node id 0 and err state 0x00000000 : HSM Return: SUCCESS
Cfm3FindKey returned: 0x00 : HSM Return: SUCCESS
This command uses setAttribute to convert key 262154 from a session key to a persistent key. To do so,
it changes the value of the token attribute (OBJ_ATTR_TOKEN) of the key from 0 (false) to 1 (true). For
help interpreting the key attributes, see the Key Attribute Reference (p. 176).
The command uses the -o parameter to specify the key handle (262154) and the -a parameter to
specify the constant that represents the token attribute (1). When you run the command, it prompts you
for a value for the token attribute. The only valid value is 1 (true); the value for a persistent key.
Command: setAttribute -o 262154 -a 1
This attribute is defined as a boolean value.
Enter the boolean attribute value (0 or 1):1
Cfm3SetAttribute returned: 0x00 : HSM Return: SUCCESS
Cluster Error Status
Node id 1 and err state 0x00000000 : HSM Return: SUCCESS
Node id 0 and err state 0x00000000 : HSM Return: SUCCESS
To confirm that key 262154 is now persistent, this command uses findKey to search for session keys (-
sess 1) and persistent keys (-sess 0). This time, the command does not find any session keys, but it
returns 262154 in the list of persistent keys.
Command: findKey -sess 1
Total number of keys present 0
Cluster Error Status
Node id 1 and err state 0x00000000 : HSM Return: SUCCESS
Node id 0 and err state 0x00000000 : HSM Return: SUCCESS
Cfm3FindKey returned: 0x00 : HSM Return: SUCCESS
171

AWS CloudHSM User Guide
Reference
Command: findKey -sess 0
Total number of keys present 5
number of keys matched from start index 0::4
6, 7, 524296, 9, 262154
Cluster Error Status
Node id 1 and err state 0x00000000 : HSM Return: SUCCESS
Node id 0 and err state 0x00000000 : HSM Return: SUCCESS
Cfm3FindKey returned: 0x00 : HSM Return: SUCCESS
Parameters
-h
Displays help for the command.
Required: Yes
-o
Specifies the key handle of the target key. You can specify only one key in each command. To get the
key handle of a key, use findKey (p. 133).
Required: Yes
-a
Specifies the constant that represents the attribute that you want to change. The only valid value is
1, which represents the token attribute, OBJ_ATTR_TOKEN.
To get the attributes and their integer values, use listAttributes (p. 168).
Required: Yes
Related Topics
•setAttribute (p. 109) in cloudhsm_mgmt_util
•getAttribute (p. 156)
•listAttributes (p. 168)
•Key Attribute Reference (p. 176)
unWrapKey
The unWrapKey command in the key_mgmt_util tool imports a wrapped (encrypted) symmetric or
private key from a file into the HSM. It is designed to import encrypted keys from files that were created
by the wrapKey (p. 175) command.
During the import process, unWrapKey uses an AES key on the HSM that you specify to unwrap (decrypt)
the key in the file. Then it saves the key in the HSM with a key handle and the attributes that you specify.
To export and import plaintext keys, use the exSymKey (p. 129) and imSymKey (p. 162) commands.
Imported keys work very much like keys generated in the HSM. However, the value of the
OBJ_ATTR_LOCAL attribute (p. 176) is zero, which indicates that it was not generated locally. The
unWrapKey command does not have parameters that assign a label or share the key with other users,
172

AWS CloudHSM User Guide
Reference
but you can use the shareKey command in cloudhsm_mgmt_util (p. 74) to add those attributes after
the key is imported.
After you import a key, be sure to mark or delete the key file. This command does not prevent you from
importing the same key material multiple times. The result, multiple keys with distinct key handles and
the same key material, make it difficult to track use of the key material and prevent it from exceeding its
cryptographic limits.
Before you run any key_mgmt_util command, you must start key_mgmt_util (p. 121) and
login (p. 122) to the HSM as a crypto user (CU).
Syntax
unWrapKey -h
unWrapKey -f <key-file-name>
-w <wrapping-key-handle> 4
[-sess]
[-min_srv <minimum-number-of-HSMs>]
[-timeout <number-of-seconds> ]
[-attest]
Example
Example
This command imports an wrapped (encrypted) copy of a Triple DES (3DES) symmetric key from the
3DES.key file into the HSMs. To unwrap (decrypt) the key, the command uses the -w parameter to
specify key 6, an AES key on the HSM. The AES key that unwraps during import must be the same key
that wrapped during export, or a cryptographically identical copy.
The output shows that the key in the file was unwrapped and imported. The new key has key handle 29.
If you are using unWrapKey to move a key between clusters, you must first create an AES wrapping
key that exists on both clusters. You can generate a key outside of the HSMs and then use imSymKey
to import it to the HSMs on both cluster. Or, generate an AES key in the HSMs on one cluster, use
exSymKey (p. 129) to export it in plaintext to a file. Then use imSymKey to import the plaintext key
into the other cluster. Once the wrapping key is established on both clusters, you can use wrapKey and
unWrapKey to move encrypted keys between clusters without ever exposing the plaintext key.
Command: unWrapKey -f 3DES.key -w 6
Cfm3UnWrapKey returned: 0x00 : HSM Return: SUCCESS
Key Unwrapped. Key Handle: 29
Cluster Error Status
Node id 1 and err state 0x00000000 : HSM Return: SUCCESS
Node id 0 and err state 0x00000000 : HSM Return: SUCCESS
Parameters
-h
Displays help for the command.
Required: Yes
-f
Specifies the path and name of the file that contains the wrapped key.
173

AWS CloudHSM User Guide
Reference
Required: Yes
-w
Specifies the wrapping key. Type the key handle of an AES key on the HSM. This parameter is
required. To find key handles, use the findKey (p. 133) command.
To create a wrapping key, use genSymKey (p. 151) to create an AES key (type 31). To verify
that a key can be used as a wrapping key, use getAttribute (p. 156) to get the value of the
OBJ_ATTR_WRAP attribute, which is represented by constant 262.
Note
Key handle 4 represents an unsupported internal key. We recommend that you use an AES
key that you create and manage as the wrapping key.
Required: Yes
-sess
Creates a key that exists only in the current session. The key cannot be recovered after the session
ends.
Use this parameter when you need a key only briefly, such as a wrapping key that encrypts, and
then quickly decrypts, another key. Do not use a session key to encrypt data that you might need to
decrypt after the session ends.
To change a session key to a persistent (token) key, use setAttribute (p. 170).
Default: The key is persistent.
Required: No
-min_srv
Specifies the minimum number of HSMs on which the key is synchronized before the value of the -
timeout parameter expires. If the key is not synchronized to the specified number of servers in the
time allotted, it is not created.
AWS CloudHSM automatically synchronizes every key to every HSM in the cluster. To speed up your
process, set the value of min_srv to less than the number of HSMs in the cluster and set a low
timeout value. Note, however, that some requests might not generate a key.
Default: 1
Required: No
-timeout
Specifies how long (in seconds) the command waits for a key to be synchronized to the number of
HSMs specified by the min_srv parameter.
This parameter is valid only when the min_srv parameter is also used in the command.
Default: No timeout. The command waits indefinitely and returns only when the key is synchronized
to the minimum number of servers.
Required: No
-attest
Runs an integrity check that verifies that the firmware on which the cluster runs has not been
tampered with.
Default: No attestation check.
Required: No
174

AWS CloudHSM User Guide
Reference
Related Topics
•wrapKey (p. 175)
•exSymKey (p. 129)
•imSymKey (p. 162)
wrapKey
The wrapKey command in key_mgmt_util exports an encrypted copy of a symmetric or private key from
the HSM to a file on disk. When you run wrapKey, you specify the key to export, an AES key on the HSM
to encrypt (wrap) the key to be exported, and the output file.
The wrapKey command writes the encrypted key to a file that you specify, but it does not remove the
key from the HSM, change its key attributes (p. 176), or prevent you from using it in cryptographic
operations. You can export the same key multiple times.
Only the owner of a key, that is, the CU user who created the key, can export it. Users who share the key
can use it in cryptographic operations, but they cannot export it.
To import (and unwrap) the encrypted key from the file to an HSM, use unWrapKey (p. 172). To export
a plaintext key from the HSM, use exSymKey (p. 129). The aesWrapUnwrap (p. 124) command cannot
decrypt (unwrap) keys that wrapKey encrypts.
Before you run any key_mgmt_util command, you must start key_mgmt_util (p. 121) and
login (p. 122) to the HSM as a crypto user (CU).
Syntax
wrapKey -h
wrapKey -k <exported-key-handle>
-w <wrapping-key-handle>
-out <output-file>
Example
Example
This command exports a 192-bit Triple DES (3DES) symmetric key (key handle 7). It uses a 256-bit AES
key in the HSM (key handle 14) to wrap key 7. Then it writes the encrypted 3DES key to the 3DES-
encrypted.key file.
The output shows that key 7 (the 3DES key) was successfully wrapped and written to the specified file.
The encrypted key is 307 bytes long.
Command: wrapKey -k 7 -w 14 -out 3DES-encrypted.key
Key Wrapped.
Wrapped Key written to file "3DES-encrypted.key length 307
Cfm2WrapKey returned: 0x00 : HSM Return: SUCCESS
Parameters
-h
Displays help for the command.
175

AWS CloudHSM User Guide
Reference
Required: Yes
-k
Specifies the key handle of the key to export. Type the key handle of a symmetric or private key that
you own. To find key handles, use the findKey (p. 133) command.
To verify that a key can be exported, use the getAttribute (p. 156) command to get the value of the
OBJ_ATTR_EXTRACTABLE attribute, which is represented by constant 354. For help interpreting the
key attributes, see the Key Attribute Reference (p. 176).
Also, you can export only keys that you own. To find the owner of a key, use the
getKeyInfo (p. 159) command.
Required: Yes
-w
Specifies the wrapping key. Type the key handle of an AES key on the HSM. This parameter is
required. To find key handles, use the findKey (p. 133) command.
To create a wrapping key, use genSymKey (p. 151) to create an AES key (type 31). To verify
that a key can be used as a wrapping key, use getAttribute (p. 156) to get the value of the
OBJ_ATTR_WRAP attribute, which is represented by constant 262.
Note
Key handle 4 represents an unsupported internal key. We recommend that you use an AES
key that you create and manage as the wrapping key.
Required: Yes
-out
Specifies the path and name of the output file. When the command succeeds, this file contains an
encrypted copy of the exported key. If the file already exists, the command overwrites it without
warning.
Required: Yes
Related Topics
•exSymKey (p. 129)
•imSymKey (p. 162)
•unWrapKey (p. 172)
Key Attribute Reference
The key_mgmt_util commands use constants to represent the attributes of keys in an HSM. This topic
can help you to identify the attributes, find the constants that represent them in commands, and
understand their values.
You set the attributes of a key when you create it. To change the token attribute, which indicates
whether a key is persistent or exists only in the session, use the setAttribute (p. 170) command
in key_mgmt_util. To change the label, wrap, unwrap, encrypt, or decrypt attributes, use the
setAttribute command in cloudhsm_mgmt_util.
To get a list of attributes and their constants, use listAttributes (p. 168). To get the attribute values for
a key, use getAttribute (p. 156).
176

AWS CloudHSM User Guide
Reference
The following table lists the key attributes, their constants, and their valid values.
Attribute Constant Values
OBJ_ATTR_CLASS 0 2: Public key in a public–private
key pair.
3: Private key in a public–private
key pair.
4: Secret (symmetric) key.
OBJ_ATTR_TOKEN 1 0: False. Session key.
1: True. Persistent key.
OBJ_ATTR_PRIVATE 2 0: False.
1: True. Private key in a public–
private key pair.
OBJ_ATTR_LABEL 3 User-defined string. It does not
have to be unique in the cluster.
OBJ_ATTR_KEY_TYPE 256 0: RSA.
1: DSA.
3: EC.
16: Generic secret.
18: RC4.
21: Triple DES (3DES).
31: AES.
OBJ_ATTR_ID 258 User-defined string. Must
be unique in the cluster. The
default is an empty string.
OBJ_ATTR_SENSITIVE 259 0: False. Public key in a public–
private key pair.
1: True.
OBJ_ATTR_ENCRYPT 260 0: False.
1: True. The key can be used to
encrypt data.
OBJ_ATTR_DECRYPT 261 0: False.
1: True. The key can be used to
decrypt data.
OBJ_ATTR_WRAP 262 0: False.
1: True. The key can be used to
encrypt keys.
177

AWS CloudHSM User Guide
Reference
Attribute Constant Values
OBJ_ATTR_UNWRAP 263 0: False.
1: True. The key can be used to
decrypt keys.
OBJ_ATTR_SIGN 264 0: False.
1: True. The key can be used for
signing (private keys).
OBJ_ATTR_VERIFY 266 0: False.
1: True. The key can be used for
verification (public keys).
OBJ_ATTR_MODULUS 288 The modulus that was used to
generate an RSA key pair.
For other key types, this
attribute does not exist.
OBJ_ATTR_MODULUS_BITS 289 The length of the modulus used
to generate an RSA key pair.
For other key types, this
attribute does not exist.
OBJ_ATTR_PUBLIC_EXPONENT 290 The public exponent used to
generate an RSA key pair.
For other key types, this
attribute does not exist.
OBJ_ATTR_VALUE_LEN 353 Key length in bytes.
OBJ_ATTR_EXTRACTABLE 354 0: False.
1: True. The key can be exported
from the HSMs.
OBJ_ATTR_LOCAL 355 0. False. The key was imported
into the HSMs.
1. True.
OBJ_ATTR_KCV 371 Key check value of the key.
For more information, see
Additional Details (p. 178).
OBJ_ATTR_ALL 512 Represents all attributes.
Additional Details
Key check value (kcv)
The key check value (KCV) is an 8-byte hash or checksum of a key. The HSM calculates a KCV when it
generates the key. You can also calculate a KCV outside of the HSM, such as after you export a key.
178

AWS CloudHSM User Guide
Configure Tool
You can then compare the KCV values to confirm the identity and integrity of the key. To get the KCV
of a key, use getAttribute (p. 156).
AWS CloudHSM uses the following standard method to generate a key check value:
•Symmetric keys: First 8 bytes of the result of encrypting 16 zero-filled bytes with the key.
•Asymmetric key pairs: First 8 bytes of the modulus hash.
Configure Tool
AWS CloudHSM automatically synchronizes data among all HSMs in a cluster. The Configure tool
updates the HSM data in the configuration files that the synchronization mechanisms use. Use Configure
to refresh the HSM data before you use the command line tools, especially when the HSMs in the cluster
have changed.
Before using the key_mgmt_util tool, run configure -a. Before using the cloudhsm_mgmt_util tool,
run configure -a and then run configure -m. You can also run configure --ssl to update SSL
keys and certificates.
You can also use the Configure tool to update SSL keys and certificates.
Syntax
configure -h | --help
configure -a <ENI IP address>
configure -m [-i <daemon_id>]
configure --ssl --pkey <private key file> --cert <certificate file>
Examples
These examples show how to use the Configure tool.
Example : Update the HSM Data for the AWS CloudHSM Client and key_mgmt_util
This example uses the configure -a command to update the HSM data for the AWS CloudHSM
client and key_mgmt_util. This command is also the first step in updating the cloudhsm_mgmt_util
configuration file.
Before running configure -a, stop the AWS CloudHSM client. This prevents conflicts that might occur
while Configure edits the client's configuration file. If the client is already stopped, this command has no
ill effects, so you can use it in a script.
$ sudo stop cloudhsm-client
cloudhsm-client stop/waiting
Next, get the ENI IP address of any one of the HSMs in your cluster. This command uses the describe-
clusters command in the AWS CLI, but you can also use the DescribeClusters operation or the Get-
HSM2Cluster PowerShell cmdlet.
This excerpt of the output shows the ENI IP addresses of the HSMs in a sample cluster. We can use either
of the IP addresses in the next command.
179
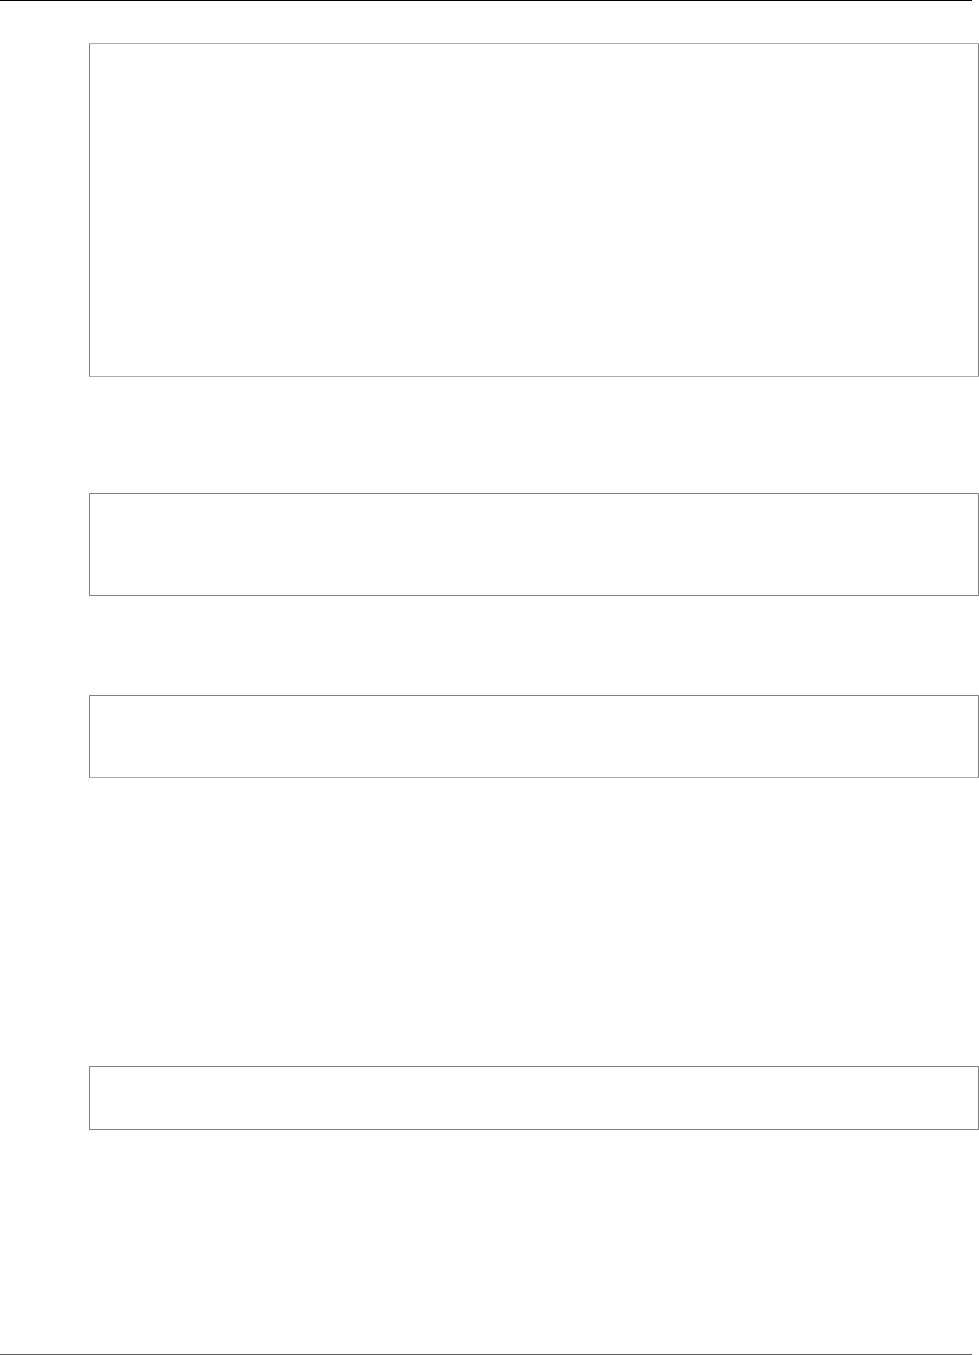
AWS CloudHSM User Guide
Parameters
$ aws cloudhsmv2 describe-clusters
{
"Clusters": [
{ ... }
"Hsms": [
{
...
"EniIp": "10.0.0.9",
...
},
{
...
"EniIp": "10.0.1.6",
...
This step uses configure -a to add the 10.0.0.9 ENI IP address to the configurations files.
The output shows that Configure added 10.0.0.9 to the cloudhsm_client.cfg and
cloudhsm_mgmt_util.cfg files.
$ sudo /opt/cloudhsm/bin/configure -a 10.0.0.9
Updating server config in /opt/cloudhsm/etc/cloudhsm_client.cfg
Updating server config in /opt/cloudhsm/etc/cloudhsm_mgmt_util.cfg
Next, restart the AWS CloudHSM client. When the client starts, it uses the ENI IP address in its
configuration file to query the cluster. Then, it writes the ENI IP addresses of all HSMs in the cluster to
the cluster.info file.
$ sudo start cloudhsm-client
cloudhsm-client start/running, process 2747
When the command completes, the HSM data that the AWS CloudHSM client and key_mgmt_util use is
complete and accurate. Before using cloudhsm_mgmt_util, run the configure -m command, as shown in
the following example.
Example : Update the HSM Data for cloudhsm_mgmt_util
This example uses the configure -m command to copy the update the updated HSM data from the
cluster.info file to the cloudhsm_mgmt_util.cfg file that cloudhsm_mgmt_util uses.
Before running configure -m, stop the AWS CloudHSM client, run configure -a, and then restart the
AWS CloudHSM client, as shown in the previous example (p. 179). This ensures that the data copied
into the cloudhsm_mgmt_util.cfg file from the cluster.info file is complete and accurate.
$ sudo /opt/cloudhsm/bin/configure -m
Updating '/opt/cloudhsm/etc/cloudhsm_mgmt_util.cfg' from cluster state
Parameters
-h | --help
Displays command syntax.
Required: Yes
180

AWS CloudHSM User Guide
Parameters
-a <ENI IP address>
Adds the specified HSM elastic network interface (ENI) IP address to AWS CloudHSM configuration
files. Enter the ENI IP address of any one of the HSMs in the cluster. It does not matter which one
you select.
To get the ENI IP addresses of the HSMs in your cluster, use the DescribeClusters operation, the
describe-clusters AWS CLI command, or the Get-HSM2Cluster PowerShell cmdlet.
Note
Before running configure -a, stop the AWS CloudHSM client. Then, when configure -a
completes, restart the AWS CloudHSM client. For details, see the examples (p. 179).
This parameter edits the following configuration files:
•/opt/cloudhsm/etc/cloudhsm_client.cfg: Used by AWS CloudHSM client and
key_mgmt_util (p. 119).
•/opt/cloudhsm/etc/cloudhsm_mgmt_util.cfg: Used by cloudhsm_mgmt_util (p. 74).
When the AWS CloudHSM client starts, it uses the ENI IP address in its configuration file to query the
cluster and update the cluster.info file (/opt/cloudhsm/daemon/1/cluster.info) with the
correct ENI IP addresses for all HSMs in the cluster.
Required: Yes
-m
Updates the HSM ENI IP addresses in the configuration file that cloudhsm_mgmt_util uses.
When you run configure -a and then start the AWS CloudHSM client, the client daemon queries
the cluster and updates the cluster.info files with the correct HSM IP addresses for all HSMs in
the cluster. Running configure -m completes the update by copying the HSM IP addresses from the
cluster.info to the cloudhsm_mgmt_util.cfg configuration file that cloudhsm_mgmt_util
uses.
Be sure to run configure -a and restart the AWS CloudHSM client before running configure -m. This
ensures that the data copied into cloudhsm_mgmt_util.cfg from cluster.info is complete
and accurate.
Required: Yes
-i
Specifies an alternate client daemon. The default value represents the AWS CloudHSM client.
Default: 1
Required: No
--ssl
Replaces the SSL key and certificate for the cluster with the specified private key and certificate.
When you use this parameter, the --pkey and --cert parameters are required.
Required: No
--pkey
Specifies the new private key. Enter the path and file name of the file that contains the private key.
Required: Yes if --ssl is specified. Otherwise, this should not be used.
--cert
Specifies the new certificate. Enter the path and file name of the file that contains the certificate.
The certificate should chain up to the customerCA.crt certificate, the self-signed certificate used
to initialize the cluster. For more information, see Initialize the Cluster.
181


AWS CloudHSM User Guide
PKCS #11 Library
Using the AWS CloudHSM Software
Libraries
The AWS CloudHSM software libraries integrate your applications with the HSMs in your cluster. The
libraries enable your application to perform cryptographic operations on the HSMs.
For detailed information about supported platforms and a full version history, see AWS CloudHSM Client
and Software Information (p. 276).
Topics
•AWS CloudHSM Software Library for PKCS #11 (p. 183)
•AWS CloudHSM Dynamic Engine for OpenSSL (p. 192)
•AWS CloudHSM Software Library for Java (p. 194)
•KSP and CNG Providers for Windows (p. 203)
AWS CloudHSM Software Library for PKCS #11
The AWS CloudHSM software library for PKCS #11 is a PKCS #11 standard implementation that
communicates with the HSMs in your AWS CloudHSM cluster. It is supported only on Linux and
compatible operating systems. This library is compliant with PKCS #11 version 2.40, and implements the
following key types, mechanisms, and API operations.
Topics
•Installing the AWS CloudHSM Software Library for PKCS #11 (p. 183)
•Authenticating to PKCS #11 (p. 188)
•Supported PKCS #11 Key Types (p. 189)
•Supported PKCS #11 Mechanisms (p. 189)
•Supported PKCS #11 API operations (p. 190)
Installing the AWS CloudHSM Software Library for
PKCS #11
With the AWS CloudHSM software libraries for PKCS #11, you can to build PKCS #11–compatible
applications that use the HSMs in your AWS CloudHSM cluster. You can use the standard AWS CloudHSM
PKCS #11 library or the AWS CloudHSM PKCS #11 library that uses a Redis cache (p. 185). Both of the
AWS CloudHSM libraries for PKCS #11 are supported only on Linux operating systems.
Topics
•Prerequisites (p. 183)
•Install the PKCS #11 Library (p. 184)
•Install the PKCS #11 Library with Redis (Optional) (p. 185)
Prerequisites
The AWS CloudHSM software libraries for PKCS #11 require the AWS CloudHSM client.
183

AWS CloudHSM User Guide
Installing the PKCS #11 Library
If you haven't installed and configured the AWS CloudHSM client, do that now by following the steps at
Install the Client (Linux) (p. 35). After you install and configure the client, use the following command to
start it.
Amazon Linux
$ sudo start cloudhsm-client
Amazon Linux 2
$ sudo service cloudhsm-client start
CentOS 6
$ sudo start cloudhsm-client
CentOS 7
$ sudo service cloudhsm-client start
RHEL 6
$ sudo start cloudhsm-client
RHEL 7
$ sudo service cloudhsm-client start
Ubuntu 16.04 LTS
$ sudo service cloudhsm-client start
Install the PKCS #11 Library
The following command downloads and installs (or updates) the AWS CloudHSM software library
for PKCS #11. This step is required for the standard AWS CloudHSM PKCS #11 library and the AWS
CloudHSM PKCS #11 library for Redis (p. 185).
Amazon Linux
$ wget https://s3.amazonaws.com/cloudhsmv2-software/CloudHsmClient/EL6/cloudhsm-client-
pkcs11-latest.el6.x86_64.rpm
$ sudo yum install -y ./cloudhsm-client-pkcs11-latest.el6.x86_64.rpm
Amazon Linux 2
$ wget https://s3.amazonaws.com/cloudhsmv2-software/CloudHsmClient/EL7/cloudhsm-client-
pkcs11-latest.el7.x86_64.rpm
$ sudo yum install -y ./cloudhsm-client-pkcs11-latest.el7.x86_64.rpm
184

AWS CloudHSM User Guide
Installing the PKCS #11 Library
CentOS 6
$ wget https://s3.amazonaws.com/cloudhsmv2-software/CloudHsmClient/EL6/cloudhsm-client-
pkcs11-latest.el6.x86_64.rpm
$ sudo yum install -y ./cloudhsm-client-pkcs11-latest.el6.x86_64.rpm
CentOS 7
$ wget https://s3.amazonaws.com/cloudhsmv2-software/CloudHsmClient/EL7/cloudhsm-client-
pkcs11-latest.el7.x86_64.rpm
$ sudo yum install -y ./cloudhsm-client-pkcs11-latest.el7.x86_64.rpm
RHEL 6
$ wget https://s3.amazonaws.com/cloudhsmv2-software/CloudHsmClient/EL6/cloudhsm-client-
pkcs11-latest.el6.x86_64.rpm
$ sudo yum install -y ./cloudhsm-client-pkcs11-latest.el6.x86_64.rpm
RHEL 7
$ wget https://s3.amazonaws.com/cloudhsmv2-software/CloudHsmClient/EL7/cloudhsm-client-
pkcs11-latest.el7.x86_64.rpm
$ sudo yum install -y ./cloudhsm-client-pkcs11-latest.el7.x86_64.rpm
Ubuntu 16.04 LTS
$ wget https://s3.amazonaws.com/cloudhsmv2-software/CloudHsmClient/Xenial/cloudhsm-
client-pkcs11_latest_amd64.deb
$ sudo dpkg -i cloudhsm-client-pkcs11_latest_amd64.deb
When the installation succeeds, the PKCS #11 libraries are /opt/cloudhsm/lib.
Install the PKCS #11 Library with Redis (Optional)
AWS CloudHSM provides an optional software library for PKCS #11 that uses a Redis cache. The cache
stores key handles and attributes locally so you can access them without calling into your HSMs.
When you build the cache, you specify the crypto user (CU) that your PKCS #11 application uses
to authenticate (p. 188). The cache is preloaded with the keys that the CU owns and shares. It is
automatically updated when your application uses functions in the PKCS #11 library to make changes in
the HSMs, such as creating or deleting keys or changing keys attributes. The cache is not aware of any
other keys on the HSM.
Caching can improve the performance of your PKCS #11 application, but it might not be the right choice
for all applications. Consider the following:
• Redis caches all PKCS #11 library operations that run on the host, but it's not aware of operations
that are performed outside the library. For example, if you use the command line tools (p. 74) or the
185

AWS CloudHSM User Guide
Installing the PKCS #11 Library
software library for Java (p. 194) to manage keys in your HSMs, those operations do not update
the cache. You can rebuild the cache to update it to the new state of the HSMs, but the cache is not
synchronized with the HSMs automatically.
• Do not use the PKCS #11 library with Redis if you have other applications that use Redis on the same
host. The PKCS #11 library configures Redis to recognize it as the only Redis consumer on the host.
To install the PKCS #11 Library with Redis, you use the Extra Packages for Enterprise Linux (EPEL)
repository to install the Redis package. Then you enable and configure Redis to work with AWS
CloudHSM and PKCS #11.
Some steps in this process are required only on selected operating systems.
Step 1: Install the AWS CloudHSM PKCS #11 library
To install the PKCS #11 Library with Redis, you must first install the standard AWS CloudHSM PKCS #11
library (p. 184). This library is required.
Required for Redis on: All supported operating systems.
Step 2: Install the EPEL Repository
This step installs the Extra Packages for Enterprise Linux (EPEL) repository. It is required only on
operating systems that do not include EPEL.
Required for Redis only on: Amazon Linux 2, CentOS 6, CentOS 7, RedHat Enterprise Linux (RHEL) 6,
RedHat Enterprise Linux (RHEL) 7
Amazon Linux 2
1. Download the EPEL repository.
curl -O https://dl.fedoraproject.org/pub/epel/epel-release-latest-7.noarch.rpm
2. Install the EPEL repository.
sudo yum install epel-release-latest-7.noarch.rpm
CentOS 6
1. Download the EPEL repository.
curl -O https://dl.fedoraproject.org/pub/epel/epel-release-latest-6.noarch.rpm
2. Install the EPEL repository.
sudo yum install epel-release-latest-6.noarch.rpm
CentOS 7
1. Download the EPEL repository.
curl -O https://dl.fedoraproject.org/pub/epel/epel-release-latest-7.noarch.rpm
2. Install the EPEL repository.
186
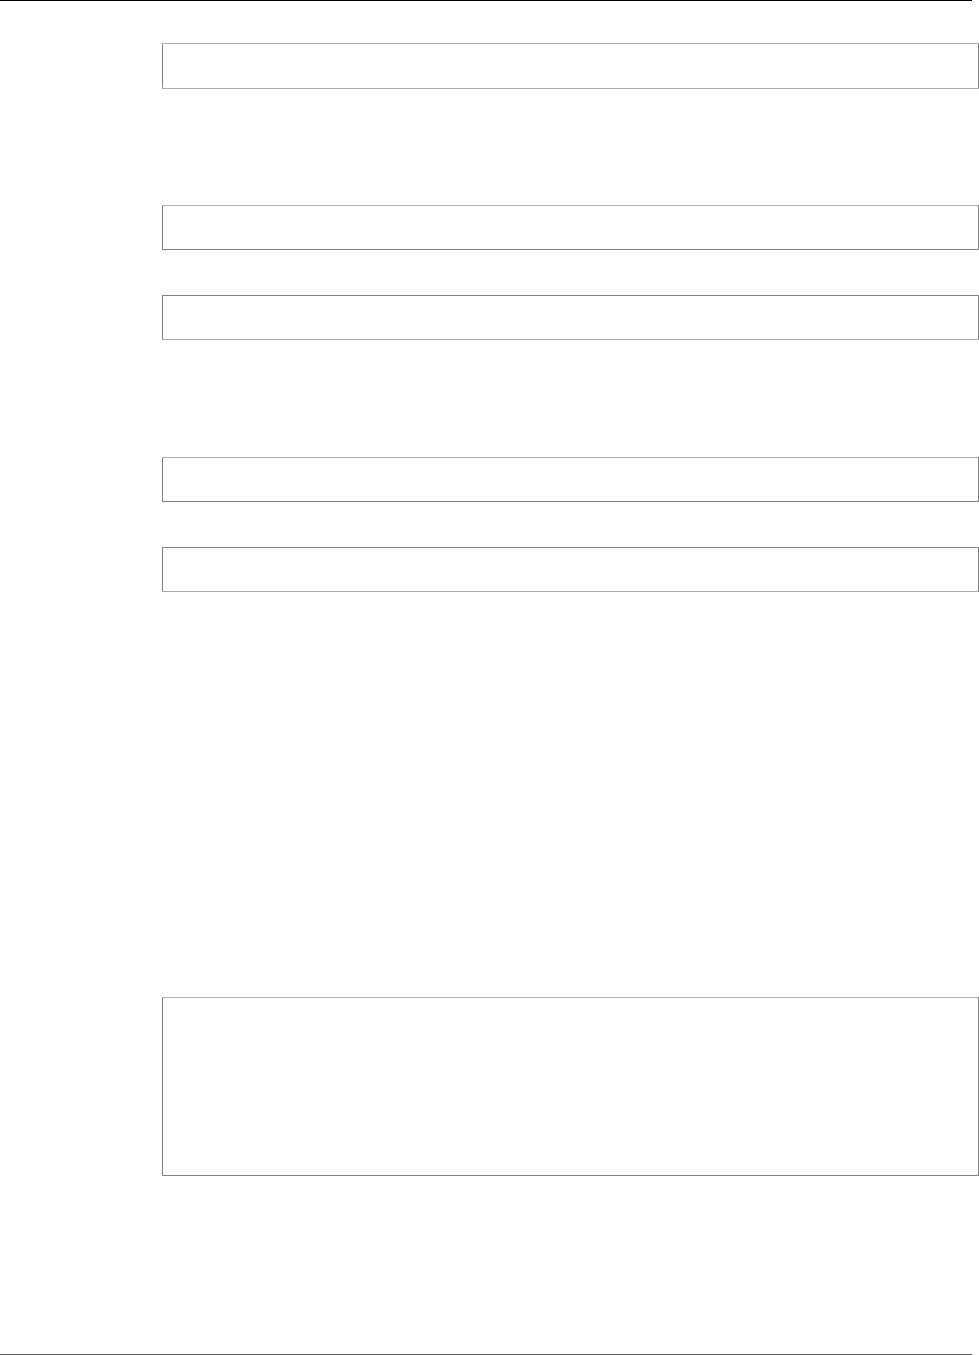
AWS CloudHSM User Guide
Installing the PKCS #11 Library
sudo yum install epel-release-latest-7.noarch.rpm
RHEL 6
1. Download the EPEL repository.
curl -O https://dl.fedoraproject.org/pub/epel/epel-release-latest-6.noarch.rpm
2. Install the EPEL repository.
sudo yum install epel-release-latest-6.noarch.rpm
RHEL 7
1. Download the EPEL repository.
curl -O https://dl.fedoraproject.org/pub/epel/epel-release-latest-7.noarch.rpm
2. Install the EPEL repository.
sudo yum install epel-release-latest-7.noarch.rpm
Step 3: Prepare for Redis
This step includes system-specific tasks that must be completed before you install and configure the
PKCS #11 library for Redis.
Required for Redis only on: Amazon Linux, CentOS 7, RedHat Enterprise Linux (RHEL) 6
Amazon Linux
This step enables the EPEL repository. It is required only on Amazon Linux, but you can use this
procedure to verify that EPEL is enabled on any Linux operating system.
1. Open the /etc/yum.repos.d/epel.repo file in a text editor. This step requires
administrative permissions (sudo).
2. In the [epel] configuration in the file, set the value of enabled to 1, as shown in the following
example. Then, save the file and close it.
[epel]
name=Extra Packages for Enterprise Linux 6 - $basearch
#baseurl=http://download.fedoraproject.org/pub/epel/6/$basearch
mirrorlist=https://mirrors.fedoraproject.org/metalink?repo=epel-6&arch=$basearch
failovermethod=priority
enabled=1
gpgcheck=1
gpgkey=file:///etc/pki/rpm-gpg/RPM-GPG-KEY-EPEL-6
CentOS 7
This command disables a Security-Enhanced Linux (SELinux) policy that prevents Redis from using
AWS CloudHSM resources.
187
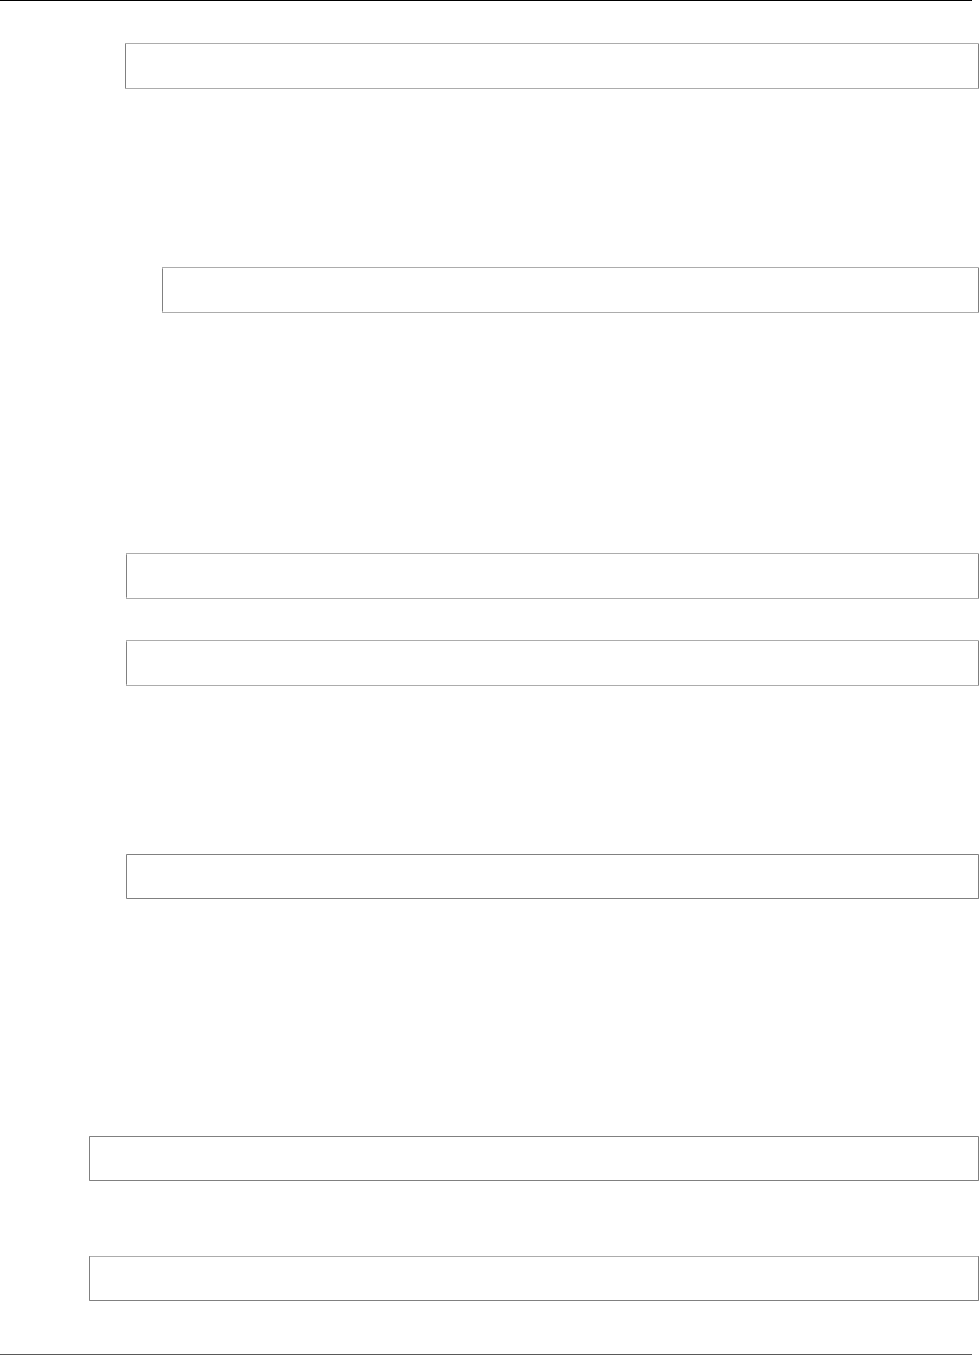
AWS CloudHSM User Guide
Authenticating to PKCS #11
sudo semanage module -d redis
RHEL 6
This command eliminates the TTY requirement in the sudoers file. The sudoers file contains the
rules for the sudo command.
1. Use visudo editor to edit the /etc/sudoers file.
2. Comment out the Defaults requiretty statement. Then, save the file and quit visudo.
# Defaults requiretty
Step 4: Install, Configure, and Build the Redis Cache
Use the following procedure to install and configure the Redis package for the AWS CloudHSM library for
PKCS #11 and build the cache.
Required for Redis on: All supported operating systems.
1. Use the setup_redis script to install Redis and configure it to work with the AWS CloudHSM PKCS
#11 library for Redis.
$ sudo /opt/cloudhsm/bin/setup_redis
2. Start the Redis service.
$ sudo service redis start
3. Use the build_keystore command to build the Redis cache. Type the name and password of the
crypto user (CU) (p. 11) that your PKCS #11 application uses for authentication (p. 188).
The cache is preloaded with the keys that the specified CU owns and shares. It is updated
automatically when your application makes changes in the HSMs on behalf of the CU, such as
creating or deleting keys, or changing key attributes. The cache is not aware of any other keys on the
HSMs.
$ /opt/cloudhsm/bin/build_keystore -s <CU user name> -p < CU password>
Authenticating to PKCS #11
When you use PKCS #11 with AWS CloudHSM, your application runs as a particular crypto user
(CU) (p. 10) in your HSMs. Your application can view and manage only the keys that the CU owns and
shares. You can use an existing CU in your HSMs or create a new CU (p. 53) for your application.
To specify the CU to PKCS #11, use the pin parameter of the PKCS #11 C_Login function. For AWS
CloudHSM, the pin parameter has the following format:
<CU_user_name>:<password>
For example, the following command sets the PKCS #11 pin to the CU with user name CryptoUser and
password CUPassword123!.
CryptoUser:CUPassword123!
188

AWS CloudHSM User Guide
Supported PKCS #11 Key Types
Supported PKCS #11 Key Types
The AWS CloudHSM software library for PKCS #11 supports the following key types.
•RSA – 2048-bit to 4096-bit RSA keys, in increments of 256 bits.
•ECDSA – Generate keys with the P-224, P-256, P-384, and P-521 curves. Only the P-256 and P-384
curves are supported for sign/verify.
•AES – 128, 192, and 256-bit AES keys.
•Triple DES (3DES) – 192-bit keys.
•GENERIC_SECRET – 1 to 64 bytes.
Supported PKCS #11 Mechanisms
The AWS CloudHSM software library for PKCS #11 supports the following PKCS #11 mechanisms.
Generate, Create, Import Keys
•CKM_AES_KEY_GEN
•CKM_DES3_KEY_GEN
•CKM_EC_KEY_PAIR_GEN
•CKM_GENERIC_SECRET_KEY_GEN
•CKM_RSA_X9_31_KEY_PAIR_GEN
Note
This mechanism is functionally identical to the CKM_RSA_PKCS_KEY_PAIR_GEN
mechanism, but offers stronger guarantees for p and q generation. If you need the
CKM_RSA_PKCS_KEY_PAIR_GEN mechanism, use CKM_RSA_X9_31_KEY_PAIR_GEN.
Sign/Verify
•CKM_RSA_PKCS
•CKM_RSA_PKCS_PSS
•CKM_SHA256_RSA_PKCS
•CKM_SHA224_RSA_PKCS
•CKM_SHA384_RSA_PKCS
•CKM_SHA512_RSA_PKCS
•CKM_SHA1_RSA_PKCS_PSS
•CKM_SHA256_RSA_PKCS_PSS
•CKM_SHA224_RSA_PKCS_PSS
•CKM_SHA384_RSA_PKCS_PSS
•CKM_SHA512_RSA_PKCS_PSS
•CKM_MD5_HMAC
•CKM_SHA_1_HMAC
•CKM_SHA224_HMAC
•CKM_SHA256_HMAC
•CKM_SHA384_HMAC
•CKM_SHA512_HMAC
•CKM_ECDSA
•CKM_ECDSA_SHA1
189

AWS CloudHSM User Guide
Supported PKCS #11 API operations
•CKM_ECDSA_SHA224
•CKM_ECDSA_SHA256
•CKM_ECDSA_SHA384
•CKM_ECDSA_SHA512
Digest
•CKM_SHA1
•CKM_SHA224
•CKM_SHA256
•CKM_SHA384
•CKM_SHA512
Note
Data under 16 KB in length are hashed on the HSM, while larger data are hashed locally in
software.
Encrypt/Decrypt
•CKM_AES_CBC
•CKM_AES_CBC_PAD
•CKM_AES_GCM
Note
When performing AES-GCM encryption, the HSM does not accept initialization vector (IV)
data from the application. It is required to use an IV that it generates. The 12-byte IV provided
by the HSM is written into the memory reference pointed to by the pIV element of the
CK_GCM_PARAMS parameters structure that you supply. To ensure there is no user confusion,
PKCS#11 SDK in version 1.1.1 and later enforce that pIV points to a zeroized buffer when AES-
GCM encryption is initialized.
•CKM_DES3_CBC
•CKM_DES3_CBC_PAD
•CKM_RSA_OAEP_PAD
•CKM_RSA_PKCS
Key Derive
•CKM_ECDH1_DERIVE
Note
This mechanism is implemented to support SSL/TLS Offload cases and is executed only
partially within the HSM. Before using this mechanism, see Issue: ECDH key derivation is
executed only partially within the HSM in Known Issues for the PKCS #11 SDK (p. 265).
Key Wrap
•CKM_AES_KEY_WRAP
Supported PKCS #11 API operations
The AWS CloudHSM software library for PKCS #11 supports the following PKCS #11 API operations.
190

AWS CloudHSM User Guide
Supported PKCS #11 API operations
•C_CreateObject
•C_Decrypt
•C_DecryptFinal
•C_DecryptInit
•C_DecryptUpdate
•C_DestroyObject
•C_DigestInit
•C_Digest
•C_Encrypt
•C_EncryptFinal
•C_EncryptInit
•C_EncryptUpdate
•C_FindObjects
•C_FindObjectsFinal
•C_FindObjectsInit
•C_Finalize
•C_GenerateKey
•C_GenerateKeyPair
•C_GenerateRandom
•C_GetAttributeValue
•C_GetFunctionList
•C_GetInfo
•C_GetMechanismInfo
•C_GetMechanismList
•C_GetOperationState
•C_GetSessionInfo
•C_GetSlotInfo
•C_GetSlotList
•C_GetTokenInfo
•C_Initialize
•C_Login
•C_Logout
•C_OpenSession
•C_Sign
•C_SignFinal
•C_SignInit
•C_SignRecover
•C_SignRecoverInit
•C_SignUpdate
•C_UnWrapKey
•C_Verify
•C_VerifyFinal
•C_VerifyInit
•C_VerifyRecover
•C_VerifyRecoverInit
191

AWS CloudHSM User Guide
OpenSSL Dynamic Engine
•C_VerifyUpdate
•C_WrapKey
AWS CloudHSM Dynamic Engine for OpenSSL
The AWS CloudHSM dynamic engine for OpenSSL is an OpenSSL dynamic engine that supports the
OpenSSL command line interface and EVP API operations. The dynamic engine allows applications that
are integrated with OpenSSL, such as the NGINX and Apache web servers, to offload their cryptographic
processing to the HSMs in your AWS CloudHSM cluster. The engine supports the following key types and
ciphers:
• RSA key generation for 2048, 3072, and 4096-bit keys.
• RSA sign/verify.
• RSA encrypt/decrypt.
• Random number generation that is cryptographically secure and FIPS-validated.
For more information, see the following topic.
Topics
•Install and Use the AWS CloudHSM Dynamic Engine for OpenSSL (p. 192)
Install and Use the AWS CloudHSM Dynamic Engine
for OpenSSL
Before you can use the AWS CloudHSM dynamic engine for OpenSSL, you need the AWS CloudHSM
client.
The client is a daemon that establishes end-to-end encrypted communication with the HSMs in your
cluster, and the OpenSSL engine communicates locally with the client. If you haven't installed and
configured the AWS CloudHSM client package, do that now by following the steps at Install the Client
(Linux) (p. 35). After you install and configure the client, use the following command to start it.
The AWS CloudHSM dynamic engine for OpenSSL is supported only on Linux and compatible operating
systems.
Amazon Linux
$ sudo start cloudhsm-client
Amazon Linux 2
$ sudo service cloudhsm-client start
CentOS 6
$ sudo start cloudhsm-client
CentOS 7
$ sudo service cloudhsm-client start
192
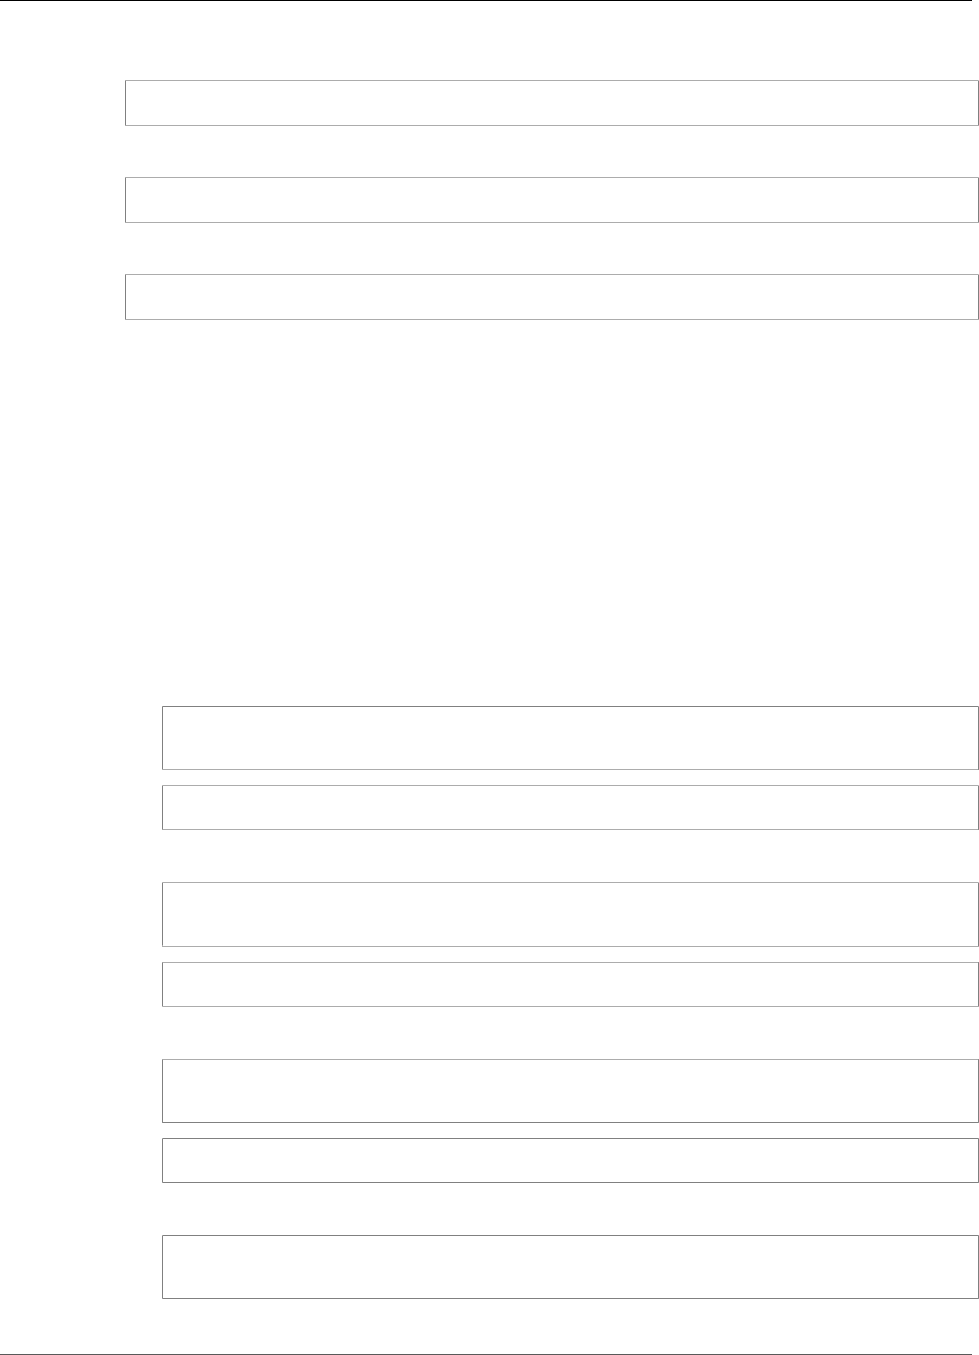
AWS CloudHSM User Guide
Installing the OpenSSL Dynamic Engine
RHEL 6
$ sudo start cloudhsm-client
RHEL 7
$ sudo service cloudhsm-client start
Ubuntu 16.04 LTS
$ sudo service cloudhsm-client start
Topics
•Install and Configure the OpenSSL Dynamic Engine (p. 193)
•Use the OpenSSL Dynamic Engine (p. 194)
Install and Configure the OpenSSL Dynamic Engine
Complete the following steps to install (or update) and configure the AWS CloudHSM dynamic engine for
OpenSSL. It is supported only on Linux and compatible operating systems.
To install (or update) and configure the OpenSSL engine
1. Use the following commands to download and install the OpenSSL engine.
Amazon Linux
$ wget https://s3.amazonaws.com/cloudhsmv2-software/CloudHsmClient/EL6/cloudhsm-
client-dyn-latest.el6.x86_64.rpm
$ sudo yum install -y ./cloudhsm-client-dyn-latest.el6.x86_64.rpm
Amazon Linux 2
$ wget https://s3.amazonaws.com/cloudhsmv2-software/CloudHsmClient/EL7/cloudhsm-
client-dyn-latest.el7.x86_64.rpm
$ sudo yum install -y ./cloudhsm-client-dyn-latest.el7.x86_64.rpm
CentOS 6
$ wget https://s3.amazonaws.com/cloudhsmv2-software/CloudHsmClient/EL6/cloudhsm-
client-dyn-latest.el6.x86_64.rpm
$ sudo yum install -y ./cloudhsm-client-dyn-latest.el6.x86_64.rpm
CentOS 7
$ wget https://s3.amazonaws.com/cloudhsmv2-software/CloudHsmClient/EL7/cloudhsm-
client-dyn-latest.el7.x86_64.rpm
193

AWS CloudHSM User Guide
Java Library
$ sudo yum install -y ./cloudhsm-client-dyn-latest.el7.x86_64.rpm
RHEL 6
$ wget https://s3.amazonaws.com/cloudhsmv2-software/CloudHsmClient/EL6/cloudhsm-
client-dyn-latest.el6.x86_64.rpm
$ sudo yum install -y ./cloudhsm-client-dyn-latest.el6.x86_64.rpm
RHEL 7
$ wget https://s3.amazonaws.com/cloudhsmv2-software/CloudHsmClient/EL7/cloudhsm-
client-dyn-latest.el7.x86_64.rpm
$ sudo yum install -y ./cloudhsm-client-dyn-latest.el7.x86_64.rpm
Ubuntu 16.04 LTS
$ wget https://s3.amazonaws.com/cloudhsmv2-software/CloudHsmClient/Xenial/cloudhsm-
client-dyn_latest_amd64.deb
$ sudo dpkg -i cloudhsm-client-dyn_latest_amd64.deb
2. After you complete the preceding step, you can find the OpenSSL engine at /opt/cloudhsm/lib/
libcloudhsm_openssl.so.
3. Use the following command to set an environment variable named n3fips_password that
contains the credentials of a crypto user (CU).
$ export n3fips_password=<HSM user name>:<password>
Use the OpenSSL Dynamic Engine
To use the AWS CloudHSM dynamic engine for OpenSSL from the OpenSSL command line, use the -
engine option to specify the OpenSSL dynamic engine named cloudhsm. For example:
$ openssl s_server -cert server.crt -key server.key -engine cloudhsm
To use the AWS CloudHSM dynamic engine for OpenSSL from an OpenSSL-integrated application,
ensure that your application uses the OpenSSL dynamic engine named cloudhsm. The shared library for
the dynamic engine is located at /opt/cloudhsm/lib/libcloudhsm_openssl.so.
AWS CloudHSM Software Library for Java
The AWS CloudHSM software library for Java is a provider implementation for the Sun Java JCE (Java
Cryptography Extension) provider framework. It includes implementations for interfaces and engine
classes in the JCA (Java Cryptography Architecture) standard. For more information about installing and
using the Java library, see the following topics.
Topics
194

AWS CloudHSM User Guide
Installing the Java Library
•Install and Use the AWS CloudHSM Software Library for Java (p. 195)
•Supported Mechanisms (p. 199)
•Sample Code Prerequisites (p. 202)
•Code Samples for the AWS CloudHSM Software Library for Java (p. 202)
Install and Use the AWS CloudHSM Software Library
for Java
Before you can use the AWS CloudHSM software library for Java, you need the AWS CloudHSM client.
The client is a daemon that establishes end-to-end encrypted communication with the HSMs in your
cluster, and the Java library communicates locally with the client. If you haven't installed and configured
the AWS CloudHSM client package, do that now by following the steps at Install the Client (Linux) (p. 35).
After you install and configure the client, use the following command to start it.
The AWS CloudHSM software library for Java is supported only on Linux and compatible operating
systems.
Amazon Linux
$ sudo start cloudhsm-client
Amazon Linux 2
$ sudo service cloudhsm-client start
CentOS 6
$ sudo start cloudhsm-client
CentOS 7
$ sudo service cloudhsm-client start
RHEL 6
$ sudo start cloudhsm-client
RHEL 7
$ sudo service cloudhsm-client start
Ubuntu 16.04 LTS
$ sudo service cloudhsm-client start
Topics
•Installing the Java Library (p. 196)
•Testing the Java Library (p. 197)
•Providing Credentials to the Java Library (p. 198)
195

AWS CloudHSM User Guide
Installing the Java Library
•Key Management Basics in the Java Library (p. 199)
Installing the Java Library
Complete the following steps to install or update the AWS CloudHSM software library for Java.
Use the following commands to download and install the Java library. This library is supported only on
Linux and compatible operating systems.
Amazon Linux
$ wget https://s3.amazonaws.com/cloudhsmv2-software/CloudHsmClient/EL6/cloudhsm-client-
jce-latest.el6.x86_64.rpm
$ sudo yum install -y ./cloudhsm-client-jce-latest.el6.x86_64.rpm
Amazon Linux 2
$ wget https://s3.amazonaws.com/cloudhsmv2-software/CloudHsmClient/EL7/cloudhsm-client-
jce-latest.el7.x86_64.rpm
$ sudo yum install -y ./cloudhsm-client-jce-latest.el7.x86_64.rpm
CentOS 6
$ wget https://s3.amazonaws.com/cloudhsmv2-software/CloudHsmClient/EL6/cloudhsm-client-
jce-latest.el6.x86_64.rpm
$ sudo yum install -y ./cloudhsm-client-jce-latest.el6.x86_64.rpm
CentOS 7
$ wget https://s3.amazonaws.com/cloudhsmv2-software/CloudHsmClient/EL7/cloudhsm-client-
jce-latest.el7.x86_64.rpm
$ sudo yum install -y ./cloudhsm-client-jce-latest.el7.x86_64.rpm
RHEL 6
$ wget https://s3.amazonaws.com/cloudhsmv2-software/CloudHsmClient/EL6/cloudhsm-client-
jce-latest.el6.x86_64.rpm
$ sudo yum install -y ./cloudhsm-client-jce-latest.el6.x86_64.rpm
RHEL 7
$ wget https://s3.amazonaws.com/cloudhsmv2-software/CloudHsmClient/EL7/cloudhsm-client-
jce-latest.el7.x86_64.rpm
$ sudo yum install -y ./cloudhsm-client-jce-latest.el7.x86_64.rpm
196
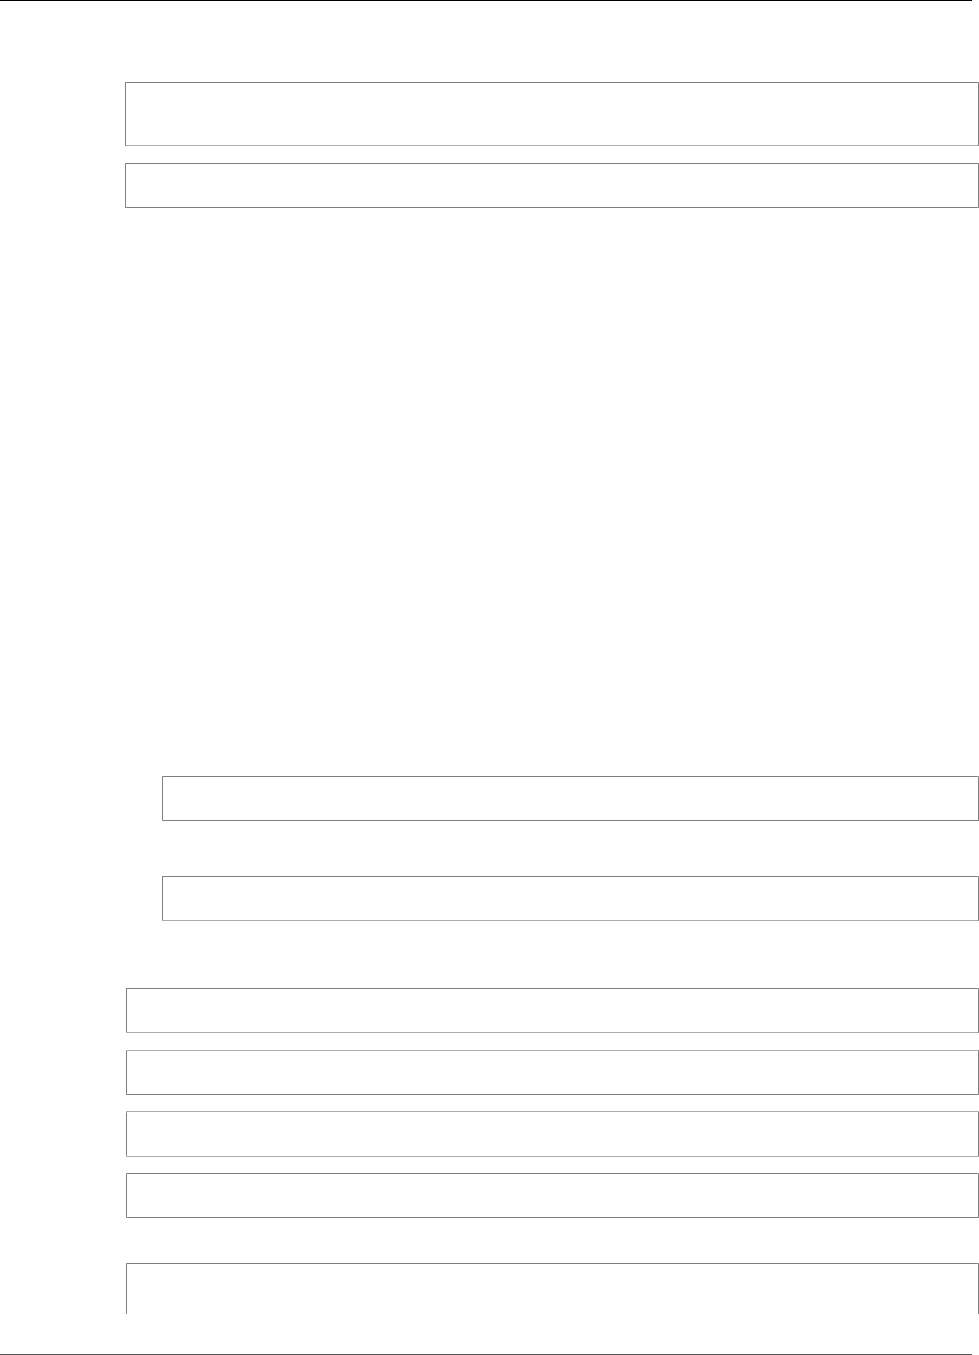
AWS CloudHSM User Guide
Installing the Java Library
Ubuntu 16.04 LTS
$ wget https://s3.amazonaws.com/cloudhsmv2-software/CloudHsmClient/Xenial/cloudhsm-
client-jce_latest_amd64.deb
$ sudo dpkg -i cloudhsm-client-jce_latest_amd64.deb
After you complete the preceding steps, you can find the following Java library files:
•/opt/cloudhsm/java/cloudhsm-version.jar
•/opt/cloudhsm/java/cloudhsm-test-version.jar
•/opt/cloudhsm/java/hamcrest-all-1.3.jar
•/opt/cloudhsm/java/junit.jar
•/opt/cloudhsm/java/log4j-api-2.8.jar
•/opt/cloudhsm/java/log4j-core-2.8.jar
•/opt/cloudhsm/lib/libcaviumjca.so
Testing the Java Library
To test that the AWS CloudHSM software library for Java works with the HSMs in your cluster, complete
the following steps.
To test the Java library with your cluster
1. (Optional) If you don't already have Java installed in your environment, use the following command
to install it.
Linux (and compatible libraries)
$ sudo yum install -y java-1.8.0-openjdk
Ubuntu
$ sudo apt-get install openjdk-8-jre
2. Use the following commands to set the necessary environment variables. Replace <HSM user
name> and <password> with the credentials of a crypto user (CU).
$ export LD_LIBRARY_PATH=/opt/cloudhsm/lib
$ export HSM_PARTITION=PARTITION_1
$ export HSM_USER=<HSM user name>
$ export HSM_PASSWORD=<password>
3. Use the following command to run the RSA test.
$ java8 -cp "/usr/share/java/junit4.jar:/opt/cloudhsm/java/*" \
org.junit.runner.JUnitCore \
197

AWS CloudHSM User Guide
Installing the Java Library
com.cavium.unittest.TestRSA
To run a different test, replace TestRSA in the preceding command with one of the following values:
•TestAESKeyGen
•TestAes
•TestBlockCipherBuffer
•TestKeyStore
•TestLoginManager
•TestMac
•TestMessageDigest
•TestMessageUtil
•TestPadding
•TestProvider
•TestRSA
•TestRSAKeyGen
•TestSUNJce
•TestUtils
Providing Credentials to the Java Library
Your Java application must be authenticated by the HSMs in your cluster before it can use them. Each
application can use one session, which is established by providing credentials in one of the following
ways. In the following examples, replace <HSM user name> and <password> with the credentials of a
crypto user (CU).
Note
The search order for credentials goes as follows. If any credentials are found at one step, the
search will not continue, even if the credentials are invalid:
1. Explicitly provided
2. Properties file
3. System properties
4. Environment Variables
The first of the following examples shows how to use the LoginManager class to manage sessions in
your code. Instead, you can let the library implicitly manage sessions when your application starts, as
shown in the remaining examples. However in these latter cases it might be difficult to understand error
conditions when the provided credentials are invalid or the HSMs are having problems. When you use the
LoginManager class, you have more control over how your application deals with failures.
• Add a file named HsmCredentials.properties to your application's CLASSPATH. The file's
contents should look like the following:
HSM_PARTITION = PARTITION_1
HSM_USER = <HSM user name>
HSM_PASSWORD = <password>
• Provide Java system properties when running your application. The following examples show two
different ways that you can do this:
$ java -DHSM_PARTITION=PARTITION_1 -DHSM_USER=<HSM user name> -DHSM_PASSWORD=<password>
198

AWS CloudHSM User Guide
Supported Mechanisms
System.setProperty("HSM_PARTITION","PARTITION_1");
System.setProperty("HSM_USER","<HSM user name>");
System.setProperty("HSM_PASSWORD","<password>");
• Set system environment variables. For example:
$ export HSM_PARTITION=PARTITION_1
$ export HSM_USER=<HSM user name>
$ export HSM_PASSWORD=<password>
Key Management Basics in the Java Library
The following key management basics can help you get started with the AWS CloudHSM software library
for Java.
To import a key implicitly
Pass the key to any API operation that accepts one. If the key is the correct type for the specified
operation, the HSMs automatically import and use the provided key.
To import a key explicitly
Use the utility class named ImportKey to import a key and set its attributes.
To make a session key persist
Use the Util.persistKey() method to make a session key into a token key—that is, to persist the
key in the HSMs.
To delete a key
Use the Util.deleteKey() method to delete a key.
Supported Mechanisms
For information about the Java Cryptography Architecture (JCA) interfaces and engine classes supported
by AWS CloudHSM, see the following topics.
Topics
•Supported Keys (p. 199)
•Supported Ciphers (p. 200)
•Supported Digests (p. 201)
•Supported Hash-Based Message Authentication Code (HMAC) Algorithms (p. 201)
•Supported Sign/Verify Mechanisms (p. 202)
Supported Keys
The AWS CloudHSM software library for Java enables you to generate the following key types.
•RSA – 2048-bit to 4096-bit RSA keys, in increments of 256 bits.
•AES – 128, 192, and 256-bit AES keys.
199

AWS CloudHSM User Guide
Supported Mechanisms
• ECC key pairs for NIST curves P256 and P384.
In addition to standard parameters, we support the following parameters for each key that is generated.
•Label: A key label that you can use to search for keys.
•isExtractable: Indicates whether the key can be exported from the HSM.
•isPersistent: Indicates whether the key remains on the HSM when the current session ends.
Supported Ciphers
The AWS CloudHSM software library for Java supports the following algorithm, mode, and padding
combinations.
Algorithm Mode Padding Notes
AES CBC AES/CBC/NoPadding
AES/CBC/
PKCS5Padding
Implements
Cipher.ENCRYPT_MODE,
Cipher.DECRYPT_MODE,
Cipher.WRAP_MODE,
Cipher.UNWRAP_MODE.
AES ECB NoPadding Implements
Cipher.WRAP_MODE
and
Cipher.UNWRAP_MODE.
Use Transformation
AES.
AES GCM AES/GCM/NoPadding Implements
Cipher.ENCRYPT_MODE
and
Cipher.DECRYPT_MODE.
When performing
AES-GCM encryption,
the HSM ignores the
initialization vector (IV)
in the request and uses
an IV that it generates.
When the operation
completes, you must
call Cipher.getIV()
to get the IV.
DESede (Triple DES) CBC DESede/CBC/
NoPadding
DESede/CBC/
PKCS5Padding
Implements
Cipher.ENCRYPT_MODE
and
Cipher.DECRYPT_MODE.
The key generation
routines accept a size
of 168 or 192 bits.
However, internally, all
DESede keys are 192
bits.
200

AWS CloudHSM User Guide
Supported Mechanisms
Algorithm Mode Padding Notes
RSA ECB RSA/ECB/NoPadding
RSA/ECB/
PKCS1Padding
Implements
Cipher.ENCRYPT_MODE
and
Cipher.DECRYPT_MODE.
RSA ECB RSA/ECB/
OAEPPadding
RSA/ECB/
OAEPWithSHA-1ANDMGF1Padding
RSA/ECB/
PKCS1Padding
RSA/ECB/
OAEPPadding
RSA/ECB/
OAEPWithSHA-224ANDMGF1Padding
RSA/ECB/
OAEPWithSHA-256ANDMGF1Padding
RSA/ECB/
OAEPWithSHA-384ANDMGF1Padding
RSA/ECB/
OAEPWithSHA-512ANDMGF1Padding
Implements
Cipher.ENCRYPT_MODE
and
Cipher.DECRYPT_MODE.
OAEPPadding is
OAEP with the SHA-1
padding type.
Supported Digests
The AWS CloudHSM software library for Java supports the following message digests.
•SHA-1
•SHA-224
•SHA-256
•SHA-384
•SHA-512
Note
Data under 16 KB in length are hashed on the HSM, while larger data are hashed locally in
software.
Supported Hash-Based Message Authentication Code (HMAC)
Algorithms
The AWS CloudHSM software library for Java supports the following HMAC algorithms.
•HmacSHA1
•HmacSHA224
•HmacSHA256
•HmacSHA384
201

AWS CloudHSM User Guide
Sample Prerequisites
•HmacSHA512
Supported Sign/Verify Mechanisms
The AWS CloudHSM software library for Java supports the following types of signature and verification.
RSA Signature Types
•NONEwithRSA
•SHA1withRSA
•SHA224withRSA
•SHA256withRSA
•SHA384withRSA
•SHA512withRSA
•SHA1withRSA/PSS
•SHA224withRSA/PSS
•SHA256withRSA/PSS
•SHA384withRSA/PSS
•SHA512withRSA/PSS
ECDSA Signature Types
•NONEwithECDSA
•SHA1withECDSA
•SHA224withECDSA
•SHA256withECDSA
•SHA384withECDSA
•SHA512withECDSA
Sample Code Prerequisites
The Java code samples included in this documentation show you how to use the AWS CloudHSM
software library for Java (p. 194) to perform basic tasks in AWS CloudHSM. Before running the
samples, perform the following steps to set up your environment:
• Install and configure the AWS CloudHSM software library for Java (p. 195) and the AWS CloudHSM
client package (p. 35).
• Set up a valid HSM user name and password (p. 53). Cryptographic user (CU) permissions are sufficient
for these tasks. Your application uses these credentials to log in to the HSM in each example.
• Decide how to specify the Cavium provider.
Code Samples for the AWS CloudHSM Software
Library for Java
The Java library code samples linked below show you how to use the AWS CloudHSM software library for
Java (p. 194) to perform basic tasks in AWS CloudHSM.
•Login to an HSM
202

AWS CloudHSM User Guide
KSP and CNG Providers
•Manage keys
•Generate an AES key
•Encrypt and decrypt data with AES GCM
•Wrap and unwrap keys with AES
•Enumerate through the KeyStore
•Sign messages in a multi-threaded sample
KSP and CNG Providers for Windows
Cryptography API: Next Generation (CNG) is a cryptographic API specific to the Microsoft Windows
operating system. CNG enables developers to use cryptographic techniques to secure Windows-based
applications. At a high level, CNG provides the following functionality.
•Cryptographic Primitives - enable you to perform fundamental cryptographic operations.
•Key Import and Export - enables you to import and export symmetric and asymmetric keys.
•Data Protection API (CNG DPAPI) - enables you to easily encrypt and decrypt data.
•Key Storage and Retrieval - enables you to securely store and isolate the private key of an asymmetric
key pair.
Key storage providers (KSPs) enable key storage and retrieval. For example, if you add the Microsoft
Active Directory Certificate Services (AD CS) role to your Windows server and you choose to create a
new private key for your certificate authority (CA), you can choose the KSP that will manage key storage.
The Windows CloudHSM client includes KSPs created by Cavium specifically for AWS CloudHSM. When
you configure the AD CS role, you can choose a Cavium KSP. For more information, see Create Windows
Server CA (p. 237). The Windows CloudHSM client also installs a Cavium CNG provider.
Topics
•Install the KSP and CNG Providers for Windows (p. 203)
•Windows AWS CloudHSM Prerequisites (p. 204)
•Code Sample for Cavium CNG Provider (p. 204)
Install the KSP and CNG Providers for Windows
The Cavium KSP and CNG providers are installed when you install the Windows AWS CloudHSM client.
• For client installation instructions, see Install the Client (Windows) (p. 37).
• Before you can use the Windows CloudHSM client, you must satisfy the Prerequisites (p. 204).
• You can choose the Cavium KSP when add the AD CS role to your Windows Server. See Create
Windows Server CA (p. 237).
You can use either of the following commands to determine which providers are installed on your
system. The commands list the registered KSP and CNG providers. The AWS CloudHSM client does not
need to be running.
C:\Program Files\Amazon\CloudHSM>ksp_config.exe -enum
C:\Program Files\Amazon\CloudHSM>cng_config.exe -enum
203
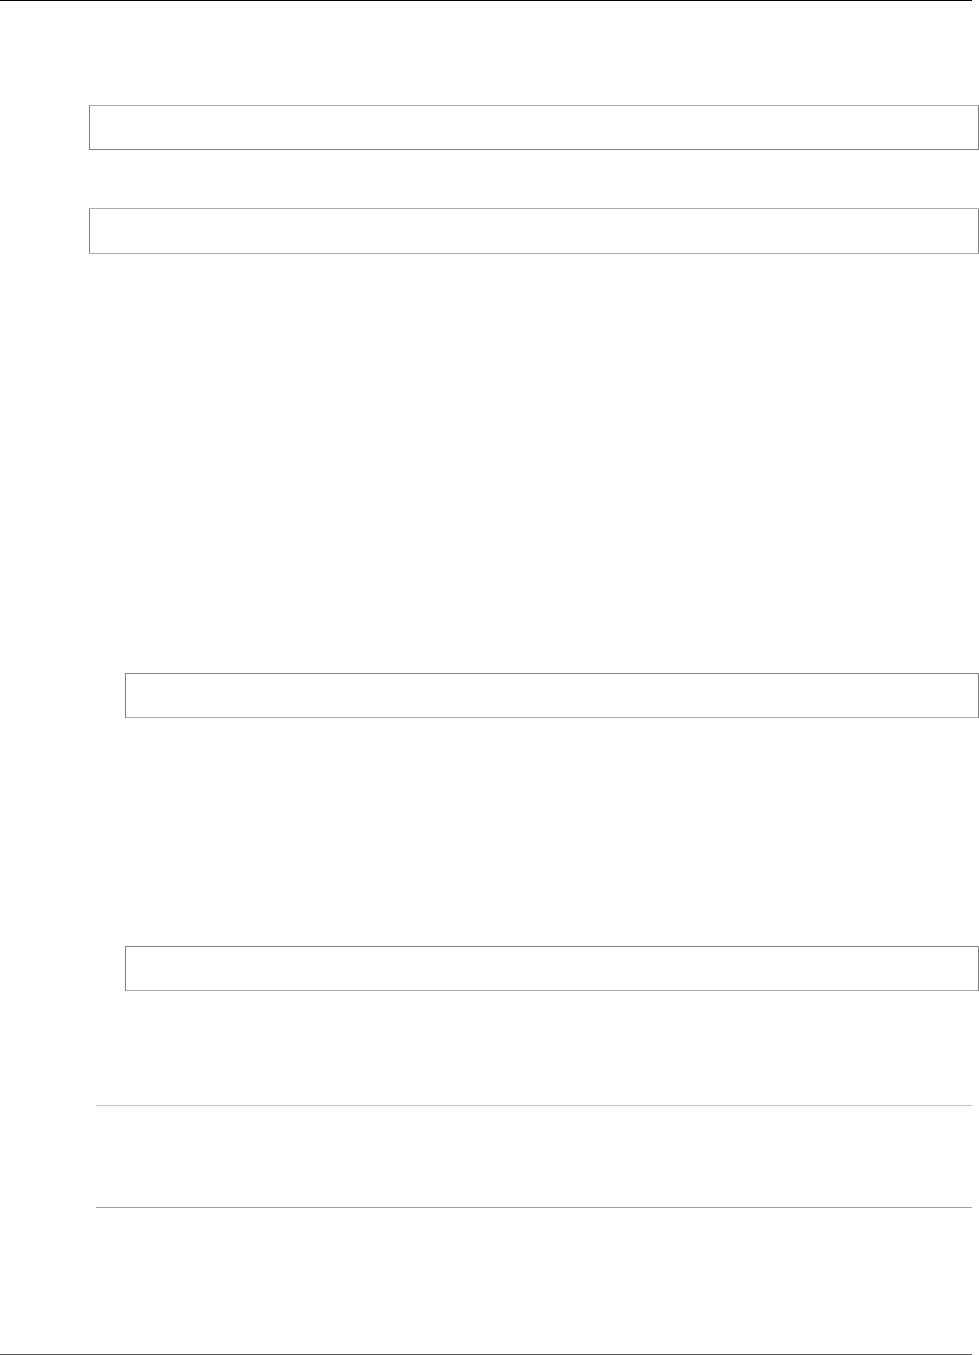
AWS CloudHSM User Guide
Prerequisites
Verify that the Cavium KSP and CNG providers are installed on your Windows Server EC2 instance. If the
CNG provider is missing, run the following command.
C:\Program Files\Amazon\CloudHSM>cng_config.exe -register
If the Cavium KSP is missing, run the following command.
C:\Program Files\Amazon\CloudHSM>ksp_config.exe -register
Windows AWS CloudHSM Prerequisites
Before you can start the Windows AWS CloudHSM client and use the KSP and CNG providers, you must
set the required system environment variables. These variables identify an HSM and a crypto user (p. 11)
(CU) for your Windows application. You can use the setx command to set system environment variables,
or set permanent system environment variables programmatically or in the Advanced tab of the
Windows System Properties Control Panel.
Set the following system environment variables:
n3fips_partition=HSM-ID
Identifies an HSM in your cluster. Because they are synchronized, you can specify any HSM in the
cluster. To create an HSM, use CreateHsm. To find the HSM ID of an HSM, use DescribeClusters or
choose a cluster in the AWS CloudHSM console.
For example:
setx /m n3fips_partition hsm-lgavqitns2a
n3fips_password=CU-username:CU-password
Identifies a crypto user (p. 11) (CU) in the HSM and provides all required login information. Your
application authenticates and runs as this CU. The application has the permissions of this CU and
can view and manage only the keys that the CU owns and shares. This CU must be available in
the HSM specified by the n3fips_partition environment variable. To create a new CU, use
createUser (p. 85). To find existing CUs, use listUsers (p. 105).
For example:
setx /m n3fips_password test_user:password123
Code Sample for Cavium CNG Provider
** Example code only - Not for production use **
This page includes example code that has not been fully tested. It is designed for test environments.
Do not run this code in production.
The following sample shows how to enumerate the registered cryptographic providers on your system to
find the Cavium CNG provider. The sample also shows how to create an asymmetric key pair and how to
use the key pair to sign data.
204

AWS CloudHSM User Guide
Code Sample
Important
Before you run this example, you must set the n3fips_partition and n3fips_password
environment variables. For details, see Windows AWS CloudHSM Prerequisites (p. 204).
// CloudHsmCngExampleConsole.cpp : Console application that demonstrates CNG capabilities.
// This example contains the following functions.
//
// VerifyProvider() - Enumerate the registered providers and retrieve Cavium KSP
and CNG providers.
// GenerateKeyPair() - Create an RSA key pair.
// SignData() - Sign and verify data.
//
#include "stdafx.h"
#include <Windows.h>
#ifndef NT_SUCCESS
#define NT_SUCCESS(Status) ((NTSTATUS)(Status) >= 0)
#endif
#define CAVIUM_CNG_PROVIDER L"Cavium CNG Provider"
#define CAVIUM_KEYSTORE_PROVIDER L"Cavium Key Storage Provider"
// Enumerate the registered providers and determine whether the Cavium CNG provider
// and the Cavium KSP provider exist.
//
bool VerifyProvider()
{
NTSTATUS status;
ULONG cbBuffer = 0;
PCRYPT_PROVIDERS pBuffer = NULL;
bool foundCng = false;
bool foundKeystore = false;
// Retrieve information about the registered providers.
// cbBuffer - the size, in bytes, of the buffer pointed to by pBuffer.
// pBuffer - pointer to a buffer that contains a CRYPT_PROVIDERS structure.
status = BCryptEnumRegisteredProviders(&cbBuffer, &pBuffer);
// If registered providers exist, enumerate them and determine whether the
// Cavium CNG provider and Cavium KSP provider have been registered.
if (NT_SUCCESS(status))
{
if (pBuffer != NULL)
{
for (ULONG i = 0; i < pBuffer->cProviders; i++)
{
// Determine whether the Cavium CNG provider exists.
if (wcscmp(CAVIUM_CNG_PROVIDER, pBuffer->rgpszProviders[i]) == 0)
{
printf("Found %S\n", CAVIUM_CNG_PROVIDER);
foundCng = true;
}
// Determine whether the Cavium KSP provider exists.
else if (wcscmp(CAVIUM_KEYSTORE_PROVIDER, pBuffer->rgpszProviders[i]) == 0)
{
printf("Found %S\n", CAVIUM_KEYSTORE_PROVIDER);
foundKeystore = true;
}
}
}
}
205

AWS CloudHSM User Guide
Code Sample
else
{
printf("BCryptEnumRegisteredProviders failed with error code 0x%08x\n", status);
}
// Free memory allocated for the CRYPT_PROVIDERS structure.
if (NULL != pBuffer)
{
BCryptFreeBuffer(pBuffer);
}
return foundCng == foundKeystore == true;
}
// Generate an asymmetric key pair. As used here, this example generates an RSA key pair
// and returns a handle. The handle is used in subsequent operations that use the key
pair.
// The key material is not available.
//
// The key pair is used in the SignData function.
//
NTSTATUS GenerateKeyPair(BCRYPT_ALG_HANDLE hAlgorithm, BCRYPT_KEY_HANDLE *hKey)
{
NTSTATUS status;
// Generate the key pair.
status = BCryptGenerateKeyPair(hAlgorithm, hKey, 2048, 0);
if (!NT_SUCCESS(status))
{
printf("BCryptGenerateKeyPair failed with code 0x%08x\n", status);
return status;
}
// Finalize the key pair. The public/private key pair cannot be used until this
// function is called.
status = BCryptFinalizeKeyPair(&hKey, 0);
if (!NT_SUCCESS(status))
{
printf("BCryptFinalizeKeyPair failed with code 0x%08x\n", status);
return status;
}
return status;
}
// Sign and verify data using the RSA key pair. The data in this function is hardcoded
// and is for example purposes only.
//
NTSTATUS SignData(BCRYPT_KEY_HANDLE hKey)
{
NTSTATUS status;
PBYTE sig;
ULONG sigLen;
ULONG resLen;
BCRYPT_PKCS1_PADDING_INFO pInfo;
// Hardcode the data to be signed (for demonstration purposes only).
PBYTE message =
(PBYTE)"d83e7716bed8a20343d8dc6845e574477e4a9be63a80a0122f1fdcaa7a3c18c3";
ULONG messageLen = strlen((char*)message);
// Retrieve the size of the buffer needed for the signature.
status = BCryptSignHash(hKey, NULL, message, messageLen, NULL, 0, &sigLen, 0);
if (!NT_SUCCESS(status))
{
printf("BCryptSignHash failed with code 0x%08x\n", status);
206

AWS CloudHSM User Guide
Code Sample
return status;
}
// Allocate a buffer for the signature.
sig = (PBYTE)HeapAlloc(GetProcessHeap(), 0, sigLen);
if (sig == NULL)
{
return -1;
}
// Use the SHA256 algorithm to create padding information.
pInfo.pszAlgId = BCRYPT_SHA256_ALGORITHM;
// Create a signature.
status = BCryptSignHash(hKey, &pInfo, message, messageLen, sig, sigLen, &resLen,
BCRYPT_PAD_PKCS1);
if (!NT_SUCCESS(status))
{
printf("BCryptSignHash failed with code 0x%08x\n", status);
return status;
}
// Verify the signature.
status = BCryptVerifySignature(hKey, &pInfo, message, messageLen, sig, sigLen, 0);
if (!NT_SUCCESS(status))
{
printf("BCryptVerifySignature failed with code 0x%08x\n", status);
return status;
}
// Free the memory allocated for the signature.
if (sig != NULL)
{
HeapFree(GetProcessHeap(), 0, sig);
sig = NULL;
}
return 0;
}
// Main function.
//
int main()
{
NTSTATUS status;
BCRYPT_ALG_HANDLE hRsaAlg;
BCRYPT_KEY_HANDLE hKey = NULL;
// Enumerate the registered providers.
printf("Searching for Cavium providers...\n");
if (VerifyProvider() == false) {
printf("Could not find the CNG and Keystore providers\n");
return 1;
}
// Get the RSA algorithm provider from the Cavium CNG provider.
printf("Opening RSA algorithm\n");
status = BCryptOpenAlgorithmProvider(&hRsaAlg, BCRYPT_RSA_ALGORITHM, CAVIUM_CNG_PROVIDER,
0);
if (!NT_SUCCESS(status))
{
printf("BCryptOpenAlgorithmProvider RSA failed with code 0x%08x\n", status);
return status;
}
// Generate an asymmetric key pair using the RSA algorithm.
207

AWS CloudHSM User Guide
Code Sample
printf("Generating RSA Keypair\n");
GenerateKeyPair(hRsaAlg, &hKey);
if (hKey == NULL)
{
printf("Invalid key handle returned\n");
return 0;
}
printf("Done!\n");
// Sign and verify [hardcoded] data using the RSA key pair.
printf("Sign/Verify data with key\n");
SignData(hKey);
printf("Done!\n");
// Remove the key handle from memory.
status = BCryptDestroyKey(hKey);
if (!NT_SUCCESS(status))
{
printf("BCryptDestroyKey failed with code 0x%08x\n", status);
return status;
}
// Close the RSA algorithm provider.
status = BCryptCloseAlgorithmProvider(hRsaAlg, NULL);
if (!NT_SUCCESS(status))
{
printf("BCryptCloseAlgorithmProvider RSA failed with code 0x%08x\n", status);
return status;
}
return 0;
}
208

AWS CloudHSM User Guide
SSL/TLS Offload
Integrating Third-Party Applications
with AWS CloudHSM
Some of the use cases (p. 1) for AWS CloudHSM involve integrating third-party software applications
with the HSM in your AWS CloudHSM cluster. By integrating third-party software with AWS CloudHSM,
you can accomplish a variety of security-related goals. The following topics describe how to accomplish
some of these goals.
Topics
•Improve Your Web Server's Security with SSL/TLS Offload in AWS CloudHSM (p. 209)
•Configure Windows Server as a Certificate Authority (CA) with AWS CloudHSM (p. 236)
•Oracle Database Transparent Data Encryption (TDE) with AWS CloudHSM (p. 239)
Improve Your Web Server's Security with SSL/TLS
Offload in AWS CloudHSM
Web servers and their clients (web browsers) can use Secure Sockets Layer (SSL) or Transport Layer
Security (TLS). These protocols confirm the identity of the web server and establish a secure connection
to send and receive webpages or other data over the internet. This is commonly known as HTTPS.
The web server uses a public–private key pair and an SSL/TLS public key certificate to establish an
HTTPS session with each client. This process involves a lot of computation for the web server, but you
can offload some of this to the HSMs in your AWS CloudHSM cluster. This is sometimes known as SSL
acceleration. Offloading reduces the computational burden on your web server and provides extra
security by storing the server's private key in the HSMs.
The following topics provide an overview of how SSL/TLS offload with AWS CloudHSM works and
tutorials for setting up SSL/TLS offload with AWS CloudHSM on the following platforms:
•Linux – Using the NGINX or Apache HTTP Server web server software
•Windows – Using the Internet Information Services (IIS) for Windows Server web server software
Topics
•How SSL/TLS Offload with AWS CloudHSM Works (p. 209)
•Tutorial: Using SSL/TLS Offload with AWS CloudHSM on Linux (p. 210)
•Tutorial: Using SSL/TLS Offload with AWS CloudHSM on Windows (p. 224)
How SSL/TLS Offload with AWS CloudHSM Works
To establish an HTTPS connection, your web server performs a handshake process with clients. As part
of this process, the server offloads some of the cryptographic processing to the HSMs, as shown in the
following figure. Each step of the process is explained below the figure.
Note
The following image and process assumes that RSA is used for server verification and key
exchange. The process is slightly different when Diffie–Hellman is used instead of RSA.
209

AWS CloudHSM User Guide
SSL/TLS Offload on Linux
1. The client sends a hello message to the server.
2. The server responds with a hello message and sends the server's certificate.
3. The client performs the following actions:
a. Verifies that the SSL/TLS server certificate is signed by a root certificate that the client trusts.
b. Extracts the public key from the server certificate.
c. Generates a premaster secret and encrypts it with the server's public key.
d. Sends the encrypted premaster secret to the server.
4. To decrypt the client's premaster secret, the server sends it to the HSM. The HSM uses the private
key in the HSM to decrypt the premaster secret and then it sends the premaster secret to the server.
Independently, the client and server each use the premaster secret and some information from the
hello messages to calculate a master secret.
5. The handshake process ends. For the rest of the session, all messages sent between the client and the
server are encrypted with derivatives of the master secret.
To learn how to configure SSL/TLS offload with AWS CloudHSM, see one of the following topics:
•Tutorial: Using SSL/TLS Offload with AWS CloudHSM on Linux (p. 210)
•Tutorial: Using SSL/TLS Offload with AWS CloudHSM on Windows (p. 224)
Tutorial: Using SSL/TLS Offload with AWS CloudHSM
on Linux
This tutorial provides step-by-step instructions for setting up SSL/TLS offload with AWS CloudHSM on a
Linux web server.
Topics
•Overview (p. 211)
•Step 1: Set Up the Prerequisites (p. 211)
•Step 2: Generate or Import a Private Key and SSL/TLS Certificate (p. 212)
•Step 3: Configure the Web Server (p. 215)
210

AWS CloudHSM User Guide
SSL/TLS Offload on Linux
•Step 4: Enable HTTPS Traffic and Verify the Certificate (p. 218)
•(Optional) Step 5: Add a Load Balancer with Elastic Load Balancing (p. 220)
Overview
On Linux, the NGINX and Apache HTTP Server web server software integrate with OpenSSL to support
HTTPS. The AWS CloudHSM dynamic engine for OpenSSL (p. 192) provides an interface that enables the
web server software to use the HSMs in your cluster for cryptographic offloading and key storage. The
OpenSSL engine is the bridge that connects the web server to your AWS CloudHSM cluster.
To complete this tutorial, you must first choose whether to use the NGINX or Apache web server
software on Linux. Then the tutorial shows you how to do the following:
• Install the web server software on an Amazon EC2 instance.
• Configure the web server software to support HTTPS with a private key stored in your AWS CloudHSM
cluster.
• (Optional) Use Amazon EC2 to create a second web server instance and Elastic Load Balancing to
create a load balancer. Using a load balancer can increase performance by distributing the load across
multiple servers. It can also provide redundancy and higher availability if one or more servers fail.
When you're ready to get started, go to Step 1: Set Up the Prerequisites (p. 211).
Step 1: Set Up the Prerequisites
To set up web server SSL/TLS offload with AWS CloudHSM, you need the following:
• An active AWS CloudHSM cluster with at least one HSM.
• An Amazon EC2 instance running a Linux operating system with the following software installed:
• The AWS CloudHSM client and command line tools.
• The NGINX or Apache web server application.
• The AWS CloudHSM dynamic engine for OpenSSL.
• A crypto user (p. 11) (CU) to own and manage the web server's private key on the HSM.
To set up a Linux web server instance and create a CU on the HSM
1. Complete the steps in Getting Started (p. 15). You will then have an active cluster with one HSM and
an Amazon EC2 client instance. Your EC2 instance will be configured with the command line tools.
Use this client instance as your web server.
2. Connect to your client instance. For more information, see Connecting to Your Linux Instance
Using SSH or Connecting to Your Linux Instance from Windows Using PuTTY in the Amazon EC2
documentation. Then do the following:
a. Choose whether to install the NGINX or Apache web server application. Then complete one of
the following steps:
• To install NGINX, run the following command.
sudo yum install -y nginx
• To install Apache, run the following command.
sudo yum install -y httpd24 mod24_ssl
b. Install and configure the OpenSSL engine (p. 193).
211

AWS CloudHSM User Guide
SSL/TLS Offload on Linux
3. (Optional) Add more HSMs to your cluster. For more information, see Adding an HSM (p. 42).
4. To create a crypto user (p. 11) (CU) on your HSM, do the following:
a. Start the AWS CloudHSM client (p. 77).
b. Update the cloudhsm_mgmt_util configuration file (p. 77).
c. Use cloudhsm_mgmt_util to create a CU. For more information, see Managing HSM
Users (p. 53). Keep track of the CU user name and password. You will need them later when you
generate or import the HTTPS private key and certificate for your web server.
After you complete these steps, go to Step 2: Generate or Import a Private Key and SSL/TLS
Certificate (p. 212).
Step 2: Generate or Import a Private Key and SSL/TLS
Certificate
To enable HTTPS, your web server application (NGINX or Apache) needs a private key and a
corresponding SSL/TLS certificate. To use web server SSL/TLS offload with AWS CloudHSM, you must
store the private key in an HSM in your AWS CloudHSM cluster. You can accomplish this in one of the
following ways:
• If you don't yet have a private key and a corresponding certificate, you can generate a private key in an
HSM (p. 212). You can then use the private key to create a certificate signing request (CSR). Use the
CSR to create the SSL/TLS certificate.
• If you already have a private key and corresponding certificate, you can import the private key into an
HSM (p. 213).
Regardless of which method you choose, you then export a fake PEM private key from the HSM and save
it to a file. This file doesn't contain the actual private key. It contains a reference to the private key that is
stored on the HSM. Your web server uses the fake PEM private key file and the AWS CloudHSM dynamic
engine for OpenSSL to offload SSL/TLS processing to an HSM.
Topics (choose only one)
•Generate a Private Key and Certificate (p. 212)
•Import an Existing Private Key (p. 213)
Generate a Private Key and Certificate
If you don't have a private key and a corresponding SSL/TLS certificate to use for HTTPS, you can
generate a private key on an HSM. You can then you use the private key to create a certificate signing
request (CSR). Sign the CSR to create the certificate.
To generate a private key on an HSM
1. Connect to your client instance.
2. Run the following command to set an environment variable named n3fips_password that
contains the user name and password of the cryptographic user (CU). Replace <CU user name>
with the user name of the cryptographic user. Replace <password> with the CU password.
export n3fips_password=<CU user name>:<password>
3. Run the following command to use the AWS CloudHSM dynamic engine for OpenSSL to generate
a private key on an HSM. This command also exports the fake PEM private key and saves it in a file.
212
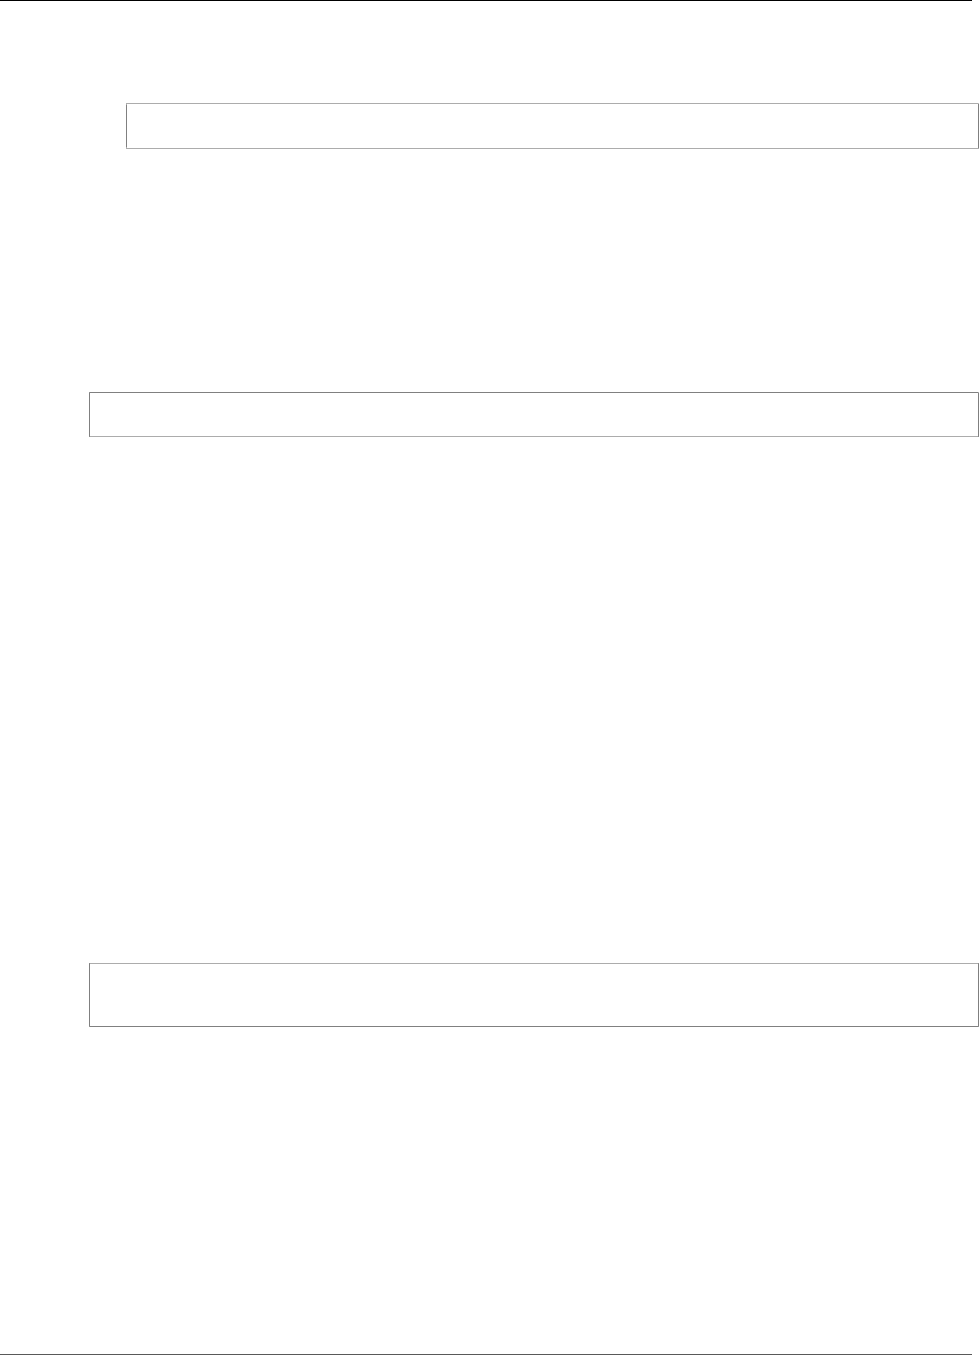
AWS CloudHSM User Guide
SSL/TLS Offload on Linux
Replace <web_server_fake_PEM.key> with the file name you want to use for the exported fake
PEM private key.
openssl genrsa -engine cloudhsm -out <web_server_fake_PEM.key> 2048
To create a CSR
Run the following command to use the AWS CloudHSM dynamic engine for OpenSSL to create a
certificate signing request (CSR). Replace <web_server_fake_PEM.key> with the name of the file that
contains your fake PEM private key. Replace <web_server.csr> with the name of the file that contains
your CSR.
The req command is interactive. Respond to each field. The field information is copied into your SSL/
TLS certificate.
openssl req -engine cloudhsm -new -key <web_server_fake_PEM.key> -out <web_server.csr>
In a production environment, you typically use a certificate authority (CA) to create a certificate
from a CSR. A CA is not necessary for a test environment. If you do use a CA, send the CSR file
(<web_server.csr>) to it and use the CA create a signed SSL/TLS certificate. Your web server uses the
signed certificate for HTTPS.
As an alternative to using a CA, you can use the AWS CloudHSM dynamic engine for OpenSSL to create
a self-signed certificate. Self-signed certificates are not trusted by browsers and should not be used in
production environments. They can be used in test environments.
Warning
Self-signed certificates should be used in a test environment only. For a production
environment, use a more secure method such as a certificate authority to create a certificate.
To create a self-signed certificate
Run the following command to use the AWS CloudHSM dynamic engine for OpenSSL to sign your CSR
with your private key on your HSM. This creates a self-signed certificate. Replace the following values in
the command with your own.
•<web_server.csr> – Name of the file that contains the CSR.
•<web_server_fake_PEM.key> – Name of the file that contains the fake PEM private key.
•<web_server.crt> – Name of the file that will contain your web server certificate.
openssl x509 -engine cloudhsm -req -days 365 -in <web_server.csr> -
signkey <web_server_fake_PEM.key> -out <web_server.crt>
After you complete these steps, go to Step 3: Configure the Web Server (p. 215).
Import an Existing Private Key
You might already have a private key and a corresponding SSL/TLS certificate that you use for HTTPS on
your web server. If so, you can import that key into an HSM by doing the following:
To import an existing private key into an HSM
1. Connect to your Amazon EC2 client instance. If necessary, copy your existing private key and
certificate to the instance.
2. Run the following command to start the AWS CloudHSM client.
213

AWS CloudHSM User Guide
SSL/TLS Offload on Linux
Amazon Linux
$ sudo start cloudhsm-client
Amazon Linux 2
$ sudo service cloudhsm-client start
CentOS 6
$ sudo start cloudhsm-client
CentOS 7
$ sudo service cloudhsm-client start
RHEL 6
$ sudo start cloudhsm-client
RHEL 7
$ sudo service cloudhsm-client start
Ubuntu 16.04 LTS
$ sudo service cloudhsm-client start
3. Run the following command to start the key_mgmt_util command line tool.
/opt/cloudhsm/bin/key_mgmt_util
4. Run the following command to log in to the HSM. Replace <user name> and <password> with the
user name and password of the cryptographic user (CU).
loginHSM -u CU -s <user name> -p <password>
5. Run the following commands to import your private key into an HSM.
a. Run the following command to create a symmetric wrapping key that is valid for the current
session only. The command and output are shown.
genSymKey -t 31 -s 16 -sess -l wrapping_key_for_import
Cfm3GenerateSymmetricKey returned: 0x00 : HSM Return: SUCCESS
Symmetric Key Created. Key Handle: 6
Cluster Error Status
Node id 0 and err state 0x00000000 : HSM Return: SUCCESS
b. Run the following command to import your existing private key into an HSM. The command and
output are shown. Replace the following values with your own:
•<web_server_existing.key> – Name of the file that contains your private key.
•<web_server_imported_key> – Label for your imported private key.
214
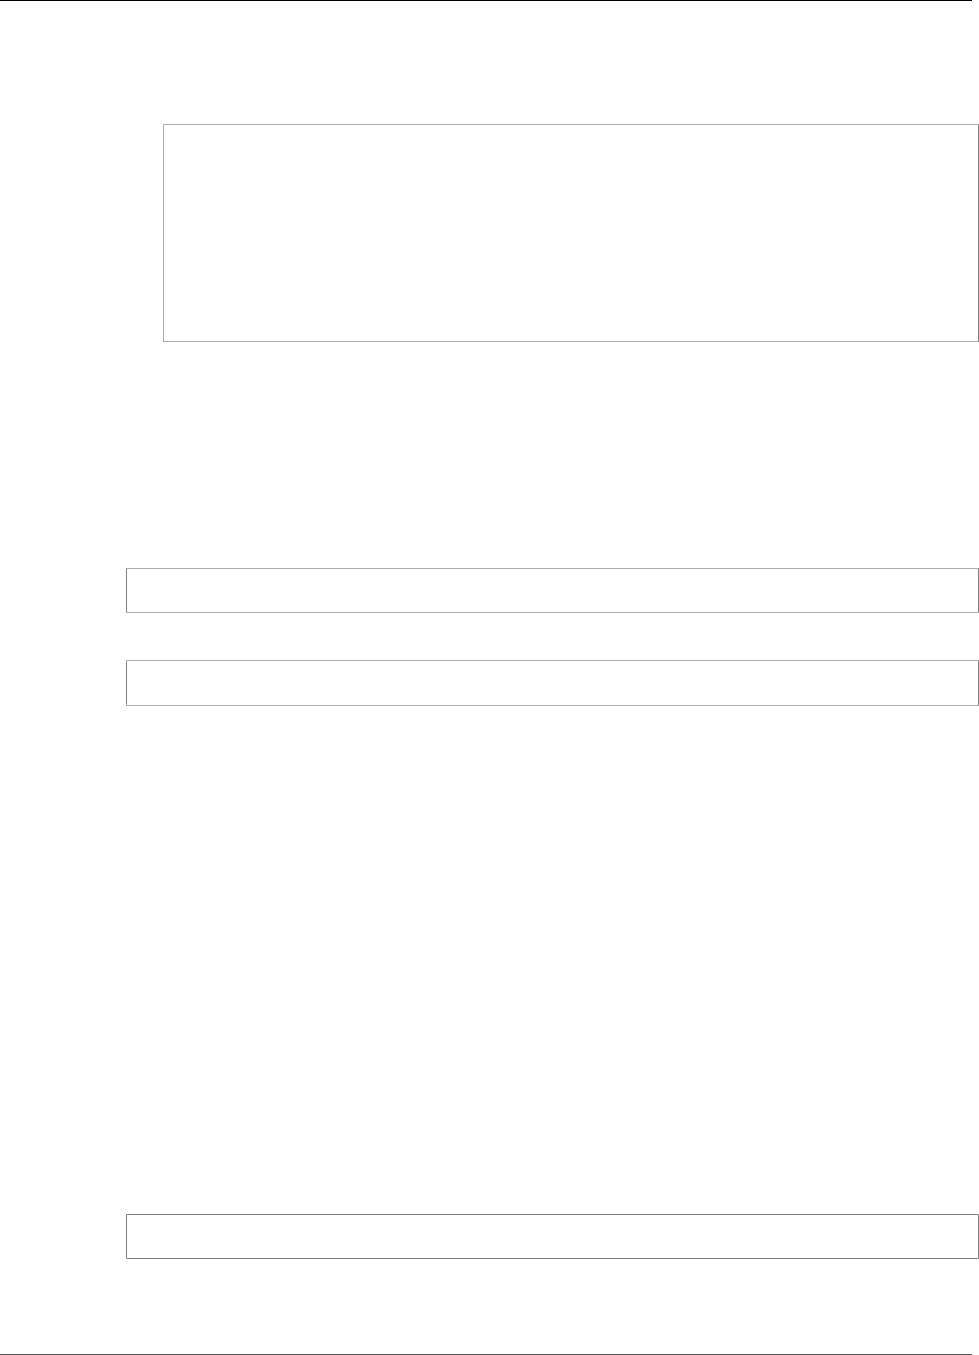
AWS CloudHSM User Guide
SSL/TLS Offload on Linux
•<wrapping_key_handle> – Wrapping key handle generated by the preceding command. In
the previous example, the wrapping key handle is 6.
importPrivateKey -f <web_server_existing.key> -l <web_server_imported_key> -
w <wrapping_key_handle>
BER encoded key length is 1219
Cfm3WrapHostKey returned: 0x00 : HSM Return: SUCCESS
Cfm3CreateUnwrapTemplate returned: 0x00 : HSM Return: SUCCESS
Cfm3UnWrapKey returned: 0x00 : HSM Return: SUCCESS
Private Key Unwrapped. Key Handle: 8
Cluster Error Status
Node id 0 and err state 0x00000000 : HSM Return: SUCCESS
6. Run the following command to export the private key in fake PEM format and save it to a file.
Replace the following values with your own.
•<private_key_handle> – Handle of the imported private key. This handle was generated by the
second command in the preceding step. In the preceding example, the handle of the private key is
8.
•<web_server_fake_PEM.key> – Name of the file that contains your exported fake PEM private
key.
getCaviumPrivKey -k <private_key_handle> -out <web_server_fake_PEM.key>
7. Run the following command to stop key_mgmt_util.
exit
After you complete these steps, go to Step 3: Configure the Web Server (p. 215).
Step 3: Configure the Web Server
Update your web server software's configuration to use the HTTPS certificate and corresponding fake
PEM private key that you created in the previous step (p. 212). This will finish setting up your Linux web
server software for SSL/TLS offload with AWS CloudHSM.
To update your web server configuration, complete the steps in one of the following procedures. Choose
the procedure that corresponds to your web server software.
•Update the configuration for NGINX (p. 215)
•Update the configuration for Apache HTTP Server (p. 217)
To update the web server configuration for NGINX
1. Connect to your client instance.
2. Run the following command to create the required directories for the web server certificate and the
fake PEM private key.
sudo mkdir -p /etc/pki/nginx/private
3. Run the following command to copy your web server certificate to the required location. Replace
<web_server.crt> with the name of your web server certificate.
215
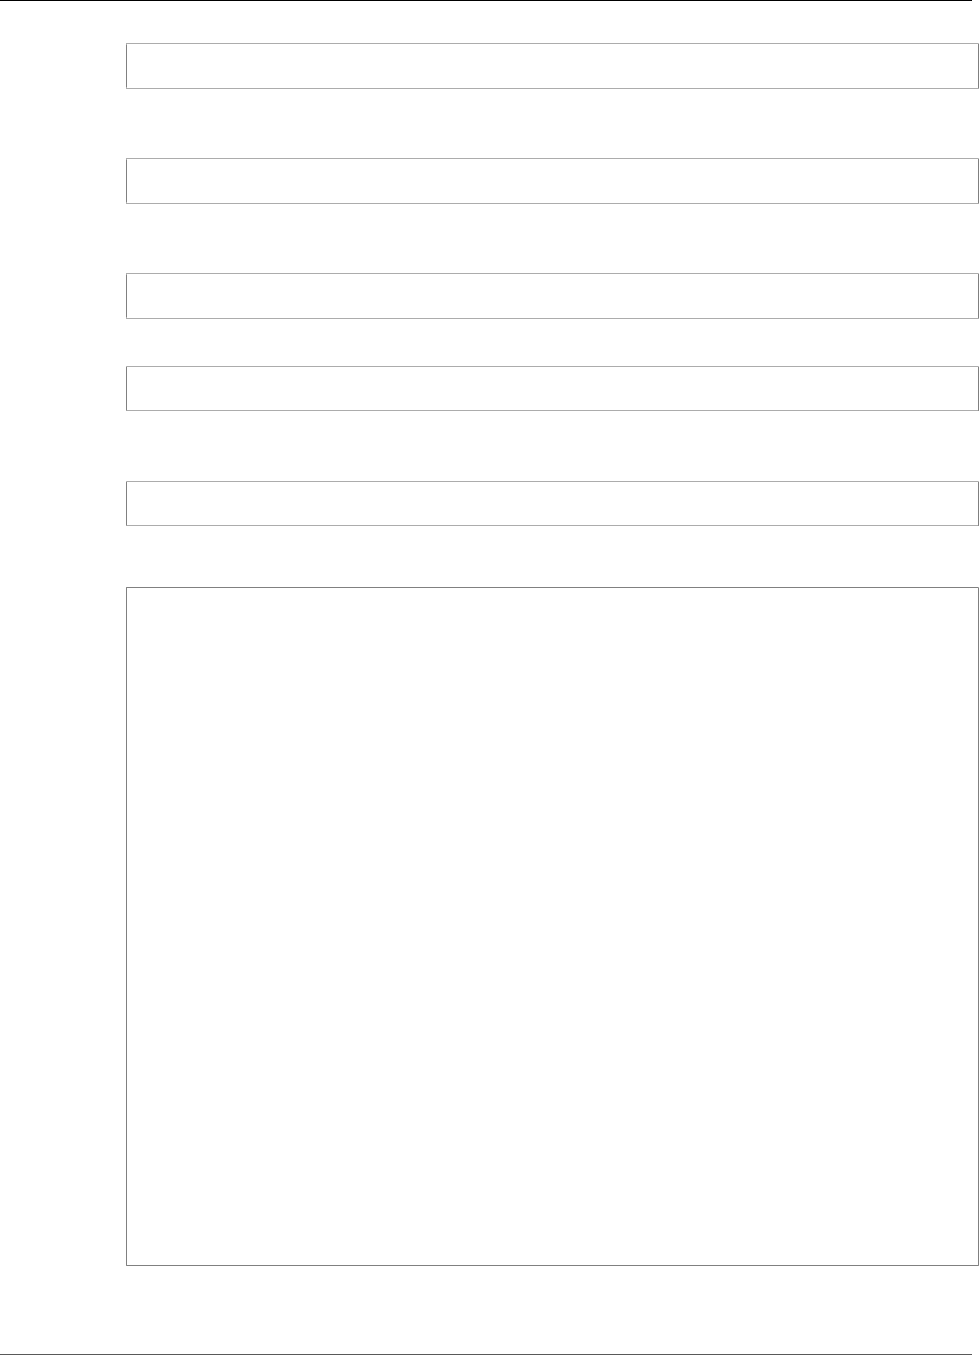
AWS CloudHSM User Guide
SSL/TLS Offload on Linux
sudo cp <web_server.crt> /etc/pki/nginx/server.crt
4. Run the following command to copy your fake PEM private key to the required location. Replace
<web_server_fake_PEM.key> with the name of the file that contains your fake PEM private key.
sudo cp <web_server_fake_PEM.key> /etc/pki/nginx/private/server.key
5. Run the following command to change the file ownership so that the user named nginx can read
them.
sudo chown nginx /etc/pki/nginx/server.crt /etc/pki/nginx/private/server.key
6. Run the following command to make a backup copy of the file named /etc/nginx/nginx.conf.
sudo cp /etc/nginx/nginx.conf /etc/nginx/nginx.conf.backup
7. Use a text editor to edit the file named /etc/nginx/nginx.conf. At the top of the file, add the
following line:
ssl_engine cloudhsm;
Then uncomment the TLS section of the file so that it looks like the following:
# Settings for a TLS enabled server.
server {
listen 443 ssl http2 default_server;
listen [::]:443 ssl http2 default_server;
server_name _;
root /usr/share/nginx/html;
ssl_certificate "/etc/pki/nginx/server.crt";
ssl_certificate_key "/etc/pki/nginx/private/server.key";
# It is *strongly* recommended to generate unique DH parameters
# Generate them with: openssl dhparam -out /etc/pki/nginx/dhparams.pem 2048
#ssl_dhparam "/etc/pki/nginx/dhparams.pem";
ssl_session_cache shared:SSL:1m;
ssl_session_timeout 10m;
ssl_protocols TLSv1 TLSv1.1 TLSv1.2;
ssl_ciphers HIGH:SEED:!aNULL:!eNULL:!EXPORT:!DES:!RC4:!MD5:!PSK:!RSAPSK:!aDH:!
aECDH:!EDH-DSS-DES-CBC3-SHA:!KRB5-DES-CBC3-SHA:!SRP;
ssl_prefer_server_ciphers on;
# Load configuration files for the default server block.
include /etc/nginx/default.d/*.conf;
location / {
}
error_page 404 /404.html;
location = /40x.html {
}
error_page 500 502 503 504 /50x.html;
location = /50x.html {
}
}
Save the file. This requires Linux root permissions.
216
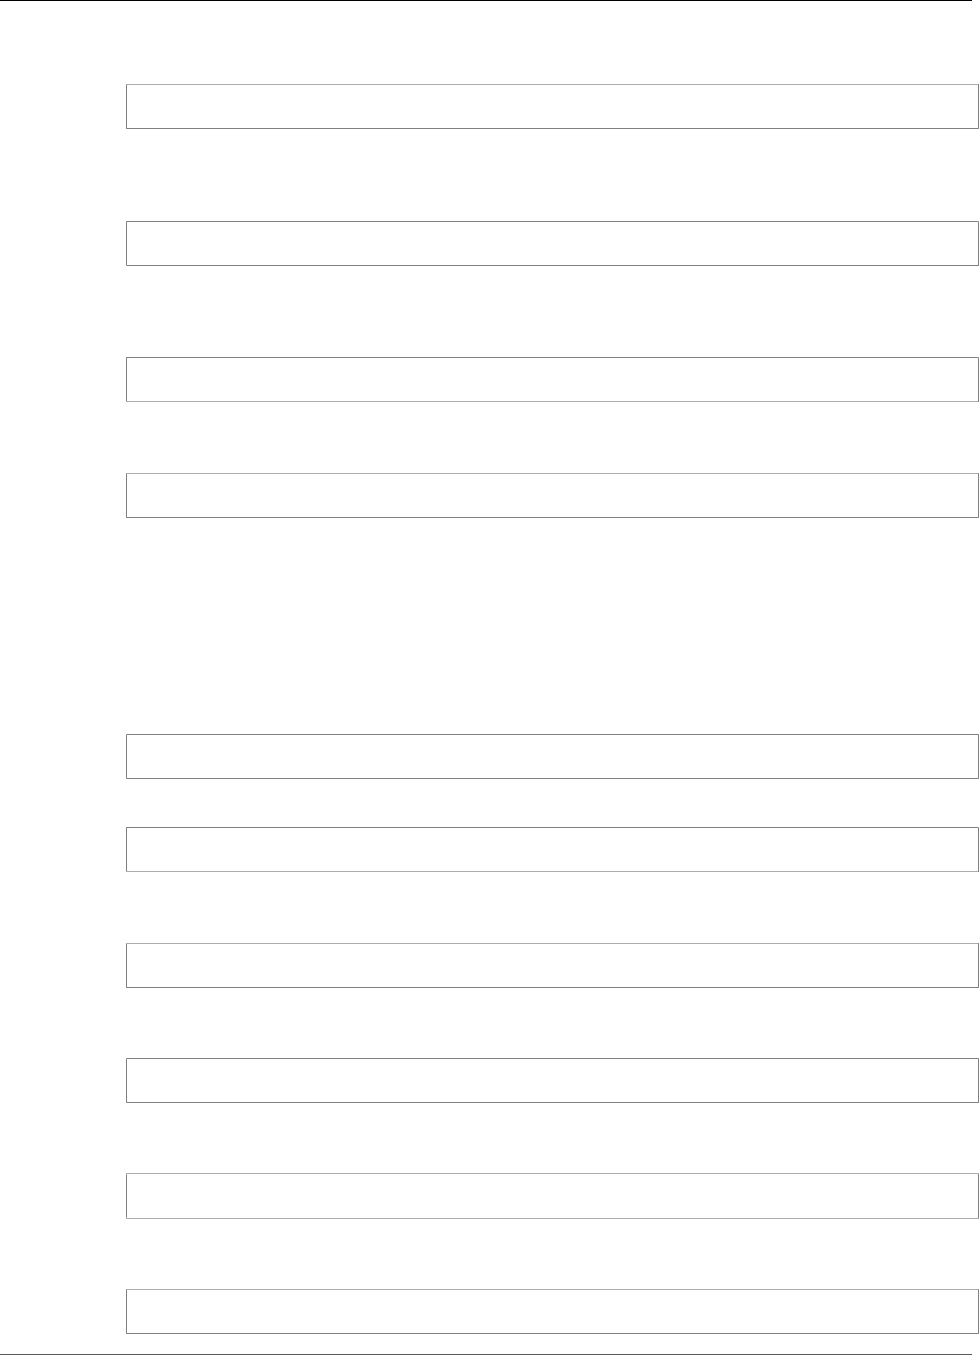
AWS CloudHSM User Guide
SSL/TLS Offload on Linux
8. Run the following command to make a backup copy of the file named /etc/sysconfig/nginx.
sudo cp /etc/sysconfig/nginx /etc/sysconfig/nginx.backup
9. Use a text editor to edit the file named /etc/sysconfig/nginx. Add the following line, specifying
the user name and password of the cryptographic user (CU). Replace <CU user name> with the
user name of the cryptographic user. Replace <password> with the CU password.
export n3fips_password=<CU user name>:<password>
Save the file. This requires Linux root permissions.
10. Run the following command to start the NGINX web server.
sudo service nginx start
11. Run the following command if you want to configure your server to start NGINX when the server
starts.
$ sudo chkconfig nginx on
After you update your web server configuration, go to Step 4: Enable HTTPS Traffic and Verify the
Certificate (p. 218).
To update the web server configuration for Apache
1. Connect to your Amazon EC2 client instance.
2. Run the following command to make a backup copy of the default certificate.
sudo cp /etc/pki/tls/certs/localhost.crt /etc/pki/tls/certs/localhost.crt.backup
3. Run the following command to make a backup copy of the default private key.
sudo cp /etc/pki/tls/private/localhost.key /etc/pki/tls/private/localhost.key.backup
4. Run the following command to copy your web server certificate to the required location. Replace
<web_server.crt> with the name of your web server certificate.
sudo cp <web_server.crt> /etc/pki/tls/certs/localhost.crt
5. Run the following command to copy your fake PEM private key to the required location. Replace
<web_server_fake_PEM.key> with the name of the file that contains your fake PEM private key.
sudo cp <web_server_fake_PEM.key> /etc/pki/tls/private/localhost.key
6. Run the following command to change the ownership of these files so that the user named apache
can read them.
sudo chown apache /etc/pki/tls/certs/localhost.crt /etc/pki/tls/private/localhost.key
7. Run the following command to make a backup copy of the file named /etc/httpd/conf.d/
ssl.conf.
sudo cp /etc/httpd/conf.d/ssl.conf /etc/httpd/conf.d/ssl.conf.backup
217

AWS CloudHSM User Guide
SSL/TLS Offload on Linux
8. Use a text editor to edit the file named /etc/httpd/conf.d/ssl.conf. Replace the line that
starts with SSLCryptoDevice so that it looks like the following:
SSLCryptoDevice cloudhsm
Save the file. This requires Linux root permissions.
9. Run the following command to make a backup copy of the file named /etc/sysconfig/httpd.
sudo cp /etc/sysconfig/httpd /etc/sysconfig/httpd.backup
10. Use a text editor to edit the file named /etc/sysconfig/httpd. Add the following line, specifying
the user name and password of the cryptographic user (CU). Replace <CU user name> with the
name of the cryptographic user. Replace <password> with the CU password.
export n3fips_password=<CU user name>:<password>
Save the file. This requires Linux root permissions.
11. Run the following command to start the Apache HTTP Server.
sudo service httpd start
12. Run the following command to configure your server to start Apache when the server starts.
sudo chkconfig httpd on
After you update your web server configuration, go to Step 4: Enable HTTPS Traffic and Verify the
Certificate (p. 218).
Step 4: Enable HTTPS Traffic and Verify the Certificate
After you configure your web server for SSL/TLS offload with AWS CloudHSM, add your web server
instance to a security group that allows inbound HTTPS traffic. This allows clients, such as web browsers,
to establish an HTTPS connection with your web server. Then make an HTTPS connection to your
web server and verify that it's using the certificate that you configured for SSL/TLS offload with AWS
CloudHSM.
Topics
•Enable Inbound HTTPS Connections (p. 218)
•Verify That HTTPS Uses the Certificate That You Configured (p. 219)
Enable Inbound HTTPS Connections
To connect to your web server from a client (such as a web browser), create a security group that allows
inbound HTTPS connections. Specifically, it should allow inbound TCP connections on port 443. Assign
this security group to your web server.
To create a security group for HTTPS and assign it to your web server
1. Open the Amazon EC2 console at https://console.aws.amazon.com/ec2/.
2. Choose Security Groups in the navigation pane.
3. Choose Create Security Group.
218

AWS CloudHSM User Guide
SSL/TLS Offload on Linux
4. For Create Security Group, do the following:
a. For Security group name, type a name for the security group that you are creating.
b. (Optional) Type a description of the security group that you are creating.
c. For VPC, choose the VPC that contains your web server Amazon EC2 instance.
d. Choose Add Rule.
e. For Type, choose HTTPS.
5. Choose Create.
6. In the navigation pane, choose Instances.
7. Select the check box next to your web server instance. Then choose Actions, Networking, and
Change Security Groups.
8. Select the check box next to the security group that you created for HTTPS. Then choose Assign
Security Groups.
Verify That HTTPS Uses the Certificate That You Configured
After you add the web server to a security group, you can verify that SSL/TLS offload with AWS
CloudHSM is working. You can do this with a web browser or with a tool such as OpenSSL s_client.
To verify SSL/TLS offload with a web browser
1. Use a web browser to connect to your web server using the public DNS name or IP address of
the server. Ensure that the URL in the address bar begins with https://. For example, https://
ec2-52-14-212-67.us-east-2.compute.amazonaws.com/.
Tip
You can use a DNS service such as Amazon Route53 to route your website's domain name
(for example, https://www.example.com/) to your web server. For more information, see
Routing Traffic to an Amazon EC2 Instance in the Amazon Route53 Developer Guide or in
the documentation for your DNS service.
2. Use your web browser to view the web server certificate. For more information, see the following:
• For Mozilla Firefox, see View a Certificate on the Mozilla Support website.
• For Google Chrome, see Understand Security Issues on the Google Tools for Web Developers
website.
Other web browsers might have similar features that you can use to view the web server certificate.
3. Ensure that the SSL/TLS certificate is the one that you configured your web server to use.
To verify SSL/TLS offload with OpenSSL s_client
1. Run the following OpenSSL command to connect to your web server using HTTPS. Replace <server
name> with the public DNS name or IP address of your web server.
openssl s_client -connect <server name>:443
Tip
You can use a DNS service such as Amazon Route53 to route your website's domain name
(for example, https://www.example.com/) to your web server. For more information, see
Routing Traffic to an Amazon EC2 Instance in the Amazon Route53 Developer Guide or in
the documentation for your DNS service.
2. Ensure that the SSL/TLS certificate is the one that you configured your web server to use.
219

AWS CloudHSM User Guide
SSL/TLS Offload on Linux
You now have a website that is secured with HTTPS. The private key for the web server is stored in an
HSM in your AWS CloudHSM cluster. However, you have only one web server. To set up a second web
server and a load balancer for higher availability, go to (Optional) Step 5: Add a Load Balancer with
Elastic Load Balancing (p. 220).
(Optional) Step 5: Add a Load Balancer with Elastic Load
Balancing
After you set up SSL/TLS offload with one web server, you can create more web servers and an Elastic
Load Balancing load balancer that routes HTTPS traffic to the web servers. A load balancer can reduce
the load on your individual web servers by balancing traffic across two or more servers. It can also
increase the availability of your website because the load balancer monitors the health of your web
servers and only routes traffic to healthy servers. If a web server fails, the load balancer automatically
stops routing traffic to it.
Topics
•Create a Subnet for a Second Web Server (p. 220)
•Create the Second Web Server (p. 221)
•Create the Load Balancer (p. 223)
Create a Subnet for a Second Web Server
Before you can create another web server, you need to create a new subnet in the same VPC that
contains your existing web server and AWS CloudHSM cluster.
To create a new subnet
1. Open the Subnets section of the Amazon VPC console at https://console.aws.amazon.com/vpc/
home#subnets:.
2. Choose Create Subnet.
3. In the Create Subnet dialog box, do the following:
a. For Name tag, type a name for your subnet.
b. For VPC, choose the AWS CloudHSM VPC that contains your existing web server and AWS
CloudHSM cluster.
c. For Availability Zone, choose an Availability Zone that is different from the one that contains
your existing web server.
d. For IPv4 CIDR block, type the CIDR block to use for the subnet. For example, type
10.0.10.0/24.
e. Choose Yes, Create.
4. Select the check box next to the public subnet that contains your existing web server. This is
different from the public subnet that you created in the previous step.
5. In the content pane, choose the Route Table tab. Then choose the link for the route table.
220
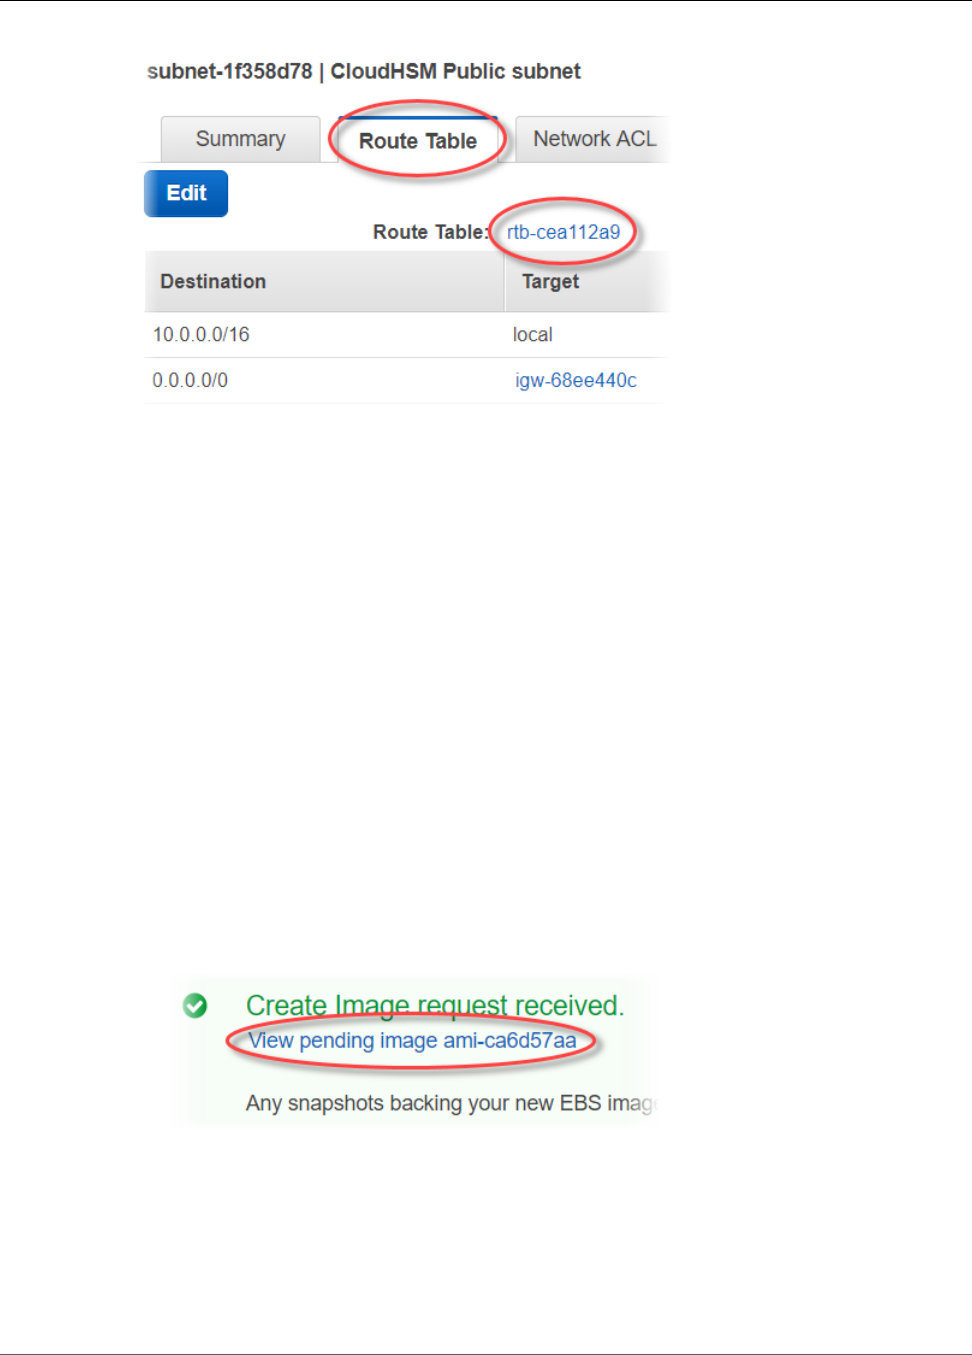
AWS CloudHSM User Guide
SSL/TLS Offload on Linux
6. Select the check box next to the route table.
7. Choose the Subnet Associations tab. Then choose Edit.
8. Select the check box next to the public subnet that you created earlier in this procedure. Then
choose Save.
Create the Second Web Server
Complete the following steps to create a second web server with the same configuration as your existing
web server.
To create a second web server
1. Open the Instances section of the Amazon EC2 console at https://console.aws.amazon.com/ec2/v2/
home#Instances:.
2. Select the check box next to your existing web server instance.
3. Choose Actions, Image, and then Create Image.
4. In the Create Image dialog box, do the following:
a. For Image name, type a name for the image.
b. For Image description, type a description for the image.
c. Choose Create Image. This action reboots your existing web server.
d. Choose the View pending image ami-<AMI ID> link.
In the Status column, note your image status. When your image status is available (this might
take several minutes), go to the next step.
5. In the navigation pane, choose Instances.
6. Select the check box next to your existing web server.
7. Choose Actions and choose Launch More Like This.
8. Choose Edit AMI.
221

AWS CloudHSM User Guide
SSL/TLS Offload on Linux
9. In the left navigation pane, choose My AMIs. Then clear the text in the search box.
10. Next to your web server image, choose Select.
11. Choose Yes, I want to continue with this AMI (<image name> - ami-<AMI ID>).
12. Choose Next.
13. Select an instance type, and then choose Next: Configure Instance Details.
14. For Step 3: Configure Instance Details, do the following:
a. For Network, choose the VPC that contains your existing web server.
b. For Subnet, choose the public subnet that you created for the second web server.
c. For Auto-assign Public IP, chooseEnable.
d. Change the remaining instance details as preferred. Then choose Next: Add Storage.
15. Change the storage settings as preferred. Then choose Next: Add Tags.
16. Add or edit tags as preferred. Then choose Next: Configure Security Group.
17. For Step 6: Configure Security Group, do the following:
a. For Assign a security group, choose Select an existing security group.
b. Select the check box next to the security group named cloudhsm-<cluster ID>-sg. AWS
CloudHSM created this security group on your behalf when you created the cluster (p. 21). You
must choose this security group to allow the web server instance to connect to the HSMs in the
cluster.
c. Select the check box next to the security group that allows inbound HTTPS traffic. You created
this security group previously (p. 218).
d. (Optional) Select the check box next to a security group that allows inbound SSH (for Linux) or
RDP (for Windows) traffic from your network. That is, the security group must allow inbound
TCP traffic on port 22 (for SSH on Linux) or port 3389 (for RDP on Windows). Otherwise, you
cannot connect to your client instance. If you don't have a security group like this, you must
create one and then assign it to your client instance later.
Choose Review and Launch.
18. Review your instance details, and then choose Launch.
19. Choose whether to launch your instance with an existing key pair, create a new key pair, or launch
your instance without a key pair.
• To use an existing key pair, do the following:
1. Choose Choose an existing key pair.
2. For Select a key pair, choose the key pair to use.
3. Select the check box next to I acknowledge that I have access to the selected private key file
(<private key file name>.pem), and that without this file, I won't be able to log into
my instance.
• To create a new key pair, do the following:
1. Choose Create a new key pair.
2. For Key pair name, type a key pair name.
222

AWS CloudHSM User Guide
SSL/TLS Offload on Linux
3. Choose Download Key Pair and save the private key file in a secure and accessible location.
Warning
You cannot download the private key file again after this point. If you do not download
the private key file now, you will be unable to access the client instance.
• To launch your instance without a key pair, do the following:
1. Choose Proceed without a key pair.
2. Select the check box next to I acknowledge that I will not be able to connect to this instance
unless I already know the password built into this AMI.
Choose Launch Instances.
Create the Load Balancer
Complete the following steps to create an Elastic Load Balancing load balancer that routes HTTPS traffic
to your web servers.
To create a load balancer
1. Open the Load Balancers section of the Amazon EC2 console at https://console.aws.amazon.com/
ec2/v2/home#LoadBalancers:.
2. Choose Create Load Balancer.
3. In the Network Load Balancer section, choose Create.
4. For Step 1: Configure Load Balancer, do the following:
a. For Name, type a name for the load balancer that you are creating.
b. In the Listeners section, for Load Balancer Port, change the value to 443.
c. In the Availability Zones section, for VPC, choose the VPC that contains your web servers.
d. In the Availability Zones section, choose the subnets that contain your web servers.
e. Choose Next: Configure Routing.
5. For Step 2: Configure Routing, do the following:
a. For Name, type a name for the target group that you are creating.
b. For Port, change the value to 443.
c. Choose Next: Register Targets.
6. For Step 3: Register Targets, do the following:
a. In the Instances section, select the check boxes next to your web server instances. Then choose
Add to registered.
b. Choose Next: Review.
7. Review your load balancer details, then choose Create.
8. When the load balancer has been successfully created, choose Close.
After you complete the preceding steps, the Amazon EC2 console shows your Elastic Load Balancing load
balancer.
When your load balancer's state is active, you can verify that the load balancer is working. That is, you
can verify that it's sending HTTPS traffic to your web servers with SSL/TLS offload with AWS CloudHSM.
You can do this with a web browser or a tool such as OpenSSL s_client.
223

AWS CloudHSM User Guide
SSL/TLS Offload on Windows
To verify that your load balancer is working with a web browser
1. In the Amazon EC2 console, find the DNS name for the load balancer that you just created. Then
select the DNS name and copy it.
2. Use a web browser such as Mozilla Firefox or Google Chrome to connect to your load balancer using
the load balancer's DNS name. Ensure that the URL in the address bar begins with https://.
Tip
You can use a DNS service such as Amazon Route53 to route your website's domain name
(for example, https://www.example.com/) to your web server. For more information, see
Routing Traffic to an Amazon EC2 Instance in the Amazon Route53 Developer Guide or in
the documentation for your DNS service.
3. Use your web browser to view the web server certificate. For more information, see the following:
• For Mozilla Firefox, see View a Certificate on the Mozilla Support website.
• For Google Chrome, see Understand Security Issues on the Google Tools for Web Developers
website.
Other web browsers might have similar features that you can use to view the web server certificate.
4. Ensure that the certificate is the one that you configured the web server to use.
To verify that your load balancer is working with OpenSSL s_client
1. Use the following OpenSSL command to connect to your load balancer using HTTPS. Replace <DNS
name> with the DNS name of your load balancer.
openssl s_client -connect <DNS name>:443
Tip
You can use a DNS service such as Amazon Route53 to route your website's domain name
(for example, https://www.example.com/) to your web server. For more information, see
Routing Traffic to an Amazon EC2 Instance in the Amazon Route53 Developer Guide or in
the documentation for your DNS service.
2. Ensure that the certificate is the one that you configured the web server to use.
You now have a website that is secured with HTTPS, with the web server's private key stored in an HSM
in your AWS CloudHSM cluster. Your website has two web servers and a load balancer to help improve
efficiency and availability.
Tutorial: Using SSL/TLS Offload with AWS CloudHSM
on Windows
This tutorial provides step-by-step instructions for setting up SSL/TLS offload with AWS CloudHSM on a
Windows web server.
Topics
•Overview (p. 225)
•Step 1: Set Up the Prerequisites (p. 225)
•Step 2: Create a Certificate Signing Request (CSR) and Certificate (p. 226)
•Step 3: Configure the Web Server (p. 228)
•Step 4: Enable HTTPS Traffic and Verify the Certificate (p. 229)
224

AWS CloudHSM User Guide
SSL/TLS Offload on Windows
•(Optional) Step 5: Add a Load Balancer with Elastic Load Balancing (p. 231)
Overview
On Windows, the Internet Information Services (IIS) for Windows Server web server application natively
supports HTTPS. The AWS CloudHSM key storage provider (KSP) for Microsoft's Cryptography API: Next
Generation (CNG) (p. 203) provides the interface that allows IIS to use the HSMs in your cluster for
cryptographic offloading and key storage. The AWS CloudHSM KSP is the bridge that connects IIS to your
AWS CloudHSM cluster.
This tutorial shows you how to do the following:
• Install the web server software on an Amazon EC2 instance.
• Configure the web server software to support HTTPS with a private key stored in your AWS CloudHSM
cluster.
• (Optional) Use Amazon EC2 to create a second web server instance and Elastic Load Balancing to
create a load balancer. Using a load balancer can increase performance by distributing the load across
multiple servers. It can also provide redundancy and higher availability if one or more servers fail.
When you're ready to get started, go to Step 1: Set Up the Prerequisites (p. 225).
Step 1: Set Up the Prerequisites
To set up web server SSL/TLS offload with AWS CloudHSM, you need the following:
• An active AWS CloudHSM cluster with at least one HSM.
• An Amazon EC2 instance running a Windows operating system with the following software installed:
• The AWS CloudHSM client software for Windows.
• Internet Information Services (IIS) for Windows Server.
• A crypto user (p. 11) (CU) to own and manage the web server's private key on the HSM.
Note
This tutorial uses Microsoft Windows Server 2016. Microsoft Windows Server 2012 is also
supported, but Microsoft Windows Server 2012 R2 is not.
To set up a Windows Server instance and create a CU on the HSM
1. Complete the steps in Getting Started (p. 15). When you launch the Amazon EC2 client, choose a
Windows Server 2016 or Windows Server 2012 AMI. When you complete these steps, you have an
active cluster with at least one HSM. You also have an Amazon EC2 client instance running Windows
Server with the AWS CloudHSM client software for Windows installed.
2. (Optional) Add more HSMs to your cluster. For more information, see Adding an HSM (p. 42).
3. Connect to your Windows server. For more information, see Connect to Your Instance in the Amazon
EC2 User Guide for Windows Instances.
4. To create a cryptographic user (CU) on your HSM, do the following:
a. Start the AWS CloudHSM client (p. 77).
b. Update the cloudhsm_mgmt_util configuration file (p. 77).
c. Start cloudhsm_mgmt_util (p. 78).
d. Enable end-to-end encryption (p. 79).
e. Log in to the HSMs (p. 80) with the user name and password of a crypto officer (CO).
225

AWS CloudHSM User Guide
SSL/TLS Offload on Windows
f. Create a crypto user (CU) (p. 53). Keep track of the CU user name and password. You will need
them to complete the next step.
5. Set the Windows system environment variables (p. 204), using the CU user name and password that
you created in the previous step.
To install IIS on your Windows Server
1. If you haven't already done so, connect to your Windows server. For more information, see Connect
to Your Instance in the Amazon EC2 User Guide for Windows Instances.
2. On your Windows server, start Server Manager.
3. In the Server Manager dashboard, choose Add roles and features.
4. Read the Before you begin information, and then choose Next.
5. For Installation Type, choose Role-based or feature-based installation. Then choose Next.
6. For Server Selection, choose Select a server from the server pool. Then choose Next.
7. For Server Roles, do the following:
a. Select Web Server (IIS).
b. For Add features that are required for Web Server (IIS), choose Add Features.
c. Choose Next to finish selecting server roles.
8. For Features, accept the defaults. Then choose Next.
9. Read the Web Server Role (IIS) information. Then choose Next.
10. For Select role services, accept the defaults or change the settings as preferred. Then choose Next.
11. For Confirmation, read the confirmation information. Then choose Install.
12. After the installation is complete, choose Close.
After you complete these steps, go to Step 2: Create a Certificate Signing Request (CSR) and
Certificate (p. 226).
Step 2: Create a Certificate Signing Request (CSR) and
Certificate
To enable HTTPS, your web server needs an SSL/TLS certificate and a corresponding private key. To
use SSL/TLS offload with AWS CloudHSM, you store the private key in the HSM in your AWS CloudHSM
cluster. To do this, you use the AWS CloudHSM key storage provider (KSP) for Microsoft's Cryptography
API: Next Generation (CNG) (p. 203) to create a certificate signing request (CSR). Then you give the CSR
to a certificate authority (CA), which signs the CSR to produce a certificate.
Topics
•Create a CSR (p. 226)
•Get a Signed Certificate and Import It (p. 227)
Create a CSR
Use the AWS CloudHSM KSP on your Windows Server to create a CSR.
To create a CSR
1. If you haven't already done so, connect to your Windows server. For more information, see Connect
to Your Instance in the Amazon EC2 User Guide for Windows Instances.
226

AWS CloudHSM User Guide
SSL/TLS Offload on Windows
2. Start the AWS CloudHSM client (p. 77).
3. On your Windows Server, use a text editor to create a certificate request file named
IISCertRequest.inf. The following shows the contents of an example IISCertRequest.inf
file. For more information about the sections, keys, and values that you can specify in the file, see
Microsoft's documentation. Do not change the ProviderName value.
[Version]
Signature = "$Windows NT$"
[NewRequest]
Subject = "CN=example.com,C=US,ST=Washington,L=Seattle,O=ExampleOrg,OU=WebServer"
HashAlgorithm = SHA256
KeyAlgorithm = RSA
KeyLength = 2048
ProviderName = "Cavium Key Storage Provider"
KeyUsage = 0xf0
MachineKeySet = True
[EnhancedKeyUsageExtension]
OID=1.3.6.1.5.5.7.3.1
4. Use the Windows certreq command to create a CSR from the IISCertRequest.inf file
that you created in the previous step. The following example saves the CSR to a file named
IISCertRequest.csr. If you used a different file name for your certificate request file,
replace IISCertRequest.inf with the appropriate file name. You can optionally replace
IISCertRequest.csr with a different file name for your CSR file.
C:\>certreq -new IISCertRequest.inf IISCertRequest.csr
SDK Version: 2.03
CertReq: Request Created
The IISCertRequest.csr file contains your CSR. You need this CSR to get a signed certificate.
Get a Signed Certificate and Import It
In a production environment, you typically use a certificate authority (CA) to create a certificate
from a CSR. A CA is not necessary for a test environment. If you do use a CA, send the CSR file
(IISCertRequest.csr) to it and use the CA to create a signed SSL/TLS certificate.
As an alternative to using a CA, you can use a tool like OpenSSL to create a self-signed certificate.
Warning
Self-signed certificates are not trusted by browsers and should not be used in production
environments. They can be used in test environments.
The following procedures show how to create a self-signed certificate and use it to sign your web server's
CSR.
To create a self-signed certificate
1. Use the following OpenSSL command to create a private key. You can optionally replace
SelfSignedCA.key with the file name to contain your private key.
openssl genrsa -aes256 -out SelfSignedCA.key 2048
Generating RSA private key, 2048 bit long modulus
......................................................................+++
.........................................+++
e is 65537 (0x10001)
Enter pass phrase for SelfSignedCA.key:
Verifying - Enter pass phrase for SelfSignedCA.key:
227

AWS CloudHSM User Guide
SSL/TLS Offload on Windows
2. Use the following OpenSSL command to create a self-signed certificate using the private key that
you created in the previous step. This is an interactive command. Read the on-screen instructions
and follow the prompts. Replace SelfSignedCA.key with the name of the file that contains your
private key (if different). You can optionally replace SelfSignedCA.crt with the file name to
contain your self-signed certificate.
openssl req -new -x509 -days 365 -key SelfSignedCA.key -out SelfSignedCA.crt
Enter pass phrase for SelfSignedCA.key:
You are about to be asked to enter information that will be incorporated
into your certificate request.
What you are about to enter is what is called a Distinguished Name or a DN.
There are quite a few fields but you can leave some blank
For some fields there will be a default value,
If you enter '.', the field will be left blank.
-----
Country Name (2 letter code) [AU]:
State or Province Name (full name) [Some-State]:
Locality Name (eg, city) []:
Organization Name (eg, company) [Internet Widgits Pty Ltd]:
Organizational Unit Name (eg, section) []:
Common Name (e.g. server FQDN or YOUR name) []:
Email Address []:
To use your self-signed certificate to sign your web server's CSR
• Use the following OpenSSL command to use your private key and self-signed certificate to sign
the CSR. Replace the following with the names of the files that contain the corresponding data (if
different).
•IISCertRequest.csr – The name of the file that contains your web server's CSR
•SelfSignedCA.crt – The name of the file that contains your self-signed certificate
•SelfSignedCA.key – The name of the file that contains your private key
•IISCert.crt – The name of the file to contain your web server's signed certificate
openssl x509 -req -days 365 -in IISCertRequest.csr \
-CA SelfSignedCA.crt \
-CAkey SelfSignedCA.key \
-CAcreateserial \
-out IISCert.crt
Signature ok
subject=/ST=IIS-HSM/L=IIS-HSM/OU=IIS-HSM/O=IIS-HSM/CN=IIS-HSM/C=IIS-HSM
Getting CA Private Key
Enter pass phrase for SelfSignedCA.key:
After you complete the previous step, you have a signed certificate for your web server (IISCert.crt)
and a self-signed certificate (SelfSignedCA.crt). When you have these files, go to Step 3: Configure
the Web Server (p. 228).
Step 3: Configure the Web Server
Update your IIS website's configuration to use the HTTPS certificate that you created at the end of the
previous step (p. 226). This will finish setting up your Windows web server software (IIS) for SSL/TLS
offload with AWS CloudHSM.
If you used a self-signed certificate to sign your CSR, you must first import the self-signed certificate into
the Windows Trusted Root Certification Authorities.
228

AWS CloudHSM User Guide
SSL/TLS Offload on Windows
To import your self-signed certificate into the Windows Trusted Root Certification
Authorities
1. If you haven't already done so, connect to your Windows server. For more information, see Connect
to Your Instance in the Amazon EC2 User Guide for Windows Instances.
2. Copy your self-signed certificate to your Windows server.
3. On your Windows Server, open the Control Panel.
4. For Search Control Panel, type certificates. Then choose Manage computer certificates.
5. In the Certificates - Local Computer window, double-click Trusted Root Certification Authorities.
6. Right-click on Certificates and then choose All Tasks, Import.
7. In the Certificate Import Wizard, choose Next.
8. Choose Browse, then find and select your self-signed certificate. If you created your self-signed
certificate by following the instructions in the previous step of this tutorial (p. 226), your self-
signed certificate is named SelfSignedCA.crt. Choose Open.
9. Choose Next.
10. For Certificate Store, choose Place all certificates in the following store. Then ensure that Trusted
Root Certification Authorities is selected for Certificate store.
11. Choose Next and then choose Finish.
To update the IIS website's configuration
1. If you haven't already done so, connect to your Windows server. For more information, see Connect
to Your Instance in the Amazon EC2 User Guide for Windows Instances.
2. Start the AWS CloudHSM client (p. 77).
3. Copy your web server's signed certificate—the one that you created at the end of this tutorial's
previous step (p. 226)—to your Windows server.
4. On your Windows Server, use the Windows certreq command to accept the signed certificate, as
in the following example. Replace IISCert.crt with the name of the file that contains your web
server's signed certificate.
C:\>certreq -accept IISCert.crt
SDK Version: 2.03
5. On your Windows server, start Server Manager.
6. In the Server Manager dashboard, in the top right corner, choose Tools, Internet Information
Services (IIS) Manager.
7. In the Internet Information Services (IIS) Manager window, double-click your server name. Then
double-click Sites. Select your website.
8. Select SSL Settings. Then, on the right side of the window, choose Bindings.
9. In the Site Bindings window, choose Add.
10. For Type, choose https. For SSL certificate, choose the HTTPS certificate that you created at the end
of this tutorial's previous step (p. 226).
11. Choose OK.
After you update your website's configuration, go to Step 4: Enable HTTPS Traffic and Verify the
Certificate (p. 229).
Step 4: Enable HTTPS Traffic and Verify the Certificate
After you configure your web server for SSL/TLS offload with AWS CloudHSM, add your web server
instance to a security group that allows inbound HTTPS traffic. This allows clients, such as web browsers,
229

AWS CloudHSM User Guide
SSL/TLS Offload on Windows
to establish an HTTPS connection with your web server. Then make an HTTPS connection to your
web server and verify that it's using the certificate that you configured for SSL/TLS offload with AWS
CloudHSM.
Topics
•Enable Inbound HTTPS Connections (p. 230)
•Verify That HTTPS Uses the Certificate That You Configured (p. 230)
Enable Inbound HTTPS Connections
To connect to your web server from a client (such as a web browser), create a security group that allows
inbound HTTPS connections. Specifically, it should allow inbound TCP connections on port 443. Assign
this security group to your web server.
To create a security group for HTTPS and assign it to your web server
1. Open the Amazon EC2 console at https://console.aws.amazon.com/ec2/.
2. Choose Security Groups in the navigation pane.
3. Choose Create Security Group.
4. For Create Security Group, do the following:
a. For Security group name, type a name for the security group that you are creating.
b. (Optional) Type a description of the security group that you are creating.
c. For VPC, choose the VPC that contains your web server Amazon EC2 instance.
d. Choose Add Rule.
e. For Type, choose HTTPS.
5. Choose Create.
6. In the navigation pane, choose Instances.
7. Select the check box next to your web server instance. Then choose Actions, Networking, and
Change Security Groups.
8. Select the check box next to the security group that you created for HTTPS. Then choose Assign
Security Groups.
Verify That HTTPS Uses the Certificate That You Configured
After you add the web server to a security group, you can verify that SSL/TLS offload with AWS
CloudHSM is working. You can do this with a web browser or with a tool such as OpenSSL s_client.
To verify SSL/TLS offload with a web browser
1. Use a web browser to connect to your web server using the public DNS name or IP address of
the server. Ensure that the URL in the address bar begins with https://. For example, https://
ec2-52-14-212-67.us-east-2.compute.amazonaws.com/.
Tip
You can use a DNS service such as Amazon Route53 to route your website's domain name
(for example, https://www.example.com/) to your web server. For more information, see
Routing Traffic to an Amazon EC2 Instance in the Amazon Route53 Developer Guide or in
the documentation for your DNS service.
2. Use your web browser to view the web server certificate. For more information, see the following:
• For Mozilla Firefox, see View a Certificate on the Mozilla Support website.
• For Google Chrome, see Understand Security Issues on the Google Tools for Web Developers
website.
230

AWS CloudHSM User Guide
SSL/TLS Offload on Windows
Other web browsers might have similar features that you can use to view the web server certificate.
3. Ensure that the SSL/TLS certificate is the one that you configured your web server to use.
To verify SSL/TLS offload with OpenSSL s_client
1. Run the following OpenSSL command to connect to your web server using HTTPS. Replace <server
name> with the public DNS name or IP address of your web server.
openssl s_client -connect <server name>:443
Tip
You can use a DNS service such as Amazon Route53 to route your website's domain name
(for example, https://www.example.com/) to your web server. For more information, see
Routing Traffic to an Amazon EC2 Instance in the Amazon Route53 Developer Guide or in
the documentation for your DNS service.
2. Ensure that the SSL/TLS certificate is the one that you configured your web server to use.
You now have a website that is secured with HTTPS. The private key for the web server is stored in an
HSM in your AWS CloudHSM cluster. However, you have only one web server. To set up a second web
server and a load balancer for higher availability, go to (Optional) Step 5: Add a Load Balancer with
Elastic Load Balancing (p. 231).
(Optional) Step 5: Add a Load Balancer with Elastic Load
Balancing
After you set up SSL/TLS offload with one web server, you can create more web servers and an Elastic
Load Balancing load balancer that routes HTTPS traffic to the web servers. A load balancer can reduce
the load on your individual web servers by balancing traffic across two or more servers. It can also
increase the availability of your website because the load balancer monitors the health of your web
servers and only routes traffic to healthy servers. If a web server fails, the load balancer automatically
stops routing traffic to it.
Topics
•Create a Subnet for a Second Web Server (p. 231)
•Create the Second Web Server (p. 232)
•Create the Load Balancer (p. 234)
Create a Subnet for a Second Web Server
Before you can create another web server, you need to create a new subnet in the same VPC that
contains your existing web server and AWS CloudHSM cluster.
To create a new subnet
1. Open the Subnets section of the Amazon VPC console at https://console.aws.amazon.com/vpc/
home#subnets:.
2. Choose Create Subnet.
3. In the Create Subnet dialog box, do the following:
a. For Name tag, type a name for your subnet.
231
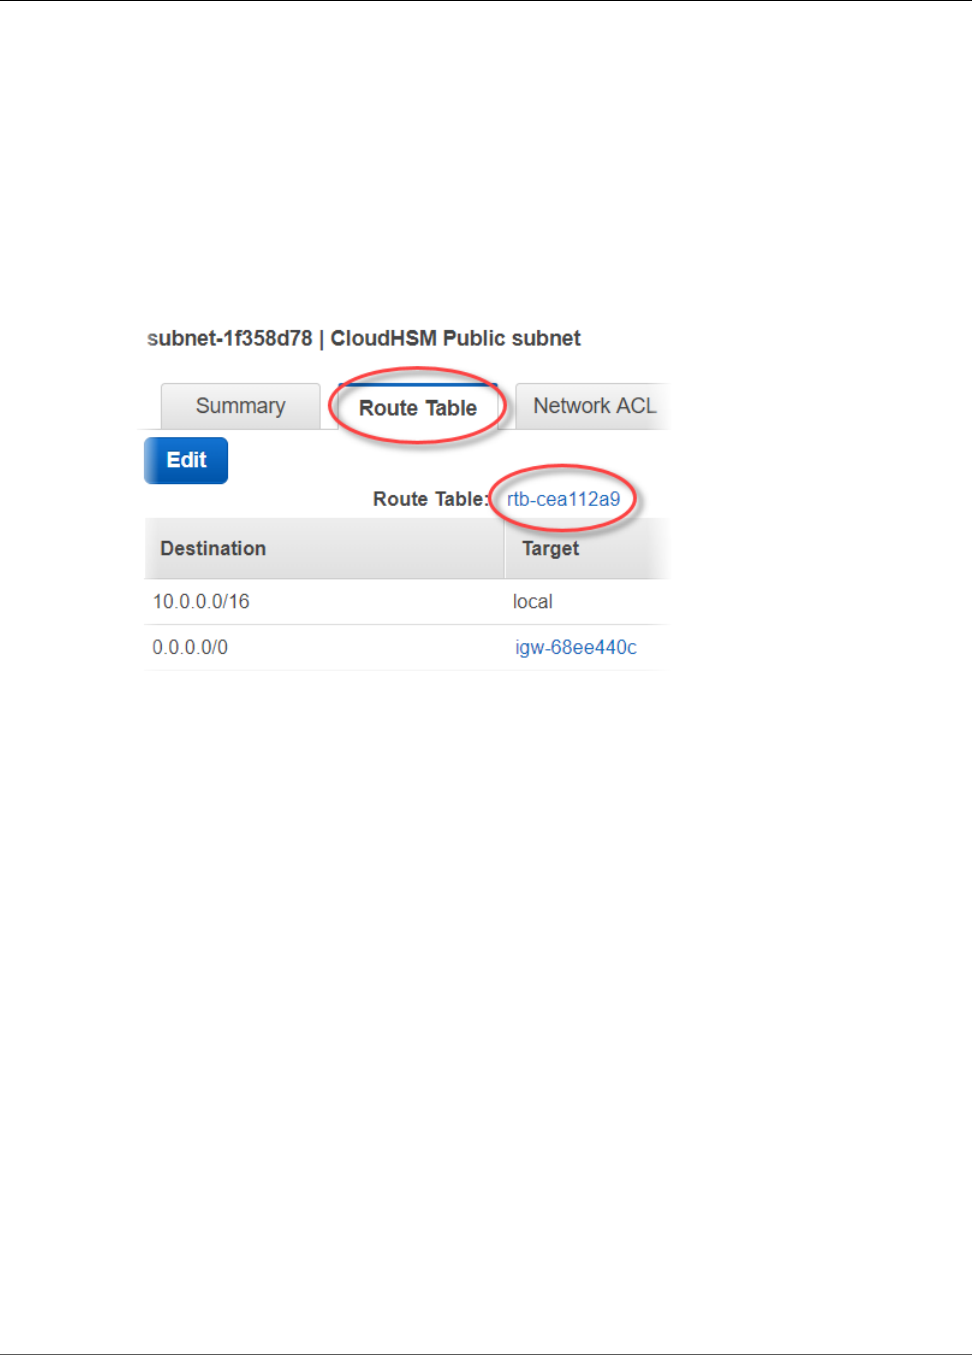
AWS CloudHSM User Guide
SSL/TLS Offload on Windows
b. For VPC, choose the AWS CloudHSM VPC that contains your existing web server and AWS
CloudHSM cluster.
c. For Availability Zone, choose an Availability Zone that is different from the one that contains
your existing web server.
d. For IPv4 CIDR block, type the CIDR block to use for the subnet. For example, type
10.0.10.0/24.
e. Choose Yes, Create.
4. Select the check box next to the public subnet that contains your existing web server. This is
different from the public subnet that you created in the previous step.
5. In the content pane, choose the Route Table tab. Then choose the link for the route table.
6. Select the check box next to the route table.
7. Choose the Subnet Associations tab. Then choose Edit.
8. Select the check box next to the public subnet that you created earlier in this procedure. Then
choose Save.
Create the Second Web Server
Complete the following steps to create a second web server with the same configuration as your existing
web server.
To create a second web server
1. Open the Instances section of the Amazon EC2 console at https://console.aws.amazon.com/ec2/v2/
home#Instances:.
2. Select the check box next to your existing web server instance.
3. Choose Actions, Image, and then Create Image.
4. In the Create Image dialog box, do the following:
a. For Image name, type a name for the image.
b. For Image description, type a description for the image.
c. Choose Create Image. This action reboots your existing web server.
d. Choose the View pending image ami-<AMI ID> link.
232
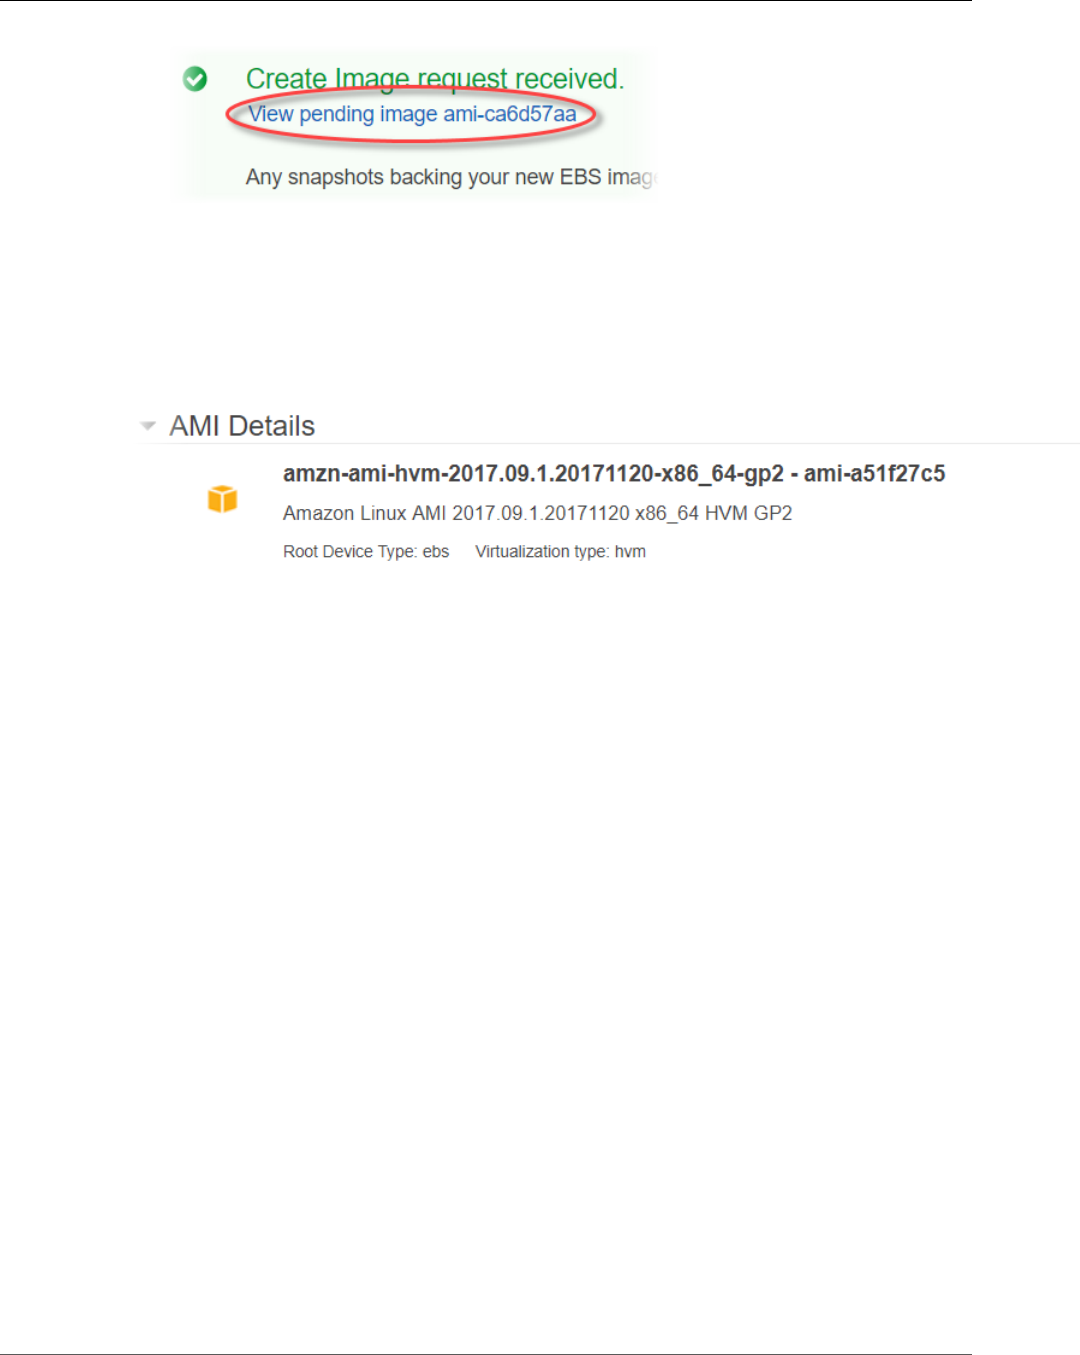
AWS CloudHSM User Guide
SSL/TLS Offload on Windows
In the Status column, note your image status. When your image status is available (this might
take several minutes), go to the next step.
5. In the navigation pane, choose Instances.
6. Select the check box next to your existing web server.
7. Choose Actions and choose Launch More Like This.
8. Choose Edit AMI.
9. In the left navigation pane, choose My AMIs. Then clear the text in the search box.
10. Next to your web server image, choose Select.
11. Choose Yes, I want to continue with this AMI (<image name> - ami-<AMI ID>).
12. Choose Next.
13. Select an instance type, and then choose Next: Configure Instance Details.
14. For Step 3: Configure Instance Details, do the following:
a. For Network, choose the VPC that contains your existing web server.
b. For Subnet, choose the public subnet that you created for the second web server.
c. For Auto-assign Public IP, chooseEnable.
d. Change the remaining instance details as preferred. Then choose Next: Add Storage.
15. Change the storage settings as preferred. Then choose Next: Add Tags.
16. Add or edit tags as preferred. Then choose Next: Configure Security Group.
17. For Step 6: Configure Security Group, do the following:
a. For Assign a security group, choose Select an existing security group.
b. Select the check box next to the security group named cloudhsm-<cluster ID>-sg. AWS
CloudHSM created this security group on your behalf when you created the cluster (p. 21). You
must choose this security group to allow the web server instance to connect to the HSMs in the
cluster.
c. Select the check box next to the security group that allows inbound HTTPS traffic. You created
this security group previously (p. 230).
d. (Optional) Select the check box next to a security group that allows inbound SSH (for Linux) or
RDP (for Windows) traffic from your network. That is, the security group must allow inbound
TCP traffic on port 22 (for SSH on Linux) or port 3389 (for RDP on Windows). Otherwise, you
cannot connect to your client instance. If you don't have a security group like this, you must
create one and then assign it to your client instance later.
Choose Review and Launch.
233

AWS CloudHSM User Guide
SSL/TLS Offload on Windows
18. Review your instance details, and then choose Launch.
19. Choose whether to launch your instance with an existing key pair, create a new key pair, or launch
your instance without a key pair.
• To use an existing key pair, do the following:
1. Choose Choose an existing key pair.
2. For Select a key pair, choose the key pair to use.
3. Select the check box next to I acknowledge that I have access to the selected private key file
(<private key file name>.pem), and that without this file, I won't be able to log into
my instance.
• To create a new key pair, do the following:
1. Choose Create a new key pair.
2. For Key pair name, type a key pair name.
3. Choose Download Key Pair and save the private key file in a secure and accessible location.
Warning
You cannot download the private key file again after this point. If you do not download
the private key file now, you will be unable to access the client instance.
• To launch your instance without a key pair, do the following:
1. Choose Proceed without a key pair.
2. Select the check box next to I acknowledge that I will not be able to connect to this instance
unless I already know the password built into this AMI.
Choose Launch Instances.
Create the Load Balancer
Complete the following steps to create an Elastic Load Balancing load balancer that routes HTTPS traffic
to your web servers.
To create a load balancer
1. Open the Load Balancers section of the Amazon EC2 console at https://console.aws.amazon.com/
ec2/v2/home#LoadBalancers:.
2. Choose Create Load Balancer.
3. In the Network Load Balancer section, choose Create.
4. For Step 1: Configure Load Balancer, do the following:
a. For Name, type a name for the load balancer that you are creating.
b. In the Listeners section, for Load Balancer Port, change the value to 443.
c. In the Availability Zones section, for VPC, choose the VPC that contains your web servers.
d. In the Availability Zones section, choose the subnets that contain your web servers.
e. Choose Next: Configure Routing.
5. For Step 2: Configure Routing, do the following:
a. For Name, type a name for the target group that you are creating.
b. For Port, change the value to 443.
c. Choose Next: Register Targets.
6. For Step 3: Register Targets, do the following:
a. In the Instances section, select the check boxes next to your web server instances. Then choose
Add to registered.
234

AWS CloudHSM User Guide
SSL/TLS Offload on Windows
b. Choose Next: Review.
7. Review your load balancer details, then choose Create.
8. When the load balancer has been successfully created, choose Close.
After you complete the preceding steps, the Amazon EC2 console shows your Elastic Load Balancing load
balancer.
When your load balancer's state is active, you can verify that the load balancer is working. That is, you
can verify that it's sending HTTPS traffic to your web servers with SSL/TLS offload with AWS CloudHSM.
You can do this with a web browser or a tool such as OpenSSL s_client.
To verify that your load balancer is working with a web browser
1. In the Amazon EC2 console, find the DNS name for the load balancer that you just created. Then
select the DNS name and copy it.
2. Use a web browser such as Mozilla Firefox or Google Chrome to connect to your load balancer using
the load balancer's DNS name. Ensure that the URL in the address bar begins with https://.
Tip
You can use a DNS service such as Amazon Route53 to route your website's domain name
(for example, https://www.example.com/) to your web server. For more information, see
Routing Traffic to an Amazon EC2 Instance in the Amazon Route53 Developer Guide or in
the documentation for your DNS service.
3. Use your web browser to view the web server certificate. For more information, see the following:
• For Mozilla Firefox, see View a Certificate on the Mozilla Support website.
• For Google Chrome, see Understand Security Issues on the Google Tools for Web Developers
website.
Other web browsers might have similar features that you can use to view the web server certificate.
4. Ensure that the certificate is the one that you configured the web server to use.
To verify that your load balancer is working with OpenSSL s_client
1. Use the following OpenSSL command to connect to your load balancer using HTTPS. Replace <DNS
name> with the DNS name of your load balancer.
openssl s_client -connect <DNS name>:443
Tip
You can use a DNS service such as Amazon Route53 to route your website's domain name
(for example, https://www.example.com/) to your web server. For more information, see
Routing Traffic to an Amazon EC2 Instance in the Amazon Route53 Developer Guide or in
the documentation for your DNS service.
2. Ensure that the certificate is the one that you configured the web server to use.
You now have a website that is secured with HTTPS, with the web server's private key stored in an HSM
in your AWS CloudHSM cluster. Your website has two web servers and a load balancer to help improve
efficiency and availability.
235

AWS CloudHSM User Guide
Windows Server CA
Configure Windows Server as a Certificate
Authority (CA) with AWS CloudHSM
In a public key infrastructure (PKI), a certificate authority (CA) is a trusted entity that issues digital
certificates. These digital certificates bind a public key to an identity (a person or organization) by means
of public key cryptography and digital signatures. To operate a CA, you must maintain trust by protecting
the private key that signs the certificates issued by your CA. You can store the private key in the HSM in
your AWS CloudHSM cluster, and use the HSM to perform the cryptographic signing operations.
In this tutorial, you use Windows Server and AWS CloudHSM to configure a CA. You install the AWS
CloudHSM client software for Windows on your Windows server, then add the Active Directory
Certificate Services (AD CS) role to your Windows Server. When you configure this role, you use an AWS
CloudHSM key storage provider (KSP) to create and store the CA's private key on your AWS CloudHSM
cluster. The KSP is the bridge that connects your Windows server to your AWS CloudHSM cluster. In the
last step, you sign a certificate signing request (CSR) with your Windows Server CA.
For more information, see the following topics:
Topics
•Windows Server CA Step 1: Set Up the Prerequisites (p. 236)
•Windows Server CA Step 2: Create a Windows Server CA with AWS CloudHSM (p. 237)
•Windows Server CA Step 3: Sign a Certificate Signing Request (CSR) with Your Windows Server CA
with AWS CloudHSM (p. 238)
Windows Server CA Step 1: Set Up the Prerequisites
To set up Windows Server as a certificate authority (CA) with AWS CloudHSM, you need the following:
• An active AWS CloudHSM cluster with at least one HSM.
• An Amazon EC2 instance running a Windows Server operating system with the AWS CloudHSM client
software for Windows installed. This tutorial uses Microsoft Windows Server 2016.
• A cryptographic user (CU) to own and manage the CA's private key on the HSM.
To set up the prerequisites for a Windows Server CA with AWS CloudHSM
1. Complete the steps in Getting Started (p. 15). When you launch the Amazon EC2 client, choose a
Windows Server AMI. This tutorial uses Microsoft Windows Server 2016. When you complete these
steps, you have an active cluster with at least one HSM. You also have an Amazon EC2 client instance
running Windows Server with the AWS CloudHSM client software for Windows installed.
2. (Optional) Add more HSMs to your cluster. For more information, see Adding an HSM (p. 42).
3. Connect to your client instance. For more information, see Connect to Your Instance in the Amazon
EC2 User Guide for Windows Instances.
4. To create a cryptographic user (CU) on your HSM, do the following:
a. Start the AWS CloudHSM client (p. 77).
b. Update the cloudhsm_mgmt_util configuration file (p. 77).
c. Start cloudhsm_mgmt_util (p. 78).
d. Enable end-to-end encryption (p. 79).
e. Log in to the HSMs (p. 80) with the user name and password of a crypto officer (CO).
f. Create a crypto user (CU) (p. 53). Keep track of the CU user name and password. You will need
them to complete the next step.
236

AWS CloudHSM User Guide
Create Windows Server CA
5. Set the Windows system environment variables (p. 204), using the CU user name and password that
you created in the previous step.
To create a Windows Server CA with AWS CloudHSM, go to Create Windows Server CA (p. 237).
Windows Server CA Step 2: Create a Windows Server
CA with AWS CloudHSM
To create a Windows Server CA, you add the Active Directory Certificate Services (AD CS) role to your
Windows Server. When you add this role, you use an AWS CloudHSM key storage provider (KSP) to create
and store the CA's private key on your AWS CloudHSM cluster.
Note
When you create your Windows Server CA, you can choose to create a root CA or a subordinate
CA. You typically make this decision based on the design of your public key infrastructure and
the security policies of your organization. This tutorial explains how to create a root CA for
simplicity.
To add the AD CS role to your Windows Server and create the CA's private key
1. If you haven't already done so, connect to your Windows server. For more information, see Connect
to Your Instance in the Amazon EC2 User Guide for Windows Instances.
2. On your Windows server, start Server Manager.
3. In the Server Manager dashboard, choose Add roles and features.
4. Read the Before you begin information, and then choose Next.
5. For Installation Type, choose Role-based or feature-based installation. Then choose Next.
6. For Server Selection, choose Select a server from the server pool. Then choose Next.
7. For Server Roles, do the following:
a. Select Active Directory Certificate Services.
b. For Add features that are required for Active Directory Certificate Services, choose Add
Features.
c. Choose Next to finish selecting server roles.
8. For Features, accept the defaults, and then choose Next.
9. For AD CS, do the following:
a. Choose Next.
b. Select Certification Authority, and then choose Next.
10. For Confirmation, read the confirmation information, and then choose Install. Do not close the
window.
11. Choose the highlighted Configure Active Directory Certificate Services on the destination server
link.
12. For Credentials, verify or change the credentials displayed. Then choose Next.
13. For Role Services, select Certification Authority. Then choose Next.
14. For Setup Type, select Standalone CA. Then choose Next.
15. For CA Type, select Root CA. Then choose Next.
Note
You can choose to create a root CA or a subordinate CA based on the design of your public
key infrastructure and the security policies of your organization. This tutorial explains how
to create a root CA for simplicity.
16. For Private Key, select Create a new private key. Then choose Next.
237

AWS CloudHSM User Guide
Sign a CSR
17. For Cryptography, do the following:
a. For Select a cryptographic provider, choose one of the Cavium Key Storage Provider options
from the menu. These are the AWS CloudHSM key storage providers. For example, you can
choose RSA#Cavium Key Storage Provider.
b. For Key length, choose one of the key length options.
c. For Select the hash algorithm for signing certificates issued by this CA, choose one of the
hash algorithm options.
Choose Next.
18. For CA Name, do the following:
a. (Optional) Edit the common name.
b. (Optional) Type a distinguished name suffix.
Choose Next.
19. For Validity Period, specify a time period in years, months, weeks, or days. Then choose Next.
20. For Certificate Database, you can accept the default values, or optionally change the location for
the database and the database log. Then choose Next.
21. For Confirmation, review the information about your CA; Then choose Configure.
22. Choose Close, and then choose Close again.
You now have a Windows Server CA with AWS CloudHSM. To learn how to sign a certificate signing
request (CSR) with your CA, go to Sign a CSR (p. 238).
Windows Server CA Step 3: Sign a Certificate Signing
Request (CSR) with Your Windows Server CA with
AWS CloudHSM
You can use your Windows Server CA with AWS CloudHSM to sign a certificate signing request (CSR).
To complete these steps, you need a valid CSR. You can create a CSR in several ways, including the
following:
• Using OpenSSL
• Using the Windows Server Internet Information Services (IIS) Manager
• Using the certificates snap-in in the Microsoft Management Console
• Using the certreq command line utility on Windows
The steps for creating a CSR are outside the scope of this tutorial. When you have a CSR, you can sign it
with your Windows Server CA.
To sign a CSR with your Windows Server CA
1. If you haven't already done so, connect to your Windows server. For more information, see Connect
to Your Instance in the Amazon EC2 User Guide for Windows Instances.
2. On your Windows server, start Server Manager.
3. In the Server Manager dashboard, in the top right corner, choose Tools, Certification Authority.
4. In the Certification Authority window, choose your computer name.
5. From the Action menu, choose All Tasks, Submit new request.
238
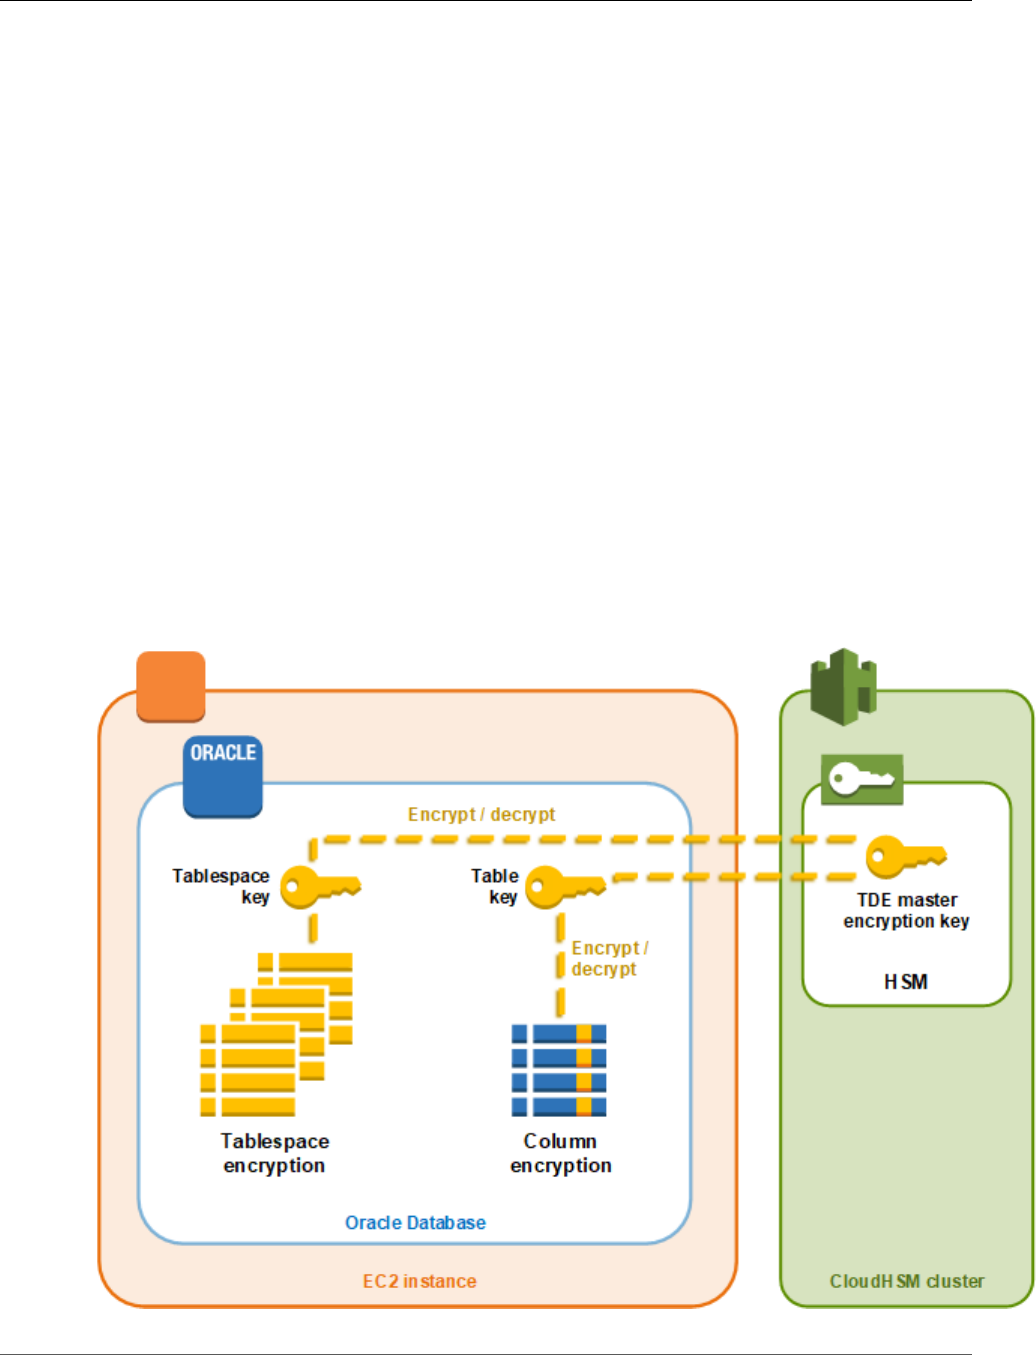
AWS CloudHSM User Guide
Oracle Database Encryption
6. Select your CSR file, and then choose Open.
7. In the Certification Authority window, double-click Pending Requests.
8. Select the pending request. Then, from the Action menu, choose All Tasks, Issue.
9. In the Certification Authority window, double-click Issued Requests to view the signed certificate.
10. (Optional) To export the signed certificate to a file, complete the following steps:
a. In the Certification Authority window, double-click the certificate.
b. Choose the Details tab, and then choose Copy to File.
c. Follow the instructions in the Certificate Export Wizard.
You now have a Windows Server CA with AWS CloudHSM, and a valid certificate signed by the Windows
Server CA.
Oracle Database Transparent Data Encryption
(TDE) with AWS CloudHSM
Some versions of Oracle's database software offer a feature called Transparent Data Encryption (TDE).
With TDE, the database software encrypts data before storing it on disk. The data in the database's table
columns or tablespaces is encrypted with a table key or tablespace key. These keys are encrypted with
the TDE master encryption key. You can store the TDE master encryption key in the HSMs in your AWS
CloudHSM cluster, which provides additional security.
239

AWS CloudHSM User Guide
Set Up Prerequisites
In this solution, you use Oracle Database installed on an Amazon EC2 instance. Oracle Database
integrates with the AWS CloudHSM software library for PKCS #11 (p. 183) to store the TDE master key in
the HSMs in your cluster.
Important
You cannot use an Oracle instance in Amazon Relational Database Service (Amazon RDS) to
integrate with AWS CloudHSM. You must install Oracle Database on an Amazon EC2 instance.
For information about integrating an Oracle instance in Amazon RDS with AWS CloudHSM
Classic, see Using AWS CloudHSM Classic to Store Amazon RDS Oracle TDE Keys in the Amazon
RDS User Guide.
Complete the following steps to accomplish Oracle TDE integration with AWS CloudHSM.
To configure Oracle TDE integration with AWS CloudHSM
1. Follow the steps in Set Up Prerequisites (p. 240) to prepare your environment.
2. Follow the steps in Configure the Database (p. 241) to configure Oracle Database to integrate with
your AWS CloudHSM cluster.
Oracle TDE with AWS CloudHSM: Set Up the
Prerequisites
To accomplish Oracle TDE integration with AWS CloudHSM, you need the following:
• An active AWS CloudHSM cluster with at least one HSM.
• An Amazon EC2 instance running the Amazon Linux operating system with the following software
installed:
• The AWS CloudHSM client and command line tools.
• The AWS CloudHSM software library for PKCS #11.
• Oracle Database. AWS CloudHSM supports Oracle TDE integration with Oracle Database versions 11
and 12.
• A cryptographic user (CU) to own and manage the TDE master encryption key on the HSMs in your
cluster.
Complete the following steps to set up all of the prerequisites.
To set up the prerequisites for Oracle TDE integration with AWS CloudHSM
1. Complete the steps in Getting Started (p. 15). After you do so, you'll have an active cluster with one
HSM. You will also have an Amazon EC2 instance running the Amazon Linux operating system. The
AWS CloudHSM client and command line tools will also be installed and configured.
2. (Optional) Add more HSMs to your cluster. For more information, see Adding an HSM (p. 42).
3. Connect to your Amazon EC2 client instance and do the following:
a. Install the AWS CloudHSM software library for PKCS #11 (p. 183).
b. Install Oracle Database. For more information, see the Oracle Database documentation. AWS
CloudHSM supports Oracle TDE integration with Oracle Database versions 11 and 12.
c. Start the AWS CloudHSM client (p. 77).
d. Update the configuration file for the cloudhsm_mgmt_util command line tool (p. 77).
e. Use the cloudhsm_mgmt_util command line tool to create a cryptographic user (CU) on your
cluster. For more information, see Managing HSM Users (p. 53).
240

AWS CloudHSM User Guide
Configure the Database
After you complete these steps, you can Configure the Database (p. 241).
Oracle TDE with AWS CloudHSM: Configure the
Database and Generate the Master Encryption Key
To integrate Oracle TDE with your AWS CloudHSM cluster, see the following topics:
1. Update the Oracle Database Configuration (p. 241) to use the HSMs in your cluster as the external
security module. For information about external security modules, see Introduction to Transparent
Data Encryption in the Oracle Database Advanced Security Guide.
2. Generate the Oracle TDE Master Encryption Key (p. 242) on the HSMs in your cluster.
Topics
•Update the Oracle Database Configuration (p. 241)
•Generate the Oracle TDE Master Encryption Key (p. 242)
Update the Oracle Database Configuration
To update the Oracle Database configuration to use an HSM in your cluster as the external security
module, complete the following steps. For information about external security modules, see Introduction
to Transparent Data Encryption in the Oracle Database Advanced Security Guide.
To update the Oracle configuration
1. Connect to your Amazon EC2 client instance. This is the instance where you installed Oracle
Database.
2. Make a backup copy of the file named sqlnet.ora. For the location of this file, see the Oracle
documentation.
3. Use a text editor to edit the file named sqlnet.ora. Add the following line. If an existing line in the
file begins with encryption_wallet_location, replace the existing line with the following one.
encryption_wallet_location=(source=(method=hsm))
Save the file.
4. Run the following command to create the directory where Oracle Database expects to find the
library file for the AWS CloudHSM PKCS #11 software library.
sudo mkdir -p /opt/oracle/extapi/64/hsm
5. Use one of the following commands to copy the AWS CloudHSM software library for PKCS #11 file
to the directory that you created in the previous step.
• If you installed the PKCS #11 library without Redis, run the following command.
sudo cp /opt/cloudhsm/lib/libcloudhsm_pkcs11_standard.so /opt/oracle/extapi/64/hsm/
• If you installed the PKCS #11 library with Redis, run the following command.
sudo cp /opt/cloudhsm/lib/libcloudhsm_pkcs11_redis.so /opt/oracle/extapi/64/hsm/
241
AWS CloudHSM User Guide
Configure the Database
Note
The /opt/oracle/extapi/64/hsm directory must contain only one library file. Copy only
the library file that corresponds to the way you installed the PKCS #11 library (p. 184). If
additional files exist in that directory, remove them.
6. Run the following command to change the ownership of the /opt/oracle directory and
everything inside it.
sudo chown -R oracle:dba /opt/oracle
7. Start the Oracle Database.
Generate the Oracle TDE Master Encryption Key
To generate the Oracle TDE master key on the HSMs in your cluster, complete the steps in the following
procedure.
To generate the master key
1. Use the sqlplus command to open Oracle SQL*Plus. When prompted, type the system password that
you set when you installed Oracle Database.
2. Run the SQL statement that creates the master encryption key, as shown in the following examples.
Use the statement that corresponds to your version of Oracle Database. Replace <CU user name>
with the user name of the cryptographic user (CU). Replace <password> with the CU password.
Important
Run the following command only once. Each time the command is run, it creates a new
master encryption key.
• For Oracle Database version 11, run the following SQL statement.
SQL> alter system set encryption key identified by "<CU user name>:<password>";
• For Oracle Database version 12, run the following SQL statement.
SQL> administer key management set key identified by "<CU user name>:<password>";
If the response is System altered or keystore altered, then you successfully generated and
set the master key for Oracle TDE.
3. (Optional) Run the following command to verify the status of the Oracle wallet.
SQL> select * from v$encryption_wallet;
If the wallet is not open, use one of the following commands to open it. Replace <CU user name>
with the name of the cryptographic user (CU). Replace <password> with the CU password.
• For Oracle 11, run the following command to open the wallet.
SQL> alter system set encryption wallet open identified by "<CU user
name>:<password>";
To manually close the wallet, run the following command.
SQL> alter system set encryption wallet close identified by "<CU user
name>:<password>";
242

AWS CloudHSM User Guide
Configure the Database
• For Oracle 12, run the following command to open the wallet.
SQL> administer key management set keystore open identified by "<CU user
name>:<password>";
To manually close the wallet, run the following command.
SQL> administer key management set keystore close identified by "<CU user
name>:<password>";
243

AWS CloudHSM User Guide
Getting Client Logs
Monitoring AWS CloudHSM Logs
AWS CloudHSM is integrated with the following AWS services to provide different kinds of logs.
AWS CloudTrail for API logs
AWS CloudHSM is integrated with AWS CloudTrail, a service that records all AWS CloudHSM API
calls in your AWS account. CloudTrail records these calls in log files that are delivered to an Amazon
Simple Storage Service (Amazon S3) bucket of your choice. For example, when you create and delete
AWS CloudHSM clusters, create and delete HSMs in a cluster, tag AWS CloudHSM resources, and
more, the corresponding API calls are recorded in CloudTrail log files.
Amazon CloudWatch Logs for HSM Audit Logs
AWS CloudHSM sends the audit logs recorded by your HSM instances to Amazon CloudWatch Logs,
a service that stores, organizes, and displays log data from multiple sources. For example, when you
create and delete HSM users, change user passwords, create and delete keys, and more, these events
are collected and stored in CloudWatch Logs.
For more information, see the following topics.
Topics
•Getting AWS CloudHSM Client Logs (p. 244)
•Logging AWS CloudHSM API Calls with AWS CloudTrail (p. 245)
•Monitoring AWS CloudHSM Audit Logs in Amazon CloudWatch Logs (p. 247)
Getting AWS CloudHSM Client Logs
You can retrieve the logs generated by the AWS CloudHSM client. These logs contain detailed
information from the AWS CloudHSM client daemon. The location of the logs depends on the operating
system of the Amazon EC2 client instance where you run the AWS CloudHSM client.
Amazon Linux
In Amazon Linux, the AWS CloudHSM client logs are written to the file named /opt/cloudhsm/
run/cloudhsm_client.log. You can use logrotate or a similar tool to rotate and manage these
logs.
Amazon Linux 2
In Amazon Linux 2, the AWS CloudHSM Client logs are collected and stored in the journal. You can
use journalctl to view and manage these logs. For example, use the following command to view the
AWS CloudHSM Client logs.
journalctl -f -u cloudhsm-client
CentOS 6
In CentOS 6, the AWS CloudHSM client logs are written to the file named /opt/cloudhsm/run/
cloudhsm_client.log. You can use logrotate or a similar tool to rotate and manage these logs.
CentOS 7
In CentOS 7, the AWS CloudHSM Client logs are collected and stored in the journal. You can use
journalctl to view and manage these logs. For example, use the following command to view the AWS
CloudHSM Client logs.
244
AWS CloudHSM User Guide
Logging AWS CloudHSM API Calls with AWS CloudTrail
journalctl -f -u cloudhsm-client
RHEL 6
In Red Hat Enterprise Linux 6, the AWS CloudHSM client logs are written to the file named /opt/
cloudhsm/run/cloudhsm_client.log. You can use logrotate or a similar tool to rotate and
manage these logs.
RHEL 7
In Red Hat Enterprise Linux 7, the AWS CloudHSM Client logs are collected and stored in the journal.
You can use journalctl to view and manage these logs. For example, use the following command to
view the AWS CloudHSM Client logs.
journalctl -f -u cloudhsm-client
Ubuntu 16.04
In Ubuntu, the AWS CloudHSM Client logs are collected and stored in the journal. You can use
journalctl to view and manage these logs. For example, use the following command to view the AWS
CloudHSM Client logs.
journalctl -f -u cloudhsm-client
Windows Server
In Microsoft Windows Server, the AWS CloudHSM client logs are not written to a file. The logs
are displayed at the command prompt or in the PowerShell window where you started the AWS
CloudHSM client.
Logging AWS CloudHSM API Calls with AWS
CloudTrail
AWS CloudHSM is integrated with AWS CloudTrail, a service that provides a record of actions taken by
a user, role, or an AWS service in AWS CloudHSM. CloudTrail captures all API calls for AWS CloudHSM
as events. The calls captured include calls from the AWS CloudHSM console and code calls to the AWS
CloudHSM API operations. If you create a trail, you can enable continuous delivery of CloudTrail events
to an Amazon S3 bucket, including events for AWS CloudHSM. If you don't configure a trail, you can still
view the most recent events in the CloudTrail console in Event history. Using the information collected
by CloudTrail, you can determine the request that was made to AWS CloudHSM, the IP address from
which the request was made, who made the request, when it was made, and additional details.
To learn more about CloudTrail, see the AWS CloudTrail User Guide. For a full list of AWS CloudHSM API
operations, see Actions in the AWS CloudHSM API Reference.
AWS CloudHSM Information in CloudTrail
CloudTrail is enabled on your AWS account when you create the account. When activity occurs in AWS
CloudHSM, that activity is recorded in a CloudTrail event along with other AWS service events in Event
history. You can view, search, and download recent events in your AWS account. For more information,
see Viewing Events with CloudTrail Event History.
For an ongoing record of events in your AWS account, including events for AWS CloudHSM, create a
trail. A trail enables CloudTrail to deliver log files to an Amazon S3 bucket. By default, when you create
a trail in the console, the trail applies to all AWS Regions. The trail logs events from all Regions in the
AWS partition and delivers the log files to the Amazon S3 bucket that you specify. Additionally, you can
245

AWS CloudHSM User Guide
Understanding AWS CloudHSM Log File Entries
configure other AWS services to further analyze and act upon the event data collected in CloudTrail logs.
For more information, see the following:
•Overview for Creating a Trail
•CloudTrail Supported Services and Integrations
•Configuring Amazon SNS Notifications for CloudTrail
•Receiving CloudTrail Log Files from Multiple Regions and Receiving CloudTrail Log Files from Multiple
Accounts
CloudTrail logs all AWS CloudHSM operations, including read-only operations, such as
DescribeClusters and ListTags, and management operations, such as InitializeCluster,
CreatHsm, and DeleteBackup.
Every event or log entry contains information about who generated the request. The identity
information helps you determine the following:
• Whether the request was made with root or AWS Identity and Access Management (IAM) user
credentials.
• Whether the request was made with temporary security credentials for a role or federated user.
• Whether the request was made by another AWS service.
For more information, see the CloudTrail userIdentity Element.
Understanding AWS CloudHSM Log File Entries
A trail is a configuration that enables delivery of events as log files to an Amazon S3 bucket that you
specify. CloudTrail log files contain one or more log entries. An event represents a single request from
any source and includes information about the requested action, the date and time of the action, request
parameters, and so on. CloudTrail log files aren't an ordered stack trace of the public API calls, so they
don't appear in any specific order.
The following example shows a CloudTrail log entry that demonstrates the AWS CloudHSM CreateHsm
action.
{
"eventVersion": "1.05",
"userIdentity": {
"type": "AssumedRole",
"principalId": "AROAJZVM5NEGZSTCITAMM:ExampleSession",
"arn": "arn:aws:sts::111122223333:assumed-role/AdminRole/ExampleSession",
"accountId": "111122223333",
"accessKeyId": "ASIAIY22AX6VRYNBGJSA",
"sessionContext": {
"attributes": {
"mfaAuthenticated": "false",
"creationDate": "2017-07-11T03:48:44Z"
},
"sessionIssuer": {
"type": "Role",
"principalId": "AROAJZVM5NEGZSTCITAMM",
"arn": "arn:aws:iam::111122223333:role/AdminRole",
"accountId": "111122223333",
"userName": "AdminRole"
}
}
},
"eventTime": "2017-07-11T03:50:45Z",
"eventSource": "cloudhsm.amazonaws.com",
246

AWS CloudHSM User Guide
Monitoring Audit Logs
"eventName": "CreateHsm",
"awsRegion": "us-west-2",
"sourceIPAddress": "205.251.233.179",
"userAgent": "aws-internal/3",
"requestParameters": {
"availabilityZone": "us-west-2b",
"clusterId": "cluster-fw7mh6mayb5"
},
"responseElements": {
"hsm": {
"eniId": "eni-65338b5a",
"clusterId": "cluster-fw7mh6mayb5",
"state": "CREATE_IN_PROGRESS",
"eniIp": "10.0.2.7",
"hsmId": "hsm-6lz2hfmnzbx",
"subnetId": "subnet-02c28c4b",
"availabilityZone": "us-west-2b"
}
},
"requestID": "1dae0370-65ec-11e7-a770-6578d63de907",
"eventID": "b73a5617-8508-4c3d-900d-aa8ac9b31d08",
"eventType": "AwsApiCall",
"recipientAccountId": "111122223333"
}
Monitoring AWS CloudHSM Audit Logs in Amazon
CloudWatch Logs
When an HSM in your account receives a command from the AWS CloudHSM command line tools (p. 74)
or software libraries (p. 183), it records its execution of the command in audit log form. The HSM audit
logs include all client-initiated management commands (p. 260), including those that create and delete
the HSM, log into and out of the HSM, and manage users and keys. These logs provide a reliable record
of actions that have changed the state of the HSM.
AWS CloudHSM collects your HSM audit logs and sends them to Amazon CloudWatch Logs on your
behalf. You can use the features of CloudWatch Logs to manage your AWS CloudHSM audit logs,
including searching and filtering the logs and exporting log data to Amazon S3. You can work with your
HSM audit logs in the Amazon CloudWatch console or use the CloudWatch Logs commands in the AWS
CLI and CloudWatch Logs SDKs.
Topics
•How Audit Logging Works (p. 247)
•Viewing Audit Logs in CloudWatch Logs (p. 248)
•Interpreting HSM Audit Logs (p. 250)
•Audit Log Reference (p. 260)
How Audit Logging Works
Audit logging is automatically enabled in all AWS CloudHSM clusters. It cannot be disabled or turned off,
and no settings can prevent AWS CloudHSM from exporting the logs to CloudWatch Logs. Each log event
has a time stamp and sequence number that indicate the order of events and help you detect any log
tampering.
Each HSM instance generates its own log. The audit logs of various HSMs, even those in the same cluster,
are likely to differ. For example, only the first HSM in each cluster records initialization of the HSM.
247
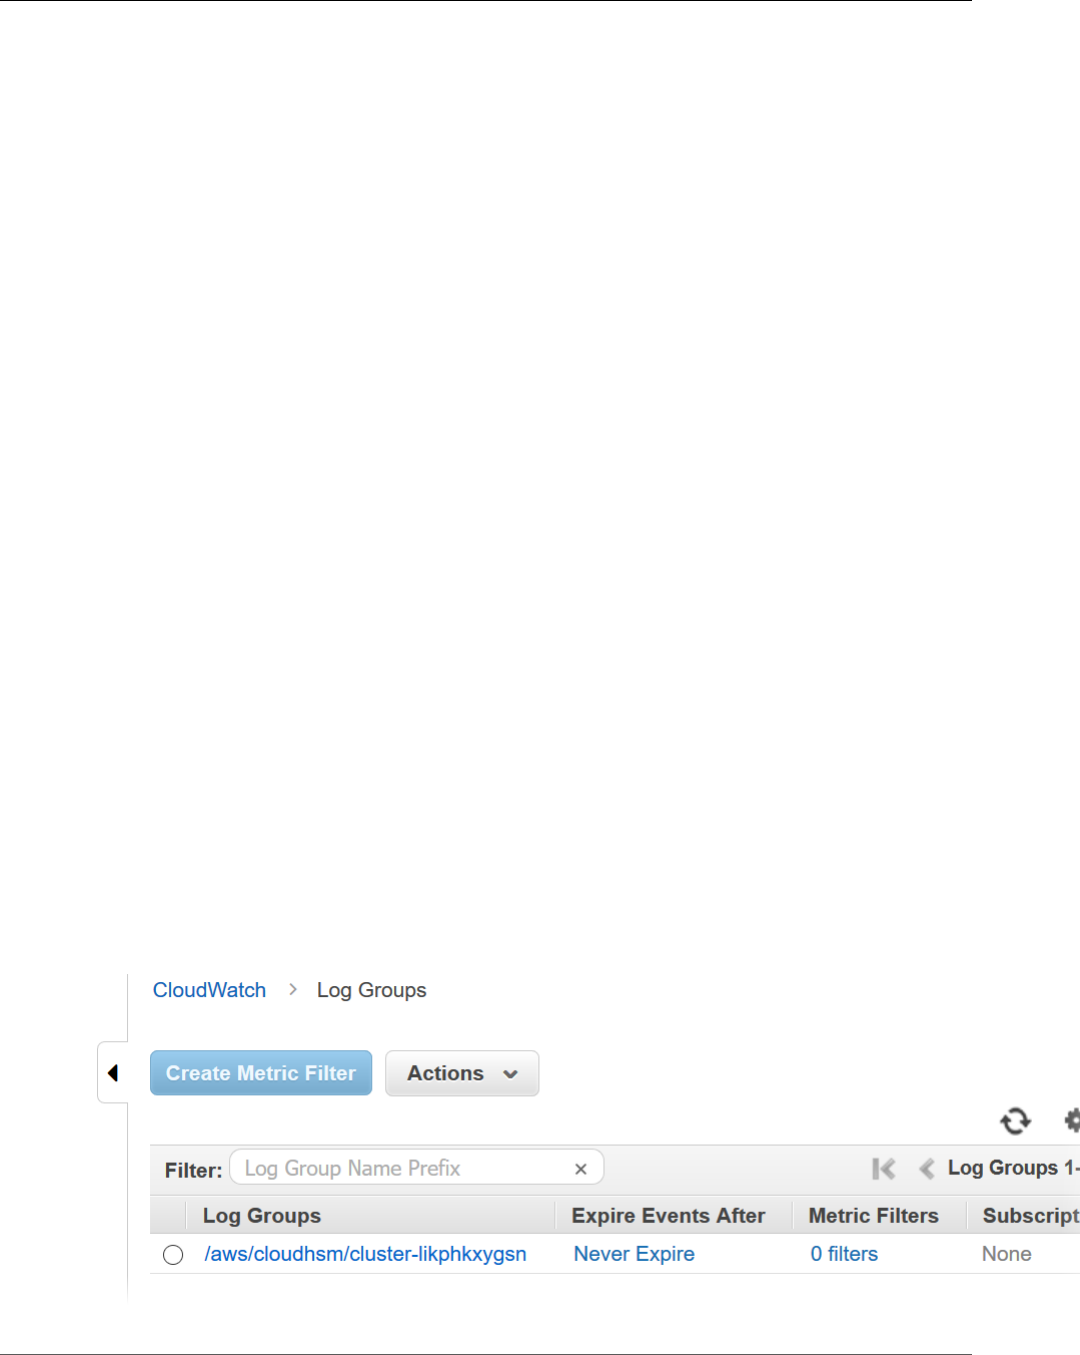
AWS CloudHSM User Guide
Viewing Audit Logs in CloudWatch Logs
Initialization events do not appear in the logs of HSMs that are cloned from backups. Similarly, when
you create a key, the HSM that generates the key records a key generation event. The other HSMs in the
cluster record an event when they receive the key via synchronization.
AWS CloudHSM collects the logs and posts them to CloudWatch Logs in your account. To communicate
with the CloudWatch Logs service on your behalf, AWS CloudHSM uses a service-linked role (p. 19). The
IAM policy that is associated with the role allows AWS CloudHSM to perform only the tasks required to
send the audit logs to CloudWatch Logs.
Important
If you created a cluster before January 20, 2018, and have not yet created an attached service-
linked role, you must manually create one. This is necessary for CloudWatch to receive audit logs
from your AWS CloudHSM cluster. For more information about service-linked role creation, see
Understanding Service-Linked Roles (p. 19), as well as Creating a Service-Linked Role in the IAM
User Guide.
Viewing Audit Logs in CloudWatch Logs
Amazon CloudWatch Logs organizes the audit logs into log groups and, within a log group, into log
streams. Each log entry is an event. AWS CloudHSM creates one log group for each cluster and one log
stream for each HSM in the cluster. You do not have to create any CloudWatch Logs components or
change any settings.
• The log group name is /aws/cloudhsm/<cluster ID>; for example /aws/cloudhsm/cluster-
likphkxygsn. When you use the log group name in a AWS CLI or PowerShell command, be sure to
enclose it in double quotation marks.
• The log stream name is the HSM ID; for example, hsm-nwbbiqbj4jk.
In general, there is one log stream for each HSM. However, any action that changes the HSM ID, such
as when an HSM fails and is replaced, creates a new log stream.
For more information about CloudWatch Logs concepts, see Concepts in the Amazon CloudWatch Logs
User Guide.
You can view the audit logs for an HSM from the CloudWatch Logs page in the AWS Management
Console, the CloudWatch Logs commands in the AWS CLI, the CloudWatch Logs PowerShell cmdlets, or
the CloudWatch Logs SDKs. For instructions, see View Log Data in the Amazon CloudWatch Logs User
Guide.
For example, the following image shows the log group for the cluster-likphkxygsn cluster in the
AWS Management Console.
248

AWS CloudHSM User Guide
Viewing Audit Logs in CloudWatch Logs
When you choose the cluster log group name, you can view the log stream for each of the HSMs in the
cluster. The following image shows the log streams for the HSMs in the cluster-likphkxygsn cluster.
When you choose an HSM log stream name, you can view the events in the audit log. For example, this
event, which has a sequence number of 0x0 and an Opcode of CN_INIT_TOKEN, is typically the first
event for the first HSM in each cluster. It records the initialization of the HSM in the cluster.
You can use all the many features in CloudWatch Logs to manage your audit logs. For example, you can
use the Filter events feature to find particular text in an event, such as the CN_CREATE_USER Opcode.
To find all events that do not include the specified text, add a minus sign (-) before the text. For example,
to find events that do not include CN_CREATE_USER, enter -CN_CREATE_USER.
249
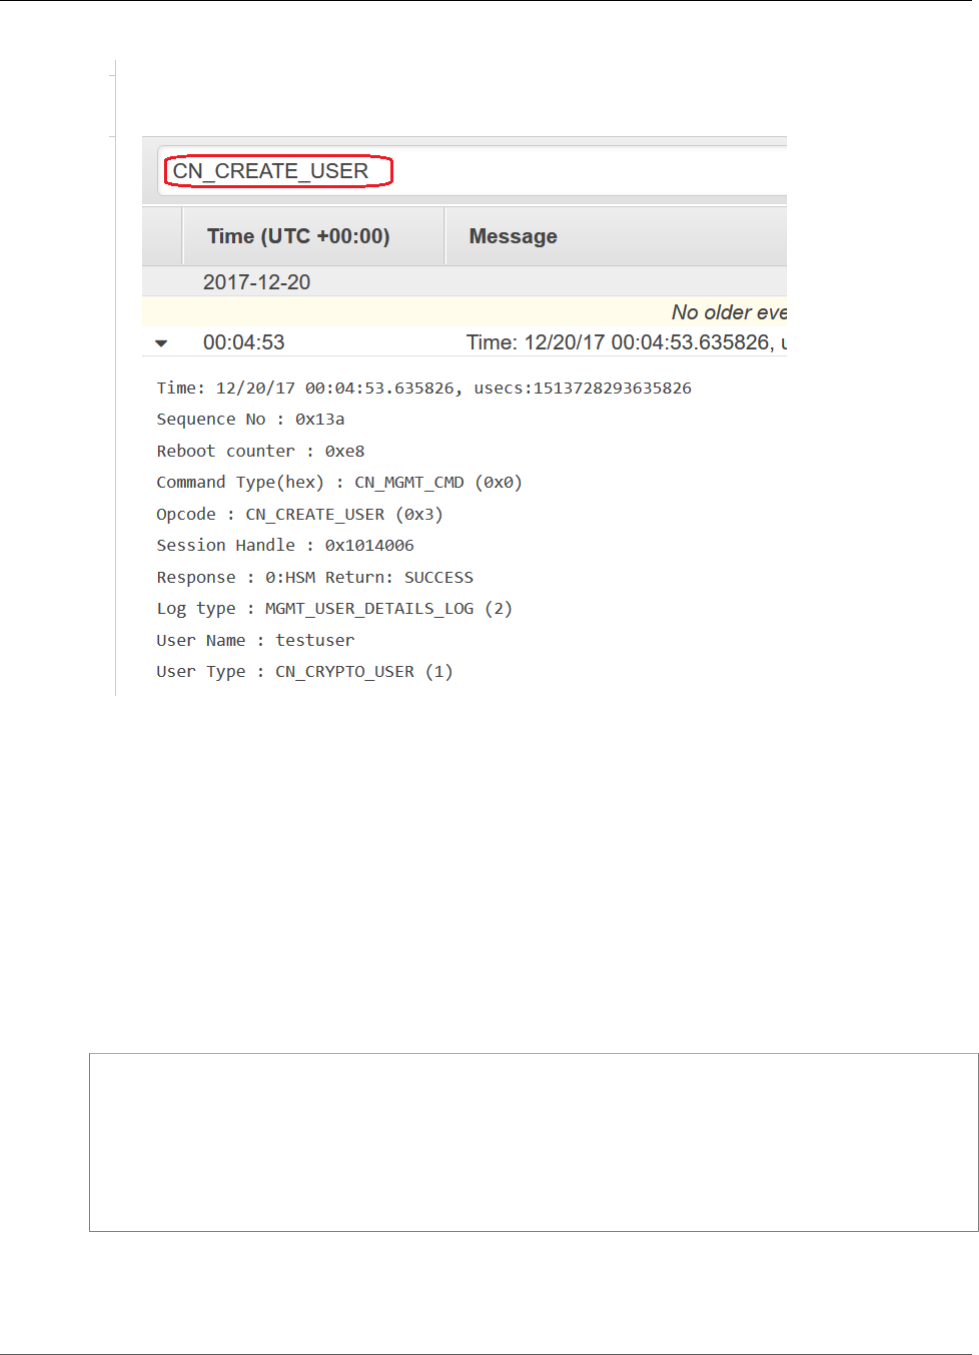
AWS CloudHSM User Guide
Interpreting HSM Audit Logs
Interpreting HSM Audit Logs
The events in the HSM audit logs have standard fields. Some event types have additional fields that
capture useful information about the event. For example, user login and user management events
include the user name and user type of the user. Key management commands include the key handle.
Several of the fields provide particularly important information. The Opcode identifies the management
command that is being recorded. The Sequence No identifies an event in the log stream and indicates
the order in which it was recorded.
For example, the following example event is the second event (Sequence No: 0x1) in the log stream
for an HSM. It shows the HSM generating a password encryption key, which is part of its startup routine.
Time: 12/19/17 21:01:17.140812, usecs:1513717277140812
Sequence No : 0x1
Reboot counter : 0xe8
Command Type(hex) : CN_MGMT_CMD (0x0)
Opcode : CN_GEN_PSWD_ENC_KEY (0x1d)
Session Handle : 0x1004001
Response : 0:HSM Return: SUCCESS
Log type : MINIMAL_LOG_ENTRY (0)
The following fields are common to every AWS CloudHSM event in the audit log.
250

AWS CloudHSM User Guide
Interpreting HSM Audit Logs
Time
The time that the event occurred in the UTC time zone. The time is displayed as a human-readable
time and Unix time in microseconds.
Reboot counter
A 32-bit persistent ordinal counter that is incremented when the HSM hardware is rebooted.
All events in a log stream have the same reboot counter value. However, the reboot counter might
not be unique to a log stream, as it can differ across different HSM instances in the same cluster.
Sequence No
A 64-bit ordinal counter that is incremented for each log event. The first event in each log stream
has a sequence number of 0x0. There should be no gaps in the Sequence No values. The sequence
number is unique only within a log stream.
Command type
A hexadecimal value that represents the category of the command. Commands in the AWS
CloudHSM log streams have a command type of CN_MGMT_CMD (0x0) or CN_CERT_AUTH_CMD (0x9).
Opcode
Identifies the management command that was executed. For a list of Opcode values in the AWS
CloudHSM audit logs, see Audit Log Reference (p. 260).
Session handle
Identifies the session in which the command was run and the event was logged.
Response
Records the response to the management command. You can search the Response field for
SUCCESS and ERROR values.
Log type
Indicates the log type of the AWS CloudHSM log that recorded the command.
•MINIMAL_LOG_ENTRY (0)
•MGMT_KEY_DETAILS_LOG (1)
•MGMT_USER_DETAILS_LOG (2)
•GENERIC_LOG
Examples of Audit Log Events
The events in a log stream record the history of the HSM from its creation to deletion. You can use the
log to review the lifecycle of your HSMs and gain insight into its operation. When you interpret the
events, note the Opcode, which indicates the management command or action, and the Sequence No,
which indicates the order of events.
Topics
•Example: Initialize the First HSM in a Cluster (p. 252)
•Login and Logout Events (p. 253)
•Example: Create and Delete Users (p. 252)
•Example: Create and Delete a Key Pair (p. 255)
•Example: Generate and Synchronize a Key (p. 256)
•Example: Export a Key (p. 258)
•Example: Import a Key (p. 259)
251
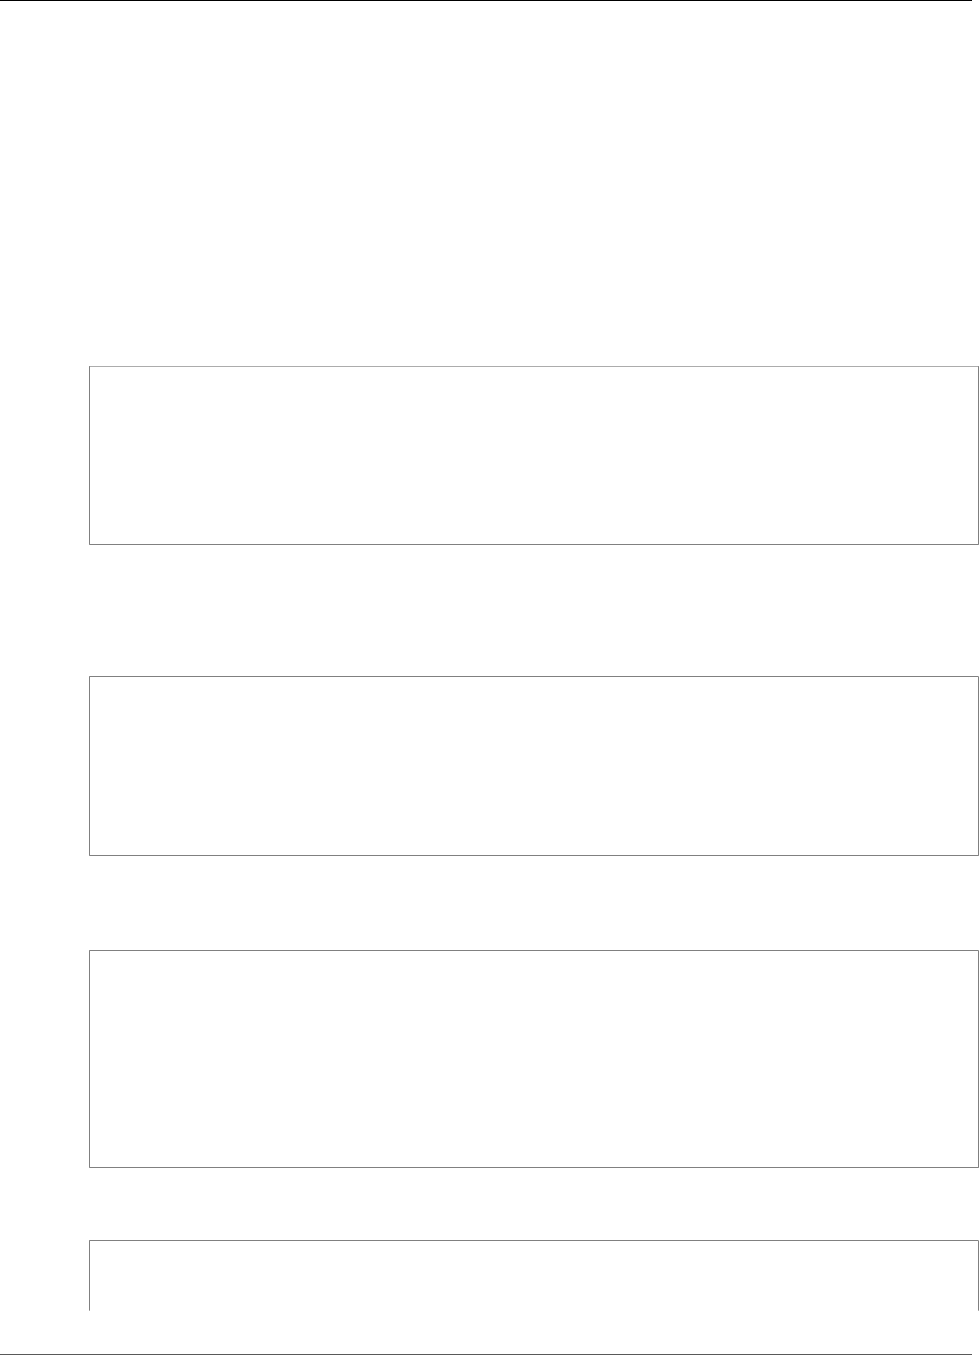
AWS CloudHSM User Guide
Interpreting HSM Audit Logs
Example: Initialize the First HSM in a Cluster
The audit log stream for the first HSM in each cluster differs significantly from the log streams of other
HSMs in the cluster. The audit log for the first HSM in each cluster records its creation and initialization.
The logs of additional HSMs in the cluster, which are generated from backups, begin with a login event.
Important
The following initialization entries will not appear in the CloudWatch logs of clusters initialized
before the release of the CloudHSM audit logging feature (August 30, 2018). For more
information, see Document History (p. 290).
The following example events appear in the log stream for the first HSM in a cluster. The first event
in the log — the one with Sequence No 0x0 — represents the command to initialize the HSM
(CN_INIT_TOKEN). The response indicates that the command was successful (Response : 0: HSM
Return: SUCCESS).
Time: 12/19/17 21:01:16.962174, usecs:1513717276962174
Sequence No : 0x0
Reboot counter : 0xe8
Command Type(hex) : CN_MGMT_CMD (0x0)
Opcode : CN_INIT_TOKEN (0x1)
Session Handle : 0x1004001
Response : 0:HSM Return: SUCCESS
Log type : MINIMAL_LOG_ENTRY (0)
The second event in this example log stream (Sequence No 0x1) records the command to create the
password encryption key that the HSM uses (CN_GEN_PSWD_ENC_KEY).
This is a typical startup sequence for the first HSM in each cluster. Because subsequent HSMs in the same
cluster are clones of the first one, they use the same password encryption key.
Time: 12/19/17 21:01:17.140812, usecs:1513717277140812
Sequence No : 0x1
Reboot counter : 0xe8
Command Type(hex) : CN_MGMT_CMD (0x0)
Opcode : CN_GEN_PSWD_ENC_KEY (0x1d)
Session Handle : 0x1004001
Response : 0:HSM Return: SUCCESS
Log type : MINIMAL_LOG_ENTRY (0)
The third event in this example log stream (Sequence No 0x2) is the creation of the appliance user
(AU) (p. 11), which is the AWS CloudHSM service. Events that involve HSM users include extra fields for
the user name and user type.
Time: 12/19/17 21:01:17.174902, usecs:1513717277174902
Sequence No : 0x2
Reboot counter : 0xe8
Command Type(hex) : CN_MGMT_CMD (0x0)
Opcode : CN_CREATE_APPLIANCE_USER (0xfc)
Session Handle : 0x1004001
Response : 0:HSM Return: SUCCESS
Log type : MGMT_USER_DETAILS_LOG (2)
User Name : app_user
User Type : CN_APPLIANCE_USER (5)
The fourth event in this example log stream (Sequence No 0x3) records the CN_INIT_DONE event,
which completes the initialization of the HSM.
Time: 12/19/17 21:01:17.298914, usecs:1513717277298914
Sequence No : 0x3
Reboot counter : 0xe8
252

AWS CloudHSM User Guide
Interpreting HSM Audit Logs
Command Type(hex) : CN_MGMT_CMD (0x0)
Opcode : CN_INIT_DONE (0x95)
Session Handle : 0x1004001
Response : 0:HSM Return: SUCCESS
Log type : MINIMAL_LOG_ENTRY (0)
You can follow the remaining events in the startup sequence, which might include several login and
logout events, and the generation of the key encryption key (KEK). The following event records the
command that changes the password of the precrypto officer (PRECO) (p. 11). This command activates
the cluster.
Time: 12/13/17 23:04:33.846554, usecs:1513206273846554
Sequence No: 0x1d
Reboot counter: 0xe8
Command Type(hex): CN_MGMT_CMD (0x0)
Opcode: CN_CHANGE_PSWD (0x9)
Session Handle: 0x2010003
Response: 0:HSM Return: SUCCESS
Log type: MGMT_USER_DETAILS_LOG (2)
User Name: admin
User Type: CN_CRYPTO_PRE_OFFICER (6)
Login and Logout Events
When interpreting your audit log, note events that record users logging and in and out of the HSM.
These events help you to determine which user is responsible for management commands that appear in
sequence between the login and logout commands.
For example, this log entry records a login by a crypto officer named admin. The sequence number, 0x0,
indicates that this is the first event in this log stream.
When a user logs into an HSM, the other HSMs in the cluster also record a login event for the user. You
can find the corresponding login events in the log streams of other HSMs in the cluster shortly after the
initial login event.
Time: 01/16/18 01:48:49.824999, usecs:1516067329824999
Sequence No : 0x0
Reboot counter : 0x107
Command Type(hex) : CN_MGMT_CMD (0x0)
Opcode : CN_LOGIN (0xd)
Session Handle : 0x7014006
Response : 0:HSM Return: SUCCESS
Log type : MGMT_USER_DETAILS_LOG (2)
User Name : admin
User Type : CN_CRYPTO_OFFICER (2)
The following example event records the admin crypto officer logging out. The sequence number, 0x2,
indicates that this is the third event in the log stream.
If the logged in user closes the session without logging out, the log stream includes an
CN_APP_FINALIZE or close session event (CN_SESSION_CLOSE), instead of a CN_LOGOUT event. Unlike
the login event, this logout event typically is recorded only by the HSM that executes the command.
Time: 01/16/18 01:49:55.993404, usecs:1516067395993404
Sequence No : 0x2
Reboot counter : 0x107
Command Type(hex) : CN_MGMT_CMD (0x0)
Opcode : CN_LOGOUT (0xe)
Session Handle : 0x7014000
Response : 0:HSM Return: SUCCESS
Log type : MGMT_USER_DETAILS_LOG (2)
253

AWS CloudHSM User Guide
Interpreting HSM Audit Logs
User Name : admin
User Type : CN_CRYPTO_OFFICER (2)
If a login attempt fails because the user name is invalid, the HSM records a CN_LOGIN event with the
user name and type provided in the login command. The response displays error message 157, which
explains that the user name does not exist.
Time: 01/24/18 17:41:39.037255, usecs:1516815699037255
Sequence No : 0x4
Reboot counter : 0x107
Command Type(hex) : CN_MGMT_CMD (0x0)
Opcode : CN_LOGIN (0xd)
Session Handle : 0xc008002
Response : 157:HSM Error: user isn't initialized or user with this name doesn't exist
Log type : MGMT_USER_DETAILS_LOG (2)
User Name : ExampleUser
User Type : CN_CRYPTO_USER (1)
If a login attempt fails because the password is invalid, the HSM records a CN_LOGIN event with the
user name and type provided in the login command. The response displays the error message with the
RET_USER_LOGIN_FAILURE error code.
Time: 01/24/18 17:44:25.013218, usecs:1516815865013218
Sequence No : 0x5
Reboot counter : 0x107
Command Type(hex) : CN_MGMT_CMD (0x0)
Opcode : CN_LOGIN (0xd)
Session Handle : 0xc008002
Response : 163:HSM Error: RET_USER_LOGIN_FAILURE
Log type : MGMT_USER_DETAILS_LOG (2)
User Name : testuser
User Type : CN_CRYPTO_USER (1)
Example: Create and Delete Users
This example shows the log events that are recorded when a crypto officer (CO) creates and deletes
users.
The first event records a CO, admin, logging into the HSM. The sequence number of 0x0 indicates that
this is the first event in the log stream. The name and type of the user who logged in are included in the
event.
Time: 01/16/18 01:48:49.824999, usecs:1516067329824999
Sequence No : 0x0
Reboot counter : 0x107
Command Type(hex) : CN_MGMT_CMD (0x0)
Opcode : CN_LOGIN (0xd)
Session Handle : 0x7014006
Response : 0:HSM Return: SUCCESS
Log type : MGMT_USER_DETAILS_LOG (2)
User Name : admin
User Type : CN_CRYPTO_OFFICER (2)
The next event in the log stream (sequence 0x1) records the CO creating a new crypto user (CU). The
name and type of the new user are included in the event.
Time: 01/16/18 01:49:39.437708, usecs:1516067379437708
Sequence No : 0x1
Reboot counter : 0x107
Command Type(hex) : CN_MGMT_CMD (0x0)
254

AWS CloudHSM User Guide
Interpreting HSM Audit Logs
Opcode : CN_CREATE_USER (0x3)
Session Handle : 0x7014006
Response : 0:HSM Return: SUCCESS
Log type : MGMT_USER_DETAILS_LOG (2)
User Name : bob
User Type : CN_CRYPTO_USER (1)
Then, the CO creates another crypto officer, alice. The sequence number indicates that this action
followed the previous one with no intervening actions.
Time: 01/16/18 01:49:55.993404, usecs:1516067395993404
Sequence No : 0x2
Reboot counter : 0x107
Command Type(hex) : CN_MGMT_CMD (0x0)
Opcode : CN_CREATE_CO (0x4)
Session Handle : 0x7014007
Response : 0:HSM Return: SUCCESS
Log type : MGMT_USER_DETAILS_LOG (2)
User Name : alice
User Type : CN_CRYPTO_OFFICER (2)
Later, the CO named admin logs in and deletes the crypto officer named alice. The HSM records a
CN_DELETE_USER event. The name and type of the deleted user are included in the event.
Time: 01/23/18 19:58:23.451420, usecs:1516737503451420
Sequence No : 0xb
Reboot counter : 0x107
Command Type(hex) : CN_MGMT_CMD (0x0)
Opcode : CN_DELETE_USER (0xa1)
Session Handle : 0x7014007
Response : 0:HSM Return: SUCCESS
Log type : MGMT_USER_DETAILS_LOG (2)
User Name : alice
User Type : CN_CRYPTO_OFFICER (2)
Example: Create and Delete a Key Pair
This example shows the events that are recorded in an HSM audit log when you create and delete a key
pair.
The following event records the crypto user (CU) named crypto_user logging in to the HSM.
Time: 12/13/17 23:09:04.648952, usecs:1513206544648952
Sequence No: 0x28
Reboot counter: 0xe8
Command Type(hex): CN_MGMT_CMD (0x0)
Opcode: CN_LOGIN (0xd)
Session Handle: 0x2014005
Response: 0:HSM Return: SUCCESS
Log type: MGMT_USER_DETAILS_LOG (2)
User Name: crypto_user
User Type: CN_CRYPTO_USER (1)
Next, the CU generates a key pair (CN_GENERATE_KEY_PAIR). The private key has key handle 131079.
The public key has key handle 131078.
Time: 12/13/17 23:09:04.761594, usecs:1513206544761594
Sequence No: 0x29
Reboot counter: 0xe8
Command Type(hex): CN_MGMT_CMD (0x0)
Opcode: CN_GENERATE_KEY_PAIR (0x19)
255

AWS CloudHSM User Guide
Interpreting HSM Audit Logs
Session Handle: 0x2014004
Response: 0:HSM Return: SUCCESS
Log type: MGMT_KEY_DETAILS_LOG (1)
Priv/Secret Key Handle: 131079
Public Key Handle: 131078
The CU immediately deletes the key pair. A CN_DESTROY_OBJECT event records the deletion of the
public key (131078).
Time: 12/13/17 23:09:04.813977, usecs:1513206544813977
Sequence No: 0x2a
Reboot counter: 0xe8
Command Type(hex): CN_MGMT_CMD (0x0)
Opcode: CN_DESTROY_OBJECT (0x11)
Session Handle: 0x2014004
Response: 0:HSM Return: SUCCESS
Log type: MGMT_KEY_DETAILS_LOG (1)
Priv/Secret Key Handle: 131078
Public Key Handle: 0
Then, a second CN_DESTROY_OBJECT event records the deletion of the private key (131079).
Time: 12/13/17 23:09:04.815530, usecs:1513206544815530
Sequence No: 0x2b
Reboot counter: 0xe8
Command Type(hex): CN_MGMT_CMD (0x0)
Opcode: CN_DESTROY_OBJECT (0x11)
Session Handle: 0x2014004
Response: 0:HSM Return: SUCCESS
Log type: MGMT_KEY_DETAILS_LOG (1)
Priv/Secret Key Handle: 131079
Public Key Handle: 0
Finally, the CU logs out.
Time: 12/13/17 23:09:04.817222, usecs:1513206544817222
Sequence No: 0x2c
Reboot counter: 0xe8
Command Type(hex): CN_MGMT_CMD (0x0)
Opcode: CN_LOGOUT (0xe)
Session Handle: 0x2014004
Response: 0:HSM Return: SUCCESS
Log type: MGMT_USER_DETAILS_LOG (2)
User Name: crypto_user
User Type: CN_CRYPTO_USER (1)
Example: Generate and Synchronize a Key
This example shows the effect of creating a key in a cluster with multiple HSMs. The key is generated
on one HSM, extracted from the HSM as a masked object, and inserted in the other HSMs as a masked
object.
Note
The client tools might fail to synchronize the key, or the command might include the min_srv
parameter, which synchronizes the key only to the specified number of HSMs. In either case, the
AWS CloudHSM service synchronizes the key to the other HSMs in the cluster. Because the HSMs
record only client-side management commands in their logs, the server-side synchronization is
not recorded in the HSM log.
First consider the log stream of the HSM that receives and executes the commands. The log stream is
named for HSM ID, hsm-abcde123456, but the HSM ID does not appear in the log events.
256

AWS CloudHSM User Guide
Interpreting HSM Audit Logs
First, the testuser crypto user (CU) logs in to the hsm-abcde123456 HSM.
Time: 01/24/18 00:39:23.172777, usecs:1516754363172777
Sequence No : 0x0
Reboot counter : 0x107
Command Type(hex) : CN_MGMT_CMD (0x0)
Opcode : CN_LOGIN (0xd)
Session Handle : 0xc008002
Response : 0:HSM Return: SUCCESS
Log type : MGMT_USER_DETAILS_LOG (2)
User Name : testuser
User Type : CN_CRYPTO_USER (1)
The CU runs an exSymKey (p. 151) command to generate a symmetric key. The hsm-abcde123456 HSM
generates a symmetric key with a key handle of 262152. The HSM records a CN_GENERATE_KEY event in
its log.
Time: 01/24/18 00:39:30.328334, usecs:1516754370328334
Sequence No : 0x1
Reboot counter : 0x107
Command Type(hex) : CN_MGMT_CMD (0x0)
Opcode : CN_GENERATE_KEY (0x17)
Session Handle : 0xc008004
Response : 0:HSM Return: SUCCESS
Log type : MGMT_KEY_DETAILS_LOG (1)
Priv/Secret Key Handle : 262152
Public Key Handle : 0
The next event in the log stream for hsm-abcde123456 records the first step in the key synchronization
process. The new key (key handle 262152) is extracted from the HSM as a masked object.
Time: 01/24/18 00:39:30.330956, usecs:1516754370330956
Sequence No : 0x2
Reboot counter : 0x107
Command Type(hex) : CN_MGMT_CMD (0x0)
Opcode : CN_EXTRACT_MASKED_OBJECT_USER (0xf0)
Session Handle : 0xc008004
Response : 0:HSM Return: SUCCESS
Log type : MGMT_KEY_DETAILS_LOG (1)
Priv/Secret Key Handle : 262152
Public Key Handle : 0
Now consider the log stream for HSM hsm-zyxwv987654, another HSM in the same cluster. This log
stream also includes a login event for the testuser CU. The time value shows that occurs shortly after
the user logs in to the hsm-abcde123456 HSM.
Time: 01/24/18 00:39:23.199740, usecs:1516754363199740
Sequence No : 0xd
Reboot counter : 0x107
Command Type(hex) : CN_MGMT_CMD (0x0)
Opcode : CN_LOGIN (0xd)
Session Handle : 0x7004004
Response : 0:HSM Return: SUCCESS
Log type : MGMT_USER_DETAILS_LOG (2)
User Name : testuser
User Type : CN_CRYPTO_USER (1)
This log stream for this HSM does not have a CN_GENERATE_KEY event. But it does have an event that
records synchronization of the key to this HSM. The CN_INSERT_MASKED_OBJECT_USER event records
the receipt of key 262152 as a masked object. Now key 262152 exists on both HSMs in the cluster.
257

AWS CloudHSM User Guide
Interpreting HSM Audit Logs
Time: 01/24/18 00:39:30.408950, usecs:1516754370408950
Sequence No : 0xe
Reboot counter : 0x107
Command Type(hex) : CN_MGMT_CMD (0x0)
Opcode : CN_INSERT_MASKED_OBJECT_USER (0xf1)
Session Handle : 0x7004003
Response : 0:HSM Return: SUCCESS
Log type : MGMT_KEY_DETAILS_LOG (1)
Priv/Secret Key Handle : 262152
Public Key Handle : 0
When the CU user logs out, this CN_LOGOUT event appears only in the log stream of the HSM that
received the commands.
Example: Export a Key
This example shows the audit log events that are recorded when a crypto user (CU) exports keys from a
cluster with multiple HSMs.
The following event records the CU (testuser) logging into key_mgmt_util (p. 119).
Time: 01/24/18 19:42:22.695884, usecs:1516822942695884
Sequence No : 0x26
Reboot counter : 0x107
Command Type(hex) : CN_MGMT_CMD (0x0)
Opcode : CN_LOGIN (0xd)
Session Handle : 0x7004004
Response : 0:HSM Return: SUCCESS
Log type : MGMT_USER_DETAILS_LOG (2)
User Name : testuser
User Type : CN_CRYPTO_USER (1)
The CU runs an exSymKey (p. 129) command to export key 7, a 256-bit AES key. The command uses key
6, a 256-bit AES key on the HSMs, as the wrapping key.
The HSM that receives the command records a CN_WRAP_KEY event for key 7, the key that is being
exported.
Time: 01/24/18 19:51:12.860123, usecs:1516823472860123
Sequence No : 0x27
Reboot counter : 0x107
Command Type(hex) : CN_MGMT_CMD (0x0)
Opcode : CN_WRAP_KEY (0x1a)
Session Handle : 0x7004003
Response : 0:HSM Return: SUCCESS
Log type : MGMT_KEY_DETAILS_LOG (1)
Priv/Secret Key Handle : 7
Public Key Handle : 0
Then, the HSM records a CN_NIST_AES_WRAP event for the wrapping key, key 6. The key is wrapped and
then immediately unwrapped, but the HSM records only one event.
Time: 01/24/18 19:51:12.905257, usecs:1516823472905257
Sequence No : 0x28
Reboot counter : 0x107
Command Type(hex) : CN_MGMT_CMD (0x0)
Opcode : CN_NIST_AES_WRAP (0x1e)
Session Handle : 0x7004003
Response : 0:HSM Return: SUCCESS
Log type : MGMT_KEY_DETAILS_LOG (1)
Priv/Secret Key Handle : 6
258

AWS CloudHSM User Guide
Interpreting HSM Audit Logs
Public Key Handle : 0
The exSymKey command writes the exported key to a file but does not change the key on the HSM.
Consequently, there are no corresponding events in the logs of other HSMs in the cluster.
Example: Import a Key
This example shows the audit log events that are recorded when you import keys into the HSMs in a
cluster. In this example, the crypto user (CU) uses the imSymKey (p. 162) command to import an AES key
into the HSMs. The command uses key 6 as the wrapping key.
The HSM that receives the commands first records a CN_NIST_AES_WRAP event for key 6, the wrapping
key.
Time: 01/24/18 19:58:23.170518, usecs:1516823903170518
Sequence No : 0x29
Reboot counter : 0x107
Command Type(hex) : CN_MGMT_CMD (0x0)
Opcode : CN_NIST_AES_WRAP (0x1e)
Session Handle : 0x7004003
Response : 0:HSM Return: SUCCESS
Log type : MGMT_KEY_DETAILS_LOG (1)
Priv/Secret Key Handle : 6
Public Key Handle : 0
Then, the HSM records a CN_UNWRAP_KEY event that represents the import operation. The imported key
is assigned a key handle of 11.
Time: 01/24/18 19:58:23.200711, usecs:1516823903200711
Sequence No : 0x2a
Reboot counter : 0x107
Command Type(hex) : CN_MGMT_CMD (0x0)
Opcode : CN_UNWRAP_KEY (0x1b)
Session Handle : 0x7004003
Response : 0:HSM Return: SUCCESS
Log type : MGMT_KEY_DETAILS_LOG (1)
Priv/Secret Key Handle : 11
Public Key Handle : 0
When a new key is generated or imported, the client tools automatically attempt to synchronize the new
key to other HSMs in the cluster. In this case, the HSM records a CN_EXTRACT_MASKED_OBJECT_USER
event when key 11 is extracted from the HSM as a masked object.
Time: 01/24/18 19:58:23.203350, usecs:1516823903203350
Sequence No : 0x2b
Reboot counter : 0x107
Command Type(hex) : CN_MGMT_CMD (0x0)
Opcode : CN_EXTRACT_MASKED_OBJECT_USER (0xf0)
Session Handle : 0x7004003
Response : 0:HSM Return: SUCCESS
Log type : MGMT_KEY_DETAILS_LOG (1)
Priv/Secret Key Handle : 11
Public Key Handle : 0
The log streams of other HSMs in the cluster reflect the arrival of the newly imported key.
For example, this event was recorded in the log stream of a different HSM in the same cluster. This
CN_INSERT_MASKED_OBJECT_USER event records the arrival of a masked object that represents key 11.
Time: 01/24/18 19:58:23.286793, usecs:1516823903286793
Sequence No : 0xb
259

AWS CloudHSM User Guide
Audit Log Reference
Reboot counter : 0x107
Command Type(hex) : CN_MGMT_CMD (0x0)
Opcode : CN_INSERT_MASKED_OBJECT_USER (0xf1)
Session Handle : 0xc008004
Response : 0:HSM Return: SUCCESS
Log type : MGMT_KEY_DETAILS_LOG (1)
Priv/Secret Key Handle : 11
Public Key Handle : 0
Audit Log Reference
AWS CloudHSM records HSM management commands in audit log events. Each event has an operation
code (Opcode) value that identifies the action that occurred and its response. You can use the Opcode
values to search, sort, and filter the logs.
The following table defines the Opcode values in an AWS CloudHSM audit log.
Operation Code (Opcode) Description
User Login: These events include the user name and user type.
CN_LOGIN (0xd) User login (p. 106) (excludes appliance user [AU]).
CN_LOGOUT (0xe) User logout (p. 106) (excludes appliance user
[AU]).
CN_APP_FINALIZE App finalize (logged only when user did not
explicitly log out)
CN_CLOSE_SESSION Close session (logged only when user did not
explicitly log out)
User Management: These events include the user name and user type.
CN_CREATE_USER (0x3) Create a crypto user (CU) (p. 85)
CN_CREATE_CO Create a crypto officer (CO) (p. 85)
CN_CREATE_APPLIANCE_USER Create an appliance user (AU) (p. 85)
CN_DELETE_USER Delete a user (p. 88)
CN_CHANGE_PSWD Change a user password (p. 82)
CN_SET_M_VALUE Set quorum authentication (M of N) for a user
action.
CN_APPROVE_TOKEN Approve a quorum authentication token for a user
action.
Key Management: These events include the key handle.
CN_GENERATE_KEY Generate a symmetric key (p. 151)
CN_GENERATE_KEY_PAIR (0x19) Generate a key pair (DSA (p. 137), ECC (p. 142), or
RSA (p. 146))
CN_CREATE_OBJECT Import a public key (without wrapping)
CN_MODIFY_OBJECT Set a key attribute in key_mgmt_util (p. 170) or
cloudhsm_mgmt_util (p. 109).
260

AWS CloudHSM User Guide
Audit Log Reference
Operation Code (Opcode) Description
CN_DESTROY_OBJECT (0x11) Delete a key (p. 126)
CN_TOMBSTONE_OBJECT Mark the key for deletion, but do not remove it
CN_SHARE_OBJECT Share or unshare a key (p. 112)
CN_WRAP_KEY Export an encrypted copy of a key
(wrapKey (p. 175))
CN_UNWRAP_KEY Import an encrypted copy of a key
(unwrapKey (p. 172))
CN_NIST_AES_WRAP Encrypt or decrypt a file
(aesWrapUnwrap (p. 124))
CN_INSERT_MASKED_OBJECT_USER Receive a key (as a masked object) from another
HSM in the cluster; this event is recorded when a
client action synchronizes the key
CN_EXTRACT_MASKED_OBJECT_USER Send a key (as a masked object) to other HSMs in
the cluster; this event is recorded when a client
action synchronizes the key
Clone HSMs
CN_CLONE_SOURCE_INIT Clone source start
CN_CLONE_SOURCE_STAGE1 Clone source end
CN_CLONE_TARGET_INIT Clone target start
CN_CLONE_TARGET_STAGE1 Clone target end
Certificate-Based Authentication
CN_CERT_AUTH_STORE_CERT Store a certificate
CN_CERT_AUTH_VALIDATE_PEER_CERTS Validate a certificate
CN_CERT_AUTH_SOURCE_KEY_EXCHANGE Source key exchange
CN_CERT_AUTH_TARGET_KEY_EXCHANGE Target key exchange
HSM Instance Commands
CN_INIT_TOKEN (0x1) Initialize the HSM: Start
CN_INIT_DONE Initialize the HSM: Complete
CN_GEN_KEY_ENC_KEY Generate a key encryption key (KEK)
CN_GEN_PSWD_ENC_KEY (0x1d) Generate a password encryption key (PEK)
CN_CLOSE_PARTITION_SESSIONS Close a session on the HSM
CN_STORE_KBK_SHARE Store the key backup key (KBK)
CN_SET_NODEID Set the node ID of the HSM in the cluster
CN_ZEROIZE Zeroize the HSM
261

AWS CloudHSM User Guide
Getting CloudWatch Metrics
Getting Metrics
You can retrieve metrics from your AWS CloudHSM environment by getting CloudWatch
metrics (p. 262).
Topics
•Getting CloudWatch Metrics (p. 262)
Getting CloudWatch Metrics
AWS CloudHSM publishes metrics about your HSM instances to your CloudWatch dashboard. The metrics
can be grouped by region, by cluster ID, and by HSM ID. Note, however, that the HSM ID will change if
AWS CloudHSM replaces a failed HSM. We therefore recommend that you alarm and measure on the
regional or cluster ID level rather than on the HSM ID. The following metrics are available:
•HsmUnhealthy: The HSM instance is not performing properly. AWS CloudHSM automatically
replaces unhealthy instances for you. However, you can proactively expand cluster size to avoid HSM
replacement.
•HsmTemperature: Junction temperature of the hardware processor. The system shuts down if
temperature reaches 110 degrees Centigrade.
•HsmKeysSessionOccupied: Number of session keys being used by the HSM instance.
•HsmKeysTokenOccupied: Number of token keys being used by the HSM instance and the cluster.
•HsmSslCtxsOccupied: Number of end-to-end encrypted channels currently established for the HSM
instance. Up to 2048 channels are allowed.
•HsmSessionCount: Number of open connections to the HSM instance. Up to 2048 are allowed. By
default, the client daemon is configured to open two sessions with each HSM instance under one end-
to-end encrypted channel.
•HsmUsersAvailable: Number of additional users that can be created. This equals the maximum
number of users, HsmUsersMax, minus the users created to date.
•HsmUsersMax: Maximum number of users that can be created on the HSM instance. Currently this is
1024.
•InterfaceEth2OctetsInput : Cumulative sum of traffic to the HSM to date. We recommend that you
also examine Amazon EC2 instance metrics.
•InterfaceEth2OctetsOutput : see the preceding metric - InterfaceEth2OctetsInput.
262

AWS CloudHSM User Guide
Known Issues
Troubleshooting AWS CloudHSM
If you encounter problems with AWS CloudHSM, the following topics can help you resolve them.
Topics
•Known Issues (p. 263)
•Lost Connection to the Cluster (p. 268)
•Keep HSM Users In Sync Across HSMs In The Cluster (p. 270)
•Verify the Performance of the HSM (p. 270)
•Resolving Cluster Creation Failures (p. 273)
•Missing AWS CloudHSM Audit Logs in CloudWatch (p. 275)
Known Issues
The following issues are currently known for AWS CloudHSM.
Topics
•Known Issues for all HSM instances (p. 263)
•Known Issues for Amazon EC2 Instances Running Amazon Linux 2 (p. 265)
•Known Issues for the PKCS #11 SDK (p. 265)
•Known Issues for the JCE SDK (p. 267)
•Known Issues for the OpenSSL SDK (p. 267)
Known Issues for all HSM instances
The following issues impact all AWS CloudHSM users regardless of whether they use the key_mgmt_util
command line tool, the PKCS #11 SDK, the JCE SDK, or the OpenSSL SDK.
Issue: AES key wrapping uses PKCS#5 padding instead of providing a standards-compliant
implementation of key wrap with zero padding. Additionally, key wrap with no padding is not supported.
•Impact: There is no impact if you wrap and unwrap within AWS CloudHSM. Keys wrapped with AWS
CloudHSM cannot be unwrapped within other HSMs or software that expects compliance to the no-
padding specification. This is because 8 bytes of padding data might be suffixed to your key data
following a standards-compliant unwrap. Externally wrapped keys cannot be properly unwrapped into
an AWS CloudHSM instance.
•Workaround: To externally unwrap a key that was wrapped with AES Key Wrapping on a AWS
CloudHSM instance, strip the extra padding before you attemp to use the key. You can do this by
trimming the extra bytes in a file editor or copying only the key bytes into a new buffer in your code.
•Resolution status: We are fixing the client and SDKs to provide SP800-38F compliant AES key
wrapping. Updates will be announced in the AWS CloudHSM forum and on the version history page.
The update will include mechanisms to assist you in rewrapping any existing wrapped keys in a
standards-compliant way.
263

AWS CloudHSM User Guide
Known Issues for all HSM instances
Issue: The client daemon requires at least one valid IP address in its configuration file to successfully
connect to the cluster.
•Impact: If you delete every HSM in your cluster and then add another HSM, which gets a new IP
address, the client daemon continues to search for your HSMs at their original IP addresses.
•Workaround: If you run an intermittent workload, we recommend that you use the IpAddress
argument in the CreateHsm function to set the elastic network interface (ENI) to its original value.
Note than an ENI is specific to an Availability Zone (AZ). The alternative is to delete the /opt/
cloudhsm/daemon/1/cluster.info file and then reset the client configuration to the IP address
of your new HSM. You can use the client -a <IP address> command. For more information, For
more information, see Install and Configure the AWS CloudHSM Client (Linux) (p. 35) or Install and
Configure the AWS CloudHSM Client (Windows) (p. 37).
Issue: There was an upper limit of 16 KB on data that can be hashed and signed by AWS CloudHSM.
•Resolution status: Data less than 16KB in size continues to be sent to the HSM for hashing. We have
added capability to hash locally, in software, data between 16KB and 64KB in size. The client and the
SDKs will explicitly fail if the data buffer is larger than 64KB. You must update your client and SDK(s)
to version 1.1.1 or higher to benefit from the fix.
Issue: Imported keys could not be specified as nonexportable.
•Resolution Status: This issue is fixed. No action is required on your part to benefit from the fix.
Issue: If you have a single HSM in your cluster, HSM failover does not work correctly.
•Impact: If the single HSM instance in your cluster loses connectivity, the client will not reconnect with
it even if the HSM instance is later restored.
•Workaround: We recommend at least two HSM instances in any production cluster. If you use this
configuration, you will not be impacted by this issue. For single-HSM clusters, bounce the client
daemon to restore connectivity.
•Resolution status: This issue has been resolved in the AWS CloudHSM client 1.1.2 (p. 276) release.
You must upgrade to this client to benefit from the fix.
Issue: If you exceed the key capacity of the HSMs in your cluster within a short period of time, the client
enters an unhandled error state.
•Impact: When the client encounters the unhandled error state, it freezes and must be restarted.
•Workaround: Test your throughput to ensure you are not creating session keys at a rate that the client
is unable to handle. You can lower your rate by adding an HSM to the cluster or slowing down the
session key creation.
•Resolution status: This issue has been resolved in the AWS CloudHSM client 1.1.2 (p. 276) release.
You must upgrade to this client to benefit from the fix.
Issue: Digest operations with HMAC keys of size greater than 800 bytes are not supported.
•Impact: HMAC keys larger than 800 bytes can be generated on or imported into the HSM. However, if
you use this larger key in a digest operation via the JCE or key_mgmt_util, the operation will fail. Note
that if you are using PKCS11, HMAC keys are limited to a size of 64 bytes.
•Workaround: If you will be using HMAC keys for digest operations on the HSM, ensure the size is
smaller than 800 bytes.
•Resolution status: None at this time.
264
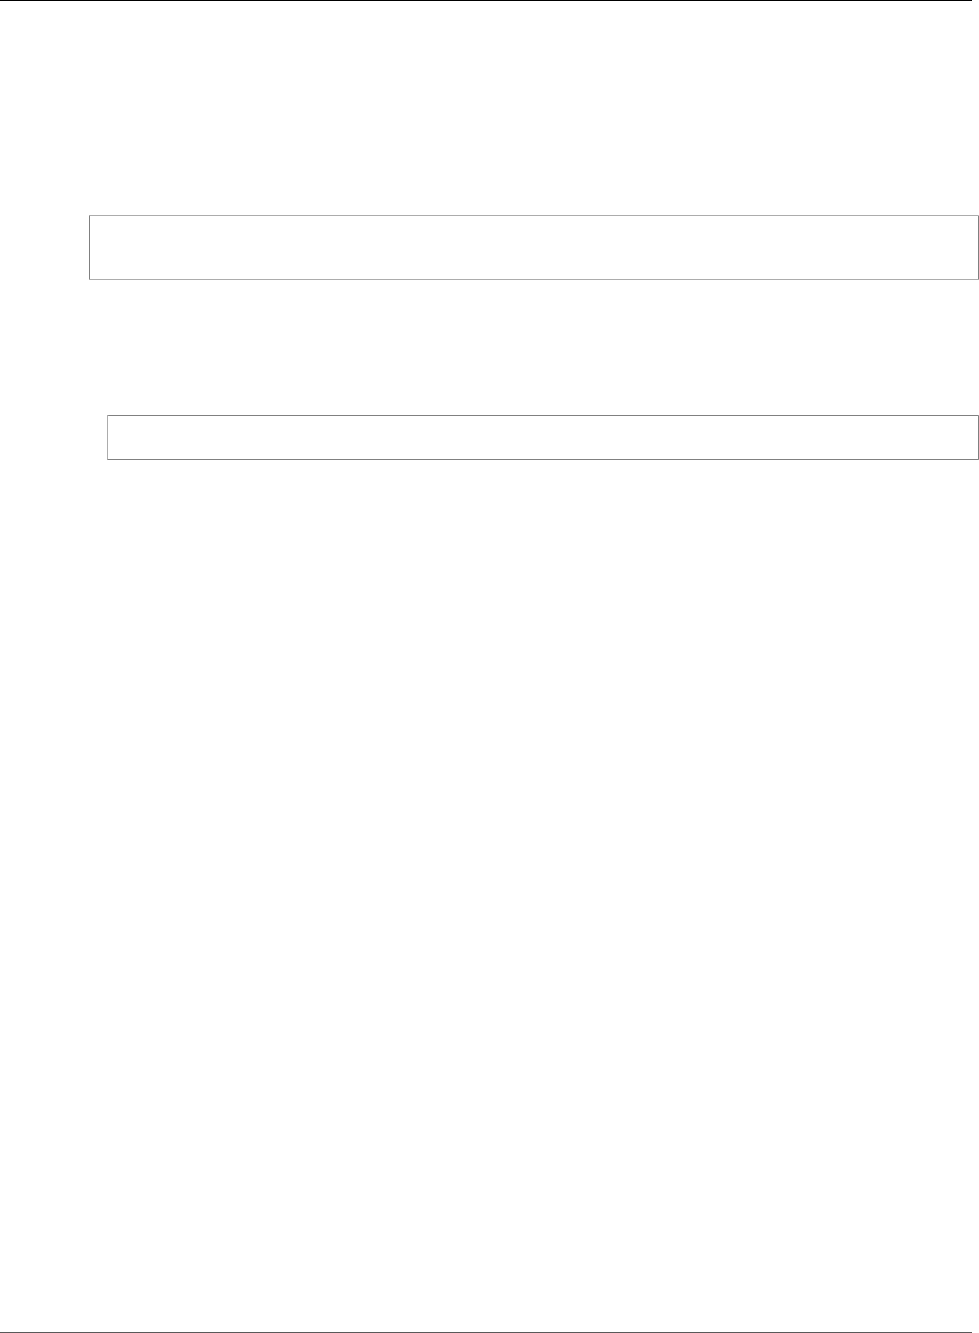
AWS CloudHSM User Guide
Known Issues for Amazon EC2
Instances Running Amazon Linux 2
Known Issues for Amazon EC2 Instances Running
Amazon Linux 2
Issue: Amazon Linux 2 version 2018.07 uses an updated ncurses package (version 6) that is currently
incompatible with the AWS CloudHSM SDKs. The following error will be returned upon running the AWS
CloudHSM cloudhsm_mgmt_util (p. 74) or key_mgmt_util (p. 119):
/opt/cloudhsm/bin/cloudhsm_mgmt_util: error while loading shared libraries:
libncurses.so.5: cannot open shared object file: No such file or directory
•Impact: Instances running on Amazon Linux 2 version 2018.07 will be unable to use all AWS
CloudHSM utilities.
•Workaround: Issue the following command on your Amazon Linux 2 EC2 instances to install the
supported ncurses package (version 5):
sudo yum install ncurses-compat-libs
•Resolution status: This issue has been resolved in the AWS CloudHSM client 1.1.2 (p. 276) release.
You must upgrade to this client to benefit from the fix.
Known Issues for the PKCS #11 SDK
Issue: PKCS #11–compliant error messages are not directly available from the HSM instance.
•Impact: The PKCS #11 library makes two round trips to the HSM per call: The first verifies whether the
requested operation is permitted. The second executes the operation if it is permitted. This results in
slower performance.
•Workaround: We provide an alternative PKCS #11 library with a local Redis cache so permissions for
the requested operation can be checked locally. For details, including information about the limitations
of this solution, see Install the PKCS #11 Library with Redis (Optional) (p. 185).
•Resolution status: We are implementing fixes to directly provide PKCS #11–compliant error messages,
removing the need for the Redis workaround. The updated PKCS #11 library will be announced on the
version history page.
Issue: The CKA_DERIVE attribute was not supported and was not handled.
•Resolution status: We have implemented fixes to accept CKA_DERIVE if it is set to FALSE.
CKA_DERIVE set to TRUE will not be supported until we begin to add key derivation function support
to AWS CloudHSM. You must update your client and SDK(s) to version 1.1.1 or higher to benefit from
the fix.
Issue: The CKA_SENSITIVE attribute was not supported and was not handled.
•Resolution status: We have implemented fixes to accept and properly honor the CKA_SENSITIVE
attribute. You must update your client and SDK(s) to version 1.1.1 or higher to benefit from the fix.
Issue: Multipart hashing and signing are not supported.
•Impact: C_DigestUpdate and C_DigestFinal are not implemented. C_SignFinal is also not
implemented and will fail with CKR_ARGUMENTS_BAD for a non-NULL buffer.
265

AWS CloudHSM User Guide
Known Issues for the PKCS #11 SDK
•Workaround: Hash your data within your application and use AWS CloudHSM only for signing the
hash.
•Resolution status: We are fixing the client and the SDKs to correctly implement multipart hashing.
Updates will be announced in the AWS CloudHSM forum and on the version history page.
Issue: C_GenerateKeyPair does not handle CKA_MODULUS_BITS or CKA_PUBLIC_EXPONENT in the
private template in a manner that is compliant with standards.
•Impact: C_GenerateKeyPair should return CKA_TEMPLATE_INCONSISTENT when the private
template contains CKA_MODULUS_BITS or CKA_PUBLIC_EXPONENT. It instead generates a private key
for which all usage fields are set to FALSE. The key cannot be used.
•Workaround: We recommend that your application check the usage field values in addition to the
error code.
•Resolution status: We are implementing fixes to return the proper error message when an incorrect
private key template is used. The updated PKCS #11 library will be announced on the version history
page.
Issue: You could not hash more than 16KB of data. For larger buffers, only the first 16KB will be hashed
and returned. The excess data would have been silently ignored.
•Resolution status: Data less than 16KB in size continues to be sent to the HSM for hashing. We have
added capability to hash locally, in software, data between 16KB and 64KB in size. The client and the
SDKs will explicitly fail if the data buffer is larger than 64KB. You must update your client and SDK(s)
to version 1.1.1 or higher to benefit from the fix.
Issue: Buffers for the C_Encrypt and C_Decrypt API operations cannot exceed 16 KB when using the
CKM_AES_GCM mechanism. Also, AWS CloudHSM does not support multipart AES-GCM encryption.
•Impact: You cannot use the CKM_AES_GCM mechanism to encrypt data larger than 16 KB.
•Workaround: You can use an alternative mechanism such as CKM_AES_CBC or you can divide your
data into pieces and encrypt each piece individually. You must manage the division of your data and
subsequent encryption. AWS CloudHSM does not perform multipart AES-GCM encryption for you.
Note that FIPS requires that the initialization vector (IV) for AES-GCM be generated on the HSM.
Therefore, the IV for each piece of your AES-GCM encrypted data will be different.
•Resolution status: We are fixing the SDK to fail explicitly if the data buffer is too large. We return
CKR_MECHANISM_INVALID for the C_EncryptUpdate and C_DecryptUpdate API operations. We
are evaluating alternatives to support larger buffers without relying on multipart encryption. Updates
will be announced in the AWS CloudHSM forum and on the version history page.
Issue: ECDH key derivation is executed partially within the HSM. Your EC private key remains within the
HSM at all times, but the key derivation process is performed in multiple steps. As a result, intermediate
results from each step are available on the client.
•Impact: The key derived using the CKM_ECDH1_DERIVE mechanism is first available on the client and
is then imported into the HSM. A key handle is then returned to your application.
•Workaround: If you are implementing SLL/TLS Offload in AWS CloudHSM, this limitation may not be
an issue. If your application requires your key to remain within an FIPS boundary at all times, consider
using an alternative protocol that does not rely on ECDH key derivation.
•Resolution status: We are developing the option to perform ECDH key derivation entirely within the
HSM. The updated implementation will be announced on the version history page once available.
266

AWS CloudHSM User Guide
Known Issues for the JCE SDK
Known Issues for the JCE SDK
Issue: Key wrap and key unwrap functions are not implemented.
•Impact: You cannot programmatically wrap or unwrap keys using the JCE.
•Workaround: You can script key_mgmt_util to wrap and unwrap keys.
•Resolution status: We are planning to add support for key wrap and unwrap directly through the JCE.
The update will be announced on the version history page once available.
Issue: The JCE KeyStore is read only.
•Impact: You cannot store an object type that is not supported by the HSM in the JCE keystore today.
Specifically, you cannot store certificates in the keystore. This precludes interoperability with tools like
jarsigner, which expect to find the certificate in the keystore.
•Workaround: You can rework your code to load certificates from local files or from an S3 bucket
location instead of from the keystore.
•Resolution status: We are adding support for certificate storage in the keystore. The feature will be
announced on the version history page once available.
Issue: Buffers for AES-GCM encryption cannot exceed 16,000 bytes. Also, multi-part AES-GCM
encryption is not supported.
•Impact: You cannot use AES-GCM to encrypt data larger than 16,000 bytes.
•Workaround: You can use an alternative mechanism, such as AES-CBC, or you can divide your data
into pieces and encrypt each piece individually. If you divide the data, you must manage the divided
ciphertext and its decryption. Because FIPS requires that the initialization vector (IV) for AES-GCM be
generated on the HSM, the IV for each AES-GCM-encrypted piece of data will be different.
•Resolution status: We are fixing the SDK to fail explicitly if the data buffer is too large. We are
evaluating alternatives that support larger buffers without relying on multi-part encryption. Updates
will be announced in the AWS CloudHSM forum and on the version history page.
Known Issues for the OpenSSL SDK
Issue: Only RSA offload to the HSM is supported by default.
•Impact: To maximize performance, the SDK is not configured to offload additional functions such as
random number generation or EC-DH operations.
•Workaround: Please contact us through a support case if you need to offload additional operations.
•Resolution status: We are adding support to the SDK to configure offload options through a
configuration file. The update will be announced on the version history page once available.
Issue: RSA encryption and decryption with OAEP padding using a key on the HSM is not supported.
•Impact: Any call to RSA encryption and decryption with OAEP padding fails with a divide-by-zero
error. This occurs because the OpenSSL dynamic engine calls the operation locally using the fake PEM
file instead of offloading the operation to the HSM.
•Workaround: You can perform this procedure by using either the AWS CloudHSM Software Library for
PKCS #11 (p. 183) or the AWS CloudHSM Software Library for Java (p. 194).
•Resolution status: We are adding support to the SDK to correctly offload this operation. The update
will be announced on the version history page once available.
267
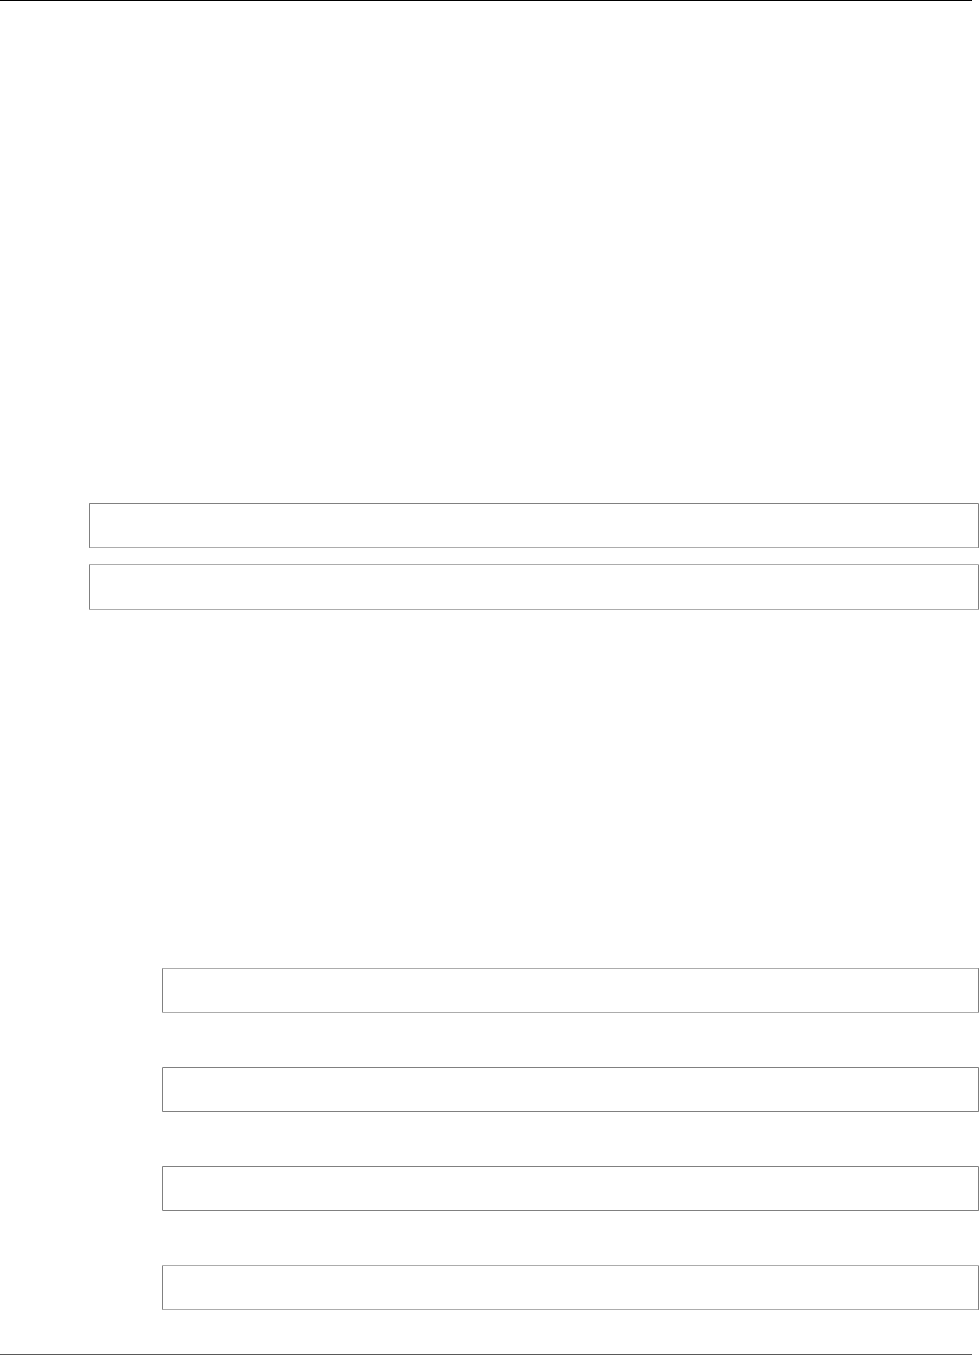
AWS CloudHSM User Guide
Lost Connection
Issue: Only private key generation of RSA and ECC keys is offloaded to the HSM. For any other key type,
the OpenSSL AWS CloudHSM engine is not used for call processing. The local OpenSSL engine is used
instead. This generates a key locally in software.
•Impact: Because the failover is silent, there is no indication that you have not received a key that was
securely generated on the HSM. You will see an output trace that contains the string "...........+
+++++" if the key is locally generated by OpenSSL in software. This trace is absent when the operation
is offloaded to the HSM. Because the key is not generated or stored on the HSM, it will be unavailable
for future use.
•Workaround: Only use the OpenSSL engine for key types it supports. For all other key types, use PKCS
#11 or JCE in applications, or use key_mgmt_util in the AWS CLI.
Lost Connection to the Cluster
When you configured the AWS CloudHSM client (p. 37), you provided the IP address of the first HSM in
your cluster. This IP address is saved in the configuration file for the AWS CloudHSM client. When the
client starts, it tries to connect to this IP address. If it can't—for example, because the HSM failed or you
deleted it—you might see errors like the following:
LIQUIDSECURITY: Daemon socket connection error
LIQUIDSECURITY: Invalid Operation
To resolve these errors, update the configuration file with the IP address of an active, reachable HSM in
the cluster.
To update the configuration file for the AWS CloudHSM client
1. Use one of the following ways to find the IP address of an active HSM in your cluster.
• View the HSMs tab on the cluster details page in the AWS CloudHSM console.
• Use the AWS Command Line Interface (AWS CLI) to issue the describe-clusters command.
You need this IP address in a subsequent step.
2. Use the following command to stop the client.
Amazon Linux
$ sudo stop cloudhsm-client
Amazon Linux 2
$ sudo service cloudhsm-client stop
CentOS 6
$ sudo stop cloudhsm-client
CentOS 7
$ sudo service cloudhsm-client stop
268

AWS CloudHSM User Guide
Lost Connection
RHEL 6
$ sudo stop cloudhsm-client
RHEL 7
$ sudo service cloudhsm-client stop
Ubuntu 16.04 LTS
$ sudo service cloudhsm-client stop
Windows
You can use Ctrl+C to stop the client.
3. Use the following command to update the client's configuration file, providing the IP address that
you found in a previous step.
$ sudo /opt/cloudhsm/bin/configure -a <IP address>
4. Use the following command to start the client.
Amazon Linux
$ sudo start cloudhsm-client
Amazon Linux 2
$ sudo service cloudhsm-client start
CentOS 6
$ sudo start cloudhsm-client
CentOS 7
$ sudo service cloudhsm-client start
RHEL 6
$ sudo start cloudhsm-client
RHEL 7
$ sudo service cloudhsm-client start
Ubuntu 16.04 LTS
$ sudo service cloudhsm-client start
269

AWS CloudHSM User Guide
Keep HSM Users In Sync
Windows
C:\Program Files\Amazon\CloudHSM>start "cloudhsm_client" cloudhsm_client.exe C:
\ProgramData\Amazon\CloudHSM\data\cloudhsm_client.cfg
Keep HSM Users In Sync Across HSMs In The
Cluster
To manage your HSM's users (p. 53), you use a AWS CloudHSM command line tool known as
cloudhsm_mgmt_util. It communicates only with the HSMs that are in the tool's configuration file. It's
not aware of other HSMs in the cluster that are not in the configuration file.
AWS CloudHSM synchronizes the keys on your HSMs across all other HSMs in the cluster, but it
doesn't synchronize the HSM's users or policies. When you use cloudhsm_mgmt_util to manage HSM
users (p. 53), these user changes might affect only some of the cluster's HSMs—the ones that are in the
cloudhsm_mgmt_util configuration file. This can cause problems when AWS CloudHSM syncs keys across
HSMs in the cluster, because the users that own the keys might not exist on all HSMs in the cluster.
To avoid these problems, edit the cloudhsm_mgmt_util configuration file before managing users. For
more information, see Step 4: Update the cloudhsm_mgmt_util Configuration File (p. 77).
Verify the Performance of the HSM
To verify the performance of the HSMs in your AWS CloudHSM cluster, you can use the pkpspeed (Linux)
or pkpspeed_blocking (Windows) tool that is included with the AWS CloudHSM client software. For
more information about installing the client on a Linux EC2 instance, see Install and Configure the AWS
CloudHSM Client (Linux) (p. 35). For more information about installing the client on a Windows instance,
see Install and Configure the AWS CloudHSM Client (Windows) (p. 37).
After you install and configure the AWS CloudHSM client, run the following command to start it.
Amazon Linux
$ sudo start cloudhsm-client
Amazon Linux 2
$ sudo service cloudhsm-client start
CentOS 6
$ sudo start cloudhsm-client
CentOS 7
$ sudo service cloudhsm-client start
RHEL 6
$ sudo start cloudhsm-client
270

AWS CloudHSM User Guide
Verify Performance
RHEL 7
$ sudo service cloudhsm-client start
Ubuntu 16.04 LTS
$ sudo service cloudhsm-client start
Windows
C:\Program Files\Amazon\CloudHSM>start "cloudhsm_client" cloudhsm_client.exe C:
\ProgramData\Amazon\CloudHSM\data\cloudhsm_client.cfg
If you have already installed the client software, you might need to download and install the latest
version to get pkpspeed. You can find the pkpspeed tool at /opt/cloudhsm/bin/pkpspeed in Linux or
C:\Program Files\Amazon\CloudHSM\ in Windows.
To use pkpspeed, run the pkpspeed command or pkpspeed_blocking.exe, specifying the user name and
password of a crypto user (CU) on the HSM. Then set the options to use while considering the following
recommendations.
Recommendations
• To test the performance of RSA sign and verify operations, choose the RSA_CRT cipher in
Linux or option B in Windows. Don't choose RSA (option A in Windows). The ciphers are
equivalent, but RSA_CRT is optimized for performance.
• Start with a small number of threads. For testing AES performance, one thread is typically
enough to show maximum performance. For testing RSA performance(RSA_CRT), three or
four threads is typically enough.
The following examples show the options that you can choose with pkpspeed (Linux) or
pkpspeed_blocking (Windows) to test the HSM's performance for RSA and AES operations.
Example – Using pkpspeed to test RSA performance
You can run this example on Windows, Linux, and compatible operating systems.
Linux
Use these instructions for Linux and compatible operating systems.
/opt/cloudhsm/bin/pkpspeed -s CU user name -p password
SDK Version: 2.03
Available Ciphers:
AES_128
AES_256
3DES
RSA (non-CRT. modulus size can be 2048/3072)
RSA_CRT (same as RSA)
For RSA, Exponent will be 65537
Current FIPS mode is: 00002
Enter the number of thread [1-10]: 3
Enter the cipher: RSA_CRT
Enter modulus length: 2048
271

AWS CloudHSM User Guide
Verify Performance
Enter time duration in Secs: 60
Starting non-blocking speed test using data length of 245 bytes...
[Test duration is 60 seconds]
Do you want to use static key[y/n] (Make sure that KEK is available)?n
Windows
c:\Program Files\Amazon\CloudHSM>pkpspeed_blocking.exe -s CU user name -p password
Please select the test you want to run
RSA non-CRT------------------->A
RSA CRT----------------------->B
Basic 3DES CBC---------------->C
Basic AES--------------------->D
FIPS Random------------------->H
Random------------------------>I
AES GCM ---------------------->K
eXit------------------------>X
B
Running 4 threads for 25 sec
Enter mod size(2048/3072):2048
Do you want to use Token key[y/n]n
Do you want to use static key[y/n] (Make sure that KEK is available)? n
OPERATIONS/second 821/1
OPERATIONS/second 833/1
OPERATIONS/second 845/1
OPERATIONS/second 835/1
OPERATIONS/second 837/1
OPERATIONS/second 836/1
OPERATIONS/second 837/1
OPERATIONS/second 849/1
OPERATIONS/second 841/1
OPERATIONS/second 856/1
OPERATIONS/second 841/1
OPERATIONS/second 847/1
OPERATIONS/second 838/1
OPERATIONS/second 843/1
OPERATIONS/second 852/1
OPERATIONS/second 837/
Example – Using pkpspeed to test AES performance
Linux
Use these instructions for Linux and compatible operating systems.
/opt/cloudhsm/bin/pkpspeed -s <CU user name> -p <password>
SDK Version: 2.03
Available Ciphers:
AES_128
AES_256
3DES
RSA (non-CRT. modulus size can be 2048/3072)
RSA_CRT (same as RSA)
For RSA, Exponent will be 65537
272

AWS CloudHSM User Guide
Resolving Cluster Creation Failures
Current FIPS mode is: 00000002
Enter the number of thread [1-10]: 1
Enter the cipher: AES_256
Enter the data size [1-16200]: 8192
Enter time duration in Secs: 60
Starting non-blocking speed test using data length of 8192 bytes...
Windows
c:\Program Files\Amazon\CloudHSM>pkpspeed_blocking.exe -s CU user name -p password
login as USER
Initializing Cfm2 library
SDK Version: 2.03
Current FIPS mode is: 00000002
Please enter the number of threads [MAX=400] : 1
Please enter the time in seconds to run the test [MAX=600]: 20
Please select the test you want to run
RSA non-CRT------------------->A
RSA CRT----------------------->B
Basic 3DES CBC---------------->C
Basic AES--------------------->D
FIPS Random------------------->H
Random------------------------>I
AES GCM ---------------------->K
eXit------------------------>X
D
Running 1 threads for 20 sec
Enter the key size(128/192/256):256
Enter the size of the packet in bytes[1-16200]:8192
OPERATIONS/second 9/1
OPERATIONS/second 10/1
OPERATIONS/second 11/1
OPERATIONS/second 10/1
OPERATIONS/second 10/1
OPERATIONS/second 10/...
Resolving Cluster Creation Failures
When you create a cluster, AWS CloudHSM creates the AWSServiceRoleForCloudHSM service-linked role,
if the role does not already exist. If AWS CloudHSM cannot create the service-linked role, your attempt to
create a cluster might fail.
This topic explains how to resolve the most common problems so you can create a cluster successfully.
You need to create this role only one time. Once the service-linked role is created in your account, you
can use any of the supported methods to create additional clusters and to manage them.
The following sections offer suggestions to troubleshoot cluster creation failures that are related to the
service-linked role. If you try them but are still unable to create a cluster, contact AWS Support. For more
information about the AWSServiceRoleForCloudHSM service-linked role, see Understanding Service-
Linked Roles (p. 19).
Topics
273

AWS CloudHSM User Guide
Add the Missing Permission
•Add the Missing Permission (p. 274)
•Create the Service-Linked Role Manually (p. 274)
•Use a Nonfederated User (p. 274)
Add the Missing Permission
To create a service-linked role, the user must have the iam:CreateServiceLinkedRole permission. If
the IAM user who is creating the cluster does not have this permission, the cluster creation process fails
when it tries to create the service-linked role in your AWS account.
When a missing permission causes the failure, the error message includes the following text.
This operation requires that the caller have permission to call iam:CreateServiceLinkedRole
to create the CloudHSM Service Linked Role.
To resolve this error, give the IAM user who is creating the cluster the AdministratorAccess
permission or add the iam:CreateServiceLinkedRole permission to the user's IAM policy. For
instructions, see Adding Permissions to a New or Existing User.
Then try to create the cluster (p. 21) again.
Create the Service-Linked Role Manually
You can use the IAM console, CLI, or API to create the AWSServiceRoleForCloudHSM service-linked role.
For more information, see Creating a Service-Linked Role in the IAM User Guide.
Use a Nonfederated User
Federated users, whose credentials originate outside of AWS, can perform many of the tasks of a
nonfederated user. However, AWS does not allow users to make the API calls to create a service-linked
role from a federated endpoint.
To resolve this problem, create a non-federated user (p. 15) with the iam:CreateServiceLinkedRole
permission, or give an existing non-federated user the iam:CreateServiceLinkedRole permission.
Then have that user create a cluster (p. 21) from the AWS CLI. This creates the service-linked role in your
account.
Once the service-linked role is created, if you prefer, you can delete the cluster that the nonfederated
user created. Deleting the cluster does not affect the role. Thereafter, any user with the required
permissions, included federated users, can create AWS CloudHSM clusters in your account.
To verify that the role was created, open the IAM console at https://console.aws.amazon.com/iam/ and
choose Roles. Or use the IAM get-role command in the AWS CLI.
$ aws iam get-role --role-name AWSServiceRoleForCloudHSM
{
"Role": {
"Description": "Role for CloudHSM service operations",
"AssumeRolePolicyDocument": {
"Version": "2012-10-17",
"Statement": [
{
"Action": "sts:AssumeRole",
"Effect": "Allow",
"Principal": {
"Service": "cloudhsm.amazonaws.com"
274

AWS CloudHSM User Guide
Missing AWS CloudHSM Audit Logs in CloudWatch
}
}
]
},
"RoleId": "AROAJ4I6WN5QVGG5G7CBY",
"CreateDate": "2017-12-19T20:53:12Z",
"RoleName": "AWSServiceRoleForCloudHSM",
"Path": "/aws-service-role/cloudhsm.amazonaws.com/",
"Arn": "arn:aws:iam::111122223333:role/aws-service-role/cloudhsm.amazonaws.com/
AWSServiceRoleForCloudHSM"
}
}
Missing AWS CloudHSM Audit Logs in CloudWatch
If you created a cluster before January 20th, 2018, you will need to manually configure a service-linked
role (p. 19) in order to enable the delivery of that cluster's audit logs. For instructions on how to enable a
service-linked role on an HSM cluster, see Understanding Service-Linked Roles (p. 19), as well as Creating
a Service-Linked Role in the IAM User Guide.
275

AWS CloudHSM User Guide
Version History
AWS CloudHSM Client and Software
Information
To manage and use the HSMs in your cluster, you use the AWS CloudHSM client (p. 8) and related
software libraries. If you installed the AWS CloudHSM client for Linux (p. 35) or Windows (p. 37) and any
required software libraries (p. 183), you have all the software needed to use AWS CloudHSM.
This section provides information about supported platforms and a full version history.
Topics
•AWS CloudHSM Client and Software Version History (p. 276)
•Supported Platforms (p. 287)
AWS CloudHSM Client and Software Version
History
This section describes the updates to each version of the AWS CloudHSM client (p. 8) and related
software libraries. We recommend that you use the most recent versions whenever possible.
This section includes links to download newer versions of the software. We recommend updating
your AWS CloudHSM client and software libraries in order to utilize new features and fixes as they are
released.
Topics
•Current Version: 1.1.2 (p. 276)
•Version: 1.1.1 (p. 278)
•Version: 1.1.0 (p. 281)
•Version: 1.0.18 (p. 283)
•Version 1.0.14 (p. 285)
•Version 1.0.11 (p. 285)
•Version 1.0.10 (p. 286)
•Version 1.0.8 (p. 286)
•Version 1.0.7 (p. 287)
•Version 1.0.0 (p. 287)
Current Version: 1.1.2
To download the software, choose the tab for your preferred operating system, then choose the link to
each software package.
Amazon Linux
Download the version 1.1.2 software for Amazon Linux:
•AWS CloudHSM Client
•PKCS #11 Library
276

AWS CloudHSM User Guide
Current Version: 1.1.2
•OpenSSL Dynamic Engine
•Java Library
Amazon Linux 2
Download the version 1.1.2 software for Amazon Linux 2:
•AWS CloudHSM Client
•PKCS #11 Library
•OpenSSL Dynamic Engine
•Java Library
CentOS 6
Download the version 1.1.2 software for CentOS 6:
•AWS CloudHSM Client
•PKCS #11 Library
•OpenSSL Dynamic Engine
•Java Library
CentOS 7
Download the version 1.1.2 software for CentOS 7:
•AWS CloudHSM Client
•PKCS #11 Library
•OpenSSL Dynamic Engine
•Java Library
RHEL 6
Download the version 1.1.2 software for RedHat Enterprise Linux 6:
•AWS CloudHSM Client
•PKCS #11 Library
•OpenSSL Dynamic Engine
•Java Library
RHEL 7
Download the version 1.1.2 software for RedHat Enterprise Linux 7:
•AWS CloudHSM Client
•PKCS #11 Library
•OpenSSL Dynamic Engine
•Java Library
Ubuntu 16.04 LTS
Download the version 1.1.2 software for Ubuntu 16.04 LTS:
277

AWS CloudHSM User Guide
Version: 1.1.1
•AWS CloudHSM Client
•PKCS #11 Library
•OpenSSL Dynamic Engine
•Java Library
Windows Server
The latest AWS CloudHSM client software for Windows is version 1.1.1 (p. 278).
Version 1.1.2 contains performance improvements and bug fixes. Significant changes in this version are
as follows:
AWS CloudHSM Client Software
• Improved performance and bug fixes.
PKCS #11 Library
• DER-formatted EC public keys are now correctly imported.
Note
At this time, AWS CloudHSM continues to support the ability to import EC keys in raw format.
Support for this format may be deprecated at a future time, as it is not compliant with
PKCS#11 specifications.
• Improved performance and bug fixes.
OpenSSL Dynamic Engine
• Updated the version for consistency.
Java Library
• Updated the version for consistency.
Windows (CNG, KSP)
• No update. Continue to use version 1.1.1.
Version: 1.1.1
To download the software, choose the tab for your preferred operating system, then choose the link to
each software package.
Amazon Linux
Download the version 1.1.1 software for Amazon Linux:
•AWS CloudHSM Client
•PKCS #11 Library
•OpenSSL Dynamic Engine
•Java Library
278

AWS CloudHSM User Guide
Version: 1.1.1
Amazon Linux 2
Download the version 1.1.1 software for Amazon Linux 2:
•AWS CloudHSM Client
•PKCS #11 Library
•OpenSSL Dynamic Engine
•Java Library
CentOS 6
Download the version 1.1.1 software for CentOS 6:
•AWS CloudHSM Client
•PKCS #11 Library
•OpenSSL Dynamic Engine
•Java Library
CentOS 7
Download the version 1.1.1 software for CentOS 7:
•AWS CloudHSM Client
•PKCS #11 Library
•OpenSSL Dynamic Engine
•Java Library
RHEL 6
Download the version 1.1.1 software for RedHat Enterprise Linux 6:
•AWS CloudHSM Client
•PKCS #11 Library
•OpenSSL Dynamic Engine
•Java Library
RHEL 7
Download the version 1.1.1 software for RedHat Enterprise Linux 7:
•AWS CloudHSM Client
•PKCS #11 Library
•OpenSSL Dynamic Engine
•Java Library
Ubuntu 16.04 LTS
Download the version 1.1.1 software for Ubuntu 16.04 LTS:
•AWS CloudHSM Client
•PKCS #11 Library
279

AWS CloudHSM User Guide
Version: 1.1.1
•OpenSSL Dynamic Engine
•Java Library
Windows Server
AWS CloudHSM supports 64-bit versions of Windows Server 2012, Windows Server 2012 R2 and
Windows Server 2016. The AWS CloudHSM 1.1.1 client software for Windows Server includes the
required CNG and KSP providers. For details, see Install and Configure the AWS CloudHSM Client
(Windows) (p. 37).
Download the version 1.1.1 software for Windows Server:
•AWS CloudHSM Client for Windows Server
Version 1.1.1 is a strongly recommended upgrade, as it contains a security fix. Significant changes in this
version are as follows:
AWS CloudHSM Client Software
• Improved stability and bug fixes.
• In cloud_hsm_mgmt_util, enable_e2e now set by default.
•SECURITY FIX: in key_mgmt_util, resolved issue with the incorrect PKCS#1v1.5 signature parsing.
This eliminates potential errors when validating signatures with imported RSA keys that use a public
exponent of 3. CloudHSM does not allow generating RSA keys with exponents smaller than 65537 to
meet FIPS 140-2 requirements.
PKCS #11 Library
• Improved stability and bug fixes.
•SECURITY FIX: Resolved issue with incorrect PKCS#1v1.5 signature parsing. This eliminates potential
errors when validating signatures with imported RSA keys that use a public exponent of 3. CloudHSM
does not allow generating RSA keys with exponents smaller than 65537 to meet FIPS 140-2
requirements.
•BREAKING CHANGE: To protect against user error, AES-GCM initialization now requires the user
supplied IV buffer to be zeroized. NIST requires the IV for AES-GCM to be generated by the HSM and
noted by the application after encryption is complete, as described here (p. 189). IV is always 12 bytes
long.
• Added support for CKM_RSA_PKCS_KEY_PAIR_GEN mechanism.
• Added software hashing of buffers larger than 16KB for digest, sign and verify operations. Hashes of
buffers less than 16KB continue to be offloaded to the HSM as before.
•BREAKING CHANGE: Strengthened PKCS#11 compliance, including explicit failure when handling
unsupported or inconsistent attributes. If your application was not strictly PKCS#11 compliant before,
you may experience errors or failures after updating to this version. Specifically:
• If an application is already logged in, logging in will now return the error
CKR_USER_ALREADY_LOGGED_IN.
• CKA_KEY_GEN_MECHANISM will cause an error if included in a C_CreateObject call.
• CKA_ALWAYS_SENSITIVE, CKA_LOCAL and CKA_NEVER_EXTRACTABLE will cause errors if included
in a key generation or import template.
• CKA_VALUE_LEN is now validated.
• By default, new keys are scoped as session keys rather than token keys, to comply with PKCS#11.
OpenSSL Dynamic Engine
280

AWS CloudHSM User Guide
Version: 1.1.0
• Improved stability and bug fixes.
•SECURITY FIX: Resolved issue with incorrect PKCS#1v1.5 signature parsing. This eliminates potential
errors when validating signatures with imported RSA keys that use a public exponent of 3. CloudHSM
does not allow generating RSA keys with exponents smaller than 65537 to meet FIPS 140-2
requirements.
Java Library
• Improved stability and bug fixes.
• Added software hashing of buffers larger than 16KB for digest, sign and verify operations. Hashes of
buffers less than 16KB continue to be offloaded to the HSM as before.
• For non-exportable keys, getFormat and getEncoded now return NULL without throwing an exception.
Windows (CNG, KSP)
•SECURITY FIX: Resolved issue with incorrect PKCS#1v1.5 signature parsing. This eliminates potential
errors when validating signatures with imported RSA keys that use a public exponent of 3. CloudHSM
does not allow generating RSA keys with exponents smaller than 65537 to meet FIPS 140-2
requirements.
Version: 1.1.0
To download the software, choose the tab for your preferred operating system, and then choose the link
to each software package.
Amazon Linux
Download the version 1.1.0 software for Amazon Linux:
•AWS CloudHSM Client
•PKCS #11 Library
•OpenSSL Dynamic Engine
•Java Library
Amazon Linux 2
Download the version 1.1.0 software for Amazon Linux 2:
•AWS CloudHSM Client
•PKCS #11 Library
•OpenSSL Dynamic Engine
•Java Library
CentOS 6
Download the version 1.1.0 software for CentOS 6:
•AWS CloudHSM Client
•PKCS #11 Library
•OpenSSL Dynamic Engine
•Java Library
281

AWS CloudHSM User Guide
Version: 1.1.0
CentOS 7
Download the version 1.1.0 software for CentOS 7:
•AWS CloudHSM Client
•PKCS #11 Library
•OpenSSL Dynamic Engine
•Java Library
RHEL 6
Download the version 1.1.0 software for RedHat Enterprise Linux 6:
•AWS CloudHSM Client
•PKCS #11 Library
•OpenSSL Dynamic Engine (Supports RHEL 6.5 and later)
•Java Library
RHEL 7
Download the version 1.1.0 software for RedHat Enterprise Linux 7:
•AWS CloudHSM Client
•PKCS #11 Library
•OpenSSL Dynamic Engine
•Java Library
Ubuntu 16.04 LTS
Download the version 1.1.0 software for Ubuntu 16.04 LTS:
•AWS CloudHSM Client
•PKCS #11 Library
•OpenSSL Dynamic Engine
•Java Library
Windows Server
AWS CloudHSM supports 64-bit versions of Windows Server 2012, Windows Server 2012 R2 and
Windows Server 2016. The AWS CloudHSM 1.1.0 client software for Windows Server includes the
required CNG and KSP providers. For details, see Install and Configure the AWS CloudHSM Client
(Windows) (p. 37).
Download the version 1.1.0 software for Windows Server:
•AWS CloudHSM Client for Windows Server
Significant changes in this version include the following:
AWS CloudHSM Client Software
• Added new Linux platforms.
• Amazon Linux 2
282

AWS CloudHSM User Guide
Version: 1.0.18
• Ubuntu 16.04 LTS
• RedHat Enterprise Linux 6 (RHEL 6)
• RedHat Enterprise Linux 7 (RHEL 7)
• CentOS 6
• CentOS 7
CNG/KSP Providers for Windows Server
The AWS CloudHSM client software for Windows Server includes the required CNG and KSP providers.
• Updated the version for consistency.
PKCS #11 Library
• Added support for Linux platforms.
OpenSSL Dynamic Engine
• Added support for Linux platforms.
Java Library
•If you downloaded this package prior to May 23, 5PM PDT, you will need to recompile your
application for it to work with this version of the JCE, as the loadNative() method had
temporarily changed from non-static to static. Alternatively, you can download the package again,
and install the JCE. We have now restored the loadNative() method to static.
• Eliminated the breaking change in version 1.0.18. The LoginManager.getInstance() public
method accepts username and password arguments.
• Added support for Linux platforms.
Version: 1.0.18
Version 1.0.18 includes the following software packages for each platform.
Amazon Linux
To download the version 1.0.18 software for Amazon Linux and compatible distributions, choose the
link for each package.
•AWS CloudHSM Client
•PKCS #11 Library
•OpenSSL Dynamic Engine
• Java Library – Version 1.0.18 is deprecated due to issues with backward compatibility. Use the
current version or version 1.0.14.
Ubuntu
To download the version 1.0.18 software for Ubuntu, choose the link for each package.
•AWS CloudHSM Client
•PKCS #11 Library
283

AWS CloudHSM User Guide
Version: 1.0.18
•OpenSSL Dynamic Engine
• Java Library – Version 1.0.18 is deprecated due to issues with backward compatibility. Use the
current version or version 1.0.14.
Windows Server
AWS CloudHSM supports Windows Server 2012, Windows Server 2012 R2 and Windows Server
2016. The AWS CloudHSM 1.0.18 client software for Windows Server includes the required CNG and
KSP providers. For details, see Install and Configure the AWS CloudHSM Client (Windows) (p. 37).
To download the version 1.0.18 software for Windows, choose the link: AWS CloudHSM Client for
Windows Server.
Significant changes in this version include the following:
AWS CloudHSM Client Software
Added an AWS CloudHSM client for Windows Server. The following Windows Server operating systems
are currently supported:
• Microsoft Windows Server 2012 (64-bit)
• Microsoft Windows Server 2012 R2 (64-bit)
• Microsoft Windows Server 2016 (64-bit)
CNG/KSP Providers for Windows Server
• Implemented PKCS7Padding for C_DecryptUpdate and C_EncryptUpdate.
• CKA_ID no longer required for RSA private key generation.
• Improved multi-threading performance.
• Fixed various bugs.
PKCS #11 Library
• Added support for PKCS7Padding.
• Strengthened checks on key templates.
• Fixed various bugs.
OpenSSL Dynamic Engine
• Added support to getCaviumPrivKey for ECC-based keys.
• Improved stability when client daemon connectivity is lost.
• Fixed various bugs.
Java Library
•[Breaking Change] The LoginManager.getInstance() public method does not accept username
and password arguments directly.
• Added support for PKCS7Padding.
• Added wrap and unwrap methods.
• Improved stability when client daemon connectivity is lost.
• Fixed various bugs.
284

AWS CloudHSM User Guide
Version 1.0.14
Version 1.0.14
Version 1.0.14 includes the following software packages for each platform.
Amazon Linux
To download the version 1.0.14 software for Amazon Linux and compatible distributions, choose the
link for each package.
•AWS CloudHSM Client
•PKCS #11 Library
•OpenSSL Dynamic Engine
•Java Library
Ubuntu
To download the version 1.0.14 software for Ubuntu, choose the link for each package.
•AWS CloudHSM Client
•PKCS #11 Library
•OpenSSL Dynamic Engine
•Java Library
Significant changes in this version include the following:
AWS CloudHSM Client Software
• Improved failover behavior.
• Displays version metadata.
• Fixed various bugs.
PKCS #11 Library
• Implemented PKCS7Padding for C_DecryptUpdate and C_EncryptUpdate.
• CKA_ID no longer required for RSA private key generation.
• Improved multi-threading performance.
• Fixed various bugs.
OpenSSL Dynamic Engine
• Added support for CSRs for ECC keys.
• Improved stability and failure handling.
Java Library
No changes. Updated the version number for consistency.
Version 1.0.11
Significant changes in this version include the following:
285

AWS CloudHSM User Guide
Version 1.0.10
AWS CloudHSM Client Software
• Improved load balancing.
• Improved performance.
• Improved handling of lost server connections.
PKCS #11 Library
• Added support for the CKM_RSA_PKCS_PSS sign/verify mechanism.
OpenSSL Dynamic Engine
• Updated the version number for consistency.
Java Library
• Improved the performance of several algorithms.
• Added Triple DES (3DES) key import feature.
• Various bug fixes.
Version 1.0.10
Significant changes in this version include the following:
AWS CloudHSM Client Software
• Updated the key_mgmt_util command line tool to enable AES wrapped key import.
• Improved performance.
• Fixed various bugs.
PKCS #11 Library
• Updated the version number for consistency.
OpenSSL Dynamic Engine
• Updated the version number for consistency.
Java Library
• Added support for additional algorithms.
• Improved performance.
Version 1.0.8
Significant changes in this version include the following:
AWS CloudHSM Client Software
• Improved setup experience.
286

AWS CloudHSM User Guide
Version 1.0.7
• Added respawning to the client upstart service.
• Fixed various bugs.
PKCS #11 Library
• Fixed bugs to address relative paths in the Redis setup.
OpenSSL Dynamic Engine
• Improved performance.
Java Library
• Updated the version number for consistency.
Version 1.0.7
Significant changes in this version include the following:
AWS CloudHSM Client Software
• Added the pkpspeed (p. 270) performance testing tool.
• Fixed bugs to improve stability and performance.
PKCS #11 Library
• Added an accelerated version of the library that uses a Redis local cache to improve performance.
• Fixed bugs related to attribute handling.
• Added the ability to generate ECDSA keys.
OpenSSL Dynamic Engine
• Updated the version number for consistency.
Java Library
• Added support for additional algorithms.
• Signed the JAR files for compatibility with the Sun JCE provider.
Version 1.0.0
This is the initial release.
Supported Platforms
The AWS CloudHSM client (p. 8) and related software libraries (p. 183) support 64-bit versions of the
following operating systems.
287

AWS CloudHSM User Guide
Supported Platforms
Note
Earlier versions of the software do not support all listed operating systems. For detailed
information about each version of the AWS CloudHSM client and related software, see AWS
CloudHSM Client and Software Version History (p. 276).
Note
If you are running CloudHSM client 1.1.1 or earlier on an Amazon Linux 2 EC2 instance, see
Known Issues for Amazon EC2 Instances Running Amazon Linux 2 (p. 265).
Library Operating System
AWS CloudHSM Client Amazon Linux
Amazon Linux 2
Red Hat Enterprise Linux (RHEL) 6.7+
Red Hat Enterprise Linux (RHEL) 7.3+
CentOS 6.7+
CentOS 7.3+
Ubuntu 16.04 LTS
Microsoft Windows Server 2012
Microsoft Windows Server 2012 R2
Microsoft Windows Server 2016
CNG/KSP Providers Microsoft Windows Server 2012
Microsoft Windows Server 2012 R2
Microsoft Windows Server 2016
PKCS #11 Amazon Linux
Amazon Linux 2
Red Hat Enterprise Linux (RHEL) 6.7+
Red Hat Enterprise Linux (RHEL) 7.3+
CentOS 6.7+
CentOS 7.3+
Ubuntu 16.04 LTS
OpenSSL Dynamic Engine
(Compatible with OpenSSL 1.0.2[f+])
Amazon Linux
Amazon Linux 2
Red Hat Enterprise Linux (RHEL) 6.7+
Red Hat Enterprise Linux (RHEL) 7.3+
CentOS 6.7+
288

AWS CloudHSM User Guide
Supported Platforms
Library Operating System
CentOS 7.3+
Ubuntu 16.04 LTS
JCE Provider
(Supported on OpenJDK 1.8)
Amazon Linux
Amazon Linux 2
Red Hat Enterprise Linux (RHEL) 6.7
Red Hat Enterprise Linux (RHEL) 7.3+
CentOS 6.7+
CentOS 7.3+
Ubuntu 16.04 LTS
289

AWS CloudHSM User Guide
Document History
Latest documentation update: September 10, 2018
The following table describes the documentation release history of AWS CloudHSM after May 2018.
update-history-change update-history-description update-history-date
Updated Known Issues (p. 290) New content was added to the
Known Issues section of the
Troubleshooting guide.
November 8, 2018
Added new content (p. 290) Released AWS CloudHSM
client version 1.1.2 for Linux
platforms. For more information,
see AWS CloudHSM Client and
Version Software History.
November 8, 2018
Added region support (p. 290) Added AWS CloudHSM support
for the EU (Paris) and Asia Pacific
(Seoul) regions.
October 24, 2018
Added new content (p. 290) Added the ability to delete
and restore AWS CloudHSM
backups. For more information,
see Deleting and Restoring an
AWS CloudHSM Cluster Backup.
September 10, 2018
Added new content (p. 290) Added automatic audit
log delivery to Amazon
CloudWatch Logs. For more
information, see Monitoring
AWS CloudHSM Audit Logs in
Amazon CloudWatch Logs.
August 13, 2018
Added new content (p. 290) Added the ability to copy
an AWS CloudHSM cluster
backup across regions. For more
information, see Copying A
Backup Across Regions.
July 30, 2018
Added region support (p. 290) Added AWS CloudHSM support
for the EU (London) region.
June 13, 2018
The following table describes the documentation release history of AWS CloudHSM before June 2018.
Change Description Date
New content Added AWS CloudHSM client
and library support for Amazon
Linux 2, Red Hat Enterprise
Linux (RHEL) 6, Red Hat
Enterprise Linux (RHEL) 7,
May 10, 2018
290

AWS CloudHSM User Guide
Change Description Date
CentOS 6, CentOS 7, and
Ubuntu 16.04 LTS. For more
information, see Install and
Configure the AWS CloudHSM
Client (Linux) (p. 35).
New content Added a Windows AWS
CloudHSM client. For more
information, see the following
topics:
•Install and Configure the
AWS CloudHSM Client
(Windows) (p. 37)
•KSP and CNG Providers for
Windows (p. 203)
•Configure Windows Server as
a Certificate Authority (CA)
with AWS CloudHSM (p. 236)
April 30, 2018
New content Added quorum authentication
(M of N access control) for
crypto officers (COs). For more
information, see Enforcing
Quorum Authentication (M of N
Access Control) (p. 61).
November 9, 2017
Update Added documentation about
using the key_mgmt_util
command line tool. For more
information, see key_mgmt_util
Command Reference (p. 122).
November 9, 2017
New content Added Oracle Transparent
Data Encryption. For more
information, see Oracle
Database Encryption (p. 239).
October 25, 2017
New content Added SSL Offload. For more
information, see SSL/TLS
Offload (p. 209).
October 12, 2017
New guide This release introduces AWS
CloudHSM
August 14, 2017
291
