Co Ax Reloading Press
User Manual: co-ax reloading press
Open the PDF directly: View PDF ![]() .
.
Page Count: 8
- /
- Issue 8
- User Instructions for the Forster Products Co-Ax® Reloading Press
- Due to the extreme mechanical advantage engineered in Co-Ax Press, only two “C” clamps are needed to fasten a board-mounted Co-Ax Press to a working surface.
- 1.0 GENERAL INFORMATION
- Co-Ax® Press is designed for three rifle and pistol handloading steps:
- 5.0 SETUP AND ASSEMBLY
- 1. Case resizing.
- 2. Primer seating.
- 5.1 Install the Handle
- 3. Bullet seating.
- 1. Insert the Handle into the Yoke Handle Casting (-055).
- 2. Using the 5/32" Allen Wrench (SHORTARMHEXKEY5/32), tighten the 5/16-24 Handle Set Screw (-028).
- Co-Ax Reloading Press accepts any 7/8" x 14 reloading die.
- For proper press operation, you must use the two aluminum Cross Bolt Die Lock Rings provided in the Important Parts Packet (Figure 2) on either Forster Products Reloading Dies or on your own dies. The Cross Bolt Die Lock Rings are important for two reasons:
- A short handle with a ball end is also available separately for use when less leverage is needed. See Section 9.0.
- 5.2 Install the Primer Catcher
- They keep the Co-Ax Press T-Slot free from wear that may be caused by other harder steel lock rings
- Fig. 1a. Drop Tube in Primer Catcher Cap, Ready to Attach to Cup
- They are the proper thickness to allow the dies to “float” in the T-Slot for optimal reloading
- 1. From below, insert the threaded part of the Primer Drop Tube (-057) through the hole in the Primer Catcher Cap (-050).
- CAUTION
- PRODUCT DAMAGE
- Do not drop Co-Ax Press or expose it to sudden stresses.
- Failure to comply with these instructions may result in product damage.
- 2. Screw the Primer Catcher Cap to the Primer Catcher Cup (-051), as shown in Figure 1a.
- 2.0 SHIPPING PACKAGE CONTENTS (See Figure 2.)
- Your shipping package should contain the following:
- Section A: Co-Ax Press already assembled
- Section B: Important Parts Packet
- Section C: Loose Components
- 3.0 SAFETY INFORMATION
- Fig. 1b. Primer Catcher under Press
- 3. Pass the Primer Drop Tube through the middle hole in the bottom of the Frame Casting (-031), as shown in Figure 1b.
- WARNING
- PERSONAL INJURY
- Avoid possible pinch points.
- Failure to comply with these instructions could result in death or serious injury.
- 4. Screw the Primer Drop Tube into the tapped hole in the bottom of the Guide Block Casting (-045) until finger tight.
- Always wear safety glasses.
- 4.0 MOUNT CO-AX PRESS TO A WORK SURFACE
- Co-Ax Press may be directly mounted to a work bench, or to a board for later use on the range or in the field.
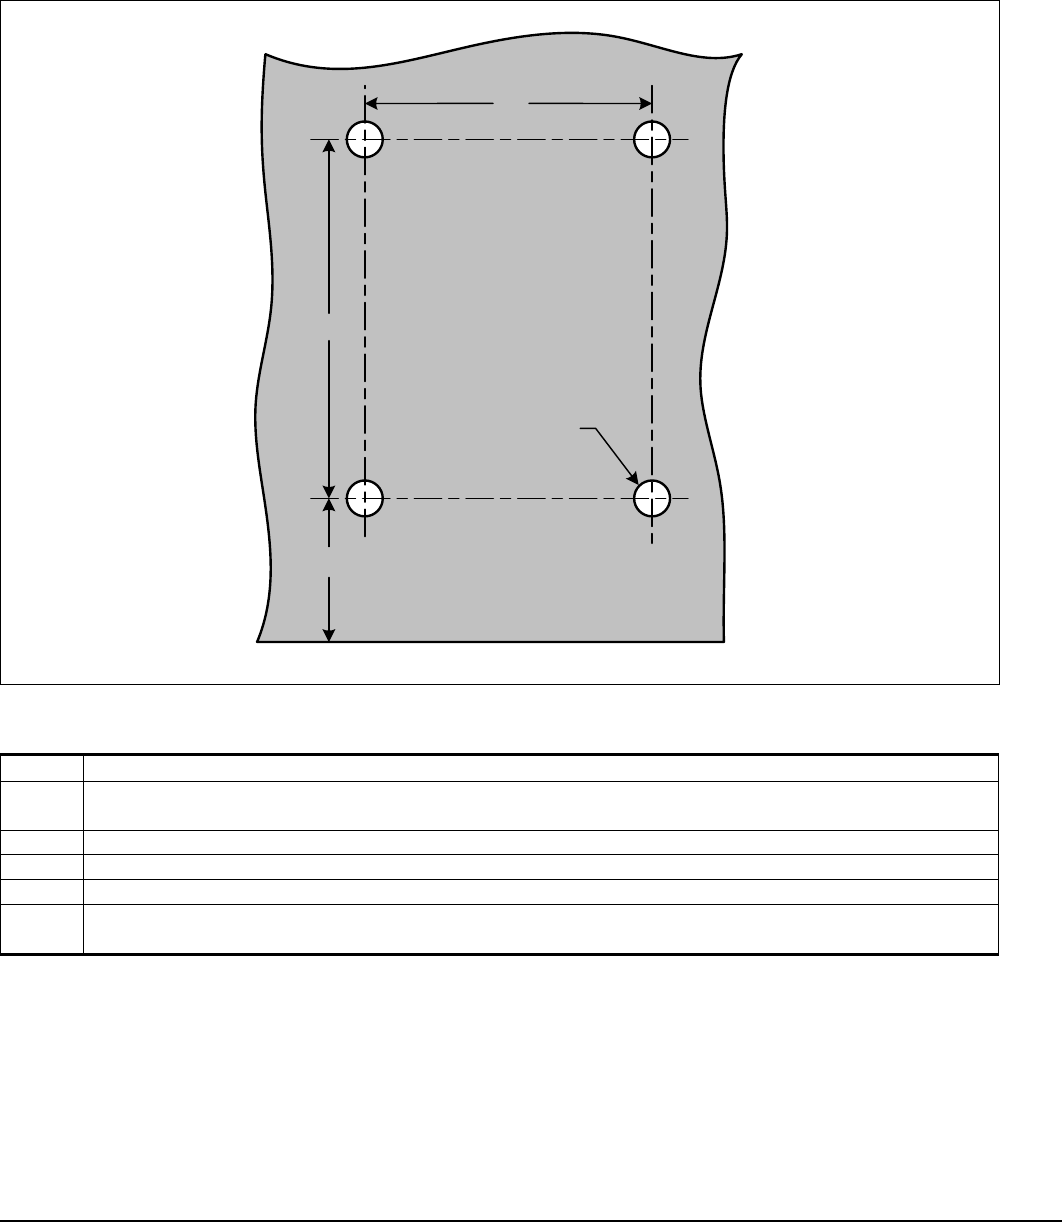
- 1. See Figure 12 on page 8 for a scale drilling template. Drill four ¼” holes as shown.
- 2. Mount Co-Ax Press using ¼” lag bolts.
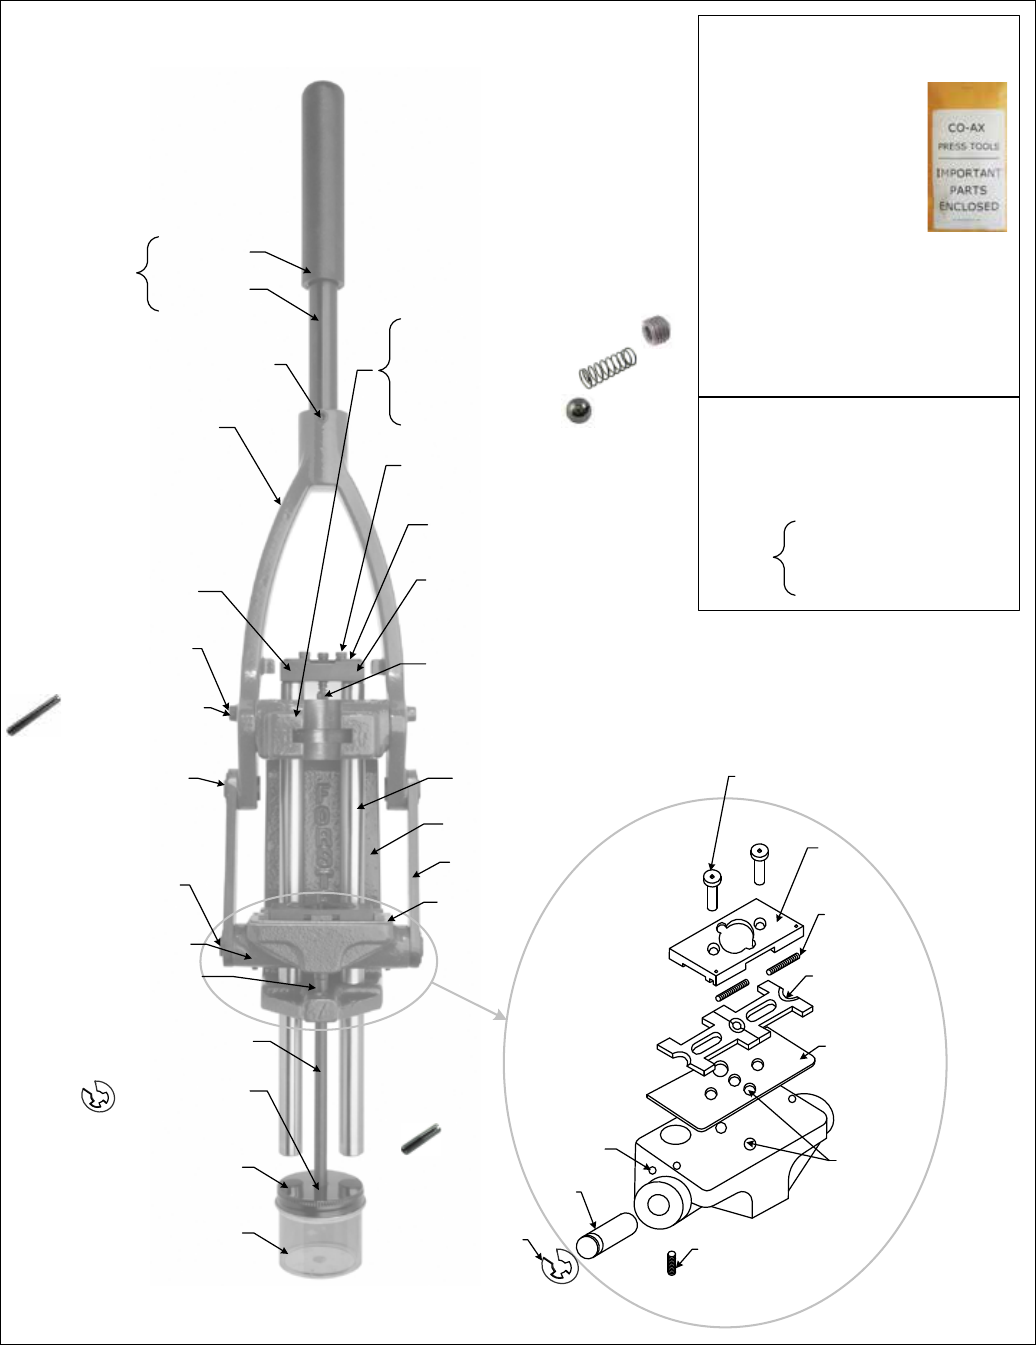
- Figure 2. Co-Ax Reloading Press (028271) Nomenclature
- 5.3 Adjust the Jaw Opening Screw
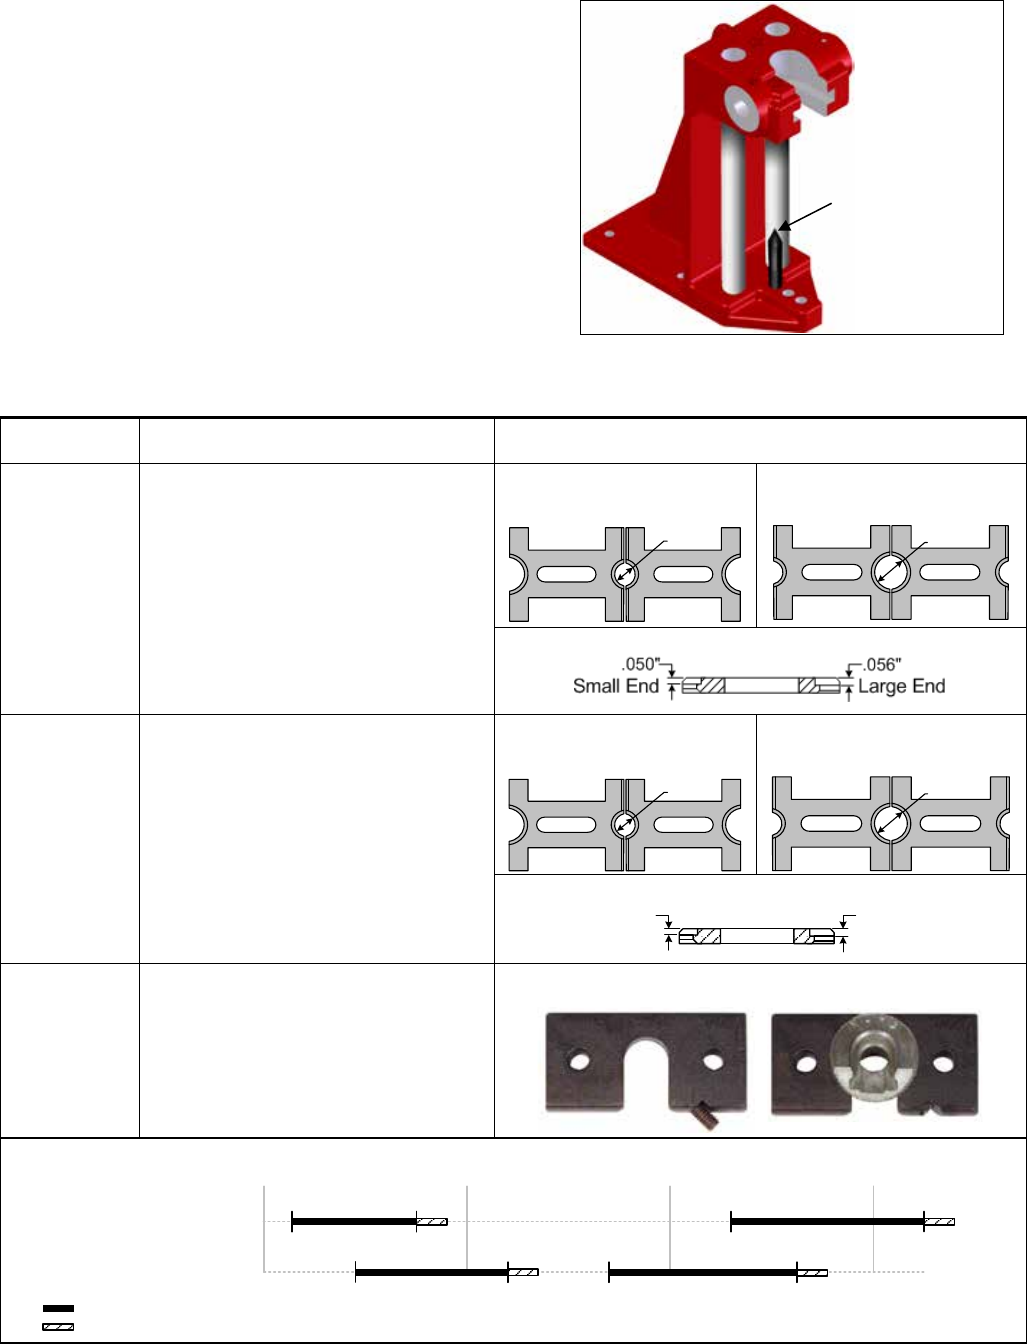
- Figure 3. Position of Jaw Opening Screw
- The Jaw Opening Screw (-044) controls the amount the lower Shellholder Jaws open to accept cases when the Handle is raised to its highest position.
- Adjust the Jaw Opening Screw’s height so that the Shellholder Jaws completely open when the handle is in the full up position, but not so far up that it could damage the Shellholder Housing (-037). This important adjustment controls how far the jaws open to accept cases.
- 6.0 CASE SIZING AND BULLET SEATING
- 6.1 Choose the correct lower shell holder for the caliber being sized/seated.
- Table 1 shows the three lower shell holders available.
- Figure 4 shows how to use the online Forster Products Tool Search By Cartridge to find which lower shell holder to use with your particular caliber,
- Table 1. Lower Shell Holder Specifications
- Name
- Dimensions
- Description
- (Order Number)
- Large ends hold:.468” to .562” rim
- Small ends hold:.343” to .422” rim
- Set of two, factory installed on Co-Ax Press with large ends aligned; ready for reloading.
- “S” Lower Shell Holder Jaws
- Spring-loaded; automatically open and close on the case head when the case is inserted in the die and the Co-Ax Press handle lowered for full length resizing, allowing the case to float. When the handle is raised and the case extracted from the die, these jaws automatically open and release the case.
- (001231)
- Default Jaws.
- Side View
- Large ends hold:.531” to .625” rim
- Small ends hold:.312” to .375” rim
- Set of two; accommodates a wide range of very large and very small case heads.
- “LS” Lower Shell Holder Jaws
- Spring-loaded; automatically open and close on the case head when the case is inserted into the die and the Co-Ax Press handle lowered for full length resizing, allowing the case to float. When the handle is raised and the case extracted from the die, these jaws automatically open and release the case.
- (001251)
- Available separately.
- Side View
- For use with those few calibers that the “S” or “LS” Shell Holder Jaws do not accommodate. Requires a caliber-specific shell holder (not available through Forster Products).
- Lower Shell Holder Adapter Plate
- (AP1000)
- Not spring-loaded.
- Available separately.
- Single plate.
- Case Rim Diameter Comparison
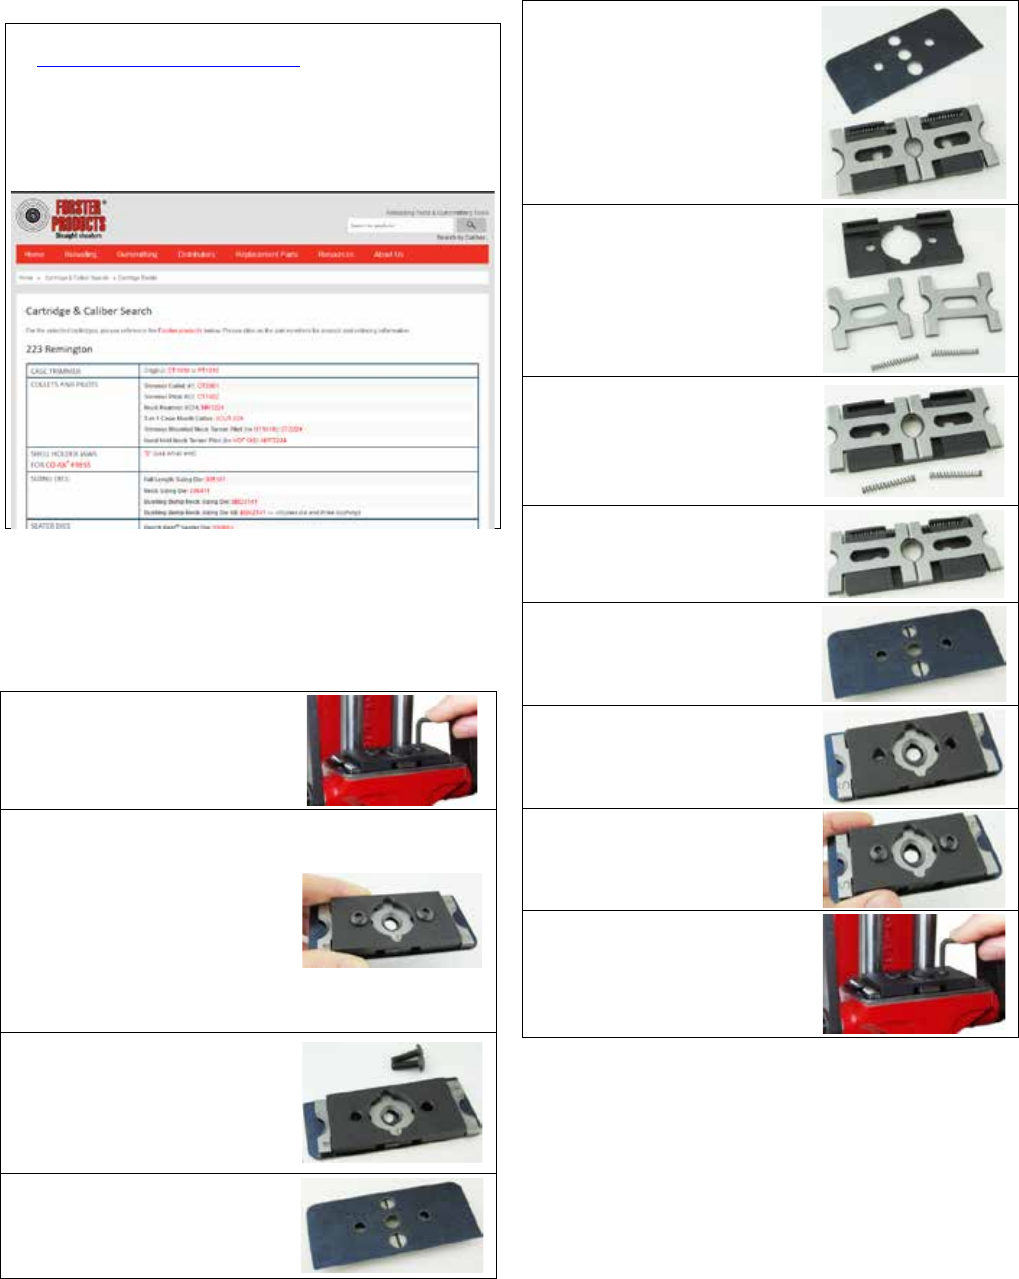
- Figure 4. Online Search for Lower Shell Holder Jaws
- Step 5. Carefully slide the Wear Plate off and set it aside. This is to prevent the two Jaw Pressure Springs from coming loose too soon.
- 1. Go to the cartridge search at http://search.forsterproducts.com.
- 2. Input your cartridge name (223 Rem is used here as an example). Click the “Search” button.
- 3. The search should return matching tools as shown below, including the Lower Shell Holder Jaws:
- Step 6. Remove the “S” or “LS” Shell Holder Jaws and the two Jaw Pressure Springs, in that order.
- Step 7. Ensure the ends of the selected pair of Shell Holder Jaws are correctly matched. Insert them into the Shell Holder Jaw Housing.
- Step 8: Replace the two Jaw Pressure Springs.
- 6.2 Change/Adjust the Lower Shell Holders (if Needed)
- 6.21 Change/Adjust the “S” or “LS” Lower Shell Holder Jaws
- Step 9: Replace the Wear Plate. Ensure the rounded edge of the Wear Plate is placed over the two Jaw Pressure Springs.
- Figure 5. Lower Shell Holder Jaws Change/Adjustment
- Step 1: Using the provided 1/8 Allen wrench, loosen the two Button Head Screws (-020).
- Step 10: Carefully turn the component stack back over.
- Step 11: Carefully pick up the component stack and replace the two Button Head Screws.
- Step 2. Carefully lift off the subassembly containing:
- Two Button Head Screws
- Shell Holder Jaw Housing (-037)
- Step 12: Replace the subassembly on Co-Ax Press and tighten the Button Head Screws.
- Two Jaw Pressure Springs (-039)
- “S” or “LS” Shell Holder Jaws
- Wear Plate (-046).
- Step 3: Remove the two Button Head Screws and set them aside. Set the component stack on a work surface.
- Step 4. Carefully turn the component stack over.
- The primer seater design is engineered with such precision that no excessive tolerance or “slop” is required in any of the mating parts. The primer post in the Primer Seater Assembly (see Figure 7) moves freely in its channel with minimal clearance. This extremely tight tolerance delivers remarkably consistent seating depth, time after time.
- 6.22 Optional Lower Shell Holder Adapter Plate Installation
- 1. Remove the Lower Shell Holder Jaws Subassembly following the instructions in Section 6.21 and set aside.
- 2. Remove the two Button Screws from the Lower Shell Holder Jaws Subassembly and place them in the corresponding holes in the Lower Shell Holder Adapter Plate.
- Regardless of the variation in the dimension of the case rim or the amount of force used in seating the primer, with the Forster Products Co-Ax Press, it is impossible to crush a primer or vary the seating depth.
- 3. Place the Lower Shell Holder Adapter Plate on Co-Ax Press and tighten the Button Head Screws.
- 4. Using the 5/64 Allen wrench (provided separately with Adapter Plate) tighten the set screw against the shell holder.
- Figure 7. Primer Seater Assembly Function
- 6.3 Adjust the Sizing/Seating Die in Co-Ax Press (See Figure 6.)
- View A View B
- 1. Unscrew the die approximately two-thirds out of the Cross Bolt Die Lock Ring, ensuring that its screw is centered in front.
- Figure 6. Reloading Die Adjustment
- View A: Dimension “A” is greater than dimension “B” by .004" to .006".
- View B: When force is applied to the guide block of the press, the bottom of the primer cup stops against the base of the primer post. The top of the primer cup stops against the case head. Because the primer post is longer than the cup by .004" to .006", the primer will always be seated .004" to .006" below the case head as shown in View C.
- 2. Lower the Handle all the way down against the stop.
- 3. While holding the Lock Ring with one hand, screw the die through the Lock Ring until the die makes contact with the Shell Holder Jaws.
- 4. Using the provided 7/64 Allen wrench, tighten the Lock Ring in place on the die. For specific Forster Products Sizing and Seating Die Instructions, go to forsterproducts.com, then click “Resources | User Instructions.”
- View C
- 5. Do not overtighten the 5/16” Lock Ring Detent Screw (028271-028). This screw should be just tight enough to keep the die lock ring under tension. The die must be allowed to float for Co-Ax alignment. We recommend using Forster Cross Bolt Locking Rings (DIE-G-10).
- 7.0. PRIMER SEATING
- 7.1 Primer Seating Overview (See Figure 7.)
- Proper priming is one of the most critical operations in the reloading process. In order for your ammunition to perform efficiently, consistent ignition is absolutely mandatory. For this reason, we paid special attention to the priming function in the design of Co-Ax Press.
- 7.2 Adjust Co-Ax Press
- 7.23 Locator
- 1. Match the Locator end to the primer diameter being used (Figure 9).
- 7.21 Primer Seater Assembly (See Figure 8.)
- Based on the primer diameter being used, select either the Small Primer Seater Assembly or the Large Primer Seater Assembly (see Figure 8) and screw it into Co-Ax Press.
- Figure 10. Locator (-018)
- Figure 8. Primer Seater Assembly Versions
- Large Primer Seater Assembly
- Small Primer Seater Assembly
- (-102)
- (-101)
- 2. Lower the Co-Ax Press Handle until there is enough room to insert the Locator up into the Top Shell Holder Jaw Block (-017) from underneath.
- 3. Center an unprimed case on the Locator.
- 4. While holding the locator in place, adjust the three Top Shell Holder Jaws inward onto the case rim and tighten the three Socket Head Cap Screws (SCR10-24X1/2SHEADCAP) around the case. Do not overtighten. (See Figure 11.)
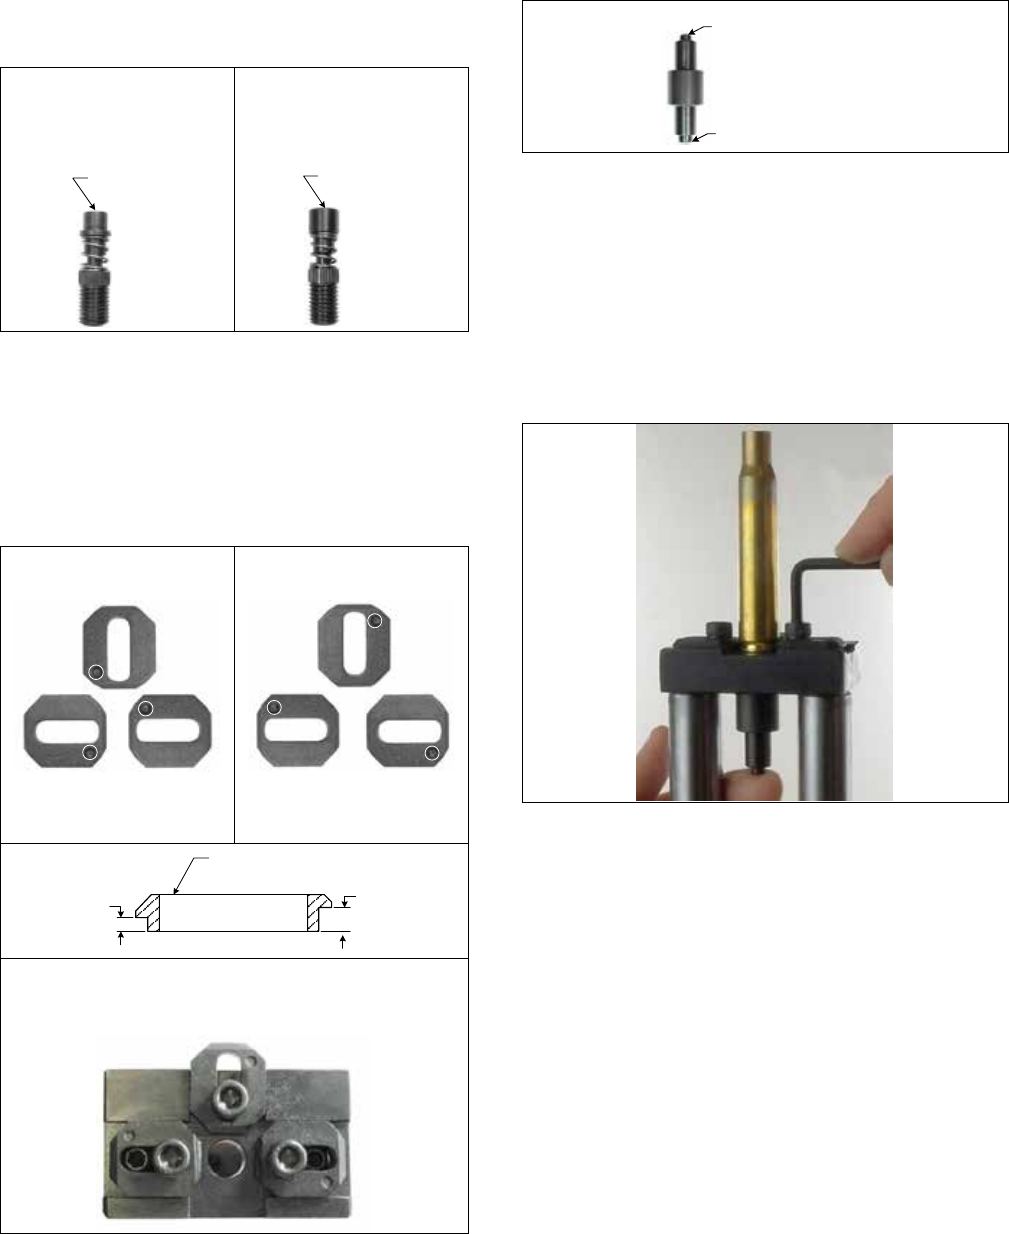
- 7.22 Top Shell Holder Jaws (See Figure 9.)
- Based on the thickness of the case rim being used, ensure all three ends of the Top Shell Holder Jaws are matched and aligned, and held loosely face down on the Shell Holder Jaw Block (-017). Note the stamped circle that indicates which ends are aligned.
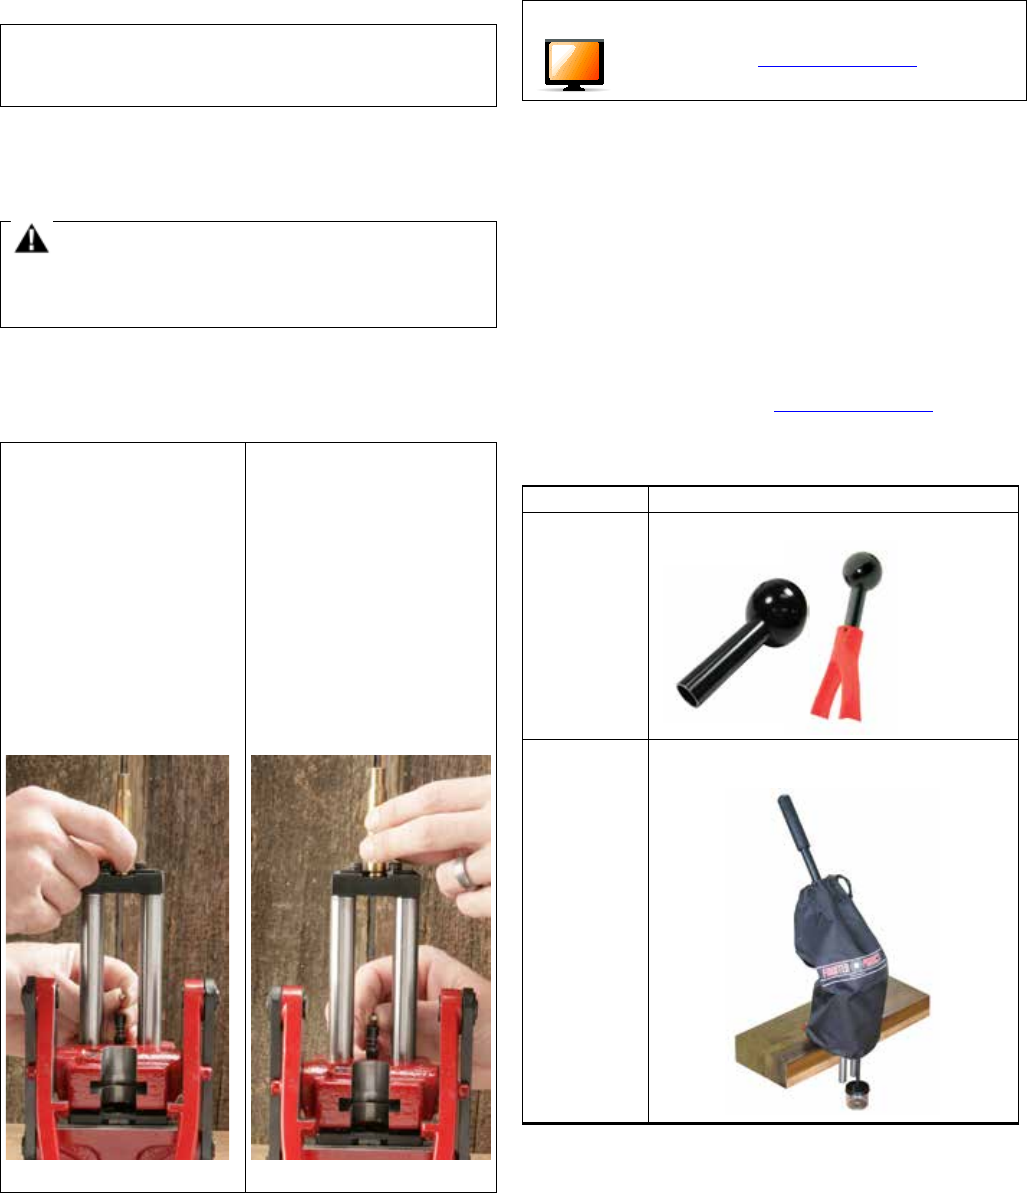
- Figure 11. Locator in Use
- Figure 9. Top Shell Holder Jaws (-016)
- 0.072” Ends
- 0.054” Ends
- 5. Lower the Co-Ax Press handle and remove the Locator. You are now ready to prime. If the case rim is either too loose or too tight, try using the opposite end of the Top Shell Holder Jaws.
- Top Shell Holder Jaws in Place and Ready to Be Tightened
- 7.3 Prime Your Cartridges
- FORSTER VIDEO LIBRARY
- NOTICE
- Go to the online Video Library under “Resources” at forsterproducts.com to see videos of Co-Ax Press.
- Wear thin medical gloves on the primer hand to improve the grip and help keep the primer from contamination.
- 8.0 MAINTENANCE
- 1. Insert the primer on the Primer Seater Assembly and the case on the Top Shell Holder Jaws following the instructions below.
- Use a good quality gun oil to lubricate moving parts, wipe all unpainted parts with oil to prevent rust.
- When not in use, keep a protective cover, such as our 028271-300 (see Table 2), over Co-Ax Press.
- WARNING
- PERSONAL INJURY
- Failure to comply with these instructions could result in death or serious injury.
- 9.0 REPLACEMENT PARTS
- Every product component is available individually. A complete list of component order numbers and prices is available on our website. Go to forsterproducts.com, then click “Replacement Parts.”
- 2. Use one of the two following positions for inserting the primers on the Primer Seater Assembly and the cases on the Top Shell Holder Jaws:
- Right-handed primer handling:
- Left-handed primer handling:
- Table 2. Accessories
- Description
- Order No.
- A. Facing the press, take a position to the right of the press.
- A. Facing the press, take a position to the left of the press.
- Short Handle for Co-Ax Press
- SH1000
- B. Lower the handle forward approximately 90°.
- B. Lower the handle forward approximately 90°.
- C. From the rear of the press, use your right hand to insert the primer and the left hand to insert the case.
- C. From the rear of the press, use your left hand to insert the primer and the right hand to insert the case.
- Protective Cover for Co-Ax Press (Press not included)
- 028271-300
- 10.0 DISTRIBUTORS/RESELLERS
- See www.forsterproducts.com for complete documentation and part numbers.
- 3. Raise the Co-Ax Press handle to seat the primer. Only a very small amount of force is needed.
- For best prices, contact your Forster distributor. Experienced distributors are an integral part of the shooting sports. Please make frequent use of their knowledge and support them. If your distributor cannot supply you, please contact us by email, fax or phone.
- Figure 12. Scale Drilling Template
- 11.0 RELEASE HISTORY
- Revisions/Enhancements
- Model
- B1
- Compound leverage, reloading press.
- (Designer: Clarence Purdie in conjunction with Army Marksmanship Unit)
- Eliminated removable shellholders from top priming station.
- B2
- B3
- Added 1⅛” more clearance under yoke handle to accommodate tall dies.
- Enlarged drop tube (028271-057) for primer collection and larger set screw (028271-028) for securing handle.
- B4
- B5
- Two pins (028271-037-PIN) added to Shell Holder Jaw Housing (028271-037) to retain Jaw Pressure Springs (028271-039).
1
User Instructions for the Forster Products Co-Ax
®
Reloading Press
Issue 8
1.0 GENERAL INFORMATION
Co-Ax® Press is designed for three rifle and pistol handloading
steps:
1. Case resizing.
2. Primer seating.
3. Bullet seating.
Co-Ax Reloading Press accepts any 7/8" x 14 reloading die.
For proper press operation, you must use the two aluminum
Cross Bolt Die Lock Rings provided in the Important Parts
Packet (Figure 2) on either Forster Products Reloading Dies or
on your own dies. The Cross Bolt Die Lock Rings are important
for two reasons:
• They keep the Co-Ax Press T-Slot free from wear that
may be caused by other harder steel lock rings
• They are the proper thickness to allow the dies to “float”
in the T-Slot for optimal reloading
CAUTION
PRODUCT DAMAGE
• Do not drop Co-Ax Press or expose it to sudden
stresses.
Failure to comply with these instructions may result in
product damage.
2.0 SHIPPING PACKAGE CONTENTS (See Figure 2.)
Your shipping package should contain the following:
• Section A: Co-Ax Press already assembled
• Section B: Important Parts Packet
• Section C: Loose Components
3.0 SAFETY INFORMATION
WARNING
PERSONAL INJURY
• Avoid possible pinch points.
Failure to comply with these instructions could result
in death or serious injury.
Always wear safety glasses.
4.0 MOUNT CO-AX PRESS TO A WORK SURFACE
Co-Ax Press may be directly mounted to a work bench, or to a
board for later use on the range or in the field.
1. See Figure 12 on page 8 for a scale drilling template.
Drill four ¼” holes as shown.
2. Mount Co-Ax Press using ¼” lag bolts.
Due to the extreme mechanical advantage engineered in Co-
Ax Press, only two “C” clamps are needed to fasten a board-
mounted Co-Ax Press to a working surface.
5.0 SETUP AND ASSEMBLY
5.1 Install the Handle
1. Insert the Handle into the Yoke Handle Casting (-055).
2. Using the 5/32" Allen Wrench
(SHORTARMHEXKEY5/32), tighten the 5/16-24 Handle
Set Screw (-028).
A short handle with a ball end is also available separately for
use when less leverage is needed. See Section 9.0.
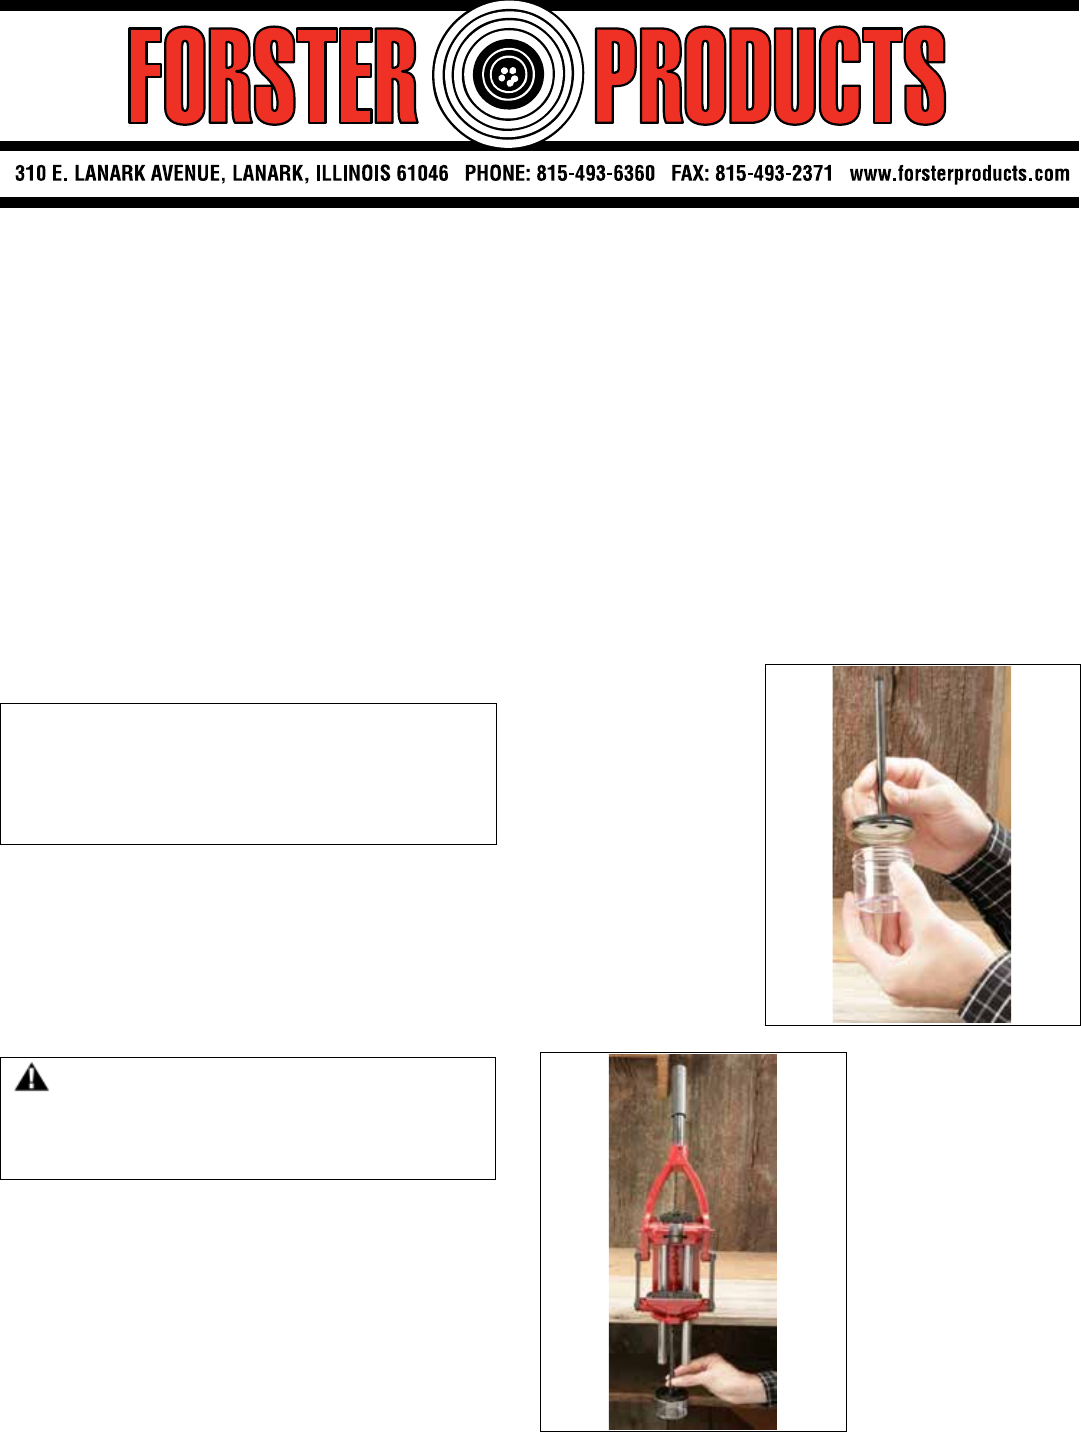
5.2 Install the Primer Catcher
1. From below, insert
the threaded part of
the Primer Drop
Tube (-057) through
the hole in the
Primer Catcher Cap
(-050).
2. Screw the Primer
Catcher Cap to the
Primer Catcher Cup
(-051), as shown in
Figure 1a.
Fig
. 1a. Drop Tube in Primer
Catcher
Cap, Ready to Attach to Cup
Fig. 1b. Primer Catcher under Press
3. Pass the Primer Drop
Tube through the
middle hole in the
bottom of the Frame
Casting (-031), as
shown in Figure 1b.
4. Screw the Primer
Drop Tube into the
tapped hole in the
bottom of the Guide
Block Casting (-045)
until finger tight.
2
Figure 2. Co-Ax Reloading Press (028271) Nomenclature
Yoke Handle Casting
(028271-055)
3X Top Shell Holder Jaws
(028271-016) (See Figure 8.)
Top Shell Holder
Jaw Block
(028271-017)
Locator
(028271-018) (See Figure 9.)
Primer Catcher Cap
(028271-050)
Primer Catcher Cup
(028271-051)
Primer Drop Tube
(028271-057)
1/8 Allen Wrench
(
SHORTARMHEXKEY1/8)
Section B. Important Parts
Packet
5/32 Allen Wrench
(
SHORTARMHEXKEY5/32)
2X Guide Rod
(028271-048)
2X Pin “C”
(028271-047)
3X Socket Head Cap Screw
(10-24x ½”)
(SCR10-24X1/2SHEADCAP)
Large Primer Seater Assembly
(028271-102) (See Figure 7.)
2X Pin “B”
(028271-032)
2X Link
(028271-034)
2X Pin “A”
(028271-026)
2X Roll Pin
(1/8" x 1" for Pin “A”)
(028271-026A)
Guide Block Casting
(028271-045)
Primer Drop Tube
Retaining Ring
(028271-056)
Wear Plate
(028271-046)
Jaw Opening Screw
(028271-044)
2X Socket Set Screw 10-24x3/8" for Pin “C”
(028271-054)
2X Button Head Screw (10-24x5/8")
(028271-020)
2X Roll Pin (1/8"x5/8")
(028271-038)
4X E-Ring (½”)
(028271-035)
Shell Holder Jaw Housing
(028271-037)
2X Jaw Pressure Spring
(028271-039)
Frame Casting
(028271-031)
“S” Lower Shell Holder Jaws
(001231) (See Table 1)
(Holes not used.)
Handle Set Screw (5/16-24)
(028271-028)
2X Button Head Screw
(10-24x5/8") (not shown)
(028271-020)
2X Pin “C”
(028271-047)
Wear Plate
(028271-046)
Primer Catcher Cap
(028271-050)
Primer Drop Tube Retaining Ring
(028271-056)
7/64 Allen Wrench
(
SHORTARMHEXKEY7/64)
Small Primer Seater Assembly
(028271-101) (See Figure 7.)
Section A. Co-Ax Press with All Components Not Noted
in Sections B and C Already Assembled
Lock Ring Detent Screw (5/16-24)
(028271-028)
Lock Ring Detent Ball
(028271-030)
Lock Ring Detent Spring
(028271-029)
Two Cross Bolt Lock Rings
(DIE-G-10)
Primer Drop Tube
(028271-057)
Primer Catcher Cup
(028271-051)
Section C. Loose Components
Handle Grip
(028271-011)
Handle Tube
(028271-013)
Handle
Handle Grip
(028271-011)
Handle Tube
(028271-013)
Handle
3
5.3 Adjust the Jaw Opening Screw
The Jaw Opening Screw (-044) controls the amount the lower
Shellholder Jaws open to accept cases when the Handle is raised to
its highest position.
Adjust the Jaw Opening Screw’s height so that the Shellholder Jaws
completely open when the handle is in the full up position, but not so
far up that it could damage the Shellholder Housing (-037). This
important adjustment controls how far the jaws open to accept cases.
6.0 CASE SIZING AND BULLET SEATING
6.1 Choose the correct lower shell holder for the caliber
being sized/seated.
• Table 1 shows the three lower shell holders available.
• Figure 4 shows how to use the online Forster Products Tool
Search By Cartridge to find which lower shell holder to use
with your particular caliber,
Table 1. Lower Shell Holder Specifications
Name
(Order Number)
Description Dimensions
“S” Lower
Shell Holder
Jaws
(001231)
Default Jaws.
• Set of two, factory installed on Co-Ax
Press with large ends aligned; ready for
reloading.
• Spring-loaded; automatically open and
close on the case head when the case is
inserted in the die and the Co-Ax Press
handle lowered for full length resizing,
allowing the case to float. When the
handle is raised and the case extracted
from the die, these jaws automatically
open and release the case.
Small ends hold:
.343” to .422” rim
.343"
Large ends hold:
.468” to .562” rim
.468"
Side View
“LS” Lower
Shell Holder
Jaws
(001251)
Available
separately.
• Set of two; accommodates a wide range
of very large and very small case heads.
• Spring-loaded; automatically open and
close on the case head when the case is
inserted into the die and the Co-Ax
Press handle lowered for full length
resizing, allowing the case to float.
When
the handle is raised and the case
extracted from the die, these jaws
automatically open and release the case.
Small ends hold:
.312” to .375” rim
.312" .312"
Large ends hold:
.531” to .625” rim
.531"
Side View
Large End
.065"
Small End
.070"
Lower Shell
Holder
Adapter Plate
(AP1000)
Available
separately.
• For use with those few calibers that the
“S” or “LS” Shell Holder Jaws do not
accommodate. Requires a caliber-
specific shell holder (not available
through Forster Products).
• Not spring-loaded.
• Single plate.
Without Caliber-Specific
Shell Holder With Caliber-Specific
Shell Holder
Case Rim Diameter Comparison
.312" to .375"
.343" to .422"
“S” Shell Holder Jaws
“LS” Shell Holder Jaws
.468" to .562"
.531" to .625"
300" 400" 500" 600"
Complete contact of shell holder to case - case held securely.
Incomplete contact of shell holder to case - case still held securely as determined by user.
Figure 3. Position of Jaw Opening Screw
Jaw Opening Screw
(028271-044)
4
Figure 4. Online Search for Lower Shell Holder Jaws
1. Go to the cartridge search at
http://search.forsterproducts.com.
2. Input your cartridge name (223 Rem is used here as an
example). Click the “Search” button.
3. The search should return matching tools as shown
below, including the Lower Shell Holder Jaws:
6.2 Change/Adjust the Lower Shell Holders (if
Needed)
6.21 Change/Adjust the “S” or “LS” Lower Shell
Holder Jaws
Figure 5. Lower Shell Holder Jaws Change/Adjustment
Step 1:
Using the provided 1/8
Allen wrench, loosen the two
Button Head Screws (-020).
Step 2.
Carefully lift off the
subassembly containing:
• Two Button Head Screws
• Shell Holder Jaw Housing
(-037)
• Two Jaw Pressure Springs
(-039)
• “S” or “LS” Shell Holder Jaws
• Wear Plate (-046).
Step 3: Remove the two Button
Head Screws and set them
aside. Set the component stack
on a work surface.
Step 4. Carefully turn the
component stack over.
Step 5. Carefully slide the Wear
Plate off and set it aside. This is
to prevent the two Jaw Pressure
Springs from coming loose too
soon.
Step 6. Remove the “S” or “LS”
Shell Holder Jaws and the two
Jaw Pressure Springs, in that
order.
Step 7. Ensure the ends of the
selected pair of Shell Holder
Jaws are correctly matched.
Insert them into the Shell Holder
Jaw Housing.
Step 8:
Replace the two Jaw
Pressure Springs.
Step 9: Replace the Wear Plate.
Ensure the rounded edge of the
Wear Plate is placed over the
two Jaw Pressure Springs.
Step 10: Carefully turn the
component stack back over.
Step 11: Carefully pick up the
component stack and replace the
two Button Head Screws.
Step 12: Replace the
subassembly on Co-Ax Press
and tighten the Button Head
Screws.

5
6.22 Optional Lower Shell Holder Adapter Plate
Installation
1. Remove the Lower Shell Holder Jaws Subassembly
following the instructions in Section 6.21 and set
aside.
2. Remove the two Button Screws from the Lower Shell
Holder Jaws Subassembly and place them in the
corresponding holes in the Lower Shell Holder
Adapter Plate.
3. Place the Lower Shell Holder Adapter Plate on Co-Ax
Press and tighten the Button Head Screws.
4. Using the 5/64 Allen wrench (provided separately with
Adapter Plate) tighten the set screw against the shell
holder.
6.3 Adjust the Sizing/Seating Die in Co-Ax Press
(See Figure 6.)
1. Unscrew the die approximately two-thirds out of the
Cross Bolt Die Lock Ring, ensuring that its screw is
centered in front.
Figure 6. Reloading Die Adjustment
2. Lower the Handle all the way down against the stop.
3. While holding the Lock Ring with one hand, screw the
die through the Lock Ring until the die makes contact
with the Shell Holder Jaws.
4. Using the provided 7/64 Allen wrench, tighten the
Lock Ring in place on the die. For specific Forster
Products Sizing and Seating Die Instructions, go to
forsterproducts.com, then click “Resources | User
Instructions.”
5. Do not overtighten the 5/16” Lock Ring Detent Screw
(028271-028). This screw should be just tight enough
to keep the die lock ring under tension. The die must
be allowed to float for Co-Ax alignment. We
recommend using Forster Cross Bolt Locking Rings
(DIE-G-10).
7.0. PRIMER SEATING
7.1 Primer Seating Overview (See Figure 7.)
Proper priming is one of the most critical operations in the
reloading process. In order for your ammunition to perform
efficiently, consistent ignition is absolutely mandatory. For
this reason, we paid special attention to the priming function
in the design of Co-Ax Press.
The primer seater design is engineered with such precision
that no excessive tolerance or “slop” is required in any of the
mating parts. The primer post in the Primer Seater Assembly
(see Figure 7) moves freely in its channel with minimal
clearance. This extremely tight tolerance delivers remarkably
consistent seating depth, time after time.
Regardless of the variation in the dimension of the case rim
or the amount of force used in seating the primer, with the
Forster Products Co-Ax Press, it is impossible to crush a
primer or vary the seating depth.
Figure 7. Primer Seater Assembly Function
View A View B
Primer
Post
A
B
View A: Dimension “A” is greater than dimension “B” by
.004" to .006".
View B: When force is applied to the guide block of the
press, the bottom of the primer cup stops against the base
of the primer post. The top of the primer cup stops against
the case head. Because the primer post is longer than the
cup by .004" to .006", the primer will always be seated
.004" to .006" below the case head as shown in View C.
View C
.004" to .006”
Anvil contact
Step 5
Step 4
6
7.2 Adjust Co-Ax Press
7.21 Primer Seater Assembly (See Figure 8.)
Based on the primer diameter being used, select either the
Small Primer Seater Assembly or the Large Primer Seater
Assembly (see Figure 8) and screw it into Co-Ax Press.
Figure 8. Primer Seater Assembly Versions
Small Primer Seater
Assembly
(-101)
.175"
Diameter
Large Primer Seater
Assembly
(-102)
.210"
Diameter
7.22 Top Shell Holder Jaws (See Figure 9.)
Based on the thickness of the case rim being used, ensure
all three ends of the Top Shell Holder Jaws are matched and
aligned, and held loosely face down on the Shell Holder Jaw
Block (-017). Note the stamped circle that indicates which
ends are aligned.
Figure 9. Top Shell Holder Jaws (-016)
0.054” Ends
0.072” Ends
.054".072"
Stamped
Circle
Top Shell Holder Jaws in Place and Ready to Be
Tightened
7.23 Locator
1. Match the Locator end to the primer diameter being
used (Figure 9).
Figure 10. Locator (-018)
.175" Diameter
.210" Diameter
2. Lower the Co-Ax Press Handle until there is enough
room to insert the Locator up into the Top Shell
Holder Jaw Block (-017) from underneath.
3. Center an unprimed case on the Locator.
4. While holding the locator in place, adjust the three
Top Shell Holder Jaws inward onto the case rim and
tighten the three Socket Head Cap Screws (SCR10-
24X1/2SHEADCAP) around the case. Do not
overtighten. (See Figure 11.)
Figure 11. Locator in Use
5. Lower the Co-Ax Press handle and remove the
Locator. You are now ready to prime. If the case rim
is either too loose or too tight, try using the opposite
end of the Top Shell Holder Jaws.
7
7.3 Prime Your Cartridges
NOTICE
Wear thin medical gloves on the primer hand to improve
the grip and help keep the primer from contamination.
1. Insert the primer on the Primer Seater Assembly and
the case on the Top Shell Holder Jaws following the
instructions below.
WARNING
PERSONAL INJURY
Failure to comply with these instructions could result
in death or serious injury.
2. Use one of the two following positions for inserting the
primers on the Primer Seater Assembly and the cases
on the Top Shell Holder Jaws:
Left-handed primer
handling:
A. Facing the press, take a
position to the left of the
press.
B. Lower the
handle forward
approximately 90°.
C. From the rear of the
press, use your left hand
to insert the primer and
the right hand to insert
the case.
Right-handed primer
handling:
A. Facing the press, take a
position to the right of the
press.
B. Lower the handle forward
approximately 90°.
C. From the rear of the
press, use your right hand
to insert the primer and
the left hand to insert the
case.
3. Raise the Co-Ax Press handle to seat the primer.
Only a very small amount of force is needed.
FORSTER VIDEO LIBRARY
Go to the online Video Library under
“Resources” at forsterproducts.com to see
videos of Co-Ax Press.
8.0 MAINTENANCE
• Use a good quality gun oil to lubricate moving parts,
wipe all unpainted parts with oil to prevent rust.
• When not in use, keep a protective cover, such as our
028271-300 (see Table 2), over Co-Ax Press.
9.0 REPLACEMENT PARTS
Every product component is available individually. A
complete list of component order numbers and prices is
available on our website. Go to forsterproducts.com, then
click “Replacement Parts.”
Table 2. Accessories
Order No.
Description
SH1000
Short Handle for Co-Ax Press
In use
028271-300 Protective Cover for Co-Ax Press (Press
not included)
10.0 DISTRIBUTORS/RESELLERS
See www.forsterproducts.com for complete documentation
and part numbers.
For best prices, contact your Forster distributor. Experienced
distributors are an integral part of the shooting sports.
Please make frequent use of their knowledge and support
them. If your distributor cannot supply you, please contact us
by email, fax or phone.
WARRANTY
All Forster Products are warranted against defects in materials and workmanship for the life of the product. Parts excluded from the warranty
are those that, by nature of their function, are subject to normal wear (such as springs, pins, etc.) or that have been altered, abused, or
neglected. If the product is deemed defective by workmanship or materials, it will be repaired, reconditioned or replaced (at Forster’s option).
This warranty supersedes all other warranties for Forster Products, whether written or oral.
forsterproducts.com
028271-002 Issue 8, May 2017
Figure 12. Scale Drilling Template
2"
2.5"
1"
Edge of Workbench
4X 0.25" Dia.
Mounting
Holes
11.0 RELEASE HISTORY
Model
Revisions/Enhancements
B1 Compound leverage, reloading press.
(Designer: Clarence Purdie in conjunction with Army Marksmanship Unit)
B2
Eliminated removable shellholders from top priming station.
B3
Added 1⅛” more clearance under yoke handle to accommodate tall dies.
B4
Enlarged drop tube (028271-057) for primer collection and larger set screw (028271-028) for securing handle.
B5 Two pins (028271-037-PIN) added to Shell Holder Jaw Housing (028271-037) to retain Jaw Pressure Springs
(028271-039).
