Crazyflie Guide
User Manual:
Open the PDF directly: View PDF ![]() .
.
Page Count: 22

Crazyflie Guide
(AKA Drones for Dummies)
Typeset by Brian Raymond,
Contributed to by Tameez Latib, Joey Miller
Under the guidance of:
Prof. Tabuada’s Cyber-Physical Systems Laboratory and
Prof. Fragouli’s Algorithmic Research in Network Information
Flow Laboratory
August 20, 2018

Contents
1 Native Installation 3
1.1 Crazyflie Python Library . . . . . . . . . . . . . . . . . . . . . . 3
1.2 Crazyflie Python Client . . . . . . . . . . . . . . . . . . . . . . . 3
1.3 CrazyflieFirmware.......................... 3
1.4 Crazyflie LPS Node Firmware . . . . . . . . . . . . . . . . . . . . 4
2 VM Installation and Software 4
2.1 Installation .............................. 4
2.2 InstalledSoftware........................... 4
2.3 Systemtweaks ............................ 5
2.4 Projects................................ 5
3 ROS Installation 5
3.1 Installation Script . . . . . . . . . . . . . . . . . . . . . . . . . . 5
3.2 ROS Crazyflie Installation . . . . . . . . . . . . . . . . . . . . . . 5
4 Running Crazyflie 5
4.1 PCClient ............................... 5
4.2 UpdatingRepos ........................... 6
4.3 Updating Crazyradio Firmware . . . . . . . . . . . . . . . . . . . 6
4.4 Compiling Crazyflie Firmware . . . . . . . . . . . . . . . . . . . . 6
4.5 AddingUSBDrivers ......................... 7
4.6 Bootloading the Crazyflie . . . . . . . . . . . . . . . . . . . . . . 7
5 Running ROS 7
5.1 ROSFlow............................... 7
5.2 TerminalCommands......................... 7
5.3 Tips&Tricks............................. 8
6 Custom Firmware 8
6.1 Crazyflie................................ 8
6.2 Loco-Positioning System . . . . . . . . . . . . . . . . . . . . . . . 8
7 Debugging 9
7.1 Crazyflie Firmware Debugging . . . . . . . . . . . . . . . . . . . 9
7.1.1 STM32 ............................ 9
7.1.2 nRF51............................. 12
7.2 CrazyfliePythonLib......................... 12
7.3 ROS .................................. 13
8 Loco-Positioning System 13
8.1 ConfiguringDrones.......................... 13
8.2 ConfiguringNodes .......................... 13
8.3 NodePlacement ........................... 13
1
9 Setpoint Following 13
9.1 Setup ................................. 13
9.2 Code.................................. 14
10 Logging 16
10.1 Loggable Variables . . . . . . . . . . . . . . . . . . . . . . . . . . 16
10.2SkeletonCode............................. 16
10.3AltLogger ............................... 18
11 Custom Communication 18
11.1 Crazyflie *
)BaseStation ...................... 18
11.1.1 Crazyflie Code . . . . . . . . . . . . . . . . . . . . . . . . 18
11.1.2 Base Station Code . . . . . . . . . . . . . . . . . . . . . . 19
11.2 Crazyflie *
)Beacon ......................... 19
11.2.1 Crazyflie Code . . . . . . . . . . . . . . . . . . . . . . . . 19
11.2.2 BeaconCode ......................... 20
11.3 Crazyflie *
)Crazyflie......................... 21
2

1 Native Installation
1.1 Crazyflie Python Library
In terminal, type the following to install cflib:
$git cl one https :// git hub . com / b itc raze / craz yf lie -lib - py thon . git
$pip i nst all - e path / to / cflib
To use USB radio without being root:
$sudo groupadd plugdev
$sudo usermod -a -G plugdev <username >
You will also either need to create or edit the following file:
# / etc / udev / rules .d/99 - cr azyradio . rules
SU BSYS TEM == " usb " , ATTRS { id Vend or }== " 1915 " , AT TRS { i dPr odu ct }== " 7777 " , MODE ="
0664 " , GROUP =" plug dev "
# to con nect Craz yflie 2.0 via usb
SU BSYS TEM == " usb " , ATTRS { id Vend or }== " 0483 " , AT TRS { i dPr odu ct }== " 5740 " , MODE ="
0664 " , GROUP =" plug dev "
1.2 Crazyflie Python Client
To install the client, clone the following repo and install:
$git cl one https :// git hub . com / b itc raze / craz yf lie - clie nts - py thon . git
$sudo apt - get install pytho n3 python3 - pip python3 - pyqt5 python3 - pyqt5 . qtsvg
$pip3 install -e .
1.3 Crazyflie Firmware
To install the Crazyflie 2.0 firmware and be able to edit it:
$git clone https :// github . com / bitcraze / crazyflie - fir mwa re . git
$sudo add - apt - rep osito ry ppa : terry .guo /gcc -arm - embedded # For ubuntu 14.04
64 b
$sudo add - apt - rep osito ry ppa : team - gcc - arm - embe dde d / ppa # For ubuntu 16.04 64
b
$sudo apt - get upd ate
$sudo apt - get install libnewlib -arm - none - eabi
Compiling is done with ‘make’
3

1.4 Crazyflie LPS Node Firmware
To install the location positioning system (LPS) firmware and be able to edit it:
$git clone https :// github . com / bitcraze / lps - node - firmware . git
$sudo apt - get in stal l l ibn cur ses 5 : i386
$sudo apt - get install gcc - arm - none - eabi
Compiling is done with ‘make’
2 VM Installation and Software
2.1 Installation
In order to get the Crazyflie in the air quickly, Bitcraze has set up its own Virtual Machine that is preloaded
with all the essential software and code necessary to begin flying the Crazyflie. The virtual machine is intended
to be run in Oracle VirtualBox. If you wish to run the VM in WMPlayer you will need to install some additional
tools yourself. The Virtual Machine itself has an online index. If you wish to get the latest version of the VM,
it can be found on their VM release page on Github.
One error that may come up iswhen running the VM will say something to the effect that there is an issue with
the USB controller. To fix this, be sure to select the USB 1.1 OHCI configuration. Once this is done, the virtual
machine should hopefully install and boot smoothly. Once it finishes installing, boot up the VM and click on the
desktop configuration file named Update all Projects to automatically update all Crazyflie Github Repos. The
Following is all the information necessary about the VM. It can also be found in the README on the Desktop
of the VM.
* The us ern ame is : bi tcr aze
* The pa ssw ord is : c raz yfl ie
* The virtual machin e has 30 GB drive and 1 GB of RAM
* The virtual machine is using Xubuntu 14.04.4 LTS
2.2 Installed Software
The following software has been pre-installed (besides basic setup)
•Virtualbox guest additions
•gnu-arm-none-eabi + build tools
•Git
•gitg
•PyCharm
•Oracle Java JRE (for PyCharm)
•pyusb, pygame and pyqt
•PyQtGraph
•Qt4 and Qt Designer
•KDE Marble with Python-bindings
•KiCad
•Eclipse with compiling/debugging/flashing
4

•Leafpad
•EmbSys RegView for Eclipse
•dfu-util
2.3 System tweaks
The udev rules to access the Crazyradio and the NRF bootloader have been added to the udev configuration.
They have also been added to the Virtual Box pre-set filters.
2.4 Projects
The following projects have been pre-cloned into the /home/bitcraze/projects directory:
•crazyflie-pc-client
•crazyflie-firmware
•crazyflie-bootloader
•crazyradio-firmware
•crazyradio-electronics
•crazyflie2-nrf-firmware
•crazyflie2-stm-firmware
•crazyflie2-stm-bootloader
3 ROS Installation
3.1 Installation Script
Rather than install ROS Kinetic via the website for Ubuntu 16.04, run the following script via terminal:
$wget -- output - d ocum ent i nst all _ro s . sh https :// raw . gi th ubu se rco nte nt . com / il -
dionigi / drone - cyphy / master / install . sh
$chm od +7 55 i nsta ll . sh
$bash in sta ll . sh
3.2 ROS Crazyflie Installation
Clone the following repository into your ∼/catkin ws/src/ and then run catkin make within ∼/catkin ws/ to
compile the library and install it.
$git cl one https :// g ithub . com / il - dioni gi / c raz yf lie _r os_ cy phy . git
4 Running Crazyflie
4.1 PC Client
The Crazyflie PC client can be run by using the following command:
5

# On virtual machine:
$python3 / home / bitcraze / projects / crazyflie - pc - client / bin / cfclient
# On native install :
$cfclient
Or by using the shortcut on the desktop.
Please note: If no other input device is passed to the VM the “VirtualBox USB Tablet” device will be used. Do
not connect to the Crazyflie using this device, since the thrust will then be controlled by the mouse movements
on the screen.
4.2 Updating Repos
Updating to the latest versions of all the repositories can be done by using the following:
# On virtual machine:
$/ home / b itc raze / bin / u pd ate _a ll_ pr oje ct s . sh
# On native install :
$/ home / d esire dRepoToUp date git pull
On the virtual machine, the shortcut on the desktop may also be used.
4.3 Updating Crazyradio Firmware
Download the latest firmware and run the following commands:
$cd / home / bitcraze / projects / crazyradio - firmware
$python usbtools / launchBo ot lo ader . py
If you have not activated the USB filter for the NRF bootloader, pass the newly found ”NRF BOOT” USB device
to the virtual machine and then run the following command:
$python usbtools / nrfb ootlo ad . py flash n ew _firmware_f il e . bin
4.4 Compiling Crazyflie Firmware
A version of the Crazyflie firmware that is upgradable using the Crazyradio bootloader can be built using the
following commands:
$cd / Install Lo cation / crazyflie - firmware
$make CLOAD =1 DEBUG =0
This firmware can then be downloaded to the Crazyflie using the cfclient or the “Flash using radio” make target
in Eclipse.
6

4.5 Adding USB Drivers
Finally, be sure to right-click on the USB at the bottom of the Virtual Machine and select USB Settings. This
will allow you to add USB drivers to the VM and is necessary to run a controller for flying the drone or allow it
to recognize the CrazyRadio Dongle.
4.6 Bootloading the Crazyflie
Once the Drone has been assembled, it is necessary to flash the latest firmware onto the drone itself. Select the
latest release zip file and use it for bootloading. To bootload the Crazyflie, hold the power button for 3 seconds
and it should begin to flash blue LED’s. If it makes the ordinary startup jingle and rotates its motors, turn it
off and try again. Open up the CFClient and click on the connect tab on the top to open a drop down menu.
Select Bootloader and then click on Initiate bootloader cold boot in the new window. It should connect to the
Crazyflie. Once it is connected, click on browse and select the zip file you previously downloaded. Now click
program and wait for it to finish flashing the firmware. once it has completed, be sure to click restart in firmware
mode. Failure to do so will result in the Crazyflie not being updated to the new firmware.
5 Running ROS
5.1 ROS Flow
About ROS topics:
ROS uses topics to manage shared data; one ‘node’ or process can publish data as a message to a topic, ad then
another node can get that data by subscribing. An example of a subscriber/publisher can be found in interface.py.
It subscribes to the location data that the server gets from he drone, and it publishes data the server should send.
About the code:
The launch files use crazyflie add node to add the crazyflie based on its uri and then calls the crazyflie server
node and the python script. The server is in direct communication with the drone; it gets messages to send based
on the subscribed topics, i.e. based on which topic the python code publishes to.
5.2 Terminal Commands
$roscore // start the ro score which is needed for further commands
$roslaunc h <dir > < file > // run a . launch file
$e.g. rosl aunch crazyfli e_demo p osi tio n . launch
$rosrun craz yf li e_tools <tool > // e. g. scan , which scans
$rostopic echo < topic > // echos all data published to topic
$rostopic list -v // lists all topics + how many subsc riber s / publishe rs
$rostopic info < topic > // lists which nodes are published / su bscribed
$rosrun rq t_g raph rqt_grap h // shows a graph of publ isher s / s ubscr ibers
7

5.3 Tips & Tricks
An easy way to run catkin make from any directory is by adding the following line to your ∼/.bashrc:
$~/.bashrc
$cm=‘ cd ~/ catkin_ ws && cat kin_make && cd -’
This allows one to type ‘cm’ from any directory to compile/make the ROS library and then return to the directory
the command was executed from.
Note, however, that catkin make only needs to be run if C code is modified, and not if python code or launch
files are changed.
On creating a python file, it must be chmod’d to add executable permission.
If you get a what() timeout error, this usually means the connection failed because it could not find the drone,
you must change the address in the launch file.
6 Custom Firmware
6.1 Crazyflie
If the project you are currently working on requires you to modify the firmware, there are two repositories you
will need to focus on. The first is the Crazyflie 2.0 Firmware and the second is the Crazyflie 2.0 NRF Firmware.
Clone these repositories and make your modifications as necessary. Once you are finished, run the make file and
copy the binary created. The zip file downloaded in the last section contains 2 binaries and a json file. The
json file specifies the names of the binaries so it is easiest to rename the binaries you generate from the make
to the names of the binaries in the zip, extract the json file and then zip them up to create your new firmware
package. The binaries are thankfully named appropriately such that it is easy to tell which one corresponds to
NRF and the one for the ordinary firmware. Once you have your new zip file, follow the same steps in the section
on Bootloading the drone to flash your modified firmware to the drone itself.
6.2 Loco-Positioning System
To modify the firmware for the LPS system, you will need to modify the lps node firmware repository and upload
it the node using lps tools.
To install and run lps tools:
# To install , na viga te to clo ned f older and type :
$pip3 install -e .[ pyqt5 ]
# To run :
$python3 -m lpstools
8

If trying to modify the firmware on 64bit Linux, make sure you have the following 32bit libraries:
$sudo apt - get in stal l l ibn cur ses 5 : i386
Then once files are modified, run the following in the root directory and upload the ‘.dfu’ in ‘lps-node-firmware/bin’
with lpstools:
$make clean ; make
7 Debugging
7.1 Crazyflie Firmware Debugging
For debugging the Crazyflie, the debug adapter sold through bitcraze and a ST-Link/v2 will be needed. To
install the proper ST-Link v2 drivers, do the following:
$git cl one https :// g ithub . com / te xane / s tlink st link . git
$cd stlink
$make
# install b ina rie s
$sudo cp build / Debug /st -* / usr / local / bin
# install udev rules
$sudo cp etc / udev / rules .d /49 - st linkv * / etc / udev / rules .d/
# restart udev rules
$sudo resta rt udev
Also be sure to install Eclipse Photon and openOCD both on-system and within Eclipse as a debugging plugin
(reference link for both).
7.1.1 STM32
Within Eclipse:
Go to ‘Run’ →‘Debug Configuration’. Create a new ‘GDB OpenOCD Debugging’ configuration and call it
‘Crazyflie 2.0 STM32.’
Under Main:
Make ‘Project’ your firmware folder and ‘C/C++ Application’ your cf2.elf file. Within ‘Build (if required) before
launching’ section set ‘Build Configuration’ to ‘Select Automatically’ and click on ‘Use workspace settings’.
9
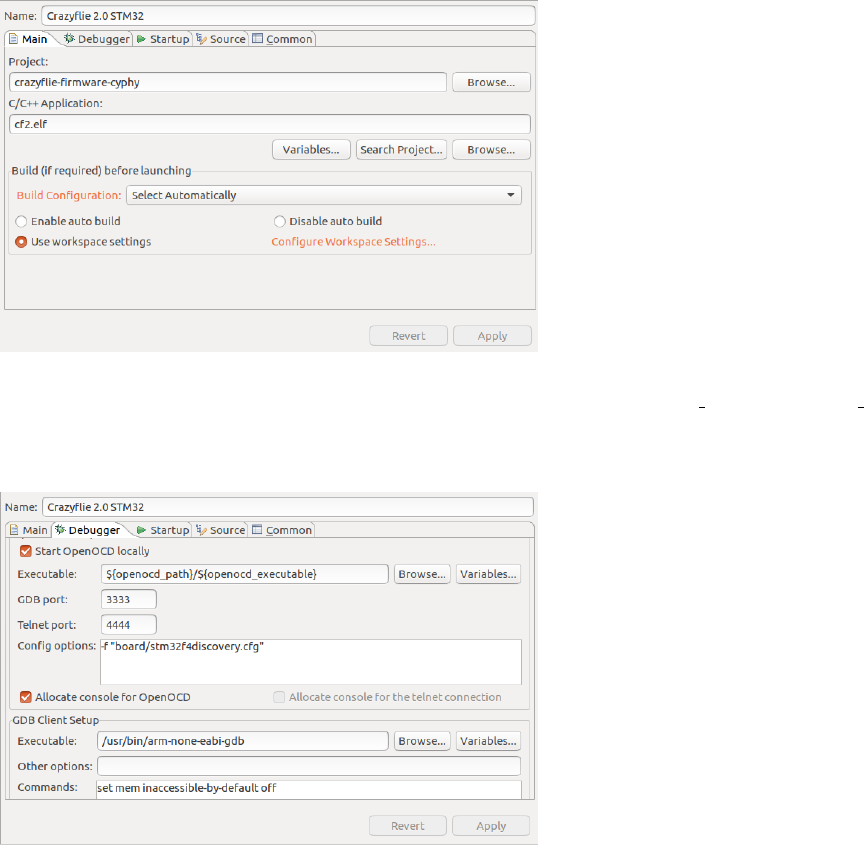
Under Debugger:
Within ‘OpenOCD Client Setup’ section ensure that executable is ‘${openocd path}/${openocd executable}’,
‘GDB port’ is 3333, ‘Telnet port’ is 4444, and ‘Config options’ are ‘ -f “board/stm32discovery.cfg” ’.
Within ‘GDB Client Setup’ ensure that ‘Executable’ is ‘/usr/bin/arm-none-eabi-gdb’ and the ‘Commands’ are
‘set mem inaccesible-by-default off’.
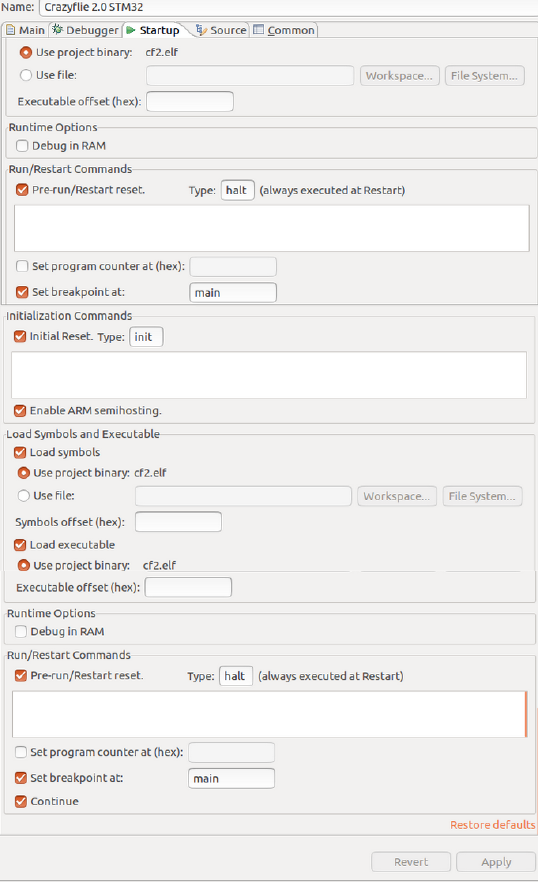
Under Startup:
Ensure it is the same as the following.
10
11
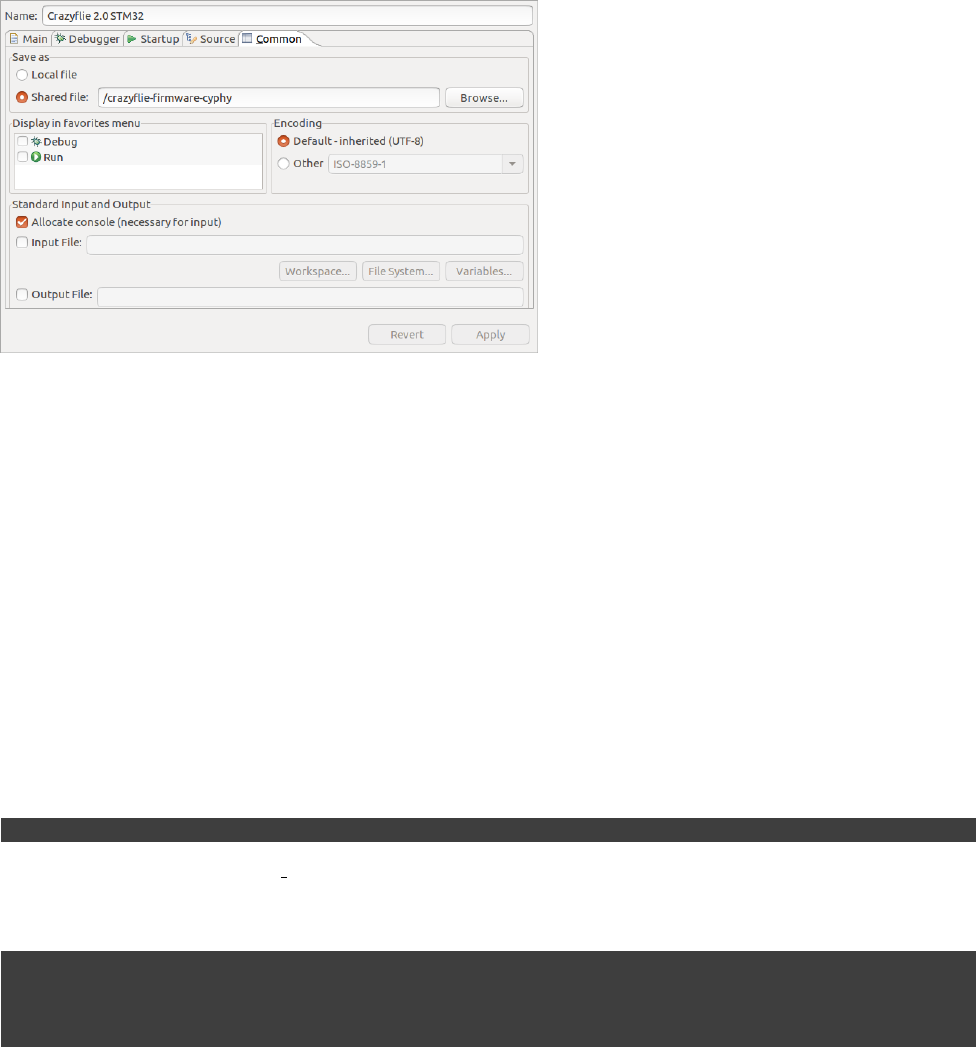
Under Common:
Within ‘Save as’ section check ‘Shared file’ and set the location to the folder of the crazyflie firmware.
Under the Build Targets view add the following targets by clicking ‘New Build Target’: “Make CLOAD DE-
BUG” with the parameters “all CLOAD=1 DEBUG=1” “Make CLOAD” with the parameters “all CLOAD=1
DEBUG=0” “Make DEBUG” with the parameters “all CLOAD=0 DEBUG=1” “Flash using debugger” with
parameters “flash” “Flash using radio” with parameters “cload”
To run the debugger within Eclipse:
>Make DEBUG
>Flash using debugger
>Run →Debug Configurations →Crazyflie 2.0 STM32 →Debug
7.1.2 nRF51
Currently unsure how to debug.
7.2 Crazyflie Python Lib
The debugging of the python code is a lot simpler as you can just use the python debugger (pdb) library.
This can be done by either running the following terminal command:
$py thon - m pdb m ysc rip t . py
Or adding ‘import pdb; pdb.set trace()’ where you want to break the file you wish to debug and then running
the file via terminal.
Within terminal, these are key commands:
$h# help
$l# list code around current break
$s# step to next executed line
$n# step to next line in current file
12

$c# continue to next b reakpoin t
7.3 ROS
8 Loco-Positioning System
8.1 Configuring Drones
To install the Loco-Positioning deck onto the Crazyflie, be sure to place the flat end of the deck that has the
‘0xBC’ logo face down over the battery. The drone must be powered off while installing and removing the deck.
Push all the pins through the inserts on the deck and it should now be ready to use with the Loco-Positioning
System (LPS).
Note: We found that for the Crazyflie to work, we needed to re-flash (see Section 4.4) the firmware as the drone
is only configured for currently connected decks (e.g. flow deck and LPS deck).
8.2 Configuring Nodes
To flash node firmware to the Loco-Positioning Nodes, you will need to install the LPS configuration tool. Clone
the following Git Repository and follow the instructions in the README. If you are running Windows on your
device, you can alternatively install it by downloading the lps-tools-win32-install file. Once you have installed
the configuration tool, you must download the firmware for the nodes. Select the .dfu file. To update the node,
open up the LPS configuration tool and plug in the node via USB while holding down the button labeled DFU.
If on Windows, you will need to follow instructions on installing the nodes USB driver with Zadig. In the client,
click on the browse button and select the firmware file you recently downloaded. Now click update and finally
press the reset button on the node once it completes the update. Once all the nodes are updated, connect them
to the computer normally and configure the ID. If you wish to operate in TWR mode, make sure the Mode is
set to Anchor (TWR). Click apply and assign every node a different ID. Mark them with electrical tape or some
other method to easily keep track of the IDs of the nodes.
If the above doesn’t work for setting the ID/ switching the mode or flashing a new firmware is not required, there
is another method. By installing picocom and plugging in a beacon, one is able to modify the beacon’s ID or
mode via terminal in the following way:
$sudo apt - get in stal l pi coco m
$dmesg # use this to find the ad dress
$picocom /dev/ttyACM0 # this was the address on my device
$h# help com mand which lists all other commands
8.3 Node Placement
Place the anchors in the room at least 2 meters apart with a line of site to the flying volume. For TWR Mode,
4 anchors is the minimum with 6 being ideal and 8 if redundancy is needed.
13

9 Setpoint Following
9.1 Setup
To accomplish this, we used the Crazyflie2.0 with the ‘Flow deck’ and the ‘Loco-Postioning deck’ as the flow
sensor aides in velocity/ height calculations while the loco-positoning deck aides in absolute position calculations.
This is all done with Bitcraze’s internal kalman filter and pid functions which are a part of the crazyflie firmware
code.
9.2 Code
For setpoint following we heavily modified Luigi Pannochhi’s code which utilizes the built-in commander python
library provided by bitcraze. The python script takes in an input to specify which type of path following it
should use: ‘l’ for loco-positioning based, ‘p’ for positioning based, and ‘v’ for velocity based. The names are a
little deceiving, however, as both ‘l’ and ‘p’ use the beacons. The difference between the two is that ‘l’ creates
setpoints internally using thrust, roll, pitch, and yaw while ‘p’ creates setpoints using x, y, z, and yaw.
The following is a look at each of these setpoint following functions. Note that there are globals DT, T, VMAX,
and START HEIGHT. DT is the default dT for go straight d, T is the default time of flight, VMAX is the
maximum velocity limit, and START HEIGHT is the initial hover height.
14

1def g o_st raig ht_ d ( cf , d_x , d_y , z , t , dt =DT ) :
2if ( t == 0) :
3return
4steps =int(t/dt )
5v=[ d_x /t , d_y /t ]
6for rin range ( steps ):
7cf . comm ander . send_hover_setpoint( v [0] , v [1] , 0 , z )
8time.sleep ( dt )
9
10 def loco_follow_paths( scf ):
11 cf =s cf . cf
12 cf . param . se t_value (’ f ligh tmode . posSe t ’ ,’1’)
13 for position in sequence:
14 for iin range ( 200) :
15 cf . comm ander . se nd_se tpoin t ( positi on [1] , posit io n [0] ,
16 posit io n [3] , int( po si tion [2] *1000) )
17 time.sleep (0.01)
18 time.sleep (0.1)
19
20 def pos_follow_paths( scf ):
21 cf =s cf . cf
22 cf . param . se t_value (’ f ligh tmode . posSe t ’ ,’1’)
23 cf . comm ander . send_hover_setpoint(0 ,0 ,0 , S TART_ HEIGH T )
24 time.sleep (1)
25 cf . comm ander . s end_ posi tion _set poi nt (0,0,START_HEIGHT ,0)
26 time.sleep (1)
27 for position in sequence:
28 cf . comm ander . send_position_setpoint( positi on [0] , posi ti on [1] ,
29 posit io n [2] , 0)
30 time.sleep (1)
31
32 def vel_follow_paths( scf ):
33 cf =s cf . cf
34 cf . param . se t_value (’ f ligh tmode . posSe t ’ ,’1’)
35 cf . comm ander . send_hover_setpoint(0 ,0 ,0 , S TART_ HEIGH T )
36 time.sleep (1)
37 movement =seque nce [0]
38 for position in sequence:
39 movement =( posit ion [0] -position_internal[0],
40 posit ion [1] -position_internal[1],
41 posit io n [2] , p osition [3])
42 t=T
43 if (a bs ( m oveme nt [0] /T) > VMAX or abs ( m ovement [1] /T ) > VMAX ):
44 t= abs ( mo vement [0] /VMAX) if abs ( m ovement [0] /VMAX ) >
45 abs( m ovemen t [1] /VMAX) else abs ( mov em ent [1] /VMAX)
46 go_ strai ght_d ( cf , mov em ent [0] , movement [1] , moveme nt [2] , t )
47 time.sleep (1)
48 for iin range ( 4) :
49 position_internal[i] =p osition [ i]
50 time.sleep (0.1)
15
10 Logging
10.1 Loggable Variables
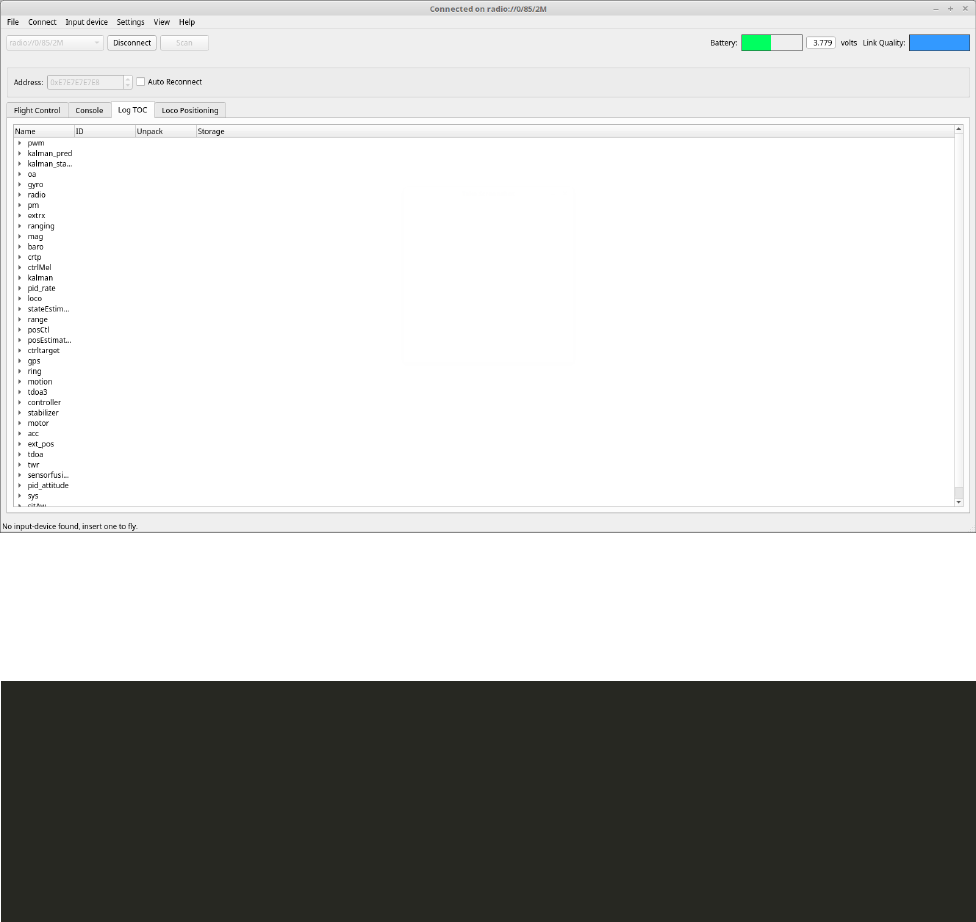
To see all the variables which can be logged, open the cfclient, connect to the crazyflie, and enable the Log TOC
by selecting ‘View →Tabs’ in the top menu bar and checking the box next to ‘Log TOC.’ This should then
enable the following tab, which may be perused to see all variables logged by each of the key words.
Logging is done by creating a LogConfig with the name of the measurement to be recorded, and then adding
variables with the names formatted according to the Log TOC.
10.2 Skeleton Code
1import cflib
2import logging
3from cflib . crazyf li e .log import Lo gConfig
4
5dataLog =errorL og =pos_w riter =lo g_tim estam p =log_conf =Logger =None
6
7def beg in_log ging ( cf ) :
8global Logger
9Logger =SkeletonLogger(cf)
10 Logger . s tart_l oggin g ()
11
16

12 class SkeletonLogger:
13 def _ _i ni t_ _ ( se lf , cf ):
14 self . cf =cf
15 logging . ba sicCon fig ( level =loggin g . ERROR )
16
17 def s tart _logg ing ( self ):
18 global pos_ writer
19 pos_log_file =open( self . di re ctory +self . lo g_tim esta mp
20 +’ _pos . c sv ’ ,’ wb ’)
21 pos_ writer =csv . writer(pos_log_file)
22 pos_ wr iter . writerow([ ’ t im e ’ ,’ x_pos ’ ,’ y_pos ’ ,’ z _p os ’ ])
23 log_pos =LogC onfig ( name =’ Po si tion ’ , period_in_ms=10)
24
25 try:
26 log_pos.add_variable(’kalman.stateX’,’ float ’ )
27 log_pos.add_variable(’kalman.stateY’,’ float ’ )
28 log_pos.add_variable(’kalman.stateZ’,’ float ’ )
29 self . cf . log . add_ co nf ig (log_pos)
30 # This call back will receive the data
31 log_pos . da ta_re ceive d_cb . add_callback( print_ pos )
32 # This callback will be called on errors
33 log_pos . e rr or_cb . add_callback( lo g_ er ro r )
34 # Start the l ogging
35 log_pos . start ()
36 except KeyEr ror as e:
37 print (’ Could not start log configurat ion , ’
38 ’{} not found in TOC ’.format(str (e)))
39 except AttributeError:
40 print (’ Could not add Pos ition l og c onfig , bad c on fig urat ion . ’ )
41
42 def p rint_p os ( timestamp , data , self ):
43 print ([ t im estamp , data [ ’kalman.stateX’] , data [ ’kalman.stateY’],
44 data[’kalman.stateZ’]])
45
46 def l og _erro r ( self , logco nf , msg ) :
47 """ Ca llback from the log API when an error occurs """
48 print (’ Error w he n l og ging %s: %s ’ %( l ogc on f . nam e , msg ) )
49 if s elf . e rrorLog == None:
50 if not os . path . exists( D IR EC TO RY ) :
51 os . make di rs ( D IR EC TO RY )
52 self . erro rL og =open( D IRECTOR Y +date ti me . d at et im e .now ().
strftime(" E rror Log %Y-% m-% d_ %H:%M:%S") , ’a’)
53 else:
54 self . errorLo g . write ( ’ E rr or when l oggin g %s: %s \ n ’
55 %( logconf . name , msg ))
This code may be copy/pasted into a python script, and the begin logging function be called by passing a Crazyflie
handle. Note that if using a SyncCrazyflie handle called ‘scf,’ one should instead pass ‘scf.cf’ to begin logging.
17

10.3 AltLogger
AltLogger.py is the robust, custom logger class that we created. To use, simply put ‘include AltLogger as
AltLogger’ in your python script header, and then once having created the Crazyflie handle, call AltLog-
ger.begin logging(). Called with just the Crazyflie handle, this function saves data about stability, position,
acceleration, and gyroscope to .csv files in a folder called ‘/LoggedData/’ in the same directory as file being ran.
The following is the header for the function:
1allowedItems =[’ stab ’ ,’ pos ’,’ acc ’,’ g yro ’ ]
2defaultPath =’./L o ggedDat a /’
3
4def beg in_log ging ( handle , arg1 =None , arg2=None)
5# By default , arg1 =allowedItems and arg2 =defaultPath
6# To pass somethin g other than allowedItems , pass a list subs et of a llowed Items
7# To pass someth i ng other than defaultPath , pass a string that is a valid file path
8# Note : None , either , or both of these may be passed , order inde pende nt
11 Custom Communication
11.1 Crazyflie *
)Base Station
11.1.1 Crazyflie Code
When consoleCommInit is called, it creates the header for our CRTP packet and this allows us to direct it at a
particular port. It also creates a new task/process. This process will block until it receives a packet with the right
header. Then, we can interpret this custom data from the PC. In the sample code, we also call consoleCommPuts,
which puts a string into the buffer ready to be sent and consoleCommPflush, which puts and flushes.
1// co nsole Comm .c
2
3void co nsoleComm In it () {
4if (isInit) return;
5 messageToPrint.size = 0;
6 m ess ag eT oPr in t . he ader = C RTP _HE AD ER ( C RT P_P ORT _CO NSO LE , 0) ;
7 vS ema ph or eC re at eB in ar y ( co nsole Lock );
8 xTask Creat e ( consoleCommTas k , C ONSOLE_COMM_TASK _NAME ,
9 CO NSOLE_C OMM_TAS K_STACK SI ZE , NULL , CO NS OL E_ CO MM _T AS K_ PR I );
10 isIn it = true ;
11 consoleCommPflush(" Console Comm init !" );
12 }
18

1// co nsole Comm .c
2
3void co nso leC omm Tas k ( void * prm ) {
4 crtpInitTaskQueue(CRTP_PORT_CONSOLE);
5
6while (1) {
7 cr tp Re ce iv eP ac ke tB lo ck ( CRTP_PO RT_ CON SOLE , & messa ge Receive d );
8
9// proces s data in m ess age Recei ved . data
10 }
11 }
11.1.2 Base Station Code
For the Base Station to communicate it needs to send a packet to the drone using the CRTProtocol. We included
this in the commander class but it could be done anywhere with the correct includes.
1def send_message(self, str ):
2for iin range (len (st r )/29 +1) :
3pk =C RTPPac ket ()
4pk . port =CRTP Po rt . DRONE
5pk . data =s tr uct . p ack ( ’ <30 s ’ ,str [29 *i:(30*(i+1) ) -(i+1) ])
6self ._cf . send_ packet ( pk )
11.2 Crazyflie *
)Beacon
11.2.1 Crazyflie Code
When the drone receives a packet from the beacon we check the type of packet it is. If it is of type LPS TWR RELAY B2D
(B2D = Beacon to Drone), then we can process it within beaconComm’s analyzePayload() function. Currently,
we have this function make a call to consoleCommPflush().
1// lpstw rta g .c
2case LPS_TWR_RELAY_B2D:
3 {
4 beaconAnalyzePayload((char*) rxPacket . payload ) ;
5 ranging_complete = true;
6 message To Send = 0;
7 me ssageExpe ct ed = 0;
8return 0;
9break ;
10 }
Note that in sendMessageToBeacon(), we set the messageToSend flag which tells lpstwrtag.c to communicate our
custom messages instead of its normal poll →ans →final →report routing. Within the CRTPPAcket we set
the header to LPS TWR RELAY D2B instead of LPS TWR POLL which is just a #define.
19

1// lpstw rta g .c
2void in itiat eR ang ing ( d wDe vic e_t * dev ) {
3// ...
4if ( messa geToSen d ) {
5 me ssageEx pe cted = 1;
6 memcpy ( txPacket . payload , message , L PS_ MAX_DATA_SI ZE );
7 txPacket . payload [ LP S_TWR _TYPE ] = LPS_TWR_REL AY_ D2B ;
8 }
9else {
10 txPacket . pay load [ LPS _TWR_ TYPE ] = L PS_TWR_POLL ;
11 }
12 txP ack et . payload [ LPS_TWR_SEQ ] = ++ curr_seq ;
13 txP ack et . sour ceAddre ss = options - > tagAddress ;
14 txP ack et . de stAdd ress = options -> anc horAddr ess [ curre nt _anchor ];
15 dw New Tra ns mit ( dev ) ;
16 dw Set Def au lts ( dev ) ;
17 dwSetData (dev , ( uint8_t*) & t xPacket , MA C8 02 15 4_ HE AD ER _L EN GT H +2 +28) ;
18 // ...
19 }
The file/header pair beaconComm has functions similar to those of consoleComm, but on beaconCommFlush
(and the subsequent call to beaconCommSendMessage) it puts the data into a buffer in lpstwrtag, which will be
sent on the next communication cycle between the beacon and drone.
1// beaconComm . c
2static bool beaconCommSendMessage(void) {
3 se ndM es saeToBeacon ( message );
4 co nso leCommPflus h ( message ) ;
5 message Le ngth = 2;
6// First byte is the header , and the second is the s equ enc e number
7return true;
8 }
9// ...
10 void sendMessageToBeacon(char * msg ) {
11 me ssage To Send = 1;
12 consoleCommPflush(msg);
13 memc py ( message , msg , LP S_MAX_D ATA_SIZ E ) ;
14 }
11.2.2 Beacon Code
On the beacon’s side of the firmware, we just modified uwb twr anchor.c to listen for the header which specifies
the packet as being a part of our custom communication. Note that RELAY D2B is defined the same as
LPS TWR RELAY D2B in the Crazyflie side of the firmware. RELAY B2D signifies the packet as being from
the Beacon to the Drone (Crazyflie).
20

1// uwb_twr_anchor.c
2case RELAY_D2 B :
3 {
4 txP ack et . payload [ TYPE ] = RELAY_B2D ;
5 txP ack et . payload [ SEQ ] = rxPacket . payload [ SEQ ];
6 memcpy ( receivedMsg , rxPacket . payload + 2, PAYLOA D_LENGTH - 2) ;
7
8// do somet hin g to process the data
9
10 dw New Tra ns mit ( dev ) ;
11 dw Set Def au lts ( dev ) ;
12 dwSetData (dev , ( uint8_t*) & t xPacket , MA C8 02 15 4_ HE AD ER _L EN GT H + 2+
PAYLOAD_LENGTH);
13
14 dw Wai tForR espon se ( dev , true ) ;
15 dw Start Tr ans mit ( dev ) ;
16
17 break ;
18 }
11.3 Crazyflie *
)Crazyflie
Currently abandoned for other work
21
