Create Role And Dashboard Workflow Guide AVX12.3
User Manual:
Open the PDF directly: View PDF ![]() .
.
Page Count: 14

Create Role and Dashboard
Workflow Guide

Copyright © 2018 AppViewX, Inc. All Rights Reserved.
This document may not be copied, disclosed, transferred, or modified without the prior written consent of AppViewX,
Inc. While all content is believed to be correct at the time of publication, it is provided as general purpose information.
The content is subject to change without notice and is provided “as is” and with no expressed or implied warranties
whatsoever, including, but not limited to, a warranty for accuracy made by AppViewX. The software described in this
document is provided under written license only, contains valuable trade secrets and proprietary information, and is
protected by the copyright laws of the United States and other countries. Unauthorized use of software or its
documentation can result in civil damages and criminal prosecution.
Trademarks
The trademarks, logos, and service marks displayed in this manual are the property of AppViewX or other third
parties. Users are not permitted to use these marks without the prior written consent of AppViewX or such third party
which may own the mark.
This product includes software developed by the CentOS Project (www.centos.org).
This product includes software developed by Red Hat, Inc. (www.redhat.com).
This product includes software developed by VMware, Inc. (www.vmware.com).
All other trademarks mentioned in this document are the property of their respective owners.
Contact Information
AppViewX, Inc.
500 Yale Avenue North, Suite 100
Seattle, WA 98109
Tel: +1 (206) 207 7541
Email: info@appviewx.com
Web: www.appviewx.com
Document Information
Software Version: 12.3.0
Document Version: 1.0
Last updated on: April 03, 2018
Contents
Description ................................................................................................................................. 1
Prerequisites .............................................................................................................................. 1
Compatible Software Versions ................................................................................................... 1
Log In to AppViewX ................................................................................................................... 1
Import Visual Workflows ............................................................................................................. 1
Import Helper Scripts ................................................................................................................. 2
Add an ADC Device: F5 and Citrix ............................................................................................. 3
Enable a Workflow ..................................................................................................................... 5
Generate F5 iHealth Report Now Workflow ................................................................................ 5
WorkOrder Flow ......................................................................................................................... 7
Request Inventory ...................................................................................................................... 9
Schedule a Workflows ...............................................................................................................10
View Scheduled Workflows .......................................................................................................10
Add a Credential .......................................................................................................................10
Troubleshooting ........................................................................................................................11

Create Role and Dashboard Workflow Guide
1
Description
The Create Role and Dashboard workflow is used to create a Role and Dashboard for F5 and
Citrix objects efficiently by reducing the manual effort. This workflow enables the user to perform
the following:
Create a new role for multiple applications by assigning a specific permission to access
its objects.
Choose a persona to replicate the access and workflow permissions of an existing role
to a new role that you create.
Create a new dashboard where the user can select multiple applications and associate
various tasks to it. Each application you selected in the workflow will be displayed as a
separate Widget in the Dashboard.
Share the dashboards you created with the roles in AppViewX.
Prerequisites
To run this workflow, ensure that the following pre-requisites are met:
• Free AppViewX or AppViewX version 12.3.0 has been downloaded and installed.
• The ADC F5 and Citrix devices has been added in the AppViewX device inventory.
• Each ADC device is a managed entity in AppViewX.
Compatible Software Versions
The automation temple has been tested and validated on the following software versions:
• AppViewX – Free AppViewX and AVX 12.3.0
• F5 (both LTM and GTM) – version10.x, 11.x, or 12.x
Limitations
• The action Clear RAM Cache is not supported by this workflow for Dashboard creation.
• Only the F5 and Citrix applications are supported.
• Only the Application View Widget is supported.
Log In to AppViewX
Log in to the AppViewX web interface. The standard format for a login URL is:
https://hostname:portnumber.
The hostname and port number are configured during deployment, with the default port number
set to 5004 and the default web credentials set to admin/AppViewX@123.
Note: It is recommended that you access AppViewX using Internet Explorer, Firefox, or Google
Chrome.
Import Visual Workflows
Note: Free AppViewX comes preloaded with visual workflows. You will only need to use the
following import instructions when newer versions of the workflows are available.
Create Role and Dashboard Workflow Guide
2
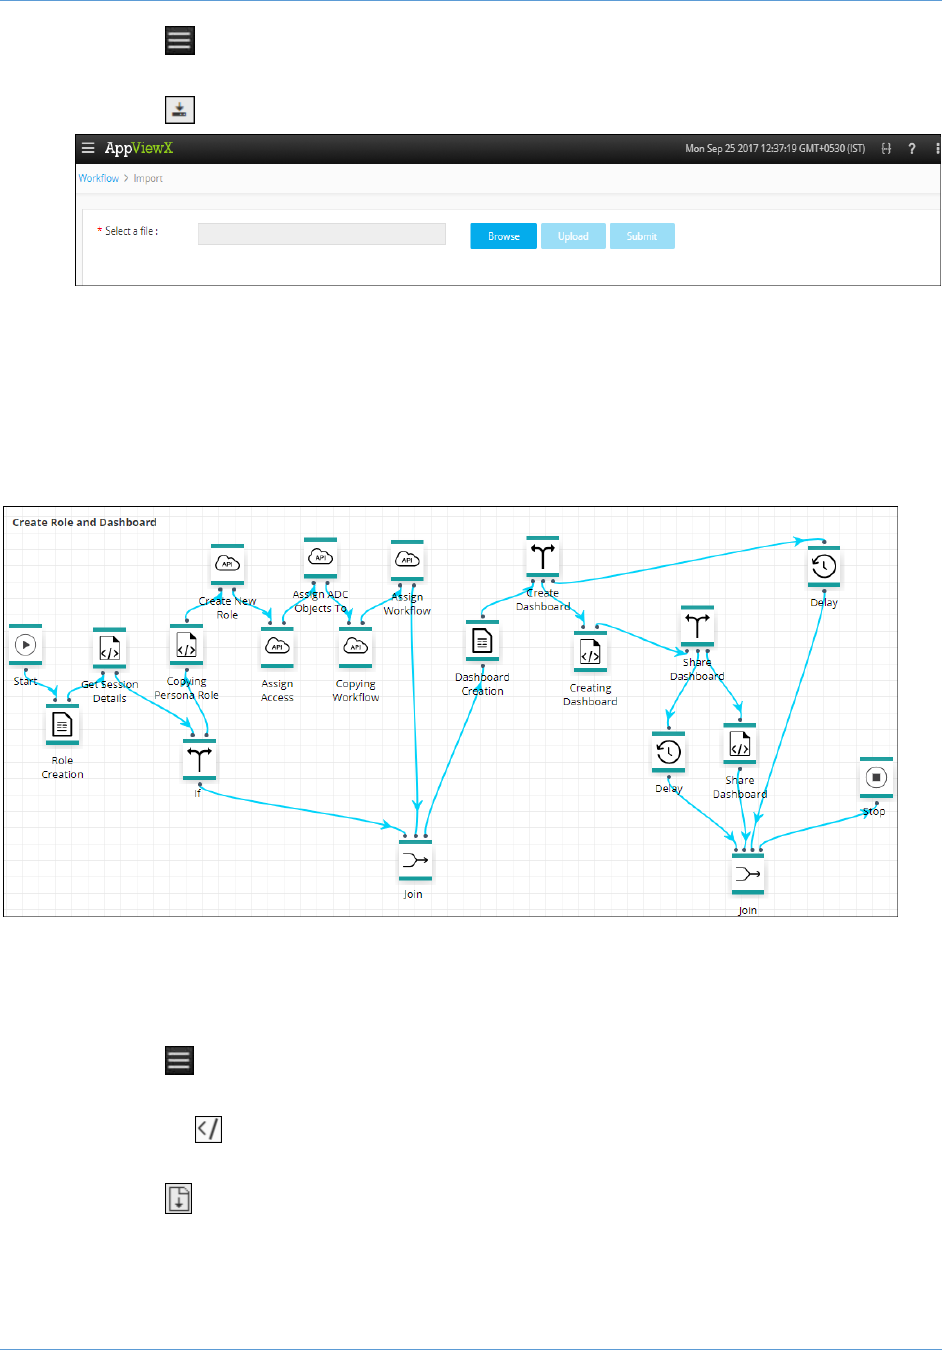
1. Click the (Menu) button.
2. Navigate to Workflow > Studio.
3. Click the (Import) button in the Command bar.
4. To import a workflow, complete the following steps:
a. Click the Browse button.
b. Select the zip file containing one or more workflows, then click Upload.
c. In the table at the bottom of the Import page, select the check box beside the
unzipped workflow file.
d. Click Submit to deploy the workflow into your AppViewX environment.
The Create Role and Dashboard workflow is shown in the image below:
Import Helper Scripts
Note: Free AppViewX comes preloaded with helper scripts. You will only need to use the
following import instructions when newer versions of the helper scripts are available.
1. Click the (Menu) button.
2. Navigate to Workflow > Studio.
3. Click on the (Helper script) button in the Command bar.
The Helper script library screen appears.
4. Click the (Import) button.
5. Click Browse and select the helper script zip file you want to import.
6. Click Upload to import the file and view its contents.
Create Role and Dashboard Workflow Guide
3
Note: Select the checkbox Overwrite existing file, only if the names of the new script
file that you are trying to upload and the existing script file are the same.
7. In the table at the bottom of the Import page, select the check boxes beside each of the
helper scripts.
8. Click Submit to deploy them into your AppViewX environment.
Add an ADC Device: F5 and Citrix
1. Click the (Menu) button.
2. Navigate to Inventory > Device.
3. The Device screen opens with the ADC device inventory displayed by default.
4. Click the (Add) button in the Command bar.
5. On the Add screen that opens, click to select F5 as the ADC vendor.
6. (Only applicable for F5 device) Click the vCMP Host check box, if you want to add and
manage the host devices.
7. Select the module to be managed on the ADC device inventory.
8. (Only applicable for F5 device) Click the vCMP Guest check box, if you want to add and
manage the guest devices.
Create Role and Dashboard Workflow Guide
4
9. Create a Device name that is specific to AppViewX and that will identify the device in
the AppViewX inventory.
10. Enter the management IP address of the device.
11. (Only applicable for F5 device) Select the IP address or FQDN radio button based on
how you want to establish the communication.
Enter the IP address or FQDN in their corresponding fields depending on what you
selected.
12. Enter the SSH port number of the device.
13. Specify a Data center location if you want to have the option later to filter devices
based on their location.
14. In the Cert sync field, select the radio button for the kind of synchronization relationship
you want to establish between SSL certificates on the ADC device and AppViewX:
Managed, Monitored, or Ignored.
15. (Optional) Select the AppViewX group sync check box if you need AppViewX to sync
the configuration changes from an active to standby F5 ADC device. This is required in
older F5 versions like v10. The latest versions of F5 sync automatically.
16. From the Credential type dropdown list, select how to want to provide the credentials:
o Select Manual entry, if you want to manually enter the credential details (user name
and the associated password) every time the device is accessed.
o Select Credential list, if you want to retrieve the login details created in the
credential template. For more details on how to add a credential to a device, refer to
the Add a Credential section of this guide.
When you select the credential name from the dropdown list, the user name and
password fields will be auto-filled with the values provided in the credential template.
17. In the Secondary/Alternate device field, select how you want to fetch the details of a
backup device when the primary device becomes unavailable due to failure or scheduled
down time:
a. Select Auto detect if you want AppViewX to automatically detect and retrieve the
configuration of the secondary/alternate device, then click Save to add the device
to AppViewX.
b. Select Manual Entry if you want to manually provide the details of the secondary
device. At a minimum, fill in all fields that contain a red asterisk ( ) beside their
names.
18. Click Add to add the secondary device to the list at the bottom of the screen.
Note: You can add more than one secondary devices. The Update and Delete buttons
are enabled only when you try to modify the existing secondary device.
19. Click Save to save the new F5 device in the table on the ADC tab.
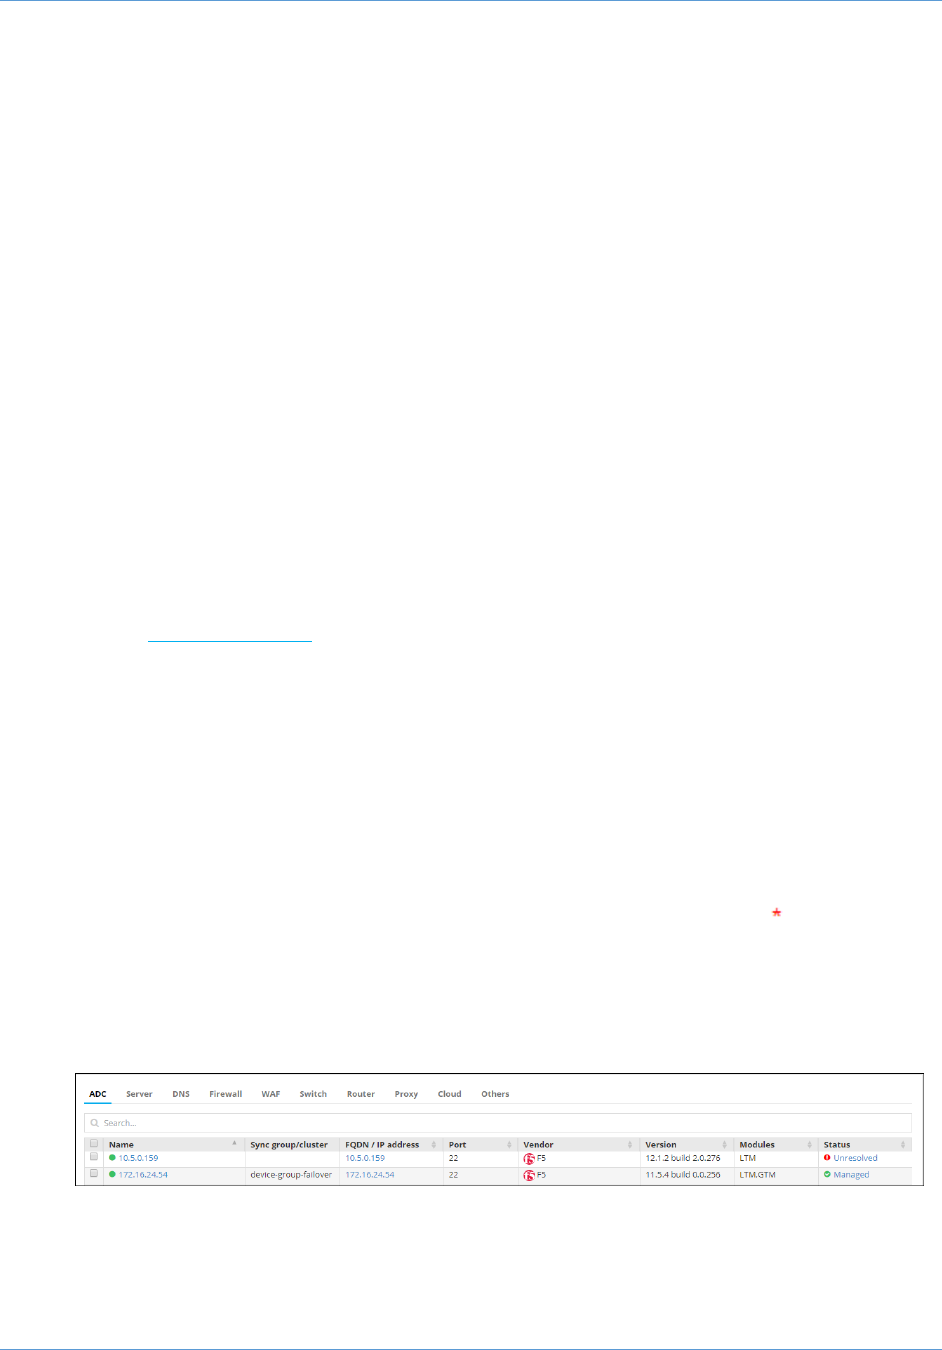
The device will display one of the following statuses:
In Progress – Device configuration fetch is in progress.
Create Role and Dashboard Workflow Guide
5
Managed - Device configurations are fetched and parsed successfully. This is
the status a successfully added ADC device should have.
Unresolved – Unable to communicate with device due to invalid login
credentials.
Failed – Device configuration fetch failed due to unsupported version.
Enable a Workflow
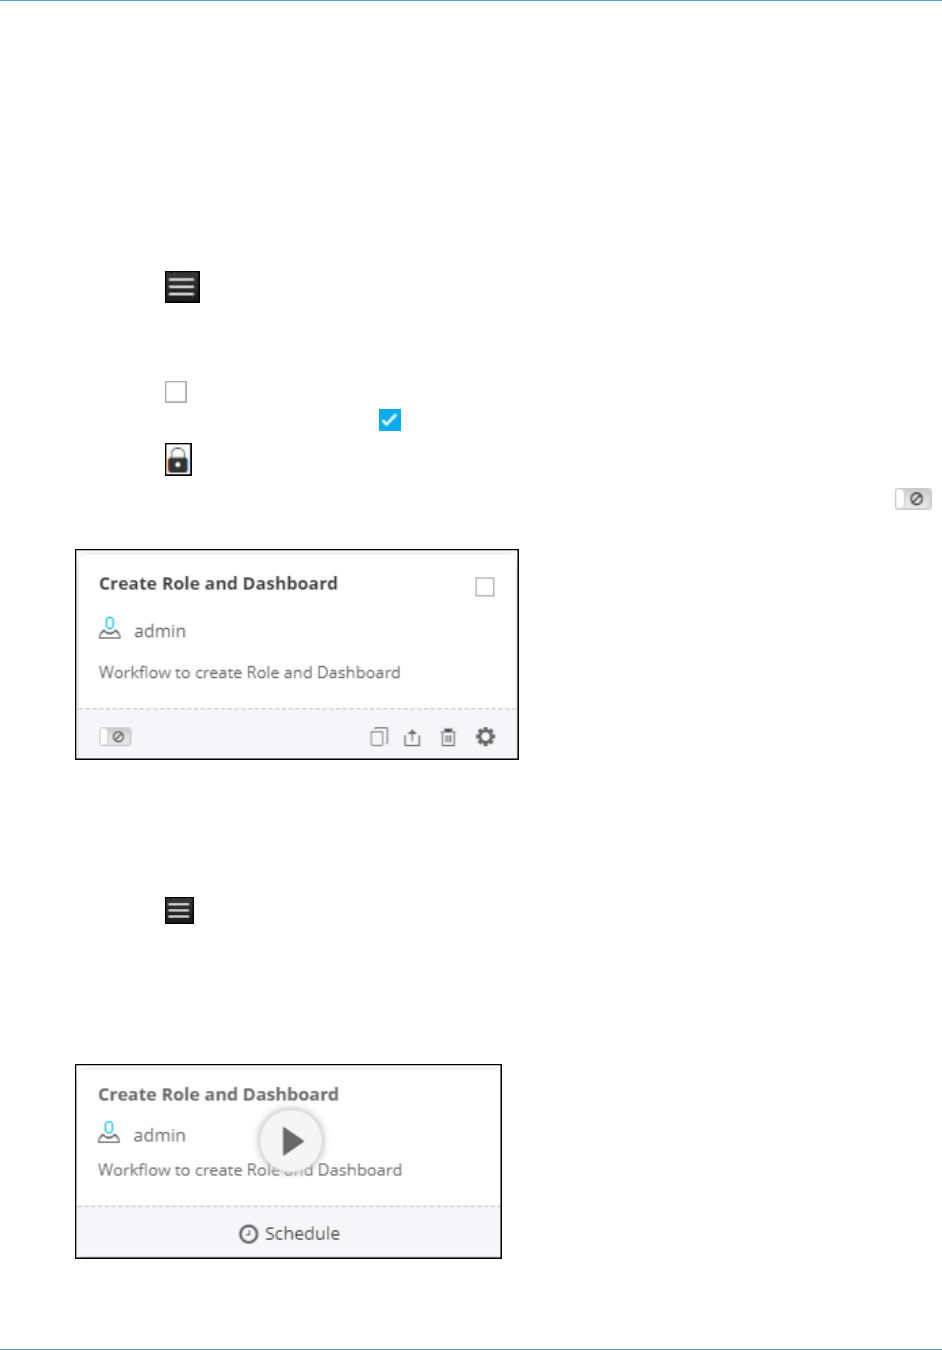
To enable the workflow, complete the following steps:
1. Click the (Menu) button.
2. Navigate to Workflow > Studio.
The Workflow screen opens.
3. Click the (Select) button on the Create Role and Dashboard workflow to enable. If the
workflow is already selected, a (Deselect) button appears.
4. Click the (Enable) button in the Command bar.
Note: You can also enable the Create Role and Dashboard workflow by clicking the
(Disable) button from its Card view.
On the Confirmation screen that appears, click Yes.
Generate F5 iHealth Report Now Workflow
To submit the Generate F5 iHealth Report Now workflow, complete the following steps:
1. Click the (Menu) button.
2. Navigate to Workflow > Request.
The Request screen opens with My catalog tab displayed by default. This screen
displays all enabled workflows assigned to a specific user role.
3. Click the Play button on the Create Role and Dashborad workflow to execute.
4. The Form Builder screen opens with the Request View tab displayed by default.
Create Role and Dashboard Workflow Guide
6
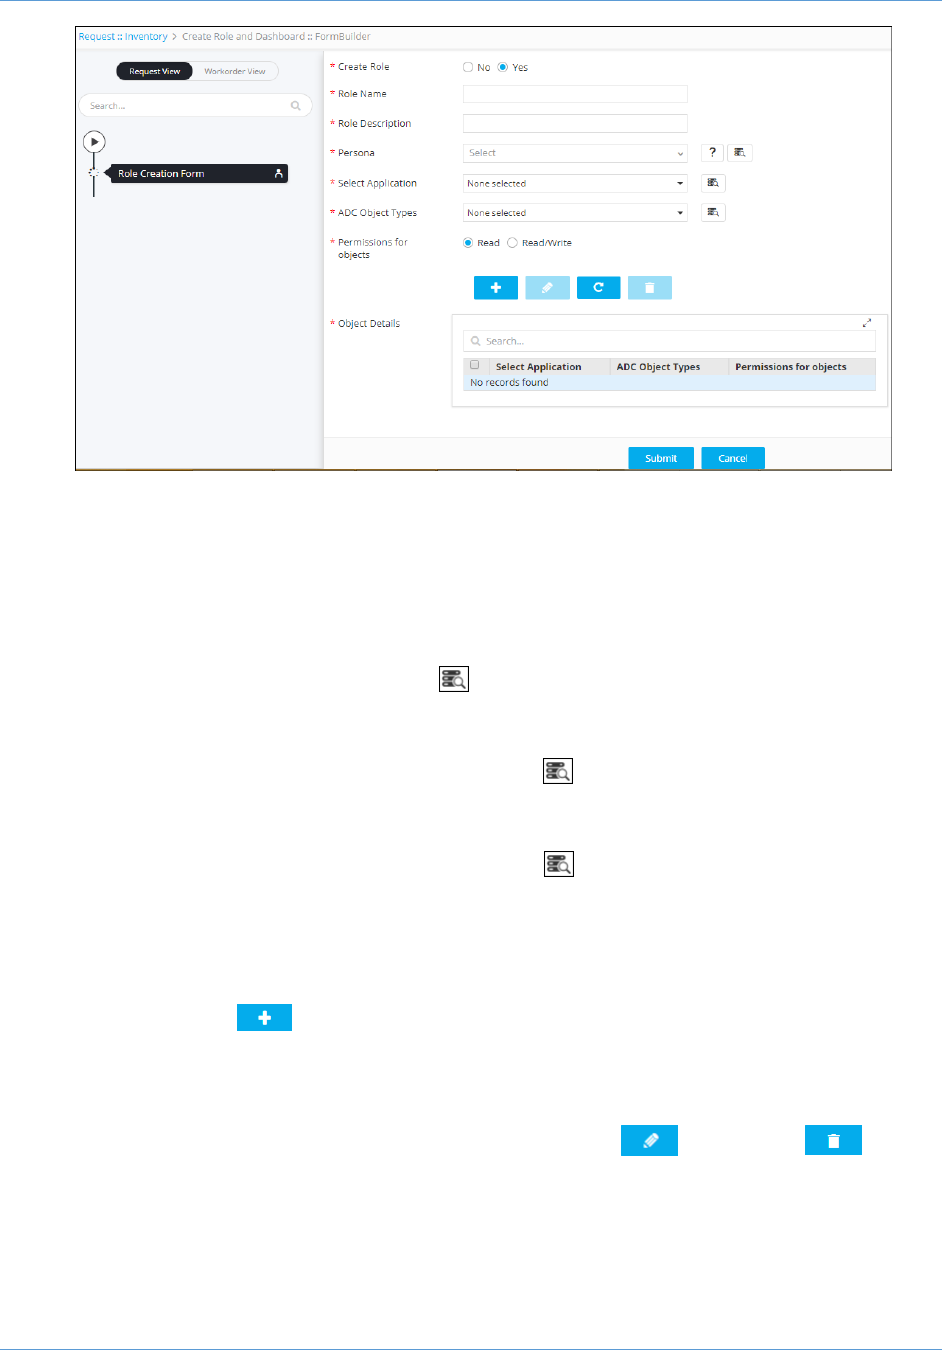
5. Select the Yes or No radio button depending on whether or not you want to create a
role.
6. If the option Yes is selected, do the following:
a. Enter a name for the role to help the users identify it.
b. Enter a brief description of what users assigned to the role are able to do and/or
what features or functionalities are associated with the role.
c. In the Persona filed, click the (Retrieve field values) to fetch the list of
existing roles. Select the role whose access and workflow permissions you want
to replicate to the new role that you are creating.
d. In the Select Application field, click the (Retrieve field values) to fetch the
list of applications from the App Tag collection database. Select the applications
for which you want the role to have access.
e. In the ADC Object Types field, click the (Retrieve field values) to fetch the
list of associated objects from the database. Select the objects for which you
want to provide the permission.
f. Select either the Read or Read/Write radio button to designate whether users
assigned to the role have read-only or read/write permissions on the objects.
g. Click the (Add) button.
The application and object details are displayed in the Objects details table at
the bottom of the screen. You can delete or modify the device and object details
by selecting the check box beside the troubleshooting options in the table at the
bottom of the screen and then clicking either the (Update) or
(Delete) button.
h. Click Submit to trigger the workflow immediately.
Create Role and Dashboard Workflow Guide
7
WorkOrder Flow
The following are the workorder tasks of Create Role and Dashboard workflow.
Note: You can click each task to view its details. Wherever applicable, all logs related to the
selected task are displayed in the Logs pane at the bottom of the screen.
1. Role Creation Form ─ Displays all the details that you have mentioned to create a role.
2. Get Session details ─ The session details will be generated to retrieve the information
(corresponding to the application you selected) from the database using the API.
3. Copying Persona Role Details ─ All the access details of an existing role are copied.
4. Create New Role ─ A new role is created in AppViewX based on the inputs provided in
the form builder.
5. Assign Access Permissions To New Role ─ Fetches the access details from the
selected Persona and assigns them to the New Role.
6. Assign ADC Objects To New Role ─ Assigns the access permission of the ADC
objects to the New Role.
7. Copying Workflow Permissions from Persona ─ All the workflow permission of an
existing role is copied.
8. Assigning Workflow Permissions To New Role ─ Assigns the workflow permission of
the ADC objects to the New Role
9. Dashboard Creation Form ─ Select the Yes or No radio button depending on whether
or not you want to create a dashboard.
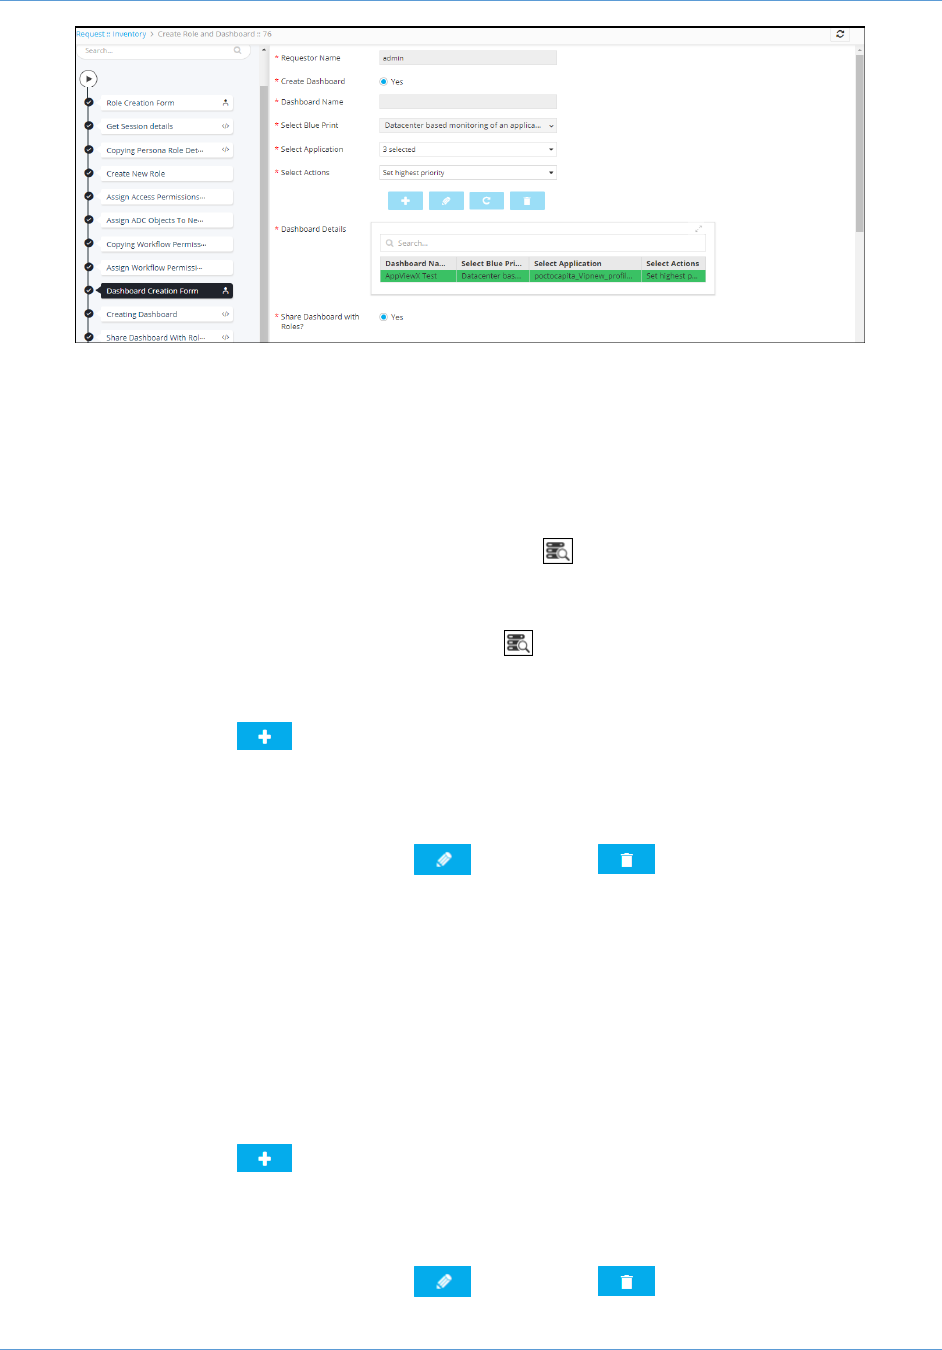
Create Role and Dashboard Workflow Guide
8
If the option Yes is selected, do the following:
a. Enter a name for the dashboard to help the users identify it.
b. Select the Blueprint based on how to want the objects of an application to be
displayed in the dashboard.
Note: Only the Datacenter based monitoring of an application is supported in
this workflow.
c. In the Select Application field, click the (Retrieve field values) to fetch the
list of F5 and Citrix applications from the App Tag collection database. Select the
applications for which you want the dashboard to be created.
d. In the Select Actions field, click the (Retrieve field values) to fetch the
complete list of actions available for Application View widgets. Select the actions
that you want to be performed on the selected application.
e. Click the (Add) button.
The application details are displayed in the Dashboard details table at the
bottom of the screen. You can delete or modify the details by selecting the check
box beside the troubleshooting options in the table at the bottom of the screen
and then clicking either the (Update) or (Delete) button.
Note: You can create multiple dashboards and associate various actions to it
using this workflow
f. Select the Yes or No radio button depending on whether or not you want to
share the Dashboard with an existing role.
g. If the option Yes is selected, click the Fetch Roles button to retrieve the list of
roles that are available in AppViewX.
h. Select the role from the dropdown list to which you want to share the dashboard.
i. Select either the R or RW radio button to designate whether users assigned to
the role have read-only or read/write permissions on the objects.
j. Click the (Add) button.
The role and its access details are displayed in the Shared Roles table at the
bottom of the screen. You can delete or modify the details by selecting the check
box beside the troubleshooting options in the table at the bottom of the screen
and then clicking either the (Update) or (Delete) button.
Create Role and Dashboard Workflow Guide
9
k. Click Submit to trigger the workflow immediately.
10. Creating Dashboard ─ A new dashboard is created and each application you selected
in this workflow will be displayed as a separate Widget under the respective dashboard.
Wide IP(s) will be grouped under Global-Traffic. Virtual Servers will be grouped under
respective Data center. Data center will be grouped under the group Local-Traffic.
Actions will be assigned to the objects under each group and the default action
messages are set.
11. Share Dashboard with Roles ─ The dashboard you created are shared with the selected
Roles.
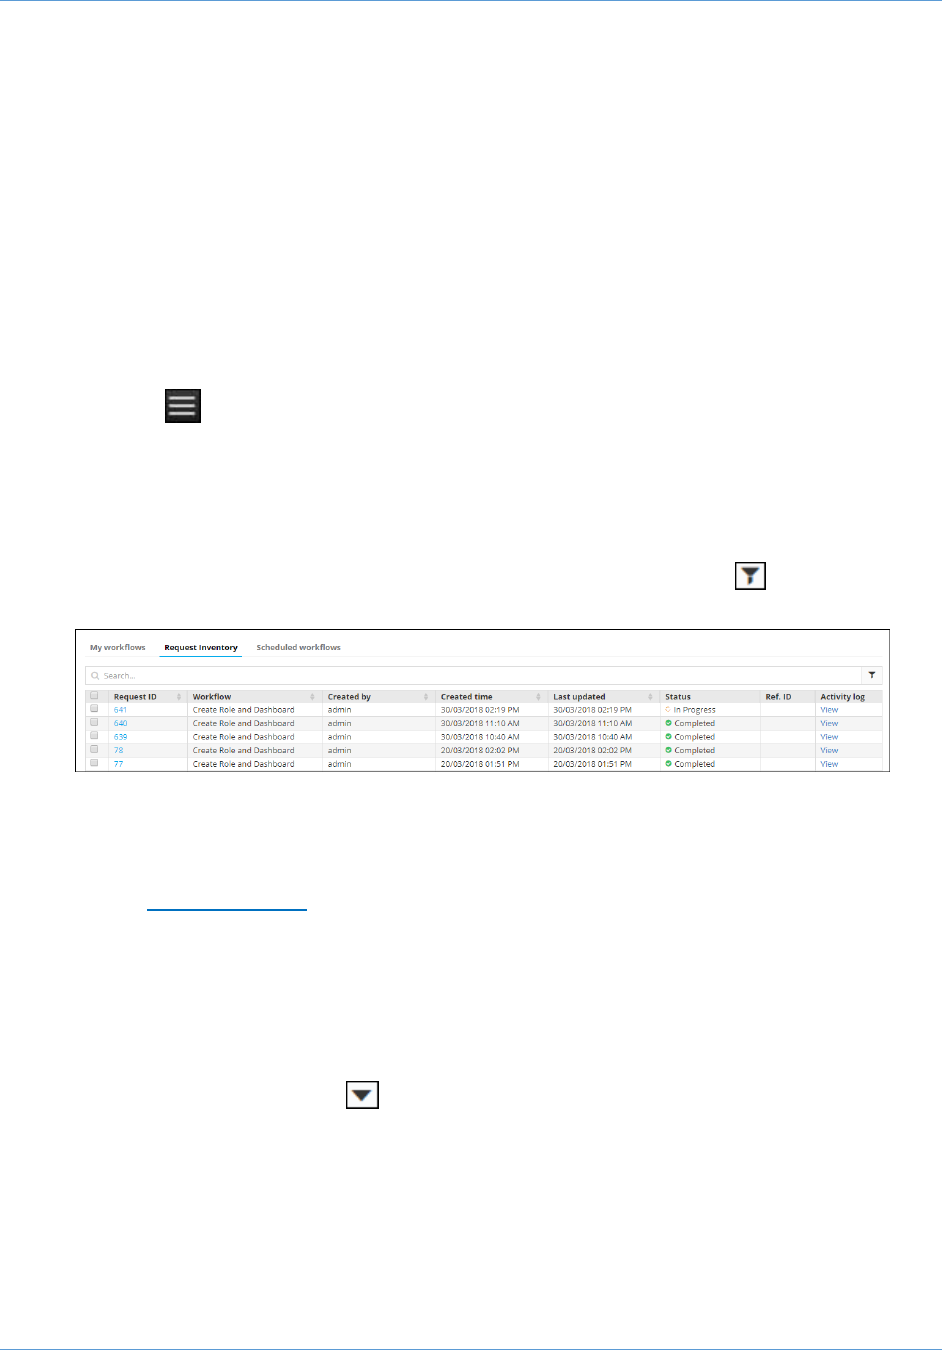
Request Inventory
To go to the Request inventory, complete the following steps:
1. Click the (Menu) button.
2. Navigate to Workflow > Request.
The Request screen opens with My catalog tab displayed by default.
3. Click the Request Inventory tab.
This displays all workflows that have been triggered. On the Request Inventory screen,
you can search for a request using the Search field and/or click the (Filter) button to
select the options you want to use to sort the requests.
4. Click the Request ID created for Create Role and Dashboard workflow to view its
details. The screen opens with the Request View tab selected by default.
a. After the workflow execution is complete, the Request View tab displays the
tasks or phases of a request in a tree view. For more details, refer to the
WorkOrder Flow section of this guide.
b. Click the Workorder View tab to view the work order details such as work order
ID, date and time when the work order was created and updated, status, RFC ID,
and RFC status.
5. In the Request Inventory screen, you can also view the following details of the request:
request creator, request time, last updated time, status, and activity log.
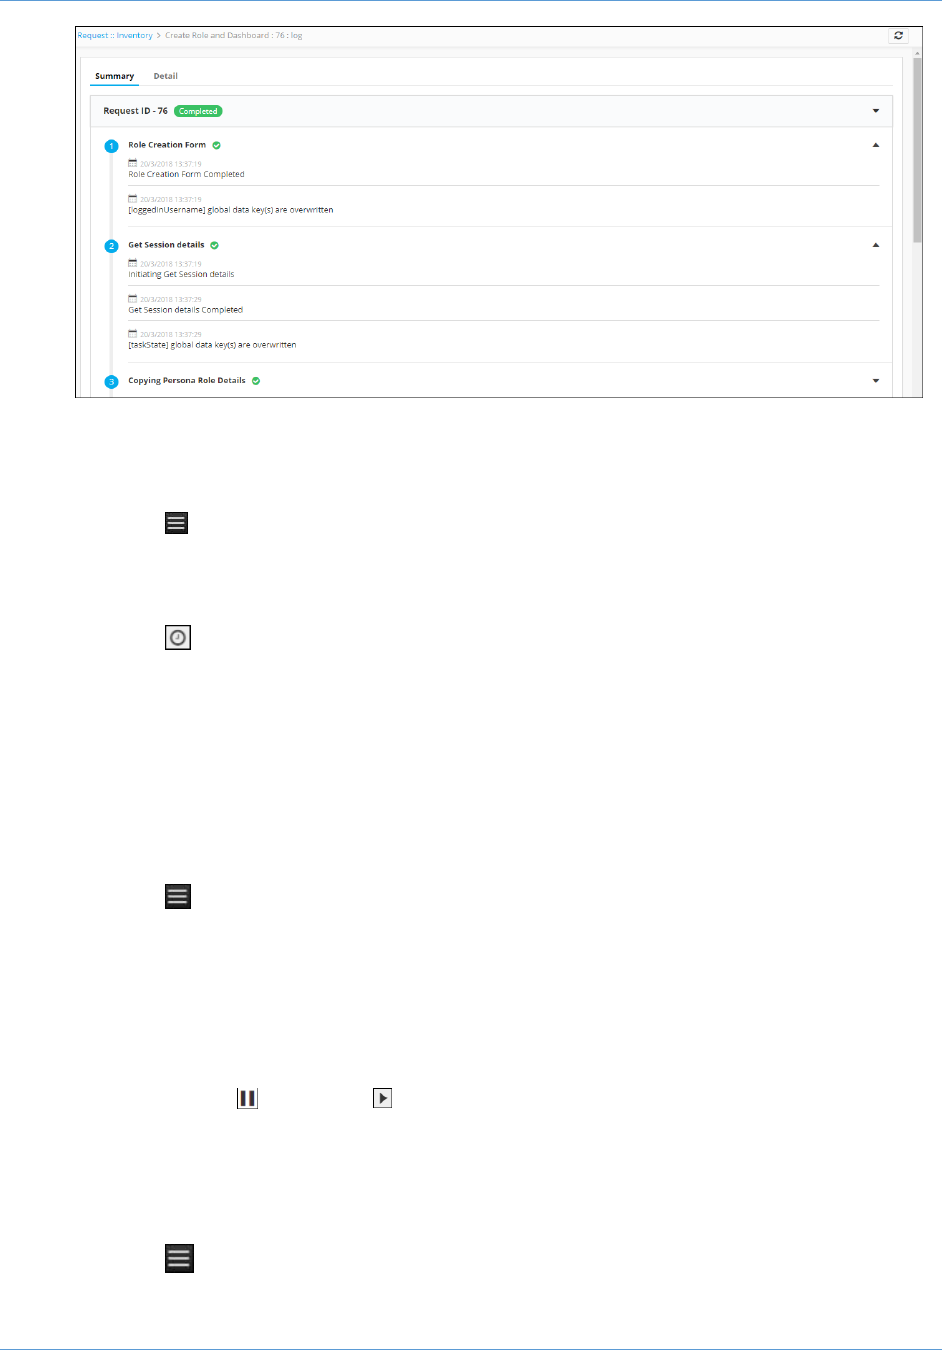
6. Click the View link in the Activity log column to display the request in a stage view. In
the Summary tab, click the (Expand) icon to view the details of each task. Click the
Details tab to view log messages and other particulars of a request.
Create Role and Dashboard Workflow Guide
10
Schedule a Workflows
To schedule a workflow, complete the following steps:
1. Click the (Menu) button.
2. Navigate to Workflow > Request.
The Request screen opens with My catalog tab displayed by default.
3. Click the (Schedule) button on the corresponding workflow.
4. On the respective window that opens, select the frequency of the report generation
process: once, hourly, daily, weekly, monthly, or yearly. The remaining fields in the
Scheduler region update depending on what you select.
5. Click Save.
View Scheduled Workflows
To go to the scheduled workflow screen, complete the following steps:
1. Click the (Menu) button.
2. Navigate to Workflow > Request.
3. The Request screen opens with My catalog tab displayed by default.
4. Click the Scheduled workflows tab.
5. On the Scheduled workflow screen that appears, you can perform the following tasks:
o In the View log column, click View to display the details of a scheduled workflow.
o Click the (Pause) or (Resume) button to temporarily stop or continue the
execution of a workflow.
Add a Credential
To add a credential to a device, complete the following steps:
1. Click the (Menu) button.

Create Role and Dashboard Workflow Guide
11
2. Navigate to Inventory > Device.
The Device screen opens with the ADC tab selected by default.
3. Click the check box beside the device name, then click the (Credential) button in the
Command bar.
4. On the Add credential screen that appears, enter the name of the credential you want to
add to the device.
5. Enter the username and password associated with the credential.
6. (Optional) If a secondary credential password was created by a vendor in order to
communicate with the device, thus allowing different levels of control over the credential,
enter this password in the Secondary password field.
7. Click Save.
The credential is then added to the table at the bottom of the screen. You can delete a
credential or modify its name, user name, or password by selecting the check box
beside the credential name in the table at the bottom of the screen and then clicking
either the Modify credential or Delete button in the Command bar.
Troubleshooting
I cannot find the workflow in the Request Catalog
You must enable the workflow from the Configurator section. For more details on how to enable
a workflow, refer to the Enable a Workflow section of this guide.
