PeopleSoft Enterprise Student Financials 9.0 PeopleBook Collection System CS9 Cs9lssf B0310
User Manual: Collection System CS9
Open the PDF directly: View PDF ![]() .
.
Page Count: 854 [warning: Documents this large are best viewed by clicking the View PDF Link!]
- PeopleSoft Enterprise Student Financials 9.0 PeopleBook
- Copyright
- Contents
- Preface: PeopleSoft Enterprise Student Financials Preface
- Chapter 1: Getting Started with PeopleSoft Enterprise Student Financials
- Chapter 2: Completing Student Financials General Setup
- Understanding Student Financials General Setup
- Setting Up Installation Parameters and Keywords
- Understanding Installation Parameters
- Understanding Global Invoicing
- Pages Used to Set Up Installation Parameters and Keywords
- Defining Number Sequence Start Points, Maximum Row Settings, and ChartField Edit Options
- Defining Payment by Invoice
- Defining Keyword Edit Tables and a Null Due Date
- Defining Commit Levels
- Defining Keywords
- Reviewing Valid Records and Fields
- Setting Up Business Units
- Understanding Business Units
- Pages Used to Set Up Business Units
- Defining Basic Business Unit Parameters
- Defining Additional Business Unit Parameters
- Defining Posting Parameters
- Defining Committal and Approval Options
- Defining Collection Rules
- Defining Basic Refunding Rules
- Defining Refund Approval Parameters
- Defining Default Payroll Parameters
- Defining Auto-Numbering Sequences
- (CAN)(AUS)(NZL) Defining Tax Parameters for Students from Canada, Australia, and New Zealand
- Setting Up Tax Authorities and Tax Codes
- Setting Up Aging Sets
- Setting Up Payment Application Rules
- Setting Up Account Types
- Setting Up Accounting Dates
- Setting Up Item Types and Item Type Groups
- Understanding Item Types and Item Type Groups
- Pages Used to Set Up Item Types and Item Type Groups
- Defining Basic Item Type Attributes
- Defining Transaction Amount and Tax Form Parameters for Item Types
- Defining Miscellaneous Parameters for Item Types
- Defining External Awards
- Defining Item Type Posting Restrictions
- Linking Account Types to an Item Type
- Mapping Item Types to General Ledger Accounts
- Defining Item Type Groups
- Setting Up Service Indicator Sets
- Setting Up a Default Academic Term
- Chapter 3: Setting Up ePayment Processing
- Understanding ePayment Processing
- Setting Up Credit Card Types
- Re-encrypting Credit Card, Bank Account Numbers, Security Code Data, and Security Key
- Setting Up Payment Merchants
- Testing Payment and Hosted Payment Transactions
- Setting Up SF Merchants
- Setting Up Institution Sets
- Setting Up Item Types for ePayment
- Setting Up Self-Service Options
- Chapter 4: Setting Up GL Interface Processing
- Understanding GL Interface Processing Setup
- Loading Setup Data Using PeopleSoft Application Messaging
- Reviewing Setup Table Data for PeopleSoft Financials
- Linking Student Financials Business Units to PeopleSoft General Ledger Units
- Setting Up HRMS for Oracle Financials
- Setting Up the Ledger Fields Table
- Synchronizing Oracle GL Segments
- Mapping General Ledger Business Units to Oracle General Ledger
- Synchronizing ChartField Values
- (Optional) Creating ChartField SpeedType Keys
- (Optional) Activating ChartField Validation Options
- Assigning Charts of Accounts
- Validating ChartFields
- Setting Up Integration with PeopleSoft Financials and Oracle Financials
- Pages Used to Set Up Integration with PeopleSoft Financials and Oracle Financials
- Defining Batch Publish Rules for GL Messaging
- Defining Batch Programs for GL Messaging
- Setting Up Business Unit Synchronization for PeopleSoft Financials
- Synchronizing Student Financials Business Unit Data with PeopleSoft Financials
- Copying ChartField Information for Item Types from One Term to Another
- Chapter 5: Setting Up Tuition Controls, Criteria, Equations, and Waivers
- Understanding Tuition Controls, Criteria, Equations, and Waivers
- Creating Billing and Due Date Calendars
- Setting Up Adjustment Calendars
- Establishing Tuition Calculation Controls
- Defining Variables for Criteria and Equations
- Establishing Criteria for Tuition Groups and Fee Triggers
- Using Equation Engine to Define Tuition Calculation Equations
- Defining Waivers and Waiver Groups
- Creating Course Lists
- Chapter 6: Setting Up Fees and Tuition Groups
- Setting Up Fee Classes
- Defining Minimum and Maximum Fees
- Setting Up Application Fees
- Setting Up Deposit Fees and Deposit Due Dates
- Setting Up Term Fee Codes
- Setting Up Course Fees and Class Fees
- Understanding Course Fees and Class Fees
- Pages Used to Set Up Course Fees and Class Fees
- Setting Up Rate Tables for Course Fees
- Defining Course Fees
- Defining Course Sub Fees
- Defining Modal Course Fees
- Defining Modal Course Sub Fees
- Defining Class Fees
- Defining Class Sub Fees
- Defining Modal Class Fees
- Defining Modal Class Sub Fees
- Rolling Over Course and Class Fees to Future Terms
- Defining Optional Fees
- Setting Up Transaction Fees
- Setting Up Course List Fees
- Setting Up Tuition Groups
- Understanding Tuition Groups
- Pages Used to Set Up Tuition Groups
- Defining Tuition Groups
- Linking Adjustment Codes to Tuition Groups
- Linking Criteria to Tuition Groups
- Linking Term Fees to Tuition Groups
- Linking a Waiver Code to a Single Term Fee Within a Tuition Group
- Linking Course Lists to Tuition Groups
- Linking Waiver Codes to Tuition Groups
- Reviewing Established Tuition Group Priorities
- Chapter 7: Setting Up Refunding
- Chapter 8: Setting Up Payment Plans
- Chapter 9: Setting Up Billing
- Setting Up Billing Messages
- Setting Up Invoice Layouts
- Setting Up Invoice ID Number Generation
- Setting Up Billing Scan Lines
- Setting Up Billing Types
- Setting Up Billing Standard Requests
- Pages Used to Set Up Billing Standard Requests
- Defining General Selections
- Define Additional General Selections
- Defining Communication Information
- Defining Academic Selections
- Defining Additional Academic Selections
- Selecting Billing Messages
- Selecting Student Groups
- Select Enrollment Blocks
- Selecting Account Types
- Defining Corporation Information
- Chapter 10: Setting Up Cashiering
- Chapter 11: Setting Up Receivables Maintenance
- Chapter 12: Setting Up Receivables Collection
- Chapter 13: Setting Up Tax Form Production
- Chapter 14: Processing ePayment Transactions
- Chapter 15: Using GL Interface Processing
- Chapter 16: Calculating Tuition and Fees
- Chapter 17: Refunding Customers
- Understanding Refunds
- Creating Batch Refunds
- Creating Online Refunds
- Approving Refunds
- Completing Batch Payroll Refunds
- Distributing Payroll Refunds Through Direct Deposit
- Printing Checks and Direct Deposit Advice Slips
- Completing AP Refunds
- Distributing Refunds to ePayment Accounts
- Canceling Refunds
- Reversing Refunds
- Renumbering Refund Checks for Reprinting
- Deleting Paysheets
- Viewing Refund Information in Student Financials
- Chapter 18: Administering Payment Plans
- Chapter 19: Billing Customers
- Understanding Customer Billing
- Completing Billing Requests
- Understanding Billing Requests
- Pages Used to Complete Billing Requests
- Specifying Basic Student Billing Request Parameters
- Specifying Bill Terms and Print Options for Student Billing Requests
- Specifying Basic Corporate Billing Request Parameters
- Specifying Bill Terms and Print Options for Student Billing Requests
- Billing Specific Charges for Individual Students
- Processing Billing Requests
- Printing Invoices
- Pages Used to Print Invoices
- Printing Student Invoices Using Form Based Extract Bill
- Printing Corporate Invoices Using Form Based Extract Bill
- Printing Student Invoices Using an SQR or XML Publisher
- Printing Corporate Invoices Using an SQR or XML Publisher
- Printing Student Invoices Using Crystal
- Printing Corporate Invoices Using Crystal
- Canceling Bills
- Viewing Billing Information
- Chapter 20: Cashiering
- Understanding Cashiering
- Opening a Cashiering Office for a Business Day
- Processing Cashiering Transactions
- Understanding Cashiering Transactions
- Pages Used to Process Cashiering Transactions
- Accepting Student Payments
- Allocating Student Payments to Specific Charges
- Accepting Corporate Payments
- Allocating Corporate Payments to Sponsored Charges
- Creating Third-Party Tracking Information for Corporate Payments
- Creating Department Receipts
- Cashing Checks
- Processing Interim Deposits
- Replenishing Cash
- Selecting Exchange Rates for Cashiering Transactions Processed with Foreign Currency
- Entering Check Information for Cashiering Transactions
- Entering Credit Card Information for Cashiering Transactions
- Posting Delayed Receipts
- Processing the Cashiering GL Interface
- Voiding Receipts
- Reviewing Details for Individual Receipts
- Reviewing Receipt and Tender Activity
- Understanding Receipt and Tender Activity Review
- Pages Used to Review Receipt and Tender Activity
- Reviewing Receipts by Business Date
- Reviewing Payment Activity for an Organization
- Reviewing Payment and Check Cashing Activity for a Student
- Reviewing Tender Activity by Cashier
- Reviewing Tender Activity by Register
- Reviewing Receipt Tender Flow
- Reviewing Totals by Deposit ID
- Closing a Cashiering Office for a Business Day
- Reopening a Cashiering Office for a Closed Business Day
- Chapter 21: Maintaining Receivables
- Common Elements Used in This Chapter
- Entering Groups of Transactions
- Entering Transactions from an External Source
- Processing Payroll Deductions
- Reviewing and Revising Group Data Entries Before Posting
- Posting Group Data Entries
- Posting Transactions for Individual Students and Organizations
- Consolidating and Reviewing Transactions for Individual Students and Organizations
- Viewing Account Information Within the Maintain Receivables Feature
- Viewing Payment by Invoice Information Within the Maintain Receivables Feature
- Managing Disputed Charges
- Reversing Payments and Charges
- Applying Payments
- Writing Off Charges and Account Balances
- Understanding Write-offs
- Pages Used to Write Off Charges and Account Balances
- Creating Write-offs for Individual Students
- Creating Write-offs for Individual Organizations
- Selecting Accounts to Write Off for Individual Students and Organizations
- Selecting Items to Write Off for Individual Students and Organizations
- Processing Batch Write-offs
- Reversing Write-offs for Students
- Reversing Write-offs for Organizations
- Processing Enrollment Deposits
- Processing Late Fees
- Processing Late Fees Using the Billing Request Number
- Processing Enrollment Cancellation
- Validating Tables
- Chapter 22: Maintaining Customers
- Chapter 23: Collecting Receivables
- Chapter 24: Producing Tax Forms and Receipt Information
- Chapter 25: Setting Up and Using International Health Coverage
- Chapter 26: (NLD) Using the Banking Interface
- Chapter 27: (AUS) Setting Up and Using Australian Loan Processing
- Understanding Loan Processing for Australian Higher Education
- Setting Up Australian Loan Defaults
- Pages Used to Set Up Australian Loan Defaults
- Defining Liability Statuses
- Defining HECS HELP Loan Defaults
- Defining FEE HELP Loan Defaults
- Defining OS HELP Loan Defaults
- Defining Status Change Rule Loan Defaults
- Setting Up HECS Fee Codes
- Setting Up HECS Band Fees
- Linking Band Fees to Tuition Groups
- Excluding HECS Classes
- Reviewing HECS Results and Running the HECS Reconciliation
- Creating and Updating FEE-HELP Loans
- Creating and Updating OS-HELP Loans
- Creating Commonwealth Assistance Notices
- Chapter 28: (NZL) StudyLink Processing
- Chapter 29: (NZL) New Zealand Qualification Authority Fees
- Appendix A: Delivered Workflows for Student Financials
- Appendix B: Student Financials Global Invoicing Reminder Letters
- Defining and Issuing Reminder Letters
- Pages Used to Define and Issue Reminder Letters
- Defining Communication Data Source
- Defining Invoice Reminder Letter Properties
- Defining Template Properties
- Defining Output Properties
- Defining Bursting Properties
- Setting Up Standard Letter
- Defining Comm Key
- Defining Event 3C Groups
- Defining Event Definition
- Defining 3C Engine Parameters
- Defining Manage Duplicate Assignment
- Reviewing the Generated Communication
- Running Communication Generation Process
- Setting Up Process Parameters
- Reviewing Communication
- Defining and Issuing Reminder Letters
- Appendix C: PeopleSoft Student Financials Reports
- Index
PeopleSoft Enterprise Student
Financials 9.0 PeopleBook
March 2010
PeopleSoft Enterprise Student Financials 9.0 PeopleBook
SKU cs9lssf-b0310
Copyright © 1988, 2010, Oracle and/or its affiliates. All rights reserved.
Trademark Notice
Oracle is a registered trademark of Oracle Corporation and/or its affiliates. Other names may be trademarks of their
respective owners.
License Restrictions Warranty/Consequential Damages Disclaimer
This software and related documentation are provided under a license agreement containing restrictions on use and
disclosure and are protected by intellectual property laws. Except as expressly permitted in your license agreement or
allowed by law, you may not use, copy, reproduce, translate, broadcast, modify, license, transmit, distribute, exhibit,
perform, publish or display any part, in any form, or by any means. Reverse engineering, disassembly, or decompilation
of this software, unless required by law for interoperability, is prohibited.
Warranty Disclaimer
The information contained herein is subject to change without notice and is not warranted to be error-free. If you find
any errors, please report them to us in writing.
Restricted Rights Notice
If this software or related documentation is delivered to the U.S. Government or anyone licensing it on behalf of the U.S.
Government, the following notice is applicable:
U.S. GOVERNMENT RIGHTS
Programs, software, databases, and related documentation and technical data delivered to U.S. Government
customers are "commercial computer software" or "commercial technical data" pursuant to the applicable
Federal Acquisition Regulation and agency-specific supplemental regulations. As such, the use, duplication,
disclosure, modification, and adaptation shall be subject to the restrictions and license terms set forth in the
applicable Government contract, and, to the extent applicable by the terms of the Government contract, the
additional rights set forth in FAR 52.227-19, Commercial Computer Software License (December 2007).
Oracle USA, Inc., 500 Oracle Parkway, Redwood City, CA 94065.
Hazardous Applications Notice
This software is developed for general use in a variety of information management applications. It is not developed or
intended for use in any inherently dangerous applications, including applications which may create a risk of personal
injury. If you use this software in dangerous applications, then you shall be responsible to take all appropriate fail-safe,
backup, redundancy and other measures to ensure the safe use of this software. Oracle Corporation and its affiliates
disclaim any liability for any damages caused by use of this software in dangerous applications.
Third Party Content, Products, and Services Disclaimer
This software and documentation may provide access to or information on content, products and services from third
parties. Oracle Corporation and its affiliates are not responsible for and expressly disclaim all warranties of any kind
with respect to third party content, products and services. Oracle Corporation and its affiliates will not be responsible for
any loss, costs, or damages incurred due to your access to or use of third party content, products or services.
Copyright © 1988, 2010, Oracle and/or its affiliates. All Rights Reserved. iii
Contents
Preface
PeopleSoft Enterprise Student Financials Preface ................................................................................ xxix
PeopleSoft Products .................................................................................................................................... xxix
PeopleSoft Enterprise Campus Solutions Application Fundamentals ........................................................ xxix
PeopleBook Structure ................................................................................................................................. xxix
PeopleBooks and the Online PeopleSoft Library ...................................................................................... xxxii
Chapter 1
Getting Started with PeopleSoft Enterprise Student Financials .............................................................. 1
PeopleSoft Enterprise Student Financials Overview ....................................................................................... 1
PeopleSoft Student Financials Business Processes ......................................................................................... 2
PeopleSoft Student Financials Integrations ..................................................................................................... 2
PeopleSoft Enterprise Student Financials Implementation ............................................................................. 3
Chapter 2
Completing Student Financials General Setup .......................................................................................... 5
Understanding Student Financials General Setup ............................................................................................ 5
Setting Up Installation Parameters and Keywords ......................................................................................... 5
Understanding Installation Parameters ...................................................................................................... 6
Understanding Global Invoicing ............................................................................................................... 6
Pages Used to Set Up Installation Parameters and Keywords .................................................................. 7
Defining Number Sequence Start Points, Maximum Row Settings, and ChartField Edit Options ......... 7
Defining Payment by Invoice .................................................................................................................. 11
Defining Keyword Edit Tables and a Null Due Date ............................................................................. 11
Defining Commit Levels ........................................................................................................................ 15
Defining Keywords ................................................................................................................................ 16
Reviewing Valid Records and Fields ............................................................................................................ 17
Pages Used to Review Valid Records and Fields ................................................................................... 17
Reviewing Valid Records ....................................................................................................................... 17
Reviewing Valid Fields .......................................................................................................................... 18
Setting Up Business Units ............................................................................................................................ 19
Understanding Business Units ............................................................................................................... 19
Pages Used to Set Up Business Units ..................................................................................................... 20
Contents
iv Copyright © 1988, 2010, Oracle and/or its affiliates. All Rights Reserved.
Defining Basic Business Unit Parameters .............................................................................................. 21
Defining Additional Business Unit Parameters ..................................................................................... 22
Defining Posting Parameters .................................................................................................................. 24
Defining Committal and Approval Options ........................................................................................... 28
Defining Collection Rules ....................................................................................................................... 30
Defining Basic Refunding Rules ............................................................................................................. 30
Defining Refund Approval Parameters ................................................................................................... 30
Defining Default Payroll Parameters ...................................................................................................... 30
Defining Auto-Numbering Sequences ................................................................................................... 31
(CAN)(AUS)(NZL) Defining Tax Parameters for Students from Canada, Australia, and New Zealand
.............................................................................................................................................................. 32
Setting Up Tax Authorities and Tax Codes .................................................................................................. 34
Understanding Tax Authorities and Tax Codes ...................................................................................... 34
Pages Used to Set Up Tax Authorities and Tax Codes ........................................................................... 35
Defining Tax Authorities ....................................................................................................................... 35
Specifying VAT Rebates for Tax Authorities ........................................................................................ 36
Defining Tax Codes ............................................................................................................................... 36
Setting Up Aging Sets ................................................................................................................................... 37
Page Used to Set Up Aging Sets ............................................................................................................. 37
Defining Aging Sets ............................................................................................................................... 37
Setting Up Payment Application Rules ........................................................................................................ 39
Understanding Payment Application Rules ............................................................................................ 39
Pages Used to Set Up Payment Application Rules ................................................................................. 40
Creating a Charge Priority List and Linking It to an Item Type Tree .................................................... 40
Defining Charge Priority List Rules ....................................................................................................... 41
Defining Payment Overall Priorities ...................................................................................................... 47
Setting Up Account Types ............................................................................................................................ 51
Pages Used to Set Up Account Types ..................................................................................................... 51
Setting Up Account Types ..................................................................................................................... 52
Setting Up Accounting Dates ........................................................................................................................ 54
Page Used to Set Up Accounting Dates .................................................................................................. 54
Page Used to Set Up Accounting Dates .................................................................................................. 55
Setting Up Item Types and Item Type Groups ............................................................................................. 55
Understanding Item Types and Item Type Groups ................................................................................ 56
Pages Used to Set Up Item Types and Item Type Groups ...................................................................... 57
Defining Basic Item Type Attributes ..................................................................................................... 58
Defining Transaction Amount and Tax Form Parameters for Item Types ............................................. 62
Defining Miscellaneous Parameters for Item Types .............................................................................. 64
Defining External Awards ....................................................................................................................... 67
Defining Item Type Posting Restrictions ............................................................................................... 68
Linking Account Types to an Item Type ............................................................................................... 69
Mapping Item Types to General Ledger Accounts ................................................................................ 70
Defining Item Type Groups ................................................................................................................... 76
Setting Up Service Indicator Sets ................................................................................................................. 77
Understanding Service Indicator Sets ..................................................................................................... 77
Contents
Copyright © 1988, 2010, Oracle and/or its affiliates. All Rights Reserved. v
Pages Used to Set Up Service Indicator Sets .......................................................................................... 78
Defining Service Indicator Set Details ................................................................................................... 78
Defining Eligible Academic Careers for Service Indicator Sets ............................................................ 80
Setting Up a Default Academic Term ........................................................................................................... 81
Page Used to Set Up a Default Academic Term ..................................................................................... 81
Defining Default Academic Terms ........................................................................................................ 81
Chapter 3
Setting Up ePayment Processing ............................................................................................................... 83
Understanding ePayment Processing ............................................................................................................. 83
Setting Up Credit Card Types ....................................................................................................................... 83
Page Used to Set Up Credit Card Types ................................................................................................. 84
Defining Accepted Credit Card Types ................................................................................................... 84
Re-encrypting Credit Card, Bank Account Numbers, Security Code Data, and Security Key ..................... 84
Understanding Encryption ....................................................................................................................... 85
Understanding Re-encryption ................................................................................................................. 85
Pages Used to Re-Encrypt and Convert Data .......................................................................................... 87
Regenerating the Encryption Key ........................................................................................................... 87
Converting Data to Use a Regenerated Encryption Key ........................................................................ 88
Setting Up Payment Merchants ..................................................................................................................... 90
Page Used to Set Up Payment Merchants ............................................................................................... 91
Defining Electronic Payment Merchants ................................................................................................ 91
Testing Payment and Hosted Payment Transactions ..................................................................................... 96
Page Used to Test Payment and Hosted Payment Transactions ............................................................. 96
Testing ePayment and Hosted Payment Transactions ............................................................................. 97
Setting Up SF Merchants ............................................................................................................................ 100
Understanding SF Merchants ................................................................................................................ 100
Page Used to Set Up SF Merchants ...................................................................................................... 101
Defining ePayment Processing Parameters .......................................................................................... 101
Setting Up Institution Sets ........................................................................................................................... 106
Setting Up Item Types for ePayment .......................................................................................................... 107
Setting Up Self-Service Options .................................................................................................................. 107
Chapter 4
Setting Up GL Interface Processing ........................................................................................................ 109
Understanding GL Interface Processing Setup ........................................................................................... 109
GL Interface Processing Using PeopleSoft General Ledger or Oracle General Ledger ...................... 110
GL Interface Processing Using a Third-Party or Legacy General Ledger System .............................. 112
Loading Setup Data Using PeopleSoft Application Messaging ................................................................. 112
Reviewing Setup Table Data for PeopleSoft Financials ............................................................................. 117
Contents
vi Copyright © 1988, 2010, Oracle and/or its affiliates. All Rights Reserved.
Understanding Table Setup Data ........................................................................................................... 117
Pages Used to Review Setup Table Data .............................................................................................. 117
Linking Student Financials Business Units to PeopleSoft General Ledger Units ...................................... 118
Setting Up HRMS for Oracle Financials ..................................................................................................... 118
Setting Up the Ledger Fields Table ............................................................................................................ 119
Understanding the Ledger Fields Table Setup ...................................................................................... 119
Page Used to Set Up the Ledger Fields Table ....................................................................................... 119
Defining Ledger Fields ......................................................................................................................... 119
Synchronizing Oracle GL Segments ............................................................................................................ 120
Mapping General Ledger Business Units to Oracle General Ledger ........................................................... 120
Pages Used to Map General Ledger Business Units to Oracle General Ledger ................................... 121
Mapping GL Business Units to Oracle GL ........................................................................................... 121
Mapping Transaction Classification to Oracle GL Journal Categories ................................................. 123
Synchronizing ChartField Values ................................................................................................................ 125
Page Used to Synchronize ChartField Values ....................................................................................... 125
Synchronizing ChartField Values ......................................................................................................... 125
(Optional) Creating ChartField SpeedType Keys ....................................................................................... 127
Understanding ChartField SpeedType Keys ......................................................................................... 127
Page Used to Create ChartField SpeedType Keys ................................................................................ 127
Defining ChartField SpeedTypes ......................................................................................................... 127
(Optional) Activating ChartField Validation Options ................................................................................. 130
Assigning Charts of Accounts .................................................................................................................... 130
Validating ChartFields ................................................................................................................................ 130
Understanding ChartFields Validation .................................................................................................. 131
Page Used to Validate ChartFields ........................................................................................................ 131
Identifying Invalid ChartFields ............................................................................................................ 131
Setting Up Integration with PeopleSoft Financials and Oracle Financials ................................................. 132
Pages Used to Set Up Integration with PeopleSoft Financials and Oracle Financials .......................... 132
Defining Batch Publish Rules for GL Messaging ................................................................................ 133
Defining Batch Programs for GL Messaging ....................................................................................... 134
Setting Up Business Unit Synchronization for PeopleSoft Financials ................................................ 134
Synchronizing Student Financials Business Unit Data with PeopleSoft Financials ............................ 135
Copying ChartField Information for Item Types from One Term to Another ............................................ 137
Page Used to Copy ChartField Information for Item Types from One Term to Another ..................... 137
Running the GL Term Copy Process ................................................................................................... 137
Chapter 5
Setting Up Tuition Controls, Criteria, Equations, and Waivers .......................................................... 139
Understanding Tuition Controls, Criteria, Equations, and Waivers ............................................................ 139
Creating Billing and Due Date Calendars ................................................................................................... 139
Page Used to Create Billing and Due Date Calendars .......................................................................... 140
Defining Billing and Due Date Calendars ............................................................................................ 140
Contents
Copyright © 1988, 2010, Oracle and/or its affiliates. All Rights Reserved. vii
Setting Up Adjustment Calendars ............................................................................................................... 142
Understanding Adjustment Calendars ................................................................................................... 142
Pages Used to Set Up Adjustment Calendars ........................................................................................ 143
Defining Adjustment Calendars ........................................................................................................... 143
Defining Administrative Fees for Adjustment Periods ........................................................................ 145
Calculating the Term Fee by Term and Adjusting by Term Scenarios ................................................. 147
Establishing Tuition Calculation Controls .................................................................................................. 150
Pages Used to Establish Tuition Calculation Controls .......................................................................... 151
Specifying Tuition Calculation Parameters .......................................................................................... 151
Establishing Restrictions on Automatic Tuition Calculation ............................................................... 153
Selecting Errors and Warnings ............................................................................................................. 154
Defining Variables for Criteria and Equations ........................................................................................... 155
Understanding Equation Variables ........................................................................................................ 155
Pages Used to Define Variables for Criteria and Equations ................................................................. 155
Defining Character Variables ............................................................................................................... 156
Defining Numeric Variables ................................................................................................................ 156
Defining Yes/No Flags ......................................................................................................................... 157
Establishing Criteria for Tuition Groups and Fee Triggers ........................................................................ 158
Understanding Tuition Group and Fee Trigger Criteria ........................................................................ 158
Pages Used to Establish Criteria for Tuition Groups and Fee Triggers ................................................ 159
Defining Criteria Codes and Criteria Types ......................................................................................... 159
Defining Criteria Details ...................................................................................................................... 160
Using Equation Engine to Define Tuition Calculation Equations ............................................................... 161
Understanding Global Variables ........................................................................................................... 162
Page Used to Define Tuition Calculation Equations ............................................................................. 163
Viewing Delivered Equations .............................................................................................................. 163
Viewing Equation Information .............................................................................................................. 164
Using Equation Engine in Student Financials Tuition Calculation ....................................................... 168
Using Student Financials Undergraduate Selection Equation ............................................................... 169
Defining Waivers and Waiver Groups ........................................................................................................ 171
Pages Used to Define Waivers and Waiver Groups .............................................................................. 171
Defining Waivers ................................................................................................................................. 171
Defining Waiver Groups ...................................................................................................................... 173
Creating Course Lists .................................................................................................................................. 174
Page Used to Create Course Lists ......................................................................................................... 174
Defining Course Lists ........................................................................................................................... 174
Chapter 6
Setting Up Fees and Tuition Groups ....................................................................................................... 177
Setting Up Fee Classes ................................................................................................................................ 177
Page Used to Set Up Fee Classes .......................................................................................................... 178
Defining Minimum and Maximum Fees ..................................................................................................... 178
Contents
viii Copyright © 1988, 2010, Oracle and/or its affiliates. All Rights Reserved.
Understanding Minimum and Maximum Fees ...................................................................................... 178
Pages Used to Define Minimum and Maximum Fees ........................................................................... 178
Defining Minimum and Maximum Fees for Billing Careers and Academic Years ............................. 179
Defining Minimum and Maximum Fees for Terms and Sessions ....................................................... 180
Defining Minimum and Maximum Fees for Admit Terms .................................................................. 181
Setting Up Application Fees ....................................................................................................................... 181
Understanding Application Fees ........................................................................................................... 181
Pages Used to Set Up Application Fees ................................................................................................ 182
Defining Application Fees ................................................................................................................... 182
Defining Application Fee Item Types .................................................................................................. 183
Defining Application Sub Fees ............................................................................................................ 185
Setting Up Deposit Fees and Deposit Due Dates ........................................................................................ 186
Pages Used to Set Up Deposit Fees and Deposit Due Dates ................................................................ 186
Defining Deposit Fees .......................................................................................................................... 187
Defining Deposit Fee Due Dates .......................................................................................................... 188
Defining Status Changes Resulting from Deposits .............................................................................. 189
Setting Up Term Fee Codes ........................................................................................................................ 190
Understanding Term Fee Codes ............................................................................................................ 190
Pages Used to Set Up Term Fee Codes ................................................................................................. 191
Defining Term Fee Codes .................................................................................................................... 191
Defining Term and Session Fees .......................................................................................................... 193
Defining Term Sub Fee Codes ............................................................................................................. 195
Defining Term Sub Fees ...................................................................................................................... 198
Defining Tuition Residency Minimums and Maximums ..................................................................... 202
Copying Term Fees to Subsequent Terms ........................................................................................... 203
Setting Up Course Fees and Class Fees ...................................................................................................... 204
Understanding Course Fees and Class Fees .......................................................................................... 205
Pages Used to Set Up Course Fees and Class Fees ............................................................................... 206
Setting Up Rate Tables for Course Fees .............................................................................................. 207
Defining Course Fees ........................................................................................................................... 209
Defining Course Sub Fees .................................................................................................................... 210
Defining Modal Course Fees ................................................................................................................ 212
Defining Modal Course Sub Fees ......................................................................................................... 213
Defining Class Fees .............................................................................................................................. 213
Defining Class Sub Fees ...................................................................................................................... 214
Defining Modal Class Fees .................................................................................................................. 216
Defining Modal Class Sub Fees ............................................................................................................ 217
Rolling Over Course and Class Fees to Future Terms ......................................................................... 217
Defining Optional Fees ............................................................................................................................... 218
Pages Used to Define Optional Fees ..................................................................................................... 218
Defining Optional Fee Codes ............................................................................................................... 219
Defining Optional Fee Values .............................................................................................................. 219
Linking Optional Fees to Terms ........................................................................................................... 220
Defining Optional Fee Amounts .......................................................................................................... 221
Setting Up Transaction Fees ....................................................................................................................... 222
Contents
Copyright © 1988, 2010, Oracle and/or its affiliates. All Rights Reserved. ix
Page Used to Set Up Transaction Fees .................................................................................................. 223
Defining Transaction Fees ................................................................................................................... 223
Setting Up Course List Fees ....................................................................................................................... 224
Page Used to Set Up Course List Fees .................................................................................................. 224
Defining Course List Fees .................................................................................................................... 225
Setting Up Tuition Groups .......................................................................................................................... 227
Understanding Tuition Groups .............................................................................................................. 228
Pages Used to Set Up Tuition Groups ................................................................................................... 228
Defining Tuition Groups ...................................................................................................................... 229
Linking Adjustment Codes to Tuition Groups ..................................................................................... 230
Linking Criteria to Tuition Groups ...................................................................................................... 231
Linking Term Fees to Tuition Groups .................................................................................................. 232
Linking a Waiver Code to a Single Term Fee Within a Tuition Group ............................................... 233
Linking Course Lists to Tuition Groups .............................................................................................. 234
Linking Waiver Codes to Tuition Groups ............................................................................................ 234
Reviewing Established Tuition Group Priorities ................................................................................. 235
Chapter 7
Setting Up Refunding ............................................................................................................................... 237
Prerequisites ................................................................................................................................................. 237
Setting Up Your Business Unit to Refund Customers ................................................................................ 238
Pages Used to Set Up Your Business Unit to Refund Customers ......................................................... 238
Defining Basic Refunding Rules .......................................................................................................... 238
Defining Refund Approval Parameters ................................................................................................ 241
Defining Default Payroll Interface Parameters .................................................................................... 242
Setting Default Withholding Amounts for Payroll Refunds ................................................................ 243
Setting Up Accounts Payable Options ........................................................................................................ 243
Pages Used to Set Up Accounts Payable Options ................................................................................. 243
Setting Up an AP Business Unit .......................................................................................................... 243
Defining AP Set Controls for Vendors ................................................................................................ 245
Setting Up Payroll Refund Options ............................................................................................................ 246
Creating Job Data for Payroll Refunds ....................................................................................................... 246
Pages Used to Create Job Data .............................................................................................................. 247
Creating Job Data for Payroll Refunds ................................................................................................ 247
Creating Job Data in Batch ................................................................................................................... 248
Creating T4A Tax Job Data .................................................................................................................. 249
Setting Up Direct Deposit for Students ...................................................................................................... 249
Designating Sponsors .................................................................................................................................. 249
Pages Used to Designate Sponsors ........................................................................................................ 250
Designating Sponsors for Individual Students ..................................................................................... 250
Designating Sponsors for Organizations .............................................................................................. 251
Contents
x Copyright © 1988, 2010, Oracle and/or its affiliates. All Rights Reserved.
Chapter 8
Setting Up Payment Plans ........................................................................................................................ 253
Common Elements Used in This Chapter ............................................................................................. 253
Setting Up Deferral Contracts ..................................................................................................................... 253
Pages Used to Set Up Deferral Contracts .............................................................................................. 254
Defining Basic Deferral Contract Parameters ...................................................................................... 254
Defining Deferral Contract Administrative Fees ................................................................................. 256
Defining Deferral Contract Eligible Charges and Maximum Amounts ............................................... 257
Setting Up Payment Plan Contracts ............................................................................................................ 259
Pages Used to Set Up Payment Plan Contracts ..................................................................................... 259
Defining Basic Payment Plan Contract Parameters ............................................................................. 259
Defining Payment Plan Type, Eligible Charges, and Time Frame ...................................................... 262
Defining Payment Plan Item Types ..................................................................................................... 265
Defining Self Service Options ............................................................................................................... 267
Defining Payment Plan Administrative Fees ....................................................................................... 269
Setting Up Third-Party Contracts ............................................................................................................... 270
Pages Used to Set Up Third-Party Contracts ........................................................................................ 271
Defining Basic Third-Party Contract Parameters ................................................................................. 271
Defining Third-Party Contract Item Types .......................................................................................... 274
Defining Third-Party Charge Transfers ............................................................................................... 276
Setting Up Collection Agreements ............................................................................................................. 277
Pages Used to Set Up Collection Agreements ...................................................................................... 278
Defining Basic Collection Agreement Parameters ............................................................................... 278
Defining Collection Agreement Administrative Fees .......................................................................... 280
Chapter 9
Setting Up Billing ...................................................................................................................................... 283
Setting Up Billing Messages ....................................................................................................................... 283
Understanding Billing Messages ........................................................................................................... 283
Pages Used to Set Up Billing Messages ................................................................................................ 284
Defining Billing Messages ................................................................................................................... 284
Linking Billing Messages to Item Types ............................................................................................. 285
Linking Billing Messages to Aging Sets .............................................................................................. 285
Linking Billing Messages to Business Units ........................................................................................ 286
Linking Billing Messages to Students .................................................................................................. 286
Linking Billing Messages to Corporations ........................................................................................... 286
Setting Up Invoice Layouts ........................................................................................................................ 286
Understanding XML Publisher ............................................................................................................. 287
Pages Used to Set Up Invoice Layouts ................................................................................................. 287
Contents
Copyright © 1988, 2010, Oracle and/or its affiliates. All Rights Reserved. xi
Defining and Maintaining Reports ........................................................................................................ 288
View Sample XML For Report Definition ........................................................................................... 289
Print Invoices From The Run Control Page .......................................................................................... 289
Defining Invoice Layout Information .................................................................................................. 291
Defining Invoice Layout Sorting and Summarization ......................................................................... 292
Setting Up Invoice ID Number Generation ................................................................................................ 295
Page Used to Set Up Invoice ID Number Generation ........................................................................... 295
Defining Invoice Number Generation .................................................................................................. 295
Setting Up Billing Scan Lines ..................................................................................................................... 296
Page Used to Set Up Bill Scan Lines .................................................................................................... 296
Defining Billing Scan Lines ................................................................................................................. 296
Setting Up Billing Types ............................................................................................................................ 298
Page Used to Define Billing Types ....................................................................................................... 298
Setting Up Billing Standard Requests ......................................................................................................... 298
Pages Used to Set Up Billing Standard Requests ................................................................................. 299
Defining General Selections ................................................................................................................. 300
Define Additional General Selections .................................................................................................. 302
Defining Communication Information ................................................................................................. 304
Defining Academic Selections ............................................................................................................. 305
Defining Additional Academic Selections ........................................................................................... 307
Selecting Billing Messages .................................................................................................................. 307
Selecting Student Groups ..................................................................................................................... 308
Select Enrollment Blocks ...................................................................................................................... 309
Selecting Account Types ...................................................................................................................... 310
Defining Corporation Information ....................................................................................................... 311
Chapter 10
Setting Up Cashiering ................................................................................................................................ 313
Defining a Cashiering Office ...................................................................................................................... 313
Pages Used to Define a Cashiering Office ............................................................................................ 313
Defining the Basic Cashiering Office Parameters ................................................................................ 314
Defining the Transaction Setup of a Cashiering Office ....................................................................... 316
Setting Up Valid Registers and Cashiers .................................................................................................... 320
Pages Used to Set Up Valid Registers and Cashiers ............................................................................. 320
Defining Valid Registers ...................................................................................................................... 320
Defining Valid Cashiers ....................................................................................................................... 321
Setting Up Target Keys ............................................................................................................................... 323
Pages Used to Set Up Target Keys ........................................................................................................ 323
Defining Target Keys ........................................................................................................................... 323
Linking Tax Authorities to Target Keys .............................................................................................. 326
Setting Up Tender Keys .............................................................................................................................. 327
Pages Used to Set Up Tender Keys ....................................................................................................... 328
Contents
xii Copyright © 1988, 2010, Oracle and/or its affiliates. All Rights Reserved.
Defining Tender Keys .......................................................................................................................... 328
Specifying Cashiers for Tender Keys ................................................................................................... 331
Setting Up for Processing Credit Cards ....................................................................................................... 331
Setting Up Void Reasons ............................................................................................................................ 332
Page Used to Set Up Void Reasons ...................................................................................................... 332
Setting Up Receipt Messages ...................................................................................................................... 332
Pages Used to Set Up Receipt Messages .............................................................................................. 332
Creating Receipt Messages Linked to Cashiering Offices ................................................................... 333
Creating Receipt Messages Linked to Target Keys ............................................................................. 333
Creating Receipt Messages Linked to Tender Keys ............................................................................ 334
Modifying Cashiering Receipt Forms ......................................................................................................... 335
Pages Used to Modify Cashiering Receipt Forms ................................................................................ 335
Preparing Image Files for Uploading ................................................................................................... 336
Uploading Image Files ......................................................................................................................... 337
Setting Up Form Image Text ................................................................................................................ 337
Using Form Editor to Change a Receipt Title and Add an Image ....................................................... 338
Chapter 11
Setting Up Receivables Maintenance ...................................................................................................... 341
Defining Origins and Group Types ............................................................................................................. 341
Understanding Origins and Group Types .............................................................................................. 341
Pages Used to Define Origins and Group Types ................................................................................... 342
Defining Origins ................................................................................................................................... 342
Defining Group Types .......................................................................................................................... 343
Setting Up Late Fees ................................................................................................................................... 344
Pages Used to Set Up Late Fees ............................................................................................................ 345
Setting Up Basic Late Fee Parameters ................................................................................................. 345
Setting Up Aging Category Information for Late Fees ........................................................................ 348
Defining Late Fee Maximums and Due Dates ..................................................................................... 349
Specifying Academic Programs for Late Fees ..................................................................................... 351
Setting Up Late Fees - Billing ..................................................................................................................... 353
Understanding Late Fees Billing ........................................................................................................... 353
Page Used to Set Up Late Fees - Billing ............................................................................................... 353
Set up Late Fees - Billing Parameters ................................................................................................... 353
Setting Up External File Layouts ................................................................................................................ 355
Understanding External File Layouts .................................................................................................... 355
Pages Used to Set Up External File Layouts ......................................................................................... 356
Defining Basic File Layout Parameters ............................................................................................... 356
Defining Field Positions and Lengths .................................................................................................. 357
Defining Locations and Lengths of Control Data ................................................................................ 358
Setting Up Item Reasons ............................................................................................................................. 359
Page Used to Set Up Item Reasons ....................................................................................................... 359
Contents
Copyright © 1988, 2010, Oracle and/or its affiliates. All Rights Reserved. xiii
Setting Up Payroll Deduction ..................................................................................................................... 359
Understanding Payroll Deduction ......................................................................................................... 359
Pages Used to Set Up Payroll Deduction .............................................................................................. 360
Defining Payroll Deduction Codes ...................................................................................................... 360
Defining Payroll Deduction Relationships ........................................................................................... 361
Assigning Payroll Deduction Codes to Payment Plans ........................................................................ 361
Chapter 12
Setting Up Receivables Collection ........................................................................................................... 363
Prerequisites ................................................................................................................................................. 363
Setting Up Business Units for Collections .................................................................................................. 363
Pages Used to Set Up Business Units for Collections .......................................................................... 364
Defining Collection Rules for Business Units ..................................................................................... 364
Setting Up Collectors .................................................................................................................................. 366
Page Used to Set Up Collectors ............................................................................................................ 366
Defining Collectors .............................................................................................................................. 366
Setting Up Collection Criteria .................................................................................................................... 367
Pages Used to Set Up Collection Criteria ............................................................................................. 367
Setting Up Student Collection Criteria ................................................................................................. 367
Setting Up Organization Collection Criteria ........................................................................................ 369
Defining Reason In and Reason Out Codes ................................................................................................ 369
Pages Used to Define Reason In and Reason Out Codes ...................................................................... 370
Creating Follow-Up Actions ....................................................................................................................... 370
Page Used to Create Follow-Up Actions .............................................................................................. 370
Setting Up Collection Letter Templates ..................................................................................................... 370
Page Used to Set Up Collection Letter Templates ................................................................................ 371
Defining Collection Letter Templates .................................................................................................. 371
Chapter 13
Setting Up Tax Form Production ............................................................................................................ 375
Common Element Used in This Chapter ............................................................................................... 375
Setting Up 1098-T Tax Form Production ................................................................................................... 375
Understanding 1098-T Tax Form Production Setup ............................................................................. 375
Pages Used to Set Up 1098-T Tax Form Production ............................................................................ 376
Setting Up a TIN .................................................................................................................................. 376
Setting Up Valid Citizenship Statuses .................................................................................................. 378
Setting Up T2202A Tax Form Production .................................................................................................. 379
Setting Up T4A Tax Form Production ........................................................................................................ 379
Contents
xiv Copyright © 1988, 2010, Oracle and/or its affiliates. All Rights Reserved.
Chapter 14
Processing ePayment Transactions ......................................................................................................... 381
Understanding ePayment Transactions ....................................................................................................... 381
Processing ePayment Service Requests ...................................................................................................... 382
Pages Used to Process ePayment Service Requests .............................................................................. 382
Processing Submitted Credit Card Transactions .................................................................................. 383
Processing Submitted eCheck Transactions ......................................................................................... 385
Purging Security Code Data .................................................................................................................. 385
Reviewing and Canceling Self-Service ePayment Transactions ................................................................ 386
Page Used to Review and Cancel Self-Service ePayment Transactions ............................................... 387
Viewing and Canceling Self-Service Credit Card Transactions .......................................................... 387
Processing Refunds for ePayments .............................................................................................................. 391
Pages Used to Process Refunds for ePayments ..................................................................................... 392
Creating Online Student Refunds .......................................................................................................... 392
Running the ePayment Refunds Process ............................................................................................... 392
Reviewing ePayment Transactions ............................................................................................................. 392
Pages Used to Review ePayment Transactions ..................................................................................... 393
Defining Selection Criteria for Reviewing ePayment Transactions .................................................... 393
Reviewing ePayment Transaction Details ............................................................................................ 396
Reviewing Self-Service Agreements ........................................................................................................... 398
Page Used to Review Self-Service Agreements .................................................................................... 399
Reviewing Self-Service Agreements .................................................................................................... 399
Chapter 15
Using GL Interface Processing ................................................................................................................. 403
Understanding GL Interface Processing ..................................................................................................... 403
Running the Chartfield Audit Report ........................................................................................................... 406
Understanding the Chartfield Audit Report .......................................................................................... 406
Page Used to Run the Chartfield Audit Report ..................................................................................... 409
Running the Chartfield Audit Report .................................................................................................... 409
Creating Accounting Entries ....................................................................................................................... 411
Understanding Accounting Entry Creation ........................................................................................... 411
Pages Used to Create Accounting Entries ............................................................................................. 414
Creating Accounting Entries Using the GL Interface Process ............................................................. 414
Creating Accounting Entries Using the Cashiering GL Interface Process ............................................ 415
Reviewing GL Interface Information .......................................................................................................... 416
Pages Used to Review GL Interface Information ................................................................................. 416
Reviewing GL Interface Run History .................................................................................................. 417
Reviewing Accounting Line Information ............................................................................................ 417
Contents
Copyright © 1988, 2010, Oracle and/or its affiliates. All Rights Reserved. xv
Reviewing Batch Publish Control Records .......................................................................................... 420
Using the Back Out GL Interface Process .................................................................................................. 421
Page Used to Run the Back Out GL Interface Process ......................................................................... 421
Running the Back Out GL Interface Process ....................................................................................... 421
Sending Accounting Entries to the General Ledger .................................................................................... 422
Page Used to Send Accounting Entries to the General Ledger ............................................................. 423
Publishing Accounting Line Information ............................................................................................. 423
Chapter 16
Calculating Tuition and Fees .................................................................................................................... 425
Calculating Tuition for a Single Student .................................................................................................... 425
Pages Used to Calculate Tuition for a Single Student .......................................................................... 425
Calculating a Student's Tuition ............................................................................................................ 426
Calculating Tuition for Multiple Students .................................................................................................. 427
Pages Used to Calculate Tuition for Multiple Students ........................................................................ 427
Calculating Tuition in Batch ................................................................................................................ 428
Locking In a Minimum Tuition Amount .................................................................................................... 430
Page Used to Lock In a Minimum Tuition Amount .............................................................................. 430
Locking In Tuition ............................................................................................................................... 430
Recalculating Tuition and Fees After Enrollment Cancellation ................................................................. 431
Page Used to Recalculate Tuition and Fees After Enrollment Cancellation ......................................... 431
Recalculating Tuition and Fees After Enrollment Cancellation .......................................................... 431
Changing, Calculating, and Posting Optional Fees .................................................................................... 432
Pages Used to Change, Calculate, and Post Optional Fees ................................................................... 432
Calculating Optional Fees for an Individual Student ........................................................................... 433
Overriding Optional Fees After the No Change Date .......................................................................... 434
Chapter 17
Refunding Customers ............................................................................................................................... 435
Understanding Refunds ............................................................................................................................... 435
Refunding Methods .............................................................................................................................. 436
Refunding Processes ............................................................................................................................ 436
Refunding Recipients ........................................................................................................................... 436
Refunding Formats ............................................................................................................................... 436
Refunding Process Flow ........................................................................................................................ 437
Creating Batch Refunds .............................................................................................................................. 439
Pages Used to Create Batch Refunds .................................................................................................... 440
Defining General Parameters ............................................................................................................... 441
Selecting Academic Programs ............................................................................................................. 442
Selecting Account Types and Terms .................................................................................................... 443
Contents
xvi Copyright © 1988, 2010, Oracle and/or its affiliates. All Rights Reserved.
Selecting Item Types ............................................................................................................................ 444
Creating Online Refunds ............................................................................................................................. 444
Pages Used to Create Online Refunds ................................................................................................... 445
Creating Student Refunds ...................................................................................................................... 445
Creating Organization Refunds ............................................................................................................ 448
Creating Student Refunds with an Extra Amount ................................................................................ 449
Specifying the Account and Term Associated with an Extra Refunded Amount ................................ 451
Creating Online Refunds for a Sponsor ............................................................................................... 451
Approving Refunds ..................................................................................................................................... 453
Pages Used to Approve Refunds ........................................................................................................... 453
Routing Batch Refunds to Worklists .................................................................................................... 453
Approving Refunds .............................................................................................................................. 454
Completing Batch Payroll Refunds ............................................................................................................ 455
Pages Used to Complete Batch Payroll Refunds .................................................................................. 455
Creating Job Data by Batch ................................................................................................................... 456
Requesting a Payroll Interface ............................................................................................................. 456
Creating and Loading Paysheets .......................................................................................................... 456
Calculating Refunds ............................................................................................................................. 457
Confirming Refunds ............................................................................................................................. 457
Distributing Payroll Refunds Through Direct Deposit ............................................................................... 457
Page Used to Distribute Payroll Refunds Through Direct Deposit ....................................................... 458
Running the Create Direct Deposit File Process .................................................................................. 458
Printing Checks and Direct Deposit Advice Slips ...................................................................................... 458
Pages Used to Print Checks and Direct Deposit Advice Slips .............................................................. 458
Running the Refund Check and Advice Slip Printing Processes ......................................................... 459
Completing AP Refunds ............................................................................................................................. 459
Understanding AP Refund Completion ................................................................................................ 459
Page Used to Complete AP Refunds ..................................................................................................... 460
Running the AP Refund Process .......................................................................................................... 460
Distributing Refunds to ePayment Accounts .............................................................................................. 461
Understanding ePayment Refunds ........................................................................................................ 461
Pages Used to Distribute ePayment Refunds ........................................................................................ 462
Distributing Refunds for ePayment Transactions ................................................................................ 462
Distributing Refunds for Other Credit Card Transactions ................................................................... 462
Canceling Refunds ...................................................................................................................................... 463
Pages Used to Cancel Refunds .............................................................................................................. 463
Canceling Student Refunds .................................................................................................................. 463
Canceling Organization Refunds ......................................................................................................... 464
Reversing Refunds ...................................................................................................................................... 464
Understanding Refund Reversals ......................................................................................................... 464
Pages Used to Reverse Refunds ............................................................................................................ 465
Reversing Student Refunds by ID ........................................................................................................ 465
Reversing Student Refunds by Date ..................................................................................................... 466
Reversing Organization Refunds by ID ............................................................................................... 467
Reversing Organization Refunds by Date ............................................................................................ 467
Contents
Copyright © 1988, 2010, Oracle and/or its affiliates. All Rights Reserved. xvii
Reversing Refunds Within Payroll for North America ........................................................................ 467
Renumbering Refund Checks for Reprinting .............................................................................................. 467
Page Used to Renumber Refund Checks for Reprinting ....................................................................... 468
Renumbering Checks ........................................................................................................................... 468
Deleting Paysheets ...................................................................................................................................... 468
Page Used to Delete Paysheets .............................................................................................................. 469
Deleting Paysheets ............................................................................................................................... 469
Viewing Refund Information in Student Financials ................................................................................... 469
Pages Used to View Refund Information .............................................................................................. 469
Chapter 18
Administering Payment Plans .................................................................................................................. 471
Understanding Payment Plans .................................................................................................................... 471
Common Elements Used in This Chapter ............................................................................................. 471
Understanding Payment Plans ............................................................................................................... 471
Linking Students to Deferral Contracts ...................................................................................................... 473
Pages Used to Link Students to Deferral Contracts .............................................................................. 473
Defining Student-Specific Details for a Deferral Contract .................................................................. 473
Administering Payment Plan Contracts ...................................................................................................... 474
Pages Used to Administer Payment Plan Contracts .............................................................................. 475
Confirming and Modifying Payment Plan Contract Parameters for an Individual Student ................. 475
Confirming and Modifying Additional Payment Plan Contract Parameters for an Individual Student .
476
Recalculating Payment Plan Contracts ................................................................................................ 478
Administering Third-Party Contracts ......................................................................................................... 479
Page Used to Administer Third-Party Contracts ................................................................................... 479
Linking Students to Third-Party Contracts .......................................................................................... 479
Recalculating Third-Party Contracts .................................................................................................... 481
Enrolling Multiple Students in a Payment Plan or Third-Party Contract .................................................... 482
Pages Used to Enroll Multiple Students in a Payment Plan or Third-Party Contract ........................... 482
Defining Enrollment for Multiple Students .......................................................................................... 482
Reviewing Results by Contract ............................................................................................................. 484
Processing Mass Contract Assignments ................................................................................................ 485
Processing Mass Cancellations ............................................................................................................. 486
Using Inquire Contract Assignments .................................................................................................... 488
Chapter 19
Billing Customers ....................................................................................................................................... 489
Understanding Customer Billing ................................................................................................................ 489
Completing Billing Requests ...................................................................................................................... 489
Contents
xviii Copyright © 1988, 2010, Oracle and/or its affiliates. All Rights Reserved.
Understanding Billing Requests ............................................................................................................ 490
Pages Used to Complete Billing Requests ............................................................................................ 492
Specifying Basic Student Billing Request Parameters ......................................................................... 492
Specifying Bill Terms and Print Options for Student Billing Requests ............................................... 494
Specifying Basic Corporate Billing Request Parameters ..................................................................... 497
Specifying Bill Terms and Print Options for Student Billing Requests ............................................... 498
Billing Specific Charges for Individual Students ....................................................................................... 498
Pages Used to Bill Specific Charges for Individual Students ............................................................... 499
Viewing Pending To Bill Items ............................................................................................................ 499
Creating Individual Bills for Students .................................................................................................. 500
Viewing the Student Invoice Summary Pages ..................................................................................... 502
Processing Billing Requests ........................................................................................................................ 504
Pages Used to Process Billing Requests ............................................................................................... 505
Processing Student Billing Requests .................................................................................................... 505
Processing Corporate Billing Requests ................................................................................................ 506
Printing Invoices ......................................................................................................................................... 506
Pages Used to Print Invoices ................................................................................................................. 506
Printing Student Invoices Using Form Based Extract Bill ................................................................... 507
Printing Corporate Invoices Using Form Based Extract Bill ............................................................... 509
Printing Student Invoices Using an SQR or XML Publisher ............................................................... 510
Printing Corporate Invoices Using an SQR or XML Publisher ........................................................... 511
Printing Student Invoices Using Crystal .............................................................................................. 511
Printing Corporate Invoices Using Crystal .......................................................................................... 512
Canceling Bills ............................................................................................................................................ 513
Pages Used to Cancel a Bill .................................................................................................................. 513
Canceling Bills ..................................................................................................................................... 514
Viewing Billing Information ....................................................................................................................... 515
Pages Used to View Billing Information .............................................................................................. 515
Reviewing Student Billing History ....................................................................................................... 516
Viewing Details for Student Bill Items ................................................................................................. 517
Chapter 20
Cashiering ................................................................................................................................................... 519
Understanding Cashiering ........................................................................................................................... 519
Common Elements Used in This Chapter ............................................................................................. 519
Cashiering .............................................................................................................................................. 520
Opening a Cashiering Office for a Business Day ....................................................................................... 520
Pages Used to Open a Cashiering Office for a Business Day ............................................................... 520
Opening a Cashiering Office ................................................................................................................ 520
Opening Valid Registers ...................................................................................................................... 522
Opening Valid Cashiers ....................................................................................................................... 523
Processing Cashiering Transactions ............................................................................................................ 524
Contents
Copyright © 1988, 2010, Oracle and/or its affiliates. All Rights Reserved. xix
Understanding Cashiering Transactions ................................................................................................ 524
Pages Used to Process Cashiering Transactions ................................................................................... 526
Accepting Student Payments ................................................................................................................ 527
Allocating Student Payments to Specific Charges ............................................................................... 534
Accepting Corporate Payments ............................................................................................................ 534
Allocating Corporate Payments to Sponsored Charges ....................................................................... 536
Creating Third-Party Tracking Information for Corporate Payments .................................................. 537
Creating Department Receipts ............................................................................................................. 537
Cashing Checks .................................................................................................................................... 539
Processing Interim Deposits ................................................................................................................. 542
Replenishing Cash ................................................................................................................................ 543
Selecting Exchange Rates for Cashiering Transactions Processed with Foreign Currency ................. 544
Entering Check Information for Cashiering Transactions ................................................................... 545
Entering Credit Card Information for Cashiering Transactions ........................................................... 546
Posting Delayed Receipts ........................................................................................................................... 548
Page Used to Post Delayed Receipts ..................................................................................................... 548
Posting Delayed Payment Receipts ...................................................................................................... 548
Processing the Cashiering GL Interface ...................................................................................................... 549
Voiding Receipts ......................................................................................................................................... 549
Understanding Receipt Voiding ............................................................................................................ 549
Pages Used to Void Receipts ................................................................................................................ 550
Voiding Receipts Using Security ......................................................................................................... 550
Voiding Receipts Without Using Security ........................................................................................... 550
Reviewing Details for Individual Receipts ................................................................................................. 551
Page Used to Review Details for Individual Receipts .......................................................................... 552
Reviewing and Printing Individual Receipts ........................................................................................ 552
Reviewing Receipt and Tender Activity ..................................................................................................... 553
Understanding Receipt and Tender Activity Review ............................................................................ 553
Pages Used to Review Receipt and Tender Activity ............................................................................. 553
Reviewing Receipts by Business Date ................................................................................................. 554
Reviewing Payment Activity for an Organization ............................................................................... 555
Reviewing Payment and Check Cashing Activity for a Student .......................................................... 556
Reviewing Tender Activity by Cashier ................................................................................................ 557
Reviewing Tender Activity by Register ............................................................................................... 558
Reviewing Receipt Tender Flow .......................................................................................................... 559
Reviewing Totals by Deposit ID ................................................................................................................. 561
Page Used to Review Totals by Deposit ID .......................................................................................... 561
Reviewing Cashiering Office Balance Totals by Deposit ID ............................................................... 561
Closing a Cashiering Office for a Business Day ......................................................................................... 562
Pages Used to Close a Cashiering Office for a Business Day ............................................................... 563
Closing Registers .................................................................................................................................. 563
Closing Cashiers ................................................................................................................................... 564
Closing a Cashiering Office ................................................................................................................. 565
Reopening a Cashiering Office for a Closed Business Day ........................................................................ 566
Pages Used to Reopen a Cashiering Office for a Closed Business Day ............................................... 566
Contents
xx Copyright © 1988, 2010, Oracle and/or its affiliates. All Rights Reserved.
Reopening the Office ........................................................................................................................... 566
Reopening Registers ............................................................................................................................. 567
Reopening Cashiers .............................................................................................................................. 568
Chapter 21
Maintaining Receivables ........................................................................................................................... 571
Common Elements Used in This Chapter ............................................................................................. 571
Entering Groups of Transactions ................................................................................................................ 573
Understanding Group Data Entry .......................................................................................................... 573
Pages Used to Enter Groups of Transactions ........................................................................................ 573
Defining Source Information and Control Totals for Group Transactions .......................................... 574
Adding Transactions to a Group Entry ................................................................................................ 576
Entering Transactions from an External Source .......................................................................................... 579
Page Used to Enter Transactions from an External Source ................................................................... 580
Loading External Files ......................................................................................................................... 580
Processing Payroll Deductions ................................................................................................................... 581
Prerequisites ......................................................................................................................................... 581
Pages Used to Process Payroll Deductions ........................................................................................... 582
Selecting Payroll Deduction Records ................................................................................................... 582
Reviewing Results of Payroll Deduction Record Selection ................................................................. 584
Creating Payroll Deduction Groups ..................................................................................................... 585
Reviewing and Revising Group Data Entries Before Posting .................................................................... 586
Pages Used to Review and Revise Group Data Entries Before Posting ............................................... 586
Reviewing Suspended Transactions from a Data Group ...................................................................... 587
Reviewing and Updating Details About a Specific Data Group Transaction ...................................... 587
Posting Group Data Entries ........................................................................................................................ 587
Pages Used to Post Group Data Entries ................................................................................................ 588
Running the Group Post Process .......................................................................................................... 588
Posting Transactions for Individual Students and Organizations ............................................................... 589
Pages Used to Post Transactions for Individual Students and Organizations ....................................... 589
Posting Transactions for Individual Students ....................................................................................... 590
Posting Transactions for Individual Organizations .............................................................................. 592
Consolidating and Reviewing Transactions for Individual Students and Organizations ............................ 592
Pages Used to Consolidate and Review Transactions for Individual Students and Organizations ....... 593
Viewing Account Information Within the Maintain Receivables Feature ................................................. 593
Pages Used to View Account Information Within the Maintain Receivables Feature ......................... 593
Viewing Payment by Invoice Information Within the Maintain Receivables Feature ................................ 594
Pages Used to View Payment by Invoice Information Within the Maintain Receivables Feature ....... 594
Viewing Items by Invoice ..................................................................................................................... 594
Viewing Corp Items by Invoice ............................................................................................................ 595
Updating Payment Invoice ID ............................................................................................................... 596
Updating Corp Payment ID ................................................................................................................... 597
Contents
Copyright © 1988, 2010, Oracle and/or its affiliates. All Rights Reserved. xxi
Managing Disputed Charges ........................................................................................................................ 597
Understanding Disputed Charges ......................................................................................................... 597
Pages Used to Manage Disputed Charges ............................................................................................. 598
Entering Dispute Information ............................................................................................................... 598
Reversing Payments and Charges ............................................................................................................... 600
Pages Used to Reverse Payments and Charges ..................................................................................... 600
Reversing Payments ............................................................................................................................. 601
Reversing Charges ................................................................................................................................ 601
Reversing Groups of Transactions ....................................................................................................... 602
Processing Payroll Deduction Reversals .............................................................................................. 603
Applying Payments ..................................................................................................................................... 603
Pages Used to Apply Payments ............................................................................................................. 603
Running the Payment Applier Process ................................................................................................. 603
Writing Off Charges and Account Balances ............................................................................................... 604
Understanding Write-offs ..................................................................................................................... 605
Pages Used to Write Off Charges and Account Balances ..................................................................... 605
Creating Write-offs for Individual Students ......................................................................................... 606
Creating Write-offs for Individual Organizations ................................................................................ 607
Selecting Accounts to Write Off for Individual Students and Organizations ...................................... 607
Selecting Items to Write Off for Individual Students and Organizations ............................................ 608
Processing Batch Write-offs ................................................................................................................. 608
Reversing Write-offs for Students ........................................................................................................ 610
Reversing Write-offs for Organizations ............................................................................................... 611
Processing Enrollment Deposits ................................................................................................................. 611
Pages Used to Process Enrollment Deposits ......................................................................................... 611
Defining Basic Parameters for Enrollment Deposit Processing ........................................................... 612
Selecting Academic Programs and Waiver Forms (Student Permissions) for the Enrollment Deposit
Process ............................................................................................................................................... 613
Processing Late Fees ................................................................................................................................... 614
Pages Used to Process Late Fees ........................................................................................................... 615
Calculating and Posting Late Fees ....................................................................................................... 615
Processing Late Fees Using the Billing Request Number ........................................................................... 617
Pages Used to Process Late Fees Using the Billing Request Number .................................................. 617
Processing Late Fees - Billing ............................................................................................................... 618
Processing Enrollment Cancellation ........................................................................................................... 619
Understanding Enrollment Cancellation ............................................................................................... 620
Pages Used to Process Enrollment Cancellation ................................................................................... 620
Defining Student Selection Criteria for Enrollment Cancellation ....................................................... 620
Defining Charges, Offset Payments, Cancellation Options, and Service Indicators for Enrollment
Cancellation ....................................................................................................................................... 625
Validating Tables ......................................................................................................................................... 626
Page Used to Validate Tables ................................................................................................................ 626
Running the Table Validation Process ................................................................................................. 627
Contents
xxii Copyright © 1988, 2010, Oracle and/or its affiliates. All Rights Reserved.
Chapter 22
Maintaining Customers ............................................................................................................................ 633
Understanding the Maintain Customers Feature .......................................................................................... 633
Understanding the Maintain Customers Feature ......................................................................................... 633
Managing Student Permissions .................................................................................................................... 634
Understanding Student Permissions ..................................................................................................... 634
Pages Used to Manage Student Permissions ......................................................................................... 634
Creating Student Permission Forms to Apply Restricted Credits ........................................................ 635
Attaching Student Permission Forms to Student Records ................................................................... 635
Attaching Student Permission Forms to Charge Priority Lists ............................................................ 636
Processing and Reviewing Customer Credit History .................................................................................. 637
Pages Used to Process and Review Customer Credit History .............................................................. 637
Processing Customer Credit History .................................................................................................... 637
Chapter 23
Collecting Receivables ............................................................................................................................... 643
Understanding Receivables Collection ....................................................................................................... 643
Prerequisites .......................................................................................................................................... 643
Common Element Used in This Chapter ............................................................................................... 643
Receivables Collection .......................................................................................................................... 644
Assigning Collection Items to Collectors and Worklists ............................................................................ 644
Pages Used to Assign Collection Items to Collectors and Worklists .................................................... 644
Assigning Collection Items to Collectors ............................................................................................. 644
Assigning Collection Items to Worklists ............................................................................................. 646
Working Collection Items ........................................................................................................................... 646
Understanding Collection Items ............................................................................................................ 646
Pages Used to Work Collection Items ................................................................................................... 647
Viewing Demographic Information and Collection Items ................................................................... 648
Selecting Collection Letter Templates ................................................................................................. 650
Recording Collection Steps and Follow-Up Actions for Collection Items .......................................... 651
Updating Collection Letter Information ..................................................................................................... 654
Pages Used to Update Collection Letter Information ........................................................................... 654
Processing Collection Letters ..................................................................................................................... 655
Page Used to Process Collection Letters ............................................................................................... 655
Adding to a Collector's Queue Without Using Worklists ........................................................................... 655
Pages Used to Add to a Collector's Queue Without Using Worklists ................................................... 655
Manually Adding Students To Collections Without Using The Workflow Process ............................. 656
Manually Adding Corporations To Collections Without Using The Workflow Process ..................... 656
Viewing Customers or Corporations That Are in Collection ..................................................................... 657
Contents
Copyright © 1988, 2010, Oracle and/or its affiliates. All Rights Reserved. xxiii
Pages Used to View Customers or Corporations That Are in Collection ............................................. 657
Viewing Customers in Collection ......................................................................................................... 657
Viewing Corporations in Collection ..................................................................................................... 658
Chapter 24
Producing Tax Forms and Receipt Information .................................................................................... 659
Understanding Tax Form and Receipt Production ....................................................................................... 659
Common Elements Used in This Chapter ............................................................................................. 659
Tax Form Production ............................................................................................................................ 659
Understanding Receipt Information Generation .......................................................................................... 660
Producing and Filing 1098-T Tax Forms .................................................................................................... 661
Prerequisites .......................................................................................................................................... 662
Pages Used to Produce and File 1098-T Tax Forms ............................................................................. 662
Generating 1098-T Data ....................................................................................................................... 663
Reviewing 1098–T Messages ............................................................................................................... 665
Reviewing and Overriding 1098-T Data .............................................................................................. 665
Validating and Auditing 1098-T Data .................................................................................................. 671
Printing 1098-T Forms and Creating Transmission Files .................................................................... 672
Producing T2202A Tax Forms ................................................................................................................... 675
Prerequisite ............................................................................................................................................ 675
Pages Used to Produce T2202A Tax Forms ......................................................................................... 675
Generating T2202A Data ..................................................................................................................... 676
Reviewing and Editing T2202A Data .................................................................................................. 677
Printing T2202A Tax Information on Preprinted Forms ..................................................................... 678
Printing T2202A Tax Information Using File Extract ......................................................................... 679
Producing T4A Tax Forms ......................................................................................................................... 679
Prerequisites .......................................................................................................................................... 680
Pages Used to Produce T4A Tax Forms ............................................................................................... 680
Creating POI Job Data for T4A ............................................................................................................. 680
Generating T4A Data ............................................................................................................................ 681
Reviewing T4A Tax Forms ................................................................................................................... 682
Generating Income Tax and Donation Receipt Information ....................................................................... 683
Pages Used to Generate Income Tax and Donation Receipt Information ............................................. 683
Generating Income Tax Receipt Information ....................................................................................... 683
Generating Donation Receipt Information ........................................................................................... 683
Chapter 25
Setting Up and Using International Health Coverage ............................................................................ 685
Understanding International Health Coverage ............................................................................................ 685
IHC Process Flow .................................................................................................................................. 685
Contents
xxiv Copyright © 1988, 2010, Oracle and/or its affiliates. All Rights Reserved.
Purchasing ............................................................................................................................................. 687
Reporting and Paying ............................................................................................................................ 687
Refunding .............................................................................................................................................. 687
Setting Up the IHC Feature ......................................................................................................................... 688
Pages Used to Set Up IHC .................................................................................................................... 688
Setting Up Provider Information ........................................................................................................... 689
Setting Up Provider Coverage Plans and Rates .................................................................................... 690
Setting Up IHC Item Types ................................................................................................................... 691
Setting Up IHC Contact Information .................................................................................................... 691
Maintaining Student Information and Creating Schedules ......................................................................... 692
Pages Used Maintain Student Information ............................................................................................ 692
Maintaining Student Health Coverage Information .............................................................................. 692
Creating Schedules ................................................................................................................................ 697
Generating IHC Letters ............................................................................................................................... 698
Page Used to Generate Letters .............................................................................................................. 699
Generating Letters to Students .............................................................................................................. 699
Chapter 26
(NLD) Using the Banking Interface ........................................................................................................ 703
Understanding the Banking Interface for the Netherlands ........................................................................... 703
Setting Up the Banking Interface ................................................................................................................ 703
Pages Used to Set Up the Banking Interface ......................................................................................... 704
Setting Up Account Information for Business Units ........................................................................... 704
Setting Up Bank Account Numbers for Students ................................................................................. 706
Setting Up Default Values for VERWINFO or Clieop03 Files ........................................................... 708
Billing Students Using OLA or VERWINFO ............................................................................................ 710
Understanding Billing Students Using OLA or VERWINFO .............................................................. 710
Pages Used to Bill Students Using OLA or VERWINFO .................................................................... 711
Posting Student Transactions ............................................................................................................... 711
Printing OLA Forms ............................................................................................................................. 711
Loading VERWINFO Files .................................................................................................................. 712
Processing Payments ............................................................................................................................ 713
Using the Clieop03 Process ........................................................................................................................ 713
Understanding the Clieop03 Process ..................................................................................................... 714
Prerequisites .......................................................................................................................................... 714
Page Used for the Clieop03 Process ..................................................................................................... 714
Creating Clieop03 Files ........................................................................................................................ 714
Chapter 27
(AUS) Setting Up and Using Australian Loan Processing .................................................................... 717
Contents
Copyright © 1988, 2010, Oracle and/or its affiliates. All Rights Reserved. xxv
Understanding Loan Processing for Australian Higher Education ............................................................. 717
HECS-HELP ........................................................................................................................................ 717
Tuition Calculation for HECS .............................................................................................................. 720
FEE-HELP ........................................................................................................................................... 721
OS-HELP ............................................................................................................................................. 721
Preparing for Setting Up HELP ........................................................................................................... 721
Setting Up Australian Loan Defaults .......................................................................................................... 722
Pages Used to Set Up Australian Loan Defaults ................................................................................... 722
Defining Liability Statuses ................................................................................................................... 723
Defining HECS HELP Loan Defaults .................................................................................................. 725
Defining FEE HELP Loan Defaults ..................................................................................................... 725
Defining OS HELP Loan Defaults ....................................................................................................... 726
Defining Status Change Rule Loan Defaults ....................................................................................... 727
Setting Up HECS Fee Codes ................................................................................................................ 728
Setting Up HECS Band Fees ................................................................................................................ 728
Linking Band Fees to Tuition Groups .................................................................................................. 730
Excluding HECS Classes ..................................................................................................................... 731
Reviewing HECS Results and Running the HECS Reconciliation ............................................................. 732
Pages Used to Review HECS Results and Run the HECS Reconciliation ........................................... 733
Reviewing HECS Results ..................................................................................................................... 733
Reconciling HECS on the Census Date ............................................................................................... 734
Creating and Updating FEE-HELP Loans ................................................................................................... 735
Understanding FEE-HELP Loans ........................................................................................................ 735
Pages Used to Create and Update FEE-HELP Loans ........................................................................... 736
Creating and Updating FEE-HELP Loans ........................................................................................... 736
Updating Statuses for FEE HELP Determinations .............................................................................. 737
Creating and Updating OS-HELP Loans ..................................................................................................... 741
Page Used to Create and Update OS-HELP Loans ............................................................................... 742
Maintaining OS-HELP Loans .............................................................................................................. 742
Creating Commonwealth Assistance Notices .............................................................................................. 743
Page Used to Create Commonwealth Assistance Notices .................................................................... 743
Creating or Updating Commonwealth Assistance Notices .................................................................. 743
Chapter 28
(NZL) StudyLink Processing ................................................................................................................... 745
Understanding StudyLink ............................................................................................................................ 745
Setting Up StudyLink Functionality ............................................................................................................ 745
Pages Used to Set Up StudyLink Functionality .................................................................................... 746
Defining StudyLink Institution Defaults .............................................................................................. 746
Defining the Institution ID ................................................................................................................... 748
Defining StudyLink Posting Parameters .............................................................................................. 750
Processing VOS Requests and Responses .................................................................................................. 751
Contents
xxvi Copyright © 1988, 2010, Oracle and/or its affiliates. All Rights Reserved.
Pages Used to Process VOS Requests and Responses .......................................................................... 751
Requesting VOS Information ............................................................................................................... 751
Initiating VOS Responses .................................................................................................................... 752
Maintaining StudyLink Loan Information .................................................................................................. 753
Understanding Maintaining StudyLink Loan Information .................................................................... 753
Pages Used to Maintain StudyLink Loan Information .......................................................................... 754
Creating Payment Schedules ................................................................................................................ 754
Processing Batch Refunds .................................................................................................................... 755
Creating Student Reports ..................................................................................................................... 756
Chapter 29
(NZL) New Zealand Qualification Authority Fees ................................................................................ 757
Understanding NZQA Fees .......................................................................................................................... 757
Setting Up NZQA Fee Information ............................................................................................................ 757
Page Used to Set Up NZQA Fees ......................................................................................................... 758
Setting Up Valid Records ..................................................................................................................... 759
Setting Up Valid Fields ........................................................................................................................ 759
Setting Up Fee Triggers ....................................................................................................................... 760
Setting Up Term Fee Codes ................................................................................................................. 762
Setting Up Term Fees ........................................................................................................................... 763
Viewing Term Sub Fee Codes ............................................................................................................. 765
Setting Up Term Sub Fees ................................................................................................................... 766
Setting Up Per Credit Charges ............................................................................................................. 768
Appendix A
Delivered Workflows for Student Financials .......................................................................................... 771
Delivered Workflows for Student Financials ............................................................................................... 771
Corporate Collection Worklist .............................................................................................................. 771
Customer Collection Worklist ............................................................................................................... 772
Department Receipt Approval ............................................................................................................... 773
Group Posting Approval ........................................................................................................................ 773
Refund Approval ................................................................................................................................... 774
Appendix B
Student Financials Global Invoicing Reminder Letters ......................................................................... 775
Defining and Issuing Reminder Letters ....................................................................................................... 775
Pages Used to Define and Issue Reminder Letters ................................................................................ 775
Defining Communication Data Source ................................................................................................. 777
Contents
Copyright © 1988, 2010, Oracle and/or its affiliates. All Rights Reserved. xxvii
Defining Invoice Reminder Letter Properties ....................................................................................... 779
Defining Template Properties ............................................................................................................... 780
Defining Output Properties ................................................................................................................... 781
Defining Bursting Properties ................................................................................................................. 782
Setting Up Standard Letter .................................................................................................................... 782
Defining Comm Key ............................................................................................................................. 783
Defining Event 3C Groups .................................................................................................................... 784
Defining Event Definition ..................................................................................................................... 785
Defining 3C Engine Parameters ............................................................................................................ 785
Defining Manage Duplicate Assignment .............................................................................................. 786
Reviewing the Generated Communication ........................................................................................... 787
Running Communication Generation Process ...................................................................................... 788
Setting Up Process Parameters .............................................................................................................. 789
Reviewing Communication ................................................................................................................... 790
Appendix C
PeopleSoft Student Financials Reports ................................................................................................... 793
PeopleSoft Student Financials Reports: A to Z .......................................................................................... 793
Crystal and SQR Reports ...................................................................................................................... 793
Setup Table Crystal Reports .................................................................................................................. 802
Index ............................................................................................................................................................ 807
Copyright © 1988, 2010, Oracle and/or its affiliates. All Rights Reserved. xxix
PeopleSoft Enterprise Student Financials
Preface
This preface discusses:
•PeopleSoft Products.
•PeopleSoft Enterprise Campus Solutions Application Fundamentals.
•PeopleBook structure.
PeopleSoft Products
This PeopleBook refers to the following PeopleSoft product: PeopleSoft Enterprise Student Financials.
PeopleSoft Enterprise Campus Solutions Application Fundamentals
Additional, essential information describing the setup and design of your system appears in two companion
volumes of documentation called PeopleSoft Enterprise Campus Solutions 9.0 Application Fundamentals
PeopleBookand PeopleSoft Enterprise Campus Community Fundamentals 9.0 PeopleBook. Each PeopleSoft
product line has its own version of this documentation.
Note. One or more pages in Student Financials operate in deferred processing mode. Deferred processing is
described in the preface in the PeopleSoft Enterprise Campus Solutions 9.0 Application Fundamentals
PeopleBook.
See Also
PeopleSoft Enterprise Campus Solutions 9.0 Application Fundamentals PeopleBook, "PeopleSoft Enterprise
Campus Solutions Preface"
PeopleSoft Enterprise Campus Community 9.0 Fundamentals PeopleBook, "PeopleSoft Enterprise Campus
Community Preface"
PeopleBook Structure
PeopleSoft PeopleBooks follow a common structure. By understanding this structure, you can use this
PeopleBook more efficiently.

Preface
xxx Copyright © 1988, 2010, Oracle and/or its affiliates. All Rights Reserved.
The PeopleBooks structure conveys a task-based hierarchy of information. Each chapter describes a process
that is required to set up or use the application. Chapter sections describe each task in the process.
Subsections within a section describe a single step in the process task.
Some PeopleBooks may also be divided into parts. PeopleBook parts can group together similar
implementation or business process chapters within an application or group together two or more applications
that integrate into one overall business solution. When a book is divided into parts, each part is divided into
chapters.
The following table provides the order and descriptions of chapters in a PeopleBook:
Chapters Description
Preface This is the chapter you're reading now. It explains:
•How to use the Application Fundamentals book.
•How PeopleBooks are structured.
•Common elements used in the PeopleBook, if
necessary.
Getting Started With…This chapter discusses product implementation
guidelines. It explains:
•The business processes documented within the
book.
•Integrations between the product and other
products.
•A high-level overview of how our documentation
maps to the overall implementation process; it
doesn't offer step-by-step guidance on how to
perform an actual implementation.
Navigation (Optional) Some PeopleSoft applications provide
custom navigation pages that contain groupings of
folders that support a specific business process, task, or
user role. When an application contains custom
navigation pages, this chapter provides basic navigation
information for these pages.
Note. Not all applications have delivered custom
navigation pages.
Understanding…(Optional) This is an introductory chapter that broadly
explains the product and the functionality within the
product.

Preface
Copyright © 1988, 2010, Oracle and/or its affiliates. All Rights Reserved. xxxi
Chapters Description
Setup and Implementation This can be one or more chapters. These chapters
contain documentation to assist you in setting up and
implementing the product. For example, if functionality
X is part of a product, this chapter would be devoted to
explaining how to set up functionality X, not necessarily
how to use functionality X. You would look to the
corresponding business process chapter to learn how to
use the functionality.
Note. Sometimes a small amount of business process
information is included in a setup chapter if the amount
of business process documentation is insufficient to
create a separate section in the book.
Business Process This can be one or more chapters. These chapters
contain documentation that addresses specific business
processes with each chapter generally devoted to a
specific functional area. For example, if functionality X
is part of a product, this chapter would be devoted to
explain how the functionality works, not necessarily
how to set up functionality X. You would look to the
corresponding setup and implementation chapter to
learn how to set up the functionality.
Note. Sometimes a small amount of setup and
implementation information is included in a business
process chapter if the amount of setup and
implementation documentation is insufficient to create a
separate chapter in the book.
Appendixes (Optional) If the book requires it, one or more
appendixes might be included in the book. Appendixes
contain information that is considered supplemental to
the primary documentation.
Delivered Workflow Appendix (Optional) The delivered workflow appendix describes
all of the workflows that are delivered for the
application.
Note. Not all applications have delivered workflows.
Reports Appendix (Optional) This appendix contains an abbreviated list of
all of the product's reports. The detailed documentation
on the use of these reports is usually included in the
related business process chapter.

Preface
xxxii Copyright © 1988, 2010, Oracle and/or its affiliates. All Rights Reserved.
PeopleBooks and the Online PeopleSoft Library
A companion PeopleBook called PeopleBooks and the Online PeopleSoft Library contains general
information, including:
•Understanding the PeopleSoft online library and related documentation.
•How to send PeopleSoft documentation comments and suggestions to Oracle.
•How to access hosted PeopleBooks, downloadable HTML PeopleBooks, and downloadable PDF
PeopleBooks as well as documentation updates.
•Understanding PeopleBook structure.
•Typographical conventions and visual cues used in PeopleBooks.
•ISO country codes and currency codes.
•PeopleBooks that are common across multiple applications.
•Common elements used in PeopleBooks.
•Navigating the PeopleBooks interface and searching the PeopleSoft online library.
•Displaying and printing screen shots and graphics in PeopleBooks.
•How to manage the PeopleSoft online library including full-text searching and configuring a reverse
proxy server.
•Understanding documentation integration and how to integrate customized documentation into the library.
•Glossary of useful PeopleSoft terms that are used in PeopleBooks.
You can find this companion PeopleBook in your PeopleSoft online library.

Copyright © 1988, 2010, Oracle and/or its affiliates. All Rights Reserved. 1
Chapter 1
Getting Started with PeopleSoft
Enterprise Student Financials
This chapter provides an overview of PeopleSoft Enterprise Student Financials and discusses:
•PeopleSoft Enterprise Student Financials business processes.
•PeopleSoft Enterprise Student Financials integrations.
•PeopleSoft Enterprise Student Financials implementation.
PeopleSoft Enterprise Student Financials Overview
Student Financials is a tool for higher education institutions to manage student receivables, billing,
collections, and cashiering. Using Student Financials, both staff and students can quickly find and use the
financial information they need to make critical decisions. Student Financials receives information from
virtually all areas of PeopleSoft Enterprise Campus Solutions. With this application, you can:
•Calculate fees and tuition.
•Maintain customer account information.
•Create bills.
•Establish payment plans.
•Refund tuition and fees.
•Perform cashiering.
•Process collections.
•Interact with your general ledger system.
•Set up and print tax forms.
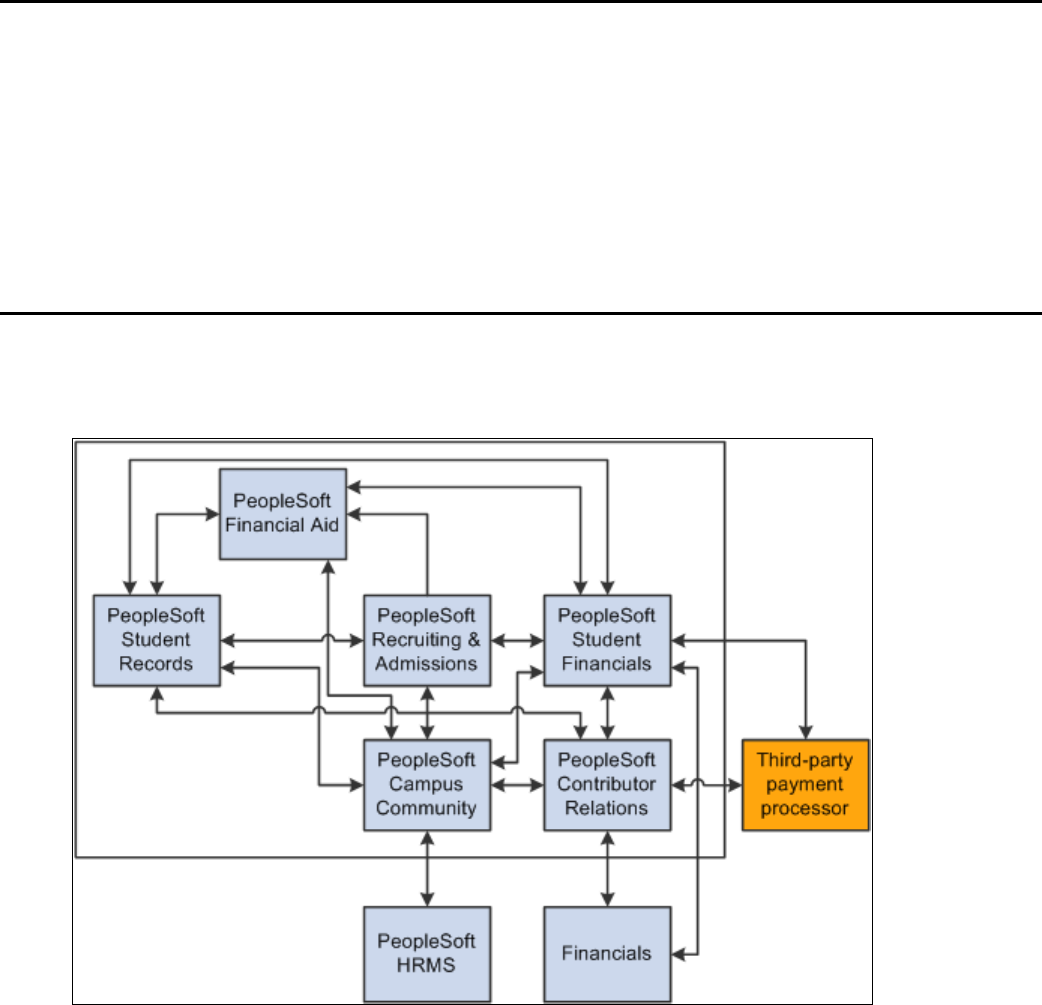
Getting Started with PeopleSoft Enterprise Student Financials Chapter 1
2 Copyright © 1988, 2010, Oracle and/or its affiliates. All Rights Reserved.
PeopleSoft Student Financials Business Processes
Student Financials enables you to manage and calculate student financial information for your institution.
With it you can calculate tuition and fees, bill customers, and issue refunds. It provides functionality enabling
you to set up payment plans for students and implement an automated collections process. It integrates with
your general ledger to properly track and allocate your institution's debits and credits. Student Financials
provides built-in tax reporting functionality for both the U.S. (1098-T) and Canada (T2202A, T4A, Donation
Receipts, and Tax Receipts). It supports and automates third-party processing by providing a seamless link to
the payment posting process, enabling you to process both split payments, directed payments, or both online.
PeopleSoft Student Financials Integrations
Student Financials integrates with these applications:
PeopleSoft Student Financials integrations
We discuss integration considerations in the implementation chapter in this PeopleBook. Supplemental
information about third-party application integrations is located on the My Oracle Support website.
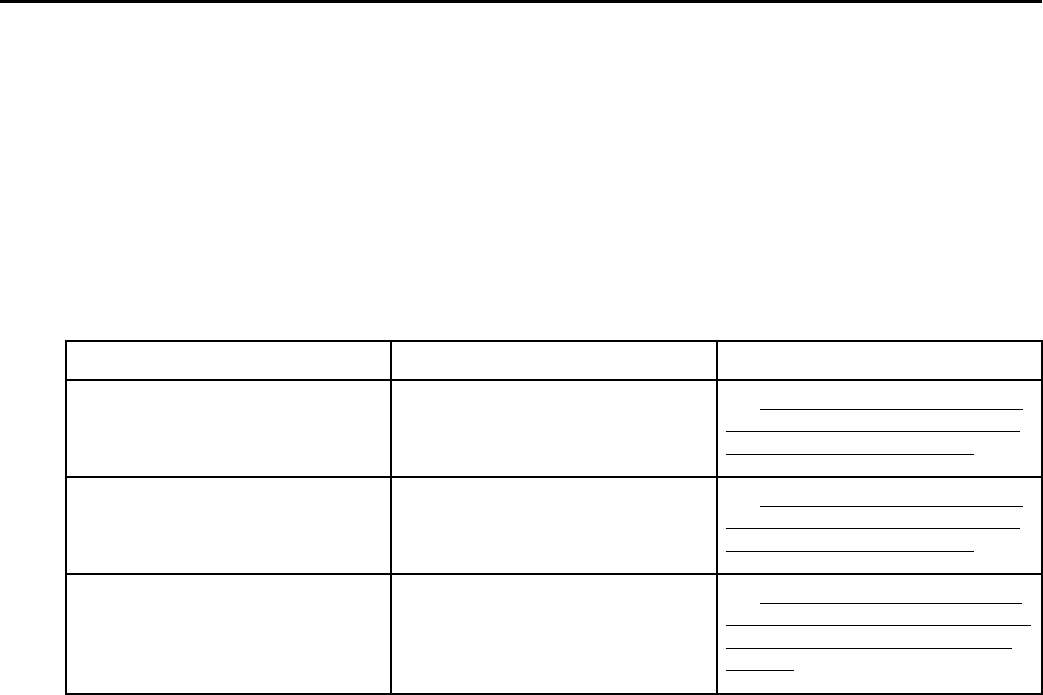
Chapter 1 Getting Started with PeopleSoft Enterprise Student Financials
Copyright © 1988, 2010, Oracle and/or its affiliates. All Rights Reserved. 3
PeopleSoft Enterprise Student Financials Implementation
PeopleSoft Setup Manager enables you to generate a list of setup tasks for your organization based on the
features that you are implementing. The setup tasks include the components that you must set up, listed in the
order in which you must enter data into the component tables, and links to the corresponding PeopleBook
documentation.
Student Financials also provides component interfaces to help you load data from your existing system into
Student Financials tables. Use the Excel to Component Interface utility with the component interfaces to
populate the tables.
This table lists all of the components that have setup component interfaces:
Component Component Interface References
CLASS_FEE_PANEL SSF_CLASS_FEE_PANEL_GBL See Chapter 6, "Setting Up Fees and
Tuition Groups," Setting Up Course
Fees and Class Fees, page 204.
CLST_FEE_PANEL SSF_CLST_FEE_PANEL_GBL See Chapter 6, "Setting Up Fees and
Tuition Groups," Setting Up Course
Fees and Class Fees, page 204.
ITEM_TYPE_PANEL SSF_ITEM_TYPE_PANEL_GBL See Chapter 2, "Completing Student
Financials General Setup," Setting Up
Item Types and Item Type Groups,
page 55.
This section lists tasks that you should complete as part of setting up your PeopleSoft Student Financials
system.
•Complete the general setup of your Student Financials system. This setup is required before you can set
up any of the features that are delivered with Student Financials. During this step you define the most
basic elements of the Student Financials system including tableset IDs, SF installation parameters, item
types, the 1098-T TIN table, and account types.
•Define how your Student Financials system interacts with your general ledger. The required steps of this
implementation task depend on whether your institution interacts with PeopleSoft General Ledger, Oracle
General Ledger, or a third party general ledger application.
•Set up application fee and enrollment deposit processing.
•Define payment processing parameters including payment item types and charge priority.
•If your institution has satellite departments or auxiliary services, such as Housing, Library, and Parking,
that will need to interact with Student Financials, you will likely need to set up the External File Load
feature.
•Decide how your institution calculates tuition and set up the appropriate components.
•Set up the parameters for the Billing feature.
Getting Started with PeopleSoft Enterprise Student Financials Chapter 1
4 Copyright © 1988, 2010, Oracle and/or its affiliates. All Rights Reserved.
•If your institution chooses to use the Cashiering feature that is delivered with Student Financials, you
must define cashiering offices, valid registers and cashiers, tender keys, and target keys.
•Determine whether your institution issues refunds through accounts payable or payroll, and set up your
system accordingly.
•Define payment plans for your institution. Student Financials delivers functionality for several different
types of payment plans.
•In conjunction with the 3Cs setup, define your collections process.
•Coordinate with the financial aid staff to set up item types for financial aid disbursement.
Other Sources of Information
In the planning phase of your implementation, take advantage of all PeopleSoft sources of information,
including the installation guides, data models, business process maps, and troubleshooting guidelines.
See Also
PeopleSoft Enterprise Campus Community 9.0 Fundamentals PeopleBook, "PeopleSoft Enterprise Campus
Community Preface"
PeopleTools PeopleBook: PeopleSoft Component Interfaces
Enterprise PeopleTools PeopleBook: PeopleSoft Setup Manager

Copyright © 1988, 2010, Oracle and/or its affiliates. All Rights Reserved. 5
Chapter 2
Completing Student Financials General
Setup
This chapter provides an overview of PeopleSoft Student Financials general setup and discusses how to:
•Set up installation parameters and keywords.
•Review valid records and fields.
•Set up business units.
•Set up tax authorities and tax codes.
•Set up aging sets.
•Set up payment application rules.
•Set up account types.
•Set up accounting dates.
•Set up item types and item type groups.
•Set up service indicator sets.
•Set up a default academic term.
Understanding Student Financials General Setup
A substantial amount of setup is required before you can use. The setup described in this chapter establishes
the framework for everything that follows. Take enough time and resources now to build a strong foundation,
which you can add to later. You do much of this setup once, and modify it rarely, if ever. You use other parts
repeatedly as the system expands and changes.
Be aware that PeopleSoft Campus Solutions is an integrated system and coordination between departments
and applications is essential to the success of your implementation.
Setting Up Installation Parameters and Keywords
To set up installation parameters and keywords, use the Student Fin Installation component
(INSTALLATION_SF) and the Keywords component (KEYWORDS).

Completing Student Financials General Setup Chapter 2
6 Copyright © 1988, 2010, Oracle and/or its affiliates. All Rights Reserved.
This section provides overviews of installation parameters and key words and global invoicing and discusses
how to:
•Define number sequence start points, maximum row settings, and ChartField edit options.
•Define payment by invoice.
•Define keyword edit tables and a null due date.
•Define commit levels.
•Define keywords.
Understanding Installation Parameters
Installation parameters define how Student Financials looks and performs. You specify how the system:
•Numbers certain elements.
•Displays results for various functions.
•Determines the frequency for committing work to the database.
You can change most of these settings at any time without any negative impact. In fact, you should
experiment with your settings to strike the proper performance balance. PeopleSoft software provides default
settings for many of these parameters, but review them to make sure that they work well for your institution.
Keywords
Key words enable you to quickly locate item types within a long list of possibilities. For example, you might
have dozens of payment item types, but only a handful that are related to scholarships. By defining
Scholarship as one of your key words and associating it with the select few item types, it will be much easier
to locating just the item type you need will be much easier. You can define up to three keywords per item
type. Key words are associated with edit tables, and you must select the appropriate edit table to use for each
key word.
Note. Because Student Financials, Financial Aid, and Contributor Relations all use keywords, we recommend
Student Financials, Financial Aid, and Contributor Relations staff work together to define a keyword standard
for your institution.
Understanding Global Invoicing
Many institutions, especially those outside the United States, are required to bill and collect payments from
students using an invoice model rather than the standard statements typically used in the United States.
Campus Solutions enables such global institutions to invoice for student receivables.
Global invoicing enables institutions to:
•Link charges to a specific invoice with a unique invoice number. Subsequent invoices include only new
activity and do not include any prior balance.

Chapter 2 Completing Student Financials General Setup
Copyright © 1988, 2010, Oracle and/or its affiliates. All Rights Reserved. 7
•Send a reminder letter rather than include unpaid charges in another invoice if a student does not pay an
invoice.
•Allow students to make a payment against a specific invoice rather than against the overall account. Any
charge or payment priorities are applied only within the context of the specific invoice.
•Create a specific credit invoice that references the original invoice if charges are reversed after being
invoiced.
•Refund excess payments or a credit balance from an invoice to the student unless the student authorizes
the institution to apply that credit to a different invoice.
•Pass charges to the General Ledger only after they have been invoiced.
Campus Solutions offers institutions the flexibility to use its global invoicing functionality or to use billing
statements.
An option in the Student Financials installation setup enables the global invoicing functionality. Institutions
can also define banking information for inclusion on the invoice as necessary.
Pages Used to Set Up Installation Parameters and Keywords
Page Name Definition Name Navigation Usage
SF Installation INSTALLATION_SF Set Up SACR, Install,
Student Fin Installation, SF
Installation
Define number sequence
start points, maximum row
settings, ChartField edit
options, and financial
system setup.
Populate Items by Invoice SSF_RUNCTL_EURO_BI Set Up SACR, Product
Related, Student Financials,
Charges and Payments,
Populate Items by Invoice
Define payment by invoice.
SF Installation 2 INSTALLATION_SF2 Set Up SACR, Install,
Student Fin Installation, SF
Installation 2
Define keyword edit tables,
invoice/payment
processing, and a null due
date.
SF Installation 3 INSTALLATION_SF3 Set Up SACR, Install,
Student Fin Installation, SF
Installation 3
Define commit levels.
Keywords KEYWORD_TBL Set Up SACR, Product
Related, Student Financials,
Item Types, Keywords
Define keywords.
Defining Number Sequence Start Points, Maximum Row Settings, and
ChartField Edit Options
Access the SF Installation page (Set Up SACR, Install, Student Fin Installation, SF Installation).
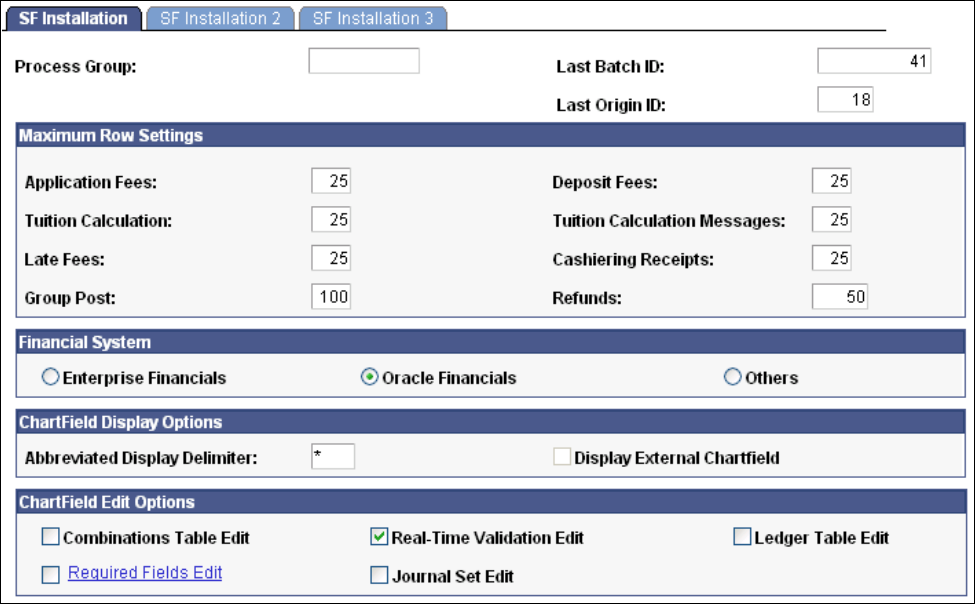
Completing Student Financials General Setup Chapter 2
8 Copyright © 1988, 2010, Oracle and/or its affiliates. All Rights Reserved.
SF Installation page
Process Group Enter a value for the process group. The system uses the process group in
conjunction with GL Combination processes.
Last Batch ID Each batch transaction is assigned an ID number. This field displays the last ID
number assigned to a batch. To start your numbering sequence at a particular
point, enter a number here. Otherwise, the system continues to increment
subsequent batch transactions from the number shown.
Last Origin ID Use origin IDs to track the source of batch transactions (for example, receipts
from the housing or parking offices). This field displays the last ID number that
was assigned to an origin definition. To start your numbering sequence at a
particular point, enter a number here. Otherwise, the system continues to
increment subsequent origin definitions from the number shown.
Maximum Row Settings Group Box
For each field in this group box, enter the maximum rows of results that you want to display on a page at one
time.
Financial System
Use this group box to select the financial system that you want to use: Enterprise Financials, Oracle
Financials, or Others.

Chapter 2 Completing Student Financials General Setup
Copyright © 1988, 2010, Oracle and/or its affiliates. All Rights Reserved. 9
The selection and functioning of the options in this group box depends on the General Ledger check box
selection on the HRMS Installation Table (Setup HRMS, Install, Installation Table).
If the General Ledger check box is selected in HRMS:
•The Enterprise Financials option is selected by default and is read-only.
•The Oracle Financials and Others options are not available for selection.
If the General Ledger check box is cleared in HRMS:
•The Enterprise Financials option is selected by default and is available for selection.
•The Oracle Financials option is available for selection.
•The Others option is available for selection.
ChartField Display Options
Abbreviated Display
Delimiter This field is used to distinguish individual ChartFields to be added, updated or
viewed as a string on setup pages. Select a delimiter that is not a letter, number or
special character used to define any of the ChartField values. For example, if the
character '-' is used within the ChartField value 23-1103, do not use the '-'
character as the delimiter. If 'A' is used within the ChartField value such as
TRAINING, do not use 'A' as the delimiter.
Display External
Chartfield This field is available only if the General Ledger check box is cleared in HRMS
and the Others option is selected in the Financial System group box.
ChartField Edit Options
ChartFields represent organizational or reporting structures and are used to facilitate the journaling of
accounting entries. You can use dynamic ChartFields to customize certain display characteristics (such as
order, visibility, labels) of the standard set of ChartFields. Selecting one of the first four options ensures that
the Student Financials Departmental Receipt is created with a required ChartField.
Combinations Table
Edit Evaluates the ChartField combination to determine whether it exists in the
PS_VALID_COMBO_TBL.
If you select the Combinations Table Edit check box, you cannot select the Real-
Time Validation Edit check box.
If you select Oracle Financials in the Financial System group box, this check box
is cleared by default.
Note. The Combinations Table Edit option is not supported for Oracle
Financials.

Completing Student Financials General Setup Chapter 2
10 Copyright © 1988, 2010, Oracle and/or its affiliates. All Rights Reserved.
Real-Time Validation
Edit Evaluates the ChartField combination using the Synchronous Message
COMBO_CF_EDIT_REQUEST with Student Financials.
If you select the Real-Time Validation Edit check box, you cannot select the
Combinations Table Edit check box.
If you select Oracle Financials in the Financial System group box, this check box
is selected by default.
Note. The Real-Time Validation Edit option is supported for Oracle Financials
and you should select this option if you select Oracle Financials as the financial
system. When you set up chartfield combinations, a web service performs real
time validation of the chartfield combinations against the Oracle GL
combinations.
Ledger Table Edit The LED_FLDS_SF_TBL is used to store required ChartFields for a specified
ledger. Required ChartFields are examined for values, and edit errors occur when
required values do not exist in the specified ChartFields.
If you select Oracle Financials in the Financial System group box, this check box
is cleared by default.
Note. The Ledger Table Edit option is not supported for Oracle Financials.
Required Fields Edit Checks for values in all fields defined in the Required Fields secondary page.
Journal Set Edit Evaluates individual sets of ChartFields (journal sets) to make sure that percent
totals equal 100 and that ledger values remain the same for ChartFields of the
same journal set. Selecting this check box also ensures that debit and credit
journal set entries are properly balanced.
Use External
ChartFields This check box appears only if you clear the General Ledger check box in
HRMS, select Others as the Financial System on the SF Installation page, and
restart the application server.
See CS90 to EBS GL Integration Developer's Reference Guide. The guide is posted to My Oracle Support.
See Also
Chapter 11, "Setting Up Receivables Maintenance," Defining Origins and Group Types, page 341
Chapter 4, "Setting Up GL Interface Processing," Understanding GL Interface Processing Setup, page 109
Chapter 17, "Refunding Customers," Understanding Refunds, page 435
PeopleSoft Enterprise HRMS 9.0 Application Fundamentals PeopleBook, "Setting Up and Working with
ChartFields and ChartField Combinations" Populating HRMS with Valid ChartField Combinations
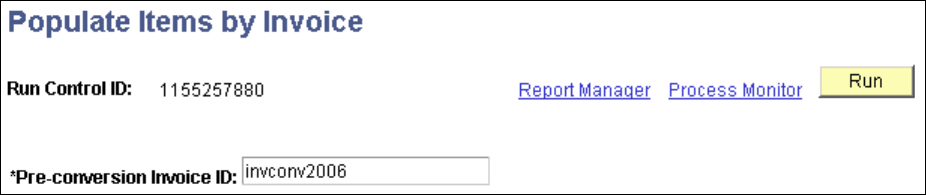
Chapter 2 Completing Student Financials General Setup
Copyright © 1988, 2010, Oracle and/or its affiliates. All Rights Reserved. 11
Defining Payment by Invoice
Access the Populate Items by Invoice page (Set Up SACR, Product Related, Student Financials, Charges and
Payments, Populate Items by Invoice).
Populate Items by Invoice page
You can define your business requirements based on country requirements and business model needs.
This enables you to associate charges to individual invoices, create credit invoices, and produce reminder
letters. On the payment side, you can run online posting, Cashiering, and batch processes to apply payments
to specific invoices.
Run the Populate Item Invoice process to initialize the apply payments by invoice functionality.
This process creates rows in SSF_ITEM_INV that are required to apply payments by invoice. Before running
this process, run billing for any transaction that has not yet been billed.
After the process is run, the installation Apply Payments by Invoice check box is selected on the SF
Installation 2 page. If you decide at a later time to not apply payments by invoice, the user can clear the check
box.
*Pre-conversion Invoice
ID The pre-conversion invoice ID can be any value and does not need to be defined
in the Billing Invoice setup, for example, invconv2006.
Run Click to initiate the process.
Defining Keyword Edit Tables and a Null Due Date
Access the SF Installation 2 page (Set Up SACR, Install, Student Fin Installation, SF Installation 2).
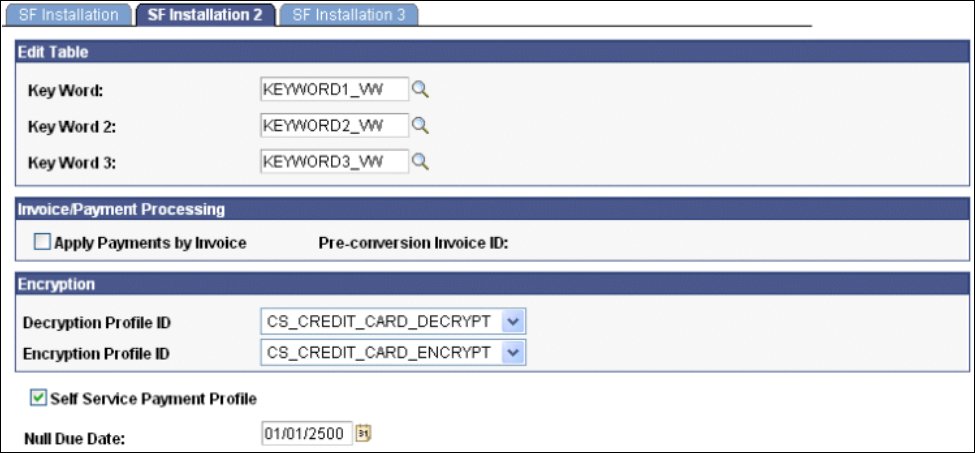
Completing Student Financials General Setup Chapter 2
12 Copyright © 1988, 2010, Oracle and/or its affiliates. All Rights Reserved.
SF Installation 2 page
Applying Payment by Invoice
Global institutions may have the requirement to assign payments to a specific invoice and not to individual
charges.
Campus Solutions allows institutions to select whether to associate payments with a specific invoice or with
individual charges. Global Invoicing will associate charges with individual invoices. When payments are
received, they are paid against an invoice number and the payment is applied to the charges associated with
that invoice. If an overpayment of an invoice number exists, a refund can be generated. A student can make a
prepayment prior to any charges invoiced in order to hold his or her place in class. Such a prepayment is not
part of the invoice. When tuition calculation is run and charges are incurred, and a bill is generated with the
unique invoice number, the prepayment is applied to that invoice. Future bills show only the unpaid amount
of the invoice, not an accumulation of charges and payments. If a waiver exists for a student's payment, the
waiver appears on the invoice.
Applying payments by invoice involves:
Chapter 2 Completing Student Financials General Setup
Copyright © 1988, 2010, Oracle and/or its affiliates. All Rights Reserved. 13
•Invoicing
•Generate an invoice with unique invoice numbers for charges.
• Associate invoice numbers with items on the invoice.
• Create a credit invoice for overpayments.
•Create a credit invoice for credit balances based on charge reversals while referencing the original
invoice.
• Create invoices in batch as well as on line.
•View and reprint any individual invoice using original invoice data.
• Store student bank information (similar to payment profile information but accessible
administratively) for student or the legally responsible party.
• Invoices with a payment voucher which include can line (OCR-B font) that can incorporate the
institution's bank information as well as the student's bank information, invoice number, and amount
due.
•Payment Processing
•Payments applied against a specific invoice. If a credit balance remains from a specific invoice, it can
manually be applied to another invoice or the student can request a refund.
• Payments are accepted and applied using payment files from banks or clearinghouses.
•Prepayments are applied when an invoice is generated
•Reminders and Collections
•Reminders can be generated for open invoices after a due date has passed using the Campus
Community Comm Gen process. Reminder letters include original invoice amount, any payments,
remaining unpaid balance, and the number of days passed due.
• Institutions define a minimum balance as selection criteria when sending reminder letters.
• All reminders are tracked at the student level for each invoice.
Edit Table
Key Word Select an edit table to use for your first level Key Word values.
Key Word 2 Select an edit table to use for your Key Word 2 values.
Key Word 3 Select an edit table to use for your Key Word 3 values.
Invoice Payment Processing
You cannot set the Apply Payments by Invoice check box. You must instead run the Populate Item Invoice
process.
After the process is run, the installation check box, Apply Payments by Invoice, is selected.

Completing Student Financials General Setup Chapter 2
14 Copyright © 1988, 2010, Oracle and/or its affiliates. All Rights Reserved.
If you decide at a later time to not apply payments by invoice, you can clear the check box.
Encryption
Set default profile IDs.
PeopleTools Pluggable Cryptography framework provides the delivered profiles of TRIPLE DES ENC B64
and TRIPLE DES DEC B64.
PeopleSoft Enterprise Campus Solutions has enhanced the PeopleTools profiles specifically for Campus
Solutions re-encryption.
Profiles specify multiple user-defined steps applying various algorithms and keys to the data in a specified
order and supporting various encryption standards and third-party encryption libraries.
The decrypt profile must be the same profile and have the same keys that are used to encrypt the data as it is.
The encryption profile must contain the new keys and algorithm to which you are converting. Therefore,
when using the delivered Campus Solutions profiles, you must change the key value on the Algorithm Keyset
page for the encrypt profile and associated algorithm before running the conversion process. After running the
conversion, you must modify the decrypt profile to include the new key.
Decryption Profile ID The predefined, enhanced profile that is delivered for Campus Solution is
CS_CREDIT_CARD_DECRYPT.
Encryption Profile ID The predefined, enhanced profile that is delivered for Campus Solution is
CS_CREDIT_CARD_ENCRYPT.
This encryption profile is used in the storage of credit card, bank account
numbers, Security Code data, and Security Key.
The profile is used by both Student Financials and Contributor Relations.
See PeopleSoft Enterprise Student Financials 9.0,Setting Up ePayment
Processing, Re-encrypting Credit Card, Bank Account Numbers, Security Code
Data, and Security Key
See Chapter 14, "Processing ePayment Transactions," Purging Security Code
Data, page 385.

Chapter 2 Completing Student Financials General Setup
Copyright © 1988, 2010, Oracle and/or its affiliates. All Rights Reserved. 15
Self Service Payment Profile
Self Service Payment
Profile The check box is selected by default. When the check box is selected, existing
self-service payment profiles are retained and students can create and save new
profiles.
Clear the check box to prevent students from creating and saving new payment
profiles and from using existing profiles in Self Service.
Note. Clearing the check box does not automatically delete existing payment
profiles. The check box is therefore not cleared by default, because you might
have existing profiles in your system.
Note also that clearing the check box does not automatically prevent students
from creating and maintaining profiles.
Use the following instructions to delete existing profiles and ensure that students
cannot create and maintain payment profiles.
After you clear the check box, you must:
1. Run the SSF_PPROFDEL process to delete existing payment profiles:
PeopleTools, Process Scheduler, System Process Requests. Click Run, select
Purge SF Payment Profiles, and click OK.
2. Remove security for the Payment Profile (SS_SF_ACCT_PROFILE)
component by removing the component from all permission lists.
If you clear the check box and take these steps, the default behavior in Self
Service will be to not create or save payment profiles.
If you forget to remove security for the Payment Profile component and the Self
Service Payment Profile check box is cleared, students will still be able to create
new and maintain existing payment profiles.
This information appears in a warning message when you clear the Self Service
Payment Profile check box and click Save.
Null Due Date
Enter a date that you want the system to use when no other form of due date is specified. Charges with a null
due date appear as future charges. You should select a date well into the future. This date appears on the Total
Due Charges page of the self-service portion of Student Financials.
Defining Commit Levels
Access the SF Installation 3 page (Set Up SACR, Install, Student Fin Installation, SF Installation 3).
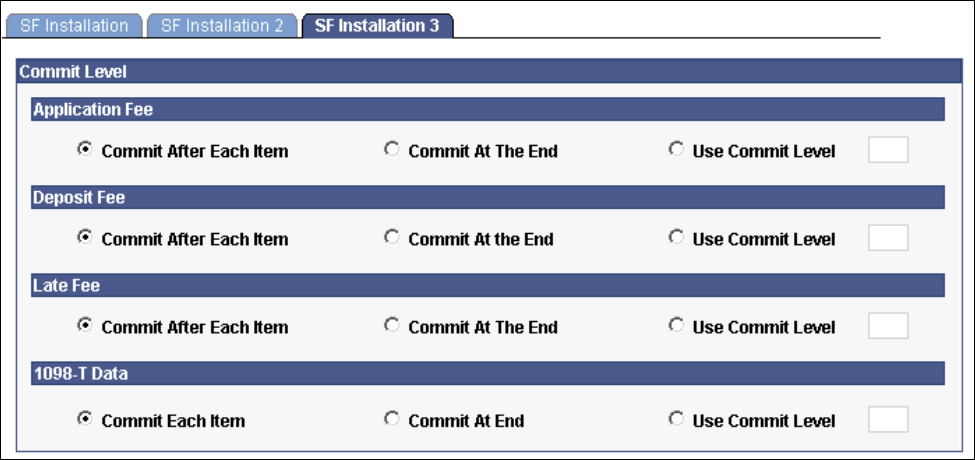
Completing Student Financials General Setup Chapter 2
16 Copyright © 1988, 2010, Oracle and/or its affiliates. All Rights Reserved.
SF Installation 3 page
Application Fee, Deposit Fee, Late Fee, and 1098–T Data Commit Level Group Boxes
The selections that you make in the following fields control how often the system commits batched
application, deposit, 1098–T, and late fee transactions to the database.
Commit After Each
Item Select to commit each transaction when it is processed. The advantage to this
selection is that the commitment process does not affect access to your database.
Commit At The End Select this option to commit all the transactions contained in the batch being
processed at the conclusion of that batch's process. The advantage to this
selection is that processing itself is more efficient. The disadvantage is that when
transactions are being committed, other processing involving that database may
be affected until commitment is complete.
Use Commit Level Select to commit a specified number of transactions during processing. For
example, if you enter 50 in the Use Commit Level field, when the transactions
are saved the system commits blocks of fifty transactions until the batch is
complete. At the end of a batch process, the system commits all remaining
transactions even if the number of transactions is less than the number in the
Commit Level field.
Defining Keywords
Access the Keywords page (Set Up SACR, Product Related, Student Financials, Item Types, Keywords).
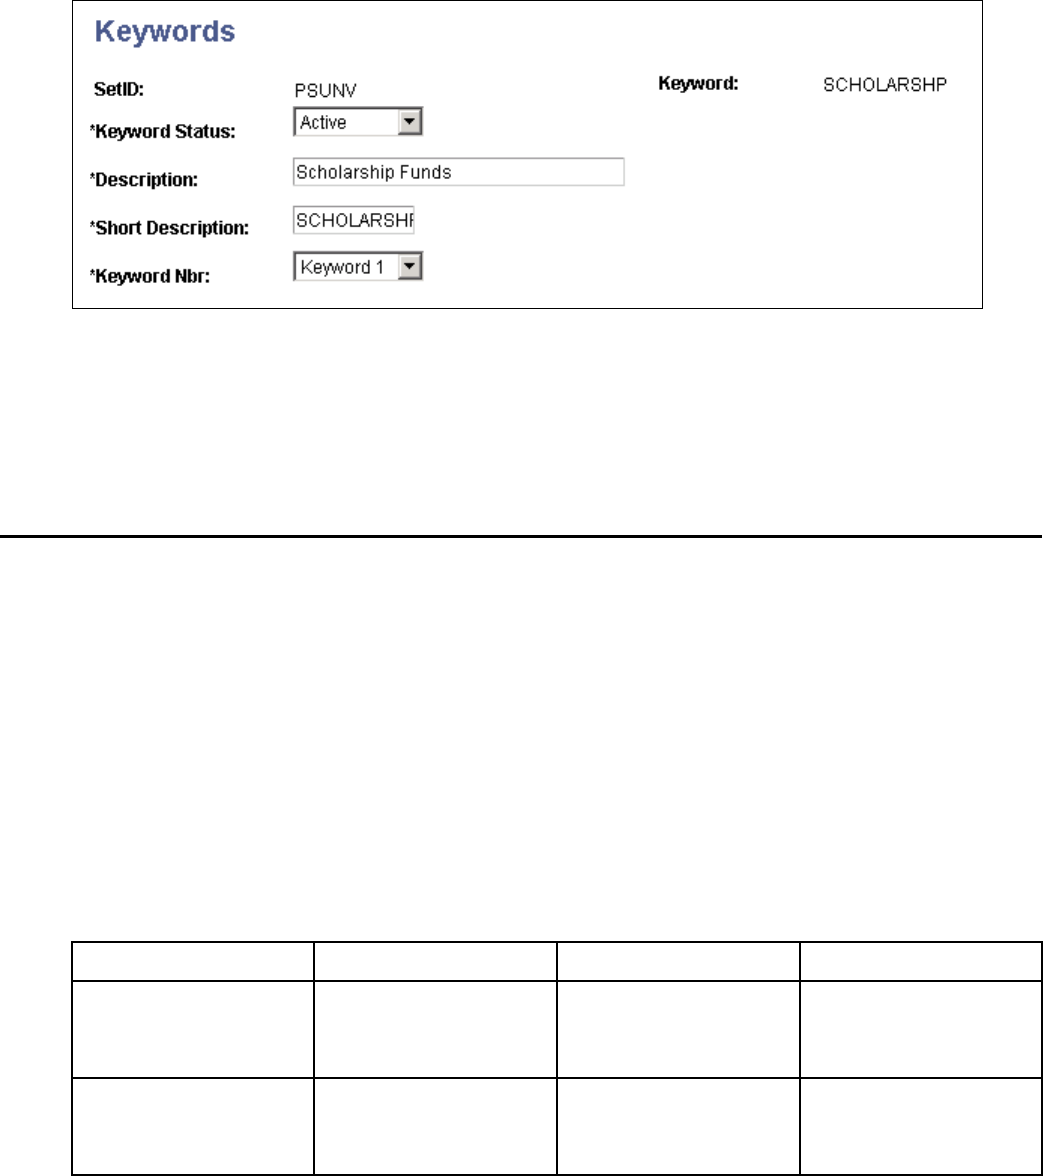
Chapter 2 Completing Student Financials General Setup
Copyright © 1988, 2010, Oracle and/or its affiliates. All Rights Reserved. 17
Keywords page
Keyword Nbr (keyword
number) Select the keyword number for this keyword. Each keyword is associated with an
edit table that is set up in SF Installation.
Reviewing Valid Records and Fields
To set up records and fields, use the Valid Records component (VALID_RECORD_SF) and the Valid Fields
component (VALID_FIELDS).
Student Financials makes certain valid records (tables) and fields available for users to review. You can
modify these records and fields, but it is not advised. This section discusses how to:
•Review valid records.
•Review valid fields.
Pages Used to Review Valid Records and Fields
Page Name Definition Name Navigation Usage
Valid Records SEL_VALID_RECS Set Up SACR, Product
Related, Student Financials,
Valid Records
Review valid records.
Valid Fields SEL_VALID_VARS Set Up SACR, Product
Related, Student Financials,
Valid Fields
Review valid fields.
Reviewing Valid Records
Access the Valid Records page (Set Up SACR, Product Related, Student Financials, Valid Records).
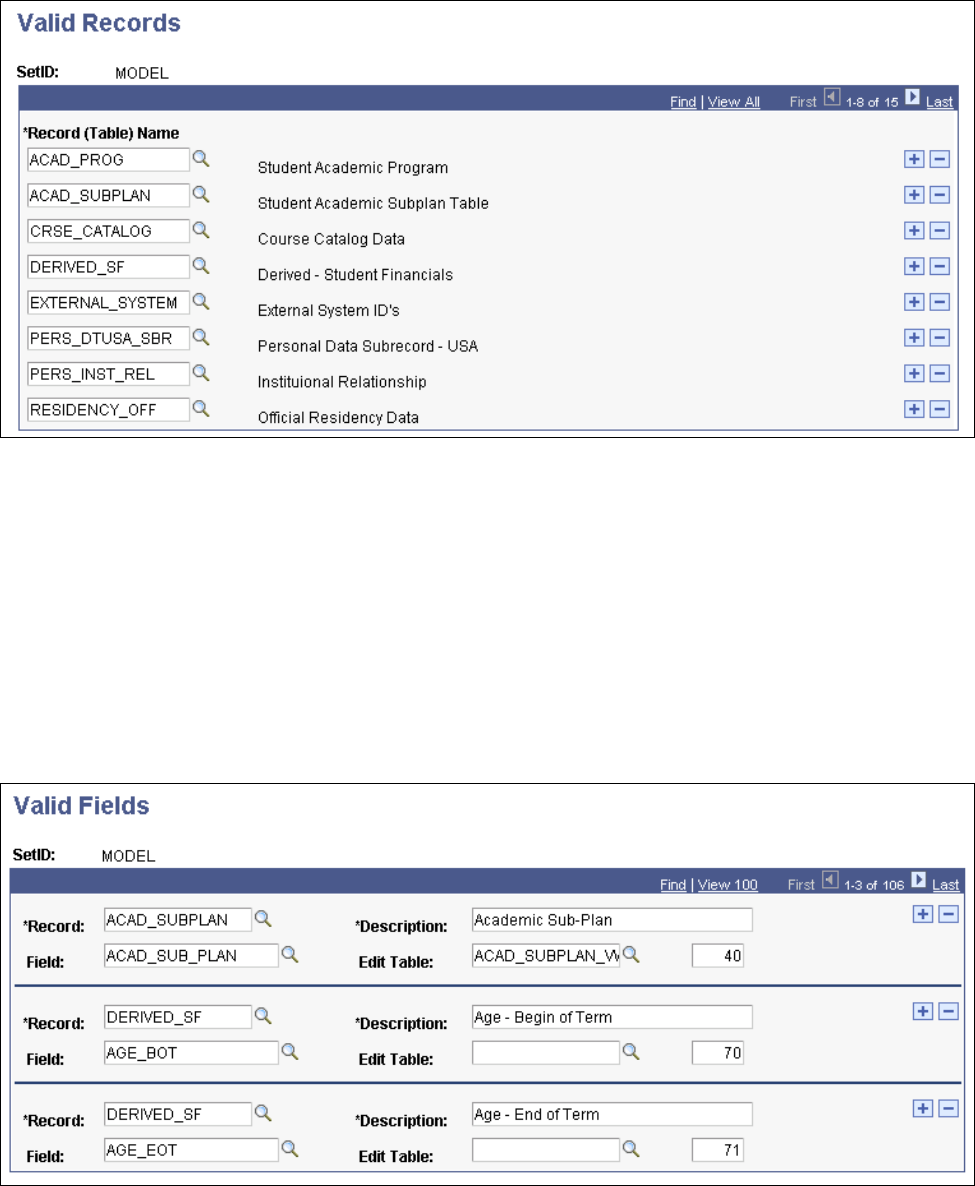
Completing Student Financials General Setup Chapter 2
18 Copyright © 1988, 2010, Oracle and/or its affiliates. All Rights Reserved.
Valid Records page
Record (Table) Name The record (table) name used in the tuition calculation setup appears when you
open the page. Because this information is delivered with the system, be careful
whenever you plan to make changes to it.
Reviewing Valid Fields
Access the Valid Fields page (Set Up SACR, Product Related, Student Financials, Valid Fields).
Valid Fields page
Record This field displays the record name. The system provides the default selection for
this field.

Chapter 2 Completing Student Financials General Setup
Copyright © 1988, 2010, Oracle and/or its affiliates. All Rights Reserved. 19
Description This field displays the record description. The system provides the default
selection for this field.
Field This field displays the field name. The system provides the default selection for
this field.
Edit Table This field displays the edit table associated with the record. The system provides
the default selection for this field.
Setting Up Business Units
To set up business units, use the SF Business Unit component (BUSINESS_UNIT_SF).
This section provides an overview of business units and discusses how to:
•Define basic business unit parameters.
•Define additional business unit parameters.
•Define posting parameters.
•Define committal and approval options.
•Define collection rules.
•Define basic refunding rules.
•Define refund approval parameters.
•Define default payroll interface parameters.
•Define auto-numbering sequences.
•Define tax parameters for students from Canada, Australia, and New Zealand (includes Tax Calculation
Options).
Understanding Business Units
The SF business unit is the framework that controls all processing within the Student Financials application.
Each business unit can have its own set of business rules. For example, you might have different campuses
that operate independently from each other financially. By setting up different business units, you can define
just what you need. You must set up at least one business unit.

Completing Student Financials General Setup Chapter 2
20 Copyright © 1988, 2010, Oracle and/or its affiliates. All Rights Reserved.
Pages Used to Set Up Business Units
Page Name Definition Name Navigation Usage
General 1 BUS_UNIT_TBL_SF Set Up SACR, Product
Related, Student Financials,
SF Business Unit, General 1
Define basic business unit
parameters.
General 2 BUS_UNIT_TBL_SF2 Set Up SACR, Product
Related, Student Financials,
SF Business Unit, General 2
Define additional business
unit parameters.
Posting Setup BUS_UNIT_TBL_SF14 Set Up SACR, Product
Related, Student Financials,
SF Business Unit, Posting
Setup
Define posting parameters.
Commit Options BUS_UNIT_TBL_SF10 Set Up SACR, Product
Related, Student Financials,
SF Business Unit, Commit
Options
Define committal and
approval options.
Collections BUS_UNIT_TBL_SF7 Set Up SACR, Product
Related, Student Financials,
SF Business Unit,
Collections
Define collection rules.
Refund Setup BUS_UNIT_TBL_SF3 Set Up SACR, Product
Related, Student Financials,
SF Business Unit, Refund
Setup
Define basic refunding
rules.
Refund Approval BUS_UNIT_TBL_SF20 Set Up SACR, Product
Related, Student Financials,
SF Business Unit, Refund
Approval
Define refund approval
parameters.
Payroll Defaults BUS_UNIT_TBL_SF4 Set Up SACR, Product
Related, Student Financials,
SF Business Unit, Payroll
Defaults
Define default payroll
parameters. Use PeopleSoft
Payroll for North America
to process refunds.
Counters BUS_UNIT_TBL_SF8 Set Up SACR, Product
Related, Student Financials,
SF Business Unit, Counters
Define auto-numbering
sequences.
Canadian/ANZ Taxes BUS_UNIT_TBL_SF19 Set Up SACR, Product
Related, Student Financials,
SF Business Unit,
Canadian/ANZ Taxes
Define tax parameters for
students from Canada,
Australia, and New Zealand
and tax calculation options.
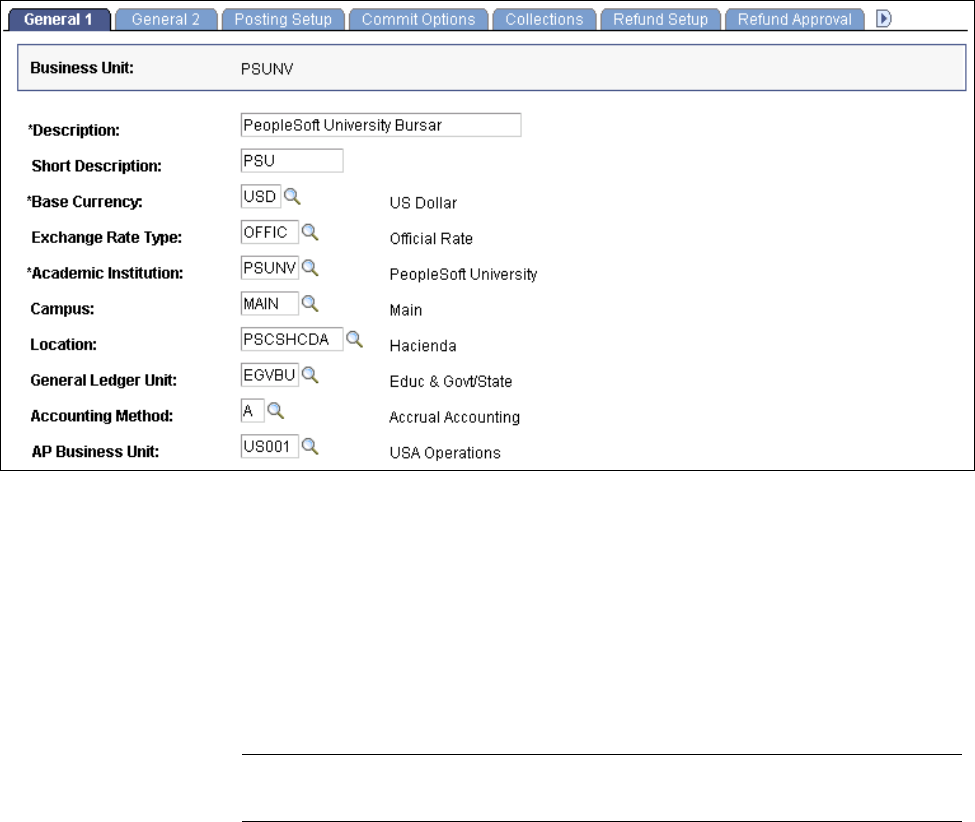
Chapter 2 Completing Student Financials General Setup
Copyright © 1988, 2010, Oracle and/or its affiliates. All Rights Reserved. 21
Defining Basic Business Unit Parameters
Access the General 1 page (Set Up SACR, Product Related, Student Financials, SF Business Unit, General 1).
General 1 page
Base Currency Confirm or select the base currency that you want this business unit to use. The
default value is the base currency selected for the institution under Set Up
HRMS, Install, Installation Table, HRMS Options. You can override the base
currency for each business unit.
Exchange Rate Type Select the exchange rate type that you use to convert other currency types to the
base currency. The exchange rate type is necessary for the posting of charges.
Note. You define exchange rate types on the Currency Rate Type page (same
navigation as above).
Academic Institution Identify the academic institution that contains the SF business unit.
Campus Enter the appropriate campus for the SF business unit.
Location Enter the appropriate location for the SF business unit.
General Ledger Unit If your institution uses PeopleSoft Financials, select the general ledger unit that
receives information from the SF business unit. Otherwise, leave this field blank.
Accounting Method Select your institution's accounting method: Accrual,Cash, or Modified Cash
accounting.
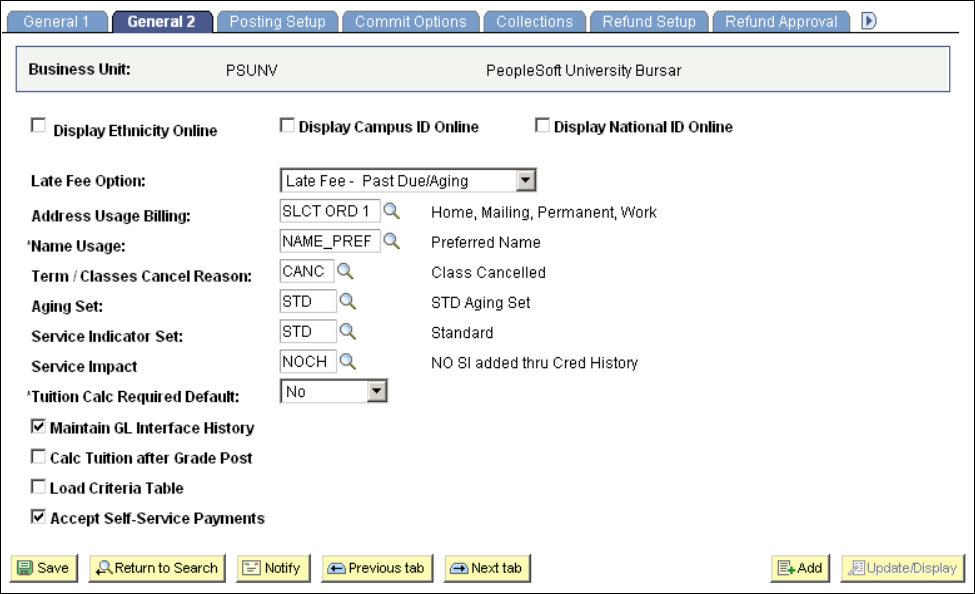
Completing Student Financials General Setup Chapter 2
22 Copyright © 1988, 2010, Oracle and/or its affiliates. All Rights Reserved.
AP Business Unit Select the business unit with which your system interacts when processing
refunds through the accounts payable department.
Defining Additional Business Unit Parameters
Access the General 2 page (Set Up SACR, Product Related, Student Financials, SF Business Unit, General 2).
General 2 page
Display Ethnicity Online Select this option if you want the student's ethnicity to appear on the Academic
Information page.
Display Campus ID
Online Select this option if you want the campus ID to appear on the Academic
Information page. The campus ID identifies the campus, not the student.
Display National ID
Online Select this option if you want the student's national ID (for example, social
security number) to appear on the Academic Information page.

Chapter 2 Completing Student Financials General Setup
Copyright © 1988, 2010, Oracle and/or its affiliates. All Rights Reserved. 23
Late Fee Option Select one of two Late Fee - Billing methods: Late Fees - Bill Request Nbr or
Late Fees - Past Due/Aging.
Late Fees run control pages use this option to verify that the correct process is
used before processing.
You can use two distinct processes to calculate late fees. One method is based on
the account aging or the due date. The other method is based on a billing request
number using the amount billed as a basis.
Address Usage Billing Select a default address usage type to use when you generate customer bills.
Name Usage Select a default name usage type.
Term/Class Cancel
Reason Select a term/class cancellation code that you want to use as the default reason
when you run the Term/Class Cancellation process.
Aging Set Select the aging set that the system uses by default for the Assign Collector
process.
Service Indicator Set Select the service indicator set to use. This service indicator set must include all
service indicators that you want to use for credit history processing.
Service Impact Select the service impact to use to stop a service indicator from being placed by
the credit history process. This is a default value that will be used when credit
history is called from the self-service pages.
Tuition Calc Required
Default (tuition
calculation required
default)
Select Yes if you want the Tuition Calc Required flag set automatically when a
student is activated in a term. Use this option if you want tuition to be calculated
on Anticipated Units.
Select No if you do not want the Tuition Calc Required flag set automatically
when a student is activated in a term. Use this option if you want tuition fees
calculated only after enrollment activity (Bill Units).
Maintain GL Interface
History Select this option if you want the system to maintain general ledger interface
history. This selection is required for you to use the Back Out GL Interface
functionality.
Calc Tuition after Grade
Post (calculate tuition
after grade post)
Select this option if you want the Tuition Calc Required flag to be set to Yes
whenever student grades are posted or changed through the Grade Roster page.
Note. This check box does not affect the Tuition Calc Required flag being set to
Yes when grades are posted or changed through the Enrollment pages.
Load Criteria Table Select this option if you want the criteria tables (for example, Career, Program,
Fee Triggers, and so on) to be loaded into working storage at the beginning of the
Tuition Calculation process. If you are using a large number of waiver criteria,
fee triggers, and criteria for tuition groups, selecting this option can improve
Tuition Calculation process performance.
Note. If more than 1000 total criteria values exist, this option must not be
selected. Working storage is currently limited to 1000 maximum values.
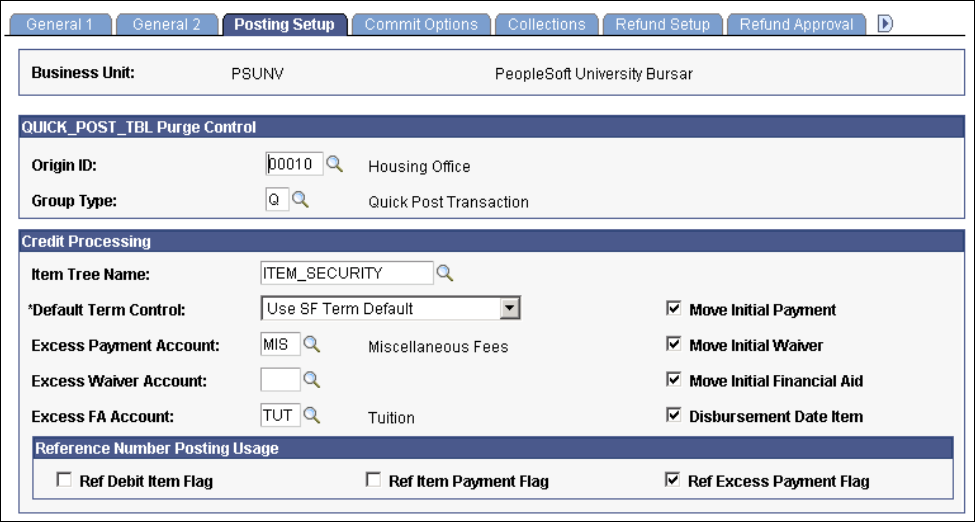
Completing Student Financials General Setup Chapter 2
24 Copyright © 1988, 2010, Oracle and/or its affiliates. All Rights Reserved.
Accept Self-Service
Payments Select this option if you want to allow students to make payments over the web
using ePayments. This selection is limited to this SF business unit. This SF
business unit must also be attached to an institution set that enables self-service
payments. Unless self-service payments are enabled for both the SF business unit
and the institution set, students will have access to only one of the self-service
pages (Account Inquiry).
See PeopleSoft Enterprise Campus Self Service 9.0 PeopleBook, "Setting Up
Student Financials Self Service."
Defining Posting Parameters
Access the Posting Setup page (Set Up SACR, Product Related, Student Financials, SF Business Unit,
Posting Setup).
Posting Setup page
Chapter 2 Completing Student Financials General Setup
Copyright © 1988, 2010, Oracle and/or its affiliates. All Rights Reserved. 25
Default Term Control Select a value on which to base the term.
The values are:
•Latest Enrollment Term. Select if you want the default term to be based on
the maximum term from STDNT_CAR_TERM where the eligible to enroll
check box is on. If that does not return a term, then the default term will be
based on the term value defined in the SF Term Default setup.
•Most Current Enrollment Term Select if you want the default term based on
the term from STDNT_CAR_TERM with a begin date of less than equal to
the current date. If that does not return a term, then the default term will be
based on the term from STDNT_CAR_TERM where the end date is greater
than or equal to the current date. If this does not return a term, then the
default term will be based on the term value defined in the SF Term Default
setup.
QUICK_POST_TBL Purge Control
Student Post (Quick Post) and Corp Post transactions are recorded in the Quick Post table. These entries can
be consolidated into posting groups using the Purge QUICK_POST_TBL process. The options in this group
box create entries in the Group Control record that enable you to easily track Student Post transactions.
Origin ID Select the origin ID that you want the system to use when consolidating
transactions into posting groups.
Group Type Select the group type that you want the system to use when consolidating
transactions into posting groups.
Credit Processing
Set the conditions that you want the system to use when credits (payments) are posted on an account.
Item Tree Name Select the name of the item type tree that contains all of the item types that you
use for transactions. This tree also controls item type security.

Completing Student Financials General Setup Chapter 2
26 Copyright © 1988, 2010, Oracle and/or its affiliates. All Rights Reserved.
Default Term Control Select how you want to determine the term that the system uses as the default if a
charge or payment is entered without specifying a term.
Note. Values for this field are delivered with your system as translate values. Do
not modify these values in any way. Any modifications to these values require a
substantial programming effort.
Warning! Your selection of a default term control can affect how payments are
processed. When either of the enrollment term selections are used, the actual
term value may vary from student to student. The actual term value used
becomes the value of the current term for payment processing.
Values are:
Last Enrollment Term: Select if you want the default term to be based on the
student's most recent completed term of enrollment.
Most Current Enrollment Term: Select if you want the default term to be based
on the student's most recent term of enrollment, whether completed or not.
Use SF Term Default: Select if you want the default term to be based on the term
value that you defined in SF Term Default setup.
Move Initial Payment Select to move all payments in excess of charges to the account specified for
excess payments. If the option is not selected, excess payments show as a credit
balance on the charge account.
Excess Payment Account Select a default account that you want to use for payments that are received in
excess of charges.
Move Initial Waiver Select to move all waivers in excess of charges to the account specified for
excess waivers. If this option is not selected, excess waivers show as a credit
balance on the charge account.
Excess Waiver Account Select a default account that you want to use for waivers that are posted to an
account in advance of charges. This feature can also be used as an option for
waivers that are posted in excess of charges.
Warning! Waivers should rarely, if ever, be applied to a student's account other
than through the tuition calculation process. Waivers posted using the Student
Post or Group Post processes may not be able to be adjusted properly.
Move Initial Financial
Aid Select to move all financial aid payments in excess of eligible charges to the
account specified for excess financial aid. If this option is not selected, excess
financial aid payments show as a credit balance on the charge account.
Excess FA Account
(excess financial aid
account)
Select a default account that you want to use for financial aid that is posted to an
account in excess of eligible charges.

Chapter 2 Completing Student Financials General Setup
Copyright © 1988, 2010, Oracle and/or its affiliates. All Rights Reserved. 27
Disbursement Date Item Select if you want the system to display each disbursement of a financial aid
award in a single term (same item type) as a separate line item on a student's
account. Also, selecting this option enables the system to identify specific
disbursements in the event that an adjustment is required.
For example, if a direct loan requires more than one disbursement in one term,
selecting this check box identifies each disbursement with a unique date causing
the system to recognize each as a separate entry.
Clear this option to have all disbursements in a term roll into one line item.
Note. After you begin posting financial aid awards, you should not change this
setting.
Warning! Financial aid disbursement does not correctly reverse disbursements
when multiple disbursements exist within a term and you do not select the
Disbursement Date Item check box. This can occur, for example, if multiple
disbursements are in a single term and one or more of them is reduced. If you use
batch disbursement to post the new disbursement amount, the posting process
reverses the entire disbursement total for the term and then reposts only one of
the disbursements in the term. In PeopleSoft Financial Aid, the disbursements
look like they have been disbursed properly, but in Student Financials only one
of the disbursements is properly posted, so the two applications are out of sync. If
you use online disbursement to update the newly reduced disbursement amount,
the same problem occurs. The online disbursement process reverses the entire
award amount for the term and posts only the new reduced single disbursement
amount.
Reference Number Posting Usage
This group box provides additional options for the posting of debits and payments.
Ref Debit Item Flag
(reference debit item flag) Select to have the option of associating a reference number with charge items.
For example, you could use a parking ticket number as a reference on a parking
fine charge. Each charge item with a reference number is displayed separately on
the Charge Detail page.
Ref Item Payment Flag
(reference item payment
flag)
Select to have the option of associating a payment with a particular charge by
using the reference number. For example, if you use a parking ticket number as a
reference number on a parking fine charge, you can use that same ticket number
to tie the payment to the specific charge.
Note. The Ref Debit Item Flag check box must be selected for you to use the Ref
Item Payment Flag option.
Ref Excess Payment
Flag (reference excess
payment flag)
Select this option to have payments made in excess of a particular charge applied
to other charges with the same reference ID.
Note. The Move Initial Payment check box must be selected for you to use the
Ref Excess Payment Flag.
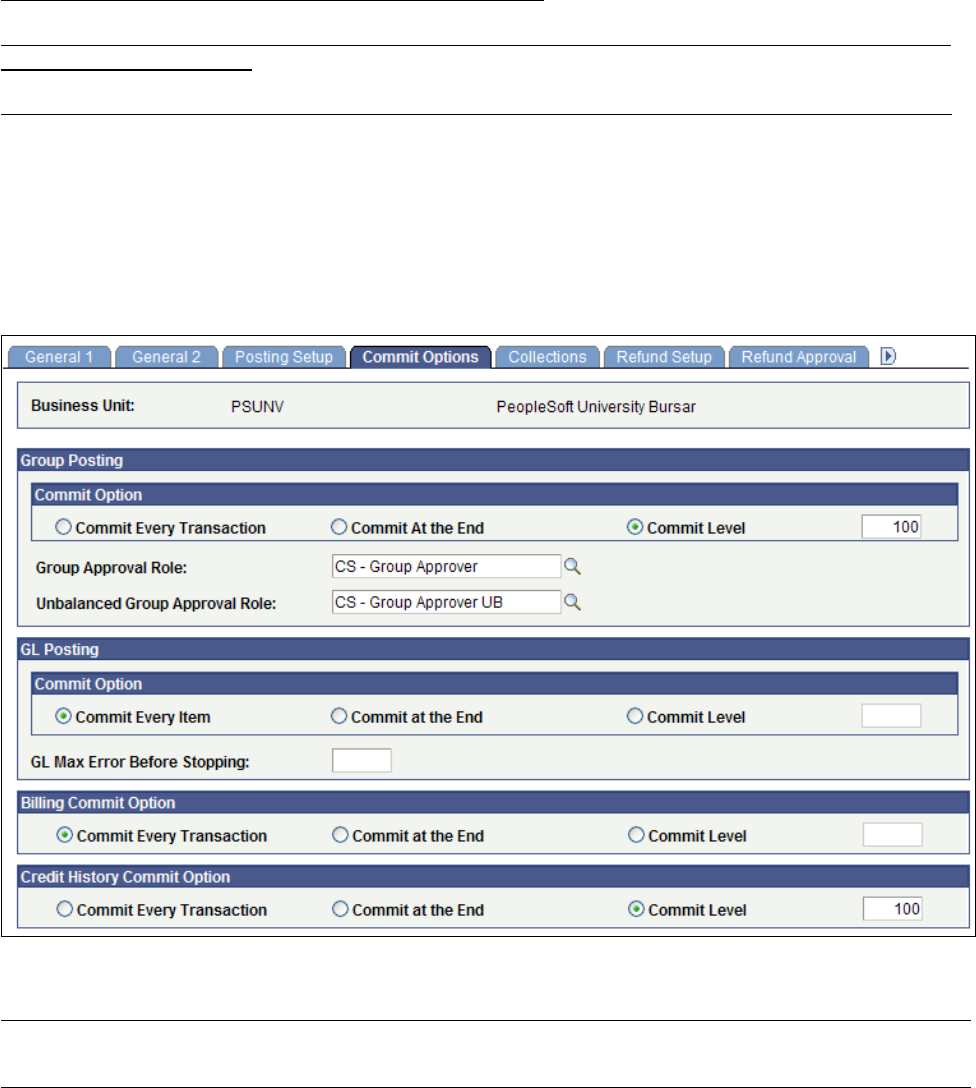
Completing Student Financials General Setup Chapter 2
28 Copyright © 1988, 2010, Oracle and/or its affiliates. All Rights Reserved.
See Also
Chapter 11, "Setting Up Receivables Maintenance," page 341
Chapter 21, "Maintaining Receivables," Consolidating and Reviewing Transactions for Individual Students
and Organizations, page 592
Chapter 2, "Completing Student Financials General Setup," Setting Up Payment Application Rules, page 39
Defining Committal and Approval Options
Access the Commit Options page (Set Up SACR, Product Related, Student Financials, SF Business Unit,
Commit Options).
Commit Options page
Important! The selections that you make in this page have a specific effect on processing. Consult your IT
staff and system administrators to determine the optimum selections for your processing needs.
Group Posting
Set the levels at which group post transactions are committed to the database.
Chapter 2 Completing Student Financials General Setup
Copyright © 1988, 2010, Oracle and/or its affiliates. All Rights Reserved. 29
Commit Every
Transaction Select to commit each transaction when it is processed.
Commit At the End Select to commit all the transactions that are contained in the batch being
processed at the conclusion of that batch process.
Commit Level Select to commit a specified number of transactions during background
processing. For example, if you enter 100 in the Commit Level field, when you
run a batch process the system processes 100 transactions and then commits them
to the database until the batch is complete. At the end of a batch process, the
system commits all remaining transactions even if the number of transactions is
less than the number in the Commit Level field.
Group Approval Role Select the role of the person or persons who can approve the group.
Unbalanced Group
Approval Role Select the role of the person or persons who can approve an out-of-balance
group.
GL Posting
Set the levels at which general ledger transactions are committed to the database.
Commit Every Item Select to commit each transaction when it is processed.
Commit at the End Select to commit all the transactions that are contained in the batch being
processed at the conclusion of that batch process.
Commit Level Select to commit a set number of transactions during background processing.
GL Max Error Before
Stopping (general ledger
maximum error before
stopping)
Enter the maximum number of errors that you want the system to allow before
stopping transaction processing.
Billing Commit Option
Set the levels at which billing transactions are committed to the database.
Commit Every
Transaction Select to commit each transaction when it is processed.
Commit at the End Select to commit all the transactions that are contained in the batch being
processed at the conclusion of that batch's process.
Commit Level Select to commit a set number of transactions during background processing.
Enter a commit level in the field to the right of this option.

Completing Student Financials General Setup Chapter 2
30 Copyright © 1988, 2010, Oracle and/or its affiliates. All Rights Reserved.
Credit History Commit Option
Set the levels at which Credit History process transactions are committed to the database.
The functionality of Credit History commit options is similar to other commit options on this page.
See Also
Enterprise PeopleTools PeopleBook: Workflow Technology
Defining Collection Rules
Define the rules governing how your business unit handles receivables collection.
See Also
Chapter 12, "Setting Up Receivables Collection," page 363
Defining Basic Refunding Rules
Specify the business unit rules governing how the system handles refunds.
See Also
Chapter 7, "Setting Up Refunding," Setting Up Your Business Unit to Refund Customers, page 238
Defining Refund Approval Parameters
Set refund approval levels for student and organization refunds.
See Also
Chapter 7, "Setting Up Refunding," Setting Up Your Business Unit to Refund Customers, page 238
Defining Default Payroll Parameters
Establish default parameters for refunds created using PeopleSoft Payroll for North America.
See Also
PeopleSoft Enterprise Payroll for North America 9.0 PeopleBook, "Setting Up the Payroll Process"
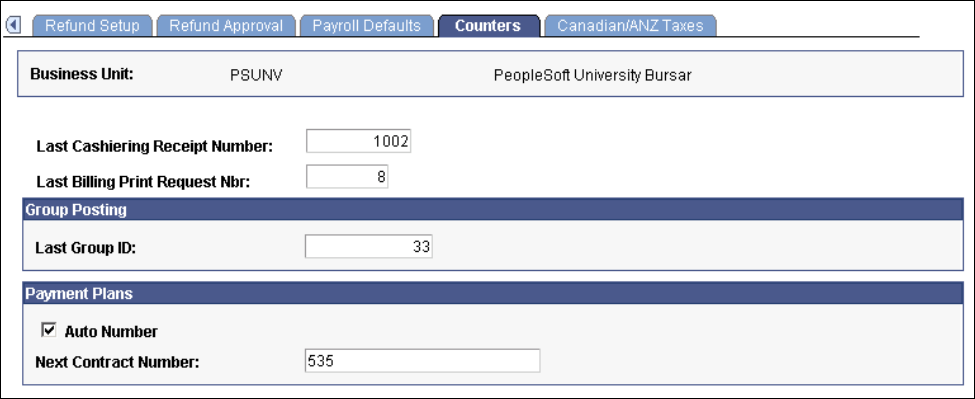
Chapter 2 Completing Student Financials General Setup
Copyright © 1988, 2010, Oracle and/or its affiliates. All Rights Reserved. 31
Defining Auto-Numbering Sequences
Access the Counters page (Set Up SACR, Product Related, Student Financials, SF Business Unit, Counters).
Counters page
With the exception of payment plans, the counter number fields on this page automatically display the last
number used. You can specify a number with which you would like the sequence numbering to begin. For
example, if you want cashiering receipt numbers to begin at 1,000, enter the number 999 in the Last
Cashiering Receipt Number field. The system automatically assigns the number 1,000 to the first receipt
produced and increments all receipts by 1 thereafter.
Last Cashiering Receipt
Number If you want to change the starting point of the numbering sequence for cashiering
receipts, enter a number that is one less than the number that you want to begin
with.
Last Billing Print
Request Nbr (last billing
print request number)
If you want to change the starting point of the numbering sequence for billing
requests, enter a number that is one less than the number that you want to begin
with.
Group Posting
Last Group ID If you want to change the starting point of the numbering sequence for posting
group ID numbers, enter a number that is one less than the number that you want
to begin with.
Payment Plans
Auto Number Select if you want the system to automatically generate sequential contract
numbers for payment plan contracts.
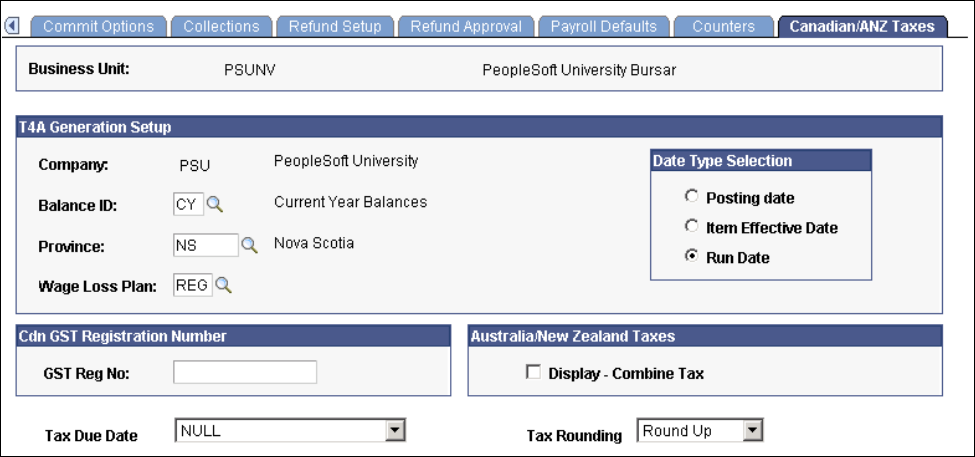
Completing Student Financials General Setup Chapter 2
32 Copyright © 1988, 2010, Oracle and/or its affiliates. All Rights Reserved.
Next Contract Number If you want to change the starting point of the numbering sequence for payment
plan contract numbers, enter the contract number that you want to begin with.
Unlike the previous counters, the Next Contract Number field displays the next
number in the sequence.
(CAN)(AUS)(NZL) Defining Tax Parameters for Students from Canada,
Australia, and New Zealand
Access the Canadian/ANZ Taxes page (Set Up SACR, Product Related, Student Financials, SF Business
Unit, Canadian/ANZ Taxes).
Canadian/ANZ Taxes page
T4A Generation Setup
Canadian students are required to report all scholarship income. The T4A report is generated for the student's
use.
The following fields define the setup that is needed to transfer information from the Student Financials
application to the PeopleSoft Payroll for North America application for the processing and generation of T4A
reports. Consult your payroll staff to determine the proper selections for the following options.
Company Enter the company that generates the report. This is used to aggregate student
income balances in payroll.
Balance ID Enter the balance ID. This selection controls the period of time covered by the
report.
Province Enter the province where scholarship income is received.

Chapter 2 Completing Student Financials General Setup
Copyright © 1988, 2010, Oracle and/or its affiliates. All Rights Reserved. 33
Wage Loss Plan Enter a wage loss plan. Wage loss plans are set up in Set Up HRMS, Product
Related, Payroll for North America, Canadian Taxes, Wage Loss Plan Table.
Date Type Selection
In this group box, select the type of date that you want to use to govern selection of items to be included in
the T4A report. The system uses the date type selection in conjunction with the balance ID to control which
transactions it includes in the report.
Posting Date Select to use the item posting date to govern transaction selection.
Item Effective Date Select to use the item effective date to govern transaction selection.
Run Date Select to use the item run date to govern transaction selection.
Note. Use only when the T4A Generation process is run within the same calendar
or tax year as the transactions.
Cdn GST Registration Number
Enter the GST Reg No (Goods and Services Tax registration number) that is assigned to this business unit.
The system uses this value for any receipts and invoices that are specifically designed to include the GST
registration number when GST is assessed.
Australia/New Zealand Taxes
Display − Combine Tax Select to display transactions with tax included (summed). The default setting
(check box cleared) displays taxes as a separate line item.
Tax Due Date Select a Tax Due Date option to control when taxes that are associated with
charges are considered due. Options are:
Charge Due Date: Select to make taxes due on the same date as the
corresponding charge.
Charge Effective Date: Select to make taxes due on the date that the
corresponding charge becomes effective. This date may be different from the due
date of the charge.
Null: Select if you do not want the system to automatically assign a due date.
This setting leaves open the option of assigning a due date at a later point (for
example, through the Billing process). This is the default setting.
Posting Date: Select to make tax charges due immediately on the date that the
corresponding charge is posted.

Completing Student Financials General Setup Chapter 2
34 Copyright © 1988, 2010, Oracle and/or its affiliates. All Rights Reserved.
Tax Rounding This option controls how taxes are adjusted at the half-cent point. Different
taxing authorities have different rules for how adjustments must be made.
Determine the requirements for your institution before selecting an option.
Rounding affects only tax amounts that are calculated to the exact half-cent
point. Options are:
No Rounding: Select to truncate the calculated tax amount to the full-cent value.
This option effectively eliminates any fraction of a cent. For example, 3.769
USD would be truncated to 3.76 USD. Fractions will never be rounded up.
Round Down: Select if you want taxes that calculate to the half-cent point or less
to be reduced to the nearest full-cent value. For example, 3.765 USD would be
reduced to 3.76 USD.
Round Up: Select if you want taxes that calculate to the half-cent point or more
to be increased to the nearest full-cent value. For example, 3.765 USD would be
increased to 3.77 USD.
Note. Student Financials rounds based on the third decimal place of a number.
Setting Up Tax Authorities and Tax Codes
To set up tax authorities and tax codes, use the Tax Authorities component (TAX_AUTHORITY) and the
Tax Codes component (TAX_CODE_VAT).
This section provides an overview of tax authorities and tax codes and discusses how to:
•Define tax authorities.
•Specify VAT rebates for tax authorities.
•Define tax codes.
Understanding Tax Authorities and Tax Codes
Your institution may be under the jurisdiction of one or more tax authorities that require you to charge taxes
for certain transactions. To process tax charges, you must define one or more tax authority codes.
Tax codes are used to link taxes to charge item types. Each tax code must include at least one tax authority,
but can include more than one if your institution is subject to more than one taxing authority. For example,
you may need to charge students both state and local sales taxes for books. By setting up a tax code that
combines the two authorities, you can charge both taxes.
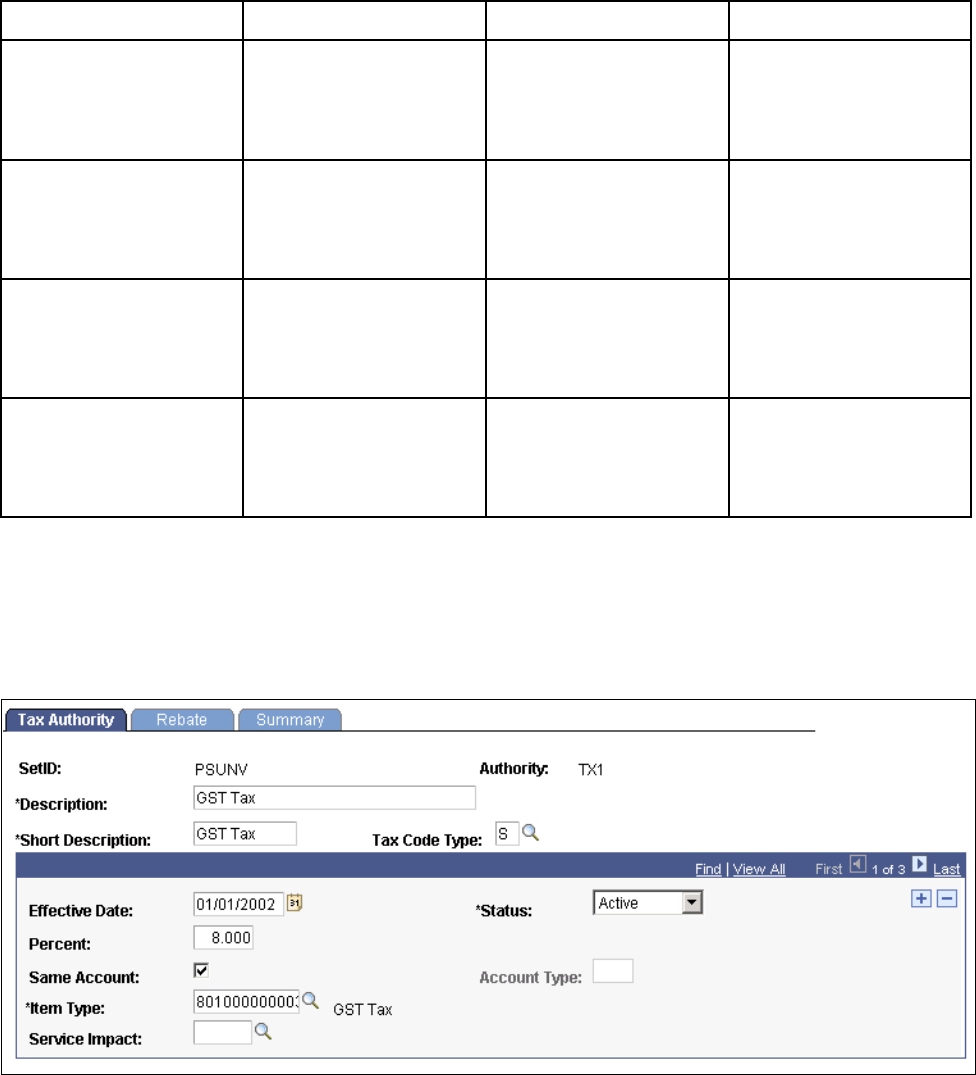
Chapter 2 Completing Student Financials General Setup
Copyright © 1988, 2010, Oracle and/or its affiliates. All Rights Reserved. 35
Pages Used to Set Up Tax Authorities and Tax Codes
Page Name Definition Name Navigation Usage
Tax Authority TAX_AUTHORITY Set Up SACR, Product
Related, Student Financials,
Charges and Payments, Tax
Authorities, Tax Authority
Define tax authorities.
Tax Authorities - Rebate TAX_AUTHORITY_PSB Set Up SACR, Product
Related, Student Financials,
Charges and Payments, Tax
Authorities, Rebate
Specify VAT rebates for tax
authorities.
Tax Authorities - Summary TAX_AUTHORITY_VAT Set Up SACR, Product
Related, Student Financials,
Charges and Payments, Tax
Authorities, Summary
Review tax authority
parameters.
Tax Codes TAX_CODE_VAT Set Up SACR, Product
Related, Student Financials,
Charges and Payments, Tax
Codes
Define tax codes using one
or more tax authorities.
Defining Tax Authorities
Access the Tax Authority page (Set Up SACR, Product Related, Student Financials, Charges and Payments,
Tax Authorities, Tax Authority).
Tax Authority page
Tax Code Type Select a tax code type of S (sales tax) or V (value added tax).
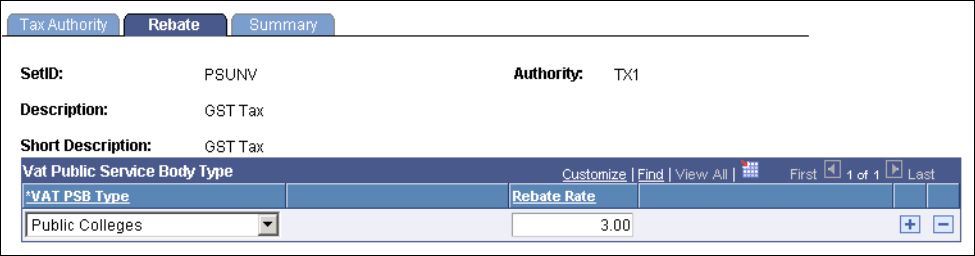
Completing Student Financials General Setup Chapter 2
36 Copyright © 1988, 2010, Oracle and/or its affiliates. All Rights Reserved.
Percent Set the default percentage of tax that the authority assesses.
Same Account andAcct
Type (account type) Select the Same Account check box if you want the tax assessed to appear in the
same account as its associated charge. If you clear the check box, you can select
a different account type in the Acct Type field.
Item Type Select the item type that you have defined for transactions from this tax authority.
Service Impact Select the service impact that exempts customers from this taxation.
Specifying VAT Rebates for Tax Authorities
Access the Tax Authorities - Rebate page (Set Up SACR, Product Related, Student Financials, Charges and
Payments, Tax Authorities, Rebate).
Tax Authorities - Rebate page
VAT PSB Type (value
added tax public service
body type) and Rebate
Rate
If applicable, select the value added tax public service body type and enter a
rebate rate.
Defining Tax Codes
Access the Tax Codes page (Set Up SACR, Product Related, Student Financials, Charges and Payments, Tax
Codes).

Chapter 2 Completing Student Financials General Setup
Copyright © 1988, 2010, Oracle and/or its affiliates. All Rights Reserved. 37
Tax Codes page
Consolidate Same Item
Type If you are creating a code that combines two or more different tax authorities,
you can select this check box to consolidate the tax transactions that make up the
code into the same item type during posting. Otherwise, the system creates each
transaction on an account as individual entries.
Authority Select the tax authority that you want to attach to the tax code.
Percentage The default percentage appears to the right of each authority that you add.
Setting Up Aging Sets
To set up aging sets, use the Aging Set component (AGING_TABLE).
An aging set is a complete set of aging categories that defines how your system ages your accounts. You can
define multiple aging sets to be used for different types of customers. For example, you might want to age
student accounts differently than you do organization accounts.
Page Used to Set Up Aging Sets
Page Name Definition Name Navigation Usage
Aging Set AGING_TABLE Set Up SACR, Product
Related, Student Financials,
Collections, Aging Set
Define aging sets.
Defining Aging Sets
Access the Aging Set page (Set Up SACR, Product Related, Student Financials, Collections, Aging Set).
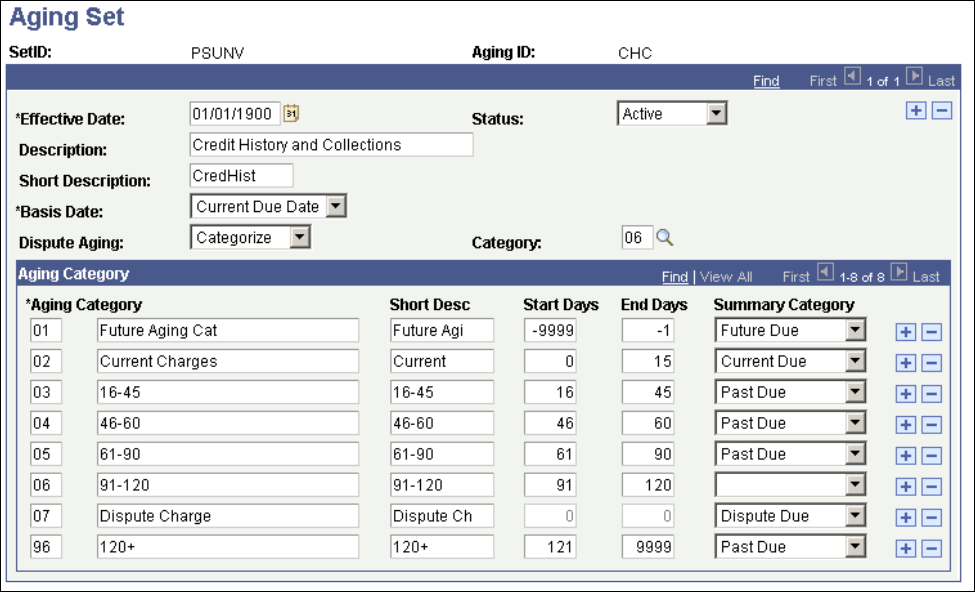
Completing Student Financials General Setup Chapter 2
38 Copyright © 1988, 2010, Oracle and/or its affiliates. All Rights Reserved.
Aging Set page
Basis Date Select the basis date that you want to use when a charge is assigned to an aging
category. Options are: Actual Billing Date, Billing Date, Current Due Date, and
Original Due Date. For External Organization accounts, the two valid basis dates
are Actual Billing Date and Original Due Date.
Dispute Aging In the Dispute Aging and Category fields, define how you want to categorize any
charges in dispute.
Values are:
Age Normal: Select to age disputed charges like any other charge. When you
select this option, disputed charges can still show up as being past due and can
trigger collection actions.
Categorize: Select if you want disputed charges to be distinguished as a unique
category. When you select this option, the Category field becomes active.
Ignore: Select if you want the system to overlook disputed charges. When you
select this option, the system does not distinguish disputed charges as a unique
category and does not age them like other charges. In addition, disputed charges
do not trigger collection actions.
Category Enter the category value that you want to use for disputed charges.
Aging Category Enter an aging category value that you want to use to distinguish each time
range. In the field to the right, enter a description of the particular category.

Chapter 2 Completing Student Financials General Setup
Copyright © 1988, 2010, Oracle and/or its affiliates. All Rights Reserved. 39
Start Days and End Days Enter the beginning and ending points of the aging category. For example, if
charges that are up to thirty days old are considered current, enter 0 in the Start
Days field and 30 in the End Days field. The beginning and ending points of the
range are controlled by the basis date.
Summ (summary) Select a code to identify the late charge category. Values are C (current due), D
(dispute due), F (future due), O (other), or P (past due).
Setting Up Payment Application Rules
To set up payment application rules, use the Charge Priority List component (CHARGE_PRIORITY) and the
Payment Overall Priority component (OVERALL_PRIORITY).
This section provides an overview of payment application rules and discusses how to:
•Create a charge priority list and link it to an item type tree.
•Define charge priority list rules.
•Define payment overall priorities.
Understanding Payment Application Rules
Your institution probably has rules about how payments are to be applied to charges on student accounts. You
may want tuition to always be paid first, or you may want the oldest charges paid first. In addition, many
rules apply to financial aid. Regardless of your institution's specific rules, you want Student Financials to
automatically apply them, eliminating the need to make immediate decisions about each payment.
Obviously, defining one set of rules that works for every situation is difficult. To meet all of your needs, you
should carefully plan and define several sets of rules. You must understand how these rule sets work
separately and with each other, and how they work with other parts of the system.
To make setup as flexible, yet precise, as possible, the system uses a combination of charge priority list and
payment overall priority rules that are attached to payment item types. These very specific payment
processing definitions are also affected by the default term, business unit posting rules, and priority values
defined for payment item types.
Student Financials provides flexible payment processing capabilities, but setup requires considerable thought.
While complex, the process is logical and accommodates most payment application schemes. Plan well and
take the time to test your setup extensively.
Before you start setting up your charge priority list and payment overall priority rules, be sure to check your
item type tree setup. Because your charge priority definition depends on your item type tree, the tree must be
set up correctly. For example, all item types that are related to tuition should be grouped together under a tree
node named Tuition. The same applies to housing and parking item types. Your actual item type tree setup
may use different terminology, but the structure must include nodes similar to these examples. Also, make
sure that the same item type number has not been included in more than one tree node.

Completing Student Financials General Setup Chapter 2
40 Copyright © 1988, 2010, Oracle and/or its affiliates. All Rights Reserved.
Charge Priority List Rules
Defining charge priority rules is the first step in determining how the system applies a payment. You define
exactly what charges are eligible for payment under a particular rule set. You also define whether payments
can be applied to charges from various time periods and you can establish a priority order for allowed
charges.
Charge priority lists depend on item type trees to identify which charge items are qualified for the particular
type of payment. Because charge priority list details are defined at the tree node level, you can make payment
restrictions as broad or narrow as you want.
Payment Overall Priority Rules
Payment overall priority rules define the order of payment allocation when payments do not fully cover all
eligible charges. You have two options when defining payment overall priority rules. Either your payment
overall priority can act as a tiebreaker, or it can pay all eligible charges equally.
See Also
Enterprise PeopleTools PeopleBook: Tree Manager
Pages Used to Set Up Payment Application Rules
Page Name Definition Name Navigation Usage
Charge Priority List ITEM_CHRG_TYP_PRTY Set Up SACR, Product
Related, Student Financials,
Charges and Payments,
Charge Priority List
Create a charge priority list
and link it to an item type
tree.
Charge Priority List -
Details
ITEM_CHRG_TYP_PRT2 Set Up SACR, Product
Related, Student Financials,
Charges and Payments,
Charge Priority List, Details
Define charge priority list
rules.
Payment Overall Priority PAY_PRIOR_ALL Set Up SACR, Product
Related, Student Financials,
Charges and Payments,
Payment Overall Priority
Define payment overall
priorities.
Creating a Charge Priority List and Linking It to an Item Type Tree
Access the Charge Priority List page (Set Up SACR, Product Related, Student Financials, Charges and
Payments, Charge Priority List).
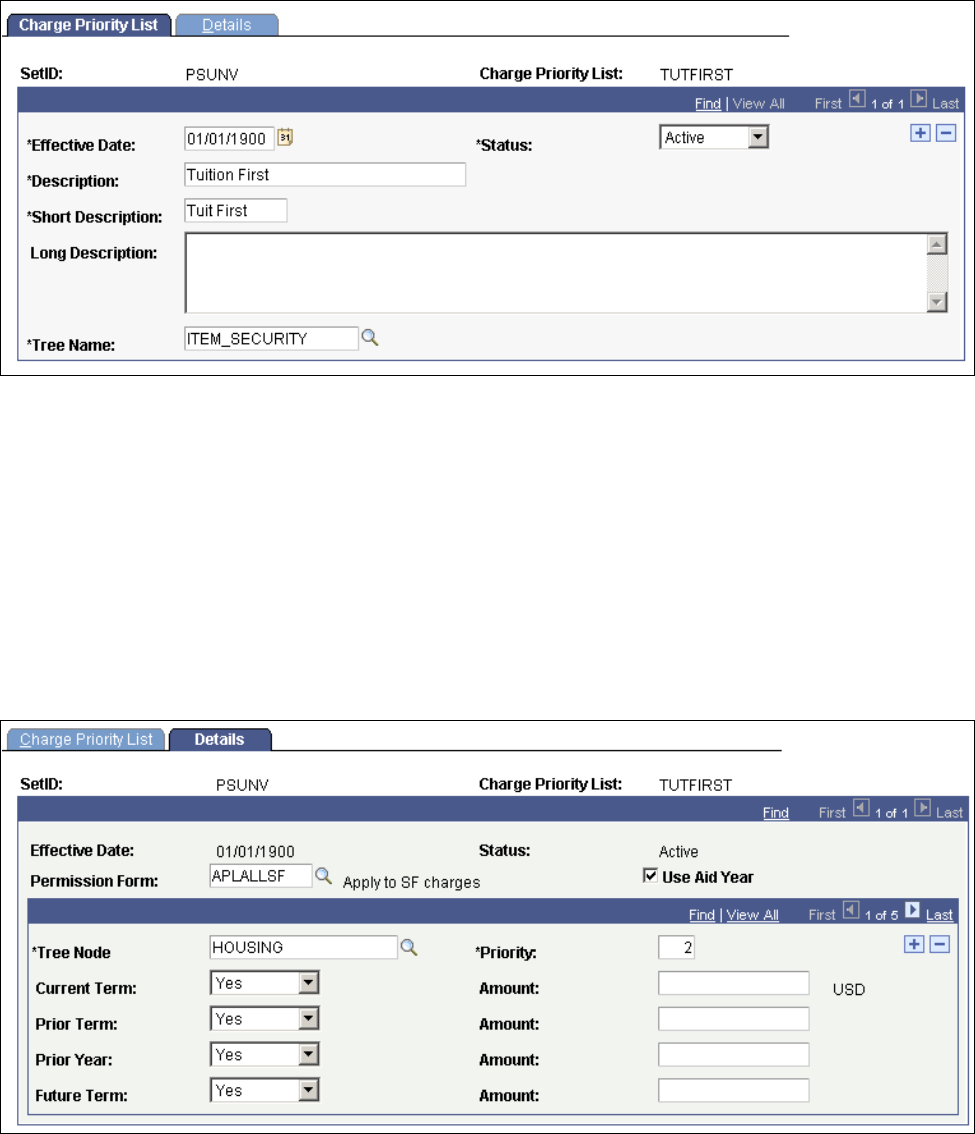
Chapter 2 Completing Student Financials General Setup
Copyright © 1988, 2010, Oracle and/or its affiliates. All Rights Reserved. 41
Charge Priority List page
Tree Name Select the name of the item type tree that includes all item types to be paid under
this charge priority list.
Defining Charge Priority List Rules
Access the Charge Priority List - Details page (Set Up SACR, Product Related, Student Financials, Charges
and Payments, Charge Priority List, Details).
Charge Priority List - Details page
Self service student permissions can be used for a student to grant permission.

Completing Student Financials General Setup Chapter 2
42 Copyright © 1988, 2010, Oracle and/or its affiliates. All Rights Reserved.
Permission Form Select a permission form if you want one to apply. A permission form is a type of
advance permission that the system uses with item types that have payment
application restrictions. When you select a permission form, the system applies
the charge priority definition only if the permission form has been attached to the
student.
Permission forms are commonly used with financial aid payment. For example, if
a particular type of financial aid award restricts payments to the current term
charges unless permission is given by the student to pay prior term charges, then
a permission form can grant that permission. The permission form must be
attached to the charge priority list definition that is set to Permission for the
prior term.
Use Aid Year Select to use the financial aid year for the charge priority list. When the flag is
off (cleared), current functionality applies and the academic year is used.
Tree Node Select allowable charges by entering the appropriate tree nodes. The system
applies payments only to charge item types that fall in the range of the tree node.
Warning! If you want to use the pay proportionate % tax functionality that is
available in Payment Overall Priority setup (see the following field description),
the tax item type must not be included within the range of allowable charges. If it
is included within the range, the system treats it as any other eligible charge and
it does not distinguish it as unique.
Priority Assign a priority level for each tree node that is used to define allowable charges.
The system uses this priority value only when you select Charge Tree Node as
one of the Sort Payment Field values in your Payment Overall Priority setup. A
priority of 1 is higher than a priority of 2.

Chapter 2 Completing Student Financials General Setup
Copyright © 1988, 2010, Oracle and/or its affiliates. All Rights Reserved. 43
Current Term Select a value to control whether payments can be applied to charges for the
current term. Four values are available for this field:
Yes: Select this value if you want the system to apply payments with no
restrictions to charges in this time period.
No: Select this value if you do not want the system to apply payments to any
charges in this time period.
Neg. Perm: (negative permission) Select this value if you want the system to
apply payments as necessary to charges in this time period, unless the student
expressly prevents it. Student permissions can be used in conjunction with
negative permission.
Permission: Select this value if you want the system to require specific
permission before applying payments to charges in this time period. Student
permissions can be used in conjunction with permission needed.
Note. The definition of the Current Term value is determined by the value of the
payment term. If no term is specified, the value of the payment term is
determined by the Default Term Control value in the SF Business Unit
component. Three options are available for default term control: Use SF Default
Term, Use Last Enrollment Term, and Use Current Enrollment Term. When you
use SF Default Term, the value of the payment term is the same as that of the SF
default term. If you use either Last Enrollment Term or Current Enrollment Term
as the default term control, the value of the payment term varies by the
enrollment history of the student against whose account the payment is being
applied.
Prior Term Select a value to control whether and how payments can be applied to charges for
the prior term. The four values for this field are the same as those defined for the
Current Term field.
The prior term is the academic term that immediately precedes the current term.
The actual determination of the prior term is based on the value that is used for
the current term. Values are:
Use Aid Year OFF:All terms prior to the current term within the academic year
only.
Use Aid Year ON:All terms prior to the current term within the current aid year
only.
Prior Year Select a value to control whether and how payments are applied to charges for
the prior year. The four values for this field are the same as those defined for the
Current Term field.
Use Aid Year OFF:All terms prior to the current academic year.
Use Aid Year ON:All terms prior to the current term that are in the aid year
immediately prior to the current aid year.

Completing Student Financials General Setup Chapter 2
44 Copyright © 1988, 2010, Oracle and/or its affiliates. All Rights Reserved.
Future Term Select a value to control whether and how payments can be applied to charges for
any future terms. The four values for this field are the same as those defined for
the Current Term field.
A future term is an academic term that comes after the current term. The actual
determination of a future term is based on the value that is used for the current
term.
Use Aid Year flag OFF: A future term is an academic term that comes after the
current term. The actual determination of a future term is based on the value that
is used for current term.
Use Aid Year flag ON: All terms after the current term within the current aid
year.
Amount Enter the maximum amount that can be applied to the corresponding period. If no
limitation exists for this payment, leave the amount field blank on all platforms
except for DB2. If the amount is left blank on a DB2 platform, it functions as if it
is zero and does not allow any amounts to be paid by the payment. On DB2
platforms only, you must complete the amount field with all 9s (a value of
999,999,999.00) to allow for no limitation. The field is formatted for 12.2
number entries.
Example of a Charge Priority List Selection
Charge priority setup can be confusing, and small differences can sometimes yield surprising results. It is not
possible to provide examples of all scenarios, but the following examples present two common outcomes.
Remember that any charge that is qualified for payment by the charge priority selection is considered equal
and can be paid according to the rules of the definition. This is why tax item types must be excluded from the
range of allowable charges if you want to pay them proportionate to the payment against the charge. If they
were included within the range of allowable charges, the tax could be paid in full, or not at all, regardless of
the amount paid on the associated charge.
Using our sample charges, and a charge priority list allowing charges from the Tuition, Housing,
Miscellaneous, and Parking tree nodes, examine the following two scenarios and see how minor changes can
affect payment application. In each case, the SF Business Unit Default Term Control is set to use the value
Last Enrollment Term. For purposes of this example, assume that the student's last completed term of
enrollment is Fall, 2000 and no term is specified with the payment (causing the system to use the SF Business
Unit Default Term Control value—this point is important to understanding these examples).
Sample Charges
Transaction Type Tree Node Term Charge Amount Due Date
Tuition Charge Tuition Fall, 1999 500.00 USD October 15, 1999
Housing Charge Housing Fall, 1999 1,000.00 USD October 30, 1999
Phone Charge Other Fall, 1999 100.00 USD October 30, 1999

Chapter 2 Completing Student Financials General Setup
Copyright © 1988, 2010, Oracle and/or its affiliates. All Rights Reserved. 45
Transaction Type Tree Node Term Charge Amount Due Date
Tuition Charge Tuition Spring, 2000 2,000.00 USD February 15, 2000
Tuition Charge Tuition Fall, 2000 2,000.00 USD October 5, 2000
Housing Charge Housing Fall, 2000 700.00 USD October 5, 2000
Misc. Charge Miscellaneous Fall, 2000 75.00 USD October 1, 2000
Housing Charge Housing Fall, 2000 200.00 USD February 1, 2001 2
Tuition Charge Tuition Spring, 2001 1,800.00 USD January 15, 2001
Housing Charge Housing Spring, 2001 1,050.00 USD February 5, 2001
Misc. Charge Miscellaneous Spring, 2001 50.00 USD February 5, 2001
Selected Charges—Scenario One
When the student makes a payment to the account, the charge priority list rules allow the following charges to
be selected as eligible for payment:
Transaction Type Tree Node Term Charge Amount Due Date
Tuition Charge Tuition Fall, 1999 500.00 USD 10/15/99
Housing Charge Housing Fall, 1999 1,000.00 USD 10/30/99
Tuition Charge Tuition Spring, 2000 2,000.00 USD 2/15/00
Tuition Charge Tuition Fall, 2000 2,000.00 USD 10/5/00
Housing Charge Housing Fall, 2000 700.00 USD 10/5/00
Misc. Charge Miscellaneous Fall, 2000 75.00 USD 10/1/00
Housing Charge Housing Fall, 2000 200.00 USD 2/1/01

Completing Student Financials General Setup Chapter 2
46 Copyright © 1988, 2010, Oracle and/or its affiliates. All Rights Reserved.
Transaction Type Tree Node Term Charge Amount Due Date
Tuition Charge Tuition Spring, 2001 1,800.00 USD 1/15/01
Housing Charge Housing Spring, 2001 1,050.00 USD 2/5/01
Misc. Charge Miscellaneous Spring, 2001 50.00 USD 2/5/01
Comparing the two tables, you can see that the only item not included in the set of eligible charges is the
phone charge. The reason for this is that the charge priority list example given previously allows payments for
charges from four tree nodes: Tuition, Housing, Miscellaneous, and Parking. The Phone charge is under the
tree node of Other and, therefore, is not considered an eligible charge. Also, because payments can be applied
to all time periods (current term, prior term, prior year, and future term), the system can include all active
charges.
Selected Charges—Scenario Two
If you use a different charge priority setup that excludes payments for a future term on each of the allowable
charge nodes, the results are considerably different:
Transaction Type Tree Node Term Charge Amount Due Date
Tuition Charge Tuition Fall, 1999 500.00 USD 10/15/99
Housing Charge Housing Fall, 1999 1,000.00 USD 10/30/99
Tuition Charge Tuition Spring, 2000 2,000.00 USD 2/15/00
Tuition Charge Tuition Fall, 2000 2,000.00 USD 10/5/00
Housing Charge Housing Fall, 2000 700.00 USD 10/5/00
Misc. Charge Miscellaneous Fall, 2000 75.00 USD 10/1/00
Housing Charge Housing Fall, 2000 200.00 USD 2/1/01
In this case, the system does not include charges for Spring, 2001 because they are associated with a future
term. This is because you established the current term as the last enrollment term when you defined your
default term control. In this case, the last enrollment term is Fall, 2000. If you change the Default Term
Control value to Use SF Default Term, the system will once again include all charges because the current
term will be Spring, 2001.
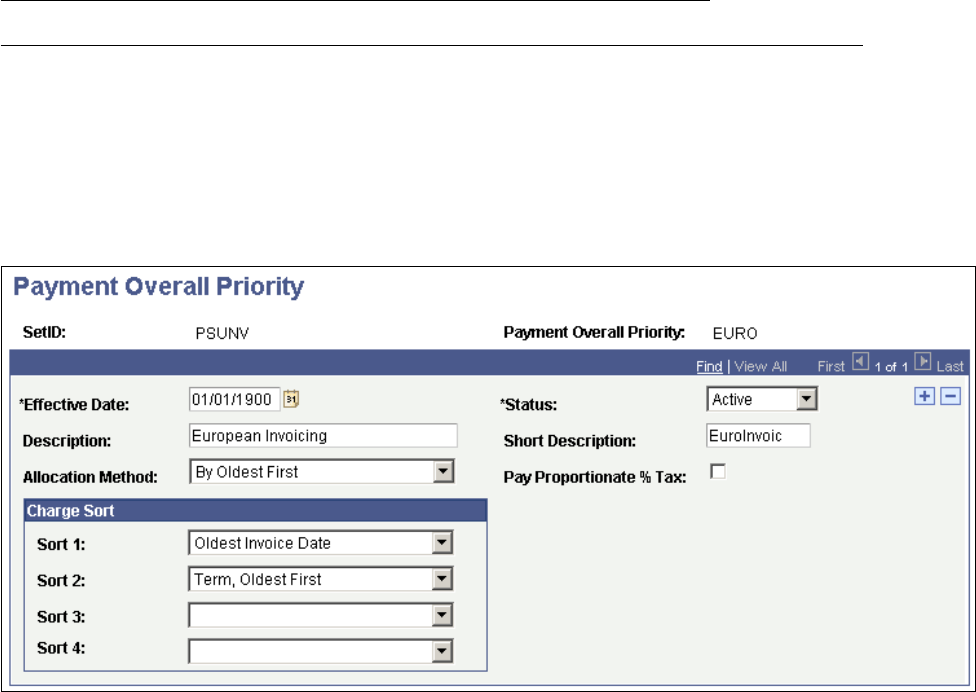
Chapter 2 Completing Student Financials General Setup
Copyright © 1988, 2010, Oracle and/or its affiliates. All Rights Reserved. 47
In summary, your charge priority definitions determine what charges are eligible for payment. This
determination is made by limiting payments to charge item types that meet specific criteria that are related to
tree nodes and time periods.
See Also
Chapter 22, "Maintaining Customers," Managing Student Permissions, page 634
Chapter 2, "Completing Student Financials General Setup," Defining Posting Parameters, page 24
Defining Payment Overall Priorities
Access the Payment Overall Priority page (Set Up SACR, Product Related, Student Financials, Charges and
Payments, Payment Overall Priority).
Payment Overall Priority page
Allocation Method Select an allocation method:
By Oldest First: Select if you want to use sort payment fields to sort the eligible
charges. If you select this option, the last sort is to order the eligible charges by
the oldest item number first.
Equal Percentages: Select if you want to pay an equal portion of each eligible
charge. If you elect to pay by equal percentages, the sort payment fields are not
used.

Completing Student Financials General Setup Chapter 2
48 Copyright © 1988, 2010, Oracle and/or its affiliates. All Rights Reserved.
Pay Proportionate %
Tax Select if you want all taxes associated with a particular charge to be paid
proportionate to the payment against the charge. Payment of taxes follows the
same payment priority as the associated charge.
Note. For pay proportionate % tax functionality to work, the tax item type cannot
be included as an allowable charge in the charge priority setup. Make sure that
the tax item type is not included within the range of any of the tree nodes that are
selected as allowable charges.
Charge Sort
You can define up to four charge sort criteria. Remember that all sort rules defined for Payment Overall
Priority apply only to charges already selected by the Charge Priority rules. For example, if your Charge
Priority rules are set up to select charges for current and future terms only, and your Payment Overall Priority
rules are set up to sort by Term, Oldest First, the term that is defined as current will be the oldest term
available.
Sort 1 Sort 2 Sort 3 and
Sort 4 A number of possible values exist for each sort field:
Academic Year: Select to sort active charges by academic year, beginning with
active charges from the earliest year.
Academic Year, Current First: Select to sort active charges by the academic year,
using the current academic year first. After the system selects eligible charges for
the current academic year, it sorts the remaining charges by academic year from
the oldest to the most recent.
Charge Tree Node: Select to sort active charges by the priority value of the
charge tree nodes that are established in the charge priority list definition being
used.
Item Charge Due Date: Select to sort active charges by charge due date,
beginning with the active charge with the earliest due date.
Term, Current First: Select to sort active charges by term, using the current term
first. You determine the definition of the current term using the Default Term
Control field on the Posting Setup page of the SF Business Unit component.
Therefore, it is not necessarily the chronological current term. After the system
selects eligible charges for the current term, it sorts the remaining charges by
term from the oldest to the most recent.
Term, Oldest First: Select to sort active charges by terms, using the oldest term
first.
Term, Payment Term First: Select to sort active charges by terms, using the term
for which the payment applies first. If no term is specified with the payment, the
system uses the SF default term. After the system selects eligible charges for the
payment term, it sorts the remaining charges by term from the oldest to the most
recent.
Oldest Invoice Date: Select if you want the posting to gather the charges by
invoice. This value is available only if the Apply Payments by Invoice flag is
selected on the SF Installation setup.

Chapter 2 Completing Student Financials General Setup
Copyright © 1988, 2010, Oracle and/or its affiliates. All Rights Reserved. 49
Example of How Payment Overall Priority Sorts Eligible Charges
Using our sample set of charges, look at how charge priority and payment overall priority rules work together
to control payment application. Suppose that a student makes a payment of 8,000.00 USD against his or her
account. Consider the following two setup scenarios to understand how differently payments are applied.
Sample Charges
Transaction Type Tree Node Term Charge Amount Due Date
Tuition Charge Tuition Fall, 1999 500.00 USD 10/15/99
Housing Charge Housing Fall, 1999 1,000.00 USD 10/30/99
Phone Charge Other Fall, 1999 100.00 USD 10/30/99
Tuition Charge Tuition Spring, 2000 2,000.00 USD 2/15/00
Tuition Charge Tuition Fall, 2000 2,000.00 USD 10/5/00
Housing Charge Housing Fall, 2000 700.00 USD 10/5/00
Misc. Charge Miscellaneous Fall, 2000 75.00 USD 10/1/00
Housing Charge Housing Fall, 2000 200.00 USD 2/1/01
Tuition Charge Tuition Spring, 2001 1,800.00 USD 1/15/01
Housing Charge Housing Spring, 2001 1,050.00 USD 2/5/01
Misc. Charge Miscellaneous Spring, 2001 50.00 USD 2/5/01
In the previous section on setting up a charge priority list, the setup example shown selects charges using four
Item Type Tree nodes (Tuition, Housing, Miscellaneous, and Parking) and allows payments to be applied in
all time periods. Using this rule set, the system selects all of the charges on the student's account as eligible,
with the exception of the phone charge.
Selected and Sorted Charges—Scenario One
Using the Payment Overall Priority setup shown previously (eligible charges sorted first by due date, then by
charge tree node), the system sorts the eligible charges in this way:

Completing Student Financials General Setup Chapter 2
50 Copyright © 1988, 2010, Oracle and/or its affiliates. All Rights Reserved.
Transaction Type Tree Node Term Charge Amount Due Date
Tuition Charge Tuition Fall, 1999 500.00 USD 10/15/99
Housing Charge Housing Fall, 1999 1,000.00 USD 10/30/99
Tuition Charge Tuition Spring, 2000 2,000.00 USD 2/15/00
Misc. Charge Miscellaneous Fall, 2000 75.00 USD 10/1/00
Tuition Charge Tuition Fall, 2000 2,000.00 USD 10/5/00
Housing Charge Housing Fall, 2000 700.00 USD 10/5/00
Tuition Charge Tuition Spring, 2001 1,800.00 USD 1/15/01
Housing Charge Housing Fall, 2000 200.00 USD 2/1/01
Housing Charge Housing Spring, 2001 1,050.00 USD 2/5/01
Misc. Charge Miscellaneous Spring, 2001 50.00 USD 2/5/01
In this example, all charges with due dates through 10/5/00 will be paid in full and 1,725.00 USD will be
applied to the Spring, 2001 Tuition charge due 1/15/01. Because not enough money is exists to pay all
charges in full, the system applies the payment to the charges in order of the due date.
Also, note that two charges are due 10/5/00 and also two are due on 2/5/01. The system sorted these charges
in order of their charge tree node priority. Recall that in the charge priority setup, the Tuition node is given a
priority of 1, Housing a priority of 2, and Miscellaneous and Parking a priority of 3.
Selected and Sorted Charges—Scenario Two
If you use a payment overall priority that reverses the order of the sort payment fields (charge tree node first
and charge due date second), the results are very different. In this case, the system sorts the eligible charges in
the following way:
Transaction Type Tree Node Term Charge Amount Due Date
Tuition Charge Tuition Fall, 1999 500.00 USD 10/15/99
Tuition Charge Tuition Spring, 2000 2,000.00 USD 2/15/00

Chapter 2 Completing Student Financials General Setup
Copyright © 1988, 2010, Oracle and/or its affiliates. All Rights Reserved. 51
Transaction Type Tree Node Term Charge Amount Due Date
Tuition Charge Tuition Fall, 2000 2,000.00 USD 10/5/00
Tuition Charge Tuition Spring, 2001 1,800.00 USD 1/15/01
Housing Charge Housing Fall, 1999 1,000.00 USD 10/30/99
Housing Charge Housing Fall, 2000 700.00 USD 10/5/00
Housing Charge Housing Fall, 2000 200.00 USD 2/1/01
Housing Charge Housing Spring, 2001 1,050.00 USD 2/5/01
Misc. Charge Miscellaneous Fall, 2000 75.00 USD 10/1/00
Misc. Charge Miscellaneous Spring, 2001 50.00 USD 2/5/01
The system pays in full all Tuition charges and those Housing charges through the October 5, 2000 due date.
This is because the system sorts charges first by charge tree node and second by the charge due date.
In summary, your Payment Overall Priority definition determines how the system sorts eligible charges
(selected by your corresponding charge priority definition) to allocate payment.
Setting Up Account Types
To set up account types, use the SF Account Types component (ACCT_TYPE_SF).
Account types classify item types into usable account groupings. Differentiating charges into multiple
accounts enables flexibility in billing and assessing late fees. For example, creating a separate account type
for housing enables you to bill and assess late fees for housing charges differently than you do for tuition
charges.
Pages Used to Set Up Account Types
Page Name Definition Name Navigation Usage
Account Types ACCT_TYPE_SF Set Up SACR, Product
Related, Student Financials,
Item Types, SF Account
Types, Account Types
Set up account types.
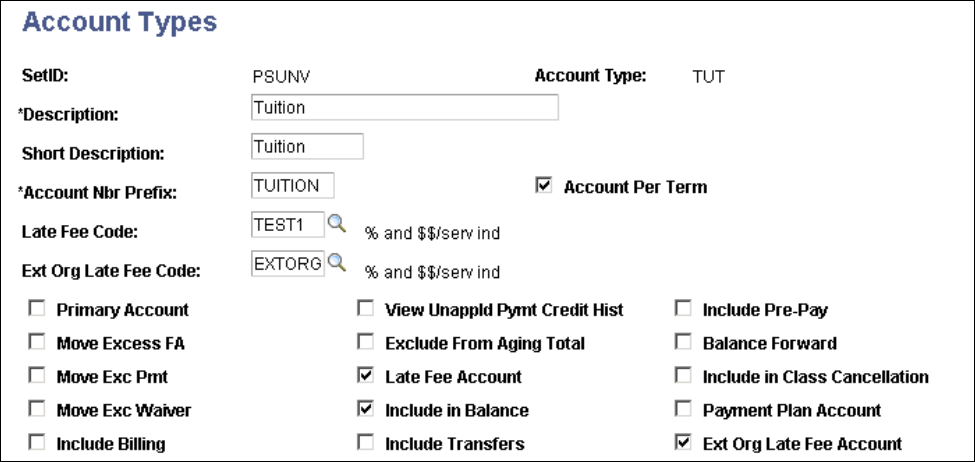
Completing Student Financials General Setup Chapter 2
52 Copyright © 1988, 2010, Oracle and/or its affiliates. All Rights Reserved.
Setting Up Account Types
Access the Account Types page (Set Up SACR, Product Related, Student Financials, Item Types, SF Account
Types, Account Types).
Account Types page
Account Nbr Prefix
(account number prefix) Enter an account number prefix that appears as part of the charge description on
account display pages. For example, charges with the account number prefix
TUITION would appear as TUITION001.
Account Per Term Select to maintain a distinction between charges by term. If you do not select this
option, all charges are placed in a single account.
Late Fee Code This code is used with the late fee process based on aging, past due accounts, or
both. Enter a late fee code to control the application of late fees to student
charges in this account type. This selection does not apply late fees to external
organization charges. This does not pertain to the Late Fees - Billing process.
Ext Org Late Fee Code
(external organization late
fee code)
This code is used with the late fee process based on aging, past due accounts, or
both. Enter an external organization late fee code to control the application of late
fees to external organization charges in this account type. This selection does not
apply late fees to student charges. This does not pertain to the Late Fees - Billing
process.
Primary Account Select to establish this account as primary. Only one account type can be
designated as the primary account.

Chapter 2 Completing Student Financials General Setup
Copyright © 1988, 2010, Oracle and/or its affiliates. All Rights Reserved. 53
View Unappld Pymt
Credit Hist (view
unapplied payment credit
history)
Select if you want unapplied payments to offset eligible charges. For example, a
student has a tuition charge of 5,000 USD that is 90 days past due and an
unapplied payment of 1,000 USD that is in the student's account. If you clear the
check box, Credit History shows 5,000 USD as 90 days past and –1,000 USD as
current. If you select the check box, Credit History shows 4,000 USD as 90 days
past due.
Include Pre-Pay Reserved for future use.
Move Excess FA(move
excess financial aid) Select to have excess financial aid moved into the FA Excess account that is
defined on the SF business unit. For example, a student owes 1,000 USD in
tuition and receives 1,000 USD in financial aid but later drops a class and overall
charges are reduced to 750 USD. If the check box is selected, the excess 250
USD is moved from the Tuition account to the FA Excess account that is
specified on the SF business unit. If the check box is cleared, the excess remains
in the Tuition account as a credit.
Note. When you select this option, you must also select the Move Initial
Financial Aid option on the SF Business Unit, Posting setup page.
Exclude from Aging
Total Select to prevent this account from aging and being included in the collection
process.
Balance Forward Reserved for future use.
Move Exc Pmt (move
excess payment) Select to move an excess payment into the Payment Excess account that is
defined on the Posting setup page in the SF Business Unit component. For
example, a student receives a parking ticket for 200 USD that is subsequently
paid with a 200 USD check. The student then launches an appeal and the ticket is
reduced to 150 USD. If the check box is selected, the excess 50 USD is moved
from the Parking account to the Payment Excess account defined on the SF
business unit. If the check box is cleared, the excess 50 USD remains in the
Parking account as a credit.
Note. When you select this option, you must also select the Move Initial Payment
option on the SF Business Unit, Posting setup page.
Late Fee Account This amount is used with the late fee process based on aging, past due accounts,
or both. Select to designate the account as the recipient of all late fees. When you
select this option, you must also enter a late fee code. This does not pertain to the
Late Fees - Billing process.
Include In Class
Cancellation Select to include this account when determining whether a student's enrollment
will be canceled due to nonpayment of fees. If the check box is cleared, this
account will not be included in calculations. For example, you might want to
include charges in the tuition account but exclude charges in a miscellaneous
account.

Completing Student Financials General Setup Chapter 2
54 Copyright © 1988, 2010, Oracle and/or its affiliates. All Rights Reserved.
Move Exc Waiver (move
excess waiver) Select to move an excess waiver payment into the Excess Waiver account type
that is defined on the SF business unit. For example, a student owes 1,000 USD
in tuition and receives a 1,000 USD tuition waiver but later drops a class that
reduces the overall charge to 750 USD. If the check box is selected, the excess
250 USD moves from the Tuition account to the Excess Waiver account
specified on the SF business unit. If the check box is cleared, the excess 250
USD remains in the Tuition account as a credit.
Note. When you select this option, you must also select the Move Initial Waiver
option on the SF Business Unit, Posting setup page.
Include in Balance Select to include the account in the student's account balance. If this check box is
cleared, the account is excluded from the student's balance.
Payment Plan Account Select if the account is to be used as a payment plan account.
Note. If you select this check box, do not select a late fee code. This does not
pertain to the Late Fees - Billing process.
Include Billing Reserved for future use.
Include Transfers Reserved for future use.
Ext Org Late Fee
Account (external
organization late fee
account)
This is account used with the late fee process based on aging, past due accounts,
or both. Select to attach a late fee to the account. When you select this option,
you must also enter an external organization and late fee code. This does not
pertain to the Late Fees - Billing process.
See Also
Chapter 18, "Administering Payment Plans," page 471
Setting Up Accounting Dates
This section discusses how to set up accounting dates.
Page Used to Set Up Accounting Dates
Page Name Definition Name Navigation Usage
Accounting Dates SSF_ACCTG_DT_DEFN Set up SACR, Product
Related, Student Financials,
Item Types, Accounting
Dates, Accounting Dates
Set up accounting dates for
a term or a combination of
term and session.
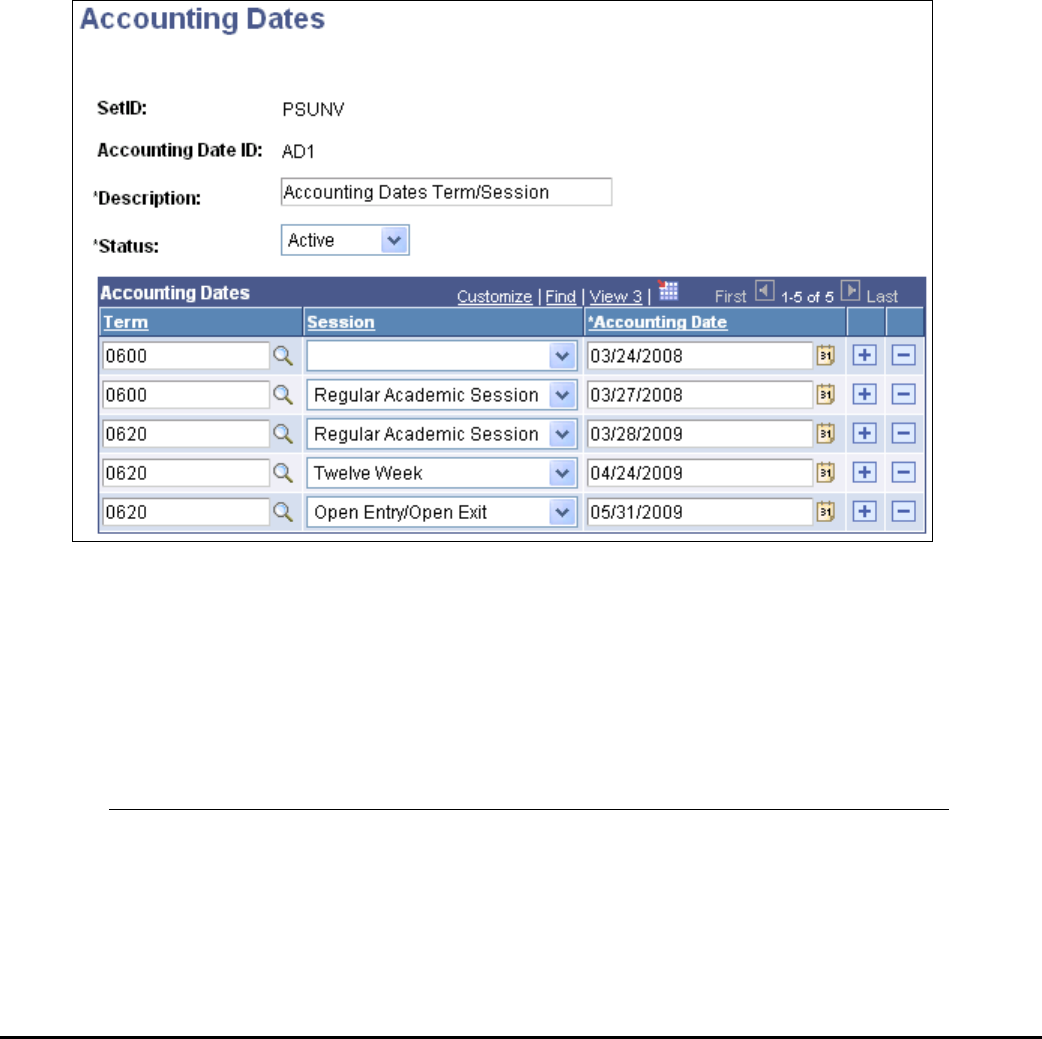
Chapter 2 Completing Student Financials General Setup
Copyright © 1988, 2010, Oracle and/or its affiliates. All Rights Reserved. 55
Page Used to Set Up Accounting Dates
Access the Accounting Dates page (Set up SACR, Product Related, Student Financials, Item Types,
Accounting Dates, Accounting Dates).
Accounting Dates page
Use this page to maintain accounting date IDs and accounting dates for each term or combination of term and
session.
All IDs that you set up on this page and that have an active status are available in the Accounting Date ID
field on the Initial Setup page. On that page you can assign an ID to an item type to designate the specific
date to be used for transactions.
See Chapter 2, "Completing Student Financials General Setup," Accounting Date Options, page 59.
Accounting Date Enter a date to be used to stamp Accounting Date (ACCOUNTING_DT) in
Accounting Line (SF_ACCTG_LN) transactions.
You can set up an accounting date for a term or a combination of term and
session.
Setting Up Item Types and Item Type Groups
To set up item types and item type groups, use the Item Types component (ITEM_TYPE_PANEL) and the
Item Type Groups component (ITEM_GROUPINGS).

Completing Student Financials General Setup Chapter 2
56 Copyright © 1988, 2010, Oracle and/or its affiliates. All Rights Reserved.
This section provides an overview of item types and item type groups and discusses how to:
•Define basic item type attributes.
•Define transaction amount and tax form parameters for item types.
•Define miscellaneous parameters for item types.
•Define external awards.
•Define item type posting restrictions.
•Link account types to an item type.
•Map item types to general ledger accounts.
•Define item type groups.
Understanding Item Types and Item Type Groups
Item types are the basic work unit of the Student Financials application. Each item type defines and describes
a unique action. During the setup of your item types, you differentiate between charges and credits and define
how and where each can be applied. You also group them by classification and determine how your system
uses them to transfer student account information to your general ledger.
Many functions in the Student Financials application also use item type trees. You need to understand how
item type trees are organized and used.
Note. Virtually everything you do within Student Financials involves item types (the exception being certain
transactions in cashiering). Because of this, planning your item type setup is very important. Make sure that
you create enough item types to represent every unique transaction. Also, establish a numbering scheme that
enables you to group similar charges and credits. This helps you later when you define item type security and
facilitates creating groups of item types for other setup procedures such as defining waivers, charge priority
lists, and payment plans. Use the sample data that is provided with the system as an example.
Item Type Groups
Use item type groups to combine ranges of item types using multiple item type tree nodes. Item type groups
limit the application of credits to desired charge items only. For example, if you have a waiver attached to a
tuition group, you can use an item grouping to limit the application of the waiver to only tuition and housing,
rather than to all fees.
See Also
Enterprise PeopleTools PeopleBook: Tree Manager

Chapter 2 Completing Student Financials General Setup
Copyright © 1988, 2010, Oracle and/or its affiliates. All Rights Reserved. 57
Pages Used to Set Up Item Types and Item Type Groups
Page Name Definition Name Navigation Usage
Initial Setup ITEM_TYPE_TBL Set Up SACR, Product
Related, Student Financials,
Item Types, Item Types,
Initial Setup
Define basic item type
attributes.
Amount Edits ITEM_TYPE_TBL4 Set Up SACR, Product
Related, Student Financials,
Item Types, Item Types,
Amount Edits
Define transaction amount
and tax form parameters for
item types.
Miscellaneous ITEM_TYPE_TBL2 Set Up SACR, Product
Related, Student Financials,
Item Types, Item Types,
Miscellaneous
Define miscellaneous
parameters for item types.
External Awards SSF_EAITMTYPE_TBL Set Up SACR, Product
Related, Student Financials,
Item Types, Item Types,
External Awards
Define the financial aid
external award type, source,
and program code attributes
for SF payments to be
considered as external
awards.
Posting Restrictions ITEM_TYPE_TBL3 Set Up SACR, Product
Related, Student Financials,
Item Types, Item Types,
Posting Restrictions
Define item type posting
restrictions.
Account Types ITEM_ACCT_TYPE Set Up SACR, Product
Related, Student Financials,
Item Types, Item Types,
Account Types
Link account types to an
item type.
GL Interface GL_INTERFACE Set Up SACR, Product
Related, Student Financials,
Item Types, Item Types, GL
Interface
Map item types to general
ledger accounts.
AP ChartFields SSF_CF_WRKGRID_SEC Click the Jrnl Set
ChartFields link on the GL
Interface page.
Define item type GL
interface parameters for AP
distribution.
Write-off ChartFields SSF_CF_WRKGRID_SEC Click the Write-off
ChartFields link on the Item
Interface page.
Define item type GL
interface parameters for
write-offs.
Journal Set ChartFields SSF_CF_WRKGRID_SEC Click the Jrnl Set
ChartFields link on the GL
Interface page.
Define item type GL
interface parameters for a
journal set.
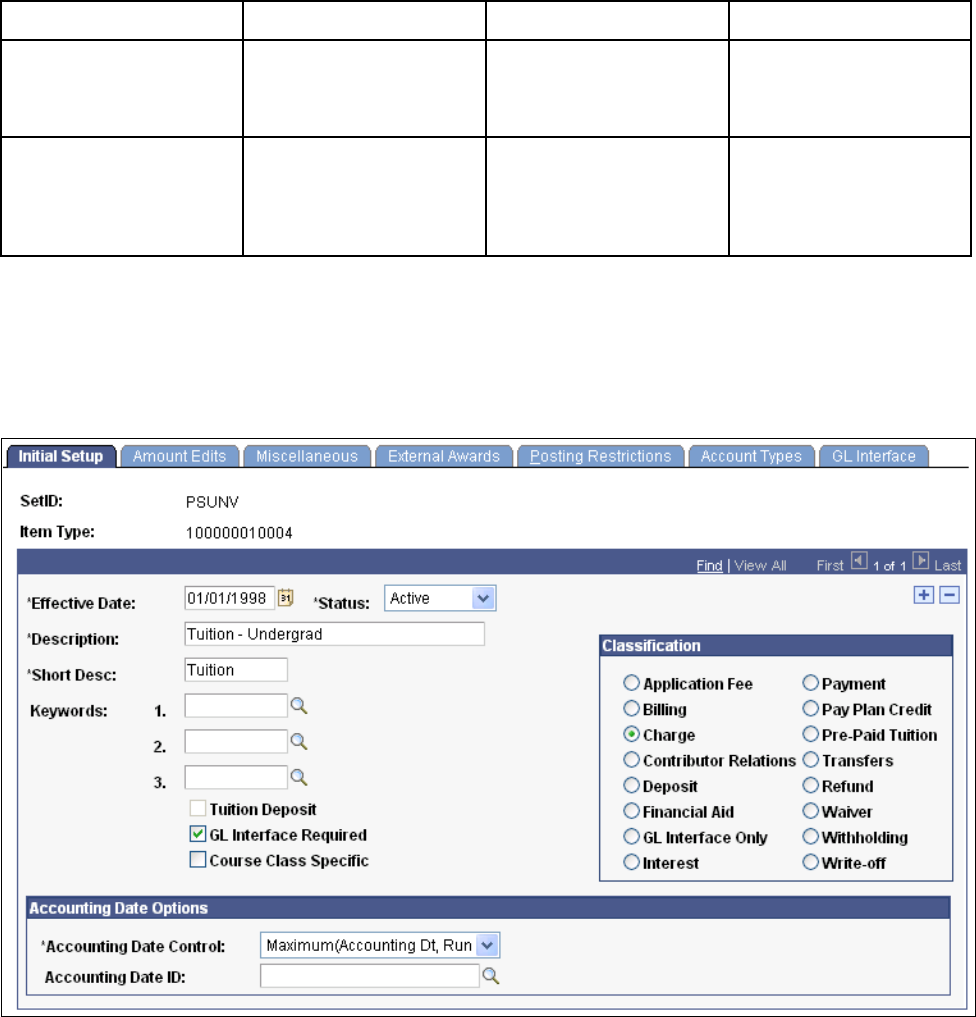
Completing Student Financials General Setup Chapter 2
58 Copyright © 1988, 2010, Oracle and/or its affiliates. All Rights Reserved.
Page Name Definition Name Navigation Usage
Deferred ChartFields SSF_CF_WRKGRID_SEC Click the Deferred
ChartFields link on the GL
Interface page.
Define item type GL
interface parameters for a
deferred revenue account.
Item Type Groups ITEM_GROUP_TBL Set Up SACR, Product
Related, Student Financials,
Item Types, Item Type
Groups
Define item type groups.
Defining Basic Item Type Attributes
Access the Initial Setup page (Set Up SACR, Product Related, Student Financials, Item Types, Item Types,
Initial Setup).
Initial Setup page
Keywords Select up to three keywords that you want to link to the item type.
Tuition Deposit Select if the item type is for a tuition deposit. This check box is active only when
the Deposit item type classification is selected.

Chapter 2 Completing Student Financials General Setup
Copyright © 1988, 2010, Oracle and/or its affiliates. All Rights Reserved. 59
GL Interface Required If you select this check box, you must complete the GL Interface page of this
component to save the item type. You must define both a debit and credit side for
the item type, the GL Pct (general ledger percent) must add up to 100 percent for
all accounts on each side, and all of the required fields on the GL Interface page
must be populated. If you select this check box, the Course Class Specific check
box and Accounting Date Options group box also become available.
See Chapter 2, "Completing Student Financials General Setup," Mapping Item
Types to General Ledger Accounts, page 70.
Course Class Specific Select if you want to override the GL Interface defined for this item type and use
one that is defined specifically for certain courses or classes. When you select
this check box, the GL Interface defined for the item type is overridden if you
define an interface at the course or class level only and select the Track Class
Pricing check box on the related term fee setup.
For example, if you want tuition revenue from certain math classes credited to a
special account rather than the normal tuition account, set up a unique item type
using the Course Class Specific option.
Note. GL Interfaces specific to a course or class are defined on the Student
Records GL Interface page in either the Course Catalog component or the Class
Schedule component.
Accounting Date Options
The Accounting Date Options group box is available only when the GL Interface Required check box is
selected.

Completing Student Financials General Setup Chapter 2
60 Copyright © 1988, 2010, Oracle and/or its affiliates. All Rights Reserved.
Accounting Date
Control Select the accounting date of the item type. Transactions in Accounting Line
(SF_ACCTG_LN) are stamped with the accounting date.
Values are:
Accounting Date:
Select this value to use the accounting date that is set up on the Accounting Dates
page.
When you select Accounting Date here, you must then select a value in the
Accounting Date ID field, to associate it with the item type. The date that is used
in Accounting Line transactions is the date that is set up for the term or a
combination of term and session for that ID on the Accounting Dates page.
Item Effective Date: Select to use the effective date of the transaction (item) as
the accounting date.
Maximum (Accounting Dt, Run Dt):
Select this value to use the date that is the greater of these two dates—the
accounting date (see the definition of the Accounting Date value) and the run
date, which is the GL Interface process date.
Maximum (Term Start Dt, Run Dt): Select to make the system use the more
recent of term start date or run date as the accounting date. This option is useful
to prevent complications resulting from accounting periods that have already
been closed.
Run Date: Select to use the GL Interface process date as the accounting date.
This is the default value for this field.
Term Start Date: Select to use the beginning of the term as the accounting date.
For example, suppose students at your institution register for fall term courses in
the spring, but you want the system to put the tuition income from those
registrations into a fall accounting period. By selecting term start date as your
accounting date control and specifying the fall term on your tuition transaction,
the system posts the charges to the fall period.
Warning! Selecting Term Start Date in the Accounting Date Control field could
cause transactions to be backdated into an already closed accounting period.
Select this option with caution.
Accounting Date ID This field is available and required only when the value in the Accounting Date
Control field is Accounting Date or Maximum (Accounting Dt, Run Dt).
All IDs that are set up on the Accounting Dates page and have an active status
are available values in this field.
Use this field to assign an accounting date ID to an item type to designate the
specific date to be used for Accounting Line transactions.
See Chapter 2, "Completing Student Financials General Setup," Setting Up
Accounting Dates, page 54.

Chapter 2 Completing Student Financials General Setup
Copyright © 1988, 2010, Oracle and/or its affiliates. All Rights Reserved. 61
Classification
Select the appropriate classification for this item type. Your choice determines the fields that are available to
you on the Miscellaneous Edits page, and indicates to the system whether the item type is a charge or credit
entry.
Application Fee Select if you are defining an item type used for an application fee. Application
Fee transactions result in a charge on the student's account.
Billing Reserved for future use.
Charge Select if you are defining a charge item type.
Charge transactions result in a charge on the student's account and, depending on
your GL setup, may create a receivable.
Contributor Relations Select if you are defining a contributor relations item type. Typically, the
Contributor Relations staff define contributor relations item types.
Deposit Select if you are defining a deposit item type. If the deposit classification is
selected, a Tuition Deposit check box is also activated. If this item type is used
for a tuition deposit, both the Deposit classification and the Tuition Deposit
check box must be selected.
Deposit and Tuition Deposit transactions result in a credit on the student's
account.
Financial Aid Select if you are defining a financial aid item type.
Financial Aid transactions result in a credit (payment) on the student's account.
Note. Financial Aid item types also require definition in the Financial Aid
application.
GL Interface Only Reserved for future use.
Interest Select if you are defining an item type for interest charges for payment plans.
Interest transactions result in a charge on the student's account.
Payment Select if you are defining a payment item type.
Payment transactions result in a credit (payment) on the student's account.
Pay Plan Credit Reserved for future use.
Pre-Paid Tuition Reserved for future use.
Transfers Reserved for future use.
Refund Select if you are defining an item type used for an overpayment refund.
Refund transactions result in a charge on the student's account.
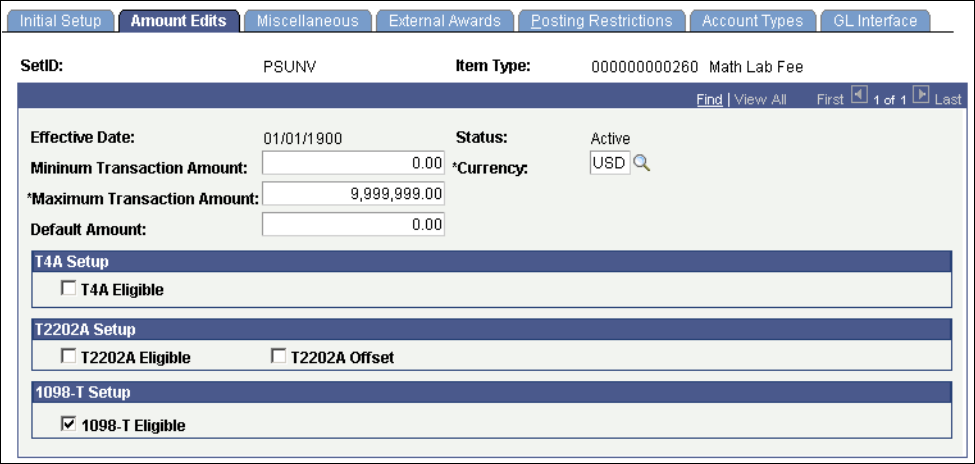
Completing Student Financials General Setup Chapter 2
62 Copyright © 1988, 2010, Oracle and/or its affiliates. All Rights Reserved.
Waiver Select if you are defining an item type used for waivers.
Waiver transactions result in a credit (payment) on the student's account.
Withholding Select if you are defining an item type for tax withholding.
Withholding transactions result in a charge on the student's account.
Write-off Select if you are defining an item type used for bad debt write-off.
Write-off transactions result in a credit on the student's account.
See Also
PeopleSoft Enterprise Contributor Relations 9.0 PeopleBook, "Setting Up Commitment Management,"
Completing Item Type Initial Setup
PeopleSoft Enterprise Financial Aid 9.0 PeopleBook, "Setting Up Packaging Basics," Defining Financial Aid
Item Types
Defining Transaction Amount and Tax Form Parameters for Item Types
Access the Amount Edits page (Set Up SACR, Product Related, Student Financials, Item Types, Item Types,
Amount Edits).
Amount Edits page

Chapter 2 Completing Student Financials General Setup
Copyright © 1988, 2010, Oracle and/or its affiliates. All Rights Reserved. 63
Min Transaction
Amount (minimum
transaction amount) and
Max Transaction
Amount(maximum
transaction amount)
Select the optional minimum and maximum amounts for each transaction using
this item type. The system uses these amounts as edits for group posting.
Base Currency The base currency selected by your institution is supplied automatically to the
Base Currency field. You can override this field.
Default Amount You can enter a default amount for your item types to streamline data entry. This
is particularly useful when you are entering a charge or payment for something
with a fixed cost (for example, a parking permit). You can override this default
amount whenever necessary. The default amount must be greater than or equal to
the minimum transaction amount.
T4 Setup
This group box pertains to the form that is required by the Canadian government to report certain scholarships
and other financial aid that must be counted as income.
T4 processing in Student Financials is a payroll interface. You can use Student Financials or Financial Aid to
process income scholarships and have the scholarship income reported to the federal government through the
standard payroll T4 process.
Note. If your institution does not use PeopleSoft Payroll for North America, you can run the SF Generate T4
Data process (SFGENT4) and use the output from the file generated by this process to create an interface with
your payroll system.
T4A Eligible Select the T4A Income check box and enter a corresponding wage loss plan on
the CDN/ANZ Taxes page (in the SF business unit component) to indicate that
this item type is considered income per the T4 definition (and, therefore, needs to
be reported as income). A process in tax reporting generates the payroll interface
that is necessary to generate a T4 transaction as an interface to the payroll
system.
Note. Wage loss plans are set up in Set Up HRMS, Product Related, Payroll for
North America, Canadian Taxes, Wage Loss Plan Table.
T2202A Setup
This group box pertains to the form that is required by the Canadian government to report eligible educational
expenses for Canadian students.
T2202A Eligible Select if this item is an eligible educational expense.
T22202A Offset Select if this item is to be used to offset eligible educational expenses. For
example, waivers may reduce the total fees paid by the student and would,
therefore, be considered an offset.
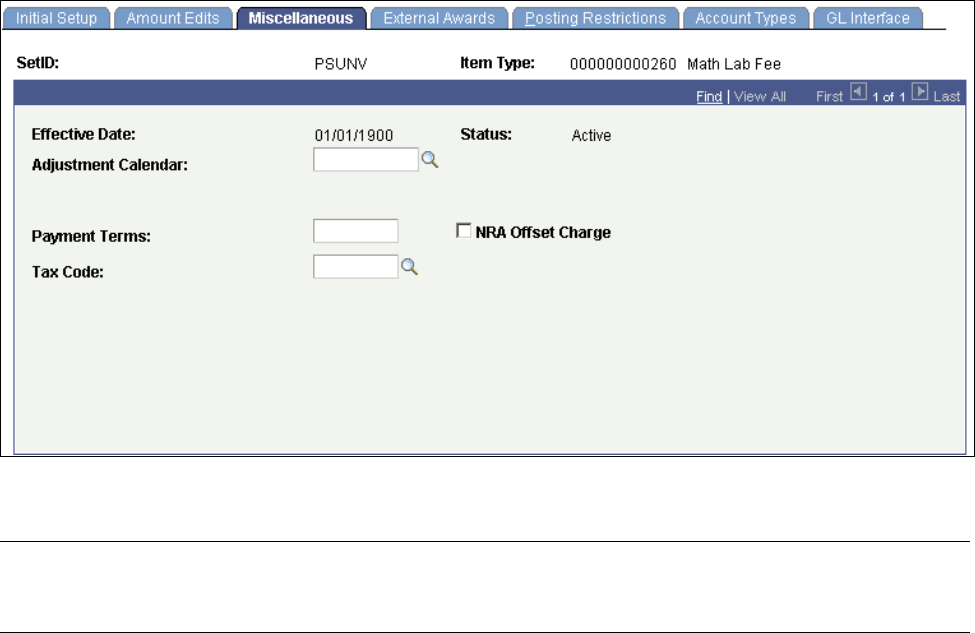
Completing Student Financials General Setup Chapter 2
64 Copyright © 1988, 2010, Oracle and/or its affiliates. All Rights Reserved.
1098-T Setup
This group box pertains to the form that is required by the U.S. government to report eligible educational
expenses for U.S. students.
1098-T Eligible Select if this item is an eligible educational expense.
Defining Miscellaneous Parameters for Item Types
Access the Miscellaneous page (Set Up SACR, Product Related, Student Financials, Item Types, Item Types,
Miscellaneous).
Miscellaneous page
Note. Not all fields shown in the example are available for all item type classifications. And other fields may
be available that are not shown. The following list defines all fields that are used with all item type
classifications.

Chapter 2 Completing Student Financials General Setup
Copyright © 1988, 2010, Oracle and/or its affiliates. All Rights Reserved. 65
Charge Priority List Select the charge priority list that you want to use to control which charges are
eligible for payment with this item type.
If you are selecting a charge priority list for an ePayment item type, the value that
you select here affects the charges that are eligible for self-service payment on
the Payment Information, Charge Information, and Payment Allocation pages.
This field is used with Deposit, Financial Aid, Payment, Pre-Paid Tuition, and
Waiver item type classifications.
Note. You can leave this field blank if you want charge priority lists to be
ignored for this item type. If you do so, excess payments appear as unapplied
payments, potentially available for refund to the student. For example, if this
item type is a Financial Aid stipend that a student uses to pay for living expenses,
but not available for tuition and mandatory fees, you could leave this field blank.
Any stipend is then reflected as an excess payment and may be given to the
student as a refund for living expenses.
Warning! Do not change this setting after transactions have been posted. Create
a new item type with a new charge priority list.
Payment Overall
Priority Select the payment overall priority definition that you want to use to control the
order in which payments are applied to eligible charges using this item type.
This field is used with Deposit, Financial Aid, Payment, Pre-Paid Tuition, and
Waiver item type classifications.
Warning! Do not change this setting after transactions have been posted. Create
a new item type with a new payment overall priority.
Adjustment Calendar Reserved for future use.
Days to Encumber If you want to encumber payments for a period of time before making them
available for a refund, enter the number of days in this field.
The number that you enter in this field establishes how many business days must
pass before a refund can be made. For example, if you entered the number 10 in
this field, ten working days would have to pass before a customer could receive a
payment refund (the student could receive a refund on the eleventh day).
This field is used with Payment item type classifications.
Payment Terms Reserved for future use.
NRA Taxable Credit
(nonresident alien taxable
credit) and Earnings
Code
Select if this item type is considered taxable income for nonresident aliens. When
you select this option, the Earnings Code field becomes active and you can
identify the item type with its corresponding payroll earnings code.
This field is used with Financial Aid, Payment, and Waiver item type
classifications.

Completing Student Financials General Setup Chapter 2
66 Copyright © 1988, 2010, Oracle and/or its affiliates. All Rights Reserved.
NRA Offset Charge
(nonresident alien offset
charge) and Earnings
Code
Select if this item type can offset (reduce) tax liability for nonresident aliens.
When you select this option, the Earnings Code field becomes active and you can
identify the item type with its corresponding payroll earnings code. This field is
not shown on the sample page.
This field is used with Application Fee, Billing, Charge, GL Interface Only,
Interest, and Withholding item type classifications.
Tax Code Select a tax code for charges that are taxable. For example, purchases that are
made at a campus bookstore might be subject to state taxes, local sales taxes, or
both. This field is not shown on the sample page.
This field is used with Charge, GL Interface Only, Refund and Withholding item
type classifications.
Earnings Code Non
Taxable Enter an earnings code to be used with nontaxable payments.
This field is used with Deposit, Financial Aid, Payment, Pre-Paid Tuition,
Refund, and Waiver item type classifications.
Earnings Code If you process refunds through payroll, choose the appropriate earnings code.
This field is used with all item type classifications except Write-off.
Tender Specific Select if you want to specify the form of tender to use with this item type. For
example, if you set up an item type to be used for credit card payments, you
should select this check box and specify the desired tender form in the Tender
Category field. The Tender Category field appears when you select this option.
This field is used with Deposit and Payment item type classifications.
Tender Category Select the tender category that you want to use with a tender specific charge.
Refundable Indicator Select if you want payments against the charge to be eligible for refunding.
This field is used with Deposit, Financial Aid, Payment, and Pre-Paid Tuition
item type classifications.
Taxable If you use PeopleSoft Payroll for North America, the system automatically
selects and uses this option. Clear the check box if the item type is not taxable
under any circumstance, or your institution does not use Payroll for North
America.
This field is used with Deposit, Financial Aid, Payment, and Pre-Paid Tuition
item type classifications.
Payment Priority Flag Select to assign a priority ranking to this payment. When you select this check
box, the Priority field is activated. If you do not select this option, the system
ignores values in the Priority field and the payment has the lowest priority
ranking (999).
This field is used with Deposit, Financial Aid, Payment, and Waiver item type
classifications.
Warning! Do not change this setting after transactions have been posted. Create
a new item type with the Payment Priority Flag check box cleared.
Chapter 2 Completing Student Financials General Setup
Copyright © 1988, 2010, Oracle and/or its affiliates. All Rights Reserved. 67
Priority Enter a priority value.
Payment priority is used to cause payment swapping whereby payments with a
higher priority can actually displace lower-priority payments. For example, you
might want financial aid payments to be applied to tuition charges whenever
possible, leaving the student with less out-of-pocket expenses. And rules that are
associated with certain types of financial aid might require that institutional
waivers be applied ahead of the aid. In this case, the institutional waivers should
have a higher priority value (1 being the highest priority value and 999 being the
lowest) than the financial aid, and the financial aid should have a higher priority
value than a cash payment.
With payment swapping, waivers and financial aid payments (in the previous
example) can be applied after a cash payment has been made and the cash
payment is swapped out, or displaced by the higher priority payments. Assuming
that the total payments exceed the amount of the charge resulting in an
overpayment, the cash payment would then be eligible for refund to the student.
This field is used with Deposit, Financial Aid, Payment, and Waiver item type
classifications.
Pick Up Receivable from
Charge Select to credit receivables based on the specific charge being paid by the
payment. This selection is used in GL processing.
This field is used with Deposit, Financial Aid, Payment, and Waiver item type
classifications.
Match Charge Write-
Offs Select to match write-off entries to the original charges. You must also complete
the Write-Off page for each charge item type and term for which you want to
match charges to write-offs on the GL Interface. This field is not shown on the
sample page.
If this check box is cleared, write-offs will be routed to the generic receivables
account that is set up in the write-off item type.
This field is used only with the Write-off item type classification.
Defining External Awards
Access the External Awards page (Set Up SACR, Product Related, Student Financials, Item Types, Item
Types, External Awards).
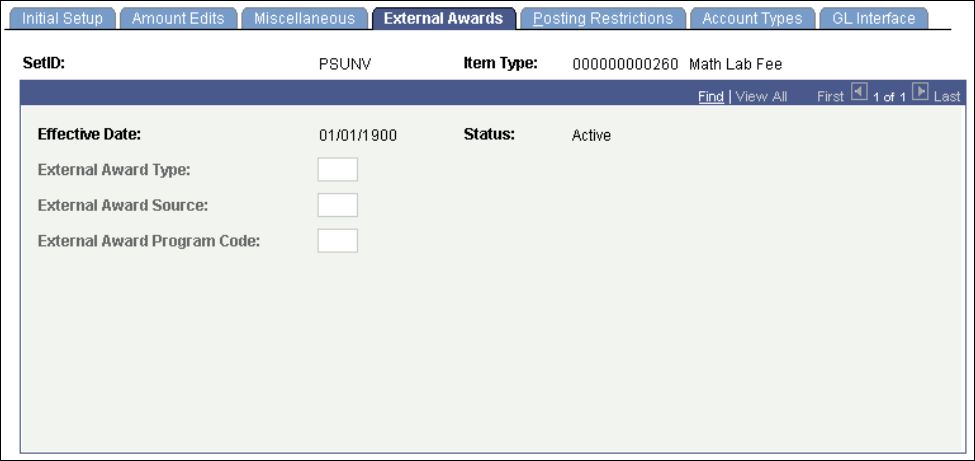
Completing Student Financials General Setup Chapter 2
68 Copyright © 1988, 2010, Oracle and/or its affiliates. All Rights Reserved.
External Awards page
Use this page to define the financial aid external award type, source, and program code.
To define an external award, complete the financial aid setup that defines the general external award
attributes, then set the way your institution mapping strategy will represent a student's financial payment will
be represented on a Financial Aid Award package. Once this is completed, complete the External Award
Cross Reference setup in Financial Aid which will maps the award attributes to a financial aid item type.
Finally, complete the External Award page on the Student Financials item type setup to complete the
mapping of payments to a Financial Aid award.
The Student Financials External Awards process uses the cross-reference mapping and external award
attributes mapped on the Student Financials item type setup to determine which Student Financials payments
to process and report as external award transactions.
See Also
[lsfa] Setting Up External Awards
[lsfa] Managing External Award Reporting
Defining Item Type Posting Restrictions
Access the Posting Restrictions page (Set Up SACR, Product Related, Student Financials, Item Types, Item
Types, Posting Restrictions).
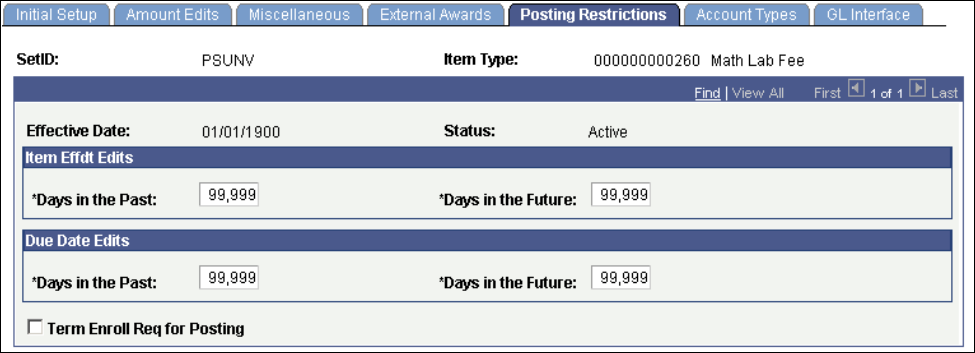
Chapter 2 Completing Student Financials General Setup
Copyright © 1988, 2010, Oracle and/or its affiliates. All Rights Reserved. 69
Posting Restrictions page
Item Effdt Edits (item effective date edits)
Days in the Past and
Days in the Future Enter the number of days in the past and the number of days in the future that an
item can be effective-dated.
Due Date Edits
Days in the Past and
Days in the Future Enter the number of days in the past and the number of days in the future that a
due date can be set.
Appropriate Term
Enroll Req for Posting
(appropriate term enroll
required for posting)
Select if you want the system to make sure the student is enrolled in the
appropriate term before posting the charge. If the student is not enrolled, the
charge is left with the status unposted. Use this feature to avoid posting charges
that have a high probability of being canceled.
Linking Account Types to an Item Type
Access the Account Types page (Set Up SACR, Product Related, Student Financials, Item Types, Item Types,
Account Types).
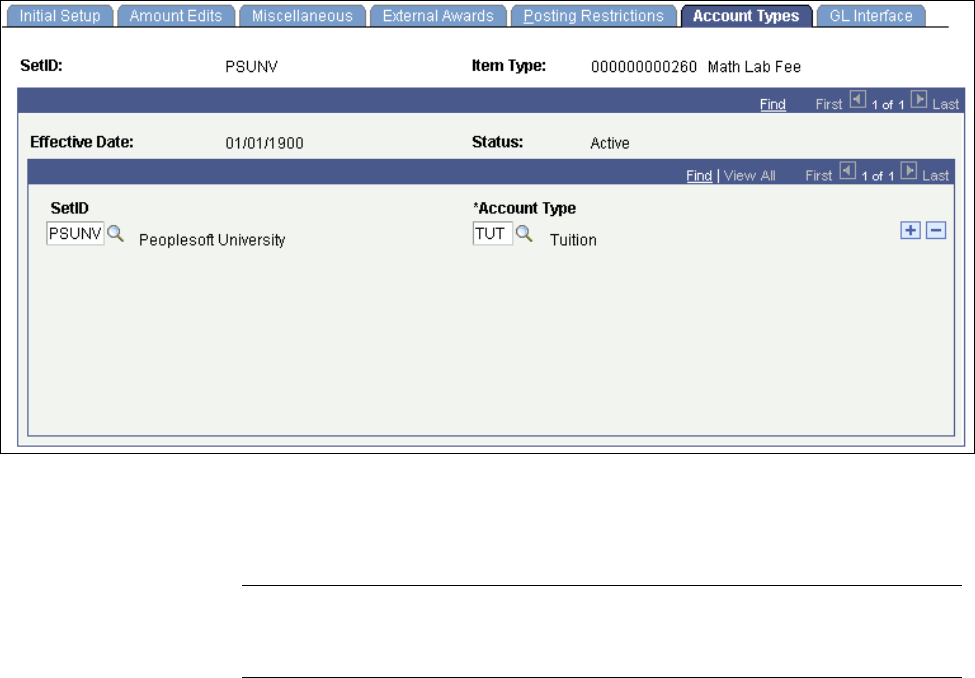
Completing Student Financials General Setup Chapter 2
70 Copyright © 1988, 2010, Oracle and/or its affiliates. All Rights Reserved.
Account Types page
SetID Enter the setID that includes both the account type and the item type.
Warning! You can have item types and account types duplicated in more than
one setID, but this is not recommended. Exercise caution that you do not specify
a setID that is incorrect for the item type that you are defining.
Account Type Enter an account type that you want to associate with the item type. Account
types provide information for prompting when you are performing data entry.
Mapping Item Types to General Ledger Accounts
Access the GL Interface page (Set Up SACR, Product Related, Student Financials, Item Types, Item Types,
GL Interface).
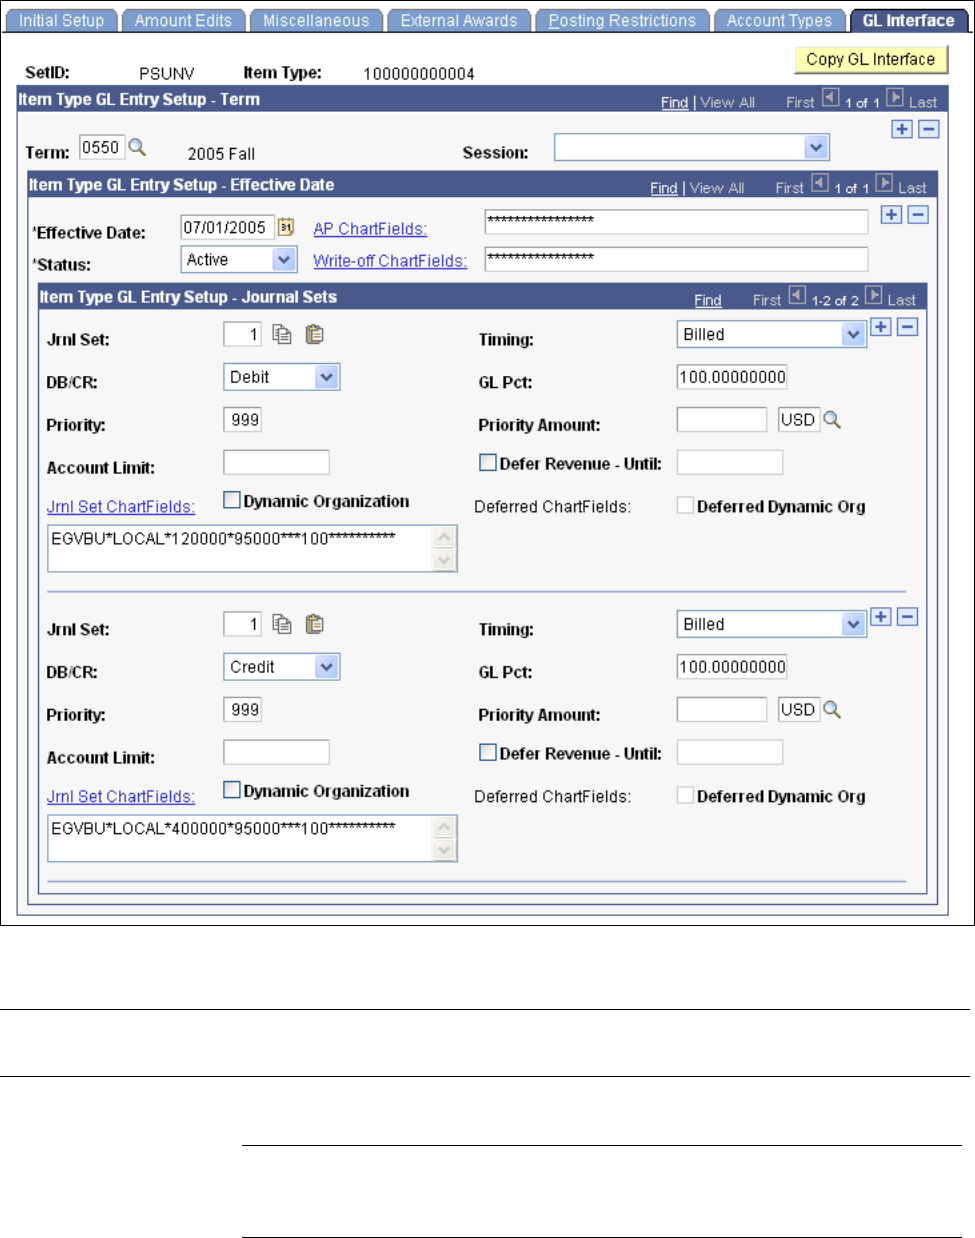
Chapter 2 Completing Student Financials General Setup
Copyright © 1988, 2010, Oracle and/or its affiliates. All Rights Reserved. 71
GL Interface page
Note. If you select the GL Interface Required check box on the Initial Setup page, you must complete this
page to save the item type.
Copy GL Interface Click to copy a GL Interface setup from a previous term.
Note. Although the GL Interface definition is designated for a specific term, it is
also effective-dated. Therefore, you need not perform the copy function if no
changes are made to your setup.
Completing Student Financials General Setup Chapter 2
72 Copyright © 1988, 2010, Oracle and/or its affiliates. All Rights Reserved.
Item Type GL Entry Setup - Term
Term Select a term if you have a term-specific general ledger. If you do not enter a
term, you must enter 0000 as a placeholder.
Session Select a session if you want to limit the GL Interface definition to a specific
academic session.
Item Type GL Entry Setup - Effective Date
Effective Date and Status Enter the effective date and the status for the interface.
AP ChartFields Click to access the AP ChartFields page, where you can enter chart of accounts
information to define a liability account—typically a holding account. The link is
not available if this is a Contributor Relations item type.
Use this link if you use the PeopleSoft Accounts Payable interface to create
refund checks for students, external organizations, or both.
Select a predefined SpeedType definition to populate the ChartFields.
Click the Copy button to copy ChartField values into a temporary variable. Click
the Paste button to paste the copied ChartField values from the temporary
variable into another ChartField page. Note that if one of the check boxes in the
ChartField Edit Options group box on the SF Installation page is selected, then a
check mark button appears next to the Copy and Paste buttons. Click the check
mark to validate the ChartField combination. This button does not start journal
set edits.
Writeoff ChartFields Click to access the Writeoff ChartFields page, where you can enter chart of
accounts information to define an account for write-offs. You must define a
unique account for each charge that you want the system to match.
Select a predefined SpeedType definition to populate the ChartFields.
Click the Copy button to copy ChartField values into a temporary variable. Click
the Paste button to paste the copied ChartField values from the temporary
variable into another ChartField page. Note that one of the check boxes in the
ChartField Edit Options group box on the SF Installation page is selected, then a
check mark button appears next to the Copy and Paste buttons. Click the check
mark to validate the ChartField combination. This button does not start journal
set edits.
Item Type GL Entry Setup - Journal Sets
Each GL Interface definition requires at least one debit and one credit entry. Each debit entry and each credit
entry can be split into multiple entries for distribution to your general ledger, but you must make sure that
each side (debit and credit) totals 100 percent.

Chapter 2 Completing Student Financials General Setup
Copyright © 1988, 2010, Oracle and/or its affiliates. All Rights Reserved. 73
Jrnl Set (journal set) Enter the journal set that is used by your institution. You can use multiple journal
sets. This enables you to generate a set of balanced entries into your journals.
Using multiple journal sets also enables you to set journals for multiple ledgers,
for example, budget or actuals.
Use the copy icon to copy the setup for the row, which can then be pasted to the
new or any proceeding row.
Timing Select the appropriate timing for sending the charge to the general ledger. You
can select either Assessment, which sends the charge when it is incurred,
Satisfaction, which sends the charge when the offset is posted, or Billed, which
sends the charge or waiver when it has been billed.
DB/CR(debit/credit) Select either Debit or Credit for the DB/CR field. You must set up one debit and
one credit for each item type.
Note. For charge classifications, the debit side represents accounts receivable and
the credit side represents revenue.
Next to the Jrnl Set field, there are copy and paste icons. Use the copy icon to copy the setup for the row,
which can then be pasted to the new, or any proceeding row.
To input all areas for the ChartFields, abbreviated display fields have been added. The number of delimiters
displayed is based on the number of ChartFields. The abbreviated display fields are used to view the
ChartField set up as a string, add or update the ChartField string. All ChartField edits set up on the SF
Installation page are adhered to within the display field.
Splitting a Transaction Between Multiple GL Accounts
The General Ledger Percent (GL Pct), Priority,Priority Amount, and Account Limit fields are used to split a
debit or credit across multiple GL accounts.
GL Pct (general ledger
percent) Enter an optional percentage of the transaction that you want posted to the GL
account.
Priority Enter the posting priority for either the GL percent or priority amount. The lower
the number, the higher the priority.
Priority Amt (priority
amount) Enter an optional priority amount that you want distributed to a GL account. If
you specify a priority amount, the amount specified will be distributed to the GL
account definition with the highest priority. The remaining balance will be
distributed to the remaining GL accounts as defined.
Account Limit Enter a maximum monetary amount that you want to distribute to the specified
GL account. For example, if you set the GL Pct field to 25 percent and the
Account Limit field to 100 USD, 25 percent of a debit or credit up to a maximum
of 100 USD will be distributed to the specified GL account.

Completing Student Financials General Setup Chapter 2
74 Copyright © 1988, 2010, Oracle and/or its affiliates. All Rights Reserved.
Defer Revenue - Until
and Deferred Date Select the Defer Revenue - Until check box on the revenue (credit) side of your
ChartField setup and specify a date. Then click the Deferred ChartFields link to
access the Deferred GL Interface page, where you can define GL Interface
parameters for a deferred revenue account.
If you indicate that a particular item type needs to defer revenue, the system
prompts you for liability account information and the deferred date. The system
uses the liability account until the date that you have indicated for that item type.
The system does not automatically generate the entry for moving the deferred
revenue from the liability account to the realized revenue. When this date passes,
you must move the revenue into the general ledger.
Select a predefined SpeedType definition to populate the ChartFields.
Click the Copy button to copy ChartField values into a temporary variable. Click
the Paste button to paste the copied ChartField values from the temporary
variable into another ChartField page. Note that if one of the check boxes in the
ChartField Edit Options group box on the SF Installation page is selected, then a
check mark button appears next to the Copy and Paste buttons. Click the check
mark to validate the ChartField combination. This button does not start journal
set edits.
Deferred ChartFields This link becomes available only if you check the Defer Revenue - Until check
box above. Click this link to access the Deferred GL Interface page, where you
can define GL Interface parameters for a deferred revenue account.
Select a predefined SpeedType definition to populate the ChartFields.
Click the Copy button to copy ChartField values into a temporary variable. Click
the Paste button to paste the copied ChartField values from the temporary
variable into another ChartField page. Note that if one of the check boxes in the
ChartField Edit Options group box on the SF Installation page is selected, then a
check mark button appears next to the Copy and Paste buttons. Click the check
mark to validate the ChartField combination. This button does not start journal
set edits.
Journal Set ChartFields Click this link to access the Journal Set ChartFields page, where you can define
the parameters for the journal set.
Dynamic Organization If you select this optional check box, the system allocates the appropriate revenue
based on the subject area of the classes in which a student is enrolled. In the
PeopleSoft Student Records system, subject areas map to academic
organizations, and academic organizations map to financial organizations.
Consequently, the system enables you to map subject areas to financial
organizations. By using these constructs with the dynamic organization
capabilities, you can distribute revenue based on a student's course load using the
organizational ChartField.
Note. The dynamic organization feature uses billing units. When making
adjustments, the system reallocates based on the number of billing units. It does
not use the adjustment calendar to determine how much remains allocated to the
organization. It reallocates 100 percent of the funds.
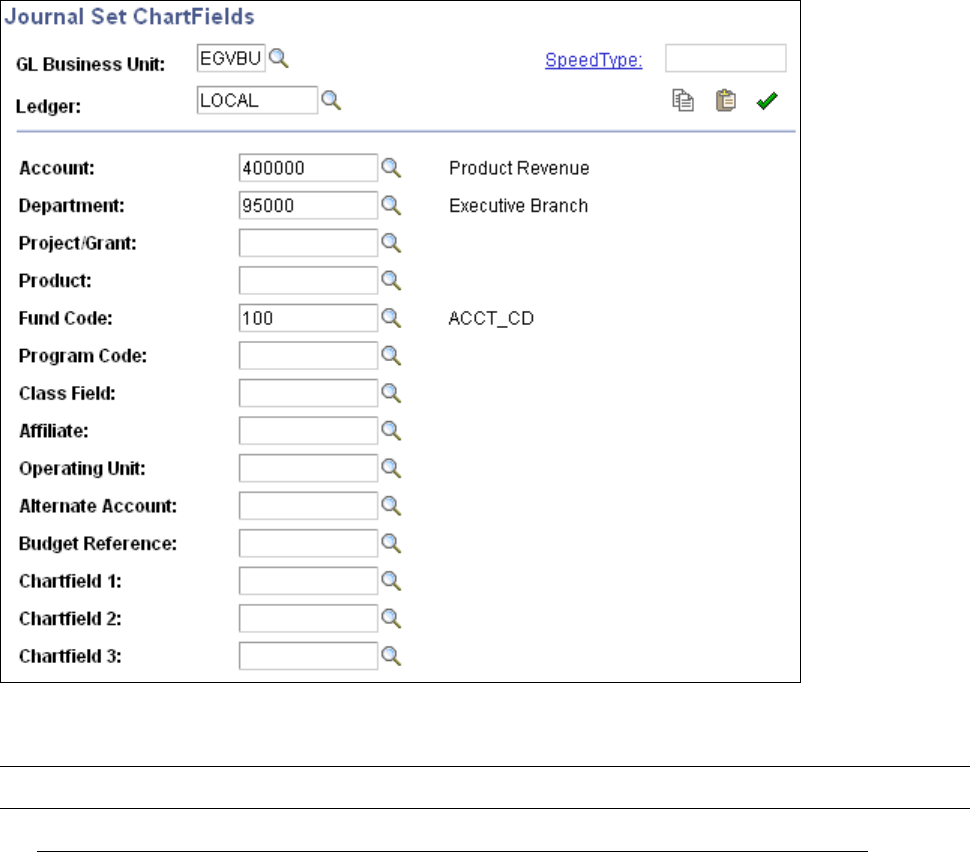
Chapter 2 Completing Student Financials General Setup
Copyright © 1988, 2010, Oracle and/or its affiliates. All Rights Reserved. 75
Deferred Dynamic Org Select to have the system defer the appropriate revenue based on the subject area
of the classes in which a student is enrolled. This capability enables you to defer
revenue based on a student's course load using the organizational ChartField.
Journal Set ChartFields Page
Access the Journal Set ChartFields page (Click the Jrnl Set ChartFields link on the GL Interface page).
Journal Set ChartFields page
Note. You must run the Sync Chartfield Values process before you use this page.
See Chapter 4, "Setting Up GL Interface Processing," Synchronizing ChartField Values, page 125.
Use this page to define the parameters for the journal set.
Select a predefined SpeedType definition to populate the ChartFields.
Click the Copy button to copy ChartField values into a temporary variable.
Click the Paste button to paste the copied ChartField values from the temporary variable into another
ChartField page.

Completing Student Financials General Setup Chapter 2
76 Copyright © 1988, 2010, Oracle and/or its affiliates. All Rights Reserved.
If one of the check boxes in the ChartField Edit Options group box on the SF Installation page is selected, a
Validate check mark icon appears next to the Copy and Paste buttons. Click the Validate icon to validate the
ChartField combination. This icon does not start journal set edits. If you do not click the Validate icon,
validation is still performed when you save the Item Types component.
For Oracle Financials, the Real-Time Validation Edit option should be selected on the SF Installation page.
Click the Validate icon to perform real time validation of the entered combination with Oracle GL. If you do
not click the Validate icon, real time validation is still performed when you save the Item Types component.
Integration with Oracle Financials
The Journal Set ChartFields page appears and functions differently if Oracle Financials is selected in the
Financial System group box on the SF Installation page:
•If you select a GL business unit that has not been mapped on the Chartfield Mapping page, you receive an
error message.
•The Ledger field does not appear.
•The 2 Affiliate Intra (Intra Unit), Project/Grant, and Affiliate chartfields are not supported and these
should be made inactive on the HRMS Standard Chartfield Configuration page.
•The prompt table associated with the chartfields displays valid segment values based on the mapping on
the ChartFields Mapping page.
See Chapter 2, "Completing Student Financials General Setup," Defining Number Sequence Start Points,
Maximum Row Settings, and ChartField Edit Options, page 7.
See Chapter 4, "Setting Up GL Interface Processing," Mapping General Ledger Business Units to Oracle
General Ledger, page 120.
See CS90 to EBS GL Integration Developer's Reference Guide. The guide is posted to My Oracle Support.
Defining Item Type Groups
Access the Item Type Groups page (Set Up SACR, Product Related, Student Financials, Item Types, Item
Type Groups).
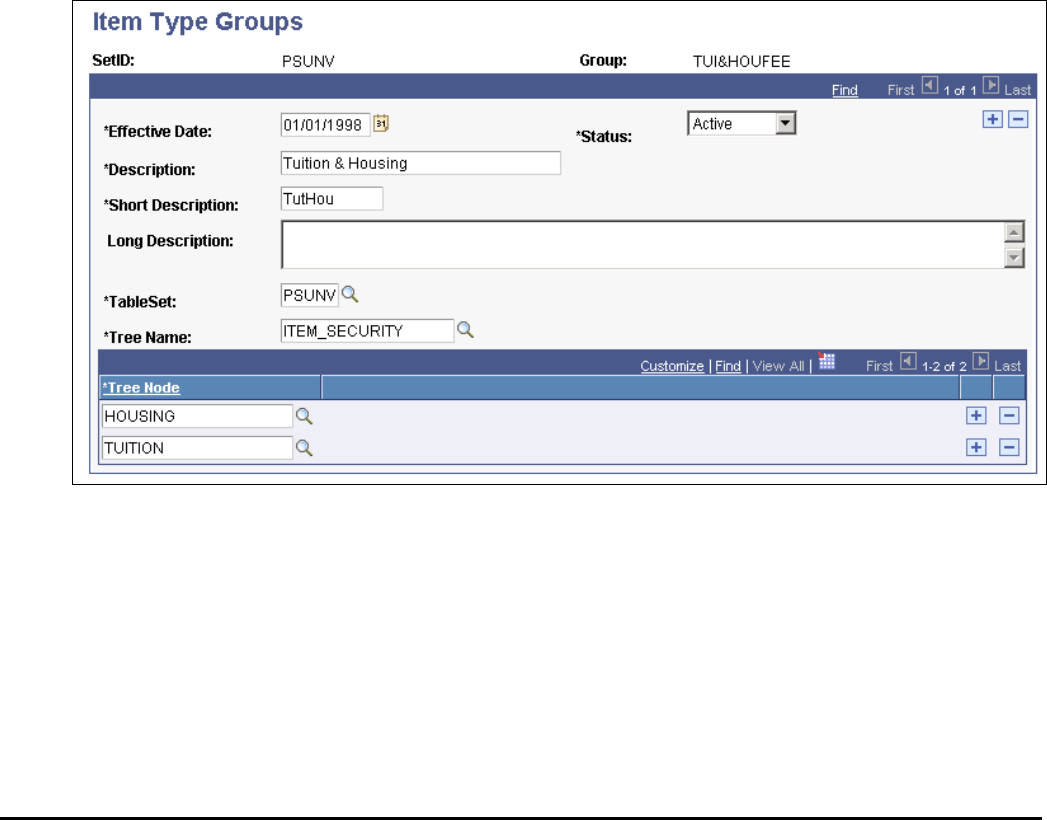
Chapter 2 Completing Student Financials General Setup
Copyright © 1988, 2010, Oracle and/or its affiliates. All Rights Reserved. 77
Item Type Groups page
TableSet Select the setID that includes the item type tree that you want to use.
Tree Name Select the tree name of an item type tree that includes all of the tree nodes that
you want to include in your item type group.
Tree Node Select a tree node that you want to include in your item type group
Setting Up Service Indicator Sets
To set up service indicator sets, use the Service Indicator Sets component (SERVICE_IND_SETUP).
This section provides an overview of service indicator sets and discusses how to:
•Define service indicator set details.
•Define eligible academic careers for service indicator sets.
Understanding Service Indicator Sets
Service indicator sets enable you to automatically attach service indicators to student accounts by running the
Credit History process. When you define service indicator sets, you link a service indicator to an aging
category and minimum amount combination. When you run the Credit History process, the system applies the
linked service indicator to any student or external organization with an overdue balance that falls within the
specified aging category and is over the minimum amount. In addition, if the linked service indicator is
already applied to an account and the overdue balance is paid off, the next time you run the Credit History
process, the system removes the service indicator.

Completing Student Financials General Setup Chapter 2
78 Copyright © 1988, 2010, Oracle and/or its affiliates. All Rights Reserved.
See Also
Chapter 22, "Maintaining Customers," Processing and Reviewing Customer Credit History, page 637
PeopleSoft Enterprise Campus Community 9.0 Fundamentals PeopleBook, "Setting Up Service Indicators,"
Setting Up Service Indicator Codes and Reasons
Pages Used to Set Up Service Indicator Sets
Page Name Definition Name Navigation Usage
Service Indicator SRVC_IND_SF_TBL Set Up SACR, Product
Related, Student Financials,
Collections, Service
Indicator Sets, Service
Indicator
Create service indicator sets
and define descriptive
information for them.
Service Indicator - Details SRVC_IND_SF Set Up SACR, Product
Related, Student Financials,
Collections, Service
Indicator Sets, Service
Indicator, Details
Define service indicator set
details.
Service Indicator - Career
Setup
SRVC_IND_SF_C Set Up SACR, Product
Related, Student Financials,
Collections, Service
Indicator Sets, Service
Indicator, Career Setup
Define eligible academic
careers for service indicator
sets.
Defining Service Indicator Set Details
Access the Service Indicator - Details page (Set Up SACR, Product Related, Student Financials, Collections,
Service Indicator Sets, Service Indicator, Details).
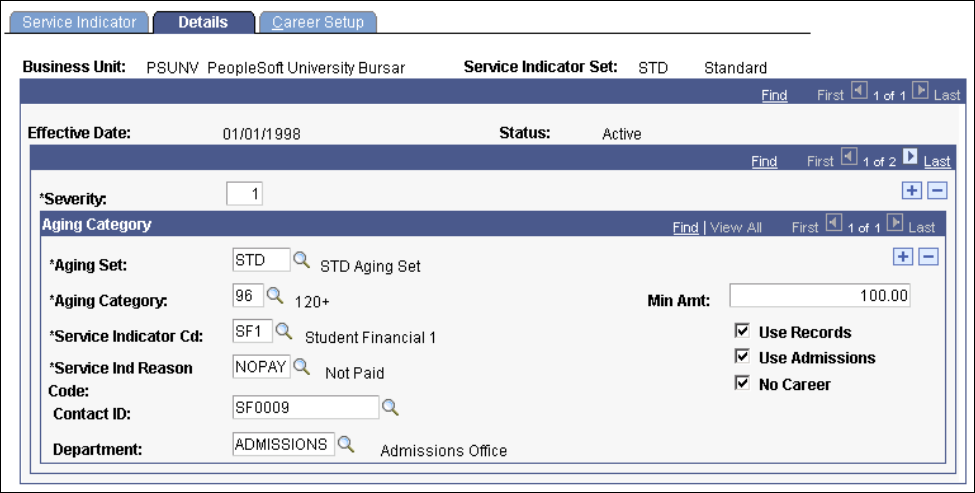
Chapter 2 Completing Student Financials General Setup
Copyright © 1988, 2010, Oracle and/or its affiliates. All Rights Reserved. 79
Service Indicator - Details page
Severity Enter the alphanumeric code established by your institution to indicate the
severity of the service indicator.
Aging Set Select the aging set containing the aging category to which you are linking a
service indicator.
Aging Category Select the aging category that triggers the application of the service indicator to
student accounts.
Min Amt (minimum
amount) Define the minimum amount that triggers the application of the service indicator
to student accounts.
Service Indicator Cd
(service indicator code) Select a service indicator code from your established list. This code is linked to a
service impact that controls what actions the system takes related to the service
indicator.
Service Ind Reason Cd
(service indicator reason
code)
Select a service indicator reason code from your established list. This code
explains why this service indicator is being applied.
Contact ID Select the ID number of a specific person with the department responsible for
this service indicator set.
Department Select the department that is responsible for this service indicator set. This is the
department that the student must contact to clear the associated service indicator.
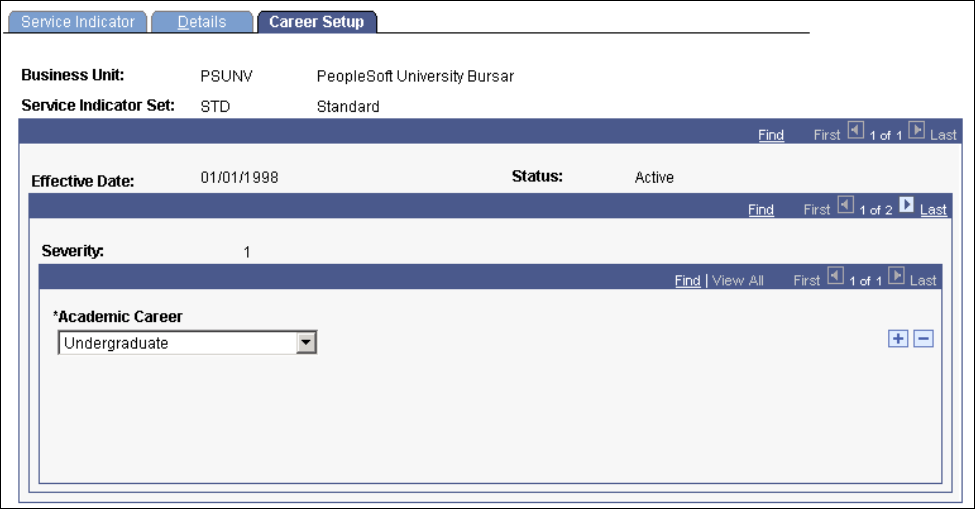
Completing Student Financials General Setup Chapter 2
80 Copyright © 1988, 2010, Oracle and/or its affiliates. All Rights Reserved.
Academic Career Controls
The check boxes in this group box control where the system searches to confirm that the student is active in
an academic career before applying a service indicator. At least one check box must be selected, but you can
select all three. You must select the No Career check box for external organizations.
Use Records Select if you want the system to verify that the student's academic career matches
the one that you establish on the Service Indicator Career Setup page.
Use Admissions Select to have the system verify that the student's admissions career matches the
one that you established on the Service Indicator Career Setup page. This
verification takes place after the academic career verification. The system
performs this verification only after it performs the verification in Student
Records and cannot find a match.
No Career Select if you want the system to process the student only if no admissions career
or academic career is associated with the student, regardless of whether you
selected the Use Records check box or the Use Admissions check box. Selecting
this check box indicates to the system that you want a service indicator placed
even if the student is not activated in Student Records or PeopleSoft Student
Admissions. This must be selected for external organizations.
Defining Eligible Academic Careers for Service Indicator Sets
Access the Service Indicator - Career Setup page (Set Up SACR, Product Related, Student Financials,
Collections, Service Indicator Sets, Service Indicator, Career Setup).
Service Indicator - Career Setup page
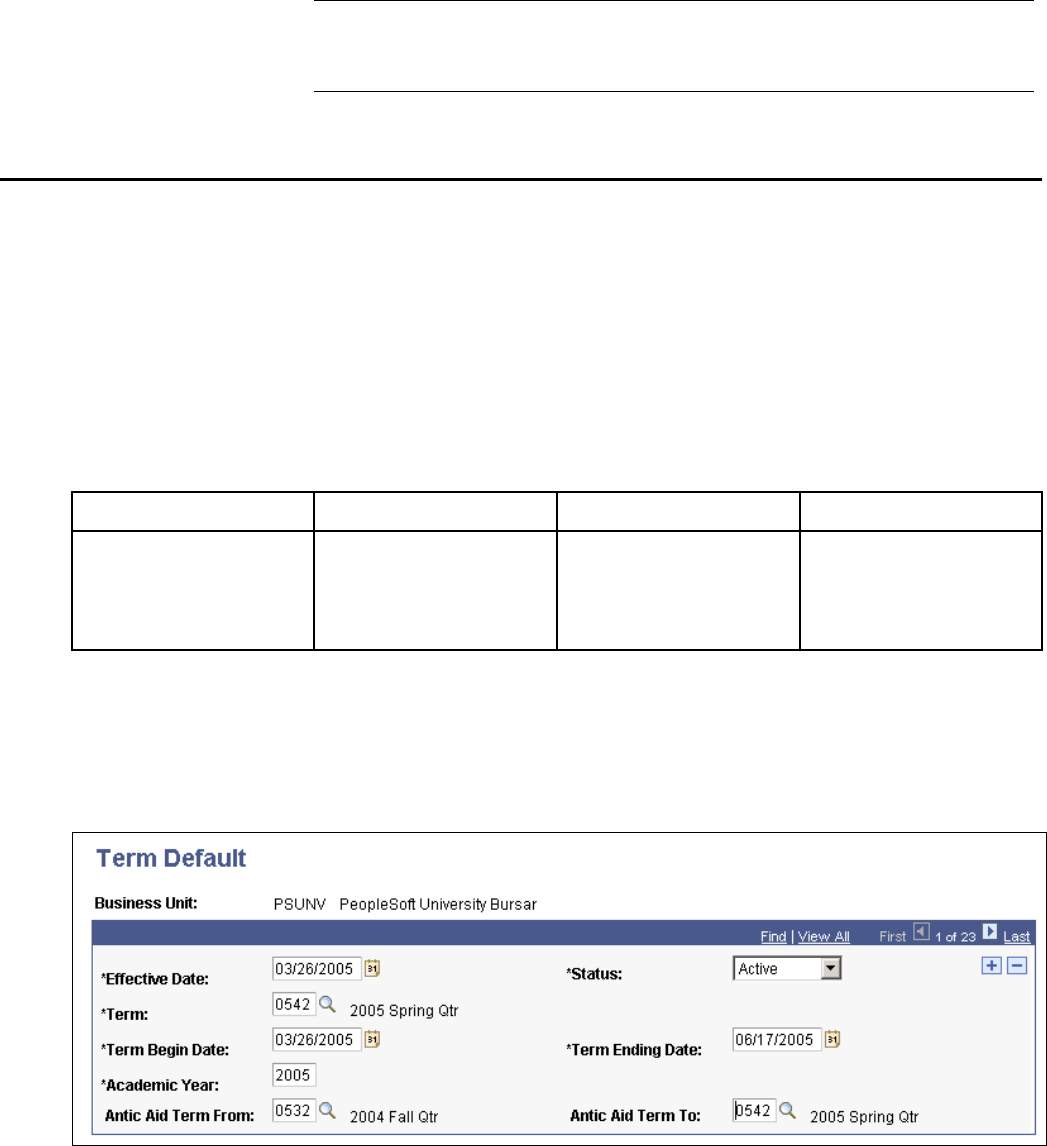
Chapter 2 Completing Student Financials General Setup
Copyright © 1988, 2010, Oracle and/or its affiliates. All Rights Reserved. 81
Academic Career Select the academic career to which the associated service indicator can be
applied.
Note. If you did not select the No Career check box on the Service Indicator -
Details page, you must be sure to specify the career for all appropriate rows and
severity levels.
Setting Up a Default Academic Term
To set up a default academic term, use the SF Term Default component (DFLT_TERM_TBL).
A default term value simplifies data entry. Typically, changing the default term value at the beginning of each
term is most beneficial. Using effective dating functionality, you can predefine default term values in advance
and have them automatically change on the first day of the term.
Page Used to Set Up a Default Academic Term
Page Name Definition Name Navigation Usage
Term Default DFLT_TERM_TBL Set Up SACR, Product
Related, Student Financials,
Charges and Payments, SF
Term Default, Term Default
Define default academic
terms.
Defining Default Academic Terms
Access the Term Default page (Set Up SACR, Product Related, Student Financials, Charges and Payments,
SF Term Default, Term Default).
Term Default page
Completing Student Financials General Setup Chapter 2
82 Copyright © 1988, 2010, Oracle and/or its affiliates. All Rights Reserved.
Effective Date Enter the effective date for the SF term that you are identifying.
Status Select the status for this term default.
Term Enter the default academic term.
Term Beginning Date
andTerm Ending Date Enter the term beginning date and the term ending date.
Academic Year Enter the academic year to which the term belongs.
Antic Aid Term From
(anticipated aid term
from)
Enter the value of the first (beginning) term that you want considered for
anticipated financial aid (aid awarded but not disbursed).
Antic Aid Term To
(anticipated aid term to) Enter the value of the last (ending) term that you want considered for anticipated
financial aid.

Copyright © 1988, 2010, Oracle and/or its affiliates. All Rights Reserved. 83
Chapter 3
Setting Up ePayment Processing
This chapter includes an overview of ePayment processing and discusses how to:
•Set up credit card types.
•Re-encrypt credit card, bank account numbers, Security Code data, and Security Key.
•Set up Payment merchants.
•Test Payment and Hosted Payment Transactions.
•Set up Student Financials merchants.
•Set up institution sets.
•Set up item types for an ePayment transaction.
•Set up self-service options.
Understanding ePayment Processing
Student Financials enables your institution to receive payments for charges by eCheck or credit card through
cashiering (credit card only) and over the web using self-service functionality (credit card and eCheck). The
rules that your institution defines for authorizing and capturing ePayment transactions as well as for
processing ePayment credits are established when you set up your payment merchant, SF merchant, and SF
institution set parameters.
Setting Up Credit Card Types
To set up credit card types, use the Credit Card Type component (CREDIT_CARD_TYPE).
Your institution must have contracts with credit card providers (such as VISA or Master Card) to be able to
accept payments using their cards. To prevent users from attempting to record payments using unauthorized
cards, you must define the credit card types accepted by your institution.
This section discusses how to define accepted credit card types.
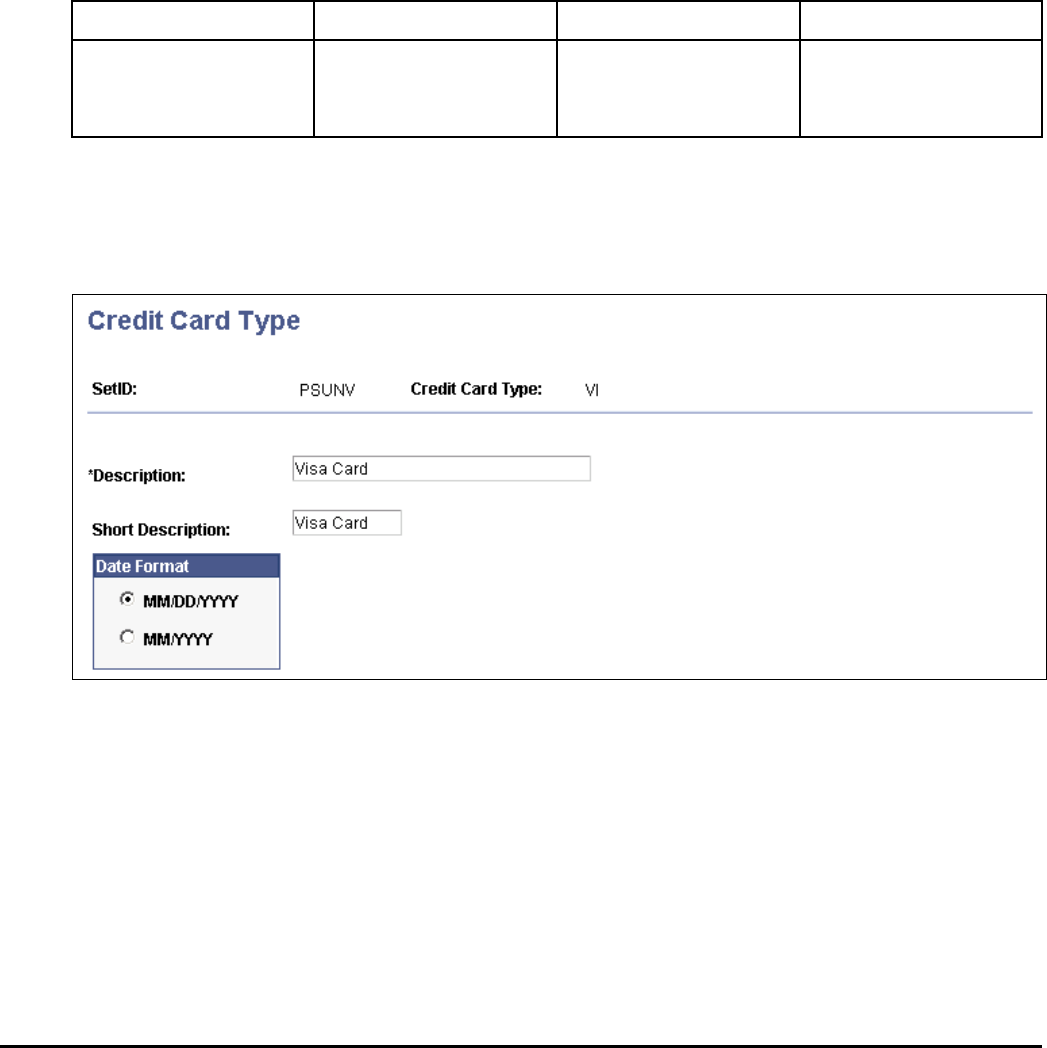
Setting Up ePayment Processing Chapter 3
84 Copyright © 1988, 2010, Oracle and/or its affiliates. All Rights Reserved.
Page Used to Set Up Credit Card Types
Page Name Definition Name Navigation Usage
Credit Card Type CREDIT_CARD_TYPE Set Up SACR, Product
Related, Student Financials,
Credit Card Type
Define accepted credit card
types.
Defining Accepted Credit Card Types
Access the Credit Card Type page (Set Up SACR, Product Related, Student Financials, Credit Card Type).
Credit Card Type page
Date Format
Select an expiration date format.
MM/DD/YYYY Select to include the month, day, and year in the expiration date format.
MM/YYYY Select to include only the month and year in the expiration date format.
Re-encrypting Credit Card, Bank Account Numbers, Security Code
Data, and Security Key
To replace a known or suspected compromised encryption key, regenerate the encryption key and convert
existing credit card, bank account numbers, and Security Code data using the new key. Periodic key changes
can be essential to your institution's encryption key management.

Chapter 3 Setting Up ePayment Processing
Copyright © 1988, 2010, Oracle and/or its affiliates. All Rights Reserved. 85
This section provides overviews of encryption and re-encryption and discusses how to:
•Regenerate the encryption key.
•Convert data to use a regenerated encryption key.
Understanding Encryption
PeopleSoft Enterprise Campus Solutions encryption uses PeopleTools Pluggable Cryptography, which is an
advanced security framework that provides a security model for applications to encrypt credit card data.
Pluggable Cryptography enables you to secure critical PeopleSoft data and communicate securely with other
businesses. It enables you to extend and improve cryptographic support for your data in PeopleTools, giving
you strong cryptography with the flexibility to change and grow, by incrementally acquiring stronger and
more diverse algorithms for encrypting data. In PeopleTools, pluggable cryptography capability is provided
by PeopleSoft pluggable encryption technology (PET).
By using the Tools Pluggable Cryptography for strong encryption/decryption, the system encrypts data using
3DES algorithms and 168-bit encryption keys.
To replace a known or suspected compromised key, regenerate the encryption key and convert existing credit
card, bank account numbers, and Security Code data using the new key. Periodic key changes can be essential
to your institution's encryption key management.
This section provides an overview of how to regenerate the encryption key and convert credit card, bank
account numbers, and Security Code data using the new key.
Understanding Re-encryption
When you change the encryption key at any time after the initial conversion, you must also re-encrypt all of
your credit card, bank account numbers, and Security Code data using that key. Predefined encrypt and
decrypt profiles are delivered for Campus Solutions re-encryption. These profiles specify multiple user-
defined steps applying various algorithms and keys to the data in a specified order and supporting various
encryption standards and third-party encryption libraries.
Use the following parameters for Campus Solutions re-encryption.
Parameter Value
Encrypt Profile ID CS_CREDIT_CARD_ENCRYPT
Algorithm ID (encrypt) 3des_ks168_cbc_encrypt
Keyset ID CSCreditCard
Decrypt Profile ID CS_CREDIT_CARD_DECRYPT
Algorithm ID (decrypt) 3des_ks168_cbc_decrypt
Note. You can create your own profiles or modify the delivered ones. However, we do not recommend it. If
you do, you must be very careful to use the appropriate values for whatever you create or modify.

Setting Up ePayment Processing Chapter 3
86 Copyright © 1988, 2010, Oracle and/or its affiliates. All Rights Reserved.
To change the credit card encryption key and re-encrypt the data, do the following:
1. Navigate to the Generate Encryption Key page (Set Up SACR, Common Definitions, Encryption,
Generate Encryption Key).
2. Click the Generate Random Key button to generate a new random hexadecimal encryption key.
Clicking this button generates a new, random hexadecimal encryption key. You can modify this key.
However, you must format it as a 24-byte string in hexadecimal notation. The first two characters must be
0x, and the remainder must be exactly 48 characters consisting of a combination of numeric digits and the
lowercase letters a through f.
3. Copy the regenerated encryption key.
4. Navigate to the Algorithm page (PeopleTools, Security, Encryption, Algorithm Keyset) for the encrypt
algorithm ID and keyset ID (3des_ks168_cbc_encrypt and CSCredi Card).
5. Paste the regenerated encryption key value in the Key Value field, replacing the previous value, and save
the page.
6. Navigate to the Convert Encryption page (Set Up SACR, Common Definitions, Encryption, Convert
Encryption).
7. Confirm that the encrypt and decrypt profile IDs are correct, then click the Run button to start the
conversion process.
The Credit Card Conversion process converts each field in the grid. If the process fails for any reason, the
process can be restarted in the standard way and the process picks up where it left off. If the process
cannot be restarted, the process can be run from the beginning and it automatically bypasses fields that
have already been processed.
Warning! You must complete steps 1-7 to encrypt and run the conversion process prior to completing
the next steps, which set up decryption.
8. Navigate back to the Algorithm page (PeopleTools, Security, Encryption, Algorithm Keyset) for the
decrypt algorithm ID and keyset ID (3des_ks168_cbc_decrypt and CSCreditCard).
9. Paste the regenerated encryption key value in the Key Value field, replacing the previous value, and save
the page.
See Also
PeopleSoft Enterprise PeopleTools PeopleBook: Security Administration, "Securing Data with Pluggable
Cryptography"
Chapter 2, "Completing Student Financials General Setup," Defining Keyword Edit Tables and a Null Due
Date, page 11
Chapter 14, "Processing ePayment Transactions," page 381

Chapter 3 Setting Up ePayment Processing
Copyright © 1988, 2010, Oracle and/or its affiliates. All Rights Reserved. 87
Pages Used to Re-Encrypt and Convert Data
Page Name Definition Name Navigation Usage
Generate Encryption Key SSF_CC_ENCRYPT_KEY Set Up SACR, Common
Definitions, Encryption,
Generate Encryption Key
Use this utility to change
the key used to encrypt
credit card, bank account
numbers, Security Code
data, and Security Key.
Note. When you change the
key, you must also run the
conversion utility to re-
encrypt credit card numbers
using the new encryption
key. Never change the key
without also running the
conversion.
Convert Encryption SSF_CC_RUN_CNVRT Set Up SACR, Common
Definitions, Encryption,
Convert Encryption
Perform conversion of
credit card numbers to use a
regenerated credit card
encryption key.
Algorithm Keyset CRYPT_KEYSET PeopleTools, Security,
Encryption, Algorithm
Keyset
Copy the regenerated key to
the key value field on this
page for the encrypt profile
prior to running the
conversion process.
After running the
conversion process, copy
the regenerated key to the
key value field on this page
for the decrypt profile.
Process Scheduler PRCSRQSTDLG Click the Run button on the
Convert Encryption page. Run the SSF_CC_CNVRT
conversion process to
convert existing credit card
data using the regenerated
credit card encryption key.
Regenerating the Encryption Key
Access the Generate Encryption Key page (Set Up SACR, Common Definitions, Encryption, Generate
Encryption Key).
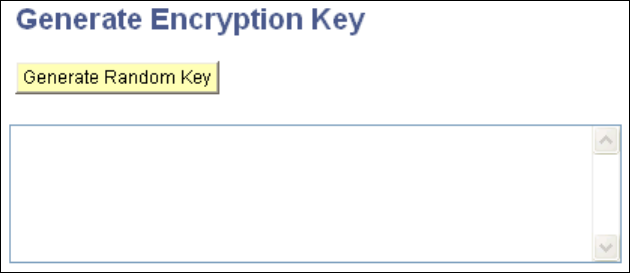
Setting Up ePayment Processing Chapter 3
88 Copyright © 1988, 2010, Oracle and/or its affiliates. All Rights Reserved.
Generate Encryption Key page
Generate Random Key Click to have the system generate a random key in the format needed by the
encryption algorithms used for credit card encryption and decryption profiles.
Converting Data to Use a Regenerated Encryption Key
Access the Convert Encryption page (Set Up SACR, Common Definitions, Encryption, Convert Encryption).
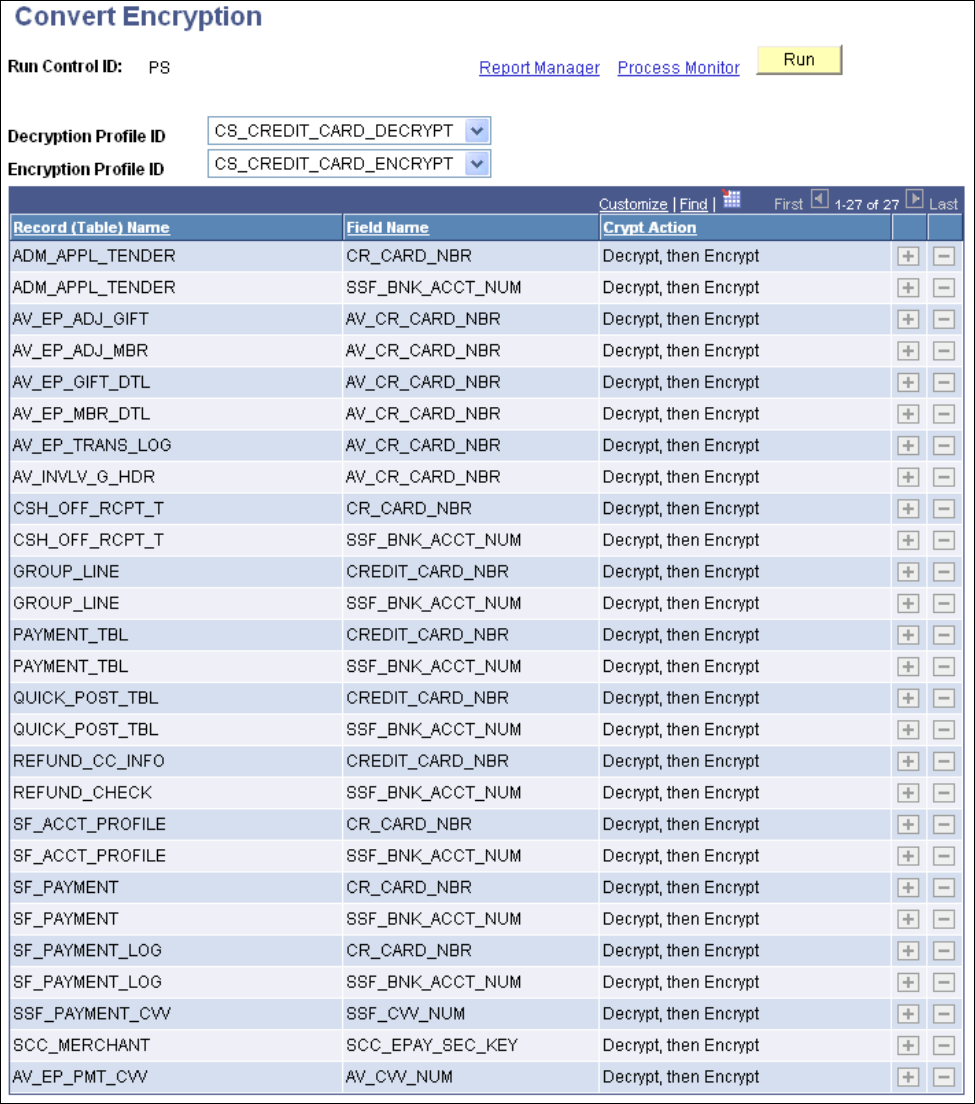
Chapter 3 Setting Up ePayment Processing
Copyright © 1988, 2010, Oracle and/or its affiliates. All Rights Reserved. 89
Convert Encryption page

Setting Up ePayment Processing Chapter 3
90 Copyright © 1988, 2010, Oracle and/or its affiliates. All Rights Reserved.
Decryption Profile ID
and Encryption Profile
ID
Default profile IDs are set on the SF Installation 2 page (Set Up SACR, Install,
Student Fin Installation, SF Installation 2).
PeopleTools Pluggable Cryptography framework provides the delivered profiles
of TRIPLE DES ENC B64 and TRIPLE DES DEC B64.
PeopleSoft Enterprise Campus Solutions has enhanced the PeopleTools profiles
specifically for Campus Solutions re-encryption. The predefined, enhanced
profiles delivered for Campus Solution are CS_CREDIT_CARD_DECRYPT and
CS_CREDIT_CARD_ENCRYPT.
Profiles specify multiple user-defined steps applying various algorithms and keys
to the data in a specified order and supporting various encryption standards and
third-party encryption libraries.
The decrypt profile must be the same profile and have the same keys used to
encrypt the data as it is. The encryption profile must contain the new keys and
algorithm to which you are converting. Therefore, when using the delivered CS
profiles, you must change the key value on the Algorithm Keyset page for the
encrypt profile and associated algorithm, before running the conversion process.
After running the conversion, you must modify the decrypt profile to include the
new key.
Crypt Action Decrypt, then Encrypt is the action set to occur when you run the Credit Card
Conversion process. The process first decrypts the credit card, account numbers,
and Security Code data using the old algorithm and keys, and then encrypts it
with the new set of algorithm and keys.
Setting Up Payment Merchants
A flexible interface supports the processing of credit card and eCheck transactions. The interface uses a
flexible adapter-based model to support the transmission of electronic payment transactions. You can use
either the Integration Broker-based interface or the Business Interlinks interface to send electronic payment
transactions to third party payment processors. The Integration Broker interface provides Security Code
support but the Business Interlinks interface does not.
Warning! Before you read this section, refer to the Setting Up Adapters chapter in the Application
Fundamentals PeopleBook for information about the Adapter Type Table and Adapter Table components.
The components are used to define the adapters that are used in electronic payment and hosted payment
processing.
See PeopleSoft Enterprise Campus Solutions 9.0 Application Fundamentals PeopleBook, "Setting Up
Adapters."
To set up Payment merchants, use the Payment Merchant (SCC_MERCHANT) component.
This section discusses how to define Payment merchants.
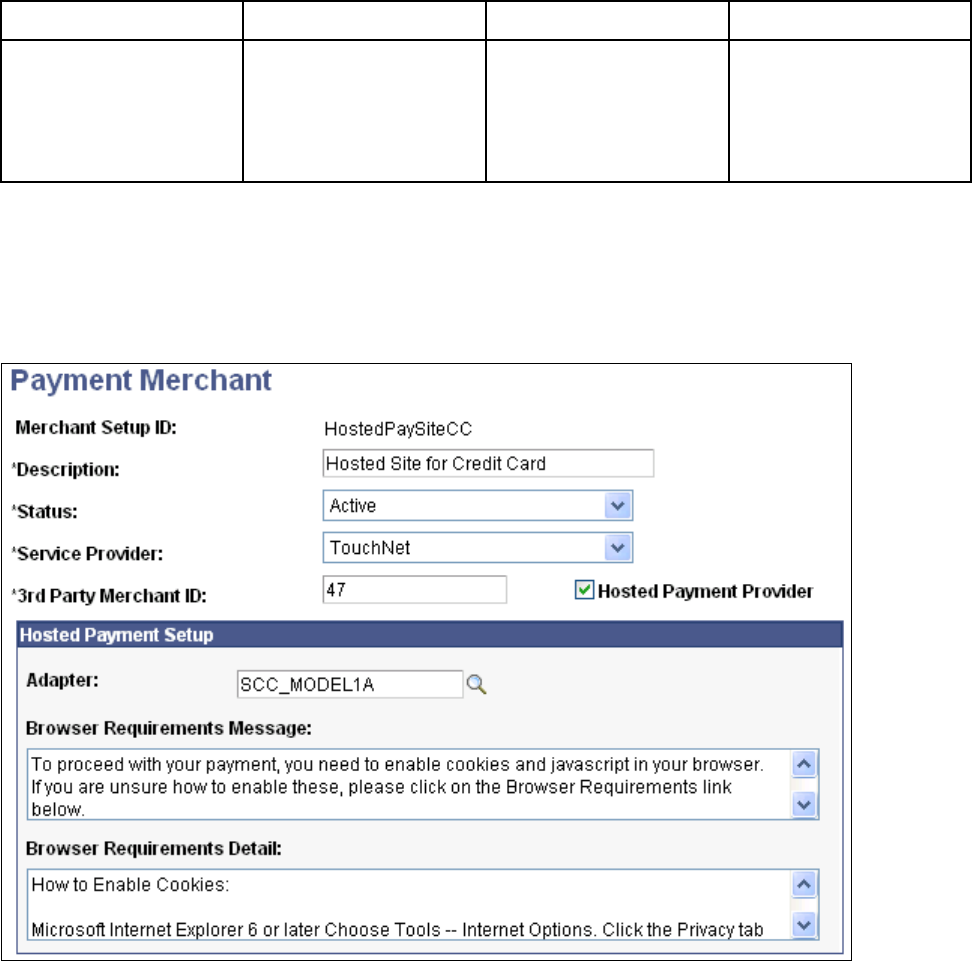
Chapter 3 Setting Up ePayment Processing
Copyright © 1988, 2010, Oracle and/or its affiliates. All Rights Reserved. 91
Page Used to Set Up Payment Merchants
Page Name Definition Name Navigation Usage
Payment Merchant SCC_MERCHANT Set Up SACR, Common
Definitions, Electronic
Payments, Payment
Merchant, Payment
Merchant
Define electronic payment
merchants.
Defining Electronic Payment Merchants
Access the Payment Merchant page (Set Up SACR, Common Definitions, Electronic Payments, Payment
Merchant, Payment Merchant).
Payment Merchant page (1 of 2)
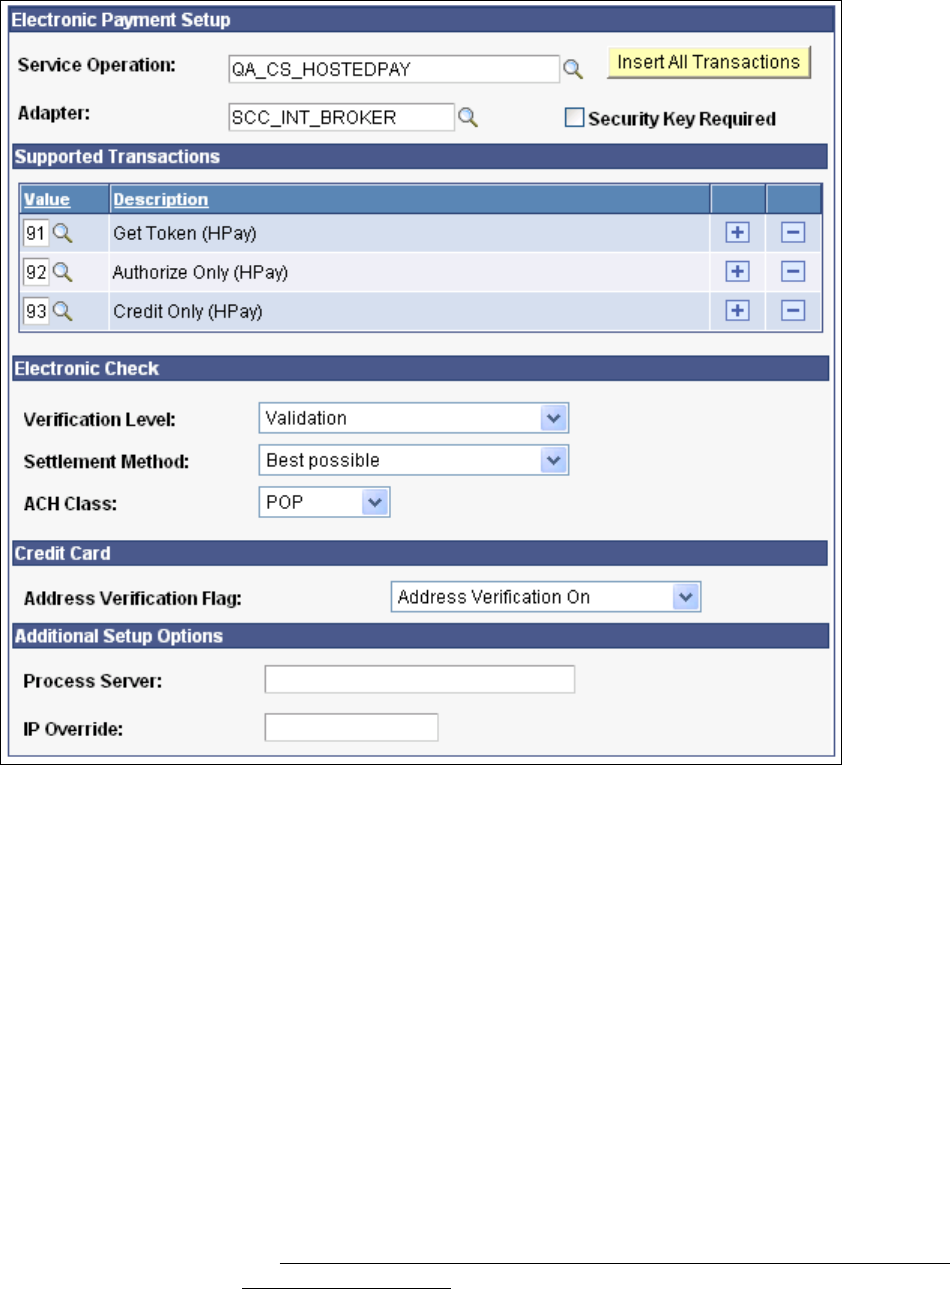
Setting Up ePayment Processing Chapter 3
92 Copyright © 1988, 2010, Oracle and/or its affiliates. All Rights Reserved.
Payment Merchant page (2 of 2)
Service Provider Select a service provider: Cybersource,TouchNet, or Unsupported.
This field is informational only.
3rd party Merchant ID Enter the merchant name.
Hosted Payment
Provider Select this check box to identify the payment merchant as a hosted payment
provider.
If you select this check box:
•The Hosted Payment Setup group box becomes available.
•The Security Code Supported check box in the Credit Card group box is not
available, because that control is established (as well as collected) at the
hosted payment (third party) site.
See Chapter 14, "Processing ePayment Transactions," Understanding ePayment
Transactions, page 381.
Chapter 3 Setting Up ePayment Processing
Copyright © 1988, 2010, Oracle and/or its affiliates. All Rights Reserved. 93
Hosted Payment Setup
This group box is available only if the Hosted Payment Provider check box is selected.
Adapter Select the adapter to be used by the hosted payment merchant to process hosted
payment transactions.
Browser Requirements
Message and Browser
Requirements Detail
Enter a browser-related message, or browser-related detail about browser
requirements, that an application can display to a user before the user is
transferred to the third party hosted site.
Browser Requirements
Message For schools that use hosted payment, the message that you enter here appears on
the Make a Payment - Confirm Payment page if the Display Browser Message
check box is selected on the Electronic Payments (Institution Set) setup page.
Browser Requirements
Detail For schools that use hosted payment, the detail that you provide here appears
when students click the Browser Requirements link on the Make a Payment -
Confirm Payment page if the Display Browser Message check box is selected on
the Electronic Payments (Institution Set) setup page.
See PeopleSoft Enterprise Campus Self Service 9.0 PeopleBook, "Setting Up
Student Financials Self Service," Defining Self-Service ePayments for Institution
Sets.
Electronic Payment Setup
Service Operation Select the service operation to be used by the adapter when processing the
electronic or hosted payment transaction request. This field is required only if
you use the Integration Broker based adapter (SCC_INT_BROKER).
Adapter Select the adapter to be used by this merchant to process electronic payment
transactions using the electronic payment interface.
Insert All Transactions Click this button to insert all transactions into the Supported Transactions group
box.
Security Key Required Use this check box to indicate that a special security token or password is needed
to process transactions. If you select this check box, the Security Key Setup
group box becomes available.
Security Key Setup
This group box is available only if you select the Security Key Required check box.
Key This field contains the security token or password that might be required by a
third party payment processor. This field is encrypted using the encryption
profiles from the SF Installation table.

Setting Up ePayment Processing Chapter 3
94 Copyright © 1988, 2010, Oracle and/or its affiliates. All Rights Reserved.
Supported Transactions
The following services are available for the ePayment API. Check with your third party provider for a list of
supported services.
Value Select a value for the supported transactions.
Credit Card transactions:
•1: Authorize Only
•2: Authorize and Bill
•3: Bill Only
•4: Credit Only
eCheck transactions:
•5: Make Payment
•6: Apply Credit
Hosted transactions:
•91: Get Token
•92: Authorize Only
•93: Credit Only
Electronic Check
Verification Level Select the level of verification that the system uses for eCheck payments.
If a valid value is not entered on the transaction request, the value that you select
here is used.
Validation: Select to test the format and bank routing number of each eCheck
payment and to compare the transaction information to the check-processing
partner's internal negative file.
Verification: Select to perform all validation steps and to compare each
transaction's information with an external negative file to identify accounts that
have a history of bad checks or that were closed for cause.
Note. Validation and verification are optional. Neither process checks the status
or the existence of an account nor do they guarantee that funds are available.

Chapter 3 Setting Up ePayment Processing
Copyright © 1988, 2010, Oracle and/or its affiliates. All Rights Reserved. 95
Settlement Method Select the default method that the system uses to deliver settlements to and from
your students' banks.
If a valid value is not entered on the transaction request, the value that you select
here is used.
Automated Clearing House: Select to deposit U.S. and Canadian transactions
using the Automated Clearing House (ACH) or the Canadian Payment
Association.
Facsimile draft: Select to deposit transactions as facsimile drafts. Use this
method when the issuing bank is not an ACH member.
Best possible: Select to deposit transactions through the ACH system unless the
student's bank is not an ACH participant, in which case, the system creates a
facsimile draft and deposits it.
ACH Class Select the default value for ACH Class data element used by eCheck
transactions. If a valid value is not entered on the transaction request, the value
that you select here is used.
The values are:
1. ARC (Accounts Receivable Entries): Checks received by a merchant through
mail or drop box and presented as a HYPERLINK
"http://www.nationalach.com" ACH entry.
2. POP (Point-of-Purchase): A check presented in-person to a merchant for
purchase is presented as a HYPERLINK "http://www.nationalach.com" ACH
entry instead of a physical check.
3. TEL (Telephone Initiated-Entry) Verbal authorization by telephone to issue a
HYPERLINK "http://www.nationalach.com" ACH entry such as checks by
phone.
4. WEB (Web Initiated-Entry): Electronic authorization through the Internet to
create a HYPERLINK "http://www.nationalach.com" ACH .
Credit Card
Security Code
Supported Select this check box to indicate that the merchant supports the sending of
Security Code values.
You must clear this check box for merchants using Business Interlink based
integration technology.
Because the Security Code is captured at the third party site for hosted payment
transactions, this check box is not available for hosted payment providers—that
is, where the Hosted Payment Provider check box is selected.
See Chapter 14, "Processing ePayment Transactions," page 381.

Setting Up ePayment Processing Chapter 3
96 Copyright © 1988, 2010, Oracle and/or its affiliates. All Rights Reserved.
Address Verification
Flag This field controls whether the system verifies the credit card billing address
during credit card processing. The options are Address Verification Off and
Address Verification On.
Note. If you select Address Verification On and the address given does not
match, authorization is declined, but the credit card funds are set aside.
If a valid value is not entered on the transaction request, the value that you select
here is used for credit card transactions.
This field also appears on the SF Merchants page.
Additional Setup Options
Process Server This field holds the location of the Process Server used by the Business Interlink
based credit card and eCheck transactions. This field is only relevant if you are
using the Business Interlinks and the Business Interlink adapter
(SCC_BUS_INTERLINK).
IP Override This field is used by the credit card and eCheck business interlinks and is passed
through the ip_address input property. This field is also used as a default ip
address for transactions processed by the Integration Broker based adapter for
electronic payment transactions that require this field.
See Electronic Payment Integration Developer's Reference Guide. The guide is posted to My Oracle Support.
See Also
PeopleSoft Enterprise Student Financials 9.0 PeopleBook, Processing ePayment Transactions
Testing Payment and Hosted Payment Transactions
The Electronic Payment Test component allows testing of ePayment and hosted payment transactions. This
page also serves as a run control page for the batch testing component (SCC_EPAY_TST – Epayment Batch
Test).
Page Used to Test Payment and Hosted Payment Transactions
Page Name Definition Name Navigation Usage
Electronic Payment Test SCC_EPAYMENT_TEST Set Up SACR, Common
Definitions, Electronic
Payments, Electronic
Payment Test
Test ePayment and hosted
payment transactions.
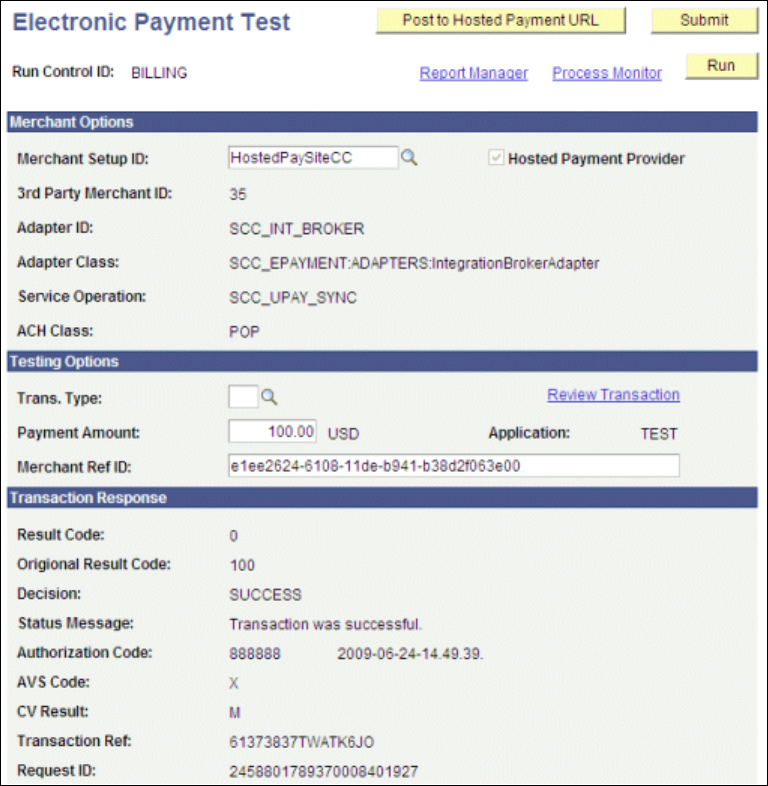
Chapter 3 Setting Up ePayment Processing
Copyright © 1988, 2010, Oracle and/or its affiliates. All Rights Reserved. 97
Testing ePayment and Hosted Payment Transactions
Access the Electronic Payment Test page (Set Up SACR, Common Definitions, Electronic Payments,
Electronic Payment Test).
Electronic Payment Test page (1 of 3)
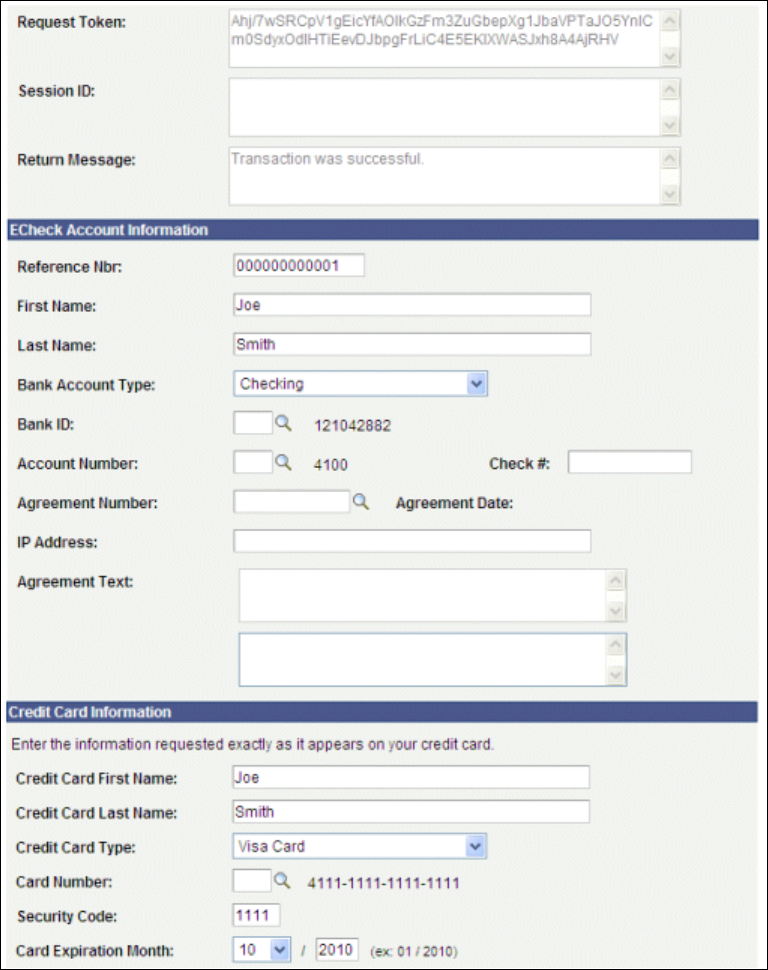
Setting Up ePayment Processing Chapter 3
98 Copyright © 1988, 2010, Oracle and/or its affiliates. All Rights Reserved.
Electronic Payment Test page (2 of 3)
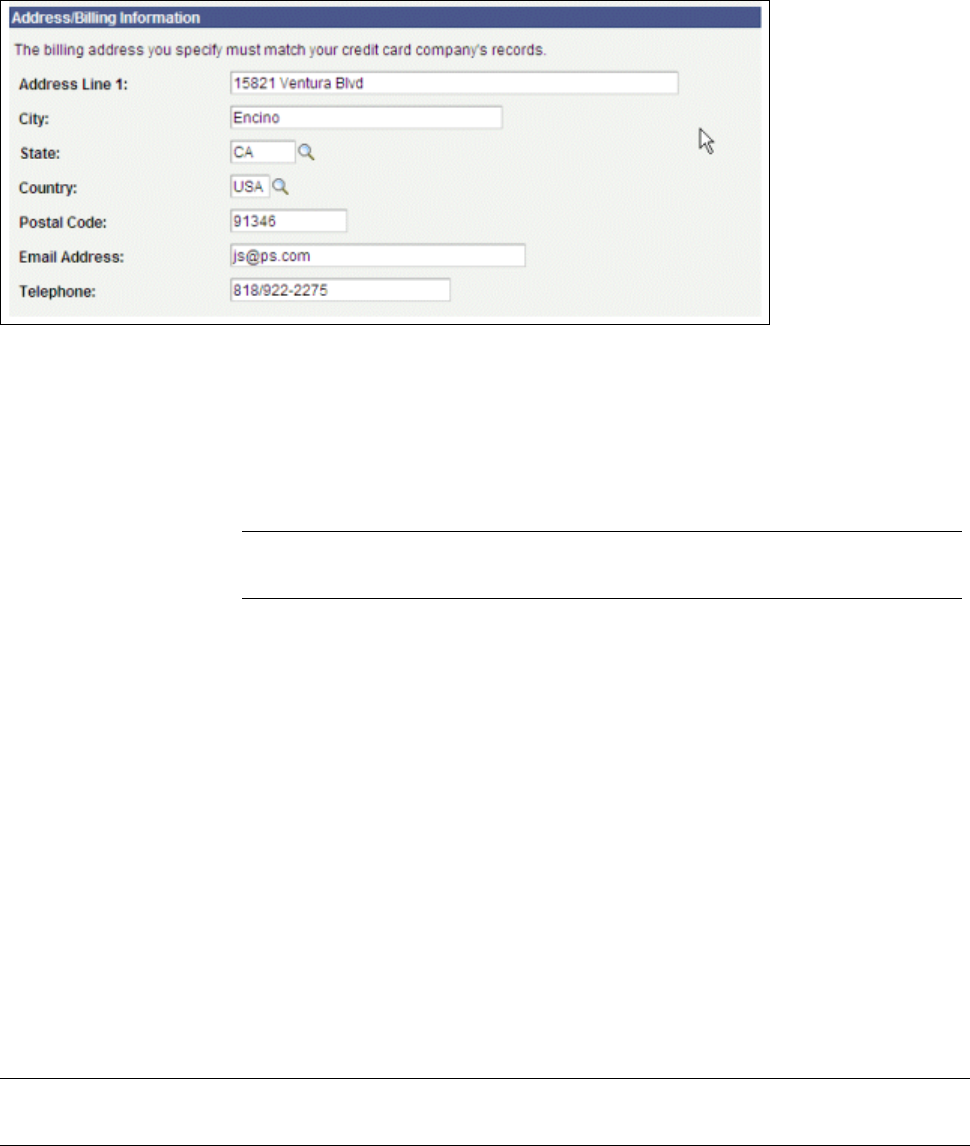
Chapter 3 Setting Up ePayment Processing
Copyright © 1988, 2010, Oracle and/or its affiliates. All Rights Reserved. 99
Electronic Payment Test page (3 of 3)
Post to Hosted Payment
URL Click this button to cause a redirect to the third party URL where a sample
payment can be made. The third party site should redirect you back to this page
after the payment is made. You can then authorize the payment by using the
Trans. Type field to select the Authorize Only (92) transaction.
Note. The Session ID field should be updated after you select either Authorize
Only (92) or Credit Only (93) transaction.
This button is available only for payment merchants who are hosted payment
providers.
Submit Click this button to submit the transaction using the Electronic Payment API.
Run Click this button to run the batch electronic payment test program. This program
tests credit card and eCheck transactions (Authorize and Credit) to make sure that
these transactions function correctly in a batch environment (this is more relevant
when using the Business Interlink adapter).
Merchant Options
Merchant Setup ID Select a Merchant Setup ID. Values are defined in the Payment Merchant setup
component (Set Up SACR, Common Definitions, Electronic Payments, Payment
Merchant, Payment Merchant).
Note. The remaining fields in this section are informational only and appear based on the setup in the
Payment Merchant setup component and the Adapter Type Table and Adapter Table setup components.

Setting Up ePayment Processing Chapter 3
100 Copyright © 1988, 2010, Oracle and/or its affiliates. All Rights Reserved.
Testing Options
Trans. Type(transaction
type) Select the type of transaction to be processed. The valid values for this field are
defined in the Supported Transactions section of the Payment Merchant setup
page (Set Up SACR, Common Definitions, Electronic Payments, Payment
Merchant, Payment Merchant).
Merchant Ref ID Enter a value that uniquely identifies the transaction that is sent to the third party
processor. If this field is left blank it is programmatically populated with a
uniquely generated ID.
Transaction Response
This section of the page contains the results of the transaction request. The fields all appear based on
properties of the Transaction Response class that is returned from the Electronic Payment Manager class.
See Also
Chapter 3, "Setting Up ePayment Processing," Setting Up Payment Merchants, page 90
Setting Up SF Merchants
To set up SF merchants, use the SF Merchants (MERCHANT_TBL) component.
This section provides an overview of SF merchants and discusses how to define ePayment processing
parameters.
Understanding SF Merchants
An SF merchant (student financials merchant) is an entity within the Student Financials application that
enables you to set up unique credit card and eCheck processing rules for different departments in your
institution. You can use an SF merchant to set up credit card and eCheck processing for cashiering offices and
student self-service functions. The SF merchant definition provides information needed by the ePayment
service provider and defines what services it performs and what customer information the system displays on
the payment page.
To process credit cards and eChecks in Student Financials, you must establish at least two SF merchant
definitions—one for credit card support and one for eCheck support. If you have different processing rules for
credit card processing in the cashiering office than you do in student self service, then you will need to
establish multiple credit card SF merchants to handle these different processing rules.

Chapter 3 Setting Up ePayment Processing
Copyright © 1988, 2010, Oracle and/or its affiliates. All Rights Reserved. 101
Page Used to Set Up SF Merchants
Page Name Definition Name Navigation Usage
SF Merchants MERCHANT_TBL Set Up SACR, Common
Definitions, Self Service,
Student Financials, SF
Merchants
Define ePayment
processing parameters.
Used for cashiering offices
and student self service.
Defining ePayment Processing Parameters
Access the SF Merchants page (Set Up SACR, Common Definitions, Self Service, Student Financials, SF
Merchants).

Setting Up ePayment Processing Chapter 3
102 Copyright © 1988, 2010, Oracle and/or its affiliates. All Rights Reserved.
SF Merchants page
Process Option Select the type of transaction that is governed by the SF Merchant rules that you
are defining: Credit Card or Electronic Check.

Chapter 3 Setting Up ePayment Processing
Copyright © 1988, 2010, Oracle and/or its affiliates. All Rights Reserved. 103
Payment Merchant Enter the Payment Merchant that you wish to use for this SF Merchant. The ID
can be shared by several SF Merchant definitions.
Note. If you intend to process both credit card and eCheck self-service
transactions, you must set up two SF merchants, one with a process option of
Credit Card and one with a process option of Electronic Check.
Hosted Payment
Provider If the payment merchant that you select on this page is a hosted payment provider
and you selected the Hosted Payment Provider check box on the Payment
Merchant page, the check box on this page appears selected and unavailable for
edit.
If the payment merchant that you select on this page is not a hosted payment
merchant, the Hosted Payment Provider check box appears on this page but is
cleared and is not available for edit.
Security Code
Supported If you select the Security Code Supported check box on the Payment Merchant
page to indicate that the merchant supports the sending of Security Code values,
the check box on this page appears selected and unavailable for edit.
This check box does not appear for hosted payment providers.
Batch Transmission
Error Enter the maximum number of batch transmission errors that you want the
system to allow before canceling the batch transmission.
Credit Card
This group box appears if you select Credit Card in the Process Option field. Use it to enter credit card–
specific processing parameters. Check with your third party provider for a list of supported services.
Real-Time
Authorization Select to authorize credit card transactions in real time, actually reserving or
setting aside credit card funds. If you clear this check box, you must authorize
credit card transactions in batch mode. When you select this check box, the Real-
Time Capture check box becomes available.
For hosted payment providers, this check box is selected and is not available for
edit.
Real-Time Capture Select to capture credit card transactions in real time, actually transferring funds
to your institution as the transaction takes place. If you clear this check box, you
must capture credit card transactions in batch mode.
For hosted payment providers, this check box is selected and is not available for
edit.
Real-Time Credit Select to credit in real time when you void credit card payments originating from
cashiering offices.
Note. Do not select this check box for self-service transactions because you can
only process credits for self-service transactions in batch.

Setting Up ePayment Processing Chapter 3
104 Copyright © 1988, 2010, Oracle and/or its affiliates. All Rights Reserved.
Perform Check Risk
Service Select to perform a risk assessment at the time of authorization. The risk
assessment is an estimation of the veracity of the transaction. Factors such as
improper address, too many transactions, or transactions dispersed
geographically increase the risk of fraud.
This check box is not available for hosted payment providers.
Check Digit Edit Select to verify the check digit of the credit card number being used prior to
processing the transaction. If the check digit is incorrect, the customer receives
an error message and is asked to correct the credit card number entered.
This check box is not available for hosted payment providers.
Check Risk Threshold Enter an amount above which the credit card processing merchant is alerted to
the possibility of fraud. When a transaction is processed, the credit card
processing vendor returns a risk assessment. The check risk threshold is the
allowable risk that a school is willing to assume for a given transaction.
This check box is not available for hosted payment providers.
Security Code Required This check box is available only for credit card merchants.
The check box does not appear if the merchant is a hosted payment provider.
If you select this check box, the Security Code field is available as a required
field on all pages that accept credit card transactions—Cashiering, Make a
Payment, and Purchase Miscellaneous Items.
The Security Code field does not appear on any inquiry pages.
Note. The Security Code is supported only if you use the Integration Broker
interface for credit card processing. Do not select the check box if you use
Business Interlinks.
Address Verification
Flag This field controls whether the system verifies the credit card billing address
during credit card processing. The options are Address Verification Off and
Address Verification On.
Note. If you select Address Verification On and the address given does not
match, authorization will be declined, but the credit card funds will be set aside.
This field appears on this page and the Payment Merchant page.
Electronic Check
This group box appears if you select Electronic Check in the Process Option field. Use it to enter eCheck-
specific processing parameters. Check with your third party provider for a list of supported services.
Real-Time Debit Select to process eCheck transactions in real time. If you clear this check box,
you must run the eCheck Processing process to debit eCheck payments in batch.

Chapter 3 Setting Up ePayment Processing
Copyright © 1988, 2010, Oracle and/or its affiliates. All Rights Reserved. 105
Authentication Method
or Shared Secret For Integration Broker and Business Interlinks, the field appears as
Authentication Method.
Define how the system authenticates eCheck payments. If you select Birthdate,
PIN, or National ID Number, students must enter the required information to
authenticate an eCheck payment. If you select No Authentication, students can
submit eCheck payments without authentication.
You define a student's birthdate, national ID number, or PIN in PeopleSoft
Campus Community. The system always uses a student's primary national ID
number for authentication purposes.
For Hosted Payment, the field appears as Shared Secret.
When the third party payment provider authenticates the student on their site,
they use the Shared Secret provided by Campus Solutions to verify the student.
Valid values are PIN and Birthdate.
Note. Students should not use dashes when entering the national ID number.
See PeopleSoft Enterprise Campus Community 9.0 Fundamentals PeopleBook,
"Managing Personal Identification Data," Entering PINs.
See PeopleSoft Enterprise Campus Community 9.0 Fundamentals PeopleBook,
"Adding a Person to Your Campus Solutions Database."
See PeopleSoft Enterprise Campus Community 9.0 Fundamentals PeopleBook,
"Managing Biographical Information."
Self Service Options
Convenience Fee Option Select one of the following options if you want to charge students a fee for each
ePayment transaction.
Fixed Amount: Select to charge a fixed convenience fee for each ePayment
transaction.
Percentage: Select to make the convenience fee equal a percentage of the
ePayment transaction.
Note. In most cases, the ePayment convenience fee is posted wherever the
payment is applied. For example, if a payment is allocated to charges across
multiple business units, the convenience fee is based on the total payment, but is
distributed proportionately across the business units. If the payment is not
allocated across business units but is directed to charges in one business unit, the
convenience fee will be posted in the same business unit. If a payment is not
manually allocated, the convenience fee is directed to the business unit with the
highest priority.
Convenience Fee
Amount If you want to charge a fixed convenience fee amount, specify the amount as
currency. (For example, using U.S. Dollars as the base currency, an entry of 1.50
results in a surcharge of 1.50 USD per transaction).

Setting Up ePayment Processing Chapter 3
106 Copyright © 1988, 2010, Oracle and/or its affiliates. All Rights Reserved.
Convenience Fee
Percentage If you want to charge a percentage convenience fee, specify the percentage as a
number greater than zero. In the previous example, the entry 5.5 results in a
surcharge of 5.5 percent per transaction.
Minimum Payment
Amount Set the minimum amount that a student can pay during a single ePayment
transaction.
Maximum Payment
Amount Set the maximum amount that a student can pay during a single ePayment
transaction.
Default Options
Items in this group box relate to customer information that the system displays on the Make a Payment page
for self-service transactions, and the Tender Details page for cashiering transactions.
Contact Type Select the contact type representing the address for an External Org ID.
Address Usage Select the address usage type that you want to use to display default customer
addresses on the payment page.
Default Email ePayment processing vendors require an email address to process transactions.
Select this check box to use the default email address entered in the Email ID
field rather than requiring students to enter one. When you select this check box,
the Email Address field does not appear on the Make a Payment self-service
page.
Type of Name Select the default name type that the system uses to look up and display the
customer name on the Make a Payment page.
Phone Type ePayment processing vendors require a phone number to process transactions
over the web. Select the default phone type that the system uses to look up and
display the customer phone number on the Make a Payment page.
Email ID Enter the default generic email address that the system uses for all credit card
transactions when you select the Default Email check box.
See Electronic Payment Integration Developer's Reference Guide. The guide is posted to My Oracle Support.
See Also
Chapter 14, "Processing ePayment Transactions," page 381
Setting Up Institution Sets
You use institution sets to define basic institution set parameters and to set up ePayment rules for institution
sets. This setup is done in Campus Self Service.

Chapter 3 Setting Up ePayment Processing
Copyright © 1988, 2010, Oracle and/or its affiliates. All Rights Reserved. 107
See PeopleSoft Enterprise Campus Self Service 9.0 PeopleBook, "Setting Up Student Financials Self
Service," Setting Up Institution Sets.
Setting Up Item Types for ePayment
To enable eCheck and credit card processing, you must define miscellaneous parameters for item types. The
system uses the following attributes from the credit card or eCheck Item Type, Miscellaneous page:
•Charge Priority List (during posting of the ePayment transaction).
•Payment Overall Priority (during posting of the ePayment transaction).
•Tender Specific and Tender Specify Category (eCheck or credit card; this value controls what will be
displayed on SF Institution Set 2 page for an eCheck item type or a credit card item type.
See Also
Chapter 2, "Completing Student Financials General Setup," Setting Up Item Types and Item Type Groups,
page 55
Setting Up Self-Service Options
You can use self-service options to define business unit labels for self-service payment pages. The values you
enter here are used in the View By column headings on self-service pages.
See PeopleSoft Enterprise Campus Self Service 9.0 PeopleBook, "Setting Up Student Financials Self
Service," Setting Up Self-Service Options.

Copyright © 1988, 2010, Oracle and/or its affiliates. All Rights Reserved. 109
Chapter 4
Setting Up GL Interface Processing
This chapter provides an overview of General Ledger (GL) interface processing setup and discusses how to:
•Load setup data using PeopleSoft Application Messaging.
•Review setup table data for PeopleSoft Financials.
•Link Student Financials business units to PeopleSoft General Ledger units.
•Set up HRMS for Oracle Financials.
•Set up the Ledger Fields table.
•Synchronize Oracle GL Segments.
•Map General Ledger business units to Oracle General Ledger.
•Synchronize ChartField values.
•(Optional) Create ChartField speed type keys.
•(Optional) Activate ChartField validation options.
•Assign charts of accounts.
•Validate ChartFields.
•Set up integration with PeopleSoft Financials and Oracle Financials.
•Copy ChartField information for item types from one term to another.
Understanding GL Interface Processing Setup
This section discusses:
•GL Interface processing using PeopleSoft General Ledger or Oracle General Ledger.
•GL Interface processing using a third-party or legacy general ledger system.
Note. When customers license PeopleSoft Campus Solutions, they receive a limited use license for Human
Resources, Benefits Administration, and Payroll for North America.

Setting Up GL Interface Processing Chapter 4
110 Copyright © 1988, 2010, Oracle and/or its affiliates. All Rights Reserved.
GL Interface Processing Using PeopleSoft General Ledger or Oracle General
Ledger
Most of the setup that is needed to transfer information between the Student Financials application and the
PeopleSoft General Ledger or Oracle General Ledger applications is done within General Ledger and then
transferred to Student Financials. Throughout the setup process, you should work closely with staff who
coordinate the General Ledger application. They will help you define your setup tables and tell you what
information is necessary for the GL Interface process.
If the system interacts with PeopleSoft or Oracle Financials, it uses application messaging to share accounting
line information with the PeopleSoft or Oracle General Ledger.
GL Messaging
During the GL Messaging process, Student Financials delivers these queues and messages to the PeopleSoft
Financials database:
Message Queue Message Description
STUDENT_ADMI
N_ACCOUNTING STUDENT_FIN_ACCTG_LINE Notifies the message broker that new
SF_ACCTG_LN records are ready to be retrieved
by PeopleSoft Financials and, after journal
generation, retrieves the updated SF_ACCTG_LN
records into Student Financials.
HR_SETUP BUS_UNIT_SF_FULLSYNC Sends the BUS_UNIT, DESCR, and
DESCRSHORT rows in the
BUS_UNIT_TBL_SF to PeopleSoft Financials to
seed its BUS_UNIT_TBL_SF.
HR_SETUP BUS_UNIT_SF_SYNC Sends new Student Financials business units or
updates when the DESCR field or
DESCRSHORT field is changed.
During the GL Messaging process, Student Financials delivers these queues and messages to the Oracle
Financials database:
Message Queue Message Description
STUDENT_ADMIN_ACCOUNTI
NG STUDENT_FIN_ACCTG_LINE Notifies the message broker that
new SF_ACCTG_LN records are
ready to be retrieved by Oracle
Financials.

Chapter 4 Setting Up GL Interface Processing
Copyright © 1988, 2010, Oracle and/or its affiliates. All Rights Reserved. 111
Message Queue Message Description
SSF_GL_INT SSF_GL_SEGMENT_FULLSYNC Fetches all available active ledgers,
segments from Oracle GL and
inserts the data into
PS_SSF_EB_SEGMENTS record.
SSF_GL_INT SSF_GL_SEGMENT_VAL_REQ
SSF_GL_SEGMENT_VAL_RESP
Full/partial sync of segment values.
This inserts/updates the chartfield
prompt tables based on mappings
from SSF_EB_GLBU_LED.
SSF_GL_INT SSF_CF_COMBO_RTVLD_REQ
SSF_CF_COMBO_RTVLD_RESP
Performs realtime validation of
entered chartfield combination
against the combinations table in
Oracle GL.
SSF_GL_INT SSF_ACCTG_LINE_TRFM_EBG
L This is a transformation program
used by the batch publish utility.
This maps and inserts data from
SF_ACCTG_LN and
AV_ACCTG_LN into the
GL_INTERFACE table in Oracle
GL.
SSF_GL_INT SSF_GL_ACCTG_LINE_SYNC This message receives the non-
rowset based message, validates
and parses the message, and updates
the journal related fields in one of
the SF_ACCTG_LN and
AV_ACCTG_LN tables.
The PeopleSoft system delivers a default node of PSFT_HR. If you change this default, you must reconfigure
the message channel. However, regardless of whether you change the message node, you must configure it by
inserting the proper URL.
Note. An easy way to determine where messaging starts and ends is to name the publishing node with the
name of the database to which it publishes or from which it publishes.
In the PeopleSoft Financials database, message definition, queue, and message node naming must match the
naming that is used in the Student Financials database.
PeopleSoft Financials subscribes to the published messages in the Student Financials database, takes the
accounting lines into the SF_ACCTG_LN table, and runs those lines through Journal Generator to create
journal entries. PeopleSoft Financials then publishes the updated accounting lines, Student Financials
subscribes to these lines, and then the data that is published by PeopleSoft Financials updates the Student
Financials SF_ACCTG_LN table.
In addition, you must select the Display External ChartField check box on the SF Installation Table.
For information about messaging for Oracle Financials:
Setting Up GL Interface Processing Chapter 4
112 Copyright © 1988, 2010, Oracle and/or its affiliates. All Rights Reserved.
See CS90 to EBS GL Integration Developer's Reference Guide. The guide is posted to My Oracle Support.
GL Interface Processing Using a Third-Party or Legacy General Ledger
System
Student Financials provides an extra field for you to use to enter chart of accounts data on your item types,
course or class fees, and cashiering tenders or targets. You can use the existing PeopleSoft-delivered
ChartFields (ACCOUNT, DEPTID, and so on) to enter your chart of accounts information.
Alternatively, Student Financials provides a 50-character field called External GL Chart Field (field name
EXT_GL_CHARTFLD) that you can use to enter chart of accounts data. To enable this field, you must
signify to the system that you are not using PeopleSoft or Oracle General Ledger. To indicate that you are not
using PeopleSoft or Oracle General Ledger, clear the General Ledger check box on the Installation Table
page and select Others as the financial system on the SF Installation page. After you clear this check box and
complete setup on the SF Installation page, pages that usually display the PeopleSoft-delivered ChartFields
for data entry display instead—or, in some instances, also—the External GL ChartField field.
Using the External GL Chart Field does have some limitations. The system does not perform any editing
against this field. In addition, the ChartField validation process does not check the contents of the External
GL Chart Field to ensure that you have supplied valid chart of accounts information for each item type,
course/class fee, and cashiering tender/target.
Even if you are not using PeopleSoft General Ledger, you must populate the GL setup tables (except the
ChartField definition tables) before you can use the GL Interface or Cashiering GL Interface processes.
See Also
PeopleSoft Enterprise Campus Solutions 9.0 Application Fundamentals PeopleBook, "Reviewing Installation
Setup and System Defaults"
Chapter 2, "Completing Student Financials General Setup," Defining Number Sequence Start Points,
Maximum Row Settings, and ChartField Edit Options, page 7
Loading Setup Data Using PeopleSoft Application Messaging
If your system interacts with PeopleSoft or Oracle Financials, it shares accounting messaging directly through
PeopleSoft Application Messaging.
This table lists all PeopleSoft Financials published messages to which Student Financials subscribes in order
to load ChartFields:
Message Name Channel Pub/Sub Node Records
BUD_REF_CF_FULLSY
NC ENTERPRISE_SETUP PSFT_EP
(FIN)/PSFT_HR (CS) BUD_REF_TBL

Chapter 4 Setting Up GL Interface Processing
Copyright © 1988, 2010, Oracle and/or its affiliates. All Rights Reserved. 113
Message Name Channel Pub/Sub Node Records
BUD_REF_CF_SYNC ENTERPRISE_SETUP PSFT_EP
(FIN)/PSFT_HR (CS) BUD_REF_TBL
CHARTFIELD1_FULLS
YNC ENTERPRISE_SETUP PSFT_EP
(FIN)/PSFT_HR (CS) CHARTFIELD1_TBL
CHARTFIELD1_SYNC ENTERPRISE_SETUP PSFT_EP
(FIN)/PSFT_HR (CS) CHARTFIELD1_TBL
CHARTFIELD2_FULLS
YNC ENTERPRISE_SETUP PSFT_EP
(FIN)/PSFT_HR (CS) CHARTFIELD2_TBL
CHARTFIELD2_SYNC ENTERPRISE_SETUP PSFT_EP
(FIN)/PSFT_HR (CS) CHARTFIELD2_TBL
CHARTFIELD3_SYNC ENTERPRISE_SETUP PSFT_EP
(FIN)/PSFT_HR (CS) CHARTFIELD3_TBL
CHARTFIELD3_FULLS
YNC ENTERPRISE_SETUP PSFT_EP
(FIN)/PSFT_HR (CS) CHARTFIELD3_TBL
CLASS_CF_SYNC ENTERPRISE_SETUP PSFT_EP
(FIN)/PSFT_HR (CS) CLASS_CF_TBL
CLASS_CF_FULLSYNC ENTERPRISE_SETUP PSFT_EP
(FIN)/PSFT_HR (CS) CLASS_CF_TBL
DEPT_FULLSYNC ENTERPRISE_SETUP PSFT_EP
(FIN)/PSFT_HR (CS) DEPT_TBL
DEPT_SYNC ENTERPRISE_SETUP PSFT_EP
(FIN)/PSFT_HR (CS) DEPT_TBL
FUND_LOAD ENTERPRISE_SETUP PSFT_EP
(FIN)/PSFT_HR (CS) FUND_TBL
FUND_CF_SYNC ENTERPRISE_SETUP PSFT_EP
(FIN)/PSFT_HR (CS) FUND_TBL
PROGRAM_CF_FULLS
YNC ENTERPRISE_SETUP PSFT_EP
(FIN)/PSFT_HR (CS) PROGRAM_TBL

Setting Up GL Interface Processing Chapter 4
114 Copyright © 1988, 2010, Oracle and/or its affiliates. All Rights Reserved.
Message Name Channel Pub/Sub Node Records
OPER_UNIT_CF_FULL
SYNC ENTERPRISE_SETUP PSFT_EP
(FIN)/PSFT_HR (CS) OPER_UNIT_TBL
OPER_UNIT_CF_SYNC ENTERPRISE_SETUP PSFT_EP
(FIN)/PSFT_HR (CS) OPER_UNIT_TBL
PRODUCT_CHARTFIE
LD_FULLSYNC ENTERPRISE_SETUP PSFT_EP
(FIN)/PSFT_HR (CS) PRODUCT_TBL
PRODUCT_CHARTFIE
LD_SYNC ENTERPRISE_SETUP PSFT_EP
(FIN)/PSFT_HR (CS) PRODUCT_TBL
PROGRAM_CF_SYNC ENTERPRISE_SETUP PSFT_EP
(FIN)/PSFT_HR (CS) PROGRAM_TBL
HR_ACCT_CD_LOAD ENTERPRISE_SETUP PSFT_EP
(FIN)/PSFT_HR (CS) ACCT_CD_TBL
BUS_UNIT_FS_FULLS
YNC ENTERPRISE_SETUP PSFT_EP
(FIN)/PSFT_HR (CS) BUS_UNIT_TBL_FS
BUS_UNIT_FS_SYNC ENTERPRISE_SETUP PSFT_EP
(FIN)/PSFT_HR (CS) BUS_UNIT_TBL_FS
ACCOUNT_CHARTFIE
LD_FULLSYNC GL_SETUP PSFT_EP
(FIN)/PSFT_HR (CS) GL_ACCOUNT_TBL
ACCOUNT_CHARTFIE
LD_SYNC GL_SETUP PSFT_EP
(FIN)/PSFT_HR (CS) GL_ACCOUNT_TBL
LEDGER_DEFN_FULL
SYNC GL_SETUP PSFT_EP
(FIN)/PSFT_HR (CS) LED_DEFN_TBL
LEDGER_DEFN_SYNC GL_SETUP PSFT_EP
(FIN)/PSFT_HR (CS) LED_DEFN_TBL
BUS_UNIT_GL_FULLS
YNC GL_SETUP PSFT_EP
(FIN)/PSFT_HR (CS) BUS_UNIT_TBL_GL
BUS_UNIT_GL_SYNC GL_SETUP PSFT_EP
(FIN)/PSFT_HR (CS) BUS_UNIT_TBL_GL

Chapter 4 Setting Up GL Interface Processing
Copyright © 1988, 2010, Oracle and/or its affiliates. All Rights Reserved. 115
Message Name Channel Pub/Sub Node Records
BUS_UNIT_SF_FULLS
YNC HR_SETUP PSFT_EP
(FIN)/PSFT_HR (CS) BUS_UNIT_TBL_SF
BUS_UNIT_SF_SYNC HR_SETUP PSFT_EP
(FIN)/PSFT_HR (CS) BUS_UNIT_TBL_SF
JOURNAL_GEN_APPL
_ID_FULLSYNC JOURNAL_GENERATO
RPSFT_EP
(FIN)/PSFT_HR (CS) JRNLGEN_APPL_ID
JOURNAL_GENERATO
R_APPL_ID_SYNC JOURNAL_GENERATO
RPSFT_EP
(FIN)/PSFT_HR (CS) JRNLGEN_APPL_ID
PROJECT_FULLSYNC PROJECTS_SETUP PSFT_EP
(FIN)/PSFT_HR (CS) PROJECT
PROJECT_SYNC PROJECTS_SETUP PSFT_EP
(FIN)/PSFT_HR (CS) PROJECT
This table lists the messages that are required to integrate with Oracle Financials:
Message Name Channel Pub/Sub Node Records/Comments
SSF_GL_SEGMENT_FULLSY
NC SSF_GL_INT ~~ANY~~/PSFT_HR
(CS) SSF_EB_SEGMENTS
SSF_GL_SEGMENT_VAL_RE
QSSF_GL_INT PSFT_HR (CS)
/WSDL_NODE Request message for
Chartfield values
synchronization.

Setting Up GL Interface Processing Chapter 4
116 Copyright © 1988, 2010, Oracle and/or its affiliates. All Rights Reserved.
Message Name Channel Pub/Sub Node Records/Comments
SSF_GL_SEGMENT_VAL_RE
SP SSF_GL_INT ~~ANY~~/PSFT_HR
(CS) •GL_ACCOUNT_TBL
•DEPT_TBL
•PRODUCT_TBL
•FUND_TBL
• PROGRAM_TBL
•CLASS_CF_TBL
•OPER_UNIT_TBL
•ALTACCT_TBL
•BUD_REF_TBL
•CHARTFIELD1_TBL
•CHARTFIELD2_TBL
•CHARTFIELD3_TBL
SSF_CF_COMBO_RTVLD_RE
QSSF_GL_INT PSFT_HR (CS)
/WSDL_NODE Transformation message for
real time Chartfield
combination validation
request.
SSF_CF_COMBO_RTVLD_RE
SP SSF_GL_INT ~~ANY~~/PSFT_HR
(CS) Transformation message for
real time Chartfield
combination validation
response.
SSF_ACCTG_LINE_TRFM_E
BGL SSF_GL_INT PSFT_HR (CS)
/WSDL_NODE Transformation message for
Batch Publish.
SSF_GL_ACCTG_LINE_SYN
CSSF_GL_INT ~~ANY~~/PSFT_HR
(CS) SF_ACCTG_LN,
AV_ACCTG_LN
See Also
PeopleSoft Enterprise General Ledger PeopleBook, "Integrating and Transferring Information Among
Applications," and "Integrating PeopleSoft General Ledger with PeopleSoft Applications"
Enterprise PeopleTools 8.45 PeopleBook: PeopleSoft Integration Broker
CS90 to EBS GL Integration Developer's Reference Guide. The guide is posted to My Oracle Support.

Chapter 4 Setting Up GL Interface Processing
Copyright © 1988, 2010, Oracle and/or its affiliates. All Rights Reserved. 117
Reviewing Setup Table Data for PeopleSoft Financials
This section provides an overview of setup table data and lists the pages used to review setup table data.
Note. This section applies to integration with PeopleSoft Financials only.
Understanding Table Setup Data
After you load all of the setup tables that support the GL Interface, you can use a variety of components to
review the setup data for accuracy.
The PeopleSoft Student Financials application recognizes three types of business units: the SF (student
financials) business unit, the AP (accounts payable) business unit, and the GL (general ledger) business unit.
You define GL business units in PeopleSoft General Ledger and load them through an integration point. The
Business Unit GL component enables you to review the GL business unit definition.
You define the journal generator templates in PeopleSoft General Ledger and load them through an
integration point. The Journal Generator templates define the valid template IDs that the GL Interface process
assigns to each accounting entry that it creates. Each accounting entry must have a valid journal generator
template ID for it to be properly recorded in PeopleSoft General Ledger.
Note. Most of the fields on the Journal Generator Template - Defaults and Journal Generator Template -
Summarization pages are used only by the PeopleSoft General Ledger system during journal generation
processing.
Pages Used to Review Setup Table Data
Page Name Definition Name Navigation Usage
Business Unit GL -
Definition
BUS_UNIT_TBL_GL1 Set Up HRMS, Product
Related, Payroll for North
America, GL Interface,
Review GL Business Units,
Definition
View attributes assigned to
your GL business unit.
Currency Options BUS_UNIT_TBL_GL2 Set Up HRMS, Product
Related, Payroll for North
America, GL Interface,
Review GL Business Units,
Currency Options
View currency option
settings from your GL
business unit.
Journal Generator
Templates - Defaults
JRNL_GEN_DEFAULTS Set Up HRMS, Product
Related, Payroll for North
America, GL Interface,
Review Journal Generator
Tmpl, Defaults
View the journal generator
template ID that is used by
the GL Interface process.
Other fields on this page are
used only in PeopleSoft
General Ledger by the
journal generator process.

Setting Up GL Interface Processing Chapter 4
118 Copyright © 1988, 2010, Oracle and/or its affiliates. All Rights Reserved.
Page Name Definition Name Navigation Usage
Journal Generator
Templates - Summarization
JRNL_GEN_SUM Set Up HRMS, Product
Related, Payroll for North
America, GL Interface,
Review Journal Generator
Tmpl, Defaults
View summarization
parameters that the
PeopleSoft General Ledger
Journal Generator process
uses.
Detail Calendar DETAIL_CALENDAR1 Set Up HRMS, Product
Related, Payroll for North
America, GL Interface,
Review Detail Calendar
View fiscal years and
accounting periods from
PeopleSoft General Ledger.
Linking Student Financials Business Units to PeopleSoft General
Ledger Units
This section applies to integration with PeopleSoft Financials only.
After reviewing your PeopleSoft general ledger setup data, you must associate each Student Financials
business unit to a PeopleSoft General Ledger unit using the General Ledger Unit field on the General 1 page.
See Also
Chapter 2, "Completing Student Financials General Setup," Defining Basic Business Unit Parameters, page
21
Setting Up HRMS for Oracle Financials
For integration with Oracle Financials, the General Ledger check box must be cleared on the HRMS
Installation Table (Setup HRMS, Install, Installation Table).
Use the Business Unit GL - Definition page (Set Up HRMS, Product Related, Payroll for North America, GL
Interface, Review GL Business Units, Definition) to create and maintain GL business units. These business
units are mapped to Oracle Ledger, Operating Unit, and Legal Entity using the Chartfields Mapping page—
more information about this page is provided later in the chapter.
For more information, refer to the User Task Flow diagram in the Using GL Interface Processing chapter.

Chapter 4 Setting Up GL Interface Processing
Copyright © 1988, 2010, Oracle and/or its affiliates. All Rights Reserved. 119
See Also
Chapter 15, "Using GL Interface Processing," Understanding GL Interface Processing, page 403
Chapter 2, "Completing Student Financials General Setup," Defining Number Sequence Start Points,
Maximum Row Settings, and ChartField Edit Options, page 7
Chapter 4, "Setting Up GL Interface Processing," Mapping General Ledger Business Units to Oracle General
Ledger, page 120
CS90 to EBS GL Integration Developer's Reference Guide. The guide is posted to My Oracle Support.
Setting Up the Ledger Fields Table
To set up the ledger fields table, use the Ledger Fields Table component (SF_LED_FLDS_TBL).
This section provides an overview of setting up the ledger fields table and discusses how to define ledger
fields.
Note. This page is not used for integration with Oracle Financials.
If you select Oracle Financials as the financial system, you must manually remove the Ledger Fields Table
page from the menu navigation by changing the Permission Lists. You should create a custom permission list
to hide the menu navigation to this component.
Understanding the Ledger Fields Table Setup
When you define an item type GL Interface, you specify the ledger to which account information is
transferred. The Ledger Fields Table defines the fields that are available. Not all available ChartFields are
needed to convey the accounting information. To prevent entering data into an incorrect ChartField, define
only the values that you need. The business unit, account, and ledger fields are always required for the GL
Interface definition and do not need to be added to the Ledger Fields Table.
Page Used to Set Up the Ledger Fields Table
Page Name Definition Name Navigation Usage
Ledger Fields Table SF_LED_FLDS_TBL Set Up SACR, Product
Related, Student Financials,
General Ledger Interface,
Ledger Fields Table
Define ledger fields.
Defining Ledger Fields
Access the Ledger Fields Table page (Set Up SACR, Product Related, Student Financials, General Ledger
Interface, Ledger Fields Table).
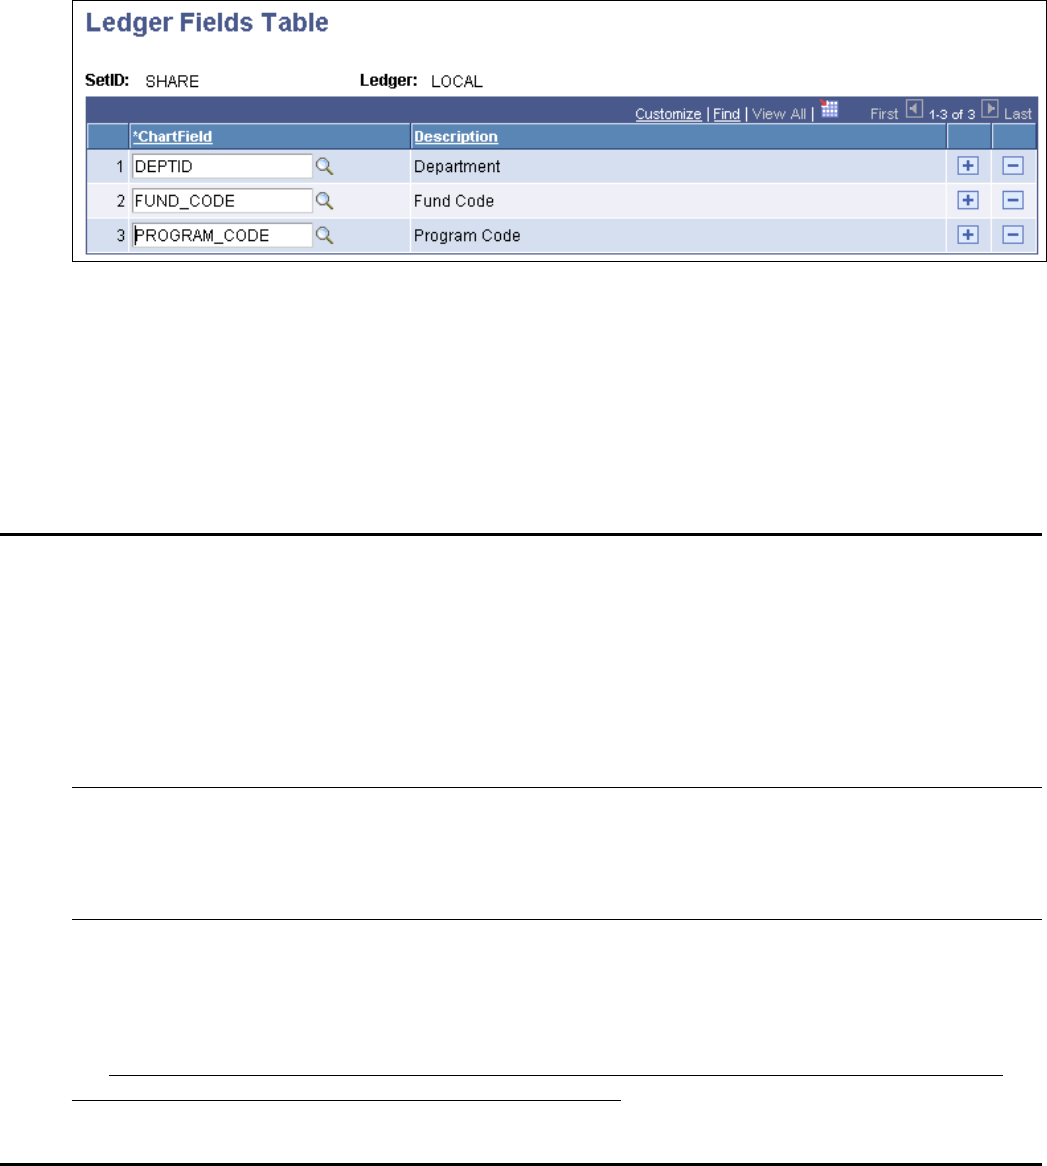
Setting Up GL Interface Processing Chapter 4
120 Copyright © 1988, 2010, Oracle and/or its affiliates. All Rights Reserved.
Ledger Fields Table page
This page is not available if Oracle Financials is selected in the Financial System group box on the SF
Installation page.
ChartField Select the database field name that represents a valid ChartField.
Synchronizing Oracle GL Segments
Integration Broker messaging brings all available Segment details—Segment Name, Segment Description,
Segment ID and Ledger ID—from Oracle GL and stores them in the SSF_EB_SEGMENTS record in Student
Financials.
You use the data that is available as a result of this process to complete the chartfields to segments mapping
on the Chartfields Mapping page.
Warning! Synchronizing Oracle GL segments is essential for integration with Oracle Financials.
No delivered process or Campus Solutions component is available for this synchronization.
The Synchronize Oracle GL Segments web service is a Consulting solution only.
See CS90 to EBS GL Integration Developer's Reference Guide. The guide is posted to My Oracle Support.
The Integration Broker Message is successful only if Oracle Financials is selected in the Financial System
group box on the SF Installation page.
See Chapter 2, "Completing Student Financials General Setup," Defining Number Sequence Start Points,
Maximum Row Settings, and ChartField Edit Options, page 7.
Mapping General Ledger Business Units to Oracle General Ledger
This section discusses how to:
•Map GL business units to Oracle GL.

Chapter 4 Setting Up GL Interface Processing
Copyright © 1988, 2010, Oracle and/or its affiliates. All Rights Reserved. 121
•Map transaction classifications to Oracle GL journal categories.
See CS90 to EBS GL Integration Developer's Reference Guide. The guide is posted to My Oracle Support.
Pages Used to Map General Ledger Business Units to Oracle General Ledger
Page Name Definition Name Navigation Usage
ChartFields Mapping SSF_EB_CF_SEG_MAP Setup SACR, Product
Related, Student Financials,
General Ledger Interface,
Map GL BU to Oracle GL,
Chartfields Mapping
Map GL business units to
Oracle Financials ledger,
legal entity, and operating
unit. Map chartfields to
segments.
Journal Details Mapping SSF_EB_ITM_JRN_MAP Setup SACR, Product
Related, Student Financials,
General Ledger Interface,
Map GL BU to Oracle GL,
Journal Details Mapping
Map transaction
classification to Oracle GL
journal category.
Mapping GL Business Units to Oracle GL
Access the Chartfields Mapping page (Setup SACR, Product Related, Student Financials, General Ledger
Interface, Map GL BU to Oracle GL, Chartfields Mapping)
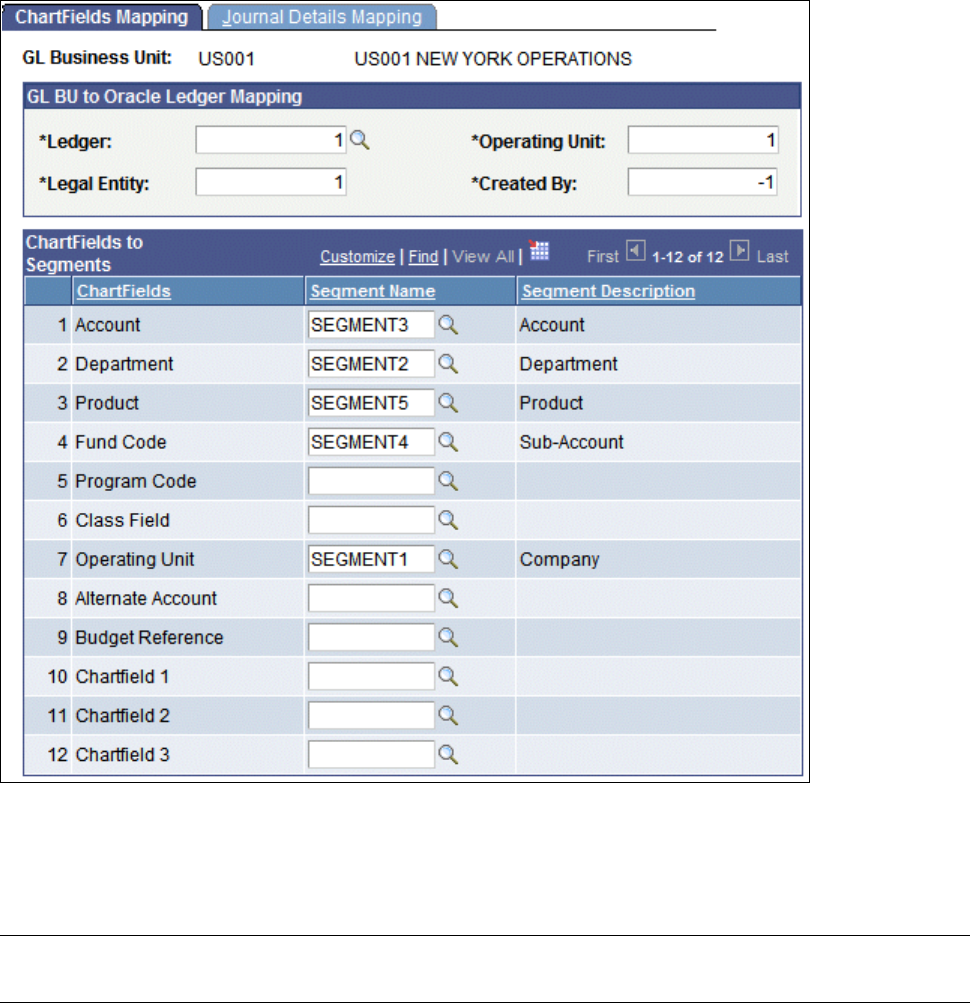
Setting Up GL Interface Processing Chapter 4
122 Copyright © 1988, 2010, Oracle and/or its affiliates. All Rights Reserved.
ChartFields Mapping page
To use this page, ensure that you have selected the Oracle Financials check box in the Financial System group
box on the SF Installation page.
Note. The synchronization of Oracle GL Segments must be performed before you map chartfields to
segments on this page.
GL BU to Oracle Ledger Mapping
You must enter a value in the Ledger,Legal Entity, and Operating Unit fields because in Oracle Financials,
the chart of account consists of Ledger, Legal Entity, and Operating Unit.
The values in the Ledger field are available after you run the Synchronize Oracle GL Segments web service.
The Legal Entity and Operating Unit fields are not validated in Student Financials at this time, but must be
valid values in Oracle Financials (available from the department that sets up Oracle GL).
You must enter a value in the Created By field because when transactions from Accounting Line are pushed
to the GL Interface, a Created By value is required. The value must be numeric.

Chapter 4 Setting Up GL Interface Processing
Copyright © 1988, 2010, Oracle and/or its affiliates. All Rights Reserved. 123
ChartFields to Segments
The chartfields that appear in this group box are the active chartfields on the HRMS Standard Chartfield
Configuration page (Set up HRMS, Common Definitions, ChartField Configuration, Standard ChartField
Configuration). This list of chartfields here is the same as the list on the Journal Set ChartFields page.
The 2 Affiliate Intra (Intra Unit), Project/Grant, and Affiliate chartfields are not supported and will not be
available—ensure that these values are inactive on the Standard Chartfield Configuration page.
Note. You must map each chartfield to a segment name. If you do not, when you click Save, an error message
appears and the page is not saved: All available segments must be mapped to chartfields.
Also, you must map each chartfield to a distinct segment name. If you do not, when you click Save, an error
message appears and the page is not saved: Segment is mapped to more than one chartfield.
Mapping Transaction Classification to Oracle GL Journal Categories
Access the Journal Details Mapping page (Setup SACR, Product Related, Student Financials, General Ledger
Interface, Map GL BU to Oracle GL, Journal Details Mapping).
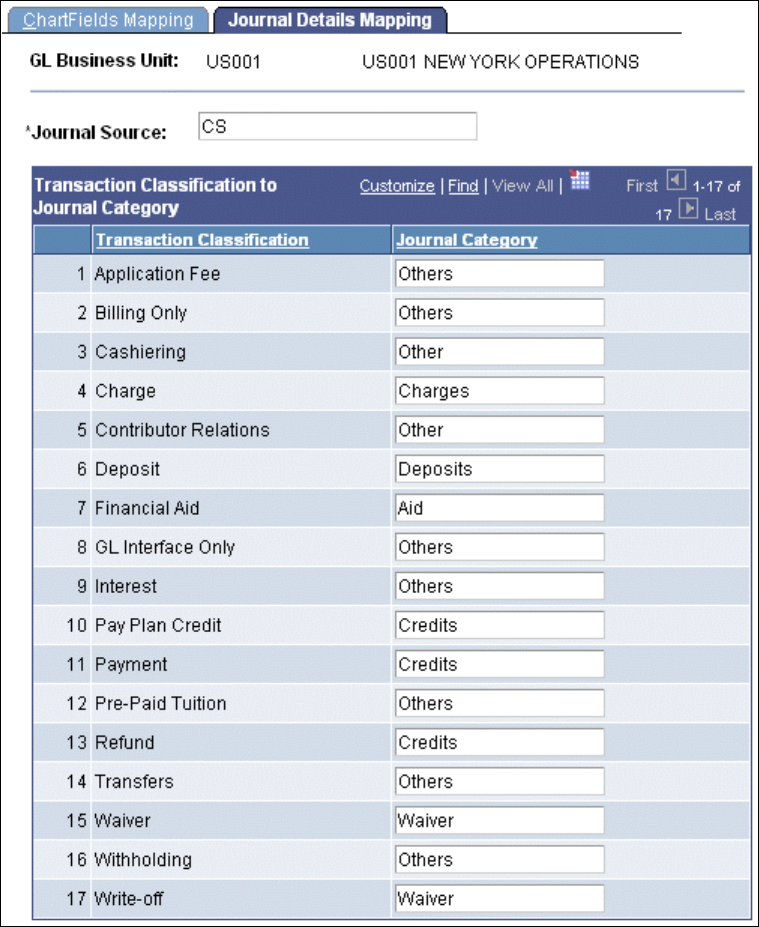
Setting Up GL Interface Processing Chapter 4
124 Copyright © 1988, 2010, Oracle and/or its affiliates. All Rights Reserved.
Journal Details Mapping page
To use this page, ensure that you have selected the Oracle Financials check box in the Financial System group
box on the SF Installation page.
The Journal Source field is used to identify the source of financial transactions in Oracle GL. The value that
you enter here is passed to the GL_INTERFACE in Oracle GL. This value must exist as a valid source in
Oracle GL. The journaling process in Oracle GL validates this value during import and fails to import details
if the source is invalid. Oracle GL provides a facility to correct such entries and re-import.
Transaction Classification to Journal Category
The list of Transaction Classification values on this page is the same as the list of values that are available in
the Item Type Code field on the Item Types (Search) page (Set Up SACR, Product Related, Student
Financials, Item Types, Item Types).
Chapter 4 Setting Up GL Interface Processing
Copyright © 1988, 2010, Oracle and/or its affiliates. All Rights Reserved. 125
The Journal Category value is used to identify the category of financial transactions in Oracle GL. This value
must exist as a valid category in Oracle GL. The journaling process in Oracle GL validates this value during
import. Errors are logged and Oracle GL provides a facility to correct the entries and re-import.
Map a journal category for Cashiering to ensure that cashiering entries are transferred to Oracle GL.
You should map each transaction classification to a journal category—you must map at least one journal
category to be able to save the page. If you leave a journal category blank, you receive a warning message
when you save the page and a value of Others is entered in the Journal Category field.
Synchronizing ChartField Values
The Synchronize Chartfield Values component is used for integration with Oracle Financials only.
Use the Synchronize Segment Values (SSF_SYNSEGVL) batch process to insert/update segment values into
appropriate ChartField prompt tables based on the values that you mapped in the ChartFields to Segments
group box on the ChartFields Mapping page.
Note. Synchronization of Oracle GL segments must be performed and chartfields must be mapped to
segments before you run the Synchronize Segment Values process.
See Chapter 2, "Completing Student Financials General Setup," ChartField Display Options, page 9.
See CS90 to EBS GL Integration Developer's Reference Guide. The guide is posted to My Oracle Support.
Page Used to Synchronize ChartField Values
Page Name Definition Name Navigation Usage
Synchronize Chartfield
Values
SSF_RUNCTL_CFSYNC Setup SACR, Product
Related, Student Financials,
General Ledger Interface,
Synchronize Chartfield
Values, Synchronize
Chartfield Values
Insert/update segment
values into appropriate
ChartField prompt tables
based on the ChartFields to
Segments mapping.
Synchronizing ChartField Values
Access the Synchronize Chartfield Values page (Setup SACR, Product Related, Student Financials, General
Ledger Interface, Synchronize Chartfield Values, Synchronize Chartfield Values).
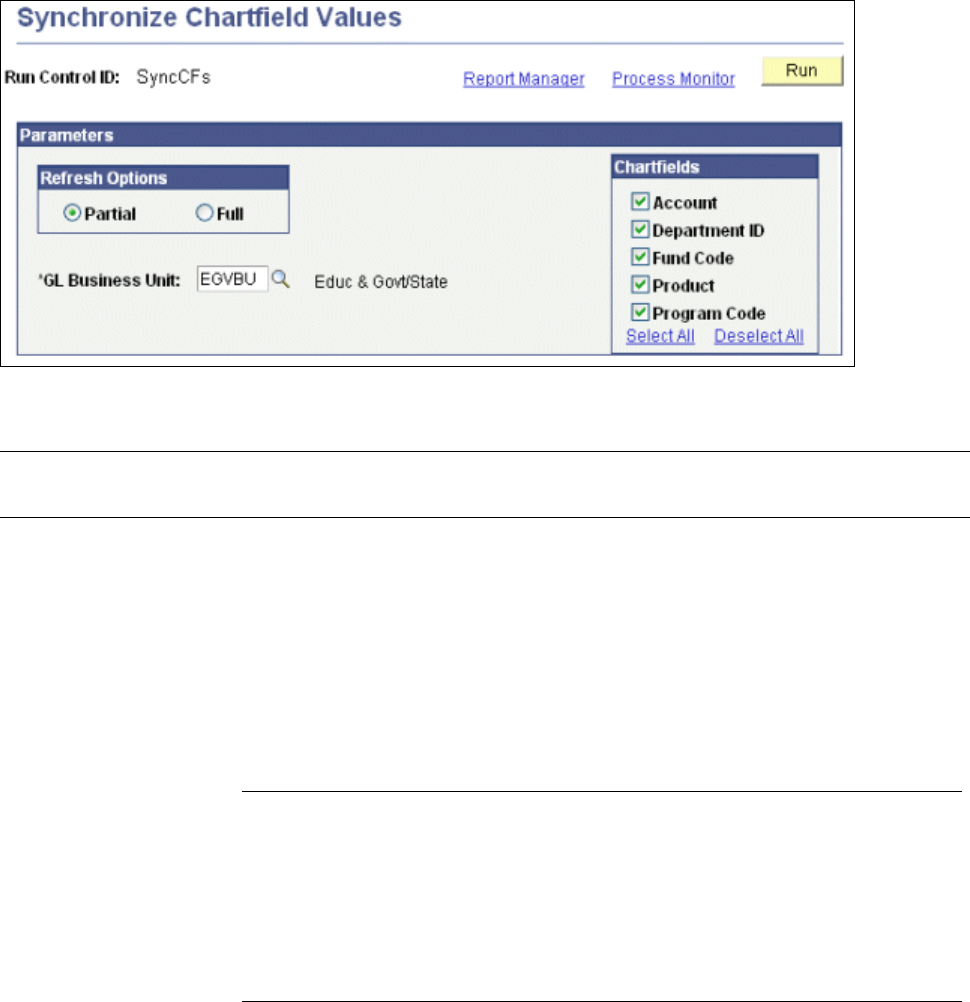
Setting Up GL Interface Processing Chapter 4
126 Copyright © 1988, 2010, Oracle and/or its affiliates. All Rights Reserved.
Synchronize Chartfield Values page
Note. To use this batch process, ensure that you have selected the Oracle Financials check box in the
Financial System group box on the SF Installation page.
Refresh Options
Partial This option is selected by default. Use this option to run an incremental update of
the prompt tables. Student Financials data is updated only if there has been a
change to Oracle GL data since the last time that the process was run.
Full Select this option to run a complete refresh of the prompt tables.
You would usually select this option for first time installation only.
Note. If you select the Full option, all prompt tables except the Department
Chartfield (DEPT_TBL) prompt table are truncated and existing data is purged
before the full synchronization happens.
The Department Chartfield prompt table is not truncated. Unlike other chartfield
prompt tables that are truncated based on an inactive status of chartfields on the
HRMS Standard Chartfield Configuration page, new values are added to the
Department Chartfield table and the existing values remain intact.
When you click Run:
1. Ledger details associated with the GL Business Unit are retrieved based on the setup on the ChartFields
Mapping page.
2. SetID and Segment details for the specified GL Business Unit are retrieved from the Chartfields to
Segments Mapping table— this information is required to insert data into the ChartField prompt tables.

Chapter 4 Setting Up GL Interface Processing
Copyright © 1988, 2010, Oracle and/or its affiliates. All Rights Reserved. 127
3. A Web Service call to Oracle GL is made with the Ledger and Segment details.
The SSF_GL_SEGMENT_VAL_SYNC message is invoked for both Partial and Full options. For the
Partial option, the business unit that is selected on this page is used and the related setID and segment
details are retrieved from the mapping setup. For the Full option, all business units that are mapped to
Oracle GL in the mapping setup are used.
4. Returned data is inserted into the appropriate prompt tables along with the derived SetID and Effective
Date is updated with the LAST_UPDATE_DATE from Oracle Financials.
See CS90 to EBS GL Integration Developer's Reference Guide. The guide is posted to My Oracle Support.
(Optional) Creating ChartField SpeedType Keys
To set up ChartField speed type keys, use the SpeedTypes component (SPEEDTYPE).
This section provides an overview of Chartfield SpeedType Keys and discuss how to define ChartField
SpeedTypes Keys.
Understanding ChartField SpeedType Keys
Often you will want to enter the same combination of ChartField values repeatedly. By creating shortcut keys
called SpeedTypes for these frequently used combinations of ChartFields, you can reduce data entry time and
increase data entry accuracy. Using a SpeedType key that you define, you can enter one alphanumeric code
that automatically enters all of its defined ChartField values.
Page Used to Create ChartField SpeedType Keys
Page Name Definition Name Navigation Usage
SpeedTypes SPEEDTYPE Set Up SACR, Product
Related, Student Financials,
General Ledger Interface,
SpeedTypes
Define ChartField
SpeedTypes.
Defining ChartField SpeedTypes
Access the SpeedTypes page (Set Up SACR, Product Related, Student Financials, General Ledger Interface,
SpeedTypes).
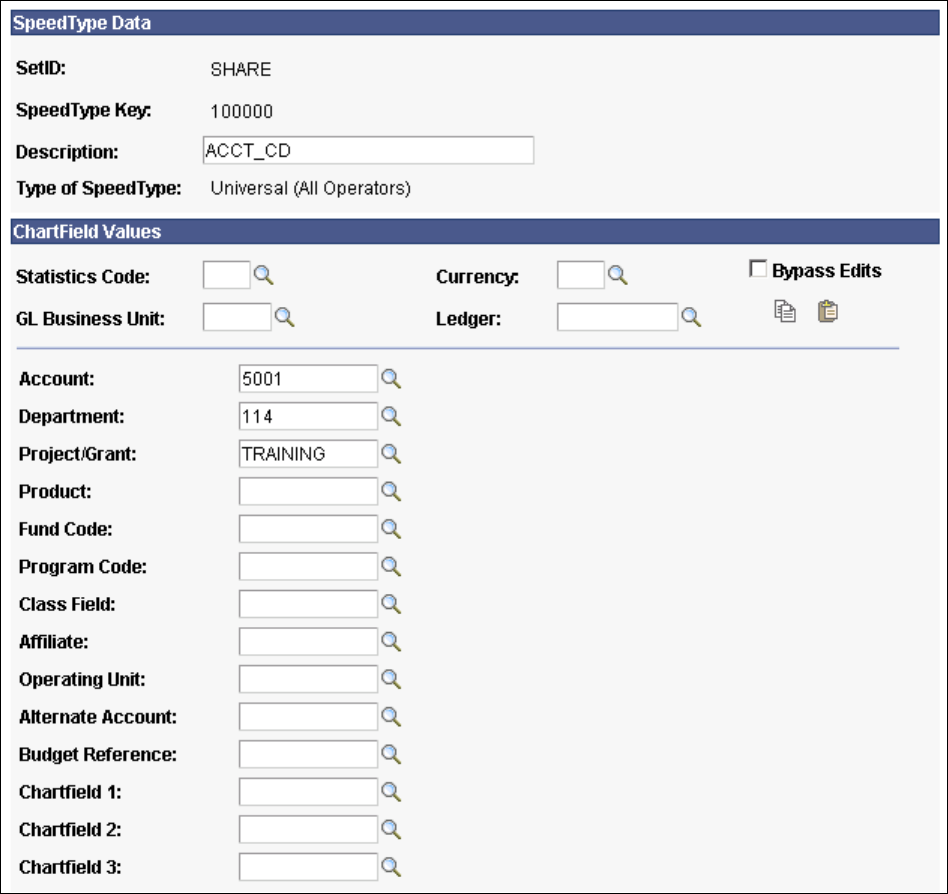
Setting Up GL Interface Processing Chapter 4
128 Copyright © 1988, 2010, Oracle and/or its affiliates. All Rights Reserved.
SpeedTypes page
The type of SpeedType depends on what you select for the User ID and Primary Permission List fields. The
type of SpeedType is then displayed at the top of the SpeedTypes page.

Chapter 4 Setting Up GL Interface Processing
Copyright © 1988, 2010, Oracle and/or its affiliates. All Rights Reserved. 129
Type of SpeedType Select the type of speed type to restrict the key to a particular operator or class.
Values are:
One Operator: Only the operator specified in the dialog box can use this key
combination. When you select this option, the User field becomes available and
the Prim Perm List (primary permission list) field becomes unavailable.
One Operator Class: Only the operator class specified in the dialog box can use
this key combination. When you select this option, the Prim Perm List field
becomes available for use and the User field becomes unavailable.
Universal (All Operators): All operators are authorized to use this combination.
When this option is selected, both the User and Prim Perm List fields become
unavailable.
Statistics Code Optionally, enter a statistics code to record information used for statistical
analysis. The PeopleSoft General Ledger staff defines statistics codes.
Currency The system automatically populates this field with your institution's base
currency value. You can override this value to change the currency code.
Bypass Edits Select to bypass the edits when setting up SpeedTypes. Bypassing the edits
enables you to set up an incomplete SpeedType. For example, you could leave
the Fund field blank, and cashiers could enter the appropriate fund during
department receipt creation.
Note. The functionality of the Bypass Edits check box is relevant only if you
select the Combinations Table Edit check box on the SF Installation page. When
you select the Combinations Table Edit check box, the system processes
department receipts only if cashiers select the correct ChartFields.
See Chapter 2, "Completing Student Financials General Setup," Setting Up
Installation Parameters and Keywords, page 5.
Copy and Paste If you are entering multiple SpeedTypes, you can select your ChartFields, copy
and paste them into the next SpeedType that you create, and then revise
individual ChartFields.
Integration with Oracle Financials
The SpeedTypes page appears differently if Oracle Financials is selected in the Financial System group box
on the SF Installation page:
•The Ledger field is not available.
•The Validate icon is available to validate the combination entered. Click the icon to trigger real time
validation of the entered combination with Oracle GL.
•The Bypass Edits check box is cleared by default.
•ChartField prompt tables display valid values based on the Chartfields to Segments mapping on the
ChartFields Mapping page and the values populated from Oracle GL for each segment into respective
prompt tables.

Setting Up GL Interface Processing Chapter 4
130 Copyright © 1988, 2010, Oracle and/or its affiliates. All Rights Reserved.
•The 2 Affiliate Intra (Intra Unit), Project/Grant, and Affiliate chartfields are not supported and should be
made inactive on the HRMS Standard Chartfield Configuration page.
See Chapter 2, "Completing Student Financials General Setup," ChartField Display Options, page 9.
See Also
Chapter 2, "Completing Student Financials General Setup," Setting Up Business Units, page 19
(Optional) Activating ChartField Validation Options
ChartFields in Student Financials can be dynamically displayed, and they depend on the ChartField setup in
PeopleSoft Enterprise Human Resources Management (HRMS).
See PeopleSoft Enterprise Student Financials 9.0 PeopleBook, "Completing Student Financials General
Setup" Defining Number Sequence Start Points, Maximum Row Settings and ChartField Edit Options,
Defining Dynamic ChartFields
See PeopleSoft Enterprise Student Financials 9.0 PeopleBook, Completing Student Financials General Setup,
Setting Up Item Types and Item Type Groups
See PeopleSoft Enterprise HRMS 9.0 Application Fundamentals PeopleBook, "Setting Up and Working with
ChartFields and ChartField Combinations" Populating HRMS with Valid ChartField Combinations
Assigning Charts of Accounts
You can assign a chart of accounts (ChartFields) to item types, course and class fees (if you use course and
class fees), and cashiering setup (if you use the Cashiering feature).
See Also
Chapter 2, "Completing Student Financials General Setup," Setting Up Item Types and Item Type Groups,
page 55
Chapter 5, "Setting Up Tuition Controls, Criteria, Equations, and Waivers," Establishing Criteria for Tuition
Groups and Fee Triggers, page 158
Chapter 10, "Setting Up Cashiering," page 313
Validating ChartFields
This section provides an overview of chartfield validation and discusses how to identify invalid chartfields.
This section applies to integration with PeopleSoft Financials only.
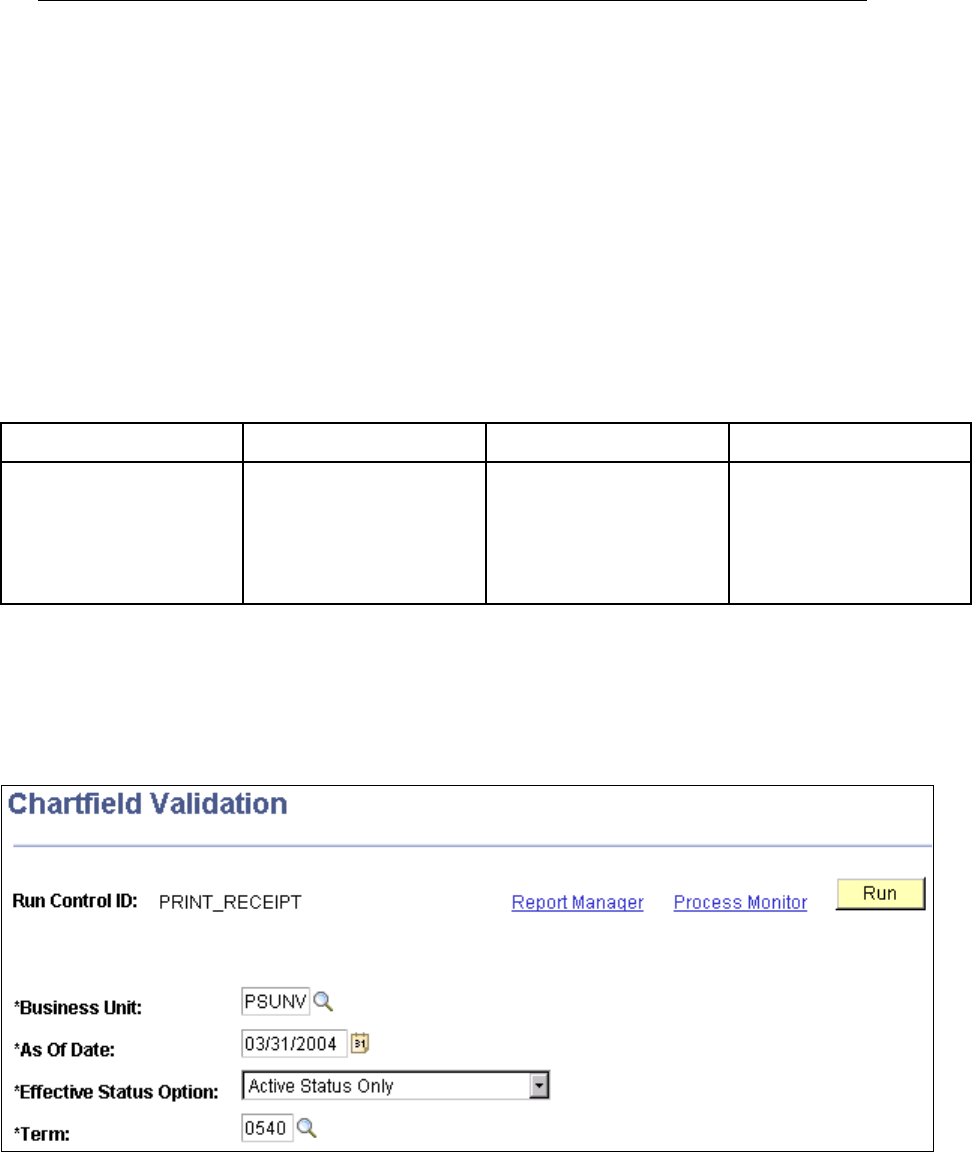
Chapter 4 Setting Up GL Interface Processing
Copyright © 1988, 2010, Oracle and/or its affiliates. All Rights Reserved. 131
To identify invalid chartfield combinations,
See Chapter 15, "Using GL Interface Processing," Running the Chartfield Audit Report, page 406.
Understanding ChartFields Validation
Student Financials provides several methods for ensuring that the chartfields that you enter on item types,
course and class fees, and Cashiering tender keys and target keys are valid. When you create these elements,
PeopleCode programs on the GL Interface pages validate the chartfields that you enter against the setup data
that you loaded from PeopleSoft General Ledger. Because your General Ledger staff can change chartfields
over time, inactivating them or even perhaps deleting them, Student Financials provides a process that
validates chartfields on item types, course and class fees, and cashiering tenders and targets. The ChartField
Validation process produces a report that identifies item types, course and class fees, and cashiering setup that
contain invalid chartfields.
Page Used to Validate ChartFields
Page Name Definition Name Navigation Usage
Chartfield Validation RUNCTL_SFGLVAL1 Set Up SACR, Product
Related, Student Financials,
General Ledger Interface,
Chart Field Validation,
Chartfield Validation
Identify invalid ChartFields
in Student Financials.
Identifying Invalid ChartFields
Access the Chartfield Validation page (Set Up SACR, Product Related, Student Financials, General Ledger
Interface, Chart Field Validation, Chartfield Validation).
Chartfield Validation page

Setting Up GL Interface Processing Chapter 4
132 Copyright © 1988, 2010, Oracle and/or its affiliates. All Rights Reserved.
Business Unit Select the Student Financials business unit for which you want to validate
ChartField information.
As of Date Because ChartField values can change as you synchronize with the PeopleSoft
Financials application, you must specify a date on which you want to run the
verification.
Effective Status Option Status options are:
Active Status Only: Select to validate ChartField definitions for item types with a
status of Active.
Active and Inactive Status: Select to validate ChartField definitions on all item
types regardless of status.
Term Select the term that you want to verify.
Setting Up Integration with PeopleSoft Financials and Oracle
Financials
This section discusses how to:
•Define batch publish rules for GL messaging.
•Define batch programs for GL messaging.
•Set up business unit synchronization for PeopleSoft Financials.
•Synchronize Student Financials business unit data with PeopleSoft Financials.
Pages Used to Set Up Integration with PeopleSoft Financials and Oracle
Financials
Page Name Definition Name Navigation Usage
Batch Publish Rules EO_MSGPUBBATCH Enterprise Components,
Integration Definitions,
Batch Publish Rules
Define batch publish rules
for GL messaging.
Batch Programs EO_MSGBATPGM Enterprise Components,
Integration Definitions,
Batch Publish Rules, Batch
Programs
Define batch programs for
GL messaging.
Full Table Publish Rules EO_MSGPUBFULL Enterprise Components,
Integration Definitions, Full
Data Publish Rules, Full
Table Publish Rules
Set up business unit
synchronization for
PeopleSoft Financials.
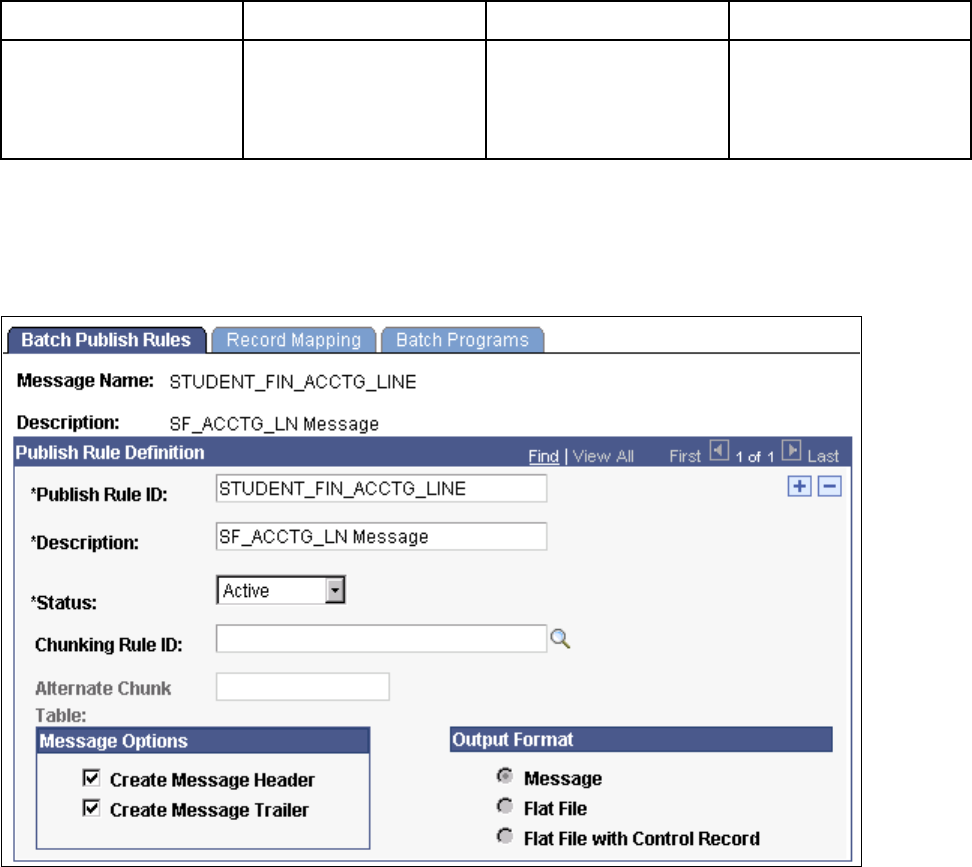
Chapter 4 Setting Up GL Interface Processing
Copyright © 1988, 2010, Oracle and/or its affiliates. All Rights Reserved. 133
Page Name Definition Name Navigation Usage
Full Data Publish EO_FULLDATAPUB Enterprise Components,
Integration Definitions,
Initiate Processes, Full Data
Publish
Synchronize Student
Financials business unit
data with PeopleSoft
Financials.
Defining Batch Publish Rules for GL Messaging
Access the Batch Publish Rules page (Enterprise Components, Integration Definitions, Batch Publish Rules).
Batch Publish Rules page
To define batch publish rules:
1. Enter STUDENT_FIN_ACCTG_LINE in the Publish Rule ID field.
2. Select Active in the Status field.
3. For PeopleSoft Financials 8.4 integration, select the Create Message Header and Create Message Trailer
check boxes.
For integration with PeopleSoft Financials version 8.8 onwards, clear both check boxes.
For Oracle Financials integration, clear both check boxes.
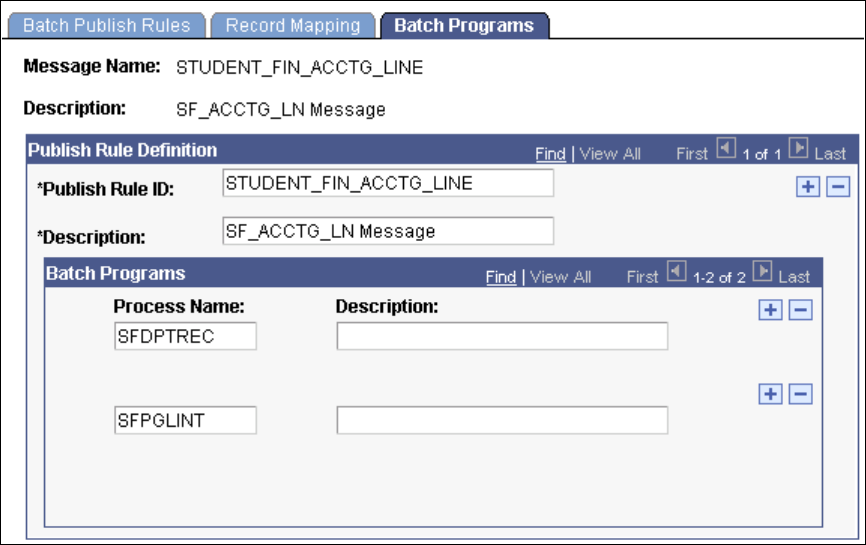
Setting Up GL Interface Processing Chapter 4
134 Copyright © 1988, 2010, Oracle and/or its affiliates. All Rights Reserved.
Defining Batch Programs for GL Messaging
Access the Batch Programs page (Enterprise Components, Integration Definitions, Batch Publish Rules,
Batch Programs).
Batch Programs page
1. Select STUDENT_FIN_ACCTG_LINE as the message name.
2. Enter the process names SFDPTREC (Cashiering GL Interface process) and SFPGLINT (GL Interface
process), which EOP_PUBLISHM picks up when publishing accounting lines to PeopleSoft Financials or
Oracle Financials.
If you do not select these process, the messages will not be created when EOP_PUBLISHM runs.
Setting Up Business Unit Synchronization for PeopleSoft Financials
This section applies to integration with PeopleSoft Financials only.
Access the Full Table Publish Rules page (Enterprise Components, Integration Definitions, Full Data Publish
Rules, Full Table Publish Rules).
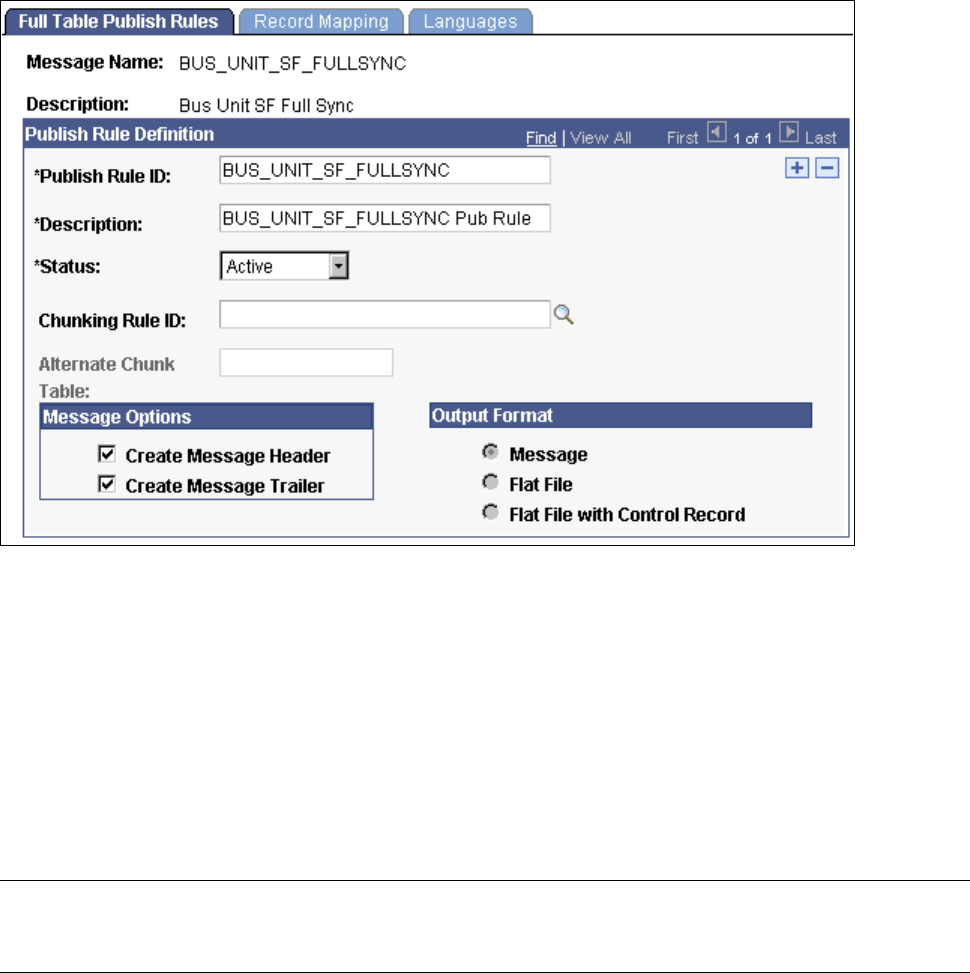
Chapter 4 Setting Up GL Interface Processing
Copyright © 1988, 2010, Oracle and/or its affiliates. All Rights Reserved. 135
Full Table Publish Rules page
To set up business unit synchronization:
1. Enter BUS_UNIT_SF_FULLSYNC in the Publish Rule ID field.
This rule publishes three fields (Business Unit, Description, Short Description) for all rows on the table to
PeopleSoft Financials.
2. Select Active in the Status field.
3. Select the Create Message Header and Create Message Trailer check boxes.
Note. You must synchronize all Student Financials business units before you run any GL processes by
running BUS_UNIT_SF_FULLSYNC full table publish once. Thereafter, the system manages additions or
changes through messaging in the SF Business Unit component (BUSINESS_UNIT_SF).
Synchronizing Student Financials Business Unit Data with PeopleSoft
Financials
This section applies to integration with PeopleSoft Financials only.
Access the Full Data Publish page (Enterprise Components, Integration Definitions, Initiate Processes, Full
Data Publish).
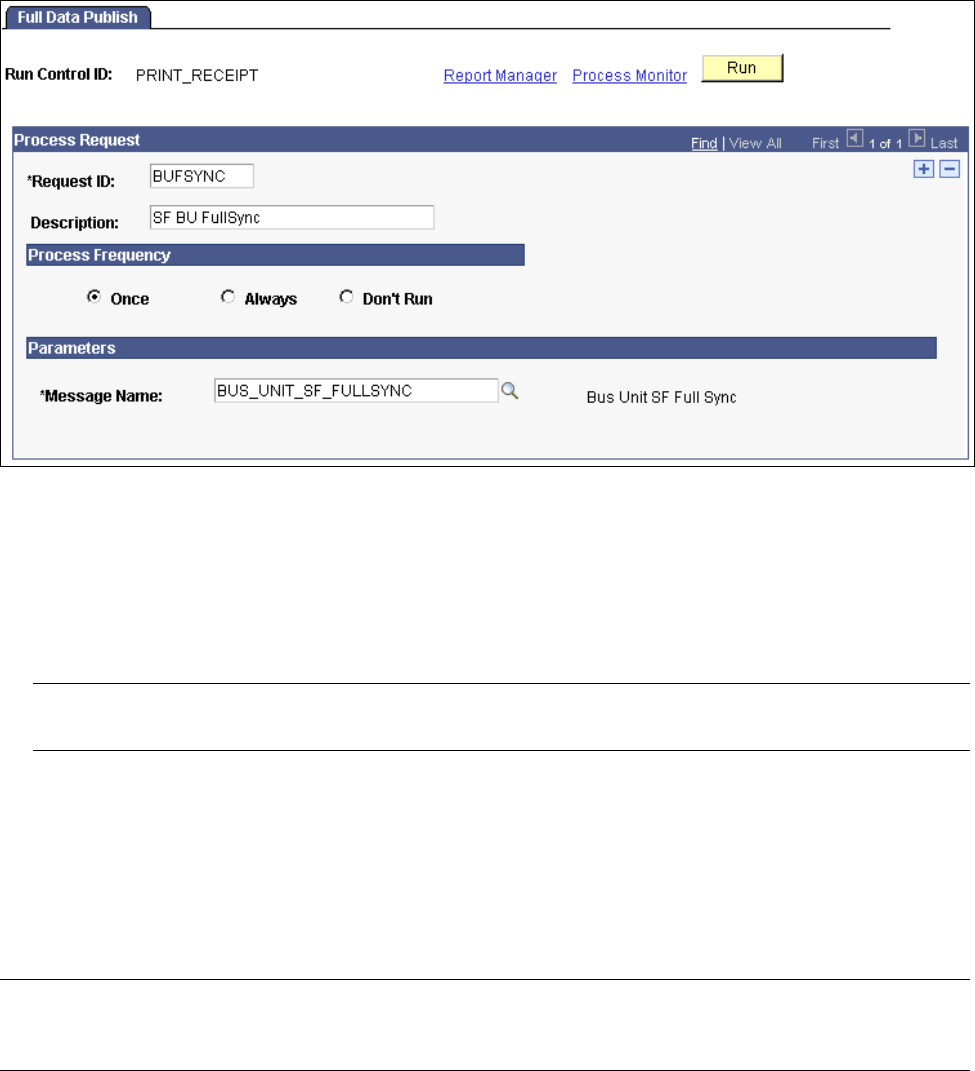
Setting Up GL Interface Processing Chapter 4
136 Copyright © 1988, 2010, Oracle and/or its affiliates. All Rights Reserved.
Full Data Publish page
To synchronize business units:
1. Enter a request ID and description.
2. Select the Once option in the Process Frequency group box.
Note. You can rerun this process without harming your system if the PeopleSoft Financials database
becomes unsynchronized or corrupt.
3. Select BUS_UNIT_SF_FULLSYNC in the Message Name field.
4. Click Run.
After the process runs, the system keeps business units synchronized by triggering a message to the
PeopleSoft Financials database whenever you change information in the Description field or the Short
Description field on the General 1 page of the SF Business Unit component. In addition, the system triggers a
message to PeopleSoft Financials whenever you add a new business unit.
Note. The queue HR_SETUP enables one-way messaging and data publishing. To use this channel, you must
configure the message node information by inserting the proper URL. PeopleSoft Financials must subscribe
to these Student Financials published messages to keep its database up to date.
See Also
PeopleSoft Enterprise General Ledger PeopleBook, "Integrating PeopleSoft General Ledger with PeopleSoft
Applications"
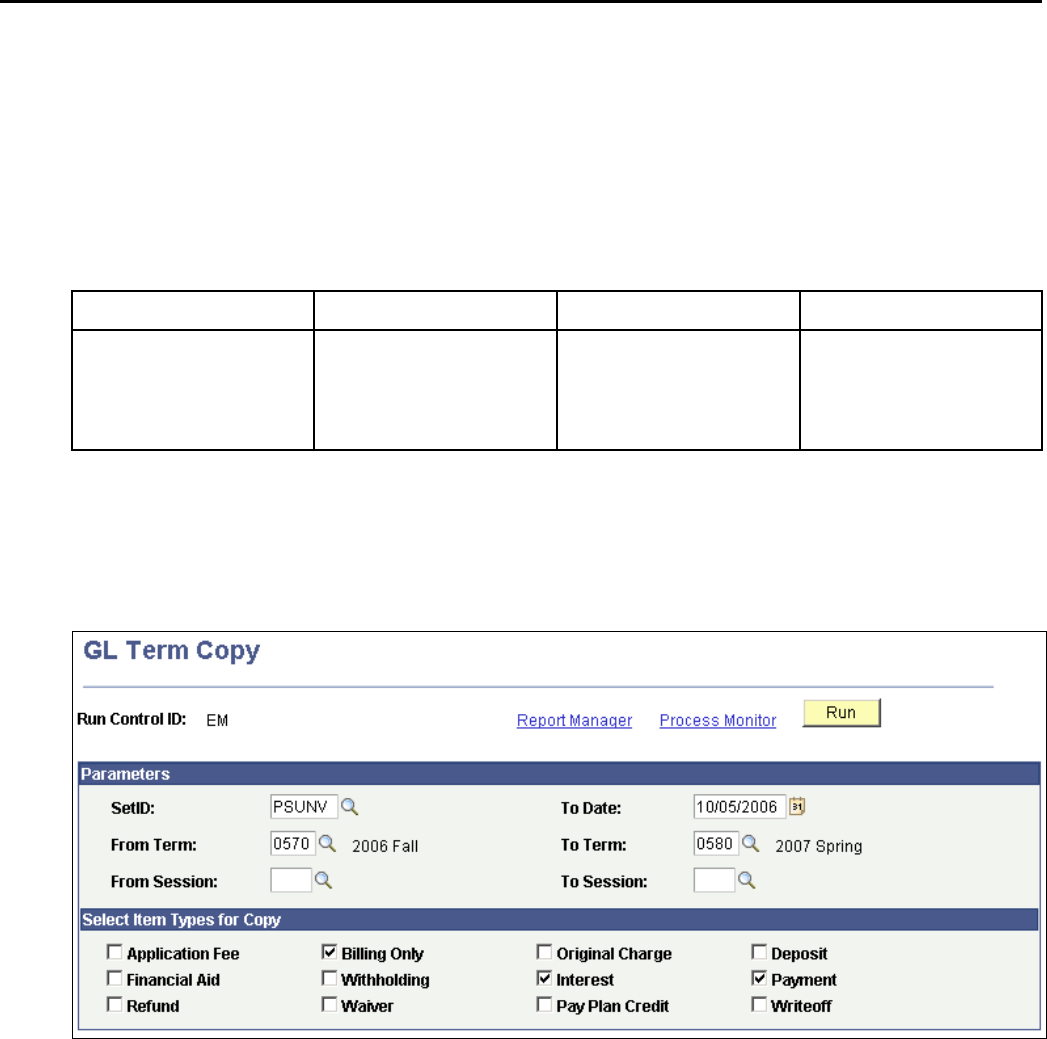
Chapter 4 Setting Up GL Interface Processing
Copyright © 1988, 2010, Oracle and/or its affiliates. All Rights Reserved. 137
Copying ChartField Information for Item Types from One Term to
Another
This section discusses how to run the GL Term Copy process.
Page Used to Copy ChartField Information for Item Types from One Term to
Another
Page Name Definition Name Navigation Usage
GL Term Copy RUNCTL_SFGL_FEE Set Up SACR, Product
Related, Student Financials,
General Ledger Interface,
Copy Term, GL Term Copy
Run the GL Term Copy
process.
Running the GL Term Copy Process
Access the GL Term Copy page (Set Up SACR, Product Related, Student Financials, General Ledger
Interface, Copy Term, GL Term Copy).
GL Term Copy page
Parameters
From Term and To
Term Select the term from which you are copying item type ChartField information
and the term that you are copying it to.
Setting Up GL Interface Processing Chapter 4
138 Copyright © 1988, 2010, Oracle and/or its affiliates. All Rights Reserved.
From Session and To
Session Select the session from which you are copying item type ChartField information
and the session that you are copying it to.
To Date Select the effective date to be used for the copy.
Check One or More Item Types for Copy
In this group box, select the classification of item types for which you want to copy ChartField information.
When you run the GL Term Copy process, it copies all of the ChartField information for all item types within
the classification that you select. This process functions even if you previously copied ChartField information
for an individual item type using the Copy GL Interface button on the GL Interface page of the Item Types
component.

Copyright © 1988, 2010, Oracle and/or its affiliates. All Rights Reserved. 139
Chapter 5
Setting Up Tuition Controls, Criteria,
Equations, and Waivers
This chapter provides an overview of tuition controls, criteria, equations, and waivers and discusses how to:
•Create billing and due date calendars.
•Set up adjustment calendars.
•Establish tuition calculation controls.
•Define variables for criteria and equations.
•Establish criteria for tuition groups and fee triggers.
•Use Equation Engine to define tuition calculation equations.
•Define waivers and waiver groups.
•Create course lists.
Understanding Tuition Controls, Criteria, Equations, and Waivers
Controls, criteria, and waivers determine when the system calculates tuition and for whom. They define how
much money the system returns if a student drops a class or withdraws. They also establish for whom tuition
should be waived and for what reason. Equation Engine replaces the equation processor previously used in
Campus Solutions applications. Equation Engine performs complicated calculations that can help you select
students for inclusion in a group or determine a fee for a unique situation.
Creating Billing and Due Date Calendars
To set up billing and due date calendars, use the Billing and Due Calendars component
(DUE_DATE_PANEL).
Billing and due date calendars are associated with tuition calculation and are used to determine the percentage
of specific fees due to be paid by a particular time. Because a due date calendar is required for the setup of
fees, you must define at least one billing and due date calendar for your institution. You can also define
additional billing and due date calendars as needed to meet the requirements of your business processes.
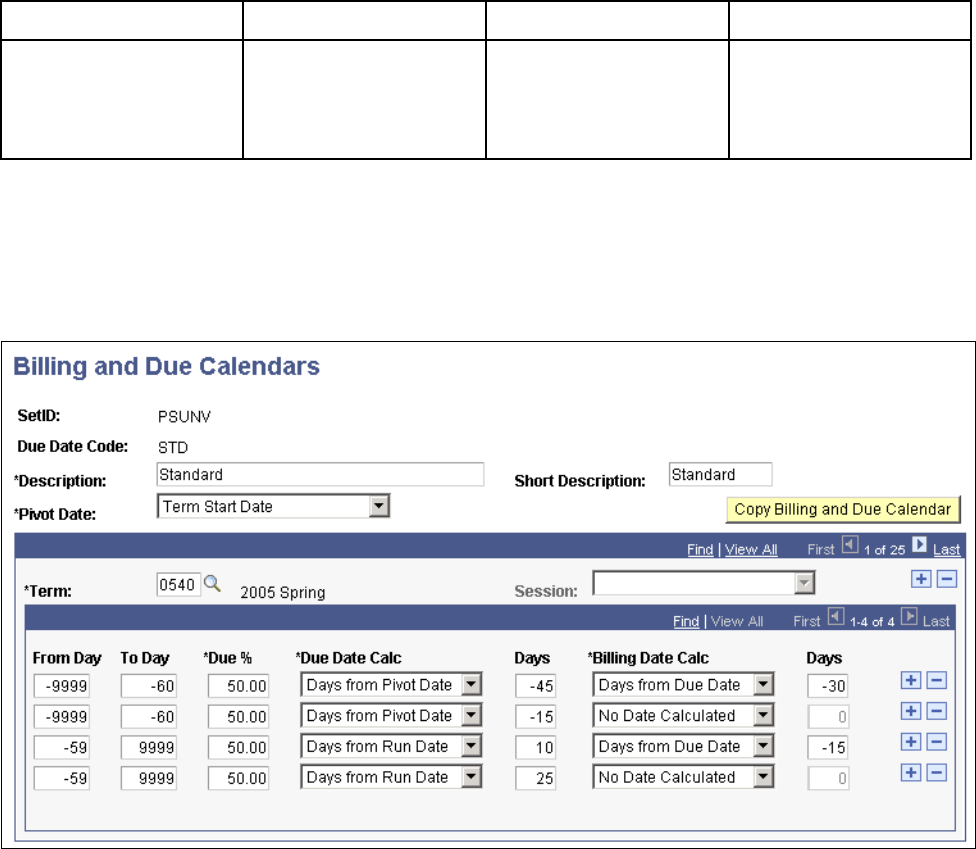
Setting Up Tuition Controls, Criteria, Equations, and Waivers Chapter 5
140 Copyright © 1988, 2010, Oracle and/or its affiliates. All Rights Reserved.
When creating your billing and due date calendar, you can specify that the payment of a fee is due in full at a
particular date, or you can create a payment schedule. For example, you can define a billing and due date
calendar that indicates that your application fee is due in full at the time that an application is filed and create
another billing and due date calendar for installment payments for your tuition fees. You can also design the
system so that a due date for a fee is designated at the time that you create a bill or post a charge.
Page Used to Create Billing and Due Date Calendars
Page Name Definition Name Navigation Usage
Billing and Due Calendars DUE_DATE_TABLE Set Up SACR, Product
Related, Student Financials,
Tuition and Fees, Billing
and Due Calendars
Define billing and due date
calendars.
Defining Billing and Due Date Calendars
Access the Billing and Due Calendars page (Set Up SACR, Product Related, Student Financials, Tuition and
Fees, Billing and Due Calendars).
Billing and Due Calendars page

Chapter 5 Setting Up Tuition Controls, Criteria, Equations, and Waivers
Copyright © 1988, 2010, Oracle and/or its affiliates. All Rights Reserved. 141
Pivot Date Select a pivot date for this calendar. Student Financials uses the pivot date as the
starting place to calculate due dates or billing dates. The system counts the billing
dates and due dates—either back in time or forward in time—from the pivot date
that you select.
Warning! Values for this field are delivered with your system as translate
values. Do not modify these values in any way. Any modifications to these
values requires a substantial programming effort.
Select from:
Admit Term Start Date: Select to use as the pivot date the first day of the term
that the student is admitted. This option pertains to application fee processing
only.
Application Date: Select to use as the pivot date the date that the application is
filed. This option pertains to application fee processing only.
Class Start Date: Select to use as the pivot date the first day of the class.
Session Start Date: Select to use as the pivot date the first day of the session.
Term Start Date: Select to use as the pivot date the first day of the term.
Copy Billing and Due
Calendar Click to copy this billing and due calendar to a new term or session.
Term Enter the term for this billing and due calendar.
Session If you are defining a billing and due calendar for a session within a term, or you
want to use the session start date as the pivot date, specify the session.
From Day and To Day Enter the first and last day that you assess fees. Express the number of days
before the pivot date as a negative number, and the number of days after the pivot
date as a positive number.
Due % (due percent) Define the percentage of the fee that's due for the respective assessment period.
Due Date Calc (due date
calculation) Use this field to determine how the system calculates the due date for a given fee
assessment period. Select from:
Days from Pivot Date: Select to calculate the due date based on the pivot date.
Days from Run Date: Select to calculate the due date based on the day that you
assessed fees.
No Date Calculated: Select to disable the calculation of a due date.
Days Enter the number of days from the pivot date or run date that the fees are due.
Enter a negative number to indicate days before the respective date; enter a
positive number to indicate days after the respective date. If you select No Date
Calculated in the Due Date Calc field, the Days field becomes unavailable.

Setting Up Tuition Controls, Criteria, Equations, and Waivers Chapter 5
142 Copyright © 1988, 2010, Oracle and/or its affiliates. All Rights Reserved.
Billing Date Calc (billing
date calculation) Use this field to determine how the system calculates the billing date for a given
fee assessment period. Select from:
Days from Due Date: Select to calculate the billing date based on the calculated
due date.
Days from Pivot Date: Select to calculate the billing date based on the pivot date.
Days from Run Date: Select to calculate the billing date based on the day that
you assessed fees.
No Date Calculated: Select to disable the calculation of a billing date.
Days Enter the number of days from the due date, pivot date, or run date that the
system produces a bill. Enter a negative number to indicate days before the
respective date; enter a positive number to indicate days after the respective date.
If you select No Date Calculated in the Billing Date Calc field, the Days field
becomes unavailable.
Setting Up Adjustment Calendars
To set up adjustment calendars, use the Adjustment Calendars component (ADJ_TERM_PANEL).
This section provides an overview of adjustment calendars and discusses how to:
•Define adjustment calendars.
•Define administrative fees for adjustment periods.
•Calculate the Term Fee by Term and Adjust by Term Scenarios
Understanding Adjustment Calendars
Adjustment calendars determine the refund schedules that you apply to the members of a tuition group. These
calendars govern how the system adjusts term and class level fees when a student withdraws or drops a class.
The system uses the number of days that a term or class has been in session or the class attendance percentage
to determine the percentage of refund due. The system calculates these figures using date and time stamps
located in the STDNT_ENRL table. State government, an agency, the federal government, or your institution
can mandate refund schedules. The pro rata refund is applied to first-time students who withdraw. Federal
regulations require you to use the refund table that is best for the student.
The logic for term fee calculations and adjustments for each student is:
•The student enrollment record contains all the add and drop transactions. When a student adds or drops a
class, the Tuition Calculation process records various fields from the enrolment records in a temporary
table. The temporary table references the add and drop dates as the transaction date.
•When a student drops a class, the Tuition Calculation process calculates the drop costs by comparing the
amount before the drop to the amount after the drop. Tuition Calculation then applies the appropriate
adjustment calendar percentage.
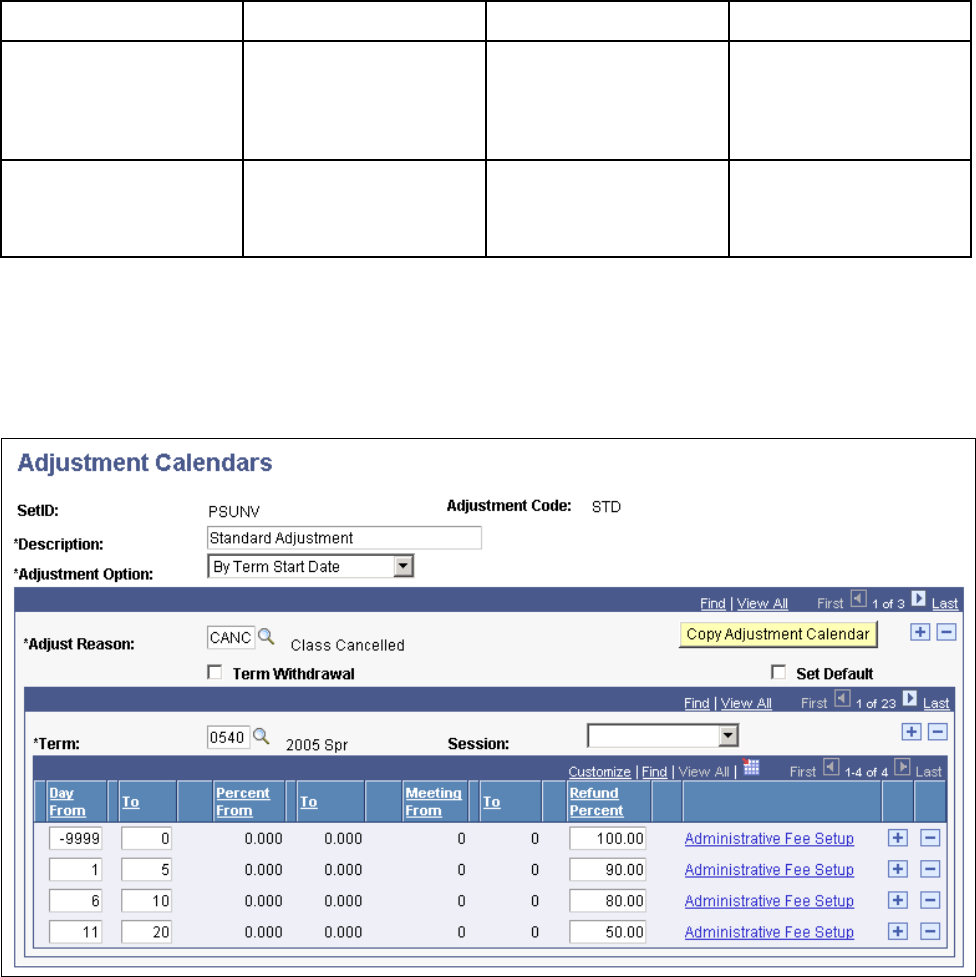
Chapter 5 Setting Up Tuition Controls, Criteria, Equations, and Waivers
Copyright © 1988, 2010, Oracle and/or its affiliates. All Rights Reserved. 143
See Also
PeopleSoft Enterprise Student Records 9.0 PeopleBook, "Processing Class Enrollment Transactions,"
Understanding Class Enrollment Processing
Pages Used to Set Up Adjustment Calendars
Page Name Definition Name Navigation Usage
Adjustment Calendars ADJ_TERM_TABLE Set Up SACR, Product
Related, Student Financials,
Tuition and Fees,
Adjustment Calendars
Define adjustment
calendars.
Administrative Fee Setup ADMIN_FEE_SP Click the Administrative
Fee Setup link on the
Adjustment Calendars page.
Define administrative fee
for adjustment periods.
Defining Adjustment Calendars
Access the Adjustment Calendars page (Set Up SACR, Product Related, Student Financials, Tuition and Fees,
Adjustment Calendars).
Adjustment Calendars page

Setting Up Tuition Controls, Criteria, Equations, and Waivers Chapter 5
144 Copyright © 1988, 2010, Oracle and/or its affiliates. All Rights Reserved.
Note. Most types of financial aid have specific fee adjustment requirements. Consult your financial aid staff
to determine adjustment calendar requirements.
Description Enter a description to identify this adjustment calendar.
Adjustment Option Select the adjustment option for this adjustment calendar. Values are:
By Census Date:Select to adjust fees based on the census date. Use only for
Higher Education Contribution Scheme (HECS) calculation. This adjustment
option is not available for term fees.
By Class Length % (by class length percentage): Select to adjust fees based on
the number of days that have passed out of the total number of class days
scheduled. For example, if a class is scheduled to run for 13 weeks, and a student
drops the class at the end of the second week, the student would have attended
slightly over 15 percent of the class length.By Class Meeting % (by class meeting
percentage): Select to adjust fees based on the number of class meetings attended
out of the total number of scheduled class meetings.
By Class Meetings Select to adjust fees based on the number of class meetings
attended regardless of the total number of meetings scheduled.
By Class Start Date: Select to adjust fees based on the number of days that have
passed from the class start date.
By Session Start Date: Select to adjust fees based on the number of days that
have passed from the first day of the session.
By Term Start Date: Select to adjust fees based on the number of days that have
passed from the first day of the term.
Adjust Reason
(adjustment reason) Select the adjustment reason code. You might adjust fees differently depending
on the reason that the student drops or withdraws. For example, you might give a
full refund to a student who has to drop for reasons beyond his control. The
adjust reason is a short explanation of the difference.
Note. If you want to select an adjustment reason for a term withdrawal, you must
first select the Term Withdrawal check box.
Term Withdrawal Select if this adjustment code is to be used for term withdrawal. Do not select this
check box if the adjust reason is for dropped classes.
Copy Adjustment
Calendar Click to copy an adjustment calendar from one term to another.
Set Default Select to designate an adjust reason as the default reason for both term
withdrawal and dropping a class. Both term withdrawal and class drop must have
one adjustment calendar defined as the default.
Term and Session Enter the appropriate term and session information for each adjust reason.

Chapter 5 Setting Up Tuition Controls, Criteria, Equations, and Waivers
Copyright © 1988, 2010, Oracle and/or its affiliates. All Rights Reserved. 145
Day From and To If you select the adjustment options By Class Start Date,By Term Start Date, or
By Session Start Date, enter the beginning (Day From) and ending point (Day
To) of the time period. For both of these fields, express the number of days
before the start date defined in the Adjustment Option field as a negative number.
For example, if you want a student to receive a full refund from any time before
the start of a term to the day before the start of a term, enter –9999 in the From
Day field and –1 in the To Day field.
Percent From and To If you select the adjustment options By Class Length % or By Class Meeting %,
enter a beginning (Percent From) and ending point (Percent To) of the range.
Percent values cannot be expressed as negative numbers.
For example, if you want students to receive a full refund if they drop any time
before attending at least 10 percent of the class, enter 0% in the Percent From
field and 9.999% in the Percent To field.
Meeting From and
Meeting To If you select the adjustment option By Class Meetings, enter a beginning
(Meeting From) and ending (Meeting To) class session.
For example, if you want students to receive a full refund if they drop any time
before attending the third class session, enter 0 in the Meeting From field and 2
in the Meeting To field.
Refund Percent Enter the percent of fees charged that you want the student to receive as a refund.
Administrative Fee
Setup Click to define any administrative fees that are associated with the adjustment
period.
Note. Administrative fees for withdrawal can be defined for each refund range
row. You can set up an administrative fee for cancellation only on the first row
and only if the refund percent is 100 percent.
Defining Administrative Fees for Adjustment Periods
Access the Administrative Fee Setup page (click the Administrative Fee Setup link on the Adjustment
Calendars page).
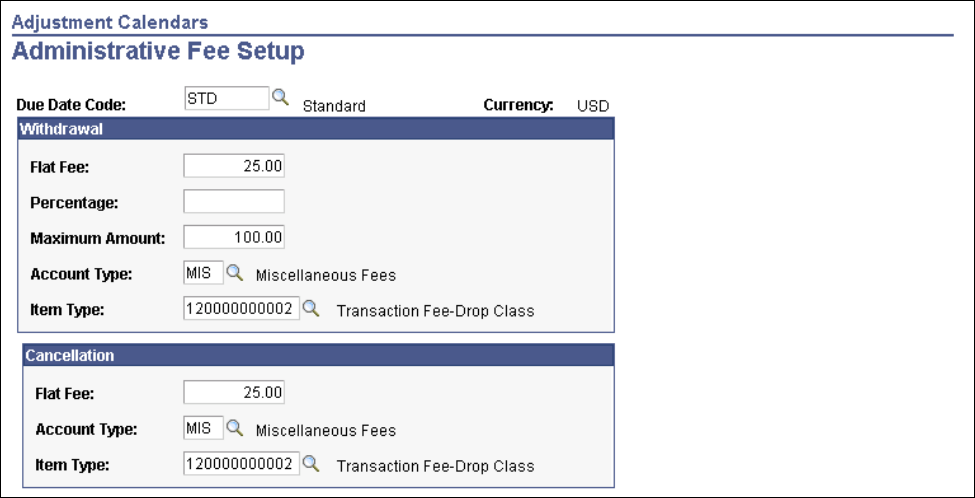
Setting Up Tuition Controls, Criteria, Equations, and Waivers Chapter 5
146 Copyright © 1988, 2010, Oracle and/or its affiliates. All Rights Reserved.
Administrative Fee Setup page
Due Date Code Select the due date code (billing and due calendar) that you want to use for the
administrative fee.
Withdrawal Group Box
Flat Fee If you want to charge a student a specific amount for withdrawing from school or
for canceling enrollment in classes, enter the amount in the Flat Fee fields. This
option can be used alone or in conjunction with a percentage fee.
Percentage If you want to charge students a percentage of their tuition and fees when they
withdraw from school, enter that percentage in this field. This option can be used
alone or in conjunction with a flat fee. This option applies to withdrawal only.
Maximum Amount If you want to put a limit on the total administrative fees that can be charged to
students who withdraw from school, enter a maximum amount in this field. This
option applies to withdrawal only.
Account Type Select an account type for the administrative fee.
Item Type Select the item type that you have set up for administrative fee charges.
Chapter 5 Setting Up Tuition Controls, Criteria, Equations, and Waivers
Copyright © 1988, 2010, Oracle and/or its affiliates. All Rights Reserved. 147
Cancellation
Flat Fee If you want to charge a student a specific amount for withdrawing from school or
for canceling enrollment in classes, enter the amount in the Flat Fee fields. This
option can be used alone or in conjunction with a percentage fee.
Account Type Select an account type for the administrative fee.
Item Type Select the item type that you have set up for administrative fee charges.
See Also
Chapter 2, "Completing Student Financials General Setup," Setting Up Account Types, page 51
Chapter 2, "Completing Student Financials General Setup," Setting Up Item Types and Item Type Groups,
page 55
Calculating the Term Fee by Term and Adjusting by Term Scenarios
The following scenarios describe how the system calculates the term fees after a student initially enrolls in
four classes and then:
•Drops one class.
•Adds an additional class.
•Drops two classes on the same day, with the same reason.
•Drops two classes on the same day, with two different reasons.
The term fee is assessed through an equation and is charged by term and adjusted by term. Refer to the
section Using Equation Engine to Define Tuition Calculation Equations to see the sample equation,
SFTDTFTRMTRM (Charge by Term, Adjust by Term).
Scenario 1: On January 1, 2007 the student enrolled in four classes at 100 per unit. Each class is three billing
units; therefore, the total billing units equals 12 and the total amount equals 1200.00 USD, as shown in the
following examples:
Class_nbr Stdnt_enrl_status Enrl_add_dt Trans_date Enrol_actn_rsn_last
1001 E 01/01/2007 N/A N/A
1022 E 01/01/2007 N/A N/A
1003 E 01/01/2007 N/A N/A
1004 E 0/01/2007 N/A N/A
The following table lists the transaction in the Tuition Calculation temporary table after initial enrollment:

Setting Up Tuition Controls, Criteria, Equations, and Waivers Chapter 5
148 Copyright © 1988, 2010, Oracle and/or its affiliates. All Rights Reserved.
Transaction
Date Amount Difference Drop Date Reason Refund % Drop Cost
01/01/2007 1200.00 N/A N/A N/A /AN N/A
Student Balance is 1200.00
Scenario 2: On January 1, 2007 the student initially enrolled in four classes. Then on January 2, 2007 the
student drops one class:
Class_nbr Stdnt_enrl_status Enrl_add_dt Trans_date Enrol_actn_reason_l
ast
1001 D 01/01/2007 01/02/2007 SDRP
1002 E 01/01/2007 N/A N/A
1003 E 01/01/2007 N/A N/A
1004 E 01/01/2007 N/A N/A
The following table lists the transactions in the Tuition Calculation temporary table after initial enrollment
and dropping one class:
Transaction
Date Amount Difference Drop Date Reason Refund % Drop Cost
01/0/2007 1200.00 N/A N/A N/A N/A N/A
01/02/2007 900.00 300.00 01/02/2007 SDRP 80% 300* (100%
— 80%) = 60
Student balance: 900.00 + 60.00 = 960.00
Scenario 3: On January 3, 2007 the student initially enrolled in four classes. On January 2, 2007 the student
dropped a class and then on January 3, 2007 the student adds an additional class:
Class_nbr Stdnt_enrl_status Enrl_add_dt Trans_date Enrol_actn_ran_last
1011 D 01/01/2007 01/02/2007 SDRP
1002 E 01/01/2007 N/A N/A
1003 E 01/01/2007 N/A N/A
1004 E 01/01/2007 N/A N/A
1005 E 01/03/2007 N/A N/A
The following table lists the transactions in the Tuition Calculation temporary table after initial enrollment
and dropping one class and adding one class:

Chapter 5 Setting Up Tuition Controls, Criteria, Equations, and Waivers
Copyright © 1988, 2010, Oracle and/or its affiliates. All Rights Reserved. 149
Transaction
Date Amount Difference Drop Date Reason Refund % Drop Cost
01/0/2007 1200.00 N/A N/A N/A N/A N/A
01/02/2007 900.00 300.00 01/02/2007 SDRP 80% 300* (100%
— 80%) = 60
01/03/2007 1200.00 N/A N/A N/A N/A N/A
Note. In this example, the drop cost of 1200.00 on January 3, 2007 is not calculated on an added class.
Student balance: 1200.00 + 60.00 = 1260
Scenario 4; On January 1, 2007 the student initially enrolled in four classes. Then on January 2, 2007 the
student drops two classes with the same reason, on the same day.
Class_nbr Stdnt_enrl_status Enrl_add_dt Trans_date Enrol_actn_ran_last
1011 D 01/01/2007 01/02/2007 SDRP
1002 D 01/01/2007 01/02/2007 SDRP
1003 E 01/01/2007 N/A N/A
1004 E 01/01/2007 N/A N/A
The following table lists the transactions in the Tuition Calculation temporary table after the initial enrollment
and dropping of two classes with the same reason, on the same day.
Transaction
Date Amount Difference Drop Date Reason Refund % Drop Cost
01/0/2007 1200.00 N/A N/A N/A N/A N/A
01/02/2007 900.00 600.00 01/02/2007 SDRP 80% 600 (100% —
80%) = 120.00
Student balance: 600.00 + 120.00 = 720.00
Scenario 5: On January 1, 2007 the student initially enrolled in four classes. Then on January 2, 2007 the
student drops two classes with two different reasons:
Class_nbr Stdnt_enrl_status Enrl_add_dt Trans_date Enrol_actn_ran_last
1011 D 01/01/2007 01/02/2007 SDRP
1002 D 01/01/2007 01/02/2007 CANC
1003 E 01/01/2007 N/A N/A

Setting Up Tuition Controls, Criteria, Equations, and Waivers Chapter 5
150 Copyright © 1988, 2010, Oracle and/or its affiliates. All Rights Reserved.
Class_nbr Stdnt_enrl_status Enrl_add_dt Trans_date Enrol_actn_ran_last
1004 E 01/01/2007 N/A N/A
The following table lists the transactions in the Tuition Calculation temporary table after the initial enrollment
and dropping of two classes with two different reasons, on the same day.
Transaction
Date Amount Difference Drop Date Reason Refund % Drop Cost
01/0/2007 1200.00 N/A N/A N/A N/A N/A
01/02/2007 900.00* 300.00 01/02/2007 CANC 90% 300* (100%
— 90%) =
30.00
01/02/2007 600.00 300.00 01/02/2007 SDRP 80% $600 (100%
— 80%) =
60.00
Student Balance: 600.00 + 30.00 + 60.00 = 690.00
When a student drops two classes with two different reasons on the same day, the temporary table is inserted
alphabetically by reason and each class is calculated separately. The first amount is calculated by only noting
that one class has been canceled. The second amount is calculated by using the second class that has been
dropped by the student.
If the adjustment calendar is by session start date, the session code is taken into account similarly to the
reason.
During withdrawal processing, the student's enrollment record, for enrolled classes, will have the drop date
equal the last attendance date. Therefore, the transaction date will be the last attendance date.
Establishing Tuition Calculation Controls
To set up tuition calculation controls, use the Tuition Calculation Controls component
(CALC_CNTROL_PANEL).
Tuition calculation controls determine the academic careers that are eligible for tuition and fee calculation
each term.
This section discusses how to:
•Specify tuition calculation parameters.
•Establish restrictions on automatic tuition calculation.
•Select errors and warnings.

Chapter 5 Setting Up Tuition Controls, Criteria, Equations, and Waivers
Copyright © 1988, 2010, Oracle and/or its affiliates. All Rights Reserved. 151
Pages Used to Establish Tuition Calculation Controls
Page Name Definition Name Navigation Usage
Tuition Calculation
Controls
CALC_CNTL_TABLE Set Up SACR, Product
Related, Student Financials,
Tuition and Fees, Tuition
Calculation Controls
Specify tuition calculation
parameters for academic
careers by term.
Refund Calculation
Controls
CALC_ON_REFUND_CTL Set Up SACR, Product
Related, Student Financials,
Tuition and Fees, Tuition
Calculation Controls,
Refund Calculation
Controls
Establish restrictions on
automatic tuition
calculation.
Display Error/Warning
Controls
DISP_ERR_CNTL Set Up SACR, Product
Related, Student Financials,
Tuition and Fees, Tuition
Calculation Controls,
Display Error/Warning
Controls
Select errors and warnings
for tuition calculation.
Specifying Tuition Calculation Parameters
Access the Tuition Calculation Controls page (Set Up SACR, Product Related, Student Financials, Tuition
and Fees, Tuition Calculation Controls).
Tuition Calculation Controls page
Note. You must establish tuition controls for each active academic career for each term.

Setting Up Tuition Controls, Criteria, Equations, and Waivers Chapter 5
152 Copyright © 1988, 2010, Oracle and/or its affiliates. All Rights Reserved.
Academic Career Select the academic career for your tuition calculation controls.
Tuition Calculation Controls for Terms
Term Select the term to which these controls apply.
Term Wash Period The term wash period indicates the number of days that a student can drop and
add classes of equal value (wash) without penalty. This is not the same as a
drop/add period in which students are allowed to make any changes. The term
wash period typically extends beyond the normal drop/add period to
accommodate students who must make changes to their enrollment.
For example: a student enrolls in Chemistry 101 and determines, after two weeks
in class, that he or she is too advanced for the introductory level class. If the term
wash period is at least 14 days, the student can switch to Chemistry 201 without
penalty.
Note. The dropped and added classes do not need to match exactly as long as the
total amount of tuition and related fees is equal. For example, a student can drop
one four-credit course and replace it with two two-credit courses as long as the
total tuition and fee charges do not change.
Transaction Wash
Period Enter a number of days for a transaction wash period. The transaction wash
period allows students a period of time in which to complete a wash transaction.
That is, the student does not need to drop and add the wash classes at the same
time. Rather, as long as the replacement class or classes are added within the
transaction wash period, no penalty is incurred. If the drop and add take place
outside both the term wash and transaction wash periods, the student is charged
the prorated amount of the dropped class and the full amount of the added class.
Auto Calculate Tuition
(automatically calculate
tuition)
Select to automatically calculate tuition whenever you inquire on a student's
account. This feature enables you to see the most up-to-date tuition information
without having to run a separate tuition calculation.

Chapter 5 Setting Up Tuition Controls, Criteria, Equations, and Waivers
Copyright © 1988, 2010, Oracle and/or its affiliates. All Rights Reserved. 153
Auto Calculate Self
Service Select to automatically calculate tuition for a particular term in self service. If
you select the check box, a student using self service can see the most up-to-date
tuition information without you having to run a separate tuition calculation.
In self service, the system calculates tuition when a student accesses the Account
Inquiry or the Make a Payment component. The system does not automatically
calculate tuition when a student accesses the Student Center. In addition, tuition
calculation is never invoked from the Student Services Center or Student
Services Center (Student).
Note. This option impacts only self service, in contrast to the Auto Calculate
Tuition option that impacts only the administrative module. You can choose to
enable automatic tuition calculation for self service, administrative module, or
both.
The check box is cleared by default.
Note. In addition to selecting this check box, you must also select automatic self
service tuition calculation elsewhere in the system, for tuition calculation to be
invoked in self service. You must select the check box here for automatic self
service tuition calculation to have effect for a particular term.
See PeopleSoft Enterprise Campus Self Service 9.0 PeopleBook, "Setting Up
Student Financials Self Service," Defining Basic Institution Set Parameters.
Auto Calculate Waivers
(automatically calculate
waivers)
Select to automatically calculate student waivers whenever tuition is calculated.
If you select this option, Student Financials calculates a student's tuition first, and
then automatically applies all tuition waivers against the student's final tuition
amount. If you do not select this option, the system does not calculate or post
tuition waivers, so you must calculate and post waivers in background
processing.
Tuition Calculation Controls for Sessions
Session Enter a session if you want your tuition calculation controls to apply to specific
sessions within the term. If you leave this field blank, the controls apply to all
sessions in the term.
Session Wash Period If you choose to apply tuition calculation controls by the session, you must enter
a session wash period value. The session wash period works the same as a term
wash period.
Establishing Restrictions on Automatic Tuition Calculation
Access the Refund Calculation Controls page (Set Up SACR, Product Related, Student Financials, Tuition
and Fees, Tuition Calculation Controls, Refund Calculation Controls).
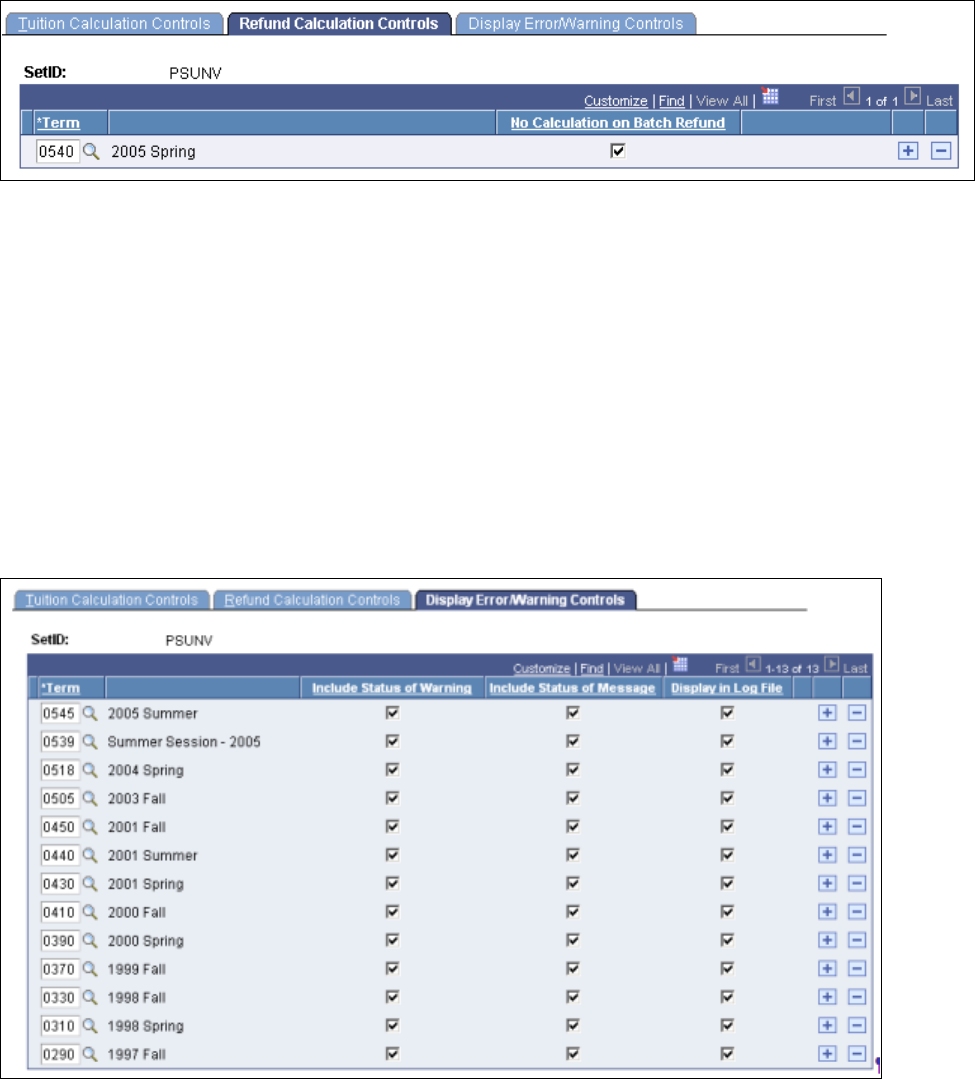
Setting Up Tuition Controls, Criteria, Equations, and Waivers Chapter 5
154 Copyright © 1988, 2010, Oracle and/or its affiliates. All Rights Reserved.
Refund Calculation Controls page
Term Enter the term for which the refund calculation control applies.
No Calculation on Batch
Refund Select if you do not want the system to automatically calculate tuition when
batch refund processing is run.
Selecting Errors and Warnings
Access the Display Error/Warning Controls page (Set Up SACR, Product Related, Student Financials, Tuition
and Fees, Tuition Calculation Controls, Display Error/Warning Controls).
Display Error/Warning Controls page
The default setting is ON to display warnings and messages. If you do not have a row for the term with these
controls cleared, you will continue to receive errors and warnings. Insert a row for every term in which you
want to clear warnings and messages.
If an equation contains the equation keyword Message, or the equation produces an error, the message is
written to the Tuition Calc log file.

Chapter 5 Setting Up Tuition Controls, Criteria, Equations, and Waivers
Copyright © 1988, 2010, Oracle and/or its affiliates. All Rights Reserved. 155
Note. The equation keyword Message may affect performance and should be used primarily in your test
environment to verify the results of the equation.
Term Select the term for the error and warning controls that you are defining.
Include Status of
Warning Select to have warning messages appear in CALC_ERROR. If you do not select
this check box, warnings do not appear.
Include Status of
Message Select to have messages appear in CALC_ERROR. If you do not select this
check box, messages do not appear.
Display in Log File Select during your installation process when you want to review log file
information. This feature is typically disabled after installation and testing has
been completed.
Defining Variables for Criteria and Equations
To set up variables for criteria and equations, use the Equation Variables component
(STDNT_EQUTN_VARS).
This section provides an overview of equation variables and discusses how to:
•Define character variables.
•Define numeric variables.
•Define yes/no flags.
Understanding Equation Variables
Equation variables are user-defined variables that you can use to classify students when no standard system
values are available. For example, you might need to calculate a fee for students involved in summer
internship programs. You could define one or more variables to use to identify the students and calculate the
appropriate fees.
Pages Used to Define Variables for Criteria and Equations
Page Name Definition Name Navigation Usage
Char Variables (character
variables)
STDNT_EQUTIN_CHAR Student Financials, Tuition
and Fees, Equation
Variables, Char Variables
Define character variables.
Num Variables (numeric
variables)
STDNT_EQUTN_NUM Student Financials, Tuition
and Fees, Equation
Variables, Num Variables
Define numeric variables.

Setting Up Tuition Controls, Criteria, Equations, and Waivers Chapter 5
156 Copyright © 1988, 2010, Oracle and/or its affiliates. All Rights Reserved.
Page Name Definition Name Navigation Usage
Y/N Flags (yes/no flags) STDNT_EQUTN_FLAG Student Financials, Tuition
and Fees, Equation
Variables, Y/N Flags
Define yes/no variables.
Defining Character Variables
Access the Char Variables page (Student Financials, Tuition and Fees, Equation Variables, Char Variables).
Char Variables page
Term Select the term for which you want the variables to apply.
Var Char1 (variable
characters 1) through Var
Char10 (variable
characters 10)
You can attach up to 10 character variables to the student, using the Var Char1
through Var Char10 fields. Save the page, and the system links the character
variables that you specified to the student. The character variables no longer
apply when the term that you selected ends.
Defining Numeric Variables
Access the Num Variables page (Student Financials, Tuition and Fees, Equation Variables, Num Variables).
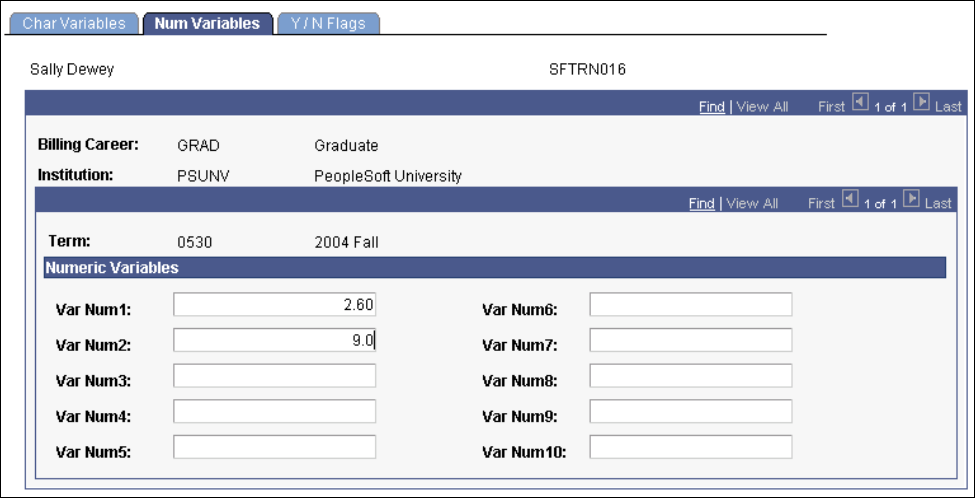
Chapter 5 Setting Up Tuition Controls, Criteria, Equations, and Waivers
Copyright © 1988, 2010, Oracle and/or its affiliates. All Rights Reserved. 157
Num Variables page
Term Select the term for which you want the variables to apply.
Var Num1 (variable
number 1) through Var
Num10 (variable number
10)
Attach up to 10 numeric variables to the student, using these fields. Save the
page, and the system links the variables that you specified to the student. The
numeric variables no longer apply when the term that you selected ends.
Defining Yes/No Flags
Access the Y/N Flags page (Student Financials, Tuition and Fees, Equation Variables, Y/N Flags).
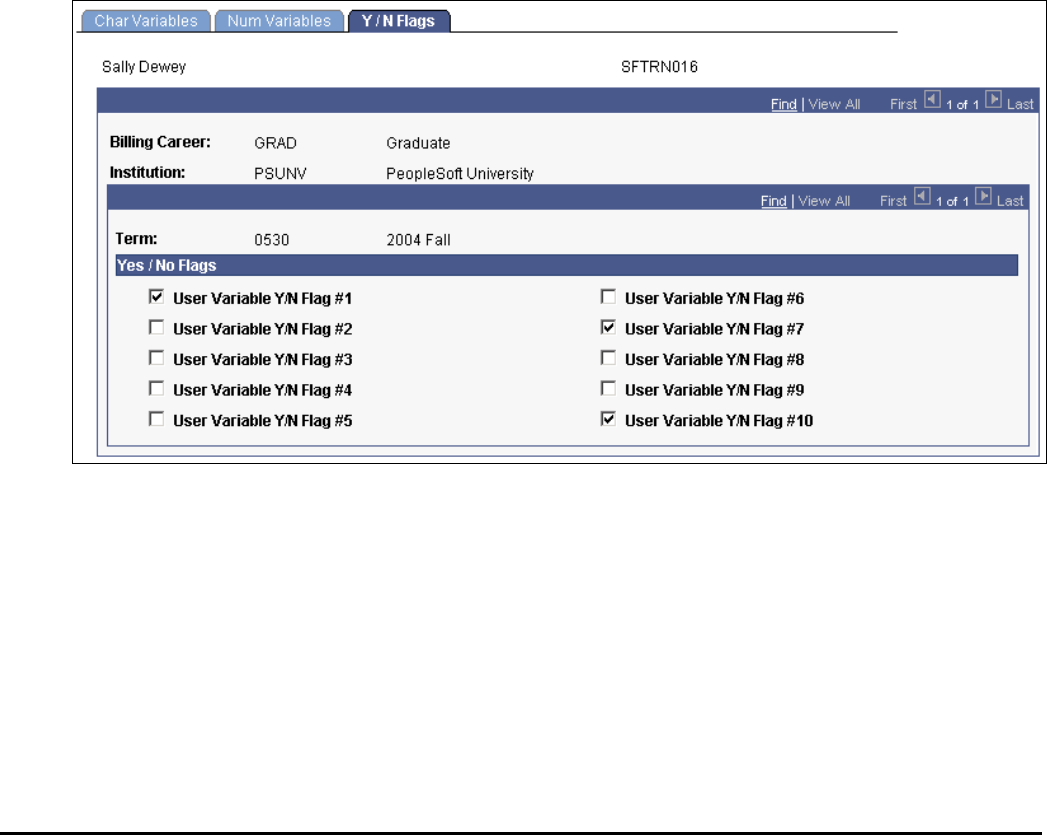
Setting Up Tuition Controls, Criteria, Equations, and Waivers Chapter 5
158 Copyright © 1988, 2010, Oracle and/or its affiliates. All Rights Reserved.
Y/N Flags page
Term Select the term for which you want the variables to apply.
User Variable Y/N Flag
#1 (user variable yes/no
flag number 1) through
User Variable Y/N Flag
#10 (user variable yes/no
flag number 10)
You can select up to 10 Y/N flags per student, using the User Variable Y/N Flag
#1 through User Variable Y/N Flag #10 check boxes. Save the page, and the
system links the variables that you specified to the student.
Establishing Criteria for Tuition Groups and Fee Triggers
To set up criteria for tuition groups and fee triggers, use the Criteria component (SEL_CRITERIA_PANEL).
This section provides an overview of tuition group and fee trigger criteria and discusses how to:
•Define criteria codes and criteria types.
•Define criteria details.
Understanding Tuition Group and Fee Trigger Criteria
Criteria are essentially questions that can be answered yes or no. In PeopleSoft Enterprise Student Financials,
use criteria to compare one or more variable values to a student's academic situation to determine whether an
action should be triggered (for example, applying a waiver to fees), or in which tuition group the student
should be included.
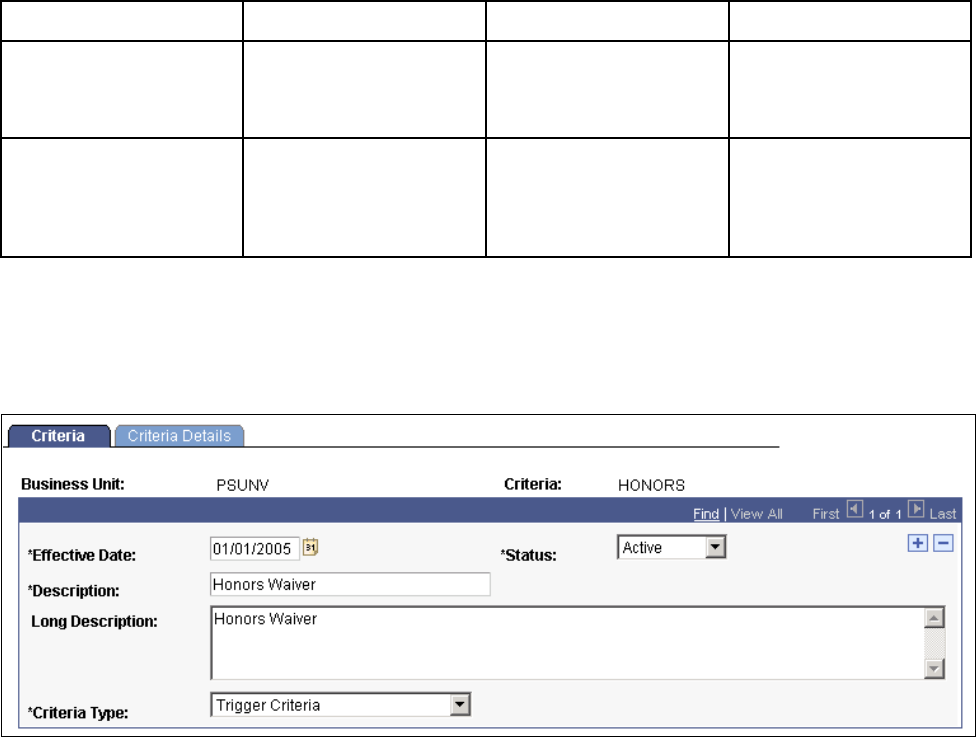
Chapter 5 Setting Up Tuition Controls, Criteria, Equations, and Waivers
Copyright © 1988, 2010, Oracle and/or its affiliates. All Rights Reserved. 159
The Criteria component is a flexible means of identifying and classifying students. Criteria can be as simple
as a single variable (for example, is the student a sophomore) or extremely complex involving multiple
variables. Whenever you create a criteria definition, test it thoroughly to make sure it produces the exact
results that you expect.
Trigger criteria and tuition group criteria cannot be used interchangeably. You can, however, create one of
each using the same detail setup.
Pages Used to Establish Criteria for Tuition Groups and Fee Triggers
Page Name Definition Name Navigation Usage
Criteria SEL_CRITERIA_TABLE Set Up SACR, Product
Related, Student Financials,
Tuition and Fees, Criteria
Define criteria codes and
criteria types.
Criteria Details SEL_CRITER_TABLE Set Up SACR, Product
Related, Student Financials,
Tuition and Fees, Criteria,
Criteria Details
Define criteria details.
Defining Criteria Codes and Criteria Types
Access the Criteria page (Set Up SACR, Product Related, Student Financials, Tuition and Fees, Criteria).
Criteria page
Criteria Type Select one of two criteria types. The two types cannot be used interchangeably.
Select from:
Trigger Criteria: Select to define a criterion that triggers an event.
Tuition Group Criteria: Select to define a criterion that links a student to a tuition
group.
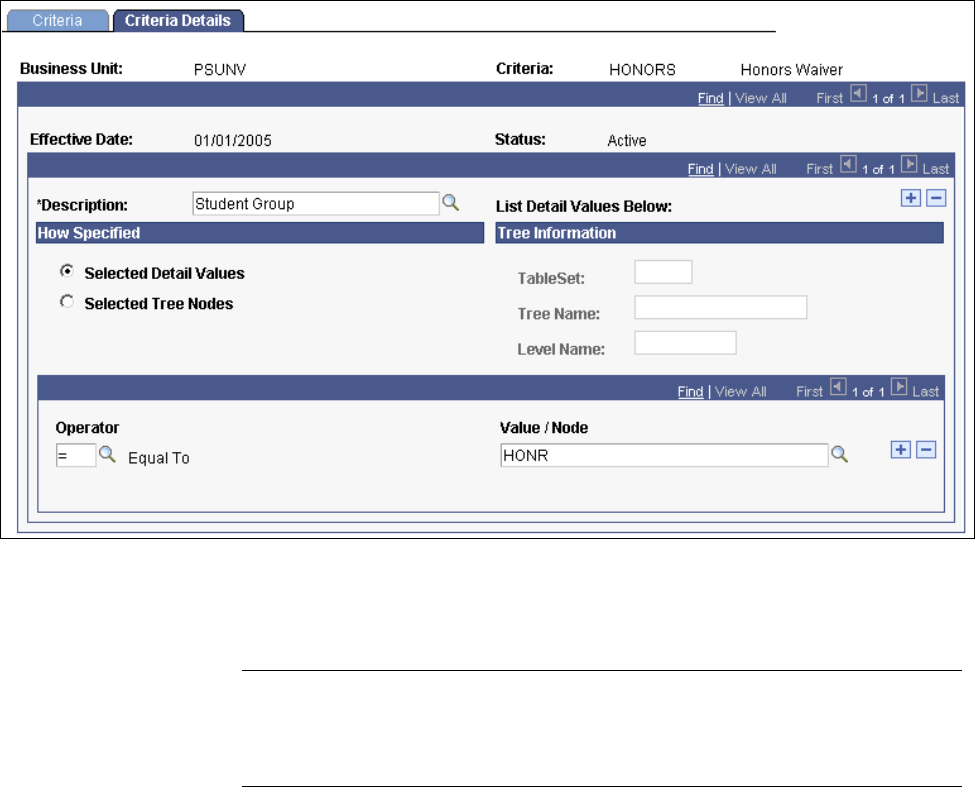
Setting Up Tuition Controls, Criteria, Equations, and Waivers Chapter 5
160 Copyright © 1988, 2010, Oracle and/or its affiliates. All Rights Reserved.
Defining Criteria Details
Access the Criteria Details page (Set Up SACR, Product Related, Student Financials, Tuition and Fees,
Criteria, Criteria Details).
Criteria Details page
Description Select a variable related to a student's characteristics for a particular term.
Note. Student Financials provides system variables that cover most needs. In
addition, 30 user-defined variables are available to use. Using these user-defined
variables is more difficult because you must know the definition of each variable
position.
How Specified
Selected Detail Values Select to match the variable with a specific value.
Selected Tree Nodes Select to match the variable using any value within a tree node. When you select
this option, the fields in the Tree Information group box become available.
TableSet,Tree Name,
and Level Name Select the tableset, tree name, and a level name on the tree if the tree has strictly
enforced levels. After specifying this information, enter a node or nodes to assist
in specifying the student group.
Operator Define the function that the system performs against the value.

Chapter 5 Setting Up Tuition Controls, Criteria, Equations, and Waivers
Copyright © 1988, 2010, Oracle and/or its affiliates. All Rights Reserved. 161
Relational Operators
< Less than
<= Less than or equal to
> Greater than
>= Greater than or equal to
<> Not equal to
BLK (blank) The field value is blank
BTW (between) The field value is between A and B
NBL (not blank) The field value is not blank
Value/Node If you select Selected Detail Values in the How Specified group box, enter an
explicit variable value. The system edits it against a prompt table if one exists, or
the system edits it for valid dates, numbers, and string lengths.
If you chose Selected Tree Nodes in the How Specified group box, specify a tree
node in the Node field.
A tree node is a collection of values that is aggregated under a single node. It is a
quick way to specify numerous values. A tree must have the same criteria as its
detail value.
See Also
Chapter 5, "Setting Up Tuition Controls, Criteria, Equations, and Waivers," Defining Variables for Criteria
and Equations, page 155
Using Equation Engine to Define Tuition Calculation Equations
The Equation Engine is a powerful tool that enables you to develop a variety of formulas. In Student
Financials, equations are used to identify a student's enrollment status, calculate and assign fees, and calculate
tuition. This section provides an overview of global variables and discusses how to:
•View delivered equations.
Setting Up Tuition Controls, Criteria, Equations, and Waivers Chapter 5
162 Copyright © 1988, 2010, Oracle and/or its affiliates. All Rights Reserved.
•View equation information.
•Use Equation Engine in Student Financials tuition calculation.
•Student Financials undergraduate selection equation.
See Also
PeopleSoft Enterprise Campus Solutions 9.0 Application Fundamentals PeopleBook, "Working with
Equation Engine"
Understanding Global Variables
The following SF global variables are now available to calculate: adjustments, course fees, course list fees,
and class fees. The new global variables use fields from the Tuition Calculation temporary table, which
originates from the STDNT_ENRL_ or CLASS_TBL.
The SF global variables are:
•A_amount
•A_select (yes/no flag)
•Acad_career (academic career)
•Billing_career
•Business_unit
•Class_nbr
•Crse_id (course id)
•Enrol_actn rsn_last (enrollment action reason last)
•Emplid
•Institution
•Session_code
•Stdnt_car_nbr (Student Career Number)
•STRM (Term)
•Trans_date
•Trans_time

Chapter 5 Setting Up Tuition Controls, Criteria, Equations, and Waivers
Copyright © 1988, 2010, Oracle and/or its affiliates. All Rights Reserved. 163
Page Used to Define Tuition Calculation Equations
Page Name Definition Name Navigation Usage
Equation Editor EQUATION_EDITOR Set Up SACR, Common
Definitions, Equation
Engine, Equation Editor
View delivered equations.
Viewing Delivered Equations
Access the Equation Editor page (Set Up SACR, Common Definitions, Equation Engine, Equation Editor).
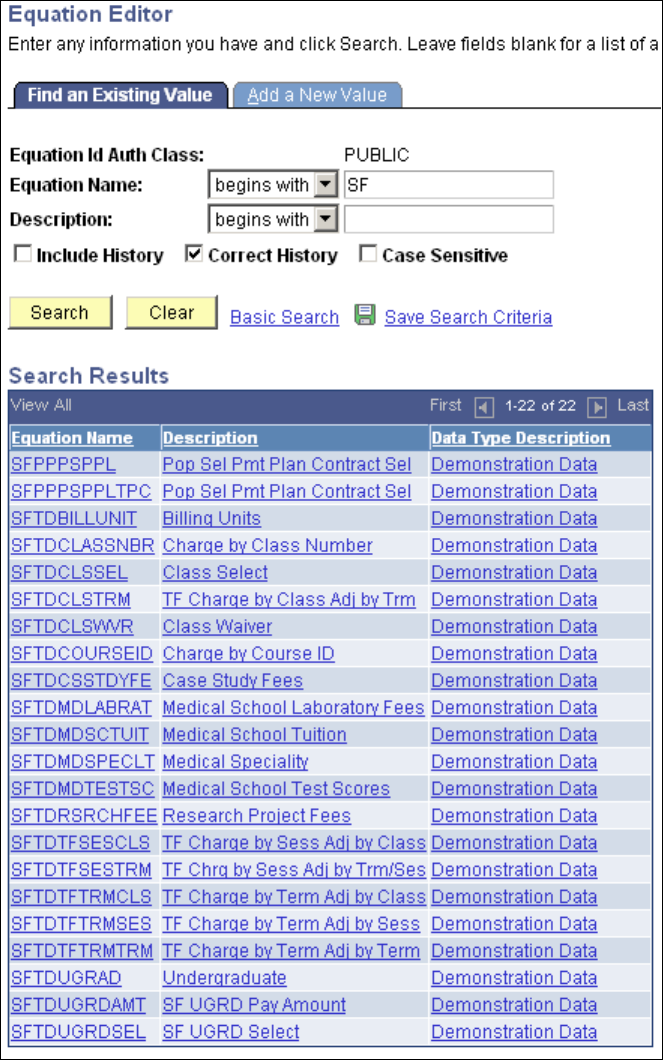
Setting Up Tuition Controls, Criteria, Equations, and Waivers Chapter 5
164 Copyright © 1988, 2010, Oracle and/or its affiliates. All Rights Reserved.
Equation Editor page
You can view any equation listed on this page.
Viewing Equation Information
Access the SFTDTFTRMTRM equation on the Equation Editor page. (Set Up SACR, Common Definitions,
Equation Engine, Equation Editor).
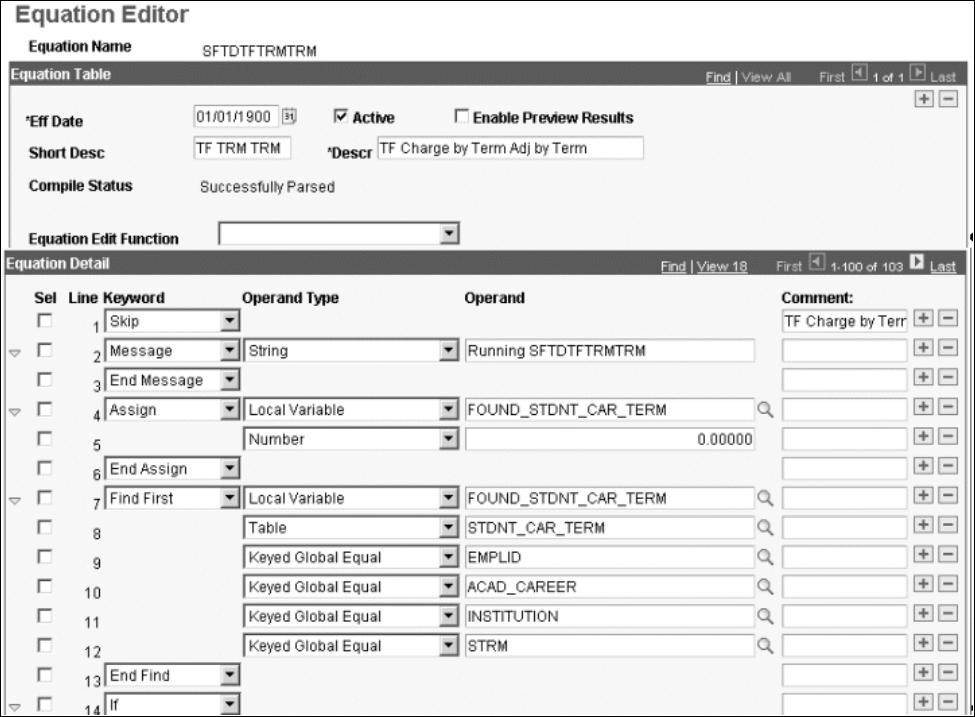
Chapter 5 Setting Up Tuition Controls, Criteria, Equations, and Waivers
Copyright © 1988, 2010, Oracle and/or its affiliates. All Rights Reserved. 165
Equation Editor page (1 of 4)
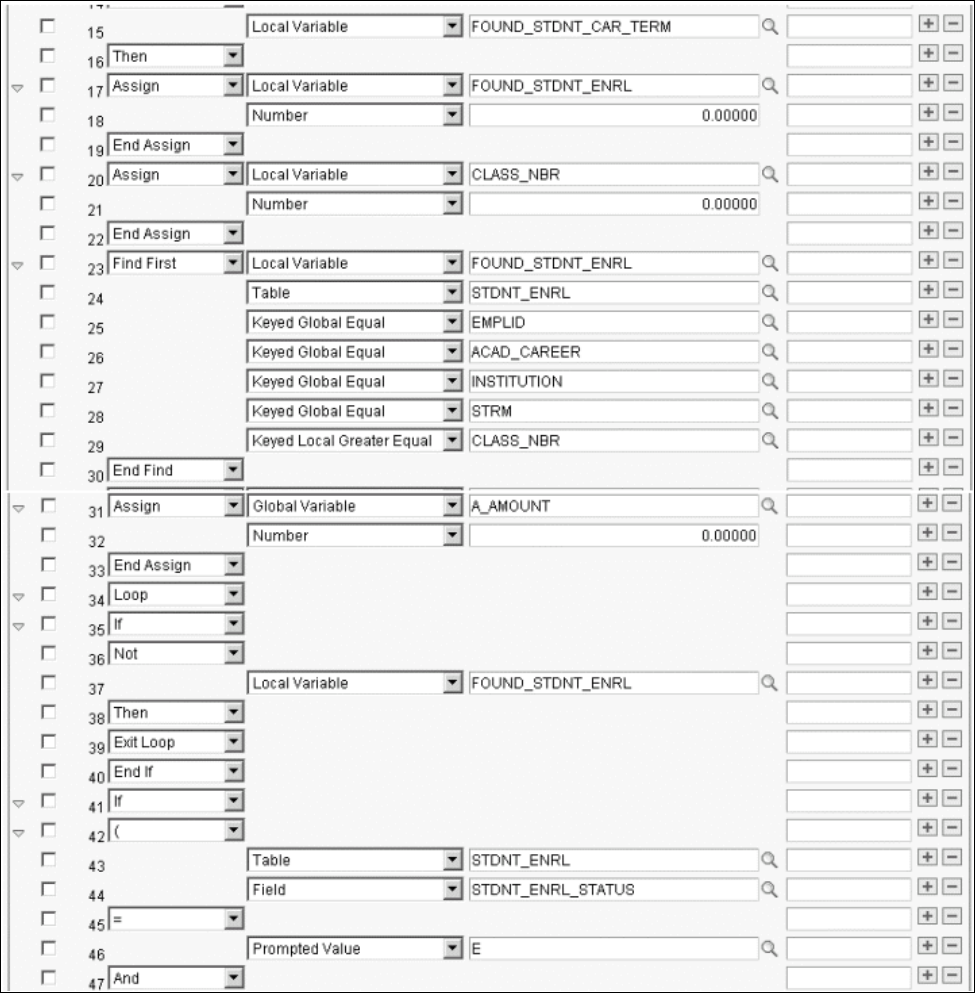
Setting Up Tuition Controls, Criteria, Equations, and Waivers Chapter 5
166 Copyright © 1988, 2010, Oracle and/or its affiliates. All Rights Reserved.
Equation Editor page (2 of 4)
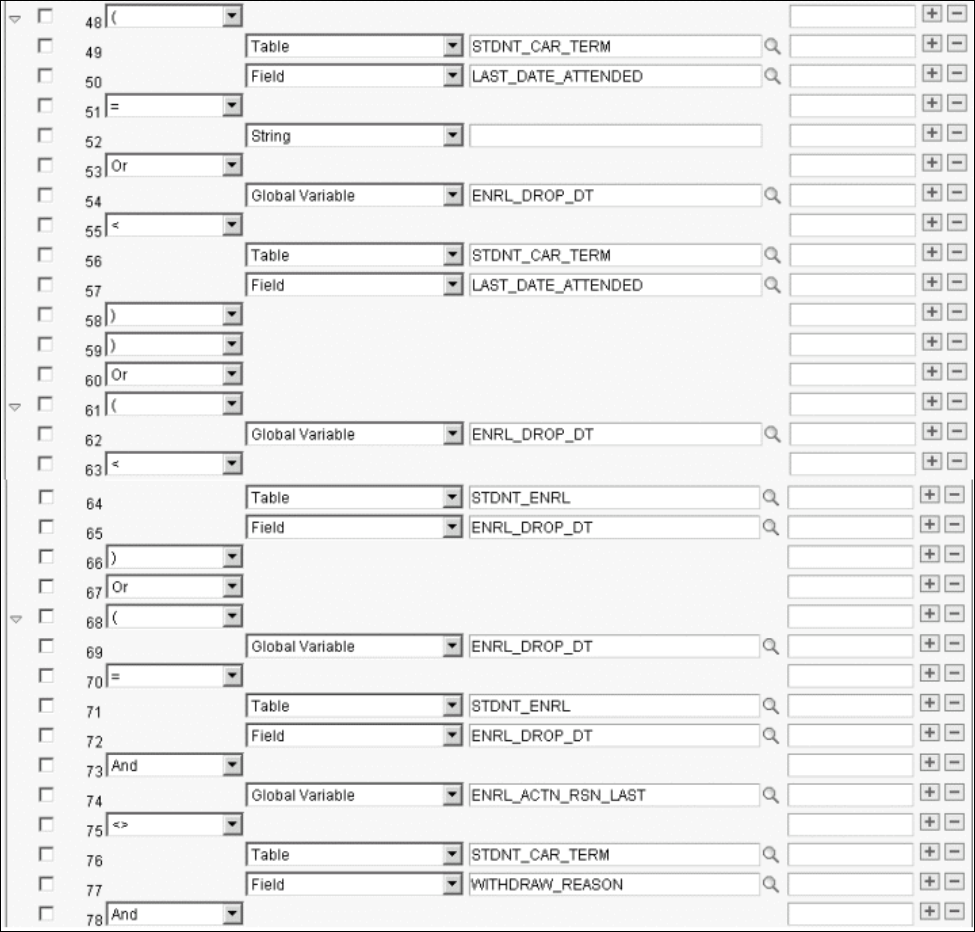
Chapter 5 Setting Up Tuition Controls, Criteria, Equations, and Waivers
Copyright © 1988, 2010, Oracle and/or its affiliates. All Rights Reserved. 167
Equation Editor page (3 of 4)
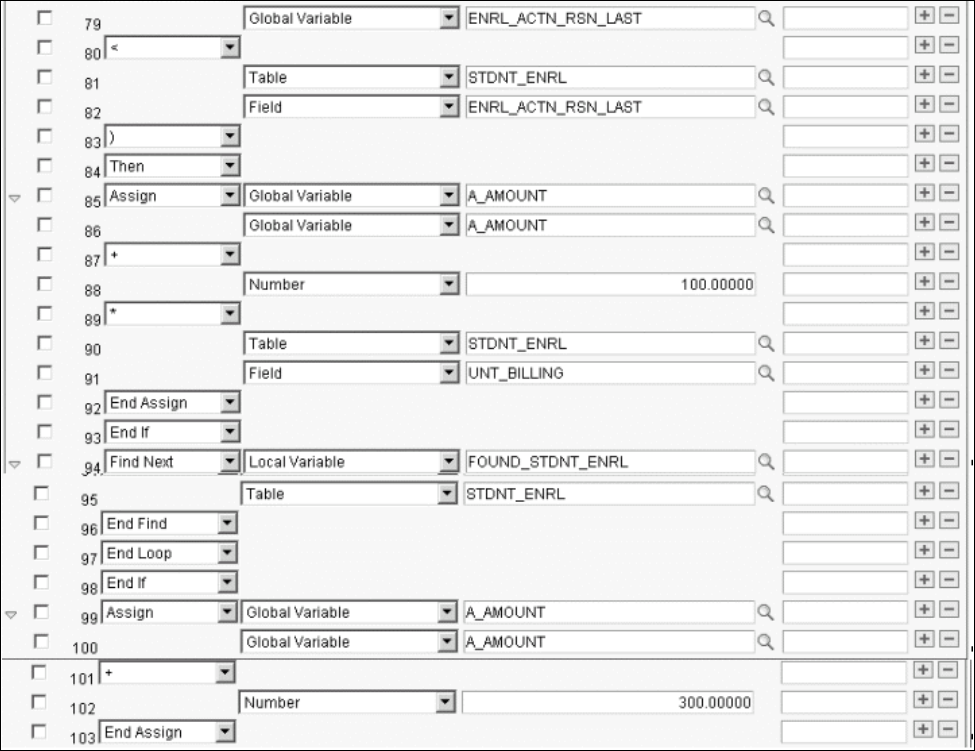
Setting Up Tuition Controls, Criteria, Equations, and Waivers Chapter 5
168 Copyright © 1988, 2010, Oracle and/or its affiliates. All Rights Reserved.
Equation Editor page (4 of 4)
This sample equation calculates the term fee by term, adjust by term. To determine the enrolled classes on a
specific date, tuition calculation looks at the temporary table and, for each row, the equation is called and it
compares the global variables from the temporary table to the student's enrollment. Refer to Understanding
the Adjustment Calendar section for logic for the term fee and adjustment calculation for each student.
See Also
PeopleSoft Enterprise Campus Solutions 9.0 Application Fundamentals PeopleBook, "Working with
Equation Engine"
Using Equation Engine in Student Financials Tuition Calculation
Access the SFTDUGRDAMT equation on the Equation Editor page.
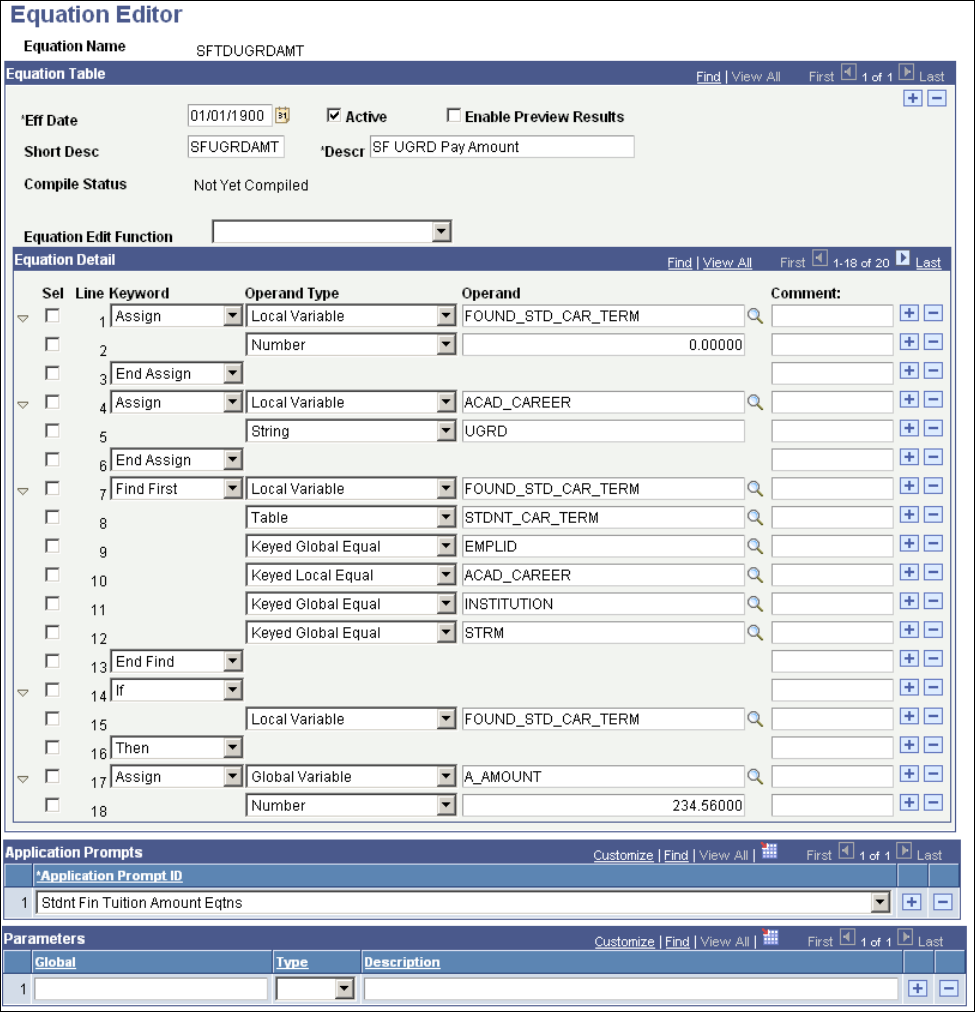
Chapter 5 Setting Up Tuition Controls, Criteria, Equations, and Waivers
Copyright © 1988, 2010, Oracle and/or its affiliates. All Rights Reserved. 169
Equation Editor page (SFTDUGRDAMT)
This equation uses the Stdnt Fin Tuit Amount Limited application prompt ID. The equation looks at a student's
career number, determines whether the student is an undergraduate, and then assigns a monetary amount.
Using Student Financials Undergraduate Selection Equation
Access the SFTDUGRDSEL equation on the Equation Editor page (Set Up SACR, Common Definitions,
Equation Engine, Equation Editor).

Setting Up Tuition Controls, Criteria, Equations, and Waivers Chapter 5
170 Copyright © 1988, 2010, Oracle and/or its affiliates. All Rights Reserved.
Equation Editor page (SFTDUGRDSEL)
This equation selects students based on their undergraduate status.
See Also
PeopleSoft Enterprise Campus Solutions 9.0 Application Fundamentals PeopleBook, "Working with
Equation Engine"

Chapter 5 Setting Up Tuition Controls, Criteria, Equations, and Waivers
Copyright © 1988, 2010, Oracle and/or its affiliates. All Rights Reserved. 171
Defining Waivers and Waiver Groups
To set up waivers and waiver groups, use the Waivers component (WAIVER_PANEL) and the Waiver
Groups component (WAIVER_GROUP_PANEL).
Waivers provide a convenient, consistent, and easily maintainable way of waiving or reducing tuition or fees
for students who meet specific criteria. Waiver groups enable you to attach one or more waivers directly to
class, course, and course list fees.
This section discusses how to:
•Define waivers.
•Define waiver groups.
Pages Used to Define Waivers and Waiver Groups
Page Name Definition Name Navigation Usage
Waivers WAIVER_TABLE Set Up SACR, Product
Related, Student Financials,
Tuition and Fees, Waivers
Define waivers.
Waiver Groups WAIVER_GROUP_TABLE Set Up SACR, Product
Related, Student Financials,
Course and Class Fees,
Waiver Groups
Define waiver groups.
Defining Waivers
Access the Waivers page (Set Up SACR, Product Related, Student Financials, Tuition and Fees, Waivers).
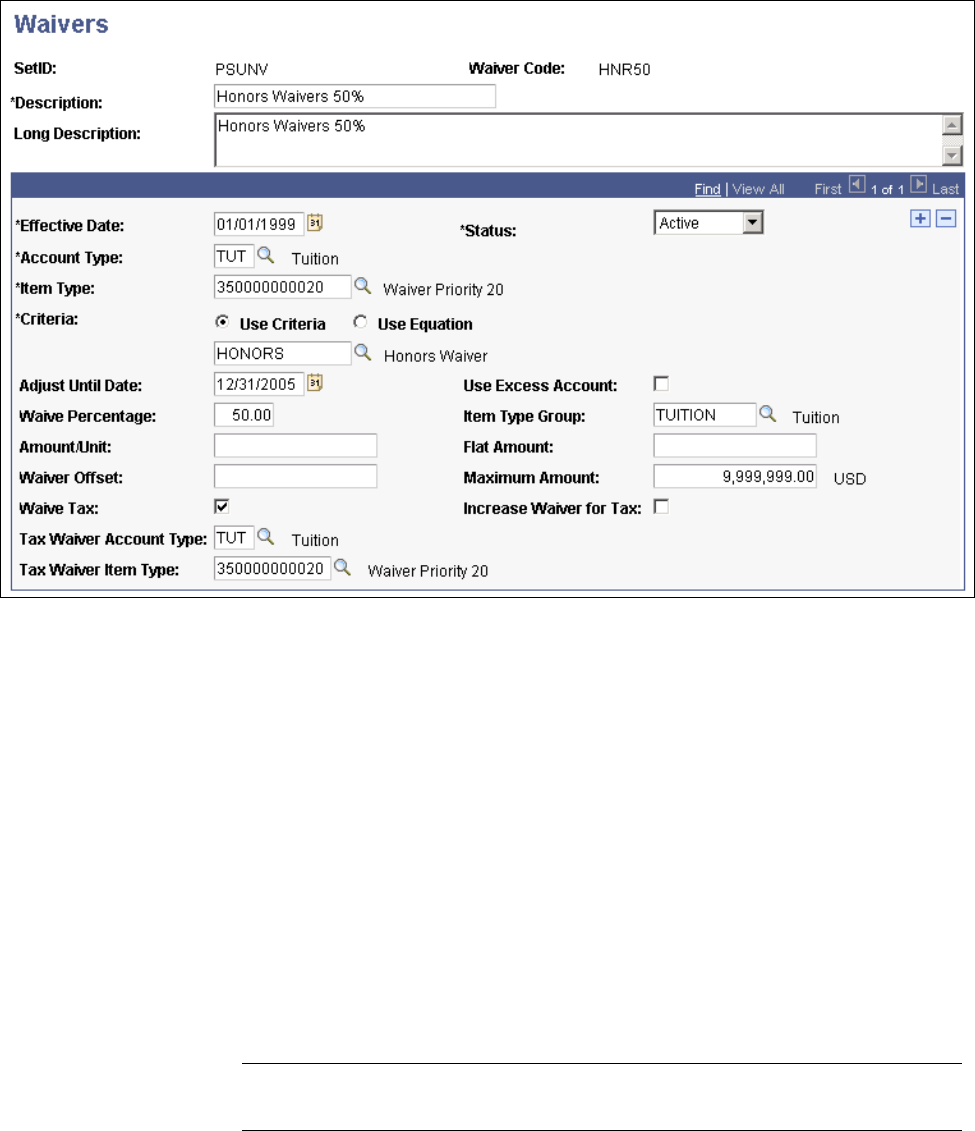
Setting Up Tuition Controls, Criteria, Equations, and Waivers Chapter 5
172 Copyright © 1988, 2010, Oracle and/or its affiliates. All Rights Reserved.
Waivers page
Criteria Select the criteria to use to determine the student's eligibility for a waiver.
Adjust Until Date Define the last day that a waiver can be granted to a student who meets the
criteria.
Use Excess Account Select to move any excess waiver amounts to the account defined for excesses.
Waive Percentage If only a percentage of a fee is to be waived, enter that percentage in this field.
Item Type Group Select an item type group if you want the option of attaching the waiver to a
tuition group. When a waiver is attached to a tuition group, an item type group is
necessary to limit which fees are affected. If the waiver is attached to a term fee,
class, course, or course list fee, the program does not consider the item type
group because the waiver is attached at a more specific level.
Note. The Item Type Group field is available only if Waiver Percentage or
Waiver Offset is selected as the method of calculating the waiver.
Amount/Unit If the waiver is based on the amount of units in a student's course load, enter the
per unit amount.
Flat Amount You can waive a flat amount for students who meet the criteria. If you select this
option, do not complete the Waive Percentage and Waiver Offset fields.
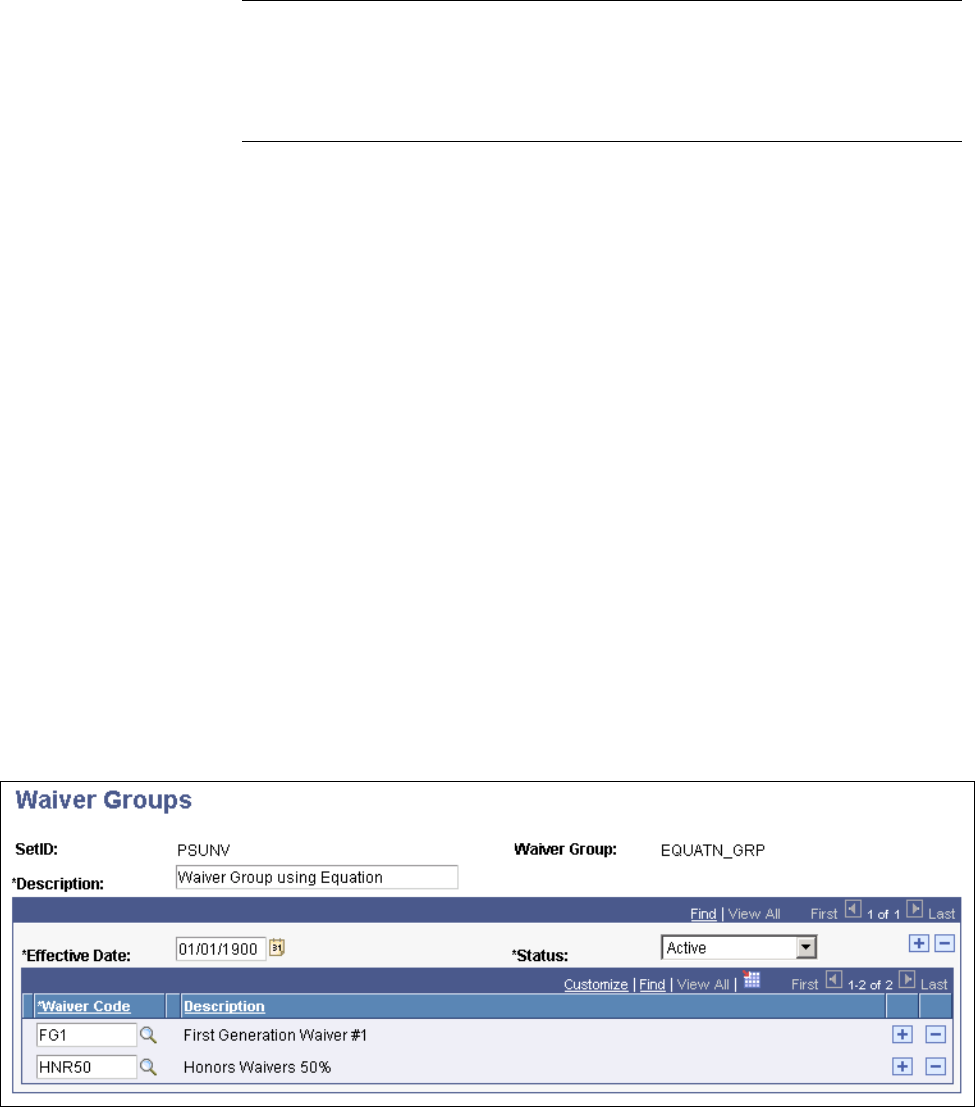
Chapter 5 Setting Up Tuition Controls, Criteria, Equations, and Waivers
Copyright © 1988, 2010, Oracle and/or its affiliates. All Rights Reserved. 173
Waiver Offset Enter an amount the students potentially pay themselves. For example, you might
waive all tuition fees for employees, but want them to pay at least 100 USD.
Enter 100 in this field, and the system reduces the calculated waiver by 100 USD.
Note. Waiver Offset cannot be used in conjunction with the Waive Percentage,
Amount/Unit, or Flat Amount option. You can use Waiver Offset with the
Maximum Amount option to limit the total amount of the waiver. Also, if the
waiver is attached to a tuition group, the Item Type Group field must be
populated.
Maximum Amount Enter the maximum amount that can be waived for a student.
Waive Tax Select to control whether the waiver adjusts taxes that are associated with a
charge. Selecting this option does not increase the amount of the waiver, but
distributes it proportionately across the charge and tax. When you select this
option, the Tax Waiver Account Type and Tax Waiver Item Type fields become
available.
Increase Waiver for Tax Select to add the amount of the tax to the waiver. When selected, this option can
cause the total waiver to exceed the maximum amount limits.
Tax Waiver Account
Type Enter an account type for the waived tax. The default value is the same as for the
waiver account type, but you can override it.
Tax Waiver Item Type Enter an item type for the waived tax. The default value is the same as for the
waiver item type, but you can override it.
Defining Waiver Groups
Access the Waiver Groups page (Set Up SACR, Product Related, Student Financials, Course and Class Fees,
Waiver Groups).
Waiver Groups page
Waiver Code Add a waiver to the waiver group.

Setting Up Tuition Controls, Criteria, Equations, and Waivers Chapter 5
174 Copyright © 1988, 2010, Oracle and/or its affiliates. All Rights Reserved.
Creating Course Lists
To set up course lists, use the Course Lists component (CRSE_LIST_PANEL).
Course lists represent a group of linked courses. You can assign a course fee to a course list rather than
attaching the fee to specific courses. Course lists can also be used with third-party contracts to control what
courses are covered by the sponsor contract.
Page Used to Create Course Lists
Page Name Definition Name Navigation Usage
Course Lists CRSE_LIST_SF Set Up SACR, Product
Related, Student Financials,
Course and Class Fees,
Course Lists
Define course lists.
Defining Course Lists
Access the Course Lists page (Set Up SACR, Product Related, Student Financials, Course and Class Fees,
Course Lists).
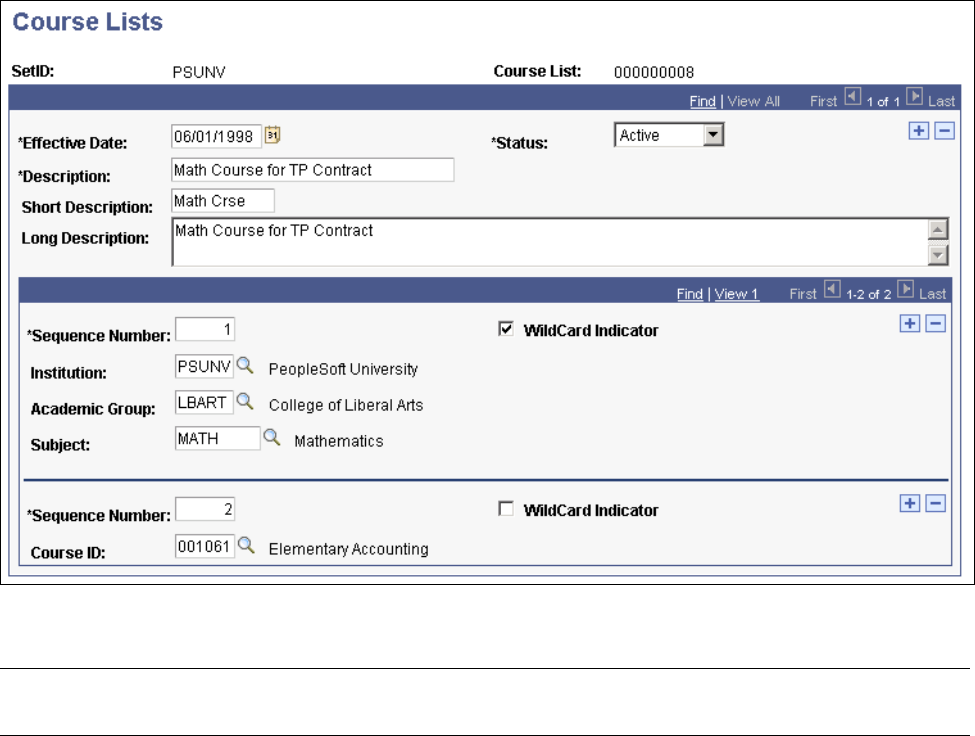
Chapter 5 Setting Up Tuition Controls, Criteria, Equations, and Waivers
Copyright © 1988, 2010, Oracle and/or its affiliates. All Rights Reserved. 175
Course Lists page
Note. The effective date of the course list cannot precede the effective date of the course catalog from which
you select courses.
Sequence Number Enter a sequence number for the class. Sequence numbers are important for
writing course information to the table and cannot be duplicated. The sequence
number does not affect the payment order.
WildCard Indicator Select if you are creating a list of courses with like characteristics. When you
select this option, the Institution, Acad Group, and Subject fields replace the
Course ID field.
Institution Select the appropriate institution. This field is available only if the WildCard
Indicator check box is selected.
Academic Group Select the academic group in which the courses reside. This field is available
only if the WildCard Indicator check box is selected.
Subject Select the subject area for the courses. This field is available only if the
WildCard Indicator check box is selected.
Course ID To create a course list using one or more specific courses, enter a course ID.

Copyright © 1988, 2010, Oracle and/or its affiliates. All Rights Reserved. 177
Chapter 6
Setting Up Fees and Tuition Groups
You charge fees to students for everything from application to graduation. You define each of those fees and
establish rules for how they will be applied and to whom. Tuition groups enable you to assess fees to large
groups of students who share attributes.
This chapter discusses how to:
•Set up fee classes.
•Define minimum and maximum fees.
•Set up application fees.
•Set up deposit fees and deposit due dates.
•Set up term fee codes.
•Set up course fees and class fees.
•Define optional fees.
•Set up transaction fees.
•Set up course list fees.
•Set up tuition groups.
Setting Up Fee Classes
To set up fee classes, use the Fee Classes component (FEE_CLASS).
You use fee classes for reporting purposes and grouping fees. For example, you might have a variety of item
types that you want to organize under the fee class of Mandatory Tuition and Fees. That way, you can
produce a report that shows all mandatory fee item types. Fee class codes are required for term fee setup.

Setting Up Fees and Tuition Groups Chapter 6
178 Copyright © 1988, 2010, Oracle and/or its affiliates. All Rights Reserved.
Page Used to Set Up Fee Classes
Page Name Definition Name Navigation Usage
Fee Classes FEE_CLASS_TBL Set Up SACR, Product
Related, Student Financials,
Tuition and Fees, Fee
Classes
Set up fee classes.
Defining Minimum and Maximum Fees
To set up minimum and maximum fees, use the Minimum / Maximum Fees component
(MIN_MAX_FEE_PANEL).
This section provides an overview of minimum and maximum fees and discusses how to:
•Define minimum and maximum fees for billing careers and academic years.
•Define minimum and maximum fees for terms and sessions.
•Define minimum and maximum fees for admit terms.
Understanding Minimum and Maximum Fees
You can define a minimum and maximum range for all of your fees and charges. You can set fee ranges for
sessions, terms, academic years, and billing careers so that they build off one another. Be sure to define
enough minimum/maximum fee codes to meet all your needs. For example, a minimum/maximum fee code
for application fees might require a career limit of 100 USD while a code for term fees might require a career
limit of 60,000 USD.
Pages Used to Define Minimum and Maximum Fees
Page Name Definition Name Navigation Usage
Minimum/Maximum Fees 1 MIN_MAX_FEE Set Up SACR, Product
Related, Student Financials,
Tuition and Fees, Minimum
/ Maximum Fees,
Minimum/Maximum Fees 1
Define minimum and
maximum fees for billing
careers and academic years.
Minimum/Maximum Fees 2 MIN_MAX_FEE_2 Set Up SACR, Product
Related, Student Financials,
Tuition and Fees, Minimum
/ Maximum Fees, Minimum
/ Maximum Fees 2
Define minimum and
maximum fees for terms
and sessions.
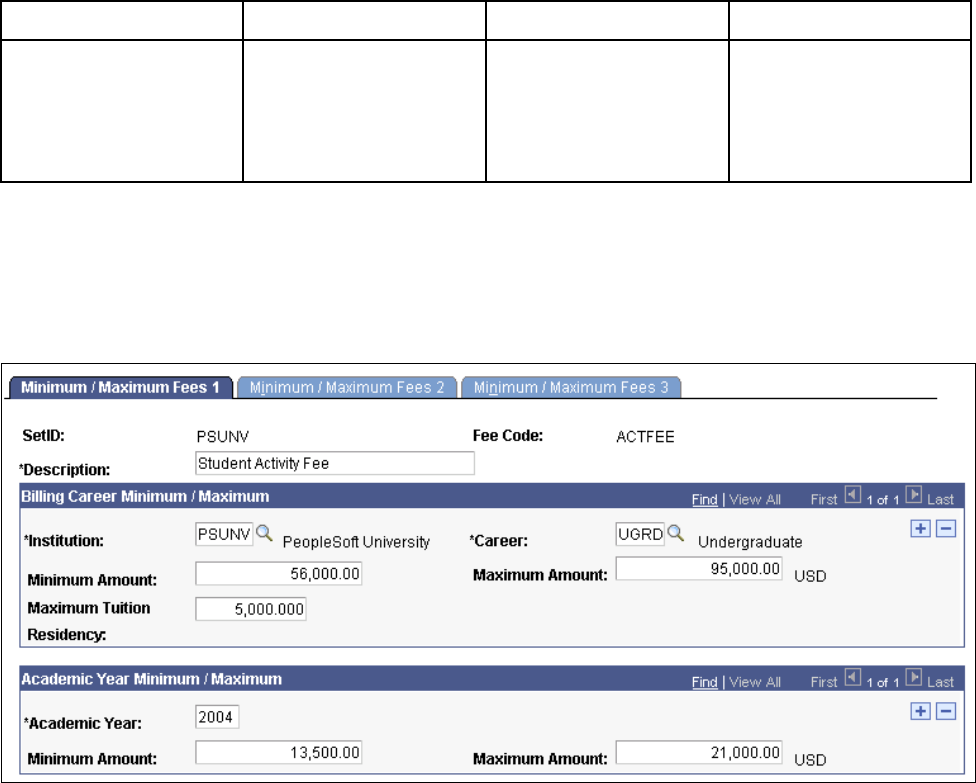
Chapter 6 Setting Up Fees and Tuition Groups
Copyright © 1988, 2010, Oracle and/or its affiliates. All Rights Reserved. 179
Page Name Definition Name Navigation Usage
Minimum/Maximum Fees 3 MAX_FEE_ADM_TERM Set Up SACR, Product
Related, Student Financials,
Tuition and Fees, Minimum
/ Maximum Fees, Minimum
/ Maximum Fees 3
Define minimum and
maximum fees for admit
terms.
Defining Minimum and Maximum Fees for Billing Careers and Academic Years
Access the Minimum/Maximum Fees 1 page (Set Up SACR, Product Related, Student Financials, Tuition
and Fees, Minimum / Maximum Fees, Minimum/Maximum Fees 1).
Minimum/Maximum Fees 1 page
Billing Career Minimum/Maximum
The system, by default, sets the student's billing career to the academic career in the student's career term
record. The tuition calculation process uses the student's billing career to calculate the student's tuition.
If the student is active in more than one academic career in the same term, you might want to consolidate
tuition calculation and billing under a single academic career. If so, then point the billing career for all of the
student's career term records to the same academic career. For example, a student might be enrolled in a term
as both a graduate student and an undergraduate student. If you wanted to consolidate tuition calculation to
just the undergraduate career, you would select undergraduate as the billing career for both the student's
undergraduate term record and graduate term record.
If you decide to use a single billing career for all of a student's academic careers within a term, note that to
perform a term or session withdrawal, the student must be enrolled in at least one class within the academic
career that you select as the student's billing career. Otherwise, the term withdrawal and session withdrawal
processes halt processing and instruct you to change the student's billing career to an academic career in
which the student has enrollments for the term.

Setting Up Fees and Tuition Groups Chapter 6
180 Copyright © 1988, 2010, Oracle and/or its affiliates. All Rights Reserved.
Institution Enter the institution that includes the career that you are defining.
Minimum Amountand
Maximum Amount Enter the minimum and the maximum amount to charge for the billing career.
Maximum Tuition
Residency Enter the maximum tuition residency for this career. This number represents the
level of tuition residency, not the monetary amount that is charged.
Academic Year Minimum/Maximum
Enter an academic year and specify its minimum and maximum fees.
See Also
Chapter 6, "Setting Up Fees and Tuition Groups," Defining Tuition Residency Minimums and Maximums,
page 202
Defining Minimum and Maximum Fees for Terms and Sessions
Access the Minimum/Maximum Fees 2 page (Set Up SACR, Product Related, Student Financials, Tuition
and Fees, Minimum / Maximum Fees, Minimum/Maximum Fees 2).
Minimum/Maximum Fees 2 page
Term Minimum/Maximum
Enter an academic term and its minimum and maximum fees.
Session Minimum/Maximum
Enter an academic session and its minimum and maximum fees.
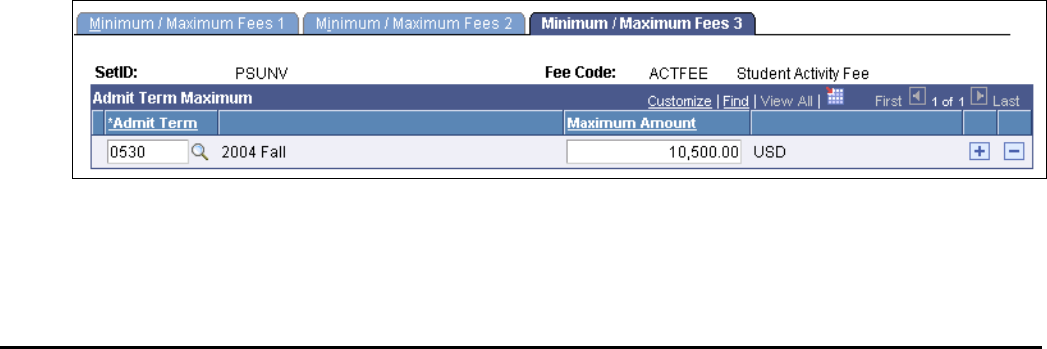
Chapter 6 Setting Up Fees and Tuition Groups
Copyright © 1988, 2010, Oracle and/or its affiliates. All Rights Reserved. 181
Defining Minimum and Maximum Fees for Admit Terms
Access the Minimum/Maximum Fees 3 page (Set Up SACR, Product Related, Student Financials, Tuition
and Fees, Minimum / Maximum Fees, Minimum/Maximum Fees 3).
Minimum/Maximum Fees 3 page
Enter an admit term and its maximum amount.
Setting Up Application Fees
To set up application fees, use the Application Fees component (APPLICATION_FEES).
This section provides an overview of application fees and discusses how to:
•Define application fees.
•Define application fee item types.
•Define application sub fees.
Understanding Application Fees
You must define the rules that your institution uses to assess application fees. Each application fee code that
you define represents one or more individual fee charges (sub fees).
A one-to-one relationship exists between an application fee and an application center. You can define only
one application fee for an application center. However, an application fee can have multiple sub fees. For
example, you could charge different sub fees based on a student's admit type. Then, each admit type (for
example, new students, transfer students, or readmitted students) would have its own application sub fee.
Each application fee code requires the definition of one or more sub fees that make up the charge. You can set
up sub fees so that they are cumulative or mutually exclusive. You can also define a combination of
cumulative and mutually exclusive fees. For example, you can define an application fee code with two sub
fees: one sub fee charges students a fee of 50 USD to apply over the web and another sub fee charges students
a fee of 75 USD to apply through the mail. While students can apply using both methods, it is unlikely that
they would do so.
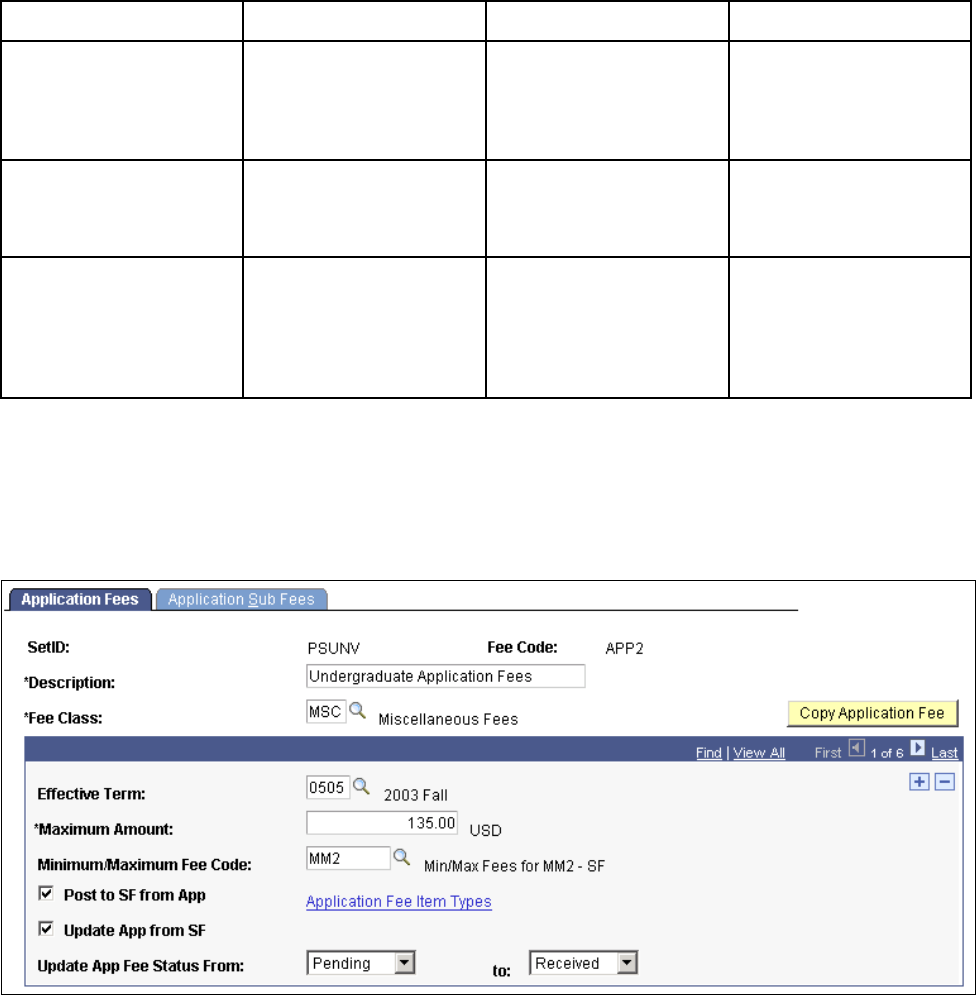
Setting Up Fees and Tuition Groups Chapter 6
182 Copyright © 1988, 2010, Oracle and/or its affiliates. All Rights Reserved.
See Also
PeopleSoft Enterprise Recruiting and Admissions 9.0 PeopleBook, "Building Your Recruiting Structure,"
Setting Up Application Processing Centers
Pages Used to Set Up Application Fees
Page Name Definition Name Navigation Usage
Application Fees APP_FEE_TABLE Set Up SACR, Product
Related, Student Financials,
Admission Fees,
Application Fees
Define application fees.
Application Fee Item Types APP_FEE_TBL_S1 Click the Application Fee
Item Types link on the
Application Fees page.
Define application fee item
types.
Application Sub Fees APP_SUBFEE_TABLE Set Up SACR, Product
Related, Student Financials,
Admission Fees,
Application Fees,
Application Sub Fees
Define application sub fees.
Defining Application Fees
Access the Application Fees page (Set Up SACR, Product Related, Student Financials, Admission Fees,
Application Fees, Application Sub-Fees).
Application Fees page

Chapter 6 Setting Up Fees and Tuition Groups
Copyright © 1988, 2010, Oracle and/or its affiliates. All Rights Reserved. 183
Fee Class Select a fee class. Fee Class is a descriptive field that is used for reporting
purposes only.
Copy Application Fee Click to copy an application fee and its sub fees from one term to the next.
Effective Term Select a term for the application fee. You must define an application fee for each
term.
Maximum Amount Enter the maximum fee amount, including all sub fees, for a single application.
Minimum/Maximum
Fee Code Select an optional minimum/maximum fee code.
Post to SF from App
(post to Student
Financials from
application)
Select to post the application fee to Student Financials as it is created. Do not
post the application fee to the student's account when the payment is recorded.
When you select this option, the Application Fee Item Types link appears. Click
it to open the Application Fee Item Types page. The first time that you select the
check box, the page opens automatically.
Update App from SF
(update application from
Student Financials)
Select this option to automatically update the student's application status from
Student Financials. When you select this option, the Update Application Fee
Status from and to fields appear.
Update Application Fee
Status from and to Select the status that you want the system to change from and to. The options for
both fields are Pending, Received, and Waived.
Note. If the student's original status is different than the option you select, the
system does not change it. Consult with your admissions staff to determine the
correct settings.
See Also
Chapter 6, "Setting Up Fees and Tuition Groups," Defining Minimum and Maximum Fees, page 178
Defining Application Fee Item Types
Access the Application Fee Item Types page (click the Application Fee Item Types link on the Application
Fees page).
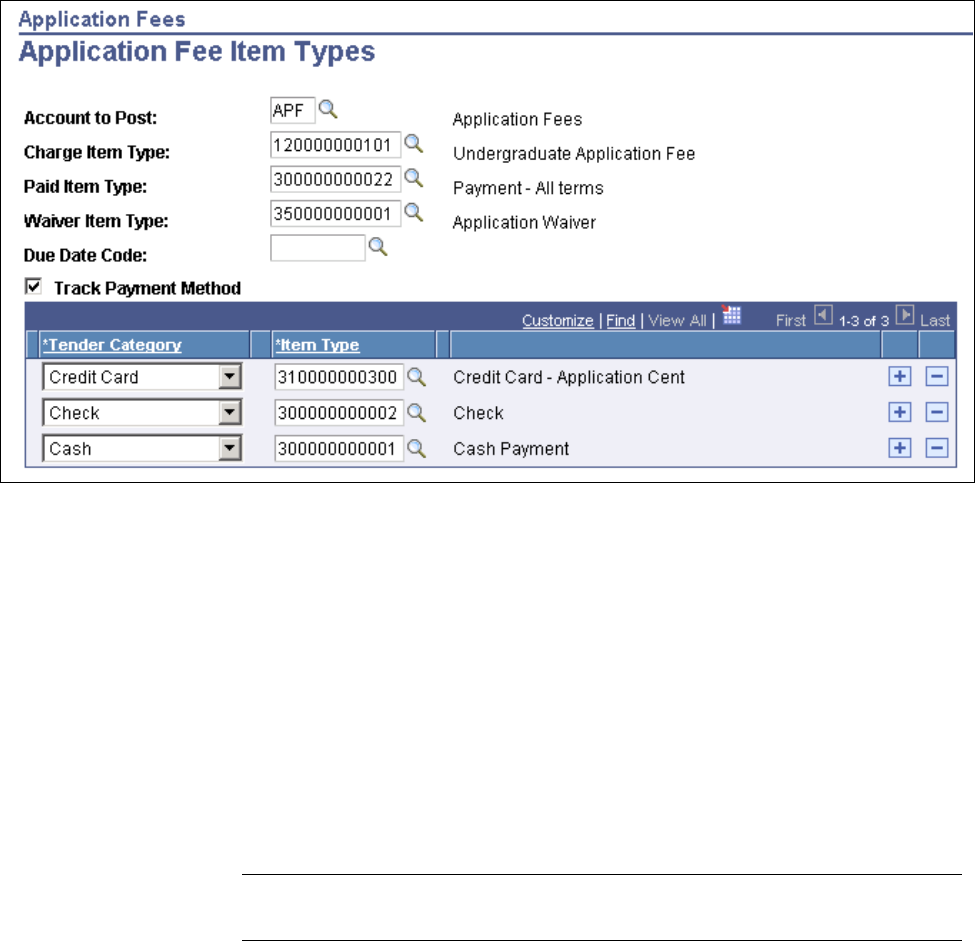
Setting Up Fees and Tuition Groups Chapter 6
184 Copyright © 1988, 2010, Oracle and/or its affiliates. All Rights Reserved.
Application Fee Item Types page
Account To Post Enter the account type that you created for application fees.
Charge Item Type Enter the charge item type that you created for application fees. If you want to
bill the student and post only the charge and not the payment, leave the Paid Item
Type and Waive Item Type fields blank.
Paid Item Type Enter the payment item type that you created for application fees.
Waiver Item Type Enter the waiver item type that you created for waiving application fees.
Due Date Code Select a code that determines when the application fee is due.
Note. The billing and due calendar must be set up with a pivot date of application
date for a due date code to be available.
Track Payment Method Select to track the tender that is used to pay this fee for reconciliation purposes.
This option is designed for real-time application processing where students walk
in with their applications and have them processed at that time. When this option
is selected, the Tender Category and Item Type fields become available.
Tender Categoryand
Item Type Attach a tender category and item type. If you elect to track the payment method,
you must attach the tender category and item type for each type of tender that
you want to accept. If you do not include a specific tender category, it cannot be
accepted in payment for application fees under this application fee code. Using
multiple tender categories also enables students to pay their application fees with
a combination of tenders.

Chapter 6 Setting Up Fees and Tuition Groups
Copyright © 1988, 2010, Oracle and/or its affiliates. All Rights Reserved. 185
Defining Application Sub Fees
Access the Application Sub Fees page (Set Up SACR, Product Related, Student Financials, Admission Fees,
Application Fees, Application Sub Fees).
Application Sub Fees page
Sub Fee Code Enter a code for the sub fee.
Calculation Option Select a calculation option. Values are:
All Matching Rows: Select to sum multiple sub fees that match the student's
characteristics. For example, if you defined a sub fee of 60 USD for
undergraduate students that submitted applications using the web and a sub fee of
40 USD for international undergraduate student applications, the system would
charge 100 USD to students who meet both of these conditions.
Most Descriptive Row: Select to charge students the sub fee that most closely
matches the application that they submitted. For example, if you charge a sub fee
of 55 USD for undergraduate applications that were submitted by a service, and a
60 USD sub fee for undergraduate applications that were submitted using the
internet, an undergraduate student that submitted an application using the internet
would be charged 60 USD. The most descriptive row option works best for sub
fees, such as the one in this example, that are mutually exclusive, as in this
example. The system charges the first application sub fee that it recognizes. No
way is available to prioritize which fee is charged.

Setting Up Fees and Tuition Groups Chapter 6
186 Copyright © 1988, 2010, Oracle and/or its affiliates. All Rights Reserved.
Maximum Amount Enter the maximum amount for this sub fee.
Note. The maximum amount of the sub fee cannot exceed the maximum amount
of the application fee.
Sub Fees
Use the check boxes on this page to select the criteria for the system to use when calculating the sub fee.
When you select a check box, a corresponding field becomes available in the lower part of the page. Use this
field to select a specific value for the calculation criterion. The fewer criteria that you select, the more broadly
the system applies the fee.
Setting Up Deposit Fees and Deposit Due Dates
To set up deposit fees and deposit due dates, use the Deposit Fees component (DEPOSIT_FEES).
Some institutions require a deposit fee from accepted applicants to reserve space in an academic program.
This section discusses how to:
•Define deposit fees.
•Define deposit fee due dates.
•Define status changes resulting from deposits.
Pages Used to Set Up Deposit Fees and Deposit Due Dates
Page Name Definition Name Navigation Usage
Deposit Fees DEP_FEE_TABLE Set Up SACR, Product
Related, Student Financials,
Admission Fees, Deposit
Fees
Define deposit fees.
Deposit Due Dates DEP_DUE_DT_TABLE Set Up SACR, Product
Related, Student Financials,
Admission Fees, Deposit
Fees, Deposit Due Dates
Define deposit fee due
dates.
Status Update DEP_DUE_DT_SP Click the Status Update
link on the Deposit Due
Dates page.
Define status changes
resulting from deposits.
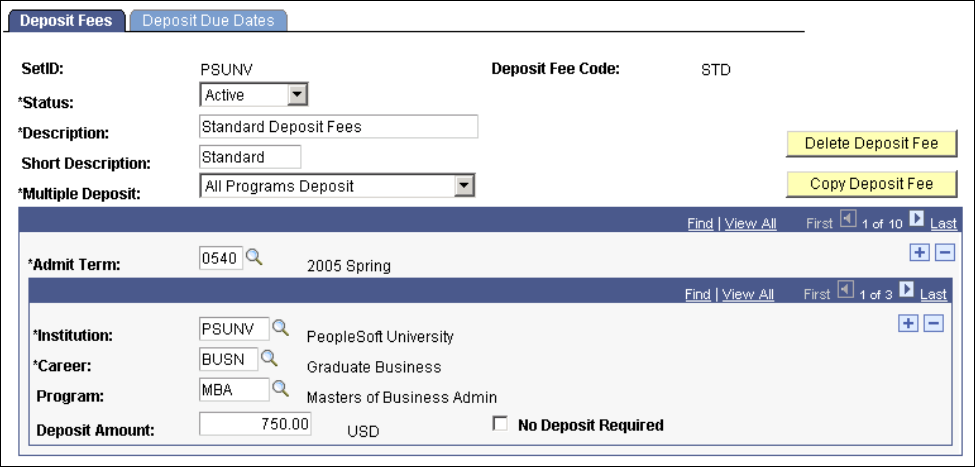
Chapter 6 Setting Up Fees and Tuition Groups
Copyright © 1988, 2010, Oracle and/or its affiliates. All Rights Reserved. 187
Defining Deposit Fees
Access the Deposit Fees page (Set Up SACR, Product Related, Student Financials, Admission Fees, Deposit
Fees, Deposit Due Dates).
Deposit Fees page
Delete Deposit Fee Click to delete the deposit fee code.
Copy Deposit Fee Click to copy the deposit fee to a new term.
Multiple Deposits Specify how to calculate deposits for students who are enrolled in more than one
program.
All Programs Deposit: Select to charge students a deposit fee for each program
into which they are admitted.
First Program In: Select to calculate a deposit fee for the First Program per
application number. If one application exists, and the student is admitted to
multiple programs on that application, one deposit is calculated (as long as the
admit rows are processed sequentially) for the first program to which the student
is admitted. If more than one application exists, and the student is admitted to
multiple programs on those applications, then a deposit is calculated for the first
program admitted on each application.
Admit Term Enter the admit term to which the deposit fee applies.
Specifying Deposit Fees by Institution, Career, and Program
Select the institution, academic career, and academic program to which the deposit fee applies along with the
deposit amount.
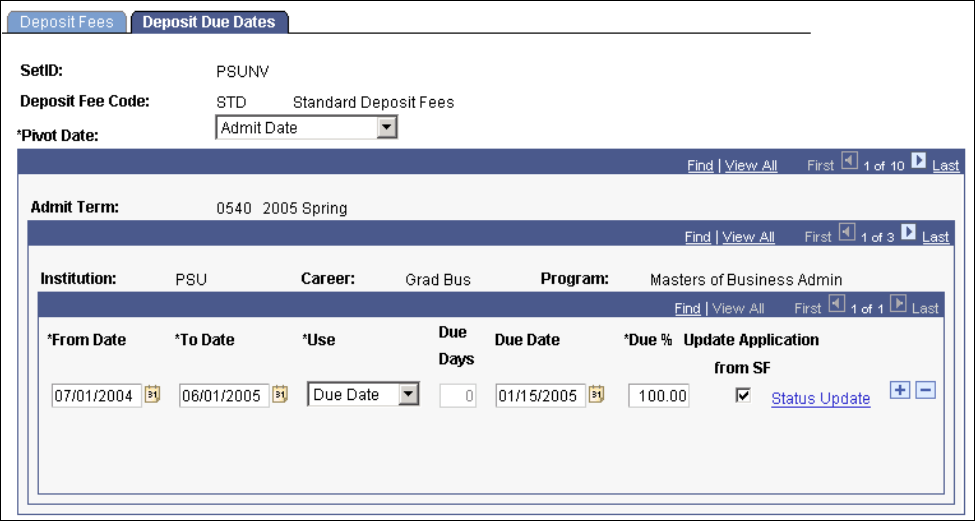
Setting Up Fees and Tuition Groups Chapter 6
188 Copyright © 1988, 2010, Oracle and/or its affiliates. All Rights Reserved.
No Deposit Required Select to exclude the deposit fee all together. For example, if your institution
recruits undergraduate Fine Arts students and admits them without requiring any
deposit, define a row and select the option. If you specify a deposit amount of
zero, a zero charge appears on the student's account. If you select this check box,
no charge appears at all.
Defining Deposit Fee Due Dates
Access the Deposit Due Dates page (Set Up SACR, Product Related, Student Financials, Admission Fees,
Deposit Fees, Deposit Due Dates).
Deposit Due Dates page
Pivot Date Select either Admit Date or Application Date as the pivot date that determines the
starting point for calculating the deposit fee due date.
From DateandTo Date Enter the range of admission dates to which the deposit fee due date applies.
Use Select either Due Days or Due Date for calculating the due date. The
corresponding field becomes available.
Due Days Enter the number of days after the pivot date that a deposit fee is due.
Due Date Enter the specific deposit fee due date.
Due %(due percentage) Enter the percentage of the deposit that is due. You must define enough rows to
total 100 percent.
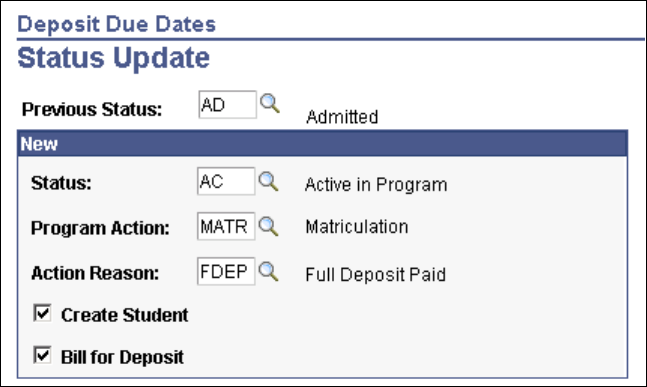
Chapter 6 Setting Up Fees and Tuition Groups
Copyright © 1988, 2010, Oracle and/or its affiliates. All Rights Reserved. 189
Update Application
from SF (update
application from Student
Financials)
Select to automatically update the student's academic program status when you
post the deposit fee.
Status Update If you select the Update Application from SF option, you must specify how
students' program statuses are updated. Click this link to access the Status Update
page.
Defining Status Changes Resulting from Deposits
Access the Status Update page (click the Status Update link on the Deposit Due Dates page).
Status Update page
Previous Status Enter the academic program status of the students prior to posting a deposit fee.
New
Status Enter the academic program status that the system assigns to students when it
posts their deposit fees.
Program Action Enter the program action that initiates the status change.
Action Reason Enter the reason for the program action that you select.
Create Student Select to automatically matriculate students into an academic program upon
receipt of the deposit.
Bill for Deposit Select to generate a bill for any remaining deposit balance.

Setting Up Fees and Tuition Groups Chapter 6
190 Copyright © 1988, 2010, Oracle and/or its affiliates. All Rights Reserved.
Setting Up Term Fee Codes
To set up term fee codes, use the Term Fees component (TERM_FEE_PANEL) and the Copy Term Fees
component (RUN_SFCPTMFE).
This section provides an overview of term fee codes and discusses how to:
•Define term fee codes.
•Define term and session fees.
•Define term sub fee codes.
•Define term sub fees.
•Define tuition residency minimums and maximums.
•Copy term fees to subsequent terms.
Understanding Term Fee Codes
Term fee codes are the most generalized method of establishing rates for tuition and fees. Each term fee code
comprises one or more term fee definitions. Each term fee definition comprises one or more term sub fee
codes. And each term sub fee code comprises one or more term sub fees. This multilevel structure provides
flexibility and convenience.
By using different fee triggers and calculation methods at the lower levels, one term fee code can control how
tuition is calculated for a wide range of unique student situations. Another term fee code can do the same for
room and board combinations. Take the time to learn how term fee codes work and how you can use them to
solve your most complex tuition calculation needs.
Term Sub Fee Codes
You can define one or more sub fee codes for a given term fee. Sub fee codes provide flexibility in how you
show charges on an account, how you calculate charges, and how you print charges on a bill. For example, if
your institution prefers to show just the bottom line charge for tuition and fees rather than the detail of these
fees, you can use sub fees to define all the fees that compose a tuition and fees charge, and one charge
appears on an account. If your institution prefers to show the detail of each charge that composes tuition and
fees, you can create individual term fees for each of these charges and break down tuition and fees into detail
on an account.
Term Fee Copying
After you define your term fees for one term, you can copy those same fees forward to subsequent terms. This
enables you to set term fees at the start of each term; you do not have to redefine your term fee schedule with
each new term, which reduces data entry time.

Chapter 6 Setting Up Fees and Tuition Groups
Copyright © 1988, 2010, Oracle and/or its affiliates. All Rights Reserved. 191
Pages Used to Set Up Term Fee Codes
Page Name Definition Name Navigation Usage
Term Fee Codes TERM_FEE_CD_TABLE Set Up SACR, Product
Related, Student Financials,
Tuition and Fees, Term
Fees, Term Fee Codes
Define term fee codes.
Term Fees TERM_FEE_TABLE Set Up SACR, Product
Related, Student Financials,
Tuition and Fees, Term
Fees
Define term and session
fees.
Term Sub Fee Codes TERM_SF_CODE_TABLE Set Up SACR, Product
Related, Student Financials,
Tuition and Fees, Term
Fees, Term Sub Fee Codes
Define term sub fee codes.
Term Sub Fees TERM_SUBFEE_TABLE Set Up SACR, Product
Related, Student Financials,
Tuition and Fees, Term
Fees, Term Sub Fees
Define term sub fees.
Term Fee Residency TERM_FEE_RES_TABLE Set Up SACR, Product
Related, Student Financials,
Tuition and Fees, Term
Fees, Term Fee Residency
Define tuition residency
minimum and maximum
amounts.
Copy Term Fees RUNCTL_SFCPTMFE Set Up SACR, Product
Related, Student Financials,
Tuition and Fees, Copy
Term Fees
Copy term fees to
subsequent terms.
Defining Term Fee Codes
Access the Term Fee Codes page (Set Up SACR, Product Related, Student Financials, Tuition and Fees,
Term Fees, Term Fee Codes).
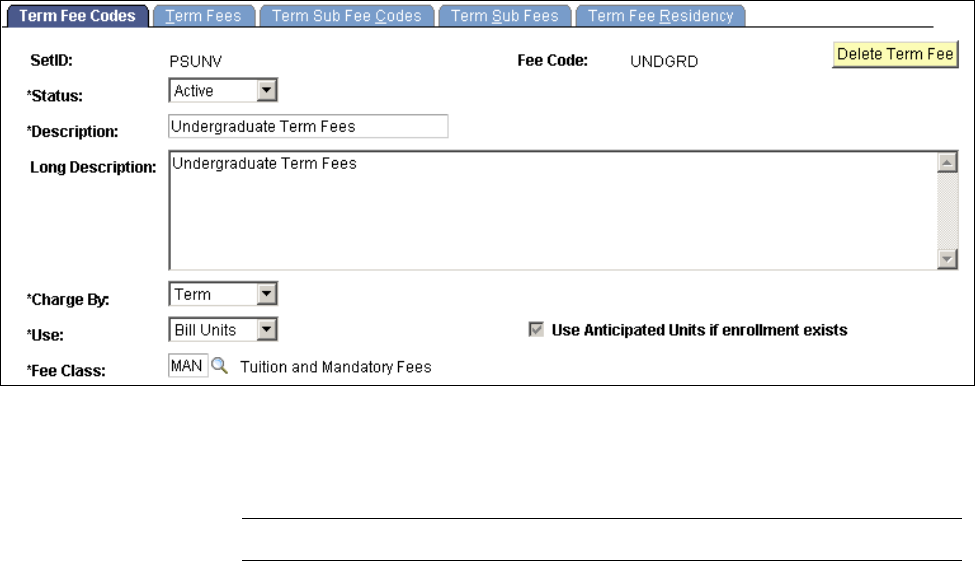
Setting Up Fees and Tuition Groups Chapter 6
192 Copyright © 1988, 2010, Oracle and/or its affiliates. All Rights Reserved.
Term Fee Codes page
Delete Term Fee Click to delete the term fee.
Note. You cannot delete a term fee that is in use by an active tuition group.
Charge By Specify how the fee code calculates fees. Values are:
Class: Select to reflect charges for the particular term fee that is relative to each
class in the student's account information. The system automatically makes
available the information that is necessary to use course lists with third-party
contracts.
Session: Select to sum charges for all classes that are taken within a particular
session in the student's account information. If you select this option and want to
use course lists with third-party contracts, you must also enable Track Class
Pricing (on the Term Fees page).
Term: Select to sum charges for all classes that are taken with a particular term in
the student's account information. If you select this option and want to use course
lists with third-party contracts, you must also enable Track Class Pricing (on the
Term Fees page).
Use Select the basis for calculating the fee. Values are:
Anti Units (anticipated units): Select to calculate fees based on the number of
units in which students typically enroll within a certain academic program. For
example, if Fine Arts freshmen are expected to enroll in 15 units, the system
calculates the fee on that basis for all freshmen.
Bill Units: Select to charge fees based on the actual number of units in which the
student is enrolled versus anticipated units.
Use Anticipated Units if
enrollment exists Select to calculate fees based on anticipated units even if actual enrollment
information is available. If you do not select this check box and you are
calculating fees using anticipated units, the system uses actual enrollment
information when it is available.
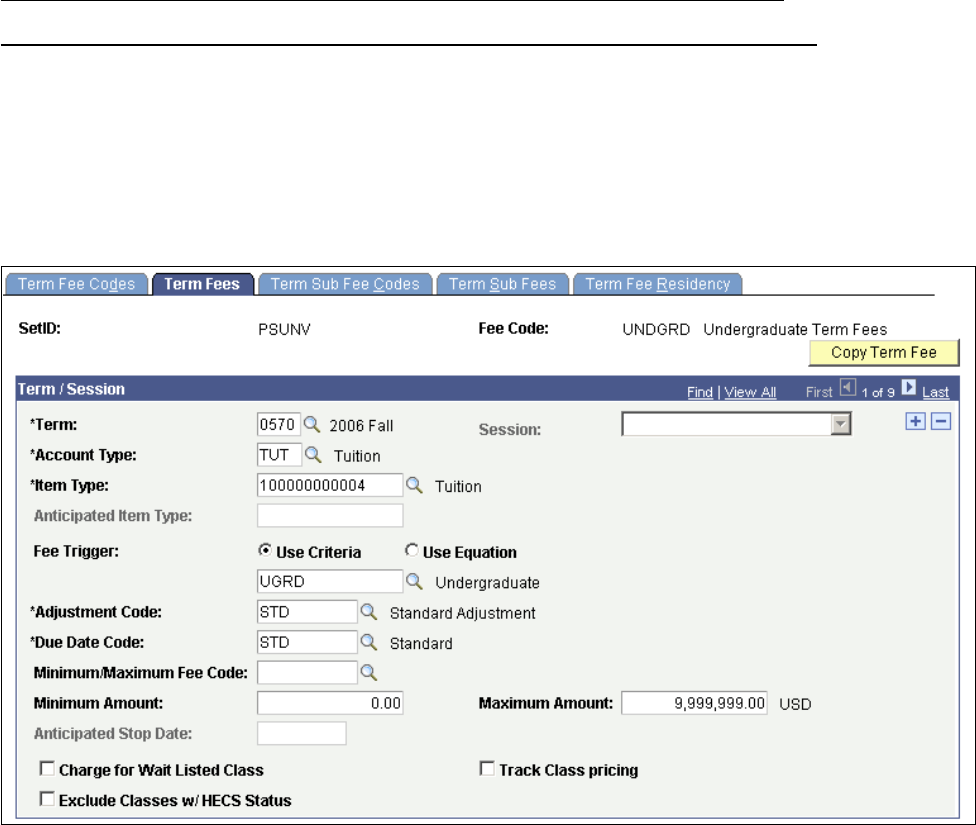
Chapter 6 Setting Up Fees and Tuition Groups
Copyright © 1988, 2010, Oracle and/or its affiliates. All Rights Reserved. 193
Fee Class Select a fee class to use for reporting purposes.
See Also
Chapter 6, "Setting Up Fees and Tuition Groups," Setting Up Course List Fees, page 224
Chapter 18, "Administering Payment Plans," Administering Third-Party Contracts, page 479
Defining Term and Session Fees
Access the Term Fees page (Set Up SACR, Product Related, Student Financials, Tuition and Fees, Term
Fees).
Term Fees page
Copy Term Fee Click to copy the term fee to a new term.
Term Select the term to which the term fee applies.
Session If you defined the term fee code to charge by session on the Term Fee Codes
page, select the session to which the term fee applies.
Account Type and Item
Type Select an account type and item type for the term fee.

Setting Up Fees and Tuition Groups Chapter 6
194 Copyright © 1988, 2010, Oracle and/or its affiliates. All Rights Reserved.
Anticipated Item Type If the system calculates the term fee code using anticipated units, this field is
required. Select a different item type from the one you selected in the Item Type
field to distinguish between charges that are based on anticipated enrollment and
charges that are based on actual enrollment.
Note. If you set up multiple terms, ensure that you specify an anticipated item
type for each term.
Fee Trigger To select an optional fee trigger that limits the application of the term fee to
specific students, click either the Use Criteria option or the Use Equation option,
and then select the predefined criteria or equation from the lookup.
See PeopleSoft Enterprise Campus Solutions 9.0 Application Fundamentals
PeopleBook, "Working with Equation Engine."
Adjustment Code Enter the adjustment code (calendar) that governs this fee. This code determines
the refund amount for students who drop classes.
Note. This adjustment code is used only for class drops. The adjustment code for
withdrawal is attached to the tuition group.
Due Date Code Select a due date code (calendar) to define when the fee is due and payable.
Minimum/Maximum
Fee Code Enter an optional minimum/maximum fee code to assign predefined limits to the
term fee.
Minimum Amount Enter a minimum charge amount that is unique to this term fee.
Maximum Amount Enter a maximum charge amount that is unique to this term fee.
Anticipated Stop Date This field becomes available when the system calculates fees using anticipated
units. Enter a date after which the system no longer uses anticipated units. At this
point, the system calculates the term fee using actual enrollment (billing) units. If
the student has not enrolled in classes by the date specified, the system calculates
fees using zero units. If so defined, minimum charges could still apply.
Charge for Wait Listed
Class Select to charge the term fee for students who are on a waiting list for a class.

Chapter 6 Setting Up Fees and Tuition Groups
Copyright © 1988, 2010, Oracle and/or its affiliates. All Rights Reserved. 195
Track Class Pricing Select to track revenue on a class-specific basis, thereby allocating revenue to
specific departments. For example, a student pays a term fee of 2,000.00 USD
and is enrolled in four classes of equal units: Physics 150, Calculus 31, Art 111,
and Philosophy 101. Breaking down the fee by class yields revenue of 500.00
USD per class. Using revenue tracking by class, you can allocate the revenue
from Physics 150 to the Physics Department, the revenue from Calculus 31 to the
Math Department, the revenue from Art 111 to the Art Department, and the
revenue from Philosophy 101 to the College of Liberal Arts.
Note. To accurately track revenue by class, you must set up your item types and
classes appropriately in addition to selecting this check box.
See PeopleSoft Enterprise Student Records 9.0 PeopleBook, "Managing the
Schedule of Classes."
Exclude Classes
w/HECS Status(exclude
classes with Higher
Education Contribution
Scheme status)(AUS)
Select this option so that students are not charged twice for the same class if they
are under multiple loan programs.
See Also
Chapter 5, "Setting Up Tuition Controls, Criteria, Equations, and Waivers," Establishing Criteria for Tuition
Groups and Fee Triggers, page 158
Chapter 6, "Setting Up Fees and Tuition Groups," Defining Minimum and Maximum Fees, page 178
Defining Term Sub Fee Codes
Access the Term Sub Fee Codes page (Set Up SACR, Product Related, Student Financials, Tuition and Fees,
Term Fees, Term Sub Fee Codes).
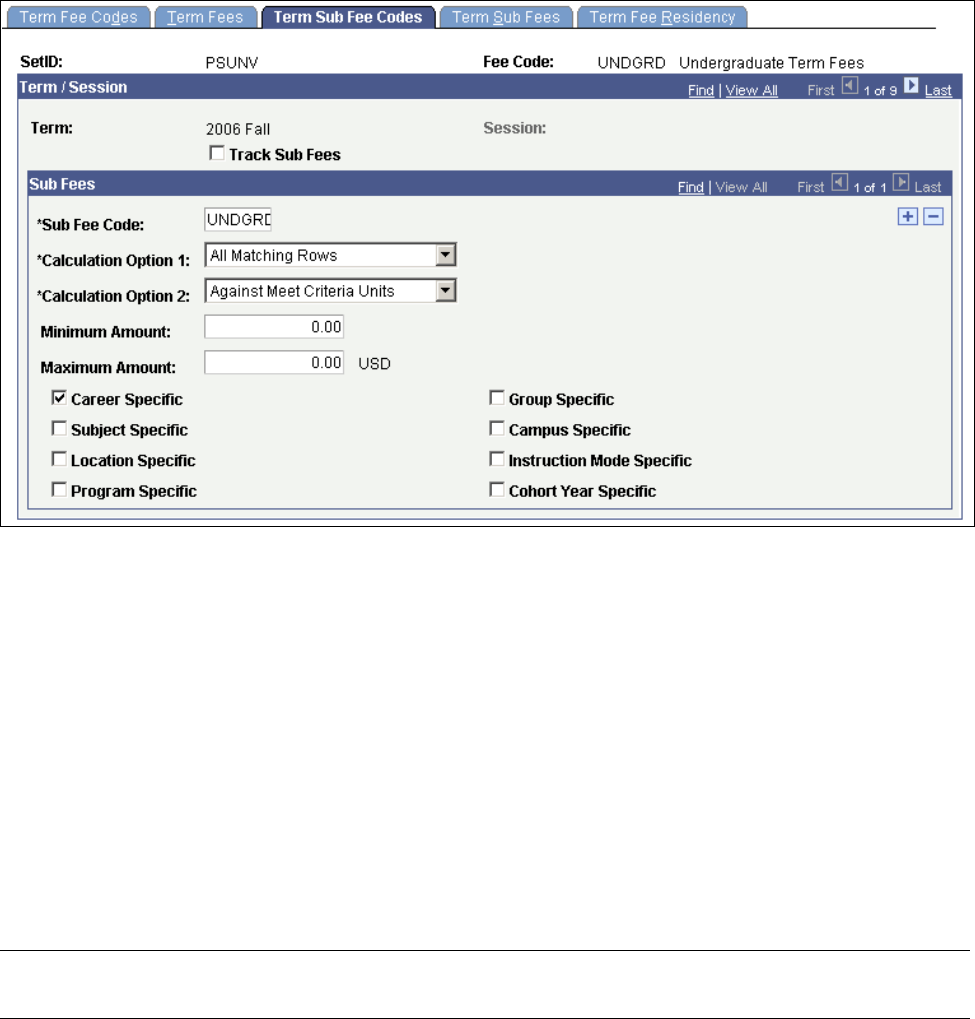
Setting Up Fees and Tuition Groups Chapter 6
196 Copyright © 1988, 2010, Oracle and/or its affiliates. All Rights Reserved.
Term Sub Fee Codes page
Track Sub Fees Select to break down charges by the individual sub fees within the sub fee code .
When the check box is cleared, the system sums all sub fee charges.
Sub Fee Code Enter the sub fee code that you are defining.
Calculation Option 1 and Calculation Option 2
To charge students the maximum fees, set the Calculation Option 1 field to All Matching Rows and the
Calculation Option 2 field to Against All Enrollment Units. To charge students the minimum fees, set the
Calculation Option 1 field to Most Descriptive Row and the Calculation Option 2 field to Against Meet
Criteria Units.
Warning! Values for these fields are delivered with your system as translate values. Do not modify these
values in any way. Any modifications to these values will require a substantial programming effort.
Calculation Option 1 This option determines who is charged a term sub fee. Values are:
All Matching Rows: The system assesses the term sub fee against all criteria that
match the check box selections that you select at the bottom of the page: Career
Specific,Group Specific,Subject Specific,Campus Specific, Location Specific,
and Instruction Specific. This is the default value.
Most Descriptive Row: The system charges the term sub fee for criteria that most
closely match the check box options that you select at the bottom of this page. If
you selected the Most Descriptive Row value for Calculation Option 1, select the
appropriate specific option: Career Specific,Group Specific,Subject Specific,
Campus Specific,Location Specific, or Instruction Mode Specific.

Chapter 6 Setting Up Fees and Tuition Groups
Copyright © 1988, 2010, Oracle and/or its affiliates. All Rights Reserved. 197
Calculation Option 2 Determines how the system calculates the term sub fee. Values are:
Against All Enrollment Units: The system charges the students (identified in the
Calculation Option 1 field) the term sub fee against all the units in their class
load. This is the default value.
Against Meet Criteria Units: The system charges the students the term sub fee
against only the courses they are taking that match the criteria that was selected
in Calculation Option 1.
Minimum Amount Set an optional minimum amount for the term sub fee.
Maximum Amount Set an optional maximum amount for the term sub fee.
Matching Criteria
If you select Most Descriptive Row for Calc Option 1, or Against Meet Criteria Units in Calc Option 2, or
both, you must define the specific criteria that the courses must match. The following check boxes enable you
to control the application of term sub fees by specifying class characteristics. For example, you might have a
class for which you charge 350.00 USD per unit if it is taught in a classroom by a professor, and 275.00 USD
per unit if the class is an independent study using videotaped lectures. By selecting the Instruction Mode
Specific check box, you can define two term sub fees under a single sub fee code. For students taking the
class with a professor, the system charges 350.00 USD per unit. For students taking the class as an
independent study, the system charges 275.00 USD.
Career Specific Select to match classes by academic career.
Group Specific Select to match classes by academic group.
Subject Specific Select to match classes by academic subject area.
Campus Specific Select to match classes by campus.
Location Specific Select to match classes by class location specification.
Instruction Mode
Specific Select to match classes by instruction mode.
Program Specific If Program Specific is selected, the Term Sub Fees page allows the user to select
the academic program that this fee is intended for.
(AUS) Cohort Year
Specific Select to specify the cohort year on the Term Sub Fees page.
Note. The Cohort Year field is available on this page only if the institution has
selected the Australia functionality in their academic structure. The value in the
Institution field is used to determine whether the Australia functionality was
selected in the academic structure (not the setID).
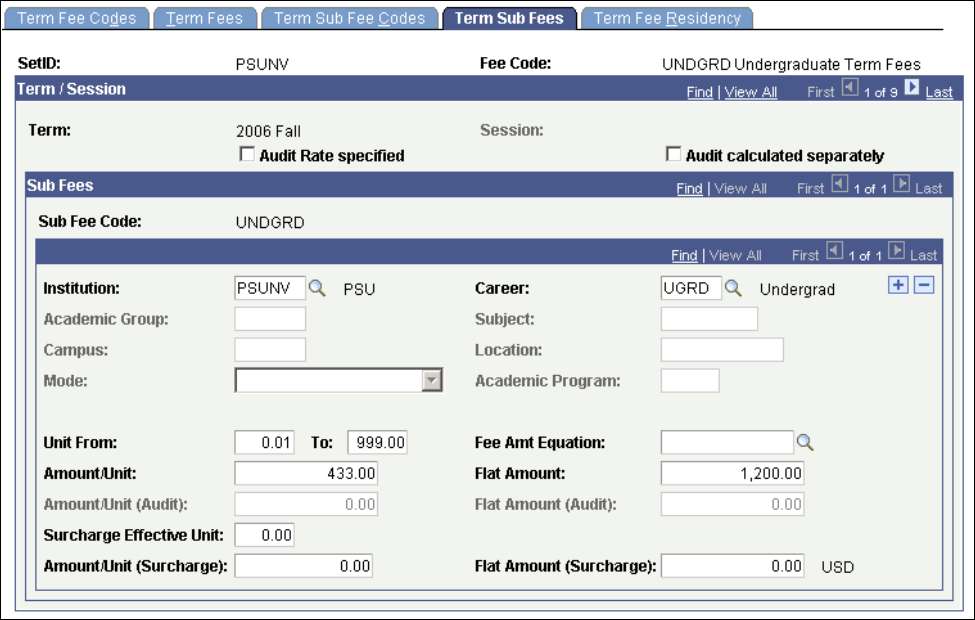
Setting Up Fees and Tuition Groups Chapter 6
198 Copyright © 1988, 2010, Oracle and/or its affiliates. All Rights Reserved.
Defining Term Sub Fees
Access the Term Sub Fees page (Set Up SACR, Product Related, Student Financials, Tuition and Fees, Term
Fees, Term Sub Fees).
Term Sub Fees page
Audit Rate Specified and Audit Calculated Separately
Two options determine how the system assesses charges for audited classes: Audit Rate Specified and Audit
Calculated Separately.
Audit Rate Specified Select to use a special rate for audited classes. If you select this option, the tuition
calculation process uses the audit rate that you have defined. If the check box is
cleared, the system applies regular rates to audited classes.
When you select this check box, the Amount/Unit (Audit) and Flat Amount
(Audit) fields become available.
Audit Calculated
Separately Select to calculate audited classes separately from graded classes. If you select
this check box, the system charges students only the audit rate for the class. If
you clear this check box, and you select the Audit Rate Specified check box, the
system charges students the audit rate in addition to the regular term fee.

Chapter 6 Setting Up Fees and Tuition Groups
Copyright © 1988, 2010, Oracle and/or its affiliates. All Rights Reserved. 199
Term Sub Fee Calculation Specifications
Use the following fields to more narrowly target the application of the fee. The fewer fields that you define,
the more broadly the system applies the fee. These fields are available only if the corresponding options are
selected on the Term Sub Fee Codes page.
Institution Select the institution that uses the term sub fee.
Career If you selected the Career Specific check box on the Term Sub Fee Codes page,
select an academic career.
Academic Group If you selected the Group Specific check box on the Term Sub Fee Codes page,
select an academic group.
Subject If you selected the Subject Specific check box on the Term Sub Fee Codes page,
select an academic subject area.
Campus If you selected the Campus Specific check box on the Term Sub Fee Codes page,
select a campus.
Location If you selected the Location Specific check box on the Term Sub Fee Codes
page, select a location.
Mode If you selected the Instruction Mode Specific check box on the Term Sub Fee
Codes page, select a mode.
Academic Program If you selected the Program Specific check box on the Term Sub Fee Codes page,
select an academic program. This is the academic program on the student's
enrollment and not the student's primary academic program.
(AUS) Cohort Year If the Cohort Year Specific check box was selected on the Term Sub Fee Codes
page, then you can specify the cohort year here.
Note. This field is available on this page only if the institution has selected the
Australia functionality in their academic structure. The value in the Institution
field is used to determine whether the Australia functionality was selected in the
academic structure (not the setID).
Fee Specifications
Using the following fields, you can control exactly how much to charge for the term sub fee. Fees can be
based on academic units, a flat fee, a per-unit surcharge, a flat fee surcharge, or a combination of all four. The
amounts that you enter are not independent of each other. Rather, they are summed. For example, if you
establish an amount per unit of 250 USD and a flat amount of 300 USD, the system charges a student taking
15 units 4,050 USD (3,750 + 300 USD). If you specify an audit rate, the system also adds fees for audited to
the total.

Setting Up Fees and Tuition Groups Chapter 6
200 Copyright © 1988, 2010, Oracle and/or its affiliates. All Rights Reserved.
Unit From and To Use the Unit From and To fields to define the range of units that are eligible for
the term sub fee. The system does not charge the term sub fee for the number of
units less than the number in the Units From field and greater than the number in
the To field. Make sure that you set the range to cover all possibilities.
Note. If the unit from value is set to zero, the system can calculate fees for
students who are active in a term but not enrolled for classes. To prevent an
incorrect calculation, set the unit from amount no lower than 0.10.
Fee Amt Equation (fee
amount equation) Enter an optional equation that you have defined to calculate fees. Equations are
an alternative method of calculating fees. If your fee structure is very complex,
equations might be more efficient, because they can reduce term fee
maintenance.
Amount/Unit Enter the amount to charge per unit.
Flat Amount Enter a flat amount to charge, regardless of the units taken.
Amount/Unit(Audit) Enter the amount to charge per unit for audited classes.
Flat Amount(Audit) Enter a flat amount to charge for audited classes, regardless of units taken.
Surcharge Effective Unit To include a surcharge when students enroll for more than a specified number of
academic units, enter the threshold number in this field. For example, to apply a
surcharge to students who are enrolled in more than 15 units, enter 15.
Amount/Unit
(Surcharge) (amount per
unit surcharge)
Enter a per unit surcharge for overload units.
Flat Amount
(Surcharge) Enter a flat amount charge for overload units.
Setting Up a Multitiered Tuition Term Sub Fee
Setting up a multitiered tuition fee schedule is easy using additional term sub fee definitions. In the following
example, three term sub fees are defined to charge tuition for three different ranges of academic units:
•Students who take up to 12 units are charged a flat amount of 1,200 USD, plus 250 USD per unit (12 units
= 4,200 USD).
•Students who take up to 15 units are charged a flat amount of 1,200 USD, plus 250 USD for the first 12
units, plus 225 USD per unit for the additional units (15 units = 4,875 USD).
•Students who take over 15 units are charged a flat amount of 1,200 USD plus 250 USD per unit for the
first 12 units, plus 225 USD per unit for the next 3 units, plus 200 USD for each unit over 15.
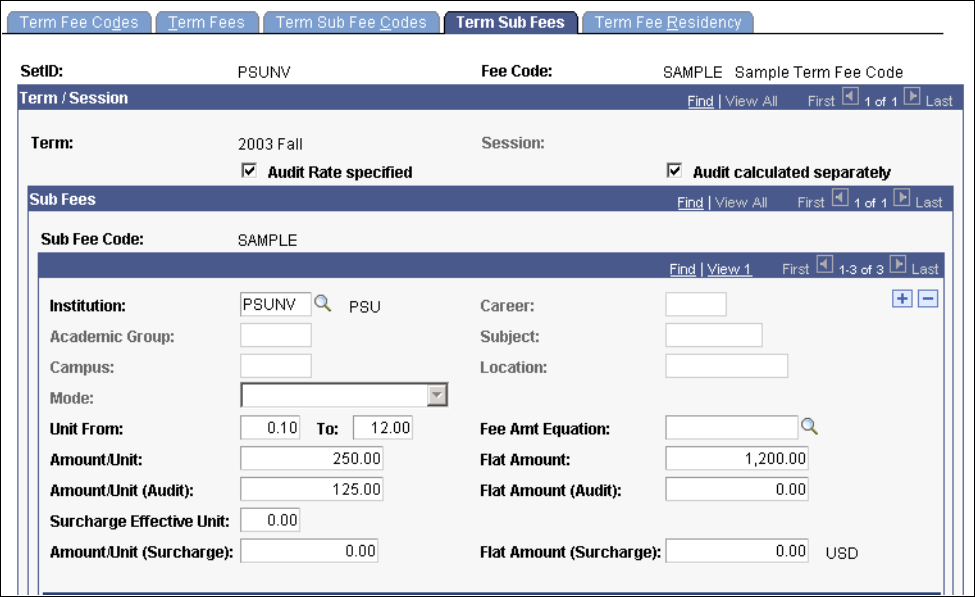
Chapter 6 Setting Up Fees and Tuition Groups
Copyright © 1988, 2010, Oracle and/or its affiliates. All Rights Reserved. 201
Term Sub Fees page (1 of 2)
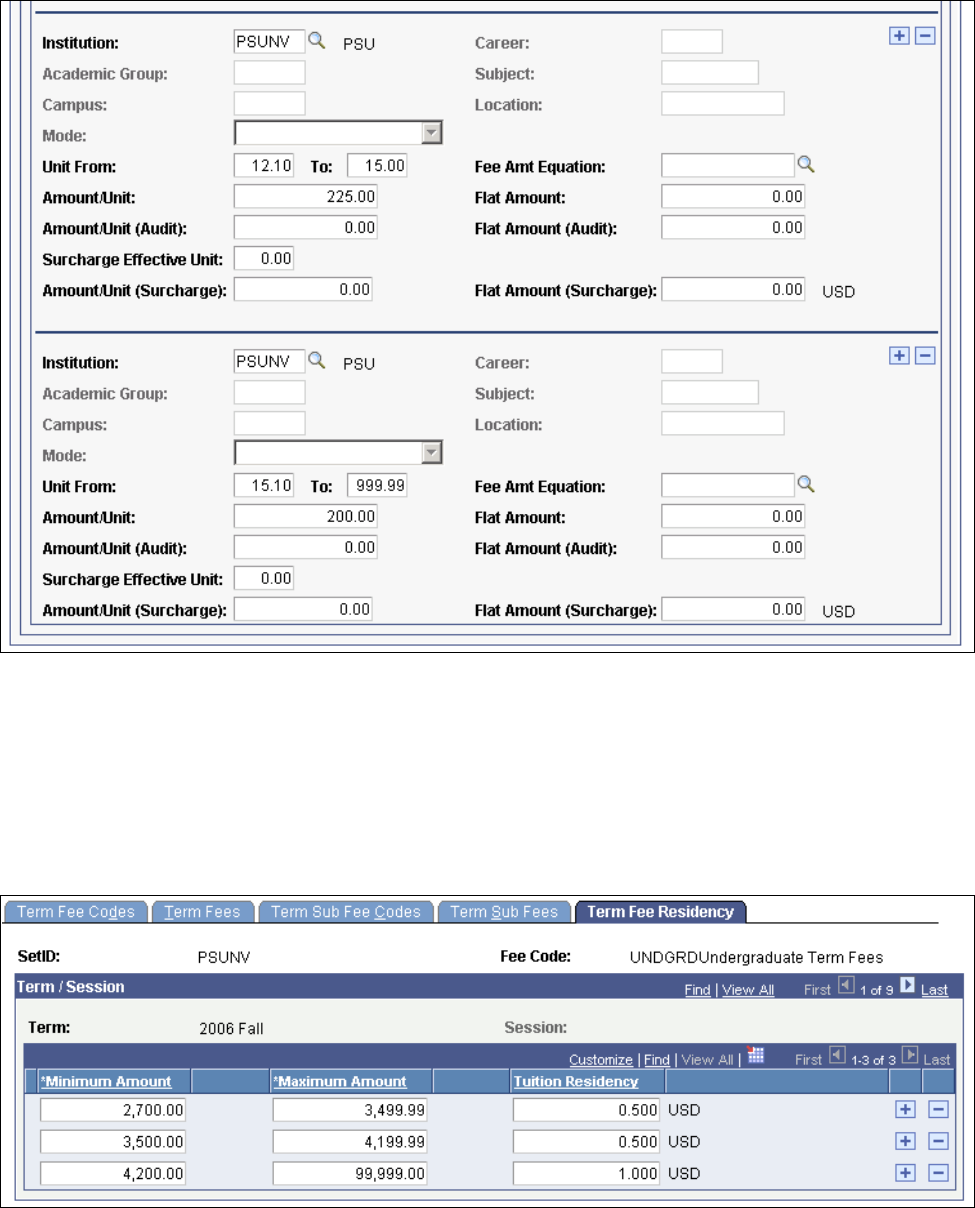
Setting Up Fees and Tuition Groups Chapter 6
202 Copyright © 1988, 2010, Oracle and/or its affiliates. All Rights Reserved.
Term Sub Fees page (2 of 2)
Defining Tuition Residency Minimums and Maximums
Access the Term Fee Residency page (Set Up SACR, Product Related, Student Financials, Tuition and Fees,
Term Fees, Term Fee Residency).
Term Fee Residency page
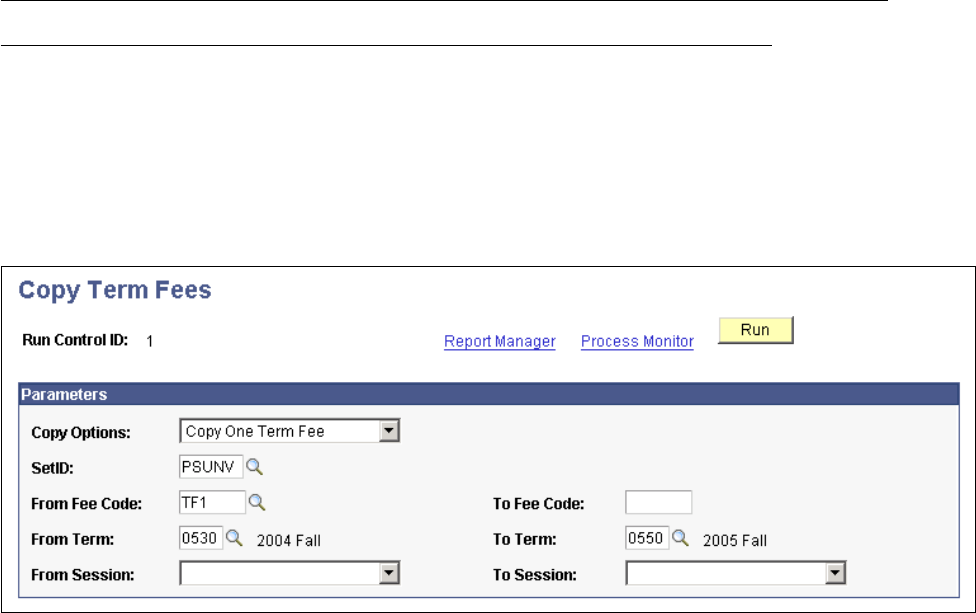
Chapter 6 Setting Up Fees and Tuition Groups
Copyright © 1988, 2010, Oracle and/or its affiliates. All Rights Reserved. 203
Minimum Amount and
Maximum Amount Enter the minimum and maximum amounts that a student pays to reach each
level of tuition residency.
Tuition Residency
If your institution has programs in which students do not have to pay for more than a specified number of
terms at full-time equivalency rates, you can use tuition residency to automatically cap the fees. For example,
you might offer a professional education program that can be completed with seven terms of full-time work.
To attract students, you advertise a seven-term course of study for a specified amount of money. Enrolling
students are placed in cohort groups, attend a structured series of classes, and pay a flat amount per term.
Over the course of seven terms, some students inevitably will have scheduling conflicts with one or more
classes and they will have to take them out of sequence. To accommodate these students, you allow them to
take the classes the next time that they are offered at no additional charge. By using tuition residency
functionality, you can automatically ensure that the students pay the full tuition and that the system does not
accidentally charge them for the delayed classes.
See Also
Chapter 6, "Setting Up Fees and Tuition Groups," Defining Minimum and Maximum Fees, page 178
Chapter 6, "Setting Up Fees and Tuition Groups," Setting Up Tuition Groups, page 227
Copying Term Fees to Subsequent Terms
Access the Copy Term Fees page (Set Up SACR, Product Related, Student Financials, Tuition and Fees,
Copy Term Fees).
Copy Term Fees page

Setting Up Fees and Tuition Groups Chapter 6
204 Copyright © 1988, 2010, Oracle and/or its affiliates. All Rights Reserved.
Copy Options Select the copy options that you want to use:
Warning! Values for this field are delivered with your system as translate
values. Do not modify these values in any way. Any modifications to these
values will require a substantial programming effort.
Copy All Term Fees: Copies all the term fees in the source term to the target
term.
Copy One Term Fee: Enables you to copy a specific fee from one term to another
or to rename a term fee definition within the same term. When you select this
option, the From Fee Code and To Fee Code fields become available for use.
SetID Select the setID to which the term fees are linked.
From Fee Code Select the source fee code from the required From Fee Code field.
To Fee Code Enter the name of the fee code in the To Fee Code field. To copy the fee code to
a new term, you can use the same name. To rename the fee code definition, enter
the new name.
From Term andTo Term Select the source term in the From Term field. Select the target term in the To
Term field.
From Session andTo
Session Use the From Session field to identify any session that is held in the source term
whose fee schedule you are copying. Use the To Session field to identify any
session target term for which you want to use the copied fee schedule.
Warning! Values for these fields are delivered with your system as translate
values. Do not modify these values in any way. Any modifications to these
values will require a substantial programming effort.
Setting Up Course Fees and Class Fees
To set up course fees and class fees, use the Rate Tables for Course Fees component
(CRSE_RATE_PANEL), the Course Fees component (CRSE_FEE_PANEL), the Course Fees Modal
component (CRSE_FEE_MODAL), the Class Fees component (CLASS_FEE_PANEL), and the Class /
Course Fees Rollover component (RUNCTL_FEE_RLVR).
This section provides an overview of course and class fees, and discusses how to:
•Set up rate tables for course fees.
•Define course fees.
•Define course sub fees.
•Define modal course fees.
•Define modal course sub fees.

Chapter 6 Setting Up Fees and Tuition Groups
Copyright © 1988, 2010, Oracle and/or its affiliates. All Rights Reserved. 205
•Define class fees.
•Define class sub fees.
•Define modal class fees.
•Define modal class sub fees.
•Roll over course and class fees to future terms.
Understanding Course Fees and Class Fees
After term fees, course fees and class fees are the most generalized method of establishing rates for fees.
Rate Tables for Course Fees
Use course rate IDs to add student characteristics to a course fee. Using a course rate ID with a course fee
enables you to charge students with different characteristics at different rates. For example, you could charge
an undergraduate chemistry student one fee for a lab, and an undergraduate humanities student a different fee
for the same lab.
Note. Course rate IDs are not a replacement for course fees. Rather, they work in conjunction with a course
fee definition.
Course Fees
Course fees provide additional flexibility in assessing fees. For example, you can define extra fees for courses
with labs or studio sections. You could also override the term fees calculation rules for a particular course and
charge a different fee altogether.
Note. If only one instance of the course exists, the course fee acts as the class fee. However, if a difference
exists between a course fee and a class fee, the class fee overrides the course fee.
Class Fees
A class is a particular instance of a course. Courses are identified at the catalog level, and classes are
identified through the class schedule. If the course fee is different from the fee charged for a class offered in
that course, the class fee overrides the course fee.
Modal Course Fees and Class Fees
The Course Fees Modal component enables student records personnel to define course fees when accessing
the Course Catalog component within PeopleSoft Student Records.
The Class Fees Modal component enables student records personnel to define class fees when accessing the
Schedule New Course or Schedule of Classes components within PeopleSoft Student Records.

Setting Up Fees and Tuition Groups Chapter 6
206 Copyright © 1988, 2010, Oracle and/or its affiliates. All Rights Reserved.
See Also
PeopleSoft Enterprise Student Records 9.0 PeopleBook, "Setting Up the Course Catalog," Creating Course
Offerings
PeopleSoft Enterprise Student Records 9.0 PeopleBook, "Managing the Schedule of Classes"
Pages Used to Set Up Course Fees and Class Fees
Page Name Definition Name Navigation Usage
Rate Tables for Course Fees CRSE_RATE_TABLE Set Up SACR, Product
Related, Student Financials,
Course and Class Fees, Rate
Tables for Course Fees
Set up rate tables for course
fees.
Course Fees CRSE_FEE_TABLE Set Up SACR, Product
Related, Student Financials,
Course and Class Fees,
Course Fees
Define course fees.
Course Sub Fees CRSE_SUBFEE_TABLE Set Up SACR, Product
Related, Student Financials,
Course and Class Fees,
Course Sub Fees
Define course sub fees.
Course Fees Modal CRSE_FEE_TBL_MDL Set Up SACR, Product
Related, Student Financials,
Course and Class Fees,
Course Fees Modal
Define modal course fees.
Course Sub Fees Modal CRSE_SUBFEE_TBL_MD Set Up SACR, Product
Related, Student Financials,
Course and Class Fees,
Course Sub Fees Modal
Define modal course sub
fees.
Class Fees CLASS_FEE_TABLE Set Up SACR, Product
Related, Student Financials,
Course and Class Fees,
Class Fees
Define class fees.
Class Sub Fees CLASS_SUBFEE_TABLE Set Up SACR, Product
Related, Student Financials,
Course and Class Fees,
Class Sub Fees
Define class sub fees.
Class Fees Modal CLASS_FEE_TBL_MDL Set Up SACR, Product
Related, Student Financials,
Course and Class Fees,
Class Fees Modal
Define modal class fees.
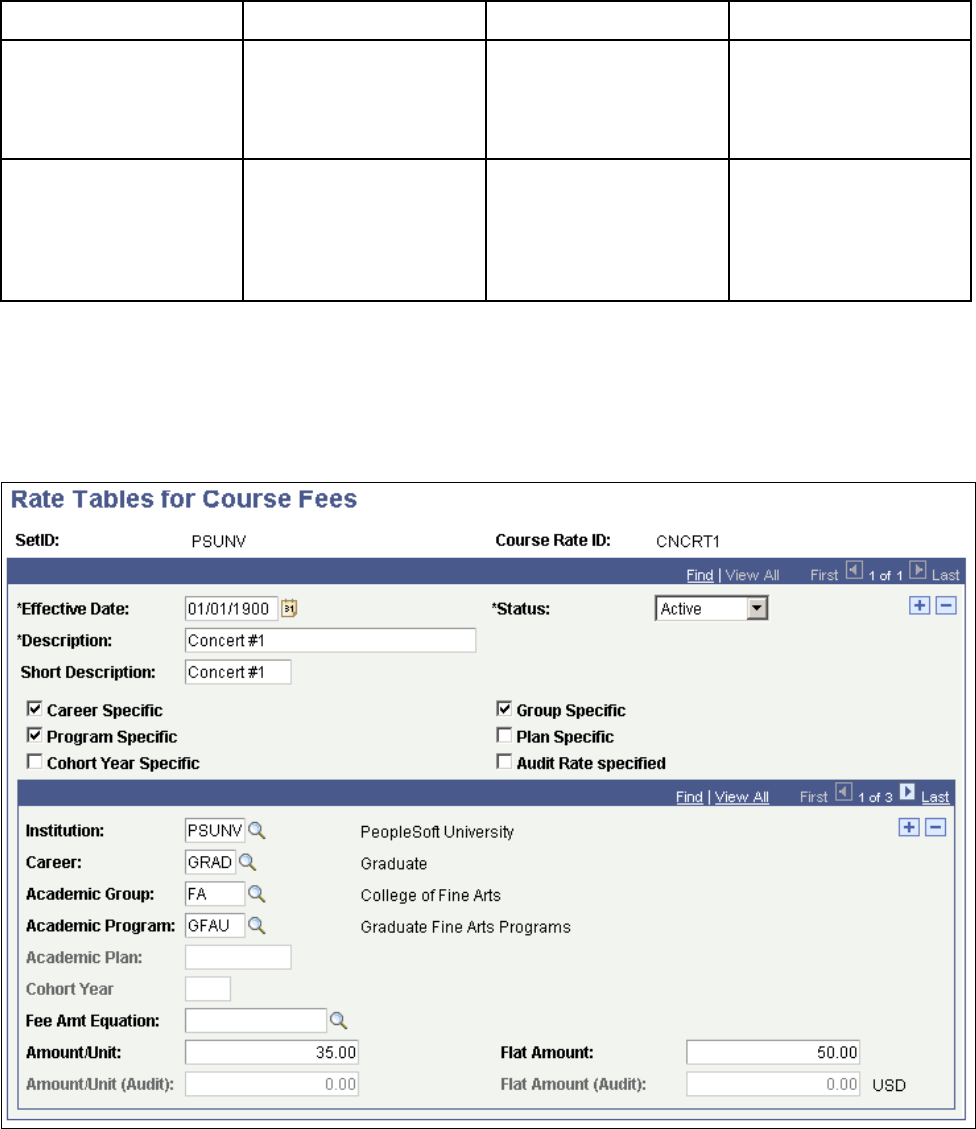
Chapter 6 Setting Up Fees and Tuition Groups
Copyright © 1988, 2010, Oracle and/or its affiliates. All Rights Reserved. 207
Page Name Definition Name Navigation Usage
Class Sub Fees Modal CLASS_SUBFEE_MDL Set Up SACR, Product
Related, Student Financials,
Course and Class Fees,
Class Sub Fees Modal
Define modal class sub fees.
Class / Course Fees
Rollover
RUNCTL_FEE_RLVR Set Up SACR, Product
Related, Student Financials,
Course and Class Fees,
Class / Course Fees
Rollover
Roll over course and class
fees to future terms.
Setting Up Rate Tables for Course Fees
Access the Rate Tables for Course Fees page (Set Up SACR, Product Related, Student Financials, Course and
Class Fees, Rate Tables for Course Fees).
Rate Tables for Course Fees page
Career Specific Select to match classes by academic career.
Group Specific Select this option to match classes by academic group.
Setting Up Fees and Tuition Groups Chapter 6
208 Copyright © 1988, 2010, Oracle and/or its affiliates. All Rights Reserved.
Program Specific Select to match classes by academic program.
Plan Specific Select to match classes by academic plan.
(AUS) Cohort Year
Specific Select to match classes by cohort year.
Audit Rate Specified Select to define a unique rate for audited courses. If this check box is cleared,
students auditing the course are charged the regular rate.
Institution Enter the academic institution.
Student Characteristics
The following fields describe characteristics of the student, not the course. By inserting additional rows with
different combinations of characteristics, you can charge a different rate for the same course. These fields are
all optional. To have the fee apply to all students within an institution, leave all of the student characteristics
fields blank.
Institution Select the institution that uses the term sub fee.
Career If you selected the Career Specific check box, select an academic career.
Academic Group If you selected the Group Specific check box, select an academic group.
Academic Program If you selected the Program Specific check box, select an academic program.
This is the academic program on the student's enrollment and not the student's
primary academic program.
Cohort Year If the Cohort Year Specific check box was selected, then you can specify the
cohort year here.
Academic Plan Enter the academic plan to which you want the fee to apply.
Fee Calculation Parameters
Using the following fields, you can control how much the system charges for the course fee. Fees can be
charged based on academic units, a flat fee, or a combination of the two. Amounts that you enter are not
independent of each other. Rather, they are summed.
Fee Amt Equation Select an optional equation. Equations can be used for more complex selections
than is possible using the student characteristics.
Amount/Unit Enter the amount to charge per unit.
Flat Amount Enter a flat amount to charge regardless of units taken.
Amount/Unit (Audit) Enter the amount to charge per unit for audited classes.
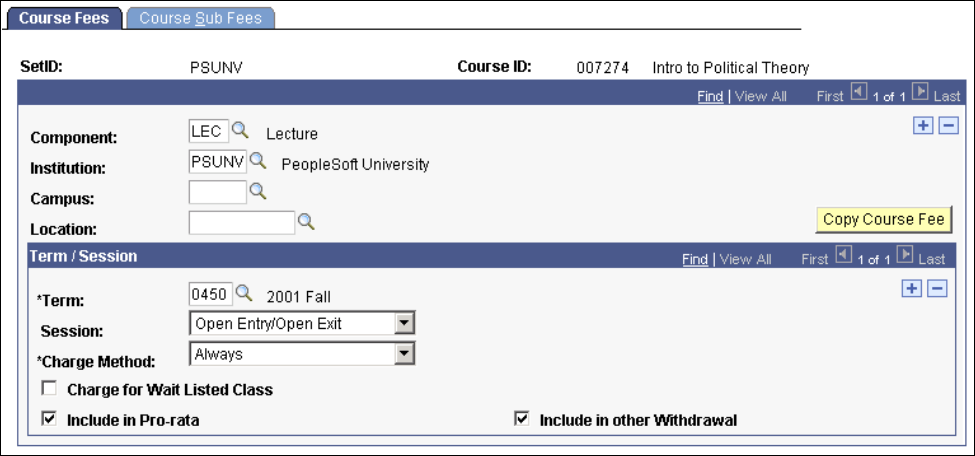
Chapter 6 Setting Up Fees and Tuition Groups
Copyright © 1988, 2010, Oracle and/or its affiliates. All Rights Reserved. 209
Flat Amount (Audit) Enter a flat amount to charge for audited classes regardless of units taken.
See Also
PeopleSoft Enterprise Campus Solutions 9.0 Application Fundamentals PeopleBook, "Working with
Equation Engine"
Defining Course Fees
Access the Course Fees page (Set Up SACR, Product Related, Student Financials, Course and Class Fees,
Course Fees, Course Sub Fees).
Course Fees page
Component If more than one component of the course exists, select the component for which
you want to define the fee. Otherwise, leave this field blank.
Institution Enter the institution to which the course belongs. If the fee is assessed regardless
of the institution, leave this field blank.
Campus Enter the campus to which the course belongs. If the fee is assessed regardless of
the campus, leave this field blank.
Location Enter the location to which the course belongs. If the fee is assessed regardless of
the location, you can leave this field blank.
Copy Course Fee Select this option to copy a definition from one term to another.
Setting Up Fees and Tuition Groups Chapter 6
210 Copyright © 1988, 2010, Oracle and/or its affiliates. All Rights Reserved.
Term/Session
Term Select the term in which the fee is charged.
Session If applicable, select the session in which the fee is charged.
Charge Method Define the charge method. Values are:
Always: If you select this value, the fee is charged in addition to term fees. For
example, the lab fee would be charged in addition to the course's term fee
(tuition).
Not included in term tuition: If you select this value, the course fee is charged in
addition to term fees. However, class units will be excluded from the term fee
calculation.
Charge for Wait Listed
Class Select this option if the course fee is to be charged to a wait listed student.
Include in Pro-rata Select this option if this course fee is included in pro rata refund calculations.
Include in Other
Withdrawal Select this option to include this fee in other withdrawal calculations. This
selection is optional.
Defining Course Sub Fees
Access the Course Sub Fees page (Set Up SACR, Product Related, Student Financials, Course and Class
Fees, Course Sub Fees).
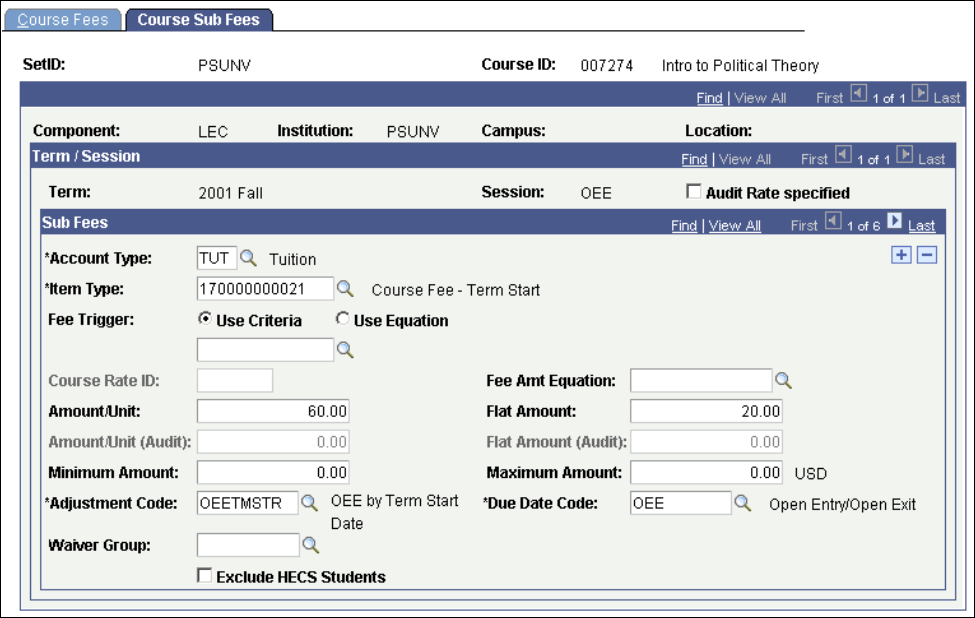
Chapter 6 Setting Up Fees and Tuition Groups
Copyright © 1988, 2010, Oracle and/or its affiliates. All Rights Reserved. 211
Course Sub Fees page
Audit Rate Specified Select to define a unique rate for audited courses. If you clear this check box,
students that audit the course are charged the regular rate.
Account Type Select the account type to which you want to post the course fee.
Item Type Select the item type to which you want the course fee posted.
Fee Trigger To apply the course fee to certain students only, select either the Use Criteria
option or the Use Equation option, and then select the predefined criteria or
equation from the lookup. If you leave this field blank, all students who take the
course are charged the fee.
See PeopleSoft Enterprise Campus Solutions 9.0 Application Fundamentals
PeopleBook, "Working with Equation Engine."
Course Rate ID Enter an optional course rate ID to control the application of the course fee using
student characteristics. If you enter a course rate ID, the Equation,Amount/Unit,
and Flat Amount fields become unavailable.
Fee Calculation Parameters
Using the following fields, you can control how much the system charges for the course fee. Fees can be
charged based on academic units, a flat fee, or a combination of the two. Amounts that you enter are not
independent of each other. Rather, they are summed.

Setting Up Fees and Tuition Groups Chapter 6
212 Copyright © 1988, 2010, Oracle and/or its affiliates. All Rights Reserved.
Fee Amt Equation(fee
amount equation) Select an optional equation. Use equations for more complex selections than are
possible using the student characteristics.
Amount/Unit Enter the amount to charge per unit.
Flat Amount Enter a flat amount to charge regardless of units taken.
Amount/Unit (Audit) Enter the amount to charge per unit for audited classes.
Flat Amount (Audit) Enter a flat amount to charge for audited classes regardless of units taken.
Minimum Amount Enter an optional minimum amount for the course sub fee.
Maximum Amount Enter an optional maximum amount for the course sub fee.
Adjustment Code Select the adjustment code (calendar) to associate with this course sub fee.
Due Date Code Select the due date code (calendar) to associate with this course sub fee.
Waiver Group Select an optional waiver group that can offset course sub fee charges.
Exclude HECS Students
exclude Higher Education
Contribution Scheme
students)(AUS)
Select this option so that students are not charged twice for the same class if they
are under multiple loan programs.
See Also
Chapter 5, "Setting Up Tuition Controls, Criteria, Equations, and Waivers," Establishing Criteria for Tuition
Groups and Fee Triggers, page 158
PeopleSoft Enterprise Campus Solutions 9.0 Application Fundamentals PeopleBook, "Working with
Equation Engine"
Chapter 5, "Setting Up Tuition Controls, Criteria, Equations, and Waivers," Setting Up Adjustment
Calendars, page 142
Chapter 5, "Setting Up Tuition Controls, Criteria, Equations, and Waivers," Creating Billing and Due Date
Calendars, page 139
Chapter 5, "Setting Up Tuition Controls, Criteria, Equations, and Waivers," Defining Waivers and Waiver
Groups, page 171
Defining Modal Course Fees
Access the Course Fee Modal page (Set Up SACR, Product Related, Student Financials, Course and Class
Fees, Course Fees Modal).
This page is identical to the Course Fees page.
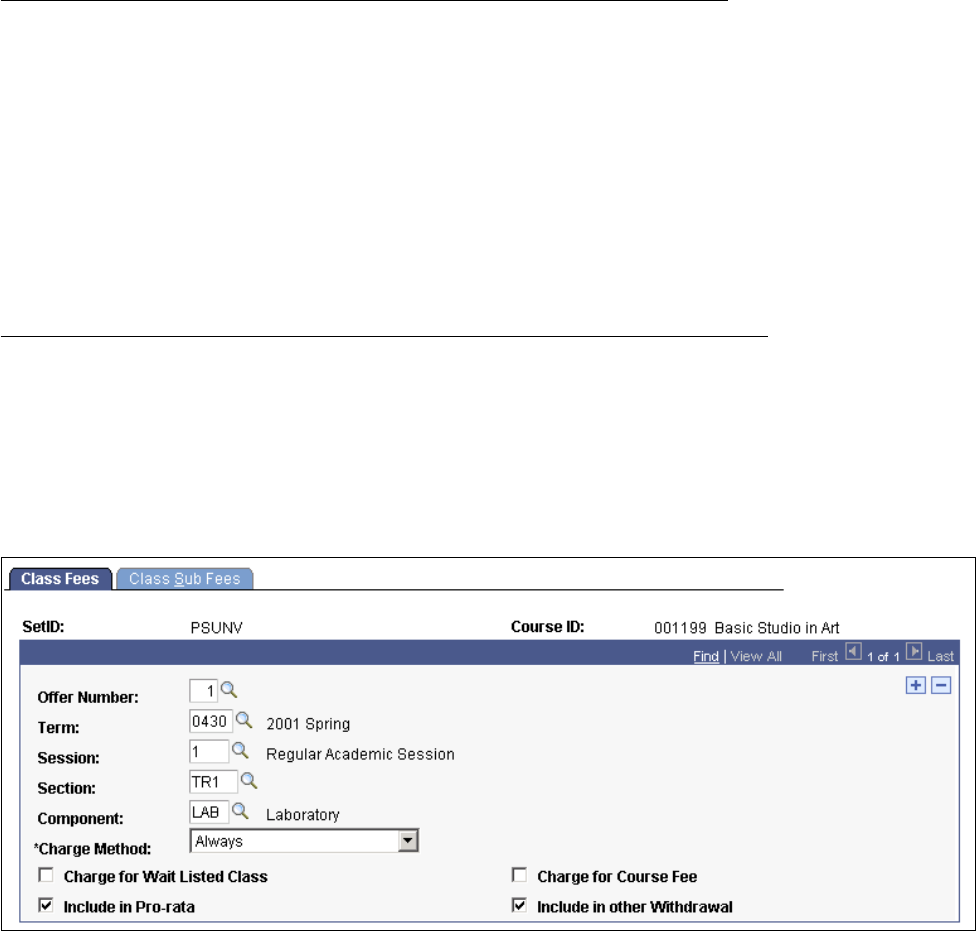
Chapter 6 Setting Up Fees and Tuition Groups
Copyright © 1988, 2010, Oracle and/or its affiliates. All Rights Reserved. 213
See Also
Chapter 6, "Setting Up Fees and Tuition Groups," Defining Course Fees, page 209
Defining Modal Course Sub Fees
Access the Course Sub Fees Modal page (Set Up SACR, Product Related, Student Financials, Course and
Class Fees, Course Sub Fees Modal).
This page is identical to the Course Sub Fees page.
See Also
Chapter 6, "Setting Up Fees and Tuition Groups," Defining Course Sub Fees, page 210
Defining Class Fees
Access the Class Fees page (Set Up SACR, Product Related, Student Financials, Course and Class Fees,
Class Fees).
Class Fees page
Offer Number Enter the offer number of the class.
Term Enter the term for which the class is offered.
Session If the class is offered in more than one session in the term, enter the session
number.
Section If the class is offered in more than one section, enter a section number.
Setting Up Fees and Tuition Groups Chapter 6
214 Copyright © 1988, 2010, Oracle and/or its affiliates. All Rights Reserved.
Component If more than one component is offered for the class, and the class charge should
apply to a specific component, select the component.
Charge Method Define the charge method. Values are:
Always: The fee is charged in addition to term fees. For example, the lab fee
would be charged in addition to the class term fee (tuition).
Not included in term tuition: The class is excluded from the term fee calculation
and the class fee becomes the total charge for the class.
Charge for Wait Listed
Class Select this option if the class fee is to be charged to a wait listed student.
Charge for Course Fee Select this option if you want to charge course fees in addition to class fees. If
you do not select this check box, class fee definitions override course fee
definitions for the same class.
Include in Pro-rata Select this option if this class fee is included in pro rata refund calculations.
Include in other
Withdrawal Select this option to include this fee in other withdrawal calculations. This
selection is optional.
Defining Class Sub Fees
Access the Class Sub Fees page (Set Up SACR, Product Related, Student Financials, Course and Class Fees,
Class Sub Fees).
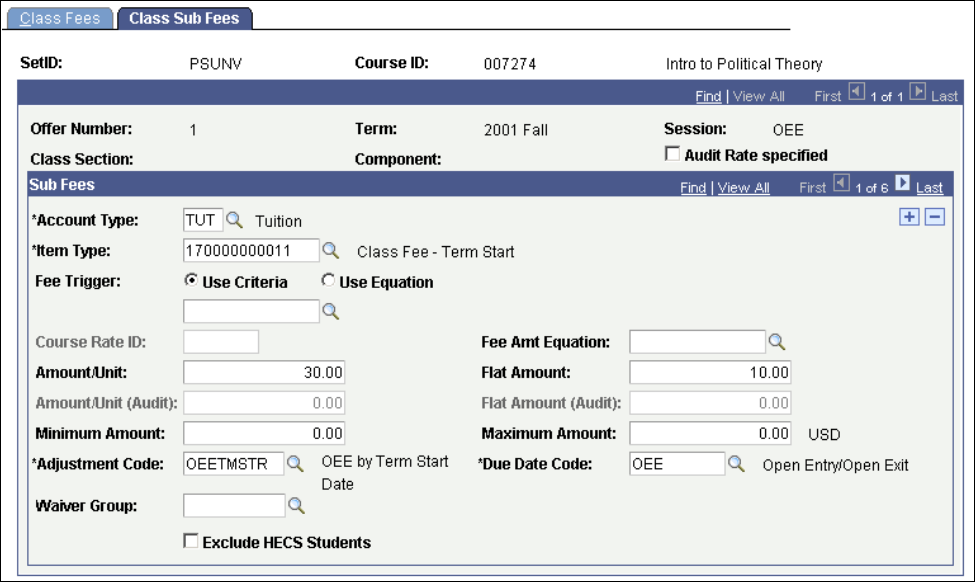
Chapter 6 Setting Up Fees and Tuition Groups
Copyright © 1988, 2010, Oracle and/or its affiliates. All Rights Reserved. 215
Class Sub Fees page
Audit Rate Specified Select to define a unique rate for audited classes. If the check box is cleared,
students auditing the class are charged the regular rate.
Account Type Select the account type to which you want the class fee posted.
Item Type Select the item type to which you want the class fee posted.
Fee Trigger To apply the class fee to specific students, select either the Use Criteria option or
the Use Equation option, and then select the predefined criteria or equation from
the lookup. If you leave the field blank, the system charges the fee to all students
who take the class.
See PeopleSoft Enterprise Campus Solutions 9.0 Application Fundamentals
PeopleBook, "Working with Equation Engine."
Course Rate ID Enter an optional course rate ID to control the application of the class fee using
student characteristics. If you enter a course rate ID, the Equation,Amount/Unit,
and Flat Amount fields become unavailable.
Fee Calculation Parameters
Using the following fields, you can control exactly how much the system charges for the class fee. Fees can
be charged based on academic units, a flat fee, or a combination of the two. Amounts that you enter are not
independent of each other. Rather, they are summed.

Setting Up Fees and Tuition Groups Chapter 6
216 Copyright © 1988, 2010, Oracle and/or its affiliates. All Rights Reserved.
Fee Amt Equation Select an optional equation. You can use equations for more complex selections
than are possible using the student characteristics.
Amount/Unit Enter the amount that you want to charge per unit.
Flat Amount Enter a flat amount that you want to charge, regardless of units taken.
Amount/Unit (Audit) Enter the amount that you want to charge per unit for audited classes.
Flat Amount (Audit) Enter a flat amount that you want to charge for audited classes regardless of units
taken.
Minimum Amount Enter an optional minimum amount for the class sub fee.
Maximum Amount Enter an optional maximum amount for the class sub fee.
Adjustment Code Select the adjustment code (calendar) to associate with this class sub fee.
Due Date Code Select the due date code (calendar) to associate with this class sub fee.
Waiver Group Select an optional waiver group that can offset class sub fee charges.
Exclude HECS Students
(exclude Higher
Education Contribution
Scheme students)(AUS)
Select this option so that students are not charged twice for the same class if they
are under multiple loan programs.
See Also
Chapter 5, "Setting Up Tuition Controls, Criteria, Equations, and Waivers," Establishing Criteria for Tuition
Groups and Fee Triggers, page 158
PeopleSoft Enterprise Campus Solutions 9.0 Application Fundamentals PeopleBook, "Working with
Equation Engine"
Chapter 5, "Setting Up Tuition Controls, Criteria, Equations, and Waivers," Setting Up Adjustment
Calendars, page 142
Chapter 5, "Setting Up Tuition Controls, Criteria, Equations, and Waivers," Creating Billing and Due Date
Calendars, page 139
Chapter 5, "Setting Up Tuition Controls, Criteria, Equations, and Waivers," Defining Waivers and Waiver
Groups, page 171
Defining Modal Class Fees
Access the Class Fees Modal page (Set Up SACR, Product Related, Student Financials, Course and Class
Fees, Class Fees Modal).
This page is identical to the Class Fees page.
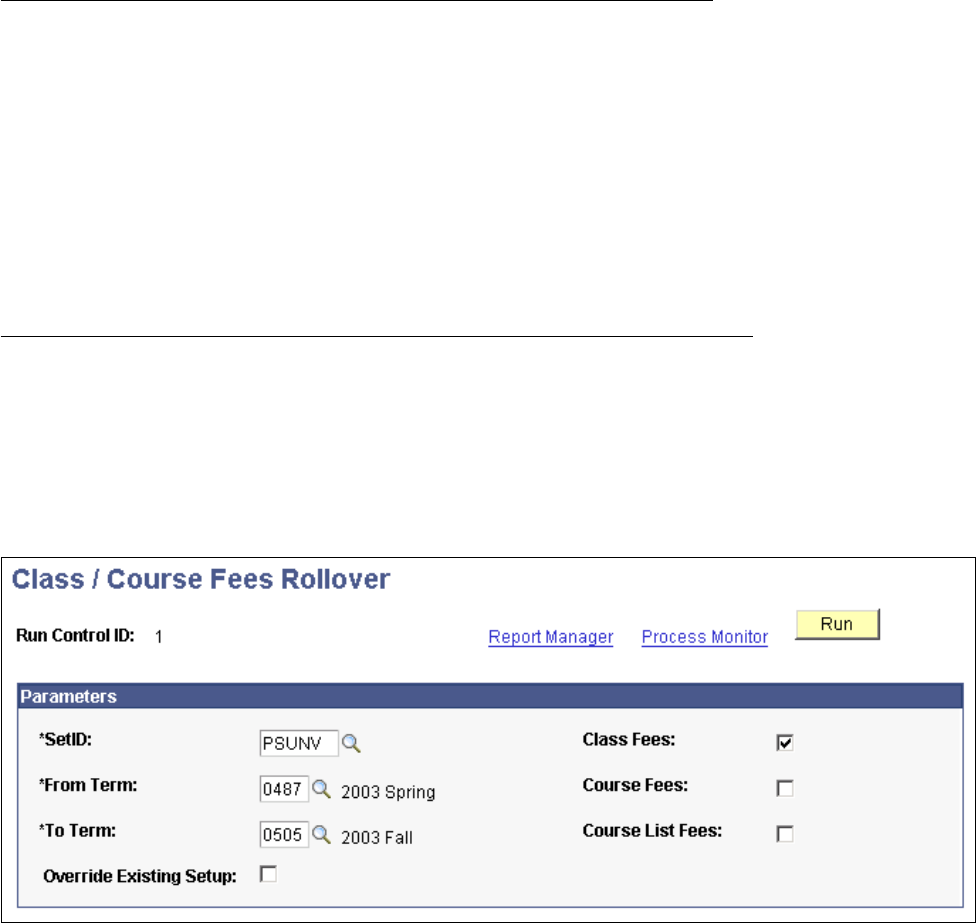
Chapter 6 Setting Up Fees and Tuition Groups
Copyright © 1988, 2010, Oracle and/or its affiliates. All Rights Reserved. 217
See Also
Chapter 6, "Setting Up Fees and Tuition Groups," Defining Class Fees, page 213
Defining Modal Class Sub Fees
Access the Class Sub Fees Modal page (Set Up SACR, Product Related, Student Financials, Course and Class
Fees, Class Sub Fees Modal).
This page is identical to the Class Sub Fees page.
See Also
Chapter 6, "Setting Up Fees and Tuition Groups," Defining Class Sub Fees, page 214
Rolling Over Course and Class Fees to Future Terms
Access the Class / Course Fees Rollover page (Set Up SACR, Product Related, Student Financials, Course
and Class Fees, Class / Course Fees Rollover).
Class / Course Fees Rollover page
From Termand To Term Enter the term from which you are copying fee information and the term to which
you are copying it.
Override Existing Setup If the term that you specify in the To Term field has existing fee information, the
process does not overwrite it unless you select this check box. If you select this
check box, the process replaces the existing fee information with the fee
information from the term specified in the From Term field.
Class Fees,Course Fees,
and Course List Fees Select the types of fee information that you want to roll over.

Setting Up Fees and Tuition Groups Chapter 6
218 Copyright © 1988, 2010, Oracle and/or its affiliates. All Rights Reserved.
Note. Reversing this process is not possible after you run it.
Defining Optional Fees
To set up optional fees, use the Optional Fees component (OPT_FEE_TABLE).
Your institution may have several fees that apply to many, but not all, students. For example, many students
might need to purchase a parking sticker. By setting up a parking sticker fee as an optional fee, students can
choose to purchase a parking sticker at the time of registration.
Institutions can use Self Service Miscellaneous Purchases to allow students to select in self service.
See Setting Up Self Service Student Financials, Setting Up Miscellaneous Fees for setup information.
See PeopleSoft Enterprise Campus Self Service 9.0 PeopleBook, "Setting Up Student Financials Self
Service," Setting Up Miscellaneous Fees.
This section discusses how to:
•Define optional fee codes.
•Define optional fee values.
•Link optional fees to terms.
•Define optional fee amounts.
Pages Used to Define Optional Fees
Page Name Definition Name Navigation Usage
Optional Fees OPT_FEE_TABLE Set Up SACR, Product
Related, Student Financials,
Optional Fees, Optional
Fees
Define optional fee codes.
Values OPT_FEE_VAL Set Up SACR, Product
Related, Student Financials,
Optional Fees, Optional
Fees, Values
Define optional fee values.
Optional Fees - Term OPT_FEE_TERM Set Up SACR, Product
Related, Student Financials,
Optional Fees, Optional
Fees - Terms
Link optional fees to terms.
Optional Fees per Term OPT_FEE_TERM_VAL Set Up SACR, Product
Related, Student Financials,
Optional Fees, Optional
Fees per Term
Define optional fee
amounts.
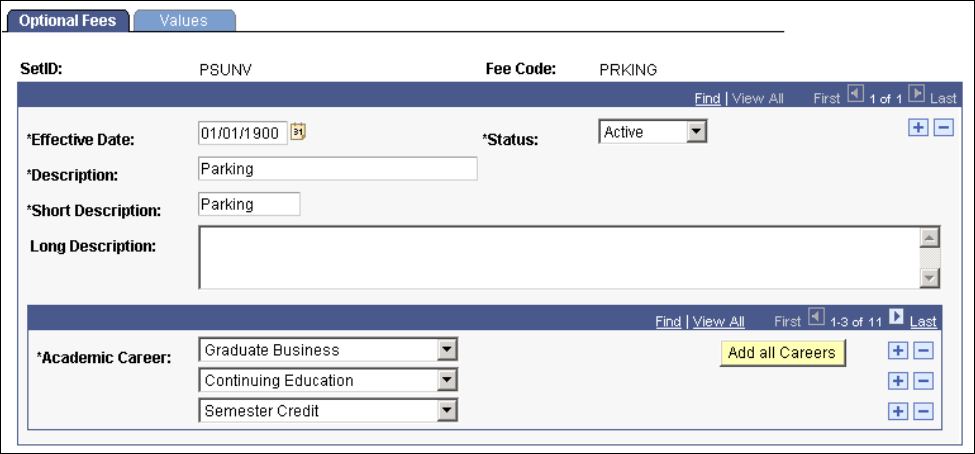
Chapter 6 Setting Up Fees and Tuition Groups
Copyright © 1988, 2010, Oracle and/or its affiliates. All Rights Reserved. 219
Defining Optional Fee Codes
Access the Optional Fees page (Set Up SACR, Product Related, Student Financials, Optional Fees, Optional
Fees).
Optional Fees page
Add all Careers Click to apply the optional fee to all active academic careers in the institution. If
you add all careers, the Academic Career field becomes unavailable.
Academic Career Enter the specific careers to which the system applies the optional fee.
Defining Optional Fee Values
Access the Values page (Set Up SACR, Product Related, Student Financials, Optional Fees, Optional Fees,
Values).
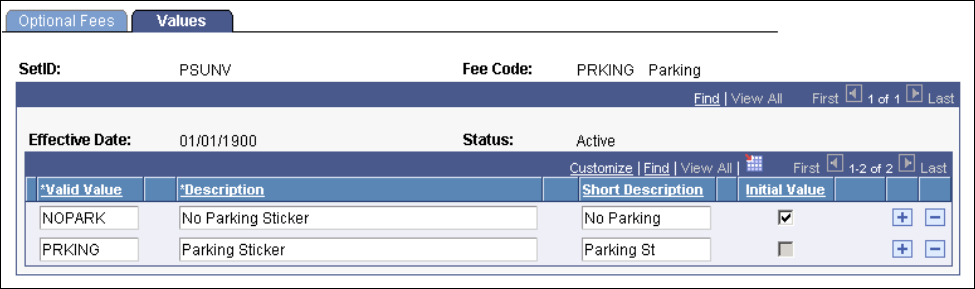
Setting Up Fees and Tuition Groups Chapter 6
220 Copyright © 1988, 2010, Oracle and/or its affiliates. All Rights Reserved.
Values page
Valid Value Define the valid value for the optional fee. This is the value that is attached to an
optional fee per term definition.
Description Provide a description for the optional fee.
Short Desc(short
description) Provide a short description for the optional fee.
Initial Value Select to make a valid value the default value.
Select the Init Value (initial value) check box as the default fee to be charged. In
this example, the default value NOPARK means that the system does not charge
an optional parking sticker fee to a student unless PRKING is manually selected
during tuition calculation.
Linking Optional Fees to Terms
Access the Optional Fees - Term page (Set Up SACR, Product Related, Student Financials, Optional Fees,
Optional Fees - Terms).
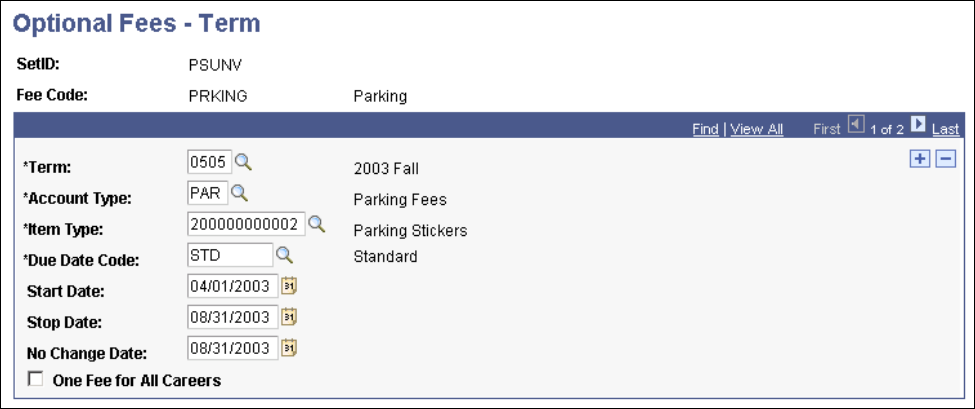
Chapter 6 Setting Up Fees and Tuition Groups
Copyright © 1988, 2010, Oracle and/or its affiliates. All Rights Reserved. 221
Optional Fees - Term page
Term Select the term in which the fee is charged.
Account Type Enter the account type for the fee.
Item Type Select the item type to which the system posts the optional term fee.
Due Date Code Select the due date code (billing and due calendar).
Start Date Enter an optional start date to specify the first day that the optional fee can be
selected.
Stop Date Enter an optional stop date to specify the last day that the optional fee can be
selected. The Optional Fees for a Student page functionality cannot be used to
calculate or link students to an optional fee after this date. However, if changes
are necessary, you can use the Optional Fees Override page.
No Change Date Enter an optional no change date after which enrollment changes do not affect
the amount of optional fees charged.
One Fee for All Careers Select to charge students one fee regardless of the number of billing careers to
which they are associated. If you clear this check box, the system charges
students who are associated with more than one billing career once for each
career.
Defining Optional Fee Amounts
Access the Optional Fees per Term page (Set Up SACR, Product Related, Student Financials, Optional Fees,
Optional Fees per Term).
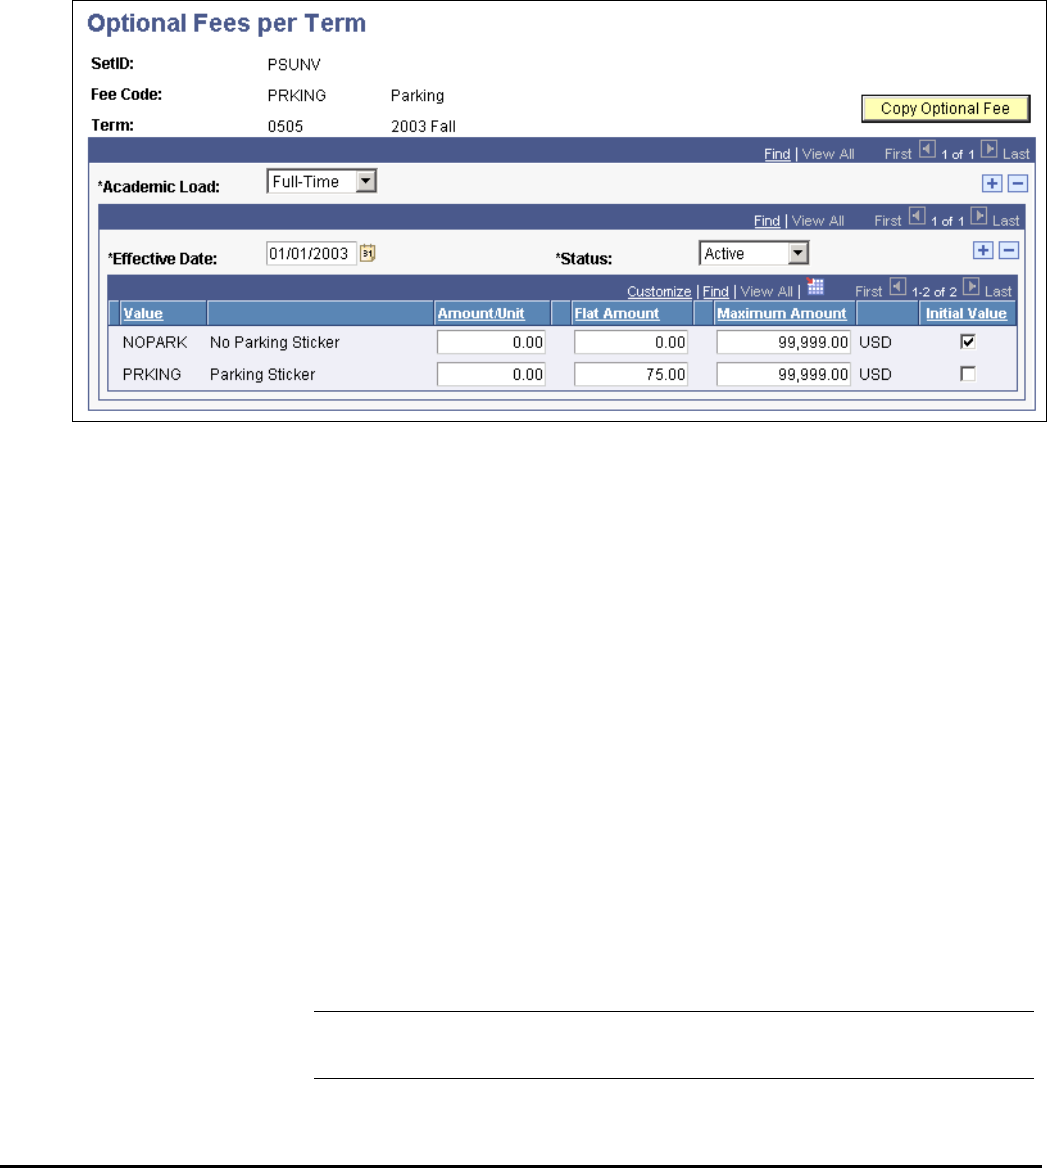
Setting Up Fees and Tuition Groups Chapter 6
222 Copyright © 1988, 2010, Oracle and/or its affiliates. All Rights Reserved.
Optional Fees per Term page
Academic Load Select an academic load as a criterion for the optional fee.
Optional Fee Parameters
Value Displays the fee code values and descriptions.
Amount/Unit Enter the amount to charge per enrollment unit.
Flat Amount Enter a flat amount to charge regardless of units taken.
Maximum Amount Enter a maximum amount to charge any one student for this optional fee.
Initial Value Select to define a valid value as the default value of the optional fee. The system
automatically selects the check box next to the default value that you specified in
the Values page, but you can override the selection for a particular term.
Copy Optional Fee Click to copy an optional fee definition from one term to another.
Note. If you have specified start, stop, and no change dates on the Optional Fee -
Term page, you might need to adjust the dates.
Setting Up Transaction Fees
To set up transaction fees, use the Transaction Fees component (TRANSACTION_FEES).
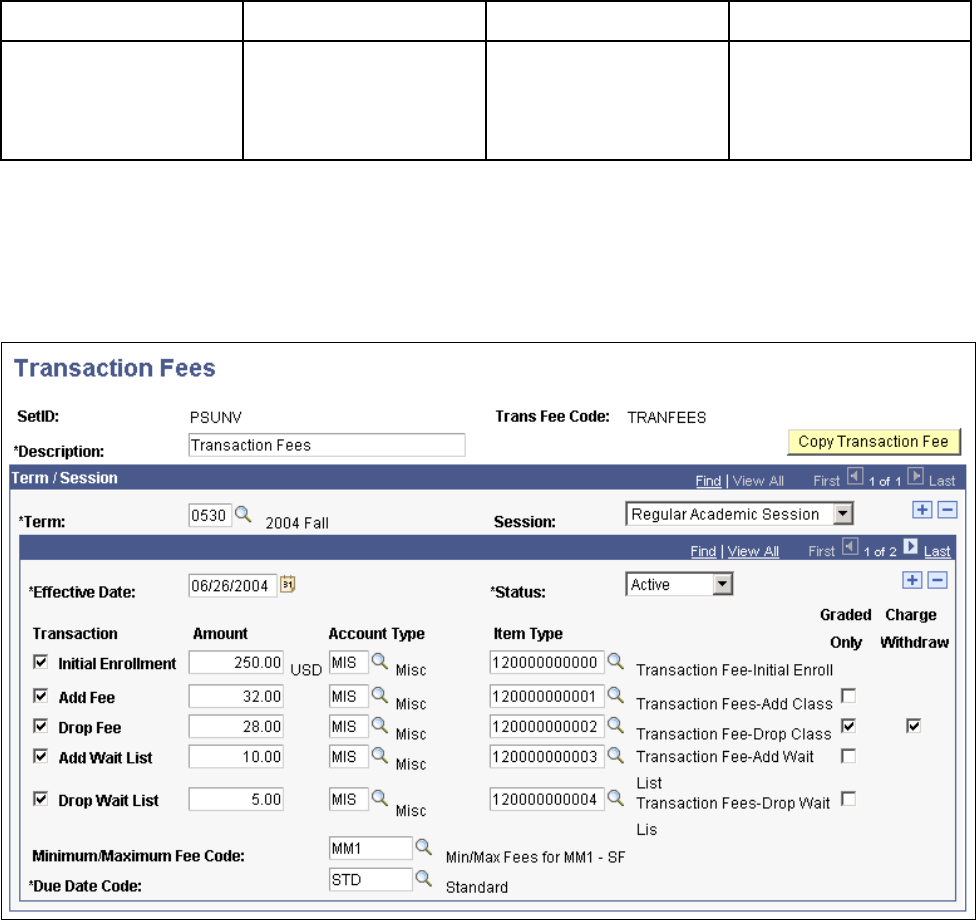
Chapter 6 Setting Up Fees and Tuition Groups
Copyright © 1988, 2010, Oracle and/or its affiliates. All Rights Reserved. 223
Transaction fees are additional fees that are charged to students in the event of an enrollment transaction such
as the addition or dropping of a class. You set up transaction fees by term with an effective date for each
term.
Page Used to Set Up Transaction Fees
Page Name Definition Name Navigation Usage
Transaction Fees TRANS_FEE_TABLE Set Up SACR, Product
Related, Student Financials,
Tuition and Fees,
Transaction Fees
Define transaction fees.
Defining Transaction Fees
Access the Transaction Fees page (Set Up SACR, Product Related, Student Financials, Tuition and Fees,
Transaction Fees).
Transaction Fees page
Copy Transaction Fee Click to copy a transaction fee definition from one term to another. You will
likely need to change the effective date when you use this button so that the
transaction fee definition becomes active on the appropriate day of the additional
term for which you are copying the fee.
Setting Up Fees and Tuition Groups Chapter 6
224 Copyright © 1988, 2010, Oracle and/or its affiliates. All Rights Reserved.
Term Enter the term for which you want the transaction fee to apply.
Session To apply the transaction fee to more than one session within the term, specify the
session.
Transaction Fee Definitions
Transaction Select the check box by the transaction fee that you want to define (Initial
Enrollment,Add Fee,Drop Fee, Add Wait List, or Drop Wait List).
Amount Enter the amount of the transaction fee.
Account Type Select the account type to which you want the transaction fee to post.
Item Type Select the item type that you have defined for the transaction fee.
Graded Only Select to apply the transaction fee to graded classes only. If this check box is
cleared, the transaction fee applies to audited and graded classes. This option is
not available for initial enrollment transaction fees.
Charge Withdraw Select to charge the transaction fee when a student withdraws from school. This
option is available with drop fee transaction charges only. If the check box is
cleared, drop fee transaction charges are not applied when a student withdraws.
Minimum/Maximum
Fee Code Select an optional minimum/maximum fee code to apply to these transaction
fees.
Due Date Code Select the due date code (billing and due calendar) that governs the transaction
fee.
Setting Up Course List Fees
To set up course list fees, use the Course List Fees component (CLST_FEE_PANEL).
Establish fees for all courses within a given course list.
Page Used to Set Up Course List Fees
Page Name Definition Name Navigation Usage
Course List Fees CLST_FEE_TABLE Set Up SACR, Product
Related, Student Financials,
Course and Class Fees,
Course List Fees
Define course list fees.

Chapter 6 Setting Up Fees and Tuition Groups
Copyright © 1988, 2010, Oracle and/or its affiliates. All Rights Reserved. 225
Defining Course List Fees
Access the Course List Fees page (Set Up SACR, Product Related, Student Financials, Course and Class
Fees, Course List Fees).
Course List Fees page
Copy Course List Fee Click to copy a course list fee definition from one term to another.
Term Enter the term in which the fee is charged.
Session Select the session in which the fee is charged.
Charge Method Select the charge method. Values are:
Always: The fee is charged in addition to term fees.
Not included in term tuition: The course is excluded from the term fee
calculation and the course fee becomes the total cost of the class.
Charge for Wait Listed
Class Select to charge the course fee to a wait listed student.
Audit Rate Specified Select to define a unique rate for audited courses. If you clear this check box, the
system charges the regular rate to students auditing the course.
Setting Up Fees and Tuition Groups Chapter 6
226 Copyright © 1988, 2010, Oracle and/or its affiliates. All Rights Reserved.
Include in Pro-rata Select to include the course fee in pro rata refund calculations.
Include in Other
Withdrawal Select to include this fee in other withdrawal calculations. This selection is
optional.
Course List Sub Fees
Account Type Enter the account type to which you want the course list fee posted.
Item Type Enter the item type to which you want the course list fee posted.
Fee Trigger To apply the course list fee to specific students, select either the Use Criteria
option or the Use Equation option, and then select the predefined criteria or
equation from the lookup. If you leave this field blank, the system charges the fee
to all students who take the courses.
See PeopleSoft Enterprise Campus Solutions 9.0 Application Fundamentals
PeopleBook, "Working with Equation Engine."
Course Rate ID Enter an optional course rate ID to control the application of the course list fee
using student characteristics. This field is available only if the Equation field is
blank and the Amount/Unit and Flat Amount fields have a value of 0.00. You
define course rate IDs using the Rate Tables for Course Fees page.
Fee Calculation Parameters
Using the following fields, you can control exactly how much the system charges for the course fee. Fees can
be charged based on academic units, a flat fee, or a combination of the two. Amounts that you enter are not
independent of each other. Rather, they are summed.
Fee Amt Equation (fee
amount equation) Enter an optional equation.
Amount/Unit Enter the amount charge per unit.
Flat Amount Enter a flat amount to charge regardless of units taken.
Amount/Unit (Audit) Enter the amount to charge per unit for audited classes.
Flat Amount (Audit) Enter a flat amount to charge for audited classes regardless of units taken.
Minimum Amount Enter an optional minimum amount for the course list sub fee.
Maximum Amount Enter an optional maximum amount for the course list sub fee.
Adjustment Code Enter the adjustment code (calendar) to associate with this course list sub fee.
Due Date Code Enter the due date code (calendar) to associate with this course list sub fee.

Chapter 6 Setting Up Fees and Tuition Groups
Copyright © 1988, 2010, Oracle and/or its affiliates. All Rights Reserved. 227
Waiver Group Enter an optional waiver group that can offset course list sub fee charges.
Warning! If the wildcard feature was used when the course list was set up, the
waiver group will apply to anyone who meets the waiver criteria and is enrolled
in any of the subjects covered by the course list.
(AUS) Exclude HECS
Students (exclude Higher
Education Contribution
Scheme students)
Select so that students are not charged twice for the same class if they are under
multiple loan programs.
See Also
Chapter 5, "Setting Up Tuition Controls, Criteria, Equations, and Waivers," Establishing Criteria for Tuition
Groups and Fee Triggers, page 158
Chapter 5, "Setting Up Tuition Controls, Criteria, Equations, and Waivers," Setting Up Adjustment
Calendars, page 142
Chapter 6, "Setting Up Fees and Tuition Groups," Setting Up Course Fees and Class Fees, page 204
PeopleSoft Enterprise Campus Solutions 9.0 Application Fundamentals PeopleBook, "Working with
Equation Engine"
Chapter 5, "Setting Up Tuition Controls, Criteria, Equations, and Waivers," Defining Waivers and Waiver
Groups, page 171
Chapter 5, "Setting Up Tuition Controls, Criteria, Equations, and Waivers," Creating Billing and Due Date
Calendars, page 139
Setting Up Tuition Groups
To set up tuition groups, use the Tuition Groups component (SEL_GROUP_PANEL).
This section provides an overview of tuition groups and discusses how to:
•Define tuition groups.
•Link adjustment codes to tuition groups.
•Link criteria to tuition groups.
•Link term fee codes to tuition groups.
•Link a waiver code to a single term fee within a tuition group.
•Link course lists to tuition groups.
•Link waiver codes to tuition groups.
•Review established tuition group priorities.

Setting Up Fees and Tuition Groups Chapter 6
228 Copyright © 1988, 2010, Oracle and/or its affiliates. All Rights Reserved.
Understanding Tuition Groups
Tuition groups enable you to combine large groups of students who are charged, generally, the same set of
fees under the same rules. Within the tuition group definition, you use adjustment codes, term fee, course list,
and waiver definitions to fine-tune charges and adjustments (refund rules) so that students receive the correct
charges for their unique situations. Because so much flexibility is in the components that compose the tuition
group, you can define relatively few tuition groups to control all tuition calculations. Students might be
assigned to a tuition group as they are activated for a term or be automatically assigned to the correct group
using criteria that you have defined when tuition is calculated. You can also override the system-assigned
tuition group on an individual student basis.
Pages Used to Set Up Tuition Groups
Page Name Definition Name Navigation Usage
Tuition Groups - Definition SEL_GROUP_TABLE Set Up SACR, Product
Related, Student Financials,
Tuition and Fees, Tuition
Groups, Definition
Define tuition groups.
Tuition Groups -
Adjustment Codes
SEL_GROUP_ADJ_CODE Set Up SACR, Product
Related, Student Financials,
Tuition and Fees, Tuition
Groups, Adjustment Codes
Link adjustment codes to
tuition groups.
Tuition Groups - Criteria GROUP_CRITR_TABLE Set Up SACR, Product
Related, Student Financials,
Tuition and Fees, Tuition
Groups, Criteria
Link criteria to tuition
groups.
Tuition Groups - Term Fees GROUP_FEE_TABLE Set Up SACR, Product
Related, Student Financials,
Tuition and Fees, Tuition
Groups, Term Fees
Link term fees to tuition
groups.
Term Fee Waivers GRP_FEE_WAIVER Click the Waivers link on
the Tuition Groups - Term
Fees page.
Link a waiver code to a
single term fee within a
tuition group.
Tuition Groups - Course
Lists
GROUP_CLST_TABLE Set Up SACR, Product
Related, Student Financials,
Tuition and Fees, Tuition
Groups, Course Lists
Link course lists to tuition
groups.
Tuition Groups - Waivers GRP_WAIVER_TABLE Set Up SACR, Product
Related, Student Financials,
Tuition and Fees, Tuition
Groups, Waivers
Link waiver codes to tuition
groups.
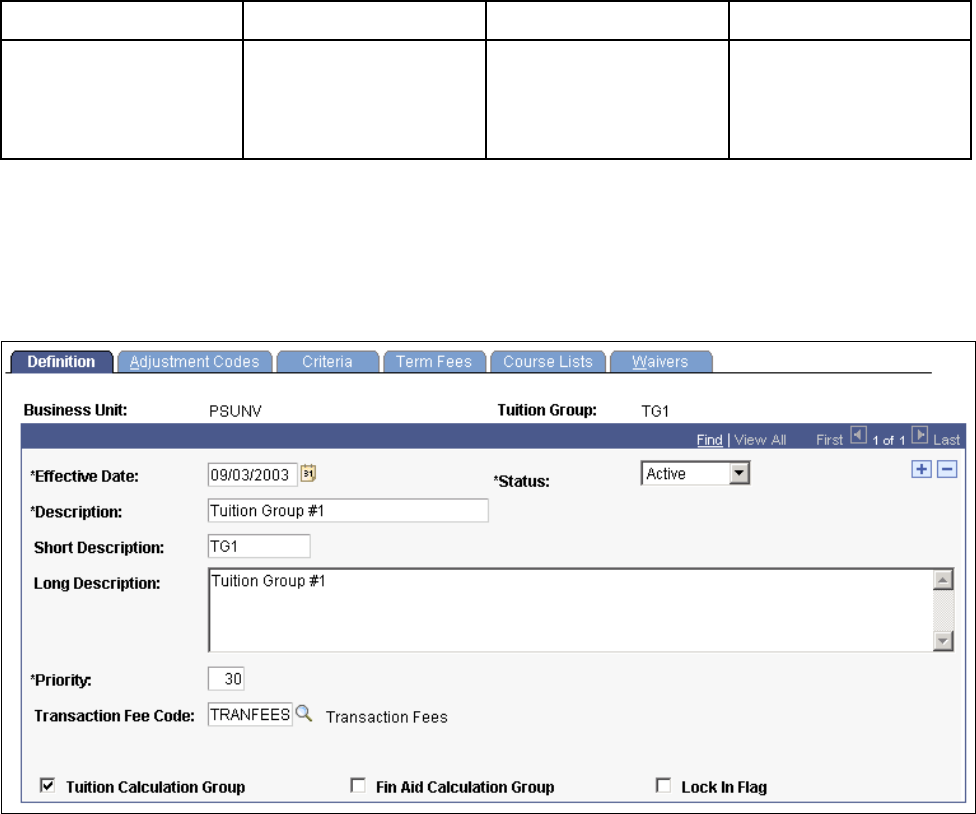
Chapter 6 Setting Up Fees and Tuition Groups
Copyright © 1988, 2010, Oracle and/or its affiliates. All Rights Reserved. 229
Page Name Definition Name Navigation Usage
Tuition Group Priority SEL_GROUP_PRIORITY Set Up SACR, Product
Related, Student Financials,
Tuition and Fees, Tuition
Group Priority
Review established tuition
group priorities.
Defining Tuition Groups
Access the Tuition Groups - Definition page (Set Up SACR, Product Related, Student Financials, Tuition and
Fees, Tuition Groups, Definition).
Tuition Groups - Definition page
Priority If a group of students cannot be categorized into one tuition group, you must
define the preferred tuition group with a higher priority. For example, if your
institution offers a combined JD/MBA program, students could be assigned to
one of three tuition groups (JD, MBA, or JD/MBA). By setting a higher priority
(lower number) for the JD/MBA group, you ensure that students are charged
appropriately.
Transaction Fee Code Select an optional transaction fee code.
Tuition Calculation
Group Clear this check box if you do not want to use this tuition group for actual tuition
calculation.
Fin Aid Calculation
Group (financial aid
calculation group)
Select to enable this definition to be used for calculating projected fees for
financial aid budgets.
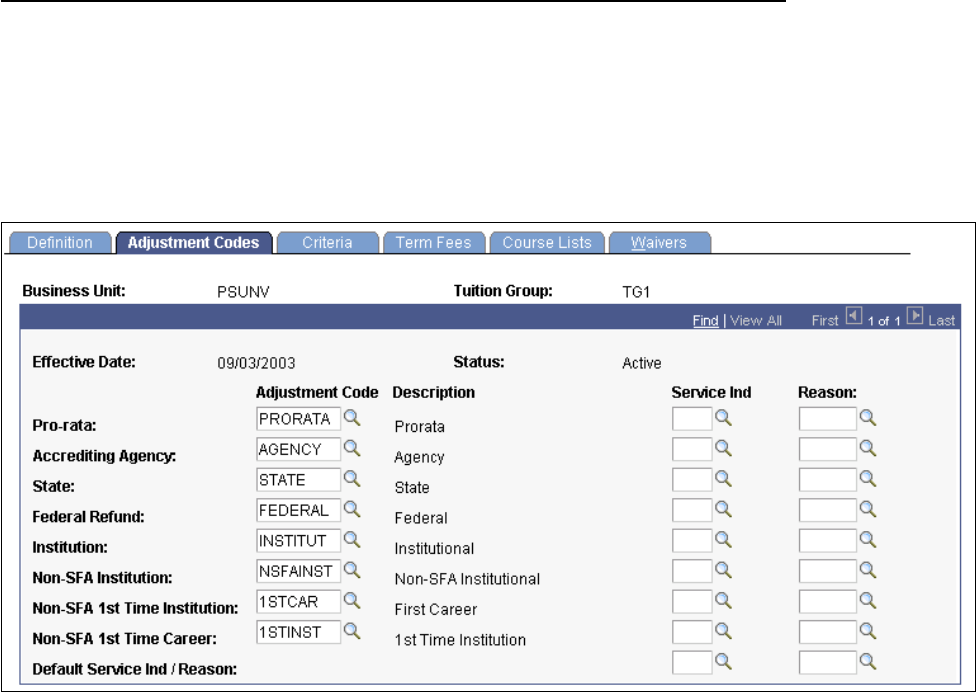
Setting Up Fees and Tuition Groups Chapter 6
230 Copyright © 1988, 2010, Oracle and/or its affiliates. All Rights Reserved.
Lock In Flag Select to lock in a minimum amount of tuition for the group at a specified point
in the term.
See Also
Chapter 6, "Setting Up Fees and Tuition Groups," Setting Up Transaction Fees, page 222
Linking Adjustment Codes to Tuition Groups
Access the Tuition Groups - Adjustment Codes page (Set Up SACR, Product Related, Student Financials,
Tuition and Fees, Tuition Groups, Adjustment Codes).
Tuition Groups - Adjustment Codes page
Select adjustment codes to determine the refund schedules for members of a tuition group. Some refund
schedules are mandated by a state government or agency, or by the federal government. Your institution can
also devise and apply its own refund schedule. Federal regulations require that refunds for students that
receive federal financial aid be calculated using the refund table most advantageous to the student.
Pro-rata Enter the adjustment code that you have defined for pro rata refund calculations.
The pro rata refund is applied to first-time students who withdraw.
Accrediting Agency Enter the adjustment code that you have defined to meet the refund requirements
of your accrediting agency for students who withdraw.
State Enter the adjustment code that you have defined to meet your state refund
requirements agency for students who withdraw.

Chapter 6 Setting Up Fees and Tuition Groups
Copyright © 1988, 2010, Oracle and/or its affiliates. All Rights Reserved. 231
Federal Refund Enter the adjustment code that you have defined to meet federal refund
requirements for students who withdraw.
Institution Enter the adjustment code that you have defined for your institution for students
who withdraw. This is the adjustment code that the system uses if no other
schedules supersede it.
Non-SFA Institution
(nonfederal student
financial aid institution)
Enter the adjustment code that you have defined for students who withdraw but
do not receive any federal financial aid.
Non-SFA 1st Time
Institution Enter the adjustment code that you have defined for students who withdraw but
do not receive any federal financial aid and are attending your institution for the
first time (first term).
Non-SFA 1st Time
Career Enter the non-SFA 1st time career schedule that your institution applies by career
for students who are first-time students, who do not receive any federal financial
aid, and who withdraw.
Service Ind (service
indicator) Enter an optional service indicator code to apply to the student upon his or her
withdrawal.
Upon the student's withdrawal, if the reason in the term history/withdrawal
component is the same as the reason that you set on the Tuition Group
Adjustment code page, the service indicator is set for the student
Reason Enter an optional service indicator reason.
Default Service
Ind/Reason (default
service indicator and
reason)
Enter an optional service indicator and reason to use as default values.
See Also
Chapter 5, "Setting Up Tuition Controls, Criteria, Equations, and Waivers," Setting Up Adjustment
Calendars, page 142
Linking Criteria to Tuition Groups
Access the Tuition Groups - Criteria page (Set Up SACR, Product Related, Student Financials, Tuition and
Fees, Tuition Groups, Criteria).
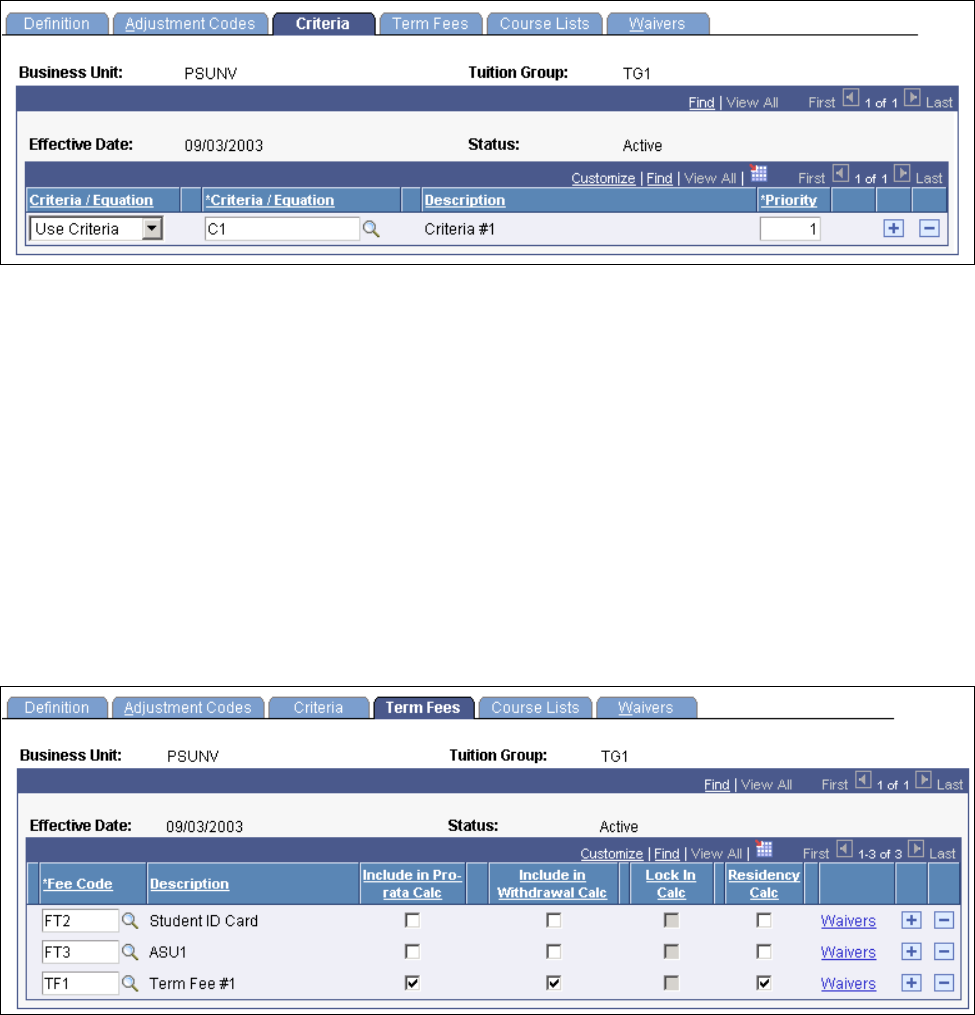
Setting Up Fees and Tuition Groups Chapter 6
232 Copyright © 1988, 2010, Oracle and/or its affiliates. All Rights Reserved.
Tuition Groups - Criteria page
Criteria Select the criteria to select students for inclusion in the tuition group. You must
attach at least one criteria code.
Priority When you use more than one criteria code, connect them with an OR operator
and provide a priority rating.
Linking Term Fees to Tuition Groups
Access the Tuition Groups - Term Fees page (Set Up SACR, Product Related, Student Financials, Tuition and
Fees, Tuition Groups, Term Fees).
Tuition Groups - Term Fees page
Fee Code Enter the term fee code that you want to link to this tuition group. You must link
at least one term fee code, but you can add as many term fee codes as necessary
to cover fees for all members of the tuition group.
Description The term fee description appears in this field.
Include in Pro-rata Calc
(include in pro rata
calculation)
Select to include the term fee in a pro rata refund calculation in the event that the
student withdraws.
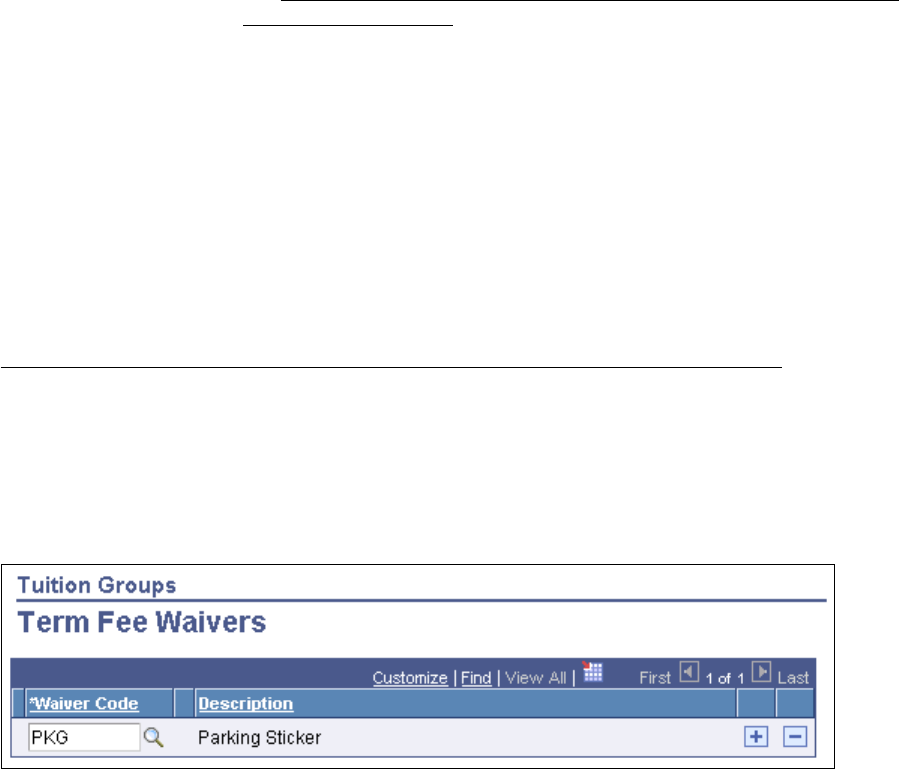
Chapter 6 Setting Up Fees and Tuition Groups
Copyright © 1988, 2010, Oracle and/or its affiliates. All Rights Reserved. 233
Include in Withdrawal
Calc (include in
withdrawal calculation)
Select to include the term fee in a withdrawal calculation if that the student
withdraws.
Select this check box when tuition calculation adjustments for a withdrawal
require different calendars and calculations for specific term fees.
If you select this check box, the tuition calculation adjustment process for
withdrawals uses the applicable adjustment calendar that is designated on the
Tuition Groups - Adjustment Codes page.
If you clear this check box, the tuition calculation adjustment process for
withdrawals uses the adjustment calendar that is defined on the Term Fees -
Term Fees page for this specific term fee.
Selecting this check box does not override an adjustment reason in PeopleSoft
Student Records. Nor does it exempt a fee from the withdrawal adjustment
calculation.
To use the adjustment calendar that is associated with the term fee when you are
adjusting tuition on a withdrawal, be sure to create a row for withdrawal in the
setup of the adjustment calendar that you have specified on your term fee.
See Chapter 6, "Setting Up Fees and Tuition Groups," Defining Term and
Session Fees, page 193.
Lock In Calc (lock in
calculation) Select to lock in charges for this term fee at a specified point in the term. This
option is available only if the Lock in Calc check box has been selected on the
Definition page.
Residency Calc
(residency calculation) Select to include the term fee in tuition residency calculation.
Waivers Click to define waivers that are specific to one term fee.
See Also
Chapter 6, "Setting Up Fees and Tuition Groups," Setting Up Term Fee Codes, page 190
Linking a Waiver Code to a Single Term Fee Within a Tuition Group
Access the Term Fee Waivers page (click the Waivers link on the Tuition Groups - Term Fees page).
Tuition Groups - Term Fee Waivers page
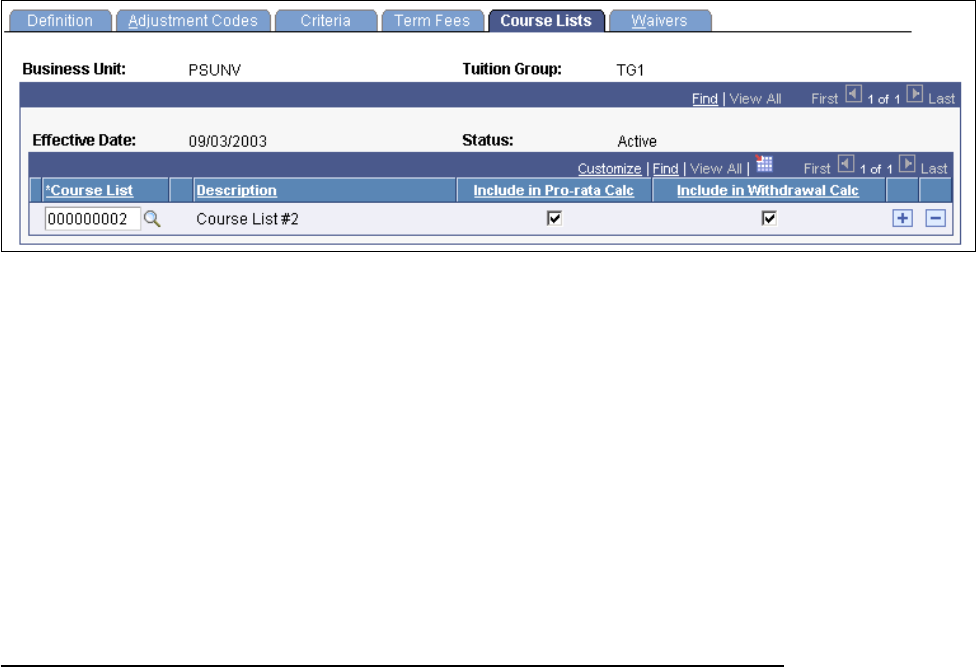
Setting Up Fees and Tuition Groups Chapter 6
234 Copyright © 1988, 2010, Oracle and/or its affiliates. All Rights Reserved.
Waiver Code Select the waiver code to apply to the term fee to waive charges. Waivers that are
attached at this level apply only to the specific term fee and not to the tuition
group as a whole.
Linking Course Lists to Tuition Groups
Access the Tuition Groups - Course Lists page (Set Up SACR, Product Related, Student Financials, Tuition
and Fees, Tuition Groups, Course Lists).
Tuition Groups - Course Lists page
Course List Enter the course list that you are linking to the tuition group.
Include in Pro-rata Calc
(include in pro rata
calculation)
Select if you want the course list fees included in any pro-rata calculation.
Include In Withdrawal
Calc(include in
withdrawal calculation)
Select if you want the course list fees included in any withdrawal calculations for
this tuition group.
See Also
Chapter 6, "Setting Up Fees and Tuition Groups," Setting Up Course List Fees, page 224
Linking Waiver Codes to Tuition Groups
Access the Tuition Groups - Waivers page (Set Up SACR, Product Related, Student Financials, Tuition and
Fees, Tuition Groups, Waivers).
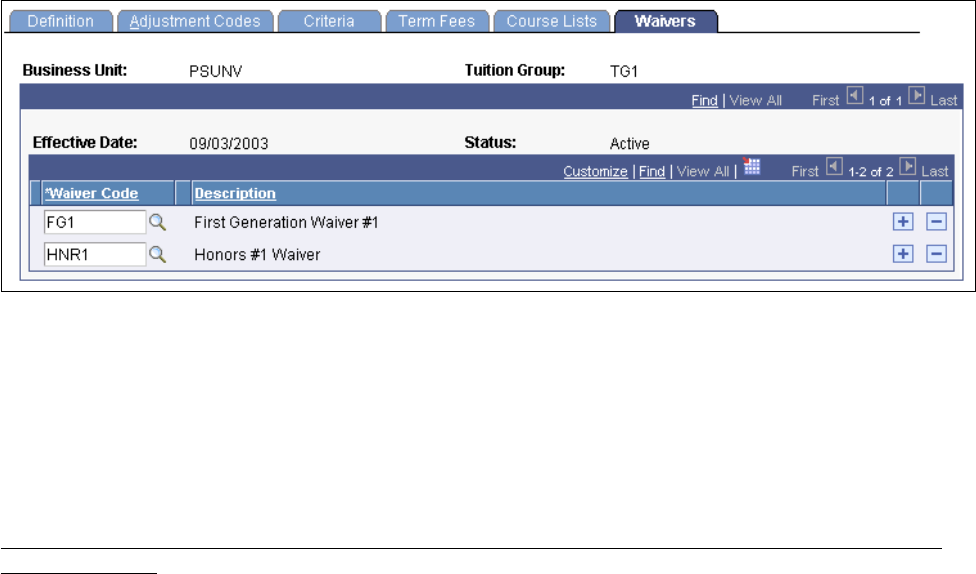
Chapter 6 Setting Up Fees and Tuition Groups
Copyright © 1988, 2010, Oracle and/or its affiliates. All Rights Reserved. 235
Tuition Groups - Waivers page
Waiver Code Select the waiver code to link to the tuition group. Waiver codes that are linked at
this level apply to all term fees that are attached to the tuition group.
See Also
Chapter 5, "Setting Up Tuition Controls, Criteria, Equations, and Waivers," Defining Waivers and Waiver
Groups, page 171
Reviewing Established Tuition Group Priorities
Access the Tuition Group Priority page (Set Up SACR, Product Related, Student Financials, Tuition and
Fees, Tuition Group Priority).
The Tuition Group Priority page lists all tuition groups that are defined for your institution, provides a
description of the tuition groups, and displays their priority. Use this page to confirm that potentially
competing tuition group definitions have the correct priority ratings.

Copyright © 1988, 2010, Oracle and/or its affiliates. All Rights Reserved. 237
Chapter 7
Setting Up Refunding
This chapter lists prerequisites and discusses how to:
•Set up your business unit to refund customers.
•Set up accounts payable (AP) options.
•Set up payroll refund options.
•Create job data for payroll refunds.
•Set up direct deposits for students.
•Designate sponsors.
See Also
Chapter 17, "Refunding Customers," Understanding Refunds, page 435
Prerequisites
To process refunds, first create refund item types. An item type defines how the item is applied to a student or
corporate account within Student Financials. Use the SF Item Type component to define refund item types.
If you use the accounts payable method to create and distribute refunds, your accounts payable department
must set up their system to recognize students and corporations as vendors to distribute refund checks to
them.
If you use the payroll method to create and distribute refunds, your payroll department must use PeopleSoft
Enterprise Payroll for North America to create a refund company that employs your students. This enables
your payroll department to issue refund checks to students as if they were paychecks. Most of the setup for
payroll refunds occurs in Payroll for North America. In addition to company and job data, you need to set up
pay groups, run IDs, and direct deposits for students. Finally, node definitions (for the HRMS node) need to
be set up for any batch processing.

Setting Up Refunding Chapter 7
238 Copyright © 1988, 2010, Oracle and/or its affiliates. All Rights Reserved.
See Also
Chapter 2, "Completing Student Financials General Setup," Setting Up Item Types and Item Type Groups,
page 55
Enterprise PeopleTools PeopleBook: Internet Technology, Configuring the Portal Environment
PeopleSoft Enterprise Payroll for North America 9.0 PeopleBook, "Administering Interfaces with PeopleSoft
HRMS and PeopleSoft Enterprise Expenses," Administering the Interface with Student Financials
Setting Up Your Business Unit to Refund Customers
This section discusses how to:
•Define basic refunding rules.
•Define refund approval parameters.
•Define default payroll interface parameters.
•Set default withholding amounts for payroll refunds.
Pages Used to Set Up Your Business Unit to Refund Customers
Page Name Definition Name Navigation Usage
Refund Setup BUS_UNIT_TBL_SF3 Set Up SACR, Product
Related, Student Financials,
SF Business Unit, Refund
Setup
Define the rules governing
how your business unit
handles refunds.
Refund Approval BUS_UNIT_TBL_SF20 Set Up SACR, Product
Related, Student Financials,
SF Business Unit, Refund
Approval
Define refund approval
levels.
Payroll Defaults BUS_UNIT_TBL_SF4 Set Up SACR, Product
Related, Student Financials,
SF Business Unit, Payroll
Defaults
Create default parameters
for refunds that use the
payroll interface.
Defining Basic Refunding Rules
Access the Refund Setup page (Set Up SACR, Product Related, Student Financials, SF Business Unit, Refund
Setup).
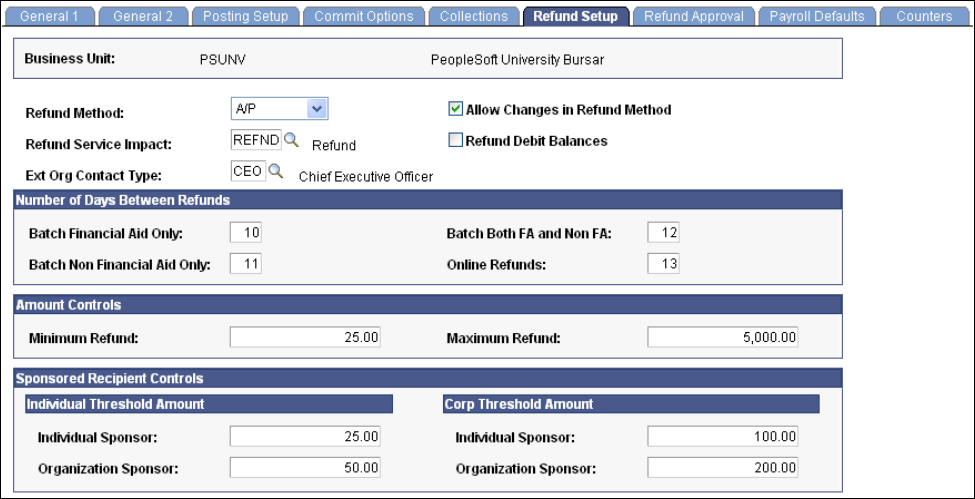
Chapter 7 Setting Up Refunding
Copyright © 1988, 2010, Oracle and/or its affiliates. All Rights Reserved. 239
Refund Setup page
Refund Method Values are:
A/P: Create the refund in Student Financials and have your accounts payable
department produce and distribute the checks.
Other: Create the refund in Student Financials and produce a check using a third-
party application.
Payroll: Use PeopleSoft Payroll for North America to create refunds and produce
checks. You can use this option for individual refunds only, not for refunds to an
organization.
Allow Changes in
Refund Method Select to enable a user to switch between the AP, Other, and Payroll methods
when processing online refunds. If you clear this check box, the user can use only
the refund method specified for the SF Business Unit.
Refund Service Impact Select the value to use to prevent or deny a refund.
Refund Debit Balances Select to create refunds that exceed the available credit balance. For example, if a
student has charges of 9,000 USD and an unapplied credit of 10,000 USD from a
fellowship award, the system allows a refund of the excess unapplied credit even
though the student's account technically has a debit balance.
Ext Org Contact Type
(external organization
contact type)
Select the external organization contact type for processing batch refunds for
external organizations.
Number of Days Between Refunds
Define the minimum number of days between the times refunds can be processed for a particular customer.

Setting Up Refunding Chapter 7
240 Copyright © 1988, 2010, Oracle and/or its affiliates. All Rights Reserved.
Note. These restrictions prevent refunds processed in batch mode, but produce only warning messages for
online refunds.
Batch Financial Aid
Only Enter the minimum number of days between batch-produced refunds of excess
financial-aid credits. This setting restricts refunds of financial aid item type
credits only and does not affect batch-produced refunds of nonfinancial-aid
credits.
Note. Use this setting to specify a different interval between refunds for financial
aid and nonfinancial-aid credits only.
Batch both FA and Non
FA (batch both financial
aid and nonfinancial aid)
Enter the minimum number of days between batch-produced refunds of all
excess credits. Use this setting to process financial-aid and nonfinancial-aid
credits the same way.
Batch Non Financial Aid
Only Enter the minimum number of days between batch-produced refunds of excess
nonfinancial-aid credits. This setting restricts nonfinancial-aid credits only and
does not affect batch-produced refunds of financial aid item type credits.
Note. Use this setting to specify a different interval between refunds for
nonfinancial-aid and financial aid credits only.
Online Refunds Enter the minimum number of days between online-produced refunds of all
excess credits.
Note. Because online refunds are usually produced for extraordinary reasons, this
setting results in a warning message when you attempt to process refunds more
frequently than the specified number of days. It does not prevent you from
processing the refund.
Amount Controls Group Box
Minimum Refund Enter an amount below which you do not want to produce refunds in batch mode.
Refunds below this amount can be processed online. You receive a warning
message, but you can override it.
Maximum Refund Enter an amount above which you do not want to produce refunds. You cannot
override this amount.
Sponsored Recipient Controls
Sponsored recipient controls refer to the threshold below which student refunds are paid directly to the
sponsored student or organization rather than to the sponsor. For example, if the individual sponsor threshold
amount is established at 25.00 USD and a sponsored student has a refundable credit balance of 20.00 USD,
the refund is paid to the student rather than to a sponsor. Sponsors can be either individuals or organizations.
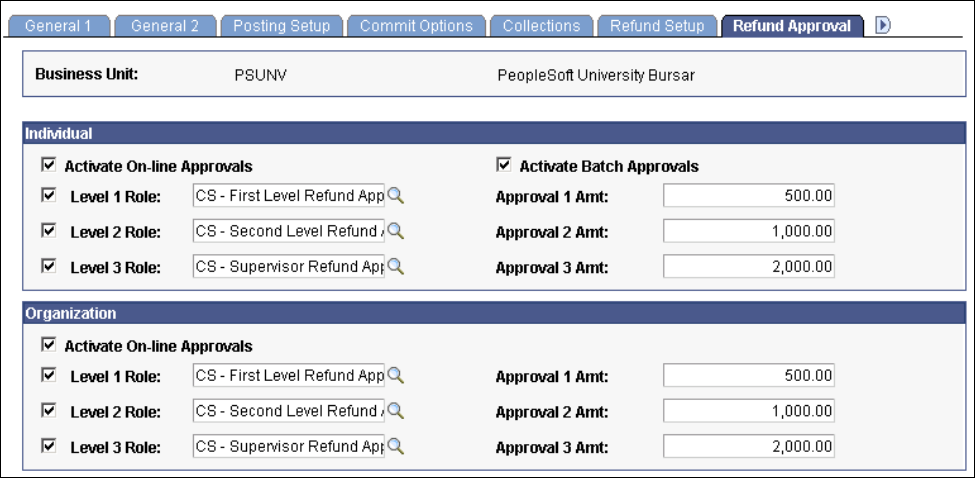
Chapter 7 Setting Up Refunding
Copyright © 1988, 2010, Oracle and/or its affiliates. All Rights Reserved. 241
Individual Threshold Amount
Individual Sponsor and
Organization Sponsor Enter a monetary amount (threshold) below which student refunds are not paid to
an individual or an organization sponsor.
Corp Threshold Amount
Individual Sponsor and
Organization Sponsor Enter a monetary amount (threshold) below which refunds to an organization are
not paid to an individual or an organization sponsor.
Defining Refund Approval Parameters
Access the Refund Approval page (Set Up SACR, Product Related, Student Financials, SF Business Unit,
Refund Approval).
Refund Approval page
Refund approval controls determine whether approval is required before a refund can be issued. If approval is
required, refund requests are routed to the appropriate approver's worklist.
Approval amounts define a range. For example, if the approval 1 amount is set at 500 USD, the approval 2
amount is set at 1,000 USD, and the approval 3 amount is set at 2,000 USD, all refunds under 500 USD do
not require approval. All refunds between 500 USD and 999 USD require only level 1 approval, and so on.
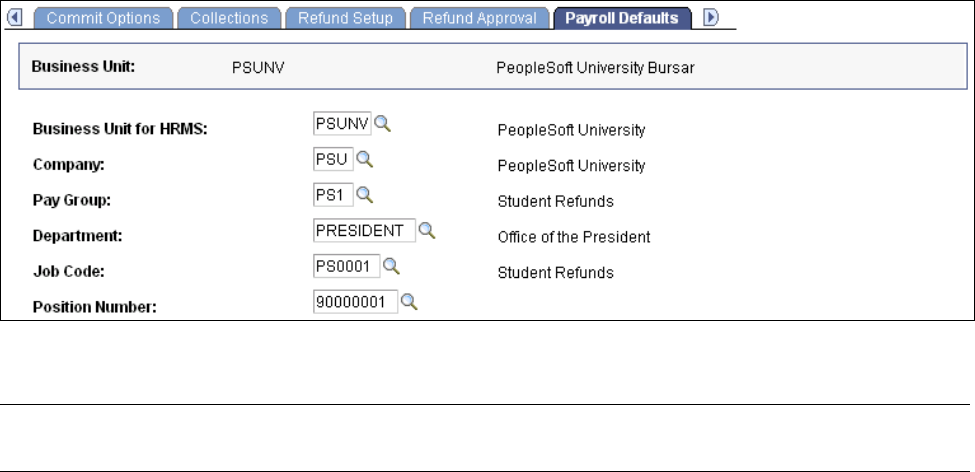
Setting Up Refunding Chapter 7
242 Copyright © 1988, 2010, Oracle and/or its affiliates. All Rights Reserved.
Individual
Activate Online
Approvals andActivate
Batch Approvals
Select to require approval of online or batch refunds. If you activate approvals,
you must establish roles and approval amounts.
Level 1 Role, Level 2
Role, andLevel 3 Role Select the appropriate role for each level of approval.
Approval 1 Amt
(approval 1 amount),
Approval 2 Amt
(approval 2 amount), and
Approval 3 Amt
(approval 3 amount)
Enter the refund amount for which the system requires each level of approval.
Organization
Establish approval parameters for corporate refunds. The fields in this group box are identical to those in the
Individual group box, except that batch approvals do not apply for organization refunds.
Defining Default Payroll Interface Parameters
Access the Payroll Defaults page (Set Up SACR, Product Related, Student Financials, SF Business Unit,
Payroll Defaults).
Payroll Defaults page
Note. Before entering data on this page, consult your institution's payroll staff to determine the correct
settings. Use PeopleSoft Payroll for North America to set up and process payroll refunds.
Business Unit for HRMS
(business unit for human
resources management
system)
Select the business unit that PeopleSoft Payroll for North America uses to
identify the refund company.

Chapter 7 Setting Up Refunding
Copyright © 1988, 2010, Oracle and/or its affiliates. All Rights Reserved. 243
Company Select the company code that has been designated for individual refunds.
Setting Default Withholding Amounts for Payroll Refunds
Default withholding amounts, as well as Federal, State, and company tax tables, are set up in PeopleSoft
Payroll for North America.
See Also
PeopleSoft Enterprise Payroll for North America 9.0 PeopleBook, "Maintaining Payroll Data"
Setting Up Accounts Payable Options
To set up accounts payable options, use the AP Business Unit component (BUS_UNIT_AP) and the AP Set
Controls - Vendor component (SF_AP_VNDR_OPTIONS).
This section discusses how to:
•Set up an AP business unit.
•Define AP set controls for vendors.
Pages Used to Set Up Accounts Payable Options
Page Name Definition Name Navigation Usage
AP Business Unit Options BUS_UNIT_TBL_AP Set Up SACR, Product
Related, Student Financials,
Refunds, AP Business Unit
Establish AP interface and
voucher numbering
parameters.
AP Set Controls - Vendor SF_AP_VNDR_OPTIONS Set Up SACR, Product
Related, Student Financials,
Refunds, AP Set Controls -
Vendor
Define vendor information.
Setting Up an AP Business Unit
Access the AP Business Unit Options page (Set Up SACR, Product Related, Student Financials, Refunds, AP
Business Unit).
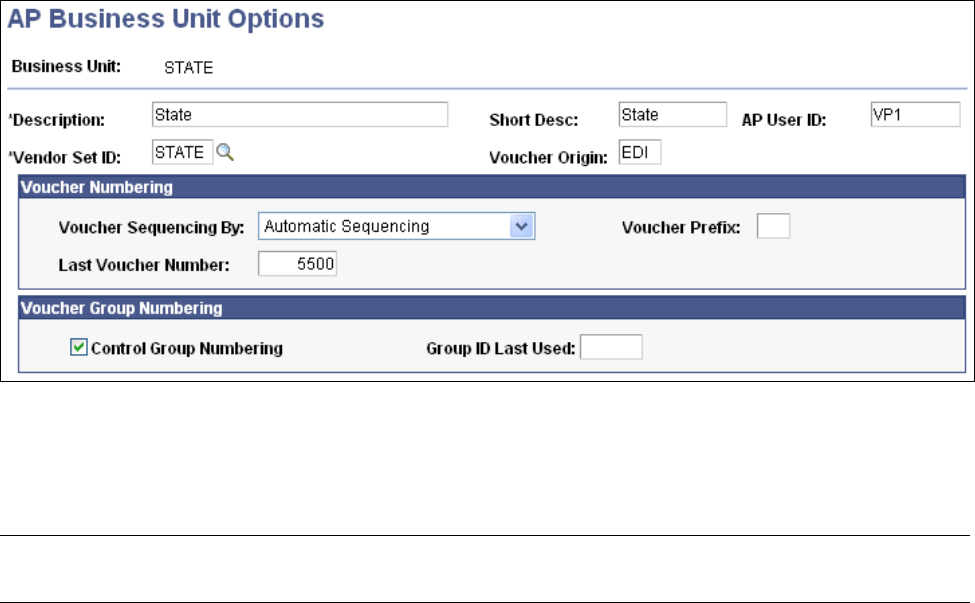
Setting Up Refunding Chapter 7
244 Copyright © 1988, 2010, Oracle and/or its affiliates. All Rights Reserved.
AP Business Unit Options page
AP business unit options control how Student Financials creates vendor and voucher file definitions. These
definitions are used for transfer to PeopleSoft Enterprise Payables to create refund payments.
Note. The AP business unit options that you define on this page should match PeopleSoft Payables
definitions.
AP User ID The Student Financials application refunding process populates each voucher it
creates with the AP user ID that you specify here. This ID must exist in
PeopleSoft Financials.
Voucher Origin The Student Financials application refunding process populates each voucher it
creates with the voucher origin that you specify here. This origin value must exist
in PeopleSoft Payables.
Voucher Numbering
Voucher Sequencing By Select how voucher numbers are assigned. Values are:
Automatic Sequencing: Assign voucher numbers starting with the number that
you specify in the Last Voucher Number field.
Use SF Refund# as Voucher#: Assign voucher numbers using the SF refund ID
number.
Voucher Prefix Enter an optional two-character voucher prefix to enable accounts payable staff
to easily identify vouchers that originate in Student Financials. Voucher IDs are
eight characters long. If you enter a prefix, a six-digit number is attached to
create the voucher ID. For example, if you use the prefix SF, the refunding
process will create the voucher ID SF000001.
Last Voucher Number Displays the last voucher number used. You can override this value to establish a
new starting point for numbering.
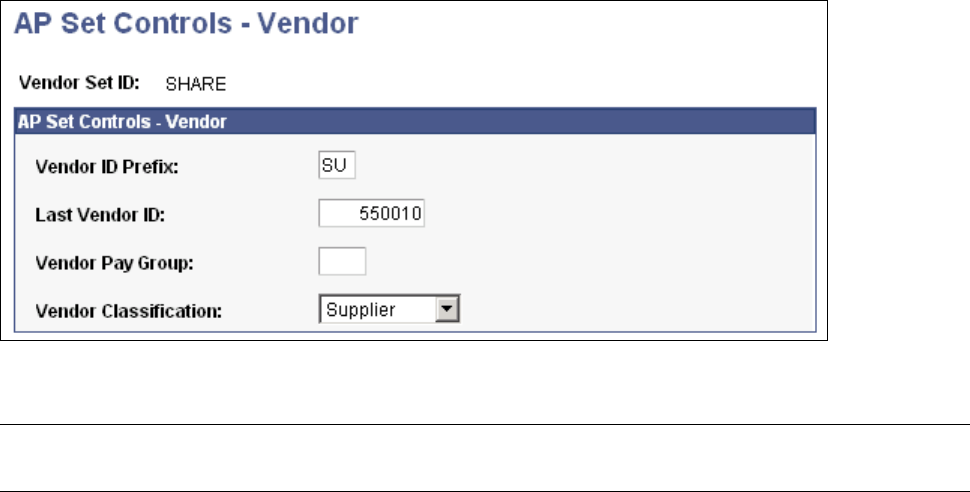
Chapter 7 Setting Up Refunding
Copyright © 1988, 2010, Oracle and/or its affiliates. All Rights Reserved. 245
Voucher Group Numbering
Control Group
Numbering Select to assign a control group ID to each voucher that the Student Financials
refunding process creates. If control group numbering is selected, the Group ID
Last Used field is updated every time you run the refund process. (All of the
vouchers created from one refund process run share a common group ID
number.)
Group ID Last Used Displays the last group ID when the Control Group Numbering check box is
selected.
Defining AP Set Controls for Vendors
Access the AP Set Controls - Vendor page (Set Up SACR, Product Related, Student Financials, Refunds, AP
Set Controls - Vendor).
AP Set Controls Vendor page
Note. AP set controls insert information into vouchers that are produced for refunds using PeopleSoft
Payables. Consult your account payables staff to determine the proper settings.
Vendor ID Prefix Enter an optional vendor ID prefix to be used with all vendor ID numbers. This
prefix should describe the entity producing the voucher transactions. When you
add a vendor ID prefix, the prefix replaces the first two characters of the vendor
ID number.
Last Vendor ID Displays the last vendor ID used by the system. Insert a new value to specify a
starting point for new vouchers.
Vendor Pay Group Enter an optional two-character vendor pay group code. This code can be used
during payment processing to cause Pay Cycle Manager to pay only vouchers
originating in Student Financials.

Setting Up Refunding Chapter 7
246 Copyright © 1988, 2010, Oracle and/or its affiliates. All Rights Reserved.
Vendor Classification Select the value to use for the VENDOR_CLASS in the VENOR_SYNC
message for the AP Interface process for refunding. Values are Attorney,
Employee, HRMS,and Supplier.The default value is Supplier.
See Also
PeopleSoft Enterprise Payables 8. 9 PeopleBook, "Entering and Processing Vouchers Online," General
Voucher Entry Information
PeopleSoft Enterprise Payables 9.0 PeopleBook, "Establishing Pay Cycles"
Setting Up Payroll Refund Options
Use PeopleSoft Payroll for North America to create and distribute refunds using the payroll method. A
number of setup steps are included on the Payroll side, including generating a calendar, which designates pay
period end dates that the Payroll system uses when generating refund checks. Most of the time you will create
a calendar for every possible day of a given year. That way, whenever you want to create a payroll refund, a
pay period end date has already been designated. You can also create calendars for specific days on an as-
needed basis. Be sure to select the Off Cycle check box when creating calendars for Student Financials.
You will also use PeopleSoft Payroll for North America to create pay groups, pay run IDs, balance IDs and so
on.
For refunding students through Payroll, Student Financials recommends the following settings in HRMS:
If the student is assigned to an existing Benefit Record Assign Primary Job, select Make New Job Primary.
If the Primary Job terminates, select Re-Assign Primary Job Highest Active Job.
See PeopleSoft Enterprise Human Resources 9.0 PeopleBook: Manage Base Benefits, "Setting Up Additional
Base Benefits Features," Setting Up Multiple Jobs
See PeopleSoft Enterprise Payroll for North America 9.0 PeopleBook: "Administering Interfaces with
PeopleSoft HRMS and PeopleSoft Enterprise Expenses," Administering the Interface with Student Financials
Creating Job Data for Payroll Refunds
To set up job data for payroll refunds, use the Create Student Job Data component (SSF_POIJOB_TEST) and
the Request Student Job Data component (SSF_RUN_POIJOB).
This section discusses how to:
•Create job data for payroll refunds.
•Create job data in batch.
•Create T4A tax job data.
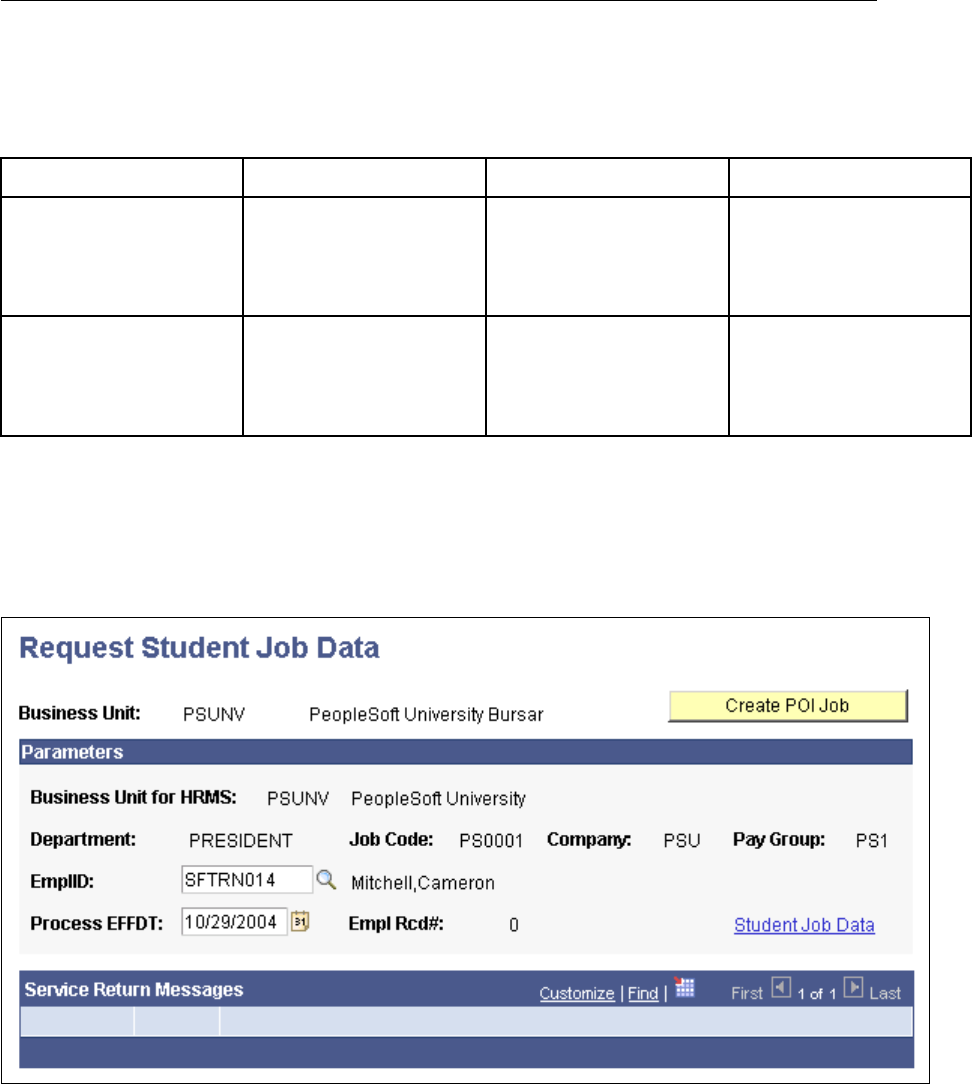
Chapter 7 Setting Up Refunding
Copyright © 1988, 2010, Oracle and/or its affiliates. All Rights Reserved. 247
See Also
Chapter 7, "Setting Up Refunding," Setting Up Your Business Unit to Refund Customers, page 238
Pages Used to Create Job Data
Page Name Definition Name Navigation Usage
Request Student Job Data SSF_POIJOB_TEST Student Financials,
Refunds, Create Student Job
Data, Request Student Job
Data
Create a student job record.
Request Student Job Data SSF_RUN_POIJOB Student Financials,
Refunds, Process Batch
Refunds, Request Student
Job Data
Create student job data in
batch.
Creating Job Data for Payroll Refunds
Access the Request Student Job Data page (Student Financials, Refunds, Create Student Job Data, Request
Student Job Data).
Request Student Job Data page (single student)
Processing Options
The fields that appear on this page depend on your processing population selection.

Setting Up Refunding Chapter 7
248 Copyright © 1988, 2010, Oracle and/or its affiliates. All Rights Reserved.
Processing Population Values are:
Refund Batch: Enables you to select a specific refund batch ID.
Refund Students: Creates job data for all students with a pending refund.
Student List: Click the Student List link to enter individual IDs.
T4A Students: Creates job (tax) records for students receiving a T4A (Canadian
tax form).
Batch ID This field appears only if you select Student List for the processing population.
Select the student IDs that you want to process.
Student List This link appears only if you select Refund Batch for the processing population.
Commit Frequency Enter a number for records committed to the database. Select this option to
commit a specified number of transactions during background processing. For
example, if you enter 100 in the Commit Frequency field, when you run a batch
process the system processes 100 transactions and then commits them to the
database until the batch is complete. At the end of a batch process, the system
commits all remaining transactions even if the number of transactions is less than
the number in the Commit Frequency field.
See Chapter 2, "Completing Student Financials General Setup," Defining
Commit Levels, page 15.
Confirm Job Data
Created Select to create a record in the message log of the process monitor for every job
record created.
Empl Rcd# (employee
record number) After the process is complete, Empl Rcd# is populated with a value of 0 for the
primary job record. A secondary job will have a value of 1. You might have a
secondary job if you have a multi-institution environment and a student is
enrolled in two institutions (and is receiving refunds from both of them).
Student Job Data Click to access the Workforce Administration, Job Information, Job Data
component.
Service Return Messages Any messages, if problems occur, appear here.
Create POI Job Click to create job data for the selected student.
Creating Job Data in Batch
Access the Request Student Job Data page (Student Financials, Refunds, Process Batch Refunds, Request
Student Job Data).

Chapter 7 Setting Up Refunding
Copyright © 1988, 2010, Oracle and/or its affiliates. All Rights Reserved. 249
Request Student Job Data page (batch)
The processing options on this page are identical to those on the previous page.
Creating T4A Tax Job Data
You may need to create T4A tax records for students.
See Chapter 24, "Producing Tax Forms and Receipt Information," Creating POI Job Data for T4A, page 680.
Setting Up Direct Deposit for Students
If you use the payroll refund method and you want to distribute refunds through direct deposit, you must first
set up direct deposit for each applicable student (for U.S. or Canadian students).
You set up direct deposits in PeopleSoft Payroll for North America.
See PeopleSoft Enterprise Payroll for North America, Maintaining Payroll Data, "Setting Up Direct
Deposits"
Designating Sponsors
Sometimes students and organizations with a negative account balance have sponsors that should be the
refund recipient. You must designate a sponsor for those sponsored students and corporations.
This section discusses how to:
•Designate sponsors for individual students.
•Designate sponsors for organizations.
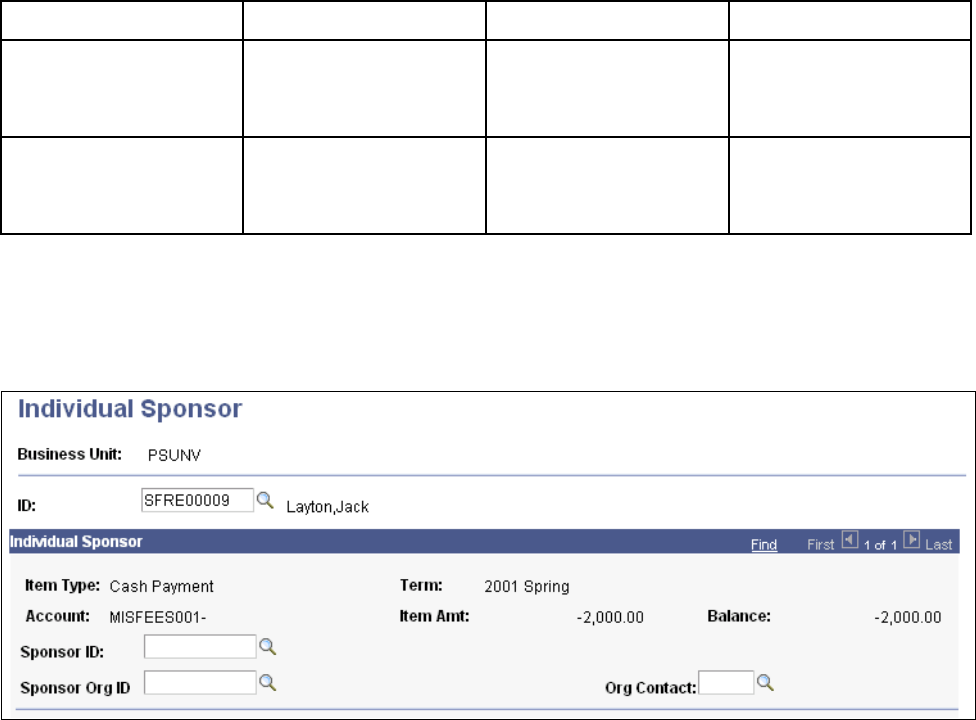
Setting Up Refunding Chapter 7
250 Copyright © 1988, 2010, Oracle and/or its affiliates. All Rights Reserved.
Pages Used to Designate Sponsors
Page Name Definition Name Navigation Usage
Individual Sponsor REFUND_CUSTOMER_ID Student Financials,
Refunds, Designate Sponsor Designate a sponsor for
each credit on the student's
account.
Corp Sponsor (corporate
sponsor)
REFUND_ORG_SPONSOR Student Financials,
Refunds, Designate
Corporate Sponsor
Designate a sponsor for
each credit on the
organization's account.
Designating Sponsors for Individual Students
Access the Individual Sponsor page (Student Financials, Refunds, Designate Sponsor, Individual Sponsor).
Individual Sponsor page
ID Enter the ID of the student for whom you want to designate one or more
sponsors.
Individual Sponsor
Sponsor ID If the sponsor that you are designating is an individual, select the ID of the
individual. When you select a value in this field, the Sponsor Org ID and Org
Contact fields become unavailable.
Sponsor Org ID (sponsor
organization ID) If the sponsor that you are designating is an external organization, select the ID
of the organization. When you select a value in this field, the Sponsor ID field
becomes unavailable.
Org Contact
(organization contact) If you select an organization in the Sponsor Org ID field, select the contact for
that organization.

Chapter 7 Setting Up Refunding
Copyright © 1988, 2010, Oracle and/or its affiliates. All Rights Reserved. 251
Designating Sponsors for Organizations
Access the Corp Sponsor page (Student Financials, Refunds, Designate Corporate Sponsor).
With the exception of the External Org ID (external organization ID) field, the fields on this page are
identical to those on the Individual Sponsor page.
External Org ID Enter the ID of the external organization for which you want to designate one or
more sponsors.
See Also
Chapter 7, "Setting Up Refunding," Designating Sponsors, page 249

Copyright © 1988, 2010, Oracle and/or its affiliates. All Rights Reserved. 253
Chapter 8
Setting Up Payment Plans
This chapter lists common elements and discusses how to:
•Set up deferral contracts.
•Set up payment plan contracts.
•Set up third-party contracts.
•Set up collection agreements.
Common Elements Used in This Chapter
Status Enter the status of the contract. Values are:
Active: Select to make the contract available for use.
Cancelled: Select to cancel the contract.
Hold: Select to prevent new students from being added to the contract, but not to
discontinue its use completely.
Inactive: Select to discontinue use of the contract.
Billing Cycle Select the billing cycle for the payment plan. Values are:
Bi-Monthly: Select to bill students every other month.
Monthly: Select to bill students each month.
One Time: Select to bill students only once.
User Selected: Select to specify billing and due dates rather than having the
system generate the schedules.
Weekly: Select to bill students weekly.
Setting Up Deferral Contracts
To set up deferral contracts, use the Create Deferral Contract component (DEFERRAL_CONTRACT).
This section discusses how to:
•Define basic deferral contract parameters.

Setting Up Payment Plans Chapter 8
254 Copyright © 1988, 2010, Oracle and/or its affiliates. All Rights Reserved.
•Define deferral contract administrative fees.
•Define deferral contract eligible charges and maximum amounts.
Pages Used to Set Up Deferral Contracts
Page Name Definition Name Navigation Usage
Deferral Contract DEFER_CONTRACT Student Financials, Payment
Plans, Create Deferral
Contract, Deferral Contract
Define basic deferral
contract parameters.
Deferral Contract Fee DEFER_CONTRACT_FEE Student Financials, Payment
Plans, Create Deferral
Contract, Deferral Contract
Fee
Define deferral contract
administrative fees.
Deferral Contract Charges DEFER_CONTRACT Student Financials, Payment
Plans, Create Deferral
Contract, Deferral Contract
Charges
Define deferral contract
eligible charges and
maximum amounts.
Defining Basic Deferral Contract Parameters
Access the Deferral Contract page (Student Financials, Payment Plans, Create Deferral Contract, Deferral
Contract).
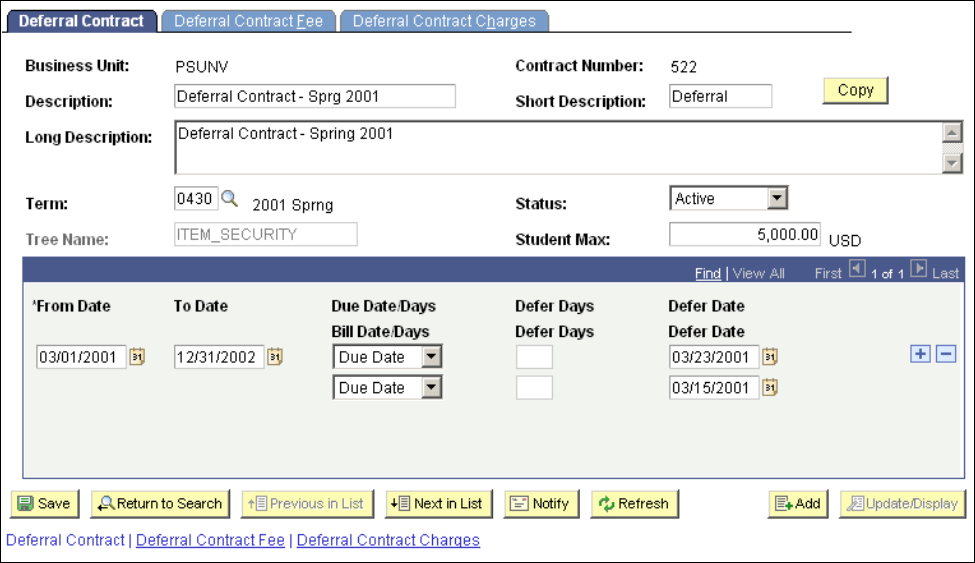
Chapter 8 Setting Up Payment Plans
Copyright © 1988, 2010, Oracle and/or its affiliates. All Rights Reserved. 255
Deferral Contract page
Term Select the term to which the contract applies.
Tree Name Select the item type tree name that includes the charge item types that you cover
under this plan.
Student Max (student
maximum) Enter the maximum amount that you want to allow any one student to defer
under the contract. Be sure to set this amount high enough to meet your needs.
The system does not defer eligible charges that cause the deferred amount to
exceed the student maximum. For example, if the student maximum is 10,000
USD and the system already deferred 8,500 USD, it rejects a new eligible charge
of 2,000 USD because the total exceeds the defined maximum.
From Date andTo Date Set the date range for the deferral contract. The system defers only eligible
charges that are posted to the student's account within this range.
Due Date/Days andBill
Date/Days Set the time unit to use to calculate the payment's due date and bill date. Options
are:
Due Date: If you select this option, the Defer Date field becomes available.
Due Days: If you select this option, the Defer Days field becomes available.
Defer Days If you select Due Days in the Due Date/Days and Bill Date/Days fields, enter the
number of days from the transaction's effective date that the system defers the
due date and bill date.
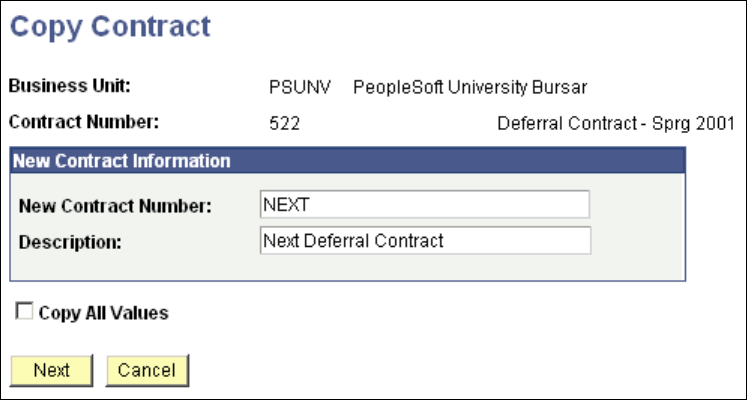
Setting Up Payment Plans Chapter 8
256 Copyright © 1988, 2010, Oracle and/or its affiliates. All Rights Reserved.
Defer Date If you select Due Date in the Due Date/Days field, set the date that the payment
is due and the date that you want it billed regardless of the charge effective date.
Copy Contracts
Click the Copy button to copy an existing deferral contract as the basis of a new deferral contract. You can
copy all contract setup information except for term and date information.
Access the Copy Contract page (click the Copy button on the Deferral Contract page).
Copy Contract page
New Contract Number Enter a new number for the copied contract.
If auto numbering is enabled on the SF Business Unit Payment Plan Contract Set
Up page, NEXT is automatically assigned as the new contract number. You can
change the contract number.
Description Enter a description for the copied contract.
Copy All Values Select to copy all other related contract information from the previous contract.
Enter the desired information and click Save. You are returned to the Deferral Contract page, where you can
modify the new contract information as desired.
Defining Deferral Contract Administrative Fees
Access the Deferral Contract Fee page (Student Financials, Payment Plans, Create Deferral Contract, Deferral
Contract Fee).
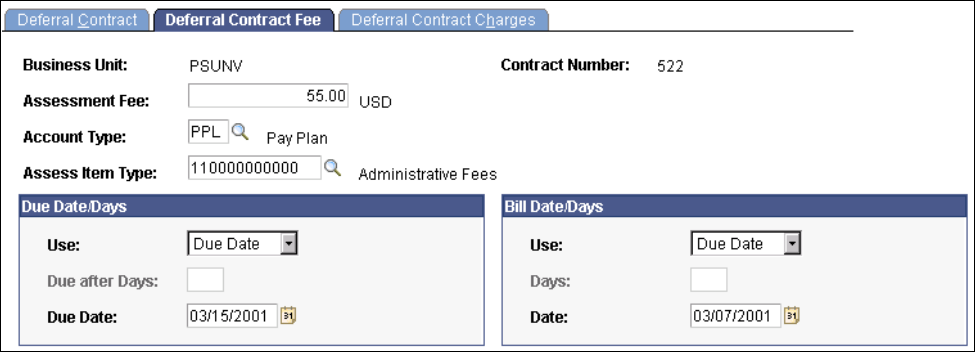
Chapter 8 Setting Up Payment Plans
Copyright © 1988, 2010, Oracle and/or its affiliates. All Rights Reserved. 257
Deferral Contract Fee page
Assessment Fee Enter the amount of the administrative fee that you want to charge for this
contract.
Account Type Enter the account type designated for payment plans.
Assess Item Type Enter the item type of the assessment fee.
Due Date/Days and Bill Date/Days
Define the parameters for calculating the due date for the assessment fee.
Use Select how you want to calculate the due date and bill date for the assessment
fee. Values are:
Due Date: Select to specify a specific date for the assessment fee to be due and
billed. When you select this option, the Due Date field becomes available.
Due Days: Select to make the assessment fee due and billed a certain number of
days after it is assessed. When you select this option, the Due after Days field
becomes available.
Due after Days In both the Due Date/Days and Bill Date/Days group boxes, enter the number of
days after the system posts the assessment fee that it becomes due and is billed.
Due Date In both the Due Date/Days and Bill Date/Days group boxes, enter the actual date
that you want the assessment fee due and billed.
Defining Deferral Contract Eligible Charges and Maximum Amounts
Access the Deferral Contract Charges page (Student Financials, Payment Plans, Create Deferral Contract,
Deferral Contract Charges).
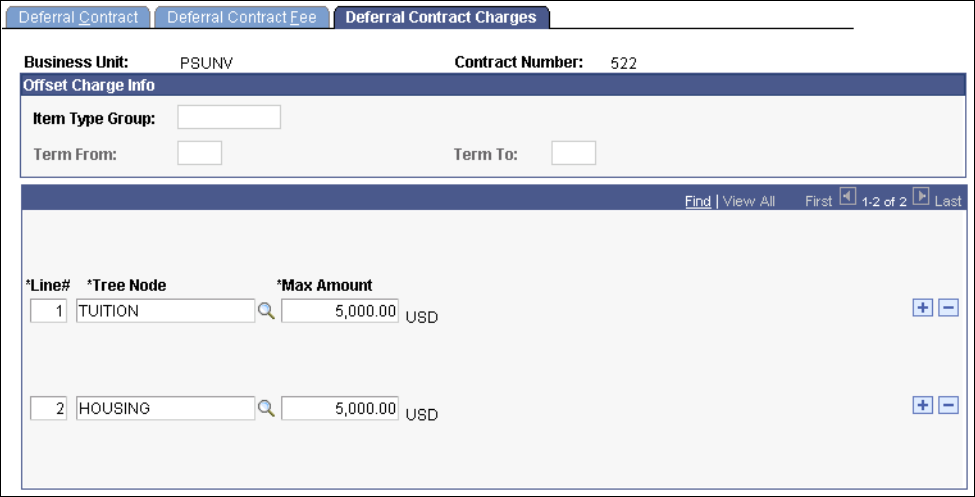
Setting Up Payment Plans Chapter 8
258 Copyright © 1988, 2010, Oracle and/or its affiliates. All Rights Reserved.
Deferral Contract Charges page
Offset Charge Info
Fields in this group box are not available for deferral contracts.
Eligible Charge Parameters
Line# (line number) This field is automatically populated as you add new charge nodes.
Tree Node Select the item type tree node to designate charges that are covered under this
contract.
Max Amount (maximum
amount) Enter the maximum amount that can be deferred under the corresponding tree
node. Be sure to set this amount high enough to meet your needs. Eligible
charges are selected for deferment on an individual basis and the sum of charges
within the node must not exceed the maximum amount.
For example, using the previous setup, suppose that a student has tuition charges
of 1,500 USD and 3,800 USD, and a housing charge of 4,900 USD. Because the
total of the tuition charges exceeds the maximum amount of 5,000 USD, the
system defers only one of the tuition charges. The housing charge is within the
maximum amount limit and the combined total of the single tuition charge and
housing charge does not exceed the student maximum amount, allowing both to
be deferred.

Chapter 8 Setting Up Payment Plans
Copyright © 1988, 2010, Oracle and/or its affiliates. All Rights Reserved. 259
Setting Up Payment Plan Contracts
To set up payment plan contracts, use the Create Payment Plan component (TP_PAYMENT_PLAN).
This section discusses how to:
•Define basic payment plan contract parameters.
•Define payment plan type, eligible charges, and time frame.
•Define payment plan item types.
•Define self-service options.
•Define payment plan administrative fees.
Pages Used to Set Up Payment Plan Contracts
Page Name Definition Name Navigation Usage
Payment Plan 1 TP_PAYMENT_PLAN Student Financials, Payment
Plans, Create Payment Plan,
Payment Plan 1
Define basic payment plan
contract parameters.
Payment Plan 2 TP_PAYMENT_PLAN3 Student Financials, Payment
Plans, Create Payment Plan,
Payment Plan 2
Define payment plan type,
eligible charges, and time
frame.
Payment Plan Item Type TP_PAYMENT_PLN2 Student Financials, Payment
Plans, Create Payment Plan,
Payment Plan Item Type
Define payment plan item
types.
Self Service Options SSF_TP_PMT_PLAN4 Student Financials, Payment
Plans, Create Payment Plan,
Self Service Options
Define self-service options.
Payment Plan Fee TP_CONTRACT_ASSESS Student Financials, Payment
Plans, Create Payment Plan,
Payment Plan Fee
Define payment plan
administrative fees.
Defining Basic Payment Plan Contract Parameters
Access the Payment Plan 1 page (Student Financials, Payment Plans, Create Payment Plan, Payment Plan 1).
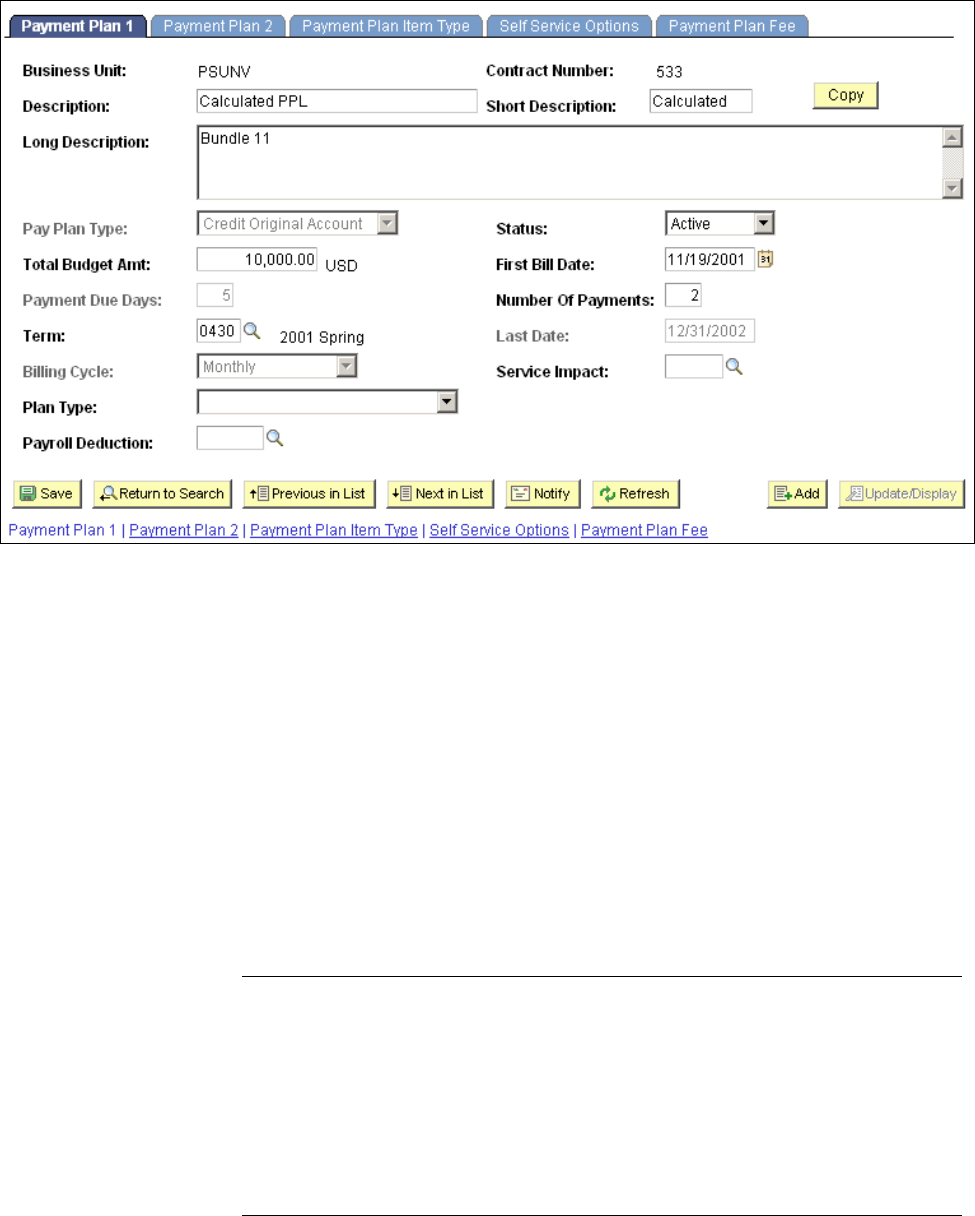
Setting Up Payment Plans Chapter 8
260 Copyright © 1988, 2010, Oracle and/or its affiliates. All Rights Reserved.
Payment Plan 1 page
Description Enter a description. This will also appear in Self Service Enroll in a Payment
Plan.
Pay Plan Type Define how the system credits payments made to this plan. Values are:
Credit the Original Account: Select to credit all eligible charges and create a new
payment plan charge.
Create Billing Entries: This option should not be used with any of the three
payment plans.
Status Specify whether the payment plan contract is active or inactive. You can change
the status of a contract to Inactive regardless of the status of any students that are
associated with it.
Note. You should change the contract status to Inactive on any calculated
payment plans for previous terms. This enhances performance because of the
way the system automatically recalculates active contracts. An active contract is
one for which both the contract and student status have a value of Active, and the
last date of the contract is greater than the current system date. When the system
recalculates contracts for a student, it evaluates all active contracts for that
student. You do not need to set the student status to Inactive to receive this
performance benefit as long as you have set the appropriate contract status to
Inactive.

Chapter 8 Setting Up Payment Plans
Copyright © 1988, 2010, Oracle and/or its affiliates. All Rights Reserved. 261
Total Budget Amt (total
budget amount) This should be defined in conjunction with all eligible charges. Enter the
maximum amount of installment payments that a student can make through the
payment plan account. Carefully consider all eligible charges when you establish
this figure to make sure that it is high enough to cover all the intended costs.
For lump sum plans, the total budget amount becomes the default lump sum
amount. You can adjust this amount for each student who is linked to the plan.
First Bill Date Set the date on which you generate the first bill for the payment plan. The system
uses the first bill date and the billing cycle to set the billing dates for the duration
of the payment plan. You can override this setting for each student who is linked
to the plan.
Note. The billing program does not acknowledge the payment plan until on or
after the first bill date specified. For example, if your first bill date is set for
November 16 and you run your billing process on the 15th, the system does not
process Payment Plan billing until the next run.
Payment Due Days Enter the number of days after the bill date that the payment is due.
Number of Payments Enter the number of payments (installments) that students must make to pay off
the plan. The system uses the information in this field as the default value. You
can override the number of payments for each student who is linked to the plan.
Term This field is required for calculated payment plans. Enter the term that the system
posts on the payment plan credit and the installments.
This field is optional for existing and lump-sum payment plans.
Last Date Enter the last date that charges can be added or adjusted and still be picked up by
the plan.
Service Impact Enter the service impact that would prevent enrollment into the payment plan.
This prevents enrollment into the payment plan through Batch Assignment,
Assign Page, and Self Service.
Plan Type Select the value of the HR plan type that applies to the payroll deduction code.
Payroll Deduction Enter the code of the payroll deduction that applies to the payment plan account.
Note. Assigning a payroll deduction code to a payment plan is necessary only if
you plan to restrict payroll deductions to apply to payment plan accounts.
Copy Contracts
Click the Copy button to copy an existing payment plan contract as the basis of a new payment plan contract.
You can copy all contract setup information except for term and date information.
Access the Copy Contract page (click the Copy button on the Payment Plan 1 page).
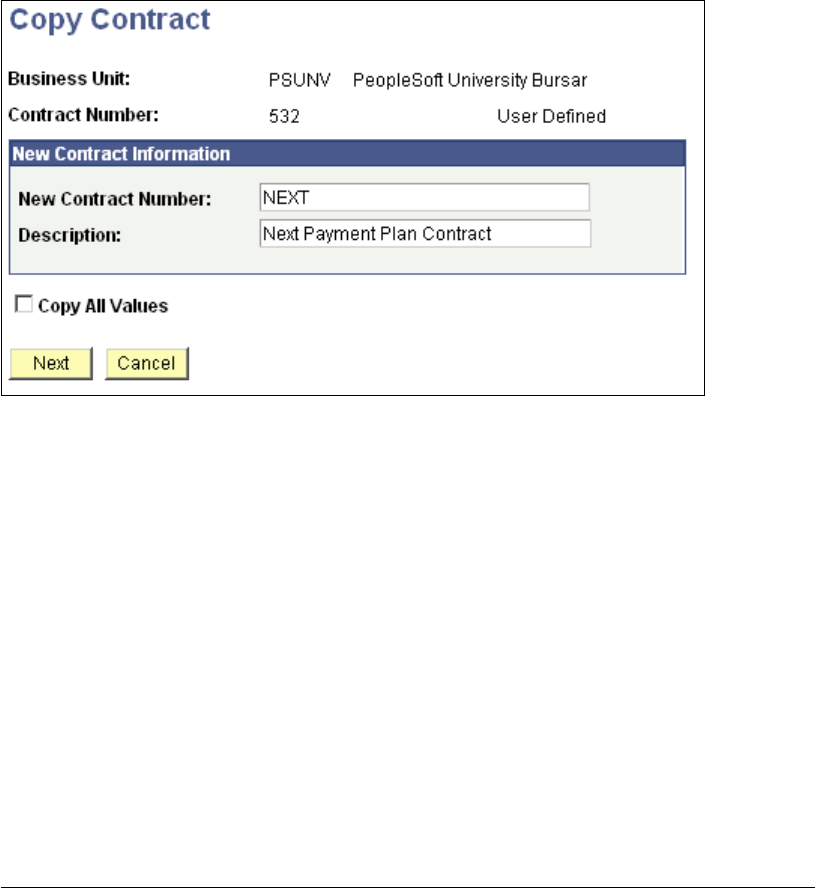
Setting Up Payment Plans Chapter 8
262 Copyright © 1988, 2010, Oracle and/or its affiliates. All Rights Reserved.
Copy Contract page
New Contract Number Enter a new number for the copied contract.
If auto numbering is enabled on the SF Business Unit payment plan contract set
up page, NEXT is automatically assigned as the new contract number. You can
change the contract number.
Description Enter a description for the copied contract.
Copy All Values Select to copy all other related contract information from the previous contract.
Enter the desired information and click Save. You are returned to the Payment Plan 1 page, where you can
modify the new contract information as desired.
See Also
Chapter 11, "Setting Up Receivables Maintenance," Setting Up Payroll Deduction, page 359
Defining Payment Plan Type, Eligible Charges, and Time Frame
Access the Payment Plan 2 page (Student Financials, Payment Plans, Create Payment Plan, Payment Plan 2).

Chapter 8 Setting Up Payment Plans
Copyright © 1988, 2010, Oracle and/or its affiliates. All Rights Reserved. 263
Payment Plan 2 page
Plan Type Select the plan type from the following values:
Calculated: Select to determine which charges to include based on the rules that
you define on this page. If you use this option, each time that you calculate or
recalculate the payment plan, the system picks up all eligible charges and adds
them to the plan balance. You can also use the Calculate Real Time option to
have the contract recalculated each time an eligible change occurs in the student's
account. This is available for Self Service Enroll in a Payment Plan.
Existing: Select to manually choose which charges to include in each student's
payment plan at the time you add the student to the plan.
Note. When you choose Existing, the rest of the fields (with the exception of
Calculate Real Time) become unavailable.
Lump Sum: Select to create a payment plan for a fixed amount. This is the most
basic type of plan and is useful for students who do not expect any changes to
occur in their accounts and know how much they need to finance. This is
available for Self Service Enroll in a Payment Plan.
Note. When you select the Lump Sum option, the Lump Sum Amount field
becomes available and all other fields on the page become unavailable.
Maximum Amount The maximum amount is set by default from the total budget amount and can be
overridden, if needed. This field is available with calculated payment plans only.
Setting Up Payment Plans Chapter 8
264 Copyright © 1988, 2010, Oracle and/or its affiliates. All Rights Reserved.
Lump Sum Amount Enter the lump sum amount that you want the contract to cover. The default
value for this field is the total budget amount that is established on the Payment
Plan 1 page. You can override this value, but you cannot exceed the total budget
amount limit. This field is available with lump sum payment plans only.
Item Type Group Select the item type group that includes all of the charges to be included in the
payment plan. This field is available with calculated payment plans only.
Offset Item Type Group Select the offset item type group that includes payments, financial aid, or both
that the system uses to offset charges and thereby reduce the amount of the
payment plan. This field is available with calculated payment plans only.
Term and Offset Term
In these group boxes, enter the range of terms for which the system includes charges and offsetting credits in
the payment plan. These fields are available with calculated payment plans only.
Charge Date and Charge Offset Date
In these group boxes, specify when charges and offsetting credits can be added to or adjusted in the payment
plan. These fields are available with calculated payment plans only.
Add Enter the earliest date to include charges, offsetting credits, or both in the
payment plan.
Adjust Enter the last date on which you can adjust the payment plan for new charges or a
reduction in charges, offsetting credits or both.
Anticipated Aid Term/Date
Enter the range of terms for which the system considers anticipated aid. These fields are available for the
calculated payment plan, but not required.
From andTo Enter the earliest term and latest term for which the system considers anticipated
aid.
Anticipated Aid Date Enter the date that the system uses to determine whether anticipated aid is
eligible. If this date is less than the current system date, the system disregards
anticipated aid when it calculates the payment plan contract.
Calculate Real Time Check Box
Calculate Real Time Select to automatically calculate payment plan charges whenever a change is
made to eligible charges. This option affects all students who are associated with
the plan, but you can override it at the student level. If you do not select this
option, you must calculate payment plan agreements in batch mode.
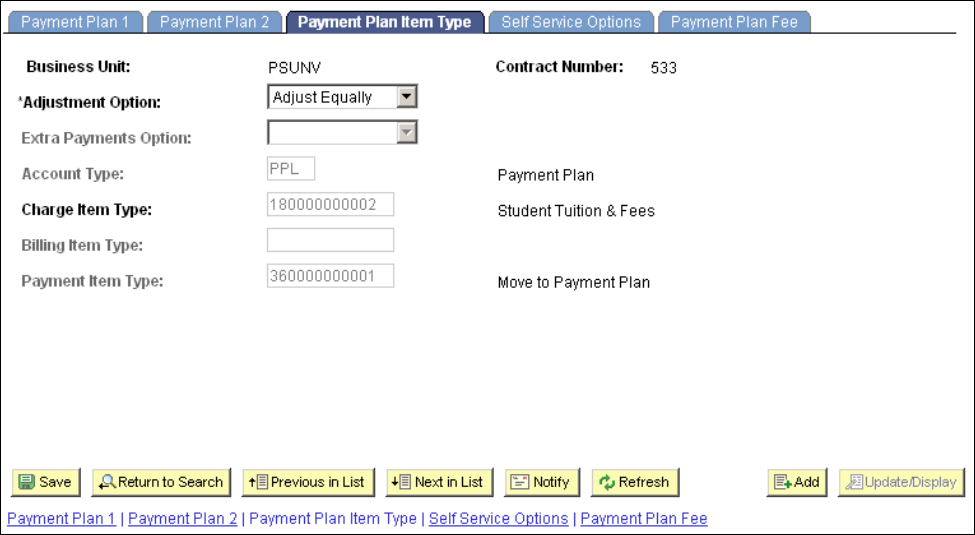
Chapter 8 Setting Up Payment Plans
Copyright © 1988, 2010, Oracle and/or its affiliates. All Rights Reserved. 265
Defining Payment Plan Item Types
Access the Payment Plan Item Type page (Student Financials, Payment Plans, Create Payment Plan, Payment
Plan Item Type).
Payment Plan Item Type page
Adjustment Option Enter how the system distributes changes to payment plan installments. See
Increasing Payment Plan Contract Installments and Decreasing Payment Plan
Contract Installments below for detailed information about this field and its
values.
Extra Payments Option Specify how the system applies payments that exceed the amount billed. Values
are:
All Bills: Select to reduce the amount due in equal portions across all remaining
bills.
First Bill: Select to reduce the amount of the next bill by the amount of the
excess payment. If the excess is greater than the amount of the next bill, the
system applies it to remaining bills in the order due.
Last Bill: Select to apply the excess amounts to the final bill of the contract.
Account Type Enter the account type that you have defined for the plan.

Setting Up Payment Plans Chapter 8
266 Copyright © 1988, 2010, Oracle and/or its affiliates. All Rights Reserved.
Charge Item Type Enter the charge item type. This creates the installment charges on the payment
plan account.
Note. If this field is not available, change the payment plan type on the Payment
Plan 1 page to Credit Original Account.
Billing Item Type This field is not available for use with this type of payment plan. If the field is
available, change the payment plan type on the Payment Plan 1 page to Credit
Original Account.
Payment Item Type Enter the payment item type to use to credit the tuition and fees covered by the
payment plan.
Note. If this field is not available, change the payment plan type on the Payment
Plan 1 page to Credit Original Account.
Note. How you set up the account types and item types that you use with your payment plans significantly
affects the way the plan works. How you define your account types determines how charges and payments
appear on the student's account. Item type setup controls how charges and payments are applied. Test your
setup using different configurations to determine what works best for your situation.
Increasing Payment Plan Contract Installments
Anytime you add a new eligible charge to a payment plan contract or decrease a payment offset for a contract,
the amount of the payment plan contract increases. When this happens, the system must distribute this
increase to one or all of the payment plan contract installments.
For calculated payment plan contracts, the Adjustment Option field value determines how the system
distributes increases to installments. Values are:
•Adjust Equally: Distributes increases equally among the unbilled installments.
•Adjust Last: Adds increases to the last unbilled installment.
•Adjust First: Adds increases to the first unbilled installment.
•Do Not Adjust: Does not allow increases.
Note. If all installments have been billed, you cannot increase the payment plan contract, regardless of the
adjustment option. In addition, these adjustment options apply only if you have billed at least one installment.
If no billing has occurred, the system adjusts equally by default.
For existing payment plan contracts, when you click the Calculate button, the system distributes increases
equally among all installments. This happens regardless of the selected adjustment option or whether you
have billed any installments. You can use the Payment Distribution page to manually update the installment
amounts before posting.

Chapter 8 Setting Up Payment Plans
Copyright © 1988, 2010, Oracle and/or its affiliates. All Rights Reserved. 267
Decreasing Payment Plan Contract Installments
Anytime you reverse or reduce an eligible charge from a payment plan contract or increase a payment offset
for a contract, the amount of the payment plan contract decreases. When this happens, the system must
distribute this decrease to the payment plan contract installments. Student Financials does not allow payment
plan credits to have an unapplied balance. This means that unlike payment plan contract increases, payment
plan contract decreases cannot be prevented. Even if all of the payment plan contract installments have been
billed, or the payment plan is inactive, or the last adjustment date has passed, the system must adjust the
installments whenever a payment plan contract amount decreases.
Similar to payment plan increases, the Adjustment Option field value determines how the system distributes
decreases to installments. Because an individual installment can never be less than 0.00, however, the
adjustment option rules don't always apply in exactly the same way that they do with payment plan contract
increases. When the total amount of a payment plan contract decrease is greater than the amount of each
individual installment, the adjustment option provides a starting point for the system to apply decreases.
Values are:
•Adjust First: Adjusts installments in ascending item number order.
•Adjust Last: Adjusts installments in descending item number order.
•Do Not Adjust: Adjusts installments in descending item number order.
•Adjust Equally: Divides the adjustment amount equally across all installments.
If no unbilled installments exist for a payment plan contract decrease, or the total of the unbilled installments
is less than the total decrease, the system adjusts installments in the following order using the starting point
that is designated by the adjustment option:
1. Unbilled and unpaid installments.
2. Unbilled and paid installments.
3. Billed and unpaid installments.
4. Billed and paid installments.
For example, a payment plan contract with an adjustment option of Adjust Last has two unbilled installments
of 200.00 USD each and undergoes a decrease of 500.00 USD. The system cannot apply the entire decrease
to the last unbilled installment because that would bring the installment to an amount that is less than 0.00
USD, so it subtracts 200.00 USD from the last unbilled installment, and with the remaining 300.00 USD
moves to the next to last unbilled installment. Again, it can apply only 200.00 USD to the installment, leaving
an unapplied balance of 100.00 USD. The system subtracts this unapplied balance to one of the billed
installments according to the order given previously.
See Also
Chapter 2, "Completing Student Financials General Setup," page 5
Defining Self Service Options
Access the Self Service Options page (Student Financials, Payment Plans, Payment Plan, Create, Self Service
Options).
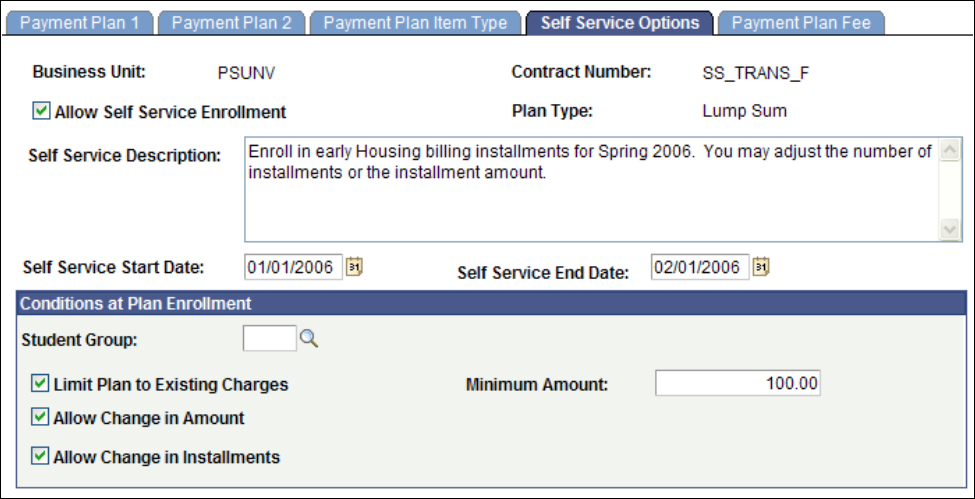
Setting Up Payment Plans Chapter 8
268 Copyright © 1988, 2010, Oracle and/or its affiliates. All Rights Reserved.
Self Service Options page
This self-service component enables students to link their charges to a specified payment plan. Only the
calculated and lump sum payment plans are available for the self-service enrollment in a Payment Plan
functionality.
If the student wants to revoke permission, this can be done only by the administrator, not by means of self
service by the student.
Allow Self Service
Enrollment Select to enable self-service enrollment in the payment plan.
Self Service Description Enter a useful summary of the payment plan that the system displays to the
student.
Self Service Start Date
and Self Service End
Date
Enter a start and end date for self-service enrollment. The system performs an
edit to check that the billing date is equal to or later than the self service end date.
Conditions at Plan Enrollment
Student Group Enter a value to limit self-service enrollment to a specific group of students.
Limit Plan to Existing
Charges Select to allow the student to link only the eligible charges to the payment plan at
the time of payment plan enrollment.
Any additional transactions do not affect the payment plan amount. If you do not
select this option, the payment plan maximum amount defaults to the contract
amount and the system can move any future eligible transactions to the payment
plan.
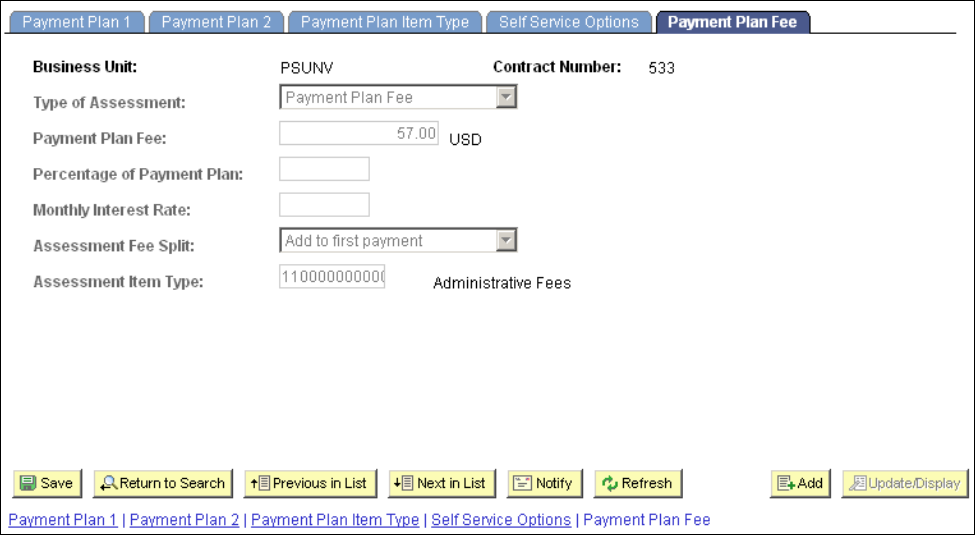
Chapter 8 Setting Up Payment Plans
Copyright © 1988, 2010, Oracle and/or its affiliates. All Rights Reserved. 269
Allow Change in
Amount Select to allow the student to change the contract amount to less than the
payment plan maximum amount or less than the existing charges but greater than
the minimum amount.
If you do not select this option and you have selected the Limit Plan to Existing
Charges option, the plan amount is either the maximum amount or the eligible
charges.
Allow Change in
Installments Select to allow the student to change the number of installments.
Minimum Amount Indicate a minimum amount for the payment plan.
If you have selected the Limit Plan to Existing Charges option or the Allow
Change In Amount option, you must enter an amount greater than zero.
Defining Payment Plan Administrative Fees
Access the Payment Plan Fee page (Student Financials, Payment Plans, Create Payment Plan, Payment Plan
Fee).
Payment Plan Fee page

Setting Up Payment Plans Chapter 8
270 Copyright © 1988, 2010, Oracle and/or its affiliates. All Rights Reserved.
Type of Assessment Select the type of assessment. You can leave this field blank if you do not want
to assess a fee. When you leave the field blank, all of the other fields on the page
become unavailable. If the majority of the students who are associated with this
payment plan should be assessed a fee, select one of the following options. When
linking each student to the payment plan, you can waive the fee on an individual
basis.
Monthly Interest Rate: Select to charge interest that is calculated monthly against
the outstanding balance in the plan. When you select this option, you must also
set a monthly interest rate.
Note. This option is not available with calculated payment plans.
Payment Plan Fee: Select to assess a fixed amount fee. If you select this option,
the Payment Plan Fee,Assessment Fee Split, and the Assessment Item Type
fields become available.
Percentage of Payment Plan: Select to assess a fee based on a percentage of the
plan's initial balance. If you select this option, the Percentage of Payment Plan,
Assessment Fee Split, and the Assessment Item Type fields become available.
Payment Plan Fee Enter an optional flat-amount payment-plan fee if your institution assesses a flat
fee for payment plans. This field is available only if you select Payment Plan Fee
in the Type of Assessment field.
Percentage of Payment
Plan Enter the percent amount that you want the system to use when you select
Percentage of Payment Plan in the Type of Assessment field.
Monthly Interest Rate Enter a monthly interest rate that you want to charge when you select Monthly
Interest Rate in the Type of Assessment field.
Assessment Fee Split Select how you want to split the assessment fee. This field is available only if
you select Payment Plan Fee or Percentage of Payment Plan in the Type of
Assessment field.
Add to first installment: Select to apply the entire assessment fee to the first
payment of the contract.
Add to last installment: Select to apply the entire assessment fee to the last
payment of the contract.
Split over all installments: Select to divide and apply the assessment fee equally
over all payments.
Assessment Item Type Enter the item type that you want to use for the assessment fee.
Setting Up Third-Party Contracts
To set up third-party contracts, use the Create Third Party Contract component (TP_CONTRACT).
This section discusses how to:
•Define basic third-party contract parameters.

Chapter 8 Setting Up Payment Plans
Copyright © 1988, 2010, Oracle and/or its affiliates. All Rights Reserved. 271
•Define third-party contract item types.
•Define third-party contract transfer parameters.
Pages Used to Set Up Third-Party Contracts
Page Name Definition Name Navigation Usage
Third Party Contract TP_CONTRACT Student Financials, Payment
Plans, Create Third Party
Contract, Third Party
Contract
Define basic third-party
contract parameters.
Third Party Item Types TP_CONTRACT_ITEM Student Financials, Payment
Plans, Create Third Party
Contract, Third Party Item
Types
Define third-party contract
item types.
Third Party Charges TP_CONTRACT_CHRG Student Financials, Payment
Plans, Create Third Party
Contract, Third Party
Charges
Define third-party contract
transfer parameters.
Defining Basic Third-Party Contract Parameters
Access the Third Party Contract page (Student Financials, Payment Plans, Create Third Party Contract, Third
Party Contract).
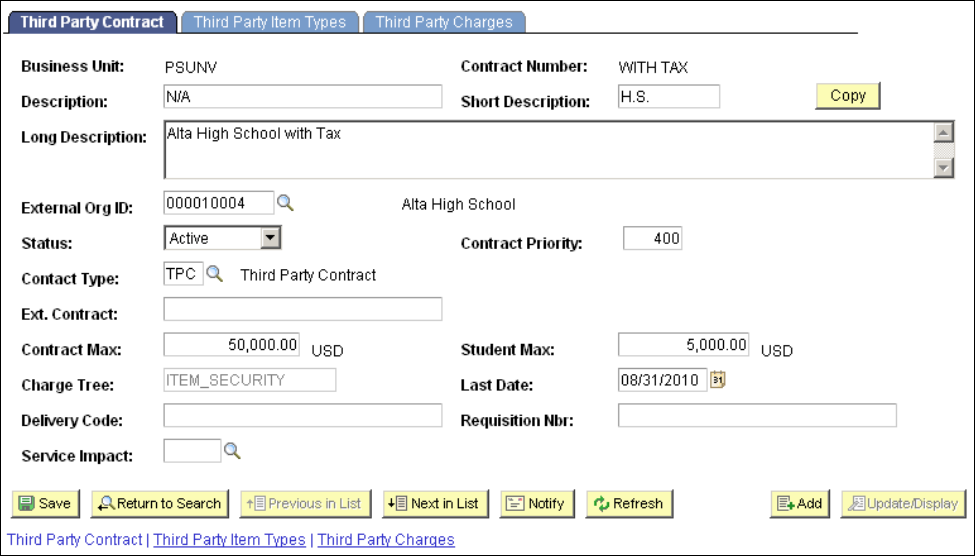
Setting Up Payment Plans Chapter 8
272 Copyright © 1988, 2010, Oracle and/or its affiliates. All Rights Reserved.
Third Party Contract page
Description Enter a description for the third-party contract. This field is required.
External Org ID
(external organization ID) Enter the ID for the contract sponsor.
Contract Priority Enter a contract priority value if a student is linked to more than one third-party
contract. This establishes an order for the contracts to apply.
Contact Type Select the type for the contact person at the organization. You define the contact
type at the same time you define the organization ID.
Ext. Contract (external
contract) Enter the sponsor's contract number in this field. This value can be used as a
reference number.
Contract Max (contract
maximum) Enter a contract maximum amount. This is the maximum monetary amount that
the sponsor provides for all sponsored students combined. This amount cannot be
adjusted after students are linked to a contract.
Student Max (student
maximum) Enter a student maximum amount. This is the maximum amount that the sponsor
provides for any one sponsored student. This amount cannot be adjusted after
students are linked to a contract.
Charge Tree Enter the charge tree (item type tree) that you want to use to define which
charges the contract covers.
Last Date Enter the last date that charges can be adjusted. This date cannot be adjusted after
students are linked to a contract.
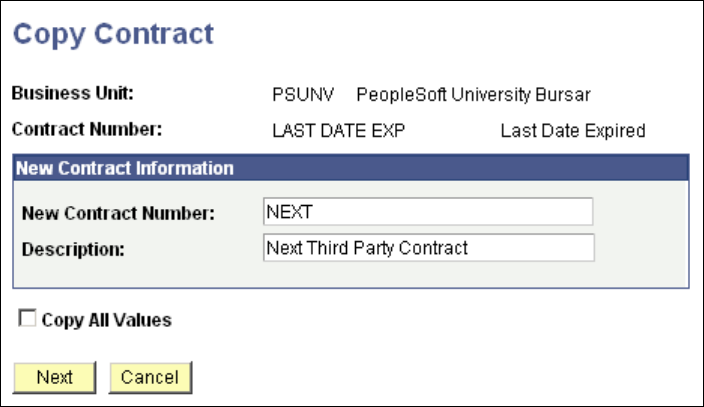
Chapter 8 Setting Up Payment Plans
Copyright © 1988, 2010, Oracle and/or its affiliates. All Rights Reserved. 273
Delivery Code and
Requisition Nbr
(delivery code and
requisition number)
Enter a delivery code, a requisition number, or both if provided by the sponsor.
These values can be used as reference numbers.
Service Impact Enter the service impact that would prevent enrollment into the third-party
contract, through individual assignment or batch assignment.
Copy Contracts
Click the Copy button to copy an existing third-party contract as the basis of a new third-party contract. You
can copy all contract setup information except for term and date information.
Access the Copy Contract page.
Copy Contract page
New Contract Number Enter a new number for the copied contract.
If auto numbering is enabled on the SF Business Unit Payment Plan Contract Set
Up page, NEXT is automatically assigned as the new contract number. You can
change the contract number.
Description Enter a description for the copied contract.
Copy All Values Select to copy all other related contract information from the previous contract.
Enter the desired information and click Save. You are returned to the Third Party Contract page, where you
can modify the new contract information as desired.
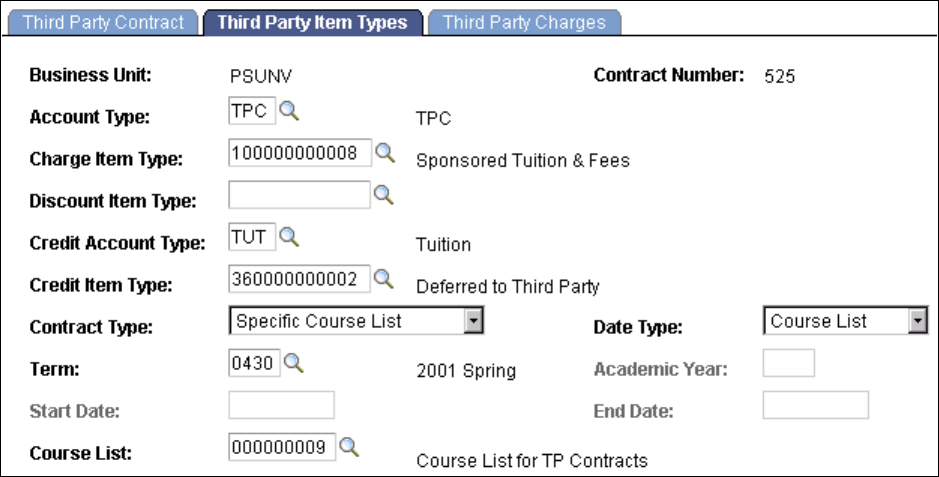
Setting Up Payment Plans Chapter 8
274 Copyright © 1988, 2010, Oracle and/or its affiliates. All Rights Reserved.
Defining Third-Party Contract Item Types
Access the Third Party Item Types page (Student Financials, Payment Plans, Create Third Party Contract,
Third Party Item Types).
Third Party Item Types page
Account Type Enter the account type for third-party contract charges.
Charge Item Type Enter the item type for third-party contract charges that will appear on the
corporate account and invoice.
Discount Item Type If you want to allow discounts to third-party contract sponsors, enter the item
type that you have set up to credit against eligible charges. For example, if you
have a local corporation that provides tuition sponsorship for dozens of
employees each year, you can offer them a discount.
This item type number is the default value for all discounts that are associated
with this contract, but you can override and specify a different item type for each
eligible node.
This is not recommended for use on a date range contract.
Credit Account Type Enter the account type that the system uses for credits to the customer's account.
Credit Item Type Enter the item type that the system uses for credits to the customer.

Chapter 8 Setting Up Payment Plans
Copyright © 1988, 2010, Oracle and/or its affiliates. All Rights Reserved. 275
Contract Type Select from the following values:
Specific Course: Reserved for future use.
Specific Course List: Select to apply the contract to a specific list of courses.
When you select this option, the Term and Course List fields become available.
Note. If you are using term fees and your third-party contract is set up with a
course list, then the applicable term fee must have Track Class Pricing enabled.
Specific Term: Select to apply the contract to charges that are assessed to the
student within a specific term. When you select this option, the Term field
becomes available.
Note. You cannot enter an offset item group if you use this option.
Specific Year or Period: Select to apply the contract to charges that are assessed
to the student within a particular academic year or specified period of time. When
you select this option, the Academic Year,Start Date, and End Date fields
become available.
This is not recommended for use on a date range contract.
Date Type When you have entered Specific Year or Period in the Contract Type field, you
must also set the time period to which the third-party contract applies. Values
are:
Academic Year: Select to apply the contract to apply to a full academic year. If
you select this option, the Academic Year field becomes available.
Course List: This option is not available.
Date Range: If you select this option, the Start Date and End Date fields become
available. Enter the start date and end date to specify the date range to which the
contract applies.
Term Year: This option is not available.
Term Enter the academic term to which the contract applies.
Academic Year Enter the academic year to which the contract applies.
Start Date and End Date Enter a start date and end date for the period for which the contract applies.
Course List Enter the course list to which the contract applies. This course list applies to all
students who are attached to the contract, but you can override it at the student
level if necessary.
Note. When using a course list with a third-party contract, particular setup issues
related to term fees exist.
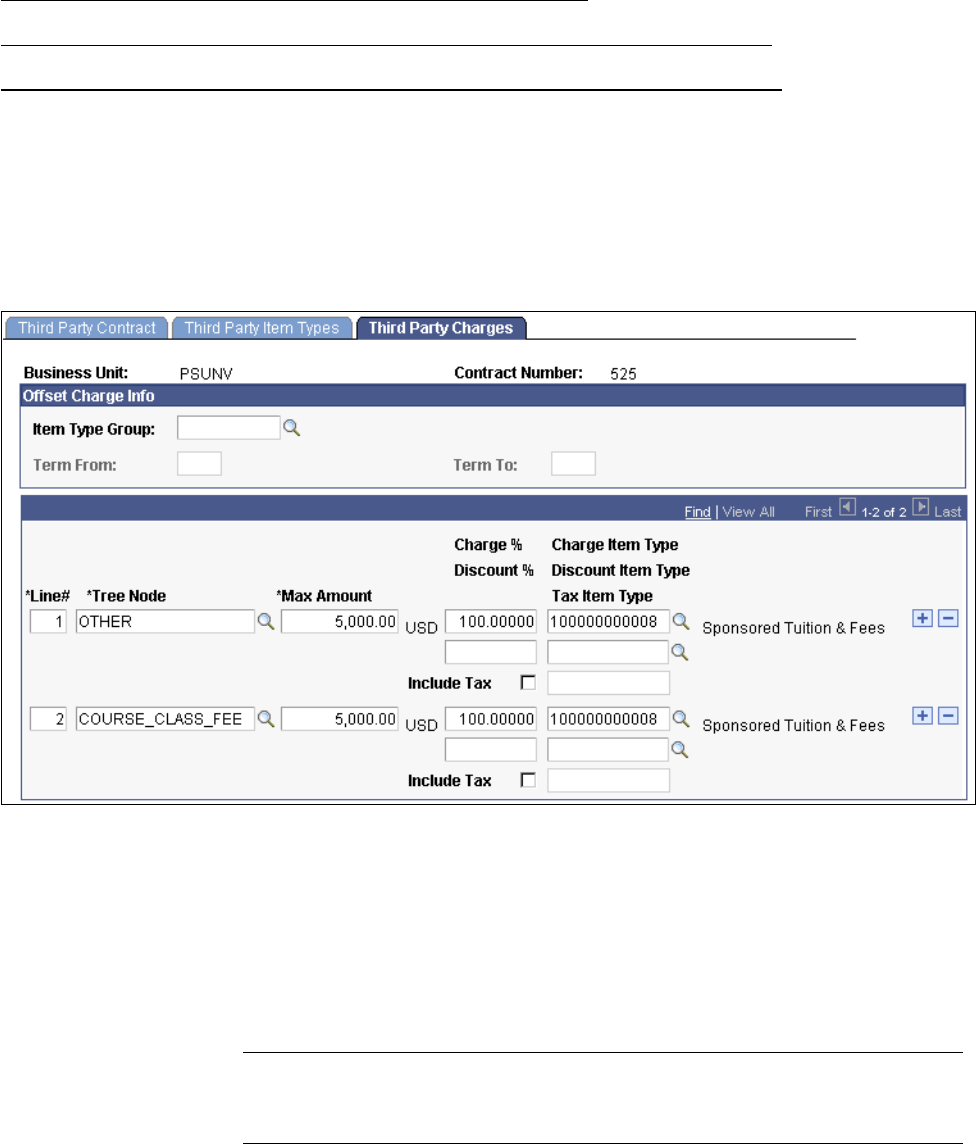
Setting Up Payment Plans Chapter 8
276 Copyright © 1988, 2010, Oracle and/or its affiliates. All Rights Reserved.
See Also
Chapter 2, "Completing Student Financials General Setup," page 5
Chapter 6, "Setting Up Fees and Tuition Groups," Setting Up Tuition Groups, page 227
Chapter 6, "Setting Up Fees and Tuition Groups," Setting Up Term Fee Codes, page 190
Defining Third-Party Charge Transfers
Access the Third Party Charges page (Student Financials, Payment Plans, Create Third Party Contract, Third
Party Charges).
Third Party Charges page
Offset Charge Info
Item Type Group Enter an item type group that the system uses to offset charges that are covered
by the contract. For example, you can apply all financial aid to the student's
account before transferring eligible charges to the sponsor.
Note. If your school uses the Payment Priority check box in the setup of these
item types, you may not want to define any offset charge item type groups. The
preferred method is to use this option.
Term From andTerm To Enter a term range for offsetting charges. You can limit the range to just one term
by entering it in both fields.

Chapter 8 Setting Up Payment Plans
Copyright © 1988, 2010, Oracle and/or its affiliates. All Rights Reserved. 277
Eligible Charges
Line# (line number) This field is automatically populated as you add new charge nodes.
Tree Node Enter a tree node from the item type tree that includes all charge item types that
you want to cover with the third-party contract.
Max Amount (maximum
amount) Define a maximum amount that you can apply to pay off the charges belonging
to the corresponding tree node.
Charge % (charge
percentage) Enter the percentage of the eligible charge that the system transfers to the
sponsor. This percentage amount is limited by the maximum amount. For
example, if the student has eligible tuition charges of 8,000 USD and a sponsor
has agreed to pay 50 percent of the charges up to a maximum amount of 3,000
USD, the system transfers only 3,000 USD to the sponsor.
Charge Item Type Enter the charge item type that the system uses to apply charges to the sponsor's
account.
Discount % (discount
percentage) If you want to give a discount to the third-party contract sponsor, enter a discount
percentage in this field.
Note. Discounts are intended to move a portion of a charge to a sponsor account
and a portion of a charge to a discount account. At no time should 100 percent of
the charges be moved to the discount account. Waive the fee to facilitate this type
of transaction.
Discount Item Type The value in this field is set by default from the discount item type selection that
you made on the Third Party Item Types setup page. You can override this value
for each eligible charge.
Include Tax Select to transfer all tax charges that are associated with an eligible charge to the
sponsor. When you select this check box, the Tax Item Type field becomes
available.
Tax Item Type Enter the item type that applies tax charges to the sponsor's account.
Setting Up Collection Agreements
To set up collection agreements, use the Collection Agreement component (COLL_AGREEMENT).
This section discusses how to:
•Define basic collection agreement parameters.
•Define collection agreement administrative fees.

Setting Up Payment Plans Chapter 8
278 Copyright © 1988, 2010, Oracle and/or its affiliates. All Rights Reserved.
Note. You can set up a collection agreement only for a customer whose account includes items in the
collection process.
See Also
Chapter 23, "Collecting Receivables," page 643
Pages Used to Set Up Collection Agreements
Page Name Definition Name Navigation Usage
Collection Agreement COLL_AGREEMENT Student Financials,
Collections, Collection
Agreement
Define basic collection
agreement parameters.
Collection Agreement
Assess
TP_CONTRACT_ASSESS Student Financials,
Collections, Collection
Agreement, Collection
Agreement Assess
Define collection agreement
administrative fees.
Payment Distribution TP_PPLN_QCK_POST Student Financials,
Collections, Collection
Agreement, Payment
Distribution
Confirm collection
agreement payment
schedules.
Defining Basic Collection Agreement Parameters
Access the Collection Agreement page (Student Financials, Collections, Collection Agreement).
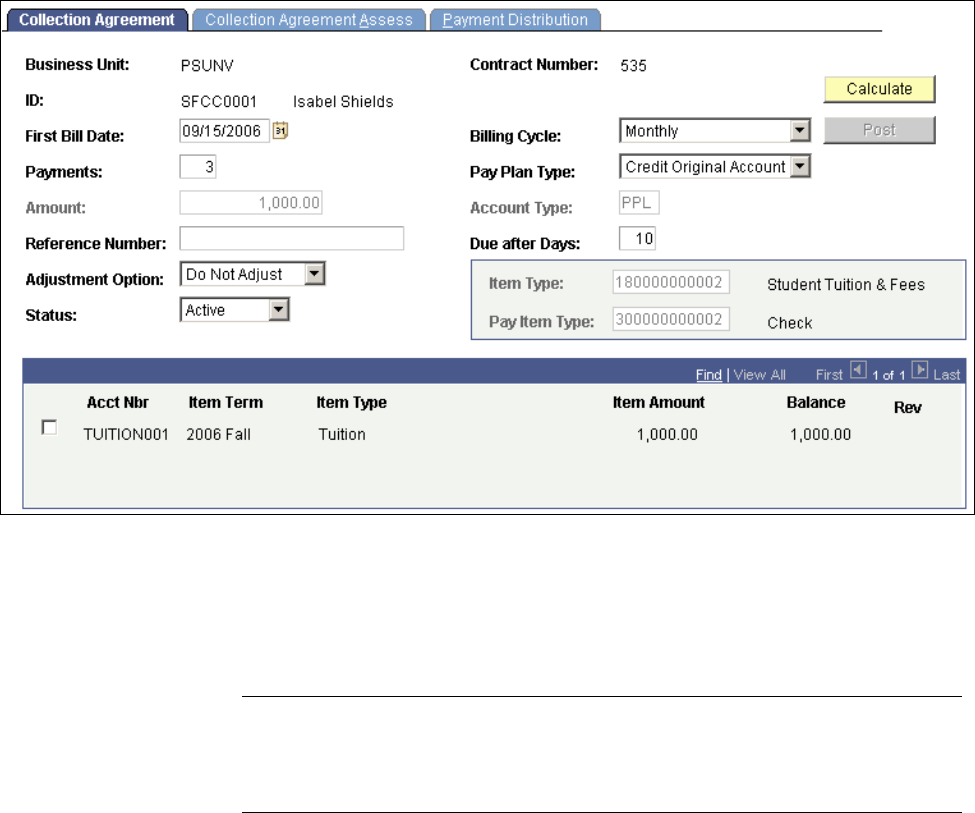
Chapter 8 Setting Up Payment Plans
Copyright © 1988, 2010, Oracle and/or its affiliates. All Rights Reserved. 279
Collection Agreement page
First Bill Date Select the date that you generate the first bill for the collection agreement. The
system uses the first bill date and the billing cycle to set the billing dates for the
duration of the collection agreement.
Note. The billing program does not acknowledge the collection agreement until
on or after the first bill date specified. For example, if your first bill date is set for
November 16 and you run your billing process on the 15th, the system does not
process the collection agreement billing until the next run.
Payments Enter the number of payments that students must make to pay off the collection
agreement.
Pay Plan Type Use this field to define how the system credits payments that are made to this
collection agreement. Values are:
Credit the Original Account: Select to credit all eligible charges and create a new
collection agreement charge.
Create Billing Entries: Do not use this option with this type of plan.
Amount Displays the amount of past due debt to be covered by the collection agreement
after you select the check box next to a line item in the bottom scroll area of the
page.
Account Type Enter the account type that is defined for the agreement.
Reference Number Enter an optional reference number for each student on a particular contract. The
reference number entry is for information only.
Setting Up Payment Plans Chapter 8
280 Copyright © 1988, 2010, Oracle and/or its affiliates. All Rights Reserved.
Due after Days Enter the number of days after the bill date that the payment is due.
Adjustment Option Select an adjustment option. Values are:
Adjust Equally: Select to apply adjustments that are made to the collection
agreement equally across all remaining payments.
Adjust First Bill: Select to apply adjustments that are made to the collection
agreement to the plan's next bill.
Adjust Last Bill: Select to apply adjustments that are made to the collection
agreement to the plan's final bill.
Do not Adjust: Select to prevent any adjustment from being made to the
collection agreement.
Item Type Enter the item type that creates the charge the student is paying off.
Pay Item Type Enter the pay item type to use to pay off the past due charges that are covered by
the collection agreement.
Calculating and Posting the Collection Agreement
Before calculating and posting the collection agreement, you should complete the Collection Agreement
Contract Assessment page. After completing this page, return to the collection agreement page to calculate
and post the collection agreement.
Calculate Click to calculate the amount of the collections agreement charges.
Post Click to post the collection agreement charges. After the agreement is posted, the
word Paid appears to the left of all items that are included in the agreement.
Rev (reverse) After you post the collection agreement, this check box becomes available. Select
it and repost the collection agreement to reverse the agreement and return the
student's account to the original state.
Display Error/Warning Click to view error messages, warning messages, or both.
Defining Collection Agreement Administrative Fees
Access the Collection Agreement Assess page (Student Financials, Collections, Collection Agreement,
Collection Agreement Assess).
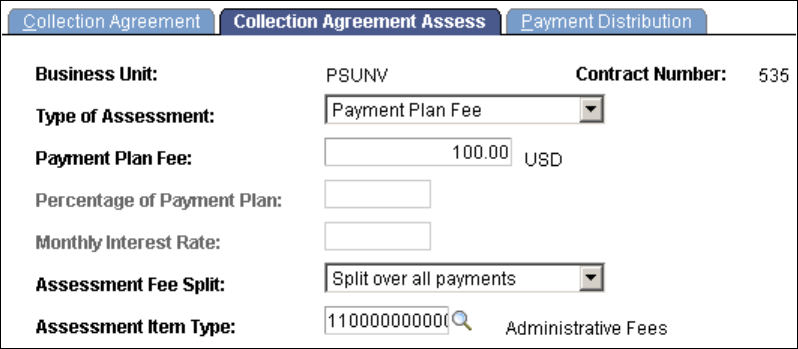
Chapter 8 Setting Up Payment Plans
Copyright © 1988, 2010, Oracle and/or its affiliates. All Rights Reserved. 281
Collection Agreement Assess page
Type of Assessment Select the type of assessment. You can leave this field blank if you do not want
to assess a fee. When you leave the field blank, all of the other fields on the page
become unavailable. If you want to assess a fee, select one of the following
options:
Monthly Interest Rate: Select to charge interest that is calculated monthly against
the outstanding balance in the plan. When you select this option, you must also
set a monthly interest rate.
Payment Plan Fee: Select to assess a fixed amount fee. If you select this option,
the Payment Plan Fee, Assessment Fee Split, and Assessment Item Type fields
become available.
Percentage of Payment Plan: Select to assess a fee based on a percentage of the
plan's initial balance. If you select this option, the Percentage of Payment Plan,
Assessment Fee Split, and Assessment Item Type fields become available.
Payment Plan Fee Enter the payment plan fee dollar amount. You can enter this amount as a flat
amount only, not as a percentage or interest rate.
Assessment Fee Split Determine the assessment fee split. Values are:
Add to first payment: Select to apply the entire assessment fee to the first
payment of the contract.
Add to last payment: Select to apply the entire assessment fee to the last payment
of the contract.
Split over all payments: Select to divide and apply the assessment fee equally
over all payments.
Percentage of Payment
Plan Enter the percentage of payment plan amount that you want the system to use
when you select Percentage of Payment Plan in the Type of Assessment field.
Monthly Interest Rate Enter a monthly interest rate to charge when you select Monthly Interest Rate in
the Type of Assessment field.
Assessment Item Type Select the item type that you want to use for the assessment fee.

Copyright © 1988, 2010, Oracle and/or its affiliates. All Rights Reserved. 283
Chapter 9
Setting Up Billing
This chapter discusses how to:
•Set up billing messages.
•Set up invoice layouts.
•Set up invoice ID number generation.
•Set up billing scan lines.
•Set up billing types.
•Set up billing standard requests.
Setting Up Billing Messages
To set up billing messages, use the Message Categories component (BI_MSG_CAT_TBL), the Item Type
Message component (BI_BILL_MSG_ITM), the Customer Message component (BI_BILL_MSG_CUS), the
Business Unit Message component (BI_BILL_MSG_ALL), the Aging Set Messages component
(BI_BILL_MSG_AGE), the Corporation Messages component (BI_BILL_MSG_ORG), and the Billing
Messages component (BI_BILL_MSG_TBL).
This section provides an overview of billing messages and discusses how to:
•Define billing messages.
•Link billing messages to item types.
•Link billing messages to aging sets.
•Link billing messages to business units.
•Link billing messages to students.
•Link billing messages to organizations.
Understanding Billing Messages
You can create and organize the messages that appear on your bills by defining message categories and
billing messages.

Setting Up Billing Chapter 9
284 Copyright © 1988, 2010, Oracle and/or its affiliates. All Rights Reserved.
Message categories enable you to track and organize billing messages that relate to one type of action or
account. You must link all your billing messages to a message category.
After you have defined message categories, you create the messages that appear on your bills. Your messages
can alert students of past due payments, warn them of potential fines or penalties, or inform them how their
bills are calculated.
You link each message to an item type, an aging set, a business unit, a student, or a corporation. When you
link the messages to these elements, the system determines which messages appear on each bill depending on
to whom the bill is issued and to what the bill pertains.
Pages Used to Set Up Billing Messages
Page Name Definition Name Navigation Usage
Message Categories BI_MSG_CAT_TBL Set Up SACR, Product
Related, Student Financials,
Billing, Message Categories
Define message categories.
Item Type Messages BI_BILL_MSG_ITM Set Up SACR, Product
Related, Student Financials,
Billing, Item Type Message
Link billing messages to
item types.
Customer Messages BI_BILL_MSG_CUS Set Up SACR, Product
Related, Student Financials,
Billing, Customer Message
Link billing messages to
students.
Business Unit Messages BI_BILL_MSG_ALL Set Up SACR, Product
Related, Student Financials,
Billing, Business Unit
Message
Link billing messages to
business units.
Aging Set Messages BI_BILL_MSG_AGE Set Up SACR, Product
Related, Student Financials,
Billing, Aging Set
Messages
Link billing messages to
aging sets.
Corporation Messages BI_BILL_MSG_ORG Set Up SACR, Product
Related, Student Financials,
Billing, Corporation
Messages
Link billing messages to
organizations.
Billing Messages BI_BILL_MSG_TBL Set Up SACR, Product
Related, Student Financials,
Billing, Billing Messages
Define billing messages.
Defining Billing Messages
Access the Billing Messages page (Set Up SACR, Product Related, Student Financials, Billing, Billing
Messages).
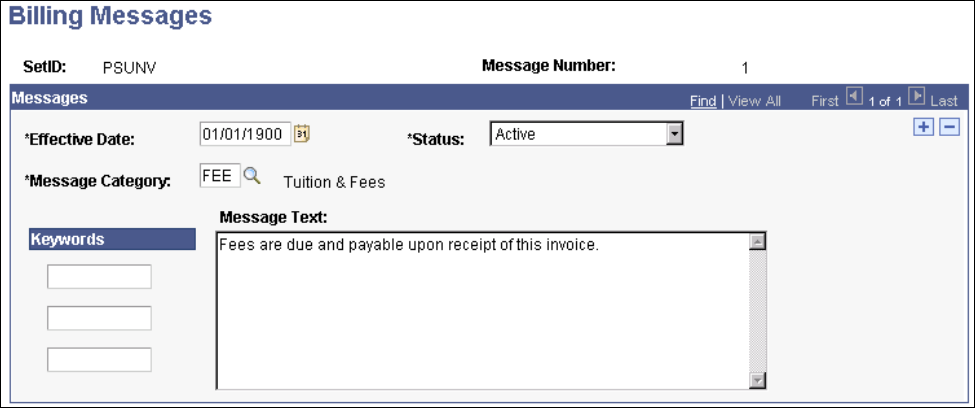
Chapter 9 Setting Up Billing
Copyright © 1988, 2010, Oracle and/or its affiliates. All Rights Reserved. 285
Billing Messages page
Message Category Select a category with which to associate this message.
Keywords Enter keywords to use when searching for this message.
Message Text Enter the message to print on the bill. Remember that you link billing messages
to item types, aging sets, business units, students, and corporations. Make the text
of the message specific to whichever one that you plan to link it to.
Linking Billing Messages to Item Types
Access the Item Type Messages page (Set Up SACR, Product Related, Student Financials, Billing, Item Type
Message).
Message Number Select the number of the billing message to link to the item type range.
When you generate a bill with charges or payments associated with the specified
item type, the message linked to that item type appears on the bill. For example,
if you create a billing message explaining how you calculate tuition, you can
attach this message to all the tuition item types. When the system generates a bill
with a charge against a tuition item type, the message explaining how you
calculate tuition appears on the bill.
Linking Billing Messages to Aging Sets
Access the Aging Set Messages page (Set Up SACR, Product Related, Student Financials, Billing, Aging Set
Messages).

Setting Up Billing Chapter 9
286 Copyright © 1988, 2010, Oracle and/or its affiliates. All Rights Reserved.
Message Number Select the number of the billing message to link to the aging set and aging
category.
When you generate a bill for a customer whose payment is late, the system
selects the message to appear on the bill based on the number of days the
payment is past due.
Note. You can attach only one message per aging category. The message associated with the oldest charge on
a customer's account is the one that appears on the customer's bill.
Linking Billing Messages to Business Units
Access the Business Unit Messages page (Set Up SACR, Product Related, Student Financials, Billing,
Business Unit Message).
Message Number Select the number of the billing message to link to the business unit.
Messages linked to a business unit appear on all bills generated by that business
unit.
Linking Billing Messages to Students
Access the Customer Messages page (Set Up SACR, Product Related, Student Financials, Billing, Customer
Message).
Message Number Select the number of the billing message to link to the student.
When you generate bills for the student, the billing messages you linked appear
on the bill.
Linking Billing Messages to Corporations
Access the Corporation Messages page (Set Up SACR, Product Related, Student Financials, Billing,
Corporation Messages).
Message Number Select the number of the billing message to link to the organization.
When you generate bills for the organization, the billing messages that you
linked appear on the bill.
Setting Up Invoice Layouts
To set up invoice layouts, use the Invoice Layout component (BI_INV_LAYOUT).

Chapter 9 Setting Up Billing
Copyright © 1988, 2010, Oracle and/or its affiliates. All Rights Reserved. 287
An invoice layout is a set of parameters that determine how the system formats the invoices that you print.
Because you may require different formats for different types of invoices, you can create many different
invoice layouts.
This section discusses how to:
•Define and maintain reports.
•View sample XML for report definition.
•Print invoices from the run control page.
•Define invoice layout information.
•Define invoice layout sorting and summarization.
Understanding XML Publisher
Institutions may use XML Publisher, 3C Engine, and Communication Generation to print a variety of
communications or letters, for example, generated invoices. Schools which use global invoicing can use any
of the three to print reminder letters. Additional setups are often required if an institution uses XML
Publisher.
Student Financials provides four templates to print invoices. They illustrate how an institution may present
invoice data to students and external organizations. The templates can be customized to accommodate
specific requirements.
The following billing templates are provided:
•Template SSF_INVOICE_O1 can be used for standard External Organization Invoicing
•Template SSF_INVOICE_OE1 can be used for Global External Organization Invoicing and includes logic
for Credit Invoicing.
•Template SSF_INVOICE_S1 can be used for standard Student Invoicing.
•Template SSF_INVOICE_SE1 can be used for Global Student Invoicing and includes logic for Credit
Invoicing.
Templates are designed to work with existing Invoice options as defined on the Invoice Layout setup page
where you can associate XML Pub Reports and templates to specific Invoice Layouts.
Pages Used to Set Up Invoice Layouts
Page Name Definition Name Navigation Usage
Report Definition SSF_PRNT_INV Reporting Tools, XML
Publisher. Setup, Report
Definition, Definition
Define and maintain
reports.
Data Source PSXPDATASRC Reporting Tools, XML
Publisher, Data Source View sample XML for
report definition.
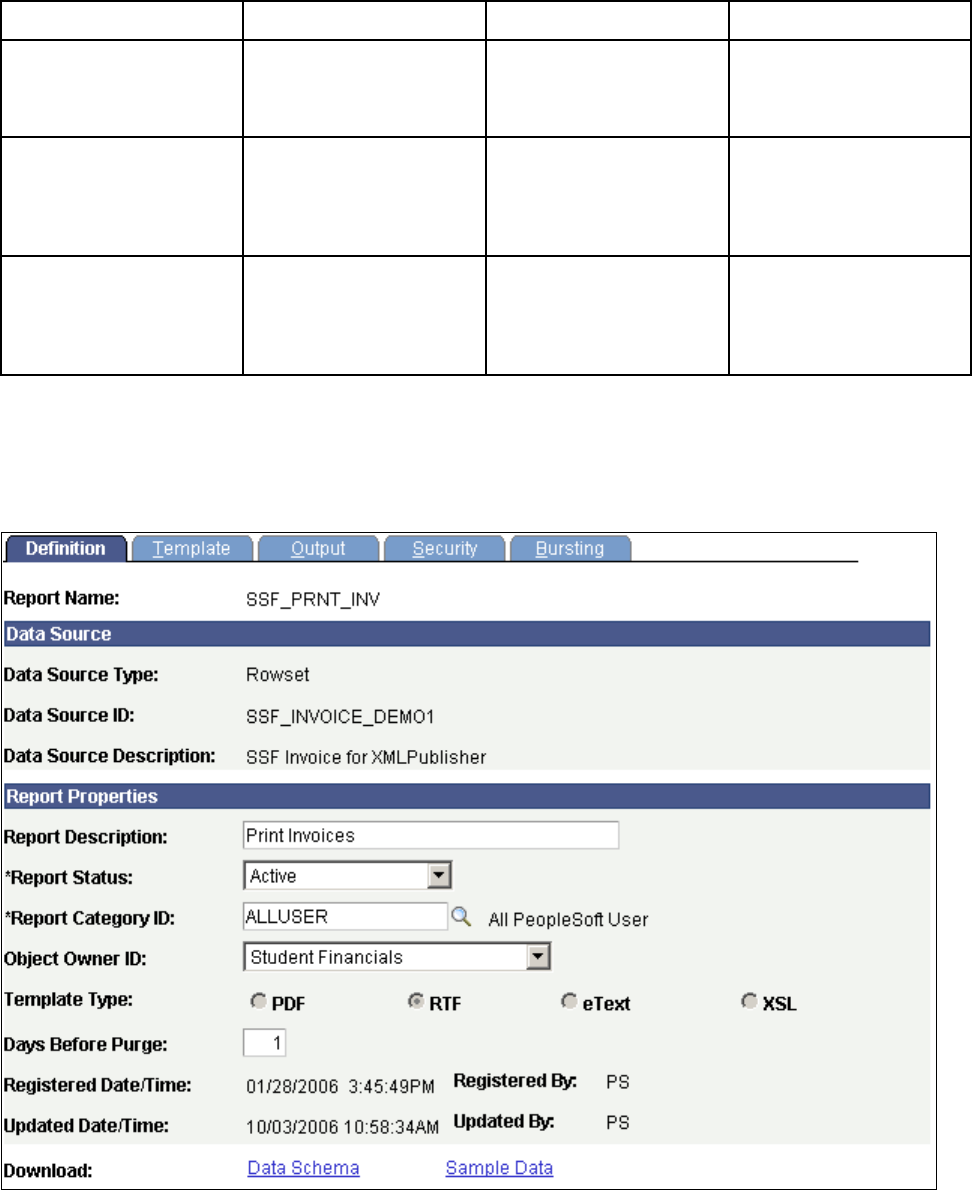
Setting Up Billing Chapter 9
288 Copyright © 1988, 2010, Oracle and/or its affiliates. All Rights Reserved.
Page Name Definition Name Navigation Usage
Student Invoice Other RUN_CNTL_PBILL Student Financials, Bill
Customers, Student Bills,
Print Invoice
Print invoices from the run
control page.
Invoice Layout One BI_INV_LAYOUT Set Up SACR, Product
Related, Student Financials,
Billing, Invoice Layout,
Invoice Layout One
Define invoice layout
information.
Invoice Layout Two BI_INV_LAYOUT2 Set Up SACR, Product
Related, Student Financials,
Billing, Invoice Layout,
Invoice Layout Two
Define invoice layout
sorting and summarization.
Defining and Maintaining Reports
Access the Report Definition page (Reporting Tools, XML Publisher. Setup, Report Definition, Definition).
Report Definition page
Use the XML Publisher Report Definition page to define and maintain reports. The Student Financials
templates reside under the XML Publisher report definition SSF_PRNT_INV.
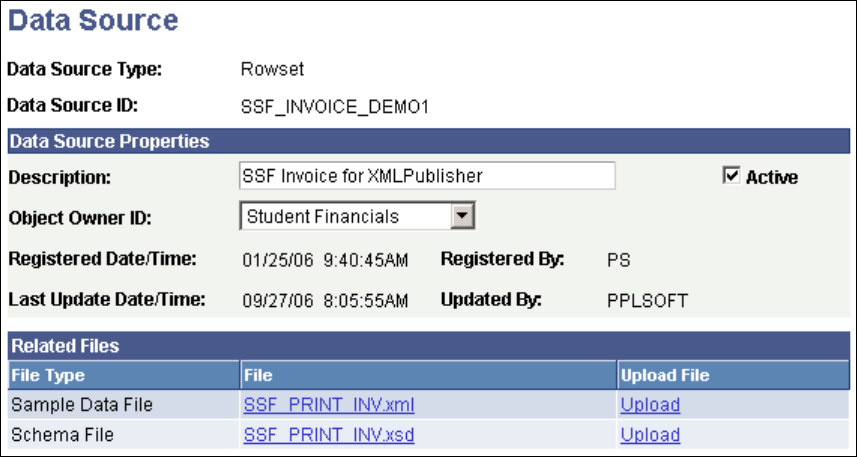
Chapter 9 Setting Up Billing
Copyright © 1988, 2010, Oracle and/or its affiliates. All Rights Reserved. 289
View Sample XML For Report Definition
Access the Data Source page (Reporting Tools, XML Publisher, Data Source).
Data Source page
Use the Data Source page to view sample XML for your report definition. This enables you to review the data
contained in the extract in detail. Use the data source ID from the Report Definition page.
Print Invoices From The Run Control Page
Access the Student Invoice Other page (Student Financials, Bill Customers, Student Bills, Print Invoice,
Student Invoice Other).
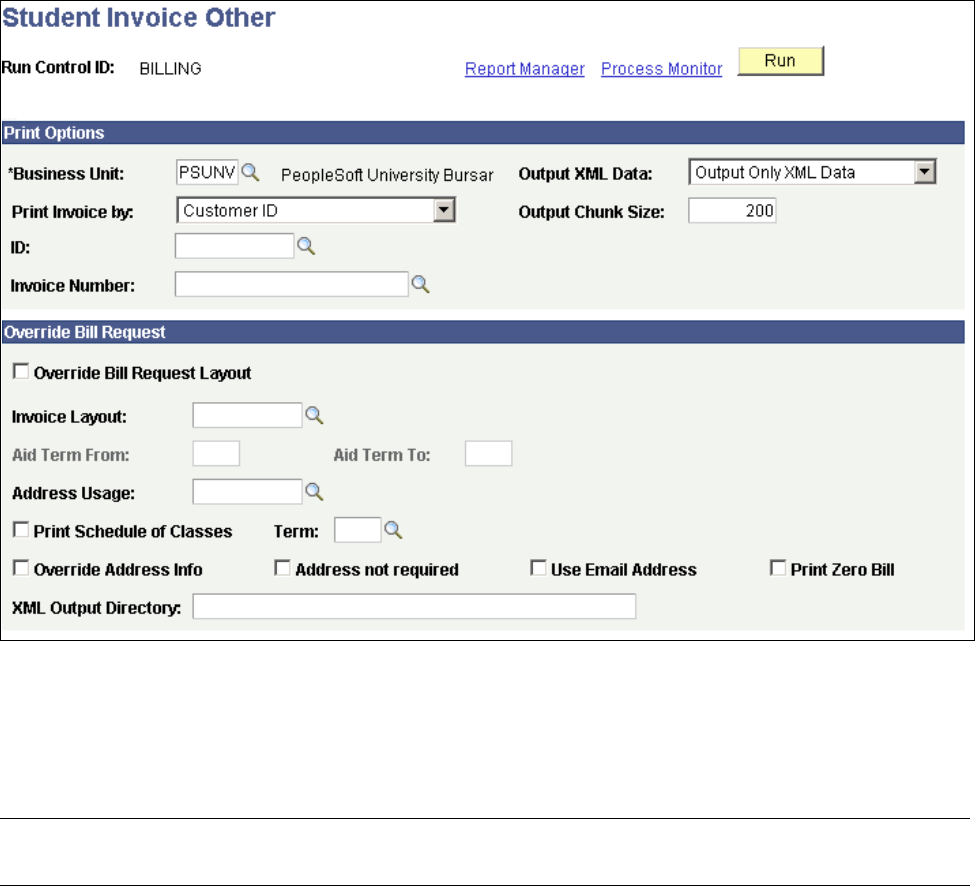
Setting Up Billing Chapter 9
290 Copyright © 1988, 2010, Oracle and/or its affiliates. All Rights Reserved.
Student Invoice Other page
XML can also be generated when printing invoices from the run control page by setting Output XML Data to
either Yes or Only Output XML Data. The second option does not produce an invoice but does produce the
related XML data, which is helpful when making modifications to the provided templates.
Note. The XML Output Directory should be populated with the target directory location. The process
automatically generates a file name for the XML.
Output XML Data Select No to create no XML output.
Select Yes to generate invoices and XML output.
Select Output Only XML Datato generate output XML data without invoices.
Output Chunk Size Use this field to determine the size of the data chunks passed to XML Publisher.
If it is set to zero, no chunking occurs.
Chunking determines how many invoices are in one file. For example, if you set
Output Chunk Size to 200, 200 invoices are placed in each file output. In this
example if you process 1,000 invoices and set Output Chunk Size to 200, five
PDF files are produced, each containing 200 invoices.
You can output directly to the printer and not create any files. In this case,
chunking only controls the size of the chunks of data that are passed to XML
Publisher. Chunking should still be used even if you output directly to the printer.
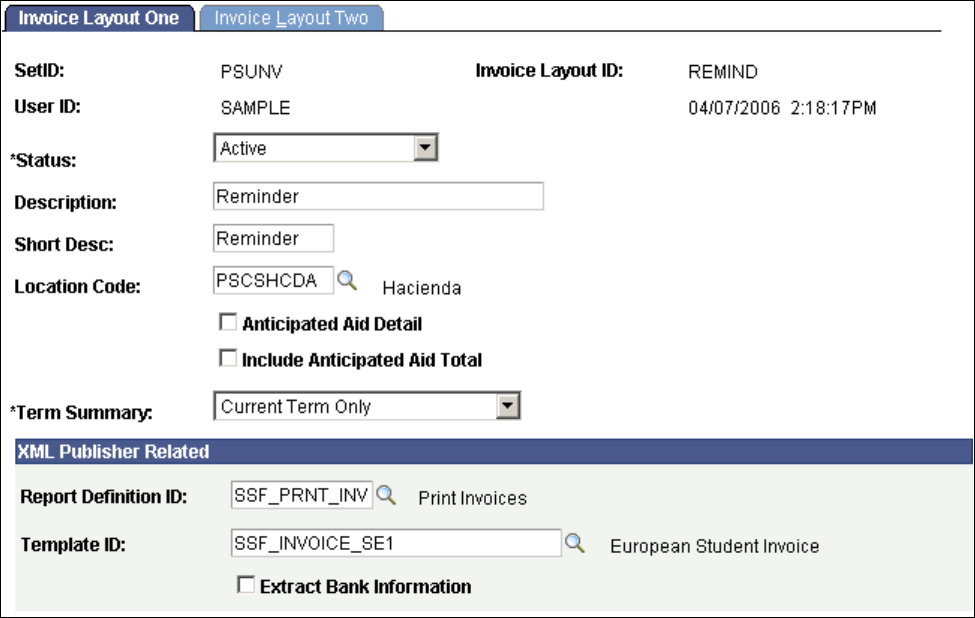
Chapter 9 Setting Up Billing
Copyright © 1988, 2010, Oracle and/or its affiliates. All Rights Reserved. 291
XML Output Directory Enter the directory path for the XML output. This field is not available when you
select not to output XML data.
Defining Invoice Layout Information
Access the Invoice Layout One page (Set Up SACR, Product Related, Student Financials, Billing, Invoice
Layout, Invoice Layout One).
Invoice Layout One page
Location Code Enter the location where invoice recipients must mail their payments.
Anticipated Aid Detail
and Include Anticipated
Aid Total
Select to print, on the invoice, a detailed summary and the total amount of the
financial aid that you expect the student to receive. If you do not select either of
these options, no anticipated financial aid information appears on the invoice.
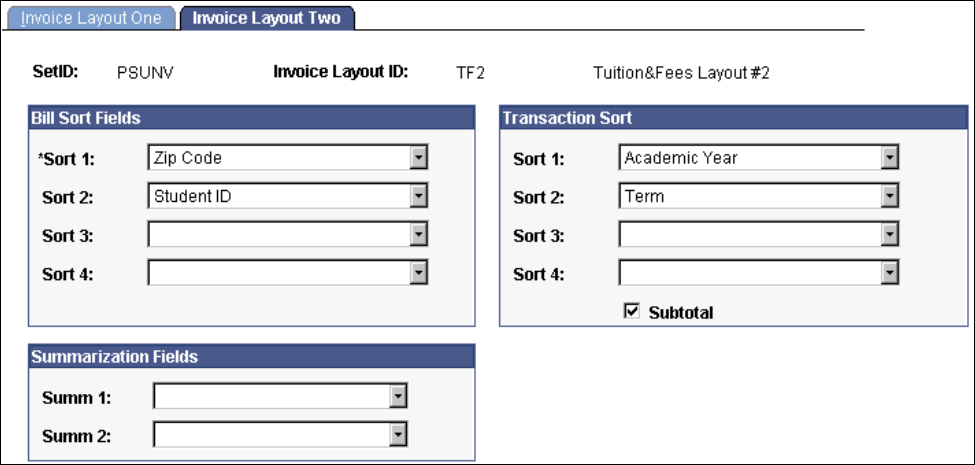
Setting Up Billing Chapter 9
292 Copyright © 1988, 2010, Oracle and/or its affiliates. All Rights Reserved.
Term Summary Select the terms for which information appears in the term summary section of
the invoice:
All Terms: Displays information for past, current, and future terms.
Current and Future Only: Displays information regarding only current and future
terms.
Current Term Only: Displays information regarding the current term only.
Future Only: Displays information regarding future terms only.
XML Publisher Related
Complete this section only if you are using XML Publisher
Report Definition ID Enter the desired report definition ID.
Template ID Enter the desired template ID.
Extract Bank
Information Select this check box if the student's banking information should be included in
the XML Publisher extract.
Defining Invoice Layout Sorting and Summarization
Access the Invoice Layout Two page (Set Up SACR, Product Related, Student Financials, Billing, Invoice
Layout, Invoice Layout Two).
Invoice Layout Two page

Chapter 9 Setting Up Billing
Copyright © 1988, 2010, Oracle and/or its affiliates. All Rights Reserved. 293
Bill Sort Fields
Determine the sort order of the invoices in a given billing run. The sort order that you choose here determines
the order in which the system prints the invoices. You do not have to enter a value in all four sort fields. In
the preceding example, invoices are sorted first by postal code, then by student ID.
Sort 1, Sort 2, Sort 3,
and Sort 4 Select the sort order of your invoices:
Academic Level: Sorts by the academic level of the student (such as freshman,
sophomore, junior, or senior).
Academic Load: Sorts by the academic course load of the student (such as part-
time or full-time load).
Academic Program: Sorts by the academic program of the student (such as
liberal arts).
Campus: Sorts by the campus of the institution that the student attends.
Corporation ID: Sorts by the unique ID (organization ID) of the external
corporation associated with each bill.
Country: Sorts by the country of residence of the student associated with each
bill.
Invoice Number: Sorts by the system-generated invoice number assigned to each
bill.
Name: Sorts by the name of the student associated with each bill.
Student Enrollment Block: Sorts by the Enrollment Block associated to the ID.
ID: Sorts by the unique ID of the student associated with each bill.
Total Amount Due: Sorts by the total dollar amount due for each bill.
Tuition Residency: Sorts by the tuition residency of the student (for example, in-
state or out-of-state tuition) in effect at the time that the system generates the bill.
Zip Code: Sorts by the postal code of the student associated with each bill.
Note. You cannot sort by both invoice number and ID. The system will not give
you an error message
Transaction Sort
Determine how transaction details are sorted on an individual invoice. You do not have to enter a value in all
four sort fields.
Setting Up Billing Chapter 9
294 Copyright © 1988, 2010, Oracle and/or its affiliates. All Rights Reserved.
Sort 1, Sort 2, Sort 3,
and Sort 4 Select how to sort transaction details on your invoices:
Academic Year: Sorts by the academic year associated with each transaction.
Account Number: Sorts by the account number of each transaction.
Amount: Sorts by the dollar amount of each transaction.
Due Date: Sorts by the due date of each transaction.
Item Description: Sorts by the description of the item type for each transaction.
Item Number All: Sorts by the item number that the system assigns to each
transaction during posting.
Session: Sorts by the academic session associated with each transaction.
Student ID (Third Party): Sorts a sponsoring organization's bills by the unique
student ID associated with each third-party transaction.
Student Name (Third Party): Sorts a sponsoring organization's bills by the
student name associated with each third-party transaction.
Term: Sorts by the academic term associated with each transaction.
Transaction Date: Sorts by the date on which each transaction occurred.
Subtotal Becomes available if you enter a value in the Sort 1 field. Select to print a
subtotal of the transactions on the invoice.
Summarization Fields
You can summarize billing information on your printed invoices rather than printing all the billing details.
Use this group box to select the fields by which you want to summarize. When you summarize, the printed
invoice no longer shows transaction detail.
Summ 1 (summary 1) and
Summ 2 (summary 2) Select how to summarize billing information on your printed invoices:
Account Number: Summarizes by the account number and account term.
Item Description: Summarizes by the item type description.
Item Nbr - Refund/Payment Only (item number - refund/payment only):
Summarizes refunds and payments by item number only. Transaction details for
other transactions still appear according to the sort order selected in the
Transaction Sort Fields group box.
Item Number All: Summarizes by the item number that the system assigns to
each transaction during posting.
Item Type Code: Summarizes by the item type code or classification.
Item Type: Summarizes by item type.
Student ID (Third Party): Summarizes a sponsoring organization's bills by the
unique student ID associated with each third-party transaction.
Student Name (Third Party): Summarizes a sponsoring organization's bills by the
student name associated with each third-party transaction.
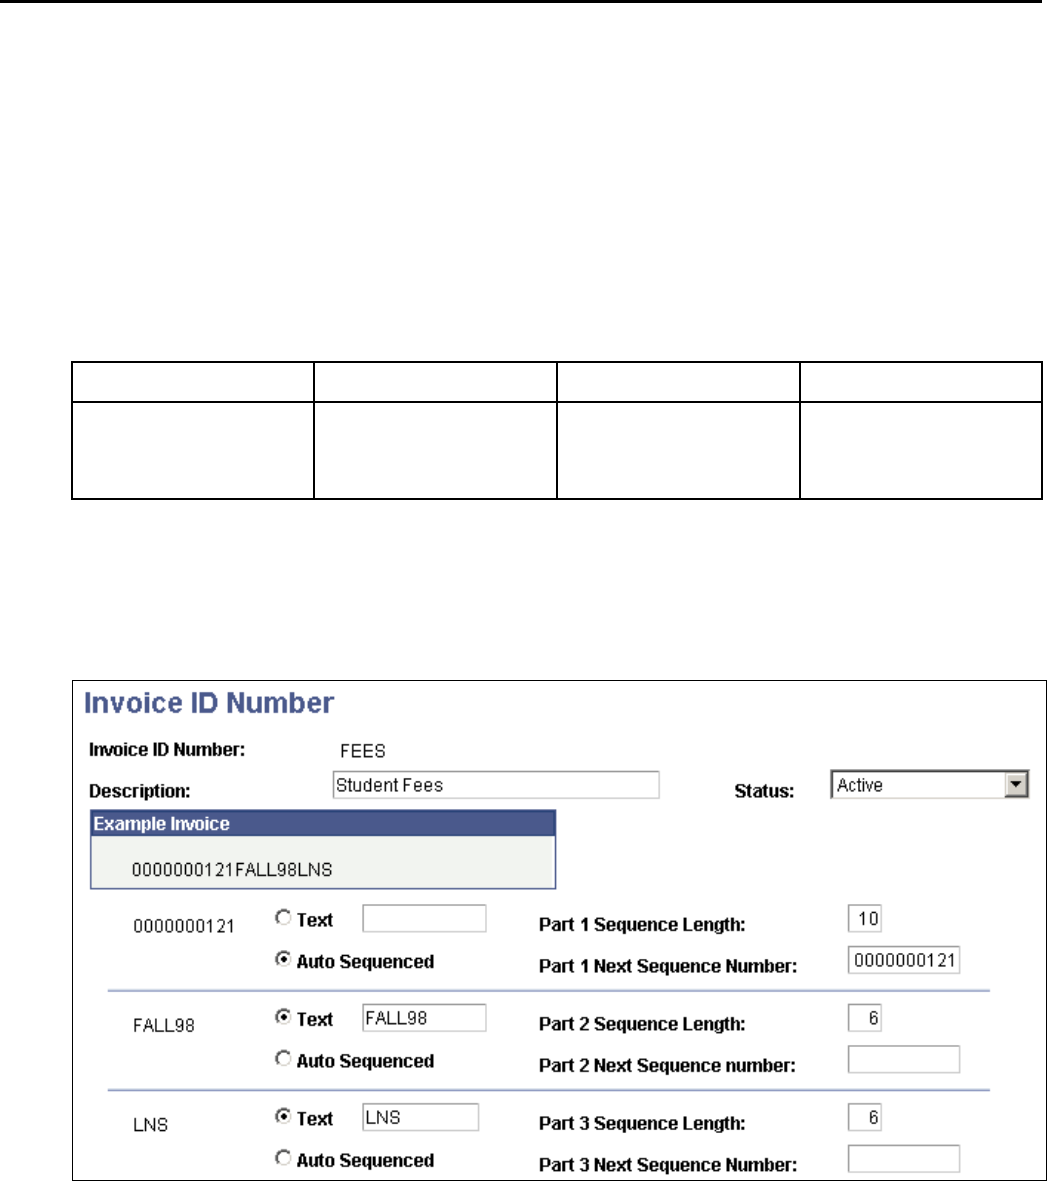
Chapter 9 Setting Up Billing
Copyright © 1988, 2010, Oracle and/or its affiliates. All Rights Reserved. 295
Setting Up Invoice ID Number Generation
To set up invoice ID number generation, use the Invoice ID Number component (INVOICE_NUMBER).
Each bill that you create must have a unique invoice ID number associated with it. You define how the
system generates each invoice ID number. The invoice number consists of three parts that combine text with
system-generated number sequences. Each part can consist of no more than 10 characters and no fewer than 2
characters. The maximum length of the entire invoice ID is 22 characters. This section discusses how to
define invoice number generation.
Page Used to Set Up Invoice ID Number Generation
Page Name Definition Name Navigation Usage
Invoice ID Number BI_IVC_NUM Set Up SACR, Product
Related, Student Financials,
Billing, Invoice ID Number
Define invoice number
generation.
Defining Invoice Number Generation
Access the Invoice ID Number page (Set Up SACR, Product Related, Student Financials, Billing, Invoice ID
Number)
Invoice ID Number page
Setting Up Billing Chapter 9
296 Copyright © 1988, 2010, Oracle and/or its affiliates. All Rights Reserved.
Example Invoice Displays how your invoice IDs appear using the parameters that you select.
Text Select to enter specific text for the segment. The Part 1 Sequence Length, Part 2
Sequence Length, or Part 3 Sequence Length field of the segment becomes
available, depending on which segment you are defining.
Auto Sequenced Select to make the segment a number automatically sequenced by the system.
The Part 1 Next Sequence Number, Part 2 Next Sequence Number, or Part 3
Next Sequence Number field becomes available, depending on which segment
that you are defining.
Part 1 Sequence Length,
Part 2 Sequence Length,
and Part 3 Sequence
Length
If you selected the Text option for a segment, enter characters to appear on the
bill along with the length of the segment. If the length is greater than the number
of characters that you enter, the system puts a number of spaces in the segment
equal to the difference between the length and the number of characters entered.
Part 1 Next Sequence
Number, Part 2 Next
Sequence Number, and
Part 3 Next Sequence
Number
If you selected the Auto Sequenced option for a segment, use these fields to set
the next number to appear on a bill. When you press TAB to move out of the
field, the system fills the remainder of the field with zeros so that the total length
is 10. This number appears in the segment of the first ID generated by the system
using this invoice ID generation scheme. The auto-sequenced segment of each ID
generated after the first is one higher than the previous. For example, if you enter
0000001 in the Part 1 Next Sequence Number field, the first segment of the first
invoice ID is 0000001. The first segment of the second invoice ID is 0000002,
and so on.
Setting Up Billing Scan Lines
To set up billings scan lines, use the Billing Scan Line component (BI_SCAN_LINE).
Create a bill scan line if your bank requires it to track transactions. Communicate with your bank to obtain
specifications on how to construct your bill scan line. This section discusses how to define bill scan lines.
Page Used to Set Up Bill Scan Lines
Page Name Definition Name Navigation Usage
Billing Scan Line BI_SCAN_LINE Set Up SACR, Product
Related, Student Financials,
Billing, Billing Scan Line
Define bill scan lines.
Defining Billing Scan Lines
Access the Billing Scan Line page (Set Up SACR, Product Related, Student Financials, Billing, Billing Scan
Line).
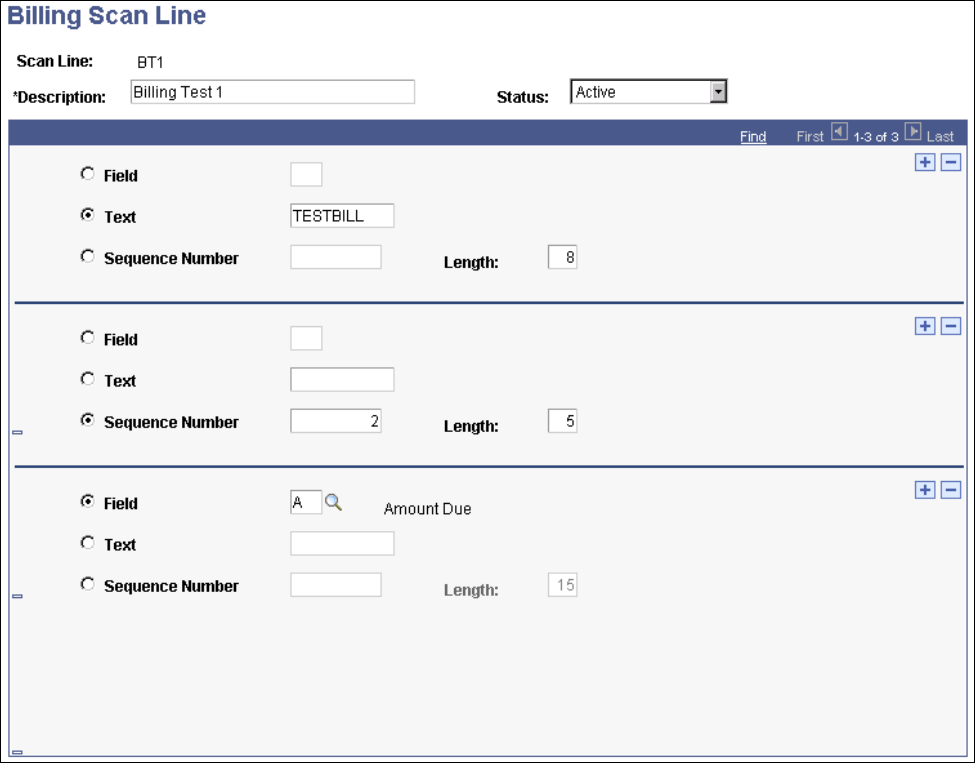
Chapter 9 Setting Up Billing
Copyright © 1988, 2010, Oracle and/or its affiliates. All Rights Reserved. 297
Billing Scan Line page
The bill scan line is a single line of no more than 60 characters of both text and numbers. You add it to a bill
using the General Selections 2 page of the Billing Standard Request component. Each segment consists of a
field, a piece of text, or a sequence number.
Field If you select the Field option, select the field that you want to use: A (amount
due), B (business unit), D (invoice due date), E (employee ID), I (invoice date), N
(invoice number), O (external org field), and P (postal code).
Text If you select the Text option, use the adjacent field to enter text to include in the
bill scan line.
Sequence Number If you select the Sequence Number option, enter the number in the adjacent field.
This number appears in the segment of the first bill scan line generated by the
system using this bill scan line generation scheme. The automatically-sequenced
segment of each bill scan line generated after the first is one higher than the
previous. For example, if you enter 0000001, the Sequence Number segment of
the first bill scan line is 0000001. The segment of the second bill scan line is
0000002, and so on.

Setting Up Billing Chapter 9
298 Copyright © 1988, 2010, Oracle and/or its affiliates. All Rights Reserved.
Length If you select the Field option, the system automatically populates the Length field
according to the option that you choose. This field is then unavailable for editing.
If you select the Text option, the system automatically populates the Length field
with the number of characters that you entered in the Text field. You can
override this number with a greater number.
If you select the Sequence Number option, the system automatically populates
the Length field with the number 10. You can override this number.
Setting Up Billing Types
To set up billing types, use the Billing Type component (BI_TYPE_TBL).
When you set up your billing standard request, the system requires that you select a billing type for the
request. The system uses billing types to distinguish bills when determining prior invoice amount and the last
billing date for students or corporations. This section lists the page used to define billing types.
Page Used to Define Billing Types
Page Name Definition Name Navigation Usage
Billing Type BI_TYPE_TBL Set Up SACR, Product
Related, Student Financials,
Billing, Billing Type
Define billing types.
Setting Up Billing Standard Requests
To set up billing standard requests, use the Billing Standard Request component (BI_STD_REQ_TBL).
This section discusses how to:
•Define general selections.
•Define additional general selections.
•Define communication information.
•Define academic selections.
•Define additional academic selections.
•Select billing messages.
•Select student groups.
•Select enrollment blocks.

Chapter 9 Setting Up Billing
Copyright © 1988, 2010, Oracle and/or its affiliates. All Rights Reserved. 299
•Select account types.
•Define corporate information.
A billing standard request is a set of parameters that determine how the system identifies and bills groups of
customers. After you set these parameters, you can use them repeatedly.
Pages Used to Set Up Billing Standard Requests
Page Name Definition Name Navigation Usage
General Selections BI_STD_REQ_TBL Set Up SACR, Product
Related, Student Financials,
Billing, Billing Standard
Request, General Selections
Define general selections.
General Selection 2 BI_STD_REQ_ALL6 Set Up SACR, Product
Related, Student Financials,
Billing, Billing Standard
Request, General Selection
2
Define additional general
selections.
Communication Info
(communication
information)
BI_STD_REQ_ALL4 Set Up SACR, Product
Related, Student Financials,
Billing, Billing Standard
Request, Communication
Info
Define communication
information.
Academic Selections BI_STD_REQ_ALL1 Set Up SACR, Product
Related, Student Financials,
Billing, Billing Standard
Request, Academic
Selections
Define academic selections.
Academic Selections 2 BI_CAN_REQ_ALL1A Set Up SACR, Product
Related, Student Financials,
Billing, Billing Standard
Request, Academic
Selections 2
Define additional academic
selections.
Billing Standard Request -
Messages
BI_STD_REQ_ALL2 Set Up SACR, Product
Related, Student Financials,
Billing, Billing Standard
Request, Messages
Select billing messages.
Student Groups BI_STD_REQ_ALL7 Set Up SACR, Product
Related, Student Financials,
Billing, Billing Standard
Request, Student Groups
Select student groups.
Enrollment Blocks SSF_STD_REQ_ERLBLK Set Up SACR, Product
Related, Student Financials,
Billing, Billing Standard
Request, Enrollment Blocks
Select enrollment blocks.
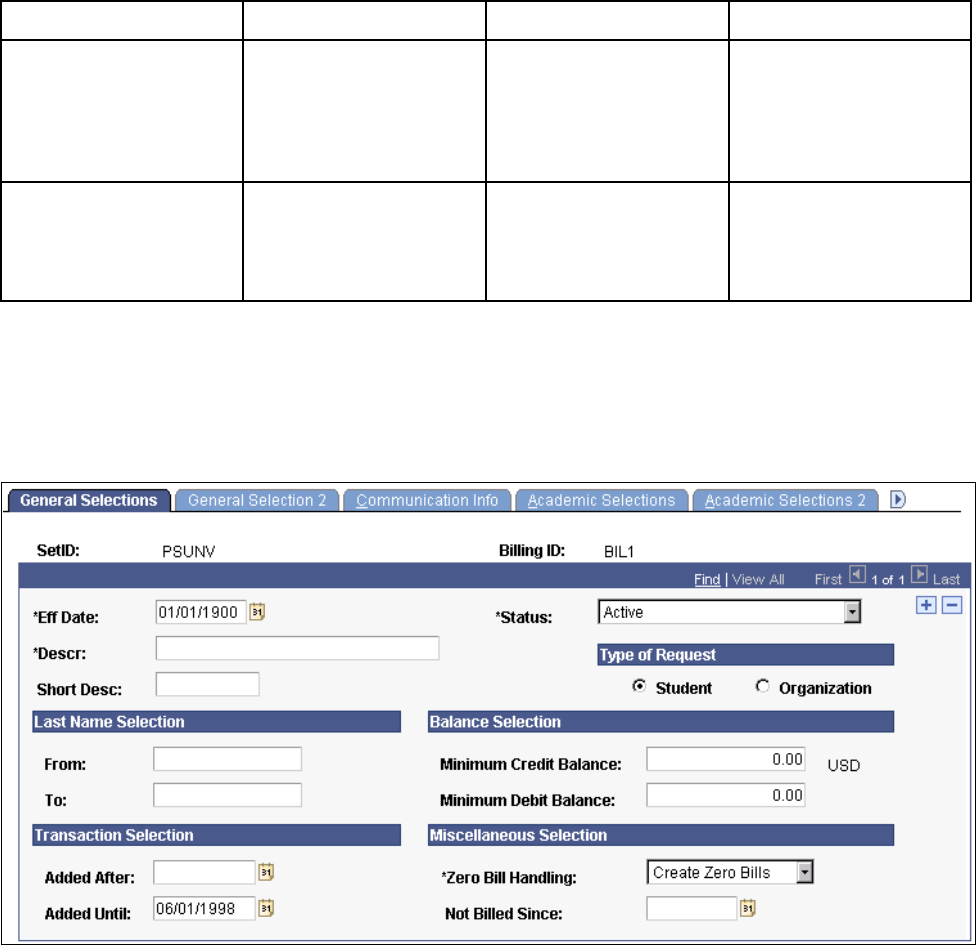
Setting Up Billing Chapter 9
300 Copyright © 1988, 2010, Oracle and/or its affiliates. All Rights Reserved.
Page Name Definition Name Navigation Usage
Account Selections BI_STD_REQ_ALL3 Set Up SACR, Product
Related, Student Financials,
Billing, Billing Standard
Request, Account
Selections
Select the account types.
Corporation Info
(corporation information)
BI_STD_REQ_ALL5 Set Up SACR, Product
Related, Student Financials,
Billing, Billing Standard
Request, Corporation Info
Define corporate
information.
Defining General Selections
Access the General Selections page (Set Up SACR, Product Related, Student Financials, Billing, Billing
Standard Request, General Selections).
General Selections page
Type of Request
Student Select to create billing requests for students and individual customers. All fields
on the page become available.
Organization Select to create billing requests for external organizations. The fields in the Last
Name Selection group box become unavailable. You must use the Last Name
Selection group box on the Corporation Info page instead.
Chapter 9 Setting Up Billing
Copyright © 1988, 2010, Oracle and/or its affiliates. All Rights Reserved. 301
Last Name Selection
From and To Define a range of students for which the system generates bills based on the
students' last names. For example, to generate a bill for all students with last
names starting with the letter A through the letter C, enter A in the From field and
C in the To field. Leave these fields blank to generate bills for all students who
meet the criteria that you set in this component.
Balance Selection
The two fields in this group box work together to generate bills for customers based on credit and debit
balances.
Minimum Credit
Balance Enter the credit balance above which you generate a bill. Enter the minimum
credit balance as a negative number.
Minimum Debit Balance Enter the debit balance above which you generate a bill. Enter the minimum debit
balance as a positive number.
To create a bill for all students regardless of account balances, leave the Minimum Credit Balance and
Minimum Debit Balance fields set to 0.00.
Transaction Selection
Added After and Added
Until Filter the charges and payments included in the bill based on the date they
posted. Only charges and payments posted after the date entered in the Added
After field are included in the bill. Only charges and payments posted before or
on the date entered in the Added Until field are included in the bill. To include all
charges and payments, leave these fields blank.
Miscellaneous Selection
To bill all customers, leave all fields and options in this group box empty.
Select Billing by Invoice Select this to indicate Select Billing by Invoice. This is only displayed when the
institution has indicated Apply Payments by Invoice on the SF Installation setup.
Zero Bill Handling Specify how the system processes bills for zero amounts:
Ignore Zero Bills: Ignores zero amounts. Be careful when using this value. The
system looks for a net amount due and does not process bills when a credit
balance in one account offsets a balance due in another account.
Create Zero Bills: Generates bills for zero amounts.
Update Zero Bills: Sets flags indicating that the account has been billed, but does
not generate a bill. The next time that you run the billing process, the system
ignores flagged zero amounts, thereby increasing performance.
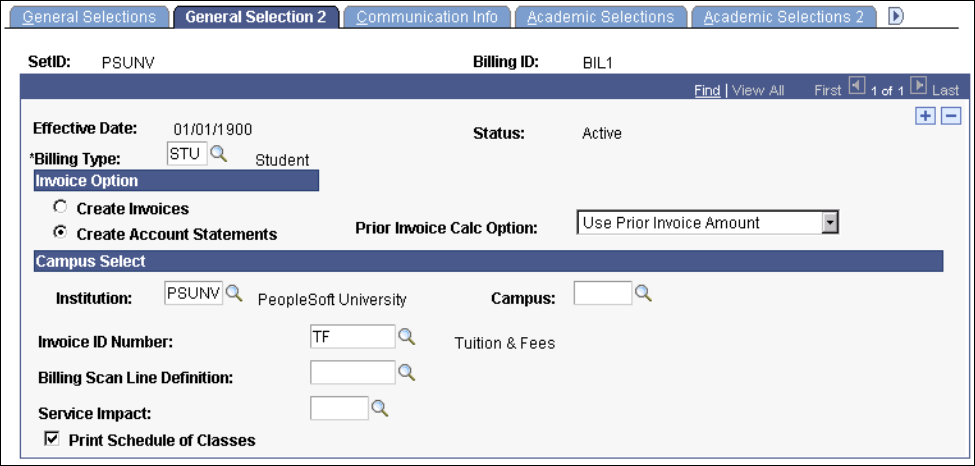
Setting Up Billing Chapter 9
302 Copyright © 1988, 2010, Oracle and/or its affiliates. All Rights Reserved.
Not Billed Since Enter a date here to bill only those customers who you have not billed since that
date. For example, if the date in the Not Billed Since field is 10/1/2005, and you
run the billing process on 10/15/2005, the system generates bills for students who
it billed before 10/1/2005 or who it has not billed at all. The system does not bill
students who it billed on 10/1/2005 or between 10/1/2005 and 10/15/2005.
If you select a value in this field, it overrides any conflicting selection criteria
that you define.
Define Additional General Selections
Access the General Selection 2 page (Set Up SACR, Product Related, Student Financials, Billing, Billing
Standard Request, General Selection 2).
General Selection 2 page
Invoice Option
Create Invoices Select so that your invoices do not reference the amount of the previous invoice.
For example, suppose that you bill a student for tuition charges of 500.00 USD
and housing charges of 2,000.00 USD, for a total of 2,500.00 USD on 10/1/2005.
On 10/15/2005, a 75.00 USD miscellaneous charge posts to the student's account
before the original bill is paid. If you generate another bill on 10/15/2005, it lists
only the new invoice amount of 75.00 USD and details only the miscellaneous
charge.
When selected, the system generates bills for accounts with new activity only.

Chapter 9 Setting Up Billing
Copyright © 1988, 2010, Oracle and/or its affiliates. All Rights Reserved. 303
Create Account
Statements Select to generate account statements rather than invoices. The details that appear
on the account statement depend on the value that you select in the Prior Invoice
Calc Option (prior invoice calculation option) field, which is available only if
you select the Create Account Statements option.
When selected, the system generates bills even for accounts with no new activity.
However, the system does not allow you to generate a bill more than once per
day for an account with no new activity.
Note. Create Credit Invoices
If your institution selected Apply Payments by Invoiceon the SF Installation 2
page of the SF Installation component, Create Credit Invoices will display in the
Invoice Option group box in place of Create Account Statements.
Select Create Credit Invoices to create a credit invoice based on charge reversals.
Prior Invoice Calc
Option (prior invoice
calculation option)
Determine the details to appear on account statements:
Use Previous Invoice Amount: Account statements reference the amount of the
previous invoice and indicate the previous invoice ID on new bills. For example,
suppose that you bill a student for tuition charges of 500.00 USD and housing
charges of 2,000.00 USD, for a total of 2,500.00 USD on 10/1/2005. On
10/15/2005, a 75.00 USD miscellaneous charge posts to the student's account
before the original bill is paid. If you generate another bill on 10/15/2005, it lists
a prior invoice amount of 2,500.00 USD and the corresponding invoice ID, along
with the new invoice amount of 75.00 USD that details only the miscellaneous
charge.
Account Balance Method: Account statements reference the amount of the
previous invoice but do not indicate the previous invoice ID on new bills. For
example, suppose that you bill a student for tuition charges of 500.00 USD and
housing charges of 2,000.00 USD, for a total of 2,500.00 USD on 10/1/2005. On
10/15/2005, a 75.00 USD miscellaneous charge posts to the student's account
before the original bill is paid. If you generate another bill on 10/15/2005, it lists
a prior invoice amount of 2,500.00 USD, along with the new invoice amount of
75.00 USD that details only the miscellaneous charge.
Campus Select
Institution Select an institution. The system generates bills for students who attend the
selected institution only.
Campus Select a campus. The system generates bills for those students on the selected
campus only. You must select an institution before you select a campus.
Remaining Fields
Invoice ID Number Select the user-defined invoice ID number generation scheme that you want to
use to assign unique invoice ID numbers to each bill.
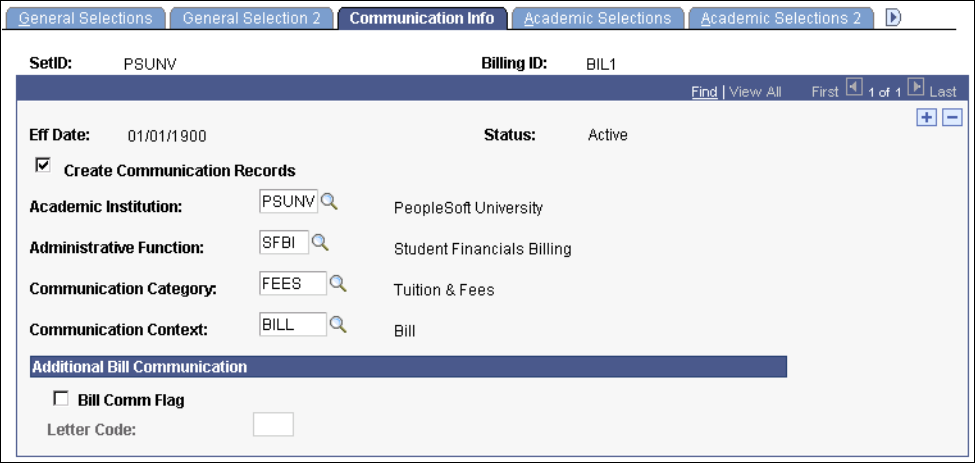
Setting Up Billing Chapter 9
304 Copyright © 1988, 2010, Oracle and/or its affiliates. All Rights Reserved.
Bill Scan Line Definition If your bank requires bill scan lines, select the bill scan line generation scheme
that you want to use to attach a bill scan line to each bill.
Service Impact (Optional) Attach a service impact to the billing standard request. You normally
use this field to attach a service impact that excludes from billing those students
or corporations with a service indicator associated with the selected service
impact.
Print Schedule of
Classes Select to print the student's enrollment summary on your invoices. This field is
not available if you select the Corporation option in the Type of Request group
box on the General Selections page.
Defining Communication Information
Access the Communication Info page (Set Up SACR, Product Related, Student Financials, Billing, Billing
Standard Request, Communication Info).
Communication Info page
Create Communication
Records Select to create a communication record during the bill generation process.
Academic Institution Enter the academic institution to which the communication record applies.
Administrative Function Enter SFBI.
Communication
Category Enter the type of communication record to create.
Chapter 9 Setting Up Billing
Copyright © 1988, 2010, Oracle and/or its affiliates. All Rights Reserved. 305
Communication Context Within the communication category that you select, choose the context of the
communication record to create.
Additional Bill Communication
Bill Comm Flag (bill
communication flag) Select to produce a duplicate bill for the parent or guardian of each student
affected by the billing standard request when you run the billing process. The
system uses the parent or guardian that you specify on the Relationships page
within PeopleSoft Campus Community. The Letter Code field becomes
available.
Letter Code If applicable, enter one or more letter codes. The system matches these against
any letter codes specified for the communication recipient on the Relationships
page within Campus Community.
See Also
PeopleSoft Enterprise Campus Community 9.0 Fundamentals PeopleBook, "Setting Up Administrative
Functions"
PeopleSoft Enterprise Campus Community 9.0 Fundamentals PeopleBook, "Managing Communications"
PeopleSoft Enterprise Campus Community 9.0 Fundamentals PeopleBook, "Managing Biographical
Information," Managing Relationships Data
Defining Academic Selections
Access the Academic Selections page (Set Up SACR, Product Related, Student Financials, Billing, Billing
Standard Request, Academic Selections).
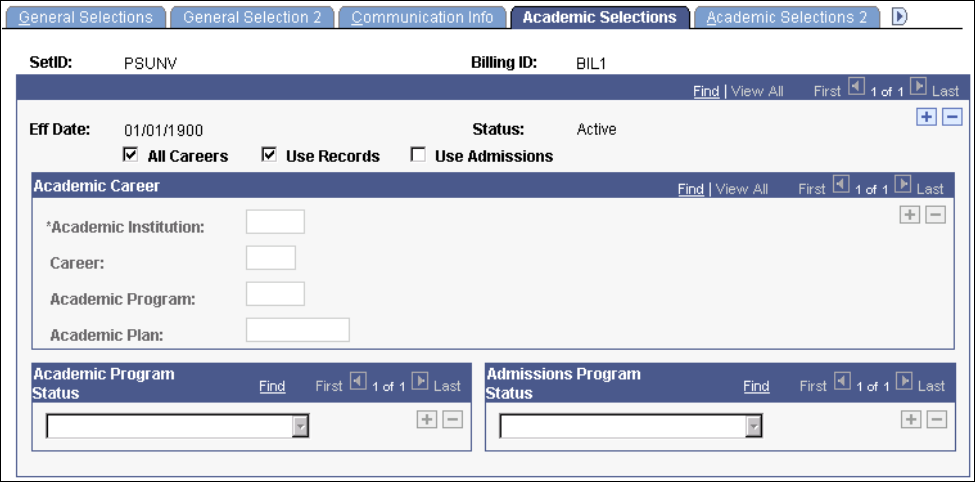
Setting Up Billing Chapter 9
306 Copyright © 1988, 2010, Oracle and/or its affiliates. All Rights Reserved.
Academic Selections page
All Careers Select to generate a bill for all students regardless of academic career. The
Academic Institution, Career, Academic Program, Academic Plan, Academic
Program Status, and Admissions Program Status fields become unavailable.
Use Records Select to filter billed students based on academic program status. The Academic
Program Status field becomes available.
Use Admissions Select to filter billed students based on admissions program status. The
Admissions Program Status field becomes available. You can select this check
box in addition to the Use Records check box. However, if you select both check
boxes, the system checks academic program status first during the billing process
to determine whether it should bill a student. It only uses admissions program
status if a student has no academic program status.
Academic Career
Select the academic institution, career, academic program, and academic plan to bill.
Academic Program Status
Select the academic program status to bill. To generate bills based on academic program status, you must
select at least one academic career and academic program on this page.
Admissions Program Status
Select the admissions program status to bill.
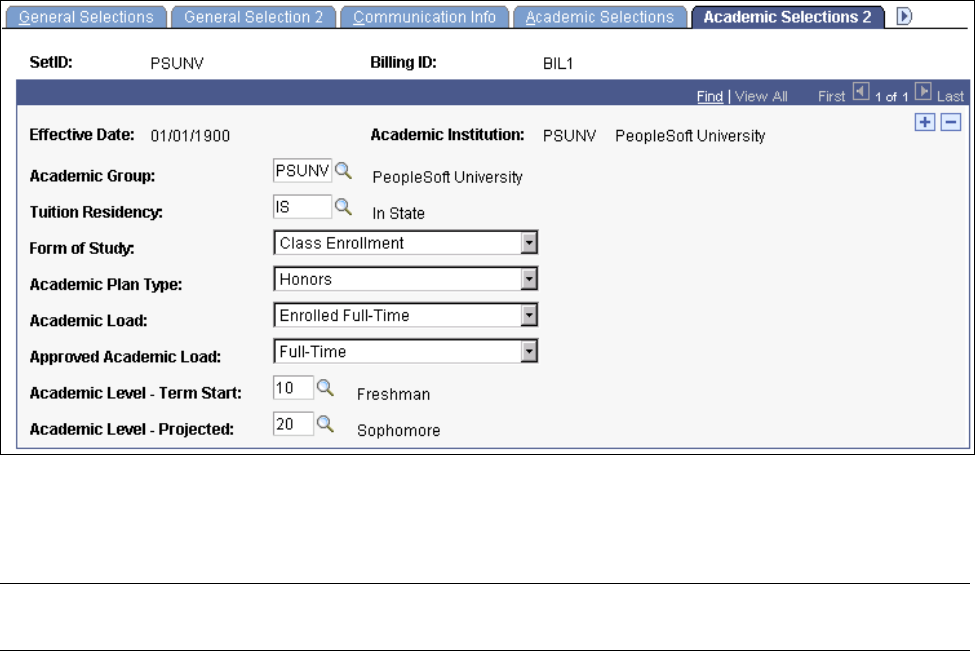
Chapter 9 Setting Up Billing
Copyright © 1988, 2010, Oracle and/or its affiliates. All Rights Reserved. 307
Defining Additional Academic Selections
Access the Academic Selections 2 page (Set Up SACR, Product Related, Student Financials, Billing, Billing
Standard Request, Academic Selections 2).
Academic Selections 2 page
Select a value for any of eight academic categories to filter your billing process.
Note. The billing process acknowledges the selection criteria on this page only if you select a Bill By option
of Bill Range when creating your billing request.
Selecting Billing Messages
Access the Billing Standard Request - Messages page (Set Up SACR, Product Related, Student Financials,
Billing, Billing Standard Request, Messages).
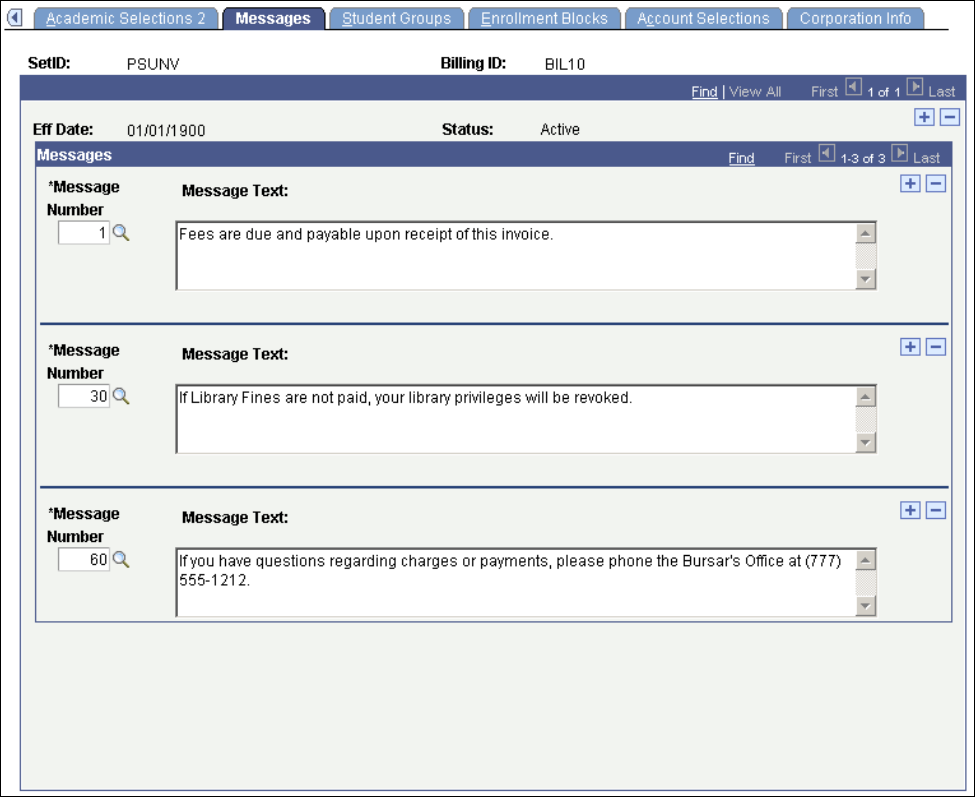
Setting Up Billing Chapter 9
308 Copyright © 1988, 2010, Oracle and/or its affiliates. All Rights Reserved.
Billing Standard Request - Messages page
Message Number Enter the message number associated with the text that you want to appear on
your bills. Remember that any business unit messages that you create appear on
the bill, in addition to the messages that you select here.
Selecting Student Groups
Access the Student Groups page (Set Up SACR, Product Related, Student Financials, Billing, Billing
Standard Request, Student Groups).
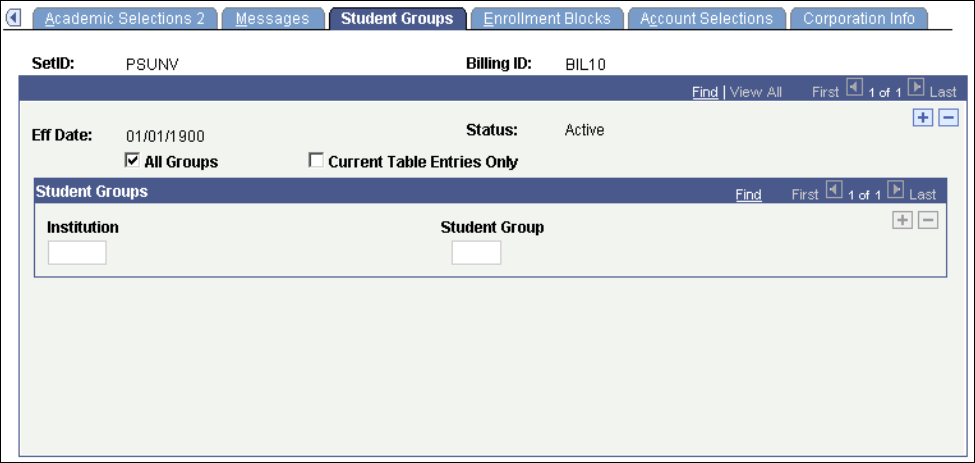
Chapter 9 Setting Up Billing
Copyright © 1988, 2010, Oracle and/or its affiliates. All Rights Reserved. 309
Student Groups page
All Groups Select to generate bills for all student groups. The Institution and Student Group
fields become unavailable.
Current Table Entries
Only Select to create bills and invoices only for students that are currently in the
student groups that you specify in the Student Groups group box. The system
excludes any students with a future-dated active status in a student group.
Student Groups
Select the institution and student group to bill.
See Also
PeopleSoft Enterprise Recruiting and Admissions 9.0 PeopleBook, "Setting Up Prospects"
Select Enrollment Blocks
Access the Enrollment Blocks page (Set Up SACR, Product Related, Student Financials, Billing, Billing
Standard Request, Enrollment Blocks).
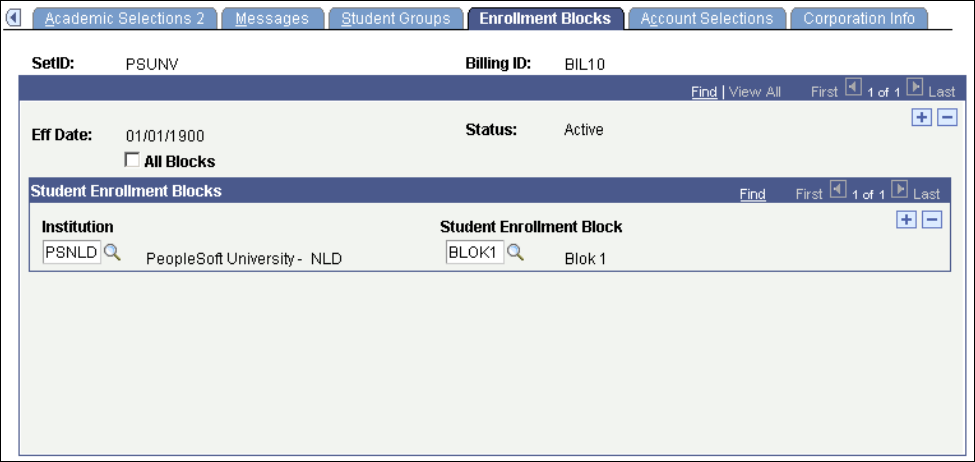
Setting Up Billing Chapter 9
310 Copyright © 1988, 2010, Oracle and/or its affiliates. All Rights Reserved.
Enrollment Blocks page
All Blocks Select to restrict processing to all enrollment blocks
Student Enrollment Blocks
Restrict processing to specific enrollment blocks
Selecting Account Types
Access the Account Selections page (Set Up SACR, Product Related, Student Financials, Billing, Billing
Standard Request, Account Selections).
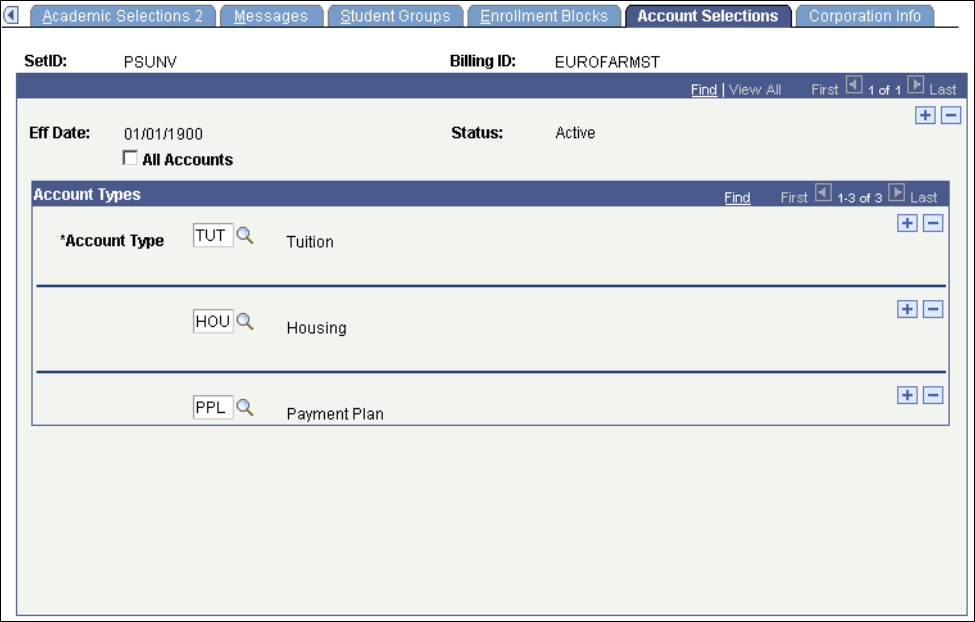
Chapter 9 Setting Up Billing
Copyright © 1988, 2010, Oracle and/or its affiliates. All Rights Reserved. 311
Account Selections page
You can determine by account type what charges and credits are included on an invoice.
An invoice is created for all unbilled activity on the account and through the account type or item type setup
you can select what is included or excluded from the invoice.
All Accounts Select to bill all account types.
Account Type Enter the specific account types to include in an invoice, for example, tuition,
housing, or payment plan.
Account Types
If you do not select the All Accounts check box, select a specific account type to bill.
Defining Corporation Information
Access the Corporation Info page (Set Up SACR, Product Related, Student Financials, Billing, Billing
Standard Request, Corporation Info).
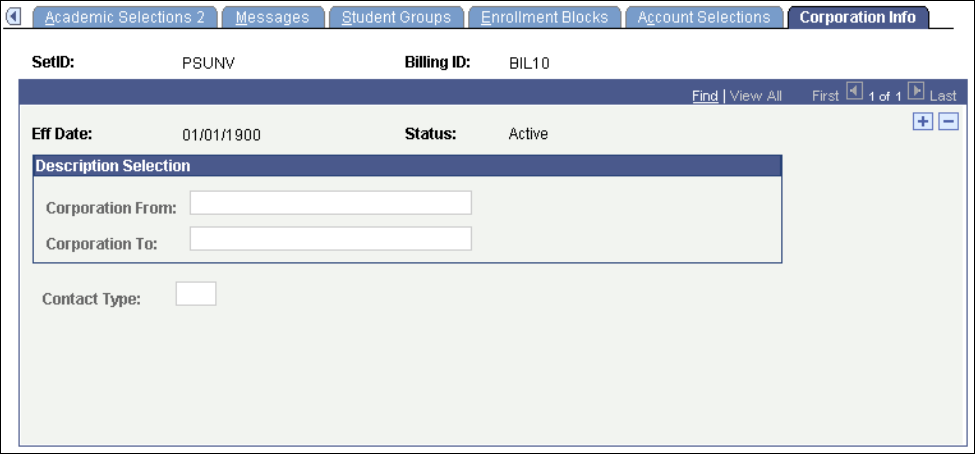
Setting Up Billing Chapter 9
312 Copyright © 1988, 2010, Oracle and/or its affiliates. All Rights Reserved.
Corporation Info page
Corporation From and
Corporation To Enter an alphabetical range of corporations to bill. Leave these fields blank to
generate bills for all corporations that meet the criteria that you set in this
component.
Contact Type To address corporate bills to a specific position (such as chief financial officer),
select the type of contact.

Copyright © 1988, 2010, Oracle and/or its affiliates. All Rights Reserved. 313
Chapter 10
Setting Up Cashiering
This chapter discusses how to:
•Define a cashiering office.
•Set up valid registers and cashiers.
•Set up target keys.
•Set up tender keys.
•Set up for processing credit cards.
•Set up void reasons.
•Set up receipt messages.
•Modify cashiering receipt forms.
Defining a Cashiering Office
To set up a cashiering office, use the Cashiering Offices component (CASHIERING_OFFICES).
Before you can run your cashiering process, you must first define the characteristics of your cashiering office.
Your institution may have multiple cashiering offices, located on or off campus. Different cashiering offices
often serve different roles in your institution. The Cashiering feature provides the flexibility to define
different cashiering offices, each with its own set of cashiering rules and requirements.
This section discusses how to:
•Define the basic cashiering office parameters.
•Define the transaction setup of a cashiering office.
Pages Used to Define a Cashiering Office
Page Name Definition Name Navigation Usage
Cashiering Offices CSH_OFF_TABLE Set Up SACR, Product
Related, Student Financials,
Cashiering, Cashiering
Offices
Define the basic parameters
of the cashiering office.

Setting Up Cashiering Chapter 10
314 Copyright © 1988, 2010, Oracle and/or its affiliates. All Rights Reserved.
Page Name Definition Name Navigation Usage
Transaction Setup CSH_OFF_TABLE2 Set Up SACR, Product
Related, Student Financials,
Cashiering, Cashiering
Offices, Transaction Setup
Define the way in which
your cashiering office
handles and posts
transactions.
Over GL Entry CSH_OFF_TBL_OVER Set Up SACR, Product
Related, Student Financials,
Cashiering, Cashiering
Offices, Over GL Entry
Define the general ledger
chart of accounts to which
you record any cash
overages for your cashiering
office. The chart of
accounts that you define on
this page provides the credit
side of the GL entry.
Short GL Entry CSH_OFF_TBL_SHORT Set Up SACR, Product
Related, Student Financials,
Cashiering, Cashiering
Offices, Short GL Entry
Define the general ledger
chart of accounts to which
you record any cash
shortages for your
cashiering office. The chart
of accounts that you define
on this page provides the
debit side of the GL entry.
Defining the Basic Cashiering Office Parameters
Access the Cashiering Offices page (Set Up SACR, Product Related, Student Financials, Cashiering,
Cashiering Offices).

Chapter 10 Setting Up Cashiering
Copyright © 1988, 2010, Oracle and/or its affiliates. All Rights Reserved. 315
Cashiering Offices page
Campus Enter the campus on which the cashiering office is located.
Location Enter the specific location of the cashiering office.
Base Currency Enter the base currency that the cashiering office uses when processing
transactions. All transactions in the office are set to this currency by default. The
default value for this field is the default currency of your business unit.
Balance By Select the method to use to balance the cashiering office. Select from the
following values:
Cashier: Select this value to balance receipts of each cashier against the cash
drawer. With this method, a cashier can use any open register, but no one else
can use his individual cash drawer. Therefore, balancing by cashier is the more
secure option. It enables you to track errors and outages to specific cashiers.
Register: Select this value to balance the receipts of each register against the cash
drawer. With this method, any number of valid cashiers can use the cash drawer
in a register during a given business day.
Change Due Tender Enter the tender key that you want to designate for change due. This is the type
of tender that the office uses to give change to customers. You define the tender
keys available in this field using the Tender Keys component.

Setting Up Cashiering Chapter 10
316 Copyright © 1988, 2010, Oracle and/or its affiliates. All Rights Reserved.
Retrieval Limit Enter the number of business days the system retrieves when you open, reopen,
or close the cashiering office. This is an optional field. Use it to enhance system
performance.
Note. If you do not enter a value, the system displays all past business days when
opening, closing, or reopening a cashiering office. This slows system
performance significantly.
Print Product Select to print receipts. If you want to print receipts automatically using the
Create Receipt button on the six receipt generation pages, you must select a print
product. You can print receipts using Crystal.
Use Forms Engine for
Receipts Select to use Forms Engine to print student payment, corporate payment,
department, and check cashing receipts. Clear to use the specified Print Product
to print your receipts.
If you select this check box, it is necessary to specify printers for your valid
registers before you can print receipts using Forms Engine.
Over GL Entry (over
general ledger entry) Click this link to access the Over GL Entry page or enter the ChartField values in
the display field . Select the ChartField values that correspond to the general
ledger account into which you record your cashiering overages.
Short GL Entry (short
general ledger entry) Click this link to access the Short GL Entry page or enter the ChartField values
in the display field. Select the ChartField values that correspond to the general
ledger account into which you record your cashiering shortages.
GL Interface Required
(general ledger interface
required)
If you select this check box, the system requires you to run the Cashiering GL
Interface process before closing the cashiering office.
Close Office Edits
Use the Close Office Edits group box to specify the requirements that your office must meet before you can
close it.
Posted Close Required If you select this check box, the system requires you to post all receipts before
closing the cashiering office. This requirement takes effect only if you select the
Delay posting or Group Post options in the Posting field of the Transaction Setup
page.
Approved Close
Required If you select this check box, the system requires you to approve all pending
department receipts before closing the cashiering office. This requirement takes
effect only if you select the Dept Receipt Approval Required check box on the
Transaction Setup page.
Defining the Transaction Setup of a Cashiering Office
Access the Transaction Setup page (Set Up SACR, Product Related, Student Financials, Cashiering,
Cashiering Offices, Transaction Setup).
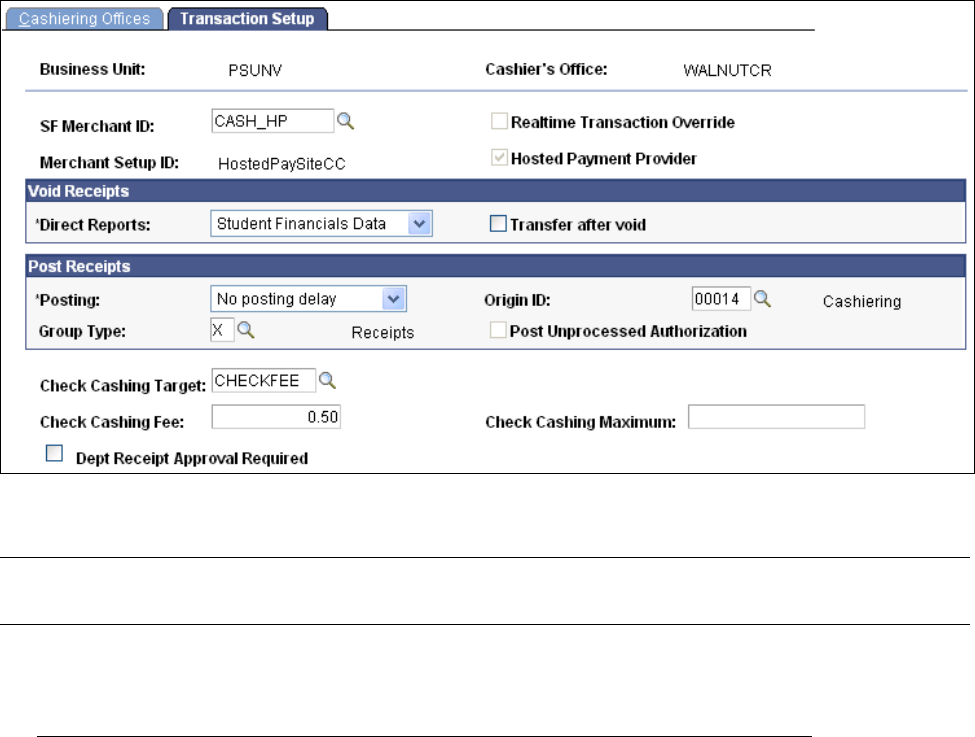
Chapter 10 Setting Up Cashiering
Copyright © 1988, 2010, Oracle and/or its affiliates. All Rights Reserved. 317
Transaction Setup
Note. If you select the Realtime Transaction Override check box, you must authorize and capture your
cashiering credit card transactions using the batch process.
The value in Merchant Setup ID field and the selection of the Hosted Payment Provider check box are based
on the setup of those fields on the Payment Merchant page.
See Chapter 3, "Setting Up ePayment Processing," Setting Up Payment Merchants, page 90.
See Electronic Payment Integration Developer's Reference Guide. The guide is posted to My Oracle Support.
If the payment merchant is set up for hosted payment transactions, the Realtime Transaction Override and
Post Unprocessed Authorization check boxes are cleared and not available for edit.
The Realtime Transaction Override check box applies to Business Interlink and Integration Broker
transactions. It allows the cashier office to override the Real-Time Authorization selection on the SF
Merchant page in case the Cashier Office is experiencing multiple timeouts. The transactions are then not
authorized online but in batch.
For information about the Post Unprocessed Authorization check box, see the Post Receipts section of
documentation.
Void Receipts
Use this group box to define how the system voids receipts.
Setting Up Cashiering Chapter 10
318 Copyright © 1988, 2010, Oracle and/or its affiliates. All Rights Reserved.
Direct Reports Enter the appropriate value for your institution to determine the rules the system
uses to establish supervisory relationships for the process of voiding receipts.
Student Financials Data: Select this value to establish supervisory relationships
of cashiers on the Valid Cashiers page.
Human Resources Data: Select this value to have Student Financials use the
employment data for each cashier defined in PeopleSoft Human Resources to
determine supervisory relationships.
Transfer after void Select this check box if, upon voiding a receipt, you want the system to transfer
you automatically to the page where the receipt was created. For example, after
voiding a student payment, the system automatically takes you to the Student
Payment page if you selected this option.
Post Receipts
Use this group box to define how the system posts student payments and corporate payments.
Posting Use this field to select when the system posts student and corporate payment
receipts. Valid values are:
No posting delay: If you select this value, the system posts receipts immediately
to student and corporate accounts from the Student Payment and Corporate
Payment pages when you click the Create Receipt button. The advantage of this
method is that the system updates account balances as you create payment
receipts.
Delay posting: If you select this value, the system does not post receipts to
student or corporate accounts when you click the Create Receipt button on the
Student Payment and Corporate Payment pages. Instead, you post delayed
student and corporate payment receipts using the Post Receipts page.
By delaying posting, you can enhance system performance during receipt
creation, especially if you have a large number of cashiers using the system.
Using the Post Receipts page, you can post receipts at any time during the day,
when it puts less demand on the system.
Group Post: If you select this value, the system does not post receipts when you
click the Create Receipt button on the Student Payment and Corporate Payment
pages. Instead, the system places each receipt that you create into a single posting
group for the business day. To post receipts for a group, use the Posting Groups
page in the Maintain Receivables feature. Like the Delay posting method, the
Group Post method enables you to enhance system performance during peak
demand. However, using the Group Post method, you post all receipts at the end
of the day by running one batch process. Therefore, the system does not update
your student or corporate accounts as often.
Origin ID and Group
Type If you selected Group Post in the Posting field, enter the origin ID and group
type of the posting group in which your cashiering office places student and
corporate payment receipts.

Chapter 10 Setting Up Cashiering
Copyright © 1988, 2010, Oracle and/or its affiliates. All Rights Reserved. 319
Post Unprocessed
Authorizations Note. If the payment merchant is set up for hosted payment transactions, this
check box is cleared and not available for edit.
If you select this check box, the system posts credit card transactions even if it
has not processed the authorizations of those transactions. If you clear this check
box, the system posts only transactions for which you have processed
authorizations.
This option is useful when intermittent timeouts of the authorization process
occur. This enables the system to save or post the transactions normally
regardless of the timeout. However, if this situation occurs, you must remember
to authorize your credit card transactions using the batch process in the Maintain
Receivables feature.
Note. You should define a group type and origin ID in Maintain Receivables specifically for cashiering
receipts so that you can more readily identify and isolate these posting groups.
Setting Check Cashing Rules
Check Cashing Target Enter the target key associated with the check-cashing fee item type. Define the
check cashing fee target key using the Target Keys component. Define the
amount of the check-cashing fee in the Check Cashing Fee field. This is not a
required field.
Check Cashing Fee Enter the amount that you want to charge customers when they use this
cashiering office to cash checks.
Check Cashing
Maximum Enter the maximum check amount that you want to allow customers to cash at
your cashiering office.
Setting Department Receipt Approval
Dept Receipt Approval
Required (department
receipt approval required)
Select this check box to implement the workflow approval process for all
department receipts generated by this cashiering office. When you select this
check box, the Cashier Approval Rolefield becomes available.
Cashier Approval Role Enter the role of the person who approves department receipts generated by your
cashiering office. A person with the cashier approval role must approve all
department receipts before you post them to the general ledger.
If you select the Approved Close Required check box on the Cashiering Offices
page, the person with the cashier approval role must approve all department
receipts before you close the cashiering office.

Setting Up Cashiering Chapter 10
320 Copyright © 1988, 2010, Oracle and/or its affiliates. All Rights Reserved.
See Also
Chapter 3, "Setting Up ePayment Processing," Setting Up SF Merchants, page 100
Chapter 14, "Processing ePayment Transactions," page 381
Chapter 21, "Maintaining Receivables," page 571
Setting Up Valid Registers and Cashiers
To set up valid registers and cashiers, use the Valid Registers component (REGISTERS) and the Valid
Cashiers component (CASHIERS).
This section discusses how to:
•Define valid registers.
•Define valid cashiers.
Pages Used to Set Up Valid Registers and Cashiers
Page Name Definition Name Navigation Usage
Valid Registers CSH_0FF_REGISTERS Set Up SACR, Product
Related, Student Financials,
Cashiering, Valid Registers
Define valid registers.
Valid Cashiers CSH_OFF_CASHIER Set Up SACR, Product
Related, Student Financials,
Cashiering, Valid Cashiers
Define valid cashiers.
Defining Valid Registers
Access the Valid Registers page (Set Up SACR, Product Related, Student Financials, Cashiering, Valid
Registers).
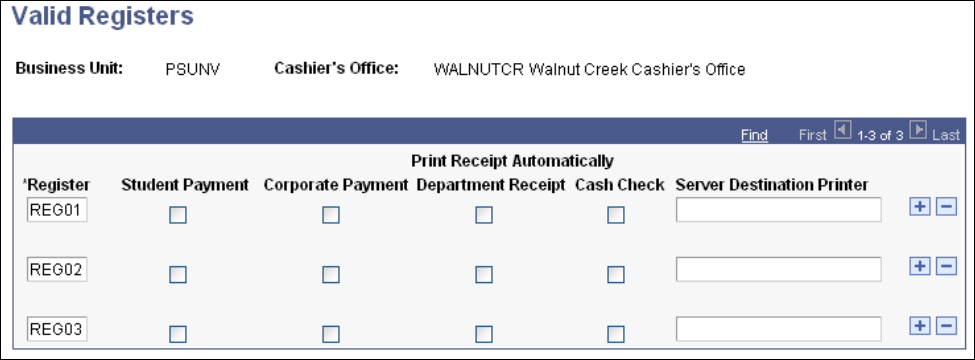
Chapter 10 Setting Up Cashiering
Copyright © 1988, 2010, Oracle and/or its affiliates. All Rights Reserved. 321
Valid Registers page
Register Enter the alphanumeric code that you use to identify the register.
Setting Up Receipts to Print Automatically
Select the check boxes under the Print Receipt Automatically heading to determine which types of receipts
print automatically when each valid register creates them. The system recognizes the selections made in these
check boxes only if you choose to balance by register in the setup of your cashiering office. You can choose
to print receipts automatically for Student Payment,Corporate Payment,Department Receipt, and Cash Check
receipts. For each valid register set to print automatically, use the Forms Engine Printer field to specify the
printer to which Forms Engine generates the receipt.
Defining Valid Cashiers
Access the Valid Cashiers page (Set Up SACR, Product Related, Student Financials, Cashiering, Valid
Cashiers).
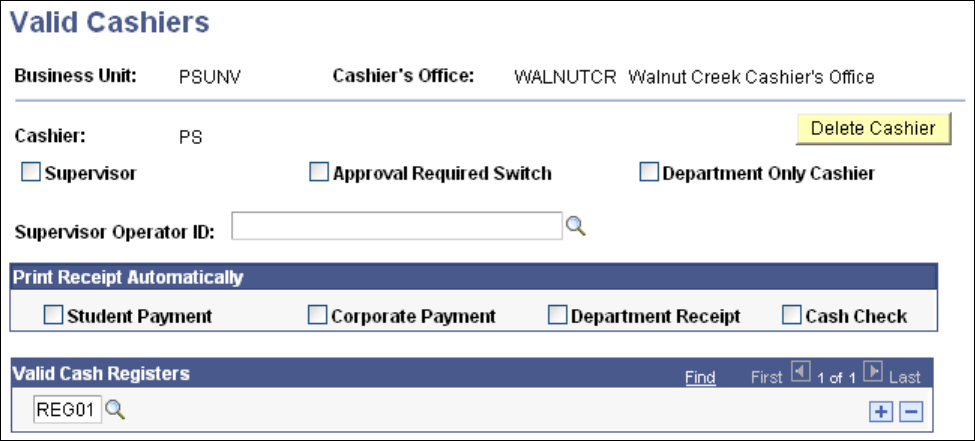
Setting Up Cashiering Chapter 10
322 Copyright © 1988, 2010, Oracle and/or its affiliates. All Rights Reserved.
Valid Cashiers page
Delete Cashier Click to delete the cashier from the cashiering office.
Supervisor Select to give the cashier the ability to void receipts. A cashier designated as a
supervisor can void his or her own receipts and the receipts of any other cashier
that directly reports to him or her.
Approval Required
Swtich Select to implement the workflow approval process for any department receipts
processed by the cashier.
Department Only
Cashier Select to designate the cashier as one who can process only department receipts
and does not have an open cash drawer. When you select this check box, the
system automatically selects the Approval Required check box and makes it
unavailable.
Supervisor Operator ID This field is available only if you select Student Financials Data in the Direct
Reports field of the Transaction Setup page. Enter an ID to indicate the
supervisor to whom the cashier directly reports. The supervisor assigned to this
cashier can view and void the cashier's receipts.
Print Receipt Automatically
Use the Print Receipt Automatically group box to determine which types of receipts print automatically when
the valid cashier creates them. The system recognizes the selections made in these check boxes only if you
choose balance by cashier in the setup of your cashiering office. You can choose to print receipts
automatically for Student Payment,Corporate Payment,Department Receipt, and Cash Check receipts.
Valid Cash Registers
In the Valid Cash Registers scroll area, enter the codes of the valid registers that you want the cashier to be
able to use.

Chapter 10 Setting Up Cashiering
Copyright © 1988, 2010, Oracle and/or its affiliates. All Rights Reserved. 323
Setting Up Target Keys
To set up target keys, use the Target Keys component (TARGET_KEYS).
Target keys indicate which charges receive credit for a given transaction. A cashier must specify a target key
for all transactions except department receipts, cash replenishments, and interim deposits. You can also enter
ChartField information for target keys.
This section discusses how to:
•Define target keys.
•Link tax authorities to target keys.
Pages Used to Set Up Target Keys
Page Name Definition Name Navigation Usage
Target Keys - Definition TARGET_KEY_TABLE Set Up SACR, Product
Related, Student Financials,
Cashiering, Target Keys,
Definition
Define a target key.
Target Key ChartFields SSF_CF_WRKGRID_SEC Click the Target GL Entry
link on the Definition page. Define a chart of accounts
for a target key.
Define the general ledger
chart of accounts to which
you record any cashiering
transactions associated with
the target key that you are
defining.
Target Keys - Tax
Authority
TARGET_KEY_TAX Set Up SACR, Product
Related, Student Financials,
Cashiering, Target Keys,
Tax Authority
Link tax authorities to target
keys.
Attach tax authorities to
your target key. This
enables you to assess tax on
certain cashiering
transactions with this target
key.
Defining Target Keys
Access the Target Keys - Definition page (Set Up SACR, Product Related, Student Financials, Cashiering,
Target Keys, Definition).
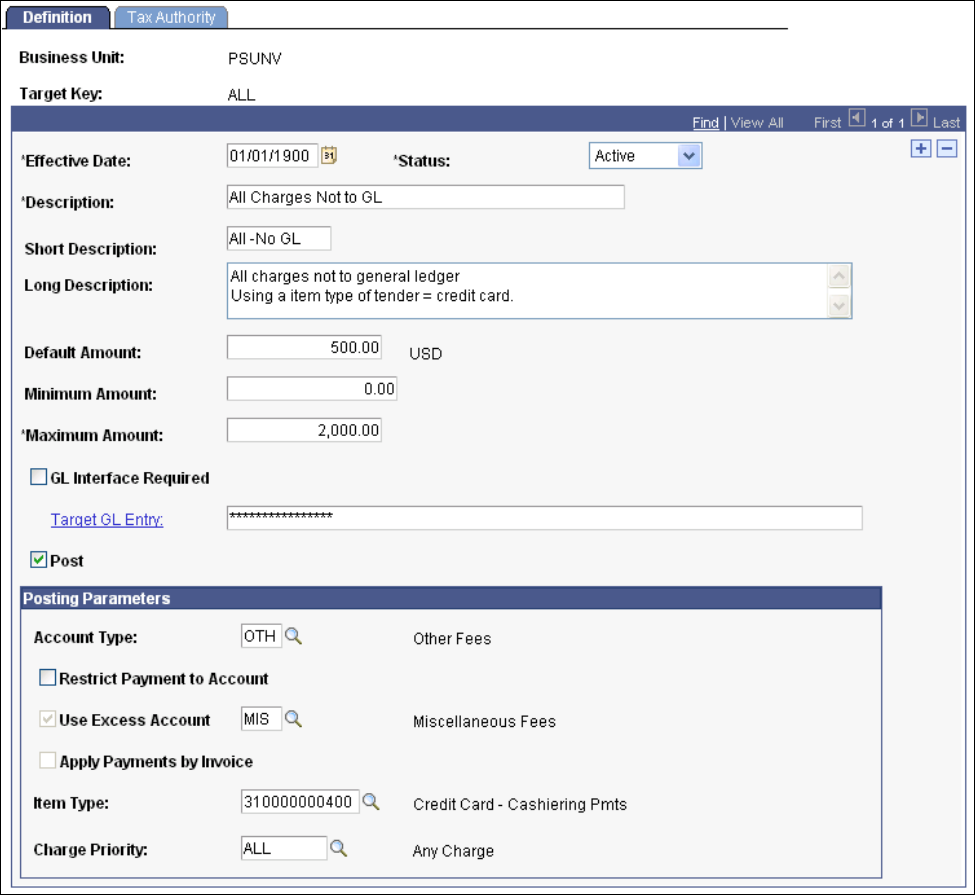
Setting Up Cashiering Chapter 10
324 Copyright © 1988, 2010, Oracle and/or its affiliates. All Rights Reserved.
Target Keys – Definition page
Default Amount Enter an optional default amount for the target. For example, if tuition charges
are typically 5,000 USD, then for the tuition target key, you can enter 5,000 USD
as a default amount to reduce the amount of data entry required at the time of
payment.
Minimum Amount Enter the minimum amount allowed for the target key per transaction.
Maximum Amount Enter the maximum amount allowed for the target key per transaction.
Chapter 10 Setting Up Cashiering
Copyright © 1988, 2010, Oracle and/or its affiliates. All Rights Reserved. 325
GL Interface Required,
Target GL Entry and
Copy and Paste buttons
Select to include transactions for this target key when you run the cashiering GL
interface process.
Click the Target GL Entry link to specify ChartFields or enter ChateField values.
Enter the ChartField values that correspond to the general ledger account into
which you record transaction information associated with the target key. The
chart of accounts that you define on this page provides the credit side of the GL
entry.
For a cashiering receipt to properly interface with your general ledger system,
both the target key and the tender key associated with the receipt must have the
GL Interface Required check box selected.
You can also specify a SpeedType on this page. To specify the Speed Type, click
the link and enter the SpeedType that you have already set up.
For ease of use, after entering your ChartFields, click the Copy button to copy
them to a clipboard. You can go to any other field and use the Paste button to
paste.
Be careful when selecting this check box because if the item type associated with
the target key also has this check box selected, the regular GL interface process
will pick up any transactions associated with the target key that you are defining.
The cashiering GL interface process is intended to be used to send transactions to
your general ledger that do not post to student or corporate accounts. Usually,
you do not want these nonpostable transactions to be picked up by the regular GL
interface process. Therefore, you normally do not want to select the GL Interface
Required check box for the target key unless it is to be used for transactions that
do not post to an account.
Post Select to post student payments or corporate payments associated with this target
key. The system selects this check box by default.
If you select this check box, you cannot attach a tax authority to the target key.
This is because when you attach a tax authority to a target key, the system
assesses a tax to any cashiering transactions associated with that target key.
Postable targets post against charges on a student or corporate account. The
system already assesses any necessary taxes to a charge when it posts to an
account. Therefore, if a tax authority were attached to a postable target key, when
you used the target key for a cashiering transaction, the system would assess tax
to the target even though the charge it would post against had already been taxed.
This would cause the payer of the charge to be taxed twice for the same charge.
Posting Parameters
Determine how the system posts transactions associated with the target key.
Account Type If you are defining target keys for student or corporate payments, enter the
account type the target affects. The account type determines the account to which
the payment posts.
Setting Up Cashiering Chapter 10
326 Copyright © 1988, 2010, Oracle and/or its affiliates. All Rights Reserved.
Restrict Payment to
Account Select to post each payment in its entirety to the account that you set in the
Account Type field. The system credits any excess payments to the account that
you selected, thereby creating a credit balance that can be applied to new charges
or refunded later. If you select this check box, the Use Excess Account check box
and its accompanying field become unavailable.
Use Excess Account If you do not select Restrict Payment to Account check box, you can select this
check box. When you select this check box and do not specify a specific account
in its accompanying field, the system credits excess payments to the default
payment excess account that you defined during the setup of your Student
Financials business unit.
Use the edit box to the right of this check box to enter a specific excess account
to which the system credits any excess payments to this target key.
Apply Payments by
Invoice Select this check box to restrict payments to an invoice. The check box displays
only if your institution indicated on the SF Installation 2 page that it will apply
payments by invoice.
Item Type If you are defining a target key for payments that post to student or corporate
accounts, enter the payment item type that appears on the account when you use
this target key.
Charge Priority The system automatically populates this field with the charge priority of the item
type that you entered. However, you can use this field to override the payment
allocation rules for payments to this target. The charge priority determines how
the system applies payments to charges.
Linking Tax Authorities to Target Keys
Access the Target Keys - Tax Authority page (Set Up SACR, Product Related, Student Financials,
Cashiering, Target Keys, Tax Authority).
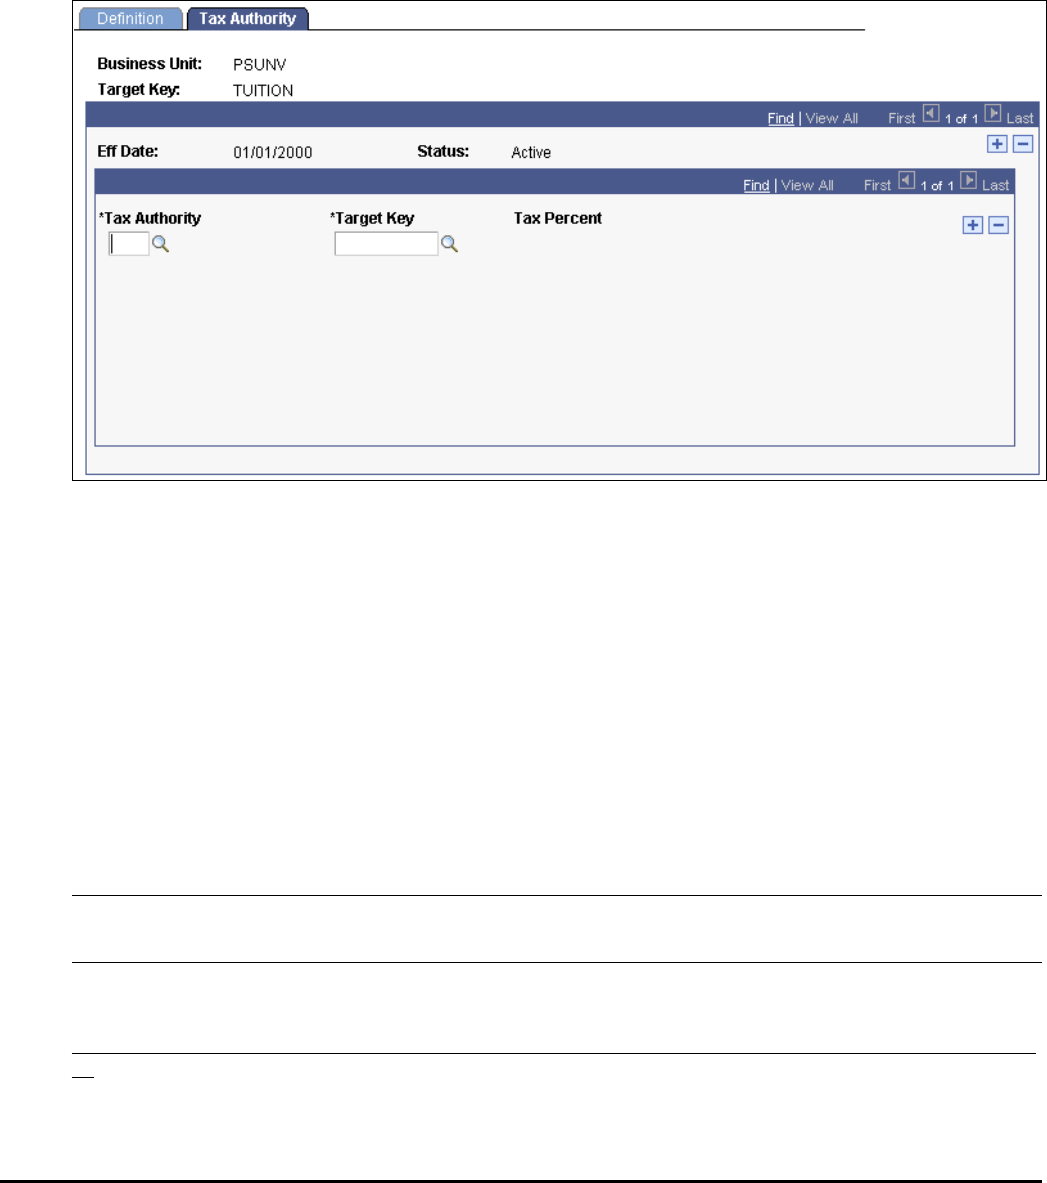
Chapter 10 Setting Up Cashiering
Copyright © 1988, 2010, Oracle and/or its affiliates. All Rights Reserved. 327
Target Keys - Tax Authority page
Tax Authority Enter tax authorities to attach to the target key. When you enter a tax authority,
the system automatically populates the Tax Percent field with the appropriate
percentage.
Target Key Enter the target key of the tax that the system adds to transactions conducted
using the target key that you are defining. Whenever you process payments to the
target key, the system adds the attached tax target key automatically, thereby
charging the customer the appropriate tax.
Tax Percent The system populates this field with the appropriate percentage when you entered
a value in the Tax Authority field.
Note. If you attach a tax authority to the target key and you select the Post check box on the Definition page,
the system does not allow you to save the target key.
See Also
Chapter 2, "Completing Student Financials General Setup," Setting Up Tax Authorities and Tax Codes, page
34
Setting Up Tender Keys
To set up tender keys, use the Tender Keys component (TENDER_KEYS).
Tender keys represent the types of tender your office can accept. Examples of tender include cash, checks,
and credit cards. You can also enter ChartField information for tender keys, overages, and shortages.

Setting Up Cashiering Chapter 10
328 Copyright © 1988, 2010, Oracle and/or its affiliates. All Rights Reserved.
This section discusses how to:
•Define tender keys.
•Specify cashiers for tender keys.
Pages Used to Set Up Tender Keys
Page Name Definition Name Navigation Usage
Tender Key TENDER_KEY_TABLE Set Up SACR, Product
Related, Student Financials,
Cashiering, Tender Keys,
Tender Key
Define tender keys.
Tender Key GL SSF_CF_WRKGRID_SEC Click the GL Entry link on
the Tender Key page. Define charts of accounts
for tender keys.
Tender Key Over GL SSF_CF_WRKGRID_SEC Click the Over GL Entry
link on the Tender Key
page.
Define charts of accounts
for overages.
Tender Key Short GL SSF_CF_WRKGRID_SEC Click the Short GL Entry
link on the Tender Key
page.
Define charts of accounts
for shortages.
Tender Key Valid Cashiers TENDER_CSHR_TABLE Set Up SACR, Product
Related, Student Financials,
Cashiering, Tender Keys,
Tender Key Valid Cashiers
Specify cashiers for tender
keys.
Defining Tender Keys
Access the Tender Key page (Set Up SACR, Product Related, Student Financials, Cashiering, Tender Keys,
Tender Key).
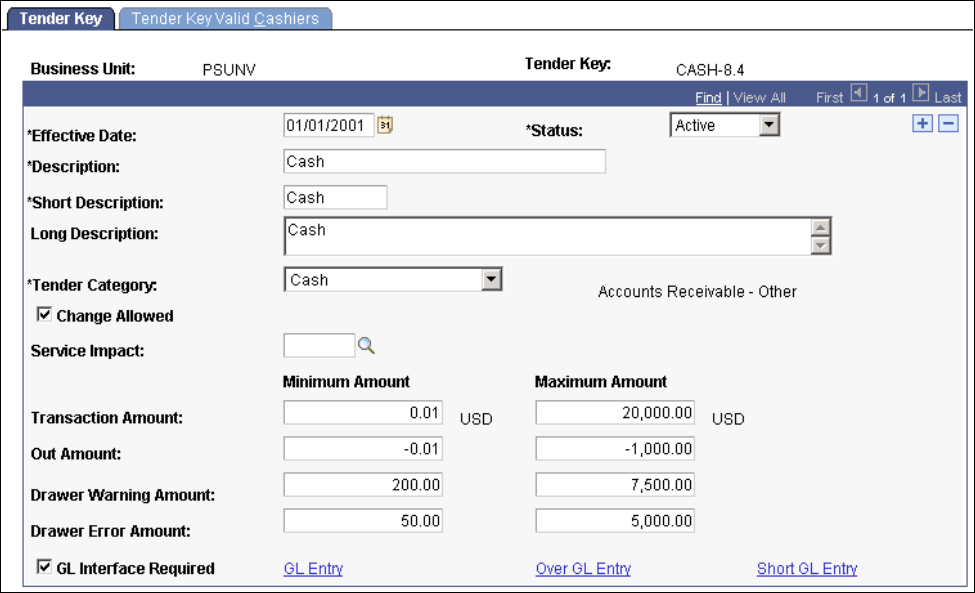
Chapter 10 Setting Up Cashiering
Copyright © 1988, 2010, Oracle and/or its affiliates. All Rights Reserved. 329
Tender Key page
Tender Category Select the appropriate category for the tender that you are defining. When a
cashier enters a tender key during a cashiering transaction, this tender category
tells the system which tender details must be entered before the cashier can
successfully conduct the transaction.
Change Allowed Select this check box if you want the cashier to be able to give change for a
transaction using this tender key.
Service Impact Enter a service impact code to affect how the system processes transactions using
this tender. For example, if this field contains a negative service impact for
checks, the system will not permit any students to tender checks as payment if
the service indicators on their accounts are associated with the negative service
impact.
Transaction Amount Enter the minimum and maximum amounts of this tender that your cashiers can
accept per transaction.
Out Amount Enter the minimum and maximum amounts of this tender that your cashiers can
dispense per transaction as change due.

Setting Up Cashiering Chapter 10
330 Copyright © 1988, 2010, Oracle and/or its affiliates. All Rights Reserved.
Drawer Warning
Amount Enter the minimum and maximum amounts of this tender that your drawers can
contain before the system generates a warning message.
When you create a receipt that causes the amount of this tender remaining in the
cashier's drawer to be equal to or less than the minimum amount, the system
generates a warning message signaling you to perform a cash replenishment.
When you create a receipt that causes the amount of this tender in the cashier's
drawer to exceed the maximum amount, the system generates a warning message
signaling you to perform an interim deposit.
Drawer Error Amount Enter the minimum and maximum amounts of this tender that your drawers can
contain before the system generates an error message.
When you attempt to create a receipt that causes the amount of this tender in the
cashier's drawer to be equal to or less than the minimum amount, the system
generates an error message signaling you to perform a cash replenishment and
does not process the receipt.
When you attempt to create a receipt that causes the amount of this tender in the
cashier's drawer to equal or exceed the maximum amount, the system generates
an error message signaling you to perform an interim deposit and does not
process the receipt.
Note. You determine the maximum amount that the cashiering office can
dispense when cashing a check in the Cashiering Offices page.
GL Interface Required
(general ledger interface
required)
If you select the GL Interface Required check box, any transactions associated
with this tender key must interface with the general ledger, and you must enter
ChartField information on the GL Entry, Over GL Entry, and Short GL Entry
pages of this component.
For a cashiering receipt to properly interface with the general ledger system, both
the target key and the tender key associated with the receipt must have the GL
Interface Required check box selected.
GL Entry (general ledger
entry) Click the GL Entry link to enter in the display field the ChartField values that
correspond to the general ledger account into which you record any cashiering
transactions associated with the tender key that you are defining. The chart of
accounts that you define on this page provides the debit side of the GL entry.
You can also specify a SpeedType on this page. To specify the Speed Type, click
this link or one of the proceeding links and enter the SpeedType that you have
already set up.
For ease of use, after entering your ChartFields values, click the Copy button to
copy them to a clipboard. You can go to any other field and use the Paste button
to paste.
Over GL Entry (over
general ledger entry) Click the Over GL Entry link to enter in the display field the ChartField values
that correspond to the general ledger account into which you record any overages
when a cashier or register does not balance for the tender that you are defining.
The chart of accounts that you define on this page provides the debit side of the
GL entry.
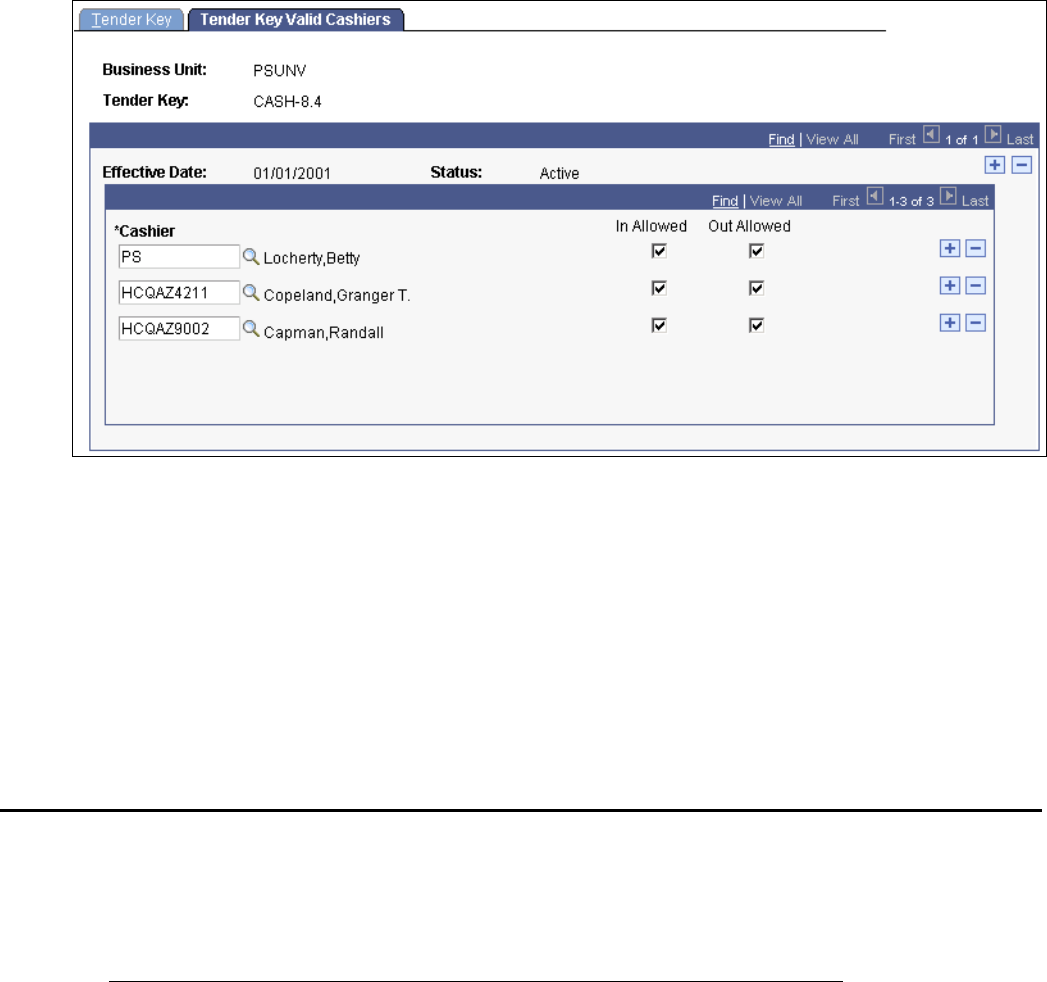
Chapter 10 Setting Up Cashiering
Copyright © 1988, 2010, Oracle and/or its affiliates. All Rights Reserved. 331
Short GL Entry (short
general ledger entry) Click the Short GL Entry link to enter in the display field the ChartField values
that correspond to the general ledger account into which you record any short
amounts when a cashier or register does not balance for the tender that you are
defining. The chart of accounts that you define on this page provides the credit
side of the GL entry.
Specifying Cashiers for Tender Keys
Access the Tender Key Valid Cashiers page (Set Up SACR, Product Related, Student Financials, Cashiering,
Tender Keys, Tender Key Valid Cashiers).
Tender Key Valid Cashiers page
Cashier Enter cashiers that can process transactions using the tender key.
In Allowed and Out
Allowed Select to determine if a cashier can take the tender in or give the tender out. For
example, if you select only the In Allowed check box for a cashier when you
define the cash tender key, the cashier can only take in cash. The cashier cannot
give cash to a customer in a check cashing transaction or as change. A cashier
with neither check box selected can not perform any transactions with this tender.
Setting Up for Processing Credit Cards
You use the SF Merchant page to set up the parameters that the cashiering system uses when processing
credit cards.
See Chapter 3, "Setting Up ePayment Processing," Setting Up SF Merchants, page 100.

Setting Up Cashiering Chapter 10
332 Copyright © 1988, 2010, Oracle and/or its affiliates. All Rights Reserved.
Setting Up Void Reasons
To set up void reasons, use the Void Reasons component (VOID_REASONS).
Void reasons provide brief explanations for voided cashiering receipts. They provide background information
for auditors and staff. This section lists the page used to set up void reasons.
Page Used to Set Up Void Reasons
Page Name Definition Name Navigation Usage
Void Reasons CO_VOID_REASON_TBL Set Up SACR, Product
Related, Student Financials,
Cashiering, Void Reasons
Create void reasons.
Setting Up Receipt Messages
To set up receipt messages, use the Receipt Print Messages component (MESSAGES).
This section discusses how to:
•Create receipt messages linked to cashiering offices.
•Create receipt messages linked to target keys.
•Create receipt messages linked to tender keys.
Pages Used to Set Up Receipt Messages
Page Name Definition Name Navigation Usage
Cashier Office Messages CSH_MSG_BD Set Up SACR, Product
Related, Student Financials,
Cashiering, Receipt Print
Messages, Cashier Office
Messages
Create receipt messages
linked to cashiering offices.
Target Messages CSH_MSG_TG Set Up SACR, Product
Related, Student Financials,
Cashiering, Receipt Print
Messages, Target Messages
Create receipt messages
linked to target keys.
Tender Messages CSH_MSG_TN Set Up SACR, Product
Related, Student Financials,
Cashiering, Receipt Print
Messages, Tender Messages
Create receipt messages
linked to tender keys.
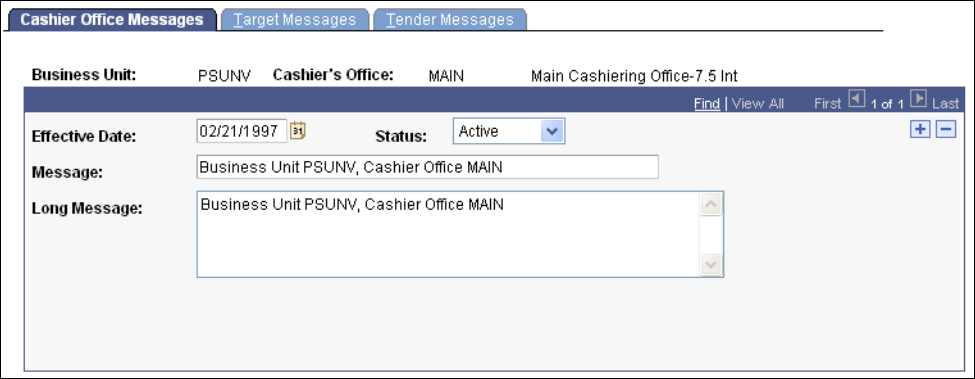
Chapter 10 Setting Up Cashiering
Copyright © 1988, 2010, Oracle and/or its affiliates. All Rights Reserved. 333
Creating Receipt Messages Linked to Cashiering Offices
Access the Cashier Office Messages page (Set Up SACR, Product Related, Student Financials, Cashiering,
Receipt Print Messages, Cashier Office Messages).
Cashier Office Messages page
Message Enter the message that you want to appear on all receipts printed by this cashier
office.
Long Message Enter an optional, more detailed message.
Creating Receipt Messages Linked to Target Keys
Access the Target Messages page (Set Up SACR, Product Related, Student Financials, Cashiering, Receipt
Print Messages, Target Messages).
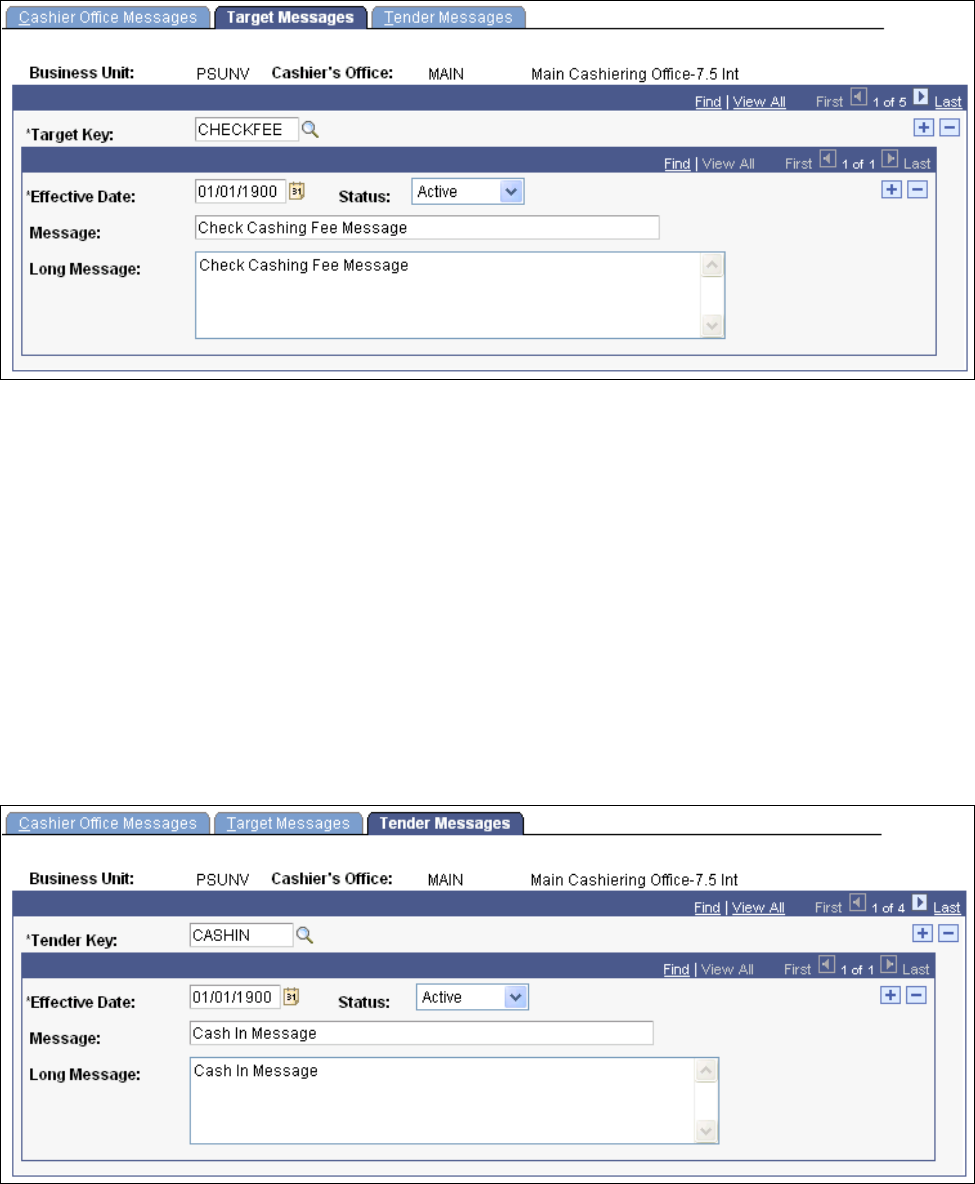
Setting Up Cashiering Chapter 10
334 Copyright © 1988, 2010, Oracle and/or its affiliates. All Rights Reserved.
Target Messages page
Target Key Enter the target key to which you want to link the message.
Message Enter a message to appear on all receipts associated with the target key.
Long Message Enter an optional, more detailed message.
Creating Receipt Messages Linked to Tender Keys
Access the Tender Messages page (Set Up SACR, Product Related, Student Financials, Cashiering, Receipt
Print Messages, Tender Messages).
Tender Messages page
Tender Key Enter the tender key to which you want to link the message.

Chapter 10 Setting Up Cashiering
Copyright © 1988, 2010, Oracle and/or its affiliates. All Rights Reserved. 335
Message Enter a message to appear on all receipts associated with the tender key.
Long Message Enter an optional, more detailed message.
Modifying Cashiering Receipt Forms
To set up cashiering receipt forms, use the Upload EPS Image File component (FE_UPIMG_RUNCTL), the
Form Image Text component (FE_IMAGE_TEXT), and the Form Editor component (FORM_EDITOR).
There are some simple modifications that you can make to the delivered Forms Engine cashiering receipts.
For example, you can have your institution's logo appear on your receipts.
This section discusses how to:
•Prepare image files for uploading.
•Upload image files.
•Set up form image text.
•Use Form Editor to change a receipt title and add an image.
Pages Used to Modify Cashiering Receipt Forms
Page Name Definition Name Navigation Usage
Upload EPS Image File FE_UPIMG_RUNCTL Set Up SACR, Common
Definitions, Forms Engine,
Process, Upload EPS Image
File
Upload image files.
Form Image Text FE_IMAGE_TEXT Set Up SACR, Common
Definitions, Forms Engine,
Setup, Form Image Text
Set up form image text.
Form Editor FORM_EDITOR Set Up SACR, Common
Definitions, Forms Engine,
Setup, Form Editor
Change a receipt title and
add an image.
Form Text Attributes FORM_TEXT Click the Edit Field
Attributes link for a form
row with a form field type
of Text.
Specify form text attributes.
Form Image Attributes FORM_IMAGE Click the Edit Field
Attributes link for a form
row with a form field type
of Image.
Specify form image
attributes.
Setting Up Cashiering Chapter 10
336 Copyright © 1988, 2010, Oracle and/or its affiliates. All Rights Reserved.
Preparing Image Files for Uploading
Before you upload an image file to your database, there are some steps you must take to prepare the file. The
required steps differ depending on whether the image is cached or noncached.
Preparing a Cached Image for Uploading
If an image is cached, Forms Engine does not resend it for each page on which it is printed. Preparing a
cached image for uploading requires some knowledge of PostScript. You must:
1. Create a plain text file with an .eps (Encapsulated PostScript) extension.
See the sample file fe_flower1.eps in the data directory of your ps_home for an example.
2. Edit this PostScript file with a plain text editor to display the graphic image.
Only edit the contents between the first "begin" and the last "end," noninclusive.
3. Test print the image. To do so:
a. Copy the EPS file to a temp file.
b. Delete everything before the first "begin" inclusive.
c. Delete everything after the last "end" inclusive.
d. Insert a line at the top that reads "40 40 translate" to move the image to within the page margins.
e. Insert a line at the bottom that reads "showpage."
f. Copy the temp file to a PostScript printer.
Preparing a Noncached Image for Uploading
If an image is noncached, Forms Engine resends it for each page on which it is printed. Preparing a
noncached image for uploading does not require knowledge of PostScript. You must:
1. Open and display the image using a graphical display or editing program.
2. Create a graphic image that is the size of a page.
This image will be a background image for the receipt, so place it within a white background.
3. Print the image to a PostScript printer, but when the print dialog box appears, select the Print to file check
box.
4. When the Print to file dialog box appears, place the file into a temp directory.
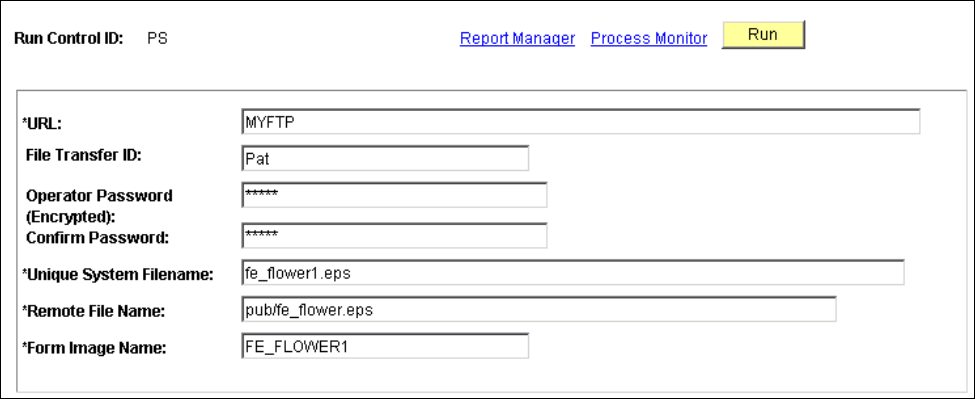
Chapter 10 Setting Up Cashiering
Copyright © 1988, 2010, Oracle and/or its affiliates. All Rights Reserved. 337
5. Make the following edits to the file:
a. Remove the "showpage" command near the end of the file.
b. Remove all lines with "@PJL" in them.
c. Remove all lines with "%%Pages" in them.
d. Remove all lines with "%%Page" in them.
e. Remove the "%%EOF" line near the end of the file.
Uploading Image Files
Access the Upload EPS Image File page (Set Up SACR, Common Definitions, Forms Engine, Process,
Upload EPS Image File).
Upload EPS Image File page
Enter the required information and run the process to upload the image to an FTP server.
Setting Up Form Image Text
Access the Form Image Text Viewer page (Set Up SACR, Common Definitions, Forms Engine, Setup, Form
Image Text).

Setting Up Cashiering Chapter 10
338 Copyright © 1988, 2010, Oracle and/or its affiliates. All Rights Reserved.
Form Image Text Viewer page
Description Enter a description for the image.
Cache Form On Printer Select if the image is cached. Clear if the image is noncached.
Using Form Editor to Change a Receipt Title and Add an Image
Access the Form Editor page (Set Up SACR, Common Definitions, Forms Engine, Setup, Form Editor).
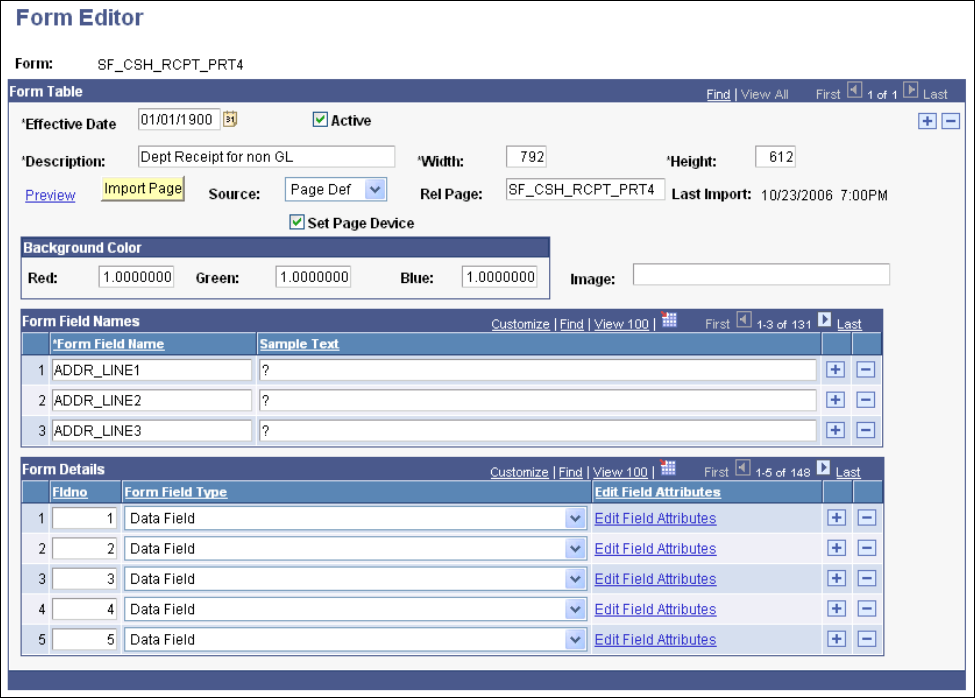
Chapter 10 Setting Up Cashiering
Copyright © 1988, 2010, Oracle and/or its affiliates. All Rights Reserved. 339
Form Editor page
Changing a Receipt Title
To change a receipt title:
1. Scroll to the row with a Fldno (field number) of 12.
2. Click the Edit Field Attributes link to open the Form Text Attributes page.
3. Edit the title in the Form Text field.
4. Click OK and save your changes to the form.
Adding a Cachable Image to a Receipt
To add a cachable image to a receipt:
1. Insert a row in the field number grid.
2. Entered a form field type of Image.
3. Click the Edit Field Attributes link to open the Form Image Attributes page.
4. Locate and select the desired image.
Setting Up Cashiering Chapter 10
340 Copyright © 1988, 2010, Oracle and/or its affiliates. All Rights Reserved.
5. Specify a start position.
X is the horizontal distance from the left side of the page, in units of 1/72 of an inch. Y is the vertical
distance from the bottom of the page, in units of 1/72 of an inch. For example, if X is 504 and Y is 684,
the start position would be 1.5 inches from the upper right corner of an 8.5-inch by 11-inch page.
6. Specify a scaling factor.
For example, if the unscaled image is roughly 3 inches square, use an X and Y scaling factor of 0.3 so that
the image comes out as one square inch.
7. Click OK and save your changes to the form.
Adding a Noncachable Image to a Receipt
To add a noncachable image to a receipt:
1. Enter the name of the image in the Image field.
2. Save your changes to the form.

Copyright © 1988, 2010, Oracle and/or its affiliates. All Rights Reserved. 341
Chapter 11
Setting Up Receivables Maintenance
This chapter discusses how to:
•Define origins and group types.
•Set up late fees.
•Set up late fees - billing.
•Set up external file layouts.
•Set up item reasons.
•Set up payroll deduction.
Defining Origins and Group Types
To define origins and group types, use the Origin Table component (ORIGIN_TABLE) and the Group Type
Table component (GROUP_TYPE).
This section provides an overview of origins and group types and discusses how to:
•Define origins.
•Define group types.
Understanding Origins and Group Types
Before you can perform group data entry using the Maintain Receivables feature, you must define origins and
group types.
Origins
Origins represent sources of charges or payments that are used during group posting. You can also apply
security at the origin level. This security limits the number of users who can view and update the transactions
with which an origin is associated. You can also use the description that you define for an origin as criteria
for selecting groups during group data entry.
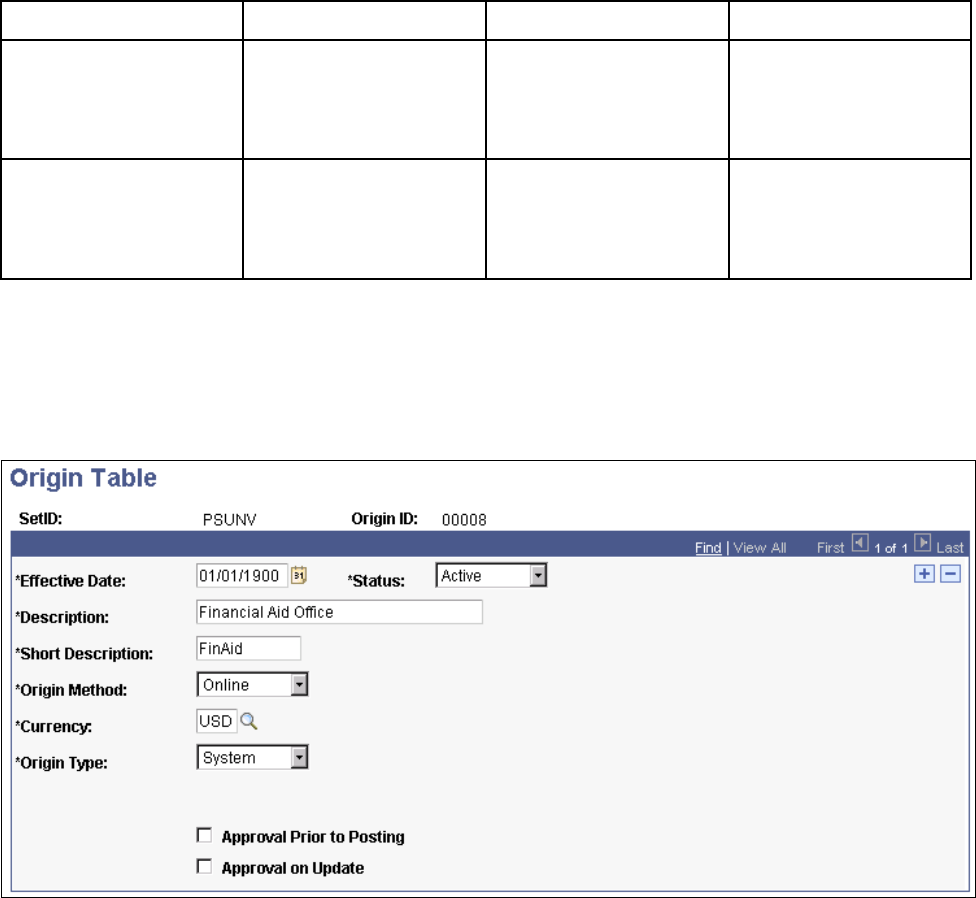
Setting Up Receivables Maintenance Chapter 11
342 Copyright © 1988, 2010, Oracle and/or its affiliates. All Rights Reserved.
Group Types
Group types represent sets of frequently posted receivables such as financial aid, housing charges, and lock
box payments. You can use the description of a group type as criteria for selecting groups for viewing during
group data entry.
Pages Used to Define Origins and Group Types
Page Name Definition Name Navigation Usage
Origin Table ORIGIN_TABLE1 Set Up SACR, Product
Related, Student Financials,
Charges and Payments,
Origin Table
Define origins.
Group Type Table GROUP_TYPE_TABLE Set Up SACR, Product
Related, Student Financials,
Charges and Payments,
Group Type Table
Define group types.
Defining Origins
Access the Origin Table page (Set Up SACR, Product Related, Student Financials, Charges and Payments,
Origin Table).
Origin Table page
Chapter 11 Setting Up Receivables Maintenance
Copyright © 1988, 2010, Oracle and/or its affiliates. All Rights Reserved. 343
Origin Method Indicate the origin method of the transactions (how the transactions were entered
into the system). Values are:
External: Select this option if the transactions were entered into the system using
an external file load from a source such as a third-party housing or parking
system.
LockBox: Select this option if the transactions were entered into the system using
an external file load from a lock box source.
Online: Select this option if the transactions were entered into the system
manually using the Group Entry component.
Currency Select the type of currency that is used by this origin. The default value is the
base currency that you specified in your SF Business Unit setup.
Origin Type Select the origin type that describes the source of the transactions. Values are:
Department: The origin is a department within your institution.
Individual: The origin is an individual either from your institution or external to
it.
Org (organization): The origin is an organization from within your institution or
external to it. An example of an organization from within your institution is a
theater box office.
System: The origin is another computer system organization from within your
institution or external to it.
Approval Prior to
Posting Select to require approval before posting transactions from this origin.
Approval on Update Select to require approval before updating any transactions in this origin.
Defining Group Types
Access the Group Type Table page (Set Up SACR, Product Related, Student Financials, Charges and
Payments, Group Type Table).
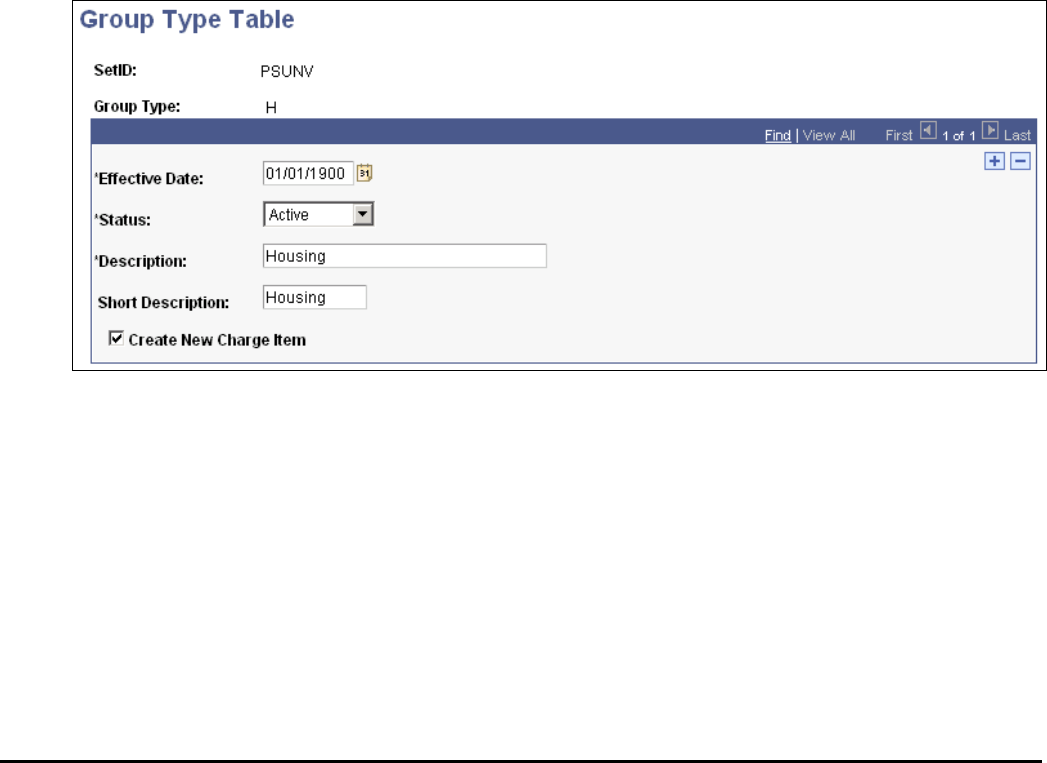
Setting Up Receivables Maintenance Chapter 11
344 Copyright © 1988, 2010, Oracle and/or its affiliates. All Rights Reserved.
Group Type Table page
Group Type Enter the one-character code that you want to use for the group type you are
creating.
Create New Charge
Item Select to create a unique item for each charge transaction in the group. Clearing
the check box allows the charge items to be consolidated by common_ID, item
type, and term.
This field appears (shaded) on the External Files run control page, the Create
Group Data Entries page, and the Create Group Corp Data Entries page.
Setting Up Late Fees
To set up late fees, use the Late Fees component (LATE_FEE_TABLE).
Student Financials enables you to create late fees that the system assesses when it identifies past due charges.
This section discusses how to:
•Set up basic late fee parameters.
•Set up aging category information for late fees.
•Define late fee maximums and due dates.
•Specify academic programs for late fees.

Chapter 11 Setting Up Receivables Maintenance
Copyright © 1988, 2010, Oracle and/or its affiliates. All Rights Reserved. 345
Pages Used to Set Up Late Fees
Page Name Definition Name Navigation Usage
Late Fees Setup 1 LATE_FEE_TABLE1 Set Up SACR, Product
Related, Student Financials,
Charges and Payments, Late
Fees, Late Fees Setup 1
Set up basic late fee
parameters.
Late Fees Setup 2 LATE_FEE_TABLE2 Set Up SACR, Product
Related, Student Financials,
Charges and Payments, Late
Fees, Late Fees Setup 2
Set up aging category
information for late fees.
Late Fees Setup 3 LATE_FEE_TABLE3 Set Up SACR, Product
Related, Student Financials,
Charges and Payments, Late
Fees, Late Fees Setup 3
Define late fee maximums
and due dates.
Late Fees Setup 4 LATE_FEE_TABLE4 Set Up SACR, Product
Related, Student Financials,
Charges and Payments, Late
Fees, Late Fees Setup 4
Specify academic programs
for late fees.
Setting Up Basic Late Fee Parameters
Access the Late Fees Setup 1 page (Set Up SACR, Product Related, Student Financials, Charges and
Payments, Late Fees, Late Fees Setup 1).
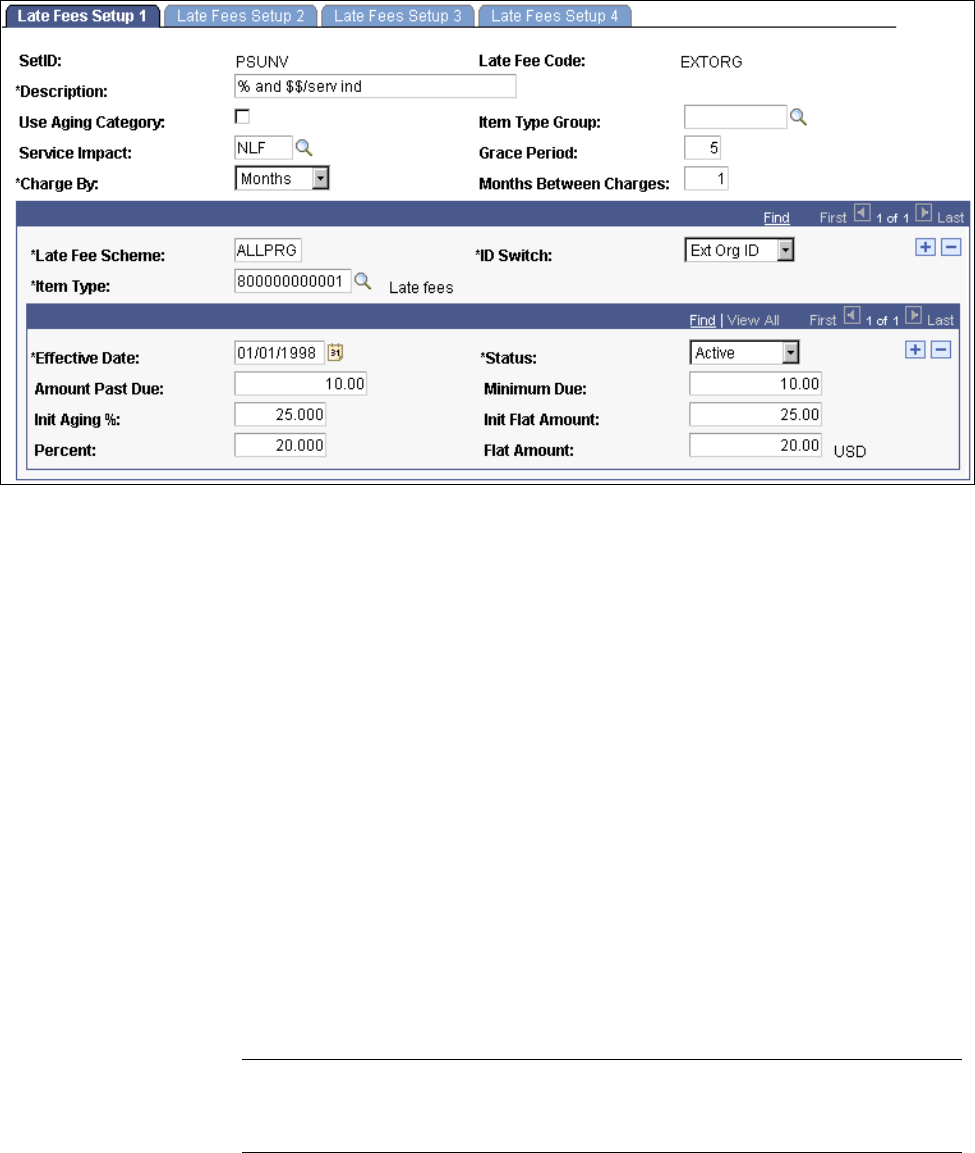
Setting Up Receivables Maintenance Chapter 11
346 Copyright © 1988, 2010, Oracle and/or its affiliates. All Rights Reserved.
Late Fees Setup 1 page
Use Aging Category Select this check box if you want to use the credit history process to assess late
fees for all overdue charges for a Student Financials Account. Aging category
definitions are entered in the Late Fees Setup 2 page.
When this check box is selected, the following fields become unavailable: Item
Type Group,Grace Period,Amount Past Due,Minimum Due,Init Aging % (initial
aging percentage), Init Flat Amount (initial flat amount), Percent, and Flat
Amount.
Item Type Group Select an item type group if you want to assess late fees for specific charges only.
Service Impact To exempt a student or external organization from a particular late fee, enter the
service impact code that you defined for exemptions.
Grace Period Enter the grace period that you want to allow the student before the system
assesses a late fee. The value in this field becomes zero by default if you do not
enter a grace period value.
Charge By Select a charge-by value to represent the frequency that you charge late fees.
Warning! Values for this field are delivered with your system as translate
values. Do not modify these values in any way. Any modifications to these
values will require a substantial programming effort. Values are:
Months: Select to assess late fees on a monthly basis regardless of the number of
days in the month.
Days: Select to specify an interval based on a set number of days.

Chapter 11 Setting Up Receivables Maintenance
Copyright © 1988, 2010, Oracle and/or its affiliates. All Rights Reserved. 347
Months Between
Charges and Days
Between Charges
The label of this field depends on the value that you select in the Charge By field.
If you select Month, the Months Between Charges label appears. If you select
Days, the Days Between Charges label appears.
Enter the months or days between charges to specify how often late fees are
charged. For example, if you charge late fees every month, enter 1 in this field. If
you charge late fees every other month, enter 2.
Late Fee Scheme Enter a description for a late fee scheme. Late fee schemes enable you to set up
multiple rules for a single late fee. For example, you can enter different academic
program load rules, academic load rules, or both. You must define at least one
late fee scheme.
ID Switch Select an ID switch for this late fee scheme. The ID switch is used to specify
whether a particular late fee scheme is for a student ID or an external
organization ID.
Warning! Values for this field are delivered with your system as translate
values. Do not modify these values in any way. Any modifications to these
values will require a substantial programming effort.
Item Type Select an item type to attach to this late fee scheme. The system posts late fees to
this item type.
Assessing Late Fees When Not Using Aging Category
If you do not assess late fees using an aging category, use the following fields to establish what fees the
system assesses. You can assess late fees as a percentage of the late charge or as a flat amount. You can also
use a combination of these methods.
Amount Past Due Enter an amount past due for this late fee. This is the minimum amount that a
charge must be past due before the system assesses a late fee.
Minimum Due Enter a minimum due amount for this late fee. This is the minimum payment that
must be made to prevent further late charges.
Init Aging % (initial
aging percentage) Enter a percentage value in this field that you want to charge as the initial late fee
assessment.
Note. If you do not enter a value in this field, then the system does not charge an
initial percentage for the first late fee. The value in this field can be the same as
the one that you enter in the Percent field.
Init Flat Amount (initial
flat amount) Enter a flat amount charge in this field that you want to charge as the initial late
fee assessment.
Note. If you do not enter a value in this field, then the system does not charge an
initial flat amount for the first late fee. The value in this field can be the same as
the one that you enter in the Flat Amount field.
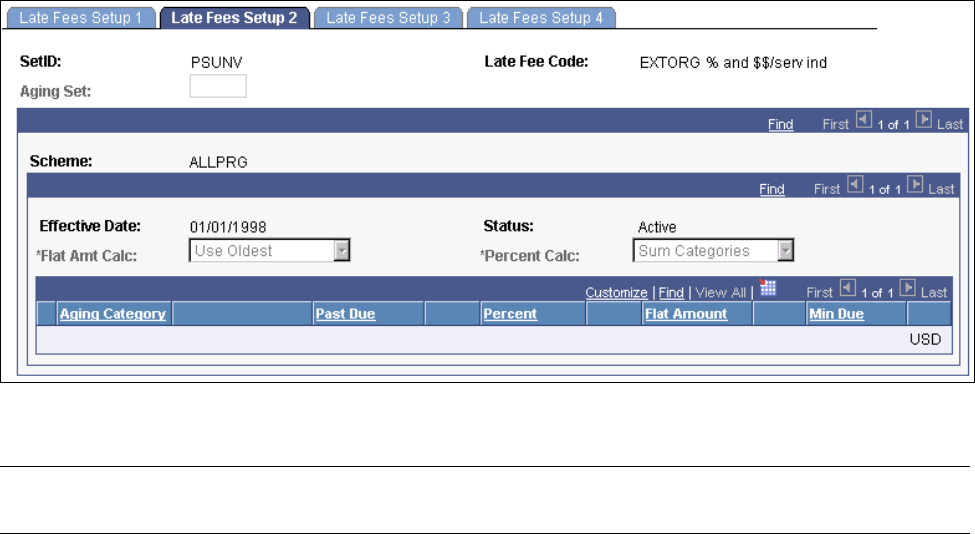
Setting Up Receivables Maintenance Chapter 11
348 Copyright © 1988, 2010, Oracle and/or its affiliates. All Rights Reserved.
Percent Enter a percentage value in this field that you want to charge for all late fee
assessments after the initial assessment.
Flat Amount Enter an amount in this field that you want to charge for all late fee assessments
after the initial assessment.
Setting Up Aging Category Information for Late Fees
Access the Late Fees Setup 2 page (Set Up SACR, Product Related, Student Financials, Charges and
Payments, Late Fees, Late Fees Setup 2).
Late Fees Setup 2 page
Note. Enter information on this page only if you select the Use Aging Category check box on the Late Fees
Setup 1 page. If the Use Aging Category check box is not selected, these fields will be unavailable.
Aging Set Enter the aging set for this late fee.
Flat Amt Calc (flat
amount calculation) Select to calculate late fees using flat amounts. Values are:
Use Oldest: Select to calculate late fees based on the flat amount of the oldest
charge only.
Sum Categories: Select to calculate late fees by applying the flat amount for each
charge.

Chapter 11 Setting Up Receivables Maintenance
Copyright © 1988, 2010, Oracle and/or its affiliates. All Rights Reserved. 349
Percent Calc (percent
calculation) Select to calculate late fees based on the percentage of outstanding charges.
Values are:
Use Oldest: Select to calculate late fees based on the sum of the outstanding
charges multiplied by the percentage that is associated with the oldest charge.
Sum Categories: Select to calculate late fees by multiplying each outstanding
charge by its associated percentage and summing the total.
Note. You can use a combination of the Use Oldest and Sum Categories values
or the same value in both the Flat Amt Calc and Percent Calc fields. The values
that you select indicate the manner in which the system calculates the rules that
you define for each of your aging categories.
Defining Aging Category Rules for the Late Fee Scheme
You can assess late fees as a percentage of the late charge, or as a flat amount. You can also use a
combination of these methods.
Past Due Enter the minimum amount past due that makes a student or external
organization subject to late fees.
Percent andFlat Amount Enter the percent, flat amount, or both of late fees that the system assesses.
Min Due (minimum due) Enter the minimum due for the minimum late fee due.
See Also
Chapter 2, "Completing Student Financials General Setup," Setting Up Aging Sets, page 37
Defining Late Fee Maximums and Due Dates
Access the Late Fees Setup 3 page (Set Up SACR, Product Related, Student Financials, Charges and
Payments, Late Fees, Late Fees Setup 3).
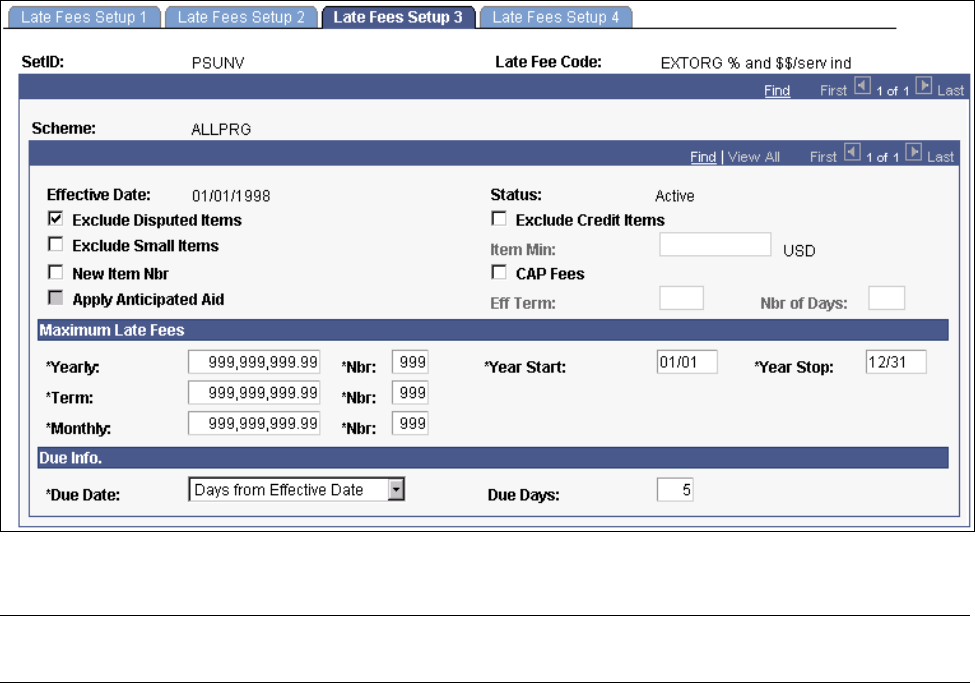
Setting Up Receivables Maintenance Chapter 11
350 Copyright © 1988, 2010, Oracle and/or its affiliates. All Rights Reserved.
Late Fees Setup 3 page
Note. If you selected the Use Aging Category option on the Late Fees Setup 1 page, all check boxes except
Apply Anticipated Aid are unavailable.
Exclude Disputed Items Select to exclude items that are being disputed from late fee charges.
Exclude Credit Items Select to disregard items with a credit balance from calculation of late fee
charges.
Exclude Small Items and
Item Min (item
minimum)
Select to exclude items below a certain threshold from late fee charges. In the
Item Min field, enter the accompanying item minimum to establish the threshold.
New Item Nbr (new item
number) Select to identify each assessed late fee separately on a student's account. For
example, if your institution charged late fees in May, June, and July, you will see
three separate entries for late fees. If you clear this option, all late fees appear as
one entry on the student's account (although you can drill down to see the
assessment detail).
CAP Fees (capitalize
fees) Select to add late fees to the total balance due (capitalize). When late fees are
capitalized, they become subject to late fees and interest.
Apply Anticipated Aid Select if you want to reduce the amount of overdue charges by anticipated
financial aid.
Eff Term (effective term)
and Nbr of Days (number
of days)
Enter the effective term of the anticipated aid and the number of days from the
award date that you continue to consider anticipated aid as a reduction to charge

Chapter 11 Setting Up Receivables Maintenance
Copyright © 1988, 2010, Oracle and/or its affiliates. All Rights Reserved. 351
Maximum Late Fees
Yearly, Term, and
Monthly On a yearly, term, and monthly basis, enter the maximum monetary amount that
you want to collect in late fees. In the Nbr field, enter the maximum number of
months, terms, or years for which you want to collect late fees.
Year Start andYear Stop If you enter a maximum amount in the Yearly field, enter the month and day for
the year start and year stop that defines your institution's time span.
Due Info (due information)
Due Date Select a due date option to establish the payment due date for late charges.
Warning! Values for this field are delivered with your system as translate
values. Do not modify these values in any way. Any modifications to these
values will require a substantial programming effort. Values are:
Days from Posted Date: Select this option if you want late fees to be due a
specified number of days after they are posted to the account.
Days from Effective Date: Select this option if you want the late fees to be due a
specified number of days after the effective date of the late fees charge.
Null Value: Select this option if you want to use the Null Due Date value that you
established in SF Installation setup. Using this option enables you to set a due
date during the billing process.
Due Days Enter the number of days after the due date that you want late fee charges to be
due.
Note. This field is not available if you select Null Value in the Due Date field.
Specifying Academic Programs for Late Fees
Access the Late Fees Setup 4 page (Set Up SACR, Product Related, Student Financials, Charges and
Payments, Late Fees, Late Fees Setup 4).
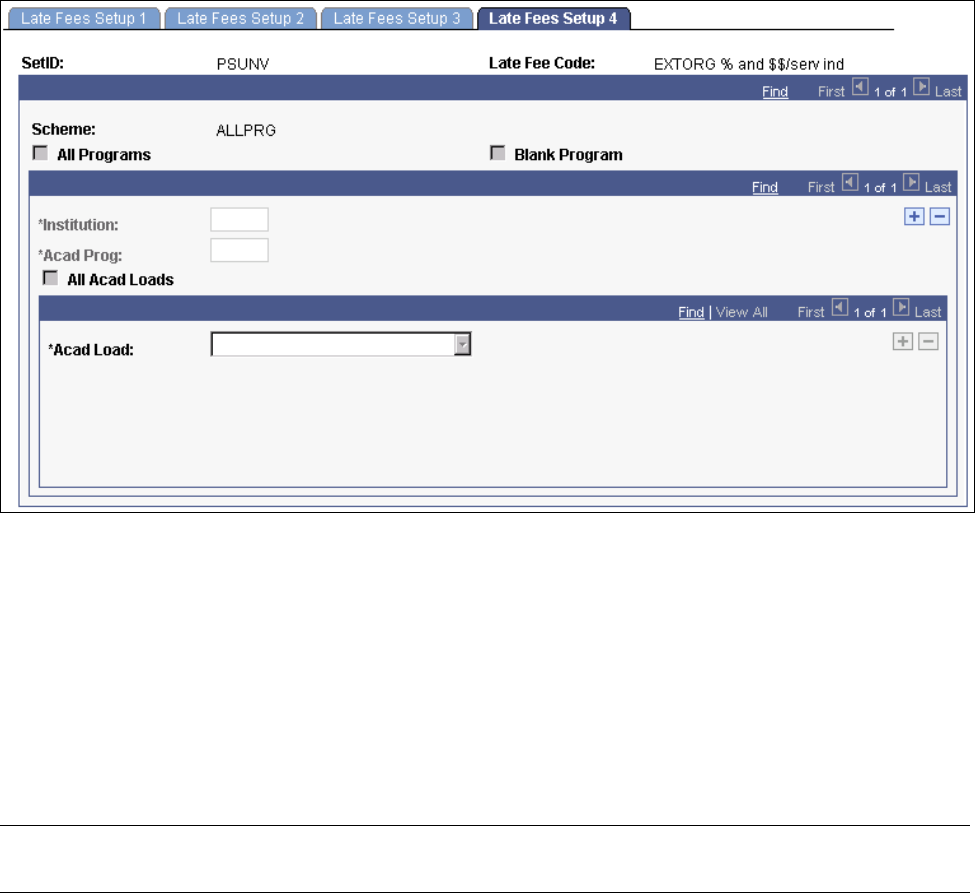
Setting Up Receivables Maintenance Chapter 11
352 Copyright © 1988, 2010, Oracle and/or its affiliates. All Rights Reserved.
Late Fees Setup 4 page
All Programs Select to have students in all academic programs included in the calculation for a
late fee scheme. If you select this option, the Institution,Acad Prog (academic
program), All Acad Loads (all academic loads), and Acad Load (academic load)
fields become unavailable.
Blank Program Select if a late fee scheme applies to a nonstudent without an academic program,
such as a faculty member who is not enrolled in your institution as a student.
Note. A late fee scheme can apply to both students and nonstudents, so you may have a late fee scheme for
which you select both All Programs and Blank Program.
Late Fee Schemes for Individual Programs
If you do not select the All Programs check box, you must indicate which academic programs are included in
the late fee scheme. At least one academic program must be defined.
Institution Enter an institution for this late fee scheme.
Acad Prog (academic
program) Enter an academic program for this late fee scheme.
All Acad Loads (all
academic loads) Select to have all academic loads included in this late fee scheme. If you select
this option, the Acad Load field becomes unavailable.
Acad Load (academic
load) Select an academic load for this late fee scheme.
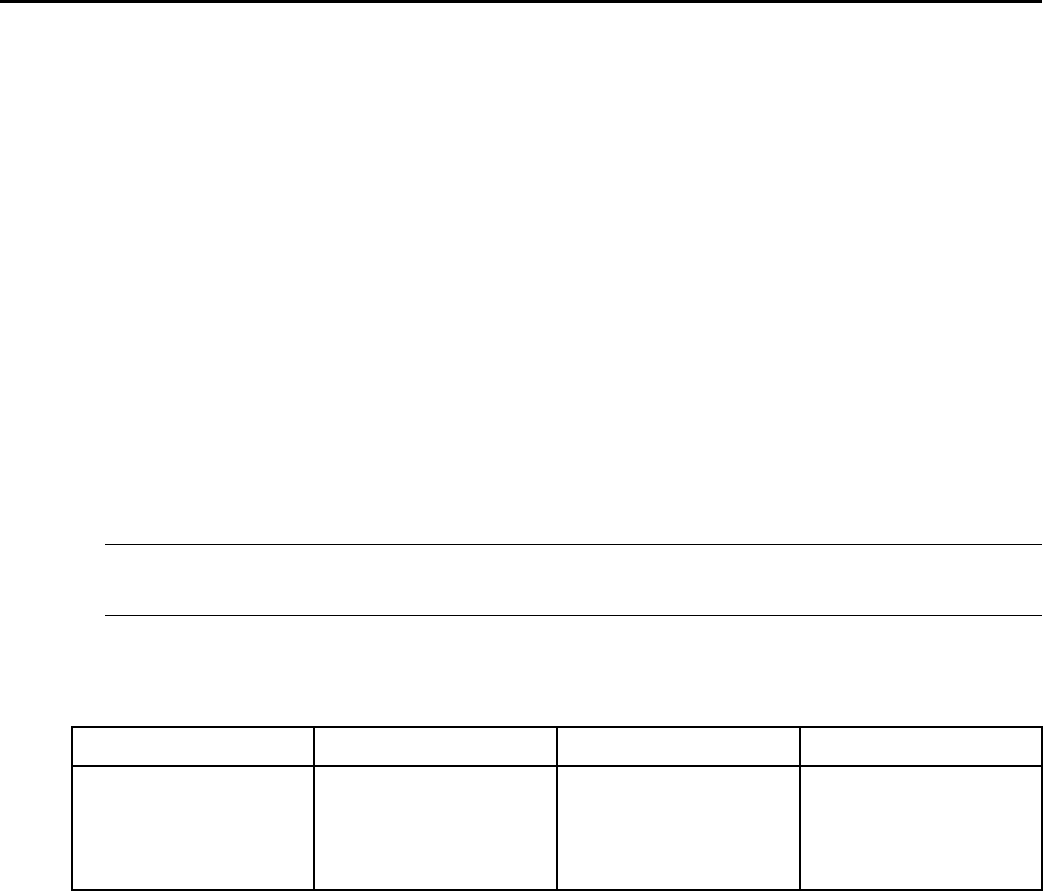
Chapter 11 Setting Up Receivables Maintenance
Copyright © 1988, 2010, Oracle and/or its affiliates. All Rights Reserved. 353
Setting Up Late Fees - Billing
This section provides an overview of late fees – billing and discusses how to defining Late Fees - Billing
Parameters.
Understanding Late Fees Billing
To supplement the Late Fees process, Campus Solutions offers an alternative Late Fees calculation process
While Late Fees uses past-due amounts, aging categories, or both to calculate late fees, Late Fees - Billing
compares the amount due from a specified billing record with the amount of payments or credits on the
account. If the payments or credits are less than the amount due, the student is assessed a late fee.
Late Fees - Billing enables you to:
• Define which payments or credits are considered in the calculation, using Item Type Group.
•Define a threshold amount for which, the account is not assessed the late fee if the unpaid balance is less
than this threshold.
Note. You must select either the Late Fees method or the Late Fee — Billing method, but not both, at the
Business Unit level as the method for calculating and processing late fees.
Page Used to Set Up Late Fees - Billing
Page Name Definition Name Navigation Usage
Late Fees - Billing SSF_LATE_FEE_CD Set Up SACR, Product
Related, Student Financials,
Charges and Payments, Late
Fees, Late Fees — Billing
Set up parameters for late
fees - billing.
Set up Late Fees - Billing Parameters
Access the Late Fees - Billing page (Set Up SACR, Product Related, Student Financials, Charges and
Payments, Late Fees, Late Fees - Billing).
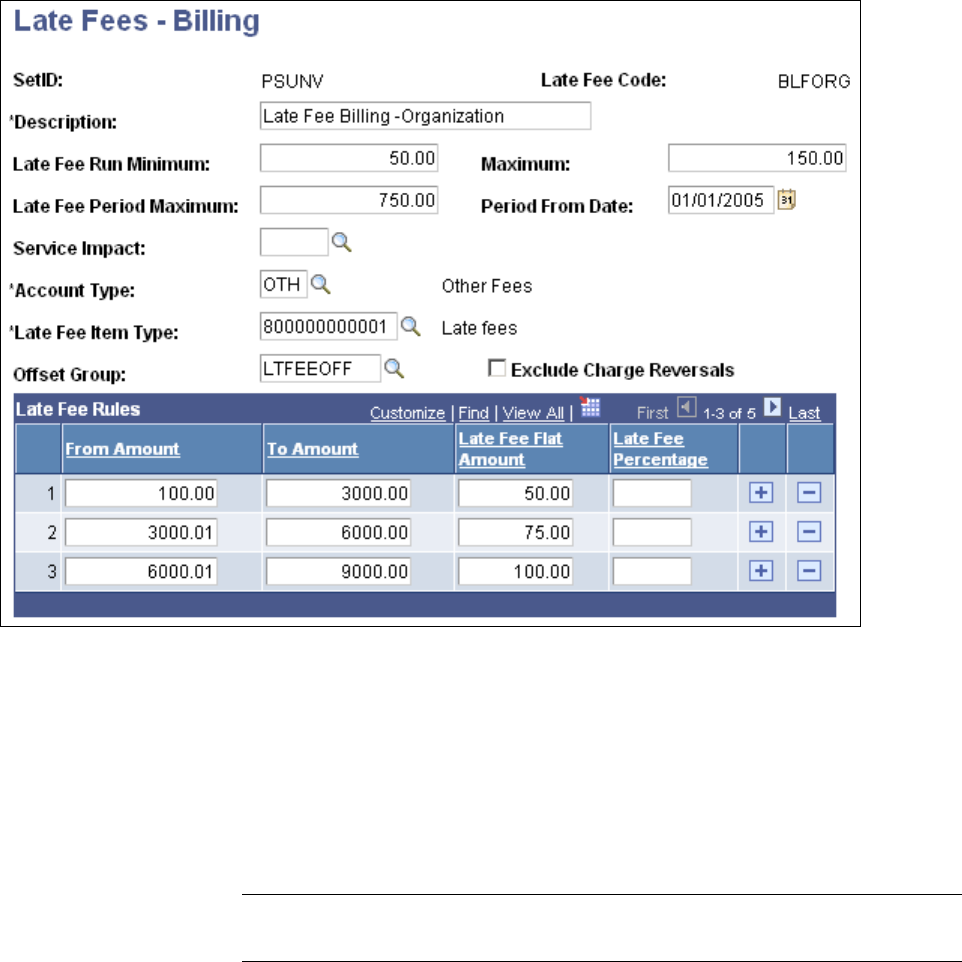
Setting Up Receivables Maintenance Chapter 11
354 Copyright © 1988, 2010, Oracle and/or its affiliates. All Rights Reserved.
Late Fees - Billing page.
Late Fee Run Minimum Enter a minimum balance for the run.
Maximum Enter a maximum balance for the run.
Late Fee Period
Maximum Enter a maximum late fee amount for the period.
Period From Date Note. Indicate the from date to be used for determining previously assessed late
fees (part of period maximum calculation).
Service Impact Enter a positive service impact to prevent late fee assessment
Account Type Indicate the account type to be used to post the late fee.
Late Fee Item Type Indicate the item type to be used to post the late fee.
Offset Group Enter the offset item group to be used to identify credits that should be applied
for processing.
Exclude Charge
Reversals Select to indicate whether reversals should be included when the system is
determining the charge adjustments. These are charge reversals from charges that
have already been billed.

Chapter 11 Setting Up Receivables Maintenance
Copyright © 1988, 2010, Oracle and/or its affiliates. All Rights Reserved. 355
Late Fee Rules
From Amount Identify a minimum amount for the range.
To Amount Identify a maximum amount for the range.
Late Fee Flat Amount Optionally, indicate a flat amount for the late fee. You must have at least the flat
amount or the percentage set up.
Late Fee Percentage Optionally, indicate a percentage amount for the late fee.
Setting Up External File Layouts
To set up external file layouts, use the External File Layouts component (BANK_INPUT_FILE).
This section provides an overview of external file layouts and discusses how to:
•Define basic file layout parameters.
•Define field positions and lengths.
•Define locations and lengths of control data.
Understanding External File Layouts
Student Financials enables you to import charge and payment information from outside sources. For example,
many institutions have housing and parking management applications from third-party vendors. Or you may
use a lock box service to receive and record payments. This information is imported into the Student
Financials application using a file transfer process.
Field Positions and Lengths
Each piece of information in an external file is defined by a starting character position and a field length.
Certain types of data (for example date fields) do not require a length definition because they have a fixed
length. Consult the data provider to determine the correct definition.
Control Data
You must also set the location and length of the control data. This information is loaded into the Group
Control Information. It is used to compare what the data source indicates they have sent to what was actually
received, loaded, and posted. Control data also includes the origin code and the currency code. Control data
may be located in the file header or trailer.

Setting Up Receivables Maintenance Chapter 11
356 Copyright © 1988, 2010, Oracle and/or its affiliates. All Rights Reserved.
Pages Used to Set Up External File Layouts
Page Name Definition Name Navigation Usage
Record Types BNK_RCN_INP_LAY1 Set Up SACR, Product
Related, Student Financials,
External File Layouts,
Record Types
Define basic file layout
parameters.
Field Details 1 BNK_RCN_INP_LAY4 Set Up SACR, Product
Related, Student Financials,
External File Layouts,
Record Types, Field Details
1
Define the first set of field
positions and lengths.
Field Details 2 BNK_RCN_INP_LAY5 Set Up SACR, Product
Related, Student Financials,
External File Layouts,
Record Types, Field Details
2
Define the second set of
field positions and lengths.
Field Details 3 BNK_RCN_INP_LAY6 Set Up SACR, Product
Related, Student Financials,
External File Layouts,
Record Types, Field Details
3
Define the third set of field
positions and lengths.
Control Totals BNK_RCN_INP_LAY2 Set Up SACR, Product
Related, Student Financials,
External File Layouts,
Record Types, Control
Totals
Defining locations and
lengths of control data.
Defining Basic File Layout Parameters
Access the Record Types page (Set Up SACR, Product Related, Student Financials, External File Layouts,
Record Types).
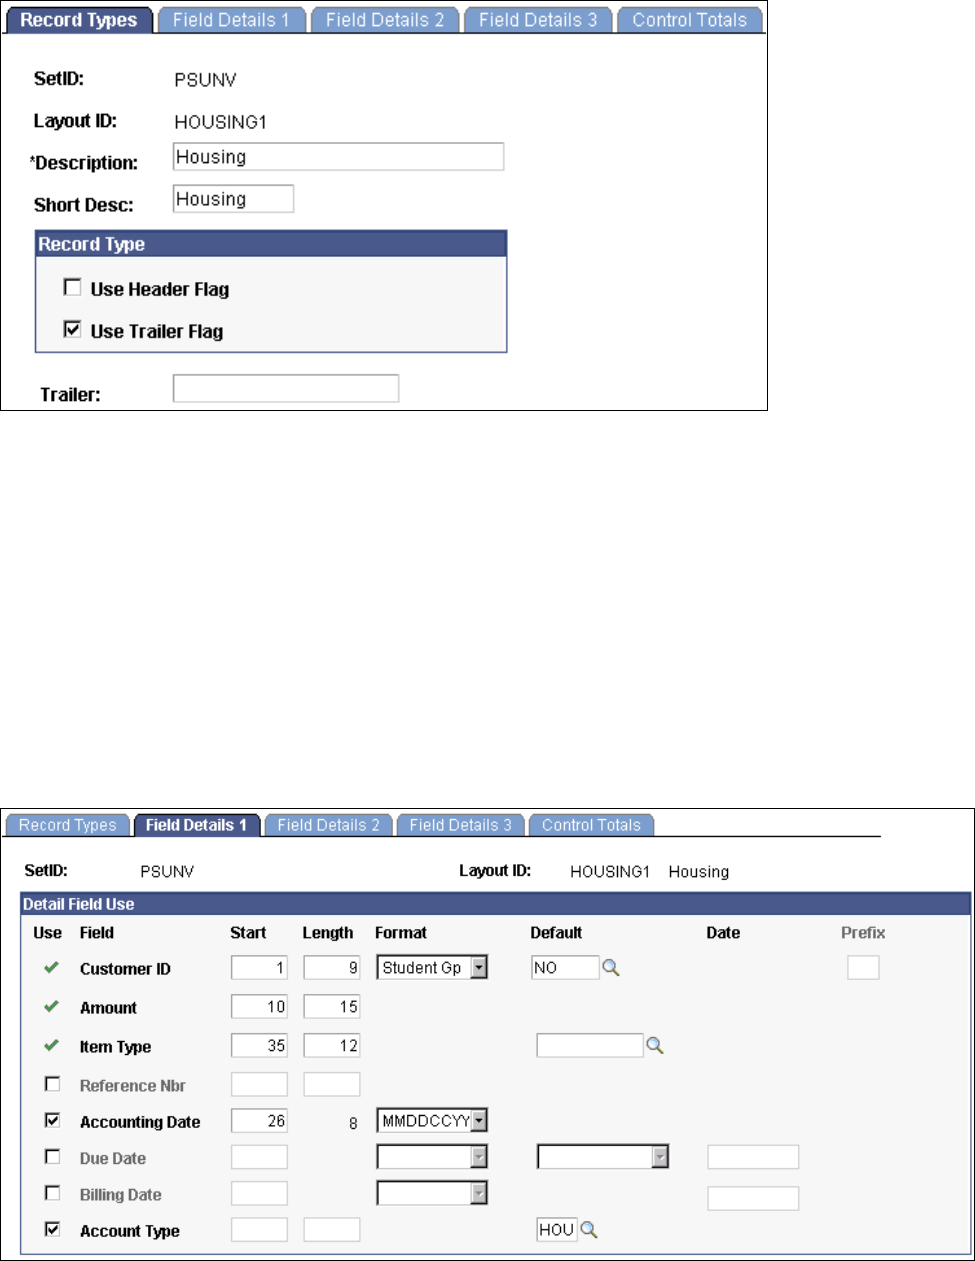
Chapter 11 Setting Up Receivables Maintenance
Copyright © 1988, 2010, Oracle and/or its affiliates. All Rights Reserved. 357
Record Types page
Use Header Flag andUse
Trailer Flag Select to indicate to the system to look for information in the header position,
trailer position, or both.
Trailer Enter any specific information that you want included in the file trailer.
Defining Field Positions and Lengths
Access the Field Details 1 page (Set Up SACR, Product Related, Student Financials, External File Layouts,
Record Types, Field Details 1).
Field Details 1 page
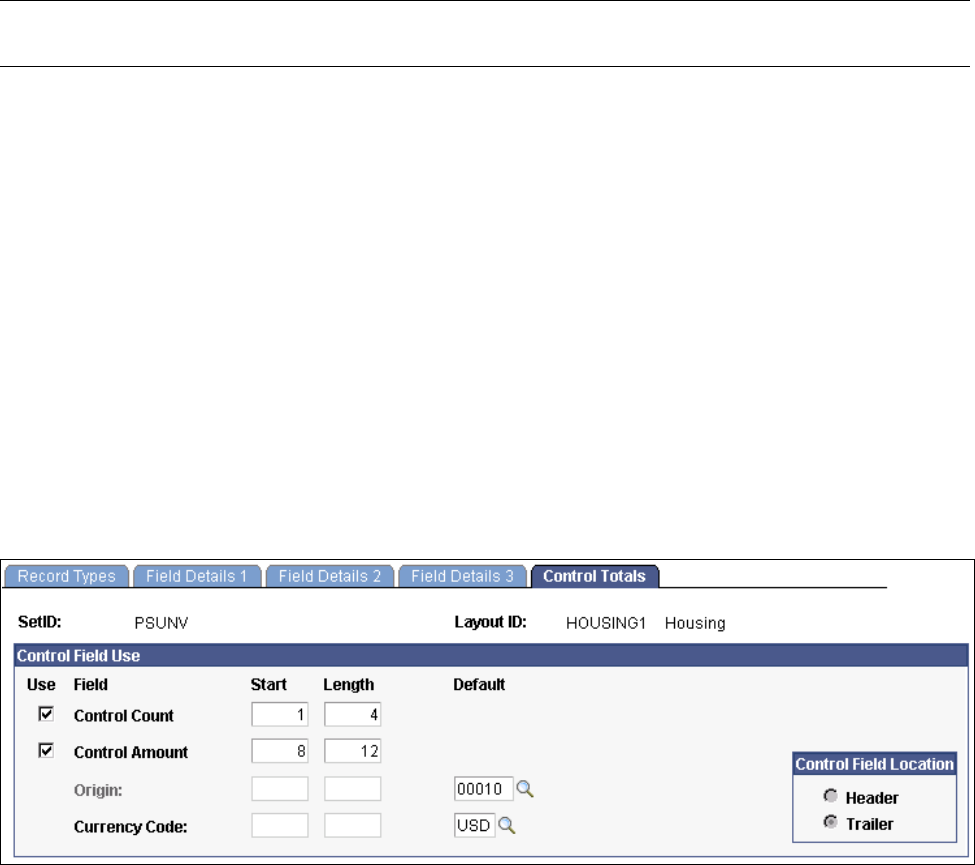
Setting Up Receivables Maintenance Chapter 11
358 Copyright © 1988, 2010, Oracle and/or its affiliates. All Rights Reserved.
Note. Use the Field Details 2 page and the Field Details 3 page to define positions and lengths for additional
fields.
Use To activate a field, select the Use check box next to it. The Customer ID,
Amount, and Item Type fields are required.
Start and Length Enter the start position and length for any applicable fields.
Format Enter the format for any applicable fields.
Default Enter the default for any applicable fields.
Prefix Enter a prefix value if one is required.
Defining Locations and Lengths of Control Data
Access the Control Totals page (Set Up SACR, Product Related, Student Financials, External File Layouts,
Record Types, Control Totals).
Control Totals page
Use To activate a field, select the Use check box next to it.
Start and Length Enter the start position and length for any applicable fields.
Default Enter the default for any applicable fields.
Control Field Location
Header or Trailer Select either header or trailer to indicate where control values can be found.

Chapter 11 Setting Up Receivables Maintenance
Copyright © 1988, 2010, Oracle and/or its affiliates. All Rights Reserved. 359
Setting Up Item Reasons
To set up item reasons, use the Item Reasons component (ITEM_REASONS).
Item reasons provide brief explanations for payment and charge reversals. They provide background
information to auditors and staff.
Page Used to Set Up Item Reasons
Page Name Definition Name Navigation Usage
Item Reasons LINE_REASON_TBL Set Up SACR, Product
Related, Student Financials,
Charges and Payments,
Item Reasons
Set up item reasons.
Setting Up Payroll Deduction
To set up payroll deduction, use the Identify SA Deduction Codes component (SSF_SA_DED_TBL), the
Create Deduction Relationship component (SF_PAYDED_RELATION), and the Create Payment Plans
component (TP_PAYMENT_PLAN).
This section provides an overview of payroll deduction and discusses how to:
•Define payroll deduction codes.
•Define payroll deduction relationships.
•Assign payroll deduction codes to payment plans.
Understanding Payroll Deduction
Student Financials enables university employees to pay tuition, fees, and other educational expenses through
payroll deductions. For applicable employees, PeopleSoft Payroll for North America calculates the payroll
deductions to be used to pay student charges. Student Financials then takes those payroll deductions and
applies them as payments to the appropriate student accounts. You also can restrict the payroll deduction
payment to a payment plan account. In addition, this new feature enables you to apply payroll deductions
from one employee to the account of a student with a different ID. This allows, for example, a university
employee, who has a dependent who attends that same university, to have deductions from his paycheck
apply to his dependent's student account.
Note. Close coordination between your PeopleSoft Payroll for North America and Student Financials staff is
crucial to properly process payroll deductions.
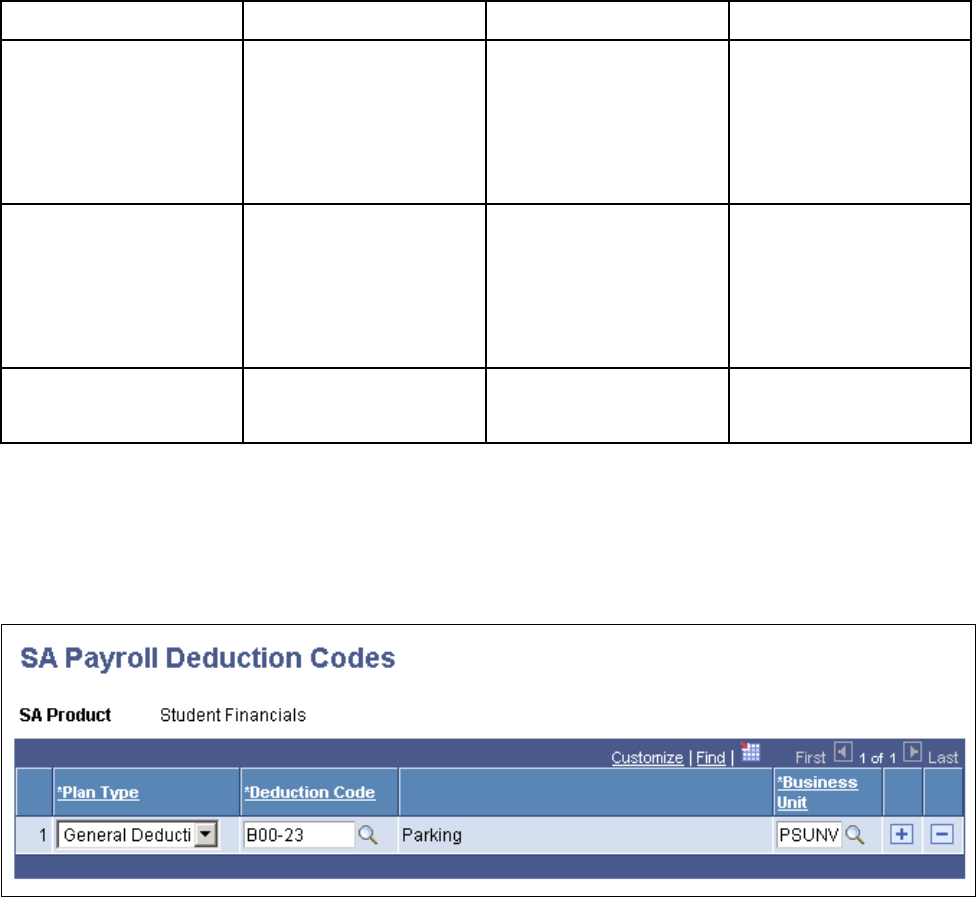
Setting Up Receivables Maintenance Chapter 11
360 Copyright © 1988, 2010, Oracle and/or its affiliates. All Rights Reserved.
Pages Used to Set Up Payroll Deduction
Page Name Definition Name Navigation Usage
SA Payroll Deduction
Codes
SSF_SA_DED_TBL Student Financials, Charges
and Payments, Payroll
Deduction Processing,
Identify SA Deduction
Codes, SA Payroll
Deduction Codes
Define payroll deduction
codes.
Payroll Deduction
Relationship
SF_PAYDED_REL Student Financials, Charges
and Payments, Payroll
Deduction Processing,
Create Deduction
Relationship, Payroll
Deduction Relationship
Define payroll deduction
relationships.
Payment Plan 1 TP_PAYMENT_PLAN Student Financials, Payment
Plans, Create Payment Plan Assigning payroll deduction
codes to payment plans
Defining Payroll Deduction Codes
Access the SA Payroll Deduction Codes page (Student Financials, Charges and Payments, Payroll Deduction
Processing, Identify SA Deduction Codes, SA Payroll Deduction Codes).
SA Payroll Deduction Codes page
These are payroll deduction codes that PeopleSoft Payroll for North America uses to deduct funds to be
applied to student charges in Student Financials.
Plan Type Enter the value of the plan type that applies to the payroll deduction code.
Deduction Code Enter the appropriate deduction code.

Chapter 11 Setting Up Receivables Maintenance
Copyright © 1988, 2010, Oracle and/or its affiliates. All Rights Reserved. 361
See Also
PeopleSoft Payroll for North America PeopleBook, "Defining Deductions"
Defining Payroll Deduction Relationships
Access the Payroll Deduction Relationship page (Student Financials, Charges and Payments, Payroll
Deduction Processing, Create Deduction Relationship, Payroll Deduction Relationship).
Payroll Deduction Relationship page
Defining payroll deduction relationships for an employee, specifying the recipients of the employee's payroll
deductions is optional.
The page displays the ID of the employee whose pay is being deducted. The name of the employee appears to
the left.
Deduction Code Enter the code of the payroll deduction that the system applies to the recipient.
Related ID Enter the ID of the student whom you want to receive the deducted funds.
Expiration Date Enter the date after which deducted funds no longer apply to the account of the
student selected in the Related ID field. After this date, the system applies any
payroll deductions to the account of the employee whose pay is being deducted.
Note. You can define only one related ID per deduction code. Defining a payroll deduction relationship is
necessary only to apply a deduction to someone other than the employee receiving the payroll deduction. If an
employee's payroll deduction is to be applied to his or her own student account, do not complete this page for
that employee.
Assigning Payroll Deduction Codes to Payment Plans
Access the Payment Plan 1 page (Student Financials, Payment Plans, Create Payment Plan). In the Payroll
Deduction field, enter the code of the payroll deduction that applies to the payment plan account.

Setting Up Receivables Maintenance Chapter 11
362 Copyright © 1988, 2010, Oracle and/or its affiliates. All Rights Reserved.
Note. Assigning a payroll deduction code to a payment plan is necessary only if you plan to restrict payroll
deductions to apply to payment plan accounts. In addition, you must be sure that you select the Use Payment
Plan check box when you run the Payroll Deduction Group Create process to restrict payroll deductions to
apply to payment plan accounts.
See Also
Chapter 8, "Setting Up Payment Plans," Defining Basic Payment Plan Contract Parameters, page 259

Copyright © 1988, 2010, Oracle and/or its affiliates. All Rights Reserved. 363
Chapter 12
Setting Up Receivables Collection
This chapter lists prerequisites and discusses how to:
•Set up business units for collections.
•Set up collectors.
•Set up collection criteria.
•Define reason in and reason out codes.
•Create follow-up actions.
•Set up collection letter templates.
Prerequisites
Before you set up and run your collection process, you must:
1. Make sure PeopleSoft Workflow is set up properly to handle your collection process.
2. Set up the 3Cs for collection purposes. Although the 3Cs are part of the PeopleSoft Campus Community
application, all of the pages that are necessary to set up the 3Cs for collection purposes can be accessed
through the Collect Receivables menu in Student Financials.
See Also
Enterprise PeopleTools PeopleBook: Using PeopleSoft Applications, Using Workflow
PeopleSoft Enterprise Campus Community 9.0 Fundamentals PeopleBook, "Understanding the 3Cs —
Communications, Checklists, and Comments"
Setting Up Business Units for Collections
You establish the collection parameters of your business unit using the Collections page of the SF Business
Unit component (BUSINESS_UNIT_SF). This page specifies the rules that the Assign Collector process uses
to determine whether it should bring past due charges into or out of the collection process. In addition, you
use this page to determine whether the system assigns collection responsibilities by role or by user ID.
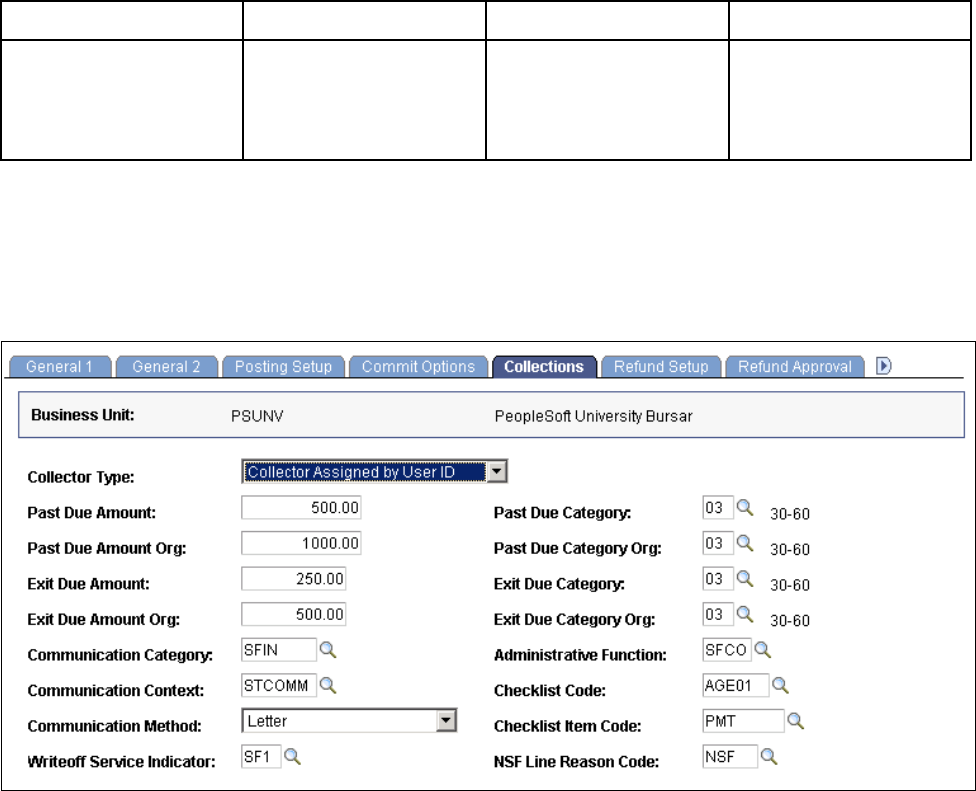
Setting Up Receivables Collection Chapter 12
364 Copyright © 1988, 2010, Oracle and/or its affiliates. All Rights Reserved.
Pages Used to Set Up Business Units for Collections
Page Name Definition Name Navigation Usage
Collections BUS_UNIT_TBL_SF7 Set Up SACR, Product
Related, Student Financials,
SF Business Unit,
Collections
Define collection rules for
business units.
Defining Collection Rules for Business Units
Access the Collections page (Set Up SACR, Product Related, Student Financials, SF Business Unit,
Collections).
Collections page
Collector Type Assign the collector type by role or by user ID. Values are:
Collector Assigned by User ID: Select to assign collection responsibilities to
specific individuals.
Collector Assigned by Role: Select to assign collection responsibilities to
everyone assigned a particular role.
Past Due Amount Enter a minimum past-due amount to assign to collections for student accounts.
By setting this minimum, you can focus your collection efforts on those accounts
that are most cost-effective to recover.
Past Due Category Select a category to define the minimum amount of time that an amount must be
past due before it is assigned for collection.

Chapter 12 Setting Up Receivables Collection
Copyright © 1988, 2010, Oracle and/or its affiliates. All Rights Reserved. 365
Past Due Amount Org
(past due amount
organization)
Enter a minimum past-due amount to assign to collections for organization
accounts.
Past Due Category Org
(past due category
organization)
Select a category that establishes the minimum amount of time that an amount
must be past due before it is assigned for collection.
Exit Due Amount Enter the exit due amount with the corresponding exit due category for
individuals (for example, students). If the past-due amount falls below the exit
due amount within the exit due category (time period), the account is
automatically removed from the collections process.
Exit Due Category The exit due category, in conjunction with the exit due amount, controls the
removal of an account from collections. For example, if the past-due balance of
an account falls below the specified exit due amount, but the length of time the
account has been past due is beyond the range of the exit due category, the
account will remain in collection. This selection is limited to accounts of
individuals.
Exit Due Amount Org
(exit due amount
organization)
Enter the exit due amount with the corresponding exit due category for
organizations. If the past-due amount falls below the exit due amount within the
exit due category (time period), the account is automatically removed from the
collections process.
Exit Due Category Org
(exit due category
organization)
The exit due category, in conjunction with the exit due amount, controls the
removal of an account from collections. For example, if the past-due balance of
an account falls below the specified exit due amount, but the length of time that
the account has been past due is beyond the range of the exit due category, the
account will remain in collection. This selection is limited to organization
accounts.
Write Off Service
Indicator Select a write-off service indicator to use if a collection balance is written off.
This service indicator code is automatically applied to all customer accounts that
you write off, and the service limitations that you define for this code are applied
to the customer.
NSF Line Reason
(insufficient funds line
reason)
Select the NSF line reason code that you want to use when a check is returned for
insufficient funds. When a check is returned, it is reversed using the Payment
Reversal process and marked with the NSF Line Reason code. If you select the
NSF check box on the Collection Criteria page, the system uses this code to
assign returned checks to your collectors who are responsible for recovering
checks that are returned for insufficient funds.
See Also
PeopleSoft Enterprise Campus Community 9.0 Fundamentals PeopleBook, "Understanding the 3Cs —
Communications, Checklists, and Comments"
Chapter 12, "Setting Up Receivables Collection," Setting Up Collectors, page 366
Enterprise PeopleTools PeopleBook: Workflow Technology, Defining Roles and Users
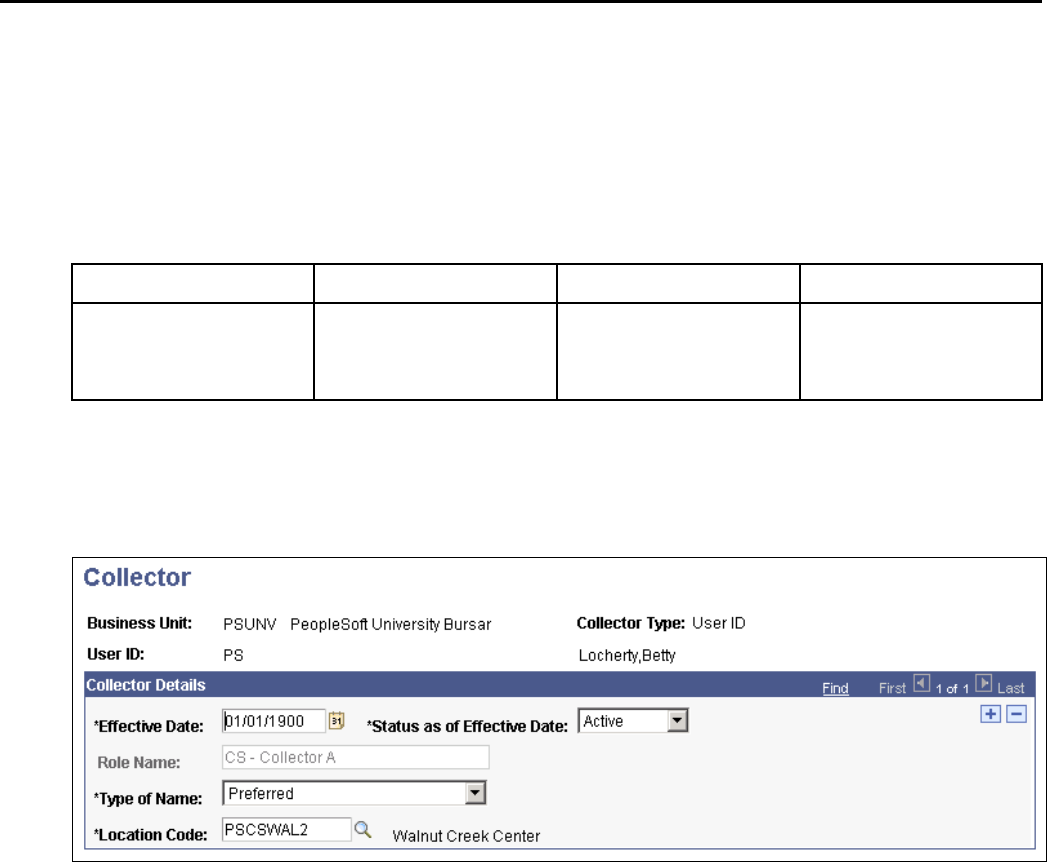
Setting Up Receivables Collection Chapter 12
366 Copyright © 1988, 2010, Oracle and/or its affiliates. All Rights Reserved.
Setting Up Collectors
To set up collectors, use the Collector component (COLLECTOR_SF).
Before you can start assigning past due items for collection, you must establish collectors within the system.
Page Used to Set Up Collectors
Page Name Definition Name Navigation Usage
Collector COLLECTOR_SF Set Up SACR, Product
Related, Student Financials,
Collections, Collector
Define collectors.
Defining Collectors
Access the Collector page (Set Up SACR, Product Related, Student Financials, Collections, Collector).
Collector page
Role Name If your business unit assigns collection responsibilities by role rather than by user
ID, select a collector role.
Type of Name Select the type of name that the system uses when referring to this collector.
Location Code Enter the code that is associated with the location where the collector is based.

Chapter 12 Setting Up Receivables Collection
Copyright © 1988, 2010, Oracle and/or its affiliates. All Rights Reserved. 367
Setting Up Collection Criteria
To set up collection criteria, use the Collection Criteria component (COLL_CRITER_SF) and the Corporate
Collection Criteria component (COLL_CRITER_ORG).
You must set up collection criteria for each collector user ID or role to which you assign collection items. The
collection criteria that you establish act as filters that assign collection items to the appropriate collector when
you run the Assign Collector process.
This section discusses how to:
•Set up student collection criteria.
•Set up organization collection criteria.
Pages Used to Set Up Collection Criteria
Page Name Definition Name Navigation Usage
Collection Criteria COLL_CRITER_SF Set Up SACR, Product
Related, Student Financials,
Collections, Collection
Criteria
Set up student collection
criteria.
Corporate Collection
Criteria (corporation
collection criteria)
COLL_CRITER_ORG Set Up SACR, Product
Related, Student Financials,
Collections, Corporate
Collection Criteria
Set up organization
collection criteria.
Setting Up Student Collection Criteria
Access the Collection Criteria page (Set Up SACR, Product Related, Student Financials, Collections,
Collection Criteria).
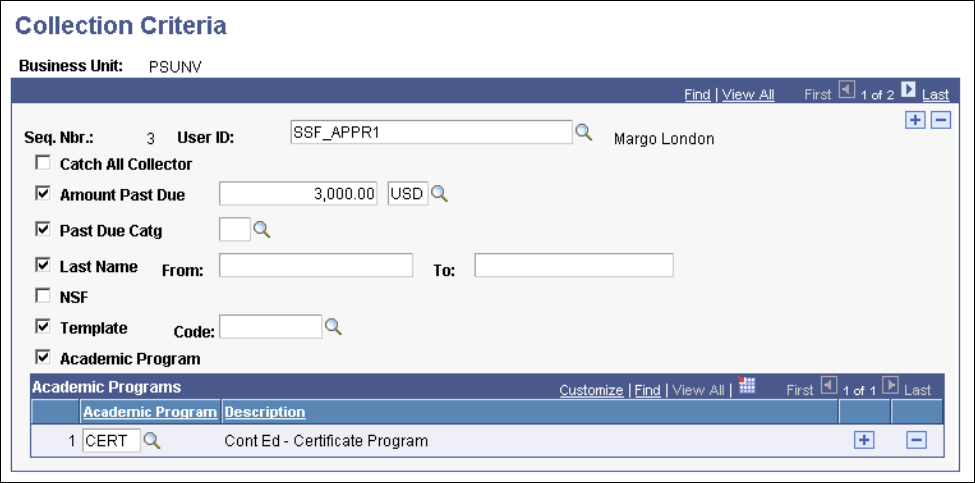
Setting Up Receivables Collection Chapter 12
368 Copyright © 1988, 2010, Oracle and/or its affiliates. All Rights Reserved.
Collection Criteria page
User ID or Role Name Select a user ID or role name. The label of the field changes depending on your
business unit setup. If you assign collection items by user ID, the User ID field
appears. If you assign collection items by role, the Role Name field appears.
Catch All Collector Select to assign to this collector any collection items that did not meet any other
collector's criteria.
Amount Past Due Select to assign collection items to this collector only if they meet the minimum
past-due amount that you enter in the field that appears to the right of the check
box when you select it.
Past Due Catg (past-due
category) Select to assign collection items to this collector only if they belong to the aging
category that you enter in the field that appears to the right of the check box
when you select it.
Last Name, From, and
To Select to assign collection items to this collector only for students who fall within
the range of last names that you specify in the From and To fields that appear to
the right of the check box when you select it.
NSF (non-sufficient
funds) Select to assign to this collector only those collection items that are associated
with students who have this item reason attached to their accounts.
Template andCode Select the Template check box to attach a particular collections letter template to
any collection items that are assigned to this when you run the Assign Collector
process. In the Code field that appears to the right of the selected check box,
select the code of the appropriate collection letter template.

Chapter 12 Setting Up Receivables Collection
Copyright © 1988, 2010, Oracle and/or its affiliates. All Rights Reserved. 369
Academic Program Select to assign to this collector only those collection items within the academic
programs that you specify in the Academic Programs scroll area. This scroll area
appears only if you select the Academic Programs check box.
Note. The system assigns collections to the first collector who meets the defined criteria. When assigning a
collection item, the system reviews the criteria by sequence number starting with the lowest number.
Therefore, you should create the criteria with the higher monetary amounts first. This will ensure that the high
monetary collections are assigned to the collector who can best handle them. For example, suppose that you
establish collection criteria with a sequence number of 1 with an amount past due of 100.00 and a past due
category of 03 (30–60 days past due). The system would assign to the collector linked to these criteria all
collection items of 100.00 USD and above that were 30−60 days past due. A collector linked to collection
criteria with a minimum past due amount that is greater than 100.00 USD for the same past due dates, but
with a higher sequence number, would not be assigned any collections.
Setting Up Organization Collection Criteria
Access the Corporate Collection Criteria page (Set Up SACR, Product Related, Student Financials,
Collections, Corporate Collection Criteria).
Except for the Description check box and the lack of the Academic Program check box, this page is identical
to the Collection Criteria page.
Description Select to assign collection items to this collector only for organizations that fall
within the range of names that you specify in the From and To fields that appear
to the right of the check box when you select it.
See Also
Chapter 12, "Setting Up Receivables Collection," Setting Up Collection Criteria, page 367
Defining Reason In and Reason Out Codes
To set up reason in and reason out codes, use the Reason In component (REASON_IN_SF) and the Reason
Out component (REASON_OUT_SF).
The Assign Collector process brings past-due items into the collections system and moves reconciled items
out of the collections system. When you move an item into or out of the system, you can track the movement
using reason in and reason out codes.

Setting Up Receivables Collection Chapter 12
370 Copyright © 1988, 2010, Oracle and/or its affiliates. All Rights Reserved.
Pages Used to Define Reason In and Reason Out Codes
Page Name Definition Name Navigation Usage
Reason In REASON_IN_SF Set Up SACR, Product
Related, Student Financials,
Collections, Reason In
Set up reason in codes that
identify why the system
moved an item into
collections.
Reason Out REASON_OUT_SF Set Up SACR, Product
Related, Student Financials,
Collections, Reason Out
Set up reason out codes that
identify why the system
moved an item out of
collections.
Creating Follow-Up Actions
To set up follow-up actions, use the Follow-Up Table component (FOLLOW_UP).
Part of the collection process involves following up on past due items that remain in the collection system.
The Collect Receivables feature enables you to create follow-up action codes that record the steps that you
intend to take to resolve a collection item.
Page Used to Create Follow-Up Actions
Page Name Definition Name Navigation Usage
Follow Up Table FOLLOWUP_TBL Set Up SACR, Product
Related, Student Financials,
Collections, Follow-Up
Table
Define follow-up action
codes.
Setting Up Collection Letter Templates
To set up collection letter templates, use the Collection Letter Template component
(COLL_LTRTMP_TABLE).
The Collect Receivables feature enables you to create a template for the dunning letters that you
automatically generate to send to students with past-due charges on their accounts. In addition, this template
enables you to set a schedule for sending different dunning letters to students depending on how long their
past-due charges have been in the collections system.
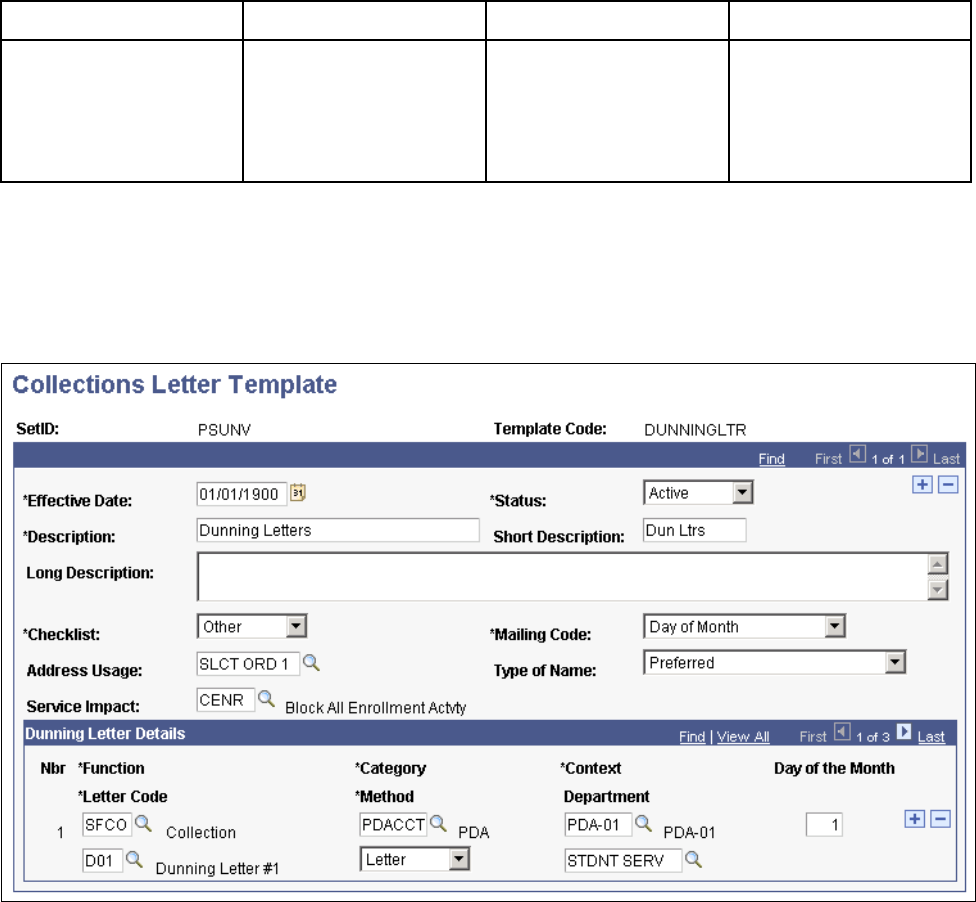
Chapter 12 Setting Up Receivables Collection
Copyright © 1988, 2010, Oracle and/or its affiliates. All Rights Reserved. 371
Page Used to Set Up Collection Letter Templates
Page Name Definition Name Navigation Usage
Collections Letter Template COLL_LTRTMP_TABLE Set Up SACR, Product
Related, Student Financials,
Collections, Collection
Letter Template, Collection
Letter Template
Define collection letter
templates.
Defining Collection Letter Templates
Access the Collections Letter Template page (Set Up SACR, Product Related, Student Financials,
Collections, Collection Letter Template, Collection Letter Template).
Collections Letter Template page
Checklist Select the type of checklist with which you want to associate this collections
letter template.
Setting Up Receivables Collection Chapter 12
372 Copyright © 1988, 2010, Oracle and/or its affiliates. All Rights Reserved.
Mailing Code Select the method that the system uses to determine the schedule for sending out
the different dunning letters that you attach to the template.
If you select Day of Month, the corresponding field that appears in the Dunning
Letter Details group box is Day of the Month. When you select this mailing code,
the system sends dunning letters according to the day of the month in which you
run the Collections Dunning Letter process.
If you select Days in Collection, the corresponding field that appears in the
Dunning Letter Details group box is Days in Collection. When you select this
mailing code, the system sends dunning letters according to how long a
collections item that is associated with this letter template has been in the
collections system.
Address Usage Enter the method that the system uses to determine the addresses to which it
sends dunning letters.
Type of Name Select the type of name that the system uses when addressing the dunning letters.
Service Impact Enter the service impact that the system attaches to students when it sends
dunning letters to them using this template.
Dunning Letter Details
Specify details for each dunning letter that is attached to the template.
Nbr (number) Indicates the number of the dunning letter with respect to all the dunning letters
that you attach to the template.
Function Enter the administrative function that you want to associate with the dunning
letter.
Category Enter the communication category that you want to associate with this dunning
letter.
Context Enter the communication context that you want to associate with the dunning
letter.
Day of the Month The system compares the number that you enter in this field to the day of the
month on which you run the Collections Dunning Letter process to determine
whether a dunning letter should be sent for any collections item associated with
the collections letter template.
For example, suppose that you enter 15 in this field and run the Collections
Dunning Letter process on 07/18/2005. Because the day that you ran the process
is on or after the value in the Day of the Month field, the system would determine
that a dunning letter should be sent for any collections items associated with this
collections letter template.
Chapter 12 Setting Up Receivables Collection
Copyright © 1988, 2010, Oracle and/or its affiliates. All Rights Reserved. 373
Days in Collections When you run the Collections Dunning Letter process, the system generates a
dunning letter for any collections items that are associated with this collections
letter template that have been in the collections system for a number of days
equal to or greater than the number that you enter in this field.
Letter Code Enter the code of the standard letter that you want to associate with this dunning
letter.
Method Enter the method of communication for the dunning letter.
Department Enter the department that is associated with the dunning letter.
Insert rows to associate additional dunning letters with the collections letter template. In this way, you can
create a schedule for sending out multiple dunning letters. For example, suppose that you attach three
different dunning letters to the collections letter template with values of 1,15, and 30 in the Day of the Month
field. If you run the Collections Dunning Letter process on 07/18/2005, the system knows to generate the first
and second dunning letter for associated collections items based on the schedule that you set up here.
See Also
PeopleSoft Enterprise Campus Community 9.0 Fundamentals PeopleBook, "Managing Checklists"

Copyright © 1988, 2010, Oracle and/or its affiliates. All Rights Reserved. 375
Chapter 13
Setting Up Tax Form Production
This chapter lists common elements and discusses how to:
•Set up 1098-T tax form production.
•Set up T2202A tax form production.
•Set up T4A tax form production.
Common Element Used in This Chapter
Calendar Year For the purposes of tax reports, the calendar year represents the tax year for
which you are reporting.
Setting Up 1098-T Tax Form Production
To set up 1098-T tax form production, use the 1098-T TIN Table component (SF_1098_INST).
This section provides an overview of 1098-T tax form production setup and discusses how to:
•Set up a taxpayer identification number (TIN).
•Set up valid citizenship statuses.
Understanding 1098-T Tax Form Production Setup
To set up Student Financials for 1098-T generation, you must:
1. Set up a TIN under which your institution files 1098-T tax information to the IRS.
While many institutions may only designate one TIN per business unit, Student Financials enables you to
set up one TIN to file 1098-T information for multiple business units.
2. Designate item types as qualified tuition and related expenses.
For the Student Financials system to determine whether a student is to receive a 1098-T form, it looks for
any item types on the student's account that you have designated as qualified tuition and related expenses.
A check box on the Amount Edits setup page enables you to identify item types as qualified tuition and
related expenses.
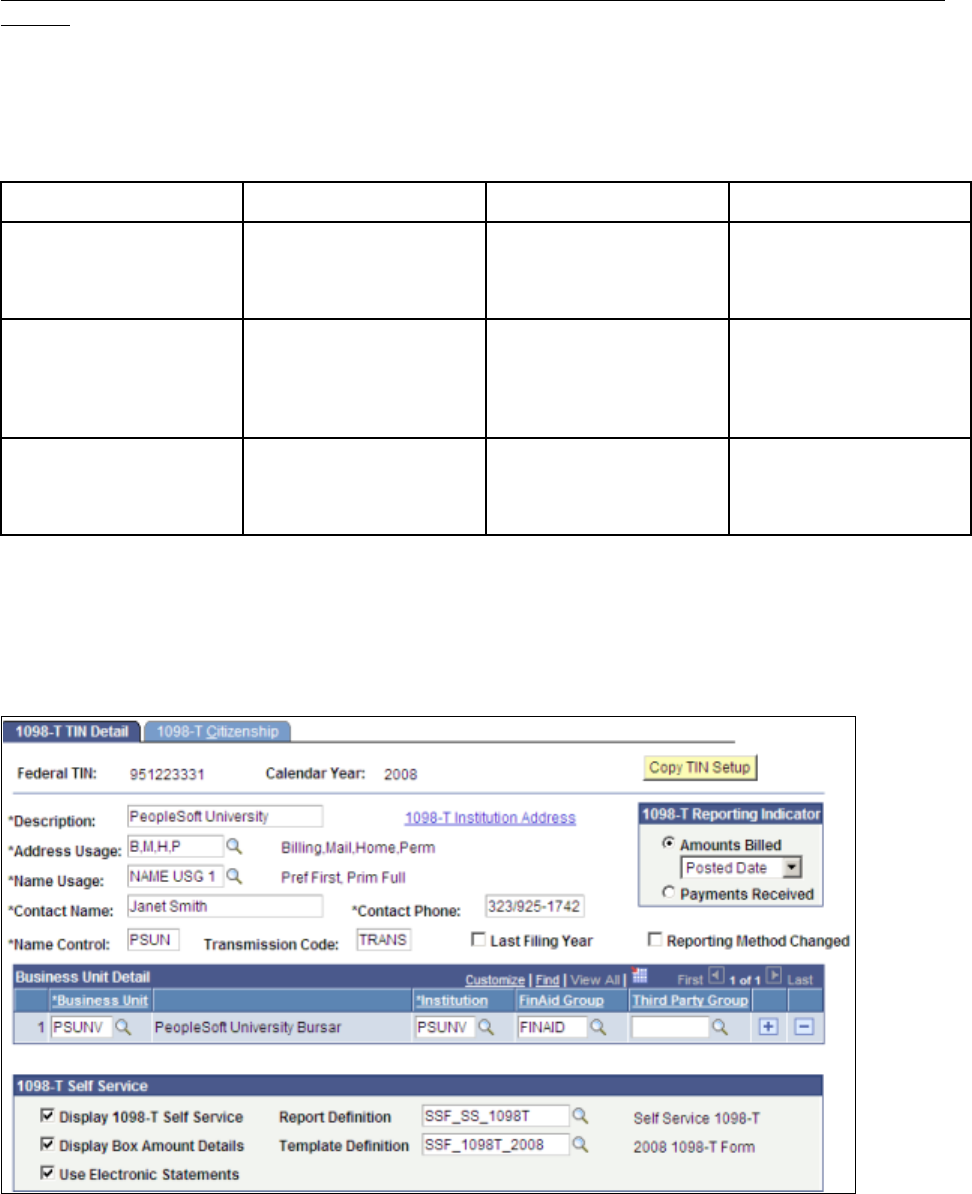
Setting Up Tax Form Production Chapter 13
376 Copyright © 1988, 2010, Oracle and/or its affiliates. All Rights Reserved.
See Also
Chapter 2, "Completing Student Financials General Setup," Setting Up Item Types and Item Type Groups,
page 55
Pages Used to Set Up 1098-T Tax Form Production
Page Name Definition Name Navigation Usage
1098-T TIN Detail SF_1098_INST Set Up SACR, Product
Related, Student Financials,
Taxes, 1098-T TIN Table
Set up a TIN.
1098-T Citizenship SF_1098_INST_CIT Set Up SACR, Product
Related, Student Financials,
Taxes, 1098-T TIN Table,
1098-T Citizenship
Set up valid citizenship
statuses.
1098-T Institution Address SF_1098_INSTAD_SEC Click the 1098-T Institution
Address link on the 1098
TIN page.
Enter the address associated
with the TIN that you are
defining.
Setting Up a TIN
Access the 1098-T TIN Detail page (Set Up SACR, Product Related, Student Financials, Taxes, 1098-T TIN
Table, 1098-T TIN Detail).
1098-T TIN Detail page
Chapter 13 Setting Up Tax Form Production
Copyright © 1988, 2010, Oracle and/or its affiliates. All Rights Reserved. 377
You set up TINs each year.
Copy TIN Setup Click to copy the TIN setup data from a previous year into the TIN that you are
creating. When you click this button, the system prompts you to enter the
calendar year from which to copy setup data.
1098-T Institution
Address Click this link to access the 1098-T Institution Address page, where you can
enter the address information associated with this TIN.
Address Usage Select the logic that the system uses to select the student address that prints on
each 1098-T form.
Name Usage Enter the logic that the system uses to select the student name that prints on each
1098-T form.
Contact Name Enter the name of the primary contact associated with the TIN.
Contact Phone Enter the telephone number of the primary contact associated with the TIN.
Name Control Enter the first four characters of the description of the institution associated with
the TIN. Disregard the word the when it is the first word of the description unless
the name has only two words.
Transmission Code To file 1098-T tax forms with the Internal Revenue Service (IRS) electronically,
you must first file IRS Form 4419, Application for Filing Information Return
Magnetically/Electronically. If the IRS accepts your application to file
electronically, you are assigned a five-character alphanumeric Transmitter
Control code. Enter this code in the Transmission Code field.
Last Filing Year Select if this is the last year that you are using this TIN to file 1098-T forms with
the IRS.
Reporting Method
Changed Select this check box if you have changed your method of reporting (payments
received or amounts billed) from the previous year.
Business Unit Detail
Select the business units that you want to include under the TIN.
Business Unit Enter the business unit for which you want to report 1098-T data under this TIN.
When you exit this field, the system populates the Institution field with the
institution that is associated with the business unit that you select.
Institution Enter the institution that is associated with the business unit that you select. If
you already selected a business unit, the system automatically populates this field
with the correct institution.

Setting Up Tax Form Production Chapter 13
378 Copyright © 1988, 2010, Oracle and/or its affiliates. All Rights Reserved.
FinAid Group (financial
aid group) Enter the item type group to use to identify items that are related to financial aid.
The system uses this group to calculate the value of Box 4 on the 1098-T form.
Note. The financial aid item type group should contain only scholarships, grants,
and fellowship item types.
Third Party Group Enter the item type group to use to identify items that are related to third-party
billing arrangements. The system uses this group to determine whether students
are eligible to receive 1098-T forms.
1098-T Self Service
Select the self-service options that you want to include under the TIN.
Set up the report template each year when the new TIN record is created.
Display 1098-T Self
Service Select to enable students to see a given year on the Selection page. Selecting the
check box causes the TIN for this calendar year to appear in self service.
Clear this check box to restrict this tax year from appearing in self service.
Use the Report Definition field to identify the associated XML Publisher
template.
Display Box Amount Select to enable students to access the details for each box amount that appears
on the View 1098-T page in Student Financials self-service. Box amounts are the
numbered and named boxes on the 1098-T form that contain amounts such as
Payments Received.
This check box is only available when the Display 1098-T Self Service check
box is selected.
Use Electronic
Statements Use this setting in batch to decide whether a paper copy should be printed. This
setting is also used online to decide whether to show the consent message/button
in self service.
Selecting this check box means that the student can consent to receive the 1098-T
form electronically (online using self service) rather than receiving a printed
copy. The student must consent to receive the 1098-T electronically; otherwise,
the form continues to be printed by means of the batch process and mailed to the
student.
Use the Template Definition field to identify the associated XML Publisher
template.
Setting Up Valid Citizenship Statuses
Access the 1098-T Citizenship page (Set Up SACR, Product Related, Student Financials, Taxes, 1098-T TIN
Table, 1098-T Citizenship).
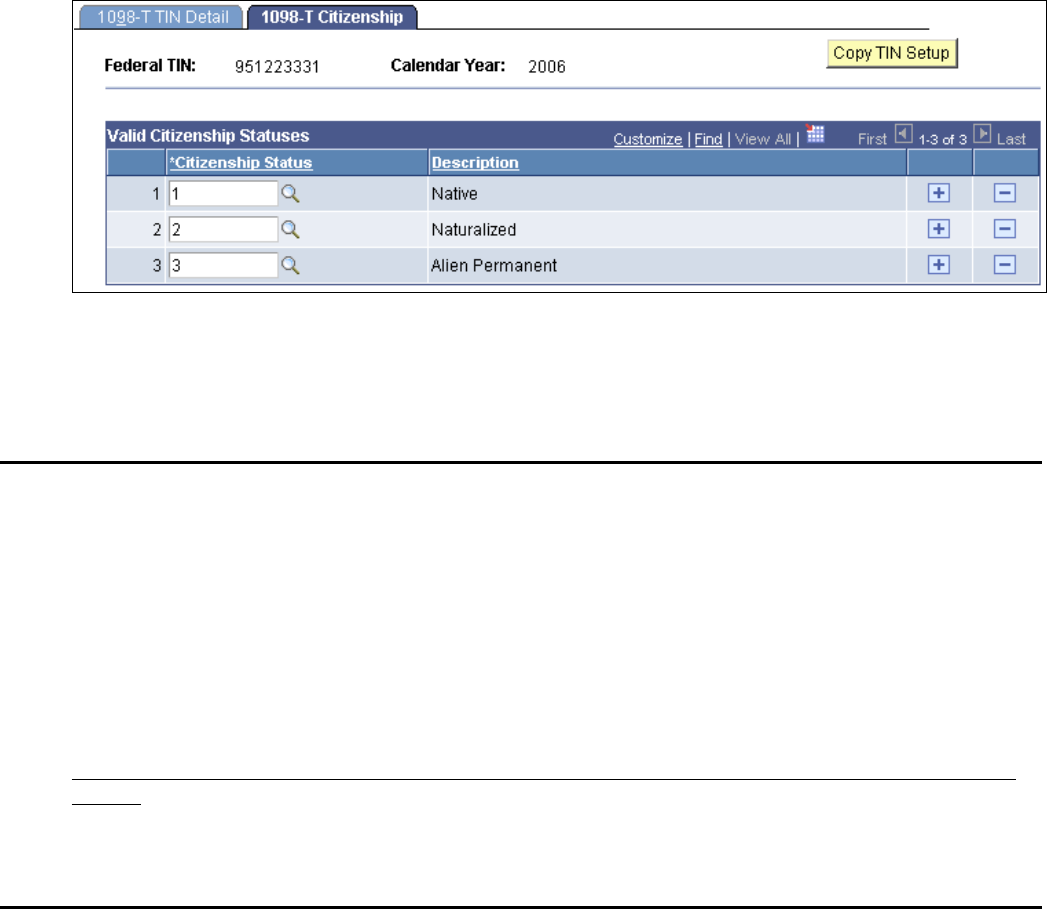
Chapter 13 Setting Up Tax Form Production
Copyright © 1988, 2010, Oracle and/or its affiliates. All Rights Reserved. 379
1098-T Citizenship page
Set up valid citizenship statuses so that a 1098-T is produced only for those statuses listed.
Setting Up T2202A Tax Form Production
To set up Student Financials for T2202A data generation, you must designate item types as T2202A eligible
tuition and offsets. For Student Financials to calculate tuition amounts for each T2202A form, it totals the
amounts of any item types on the student's account that you designated as T2202A eligible. In addition, you
must identify any waivers that offset T2202A eligible tuition so that the system accurately calculates the
tuition amount that appears on your T2202A forms. Check boxes on the Amount Edits setup page enable you
to identify item types as T2202A eligible tuition or as T2202A offsets.
See Also
Chapter 2, "Completing Student Financials General Setup," Setting Up Item Types and Item Type Groups,
page 55
Setting Up T4A Tax Form Production
This section discusses how to set up the T4A tax form production. To set up Student Financials for T4A data
generation, you must:
1. Designate item types as T4A income.
To determine whether to generate T4A data for a student, Student Financials looks for any item types on
the student's account that are designated as T4A income. A check box and associated field on the Amount
Edits setup page enable you to identify item types that count as T4A income. The Wage Loss Plan has
been moved to the Canadian/ANZ Taxes page of the SF Business Unit component. In addition, on the
Miscellaneous page, you must select an earnings code to classify the type of the T4A income.
2. Define your T4A generation processing parameters on the Canadian/ANZ Taxes page of the SF Business
Unit component.

Setting Up Tax Form Production Chapter 13
380 Copyright © 1988, 2010, Oracle and/or its affiliates. All Rights Reserved.
See Also
Chapter 2, "Completing Student Financials General Setup," Setting Up Item Types and Item Type Groups,
page 55
Chapter 2, "Completing Student Financials General Setup," Setting Up Business Units, page 19

Copyright © 1988, 2010, Oracle and/or its affiliates. All Rights Reserved. 381
Chapter 14
Processing ePayment Transactions
This chapter provides an overview of ePayment transactions and discusses how to:
•Process ePayment service requests.
•Review and cancel self-service ePayment transactions.
•Process refunds for ePayments.
•Review ePayment transactions.
•Review self-service agreements
Understanding ePayment Transactions
PeopleSoft Student Financials enables your institution to receive payments for charges by eCheck or credit
card through cashiering and over the web using self-service functionality. The rules that your institution
defines for accepting, verifying, and authorizing transactions are established when you set up your Student
Financials (SF) merchant and SF institution set.
After a credit card transaction takes place, the following steps occur during the completion of a transaction:
1. Through real time or batch authorization, your system transfers the credit card number and payment
request to the payment provider.
2. The payment provider routes the transaction to the merchant bank and then to the credit card company.
3. The credit card provider routes the payment request to the bank that issued the card, if applicable.
4. The bank or credit card company authorizes or declines the transaction, transfers the result back to the
credit card provider, then transfers the result back to you.
5. Your system generates a capture request in real time or in batch. It routes the capture request to the
issuing bank and the bank approves the money to be routed to the merchant account.
When the student submits an electronic check payment:
1. The transaction is transmitted to the school's payment provider.
2. The payment provider forwards the bank account number and routing number to the corresponding
payment processor.
3. The payment processor validates the transaction and transmits the result back to the payment provider.
4. The payment provider forwards the results back to the PeopleSoft system.

Processing ePayment Transactions Chapter 14
382 Copyright © 1988, 2010, Oracle and/or its affiliates. All Rights Reserved.
5. The results of the transaction are presented back to the student.
The check is subsequently submitted by the payment provider for settlement to the ACS System.
See Also
Chapter 3, "Setting Up ePayment Processing," Setting Up SF Merchants, page 100
Chapter 20, "Cashiering," page 519
Electronic Payment Integration Developer's Reference Guide. The guide is posted to My Oracle Support.
Processing ePayment Service Requests
Student Financials provides a batch process that authorizes, captures, and credits submitted credit card
transactions, or debits and credits eCheck transactions.
This section discusses how to:
•Process submitted credit card transactions.
•Process submitted eCheck transactions.
•Purge Security Code data.
Pages Used to Process ePayment Service Requests
Page Name Definition Name Navigation Usage
Credit Card Processing RUNCTL_SFPCRCARD Student Financials, Charges
and Payments, Electronic
Transactions, Electronic
Payments, Process Credit
Cards, Credit Card
Processing
Process submitted credit
card transactions.
eCheck Processing RUNCTL_SFPECHECK Student Financials, Charges
and Payments, Electronic
Transactions, Electronic
Payments, Process
Electronic Check, eCheck
Processing
Process submitted eCheck
transactions.
Security Code Purge
Process
SCC_RUN_CVPURGE Student Financials, Charges
and Payments, Electronic
Transactions, Electronic
Payments, Security Code
Purge, Security Code Purge
Process
Purge Security Code data.
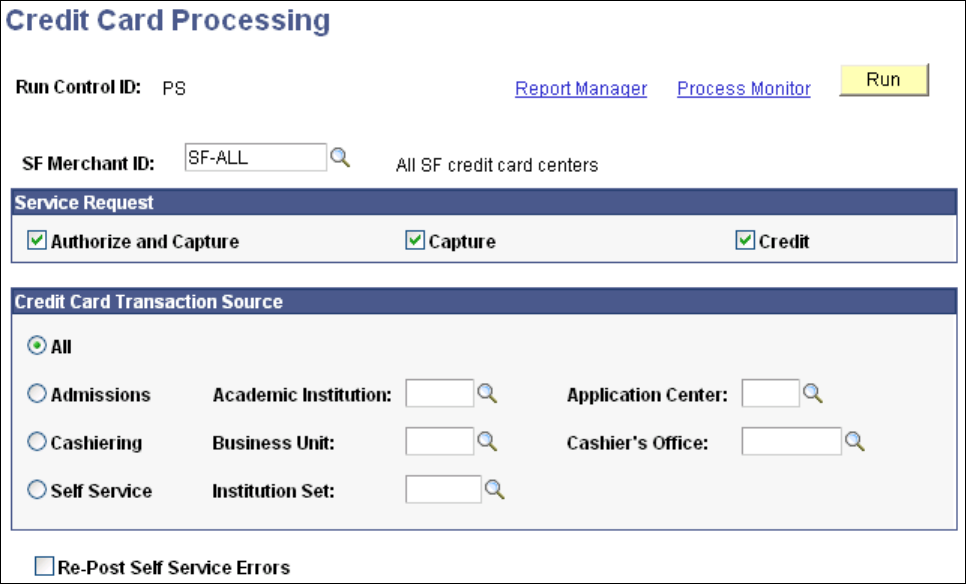
Chapter 14 Processing ePayment Transactions
Copyright © 1988, 2010, Oracle and/or its affiliates. All Rights Reserved. 383
Processing Submitted Credit Card Transactions
Access the Credit Card Processing page (Student Financials, Charges and Payments, Electronic Transactions,
Electronic Payments, Process Credit Cards, Credit Card Processing).
Credit Card Processing page
SF Merchant ID
(Student Financials
merchant ID)
Select the ID of the SF merchant whose transactions you want to process.
Service Request
Hosted transactions cannot be authorized or captured in batch.
The Real-Time Authorization and Real-Time Capture check boxes on the SF Merchants page are selected by
default and are not available for edit for hosted payment providers.
See: PeopleSoft Enterprise Student Financials 9.0 PeopleBooks, Processing ePayment Transactions,
Processing ePayment Service Requests
Authorize and Capture Select to authorize and capture any credit card transactions that have not yet been
authorized for the SF merchant ID selected. If you set up your SF merchant ID to
not authorize or capture in real time, you must run the batch process with this
check box selected to authorize and capture your credit card transactions.

Processing ePayment Transactions Chapter 14
384 Copyright © 1988, 2010, Oracle and/or its affiliates. All Rights Reserved.
Capture Select to capture any credit card transactions that have been authorized, but not
captured. If you set up your SF merchant ID to authorize in real time, but not to
capture in real time, you must run the batch process with this check box selected
to capture your credit card transactions.
Note. Even if you authorize credit card transactions in real time, you might have
connection errors with your credit card processing vendor. When this happens,
your transactions fail and remain unauthorized. Therefore, you eventually need to
run the batch process with the Authorize and Capture check box selected to
process those failed transactions.
Credit Select to credit the credit card accounts of students whose credit card transactions
have been refunded, voided, or reversed.
Note. If you intend to process credits originating from a refund using the batch
process, be sure that you have already run the Process ePayment Refunds process
(SFPCCBAT). It generates the student refund credits that you send to the web
credit card processing vendor using the Credit Card Processing batch process.
Credit Card Transaction Source
All Select to process credit card transactions from all sources using the same SF
merchant ID.
Admissions Select to process credit card transactions in order to view historical Admissions
data. You must also specify an academic institution and application center.
Application Center In order to view historical Application Center data, select an application center
for the processing of admissions deposits.
Cashiering Select to process credit card transactions from cashiering offices. You must also
specify a business unit and cashier's office.
Self Service Select to process credit card transactions from self-service sources.
Other Fields
Re-Post Self Service
Errors Select to post any transactions that previously failed to post due to setup or
system errors.
To create a file log or troubleshoot batch credit card transactions, use Application Designer: Open the
Business Interlink (CREDITCARD_TRANSACTION), click on the Input tab, and change the default value
of Trace to Y.
See Also
Chapter 17, "Refunding Customers," page 435
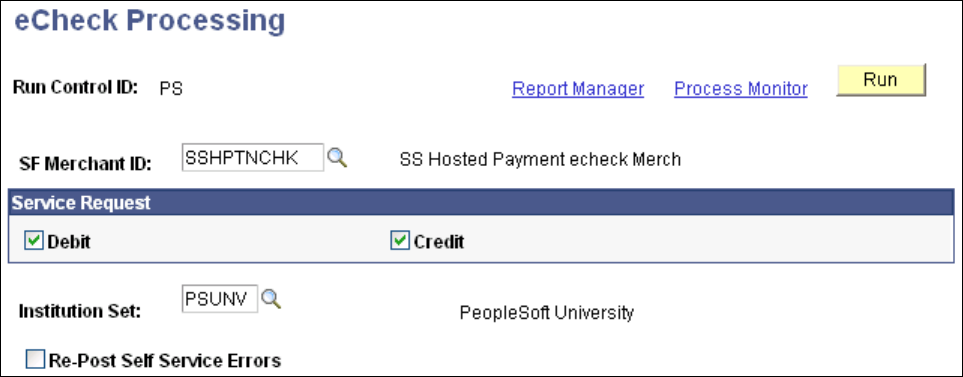
Chapter 14 Processing ePayment Transactions
Copyright © 1988, 2010, Oracle and/or its affiliates. All Rights Reserved. 385
Processing Submitted eCheck Transactions
Access the eCheck Processing page (Student Financials, Charges and Payments, Electronic Payments,
Process Electronic Check, eCheck Processing).
eCheck Processing page
Debit Select to debit any eCheck transactions that have not yet been debited for the SF
merchant ID selected. This is not applicable for hosted payment transactions.
Credit Select to credit the eCheck accounts of students whose eCheck transactions have
been refunded, voided, or reversed.
Institution Set Select the institution set for which you are processing eCheck transactions.
Re-Post Self Service
Errors Select to post any transactions that previously failed to post due to setup or
system errors.
To create a file log or troubleshoot batch eCheck transactions, use Application Designer: Open the Business
Interlink (ECHECK_TRANSACTION), click on the Input tab, and change the default value of Trace to Y.
Purging Security Code Data
Access the Security Code Purge Process page (Student Financials, Charges and Payments, Electronic
Transactions, Electronic Payments, Security Code Purge, Security Code Purge Process).
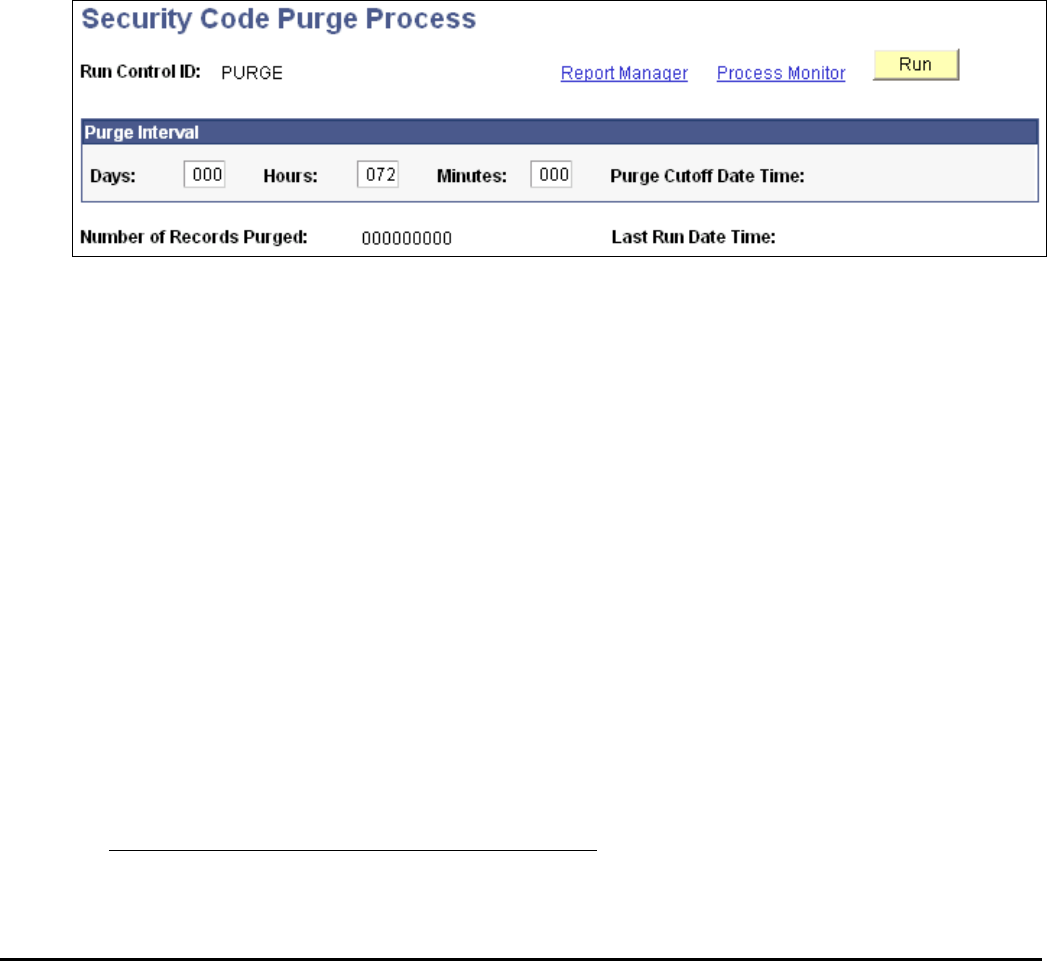
Processing ePayment Transactions Chapter 14
386 Copyright © 1988, 2010, Oracle and/or its affiliates. All Rights Reserved.
Security Code Purge Process page
The Security Code that is located on credit cards is a security feature for card not present transactions such as
Internet transactions. The Security Code is sent to the issuing bank at the time of authorization. The merchant
can stop the transaction if the Security Code is invalid.
The Security Code is supported only if you use the Integration Broker based interface for processing credit
card transactions. Collecting the Security Code at the time of the ePayment transaction can lower your
transaction costs.
Payment Application Best Practices require software vendors to delete Security Code data stored in any tables
after the transaction is completed. Security Code data is stored encrypted in the SSF_PAYMENT_CVV table.
The row is retained only as long as authorization is pending.
In real time transactions, the Security Code record is deleted immediately after submission and transmission
of authorization and/or capture transaction.
For batch authorizations, a lag time can exist between the submission of a self-service or administrative
transaction and the authorization of the transaction.
The Security Code Purge process is intended as a fail-safe measure to ensure that the Security code is either
processed or purged from the system in a reasonable amount of time.
See Chapter 3, "Setting Up ePayment Processing," page 83.
See Electronic Payment Integration Developer's Reference Guide. The guide is posted to My Oracle Support.
Reviewing and Canceling Self-Service ePayment Transactions
Student Financials enables you to review and cancel submitted payments that are not yet authorized or posted
to the student account.
This section discusses how to view self-service credit card transactions.

Chapter 14 Processing ePayment Transactions
Copyright © 1988, 2010, Oracle and/or its affiliates. All Rights Reserved. 387
Page Used to Review and Cancel Self-Service ePayment Transactions
Page Name Definition Name Navigation Usage
Maintain ePayment
Transaction
SF_PAYMENT_MAINT1 Student Financials, Charges
and Payments, Electronic
Transactions, Electronic
Payments, Maintain
ePayment Transaction
View and cancel self-
service credit card
transactions.
Viewing and Canceling Self-Service Credit Card Transactions
Access the Maintain ePayment Transaction page (Student Financials, Charges and Payments, Electronic
Transactions, Electronic Payments, Maintain ePayment Transaction)
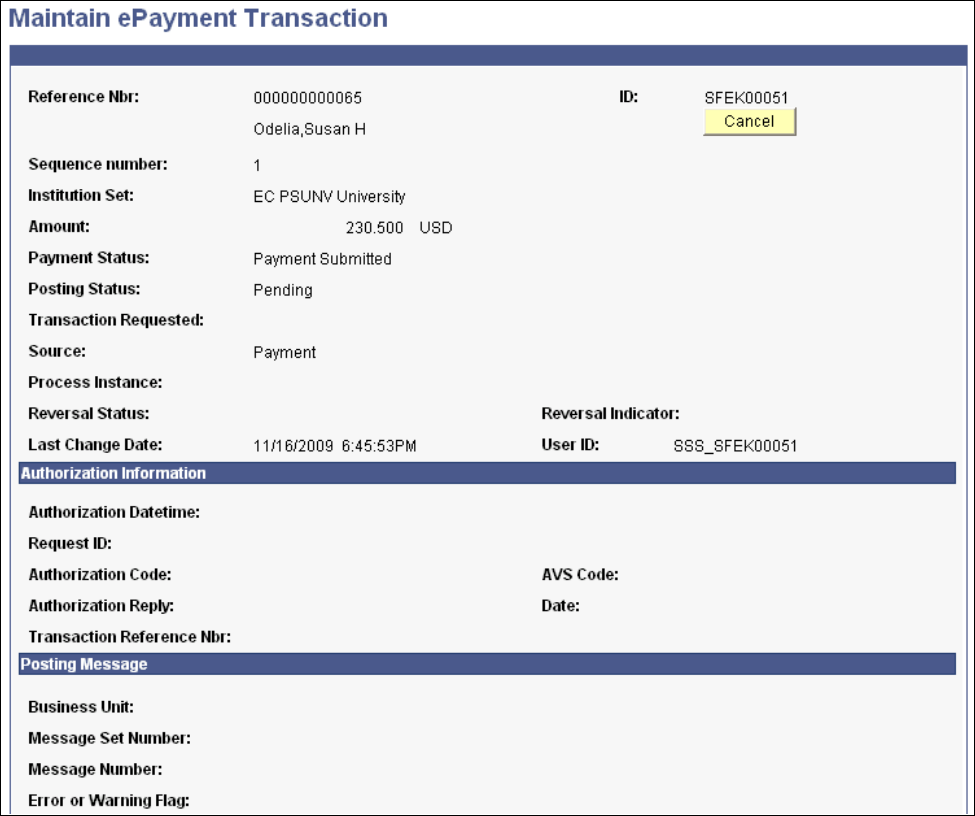
Processing ePayment Transactions Chapter 14
388 Copyright © 1988, 2010, Oracle and/or its affiliates. All Rights Reserved.
Maintain ePayment Transaction page (1 of 2)
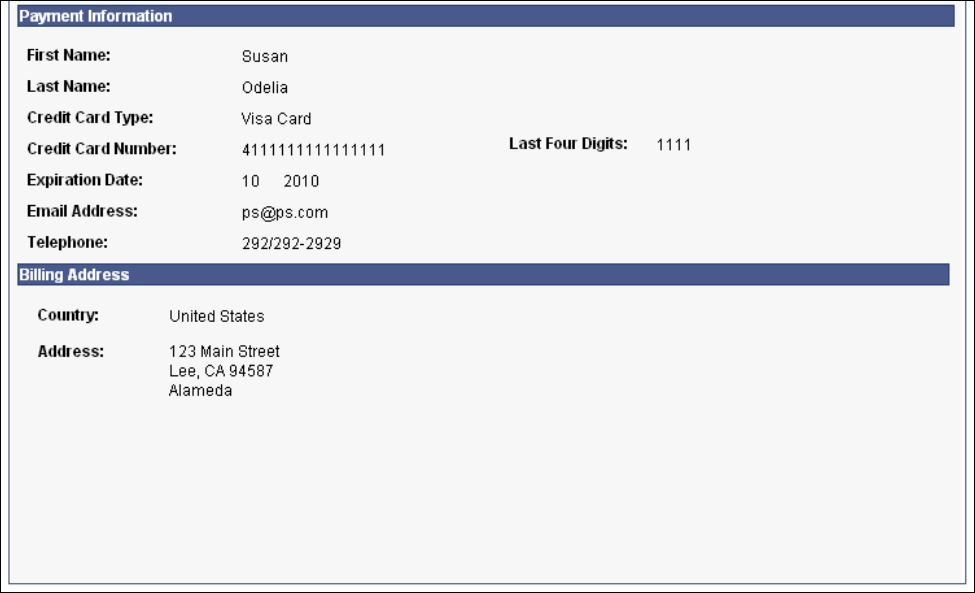
Chapter 14 Processing ePayment Transactions
Copyright © 1988, 2010, Oracle and/or its affiliates. All Rights Reserved. 389
Maintain ePayment Transaction page (2 of 2)
Reference Nbr (reference
number) Displays the unique reference number that the system assigns to each credit card
transaction.
ID Displays the ID of the student who made the credit card transaction.
Posting Status Indicates whether the Student Financials system successfully posted each
transaction. Values are:
Errors: The transaction encountered errors during posting.
Pending: The system has not yet posted the transaction.
Successful: The system successfully posted the transaction.
Source Indicates where the transaction originated. Values are:
Application Center: The transaction originated from an admissions office
application center.
Cashiering: The transaction originated from a cashiering office.
Payment: The transaction originated from the self-service Make a Payment page.
Refund: The transaction originated from the Student Financials Refund process.
Reversal: The transaction originated from the Payment Reversals page.

Processing ePayment Transactions Chapter 14
390 Copyright © 1988, 2010, Oracle and/or its affiliates. All Rights Reserved.
Reversal Status If you reversed the transaction, this field Indicates whether the system
successfully processed the reversal. Values are:
Errors: The system encountered errors during the reversal.
Successful: The system successfully reversed the transaction.
Cancel Click to cancel this transaction.
Note. The Cancel button is available only for transactions that are not posted and
authorized.
Authorization Information
Information appears in this group box when a self-service credit card transaction has been authorized.
Credit Card
Authorization DTTM
(credit card authorization
date and time)
Displays the date and time that the credit card processing vendor authorized the
credit card transaction.
Credit Card Request ID Displays the unique ID that the credit card processing vendor assigns to each
transaction.
Credit Card
Authorization Code Displays the unique authorization code sent by the bank to the credit card
processing vendor.
Date Displays the original date of the credit card transaction.
Authorization Reply Displays the authorization reply code that was received from the credit card
processing vendor for each transaction.

Chapter 14 Processing ePayment Transactions
Copyright © 1988, 2010, Oracle and/or its affiliates. All Rights Reserved. 391
Credit Card AVS
Return Code (credit card
address verification
system code)
Displays the address verification code that the credit card processing vendor
sends to the Student Financials system. The code indicates whether the address
that was sent with the transaction matches the credit card company's records. If
you set the system not to perform address verification for a transaction, the AVS
Code column is blank for that transaction.
Values are:
X (Exact): The address and the 9-digit zip code match.
Y (Yes): The address and the 5-digit zip code match.
A (Address): The address matches, but the 5-digit zip code does not.
W (Whole zip): The address does not match, but the 9-digit zip code does.
Z (Zip): The address does not match, but the 5-digit zip code does.
N (No): Neither the address nor the zip code match.
U (Unavailable): Information is unavailable or the card-issuing bank does not
support AVS.
S (Unsupported): The card-issuing bank does not support AVS.
R (Retry): The system of the card-issuing bank is unavailable.
E (Edit Error): The transaction is ineligible for AVS or an edit error occurred.
Posting Message
Information appears in this group box when a self-service credit card transaction has been posted.
Business Unit Displays the description of the business unit within which the transactions were
processed.
Message Set Number
and Message Number If any errors occurred or warnings were issued during the processing of this
transaction, use the message set number and the message number to locate the
message explaining what happened.
Error or Warning Flag Indicates whether the system encountered any errors or generated any warning
messages when it posted the transaction.
Processing Refunds for ePayments
This section discusses how to:
•Create online student refunds.
•Run the ePayment Refunds process.

Processing ePayment Transactions Chapter 14
392 Copyright © 1988, 2010, Oracle and/or its affiliates. All Rights Reserved.
Pages Used to Process Refunds for ePayments
Page Name Definition Name Navigation Usage
Student Refund REFUND_SF Student Financials,
Refunds, Student Refund Create an online refund for
a student.
ePayment Refunds RUNCTL_SFPCCBAT Student Financials,
Refunds, Electronic
Payment Refunds, Process
ePayment Refunds
Generate refund credits in
preparation of transmission
to your third-party
ePayment processor.
Review Refund Messages REFUND_CC_MSGS Student Financials,
Refunds, Electronic
Payment Refunds, Review
Refund Messages
Review ePayment refund
messages.
Batch ePayment Refund
Details
RUN_SF862 Student Financials,
Refunds, Electronic
Payment Refunds, Batch
ePayment Refund Details
Review batch ePayment
refund messages.
Creating Online Student Refunds
Access the Student Refund page (Student Financials, Refunds, Student Refund).
See Also
Chapter 17, "Refunding Customers," Creating Student Refunds, page 445
Running the ePayment Refunds Process
Access the Process ePayment Refunds page (Student Financials, Refunds, Electronic Payment Refunds,
Process ePayment Refunds)
See Also
Chapter 17, "Refunding Customers," Distributing Refunds to ePayment Accounts, page 461
Reviewing ePayment Transactions
This section discusses how to:
•Define selection criteria for reviewing ePayment transactions.

Chapter 14 Processing ePayment Transactions
Copyright © 1988, 2010, Oracle and/or its affiliates. All Rights Reserved. 393
•Review ePayment transaction details.
Pages Used to Review ePayment Transactions
Page Name Definition Name Navigation Usage
Selection Criteria SF_PAYMENT_TRANS1 •Student Financials,
Charges and Payments,
Electronic Transactions,
Electronic Payments,
Review Transaction
Log, Selection Criteria
•Student Financials,
Charges and Payments,
Electronic Payments,
Review Pending
Transactions, Selection
Criteria
Define selection criteria for
reviewing specific
ePayment transactions.
Transaction Detail SF_PAYMENT_TRANS3 •Student Financials,
Charges and Payments,
Electronic Transactions,
Electronic Payments,
Review Transaction
Log, Transaction Detail
•Student Financials,
Charges and Payments,
Electronic Transactions,
Electronic Payments,
Review Pending
Transactions,
Transaction Detail
Review ePayment
transaction details.
Pending Transaction Detail SF_PAYMENT_INQ1 Click a reference number
link on the Transaction
Detail page.
View detailed information
about a pending ePayment
transaction.
Totals SF_PAYMENT_TRANS2 Student Financials, Charges
and Payments, Electronic
Transactions, Electronic
Payments, Review
Transaction Log, Totals
Review counts and
monetary totals of
processed ePayment
transactions.
Defining Selection Criteria for Reviewing ePayment Transactions
Access the Selection Criteria page (Student Financials, Charges and Payments, Electronic Transactions,
Electronic Payments, Review Transaction Log, Selection Criteria).
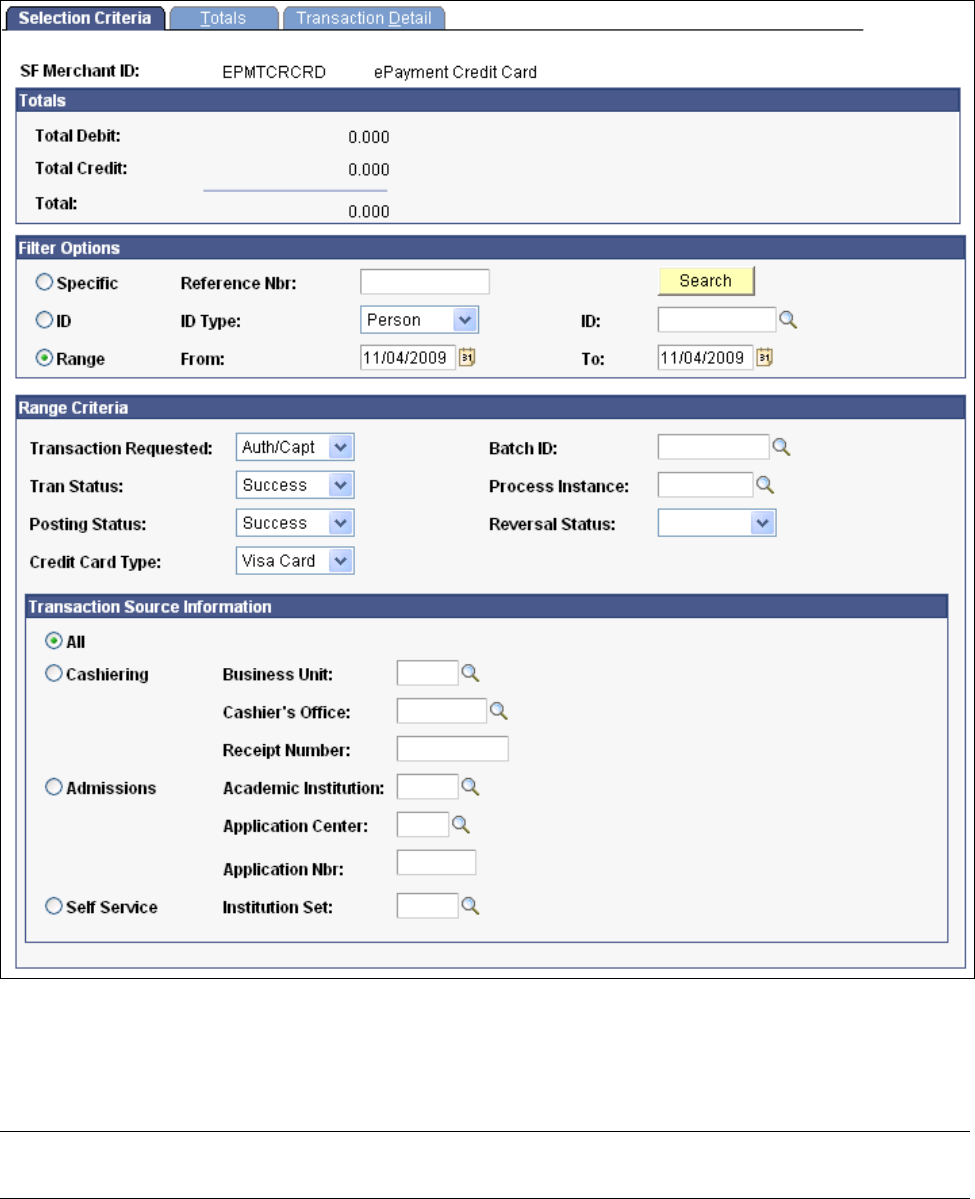
Processing ePayment Transactions Chapter 14
394 Copyright © 1988, 2010, Oracle and/or its affiliates. All Rights Reserved.
Selection Criteria page
Depending on the SF merchant ID that you select, the transaction detail displays values for credit cards or
eChecks.
Note. If you access this page through the Transaction Log component, a Totals group box appears at the top
of this page displaying the total debit and total credit, and a Totals page appears.

Chapter 14 Processing ePayment Transactions
Copyright © 1988, 2010, Oracle and/or its affiliates. All Rights Reserved. 395
Filter Options
Specific andReference
Nbr (reference number) Select the Specific option to retrieve transaction information for one specific
transaction by entering its reference number.
ID Select to retrieve transaction information related to one person or organization
ID Type Specify whether the ID for which you want to retrieve transaction information is
a person or organization.
Note. Org is valid only for corporate payments made through cashiering.
ID Select the ID of the student or organization whose transactions you want to view.
Range Select to retrieve all transaction information from the sources specified in the
Transaction Source Information group box.
Transaction Source Information
All Select to retrieve transactions from all sources using the same SF merchant ID.
Note. This selection displays all transactions for the SF merchant ID without
regard for security display restrictions.
Cashiering Select to retrieve transactions from all cashiering offices.
Business Unit Select to narrow the selection of transactions to cashier's offices that are attached
to a specific business unit.
Cashier's Office Select to narrow the selection of transactions to a specific office.
Receipt Number Select transaction information from one specific receipt.
Admissions Select to retrieve transactions in order to view historical Admissions data.
Academic Institution Select to narrow the selection of transactions to admissions offices that are part
of a specific academic institution.
Application Center In order to view historical Application Center data, select to narrow the selection
of transactions to a particular application center.
Self Service Select to retrieve transactions from self-service sources.
Institution Set Select to narrow the selection only to self-service transactions from a specific
institution set.
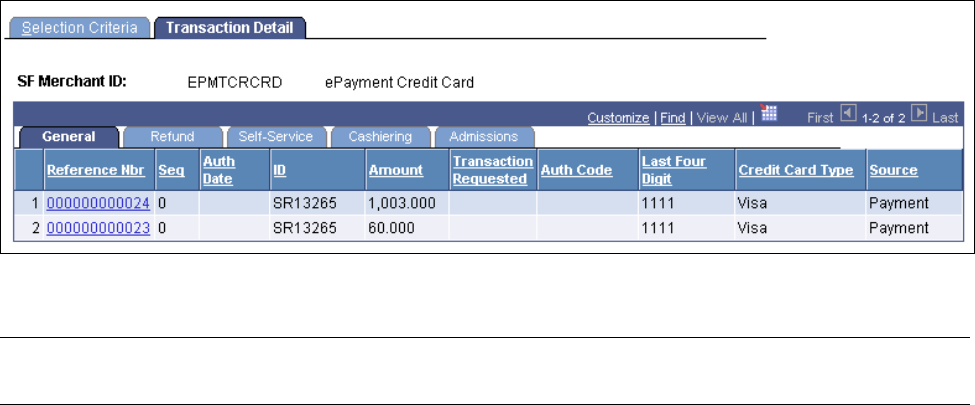
Processing ePayment Transactions Chapter 14
396 Copyright © 1988, 2010, Oracle and/or its affiliates. All Rights Reserved.
Other Fields and Elements
Credit Card Type Select the type of credit card used in the transactions that you want to view.
Batch ID When you run the Process ePayment Refunds process, the system assigns a batch
ID to all the credit card transactions that are affected by the process. Specify a
batch ID to retrieve information about all the transactions with that particular
batch ID.
Transaction Requested Use this field to filter the retrieved transaction information by the type of
transaction requested. Four types of transaction requests are available:
Authorize: Request for authorization of a credit card payment.
Auth/Capt: Request for authorization and capture of a credit card payment.
Credit: Request for an amount to be credited (refunded) to a credit card account.
Capture: Request for capture of a credit card payment.
Search Click to select all credit card transactions that meet your selection criteria. The
system displays this information on the Transaction Detail page.
Reviewing ePayment Transaction Details
Access the Transaction Detail page (Student Financials, Charges and Payments, Electronic Transactions,
Electronic Payments, Review Transaction Log, Transaction Detail).
Transaction Detail page
Note. Multiple views of this page are available when you click the tabs in the scroll area. This section
documents elements common to all views first.
Common Page Information
Reference Nbr (reference
number) Lists the unique reference number that the system assigns to each credit card
transaction. Click the Reference Nbr link to access the Pending Transaction
Detail page, where you can review detailed information about the transaction.

Chapter 14 Processing ePayment Transactions
Copyright © 1988, 2010, Oracle and/or its affiliates. All Rights Reserved. 397
Seq (sequence) Lists the sequence number that the system assigns to every activity for a given
transaction reference number.
Note. A sequence number of zero means that submitted transactions are pending
(no processing has taken place by the credit card vendor).
Date Lists the original date of each transaction.
ID Lists the ID of the student or external organization who made each transaction.
Amount Lists the monetary amount of each transaction.
General Tab
Type Lists the type of transaction requested. A blank value in this field indicates that
the transaction is awaiting background processing.
Auth Code (authorization
code) Lists the unique authorization code that was sent by the bank to the credit card
processing vendor.
Card Nbr (card number) Lists the last four digits of the credit card number that was used for each
transaction.
Card Type Lists the type of credit card that was used for each transaction.
Source Indicates where the transaction originated.
Refund Tab
Batch ID When you run the Process ePayment Refunds process, the system assigns a batch
ID to all the credit card transactions affected by the process. This heading lists
the batch ID that is assigned to each transaction.
Unit Lists the business unit that processed each refund.
Refund Nbr (refund
number) Lists the unique number that the system assigns to each refund transaction.
Line Lists the refund line number.
Self-Service Tab
Institution Set Lists the institution set within which the transactions were processed.
Business Unit Lists the business unit within which the transactions were processed.

Processing ePayment Transactions Chapter 14
398 Copyright © 1988, 2010, Oracle and/or its affiliates. All Rights Reserved.
Err/Warn
(error/warning) Lists whether a warning was issued or an error occurred.
Posted Lists the posting date for each transaction.
Posting Status Lists whether the Student Financials system successfully posted each transaction.
Values are:
Errors: Errors occurred during posting.
Pending: The system has not yet posted the transactions.
Successful: The system successfully posted the transactions.
Cashiering Tab
Unit Lists the business unit associated with the cashiering office that performed the
transactions.
Cashier's Office Lists the cashier's office from which the transaction originated.
Register Lists the register within the cashier's office from which the transaction
originated.
Receipt Nbr (receipt
number) Lists the receipt number of the transaction.
Line Lists the receipt line number.
User Lists the user or process that initiated the transaction. In the case of refunds that
necessitate a credit, it lists SFCCBAT, which is the Process ePayment Refunds
process.
ID Type Lists the ID type of the person or organization for whom the transaction applies.
Admissions Tab
Institution Lists the academic institution from which the transaction originated.
Application Center Lists the application center from which the transaction originated.
Appl Nbr (application
number) Lists the application number for which the payment was made.
Reviewing Self-Service Agreements
This section discusses how to review self-service agreements.
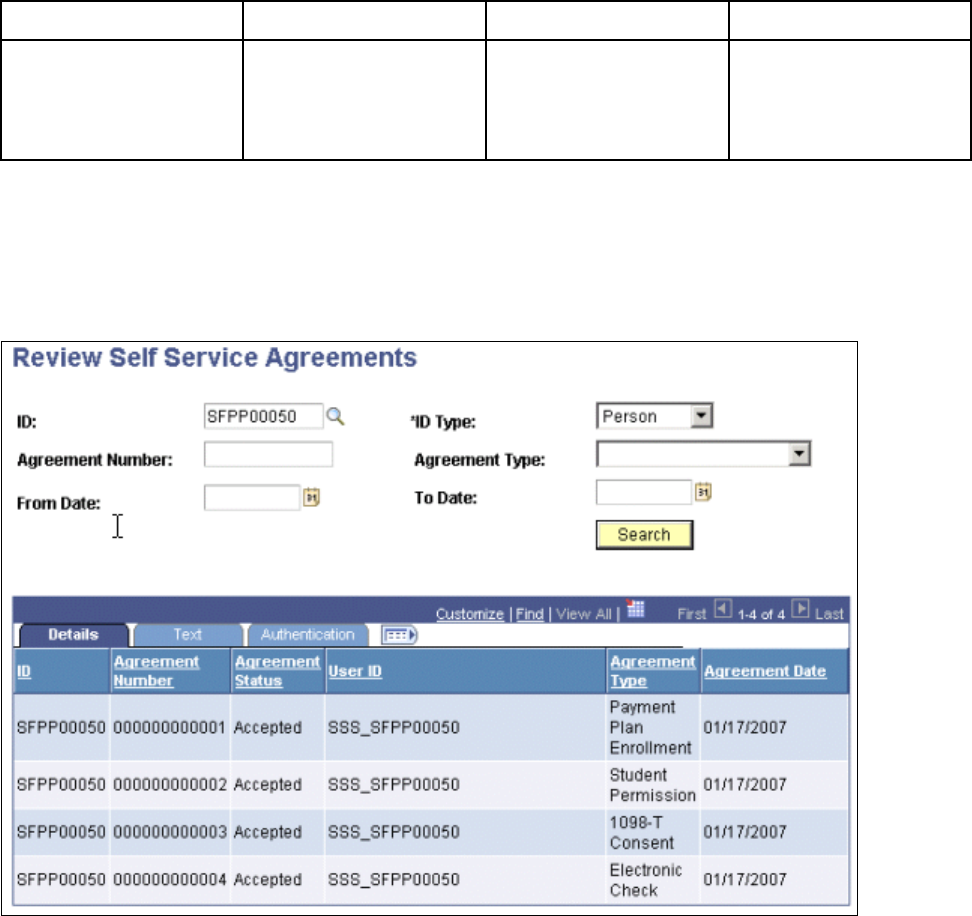
Chapter 14 Processing ePayment Transactions
Copyright © 1988, 2010, Oracle and/or its affiliates. All Rights Reserved. 399
An inquiry page is added for the administrative user to review the various self-service agreements that the
student has signed.
The self-service features require that requirements agreements include electronic (eCheck) Make a Payment
Transactions, 1098–T, Payment Plan Enrollment, and Student Permissions.
Page Used to Review Self-Service Agreements
Page Name Definition Name Navigation Usage
Review Self Service
Agreements
SSF_AGREE_INQ Student Financials, Charges
and Payment, Electronic
Transactions, Review Self
Service Agreements
View self-service
agreements text and
authentication.
Reviewing Self-Service Agreements
Access the Review Self Service Agreements page (Student Financials, Charges and Payment, Electronic
Transactions, Review Self Service Agreements)
Review Self Service Agreements page
ID Enter the student or organization ID.
ID Type Select Personor Organization.
Processing ePayment Transactions Chapter 14
400 Copyright © 1988, 2010, Oracle and/or its affiliates. All Rights Reserved.
Agreement Number Enter the agreement number that is automatically assigned when the agreement is
transacted during the self-service activity.
Agreement Type Select an agreement type. Values are1098_T, Electronic Check, Payment Plan
Enrollment, and Student Permission. To include all agreement types, leave this
field blank.
FromandTo Enter the date of the processed agreements.
Search Click to display the search results in the Details, Text and Authentication pages.
Details
Agreement Status Displays the status of the agreement. Values are Accepted and Revoked.
Text
Select the Text tab.
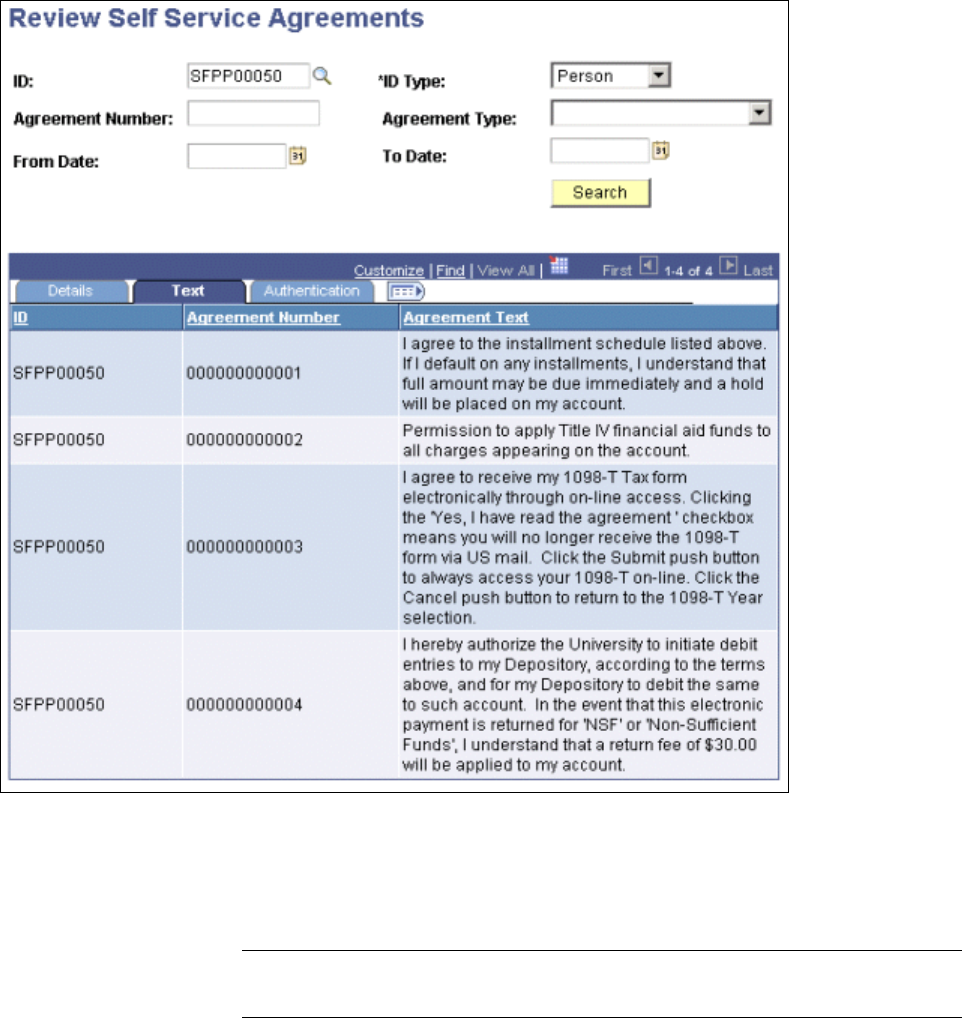
Chapter 14 Processing ePayment Transactions
Copyright © 1988, 2010, Oracle and/or its affiliates. All Rights Reserved. 401
Review Self Service Agreements page: Text tab
Agreement Text Displays the text that the student agreed to when performing the self-service
activity.
Note. The text in this field varies according to the agreement type used by the
student.
Authentication
Select the Authentication tab.
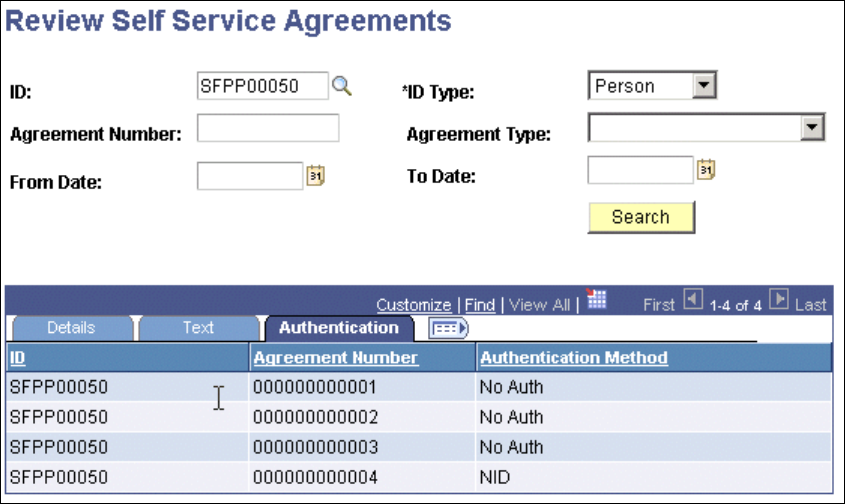
Processing ePayment Transactions Chapter 14
402 Copyright © 1988, 2010, Oracle and/or its affiliates. All Rights Reserved.
Review Self Service Agreements page: Authentication tab
Authentication Method Displays the method by which the student authenticated his or her identity.
Values are NID (national id), Birthdate, PIN (personal identification number) and
No Auth(no authentication).

Copyright © 1988, 2010, Oracle and/or its affiliates. All Rights Reserved. 403
Chapter 15
Using GL Interface Processing
This chapter provides an overview of GL Interface processing and discusses how to:
•Run the Chartfield Audit report.
•Create accounting entries.
•Review GL Interface information.
•Use the Back Out GL Interface process.
•Send accounting entries to the general ledger.
Understanding GL Interface Processing
The PeopleSoft Student Financials General Ledger Interface (GL Interface) records the effect of Student
Financials transactions (for example, charges, payments, and cash receipts) against a general ledger chart of
accounts.
A chart of accounts represents how an organization gathers, stores, combines, and uses financial information
in its operations. For example, an organization may want to track student receivables, third-party receivables,
payments, financial aid disbursements, cash receipts, or refunds disbursed for the balance sheet and other
financial statement reporting requirements.
Student Financials integrates with PeopleSoft General Ledger and Oracle General Ledger. The Student
Financials GL Interface:
•Loads setup information from the PeopleSoft General Ledger or Oracle General Ledger application that is
used in the creation of accounting information.
•Validates the chart of accounts (ChartFields) on various Student Financials setup tables against data from
PeopleSoft General Ledger or Oracle General Ledger to ensure that Student Financials reflects an
institution's current chart of accounts.
For Oracle General Ledger, validation is always real-time.
•Creates and sends accounting information to an institution's general ledger, enabling the institution's
accounting office to track revenue, expenses, receivables, and liabilities.
Accounting office staff should perform the majority of the setup that is required to record information in the
general ledger. This chapter focuses on how to process and review the information that is transferred to the
general ledger.
Using GL Interface Processing Chapter 15
404 Copyright © 1988, 2010, Oracle and/or its affiliates. All Rights Reserved.
For integration with PeopleSoft Financials, before you run the GL Interface, you can run the Chartfield Audit
report to review the existing chartfield setup and ensure that the chartfield combinations are still valid as on a
specific GL Run Date.
You can run the GL Interface at any appropriate interval. When you define an item type, a course in a course
catalog, a class, or tender keys and target keys in your cashiering office, you complete a GL Interface-related
page. The GL Interface and Cashiering GL interface processes use the information that you enter on these GL
Interface-related pages to create accounting entries. You transfer these accounting entries to the PeopleSoft
General Ledger application using Application Messaging—a feature of PeopleTools Integration Technology.
After you transfer the accounting entries to the PeopleSoft General Ledger database, your PeopleSoft General
Ledger staff creates the journal entries and posts the information to the general ledger.
Here is a user task flow for integration with Oracle Financials:
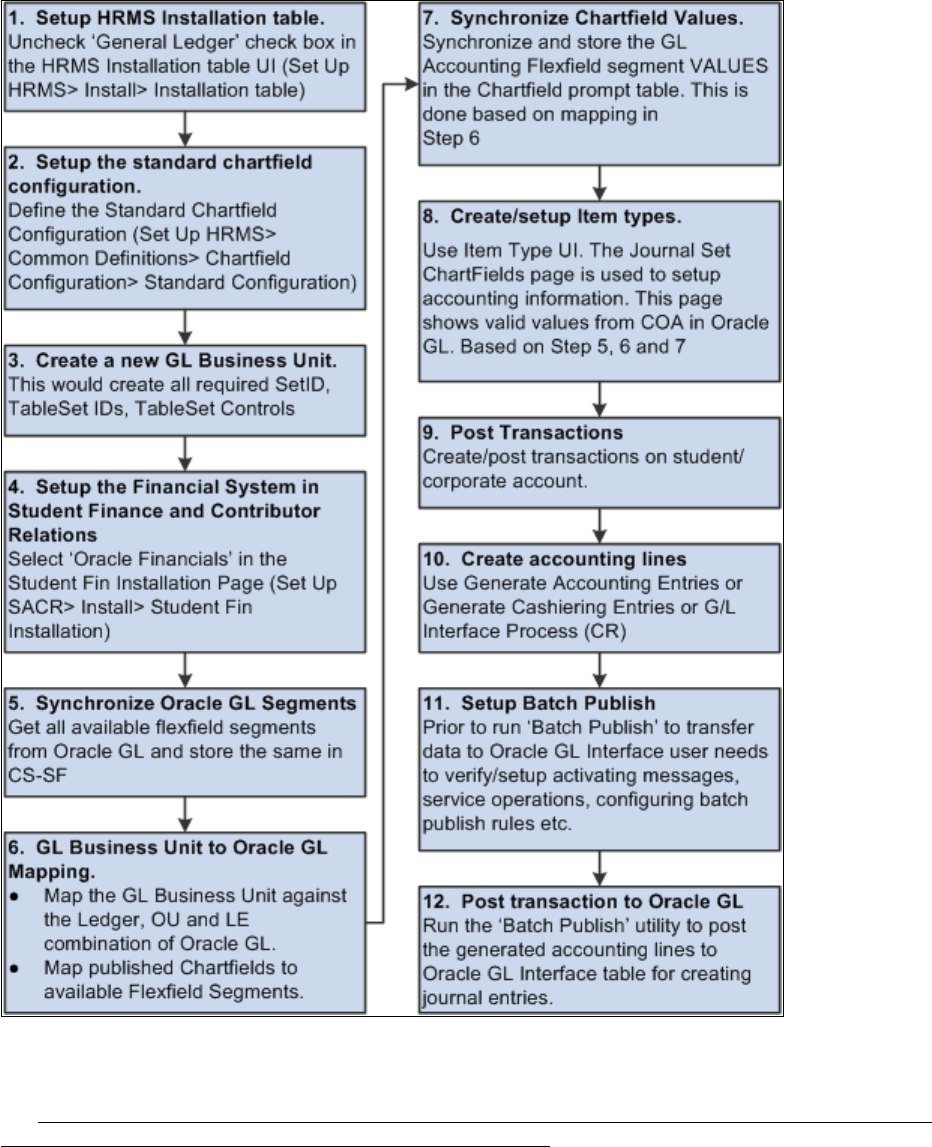
Chapter 15 Using GL Interface Processing
Copyright © 1988, 2010, Oracle and/or its affiliates. All Rights Reserved. 405
User task flow for integration with Oracle Financials
See Chapter 2, "Completing Student Financials General Setup," Defining Number Sequence Start Points,
Maximum Row Settings, and ChartField Edit Options, page 7.
See CS90 to EBS GL Integration Developer's Reference Guide. The guide is posted to My Oracle Support.
See Also
PeopleSoft Enterprise General Ledger PeopleBook

Using GL Interface Processing Chapter 15
406 Copyright © 1988, 2010, Oracle and/or its affiliates. All Rights Reserved.
Running the Chartfield Audit Report
This section provides an overview of the Chartfield Audit report and discusses how to run the report.
Note. The Chartfield Audit Report page is not used in integration with Oracle Financials.
If Oracle Financials is selected in the Financial System group box on the SF Installation page, you must
manually remove the Chartfield Audit Report page from the menu navigation by changing the Permission
Lists. You should create a custom permission list to hide the menu navigation to this component.
See Chapter 2, "Completing Student Financials General Setup," Defining Number Sequence Start Points,
Maximum Row Settings, and ChartField Edit Options, page 7.
Understanding the Chartfield Audit Report
The Chartfield Audit report reviews the existing chartfield setup and identifies invalid chartfield
combinations. The report provides details of invalid chartfield combinations that are intended for reporting to
GL, that is, those for which the GL Interface Required check box is selected on the related setup pages.
Before you run the GL Interface process, run the Chartfield Audit report and manually correct invalid
combinations. You therefore avoid invalid transactions being interfaced to the GL.
The Chartfield Audit Report uses the setup that you specify on the SF Installation page.
See Chapter 2, "Completing Student Financials General Setup," Defining Number Sequence Start Points,
Maximum Row Settings, and ChartField Edit Options, page 7.
Note. You can review the accounting line information after you run the Generate Accounting Lines batch
process and you can verify the status of the transactions after you run the Batch Publish process. The
chartfield combination cannot be edited or corrected in ACCOUNTING LINE (SF_ACCTG_LN).
Parameters
Chartfields can be set up on item types, course catalog, class schedule, cashiering target and tender keys, and
the cashiering office. All these areas must therefore be included in the audit. The records that are used to find
chartfield combinations are:
•ITEM_TYPE_TBL
•GL_INT_DT_TBL
•GL_INTERFACE
•CRSE_OFFER
•CRSE_OFFER_GL
•CLASS_TBL
•CLASS_TBL_GL
Chapter 15 Using GL Interface Processing
Copyright © 1988, 2010, Oracle and/or its affiliates. All Rights Reserved. 407
•TENDER_KEY_TBL
•TARGET_KEY_TBL
•CSH_OFF_TBL
•TERM_VAL_TBL
Here is the process flow for validating chartfield combinations:
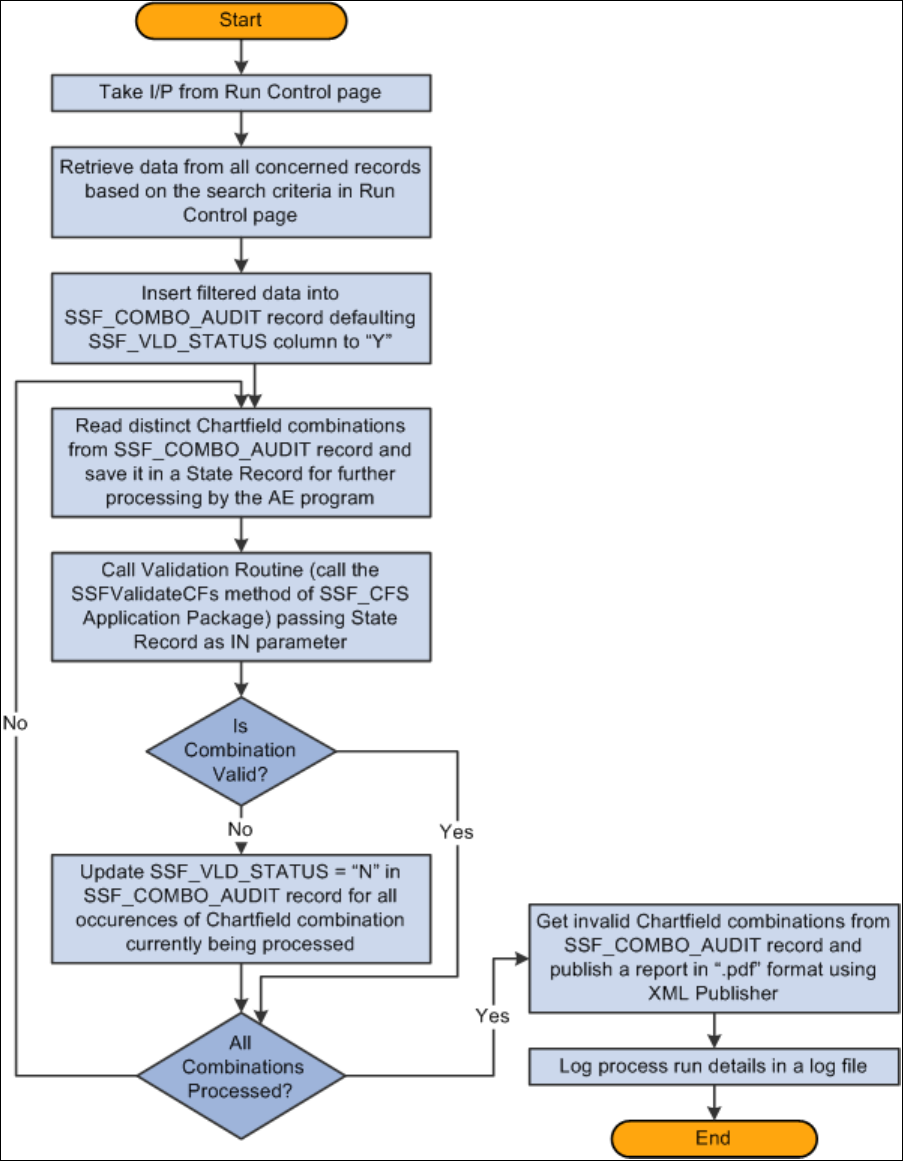
Using GL Interface Processing Chapter 15
408 Copyright © 1988, 2010, Oracle and/or its affiliates. All Rights Reserved.
Process flow for validating chartfield combinations

Chapter 15 Using GL Interface Processing
Copyright © 1988, 2010, Oracle and/or its affiliates. All Rights Reserved. 409
Page Used to Run the Chartfield Audit Report
Page Name Definition Name Navigation Usage
Chartfield Audit Report SSF_CF_AUDT_RUN Student Financials, GL
Interface, Chartfield Audit
Report, Chartfield Audit
Report
Identify invalid chartfield
combinations.
Running the Chartfield Audit Report
Access the Chartfield Audit Report page (Student Financials, GL Interface, Chartfield Audit Report,
Chartfield Audit Report).
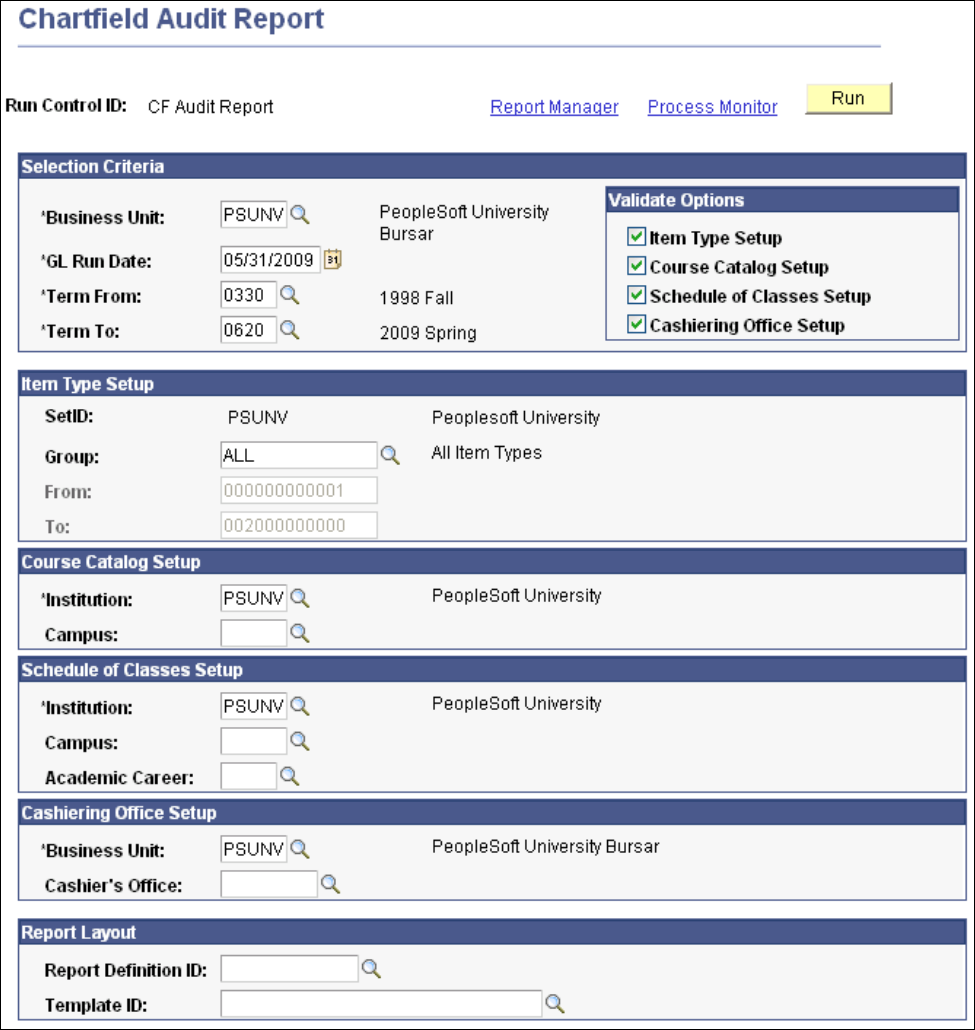
Using GL Interface Processing Chapter 15
410 Copyright © 1988, 2010, Oracle and/or its affiliates. All Rights Reserved.
Chartfield Audit Report page
You must enter a value in the Business Unit,GL Run Date,Term From and Term To fields.
GL Run Date Enter the date on which you expect to run the GL Interface process. You can
enter a future, but not a past, date. The current date appears by default.
Term To Enter a value that is equal to or greater than the value in the Term From field.

Chapter 15 Using GL Interface Processing
Copyright © 1988, 2010, Oracle and/or its affiliates. All Rights Reserved. 411
Validate Options
In the Validate Options group box, select a check box to indicate that you want to include a particular area in
the audit.
When you select a check box, a related group box with selection parameters becomes available. For example,
the Item Type Setup group box is available only if you select the Item Type Setup check box.
Item Type Setup
In the Item Type Setup group box, if you enter a value in the Group field, the From and To fields are not
available for entry.
Cashiering Office Setup
The value in the Business Unit field in the Cashiering office Setup group box is used to report invalid
chartfield combinations from Cashiering Office as well as Target and Tender Key setup.
Viewing the Report
When you click Run, an Application Engine program is initiated. A PDF report is produced using XML
Publisher.
The report lists only the chartfields that have invalid combinations. If you select an area to be audited and no
invalids are found for the combination, a No Invalids found message appears for that area on the report. If you
select an area to be audited and no data is found for the combination, a No Data found message appears for
that area on the report.
Creating Accounting Entries
This section provides an overview of accounting entry creation and discusses how to:
•Create accounting entries using the GL Interface process.
•Create accounting entries using the Cashiering GL Interface process.
Understanding Accounting Entry Creation
Financial transaction activity from the PeopleSoft Student Financials application must be transferred to the
general ledger so that your accounting office can track revenue, expenses, receivables, and liabilities that are
created in Student Financials. The GL Interface creates accounting lines to accomplish this.
If your system integrates with PeopleSoft or Oracle Financials, it publishes accounting lines directly to the
general ledger through PeopleSoft Application Messaging. A unique Cashiering GL Interface process exists
for cash receipts for cashiering transactions.
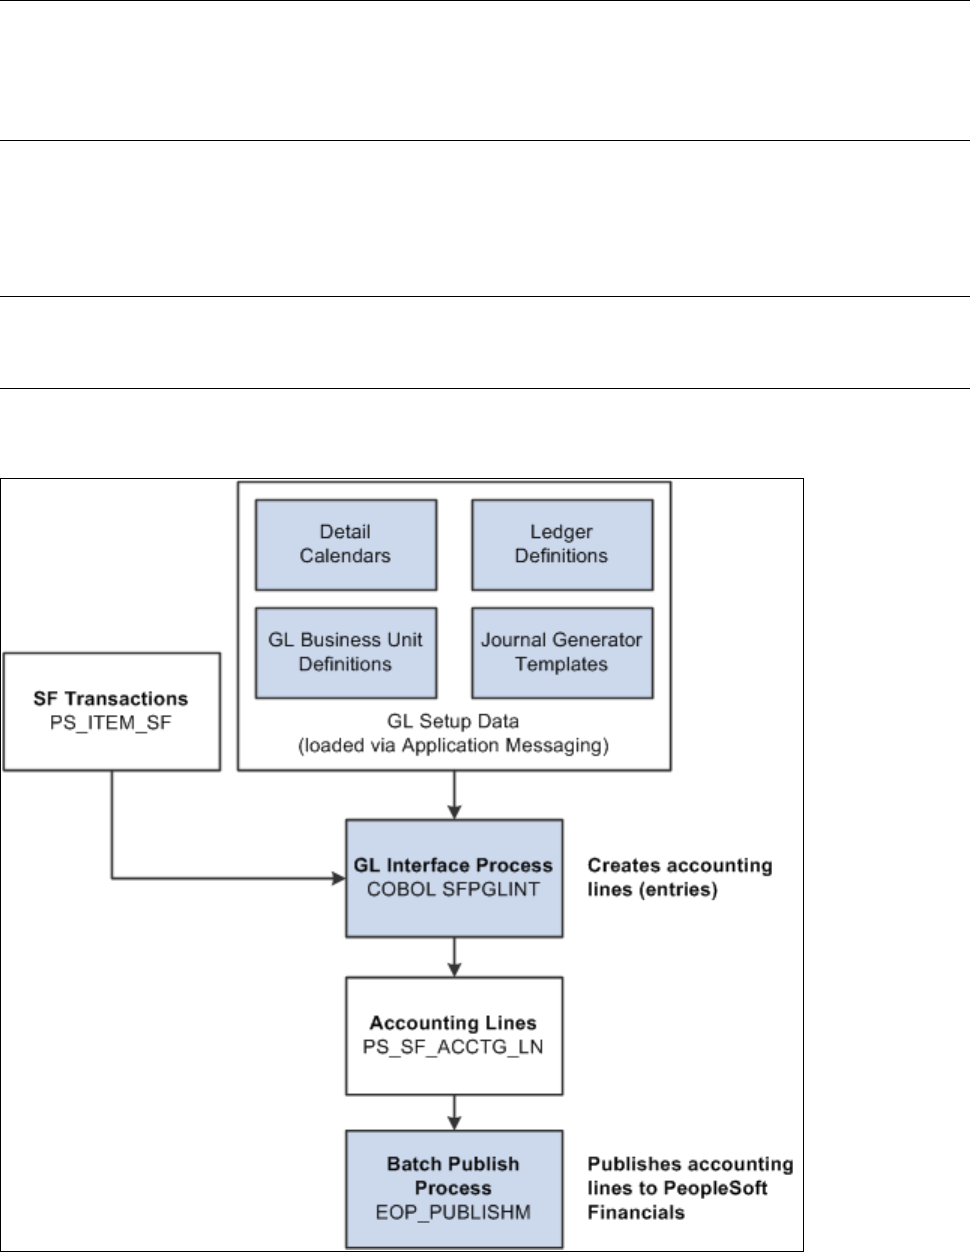
Using GL Interface Processing Chapter 15
412 Copyright © 1988, 2010, Oracle and/or its affiliates. All Rights Reserved.
Note. In this section, the term accounting entry refers to a single debit or credit entry destined for the general
ledger. Accounting entries contain four primary elements: an accounting date, ChartField (chart of accounts)
information, a currency code, and either a positive or negative monetary amount. The GL Interface creates
accounting entries and stores them in the PS_SF_ACCTG_LN table. The terms accounting entry and
accounting line are synonymous and are used interchangeably in this document.
GL Interface Process
The GL Interface process creates accounting lines for all types of transaction activity in the Student
Financials application.
Note. The GL Interface process creates accounting lines for all Student Financials transactions except cash
receipts that are accepted through the Cashiering feature. Run the Cashiering GL Interface process to create
entries for cash receipts that are accepted through the Cashiering feature.
This diagram illustrates how the PeopleSoft Financials GL Interface process creates accounting lines for
Student Financials transactions:
GL Interface process with PeopleSoft Financials integration
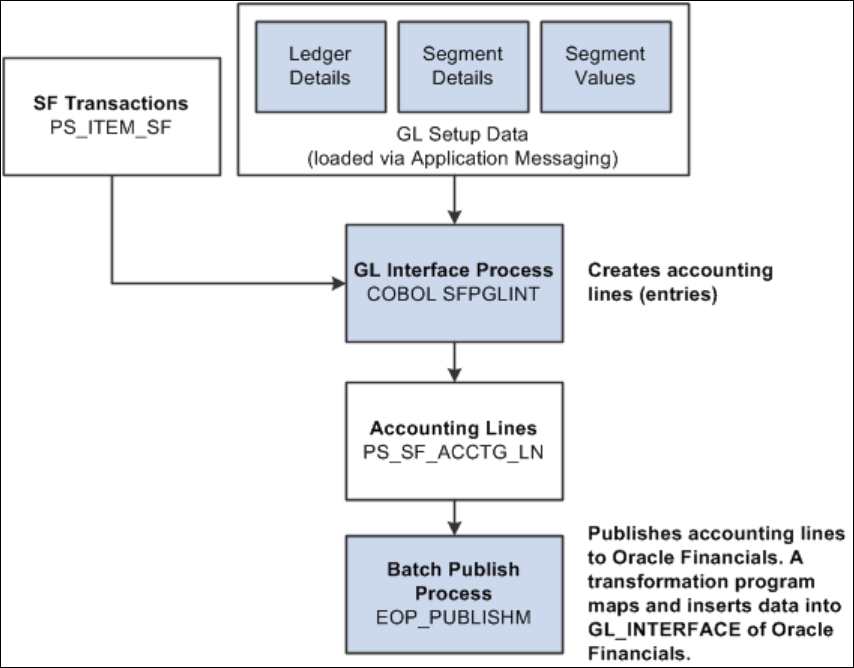
Chapter 15 Using GL Interface Processing
Copyright © 1988, 2010, Oracle and/or its affiliates. All Rights Reserved. 413
This diagram illustrates how the Oracle Financials GL Interface process creates accounting lines for Student
Financials transactions:
GL Interface process with Oracle Financials integration
If you interact with PeopleSoft or Oracle Financials, the system uses application messaging to share
accounting line information with PeopleSoft or Oracle General Ledger.
Cashiering GL Interface Process
The Cashiering GL Interface process creates accounting lines for cash receipts, cash drawer overages, and
cash drawer shortages from cashiering.
The Cashiering GL Interface process is the same as illustrated in the previous section, except that SF
Transactions: PS_ITEM_SF is replaced with Cashiering:
•Cash Drawer Shortages
•Cash Drawer Overages
•Cash Receipts
Reviewing GL Interface Results
After running the GL Interface or Cashiering GL Interface process, you can confirm the success of the run
and check details of accounting line entries before you send them to the general ledger.
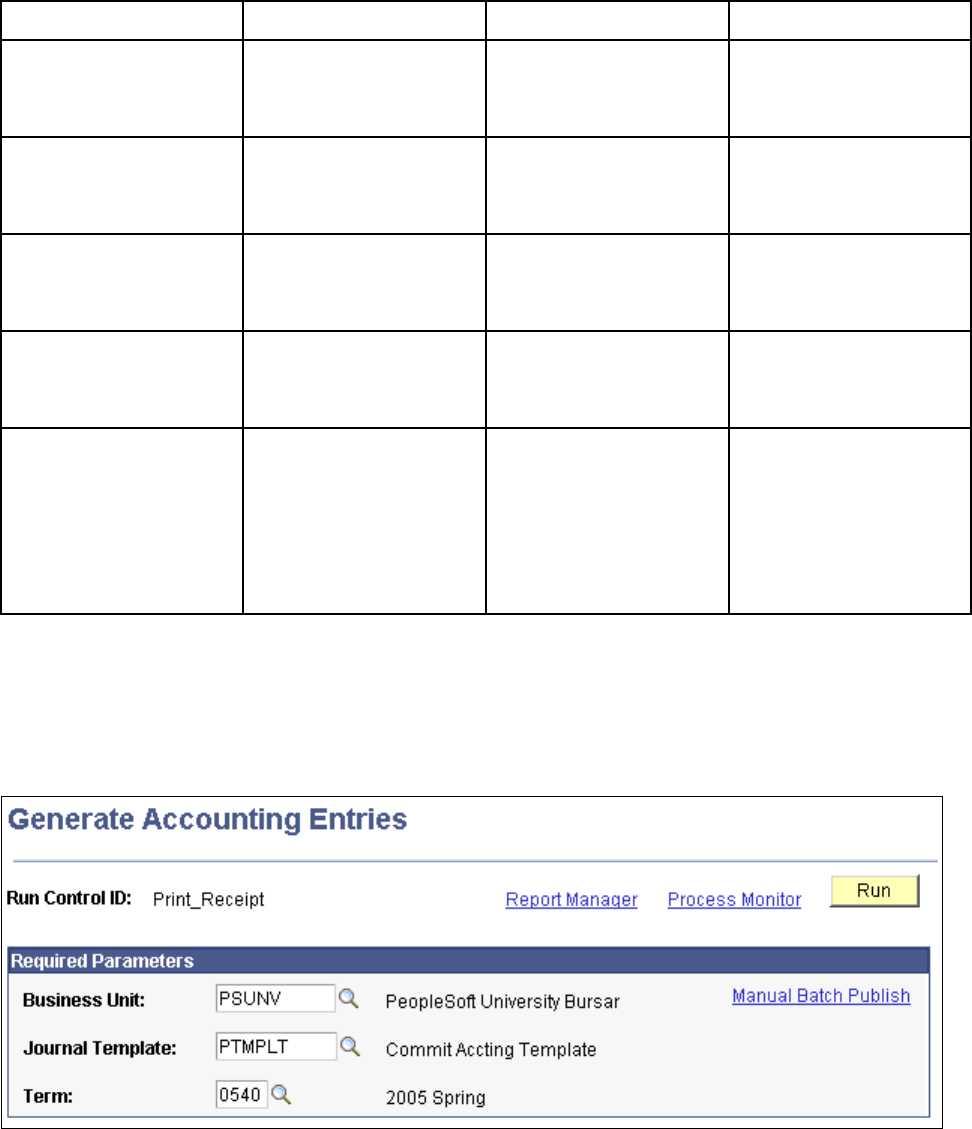
Using GL Interface Processing Chapter 15
414 Copyright © 1988, 2010, Oracle and/or its affiliates. All Rights Reserved.
You cannot use the Back Out GL Interface process to reverse cashiering entries sent to the general ledger, so
you must correct any mistakes before running the Batch Publish process for cashiering entries.
Pages Used to Create Accounting Entries
Page Name Definition Name Navigation Usage
Generate Accounting
Entries
RUNCTL_SFGL01 Student Financials, GL
Interface, Generate
Accounting Entries
Create accounting entries
using the GL Interface
process.
Cashiering GL Interface RUNCTL_SF_DEPTRCPT Student Financials, GL
Interface, Generate
Cashiering Entries
Create accounting entries
using the cashiering GL
Interface process.
Review GL Messages SF_GL_INT_MSG Student Financials, GL
Interface, Review GL
Messages
View messages resulting
from the GL Interface
process.
Cashiering GL Interface CSH_OFF_GL_INT Student Financials, GL
Interface, Review
Cashiering Entries
View the results of the
Cashiering GL Interface
process.
Cashiering GL Interface
Messages
CSH_GL_DTL_SP Click the GL Run Error
Detail link on the
Cashiering GL Interface
page. If multiple batches
have been run, select the
batch ID for the batch you
want to review.
Review messages resulting
from the Cashiering GL
Interface process.
Creating Accounting Entries Using the GL Interface Process
Access the Generate Accounting Entries page (Student Financials, GL Interface, Generate Accounting
Entries).
Generate Accounting Entries page
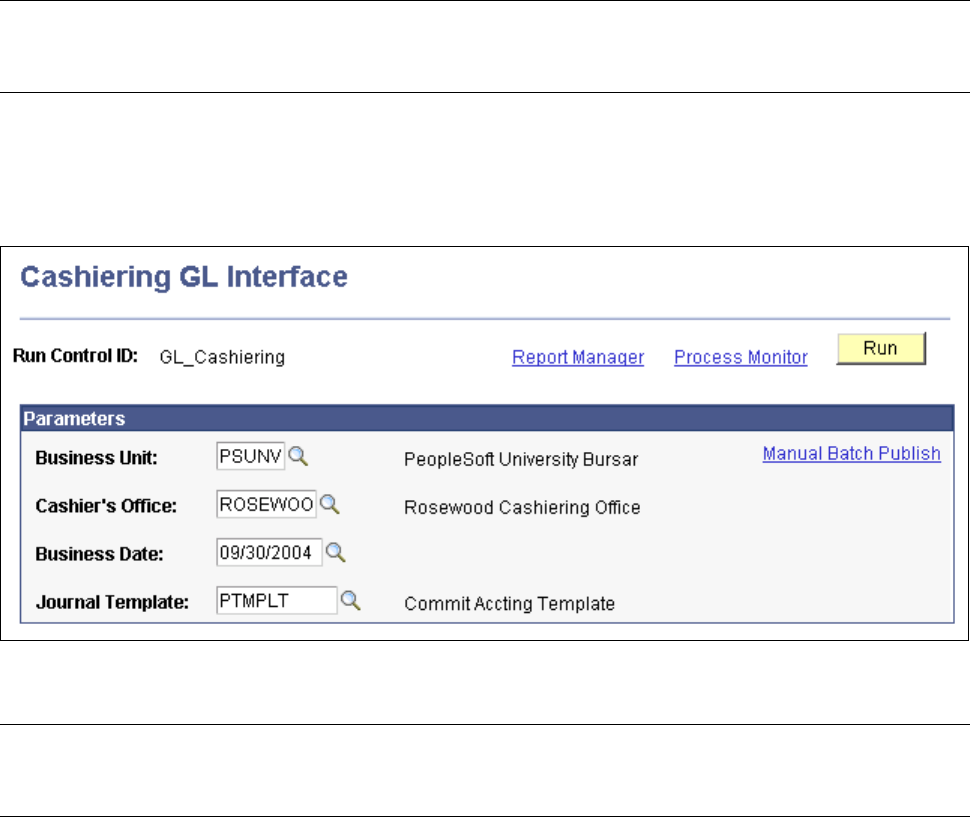
Chapter 15 Using GL Interface Processing
Copyright © 1988, 2010, Oracle and/or its affiliates. All Rights Reserved. 415
Business Unit Enter the business unit of the account activity that you are transferring to your
institution's general ledger.
Journal Template Enter the journal template that you want to use to create the transactions.
This field is not available if Oracle Financials is selected in the Financial System
group box on the SF Installation page.
Term The system selects all GL records that are less than or equal to the term code you
select here.
Manual Batch Publish Click to access the Batch Publish page. This link appears if your system interacts
with PeopleSoft Financials or Oracle Financials.
Run Click to access the Process Scheduler Request page.
If your system interacts with PeopleSoft Financials or Oracle Financials, select
the check box next to the SF GL Interface - Acct Lines (SFPGLINT) process.
Note. The GL Interface process does not populate the Budget Period ChartField on each accounting line.
Instead, when accounting entries from Student Financials are loaded into General Ledger, the General Ledger
assigns the proper budget period to them.
Creating Accounting Entries Using the Cashiering GL Interface Process
Access the Cashiering GL Interface page (Student Financials, GL Interface, Generate Cashiering Entries).
Cashiering GL Interface page
Note. If Oracle Financials is selected in the Financial System group box on the SF Installation page, ensure
that Cashiering is mapped to a journal category on the Journal Details Mapping page (Setup SACR, Product
Related, Student Financials, General Ledger Interface, Journal Details Mapping).

Using GL Interface Processing Chapter 15
416 Copyright © 1988, 2010, Oracle and/or its affiliates. All Rights Reserved.
See Chapter 2, "Completing Student Financials General Setup," Defining Number Sequence Start Points,
Maximum Row Settings, and ChartField Edit Options, page 7.
See Chapter 4, "Setting Up GL Interface Processing," Mapping General Ledger Business Units to Oracle
General Ledger, page 120.
Business Unit Enter the business unit for the account activity that you are transferring to your
institution's general ledger.
Cashier's Office Enter the cashiering office for the account activity that you are transferring to
your institution's general ledger.
Business Date Enter the business date of the cashiering office transactions that you are
transferring to your institution's general ledger.
Journal Template Enter the journal template that you want to use to create the transactions.
This field does not appear if Oracle Financials is selected in the Financial System
group box on the SF Installation page.
Manual Batch Publish Click to access the Batch Publish page. This link appears if your system interacts
with PeopleSoft Financials or Oracle Financials.
Run Click to access the Process Scheduler Request page.
If your system interacts with PeopleSoft Financials or Oracle Financials, select
the check box next to the SF Cashiering GL Interface (SFDPTREC ) process.
Reviewing GL Interface Information
This section discusses how to:
•Review GL Interface run history.
•Review accounting line information.
•Review batch publish control records.
Pages Used to Review GL Interface Information
Page Name Definition Name Navigation Usage
Review GL History SF_GL_RUN_HISTORY Student Financials, GL
Interface, Review GL
History
Review GL Interface run
history resulting from the
GL Interface, Cashiering
GL Interface, and Back Out
processes.
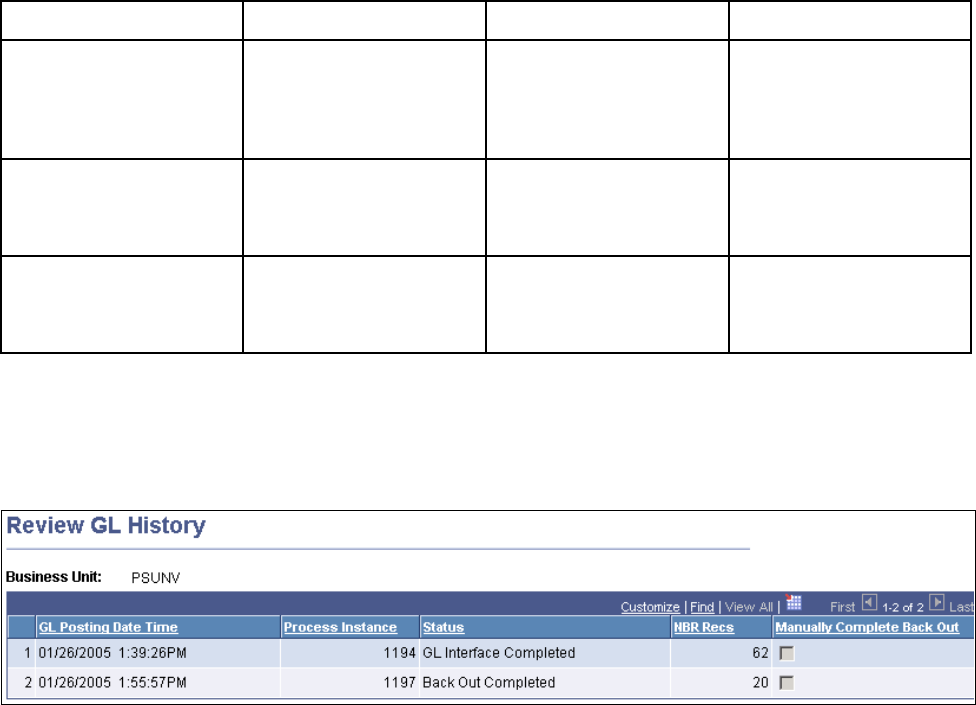
Chapter 15 Using GL Interface Processing
Copyright © 1988, 2010, Oracle and/or its affiliates. All Rights Reserved. 417
Page Name Definition Name Navigation Usage
Accounting Line SF_GL_ACCTG_INQ2 Student Financials, GL
Interface, Review
Accounting Lines,
Accounting Line
Review accounting line
information created by the
GL Interface and Cashiering
GL Interface processes.
SF Accounting Line Detail SF_GL_ACCTG_DTL Click a Detail link on the
Main tab of the Accounting
Line page.
Review detailed accounting
line information.
Review GL Integration Data SF_GL_INT_BATCHPRM Student Financials, GL
Interface, Review GL
Integration Data
Review batch publish
control records.
Reviewing GL Interface Run History
Access the Review GL History page (Student Financials, GL Interface, Review GL History).
Review GL History page
Manually Complete
Back Out If the Back Out process fails before setting the status to Backout Successful, then
this check box becomes available. Select the check box to manually complete the
failed Back Out process.
Reviewing Accounting Line Information
Access the Accounting Line page (Student Financials, GL Interface, Review Accounting Lines, Accounting
Line).
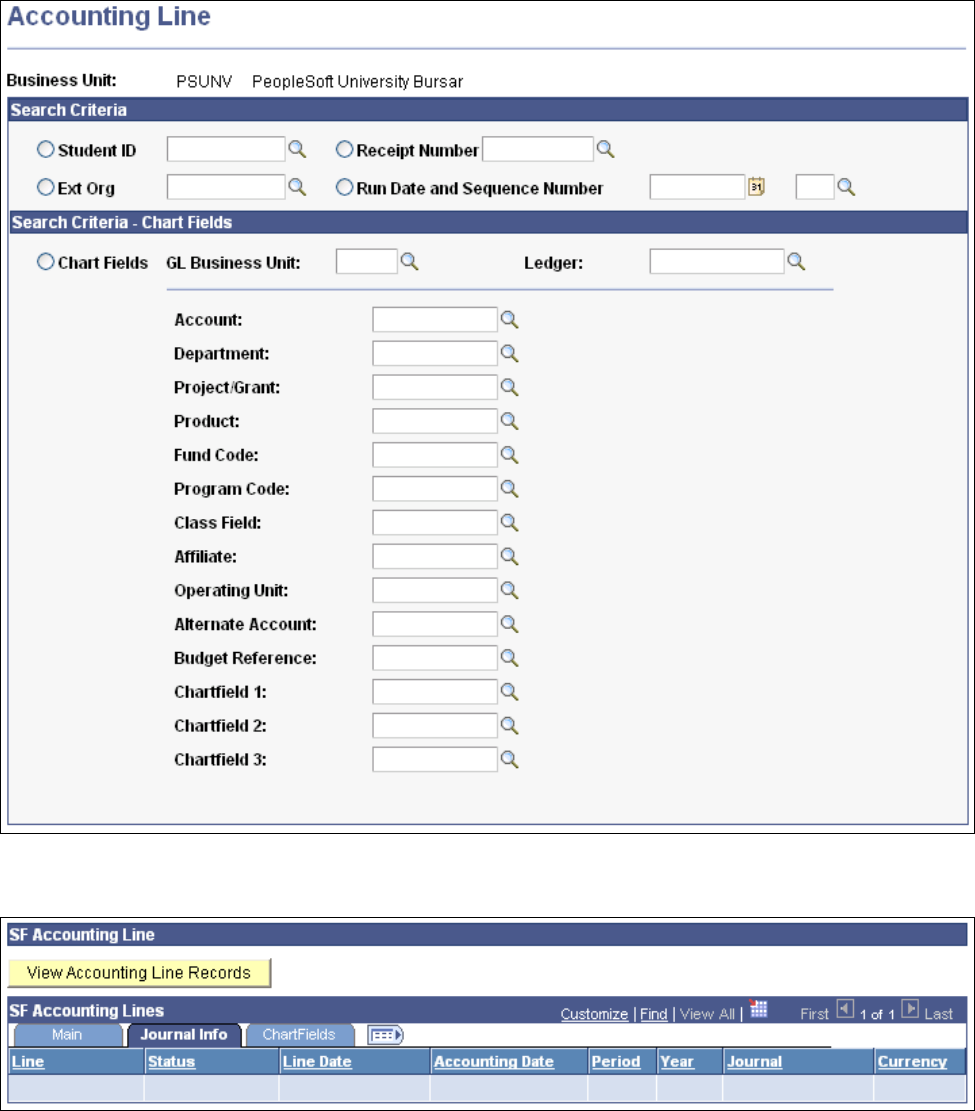
Using GL Interface Processing Chapter 15
418 Copyright © 1988, 2010, Oracle and/or its affiliates. All Rights Reserved.
Accounting Line page (1 of 2)
Accounting Line page (2 of 2)
Search Criteria
Use the options in this group box to select the fields that you want to use to search for an accounting line.
Enter a particular field value as the search criteria.

Chapter 15 Using GL Interface Processing
Copyright © 1988, 2010, Oracle and/or its affiliates. All Rights Reserved. 419
Student ID Select to view the accounting lines for a single person. Select an ID in the field to
the right.
Receipt Number Select to view the accounting lines that are related to a single receipt. Select the
receipt number in the field on the right.
Ext Org (external
organization) Select to view the accounting lines for a single external organization. Select the
external organization in the field to the right.
Run Date and Sequence
Number Select to view the accounting lines for a specific GL Interface process instance.
Select the date and enter the sequence number in the fields to the right.
Search Criteria - ChartFields
Select the ChartFields option to view the accounting lines that are related to specific ChartField values. If you
select this option, you must select one or more ChartField values.
Ext Chart (external GL
ChartField) If you are using a third-party or legacy General Ledger application, enter the
external chart of accounts information for which you want to search. If you use
this option, the search returns only accounting lines containing the specific chart
of accounts information that you supply.
If Oracle Financials is selected in the Financial System group box on the SF Installation page:
•The Ledger field is not available.
•ChartField prompt tables display valid values based on the Chartfields to Segments mapping on the
ChartFields Mapping page and the values populated from Oracle GL for each segment into respective
prompt tables.
•The 2 Affiliate Intra (Intra Unit), Project/Grant, and Affiliate chartfields are not supported and should be
made inactive on the HRMS Standard Chartfield Configuration page.
See Chapter 2, "Completing Student Financials General Setup," Defining Number Sequence Start Points,
Maximum Row Settings, and ChartField Edit Options, page 7.
See Chapter 4, "Setting Up GL Interface Processing," Mapping General Ledger Business Units to Oracle
General Ledger, page 120.
SF Accounting Line
After selecting your search criteria, click the View Accounting Line Records button to display accounting line
information in the four tabs located in this group box.
SF Accounting Lines
This scroll area displays the results of your search.
The Main tab displays general accounting line information. Click the Detail link next to an accounting line to
access the SF Accounting Line Detail page, where you can view all fields for the accounting line record.
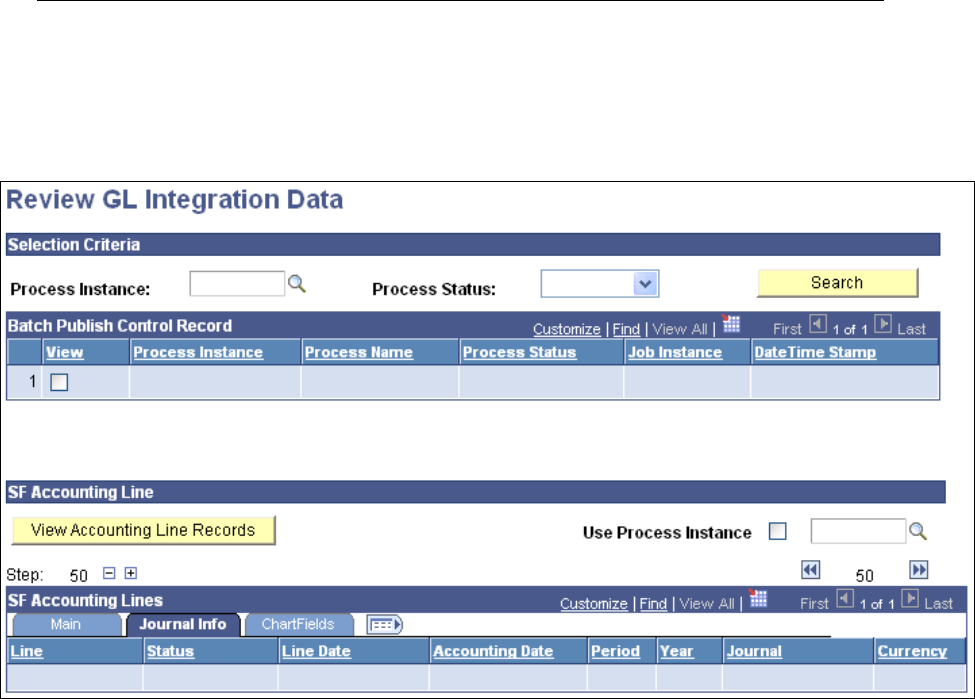
Using GL Interface Processing Chapter 15
420 Copyright © 1988, 2010, Oracle and/or its affiliates. All Rights Reserved.
The fields on the Journal Info tab display the information that is published to PeopleSoft or Oracle Financials.
This page also contains the GL journal line number, journal ID, and line date, which are supplied from the
data that is returned to Student Financials through the STUDENT_SF_ACCTG_LINE subscription message
after the journals are generated in PeopleSoft Financials. For Oracle Financials, the return data from General
Ledger is populated using the message SSF_GL_ACCTG_LINE_SYNC.
If Oracle Financials is selected in the Financial System group box on the SF Installation page, the 2 Affiliate
Intra (Intra Unit), Project/Grant, and Affiliate chartfields are not supported and should be made inactive on
the HRMS Standard Chartfield Configuration page.
See Chapter 2, "Completing Student Financials General Setup," ChartField Display Options, page 9.
Reviewing Batch Publish Control Records
Access the Review GL Integration Data page (Student Financials, GL Interface, Review GL Integration
Data).
Review GL Integration Data page
Selection Criteria - Batch Pub
Enter values for the batch publish records that you want to view in the Process Instance field or the Process
Status field. Click the Search button to display these records in the Batch Publish Control Record (PeopleSoft
Financials or Oracle Financials integration) scroll area.
Batch Publish Control Record (PeopleSoft Financials or Oracle Financials Integration)
This scroll area displays general information about the selected batch publish control records. Select the View
check box next to a batch publish control record to view its related accounting lines in the SF Accounting
Lines scroll area.
Chapter 15 Using GL Interface Processing
Copyright © 1988, 2010, Oracle and/or its affiliates. All Rights Reserved. 421
SF Accounting Line
Click the View Accounting Line Records button to display accounting lines that are associated with the batch
publish control record next to which you selected the View check box. If you want to display accounting lines
for a specific process instance regardless of the batch publish control record, select the Use Process Instance
check box and enter the desired process instance in the field to the right of the check box.
SF Accounting Lines
This scroll area is identical to the SF Accounting Line scroll area on the Accounting Line page.
If Oracle Financials is selected in the Financial System group box on the SF Installation page, the 2 Affiliate
Intra (Intra Unit), Project/Grant, and Affiliate chartfields are not supported and should be made inactive on
the HRMS Standard Chartfield Configuration page.
See Chapter 2, "Completing Student Financials General Setup," ChartField Display Options, page 9.
Using the Back Out GL Interface Process
The Back Out GL Interface process enables you to reverse the most recent run of the GL Interface process.
When you run the Back Out GL Interface process, it effectively deletes the accounting lines created in the
Accounting Line table PS_SF_ACCTG_LN for the most recent process instance and resets the corresponding
rows in PS_ITEM_SF as not having been processed by the GL Interface. The back out process makes enables
you to correct errors before information is sent to the general ledger.
Page Used to Run the Back Out GL Interface Process
Page Name Definition Name Navigation Usage
Back Out GL Interface RUNCTL_SFPGLBCK Student Financials, GL
Interface, Reverse GL
Interface
Run the Back Out GL
Interface process.
Running the Back Out GL Interface Process
Access the Back Out GL Interface page (Student Financials, GL Interface, Reverse GL Interface).

Using GL Interface Processing Chapter 15
422 Copyright © 1988, 2010, Oracle and/or its affiliates. All Rights Reserved.
Back Out GL Interface page
Business Unit Enter the business for which you want to run the back out process.
This process to deletes accounting lines created in error.
If you need to reverse an earlier run of the GL Interface process, you can return to the Back Out GL Interface
page and run the process again. Continue to run the process until you have backed out all of the entries that
you need to correct.
After the back out process finishes, you can enter any correcting transactions in Student Financials. Then
rerun the GL Interface process to create new accounting lines for the transactions.
Note. The Back Out GL Interface process does not back out accounting lines that are created by the
Cashiering GL Interface process.
Warning! Use caution when running the Back Out GL Interface process because backing out accounting
entries from Student Financials that have already been posted in PeopleSoft or Oracle General Ledger would
lead to out-of-balance conditions between Student Financials and PeopleSoft or Oracle General Ledger. Run
the Back Out GL Interface process only if you are sure that the accounting lines have not already been
transferred to PeopleSoft or Oracle General Ledger. If the accounting lines have been transferred to
PeopleSoft or Oracle General Ledger and you proceed with the Back Out GL Interface process, you must
manually reverse the corresponding entries in PeopleSoft or Oracle General Ledger.
Sending Accounting Entries to the General Ledger
This section discusses how to publish accounting line information.
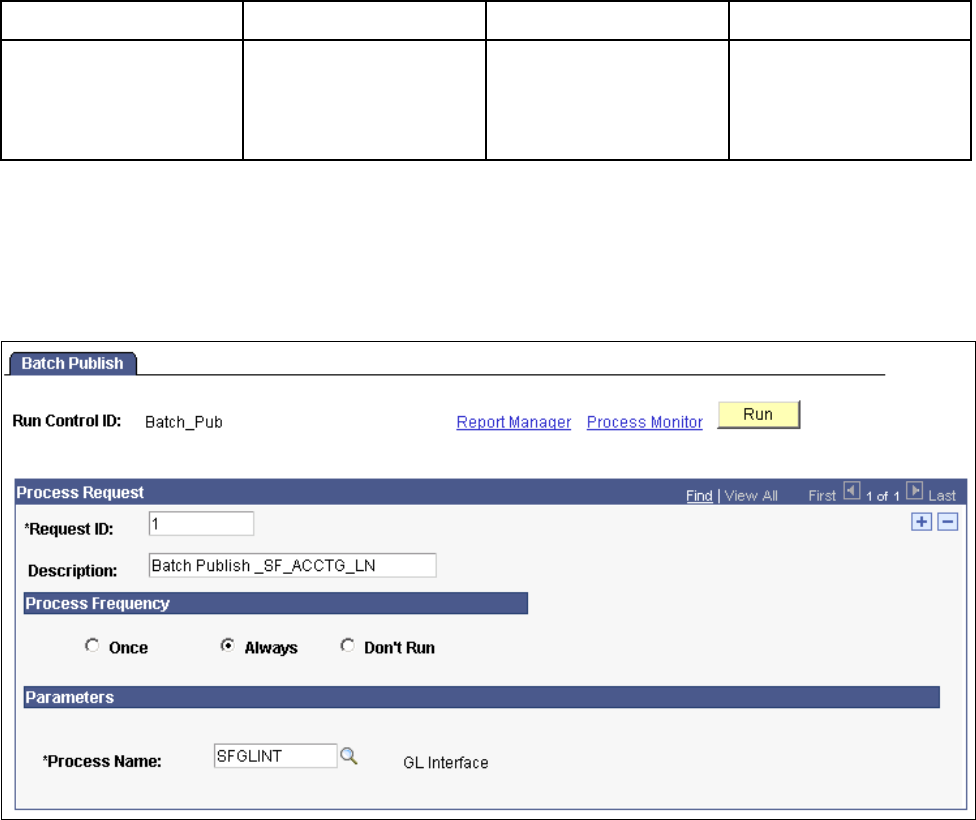
Chapter 15 Using GL Interface Processing
Copyright © 1988, 2010, Oracle and/or its affiliates. All Rights Reserved. 423
Page Used to Send Accounting Entries to the General Ledger
Page Name Definition Name Navigation Usage
Batch Publish EO_BATCHPUB Enterprise Components,
Integration Definitions,
Initiate Processes, Batch
Publish
Publish accounting line
information.
Publishing Accounting Line Information
Access the Batch Publish page (Enterprise Components, Integration Definitions, Initiate Processes, Batch
Publish).
Batch Publish page
To run the Batch Publish process:
1. Enter a request ID and description for the process.
2. Select the Always option in the Process Frequency group box.
3. Enter SFPGLINT in the Process Name field.
Enter SFDPTREC if you are using the Cashiering GL Interface process.
4. Click the Run button to initiate the Manual Batch Publish (EOP_PUBLISHM) process.
The Manual Batch Publish process:
1. Selects accounting lines based on three criteria: process or job instance, process name, and process status.
Using GL Interface Processing Chapter 15
424 Copyright © 1988, 2010, Oracle and/or its affiliates. All Rights Reserved.
2. Collects accounting line entries that are generated by the GL Interface process (SFPGLINT) and publishes
them to the PeopleSoft or Oracle Financials database.
Interface with Oracle Financials
Two types of interfaces with Oracle Financials are required: Outbound and Inbound
•Outbound: The same batch publish process that is used for PeopleSoft Financials is used to transfer
accounting line transactions from Student Financials (SF_ACCTG_LN) to the Oracle General Ledger
interface. Transformation program logic maps data from SF_ACCTG_LN to the GL_INTERFACE of
Oracle GL.
•Inbound: When the jounaling process in Oracle GL is complete, a message and transformation program is
used to send journal related information back to Student Financials (SF) and to update SF_ACCTG_LN
with the following details – Journal ID, Journal Date, Journal Line, Journal Line Status and Journal Line
Date.
See CS90 to EBS GL Integration Developer's Reference Guide. The guide is posted to My Oracle
Support.

Copyright © 1988, 2010, Oracle and/or its affiliates. All Rights Reserved. 425
Chapter 16
Calculating Tuition and Fees
This chapter discusses how to:
•Calculate tuition for a single student.
•Calculate tuition for multiple students.
•Lock in a minimum tuition amount.
•Recalculate tuition and fees after enrollment cancellation.
•Change, calculate, and post optional fees.
Calculating Tuition for a Single Student
Calculate tuition for a single student when you need to see immediate results.
Pages Used to Calculate Tuition for a Single Student
Page Name Definition Name Navigation Usage
Tuition Calculation STDNT_TUITION_CALC Student Financials, Tuition
and Fees, Tuition
Calculation
Calculate a student's tuition.
Tuition and Fees TUITION_CALC_SP Click the Display Tuition
and Fees link on the Tuition
Calculation page.
Review calculated fees for a
single student.
Fees After Calculation TUITION_CALC_TBL Student Financials, Tuition
and Fees, Review Fees
After Calculation
Review calculated fees for a
single student.
Calculation Messages STDNT_TUITION_CALC Click the Display
Errors/Warnings link on the
Tuition Calculation page.
Review messages generated
during tuition calculation
for a single student.
Fee Calculation Messages TUIT_CALC_MESSAGES Student Financials, Tuition
and Fees, Review
Calculation Messages, Fee
Calculation Messages
Review messages generated
during tuition calculation
for a single student.
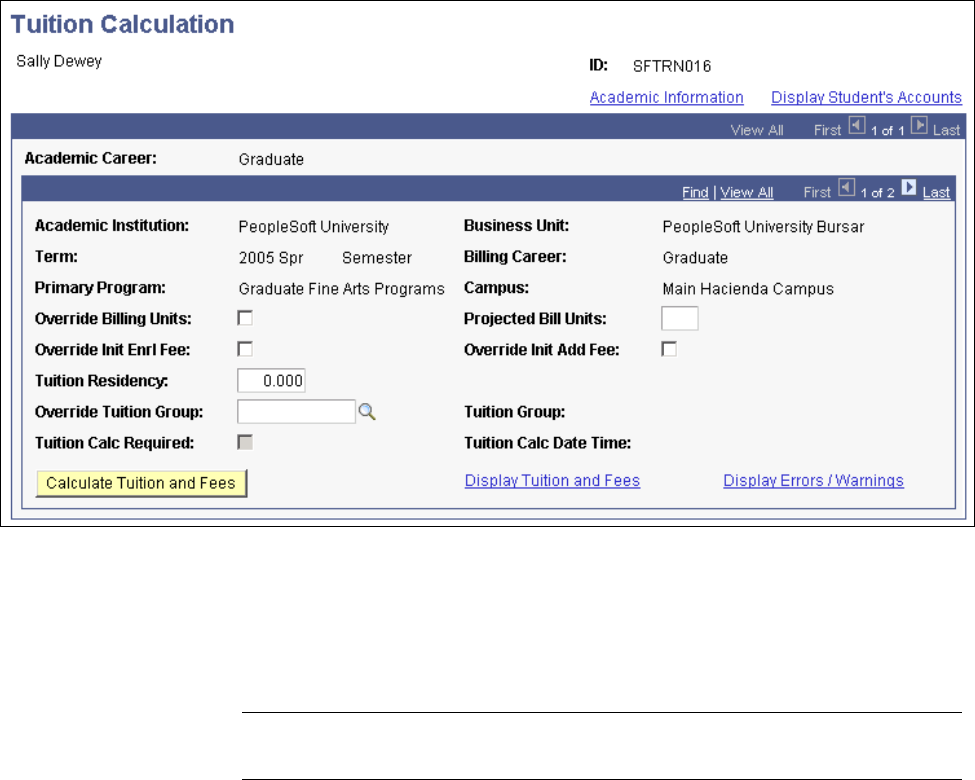
Calculating Tuition and Fees Chapter 16
426 Copyright © 1988, 2010, Oracle and/or its affiliates. All Rights Reserved.
Calculating a Student's Tuition
Access the Tuition Calculation page (Student Financials, Tuition and Fees, Tuition Calculation).
Tuition Calculation page
Academic Information Click to access the Academic Information page.
Display Student's
Accounts Click to access the Student Accounts page.
Note. If you review the student's account before calculating tuition, information
might not be available.
Override Billing Units Select to calculate tuition based on anticipated units.
Projected Billing Units If you set billing units as a part of tuition calculation, the system displays the
number of the student's projected billing units. You can edit this field.
Override Init Enrl Fee
(override initial
enrollment fee)
Select to override an initial enrollment fee.
Override Init Add Fee
(override initial add fee) Select to override an initial add fee.
Tuition Residency This field displays the tuition residency that is calculated for the student. You can
override the value and calculate it again to post the changed amount.

Chapter 16 Calculating Tuition and Fees
Copyright © 1988, 2010, Oracle and/or its affiliates. All Rights Reserved. 427
Override Tuition Group Enter a tuition group other than the one to which the student is already assigned.
When you calculate the student's tuition using this page, the system uses the
tuition group that you enter in this field instead of the previously assigned group.
Tuition Group Until tuition and fees have been calculated at least once, this field is blank. After
calculation, the field displays the tuition group into which the student was placed
upon calculation.
Tuition Calc Required
(tuition calculation
required)
The system selects this check box when changes have been made to the student's
enrollment or other attributes (such as placement in a student group) that require
an initial or new calculation of tuition and fees.
Tuition Calc Date Time
(tuition calculation date
time)
The system displays the date and time that tuition was last calculated.
Display Tuition and Fees Click to access the Tuition and Fees page, where you can review charges for
tuition and fees that have been calculated and charged to the student's account.
Display
Errors/Warnings Click to access the Calculation Messages page, where you can review all
messages associated with tuition and fees calculation for the student. This field is
available only if the corresponding selections have been made on the Display
Errors/Warning Controls page in the Tuition Calculation Controls component
(CALC_CNTL_TABLE).
See Also
Chapter 6, "Setting Up Fees and Tuition Groups," Setting Up Transaction Fees, page 222
Chapter 5, "Setting Up Tuition Controls, Criteria, Equations, and Waivers," Establishing Tuition Calculation
Controls, page 150
Calculating Tuition for Multiple Students
You can calculate tuition for multiple students using a batch process. You can define this process so that it
automatically calculates tuition at times when processing demands are low.
Pages Used to Calculate Tuition for Multiple Students
Page Name Definition Name Navigation Usage
Tuition for Multiple
Students
RUNCTL_SFPBCALC Student Financials, Tuition
and Fees, Calculate Batch
Tuition, Calculate Tuition,
Tuition for Multiple
Students
Calculate tuition in batch.
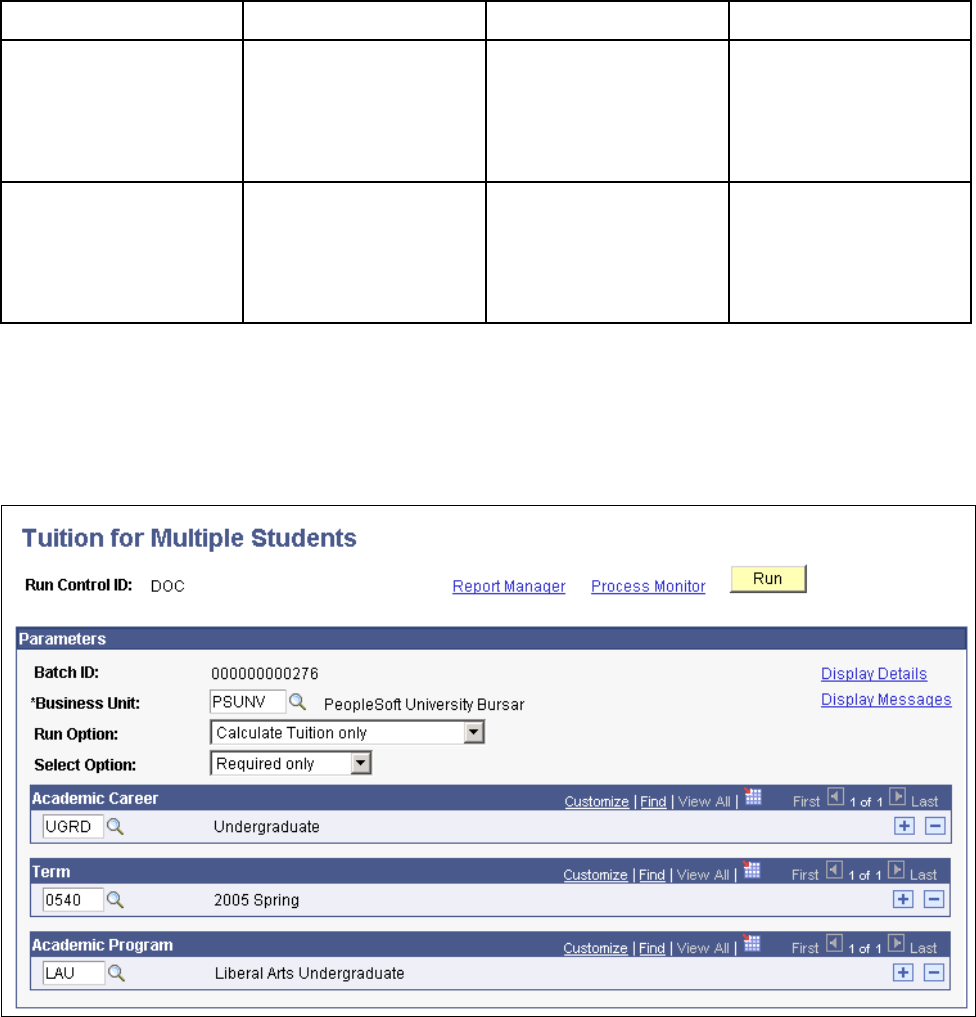
Calculating Tuition and Fees Chapter 16
428 Copyright © 1988, 2010, Oracle and/or its affiliates. All Rights Reserved.
Page Name Definition Name Navigation Usage
Fees After Calculation
(Batch)
TUIT_CALC_B_PANEL Student Financials, Tuition
and Fees, Calculate Batch
Tuition, Review Fees After
Calculation, Fees After
Calculation (Batch)
Review fees after batch
tuition calculation.
Fee Calculation Messages
(Batch)
CALC_MSG_B_PANEL Student Financials, Tuition
and Fees, Calculate Batch
Tuition, View Fee
Calculation Messages, Fee
Calc Messages (Batch)
Review messages resulting
from batch tuition
calculation.
Calculating Tuition in Batch
Access the Tuition for Multiple Students page (Student Financials, Tuition and Fees, Calculate Batch Tuition,
Calculate Tuition, Tuition for Multiple Students).
Tuition for Multiple Students page
Business Unit Enter the business unit for which you are calculating the tuition.

Chapter 16 Calculating Tuition and Fees
Copyright © 1988, 2010, Oracle and/or its affiliates. All Rights Reserved. 429
Run Option Enter the appropriate run option:
Warning! Values for this field are delivered with your system as translate
values. Do not modify these values in any way. Any modifications to these
values require a substantial programming effort.
Values are:
Calc and Post Tuition, Waivers: (calculate and post tuition, waivers): Calculates
and posts tuition and fee waivers for all students who meet the criteria that you
select on this page.
Calculate Tuition only: Calculates but does not post tuition for all students who
meet the criteria that you select on this page. This option does not calculate or
post waivers.
Calculate Waivers only: Calculates but does not post waivers for all students who
meet the criteria that you select on this page. This option does not calculate or
post tuition.
Calculate and Post Tuition: Calculates and posts tuition only for all students who
meet the criteria that you select on this page.
Calculate and Post Waivers: Calculates and posts fee waivers only for all
students who meet the criteria that you select on this page.
Post Tuition only: Posts tuition that you have already calculated.
Post Waivers only: Posts waivers that you have already calculated.
Select Option Select how students should be selected for tuition calculation.
Warning! Values for this field are delivered with your system as translate
values. Do not modify these values in any way. Any modifications to these
values require a substantial programming effort.
Values are:
All students: Calculates tuition for all students, regardless of when their tuition
was last calculated.
Required Only: Calculates tuition for students who meet the criteria in the page
and for whom the tuition calculation required check box is set to yes.
Display Details Click to review the Fees After Calculation (Batch) page.
Display Messages Click to review the Fee Calculation Messages (Batch) page.
Academic Career Enter an optional academic career for which you want to calculate tuition and
fees. Leave this field blank to calculate tuition for all careers that are limited by
your run option, and select option settings.
Term Enter the term for which you want to calculate tuition and fees.
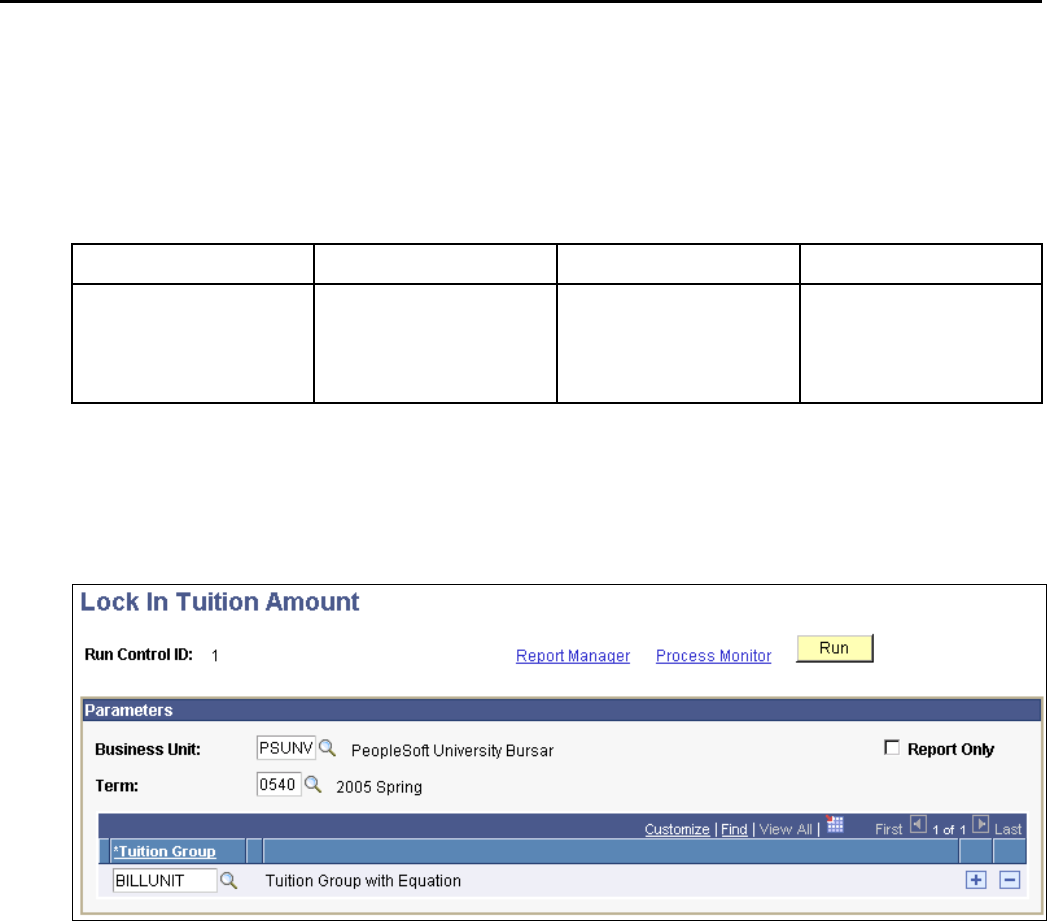
Calculating Tuition and Fees Chapter 16
430 Copyright © 1988, 2010, Oracle and/or its affiliates. All Rights Reserved.
Academic Program Enter an optional academic program for which you want to calculate tuition and
fees. Leave this field blank to calculate tuition and fees for all eligible students in
all academic programs that are limited by your run option, and select option
settings.
Locking In a Minimum Tuition Amount
The Lock In Tuition Amount process enables you to charge students a minimum lock in amount for a fee,
regardless of when they drop a class, the number of classes that they drop, or whether fees increase.
Page Used to Lock In a Minimum Tuition Amount
Page Name Definition Name Navigation Usage
Lock In Tuition Amount RUNCTL_LCK_IN_TUIT Student Financials, Tuition
and Fees, Process Tuition
Lock In, Lock In Tuition
Amount
Lock in a minimum tuition
amount.
Locking In Tuition
Access the Lock in Tuition Amount page (Student Financials, Tuition and Fees, Process Tuition Lock In,
Lock In Tuition Amount).
Lock In Tuition Amount page
Business Unit Enter the business unit for which you are processing the tuition lock.
Term Enter the term being locked.
Chapter 16 Calculating Tuition and Fees
Copyright © 1988, 2010, Oracle and/or its affiliates. All Rights Reserved. 431
Report Only Select to see the effect of the lock without processing it.
Tuition Group Enter the tuition group that you want to process.
Recalculating Tuition and Fees After Enrollment Cancellation
When the system selects students during the Enrollment Cancellation process for nonpayment of fees, you
must recalculate tuition and fees for those students.
See Also
Chapter 21, "Maintaining Receivables," Processing Enrollment Cancellation, page 619
Page Used to Recalculate Tuition and Fees After Enrollment Cancellation
Page Name Definition Name Navigation Usage
Recalc for Cancellation
(recalculate for
cancellation)
RUNCTL_SFPCCALC Student Financials, Tuition
and Fees, Calculate Batch
Tuition, Calculate After
Cancellation, Recalc for
Cancellation
Recalculate tuition and fees
after enrollment
cancellation.
Recalculating Tuition and Fees After Enrollment Cancellation
Access the Recalc for Cancellation page Student Financials, Tuition and Fees, Calculate Batch Tuition,
Calculate After Cancellation, Recalc for Cancellation).
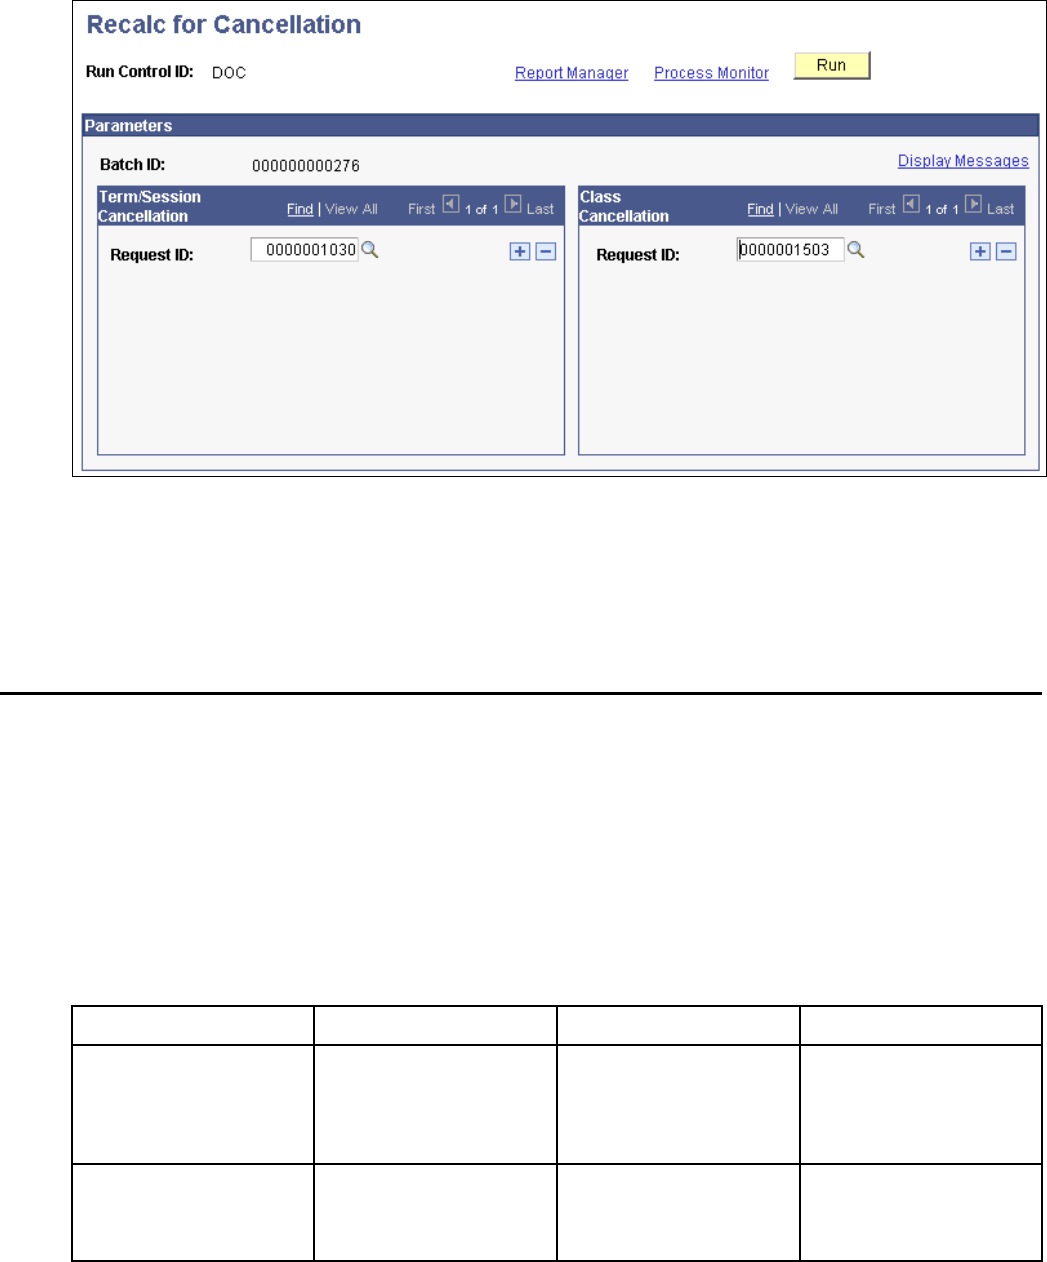
Calculating Tuition and Fees Chapter 16
432 Copyright © 1988, 2010, Oracle and/or its affiliates. All Rights Reserved.
Recalc for Cancellation page
Request ID (request
identifier) Enter a request ID for term or session cancellations, class cancellations, or both.
Changing, Calculating, and Posting Optional Fees
This section discusses how to:
•Calculate optional fees for an individual student.
•Override optional fees after the no change date.
Pages Used to Change, Calculate, and Post Optional Fees
Page Name Definition Name Navigation Usage
Optional Fees for a Student OPT_FEE_STDNT Student Financials, Tuition
and Fees, Assign Optional
Fees, Optional Fees for a
Student
Calculate optional fees for
an individual student.
Optional Fees OPT_FEE_STDNT_S Click the Display Optional
Fees link on the Optional
Fees for a Student page.
Review a student's optional
fees.
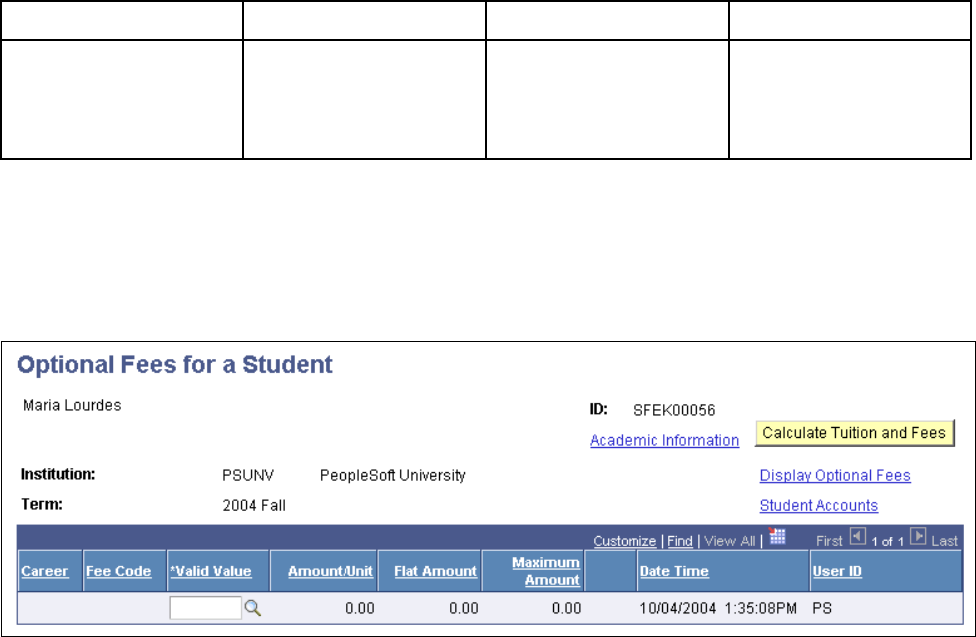
Chapter 16 Calculating Tuition and Fees
Copyright © 1988, 2010, Oracle and/or its affiliates. All Rights Reserved. 433
Page Name Definition Name Navigation Usage
Optional Fees Override OPT_FEE_OVERRIDE Student Financials, Tuition
and Fees, Override Optional
Fees, Optional Fees
Override
Override optional fees after
the no change date.
Calculating Optional Fees for an Individual Student
Access the Optional Fees for a Student page (Student Financials, Tuition and Fees, Assign Optional Fees,
Optional Fees for a Student).
Optional Fees for a Student page
Career Displays the student's academic career.
Fee Code Displays the fee code of each optional fee that is attached to the student.
Valid Value Enter a value for each fee code. The system displays the default value that you
defined on the Optional Fees per Term page. You can override this value. After
you select the value, the system displays the amount of the fee in the appropriate
field (Amount/Unit or Flat Amount).
Amount/Unit If the optional fee is based on the number of units in which the student is
enrolled, the system displays the total monetary amount in this field.
Flat Amount If the optional fee is a flat charge, the system displays the total dollar amount in
this field.
Maximum Amount Displays the maximum amount that you defined for the fee on the Optional Fees
per Term page.
Date Time Displays the date and time that the optional fee was calculated.
User ID Indicates who entered the charge.
Academic Information Click to display the student's enrollment status.

Calculating Tuition and Fees Chapter 16
434 Copyright © 1988, 2010, Oracle and/or its affiliates. All Rights Reserved.
Calculate Tuition and
Fees Click to calculate and post tuition and fees for the student, including optional
fees.
Note. After you have saved any changes that you make to a student's optional
fees, any tuition calculation process takes the changes into account. That is, you
do not need to calculate tuition from this page.
Display Optional Fees Click to display all optional fees that were charged after calculation.
Student Accounts Click to review a summary of the student's entire account and verify that the
system correctly posted the optional fees.
Overriding Optional Fees After the No Change Date
Access the Optional Fees Override page (Student Financials, Tuition and Fees, Override Optional Fees,
Optional Fees Override).
This page is identical to the Optional Fees for a Student page.
See Also
Chapter 16, "Calculating Tuition and Fees," Calculating Optional Fees for an Individual Student, page 433

Copyright © 1988, 2010, Oracle and/or its affiliates. All Rights Reserved. 435
Chapter 17
Refunding Customers
This chapter provides an overview of refunds and discusses how to:
•Create batch refunds.
•Create online refunds.
•Approve refunds.
•Complete batch payroll refunds.
•Complete online payroll refunds.
•Distribute payroll refunds through direct deposit.
•Print checks and direct deposit advice slips.
•Complete accounts payable (AP) refunds.
•Distribute refunds to ePayment accounts.
•Cancel refunds.
•Reverse refunds.
•Renumber refund checks for reprinting.
•Delete paysheets.
•View refunding information.
Understanding Refunds
This section discusses:
•Refund methods.
•Refund processes.
•Refund recipients.
•Refund format.
•Refund process flow.
Refunding Customers Chapter 17
436 Copyright © 1988, 2010, Oracle and/or its affiliates. All Rights Reserved.
Refunding Methods
You can use three refunding methods to create and distribute refunds:
•Payroll.
The payroll method involves creating and distributing refunds using PeopleSoft Enterprise Payroll for
North America that treats your students like employees. The payroll method can only create and distribute
student refunds, not organization refunds.
•Accounts payable.
The accounts payable method involves creating and distributing refunds through an interface with
PeopleSoft Enterprise Payables.
•Other.
The other method is a catchall method used by institutions that create and distribute refunds through an
interface with an application other than Payroll for North America or Payables.
Refunding Processes
You can use two types of processes to create and distribute refunds:
•Online.
Processing a refund online involves creating and distributing a refund for one recipient in real time.
•Batch.
Processing refunds in batch involves creating and distributing refunds for one or more recipients on a
scheduled basis using a batch process.
Refunding Recipients
Two types of recipients can receive refunds: students and organizations. In Student Financials, the recipient
refers to the type of account being refunded and does not necessarily indicate the person or organization that
actually receives the refund. For example, a student withdraws from a class and is due to receive a refund.
However, a nonstudent sponsor originally paid the student's tuition fees and should therefore receive the
refunded money. Although the sponsor receives the actual refund, it is still considered a student refund in
terms of how you create and distribute it.
Refunding Formats
You can use several types of formats to distribute refunds:
•Check.
Using the check format, you refund customers by sending them a check for the refund amount.
Chapter 17 Refunding Customers
Copyright © 1988, 2010, Oracle and/or its affiliates. All Rights Reserved. 437
•Credit card.
Using the credit card format, you directly refund a customer's credit card for the refund amount.
•Electronic check.
Using the electronic check format, you directly refund a customer's eCheck account for the refund
amount.
•Direct deposit.
Using the direct deposit format, you automatically deposit the refund amount into a predetermined direct
deposit account. The direct deposit format is an option only if you use the payroll method to create
refunds.
Refunding Process Flow
The following diagrams display the decisions and processes involved with creating and distributing payroll
and AP refunds.
Payroll Refund Processing
The following diagram outlines payroll refund processing:
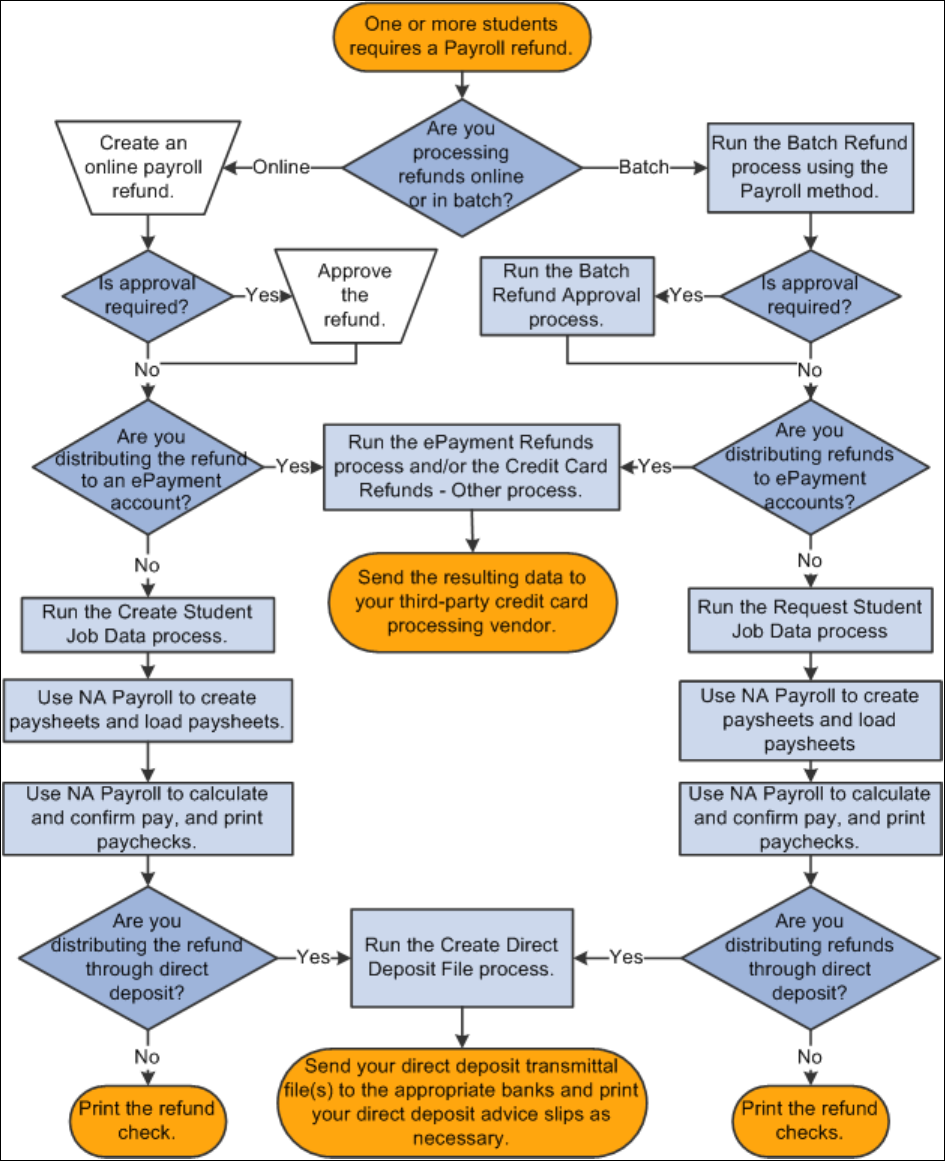
Refunding Customers Chapter 17
438 Copyright © 1988, 2010, Oracle and/or its affiliates. All Rights Reserved.
Payroll refund process flow
AP Refund Processing
The following diagram outlines AP refund processing:
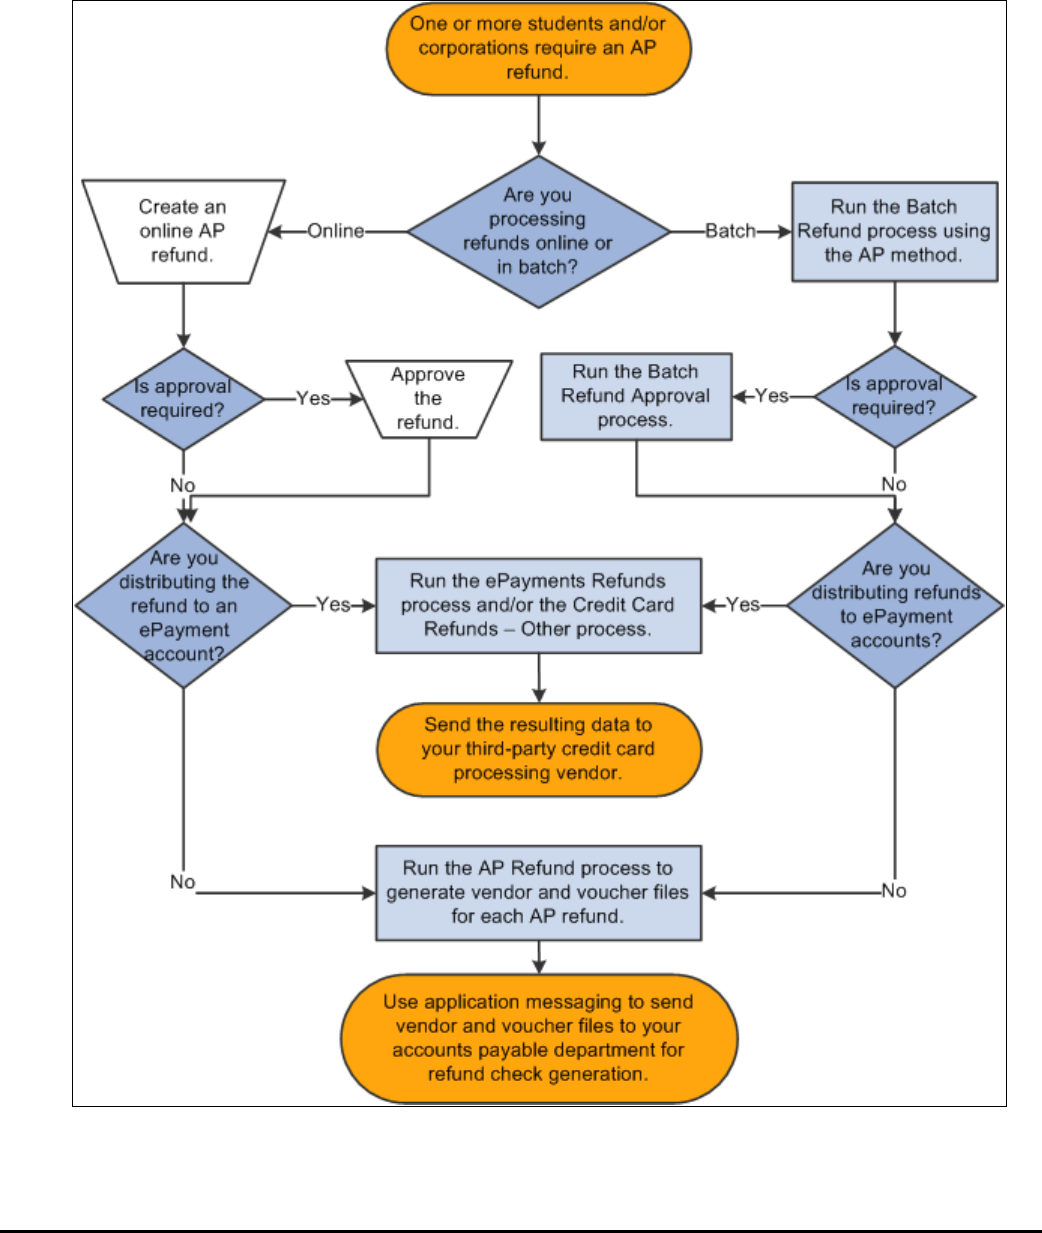
Chapter 17 Refunding Customers
Copyright © 1988, 2010, Oracle and/or its affiliates. All Rights Reserved. 439
AP refund process flow
Creating Batch Refunds
This section discusses how to:

Refunding Customers Chapter 17
440 Copyright © 1988, 2010, Oracle and/or its affiliates. All Rights Reserved.
•Define general parameters.
•Select academic programs.
•Select account types and terms.
•Select item types.
Note. You cannot refund unsettled credit card payments using the Batch Refund (SFPREFND) process. The
process ignores any unsettled credit card payments.
See Also
Chapter 14, "Processing ePayment Transactions," page 381
Pages Used to Create Batch Refunds
Page Name Definition Name Navigation Usage
Batch Refund RUNCTL_SFPREFND Student Financials,
Refunds, Process Batch
Refunds, Create Refunds,
Batch Refund
Define general parameters
of the Batch Refund
process.
Academic Programs RUNCTL_SFPREFND_2 Student Financials,
Refunds, Process Batch
Refunds, Academic
Programs
Specify academic programs
to include in the batch
refund process.
Accounts/Terms RUNCTL_SFPREFND_3 Student Financials,
Refunds, Process Batch
Refunds, Accounts / Terms
Select account types and
academic terms to include
in the batch refund process.
Item Types RUNCTL_SFPREFND_4 Student Financials,
Refunds, Process Batch
Refunds, Item Types
Select item types to include
in the batch refund process.
Batch Refund Lines REFUND_LINES Student Financials,
Refunds, Process Batch
Refunds, Review Batch
Refunds
View results of the Batch
Refund process.
Review Batch Messages REFUND_MESSAGES Student Financials,
Refunds, Process Batch
Refunds, Review Batch
Messages
View warnings or errors
generated during the Batch
Refund process.
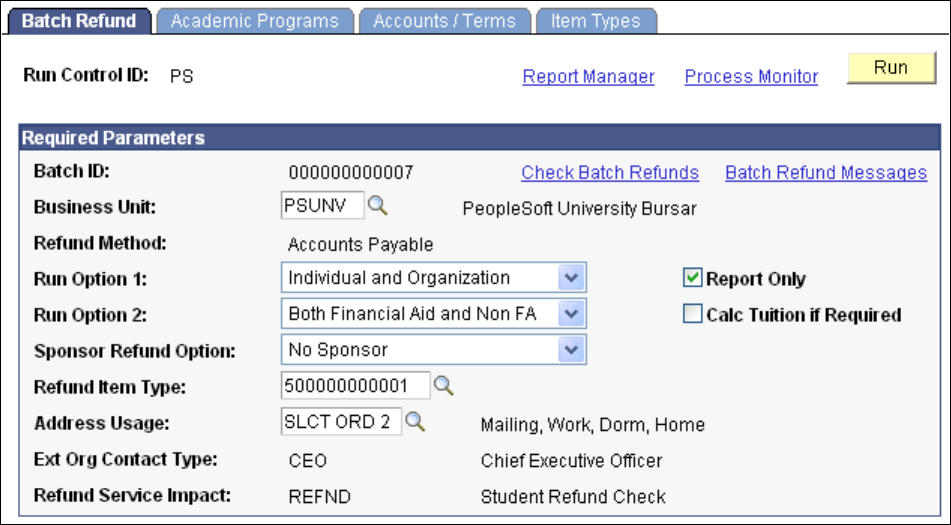
Chapter 17 Refunding Customers
Copyright © 1988, 2010, Oracle and/or its affiliates. All Rights Reserved. 441
Defining General Parameters
Access the Batch Refund page (Student Financials, Refunds, Process Batch Refunds, Create Refunds, Batch
Refund).
Batch Refund page
Batch ID Displays the unique ID assigned after you save your batch refund parameters.
Check Batch Refunds After you run the process, click to access the Batch Refund Lines page and view
created refunds.
Batch Refund Messages After you run the process, click to access the Review Batch Messages page and
view warnings or errors that the system encountered during the process.
Refund Method Displays the refund method that you selected on the Refund Setup page of the SF
Business Unit component (BUSINESS_UNIT_SF).
Run Option 1 Select the type of recipients to create refunds for. Values are: Individual Only,
Organization Only, or Individual and Organization.
Run Option 2 Select the types of credits to create refunds for. You can create refunds for
financial aid credits (credits with an item type classification of Financial Aid),
nonfinancial aid credits (credits with an item type classification other than
Financial Aid), or both.
Report Only Select to generate a report listing what refunds the system would create. When
selected, the process does not actually create the refunds listed in the report.
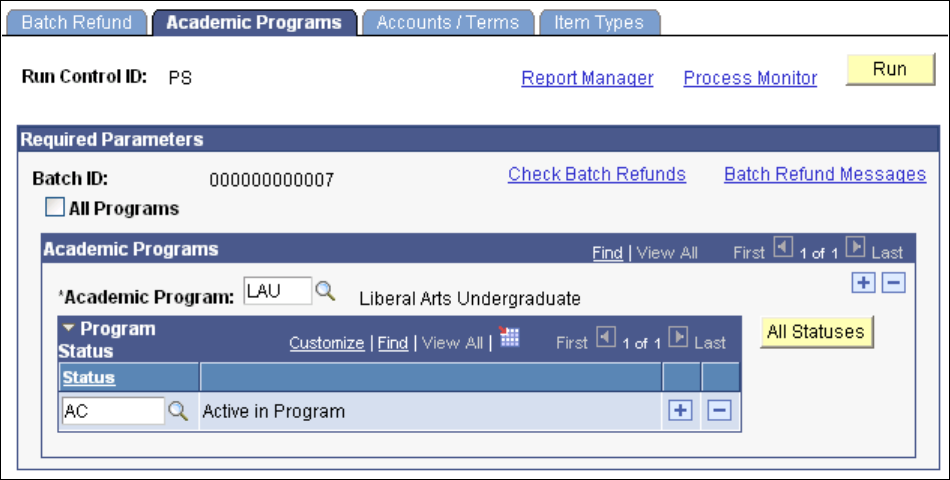
Refunding Customers Chapter 17
442 Copyright © 1988, 2010, Oracle and/or its affiliates. All Rights Reserved.
Calc Tuition if Required
(calculate tuition if
required)
Select to calculate tuition for students who have not already had their tuition
calculated or who need tuition recalculated.
Sponsor Refund Option Select whether you want to include sponsors in the process, and if so, what types
of sponsors.
Refund Item Type Select the item type to assign to the refunds that the Batch Refund process
creates.
Address Usage Enter how the system chooses the proper address for each refund.
External Org Contact
Type (external
organization contact type)
Displays the contact type that you specified on the Refund Setup page of the SF
Business Unit component. The system uses this contact type to determine the
recipient of any organization refunds generated by the batch process.
Refund Service Impact Displays the refund service impact that you specified on the Refund Setup page
of the SF Business Unit component. The system uses this service impact during
the batch process to identify any students who should be prevented from
receiving a refund.
Selecting Academic Programs
Access the Academic Programs page (Student Financials, Refunds, Process Batch Refunds, Academic
Programs).
Academic Programs page
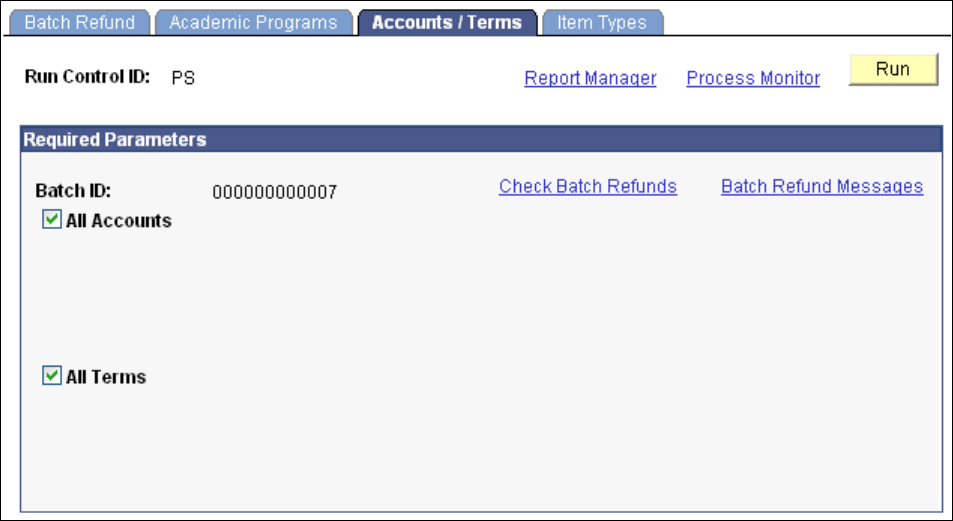
Chapter 17 Refunding Customers
Copyright © 1988, 2010, Oracle and/or its affiliates. All Rights Reserved. 443
Required Parameters
All Programs Select to include all academic programs in the batch process.
Academic Programs
This group box is available only if you clear the All Programs check box.
Academic Program Select the academic program to include in the process.
Program Status
All Statuses Expand this scroll area to select academic program statuses to include in the
batch refund process. The system creates refunds only for those students with the
statuses you select. Alternatively, you can click the All Statuses button to
populate all the statuses in the grid. This should be used with caution because
statuses included are Deceased, Dismissed, and other statuses for which you may
not want refunds processed. You can click the button and then delete the status
rows that you do not want included for refund processing.
Selecting Account Types and Terms
Access the Accounts/Terms page (Student Financials, Refunds, Process Batch Refunds, Accounts / Terms).
Accounts/Terms pag
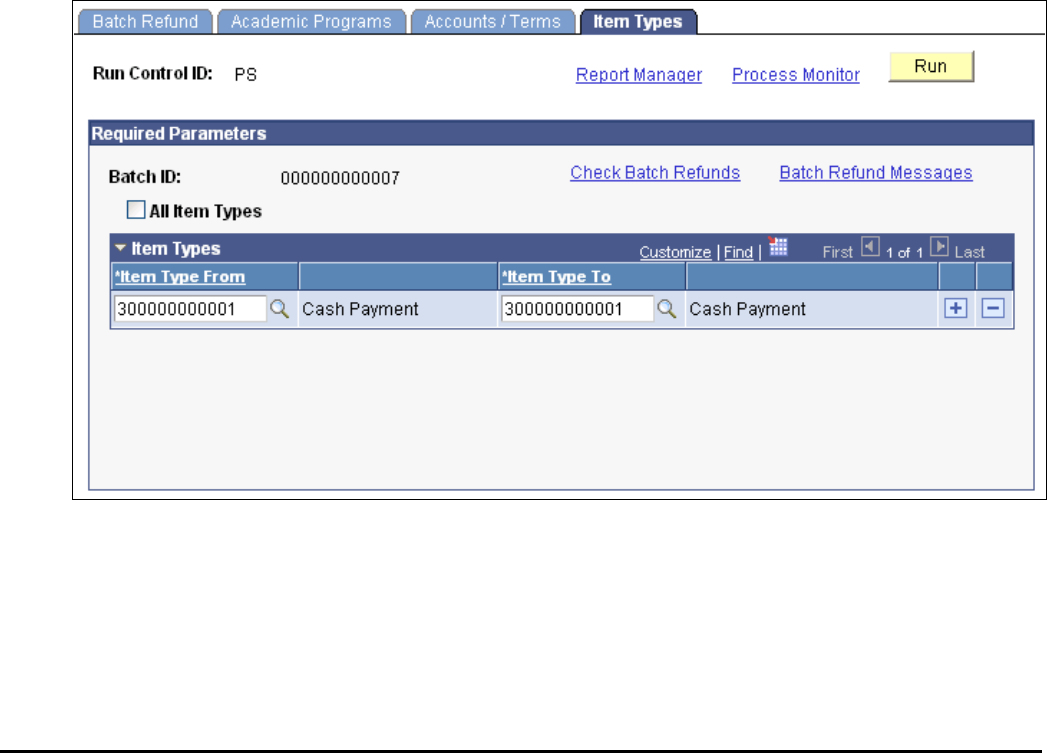
Refunding Customers Chapter 17
444 Copyright © 1988, 2010, Oracle and/or its affiliates. All Rights Reserved.
All Accounts and All
Terms Select to include all account types and academic terms in the batch refund
process. If you clear either check box and click Refresh, a scroll area appears.
Add the accounts and terms to process.
Selecting Item Types
Access the Item Types page (Student Financials, Refunds, Process Batch Refunds, Item Types).
Item Types page
All Item Types Select to include all item types in the batch refund process. If you clear the check
box, use the Item Type From and Item Type To fields to define the range of item
types to include in the batch refund process.
Creating Online Refunds
This section discusses how to:
•Create student refunds.
•Create organization refunds.
•Create student refunds with an extra amount.
•Specify the account and term associated with an extra refunded amount.
•Create online refunds for a sponsor.

Chapter 17 Refunding Customers
Copyright © 1988, 2010, Oracle and/or its affiliates. All Rights Reserved. 445
Pages Used to Create Online Refunds
Page Name Definition Name Navigation Usage
Student Refund REFUND_SF Student Financials,
Refunds, Student Refund Create an online refund for
a student.
Academic Information SF_STUDENT_SP Click the Academic
Information link on the
Student Refund page.
View enrollment and
personal information for a
given student.
Student Accounts ACCOUNT_SF_SP Click the Student Accounts
link on the Student Refund
page.
View account activity
information for a given
student.
Corporate Refund REFUND_ORG_SF Student Financials,
Refunds, Corporate Refund Create an online refund for
an organization. You can
use this page in conjunction
with the A/P refund method
only.
Corp Accounts ACCOUNT_ORG_SF_SP Click the Get Account link
on the Corporate Refund
page.
View account activity for a
given corporation.
Refund with Extra Amount REFUND_SF Student Financials,
Refunds, Refund with Extra
Amount
Create a refund for an
amount greater than the
refundable balance.
Extra Refund Amount EXTRA_REFUND_AMT Click the Extra Amount
Info link on the Refund with
Extra Amount page
Specify account and term
information associated with
the extra amount refunded.
Online Refund Other REFUND_SF_OLD Student Financials,
Refunds, Online Refund
Other
Create a refund for a
designated sponsor.
Creating Student Refunds
Access the Student Refund page (Student Financials, Refunds, Student Refund).
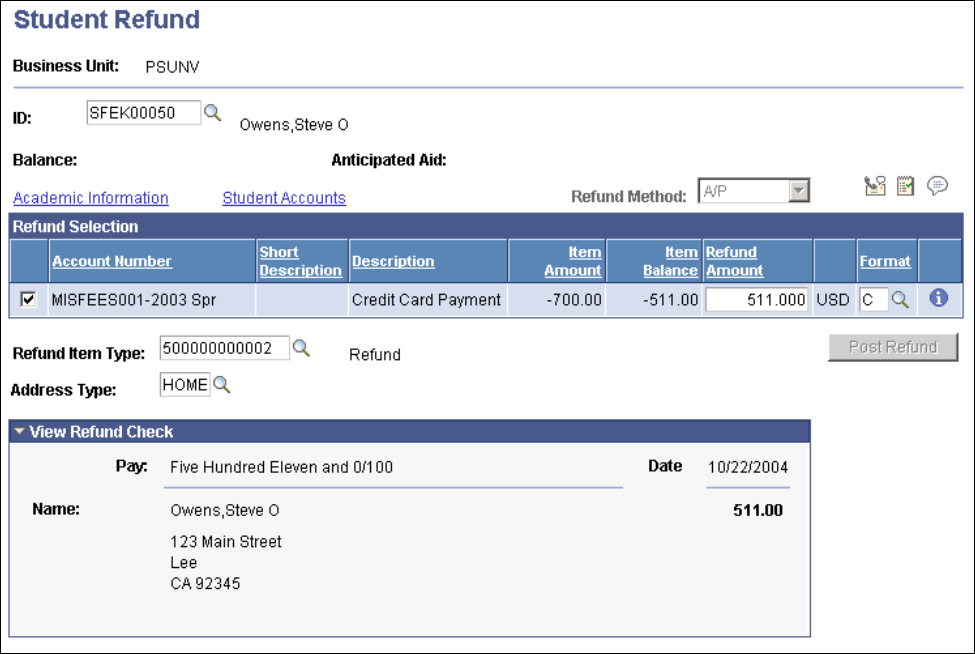
Refunding Customers Chapter 17
446 Copyright © 1988, 2010, Oracle and/or its affiliates. All Rights Reserved.
Student Refund page
Depending on the type of refund method that you select, the fields described below will differ.
ID Enter the ID of the student for whom you want to create a refund.
Balance andAnticipated
Aid Displays the account balance and any anticipated aid of the selected student.
Academic Information Click to access the Academic Information page.
Student Accounts Click to access the Student Accounts page.
Refund Method Select the refund method that you want to use to create this refund. The possible
values for this field are Payroll, A/P, and Other.
If you do not select the Allow Changes in Refund Method check box on the
Refund Setup page of the SF Business Unit component, the Refund Method field
on the Student Refund page becomes unavailable and set by default to the value
that you select in the Refund Method field on the Refund Setup page.
Refund Selection
Select the check box next to each credit line item to include in the refund. This group box displays the
account type, academic term, item type description, original monetary amount, and balance of each line item.

Chapter 17 Refunding Customers
Copyright © 1988, 2010, Oracle and/or its affiliates. All Rights Reserved. 447
Note. If you pay multiple targets by the same transaction, each target appears as a separate line item on the
Student Refund page. When you refund multiple targets from the same transaction, however, the system
combines the targets into a single refund. For example, if you are refunding a student 750.00 USD for tuition
and 125.00 USD for housing, and both targets were part of the same credit card payment, the system
combines the target refunds into a single credit card refund of 875.00 USD. It does not issue two separate
refunds to the same credit card.
See Chapter 20, "Cashiering," Accepting Student Payments, page 527.
Refund Amount The system automatically enters the total amount of the line item in this field. To
include only a portion of the line item in the refund, decrease the amount.
Format Select the format to distribute the refund. Values are:
A (automatic check): Select if you have an interface to a specific check-writing
application.
C (credit card): Select to directly refund the student's credit card. This value is
selected by default for all refunds originating from credit card payments.
D (direct deposit): Select to distribute the refund to the student's checking or
savings account through direct deposit. If you have set up the student for direct
deposit using the Direct Deposit page and the line item does not have a credit
card payment item type, the Format field is set by default to D for every refund
line item.
E (electronic check): Select to directly refund the student's eCheck account. This
value is selected by default for all refunds originating from eCheck payments.
P (paper check): Select to distribute the refund by using a check generated
according to the refund method that you selected.
Note. You can change a default format of C or E to A or P. If you do this, the
system processes the refund so that you can generate a paper check instead of
directly crediting the student's credit card or eCheck account. If you change the
format to A or P for more than one ePayment transaction, the system combines
the transactions into one lump refund so that you issue only one check to the
student. You cannot change a default format of A or P to C or E.
Address Type Select the type of address that you want printed on the check.
Note. You can only refund one ePayment at a time using the Student Refund page. Even if there are multiple
ePayments on a student's account, you can select only one at a time. In addition, the system does not allow
you to post a refund for eCheck payments that have not been debited or credit card payments that have not
been settled. If you click the Post Refund button after selecting a refund for an ePayment that has not been
debited/settled, you receive an error message.

Refunding Customers Chapter 17
448 Copyright © 1988, 2010, Oracle and/or its affiliates. All Rights Reserved.
Student Refund Buttons and Links
Post Refund Click to post the refund to the student's account. If you selected Payroll in the
Refund Method field, the Produce Check link becomes available when you click
this button.
If you set up your business unit to require refund approval, the system alerts you
to the approval requirement when you click Post Refund.
Produce Check If you are creating the refund using the payroll refund method, click to create the
payroll interface for the refund. This link opens the Produce Student Refund
Check page (SSF_REF_STU_CNTRL).
Note. For refunds using the payroll method, the Create Student Job Data step
must be completed before moving onto the Produce Student Refund Check. (You
need to run the Create Student Job Data process if a student has never had a
refund before and there is no "employee" data.) The Produce Check is the first
process for interfacing to payroll. Once there, you enter the pay period end date
and click Process Check. That step creates the paysheet data. A paysheet serves
as a repository for the data required for Payroll for North America to calculate a
refund. After creating the paysheet, (click Process Check) the system populates
the paysheet data. The Print Check button appears, enabling you to print a check
(or direct deposit advice) on your printer.
Calculate Tuition Click to calculate tuition for the selected student. This button is available only if
you selected the Auto Calculate Tuition check box on the Tuition Calculation
Controls page, there is a term listed for any of the refunds listed, and tuition is
required.
View Refund Check
Expand this group box to view a simulation of a refund check for the amount that you are refunding.
See Also
Chapter 14, "Processing ePayment Transactions," page 381
Creating Organization Refunds
Access the Corporate Refund page (Student Financials, Refunds, Corporate Refund).
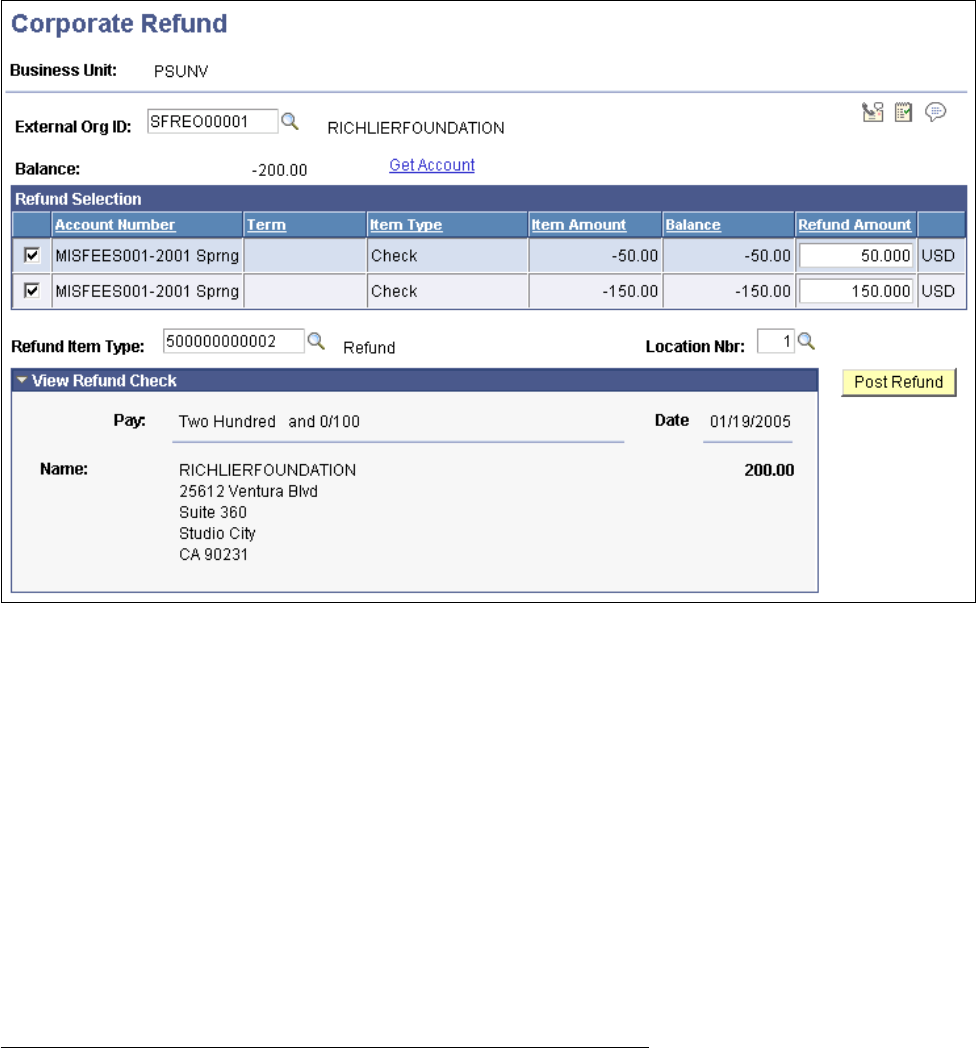
Chapter 17 Refunding Customers
Copyright © 1988, 2010, Oracle and/or its affiliates. All Rights Reserved. 449
Corporate Refund page
External Org ID(external
organization ID) Enter the ID of the organization for which you want to create a refund.
Get Account Click to access the Corp Accounts secondary page.
Location Nbr (location
number) Enter the organization's location number to determine the address to print on the
check. The address associated with the location number appears at the bottom of
the page, to the right of any image that you have inserted.
The remaining fields on this page are identical to their counterparts on the Student Refund page.
See Also
Chapter 17, "Refunding Customers," Creating Student Refunds, page 445
Creating Student Refunds with an Extra Amount
Access the Refund with Extra Amount page (Student Financials, Refunds, Refund with Extra Amount).
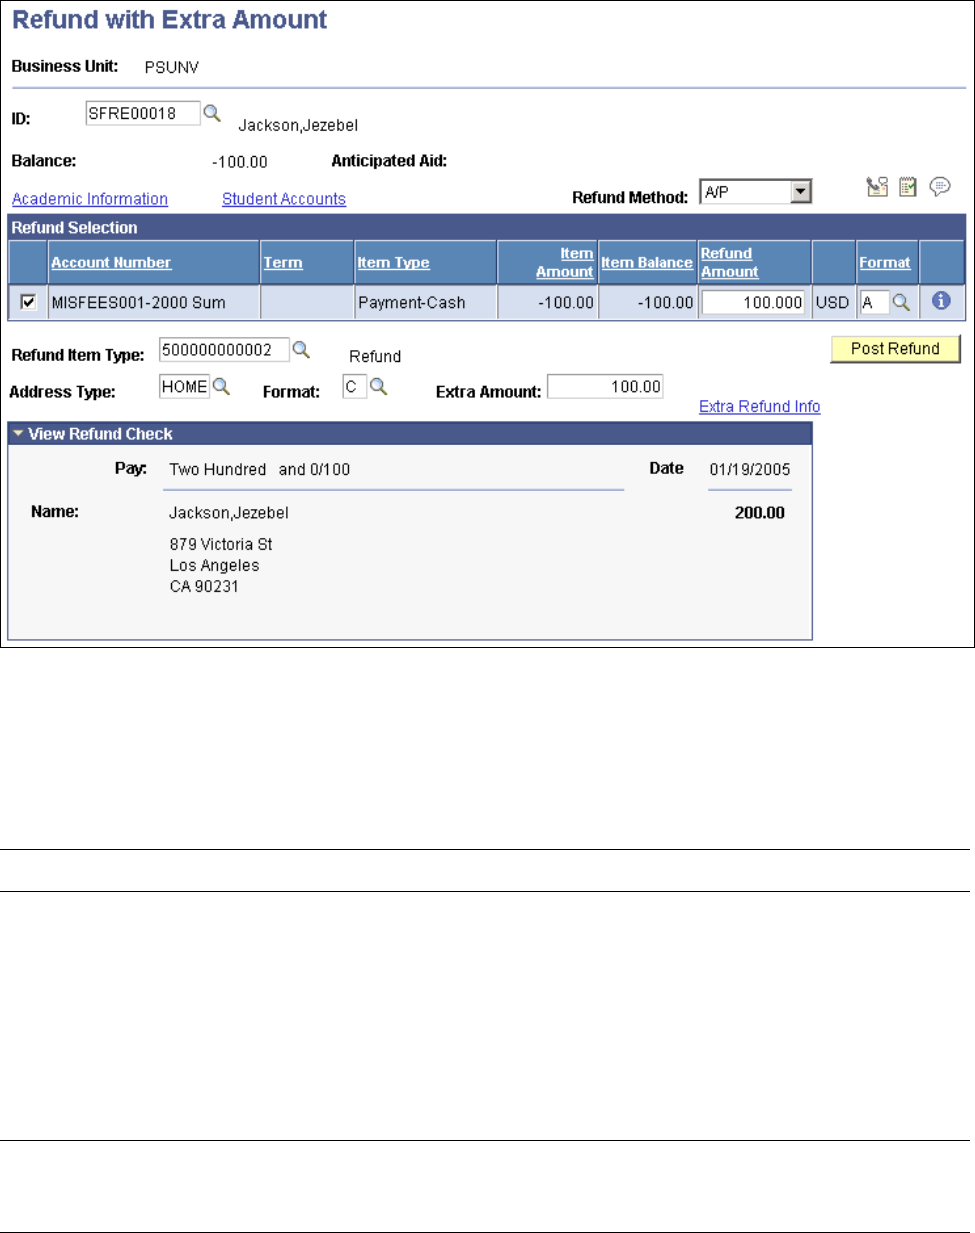
Refunding Customers Chapter 17
450 Copyright © 1988, 2010, Oracle and/or its affiliates. All Rights Reserved.
Refund with Extra Amount page
Use this page to create a refund for more than the refundable balance or in the absence of a refundable
balance. For example, you can disburse anticipated aid to a student before the actual receipt of funds. The
refund becomes a charge on the student's account that is later credited when your institution actually receives
the financial aid.
Note. You cannot use the Refund with Extra Amount page to create a refund for an organization.
With the exception of the following fields, this page is the same as the Student Refund page.
Method Enter the format to distribute any extra amount added to the refund.
Extra Amount Enter the extra amount that you are adding to the refund.
Extra Refund Info Click to access the Extra Refund Amount page.
Note. You can create a refund for more than the refundable balance only if you select the Refund Debit
Balances check box on the Refund Setup page. If you do not select this check box, you can create a refund for
an extra amount, but not for an extra amount and a credit at the same time.

Chapter 17 Refunding Customers
Copyright © 1988, 2010, Oracle and/or its affiliates. All Rights Reserved. 451
See Also
Chapter 7, "Setting Up Refunding," Setting Up Your Business Unit to Refund Customers, page 238
Chapter 17, "Refunding Customers," Creating Student Refunds, page 445
Specifying the Account and Term Associated with an Extra Refunded Amount
Access the Extra Refund Amount page (click the Extra Amount Info link on the Refund with Extra Amount
page).
Extra Account Nbr
(extra account number) Specify the account to charge the extra refund amount to.
Extra Account Term If the account that you select in the Extra Account Nbr field is set up by term,
select a term.
Extra Item Term Enter the academic term to assign to the extra refunded amount.
Creating Online Refunds for a Sponsor
Access the Online Refund Other page (Student Financials, Refunds, Online Refund Other).
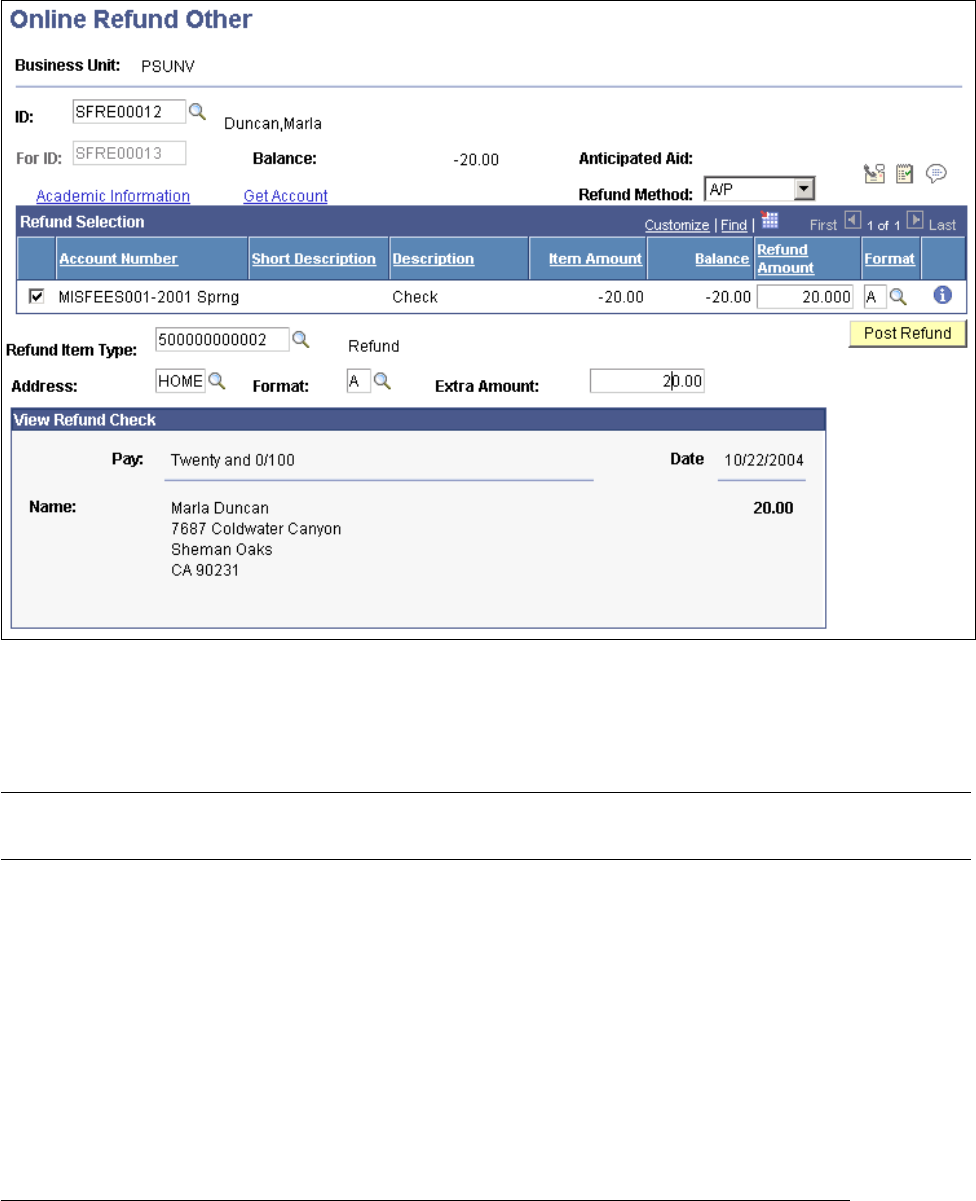
Refunding Customers Chapter 17
452 Copyright © 1988, 2010, Oracle and/or its affiliates. All Rights Reserved.
Online Refund Other page
If you have designated an individual as a sponsor for credits on a student's account, use the Online Refund
Other page to create refunds for those credits, to be distributed to the sponsor.
Note. You can create a refund for a sponsor only if you have associated the sponsor with a student using the
Designate Individual Sponsor page.
With the exception of the following fields, this page is the same as the Refund with Extra Amount page.
ID Enter the ID of the sponsor for whom you are creating a refund. If the sponsor
that you select sponsors only one student, the ID of that student appears in the
For ID field.
For ID If the sponsor that you select in the ID field sponsors more than one student,
select the student whose refund you are creating.
See Also
Chapter 17, "Refunding Customers," Creating Student Refunds with an Extra Amount, page 449

Chapter 17 Refunding Customers
Copyright © 1988, 2010, Oracle and/or its affiliates. All Rights Reserved. 453
Approving Refunds
Depending on your business unit setup, a refund might require approval by up to three separate approvers.
When approval is required, you cannot create a paysheet for a refund (payroll method only), complete a
refund, or print a refund until it has been approved. This section discusses how to:
•Route batch refunds to worklists.
•Approve refunds.
Pages Used to Approve Refunds
Page Name Definition Name Navigation Usage
Batch Refund Approval RUNCTL_RFND_APPR Student Financials,
Refunds, Approve Refunds,
Process Refund Approval,
Process Refund Approval
Route batch refunds
requiring approval to
appropriate worklists.
Refund Approval REFUND_SF_APPR From the worklist, click a
refund requiring approval. Approve refunds.
Refund Approvals REFUND_SF_APPR_INQ Student Financials,
Refunds, Approve Refunds,
Verify Student Approvals
View the progress of a
student refund requiring
approval.
Corp Refund Approval REFUND_ORG_APP_INQ Student Financials,
Refunds, Approve Refunds,
Verify Corporate
Approvals, Corp Refund
Approval
View the progress of an
organization refund
requiring approval.
Routing Batch Refunds to Worklists
Access the Batch Refund Approval page (Student Financials, Refunds, Approve Refunds, Process Refund
Approval, Process Refund Approval).
Before batch refunds can be approved, they must be routed to worklists.
Business Unit Select the business unit of the batch refunds to approve.
Refund Batch ID Enter the batch ID of the group of refunds to approve.
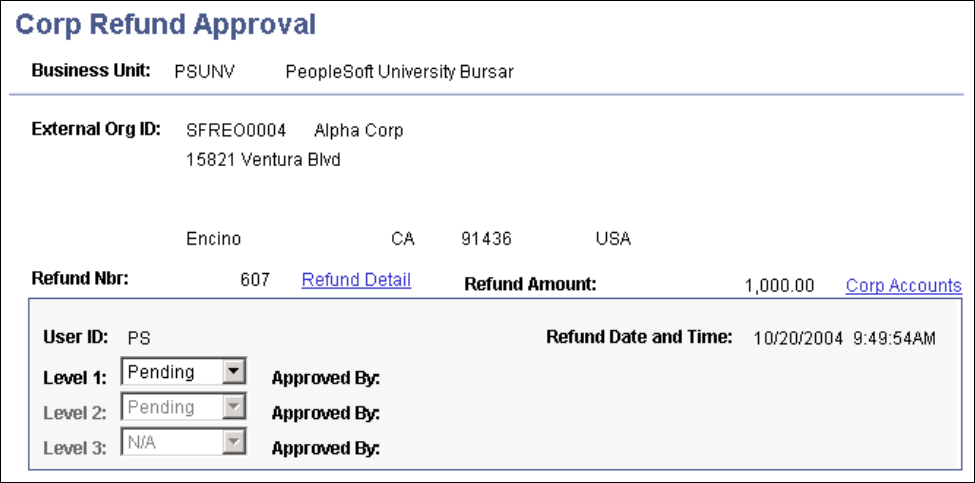
Refunding Customers Chapter 17
454 Copyright © 1988, 2010, Oracle and/or its affiliates. All Rights Reserved.
Approving Refunds
Access the Corp Refund Approval page through the worklist (Student Financials, Refunds, Approve Refunds,
Verify Corporate Approvals, Corp Refund Approval).
Corp Refund Approval page
ID Displays the ID, name, and address of the entity (student or corporation)
receiving the refund.
Academic Information Click to access the Academic Information page.
Refund Detail Click to access details about the refund.
Student Accounts or
Corp Accounts Click to access the Student Accounts or the Corp Accounts page.
View Anticipated Aid Click to access the Anticipated Aid Details page.
User ID Displays the user ID of the person who created the refund.
Date/Time Displays the date and time that the refund was created. When you approve a
refund, a date and time appear under the original date and time to indicate when
the refund was approved for a given level.
Level 1, Level 2, and
Level 3 Change the approval status from Pending to either Denied or Approved. If a
certain level of approval is not required, that field has a value of N/A.
Approved By When you approve the refund and save the page, the user ID of the approver
appears here.

Chapter 17 Refunding Customers
Copyright © 1988, 2010, Oracle and/or its affiliates. All Rights Reserved. 455
See Also
Chapter 17, "Refunding Customers," Viewing Refund Information in Student Financials, page 469
Completing Batch Payroll Refunds
This section discusses how to:
•Create job data by batch.
•Request a payroll interface.
•Create and load paysheets.
•Calculate refunds.
•Confirm refunds.
Pages Used to Complete Batch Payroll Refunds
Page Name Definition Name Navigation Usage
Request Student Job Data SSF_RUN_POIJOB Student Financials,
Refunds, Process Batch
Refunds, Request Student
Job Data
Create student job data in
batch.
Request Payroll Interface SSF_RUN_PAYINTFC Student Financials,
Refunds, Process Batch
Refunds, Request Payroll
Interface
The Request Payroll
Interface page acts in the
same way as the Produce
Check link on the individual
refund page. Instead of
taking you to the Produce
Student Refund Check
page, it does essentially the
same thing for a refund
batch.
Load Paysheet Transactions RUNCTL_PSHUP Payroll for North America,
Payroll Processing USA,
Create and Load Paysheets,
Load Paysheet Transactions
Create and load paysheets
using Payroll for North
America.
Pay Calculation RUNCTL_PAY_CALC Payroll for North America,
Payroll Processing USA,
Produce Payroll, Calculate
Pay
Calculate using Payroll for
North America.
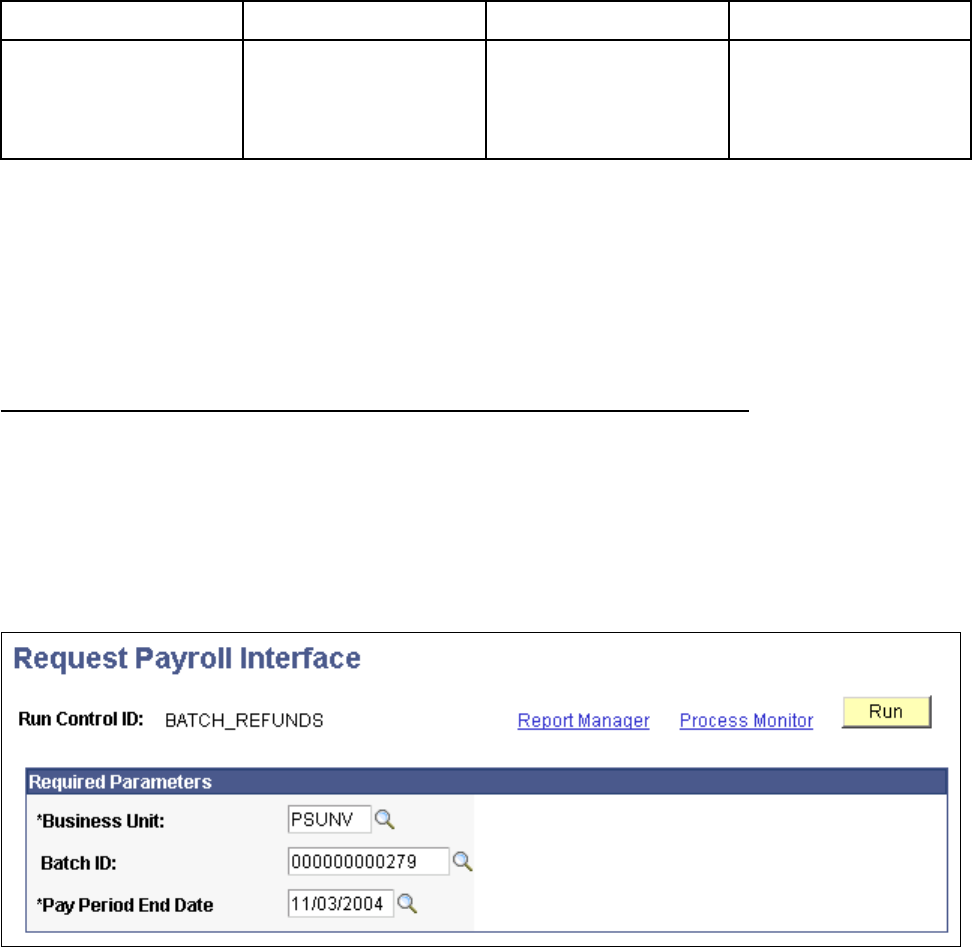
Refunding Customers Chapter 17
456 Copyright © 1988, 2010, Oracle and/or its affiliates. All Rights Reserved.
Page Name Definition Name Navigation Usage
Refund Confirmation RUNCTL_PAY_CONF Payroll for North America,
Payroll Processing USA,
Produce Payroll, Confirm
Pay
Confirm using Payroll for
North America.
Creating Job Data by Batch
Access the Request Student Job Data page (Student Financials, Refunds, Process Batch Refunds, Request
Student Job Data).
See Also
Chapter 7, "Setting Up Refunding," Creating Job Data for Payroll Refunds, page 246
Requesting a Payroll Interface
Access the Request Payroll Interface page (Student Financials, Refunds, Process Batch Refunds, Request
Payroll Interface).
Request Payroll Interface page
Batch ID Select the batch ID of the refunds you want to process.
Pay Period End Date Select the pay period end date.
Creating and Loading Paysheets
Access the Refund Paysheet Creation page.
You must create a paysheet for each batch refund created using the payroll refund method. Payroll for North
America uses these paysheets to calculate refund checks.

Chapter 17 Refunding Customers
Copyright © 1988, 2010, Oracle and/or its affiliates. All Rights Reserved. 457
See PeopleSoft Enterprise Payroll for North America 9.0 PeopleBook, "Working with Paysheets"
Calculating Refunds
Access the Refund Calculation page.
See Also
PeopleSoft Enterprise Payroll for North America 9.0 PeopleBook, "Calculating Pay"
Confirming Refunds
Access the Refund Confirmation page .(Payroll for North America, Payroll Processing USA, Produce Payroll,
Confirm Pay, Refund Confirmation).
After you have completed your refund calculations, run the Refund Confirmation (PSPCNFRM) process to
finalize refund earnings, create check records, and update period-to-date earnings balances within Payroll for
North America.
See Also
PeopleSoft Enterprise Payroll for North America 9.0 PeopleBook, "Confirming Pay"
Distributing Payroll Refunds Through Direct Deposit
If you created any batch or online refunds with a direct deposit format, you must create a transmittal file with
all the information that your institution must provide to student banks, so that the refunds can be transferred
directly into the students' bank accounts. This section discusses how to run the Create Direct Deposit File
process.
Note. The system includes a student's direct deposit refund in the transmittal file only if you set up the
student's direct deposit parameters using the Direct Deposit or Direct Deposit Canada pages (through Payroll
for North America).
See Also
Chapter 7, "Setting Up Refunding," Setting Up Direct Deposit for Students, page 249

Refunding Customers Chapter 17
458 Copyright © 1988, 2010, Oracle and/or its affiliates. All Rights Reserved.
Page Used to Distribute Payroll Refunds Through Direct Deposit
Page Name Definition Name Navigation Usage
Direct Deposit Create File RUNCTL_DDP001 Payroll for North America,
Payroll Processing USA,
Create Direct Deposits,
Create Direct Deposit File,
Direct Deposit Create File
Create an electronic
transmittal file to transfer
refunds directly into a
student's bank account.
Running the Create Direct Deposit File Process
Access the Direct Deposit Create File page (Payroll for North America, Payroll Processing USA, Create
Direct Deposits, Create Direct Deposit File, Direct Deposit Create File).
See Also
PeopleSoft Enterprise Payroll for North America 9.0 PeopleBook, "Working with Checks and Direct Deposit"
Printing Checks and Direct Deposit Advice Slips
Payroll for North America provides reports that enable you to print out refund checks or direct deposit advice
slips for a given pay end date. This section discusses how to run the Refund Check and Advice Slip Printing
processes.
Pages Used to Print Checks and Direct Deposit Advice Slips
Page Name Definition Name Navigation Usage
Refund Check Print RUNCTL_CHK_ADV1 Payroll for North America,
Payroll Processing USA,
Produce Checks, Print
Checks, Refund Check Print
Print confirmed payroll
refund checks for U.S.
students.
Refund Cheque Print RUNCTL_CHK_ADV1 Payroll for North America,
Payroll Processing CAN,
Produce Cheques, Print
Cheques
Print confirmed payroll
refund checks for Canadian
students.
DDP Advice Print RUNCTL_CHK_ADV1 Payroll for North America,
Payroll Processing USA,
Create Direct Deposits,
Print Advice Forms
Print direct deposit advice
slips for U.S. students.
Chapter 17 Refunding Customers
Copyright © 1988, 2010, Oracle and/or its affiliates. All Rights Reserved. 459
Page Name Definition Name Navigation Usage
DDP Advice Print Canada RUNCTL_CHK_ADV1 Payroll for North America,
Payroll Processing CAN,
Create Direct Deposits,
Print Advice Forms
Print direct deposit advice
slips for Canadian students.
Running the Refund Check and Advice Slip Printing Processes
Access the Refund Check Print Payroll for North America, Payroll Processing USA, Produce Checks, Print
Checks, Refund Check Print, DDP Advice Print Payroll for North America, Payroll Processing USA, Create
Direct Deposits, Print Advice Forms, DDP Advice Print). or DDP Advice Print Canada (Payroll for North
America, Payroll Processing CAN, Create Direct Deposits, Print Advice Forms)page.
Note. The Refund Cheque Print, DDP Advice Print, and DDP Advice Print Canada pages are identical to the
Refund Check Print page except for the page labels, checks, and advice slips that they generate.
See PeopleSoft Enterprise Payroll for North America 9.0 PeopleBook, "Working with Checks and Direct
Deposit"
Completing AP Refunds
This section provides an overview of AP refund completion and discusses how to run the AP Refund process.
See Also
PeopleSoft Enterprise Payables 9.0 PeopleBook
Understanding AP Refund Completion
When you create refunds using the accounts payable method, you must interface with PeopleSoft Payables to
complete your refunds. If your system interfaces with PeopleSoft Financials the AP Refund process publishes
messages to which PeopleSoft Payables subscribes through PeopleSoft Application Messaging.
AP Refund Messaging
The following diagram illustrates how AP refund messages travel between Student Financials and PeopleSoft
Financials
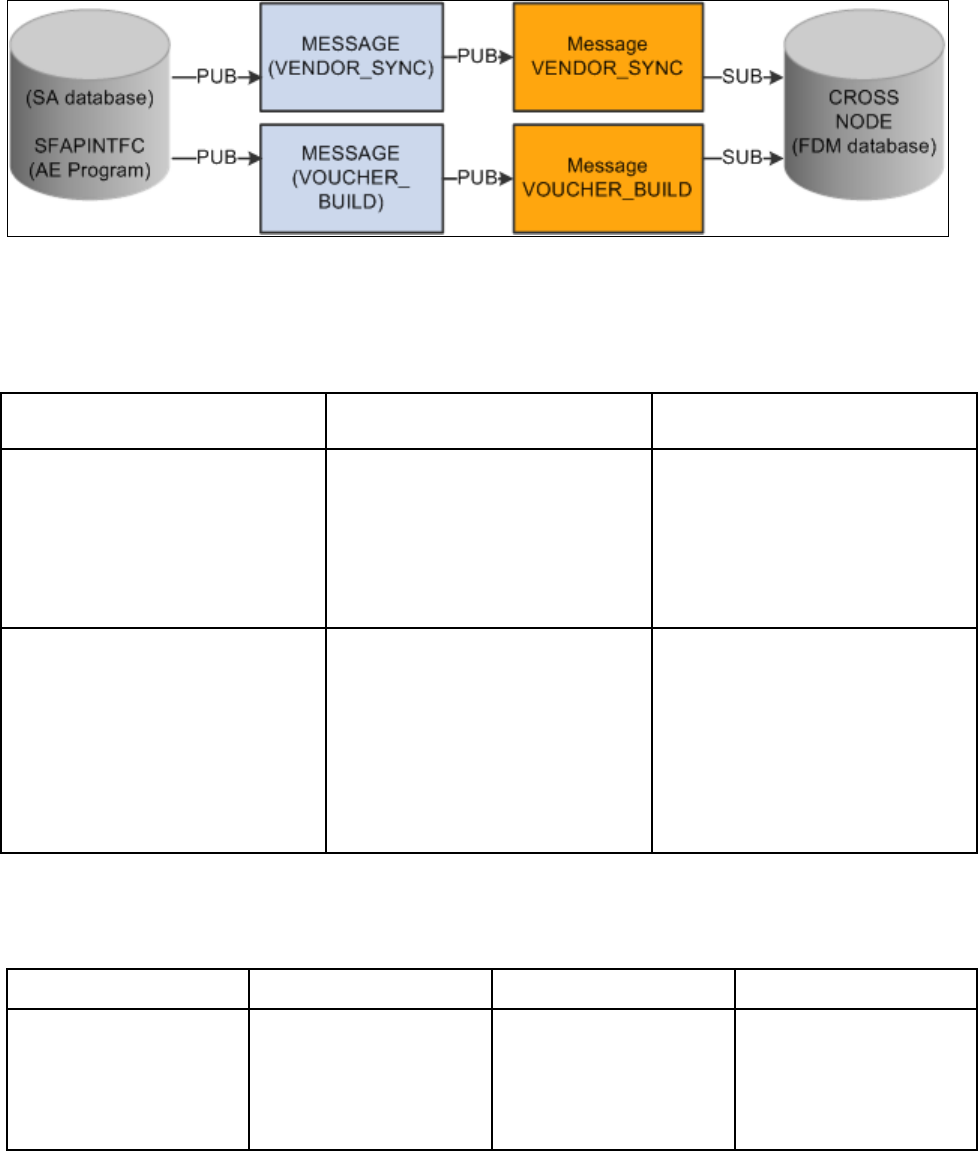
Refunding Customers Chapter 17
460 Copyright © 1988, 2010, Oracle and/or its affiliates. All Rights Reserved.
Student Financials to PeopleSoft Financials AP refund messaging process
During the AP refund messaging process, Student Financials delivers two queues and two messages to the
PeopleSoft Financials database:
Message Channel Message Description
VENDOR VENDOR_SYNC Publishes all vendor information
(address, location, and contact) in a
message to the PeopleSoft
Financials database, one vendor at a
time. Also allows changes to vendor
data to be published iteratively.
VOUCHER VOUCHER_BUILD Sends voucher header, line, and
distribution information in the
message to be processed by
PeopleSoft Payables. The system
populates staging tables with the
message data. The Voucher Build
(AP_VCHRBLD) process then
processes these staging tables.
Page Used to Complete AP Refunds
Page Name Definition Name Navigation Usage
Create Vendors and
Vouchers
RUNCTL_AP_REFUND Student Financials,
Refunds, AP Refunding,
Create Vendors and
Vouchers
Run the AP Refund process
to create vendor and
voucher files or publish
vendor and voucher
information.
Running the AP Refund Process
Access the Create Vendors and Vouchers page (Student Financials, Refunds, AP Refunding, Create Vendors
and Vouchers).
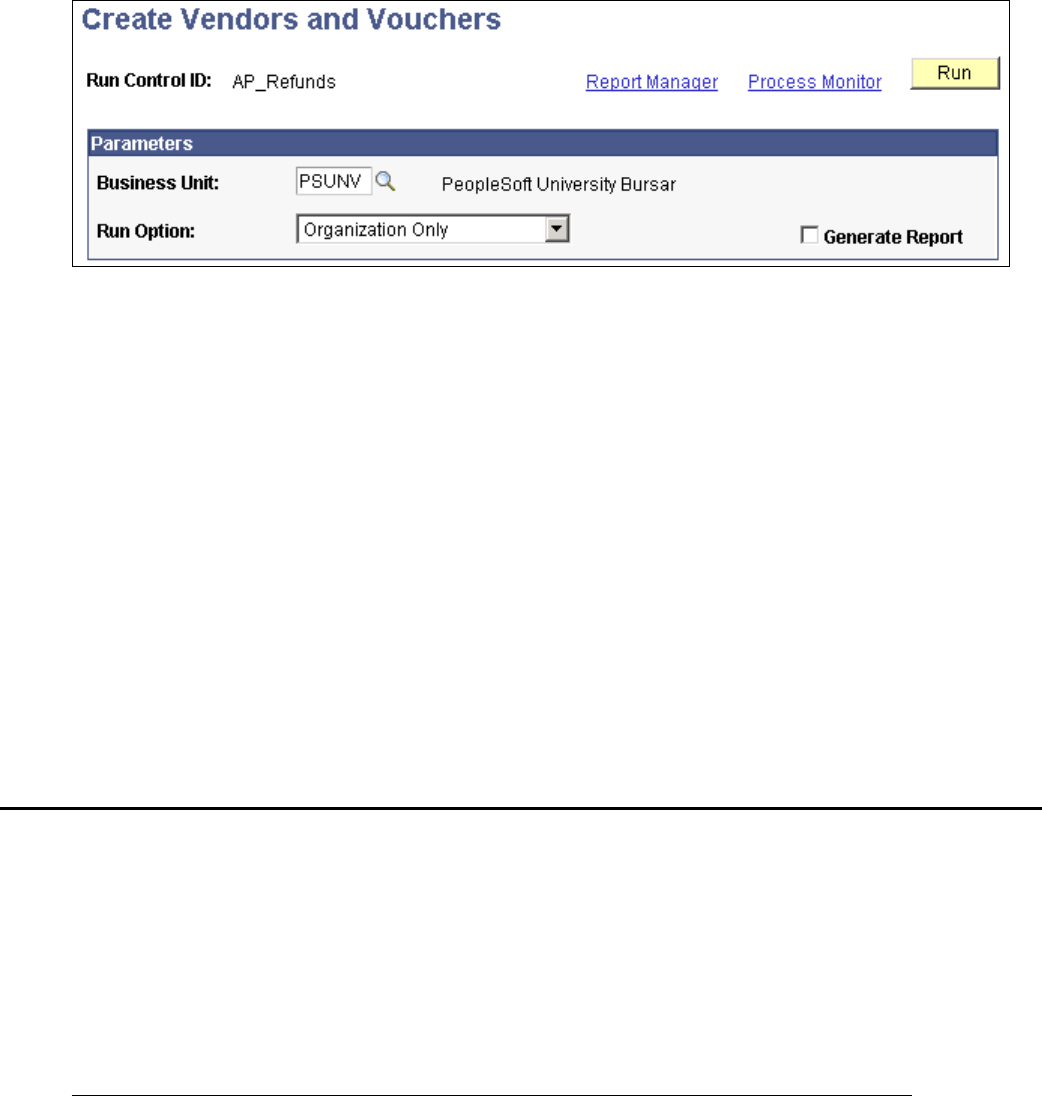
Chapter 17 Refunding Customers
Copyright © 1988, 2010, Oracle and/or its affiliates. All Rights Reserved. 461
Create Vendors and Vouchers page
Run Option Select the type of recipient for whom you are running the process. Values are:
Individual Only, Organization Only, or Individual and Organization.
Generate Report Select to generate a report that lists details of the AP Refund process.
Run Click to access the Process Scheduler page.
If your system integrates with PeopleSoft Financials, select the check box next to
the SF to Payables Interface (SF_AP_INTFC) process. This process looks at AP
setup data and refund data to build and generate messages. It publishes a message
for each vendor that it creates or changes, and it also publishes one single
message containing all processed vouchers. In addition, if a student or corporate
address changes in Student Financials, the system sends a message to PeopleSoft
Payables indicating the change. PeopleSoft Payables subscribes to this message
and updates the corresponding vendor address accordingly.
Distributing Refunds to ePayment Accounts
This section provides an overview of ePayment refunds and discusses how to:
•Distribute refunds for ePayment transactions.
•Distribute refunds for other credit card transactions.
See Also
Chapter 14, "Processing ePayment Transactions," Processing Refunds for ePayments, page 391
Understanding ePayment Refunds
Student Financials handles refunds to credit cards and eChecks (ePayments) differently than check and direct
deposit refunds.

Refunding Customers Chapter 17
462 Copyright © 1988, 2010, Oracle and/or its affiliates. All Rights Reserved.
When you refund ePayments using the Batch Refund process, the system creates a separate refund for each
credit card payment, even if there are multiple credit card payments on one student's account. The system
rolls any cash or check credits on the student's account into one lump sum refund that is separate from any
credit card refunds.
In addition, unlike refunds created using the check or direct deposit format, you do not use your Payroll for
North America or Payables interface to complete the refunds. The system ignores ePayment refunds when
you run the Refund Sheet Creation, Refund Calculation, Refund Confirmation, and AP Refunds batch
processes. Instead, you run ePayment-specific batch processes that enable you to interface with your third-
party credit card vendor to directly refund student ePayments.
Pages Used to Distribute ePayment Refunds
Page Name Definition Name Navigation Usage
ePayment Refunds RUNCTL_SFPCCBAT Student Financials,
Refunds, Electronic
Payment Refunds, Process
ePayment Refunds,
ePayment Refunds
Generate refund credits in
preparation of transmission
to your third-party
ePayment processor.
Credit Card Refund - Other RUNCTL_CC_REFUND Student Financials,
Refunds, Electronic
Payment Refunds, Other
Credit Card Refunds, Credit
Card Refund - Other
Generate a flat file logging
refunds of credit card
payments that did not occur
over the web or through
your cashiering office.
Distributing Refunds for ePayment Transactions
Access the ePayment Refunds page Student Financials, Refunds, Electronic Payment Refunds, Process
ePayment Refunds, ePayment Refunds).
The ePayment Refunds page (SFPCCBAT) process logs any refunded web credit card payments for a given
business unit and generates the credits that you send to your third-party credit card processing vendor. Run
this process prior to running the Credit Card Processing (SF_CRCRD) process.
See Also
Chapter 14, "Processing ePayment Transactions," page 381
Distributing Refunds for Other Credit Card Transactions
Access the Credit Card Refunds - Other page (Student Financials, Refunds, Electronic Payment Refunds,
Other Credit Card Refunds, Credit Card Refund - Other).
The Credit Card Refund - Other (SFCCRFND) process enables you to generate a flat file that logs refunds of
credit card payments that did not occur over the web or through your cashiering office (such as credit card
payments made using the Student Post page). Send this flat file to your third-party credit card processing
vendor for reconciliation. To reconcile your refunds in a timely manner, run this process nightly.

Chapter 17 Refunding Customers
Copyright © 1988, 2010, Oracle and/or its affiliates. All Rights Reserved. 463
Note. You might need to modify the flat file that this process generates to meet the needs of your credit card
processing vendor.
CC Interface File (credit
card interface file) Enter the location to store the flat file.
Report Only Select to generate a text file along with the flat file, so you can see the results of
the process.
Canceling Refunds
If the system generates an error during the posting of a refund, you cannot continue processing the refund,
and you cannot reverse it because the posting process did not finish. You must cancel the refund and post it
again. This section discusses how to:
•Cancel student refunds.
•Cancel organization refunds.
Note. You may never have to use the cancellation pages. They are designed solely as a safety measure for
quick recovery.
Pages Used to Cancel Refunds
Page Name Definition Name Navigation Usage
Student Refund
Cancellation
REFUND_HDR_CAN_SF Student Financials,
Refunds, Reverse and
Cancel Refunds, Cancel
Student Refund, Student
Refund Cancellation
Cancel a student refund and
begin again if you
encounter a problem during
the posting process.
Corp Refund Cancellation REFUND_ORG_CAN_SF Student Financials,
Refunds, Reverse and
Cancel Refunds, Cancel
Corporate Refund, Corp
Refund Cancellation
Cancel an organization
refund and begin again if
you encounter a problem
during the posting process.
Canceling Student Refunds
Access the Student Refund Cancellation page (Student Financials, Refunds, Reverse and Cancel Refunds,
Cancel Student Refund, Student Refund Cancellation).

Refunding Customers Chapter 17
464 Copyright © 1988, 2010, Oracle and/or its affiliates. All Rights Reserved.
Cancel Select this check box next to the refund to cancel. When you save the page, the
system cancels each selected refund and makes the Cancel check box
unavailable.
Canceling Organization Refunds
Access the Corp Refund Cancellation page (Student Financials, Refunds, Reverse and Cancel Refunds,
Cancel Corporate Refund, Corp Refund Cancellation).
This page is identical to the Student Refund Cancellation page.
See Also
Chapter 17, "Refunding Customers," Canceling Refunds, page 463
Reversing Refunds
This section provides an overview of refund reversals and discusses how to:
•Reverse student refunds by ID.
•Reverse student refunds by date.
•Reverse organization refunds by ID.
•Reverse organization refunds by date.
•Reverse refunds within Payroll for North America.
Understanding Refund Reversals
First, you reverse the refund within Student Financials, effectively unposting the refund from the recipient's
account.
Next, if you originally created the reversed refund using the payroll method, you run a process that reverses
the associated refund check within Payroll for North America. If you reverse a direct deposit refund for which
you have already created a transmittal file, the system includes the reversal in the next transmittal file that you
create.
If you originally created the reversed refund using the accounts payable method, you must notify your
accounts payable department so they can reverse the associated refund record within PeopleSoft Payables.
Credit card refund reversals are possible only during certain stages of the refunding process. You can reverse
a credit card refund after its original creation and after you run the ePayment Refunds process. When
reversing a credit card refund, you need only reverse it within Student Financials. However, after you submit
the credit to the third-party credit card processing vendor, you can no longer reverse the credit card refund.

Chapter 17 Refunding Customers
Copyright © 1988, 2010, Oracle and/or its affiliates. All Rights Reserved. 465
See Also
PeopleSoft Enterprise Payroll for North America 9.0 PeopleBook, "Working with Checks and Direct Deposit"
Pages Used to Reverse Refunds
Page Name Definition Name Navigation Usage
Student Refunds by ID REFUND_REV_STU_SF Student Financials,
Refunds, Reverse and
Cancel Refunds, Student
Refunds by ID
Reverse refunds for a
specific student.
Student Refunds by Date REFUND_REVERSE_SF Student Financials,
Refunds, Reverse and
Cancel Refunds, Student
Refunds by Date
Reverse student refunds for
a specific date.
Corporate Refunds by ID REFUND_REV_ORG Student Financials,
Refunds, Reverse and
Cancel Refunds, Corporate
Refunds by ID
Reverse refunds for a
specific organization.
Corporate Refunds by Date REFUND_REV_ORG_SF Student Financials,
Refunds, Reverse and
Cancel Refunds, Corporate
Refunds by Date
Reverse organization
refunds for a specific
organization.
Refund Check Reversal RUNCTL_PAY_REV •Payroll for North
America, Payroll
Processing USF,
Reverse/Adjust
Paychecks
•Payroll for North
America, Payroll
Processing CAN,
Reverse/Adjust
Paycheques
•Payroll for North
America, Payroll
Processing USA,
Reverse/Adjust
Paychecks
Reverse a check within
Payroll for North America.
Reversing Student Refunds by ID
Access the Student Refunds by ID page (Student Financials, Refunds, Reverse and Cancel Refunds, Student
Refunds by ID).
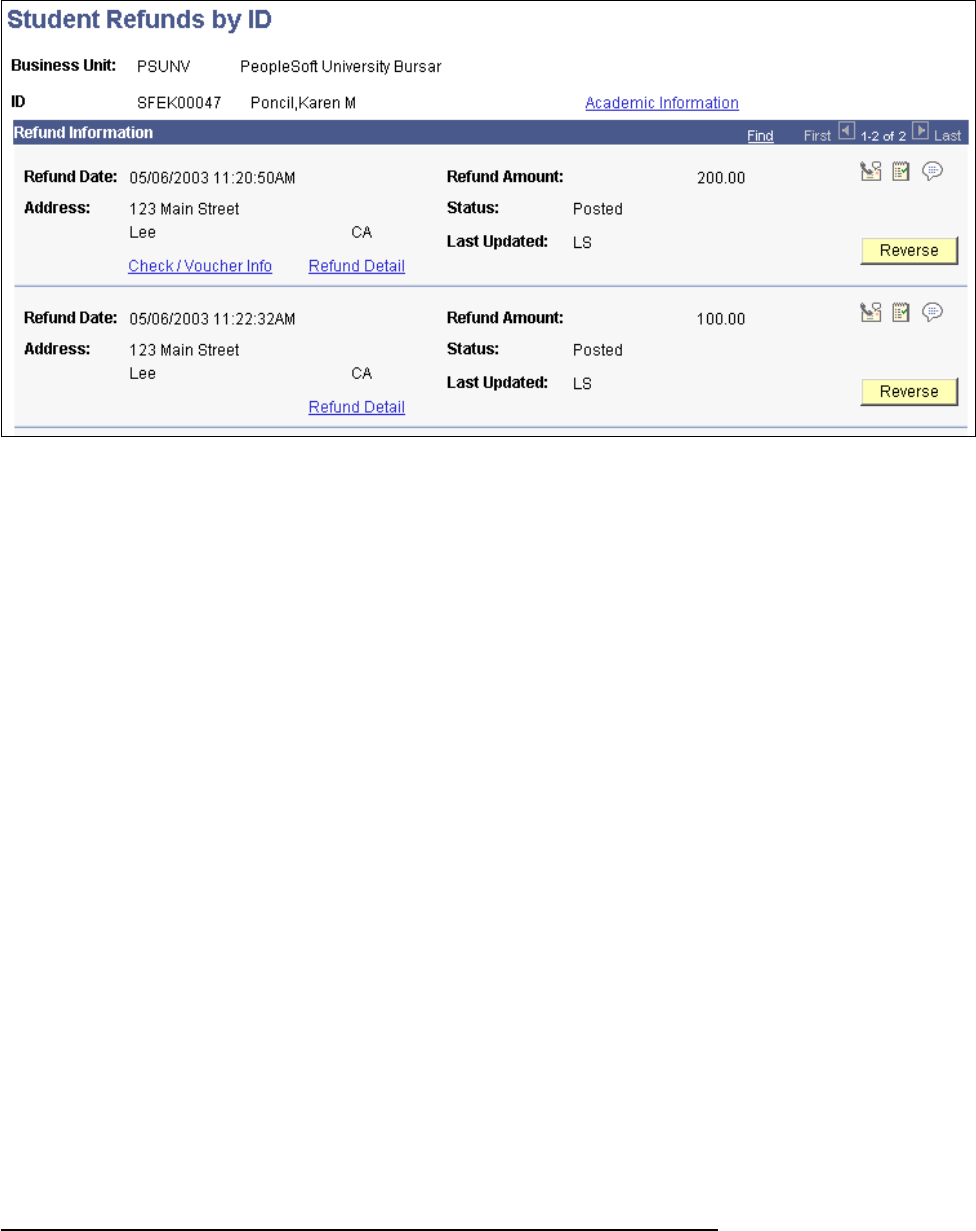
Refunding Customers Chapter 17
466 Copyright © 1988, 2010, Oracle and/or its affiliates. All Rights Reserved.
Student Refunds by ID page
Academic Information Click to access the Academic Information page.
Status The values that appear on this page are AP Interface Created, Credit Pending,
Confirmed, Declined, Posted, and Interfaced to Payroll.
Check/Voucher Info Click to view information regarding the check or voucher associated with this
refund. If you completed this refund using the Payroll for North America
interface, this link accesses the Detail Check Information page. If you completed
this refund using the PeopleSoft Payables interface, this link accesses the Detail
Refund AP Information page.
Refund Detail Click to access the Detail Refund Information by Student page.
Reverse Click this button next to the refund that you want to reverse.
Reversing Student Refunds by Date
Access the Student Refunds by Date page (Student Financials, Refunds, Reverse and Cancel Refunds,
Student Refunds by Date).
Aside from displaying refunds by date instead of student ID, this page is identical to the Student Refunds by
ID page.
See Also
Chapter 17, "Refunding Customers," Reversing Student Refunds by ID, page 465

Chapter 17 Refunding Customers
Copyright © 1988, 2010, Oracle and/or its affiliates. All Rights Reserved. 467
Reversing Organization Refunds by ID
Access the Corporate Refunds by ID page (Student Financials, Refunds, Reverse and Cancel Refunds,
Corporate Refunds by ID).
Aside from displaying organization refunds instead of student refunds, this page is identical to the Student
Refunds By ID page.
See Also
Chapter 17, "Refunding Customers," Reversing Student Refunds by ID, page 465
Reversing Organization Refunds by Date
Access the Corporate Refunds by Date page (Student Financials, Refunds, Reverse and Cancel Refunds,
Corporate Refunds by Date).
Aside from displaying organization refunds by date instead of by ID, this page is identical to the Student
Refunds By ID page.
See Also
Chapter 17, "Refunding Customers," Reversing Student Refunds by ID, page 465
Reversing Refunds Within Payroll for North America
Access the Paycheck Reversal/Adjustment page.
Note. If a refund calendar is not set up as off-cycle, you may encounter processing problems.
Renumbering Refund Checks for Reprinting
During your refunding process, you may have to reprint a range of checks. For example, if a group of
physical checks were damaged during printing, you would need to renumber the checks stored in the system
to match the replacement checks that you actually issue. This section discusses how to renumber checks.

Refunding Customers Chapter 17
468 Copyright © 1988, 2010, Oracle and/or its affiliates. All Rights Reserved.
Page Used to Renumber Refund Checks for Reprinting
Page Name Definition Name Navigation Usage
Refund Check Reprint RUNCTL_PAY_REPRINT •Payroll for North
America, Payroll
Processing USA,
Produce Checks,
Reprint Checks
•Payroll for North
America, Payroll
Processing CAN,
Produce Cheques,
Reprint Cheques
•Payroll for North
America, Payroll
Processing USF,
Produce Checks,
Reprint Checks.
Renumber checks for
reprinting.
Renumbering Checks
Access the Refund Check Reprint page (Payroll for North America, Payroll Processing USA, Produce
Checks, Reprint Checks, Refund Check Reprint).
See Also
PeopleSoft Enterprise Payroll for North America 9.0 PeopleBook, "Working with Checks and Direct Deposit"
Deleting Paysheets
While generating refund checks using Payroll for North America, you may encounter problems during the
paysheet creation or refund calculation steps. This results in an uncalculated refund check or an incomplete
paysheet, both of which cannot be completed. You must delete the paysheet and start the process over again.
This section discusses how to delete paysheets.

Chapter 17 Refunding Customers
Copyright © 1988, 2010, Oracle and/or its affiliates. All Rights Reserved. 469
Page Used to Delete Paysheets
Page Name Definition Name Navigation Usage
Refund Unsheet RUNCTL_PAY_USHT_SF Payroll for North America,
Payroll Processing USA,
Update Paysheets, Pay
Unsheet, Refund Unsheet
Delete paysheets.
Deleting Paysheets
Access the Refund Unsheet page (Payroll for North America, Payroll Processing USA, Update Paysheets,
Pay Unsheet, Refund Unsheet).
The options in the Payroll Cycle group box are unavailable.
See Also
PeopleSoft Enterprise Payroll for North America 9.0 PeopleBook, "Working with Paysheets"
Viewing Refund Information in Student Financials
Throughout your refunding process, you may want to view information about the refunds that you are
creating and distributing. The following table lists information for Student Financials. Other reports are
available in Payroll for North America. This section lists the pages used to view refund information.
Pages Used to View Refund Information
Page Name Definition Name Navigation Usage
Review Student by ID REFUND_INQ_STU_SF Student Financials,
Refunds, Review Student
by ID
View information regarding
the selected student's
refunds.
Detail Refund Check
Information
PAY_CHECK_SECON_SF Click the Check/Voucher
Info (check/voucher
information) link on various
pages within the Refunding
feature.
Review details about the
check associated with a
payroll refund.
Detail Refund AP
Information
VOUCHER_SECON_SF Click the Check/Voucher
Info (check/voucher
information) link on various
pages within the Refunding
feature.
Review details about the
voucher associated with an
AP refund.

Refunding Customers Chapter 17
470 Copyright © 1988, 2010, Oracle and/or its affiliates. All Rights Reserved.
Page Name Definition Name Navigation Usage
Detail Refund Information
By Student
REFUND_INQ_DETAIL Click the Refund Detail
link from various pages
within the Refunding
feature.
Review information about a
student refund.
Review Student by Date REFUND_INQUIRY_SF Student Financials,
Refunds, Review Student
by Date
View information regarding
student refunds created on a
specific date.
Ind Sponsor Refunds By ID
(individual sponsor refunds
by ID)
REF_IND_SP_INQ_ID Student Financials,
Refunds, Review Sponsor
Refunds by ID
View information regarding
an individual sponsor's
refunds.
Ind Sponsor Refunds By
Date (individual sponsor
refunds by date)
REF_IND_SP_INQ_DT Student Financials,
Refunds, Review Sponsor
Refunds by Date
View information regarding
individual sponsor refunds
created on a specific date.
Corp Refunds By ID
(corporation refunds by ID)
REFUND_INQ_O_ID_SF Student Financials,
Refunds, Review Corporate
Refunds by ID
View information regarding
a specific organization's
refunds.
Corp Refunds By Date
(corporation refunds by
date)
REFUND_INQ_O_DT_SF Student Financials,
Refunds, View Corporate
Refunds by Date
View information regarding
organization refunds created
on a specific date.
Corp Sponsor Refunds by
ID (corporation sponsor
refunds by ID)
REF_ORG_SP_INQ_ID Student Financials,
Refunds, Review Corporate
Sponsor by ID
View information regarding
the refunds of a specific
organization sponsor.
Corp Sponsor Refunds by
Date (corporation sponsor
refunds by date)
REF_ORG_SP_INQ_DT Student Financials,
Refunds, View Corporate
Sponsor by Date
View information regarding
the organization sponsor
refunds created on a
specific date.
Refund Address REFUND_ADDR Click the Get Address link
on the Batch Refund Lines
page.
View address information
for a refund recipient.

Copyright © 1988, 2010, Oracle and/or its affiliates. All Rights Reserved. 471
Chapter 18
Administering Payment Plans
This chapter provides an overview of payment plans and discusses how to:
•Link students to deferral contracts.
•Administer payment plan contracts.
•Administer third-party contracts.
•Enroll multiple students in a payment plan or third-party contract.
Understanding Payment Plans
This section lists common elements and provides an overview of payment plans.
Common Elements Used in This Chapter
Reference Number Enter an optional reference number for each student on a particular contract. The
reference number entry is for information purposes only and does not appear on
the student's charges.
Status This field displays the current status of the contract. Values are:
Active: Select to make the contract available for use. This is the default value for
this field until the student has been linked to the contract by posting. After the
student has been linked to the contract, the other options become available.
Cancelled: Select to remove the student from the contract.
Hold: Select to prevent new transfers from the plan account but not to
discontinue its use completely.
Inactive: Select to discontinue use of the contract.
Not Posted: Indicates that a new or changed contract has not been posted.
Understanding Payment Plans
Using Student Financials, you can create and maintain these types of payment agreements for students with
diverse financial needs or responsibilities:
Administering Payment Plans Chapter 18
472 Copyright © 1988, 2010, Oracle and/or its affiliates. All Rights Reserved.
•Deferral contract
•Payment plan
•Third-party contract
•Collection agreement
Deferral Contracts
Deferral contracts are designed for students who, for whatever reason, need to defer payment of charges for a
short period of time. Deferral contracts extend the charge due date for eligible charges. You can link multiple
students to one deferral contract definition, or you can create individual contracts to accommodate each
student's unique needs.
Payment Plans
Payment plans enable you to offer students the flexibility of paying their education expenses over a period of
time rather than in one lump sum. Student Financials provides several choices for you to create and process
student payment plans. The three types of payment plans are calculated, existing, and lump sum. These types
differ from the deferral contract in that the deferral contract only adjusts the due and billing dates. The
calculated and existing payment plans defined in this section actually credit the eligible charges.
•The calculated payment plan enables you to use item type groups to define eligible charges. Also, the
calculated payment plan can use the Offset Charges feature. Adjustments to student charges can affect this
payment plan. This payment plan may be available through self-service.
•The existing payment plan enables you to manually select individual charges that may be eligible for the
payment plan. Adjustments to the student charges can affect this payment plan.
•The lump sum payment plan uses the Charge Priority List feature to determine which charges can be paid
by the initial lump sum payment. The initial lump sum payment will be posted to the payment plan
account type. Adjustments to the student charges will not have an effect on this payment plan. This
payment plan may be available through self-service.
Third-Party Contracts
Third-party contracts are credit agreements between your institution and a third-party sponsor—typically,
corporations or government agencies. The third party agrees to sponsor one or more students and pays all or
part of their tuition, fees, or expenses. The sponsor establishes all parameters regarding what portion of which
expenses it pays.
When a student is linked to a third-party contract, a credit is applied to the student's account, the receivable is
moved from the student's account to the sponsor's account, and the student's sponsor is sent a bill. This
contract type is especially beneficial for students in a retraining program or an employee education program
who may not have the cash to pay the tuition and fees in advance and then seek reimbursement. If the
sponsoring organization does not pay, the temporary credit is reversed and the student is liable for the
payment.

Chapter 18 Administering Payment Plans
Copyright © 1988, 2010, Oracle and/or its affiliates. All Rights Reserved. 473
Collection Agreements
Often, when a student or external organization agrees to repay a past due debt, they are unable to pay the full
balance in one lump sum. Use a collection agreement to set up and maintain a payment schedule, produce
billing entries, and track receipt of payments.
See Also
Chapter 8, "Setting Up Payment Plans," page 253
Linking Students to Deferral Contracts
When you link a student to deferral contracts, you specify certain parameters that are specific to the student
you are linking.
This section discusses how to define student-specific details for a deferral contract.
Pages Used to Link Students to Deferral Contracts
Page Name Definition Name Navigation Usage
Defer Student DEFER_STUDENT Student Financials, Payment
Plans, Assign Deferral
Contract, Defer Student
Define student-specific
details for a deferral
contract.
Deferred Charges ITEM_LINE_DEFER_SP Click the Deferred Charges
link on the Student Defer
page.
View all active charges in
the student's account and
confirm that eligible
charges have been deferred
to the correct due date.
Defer Student Charges DEFER_STDNT_LINE Student Financials, Payment
Plans, Assign Deferral
Contract, Defer Student
Charges
Confirm the deferral
contract calculation results.
Defining Student-Specific Details for a Deferral Contract
Access the Defer Student page (Student Financials, Payment Plans, Assign Deferral Contract, Defer Student).
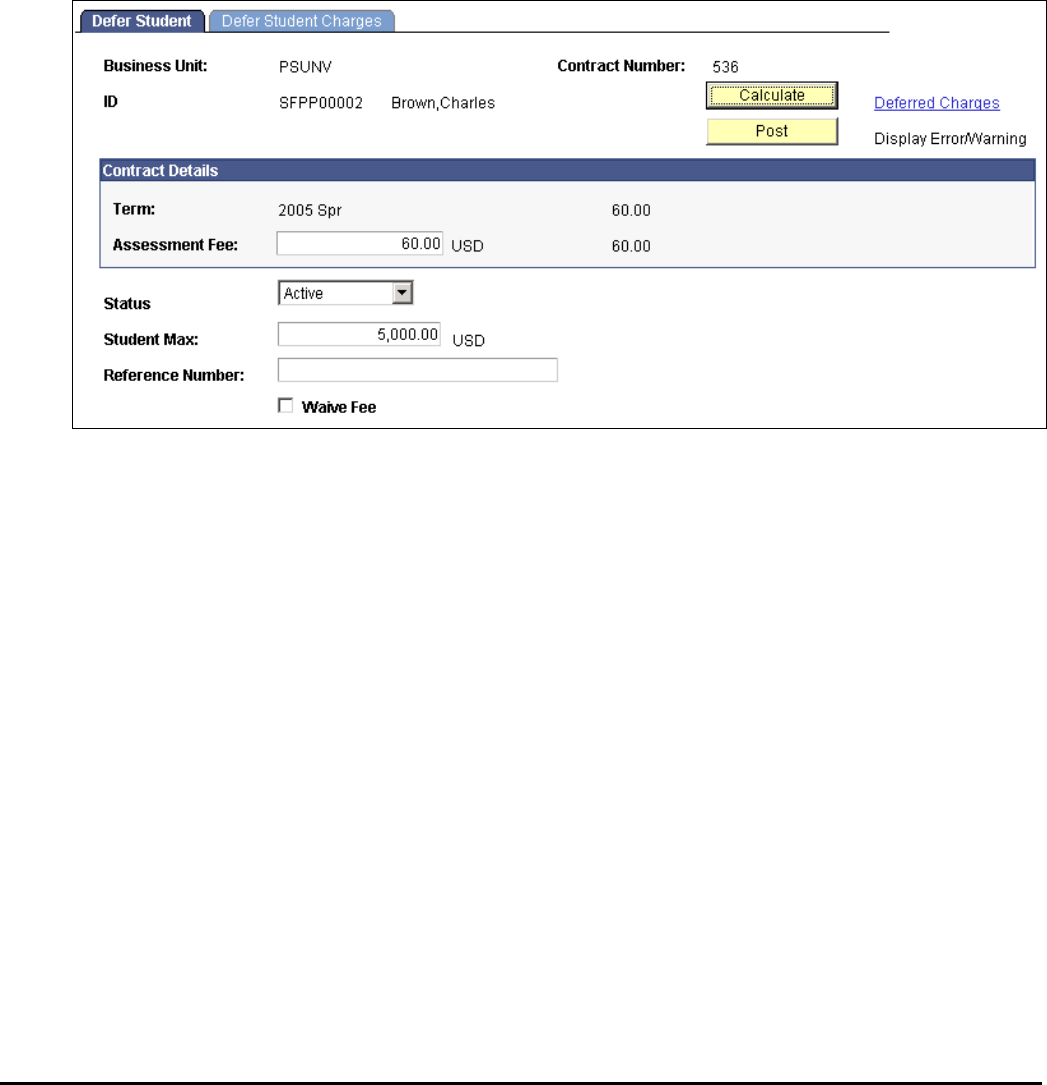
Administering Payment Plans Chapter 18
474 Copyright © 1988, 2010, Oracle and/or its affiliates. All Rights Reserved.
Defer Student page
Calculate Click to calculate charges to be deferred. After calculating the contract but before
posting it, look at the Defer Student Charges page to confirm which charges the
system selected for deferral.
Post Click to defer charges.
Deferred Charges After posting, click to confirm that the charges have been deferred to the correct
dates.
Display
Errors/Warnings Click to see errors and warning messages.
Assessment Fee The default amount in this field is the fee that you specified during the setup of
the deferral contract. Use this field to override the default amount.
Student Max (student
maximum) The default value for this field is the maximum amount that you specified during
the setup of the deferral contract. You can override this amount.
Waive Fee Select to waive the student's assessment fee.
Administering Payment Plan Contracts
This section discusses how to:
•Confirm and modify payment plan contract parameters for an individual student.
•Confirm and modify additional payment plan contract parameters for an individual student.
•Recalculate payment plan contracts.

Chapter 18 Administering Payment Plans
Copyright © 1988, 2010, Oracle and/or its affiliates. All Rights Reserved. 475
Pages Used to Administer Payment Plan Contracts
Page Name Definition Name Navigation Usage
Payment Plan 1 PAY_PLAN_SF_1 Student Financials, Payment
Plans, Assign Payment
Plan, Payment Plan 1
Confirm and modify
payment plan contract
parameters for an individual
student.
Payment Plan 2 PAY_PLAN_SF Student Financials, Payment
Plans, Assign Payment
Plan, Payment Plan 2
Confirm and modify
additional payment plan
contract parameters for an
individual student.
Payment Distribution TP_PPLN_QCK_POST Student Financials, Payment
Plans, Assign Payment
Plan, Payment Distribution
Review the payment
schedule, charge amounts,
billing dates, and due dates
for the payment plan. You
can adjust the billing dates
and installment amounts on
this page.
Recalc Payment Plan RUNCTL_PMTPLNRECAL Student Financials, Payment
Plans, Recalculate Payment
Plan, Recalc Payment Plan
Recalculate payment plan
contracts.
Confirming and Modifying Payment Plan Contract Parameters for an
Individual Student
Access the Payment Plan 1 page (Student Financials, Payment Plans, Assign Payment Plan, Payment Plan 1).
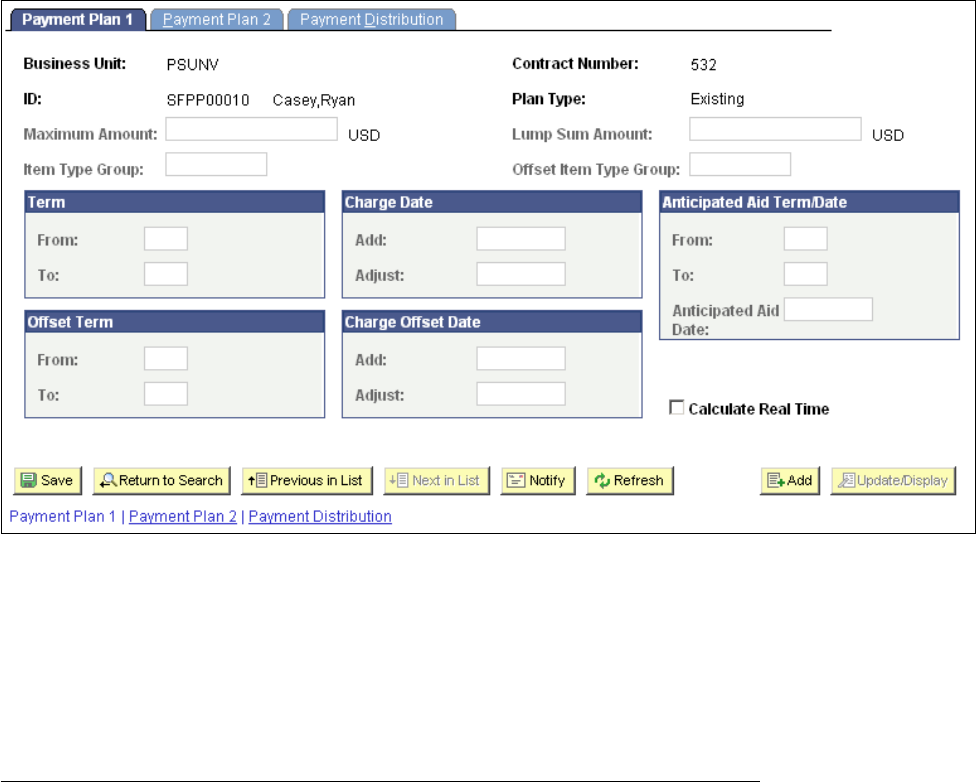
Administering Payment Plans Chapter 18
476 Copyright © 1988, 2010, Oracle and/or its affiliates. All Rights Reserved.
Payment Plan 1 page
All of the values that appear in the fields on this page are default values from the contract setup pages. You
can override values in any fields that are available, but you cannot exceed the limits established when you set
up the contract. Not all fields are available with all types of contracts.
See Also
Chapter 8, "Setting Up Payment Plans," Setting Up Payment Plan Contracts, page 259
Confirming and Modifying Additional Payment Plan Contract Parameters for
an Individual Student
Access the Payment Plan 2 page (Student Financials, Payment Plans, Assign Payment Plan, Payment Plan 2).
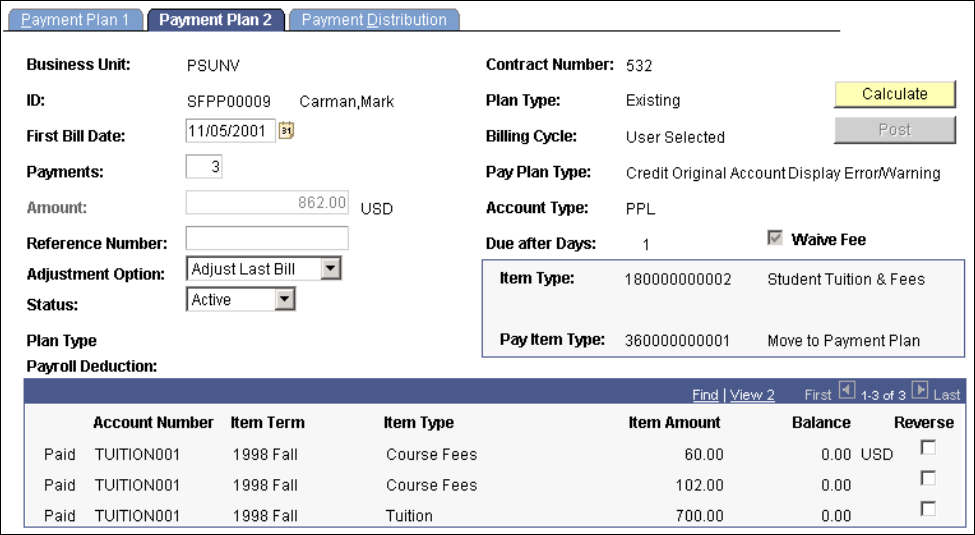
Chapter 18 Administering Payment Plans
Copyright © 1988, 2010, Oracle and/or its affiliates. All Rights Reserved. 477
Payment Plan 2 page
First Bill Date,
Payments, and
Adjustment Option
The values that appear in each of these fields are set by default from the payment
plan contract setup. You can override these values.
Status The value that appears in this field is set by default from the payment plan
contract setup. You can override this value to make the student Active,Inactive,
or Cancelled. After you set the student status to Cancelled, you can later
reactivate the payment plan contract for the student by changing the student
status back to Active.
For calculated payment plan contracts, the system distributes the charges equally
across all unbilled installments, regardless of the selected adjustment option,
when you reactivate a calculated payment plan contract for a student. Subsequent
adjustments to a reactivated plan follow the rules of the plan's adjustment option.
For both calculated and existing payment plan contracts, the system charges any
designated assessment fee upon reactivation.
For existing payment plan contracts, the system allows additional charges for
students with a status of Active if the associated contract has a status of Inactive.
Plan Type, Billing Cycle,
Pay Plan Type, Account
Type, Due after Days,
Item Type, and Pay Item
Type
The values that appear in each of these fields are set by default from the payment
plan contract setup. The values are for information only and cannot be changed.
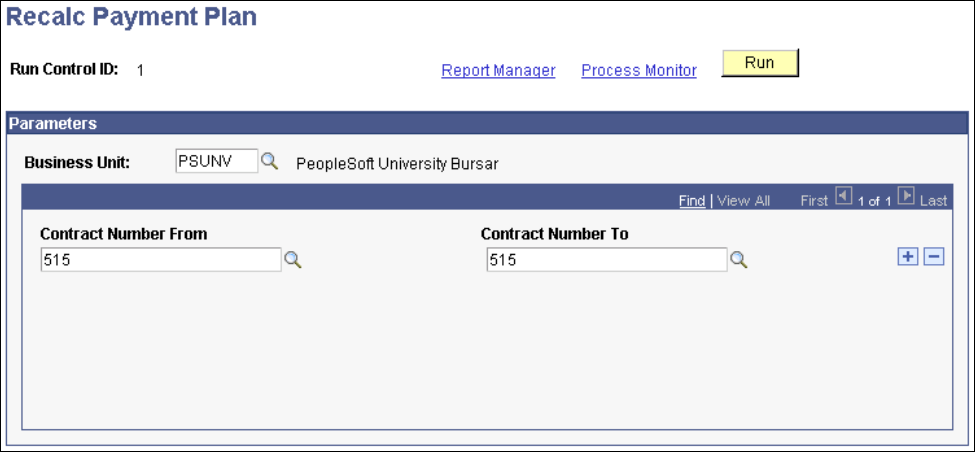
Administering Payment Plans Chapter 18
478 Copyright © 1988, 2010, Oracle and/or its affiliates. All Rights Reserved.
Amount For calculated and lump sum payment plans, the value that appears in this field is
set by default from the Maximum Amount field or the Lump Sum Amount field,
respectively, on the Payment Plan 1 page. For the existing type payment plans,
the value of the selected charges after calculation appears in this field.
Waive Fee If an administrative fee was initially defined in the payment plan setup, then you
can waive the fee. Select this check box if you want to waive the fee for
individual students.
Eligible Charges
When you add a student to an existing type payment plan, all eligible charges appear at the bottom of the
page. Select one or more charges to include in the payment plan.
Calculate Click to create the payment plan agreement. The payment plan agreement
consists of all scheduled payments and plan fees. This button is unavailable if the
student status is Inactive.
After you click this button, you can review and adjust billing dates and
installment amounts on the Payment Distribution page.
Post Click to post each of the scheduled payments and plan fees to the student's
account.
Recalculating Payment Plan Contracts
Access the Recalc Payment Plan page (Student Financials, Payment Plans, Recalculate Payment Plan, Recalc
Payment Plan).
Recalc Payment Plan page
Chapter 18 Administering Payment Plans
Copyright © 1988, 2010, Oracle and/or its affiliates. All Rights Reserved. 479
Contract Number From
and Contract Number
To
Enter contract numbers. You can recalculate one contract or a range of contracts.
To calculate just one, enter the same number in both fields. To recalculate a
range of contracts, enter the first and last contract numbers in the range.
You should recalculate payment plan contracts on a regular basis until the adjustment date has passed so that
your payment plan balances are up-to-date and reflect adjustments to the student's charges.
Note. The Payment Plan Recalculation (SFPPLNCL) process recalculates only payment plans of the
calculated type.
Administering Third-Party Contracts
This section discusses how to:
•Link students to third-party contracts.
•Recalculate third-party contracts.
Page Used to Administer Third-Party Contracts
Page Name Definition Name Navigation Usage
Third Party Contract TP_STUDENT Student Financials, Payment
Plans, Assign Third Party
Contract
Link students to third-party
contracts.
Recalc Third Party
Contracts (recalculate third-
party contracts)
RUNCTL_TPRECAL Student Financials, Payment
Plans, ReCalc Third Party
Contracts
Recalculate third-party
contracts.
Linking Students to Third-Party Contracts
Access the Third Party Contract page (Student Financials, Payment Plans, Assign Third Party Contract).
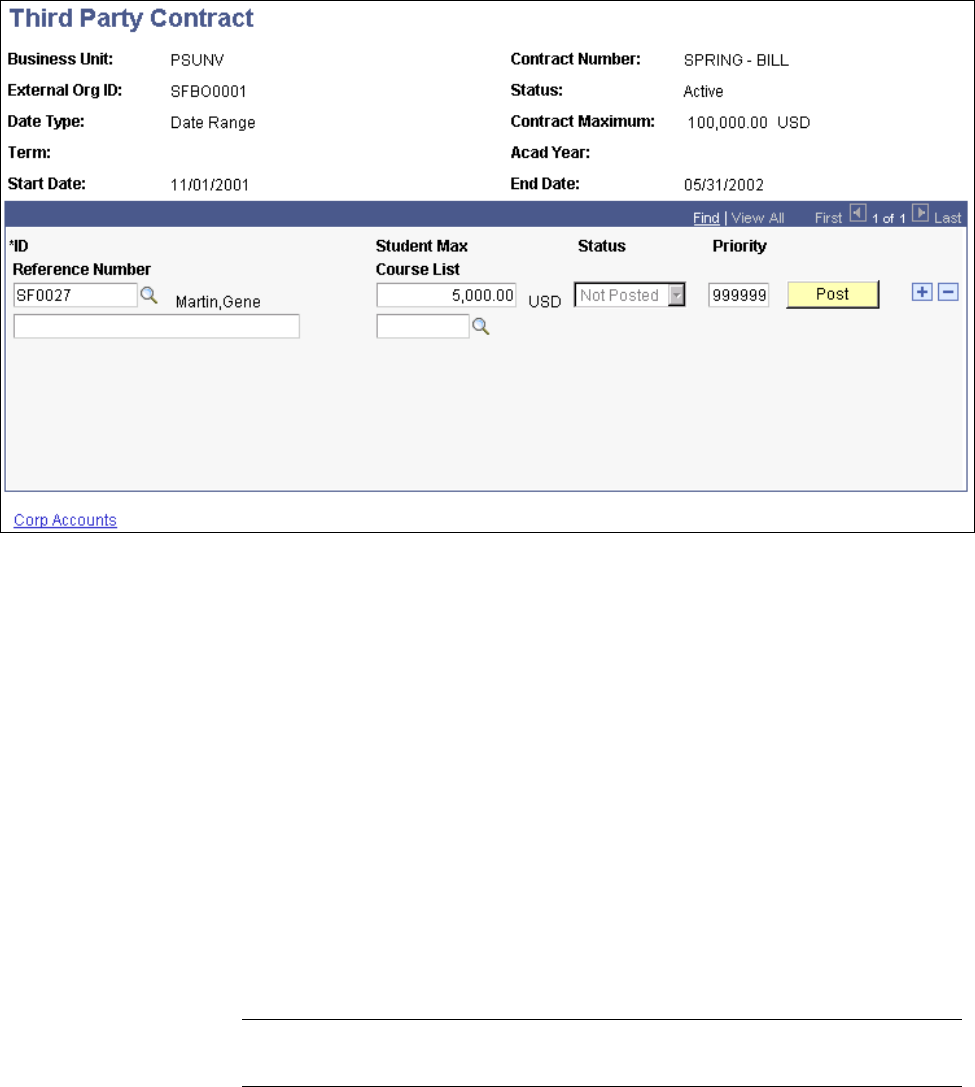
Administering Payment Plans Chapter 18
480 Copyright © 1988, 2010, Oracle and/or its affiliates. All Rights Reserved.
Third Party Contract page
ID Enter the ID of the student that you are linking to the third-party contract.
Student Max (student
maximum) The amount that you specified during the third-party contract setup appears by
default in this field. You can decrease the amount.
Priority If a student is linked to more than one third-party contract, you may want the
contracts to apply in a preferred order. Enter a priority value to determine the
order in which the contracts apply. The default priority value is 999999. The
lower the number, the higher the priority.
Course List Confirm the default course list that is attached to the third-party contract or
override the selection with a different list. If you override the default selection,
the list applies only to the individual student being linked to the contract. If the
contract was not set up with the Specific Course List option, it cannot be added
on this page.
Note. To use a course list with a third-party contract, you must consider the setup
issues that are related to term fees.
Post Click to link the student to the third-party contract.
Find Click to access the Explorer User prompt. Use the Explorer User prompt to enter
a student's ID to quickly locate his or her record in the third-party contract.
Corp Accounts
(corporation accounts) Click to access the Corp Accounts page, where you can review account details
for the sponsor of this third-party contract.
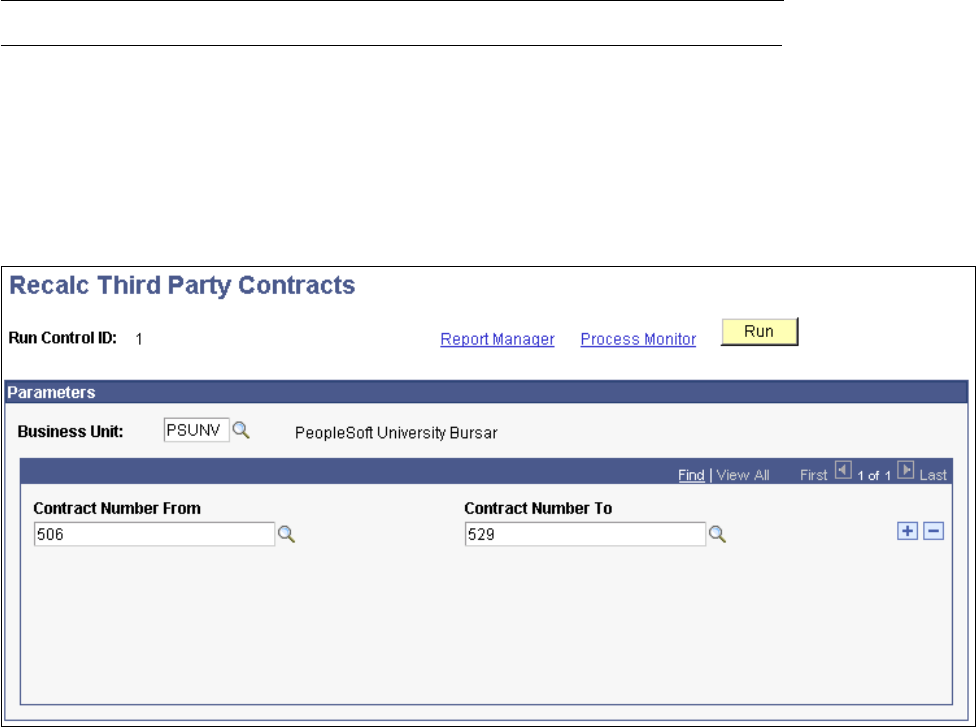
Chapter 18 Administering Payment Plans
Copyright © 1988, 2010, Oracle and/or its affiliates. All Rights Reserved. 481
See Also
Chapter 6, "Setting Up Fees and Tuition Groups," Setting Up Course List Fees, page 224
Chapter 6, "Setting Up Fees and Tuition Groups," Setting Up Term Fee Codes, page 190
Recalculating Third-Party Contracts
Access the Recalc Third Party Contracts page (Student Financials, Payment Plans, ReCalc Third Party
Contracts).
Recalc Third Party Contracts page
Contract Number From
andContract Number To You can recalculate one contract or several contracts in a range. To recalculate
only one contract, enter the contract number in the Contract Number From field.
The same number appears in the Contract Number To field by default. To
recalculate a range of contracts, enter the first contract number of the range in the
Contract Number From field and the last in the range in the Contract Number To
field.
You should periodically use the Third Party Recalculation (SFPTPPRC) process to recalculate third-party
contracts until the end of the adjustment period for third-party contracts (last date, as established on the Third
Party Contract setup page) to make sure all adjustments to charges are recognized.

Administering Payment Plans Chapter 18
482 Copyright © 1988, 2010, Oracle and/or its affiliates. All Rights Reserved.
Enrolling Multiple Students in a Payment Plan or Third-Party
Contract
This section discusses how to:
•Define enrollment for multiple students in a payment plan or third-party contract.
•Review results by contract.
•Process mass contract assignments.
•Process mass cancellations.
•Use inquire contract assignments.
Pages Used to Enroll Multiple Students in a Payment Plan or Third-Party
Contract
Page Name Definition Name Navigation Usage
Mass Contract Select SSF_RUNCTL_PS_TPC Student Financials, Payment
Plans, Mass Contract Select Define enrollment for
multiple students.
Review Results by Contract SSF_PS_PPL_REVIEW Student Financials, Payment
Plans, Review Results by
Contract
View results by contract for
payment plans and for third-
party contracts.
Recalc Payment Plan RUNCTL_PMTPLNRECAL Student Financials, Payment
Plans, Assign and Recalc,
Recalc Payment Plan
Link students to or cancel a
student's link to a contract.
Inquire Contract
Assignments
SSF_TP_PPL_INQUIRY Student Financials, Payment
Plans, Inquire Contract
Assignments
View all students linked to a
payment plan.
Defining Enrollment for Multiple Students
Access the Mass Contract Select page (Student Financials, Payment Plans, Mass Contract Select).
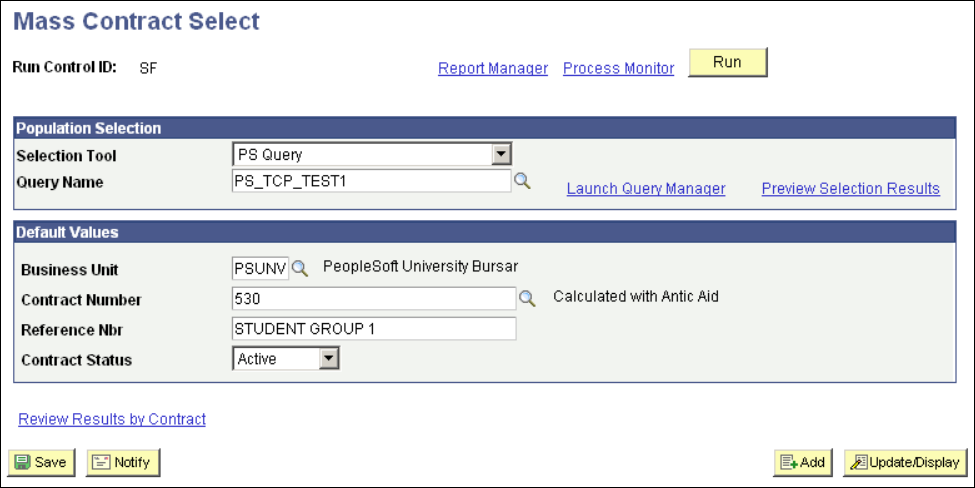
Chapter 18 Administering Payment Plans
Copyright © 1988, 2010, Oracle and/or its affiliates. All Rights Reserved. 483
Mass Contract Select page
Use this page to run a predefined query, run an equation engine, or load a flat file to identify the population
for a specific contract. Also define initial default values that will be associated with each employee ID.
Population selection is a method for selecting the IDs to process for a specific transaction. The Population
Selection group box is a standard group box that appears on run control pages when the Population Selection
process is available or required for the transaction. Selection tools are available based on the selection tools
that your institution selected in the setup of the Population Selection process for the application process and
on your user security. Fields in the group box appear based on the selection tool that you select. The fields act
the same from within the group box no matter what run control page you are on or what transaction you are
processing.
If your institution uses a specific selection tool (PS Query, Equation Engine, or external file) to identify IDs
for a specific transaction, you must use it.
Click the Run button to run the query and populate a staging table with the selected employee IDs and the
default values. A log file will contain all records that did not populate the staging table because of a service
impact or because the student is already associated with the contract number.
Population Selection
Selection Tool Select PS Query,Equation Engine, or an external file.
Query Name Enter the appropriate query.
Default Values
Contract Number Enter the appropriate contract number.
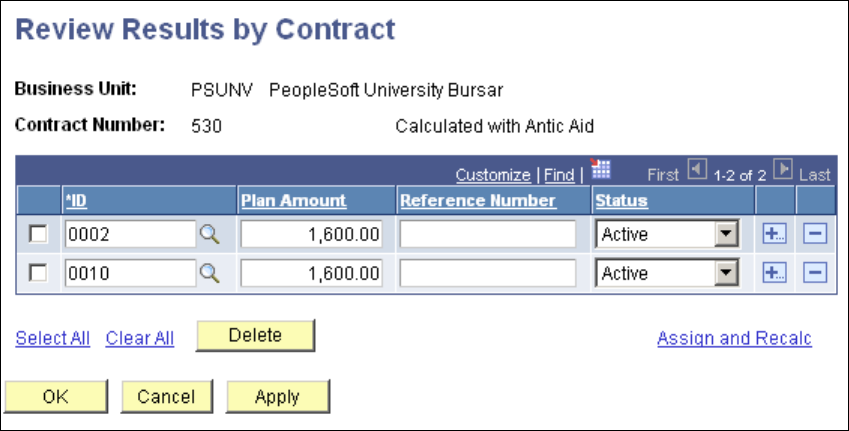
Administering Payment Plans Chapter 18
484 Copyright © 1988, 2010, Oracle and/or its affiliates. All Rights Reserved.
Reference Nbr (reference
number) Provide a reference number. This field is optional.
Contract Status Select a status of Active or Cancel.
Click the Review Results by Contract link to view the results of the query along with the default values.
Reviewing Results by Contract
The Review Results by Contract page will vary depending on the type of contract selected.
Review Results by Contract for a Payment Plan
Access the Review Results by Contract page (Student Financials, Payment Plans, Review Results by
Contract).
Review Results by Contract page
You can use the Review Results by Contract page for data entry. When you initially access the page, one row
is populated with default values, but the ID field is blank. Enter the ID.
You can also update the Plan Amount,Reference Number, and Status fields.
Click the Add (+) button to enter the number of rows desired for additional data entry.
After clicking Apply, delete individual rows or use the Select All button to select all rows and then click
Delete. This action removes the rows from the staging table. The Clear All link removes all the Select flags, if
needed.
After entering the necessary data in all rows, click Apply.

Chapter 18 Administering Payment Plans
Copyright © 1988, 2010, Oracle and/or its affiliates. All Rights Reserved. 485
Review Results by Contract for a Third-Party Contract
Access the Review Results by Contract page (Student Financials, Payment Plans, Review Results by
Contract).
Review Results by Contract page
The Third Party Contract data entry page is similar to that used for Payment Plan, except that a Student Max
column replaces the Plan Amount column on the Payment Plan page. The Third Party Contract data entry
page also includes an additional Course List column.
Processing Mass Contract Assignments
Use this batch process to link students to a contract.
You can link students to a contract or cancel students from a contract. A contract from and to range is used to
identify contracts for processing. The process scheduler contains two processes, Assign Contract and Recalc,
which enable you to either select the Assign Contract process for the new mass batch or select the current
functionality to recalculate the contract. After the Assign Contract process finishes successfully, the
respective records in the staging table are deleted. Use the Assign Contract process to either activate or cancel
your selected population from the contract.
Access the Recalc Payment Plan page (Student Financials, Payment Plans, Assign and Recalc, Recalc
Payment Plan).
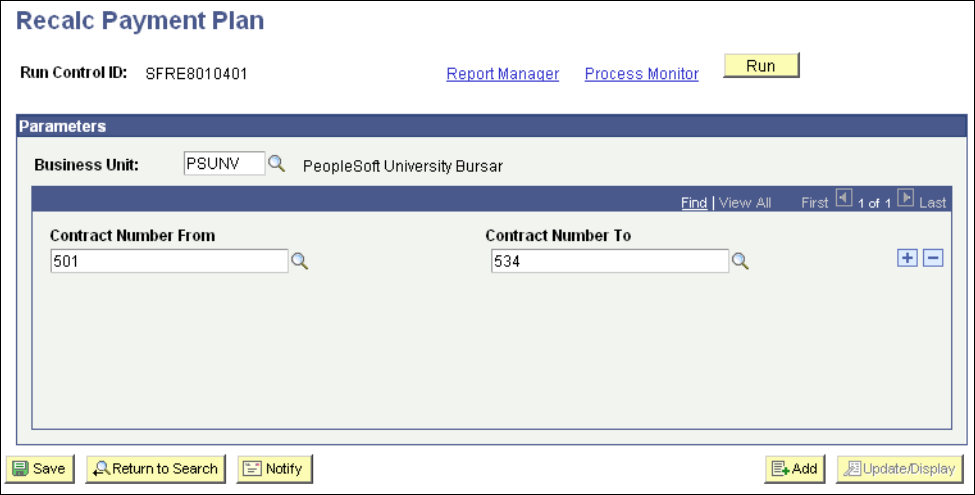
Administering Payment Plans Chapter 18
486 Copyright © 1988, 2010, Oracle and/or its affiliates. All Rights Reserved.
Recalc Payment Plan page
Contract Number From Enter the first contract number to be included in the batch process.
Contract Number To Enter the final contract number to be included in the batch process.
Processing Mass Cancellations
Access the Mass Contract Select page (Student Financials, Payment Plans, Mass Contract Select).
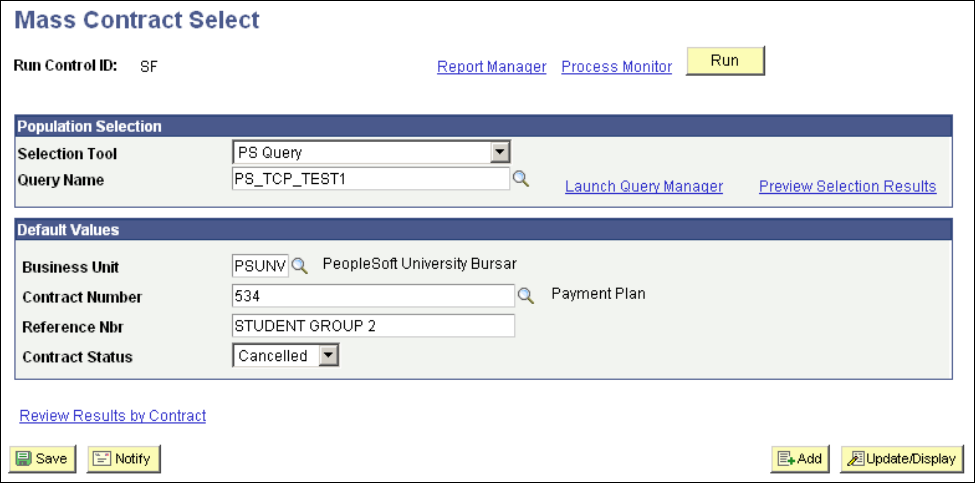
Chapter 18 Administering Payment Plans
Copyright © 1988, 2010, Oracle and/or its affiliates. All Rights Reserved. 487
Mass Contract Select page
Use this batch process to cancel students to the contract.
This page is used to remove all students from a contract. This function is especially useful to cancel all
students from a third-party contract.
Use one of the Population Selection process methods to identify all students within a contract, and then select
Cancelled in the Status field located within the Default Values group box.
Review the selected records using the Review Results by Contract page, and then use the Assign and Recalc
process to proceed with the mass cancellation. The students are canceled from the contract, installments are
reversed, and the original charges are reinstated.
Population Selection
Selection Tool Select PS Query,Equation Engine, or External File.
Query Name Enter the appropriate query, equation engine, or file path and name.
Default Values
Contract Number Enter the appropriate contract number.
Contract Status Select or cancel a status.
Click the Review Results by Contract link to view the results of the query along with the default values.
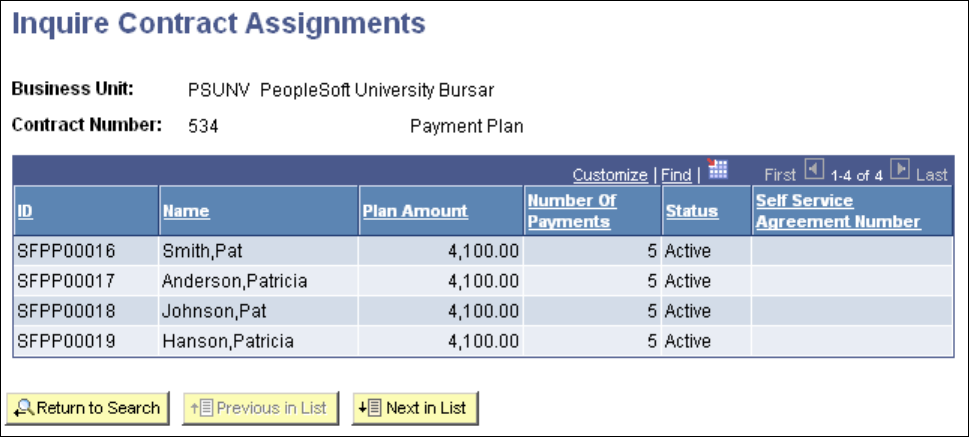
Administering Payment Plans Chapter 18
488 Copyright © 1988, 2010, Oracle and/or its affiliates. All Rights Reserved.
Using Inquire Contract Assignments
Access the Inquire Contract Assignments page (Student Financials, Payment Plans, Inquire Contract
Assignments).
Inquire Contract Assignments page
Use the Inquire Contract Assignments page to view all students linked to a payment plan.

Copyright © 1988, 2010, Oracle and/or its affiliates. All Rights Reserved. 489
Chapter 19
Billing Customers
This chapter provides an overview of customer billing and discusses how to:
•Complete billing requests.
•Bill specific charges for individual students.
•Process billing requests.
•Print invoices.
•Cancel bills.
•View billing information.
Understanding Customer Billing
You must submit a clear and accurate bill to every customer. The PeopleSoft Student Financials Billing
feature offers you great flexibility when generating these bills. You can create a single bill for one customer,
or you can create a batch of bills for several customers at once. You determine the messages that appear on
your bills. To save time, you can establish a billing standard request that enables you to repeatedly create bills
with the same parameters. You can print your bills using Form Based Extract Bill, Crystal, or a Student
Financials Structured Query Report (SQR) and XML Publisher.
Note. Although the terms bill and invoice are technically synonymous, a distinction exists between the two
terms in the context of the Student Financials application. Throughout this chapter, the term bill refers to a set
of billing data for a student or a corporation that resides in the database. When the system prints a bill, the
resulting paper document is an invoice.
Credit Invoices pertain to Oracle's global invoicing functionality and are invoices that document reductions in
charges that have been previously invoiced. Credit Invoices are used to notify the student that a prior invoice
has changed and a lesser amount is now requested from the student, a payment has a credit balance, or both.
Remember these conventions to avoid any confusion while reading the Billing Customers chapter.
See Chapter 9, "Setting Up Billing," page 283.
Completing Billing Requests
This section provides an overview of billing requests and discusses how to:

Billing Customers Chapter 19
490 Copyright © 1988, 2010, Oracle and/or its affiliates. All Rights Reserved.
•Specify basic student billing request parameters.
•Specify bill terms and print options for student billing requests.
•Specify basic corporate billing request parameters.
•Specify bill terms and print options for student billing requests.
Understanding Billing Requests
Use the Billing Request component (BI_REQUEST) to set the parameters that the billing process uses to
determine the type of bills generated. To complete a billing request, you must use the following two pages.
Versions of both of these pages are included in the Student Billing Request (BI_REQUEST) and the Corp.
Billing Request (BI_REQUEST_ORG) components.
•Billing Request 1
•Billing Request 2
On the Billing Request 1 page, you create the set of parameters that the billing process uses to generate bills.
On the Billing Request 2 page, you create printing parameters that populate the printing process pages. In
addition, the Billing Request 2 page enables you to print invoices for single students with the click of a
button, without using a separate process to generate the bill and print the invoice.
Bill By Options for Student Billing Requests
Oracle delivers three bill by options for your use when creating new billing requests. Selecting a bill by
option is required for each billing request that you create. The options are Bill One ID, Bill Range, and Bill
All Not Yet Billed. The bill by option that you select specifies whether the billing process bills one specific
student, all students meeting the criteria of the billing standard request that you select, or only those students
for whom you have not already generated bills. The option that you choose also determines which selection
criteria from the billing standard request that the system uses when generating bills.
This table lists the selection criteria that the system applies to the bill generation process according to the
option that you select:
Selection Criteria Bill All Not Yet Billed Bill Range Bill One ID
Last Name X X Does not apply
Account Type X X X
Account Term X X X
Not Billed Since X X Does not apply
Transaction Date X X X

Chapter 19 Billing Customers
Copyright © 1988, 2010, Oracle and/or its affiliates. All Rights Reserved. 491
Selection Criteria Bill All Not Yet Billed Bill Range Bill One ID
Service Impact X X Does not apply
Career/Program/Plan Does not apply X Does not apply
Campus Does not apply X Does not apply
Student Groups Does not apply X Does not apply
Bill By Options for Corporate Billing Requests
Just as with student billing requests, when you create a new corporate billing request, you must select a bill
by option. For corporate billing requests, four options are available: Bill One Ext Org ID (bill one external
organization ID), Bill Range, Bill Per Contract(s), and Bill All Not Yet Billed. The bill by option that you
select specifies whether the billing process bills one specific corporation, all corporations meeting the criteria
of the billing standard request that you select, corporations associated with specific third-party contracts, or
only those corporations for whom you have not already generated bills. The option that you choose also
determines which selection criteria from the billing standard request that the system uses when generating
bills.
This table lists the selection criteria that the system applies to the bill generation process according to the
option that you select:
Selection Criteria Bill All Not Yet
Billed Bill Range Bill One Ext Org ID Bill Per
Contract(s)
Name X X X
Account Type X X X X
Account Term X X X X
Not Billed Since X X X
Service Impact X X
Transaction Date X X X X

Billing Customers Chapter 19
492 Copyright © 1988, 2010, Oracle and/or its affiliates. All Rights Reserved.
Pages Used to Complete Billing Requests
Page Name Definition Name Navigation Usage
Billing Request 1 BI_REQUEST Student Financials, Bill
Customers, Student Bills,
Create Billing Request,
Billing Request 1
Specify basic student billing
request parameters.
Billing Request 2 BI_REQUEST_ID Student Financials, Bill
Customers, Student Bills,
Create Billing Request,
Billing Request 2
Specify bill terms and print
options for student billing
requests.
Corp Billing Request -
Billing Request 1
BI_REQUEST_ORG Student Financials, Bill
Customers, Corporate Bills,
Create Billing Request,
Billing Request 1
Specify basic corporate
billing request parameters.
Corp Billing Request -
Billing Request 2
BI_REQUEST_TWO Student Financials, Bill
Customers, Corporate Bills,
Create Billing Request,
Billing Request 2
Specify bill terms and print
options for student billing
requests.
Error Bill Message BI_BILL_ERR_SEC_PN Click the Error Info link
from the preceding various
pages.
View information regarding
any errors that the system
encountered while
processing the bill.
Warning Bill Message BI_BILL_WAR_SEC_PN Click the Warning Info link
from the preceding pages. View information regarding
any warnings that the
system encountered while
processing the bill.
Specifying Basic Student Billing Request Parameters
Access the Billing Request 1 page (Student Financials, Bill Customers, Student Bills, Create Billing Request,
Billing Request 1).
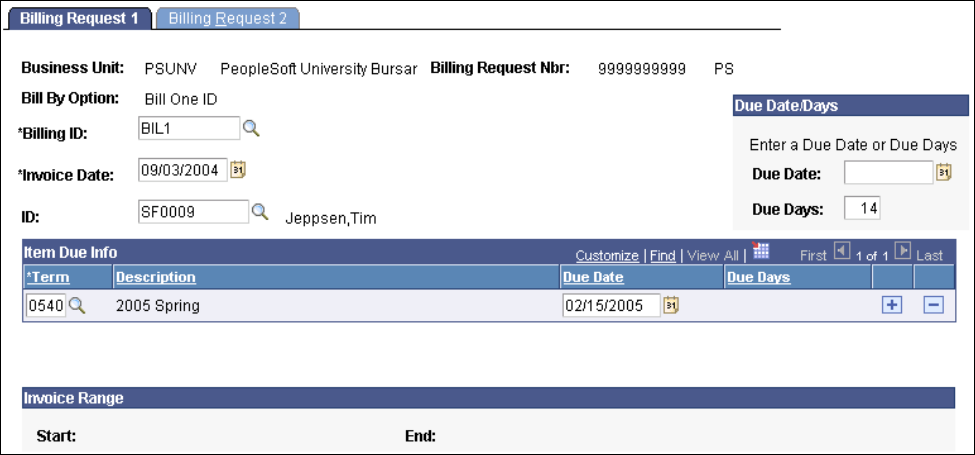
Chapter 19 Billing Customers
Copyright © 1988, 2010, Oracle and/or its affiliates. All Rights Reserved. 493
Billing Request 1 page
Billing ID Enter the ID of the billing standard request that you want to link to this billing
request.
Invoice Date Enter the date that you want to establish as the date of the invoice creation. The
system can use this date to determine when generated bills are due. The system
automatically populates the field with the current system date, but you can
override this date.
ID If you are creating a billing request for a single student, select the unique ID of
the student in this field. This field is available only if you select the Bill One ID
option when creating the request. Be sure that the student whom you select
matches the criteria of the billing standard request that you select.
Calculate Tuition If you are creating a billing request for one student ID, click this button to
calculate tuition for that student. This button is available only if you select the
Auto Calculate Tuition check box on the Tuition Calculation Controls page, and
the student whose name that you select in the ID field requires tuition calculation.
Due Date/Days
Set a default due date for all the charges included in the bill that do not already have a due date.
Due Date Enter the specific due date that you want to assign to charges without a due date
when you create the bill.
Due Days You can set the default due date as a function of the date that you generate the
bill. Enter the number of days that the system adds to the invoice date to
determine a due date.

Billing Customers Chapter 19
494 Copyright © 1988, 2010, Oracle and/or its affiliates. All Rights Reserved.
Item Due Info
Set a default due date for term-specific charges that do not already have a due date. You can use the fields in
this group box in conjunction with the fields in the Due Date/Days group box. For example, using the Due
Date field in the Due Date/Days group box, you set a due date of 10/31/2005 for all charges included in the
bill. However, suppose that you want charges from a previous term to be due sooner. In this case, you can use
the fields in the Item Due Info (item due information) group box to establish a separate due date for charges
in that specific term. The system assigns the default due date of 10/31/2005 to any charges falling outside that
term.
Term Select the specific term with the charges to which you want to assign a due date.
Due Date Enter the specific due date that you want to assign to charges without a due date
when you create the bill.
Due Days You can also set the default due date as a function of the date that you generate
the bill. Enter the number of due days that the system adds to the invoice date to
determine a due date.
Note. The Due Date and Due Days fields are mutually exclusive. If you enter a value in both fields, the
system will keep only the most recently added value after you refresh the page.
Invoice Range
Start and End If you run the billing process by clicking the Generate Invoice button on the
Billing Request 2 page, the system displays the first invoice generated during the
process in the Start field and the last invoice generated during the process in the
End field.
Specifying Bill Terms and Print Options for Student Billing Requests
Access the Billing Request 2 page (Student Financials, Bill Customers, Student Bills, Create Billing Request,
Billing Request 2).

Chapter 19 Billing Customers
Copyright © 1988, 2010, Oracle and/or its affiliates. All Rights Reserved. 495
Billing Request 2 page
Bill Term
Bill Term Select the term or terms for which you want to generate bills. Valid values are:
All Terms: Select to bill students for all terms.
One Term: Select to bill students for one specific term. If you select this option,
you must select a term in the From Term field.
Term Range: Select to bill students for a specific range of terms. If you select this
option, you must select terms in the From Term and To fields.
From Term and To If you enter One Term in the Bill Term field, enter the term for which you want
to bill in the From Term field.
If you enter Term Range in the Bill Term field, enter the beginning term of the
range in the From Term field and the ending term of the range in the To field.
Print Options
Invoice Layout Enter the invoice layout to print invoices.
Output Format Select the method to print invoices using the Generate Invoice button. Four valid
printing output methods are available: Crystal Bill, Other Bill (SQR),XML
Publisher, and Form Based Extract Bill.
Aid Term From and To Set the range of terms to print anticipated financial aid detail on the invoices.
Enter the beginning term of the range in the Aid Term From field and the ending
term of the range in the To field. These fields are required if you select either the
Anticipated Aid Detail check box or the Include Anticipated Aid Total check box
for the invoice layout that you select in the Invoice Layout field.
Billing Customers Chapter 19
496 Copyright © 1988, 2010, Oracle and/or its affiliates. All Rights Reserved.
Generate Invoice Select to generate and store the bill, but not print an invoice when you click the
Generate Invoice button. This is the default option if you select the Bill All Not
Yet Billed value or the Bill Range value when you access the component.
Generate & Print Bill Select to generate a bill and print an invoice when you click the Generate Invoice
button. Remember that this field is available only if you select the Bill One ID
option when you access the BI_REQUEST component.
Print Schedule of
Classes Select to print the student's enrollment summary when you print invoices.
for Term If you select the Print Schedule of Classes check box, use this field to select the
academic term that includes the enrollment summary that you want to print on
your invoices.
Address Usage Enter the logic that the system uses to select the address printed on the bills.
Output File Directory Enter the directory path to which the process stores the bills that it generates.
Specifying an output file directory is necessary only when you are printing
invoices using the value Form Based Extract Bill. If this field is left blank, output
will go to the Report Repository.
Override Address Info
(override address
information)
This check box affects only the printing of invoices that the system already
generated. If you select this check box, the system ignores the address that is
already associated with the bills and selects addresses to print according to the
order selected in the Address Usage field.
Address not required Select to print invoices even if the process finds no address.
Use Email Address Reserved for future use.
Print Zero Bill Select to print zero balance bills.
The system creates only zero balance bills if you select Create Zero Bills in the
Zero Bill Handling field on the General Selections page for the selected billing
standard request.
Generate Invoice Click to run the billing process manually and generate bills. If you select the Bill
One ID value when creating the request and select the Generate & Print Bill
option, the system prints an invoice for the specified student.
Information Messages & Errors
This group box displays messages indicating the success of the bill generation process after you click the
Generate Invoice button.
Invoice Generated This message appears when the process generates bills successfully.
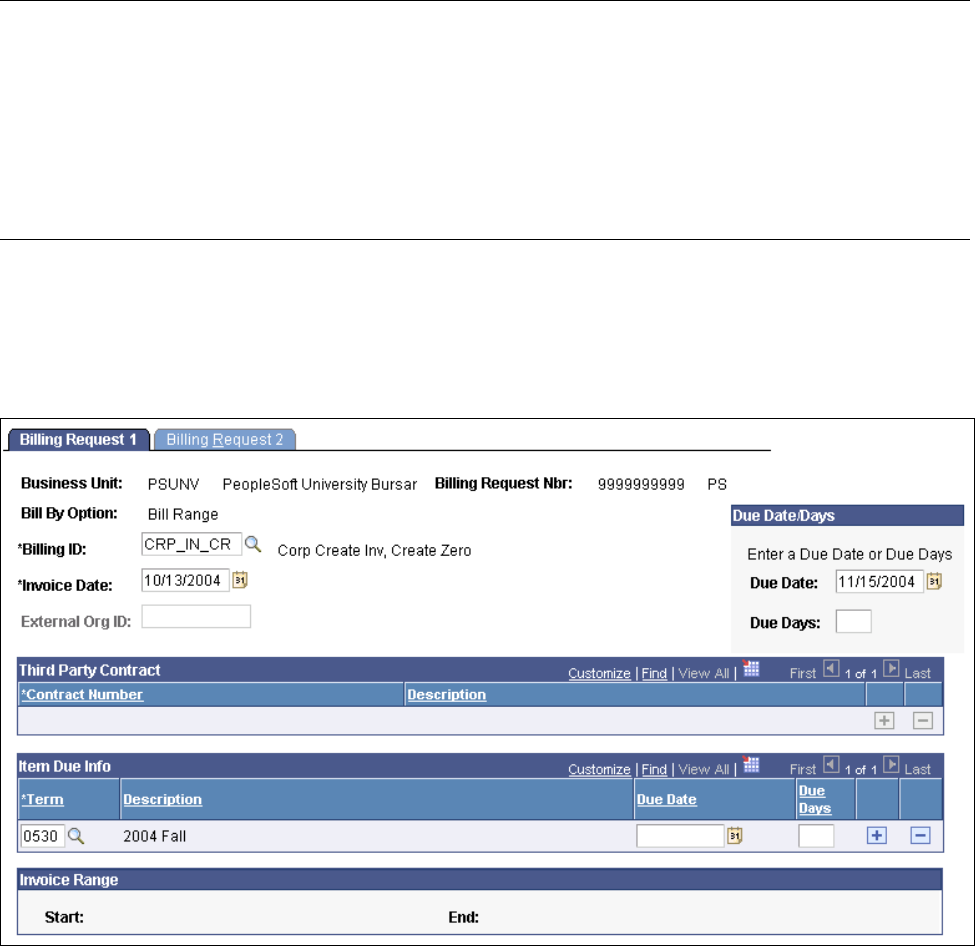
Chapter 19 Billing Customers
Copyright © 1988, 2010, Oracle and/or its affiliates. All Rights Reserved. 497
Error Info (error
information) If an error occurs when you run the billing process, this link appears in the
Information Messages & Errors group box. Click the link to open the Error Bill
Message page, where you can view detailed information about the nature of the
error.
Warning Info (warning
information) If a warning situation occurs when you try to run the billing process, this link
appears in the Information Messages & Errors group box. Click the link to open
the Warning Bill Message page, where you can view detailed information about
the nature of the warning.
Note. Although you can generate bills for a range of students using the Generate Invoice button in
combination with the Generate Invoice option in the Print Choice group box, the Generate Invoice button is
intended only for generating and printing an individual bill for a student. You should process bills for a range
of students using the Bill Request process page. If you use the same run control ID to process your billing
request and print your invoices, some of the values that you set in the Billing Request 2 page are supplied by
default to their respective fields in the printing process page that you use. The values can be supplied from the
following fields: Invoice Layout, Print Schedule of Classes for Term,Aid Term From, To, Address Usage,
Output File Directory, Bill File, Override Address Info, Address not required, Use Email Address, Address,
and Print Zero Bill.
Specifying Basic Corporate Billing Request Parameters
Access the Corp Billing Request - Billing Request 1 page Student Financials, Bill Customers, Corporate Bills,
Create Billing Request, Billing Request 1.
Corp Bill Request - Billing Request 1 page

Billing Customers Chapter 19
498 Copyright © 1988, 2010, Oracle and/or its affiliates. All Rights Reserved.
Except for the External Org ID, Invoice per Student, and Contract Number fields, this page is identical to the
Billing Request 1 page.
External Org ID
(external organization ID) If you want to create a bill for a single organization, select the unique ID of the
organization. This field is available only if you select the Bill One Ext Org ID
(bill one external organization ID) option when you create the request. Be sure
that the corporation that you select matches the criteria of the billing standard
request (Billing ID) that you select.
Invoice per Student This check box appears only if you select the Bill Per Contract(s) value when
you create the request. If you select the Invoice per Student check box, the billing
process generates a separate corporate bill for each student associated with the
contract that you select in the Contract Number field.
For example, if the contract that you choose has ten students associated with it,
then the system would generate ten separate bills for the corporation associated
with the contract. If you do not select the Invoice per Student check box, the
system generates one corporate bill per contract regardless of the number of
students attached to the contract.
Third Party Contract
Contract Number Select the number of the contract that is associated with the corporation that you
want to bill. You can select multiple contracts by inserting additional rows.
See Also
Chapter 19, "Billing Customers," Specifying Basic Student Billing Request Parameters, page 492
Specifying Bill Terms and Print Options for Student Billing Requests
Access the Corp Billing Request - Billing Request 2 pageStudent Financials, Bill Customers, Corporate Bills,
Create Billing Request, Billing Request 2.
This page is identical to the Billing Request 2 page.
See Also
Chapter 19, "Billing Customers," Specifying Basic Corporate Billing Request Parameters, page 497
Billing Specific Charges for Individual Students
Student Financials enables you to create an individual bill for a student for only some of the charges on the
account. In addition, you can review pending billing items and an invoice summary when you are done.

Chapter 19 Billing Customers
Copyright © 1988, 2010, Oracle and/or its affiliates. All Rights Reserved. 499
This section discusses how to:
•View pending to bill items.
•Create individual bills for students.
•View the Student Invoice Summary pages.
Pages Used to Bill Specific Charges for Individual Students
Page Name Definition Name Navigation Usage
Pending To Bill Items SSF_BI_CUR_ACCOUNT Student Financials, Bill
Customers, Student Bills,
Pending to Bill Items
Viewing pending to bill
items.
Identify Student Charges BI_BILL_SELECT Student Financials, Bill
Customers, Student Bills,
Identify Student Charges
Create individual bills for
students.
Prior Billing BI_BILL_HEADER_SP Click the Get Prior Billing
link on the Bill Select page. View information regarding
past billing for the student.
Billing Detail BI_BILL_DETAIL_SP Click the Get Billing Detail
Lines link on the Prior
Billing page.
View detail of bills
appearing on the Prior
Billing page.
Student Invoice Summary SSF_BI_INV_MAIN Student Financials, Bill
Customers, Student Bills,
Student Invoice Summary
Lists all invoices for a
student.
Invoice Header SSF_BI_INV_HDR Click the link on the
Student Invoice Summary
page.
View student invoice
information.
Invoice Career SSF_BILL_CAREER Click the Invoice Career
link on the Invoice Header
page
Displays academic
information for a student.
Invoice Detail SSF_BILL_DETAIL Click the Invoice Detail
link on the Invoice Header
page
Lists the individual charges
and payments for this
invoice.
Invoice Messages SSF_BILL_MESSAGES Click the Invoice Messages
link on the Invoice Header
page
Displays any messaging on
invoices.
Viewing Pending To Bill Items
Access the Pending To Bill Items page (Student Financials, Bill Customers, Student Bills, Pending to Bill
Items).
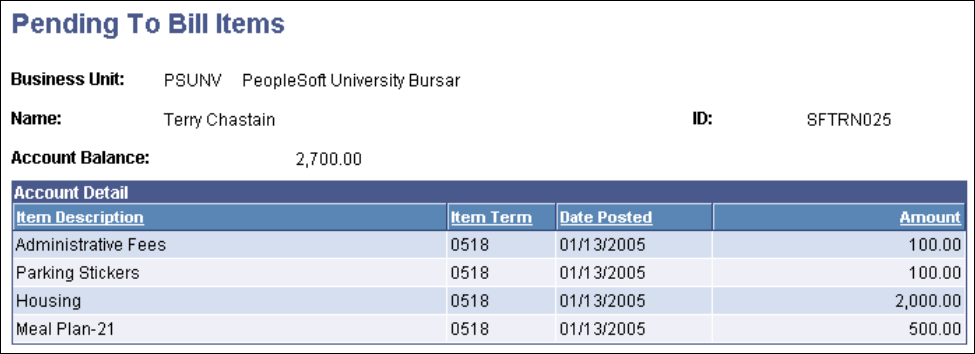
Billing Customers Chapter 19
500 Copyright © 1988, 2010, Oracle and/or its affiliates. All Rights Reserved.
Pending To Bill Items page
This page displays charges that have not been billed for a specific student. After you run the billing process,
the pending items no longer appear on this page.
Account Balance The total amount shown is not the total amount due for a student. Amounts that
were billed prior to this summary might exist.
Creating Individual Bills for Students
Access the Identify Student Charges page (Student Financials, Bill Customers, Student Bills, Identify Student
Charges).
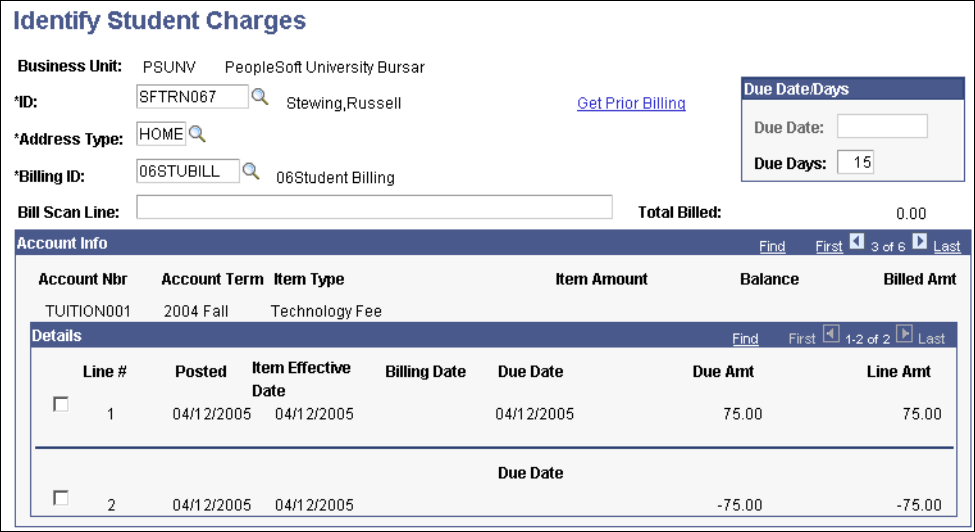
Chapter 19 Billing Customers
Copyright © 1988, 2010, Oracle and/or its affiliates. All Rights Reserved. 501
Identify Student Charges page
ID Enter the unique ID of the student whom you want to bill.
Address Type Enter the address that you want to use when creating the bill.
Billing ID Enter the ID of the billing standard request that you want to use to generate the
bill.
Bill Scan Line Enter a bill scan line if your bank requires it.
Due Date Enter the default due date that you want to assign to charges without a due date
when you create the bill.
Due Days You can also set the default due date as a function of the date on which you
generate the bill. Enter the number of due days that the system adds to the day
that you generate the bill to determine a due date.
The page displays a list of line items in the two group boxes at the bottom of the page. Select the check box
next to each line item that you want to include in the student's bill.
After you save your configured individual bill, you can review the individual bill and print it using the
specified print option.
Get Prior Billing Click to access the Prior Billing page.
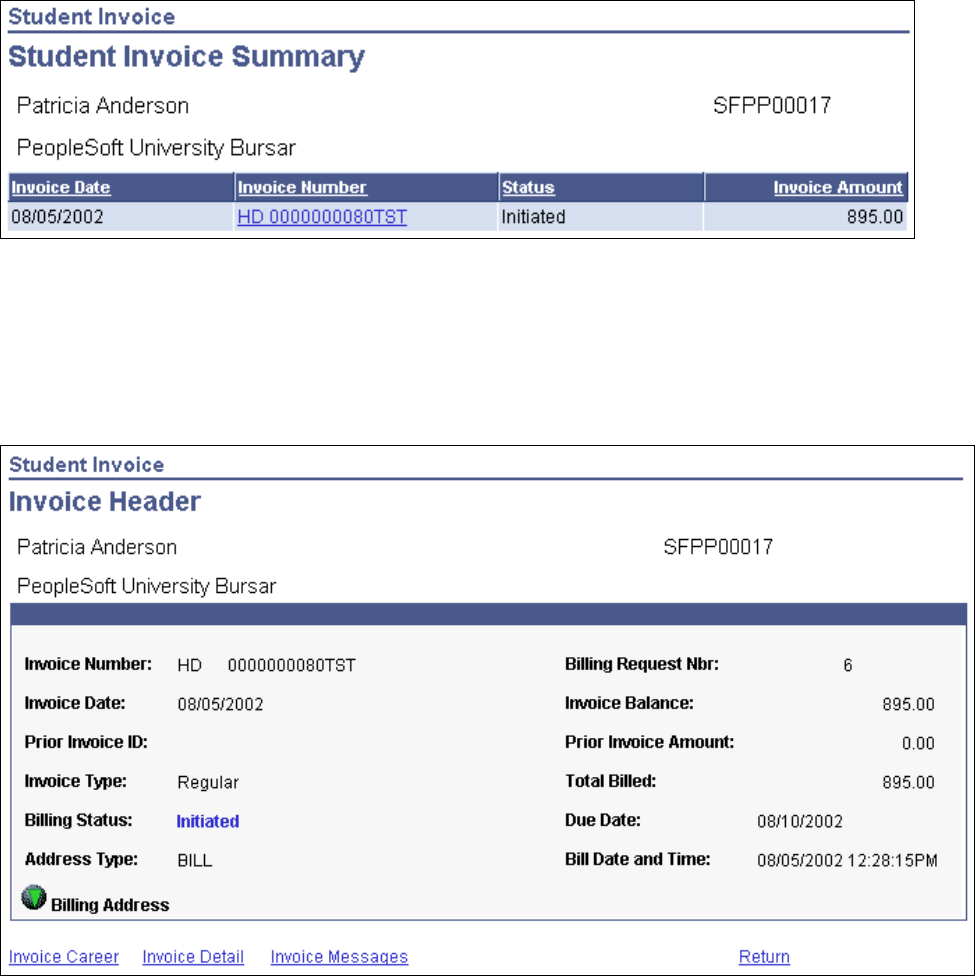
Billing Customers Chapter 19
502 Copyright © 1988, 2010, Oracle and/or its affiliates. All Rights Reserved.
Viewing the Student Invoice Summary Pages
Access the Student Invoice Summary page (Student Financials, Bill Customers, Student Bills, Student
Invoice Summary).
Student Invoice Summary page
This page lists all invoices for a specific student with the most recent invoice listed first.
Invoice Number Click to view the details of the invoice on the Invoice Header page.
Invoice Header page
The Invoice Header page displays more detail about this invoice.
Billing Status This field will indicate Initiated or Cancelled.
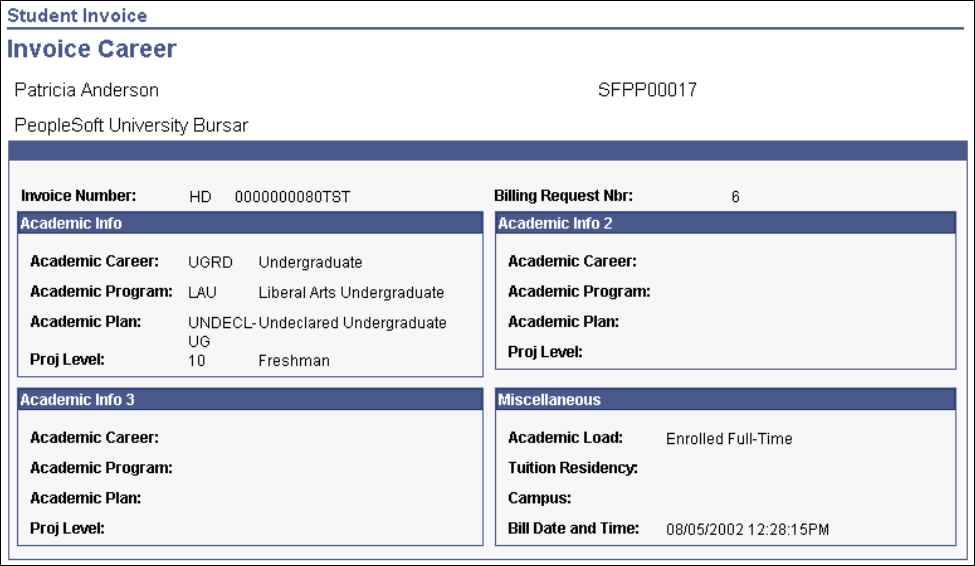
Chapter 19 Billing Customers
Copyright © 1988, 2010, Oracle and/or its affiliates. All Rights Reserved. 503
Billing Address Click the arrow button to display or hide the student's address information.
Invoice Career, Invoice
Detail, and Invoice
Messages
These links provide the same information as Invoice Info Student Information
pages, and are displayed next.
Invoice Career page
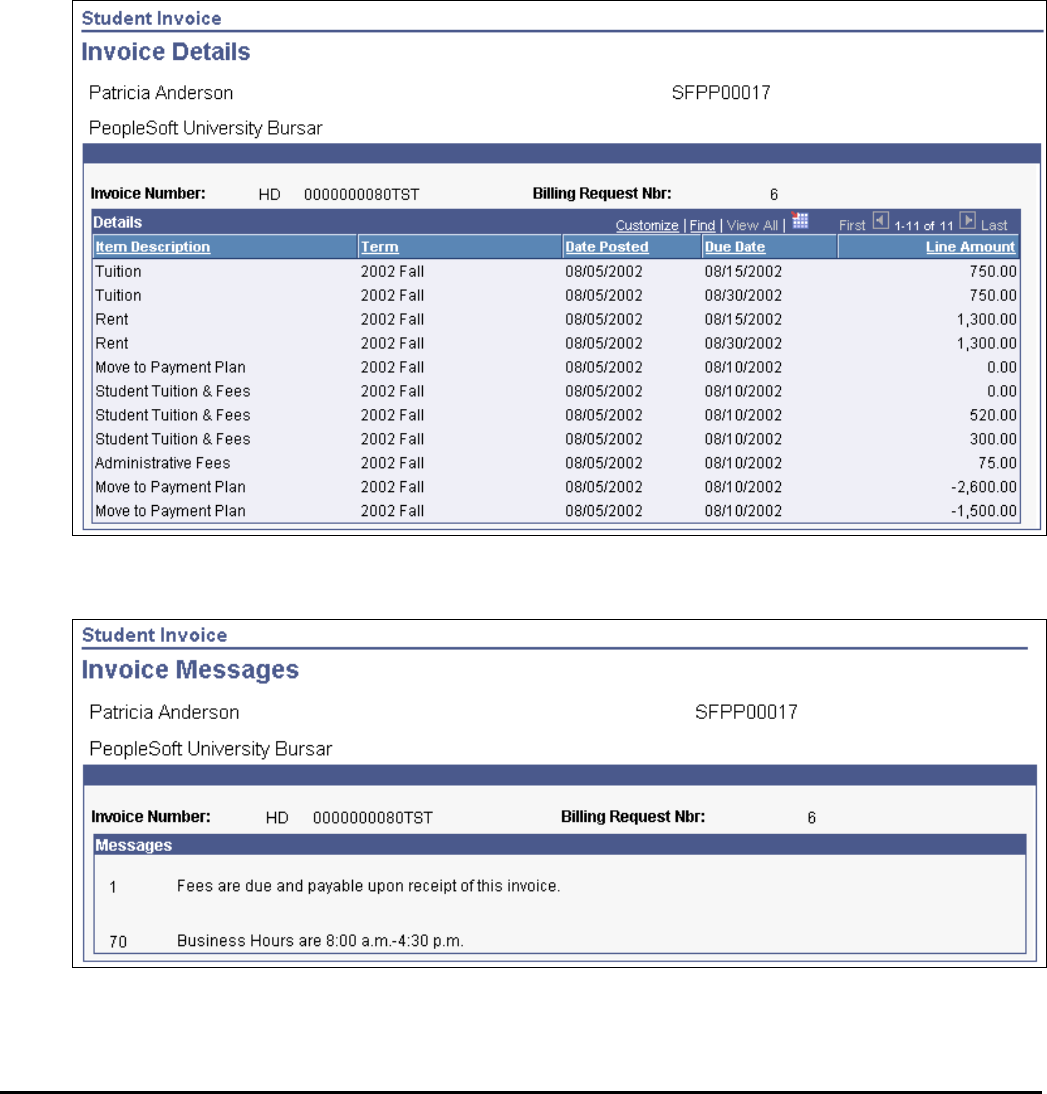
Billing Customers Chapter 19
504 Copyright © 1988, 2010, Oracle and/or its affiliates. All Rights Reserved.
Invoice Details page
Invoice Messages page
Processing Billing Requests
This section discusses how to:
•Process student billing requests.
•Process corporate billing requests.

Chapter 19 Billing Customers
Copyright © 1988, 2010, Oracle and/or its affiliates. All Rights Reserved. 505
Pages Used to Process Billing Requests
Page Name Definition Name Navigation Usage
Generate Invoice RUNCTL_SFPBILLNG2 Student Financials, Bill
Customers, Student Bills,
Generate Invoice
Process student billing
requests.
Generate Invoice RUNCTL_SFPBILLNG3 Student Financials, Bill
Customers, Corporate Bills,
Generate Invoice
Process corporate billing
requests.
Processing Student Billing Requests
Access the Generate Invoice page (Student Financials, Bill Customers, Student Bills, Generate Invoice).
Generate Invoice page (student)
Business Unit Enter the business unit for which you are generating bills.
Billing Request Nbr
(billing request number) Enter the number of the billing request that you want to use to generate your
bills.
The system populates the remaining fields on the page with the data from the
billing request that you choose in the Business Request Nbr field.
Note. If you want the system to populate the printing process pages with the printing parameters of the billing
request that you are processing, you must use the same run control ID for printing that you use for processing
the billing request.

Billing Customers Chapter 19
506 Copyright © 1988, 2010, Oracle and/or its affiliates. All Rights Reserved.
See Also
Chapter 19, "Billing Customers," Completing Billing Requests, page 489
Processing Corporate Billing Requests
Access the Generate Invoice page (corporate) (Student Financials, Bill Customers, Corporate Bills, Generate
Invoice).
This page is identical to the Generate Invoice page (student).
See Also
Chapter 19, "Billing Customers," Processing Student Billing Requests, page 505
Printing Invoices
This section discusses how to:
•Print student invoices using Form Based Extract Bill.
•Print corporate invoices using Form Based Extract Bill.
•Print student invoices using an SQR.
•Print corporate invoices using an SQR or XML Publisher.
•Print student invoices using Crystal.
•Print corporate invoices using Crystal.
You can print your bills using Form Based Extract Bill, Crystal, or a Student Financials Structured Query
Report and XML Publisher.
Pages Used to Print Invoices
Page Name Definition Name Navigation Usage
Student Invoice Extract RUN_CNTL_PBILL Student Financials, Bill
Customers, Student Bills,
Produce Extract File,
Student Invoice Extract
Print student invoices using
Form Based Extract Bill.
Corporation Invoice Extract RUN_CTNL_PBILL_ORG Student Financials, Bill
Customers, Corporate Bills,
Produce Extract File,
Corporation Invoice Extract
Print corporate invoices
using Form Based Extract
Bill.
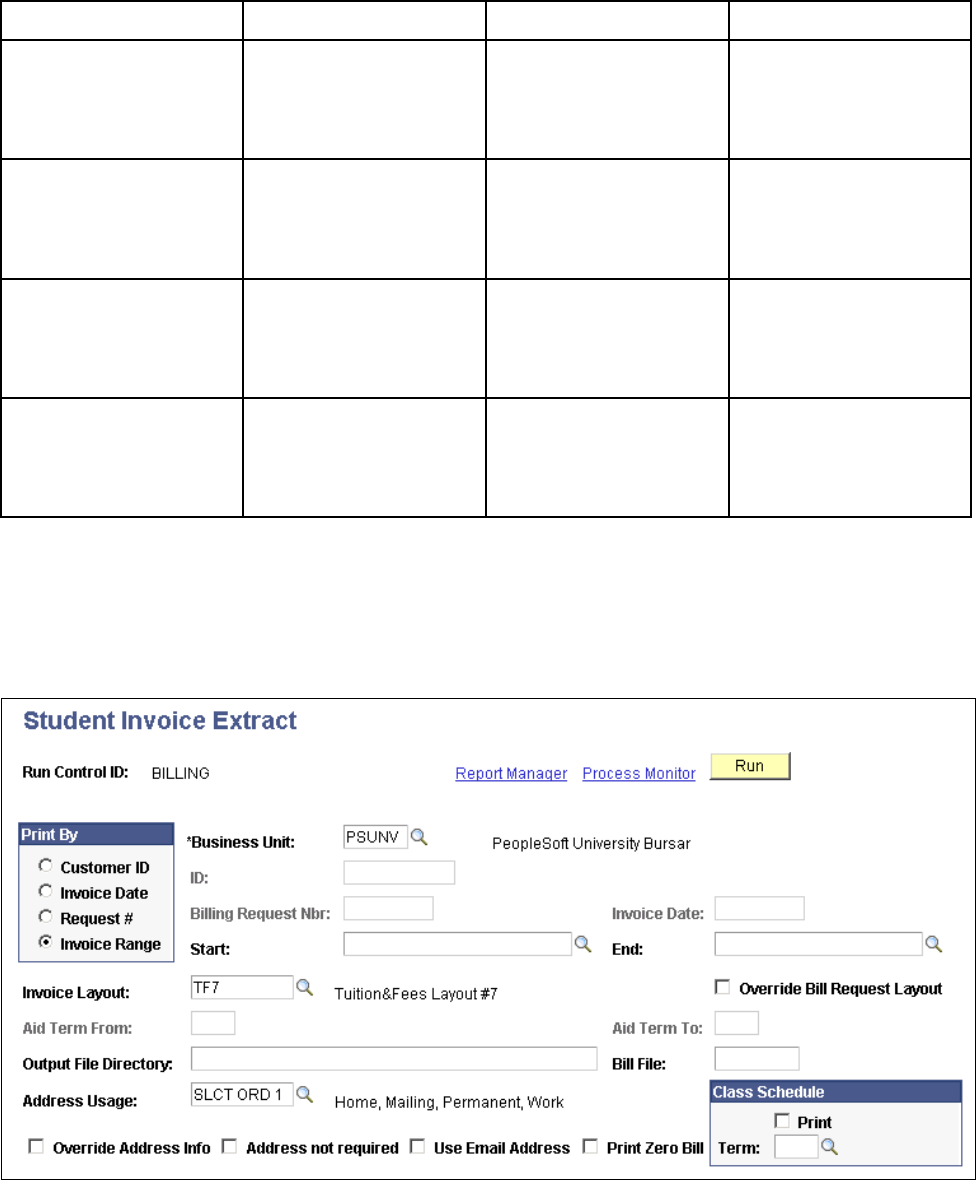
Chapter 19 Billing Customers
Copyright © 1988, 2010, Oracle and/or its affiliates. All Rights Reserved. 507
Page Name Definition Name Navigation Usage
Student Invoice Other RUN_CNTL_PBILL Student Financials, Bill
Customers, Student Bills,
Print Invoice, Student
Invoice Other
Print student invoices using
an SQR or XML Publisher.
Corporation Invoice Other RUN_CNTL_PBILL_ORG Student Financials, Bill
Customers, Corporate Bills,
Print Invoice, Corporation
Invoice Other
Print corporate invoices
using an SQR or XML
Publisher.
Student Invoice Crystal RUNCTL_SF711AB Student Financials, Bill
Customers, Student Bills,
Print Invoice Crystal,
Student Invoice Crystal
Print student invoices using
Crystal.
Corporation Invoice Crystal RUNCTL_SF753AB_ORG Student Financials, Bill
Customers, Corporate Bills,
Print Invoice Crystal,
Corporation Invoice Crystal
Print corporate invoices
using Crystal.
Printing Student Invoices Using Form Based Extract Bill
Access the Student Invoice Extract page (Student Financials, Bill Customers, Student Bills, Produce Extract
File, Student Invoice Extract).
Student Invoice Extract page
Billing Customers Chapter 19
508 Copyright © 1988, 2010, Oracle and/or its affiliates. All Rights Reserved.
Print By Select one of these values:
Customer ID: Print an invoice for a single student. When you select this option,
the ID and Invoice Number fields become available.
Invoice Date: Print all student invoices with the same invoice date. When you
select this option, the Invoice Date field becomes available.
Request #: (request number) Print all student invoices with a specific billing
request number. When you select this option, the Billing Request Nbr (billing
request number) field becomes available.
Invoice Range: Print a range of student invoices according to their invoice
numbers. When you select this option, the Start and End fields become available.
ID Enter the unique ID of the student for whom you want to print an invoice.
Billing Request Nbr
(billing request number) Enter the billing request number for which you want to print invoices. When you
select a request number, the printing parameters from the associated billing
request are supplied to the respective fields on this page.
Invoice Date Enter the invoice date of the invoices that you want to print.
Invoice Number Select the specific invoice number that you want to print. Select an ID first to
limit the valid invoice ID values to those of the student for whom you want to
print an invoice. Note that when you select the Invoice Range option in the Print
By group box, the label for this field changes from Invoice Number to Start.
Start Enter the invoice ID at the beginning of the invoice range. Note that when you
select the Customer ID option in the Print By group box, the label for this field
changes from Start to Invoice ID.
End Enter the invoice ID at the end of the invoice range.
The following fields are populated by default with the values set in the billing request if the run control ID
that you use to print is the same as the one that you use to process the billing request. They also are populated
by default with the values set in the billing request if you select Request # in the Print By group box and
specify a billing request number.
Invoice Layout Enter the invoice layout to format the printed invoices.
Override Bill Request
Layout If you select the Print By option of Invoice Range or Invoice Date, and the
invoices included use different invoice layouts, you receive a warning message
when you run the process that reads Bills may be printed with different layouts. If
you select the Override Bill Request Layout check box, you do not receive the
warning message. Instead, the system uses the layout selected in the Invoice
Layout field for all invoices for the specified invoice range or date.

Chapter 19 Billing Customers
Copyright © 1988, 2010, Oracle and/or its affiliates. All Rights Reserved. 509
Aid Term From and Aid
Term To Enter the beginning and ending terms for the term range. The term range
determines for which terms the anticipated financial aid appears on the bills.
Note. If you do not select either the Anticipated Aid Detail check box or the
Include Anticipated Aid Total check box for the invoice layout that you selected,
the Aid Term From and Aid Term To fields are not available.
Output File Directory Enter the path of the directory to which the system sends the extract file. Form
Based Extract Bill uses this file to print the invoices.
Bill File Enter the name of the file that the system generates.
Address Usage Enter the logic that the system uses to select the address printed on the bills.
Override Address Info
(override address
information)
This check box affects only the printing of bills that the system already
generated. If you select this check box, the process ignores the address that is
already associated with the bills and selects addresses to print according to the
order that is selected in the Address Usage field.
Address Not Required Select this check box to print bills even if the process finds no address.
Use Email Address Select if you send invoices by email.
Print Zero Bill Select to print zero balance bills.
Class Schedule
Print Select to print the student enrollment summary when you print invoices.
Term If you select the Print check box, enter the term of the enrollment summary that
you want to print on your invoices.
Printing Corporate Invoices Using Form Based Extract Bill
Access the Corporation Invoice Extract page (Student Financials, Bill Customers, Corporate Bills, Produce
Extract File, Corporation Invoice Extract).

Billing Customers Chapter 19
510 Copyright © 1988, 2010, Oracle and/or its affiliates. All Rights Reserved.
Corporation Invoice Extract page
Except for the Corp ID and External Org ID (external organization ID) fields, this page is identical to the
Student Invoice Extract page.
Corp ID (corporation ID) Select to print an invoice for a single corporation. When you select this option,
the Corp ID and Invoice ID (invoice ID) fields become available.
External Org ID
(external organization ID) Enter the unique ID of the corporation for which you want to print an invoice.
Printing Student Invoices Using an SQR or XML Publisher
Access the Student Invoice Other page (Student Financials, Bill Customers, Student Bills, Print Invoice,
Student Invoice Other).
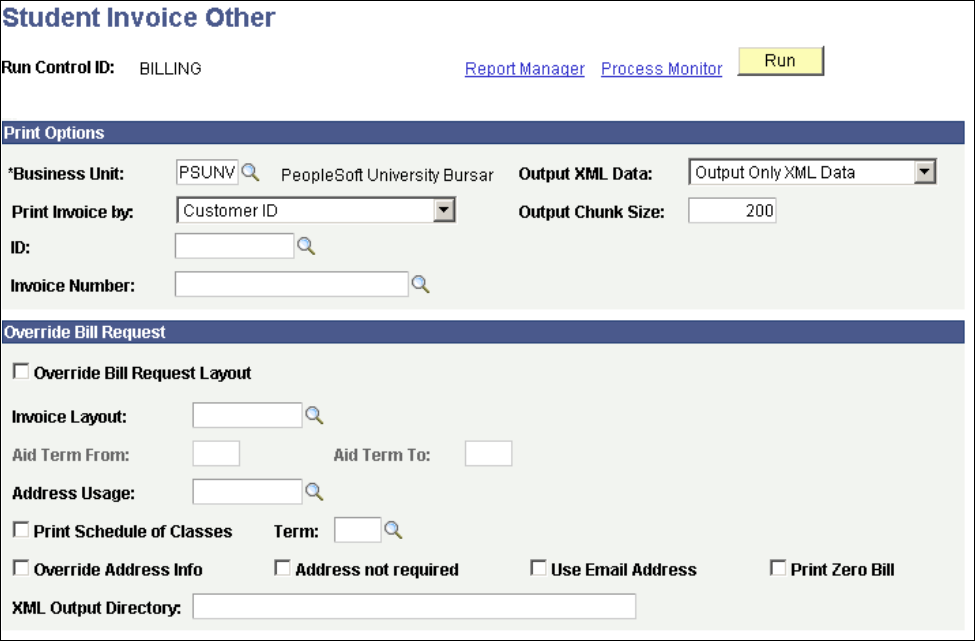
Chapter 19 Billing Customers
Copyright © 1988, 2010, Oracle and/or its affiliates. All Rights Reserved. 511
Student Invoice Other page
Except for the absence of the Output File Directory and Bill File fields, and the addition of XML Publisher
fields, this page is identical to the Student Invoice Extract page.
Printing Corporate Invoices Using an SQR or XML Publisher
Access the Corporation Invoice Other page (Student Financials, Bill Customers, Corporate Bills, Print
Invoice, Corporation Invoice Other).
Except for the absence of the Output File Directory and Bill File fields, and the addition of XML Publisher
fields, this page is identical to the Corporate Invoice Form Based Extract Bill page.
Printing Student Invoices Using Crystal
Access the Student Invoice Crystal page ( Student Financials, Bill Customers, Student Bills, Print Invoice
Crystal, Student Invoice Crystal).
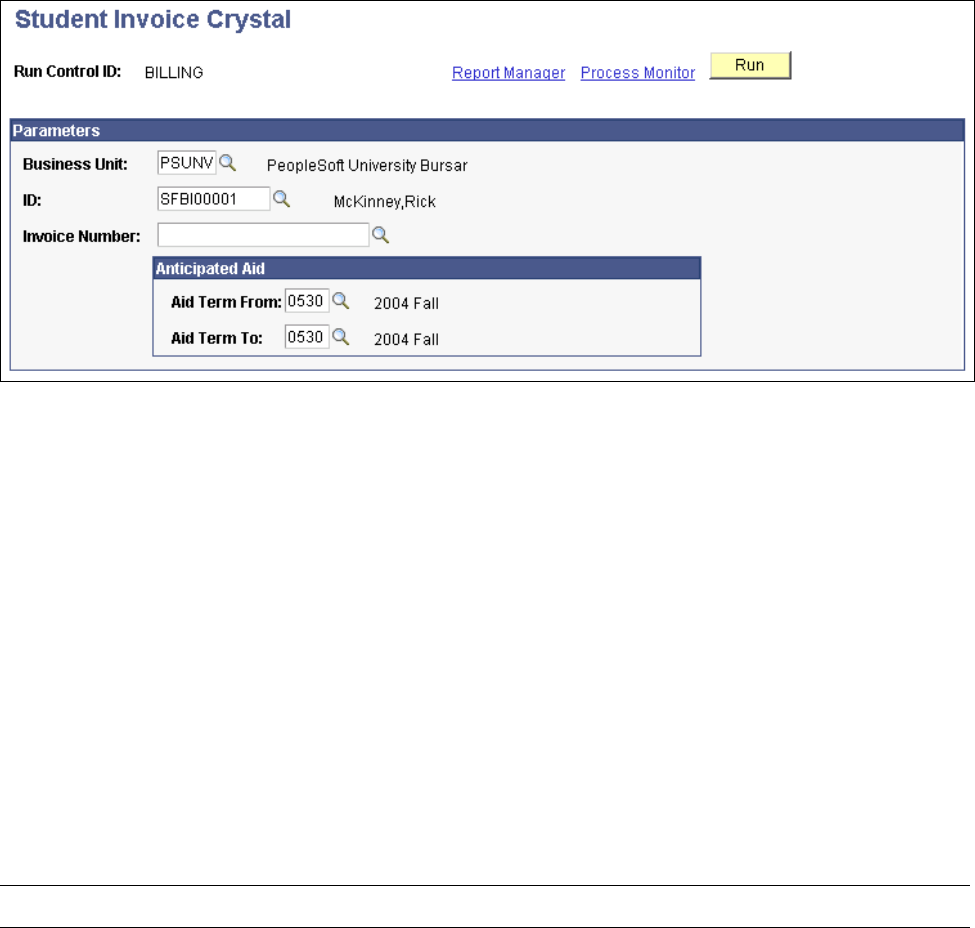
Billing Customers Chapter 19
512 Copyright © 1988, 2010, Oracle and/or its affiliates. All Rights Reserved.
Student Invoice Crystal page
Parameters
Business Unit Enter the business unit for which you are printing the invoice.
ID Enter the ID of the student whose invoice you want to print.
Invoice Number Enter the unique ID number of the invoice that you want to print.
Anticipated Aid
Aid Term From and Aid
Term To Enter the beginning and end terms for the term range. The term range determines
for which terms the anticipated financial aid appears on the bills.
Note. When using Crystal to print invoices, you can print only one invoice at a time.
Printing Corporate Invoices Using Crystal
Access the Corporation Invoice Crystal page (Student Financials, Bill Customers, Corporate Bills, Print
Invoice Crystal, Corporation Invoice Crystal).
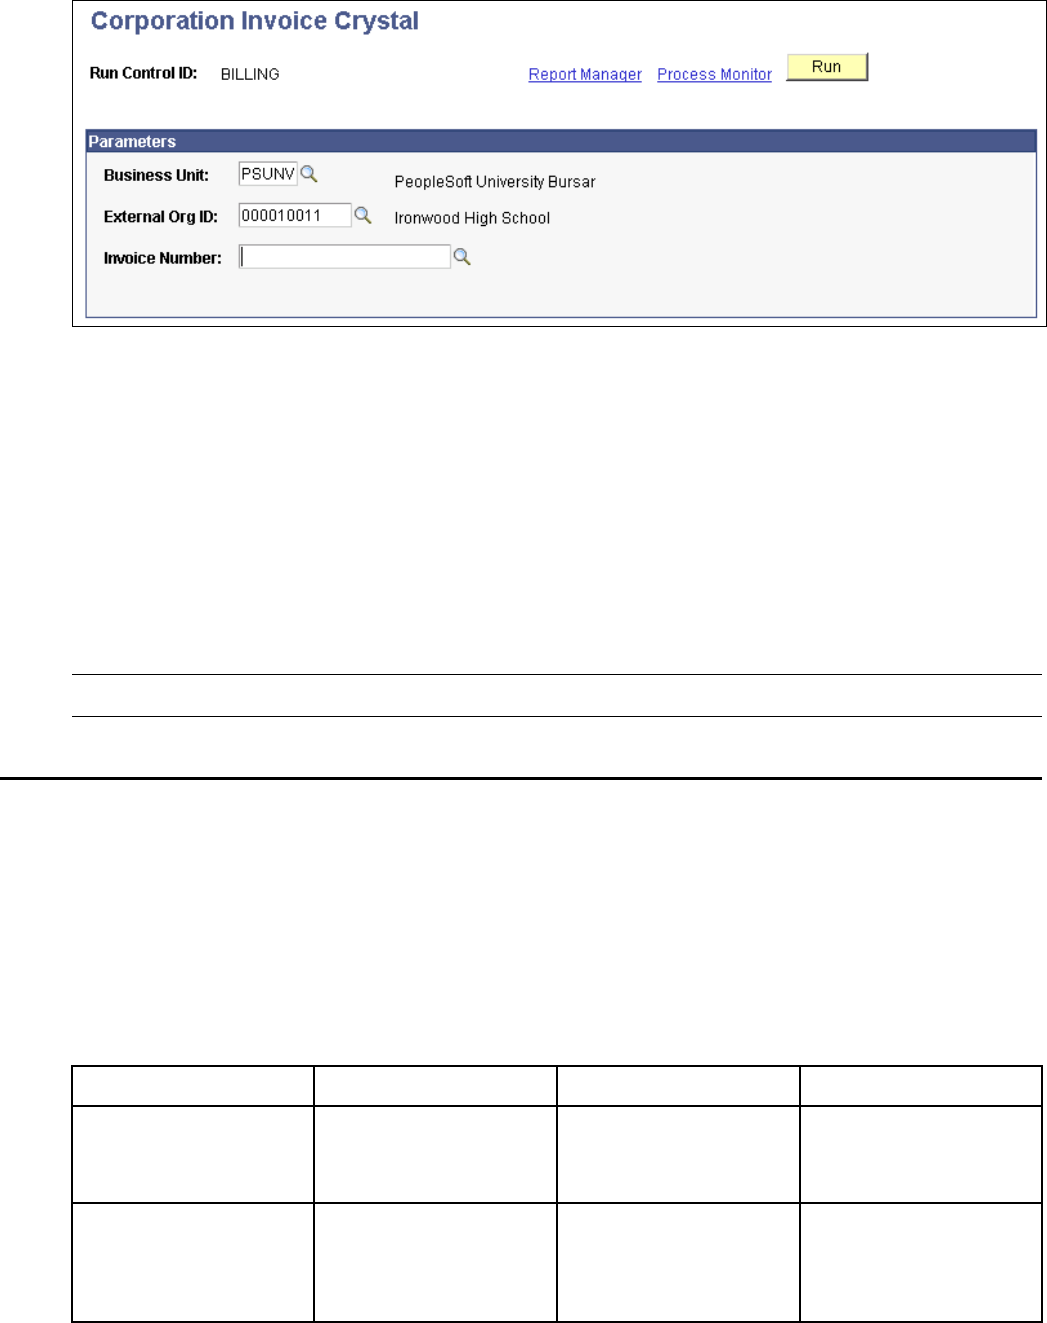
Chapter 19 Billing Customers
Copyright © 1988, 2010, Oracle and/or its affiliates. All Rights Reserved. 513
Corporation Invoice Crystal page
Parameters
Business Unit Enter the business unit for which you are printing the invoice.
External Org ID
(external organization ID) Enter the ID of the corporation with an invoice that you want to print.
Invoice Number Enter the unique ID number of the invoice that you want to print.
Note. When using Crystal to print invoices, you can print only one invoice at a time.
Canceling Bills
If you encounter problems during your billing process, Student Financials enables you to cancel bills so that
you can rerun the billing process correctly.
This section discusses how to run the Billing Cancellation process.
Pages Used to Cancel a Bill
Page Name Definition Name Navigation Usage
Bill Cancellation SF_BICANC Student Financials, Bill
Customers, Cancel Invoice,
Bill Cancellation
Run the Billing
Cancellation process.
Bill Cancellation BI_CANC_INQ Student Financials, Bill
Customers, Review Invoice
Cancellation, Bill
Cancellation
View the results of the Bill
Cancellation process.
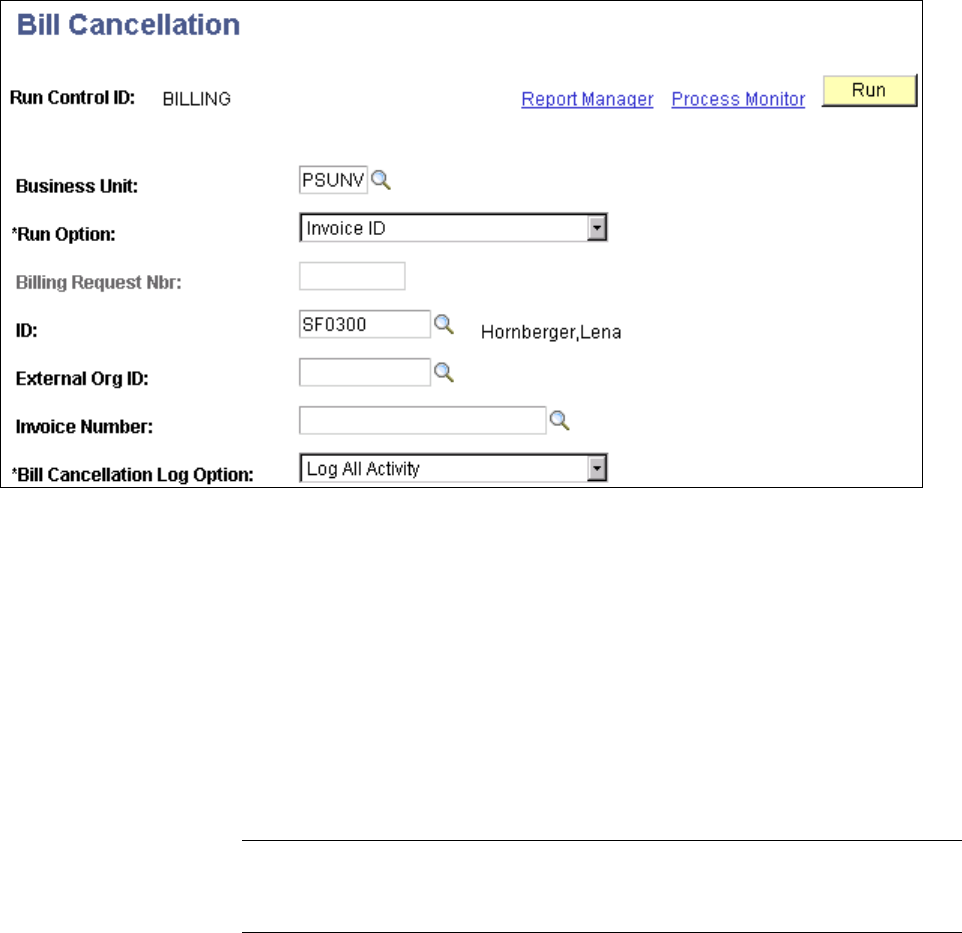
Billing Customers Chapter 19
514 Copyright © 1988, 2010, Oracle and/or its affiliates. All Rights Reserved.
Canceling Bills
Access the Bill Cancellation page (Student Financials, Bill Customers, Cancel Invoice, Bill Cancellation).
Bill Cancellation page
Run Option This field determines whether the process cancels an entire group of bills or an
individual bill. Values are:
Bill Request Nbr (bill request number): Select to cancel a bill associated with a
specific bill request number. When you select this value, the Billing Request Nbr
(billing request number) field becomes available and the Invoice Number, ID,
and External Org ID fields become unavailable.
Invoice ID: Select to cancel a bill associated with a specific invoice ID. When
you select this value, the Billing Request Nbr field becomes unavailable and the
Invoice Number, ID, and External Org ID fields become available.
Note. The system allows you to cancel only the most recently generated bill. This
means that to cancel an old bill, you must first cancel every bill that you
generated after it.
Billing Request Nbr
(billing request number) When you enter the Bill Request Nbr option in the Run Option field, the system
automatically populates this field with the billing request number of the last bill
that you generated.
ID Enter the unique ID of the student whose bill you want to cancel.
External Org ID
(external organization ID) Enter the unique ID of the organization for which you want to cancel a bill.

Chapter 19 Billing Customers
Copyright © 1988, 2010, Oracle and/or its affiliates. All Rights Reserved. 515
Invoice Number Enter the invoice ID assigned to the individual bill that you want to cancel. When
you select the Invoice Number value in the Run Option field and select an ID or
external organization ID, the system automatically populates the Invoice Number
field with the invoice number of the last bill that you generated for that ID.
Billing Cancellation Log
Option The option that you select in this field determines what type of information the
system displays on the Bill Cancellation inquiry page. We recommend that you
select Log All Activity so that you can see all of the results of the Bill
Cancellation process in the inquiry page. Values are:
Log All Activity: Select to display both failed and successful cancellation
attempts for the chosen bill request number or invoice ID.
Log Failed Cancels Only: Select to display only failed cancellation attempts for
the chosen bill request number or invoice ID.
Log Successful Cancels Only: Select to display only successful cancellation
attempts for the chosen bill request number or invoice ID.
None: Select to display only the bill cancellation number that is generated by the
system.
For each bill affected by the process, the system sets the status to Cancelled. In addition, if the system
originally set due dates on any of the bills cancelled by the Bill Cancellation process, it resets those due dates
to Null.
Viewing Billing Information
Several tools are available to use in Student Financials to view the billing activity for a customer's account.
Pages Used to View Billing Information
Page Name Definition Name Navigation Usage
Invoice Info Student BI_BILL_HEADER Student Financials, Bill
Customers, Student Bills,
Review Invoice, Invoice
Info Student
Review student billing
history.
Billing Address Info (billing
address information)
BI_BILL_HDR_SEC_PN Click the Address Info link
on the Invoice Info Student
page.
View the address
information that is
associated with a student
bill.
Bill Career BILL_CAREER Student Financials, Bill
Customers, Student Bills,
Review Invoice, Bill Career
Review the academic
information that is
associated with a student
bill.

Billing Customers Chapter 19
516 Copyright © 1988, 2010, Oracle and/or its affiliates. All Rights Reserved.
Page Name Definition Name Navigation Usage
Bill Detail BILL_DETAIL_1 Student Financials, Bill
Customers, Student Bills,
Review Invoice, Bill Detail
View details regarding all
the items that are included
in a student bill.
Bill Messages BILL_MESSAGES_SCPN Student Financials, Bill
Customers, Student Bills,
Review Invoice, Bill
Messages
View any messages that are
associated with a student
bill.
Invoice Info Corp. (invoice
information corporation)
BI_BILL_HEADER_ORG Student Financials, Bill
Customers, Corporate Bills,
Review Invoice, Invoice
Info Corp
Review an overview of
corporate billing history.
Invoice Info. Corp - Bill
Detail (invoice information
corporation - bill detail)
BILL_DETAIL Student Financials, Bill
Customers, Corporate Bills,
Review Invoice, Bill Detail
View details regarding all
the items that are included
in a corporate bill.
Academic Information BILL_DETAIL_SP Click the Bill Header -
Detail link on the Invoice
Info. Corp. - Bill Detail
page.
View academic information
regarding the student who is
associated with the third-
party contract.
Invoice Info. Corp - Bill
Messages (invoice
information corporation -
bill messages)
BILL_MESSAGES_SCPN Student Financials, Bill
Customers, Corporate Bills,
Review Invoice, Bill
Messages
View any messages that are
associated with a corporate
bill.
Invoice Printing BI_IVC_PRT_RQST Student Financials, Bill
Customers, Review Printed
Invoice
View information regarding
specific printing processes.
Reviewing Student Billing History
Access the Invoice Info Student page (Student Financials, Bill Customers, Student Bills, Review Invoice,
Invoice Info Student).
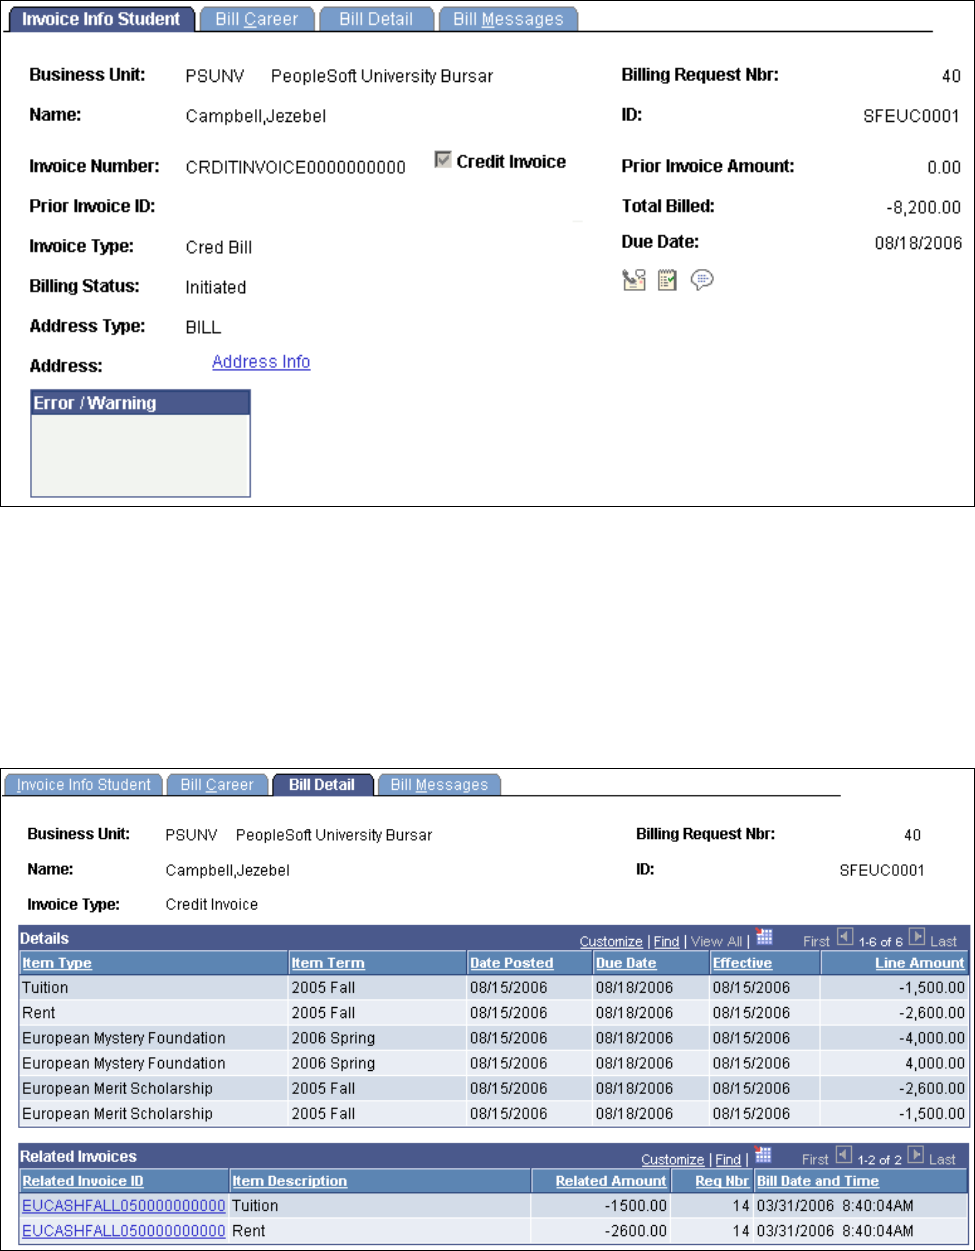
Chapter 19 Billing Customers
Copyright © 1988, 2010, Oracle and/or its affiliates. All Rights Reserved. 517
Invoice Info Student page
The Credit Invoice indicator is visible if the invoice is a credit invoice.
Viewing Details for Student Bill Items
Access the Bill Detail page (Student Financials, Bill Customers, Student Bills, Review Invoice, Bill Detail).
Bill Detail page
Billing Customers Chapter 19
518 Copyright © 1988, 2010, Oracle and/or its affiliates. All Rights Reserved.
View details regarding all the items included in a student bill.
Related Invoices
Related Invoice ID appears only if the invoice is a credit invoice. The Related Invoice ID link opens the same
page for the related invoice ID in a new window.

Copyright © 1988, 2010, Oracle and/or its affiliates. All Rights Reserved. 519
Chapter 20
Cashiering
This chapter provides an overview of cashiering and discusses how to:
•Open a cashiering office for a business day.
•Process cashiering transactions.
•Post delayed receipts.
•Process the cashiering GL interface.
•Void receipts.
•Review details for individual receipts.
•Review receipt and tender activity.
•Review totals by deposit ID.
•Close a cashiering office for a business day.
•Reopen a cashiering office for a closed business day.
Understanding Cashiering
This section lists common elements and provides an overview of cashiering.
Common Elements Used in This Chapter
Click to view the first group of receipts.
Click to view the previous group of receipts.
Click to view the next group of receipts.
Click to view the last group of receipts.
Ref Nbr (reference
number) Enter a reference number to help organize and track your transactions. This is not
a required field.

Cashiering Chapter 20
520 Copyright © 1988, 2010, Oracle and/or its affiliates. All Rights Reserved.
Cashiering
On a daily basis, the cashiering office collects and tracks a large number of transactions when students and
other customers pay tuition, library fines, and fees. With the Student Financials cashiering program, you can
perform a variety of transactions quickly, securely, and accurately. The inquiry and report features of the
system support your audit trails for maintaining integrity in the system. In addition, the system enables you to
design how each transaction interacts with the general ledger.
Opening a Cashiering Office for a Business Day
This section discusses how to:
•Open a cashiering office.
•Open valid registers.
•Open valid cashiers.
Pages Used to Open a Cashiering Office for a Business Day
Page Name Definition Name Navigation Usage
Open Cashier Offices CSH_OPEN_OFFICE Student Financials,
Cashiering, Cash
Management, Open Offices,
Open Cashier Offices
Open a cashiering office.
Open Registers CSH_OPEN_REGISTER Student Financials,
Cashiering, Cash
Management, Open Offices,
Open Registers
Open valid registers.
Open Cashiers CSH_OPEN_CASHIER Student Financials,
Cashiering, Cash
Management, Open Offices,
Open Cashiers
Open valid cashiers.
Opening a Cashiering Office
Access the Open Cashier Offices page (Student Financials, Cashiering, Cash Management, Open Offices,
Open Cashier Offices).
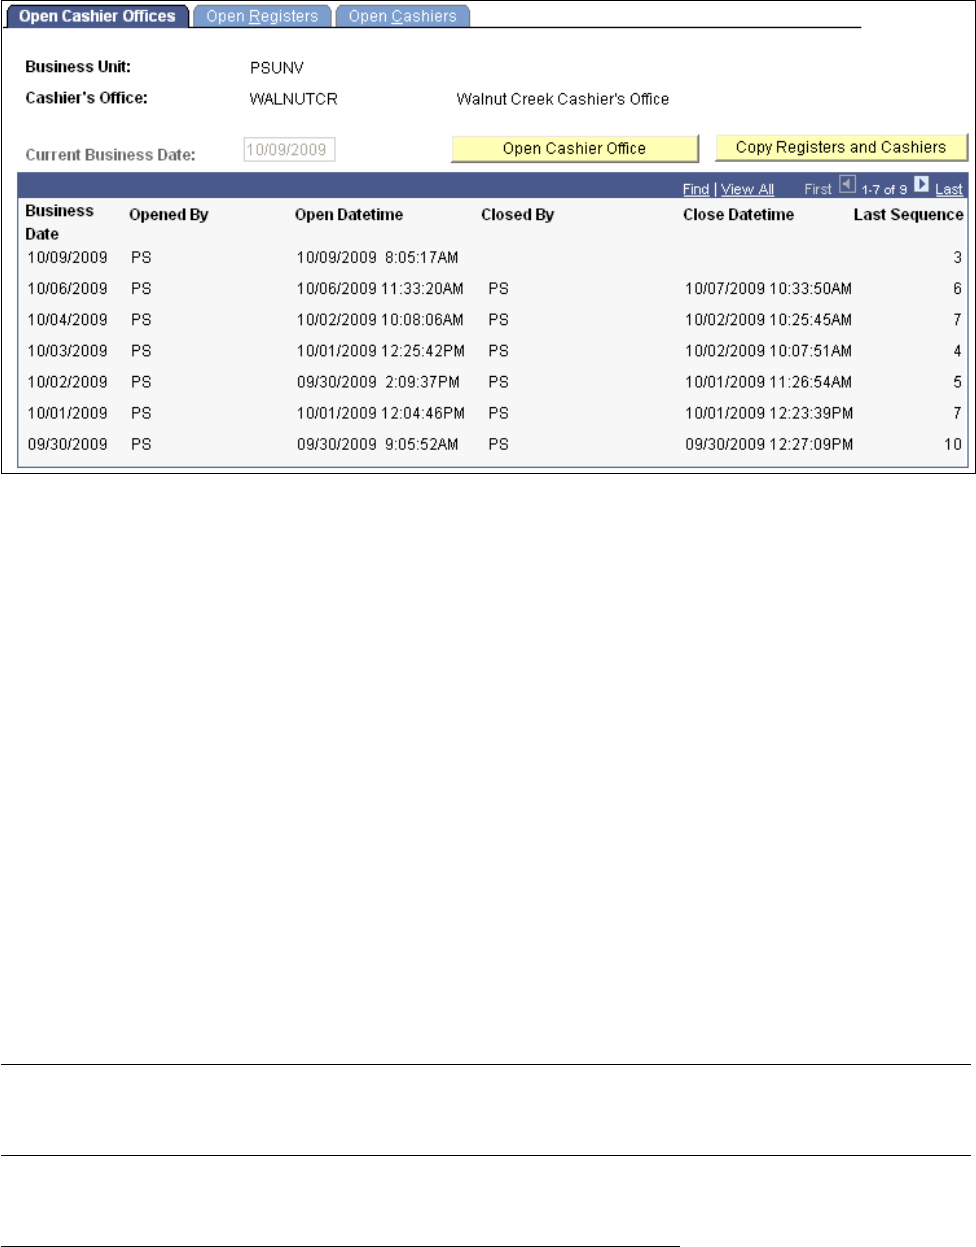
Chapter 20 Cashiering
Copyright © 1988, 2010, Oracle and/or its affiliates. All Rights Reserved. 521
Open Cashier Offices page
Current Business Date Enter the business date for which you want to open the cashiering office. The
default value for the field is the system date.
Business Date This heading displays business dates on which you opened the cashiering office.
The system displays all of the business dates on which you opened the cashiering
office unless you select a retrieval limit on the Cashiering Offices page during
the setup of your cashiering office. For example, if you specify a retrieval limit of
5 for your cashiering office, the Business Date heading displays only the last five
dates on which you opened the cashiering office.
Open Cashier Office Click to open the cashiering office. When you click this button, the Current
Business Date field becomes unavailable.
Copy Registers and
Cashiers After you open the cashiering office, you can click this button to copy
information regarding the cashiers and registers from one business date to
another. If you routinely use the same registers and cashiers from day to day, this
button saves you the time and effort involved in having to manually select and
open the registers and cashiers on the Open Registers and Open Cashiers pages.
Note. If you do not specify a retrieval limit for your cashiering office during setup, the Business Date heading
displays all business dates on which you opened the cashiering office. Eventually, this list of dates will
become so long that it can degrade system performance when you open the Open Cashier Offices page.
See Also
Chapter 10, "Setting Up Cashiering," Defining a Cashiering Office, page 313
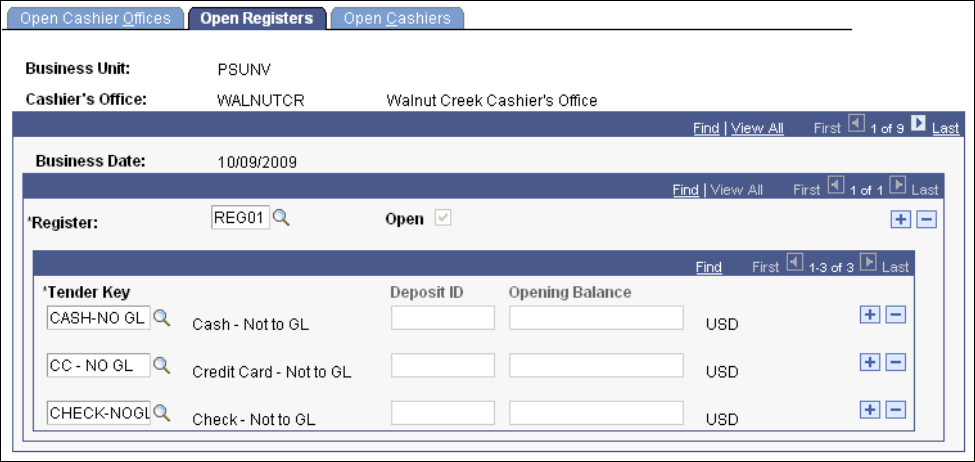
Cashiering Chapter 20
522 Copyright © 1988, 2010, Oracle and/or its affiliates. All Rights Reserved.
Opening Valid Registers
Access the Open Registers page (Student Financials, Cashiering, Cash Management, Open Offices, Open
Registers).
Open Registers page
Register Enter the register that you want to open for the business day. If you click the
Copy Registers and Cashiers button on the Open Cashier Offices page, the
system automatically selects and opens registers from the copied business day.
Open Select to open the register for the business day. After you select this check box, it
becomes unavailable. If you click the Copy Registers and Cashiers button on the
Open Cashier Offices page, the system automatically selects this check box for
each copied register.
Tender Key Enter a tender key to indicate the type of tender that you want the register to be
able to use in its transactions. If you click the Copy Registers and Cashiers button
on the Open Cashier Offices page, the system automatically inserts the tender
keys for each copied register.
Deposit ID(deposit
identifier) This is an optional field to help you track your deposits. Enter the actual bank
deposit ID in this field for each tender key. If you are not balancing by register,
this field is unavailable.
Opening Balance Enter an opening balance for each tender key. If you are not balancing by
register, this field is unavailable.
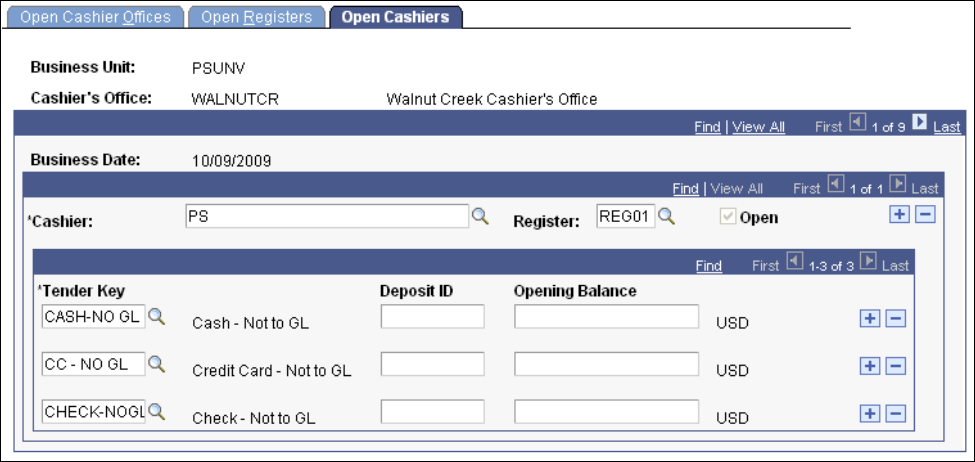
Chapter 20 Cashiering
Copyright © 1988, 2010, Oracle and/or its affiliates. All Rights Reserved. 523
Opening Valid Cashiers
Access the Open Cashiers page (Student Financials, Cashiering, Cash Management, Open Offices, Open
Cashiers).
Open Cashiers page
Cashier Enter the ID for the cashier that you want to open. If you click the Copy
Registers and Cashiers button on the Open Cashier Offices page, the system
automatically selects cashiers from the copied business day.
Register Enter the register that you want this cashier to use. Only registers that you open
on the Open Registers page are available to select. If you click the Copy
Registers and Cashiers button on the Open Cashier Offices page, the system
automatically selects registers from the copied business day.
Open Select to open this cashier for the business day. After you select this check box, it
becomes unavailable. Even if you click the Copy Registers and Cashiers button
on the Open Cashier Offices page, you must still select this check box manually
to open the cashier.
Tender Key Enter a tender key to indicate the type of tender that you want the cashier to be
able to use in its transactions. Only the tender keys that you assigned to the
selected open register are available to select. In addition, you must have assigned
the cashier to the tender key that you are selecting when you set up the tender
key. If you click the Copy Registers and Cashiers button on the Open Cashier
Offices page, the system automatically inserts the tender keys for each copied
cashier.

Cashiering Chapter 20
524 Copyright © 1988, 2010, Oracle and/or its affiliates. All Rights Reserved.
Deposit ID(deposit
identifier) This is an optional field to help you track your deposits. Enter the actual bank
deposit ID in this field for each tender key. If you do not balance by cashier, this
field is unavailable.
Opening Balance If you are balancing by cashier, enter an opening balance for each tender key. If
you do not balance by cashier, this field is unavailable.
Processing Cashiering Transactions
This section provides and overview of cashiering transactions, lists common elements, and discusses how to:
•Accept student payments.
•Allocate student payments to specific charges.
•Accept corporate payments.
•Allocate corporate payments to sponsored charges.
•Create third-party tracking information for corporate payments.
•Create department receipts.
•Cash checks.
•Process interim deposits.
•Replenish cash.
•Select exchange rates for cashiering transactions processed with foreign currency.
•Enter check information for cashiering transactions.
•Enter credit card information for cashiering transactions.
Understanding Cashiering Transactions
Using the Cashiering feature of Student Financials, you can process six types of cashiering transactions.
Type of Transaction Description
Student Payment A payment tendered by a student. Typically, the system
posts a student payment to the student's account.
However, a student payment can also represent the
purchase of an item (such as books or supplies). In this
case, the system may not necessarily post the payment
to the student's account.

Chapter 20 Cashiering
Copyright © 1988, 2010, Oracle and/or its affiliates. All Rights Reserved. 525
Type of Transaction Description
Corporate Payment A payment tendered by an external organization. The
system posts a corporate payment to the organization's
account.
Department Receipt A transfer of funds through the cashiering office to a
department's general ledger account.
Institutions often have offices or departments (such as
the housing office, the bookstore, and the athletics
office) that take in money on a daily basis or only at
certain times of the year. These departments often
deposit their funds through the cashiering office to
record their accounting information in the institution's
general ledger.
Cash Check An exchange of cash for a check tendered by a
customer.
Interim Deposit A withdrawal of funds from the cashier's drawer to be
deposited in the bank during the business day, while the
cashier is still open.
Most cashiering offices set limits on how much money
they want their cashiers' drawers to have in them. The
Cashiering feature enables you to set this limit on a
tender-specific basis on the Tender Key page. When one
of your cashiers' drawers reaches the set limit, you must
take tender out of the drawer so that you can deposit it
in the bank.
Cash Replenishment An addition of funds to a cashier's drawer during the
business day, while the cashier is still open, so that the
drawer does not run out of money.
Every time that you process one of these transactions, the Cashiering feature creates a receipt in the system.
These receipts enable you to track and organize your cashiering transactions.
Note. Both Student Payments and Corporate Payments support hosted payment transactions.
See: Student Financials 9.0 PeopleBook, Setting Up ePayment Processing
See: Student Financials 9.0 PeopleBook, Setting Up Cashiering, Defining the Transaction Setup of a
Cashiering Office
See Electronic Payment Integration Developer's Reference Guide. The guide is posted to My Oracle Support.

Cashiering Chapter 20
526 Copyright © 1988, 2010, Oracle and/or its affiliates. All Rights Reserved.
Pages Used to Process Cashiering Transactions
Page Name Definition Name Navigation Usage
Student Payments CSH_OFF_PMNT Student Financials,
Cashiering, Post Student
Payments, Student
Payments
Accept student payments in
hosted and non-hosted
payment modes.
Select Charges To Pay CSH_O_SPLITPAY_SEC Click the Select Charges to
Pay link on the Student
Payments page or the
Corporate Payments page.
Allocate student payments
to specific charges.
Corporate Payments CSH_OFF_ORG_PMNT Student Financials,
Cashiering, Post Corporate
Payments
Accept corporate payments
in hosted and non-hosted
modes.
Select Students to Pay QUICK_CSH_EMP_SEC Click the Select Students to
Pay link on the Corporate
Payments page.
Allocate corporate
payments to sponsored
charges.
Third Party Info (third-party
information)
ORG_CSH_3PARTYINF Click the Third Party Info
link on the Corporate
Payments page.
Create third-party tracking
information for corporate
payments.
Department Receipts CSH_OFF_DEPT Student Financials,
Cashiering, Collect
Department Receipts
Create department receipts.
Cash Checks CSH_OFF_CASH_CHECK Student Financials,
Cashiering, Cash Checks Cash checks.
Interim Deposits CSH_OFF_DEPOSIT Student Financials,
Cashiering, Cash
Management, Make Interim
Deposits, Interim Deposits
Process interim deposits.
Cash Replenishment CSH_OFF_REPLENISH Student Financials,
Cashiering, Cash
Management, Replenish
Cash, Cash Replenishment
Create a cash replenishment
when adding funds to a
cashiering drawer.
Currency Conversion QUICK_POST_CURR_SP Click the Currency Detail
link on the Student
Payments page, the
Corporate Payments page,
the Department Receipts
page, or the Cash Checks
page.
Select exchange rates for
cashiering transactions
processed with foreign
currency.

Chapter 20 Cashiering
Copyright © 1988, 2010, Oracle and/or its affiliates. All Rights Reserved. 527
Page Name Definition Name Navigation Usage
Check Information CSH_OFF_CHK_PMT_SP Click the Tender Details
link on the Student
Payments page, the
Corporate Payments page,
the Department Receipts
page, or the Cash Checks
page. This link accesses the
Check Information page
only if you select a check
tender in the Tender field.
Enter check information for
cashiering transactions.
Some of these details
appear on the receipt for
tracking and auditing
purposes.
Credit Card Information CSH_OFF_CC_PMT_SEC Click the Tender Details
link on the Student
Payments page, the
Corporate Payments page,
or the Department Receipts
page. This link accesses the
Credit Card Information
page only if you select a
credit card tender in the
Tender field of the
respective page and only for
non-hosted payments.
Enter credit card
information for cashiering
transactions for non-hosted
payments using Business
Interlink or Integration
Broker, but not for hosted
payments.
Some of these details
appear on the receipt for
tracking and auditing
purposes.
For the Department Receipt,
the credit card information
is only stored. It is not
processed by the third party
vendor. The credit card
authorization for the
Department Receipt must be
done outside of Campus
Solutions.
Accepting Student Payments
Access the Student Payments page (Student Financials, Cashiering, Post Student Payments, Student
Payments).
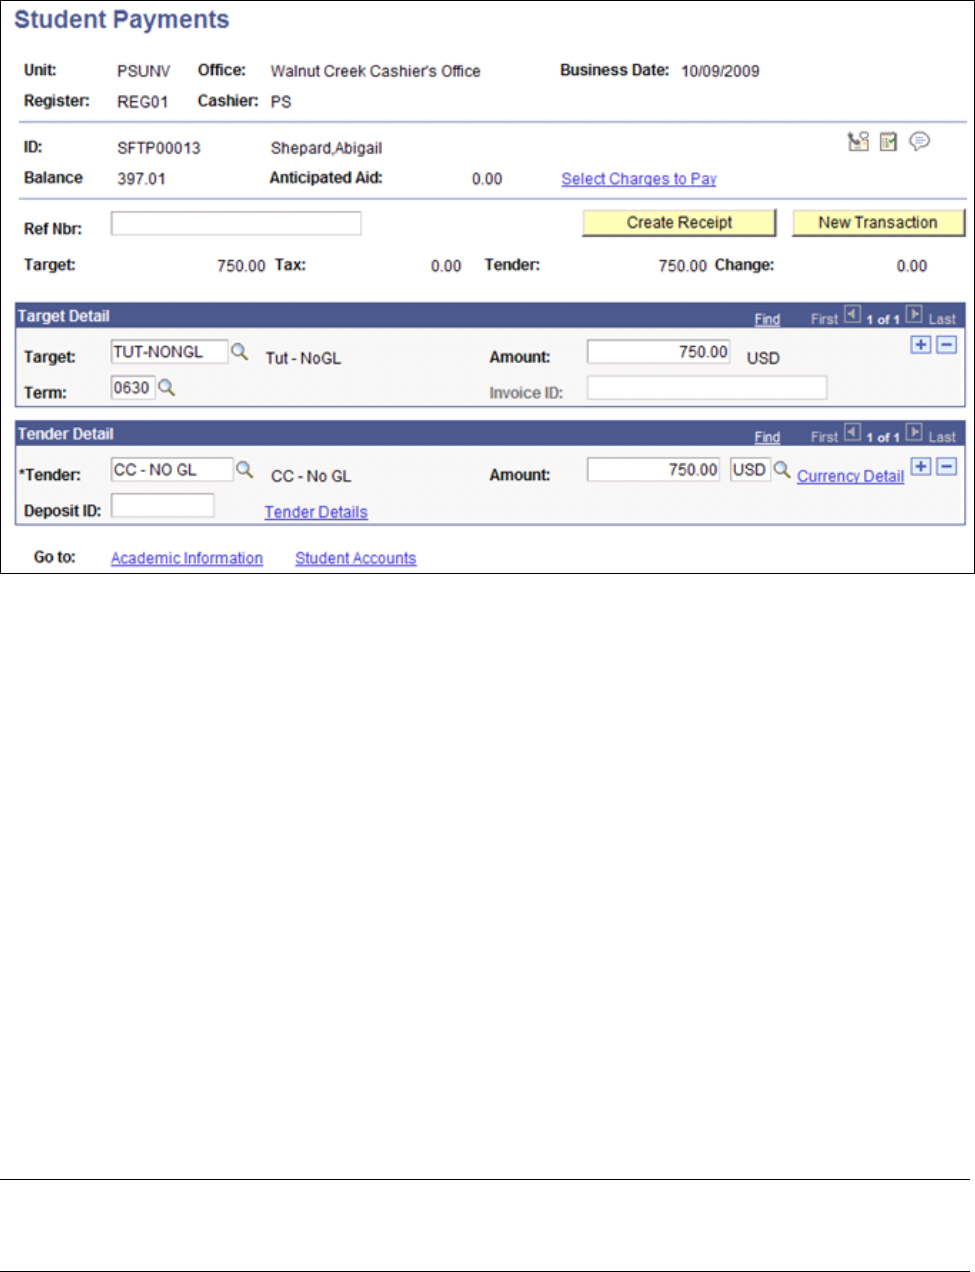
Cashiering Chapter 20
528 Copyright © 1988, 2010, Oracle and/or its affiliates. All Rights Reserved.
Student Payments page
You can process credit card payments on the Student Payments page using hosted payment or non-hosted
payment mode, depending on your setup.
See: Student Financials 9.0 PeopleBook, Setting Up ePayment Processing
See: Student Financials 9.0 PeopleBook, Setting Up Cashiering, Defining the Transaction Setup of a
Cashiering Office
See Electronic Payment Integration Developer's Reference Guide. The guide is posted to My Oracle Support.
The following documentation about the Student Payments page is based on non-hosted payment mode. For
information about hosted payment mode, see the Hosted Payment subsection later within this section of
documentation.
Select Charges to Pay Click to access the Select Charges to Pay page, where you can specify to which
charges to apply the payment to. You can pay only charges that are associated
with the target key that you select in the Target Detail group box. If you select
more than one target key in the Target Detail group box, the Select Charges to
Pay page is not available. If you select Apply Payments by Invoice on the SF
Installation 2 page, the Select Charges to Pay link cannot be used.
Note. The Target,Tax, Tender, and Change fields display the correct totals only after you click the Refresh
button. If you make a change to any of the fields in the Target Detail group box or the Tender Detail group
box, you must click the Refresh button for those changes to register in the display fields.

Chapter 20 Cashiering
Copyright © 1988, 2010, Oracle and/or its affiliates. All Rights Reserved. 529
Target Detail
Target Enter a target key for the student payment. You define target keys using the
Target Keys component (TARGET_KEYS).
If the target key that you select is associated with a tax authority, the system
automatically inserts an additional target key for the tax. This is the secondary
target key that you designated for the tax authority when you assigned the tax
authority to the primary target key during target key setup.
Note. Restrict payment by invoice
If your institution specifies that it will apply payments by invoice, you can
restrict payments to an invoice. When the target key is associated with an invoice
cash or check payment, the cashier can restrict or select an invoice for which the
payment is applied. The Restricted by Invoice label appears if Apply Payments
by Invoice is selected on the SF Installation 2 page and the Cashier Target key is
defined as Post.
Amount Enter the target amount. The system populates this field automatically if you
specify a default amount when you define the selected target key. If necessary,
you can override the target amount to match the amount that the student tenders
for payment.
If the system automatically inserts a tax target key, it supplies the appropriate
target amount.
Term Enter the term to be associated with this payment. This defines the current term
to be used in the payment allocation rules. If this field is left blank, the term will
be derived from the option selected on the SF Business Unit>Posting
Setup>Default Term Control field.
Tender Detail
You can create student payments with both cash and check tenders, but credit card tender payments must be
processed separately from other tenders. For example, a student has charges for tuition, books, and housing in
the amount of 1,465 USD. The student pays 1,000 USD by credit card, 400 USD by check, and 65 USD by
cash. Using two tender types, you can combine the check and cash payments into a single student payment for
465 USD, but you must create a separate student payment for the 1,000 USD credit card payment. This is
necessary because when the system applies a student payment made with a credit card, it associates the
payment with a payment reference number that it uses for processing. This reference number is particularly
important when you are issuing refunds for credit card payments.
See Chapter 17, "Refunding Customers," Creating Student Refunds, page 445.
See Chapter 17, "Refunding Customers," Distributing Refunds to ePayment Accounts, page 461.

Cashiering Chapter 20
530 Copyright © 1988, 2010, Oracle and/or its affiliates. All Rights Reserved.
Tender This information applies if you use non-hosted payment mode.
Select a value to identify the method of payment that the student is using. If you
enter check or credit card, the Check Information page or Credit Card
Information page appear automatically.
You can also access these pages by clicking the Tender Details link.
Note. For information about the hosted payment process, refer to the Hosted
Payment section.
Amount Enter the amount tendered. If you selected a target key with a default amount, the
system automatically supplies that default tender amount. In addition, if you click
the Refresh button or the Create Receipt button without entering a tender amount,
the system automatically populates this field with the amount that you specified
for the target. If the currency tendered is not the base currency that you selected
during the setup of your cashiering office, select the correct currency in the field
to the right of the Amount field.
Currency Detail If the student tenders foreign currency for the payment, click this link to access
the Currency Conversion page, where you select the method that the system uses
to convert the currency.
Deposit ID If you assigned a deposit ID to the selected tender key when you opened the
cashiering office, it appears in this field.
Tender Details This information applies if you use non-hosted mode.
If you select a check tender as the tender key, click this link to access the Check
Information page, where you enter specific information about the check tendered.
If you select a credit card tender as the tender key, click this link to access the
Credit Card Information page, where you enter specific information about the
credit card used.
For information about these pages refer to the Entering Credit Card Information
for Cashiering Transactions and Entering Credit Card Information for
Cashiering Transactions later in this chapter.
Some of the tender details that you enter appear on your receipts for tracking and
auditing purposes.
Note. For information about the hosted payment process, refer to the Hosted
Payment section.
Message When you create a receipt for a credit card payment and you authorize the
payment in real time, the Message field displays the status of the transaction.
Using the Go to Links
Academic Information Click to access the Academic Information page, where you can view a student's
personal and academic information.

Chapter 20 Cashiering
Copyright © 1988, 2010, Oracle and/or its affiliates. All Rights Reserved. 531
Student Account Click to access the Customer Accounts page, where you can view a student's
account information.
View Anticipated Aid Click to access the Anticipated Aid Details page, where you can view details
about the financial aid that the student is anticipated to receive. This link appears
on the page only if the student has anticipated financial aid.
Using the Student Payment Buttons
Calculate Tuition Click to calculate tuition for the student making the payment. This button is
available only if you select the Auto Calculate Tuition check box on the Tuition
Calculation Controls page.
Create Receipt, Print
Receipt, and Create and
Print Receipt
Note. For information about the hosted payment process, refer to the Hosted
Payment section.
The label and functionality of this button changes according to the automatic
receipt printing setup of your valid cashiers and valid registers.
If you are not printing automatically, the label of this button is Create Receipt.
Click it to create a receipt for the student payment. If you set up your cashiering
office for no posting delay, the system posts the payment. Depending on the
setup of the SF merchant ID assigned to your cashiering office, this button may
also trigger the authorization and capture of any student payments that are made
with a credit card.
When you click the Create Receipt button, the label changes to Print Receipt.
Click it to print the receipt using Forms Engine. Forms Engine generates the
receipt and sends it to the appropriate printer as specified on the Valid Registers
page.
If you are printing automatically, the label of this button is Create and Print
Receipt. Click it to simultaneously create the receipt and print it using Forms
Engine.
Note. If your institution specifies that it will apply payments by invoice, the
Receipt Detail page will indicate an invoice number.
Note. If you select Delay posting or Group Post in the Posting field during the
setup of your cashiering office, the system does not post the student payment
when you click the Create Receipt button. You must post your payments using
the Post Receipts page if you selected Delay posting or the Group Posting page if
you selected Group Post.
Note. If you do not select the Use Forms Engine for Receipts check box on the
Cashiering Offices page, click the Print Receipt button or the Create and Print
Receipt button to create a printable receipt using the specified print product
(Crystal or other print method). In this case, you must navigate to Report
Manager to view and print the receipt.
Cashiering Chapter 20
532 Copyright © 1988, 2010, Oracle and/or its affiliates. All Rights Reserved.
New Transaction After you create a receipt, click to return to the Student Payments dialog page to
process another student payment.
Declined Credit Card
In non-hosted payment mode, if a credit card is declined, the Create Receipt button label becomes the Re-
create Receipt button. You cannot make changes to the tender type—in the Tender Detail group box, the
Tender field is not available for edit and the Add and Delete row buttons are not available. You have 2
options:
•Click the New Transaction button to create a new receipt.
•Change the credit card details by selecting the Tender Details link, and then clicking the Re-create
Receipt button from the receipt page.
For information about hosted payment mode, refer to the Hosted Payment section.
Hosted Payment
Tender For hosted payments, when you select credit card as the tender, the Credit Card
Information page does not appear. Instead, you should ensure that the receipt is
complete and then click on the Tender Details link to access the third party
hosted site and enter credit card details. Clicking the Tender Details link causes
the receipt details to be validated and invokes the ePayment API using the
SF_PMT_REF_NBR as the merchant reference. The API retrieves the Cashier
payment details using Cashiering application classes, and transfers control to the
third party host. Alternatively, you can click the Create Receipt button to start the
same processing.
Input credit card details on the third party hosted site page.
Fields that appear on the third party page might be configurable, depending on the level of customization that
the third party allows.
If you click Cancel, you are taken back to the Receipt page on which a message appears advising that the
payment has been cancelled. The receipt cannot be used and you must start a new transaction.
If you click Continue you return to the Student Payments page where you can authorize payment. Click the
Authorize and Print button to change the SF_PAYMENT status to Submitted and invoke the ePayment API
to authorize the payment. The authorization results, credit card type, and last 4 digits of the credit card are
saved in the SF_PAYMENT record and the Receipt record.
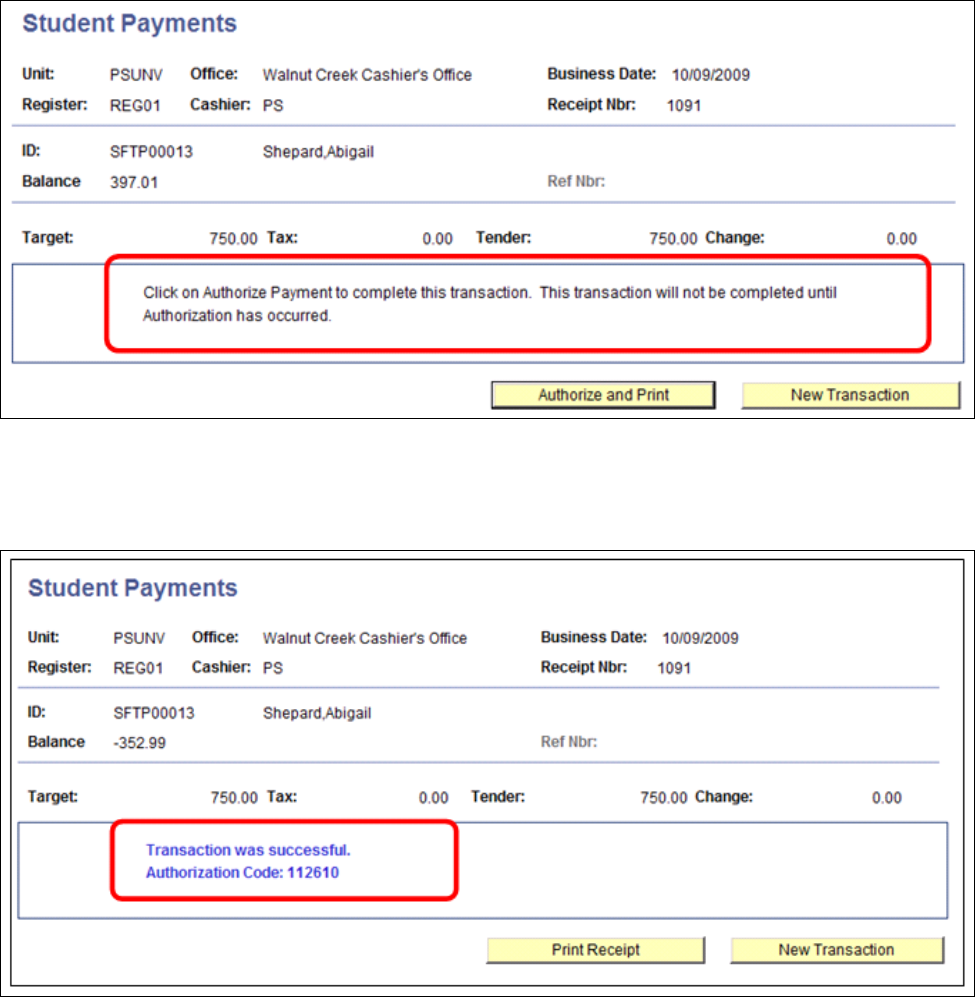
Chapter 20 Cashiering
Copyright © 1988, 2010, Oracle and/or its affiliates. All Rights Reserved. 533
Student Payments page — Authorize Transactions
If the authorization is successful, the Receipt page appears:
Student Payments page — Receipt
If the credit card is declined, the Student Payments page appears with a message: Transaction was declined.
New Transaction If you click this button, you are taken to the Student Post search page, with the
assumption that a new receipt will be created. A new SF_PAYMENT record is
created with the receipt number and an Initiated status.
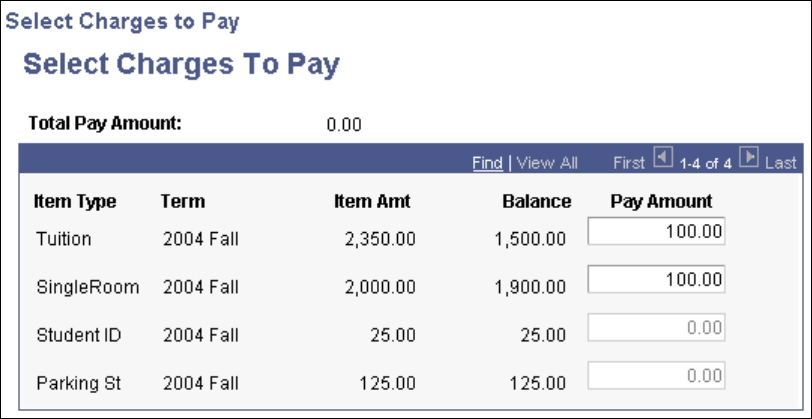
Cashiering Chapter 20
534 Copyright © 1988, 2010, Oracle and/or its affiliates. All Rights Reserved.
Allocating Student Payments to Specific Charges
Access the Select Charges To Pay page (click the Select Charges to Pay link on the Student Payments page or
the Corporate Payments page).
Select Charges To Pay page
Pay Amount Enter the amount that you want to pay toward the item on the student's account.
Remember that you can select only charges associated with the target key that
you select in the Target Detail group box on the Student Payments page or the
Corporate Payments page. This field is unavailable for all other items on a
student's account.
After you select your charges to pay and click the OK button, the fields in the Target Details group box on the
Student Payment page become unavailable.
Accepting Corporate Payments
Access the Corporate Payments page (Student Financials, Cashiering, Post Corporate Payments).
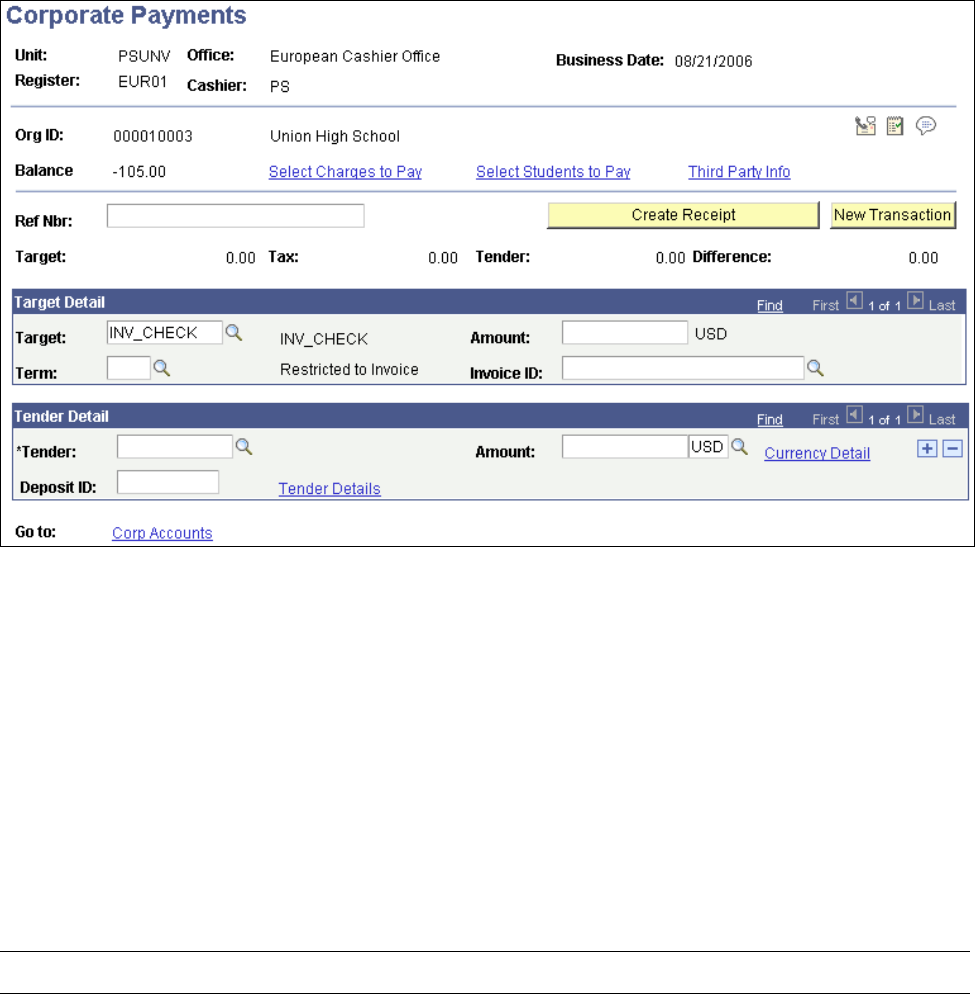
Chapter 20 Cashiering
Copyright © 1988, 2010, Oracle and/or its affiliates. All Rights Reserved. 535
Corporate Payments page.
You can process credit card payments on the Corporate Payments page using hosted payment or non-hosted
payment mode, depending on your setup.
See: Student Financials 9.0 PeopleBook, Setting Up ePayment Processing
See: Student Financials 9.0 PeopleBook, Setting Up Cashiering, Defining the Transaction Setup of a
Cashiering Office
The following documentation about the Corporate Payments page is based on non-hosted payment mode. For
information about hosted payment mode, see the Hosted Payment section in the Student Payments page
documentation.
With the exception of the following three links, this page is identical to the Student Payments page.
Note. The following links cannot be used if the institution uses Apply Payments by Invoice.
Select Students to Pay Click to access the Select Students to Pay page, where you can specify the
sponsored charges to which the system applies the corporate payment.
Third Party Info (third-
party information) Click to access the Third Party Info page, where you can enter tracking
information if your corporate payment is associated with a third-party contract.
Corp Account (corporate
account) Click to access the Corporate Accounts page, where you can view the account
information of a corporation.
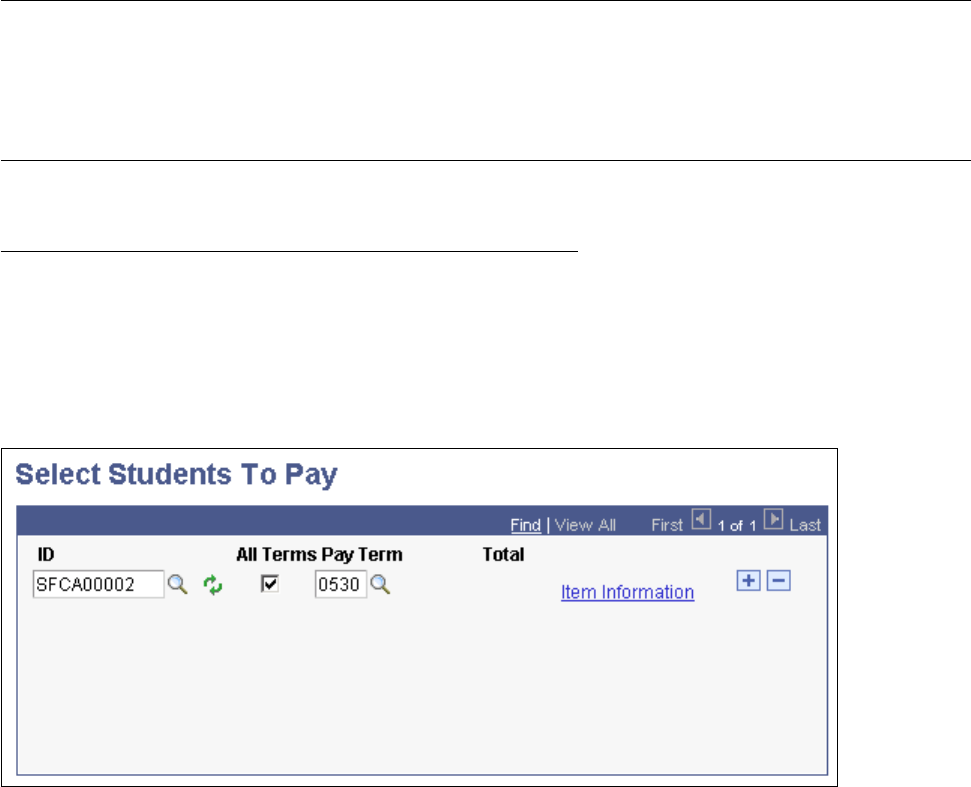
Cashiering Chapter 20
536 Copyright © 1988, 2010, Oracle and/or its affiliates. All Rights Reserved.
Note. Restrict payment by invoice.
If your institution specifies that it will apply payments by invoice, you can restrict payments to an invoice.
When the target key is associated with an invoice cash or check payment, the cashier can restrict or select an
invoice for which the payment is applied. The Restricted by Invoice label appears if Apply Payments by
Invoice is selected on the SF Installation 2 page and the Cashier Target key is defined as Post.
See Also
Chapter 20, "Cashiering," Accepting Student Payments, page 527
Allocating Corporate Payments to Sponsored Charges
Access the Select Students Pay page (click the Select Students to Pay link on the Corporate Payments page).
Select Students to Pay page
ID Enter the ID of the student whose charges the organization wants to pay. Only
students included in the organization's third-party contract are available in the
pick list.
All Terms Select to apply the corporate payment to every term in which the sponsored
student has a charge. If you select this check box, you cannot select a specific
pay term.
Pay Term If you do not select the All Terms check box, use this field to apply the corporate
payment to sponsored student charges that are associated with only one specific
term.
Total This field displays the total amount of the sponsored student's charges to which
the system can apply the corporate payment.
EmplID Org Detail
(employee ID
organization detail)
Click to access the Item Information page, where you can view the specific
sponsored charges of the selected student.
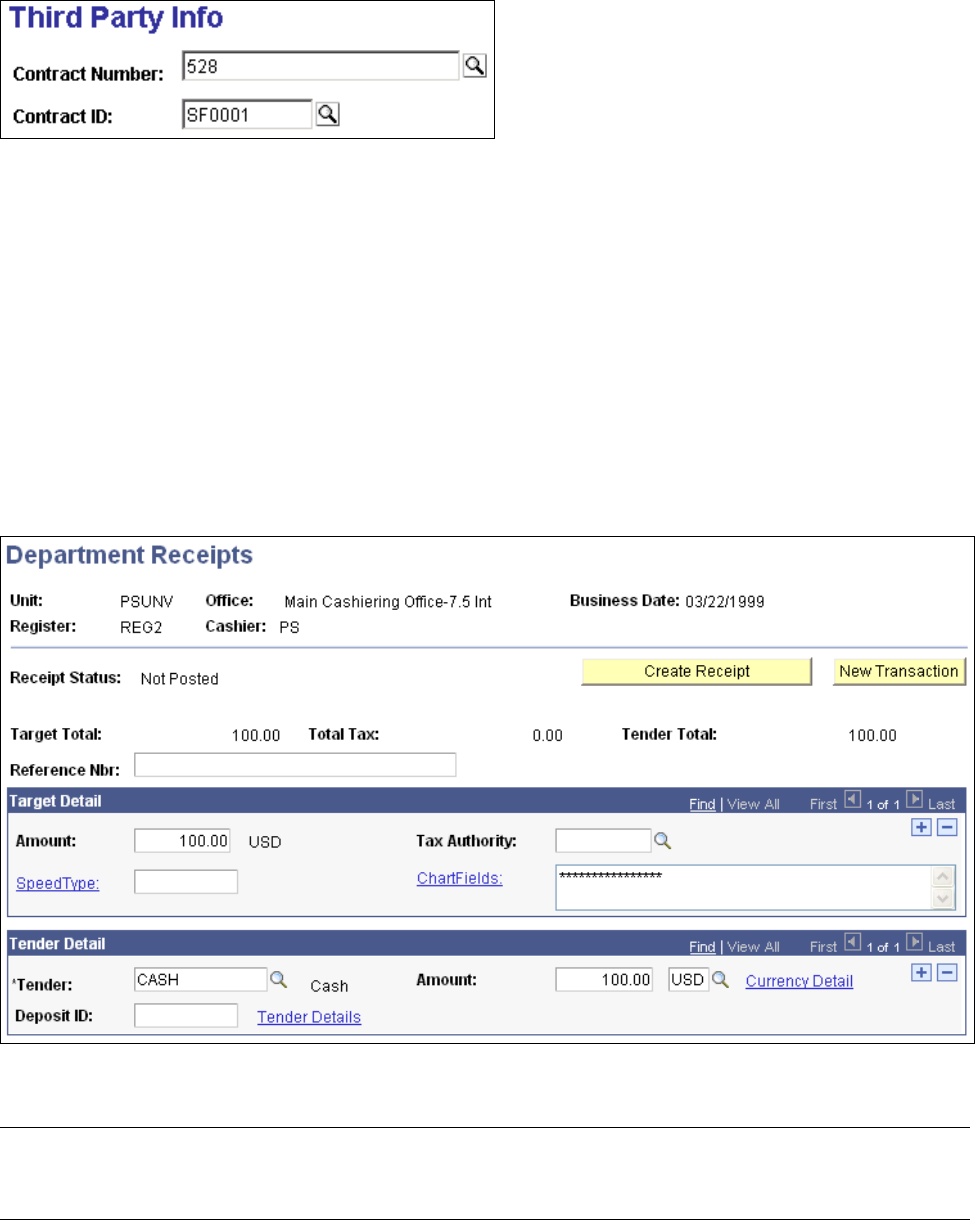
Chapter 20 Cashiering
Copyright © 1988, 2010, Oracle and/or its affiliates. All Rights Reserved. 537
Creating Third-Party Tracking Information for Corporate Payments
Access the Third Party Info page (click the Third Party Info link on the Corporate Payments page).
Third Party Info page
Contract Number Enter the number of the third-party contract that you want to associate with this
corporate payment.
Contract ID Enter the student ID of the third-party contract member that you want to
associate with the corporate payment.
Creating Department Receipts
Access the Department Receipts page (Student Financials, Cashiering, Collect Department Receipts).
Department Receipts page
Note. If your institution does not use PeopleSoft General Ledger or Oracle General Ledger, the Ext GL
Chartfield (external general ledger ChartField) field appears in the Target Detail group box instead of the
standard ChartFields.
Cashiering Chapter 20
538 Copyright © 1988, 2010, Oracle and/or its affiliates. All Rights Reserved.
Receipt Status The system displays the status of the department receipt in this field. Before you
click the Create Receipt button, this field displays the Not Posted value. After
you click the Create Receipt button, the value changes to Processed if approval
of the department receipt is not required. If approval is required, the value
changes to Pending when you click the Create Receipt button.
ChartFields Click this link to select the chart of accounts to which your department receipt
posts or enter the ChartField values in the display field.
Target Detail
Instead of specifying a target key as you do for student and corporate payments, you must select the chart of
accounts to which your department receipt posts. In addition, if tax is associated with the department receipt,
you must manually add a target row for the tax and specify its tax authority. For example, if you were
processing a department receipt for 550 USD, of which 50 USD were tax, you would enter two target rows.
The first nontax target row would be for 500 USD. The second tax target row would be for 50 USD.
Tax Authority Enter the tax authority that is associated with the amount of tax that you are
including in the department receipt. You select a tax authority for the tax target
row only.
Amount Enter the monetary amount for the target.
ChartFields Click to select the chart of accounts to which your department receipt posts.
Click the SpeedType field to enter a SpeedType, which is a predefined set of
ChartFields for a department your cashiering office works with regularly. After
you enter the SpeedType, the system automatically populates the appropriate
general ledger fields.
Tender Detail
Tender Enter the type of tender being used for the department receipt.
Amount Enter the amount of tender for the department receipt.
Currency Detail If the department receipt involves foreign currency, click this link to access the
Currency Conversion page, where you select the method that the system uses to
convert the currency.
Deposit ID If you assigned a deposit ID to the selected tender key when you opened the
cashiering office, it appears in this field.

Chapter 20 Cashiering
Copyright © 1988, 2010, Oracle and/or its affiliates. All Rights Reserved. 539
Tender Details If you enter a check tender as the tender key, click this link to access the Check
Information page where you enter specific information about the check tendered.
If you select a credit card tender as the tender key, click this link to access the
Credit Card Information page, where you enter specific information about the
credit card used.
For the Department Receipt, the credit card information is only stored. It is not
processed by the third party vendor. The credit card authorization for the
Department Receipt must be done outside of Campus Solutions.
Using the Department Receipt Buttons
Create Receipt, Print
Receipt and Create and
Print Receipt
The label and functionality of this button changes according to the automatic
receipt printing setup of your valid cashiers and valid registers.
If you are not printing automatically, the label of this button is Create Receipt.
Click it to create a department receipt.
When you click the Create Receipt button, the label changes to Print Receipt.
Click it to print the receipt using Forms Engine. Forms Engine generates the
receipt and sends it to the appropriate printer as specified on the Valid Registers
page.
If you are printing automatically, the label of this button is Create and Print
Receipt. Click it to simultaneously create the receipt and print it using Forms
Engine.
Note. If you do not select the Use Forms Engine for Receipts check box on the
Cashiering Offices page, click the Print Receipt button or the Create and Print
Receipt button to create a printable receipt using the specified print product
(Crystal or other print method). In this case, you must navigate to Report
Manager to view and print the receipt.
New Transaction After you create a receipt, click this button to return to the Department Receipts
dialog page so that you can process another department receipt.
See Also
Chapter 2, "Completing Student Financials General Setup," Setting Up Tax Authorities and Tax Codes, page
34
Chapter 4, "Setting Up GL Interface Processing," (Optional) Creating ChartField SpeedType Keys, page 127
Cashing Checks
Access the Cash Checks page (Student Financials, Cashiering, Cash Checks).
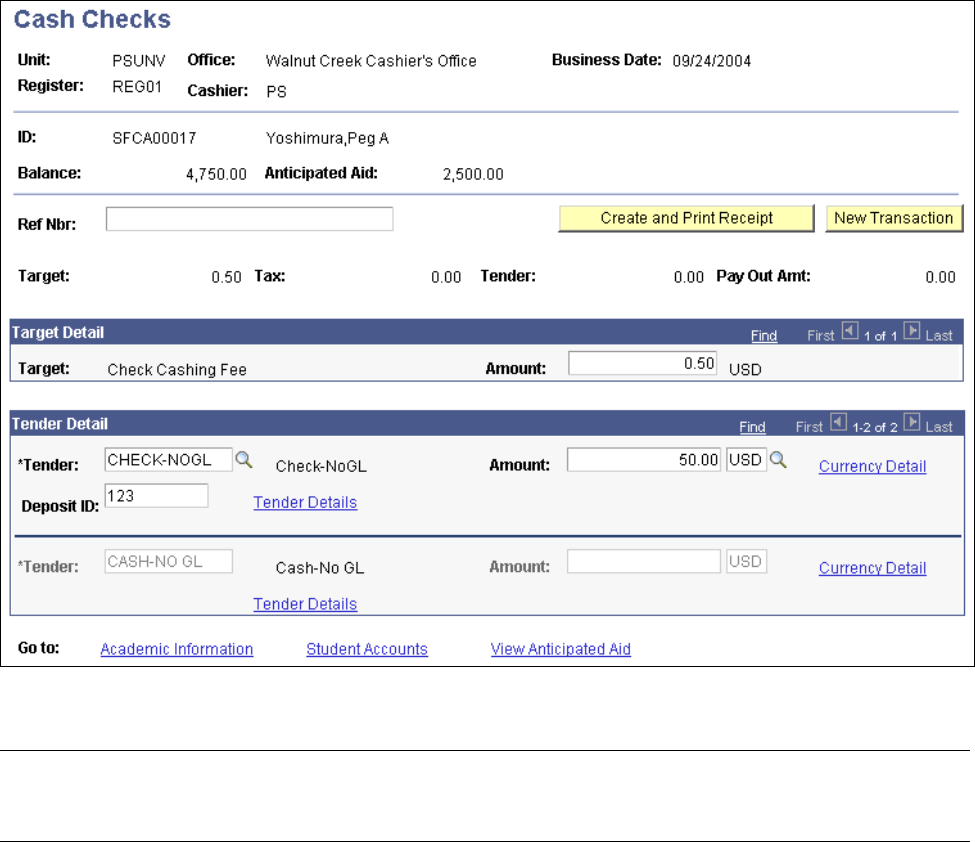
Cashiering Chapter 20
540 Copyright © 1988, 2010, Oracle and/or its affiliates. All Rights Reserved.
Cash Checks page
Note. The Target,Tax,Tender, and Pay Out Amt fields display the correct totals only after you click the
Refresh button. If you make a change to any of the fields in the Target Detail group box or the Tender Detail
group box, you must click the Refresh button for those changes to register in the display fields.
Target Detail
Target The system automatically selects the Check Cashing Fee target key. If you set up
your check-cashing target key to tax the check-cashing fee, the system
automatically inserts an additional target key for the tax.
Amount The system populates this field automatically with the check-cashing fee that you
specified for the cashiering office. The cashier can override the default check-
cashing fee.
If the system automatically inserts a tax target key, it supplies the appropriate
target amount.
Chapter 20 Cashiering
Copyright © 1988, 2010, Oracle and/or its affiliates. All Rights Reserved. 541
Tender Detail
Tender Enter a check tender. If you press Tab to move out of this field, the system
accesses the Check Information page.
Amount Enter the amount of the check being cashed. If the currency tendered is not the
base currency that you selected during the setup of your cashiering office, select
the correct currency in the field to the right of the Amt field.
Currency Detail If the student tenders foreign currency for the payment, click this link to access
the Currency Conversion page, where you select the method that the system uses
to convert the currency.
Deposit ID If you assigned a deposit ID to the check tender key when you opened the
cashiering office, it appears in this field.
Tender Details Click to access the Check Information page, where you enter specific information
about the check tendered.
Using the Go to Links
Student Accounts Click to access the Student Accounts page, where you can view a student's
account information.
Academic Information Click to access the Student Personal Information page, where you can view a
student's personal and academic information.
View Anticipated Aid Click to access the Anticipated Aid Details page, where you can view details
about the financial aid the student is anticipated to receive. This link appears on
the page only if the student has anticipated financial aid.
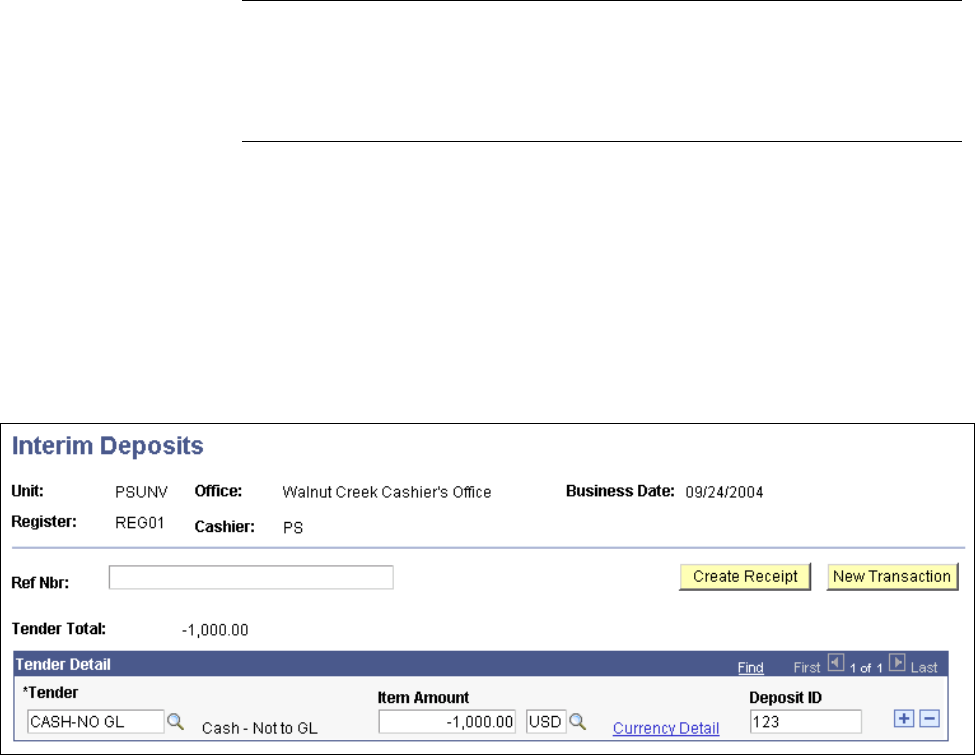
Cashiering Chapter 20
542 Copyright © 1988, 2010, Oracle and/or its affiliates. All Rights Reserved.
Using the Cash Check Buttons
Create Receipt, Print
Receipt and Create and
Print Receipt
The label and functionality of this button changes according to the automatic
receipt printing setup of your valid cashiers and valid registers.
If you are not printing automatically, the label of this button is Create Receipt.
Click it to create a receipt for the cashed check.
When you click the Create Receipt button, the label changes to Print Receipt.
Click it to print the receipt using Forms Engine. Forms Engine generates the
receipt to the appropriate printer as specified on the Valid Registers page.
If you are printing automatically, the label of this button is Create and Print
Receipt. Click it to simultaneously create the receipt and print it using Forms
Engine.
Note. If you do not select the Use Forms Engine for Receipts check box on the
Cashiering Offices page, click the Print Receipt or Create and Print Receipt
button to create a printable receipt using the specified print product (Crystal or
other print method). In this case, you must navigate to Report Manager to view
and print the receipt.
New Transaction After you create a receipt, click to return to the Cash Checks dialog page to cash
another check.
Processing Interim Deposits
Access the Interim Deposits page (Student Financials, Cashiering, Cash Management, Make Interim
Deposits, Interim Deposits).
Interim Deposits page
Tender Detail
Tender Enter the type of tender that you are removing from the drawer.
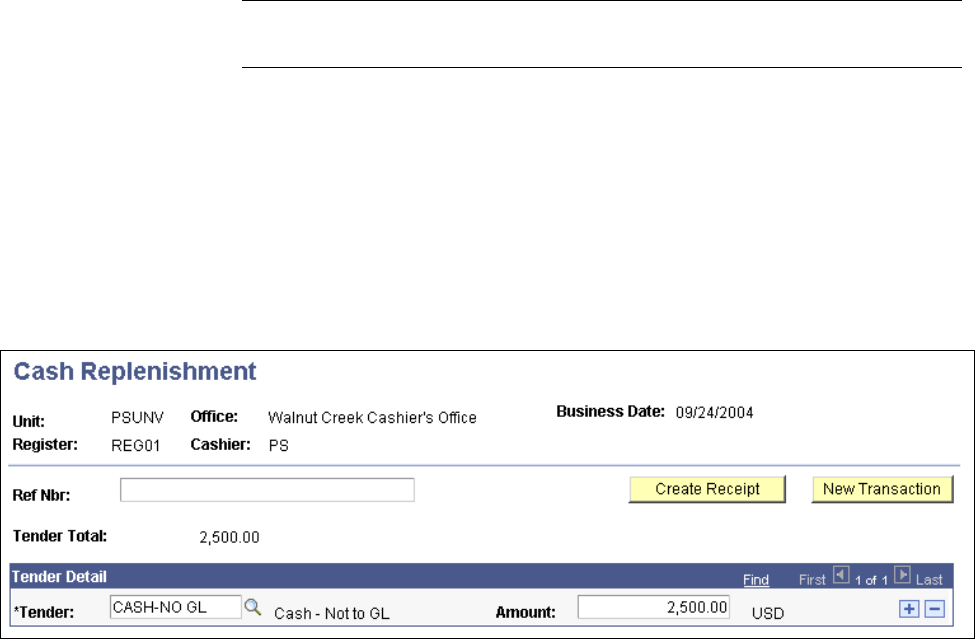
Chapter 20 Cashiering
Copyright © 1988, 2010, Oracle and/or its affiliates. All Rights Reserved. 543
Item Amount Enter the amount of tender that you are removing from the drawer. Remember
that because you are removing tender from the drawer, you must enter a negative
value in this field.
Currency Detail If you are removing foreign currency from the drawer, click this link to access
the Currency Conversion page, where you select the method that the system uses
to convert the currency.
Deposit ID If you assigned a deposit ID to the selected tender key when you opened the
cashiering office, it appears in this field.
Using the Interim Deposit Buttons
Create Receipt Click to create a receipt for the interim deposit. When you click the Create
Receipt button, it becomes unavailable and the Print Receipt button appears.
Print Receipt Click to create a report of the receipt that you just created. This button appears
only after you click the Create Receipt button.
Note. You must use the Report Manager to view the report created when you
click the Print Receipt button.
New Transaction After you have created a receipt, click this button to return to the Interim
Deposits dialog page so that you can process another interim deposit.
Replenishing Cash
Access the Cash Replenishment page (Student Financials, Cashiering, Cash Management, Replenish Cash,
Cash Replenishment).
Cash Replenishment page
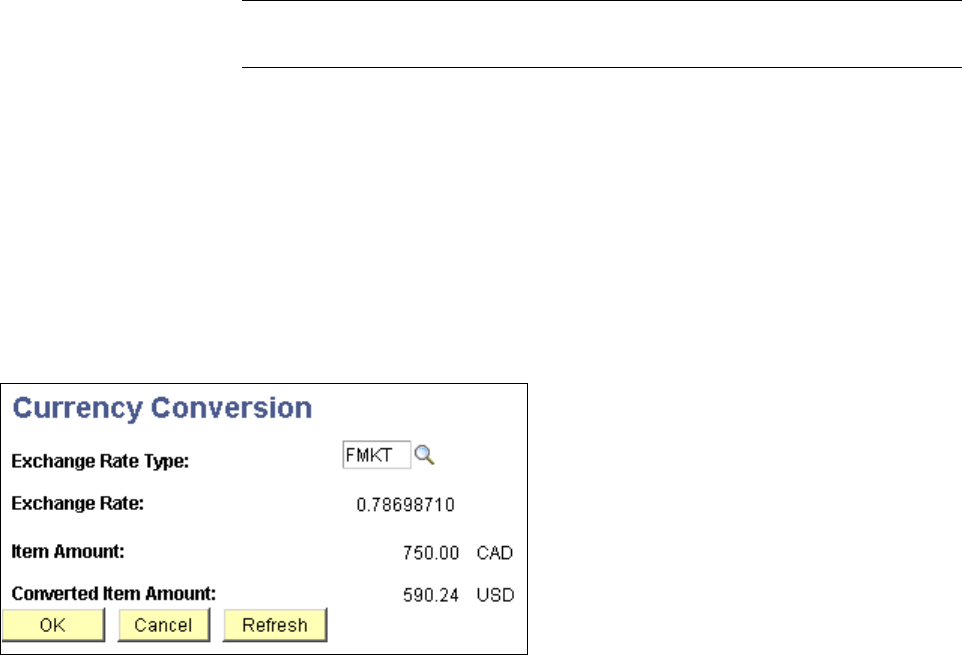
Cashiering Chapter 20
544 Copyright © 1988, 2010, Oracle and/or its affiliates. All Rights Reserved.
Tender Detail
Tender Enter the tender key that you have set up for cash payments.
Amount Enter the amount of cash that you are adding to the drawer.
Using the Cash Replenishment Buttons
Create Receipt Click to create a receipt for the cash replenishment. When you click the Create
Receipt button, it becomes unavailable and the Print Receipt button appears.
Print Receipt Click to create a report of the receipt that you just created. This button appears
only after you click the Create Receipt button.
Note. You must use the Report Manager to view the report created when you
click the Print Receipt button.
New Transaction After you create a receipt, click to return to the Cash Replenishment dialog page
so that you can process another cash replenishment.
Selecting Exchange Rates for Cashiering Transactions Processed with
Foreign Currency
Access the Currency Conversion page (click the Currency Detail link on the Student Payments page, the
Corporate Payments page, the Department Receipts page, or the Cash Checks page).
Currency Conversion page
Exchange Rate Type Enter the type of exchange rate that you want the system to use to convert the
foreign currency.
Item Amount This field displays the amount of foreign currency that is tendered to the cashier.
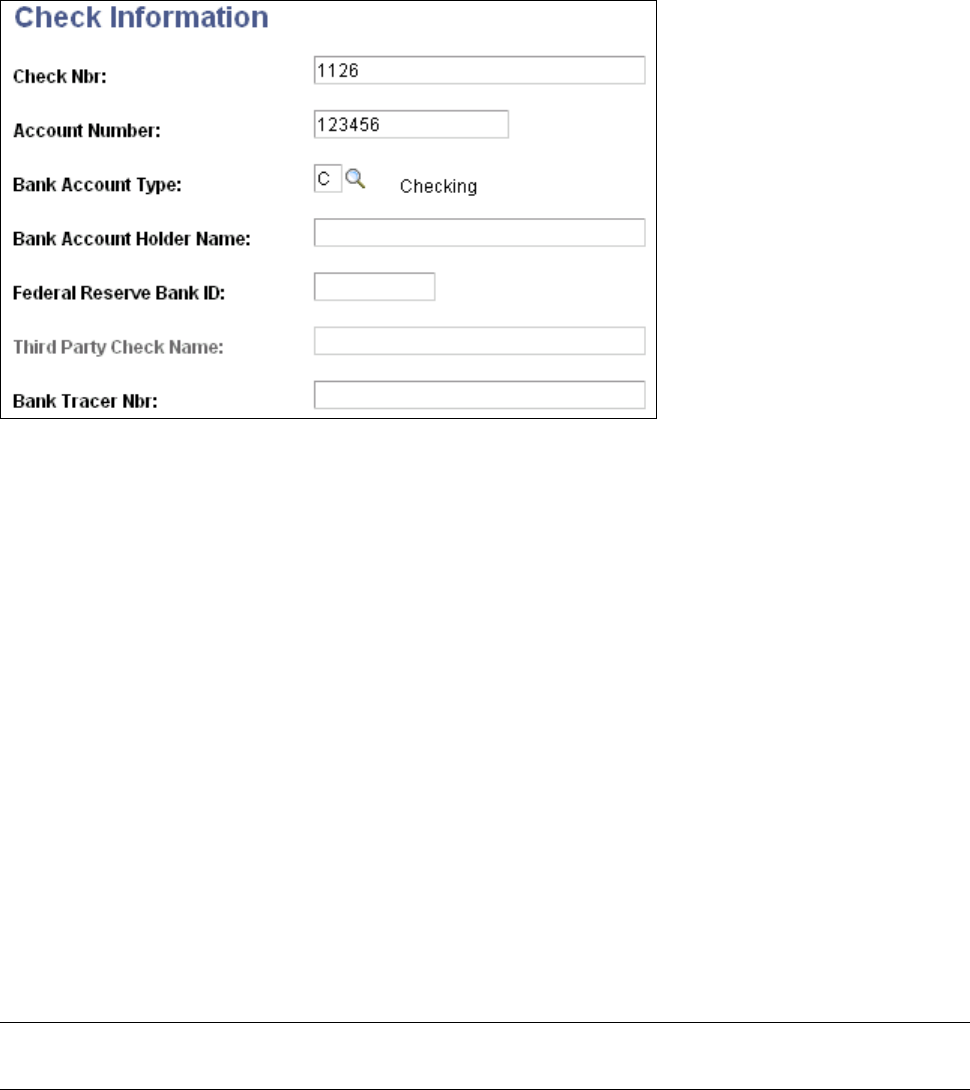
Chapter 20 Cashiering
Copyright © 1988, 2010, Oracle and/or its affiliates. All Rights Reserved. 545
Converted Item Amount This field displays the amount after the system converts the foreign currency to
your base currency.
Entering Check Information for Cashiering Transactions
Access the Check Information page (click the Tender Details link on the Student Payments page, the
Corporate Payments page, the Department Receipts page, or the Cash Checks page).
Check Information page
Check Nbr (check
number) Enter the check number as printed on the check.
Account Number Enter the customer's bank account number.
Bank Account Type Enter the type of account, C (checking) or S (savings).
Bank Account Holder
Name Enter the name of the person on the account.
Federal Reserve Bank
ID If you know the Federal Reserve Bank ID of the bank issuing the check, enter it
here.
Third Party Check
Name This field is available only if the tender category of the tender that you select on
the Student Payments page is Third Party Check. Use this field to enter the name
of the third party making the payment on the student's behalf.
Bank Tracer Nbr (bank
tracer number) Enter any information in this optional field to track or characterize the
transaction.
Note. All of the fields on the Check Information page are optional and enable you to more easily track your
check information. Some of the field values appear on your printed receipts.
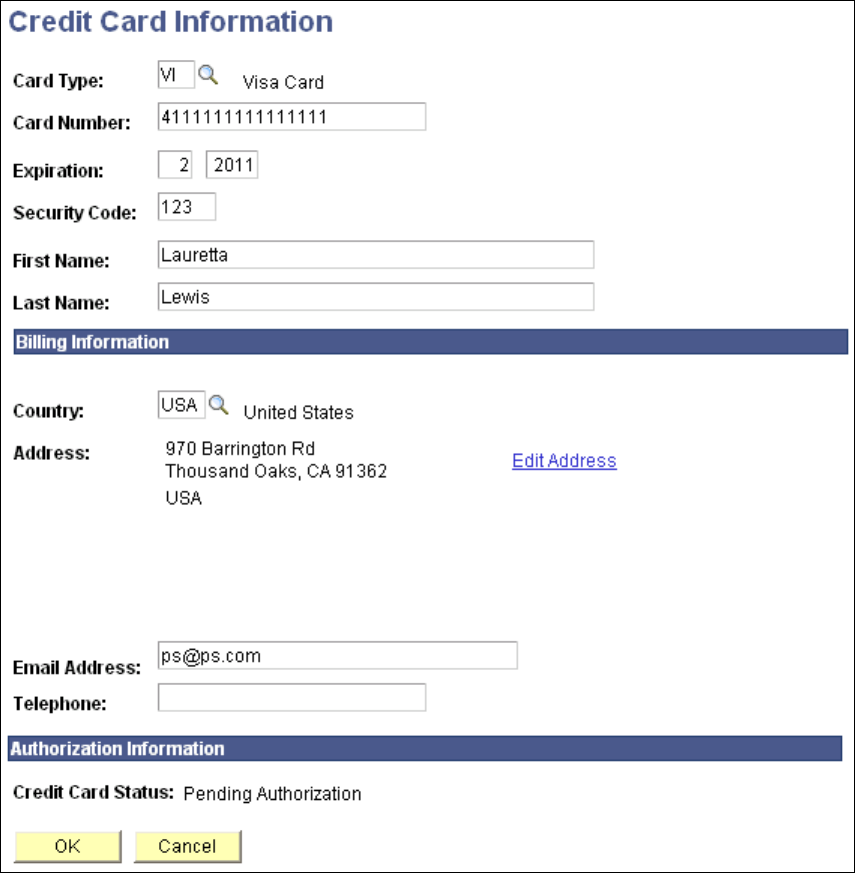
Cashiering Chapter 20
546 Copyright © 1988, 2010, Oracle and/or its affiliates. All Rights Reserved.
Entering Credit Card Information for Cashiering Transactions
This section applies only if you use non-hosted payment mode.
Access the Credit Card Information page (click the Tender Details link on the Student Payments page, the
Corporate Payments page, or the Department Receipts page).
Access the Credit Card Information page.
Credit Card Information page
Card Type Enter the type of credit card used for the transaction. This field is required.

Chapter 20 Cashiering
Copyright © 1988, 2010, Oracle and/or its affiliates. All Rights Reserved. 547
Card Number Enter the credit card number as it appears on the credit card. This field is
required.
Note. Credit card numbers do not appear on the printed receipts.
Expiration Enter the expiration date of the credit card. This field is required.
Security Code Enter the Security Code that is located on the credit card.
The Security Code is a security feature for "card not present" transactions such as
Internet transactions.
The Security Code field is available if the Security Code Required check box is
selected on the SF Merchants page.
Note. Security Code is supported for hosted payment mode and Integration
Broker. It is not supported through Business Interlink.
See Chapter 3, "Setting Up ePayment Processing," Setting Up SF Merchants,
page 100.
First Name Enter the first name of the credit card holder as it appears on the credit card. If
you accessed the Credit Card Information page from the Student Payment page,
the default value for this field is the first name of the student making the
payment. This field is required.
Last Name Enter the last name of the credit card holder as it appears on the credit card. If
you accessed the Credit Card Information page from the Student Payment page,
the default value for this field is the first name of the student making the
payment. This field is required.
Bank Tracer Nbr (bank
tracer number) Enter any information in this optional field to track or characterize the
transaction.
Billing Information
Enter the billing information of the student or organization making the payment.
Note. If you use the third-party vendor business interlink for credit card processing of student payments, you
must enter an email address and telephone number. Also, if the SF merchant ID associated with your
cashiering office requires address verification, the billing address that you enter here must match the billing
address recorded for the credit card; otherwise, the transaction will be denied.
Authorization Information
This group box displays the authorization details received from the third-party credit card processing vendor.
Prior to a user authorizing the payment, the only field appearing in this group box is the Credit Card Status
(credit card authorization status) field. After you authorize the transaction, the system displays the Reference
Nbr (reference number), Authorization Reply,Auth Code (authorization code), Auth DTTM (authorization
datetime), and Request ID fields.
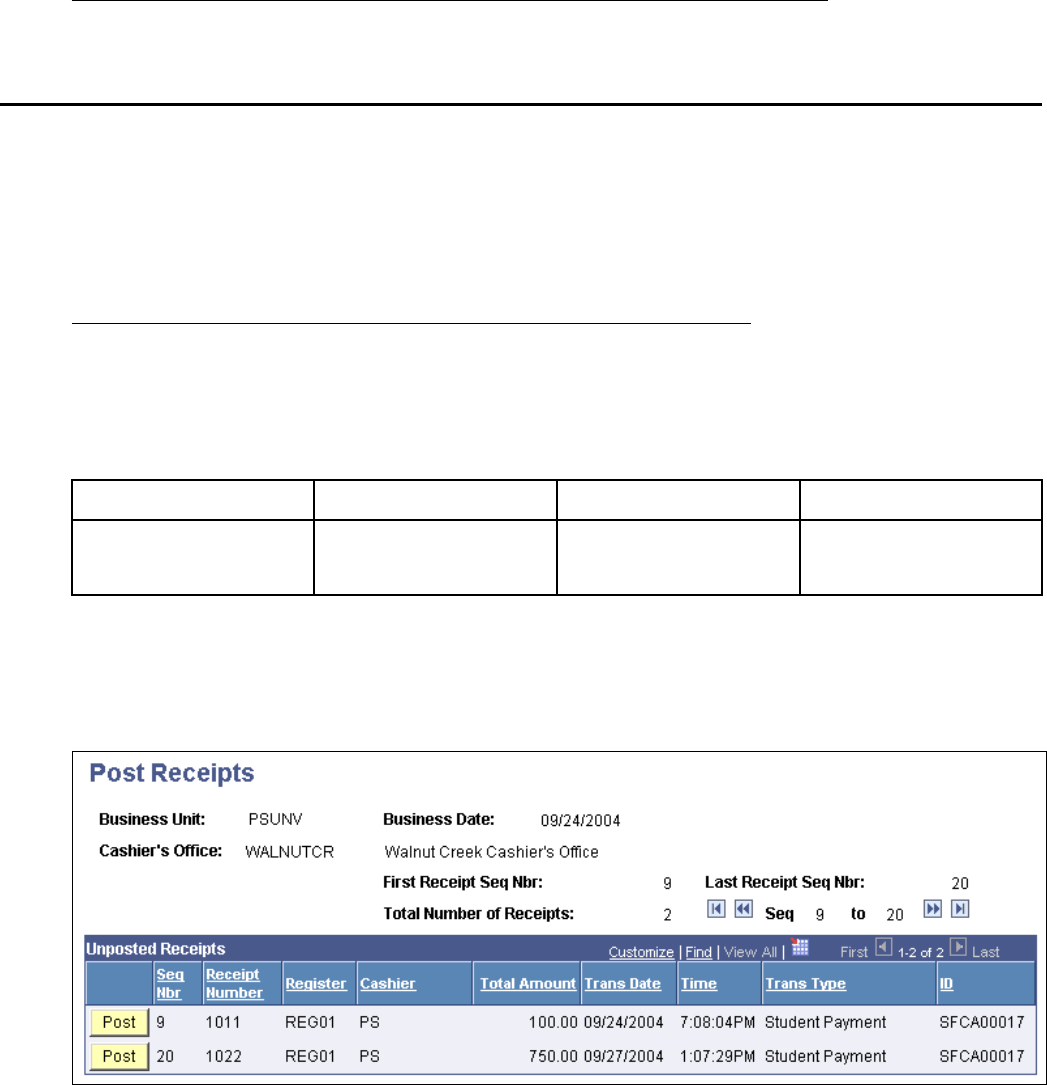
Cashiering Chapter 20
548 Copyright © 1988, 2010, Oracle and/or its affiliates. All Rights Reserved.
See Also
Chapter 3, "Setting Up ePayment Processing," Setting Up Credit Card Types, page 83
Posting Delayed Receipts
If you select the Delay posting option during the setup of your cashiering office, you must use the Post
Receipts page to select and post your payment receipts periodically throughout the day.
See Also
Chapter 10, "Setting Up Cashiering," Defining a Cashiering Office, page 313
Page Used to Post Delayed Receipts
Page Name Definition Name Navigation Usage
Post Receipts CSH_POST_RCPT Student Financials,
Cashiering, Post Receipts Post delayed payment
receipts.
Posting Delayed Payment Receipts
Access the Post Receipts page (Student Financials, Cashiering, Post Receipts).
Post Receipts page

Chapter 20 Cashiering
Copyright © 1988, 2010, Oracle and/or its affiliates. All Rights Reserved. 549
Posting Receipts
Post Click next to the unposted receipt that you want to post. When you click the
button, the system posts the receipt and makes the button unavailable.
Processing the Cashiering GL Interface
You must process the cashiering GL (general ledger) interface to send to your GL any cashiering transactions
that are not posted to a student or corporate account. You can send department receipts to the GL only
through the cashiering GL interface process. However, if you process any transactions using nonpostable
target keys but still need to send them to your GL, you must do so using the cashiering GL interface process.
The system sends cashiering transactions using postable target keys to the GL using the regular GL interface
process as long as you set up the item types that are associated with the applicable target keys to go to the
general ledger. Use caution with target key and item type setup to ensure the following results:
•The system sends all necessary transactions to the GL through either one of the two GL interface
processes.
•The system does not send transactions to the GL twice.
Furthermore, you can only send cashiering overage and shortage GL entries using the cashiering GL interface
process. And if you select the GL Interface Required check box during the setup of your cashiering office,
you must run the cashiering GL interface before you can close your cashiering office.
See Also
Chapter 2, "Completing Student Financials General Setup," Setting Up Item Types and Item Type Groups,
page 55
Chapter 10, "Setting Up Cashiering," Setting Up Target Keys, page 323
Voiding Receipts
This section provides an overview of receipt voiding and discusses how to:
•Void receipts using security.
•Void receipts without using security.
Understanding Receipt Voiding
A processed or even a posted receipt may become invalid. A cashier could make a mistake when creating a
receipt, a student's check could bounce, or an organization could stop payment on a check. In these cases, the
Cashiering feature enables you to void a receipt.

Cashiering Chapter 20
550 Copyright © 1988, 2010, Oracle and/or its affiliates. All Rights Reserved.
Note. You can void receipts only for an open business day. If you want to void a receipt for a past business
day, you must reopen the cashiering office for that business day.
Pages Used to Void Receipts
Page Name Definition Name Navigation Usage
Void Receipts CSH_VOID_SECURE Student Financials,
Cashiering, Cash
Management, Void Receipts
- Cashier
Using either SF or HR
security, void the receipts
created by you or any
cashier who directly reports
to you.
Void Receipts - All CSH_VOID_RCPT Student Financials,
Cashiering, Cash
Management, Void
Receipts- All
Bypassing SF or HR
security, void any receipts
that are created on a given
business day.
Voiding Receipts Using Security
Access the Void Receipts page (Student Financials, Cashiering, Cash Management, Void Receipts - Cashier).
This page is identical to the Void Receipts - All page.
This page is intended for use by the majority of your institution's cashiering staff when voiding receipts. It is
a secure page in that it permits you to void only receipts that you, the user, generated. If you are a supervisor,
the page also enables you to void the receipts of any cashiers that directly report to you.
Void Click next to the receipt that you want to void. When you click the button, the
system requires you to select a void reason. After you select a void reason, the
system voids the receipt, makes the Void button unavailable, and displays the
Void Code representing the void reason that you selected.
When you void a corporate or student payment receipt, the system reverses any
payments that were posted to the respective corporate or student account. In
addition, it may issue a credit to any credit card payments depending on the
status of the credit card transaction.
If the Cashier's office is set to Group Post, the credit is issued to the third party
vendor but you must adjust the transaction on the student's account or
corporation's account.
If the SF Merchant is set up for real time credits, then dependent on the third
party vendor, the credit is sent automatically to the vendor when the receipt is
voided. If the SF Merchant is not set up for real time credits, the batch job must
be run.
Voiding Receipts Without Using Security
Access the Void Receipts - All page (Student Financials, Cashiering, Cash Management, Void Receipts- All).
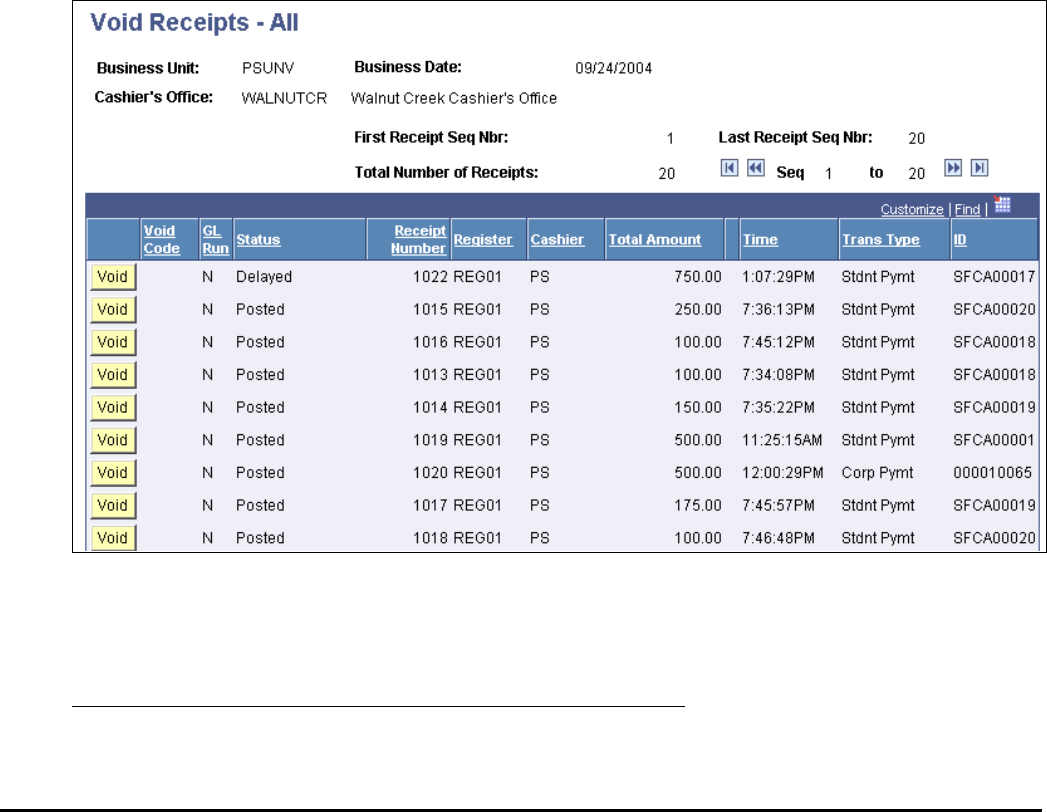
Chapter 20 Cashiering
Copyright © 1988, 2010, Oracle and/or its affiliates. All Rights Reserved. 551
This page represents an alternate receipt-voiding method that bypasses your security. Very few people at your
institution should have access to this page. It is intended only for individuals that oversee all of your
institution's cashiering activities such as a Vice Chancellor or a Chief Financial Officer. The page enables you
to void any receipt created for an open business day.
Void Receipts - All page
See Also
Chapter 20, "Cashiering," Voiding Receipts Using Security, page 550
Reviewing Details for Individual Receipts
This section discusses how to review and print individual receipts.

Cashiering Chapter 20
552 Copyright © 1988, 2010, Oracle and/or its affiliates. All Rights Reserved.
Page Used to Review Details for Individual Receipts
Page Name Definition Name Navigation Usage
Cash Check Detail
Corporate Payment Detail
Cash Replenishment Detail
Department Receipt Detail
Interim Deposit Detail
Student Payment Detail
CSH_RCPT_DETAIL •Student Financials,
Cashiering, Review
Check Cashing
•Student Financials,
Cashiering, Review
Corporate Payments
•Student Financials,
Cashiering, Cash
Management, Review
Replenishment
•Student Financials,
Cashiering, Review
Department Receipts
•Student Financials,
Cashiering, Cash
Management, Interim
Deposit Detail
•Student Financials,
Cashiering, Review
Student Payments
Review information
regarding a specific receipt.
Reviewing and Printing Individual Receipts
Access the Cash Check Detail (Student Financials, Cashiering, Review Check Cashing), Corporate Payment
Detail (Student Financials, Cashiering, Review Corporate Payments), Cash Replenishment Detail (Student
Financials, Cashiering, Cash Management, Review Replenishment),Department Receipt Detail (Student
Financials, Cashiering, Review Department Receipts), Interim Deposit Detail (Student Financials, Cashiering,
Cash Management, Interim Deposit Detail), or Student Payment Detail page Student Financials, Cashiering,
Review Student Payments) page. The page label, fields, and group boxes that appear on the inquiry page
depend on the component that you use to access it.
Print Receipt If you select the Use Forms Engine for Receipts check box on the Cashiering
Offices page, click to print the receipt using Forms Engine. Forms Engine
generates the receipt and sends it to the appropriate printer as specified on the
Valid Registers page.
If you do not select the Use Forms Engine for Receipts check box on the
Cashiering Offices page, or you click the Print Receipt button from the Cash
Replenishment Detail or Interim Deposit Detail page, the system initiates the
process of creating a printable receipt using the specified print application. In this
case, you must navigate to Report Manager to view and print the receipt.

Chapter 20 Cashiering
Copyright © 1988, 2010, Oracle and/or its affiliates. All Rights Reserved. 553
See Also
Chapter 20, "Cashiering," Processing Cashiering Transactions, page 524
Reviewing Receipt and Tender Activity
This section provides an overview of receipt and tender activity review and discusses how to:
•Review receipts by business date.
•Review payment activity for an organization.
•Review payment and check cashing activity for a student.
•Review tender activity by cashier.
•Review tender activity by register.
•Review receipt tender flow.
Understanding Receipt and Tender Activity Review
While the receipt detail pages (such as Student Payment Detail and Corporate Payment Detail) display useful
information regarding individual receipts, they provide information only for one receipt at a time. Student
Financials provides several pages enabling you to view your cashiering office's receipt activity as a whole.
In addition, Student Financials enables you to view cashiering activity by the type of tender used. For
example, you might want to know how much cash your office brought in on a given day as opposed to how
much revenue it received in checks.
Tender Flow
The Cashiering feature also enables you to review information regarding how tender flowed in and out of the
cashiering office on a given business day. You can view the tender flow for a certain cashier, register, or
tender type.
Pages Used to Review Receipt and Tender Activity
Page Name Definition Name Navigation Usage
Receipts By Business Date CSH_RCPT_BY_DATE2 Student Financials,
Cashiering, Balance by
Business Day, Review
Receipts By Date
Review receipts by business
date.

Cashiering Chapter 20
554 Copyright © 1988, 2010, Oracle and/or its affiliates. All Rights Reserved.
Page Name Definition Name Navigation Usage
Corporate Receipts CSH_RCPT_EXT_ORG Student Financials,
Cashiering, Review
Corporate Receipts
Review payment activity for
an organization.
Student Receipts CSH_RCPT_EMPLID Student Financials,
Cashiering, Review Student
Receipts
Review payment and check
cashing activity for a
student.
Tender By Cashier CSH_TENDER_BY_CASH Student Financials,
Cashiering, Balance by
Business Day, Review
Tender By Cashier
Review tender activity by
cashier.
Tender By Register CSH_TENDER_BY_REG Student Financials,
Cashiering, Balance by
Business Day, Review
Tender By Register
Review tender activity by
register.
Currencies by Tender CURR_BY_TENDER_SP Click the Currency Detail
link on the Tender By
Cashier or Tender By
Register page.
View how much each type
of currency contributed to
the tender total and how the
system converted the type
of currency.
Receipt Tender Flow CSH_OFF_TENDER_FLW Student Financials,
Cashiering, Balance by
Business Day, Review
Receipt Tender Flow
Review receipt tender flow.
Reviewing Receipts by Business Date
Access the Receipts By Business Date page (Student Financials, Cashiering, Balance by Business Day,
Review Receipts By Date).
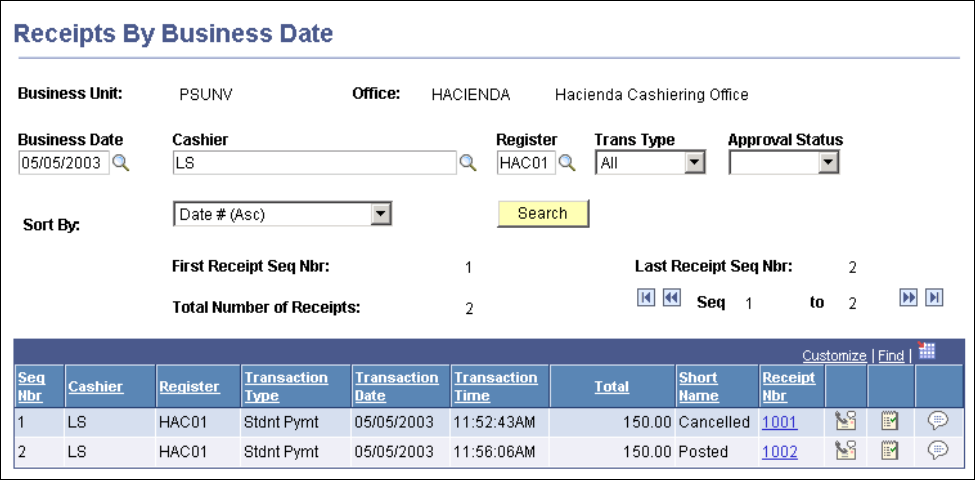
Chapter 20 Cashiering
Copyright © 1988, 2010, Oracle and/or its affiliates. All Rights Reserved. 555
Receipts By Business Date page
Business Date Enter the business date for which you want to view receipt activity.
Cashier Use this field to filter the receipts displayed for a specific cashier.
Register Use this field to filter the receipts displayed for a specific register.
Trans Type (transaction
type) Use this field to filter the receipts displayed by transaction type. You can select
all transaction types, or you can view only Cash Check (cashed checks), Cash
Repl (cash replenishments), Corp Pymt (corporate payments), Dept Rcpt
(department receipts), Interim Deposits (interim deposits), or Stdnt Pymt (student
payments) transactions.
Receipt Status Use this field to filter the receipts displayed by status. Values are Approved,
Cancelled, Delayed, Denied, Group Post, Not Posted, Pending, Posted,
Processed, Unprocessed, and Voided.
Sort By Use this field to sort the displayed receipts. You can sort them by cashier, date,
receipt status, register, total, transaction date and time, or transaction type. You
can sort by all of these criteria in either ascending or descending order.
Search Click to filter and sort the displayed receipts by the criteria that you select in the
Cashier,Register,Trans Type, and Sort By fields.
Reviewing Payment Activity for an Organization
Access the Corporate Receipts page (Student Financials, Cashiering, Review Corporate Receipts).
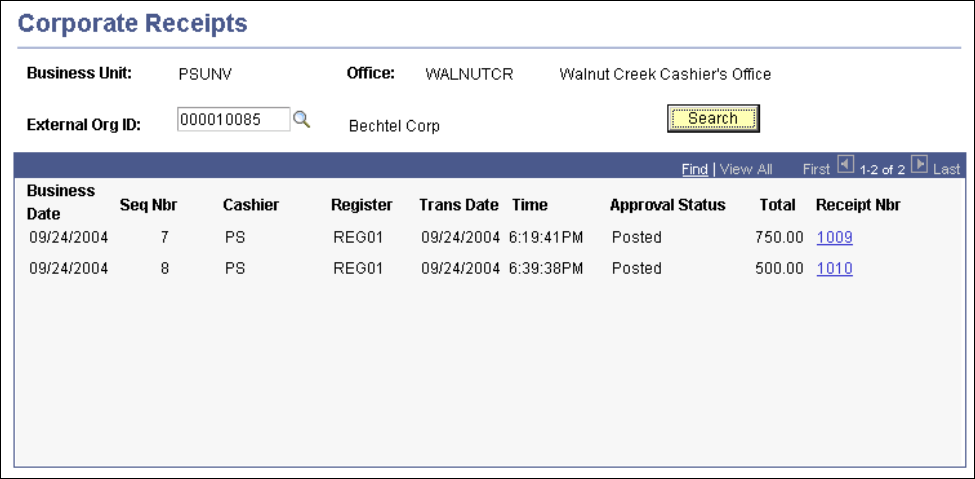
Cashiering Chapter 20
556 Copyright © 1988, 2010, Oracle and/or its affiliates. All Rights Reserved.
Corporate Receipts page
External Org ID Enter the ID of the corporation whose receipts you want to view.
Search Click the Search button to display the receipts for the selected corporation.
Receipt Nbr (receipt
number) This heading lists the system-assigned receipt number for each receipt. Click a
receipt number to access the Corporate Payment Detail page, where you can view
more detailed information about the corporate payment receipt.
Reviewing Payment and Check Cashing Activity for a Student
Access the Student Receipts page (Student Financials, Cashiering, Review Student Receipts).
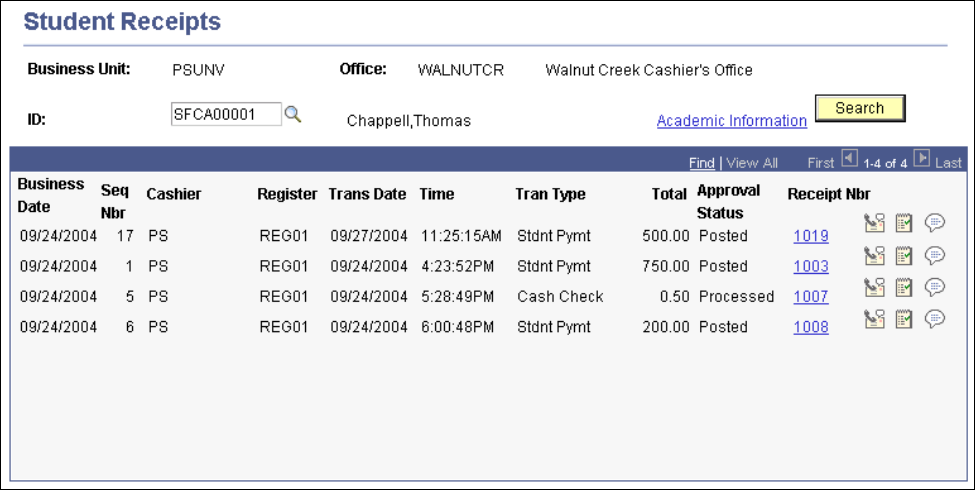
Chapter 20 Cashiering
Copyright © 1988, 2010, Oracle and/or its affiliates. All Rights Reserved. 557
Student Receipts page
ID Enter the ID of the student whose receipts you want to review.
Search Click the Search button to display the receipts for the selected student.
Receipt Nbr (receipt
number) This heading lists the system-assigned receipt number for each receipt. Click a
receipt number to access the Student Payment Detail page or the Cash Check
Detail page, depending on the transaction type, where you can view more
detailed information about the receipt.
Reviewing Tender Activity by Cashier
Access the Tender By Cashier page (Student Financials, Cashiering, Balance by Business Day, Review
Tender By Cashier)
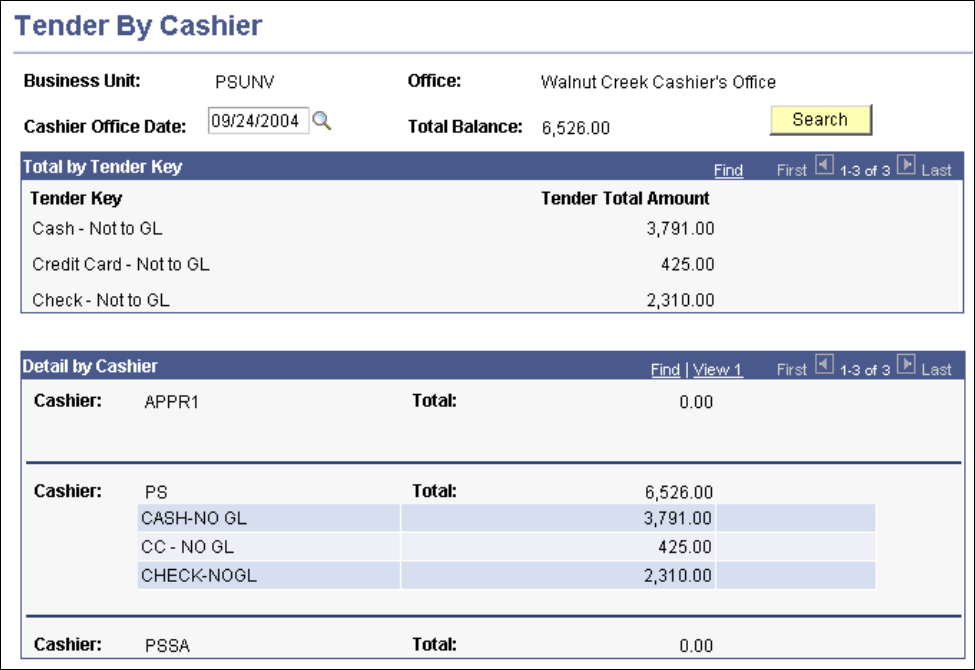
Cashiering Chapter 20
558 Copyright © 1988, 2010, Oracle and/or its affiliates. All Rights Reserved.
Tender By Cashier page
Cashier Office Date Enter the business date of the tender activity that you want to view.
Search Click to retrieve the tender activity information for the selected business date.
Currency Detail Click to access the Currencies by Tender page, where you can view a breakdown
of each currency type that the cashiering office received, its converted amount,
and how it contributed to the total balance for the tender key.
Reviewing Tender Activity by Register
Access the Tender By Register page (Student Financials, Cashiering, Balance by Business Day, Review
Tender By Register).
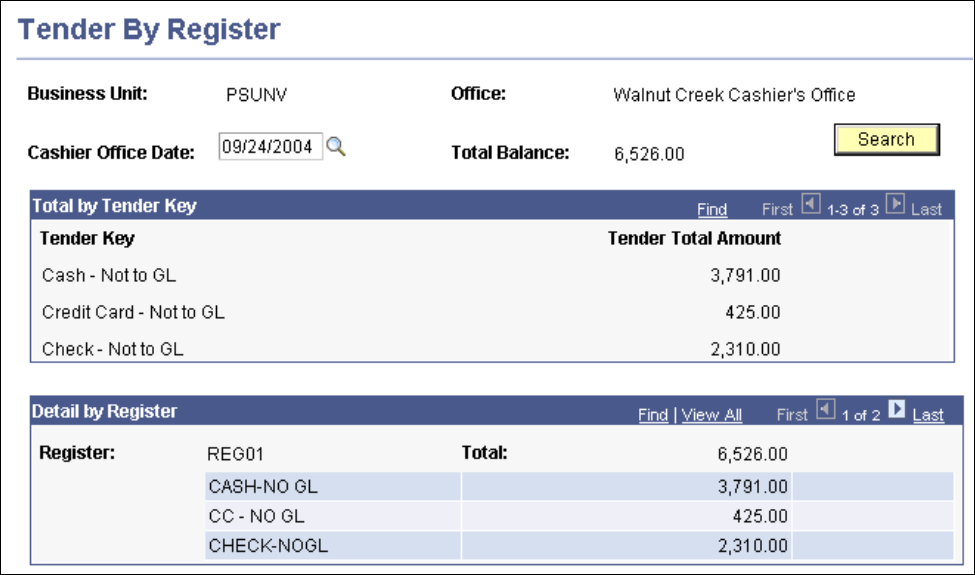
Chapter 20 Cashiering
Copyright © 1988, 2010, Oracle and/or its affiliates. All Rights Reserved. 559
Tender By Register page
Cashier Office Date Enter the business date of the tender activity that you want to view.
Search Click to retrieve the tender activity information for the selected business date.
Currency Detail Click to access the Currencies by Tender page, where you can view a breakdown
of each currency type that the cashiering office received, its converted amount,
and how it contributed to the total balance for the tender key.
Reviewing Receipt Tender Flow
Access the Receipt Tender Flow page (Student Financials, Cashiering, Balance by Business Day, Review
Receipt Tender Flow).
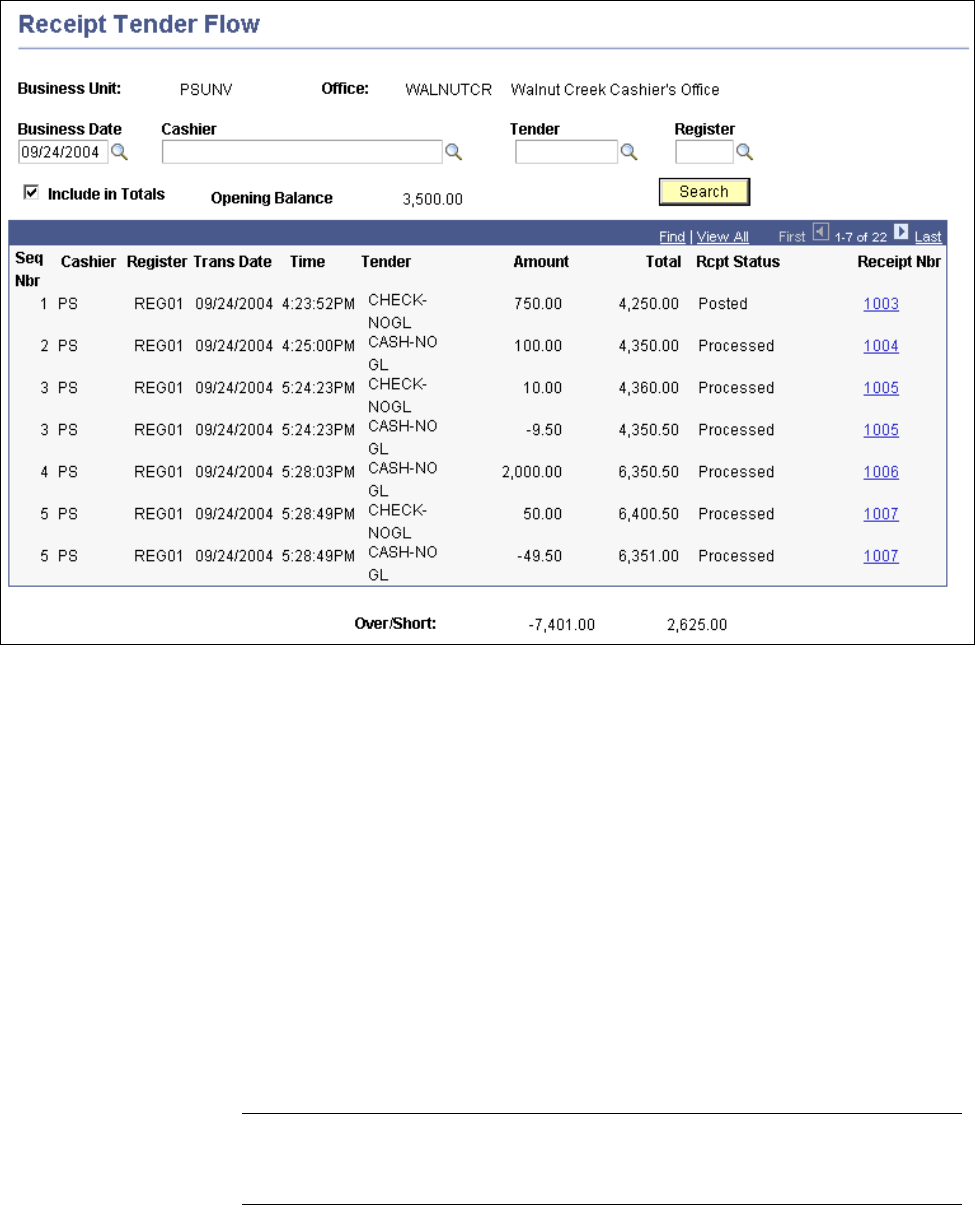
Cashiering Chapter 20
560 Copyright © 1988, 2010, Oracle and/or its affiliates. All Rights Reserved.
Receipt Tender Flow page
Business Date Enter the business date for which you want to view tender flow.
Cashier To view tender flow for a specific cashier, select the cashier.
Tender To view tender flow of a specific tender key, select the tender key.
Register To view tender flow for a specific register, select the register.
Include in Totals Select to add the opening balance of the cashiering office to the tender in and out
activity to come up with a system-generated closing balance.
Opening Balance After you click the Search button, this field displays the total of all of the opening
balances that you specified for your cashiers or registers when you opened the
cashiering office.
Note. If you select a specific cashier or register in the Cashier field or the
Register field, the Opening Balance field reflects the opening balance for only
the selected cashier or register.
Search Click to display all of the receipts that meet the criteria that you select in the
Business Date,Cashier, Tender, and Register fields.

Chapter 20 Cashiering
Copyright © 1988, 2010, Oracle and/or its affiliates. All Rights Reserved. 561
Receipt Nbr (receipt
number) This heading lists the system-assigned receipt number for each receipt. If you
click the receipt number for a receipt, the system accesses the appropriate detail
page to view complete information about the receipt. For example, if you click
the receipt number for a student payment, the system accesses the Student
Payment Detail page.
Over/Short The system calculates any overage or shortage by comparing the actual closing
balance entered on the Close Cashier page to the system-generated closing
balance, which appears to the right of the Over/Short field. If an overage or
shortage exists, you should inquire on specific tenders to narrow down the cause.
Reviewing Totals by Deposit ID
When you open your cashiers and registers using the Open Registers and Open Cashiers pages, you can
designate a deposit ID for each type of tender that you select for a cashier or register. If you use the optional
Deposit ID field to track your cashiering transactions, you can view your totals by deposit ID.
In addition, when you use the Student Post, Corp Post, Group Data Entry, or Group Corp Data Entry
components to post payments, you can assign a deposit ID to each posting. The Totals By Deposit page
enables you to see totals for these payments in addition to the totals associated with cashiering transactions.
This is useful if you reconcile all of your bank deposits through your cashiering office.
See Also
Chapter 20, "Cashiering," Opening Valid Registers, page 522
Chapter 20, "Cashiering," Opening Valid Cashiers, page 523
Chapter 21, "Maintaining Receivables," page 571
Page Used to Review Totals by Deposit ID
Page Name Definition Name Navigation Usage
Totals By Deposit ID CSH_RCPT_DEPOSITID Student Financials,
Cashiering, Balance by
Business Day, Review
Totals by Deposit ID
Review cashiering office
balance totals by deposit ID.
Reviewing Cashiering Office Balance Totals by Deposit ID
Access the Totals By Deposit ID page (Student Financials, Cashiering, Balance by Business Day, Review
Totals by Deposit ID).
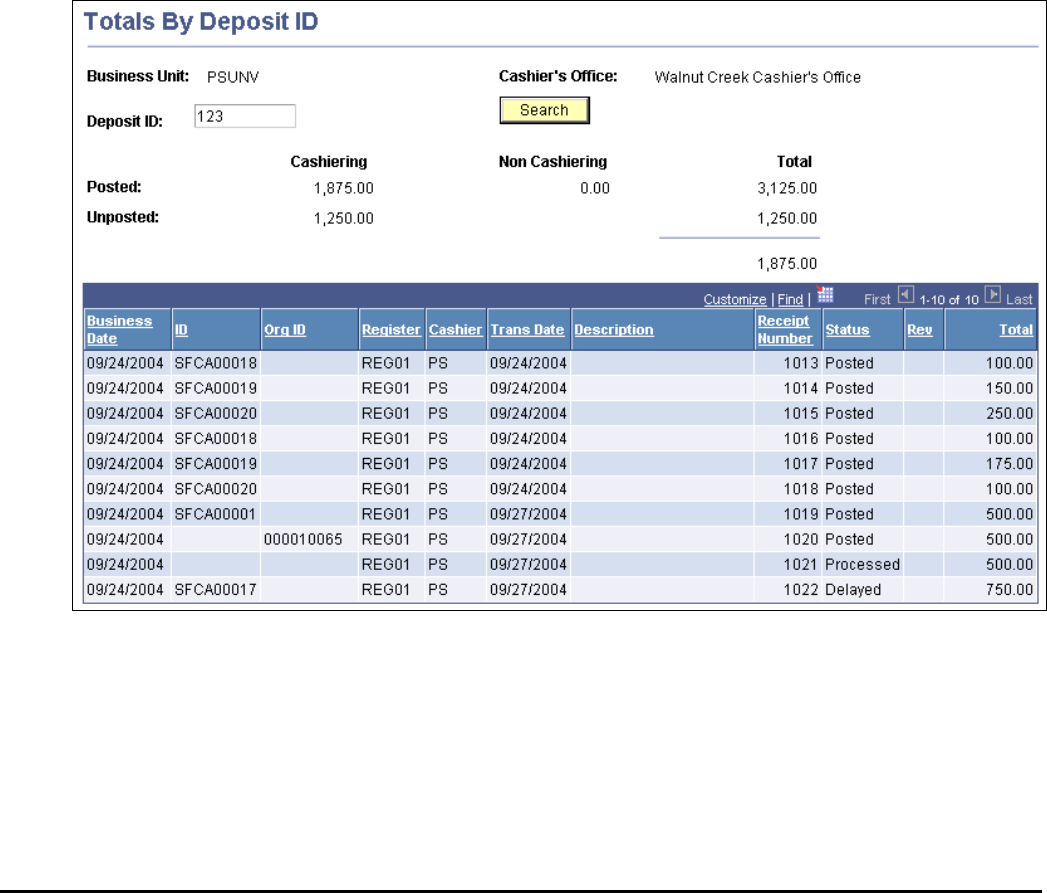
Cashiering Chapter 20
562 Copyright © 1988, 2010, Oracle and/or its affiliates. All Rights Reserved.
Totals By Deposit ID page
Deposit ID Enter the deposit ID for which you want to view totals.
Search Click to display all of the payments that are associated with the selected deposit
ID.
Closing a Cashiering Office for a Business Day
This section discusses how to:
•Close registers.
•Close cashiers.
•Close a cashiering office.
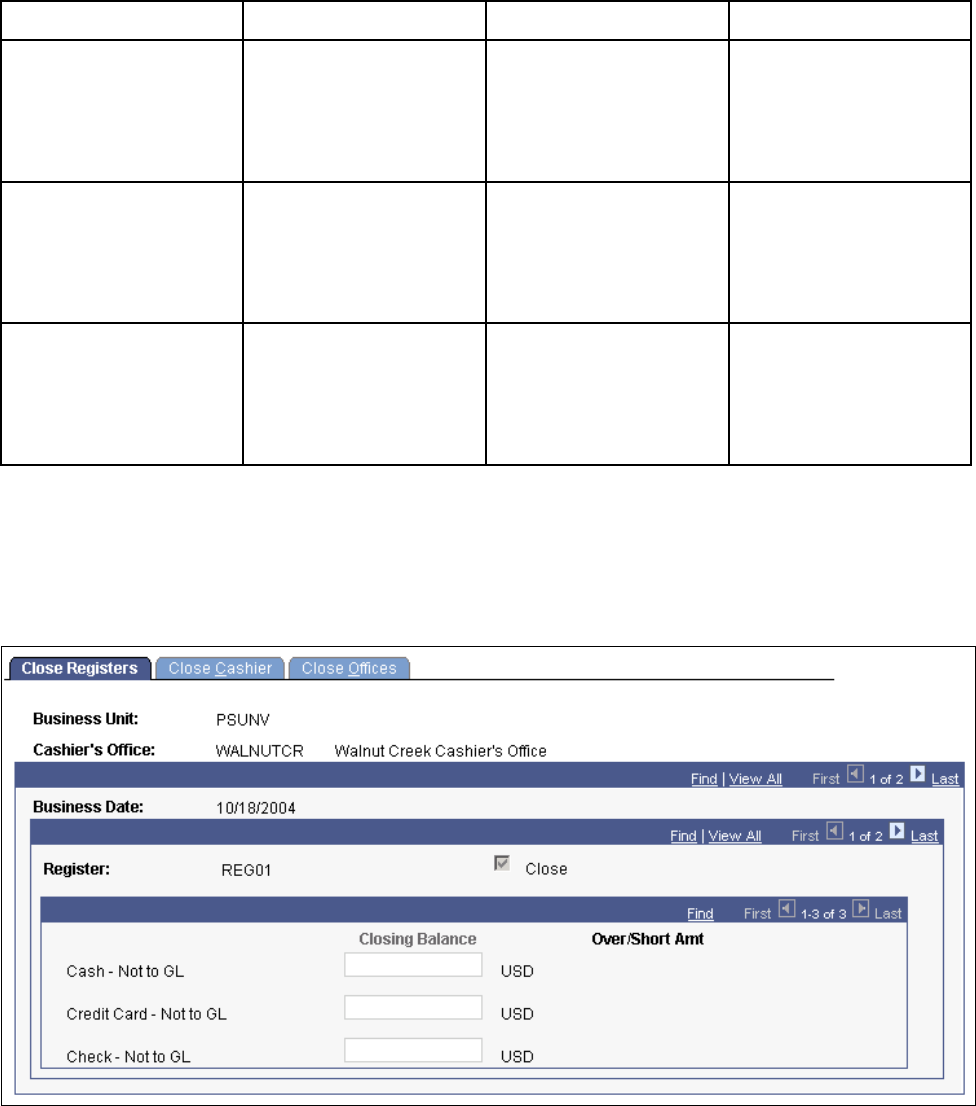
Chapter 20 Cashiering
Copyright © 1988, 2010, Oracle and/or its affiliates. All Rights Reserved. 563
Pages Used to Close a Cashiering Office for a Business Day
Page Name Definition Name Navigation Usage
Close Registers CSH_CLOSE_REGISTER Student Financials,
Cashiering, Cash
Management, Close
Offices, Close Cashier
Offices
Close registers.
Close Cashier CSH_CLOSE_CASHIER Student Financials,
Cashiering, Cash
Management, Close
Offices, Close Cashier
Offices
Close cashiers.
Close Offices CSH_CLOSE_OFFICE Student Financials,
Cashiering, Cash
Management, Close
Offices, Close Cashier
Offices
Close a cashiering office.
Closing Registers
Access the Close Registers page (Student Financials, Cashiering, Cash Management, Close Offices, Close
Cashier Offices).
Close Registers page
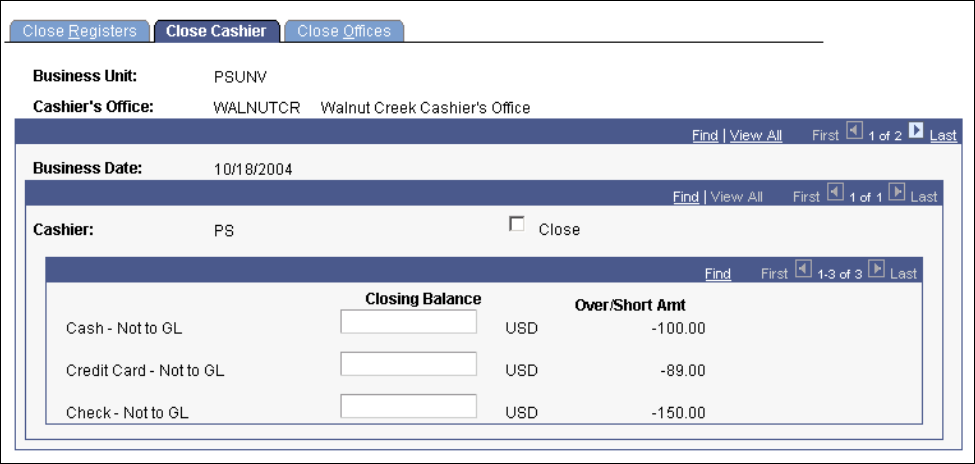
Cashiering Chapter 20
564 Copyright © 1988, 2010, Oracle and/or its affiliates. All Rights Reserved.
Close Select to close the register. When you select this check box, the system makes it
unavailable. If you have multiple open registers, be sure to close them all because
you cannot close the cashiering office for a given business day until you close all
of its open registers.
Closing Balance If you are balancing by register, enter the closing balance for each type of tender
used during the business day.
Over/Short Amount When you enter a closing balance for a tender, the system calculates and displays
the amount of any overage or shortage under this heading. If you processed any
foreign-currency transactions during the business day, the tender for each
currency appears so that you can record a closing balance.
Closing Cashiers
Access the Close Cashier page (Student Financials, Cashiering, Cash Management, Close Offices, Close
Cashier Offices).
Close Cashier page
Close Select to close the cashier. When you select this check box, the system makes it
unavailable. If you have multiple open cashiers, be sure to close them all,
because you cannot close the cashiering office for a given business day until you
close all of its open cashiers.
Closing Balance If you are balancing by cashier, enter the closing balance for each type of tender
used during the business day.
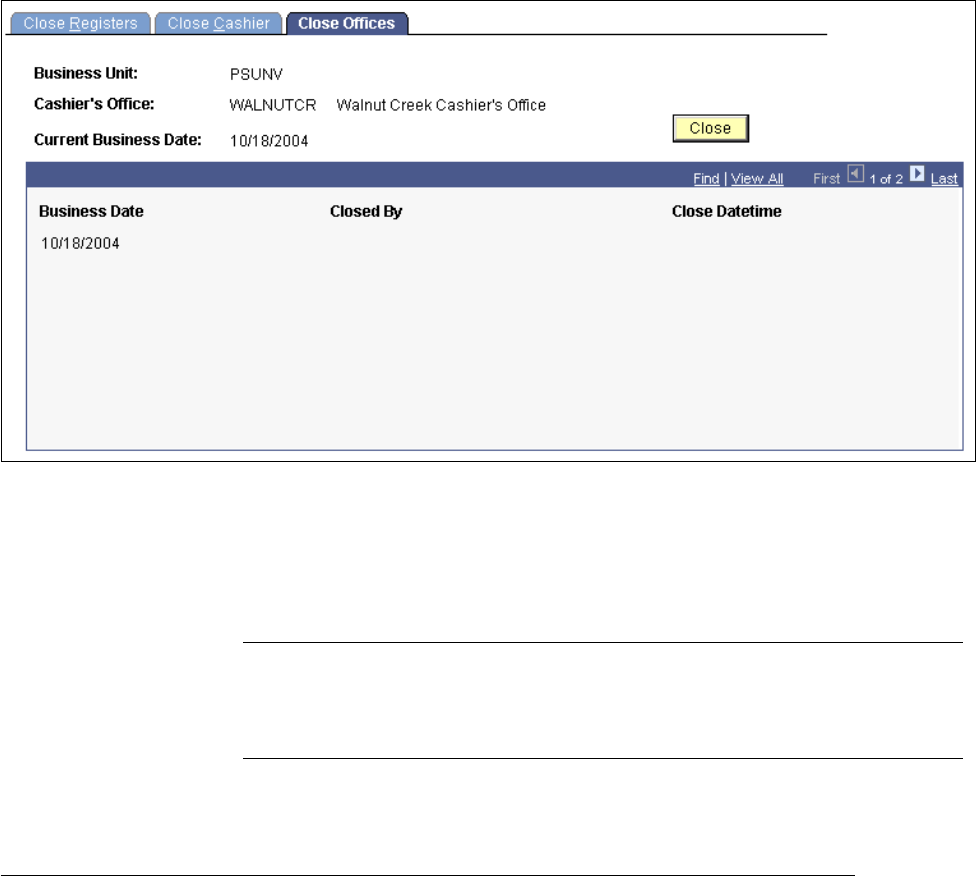
Chapter 20 Cashiering
Copyright © 1988, 2010, Oracle and/or its affiliates. All Rights Reserved. 565
Over/Short Amount When you enter a closing balance for a tender, the system calculates and displays
the amount of any overage or shortage under this heading. If you processed any
foreign-currency transactions during the business day, the tender for each
currency appears so that you can record a closing balance.
Closing a Cashiering Office
Access the Close Offices page (Student Financials, Cashiering, Cash Management, Close Offices, Close
Cashier Offices).
Close Offices page
Close Click to close the cashiering office. When you click this button, the system
populates the Closed By and Datetime fields, recording who closed the
cashiering office and when it was closed.
Note. During the setup of your cashiering office, you determine the closing
requirements of your office. If you have not met these requirements when you
click the Close button, you will receive an error message telling you what you
must do before you can close your cashiering office.
See Also
Chapter 10, "Setting Up Cashiering," Defining the Basic Cashiering Office Parameters, page 314
Cashiering Chapter 20
566 Copyright © 1988, 2010, Oracle and/or its affiliates. All Rights Reserved.
Reopening a Cashiering Office for a Closed Business Day
Situations may occur that require you to reopen a cashiering office for a business day that you have already
closed. For example, to void a receipt from a closed business day, you must reopen your cashiering office for
that business day.
Note. After performing the transaction that required the reopening of the cashiering office, be sure to close it
again.
This section discusses how to:
•Reopen a cashiering office.
•Reopen registers.
•Reopen cashiers.
Pages Used to Reopen a Cashiering Office for a Closed Business Day
Page Name Definition Name Navigation Usage
Reopen Office CSH_REOPEN_OFFICE Student Financials,
Cashiering, Cash
Management, Reopen
Offices, Reopen Office
Reopen a cashiering office
for a previously closed
business date.
Reopen Register CSH_OPEN_REGISTER Student Financials,
Cashiering, Cash
Management, Reopen
Offices, Reopen Register
Reopen registers for a
previously closed business
day.
Reopen Cashier CSH_OPEN_CASHIER Student Financials,
Cashiering, Cash
Management, Reopen
Offices, Reopen Cashier
Reopen cashiers for a
previously closed business
day.
Reopening the Office
Access the Reopen Office page (Student Financials, Cashiering, Cash Management, Reopen Offices, Reopen
Office).
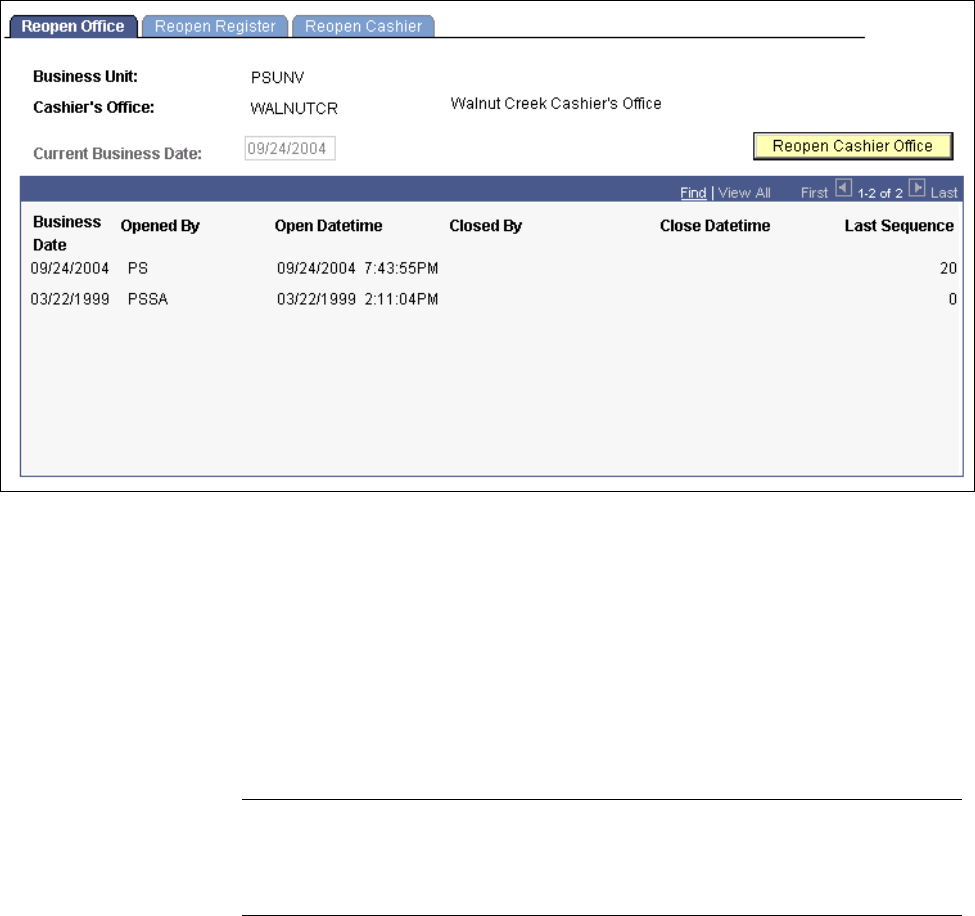
Chapter 20 Cashiering
Copyright © 1988, 2010, Oracle and/or its affiliates. All Rights Reserved. 567
Reopen Office page
Current Business Date Enter the business date for which you want to reopen the cashiering office.
Business Date This heading displays business dates for which you opened the cashiering office.
The system displays all of the business dates on which you opened the cashiering
office unless you select a retrieval limit on the Cashiering Offices page during
the setup of your cashiering office. For example, if you specify a retrieval limit of
5 for your cashiering office, the Business Date heading displays only the last five
dates on which you opened the cashiering office.
Note. If you do not specify a retrieval limit for your cashiering office during
setup, the Business Date heading displays all business dates on which you
opened the cashiering office. In time, this list of dates will become so long that it
can degrade system performance when you open the Open Cashier Offices page.
Reopen Cashier Office Click to reopen the cashiering office. When you click this button, the Current
Business Date field becomes unavailable.
Reopening Registers
Access the Reopen Register page (Student Financials, Cashiering, Cash Management, Reopen Offices,
Reopen Register).
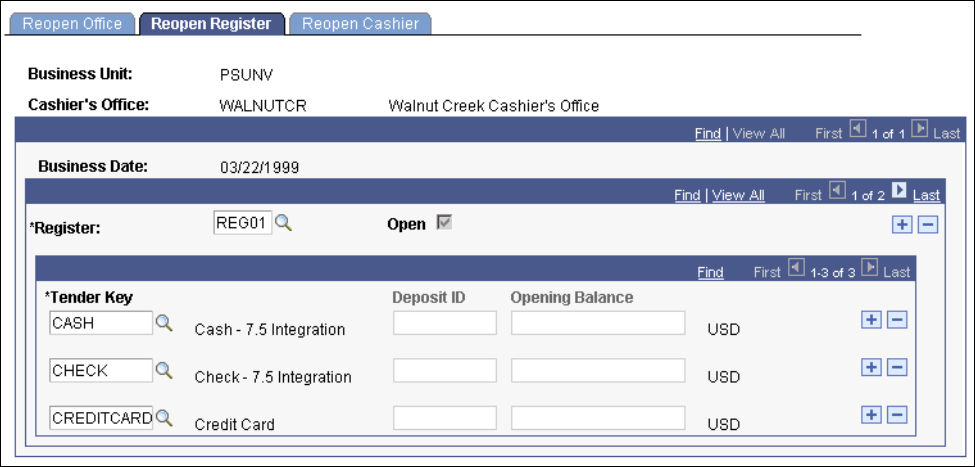
Cashiering Chapter 20
568 Copyright © 1988, 2010, Oracle and/or its affiliates. All Rights Reserved.
Reopen Register page
Register Enter the register that you want to reopen for the business day. The system
automatically selects the registers from the business day for which you are
reopening the cashiering office.
Open Select to reopen this register for the business day. After you select the check box,
it becomes unavailable.
Tender Key Each tender key that you assigned to the register when you originally opened the
office appears automatically.
Deposit ID The deposit IDs that you assigned to each tender key appear automatically.
Opening Balance If you balance by register, enter an opening balance for each tender key.
Reopening Cashiers
Access the Reopen Cashier page (Student Financials, Cashiering, Cash Management, Reopen Offices,
Reopen Cashier).
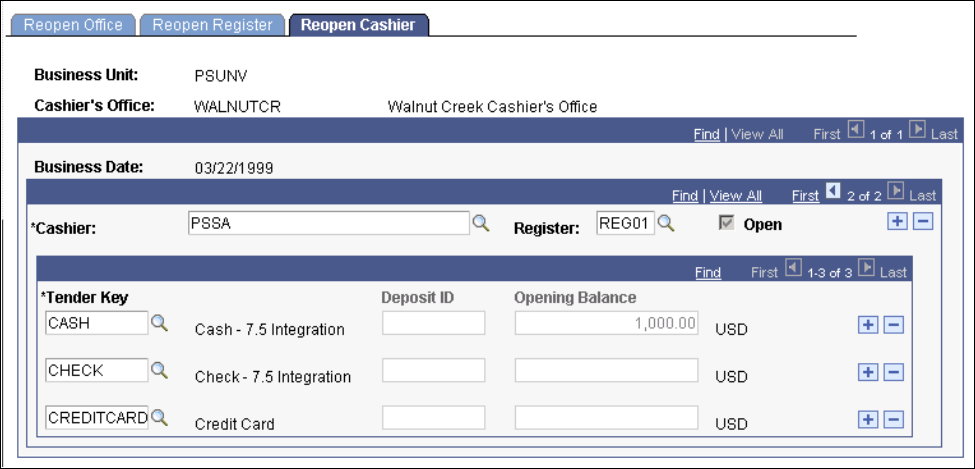
Chapter 20 Cashiering
Copyright © 1988, 2010, Oracle and/or its affiliates. All Rights Reserved. 569
Reopen Cashier page
Cashier The system automatically selects the cashiers from the business day for which
you are reopening the cashiering office.
Register The register that you originally assigned to this cashier when you first opened the
office automatically appears.
Open Select to reopen the cashier for the business day.
Tender Key Each tender key that you assigned to the cashier when you originally opened the
office appears automatically.
Deposit ID The deposit IDs that you assigned to each tender key appear automatically.
Opening Balance If you balance by cashier, enter an opening balance for each tender key.

Copyright © 1988, 2010, Oracle and/or its affiliates. All Rights Reserved. 571
Chapter 21
Maintaining Receivables
This chapter lists common elements and discusses how to:
•Enter groups of transactions.
•Enter transactions from an external source.
•Process payroll deductions.
•Review and revise group data entries before posting.
•Post group data entries.
•Post transactions for individual students and organizations.
•Consolidate and review transactions for individual students and organizations.
•View account information within the Maintain Receivables feature.
•View payment by invoice information within the Maintain Receivables feature.
•Manage disputed charges.
•Reverse payments and charges.
•Apply payments.
•Write off charges and account balances.
•Process enrollment deposits.
•Process late fees.
•Process late fees – billing.
•Process enrollment cancellation.
•Validate tables.
Common Elements Used in This Chapter
Click to view the first group of transactions.
Click to view the previous group of transactions.

Maintaining Receivables Chapter 21
572 Copyright © 1988, 2010, Oracle and/or its affiliates. All Rights Reserved.
Click to view the next group of transactions.
Click to view the last group of transactions.
Account Nbr (account
number) This field displays the account number that is assigned by the Student Financials
application to the line item.
Acct Term (accounting
term) This field displays the accounting term that is assigned by the Student Financials
application to the line item.
Anticipated Aid This field displays financial aid that was awarded to the student but not yet
disbursed.
Balance This field displays the positive or negative balance of any active account.
Billing Date This field displays billing dates that are specified for charges.
Business Unit This field displays the business unit of the transactions.
Contract ID This field displays the student ID or IDs that are associated with a third-party
contract sponsored by the corporation for which you are viewing account
information.
Contract Number This field displays the contract number of any third-party contracts that are
sponsored by the corporation for which you are viewing account information.
Descr (description) This field displays the description of the item type.
Due Amount This field displays the amount that is due on a charge and is displayed in
conjunction with the Due Date field.
Due Date This field displays the date on which a charge is due.
Effective Date This field displays the item effective date of the transaction.
Item Amount This field displays the amount of the transaction item.
Item Balance This field displays the remaining balance of the item.
Item Type This field displays the item type number.
Line Seq Nbr (line
sequence number) This field displays the sequence number of transactions that involve multiple
item lines.
Name This field displays the name of the student that is associated with a third-party
contract for which a sponsor is being charged.
Net Award This field displays the student's anticipated financial aid.
Posted Date & Time This field displays the date and time that a transaction was posted.

Chapter 21 Maintaining Receivables
Copyright © 1988, 2010, Oracle and/or its affiliates. All Rights Reserved. 573
Term This field displays the term of the transaction.
Entering Groups of Transactions
This section provides an overview of group data entry and discusses how to:
•Define source information and control totals for group transactions.
•Add transactions to a group entry.
Understanding Group Data Entry
PeopleSoft Student Financials enables you to post transactions for a group of students or organizations, which
enables you to quickly and easily post many receivables without having to post and approve each one
individually. Student Financial Cashiering Office application has the option to create Group Data entries. In
addition, charges and payments from external sources can be loaded through the SF External File Load
process, and these transactions populate the Group Data Entry tables.
To enter groups of transactions for students and organizations, access the pages using the Group Data Entry
and Group Corp Data Entry components, respectively. To approve groups of transactions, use the same two
pages, but access them from the worklist.
Pages Used to Enter Groups of Transactions
Page Name Definition Name Navigation Usage
Group Entry GROUP_ENT_ONE Student Financials, Charges
and Payments, Group
Processing, Create Group
Data Entries, Group Entry
Student Financials, Charges
and Payments, Group
Processing, Create Group
Corp Data Entries, Group
Corp Entry
Define source information
and control totals for group
transactions.
Group Line Entry GROUP_LINE_CNTRL Student Financials, Charges
and Payments, Group
Processing, Create
Transactions, Group Line
Entry
Student Financials, Charges
and Payments, Group
Processing, Create
Corporate Transactions,
Group Corp Line Entry
Add transactions to a group
entry.
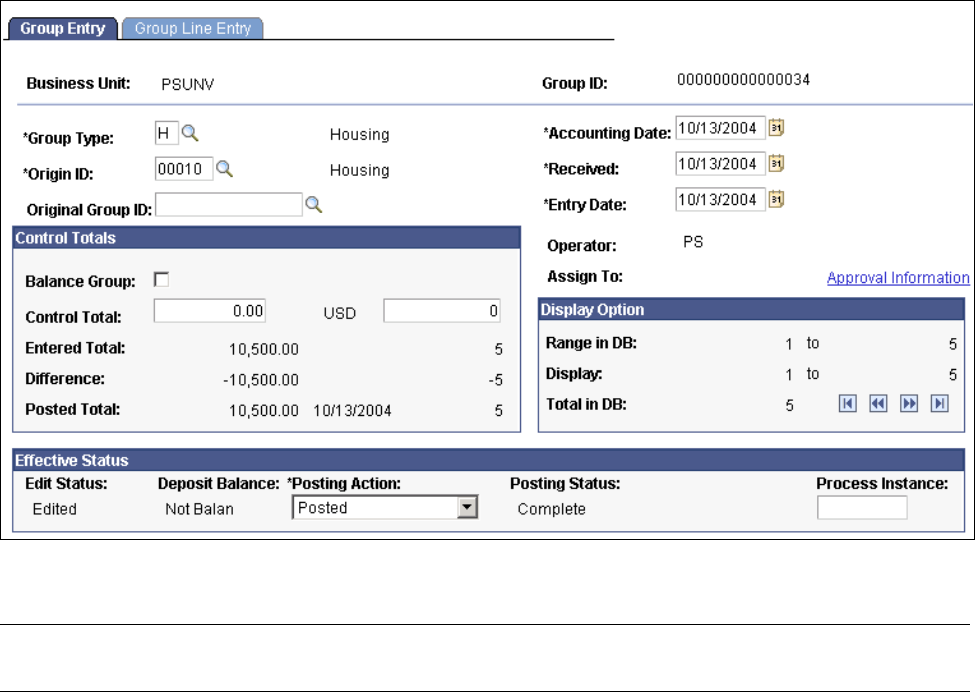
Maintaining Receivables Chapter 21
574 Copyright © 1988, 2010, Oracle and/or its affiliates. All Rights Reserved.
Defining Source Information and Control Totals for Group Transactions
Access the Group Entry page (Student Financials, Charges and Payments, Group Processing, Create Group
Data Entries, Group Entry).
Group Entry page
Note. The system uses all of the information on this page as group control information and does not post it to
student or corporate accounts.
Group Type Enter the group type that describes the transactions.
Accounting Date Enter the accounting date for the transactions. The default value is the current
system date, but you can change it if necessary.
Origin ID Enter an origin ID to indicate the source of the transactions. Depending on the
origin ID, approval for the transactions might be required. SF Security can be
placed on this field to allow individual sources (origins) to access only their
groups of transactions.
Received Enter the date on which your office received payment or charge transactions.
Original Group ID This field is populated after the Reverse Groups process runs. The Reverse
Group process creates a new group ID representing the transactions that were
reversed, and this field will reference the original group ID.
Entry Date Enter the date that you are entering the transactions.

Chapter 21 Maintaining Receivables
Copyright © 1988, 2010, Oracle and/or its affiliates. All Rights Reserved. 575
Operator This field displays the ID of the user who is entering transactions.
Assign To Reserved for future use.
Note. For groups requiring approval, the Approval Information link appears
following the Assign To field. This link gives you the Original Approver ID,
Approved At Date/Time Stamp, Last Approver ID, and Approved At Date/Time
Stamp data. This link does not replace the Assign To field, it just provides further
information about the content of the field.
Control Totals
Balance Group Select this option to require that the group be in balance before the system posts
it. To determine whether a group is balanced, the system compares the number of
transactions and amounts to information in the control totals fields.
Control Total Enter the monetary sum of the transactions in the group in the Control Total
field and enter the total number of transactions in the group in the unlabeled field
to the right. For example, if you are entering a group of checks that was received
from students, enter the total monetary value of the checks in the Control Total
field and the number of checks (count) in the unlabeled field. If the external file
load process is used and the external file setup defines control totals, these fields
are populated through the file load process.
Entered Total These fields display the monetary amount of all transactions that are entered in
the batch and the count of the entries.
Difference These fields display the difference between the entered totals and the control
totals.
Posted Total These fields display the monetary total, posting date, and count of the entries
after the batch is posted.
Display Option
The display option enables you to view multiple rows. The number of transaction rows that are chunked
(viewable at one time) is controlled by the maximum row settings selection in the SF Installation setup.
Range in DB This field displays the range of sequence numbers within the group ID.
Display This field displays the range of sequence numbers that is currently displayed. The
display range is the viewable "chunk."
Total in DB This field displays the total number of transactions within the group ID.
Maintaining Receivables Chapter 21
576 Copyright © 1988, 2010, Oracle and/or its affiliates. All Rights Reserved.
Effective Status
Edit Status This field displays whether the batch has been edited.
Deposit Balance This field displays whether the batch is balanced. You must select the Balance
Group check box and the batch must balance for this field to display Balanced.
Posting Action Select one of these values:
Available for Posting: If no approval is required, the field contains this value.
Do Not Post: If you are approving this posting group, select this option to hold
the group for further review.
Posted: Indicates that the group has been posted.
Waiting for Approval: If approval is required, the field contains this value.
Posting Status This field displays the posting status. Possible values for this field are Balance,
Complete, Error, Incomplete, Not Posted, and Reversed.
Process Instance This field displays the process instance number assigned by the process
scheduler. This field is only populated if the posting job is not successful. To post
a corrected group, you must remove the process instance number using the Reset
Process Instance button on the Group Post Run Control page.
Adding Transactions to a Group Entry
Access the Group Line Entry page (Student Financials, Charges and Payments, Group Processing, Create
Transactions, Group Line Entry).
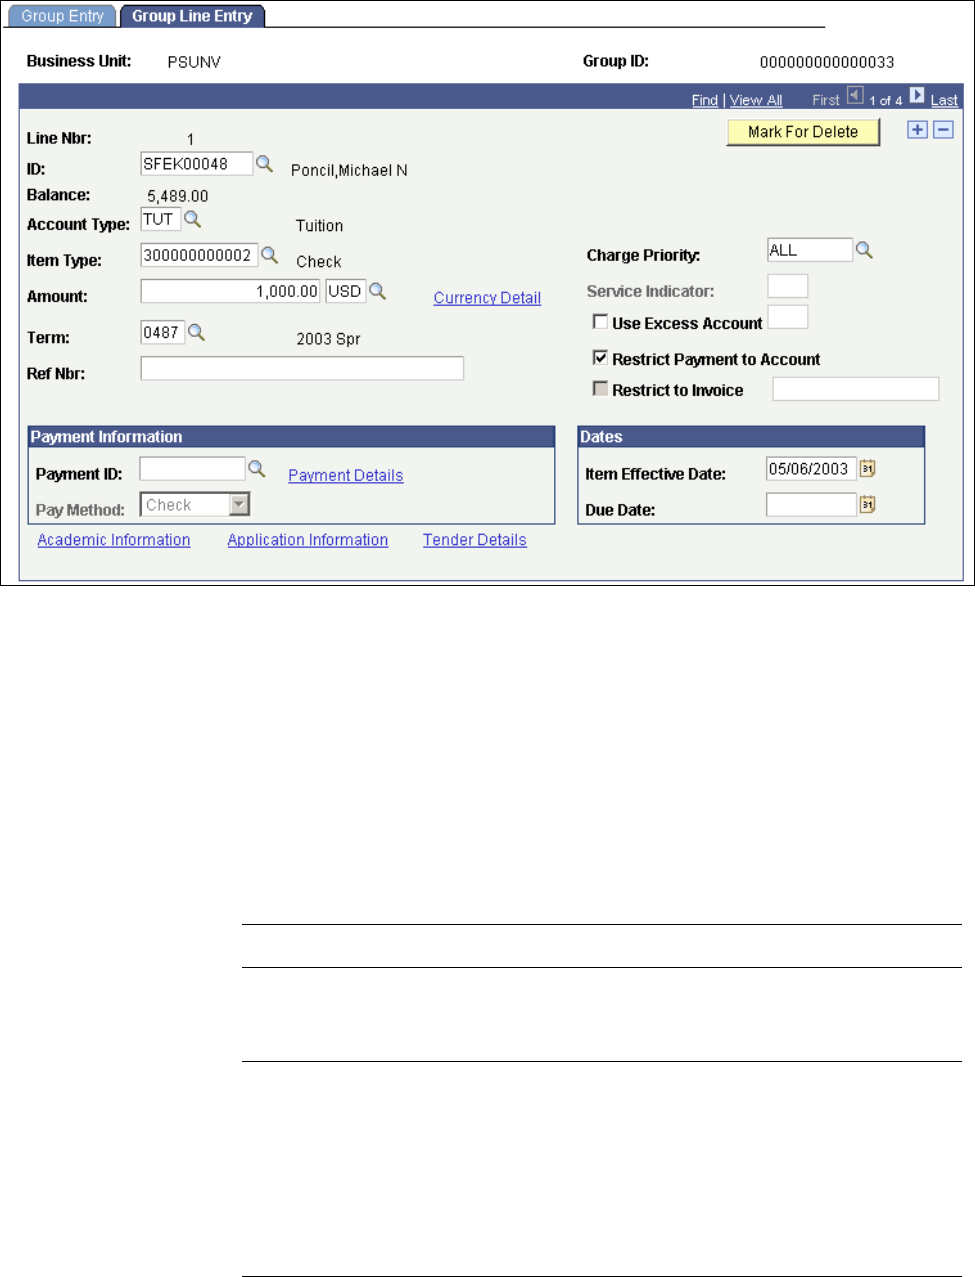
Chapter 21 Maintaining Receivables
Copyright © 1988, 2010, Oracle and/or its affiliates. All Rights Reserved. 577
Group Line Entry page
Line Nbr (line number) This field displays the line number of the current entry. This field increments as
each new entry line is added.
ID Enter the ID for the student that you are adding to the group.
Balance This field displays the current balance of the student's account.
Account Type Select the account type of the new entry. The description of the account type
appears to the right of the field.
Note. Specifying an account type for a payment transaction is optional.
Item Type Select the item type of the new entry. The description of the item type appears to
the right of the field.
Warning! We strongly advise that you do not enter refund item types through
Group Post. If you enter a refund item type through Group Post, the Refund
Table is not updated. If you try to reverse the refund item type through the Group
Reversal process, the reversal process tries to reverse all items with the same
refund number. Refund item types that are posted through Group Post have a
refund number of zero because they are not true refunds. Posting reverses all
items on the account with a refund number of zero, that is, all items on the
account that are not refunds.
Maintaining Receivables Chapter 21
578 Copyright © 1988, 2010, Oracle and/or its affiliates. All Rights Reserved.
Charge Priority The charge priority list that is attached to the selected item type (credit item types
only) appears in this field. You may override this value.
Amount Enter the item (charge or payment) amount of the transaction.
Use Excess Account Select to direct payment amounts in excess of the charge to another account.
Enter the target account in the field to the right.
Restrict Payment to
Account Select to keep the entire amount of the payment in the account. Selecting this
option prevents an excess payment from being transferred to an excess payment
account.
Restrict to Invoice If your institution specifies that it will apply payments by invoice, you can
restrict payments to an invoice.
Term Enter the term for which you want to post this transaction.
Ref Nbr (reference
number) Enter an optional reference number to track the transaction.
Service Indicator If this transaction is a write-off, the system populates the write-off service
indicator code.
Payment Information
Payment ID Enter a payment ID in this field to reverse a payment. When you exit the field,
the system populates the remaining fields on the page with the original payment
information.
Pay Method If the payment item type is set up to be tender-specific, the tender value appears
in this field. If the field is not populated, you may select a payment method
(tender).
Dates
Item Effective Date Enter the date on which the transaction becomes active. The default value is the
current date.
Due Date Enter an optional due date for charge transactions. If you leave this field blank,
the billing program populates the field in the student's account.

Chapter 21 Maintaining Receivables
Copyright © 1988, 2010, Oracle and/or its affiliates. All Rights Reserved. 579
Mark For Delete Click to select a particular row on the group entry page of the non-posted group
for deletion.
Note. This button only appears for non-posted rows on the Create Transaction
page and when the posting status value is Not Complete. When you click the
button, the label changes to Unmark for Delete. You can post the group and this
transaction will not be posted, but you will still have a record of it as part of the
group for audit or reconciliation purposes. You can later correct the item, click
Unmark for Delete, and repost the group.
Currency Detail Click to access the Currency Conversion page, where you can change the
exchange rate type on payment item types if you changed the default currency
code.
Payment Details Click to access the Payment Details page, where you can review details about the
payment that was made. You can review the details about the payment for a
payment item type, but typically, when you post a payment, you would use this
page to enter data to which the payment should apply. For example, posting a
payment toward payment plans, you could enter the specific contract number or
post a payment for a specific career or class if you only want the payment to go
towards one career or a particular class.
Academic Information Click to access the Academic Information page, where you can review the
student's enrollment information.
Application Information Click to access the Application Information page, where you can review the
student's application status.
Tender Details Click to access the Check Information page, where you can enter details about a
payment by check. When entering a specific item type that is attached to a
particular tender type (check or credit card), this page appears so that you can
enter specific tender details. Otherwise, click the link to view the tender details.
Entering Transactions from an External Source
Many institutions receive transaction information from external sources, such as third-party housing and
parking applications, and lock box services. Loading external files enables you to maintain your receivables
with transactions created by sources both outside and inside your institution.
This section discusses how to load external files.
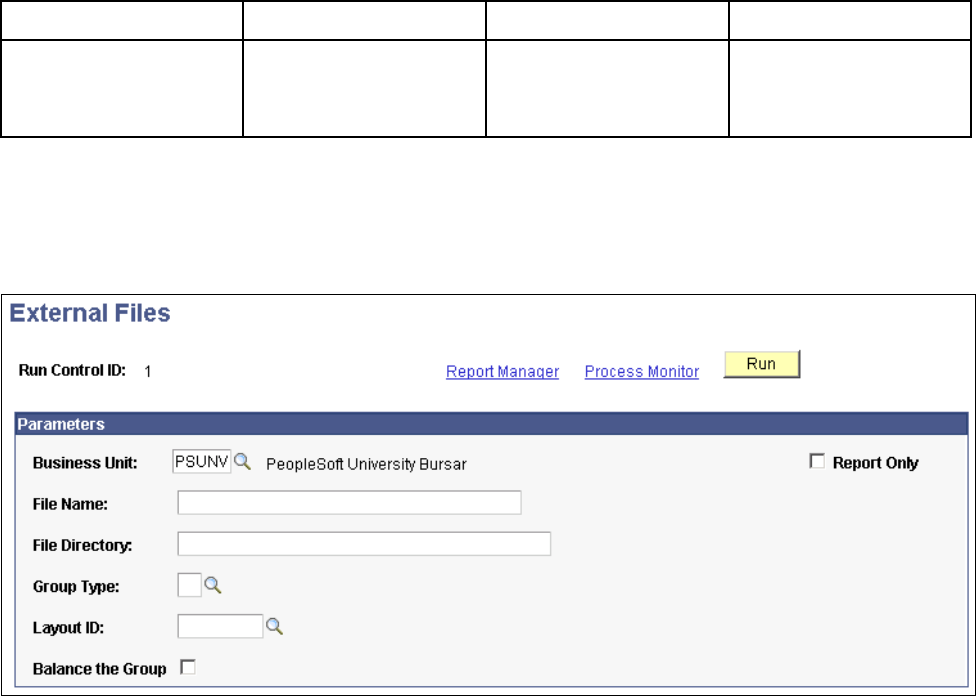
Maintaining Receivables Chapter 21
580 Copyright © 1988, 2010, Oracle and/or its affiliates. All Rights Reserved.
Page Used to Enter Transactions from an External Source
Page Name Definition Name Navigation Usage
External Files RUNCTL_SFGPLOAD Student Financial, Charges
and Payments, Group
Processing, External Files
Load external files.
Loading External Files
Access the External Files page (Student Financial, Charges and Payments, Group Processing, External Files).
External Files page
Parameters
Business Unit Enter the business unit that uses the file.
File Name Enter the name of the data file. Do not include the file extension. The extension
on data files must always be .dat.
File Directory Enter the file directory where the file was stored.
Group Type Enter the appropriate group type for the data source.
Layout ID Enter the layout ID that you defined for the type of file that is being loaded.
Balance the Group If you select this check box, the Balance Group check box is selected when you
access the Group Entry page.

Chapter 21 Maintaining Receivables
Copyright © 1988, 2010, Oracle and/or its affiliates. All Rights Reserved. 581
Report Only Select this option to generate a report to review the contents of the file after the
file is loaded into Group Data Entry.
See Also
Chapter 11, "Setting Up Receivables Maintenance," Setting Up External File Layouts, page 355
Processing Payroll Deductions
This section lists prerequisites for payroll deduction processing and discusses how to:
1. Select payroll deduction records.
2. Review results of payroll deduction record selection.
3. Create payroll deduction groups.
See Also
Chapter 11, "Setting Up Receivables Maintenance," Understanding Payroll Deduction, page 359
Prerequisites
Before Student Financials can retrieve deduction information from PeopleSoft Payroll for North America,
your payroll department must calculate payroll deductions as part of its normal payroll process. The system
stores payroll deduction records in the PS_PAY_DEDUCTION table.
Note. Consult your Payroll for North America staff for more information about how they calculate payroll
deductions for employees.
See Also
PeopleSoft Enterprise Payroll for North America 9.0 PeopleBook, "Defining Deductions"

Maintaining Receivables Chapter 21
582 Copyright © 1988, 2010, Oracle and/or its affiliates. All Rights Reserved.
Pages Used to Process Payroll Deductions
Page Name Definition Name Navigation Usage
Select SA Payroll
Deduction
RUNCTL_PAYINIT_SF1 Student Financials, Charges
and Payments, Payroll
Deduction Processing,
Process SA Payroll
Deduction, Select SA
Payroll Deduction
Select PeopleSoft
Enterprise Student
Administration payroll
deduction records.
SA Payroll Deduction
Summary
SF_PAYDED_SUMMARY Student Financials, Charges
and Payments, Payroll
Deduction Processing,
Review Deduction
Transactions, SA Payroll
Deduction Summary
Review results of payroll
deduction record selection
for an individual employee.
Payroll Deduction Group
Creation
RUNCTL_SFPAYDED Student Financials, Charges
and Payment, Payroll
Deduction Processing,
Create Deduction
Transactions, Payroll
Deduction Group Creation
Create payroll deduction
groups.
Selecting Payroll Deduction Records
Access the Select SA Payroll Deduction page (Student Financials, Charges and Payments, Payroll Deduction
Processing, Process SA Payroll Deduction, Select SA Payroll Deduction).
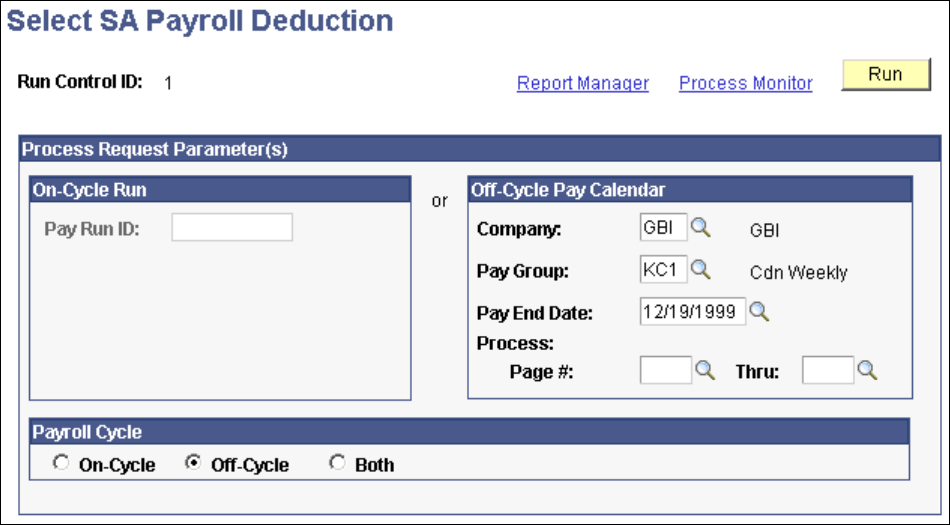
Chapter 21 Maintaining Receivables
Copyright © 1988, 2010, Oracle and/or its affiliates. All Rights Reserved. 583
Select SA Payroll Deduction page
On-Cycle Run
To select payroll deduction records that result from normal, scheduled payroll processing, select a Pay Run
ID. Each Pay Run ID represents a single batch payroll process.
Off-Cycle Pay Calendar
To select payroll deduction records that result from manually issued or on-demand checks, select a specific
pay calendar record using the Company, Pay Group, Pay End Date, Page #, and Thru fields.
Payroll Cycle
Consult your Payroll for North America staff for more information about the best method for running the
process.
On-Cycle Select to have the process review only on-cycle payroll transactions.
Off-Cycle Select to have the process review only off-cycle payroll transactions.
Both Select to have the process review both on- and off-cycle payroll transactions.
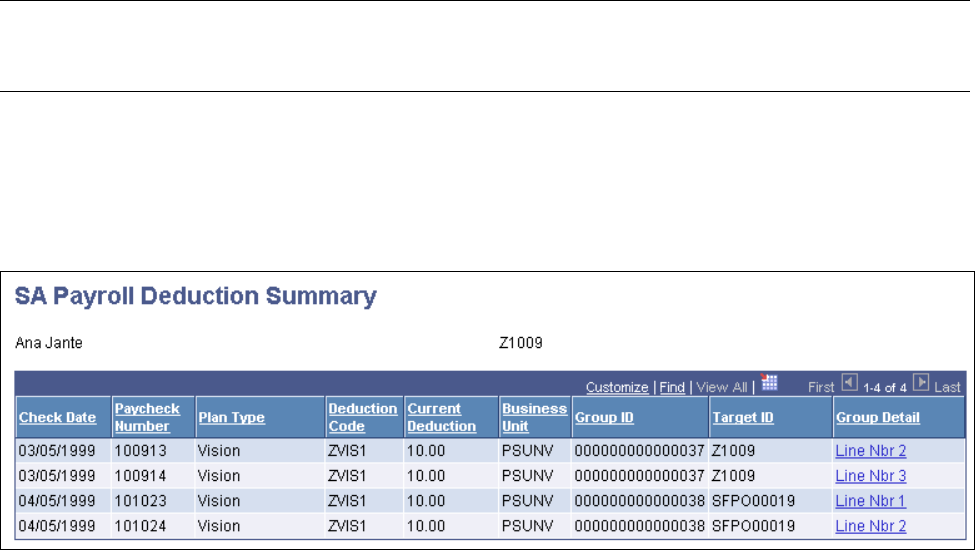
Maintaining Receivables Chapter 21
584 Copyright © 1988, 2010, Oracle and/or its affiliates. All Rights Reserved.
Running the Select Payroll Deduction Process
When you run the Select Payroll Deduction (SFPAYDED) process, the system scans the
PS_PAY_DEDUCTION table in Payroll for North America for any payroll deduction records with the
deduction codes that you designated to use with Student Financials. If these records were not already selected
in a previous process run, the system moves them to the PS_PAY_DED_PROC staging table.
Note. To run this process properly, you must have a working knowledge of Payroll for North America
functionality. Consult your payroll staff for more information about how to define the parameters of this
process and when to run it.
Reviewing Results of Payroll Deduction Record Selection
Access the SA Payroll Deduction Summary page (Student Financials, Charges and Payments, Payroll
Deduction Processing, Review Deduction Transactions, SA Payroll Deduction Summary).
SA Payroll Deduction Summary page
Check Date The issue date of the paycheck from which the system made the deduction.
Paycheck Number The unique number of the paycheck.
Deduction Code The PeopleSoft Student Administration payroll deduction code that is associated
with the deduction.
Current Deduction The monetary amount of the deduction.
Business Unit The business unit to which the system applied the deduction.
Group ID The ID of the group transaction in which the system included the deduction.
Target ID The student ID associated with the account that the system credited with the
deduction.
Group Detail Click to access the Group Line Entry page. From this page, you can review
details about the group transaction that was used to post the deduction to a
student account.
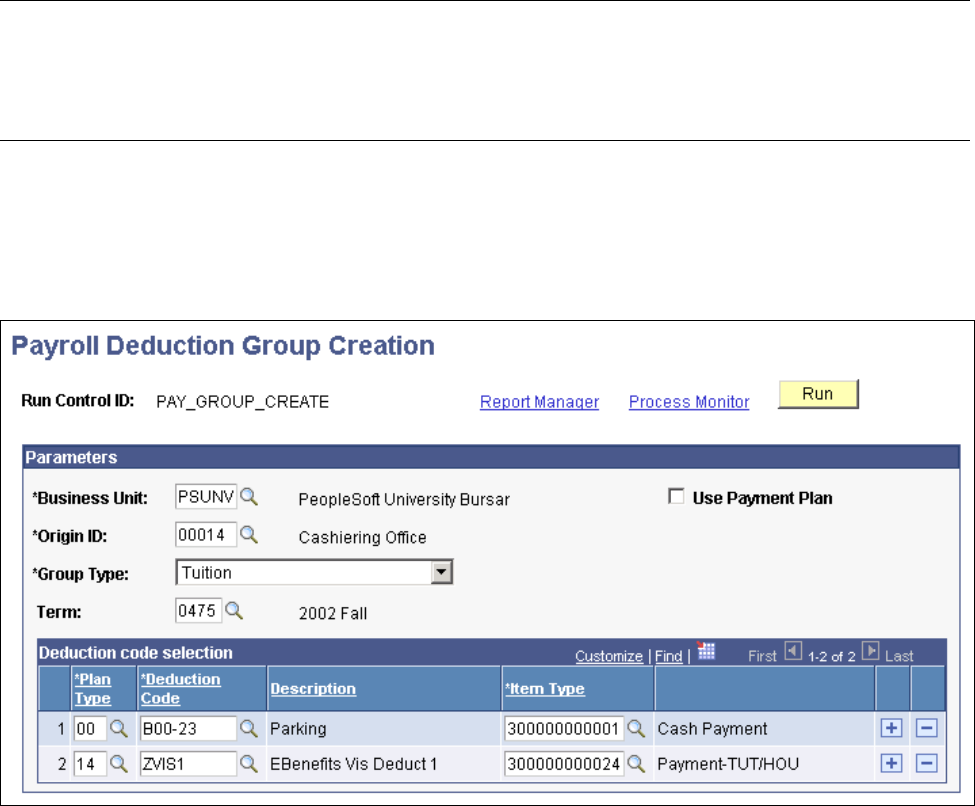
Chapter 21 Maintaining Receivables
Copyright © 1988, 2010, Oracle and/or its affiliates. All Rights Reserved. 585
Note. If you have not yet added a deduction record to a group transaction using the Payroll Deduction Group
Create (SF_PAY_DED) process, the Business Unit,Group ID,Target ID, and Group Detail fields are blank for
that record. To reconcile deduction records that have not been processed into the group post tables, create a
query that checks the PS_PAY_DED_PROC table for blank values in BUSINESS_UNIT, GROUP_ID_SF,
EMPLID_RELATED, and where PROCESS_FLAG = N.
Creating Payroll Deduction Groups
Access the Payroll Deduction Group Creation page (Student Financials, Charges and Payment, Payroll
Deduction Processing, Create Deduction Transactions, Payroll Deduction Group Creation).
Payroll Deduction Group Creation page
Parameters
Enter the Business Unit, Origin ID, Group Type, and Term values that the system assigns to the group
transaction you are creating. If you are restricting payroll deductions to pay payment plan contract charges,
select the Use Payment Plan check box.
Deduction code selection
Plan Type Select the benefit plan type to restrict the selection of available deduction codes.
Deduction Code Select the deduction codes of the payroll deduction records that you are adding to
a posting group.
Item Type For each deduction code that you add to a posting group, select the payment item
type that the system uses when posting the associated deductions to student
accounts.

Maintaining Receivables Chapter 21
586 Copyright © 1988, 2010, Oracle and/or its affiliates. All Rights Reserved.
Run Click to run the Payroll Deduction Group Create (SF_PAY_DED) process.
The process creates a group transaction for any payroll deductions in the PS_PAY_DED_PROC staging table
that match the run control criteria and were not included in a previous posting group. If you do not select the
Use Payment Plan check box, the system ignores the payment plan contract information that is associated
with accounts receiving deduction funds. If you select the Use Payment Plan check box and you assigned
deduction codes to the appropriate payment plan contracts, then for any students who are linked to those
contracts, the system includes contract information in the group line entry.
On the Group Entry page, the Payroll Deduction Group Create (SF_PAY_DED) process sets the posting
action of the created group to Available for Posting. On the Group Line Entry page, the Payroll Deduction
Group Create (SF_PAY_DED) process selects the Restrict Payment to Account check box for students who
are linked to an eligible payment plan contract. On the Payment Details page, the Payroll Deduction Group
Create process populates the Contract # field for group line entries that are restricted to payment plan
accounts.
Note. The system applies payroll deductions to payment plan accounts only if you assign deduction codes to
the appropriate payment plan contracts and if you select the Use Payment Plan check box when running the
Payroll Deduction Group Create (SF_PAY_DED) process. You can also use the charge priority list to restrict
your payroll deduction payments to specific charges.
Reviewing and Revising Group Data Entries Before Posting
The Group Data Entry and External File Load processes put saved transaction data into a suspended status
until the group is actually posted. The Suspended Group Post component enables you to view and revise
transaction entries for individual transactions.
This section discusses how to:
•Review suspended transactions from a data group.
•Review and update details about a specific data group transaction.
Pages Used to Review and Revise Group Data Entries Before Posting
Page Name Definition Name Navigation Usage
Suspended Group Post GROUP_POST_SUSPEND Student Financials, Charges
and Payments, Group
Processing, Review
Suspended Transactions,
Suspended Group Post
Review suspended
transactions from a data
group.
Group Post Details GROUP_POST_INFO_SP Click the Group Post
Details link on the
Suspended Group Post
page.
Review details about a
suspended posting group.

Chapter 21 Maintaining Receivables
Copyright © 1988, 2010, Oracle and/or its affiliates. All Rights Reserved. 587
Page Name Definition Name Navigation Usage
Group Line Details GRPLINE_SUSP_SP Click the Line Details link
on the Suspended Group
Post page.
Review and update details
about a specific data group
transaction.
Reviewing Suspended Transactions from a Data Group
Access the Suspended Group Post page (Student Financials, Charges and Payments, Group Processing,
Review Suspended Transactions, Suspended Group Post).
Group Post Details Click to access the Group Post Details page.
Acad Info (academic
information) Click to access the Academic Information page, where you can view the student's
enrollment information.
Line Details Click to access the Group Line Details page.
Reviewing and Updating Details About a Specific Data Group Transaction
Access the Group Line Details page (click the Line Details link on the Suspended Group Post page).
Update Click this button to access the Group Line Entry page and update the transaction
information. Alternatively, you can correct or update group lines from Student
Financials, Charges and Payments, Group Processing, Correct Transactions or
Student Financials, Charges and Payments, Group Processing, Correct Corporate
Transactions.
See Also
Chapter 21, "Maintaining Receivables," Adding Transactions to a Group Entry, page 576
Posting Group Data Entries
This section discusses how to run the Group Post process.
After you correct entries in the group, you must save the group and then post it to update the affected
accounts.
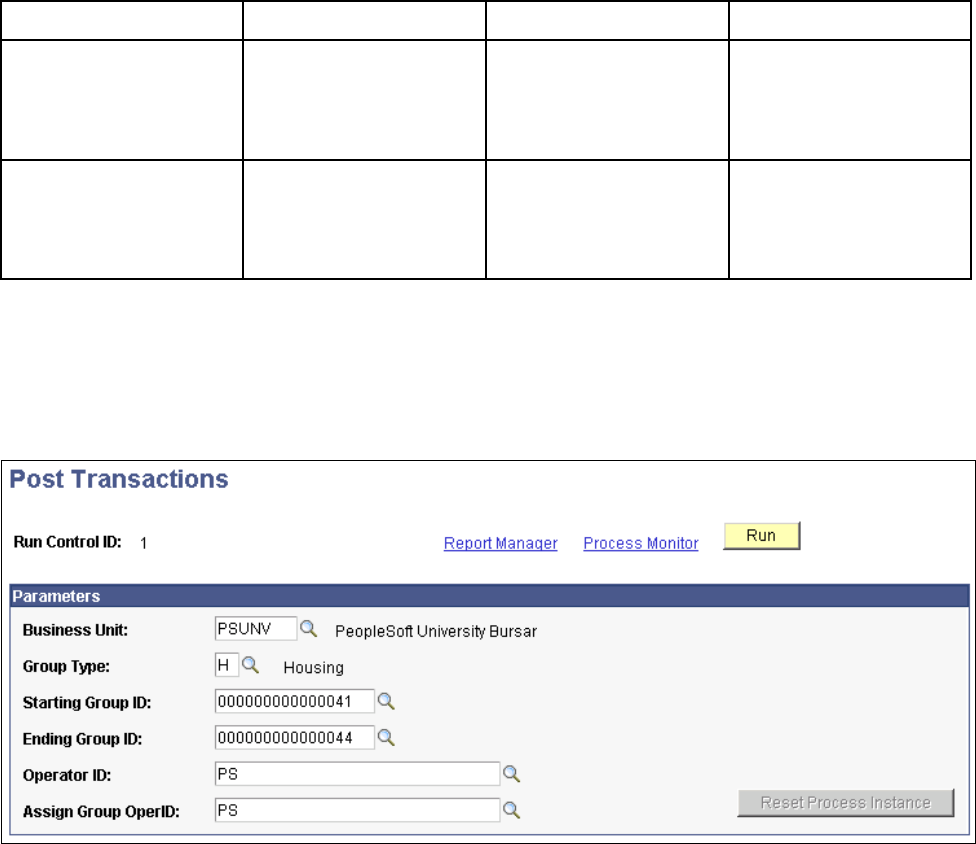
Maintaining Receivables Chapter 21
588 Copyright © 1988, 2010, Oracle and/or its affiliates. All Rights Reserved.
Pages Used to Post Group Data Entries
Page Name Definition Name Navigation Usage
Post Transactions RUNCTL_SFPGRPST Student Financials, Charges
and Payments, Group
Processing, Post
Transactions
Run the Group Post process.
Review Transactions GROUP_SUMM_VW Student Financials, Charges
and Payments, Group
Processing, Review
Transactions
Review group entry
information after it is
posted.
Running the Group Post Process
Access the Post Transactions page (Student Financials, Charges and Payments, Group Processing, Post
Transactions).
Post Transactions page
Parameters
Business Unit Select the business unit to which the group is associated.
Group Type Select the group type to which the group ID is associated.
Starting Group IDand
Ending Group ID Select the starting group ID and the ending group ID. The system generates these
IDs when you complete the Group Data Entry pages.
Operator ID Optionally, select the user ID of the person posting the group.

Chapter 21 Maintaining Receivables
Copyright © 1988, 2010, Oracle and/or its affiliates. All Rights Reserved. 589
Assign Group OperID
(assign group operator ID) Optionally, select and assign a user to the group.
Reset Process Instance Click to delete a process instance number from a posting group that failed.
Run Click to access the Process Scheduler Request page. You can run two processes:
Group Posting Common ID Create (SFPGRPDR) and Group Posting Process
(SFPGRPST).
The Group Posting Common ID Create (SFPGRPDR) process is an optional
process that evaluates all pending groups to find new IDs that do not yet have a
row in the SF_COMMON_ID table. When the system encounters a new ID, it
inserts a row into SF_COMMON_ID, which eliminates the need for the posting
process to perform this function before posting pending transactions to an
account. This process is especially useful during certain times of the year, such as
the beginning of a term or the beginning of an academic year, when you have
large groups with new IDs that have not undergone the posting process. If you
run the Group Posting Common ID Create (SFPGRPDR) process before you run
the Group Posting (SFPGRPST) process, the posting process is faster because it
has fewer records to process.
The Group Posting Process (SFPGRPST) posts group transactions and inserts
rows into SF_COMMON_ID for new IDs if you do not run the Group Posting
Common ID Create (SFPGRPDR) process first.
Posting Transactions for Individual Students and Organizations
Student Financials enables you to process online transactions for students and organizations without entering
control information or running a batch process. This section discusses how to:
•Post transactions for individual students.
•Post transactions for individual organizations.
Pages Used to Post Transactions for Individual Students and Organizations
Page Name Definition Name Navigation Usage
Student Post GRP_QUICK_POST Student Financials, Charges
and Payments, Post Student
Transaction, Student Post
Post transactions for
individual students.
Select Charges to Pay QUICK_SPLITPAY_SEC Click the Select Charges to
Pay link on the Student Post
page.
Specify the charges to
which the system applies a
student payment.
Payment Details QUICK_POST_SECPAN Click the Payment Details
link on the Student Post
page.
Add specific information to
the payment record.
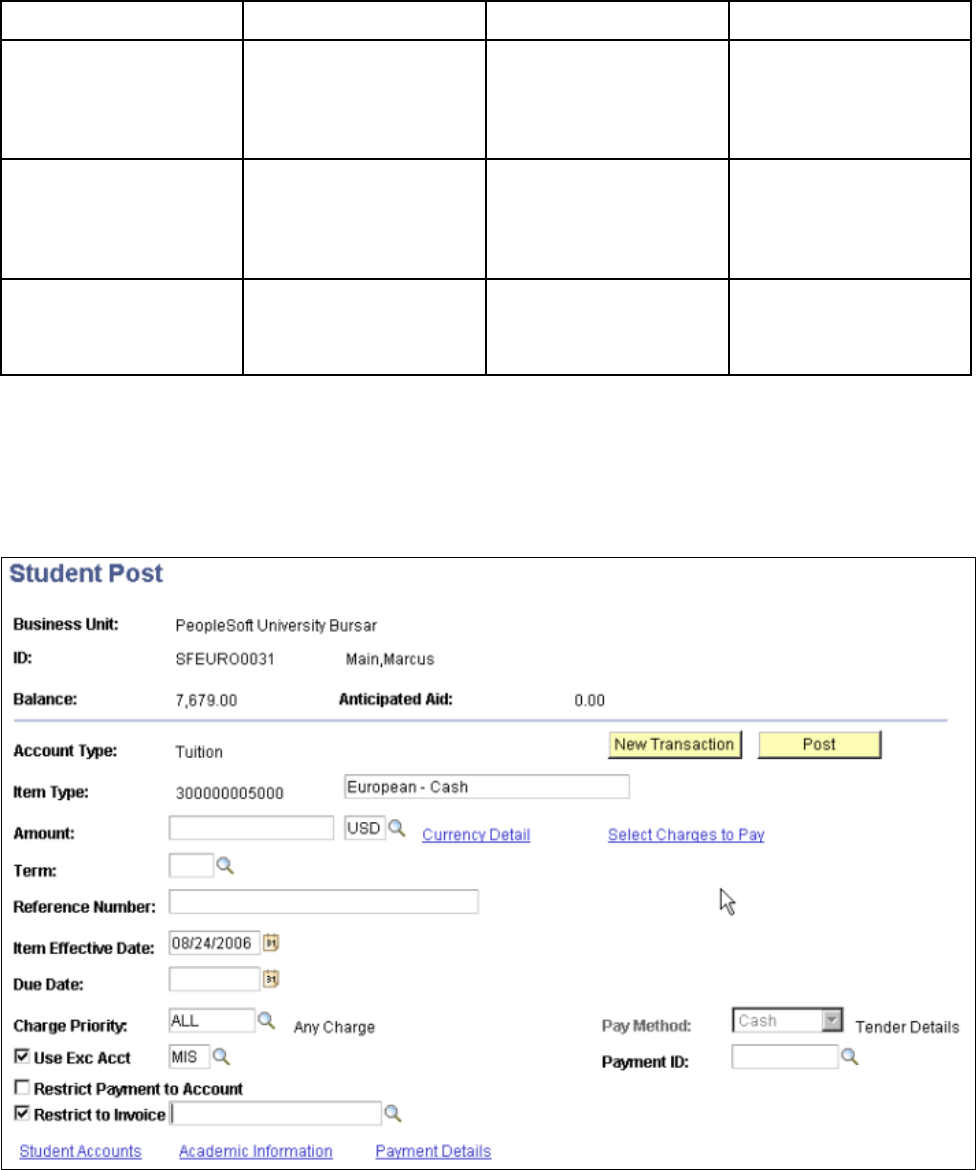
Maintaining Receivables Chapter 21
590 Copyright © 1988, 2010, Oracle and/or its affiliates. All Rights Reserved.
Page Name Definition Name Navigation Usage
Corp Post ORG_QUICK_POST Student Financials, Charges
and Payments, Post
Corporation Transaction,
Corp Post
Post transactions for
individual organizations.
Select Students to Pay QUICK_EMPLIPAY_SEC Click the Select Students to
Pay link on the Corp Post
page.
Specify the sponsored
student charges to which the
system applies the corporate
payment.
Third Party Information ORG_THIRD_PARTYINF Click the Third Party
Information link on the
Corp Post page.
Specify third-party contract
information.
Posting Transactions for Individual Students
Access the Student Post page (Student Financials, Charges and Payments, Post Student Transaction, Student
Post)
Student Post page
New Transaction Click to enter a new transaction.
Chapter 21 Maintaining Receivables
Copyright © 1988, 2010, Oracle and/or its affiliates. All Rights Reserved. 591
Post Click to post the entered transaction.
Amount Enter the item amount. Click the Currency Detail link to specify the exchange
rate.
Term Enter the term for which you want to post this transaction.
Reference Number Enter an optional reference number to track the transaction.
Posted Date After the transaction posts, the date it was posted appears in this field.
Item Effective Date Enter the date on which the transaction becomes active. The default is the current
date.
Due Date Optionally, enter a due date if the transaction is a charge.
Charge Priority For all credit item types, this field displays the charge priority list that is
associated with the item type. If necessary, you may override this value.
Pay Method If the payment item type is set up as tender-specific, then the tender category
appears in this field. If the field is not populated, select a value from the list.
Click the Tender Details button to add specific information, such as check
number and bank information.
Payment ID This field is used only when reversing a payment. Enter the payment ID number
of the transaction to be reversed. When you exit the field, the page is completed
with the original transaction information.
Use Exc Acct (use excess
account) Select the Exc Acct check box to route payments in excess of a charge or account
balance to a designated excess account. When the check box is selected, enter the
excess account type in the field to the right.
Restrict Payment to
Account Select to restrict the entire amount of the payment to the specified account type.
Selecting this option prevents excess payments from being transferred to an
excess payment account.
Restrict to Invoice Select to restrict payment to an invoice. This option is only available if an
institution elected to apply payments by invoice on the SF Installation page.
Select Charges to Pay Click this link to access the Select Charges to Pay page.
Pay Amount From the Select Charges to Pay page, specify the amount of the total payment
that you want to apply against this charge. The specified amounts must total 100
percent of the payment.
Student Accounts Click this link to access the Student Accounts page.
Academic Information Click this link to access the Academic Information page.
Payment Details Click this link to access the Payment Details page.

Maintaining Receivables Chapter 21
592 Copyright © 1988, 2010, Oracle and/or its affiliates. All Rights Reserved.
Posting Transactions for Individual Organizations
Access the Corp Post page (Student Financials, Charges and Payments, Post Corporation Transaction, Corp
Post).
With the exception of the following links, this page is the same as the Student Post page.
Select Students to Pay Click this link to access the Select Students to Pay page.
Corp Accounts Click this link to access the Corp Accounts page.
Third Party Information Click this link to access the Third Party Information page.
See Also
Chapter 21, "Maintaining Receivables," Posting Transactions for Individual Students, page 590
Consolidating and Reviewing Transactions for Individual Students
and Organizations
This section lists the pages used to consolidate and reviewing transactions for individual students and
organizations.
Note. Single transactions that are created using the Student Post and Corp Post components are stored in the
QUICK_POST_TBL (quick post table). This table can become very large. The Purge QUICK_POST_TBL
process consolidates these transactions into two posting groups, one for student transactions and one for
corporate transactions. It then empties the table. After these transactions are consolidated into posting groups,
they can be easily tracked and audited.
Note. Define the origin ID and group type that the system uses to consolidate transactions into posting groups
on the Posting Setup page.
See Also
Chapter 2, "Completing Student Financials General Setup," Defining Posting Parameters, page 24

Chapter 21 Maintaining Receivables
Copyright © 1988, 2010, Oracle and/or its affiliates. All Rights Reserved. 593
Pages Used to Consolidate and Review Transactions for Individual Students
and Organizations
Page Name Definition Name Navigation Usage
Purge Posting Table RUN_CNTL_SFBKPOST Student Financials, Charges
and Payments, Group
Processing, Purge Posting
Table
Run the Purge
QUICK_POST_TBL
process.
Posting Information QUICK_POST_ACTIVIT Student Financials, Charges
and Payments, Group
Processing, Review Posting
Information, Posting
Information
Review transactions that
were consolidated by the
Purge QUICK_POST_TBL
process.
Viewing Account Information Within the Maintain Receivables
Feature
This section lists the pages used to view account information within the Maintain Receivables feature.
Pages Used to View Account Information Within the Maintain Receivables
Feature
Page Name Definition Name Navigation Usage
Item View ITEM_SF Student Financials, View
Item, Item View Review item activity for
student accounts.
Corp Item View ITEM_ORG_SF Student Financials, View
Corporate Item, Corp Item
View
Review item activity for
organization accounts.
Item Line View ITEM_LINE_SF Student Financials, View
Item Line, Item Line View Review information about
each line item in a student
account.
Item Line Corp View ITEM_LINE_ORG_SF Student Financials, View
Corporate Item Line, Item
Line Corp View
Review charges to a
corporate account by the
account type that is
affected.
Item Due View ITEM_DUE_SF Student Financials, View
Item Due, Item Due View Review detailed
information about due line
items in a student account.

Maintaining Receivables Chapter 21
594 Copyright © 1988, 2010, Oracle and/or its affiliates. All Rights Reserved.
Page Name Definition Name Navigation Usage
Corp Item Due View ITEM_DUE_ORG_SF Student Financials, View
Corporate Item Due, Corp
Item Due View
Review detailed
information about due line
items in an organization
account.
Viewing Payment by Invoice Information Within the Maintain
Receivables Feature
The Maintain Receivables application provides a variety of ways to inquire on payment by invoice
information at various levels of detail.
Note. This section is only valid for institutions that apply payments by invoice.
Pages Used to View Payment by Invoice Information Within the Maintain
Receivables Feature
Page Name Definition Name Navigation Usage
View Items by Invoice SSF_VW_ITEM_INV Student Financials, Charges
and Payments, Payments by
Invoice, View Items by
Invoice
View a summary of student
items by invoice.
View Corp Items by Invoice SSF_VW_ITEMORG_INV Student Financials, Charges
and Payments, Payments by
Invoice, View Corp Items
by Invoice
View a summary of
corporate items by invoice.
Update Payment Invoice ID SSF_PMT_INVOICE Student Financials, Charges
and Payments, Payments by
Invoice, Update Payment
Invoice ID
Update the invoice ID for
payments restricted to
invoices.
Update Corp Payment
Invoice ID
SSF_ORGPMT_INVOICE Student Financials, Charges
and Payments, Payments by
Invoice, Update Corp
Payment Invoice
Update the invoice ID of
corporate payments.
Viewing Items by Invoice
Access the View Items by Invoice page (Student Financials, Charges and Payments, Payments by Invoice,
View Items by Invoice).
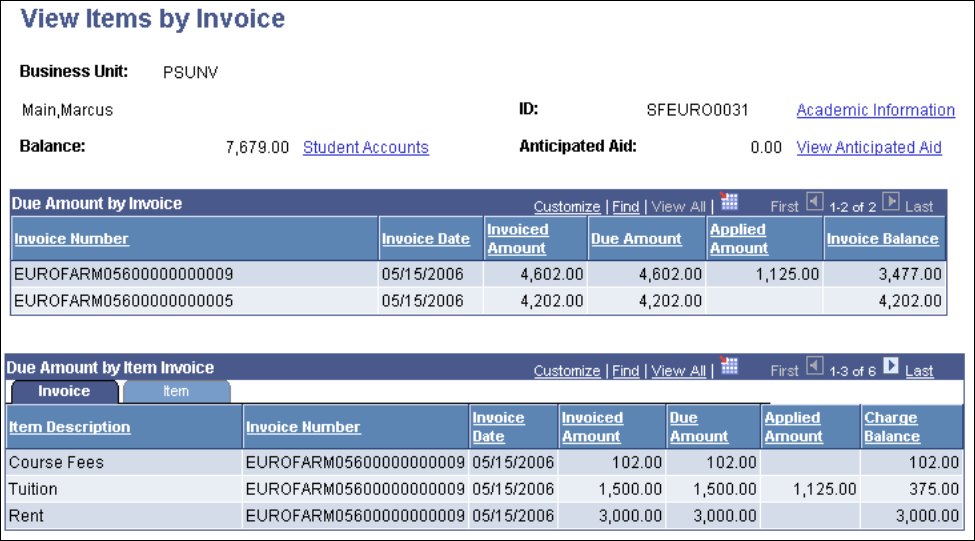
Chapter 21 Maintaining Receivables
Copyright © 1988, 2010, Oracle and/or its affiliates. All Rights Reserved. 595
View Items by Invoice page
If payments are not restricted to invoice, then payments may be applied to charges that are not invoiced. In
addition, the system displays both student and corporate payments that were received and posted towards an
invoice. Only invoices with an invoice balance of more than $0.00 appear.
View items by invoice number.
Viewing Corp Items by Invoice
Access the View Corp Items by Invoice page (Student Financials, Charges and Payments, Payments by
Invoice, View Corp Items by Invoice).
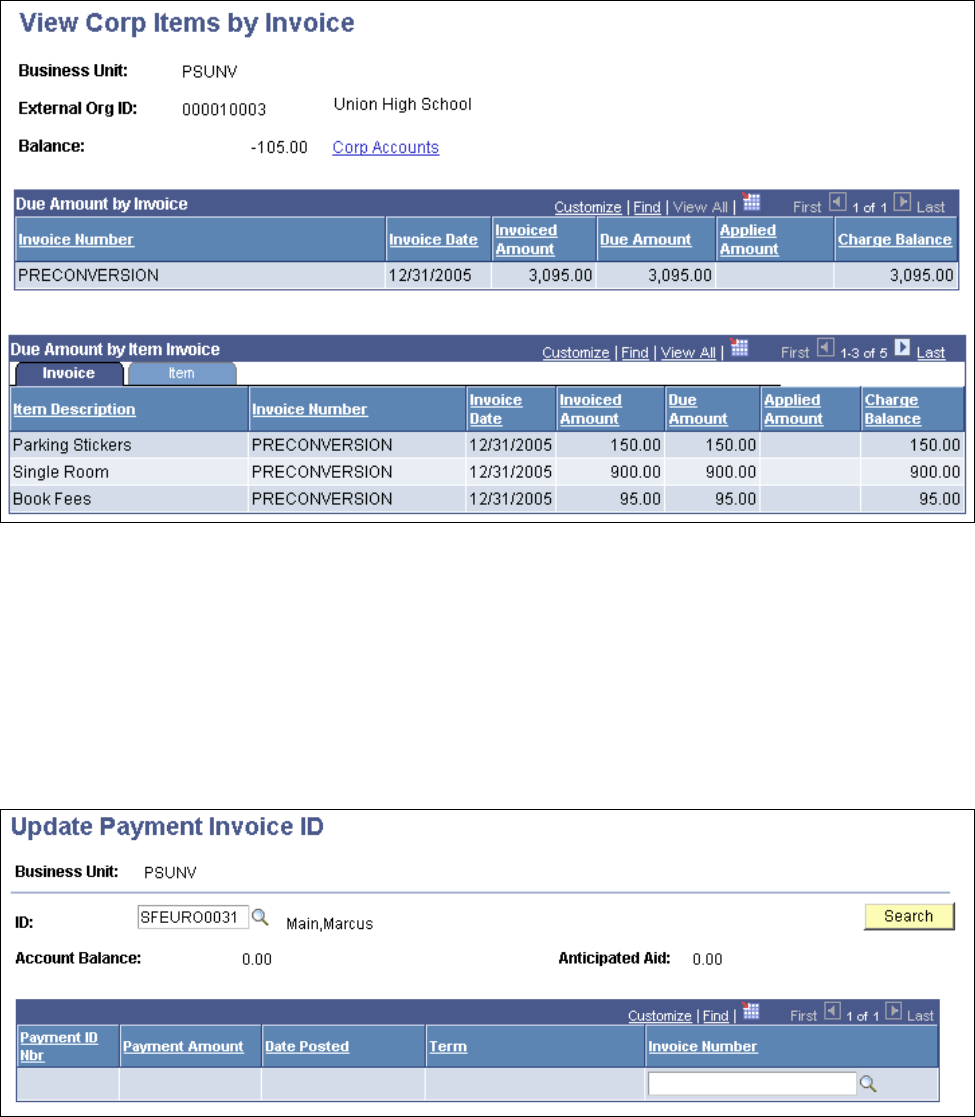
Maintaining Receivables Chapter 21
596 Copyright © 1988, 2010, Oracle and/or its affiliates. All Rights Reserved.
View Corp Items by Invoice page
View a summary of corporate items by invoice number.
Updating Payment Invoice ID
Access the Update Payment Invoice ID page (Student Financials, Charges and Payments, Payments by
Invoice, Update Payment Invoice ID).
Update Payment Invoice ID page
Use this page to designate an unapplied payment towards an invoice:
1. Select the invoice ID to which the payment is to be applied.
2. Click Save.
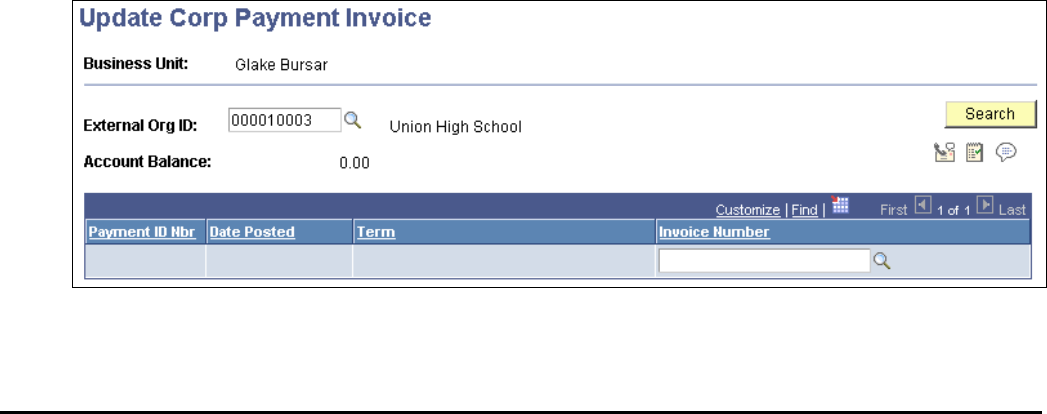
Chapter 21 Maintaining Receivables
Copyright © 1988, 2010, Oracle and/or its affiliates. All Rights Reserved. 597
3. Run the Payment Applier process for the student.
The Payment Applier process applies the credit to the invoice. Payments restricted to a specific invoice
cannot be designated to pay another invoice; however, they can be refunded.
Updating Corp Payment ID
Access the Update Corp Payment Invoice page (Student Financials, Charges and Payments, Payments by
Invoice, Update Corp Payment Invoice).
Update Corp Payment Invoice page
Managing Disputed Charges
This section provides an overview of disputed charges and discusses how to enter dispute information.
Understanding Disputed Charges
When a student or organization disputes charges, the disputed charge is designated as a line entry on the
Review Credit History page (depending on how Dispute Aging is set up in the Aging Set). When you have
resolved the dispute, the customer can pay the charge, you can remove the disputed amount from the item, or
you can move the charge to a write-off account
You would follow these steps to dispute a charge:
1. Access the Change Item Line (for students) or Change Corp Item Line (for organizations) page to display
a list of accounts for a student or organization.
2. Click the Account Details link next to the account that contains the disputed charge to access the Change
Item Line - Account Summary (for students) or Change Corp Item Line - Account Summary (for
organizations) page.
These pages display all charges that are associated with the selected account.
3. Click the Item Details link next to the disputed charge to access the Change Item Line - Line Detail
Update (for students) or Change Corp Item Line - Line Detail Update (for organizations) page.

Maintaining Receivables Chapter 21
598 Copyright © 1988, 2010, Oracle and/or its affiliates. All Rights Reserved.
4. Enter dispute information for the charge and click the Save button.
Pages Used to Manage Disputed Charges
Page Name Definition Name Navigation Usage
Change Item Line ACCOUNT_SF Student Financials,
Collection, Adjustments,
Change Item Line
Select an account that
contains a disputed charge
for a student.
Change Item Line -
Account Summary
CHG_ITEM_LINE_SP Click the Account Details
link on the Change Item
Line page.
Select a disputed charge for
a student.
Change Item Line - Line
Detail Update
ITEM_LINE_SF_SP_UP Click the Item Details link
on the Account Summary
page.
Enter dispute information
for a student.
Change Corp Item Line ACCOUNT_ORG_SF Student Financials,
Collections, Adjustments,
Change Corporate Item
Line, Change Corp Item
Line
Select an account
containing a disputed
charge for an organization.
Change Item Line -
Account Summary
CHG_ORG_ITM_LN_SP Click the Account Details
link on the Change Item
Line page.
Select a disputed charge for
an organization.
Change Item Line - Line
Detail Update
ITEM_LNE_ORGSF_UP Click the Item Details link
on the Change Item Line -
Account Summary page.
Enter dispute information
for an organization.
Entering Dispute Information
Access the Change Item Line - Line Detail Update (click the Item Details link on the Account Summary
page).
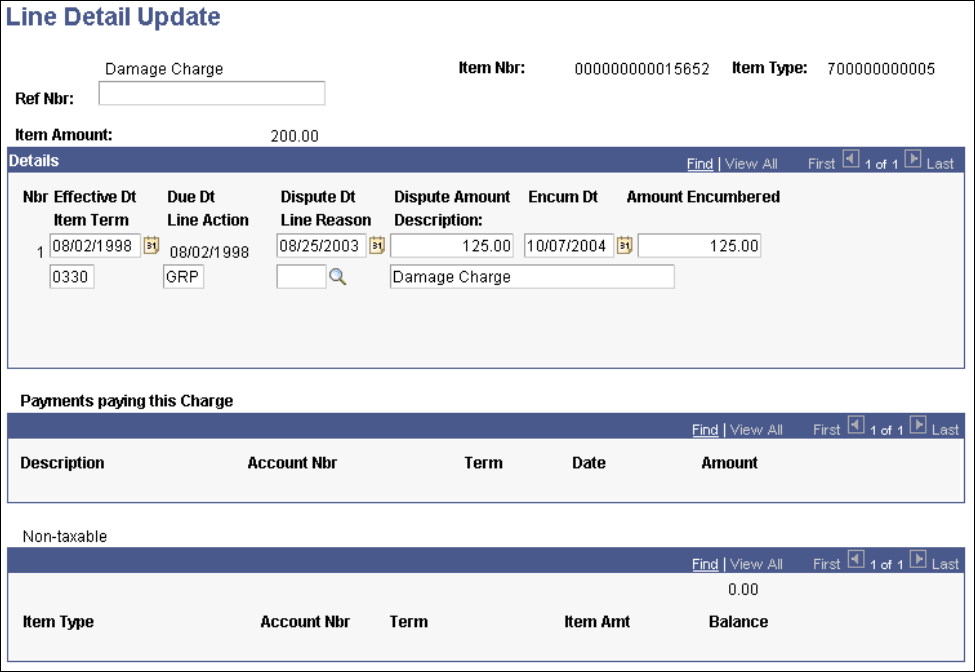
Chapter 21 Maintaining Receivables
Copyright © 1988, 2010, Oracle and/or its affiliates. All Rights Reserved. 599
Line Detail Update page
Ref Nbr (reference
number) Enter the reference number that you are using to track the disputed receivable.
Nbr Effective Dt
(number effective date) This field is set by default to the current system date.
Due Dt (due date) Enter the due date of the charge.
Dispute Dt (dispute date) Enter the date that the student or organization disputed the charge.
Dispute Amount Enter the amount of the dispute.
Encum Dt (encumbrance
date) Enter the encumbrance date from which you want the disputed amount of the
payment held.
Amount Encumbered Enter the dollar amount of the student's account that the dispute encumbers in
this field.
Item Term This field displays the term to which the system posted the charge.
Line Action Enter the line action.

Maintaining Receivables Chapter 21
600 Copyright © 1988, 2010, Oracle and/or its affiliates. All Rights Reserved.
Line Reason Enter a line reason code that specifies the reason for the dispute.
Description The description is set by default to the description of the original transaction.
Reversing Payments and Charges
This section discusses how to:
•Reverse payments.
•Reverse charges.
•Reverse groups of transactions.
•Process payroll deduction reversals.
Pages Used to Reverse Payments and Charges
Page Name Definition Name Navigation Usage
Payment Reversal PMT_REVERSAL Student Financials, Charges
and Payments, Reversals,
Reverse Payment, Payment
Reversal
Reverse student payments.
Payment Reversal -
Payment Detail
PAYMENT_DTL_SP Click the Payment Detail
link on the Payment
Reversal page.
Review details about a
student payment before
reversing it.
Payment Corp Reversal PMT_ORG_REVERSAL Student Financials, Charges
and Payments, Reversals,
Reverse Corporate
Payment, Payment Corp
Reversal
Reverse corporate
payments.
Payment Corp Reversal -
Payment Detail (payment
corporate reversal -
payment detail)
PAYMENT_DTL_ORG_SP Click the link next to a
payment on the Payment
Corp Reversal page.
Review details about a
corporate payment before
reversing it.
Charge Reversal ACCOUNT_SF Student Financials, Charges
and Payments, Reversals,
Reverse Charge, Charge
Reversal
Select a student account
containing a charge you
want to reverse.
Charge Reversal - Charge
Detail
CHARGE_REV_SP Click the Account Details
link on the Charge Reversal
page.
Reverse student charges.

Chapter 21 Maintaining Receivables
Copyright © 1988, 2010, Oracle and/or its affiliates. All Rights Reserved. 601
Page Name Definition Name Navigation Usage
Reverse Corporate Charge -
Charge Reversal
ACCOUNT_ORG_SF Student Financials, Charges
and Payments, Reversals,
Reverse Corporate Charge
Select a corporate account
containing a charge you
want to reverse.
Reverse Corporate Charge -
Charge Detail
CHARGE_REV_ORG_SP Click the Account Details
link on the Reverse
Corporate Charge - Charge
Reversal page.
Reverse corporate charges.
Reversal Detail LINE_REASON_SF_SP Click the Reverse button on
the Payment Reversal,
Payment Corp Reversal,
Charge Reversal, or
Reverse Corporate Charge -
Charge Reversal page.
Enter optional reversal
information after reversing
a payment or charge.
Group Reversal RUNCTL_SFRVRGRP Student Financials, Charges
and Payments, Group
Processing, Reverse
Groups, Group Reversal
Reverse groups of
transactions.
Reversing Payments
Access the Payment Reversal (for students) (Student Financials (Student Financials, Charges and Payments,
Reversals, Reverse Payment, Payment Reversal), Charges and Payments, Reversals, Reverse Payment) or
Payment Corp Reversal (for organizations) page.
1. Enter search criteria and click the Search button to display the desired payments.
2. Click the Reverse button next to a payment to access the Reversal Detail page.
3. Enter optional reversal information (such as Item Effective Date, Description, and Reason Code) on the
Reversal Detail page and click the OK button to complete the payment reversal.
Reversing Charges
Access the Charge Reversal (for students) (Student Financials (Student Financials, Charges and Payments,
Reversals, Reverse Charge, Charge Reversal), Charges and Payments, Reversals, Reverse Charge) or Charge
Corp Reversal - Charge Reversal (for organizations) page.
1. Click the Account Details link next to the account that contains the charge you want to reverse.
This link accesses the Charge Reversal - Charge Detail (for students) or Charge Corp Reversal - Charge
Detail (for organizations) page, which displays all charges that are associated with the selected account.
2. Click the Reverse button next to a charge to access the Reversal Detail page.
3. Enter optional reversal information (such as Item Effective Date, Description, and Reason Code) on the
Reversal Detail page and click the OK button to complete the charge reversal.

Maintaining Receivables Chapter 21
602 Copyright © 1988, 2010, Oracle and/or its affiliates. All Rights Reserved.
Reversing Groups of Transactions
Access the Group Reversal page (Student Financials, Charges and Payments, Group Processing, Reverse
Group, Group Reversal).
Group Reversal page
Parameters
Include Detail Select this option to generate a detailed report of the transactions reversed when
you run the process.
Group ID Enter the unique ID of the group of transactions that you want to reverse.
Description Enter an optional description for the group reversal. This description appears next
to the item type on the Group Line Entry page.
Bank Tracer Nbr (bank
tracer number) Enter a number for tracking purposes. This field is optional.
Item Effective Date Enter the effective date that the system assigns to the reversed transactions.
Due Date Option Select an option to determine how the system calculates due dates for the
reversed transactions.
New Due Dt (new due date): Select this option to enter a new due date that the
system assigns to the reversed transactions.
Null: The system assigns a null value to the due date of the reversed transactions
and assigns new due dates during the billing process.
Old Due Dt (old due date): The system assigns the original due date of the
reversed transaction.

Chapter 21 Maintaining Receivables
Copyright © 1988, 2010, Oracle and/or its affiliates. All Rights Reserved. 603
Processing Payroll Deduction Reversals
When Payroll for North America reverses a previous payroll deduction, the resulting deduction is a negative
amount. Student Financials cannot link the negative deduction amount to the originally posted deduction. The
system selects these negative deductions through the Select Payroll Deduction (SFPAYDED) process.
However, when you run the Payroll Deduction Group Create (SF_PAY_DED) process on negative
deductions, the system enters them into the posting tables as a group with a Posting Action of Do Not Post
and a Posting Status of Errors. Because you cannot post these negative deductions using the normal method,
you must manually resolve the affected student accounts.
Note. If the Payroll Deduction Group Create (SF_PAY_DED) process encounters both negative and positive
deductions, it creates two separate posting groups, one for the negative deductions and one for the positive
deductions.
Applying Payments
You can run the Payment Applier process to allocate unapplied payments to eligible charges that are still
owing. The process applies payments to both student and corporate accounts. Payment swapping might occur
if a priority payment is applied.
Pages Used to Apply Payments
Page Name Definition Name Navigation Usage
Payment Applier RUNCTL_PMTWKUP Student Financials, Charges
and Payments, Apply
Payment. Payment Applier
Run the Payment Applier
process.
Payment Shuffle ITEM_SF_XREF Student Financials, Charges
and Payments, Payment
Shuffle
Identify remaining
unapplied payments after
running the Payment
Applier process.
Running the Payment Applier Process
Access the Payment Applier page (Student Financials, Charges and Payments, Apply Payment. Payment
Applier).

Maintaining Receivables Chapter 21
604 Copyright © 1988, 2010, Oracle and/or its affiliates. All Rights Reserved.
Payment Applier page
Business Unit Enter the business unit for which you want to run the Payment Applier process.
Select All IDs Select to run the Payment Applier process for all student and corporate IDs.
Reset IDs When you select this option, all applied payments are unapplied. Then, all
payments are applied to their eligible charges as if for the first time, following
payment allocation rules. All payments are applied in priority order.
Note. The Payment Applier process does not reset payments if the account is a
payment plan or if the account has write-off or refund transactions.
ID or External Org ID If you do not select the Select All IDs check box, enter ID numbers for the
students or organizations to which you want payments applied.
Note. When running the process for individual IDs, you cannot include both
students and organizations at the same time.
Writing Off Charges and Account Balances
This section provides an overview of write-offs and discusses how to:
•Create write-offs for individual students.
•Create write-offs for individual organizations.
•Select accounts to write off for individual students and organizations.

Chapter 21 Maintaining Receivables
Copyright © 1988, 2010, Oracle and/or its affiliates. All Rights Reserved. 605
•Select items to write off for individual students and organizations.
•Process batch write-offs.
•Reverse write-offs for students.
•Reverse write-offs for organizations.
Understanding Write-offs
If a receivable becomes impossible to collect, you can write off the receivable by moving the charge within
your general ledger from your receivable or collections account to your write-off account. The system adds
the write-off service indicator to the customer's account and applies the restrictions that you defined for write-
off customers.
If you process a write-off by mistake, or if a customer agrees to pay a debt that you already wrote off, Student
Financials enables you to reverse the write-off.
Pages Used to Write Off Charges and Account Balances
Page Name Definition Name Navigation Usage
Student Writeoff WRITEOFF_QCK_POST Student Financials,
Collections, Write Offs,
Post Student Write-off,
Student Writeoff
Create write-offs for
individual students.
Corp Writeoff WRITEOFF_ORG_POST Student Financials,
Collections, Write Offs,
Post Corporate Writeoff,
Corp Writeoff
Create write-offs for
individual organizations.
Accounts To Writeoff WRITEOFF_ACCT_SP Select the Writeoff
Accounts option or click the
Accounts to Writeoff link
on the Student Writeoff
page.
Select accounts to write off
for individual students and
organizations.
Items To Writeoff WRITEOFF_ITEMS_SP Select the Writeoff Items
option and click the Items to
Writeoff link on the Student
Writeoff page.
Select items to write off for
individual students and
organizations.
Write Offs RUNCTL_WRITE_OFF Student Financials,
Collections, Write Offs,
Run Write-off Process,
Write Offs
Process batch write-offs.
Writeoff Reversal WRITEOFF_REVERSAL Student Financials,
Collections, Write Offs,
Reverse Student Writeoff,
Writeoff Reversal
Reverse write-offs for
students.
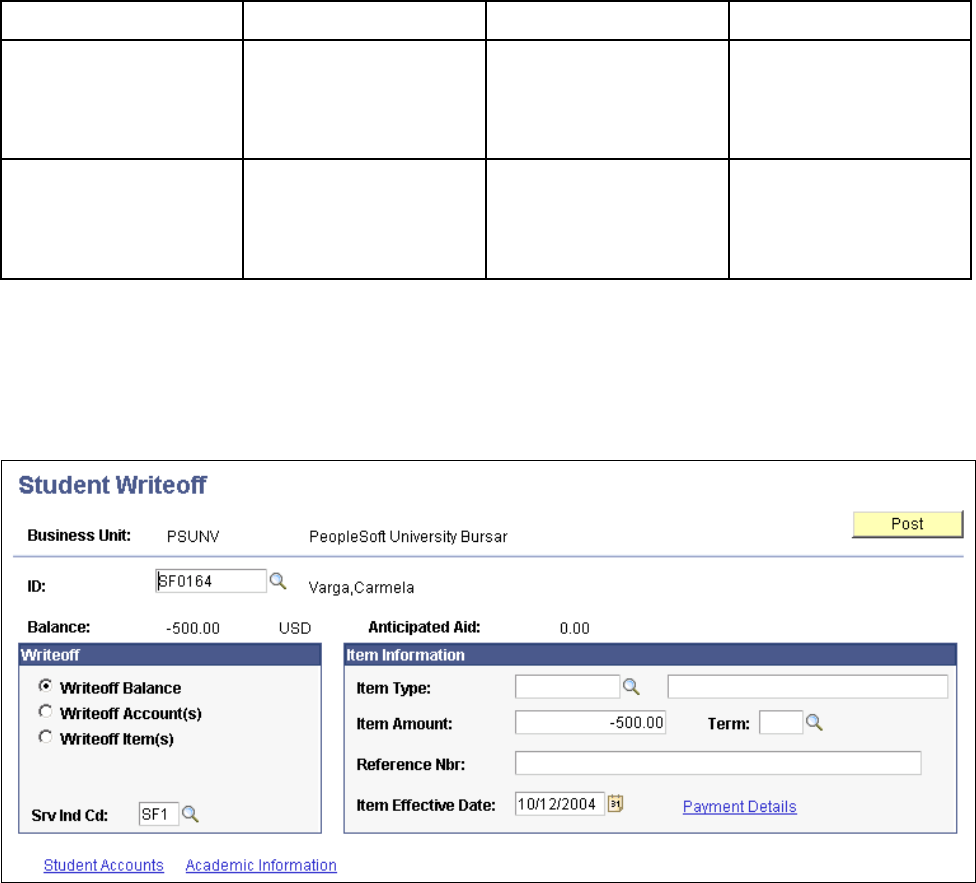
Maintaining Receivables Chapter 21
606 Copyright © 1988, 2010, Oracle and/or its affiliates. All Rights Reserved.
Page Name Definition Name Navigation Usage
Writeoff Corp Reversal WRITEOFF_ORG_REVER Student Financials,
Collections, Write Offs,
Reverse Corporate Writeoff,
Writeoff Corp Reversal
Reverse write-offs for
organizations.
Writeoff Detail WRITEOFF_DTL_SP Click the Writeoff Detail
link on the Writeoff
Reversal or Writeoff Corp
Reversal page.
Review information about a
write-off.
Creating Write-offs for Individual Students
Access the Student Writeoff page (Student Financials, Collections, Write Offs, Post Student Write-off,
Student Writeoff).
Student Writeoff page
ID Select the ID of the student whose receivables you are writing off.
Balance This field displays the total balance of the customer's account.
Anticipated Aid This field displays the amount of financial aid that was awarded to the student
but not yet disbursed.
Writeoff
Select a write-off method.
Writeoff Balance Select this option to write off the entire amount shown in the Balance field.

Chapter 21 Maintaining Receivables
Copyright © 1988, 2010, Oracle and/or its affiliates. All Rights Reserved. 607
Writeoff Account(s) When you select this option, the Accounts to Writeoff link becomes available.
Writeoff Item(s) When you select this option, the Items to Writeoff link becomes available.
Srv Ind Cd (service
indicator code) Select the service indicator code that sets the desired limitations on transactions
for customers whose accounts you have written off.
Student Accounts and
Academic Information Click the Student Accounts link to see the View Customer Accounts page. Click
the Academic Information link to view academic plan and enrollment
information.
Item Information
Item Type Select the item type that you are using for your write-off account. The description
of the item type appears in the field to the right.
Item Amount The amount of the transaction that you are writing off appears next to the term
you select.
Term Enter a term for the write-off.
Reference Nbr (reference
number) Enter the reference number that you use to track your write-offs.
Item Effective Date Enter the effective date of the item.
Payment Details Click this link to review further details about the write-off.
Creating Write-offs for Individual Organizations
Access the Corp Writeoff page (Student Financials, Collections, Write Offs, Post Corporate Writeoff, Corp
Writeoff).
This page is identical to the Student Writeoff page.
See Also
Chapter 21, "Maintaining Receivables," Creating Write-offs for Individual Students, page 606
Selecting Accounts to Write Off for Individual Students and Organizations
Access the Accounts To Writeoff page (Select the Writeoff Accounts option or click the Accounts to Writeoff
link on the Student Writeoff page.
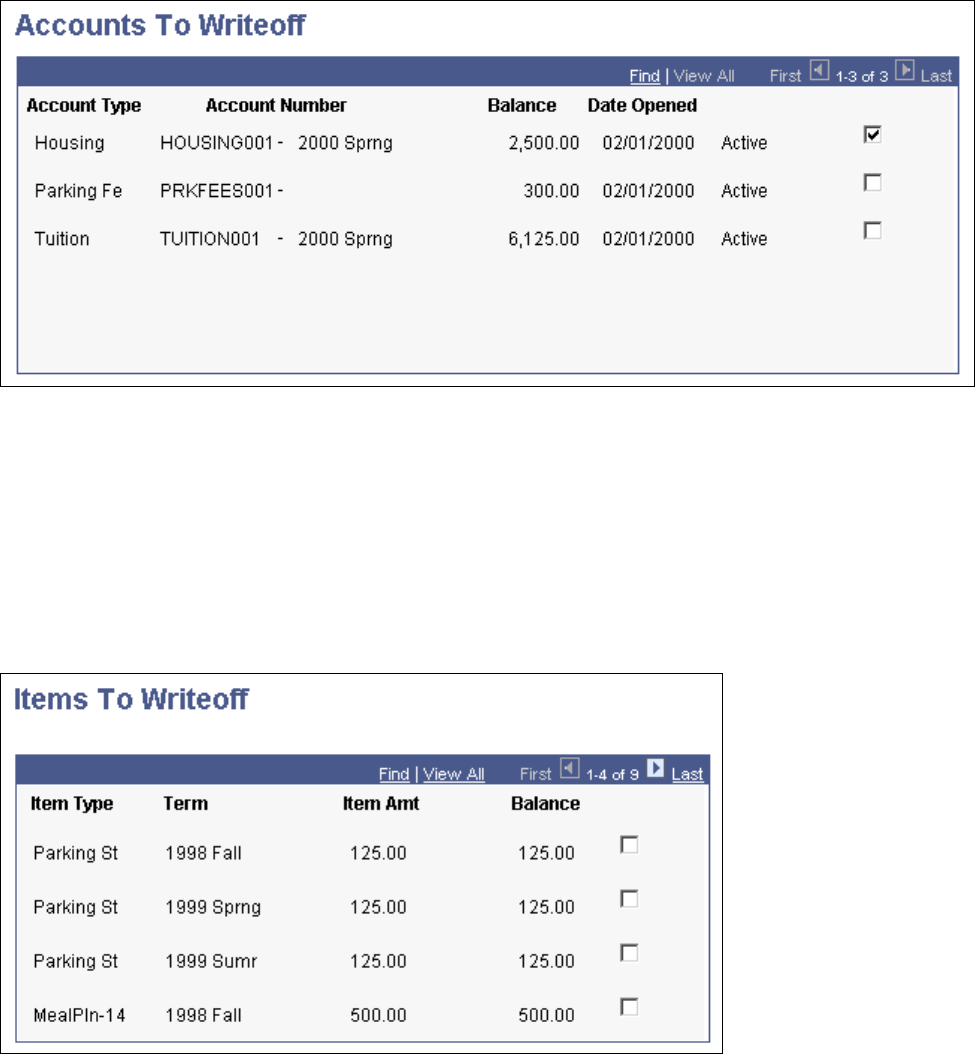
Maintaining Receivables Chapter 21
608 Copyright © 1988, 2010, Oracle and/or its affiliates. All Rights Reserved.
Accounts To Writeoff page
Select the check box next to the accounts that you want to write off.
Selecting Items to Write Off for Individual Students and Organizations
Access the Items To Writeoff page (Select the Writeoff Items option and click the Items to Writeoff link on
the Student Writeoff page).
Items To Writeoff page
Select the check box next to the items you want to write off.
Processing Batch Write-offs
Access the Write Offs page (Student Financials, Collections, Write Offs, Run Write-off Process, Write Offs).
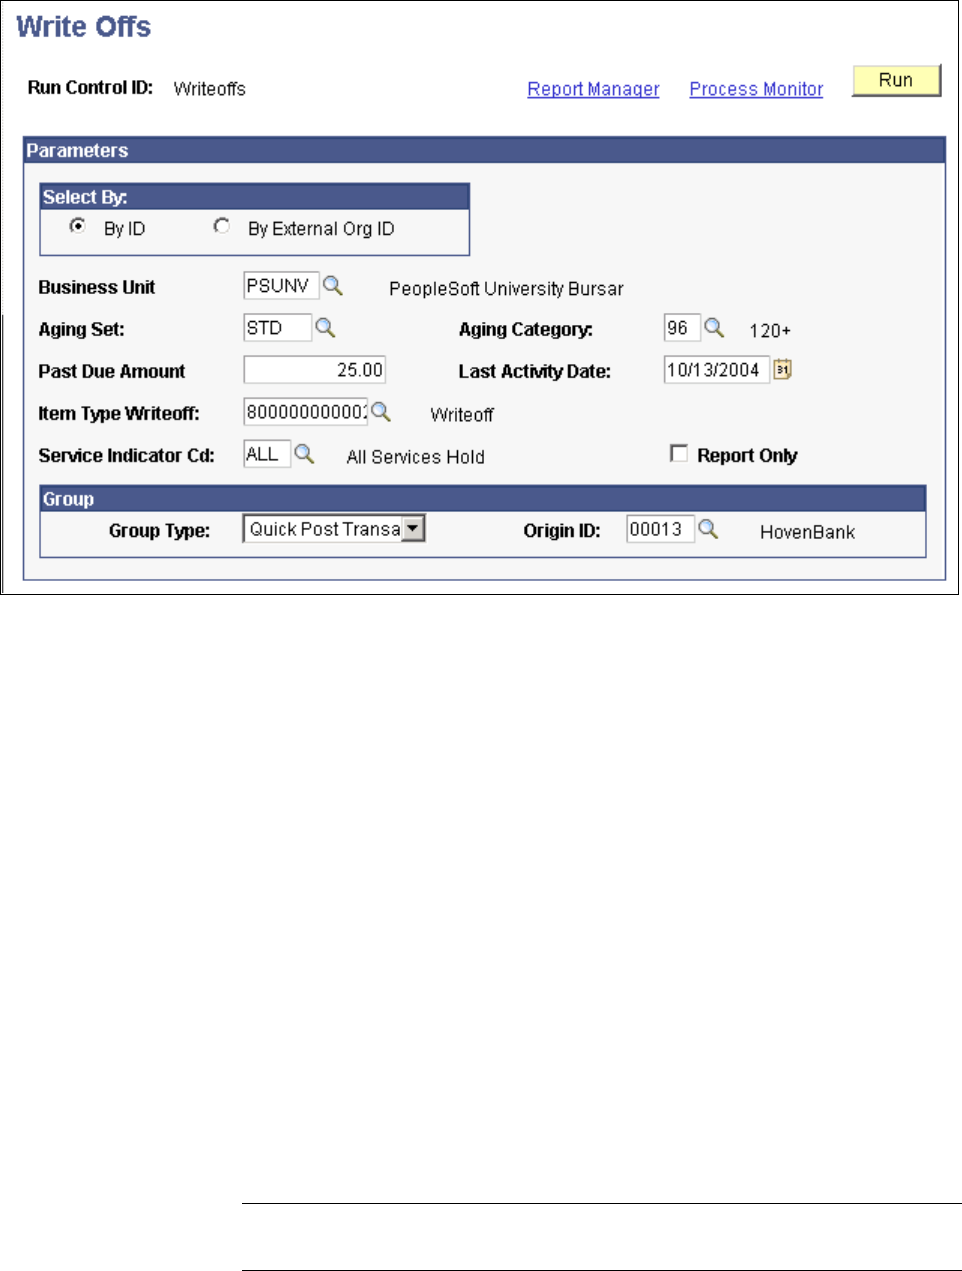
Chapter 21 Maintaining Receivables
Copyright © 1988, 2010, Oracle and/or its affiliates. All Rights Reserved. 609
Write Offs page
By ID Select this option to execute this process for individuals.
By External Org ID (by
external organization ID) Select this option to execute this process for organizations.
Business Unit Select the business unit for the write-offs that you are processing.
Aging Set andAging
Category Enter the aging set and the appropriate aging category to select the overdue
amounts. For example, if you select the STD (standard) aging set and the code of
96 for the 120+ day aging category, transactions for individuals or organizations
that match the criteria for the STD aging set and are more than 120 days past due
are selected to be written off.
Past Due Amountand
Last Activity Date Enter the past due amount criteria for the aging category and the last activity date
to further refine your selection.
Item Type Writeoff Select the item type that your institution uses for write-offs.
Service Indicator Cd
(service indicator code) Select the appropriate service indicator code to place a hold on an individual after
you write off charges.
Note. Service indicators cannot be applied to organizations that use the Student
Financials application.
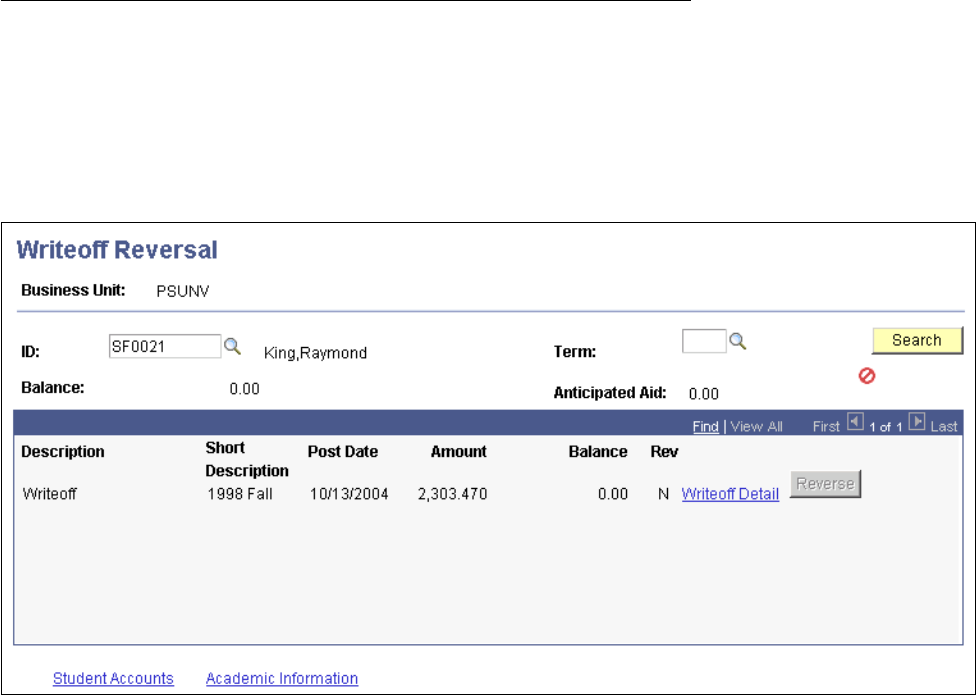
Maintaining Receivables Chapter 21
610 Copyright © 1988, 2010, Oracle and/or its affiliates. All Rights Reserved.
Report Only Select this option to produce a report of individuals who are selected for write-off
before you continue with the process.
Group Type and Origin
ID To perform the write-off, you must create a posting group that consists of all
amounts to be written off. Select the group type and origin ID to use when
creating your posting group. These fields are used for security purposes. You
should use a group type and origin type with limited access.
Running this process creates a posting group. Make note of the posting group ID because you should review
the posting group before you post it. After you are satisfied with the posting group, post it using the Group
Post process.
See Also
Chapter 21, "Maintaining Receivables," Posting Group Data Entries, page 587
Reversing Write-offs for Students
Access the Writeoff Reversal page (Student Financials, Collections, Write Offs, Reverse Student Writeoff,
Writeoff Reversal).
Writeoff Reversal page
ID Enter the ID of the student for whom you want to reverse the write-off.
Term Enter the term for which you want the write off reversal to apply.
Description This field displays the description of the write-off item type.

Chapter 21 Maintaining Receivables
Copyright © 1988, 2010, Oracle and/or its affiliates. All Rights Reserved. 611
Term This field displays the term of the original charge.
Post Date This field displays the date the write-off was posted.
Amount This field displays the amount of the write-off.
Balance This field displays the balance of each transaction.
Rev (reversed) This field displays the write-off reversal status. When the reversal is complete,
the N changes to a Y to indicate that you successfully reversed the write-off.
Reverse Click this button next to the write-off that you want to reverse.
Writeoff Detail Click this link to access the Writeoff Detail page.
Reversing Write-offs for Organizations
Access the Writeoff Corp Reversal page (Student Financials, Collections, Write Offs, Reverse Corporate
Writeoff, Writeoff Corp Reversal).
This page is identical to the Writeoff Reversal page.
See Also
Chapter 21, "Maintaining Receivables," Reversing Write-offs for Students, page 610
Processing Enrollment Deposits
The Enrollment Deposit process enables you to restrict services by automatically placing a service indicator
on student records if the respective students do not pay the required enrollment deposits. This process also
automatically releases service indicators upon receipt of enrollment deposits.
This section discusses how to:
•Define basic parameters for the Enrollment Deposit process.
•Select academic programs and waiver forms for the Enrollment Deposit process.
Pages Used to Process Enrollment Deposits
Page Name Definition Name Navigation Usage
Enroll Deposit RUNCTL_ENRL_DPST Student Financials, Charges
and Payments, Enrollment
Deposits, Enroll Deposit
Define basic parameters for
the Enrollment Deposit
process.
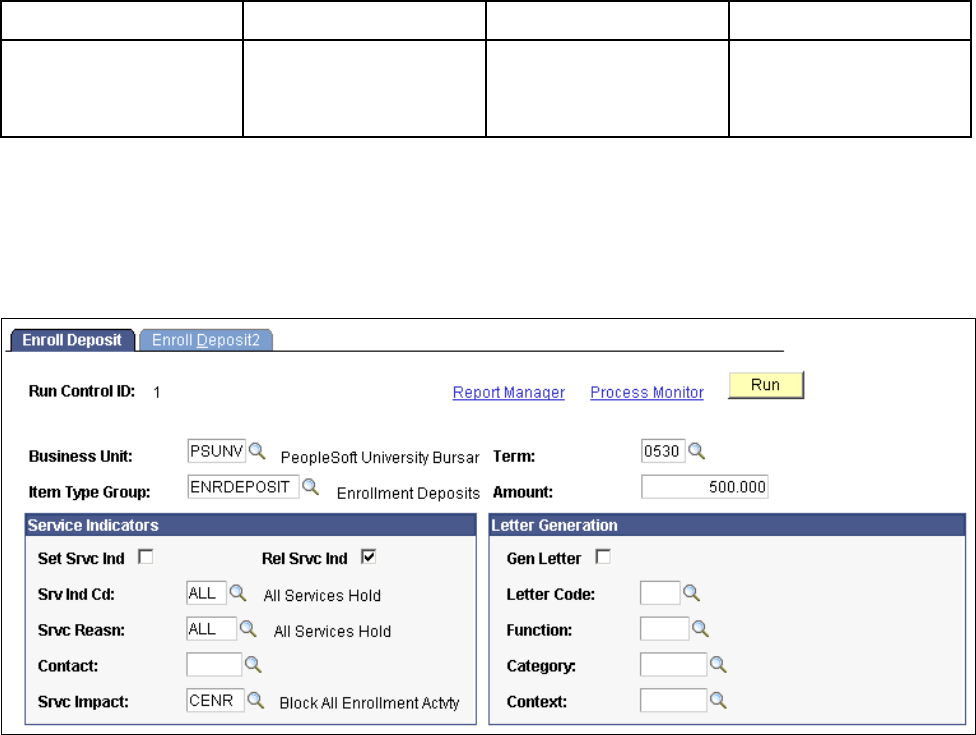
Maintaining Receivables Chapter 21
612 Copyright © 1988, 2010, Oracle and/or its affiliates. All Rights Reserved.
Page Name Definition Name Navigation Usage
Enroll Deposit2 RUNCTL_ENRL_DPST2 Student Financials, Charges
and Payments, Enrollment
Deposits, Enroll Deposit2
Select academic programs
and waiver forms for the
Enrollment Deposit process.
Defining Basic Parameters for Enrollment Deposit Processing
Access the Enroll Deposit page (Student Financials, Charges and Payments, Enrollment Deposits, Enroll
Deposit).
Enroll Deposit page
Business Unit Select the business unit for which you are processing enrollment deposits.
Term Select the term for which you are processing enrollment deposits.
Item Type Group Select the item type group that you are using for enrollment deposits.
Amount Enter the amount of the enrollment deposit. The amount is the monetary amount
of a single deposit.
Service Indicators
Set Srvc Ind (set service
indicator) Select this option to set service indicator codes.
Rel Srvc Ind (release
service indicators) Select this option to release the service indicator codes that have been applied to
student's accounts.
Chapter 21 Maintaining Receivables
Copyright © 1988, 2010, Oracle and/or its affiliates. All Rights Reserved. 613
Srv Ind Cd (service
indicator code) Select the service indicator code that you want to apply.
Srvc Reason (service
reason),Contact, and
Srvc Impact (service
impact)
Select the service reason code that is attached to the service indicator code, the
contact, and the service impact code.
Letter Generation
Using the 3Cs functionality, you can automatically generate letters to students.
Gen Letter (generate
letter) and Letter Code When you select the Gen Letter option, use the Letter Code field to identify the
letter that the system generates.
Function, Category,and
Context Select the desired function, category, and context.
See Also
PeopleSoft Enterprise Campus Community 9.0 Fundamentals PeopleBook, "Understanding the 3Cs —
Communications, Checklists, and Comments"
Selecting Academic Programs and Waiver Forms (Student Permissions) for
the Enrollment Deposit Process
Access the Enroll Deposit2 page (Student Financials, Charges and Payments, Enrollment Deposits, Enroll
Deposit2).
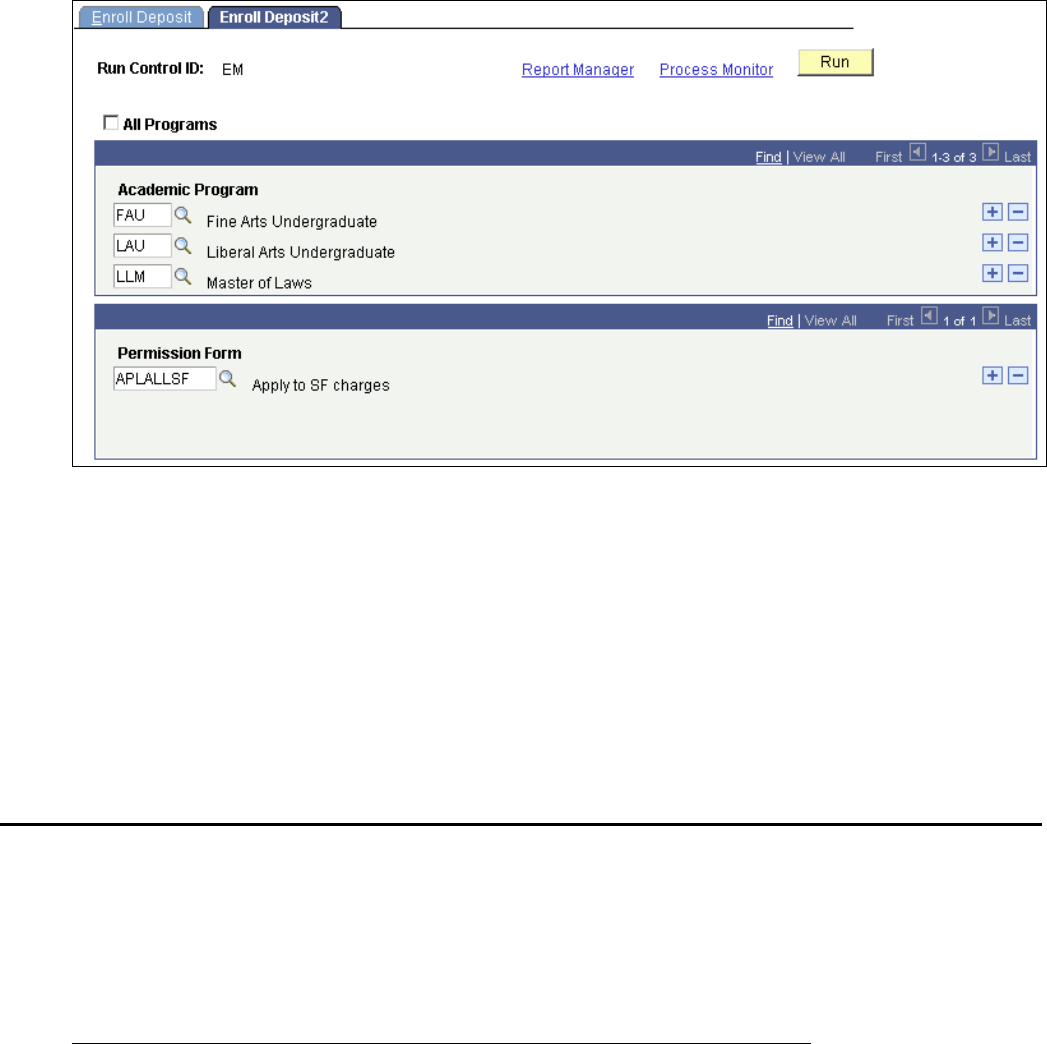
Maintaining Receivables Chapter 21
614 Copyright © 1988, 2010, Oracle and/or its affiliates. All Rights Reserved.
Enroll Deposit2 page
All Programs To evaluate enrollment deposits for all academic programs, select this option.
This selection makes the Academic Program fields unavailable.
Academic Program Select the academic program whose deposits you want to process.
Permission Form Select a permission form (Student Permissions) that allows financial aid monies
to pay the enrollment fee for students who have been granted permission.
Processing Late Fees
The Late Fee process enables you to calculate late fees for all students and organizations that are past due on
their accounts.
See Also
Chapter 11, "Setting Up Receivables Maintenance," Setting Up Late Fees, page 344

Chapter 21 Maintaining Receivables
Copyright © 1988, 2010, Oracle and/or its affiliates. All Rights Reserved. 615
Pages Used to Process Late Fees
Page Name Definition Name Navigation Usage
Late Fees RUNCTL_SFPLATFE Student Financials, Charges
and Payments, Late Fees,
Late Fees Processing, Late
Fees
Calculate and post late fees.
Late Fees LATE_FEE_TBL Student Financials, Charges
and Payments, Late Fees,
Review Student Late Fees,
Late Fees
Review late fees for
students.
Late Fee Details LATE_FEE_DTL_EMP Click the Details link on
the Late Fees page: Late
Fees 2 tab.
Review details about a
student late fee.
Late Fee Messages LATE_FEE_MESSAGES Student Financials, Charges
and Payments, Late Fees,
Review Late Fee Messages,
Late Fee Messages
Review errors and warnings
generated during the
processing of student late
fees.
Corp Late Fees LATE_FEE_ORG Student Financials, Charges
and Payments, Late Fees,
Review Corp Late Fees,
Corp Late Fees
Review late fees for
organizations.
Corp Late Fees - Late Fees
Details
LATE_FEE_ORG Click the Details link on
the Corp Late Fees - Late
Fees 2 tab.
Review details about a
corporate late fee.
Corp Late Fee Messages LATE_FEE_ORG_MSG Student Financials, Charges
and Payments, Late Fees,
Review Corp Late Fee
Messages
Review errors or warnings
generated during the
processing of corporate late
fees.
Calculating and Posting Late Fees
Access the Late Fees page (Student Financials, Charges and Payments, Late Fees, Late Fees Processing, Late
Fees).
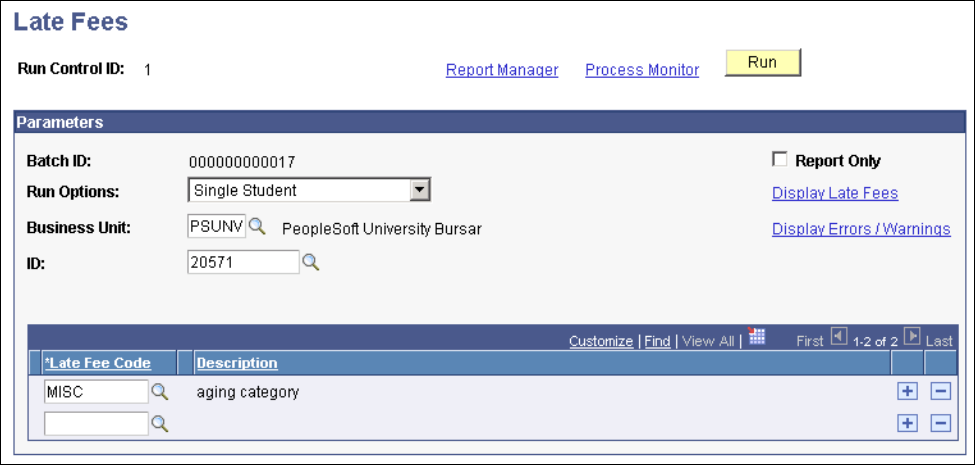
Maintaining Receivables Chapter 21
616 Copyright © 1988, 2010, Oracle and/or its affiliates. All Rights Reserved.
Late Fees page
Batch ID This field displays the batch ID that the system assigns when it runs the process.
Report Only Select this option to produce a report without posting the late fee.
Run Options Select from these values:
All External Organizations: Enables you to process late fees for external
corporate customers. If you select this run option, the ID and External Org ID
fields become unavailable and the From ID and To ID fields become available.
These fields enable you to specify a range of external organizations against
which to process late fees. These fields are not required. If you leave them blank,
the system processes late fees for all external organizations.
Single External Organization: Enables you to process late fees that are incurred
by a single corporate customer. If you select this run option, the External Org ID
field becomes available and the ID,From ID, and To ID fields become
unavailable.
Single Student: This is the default value. It enables you to process a late fee for
one individual. If you select this run option, the ID field becomes available and
the External Org ID,From ID, and To ID fields become unavailable.
All Students: Enables you to process late fees for all students. If you select this
run option, the ID and External Org ID fields become unavailable and the From
ID and To ID fields become available. These fields enable you to specify a range
of students against which to process late fees. These fields are not required. If
you leave them blank, the system processes late fees for all students.
Business Unit Select the business unit for which you are processing late fees.
ID If applicable, select the ID of the student for which you are processing late fees.
This field becomes available when you select the Single Student run option.

Chapter 21 Maintaining Receivables
Copyright © 1988, 2010, Oracle and/or its affiliates. All Rights Reserved. 617
From ID If applicable, select the beginning ID of your range. This field is only applicable
if you process a range of either students or corporations when using the
respective run options All Students or All External Organizations.
To ID If applicable, select the ending ID of your range. This field is only applicable if
you process a range of either students or corporations when using the respective
run options All Students or All External Organizations.
External Org ID
(external organization ID) If applicable, select the ID of the organization for which you are processing late
fees.
Late Fee Code Select the late fee code for the fee schedule that you are applying.
Display Late Fees Click the Display Late Fees link to access the Display Late Fees page, where you
can review the accounts that were processed in this run.
Display
Errors/Warnings Click the Display Errors/Warnings link to access the Late Fee Messages page,
where you can view errors or warnings that you encountered during this run.
Processing Late Fees Using the Billing Request Number
An alternative Late Fees process starts with the amount due from a specified billing request number and nets
any payments or credits received on the account since the billing date. If the payments or credits are less than
the amount due, the student is assessed a late fee.
Pages Used to Process Late Fees Using the Billing Request Number
Page Name Definition Name Navigation Usage
Late Fees – Billing RUNCTL_SFPBLTFE Student Financials, Charges
and Payments, Late Fees,
Late Fees Processing –
Billing, Late Fees–Billing
Process late fees using the
Billing Request number.
Late Fees – Billing SSF_LTFEE_TBL Student Financials, Charges
and Payments, Late Fees,
Review Late Fees – Billing,
Late Fees – Billing
Review student late fees –
billing for students.
Late Fee Messages LATE_FEE_MESSAGES Student Financials, Charges
and Payments, Late Fees,
Review Late Fee Messages
Review any errors or
warnings generated during
the processing of student
late fees.
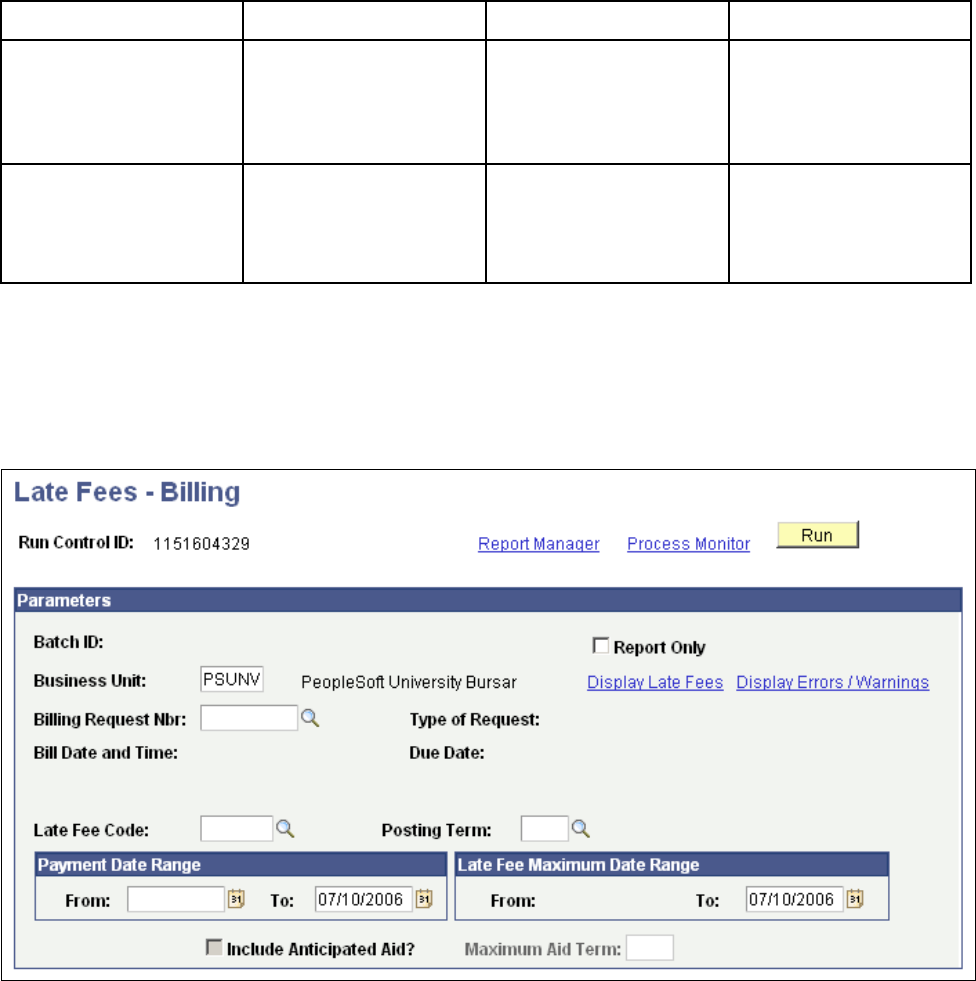
Maintaining Receivables Chapter 21
618 Copyright © 1988, 2010, Oracle and/or its affiliates. All Rights Reserved.
Page Name Definition Name Navigation Usage
Review Corp Late Fees -
Billing (corporation late
fees)
SSF_LTFEE_ORGG Student Financials, Charges
and Payments, Late Fees,
Review Corp Late Fees –
Bill (corporation late fees)
Review late fees for
organizations.
Corp Late Fee Messages
(corporation late fee
messages)
LATE_FEE_ORG_MSG Student Financials, Charges
and Payments, Late Fees,
Review Corp Late Fee
Messages
Review any errors or
warnings generated during
the processing of corporate
late fees.
Processing Late Fees - Billing
Access the Late Fees - Billing page (Student Financials, Charges and Payments, Late Fees, Late Fees
Processing – Billing, Late Fees–Billing)
Late Fees - Billing page.
Parameters
Report Only Select if the process is Report Only mode.
Business Unit Select the business unit to be used for identifying the students, organizations, or
both to be processed.
Display Late Fees Select to access the Display Late Fees page, where you can review the accounts
that were processed in this run.

Chapter 21 Maintaining Receivables
Copyright © 1988, 2010, Oracle and/or its affiliates. All Rights Reserved. 619
Display Errors /
Warnings Select to access the Late Fee Messages page, where you can view any errors or
warnings that you encountered during this run.
Billing Request Nbr
(billing request number) Enter the number to be used for identifying the students, organizations, or both to
be processed.
Emplid/External Org Id
(employee ID/external
organization ID)
Enter a single student or organization for processing.
Late Fee Code Select a value.
Posting Term Select the term in which the late fee will be posted.
Include Anticipated
Aid? Select to include anticipated aid.
Maximum Aid Term Enter a maximum aid term for the process.
Run Click to run the Late Fees - Billing process.
Payment Date Range
From Enter a start date for the payment date range.
To Enter an end date for the payment date range.
Late Fee Maximum Date Range
From This value is provided by default from the late fee code setup.
To Enter an end date for the late fee maximum date range.
Processing Enrollment Cancellation
This section provides an overview of enrollment cancellation and discusses how to:
•Define student selection criteria for enrollment cancellation.
•Define charges, offset payments, cancellation options, and service indicators for enrollment cancellation.

Maintaining Receivables Chapter 21
620 Copyright © 1988, 2010, Oracle and/or its affiliates. All Rights Reserved.
Understanding Enrollment Cancellation
The Enrollment Cancellation process selects students for enrollment cancellation when they are past due on
their fee payments. You can set up the system to cancel individual classes within a term, individual classes
within a session, the entire term, or the entire session for students who meet the past due requirements that
you define. You can apply enrollment cancellation criteria to all students in your institution or only to
students in specific tuition groups or academic programs. You have the flexibility to define enrollment
cancellation rules that meet the specific needs of your institution.
The Enrollment Cancellation process in the Student Financials application selects only students for
cancellation. The actual cancellation process is completed in PeopleSoft Student Records using the Student
Records Term Withdrawal process (SRPCWDPR).
See Also
PeopleSoft Enterprise Student Records 9.0 PeopleBook
Pages Used to Process Enrollment Cancellation
Page Name Definition Name Navigation Usage
Enrollment Cancellation 1 RUNCTL_SFPCLCAN Student Financials, Tuition
and Fees, Cancellation,
Cancel Enrollment,
Enrollment Cancellation 1
Define student selection
criteria for enrollment
cancellation.
Enrollment Cancellation 2 RUNCTL_SFPCLCAN2 Student Financials, Tuition
and Fees, Cancellation,
Cancel Enrollment,
Enrollment Cancellation 2
Define charges, offset
payments, cancellation
options, and service
indicators for enrollment
cancellation.
Enrollment Cancellation CANC_TERM_CLASS Student Financials, Tuition
and Fees, Cancellation,
Review Enrollment
Cancellation, Enrollment
Cancellation
Review results of the
Enrollment Cancellation
process.
Enrollment Cancellation
Messages
CANC_MESSAGES Student Financials, Tuition
and Fees, Cancellation,
Review Cancellation
Messages
Review messages generated
by the Enrollment
Cancellation process.
Defining Student Selection Criteria for Enrollment Cancellation
Access the Enrollment Cancellation 1 page (Student Financials, Tuition and Fees, Cancellation, Cancel
Enrollment, Enrollment Cancellation 1).
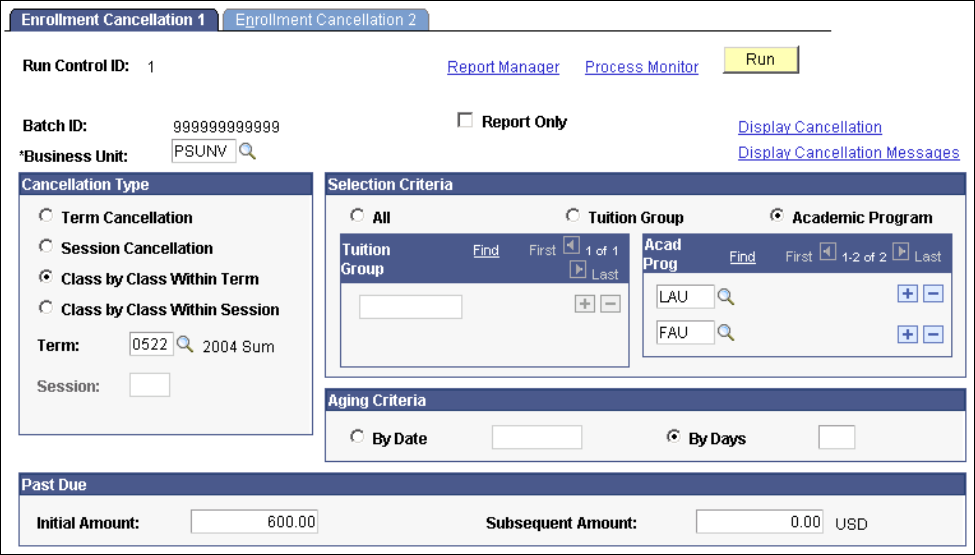
Chapter 21 Maintaining Receivables
Copyright © 1988, 2010, Oracle and/or its affiliates. All Rights Reserved. 621
Enrollment Cancellation 1 page
Business Unit Select the business unit for the students that you are reviewing.
Report Only Select to view which students are eligible for cancellation without completing the
process. The results of the report are available when you click the Display
Cancellation link.
Display Cancellation Click to view cancellation results. It does not matter whether the Report Only
check box is selected. The system displays results for the Class Cancellation
process you have run.
Display Cancellation
Messages Click to view enrollment cancellation warning and error messages.
Cancellation Type
Define which enrollments are canceled by running the process. The cancellation type works in conjunction
with the Cancel Completed Classes and Cancel Classes With Grades check boxes on the Enrollment
Cancellation 2 page to determine what type of request the Enrollment Cancellation process generates for a
student.
Maintaining Receivables Chapter 21
622 Copyright © 1988, 2010, Oracle and/or its affiliates. All Rights Reserved.
Term Cancellation Select to cancel all the classes that a student is taking for a term.
If you select this option and you also select the Cancel Completed Classes check
box, Cancel Classes With Grades check box, or both, then the Enrollment
Cancellation process generates a term cancellation request for each selected
student.
If you select this option, you do not select the Cancel Completed Classes or the
Cancel Classes With Grades check boxes, and a student has either completed a
class or has a graded class, then the Enrollment Cancellation process generates an
enrollment request with an action of drop, instead of a term cancellation request,
for the student's uncompleted and ungraded classes.
If you select this option, you do not select the Cancel Completed Classes or the
Cancel Classes With Grades check boxes, and the student has no completed or
graded classes, then the Enrollment Cancellation process generates a term
cancellation request.
Session Cancellation Select to cancel all the classes that a student is taking for a session.
If you select this option and you select the Cancel Completed Classes check box,
the Cancel Classes With Grades check box, or both, then the Enrollment
Cancellation process generates a session cancellation request for each selected
student.
If you select this option, you do not select the Cancel Completed Classes or the
Cancel Classes With Grades check boxes, and a student has either completed a
class or has a graded class, then the Enrollment Cancellation process generates an
enrollment request with an action of drop, instead of a session cancellation
request, for the student's uncompleted and ungraded classes.
If you select this option, you do not select the Cancel Completed Classes or the
Cancel Classes With Grades check boxes, and the student has no completed or
graded classes, then the Enrollment Cancellation process generates a session
cancellation request.
Chapter 21 Maintaining Receivables
Copyright © 1988, 2010, Oracle and/or its affiliates. All Rights Reserved. 623
Class by Class Within
Term Select to cancel individual classes within a term.
If you select this option and you select the Cancel Completed Classes check box,
the Cancel Classes With Grades check box, or both, then the Enrollment
Cancellation process generates an enrollment request with an action of drop. The
system drops each class in the term, one by one, until the past due amount is less
than the Subsequent Amount that you specify. If the request results in all classes
being dropped for a student, then the process generates a term cancellation
request.
If you select this option, you do not select the Cancel Completed Classes or the
Cancel Classes With Grades check boxes, and a student has either completed a
class or has a graded class, then the Enrollment Cancellation process generates an
enrollment request with an action of drop for the student's uncompleted and
ungraded classes. The system drops each class, one by one, until the past due
amount is less than the Subsequent Amount.
If you select this option, you do not select the Cancel Completed Classes or the
Cancel Classes With Grades check boxes, and the student has no completed or
graded classes, then the Enrollment Cancellation process generates an enrollment
request with an action of drop. The system drops each class, one by one, until the
past due amount is less than the Subsequent Amount. If the request results in all
classes being dropped for a student, then the process generates a term
cancellation request.
Class by Class Within
Session Select to cancel individual classes within a session.
If you select this option and you select the Cancel Completed Classes check box,
the Cancel Classes With Grades check box, or both, then the Enrollment
Cancellation process generates an enrollment request with an action of drop. The
system drops each class in the session, one by one, until the past due amount is
less than the Subsequent Amount that you specify. If the request results in all
classes being dropped for a student, then the process generates a session
cancellation request.
If you select this option, you do not select the Cancel Completed Classes or the
Cancel Classes With Grades check boxes, and a student has either completed a
class or has a graded class, then the Enrollment Cancellation process generates an
enrollment request with an action of drop for the student's uncompleted and
ungraded classes. The system drops each class, one by one, until the past due
amount is less than the Subsequent Amount.
If you select this option, you do not select the Cancel Completed Classes or the
Cancel Classes With Grades check boxes, and the student has no completed or
graded classes, then the Enrollment Cancellation process generates an enrollment
request with an action of drop. The system drops each class, one by one, until the
past due amount is less than the Subsequent Amount. If the request results in all
classes being dropped for a student, then the process generates a session
cancellation request.
Term Enter the term for which you are canceling enrollments. This field is required.
Session Enter the session for which you are canceling enrollments if you are using either
session option.
Maintaining Receivables Chapter 21
624 Copyright © 1988, 2010, Oracle and/or its affiliates. All Rights Reserved.
Selection Criteria
Select which students you want to review for enrollment cancellation processing.
All Select to review all students in the business unit who meet the criteria that you
specify. If you select this option, the Tuition Group and Academic Program fields
are not available.
Tuition Group Select n to review students within a specific tuition group.
Academic Program Select to review students within a specific academic program.
Aging Criteria
By Date Select and enter a date to indicate that any student with a past due amount on the
specified payment date should be selected for enrollment cancellation.
By Days Select and enter the number of days to indicate that any student with a past due
amount for the number of days specified should be selected for enrollment
cancellation.
Past Due
Initial Amount Enter the initial past due amount that places a student in the enrollment
cancellation process. Students with past due amounts that are lower than the
initial amount are not selected.
Subsequent Amount This field is available only when the Class by Class Within Term or Class by
Class Within Session option is selected. The system uses this information to
automatically cancel classes one by one until the past due amount is less than the
subsequent amount.
Example of the Class by Class Cancellation Process with Subsequent Amount
A student enrolls in four classes at a cost of 300 USD per class, but pays only 300 USD. For enrollment
cancellation purposes, the initial amount is 600 USD and the subsequent amount is 350 USD. The system
selects the student as eligible for enrollment cancellation because the past due amount is 900 USD, which
exceeds the specified initial amount. The first class that is cancelled lowers the past due amount to 600 USD.
Because this figure is still higher than the subsequent amount (350 USD), the system cancels a second class,
which brings the past due amount to 300 USD. Because this figure is lower than the subsequent amount
specified, no more classes are cancelled.
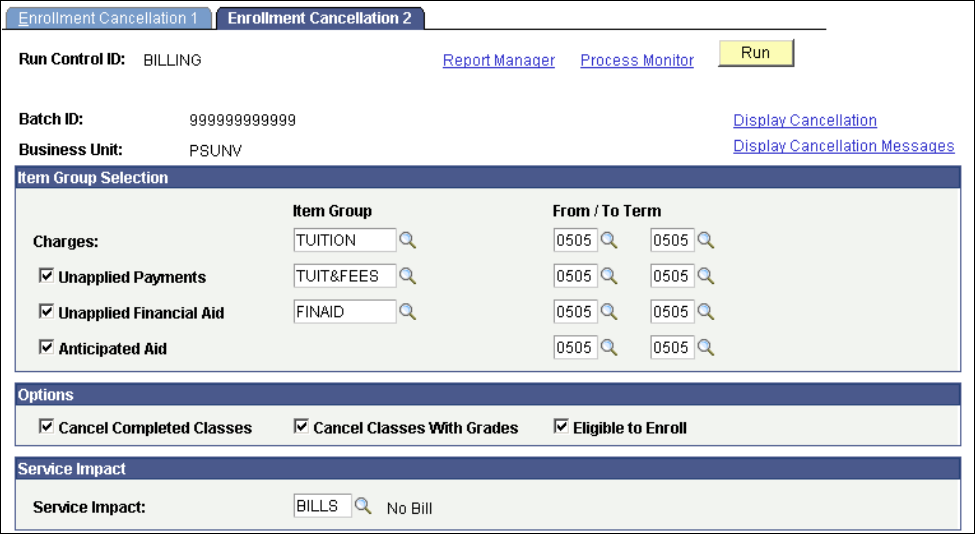
Chapter 21 Maintaining Receivables
Copyright © 1988, 2010, Oracle and/or its affiliates. All Rights Reserved. 625
Defining Charges, Offset Payments, Cancellation Options, and Service
Indicators for Enrollment Cancellation
Access the Enrollment Cancellation 2 page (Student Financials, Tuition and Fees, Cancellation, Cancel
Enrollment, Enrollment Cancellation 2).
Enrollment Cancellation 2 page
Display Cancellation Click to access the Enrollment Cancellation page, where you can review details
about students with cancelled enrollment.
Display Cancellation
Messages Click to access the Enrollment Canc Messages page, where you can review
cancellation messages.
Item Group Selection
Item Group Select the appropriate item group to indicate the specific charges to be included
in the past due amount.
From/To Term Enter the From/To Term range for picking up the charges.
Unapplied Payments,
Unapplied Financial
Aid, Anticipated Aid
To reduce charges by certain types of unapplied payments, unapplied financial
aid, or anticipated aid, select the option and then enter the appropriate item group
and the from/to term range for picking up these credits.
Maintaining Receivables Chapter 21
626 Copyright © 1988, 2010, Oracle and/or its affiliates. All Rights Reserved.
Options
Cancel Completed
Classes Select this option to cancel classes that have been completed but not graded. The
system will not cancel any classes for which the student has received grades.
Cancel Classes With
Grades If grades have been entered, and you want to include graded classes in the
cancellation process, select this option to cancel classes with grades.
Eligible to Enroll If you select this check box, the Enrollment Cancellation process selects the
Eligible to Enroll check box on the Term Activation page for students selected by
the process. If you do not select this check box, the Enrollment Cancellation
process clears the Eligible to Enroll check box on the Term Activation page for
students that were selected by the process.
Service Impact
Service Impact Enter a service impact to exclude students from the enrollment cancellation
process. Those students with the service indicator are not selected for the
enrollment cancellation process.
A service impact, once set, is not in effect for all terms after that time. It must be
reset every term or set for the generic term 0000. No effective term is associated
with a service impact. A service impact set at one institution will not be respected
by other institutions.
See Also
PeopleSoft Enterprise Student Records 9.0 PeopleBook, "Managing Student Programs, Plans, and Subplans"
Validating Tables
The Table Validation process is a powerful tool that enables you to report on and correct referential integrity
errors within Student Financials tables. These errors can occur as a result of setup errors, changes to setup
after data is partially processed, or your own modified programs that insert or update Student Financials
tables.
Page Used to Validate Tables
Page Name Definition Name Navigation Usage
Table Validation RUN_CNTL_SFTBLVAL Student Financials, Charges
and Payments, Validate
Tables, Table Validation
Run the Table Validation
process.
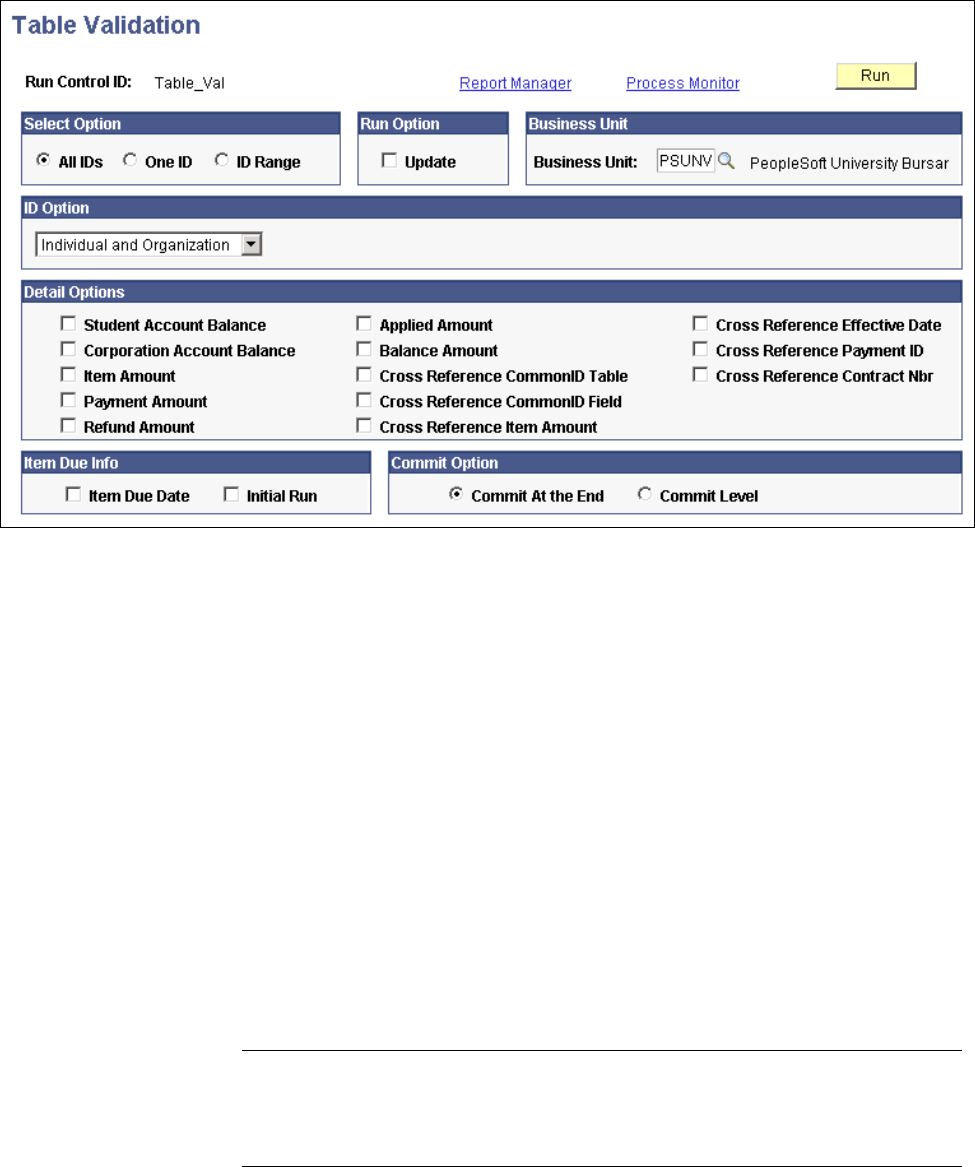
Chapter 21 Maintaining Receivables
Copyright © 1988, 2010, Oracle and/or its affiliates. All Rights Reserved. 627
Running the Table Validation Process
Access the Table Validation page (Student Financials, Charges and Payments, Validate Tables, Table
Validation).
Table Validation page
Select Option
All IDs Select to run the process against all accounts in the system. If Individual and
Organization is selected as the ID Option,All IDs is the required Select Option.
One ID Select to run the process against a single individual or corporate account.
ID Range Select to process a range of either individual or corporate accounts.
Run Option
Update Select to correct data errors when they are detected. Clear this check box to
produce reports only. If you select this check box, the process still produces
reports.
Note. When you run the Table Validation process, you have the option of
selecting as many reports and updates as you want. In update mode, data
dependencies and processing must occur in the order that the options appear on
the page.
Maintaining Receivables Chapter 21
628 Copyright © 1988, 2010, Oracle and/or its affiliates. All Rights Reserved.
ID Option
ID Option Individual and Organization: Select to process all accounts in the system. If you
select this option, the Select Option is limited to All IDs, and the Start and End
fields are hidden.
Individual Only: Select to process only individual accounts. If you select this
option, all Select Options are available.
Organization Only: Select to process only external organization accounts. If you
select this option, all Select Options are available.
From ID This field is available when either One ID or ID Range is selected as the Select
Option and is labeled appropriate to the ID Option selection.
To ID This field is available when ID Range is selected as the Select Option and the
label is associated with the appropriate ID Option selection.
Detail Options
In the Detail Options group box, select the reports or updates that you want to process. If the Update run
option is not selected, the process produces a report that identifies referential data integrity discrepancies, but
it does not change any data. If you select the Update run option, discrepancies are corrected as indicated in
each description.
Student Account
Balance Select to compare the account balance from the ACCOUNT_SF table with the
sum of the item amounts from the ITEM_SF table. If the amounts are different,
the system uses the sum of the item amounts to update the account balance.
Corporation Account
Balance Select to compare the account balance from the ACCOUNT_ORG_SF table with
the sum of the item amounts from the ITEM_SF table. If the amounts are
different, the system uses the sum of the item amounts to update the account
balance.
Item Amount Select to compare the item amount from the ITEM_SF table with the sum of the
line amounts from the ITEM_LINE_SF table. If the amounts are different, the
system uses the sum of the line amounts to update the item amount.
Payment Amount Select to compare the payment amounts from the PAYMENT_TBL table with
the sum of the item amounts for each payment from the ITEM_SF table. If the
amounts are different, the system uses the sum of the item amounts to update the
payment amount.
Refund Amount Select to compare the refund amount from the REFUND_HDR table with the
item amount from the ITEM_SF table. If the amounts are different, the system
uses the item amount to update the refund amount.
Applied Amount Select to compare the sum of the cross reference amounts from the ITEM_XREF
table with the applied amount from the ITEM_SF table. If the amounts are
different, the system uses the cross-reference amount to update the applied
amount.

Chapter 21 Maintaining Receivables
Copyright © 1988, 2010, Oracle and/or its affiliates. All Rights Reserved. 629
Balance Amount Select to compare the sum of the cross-reference amount from the ITEM_XREF
table with the net value of the item amount, minus the item balance from the
ITEM_SF table. If the amounts are different, the system subtracts the sum of the
cross-reference amount from the item amount and uses the result to update the
item balance.
Cross Reference
CommonID Table Select the Cross Reference CommonID Table check box and run the process.
The report performs the following cross checks:
•For every student with an account that is defined in ACCOUNT_SF and for
every organization with an account that is defined in ACCOUNT_ORG_SF,
the report verifies that a row exists in the SF_COMMON_ID table. If a row
does not exist in the SF_COMMON_ID table and you run the report in
update mode, the system inserts a row for the student or organization ID into
SF_COMMON_ID.
•For every person or organization, the report verifies for each COMMON_ID
that the maximum item number that is recorded in the ITEM_SF table
matches the field ITEM_NBR_LAST stored in the SF_COMMON_ID table.
When you run the report in update mode, if the ITEM_NBR_LAST in the
SF_COMMON_ID table does not match the highest ITEM_NBR for a given
student or organization in ITEM_SF, the program updates the field
ITEM_NBR_LAST to match the highest ITEM_NBR in ITEM_SF for that
student or organization.
•For every person or organization, the report verifies for each COMMON_ID
that the maximum payment ID number recorded in the PAYMENT_TBL
matches the field PAYMENT_ID_LAST stored in the SF_COMMON_ID
table. When you run the report in update mode, if the PAYMENT_ID_LAST
in the SF_COMMON_ID table does not match the highest
PAYMENT_ID_NBR for a given student or organization in
PAYMENT_TBL, the program updates the field PAYMENT_ID_LAST to
match the highest PAYMENT_ID_NBR in PAYMENT_TBL for that student
or organization.
The report lists any discrepancies found.
Note. Due to its intensive table analysis of the core SF transaction tables and
possible updates to SF_COMMON_ID, you should run the Cross Reference
CommonID Table report in update mode only on a limited basis and only while it
has exclusive access to the system. Do not run other Student Financials processes
while this report is running.

Maintaining Receivables Chapter 21
630 Copyright © 1988, 2010, Oracle and/or its affiliates. All Rights Reserved.
Cross Reference
CommonID Field Select the Cross Reference CommonID Field check box and run the process.
The report cross checks COMMON_ID and SA_ID_TYPE against the fields
EMPLID and EXT_ORG_ID in the following tables:
•ITEM_SF
•ITEM_LINE_SF
•PAYMENT_TBL
•ITEM_DUE_SF
For each table, the system reports errors when the following conditions occur:
1. Both EMPLID and EXT_ORG_ID are populated.
2. Neither EMPLID nor EXT_ORG_ID is populated.
3. The SF_COMMON_ID.SA_ID_TYPE = P (person) and the EMPLID has a
value that is not the same value in COMMON_ID.
4. The SF_COMMON_ID.SA_ID_TYPE = O (organization) and the
EXT_ORG_ID have values that are not the same value in COMMON_ID.
Note. Even if you run the report in update mode, the system does not update the
EMPLID, EXT_ORG_ID, COMMON_ID, and SA_ID_TYPE fields to prevent
an inadvertent change to these ID fields. You must identify the correct values and
make a manual correction in all relevant tables.
Cross Reference Item
Amount Select to compare the sum of the cross-reference amounts from the ITEM_XREF
table with the item amount from the ITEM_SF table. If the item amount is less
than this sum, the values in the ITEM_XREF table are set to zero and the errors
are reported. To correct the errors, the payments must be backed out and then
reapplied. Each payment can be backed out manually or by running the Applied
Amount and Balance Amount reports after running this report. Exception: If the
item is linked to a contract, the system does not set the values in the
ITEM_XREF table to zero. To correct the errors, the contracts must be cancelled,
the update process must be run again to zero the ITEM_XREF values, and the
contracts must be reapplied.
Cross Reference
Effective Date Select to find any missing effective dates in the ITEM_XREF table to the item
effective date in the ITEM_SF table. If dates are missing, the system uses the
item effective date from ITEM_SF to update the effective date.
Cross Reference
Payment ID Select to find any missing payment ID numbers from the ITEM_XREF table with
the payment ID number from the ITEM_SF table. If the numbers are different,
the system uses the payment ID number from ITEM_SF to update the payment
ID number in ITEM_XREF.
Cross Reference
Contract Nbr (cross
reference contract
number)
Select to validate the contract number in the ITEM_XREF table. If the item
number contract is populated but the contract number is blank, the system uses
the contract number from the TP_STUDENT table to update the ITEM_XREF
table.

Chapter 21 Maintaining Receivables
Copyright © 1988, 2010, Oracle and/or its affiliates. All Rights Reserved. 631
Item Due Info
Item Due Date Select to find due date discrepancies in the ITEM_DUE_SF table. The program
compares this due date with the due date from the ITEM_LINE_SF table. If the
dates are different, the system uses the due date from ITEM_LINE_SF to
calculate the appropriate value and update the ITEM_DUE_SF due date.
Initial Run Select in conjunction with the Item Due Date option to delete all due date values
from the ITEM_DUE_SF table before recalculating them. This option only has
an effect if the report is run in update mode.
Note. The Item Due Date and Initial Run fields must always be considered
together.
Commit Option
Commit At the End Select to commit changes only at the end of processing.
This option applies only to the Item Due Date option.
Commit Level Select to specify a commit level. When you select this option, you are required to
specify a value in the box that appears to the right. The program commits
changes to the table after each 100 IDs have been processed.
Note. This option applies only to the Item Due Date option.
You can use the Operator ID and Date Time Stamp columns to find out who last performed an update or
insert operation on the following tables and when the operation was last performed
•ITEM_SF
•ITEM_LINE_SF
•PAYMENT_TBL
•ITEM_DUE_SF
•ACCOUNT_SF
•ACCOUNT_ORG_SF
•ITEM_XREF
•BI_BILL_HEADER
•BI_BILLING_LINE
•SF_ACCTG_LN
You will need to use a query tool to find out the Operator ID and Date Time Stamp column values.

Copyright © 1988, 2010, Oracle and/or its affiliates. All Rights Reserved. 633
Chapter 22
Maintaining Customers
This chapter provides an overview of the Maintain Customers feature and discusses how to:
•Manage student permissions.
•Process and review customer credit history.
Understanding the Maintain Customers Feature
The Maintain Customers feature provides components that enable you to maintain, view, and report some
student data within PeopleSoft Student Financials without having to access the PeopleSoft Campus
Community application. The Maintain Customers feature has these components:
•Address Maintenance
•Electronic Addresses
•Relations with Institution
•Residency Data
•Service Indicator Data
•Active Service Indicators
•Address Search
•Address Listing
Understanding the Maintain Customers Feature
For more information:
See Also
PeopleSoft Enterprise Campus Community 9.0 Fundamentals PeopleBook

Maintaining Customers Chapter 22
634 Copyright © 1988, 2010, Oracle and/or its affiliates. All Rights Reserved.
Managing Student Permissions
This section provides an overview of student permissions and discusses how to:
1. Create student permission forms to apply restricted credits.
2. Attach student permission forms to student records.
3. Attach student permission forms to charge priority lists.
Understanding Student Permissions
Certain types of credits to a student's account are restricted as to what types of charges they can be applied to
as well as what term or terms, by Aid Year versus by Academic Year. For example, the Department of
Education requires authorization from a student before applying Title IV financial aid to a students account
for charges other than allowable charges, which are tuition, mandatory fees, and contracted housing and
board. Additionally, some scholarships pay charges for a specific term. Student permissions, which are
granted by the student, allow this money to pay charges incurred from other terms.
Institutions that use an automated system to manage student finances can create student permissions that are a
record of standing permissions from students to apply restricted credits.
Note. If you attach student permissions to a charge priority, you can define the terms for which permission is
required for application of payment.
Pages Used to Manage Student Permissions
Page Name Definition Name Navigation Usage
Permission Form WAIVER_FORM_TABLE Set Up SACR, Product
Related, Student Financials,
Charges and Payments,
Student Permission Forms,
Permission Form
Create permission form for
applying restricted credits.
Assign Student Permissions STDNT_WAIVER_FORM Student Financials, Charges
and Payments, Assign
Student Permissions
Assign permission to apply
restricted credits.
Details ITEM_CHRG_TYP_PRT2 Set Up SACR, Product
Related, Student Financials,
Charges and Payments,
Charge Priority List, Details
Attach permission forms to
charge priority lists.
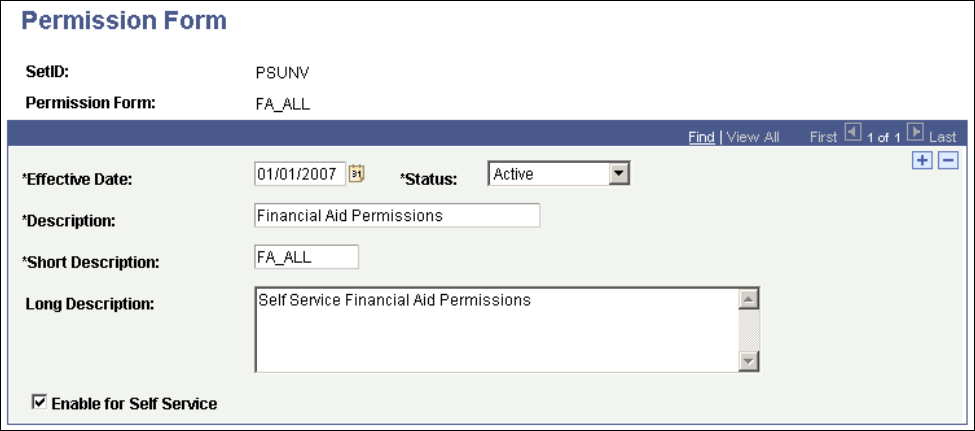
Chapter 22 Maintaining Customers
Copyright © 1988, 2010, Oracle and/or its affiliates. All Rights Reserved. 635
Creating Student Permission Forms to Apply Restricted Credits
Access the Permission Form page (Set Up SACR, Product Related, Student Financials, Charges and
Payments, Student Permission Forms, Permission Form).
Permission Form page
Enable for Self Service Select the check box to identify permission waivers as eligible for use in student
self-service.
Attaching Student Permission Forms to Student Records
Access the Assign Student Permissions page (Student Financials, Charges and Payments, Assign Student
Permissions).
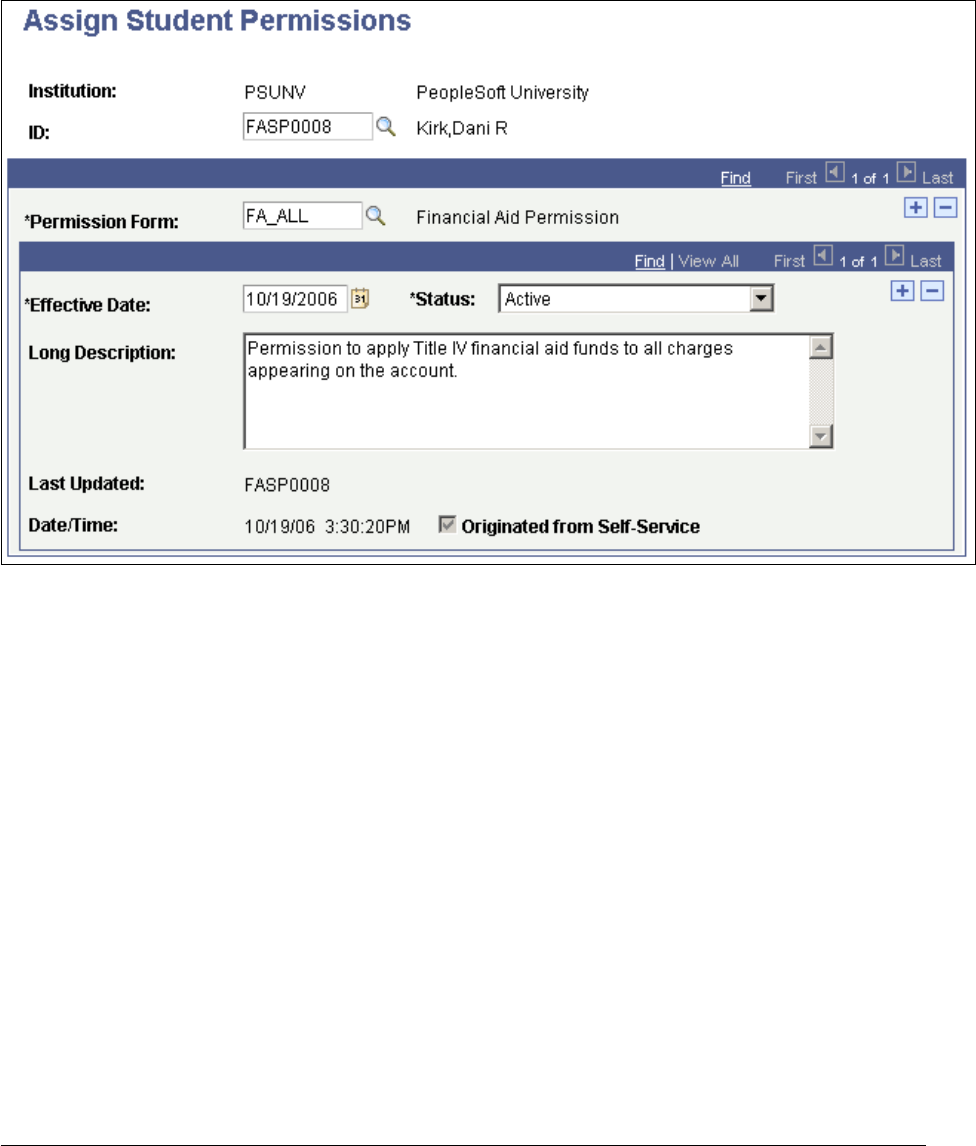
Maintaining Customers Chapter 22
636 Copyright © 1988, 2010, Oracle and/or its affiliates. All Rights Reserved.
Assign Student Permissions page
Permission Form Enter the permission form that you want to attach to the student's record.
Originated from Self-
Service This check box is selected by default when the permission form is initiated via
the self-service application.
For each Permission (Waiver) level 2 added in the Effective Date section, the Oprid and the Process
Date/Time fields are modified to indicate who performed the update.
Attaching Student Permission Forms to Charge Priority Lists
Access the Details page (Set Up SACR, Product Related, Student Financials, Charges and Payments, Charge
Priority List, Details).
Attach Student Permission forms to charge priority lists during the setup of your charge priority list rules.
See Also
Chapter 2, "Completing Student Financials General Setup," Defining Charge Priority List Rules, page 41

Chapter 22 Maintaining Customers
Copyright © 1988, 2010, Oracle and/or its affiliates. All Rights Reserved. 637
Processing and Reviewing Customer Credit History
The Credit History process assigns outstanding charges for one or more students or organizations to aging
categories of a particular aging set. After the charges are assigned to aging sets, you can use the Collect
Receivables feature to begin the collection process.
See Also
Chapter 2, "Completing Student Financials General Setup," Setting Up Aging Sets, page 37
Pages Used to Process and Review Customer Credit History
Page Name Definition Name Navigation Usage
Credit History RUNCTL_CREHIST Student Financials,
Collections, Credit History,
Process Credit History,
Credit History
Process customer credit
history.
Credit History CREDIT_HIST_LIST Student Financials,
Collections, Credit History,
Review Credit History
Review the aging history of
a student's account.
Corporation Credit History CREDIT_HIST_LIST_O Student Financials,
Collections, Credit History,
Review Corp Credit
History, Corporation Credit
History
Review the aging history of
an organization's account.
Processing Customer Credit History
Access the Credit History page (Student Financials, Collections, Credit History, Process Credit History,
Credit History).
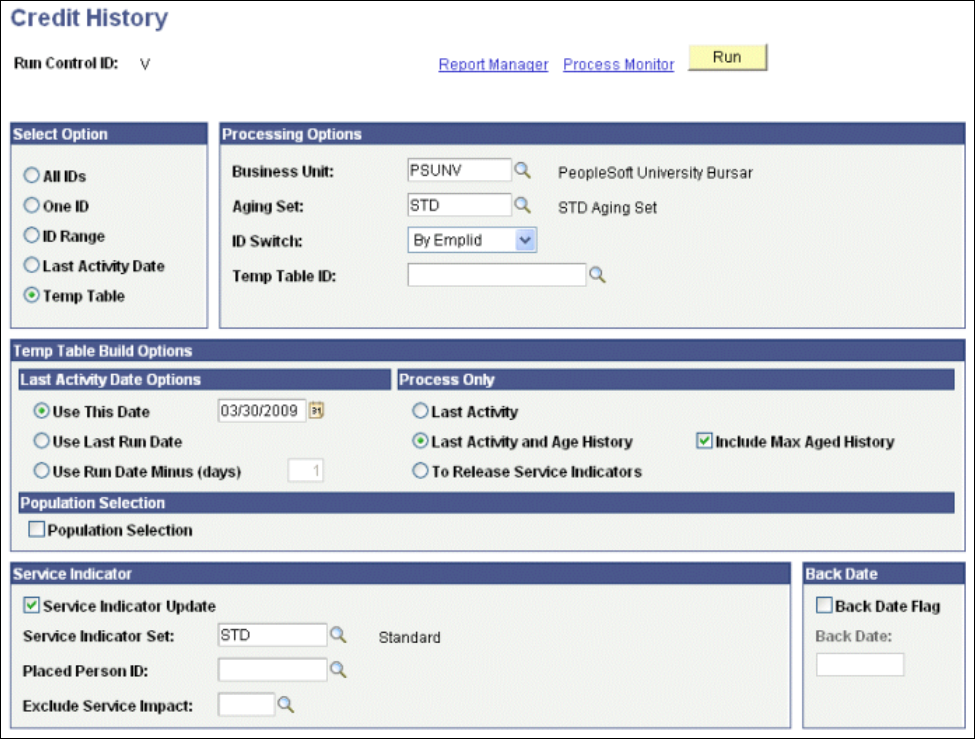
Maintaining Customers Chapter 22
638 Copyright © 1988, 2010, Oracle and/or its affiliates. All Rights Reserved.
Credit History page
Select Option
All IDs Select to run the Credit History process for all students or organizations with
outstanding charges in the database.
One ID Select to run the Credit History process for a single student or external
organization. When you select this option, the ID field or the External Org ID
field appears, depending on the value that you select in the ID Switch field.
ID Range Select to run the Credit History process for a range of students or external
organizations. When you select this option, the Start EmplID and End EmplID
fields or the Start Ext Org ID (start external organization ID) and End Ext Org ID
(end external organization ID) fields appear, depending on the value that you
select in the ID Switch field.
Last Activity Date Select to run Credit History process for only those students or external
organizations that have had activity on their accounts since a given date. When
you select this option, the Last Activity Date field appears.
Chapter 22 Maintaining Customers
Copyright © 1988, 2010, Oracle and/or its affiliates. All Rights Reserved. 639
Temp Table Select this option to have the system insert records into the temp table for credit
history processing. When you select this option, the Temp Table ID field and the
Last Activity Date Options, Process Only, and Population Selection group boxes
appear. You can use these group boxes to determine which records should be
inserted into the temp table for credit history processing.
Processing Options
Aging Set Enter the aging set containing the aging categories to which you want to assign
outstanding charges.
ID Switch Choose whether the Credit History process includes students or organizations.
Select the By Emplid (by employee ID) value to run the process for students or
the By Org ID (by organization ID) value to run the process for organizations.
ID Select the identification number of the student for whom you are running the
Credit History process.
External Org ID
(external organization ID) Select the identification number of the organization for which you are running
the Credit History process.
Start ID and End ID Use these fields to set a range of students for which you want to run the Credit
History process.
Start Ext Org ID and
End Ext Org ID Use these fields to set a range of organizations for which you want to run the
Credit History process.
Last Activity Date Enter the date on or after which activity must have occurred in a student or
corporate account to be included in the Credit History process.
Temp Table ID Select the temp table into which the system inserts records for credit history
processing.
Last Activity Date Options
Use this group box to specify how the system should determine the Last Activity Date for the temp table
option. Use this group box in conjunction with the Process Only group box.
Use This Date Enter the date the system uses as the Last Activity Date. For example, if you
enter January 10 2009, only activities that have occurred on or after January 10
2009 in a student or corporate account are included in the Credit History process.
Use Last Run Date Select to have the system use the date when the Credit History process last ran as
the Last Activity Date. To find out the last run date, the system looks at records
with the same Operator ID and Run Control ID as the current run. If the last run
date record is not available, the system sets the Last Activity Date as one day
prior to the current run date. For example, if you run the Credit History process
on January 10 2009 and the system does not find any last run record, the system
uses January 09 2009 as the Last Activity Date.
Maintaining Customers Chapter 22
640 Copyright © 1988, 2010, Oracle and/or its affiliates. All Rights Reserved.
Use Run Date Minus
(days) Enter the number of days that the system should subtract from the current run
date to calculate the Last Activity Date. For example, if you enter 2 in this field
and the process is run on January 10 2009, the system uses January 08 2009 as
the Last Activity Date.
Process Only
Use this group box in conjunction with the Last Activity Date Options group box for the Temp Table option.
Last Activity Select to run the process for students or organizations that have activities
occurring on or after the Last Activity Date. For example, if you have selected
this option and entered January 10 2009 in the Use This Date field, only activities
that have occurred on or after January 10 2009 in a student or corporate account
are included in the Credit History process.
Last Activity and Age
History Select to run the process for students or organizations that have activities
occurring on or after the Last Activity Date.
By selecting this option, the process includes the existing non-zero credit history
records in the temporary table for processing. These records are included to
ensure that the correct aging category is applied (an existing entry moves from a
past due aging category to another, for example, from past due 31-60 to past due
61 -90).
The Last Activity and Age History selection excludes the accounts in the
maximum aging category, if no activity has occurred since the last activity date
specified. These accounts cannot age beyond the maximum aging category. To
reduce the population selected for the credit history process and improve
performance, the accounts are therefore not selected. Removing a service
indicator does not constitute an activity.
To Release Service
Indicators Select to run the process for students or organizations that have activities
occurring on or after the Last Activity Date. By selecting this option, the process
also determines whether the selected activities have service indicators which
need to be released. The process uses the options you have set up in the Service
Indicator Set group box to determine which service indicators need to be
considered.
Include Max Aged
History If service indicators have been manually removed for any accounts in this
category, the accounts will not be included in the credit history process and a
service indicator will not be placed on the account again.
If you select the Include Max Aged History check box, the accounts in the
maximum aging category are included in the temp table and are processed in the
credit history process.
Population Selection
Use this group box if you want to use a Population Selection tool for the temp table option. You can select
only PS Query or External File as the selection tool. For information about Population Selection, see the
Campus Community Fundamentals PeopleBook.

Chapter 22 Maintaining Customers
Copyright © 1988, 2010, Oracle and/or its affiliates. All Rights Reserved. 641
Service Indicator
Service Indicator
Update Select to post a service indicator to the accounts. When you select this check box,
the Service Indicator Set,Placed Person ID, and Exclude Service Impact fields
appear in the group box.
Service Indicator Set Enter the set of rules that you want to use for the service indicator.
Placed Person ID Enter the identification number of the person who is assigning the service
indicator.
Exclude Service Impact Enter the value that restricts a service indicator from being applied through the
Credit History process.
Back Date
Back Date Flag Select this check box if you want to recalculate credit history for a previous date.
If you select this option, the Back Date field appears in the group box.
Back Date Enter the previous date for which you want to run the Credit History process.
Note. When running this option, the system will create two records: one record
for today's date (effective date) and one record for the back-dated effective date
record.

Copyright © 1988, 2010, Oracle and/or its affiliates. All Rights Reserved. 643
Chapter 23
Collecting Receivables
This chapter provides an overview of receivables collection and discusses how to:
•Assign collection items to collectors and worklists.
•Work collection items.
•Update collection letter information.
•Process collection letters.
•Add to a collector's queue without using worklists.
•View customers and corporations that are in collection.
Understanding Receivables Collection
This section lists prerequisites and common elements and provides an overview of receivables collection.
Prerequisites
Before you can move items into or out of the collection system, you must run the Credit History
(RUNCTL_CREHIST) process to determine the aging categories in which past due items belong.
See Also
Chapter 22, "Maintaining Customers," Processing and Reviewing Customer Credit History, page 637
Common Element Used in This Chapter
Collection ID (collection
identifier) A system-assigned ID for a given collection item.

Collecting Receivables Chapter 23
644 Copyright © 1988, 2010, Oracle and/or its affiliates. All Rights Reserved.
Receivables Collection
The Collect Receivables feature provides early intervention for past-due accounts. The feature interacts with
PeopleSoft Workflow to assign collections items to the worklist of specific users. In addition, the feature
interacts with the 3Cs (communications, comments, and checklists) from Campus Community to generate
automated collection (dunning) letters. All the information that is needed to manage the collections cycle is
compiled in one location and can be reviewed and updated by collectors and supervisors.
Assigning Collection Items to Collectors and Worklists
This section discusses how to:
•Assign collection items to collectors.
•Assign collection items to worklists.
Pages Used to Assign Collection Items to Collectors and Worklists
Page Name Definition Name Navigation Usage
Process Collections RUNCTL_COLLECT_SF Student Financials,
Collections, Process
Collections
Assign collection items to
collectors.
Assign Collections Worklist RUNCTL_COLLECT •Student Financials,
Collections, Assign
Customers to Worklist,
Assign Collections
Worklist
•Student Financials,
Collections, Assign
Corporation to
Worklist, Assign
Collections Worklist
Assign collection items to
worklist.
Assigning Collection Items to Collectors
Access the Process Collections page (Student Financials, Collections, Process Collections).
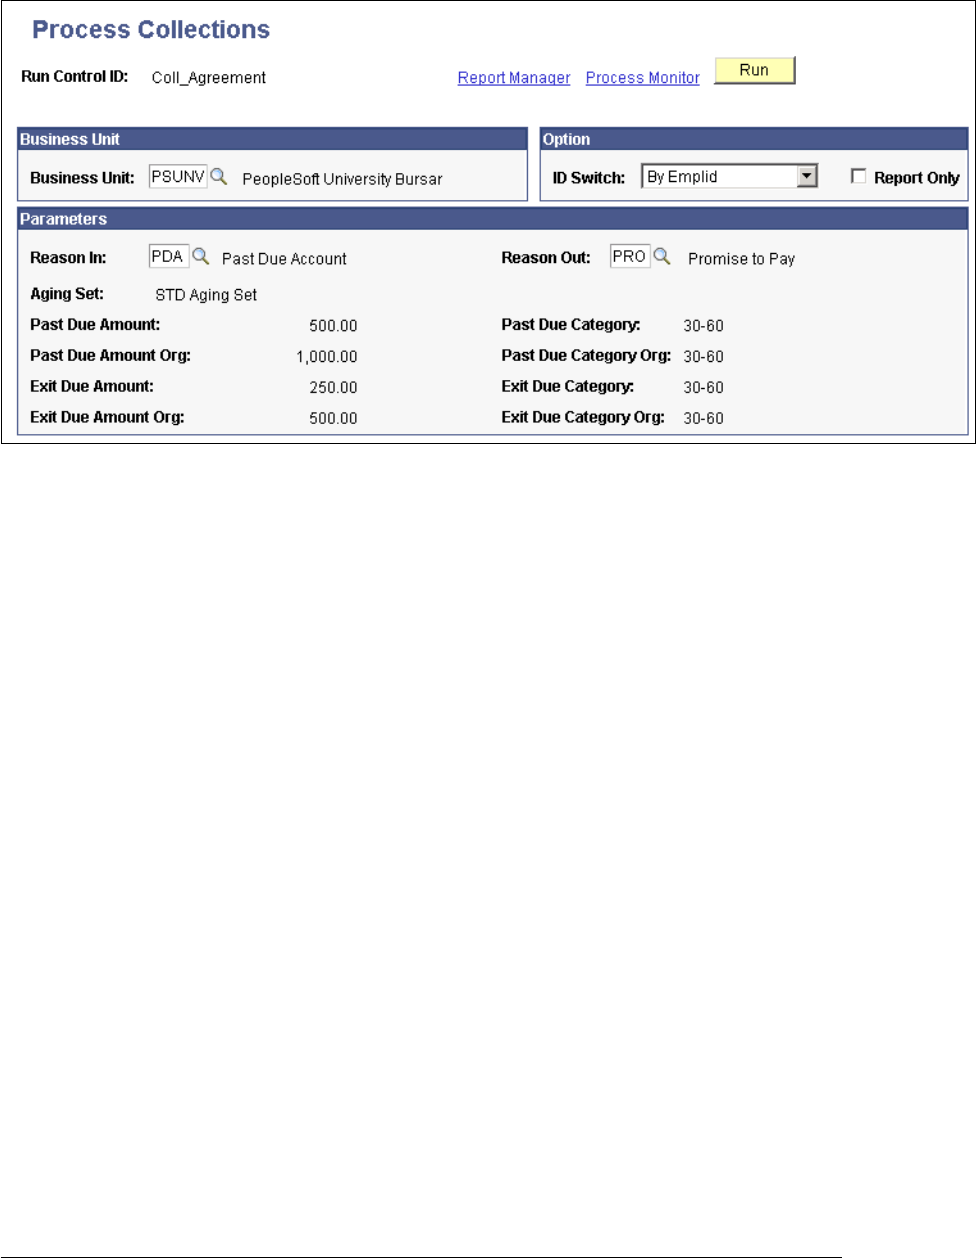
Chapter 23 Collecting Receivables
Copyright © 1988, 2010, Oracle and/or its affiliates. All Rights Reserved. 645
Process Collections page
Option
ID Switch Select whether to assign collection items for students or for organizations. The
two valid values for this field are By Emplid and By Org ID.
Report Only The Assign Collector process normally generates a report of the collection items
that it assigns to collectors. If you want to generate the report of what
assignments the system will make without actually making them, select this
check box.
Parameters
Reason In Enter the reason in code that the system attaches to each item that the Assign
Collector process moves into the collection system.
Reason Out Enter the reason out code that the system attaches to each item that the Assign
Collector process moves out of the collection system.
The Assign Collector (SFCOLLEC) process assigns each receivable that is eligible for collection to a
collector based on the collection criteria that you established during your collections setup. It creates new
collection records for items moved into collections for the first time. In addition, it updates the collection
records for items that have been resolved or modified since the last time the process was run.
See Also
Chapter 2, "Completing Student Financials General Setup," Setting Up Business Units, page 19

Collecting Receivables Chapter 23
646 Copyright © 1988, 2010, Oracle and/or its affiliates. All Rights Reserved.
Assigning Collection Items to Worklists
Access the Assign Collections Worklist page (Student Financials, Collections, Assign Customers to Worklist,
Assign Collections Worklist).
The Collections (SSF_ASGNWORK) process (if you assign collection items by user ID) or the Collections
Role SSF_ASGNWORK process (if you assign collection items by role) routes collection items to the
worklist of the appropriate collector.
Note. If you access this page using the Assign Org Worklist component, you can choose to run the Process
Org Collections process (if you assign collection items by user ID) or the Process Org Role Collections
process (if you assign collection items by role) when you click Run. These processes route organization
collection items to worklists rather than student collection items.
Working Collection Items
This section provides an overview of collection items and discusses how to:
•View demographic information and collection items.
•Select collection letter templates for collection items.
•Record collection steps and follow-up actions for collection items.
Understanding Collection Items
After you assign collection items to the appropriate worklists, your collectors can begin working each item.
Working Student Collection Items
Collectors and supervisors use the Demographic Information and Collection Information pages to work
student collection items. You can access these pages using three different components:
•Customer Conversations
Collectors normally use the Customer Conversations component to manually create a collection record for
a past-due item without running the Assign Collector process.
•Customer Conversations Wrklst (customer conversations worklist)
This is the most common component that collectors use to work student collection items. It is also the
most secure method for working collection items because collectors can access this component only
through their personal worklists.
•Customer Conversations Update
This component is the least secure of the three. It is intended for users in a supervisory position who
check and update the work of the collectors at your institution. Using this component, a supervisor can
access any collection item that is associated with a given business unit.

Chapter 23 Collecting Receivables
Copyright © 1988, 2010, Oracle and/or its affiliates. All Rights Reserved. 647
Working Corporate Collection Items
Collectors and supervisors use the Demographic Information and Cust Conv Coll (customer conversation
collection) pages to work corporate collection items. You can access these pages using three different
components:
•Org Customer Conversations (organization customer conversations)
Collectors use this component to work corporate collection items in the same way that they use the
Customer Conversations component to work student collection items.
•Org Customer Convers Wrklst (organization customer conversations worklist)
Collectors use this component to work corporate collection items in the same way that they use the
Customer Conversations Wrklst component to work student collection items.
•Org Customer Convers Update (organization customer conversations update)
Collectors use this component to work corporate collection items in the same way that they use the
Customer Conversations Update component to work student collection items.
Pages Used to Work Collection Items
Page Name Definition Name Navigation Usage
Demographic Information CUST_CONV Student Financials,
Collections, Collection
Effort, Begin Customer
Collection, Demographic
Information
View demographic
information and collection
items for a student.
Demographic Information CUST_CONV_ORG Student Financials,
Collections, Collection
Effort, Begin Corporate
Collection, Demographic
Information
View demographic
information and collection
items for an organization.
Collections Dunning Letter COLL_DUNN_LTR_SP Click the Dunning Letter
Info (dunning letter
information) link on the
Demographic Information
page.
Select collection letter
templates for item types.
Credit History CRED_HIST_LST_SP Click the Get Credit
History link on the
Demographic Information
page.
Review the credit history of
the student whose collection
records you are working.
Credit History CRED_HIST_LST_SP_O Click the Get Credit
History link on the Org
Customer Convers Wrklst -
Demographic Information
page
Review the credit history of
the organization for which
you are working collection
records.

Collecting Receivables Chapter 23
648 Copyright © 1988, 2010, Oracle and/or its affiliates. All Rights Reserved.
Page Name Definition Name Navigation Usage
Collection Information CUST_CONV_COLL Student Financials,
Collections, Collection
Effort, Begin Customer
Collection, Collection
Information
Record collection steps and
follow-up actions for
collection items.
Communication COMM_SF_SP Click the Get
Communication link on the
Collection Information
page.
View information about
communication records that
you created for the
collection item.
Checklist PERS_CHKLST_SF_SP Click the Get Checklist link
on the Collection
Information page.
View information about
checklist records that you
created for the collection
item.
Comments CMNT_SF_SP Click the Get Comment
link on the Collection
Information page.
View information about
comment records that you
created for the collection
item.
Viewing Demographic Information and Collection Items
Access the Demographic Information page (Student Financials, Collections, Collection Effort, Begin
Customer Collection, Demographic Information).
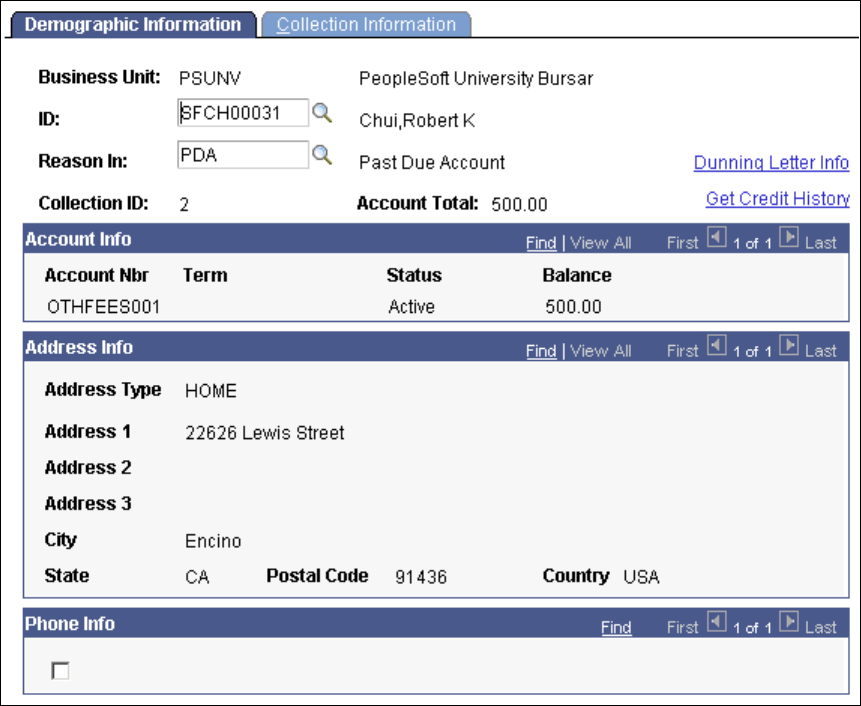
Chapter 23 Collecting Receivables
Copyright © 1988, 2010, Oracle and/or its affiliates. All Rights Reserved. 649
Demographic Information page
ID Displays the ID of the student whose collection items you are working. The name
of the student appears to the right of this field.
If you access this page from the Customer Conversations component or the
Customer Conversations Update component, use this field to select the student
whose collection items you want to work.
Dunning Letter Info
(dunning letter
information)
Click to access the Collections Dunning Letter secondary page.
Reason In Displays the reason in code that is associated with the collection record.
If you are using this page to manually create a collection record, use this field to
select a reason in code for the collection record.
Get Credit History Click to access the Credit History secondary page.
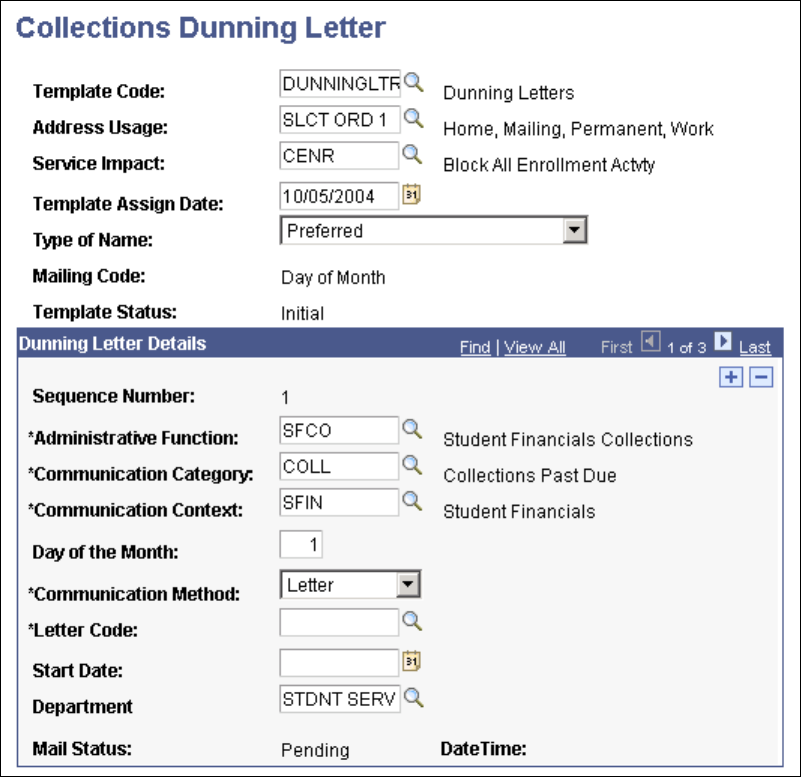
Collecting Receivables Chapter 23
650 Copyright © 1988, 2010, Oracle and/or its affiliates. All Rights Reserved.
Phone Info
This scroll area displays all of the phone numbers that are associated with the student. If you select the check
box next to one of the phone numbers, the selected phone number appears in the Phone field on the Collection
Information page.
Selecting Collection Letter Templates
Access the Collections Dunning Letter page (click the Dunning Letter Info link on the Demographic
Information page).
Collections Dunning Letter page
Template Code Enter the code of the collection letter template that you want to attach to the
collection record.
Template Assign Date Enter the date on which you assigned the template to this collection record.

Chapter 23 Collecting Receivables
Copyright © 1988, 2010, Oracle and/or its affiliates. All Rights Reserved. 651
Template Status Displays the status of the collection letter template.
Date Time Displays the date and time that the Collections Dunning Letter process creates a
communication record for a letter.
Mail Status Displays the status of the individual collection letter.
Note. If you attached a collection letter template to the collection criteria of the collector who is responsible
for the collection items, the system enters this information automatically when you run Process Collections.
See Also
Chapter 12, "Setting Up Receivables Collection," Setting Up Collection Letter Templates, page 370
Recording Collection Steps and Follow-Up Actions for Collection Items
Access the Collection Information page (Student Financials, Collections, Collection Effort, Begin Customer
Collection, Collection Information).
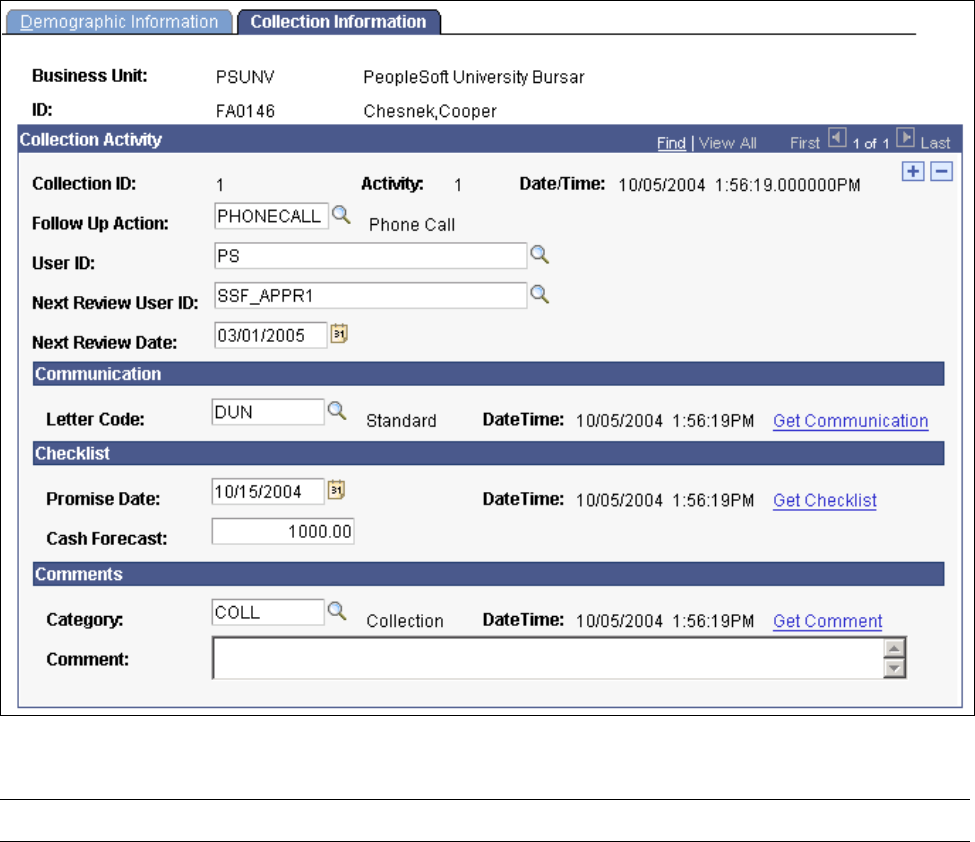
Collecting Receivables Chapter 23
652 Copyright © 1988, 2010, Oracle and/or its affiliates. All Rights Reserved.
Collection Information page
Note. The Cust Conv Coll (customer conversation collection) page is identical to this page.
Follow Up Action Enter any follow-up actions that are required for the collection record.
User ID Enter the user ID of the collector who worked this item.
Next Review Date Enter the date on which this collection record must be worked again if it hasn't
yet been resolved.
Next Review User ID Enter the user ID of the collector who is assigned to review the collection record
next.
Action Date/Time Indicates the date and time that a collector last entered information for this
collection record on this page.
Communication Date
Time Indicates the date and time that a collector last modified the information in the
Communication group box.
Chapter 23 Collecting Receivables
Copyright © 1988, 2010, Oracle and/or its affiliates. All Rights Reserved. 653
Checklist Date Time Indicates the date and time that a collector last modified the information in the
Checklist group box.
Comment Date Time Indicates the date and time that a collector last modified the information in the
Comments group box.
Phone If you select the check box next to one of the phone numbers displayed on the
Demographic Information page, that phone number appears here.
Communication
Use this group box to record communication activity that you perform for this collection record that lies
outside of the automated letter generation process.
Letter Code Enter the letter code of the letter that you sent.
Get Communication Click to access the Communication page, where you can view information about
any communications that are associated with the collection item that you are
working.
Checklist
Use this group box to record any checklist activity that you perform for this collection record.
Promise Date Enter the date by which the student promised to make a payment toward a
collection item.
Cash Forecast Enter the amount of money that the student promised to pay.
Get Checklist Click to access the Checklist page, where you can view information about any
checklists that are associated with the collection item that you are working.
Comments
Use this group box to record any comment activity that you perform for this collection record.
Category Enter a category for the comment.
Comment Enter a comment.
Get Comment Click to access the Comments page, where you can view information about any
comments that are associated with the collection item that you are working.

Collecting Receivables Chapter 23
654 Copyright © 1988, 2010, Oracle and/or its affiliates. All Rights Reserved.
See Also
PeopleSoft Enterprise Campus Community 9.0 Fundamentals PeopleBook, "Managing Communications"
PeopleSoft Enterprise Campus Community 9.0 Fundamentals PeopleBook, "Managing Comments"
PeopleSoft Enterprise Campus Community 9.0 Fundamentals PeopleBook, "Managing Checklists"
Updating Collection Letter Information
At some point during the collection process, you may need to review and update the status of a collection
letter template that is assigned to a student collection record. Two pages are available for this purpose, one for
student collection letters and one for corporate collection letters. Both pages have identical functionality.
Note. You cannot modify the Template Assign Date field or the Template Code field on either of these pages.
See Also
Chapter 23, "Collecting Receivables," Selecting Collection Letter Templates, page 650
Chapter 12, "Setting Up Receivables Collection," Setting Up Collection Letter Templates, page 370
Pages Used to Update Collection Letter Information
Page Name Definition Name Navigation Usage
Collections Dunning Letter COLL_DUNNING_LTR Student Financials,
Collections, Letter
Generation, Dunning Letter
Content, Collections
Dunning Letter
Review and update the
collection letter information
for a given student
collection record.
Collections Dunning Letter COLL_DUNNING_O_LTR Student Financials,
Collections, Letter
Generation, Corporate
Dunning Letter, Collections
Dunning Letter
Review and update the
collection letter information
for a given corporate
collection record.

Chapter 23 Collecting Receivables
Copyright © 1988, 2010, Oracle and/or its affiliates. All Rights Reserved. 655
Processing Collection Letters
The Collect Receivables feature enables you to generate automated collection letters to send to customers
with past-due items. Based on the collection letter templates that you assign to your collection records, the
Collections Dunning Letter process determines which letters to send and creates a communication record for
them in PeopleSoft Campus Community. Your Campus Community personnel use these communication
records to run a letter generation process to generate the letters. In addition, for every letter requiring
generation, the process updates its mail status in Student Financials to Sent. The process updates the template
status of any affected collection letter template to Complete.
See Also
PeopleSoft Enterprise Campus Community 9.0 Fundamentals PeopleBook, "Managing Communications"
Page Used to Process Collection Letters
Page Name Definition Name Navigation Usage
Collections Dunning Letter RUNCTL_SFBU Student Financials,
Collections, Letter
Generation, Generate
Dunning Letters, Collection
Dunning Letter
Run the process that
determines what collection
letters need to be generated
and sent to customers.
Adding to a Collector's Queue Without Using Worklists
This section discusses how to:
•Manually add students to collections.
•Manually add corporations to collections.
Pages Used to Add to a Collector's Queue Without Using Worklists
Page Name Definition Name Navigation Usage
Collection Placement SSF_ASGN_COLLECTN Student Financials,
Collections, Put Customers
in Collection, Collection
Placement
Manually add students to
collections without using
the workflow process.
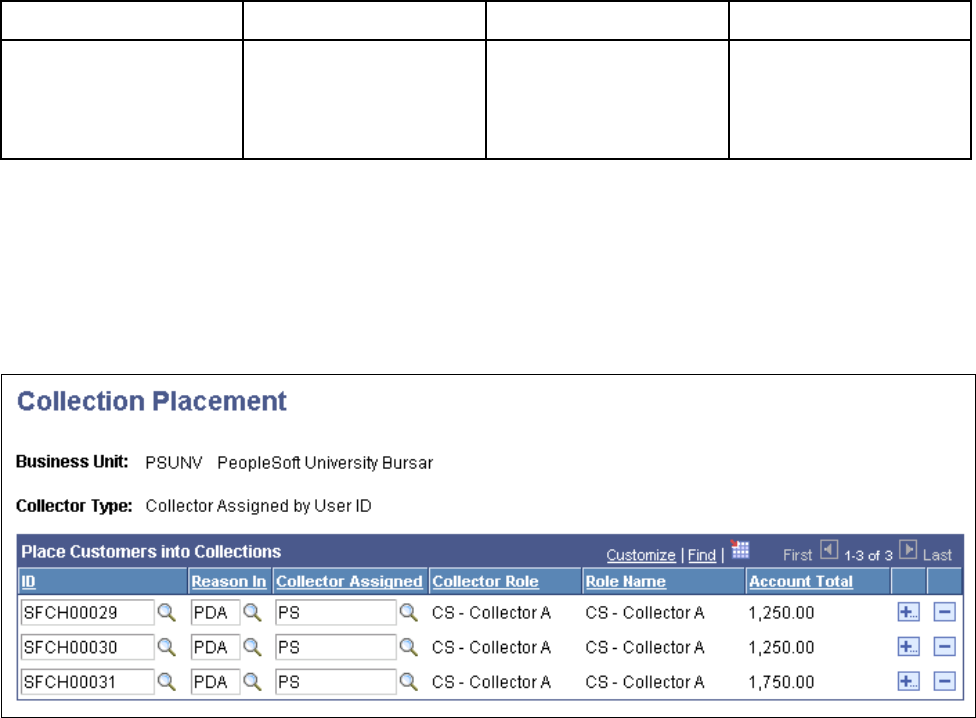
Collecting Receivables Chapter 23
656 Copyright © 1988, 2010, Oracle and/or its affiliates. All Rights Reserved.
Page Name Definition Name Navigation Usage
Collection Placement SSF_ASGN_COLL_ORG Student Financials,
Collections, Put
Corporations in Collection,
Collection Placement
Manually add corporations
to collections without using
the workflow process.
Manually Adding Students To Collections Without Using The Workflow
Process
Access the Collection Placement page (Student Financials, Collections, Put Customers in Collection,
Collection Placement).
Collection Placement page
The Collection Placement page enables you to assign collectors to students or corporations. However, you
must run the Credit History process first, which uses aging categories against students or corporations to
determine who should be placed in collection
ID Enter the student whom you want to add to collections.
Reason In Enter the reason that the student is in collection.
Collector Assigned Enter the collector.
Manually Adding Corporations To Collections Without Using The Workflow
Process
Access the Collection Placement page (Student Financials, Collections, Put Corporations in Collection). This
page is identical to the page for customers.
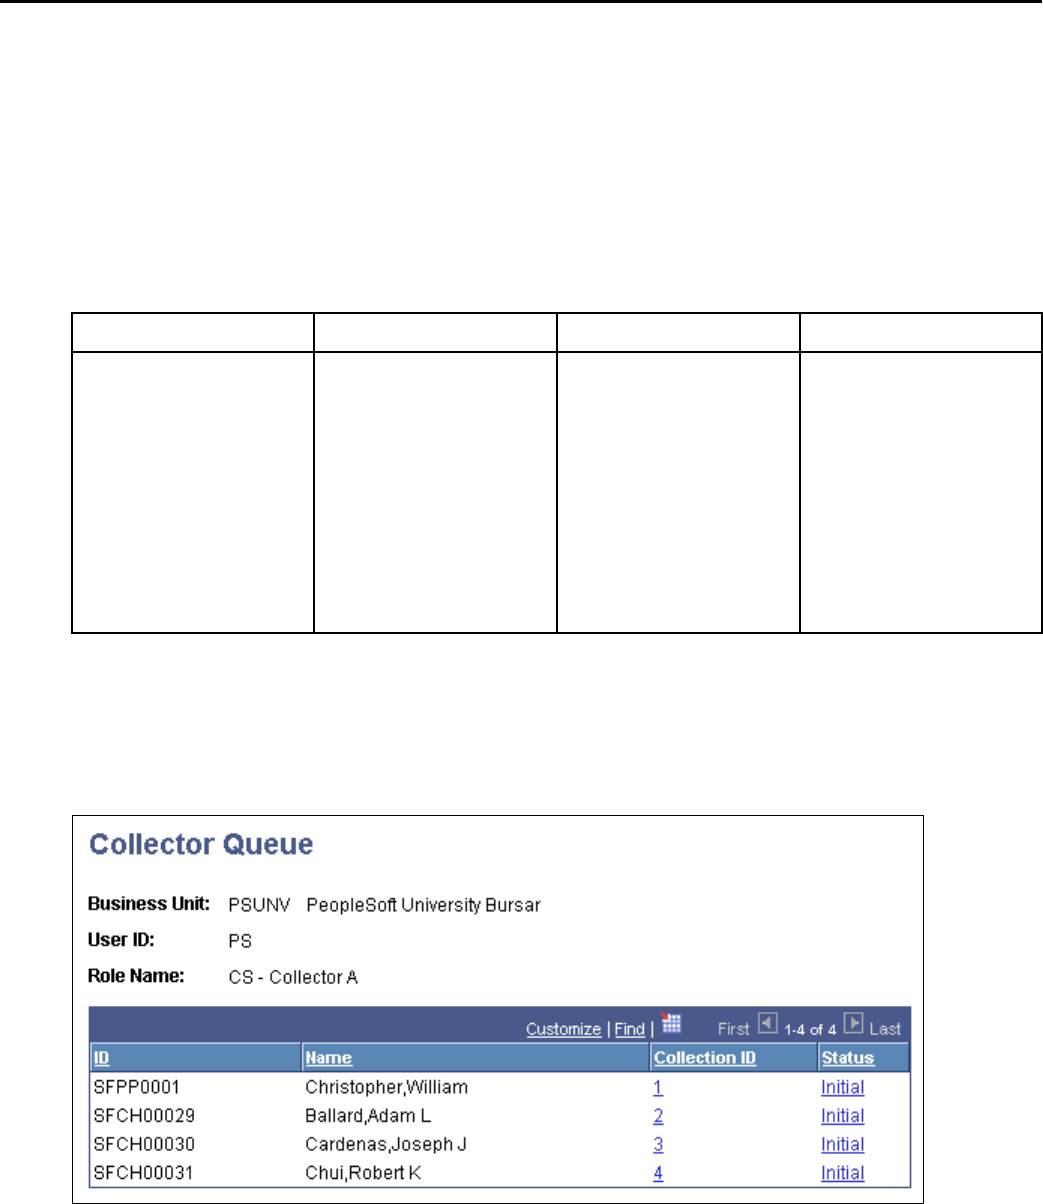
Chapter 23 Collecting Receivables
Copyright © 1988, 2010, Oracle and/or its affiliates. All Rights Reserved. 657
Viewing Customers or Corporations That Are in Collection
This section discusses how to:
•View customers in collection.
•View corporations in collection.
Pages Used to View Customers or Corporations That Are in Collection
Page Name Definition Name Navigation Usage
Collector Queue SSF_COLLECTOR_INQ •Student Financials,
Collections, Collection
Effort, View Customer
Collector Queue,
Collector Queue
•Student Financials,
Collections, Collection
Effort, View Corporate
Collector Queue,
Collector Queue
View collection activity for
a student or corporation by
collector queue, enabling
you to view what is
currently in a collector's
queue.
Viewing Customers in Collection
Access the Collector Queue page (Student Financials, Collections, Collection Effort, View Customer
Collector Queue, Collector Queue).
Collector Queue page
Collecting Receivables Chapter 23
658 Copyright © 1988, 2010, Oracle and/or its affiliates. All Rights Reserved.
Collection ID and Status Click to either link to view the Demographic Information page.
Viewing Corporations in Collection
Access the Collector Queue page (Student Financials, Collections, Collection Effort, View Corporate
Collector Queue, Collector Queue). This page is identical to the page for customers.

Copyright © 1988, 2010, Oracle and/or its affiliates. All Rights Reserved. 659
Chapter 24
Producing Tax Forms and Receipt
Information
This chapter provides overviews of tax form and receipt production and receipt information generation and
discusses how to:
•Produce and file 1098-T tax forms.
•Produce T2202A tax forms.
•Produce T4A tax forms.
•Generate income tax and donation receipt information.
Understanding Tax Form and Receipt Production
This section lists common elements and discusses tax form production.
Common Elements Used in This Chapter
Calendar Year For the purposes of tax reports, the calendar year represents the tax year for
which you are reporting.
TIN (taxpayer
identification number) The number under which an institution files 1098-T tax information.
Tax Form Production
PeopleSoft Student Financials provides tools that you can use when managing your tax data and generating
tax reports. The Manage Tax Reporting feature enables you to process data and generate reports using one
Internal Revenue Service (IRS) tax form and two Canada Customs and Revenue Agency (CCRA) tax forms:
•1098-T: An IRS form that reports tuition and related expenses for a student to use to claim an educational
tax credit.
•T2202A: A CCRA form that reports tuition and related expenses for a student to use to claim an
educational tax credit.
•T4A data: A CCRA form that reports all scholarship-related income for a student.

Producing Tax Forms and Receipt Information Chapter 24
660 Copyright © 1988, 2010, Oracle and/or its affiliates. All Rights Reserved.
1098-T Tax Forms
The Taxpayer Relief Act of 1997 allows taxpayers to claim educational credits for some higher education
expenses. Institutions that receive qualified tuition and related expenses from or on behalf of a student are
required to furnish each eligible student with an IRS Form 1098-T, Tuition Statement. The information on the
form helps determine whether a student, or the person who can claim the student as a dependent, can claim an
income tax credit for the Hope Scholarship Credit or Lifetime Learning Credit. In addition, for every 1098-T
provided to an eligible student, your institution must also file a 1098-T with the IRS. PeopleSoft Student
Financials enables your institution to print your 1098-T forms for mailing to students and to transmit your
1098-T data electronically to the IRS.
Self-Service 1098-T Forms (United States)
Institutions based in the United States are required annually to issue IRS Form 1098-T to students so that they
can report tuition and fee amounts on their tax returns. PeopleSoft Campus Solutions enables students to
display and print their completed 1098-T forms in PDF format using self-service. This functionality supports
institutions and their efforts to reduce costs and streamline administrative processes. Use Oracle's XML
Publisher tool to create the PDF document.
Institutions can control the appearance of completed forms using the 1098-T TIN Detail setup page.
When 1098-T forms are generated and printed, the student can access a summary of the information from the
completed 1098-T form. The student can then print the completed form in PDF format.
The student is required to provide consent and an eSignature before accessing the completed form.
(CAN) T2202A Tax Forms
Canadian taxpayers can claim tuition and education amounts as tax credits that reduce the amount of federal
income tax they pay. For students to determine whether they are eligible for these tax credits, Canadian
institutions must provide each of them with a Form T2202A. This form details the eligible tuition fees and
education amounts that a student can claim for a given tax year.
(CAN) T4A Tax Forms
The CCRA requires that taxpayers report scholarship-related income. To comply with this requirement,
Canadian institutions must provide each eligible student with a T4A slip detailing any scholarship-related
income. Then, the student is responsible for reporting this income to the federal government.
Student Financials, in conjunction with PeopleSoft Payroll for North America, enables your institution to
produce and print T4A forms. Using Student Financials, you can identify which students have items on their
accounts that are T4A reportable and report these taxable items to your payroll department through an
interface with PeopleSoft Payroll for North America. Your payroll department then uses processes within
PeopleSoft Payroll for North America to produce T4A slips for the applicable students.
Understanding Receipt Information Generation
This section discusses generating income tax receipts and donation receipts.

Chapter 24 Producing Tax Forms and Receipt Information
Copyright © 1988, 2010, Oracle and/or its affiliates. All Rights Reserved. 661
Income Tax Receipt Information Generation
Canada allows students who are enrolled in non-degree continuing education courses to claim income tax
credits for tuition fees. For these students to take advantage of this credit, they must receive an income tax
receipt from their respective university listing the following information:
•GST (goods and services tax) registration number of the university.
•Student ID.
•Term in which the student was enrolled in the course.
•Course title.
•Course number.
•Period (date and time) during which the course was covered.
•Location (facility and room number).
•Student name.
•Student address.
•Assessed fee.
•Assessed GST, along with an indication of any tax exemptions.
•Tax credit portion.
•Date issued.
•Payment method.
Donation Receipt Information Generation
Universities often receive donations from students and third-party organizations. When this occurs, the
university is responsible to provide a receipt listing the following information:
•GST registration number of the university.
•Date that the university received the donation.
•Date that the university issued the receipt.
•Name of the student or third-party organization.
•Address of the student or third-party organization.
Producing and Filing 1098-T Tax Forms
This section lists prerequisites and discusses how to:
•Generate 1098-T data.

Producing Tax Forms and Receipt Information Chapter 24
662 Copyright © 1988, 2010, Oracle and/or its affiliates. All Rights Reserved.
•Review 1098–T messages.
•Review and override 1098-T data.
•Validate and audit 1098-T data.
•Print 1098-T forms and create electronic transmission files.
Prerequisites
Before you begin generating and transmitting 1098-T information, you must complete these setup tasks in
your PeopleSoft Student Financials system:
1. Set up a TIN under which your institution files 1098-T tax information to the IRS.
2. Determine which of your item types to designate as qualified tuition and related expenses.
See Also
Chapter 13, "Setting Up Tax Form Production," Setting Up a TIN, page 376
Chapter 2, "Completing Student Financials General Setup," Setting Up Item Types and Item Type Groups,
page 55
Pages Used to Produce and File 1098-T Tax Forms
Page Name Definition Name Navigation Usage
Generate 1098-T RUNCTL_SF_SFP1098P Student Financials, Taxes,
Generate 1098-T Generate 1098-T data.
Review 1098–T Messages SSF_1098T_INQ Student Financials, Taxes,
Review 1098–T Messages,
Review 1098–T Messages
Review 1098–T messages.
1098-T Data SF_1098_DTL Student Financials, Taxes,
Edit 1098-T Data, 1098-T
Data
Student Financials, Taxes,
Review 1098–T Data,
1098–T Data
Edit or review 1098-T data
by student.
1098-T Student Address SF_1098_STUADDR_PB Click the Student Address
link on the 1098-T Data
page.
View the address of the
student whose 1098-T data
you are reviewing or
overriding.
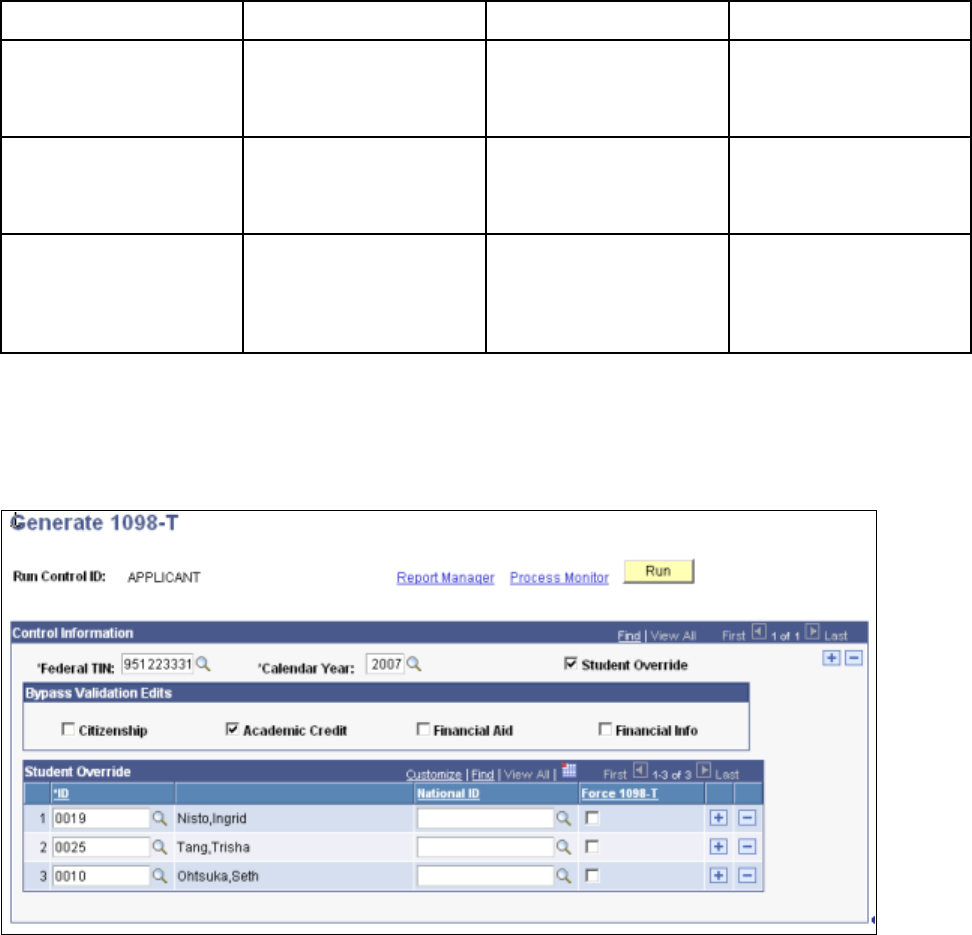
Chapter 24 Producing Tax Forms and Receipt Information
Copyright © 1988, 2010, Oracle and/or its affiliates. All Rights Reserved. 663
Page Name Definition Name Navigation Usage
1098-T Audit Report RUNCTL_SF_SF1098VP Student Financials, Taxes,
Tax Reports, 1098-T Audit
Report
Validate and audit 1098-T
data.
1098-T Print RUNCTL_SF_SF1098RP Student Financials, Taxes,
Tax Reports, 1098-T Form
Print, 1098-T Print
Print 1098-T forms and
create electronic
transmission files.
1098-T File Info SF_1098_FILE_PB Click the File Parameters
link on the 1098-T Print
page.
Enter the file path and file
name of the electronic file
that you want to create and
send to the IRS.
Generating 1098-T Data
Access the Generate 1098-T page (Student Financials, Taxes, Generate 1098-T, Generate 1098-T).
Generate 1098–T page
Control Information
Student Override Clear to generate data for all applicable students who fall under the federal TIN
and calendar year that you select.
Select to use the fields in the Student Override group box to specify the students
for which the process generates 1098-T data.

Producing Tax Forms and Receipt Information Chapter 24
664 Copyright © 1988, 2010, Oracle and/or its affiliates. All Rights Reserved.
Bypass Validation Edits
Citizenship Select to bypass the Citizenship edit, so that a 1098–T is produced for all
students with eligible charges regardless of citizenship status.
Academic Credit Select to bypass the Earned Academic Credit edit, so that a 1098–T is produced
for all students with eligible charges, even if they are enrolled in classes that earn
no academic credit.
Financial Aid Select to bypass the Financial Aid edit, so that a 1098–T is produced for students
who have eligible charges paid entirely by Financial Aid.
Financial Info (financial
information) Select to produce a 1098–T for students who have no financial information in
boxes one through six. If the students are currently enrolled, the 1098-T is
produced.
Note. Each edit bypass work independently—an institution can choose one, all, or none of the edit bypasses.
Student Override
ID Select an ID to generate 1098-T data for the student.
National ID Use this field to produce a 1098-T for a student who does not have a Social
Security Number (SSN).
Force 1098-T The Generate 1098-T process generates 1098-T data for all students who meet
the following criteria:
•The institution received payments of qualified tuition and related expenses
from the student.
•The student is not a nonresident alien.
•The student is enrolled in courses for which he or she receives academic
credit.
•The student's qualified tuition and related expenses are not entirely waived or
paid entirely with scholarships.
•The student's qualified tuition and related expenses are not covered by a
formal billing arrangement between an institution and the student's employer
or a governmental entity.
If you select the Force 1098-T check box, the system generates a 1098-T record
for the student specified in the ID field, even if the student does not meet the
previous criteria.

Chapter 24 Producing Tax Forms and Receipt Information
Copyright © 1988, 2010, Oracle and/or its affiliates. All Rights Reserved. 665
The 1098-T (SFP1098P) process retrieves the necessary data from Campus Community and Student Records
to populate and update the PS_SF_1098_DTL table in Student Financials. The system generates new 1098-T
data for students who have no existing 1098-T records. In addition, the process compares the new 1098-T
data it retrieves to any existing 1098-T data. When the process detects differences in an existing row of 1098-
T data that has never been printed or included in an electronic transmission file, it updates all the affected
fields in the record with the new information. However, if you have already printed a 1098-T record or
included it in an electronic transmission file, the process does not update the existing record. Instead, it inserts
a new row of updated 1098-T information for the student.
Reviewing 1098–T Messages
Access the Review 1098–T Messages page (Student Financials, Taxes, Review 1098–T Messages, Review
1098–T Messages).
Review 1098–T Messages page
Use this page to view the messages that are created when 1098–T data is not generated for a student during
the Generate 1098–T process.
Messages from only the most recent run of the Generate 1098–T process appear.
The Generate 1098–T process stores the message header values in the SSF_1098_MSGHDR table and stores
the message details in the SSF_1098_MSGDTL table. You can access these tables in SF Query Tree.
ID is an optional search criteria when you enter criteria to access this page.
Reviewing and Overriding 1098-T Data
Access the 1098-T Data page (Student Financials, Taxes, Edit 1098-T Data, 1098-T Data).
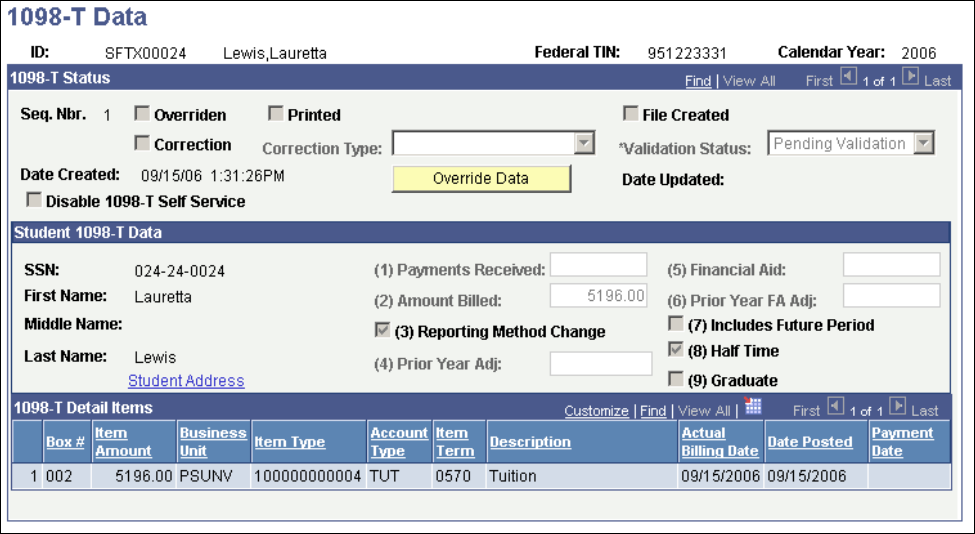
Producing Tax Forms and Receipt Information Chapter 24
666 Copyright © 1988, 2010, Oracle and/or its affiliates. All Rights Reserved.
1098-T Data page
1098-T Status
Overridden Indicates whether either you or the system has overridden a record. The system
designates any records created using the Force 1098-T check box on the Generate
1098-T page as Overridden. When you click the Override Data button, the
system automatically selects the Overridden check box for the resulting new row.
The Generate 1098-T process updates existing overridden records only if it
detects a change in the student's name or SSN. When editing a record, you can
clear this check box.
Printed Indicates whether you have printed a 1098-T form for this record. When you run
the 1098-T Form Print report, the system selects this check box for all the records
it prints. The date and time that the system printed the record appears to the right
of the field.
To reprint a 1098-T form for a student, use the Override Data button to clear the
Printed check box. Then use the 1098-T Print process to reprint the form.
File Created Indicates whether you have included a 1098-T record in an electronic
transmission file. When you run the 1098-T Form Print report, the system selects
this check box for all the records it includes in the transmission file. The date and
time that the system created the transmission file appears to the right of the field.

Chapter 24 Producing Tax Forms and Receipt Information
Copyright © 1988, 2010, Oracle and/or its affiliates. All Rights Reserved. 667
Correction If you create a transmission file to send to the IRS and then discover an error in
one of the records, you must submit a correction for that record. If you run the
Generate 1098-T process and it inserts a new row for a record already included in
a transmission file, the system selects this check box for the inserted row.
Note. If you manually edit a record that is already included in a transmission file,
select the Correction check box.
Validation Status Indicates whether the data in the record is valid. The 1098-T Audit report
automatically sets the validation status to one of the following values. When you
run the 1098-T Form Print report, the system uses this field to determine whether
to pick up the record.
Do Not Report: The 1098-T Form Print report ignores records with this
validation status. You can only assign this validation status to a record manually.
Change the validation status to Do Not Report if you determine that you do not
want to print or electronically file a 1098-T tax form for this student.
Failed Validation: The 1098-T Form Print report does not pick up records with
this validation status. If you run the 1098-T Audit report to validate your data and
it determines a record to be invalid, the system assigns this validation status to
the record.
Passed Validation: The 1098-T Form Print report picks up records with this
validation status. If you run the 1098-T Audit report to validate your data and it
determines a record to be valid, the system assigns this validation status to the
record.
Pending Validation: The 1098-T Form Print report does not pick up records with
this validation status. The system assigns this validation status to all new records
created by the Generate 1098-T process. In addition, if you click the Override
Data button, the system assigns the new row this validation status.
Validation Overridden: The 1098-T Form Print report picks up records with this
validation status. You can only assign this validation status to a record manually.
Assign this value when a student's 1098-T data fails validation and you want the
printing and file creation process to ignore the errors, transmitting the data
exactly as it appears.
Disable 1098-T self-
service Select to prevent the current record from appearing on the 1098–T Year Select
page.
By default, this check box is cleared.
Producing Tax Forms and Receipt Information Chapter 24
668 Copyright © 1988, 2010, Oracle and/or its affiliates. All Rights Reserved.
Override Data Click if you want to edit any of these fields: Overridden, Printed, File Created,
Validation Status, and Correction.
You can also override data such as financial information and the SSN in the
Student 1098-T Data group box.
When you click the Override Data button, the system inserts a new row for the
student and selects the Overridden check box by default.
If a Social Security Number is not entered in the National ID field on the Campus
Community Biographical Details page, the system enters a value of all nines (9s)
in that field. This value appears by default in the SSN field on the 1098–T pages.
The IRS does not accept invalid SSNs (for example, all nines, ones, zeroes). If no
valid SSN exists, the SSN can be recorded as blank, which the IRS accepts.
When you click the Override Data button, the SSN field becomes available for
edit. You can then enter a valid SSN or delete the invalid SSN and leave the field
blank.
Updating the SSN field on the 1098–T page does not update data in Campus
Community.
Student 1098-T Data
(1) Payments Received Displays the value that prints in Box 1 on 1098-T forms. (Payments received that
applied to eligible tuition and fee charges.)
(2) Amount Billed Displays the value that prints in Box 2 on 1098-T forms. (Billed eligible tuition
and fee charges.)
(3) Reporting Method
Change Selects this check box if you have changed your reporting method on the TIN
Setup page.
(4) Prior Year Adj (prior
year adjustment) Displays the value that prints in Box 4 on 1098-T forms.
Indicates adjustments made for a prior year to payments received or amount
billed (adjustments to Box 1 or 2 for prior year).
(5) Financial Aid Displays the value that prints in Box 5 on 1098-T forms.
Indicates receipt of scholarships or grants.
(6) Prior Year FA Adj
(prior year financial aid
adjustment)
Displays the value that prints in Box 6 on 1098-T forms.
Indicates adjustments to scholarships or grants for a prior year.
(7) Includes Future
Period Displays the value that prints in Box 7 on 1098-T forms.
The system selects this check box during the Generate 1098-T process if any of
the amounts reported in Boxes 1 or 2 (Payments Received or Amount Billed)
were related to an academic period that last from January through March. March
of the following year.

Chapter 24 Producing Tax Forms and Receipt Information
Copyright © 1988, 2010, Oracle and/or its affiliates. All Rights Reserved. 669
(8) Half Time Displays the value that prints in Box 8 on 1098-T forms.
The system selects this check box during the Generate 1098-T process if the
student's academic load was at least half-time during any term within the tax-
reporting year.
(9) Graduate Displays the value that prints in Box 9 on 1098-T forms.
The system selects this check box during the Generate 1098-T process if the
student was enrolled as a graduate student during any term within the tax-
reporting year.
Student Address Click to access the 1098-T Student Address page.
Note. The inquiry version of this page (Student Financials, Taxes, Review 1098–T Data, 1098–T Data)
displays the same information as the (Edit 1098-T Data) 1098-T Data page. However, the inquiry page has no
Override Data button, so you cannot edit any of the information that appears.
Viewing a 1098–T Form
Click the View 1098–T link on the (Review 1098–T Data) 1098–T Data page to access a 1098–T form (.pdf)
and print it for a student.
You can also access the View 1098–T link on this page by clicking the 1098–T link on the finances page in
the Student Service Ctr (Student).
Here is an example of the 1098–T Data page (Student Financials, Taxes, Review 1098–T Data, 1098–T Data)
showing the View 1098–T link:
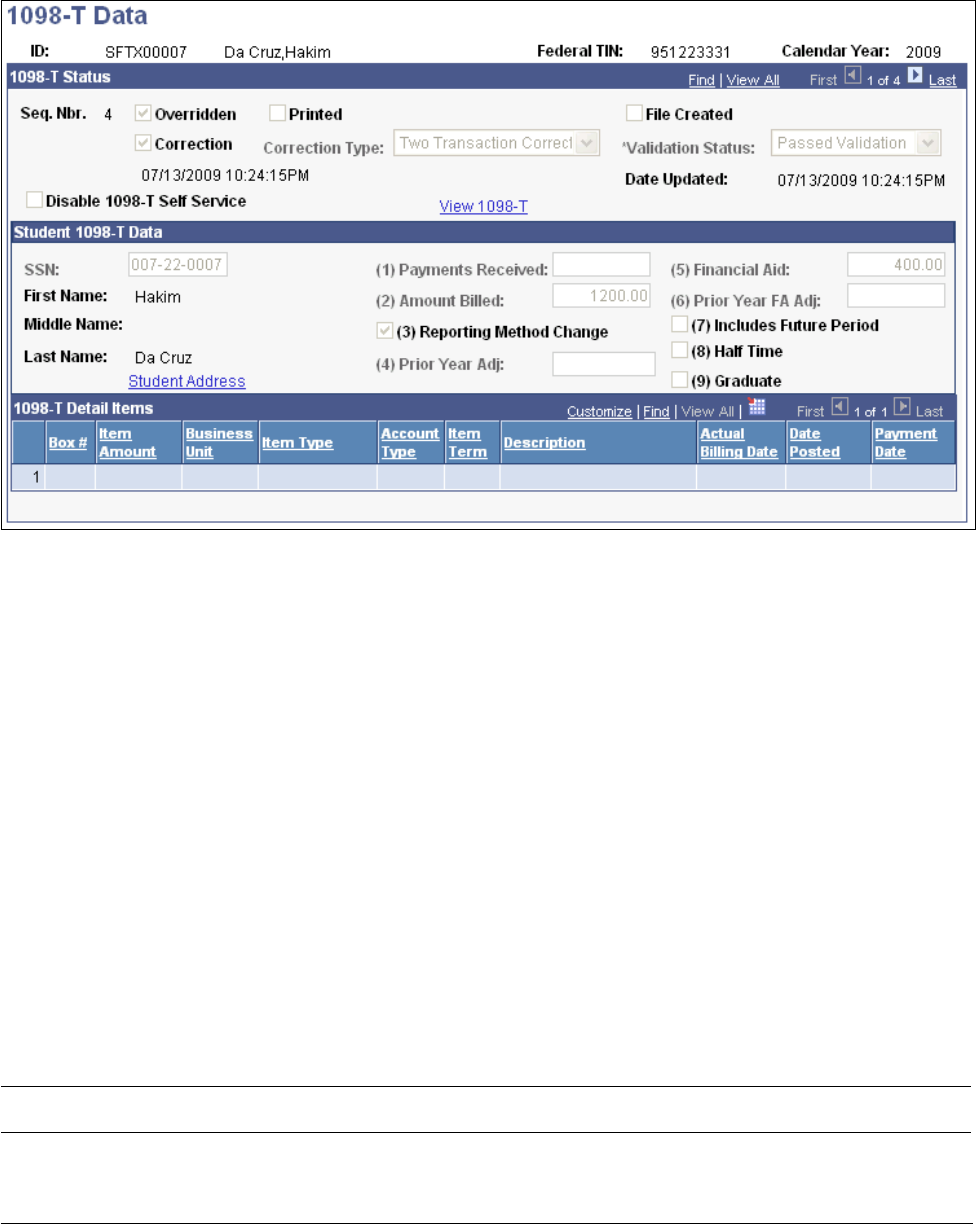
Producing Tax Forms and Receipt Information Chapter 24
670 Copyright © 1988, 2010, Oracle and/or its affiliates. All Rights Reserved.
1098–T Data example page
The View 1098–T link appears only if the Use Electronic Statements check box on the 1098–T TIN Detail
setup page is selected. The link appears whether or not the Display 1098–T Self Service check box on the
setup page is selected.
The link is enabled only when the value in the Validation Status field is Passed Validation or Validation
Overridden.
If the record fails validation because of an invalid SSN, you can use the Override Data button on the (Edit
1098–T Data) 1098–T Data page to update the value in the SSN field to blank (a blank SSN can be submitted
to the IRS) or to input a valid SSN. When the Audit/Validation process is run again, blanks are treated as a
valid SSN so the record will not fail validation.
See the documentation about the Override Data button earlier in this section.
Click the link to retrieve a 1098–T .pdf of the most recent 1098–T data.
The link is sensitive to the context in the 1098-T Status scroll area—that is, the .pdf is generated using the
data in context (the example 1098–T page has 4 rows of data).
Note. The View 1098–T link does not appear on the (Edit 1098-T Data) 1098–T Data page.
See Also
Chapter 24, "Producing Tax Forms and Receipt Information," Validating and Auditing 1098-T Data, page 671
PeopleSoft Enterprise Campus Community 9.0 Fundamentals PeopleBook, "Using the Student Services
Center Component," Viewing a Student's Self-Service Finances Information
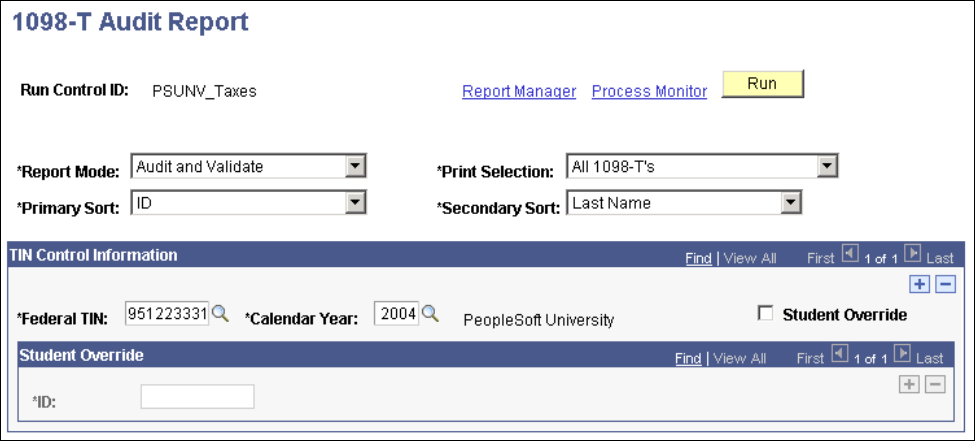
Chapter 24 Producing Tax Forms and Receipt Information
Copyright © 1988, 2010, Oracle and/or its affiliates. All Rights Reserved. 671
Validating and Auditing 1098-T Data
Access the 1098-T Audit Report page (Student Financials, Taxes, Tax Reports, 1098-T Audit Report).
1098-T Audit Report page
Report Mode Select the report mode. Values are:
Audit Only: The report prints all 1098-T records meeting the parameters that you
specify on this page, enabling you to check the data manually before printing or
creating a transmission file.
Validate Only: The 1098-T Audit report checks each applicable record to
determine the validity of its data.
If a record has an invalid SSN, name, or address, the system assigns it a
validation status of Failed Validation and prints it on the 1098-T Audit Report. If
a record has a valid SSN, name, and address, the system assigns it a validation
status of Passed Validation and does not print it. Blanks are a valid SSN for
reporting to the IRS.
In addition, if the system finds any records containing no data for the related
academic statistics period, it issues a warning.
Audit and Validate: The 1098-T Audit Report prints all applicable records and
assigns a validation status to them.

Producing Tax Forms and Receipt Information Chapter 24
672 Copyright © 1988, 2010, Oracle and/or its affiliates. All Rights Reserved.
Print Selection Determine which types of 1098-T records the system includes in the 1098-T
Audit Report. Values are.
All 1098-T's: Select to include all types of 1098-T records.
Not Filed Corrected 1098-T's: Select to include only those 1098-T records that
were included in a transmission file and have the Correction check box selected.
Not Filed Original 1098-T's: Select to include only those 1098-T records that
were not included in a transmission file and do not have the Correction check box
selected.
Not Printed Corrected 1098-T's: Select to include only those 1098-T records that
you have not printed and that have the Correction check box selected.
Not Printed Original 1098-T's: Select to include only those 1098-T records that
you have not printed and that do not have the Correction check box selected.
Primary Sort and
Secondary Sort Use these fields to determine the fields on which the system sorts when printing
the report. It will sort first by the primary sort and then by the secondary sort
value. Both fields have the following available values: Country, ID, Last Name,
Postal Code, SSN, and State.
TIN Control Information
Student Override Clear to run the report for all applicable students who fall under the Federal TIN
and calendar year that you select.
Select to use the ID field to run the report on only the students that you specify.
See Also
Chapter 24, "Producing Tax Forms and Receipt Information," Reviewing and Overriding 1098-T Data, page
665
Printing 1098-T Forms and Creating Transmission Files
Access the 1098-T Print page (Student Financials, Taxes, Tax Reports, 1098-T Form Print, 1098-T Print).
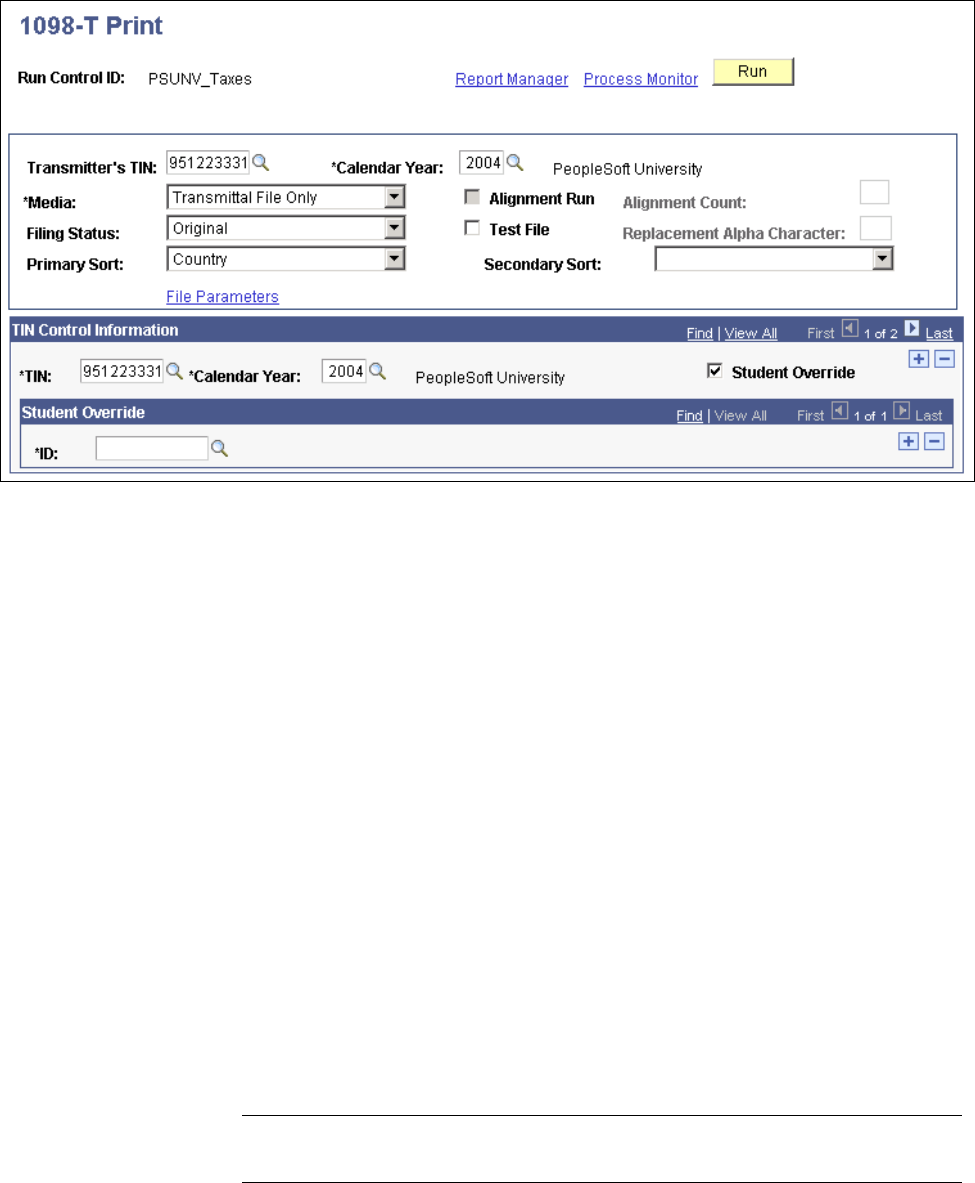
Chapter 24 Producing Tax Forms and Receipt Information
Copyright © 1988, 2010, Oracle and/or its affiliates. All Rights Reserved. 673
1098-T Print page
Transmitter Information
Calendar Year Select the calendar year for which you are reporting.
Media Select what you want the report to produce. Values are:
Extract File Only: Select to create a generic extract file containing the 1098-T
Form data.
Extract and Transmittal Files: Select to create the IRS transmission and extract
files simultaneously.
Print Only: Select to print your 1098-T tax forms using 1098-T print stock.
Print and Transmittal File: Select to create the IRS transmission file and
simultaneously print your 1098-T tax forms using 1098-T print stock.
Transmittal File Only: Select to create the IRS transmission file.
Alignment Run Select to run a print job that helps you align your print stock in the printer. When
you select this check box, the report prints X instead of characters and 9 instead
of numbers in the data fields of your 1098-T print stock. This field is available
only if you select Print Only in the Media field.
Note. Because printer definitions vary, you may have to modify the SQR
(Structured Query Report) for printer alignment purposes.
Alignment Count Enter the number of dummy 1098-T forms that you want to print in your
alignment run. This field is available only if you select the Alignment Run check
box.

Producing Tax Forms and Receipt Information Chapter 24
674 Copyright © 1988, 2010, Oracle and/or its affiliates. All Rights Reserved.
Filing Status Select the type of records that you want to include in the report and specify the
type of file that you intend to transmit to the IRS.
Correction: The report includes only those records that have the Correction
check box selected. In addition, the system designates the file as containing only
corrected records.
Original: The report includes only those records that do not have the Correction
check box selected. In addition, the system designates the file as containing only
original records.
Replacement: Select if the IRS rejected the file that you originally sent. The
report includes only original records in the replacement file.
Note. The filing status that you select applies to the entire file. The IRS does not
allow a transmitting TIN to mix original information and correction information
within the same file.
Note. The 1098-T Form Print process always includes all 1098-T forms, even if
they were previously printed or included in a transmission file. Use caution when
running the 1098-T Form Print process after its initial run for a tax year. You
should use the Student Override option with subsequent runs so that only those
students whose information needs to be processed are included in the process.
Test File Select to set a test file flag in the transmission file that is sent to the IRS. This
selection indicates to the IRS that the file is for testing purposes only.
Note. You should participate in the IRS test electronic filing program. This
program enables you to submit an electronic file containing 1098-T returns so
that the IRS can confirm that the file is in a valid, readable format.
Replacement Alpha
Character If the IRS rejects your original file, it will request a replacement and assign you a
two-character replacement alpha character to include with your file. Enter it here.
This field is available only if you select Replacement in the Filing Status field.
Primary Sort and
Secondary Sort Use these fields to determine the fields on which the system sorts when printing
the report. It will sort first by the primary sort and then by the secondary sort.
Both fields have the following available values: Country, EmplID, Last Name,
Postal Code, SSN, and State.
File Parameters Click to access the 1098-T File Info page.
1098-T File Info Page
File Path Enter the location where the system sends the transmission and extract files.
Transmission File Name Enter the name of the transmission file. If you do not specify a name for the file,
the default name is IRSTAX.001.

Chapter 24 Producing Tax Forms and Receipt Information
Copyright © 1988, 2010, Oracle and/or its affiliates. All Rights Reserved. 675
Extract File Name If you are using another system to print your 1098-T forms, enter the name of the
extract file that the system will use to print the forms. If you do not specify a
name, the default name is SF1098RP.dat.
TIN Control Information
TIN Select the TIN for which you want to report 1098-T information. You transmit
the information generated by the report using the Transmitter's TIN.
Student Override Clear to run the report for all applicable students who fall under the federal TIN
and calendar year that you select.
Select to use the ID field to run the report for only the students that you specify.
Producing T2202A Tax Forms
This section lists a prerequisite and discusses how to:
1. Generate T2202A data.
2. Review and edit T2202A data.
3. Print T2202A tax information on preprinted forms.
4. Print T2202A tax information using File Extract.
Prerequisite
Determine which of your item types you want to designate as T2202A- eligible tuition and offsets.
See Also
Chapter 2, "Completing Student Financials General Setup," Setting Up Item Types and Item Type Groups,
page 55
Pages Used to Produce T2202A Tax Forms
Page Name Definition Name Navigation Usage
Generate T2202A RUNCTL_SF_SFGT2202 Student Financials, Taxes,
Generate T2202A Generate T2202A data.
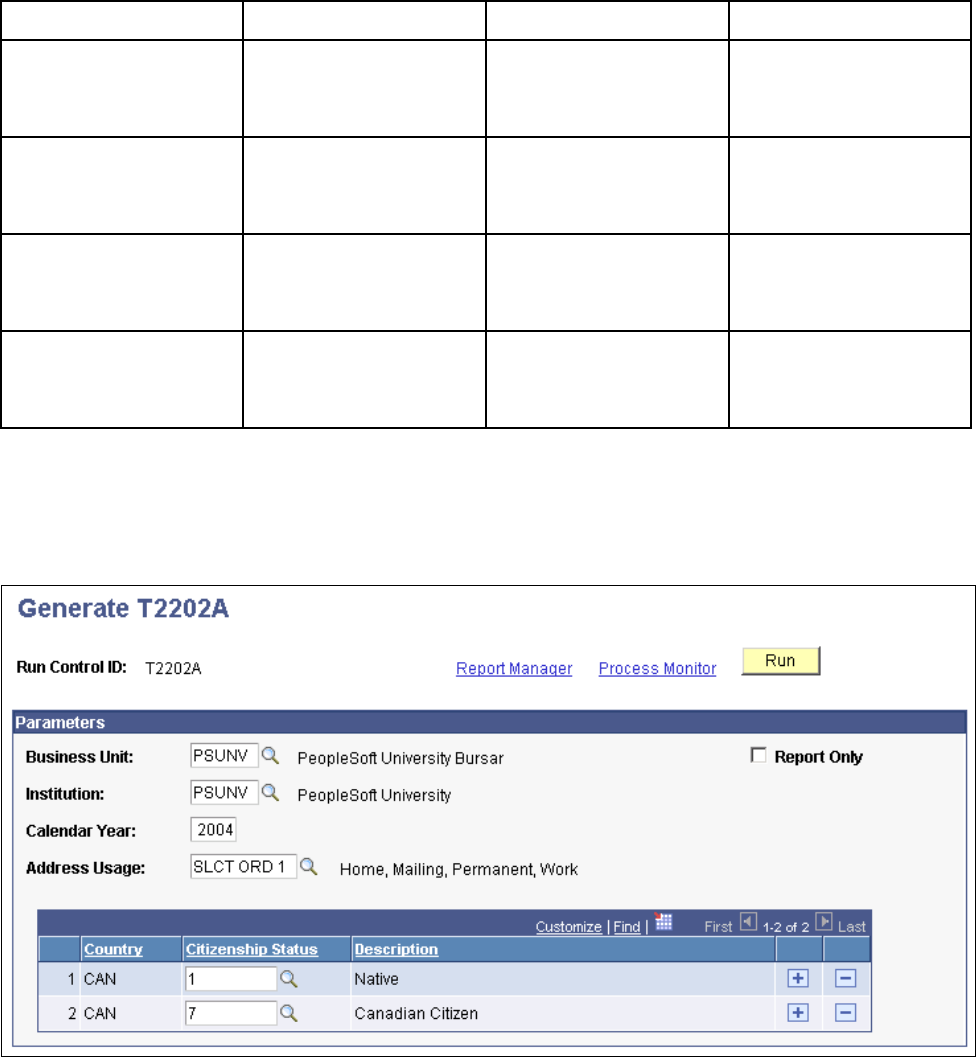
Producing Tax Forms and Receipt Information Chapter 24
676 Copyright © 1988, 2010, Oracle and/or its affiliates. All Rights Reserved.
Page Name Definition Name Navigation Usage
T2202A Data SF_T2202A_DATA Student Financials, Taxes,
Edit T2202A Data, T2202a
Data
Review and edit T2202A
data, or add T2202A data
manually.
Student Address ADDREMP_SEC Click the Student Address
link on the T2202A Data
page.
View and edit the address of
the student whose T2202A
data you are reviewing.
Print T2202A RUNCTL_SFPR2202 Student Financials, Taxes,
Print T2202A Print T2202A tax
information on preprinted
forms.
Create T2202A Extract File RUNCTL_SF_SFJT2202 Student Financials, Taxes,
Create T2202A Extract File Print T2202A tax
information using the
Extract File process.
Generating T2202A Data
Access the Generate T2202A page (Student Financials, Taxes, Generate T2202A).
Generate T2202A page
Address Usage Select the logic that the system uses to select the student address associated with
each T2202A form.
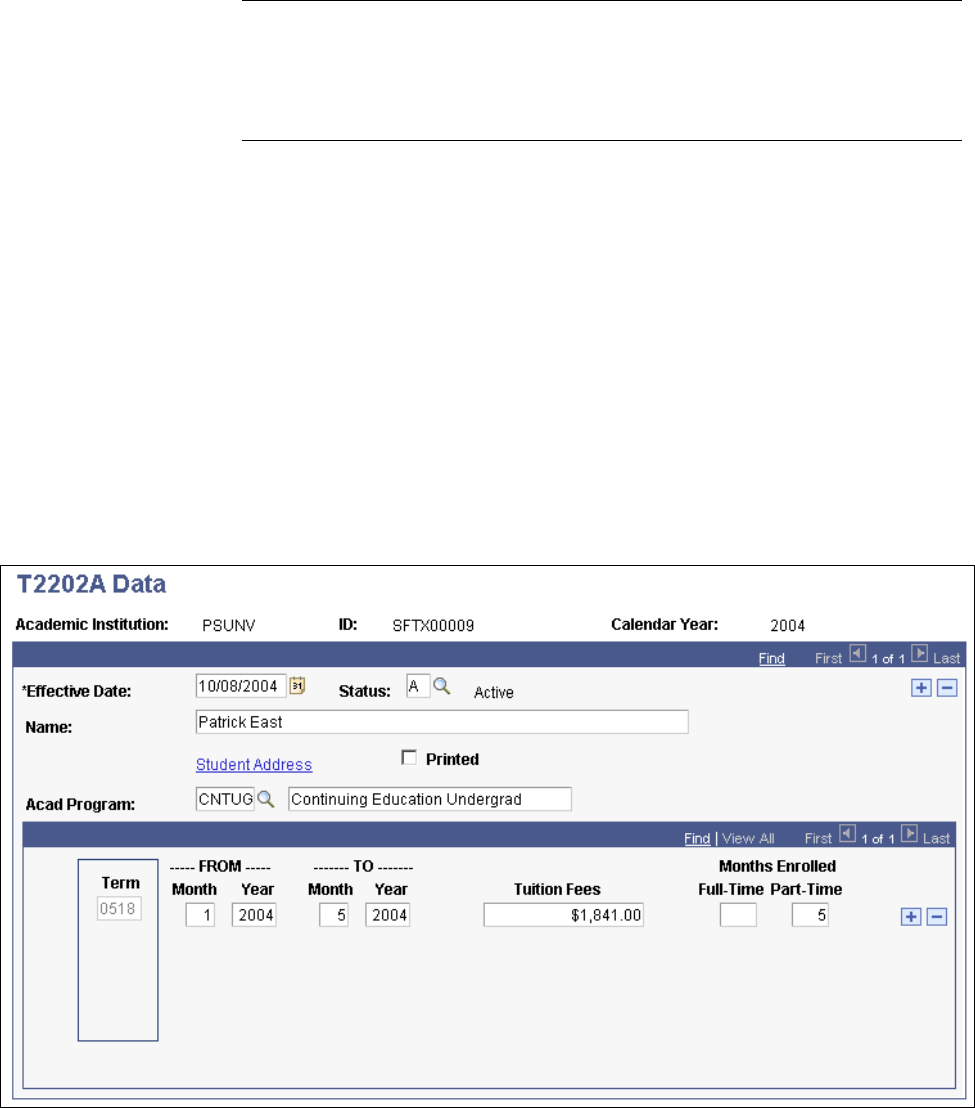
Chapter 24 Producing Tax Forms and Receipt Information
Copyright © 1988, 2010, Oracle and/or its affiliates. All Rights Reserved. 677
Report Only Select to create a report of the T2202A data retrieved without actually populating
your Student Financials tables with T2202A data.
Note. Because the process generates effective-dated rows of data, you cannot run
the Generate T2202A Data process more than once per day. However, if you
select the Report Only check box before running the process, the system does not
insert rows of data into your tables. Therefore, you can run the process in report
only mode as many times as you want during a given day.
Citizenship Status Select the student citizenship status for which you want to generate T2202A data.
You can select from these values: Native, Naturalized, Alien Permanent, Alien
Temporary, Permanent Resident, Employment Visa, Canadian Citizen, Student
Visa, and Not Indicated.
The Generate T2202A process reviews the Student Enrollment table for the reporting calendar year. It
summarizes all enrollment units taken by month and tabulates them to determine the academic load (full-time
or part-time) for each month. The process then writes these results to the T2202A Data records, along with
the financial information regarding tuition amounts.
Reviewing and Editing T2202A Data
Access the T2202A Data page (Student Financials, Taxes, Edit T2202A Data, T2202A Data).
T2202A Data page
Student Address Click to access the Student Address page, where you can view and edit the
address information for the student whose T2202A data you are reviewing.
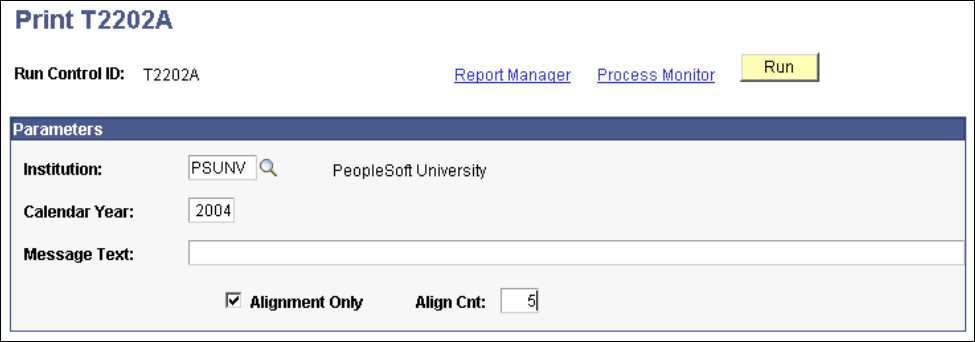
Producing Tax Forms and Receipt Information Chapter 24
678 Copyright © 1988, 2010, Oracle and/or its affiliates. All Rights Reserved.
Printed Indicates whether you have printed a T2202A form for this row of data. When
you run the Print T2202A process, the system selects this check box for all the
rows of data that it prints. Subsequent runs of the Print T2202A process do not
print any rows with the Printed check box selected. The date and time that the
system printed the record appears to the right of the field.
Reviewing and Entering Enrollment and Tuition Information
If you are reviewing and editing T2202A data, the fields in the lower scroll area are already populated with
information. If you are adding a new row of data, you must enter values in these fields manually.
Acad Program (academic
program) This field displays the academic program in which the student is enrolled. The
description of the selected program appears in the field to the right of this field.
You can edit this description if necessary.
Term This field displays the term during which a student was enrolled.
FROM and TO The Month and Year fields under these headings display the starting and ending
month and year of the term.
Tuition Fees Displays the amount of tuition that the student paid for the term.
Full-Time This field displays the number of months within the term that the student was
enrolled with full-time status.
Part-Time This field displays the number of months within the term that the student was
enrolled with part-time status.
Printing T2202A Tax Information on Preprinted Forms
Access the Print T2202A page (Student Financials, Taxes, Print T2202A).
Print T2202A page
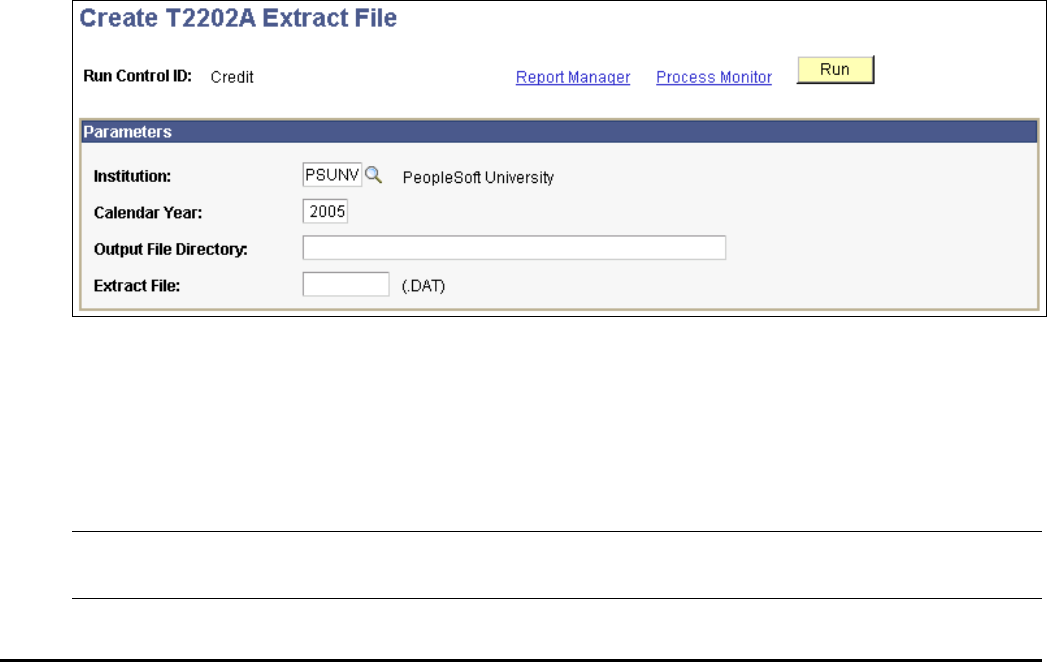
Chapter 24 Producing Tax Forms and Receipt Information
Copyright © 1988, 2010, Oracle and/or its affiliates. All Rights Reserved. 679
Message Text Enter any text that you want to appear in the comment section of the T2202A
form.
Alignment Only If you select this check box, the system will print dummy forms that enable you
to align the preprinted forms properly in your printer.
Align Cnt (alignment
count) If you select the Alignment Only check box, enter the number of dummy forms
that you want to print.
The process prints a T2202A tax form for all students for whom data is available except those with the
Printed check box selected. The system selects the Printed check box for all students whose T2202A
information it prints. If you want to reprint a T2202A tax form for a given student, you must first clear the
Printed check box using the T2202A Data page and then rerun the Print T2202A process.
Printing T2202A Tax Information Using File Extract
Access the Create T2202A Extract File page (Student Financials, Taxes, Create T2202A Extract File).
Create T2202A Extract File page
Output File Directory Enter the location where you want the system to send the extract.
Extract File Enter the name that you want to give the extract.
Note. Unlike the Print T2202A process, this process neither recognizes nor updates the Printed check box on
the T2202A Data page.
Producing T4A Tax Forms
This section lists prerequisites and discusses how to:
•Create people of interest (POI) job data for T4A.
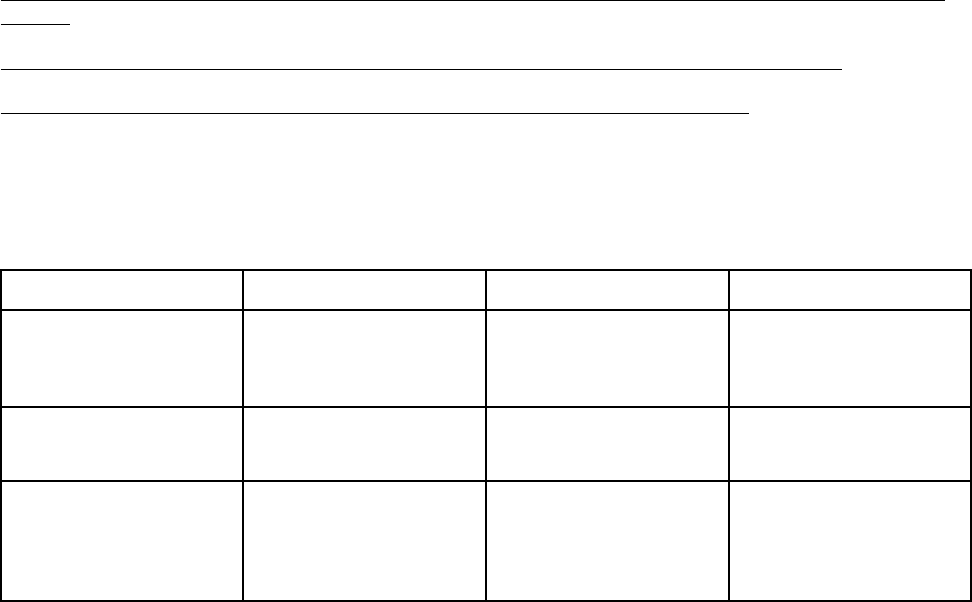
Producing Tax Forms and Receipt Information Chapter 24
680 Copyright © 1988, 2010, Oracle and/or its affiliates. All Rights Reserved.
•Generate T4A data.
•Review T4A tax forms.
Prerequisites
Before you begin generating T4A data, you must:
1. Determine which of your item types are designated as T4A income.
2. Define your T4A generation processing parameters on the Canadian/ANZ Taxes page of the SF Business
Unit (BUSINESS_UNIT_SF) component.
3. Run the Create POI Job Data process.
See Also
Chapter 2, "Completing Student Financials General Setup," Setting Up Item Types and Item Type Groups,
page 55
Chapter 2, "Completing Student Financials General Setup," Setting Up Business Units, page 19
Chapter 7, "Setting Up Refunding," Creating Job Data for Payroll Refunds, page 246
Pages Used to Produce T4A Tax Forms
Page Name Definition Name Navigation Usage
Request Student Job Data SSF_RUN_POIJOB Student Financials, Taxes,
Create POI Job Data,
Request Student Job Data
Run this process to create
job and tax records for
students.
Generate T4A RUNCTL_SF_GENT4 Student Financials, Taxes,
Generate T4A Generate T4A data by
running the T4A process.
T4A Data SF_ADJ_CAN_ERN_BAL Student Financials, Taxes,
Review T4A Data View and validate the T4A
student income balances
resulting from the T4A
process.
Creating POI Job Data for T4A
Access the Request Student Job Data page (Student Financials, Taxes, Create POI Job Data, Request Student
Job Data).
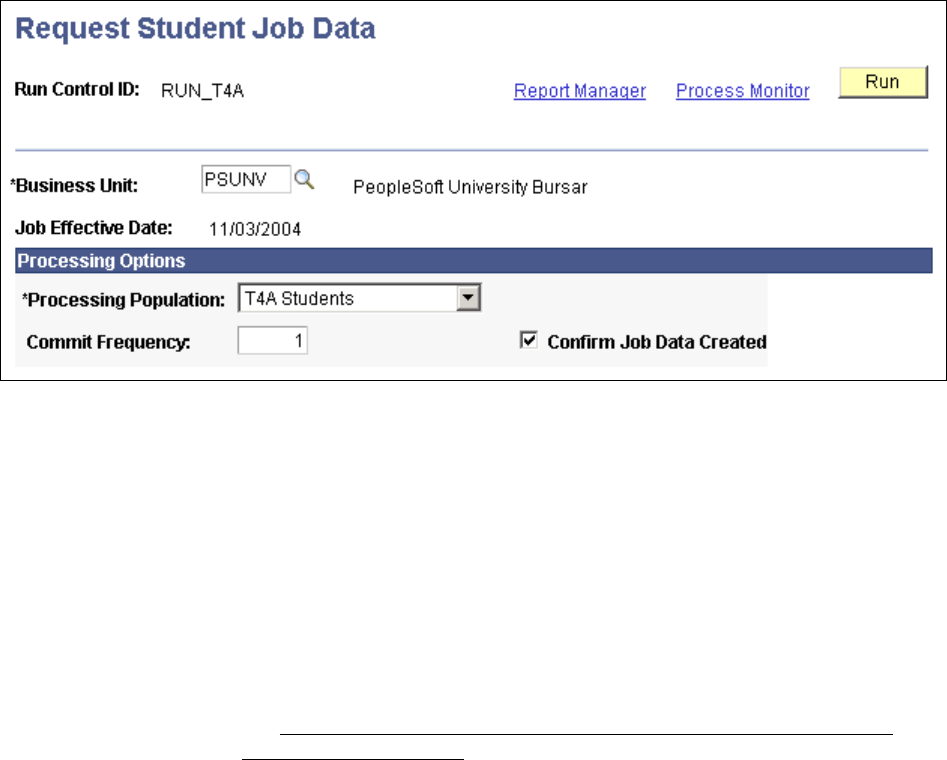
Chapter 24 Producing Tax Forms and Receipt Information
Copyright © 1988, 2010, Oracle and/or its affiliates. All Rights Reserved. 681
Request Student Job Data page
Processing Population Select T4A Students to create tax data for students.
Commit Frequency Enter a number for records committed to the database. Select this option to
commit a specified number of transactions during background processing. For
example, if you enter 100 in the Commit Frequency field, when you run a batch
process the system will process 100 transactions and then commit them to the
database until the batch is complete. At the end of a batch process, the system
will commit all remaining transactions, even if the number of transactions is less
than the number in the Commit Frequency field.
See Chapter 2, "Completing Student Financials General Setup," Defining
Commit Levels, page 15.
Confirm Job Data
Created Select to create a record in the message log of the process monitor for every job
record created.
Generating T4A Data
Access the Generate T4A page (Student Financials, Taxes, Generate T4A).
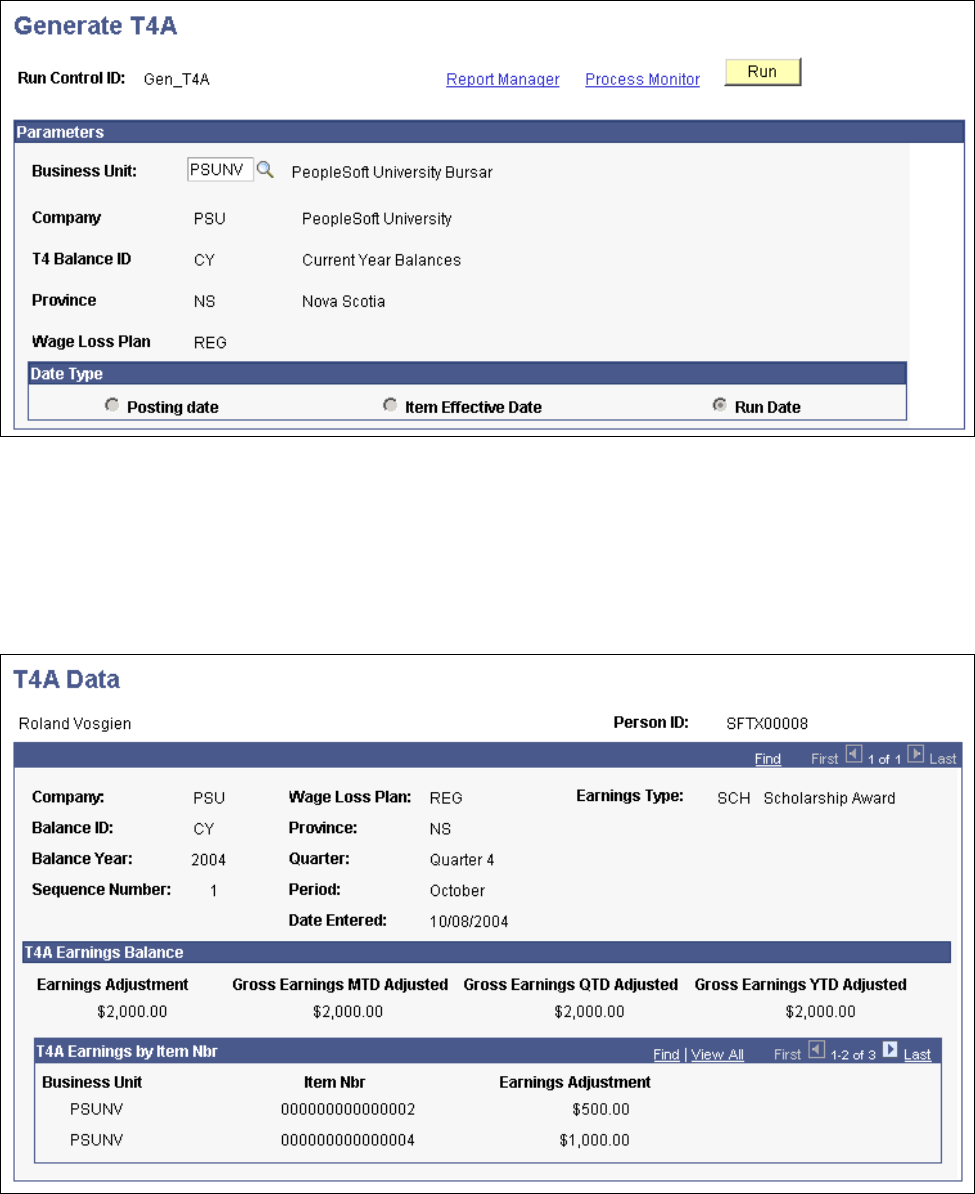
Producing Tax Forms and Receipt Information Chapter 24
682 Copyright © 1988, 2010, Oracle and/or its affiliates. All Rights Reserved.
Generate T4A page
Reviewing T4A Tax Forms
Access the T4A Data page (Student Financials, Taxes, Review T4A Data, T4A Data).
T4A Data page
The T4A Data page is a display-only page.
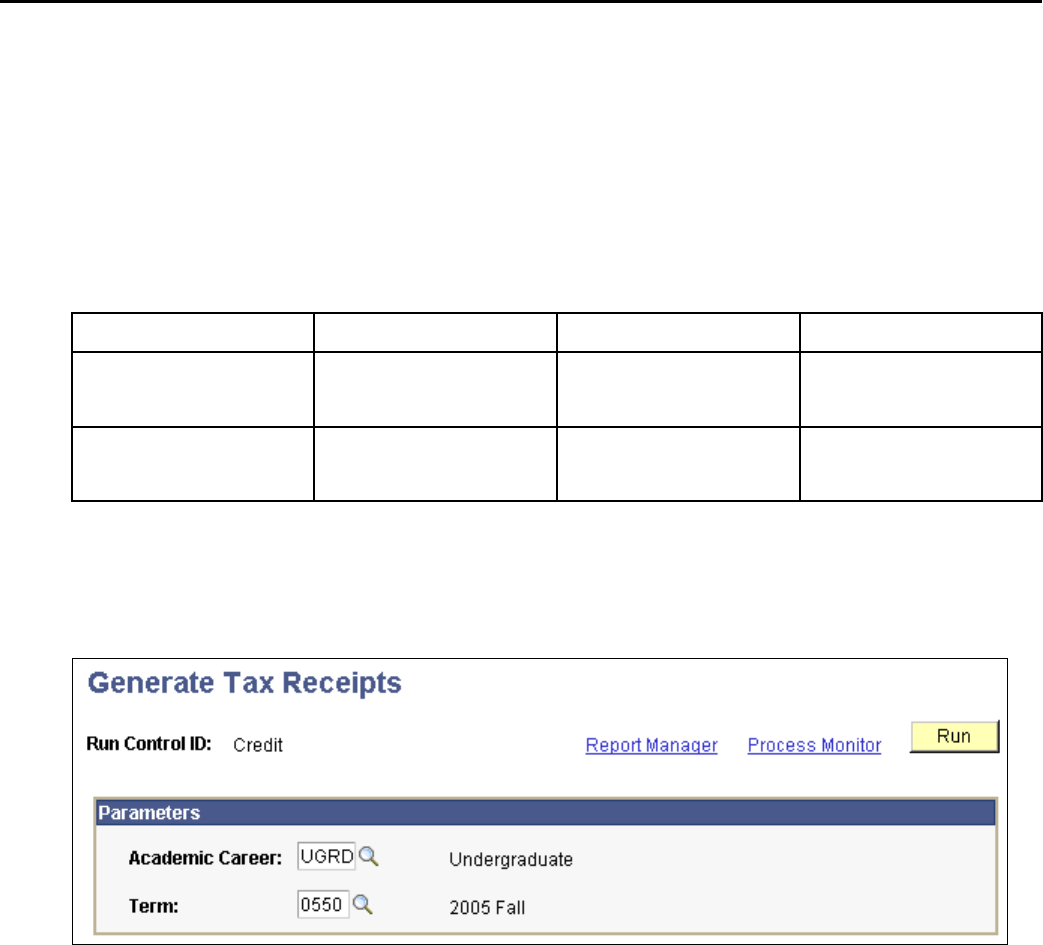
Chapter 24 Producing Tax Forms and Receipt Information
Copyright © 1988, 2010, Oracle and/or its affiliates. All Rights Reserved. 683
Generating Income Tax and Donation Receipt Information
This section discusses how to:
•Generate income tax receipt information.
•Generate donation receipt information.
Pages Used to Generate Income Tax and Donation Receipt Information
Page Name Definition Name Navigation Usage
Generate Tax Receipts RUNCTL_SFRECEPT Student Financials, Taxes,
Generate Tax Receipts Generate income tax receipt
information.
Generate Donation Receipts RUN_PARM_DONAT Student Financials, Taxes,
Generate Donation Receipts Generate donation receipt
information.
Generating Income Tax Receipt Information
Access the Generate Tax Receipts page (Student Financials, Taxes, Generate Tax Receipts).
Generate Tax Receipts page
Select values in the Academic Career and Term fields for which you want to generate income tax receipt
information and run the process. The process retrieves the required data from Student Records and Student
Financials to populate the PS_CAN_TAX_RECEPT table. You can then use the data in this table to create
official income tax receipts for students.
Generating Donation Receipt Information
Access the Generate Donation Receipts page (Student Financials, Taxes, Generate Donation Receipts).
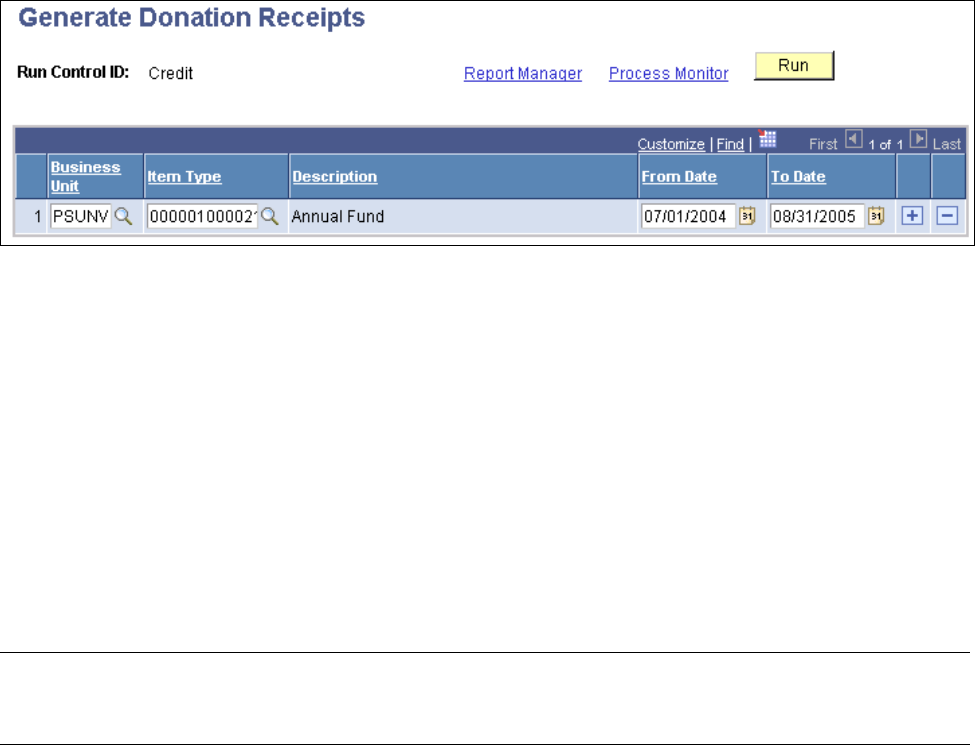
Producing Tax Forms and Receipt Information Chapter 24
684 Copyright © 1988, 2010, Oracle and/or its affiliates. All Rights Reserved.
Generate Donation Receipts page
Item Type Select the item type of the donation for which you want to generate receipt
information. If you have more than one donation item type within your system,
insert rows to include all types of donations for which you want to generate
receipt information.
From Date and To Date Enter the range of dates for which you want to generate donation receipt
information.
The process retrieves the required data from Student Financials to populate the PS_CAN_DONAT_RECEPT
table. You can then use the data in this table to create official donation receipts for students and third-party
organizations.
Note. The Donation Receipt process obtains information according to the item types that you select when you
establish the process parameters. Therefore, you must set up specific item types for each type of donation that
your institution receives.

Copyright © 1988, 2010, Oracle and/or its affiliates. All Rights Reserved. 685
Chapter 25
Setting Up and Using International Health
Coverage
This chapter provides an overview of International Health Coverage (IHC) and discusses how to:
•Set up the IHC feature.
•Maintain student information and create schedules.
•Generate IHC letters.
Understanding International Health Coverage
This section discusses:
•IHC process flow
•Purchasing
•Reporting and paying
•Refunding
IHC Process Flow
The IHC feature was designed using the Australian Overseas Student Health Cover business process as its
foundation. With the addition of this feature to the core Campus Solutions product, customers can use IHC to
manage the health care policies for their international students. Customers in Australian markets will continue
to enjoy the functionality they have used before, with some enhancements, including creating the premium
charge directly through the IHC component and creating the schedule in electronic or paper format.
Following is the general business model on which this feature is based. Institutions are not limited to this
business model, but can use this as an example of the feature design:
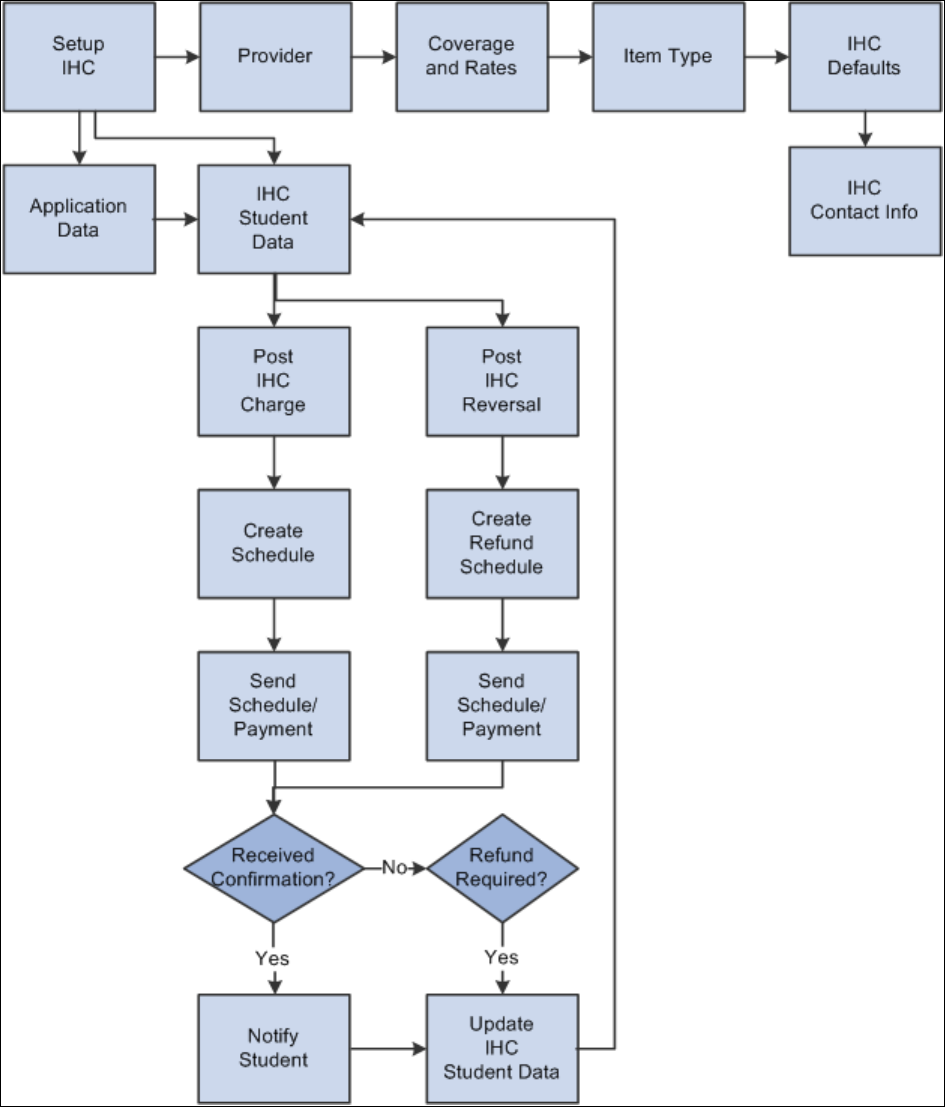
Setting Up and Using International Health Coverage Chapter 25
686 Copyright © 1988, 2010, Oracle and/or its affiliates. All Rights Reserved.
IHC process flow
Chapter 25 Setting Up and Using International Health Coverage
Copyright © 1988, 2010, Oracle and/or its affiliates. All Rights Reserved. 687
Purchasing
The IHC feature assumes that international student heath coverage policy rates are set by the insurance
providers and that these rates can and will change at any time. In most cases, institutions then have the
responsibility of processing the insurance on behalf of the student, including purchasing the policy from the
provider.
International students apply for the insurance at the time they apply for admission. They are advised of the
charges at the time they are offered admission and are required to pay the premium at the time of accepting
admission. Coverage options can be for the student only or for the student and their family.
A new international student at your institution may have a provider number as a result of either having
enrolled in a previous program at your institution or having previously accepted an offer and paid IHC to
another institution before attending your institution. Students with previous coverage should provide your
institution with their provider (policy) number and details of the expiration date of their current coverage.
Coverage is supplied by the number of months of coverage depending on the amount of time that is required
for them to complete their studies.
Reporting and Paying
Institutions have the option of generating a report (the schedule), which is a list of international students'
health coverage payment fees sorted by provider. This information can then be sent to the provider in either
paper or electronic format. The schedule shows the student name, student ID, existing provider number (if
applicable), date of birth, length of coverage, and amount, as well as the total of all policy charges on the
schedule. In one report run, separate schedules are created for students with existing provider numbers versus
for students without existing provider numbers.
The schedule can be forwarded to the Accounts Payable office where a check is prepared to send to the
provider. In some cases, institutions receive a commission for administering the insurance program. This
commission is also calculated on the schedule.
Providers can send a letter to the institution acknowledging receipt of each schedule and advising them of the
batch number assigned by the provider to the schedule and the provider member (policy) number for each
student. The provider validates the period of coverage from the date that the student arrived in the visiting
country, verified from the student's passport. Once notified of the batch number and provider number, the
institution has the ability to notify each international student of the member number issued by the provider
and the batch receipt number.
Refunding
Refunding a student's IHC premiums is done manually outside of the IHC component. If there is a policy
change, for example, a change in plan (student only versus student with family coverage), or a change in the
number of months of coverage, the IHC schedule will reflect the new charge amount or the difference in
coverage between the previous reported charge and the resulting new charge, depending on the report options
selected when the schedule is run.
This feature assumes the provider will refund IHC contributions only under the following circumstances:
•If a student does not arrive in the institution's country. (Handled by the institution).
•If the student's visa is not extended. (Handled directly by the student).

Setting Up and Using International Health Coverage Chapter 25
688 Copyright © 1988, 2010, Oracle and/or its affiliates. All Rights Reserved.
•If the student is granted resident status in the institution's country. (Handled directly by the student).
•If a student has to return to their home country due to death in the immediate family and will not return to
school. (Handled directly by the student).
Setting Up the IHC Feature
This section discusses how to:
•Set up provider information.
•Set up provider coverage plans and rates.
•Set up IHC item types.
•Set up IHC contact information.
Pages Used to Set Up IHC
Page Name Definition Name Navigation Usage
International Health
Coverage Provider
SSF_IHC_PROVIDER Set Up SACR, Product
Related, Student Financials,
International Health
Coverage, Provider Table,
International Health
Coverage Provider
Enter or edit provider
information.
Provider Coverage and
Rates
SSF_IHC_PROV_COVER Set Up SACR, Product
Related, Student Financials,
International Health
Coverage, Coverage and
Rates, Provider Coverage
and Rates
Enter or edit coverage and
rate information.
International Health
Coverage Item Type Setup
SSF_IHC_DEFAULTS Set Up SACR, Product
Related, Student Financials,
International Health
Coverage, Item and
Account Types,
International Health
Coverage Item Type Setup
Enter an item and account
type for the business unit.
International Health
Coverage Institutional
Contact Information
SSF_IHC_CONTACT Set Up SACR, Product
Related, Student Financials,
International Health
Coverage, Institutional
Contact, International
Health Coverage
Institutional Contact
Information
Enter contact information
for the academic institution.
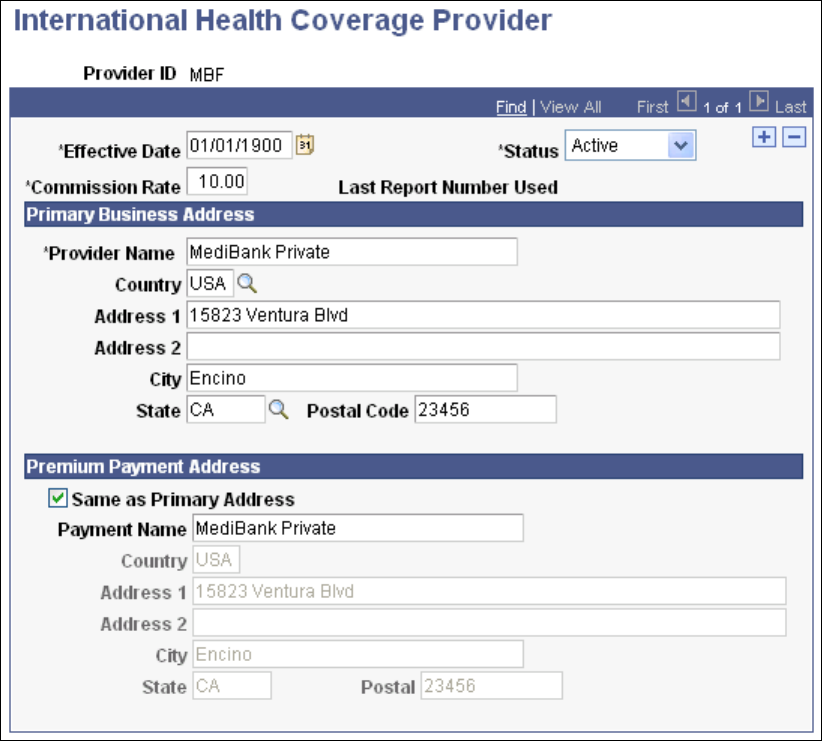
Chapter 25 Setting Up and Using International Health Coverage
Copyright © 1988, 2010, Oracle and/or its affiliates. All Rights Reserved. 689
Setting Up Provider Information
Access the International Health Coverage Provider page (Set Up SACR, Product Related, Student Financials,
International Health Coverage, Provider Table, International Health Coverage Provider).
International Health Coverage Provider page
Commission Rate Enter the percentage that is returned to the institution based on the total
contribution to the provider.
Last Report Number
Used Displays the last schedule number generated for this provider. Each time a
schedule is generated, the last report number used is increased by one.
Primary Business Address
Provider Name The name of the provider.
Country The country of the provider's address.
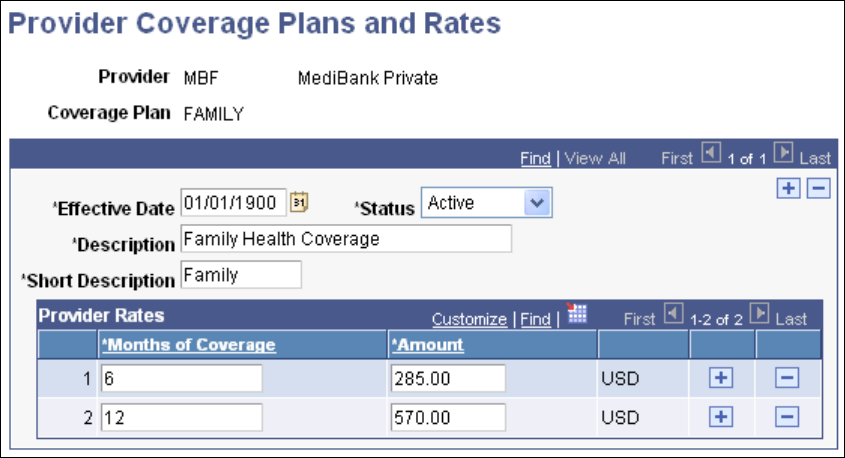
Setting Up and Using International Health Coverage Chapter 25
690 Copyright © 1988, 2010, Oracle and/or its affiliates. All Rights Reserved.
Address 1 and Address
2The first and second line of the provider's address.
City The city of the provider's address.
State The state of the provider's address.
Postal Code The post code of the provider's address.
Premium Payment Address
Same as Primary
Address Enter the address where premiums for this provider should be sent. If the address
for premium payments is the same as the business address, select the Same as
Primary Address check box and the primary address information is automatically
added to the address fields, and then are not available for editing.
Payment Name Use the Payment Name field if the payment should be made payable to someone
other than the provider.
Setting Up Provider Coverage Plans and Rates
Access the Provider Coverage Plans and Rates page (Set Up SACR, Product Related, Student Financials,
International Health Coverage, Coverage and Rates, Provider Coverage and Rates).
Provider Coverage Plans and Rates page
Months of Coverage The intervals of coverage in months that IHC is offered by this provider. Enter
any amount in this field up to 99 months.
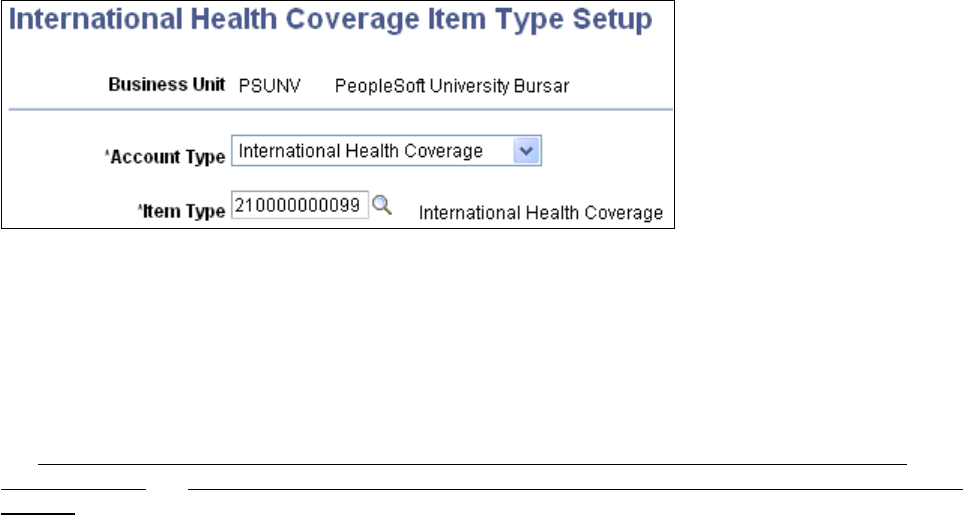
Chapter 25 Setting Up and Using International Health Coverage
Copyright © 1988, 2010, Oracle and/or its affiliates. All Rights Reserved. 691
Amount The premium rate amount of the specified interval.
USD Displays the appropriate currency type. The currency type defaults from the base
currency specified on the Installation Table page.
Setting Up IHC Item Types
Access the International Health Coverage Item Type Setup page (Set Up SACR, Product Related, Student
Financials, International Health Coverage, Item and Account Types, International Health Coverage Item Type
Setup).
International Health Coverage Item Type Setup page
Account Type Select the account type to which the IHC charge item type is associated.
Item Type Select the appropriate IHC charge item type.
See Chapter 2, "Completing Student Financials General Setup," Setting Up Item Types and Item Type
Groups, page 55 and Chapter 2, "Completing Student Financials General Setup," Setting Up Account Types,
page 51.
Setting Up IHC Contact Information
Access the International Health Coverage Institutional Contact Information page (Set Up SACR, Product
Related, Student Financials, International Health Coverage, Institutional Contact, International Health
Coverage Institutional Contact Information).
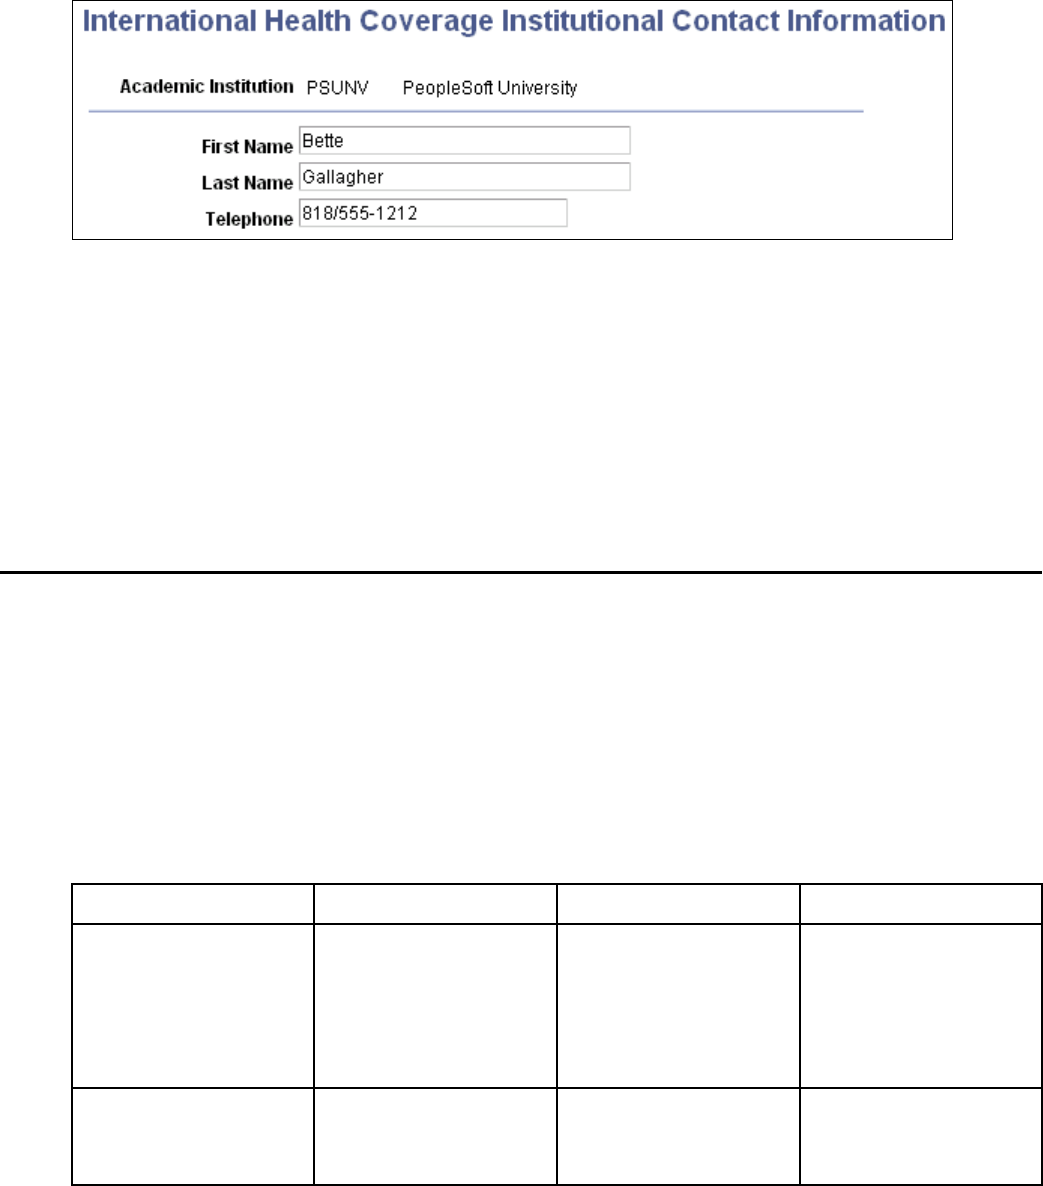
Setting Up and Using International Health Coverage Chapter 25
692 Copyright © 1988, 2010, Oracle and/or its affiliates. All Rights Reserved.
International Health Coverage Institutional Contact Information page
First Name Enter the first name of the IHC contact at the institution. This information is used
on the payment schedule.
Last Name Enter the last name of the IHC contact at the institution.
Telephone Enter the telephone number of the IHC contact at the institution.
Maintaining Student Information and Creating Schedules
This section discusses how to:
•Maintain student health coverage information.
•Create schedules.
Pages Used Maintain Student Information
Page Name Definition Name Navigation Usage
International Health
Coverage - Student
Maintenance
SSF_IHC_STDNT Student Financials,
International Health
Coverage, Student
Maintenance, International
Health Coverage - Student
Maintenance
Maintain student health
coverage information.
Create Schedules SSF_IHC_RUNCTL Student Financials,
International Health
Coverage, Create Schedules
Create schedules to send to
the provider.
Maintaining Student Health Coverage Information
Access the International Health Coverage - Student Maintenance page (Student Financials, International
Health Coverage, Student Maintenance, International Health Coverage - Student Maintenance).
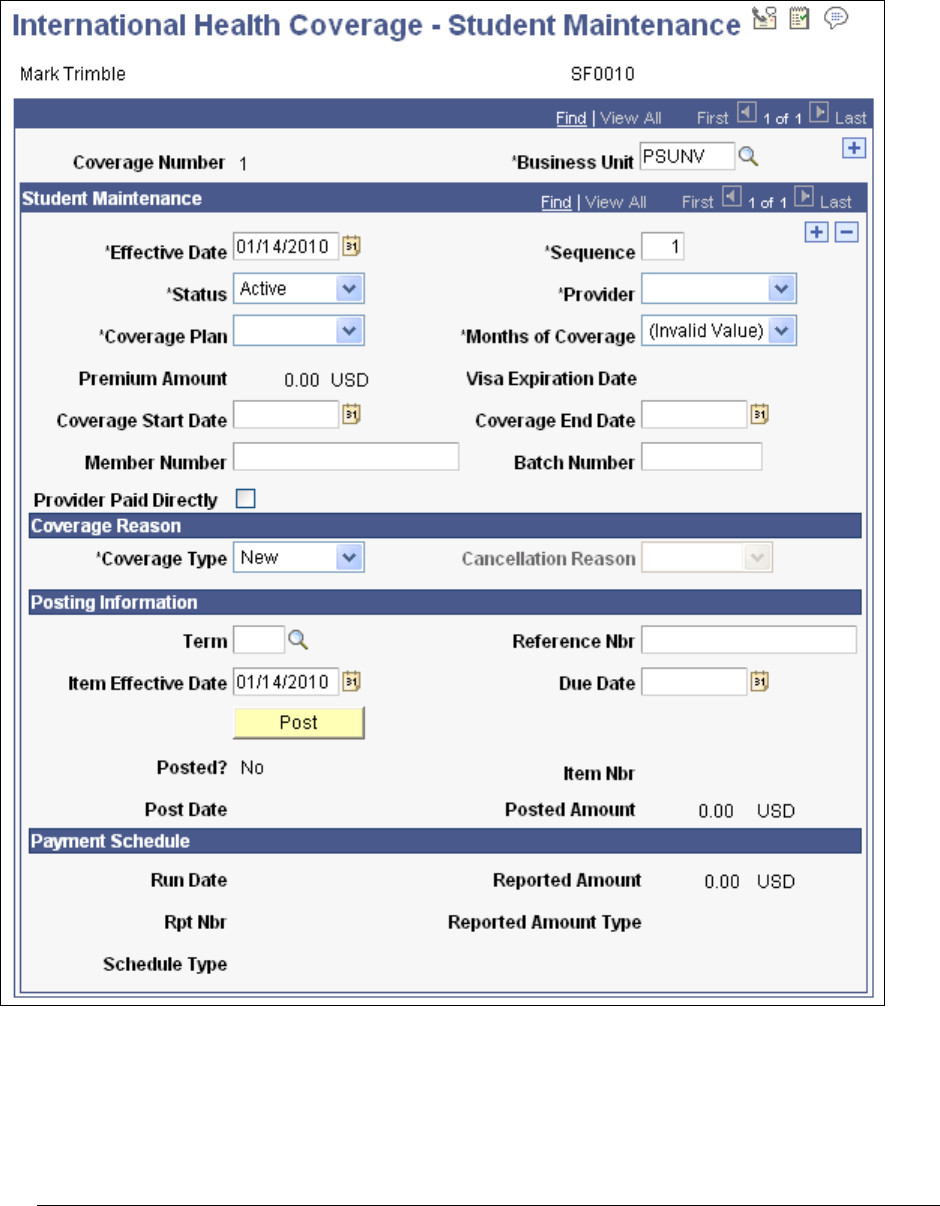
Chapter 25 Setting Up and Using International Health Coverage
Copyright © 1988, 2010, Oracle and/or its affiliates. All Rights Reserved. 693
International Health Coverage - Student Maintenance page
At the top right of this page, there are 3C buttons you can use to add a new communication, add a new
checklist, or add a new comment for this student. If you click the Add a New Communication button, you are
redirected to the Communication Management 1 page.
See Chapter 25, "Setting Up and Using International Health Coverage," Generating IHC Letters, page 698.
See PeopleSoft Enterprise Campus Community Fundamentals 9.0 PeopleBook, Managing Communications
Setting Up and Using International Health Coverage Chapter 25
694 Copyright © 1988, 2010, Oracle and/or its affiliates. All Rights Reserved.
Coverage Number This is an internally generated number that keeps track of the various distinct
policies for a student. Students can have a policy for year 1 and another policy
for year 2. In this instance, students have two Coverage Number rows, row 1 for
year 1 and row 2 for year 2. Changes can be made to the distinct policies by
inserting a new effective-dated row.
Business Unit The business unit that appears here is based on user defaults and is used for
posting IHC charges and charge reversals to a student's account. This is the
business unit that is tied to the IHC policy governed by the coverage number.
This supports the student having a different business unit per policy. When a new
row is added, the user will have the ability to define the business unit for that
policy. After the IHC charge is posted, the user will not be able to change the
business unit. After posting has occurred, if you need to delete/replace the
business unit or delete the policy, you must insert a new effective-dated row and
make that row inactive, thereby deleting the policy.
Sequence Enter the sequence number associated with this effective date. A student can
have multiple sequences for a single effective date. Multiple changes could occur
in a single day.
Provider Select the name of the provider. The provider was set up on the International
Health Coverage Provider page.
Coverage Plan Select the coverage plan. This information was set up on the Provider Coverage
Plans and Rates page.
Months of Coverage Select the number of months of coverage. The choices available were defined on
the Provider Coverage Plans and Rates page.
Premium Amount The full amount of the premium displayed, based on information provided in the
Provider Coverage Plans and Rates page, as well as the student's intended
coverage plan and months of coverage.
Visa Expiration Date If applicable, the student's visa expiration date is displayed.
Coverage Start Date and
Coverage End Date Enter the start and end dates of the policy. These dates are not related to the
months of coverage. They are for reporting purposes only, and appear on the
payment schedule.
Member Number Enter the number assigned to the student by the provider. This number stays with
the student permanently. If the student changes providers, a new number is
assigned by the new provider. This field can be left blank, which indicates that
the student is new from the provider's perspective. The value of this field (blank
or not) is communicated to the provider on the payment schedule.
Batch Number After the provider has processed a schedule, enter the number assigned to the
student by the provider. After posting, the Member Number and the Batch
Number are the only two fields that can be modified.
Chapter 25 Setting Up and Using International Health Coverage
Copyright © 1988, 2010, Oracle and/or its affiliates. All Rights Reserved. 695
Provider Paid Directly Select if the provider was paid by the student directly. If this check box is
selected, then the Post button becomes unavailable, the student is not included on
the schedule to the provider, and any policy changes will become informational
only because the student deals directly with the provider. If this check box is
cleared, then the student is charged the coverage amount, and is included on the
schedule to the provider. Any changes to the policy will be posted to the account
and reported to the provider.
Coverage Reason
Coverage Type Select one of the following options to show changes in coverage types for a
student:
New: The student does not yet have a provider number. The student will be
included on the payment schedule for new students.
Increase: The student may have a provider number. Use this option to increase a
previously posted premium amount. The student will be included in the new or
continuing payment schedule, depending on whether the student has a provider
number or not. New students do not have a provider number, while continuing
students do have a provider number.
Decrease: The student has a provider number and will be included on the
payment schedule for new or continuing students. Use this option to decrease a
previously posted premium amount.
Renewal: The student has a provider number, has secured a new policy for a
subsequent year from the same provider, and will be included on the payment
schedule for continuing students.
Cancelled: This policy was cancelled either by the student, the institution, or the
Provider. If the cancellation reason is Did Not Arrive, then the student will be
included on the refund schedule to the provider.
Cancellation Reason This field is available only if the coverage type is Cancelled. Select one of the
following options to show changes in coverage types for a student:
Death: Select this value and then click Post to initiate a charge reversal. This
student will not be included on the refund schedule to the provider.
Not Arrive: Select this value and then click Post to initiate a charge reversal. This
student will be included on the refund schedule to the provider.
Rejected: Select this value and then click Post to initiate a charge reversal. This
student will not be included on the refund schedule to the provider.
Reclassify: Select this value and then click Post to initiate a charge reversal. This
student will not be included on the refund schedule to the provider.
Error: If a user posts a non-zero transaction to the student's account in error for
this policy, use this option to invalidate the transaction. Select Error and then
click Post to initiate a charge reversal. This student will not be included on the
refund schedule to the provider.
Setting Up and Using International Health Coverage Chapter 25
696 Copyright © 1988, 2010, Oracle and/or its affiliates. All Rights Reserved.
Posting Information
Term (Optional) Select the term to which the charge is associated. If the Term field is
left blank, a default term is assigned, based on installation defaults.
Reference Nbr (reference
number) (Optional) Enter the posting reference number.
Item Effective Date If the coverage type is New or Renewal this field is required.
Due Date (Optional) Enter the charge due date.
Post Click to post charges. You should not use Student Post or Group Post to post IHC
charges. Students appear on the IHC Schedule only if posted from the
International Health Coverage - Student Maintenance page. Also note that after
posting charges, the only fields you can change are the Member Number and the
Batch Number fields. Any changes to a previously posted charge require that you
insert a new effective date/effective sequence row.
Posted Displays Yes or No depending on whether or not posting was successful.
Item Nbr(item number) Displays the item number generated by posting. This field is used as a selection
criterion for including a student on the payment schedule.
Post Date Displays the post date.
Posted Amount Displays the amount that was posted.
Payment Schedule
The Payment Schedule fields are populated if the institution generates a payment schedule or a refund
schedule.
Run Date Displays the date on which the payment or refund schedule was run.
Reported Amount Displays the amount reported on the schedule. The reported amount is
determined by the run control option Report Amount Type on the Create
Schedules page.
Rpt Nbr (report number) Displays the report number generated by the payment or refund schedule process.
Reported Amount Type Displays whether the Full Amount or the Difference was the report amount type
used for reporting the information on the new and continuing payment schedules.
On the refund schedule, the reported amount is the value from the Premium
Amount field; the Report Amount Type option on Create Schedules run control
does not affect this field on the refund schedule.
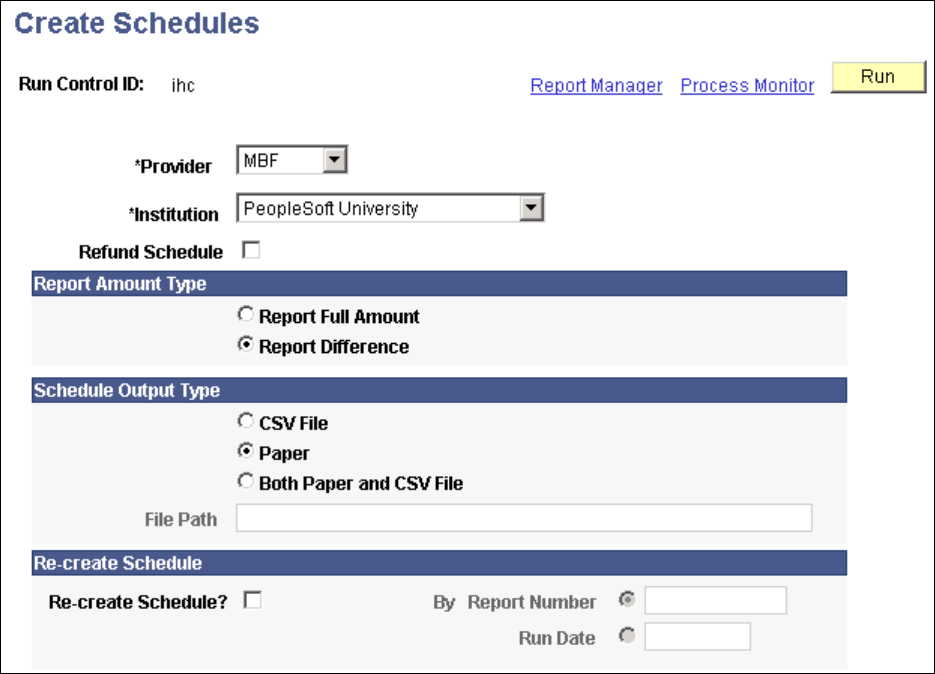
Chapter 25 Setting Up and Using International Health Coverage
Copyright © 1988, 2010, Oracle and/or its affiliates. All Rights Reserved. 697
Schedule Type This field provides an audit trail of how the student was reported to the provider:
New: Assigned if, during the selection phase of the payment schedule, the
provider number is blank. This indicates that the student does not have a
relationship with the provider, either for this institution or any other previous
institution and should be selected for new student payment schedule
Continuing: Assigned if, during the selection phase of the payment schedule, the
provider number is not blank. This indicates that the student has a relationship
with the provider, either for this institution or any other previous institution and
should be selected for the continuing student payment schedule
Refund: During the selection phase of the refund schedule, the provider number
can be blank or not blank, the coverage type equals Canceled, the cancellation
reason equals Did Not Arrive, and the student has paid his or her IHC charge in
full. This indicates that the student (and the institution) is eligible for a refund
and should be selected for the refund schedule.
Creating Schedules
Access the Create Schedules page (Student Financials, International Health Coverage, Create Schedules).
Create Schedules page

Setting Up and Using International Health Coverage Chapter 25
698 Copyright © 1988, 2010, Oracle and/or its affiliates. All Rights Reserved.
Provider Select a provider.
Institution Select an institution.
Refund Schedule Select to create both a payment schedule and a refund schedule. Clear this check
box to create only a payment schedule. A payment schedule will always include
two schedules: one for continuing students and one for new students.
Report Amount Type
Report Full Amount Select to report the full premium amount on the payment schedules.
Report Difference Select to report differences between the current premium amount for a student
and any prior reported amounts for that same coverage number on the payment
schedules. If there are no reported amounts, the report shows the full premium
amount
Schedule Output Type
CSV File Select to produce electronic file output.
Paper Select to produce paper output.
Both Paper and CSV
File Select to produce paper and electronic file output.
File Path Enter the path for electronic file output.
Re-create Schedule
Note that it is possible that you could generate three schedules with one process run (for example, schedules
for new students, continuing students and for refunds). Use the Report Number and Run Date options to
specify which schedules you want to re-create. If you want to re-create all three reports, then you have to run
the re-create process three times.
Re-create Schedule Select x to regenerate an existing single schedule.
Report Number Select to choose a single schedule to re-create by report number.
Run Date Select to re-create all of the schedules that were run on a specific date.
Generating IHC Letters
This section discusses how to generate letters to students.

Chapter 25 Setting Up and Using International Health Coverage
Copyright © 1988, 2010, Oracle and/or its affiliates. All Rights Reserved. 699
Page Used to Generate Letters
Page Name Definition Name Navigation Usage
Person Communication COMM_MGMT1 Click the Add a New
Communication button on
the International Health
Coverage - Student
Maintenance page.
Campus Community,
Communications, Person
Communications,
Communication
Management, Person
Communication
Generate letters to students.
Generating Letters to Students
Access the Communication Management 1 page (Campus Community, Communications, Person
Communications, Communication Management, Person Communication).
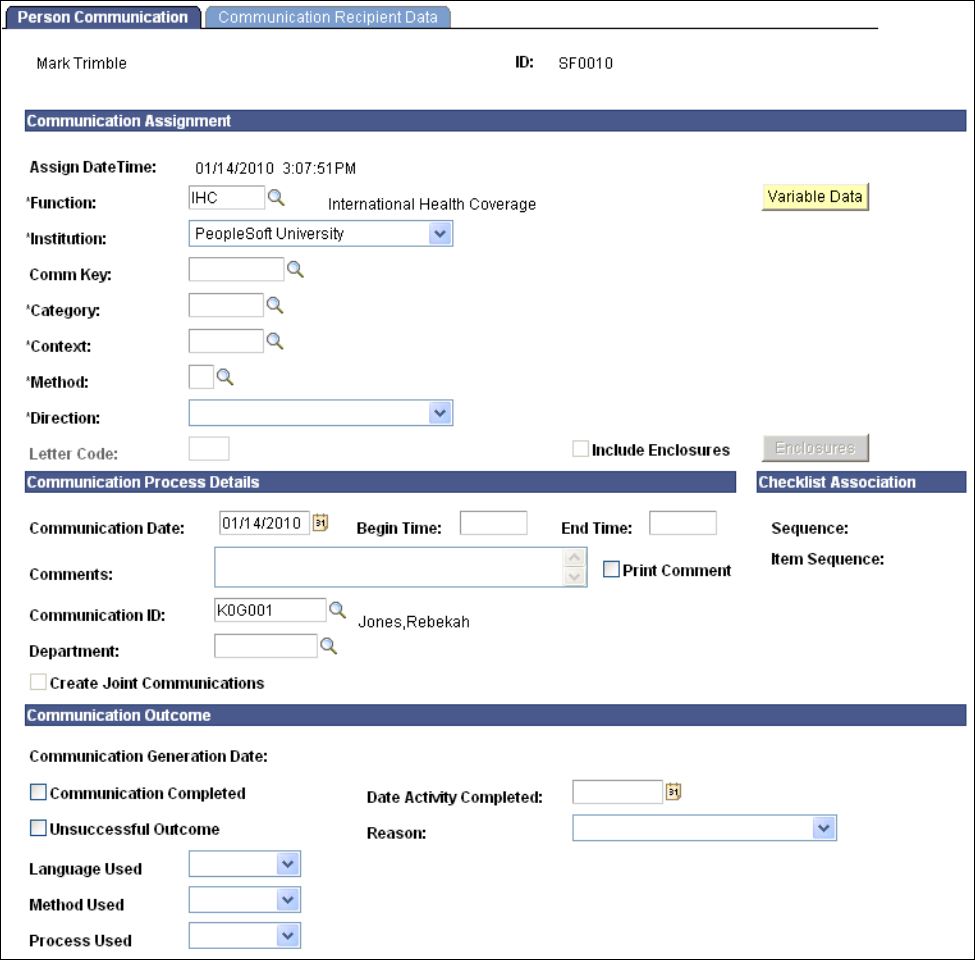
Setting Up and Using International Health Coverage Chapter 25
700 Copyright © 1988, 2010, Oracle and/or its affiliates. All Rights Reserved.
Person Communication page
Click the Add a New Communication button on the International Health Coverage - Student Maintenance
page to create a letter notifying the student of their member number and the batch number that was sent to the
school by the provider.
The letter generation process creates a csv file named CCLTRIHC.CSV. This comma delimited file contains
the data that you can merge into the delivered Microsoft Word document named CCLTRIHC.DOC.
Function IHC appears as a default after you click the Add a New Communication button
from the International Health Coverage - Student Maintenance page.
Variable Data Click to select the appropriate coverage number from the list.
Chapter 25 Setting Up and Using International Health Coverage
Copyright © 1988, 2010, Oracle and/or its affiliates. All Rights Reserved. 701
Category,Context, and
Method Select the appropriate IHC category and context codes. Letter codes, category
codes, and method are set up in PeopleSoft Campus Community.

Copyright © 1988, 2010, Oracle and/or its affiliates. All Rights Reserved. 703
Chapter 26
(NLD) Using the Banking Interface
This chapter provides an overview of the banking interface for the Netherlands and discusses how to:
•Set up the banking interface.
•Bill students using OLA (Optical Readable Giro Slip) or VERWINFO (electronic file containing payment
information).
•Use the Clieop03 process.
Understanding the Banking Interface for the Netherlands
Complete these steps to set up and run the banking interface so that Netherlands students can pay their tuition
and fees:
1. Set up bank accounts for business units.
2. Set up bank accounts for students.
3. Set up several different file layouts.
4. Post and bill students.
Students can pay using these options:
•Print OLA forms and load VERWINFO payment files.
•Create Clieop03 receivables.
Setting Up the Banking Interface
This section discusses how to:
•Set up account information for business units.
•Set up bank account numbers for students.
•Set up default values for VERWINFO and Clieop03 files.

(NLD) Using the Banking Interface Chapter 26
704 Copyright © 1988, 2010, Oracle and/or its affiliates. All Rights Reserved.
Pages Used to Set Up the Banking Interface
Page Name Definition Name Navigation Usage
Business Unit Bank
Accounts
SSF_ACCOUNT_BU_NLD •Set Up SACR, Product
Related, Student
Financials, Billing,
Bank Accounts -
Business Unit, Business
Unit Bank Accounts
•Student Financials,
Student Financials
NLD, Business Unit
Bank Accounts
Establish bank account
information for businesses.
Student Bank Accounts SSF_STDNT_BNK_NLD •Set Up SACR, Product
Related, Student
Financials, Billing,
Bank Accounts -
Student, Student Bank
Accounts
•Student Financials,
Student Financials
NLD, Student Bank
Accounts
Establish bank account
information for students.
Set Up default Values
VERWINFO/Clieop03
SSF_BNK_LAY_NLD Student Financials, Student
Financials NLD, Layout for
Verwinfo and Clieop, Set
Up default Values
VERWINFO/Clieop03
Set up default values for
VERWINFO or Clieop03.
Setting Up Account Information for Business Units
Access the Business Unit Bank Accounts page (Set Up SACR, Product Related, Student Financials, Billing,
Bank Accounts - Business Unit, Business Unit Bank Accounts).
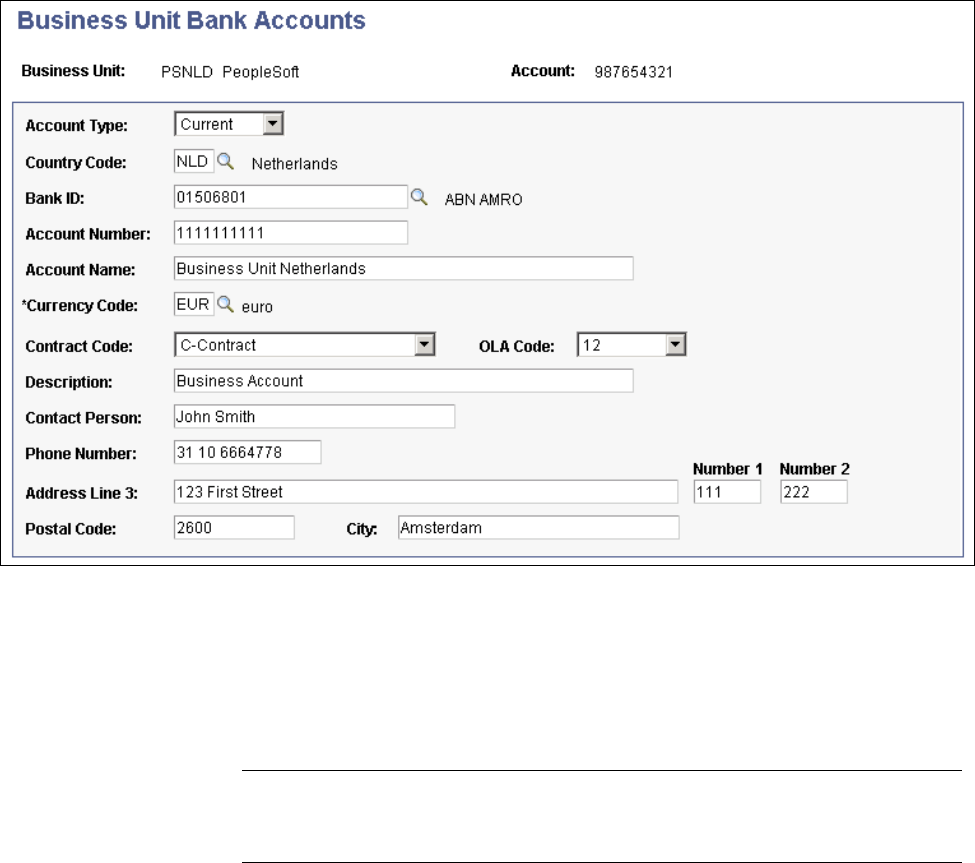
Chapter 26 (NLD) Using the Banking Interface
Copyright © 1988, 2010, Oracle and/or its affiliates. All Rights Reserved. 705
Business Unit Bank Accounts page
Account Type Select one of these options to specify the type of bank account:
Current
Giro
Note. If the Account Type is Giro, then the Bank ID is always Postbank. If the
Account Type is Current, then the Bank ID can be any bank that you have set up.
You can set banks up in Set Up HRMS, Common Definitions, Banking, Banks.
Country Code Select the appropriate country code.
Bank ID Select the appropriate bank ID.
Account Number Enter the account number.
Account Name Enter the account name.
Currency Code Select the currency code.
(NLD) Using the Banking Interface Chapter 26
706 Copyright © 1988, 2010, Oracle and/or its affiliates. All Rights Reserved.
Contract Code Select one of these options:
A-Contract: The collector is not permitted to add or cause to be added (OCR-B
font) data to the reader strip of the submittal section of the accept giro.
B-Contract: The collector is not permitted to add the form code and the
collector's account number to the reader strip, or to add the name, address, place
of residence, or business and account number to the body.
C-Contract: The collector is permitted to add the form code and the collector's
account number to the reader strip, or to add the name, address, place of
residence, or business and account number to the body.
OLA Code Select one of these options:
12: Deposit fees for payer with annotations.
13: Deposit fees for payer without annotations.
14: Deposit fees for collector with annotations.
15: Deposit fees for collector without annotations.
Description The name of the business unit account, if one is available.
Contact Person, Phone
Number, Address Line
3, Number 1, Number 2,
Postal Code, and City
Enter the appropriate information about the contact person.
Setting Up Bank Account Numbers for Students
Access the Student Bank Accounts page (Set Up SACR, Product Related, Student Financials, Billing, Bank
Accounts - Student, Student Bank Accounts).
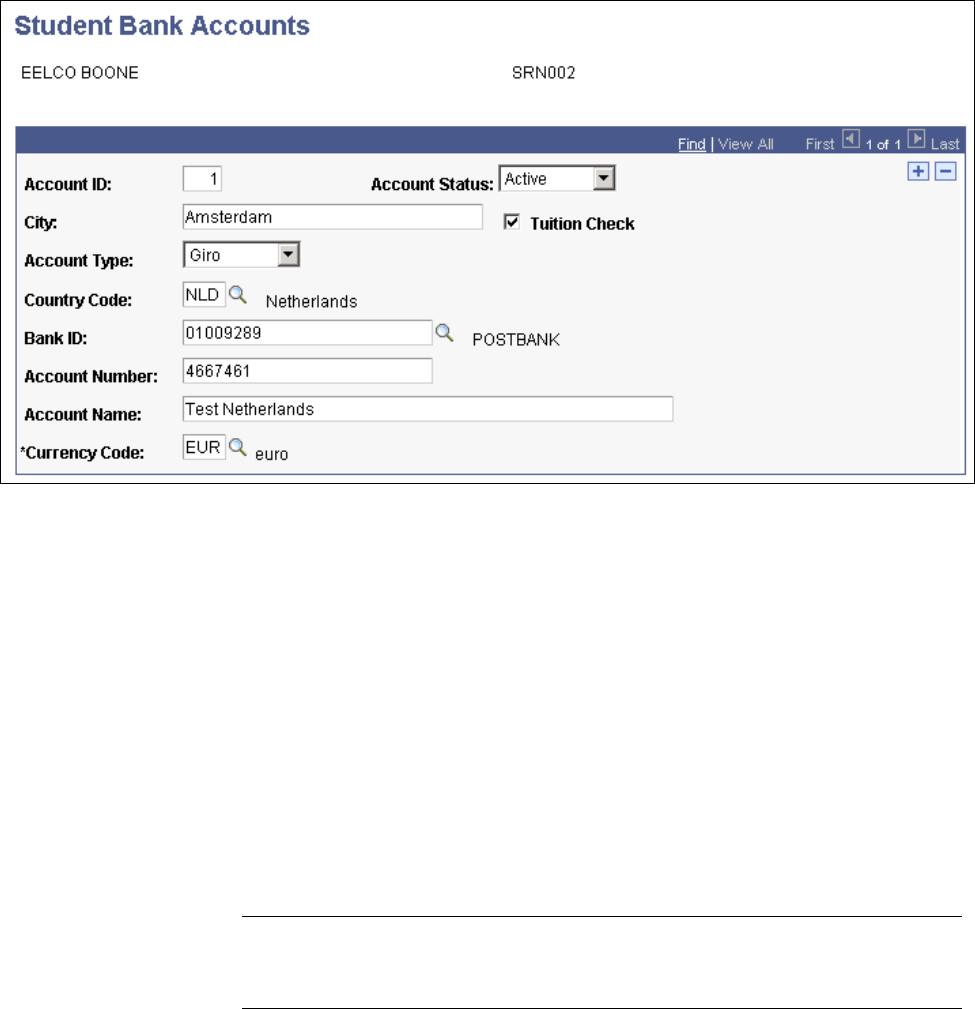
Chapter 26 (NLD) Using the Banking Interface
Copyright © 1988, 2010, Oracle and/or its affiliates. All Rights Reserved. 707
Student Bank Accounts page
Account ID and Account
Status Enter a unique ID for the bank account, and enter the status of the account. You
can link more than one account to a student, so you must uniquely identify each
account and its status.
Tuition Check Select to specify this account to be used for the payment of tuition fees. This
setting tells the system which account it should use for automatic debit or for the
creation of giro slips. When you link bank accounts to a student, you must select
this check box for one of the accounts.
Account Type Select one of these options to specify the type of bank account:
Current
Giro
Note. If the Account Type is Giro, then the Bank ID is always Postbank. If the
Account Type is Current, then the Bank ID can be any bank that you have set up.
You can set banks up in Set Up HRMS, Common Definitions, Banking, Banks.
Country Code Select the appropriate country code from the list.
Bank ID Select the appropriate bank ID.
Bank Branch ID Select the appropriate bank branch.
Account Number Enter the account number. The system validates the account number using
Elfproef, the Dutch check for valid bank account numbers. Current bank account
numbers must be less than seven digits long. Giro account numbers are not
checked.
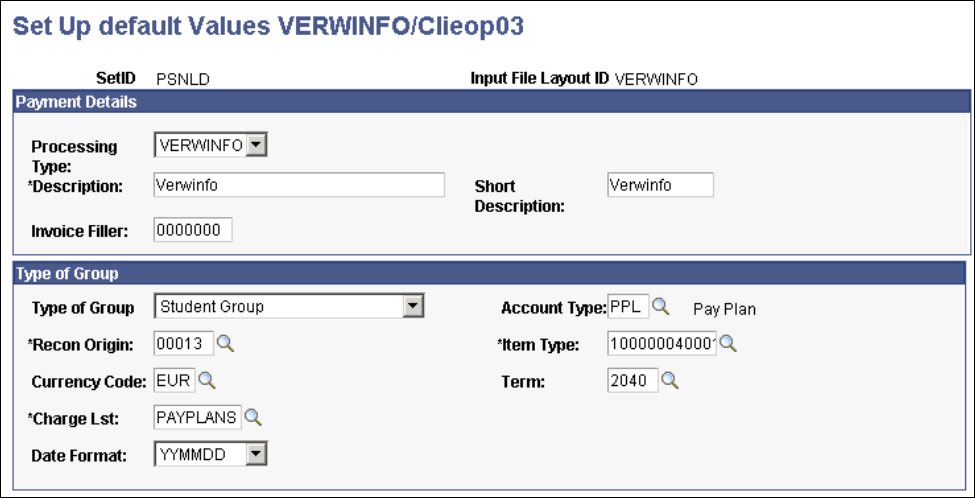
(NLD) Using the Banking Interface Chapter 26
708 Copyright © 1988, 2010, Oracle and/or its affiliates. All Rights Reserved.
Account Name Enter the account name.
Currency Code Select the currency code.
Setting Up Default Values for VERWINFO or Clieop03 Files
Access the Set Up default Values VERWINFO/Clieop03 page (Student Financials, Student Financials NLD,
Layout for Verwinfo and Clieop, Set Up default Values VERWINFO/Clieop03).
Set Up default Values VERWINFO/Clieop03 page (1 of 2)
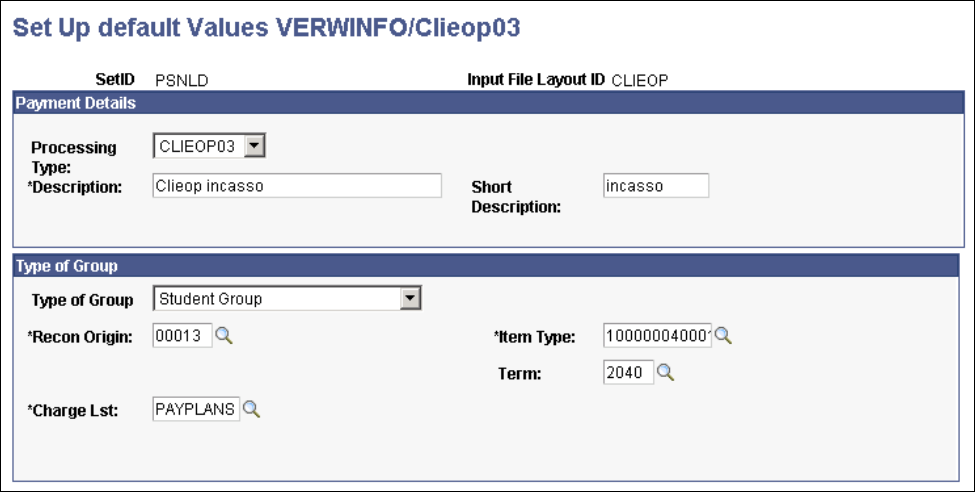
Chapter 26 (NLD) Using the Banking Interface
Copyright © 1988, 2010, Oracle and/or its affiliates. All Rights Reserved. 709
Set Up default Values VERWINFO/Clieop03 page (2 of 2)
Payment Details
Processing Type Select one of these options:
CLIEOP03
VERWINFO
Description and Short
Description Enter a long and a short description.
Invoice Filler Enter seven numeric characters.
Type of Group
Depending on the processing type, some or all of the following fields will appear.
Type of Group Select one of these options:
Student Group
External Org Group
Account Type Select the account type.
Recon Origin
(reconciliation origin) Select the reconciliation origin.
Item Type Select the item type.

(NLD) Using the Banking Interface Chapter 26
710 Copyright © 1988, 2010, Oracle and/or its affiliates. All Rights Reserved.
Currency Code Select the currency code.
Term Select the term.
Charge Lst (charge list) Select the charge priority list.
Date Format Select a date format.
See Also
Chapter 2, "Completing Student Financials General Setup," page 5
Billing Students Using OLA or VERWINFO
This section provides an overview of billing students using OLA or VERWINFO and discusses how to:
•Post student transactions.
•Print OLA forms.
•Load VERWINFO files.
•Process payments.
Understanding Billing Students Using OLA or VERWINFO
These steps must be completed to bill students using OLA or VERWINFO:
1. The institution calculates tuition and fees and bills students.
2. The institution prints and sends OLA forms to students.
3. The students sign and return OLA forms to the bank by mail or use electronic banking to notify the bank
of OLA details and payments to be deducted from the banking account assigned.
4. The bank processes the OLA forms, produces the VERWINFO, and sends the VERWINFO to the
institution.
5. The institution loads the VERWINFO and posts payments.

Chapter 26 (NLD) Using the Banking Interface
Copyright © 1988, 2010, Oracle and/or its affiliates. All Rights Reserved. 711
Pages Used to Bill Students Using OLA or VERWINFO
Page Name Definition Name Navigation Usage
Student Post GRP_QUICK_POST Student Financials, Charges
and Payments, Post Student
Transaction, Student Post
Post transactions for
individual students.
Print OLA Forms SSF_RUNCTL_OLA_NLD Student Financials, Student
Financials NLD, Print OLA
Forms
Print OLA forms.
Load VERWINFO SSF_RUNCTL_GP_NLD Student Financials, Student
Financials NLD, Load
Verwinfo
Load the VERWINFO
payment file.
Posting Student Transactions
Access the Student Post page (Student Financials, Charges and Payments, Post Student Transaction, Student
Post).
Post transactions.
See Also
Chapter 21, "Maintaining Receivables," Posting Transactions for Individual Students and Organizations, page
589
Printing OLA Forms
Access the Print OLA Forms page (Student Financials, Student Financials NLD, Print OLA Forms).
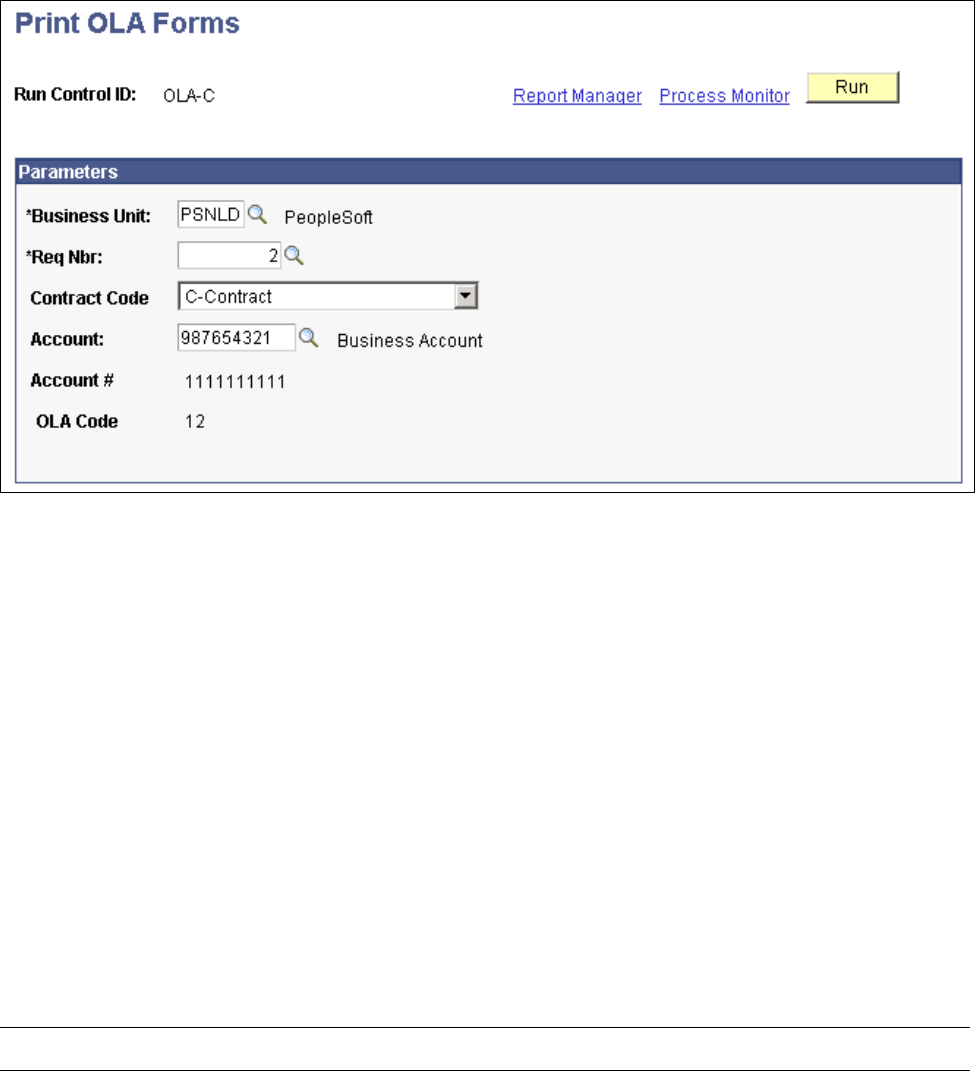
(NLD) Using the Banking Interface Chapter 26
712 Copyright © 1988, 2010, Oracle and/or its affiliates. All Rights Reserved.
Print OLA Forms page
Business Unit Select the business unit.
Req Nbr (request
number) Select the request number from your billing process. Before you print OLA
forms, you must run billing and get the request number.
Contract Code Select one of the following:
A-Contract
B-Contract
C-Contract
Loading VERWINFO Files
Access the Load VERWINFO page (Student Financials, Student Financials NLD, Load Verwinfo).
Note. Using this page, you run the process that loads payments from the banking institution.
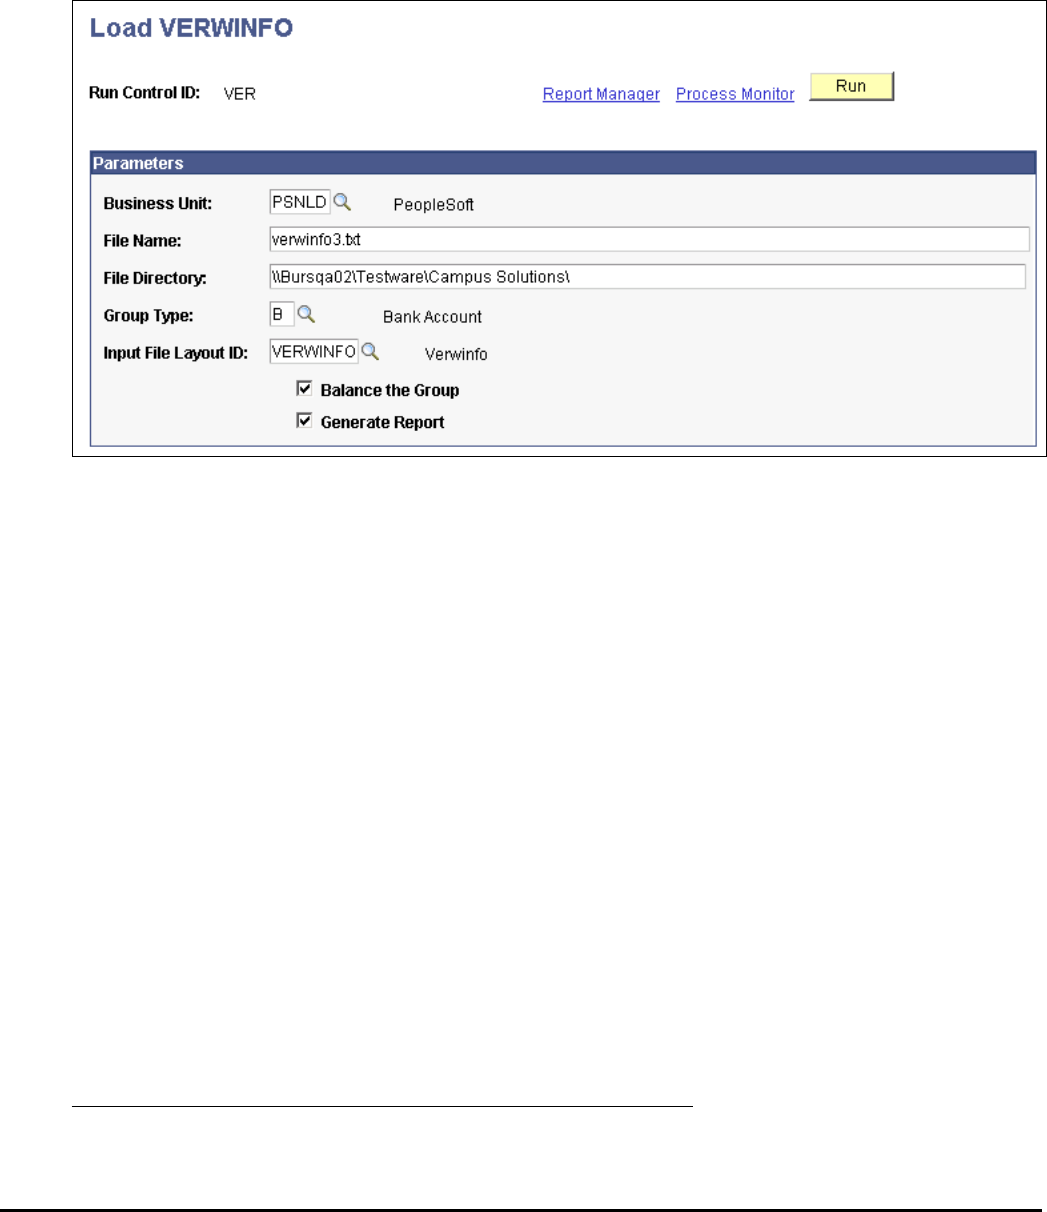
Chapter 26 (NLD) Using the Banking Interface
Copyright © 1988, 2010, Oracle and/or its affiliates. All Rights Reserved. 713
Load VERWINFO page
File Name and File
Directory This file name, which is provided by the banking institution, will be loaded into
the PeopleSoft system. The File Directory is the location where the file will be
sent.
Group Type Select a group type for creation of the Posting Group.
Input File Layout ID Select a layout ID from those already set up. The values in the layout will be
used as defaults.
Balance the Group Select this check box to post the group during processing.
Generate Report Select this check box to create a report of the file load.
Processing Payments
Use the standard process to process payments.
See Also
Chapter 21, "Maintaining Receivables," Applying Payments, page 603
Using the Clieop03 Process
This section provides an overview of the Clieop03 process and discusses how to create Clieop03 files.

(NLD) Using the Banking Interface Chapter 26
714 Copyright © 1988, 2010, Oracle and/or its affiliates. All Rights Reserved.
Understanding the Clieop03 Process
These steps must be completed when billing students using Incasso and the Clieop03 process:
1. The institution prints Incasso form and sends them to students.
2. Students sign and return the Incasso form to the institution.
3. The institution processes the form by assigning students to payment plans.
4. The institution creates Clieop03 receivables to produce direct debits, and it sends the file to the bank.
5. The bank runs the Clieop03 file and transfers money to the institution.
6. The institution manually processes rejects using standard payment reversal functionality.
Note. Steps 1 and 2 are functional prerequisites that are not supported by the PeopleSoft application. The
Incasso is a contract between the student and the Institution stating that a student payee authorizes the
Institution to deduct a certain amount of funds at certain time intervals.
Before the Clieop03 file can be created, students must be linked to a payment plan. This payment plan must
be set up, and students must be linked to this payment plan. After students are linked to a payment plan, you
can create the Clieop03 files.
Prerequisites
The prerequisites are:
1. A valid bank account is set up for the student.
2. The student is assigned to a payment plan.
3. The Clieop03 file was created.
Page Used for the Clieop03 Process
Page Name Definition Name Navigation Usage
Create Clieop03 File SSF_RUNCTL_CLI_NLD Student Financials, Student
Financials NLD, Create
Clieop Receivables, Create
Clieop03 File
Create a Clieop03 file.
Creating Clieop03 Files
Access the Create Clieop03 File page (Student Financials, Student Financials NLD, Create Clieop
Receivables, Create Clieop03 File).
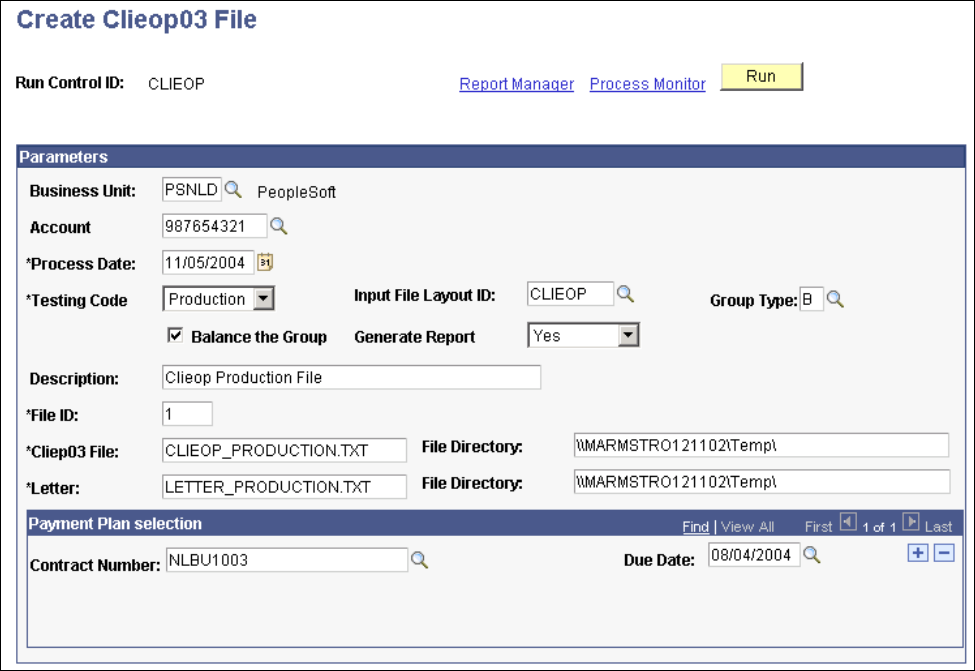
Chapter 26 (NLD) Using the Banking Interface
Copyright © 1988, 2010, Oracle and/or its affiliates. All Rights Reserved. 715
Create Clieop03 File page
The institution runs the Clieop03 process (SSFCL1NL) to produce direct debits, and then it sends the file to
the bank.
Parameters
Account Enter or select the account number of the business unit that is to be used.
Generally, this account number is used for the collection of tuition and fees.
Process Date Select a process date for the direct debits. On this date, the direct debits will be
affected.
Testing Code Select one of these options:
Production
Test
Input File Layout ID Choose a layout ID that has been set up. The values in this layout will be used as
defaults.
Group Type Select a group type to create the Post Group.

(NLD) Using the Banking Interface Chapter 26
716 Copyright © 1988, 2010, Oracle and/or its affiliates. All Rights Reserved.
Balance the Group Select this check box to balance the Post Group.
Generate Report Select Yes to create a report.
Description Enter a description, which will be printed on the student's bank statement.
File ID Enter a value. Positions 1-2 are used for the creation date of the file. Positions 3-
4 should be used for sequential numbering, increasing by 1 per day of the month.
For example. 0503 would be May 03.
Clieop03 File Enter a name for the output file.
File Directory Enter the location of where the file will be sent.
Letter Enter a file name for the cover letter.
File Directory Enter the location of where the file will be sent.
Payment Plan selection
Contract Number Select a value.
Due Date Select the date that payment plan charges are due. All charges with a due date
less than or equal to the due date and with a balance greater than zero must be
included in the Clieop03 file.
See Also
Chapter 8, "Setting Up Payment Plans," page 253
Chapter 18, "Administering Payment Plans," page 471

Copyright © 1988, 2010, Oracle and/or its affiliates. All Rights Reserved. 717
Chapter 27
(AUS) Setting Up and Using Australian
Loan Processing
This chapter provides an overview of loan processing for Australian higher education and discusses how to:
•Set up Australian loan defaults.
•Review Higher Education Contribution Scheme (HECS) results and run the HECS reconciliation.
•Create and update FEE-HELP loans.
•Create and update OS-HELP loans.
•Create Commonwealth Assistance Notices (CAN).
Understanding Loan Processing for Australian Higher Education
The Higher Education Loan Program (HELP) is a suite of income contingent loans: HECS-HELP, FEE-
HELP, and OS-HELP.
This section discusses:
•HECS-HELP.
•Tuition Calculation for HECS.
•FEE-HELP.
•OS-HELP.
•How to prepare for setting up HELP.
HECS-HELP
The Higher Education Contribution Scheme (HECS) provides students with a loan to cover all or part of the
Student Contribution amount. Students may also receive a discount if they choose to pay their Student
Contribution up-front. HECS-HELP loans are available to eligible students enrolled in Commonwealth-
supported places. If a student receives a HECS-HELP loan, the Australian government pays the loan amount
directly to the higher education provider on the student's behalf, and a HECS-HELP debt is recorded with the
Tax Office. No loan fees are charged on HECS-HELP loans.

(AUS) Setting Up and Using Australian Loan Processing Chapter 27
718 Copyright © 1988, 2010, Oracle and/or its affiliates. All Rights Reserved.
HECS requires most students to contribute to the cost of their higher education. Student Contribution is
calculated for each class based on the academic student load—the EFTSL (Equivalent Full Time Student
Load) and annual course contributions—HECS Bands. Student Contribution is calculated based on a student's
load as of the census date for the term. A student's total Student Contribution for the term is based on the sum
of the Student Contribution amounts for each class in which the student is enrolled for that term.
Students can pay their Student Contribution in full, make a partial payment and defer the remainder, or defer
the entire amount. Students who defer the payment of their Student Contribution incur a debt with the
government that is repaid through the taxation system when the student's salary is above a predetermined
level.
Administering HECS requires you to complete tasks using the PeopleSoft system as well as tasks outside the
system. The tasks that use the system during HECS processing are listed here. They are organized into groups
based on the time frame for performing the tasks during the academic cycle.
At the time of enrollment:
•Estimate each student's Student Contribution by term for the classes in which the student is enrolling.
The Student Contribution is a type of tuition fee and that you calculate using the Tuition Calculation
process.
•Inform all students in writing of their Student Contribution by sending student bills.
By the census date of each term:
•Collect and enter into the system full up-front payments from students who choose the up-front payment
option for HECS payments.
•Collect and enter into the system partial up-front payments from students who choose the deferred
payment option for HECS payments.
After the census date of each term:
•Calculate the actual Student Contribution of each student as of the census date.
•Inform all students in writing of their Commonwealth Support.
A CAN must be issued within 28 days of the class census date.
•Refund any excess contributions, confirm payment application for Student Contributions, or both.
Note. Every time tuition is calculated or a payment is processed for a student, the system updates the student's
HECS calculations.
•Supply the Australian Tax Office (ATO) with a file of data containing details of the HECS liabilities of
students who elect to defer payment of their contributions together with relevant personal identification
details required by the ATO.
Do this through Department of Education and Science Training (DEST) reporting.
•Supply DEST with a file of data on HECS liabilities for all students.
Do this through DEST reporting.
•Supply DEST with information regarding adjustments to up-front payments and refunds due to special
circumstances.
Chapter 27 (AUS) Setting Up and Using Australian Loan Processing
Copyright © 1988, 2010, Oracle and/or its affiliates. All Rights Reserved. 719
•Supply the ATO with information about changes to HECS liabilities that were made after the initial data
files were sent.
Do this through DEST reporting.
Students must complete a Commonwealth Assistance Form (CAF) for each program in which they are
enrolled before the census date of the first term in which they commenced their program of study. Students
who want to defer all or part of their Student Contribution must provide a valid Tax File Number (TFN) on
the Payment Options Declaration form. Students cannot be enrolled if they have not completed these
requirements.
Calculating Student Contribution and Deferment Amounts
The Higher Education Support Act 2003 (HESA) requires higher education providers to allocate individual
units of study (courses) to funding clusters. Units of study are allocated to funding clusters based on their
classification against the Australian Standard Classification of Education (ASCED). Each provider then
determines the Student Contribution amount applicable to each unit of study up to a maximum Student
Contribution amount allowed for the funding cluster in which the unit is classified. The funding clusters are
currently grouped into four contribution bands.
Commonwealth-supported students are classified into three groups for the purpose of determining the
maximum Student Contribution amount:
•Post-Reform students (student commenced course of study on or after 1 January 2005).
•Pre-2005 Differential HECS students.
•Pre-1997 students or Fixed HECS.
If students make up-front payments, they may be eligible for a discount on their Student Contribution amount.
If a student withdraws from a program of study on or before the census date, no Student Learning Entitlement
is consumed and no contribution is payable. The institution must refund any payments made by the student
for that term.
Making Payments
Students can pay their Student Contribution in these ways:
•Pay the Student Contribution in full up-front and receive a 20 percent discount on the total Student
Contribution for the term.
•Make a partial up-front payment of 500.00 AUD or more and receive a 20 percent discount on that
payment; the remainder of the Student Contribution is deferred. (Note that if a student's assessed fees are
less than 500.00 AUD, then he or she can make a partial payment and still receive the 20 percent
discount.)
•Make a payment of less than 500.00 AUD with no discount applied; the remainder of the Student
Contribution is deferred.
•Defer payment and repay through the ATO when the student's income exceeds the minimum repayment
threshold.

(AUS) Setting Up and Using Australian Loan Processing Chapter 27
720 Copyright © 1988, 2010, Oracle and/or its affiliates. All Rights Reserved.
Students who complete the CAF are required to indicate their intended payment option on the form. This
information is intended to provide institutions with an indication of students' intended payment options. A
student's actual payment option is determined after the census date based on the up-front payments that the
student made on or before the census date. This determines the student status that is applicable at the
enrolment level.
Note. After the census date, students can make only repayments of deferred Student Contribution to a branch
of the ATO.
Making Full Up-Front Payments
Students who want to make a full up-front payment must pay 80 percent of their Student Contribution for the
term by the census date or the date set by the institution, whichever is earlier. When students pay 80 percent
of their total Student Contribution, the remaining 20 percent of their Student Contribution is discounted. If a
student has not made a full up-front payment of the Student Contribution for the term by the census date and
has not provided a TFN, the institution must cancel the student's enrollment.
A payment of more than 80 percent of the total Student Contribution for a term cannot be used to reduce the
student's HECS debt from previous terms. Any overpayment amount should be left on the student's account as
an unapplied charge or can be refunded to the student.
Making Partial Up-Front Payments
Students can choose to make partial up-front payments toward their Student Contribution. If a student makes
an up-front payment of 500.00 AUD or more, the student can receive a discount on that payment. Partial up-
front payments can be made to the institution only before the census date.
Institutions can accept partial payments that total less than 500.00 AUD; however, payments that total less
than 500.00 AUD are not discounted (unless the total Student Contribution amount applicable to the student,
program, and census date is less than 500.00 AUD).
Deferring All Charges
Eligible students can choose to make no up-front payments and defer the entire Student Contribution amount.
If they choose this option, they must provide a TFN to their institution on the CAF. No discount exists for
students who defer their entire Student Contribution amount.
Tuition Calculation for HECS
The Tuition Calculation process calculates tuition using HECS bands. When you set up Term Fee codes for
HECS charges, you indicate that the fee should be charged by band. When Tuition Calculation processes a
fee charged by band, the process knows that it must calculate the HECS load factor, which is the EFTSL
using billing units. The HECS load factor calculation uses the Level/Load rules from the student's academic
program. The process calculates the HECS load factor for each class. It then calculates the charges for each
class in which the student is enrolled by using the band assigned to the class and the band charge that is
indicated on the Fee Code table (SEV_FEE_TBL). Fee codes are assigned to tuition groups and students are
selected for tuition groups based on the selection criteria that is set up for the tuition group.
To calculate a HECS discount waiver or HECS deferral waiver, the Tuition Calculation process references the
student liability status code, which is indicated on the AUS Student Enrol page in the Enrolment component.
The appropriate discount or deferral waiver is created based on the enrolment level student status.

Chapter 27 (AUS) Setting Up and Using Australian Loan Processing
Copyright © 1988, 2010, Oracle and/or its affiliates. All Rights Reserved. 721
When a student makes a payment for HECS, the posting program updates the enrolment-level student liability
status, if necessary, based on the amount of the payment. For example, if a student indicates that he or she
will make a partial payment, but the student actually makes a full payment, the Payment Posting process
changes the enrolment level student status code accordingly.
Note. The student liability status referenced on the HECS Election page in the Term Activation component is
a default value for all enrolments in that program and term. Tuition calculation, payment processing, or
HECS reconciliation processing never updates the default value.
FEE-HELP
FEE-HELP is a loan program that provides eligible fee-paying students with help to pay part or all of their
tuition fees. The Commonwealth pays the amount of the loan directly to the student's provider. Students repay
their loan through the tax system after their income is above the minimum threshold for compulsory
repayment. A 20 percent loan fee is applied if a student in an undergraduate course of study accesses FEE-
HELP.
OS-HELP
Overseas HELP (OS-HELP) assists eligible undergraduate Commonwealth-supported students to undertake
some of their courses of study overseas. OS-HELP is not available to students undertaking all of their courses
outside Australia. The loans are allocated to higher education providers (HEPs). The HEPs select the students
who receive the loans. Eligible students can borrow up to 5,000.00 AUD per study period for one or two
study periods of overseas study.
See Chapter 27, "(AUS) Setting Up and Using Australian Loan Processing," Defining OS HELP Loan
Defaults, page 726.
Preparing for Setting Up HELP
These are some of the general setup steps that you must complete within Student Financials:
•Set up Australian loan data.
•Set up HECS-HELP account types.
•Set up HECS and FEE-HELP item types.
•Set up HECS and FEE-HELP charge priority lists.
•Set up a HECS and a FEE-HELP tuition group.
You specify the HECS Fee code in a HECS tuition group.
•Set up HECS and FEE-HELP criteria.
These are some of the general setup steps that you must complete outside of Student Financials:
•Set up foundation table reporting codes.
•Set up academic structure defaults.

(AUS) Setting Up and Using Australian Loan Processing Chapter 27
722 Copyright © 1988, 2010, Oracle and/or its affiliates. All Rights Reserved.
•Set up DEST reporting codes.
•Set up items in the course catalog.
•Activate and enroll students.
See Also
PeopleSoft Enterprise Campus Solutions 9.0 Application Fundamentals PeopleBook, "(AUS) Setting Up
Government Reporting"
PeopleSoft Enterprise Student Records 9.0 PeopleBook, "(AUS) Setting Up Government Reporting"
PeopleSoft Enterprise Student Records 9.0 PeopleBook, "(AUS) Generating Government Reports"
Setting Up Australian Loan Defaults
This section discusses how to:
•Define liability statuses.
•Define HECS HELP loan defaults.
•Define FEE HELP loan defaults.
•Define OS HELP loan defaults.
•Define status change rule loan defaults.
•Set up HECS fee codes.
•Set up HECS band fees.
•Link band fees to tuition groups.
•Exclude HECS classes.
Pages Used to Set Up Australian Loan Defaults
Page Name Definition Name Navigation Usage
Liability Status SSF_HECS_EX_TBL Set Up SACR, Product
Related, Student Financials,
Australian Defaults,
Liability Status
Define liability statuses.
HECS HELP SSF_ANZ_LOAN_DEF Set Up SACR, Product
Related, Student Financials,
Australian Defaults, Loan
Default, HECS HELP
Define HECS HELP loan
defaults.

Chapter 27 (AUS) Setting Up and Using Australian Loan Processing
Copyright © 1988, 2010, Oracle and/or its affiliates. All Rights Reserved. 723
Page Name Definition Name Navigation Usage
FEE HELP SSF_PELS_DEF_ANZ Set Up SACR, Product
Related, Student Financials,
Australian Defaults, Loan
Default, FEE HELP
Define FEE HELP loan
defaults.
OS HELP SSF_OSHELP_DEF_ANZ Set Up SACR, Product
Related, Student Financials,
Australian Defaults, Loan
Default, OS HELP
Define the OS HELP loan
defaults.
Status Change Rule SSF_STAT_CHNG_RULE Set Up SACR, Product
Related, Student Financials,
Australian Defaults, Loan
Default, Status Change Rule
Define status change rule
loan defaults.
HECS Fee Codes SFF_HECS_CD_TABLE Set Up SACR, Product
Related, Student Financials,
Australian Defaults, HECS
Band Fees, HECS Fee
Codes
Set up HECS fee codes.
HECS Band Fees SSF_HECS_FEE_TABLE Set Up SACR, Product
Related, Student Financials,
Australian Defaults, HECS
Band Fees
Define the band fees for
HECS eligible students.
These band fees can be
cohort specific.
Tuition Groups - Definition SEL_GROUP_TABLE Set Up SACR, Product
Related, Student Financials,
Tuition and Fees, Tuition
Groups, Definition
Link HECS band fees to
tuition groups.
Term Fees TERM_FEE_TABLE Set Up SACR, Product
Related, Student Financials,
Tuition and Fees, Term
Fees
Exclude HECS classes from
a term fee.
Defining Liability Statuses
Access the Liability Status page (Set Up SACR, Product Related, Student Financials, Australian Defaults,
Liability Status).
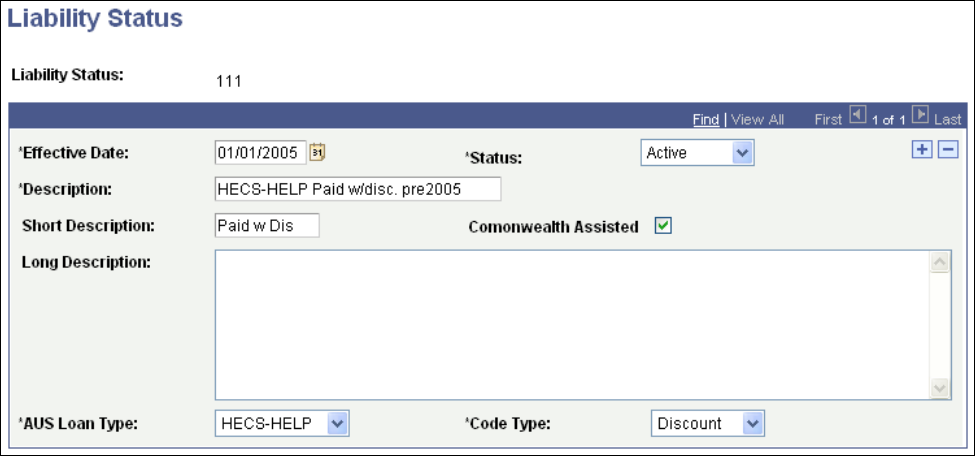
(AUS) Setting Up and Using Australian Loan Processing Chapter 27
724 Copyright © 1988, 2010, Oracle and/or its affiliates. All Rights Reserved.
Liability Status page
The discount and deferral payment processes use these codes. Each liability status can be assigned only one
code type. The code types are Deferral,Discount, and Normal.
Commonwealth Assisted Select to indicate whether the liability status is valid for reporting students in the
Commonwealth Assisted Students file and the Revised Commonwealth Assisted
Students file.
Ensure that the selection is correct for the file scope.
AUS Loan Type Select the loan type. Values are:
FEE-HELP: Specify a FEE-HELP liability status.
HECS-HELP: Specify a HECS-HELP liability status.
OS-HELP: Specify an OS-HELP liability status.
Exempt: Specify an Exempt liability status. The charge for the class will not
appear on the CAN, and will have an (E) for Exempt next to 0.00 AUD charge in
the charge column.
Code Type Defines the Exemption code.
Values are:
Deferral for the Exemption Status code that is used to defer liability.
Discount for the Exemption Status code that is used to discount liability.
Normal for all other Exemption Status codes.
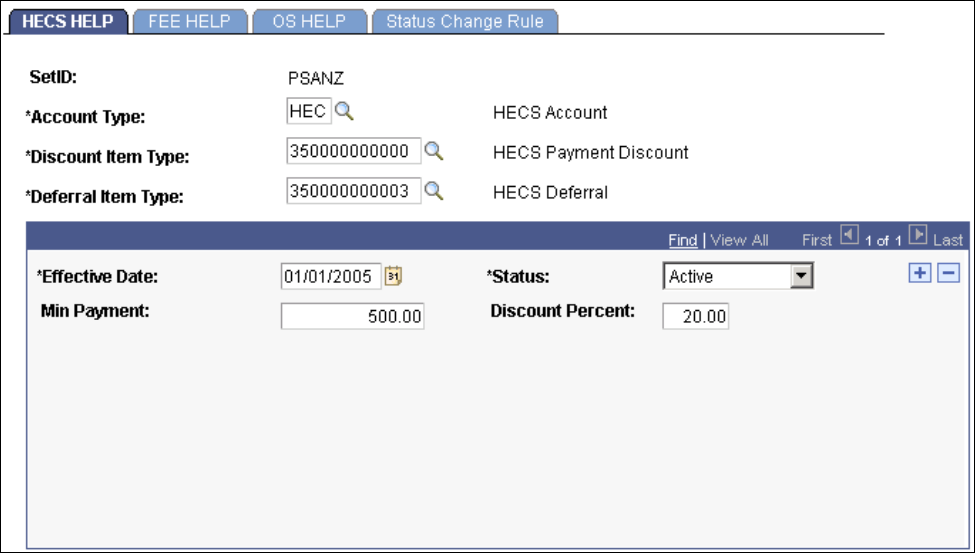
Chapter 27 (AUS) Setting Up and Using Australian Loan Processing
Copyright © 1988, 2010, Oracle and/or its affiliates. All Rights Reserved. 725
Defining HECS HELP Loan Defaults
Access the HECS HELP page (Set Up SACR, Product Related, Student Financials, Australian Defaults, Loan
Default, HECS-HELP).
HECS HELP page
Use this page to define the minimum payment amount and the discount percent for your HECS SetID,
account type, and item types.
Defining FEE HELP Loan Defaults
Access the FEE HELP page (Set Up SACR, Product Related, Student Financials, Australian Defaults, Loan
Default, FEE HELP).
Use this page to define, for each career, the FEE-HELP loan fee percent amount.
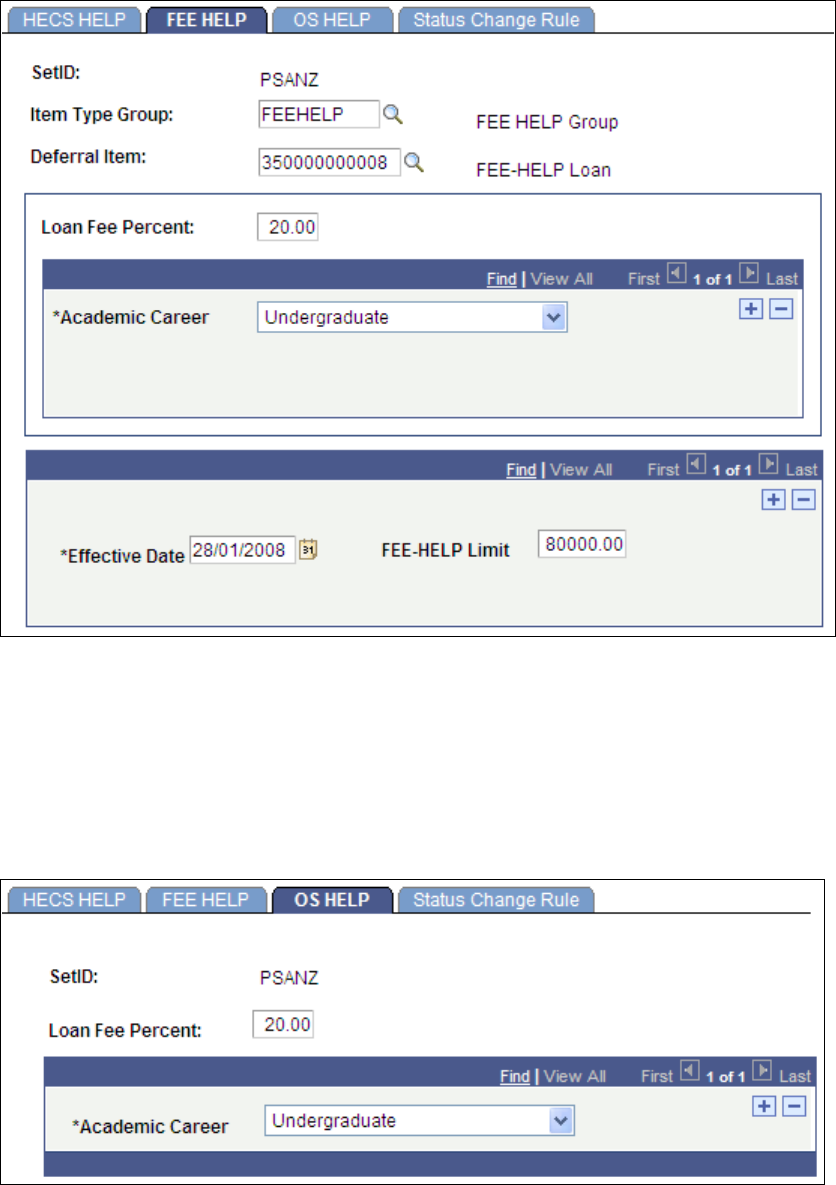
(AUS) Setting Up and Using Australian Loan Processing Chapter 27
726 Copyright © 1988, 2010, Oracle and/or its affiliates. All Rights Reserved.
FEE HELP page
Defining OS HELP Loan Defaults
Access the OS HELP page (Set Up SACR, Product Related, Student Financials, Australian Defaults, Loan
Default, OS HELP).
OS HELP page
Use this page to define the OS-HELP loan fee percent amount. OS-HELP does not show up in a student's
account; however, the loan fee percent and the loan amount appear in CAN or DEST reports.
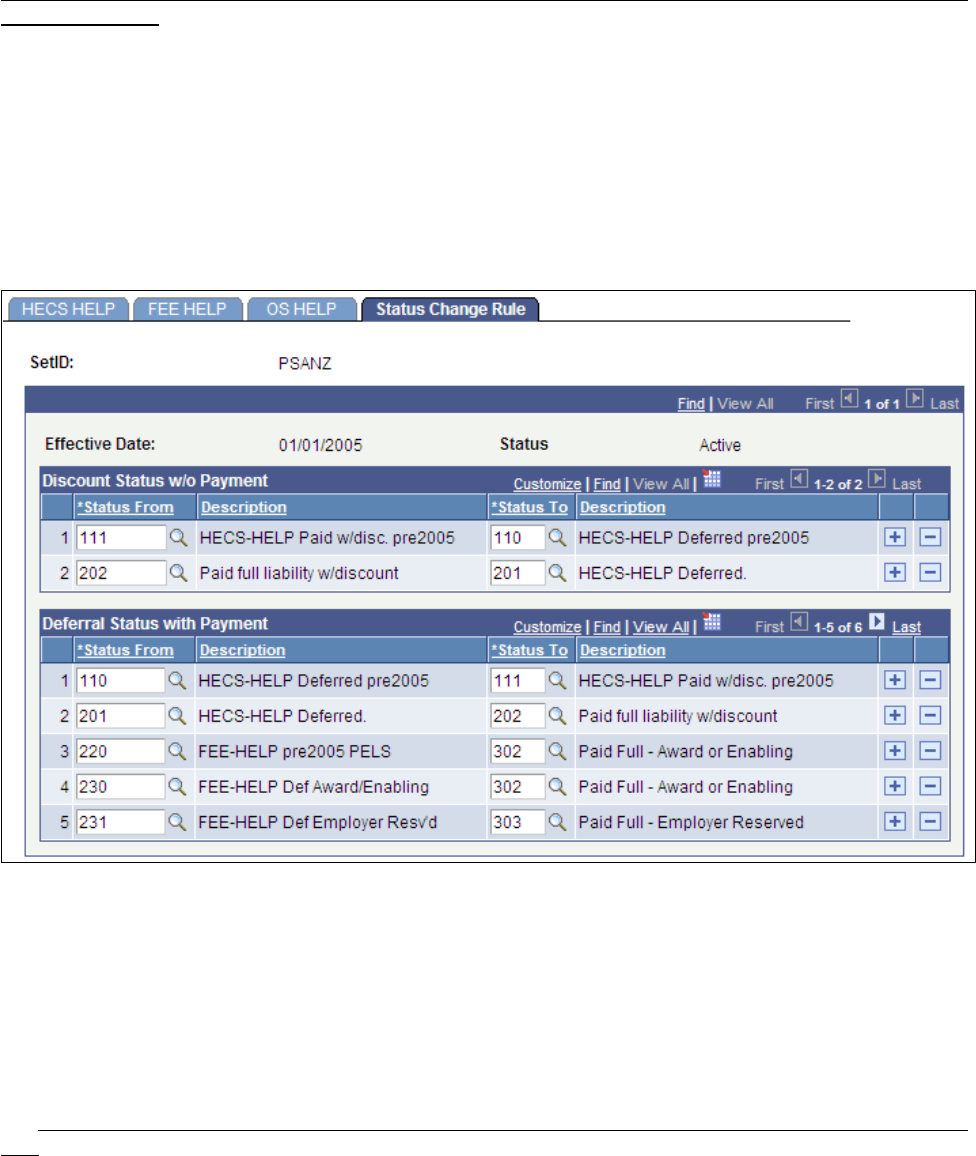
Chapter 27 (AUS) Setting Up and Using Australian Loan Processing
Copyright © 1988, 2010, Oracle and/or its affiliates. All Rights Reserved. 727
Use the Academic Career field to designate which careers are eligible to receive an OS-HELP loan.
See Also
Chapter 27, "(AUS) Setting Up and Using Australian Loan Processing," Creating Commonwealth Assistance
Notices, page 743
PeopleSoft Enterprise Student Records 9.0 PeopleBook, "(AUS) Setting Up Government Reporting"
Defining Status Change Rule Loan Defaults
Access the Status Change Rule page (Set Up SACR, Product Related, Student Financials, Australian
Defaults, Loan Default, Status Change Rule).
Status Change Rule page
Use this page to define the rules that you want to set for changing liability statuses. For example, a student is
assigned a liability status of 111 for 2005, and pays his or her fees with a discount of 20 percent. After the
tuition calculation and reconciliation is run, you discover that the fees did not meet the 500.00 AUD
requirement, so the student's status changes to 110 (deferred).
Liability statuses are delivered values.
See Chapter 27, "(AUS) Setting Up and Using Australian Loan Processing," Defining Liability Statuses, page
723.
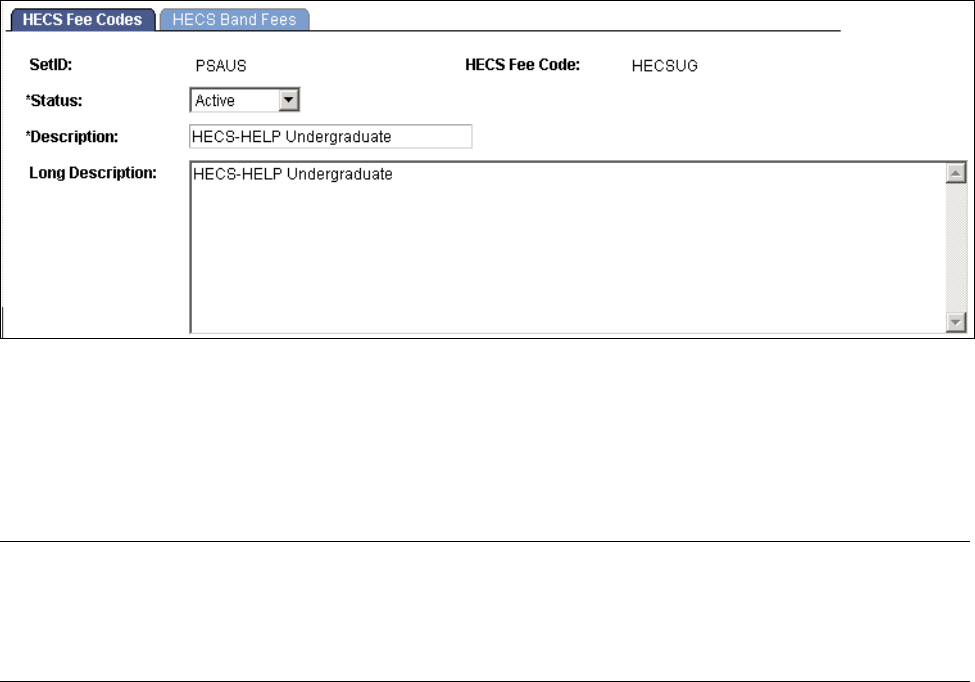
(AUS) Setting Up and Using Australian Loan Processing Chapter 27
728 Copyright © 1988, 2010, Oracle and/or its affiliates. All Rights Reserved.
Setting Up HECS Fee Codes
Access the HECS Fee Codes page (Set Up SACR, Product Related, Student Financials, Australian Defaults,
HECS Band Fees, HECS Fee Codes).
HECS Fee Codes page
HECS band fees determine the rate of the charge (Student Contribution amount) for a course taken by a
Commonwealth-Supported student. The government provides the maximum Student Contribution amount
allowable via funding clusters. Student Financials uses the band ID to calculate the Student Contribution
amount.
Note. Configuration of Student Contribution amounts via Band Fee Codes acknowledges the original
terminology for the Higher Education Contribution Scheme (HECS). Maximum Student Contribution
amounts are outlined in the current legislation and guidelines grouped by Funding Cluster. The combination
of Band ID assigned to the course and cohort assigned to the band fee code allow institutions the flexibility to
cater for as many student contribution amounts as desired for a single course (DEST Unit of Study).
Setting Up HECS Band Fees
Access the HECS Band Fees page (Set Up SACR, Product Related, Student Financials, Australian Defaults,
HECS Band Fees).
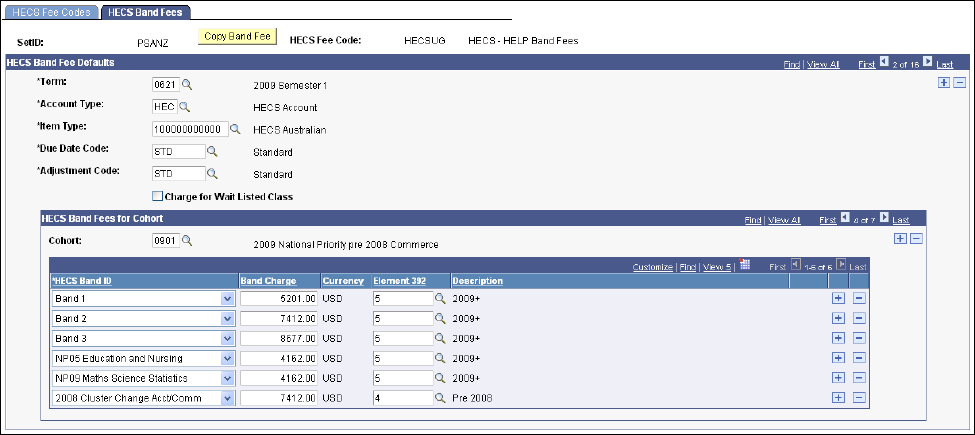
Chapter 27 (AUS) Setting Up and Using Australian Loan Processing
Copyright © 1988, 2010, Oracle and/or its affiliates. All Rights Reserved. 729
HECS Band Fees page
These are the definitions of the different HECS bands:
•Band 1: Humanities, Arts, Behavioral Science, Social Studies, Foreign Languages, Visual and Performing
Arts.
•Band 2: Accounting, Commerce, Administration, Economics, Mathematics, Statistics, Computing, Built
Environment, Health, Engineering, Science, Surveying, Agriculture.
•Band 3: Law, Dentistry, Medicine, Veterinary Science.
•Band 4: National Priorities: Education and Nursing.
•Fixed HECS: Enables you to set up an amount for students who started their courses before 1997.
Copy Band Fee Click this button to copy a band fee from one term to another. If cohort values
are associated with the Band Fee on the source term, these will be copied to the
target term.
Term Enter the term to which the band fee applies.
Account Type Enter the account type that will reflect on the customer account for students
subject to the band fee.
Item Type Enter an item type applicable to the Student Contribution amount charged.
Due Date Code Enter a due date code (calendar) to define when the fee is due and payable.
Adjustment Code Enter the adjustment code (calendar) that governs this fee. This code determines
the refund amount for students who drop classes.
Charge for Wait Listed
Class Select to charge the band fee for students who are on a waiting list for a class.
(AUS) Setting Up and Using Australian Loan Processing Chapter 27
730 Copyright © 1988, 2010, Oracle and/or its affiliates. All Rights Reserved.
Cohort An attribute of the Student Program for Institutions using installation settings for
Australia and inherited as the default value on the student enrolment record. The
cohort value on the enrolment will determine the HECS Band Fee that is
applicable. The cohort value can be blank.
HECS Band ID A unique identifier assigned on the Course Offering that will determine the
student contribution amounts applicable to an enrolment in the course.
Traditionally, Band ID values of 1 through 4 were maintained to acknowledge a
single contribution amount published by the government that was applicable to
the HECS band associated with the Discipline Group Code for the Unit for
Study.
The current legislative regime allows for a maximum student contribution
amount applicable to the funding cluster associated with the Unit of Study
subject to transitional arrangements in place at any given time for particular
cohorts of students. The Band ID associated with the course still controls the
student contribution amounts charged, but any number of values may be
configured to accommodate the policy and legislative requirements of the
institution
Band Charge The charge (Commonwealth contribution amount) for each band ID and cohort
combination.
Element 392 Select the maximum student contribution code that is reportable as Element 392
in the DEEWR Load/Liability file.
See Also
PeopleSoft Enterprise Student Records 9.0 PeopleBook, "(AUS) Setting Up Government Reporting"
Linking Band Fees to Tuition Groups
Access the Tuition Groups - Definition page (Set Up SACR, Product Related, Student Financials, Tuition and
Fees, Tuition Groups, Definition).

Chapter 27 (AUS) Setting Up and Using Australian Loan Processing
Copyright © 1988, 2010, Oracle and/or its affiliates. All Rights Reserved. 731
Tuition Group - Definition page
Use the Definition page to add the HECS fee code to the tuition group.
HECS Fee Code Link the HECS Band Fee code that you set up here.
Excluding HECS Classes
Access the Term Fees page (Set Up SACR, Product Related, Student Financials, Tuition and Fees, Term
Fees).
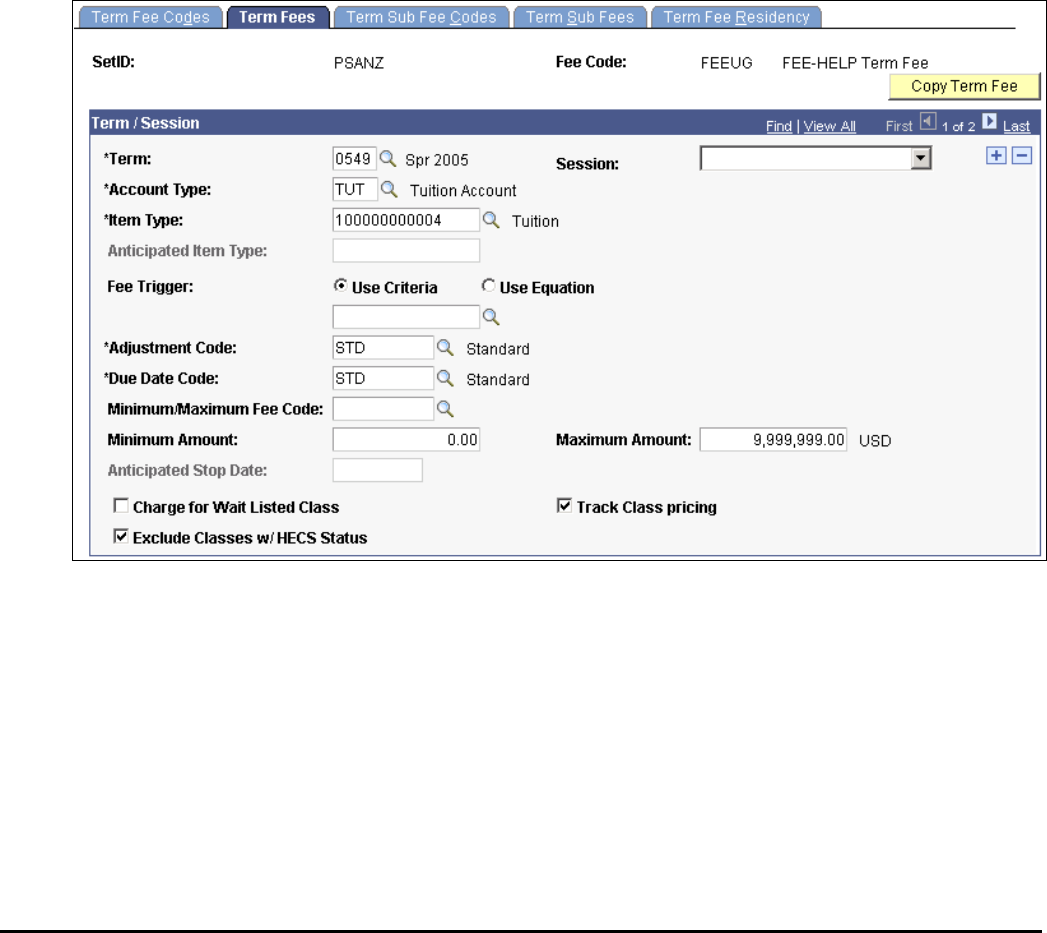
(AUS) Setting Up and Using Australian Loan Processing Chapter 27
732 Copyright © 1988, 2010, Oracle and/or its affiliates. All Rights Reserved.
Term Fees page
You can exclude HECS classes from a term fee.
Exclude Classes w/
HECS Statusexclude
classes with HECS status
Use to exclude classes that are covered by HECS-HELP from the tuition
calculation. Each class is assigned a liability status, so one class could be covered
by HECS-HELP and another by FEE-HELP (if the student has run out of HECS-
HELP eligibility). Each student can be assigned only to one tuition group so that
the student is not double charged for the HECS-HELP covered course. It is
excluded from the calculation.
Reviewing HECS Results and Running the HECS Reconciliation
This section discusses how to:
•Review HECS results.
•Reconcile HECS on the census date.
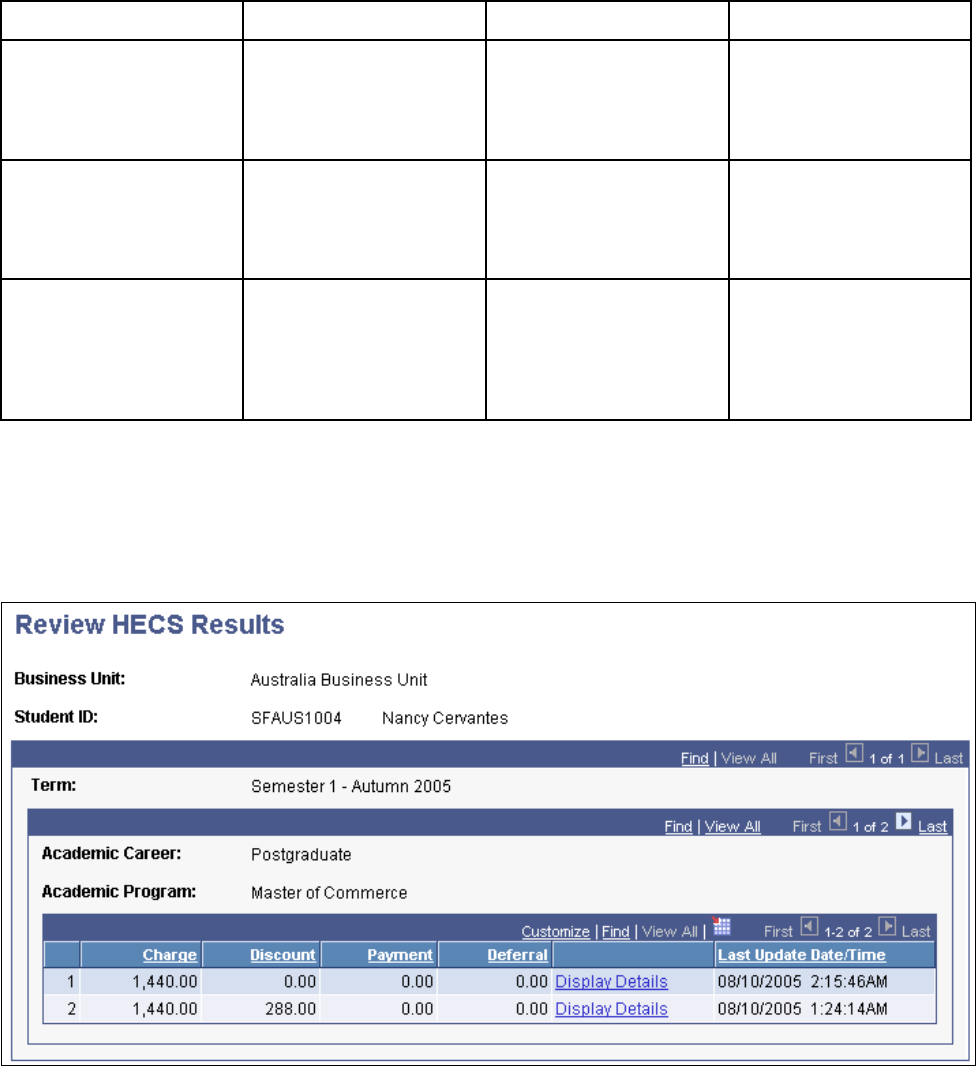
Chapter 27 (AUS) Setting Up and Using Australian Loan Processing
Copyright © 1988, 2010, Oracle and/or its affiliates. All Rights Reserved. 733
Pages Used to Review HECS Results and Run the HECS Reconciliation
Page Name Definition Name Navigation Usage
Review HECS Results SF_STDNT_HECS Student Financials, Tuition
and Fees, Australian Loan
Processing, Review HECS
Results
Review HECS results.
Review HECS Results
Class Prices
SSF_HECS_DETAIL_SP Click the Display Details
link to access the Review
HECS Results Class Prices
page.
Review HECS results class
prices.
HECS Reconciliation SSF_RUN_SFPBHECS Student Financials, Tuition
and Fees, Australian Loan
Processing, Process HECS
Reconciliation, HECS
Reconciliation
Reconciling HECS on the
census date
Reviewing HECS Results
Access the Review HECS Results page (Student Financials, Tuition and Fees, Australian Loan Processing,
Process HECS Reconciliation, Review HECS Results).
Review HECS Results page
This page shows the charge and any discount, payment, or deferral amount that is associated with that charge.
Click the Display Details link to show the class number and description, the liability status, and the individual
charge amounts for that class.
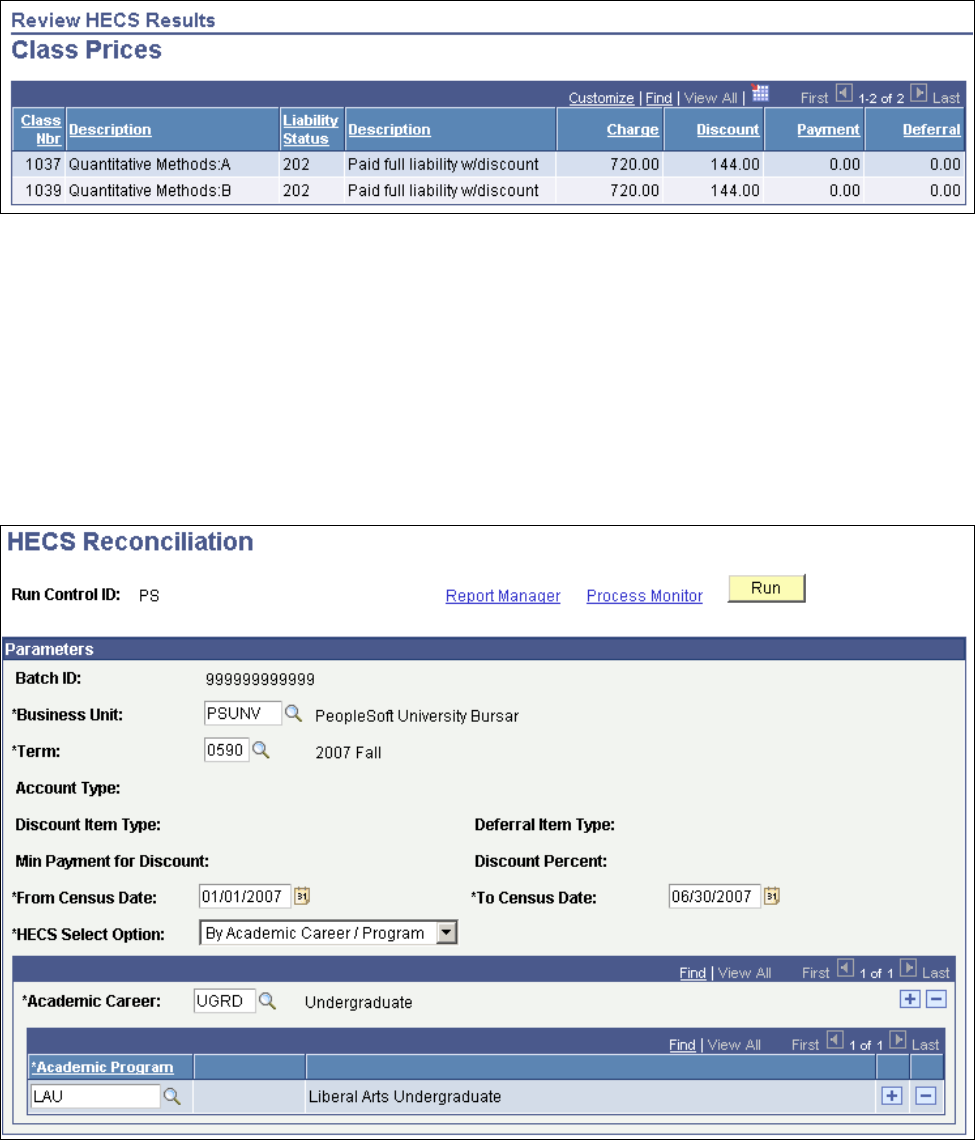
(AUS) Setting Up and Using Australian Loan Processing Chapter 27
734 Copyright © 1988, 2010, Oracle and/or its affiliates. All Rights Reserved.
Review HECS Results Class Prices page
This page displays the class number and description, the liability status, and the individual charge amounts for
that class.
Reconciling HECS on the Census Date
Access the HECS Reconciliation page (Student Financials, Tuition and Fees, Australian Loan Processing,
Process HECS Reconciliation, HECS Reconciliation).
HECS Reconciliation page
This page displays the results of HECS reconciliation: the fees charged, payments, deferrals, and discount
amounts.

Chapter 27 (AUS) Setting Up and Using Australian Loan Processing
Copyright © 1988, 2010, Oracle and/or its affiliates. All Rights Reserved. 735
The Reconciliation process reconciles the HECS payments and deferrals as of the census date. If a student has
indicated he will pay his full Student Contribution, but as of the census date he has not, this process will
change the student's exemption status to deferred or partial payment and remove the full 20 percent discount.
The program will then apply any discounts applicable to the partial payment. This process also creates
discount and deferral waivers based on the amount of payment as of the census date. You should run this
process on the census date, after all of the students' payments are entered in Student Financials.
Parameters
Account Type Displays the account type to be used when processing. The value that appears is
the value that you entered on the Loan Default page.
Discount Item Type Displays the item type that you assigned for the HECS discount. The value that
appears is the value that you entered on the Loan Default page.
Deferral Item Type Displays the item type that you assigned for the HECS deferral amount. The
value that appears is the value that you entered on the Loan Default page.
Discount Percentage Displays the percentage of Student Contribution that a student must pay to
receive the HECS discount. The value that appears is the value that you entered
on the Loan Default page.
HECS Select Option Select By Academic Career/Program to run the process for a career. The
Academic Career and Academic Program fields become available for entry to run
the process for one or more careers and one or more programs.
Select By Student ID to add student IDs to run the process for one or more
students.
Creating and Updating FEE-HELP Loans
This section provides an overview of FEE-HELP loans and discusses how to:
•Create and update FEE-HELP loans.
•Using FEE-HELP process rules.
•Update statuses for FEE-HELP determinations.
Understanding FEE-HELP Loans
FEE-HELP loans help students who are paying full fees in public and eligible private HEPs. Before you
create or update FEE-HELP, the following business processes must be completed:
•CHESSN allocation.
•Student eligibility for FEE-HELP.
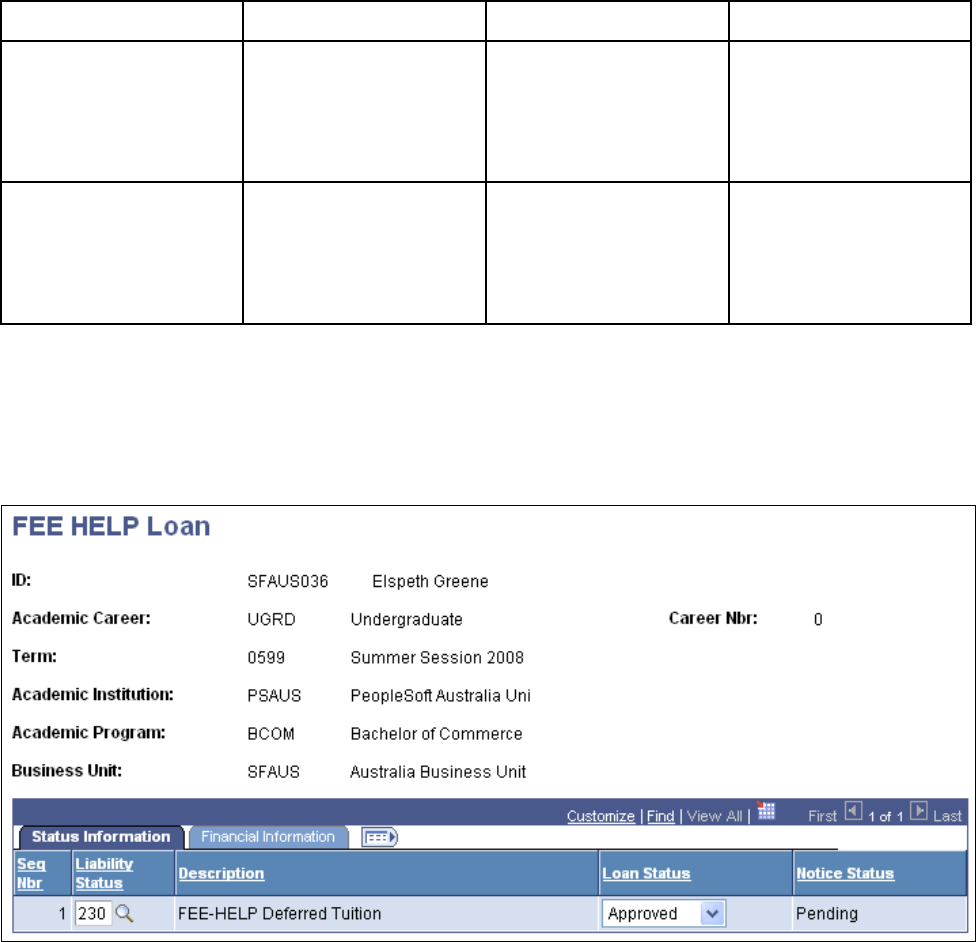
(AUS) Setting Up and Using Australian Loan Processing Chapter 27
736 Copyright © 1988, 2010, Oracle and/or its affiliates. All Rights Reserved.
See Also
PeopleSoft Enterprise Campus Community 9.0 Fundamentals PeopleBook, "(AUS) Managing CHESSN Data
Storage"
Pages Used to Create and Update FEE-HELP Loans
Page Name Definition Name Navigation Usage
FEE-HELP Loan SSF_STDNT_LN_AUS Student Financials, Tuition
and Fees, Australian Loan
Processing, Maintain FEE-
HELP Loan, FEE-HELP
Loan
Create and update FEE-
HELP loans.
FEE-HELP Determination SSF_RUN_SFPBFHLP Student Financials, Tuition
and Fees, Australian Loan
Processing, Process FEE-
HELP Determination, FEE-
HELP Determination
Update statuses for FEE
HELP determinations
Creating and Updating FEE-HELP Loans
Access the FEE HELP Loan page (Student Financials, Tuition and Fees, Australian Loan Processing,
Maintain FEE-HELP Loan, FEE-HELP Loan).
FEE HELP Loan page
Use this page to add the loan and set or change the status (both the liability and the loan status).
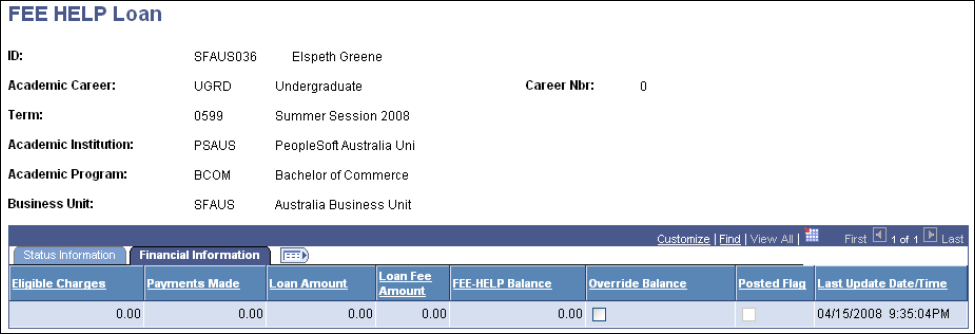
Chapter 27 (AUS) Setting Up and Using Australian Loan Processing
Copyright © 1988, 2010, Oracle and/or its affiliates. All Rights Reserved. 737
Status Information
Use the Status Information tab to add the loan and set the status.
Financial Information
Access the FEE HELP Loan page. Select the Financial Information tab.
FEE HELP Loan page - Financial Information tab
The Financial Information tab displays the eligible charges, any payments that have been made, the loan
amount, the loan fee amount, the posted flag, and the last update date and time.
Updating Statuses for FEE HELP Determinations
Access the FEE HELP Determination page (Student Financials, Tuition and Fees, Australian Loan
Processing, Process FEE-HELP Determination, FEE HELP Determination).
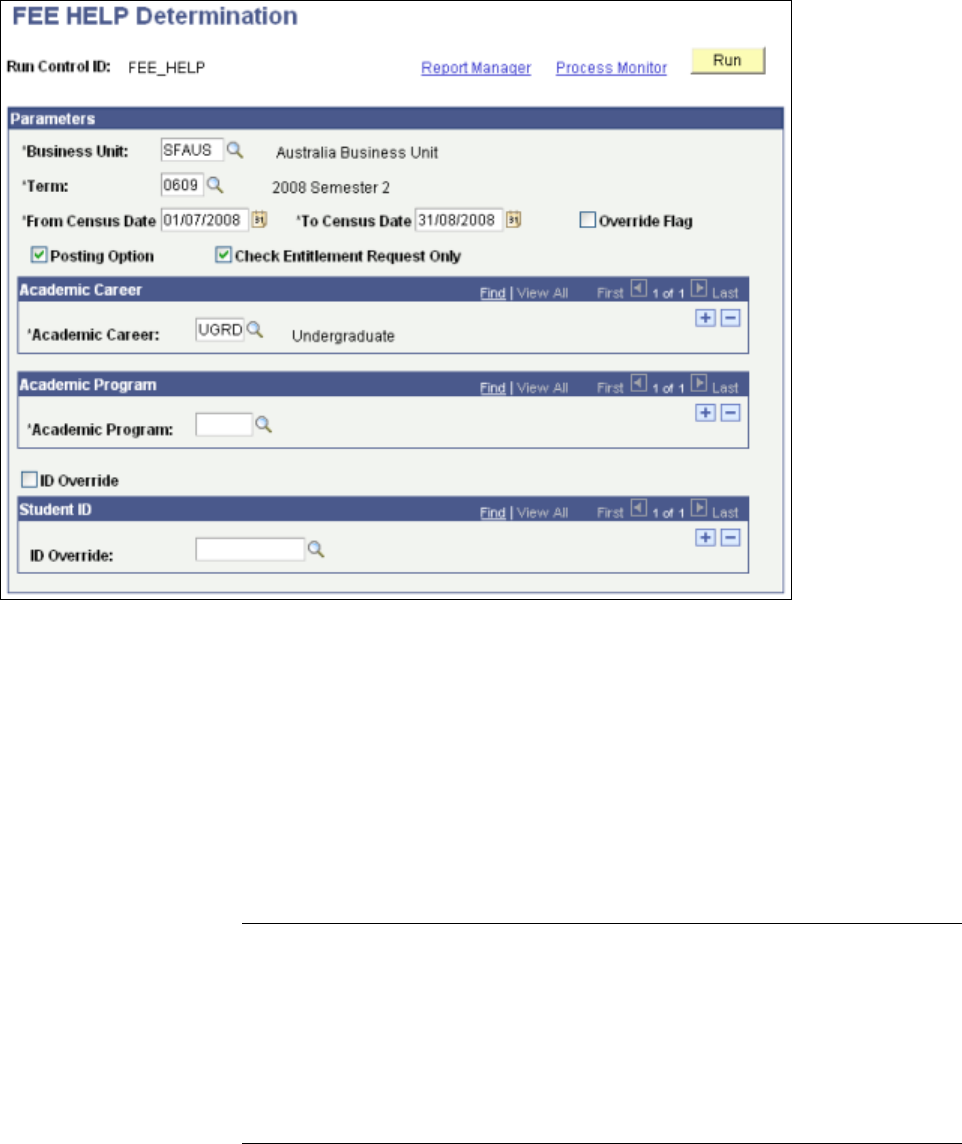
(AUS) Setting Up and Using Australian Loan Processing Chapter 27
738 Copyright © 1988, 2010, Oracle and/or its affiliates. All Rights Reserved.
FEE HELP Determination page
The FEE-HELP Determination process is run before the census date to process and post the FEE-HELP loan
to the student's account (and pay the eligible charges). The FEE-HELP Determination process must be run;
otherwise, the loan will not appear on the CAN.
From Census Date and
To Census Date Select the census date range to restrict the selection of classes by census date.
Where there are multiple census dates within the term of processing, the census
date range allows you to apply FEE-HELP deferrals to classes with earlier census
dates, allowing student time to make a decision on payment for classes within
census dates later in the term.
Note. It is imperative that your increment the To Census Date on the run control
when including later census dates in the term. The From Census Date parameter
must include all dates within the term for which you have run deferral
processing. For example, if you have two census dates in the term – 1 July and
31 August and you have run the process for Census Date 1 July, you must
include 1 July in the date range when you are ready to include the second census
date in August. The Override Flag check box still allows you to defer only those
classes for which the census date is not past.
Posting Option Select to post the loan to the student account. If you clear this check box, the loan
will not post to the student account.
Override Flag Select to override the census date criteria (if you are running the process after the
census date has passed).

Chapter 27 (AUS) Setting Up and Using Australian Loan Processing
Copyright © 1988, 2010, Oracle and/or its affiliates. All Rights Reserved. 739
ID Override Select to enter a specific ID (or multiple IDs) to process.
Academic Career Select the careers to process.
Academic Program Select the programs to process for specific careers.
ID Override This is used in conjunction with the ID Override check box. Enter the IDs to
process.
Understanding FEE-HELP Process Rules
To determine whether a FEE-HELP deferral will occur and for what amount, it is important to understand the
FEE-HELP Entitlement attributes for the student:
•Entitlement check on the Student CHESSN record.
•Balance Override check box on Student Loan Record.
•Entitlement only check box on the process run control.
The combination of these attributes determines how the process assesses the student.
Note. If the student does not have a CHESSN record, no deferral occurs.
Student CHESSN
Record Entitlement
check box
Student FEE-HELP
Loan Record
Override Balance
check box
FEE-HELP Process
Run Control –
Entitlement Request
check box
FEE-HELP Deferral
(pending FEE-HELP
balance available)
FEE-HELP Balance
Used (reflected in
FEE-HELP balance
field on student loan
record for row
inserted)
On On Off Yes Override balance
entered on fee-help
loan record (max
row). If amount is
0.00, no deferral
occurs.
On Off Off Yes FEE-HELP balance
from CHESSN
Record. If amount is
0.00, no deferral
occurs.
Off Off On No No deferral because
there is no
entitlement record.

(AUS) Setting Up and Using Australian Loan Processing Chapter 27
740 Copyright © 1988, 2010, Oracle and/or its affiliates. All Rights Reserved.
Student CHESSN
Record Entitlement
check box
Student FEE-HELP
Loan Record
Override Balance
check box
FEE-HELP Process
Run Control –
Entitlement Request
check box
FEE-HELP Deferral
(pending FEE-HELP
balance available)
FEE-HELP Balance
Used (reflected in
FEE-HELP balance
field on student loan
record for row
inserted)
Off On On Yes Override balance
entered on fee-help
loan record (max
row). If amount is
0.00, no deferral
occurs.
On Off On Yes FEE-HELP balance
from CHESSN
Record. If amount is
0.00, no deferral
occurs.
Off On Off Yes Override balance
entered on fee-help
loan record (max
row). If amount is
$0.00, no deferral
occurs.
On On On Yes FEE-HELP Limit
from CHESSN
Record. If this is 0.00
no deferral.
Off Off Off Yes FEE-HELP Limit
from CHESSN
Record. If this is 0.00
no deferral.
No record On On No No CHESSN Record.
Student skipped. Row
is inserted in fee-help
loan record and FEE-
HELP balance
override reverted to
$0.00.
No record On Off No No CHESSN Record.
Student skipped. Row
is inserted in fee-help
loan record and FEE-
HELP balance
override reverted to
$0.00.
No record Off On No No CHESSN record.
Student skipped.

Chapter 27 (AUS) Setting Up and Using Australian Loan Processing
Copyright © 1988, 2010, Oracle and/or its affiliates. All Rights Reserved. 741
Student CHESSN
Record Entitlement
check box
Student FEE-HELP
Loan Record
Override Balance
check box
FEE-HELP Process
Run Control –
Entitlement Request
check box
FEE-HELP Deferral
(pending FEE-HELP
balance available)
FEE-HELP Balance
Used (reflected in
FEE-HELP balance
field on student loan
record for row
inserted)
No record Off Off No No CHESSN record.
Student skipped.
Processing Rules Where the Limit is Less Than the Eligible Charge
If a student has eligible charges in excess of the available FEE-HELP balance, application of the FEE-HELP
balance is applied first to classes with the earliest census date and then to the most expensive units of study.
This is in accordance with the HEIMS order of precedence for entitlement consumption.
Example 1
Assume the student has a FEE-HELP balance available of 1,000 AUD and enrolls in Class A with a census
date of 31 March 2007. Tuition fees for Class A are 2,000 AUD.
When the FEE-HELP process is run, it defers Class A in part for $1,000.00. This results in a balance of 1,000
AUD remaining for payment.
The student subsequently enrolls in Class B also with a census date 31 March 2007. Tuition fees for Class B
are 2,500 AUD.
When the FEE-HELP process runs, if the student has made not made any payments, the deferral of 1,000
AUD swaps to apply to Class B, the more expensive class.
Example 2
Assume the student has a FEE-HELP balance available of 1,000 AUD and enrolls in Class A with a census
date 31 March 2007. Tuition fees for Class A are 2,000 AUD.
When the FEE-HELP process runs, it defers class A in part for 1,000 AUD. This results in a balance of
1,000.00 AUD remaining for payment.
The student subsequently enrolls in Class B, which is scheduled in the same term as Class A, but has a census
date 15 March 2007. Tuition fees for Class B are also 2,000 AUD.
The student subsequently enrolls in Class B, which is scheduled in the same term as Class A, but has a census
date 15 March 2007. Tuition fees for Class B are also 2,000 AUD.
Creating and Updating OS-HELP Loans
This section provides an overview of OS-HELP loans and discusses how to maintain OS-HELP loans.
OS-HELP loans help students who decide to take part of their study overseas. Before you create or update
OS-HELP, the following business processes must exist:
•The student is not in his or her first or last year of study.
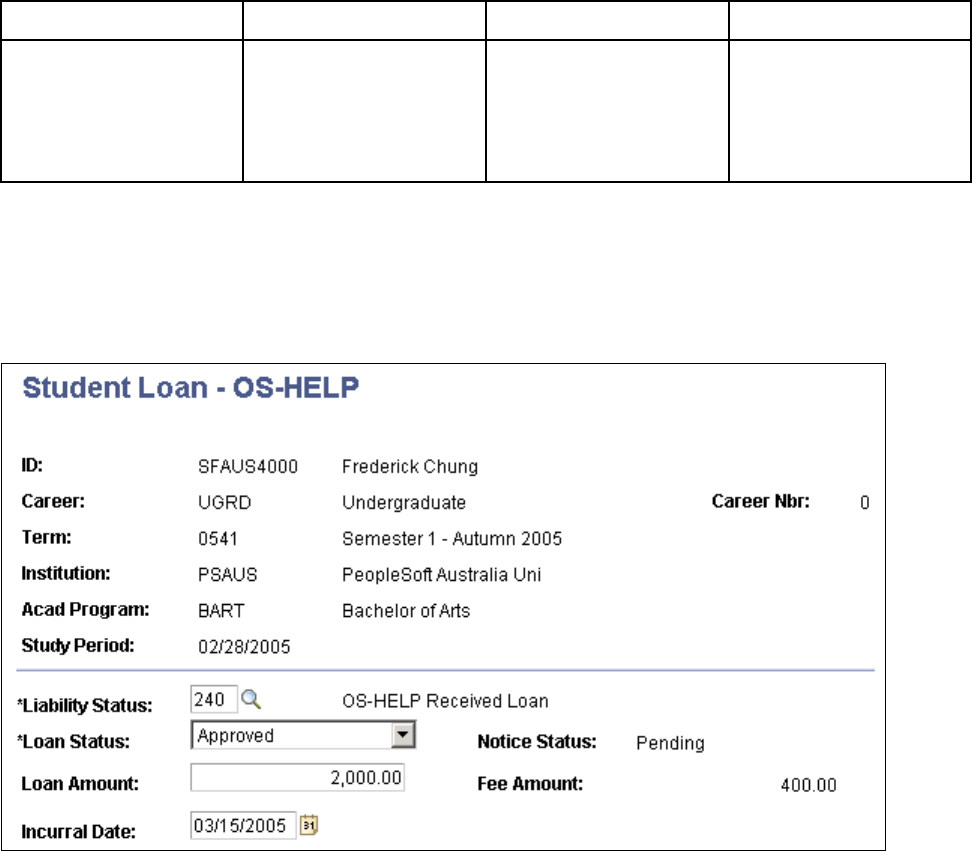
(AUS) Setting Up and Using Australian Loan Processing Chapter 27
742 Copyright © 1988, 2010, Oracle and/or its affiliates. All Rights Reserved.
•The student is eligible and has an activated CHESSN.
See Also
PeopleSoft Enterprise Campus Community 9.0 Fundamentals PeopleBook, "(AUS) Managing CHESSN Data
Storage"
Page Used to Create and Update OS-HELP Loans
Page Name Definition Name Navigation Usage
Student Loan - OS HELP SSF_STDNT_LN_OS Student Financials, Tuition
and Fees, Australian Loan
Processing, Maintain OS
HELP Loan, Student Loan -
OS HELP
Maintain OS–HELP loans.
Maintaining OS-HELP Loans
Access the Student Loan - OS-HELP page (Student Financials, Tuition and Fees, Australian Loan Processing,
Maintain OS HELP Loan, Student Loan - OS HELP).
Student Loan - OS-HELP page
Use this page to create OS loans. You can start the loan as Pending (until you receive further information),
and then change it to Approved (or Denied) according to information that you receive.
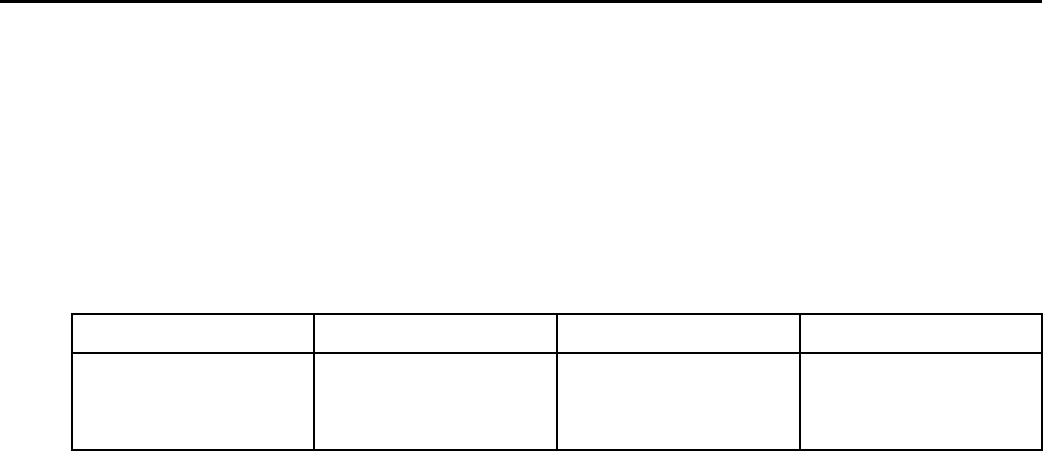
Chapter 27 (AUS) Setting Up and Using Australian Loan Processing
Copyright © 1988, 2010, Oracle and/or its affiliates. All Rights Reserved. 743
Liability Status Enter the appropriate liability status for this student.
Loan Status Change the loan status based on the information that you receive about this
student.
Notice Status Displays the status of the CAN. Possible statuses are:
Reported to DEST
Pending
Ready
Sent
Variation Required
Loan Amount and Fee
Amount Enter the OS-HELP loan payment to be made to the student. The corresponding
fee amount is calculated and displayed based on the percentage loan fee
configured for the academic career on the OS-HELP setup page.
Incurral Date Enter the date that the loan was processed.
Creating Commonwealth Assistance Notices
Create the CAN after the census date to notify students of their liabilities (the loans they have secured, the
amounts, and the courses). This notice must be provided to all students who are Commonwealth-supported or
Commonwealth-assisted.
This section discusses how to create or update commonwealth assistance notices.
Page Used to Create Commonwealth Assistance Notices
Page Name Definition Name Navigation Usage
Commonwealth Assistance
Notice
SSF_RUNCTL_CAN Student Financials, Tuition
and Fees, Commonwealth
Assistance Notice
Create or update
Commonwealth Assistance
Notices.
Creating or Updating Commonwealth Assistance Notices
Access the Commonwealth Assistance Notice page (Student Financials, Tuition and Fees, Commonwealth
Assistance Notice).
(AUS) Setting Up and Using Australian Loan Processing Chapter 27
744 Copyright © 1988, 2010, Oracle and/or its affiliates. All Rights Reserved.
Commonwealth Assistance Notice page
Reprint Use this check box to toggle printing.
Select Reprint to re-create all of the CAN data.
Clear Reprint to re-create data only for those students who have made changes
since the previous run.
For instance, if you ran the CAN process yesterday and then you run it today
with Reprint cleared, the CAN process will print only the students whose data
changed since the last run.
Group Boxes
You can enter information in any or all of the group boxes to define the group for which you want the CAN
printed. If you leave all of the group boxes blank, you will get all students who have HECS-HELP, FEE-
HELP, or OS-HELP.

Copyright © 1988, 2010, Oracle and/or its affiliates. All Rights Reserved. 745
Chapter 28
(NZL) StudyLink Processing
This chapter provides an overview of StudyLink and discusses how to:
•Set up StudyLink functionality.
•Process VOS requests and responses.
•Maintain StudyLink loan information.
Understanding StudyLink
StudyLink, formerly known as WINZ (Work and Income New Zealand) is a governmental agency that
administers the distribution of student loans for educational costs and allowances.
In the past, a third party was used to manage the transfer of fees between the student account and StudyLink.
The third-party functionality is no longer be used and payments will be posted directly to the students'
accounts.
The process is initiated when a student applies for a loan through StudyLink. StudyLink requests the student's
verification of study (VOS) from the institution where the student is enrolled. The institution matches the
student's name, date of birth, and ID, creates a loan record, and sends the student's enrollment data and tuition
charges to StudyLink in a VOS return file. StudyLink then sends the funds to the institution (if StudyLink is
covering tuition) or to the student (only if StudyLink is providing allowance), or it denies the student loan.
StudyLink sends the funds through a PAY file for confirmed students, and payments are posted to the
students' accounts. The Refund External Org ID is supplied to allow refunding to StudyLink as necessary.
StudyLink sends a declined file (DEC), and loans are recorded as declined on the student's loan record if the
loan is denied.
If a student's enrollment changes and fees are reduced, funds are returned to StudyLink. This is accomplished
through Student Financials refunding through accounts payable for external organization refunding. The
system generates an institution PAY file to list refunds to StudyLink.
Setting Up StudyLink Functionality
You must define various parameters to use the StudyLink process.
This section discusses how to:
•Define StudyLink institution defaults.

(NZL) StudyLink Processing Chapter 28
746 Copyright © 1988, 2010, Oracle and/or its affiliates. All Rights Reserved.
•Define the institution ID.
•Define StudyLink posting parameters.
Pages Used to Set Up StudyLink Functionality
Page Name Definition Name Navigation Usage
StudyLink Institution
Defaults
SSF_SL_INST_DFLT Set Up SACR, Product
Related, Student Financials,
New Zealand Defaults,
StudyLink Institution
Defaults
Define StudyLink
institution defaults.
Academic Institution 6 SSR_INST_FEATURES Set Up SACR, Foundation
Tables, Academic
Institution Tables,
Academic Institution 6
Access the Institution Table
New Zealand page.
Institution Table New
Zealand
SSR_INSTITUTN_NZL Click the View NZL
Institution Fields link on the
Academic Institution 6
page.
Set up Ministry of
Education institution ID.
StudyLink Posting
Parameters
SSF_SL_BUS_UNIT Set Up SACR, Product
Related, Student Financials,
New Zealand Defaults,
StudyLink Posting
Parameters
Define the posting
parameters for the
StudyLink process.
Defining StudyLink Institution Defaults
Access the StudyLink Institution Defaults page (Set Up SACR, Product Related, Student Financials, New
Zealand Defaults, StudyLink Institution Defaults).
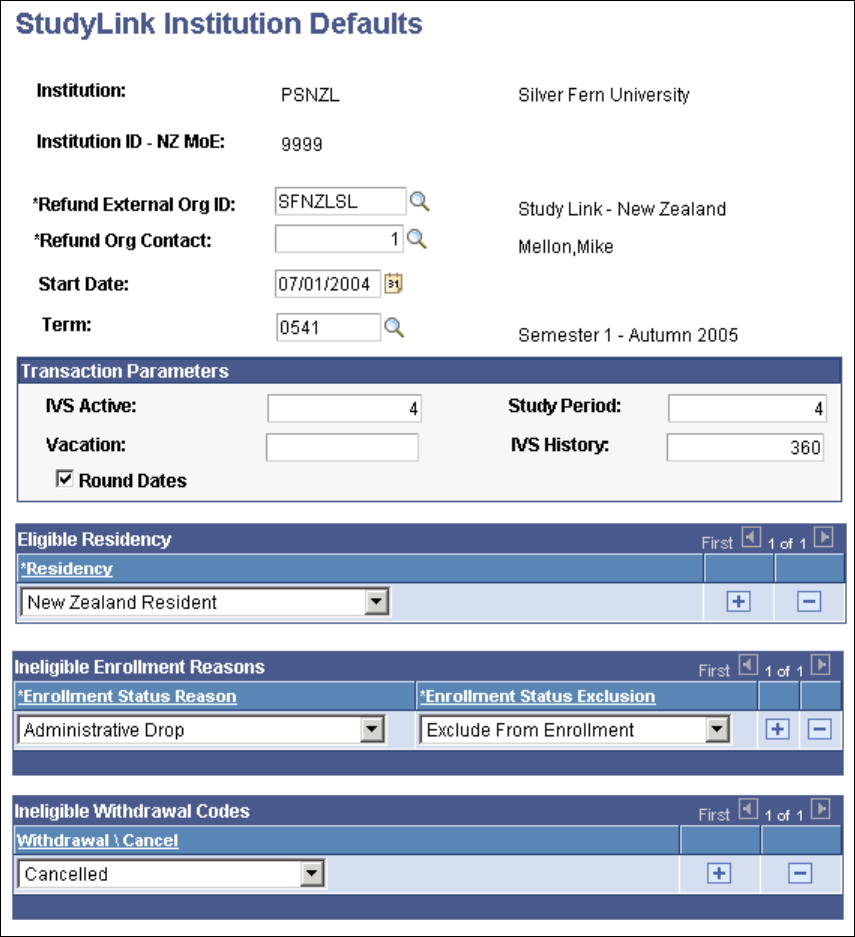
Chapter 28 (NZL) StudyLink Processing
Copyright © 1988, 2010, Oracle and/or its affiliates. All Rights Reserved. 747
StudyLink Institution Defaults page
Refund External Org ID
(refund external
organization ID)
Enter an ID setup for StudyLink so that the system can process refunds should
there be a change in the student's program causing a reduction in fees charged.
Refund Org Contact
(refund organization
contact)
Enter the contact information for the external org ID.
(NZL) StudyLink Processing Chapter 28
748 Copyright © 1988, 2010, Oracle and/or its affiliates. All Rights Reserved.
IVS Active (institutional
verification of study
active)
Indicates the number of days between VOS requests. For example, as shown
previously, an institution VOS will not pick up student information that has had a
VOS request sent within the past four days. Information will be forwarded if a
Pending, Not known, Unregistered, or Mismatch response has been received, or
if no response has been received by StudyLink following a previous VOS
request.
Study Period Used to classify the enrollments into study periods that correlate to the loan
period. This designates the number of days prior to the study period start date.
The study start date is the date that StudyLink uses to request information. This is
typically one month prior to the reported study start date. If the adjusted class
start date, one day prior in the preceding example, is earlier or the same as the
period start date, then the class is covered by that period. If later, the class will be
added to the next period within the loan.
Vacation Any break in study. This is used to enter the number of days constituting a break
in study, as in the number of days between the end of one study period or term
and the start of the next study period or term. So that the vacation period is
reported in the VOS, the vacation buffer days should be fewer or equal to the
number of days between terms.
IVS History (institutional
verification of study
history)
Used to select records for the institutional VOS. The number of days, 360 in the
preceding example, is subtracted from the current date and compared with the
study period start date and the transaction date on the history table. History
records with a study period and transaction date greater than this date are picked
up for the full institutional VOS process.
Round Dates If this is selected, the start date is set to the Monday of the week of the first class
and the end date is set to the Sunday of the week of the last class after the other
date buffer calculations are done. Otherwise, the date buffer values will apply
without regard to rounding.
Residency Identifies eligible residency defaults, New Zealand, Australia, or both. This is a
required field.
Enrollment Status
Reason and Enrollment
Status Exclusion
The default is to exclude from equivalent full-time student (EFTS) calculation or
from enrollment depending on the enrollment status reason. If the enrollment
status reason default matches the enrollment status, then the particular class is
excluded as a covered class or the EFTS is disqualified. These are required fields.
Withdrawal/Cancel Default for withdrawing or canceling from the program of study. Typically,
cancelations result in 100 percent refund of fees. This is a required field.
Defining the Institution ID
Access the Academic Institution 6 page (Set Up SACR, Foundation Tables, Academic Institution Tables,
Academic Institution 6).
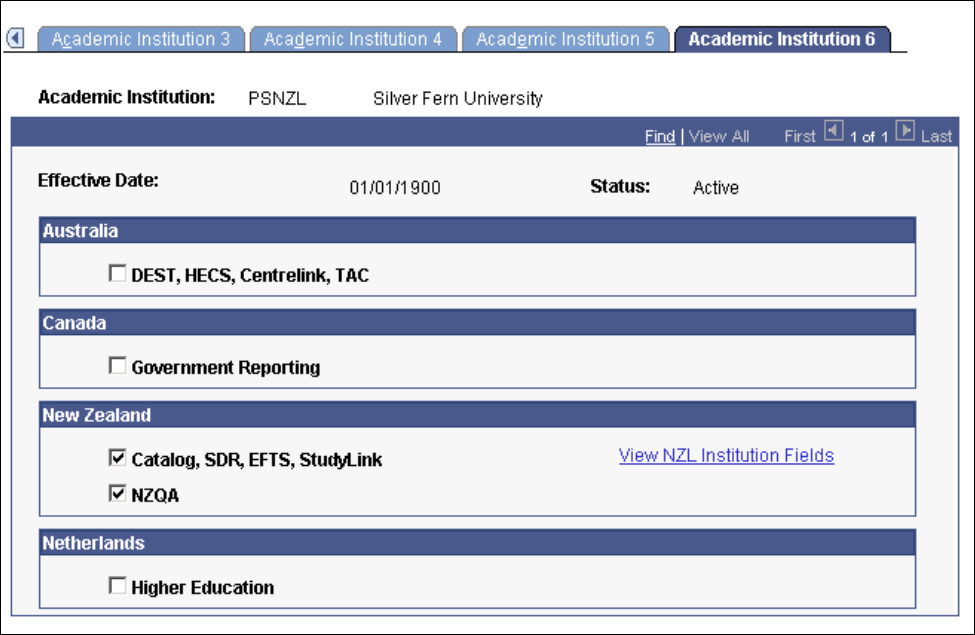
Chapter 28 (NZL) StudyLink Processing
Copyright © 1988, 2010, Oracle and/or its affiliates. All Rights Reserved. 749
Academic Institution 6 page
Access the Institution Table New Zealand page (click the View NZL Institution Fields link on the Academic
Institution 6 page).
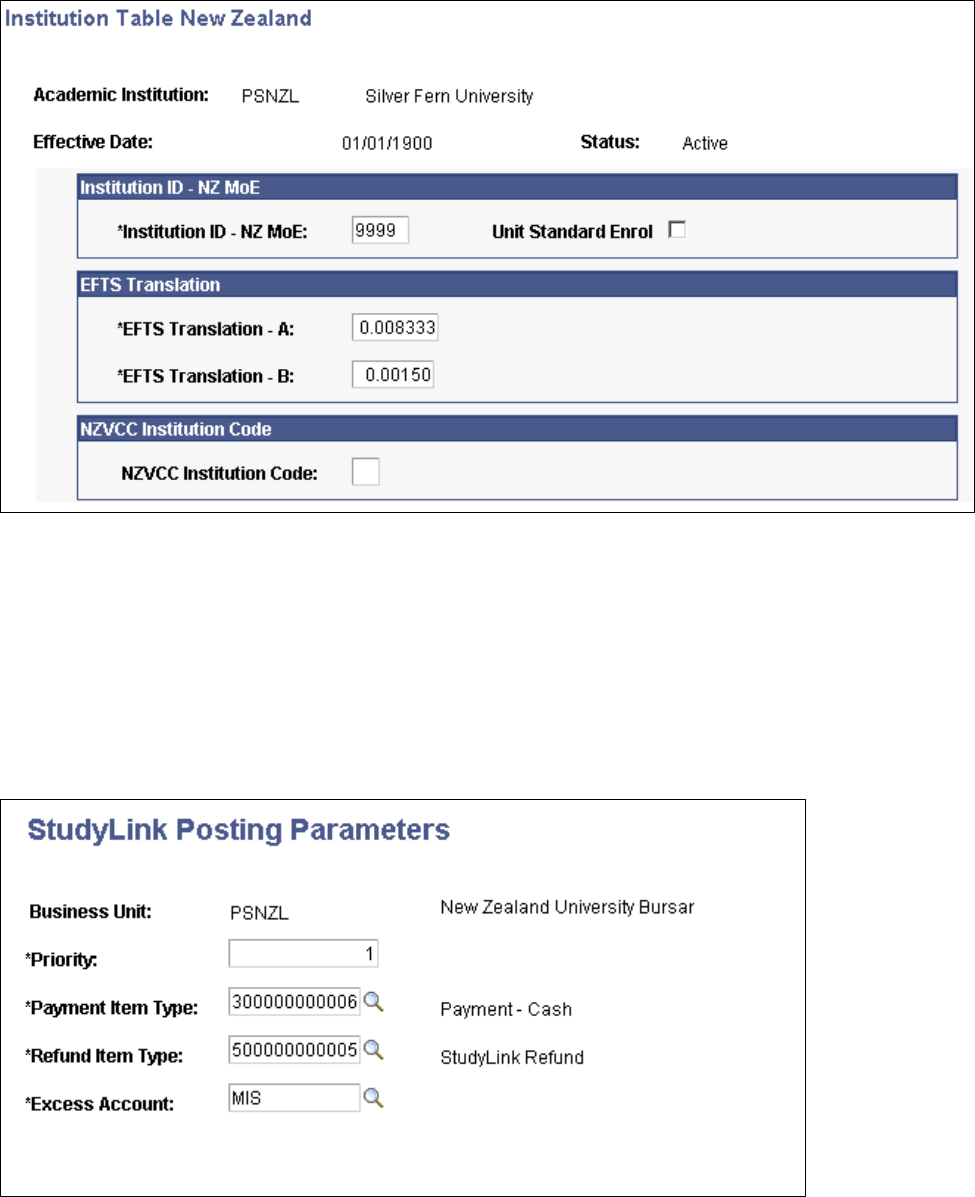
(NZL) StudyLink Processing Chapter 28
750 Copyright © 1988, 2010, Oracle and/or its affiliates. All Rights Reserved.
Institution Table New Zealand page
This page allows for multi-institution usage.
Defining StudyLink Posting Parameters
Access the StudyLink Posting Parameters page (Set Up SACR, Product Related, Student Financials, New
Zealand Defaults, StudyLink Posting Parameters).
StudyLink Posting Parameters page
Priority Refers to the business unit.

Chapter 28 (NZL) StudyLink Processing
Copyright © 1988, 2010, Oracle and/or its affiliates. All Rights Reserved. 751
Payment Item Type The item type that is posted to the student's account.
Refund Item Type Used to designate refunds to StudyLink.
Excess Account Select for situations in which excess payments are posted before being refunded
to StudyLink.
Processing VOS Requests and Responses
When a student applies for a loan from StudyLink, StudyLink sends a VOS request to the institution
requesting enrollment details and the tuition amount. The institution creates a VOS Response file if changes
occurred in the student's enrollment such as dropping courses or withdrawing from the program.
This section discusses how to:
•Request VOS information.
•Initiate VOS responses.
Pages Used to Process VOS Requests and Responses
Page Name Definition Name Navigation Usage
Process VOS Requests SSF_SL_RC_VOS Student Financials,
StudyLink, Process VOS
Requests
Request VOS information.
Initiate VOS Responses SSF_SL_RC_IVS Student Financials,
StudyLink, Initiate VOS
Responses
Initiate VOS responses
process.
Requesting VOS Information
Access the Process VOS Requests page(Student Financials, StudyLink, Process VOS Requests).
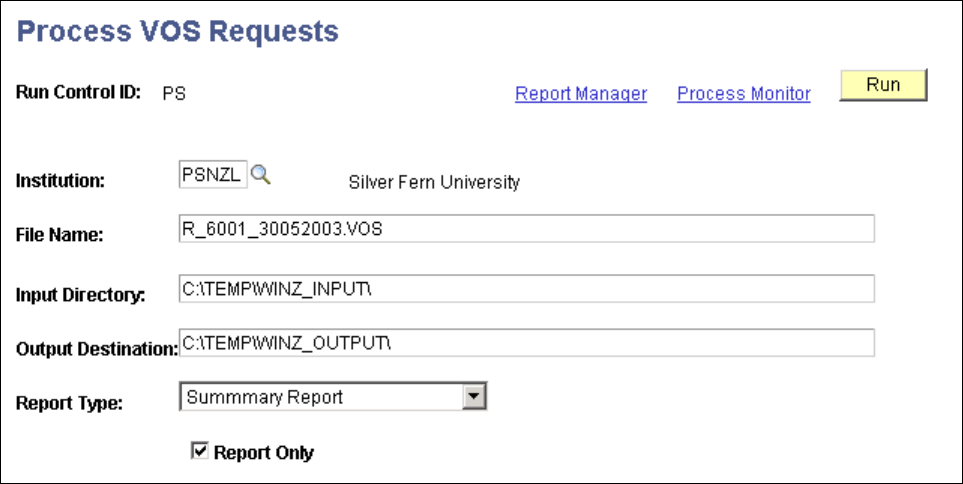
(NZL) StudyLink Processing Chapter 28
752 Copyright © 1988, 2010, Oracle and/or its affiliates. All Rights Reserved.
Process VOS Requests page
Report Type Values are:
Detailed Report: The output includes the student IDs, total fees, and EFTS values
for each record for which the student has requested coverage of tuition and fees
and not just an allowance. This report shows the confirmed students by name,
biographic and demonstration data, fee coverage requested, and enrolled
program.
Summary Report: The output contains the number of confirmed students and the
total fee amount. This report also shows any data mismatches and unregistered
students.
Report Only Running the VOS Request in Report Only mode creates the VOS record but will
not create the Loan record. If this check box is cleared, this process updates the
database and creates the Loan record.
Initiating VOS Responses
Access the Initiate VOS Responses page (Student Financials, StudyLink, Initiate VOS Responses).
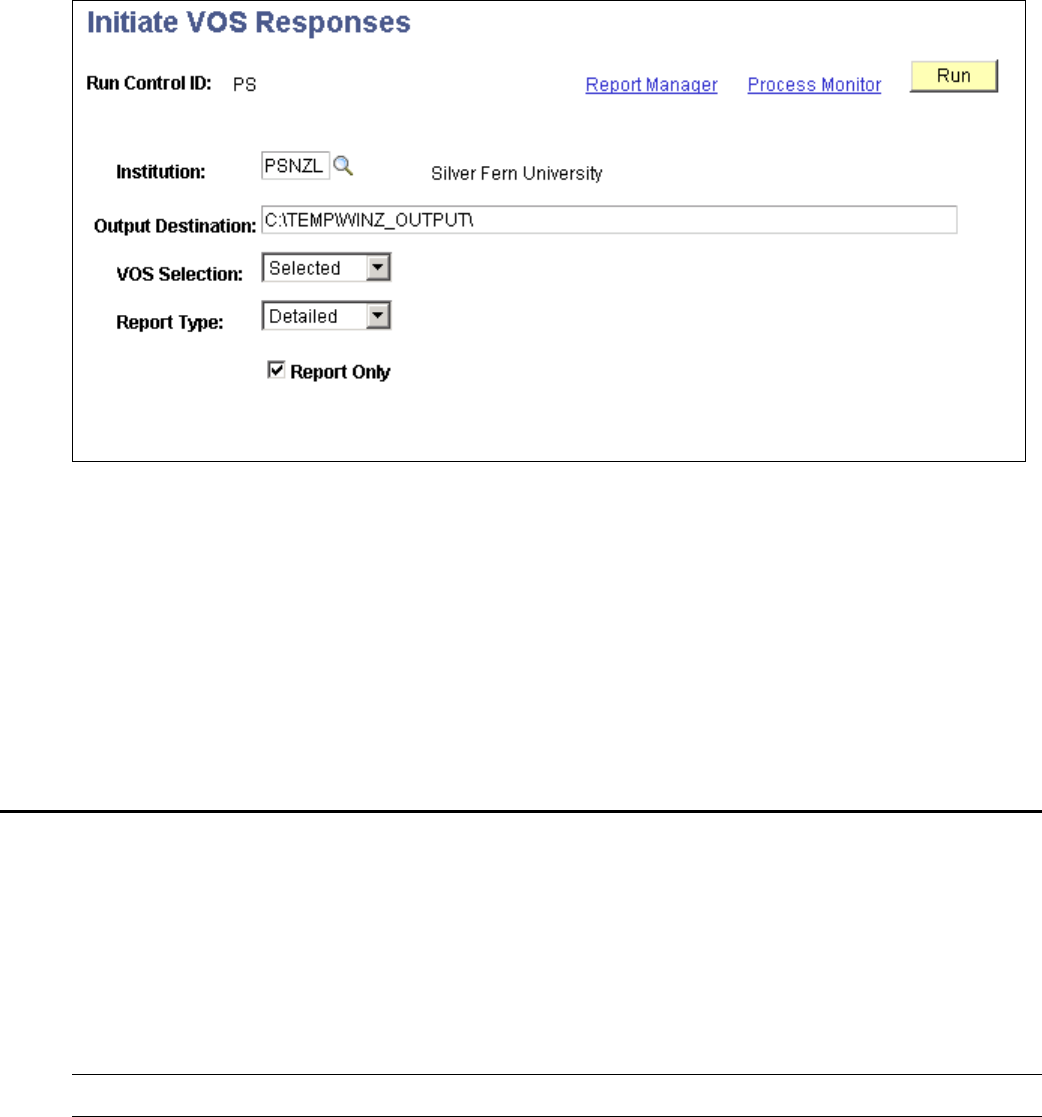
Chapter 28 (NZL) StudyLink Processing
Copyright © 1988, 2010, Oracle and/or its affiliates. All Rights Reserved. 753
Initiate VOS Responses page
VOS Selection
(verification of study
selection)
Values are:
Full: Selects all records that have not had a VOS request processed within the
number of days that are set up on the StudyLink Defaults page in the IVS Active
field.
Selected: Selects only those records that have the re-VOS check box selected on
the Maintain Student Loan page.
Maintaining StudyLink Loan Information
This section provides an overview of and discusses:
•Create payment schedules.
•Process batch refunds.
•Create student reports.
Note. All of the following processes are intended for administrative users only.
Understanding Maintaining StudyLink Loan Information
Your institution must review student loan information, process payment schedules, track refunds, and create
student account reports. Administrative users will run these processes to process loans for students to pay
their tuition and living allowances or just the allowances. Loans for allowances only are sent to directly to the
student and are not applied to the student account.

(NZL) StudyLink Processing Chapter 28
754 Copyright © 1988, 2010, Oracle and/or its affiliates. All Rights Reserved.
After a student has applied for a loan with StudyLink and StudyLink sends the VOS request to the institution,
the institution creates the VOS return file that lists any mismatches of name, date of birth, or ID; the student's
enrollment details; and the loan request amount.
Your institution receives PAY files from StudyLink for confirmed and declined student loans. For confirmed
loans, a COBOL process is run that posts the payments to the students' accounts. Any excess funds will be
refunded to StudyLink through the accounts payable process and by processing the refund file.
Pages Used to Maintain StudyLink Loan Information
Page Name Definition Name Navigation Usage
Process PAY File SSF_SL_RC_PAY Student Financials,
StudyLink, Process PAY
File
Create the payment file and
post payments to student
accounts.
Batch Refund RUNCTL_SFPREFND Student Financials,
Refunds, Process Batch
Refunds, Batch Refund
Run the batch refund
process.
Process Refund File SSF_SL_RC_PYI Student Financials,
StudyLink, Process Refund
File
Create the refund file.
Create Student Report SSF_SL_RC_RPT Student Financials,
StudyLink, Create Student
Report
Create reports on student
loan account information.
Creating Payment Schedules
Access the Process PAY File page (Student Financials, StudyLink, Process PAY File).

Chapter 28 (NZL) StudyLink Processing
Copyright © 1988, 2010, Oracle and/or its affiliates. All Rights Reserved. 755
Process PAY File page
You must run the PAY file process to create the file and to post payments to student accounts. You can run
the SQR (Structured Query Report) report SFSPAYR multiple times. Run the COBOL process SFPSLPAY to
post the payments to the student account.
Processing Batch Refunds
Access the Batch Refund page (Student Financials, Refunds, Process Batch Refunds, Batch Refund).
Batch Refund page
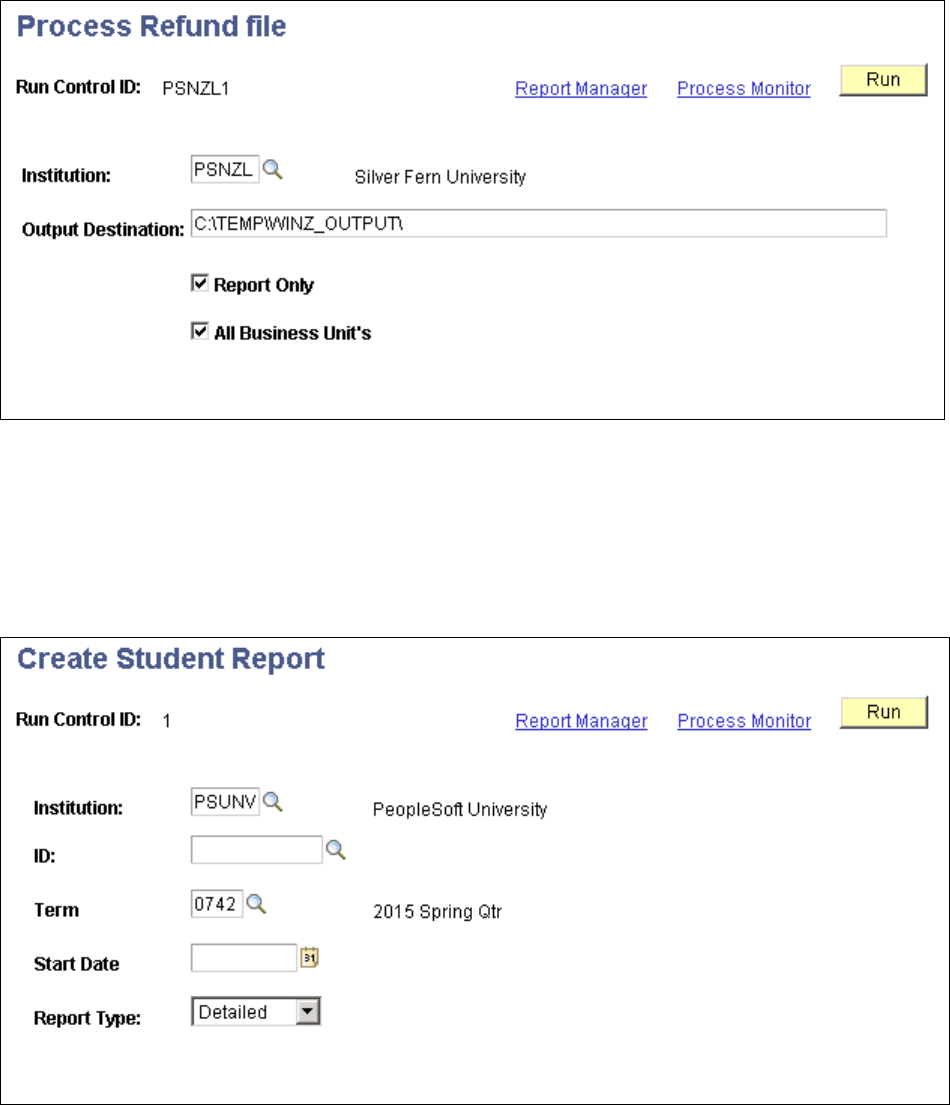
(NZL) StudyLink Processing Chapter 28
756 Copyright © 1988, 2010, Oracle and/or its affiliates. All Rights Reserved.
To create refunds for StudyLink, complete the Batch Refund page as shown in the preceding sample page.
Access the Process Refund File page (Student Financials, StudyLink, Process Refund File).
Process Refund File page
Creating Student Reports
Access the Create Student Report page (Student Financials, StudyLink, Create Student Report).
Create Student Report page

Copyright © 1988, 2010, Oracle and/or its affiliates. All Rights Reserved. 757
Chapter 29
(NZL) New Zealand Qualification Authority
Fees
This section provides an overview of New Zealand Qualification Authority (NZQA) fees and discusses how
to set up NZQA fee information.
Understanding NZQA Fees
NZQA is the New Zealand government body responsible for coordinating the National Qualifications
Framework (NQF). Educational institutions must equate their study offerings to NQF unit standards for the
purpose of cross accreditation.
Institutions are responsible for charging students a Hook-on Fee and a Per Credit Charge on behalf of the
NZQA to cover administration costs. The Hook-on Fee of 25.00 NZD is charged at the time of enrollment if
the student does not have an NZQA ID. If the student already has an NZQA ID, the fee is not charged. After
paying the fee, as the student achieves units, these units are listed in their Record of Learning.
When students enroll in classes, they are also enrolled in the associated unit standards. Each unit standard is
equivalent to a specific number of credits. As units are reported to the NQF, the NZQA charges a fee of 1.00
NZD per credit.
Setting Up NZQA Fee Information
This section discusses how to:
•Set up valid records.
•Set up valid fields.
•Set up fee triggers.
•Set up term fee codes.
•Set up term fees.
•View term sub fee codes.
•Set up term sub fees.
•Set up per credit charges.

(NZL) New Zealand Qualification Authority Fees Chapter 29
758 Copyright © 1988, 2010, Oracle and/or its affiliates. All Rights Reserved.
NQF Fees
The two types of NQF fees that must be charged are:
•Hook-on fees
These fees are charged when a student enrolls in an NQF unit standard for the first time.
•NQF per credit fees
These fees are charged as earned units are reported to the NQF.
Page Used to Set Up NZQA Fees
Page Name Definition Name Navigation Usage
Valid Records SEL_VALID_RECS Set Up SACR, Product
Related, Student Financials,
Valid Records
Set up the records required
for hook-on fees and per
credit charges.
Valid Fields SEL_VALID_VARS Set Up SACR, Product
Related, Student Financials,
Valid Fields
Set up fields required for
hook-on fees and per credit
charges.
Criteria SEL_CRITERIA_TABLE Set Up SACR, Product
Related, Student Financials,
Tuition and Fees, Criteria
Set up criteria types.
Criteria Details SEL_CRITER_TABLE Set Up SACR, Product
Related, Student Financials,
Tuition and Fees, Criteria
Details
View criteria details.
Term Fee Codes TERM_FEE_CD_TABLE Set Up SACR, Product
Related, Student Financials,
Tuition and Fees, Term
Fees, Term Fee Codes
Set up term fee codes.
Term Fees TERM_FEE_TABLE Set Up SACR, Product
Related, Student Financials,
Tuition and Fees, Term
Fees, Term Fees
Set up term fees. The hook-
on fee is treated as a term
fee and follows the steps
defined for setting up a term
fee.
Term Sub Fee Codes TERM_SF_CODE_TABLE Set Up SACR, Product
Related, Student Financials,
Tuition and Fees, Term
Fees, Term Sub Fee Codes
View information about
term sub fee codes.
Term Sub Fees TERM_SUBFEE_TABLE Set Up SACR, Product
Related, Student Financials,
Tuition and Fees, Term
Fees, Term Sub Fees
Set up term sub fees.
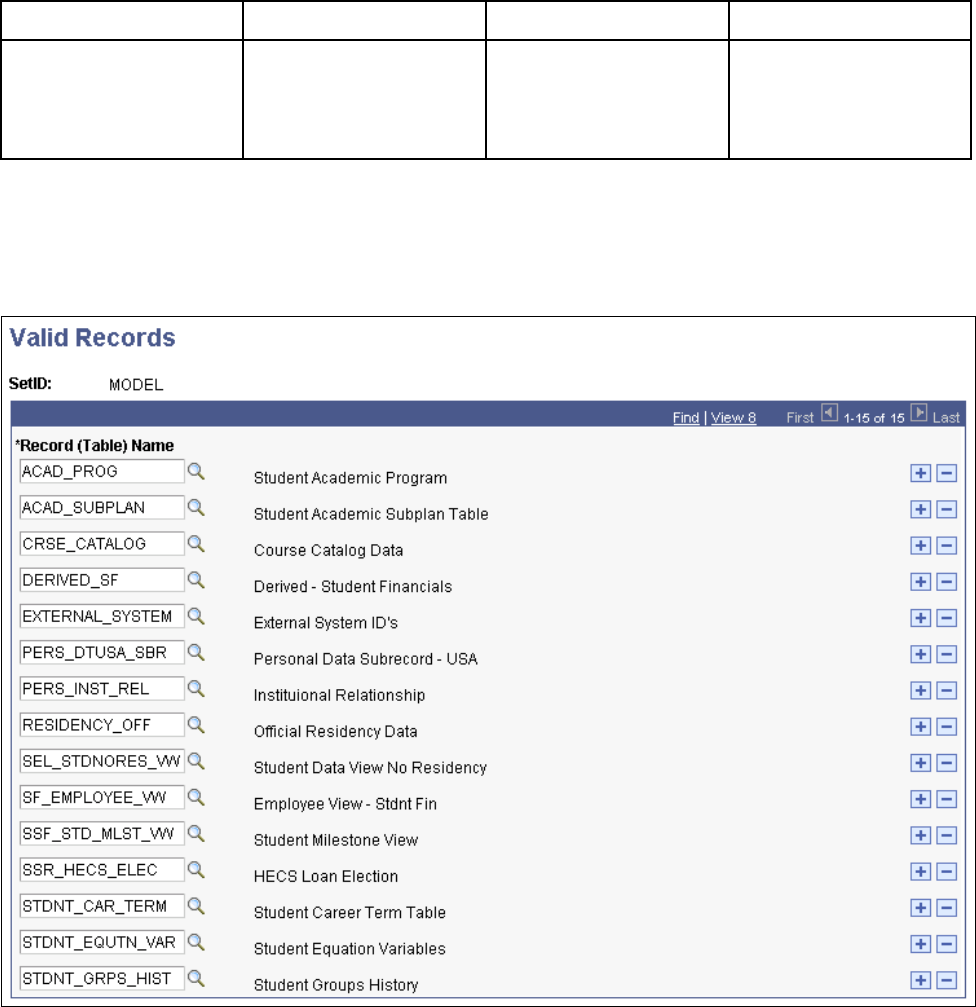
Chapter 29 (NZL) New Zealand Qualification Authority Fees
Copyright © 1988, 2010, Oracle and/or its affiliates. All Rights Reserved. 759
Page Name Definition Name Navigation Usage
Per Credit Charge SSF_PER_CREDIT_CHG Set Up SACR, Product
Related, Student Financials,
New Zealand Defaults, Per
Credit Charge
Set up information to apply
charges based on each
credit for which a student
has enrolled.
Setting Up Valid Records
Access the Valid Records page (Set Up SACR, Product Related, Student Financials, Valid Records).
Valid Records page
Add a row for EXTERNAL_SYSTEM and STDNT_CAR_MLSTN.
Setting Up Valid Fields
Access the Valid Fields page (Set Up SACR, Product Related, Student Financials, Valid Fields).
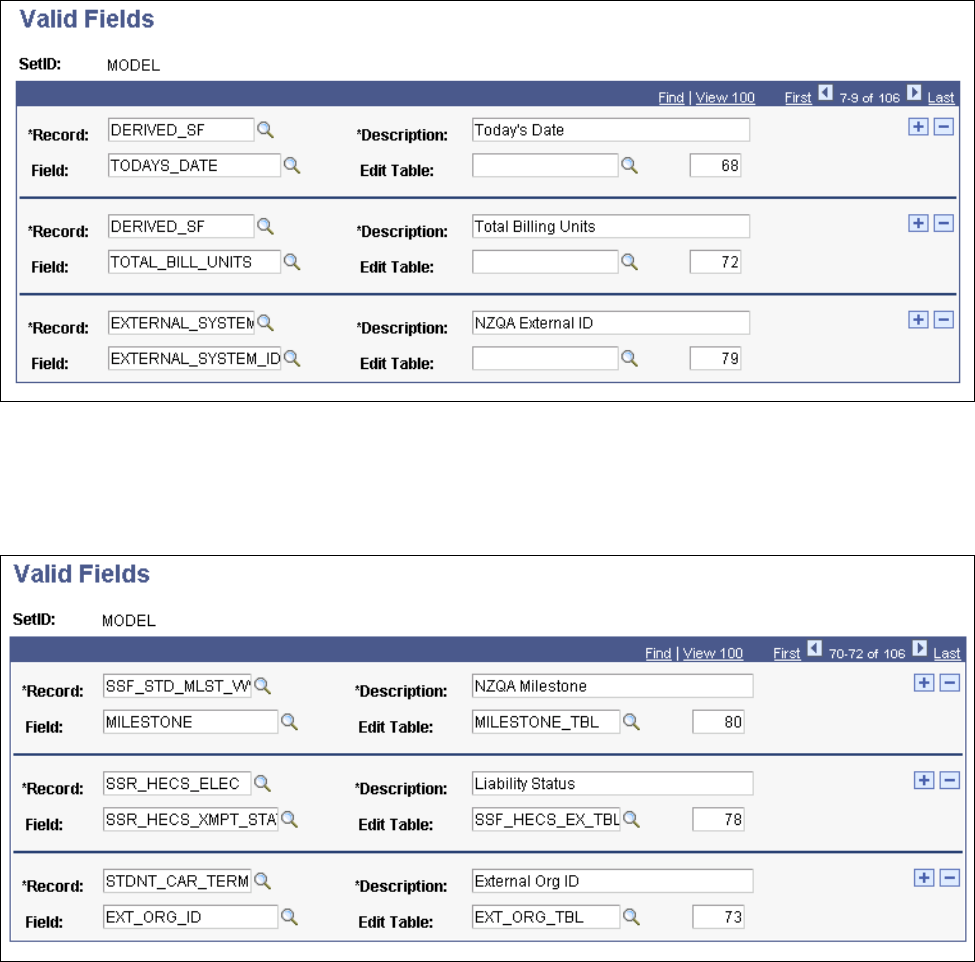
(NZL) New Zealand Qualification Authority Fees Chapter 29
760 Copyright © 1988, 2010, Oracle and/or its affiliates. All Rights Reserved.
Valid Fields page (1 of 2)
For the External_System_ID, change the Description field to NZQA External ID. Add a new field value
named MILESTONE.
Valid Fields page (2 of 2)
You no longer need to modify SFPSTDNT to load EXTERNAL_SYSTEM_ID from the
EXTERNAL_SYSTEM table, where the EXTERNAL_SYSTEM record equals NQA, and MILESTONE from
the SSF_STD_CAR_MLSTN table.
Setting Up Fee Triggers
Access the Criteria page (Set Up SACR, Product Related, Student Financials, Tuition and Fees, Criteria).
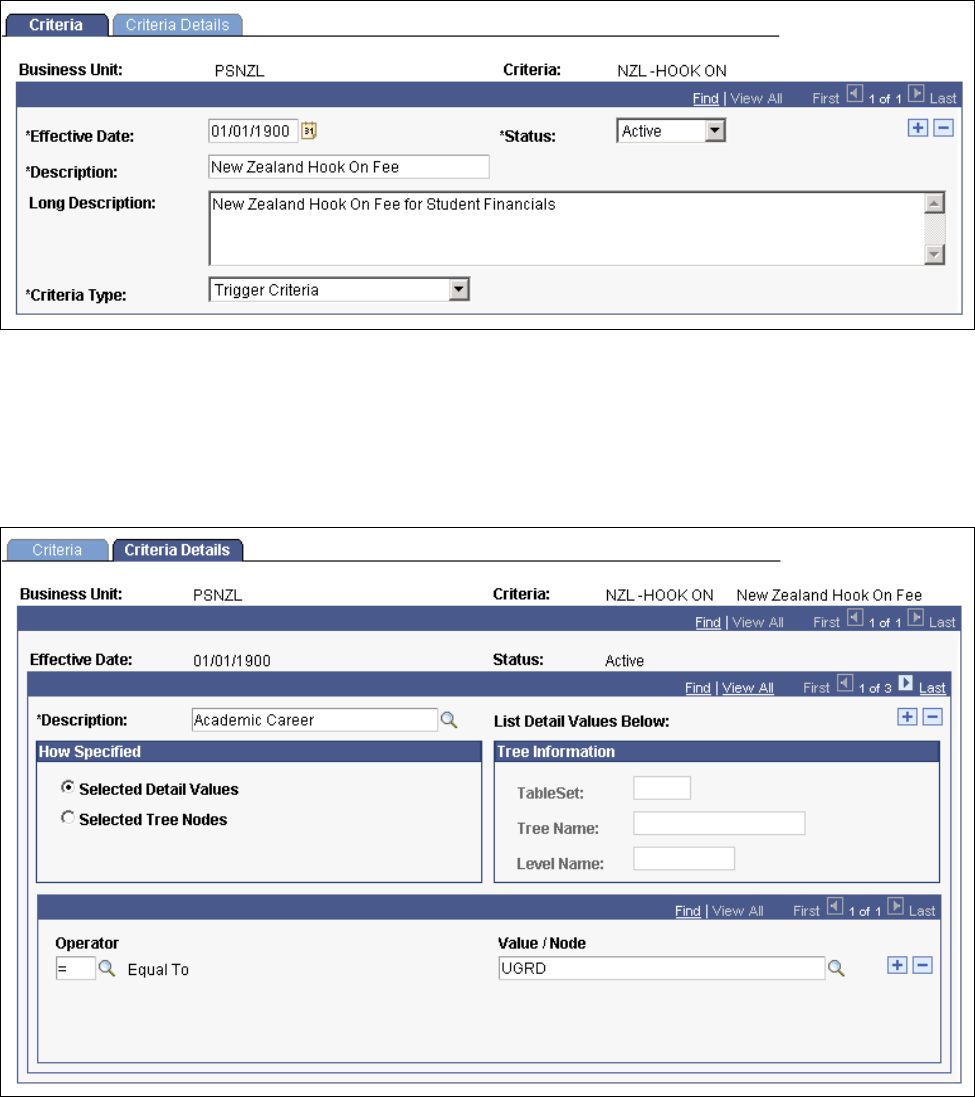
Chapter 29 (NZL) New Zealand Qualification Authority Fees
Copyright © 1988, 2010, Oracle and/or its affiliates. All Rights Reserved. 761
Criteria page
Set up criteria as a fee trigger.
Access the Criteria Details page (Set Up SACR, Product Related, Student Financials, Tuition and Fees,
Criteria Details).
Criteria Details page (1 of 2)
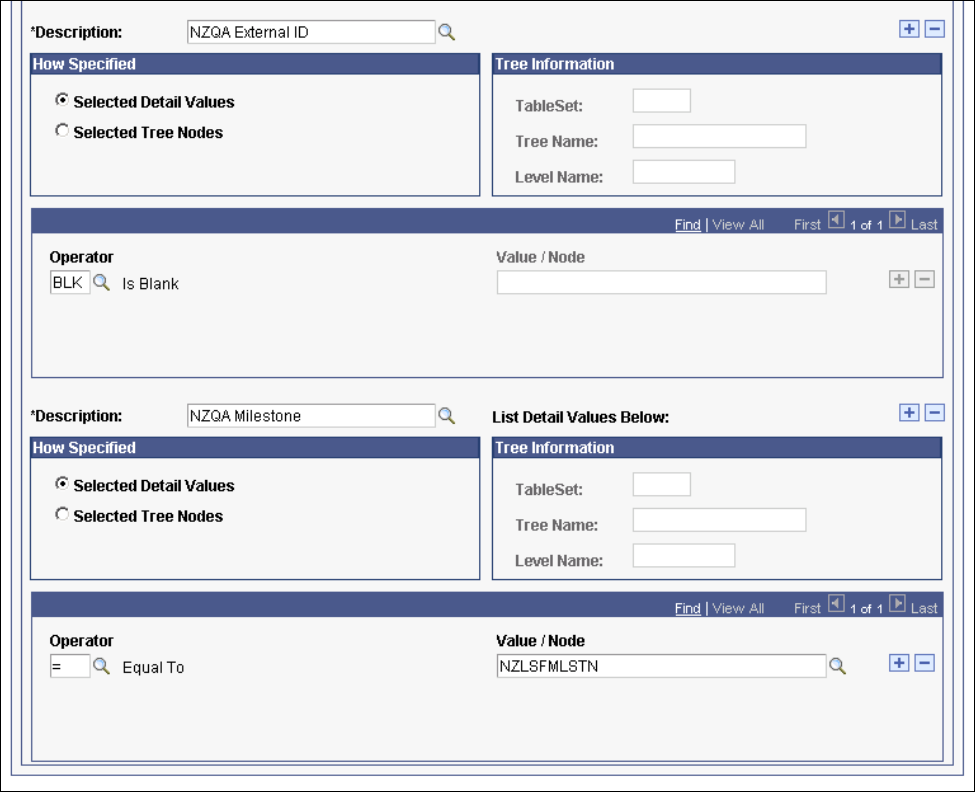
(NZL) New Zealand Qualification Authority Fees Chapter 29
762 Copyright © 1988, 2010, Oracle and/or its affiliates. All Rights Reserved.
Criteria Details page (2 of 2)
Set up the details of the fee trigger.
Setting Up Term Fee Codes
Access the Term Fee Codes page (Set Up SACR, Product Related, Student Financials, Tuition and Fees,
Term Fees, Term Fee Codes).
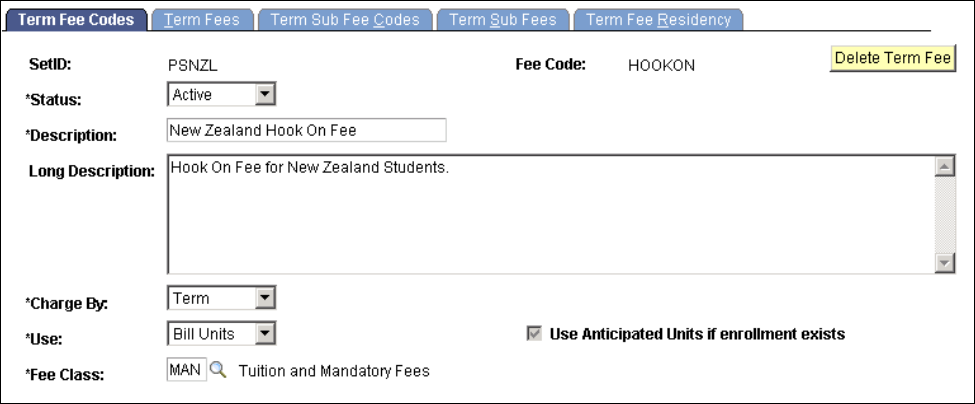
Chapter 29 (NZL) New Zealand Qualification Authority Fees
Copyright © 1988, 2010, Oracle and/or its affiliates. All Rights Reserved. 763
Term Fee Codes page
Set up the term fee to charge hook-on fees using the previous criteria as the fee trigger.
Setting Up Term Fees
Access the Term Fees page (Set Up SACR, Product Related, Student Financials, Tuition and Fees, Term
Fees, Term Fees).
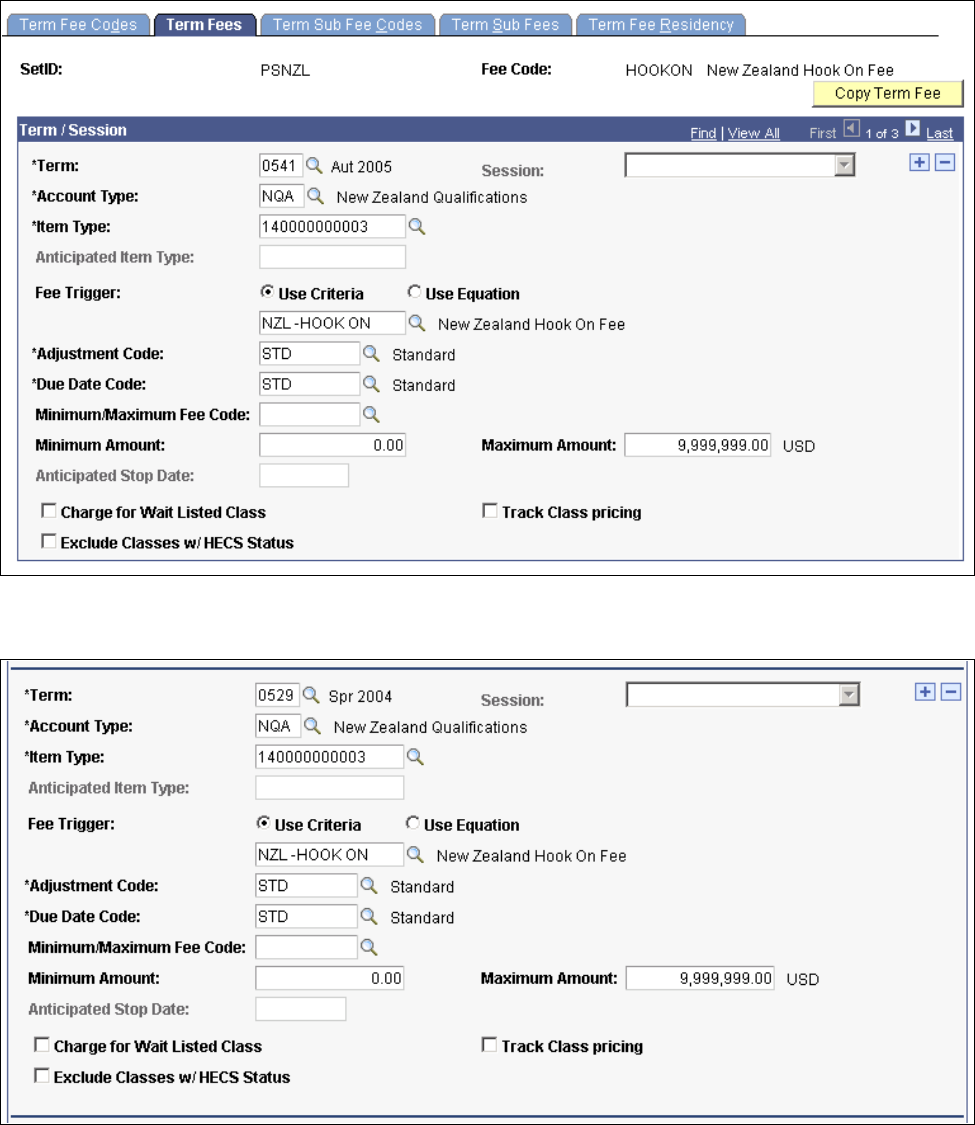
(NZL) New Zealand Qualification Authority Fees Chapter 29
764 Copyright © 1988, 2010, Oracle and/or its affiliates. All Rights Reserved.
Term Fees page (1 of 3)
Term Fees page (2 of 3)
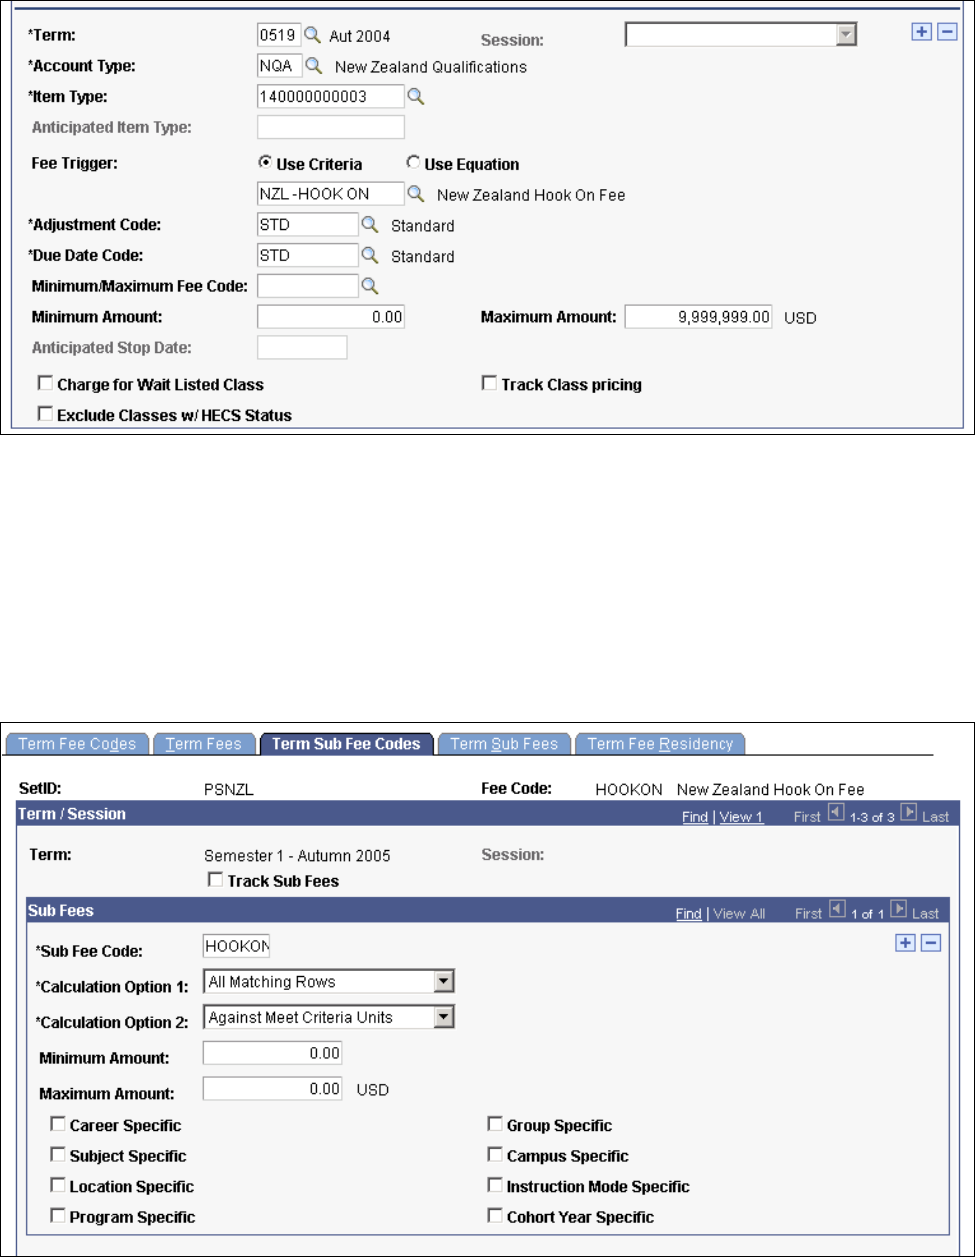
Chapter 29 (NZL) New Zealand Qualification Authority Fees
Copyright © 1988, 2010, Oracle and/or its affiliates. All Rights Reserved. 765
Term Fees page (3 of 3)
View information about the term fee.
Viewing Term Sub Fee Codes
Access the Term Sub Fee Codes page (Set Up SACR, Product Related, Student Financials, Tuition and Fees,
Term Fees, Term Sub Fee Codes).
Term Sub Fee Codes page (1 of 2)
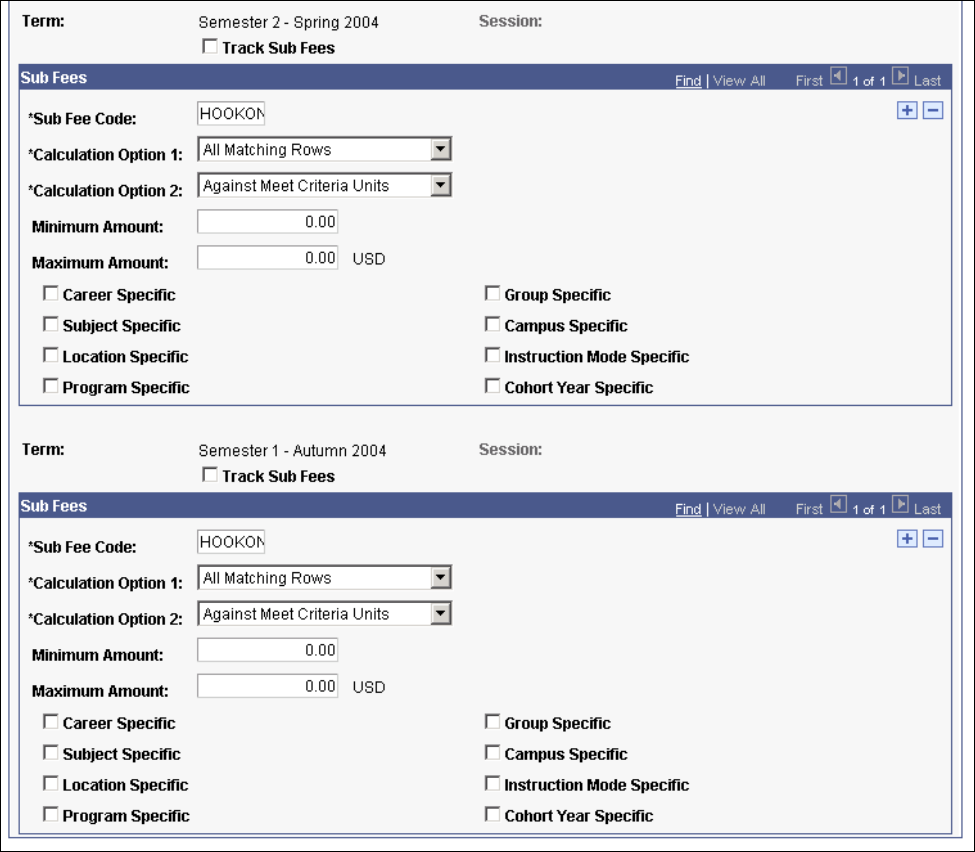
(NZL) New Zealand Qualification Authority Fees Chapter 29
766 Copyright © 1988, 2010, Oracle and/or its affiliates. All Rights Reserved.
Term Sub Fee Codes page (2 of 2)
View default values for the term sub fee code.
Setting Up Term Sub Fees
Access the Term Sub Fees page (Set Up SACR, Product Related, Student Financials, Tuition and Fees, Term
Fees, Term Sub Fees).
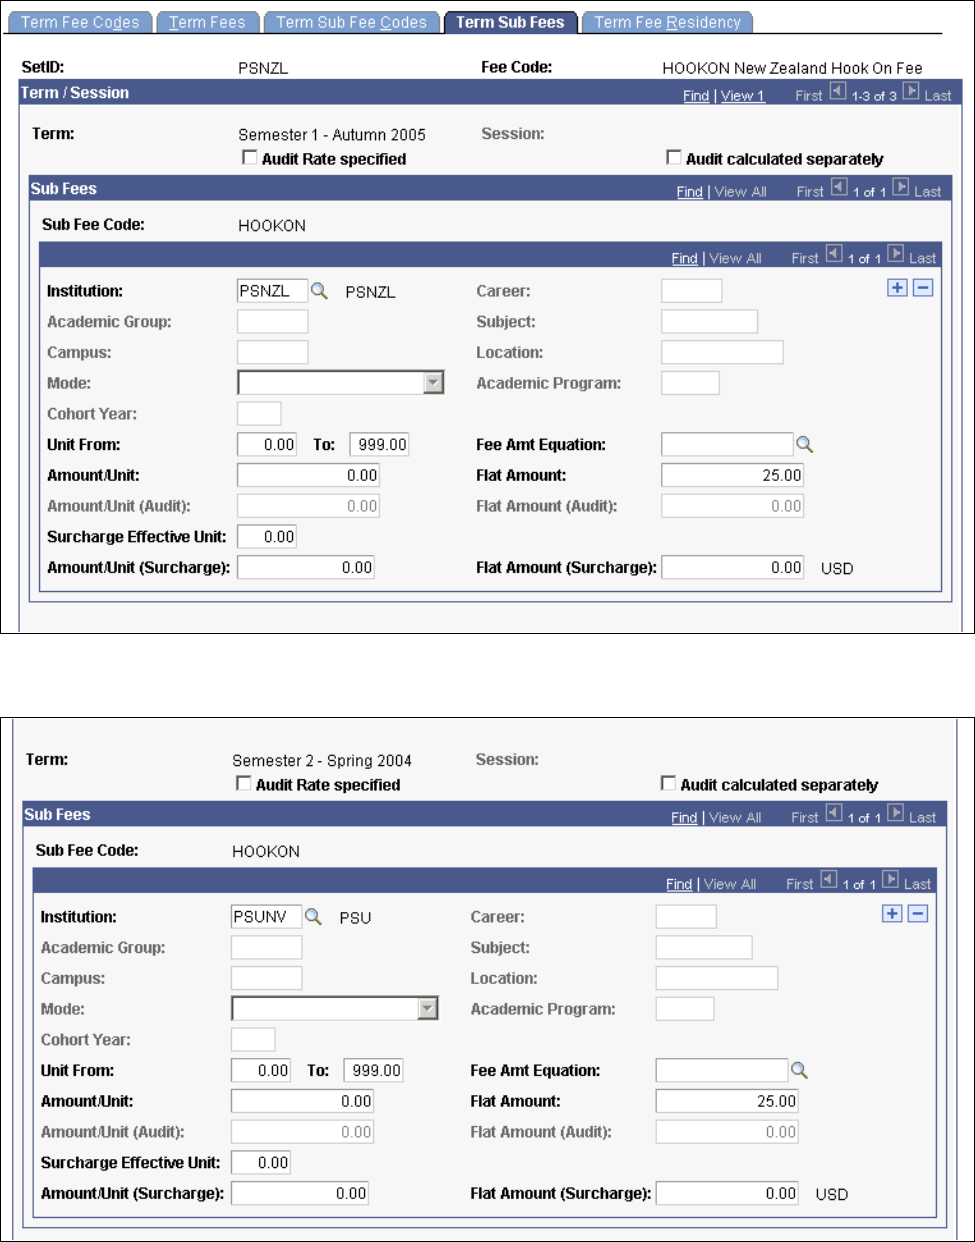
Chapter 29 (NZL) New Zealand Qualification Authority Fees
Copyright © 1988, 2010, Oracle and/or its affiliates. All Rights Reserved. 767
Term Sub Fees page (1 of 3)
Term Sub Fees page (2 of 3)

(NZL) New Zealand Qualification Authority Fees Chapter 29
768 Copyright © 1988, 2010, Oracle and/or its affiliates. All Rights Reserved.
Term Sub Fees page (3 of 3)
View information about the term sub fees.
Setting Up Per Credit Charges
Access the Per Credit Charge page (Set Up SACR, Product Related, Student Financials, New Zealand
Defaults, Per Credit Charge).
Per Credit Charge page
Set up information to apply charges based on each credit for which a student is enrolled.
Chapter 29 (NZL) New Zealand Qualification Authority Fees
Copyright © 1988, 2010, Oracle and/or its affiliates. All Rights Reserved. 769
During the tuition calculation process, the system reads the number of NQF credits determined during the
Student Records process. It then multiplies that NQF credit number by the per credit charge. Student
Financials uses the NQF credit number for the calculation, but the number itself is provided by the Student
Records process.

Copyright © 1988, 2010, Oracle and/or its affiliates. All Rights Reserved. 771
Appendix A
Delivered Workflows for Student
Financials
This appendix discusses delivered workflows for Student Financials.
See Also
Enterprise PeopleTools PeopleBook: Workflow Technology
Enterprise PeopleTools PeopleBook: Using PeopleSoft Applications
Delivered Workflows for Student Financials
This section discusses Student Financials workflows. The workflows are listed alphabetically by workflow
name.
Corporate Collection Worklist
This section discusses the Corporate Collection workflow.
Description
Event Description Assign Corporation to Worklist
Action Description Create a worklist entry for Collector (using User ID or
Role).
Notification Description Worklist
Workflow Objects
Event SSF_COLLECTION_ORG_CI
Workflow Action Automatic

Delivered Workflows for Student Financials Appendix A
772 Copyright © 1988, 2010, Oracle and/or its affiliates. All Rights Reserved.
Role Query:
Roleuser by Oprid Qry (if by User ID)
[ROLE] Roleuse SSF Collector (if by Role)
Email Template (or notification vehicle) Worklist record = COLLECT_WL and PSWORKLIST
Business Process PROCESS_ORG_COLLECTIONS
Business Activity Create Org Collections (if by User ID)
Create Org Role Collections (if by Role)
Business Event Create Worklist
Customer Collection Worklist
This section discusses the Customer Collection workflow.
Description
Event Description Assign Customers to Worklist.
Action Description Create a worklist entry for a Collector (using User ID or
Role).
Notification Description Worklist
Workflow Objects
Event SSF_COLLECTION_CI
Workflow Action Automatic
Role Query:
Roleuser by Oprid Qry (if by User ID)
[ROLE] Roleuse SSF Collector (if by Role)
Email Template (or notification vehicle) Worklist record = COLLECT_WL and PSWORKLIST
Business Process Process Collections
Business Activity Create Collections Worklist (if by User ID)
CREATE_COLLECTIONS_BY_ROLE (if by Role)
Business Event Create Worklist

Appendix A Delivered Workflows for Student Financials
Copyright © 1988, 2010, Oracle and/or its affiliates. All Rights Reserved. 773
Department Receipt Approval
This section discusses the Department Receipt Approval workflow.
Description
Event Description Department Receipt Approval
Action Description Create Worklist entry for Department Receipt Approval
Notification Description Worklist
Workflow Objects
Event No component interface for Receipt approval
Workflow Action Automatic
Role Query:
Roleusers by Rolename query
Email Template (or notification vehicle) Worklist Record – CSH_DEPT_WL
Business Process DEPT_RCPT_APPROVAL
Business Activity Approve Department Receipts
Business Event Send For Approval
Group Posting Approval
This section discusses the Group Posting Approval workflow.
Description
Event Description Group Posting Approval
Action Description Create Worklist entry for Group Approval
Notification Description Worklist
Workflow Objects

Delivered Workflows for Student Financials Appendix A
774 Copyright © 1988, 2010, Oracle and/or its affiliates. All Rights Reserved.
Event SSF_GRP_APPR_CI
Workflow Action Automatic
Role Query:
Roleusers by Rolename query
Email Template (or notification vehicle) Worklist Record - GROUP_WL
Business Process GROUP_APPROVAL
Business Activity Approve Group
Business Event Send For Approval
Refund Approval
This section discusses the Refund Approval workflow.
Description
Event Description Generate Refund Approval
Action Description Send Approval
Notification Description Worklist
Workflow Objects
Event SSF_RFNDAPPR_CI
Workflow Action Automatic
Role Query:
Roleuser RF by RoleName
Email Template (or notification vehicle) Worklist Record - REFUND_WL
Business Process REFUND_APPROVAL
Business Activity Approve Refund
Business Event Send For Approval

Copyright © 1988, 2010, Oracle and/or its affiliates. All Rights Reserved. 775
Appendix B
Student Financials Global Invoicing
Reminder Letters
This appendix provides an overview of customer billing and discusses how to define and issue Student
Financial global invoicing reminder letters:
Defining and Issuing Reminder Letters
This section provides institutions who use global invoicing an example of how to define and issue invoice
Reminder Letters.
Reminder Letters can be generated for open invoices after the due date has passed.
Reminder Letters can include fields such as: original invoice amount, any payments, remaining unpaid
balance and the number of days passed due. Institutions define a minimum balance as selection criteria when
sending reminder letters. A minimum balance can be utilized at the invoice. Like the invoice, the reminder
letter can include a payment voucher.
Reminders are tracked at the student level for each invoice through Campus Community Communications.
Student Financials uses Campus Community Communications Engine to generate reminder letters. The
Communications Engine process supports Population Selection and uses Queries and Equations to determine
who will receive a Reminder Letter and what data will be available to the template.
Note. The information below pertains to the Global Invoicing .
Additional, essential information describing the setup and generation design of communications appears in
PeopleSoft Enterprise Campus Community Fundamentals 9.0 PeopleBook.
Pages Used to Define and Issue Reminder Letters
Page Name Definition Name Navigation Usage
Communication Data
Source
SCC_CG_DTASRC Campus Community,
Communications, Set up
Communications,
Communication Data
Source
Define communication data
source.

Student Financials Global Invoicing Reminder Letters Appendix B
776 Copyright © 1988, 2010, Oracle and/or its affiliates. All Rights Reserved.
Page Name Definition Name Navigation Usage
Report Definition PSXPRPTDEFN Reporting Tools, XML
Publisher, Setup, Report
Definition
Define invoice Reminder
Letter properties.
Report Definition —
Template
PSXPRPTTMPL Reporting Tools, XML
Publisher, Setup, Report
Definition, Template
Define template properties.
Report Definition — Output PSXPRPTOUT Reporting Tools, XML
Publisher, Setup, Report
Definition, Output
Define output properties.
Report Definition —
Bursting
PSXPRPTBURST Reporting Tools, XML
Publisher, Setup, Report
Definition, Bursting
Define bursting properties.
Standard Letters SCC_STN_LTR_TBL Campus Community,
Communications, Set up
Communications, Standard
Letter Table CS
Set up standard letter.
Communication Speed
Keys
COMM_SPDKEY_TABLE Set Up SACR, Common
Definitions,
Communications,
Communication Speed Key
Table
Define communication key.
Event 3C Groups EVNT_GRP_3C_TABLE Campus Community, 3C
Engine, Set Up 3C Engine,
Event 3C Group
Define 3C Event Group.
Event Definition EVNT_3CS_SETUP Campus Community, 3C
Engine, Set Up 3C Engine,
Event Definition
Set up event definition.
3C Engine Parameters RUN_CNTL_3CENGINE Campus Community, 3C
Engine, Run 3C Engine Define 3C Engine
parameters.
Manage Duplicate
Assignment
MANAGE_DUP_ASSIGN Campus Community, 3C
Engine, Run 3C Engine,
Manage Duplicate
Assignment
Define Manage Duplicate
Assignment.
Person Communication COMM_MGMT1 Campus Community,
Communications, Person
Communications,
Communication
Management
Review generated
communication.
Selection Parameters SCC_CG_RUNCTL1 Campus Community,
Communications,
Communication Generation
Running Communication
Generation process.

Appendix B Student Financials Global Invoicing Reminder Letters
Copyright © 1988, 2010, Oracle and/or its affiliates. All Rights Reserved. 777
Page Name Definition Name Navigation Usage
Process Parameters SCC_CG_RUNCTL2 Campus Community,
Communications,
Communication Generation,
Process Parameters
Set up process parameters.
View Communication SCC_CG_ATTREL Campus Community,
Communications,
Communication Generation,
Process Parameters, View
Communication
View Reminder Letter.
Defining Communication Data Source
Access the Communication Data Source page (Campus Community, Communications, Set up
Communications, Communication Data Source).
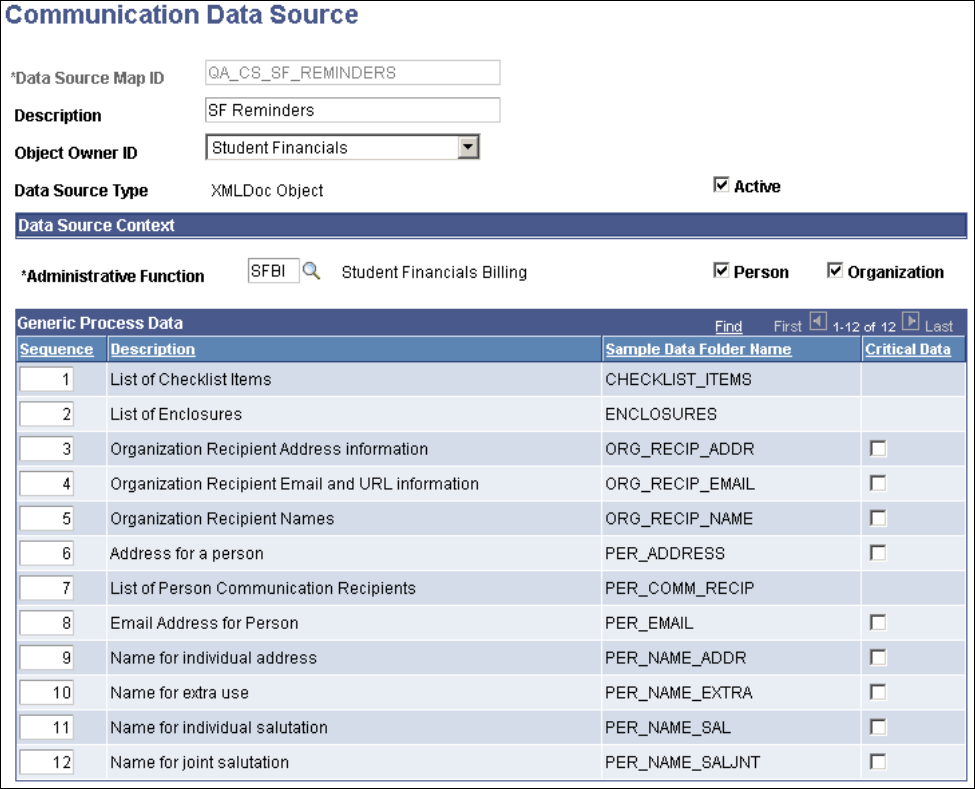
Student Financials Global Invoicing Reminder Letters Appendix B
778 Copyright © 1988, 2010, Oracle and/or its affiliates. All Rights Reserved.
Communication Data Source page (1 of 2)
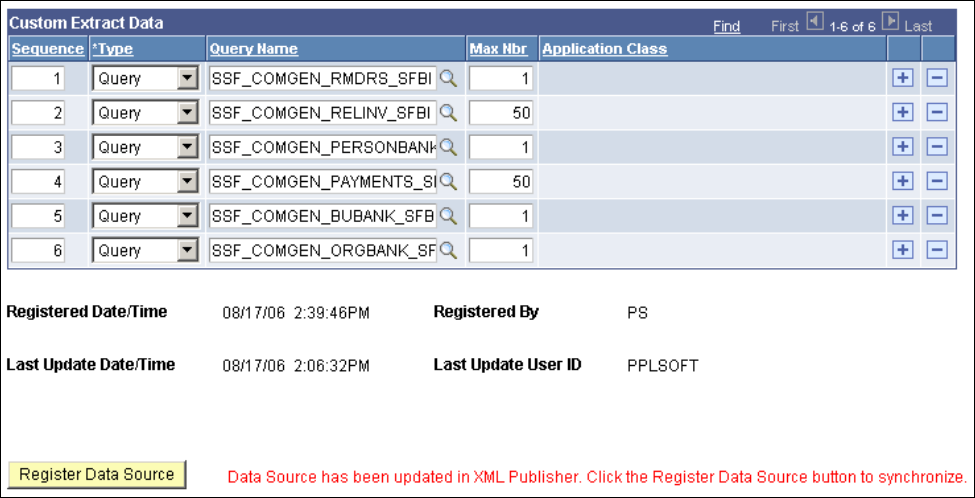
Appendix B Student Financials Global Invoicing Reminder Letters
Copyright © 1988, 2010, Oracle and/or its affiliates. All Rights Reserved. 779
Communication Data Source page (2 of 2)
Click Register Data Source if this is a new Data Source or if the Communications Data Source definition has
been modified.
Defining Invoice Reminder Letter Properties
Access the Report Definition page (Reporting Tools, XML Publisher, Setup, Report Definition).
Select the QA_CS_SF_RMD report (Invoice Reminder Letters).
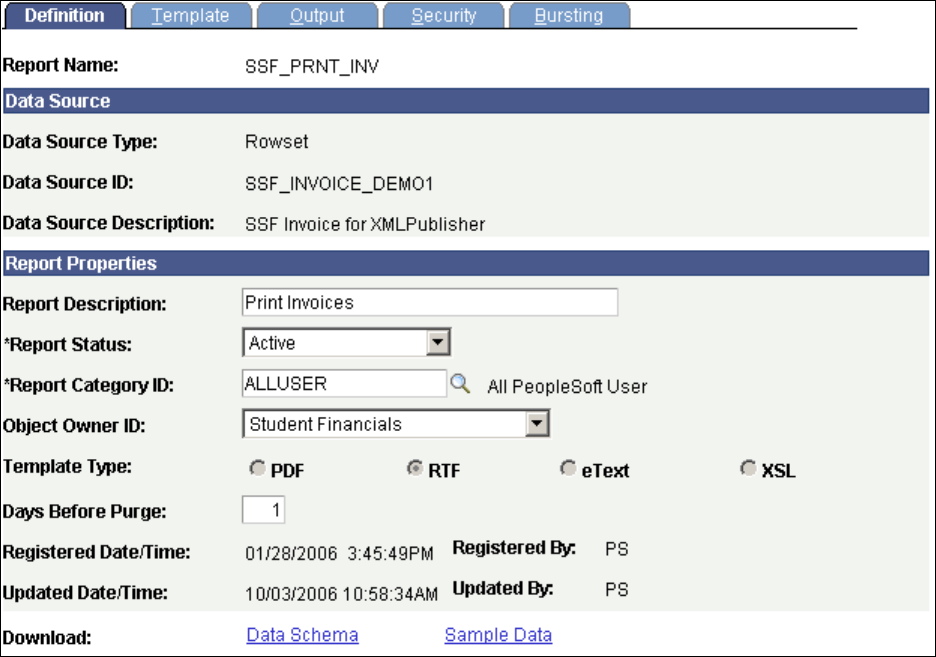
Student Financials Global Invoicing Reminder Letters Appendix B
780 Copyright © 1988, 2010, Oracle and/or its affiliates. All Rights Reserved.
Report Definition page
Defining Template Properties
Access the Report Definition — Template page (Reporting Tools, XML Publisher, Setup, Report Definition,
Template).
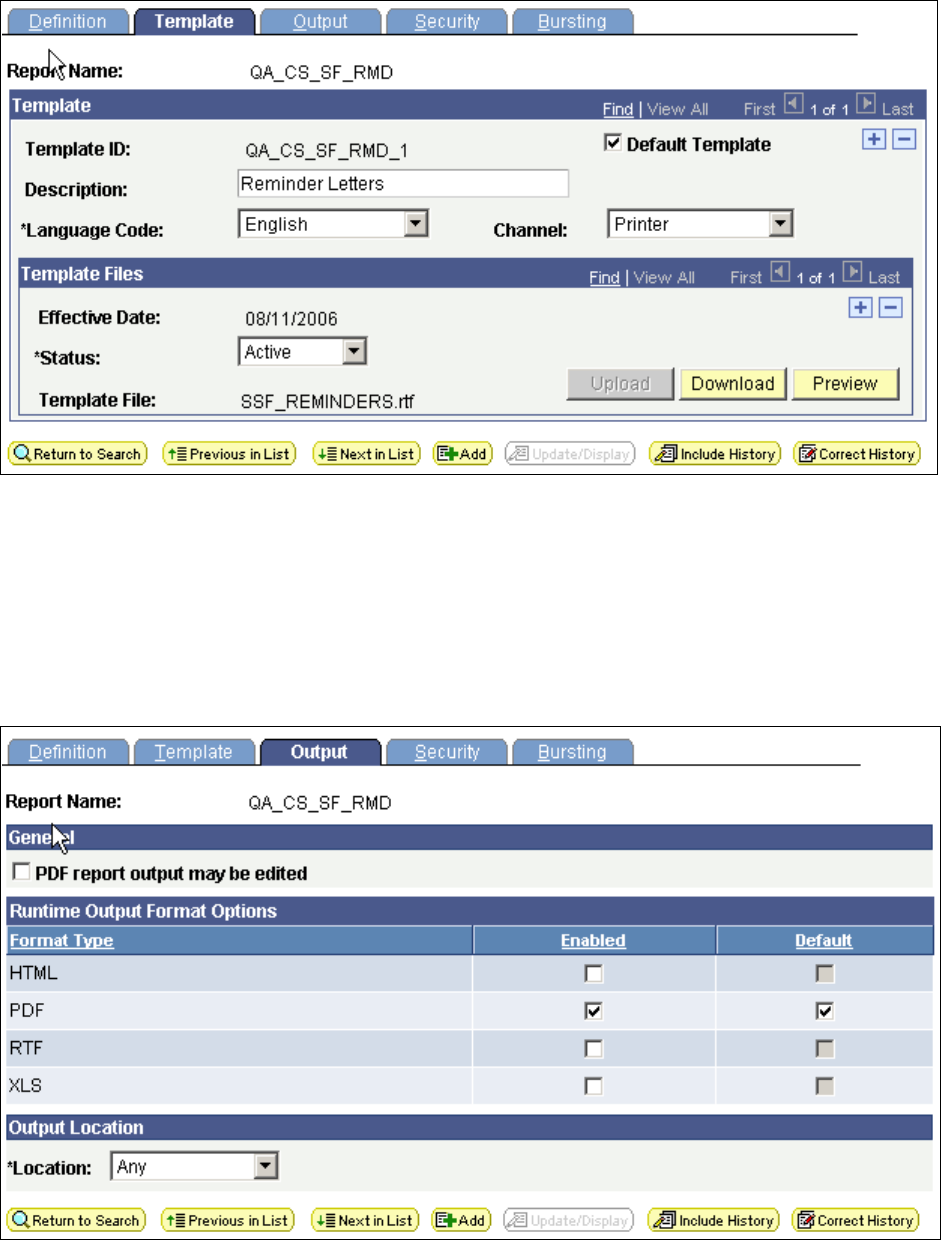
Appendix B Student Financials Global Invoicing Reminder Letters
Copyright © 1988, 2010, Oracle and/or its affiliates. All Rights Reserved. 781
Report Definition — Template page
Defining Output Properties
Access the Report Definition — Output page (Reporting Tools, XML Publisher, Setup, Report Definition,
Output).
Report Definition — Output page
For Format Type, select Enabled and Default for PDF.
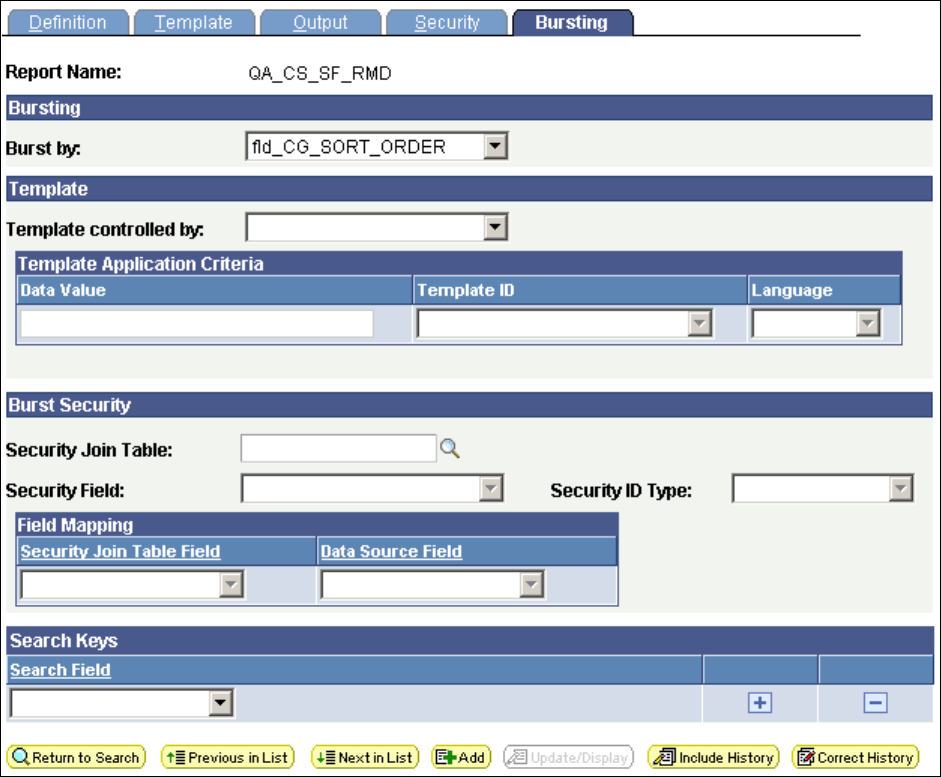
Student Financials Global Invoicing Reminder Letters Appendix B
782 Copyright © 1988, 2010, Oracle and/or its affiliates. All Rights Reserved.
Defining Bursting Properties
Access the Report Definition — Bursting page (Reporting Tools, XML Publisher, Setup, Report Definition,
Bursting).
Report Definition — Bursting page
For Burst by, select fld_CG_SORT_ORDERto he reminder letter will be used by the Comm Gen process.
Setting Up Standard Letter
Access the Standard Letters page (Campus Community, Communications, Set up Communications, Standard
Letter Table CS).
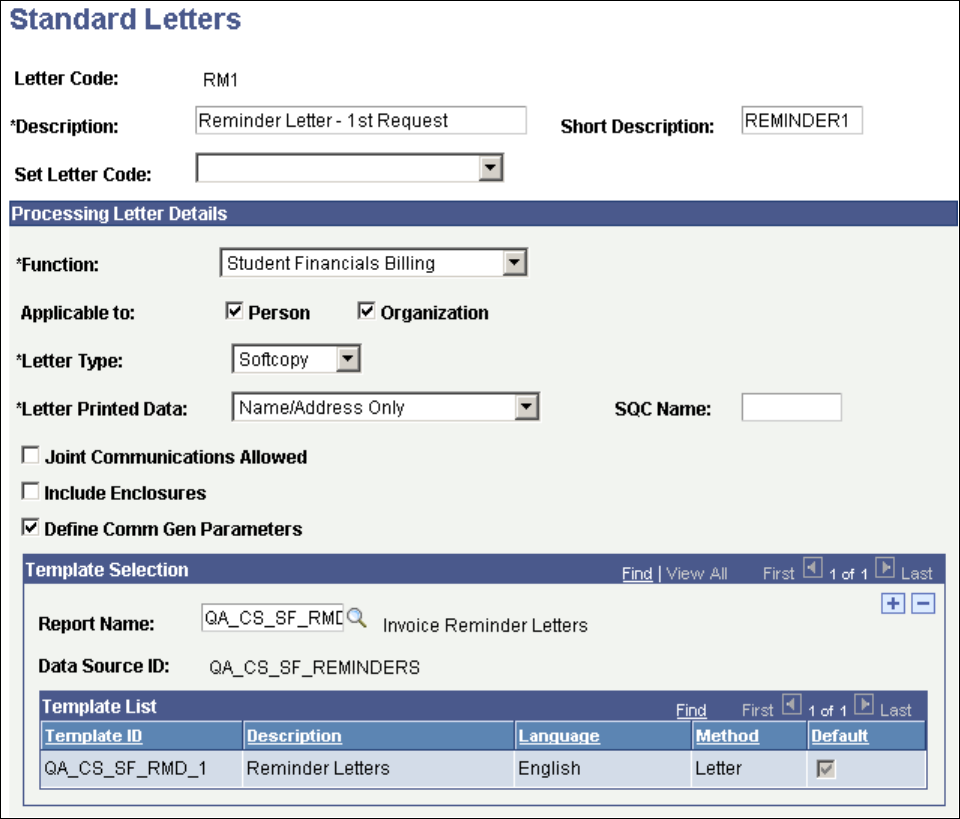
Appendix B Student Financials Global Invoicing Reminder Letters
Copyright © 1988, 2010, Oracle and/or its affiliates. All Rights Reserved. 783
Standard Letters page
Select the appropriate RM1 Letter Code and the Define Com Gen Parameters check box.
check box.
Template Selection
Select the QA_CS_SF_RMDreport name (Invoice Reminder Letters).
Defining Comm Key
Access the Communication Speed Keys page (Set Up SACR, Common Definitions, Communications,
Communication Speed Key Table).
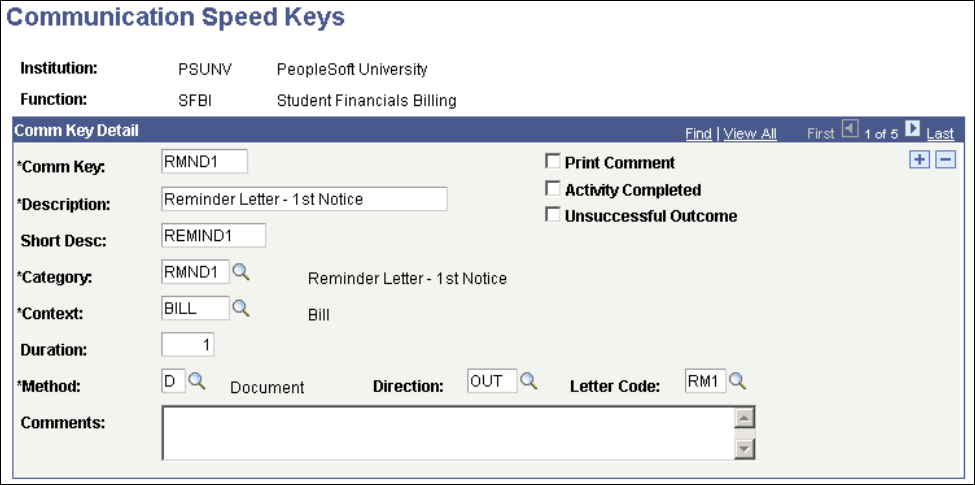
Student Financials Global Invoicing Reminder Letters Appendix B
784 Copyright © 1988, 2010, Oracle and/or its affiliates. All Rights Reserved.
Communication Speed Keys page
Select the appropriate RM1 Comm Key.
*Comm Key: Enter the name of the communication speed key to represent this set of
communication elements
Category Enter the communication category to associate with this communication speed
key
Context Enter the communication context to associate with this communication speed
key.
Duration Enter Document as method of the communication that you are associating with
this communication speed key.
Direction Enter Outgoing as the direction of the communication you are associating with
this communication speed key.
Letter Code Enter RM1 as the code you are associating with this communication speed key
Defining Event 3C Groups
Access the Event 3C Groups page (Campus Community, 3C Engine, Set Up 3C Engine, Event 3C Group).
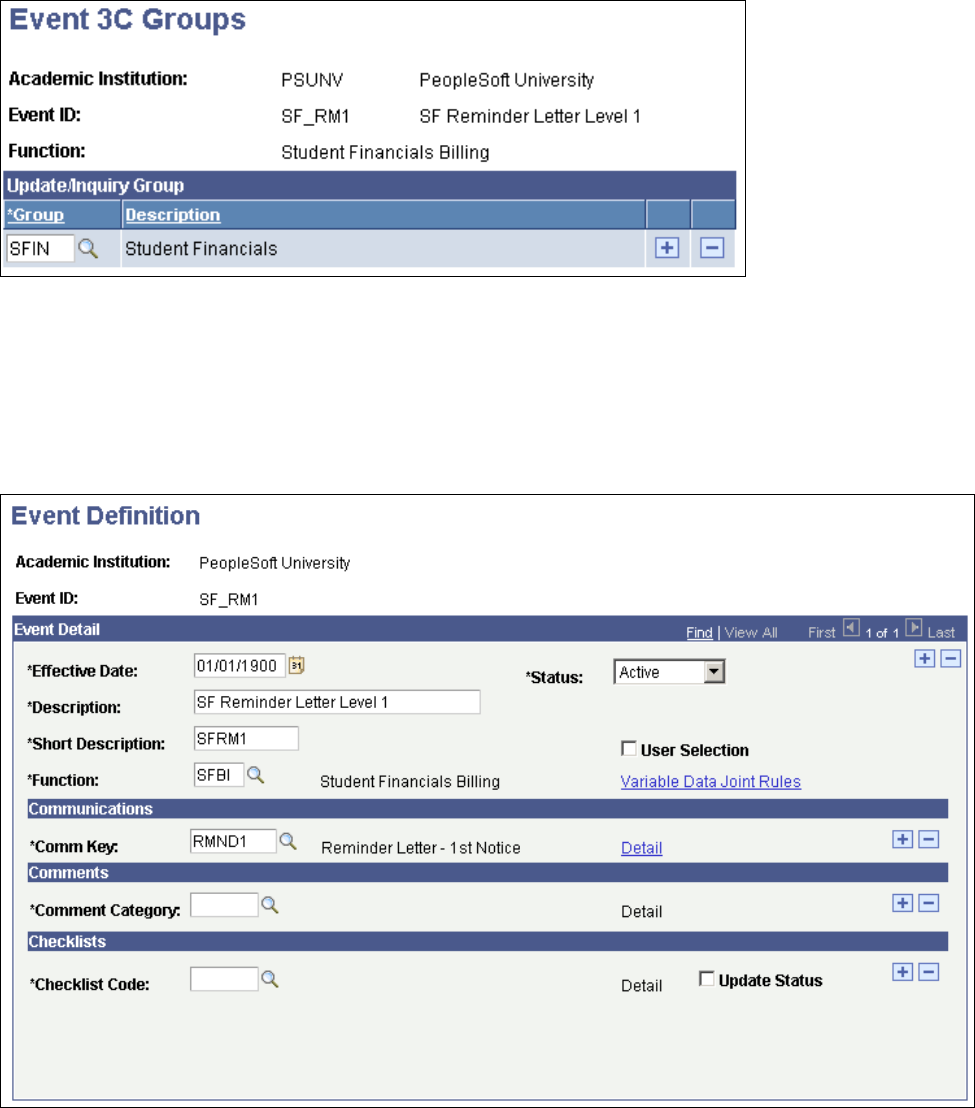
Appendix B Student Financials Global Invoicing Reminder Letters
Copyright © 1988, 2010, Oracle and/or its affiliates. All Rights Reserved. 785
Event 3C Groups page
Defining Event Definition
Access the Event Definition page (Campus Community, 3C Engine, Set Up 3C Engine, Event Definition).
Event Definition page
Select the appropriate SF RM1 Event ID.
Defining 3C Engine Parameters
Access the 3C Engine Parameters page (Campus Community, 3C Engine, Run 3C Engine).
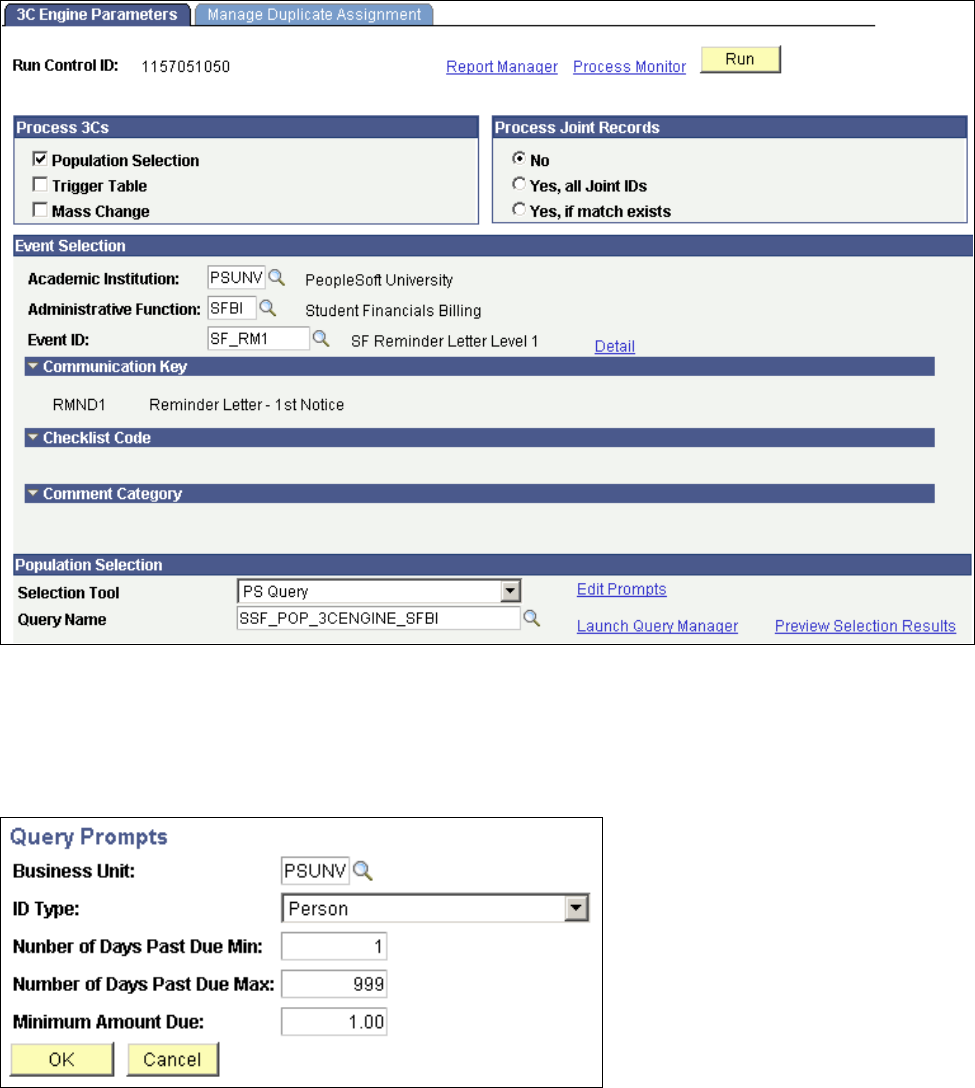
Student Financials Global Invoicing Reminder Letters Appendix B
786 Copyright © 1988, 2010, Oracle and/or its affiliates. All Rights Reserved.
3C Engine Parameters page
Select the SSF_POP_3CENGINE_SFBI query
In the Population Selection group box, select Edit Prompts to access the Query Prompts page.
Query Prompts page.
Defining Manage Duplicate Assignment
Access the Manage Duplicate Assignment page (Campus Community, 3C Engine, Run 3C Engine, Manage
Duplicate Assignment).
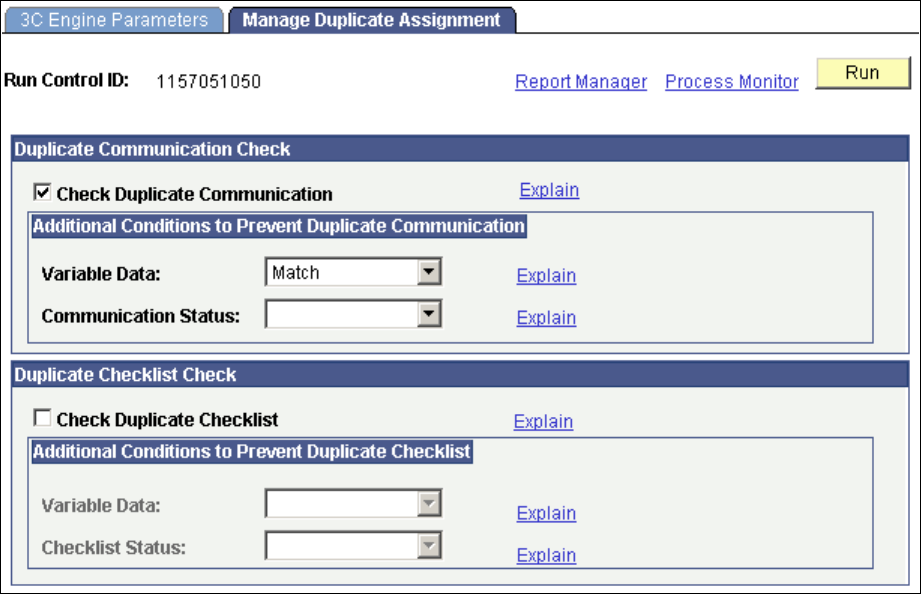
Appendix B Student Financials Global Invoicing Reminder Letters
Copyright © 1988, 2010, Oracle and/or its affiliates. All Rights Reserved. 787
Manage Duplicate Assignment page
Check Duplicate Communication
Select the Check Duplicate Communication check box.
In the Variable Data field within the Additional Conditions to Prevent Duplicate Communication group box,
select Match.
Click Run to run the process.
Reviewing the Generated Communication
Access the Person Communication page (Campus Community, Communications, Person Communications,
Communication Management).
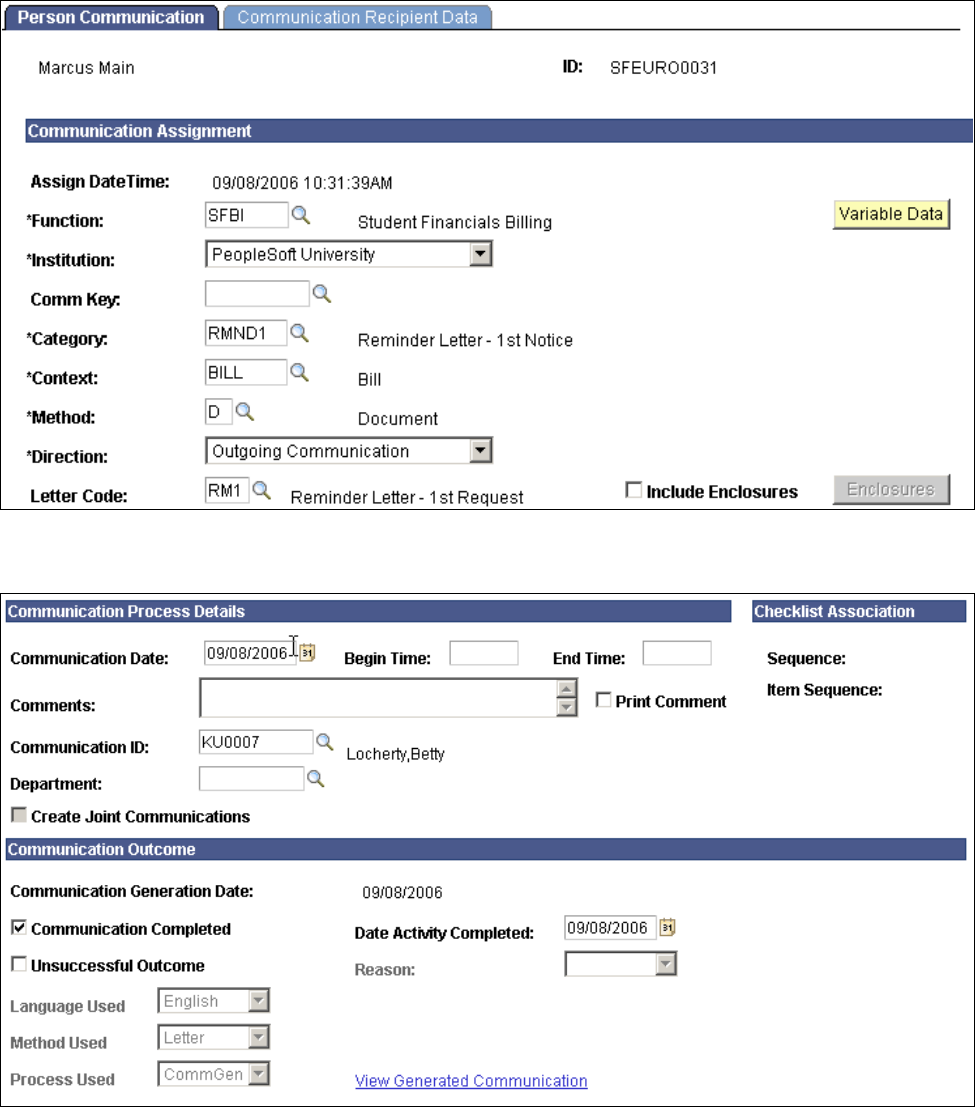
Student Financials Global Invoicing Reminder Letters Appendix B
788 Copyright © 1988, 2010, Oracle and/or its affiliates. All Rights Reserved.
Person Communication page (1 of 2)
Person Communication page (2 of 2)
Note the Communication Completed check box is not selected.
Running Communication Generation Process
Access the Selection Parameters page (Campus Community, Communications, Communication Generation).
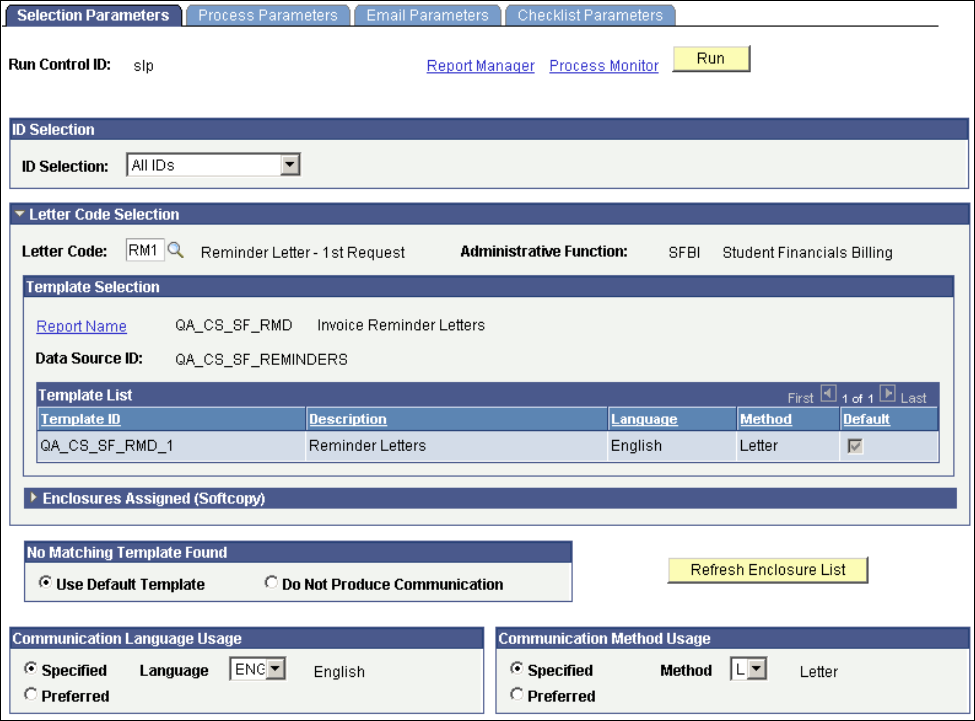
Appendix B Student Financials Global Invoicing Reminder Letters
Copyright © 1988, 2010, Oracle and/or its affiliates. All Rights Reserved. 789
Selection Parameters page
Setting Up Process Parameters
Access the Process Parameters page (Campus Community, Communications, Communication Generation,
Process Parameters).
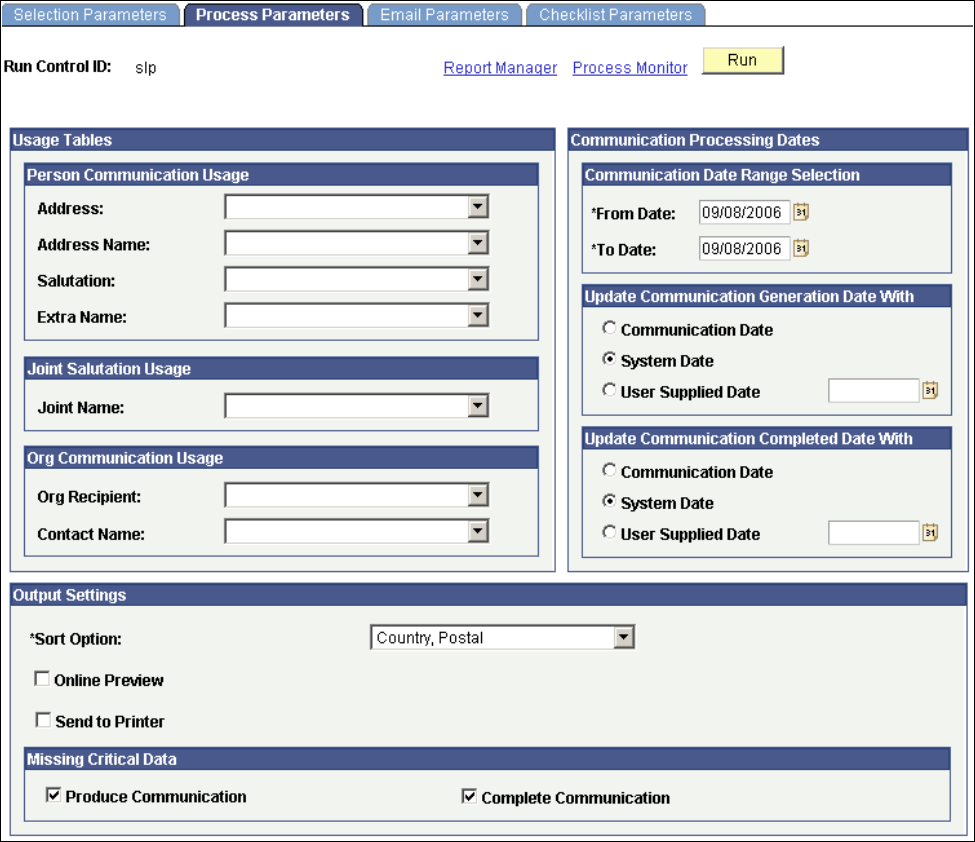
Student Financials Global Invoicing Reminder Letters Appendix B
790 Copyright © 1988, 2010, Oracle and/or its affiliates. All Rights Reserved.
Process Parameters page
Output Settings
In the Missing Critical Data group box, select the Produce Communication check box and the Complete
Communication check box.
Reviewing Communication
Access the Person Communication page (Campus Community, Communications, Person Communications,
Communication Management).

Appendix B Student Financials Global Invoicing Reminder Letters
Copyright © 1988, 2010, Oracle and/or its affiliates. All Rights Reserved. 791
Person Communication page (1 of 2)
Person Communication page (2 of 2)
Note the Communication Completed check box is selected.
Click View Generated Communication to view the reminder letter.
Access the Reminder Letter for Global Invoicing.
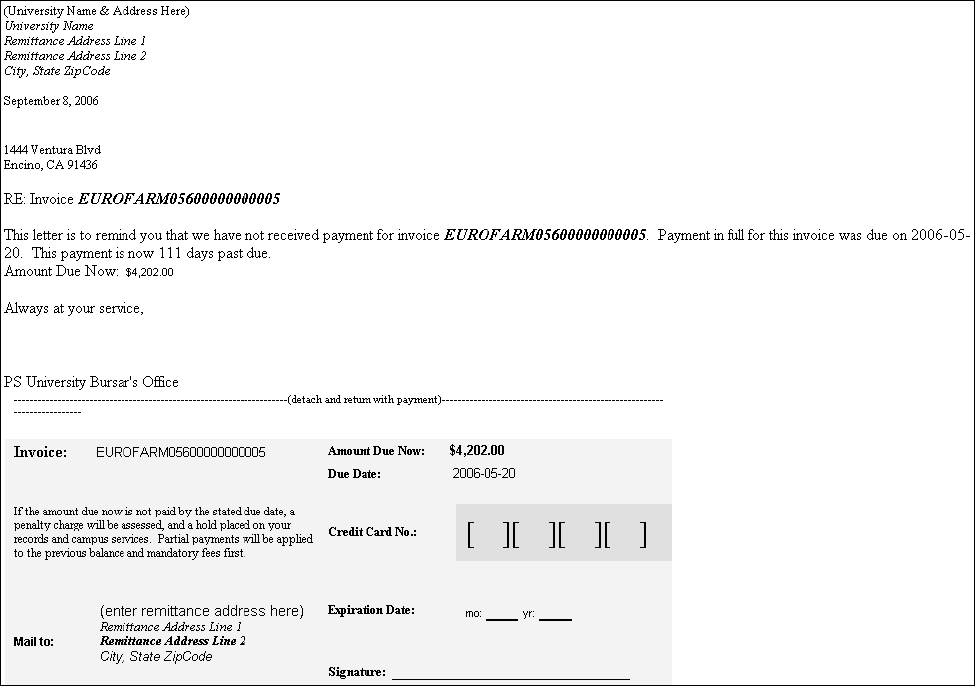
Student Financials Global Invoicing Reminder Letters Appendix B
792 Copyright © 1988, 2010, Oracle and/or its affiliates. All Rights Reserved.
Reminder Letter for Global Invoicing

Copyright © 1988, 2010, Oracle and/or its affiliates. All Rights Reserved. 793
Appendix C
PeopleSoft Student Financials Reports
This appendix provides an overview of Student Financials reports, and enables you to view a summary tables
of all reports.
Note. For samples of some of these reports, see the Portable Document Format (PDF) files published on CD-
ROM with your documentation.
See Also
Enterprise PeopleTools PeopleBook: Process Scheduler
PeopleSoft Student Financials Reports: A to Z
This table lists the Student Financials reports, sorted alphanumerically by report ID.
•Crystal and SQR Reports
•Setup Table Reports
Crystal and SQR Reports
Report ID and Report
Name Description Navigation Run Control Page
SF707
Group Summary Report
Group posting summary
report of student financial
system. (Crystal)
Student Financials, Charges
and Payments, Group
Processing, Group
Summary
RUNCTL_SF707
SF708
Fee Calculation Errors
Report
This report lists all error
messages for a batch ID.
(Crystal)
Student Financials, Tuition
and Fees, Calculate Batch
Tuition, Tuition Calc Error
Report
RUNCTL_SF708
SF709
Fees After Calculation
Report
This report lists all tuition
and fees for a student.
(Crystal)
Student Financials, Tuition
and Fees, Calculate Batch
Tuition, Fees After
Calculation Report
RUNCTL_SF709

PeopleSoft Student Financials Reports Appendix C
794 Copyright © 1988, 2010, Oracle and/or its affiliates. All Rights Reserved.
Report ID and Report
Name Description Navigation Run Control Page
SF710
Fees Prior to Posting Report
This report lists a student's
tuition and fees prior to
posting. (Crystal)
Student Financials, Tuition
and Fees, Calculate Batch
Tuition, Fees Prior to
Posting Report
RUNCTL_SF710
SF711ABI
Crystal Bill for Student
Financials
This report generates a
student bill for print using
Crystal. (Crystal)
Student Financials, Bill
Customers, Student Bills,
Print Invoice Crystal
RUNCTL_SF711AB
SF726
Daily Activity
Summary of daily posting
activity, by Item type Code.
(Crystal)
Student Financials, Charges
and Payments, Posting
Reports, Daily Activity
RUNCTL_SF726
SF727
Daily Posting Activity
Daily posting activity for
student post. (Crystal) Student Financials, Charges
and Payments, Posting
Reports, Daily Posting
Activity
RUNCTL_SF727
SF728
Enrollment Cancellation
Report
This report lists all students
who have been processed
for enrollment cancellation
for term or class
cancellations. (Crystal)
Student Financials, Tuition
and Fees, Cancellation,
Report Cancellation
RUNCTL_SF728
SF732
Refund Customers Rpt
This report lists information
on individual refunds.
(Crystal)
Student Financials,
Refunds, Reports,
Individual Refunds
RUNCTL_SF732
SF736
Run Organization Report
Refund External
Organization Report by
business unit. (Crystal)
Student Financials,
Refunds, Reports,
Corporation Refunds
RUNCTL_SF732
SF750
Receipts per Business Day
This report lists all
information about receipts
processed on a specific
business date in cashiering.
(Crystal)
Student Financials,
Cashiering, Balance by
Business Day, Receipts By
Business Date
RUNCTL_SF750
SF750R
Receipt by Number
This report generates a
cashiering receipt for print
using Crystal. It lists all
receipt information.
(Crystal)
Student Financials,
Cashiering, Balance by
Business Day, Receipts By
Number Summary
RUNCTL_SF750R
SF753ABI
Crystal Org Bill for SF
This report generates an
external organization bill
for print using Crystal.
(Crystal)
Student Financials, Bill
Customers, Corporate Bills,
Print Invoice Crystal
RUNCTL_SF753AB_ORG
SF754
Students in Collections
This report lists students
placed in collections.
(Crystal)
Student Financials,
Collections, Customers in
Collection
RUNCTL_COLLECT_SF

Appendix C PeopleSoft Student Financials Reports
Copyright © 1988, 2010, Oracle and/or its affiliates. All Rights Reserved. 795
Report ID and Report
Name Description Navigation Run Control Page
SF755
Organizations in
Collections
This report lists all
organizations placed in
collections. (Crystal)
Student Financials,
Collections, Corporations in
Collection
RUNCTL_COLLECT_SF
SF756
Group Detail Report
Group posting detail report.
(Crystal) Student Financials, Charges
and Payments, Group
Processing, Group Detail
RUNCTL_SF707
SF757
Receipts by Deposit ID
This report lists all
information about receipts
processed using a specified
deposit ID within
cashiering. (Crystal)
Student Financials,
Cashiering, Balance By
Business Day, Receipts by
Deposit ID Summary
RUNCTL_SF757
SF783
Late Fees Report
This report lists all
individuals who were
assessed late fees for a
given batch ID. (Crystal)
Student Financials, Charges
and Payments, Late Fees,
Late Fees Report
RUNCTL_SF783
SF800
Business Unit Permission
List
SF security listing of
business units secured by a
permission list. (Crystal)
Set Up SACR, Security,
Secure Student Financials,
Permission List Reports,
Business Unit
PRCSRUNCNTL_SF
SF801
Business Unit User ID
SF security listing of
business units secured by a
single user ID. (Crystal)
Set Up SACR, Security,
Secure Student Financials,
User Reports, Business Unit
PRCSRUNCNTL_SF
SF802
Cashier Office Permission
List
This report lists any
permission lists with
security for specified
cashier offices. (Crystal)
Set Up SACR, Security,
Secure Student Financials,
Permission List Reports,
Cashier Office
PRCSRUNCNTL_SF
SF803
Cashier Office User ID
This report lists all user IDs
with security for specified
cashier offices. (Crystal)
Set Up SACR, Security,
Secure Student Financials,
User Reports, Cashier
Office
PRCSRUNCNTL_SF
SF804
Credit Card Permission List
This report lists any
permission lists with credit
card security. (Crystal)
Set Up SACR, Security,
Secure Student Financials,
Permission List Reports,
Credit Card
PRCSRUNCNTL_SF
SF805
Credit Card User ID
This report lists any user
IDs with credit card
security. (Crystal)
Set Up SACR, Security,
Secure Student Financials,
User Reports, Credit Card
PRCSRUNCNTL_SF
SF806
Company Permission List
SF security listing of
companies secured by a
permission list. (Crystal)
Set Up SACR, Security,
Secure Student Financials,
Permission List Reports,
Company
PRCSRUNCNTL_SF

PeopleSoft Student Financials Reports Appendix C
796 Copyright © 1988, 2010, Oracle and/or its affiliates. All Rights Reserved.
Report ID and Report
Name Description Navigation Run Control Page
SF807
Company User ID
SF security listing of
companies secured by a
single user ID. (Crystal)
Set Up SACR, Security,
Secure Student Financials,
User Reports, Company
PRCSRUNCNTL_SF
SF809
Item Type Permission List
SF security listing of item
types secured by a
permission list. (Crystal)
Set Up SACR, Security,
Secure Student Financials,
Permission List Reports,
Item Type
PRCSRUNCNTL_SF
SF810
Item Type User ID
SF security listing of item
types secured by a single
user ID. (Crystal)
Set Up SACR, Security,
Secure Student Financials,
User Reports, Item Type
PRCSRUNCNTL_SF
SF811
SetID Permission List
SF security listing of setIDs
secured by a permission list.
(Crystal)
Set Up SACR, Security,
Secure Student Financials,
Permission List Reports,
SetID
PRCSRUNCNTL_SF
SF812
SetID User ID
SF security listing of setIDs
secured by an individual
user ID. (Crystal)
SetID Set Up SACR,
Security, Secure Student
Financials, User Reports,
SetID
PRCSRUNCNTL_SF
SF814
TP Contracts
Third-party contract setup
values. (Crystal) Student Financials, Payment
Plans, Third Party Contract,
Third Party Contract Report
RUNCTL_SF814
SF815E
Trial Bal by Acct (Eff Dt)
This report lists the trial
balance by account by item
effective date. (Crystal)
Student Financials, GL
Interface, Trial Balance
Reports, By Account
RUNCTL_SF815
SF815P
Trial Bal by Acct (Post
Date)
This report lists trial
balances by account by
posted date. (Crystal)
Student Financials, GL
Interface, Trial Balance
Reports, By Account
RUNCTL_SF815
SF816E
Trial Bal by Stud Itm (Eff
Dt)
Trial balance by student
item (item effective date).
(Crystal)
Student Financials, GL
Interface, Trial Balance
Reports, By Student Item
RUNCTL_SF815
SF816P
Trial Bal by Stud Itm (Pst
Dt)
Trial balance by student
item (post date). (Crystal) Student Financials, GL
Interface, Trial Balance
Reports, By Student Item
RUNCTL_SF815
SF817E
Trial Bal by Student (Eff
Dt)
Trial balance by student
(item effective date).
(Crystal)
Student Financials, GL
Interface, Trial Balance
Reports, By Student
RUNCTL_SF815

Appendix C PeopleSoft Student Financials Reports
Copyright © 1988, 2010, Oracle and/or its affiliates. All Rights Reserved. 797
Report ID and Report
Name Description Navigation Run Control Page
SF817P
Trial Bal by Student (Post
Dt)
Trial balance by student
(post date). (Crystal) Student Financials, GL
Interface, Trial Balance
Reports, By Student
RUNCTL_SF815
SF818E
Trl Bal Corp by Acct (Eff
Dt)
Trial balance corporation by
account (item effective
date). (Crystal)
Student Financials, GL
Interface, Trial Balance
Reports, By Corporate
Account
RUNCTL_SF815
SF818P
Trl Bal Corp by Acct (Pst
Dt)
Trial balance organization
by account (post date).
(Crystal)
Student Financials, GL
Interface, Trial Balance
Reports, By Corporate
Account
RUNCTL_SF815
SF819E
Trial Bal by Corp Itm (Eff
Dt)
Trial balance by corporation
item (item effective date).
(Crystal)
Student Financials, GL
Interface, Trial Balance
Reports, By Corporate Item
RUNCTL_SF815
SF819P
Trial Bal by Corp Itm (Pst
Dt)
Trial balance by corporation
item (post date). (Crystal) Student Financials, GL
Interface, Trial Balance
Reports, By Corporate Item
RUNCTL_SF815
SF820E
Trial Bal by Corp (Eff Date)
Trial balance by corporation
(item effective date).
(Crystal)
Student Financials, GL
Interface, Trial Balance
Reports, By Corporation
RUNCTL_SF815
SF820P
Trial Bal by Corp (Post
Date)
Trial balance by corporation
(post date). (Crystal) Student Financials, GL
Interface, Trial Balance
Reports, By Corporation
RUNCTL_SF815
SF821
Credit History for All
Students
Credit history for all
students, for a specified
business unit and effective
date. (Crystal)
Student Financials,
Collections, Credit History,
All Customer Report
RUNCTL_SFBU_ASOFDT
SF822
Credit History for One
Student
Credit history for one
student, for a specified
business unit and effective
date. (Crystal)
Student Financials,
Collections, Credit History,
One Customer Report
RUNCTL_SF822
SF823
Credit History for All
Corporations
Credit history for all
corporations, for a specified
business unit and effective
date. (Crystal)
Student Financials,
Collections, Credit History,
All Corporation Report
RUNCTL_SF823
SF824
Credit History for One
Corporation
Credit history for one
corporation, for a specified
business unit and effective
date. (Crystal)
Student Financials,
Collections, Credit History,
One Corporation Report
RUNCTL_SF824

PeopleSoft Student Financials Reports Appendix C
798 Copyright © 1988, 2010, Oracle and/or its affiliates. All Rights Reserved.
Report ID and Report
Name Description Navigation Run Control Page
SF825
Credit History Student by
Acct
Credit history for all
students, by account, for a
specified business unit and
effective date. (Crystal)
Student Financials,
Collections, Credit History,
Customer Report by
Account
RUNCTL_SF825
SF826
Credit History by Account
for Corporations
Credit history for all
corporations, by account
number, for a specified
business unit and effective
date. (Crystal)
Student Financials,
Collections, Credit History,
Corporate Account Report
RUNCTL_SF826
SF828
Open Refunds
Open refunds, sorted by
student name. (Crystal) Student Financials,
Refunds, Reports, Open
Refunds
RUNCTL_SF828
SF829
Refunds by Date
This report lists all refunds
processed for a certain date.
(Crystal)
Student Financials,
Refunds, Reports, Refunds
by Date
RUNCTL_SF829
SF830
Completed Refunds by Date
This report lists all
completed refunds by date.
It also lists information on
paycheck gross, taxes and
net amounts. (Crystal)
Student Financials,
Refunds, Reports,
Completed Refunds by Date
RUNCTL_SF830
SF847
Group Post Suspended
Report
Detailed list of transactions
that have not been posted
through the Group Post
process. (Crystal)
Student Financials, Charges
and Payments, Group
Processing, Group Post —
Suspended
RUNCTL_SF847
SF853
Batch Refund
This report lists all refunds
processed within a specified
Batch ID. (Crystal)
Student Financials,
Refunds, Process Batch
Refunds, Report Batch
Refunds
RUNCTL_SF853
SF854
Batch Refund Messages
This report lists all error or
warning messages
encountered during a
specified Batch ID.
(Crystal)
Student Financials,
Refunds, Process Batch
Refunds, Report Batch
Messages
RUNCTL_SF854
SF856
Account Audit Statement
Detail transaction listing for
an individual or external
organization. (Crystal)
Student Financials, Charges
and Payments, Posting
Reports, Account Audit
Statement Report
RUNCTL_SF856
SF859
Tax Assessment Summary
Report
The tax assessment
summary report for a given
period by business unit and
tax authority. (Crystal)
Student Financials, Taxes,
Tax Reports, GST Tax
Summary Report
RUNCTL_SF859

Appendix C PeopleSoft Student Financials Reports
Copyright © 1988, 2010, Oracle and/or its affiliates. All Rights Reserved. 799
Report ID and Report
Name Description Navigation Run Control Page
SF860
Individual tax detail
Individual tax detail report
for a given reporting period.
(Crystal)
Student Financials, Taxes,
Tax Reports, Individual
GST Tax Detail
RUNCTL_SF860
SF861
Organization Tax Detail
Organization tax detail
report for a given reporting
period. (Crystal)
Student Financials, Taxes,
Tax Reports, Organization
GST Tax Detail
RUNCTL_SF861
SF862
Batch Credit Card Detail
Rpt
This report lists all the
relevant credit card details
per batch ID from the
Refund Credit Card − Web
process. (Crystal)
Student Financials,
Refunds, Electronic
Payment Refunds, Batch
ePayment Refund Details
RUN_CNTL_SF862
SF1098RP
Print 1098-T Forms
This process prints 1098-T
forms and creates electronic
transmission files. (SQR)
Student Financials, Taxes,
Tax Reports, 1098–T Form
Print
RUNCTL_SF_SF1098RP
SF1098VP
1098-T Validation and
Audit
The 1098-T Validation
Report lists any records
with invalid data and
assigns a validation status to
records on the 1098-T Audit
report. The Audit report
lists all records generated in
the 1098-T generation
process for review before
printing or transmitting the
file. (SQR)
Student Financials, Taxes,
Tax Reports, 1098–T Audit
Report
RUNCTL_SF_SF1098VP
SFBILLIV
Print Non-Extract File
Invoice
This report generates bills
for printing. (XML
Publisher) (SQR)
•Student Financials, Bill
Customers, Student
Bills, Print Invoice
•Student Financials, Bill
Customers, Corporate
Bills, Print Invoice
RUN_CNTL_PBILL
RUN_CNTL_PBILL_ORG
SFBKPOST
SF Backup Post
This process purges the
QUICK_POST_TBL and
consolidates the
transactions into a posting
group for review. A listing
of these transactions may be
generated. (SQR)
Student Financials, Charges
and Payments, Group
Processing, Purge Posting
Table
RUN_CNTL_SFBKPOST
SFCALTUI
Tuition Residency
Calculation
This report lists all students
for whom tuition residency
calculation has been
processed. (SQR)
Student Financials, Tuition
and Fees, Calculate Batch
Tuition, Calculate Terms in
Residency
RUNCTL_CALC_TUIT_R

PeopleSoft Student Financials Reports Appendix C
800 Copyright © 1988, 2010, Oracle and/or its affiliates. All Rights Reserved.
Report ID and Report
Name Description Navigation Run Control Page
SFCOLLEC
Collections
This report lists each
student or corporation that
has been assigned to
collections. This includes
the past due categories and
amounts. (SQR)
Student Financials,
Collections, Process
Collections
RUNCTL_COLLECT_SF
SFCOLLTR
Collections Dunning Letter
This is a process that creates
communication records in
PeopleSoft Campus
Community for each
collection letter requiring
generation. (SQR)
Student Financials,
Collections, Letter
Generation, Generate
Dunning Letters
RUNCTL_SFBU
SFCPTMFE
Copy Term Fees
This program copies term
fees from one term or one
session to another. The
report shows the details of
the added term fees. (SQR)
Set Up SACR, Product
Related, Student Financials,
Tuition and Fees, Copy
Term Fees
RUNCTL_SFCPTMFE
SFDONAT
Generate Donation Receipts
This program generates the
information for receipts for
donations received by
Universities from third
parties. (SQR)
Student Financials, Taxes,
Generate Donation Receipts RUN_PARM_DONAT
SFGENT4
SF Generate T4A Data
Generates T4A data in
preparation for printing
T4A slips. (SQR)
Student Financials, Taxes,
Generate T4A RUNCTL_SF_GENT4
SFGLVAL1
Invalid GL Interface
Chartfield Report
Lists invalid chartfields in
SF targets, tenders,
class/course fees and item
types by term. (SQR)
Set Up SACR, Product
Related, Student Financials,
General Ledger Interface,
ChartField Validation
RUNCTL_SFGLVAL1
SFGT2202
SF Generate T2202 Data
Generates T2202A data in
preparation for printing
T2202A forms. (SQR)
Student Financials, Taxes,
Generate T2202A RUNCTL_SF_SFGT2202
SFJT2202
Process T2202A Report File
This process generates the
T2202A information. It will
either update the tables in
preparation for printing, or
generate a report for review.
(SQR)
Student Financials, Taxes,
Create T2202A Extract File RUNCTL_SF_SFJT2202
SFLOCKIN
Lock In Tuition and Fees
This report lists students
who have had their tuition
locked in. (SQR)
Student Financials, Tuition
and Fees, Process Tuition
Lock In
RUNCTL_LCK_IN_TUIT

Appendix C PeopleSoft Student Financials Reports
Copyright © 1988, 2010, Oracle and/or its affiliates. All Rights Reserved. 801
Report ID and Report
Name Description Navigation Run Control Page
SFPENRDP
SF Enrollment Deposits
Creates and releases service
indicators based on student
payment of enrollment
deposits. (SQR)
Student Financials, Charges
and Payments, Enrollment
Deposits
RUNCTL_ENRL_DPST
RUNCTL_ENRL_DPST2
SFPR2202
Print T2202A Tax Forms
This process prints T2202A
tax forms. (SQR) Student Financials, Taxes,
Print T2202A RUNCTL_SFPR2202
SFPRGPLD
SF External File Load
The process to load external
files. A detail listing of the
transactions loaded may be
generated. (SQR)
Student Financials, Charges
and Payments, Group
Processing, External Files
RUNCTL_SFGPLOAD
SFRCRCPT
Print Receipt
This program prints student
payment / department
receipts. (SQR) It generates
income tax receipts for
students enrolled in non
degree courses (Canadian)
Student Financials, Taxes,
Generate Tax Receipts RUNCTL_SFRECEPT
SFRSCVW
SF Load Security Views
Listing of table views used
in SF security. (SQR) Set Up SACR, Security,
Secure Student Financials,
Process, Set Security
RUNCTL_SFSCRTY
SFRVRGRP
Group Reversal
Used to reverse a group
after it has been posted.
(SQR)
Student Financials, Charges
and Payments, Group
Processing, Reverse Groups
RUNCTL_SFRVRGRP
SFTBLVAL
Table Validation Report
This process reports on,
and/or corrects any
referential integrity issues
within SF tables. (SQR)
Student Financials, Charges
and Payments, Validate
Tables
RUN_CNTL_SFTBLVAL
SFTRMCPY
Copy Term Session
This process copies
chartfield information by
Item Type Classification
from one Term to another.
(SQR)
Set Up SACR, Product
Related, Student Financials,
General Ledger Interface,
Copy Term
RUNCTL_SFGL_FEE
SFWRTOFF
Batch Write off
Detailed listing of accounts
flagged to be written off.
(SQR)
Student Financials,
Collections, Write Offs,
Run Write-off Process
RUNCTL_WRITE_OFF

PeopleSoft Student Financials Reports Appendix C
802 Copyright © 1988, 2010, Oracle and/or its affiliates. All Rights Reserved.
Setup Table Crystal Reports
Report ID and Report
Name Description Navigation Run Control Page
SF701
Term Fees Table
This report lists all
information from the Term
Fees Table. (Crystal)
Reporting Tools, Query,
Query Manager RUNCTL_SFSETID
SF702
Term Sub Fees Report
This report lists information
from the Term Subfees
Table. (Crystal)
Reporting Tools, Query,
Query Manager RUNCTL_SF703
SF703
Class Fees Report
This report lists all
information from the Class
Fees Table. (Crystal)
Reporting Tools, Query,
Query Manager RUNCTL_SF704
SF704
Course Fees Report
This report lists all
information from the
Course Fees Table.
(Crystal)
Reporting Tools, Query,
Query Manager RUNCTL_SF705
SF705
Course Rates Table
This report lists all
information from the
Course Rates Table.
(Crystal)
Reporting Tools, Query,
Query Manager RUNCTL_SFSETID
SF712
Billing and Due Calendars
This report lists all
information from the Billing
and Due Calendars Table.
(Crystal)
Reporting Tools, Query,
Query Manager RUNCTL_SF712
SF713
Keyword Table
This report lists all
information in the Keyword
Table. (Crystal)
Reporting Tools, Query,
Query Manager RUNCTL_SFSETID
SF714
Account Type Table
Detailed setup report of the
institution's SF account
types. (Crystal)
Reporting Tools, Query,
Query Manager RUNCTL_SF714
SF717
Fee Class Table
This report lists all
information in the Fee Class
Table. (Crystal)
Reporting Tools, Query,
Query Manager RUNCTL_SF717
SF718
Item Reason Table
Listing of item reason
values created. (Crystal) Reporting Tools, Query,
Query Manager RUNCTL_SF718
SF719
Charge Priority List
Listing of values defined in
the Charge Priority List
setup. (Crystal)
Reporting Tools, Query,
Query Manager RUNCTL_SF719

Appendix C PeopleSoft Student Financials Reports
Copyright © 1988, 2010, Oracle and/or its affiliates. All Rights Reserved. 803
Report ID and Report
Name Description Navigation Run Control Page
SF720
Business Unit Table
Business Unit Table.
(Crystal) Reporting Tools, Query,
Query Manager RUNCTL_SF720
SF721
Group Type Table
Listing of the Group Type
Table. (Crystal) Reporting Tools, Query,
Query Manager RUNCTL_SF721
SF722
Origin Table
Listing of values defined
the origin table setup.
(Crystal)
Reporting Tools, Query,
Query Manager RUNCTL_SF722
SF730
Selection Criteria
This report lists information
in the Criteria Table.
(Crystal)
Reporting Tools, Query,
Query Manager RUNCTL_SF730
SF733
Cash Offered Table Report
This report lists information
relative to cashiering
offices. (Crystal)
Reporting Tools, Query,
Query Manager RUNCTL_SF733
SF734
Tender Key Table Report
Report for the Tender Key
Table. (Crystal) Reporting Tools, Query,
Query Manager RUNCTL_SF734
SF735
Target Key Table Report
Report for the Target Key
Table. (Crystal) Reporting Tools, Query,
Query Manager RUNCTL_SF735
SF740
Cashier Message Business
Date
This report lists all
cashiering office messages.
(Crystal)
Reporting Tools, Query,
Query Manager RUNCTL_SF740
SF741
Cashier Message Tender
This report lists any Cashier
Tender messages within a
cashiering office. (Crystal)
Reporting Tools, Query,
Query Manager RUNCTL_SF741
SF742
Cashier Message Target
This report lists any Cashier
Target messages within a
cashiering office. (Crystal)
Reporting Tools, Query,
Query Manager RUNCTL_SF742
SF743
Valid Cashiers Per Office
Report of the valid cashiers
for each office. (Crystal) Reporting Tools, Query,
Query Manager RUNCTL_SF743
SF744
Follow Up Table
This report lists follow up
actions for collections
activity by setID and as of
date. (Crystal)
Reporting Tools, Query,
Query Manager RUNCTL_SFASOFDT

PeopleSoft Student Financials Reports Appendix C
804 Copyright © 1988, 2010, Oracle and/or its affiliates. All Rights Reserved.
Report ID and Report
Name Description Navigation Run Control Page
SF745
Collection Criteria
This report lists the criteria
used to assign student
collection items to the
appropriate collector.
(Crystal)
Reporting Tools, Query,
Query Manager RUNCTL_SFBU
SF746
Corp Collection Criteria
This report lists the criteria
used to assign corporate
collection items to the
appropriate collector.
(Crystal)
Reporting Tools, Query,
Query Manager RUNCTL_SFBU
SF747
Collector
This report lists the
collectors by user ID.
(Crystal)
Reporting Tools, Query,
Query Manager RUNCTL_SFBU_ASOFDT
SF748
Reason In Table
This report lists all
information in the Reason
In table for collection
activity. (Crystal)
Reporting Tools, Query,
Query Manager RUNCTL_SFASOFDT
SF749
Reason Out Table
This report lists all
information in the Reason
Out table to remove a
student/corporation from
collections. (Crystal)
Reporting Tools, Query,
Query Manager RUNCTL_SFASOFDT
SF769
Waiver Form Table
This lists all information on
the Waiver Form Table.
(Crystal)
Reporting Tools, Query,
Query Manager RUNCTL_SFASOFDT
SF773
Application Fee
List of application fee codes
with subfees for each term.
(Crystal)
Reporting Tools, Query,
Query Manager RUNCTL_SFSETID
SF774A
Course List
This report contains the
Course List Details.
(Crystal)
Reporting Tools, Query,
Query Manager RUNCTL_SFASOFDT
SF774B
Course List Fees
This report lists all
information from the
Course List Fee and Course
List Subfee Table. (Crystal)
Reporting Tools, Query,
Query Manager RUNCTL_SFSETID
SF775
Deposit Fees
This report lists all
information from the
Deposit Fee Table. (Crystal)
Reporting Tools, Query,
Query Manager RUNCTL_SFSETID
SF776
Minimum Maximum Fee
This lists all information on
the Minimum Maximum
Fee Table. (Crystal)
Reporting Tools, Query,
Query Manager RUNCTL_SFSETID

Appendix C PeopleSoft Student Financials Reports
Copyright © 1988, 2010, Oracle and/or its affiliates. All Rights Reserved. 805
Report ID and Report
Name Description Navigation Run Control Page
SF777
Optional Fee Table
This report lists all values in
the Optional Fee Table.
(Crystal)
Reporting Tools, Query,
Query Manager RUNCTL_SFASOFDT
SF778
Optional Fee Term
This report lists all valid
values in the Optional Fees
per Term Table. (Crystal)
Reporting Tools, Query,
Query Manager RUNCTL_SFSETID
SF779
Transaction Fees
This report lists all
information on the
Transaction Fee Table.
(Crystal)
Reporting Tools, Query,
Query Manager RUNCTL_SF779
SF779
Transaction Fee Table
Transaction Fee Table.
(Crystal) Reporting Tools, Query,
Query Manager RUNCTL_SFSETID
SF780
Calc Control Table
List of careers in use for
each term and the
parameters (auto calc
tuition/waivers, term and
transaction wash periods).
(Crystal)
Reporting Tools, Query,
Query Manager RUNCTL_SF771
SF781
Waiver Table
This report lists all
information on the Waiver
Table. (Crystal)
Reporting Tools, Query,
Query Manager RUNCTL_SFSETID
SF784
Billing Aging Messages
This report lists all billing
aging messages set up for a
business unit. (Crystal)
Reporting Tools, Query,
Query Manager RUNCTL_SFBU_ASOFDT
SF785
Billing Message Table
Billing Message Table.
(Crystal) Reporting Tools, Query,
Query Manager RUNCTL_SFASOFDT
SF786
Billing Scan Line
This report lists all
information from the Billing
Scan Line table. (Crystal)
Reporting Tools, Query,
Query Manager PRCSRUNCNTL_SF
SF787
Billing Type Table
This report lists all
information from the Billing
Type Table. (Crystal)
Reporting Tools, Query,
Query Manager RUNCTL_SFASOFDT
SF788
Billing Messages for
Students
This report lists information
from the Billing Messages
page. (Crystal)
Reporting Tools, Query,
Query Manager RUNCTL_SFBU_ASOFDT
SF789
Billing Messages for Corp
This report lists information
from the Corporate
Messages page. (Crystal)
Reporting Tools, Query,
Query Manager RUNCTL_SFBU_ASOFDT

PeopleSoft Student Financials Reports Appendix C
806 Copyright © 1988, 2010, Oracle and/or its affiliates. All Rights Reserved.
Report ID and Report
Name Description Navigation Run Control Page
SF790
Billing Messages for
Customers
This report lists information
from the Customer
Messages page. (Crystal)
Reporting Tools, Query,
Query Manager RUNCTL_SFBU_ASOFDT
SF791
Invoice Layout
This report lists all
information from the
Invoice Layout component.
(Crystal)
Reporting Tools, Query,
Query Manager RUNCTL_SFSETID
SF792
Invoice Number
This report lists all
information from the
Invoice Number page.
(Crystal)
Reporting Tools, Query,
Query Manager PRCSRUNCNTL_SF
SF793
Messages by Item Type
Messages by item type.
(Crystal) Reporting Tools, Query,
Query Manager RUNCTL_SFBU_ASOFDT
SF794
Billing Message Category
This report lists information
from the Billing Message
Category page. (Crystal)
Reporting Tools, Query,
Query Manager RUNCTL_SFBU_ASOFDT
SF795
Billing Standard Request
This report lists all
information from the Billing
Standard Request table
based on setID. (Crystal)
Reporting Tools, Query,
Query Manager RUNCTL_SFASOFDT
SF855
Adjustment Calendars
List of detail for all
adjustment codes in the
database. Includes
adjustment options, adjust
reasons, terms, and line data
for each category. (Crystal)
Reporting Tools, Query,
Query Manager RUNCTL_SF855
SF858
Tuition Group Report
This report lists all
information for tuition
groups. (Crystal)
Reporting Tools, Query,
Query Manager RUNCTL_SF858
Index
Copyright © 1988, 2010, Oracle and/or its affiliates. All Rights Reserved. 807
Numerics/Symbols
1098-T Audit Report page 663, 671
1098-T Citizenship page 376
1098-T Data page 662, 665
1098-T File Info page 663
1098-T forms
aligning print stock 673
defining item type parameters 62, 64
generating data 663
printing and creating transmission files 672
producing and filing 661
reviewing and overriding data 665
setting up production 375
setting up taxpayer identification numbers
376
submitting corrections 667
testing transmission files 674
understanding 660
validating and auditing data 671
1098-T Institution Address page 376
1098-T Print page 663, 672
1098-T self service set up 378
1098-T Student Address page 662
1098-T TIN page 376
1098-T TIN Table component (SF_1098_INST)
375
1098–T forms
reviewing messages 665
A
Academic Information page 445, 516
Academic Institution 6 (NZL) page 746, 748
Academic Programs page 440, 442
Academic Selections 2 page 299, 307
Academic Selections page 299, 305
Accounting Dates
setup 54
Accounting Dates page 54
accounting entries
creating 411, 414, 415
sending to General Ledger 422
Accounting Line page 417
accounting lines
publishing 423
reviewing 417
accounting method 21
accounts
viewing 593
writing off 604
Accounts/Terms page 440, 443
Account Selections page 300, 310
accounts payable
business units 243
refund method 237, 436
refund options 243
Accounts to Writeoff page 605, 607
account types
defining billing standard requests 310
linking item types 69
SetID warning 70
setting up 51, 52
Account Types page 51, 52
ACCT_TYPE_SF component 51
address verification 96, 104
ADJ_TERM_PANEL component 142
adjustment calendars
defining administrative fees 145
setting up 142, 143
Adjustment Calendars component
(ADJ_TERM_PANEL) 142
Adjustment Calendars page 143
adjustment codes 230
Administrative Fee Setup 143
Administrative Fee Setup page 145
admit terms 181
AGING_TABLE component 37
Aging Set component (AGING_TABLE) 37
Aging Set Messages component
(BI_BILL_MSG_AGE) 283
Aging Set Messages page 284, 285
Aging Set page 37
aging sets
linking billing messages 285
processing write-offs 609
setting up 37
Algorithm Keyset page 87
alternative Late Fees calculation process 353
Amount Edits page 57, 62
AP Business Unit component (BUS_UNIT_AP)
243
AP Business Unit Options page 243
AP ChartFields page 57
APPLICATION_FEES component 181
Application Fee Item Types page 182, 183
application fees
item type selection 183
setup 181, 182
sub fees 185
Application Fees component
(APPLICATION_FEES) 181
Application Fees page 182
application messaging 109
Application Sub Fees page 182, 185
apply payments by invoice 12
define target keys 326
approvals
business unit options 28
department receipts 316, 319, 322
refunds 241, 453, 454
AP refunds
business unit options 243
completion 459
messaging 459
process flow diagram 438
vendor set controls 245
AP Set Controls - Vendor component
(SF_AP_VNDR_OPTIONS) 243
AP Set Controls - Vendor page 243, 245
Assign Collections Worklist page 644, 646
Assign Student Permissions page 634, 635
Index
808 Copyright © 1988, 2010, Oracle and/or its affiliates. All Rights Reserved.
Australia
creating and updating FEE HELP loans 736
creating or updating Commonwealth
Assistance Notices 743
defining FEE HELP loan defaults 725
defining HECS HELP loan defaults 725
defining OS HELP loan defaults 726
defining status change rule loan defaults 727
defining tax parameters 32
excluding HECS classes 731
linking band fees to tuition groups 730
maintaining OS HELP loans 742
preparing for setting up HELP 721
reconciling HECS 734
reviewing HECS results 733
reviewing liability statuses 723
setting up HECS band fees 728
setting up HECS fee codes 728
setting up loan defaults 722
understanding FEE-HELP 721
understanding HECS-HELP 717
understanding OS-HELP 721
understanding the Higher Education Loan
Program (HELP) 717
understanding the tuition calculation for HECS
720
updating statuses for FEE HELP
determinations 737
Australian Loan Processing
setting up and using 717
authorization, credit card
103, 318, 381, 390, 531, 547
auto-numbering sequences 31
B
Back Out GL Interface page 421
BANK_INPUT_FILE component 355
bank account numbers re-encryption 84
banking interface
Netherlands functionality 703
base currency 21, 63, 129, 315, 343
Batch Programs page 132, 134
batch publishing
control records 420
process 423
rules 133
Batch Publish page 423
Batch Publish Rules page 132, 133
Batch Refund (NZL) page 754
Batch Refund Approval page 453
Batch Refund Lines page 440
Batch Refund page 440, 441
batch refunds
calculating 457
completing through payroll 455
confirming 457
creating 439
defining basic parameters 441
generating paysheets 456
routing to worklists 453
selecting academic programs 442
selecting account types and terms 443
selecting item types 444
BI_BILL_MSG_AGE component 283
BI_BILL_MSG_ALL component 283
BI_BILL_MSG_CUS component 283
BI_BILL_MSG_ITM component 283
BI_BILL_MSG_ORG component 283
BI_BILL_MSG_TBL component 283
BI_INV_LAYOUT component 286
BI_MSG_CAT_TBL component 283
BI_SCAN_LINE component 296
BI_STD_REQ_TBL component 298
BI_TYPE_TBL component 298
bill by options 490, 491
Bill Cancellation page 513, 514
Bill Career page 515
Bill Detail page 516
billing
billing requests 489
calendar creation 139
cancellation 513, 514
commit options 29
date calculation 142
information review 515
invoice layouts 286
messages 283
overview 489
Pending To Bill Items page 499
scan lines 296
setup 283
specific student charges 498, 500
standard requests 298
Student Invoice Summary page 502
types 298
Billing Address Info page 515
Billing and Due Calendars component
(DUE_DATE_PANEL) 139
Billing and Due Calendars page 140
billing and due date calendars
creation 139
pivot date warning 141
billing careers 179
Billing Detail page 499
billing messages
linking
item types 285
aging sets 285
business units 286
students 286
organizations 286
selecting 307
setting up 283, 284
Billing Messages component
(BI_BILL_MSG_TBL) 283
Billing Messages page 284
Billing Request 1 page 492
Billing Request 2 page 492, 494
billing requests
completing 489
defining basic parameters 492, 497
processing 504, 505, 506
selecting bill by options 490, 491
specifying bill terms and print options
494, 498
Billing Scan Line component (BI_SCAN_LINE)
296
Billing Scan Line page 296
Billing Standard Request - Messages page 299
Billing Standard Request component
(BI_STD_REQ_TBL) 298
billing standard requests
academic selections 305, 307
Index
Copyright © 1988, 2010, Oracle and/or its affiliates. All Rights Reserved. 809
account types 310
billing messages 307
communication information 304
general selections 300, 302
organization information 311
setup 298
student groups 308
Billing Type component (BI_TYPE_TBL) 298
Billing Type page 298
billing types 298
Bill Messages page 516
BUS_UNIT_AP component 243
BUSINESS_UNIT_SF component 19
business processes 2
Business Unit Bank Accounts (NLD) page 704
Business Unit GL - Definition page 117
Business Unit Message component
(BI_BILL_MSG_ALL) 283
Business Unit Messages page 284, 286
business units
auto-numbering sequences 31
basic parameters 21, 22
billing messages 286
Canadian, Australian, and New Zealander
taxes 32
collections setup 363, 364
commit options 28
overview 19
PeopleSoft General Ledger units 118
posting setup 24
recognized types 117
refunding setup 238
setup 19
synchronization 134, 135
C
CALC_CNTROL_PANEL component 150
Calculation Messages page 425
calendars
adjustment calendar setup 142
billing and due dates 139
refunding 246
Canada
defining tax parameters 32
Canadian/ANZ Taxes page 20, 32
cancellations See Also enrollment cancellation
default reason 23
tuition recalculation 431
capture, credit card 103
Cash Check Detail page 552
Cash Checks page 526, 539
cashiering
creating receipt messages 332
creating void reasons 332
defining cashiering offices 313
entering check information 545
entering credit card information 546
modifying receipt forms 335
posting delayed receipts 548
printing receipts 321, 322, 552
processing the GL interface 316, 413, 549
processing transactions 524
receipt and tender activity 553
reviewing totals 561
selecting exchange rates 544
setting up target keys 323
setting up tender keys 327
setting up valid registers and cashiers 320
understanding 519
viewing receipt details 551
voiding receipts 549, 550
CASHIERING_OFFICES component 313
Cashiering GL Interface Messages page 414
Cashiering GL Interface page 414, 415
Cashiering GL Interface processing
accounting entries 411
cashiering GL interface process integration 413
Cashiering Office Messages page 333
cashiering offices
closing 562, 565
creating receipt messages 333
defining basic parameters 314
defining transaction setup 316
opening 520
reopening 566
setting up 313
Cashiering Offices component
(CASHIERING_OFFICES) 313
Cashiering Offices page 313, 314
Cashier Office Messages page 332
cashiers, valid See valid cashiers
CASHIERS component 320
Cash Replenishment Detail page 552
Cash Replenishment page 526, 543
cash replenishments See Also cashiering
processing 543
understanding 525
Change Corp Item Line - Line Detail Update page
598
Change Corp Item Line page 598
Change Item Line - Account Summary page 598
Change Item Line - Line Detail Update page 598
Change Item Line page 598
character variables 156
CHARGE_PRIORITY component 39
Charge Corp Reversal - Charge Reversal page 601
charge priority
creating lists 40
defining rules 41
example of list selection 44
item type warning 65
overriding 326, 577, 591
setting item types 65
understanding 40
Charge Priority List - Details page 40
Charge Priority List component
(CHARGE_PRIORITY) 39
Charge Priority List page 40
Charge Reversal - Charge Detail page 600
Charge Reversal page 600, 601
charges
reversing 600, 601
writing off 604
Chartfield Audit report 406
Chartfield Audit Report page 409
ChartField edit options
dynamic ChartFields 7
ChartFields
copying item type information 137
defining dynamic ChartFields 7
defining for target keys 323
defining for tender keys 328
mapping item types 70
Index
810 Copyright © 1988, 2010, Oracle and/or its affiliates. All Rights Reserved.
setting up 119
validating 130, 131
Chartfield Validation page 131
chart of accounts See ChartFields
Char Variables page 155, 156
check cashing See Also cashiering
processing 539
setting rules 319
understanding 525
Check Information page 527, 545
Checklist page 648
Class / Course Fees Rollover component
(RUNCTL_FEE_RLVR) 204
Class / Course Fees Rollover page 207, 217
class fees
modal 205, 216
rollover 217
setup 204, 213
sub fees 214
Class Fees Modal page 206
Class Fees page 206, 213
classification, item type 61
Class Sub Fees Modal page 207
Class Sub Fees page 206, 214
Clieop03 703
Close Cashier page 563
Close Cashiers page 564
Close Offices page 563, 565
Close Registers page 563
CLST_FEE_PANEL component 224
COLL_AGREEMENT component 277
COLL_CRITER_ORG component 367
COLL_CRITER_SF component 367
COLL_LTRTMP_TABLE component 370
Collection Agreement Assess page 278
Collection Agreement component
(COLL_AGREEMENT) 277
Collection Agreement page 278
collection agreements
defining basic parameters 278
setting up 277
specifying administrative fees 280
understanding 473
collection criteria
organizations 369
setup 367
students 367
Collection Criteria component
(COLL_CRITER_SF) 367
Collection Criteria page 367
Collection Information page 648, 651
collection items
assigning to collectors 644
assigning to worklists 646
recording collection activity 651
viewing demographic information 648
working 646, 647
collection letters
processing 655
selecting templates 650
updating information 654
Collection Letter Template component
(COLL_LTRTMP_TABLE) 370
Collection Placement page 655
collections See Also collection items
adding to a queue without worklist 655
business unit setup 363, 364
collection item assignment 644
collection items, working 646
criteria 367
follow-up actions 370
letter templates 370
overview 643
reason in/out codes 369
setup 363
viewing corporations in collection 657
viewing customers in collection 657
Collections Dunning Letter page 647, 650, 654, 655
Collections Letter Template page 371
Collections page 20, 364
COLLECTOR_SF component 366
Collector component (COLLECTOR_SF) 366
Collector page 366
Collector Queue page 657
collectors 366
Comments page 648
commit levels 15
commit options 28
Commit Options page 20, 28
Commonwealth Assistance Notice (AUS) page 743
Communication Info page 299, 304
Communication page 648
control totals 575
Control Totals page 356, 358
convenience fees 105
Convert Encryption page 87
Copy Term Fees component (RUN_SFCPTMFE)
190
Copy Term Fees page 191, 203
Corp Accounts page 445
Corp Billing Request - Billing Request 1 page
492, 497
Corp Billing Request - Billing Request 2 page 492
Corp Collection Criteria page 369
Corp Item Due View page 594
Corp Item View page 593
Corp Late Fee Messages page 615, 618
Corp Late Fees - Late Fees Details page 615
Corp Late Fees page 615
Corporate Collection Criteria component
(COLL_CRITER_ORG) 367
Corporate Collection Criteria page 367
Corporate Payment Detail page 552
corporate payments See Also cashiering
accepting 534
allocating charges 536
tracking third-party information 537
understanding 525
Corporate Payments page 526, 534
Corporate Receipts page 554, 555
Corporate Refund page 445, 448
Corporate Refunds by Date page 465, 467
Corporate Refunds by ID page 465, 467
Corporation Credit History page 637
Corporation Info page 300, 311
Corporation Invoice Crystal page 507, 512
Corporation Invoice Extract page 506, 509
Corporation Invoice Other page 507, 511
Corporation Messages component
(BI_BILL_MSG_ORG) 283
Corporation Messages page 284, 286
Corp Post page 590, 592
Corp Refund Approvals page 453
Corp Refund Cancellation page 463, 464
Corp Refunds By Date page 470
Corp Refunds By ID page 470
Index
Copyright © 1988, 2010, Oracle and/or its affiliates. All Rights Reserved. 811
Corp Sponsor page 250, 251
Corp Sponsor Refunds by Date page 470
Corp Sponsor Refunds by ID page 470
Corp Writeoff page 605, 607
Counters page 20, 31
course fees
modal 205, 212
rate tables 207
rollover 217
setup 204, 209
sub fees 210
Course Fees component (CRSE_FEE_PANEL)
204
Course Fees Modal page 206
Course Fees page 206, 209
course list fees
setup 224, 225
sub fees 226
waiver group warning 227
Course List Fees component
(CLST_FEE_PANEL) 224
Course List Fees page 224, 225
course lists
creating 174
linking tuition groups 234
setting up fees 224
Course Lists component (CRSE_LIST_PANEL)
174
Course Lists page 174
Course Sub Fees Modal page 206
Course Sub Fees page 206, 210
Create Clieop03 File (NLD) page 714
Create Deduction Relationship component
(SF_PAYDED_RELATION) 359
Create Deferral Contract component
(DEFERRAL_CONTRACT) 253
Create Payment Plan component
(TP_PAYMENT_PLAN) 259
Create Payment Plans (TP_PAYMENT_PLAN)
359
Create Schedules page 692
Create Student Job Data component
(SSF_POIJOB_TEST) 246
Create Student Report (NZL) page 754
Create T2202A Extract File page 676, 679
Create Third Party Contract component
(TP_CONTRACT) 270
Create Vendors and Vouchers
completion 460
Create Vendors and Vouchers page 460
CREDIT_CARD_TYPE component 83
credit, credit card 103
Credit Card Information page 527, 546
credit card processing 382, 383
authorizing, settling, and crediting 103
defining credit card types 84
defining SF merchants 100
reviewing and canceling transactions 386
reviewing transactions 392
selecting transaction review criteria 393
understanding 381
viewing transactions 396
Credit Card Processing page 382, 383
credit card re-encryption 84
credit card refunds
other transactions 462
web transactions 462
Credit Card Refunds - Other page 462
Credit Card Refunds - Web page 462
Credit Card Type component
(CREDIT_CARD_TYPE) 83
Credit Card Type page 84
credit history 637
Credit History page 637, 647
credit invoice indicator 517
credit invoices 489
criteria, tuition calculation
codes and types 159
details 160
setup 139
tuition groups, linking 231
tuition groups and fee triggers 158
variables 155
Criteria (NZL) page 758, 760
Criteria component (SEL_CRITERIA_PANEL)
158
Criteria Details (NZL) page 758, 761
Criteria Details page 159, 160
Criteria page 159
CRSE_FEE_PANEL component 204
CRSE_LIST_PANEL component 174
CRSE_RATE_PANEL component 204
Currencies by Tender page 554
currency, base 21, 63, 129, 315, 343
Currency Conversion page 526, 544
Currency Options page 117
current term 43
customer maintenance See maintain customers
Customer Message component
(BI_BILL_MSG_CUS) 283
Customer Message page 286
Customer Messages page 284
D
DDP Advice Print Canada page 459
DDP Advice Print page 458
defaults
academic terms 81
adjust reasons 144
business unit parameters 23
ePayment processing 106
payroll refunding 242
term control 26
default term 81, See Also term default
DEFERRAL_CONTRACT component 253
Deferral Contract Charges page 254, 257
Deferral Contract Fee page 254, 256
Deferral Contract page 254
deferral contracts
administrative fees 256
basic parameters 254
eligible charges and maximum amounts 257
linked students 473
setup 253
student-specific details 473
summary 472
Deferred Charges page 473
Deferred ChartFields page 58
Defer Student Charges page 473
Defer Student page 473
Defining Payment by Invoice 11
delayed receipts 548
Demographic Information page 647, 648
Index
812 Copyright © 1988, 2010, Oracle and/or its affiliates. All Rights Reserved.
Department Receipt Detail page 552
department receipts
creating 537
defining SpeedTypes 127
setting approval parameters 319, 322
understanding 525
Department Receipts page 526, 537
DEPOSIT_FEES component 186
deposit due dates
defining status changes 189
setting up 186, 188
Deposit Due Dates page 186, 188
Deposit Fees component (DEPOSIT_FEES) 186
Deposit Fees page 186, 187
Detail Calendar page 118
Detail Refund AP Information page 469
Detail Refund Check Information page 469
Detail Refund Information By Student page 470
Details page 634
DFLT_TERM_TBL component 81
direct deposit
payroll refunds 457, 458
setup 249
Direct Deposit Create File page 458
disable 1098-T self-service 667
disbursement 26
Display Error/Warning Controls page 151, 154
disputed charges
entering information 598
understanding 597
donation receipt information
generating 683
understanding 661
DUE_DATE_PANEL component 139
due dates
billing request 493
calendar 139
deposit 186
item type 69
late fee 349
null 11
dunning letters 372, 650
E
eCheck processing
debiting and crediting 382, 385
refunding 461
reviewing and canceling transactions 386
reviewing transactions 392
selecting transaction review criteria 393
understanding 381
viewing transactions 396
eCheck Processing page 385
Electronic Payment Test page 96
encryption See re-encryption
Enroll Deposit2 page 612, 613
Enroll Deposit page 611, 612
Enrollment Blocks page 299
enrollment cancellation
item groups and options 625
process 619
student selection criteria 620
tuition recalculation 431
Enrollment Cancellation 1 page 620
Enrollment Cancellation 2 page 620, 625
Enrollment Cancellation Messages page 620
Enrollment Cancellation page 620
enrollment deposits
defining basic parameters 612
processing 611
selecting academic programs and waiver forms
613
EOP_PUBLISHM process 423
ePayment
item types 107
ePayment processing
defining credit card types 83
defining SF merchants 101
processing service requests 382
reviewing and canceling transactions 386
reviewing transactions 392
selecting transaction review criteria 393
setting minimum/maximum payment amounts
106
setting up 83
specifying convenience fees 105
viewing transactions 396
ePayment refunds
distribution 461
ePayment Refunds page 392, 462
ePayment transactions 381
Equation Dtl page 169
Equation Editor page 163, 164
Equation Engine Search page 163
equations, tuition calculation
setup 139
variables 155
Equation Variables component
(STDNT_EQUTN_VARS) 155
Error Bill Message page 492
excess payments
defining group transactions parameters 578
moving 53
selecting default accounts 26
exchange rates 21, 544
external file layouts
basic parameters 356
control data 358
field positions and lengths 357
setup 355
External File Layouts component
(BANK_INPUT_FILE) 355
external files 580
External Files page 580
Extra Refund Amount page 445, 451
F
FE_IMAGE_TEXT component 335
FE_UPIMG_RUNCTL component 335
FEE_CLASS component 177
FEE-HELP Determination (AUS) page 736
FEE-HELP Loan (AUS) page 736
FEE-HELP Loans
understanding 735
Fee Calculation Messages (Batch) page 428
Fee Calculation Messages page 425
Fee Classes component (FEE_CLASS) 177
Fee Classes page 178
FEE HELP (AUS) page 723
fees
Index
Copyright © 1988, 2010, Oracle and/or its affiliates. All Rights Reserved. 813
defining minimums and maximums 178
setting up 177
Fees After Calculation (Batch) page 428
Fees After Calculation page 425
fee triggers
class fees 215
course fees 211
course list fees 226
setup 158
Field Details 1 page 356, 357
Field Details 2 page 356
Field Details 3 page 356
fields, valid 18
financial aid
account type setup 53
disbursement reversal warning 27
item type setup 61
posting setup 26
follow-up actions 370
FOLLOW_UP component 370
Follow-Up Table component (FOLLOW_UP) 370
Follow Up Table page 370
FORM_EDITOR component 335
Form Editor component (FORM_EDITOR) 335
Form Editor page 335, 338
Form Image Attributes page 335
form image text 337
Form Image Text component
(FE_IMAGE_TEXT) 335
Form Image Text page 335, 337
Forms Engine 316, 321, 335, 336
Form Text Attributes page 335
Full Data Publish page 133, 135
Full Table Publish Rules page 132, 134
future term 44
G
General 1 page 20, 21
General 2 page 20, 22
General Selection 2 page 299, 302
General Selections page 299, 300
general setup 5
Generate 1098-T page 662, 663
Generate Accounting Entries page 414
Generate Donation Receipts page 683
Generate Encryption Key page 87
Generate Invoice page 505
Generate Invoice page (corporate) 505
Generate Invoice page (student) 505
Generate T2202A page 675, 676
Generate T4A page 680
Generate Tax Receipts page 683
getting started 1
GL interface processing 132
accounting entries 411
back out process 421
back out warning 422
business units and GL units, linking 118
cashiering 316, 413, 549
ChartFields 119
GL unit selection 21
information review 416
item type mapping 70
messaging 110
Oracle General Ledger 110
overview 403
PeopleSoft General Ledger 110
run history 417
setup 109
setup data, loading 112
target keys 323
tender keys 327, 328
third-party/legacy systems 112
GL interface process integration 412
GL messaging 110, 133, 134
global institutions
apply payments by invoice 12
global invoicing 6
GL setup data
PeopleSoft Application Messaging 112
GL setup data for PeopleSoft Financials
review 117
GL Term Copy page 137
Goods and Services Tax (GST) 33
GROUP_TYPE component 341
group approval roles 29
Group Entry page 573, 574
Group Line Details page 587
Group Line Entry page 573, 576
Group Post Details page 586
Group Reversal page 601, 602
group transactions
adding line entries 576
defining source information and control
totals 574
entering 573
posting 587, 588
reversing 602
reviewing suspended transactions 587
revising before posting 586
updating transaction details 587
group types 341, 343
Group Type Table component (GROUP_TYPE)
341
Group Type Table page 342, 343
GST 33
H
HECS Band Fees (AUS) page 723
HECS HELP (AUS) page 722
HECS Reconciliation (AUS) page 733
I
Identify SA Deduction Codes component
(SSF_SA_DED_TBL) 359
Identify Student Charges page 499, 500
image files
preparing 336
uploading 337
implementation 3
Individual Sponsor page 250
Ind Sponsor Refunds By Date page 470
Ind Sponsor Refunds By ID page 470
Initial Setup page 57, 58
Initiate VOS Responses (NZL) page 751
Initiating VOS Responses (NZL) page 752
Inquire Contract Assignments page 482
Index
814 Copyright © 1988, 2010, Oracle and/or its affiliates. All Rights Reserved.
INSTALLATION_SF component 5
installation parameters 5
Institution New Zealand (NZL) page 749
Institution Table New Zealand (NZL) page 746
Interim Deposit Detail page 552
interim deposits
processing 542
understanding 525
Interim Deposits page 526, 542
International Health Coverage
generating letters 698
overview 685
setting up 688
using 692
International Health Coverage - Student
Maintenance page 692
International Health Coverage Institutional Contact
Information page 688
International Health Coverage Item Type Setup
page 688
International Health Coverage Provider page 688
INVOICE_NUMBER component 295
invoice/payment processing 12
Invoice Career page 499
Invoice Detail page 499
invoice for student receivable 6
Invoice Header page 499
Invoice ID Number component
(INVOICE_NUMBER) 295
Invoice ID Number page 295
Invoice Info. Corp - Bill Detail page 516
Invoice Info. Corp - Bill Messages page 516
Invoice Info. Corp. page 516
Invoice Info Student page 515
Invoice Layout component (BI_INV_LAYOUT)
286
Invoice Layout One page 288, 291
invoice layouts
defining basic information 291
setting up 286
sorting and summarizing 292
Invoice Layout Two page 288, 292
Invoice Messages page 499
Invoice Printing page 516
invoices
defining ID number generation 295
printing 506, 507, 509, 511, 512
setting up layouts 286
ITEM_GROUPINGS component 55
ITEM_REASONS component 359
ITEM_TYPE_PANEL component 55
Item Due View page 593
Item Line Corp View page 593
Item Line View page 593
Item Reasons component (ITEM_REASONS) 359
Item Reasons page 359
Items to Writeoff page 605, 608
item type groups
setup 55, 76
third-party offset charges 276
Item Type Groups component
(ITEM_GROUPINGS) 55
Item Type Groups page 58, 76
Item Type Message component
(BI_BILL_MSG_ITM) 283
Item Type Messages page 284, 285
item types
accounting date control warning 60
account types, linking 69
amount edits 62
application fees 183
basic attributes 58
batch refunds 444
billing messages 285
charge priority list warning 65
ChartField information, copying 137
ChartField selection 70
classification 61
miscellaneous parameters 64
payment overall priority warning 65
payment plan contracts 265
payment priority flag warning 66
posting restrictions 68
SetID warning 70
setup 55
third-party contracts 274
Item Types - Account Types page 57, 69
Item Types - GL Interface page 57
Item Types component (ITEM_TYPE_PANEL) 55
Item Types page 440, 444
item type trees
business unit setup 25
charge priority 40
item type groups 56, 77
Item View page 593
J
job data
creating 246
Journal Generator Templates - Defaults page 117
Journal Generator Templates - Summarization page
118
Journal Set ChartFields page 57
K
keywords
creating 16
defining edit tables 11
linking to item types 58
setting up 5, 6
KEYWORDS component 5
Keywords component (KEYWORDS) 5
Keywords page 7, 16
L
LATE_FEE_TABLE component 344
Late Fee Details page 615
Late Fee Messages page 615, 617
late fee option 23
late fees
academic programs 351
account types 52
aging category information 348
basic parameters 345
calculation and posting 615
charge by warning 346
due date warning 351
Index
Copyright © 1988, 2010, Oracle and/or its affiliates. All Rights Reserved. 815
ID switch warning 347
maximums and due dates 349
processing 614
setup 344
late fees - billing 353
Late Fees - Billing page 353
Late Fees — Billing
processing 617
Late Fees – Billing process page 617
Late Fees component (LATE_FEE_TABLE) 344
Late Fee Setup 3 page 349
Late Fees page 615, 617
Late Fees Setup 1 page 345
Late Fees Setup 2 page 345
Late Fees Setup 3 page 345
Late Fees Setup 4 page 345, 351
layouts, invoice See invoice layouts
ledger fields See ChartFields
Ledger Fields Table component
(SF_LED_FLDS_TBL) 119
Ledger Fields Table page 119
legacy general ledger systems 112
letter generation 613, 655
letter templates, collection 370, 371, 650
Liability Status (AUS) page 722
Line Detail Update page 598
Load Paysheet Transactions page 455
Load VERWINFO (NLD) page 711
Lock In Tuition Amount page 430
M
maintain customers 633
Maintain ePayment Transaction page 387
maintain receivables
account information 593
external file layouts 355
group transactions 573
item reasons 359
late fees 344
origins and group types 341
payroll deductions 359
setup 341
Mass Contract Select page 482
maximum row settings 7
MERCHANT_TBL component 100
Message Categories component
(BI_MSG_CAT_TBL) 283
Message Categories page 284
messages, billing See billing messages
messages, receipt See receipt messages
MESSAGES component 332
Messages page 307
messaging, GL See GL messaging
MIN_MAX_FEE_PANEL component 178
Minimum/Maximum Fees 1 page 178, 179
Minimum/Maximum Fees 2 page 178, 180
Minimum/Maximum Fees 3 page 179, 181
Minimum / Maximum Fees component
(MIN_MAX_FEE_PANEL) 178
minimum and maximum fees
admit terms 181
billing careers and academic years 179
setup 178
terms and sessions 180
tuition residency 202
Miscellaneous page 57, 64
modal course fees and class fees 205
N
name usage
1098-T forms 377
business units 23
Netherlands
billing students using OLA or VERWINFO
710
creating Clieop03 files 714
loading VERWINFO files 712
posting student transactions 711
printing OLA forms 711
processing payments 713
setting up account information 704
setting up bank account numbers for students
706
setting up default values for VERWINFO or
Clieop03 files 708
setting up the banking interface 703
using the banking interface 703
using the Clieop03 process 713
New Zealand
defining tax parameters 32
NZQA 757
NZQA fees 757
NZQA fee trigger 760
NZQA per credit charge 768
NZQA term fee codes 762
NZQA term fees 763
NZQA term sub fess 766
Qualification Authority Fees
See New Zealand, NZQA
StudyLink, create student reports 756
StudyLink batch refunds 755
StudyLink information, maintain 753
StudyLink institution defaults 746
StudyLink payment schedules 754
StudyLink processing 745
StudyLink VOS requests and responses 751
non-resident aliens (NRAs)
item type setup 65
null due dates 11
number sequence start points 7
numeric variables 156
Num Variables page 155, 156
O
OLA form 703
Online Refund Other page 445, 451
online refunds
accounts and terms for extra amounts 451
completion through payroll 455
creation 444
extra amounts 449
number of days between refunds note 240
organizations 448
sponsors 451
students 445
Open Cashier Offices page 520
Index
816 Copyright © 1988, 2010, Oracle and/or its affiliates. All Rights Reserved.
Open Cashiers page 520, 523
Open Registers page 520, 522
OPT_FEE_TABLE component 218
optional fees
amounts 221
calculation 433
codes 219
overrides 434
setup 218
terms 220
values 219
Optional Fees - Term page 218, 220
Optional Fees component (OPT_FEE_TABLE) 218
Optional Fees for a Student page 432, 433
Optional Fees Override page 433, 434
Optional Fees page 218, 219, 432
Optional Fees per Term page 218, 221
Oracle Financials
GL interface process integration 132
published messages 112
ORIGIN_TABLE component 341
origins 341, 342
Origin Table component (ORIGIN_TABLE) 341
Origin Table page 342
or XML Publisher invoices
printing 510
OS HELP (AUS) page 723
OVERALL_PRIORITY component 39
Over GL Entry page 314
P
Pay Calculation page 455
payment allocation 40
payment application 39, See Also charge priority
Payment Applier page 603
Payment Corp Reversal - Payment Detail page 600
Payment Corp Reversal page 600, 601
Payment Details page 589
Payment Distribution page 278, 475
Payment Merchant page 91
payment overall priority
example of eligible charge sorting 49
item type setup 65
item type warning 65
pay proportionate % tax warning 42
rules 40
setup 47
Payment Overall Priority component
(OVERALL_PRIORITY) 39
Payment Overall Priority page 40, 47
Payment Plan 1 page 259, 360, 361, 475
Payment Plan 2 page 259, 262, 475, 476
payment plan contracts
administration 474
administrative fees 269
basic parameters 259
eligible charges 264, 478
item types 265
parameters confirmation 475
plan types 263
recalculation 478
setup 259
summary 472
time frames 264
Payment Plan Fee page 259, 269
Payment Plan Item Type page 259, 265
payment plans
collection agreements 277
counters 31
deferral contracts 253
interest 61
overview 471
payroll deduction assignment 361
setup 253
third-party contracts 270
Payment Reversal - Payment Detail page 600
Payment Reversal page 600, 601
payments
application 603
excess accounts 26
reversal 600, 601
self-service 24
Payment Shuffle page 603
payroll
refund method 237, 436
Payroll Deduction Group Creation page 582, 585
Payroll Deduction Relationship page 360, 361
payroll deductions
assigning to payment plans 361
creating groups 585
creating relationships 361
defining codes 360
processing 581
reversing 603
reviewing record selection results 584
selecting records 582
setting up 359
Payroll Defaults page 20, 238, 242
payroll refunds
batch calculation 457
batch confirmation 457
checks and direct deposit advice slips 458, 459
completion 455
creating job data 246
defaults 242
direct deposit 249, 457, 458
paysheet creation 456
paysheet deletion 468
process flow diagram 437
refund calendar creation 246
reversal 467
withholding amounts 243
paysheets
creating 456
deleting 468
Pending to Bill Items page 499
Pending To Bill Items page 499
Pending Transaction Detail page 393
PeopleSoft Application Messaging 112
PeopleSoft Campus Community 633
PeopleSoft Financials
AP refund messaging process 459
AP refunds 459
business unit synchronization 135
GL interface process integration 132
published messages 112
PeopleSoft General Ledger units 118
Per Credit Charge (NZL) page 759, 768
Permission Form page 634, 635
permission forms
defining charge priority list rules 41
Person Communication page 699
pivot dates 141
Index
Copyright © 1988, 2010, Oracle and/or its affiliates. All Rights Reserved. 817
Populate Items by Invoice page 7
posting
business unit setup 24
cashiering 318
delayed receipts 548
group transactions 587
individual transaction consolidation 592
individual transactions 589
item type restrictions 68
organization transactions 592
student transactions 590
target keys 325
Posting Information page 593
Posting Restrictions page 57, 68
Posting Setup page 20, 24
Post Receipts page 548
Post Transactions page 588
printing
1098-T forms 672
automatic receipts 321, 322
cashiering receipts 552
check cashing receipts 541
Crystal invoices 511, 512
department receipts 539
Form Based Extract Bill invoices 507, 509
invoices 506
output formats, invoice 495
refund checks and advice slips 458
SQR invoices 510
student payment receipts 531
T2202A forms 678, 679
Print OLA Forms (NLD) page 711
Print T2202A page 676, 678
Prior Billing page 499
prior term 43
Process Collections page 644
Process PAY File (NZL) page 754
Process PAY Schedule (NZL) page 754
Process Refund File (NZL) page 754
Process Scheduler page 87
Process VOS Request (NZL) page 751
Process VOS Requests (NZL) page 751
Provider Coverage and Rates page 688
PS_CAN_DONAT_RECEPT table 684
PS_CAN_TAX_RECEPT table 683
PS_PAY_DEDUCTION table 581, 584
PS_SF_1098_DTL table 665
Purge Posting Table page 593
Q
QUICK_POST_TBL table 25, 592
R
Rate Tables for Course Fees component
(CRSE_RATE_PANEL) 204
Rate Tables for Course Fees page 206, 207
re-encryption 84
REASON_IN_SF component 369
REASON_OUT_SF component 369
reason in/out codes 369
Reason In component (REASON_IN_SF) 369
Reason In page 370
Reason Out component (REASON_OUT_SF) 369
Reason Out page 370
Recalc for Cancellation page 431
Recalc Payment Plan page 475, 478, 482
Recalc Third Party Contracts page 479, 481
receipt activity
by business date 554
organizations 555
review 553
students 556
receipt forms
modifying 335
setting up form image text 337
uploading image files 336, 337
using Form Editor 338
receipt messages
cashiering offices 333
setup 332
target keys 333
tender keys 334
Receipt Print Messages component (MESSAGES)
332
receipts, cashiering
creating messages 332
modifying forms 335
posting 318
posting, delayed 548
printing 552
printing automatically 316, 321, 322
viewing details 551
voiding 317, 549, 550
receipts, donation 661, 683
receipts, income tax 661, 683
Receipts By Business Date page 553, 554
Receipt Tender Flow page 554, 559
receivables collection See collections
receivables maintenance See maintain receivables
records, valid 17
Record Types page 356
reference item payment flag 27
Refund Address page 470
Refund Approval page 20, 238, 241, 453, 454
Refund Approvals page 453
Refund Calculation Controls page 151, 153
Refund Calculation page 457
Refund Check Print page 458, 459
Refund Check Reprint page 468
Refund Check Reversal page 465, 467
Refund Cheque Print page 458
Refund Confirmation page 456, 457
refunding See Also AP refunds
accounts payable options 243
approval parameters 241
approvals 453, 454
AP set controls 245
basic rules 238
batch creation 439
business units, accounts payable 243
business unit setup 238
calendars 246
cancellation 463
check renumbering 467, 468
check reprinting 467
credit card and eCheck distribution 461
defaults, payroll 242
direct deposit 249
formats 436
information review 469
Index
818 Copyright © 1988, 2010, Oracle and/or its affiliates. All Rights Reserved.
methods 436
online refund creation 444
overview 435
processes 436
recipients 436
reversals 464, 465, 466, 467
setup 237
sponsored recipient controls 240
sponsors 249
withholding amounts, payroll 243
refund method 239
Refund Paysheet Creation page 456
Refund Setup page 20, 238
Refund Unsheet page 469
Refund with Extra Amount page 445, 449
registers, valid See valid registers
REGISTERS component 320
Reopen Cashier page 566, 568
Reopen Office page 566
Reopen Register page 566, 567
reports, A to Z 793
reports, list of 793
Request Payroll Interface page 456
Request Student Job Data component
(SSF_RUN_POIJOB) 246
Request Student Job Data page 247, 248
for T4A data 680
Restrict payment by invoice
target detail 529
Reversal Detail page 601
reversals
group transactions 602
payments and charges 601
payroll deductions 603
refunds 464
write-offs 610
Reverse Corporate Charge- Charge Detail page 601
Reverse Corporate Charge - Charge Reversal page
601
Review 1098–T Messages page 662
Review Batch Messages page 440
Review Corp Late Fees — Billing (corporation late
fees) 618
Review GL History page 416, 417
Review GL Integration Data page 417, 420
Review GL Messages page 414
Review HECS Results (AUS) page 733
Review Results by Contract page 482
Review Selection Criteria page 399
Review Student by Date page 470
Review Student by ID page 469
Review Transactions page 588
RUN_SFCPTMFE component 190
RUNCTL_FEE_RLVR component 204
S
SA Payroll Deduction Codes 360
SA Payroll Deduction Codes page 360
SA Payroll Deduction Summary page 582, 584
scan lines, billing 296
Security Code Purge Process page 382
Security Code re-encryption 84
SEL_CRITERIA_PANEL component 158
SEL_GROUP_PANEL component 227
Select Charges to Pay page 526, 534, 589
Selection Criteria page 393
Select SA Payroll Deduction page 582
Select Student Charges to Pay page 536
Select Students to Pay page 526, 590
self-service
accepting payments 24
self service
reviewing and canceling transactions 386
Self Service Options page 259
sequences, auto-numbering 31
SERVICE_IND_SETUP component 77
Service Indicator - Career Setup page 78, 80
Service Indicator - Details page 78
Service Indicator page 78
service indicators
collections write-offs 365
credit history 641
enrollment cancellation 625
enrollment deposit processing 611, 612
set selection 23
service indicator sets See Also service indicators
details 78
eligible academic careers 80
setup 77
Service Indicator Sets component
(SERVICE_IND_SETUP) 77
sessions
minimum and maximum fees 180
tuition calculation controls 153
setup, general 5
Set Up Default Values for VERWINFO/ Clieop03
(NLD) page 704
set up linking charges to specified payment plan
268
SF_1098_INST component 375
SF_AP_VNDR_OPTIONS component 243
SF_COMMON_ID table 589, 629
SF_CRCRD process 462
SF_LED_FLDS_TBL component 119
SF_PAY_DED process 585, 586, 603
SF_PAYDED_RELATION component 359
SF Accounting Line Detail page 417
SF Account Types component (ACCT_TYPE_SF)
51
SF Business Unit component
(BUSINESS_UNIT_SF) 19
SFCCRFND process 462
SFCOLLEC process 645
SFDPTREC process 424
SF Installation 2 page 7, 11
SF Installation 3 page 7, 15
SF Installation page 7
SF merchants 100, 101
SF Merchants component (MERCHANT_TBL) 100
SF Merchants page 101
SFP1098P process 665
SFPAYDED process 584, 603
SFPCCBAT process 462
SFPGLINT process 424
SFPGRPDR process 589
SFPGRPST process 589
SF Term Default component (DFLT_TERM_TBL)
81
Short GL Entry page 314
sorting, invoice layout 292
SPEEDTYPE component 127
SpeedTypes
Index
Copyright © 1988, 2010, Oracle and/or its affiliates. All Rights Reserved. 819
creating 127
SpeedTypes component (SPEEDTYPE) 127
SpeedTypes page 127
sponsors
batch refunds 442
designation 249
individual students 250
online refunds 451
organizations 251
recipient controls 240
SSF_ASGNWORK process 646
SSF_POIJOB_TEST component 246
SSF_RUN_POIJOB component 246
SSF_SA_DED_TBL component 359
standard requests, billing
See billing standard requests
start points, number sequence 7
Status Change Rule (AUS) page 723
status changes, deposit 189
Status Update page 186, 189
STDNT_EQUTN_VARS component 155
Student Accounts page 445
Student Address page 676
Student Bank Accounts (NLD) page 704
Student Fin Installation component
(INSTALLATION_SF) 5
student groups 308
Student Groups page 299, 308
Student Invoice Crystal page 507, 511
Student Invoice Extract page 506, 507
Student Invoice Other page 507, 510
Student Invoice Summary page 499, 502
Student Loan - OS-HELP (AUS) page 742
Student Payment Detail page 552
student payments
accepting 527
allocating charges 534
understanding 524
Student Payments page 526, 527
student permission form
attaching to student records 635
creating 635
student permission forms
attaching to charge priority lists 636
understanding 634
student permissions
managing 634
Student Post page 589, 590, 711
Student Receipts page 554, 556
Student Refund Cancellation page 463
Student Refund page 392, 445
Student Refunds by Date page 465, 466
Student Refunds by ID page 465
students
billing messages 286
Student Writeoff page 605, 606
StudyLink Institution Defaults (NZL) page 746
StudyLink Posting Parameters (NZL) page
746, 750
surcharges See convenience fees
Suspended Group Post page 587
Suspended Group Post page 586
T
T2202A Data page 676, 677
T2202A forms 679
defining item type parameters 62
generating data 676
printing on preprinted forms 678
producing 675
reviewing and editing data 677
setting up 379
understanding 660
T4A Data page 680
T4A reports
creating job data 679
defining item type parameters 62
producing 679
reviewing 679
setting up 32, 379
understanding 660
Table Validation page 626, 627
TARGET_KEYS component 323
Target Key ChartFields page 323
target keys
ChartFields 323
receipt messages 333
setup 323
tax authorities, linking 326
Target Keys - Definition page 323
Target Keys - Tax Authority page 323, 326
Target Keys component (TARGET_KEYS) 323
Target Messages page 332, 333
TAX_AUTHORITY component 34
TAX_CODE_VAT component 34
tax authorities
defining 35
linking to target keys 326
setting up 34
specifying VAT rebates 36
Tax Authorities - Rebate page 35, 36
Tax Authorities - Summary page 35
Tax Authorities component
(TAX_AUTHORITY) 34
Tax Authority page 35
tax codes 34, 36
Tax Codes component (TAX_CODE_VAT) 34
Tax Codes page 35, 36
tax forms See Also 1098-T forms, 379
1098-T forms 375
item type setup 62
production 659
setup 375
T2202A forms 379
T4A generation setup 32
T4A reports 379
taxpayer identification number (TIN) 376, 659
tax receipt information
generating 683
understanding 661
TENDER_KEYS component 327
tender activity
by cashier 557
by register 558
review 553
Tender By Cashier page 554, 557
Tender By Register page 554, 558
tender flow 553, 559
Tender Key ChartFields page 328
Tender Key Over ChartFields page 328
Tender Key page 328
tender keys
ChartFields 328
Index
820 Copyright © 1988, 2010, Oracle and/or its affiliates. All Rights Reserved.
receipt messages 334
setup 327, 328
valid cashiers 331
Tender Keys component (TENDER_KEYS) 327
Tender Key Short ChartFields page 328
Tender Key Valid Cashiers page 328, 331
Tender Messages page 332, 334
TERM_FEE_PANEL component 190
term default
business unit setup 26
default term control warning 26
setup 81
Term Default page 81
Term Fee Codes (NZL) page 758, 762
Term Fee Codes page 191
Term Fee Residency page 191, 202
term fees
calculation option warning 196
copying to subsequent terms 203
copy options warning 204
From Session and To Session warning 204
linking to tuition groups 232
linking waivers 233
setting up 190, 191, 193, 195, 198, 202
Term Fees (NZL) page 758, 763
Term Fees component (TERM_FEE_PANEL) 190
Term Fees page 191, 193, 723
Term Fee Waivers page 228, 233
terms
cancel reason 23
minimum and maximum fees 180
optional fees, linking 220
Term Sub Fee Codes (NZL) page 758, 765
Term Sub Fee Codes page 191, 195
Term Sub Fees (NZL) page 758, 766
Term Sub Fees page 191, 198
third-party contracts
administration 479
basic parameters 271
charge transfers 276
item types 274
recalculation 481
setup 270
students, linking 479
summary 472
third-party general ledger systems 112
Third Party Charges page 271, 276
Third Party Contract Assess page 280
Third Party Contract page 271, 479
Third Party Info page 526, 537
Third Party Information page 590
Third Party Item Types page 271, 274
TIN See taxpayer identification number (TIN)
totals, cashiering 561
Totals By Deposit ID page 561
Totals page 393
TP_CONTRACT component 270
TP_PAYMENT_PLAN component 259, 359
TRANSACTION_FEES component 222
Transaction Detail page 393, 396
Transaction Fees component
(TRANSACTION_FEES) 222
Transaction Fees page 223
transactions See Also group transactions
consolidating individual transactions 592
posting 589, 590, 592
reversing 600
Transaction Setup page 314, 316
tree node 42
trees, item type 25, 77
Tuition and Fees page 425
tuition calculation
basic parameters 151
batch process warnings 429
business unit setup 23
controls, setting up 139, 150
course lists 174
errors and warnings 154
fees and tuition groups 177
minimum amounts, locking in 430
multiple students 427, 428
optional fees 432
recalculation after enrollment cancellation 431
refund calculation control 153
single students 425, 426
variables 155
waivers 171
Tuition Calculation Controls component
(CALC_CNTROL_PANEL) 150
Tuition Calculation Controls page 151
Tuition Calculation page 425, 426
Tuition for Multiple Students page 427, 428
Tuition Group Priority page 229, 235
tuition groups
adjustment codes 230
course lists 234
criteria 231
established priorities 235
setup 158, 177, 227, 229
term fees 232
waivers 233, 234
Tuition Groups - Adjustment Codes page 228, 230
Tuition Groups - Course Lists page 228, 234
Tuition Groups - Criteria page 228, 231
Tuition Groups - Definition page 228, 229, 723
Tuition Groups - Term Fees page 228, 232
Tuition Groups - Waivers page 228, 234
Tuition Groups component
(SEL_GROUP_PANEL) 227
tuition residency 202, 203, 426
U
Update Corp Payment Invoice ID page 594
Update Payment Invoice ID page 594
Upload EPS Image File component
(FE_UPIMG_RUNCTL) 335
Upload EPS Image File page 335, 337
V
VALID_FIELDS component 17
VALID_RECORD_SF component 17
valid cashiers
closing 564
opening 523
reopening 568
setting up 320, 321
specifying for tender keys 331
Valid Cashiers component (CASHIERS) 320
Valid Cashiers page 320, 321
Valid Fields (NZL) page 758, 759
Index
Copyright © 1988, 2010, Oracle and/or its affiliates. All Rights Reserved. 821
Valid Fields component (VALID_FIELDS) 17
Valid Fields page 17, 18
valid records 17
Valid Records (NZL) page 758, 759
Valid Records component
(VALID_RECORD_SF) 17
Valid Records page 17
valid registers
closing 563
opening 522
reopening 567
setting up 320
Valid Registers component (REGISTERS) 320
Valid Registers page 320
Values page 218, 219
variables
character 156
numeric 156
tuition calculation 155
yes/no flags 157
VAT rebates 36
VERWINFO 703
View Corp Items by Invoice page 594
View Items by Invoice page 594
VOID_REASONS component 332
Void Reasons component (VOID_REASONS)
332
Void Reasons page 332
Void Receipts - All page 550
Void Receipts page 550
vouchers, AP 244
W
WAIVER_GROUP_PANEL component 171
WAIVER_PANEL component 171
waiver forms
selecting for enrollment deposit process 613
waiver groups 171, 173
Waiver Groups component
(WAIVER_GROUP_PANEL) 171
Waiver Groups page 171, 173
waivers
automatic calculation 153
excess accounts 26
excess waiver account warning 26
setup 171
term fees, linking 233
tuition calculation 139
tuition groups, linking 234
Waivers component (WAIVER_PANEL) 171
Waivers page 171
Warning Bill Message page 492
wash periods 152
worklists
assigning collection items 646
routing batch refunds 453
Write-off ChartFields page 57
write-offs
account selection 607
batch processing 608
collections service indicators 365
general ledger accounts 72
item selection 608
organizations 607
overview 605
reversals 610, 611
students 606
Writeoff Corp Reversal page 606, 611
Writeoff Detail page 606
Writeoff Reversal page 605, 610
Write Offs page 605, 608
Y
Y/N Flags page 156, 157
yes/no flags 157
Z
zero bills 301, 496
