Cuckoo Sandbox Book Manual V2 0 6
User Manual:
Open the PDF directly: View PDF ![]() .
.
Page Count: 139 [warning: Documents this large are best viewed by clicking the View PDF Link!]

Cuckoo Sandbox Book
Release 2.0.6
Cuckoo Sandbox
Oct 06, 2018

Contents
1 Using the new Cuckoo Package? 3
2 Having troubles? 5
2.1 FAQ .................................................... 5
3 Contents 15
3.1 Introduction ............................................... 15
3.2 Installation ................................................ 21
3.3 Usage ................................................... 62
3.4 Customization .............................................. 108
3.5 Development ............................................... 125
3.6 Final Remarks .............................................. 132
i

ii

Cuckoo Sandbox Book, Release 2.0.6
Cuckoo Sandbox is an open source software for automating analysis of suspicious files. To do so it makes use of
custom components that monitor the behavior of the malicious processes while running in an isolated environment.
This guide will explain how to set up Cuckoo, use it, and customize it.
Contents 1

Cuckoo Sandbox Book, Release 2.0.6
2 Contents

CHAPTER 1
Using the new Cuckoo Package?
There are various big improvements related to usability in the newly released Cuckoo Package. To get the most out of
it, start reading on the different subjects related to it. Following are some of the highlights:
•Cuckoo Working Directory
•Cuckoo Working Directory Usage
•Installing Cuckoo
•Upgrading from a previous release
•Cuckoo Feedback
3

Cuckoo Sandbox Book, Release 2.0.6
4 Chapter 1. Using the new Cuckoo Package?

CHAPTER 2
Having troubles?
If you’re having troubles you might want to check out the FAQ as it may already have the answers to your questions.
2.1 FAQ
Here you can find answers for various Frequently Asked Questions:
•General Questions
–Can I analyze URLs with Cuckoo?
–Can I use Volatility with Cuckoo?
–What do I need to use Cuckoo with VMware ESXi?
•Troubleshooting
–After upgrade Cuckoo stops to work
–Cuckoo stumbles and produces some error I don’t understand
–Check and restore current snapshot with KVM
–Check and restore current snapshot with VirtualBox
–Unable to bind result server error
–Error during template rendering
–501 Unsupported Method (‘GET’)
–Permission denied for tcpdump
–DistributionNotFound / No distribution matching the version..
–IOError: [Errno 24] Too many open files
5

Cuckoo Sandbox Book, Release 2.0.6
–pkg_resources.ContextualVersionConflict
–ValueError: incomplete format key
–Troubleshooting VM network configuration
–Cuckoo says there’s a version 2.1.0?
–No handlers could be found for logger X in UWSGI log
2.1.1 General Questions
Can I analyze URLs with Cuckoo?
New in version 0.5: Native support for URL analysis was added to Cuckoo.
Changed in version 2.0-rc1: Cuckoo will not only start the browser (i.e., Internet Explorer) but will also attempt to
actively instrument it in order to extract interesting results such as executed Javascript, iframe URLs, etc. See also our
2.0-rc1 blogpost.
Additional details on URL submissions is documented at Submit an Analysis, but it boils down to:
$ cuckoo submit --url http://www.example.com
Can I use Volatility with Cuckoo?
New in version 0.5: Cuckoo introduces support for optional full memory dumps, which are created at the end of the
analysis process. You can use these memory dumps to perform additional memory forensic analysis with Volatility.
Please also consider that we don’t particularly encourage this: since Cuckoo employs some rootkit-like technologies
to perform its operations, the results of a forensic analysis would be polluted by the sandbox’s components.
What do I need to use Cuckoo with VMware ESXi?
To run with VMware vSphere Hypervisor (or ESXi) Cuckoo leverages on libvirt or pyVmomi (the Python SDK for the
VMware vSphere API). VMware API are used to take control over virtual machines, though these APIs are available
only in the licensed version. In VMware vSphere free edition these APIs are read only, so you will be unable to use it
with Cuckoo. For the minimum license needed, please have a look at VMware website.
2.1.2 Troubleshooting
After upgrade Cuckoo stops to work
Probably you upgraded it in a wrong way. It’s not a good practice to rewrite the files due to Cuckoo’s complexity and
quick evolution.
Please follow the upgrade steps described in Upgrading from a previous release.
Cuckoo stumbles and produces some error I don’t understand
Cuckoo is a mature but always evolving project, it’s possible that you encounter some problems while running it, but
before you rush into sending emails to everyone make sure you read what follows.
6 Chapter 2. Having troubles?

Cuckoo Sandbox Book, Release 2.0.6
Cuckoo is not meant to be a point-and-click tool: it’s designed to be a highly customizable and configurable solution
for somewhat experienced users and malware analysts.
It requires you to have a decent understanding of your operating systems, Python, the concepts behind virtualization
and sandboxing. We try to make it as easy to use as possible, but you have to keep in mind that it’s not a technology
meant to be accessible to just anyone.
That being said, if a problem occurs you have to make sure that you did everything you could before asking for time
and effort from our developers and users. We just can’t help everyone, we have limited time and it has to be dedicated
to the development and fixing of actual bugs.
• We have extensive documentation, read it carefully. You can’t just skip parts of it.
• We have a Discussion page where you can find discussion platforms on which we’re frequently helping our
users.
• We have lot of users producing content on Internet, Google it.
• Spend some of your own time trying fixing the issues before asking ours, you might even get to learn and
understand Cuckoo better.
Long story short: use the existing resources, put some efforts into it and don’t abuse people.
If you still can’t figure out your problem, you can ask help on our online communities (see Final Remarks). Make sure
when you ask for help to:
• Use a clear and explicit title for your emails: “I have a problem”, “Help me” or “Cuckoo error” are NOT good
titles.
• Explain in details what you’re experiencing. Try to reproduce several times your issue and write down all steps
to achieve that.
• Use no-paste services and link your logs, configuration files and details on your setup.
• Eventually provide a copy of the analysis that generated the problem.
Check and restore current snapshot with KVM
If something goes wrong with virtual machine it’s best practice to check current snapshot status. You can do that with
the following:
$ virsh snapshot-current "<Name of VM>"
If you got a long XML as output your current snapshot is configured and you can skip the rest of this chapter; anyway
if you got an error like the following your current snapshot is broken:
$ virsh snapshot-current "<Name of VM>"
error: domain '<Name of VM>' has no current snapshot
To fix and create a current snapshot first list all machine’s snapshots:
$ virsh snapshot-list "<Name of VM>"
Name Creation Time State
------------------------------------------------------------
1339506531 2012-06-12 15:08:51 +0200 running
Choose one snapshot name and set it as current:
$ snapshot-current "<Name of VM>" --snapshotname 1339506531
Snapshot 1339506531 set as current
2.1. FAQ 7

Cuckoo Sandbox Book, Release 2.0.6
Now the virtual machine state is fixed.
Check and restore current snapshot with VirtualBox
If something goes wrong with virtual it’s best practice to check the virtual machine status and the current snapshot.
First of all check the virtual machine status with the following:
$ VBoxManage showvminfo "<Name of VM>" | grep State
State: powered off (since 2012-06-27T22:03:57.000000000)
If the state is “powered off” you can go ahead with the next check, if the state is “aborted” or something else you have
to restore it to “powered off” before:
$ VBoxManage controlvm "<Name of VM>" poweroff
With the following check the current snapshots state:
$ VBoxManage snapshot "<Name of VM>" list --details
Name: s1 (UUID: 90828a77-72f4-4a5e-b9d3-bb1fdd4cef5f)
Name: s2 (UUID: 97838e37-9ca4-4194-a041-5e9a40d6c205) *
If you have a snapshot marked with a star “*” your snapshot is ready, anyway you have to restore the current snapshot:
$ VBoxManage snapshot "<Name of VM>" restorecurrent
Unable to bind result server error
At Cuckoo startup if you get an error message like this one:
2014-01-07 18:42:12,686 [root] CRITICAL: CuckooCriticalError: Unable to bind result
˓→server on 192.168.56.1:2042: [Errno 99] Cannot assign requested address
It means that Cuckoo is unable to start the result server on the IP address written in cuckoo.conf (or in machinery.conf
if you are using the resultserver_ip option inside). This usually happen when you start Cuckoo without bringing up
the virtual interface associated with the result server IP address. You can bring it up manually, it depends from one
virtualization software to another, but if you don’t know how to do, a good trick is to manually start and stop an
analysis virtual machine, this will bring virtual networking up.
In the case of VirtualBox the hostonly interface vboxnet0 can be created as follows:
# If the hostonly interface vboxnet0 does not exist already.
$ VBoxManage hostonlyif create
# Configure vboxnet0.
$ VBoxManage hostonlyif ipconfig vboxnet0 --ip 192.168.56.1 --netmask 255.255.255.0
Error during template rendering
Changed in version 2.0-rc1.
In our 2.0-rc1 release a bug was introduced that looks as follows in the screenshot below. In order to resolve this
issue in your local setup, please open the web/analysis/urls.py file and modify the 21st line by adding an
underscore as follows:
8 Chapter 2. Having troubles?
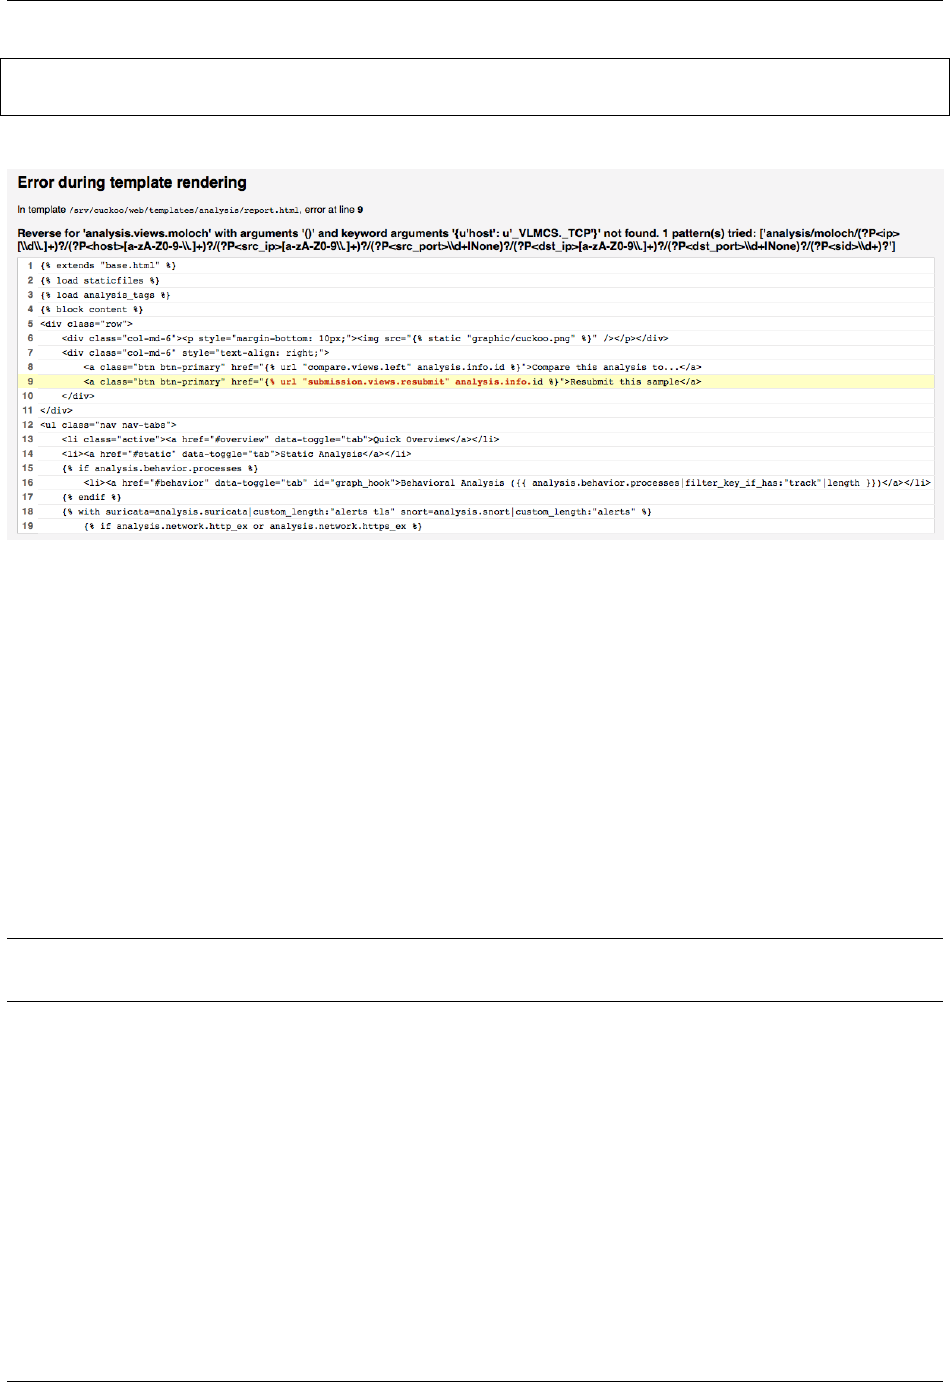
Cuckoo Sandbox Book, Release 2.0.6
-"/(?P<ip>[\d\.]+)?/(?P<host>[a-zA-Z0-9-\.]+)?"
+"/(?P<ip>[\d\.]+)?/(?P<host>[ a-zA-Z0-9-_\.]+)?"
The official fixes for this issue can be found in the following commits.
501 Unsupported Method (‘GET’)
Changed in version 2.0-rc1.
Since 2.0-rc1 Cuckoo supports both the legacy Cuckoo Agent as well as a new, REST API-based, Cuckoo Agent for
communication between the Guest and the Host machine. The new Cuckoo Agent is an improved Agent in the
sense that it also allows usage outside of Cuckoo. As an example, it is used extensively by VMCloak in order to
automatically create, configure, and cloak Virtual Machines.
Now in order to determine whether the Cuckoo Host is talking to the legacy or new Cuckoo Agent it does a HTTP
GET request to the root path (/). The legacy Cuckoo Agent, which is based on xmlrpc, doesn’t handle that specific
route and therefore returns an error, 501 Unsupported method.
Having said that, the message is not actually an error, it is simply Cuckoo trying to determine to which version of the
Cuckoo Agent it is talking.
Note: It should be noted that even though there is a new Cuckoo Agent available, backwards compatibility for the
legacy Cuckoo Agent is still available and working properly.
2.1. FAQ 9

Cuckoo Sandbox Book, Release 2.0.6
Permission denied for tcpdump
Changed in version 2.0.0.
With the new Cuckoo structure in-place all storage is now, by default, located in ~/.cuckoo, including the PCAP file,
which will be stored at ~/.cuckoo/storage/analyses/task_id/dump.pcap. On Ubuntu with AppArmor
enabled (default configuration) tcpdump doesn’t have write permission to dot-directories in $HOME, causing the
permission denied message and preventing Cuckoo from capturing PCAP files.
One of the workaround is as follows - by installing AppArmor utilities and simply disabling the tcpdump
AppArmor profile altogether (more appropriate solutions are welcome of course):
sudo apt-get install apparmor-utils
sudo aa-disable /usr/sbin/tcpdump
DistributionNotFound / No distribution matching the version..
Changed in version 2.0.0.
Installing Cuckoo through the Python package brings its own set of problems, namely that of outdated Python package
management software. This FAQ entry targets the following issue..:
10 Chapter 2. Having troubles?

Cuckoo Sandbox Book, Release 2.0.6
$ cuckoo
Traceback (most recent call last):
File "/usr/local/bin/cuckoo", line 5, in <module>
from pkg_resources import load_entry_point
File "/usr/lib/python2.7/dist-packages/pkg_resources.py", line 2749, in <module>
working_set = WorkingSet._build_master()
File "/usr/lib/python2.7/dist-packages/pkg_resources.py", line 446, in _build_master
return cls._build_from_requirements(__requires__)
File "/usr/lib/python2.7/dist-packages/pkg_resources.py", line 459, in _build_from_
˓→requirements
dists = ws.resolve(reqs, Environment())
File "/usr/lib/python2.7/dist-packages/pkg_resources.py", line 628, in resolve
raise DistributionNotFound(req)
pkg_resources.DistributionNotFound: tlslite-ng==0.6.0a3
Those issues - and related ones - are caused by outdated Python package management software. Fortunately their fix
is fairly trivial and therefore the following command should do the trick:
pip install -U pip setuptools
IOError: [Errno 24] Too many open files
It is most certainly possible running into this issue when analyzing samples that have a lot of dropped files, so many
that the Processing Utility can’t allocate any new file descriptors anymore.
The easiest workaround for this issue is to bump the soft and hard file descriptor limit for the current user. This may
be done as documented in the following blogpost.
In case if you using Supervisor set minfds in supervisord.conf.
Remember that you have to login in to a new shell (i.e., usually logout first) session in order for the changes to take
effect.
pkg_resources.ContextualVersionConflict
In case you’re installing or upgrading the Cuckoo Package, it has happened before to people that they got an error
much like the following:
pkg_resources.ContextualVersionConflict: (HTTPReplay 0.1.5
(/usr/local/lib/python2.7/dist-packages),
Requirement.parse('HTTPReplay==0.1.17'), set(['Cuckoo']))
Now this is quite odd, as generally speaking we’ve specifically requested pip to install all dependencies with their
exact version (and in fact, if you look at pip freeze you’ll see the correct version), but it does happen sometimes
that older versions of various libraries are still around.
The easiest way to resolve this issue is by uninstalling all versions of said dependency and reinstalling Cuckoo. In
the case presented above, with HTTPReplay, this may look as follows:
$ sudo pip uninstall httpreplay
Uninstalling HTTPReplay-0.1.17:
/usr/local/bin/httpreplay
/usr/local/bin/pcap2mitm
/usr/local/lib/python2.7/dist-packages/HTTPReplay-0.1.17-py2.7.egg-info
...
(continues on next page)
2.1. FAQ 11

Cuckoo Sandbox Book, Release 2.0.6
(continued from previous page)
Proceed (y/n)? y
Successfully uninstalled HTTPReplay-0.1.17
$ sudo pip uninstall httpreplay
Uninstalling HTTPReplay-0.1.5:
/usr/local/lib/python2.7/dist-packages/HTTPReplay-0.1.5-py2.7.egg-info
Proceed (y/n)? y
Successfully uninstalled HTTPReplay-0.1.5
$ sudo pip uninstall httpreplay
Cannot uninstall requirement httpreplay, not installed
Then reinstalling Cuckoo again is simply invoking pip install -U cuckoo or similar.
ValueError: incomplete format key
This issue may appear at runtime after tinkering with settings in $CWD/conf, as input is passed to the configura-
tion parser at runtime unescaped. Double-check your configuration files with an eye out for potentially troublesome
character combinations such as %(.
Troubleshooting VM network configuration
In case the network configuration of your Virtual Machine isn’t working as expected, you’ll be prompted with the
message to resolve this issue as Cuckoo isn’t able to use it for analyses as-is. There are numerous possibilities as to
why the network configuration and/or your setup are incorrect so please read our documentation once more. However,
most often the issue lies within one of the following reasons:
• The IP address of the VM has been configured incorrectly. Please verify that the VM has a static IP address,
that it matches the one in the Cuckoo configuration, and that the configured network interface exists and is up.
Also, in case of VirtualBox, did you configure the network interface to be a Host-Only interface?
• Check that there are no firewalls in-place that hinder the communication between your Host and Guest and
double check that the Host and Guest can ping each other as well as connect to each other.
If connections from the Cuckoo Host to the Guest work, but the other way around don’t, then some additional problems
may be at hand:
• Is the network configuration equivalent on the host and in the VM? If not, e.g., if the VM sees different IP
ranges, then you’ll have to configure the resultserver_ip and resultserver_port, for which we
have separate documentation.
• If you’ve modified the Cuckoo Analyzer (located at $CWD/analyzer) this error message may indicate that a
syntax error or other exception was introduced, preventing the Analyzer from being properly started, and thus
not being able to perform the analysis as expected.
If you’ve triple-checked the above and are still experiencing issues, then please contact us through one of the various
communication channels.
Cuckoo says there’s a version 2.1.0?
If you see the message Outdated! Cuckoo Sandbox version 2.1.0 is available now. and
you’ve come to this FAQ entry then you’re entirely correct. There is indeed no version 2.1.0, yet (!). However,
due to the logic implemented in the version checker of our 2.0-RC1 and 2.0-RC2 releases, the only way to inform
our users about our latest releases is by having a “new” major version release (i.e., 2.1.0 or later). We’ve decided
12 Chapter 2. Having troubles?

Cuckoo Sandbox Book, Release 2.0.6
that it’s better to sling a little bit of confusion regarding a non-existing version than not mentioning any new versions
to our users altogether. So please bear with us and install the latest version :-)
No handlers could be found for logger X in UWSGI log
If you see this message, it means Cuckoo is throwing an error before its loggers are initialized. This might happen if
database migration or CWD updates are required.
Start the development web server to see the error:
$ cuckoo web
Otherwise you can ask the developers and/or other Cuckoo users, see Join the discussion.
2.1. FAQ 13

Cuckoo Sandbox Book, Release 2.0.6
14 Chapter 2. Having troubles?

CHAPTER 3
Contents
3.1 Introduction
This is an introductory chapter to Cuckoo Sandbox. It explains some basic malware analysis concepts, what’s Cuckoo
and how it can fit in malware analysis.
3.1.1 Sandboxing
As defined by Wikipedia, “in computer security, a sandbox is a security mechanism for separating running programs.
It is often used to execute untested code, or untrusted programs from unverified third-parties, suppliers, untrusted
users and untrusted websites.”.
This concept applies to malware analysis’ sandboxing too: our goal is to run an unknown and untrusted application or
file inside an isolated environment and get information on what it does.
Malware sandboxing is a practical application of the dynamical analysis approach: instead of statically analyzing the
binary file, it gets executed and monitored in real-time.
This approach obviously has pros and cons, but it’s a valuable technique to obtain additional details on the malware,
such as its network behavior. Therefore it’s a good practice to perform both static and dynamic analysis while inspect-
ing a malware, in order to gain a deeper understanding of it.
Simple as it is, Cuckoo is a tool that allows you to perform sandboxed malware analysis.
Using a Sandbox
Before starting to install, configure and use Cuckoo, you should take some time to think on what you want to achieve
with it and how.
Some questions you should ask yourself:
• What kind of files do I want to analyze?
• What volume of analyses do I want to be able to handle?
15

Cuckoo Sandbox Book, Release 2.0.6
• Which platform do I want to use to run my analysis on?
• What kind of information I want about the file?
The creation of the isolated environment (for example a virtual machine) is probably the most critical and important
part of a sandbox deployment: it should be done carefully and with proper planning.
Before getting hands on the virtualization product of your choice, you should already have a design plan that defines:
• Which operating system, language and patching level to use.
• Which software to install and which versions (particularly important when analyzing exploits).
Consider that automated malware analysis is not deterministic and its success might depend on a trillion of factors:
you are trying to make a malware run in a virtualized system as it would do on a native one, which could be tricky to
achieve and may not always succeed. Your goal should be both to create a system able to handle all the requirements
you need as well as try to make it as realistic as possible.
For example you could consider leaving some intentional traces of normal usage, such as browsing history, cookies,
documents, images etc. If a malware is designed to operate, manipulate or steal such files you’ll be able to notice it.
Virtualized operating systems usually carry a lot of traces with them that makes them very easily detectable. Even if
you shouldn’t overestimate this problem, you might want to take care of this and try to hide as many virtualization
traces as possible. There is a lot of literature on Internet regarding virtualization detection techniques and countermea-
sures.
Once you finished designing and preparing the prototype of system you want, you can proceed creating it and de-
ploying it. You will be always in time to change things or slightly fix them, but remember that good planning at the
beginning always means less troubles in the long run.
3.1.2 What is Cuckoo?
Cuckoo is an open source automated malware analysis system.
It’s used to automatically run and analyze files and collect comprehensive analysis results that outline what the malware
does while running inside an isolated operating system.
It can retrieve the following type of results:
• Traces of calls performed by all processes spawned by the malware.
• Files being created, deleted and downloaded by the malware during its execution.
• Memory dumps of the malware processes.
• Network traffic trace in PCAP format.
• Screenshots taken during the execution of the malware.
• Full memory dumps of the machines.
Some History
Cuckoo Sandbox started as a Google Summer of Code project in 2010 within The Honeynet Project. It was originally
designed and developed by Claudio “nex” Guarnieri, who is still the project leader and core developer.
After initial work during the summer 2010, the first beta release was published on Feb. 5th 2011, when Cuckoo was
publicly announced and distributed for the first time.
In March 2011, Cuckoo has been selected again as a supported project during Google Summer of Code 2011 with The
Honeynet Project, during which Dario Fernandes joined the project and extended its functionality.
16 Chapter 3. Contents

Cuckoo Sandbox Book, Release 2.0.6
On November 2nd 2011 Cuckoo the release of its 0.2 version to the public as the first real stable release. On late
November 2011 Alessandro “jekil” Tanasi joined the team expanding Cuckoo’s processing and reporting functionality.
On December 2011 Cuckoo v0.3 gets released and quickly hits release 0.3.2 in early February.
In late January 2012 we opened Malwr.com, a free and public running Cuckoo Sandbox instance provided with a full
fledged interface through which people can submit files to be analysed and get results back.
In March 2012 Cuckoo Sandbox wins the first round of the Magnificent7 program organized by Rapid7.
During the Summer of 2012 Jurriaan “skier” Bremer joined the development team, refactoring the Windows analysis
component sensibly improving the analysis’ quality.
On 24th July 2012, Cuckoo Sandbox 0.4 is released.
On 20th December 2012, Cuckoo Sandbox 0.5 “To The End Of The World” is released.
On 15th April 2013 we released Cuckoo Sandbox 0.6, shortly after having launched the second version of Malwr.com.
On 1st August 2013 Claudio “nex” Guarnieri,Jurriaan “skier” Bremer and Mark “rep” Schloesser presented Mo’
Malware Mo’ Problems - Cuckoo Sandbox to the rescue at Black Hat Las Vegas.
On 9th January 2014, Cuckoo Sandbox 1.0 is released.
In March 2014 Cuckoo Foundation born as non-profit organization dedicated to growth of Cuckoo Sandbox and the
surrounding projects and initiatives.
On 7th April 2014, Cuckoo Sandbox 1.1 is released.
On the 7th of October 2014, Cuckoo Sandbox 1.1.1 is released after a Critical Vulnerability had been disclosed by
Robert Michel.
On the 4th of March 2015, Cuckoo Sandbox 1.2 has been released featuring a wide array of improvements regarding
the usability of Cuckoo.
During summer 2015 Cuckoo Sandbox started the development of Mac OS X malware analysis as a Google Summer
of Code project within The Honeynet Project.Dmitry Rodionov qualified for the project and developed a working
analyzer for Mac OS X.
On the 21st of February 2016 version 2.0 Release Candidate 1 is released. This version ships with almost two years
of combined effort into making Cuckoo Sandbox a better project for daily usage.
Use Cases
Cuckoo is designed to be used both as a standalone application as well as to be integrated in larger frameworks, thanks
to its extremely modular design.
It can be used to analyze:
• Generic Windows executables
• DLL files
• PDF documents
• Microsoft Office documents
• URLs and HTML files
• PHP scripts
• CPL files
• Visual Basic (VB) scripts
• ZIP files
3.1. Introduction 17
Cuckoo Sandbox Book, Release 2.0.6
• Java JAR
• Python files
•Almost anything else
Thanks to its modularity and powerful scripting capabilities, there’s no limit to what you can achieve with Cuckoo.
For more information on customizing Cuckoo, see the Customization chapter.
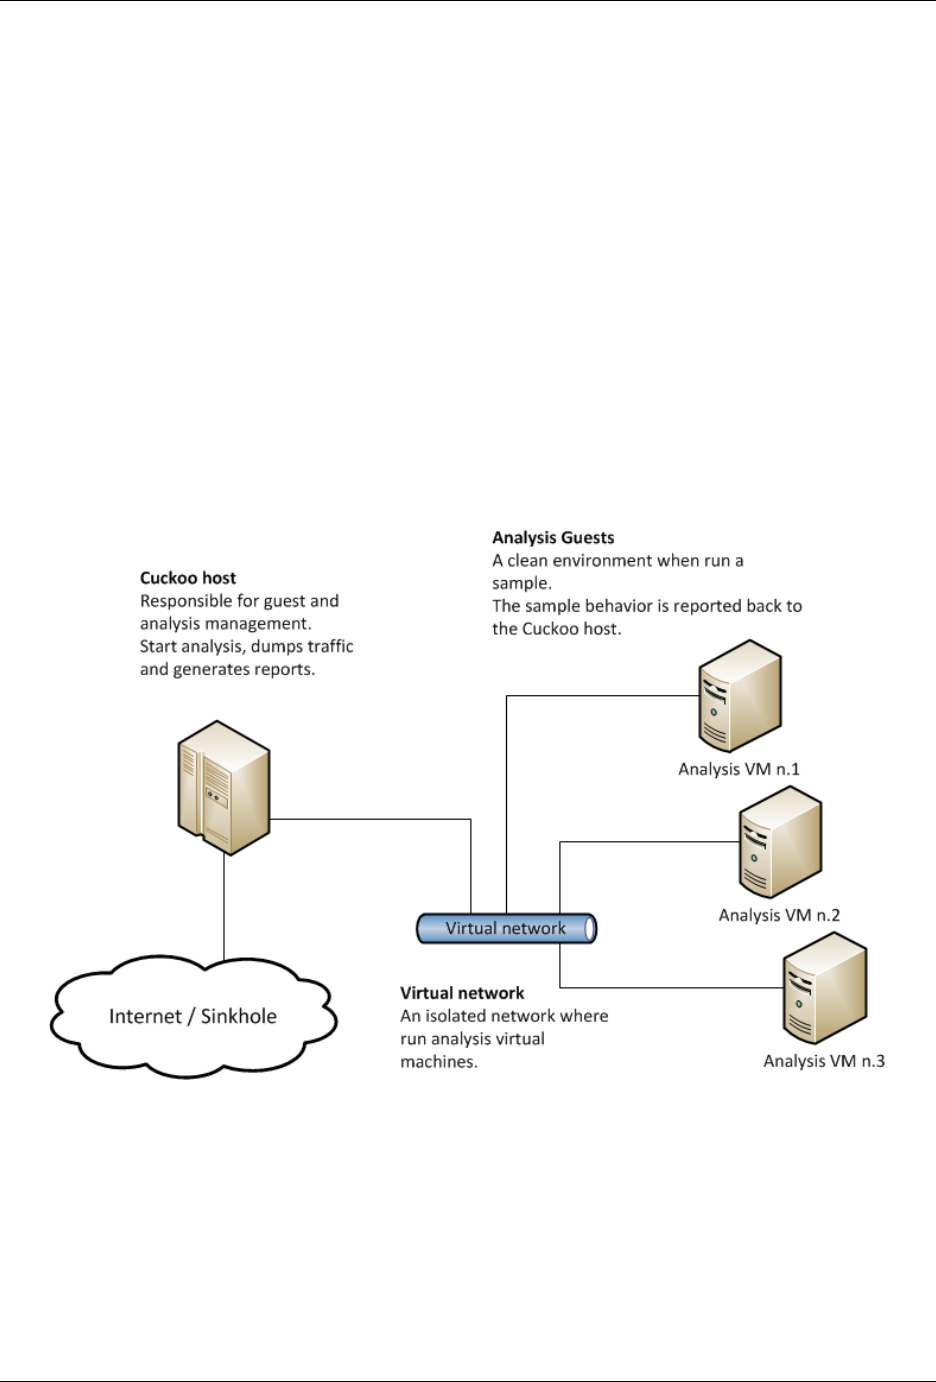
Architecture
Cuckoo Sandbox consists of a central management software which handles sample execution and analysis.
Each analysis is launched in a fresh and isolated virtual or physical machine. The main components of Cuckoo’s
infrastructure are an Host machine (the management software) and a number of Guest machines (virtual or physical
machines for analysis).
The Host runs the core component of the sandbox that manages the whole analysis process, while the Guests are the
isolated environments where the malware samples get actually safely executed and analyzed.
The following picture explains Cuckoo’s main architecture:
Obtaining Cuckoo
Deprecated since version 2.0-rc2: Although Cuckoo can still be downloaded from the website we discourage from
doing so, given that simply installing it through pip is the preferred way to get Cuckoo. Please refer to Installing
Cuckoo.
Cuckoo can be downloaded from the official website, where the stable and packaged releases are distributed, or can
be cloned from our official git repository.
18 Chapter 3. Contents

Cuckoo Sandbox Book, Release 2.0.6
Warning: While being more updated, including new features and bugfixes, the version available
in the git repository should be considered an under development stage. Therefore its stability is not
guaranteed and it most likely lacks updated documentation.
3.1.3 License
Cuckoo Sandbox license is shipped with Cuckoo and contained in the “LICENSE” file inside the “docs” folder.
3.1.4 Disclaimer
Cuckoo is distributed as it is, in the hope that it will be useful, but without any warranty neither the implied mer-
chantability or fitness for a particular purpose.
Whatever you do with this tool is uniquely your own responsibility.
3.1.5 Cuckoo Foundation
The Cuckoo Foundation is a non-profit organization incorporated as a Stichting in the Netherlands and it’s mainly
dedicated to support of the development and growth of Cuckoo Sandbox, an open source malware analysis system,
and the surrounding projects and initiatives.
The Foundation operates to secure financial and infrastructure support to our software projects and coordinates the
development and contributions from the community.
3.1.6 Community guidelines
Cuckoo Sandbox is an open source project and we appreciate any form of contribution. These guidelines are meant
to help you and us to answer questions, solve issues, and merge code as soon as we can. So, it is great that you are
reading these guidelines! We will try to keep this as short as possible.
Introduction
These guidelines contain information on
•What to include when creating issues for
–Reporting bugs/errors/unexpected behavior
–Feature suggestions/requests
•Contributing code/documentation
We obviously want to fix, help with, and merge issues and contributions as fast as possible. To do this, we will likely
ask some questions/post comments on your issue or pull request. We ask that you keep an eye on your issue/PR and
try to answer questions we ask. Realise that it may take a while before we fix your issue or answer your question.
If after 60 days there is no progress in an issue or PR because of missing information, we may consider closing the
issue. You are, of course, always welcome to re-open it in case additional information can be provided!
3.1. Introduction 19

Cuckoo Sandbox Book, Release 2.0.6
Creating issues
Issues.. Useful for many things. Bug/error/unexpected behavior reporting, asking questions, making sugges-
tions/feature requests etc. When making any of these, it is very useful for us and you if you include the information
listed here.
Reporting bugs, errors, and unexpected behavior
You notice a bug, see an error or behavior you did not expect and want to report it to us? That is great, thanks in
advance! Before you report it, please see our FAQ. Common issues and their solutions are already mentioned here.
You may also find a solution by searching existing issues.
You can also contact us using any of the methods mentioned at cuckoosandbox.org/discussion.
Now, if you do create an issue, it is very useful if you do and include the following information if you can and if it
applies:
•Use a descriptive issue title
•Try to reproduce your issue
–How can we reproduce it?
•What was the intended goal of your usage of Cuckoo Sandbox?
–Submitting a task, waiting for a result, adding a module etc.
•Any information on your environment?
–Your Cuckoo Sandbox version
–The operating system the Cuckoo host is running on
–Parts of the configuration related to the error
–If you customized code, can you tell us what was customized?
•What happened?
–Try to explain what happened in detail - this makes it possible for us to reproduce, confirm, and fix
the issue.
–For errors etc, please include the log with this error. Preferably with a link to an online paste service.
–If you can, include a hash of the file being analyzed by Cuckoo.
•What did you try to do so far?
–If you tried to do anything to fix it, please include what you have tried so far.
Feature requests/suggestions
You have thought of or would like to see a new feature in Cuckoo Sandbox. Maybe you have a suggestion to change
something? Great! We would love to hear about it.
When creating a feature request/suggestion, include the following if it applies:
•A descriptive issue title
•What is your suggestion?
–What do you want to change/add?
20 Chapter 3. Contents

Cuckoo Sandbox Book, Release 2.0.6
•What is the goal of this change/addition?
•Do you have suggestions for the implementation?
–For example: using a specific library/package
Asking questions
Have a question about Cuckoo Sandbox? Maybe it has already been asked. Please see our FAQ and documentation
first.
Did not find your answer? Feel free to contact us using any of the methods mentioned here, or by creating an issue.
Code and documentation contributions
You want to contribute by writing code or documentation? That is great, all help is appreciated! It is very easy to get
started:
1. Fork our repository
2. Take a look at our development documentation for guidelines and tips
3. Make the changes that you want to contribute
4. Create a pull request
Testing
It is very important for us to keep Cuckoo Sandbox operational. This is why we only merge a contribution after we
know it was tested and does not break anything. To unit test Cuckoo, we use Pytest. All existing tests for Cuckoo are
located in the tests/ folder.
It would be appreciated if you did add a test to your contribution. This way, the correct operation of your contribution
can be tested in the future.
Pull requests
When creating a pull request, please include the following:
•What did you create/change?
•What is the goal of this addition/change?
•Did you test your addition/change?
3.2 Installation
This chapter explains how to install Cuckoo.
Although the recommended setup is GNU/Linux (Debian or Ubuntu preferably), Cuckoo has proved to work smoothly
on Mac OS X and Microsoft Windows 7 as host as well. The recommended and tested setup for guests are Windows
XP and 64-bit Windows 7 for Windows analysis, Mac OS X Yosemite for Mac OS X analysis, and Debian for Linux
Analysis, although Cuckoo should work with other releases of guest Operating Systems as well.
3.2. Installation 21

Cuckoo Sandbox Book, Release 2.0.6
Note: This documentation refers to Host as the underlying operating systems on which you are running Cuckoo
(generally being a GNU/Linux distribution) and to Guest as the Windows virtual machine used to run the isolated
analysis.
3.2.1 Preparing the Host
To run Cuckoo we suggest a GNU/Linux operating system. We’ll be using the latest Ubuntu LTS (16.04 at the time
of writing) throughout our documentation.
Requirements
Before proceeding to installing and configuring Cuckoo, you’ll need to install some required software packages and
libraries.
Installing Python libraries (on Ubuntu/Debian-based distributions)
The Cuckoo host components is completely written in Python, therefore it is required to have an appropriate version
of Python installed. At this point we only fully support Python 2.7. Older version of Python and Python 3 versions
are not supported by us (although Python 3 support is on our TODO list with a low priority).
The following software packages from the apt repositories are required to get Cuckoo to install and run properly:
$ sudo apt-get install python python-pip python-dev libffi-dev libssl-dev
$ sudo apt-get install python-virtualenv python-setuptools
$ sudo apt-get install libjpeg-dev zlib1g-dev swig
In order to use the Django-based Web Interface, MongoDB is required:
$ sudo apt-get install mongodb
In order to use PostgreSQL as database (our recommendation), PostgreSQL will have to be installed as well:
$ sudo apt-get install postgresql libpq-dev
Yara and Pydeep are optional plugins but will have to be installed manually, so please refer to their websites.
If you want to use KVM as machinery module you will have to install KVM:
$ sudo apt-get install qemu-kvm libvirt-bin ubuntu-vm-builder bridge-utils python-
˓→libvirt
If you want to use XenServer you’ll have to install the XenAPI Python package:
$ sudo pip install XenAPI
If you want to use the mitm auxiliary module (to intercept SSL/TLS generated traffic), you need to install mitmproxy.
Please refer to its website for installation instructions.
22 Chapter 3. Contents
Cuckoo Sandbox Book, Release 2.0.6
Installing Python libraries (on Mac OS X)
This is mostly the same as the installation on Ubuntu/Debian, except that we’ll be using the brew package manager.
Install all the required dependencies as follows (this list is WIP):
$ brew install libmagic cairo pango openssl
In addition to that you’ll also want to expose the openssl header files in the standard GCC/Clang include directory, so
that yara-python may compile successfully. This can be done as follows:
$ cd /usr/local/include
$ ln -s ../opt/openssl/include/openssl .
Installing Python libraries (on Windows 7)
To be documented.
Virtualization Software
Cuckoo Sandbox supports most Virtualization Software solutions. As you will see throughout the documentation,
Cuckoo has been setup to remain as modular as possible and in case integration with a piece of software is missing
this could be easily added.
For the sake of this guide we will assume that you have VirtualBox installed (which is the default), but this does not
affect the execution and general configuration of the sandbox.
You are completely responsible for the choice, configuration, and execution of your virtualization software. Please
read our extensive documentation and FAQ before reaching out to us with questions on how to set Cuckoo up.
Assuming you decide to go for VirtualBox, you can get the proper package for your distribution at the official download
page. Please find following the commands to install the latest version of VirtualBox on your Ubuntu LTS machine.
Note that Cuckoo supports VirtualBox 4.3, 5.0, and 5.1:
$ echo deb http://download.virtualbox.org/virtualbox/debian xenial contrib | sudo tee
˓→-a /etc/apt/sources.list.d/virtualbox.list
$ wget -q https://www.virtualbox.org/download/oracle_vbox_2016.asc -O- | sudo apt-key
˓→add -
$ sudo apt-get update
$ sudo apt-get install virtualbox-5.1
For more information on VirtualBox, please refer to the official documentation.
Installing tcpdump
In order to dump the network activity performed by the malware during execution, you’ll need a network sniffer
properly configured to capture the traffic and dump it to a file.
By default Cuckoo adopts tcpdump, the prominent open source solution.
Install it on Ubuntu:
$ sudo apt-get install tcpdump apparmor-utils
$ sudo aa-disable /usr/sbin/tcpdump
3.2. Installation 23

Cuckoo Sandbox Book, Release 2.0.6
Note that the AppArmor profile disabling (the aa-disable command) is only required when using the default CWD
directory as AppArmor would otherwise prevent the creation of the actual PCAP files (see also Permission denied for
tcpdump).
For Linux platforms with AppArmor disabled (e.g., Debian) the following command will suffice to install tcpdump:
$ sudo apt-get install tcpdump
Tcpdump requires root privileges, but since you don’t want Cuckoo to run as root you’ll have to set specific Linux
capabilities to the binary:
$ sudo setcap cap_net_raw,cap_net_admin=eip /usr/sbin/tcpdump
You can verify the results of the last command with:
$ getcap /usr/sbin/tcpdump
/usr/sbin/tcpdump = cap_net_admin,cap_net_raw+eip
If you don’t have setcap installed you can get it with:
$ sudo apt-get install libcap2-bin
Or otherwise (not recommended) do:
$ sudo chmod +s /usr/sbin/tcpdump
Please keep in mind that even the setcap method is not perfectly safe (due to potential security vulnerabilities) if the
system has other users which are potentially untrusted. We recommend to run Cuckoo on a dedicated system or a
trusted environment where the privileged tcpdump execution is contained otherwise.
Installing Volatility
Volatility is an optional tool to do forensic analysis on memory dumps. In combination with Cuckoo, it can automat-
ically provide additional visibility into deep modifications in the operating system as well as detect the presence of
rootkit technology that escaped the monitoring domain of Cuckoo’s analyzer.
In order to function properly, Cuckoo requires at least version 2.3 of Volatility, but recommends the latest version,
Volatility 2.5. You can download it from their official repository.
See the volatility documentation for detailed instructions on how to install it.
Installing M2Crypto
Currently the M2Crypto library is only supported when SWIG has been installed. On Ubuntu/Debian-like systems
this may be done as follows:
$ sudo apt-get install swig
If SWIG is present on the system one may install M2Crypto as follows:
$ sudo pip install m2crypto==0.24.0
24 Chapter 3. Contents

Cuckoo Sandbox Book, Release 2.0.6
Installing guacd
guacd is an optional service that provides the translation layer for RDP, VNC, and SSH for the remote control
functionality in the Cuckoo web interface.
Without it, remote control won’t work. Versions 0.9.9 and up will work, but we recommend installing the latest
version. On an Ubuntu 17.04 machine the following command will install version 0.9.9-2:
$ sudo apt install libguac-client-rdp0 libguac-client-vnc0 libguac-client-ssh0 guacd
If you only want RDP support you can skip the installation of the libguac-client-vnc0 and
libguac-client-ssh0 packages.
If you are using an older distribution or you just want to use the latest version (our recommendation), the following
will build the latest version (0.9.14) from source:
$ sudo apt -y install libcairo2-dev libjpeg-turbo8-dev libpng-dev libossp-uuid-dev
˓→libfreerdp-dev
$ mkdir /tmp/guac-build && cd /tmp/guac-build
$ wget https://www.apache.org/dist/guacamole/0.9.14/source/guacamole-server-0.9.14.
˓→tar.gz
$ tar xvf guacamole-server-0.9.14.tar.gz && cd guacamole-server-0.9.14
$ ./configure --with-init-dir=/etc/init.d
$ make && sudo make install && cd ..
$ sudo ldconfig
$ sudo /etc/init.d/guacd start
When installing from source, make sure you don’t have another version of any of the libguac- libraries installed
from your package manager or you might experience issues due to incompatibilities which can crash guacd.
Note that the VirtualBox Extension Pack must also be installed to take advantage of the Cuckoo Control functionality
exposed by Guacamole.
Installing Cuckoo
Create a user
You can either run Cuckoo from your own user or create a new one dedicated just for your sandbox setup. Make sure
that the user that runs Cuckoo is the same user that you will use to create and run the virtual machines (at least in the
case of VirtualBox), otherwise Cuckoo won’t be able to identify and launch these Virtual Machines.
Create a new user:
$ sudo adduser cuckoo
If you’re using VirtualBox, make sure the new user belongs to the “vboxusers” group (or the group you used to run
VirtualBox):
$ sudo usermod -a -G vboxusers cuckoo
If you’re using KVM or any other libvirt based module, make sure the new user belongs to the “libvirtd” group (or the
group your Linux distribution uses to run libvirt):
$ sudo usermod -a -G libvirtd cuckoo
3.2. Installation 25

Cuckoo Sandbox Book, Release 2.0.6
Raising file limits
As outlined in the FAQ entry IOError: [Errno 24] Too many open files one may want to bump the file count limits
before starting Cuckoo as otherwise some samples will fail to properly process the report (due to opening more files
than allowed by the Operating System).
Install Cuckoo
Installing the latest version of Cuckoo is as simple as follows. Note that it is recommended to first upgrade the
pip and setuptools libraries as they’re often outdated, leading to issues when trying to install Cuckoo (see also
DistributionNotFound / No distribution matching the version..).
Warning: It is not unlikely that you’ll be missing one or more system packages required to build various Python
dependencies. Please read and re-read Requirements to resolve these sorts of issues.
$ sudo pip install -U pip setuptools
$ sudo pip install -U cuckoo
Although the above, a global installation of Cuckoo in your OS works mostly fine, we highly recommend installing
Cuckoo in a virtualenv, which looks roughly as follows:
$ virtualenv venv
$ . venv/bin/activate
(venv)$ pip install -U pip setuptools
(venv)$ pip install -U cuckoo
Some reasons for using a virtualenv:
• Cuckoo’s dependencies may not be entirely up-to-date, but instead pin to a known-to-work-properly version.
• The dependencies of other software installed on your system may conflict with those required by Cuckoo, due
to incompatible version requirements (and yes, this is also possible when Cuckoo supports the latest version,
simply because the other software may have pinned to an older version).
• Using a virtualenv allows non-root users to install additional packages or upgrade Cuckoo at a later point in
time.
• And simply put, virtualenv is considered a best practice.
Please refer to Cuckoo Working Directory and Cuckoo Working Directory Usage to learn more about the Cuckoo
Working Directory and how to operate it.
Install Cuckoo from file
By downloading a hard copy of the Cuckoo Package and installing it offline, one may set up Cuckoo using a cached
copy and/or have a backup copy of current Cuckoo versions in the future. We also feature the option to download such
a tarball on our website.
Obtaining the tarball of Cuckoo and all of its dependencies manually may be done as follows:
$ pip download cuckoo
You will end up with a file Cuckoo-2.0.0.tar.gz (or a higher number, depending on the latest released stable
version) as well as all of its dependencies (e.g., alembic-0.8.8.tar.gz).
26 Chapter 3. Contents

Cuckoo Sandbox Book, Release 2.0.6
Installing that exact version of Cuckoo may be done as you’re familiar with from installing it using pip directly,
except now using the filename of the tarball:
$ pip install Cuckoo-2.0.0.tar.gz
On systems where no internet connection is available, the $ pip download cuckoo command may be used to
fetch all of the required dependencies and as such one should be able to - in theory - install Cuckoo completely offline
using those files, i.e., by executing something like the following:
$ pip install *.tar.gz
Build/Install Cuckoo from source
By cloning Cuckoo Sandbox from our official repository, you can install it from source. After cloning, follow the
steps mentioned in Development with the Python Package to start the installation.
Cuckoo Working Directory
New in version 2.0.0.
A new concept is the Cuckoo Working Directory. From this point forward all configurable components,
generated data, and results of Cuckoo will be stored in this directory. These files include but are not limited to the
following:
• Configuration
• Cuckoo Signatures
• Cuckoo Analyzer
• Cuckoo Agent
• Yara rules
• Cuckoo Storage (where analysis results go)
• And much more..
The Cuckoo Working Directory comes with a couple of advantages over the legacy approach that Cuckoo used. Fol-
lowing we will study how the Cuckoo Working Directory (CWD from now on) overcomes various every-day
hurdles.
Note: This document merely shows the installation part of the CWD, for its actual usage, please refer to the Cuckoo
Working Directory Usage document.
Configuration
If you have ever updated your Cuckoo setup to a later version, you have run into the issue where you had to make
a backup of your configuration, update your Cuckoo instance, and either restore your configuration or re-apply it
completely.
With the introduction of the CWD we have gotten rid of this update nightmare.
The first time you run Cuckoo aCWD checkout will be created for you automatically, this pretty much goes as follows:
3.2. Installation 27

Cuckoo Sandbox Book, Release 2.0.6
$ cuckoo -d
_ _ _ _ _ _
/\ \ /\_\ /\ \ /\_\ /\ \ /\ \
/ \ \ / / / _ / \ \ / / / _ / \ \ / \ \
/ /\ \ \ \ \ \__ /\_\ / /\ \ \ / / / /\_\ / /\ \ \ / /\ \
˓→\
///\\\ \\___\ //////\\\ ///__/// ///\\\ ///\\\
/ / / \ \_\ \__ / / / // / / \ \_\ / /\_____/ / / / / \ \_\ / / / \ \_
˓→\
/ / / \/_/ / / / / / // / / \/_/ / /\_______/ / / / / / // / / / /
˓→/
/// /// ////// ///\\\ /// ////// //
˓→/
/ / /________ / / /___/ / // / /________ / / / \ \ \ / / /___/ / // / /___/ / /
/ / /_________\/ / /____\/ // / /_________\/ / / \ \ \ / / /____\/ // / /____\/ /
\/____________/\/_________/ \/____________/\/_/ \_\_\\/_________/ \/_________/
Cuckoo Sandbox 2.0.0
www.cuckoosandbox.org
Copyright (c) 2010-2017
=======================================================================
Welcome to Cuckoo Sandbox, this appears to be your first run!
We will now set you up with our default configuration.
You will be able to modify the configuration to your likings
by exploring the /home/cuckoo/.cuckoo directory.
Among other configurable things of most interest is the
new location for your Cuckoo configuration:
/home/cuckoo/.cuckoo/conf
=======================================================================
Cuckoo has finished setting up the default configuration.
Please modify the default settings where required and
start Cuckoo again (by running `cuckoo` or `cuckoo -d`).
As pointed out by the info messages you will now be able to find your CWD at /home/cuckoo/.cuckoo as it
defaults to ~/.cuckoo. All configuration files as you know them can be found in the $CWD/conf directory. I.e.,
$CWD/conf/cuckoo.conf,$CWD/conf/virtualbox.conf, etc.
Now because the CWD directory is not part of Cuckoo itself, that is, the Git repository or as part of one of the latest
releases, one will be able to upgrade Cuckoo without having to touch the CWD. (Of course if an update is installed that
requires an updated Configuration then Cuckoo will guide the user through it - instead of overwriting the Configuration
files itself).
CWD path
Even though the CWD defaults to ~/.cuckoo this path is completely configurable. The following lists the order of
precedence for Cuckoo to determine the CWD.
• Through the --cwd command-line option (e.g., --cwd ~/.cuckoo).
• Through the CUCKOO environment variable (e.g., export CUCKOO=~/.cuckoo).
• Through the CUCKOO_CWD environment variable.
• If the current directory is a CWD (e.g., cd ~/.cuckoo assuming that a CWD has been created in that directory).
28 Chapter 3. Contents

Cuckoo Sandbox Book, Release 2.0.6
• The default, ~/.cuckoo.
By using alternative CWD paths it is possible to run multiple Cuckoo instances with different configurations using
the same Cuckoo setup. If for some reason one requires two or three separate Cuckoo setups, e.g., in the case that you
want to run Windows analysis and Android analysis in parallel, then not having to upgrade each instance one-by-one
every time there is an update surely is a great step forward.
Following some examples to show how to configure the CWD.
# Places the CWD in /opt/cuckoo. Note that Cuckoo will normally create the
# CWD itself, but in order to create a directory in /opt root capabilities
# are usually required.
$ sudo mkdir /opt/cuckoo
$ sudo chown cuckoo:cuckoo /opt/cuckoo
$ cuckoo --cwd /opt/cuckoo
# You could place this line in your .bashrc, for example.
$export CUCKOO=/opt/cuckoo
$ cuckoo
Experimenting with multiple Cuckoo setups is now as simple as creating multiple CWD’s and configuring them accord-
ingly.
Configuration
Cuckoo relies on a couple of main configuration files:
•cuckoo.conf : for configuring general behavior and analysis options.
•auxiliary.conf : for enabling and configuring auxiliary modules.
•<machinery>.conf : for defining the options for your virtualization software (the file has the same name of the
machinery module you choose in cuckoo.conf).
•memory.conf : Volatility configuration.
•processing.conf : for enabling and configuring processing modules.
•reporting.conf : for enabling or disabling report formats.
To get Cuckoo working you should at the very least edit cuckoo.conf and <machinery>.conf .
cuckoo.conf
The first file to edit is $CWD/conf/cuckoo.conf. Note that we’ll be referring to the Cuckoo Working Directory
when we talk about $CWD. The cuckoo.conf file contains generic configuration options that you will want to verify
or at least familiarize yourself with before launching Cuckoo.
The file is largely commented and self-explanatory, but some of the options may be of special interest to you:
•machinery in [cuckoo]:This option defines which Machinery module you want Cuckoo to use to inter-
act with your analysis machines. The value must be the name of the module without extension (e.g.,
virtualbox or vmware).
•ip and port in [resultserver]:These define the local IP address and port that Cuckoo is going to try
to bind the result server on. Make sure this matches the network configuration of your analysis machines
or they won’t be able to return any results.
•connection in [database]:The database connection string defines how Cuckoo will connect to the in-
ternal database. You can use any DBMS supported by SQLAlchemy using a valid Database Urls syntax.
3.2. Installation 29

Cuckoo Sandbox Book, Release 2.0.6
Warning: Check your interface for resultserver IP! Some virtualization software (for example Virtualbox) don’t
bring up the virtual networking interfaces until a virtual machine is started. Cuckoo needs to have the interface
where you bind the resultserver up before the start, so please check your network setup. If you are not sure about
how to get the interface up, a good trick is to manually start and stop an analysis virtual machine, this will bring
virtual networking up. If you are using NAT/PAT in your network, you can set up the resultserver IP to 0.0.0.0
to listen on all interfaces, then use the specific options resultserver_ip and resultserver_port in <machinery>.conf
to specify the address and port as every machine sees them. Note that if you set resultserver IP to 0.0.0.0 in
cuckoo.conf you have to set resultserver_ip for all your virtual machines.
auxiliary.conf
Auxiliary modules are scripts that run concurrently with malware analysis, this file defines their options.
Following is the default $CWD/conf/auxiliary.conf file.
[sniffer]
# Enable or disable the use of an external sniffer (tcpdump) [yes/no].
enabled =yes
# Specify the path to your local installation of tcpdump. Make sure this
# path is correct.
tcpdump =/usr/sbin/tcpdump
# We used to define the network interface to capture on in auxiliary.conf, but
# this has been moved to the "interface" field of each Virtual Machinery
# configuration.
# Specify a Berkeley packet filter to pass to tcpdump.
# Note: packer filtering is not possible when using "nictrace" functionality
# from VirtualBox (for example dumping inter-VM traffic).
bpf =
[mitm]
# Enable man in the middle proxying (mitmdump) [yes/no].
enabled =no
# Specify the path to your local installation of mitmdump. Make sure this
# path is correct.
mitmdump =/usr/local/bin/mitmdump
# Listen port base. Each virtual machine will use its own port to be
# able to make a good distinction between the various running analyses.
# Generally port 50000 should be fine, in this case port 50001, 50002, etc
# will also be used - again, one port per analyses.
port_base =50000
# Script file to interact with the network traffic. Please refer to the
# documentation of mitmproxy/mitmdump to get an understand of their internal
# workings. (https://mitmproxy.org/doc/scripting/inlinescripts.html)
script =stuff/mitm.py
# Path to the certificate to be used by mitmdump. This file will be
# automatically generated for you if you run mitmdump once. It's just that
# you have to copy it from ~/.mitmproxy/mitmproxy-ca-cert.p12 to somewhere
# in the analyzer/windows/ directory. Recommended is to write the certificate
(continues on next page)
30 Chapter 3. Contents

Cuckoo Sandbox Book, Release 2.0.6
(continued from previous page)
# to analyzer/windows/bin/cert.p12, in that case the following option should
# be set to bin/cert.p12.
certificate =bin/cert.p12
[services]
# Provide extra services accessible through the network of the analysis VM
# provided in separate, standalone, Virtual Machines [yes/no].
enabled =no
# Comma-separated list with each Virtual Machine containing said service(s).
services =honeyd
# Time in seconds required to boot these virtual machines. E.g., some services
# will only get online after a minute because initialization takes a while.
timeout =0
[reboot]
# This auxiliary module should be enabled for reboot analysis support.
enabled =yes
<machinery>.conf
Machinery modules are scripts that define how Cuckoo should interact with your virtualization software of choice.
Every module has a dedicated configuration file which defines the details on the available machines. For example,
Cuckoo comes with a VMWware machinery module. In order to use it one has to specify vmware as machinery op-
tion in $CWD/conf/cuckoo.conf and populate the $CWD/conf/vmware.conf file with the available Virtual
Machines.
Cuckoo provides some modules by default and for the sake of this guide, we’ll assume you’re going to use VirtualBox.
Following is the default $CWD/conf/virtualbox.conf file.
[virtualbox]
# Specify which VirtualBox mode you want to run your machines on.
# Can be "gui" or "headless". Please refer to VirtualBox's official
# documentation to understand the differences.
mode =headless
# Path to the local installation of the VBoxManage utility.
path =/usr/bin/VBoxManage
# If you are running Cuckoo on Mac OS X you have to change the path as follows:
# path = /Applications/VirtualBox.app/Contents/MacOS/VBoxManage
# Default network interface.
interface =vboxnet0
# Specify a comma-separated list of available machines to be used. For each
# specified ID you have to define a dedicated section containing the details
# on the respective machine. (E.g. cuckoo1,cuckoo2,cuckoo3)
machines =cuckoo1
# If remote control is enabled in cuckoo.conf, specify a port range to use.
# Virtualbox will bind the VRDP interface to the first available port.
controlports =5000-5050
(continues on next page)
3.2. Installation 31

Cuckoo Sandbox Book, Release 2.0.6
(continued from previous page)
[cuckoo1]
# Specify the label name of the current machine as specified in your
# VirtualBox configuration.
label =cuckoo1
# Specify the operating system platform used by current machine
# [windows/darwin/linux].
platform =windows
# Specify the IP address of the current virtual machine. Make sure that the
# IP address is valid and that the host machine is able to reach it. If not,
# the analysis will fail.
ip =192.168.56.101
# (Optional) Specify the snapshot name to use. If you do not specify a snapshot
# name, the VirtualBox MachineManager will use the current snapshot.
# Example (Snapshot1 is the snapshot name):
snapshot =
# (Optional) Specify the name of the network interface that should be used
# when dumping network traffic from this machine with tcpdump. If specified,
# overrides the default interface specified in auxiliary.conf
# Example (vboxnet0 is the interface name):
interface =
# (Optional) Specify the IP of the Result Server, as your virtual machine sees it.
# The Result Server will always bind to the address and port specified in cuckoo.conf,
# however you could set up your virtual network to use NAT/PAT, so you can specify
˓→here
# the IP address for the Result Server as your machine sees it. If you don't specify
˓→an
# address here, the machine will use the default value from cuckoo.conf.
# NOTE: if you set this option you have to set result server IP to 0.0.0.0 in cuckoo.
˓→conf.
# Example:
resultserver_ip =
# (Optional) Specify the port for the Result Server, as your virtual machine sees it.
# The Result Server will always bind to the address and port specified in cuckoo.conf,
# however you could set up your virtual network to use NAT/PAT, so you can specify
˓→here
# the port for the Result Server as your machine sees it. If you don't specify a port
# here, the machine will use the default value from cuckoo.conf.
# Example:
resultserver_port =
# (Optional) Set your own tags. These are comma separated and help to identify
# specific VMs. You can run samples on VMs with tag you require.
tags =
# Mostly unused for now. Please don't fill it out.
options =
# (Optional) Specify the OS profile to be used by volatility for this
# virtual machine. This will override the guest_profile variable in
# memory.conf which solves the problem of having multiple types of VMs
(continues on next page)
32 Chapter 3. Contents

Cuckoo Sandbox Book, Release 2.0.6
(continued from previous page)
# and properly determining which profile to use.
osprofile =
[honeyd]
# For more information on this VM please refer to the "services" section of
# the conf/auxiliary.conf configuration file. This machine is a bit special
# in the way that its used as an additional VM for an analysis.
#*NOTE*that if this functionality is used, the VM should be registered in
# the "machines" list in the beginning of this file.
label =honeyd
platform =linux
ip =192.168.56.102
# The tags should at least contain "service" and the name of this service.
# This way the services auxiliary module knows how to find this particular VM.
tags =service, honeyd
# Not all services actually have a Cuckoo Agent running in the VM, for those
# services one can specify the "noagent" option so Cuckoo will just wait until
# the end of the analysis instead of trying to connect to the non-existing
# Cuckoo Agent. We can't really intercept any inter-VM communication from the
# host / gateway so in order to dump traffic between VMs we have to use a
# different network dumping approach. For this machine we use the "nictrace"
# functionality from VirtualBox (which is basically their internal tcpdump)
# and thus properly dumps inter-VM traffic.
options =nictrace noagent
The configuration for the other machinery modules look mostly the same with some variations where required. E.g.,
XenServer operates through an API, so to access it a URL and credentials are required.
The comments for the options are self-explanatory.
Following is the default $CWD/conf/kvm.conf file.
[kvm]
# Specify a comma-separated list of available machines to be used. For each
# specified ID you have to define a dedicated section containing the details
# on the respective machine. (E.g. cuckoo1,cuckoo2,cuckoo3)
machines =cuckoo1
# Specify the name of the default network interface that will be used
# when dumping network traffic with tcpdump.
# Example (virbr0 is the interface name):
interface =virbr0
[cuckoo1]
# Specify the label name of the current machine as specified in your
# libvirt configuration.
label =cuckoo1
# Specify the operating system platform used by current machine
# [windows/darwin/linux].
platform =windows
# Specify the IP address of the current virtual machine. Make sure that the
# IP address is valid and that the host machine is able to reach it. If not,
# the analysis will fail. You may want to configure your network settings in
(continues on next page)
3.2. Installation 33

Cuckoo Sandbox Book, Release 2.0.6
(continued from previous page)
# /etc/libvirt/<hypervisor>/networks/
ip =192.168.122.101
# (Optional) Specify the snapshot name to use. If you do not specify a snapshot
# name, the KVM MachineManager will use the current snapshot.
# Example (Snapshot1 is the snapshot name):
snapshot =
# (Optional) Specify the name of the network interface that should be used
# when dumping network traffic from this machine with tcpdump.
# Example (virbr0 is the interface name):
interface =
# (Optional) Specify the IP of the Result Server, as your virtual machine sees it.
# The Result Server will always bind to the address and port specified in cuckoo.conf,
# however you could set up your virtual network to use NAT/PAT, so you can specify
˓→here
# the IP address for the Result Server as your machine sees it. If you don't specify
˓→an
# address here, the machine will use the default value from cuckoo.conf.
# NOTE: if you set this option you have to set result server IP to 0.0.0.0 in cuckoo.
˓→conf.
# Example:
resultserver_ip =
# (Optional) Specify the port for the Result Server, as your virtual machine sees it.
# The Result Server will always bind to the address and port specified in cuckoo.conf,
# however you could set up your virtual network to use NAT/PAT, so you can specify
˓→here
# the port for the Result Server as your machine sees it. If you don't specify a port
# here, the machine will use the default value from cuckoo.conf.
# Example:
resultserver_port =
# (Optional) Set your own tags. These are comma separated and help to identify
# specific VMs. You can run samples on VMs with tag you require.
tags =
# (Optional) Specify the OS profile to be used by volatility for this
# virtual machine. This will override the guest_profile variable in
# memory.conf which solves the problem of having multiple types of VMs
# and properly determining which profile to use.
osprofile =
memory.conf
The Volatility tool offers a large set of plugins for memory dump analysis. Some of them are quite slow. The $CWD/
conf/volatility.conf file let’s you enable or disable plugins of your choice. To use Volatility you have to
follow two steps:
• Enable volatility in $CWD/conf/processing.conf
• Enable memory_dump in $CWD/conf/cuckoo.conf
In $CWD/conf/memory.conf’s basic section you can configure the Volatility profile and whether memory dumps
should be deleted after having been processed (this saves a lot of diskspace):
34 Chapter 3. Contents

Cuckoo Sandbox Book, Release 2.0.6
# Basic settings
[basic]
# Profile to avoid wasting time identifying it
guest_profile =WinXPSP2x86
# Delete memory dump after volatility processing.
delete_memdump =no
After that every plugin has its own section for configuration:
# Scans for hidden/injected code and dlls
# http://code.google.com/p/volatility/wiki/CommandReference#malfind
[malfind]
enabled =on
filter =on
# Lists hooked api in user mode and kernel space
# Expect it to be very slow when enabled
# http://code.google.com/p/volatility/wiki/CommandReference#apihooks
[apihooks]
enabled =off
filter =on
The filter configuration helps you to remove known clean data from the resulting report. It can be configured separately
for every plugin.
The filter itself is configured in the [mask] section. You can enter a list of pids in pid_generic to filter out processes:
# Masks. Data that should not be logged
# Just get this information from your plain VM Snapshot (without running malware)
# This will filter out unwanted information in the logs
[mask]
# pid_generic: a list of process ids that already existed on the machine before the
˓→malware was started.
pid_generic =4,680,752,776,828,840,1000,1052,1168,1364,1428,1476,1808,
˓→452,580,652,248,1992,1696,1260,1656,1156
processing.conf
This file allows you to enable, disable and configure all processing modules. These modules are located under the
cuckoo.processing module and define how to digest the raw data collected during the analysis.
You will find a section for each processing module in $CWD/conf/processing.conf.
# Enable or disable the available processing modules [yes/no].
# If you add a custom processing module to your Cuckoo setup, you have to add
# a dedicated entry in this file, or it won't be executed.
# You can also add additional options under the section of your module and
# they will be available in your Python class.
[analysisinfo]
enabled =yes
[apkinfo]
enabled =no
# Decompiling dex files with androguard in a heavy operation. For large dex
# files it can really take quite a while - it is recommended to limit to a
(continues on next page)
3.2. Installation 35

Cuckoo Sandbox Book, Release 2.0.6
(continued from previous page)
# certain filesize.
decompilation_threshold =5000000
[baseline]
enabled =no
[behavior]
enabled =yes
[buffer]
enabled =yes
[debug]
enabled =yes
[droidmon]
enabled =no
[dropped]
enabled =yes
[dumptls]
enabled =yes
[extracted]
enabled =yes
[googleplay]
enabled =no
android_id =
google_login =
google_password =
[memory]
# Create a memory dump of the entire Virtual Machine. This memory dump will
# then be analyzed using Volatility to locate interesting events that can be
# extracted from memory.
enabled =no
[misp]
enabled =no
url =
apikey =
# Maximum amount of IOCs to look up (hard limit).
maxioc =100
[network]
enabled =yes
# Allow domain whitelisting
whitelist_dns =no
# Allow DNS responses from your configured DNS server for whitelisting to
# deactivate when responses come from some other DNS
# Can be also multiple like : 8.8.8.8,8.8.4.4
allowed_dns =
(continues on next page)
36 Chapter 3. Contents

Cuckoo Sandbox Book, Release 2.0.6
(continued from previous page)
[procmemory]
# Enables the creation of process memory dumps for each analyzed process right
# before they terminate themselves or right before the analysis finishes.
enabled =yes
# It is possible to load these process memory dumps in IDA Pro through the
# generation of IDA Python-based script files. Although currently symbols and
# such are not properly recovered, it is still nice to get a quick look at
# specific memory addresses of a process.
idapro =no
# Extract executable images from this process memory dump. This allows us to
# relatively easily extract injected executables.
extract_img =yes
# Also extract DLL files from the process memory dump.
extract_dll =no
# Delete process memory dumps after analysis to save disk space.
dump_delete =no
[procmon]
# Enable procmon processing. This only takes place when the "procmon=1" option
# is set for an analysis.
enabled =yes
[screenshots]
enabled =yes
# Set to the actual tesseract path (i.e., /usr/bin/tesseract or similar)
# rather than "no" to enable OCR analysis of screenshots.
# Note: doing OCR on the screenshots is a rather slow process.
tesseract =no
[snort]
enabled =no
# Following are various configurable settings. When in use of a recent 2.9.x.y
# version of Snort there is no need to change any of the following settings as
# they represent the defaults.
#
snort =/usr/local/bin/snort
conf =/etc/snort/snort.conf
[static]
enabled =yes
# On bigger PDF files PeePDF may take a substantial amount of time to perform
# static analysis of PDF files, with times of over an hour per file estimated
# in production. This option will by default limit the maximum processing time
# to one minute, but this may be adjusted accordingly. Note that if the timeout
# is hit, no static analysis results through PeePDF will be available.
pdf_timeout =60
[strings]
enabled =yes
[suricata]
enabled =no
# Following are various configurable settings. When in use of a recent version
# of Suricata there is no need to change any of the following settings as they
# represent the defaults.
(continues on next page)
3.2. Installation 37

Cuckoo Sandbox Book, Release 2.0.6
(continued from previous page)
suricata =/usr/bin/suricata
conf =/etc/suricata/suricata.yaml
eve_log =eve.json
files_log =files-json.log
files_dir =files
# By specifying the following line our processing module can use the socket
# mode in Suricata. This is quite the performance improvement as instead of
# having to load all the Suricata rules for each time the processing module is
# ran (i.e., for every task), the rules are only loaded once and then we talk
# to its API. This does require running Suricata as follows or similar;
# "suricata --unix-socket -D".
# (Please find more information in utils/suricata.sh for now).
# socket = /var/run/suricata/cuckoo.socket
socket =
[targetinfo]
enabled =yes
[virustotal]
enabled =no
# How much time we can wait to establish VirusTotal connection and get the
# report.
timeout =60
# Enable this option if you want to submit files to VirusTotal not yet available
# in their database.
# NOTE: if you are dealing with sensitive stuff, enabling this option you could
# leak some files to VirusTotal.
scan =no
# Add your VirusTotal API key here. The default API key, kindly provided
# by the VirusTotal team, should enable you with a sufficient throughput
# and while being shared with all our users, it shouldn't affect your use.
key =a0283a2c3d55728300d064874239b5346fb991317e8449fe43c902879d758088
[irma]
enabled =no
# IRMA @ github : https://github.com/quarkslab/irma
# How much time we can wait to establish IRMA connection and get the report.
timeout =60
# Enable this option if you want to submit files to IRMA not yet available.
scan =no
# Force scan of submitted files
force =no
# URL to your IRMA installation
# For example : https://your.irma.host
url =
You might want to configure the VirusTotal key if you have an account of your own.
reporting.conf
The $CWD/conf/reporting.conf file contains information on the reports generation.
It contains the following sections.
38 Chapter 3. Contents

Cuckoo Sandbox Book, Release 2.0.6
# Enable or disable the available reporting modules [on/off].
# If you add a custom reporting module to your Cuckoo setup, you have to add
# a dedicated entry in this file, or it won't be executed.
# You can also add additional options under the section of your module and
# they will be available in your Python class.
[feedback]
# Automatically report errors that occurred during an analysis. Requires the
# Cuckoo Feedback settings in cuckoo.conf to have been filled out properly.
enabled =no
[jsondump]
enabled =yes
indent =4
calls =yes
[singlefile]
# Enable creation of report.html and/or report.pdf?
enabled =no
# Enable creation of report.html?
html =no
# Enable creation of report.pdf?
pdf =no
[misp]
enabled =no
url =
apikey =
# The various modes describe which information should be submitted to MISP,
# separated by whitespace. Available modes: maldoc ipaddr hashes url.
mode =maldoc ipaddr hashes url
[mongodb]
enabled =no
host =127.0.0.1
port =27017
db =cuckoo
store_memdump =yes
paginate =100
# MongoDB authentication (optional).
username =
password =
[elasticsearch]
enabled =no
# Comma-separated list of ElasticSearch hosts. Format is IP:PORT, if port is
# missing the default port is used.
# Example: hosts = 127.0.0.1:9200, 192.168.1.1:80
hosts =127.0.0.1
# Increase default timeout from 10 seconds, required when indexing larger
# analysis documents.
timeout =300
# Set to yes if we want to be able to search every API call instead of just
# through the behavioral summary.
calls =no
# Index of this Cuckoo instance. If multiple Cuckoo instances connect to the
(continues on next page)
3.2. Installation 39

Cuckoo Sandbox Book, Release 2.0.6
(continued from previous page)
# same ElasticSearch host then this index (in Moloch called "instance") should
# be unique for each Cuckoo instance.
index =cuckoo
# Logging time pattern. This sets how elasticsearch creates indexes
# by default it is yearly in most instances this will be sufficient
# valid options: yearly, monthly, daily
index_time_pattern =yearly
# Cuckoo node name in Elasticsearch to identify reporting host. Can be useful
# for automation and while referring back to correct Cuckoo host.
cuckoo_node =
[moloch]
enabled =no
# If the Moloch web interface is hosted on a different IP address than the
# Cuckoo Web Interface then you'll want to override the IP address here.
host =
# If you wish to run Moloch in http (insecure) versus https (secure) mode,
# set insecure to yes.
insecure =no
# Following are various configurable settings. When in use of a recent version
# of Moloch there is no need to change any of the following settings as they
# represent the defaults.
moloch_capture =/data/moloch/bin/moloch-capture
conf =/data/moloch/etc/config.ini
instance =cuckoo
[notification]
# Notification module to inform external systems that analysis is finished.
# You should consider keeping this as very last reporting module.
enabled =no
# External service URL where info will be POSTed.
# example : https://my.example.host/some/destination/url
url =
# Cuckoo host identifier - can be hostname.
# for example : my.cuckoo.host
identifier =
[mattermost]
enabled =no
# Mattermost webhook URL.
# example : https://my.mattermost.host/hooks/yourveryrandomkey
url =
# Cuckoo host URL to make analysis ID clickable.
# example : https://my.cuckoo.host/
myurl =
# Username to show when posting message
username =cuckoo
# What kind of data to show apart from default.
(continues on next page)
40 Chapter 3. Contents

Cuckoo Sandbox Book, Release 2.0.6
(continued from previous page)
# Show virustotal hits.
show_virustotal =no
# Show matched cuckoo signatures.
show_signatures =no
# Show collected URL-s by signature "network_http".
show_urls =no
# Hide filename and create hash of it
hash_filename =no
# Hide URL and create hash of it
hash_url =no
By setting those option to on or off you enable or disable the generation of such reports.
Per-Analysis Network Routing
Since Cuckoo 2.0-rc1 it is possible to feature per-analysis network routing. In other words, if you have one VM and
three samples to analyze, it is possible to deny internet access for the first analysis, route the second analysis through
a VPN, and pull the third analysis through the Tor network.
However, aside from the more advanced per-analysis routing, it is naturally also possible to have one default route - a
setup that used to be popular before, when the more luxurious routing was not yet available.
In our examples we’ll be focusing on VirtualBox as it is our default machinery choice.
Simple Global Routing
Before delving into the more complex and feature-rich per-analysis network routing we’ll first cover the older ap-
proach, which is based on global iptables rules that are, once set, not changed anymore.
In the following setup we’re assuming that the interface assigned to our VirtualBox VM is vboxnet0, the IP address
of our VM is 192.168.56.101 (in a /24 subnet), and that the outgoing interface connected to the internet is
eth0. With such a setup, the following iptables rules will allow the VMs access to the Cuckoo host machine
(192.168.56.1 in this setup) as well as the entire internet as you would expect from any application connecting to
the internet.
$ sudo iptables -t nat -A POSTROUTING -o eth0 -s 192.168.56.0/24 -j MASQUERADE
# Default drop.
$ sudo iptables -P FORWARD DROP
# Existing connections.
$ sudo iptables -A FORWARD -m state --state RELATED,ESTABLISHED -j ACCEPT
# Accept connections from vboxnet to the whole internet.
$ sudo iptables -A FORWARD -s 192.168.56.0/24 -j ACCEPT
# Internal traffic.
$ sudo iptables -A FORWARD -s 192.168.56.0/24 -d 192.168.56.0/24 -j ACCEPT
# Log stuff that reaches this point (could be noisy).
$ sudo iptables -A FORWARD -j LOG
3.2. Installation 41

Cuckoo Sandbox Book, Release 2.0.6
And that’s pretty much it, with these rules set we’re almost good to go. However, these rules won’t be doing any
packet forwarding unless IP forwarding is explicitly enabled in the kernel. To do so, there is a temporary method that
survives until a shutdown or reboot, and a permanent method that is taken into account when booting the machine.
Simply put, generally speaking you’ll want to run both commands:
$ echo 1 | sudo tee -a /proc/sys/net/ipv4/ip_forward
$ sudo sysctl -w net.ipv4.ip_forward=1
Iptables rules are not persistent between reboots, so if want to keep them you should use a script or just install
iptables-persistent.
Newer Linux distributions have adopted udev’s interface-naming scheme. It’s important to note that this means eth0
may no longer be your primary interface. Possible interface names include ensXX,enp0sXX, and emXX, where the
XX part identifies a number. This is particularly important to note for the NAT statement above.
Per-Analysis Network Routing Options
Having discussed the old school method for routing analyses through a network interface we will now walk through
the dynamic network routing components that allow for much more granular network routing.
As outlined in the introduction for this chapter of the documentation it has been possible since Cuckoo 2.0-rc1,
when we introduced the Cuckoo Rooter, to do per-analysis network routing. Since then various bugs have been
resolved and more network routing options have been added.
Following is the list of available routing options.
Routing
Option
Description
None Rout-
ing
No routing whatsoever, the only option that does not require the Cuckoo Rooter to be run (and
therefore also the default routing option).
Drop Rout-
ing
Completely drops all non-Cuckoo traffic, including traffic within the VMs’ subnet.
Internet
Routing
Full internet access as provided by the given network interface (similar to the Simple Global Routing
setup).
InetSim
Routing
Routes all traffic to an InetSim instance - which provides fake services - running on the host ma-
chine.
Tor Routing Routes all traffic through Tor.
VPN Rout-
ing
Routes all traffic through one of perhaps multiple pre-defined VPN endpoints.
Using Per-Analysis Network Routing
Having knowledge about the available network routing options it is time to actually use it in practice. Assuming
Cuckoo has been configured properly taking advantage of its features is really as simple as starting the Cuckoo
Rooter and choosing a network routing option for your analysis.
Documentation on starting the Cuckoo Rooter may be found in the Cuckoo Rooter Usage document.
Configuring iproute2
For Linux kernel TCP/IP source routing reasons it is required to register each of the network interfaces that we use
with iproute2. This is trivial, but necessary.
42 Chapter 3. Contents

Cuckoo Sandbox Book, Release 2.0.6
As an example we’ll be configuring Internet Routing (aka the dirty line) for which we’ll be using the eth0
network interface - reverting back to Ubuntu 14.04 and older terminology here for a second (Ubuntu 16.04 uses
network interface names based on the hardware manufacturer, as you will likely have seen happen on BSD-based
systems since forever).
To configure iproute2 with eth0 we’re going to open the /etc/iproute2/rt_tables file which will look
roughly as follows:
#
# reserved values
#
255 local
254 main
253 default
0unspec
#
# local
#
Now roll a random number that is not yet present in this file with your dice of choice and use it to craft a new line at
the end of the file. As an example, registering eth0 with iproute2 could look as follows:
#
# reserved values
#
255 local
254 main
253 default
0unspec
#
# local
#
400 eth0
And that’s really all there is to it. You will have to do this for each network interface you intend to use for network
routing.
None Routing
The default routing mechanism in the sense that Cuckoo allows the analysis to route as defined by a third party. As in,
it literally doesn’t do anything. One may use the none routing in conjunction with the Simple Global Routing.
Drop Routing
The drop routing option is somewhat like a default None Routing setup (as in, in a machine where no global
iptables rules have been created providing full internet access to VMs or so), except that it is much more aggressive
in actively locking down the internet access provided to the VM.
With drop routing the only traffic possible is internal Cuckoo traffic and hence any DNS requests or outgoing
TCP/IP connections are blocked.
3.2. Installation 43

Cuckoo Sandbox Book, Release 2.0.6
Internet Routing
By using the internet routing one may provide full internet access to VMs through one of the connected
network interfaces. We also refer to this option as the dirty line due to its nature of allowing all potentially
malicious samples to connect to the internet through the same uplink.
Note: It is required to register the dirty line network interface with iproute2 as described in the Configuring iproute2
section.
InetSim Routing
For those that have not heard of InetSim, it’s a project that provides fake services for malware to talk to. In order to
use InetSim routing one will have to setup InetSim on the host machine (or in a separate VM) and configure
Cuckoo so that it knows where to find the InetSim server.
The configuration for InetSim is self-explanatory and can be found as part of the $CWD/conf/routing.conf
configuration file:
[inetsim]
enabled =yes
server =192.168.56.1
In order to quickly get started with InetSim it is possible to download the latest version of the REMnux distribution
which features - among many other tools - the latest version of InetSim. Naturally this VM will require its own static
IP address which should then be configured in the routing.conf configuration file.
Tor Routing
Note: Although we highly discourage the use of Tor for malware analysis - the maintainers of Tor exit nodes
already have a hard enough time keeping up their servers - it is in fact a well-supported feature.
First of all Tor will have to be installed. Please find instructions on installing the latest stable version of Tor here.
We’ll then have to modify the Tor configuration file (not talking about Cuckoo’s configuration for Tor yet!) In order
to do so, we will have to provide Tor with the listening address and port for TCP/IP connections and UDP requests.
For a default VirtualBox setup, where the host machine has IP address 192.168.56.1, the following lines will
have to be configured in the /etc/tor/torrc file:
TransPort 192.168.56.1:9040
DNSPort 192.168.56.1:5353
Don’t forget to restart Tor (/etc/init.d/tor restart). That leaves us with the Tor configuration for Cuckoo,
which may be found in the $CWD/conf/routing.conf file. The configuration is pretty self-explanatory so we’ll
leave filling it out as an exercise to the reader (in fact, toggling the enabled field goes a long way):
[tor]
enabled =yes
dnsport =5353
proxyport =9040
44 Chapter 3. Contents

Cuckoo Sandbox Book, Release 2.0.6
Note that the port numbers in the /etc/tor/torrc and $CWD/conf/routing.conf files must match in order
for the two to interact correctly.
VPN Routing
Last but not least, it is possible to route analyses through a number of VPNs. By defining a couple of VPNs, perhaps
ending up in different countries, it may be possible to see if potentially malicious samples behave differently depending
on the country of origin of its IP address.
The configuration for a VPN is much like the configuration of a VM. For each VPN you will need one section in the
$CWD/conf/routing.conf configuration file detailing the relevant information for the VPN. In the configuration
the VPN will also have to be registered in the list of available VPNs (exactly the same as you’d do for registering more
VMs).
Configuration for a single VPN looks roughly as follows:
[vpn]
# Are VPNs enabled?
enabled =yes
# Comma-separated list of the available VPNs.
vpns =vpn0
[vpn0]
# Name of this VPN. The name is represented by the filepath to the
# configuration file, e.g., cuckoo would represent /etc/openvpn/cuckoo.conf
# Note that you can't assign the names "none" and "internet" as those would
# conflict with the routing section in cuckoo.conf.
name =vpn0
# The description of this VPN which will be displayed in the web interface.
# Can be used to for example describe the country where this VPN ends up.
description =Spain, Europe
# The tun device hardcoded for this VPN. Each VPN *must*be configured to use
# a hardcoded/persistent tun device by explicitly adding the line "dev tunX"
# to its configuration (e.g., /etc/openvpn/vpn1.conf) where X in tunX is a
# unique number between 0 and your lucky number of choice.
interface =tun0
# Routing table name/id for this VPN. If table name is used it *must*be
# added to /etc/iproute2/rt_tables as "<id> <name>" line (e.g., "201 tun0").
# ID and name must be unique across the system (refer /etc/iproute2/rt_tables
# for existing names and IDs).
rt_table =tun0
Note: It is required to register each VPN network interface with iproute2 as described in the Configuring iproute2
section.
Configuration (Android Analysis)
Deprecated since version 2.0-rc2: Android Analysis may not work as expected due to the changes to becoming a
Cuckoo Package. Proper Android integration will be picked up as a Cuckoo update in the future.
3.2. Installation 45

Cuckoo Sandbox Book, Release 2.0.6
To get Cuckoo running Android analysis you should download the Android SDK and extract it in a folder Cuckoo can
access. You should also configure avd.conf with the settings of your setup.
avd.conf
The main file for Android environment settings is $CWD/conf/avd.conf, it contains all the generic configuration
used to launch the Android emulator and run the analysis.
The file is largely commented and self-explanatory, but some important options are as follows:
•emulator_path:The path to the Android emulator (it is located inside Android SDK).
•adb_path:The path to the Android Debug Bridge utility (it is located inside Android SDK).
•avd_path:The path where the AVD images are located.
3.2.2 Preparing the Guest
At this point you should have configured the Cuckoo host component and you should have designed and defined the
number and the names of the virtual machines you are going to use for malware execution.
Now it’s time to create such machines and to configure them properly. The following documentation details the entire
setup guide for Windows-based Guests. For Linux Guests, please read Installing the Linux host.
Creation of the Virtual Machine
Once you have properly installed your virtualization software, you can proceed on creating all the virtual machines
you need.
Using and configuring your virtualization software is out of the scope of this guide, so please refer to the official
documentation.
Note: You can find some hints and considerations on how to design and create your virtualized environment in the
Sandboxing chapter.
Note: We recommend either 64-bit Windows 7 or Windows XP virtual machines. For Windows 7 you will have to
disable User Access Control.
Changed in version 2.0-rc2: We used to suggest Windows XP as a guest VM but nowadays a 64-bit Windows 7
machine yields much better results.
Note: KVM Users - Be sure to choose a hard drive image format that supports snapshots. See Saving the Virtual
Machine for more information.
When creating the virtual machine, Cuckoo doesn’t require any specific configuration. You can choose the options
that best fit your needs.
46 Chapter 3. Contents

Cuckoo Sandbox Book, Release 2.0.6
Requirements
In order to make Cuckoo run properly in your virtualized Windows system, you will have to install some required
software and libraries.
Install Python
Python is a strict requirement for the Cuckoo guest component (analyzer) in order to run properly.
You can download the proper Windows installer from the official website. Also in this case Python 2.7 is preferred.
Some Python libraries are optional and provide some additional features to Cuckoo guest component. They include:
•Python Pillow: it’s used for taking screenshots of the Windows desktop during the analysis.
They are not strictly required by Cuckoo to work properly, but you are encouraged to install them if you want to have
access to all available features. Make sure to download and install the proper packages according to your Python
version.
Additional Software
At this point you should have installed everything needed by Cuckoo to run properly.
Depending on what kind of files you want to analyze and what kind of sandboxed Windows environment you want to
run the malware samples in, you might want to install additional software such as browsers, PDF readers, office suites
etc. Remember to disable the “auto update” or “check for updates” feature of any additional software.
This is completely up to you and to what your needs are. You can get some hints by reading the Sandboxing chapter.
Network Configuration
Now it’s time to setup the network for your virtual machine.
Windows Settings
Before configuring the underlying networking of the virtual machine, you might want to tweak some settings inside
Windows itself.
One of the most important things to do is disabling Windows Firewall and the Automatic Updates. The reason behind
this is that they can affect the behavior of the malware under normal circumstances and that they can pollute the
network analysis performed by Cuckoo, by dropping connections or including irrelevant requests.
You can do so from Windows’ Control Panel as shown in the picture:
3.2. Installation 47
Cuckoo Sandbox Book, Release 2.0.6
Virtual Networking
Now you need to decide how to make your virtual machine able to access Internet or your local network.
While in previous releases Cuckoo used shared folders to exchange data between the Host and Guests, from release
0.4 it adopts a custom agent that works over the network using a simple XMLRPC protocol.
In order to make it work properly you’ll have to configure your machine’s network so that the Host and the Guest can
communicate. Testing the network access by pinging a guest is a good practice, to make sure the virtual network was
set up correctly. Use only static IP addresses for your guest, as Cuckoo doesn’t support DHCP and using it will break
your setup.
This stage is very much up to your own requirements and to the characteristics of your virtualization software.
Warning: Virtual networking errors! Virtual networking is a vital component for Cuckoo, you must be really sure
to get connectivity between host and guest. Most of the issues reported by users are related to a wrong setup of their
networking. If you aren’t sure about that check your virtualization software documentation and test connectivity
with ping and telnet.
The recommended setup is using a Host-Only networking layout with proper forwarding. More on such network
routing can be found in Per-Analysis Network Routing, which is part of the host machine setup.
Installing the Agent
From release 0.4 Cuckoo adopts a custom agent that runs inside the Guest and that handles the communication and
the exchange of data with the Host. This agent is designed to be cross-platform, therefore you should be able to use it
48 Chapter 3. Contents

Cuckoo Sandbox Book, Release 2.0.6
on Windows, Android, Linux, and Mac OS X. In order to make Cuckoo work properly, you’ll have to install and start
this agent.
It’s quite simple.
In the $CWD/agent/ directory you will find the agent.py file. Copy this file to the Guest operating system (in
whatever way you want, perhaps a temporary shared folder or by downloading it from a webserver on the host, we
recommend the latter) and run it. The Agent will launch a small API server that the host will be able to talk to.
On Windows simply launching the script will also spawn a Python window, if you want to hide it you can rename the
file from agent.py to agent.pyw which will prevent the console window from spawning.
If you want the script to be launched at Windows’ boot, just place the file in the Startup folder.
Saving the Virtual Machine
Now you should be ready to save the virtual machine to a snapshot state.
Before doing this make sure you rebooted it softly and that it’s currently running, with Cuckoo’s agent running
and with Windows fully booted.
Now you can proceed saving the machine. The way to do it obviously depends on the virtualization software you
decided to use.
If you follow all the below steps properly, your virtual machine should be ready to be used by Cuckoo.
VirtualBox
If you are going for VirtualBox you can take the snapshot from the graphical user interface or from the command line:
$ VBoxManage snapshot "<Name of VM>" take "<Name of snapshot>" --pause
After the snapshot creation is completed, you can power off the machine and restore it:
$ VBoxManage controlvm "<Name of VM>" poweroff
$ VBoxManage snapshot "<Name of VM>" restorecurrent
KVM
If decided to adopt KVM, you must first of all be sure to use a disk format for your virtual machines which supports
snapshots. By default libvirt tools create RAW virtual disks, and since we need snapshots you’ll either have to use
QCOW2 or LVM. For the scope of this guide we adopt QCOW2, which is easier to setup than LVM.
The easiest way to create such a virtual disk correctly is using the tools provided by the libvirt suite. You can either
use virsh if you prefer command-line interfaces or virt-manager for a nice GUI. You should be able to directly
create it in QCOW2 format, but in case you have a RAW disk you can convert it like this:
$ cd /your/disk/image/path
$ qemu-img convert -O qcow2 your_disk.raw your_disk.qcow2
Now you have to edit your VM definition as follows:
$ virsh edit "<Name of VM>"
Find the disk section, it looks like this:
3.2. Installation 49

Cuckoo Sandbox Book, Release 2.0.6
<disk type='file' device='disk'>
<driver name='qemu' type='raw'/>
<source file='/your/disk/image/path/your_disk.raw'/>
<target dev='hda' bus='ide'/>
<address type='drive' controller='0' bus='0' unit='0'/>
</disk>
And change “type” to qcow2 and “source file” to your qcow2 disk image, like this:
<disk type='file' device='disk'>
<driver name='qemu' type='qcow2'/>
<source file='/your/disk/image/path/your_disk.qcow2'/>
<target dev='hda' bus='ide'/>
<address type='drive' controller='0' bus='0' unit='0'/>
</disk>
Now test your virtual machine, if everything works prepare it for snapshotting while running Cuckoo’s agent. This
means the virtual machine needs to be running while you are taking the snapshot. Then you can shut it down. You can
finally take a snapshot with the following command:
$ virsh snapshot-create "<Name of VM>"
Having multiple snapshots can cause errors:
ERROR: No snapshot found for virtual machine VM-Name
VM snapshots can be managed using the following commands:
$ virsh snapshot-list "VM-Name"
$ virsh snapshot-delete "VM-Name" 1234567890
VMware Workstation
If you decided to adopt VMware Workstation, you can take the snapshot from the graphical user interface or from the
command line:
$ vmrun snapshot "/your/disk/image/path/wmware_image_name.vmx" your_snapshot_name
Where your_snapshot_name is the name you choose for the snapshot. After that power off the machine from the GUI
or from the command line:
$ vmrun stop "/your/disk/image/path/wmware_image_name.vmx" hard
XenServer
If you decided to adopt XenServer, the XenServer machinery supports starting virtual machines from either disk or a
memory snapshot. Creating and reverting memory snapshots require that the Xen guest tools be installed in the virtual
machine. The recommended method of booting XenServer virtual machines is through memory snapshots because
they can greatly reduce the boot time of virtual machines during analysis. If, however, the option of installing the guest
tools is not available, the virtual machine can be configured to have its disks reset on boot. Resetting the disk ensures
that malware samples cannot permanently modify the virtual machine.
50 Chapter 3. Contents

Cuckoo Sandbox Book, Release 2.0.6
Memory Snapshots
The Xen guest tools can be installed from the XenCenter application that ships with XenServer. Once installed, restart
the virtual machine and ensure that the Cuckoo agent is running.
Snapshots can be taken through the XenCenter application and the command line interface on the control domain
(Dom0). When creating the snapshot from XenCenter, ensure that the “Snapshot disk and memory” is checked. Once
created, right-click on the snapshot and note the snapshot UUID.
To snapshot from the command line interface, run the following command:
$ xe vm-checkpoint vm="vm_uuid_or_name" new-name-label="Snapshot Name/Description"
The snapshot UUID is printed to the screen once the command completes.
Regardless of how the snapshot was created, save the UUID in the virtual machine’s configuration section. Once the
snapshot has been created, you can shutdown the virtual machine.
Booting from Disk
If you can’t install the Xen guest tools or if you don’t need to use memory snapshots, you will need to ensure that the
virtual machine’s disks are reset on boot and that the Cuckoo agent is set to run at boot time.
Running the agent at boot time can be configured in Windows by adding a startup item for the agent.
The following commands must be run while the virtual machine is powered off.
To set the virtual machine’s disks to reset on boot, you’ll first need to list all the attached disks for the virtual machine.
To list all attached disks, run the following command:
$ xe vm-disk-list vm="vm_name_or_uuid"
Ignoring all CD-ROM and read-only disks, run the following command for each remaining disk to change it’s behavior
to reset on boot:
$ xe vdi-param-set uuid="vdi_uuid" on-boot=reset
After the disk is set to reset on boot, no permanent changes can be made to the virtual machine’s disk. Modifications
that occur while a virtual machine is running will not persist past shutdown.
Cloning the Virtual Machine
In case you planned to use more than one virtual machine, there’s no need to repeat all the steps done so far: you can
clone it. In this way you’ll have a copy of the original virtualized Windows with all requirements already installed.
The new virtual machine will also contain all the settings of the original one, which is not good. Now you need to
proceed repeating the steps explained in Network Configuration,Installing the Agent and Saving the Virtual Machine
for this new machine.
Installing the Linux host
First prepare the networking for your machinery platform on the host side. If you use VirtualBox with e.g. host-only
interfaces and you have a vboxnet0 interface, you do not need to install additional dependencies.
If you use QEMU, you may need to install additional dependencies on the host:
3.2. Installation 51

Cuckoo Sandbox Book, Release 2.0.6
$ sudo apt install uml-utilities bridge-utils
Next, get the list of virtual machines for which to configure the interface from conf/qemu.conf. For example,
ubuntu_x32,ubuntu_x64,ubuntu_arm,ubuntu_mips,ubuntu_mipsel, et cetera. For each VM, pre-
configure a network tap interfaces on the host, required to avoid have to start as root, e.g.:
$ sudo tunctl -b -u cuckoo -t tap_ubuntu_x32
$ sudo ip link set tap_ubuntu_x32 master br0
$ sudo ip link set dev tap_ubuntu_x32 up
$ sudo ip link set dev br0 up
$ sudo tunctl -b -u cuckoo -t tap_ubuntu_x64
$ sudo ip link set tap_ubuntu_x64 master br0
$ sudo ip link set dev tap_ubuntu_x64 up
$ sudo ip link set dev br0 up
Note that if you run Cuckoo as a different user, replace ‘‘cuckoo‘‘ after -u with your user.
Preparing x32/x64 Ubuntu 18.04 Linux guests
Ensure the agent automatically starts. The easiest way is to add it to crontab:
$ sudo crontab -e
@reboot python /path/to/agent.py
Install dependencies inside of the virtual machine:
$ sudo apt-get install systemtap gcc patch linux-headers-$(uname -r)
Install kernel debugging symbols:
$ sudo apt-key adv --keyserver keyserver.ubuntu.com --recv-keys C8CAB6595FDFF622
$ codename=$(lsb_release -cs)
$ sudo tee /etc/apt/sources.list.d/ddebs.list << EOF
deb http://ddebs.ubuntu.com/ ${codename} main restricted universe
˓→multiverse
#deb http://ddebs.ubuntu.com/ ${codename}-security main restricted universe
˓→multiverse
deb http://ddebs.ubuntu.com/ ${codename}-updates main restricted universe
˓→multiverse
deb http://ddebs.ubuntu.com/ ${codename}-proposed main restricted universe
˓→multiverse
EOF
$ sudo apt-get update
$ sudo apt-get install linux-image-$(uname -r)-dbgsym
Patch the SystemTap tapset, so that the Cuckoo analyzer can properly parse the output:
$ wget https://raw.githubusercontent.com/cuckoosandbox/cuckoo/master/stuff/systemtap/
˓→expand_execve_envp.patch
$ wget https://raw.githubusercontent.com/cuckoosandbox/cuckoo/master/stuff/systemtap/
˓→escape_delimiters.patch
$ sudo patch /usr/share/systemtap/tapset/linux/sysc_execve.stp < expand_execve_envp.
˓→patch
(continues on next page)
52 Chapter 3. Contents

Cuckoo Sandbox Book, Release 2.0.6
(continued from previous page)
$ sudo patch /usr/share/systemtap/tapset/uconversions.stp < escape_delimiters.patch
Compile the kernel extension:
$ wget https://raw.githubusercontent.com/cuckoosandbox/cuckoo/master/stuff/systemtap/
˓→strace.stp
$ sudo stap -p4 -r $(uname -r) strace.stp -m stap_ -v
Once the compilation finishes you should see the file stap_.ko in the same folder. You will now be able to test the
STAP kernel extension as follows:
$ sudo staprun -v ./stap_.ko
Output should be something like as follows:
staprun:insert_module:x Module stap_ inserted from file path_to_stap_.ko
The stap_.ko file should be placed in /root/.cuckoo:
$ sudo mkdir /root/.cuckoo
$ sudo mv stap_.ko /root/.cuckoo/
Disable the firewall inside of the VM, if it exists:
$ sudo ufw disable
Disable NTP inside of the VM:
$ sudo timedatectl set-ntp off
Optional - preinstalled remove software and configurations:
$ sudo apt-get purge update-notifier update-manager update-manager-core ubuntu-
˓→release-upgrader-core
$ sudo apt-get purge whoopsie ntpdate cups-daemon avahi-autoipd avahi-daemon avahi-
˓→utils
$ sudo apt-get purge account-plugin-salut libnss-mdns telepathy-salut
It is recommended to configure the Linux guest with a static IP addresses. Make sure the machine entry in the
configuration has the correct IP address and has the platform variable set to linux. Create a snapshot once the
VM has been configured. It is now ready for analysis!
3.2.3 Preparing the Guest (Physical Machine)
Warning: This chapter only applies for a Physical Machine setup! For normal Cuckoo usage please ignore it.
At this point you should have configured the Cuckoo host component and you should have designed and defined the
number and the names of the physical machines you are going to use for malware execution.
Now it’s time to create such machines and to configure them properly.
3.2. Installation 53

Cuckoo Sandbox Book, Release 2.0.6
Creation of the Physical Machine
Once you have properly installed your imaging software, you can proceed on creating all the physical machines you
need.
Using and configuring your imaging software is out of the scope of this guide, so please refer to the official documen-
tation.
Note: You can find some hints and considerations on how to design and create your virtualized environ-
ment in the Sandboxing chapter.
Note: For analysis purposes you are recommended to use Windows XP Service Pack 3, but Cuckoo
Sandbox also proved to work with Windows 7 with User Access Control disabled.
When creating the physical machine, Cuckoo doesn’t require any specific configuration. You can choose the options
that best fit your needs.
Requirements
In order to make Cuckoo run properly in your physical Windows system, you will have to install some required
software and libraries.
Install Python
Python is a strict requirement for the Cuckoo guest component (analyzer) in order to run properly.
You can download the proper Windows installer from the official website. Also in this case Python 2.7 is preferred.
Some Python libraries are optional and provide some additional features to Cuckoo guest component. They include:
•Python Pillow: it’s used for taking screenshots of the Windows desktop during the analysis.
They are not strictly required by Cuckoo to work properly, but you are encouraged to install them if you want to have
access to all available features. Make sure to download and install the proper packages according to your Python
version.
NOTE: Physical machinery is currently not supported by the new cuckoo agent. Please use the old cuckoo agent for
physical machinery in the meantime.
Additional Software
At this point you should have installed everything needed by Cuckoo to run properly.
Depending on what kind of files you want to analyze and what kind of sandboxed Windows environment you want to
run the malware samples in, you might want to install additional software such as browsers, PDF readers, office suites
etc. Remember to disable the “auto update” or “check for updates” feature of any additional software.
This is completely up to you and to what your needs are. You can get some hints by reading the Sandboxing chapter.
54 Chapter 3. Contents

Cuckoo Sandbox Book, Release 2.0.6
Additional Host Requirements
The physical machine manager uses RPC requests to reboot physical machines. The net command is required for this
to be accomplished, and is available from the samba-common-bin package.
On Debian/Ubuntu you can install it with:
$ sudo apt-get install samba-common-bin
In order for the physical machine manager to work, you must have a way for physical machines to be returned to a
clean state. In development/testing Fog was used as a platform to handle re-imaging the physical machines. However,
any re-imaging platform can be used (Clonezilla, Deepfreeze, etc) to accomplish this.
Cuckoo Configuration Requirements
Since we are using physical machines to perform our analysis, we must account for the reboot/rebuild time of our
physical machines in our Cuckoo configuration. Specifically, we must modify the vm_state timeout as specified in
conf/cuckoo.conf:
vm_state =60
By default, this value is set to 60 (seconds). We need to update it so that it reflects the amount of time required to reboot
and rebuild the physical guest. In testing 10 minutes (i.e., vm_state = 600) has proven sufficient, provided a Windows
7 setup with a 1 gbit connection. However, it is recommended that you analyze the time it takes to reboot/rebuild the
phyical machine in your environment before setting this value.
Network Configuration
Now it’s time to setup the network for your physical machine.
Windows Settings
Before configuring the underlying networking of the sandbox, you might want to tweak some settings inside Windows
itself.
One of the most important things to do is disabling Windows Firewall and the Automatic Updates. The reason behind
this is that they can affect the behavior of the malware under normal circumstances and that they can pollute the
network analysis performed by Cuckoo, by dropping connections or including irrelevant requests.
You can do so from Windows’ Control Panel as shown in the picture:
3.2. Installation 55
Cuckoo Sandbox Book, Release 2.0.6
Using a physical machine manager requires a few more configuration options than the virtual machine managers in
order to run properly. In addition to the steps laid out in the regular Preparing the Guest section, some settings need to
be changed for physical machines to work properly.
• Enable auto-logon (Allows for the agent to start upon reboot)
• Enable Remote RPC (Allows for Cuckoo to reboot the sandbox using RPC)
• Turn off paging (Optional)
• Disable Screen Saver (Optional)
In Windows 7 the following commands can be entered into an Administrative command prompt to enable auto-logon
and Remote RPC.
reg add "hklm\software\Microsoft\Windows NT\CurrentVersion\WinLogon" /v
˓→DefaultUserName /d<USERNAME> /t REG_SZ /f
reg add "hklm\software\Microsoft\Windows NT\CurrentVersion\WinLogon" /v
˓→DefaultPassword /d<PASSWORD> /t REG_SZ /f
reg add "hklm\software\Microsoft\Windows NT\CurrentVersion\WinLogon" /v
˓→AutoAdminLogon /d1/t REG_SZ /f
reg add "hklm\system\CurrentControlSet\Control\TerminalServer" /v AllowRemoteRPC /d
˓→0x01 /t REG_DWORD /f
reg add "HKEY_LOCAL_MACHINE\SOFTWARE\Microsoft\Windows\CurrentVersion\Policies\System
˓→"/v LocalAccountTokenFilterPolicy /d0x01 /t REG_DWORD /f
Networking
Now you need to decide how to make your physical machine able to access Internet or your local network.
While in previous releases Cuckoo used shared folders to exchange data between the Host and Guests, from release
0.4 it adopts a custom agent that works over the network using a simple XMLRPC protocol.
56 Chapter 3. Contents
Cuckoo Sandbox Book, Release 2.0.6
In order to make it work properly you’ll have to configure your machine’s network so that the Host and the Guest can
communicate. Testing the network access by pinging a guest is a good practice, to make sure the virtual network was
set up correctly. Use only static IP addresses for your guest, as today Cuckoo doesn’t support DHCP and using it will
break your setup.
This stage is very much up to your own requirements and to the characteristics of your virtualization software.
For physical machines, make sure when setting the IP address of the guest to also set the Gateway and DNS server to
be the IP address of the Cuckoo server on the physical network. For example, if your Cuckoo server has the IP address
of 192.168.1.1, then you would set the Gateway and DNS server in Windows Settings to be 192.168.1.1 as well.
Installing the Agent
Installing the Agent on a Physical machine is the same as installing it in a Virtual Machine, therefore please refer to
Installing the Agent.
Saving the Guest
Now you should be ready to save the physical machine to a clean state. In order for the physical machine manager to
work, you must have a way for physical machines to be returned to a clean state.
Before doing this make sure you rebooted it softly and that it’s currently running, with Cuckoo’s agent running
and with Windows fully booted.
Now you can proceed saving the machine. The way to do it obviously depends on the imaging software you decided
to use.
3.2. Installation 57
Cuckoo Sandbox Book, Release 2.0.6
In development/testing Fog (http://www.fogproject.org/) was used as a platform to handle re-imaging the physical
machines. However, any re-imaging platform can be used (Clonezilla, Deepfreeze, etc.) to accomplish this.
If you follow all the below steps properly, your virtual machine should be ready to be used by Cuckoo.
Fog
After installing Fog, you will need to create an image and add an image and a host to the Fog server.
To add an image to the fog server, open the Image Management window
(http://<your_fog_server>/fog/management/index.php?node=images) and click “Create New Image.” Provide
the proper inputs for your OS configuration and click “Add”
Next you will need to add the host you plan to re-image to Fog. To add a host, open a web browser and navigate to
the Host Management page of Fog (http://<your_fog_server>/fog/management/index.php?node=host). Click “Create
New Host.” Provide the proper inputs for your host configuration. Be sure to select the image you created above from
the “Host Image” option, when finished click the “Add” button.
58 Chapter 3. Contents
Cuckoo Sandbox Book, Release 2.0.6
At this point you should be ready to take an image from the guest machine. In order to
take an image you will need to navigate to the Task Management page and list all hosts
(http://<your_fog_server>/fog/management/index.php?node=tasks&sub=listhosts). From here you should be
able to click the Capture icon, which should instantly add a task to the queue to take an image. Now you should
reboot your Cuckoo guest image and it should PXE boot into Fog and capture the base image from the cuckoo guest.
Now that you have created and capture an image in FOG, Cuckoo will use this image to rebuild the guest machine after
each analysis task. If you have provided Cuckoo with valid FOG credentials and enabled Remote RPC (as shown in
the Network Configuration section), Cuckoo will automatically schedule the Deploy Task in FOG and will also reboot
the guest machine for you.
3.2. Installation 59

Cuckoo Sandbox Book, Release 2.0.6
Setup using VMWare (Bonus!)
Traditionally Cuckoo requires to be running some sort of virtualization software (e.g. VMware, Virtualbox, etc). The
physical machine manager will also work with other virtual machines, so long as they are configured to revert to a snap-
shot on shutdown/reboot, and running the agent.py script. A use case for this functionality would be to run the cuckoo
server and the guest sandboxes each in their own virtual machine on a single host, allowing for development/testing of
Cuckoo without requiring a dedicated Linux host.
3.2.4 Upgrading from a previous release
Upgrading post version 2.0.0
When updating your Cuckoo from a >=2.0.0 version, Cuckoo will automatically try to upgrade your Cuckoo Work-
ing Directory (CWD). If any actions are required, such as running automatically database migrations or backing up an
edited file in your CWD, Cuckoo will notify you.
To start an upgrade after updating Cuckoo, simply start Cuckoo as you normally would.
Upgrading to Cuckoo from legacy Cuckoo
Legacy Cuckoo is any Cuckoo version older than 2.0.0. These versions use a working directory inside of the Cuckoo
installation path. Newer Cuckoo versions use a Cuckoo Working Directory.
This document describes the process of importing an older legacy Cuckoo setup in order to upgrade your Cuckoo to
the latest and greatest version. This importing process is possible for Cuckoo 0.6 and upwards. Naturally it doesn’t
re-apply any custom code changes that you applied to your old setup, but it does migrate your database, configuration,
and analyses to the new version (in a best-effort manner).
Now, in order to upgrade your setup, you’ll simply have to perform the following steps:
1. Come up with a Cuckoo Working Directory for the new setup (although the default one should work just fine,
assuming it doesn’t exist yet).
2. Optionally create a backup of your data (Cuckoo will also offer to do this for you before doing the actual setup
import).
3. Run the cuckoo import command.
The cuckoo import command
The cuckoo import App performs a number of steps in order to import an older setup. Previously we had manual
steps for performing a database migration, these have been integrated in the import process as well.
Note: Only use the import command if you are upgrading from a Cuckoo version pre 2.0.0.
The usage of cuckoo import is as follows:
$ cuckoo import --help
Usage: cuckoo import [OPTIONS] PATH
Imports an older Cuckoo setup into a new CWD. The old setup should be
identified by PATH and the new CWD may be specified with the --cwd
parameter, e.g., "cuckoo --cwd /tmp/cwd import old-cuckoo".
(continues on next page)
60 Chapter 3. Contents

Cuckoo Sandbox Book, Release 2.0.6
(continued from previous page)
Options:
--copy Copy all existing analyses to the new CWD (default)
--move Move all existing analyses to the new CWD
--symlink Symlink all existing analyses to the new CWD
--help Show this message and exit.
As per the limited usage documentation of this command, there is an input and an output directory and a couple of
different modes. The rest is done by cuckoo import according to best-practice manners.
The three different modes are best described as follows. Keep in mind that these modes only inform the importing
process on what to do with the existing analyses and, in the case of sqlite3 usage, the database file. These modes do
not apply to any other used databases or data not mentioned in this document.
•copy:Copies all the analyses from the old setup to the new CWD. In this mode the old storage/ folder will
be copied to $CWD/storage/. The copy mode is useful if you want to maintain a backup of the old setup
and its analyses, allowing one to restore it with the appropriate SQL backup. Note that this mode will double
the size of your existing analyses directory as it does a full copy.
•move:Moves all the analyses from the old setup to the new CWD. In this mode the old storage/ folder is
moved to $CWD/storage/. After the import process you won’t have a backup of your old data anymore, but
you will be able to reference to it in the new CWD / setup.
•symlink: Creates a symbolic link from each analysis in the old setup, i.e., storage/analyses/XYZ, to
the new CWD, i.e., $CWD/storage/XYZ. This method is the most desired (as you’ll be able to access the
existing analyses in both the old setup as well as the new CWD), but doesn’t work on Windows.
The default mode is copy due to its feature of remaining available on both the old setup as well as the new CWD as
well as being cross-platform (i.e., symlink mode isn’t supported on Windows). After reading this documentation
one may opt to go for symlink or move mode on non-Windows systems and move mode on Windows systems,
though.
Following are the steps taken by Cuckoo when performing an import:
• The user has to accept a non-binding EULA-like agreement that (just kidding) attempts to inform him or her
regarding the implications of importing an older setup.
• The version of the old Cuckoo setup is identified.
• It is ensured that the new CWD does not already exist.
• The old Cuckoo Configuration is read, migrated, and then validated to be fit for usage with the new Cuckoo
version, i.e., you can configure a Cuckoo 0.6 setup and migrate it all the way to the latest version and it will
simply work.
• The new CWD is created and it is configured with the migrated configuration.
• The user is prompted to optionally create a SQL database backup. On Linux-based systems this should work
out of the box (and you’ll get a hard error otherwise), but due to issues with $PATH this may require manually
fixing up the command on Windows & Mac OS X systems.
• After the ability to create a SQL database backup, the database schema is migrated to the latest version in-
place, i.e., you will not be able to use your old Cuckoo setup with this database anymore (hence the backup).
• Any and all existing analyses are imported to the new CWD using the mode as specified, or if it has not been
specified, the default copy method.
You are now the happy owner of an up-to-date Cuckoo setup. Please inform us of any feedback that you may have
through one of the various communication channels that we’ve put in-place.
3.2. Installation 61

Cuckoo Sandbox Book, Release 2.0.6
Warning: One should not clean the old Cuckoo setup after the import. By attempting to do so you may lose the
existing analyses (if symlink mode is used) and the SQL, MongoDB, and ElasticSearch databases.
3.3 Usage
This chapter explains how to use Cuckoo.
3.3.1 Starting Cuckoo
To start Cuckoo use the command:
$ cuckoo
You will get an output similar to this:
eeee e e eeee e e eeeee eeeee
8 8 8 8 8 8 8 8 8 88 8 88
8e 8e 8 8e 8eee8e 8 8 8 8
88 88 8 88 88 8 8 8 8 8
88e8 88ee8 88e8 88 8 8eee8 8eee8
Cuckoo Sandbox 2.0.0
www.cuckoosandbox.org
Copyright (c) 2010-2017
Checking for updates...
Good! You have the latest version available.
2017-03-31 17:08:53,527 [cuckoo.core.scheduler] INFO: Using "virtualbox" as machine
˓→manager
2017-03-31 17:08:53,935 [cuckoo.core.scheduler] INFO: Loaded 1 machine/s
2017-03-31 17:08:53,964 [cuckoo.core.scheduler] INFO: Waiting for analysis tasks.
Note that Cuckoo checks for updates on a remote API located at api.cuckoosandbox.org. You can avoid this
by disabling the version_check option in the configuration file.
Now Cuckoo is ready to run and it’s waiting for submissions.
cuckoo accepts some command line options as shown by the help:
$ cuckoo --help
Usage: cuckoo [OPTIONS] COMMAND [ARGS]...
Invokes the Cuckoo daemon or one of its subcommands.
To be able to use different Cuckoo configurations on the same
machine with the same Cuckoo installation, we use the so-called
Cuckoo Working Directory (aka "CWD"). A default CWD is
available, but may be overridden through the following options -
listed in order of precedence.
*Command-line option (--cwd)
*Environment option ("CUCKOO")
(continues on next page)
62 Chapter 3. Contents

Cuckoo Sandbox Book, Release 2.0.6
(continued from previous page)
*Environment option ("CUCKOO_CWD")
*Current directory (if the ".cwd" file exists)
*Default value ("~/.cuckoo")
Options:
-d, --debug Enable verbose logging
-q, --quiet Only log warnings and critical messages
-m, --maxcount INTEGER Maximum number of analyses to process
--user TEXT Drop privileges to this user
--cwd TEXT Cuckoo Working Directory
--help Show this message and exit.
Commands:
api Operate the Cuckoo REST API.
clean Clean the CWD and associated databases.
community Fetch supplies from the Cuckoo Community.
distributed Distributed Cuckoo helper utilities.
dnsserve Custom DNS server.
import Imports an older Cuckoo setup into a new CWD.
init Initializes Cuckoo and its configuration.
machine Dynamically add/remove machines.
migrate Perform database migrations.
process Process raw task data into reports.
rooter Instantiates the Cuckoo Rooter.
submit Submit one or more files or URLs to Cuckoo.
web Operate the Cuckoo Web Interface.
The --debug and --quiet flags increase and decrease the logging verbosity for the cuckoo command or any of
its subcommands.
Cuckoo in the background
Running Cuckoo manually is useful the first few times you start using it, but if you’re running multiple machines with
Cuckoo on it, you will want the process of running Cuckoo to be automated.
Fortunately Cuckoo will automatically provide one with a supervisord.conf file in the Cuckoo Working
Directory (this topic will be explained on the next page) which may be started either by running supervisord
from the CWD directory, or by providing the configuration directly to supervisord as follows:
$ supervisord -c $CWD/supervisord.conf
It should be noted that, by default, supervisord will also start four Processing Utility instances, which means
that, as per its documentation, the process_results configuration in $CWD/conf/cuckoo.conf should be
disabled (i.e., change the value from on to off).
From there on, one may start and stop the various cuckoo processes (i.e., the main cuckoo process and the four
processing instances) by running commands such as the following (assuming that they’re run from the CWD):
# Stop the Cuckoo daemon and the processing utilities.
$ supervisorctl stop cuckoo:
# Start the Cuckoo daemon and the processing utilities.
$ supervisorctl start cuckoo:
Note that you’ll need the trailing colon (i.e., cuckoo:) so to denote the Cuckoo supervisor group, containing the
Cuckoo daemon process as well as the various processing utilities.
3.3. Usage 63

Cuckoo Sandbox Book, Release 2.0.6
3.3.2 Cuckoo Working Directory Usage
Note: Before reading this page, please read on installing Cuckoo and the Cuckoo Working Directory.
Before we go into the subject of using the CWD we’re first going to walk you through the many improvements on your
Quality of Life during your daily usage of Cuckoo Sandbox with the introduction of the Cuckoo Package and CWD
and some of the new features that come along with this.
So simply put, the CWD is a per-Cuckoo instance configuration directory. While people generally speaking only run
one Cuckoo instance per server, this still yields a lot of maintenance-related improvements:
• As outlined by Installing Cuckoo installing Cuckoo and updating it will now be pretty much pip install
-U cuckoo.
• Due to Cuckoo now being an official Python Package we have a much tighter control on how its installed on
users’ systems. No longer will users have incorrect versions of third party libraries installed breaking their setup.
• Because updating is much easier (again, pip install -U cuckoo) we will be able to put out new ver-
sions more often. E.g., when one or more users run into a bug, we’ll be able to put out a fix quickly - this has
happened a few times in the past in a way that we weren’t able to properly mitigate such issues (leaving users
high & dry for months).
•The Cuckoo Configuration is no longer part of the Git repository. Users who have updated Cuckoo in
the past will have seen the effort involved in making a backup of their configuration, pulling a new version
of Cuckoo, and either restoring their old configuration or applying the configuration against the new Cuckoo
version by hand.
• With the new CWD all configurable files will be in one centralized place in logically structured subdirectories.
• Given that a CWD denotes one Cuckoo instance, it is possible to have multiple Cuckoo instances through multiple
CWD’s while having installed/deployed Cuckoo only once.
• With the addition of the cuckoo executable and its associated Cuckoo Apps (subcommands) the various
Cuckoo commands are now centralized into one command.
Usage
After having installed the Cuckoo Package (Installing Cuckoo) and setup the initial Cuckoo Working
Directory (Cuckoo Working Directory) it is time to actually get started with Cuckoo. Just to reiterate, installing the
latest version of Cuckoo in a virtualenv environment may look roughly as follows (note the pip install -U
pip setuptools, for more information see also DistributionNotFound / No distribution matching the version..).
$ virtualenv venv
$ . venv/bin/activate
(venv)$ pip install -U pip setuptools
(venv)$ pip install -U cuckoo
(venv)$ cuckoo --cwd ~/.cuckoo
First of all you’ll probably want to update the default Cuckoo configuration in the $CWD/conf/ directory. If just to
switch from the default SQLite3 database to, e.g., PostgreSQL, or to register some virtual machines (more information
on setting up Virtual Machines can be found in Preparing the Guest). Note that in order to view the results of analyses
in the Web Interface later on it is necessary to enable the mongodb reporting module in $CWD/conf/reporting.
conf (see also Web interface).
We then proceed by downloading the Cuckoo Community which includes over 300 Cuckoo Signatures which summa-
rize a wide array of malicious behavior in a digestible way, simplifying the final results of an analysis. Downloading
the Cuckoo Community into our CWD may be done as follows:
64 Chapter 3. Contents

Cuckoo Sandbox Book, Release 2.0.6
(venv)$ cuckoo community
Alternatively, if you have a local copy of the community .tar.gz file (e.g., after running wget https://
github.com/cuckoosandbox/community/archive/master.tar.gz) this can be imported as follows:
(venv)$ cuckoo community --file master.tar.gz
Now we’re good to go let’s submit some samples and URLs using the command-line Submission Utility. Note that
multiple tasks may be submitted at once:
(venv)$ cuckoo submit /tmp/sample1.exe /tmp/sample2.exe /tmp/sample3.exe
Success: File "/tmp/sample1.exe" added as task with ID #1
Success: File "/tmp/sample2.exe" added as task with ID #2
Success: File "/tmp/sample3.exe" added as task with ID #3
(venv)$ cuckoo submit --url google.com bing.com
Success: URL "google.com" added as task with ID #4
Success: URL "bing.com" added as task with ID #5
For the actual analysis of these samples, one will have to run the Cuckoo daemon. Which is equally straightforward.
Do keep in mind that, by default, the command will run indefinitely (unless a maximum analysis count was
provided through the -m parameter, e.g., -m 5).
# This command is equal to what used to be "./cuckoo.py -d".
(venv)$ cuckoo -d
Now in order to inspect the analyses that have run we start the Web Interface. For small and/or home setups this may
be done using the built-in Django web server as follows, although we recommend a proper Web Deployment for any
bigger setup.
(venv)$ cuckoo web
Performing system checks...
System check identified no issues (0silenced).
March 31,2017 -12:10:46
Django version 1.8.4, using settings 'cuckoo.web.web.settings'
Starting development server at http://localhost:8000/
Quit the server with CONTROL-C.
There are some additional Cuckoo Apps such as cuckoo clean (Clean all Tasks and Samples), the Cuckoo
Rooter, and various other utilities listed in Cuckoo Apps, but other than that there’s not much more to learn about
installing and running Cuckoo Sandbox - so, happy analyzing.
3.3.3 Submit an Analysis
•Submission Utility
•API
•Distributed Cuckoo
•Python Functions
Submission Utility
The easiest way to submit an analysis is to use the cuckoo submit utility. It currently has the following options
available:
3.3. Usage 65

Cuckoo Sandbox Book, Release 2.0.6
$ cuckoo submit --help
Usage: cuckoo submit [OPTIONS] [TARGET]...
Submit one or more files or URLs to Cuckoo.
Options:
-u, --url Submitting URLs instead of samples
-o, --options TEXT Options for these tasks
--package TEXT Analysis package to use
--custom TEXT Custom information to pass along this task
--owner TEXT Owner of this task
--timeout INTEGER Analysis time in seconds
--priority INTEGER Priority of this task
--machine TEXT Machine to analyze these tasks on
--platform TEXT Analysis platform
--memory Enable memory dumping
--enforce-timeout Don't terminate the analysis early
--clock TEXT Set the system clock
--tags TEXT Analysis tags
--baseline Create baseline task
--remote TEXT Submit to a remote Cuckoo instance
--shuffle Shuffle the submitted tasks
--pattern TEXT Provide a glob-pattern when submitting a
directory
--max INTEGER Submit up to X tasks at once
--unique Only submit samples that have not been
analyzed before
-d, --debug Enable verbose logging
-q, --quiet Only log warnings and critical messages
--help Show this message and exit.
You may specify multiple files or directories at once. For directories cuckoo submit will enumerate all its files
and submit them one by one.
The concept of analysis packages will be dealt later in this documentation (at Analysis Packages). Following are some
usage examples:
Example: submit a local binary:
$ cuckoo submit /path/to/binary
Example: submit an URL:
$ cuckoo submit --url http://www.example.com
Example: submit a local binary and specify an higher priority:
$ cuckoo submit --priority 5 /path/to/binary
Example: submit a local binary and specify a custom analysis timeout of 60 seconds:
$ cuckoo submit --timeout 60 /path/to/binary
Example: submit a local binary and specify a custom analysis package:
$ cuckoo submit --package <name of package> /path/to/binary
Example: submit a local binary and specify a custom route:
66 Chapter 3. Contents

Cuckoo Sandbox Book, Release 2.0.6
$ cuckoo submit -o route=tor /path/to/binary
Example: submit a local binary and specify a custom analysis package and some options (in this case a command line
argument for the malware):
$ cuckoo submit --package exe --options arguments=--dosomething /path/to/binary.exe
Example: submit a local binary to be run on virtual machine cuckoo1:
$ cuckoo submit --machine cuckoo1 /path/to/binary
Example: submit a local binary to be run on a Windows machine:
$ cuckoo submit --platform windows /path/to/binary
Example: submit a local binary and take a full memory dump of the analysis machine:
$ cuckoo submit --memory /path/to/binary
Example: submit a local binary and force the analysis to be executed for the full timeout (disregarding the internal
mechanism that Cuckoo uses to decide when to terminate the analysis):
$ cuckoo submit --enforce-timeout /path/to/binary
Example: submit a local binary and set virtual machine clock. Format is %m-%d-%Y %H:%M:%S. If not specified,
the current time is used. For example if we want run a sample the 24 january 2001 at 14:41:20:
$ cuckoo submit --clock "01-24-2001 14:41:20" /path/to/binary
Example: submit a sample for Volatility analysis (to reduce side effects of the cuckoo hooking, switch it off with
options free=True):
$ cuckoo submit --memory --options free=yes /path/to/binary
API
Detailed usage of the REST API interface is described in REST API.
Distributed Cuckoo
Detailed usage of the Distributed Cuckoo API interface is described in Distributed Cuckoo.
Python Functions
In order to keep track of submissions, samples and overall execution, Cuckoo uses a popular Python ORM called
SQLAlchemy that allows you to make the sandbox use SQLite, MySQL or MariaDB, PostgreSQL and several other
SQL database systems.
Cuckoo is designed to be easily integrated in larger solutions and to be fully automated. In order to automate analysis
submission we suggest to use the REST API interface described in REST API, but in case you want to write your own
Python submission script, you can also use the add_path() and add_url() functions.
3.3. Usage 67

Cuckoo Sandbox Book, Release 2.0.6
add_path(file_path[, timeout=0[, package=None[, options=None[, priority=1[, custom=None[, owner=""[,
machine=None[, platform=None[, tags=None[, memory=False[, enforce_timeout=False],
clock=None[]]]]]]]]]]]]])
Add a local file to the list of pending analysis tasks. Returns the ID of the newly generated task.
Parameters
•file_path (string) – path to the file to submit
•timeout (integer) – maximum amount of seconds to run the analysis for
•package (string or None) – analysis package you want to use for the specified file
•options (string or None) – list of options to be passed to the analysis package (in
the format key=value,key=value)
•priority (integer) – numeric representation of the priority to assign to the specified
file (1 being low, 2 medium, 3 high)
•custom (string or None) – custom value to be passed over and possibly reused at
processing or reporting
•owner (string or None) – task owner
•machine (string or None) – Cuckoo identifier of the virtual machine you want to
use, if none is specified one will be selected automatically
•platform (string or None) – operating system platform you want to run the analy-
sis one (currently only Windows)
•tags (string or None) – tags for machine selection
•memory (True or False) – set to True to generate a full memory dump of the analysis
machine
•enforce_timeout (True or False) – set to True to force the execution for the full
timeout
•clock (string or None) – provide a custom clock time to set in the analysis machine
Return type integer
Example usage:
1>>> from cuckoo.core.database import Database
2>>> db =Database()
3>>> db.add_path("/tmp/malware.exe")
41
5>>>
add_url(url[, timeout=0[, package=None[, options=None[, priority=1[, custom=None[, owner=""[,
machine=None[, platform=None[, tags=None[, memory=False[, enforce_timeout=False],
clock=None[]]]]]]]]]]]]])
Add a local file to the list of pending analysis tasks. Returns the ID of the newly generated task.
Parameters
•url (string) – URL to analyze
•timeout (integer) – maximum amount of seconds to run the analysis for
•package (string or None) – analysis package you want to use for the specified URL
•options (string or None) – list of options to be passed to the analysis package (in
the format key=value,key=value)
68 Chapter 3. Contents

Cuckoo Sandbox Book, Release 2.0.6
•priority (integer) – numeric representation of the priority to assign to the specified
URL (1 being low, 2 medium, 3 high)
•custom (string or None) – custom value to be passed over and possibly reused at
processing or reporting
•owner (string or None) – task owner
•machine (string or None) – Cuckoo identifier of the virtual machine you want to
use, if none is specified one will be selected automatically
•platform (string or None) – operating system platform you want to run the analy-
sis one (currently only Windows)
•tags (string or None) – tags for machine selection
•memory (True or False) – set to True to generate a full memory dump of the analysis
machine
•enforce_timeout (True or False) – set to True to force the execution for the full
timeout
•clock (string or None) – provide a custom clock time to set in the analysis machine
Return type integer
Example Usage:
1>>> from cuckoo.core.database import Database
2>>> db =Database()
3>>> db.connect()
4>>> db.add_url("http://www.cuckoosandbox.org")
52
6>>>
3.3.4 Web interface
Cuckoo provides a full-fledged web interface in the form of a Django application. This interface will allow you to
submit files, browse through the reports, and search across all the analysis results.
Configuration
The web interface pulls data from a Mongo database, so having the Mongo reporting module enabled in reporting.
conf is mandatory for the Web Interface to function. If that’s not the case, the Web Interface won’t be able to start
and will instead raise an exception.
Some additional configuration options exist in the $CWD/web/local_settings.py configuration file.
# Copyright (C) 2013 Claudio Guarnieri.
# Copyright (C) 2014-2017 Cuckoo Foundation.
# This file is part of Cuckoo Sandbox - http://www.cuckoosandbox.org
# See the file 'docs/LICENSE' for copying permission.
import web.errors
# Maximum upload size (10GB, so there's basically no limit).
MAX_UPLOAD_SIZE =10*1024*1024*1024
(continues on next page)
3.3. Usage 69

Cuckoo Sandbox Book, Release 2.0.6
(continued from previous page)
# Override default secret key stored in $CWD/web/.secret_key
# Make this unique, and don't share it with anybody.
# SECRET_KEY = "YOUR_RANDOM_KEY"
# Language code for this installation. All choices can be found here:
# http://www.i18nguy.com/unicode/language-identifiers.html
LANGUAGE_CODE ="en-us"
ADMINS =(
# ("Your Name", "your_email@example.com"),
)
MANAGERS =ADMINS
# Allow verbose debug error message in case of application fault.
# It's strongly suggested to set it to False if you are serving the
# web application from a web server front-end (i.e. Apache).
DEBUG =False
DEBUG404 =False
# A list of strings representing the host/domain names that this Django site
# can serve.
# Values in this list can be fully qualified names (e.g. 'www.example.com').
# When DEBUG is True or when running tests, host validation is disabled; any
# host will be accepted. Thus it's usually only necessary to set it in production.
ALLOWED_HOSTS =["*"]
handler404 =web.errors.handler404
handler500 =web.errors.handler500
It is recommended to keep the DEBUG variable at False in production setups and to configure at least one ADMIN
entry to enable error notification by email.
Changed in version 2.0.0: The default maximum upload size has been bumped from 25 MB to 10 GB so that virtually
any file should be accepted.
Starting the Web Interface
In order to start the web interface, you can simply run the following command from the web/ directory:
$ cuckoo web runserver
If you want to configure the web interface as listening for any IP on a specified port, you can start it with the following
command (replace PORT with the desired port number):
$ cuckoo web runserver 0.0.0.0:PORT
Or directly without the runserver part as follows while also specifying the host to listen on:
$ cuckoo web -H 0
Web Deployment
While the default method of starting the Web Interface server works fine for many cases, some users may wish to
deploy the server in a more robust manner. This can be done by exposing the Web Interface as a WSGI application
70 Chapter 3. Contents

Cuckoo Sandbox Book, Release 2.0.6
to a web server. This section shows a simple example of deploying the Web Interface via uWSGI and nginx. These
instructions are written with Ubuntu GNU/Linux in mind, but may be adapted to other platforms.
This solution requires uWSGI, the uWSGI Python plugin, and nginx. All are available as packages:
$ sudo apt-get install uwsgi uwsgi-plugin-python nginx
uWSGI setup
First, use uWSGI to run the Web Interface server as an application.
To begin, create a uWSGI configuration file at /etc/uwsgi/apps-available/cuckoo-web.ini that con-
tains the actual configuration as reported by the cuckoo web --uwsgi command, e.g.:
$ cuckoo web --uwsgi
[uwsgi]
plugins = python
virtualenv = /home/cuckoo/cuckoo
module = cuckoo.web.web.wsgi
uid = cuckoo
gid = cuckoo
static-map = /static=/home/..somepath..
# If you're getting errors about the PYTHON_EGG_CACHE, then
# uncomment the following line and add some path that is
# writable from the defined user.
# env = PYTHON_EGG_CACHE=
env = CUCKOO_APP=web
env = CUCKOO_CWD=/home/..somepath..
This configuration inherits a number of settings from the distribution’s default uWSGI configuration and imports
cuckoo.web.web.wsgi from the Cuckoo package to do the actual work. In this example we installed Cuckoo in
a virtualenv located at /home/cuckoo/cuckoo. If Cuckoo is installed globally no virtualenv option is required
(and cuckoo web --uwsgi would not report one).
Enable the app configuration and start the server.
$ sudo ln -s /etc/uwsgi/apps-available/cuckoo-web.ini /etc/uwsgi/apps-enabled/
$ sudo service uwsgi start cuckoo-web # or reload, if already running
Note: Logs for the application may be found in the standard directory for distribution app instances, i.e., /var/
log/uwsgi/app/cuckoo-web.log. The UNIX socket is created in a conventional location as well, /run/
uwsgi/app/cuckoo-web/socket.
nginx setup
With the Web Interface server running in uWSGI, nginx can now be set up to run as a web server/reverse proxy,
backending HTTP requests to it.
To begin, create a nginx configuration file at /etc/nginx/sites-available/cuckoo-web that contains the
actual configuration as reported by the cuckoo web --nginx command:
$ cuckoo web --nginx
upstream _uwsgi_cuckoo_web {
(continues on next page)
3.3. Usage 71

Cuckoo Sandbox Book, Release 2.0.6
(continued from previous page)
server unix:/run/uwsgi/app/cuckoo-web/socket;
}
server {
listen localhost:8000;
# Cuckoo Web Interface
location / {
client_max_body_size 1G;
uwsgi_pass _uwsgi_cuckoo_web;
include uwsgi_params;
}
}
Make sure that nginx can connect to the uWSGI socket by placing its user in the cuckoo group:
$ sudo adduser www-data cuckoo
Enable the server configuration and start the server.
$ sudo ln -s /etc/nginx/sites-available/cuckoo-web /etc/nginx/sites-enabled/
$ sudo service nginx start # or reload, if already running
At this point, the Web Interface server should be available at port 8000 on the server. Various configurations may be ap-
plied to extend this configuration, such as to tune server performance, add authentication, or to secure communications
using HTTPS. However, we leave this as an exercise for the user.
3.3.5 REST API
As mentioned in Submit an Analysis, Cuckoo provides a simple and lightweight REST API server that is under the
hood implemented using Flask.
Starting the API server
In order to start the API server you can simply do:
$ cuckoo api
By default it will bind the service on localhost:8090. If you want to change those values, you can use the following
syntax:
$ cuckoo api --host 0.0.0.0 --port 1337
$ cuckoo api -H 0.0.0.0 -p 1337
To allow only authenticated access to the API, the api_token in cuckoo.conf must be set to a secret value. In
new Cuckoo installations, a random token is automatically generated for you. To access the API, you must send the
Authorization: Bearer <token> header with all your requests using the token defined in the configuration.
Note that if you want to access the API over an insecure network such as the Internet, you should run the API server
behind nginx described in the next section and enable HTTPS.
72 Chapter 3. Contents

Cuckoo Sandbox Book, Release 2.0.6
Web deployment
While the default method of starting the API server works fine for many cases, some users may wish to deploy the
server in a robust manner. This can be done by exposing the API as a WSGI application through a web server. This
section shows a simple example of deploying the API via uWSGI and nginx. These instructions are written with
Ubuntu GNU/Linux in mind, but may be adapted for other platforms.
This solution requires uWSGI, the uWSGI Python plugin, and nginx. All are available as packages:
$ sudo apt-get install uwsgi uwsgi-plugin-python nginx
uWSGI setup
First, use uWSGI to run the API server as an application.
To begin, create a uWSGI configuration file at /etc/uwsgi/apps-available/cuckoo-api.ini that con-
tains the actual configuration as reported by the cuckoo api --uwsgi command:
$ cuckoo api --uwsgi
[uwsgi]
plugins = python
virtualenv = /home/cuckoo/cuckoo
module = cuckoo.apps.api
callable = app
uid = cuckoo
gid = cuckoo
env = CUCKOO_APP=api
env = CUCKOO_CWD=/home/..somepath..
This configuration inherits a number of settings from the distribution’s default uWSGI configuration and imports
cuckoo.apps.api from the Cuckoo package to do the actual work. In this example we installed Cuckoo in a
virtualenv located at /home/cuckoo/cuckoo. If Cuckoo is installed globally no virtualenv option is required.
Enable the app configuration and start the server.
$ sudo ln -s /etc/uwsgi/apps-available/cuckoo-api.ini /etc/uwsgi/apps-enabled/
$ sudo service uwsgi start cuckoo-api # or reload, if already running
Note: Logs for the application may be found in the standard directory for distribution app instances, i.e., /var/
log/uwsgi/app/cuckoo-api.log. The UNIX socket is created in a conventional location as well, /run/
uwsgi/app/cuckoo-api/socket.
nginx setup
With the API server running in uWSGI, nginx can now be set up to run as a web server/reverse proxy, backending
HTTP requests to it.
To begin, create a nginx configuration file at /etc/nginx/sites-available/cuckoo-api that contains the
actual configuration as reportd by the cuckoo api --nginx command:
$ cuckoo api --nginx
upstream _uwsgi_cuckoo_api {
(continues on next page)
3.3. Usage 73

Cuckoo Sandbox Book, Release 2.0.6
(continued from previous page)
server unix:/run/uwsgi/app/cuckoo-api/socket;
}
server {
listen localhost:8090;
# REST API app
location / {
client_max_body_size 1G;
uwsgi_pass _uwsgi_cuckoo_api;
include uwsgi_params;
}
}
Make sure that nginx can connect to the uWSGI socket by placing its user in the cuckoo group:
$ sudo adduser www-data cuckoo
Enable the server configuration and start the server.
$ sudo ln -s /etc/nginx/sites-available/cuckoo-api /etc/nginx/sites-enabled/
$ sudo service nginx start # or reload, if already running
At this point, the API server should be available at port 8090 on the server. Various configurations may be applied to
extend this configuration, such as to tune server performance, add authentication, or to secure communications using
HTTPS.
Resources
Following is a list of currently available resources and a brief description of each one. For details click on the resource
name.
74 Chapter 3. Contents

Cuckoo Sandbox Book, Release 2.0.6
Resource Description
POST
/tasks/create/file
Adds a file to the list of pending tasks to be processed and analyzed.
POST
/tasks/create/url
Adds an URL to the list of pending tasks to be processed and analyzed.
POST
/tasks/create/submit
Adds one or more files and/or files embedded in archives to the list of pending tasks.
GET
/tasks/list
Returns the list of tasks stored in the internal Cuckoo database. You can optionally specify a limit
of entries to return.
GET
/tasks/sample
Returns the list of tasks stored in the internal Cuckoo database for a given sample.
GET
/tasks/view
Returns the details on the task assigned to the specified ID.
GET
/tasks/reschedule
Reschedule a task assigned to the specified ID.
GET
/tasks/delete
Removes the given task from the database and deletes the results.
GET
/tasks/report
Returns the report generated out of the analysis of the task associated with the specified ID. You
can optionally specify which report format to return, if none is specified the JSON report will be
returned.
GET
/tasks/screenshots
Retrieves one or all screenshots associated with a given analysis task ID.
GET
/tasks/rereport
Re-run reporting for task associated with a given analysis task ID.
GET
/tasks/reboot
Reboot a given analysis task ID.
GET /mem-
ory/list
Returns a list of memory dump files associated with a given analysis task ID.
GET /mem-
ory/get
Retrieves one memory dump file associated with a given analysis task ID.
GET
/files/view
Search the analyzed binaries by MD5 hash, SHA256 hash or internal ID (referenced by the tasks
details).
GET
/files/get
Returns the content of the binary with the specified SHA256 hash.
GET
/pcap/get
Returns the content of the PCAP associated with the given task.
GET /ma-
chines/list
Returns the list of analysis machines available to Cuckoo.
GET /ma-
chines/view
Returns details on the analysis machine associated with the specified name.
GET
/cuckoo/status
Returns the basic cuckoo status, including version and tasks overview.
GET
/vpn/status
Returns VPN status.
GET /exit Shuts down the API server.
/tasks/create/file
POST /tasks/create/file
Adds a file to the list of pending tasks. Returns the ID of the newly created task.
3.3. Usage 75

Cuckoo Sandbox Book, Release 2.0.6
Example request:
curl -H"Authorization: Bearer S4MPL3" -F file=@/path/to/file http://localhost:8090/
˓→tasks/create/file
Example request using Python..
import requests
REST_URL ="http://localhost:8090/tasks/create/file"
SAMPLE_FILE ="/path/to/malwr.exe"
HEADERS ={"Authorization":"Bearer S4MPL3"}
with open(SAMPLE_FILE, "rb")as sample:
files ={"file": ("temp_file_name", sample)}
r=requests.post(REST_URL, headers=HEADERS, files=files)
# Add your code to error checking for r.status_code.
task_id =r.json()["task_id"]
# Add your code for error checking if task_id is None.
Example response.
{
"task_id" :1
}
Form parameters:
•file (required) - sample file (multipart encoded file content)
•package (optional) - analysis package to be used for the analysis
•timeout (optional) (int) - analysis timeout (in seconds)
•priority (optional) (int) - priority to assign to the task (1-3)
•options (optional) - options to pass to the analysis package
•machine (optional) - label of the analysis machine to use for the analysis
•platform (optional) - name of the platform to select the analysis machine from (e.g. “windows”)
•tags (optional) - define machine to start by tags. Platform must be set to use that. Tags are comma separated
•custom (optional) - custom string to pass over the analysis and the processing/reporting modules
•owner (optional) - task owner in case multiple users can submit files to the same cuckoo instance
•clock (optional) - set virtual machine clock (format %m-%d-%Y %H:%M:%S)
•memory (optional) - enable the creation of a full memory dump of the analysis machine
•unique (optional) - only submit samples that have not been analyzed before
•enforce_timeout (optional) - enable to enforce the execution for the full timeout value
Status codes:
•200 - no error
•400 - duplicated file detected (when using unique option)
76 Chapter 3. Contents

Cuckoo Sandbox Book, Release 2.0.6
/tasks/create/url
POST /tasks/create/url
Adds a file to the list of pending tasks. Returns the ID of the newly created task.
Example request.
curl -H "Authorization: Bearer S4MPL3" -F url="http://www.malicious.site" http://
˓→localhost:8090/tasks/create/url
Example request using Python.
import requests
REST_URL ="http://localhost:8090/tasks/create/url"
SAMPLE_URL ="http://example.org/malwr.exe"
HEADERS ={"Authorization":"Bearer S4MPL3"}
data ={"url": SAMPLE_URL}
r=requests.post(REST_URL, headers=HEADERS, data=data)
# Add your code to error checking for r.status_code.
task_id =r.json()["task_id"]
# Add your code to error checking if task_id is None.
Example response.
{
"task_id" :1
}
Form parameters:
•url (required) - URL to analyze (multipart encoded content)
•package (optional) - analysis package to be used for the analysis
•timeout (optional) (int) - analysis timeout (in seconds)
•priority (optional) (int) - priority to assign to the task (1-3)
•options (optional) - options to pass to the analysis package
•machine (optional) - label of the analysis machine to use for the analysis
•platform (optional) - name of the platform to select the analysis machine from (e.g. “windows”)
•tags (optional) - define machine to start by tags. Platform must be set to use that. Tags are comma separated
•custom (optional) - custom string to pass over the analysis and the processing/reporting modules
•owner (optional) - task owner in case multiple users can submit files to the same cuckoo instance
•memory (optional) - enable the creation of a full memory dump of the analysis machine
•enforce_timeout (optional) - enable to enforce the execution for the full timeout value
•clock (optional) - set virtual machine clock (format %m-%d-%Y %H:%M:%S)
Status codes:
3.3. Usage 77

Cuckoo Sandbox Book, Release 2.0.6
•200 - no error
/tasks/create/submit
POST /tasks/create/submit
Adds one or more files and/or files embedded in archives or a newline separated list of URLs/hashes to the list of
pending tasks. Returns the submit ID as well as the task IDs of the newly created task(s).
Example request.
# Submit two executables.
curl -H "Authorization: Bearer S4MPL3" http://localhost:8090/tasks/create/submit -F
˓→files=@1.exe -F files=@2.exe
# Submit http://google.com
curl -H "Authorization: Bearer S4MPL3" http://localhost:8090/tasks/create/submit -F
˓→strings=google.com
# Submit http://google.com & http://facebook.com
curl -H "Authorization: Bearer S4MPL3" http://localhost:8090/tasks/create/submit -F
˓→strings=$'google.com\nfacebook.com'
Example request using Python.
import requests
HEADERS ={"Authorization":"Bearer S4MPL3"}
# Submit one or more files.
r=requests.post("http://localhost:8090/tasks/create/submit", files=[
("files",open("1.exe","rb")),
("files",open("2.exe","rb")),
], headers=HEADERS)
# Add your code to error checking for r.status_code.
submit_id =r.json()["submit_id"]
task_ids =r.json()["task_ids"]
errors =r.json()["errors"]
# Add your code to error checking on "errors".
# Submit one or more URLs or hashes.
urls =[
"google.com","facebook.com","cuckoosandbox.org",
]
r=requests.post(
"http://localhost:8090/tasks/create/submit",
headers=HEADERS,
data={"strings":"\n".join(urls)}
)
Example response from the executable submission.
{
"submit_id":1,
(continues on next page)
78 Chapter 3. Contents

Cuckoo Sandbox Book, Release 2.0.6
(continued from previous page)
"task_ids": [1,2],
"errors": []
}
Form parameters:
•file (optional) - backwards compatibility with naming scheme for /tasks/create/file
•files (optional) - sample(s) to inspect and add to our pending queue
•strings (optional) - newline separated list of URLs and/or hashes (to be obtained using your VirusTotal API
key)
•timeout (optional) (int) - analysis timeout (in seconds)
•priority (optional) (int) - priority to assign to the task (1-3)
•options (optional) - options to pass to the analysis package
•tags (optional) - define machine to start by tags. Platform must be set to use that. Tags are comma separated
•custom (optional) - custom string to pass over the analysis and the processing/reporting modules
•owner (optional) - task owner in case multiple users can submit files to the same cuckoo instance
•memory (optional) - enable the creation of a full memory dump of the analysis machine
•enforce_timeout (optional) - enable to enforce the execution for the full timeout value
•clock (optional) - set virtual machine clock (format %m-%d-%Y %H:%M:%S)
Status codes:
•200 - no error
/tasks/list
GET /tasks/list/ (int: limit) /(int: offset)
Returns list of tasks.
Example request.
curl -H "Authorization: Bearer S4MPL3" http://localhost:8090/tasks/list
Example response.
{
"tasks": [
{
"category":"url",
"machine":null,
"errors": [],
"target":"http://www.malicious.site",
"package":null,
"sample_id":null,
"guest": {},
"custom":null,
"owner":"",
"priority":1,
"platform":null,
(continues on next page)
3.3. Usage 79

Cuckoo Sandbox Book, Release 2.0.6
(continued from previous page)
"options":null,
"status":"pending",
"enforce_timeout":false,
"timeout":0,
"memory":false,
"tags": []
"id":1,
"added_on":"2012-12-19 14:18:25",
"completed_on":null
},
{
"category":"file",
"machine":null,
"errors": [],
"target":"/tmp/malware.exe",
"package":null,
"sample_id":1,
"guest": {},
"custom":null,
"owner":"",
"priority":1,
"platform":null,
"options":null,
"status":"pending",
"enforce_timeout":false,
"timeout":0,
"memory":false,
"tags": [
"32bit",
"acrobat_6",
],
"id":2,
"added_on":"2012-12-19 14:18:25",
"completed_on":null
}
]
}
Parameters:
•limit (optional) (int) - maximum number of returned tasks
•offset (optional) (int) - data offset
Status codes:
•200 - no error
/tasks/sample
GET /tasks/sample/ (int: sample_id)
Returns list of tasks for sample.
Example request.
curl -H "Authorization: Bearer S4MPL3" http://localhost:8090/tasks/sample/1
80 Chapter 3. Contents

Cuckoo Sandbox Book, Release 2.0.6
Example response.
{
"tasks": [
{
"category":"file",
"machine":null,
"errors": [],
"target":"/tmp/malware.exe",
"package":null,
"sample_id":1,
"guest": {},
"custom":null,
"owner":"",
"priority":1,
"platform":null,
"options":null,
"status":"pending",
"enforce_timeout":false,
"timeout":0,
"memory":false,
"tags": [
"32bit",
"acrobat_6",
],
"id":2,
"added_on":"2012-12-19 14:18:25",
"completed_on":null
}
]
}
Parameters:
•sample_id (required) (int) - sample id to list tasks for
Status codes:
•200 - no error
/tasks/view
GET /tasks/view/ (int: id)
Returns details on the task associated with the specified ID.
Example request.
curl -H "Authorization: Bearer S4MPL3" http://localhost:8090/tasks/view/1
Example response.
{
"task": {
"category":"url",
"machine":null,
"errors": [],
"target":"http://www.malicious.site",
(continues on next page)
3.3. Usage 81

Cuckoo Sandbox Book, Release 2.0.6
(continued from previous page)
"package":null,
"sample_id":null,
"guest": {},
"custom":null,
"owner":"",
"priority":1,
"platform":null,
"options":null,
"status":"pending",
"enforce_timeout":false,
"timeout":0,
"memory":false,
"tags": [
"32bit",
"acrobat_6",
],
"id":1,
"added_on":"2012-12-19 14:18:25",
"completed_on":null
}
}
Note: possible value for key status:
•pending
•running
•completed
•reported
Parameters:
•id (required) (int) - ID of the task to lookup
Status codes:
•200 - no error
•404 - task not found
/tasks/reschedule
GET /tasks/reschedule/ (int: id) /(int: priority)
Reschedule a task with the specified ID and priority (default priority is 1).
Example request.
curl -H "Authorization: Bearer S4MPL3" http://localhost:8090/tasks/reschedule/1
Example response.
{
"status":"OK"
}
Parameters:
82 Chapter 3. Contents

Cuckoo Sandbox Book, Release 2.0.6
•id (required) (int) - ID of the task to reschedule
•priority (optional) (int) - Task priority
Status codes:
•200 - no error
•404 - task not found
/tasks/delete
GET /tasks/delete/ (int: id)
Removes the given task from the database and deletes the results.
Example request.
curl -H "Authorization: Bearer S4MPL3" http://localhost:8090/tasks/delete/1
Parameters:
•id (required) (int) - ID of the task to delete
Status codes:
•200 - no error
•404 - task not found
•500 - unable to delete the task
/tasks/report
GET /tasks/report/ (int: id) /(str: format)
Returns the report associated with the specified task ID.
Example request.
curl -H "Authorization: Bearer S4MPL3" http://localhost:8090/tasks/report/1
Parameters:
•id (required) (int) - ID of the task to get the report for
•format (optional) - format of the report to retrieve [json/html/all/dropped/package_files]. If none is specified
the JSON report will be returned. all returns all the result files as tar.bz2, dropped the dropped files as
tar.bz2, package_files files uploaded to host by analysis packages.
Status codes:
•200 - no error
•400 - invalid report format
•404 - report not found
3.3. Usage 83

Cuckoo Sandbox Book, Release 2.0.6
/tasks/screenshots
GET /tasks/screenshots/ (int: id) /(str: number)
Returns one or all screenshots associated with the specified task ID.
Example request.
wget http://localhost:8090/tasks/screenshots/1
Parameters:
•id (required) (int) - ID of the task to get the report for
•screenshot (optional) - numerical identifier of a single screenshot (e.g. 0001, 0002)
Status codes:
•404 - file or folder not found
/tasks/rereport
GET /tasks/rereport/ (int: id)
Re-run reporting for task associated with the specified task ID.
Example request.
curl -H "Authorization: Bearer S4MPL3" http://localhost:8090/tasks/rereport/1
Example response.
{
"success":true
}
Parameters:
•id (required) (int) - ID of the task to re-run report
Status codes:
•200 - no error
•404 - task not found
/tasks/reboot
GET /tasks/reboot/ (int: id) **
Add a reboot task to database from an existing analysis ID.
Example request.
curl -H "Authorization: Bearer S4MPL3" http://localhost:8090/tasks/reboot/1
Example response.
84 Chapter 3. Contents

Cuckoo Sandbox Book, Release 2.0.6
{
"task_id":1,
"reboot_id":3
}
Parameters:
•id (required) (int) - ID of the task
Status codes:
•200 - success
•404 - error creating reboot task
/memory/list
GET /memory/list/ (int: id)
Returns a list of memory dump files or one memory dump file associated with the specified task ID.
Example request.
wget http://localhost:8090/memory/list/1
Parameters:
•id (required) (int) - ID of the task to get the report for
Status codes:
•404 - file or folder not found
/memory/get
GET /memory/get/ (int: id) /(str: number)
Returns one memory dump file associated with the specified task ID.
Example request.
wget http://localhost:8090/memory/get/1/1908
Parameters:
•id (required) (int) - ID of the task to get the report for
•pid (required) - numerical identifier (pid) of a single memory dump file (e.g. 205, 1908)
Status codes:
•404 - file or folder not found
/files/view
GET /files/view/md5/ (str: md5)
GET /files/view/sha256/ (str: sha256)
GET /files/view/id/ (int: id)
3.3. Usage 85

Cuckoo Sandbox Book, Release 2.0.6
Returns details on the file matching either the specified MD5 hash, SHA256 hash or ID.
Example request.
curl -H "Authorization: Bearer S4MPL3" http://localhost:8090/files/view/id/1
Example response.
{
"sample": {
"sha1":"da39a3ee5e6b4b0d3255bfef95601890afd80709",
"file_type":"empty",
"file_size":0,
"crc32":"00000000",
"ssdeep":"3::",
"sha256":"e3b0c44298fc1c149afbf4c8996fb92427ae41e4649b934ca495991b7852b855",
"sha512":
˓→"cf83e1357eefb8bdf1542850d66d8007d620e4050b5715dc83f4a921d36ce9ce47d0d13c5d85f2b0ff8318d2877eec2f63b931bd47417a81a538327af927da3e
˓→",
"id":1,
"md5":"d41d8cd98f00b204e9800998ecf8427e"
}
}
Parameters:
•md5 (optional) - MD5 hash of the file to lookup
•sha256 (optional) - SHA256 hash of the file to lookup
•id (optional) (int) - ID of the file to lookup
Status codes:
•200 - no error
•400 - invalid lookup term
•404 - file not found
/files/get
GET /files/get/ (str: sha256)
Returns the binary content of the file matching the specified SHA256 hash.
Example request.
curl -H "Authorization: Bearer S4MPL3" http://localhost:8090/files/get/
˓→e3b0c44298fc1c149afbf4c8996fb92427ae41e4649b934ca495991b7852b855 > sample.exe
Status codes:
•200 - no error
•404 - file not found
/pcap/get
GET /pcap/get/ (int: task)
86 Chapter 3. Contents

Cuckoo Sandbox Book, Release 2.0.6
Returns the content of the PCAP associated with the given task.
Example request.
curl -H "Authorization: Bearer S4MPL3" http://localhost:8090/pcap/get/1 > dump.pcap
Status codes:
•200 - no error
•404 - file not found
/machines/list
GET /machines/list
Returns a list with details on the analysis machines available to Cuckoo.
Example request.
curl -H "Authorization: Bearer S4MPL3" http://localhost:8090/machines/list
Example response.
{
"machines": [
{
"status":null,
"locked":false,
"name":"cuckoo1",
"resultserver_ip":"192.168.56.1",
"ip":"192.168.56.101",
"tags": [
"32bit",
"acrobat_6",
],
"label":"cuckoo1",
"locked_changed_on":null,
"platform":"windows",
"snapshot":null,
"interface":null,
"status_changed_on":null,
"id":1,
"resultserver_port":"2042"
}
]
}
Status codes:
•200 - no error
/machines/view
GET /machines/view/ (str: name)
Returns details on the analysis machine associated with the given name.
Example request.
3.3. Usage 87

Cuckoo Sandbox Book, Release 2.0.6
curl -H "Authorization: Bearer S4MPL3" http://localhost:8090/machines/view/cuckoo1
Example response.
{
"machine": {
"status":null,
"locked":false,
"name":"cuckoo1",
"resultserver_ip":"192.168.56.1",
"ip":"192.168.56.101",
"tags": [
"32bit",
"acrobat_6",
],
"label":"cuckoo1",
"locked_changed_on":null,
"platform":"windows",
"snapshot":null,
"interface":null,
"status_changed_on":null,
"id":1,
"resultserver_port":"2042"
}
}
Status codes:
•200 - no error
•404 - machine not found
/cuckoo/status
GET /cuckoo/status/
Returns status of the cuckoo server. In version 1.3 the diskspace entry was added. The diskspace entry shows the
used, free, and total diskspace at the disk where the respective directories can be found. The diskspace entry allows
monitoring of a Cuckoo node through the Cuckoo API. Note that each directory is checked separately as one may
create a symlink for $CUCKOO/storage/analyses to a separate harddisk, but keep $CUCKOO/storage/binaries as-is.
(This feature is only available under Unix!)
In version 1.3 the cpuload entry was also added - the cpuload entry shows the CPU load for the past minute, the past
5 minutes, and the past 15 minutes, respectively. (This feature is only available under Unix!)
Diskspace directories:
•analyses - $CUCKOO/storage/analyses/
•binaries - $CUCKOO/storage/binaries/
•temporary -tmppath as specified in conf/cuckoo.conf
Example request.
curl -H "Authorization: Bearer S4MPL3" http://localhost:8090/cuckoo/status
Example response.
88 Chapter 3. Contents

Cuckoo Sandbox Book, Release 2.0.6
{
"tasks": {
"reported":165,
"running":2,
"total":167,
"completed":0,
"pending":0
},
"diskspace": {
"analyses": {
"total":491271233536,
"free":71403470848,
"used":419867762688
},
"binaries": {
"total":491271233536,
"free":71403470848,
"used":419867762688
},
"temporary": {
"total":491271233536,
"free":71403470848,
"used":419867762688
}
},
"version":"1.0",
"protocol_version":1,
"hostname":"Patient0",
"machines": {
"available":4,
"total":5
}
}
Status codes:
•200 - no error
•404 - machine not found
/vpn/status
GET /vpn/status
Returns VPN status.
Example request.
curl -H "Authorization: Bearer S4MPL3" http://localhost:8090/vpn/status
Status codes:
•200 - show status
•500 - not available
3.3. Usage 89

Cuckoo Sandbox Book, Release 2.0.6
/exit
GET /exit
Shuts down the server if in debug mode and using the werkzeug server.
Example request.
curl -H "Authorization: Bearer S4MPL3" http://localhost:8090/exit
Status codes:
•200 - success
•403 - this call can only be used in debug mode
•500 - error
3.3.6 Distributed Cuckoo
As mentioned in Submit an Analysis, Cuckoo provides a REST API for Distributed Cuckoo usage. Distributed Cuckoo
allows one to setup a single REST API point to which samples and URLs can be submitted which will then, in turn,
be submitted to one of the configured Cuckoo nodes.
A typical setup thus includes a machine on which Distributed Cuckoo is run and one or more machines running an
instance of the Cuckoo daemon and the Cuckoo REST API.
A few notes:
• Using Distributed Cuckoo only makes sense when running at least two cuckoo nodes.
• Distributed Cuckoo can be run on a machine that also runs a Cuckoo daemon and REST API, however, make
sure it has enough disk space if the intention is to submit a lot of samples.
Starting the Distributed REST API
The Distributed REST API has the following command line options:
$ cuckoo distributed server --help
Usage: cuckoo distributed server [OPTIONS]
Options:
-H, --host TEXT Host to bind the Distributed Cuckoo server on
-p, --port INTEGER Port to bind the Distributed Cuckoo server on
--uwsgi Dump uWSGI configuration
--nginx Dump nginx configuration
--help Show this message and exit.
As may be derived from the help output, starting Distributed Cuckoo may be as simple as running cuckoo
distributed server.
The various configuration options are described in the configuration file, but following we have more in-depth descrip-
tions as well. More advanced usage naturally includes deployment using uWSGI and nginx.
90 Chapter 3. Contents

Cuckoo Sandbox Book, Release 2.0.6
Distributed Cuckoo Configuration
Report Formats
The reporting formats denote which reports you’d like to retrieve later on. Note that all task-related data will be
removed from the Cuckoo nodes once the related reports have been fetched so that the machines are not running out of
disk space. This does, however, force you to specify all the report formats that you’re interested in, because otherwise
that information will be lost.
Reporting formats include, but are not limited to and may also include your own reporting formats, report.json,
report.html, etc.
Samples Directory
The samples directory denotes the directory where the submitted samples will be stored temporarily, until the associ-
ated task has been deleted.
Reports Directory
Much like the Samples Directory the Reports Directory defines the directory where reports will be stored until
they’re fetched and deleted from the Distributed REST API.
RESTful resources
Following are all RESTful resources. Also make sure to check out the Quick usage section which documents the most
commonly used commands.
Resource Description
GET GET /api/node Get a list of all enabled Cuckoo nodes.
POST POST /api/node Register a new Cuckoo node.
GET GET /api/node/<name> Get basic information about a node.
PUT PUT /api/node/<name> Update basic information of a node.
POST POST /api/node/<name>/refresh Refresh a Cuckoo nodes metadata.
DELETE DELETE /api/node/<name> Disable (not completely remove!) a node.
GET GET /api/task Get a list of all (or a part) of the tasks in the database.
POST POST /api/task Create a new analysis task.
GET GET /api/task/<id> Get basic information about a task.
DELETE DELETE /api/task/<id> Delete all associated information of a task.
GET GET /api/report/<id>/<format> Fetch an analysis report.
GET /api/node
Returns all enabled nodes. For each node the information includes the associated name, its API URL, and machines:
$ curl http://localhost:9003/api/node
{
"success": true,
"nodes": {
(continues on next page)
3.3. Usage 91

Cuckoo Sandbox Book, Release 2.0.6
(continued from previous page)
"localhost": {
"machines": [
{
"name": "cuckoo1",
"platform": "windows",
"tags": []
}
],
"name": "localhost",
"url": "http://localhost:8090/"
}
}
}
POST /api/node
Register a new Cuckoo node by providing the name and the URL:
$ curl http://localhost:9003/api/node -F name=localhost \
-F url=http://localhost:8090/
{
"success": true
}
GET /api/node/<name>
Get basic information about a particular Cuckoo node:
$ curl http://localhost:9003/api/node/localhost
{
"success": true,
"nodes": [
{
"name": "localhost",
"url": "http://localhost:8090/"
"machines": [
{
"name": "cuckoo1",
"platform": "windows",
"tags": []
}
]
}
]
}
PUT /api/node/<name>
Update basic information of a Cuckoo node:
92 Chapter 3. Contents

Cuckoo Sandbox Book, Release 2.0.6
$ curl -XPUT http://localhost:9003/api/node/localhost -F name=newhost \
-F url=http://1.2.3.4:8090/
{
"success": true
}
POST /api/node/<name>/refresh
Refreshes metadata associated by a Cuckoo node, in particular, its machines:
$ curl -XPOST http://localhost:9003/api/node/localhost/refresh
{
"success": true,
"machines": [
{
"name": "cuckoo1",
"platform": "windows",
"tags": []
},
{
"name": "cuckoo2",
"platform": "windows",
"tags": []
}
]
}
DELETE /api/node/<name>
Disable a Cuckoo node, therefore not having it process any new tasks, but keeping its history in the Distributed Cuckoo
database:
$ curl -XDELETE http://localhost:9003/api/node/localhost
{
"success": true
}
GET /api/task
Get a list of all tasks in the database. In order to limit the amount of results, there’s an offset,limit,finished,
and owner field available:
$ curl http://localhost:9003/api/task?limit=1
{
"success": true,
"tasks": {
"1": {
"clock": null,
"custom": null,
"owner": "",
"enforce_timeout": null,
"machine": null,
(continues on next page)
3.3. Usage 93

Cuckoo Sandbox Book, Release 2.0.6
(continued from previous page)
"memory": null,
"options": null,
"package": null,
"path": "/tmp/dist-samples/tmphal8mS",
"platform": "windows",
"priority": 1,
"tags": null,
"task_id": 1,
"timeout": null
}
}
}
POST /api/task
Submit a new file or URL to be analyzed:
$ curl http://localhost:9003/api/task -F file=@sample.exe
{
"success": true,
"task_id": 2
}
GET /api/task/<id>
Get basic information about a particular task:
$ curl http://localhost:9003/api/task/2
{
"success": true,
"tasks": {
"2": {
"id": 2,
"clock": null,
"custom": null,
"owner": "",
"enforce_timeout": null,
"machine": null,
"memory": null,
"options": null,
"package": null,
"path": "/tmp/tmpPwUeXm",
"platform": "windows",
"priority": 1,
"tags": null,
"timeout": null,
"task_id": 1,
"node_id": 2,
"finished": false
}
}
}
94 Chapter 3. Contents

Cuckoo Sandbox Book, Release 2.0.6
DELETE /api/task/<id>
Delete all associated data of a task, namely the binary, the PCAP, and the reports:
$ curl -XDELETE http://localhost:9003/api/task/2
{
"success": true
}
GET /api/report/<id>/<format>
Fetch a report for the given task in the specified format:
# Defaults to the JSON report.
$ curl http://localhost:9003/api/report/2
...
Proposed setup
The following description depicts a Distributed Cuckoo setup with two Cuckoo machines, cuckoo0 and cuckoo1. In
this setup the first machine, cuckoo0, also hosts the Distributed Cuckoo REST API.
Configuration settings
Our setup will require a couple of updates with regards to the configuration files.
conf/cuckoo.conf
Update process_results to off as we will be running our own results processing script (for performance rea-
sons).
Update tmppath to something that holds enough storage to store a few hundred binaries. On some servers or setups
/tmp may have a limited amount of space and thus this wouldn’t suffice.
Update connection to use something not sqlite3. Preferably PostgreSQL or MySQL. SQLite3 doesn’t support
multi-threaded applications and as such is not a good choice for systems such as Cuckoo (as-is).
You should create a database specifically for the distributed cuckoo setup. Do not be tempted to use any existing
cuckoo database in order to avoid update problems with the DB scripts. In the configuration use the new database
name. The remaining configuration such as usernames, servers, etc can be the same as for your cuckoo install. Don’t
forget to use one DB per node and one for the machine running Distributed Cuckoo (the “management machine” or
“controller”).
conf/processing.conf
You may want to disable some processing modules, such as virustotal.
3.3. Usage 95

Cuckoo Sandbox Book, Release 2.0.6
conf/reporting.conf
Depending on which report(s) are required for integration with your system it might make sense to only make those
report(s) that you’re going to use. Thus disabling the other ones.
conf/virtualbox.conf
Assuming VirtualBox is the Virtual Machine manager of choice, the mode will have to be changed to headless
or you will have some restless nights (this is the default nowadays).
Setup Cuckoo
On each machine you will have to run the Cuckoo Daemon, the Cuckoo API, and one or more Cuckoo Process
instances. For more information on setting that up, please refer to Starting Cuckoo.
Setup Distributed Cuckoo
On the Distributed Cuckoo machine you’ll have to setup the Distributed Cuckoo REST API and the Distributed Cuckoo
Worker.
As stated earlier, Distributed Cuckoo REST API may be started by running cuckoo distributed server or
by deploying it properly with uWSGI and nginx.
The Distributed Cuckoo Worker may be started by running supervisorctl start distributed in the CWD
(make sure to start supervisord first as per Cuckoo in the background). This will automatically start the Worker
with the correct configuration and arguments, etc.
Register Cuckoo nodes
As outlined in Quick usage the Cuckoo nodes have to be registered with the Distributed Cuckoo REST API:
$ curl http://localhost:9003/api/node -F name=cuckoo0 -F url=http://localhost:8090/
$ curl http://localhost:9003/api/node -F name=cuckoo1 -F url=http://1.2.3.4:8090/
Having registered the Cuckoo nodes all that’s left to do now is to submit tasks and fetch reports once finished.
Documentation on these commands can be found in the Quick usage section. In case your Cuckoo node is not on
localhost, replace localhost with the IP address of the node where the Cuckoo REST API is running.
If you want to experiment with load balancing between the nodes you may want to try using a lower value for the
threshold parameter in the $CWD/distributed/settings.py file as the default value is 500 (meaning
tasks are assigned to Cuckoo nodes in batches of 500).
Quick usage
For practical usage the following few commands will be most interesting.
Register a Cuckoo node, in this case a Cuckoo API running on the same machine in this case:
$ curl http://localhost:9003/api/node -F name=localhost -F ip=127.0.0.1
Disable a Cuckoo node:
96 Chapter 3. Contents

Cuckoo Sandbox Book, Release 2.0.6
$ curl -XDELETE http://localhost:9003/api/node/localhost
Submit a new analysis task without any special requirements (e.g., using Cuckoo tags, a particular machine, etc):
$ curl http://localhost:9003/api/task -F file=@/path/to/sample.exe
Get the report of a task has been finished (if it hasn’t finished you’ll get an error with code 420). Following example
will default to the JSON report:
$ curl http://localhost:9003/api/report/1
If a Cuckoo node gets stuck and needs a reset, the following steps could be performed to restart it cleanly. Note that
this requires usage of our SaltStack configuration and some manual SQL commands (and preferably the Distributed
Cuckoo Worker is temporary disabled, i.e., supervisorctl stop distributed):
$ psql -c "UPDATE task SET status = 'pending' WHERE status = 'processing' AND node_id
˓→= 123"
$ salt cuckoo1 state.apply cuckoo.clean
$ salt cuckoo1 state.apply cuckoo.start
If the entire Cuckoo cluster was somehow locked up, i.e., all tasks have been ‘assigned’, are ‘processing’, or have the
‘finished’ status while none of the Cuckoo nodes are currently working on said analyses (e.g., due to numerous resets
etc), then the following steps may be used to reset the entire state:
$ supervisorctl -c ~/.cuckoo/supervisord.conf stop distributed
$ salt '*' state.apply cuckoo.stop
$ salt '*' state.apply cuckoo.clean
$ psql -c "UPDATE task SET status = 'pending', node_id = null WHERE status IN (
˓→'assigned', 'processing', 'finished')"
$ salt '*' state.apply cuckoo.start
$ supervisorctl -c ~/.cuckoo/supervisord.conf start distributed
If a Cuckoo node has a number of tasks that failed to process, therefore locking up the Cuckoo node altogether, then
upgrading the Cuckoo instances with a bugfixed version and re-processing all analyses may do the trick:
$ salt cuckoo1 state.apply cuckoo.update # Upgrade Cuckoo.
# To make sure there are failed analyses in the first place.
$ salt cuckoo1 cmd.run "sudo -u cuckoo psql -c \"SELECT *FROM tasks WHERE status =
˓→'failed_processing'\"
# Reset each analyses to be re-processed.
$ salt cuckoo1 cmd.run "sudo -u cuckoo psql -c \"UPDATE tasks SET status = 'completed
˓→', processing = null WHERE status = 'failed_processing'\""
In order to upgrade the Distributed Cuckoo master, one may want to perform the following steps:
$ /etc/init.d/uwsgi stop
$ supervisorctl -c ~/.cuckoo/supervisord.conf stop distributed
$ pip uninstall -y cuckoo
$ pip install cuckoo==2.0.0 # Specify your version here.
$ pip install Cuckoo-2.0.0.tar.gz # Or use a locally archived build.
$ cuckoo distributed migrate
$ supervisorctl -c ~/.cuckoo/supervisord.conf start distributed
$ /etc/init.d/uwsgi start
$ /etc/init.d/nginx restart
In order to test your entire Cuckoo cluster, i.e., every machine on every Cuckoo node, one may take the stuff/
distributed/cluster-test.py script as an example. As-is it allows one to check for an active internet
3.3. Usage 97

Cuckoo Sandbox Book, Release 2.0.6
connection in each and every configured machine in the cluster. This script may be used to identify machines that are
incorrect or have been corrupted in one way or another. Example usage may look as follows:
# Assuming Distributed Cuckoo listens on localhost and that you want to
# run the 'internet' script (see also the source of cluster-test.py).
$ python stuff/distributed/cluster-test.py localhost -s internet
3.3.7 Utilities
Cuckoo comes with a set of pre-built utilities to automate several common tasks. Before these utilities could be found
in the utils/ directory but since then we have moved to Cuckoo Apps.
Cuckoo Apps
ACuckoo App is essentially just a Cuckoo sub-command. There exist a couple of Cuckoo Apps, each with their
own functionality. It is important to note that each Cuckoo App can be invoked in the same way. Following are some
examples:
$ cuckoo submit --help
$ cuckoo api --help
$ cuckoo clean --help
In these examples we provided the --help parameter which shows the functionality and all available parameters for
the particular Cuckoo App.
Submission Utility
Submits samples to analysis. This tool is described in Submit an Analysis.
Web Utility
Cuckoo’s web interface. This tool is described in Web interface.
Processing Utility
Changed in version 2.0.0: We used to have longstanding issues with ./utils/process.py randomly freezing up
and ./utils/process2.py only being able to handle PostgreSQL-based databases. These two commands have
now been merged into one Cuckoo App and no longer show signs of said issues or limitations.
For bigger Cuckoo setups it is recommended to separate the results processing from the Cuckoo analyses due to
performance issues (with multiple threads & the Python GIL). Using cuckoo process it is also possible to re-
generate Cuckoo reports, this is mostly used while developing and debugging Cuckoo Processing modules, Cuckoo
Signatures, and Cuckoo Reporting modules.
In order to do results processing in one or more separate process(es) one has to disable the process_results
configuration item in $CWD/conf/cuckoo.conf by setting the value to off. Then a Cuckoo Processing instance
has to be started, this can be done as follows:
$ cuckoo process instance1
If one Cuckoo Processing instance is not enough to handle all the incoming analyses, simply create a second, third,
and possibly more instances:
98 Chapter 3. Contents

Cuckoo Sandbox Book, Release 2.0.6
$ cuckoo process instance2
In order to re-generate a Cuckoo report of an analysis task, use the -r switch:
$ cuckoo process -r 1
It is also possible to re-generate multiple or a range of Cuckoo reports at once. The following will reprocess tasks 1,
2,5,6,7,8,9,10:
$ cuckoo process -r 1,2,5-10
For more information see also the help on this Cuckoo App:
$ cuckoo process --help
Usage: cuckoo process [OPTIONS] [INSTANCE]
Process raw task data into reports.
Options:
-r, --report TEXT Re-generate one or more reports
-m, --maxcount INTEGER Maximum number of analyses to process
--help Show this message and exit.
In automated mode an instance name is required (e.g., instance1) as seen in the examples earlier above!
Community Download Utility
This Cuckoo App downloads Cuckoo Signatures, the latest monitoring binaries, and other goodies from the Cuckoo
Community Repository and installs them in your CWD.
To get all the latest and greatest from the Cuckoo Community simply execute as follows and wait until it finishes - it
currently doesn’t have any progress indication:
$ cuckoo community
For more usage see as follows:
$ cuckoo community --help
Usage: cuckoo community [OPTIONS]
Utility to fetch supplies from the Cuckoo Community.
Options:
-f, --force Overwrite existing files
-b, --branch TEXT Specify a different community branch rather than
master
--file, --filepath PATH Specify a local copy of a community .tar.gz file
--help Show this message and exit.
Database migration utility
Changed in version 2.0.0: This used to be a special process, but has since been integrated properly as a Cuckoo App.
This utility helps migrating your data between Cuckoo releases. It’s developed on top of the Alembic framework
and it should provide data migration for both SQL database and Mongo database. This tool is already described in
Upgrading from a previous release.
3.3. Usage 99

Cuckoo Sandbox Book, Release 2.0.6
Stats utility
Deprecated since version 2.0-rc2: This utility will not be ported to a Cuckoo App as this information can also be
retrieved through both the Cuckoo API as well as the Cuckoo Web Interface.
Machine utility
Changed in version 2.0.0: This used to be a standalone and hacky script directly modifying the Cuckoo configuration.
It’s now much better integrated and will be able to somewhat properly interact with Cuckoo.
The machine Cuckoo App is designed to help you automatize the configuration of virtual machines in Cuckoo. It
takes a list of machine details as arguments and write them in the specified configuration file of the machinery module
enabled in cuckoo.conf. Following are the available options:
$ cuckoo machine --help
Usage: cuckoo machine [OPTIONS] VMNAME [IP]
Options:
--debug Enable verbose logging
--add Add a Virtual Machine
--delete Delete a Virtual Machine
--platform TEXT Guest Operating System
--options TEXT Machine options
--tags TEXT Tags for this Virtual Machine
--interface TEXT Sniffer interface for this Virtual Machine
--snapshot TEXT Specific Virtual Machine Snapshot to use
--resultserver TEXT IP:Port of the Result Server
--help Show this message and exit.
As an example, a machine may be added to Cuckoo’s configuration as follows:
$ cuckoo machine --add cuckoo1 192.168.56.101 --platform windows --snapshot vmcloak
Distributed scripts
This tool is described in Distributed Cuckoo.
Mac OS X Bootstrap scripts
Deprecated since version 2.0.0: These files will be moved elsewhere in an upcoming update and so should any docu-
mentation that references these scripts.
A couple of bootstrap scripts used for Mac OS X analysis are located in utils/darwin folder, they are used to bootstrap
the guest and host system for Mac OS X malware analysis. Some settings are defined as constants inside them, so it is
suggested to have a look at them and configure them for your needs.
SMTP Sinkhole
Deprecated since version 2.0.0: This script has been removed since this functionality should be implemented properly
using a Postfix setup.
100 Chapter 3. Contents

Cuckoo Sandbox Book, Release 2.0.6
Setup script
Deprecated since version 2.0.0: This script has been replaced by a similar but much more powerful SaltStack state.
3.3.8 Cuckoo Rooter
The Cuckoo Rooter is a new concept, providing root access for various commands to Cuckoo (which itself
generally speaking runs as non-root). This command is currently only available for Ubuntu and Debian-like systems.
In particular, the rooter helps Cuckoo out with running network-related commands in order to provide per-analysis
routing options. For more information on that, please refer to the Per-Analysis Network Routing document. Cuckoo
and the rooter communicate through a UNIX socket for which the rooter makes sure that Cuckoo can reach it.
Its usage is as follows:
$ cuckoo rooter --help
Usage: cuckoo rooter [OPTIONS] [SOCKET]
Options:
-g, --group TEXT Unix socket group
--service PATH Path to service(8) for invoking OpenVPN
--iptables PATH Path to iptables(8)
--ip PATH Path to ip(8)
--sudo Request superuser privileges
--help Show this message and exit.
By default the rooter will default to chown’ing the cuckoo user as user and group for the UNIX socket, as
recommended when Installing Cuckoo. If you’re running Cuckoo under a user other than cuckoo, you will have to
specify this to the rooter as follows:
$ sudo cuckoo rooter -g <user>
The other options are fairly straightforward - you can specify the paths to specific Linux commands. By default one
shouldn’t have to do this though, as the rooter takes the default paths for the various utilities as per a default setup.
Virtualenv
Due to the fact that the rooter must be run as root user, there are some slight complications when using a
virtualenv to run Cuckoo. More specifically, when running sudo cuckoo rooter, the $VIRTUAL_ENV en-
vironment variable will not be passed along, due to which Python will not be executed from the same virtualenv
as it would have been normally.
To resolve this one simply has to execute the cuckoo binary from the virtualenv session directly. E.g., if your
virtualenv is located at ~/venv, then running the rooter command could be done as follows:
$ sudo ~/venv/bin/cuckoo rooter
Alternatively one may use the --sudo flag which will call sudo on the correct cuckoo binary with all the provided
flags. In turn the user will have to enter his or her password and, assuming all is fine, the Cuckoo Rooter will be started
properly, e.g.:
(venv)$ cuckoo rooter --sudo
3.3. Usage 101

Cuckoo Sandbox Book, Release 2.0.6
Cuckoo Rooter Usage
Using the Cuckoo Rooter is actually pretty easy. If you know how to start it, you’re basically good to go. Even
though Cuckoo talks with the Cuckoo Rooter for each analysis with a routing option other than None Routing, the
Cuckoo Rooter does not keep any state or attach to any Cuckoo instance in particular.
It is therefore that once the Cuckoo Rooter has been started you may leave it be - the Cuckoo Rooter will take care of
itself from that point onwards, no matter how often you restart your Cuckoo instance.
3.3.9 Cuckoo Feedback
New in version 2.0.0.
The Cuckoo Feedback form allows users to provide instant feedback to the Cuckoo Core Developer team. By
doing so, our development team will be able to more quickly react upon errors, partially incorrect analysis results,
errors occurred during an analysis or in the web interface, and anything else that our users think requires some extra
attention. All in all, this optional feature gives those users that are interested in a second opinion the ability to do so in
a convenient way for both the user as well as the team behind Cuckoo Sandbox.
Note: As a user you are able to ping back to us through the Cuckoo Feedback from embedded in most pages of the
web interface (e.g., an analysis page or a 404 page not found / 500 internal error page).
Following a screenshot of a part of the new (as of Cuckoo 2.0.0) analysis results page with the side bar locked in (i.e.,
permanently open).
102 Chapter 3. Contents
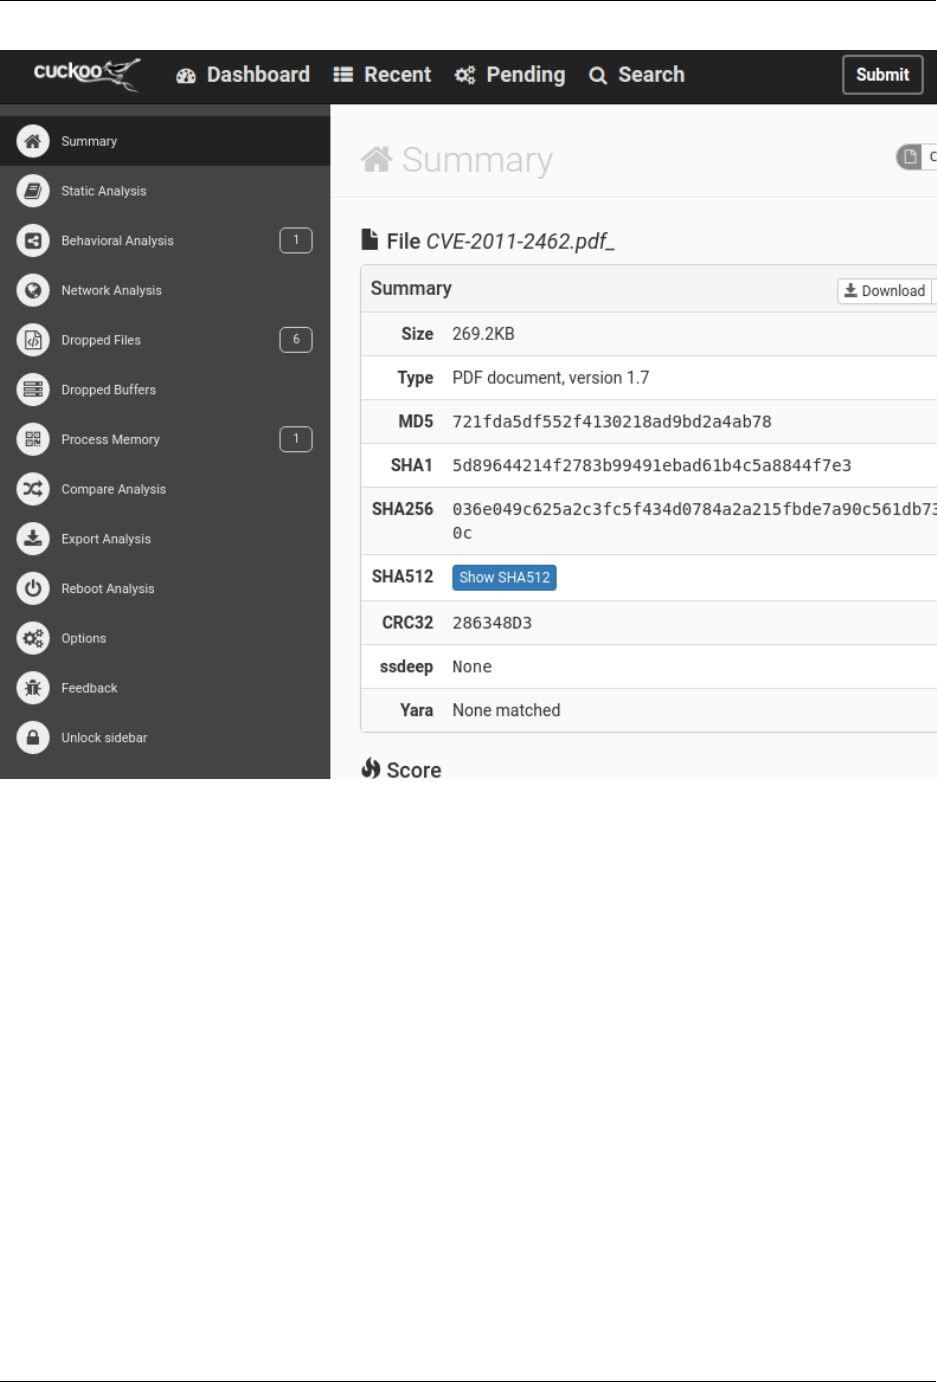
Cuckoo Sandbox Book, Release 2.0.6
At the bottom of the side bar you’ll see the Feedback button which will pop up the following feedback form.
Naturally filling out all of the fields in this form will allow you to send us feedback (in a secure manner).
It should be noted that, may you decide to provide feedback on a regular, you can also fill out your name, company,
and email address (where you’ll receive any answers) in the $CWD/conf/cuckoo.conf configuration file so those
will be auto-filled for you upon opening the feedback form.
3.3. Usage 103
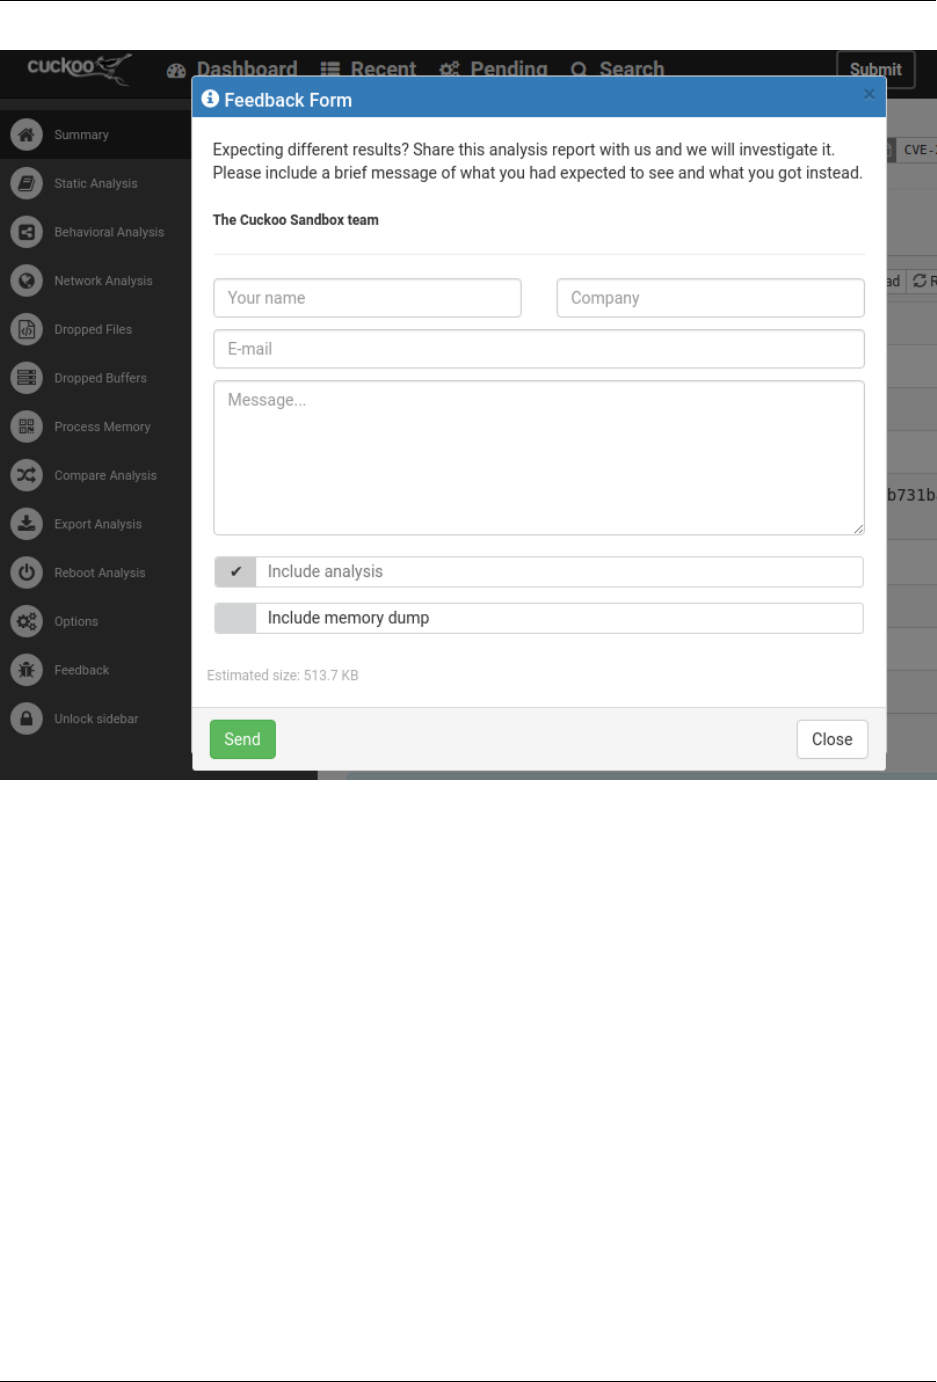
Cuckoo Sandbox Book, Release 2.0.6
3.3.10 Analysis Packages
The analysis packages are a core component of Cuckoo Sandbox. They consist in structured Python classes which,
when executed in the guest machines, describe how Cuckoo’s analyzer component should conduct the analysis.
Cuckoo provides some default analysis packages that you can use, but you are able to create your own or modify the
existing ones. You can find them at analyzer/windows/modules/packages/.
As described in Submit an Analysis, you can specify some options to the analysis packages in the form of
key1=value1,key2=value2. The existing analysis packages already include some default options that can be
enabled.
Following is a list of the options that work for all analysis packages unless explicitly stated otherwise:
•free [yes/no]: if enabled, no behavioral logs will be produced and the malware will be executed freely.
•procmemdump [yes/no]: if enabled, take memory dumps of all actively monitored processes.
•human 0: if disabled, human-like interaction (i.e., mouse movements) will not be enabled
Following is the list of existing packages in alphabetical order:
•applet: used to analyze Java applets.
Options:
104 Chapter 3. Contents

Cuckoo Sandbox Book, Release 2.0.6
–class: specify the name of the class to be executed. This option is mandatory for a correct
execution.
•bin: used to analyze generic binary data, such as shellcodes.
•cpl: used to analyze Control Panel Applets.
•dll: used to run and analyze Dynamically Linked Libraries.
Options:
–function: specify the function to be executed. If none is specified, Cuckoo will try to run
DllMain.
–arguments: specify arguments to pass to the DLL through commandline.
–loader: specify a process name to use to fake the DLL launcher name instead of rundll32.exe
(this is used to fool possible anti-sandboxing tricks of certain malware)
•doc: used to run and analyze Microsoft Word documents.
•exe: default analysis package used to analyze generic Windows executables.
Options:
–arguments: specify any command line argument to pass to the initial process of the submitted
malware.
•generic: used to run and analyze generic samples via cmd.exe.
•ie: used to analyze Internet Explorer’s behavior when opening the given URL or HTML file.
•jar: used to analyze Java JAR containers.
Options:
–class: specify the path of the class to be executed. If none is specified, Cuckoo will try to
execute the main function specified in the Jar’s MANIFEST file.
•js: used to run and analyze Javascript files (e.g., those found in attachments of emails).
•hta: used to run and analyze HTML Application files.
•msi: used to run and analyze MSI windows installer.
•pdf: used to run and analyze PDF documents.
•ppt: used to run and analyze Microsoft PowerPoint documents.
•ps1: used to run and analyze PowerShell scripts.
•python: used to run and analyze Python scripts.
•vbs: used to run and analyze VBScript files.
•wsf: used to run and analyze Windows Script Host files.
•xls: used to run and analyze Microsoft Excel documents.
•zip: used to run and analyze Zip archives.
Options:
–file: specify the name of the file contained in the archive to execute. If none is specified,
Cuckoo will try to execute sample.exe.
–arguments: specify any command line argument to pass to the initial process of the submitted
malware.
3.3. Usage 105

Cuckoo Sandbox Book, Release 2.0.6
–password: specify the password of the archive. If none is specified, Cuckoo will try to extract
the archive without password or use the password “infected”.
You can find more details on how to start creating new analysis packages in the Analysis Packages customization
chapter.
As you already know, you can select which analysis package to use by specifying its name at submission time (see
Submit an Analysis) as follows:
$ cuckoo submit --package <package name> /path/to/malware
If none is specified, Cuckoo will try to detect the file type and select the correct analysis package accordingly. If the
file type is not supported by default the analysis will be aborted, therefore we encourage to specify the package name
whenever possible.
For example, to launch a malware and specify some options you can do:
$ cuckoo submit --package dll --options function=FunctionName,loader=explorer.exe /
˓→path/to/malware.dll
3.3.11 Analysis Results
Once an analysis is completed, several files are stored in a dedicated directory. All the analyses are stored under the
$CWD/storage/analyses/ inside a subdirectory named after the incremental numerical ID that represents the
analysis task in the database.
Following is an example of an analysis directory structure:
.
|-- analysis.log
|-- binary
|-- dump.pcap
|-- memory.dmp
|-- files
| |-- 1234567890_dropped.exe
|-- logs
| |-- 1232.bson
| |-- 1540.bson
| `-- 1118.bson
|-- reports
| |-- report.html
| |-- report.json
`-- shots
|-- 0001.jpg
|-- 0002.jpg
|-- 0003.jpg
`-- 0004.jpg
analysis.log
This is a log file generated by the analyzer that contains a trace of the analysis execution inside the guest environment.
It will report the creation of processes, files and eventual errors occurred during the execution.
106 Chapter 3. Contents

Cuckoo Sandbox Book, Release 2.0.6
dump.pcap
This is the network dump generated by tcpdump or any other corresponding network sniffer.
dump_sorted.pcap
This is a sorted version of dump.pcap in the sense that it allows the Web Interface to quickly lookup TCP stream.
memory.dmp
In case you enabled it, this file contains the full memory dump of the analysis machine.
files/
This directory contains all the files the malware operated on and that Cuckoo was able to dump.
files.json
This file contains a JSON-encoded entry for each dropped file available (i.e., all files in files/,shots/, etc). It
contains meta information, where available, about all processes that touched the file, its original file path in the Guest,
etc.
logs/
This directory contains all the raw logs generated by Cuckoo’s process monitoring.
reports/
This directory contains all the reports generated by Cuckoo as explained in the Configuration chapter.
shots/
This directory contains all the screenshots of the guest’s desktop taken during the malware execution.
tlsmaster.txt
This file contains the TLS Master Secrets that were captured during the analysis. TLS Master Secrets can be used to
decrypt SSL/TLS traffic and are thus used to decrypt HTTPS streams.
3.3.12 Clean all Tasks and Samples
Changed in version 2.0.0: Turned into a proper Cuckoo App rather than a standalone script.
Since Cuckoo 1.2 a built-in clean feature has been featured, it drops all associated information of the tasks and samples
in the database, on the harddisk, from MongoDB, and from ElasticSearch. If you submit a task after running clean
you’ll start over with Task #1 again.
To clean your setup, run:
3.3. Usage 107

Cuckoo Sandbox Book, Release 2.0.6
$ cuckoo clean
To sum up, this command does the following:
• Delete analysis results.
• Delete submitted binaries.
• Delete all associated information of the tasks and samples in the configured database.
• Delete all data in the configured MongoDB database (if configured and enabled in $CWD/conf/reporting.
conf).
• Delete all data in the configured ElasticSearch database (if configured and enabled in $CWD/conf/
reporting.conf).
Warning: If you use this command you will permanently delete all data stored by Cuckoo in all available storages:
the file system, the SQL database, the MongoDB database, and the ElasticSearch database. Use it only if you are
sure you would clean up all the data.
3.4 Customization
This chapter explains how to customize Cuckoo. Cuckoo is written in a modular architecture built to be as customizable
as it can, to fit the needs of all users.
3.4.1 Auxiliary Modules
Auxiliary modules define some procedures that need to be executed in parallel to every single analysis process. All
auxiliary modules should be placed under the cuckoo/cuckoo/auxiliary/ directory, that way the module will
fall under the cuckoo.auxiliary module.
The skeleton of a module would look something like this:
1from cuckoo.common.abstracts import Auxiliary
2
3class MyAuxiliary(Auxiliary):
4
5def start(self):
6# Do something.
7
8def stop(self):
9# Stop the execution.
The function start() will be executed before starting the analysis machine and effectively executing the submitted
malicious file, while the stop() function will be launched at the very end of the analysis process, before launching
the processing and reporting procedures.
For example, an auxiliary module provided by default in Cuckoo is called sniffer.py and takes care of executing
tcpdump in order to dump the generated network traffic.
108 Chapter 3. Contents

Cuckoo Sandbox Book, Release 2.0.6
3.4.2 Machinery Modules
Machinery modules define how Cuckoo should interact with your virtualization software (or potentially even with
physical disk imaging solutions). Since we decided to not enforce any particular vendor, from release 0.4 you are able
to use your preferred solution and, in case it’s not supported by default, write a custom Python module that defines
how to make Cuckoo use it.
Every machinery module should be located inside the cuckoo/cuckoo/machinery/ directory so that it will fall
under the cuckoo.machinery module.
A basic machinery module would look like this:
1from cuckoo.common.abstracts import Machinery
2from cuckoo.common.exceptions import CuckooMachineError
3
4class MyMachinery(Machinery):
5def start(self, label):
6try:
7revert(label)
8start(label)
9except SomethingBadHappens:
10 raise CuckooMachineError("oops!")
11
12 def stop(self, label):
13 try:
14 stop(label)
15 except SomethingBadHappens:
16 raise CuckooMachineError("oops!")
The only requirements for Cuckoo are that:
• The class inherits from Machinery.
• You have a start() and stop() functions.
• You raise CuckooMachineError when something fails.
As you understand, the machinery module is a core part of a Cuckoo setup, therefore make sure to spend enough time
debugging your code and make it solid and resistant to any unexpected error.
Configuration
Every machinery module should come with a dedicated configuration file located in $CWD/conf/<machinery
module name>.conf (which translates to cuckoo/data/conf/<machinery>conf in the Git repository).
For example for cuckoo/cuckoo/machinery/kvm.py we have a $CWD/conf/kvm.conf.
The configuration file should follow the default structure:
[kvm]
# Specify a comma-separated list of available machines to be used. For each
# specified ID you have to define a dedicated section containing the details
# on the respective machine. (E.g. cuckoo1,cuckoo2,cuckoo3)
machines =cuckoo1
[cuckoo1]
# Specify the label name of the current machine as specified in your
# libvirt configuration.
label =cuckoo1
(continues on next page)
3.4. Customization 109

Cuckoo Sandbox Book, Release 2.0.6
(continued from previous page)
# Specify the operating system platform used by current machine
# [windows/darwin/linux].
platform =windows
# Specify the IP address of the current machine. Make sure that the IP address
# is valid and that the host machine is able to reach it. If not, the analysis
# will fail.
ip =192.168.122.105
A main section called [<name of the module>] with a machines field containing a comma-separated list of
machines IDs.
For each machine you should specify a label, a platform and its ip.
These fields are required by Cuckoo in order to use the already embedded initialize() function that generates
the list of available machines.
If you plan to change the configuration structure you should override the initialize() function (inside your own
module, no need to modify Cuckoo’s core code). You can find its original code in the Machinery abstract inside
cuckoo/common/abstracts.py.
LibVirt
Starting with Cuckoo 0.5 developing new machinery modules based on LibVirt is easy. Inside cuckoo/common/
abstracts.py you can find LibVirtMachinery that already provides all the functionality for a LibVirt module.
Just inherit this base class and specify your connection string, as in the example below:
1from cuckoo.common.abstracts import LibVirtMachinery
2
3class MyMachinery(LibVirtMachinery):
4# Set connection string.
5dsn ="my:///connection"
This works for all the virtualization technologies supported by LibVirt. Just remember to check if your LibVirt package
(if you are using one, for example from your Linux distribution) is compiled with the support for the technology you
need.
You can check it with the following command:
$ virsh -V
Virsh command line tool of libvirt 0.9.13
See web site at http://libvirt.org/
Compiled with support for:
Hypervisors: QEmu/KVM LXC UML Xen OpenVZ VMWare Test
Networking: Remote Daemon Network Bridging Interface Nwfilter VirtualPort
Storage: Dir Disk Filesystem SCSI Multipath iSCSI LVM
Miscellaneous: Nodedev AppArmor Secrets Debug Readline Modular
If you don’t find your virtualization technology in the list of Hypervisors, you will need to recompile LibVirt with
the specific support for the missing one.
110 Chapter 3. Contents

Cuckoo Sandbox Book, Release 2.0.6
3.4.3 Analysis Packages
As explained in Analysis Packages, analysis packages are structured Python classes that describe how Cuckoo’s ana-
lyzer component should conduct the analysis procedure for a given file inside the guest environment.
As you already know, you can create your own packages and add them along with the default ones. Designing new
packages is very easy and requires just a minimal understanding of programming and of the Python language.
Getting started
As an example we’ll take a look at the default package for analyzing generic Windows executables, lo-
cated at $CWD/analyzer/windows/packages/exe.py (which translates to cuckoo/data/analyzer/
windows/packages/exe.py in the Git repository):
1from lib.common.abstracts import Package
2
3class Exe(Package):
4"""EXE analysis package."""
5
6def start(self, path):
7args =self.options.get("arguments")
8return self.execute(path, args)
It seems really easy, thanks to all method inherited by Package object. Let’s have a look as some of the main methods
an analysis package inherits from Package object:
1from lib.api.process import Process
2from lib.common.exceptions import CuckooPackageError
3
4class Package(object):
5def start(self):
6raise NotImplementedError
7
8def check(self):
9return True
10
11 def execute(self, path, args):
12 dll =self.options.get("dll")
13 free =self.options.get("free")
14 suspended =True
15 if free:
16 suspended =False
17
18 p=Process()
19 if not p.execute(path=path, args=args, suspended=suspended):
20 raise CuckooPackageError(
21 "Unable to execute the initial process, analysis aborted."
22 )
23
24 if not free and suspended:
25 p.inject(dll)
26 p.resume()
27 p.close()
28 return p.pid
29
30 def finish(self):
31 if self.options.get("procmemdump"):
(continues on next page)
3.4. Customization 111

Cuckoo Sandbox Book, Release 2.0.6
(continued from previous page)
32 for pid in self.pids:
33 p=Process(pid=pid)
34 p.dump_memory()
35 return True
Let’s walk through the code:
• Line 1: import the Process API class, which is used to create and manipulate Windows processes.
• Line 2: import the CuckooPackageError exception, which is used to notify issues with the execution
of the package to the analyzer.
• Line 4: define the main class, inheriting object.
• Line 5: define the start() function, which takes as argument the path to the file to execute. It should be
implemented by each analysis package.
• Line 8: define the check() function.
• Line 13: acquire the free option, which is used to define whether the process should be monitored or not.
• Line 18: initialize a Process instance.
• Line 19: try to execute the malware, if it fails it aborts the execution and notify the analyzer.
• Line 24: check if the process should be monitored.
• Line 25: inject the process with our DLL.
• Line 26: resume the process from the suspended state.
• Line 28: return the PID of the newly created process to the analyzer.
• Line 30: define the finish() function.
• Line 31: check if the procmemdump option was enabled.
• Line 32: loop through the currently monitored processes.
• Line 33: open a Process instance.
• Line 34: take a dump of the process memory.
start()
In this function you have to place all the initialization operations you want to run. This may include running the
malware process, launching additional applications, taking memory snapshots and more.
check()
This function is executed by Cuckoo every second while the malware is running. You can use this function to perform
any kind of recurrent operation.
For example if in your analysis you are looking for just one specific indicator to be created (e.g., a file) you could place
your condition in this function and if it returns False, the analysis will terminate right away.
Think of it as “should the analysis continue or not?”.
For example:
112 Chapter 3. Contents

Cuckoo Sandbox Book, Release 2.0.6
def check(self):
if os.path.exists("C:\\config.bin"):
return False
else:
return True
This check() function will cause Cuckoo to immediately terminate the analysis whenever C:\\config.bin is
created.
execute()
Wraps the malware execution and deal with DLL injection.
finish()
This function is simply called by Cuckoo before terminating the analysis and powering off the machine. By default,
this function contains an optional feature to dump the process memory of all the monitored processes.
Options
Every package have automatically access to a dictionary containing all user-specified options (see Submit an Analysis).
Such options are made available in the attribute self.options. For example let’s assume that the user specified
the following string at submission:
foo=1,bar=2
The analysis package selected will have access to these values:
from lib.common.abstracts import Package
class Example(Package):
def start(self, path):
foo =self.options["foo"]
bar =self.options["bar"]
def check():
return True
def finish():
return True
These options can be used for anything you might need to configure inside your package.
Process API
The Process class provides access to different process-related features and functions. You can import it in your
analysis packages with:
from lib.api.process import Process
You then initialize an instance with:
3.4. Customization 113

Cuckoo Sandbox Book, Release 2.0.6
p=Process()
In case you want to open an existing process instead of creating a new one, you can specify multiple arguments:
•pid: PID of the process you want to operate on.
•h_process: handle of a process you want to operate on.
•thread_id: thread ID of a process you want to operate on.
•h_thread: handle of the thread of a process you want to operate on.
This class implements several methods that you can use in your own scripts.
Methods
Process.open()
Opens an handle to a running process. Returns True or False in case of success or failure of the operation.
Return type boolean
Example Usage:
1p=Process(pid=1234)
2p.open()
3handle =p.h_process
Process.exit_code()
Returns the exit code of the opened process. If it wasn’t already done before, exit_code() will perform a
call to open() to acquire an handle to the process.
Return type ulong
Example Usage:
1p=Process(pid=1234)
2code =p.exit_code()
Process.is_alive()
Calls exit_code() and verify if the returned code is STILL_ACTIVE, meaning that the given process is
still running. Returns True or False.
Return type boolean
Example Usage:
1p=Process(pid=1234)
2if p.is_alive():
3print("Still running!")
Process.get_parent_pid()
Returns the PID of the parent process of the opened process. If it wasn’t already done before,
get_parent_pid() will perform a call to open() to acquire an handle to the process.
Return type int
Example Usage:
1p=Process(pid=1234)
2ppid =p.get_parent_pid()
114 Chapter 3. Contents

Cuckoo Sandbox Book, Release 2.0.6
Process.execute(path[,args=None[,suspended=False ]])
Executes the file at the specified path. Returns True or False in case of success or failure of the operation.
Parameters
•path (string) – path to the file to execute
•args (string) – arguments to pass to the process command line
•suspended (boolean) – enable or disable suspended mode flag at process creation
Return type boolean
Example Usage:
1p=Process()
2p.execute(path="C:\\WINDOWS\\system32\\calc.exe", args="Something",
˓→suspended=True)
Process.resume()
Resumes the opened process from a suspended state. Returns True or False in case of success or failure of
the operation.
Return type boolean
Example Usage:
1p=Process()
2p.execute(path="C:\\WINDOWS\\system32\\calc.exe", args="Something",
˓→suspended=True)
3p.resume()
Process.terminate()
Terminates the opened process. Returns True or False in case of success or failure of the operation.
Return type boolean
Example Usage:
1p=Process(pid=1234)
2if p.terminate():
3print("Process terminated!")
4else:
5print("Could not terminate the process!")
Process.inject([dll[,apc=False ]])
Injects our DLL into the opened process. Returns True or False in case of success or failure of the operation.
Parameters
•dll (string) – path to the DLL to inject into the process
•apc (boolean) – enable to use QueueUserAPC() injection instead of
CreateRemoteThread(), beware that if the process is in suspended mode, Cuckoo
will always use QueueUserAPC()
Return type boolean
Example Usage:
1p=Process()
2p.execute(path="C:\\WINDOWS\\system32\\calc.exe", args="Something",
˓→suspended=True)
(continues on next page)
3.4. Customization 115

Cuckoo Sandbox Book, Release 2.0.6
(continued from previous page)
3p.inject()
4p.resume()
Process.dump_memory()
Takes a snapshot of the given process’ memory space. Returns True or False in case of success or failure of
the operation.
Return type boolean
Example Usage:
1p=Process(pid=1234)
2p.dump_memory()
3.4.4 Processing Modules
Cuckoo’s processing modules are Python scripts that let you define custom ways to analyze the raw results generated
by the sandbox and append some information to a global container that will be later used by the signatures and the
reporting modules.
You can create as many modules as you want, as long as they follow a predefined structure that we will present in this
chapter.
Global Container
After an analysis is completed, Cuckoo will invoke all the processing modules available in the cuckoo/
processing/ directory, all of which fall under the cuckoo.processing module. Any additional module you
decide to create must be placed inside that directory.
Every module should also have a dedicated section in the $CWD/conf/processing.conf file: for example if
you create a module cuckoo/processing/foobar.py you will have to append the following section to $CWD/
conf/processing.conf:
[foobar]
enabled =yes
Every module will then be initialized and executed and the data returned will be appended in a data structure that we’ll
call global container.
This container is simply just a big Python dictionary that includes the abstracted results produced by all the modules
classified by their identification key.
Cuckoo already provides a default set of modules which will generate a standard global container. It’s important for
the existing reporting modules (HTML report etc.) that these default modules are not modified, otherwise the resulting
global container structure would change and the reporting modules wouldn’t be able to recognize it and extract the
information used to build the final reports.
The currently available default processing modules are:
•AnalysisInfo (cuckoo/processing/analysisinfo.py) - generates some basic information on
the current analysis, such as timestamps, version of Cuckoo and so on.
•ApkInfo (cuckoo/processing/apkinfo.py) - generates some basic information on the current
APK analysis (Android analysis).
•Baseline (cuckoo/processing/baseline.py) - baseline results from gathered information.
116 Chapter 3. Contents

Cuckoo Sandbox Book, Release 2.0.6
•BehaviorAnalysis (cuckoo/processing/behavior.py) - parses the raw behavioral logs and per-
form some initial transformations and interpretations, including the complete processes tracing, a behav-
ioral summary and a process tree.
•Buffer (cuckoo/processing/buffer.py) - dropped buffer analysis.
•Debug (cuckoo/processing/debug.py) - includes errors and the analysis.log generated by the
analyzer.
•Droidmon (cuckoo/processing/droidmon.py) - extract Dynamic API calls Info From Droidmon
logs.
•Dropped (cuckoo/processing/dropped.py) - includes information on the files dropped by the
malware and dumped by Cuckoo.
•DumpTls (cuckoo/processing/dumptls.py) - cross-references TLS master secrets extracted
from the monitor and key information extracted from the PCAP to dump a master secrets file.
•GooglePlay (cuckoo/processing/googleplay.py) - Google Play information about the analysis
session.
•Irma (cuckoo/processing/irma.py) - IRMA connector.
•Memory (cuckoo/processing/memory.py) - executes Volatility on a full memory dump.
•Misp (cuckoo/processing/misp.py) - MISP connector.
•NetworkAnalysis (cuckoo/processing/network.py) - parses the PCAP file and extracts some
network information, such as DNS traffic, domains, IPs, HTTP requests, IRC and SMTP traffic.
•ProcMemory (cuckoo/processing/procmemory.py) - performs analysis of pro-
cess memory dump. Note: the module is able to process user defined Yara rules from
data/yara/memory/index_memory.yar. Just edit this file to add your Yara rules.
•ProcMon (cuckoo/processing/procmon.py) - extracts events from procmon.exe output.
•Screenshots (cuckoo/processing/screenshots.py) - screenshot and OCR analysis.
•Snort (cuckoo/processing/snort.py) - Snort processing module.
•StaticAnalysis (cuckoo/processing/static.py) - performs some static analysis of PE32 files.
•Strings (cuckoo/processing/strings.py) - extracts strings from the analyzed binary.
•Suricata (cuckoo/processing/suricata.py) - Suricata processing module.
•TargetInfo (cuckoo/processing/targetinfo.py) - includes information on the analyzed file,
such as hashes.
•VirusTotal (cuckoo/processing/virustotal.py) - searches on VirusTotal.com for antivirus
signatures of the analyzed file. Note: the file is not uploaded on VirusTotal.com, if the file was not
previously uploaded on the website no results will be retrieved.
Getting started
In order to make them available to Cuckoo, all processing modules must be placed inside the cuckoo/
processing/ directory.
A basic processing module could look like:
3.4. Customization 117

Cuckoo Sandbox Book, Release 2.0.6
1from cuckoo.common.abstracts import Processing
2
3class MyModule(Processing):
4
5def run(self):
6self.key ="key"
7data =do_something()
8return data
Every processing module should contain:
• A class inheriting Processing.
• A run() function.
• A self.key attribute defining the name to be used as a sub container for the returned data.
• A set of data (list, dictionary, string, etc.) that will be appended to the global container.
You can also specify an order value, which allows you to run the available processing modules in an ordered se-
quence. By default all modules are set with an order value of 1and are executed in alphabetical order.
If you want to change this value your module would look like:
1from cuckoo.common.abstracts import Processing
2
3class MyModule(Processing):
4order =2
5
6def run(self):
7self.key ="key"
8data =do_something()
9return data
You can also manually disable a processing module by setting the enabled attribute to False:
1from cuckoo.common.abstracts import Processing
2
3class MyModule(Processing):
4enabled =False
5
6def run(self):
7self.key ="key"
8data =do_something()
9return data
The processing modules are provided with some attributes that can be used to access the raw results for the given
analysis:
•self.analysis_path: path to the folder containing the results (e.g., $CWD/storage/analysis/1)
•self.log_path: path to the analysis.log file.
•self.file_path: path to the analyzed file.
•self.dropped_path: path to the folder containing the dropped files.
•self.logs_path: path to the folder containing the raw behavioral logs.
•self.shots_path: path to the folder containing the screenshots.
•self.pcap_path: path to the network pcap dump.
118 Chapter 3. Contents

Cuckoo Sandbox Book, Release 2.0.6
•self.memory_path: path to the full memory dump, if created.
•self.pmemory_path: path to the process memory dumps, if created.
With these attributes you should be able to easily access all the raw results stored by Cuckoo and perform your analytic
operations on them.
As a last note, a good practice is to use the CuckooProcessingError exception whenever the module encounters
an issue you want to report to Cuckoo. This can be done by importing the class like this:
1from cuckoo.common.exceptions import CuckooProcessingError
2from cuckoo.common.abstracts import Processing
3
4class MyModule(Processing):
5
6def run(self):
7self.key ="key"
8
9try:
10 data =do_something()
11 except SomethingFailed:
12 raise CuckooProcessingError("Failed")
13
14 return data
3.4.5 Signatures
With Cuckoo you’re able to create some customized signatures that you can run against the analysis results in order to
identify some predefined pattern that might represent a particular malicious behavior or an indicator you’re interested
in.
These signatures are very useful to give a context to the analyses: both because they simplify the interpretation of the
results as well as for automatically identifying malware samples of interest.
Some examples of what you can use Cuckoo’s signatures for:
• Identify a particular malware family you’re interested in by isolating some unique behaviors (like file names or
mutexes).
• Spot interesting modifications the malware performs on the system, such as installation of device drivers.
• Identify particular malware categories, such as Banking Trojans or Ransomware by isolating typical actions
commonly performed by those.
• Classify samples into the categories malware/unknown (it is not possible to identify clean samples)
You can find signatures created by us and by other Cuckoo users on our Community repository.
Getting started
Creation of signatures is a fairly simple process and requires just a decent understanding of Python programming.
First things first, all signatures must be located inside the cuckoo/cuckoo/signatures/ directory in Cuckoo
or the modules/signatures/ directory of the Community repository (the Community repository is still using
legacy directory structuring).
The following is a basic example signature:
3.4. Customization 119

Cuckoo Sandbox Book, Release 2.0.6
1from cuckoo.common.abstracts import Signature
2
3class CreatesExe(Signature):
4name ="creates_exe"
5description ="Creates a Windows executable on the filesystem"
6severity =2
7categories =["generic"]
8authors =["Cuckoo Developers"]
9minimum ="2.0"
10
11 def on_complete(self):
12 return self.check_file(pattern=".*\\.exe$", regex=True)
As you can see the structure is really simple and consistent with the other modules. We’re going to get into details
later, but since version 1.2 Cuckoo provides some helper functions that make the process of creating signatures much
easier.
In this example we just walk through all the accessed files in the summary and check if there is anything ending with
“.exe”: in that case it will return True, meaning that the signature matched, otherwise return False.
The function on_complete is called at the end of the cuckoo signature process. Other function will be called before
on specific events and help you to write more sophisticated and faster signatures.
In case the signature gets matched, a new entry in the “signatures” section will be added to the global container roughly
as follows:
"signatures": [
{
"severity":2,
"description":"Creates a Windows executable on the filesystem",
"alert": false,
"references": [],
"data": [
{
"file_name":"C:\\d.exe"
}
],
"name":"creates_exe"
}
]
Creating your new signature
In order to make you better understand the process of creating a signature, we are going to create a very simple
one together and walk through the steps and the available options. For this purpose, we’re simply going to create a
signature that checks whether the malware analyzed opened a mutex named “i_am_a_malware”.
The first thing to do is import the dependencies, create a skeleton and define some initial attributes. These are the ones
you can currently set:
•name: an identifier for the signature.
•description: a brief description of what the signature represents.
•severity: a number identifying the severity of the events matched (generally between 1 and 3).
•categories: a list of categories that describe the type of event being matched (for example “banker”, “injec-
tion” or “anti-vm”).
120 Chapter 3. Contents

Cuckoo Sandbox Book, Release 2.0.6
•families: a list of malware family names, in case the signature specifically matches a known one.
•authors: a list of people who authored the signature.
•references: a list of references (URLs) to give context to the signature.
•enable: if set to False the signature will be skipped.
•alert: if set to True can be used to specify that the signature should be reported (perhaps by a dedicated
reporting module).
•minimum: the minimum required version of Cuckoo to successfully run this signature.
•maximum: the maximum required version of Cuckoo to successfully run this signature.
In our example, we would create the following skeleton:
1from cuckoo.common.abstracts import Signature
2
3class BadBadMalware(Signature): # We initialize the class inheriting Signature.
4name ="badbadmalware" # We define the name of the signature
5description ="Creates a mutex known to be associated with Win32.BadBadMalware" #
˓→We provide a description
6severity =3# We set the severity to maximum
7categories =["trojan"]# We add a category
8families =["badbadmalware"]# We add the name of our fictional malware family
9authors =["Me"]# We specify the author
10 minimum ="2.0" # We specify that in order to run the signature, the user will
˓→simply need Cuckoo 2.0
11
12 def on_complete(self):
13 return
This is a perfectly valid signature. It doesn’t really do anything yet, so now we need to define the conditions for the
signature to be matched.
As we said, we want to match a particular mutex name, so we proceed as follows:
1from cuckoo.common.abstracts import Signature
2
3class BadBadMalware(Signature):
4name ="badbadmalware"
5description ="Creates a mutex known to be associated with Win32.BadBadMalware"
6severity =3
7categories =["trojan"]
8families =["badbadmalware"]
9authors =["Me"]
10 minimum ="2.0"
11
12 def on_complete(self):
13 return self.check_mutex("i_am_a_malware")
Simple as that, now our signature will return True whether the analyzed malware was observed opening the specified
mutex.
If you want to be more explicit and directly access the global container, you could translate the previous signature in
the following way:
1from cuckoo.common.abstracts import Signature
2
3class BadBadMalware(Signature):
(continues on next page)
3.4. Customization 121

Cuckoo Sandbox Book, Release 2.0.6
(continued from previous page)
4name ="badbadmalware"
5description ="Creates a mutex known to be associated with Win32.BadBadMalware"
6severity =3
7categories =["trojan"]
8families =["badbadmalware"]
9authors =["Me"]
10 minimum ="2.0"
11
12 def on_complete(self):
13 for process in self.get_processes_by_pid():
14 if "summary" in process and "mutexes" in process["summary"]:
15 for mutex in process["summary"]["mutexes"]:
16 if mutex == "i_am_a_malware":
17 return True
18
19 return False
Evented Signatures
Since version 1.0, Cuckoo provides a way to write more high performance signatures. In the past every signature
was required to loop through the whole collection of API calls collected during the analysis. This was unnecessarily
causing performance issues when such collection would be of a large size.
Since 1.2 Cuckoo only supports the so called “evented signatures”. The old signatures based on the run function
can be ported to using on_complete. The main difference is that with this new format, all the signatures will be
executed in parallel and a callback function called on_call() will be invoked for each signature within one single
loop through the collection of API calls.
An example signature using this technique is the following:
1from cuckoo.common.abstracts import Signature
2
3class SystemMetrics(Signature):
4name ="generic_metrics"
5description ="Uses GetSystemMetrics"
6severity =2
7categories =["generic"]
8authors =["Cuckoo Developers"]
9minimum ="2.0"
10
11 # Evented signatures can specify filters that reduce the amount of
12 # API calls that are streamed in. One can filter Process name, API
13 # name/identifier and category. These should be sets for faster lookup.
14 filter_processnames =set()
15 filter_apinames =set(["GetSystemMetrics"])
16 filter_categories =set()
17
18 # This is a signature template. It should be used as a skeleton for
19 # creating custom signatures, therefore is disabled by default.
20 # The on_call function is used in "evented" signatures.
21 # These use a more efficient way of processing logged API calls.
22 enabled =False
23
24 def on_complete(self):
25 # In the on_complete method one can implement any cleanup code and
(continues on next page)
122 Chapter 3. Contents

Cuckoo Sandbox Book, Release 2.0.6
(continued from previous page)
26 # decide one last time if this signature matches or not.
27 # Return True in case it matches.
28 return False
29
30 # This method will be called for every logged API call by the loop
31 # in the RunSignatures plugin. The return value determines the "state"
32 # of this signature. True means the signature matched and False it did not this
˓→time.
33 # Use self.deactivate() to stop streaming in API calls.
34 def on_call(self, call, pid, tid):
35 # This check would in reality not be needed as we already make use
36 # of filter_apinames above.
37 if call["api"]== "GetSystemMetrics":
38 # Signature matched, return True.
39 return True
40
41 # continue
42 return None
The inline comments are already self-explanatory.
Another event is triggered when a signature matches.
1required =["creates_exe","badmalware"]
2
3def on_signature(self, matched_sig):
4if matched_sig in self.required:
5self.required.remove(matched_sig)
6
7if not self.required:
8return True
9
10 return False
This kind of signature can be used to combine several signatures identifying anomalies into one signature classifying
the sample (malware alert).
Marks & Helpers
Starting from version 1.2, signatures are able to log exactly what triggered the signature. This allows users to better
understand why this signature is present in the log, and to be able to better focus malware analysis.
For examples on marks and helpers please refer to the Cuckoo Community for now - until we write some thorough
up-to-date documentation on that.
3.4.6 Reporting Modules
After the raw analysis results have been processed and abstracted by the processing modules and the global container
is generated (ref. Processing Modules), it is passed over by Cuckoo to all the reporting modules available, which will
make use of it and will make it accessible and consumable in different formats.
3.4. Customization 123

Cuckoo Sandbox Book, Release 2.0.6
Getting Started
All reporting modules must be placed inside the cuckoo/cuckoo/reporting/ directory (which translates to the
cuckoo.reporting module).
Every module must also have a dedicated section in the $CWD/conf/reporting.conf file: for example if you
create a module cuckoo/cuckoo/reporting/foobar.py you will have to append the following section to
$CWD/conf/reporting.conf (and thus cuckoo/data/conf/reporting.conf in the Git repository):
[foobar]
enabled =on
Every additional option you add to your section will be available to your reporting module in the self.options
dictionary.
Following is an example of a working JSON reporting module:
1import os
2import json
3import codecs
4
5from cuckoo.common.abstracts import Report
6from cuckoo.common.exceptions import CuckooReportError
7
8class JsonDump(Report):
9"""Saves analysis results in JSON format."""
10
11 def run(self, results):
12 """Writes report.
13 @param results: Cuckoo results dict.
14 @raise CuckooReportError: if fails to write report.
15 """
16 try:
17 report =codecs.open(os.path.join(self.reports_path, "report.json"), "w",
˓→"utf-8")
18 json.dump(results, report, sort_keys=False, indent=4)
19 report.close()
20 except (UnicodeError,TypeError,IOError)as e:
21 raise CuckooReportError("Failed to generate JSON report: %s"%e)
This code is very simple, it receives the global container produced by the processing modules, converts it into JSON
and writes it to a file.
There are few requirements for writing a valid reporting module:
• Declare your class inheriting from Report.
• Have a run() function performing the main operations.
• Try to catch most exceptions and raise CuckooReportError to notify the issue.
All reporting modules have access to some attributes:
•self.analysis_path: path to the folder containing the raw analysis results (e.g. storage/analyses/1/ )
•self.reports_path: path to the folder where the reports should be written (e.g. stor-
age/analyses/1/reports/ )
•self.options: a dictionary containing all the options specified in the report’s configuration section in
conf/reporting.conf.
124 Chapter 3. Contents

Cuckoo Sandbox Book, Release 2.0.6
3.5 Development
This chapter explains how to write Cuckoo’s code and how to contribute.
3.5.1 Development Notes
Git branches
Cuckoo Sandbox source code is available in our official Git repository.
Up until version 1.0 we used to coordinate all ongoing development in a dedicated “development” branch and we’ve
been exclusively merging pull requests in such branch. Since version 1.1 we moved development to the traditional
“master” branch and we make use of GitHub’s tags and release system to reference development milestones in time.
Release Versioning
At the moment we utilize three types of releases: * 1.2.3, an official release, preferably accompanied by a blogpost *
1.2.4a1, an alpha release that showcases functionality that will be present in the upcoming release * 1.2.3.1, a hotfix
release, meant to fix critical issues, usually found in the latest official release
Ticketing system
To submit bug reports or feature requests, please use GitHub’s Issue tracking system.
Contribute
To submit your patch just create a Pull Request from your GitHub fork. If you don’t now how to create a Pull Request
take a look to GitHub help.
3.5.2 Coding Style
In order to contribute code to the project, you must diligently follow the style rules describe in this chapter. Having a
clean and structured code is very important for our development lifecycle. We do help out with code refactoring where
required, but please try to do as much as possible on your own.
Essentially Cuckoo’s code style is based on PEP 8 - Style Guide for Python Code and PEP 257 – Docstring Conven-
tions.
Formatting
Copyright header
All existing source code files start with the following copyright header:
# Copyright (C) 2010-2013 Claudio Guarnieri.
# Copyright (C) 2014-2016 Cuckoo Foundation.
# This file is part of Cuckoo Sandbox - http://www.cuckoosandbox.org
# See the file 'docs/LICENSE' for copying permission.
Newly created files should start with the following copyright header:
3.5. Development 125

Cuckoo Sandbox Book, Release 2.0.6
# Copyright (C) 2016 Cuckoo Foundation.
# This file is part of Cuckoo Sandbox - http://www.cuckoosandbox.org
# See the file 'docs/LICENSE' for copying permission.
Indentation
The code must have a 4-spaces-tabs indentation. Since Python enforce the indentation, make sure to configure your
editor properly or your code might cause malfunctioning.
Maximum Line Length
Limit all lines to a maximum of 79 characters.
Blank Lines
Separate the class definition and the top level function with one blank line. Methods definitions inside a class are
separated by a single blank line:
class MyClass:
"""Doing something."""
def __init__(self):
"""Initialize"""
pass
def do_it(self, what):
"""Do it.
@param what: do what.
"""
pass
Use blank lines in functions, sparingly, to isolate logic sections. Import blocks are separated by a single blank line,
import blocks are separated from classes by one blank line.
Imports
Imports must be on separate lines. If you’re importing multiple objects from a package, use a single line:
from lib import a, b, c
NOT:
from lib import a
from lib import b
from lib import c
Always specify explicitly the objects to import:
from lib import a, b, c
NOT:
126 Chapter 3. Contents

Cuckoo Sandbox Book, Release 2.0.6
from lib import *
Strings
Strings must be delimited by double quotes (“).
Printing and Logging
We discourage the use of print(): if you need to log an event please use Python’s logging which is already
initialized by Cuckoo.
In your module add:
import logging
log =logging.getLogger(__name__)
And use the log handle. More details can be found in the Python documentation, but as follows is an example:
log.info("Log message")
Exceptions
Custom exceptions must be defined in the cuckoo/common/exceptions.py file.
The following is the current Cuckoo exceptions chain:
.-- CuckooCriticalError
| |-- CuckooStartupError
| |-- CuckooDatabaseError
| |-- CuckooMachineError
| `-- CuckooDependencyError
|-- CuckooOperationalError
| |-- CuckooAnalysisError
| |-- CuckooProcessingError
| `-- CuckooReportError
`-- CuckooGuestError
Beware that the use of CuckooCriticalError and its child exceptions will cause Cuckoo to terminate.
Naming
Custom exception names must start with “Cuckoo” and end with “Error” if it represents an unexpected malfunction.
Exception handling
When catching an exception and accessing its handle, use as e:
try:
foo()
except Exception as e:
bar()
3.5. Development 127

Cuckoo Sandbox Book, Release 2.0.6
NOT:
try:
foo()
except Exception, something:
bar()
It’s a good practice use “e” instead of “e.message”.
Documentation
All code must be documented in docstring format, see PEP 257 – Docstring Conventions. Additional comments may
be added in logical blocks to make the code easier to understand.
Automated testing
We believe in automated testing to provide high quality code and avoid easily overlooked mistakes.
When possible, all code must be committed with proper unit tests. Particular attention must be placed when fixing
bugs: it’s good practice to write unit tests to reproduce the bug. All unit tests and fixtures are placed in the tests folder
in the Cuckoo root. We have adopted Pytest as unit testing framework.
3.5.3 Development with the Python Package
With the new Python package developing and testing code now works slightly different than it used to be. As one
will first have to Install Cuckoo before being able to use it in the first place, a simple modify-and-test development
sequence doesn’t work out-of-the-box as it used to do.
Following we outline how to develop and test new features while using the Cuckoo Package.
• Initialize a new virtualenv. Note that any virtualenv’s in /tmp won’t survive a reboot and
as such a more convenient location may be, e.g., ~/venv/cuckoo-development (i.e., place the
cuckoo-development virtualenv in a generic ~/venv/ directory for all your virtualenv’s).
$ virtualenv /tmp/cuckoo-development
• Activate the virtualenv. This has to be done every time you start a new shell session (unless you put the
command in ~/.bashrc or similar, of course).
$ . /tmp/cuckoo-development/bin/activate
• In order to create a Cuckoo distribution package it is required to obtain the matching monitoring binaries from
our Community repository for this version of Cuckoo. Fortunately we provide a simple-to-use script to fetch
them semi-automatically for you. From the repository root directory one may run as follows to automatically
grab the binaries.
(cuckoo-development)$ python stuff/monitor.py
• Install Cuckoo in development mode, in which files from the current directory (a git clone’d Cuckoo
repository on the package branch) will be used during execution.
(cuckoo-development)$ python setup.py sdist develop
128 Chapter 3. Contents

Cuckoo Sandbox Book, Release 2.0.6
You will now be ready to modify and test files. Note that the code files are located in the cuckoo/ directory of the Git
repository and the fact that, even though you will be testing a development version of the repository, all the rules
from the Cuckoo Working Directory and Cuckoo Working Directory Usage are still in-place.
Happy development! Please reach out to us if you require additional help to get up-and-running with the latest devel-
opment tricks.
3.5.4 Frontend
Caution: This documentation is WIP.
The Javascript code in Cuckoo web is developed in ECMASript 6. For browser compatibility, this will need to be
transpiled back to ECMAScript 5.
Cuckoo makes use of Gulp to build from source to static (frontend sources). Before you can use this, make sure that
the following dependencies are installed (required for Node and following assets):
• Node.js (http://nodejs.org)
• NPM (comes with the installation of Node)
• Sass (http://sass-lang.com)
• Gulp (http://gulpjs.com)
On a Debian based system the package requirements are:
apt-get install build-essential
curl -sL https://deb.nodesource.com/setup_6.x | sudo -E bash -
sudo apt-get install nodejs
sudo npm install gulp -g
sudo apt-get install ruby-full rubygems
sudo gem update --system
sudo gem install sass
npm install
# At this point the required libs are installed.
# Run the following command to build new JS and CSS:
gulp build
After these packages have been installed, navigate to the source folder (cd cuckoo/web/src) and run npm install. This
will install all node modules as listed in package.json. After this you should be good to go!
NPM Executables
While in the cuckoo/web/src directory (or the directory where package.json is located) you can run the following
commands:
gulp OR npm start runs build processes and starts watcher
gulp build OR npm run-script build build source to static ONCE.
gulp styles only runs the ‘styles’ task (compiles SCSS to static/css)
3.5. Development 129

Cuckoo Sandbox Book, Release 2.0.6
Transpiling/Compiling
Try modifying one of the .js files in the cuckoo/web/src/scripts/ directory and confirm that Pycharm
transpiles the Javascript to ECMAScript 5.
Creating new tasks
You can easily plug in new tasks by creating a new javascript file in cuckoo/web/src/tasks. Gulpfile.js automagically
loads these tasks and will be available throughout the npm session gulp uses (this means you don’t have to do a lot
more.).
A gulp module in its basic form looks like this:
- coming!
3.5.5 Developing with Pycharm
Within this section we will cover a vast array of Pycharm configuration options in the context of Cuckoo development.
We will try to cover all aspects of running and developing Cuckoo under this IDE.
Cuckoo Web
This section covers the Cuckoo Web interface that runs on Django. The code is quite easy to modify and creating
custom features is simple.
Locations and concepts
• Cuckoo Web provides the web interface and a REST API
• The Django project root is located at cuckoo/web
• The configuration is located at cuckoo/web/web/settings.py
• URL dispatchers are in cuckoo/web/web/urls.py, as well as other locations such as (but not limited to)
cuckoo/web/analysis/urls.py
• The HTML templates use the Django Templating Language.
• The front-end uses cuckoo/web/static/js/cuckoo/ for the Cuckoo related JavaScript includes,
while their sources are in cuckoo/web/static/js/cuckoo/src/ (ECMAScript 5/6) - See paragraph
‘JavaScript transpiling’.
• So called ‘controllers’ are used instead of class-based views, where a controller is responsible for (usually back-
end) actions that don’t belong in view functions. Example: cuckoo/web/controllers/analysis/
analysis.py
• View functions are functions used by views, located in routes.py. Example: cuckoo/web/
controllers/analysis/routes.py
• API functions are functions used by the API, located in api.py. Example: cuckoo/web/controllers/
analysis/api.py
130 Chapter 3. Contents

Cuckoo Sandbox Book, Release 2.0.6
Running and debugging
Running and debugging Cuckoo web straight from Pycharm comes down to circumventing the cuckoo launcher and
using Pycharm’s built-in Django server. Thankfully, no modifications are neccesary to the Cuckoo code in order to do
this.
Firstly, It is recommended that you work in a virtualenv to keep the dependencies required by Cuckoo seper-
ate from your system-wide installed Python. Secondly, you should install Cuckoo in development mode; python
setup.py develop.
Assuming Cuckoo is installed correctly (and has an active working directory; see Cuckoo Working Directory Instal-
lation ); Start Pycharm and open the Cuckoo directory. Go to Run->Edit Configurations and click the +
button. Pick ‘Django server’. Use the following values:
•Name - web
•Host - 127.0.0.1
•Port - 8080
•Environment variables - Click ... and add 2 new values: CUCKOO_APP:web and CUCKOO_CWD:/home/
test/.cuckoo/, where the path is the location of your CWD (Cuckoo Working Directory).
•Python interpreter - Pick the virtualenv you made earlier. If it’s not there, add the virtualenv to this project
under File->Settings->Project: Cuckoo->Project Interpreter
•Working directory - This absolute path to the Django project root. For me this is /home/test/
PycharmProjects/virtualenv/cuckoo/cuckoo/web/
Cuckoo web can now be run (and debugged) from Pycharm. Go to Run->Run->web from the menu and the web-
server shall start.
JavaScript transpiling
Caution: Transpiling JavaScript through Pycharm file watchers is not recommended. The recommended way is
explained in the ‘Frontend’ section of the documentation.
The Javascript code in Cuckoo web is developed in ECMASript 6. For browser compatibility, this will need to be
transpiled back to ECMAScript 5.
Firstly, make Pycharm regonize and understand the ECMAScript 6 syntax. Go to
File->Settings->Languages & Frameworks->Javascript and pick ‘ECMAScript 6’ from the
‘Javascript language version’ dropdown. Hit Apply.
Then, use Babel to transpile the Javascript code. Install Babel in the Cuckoo project root (requires npm):
(cuckoo) test:$ pwd
/home/test/PycharmProjects/virtualenv/cuckoo
(cuckoo) test:$ npm install --save-dev babel-cl
Which will create a folder called node_modules in the Cuckoo project root.
Switch back to Pycharm and open any .js file in cuckoo/web/static/js/cuckoo/src/. Pycharm will ask
you if you want to configure a File watcher for this file. Click Add watcher (if this option is not available to you,
find the ‘file watcher’ configuration under File->Settings->Tools->File watchers).
In the following pop-up screen ‘Edit Watcher’, enter these values.
3.5. Development 131

Cuckoo Sandbox Book, Release 2.0.6
•Name - Babel ES6->ES5
•Description - Transpiles ECMAScript 6 code to ECMAScript 5
•Output filters - None
•Show console - Error
•Immediate file synchronisation - yes
•Track only root files - yes
•Trigger watcher regardless of syntax errors - no
•File type - Javascript
•Scope - Click ... -> Click +(add scope) -> Click local -> Press OK. In the file browser, browse to cuckoo/
web/static/js/cuckoo/src/ and whilst selecting the src folder, click include. The files containing
in src should now turn green. Press OK.
•Program - Should be the absolute path to node_modules/.bin/babel, for me this is /home/test/
PycharmProjects/virtualenv/cuckoo/node_modules/.bin/babel. Double check that the
path you enter reflects the actual location of the node_modules/.bin/babel file.
•Arguments ---source-maps --out-file $FileNameWithoutExtension$.js
$FilePath$
•Working directory - Browse and select cuckoo/web/static/js/cuckoo
•Output paths to refresh $FileNameWithoutExtension$-compiled.
js:$FileNameWithoutExtension$-compiled.js.map
Finally; a mock manage.py file needs to be created in order for Pycharm to see it as a Django project. Create the
following file cuckoo/web/web/manage.py with the contents:
#!/usr/bin/env python
import sys
if __name__ == "__main__":
from django.core.management import execute_from_command_line
execute_from_command_line(sys.argv)
Go to File->Settings->Langauges & Frameworks->Django and;
•Django Project root -cuckoo/web
•Settings -web/settings.py
•Manage script -web/manage.py
Testing
The configuration should now be complete. Try running Cuckoo from within Pycharm & happy coding!
3.6 Final Remarks
3.6.1 Links
•www.cuckoosandbox.org
132 Chapter 3. Contents

Cuckoo Sandbox Book, Release 2.0.6
•github.com/cuckoosandbox
•malwr.com
3.6.2 Join the discussion
If you are encountering an issue you can’t solve and are looking for some help, go to our Discussion page and pick a
platform of your choice. This is where you can get in contact with the Cuckoo Developers and users (our preference
go to the Slack & IRC).
Please read the following rules before posting:
• Before posting, read our Github issue tracker, the Cuckoo blog, the documentation and Google about your issue.
DO NOT post questions that have already been answered over and over everywhere.
• Posting messages saying just something like “Doesn’t work, help me” are completely useless. If something is
not working report the error, paste the logs, the configuration files, the information on the virtual machine, the
results of the troubleshooting, etc. Give context. We are not wizards and we don’t have a crystal ball.
• Use a proper title. Stuff like “Doesn’t work”, “Help me”, “Error” are not proper titles.
3.6.3 Support Us
Cuckoo Sandbox is a completely open source software, released freely to the public and developed mostly during free
time by volunteers. If you enjoy it and want to see it kept developed and updated, please consider supporting us.
We are always looking for financial support, hardware support and contributions of any sort. If you’re interested in
cooperating, feel free to contact us.
3.6.4 People
Cuckoo Sandbox is an open source project result of the efforts and contributions of a lot of people who enjoyed
volunteering some of their time for a greater good :).
Active Developers
Name Role Contact
Claudio nex Guarnieri Project Founder nex at nex dot sx
Alessandro jekil Tanasi Core Developer alessandro at tanasi dot it
Jurriaan skier Bremer Lead Developer jbr at cuckoo dot sh
Mark rep Schloesser Core Developer ms at mwcollect dot org
Contributors
It’s hard at this point to keep track of all individual contributions. In the Cuckoo Contributors page there is the list of
people who contributed code to our GitHub repository.
There is a number of friends who provided feedback, ideas and support during the years of development of this project,
including but not limited to:
• Felix Leder
• Tillmann Werner
3.6. Final Remarks 133


Index
A
add_path() (built-in function), 67
add_url() (built-in function), 68
P
Process.dump_memory() (built-in function), 116
Process.execute() (built-in function), 114
Process.exit_code() (built-in function), 114
Process.get_parent_pid() (built-in function), 114
Process.inject() (built-in function), 115
Process.is_alive() (built-in function), 114
Process.open() (built-in function), 114
Process.resume() (built-in function), 115
Process.terminate() (built-in function), 115
135
