SAS® Integration Technologies: Developer's Guide Dev Sp4 2
User Manual:
Open the PDF directly: View PDF ![]() .
.
Page Count: 899 [warning: Documents this large are best viewed by clicking the View PDF Link!]
- Table of Contents
- SAS® Integration Technologies: Developer's Guide
- SAS Stored Processes
- Stored Process Software Requirements
- Creating Stored Processes
- Input Parameters
- Result Types
- %STPBEGIN and %STPEND
- Reserved Macro Variables
- Stored Process Server Functions
- STPSRVGETC
- STPSRVGETN
- STPSRVSET
- STPSRV_HEADER
- STPSRV_SESSION
- STPSRV_UNQUOTE2
- Sessions
- Stored Process Samples
- Debugging Stored Processes
- Converting SAS/IntrNet Programs to Stored Processes
- Using Stored Processes
- Building a Web Application
- SAS Stored Process Web Application
- SAS Stored Process Web Application Configuration
- Web Application Input
- HTTP Headers
- Embedding Graphics
- Chaining Stored Processes
- Using Sessions: A Sample Web Application
- Debugging in the SAS Stored Process Web Application
- Implementing a Repository
- Creating a Stored Process
- Invoking a Stored Process
- Publishing Stored Process Results
- Working with Results in the Client Application
- SAS BI Web Services
- Using Web Services
- Deciding Between .NET and Java
- Writing SAS Programs for Web Services
- Discover Method
- Execute Method
- Securing SAS BI Web Services
- Securing SAS BI Web Services for .NET with WSE 2.0
- Securing SAS BI Web Services for Java
- Sample PROC MEANS Using SAS BI Web Services
- Publishing Framework
- About Packages: Package Content
- Package Rendering
- Package Transports
- Archived Packages
- Subscription Channels
- About Events
- Package Publishing
- Publishing Using the SAS Publisher GUI
- Publishing Programmatically Using SAS
- Publishing Using a Third-Party Client Application
- Package Retrieval
- URL Retrieval
- Viewer Processing
- When To Use a Viewer
- How to Create a Viewer
- How to Apply a Viewer
- <SASINSERT> Tag
- Substitution Syntax
- <SASTABLE> Tag
- <SASREPEAT> Tag
- <SASECHO> Tag
- Using the <SASINSERT> and <SASTABLE> Tags: Examples
- Sample HTML Viewer
- Rendered View in E-mail
- SAS Program with an HTML Viewer
- Sample Viewer Template
- Daily Purchase Summary
- SAS Publisher
- Package Items
- SAS Publisher Requirements
- How SAS Publisher Works
- Publishing Destination Types
- Starting SAS Publisher
- Publishing a Package
- Publishing a Package, and Saving and Viewing Publish Code
- Defining Package Content (What to Publish)
- Adding an Item (Specify Item to Insert)
- Adding a SAS Data Set to a Package
- Adding a SAS Database, SAS Catalog, or SQL View to a Package
- Adding ODS Output to a Package
- Adding an External File to a Package
- Adding a Reference to a Package
- Adding a Viewer to a Package
- Specifying Package Destination (Where to Publish)
- Specifying Name/Value Pairs
- Configuring Channels
- Specifying Package Format (How to Publish)
- Using SAS Publisher with SAS/Warehouse Administrator
- SAS Subscription Manager
- Overview
- SAS Subscription Manager Requirements
- Logging On
- Subscription Manager Interface
- Channels
- Subscribing to a Channel
- Unsubscribing from a Channel
- Viewing Channel Details
- Searching Channels
- Subscriptions
- Viewing Your Subscriptions
- Viewing Subscription Details
- Defining or Modifying Your Default Subscription Properties
- Defining Unique Subscription Properties
- Restoring a Subscription to Your Default Subscription Properties
- Subscriber Groups
- Viewing Your Group Memberships
- SAS Package Reader
- SAS Package
- Overview
- SAS Package Reader Requirements
- Package Reader Interface
- Accessing a SAS Package
- Listing One or More Packages
- Listing Package Entries
- Viewing Package Properties
- Viewing Package Entry Properties
- Viewing an Entry in a Web Browser
- Viewing SAS Data Sets
- Saving a Package Entry
- SAS Package Retriever
- SAS Package Retriever Requirements
- Invoking SAS Package Retriever
- Obtaining a Package from an Archive
- Advanced Archive Properties
- Obtaining a Package from a Queue
- Advanced Queue Properties
- Obtaining a Package from WebDAV
- Advanced WebDAV Properties
- Selecting Package Entries for Retrieval and Storage
- Retrieving and Storing a Package Entry
- Retrieving and Storing a Data Set
- Retrieving and Storing a Catalog, MDDB, or SQLView Entry
- Retrieving and Storing a Binary File Entry
- Storing a Binary CSV File Entry
- Retrieving and Storing an HTML File Entry
- HTML and Viewer Encoding Property
- Storing a Companion File
- Retrieving and Storing a Text File Entry
- Retrieving and Storing a Viewer File Entry
- Removing the Package from the Transport Location
- Publish Package Interface
- Publish/Retrieve Encoding Behavior
- INSERT_CATALOG
- INSERT_DATASET
- INSERT_FDB
- INSERT_FILE
- INSERT_HTML
- INSERT_MDDB
- INSERT_PACKAGE
- INSERT_REF
- INSERT_SQLVIEW
- INSERT_VIEWER
- PACKAGE_BEGIN
- PACKAGE_END
- PACKAGE_PUBLISH
- Publish to an Archive
- Publish to E-mail
- Publish to Queues
- Publish to Subscribers
- Publish to a WebDAV-Compliant Server
- LDAP Channel Store Syntax
- SAS Metadata Repository Channel Store Syntax
- COMPANION_NEXT
- ENTRY_FIRST
- ENTRY_NEXT
- PACKAGE_DESTROY
- PACKAGE_FIRST
- PACKAGE_NEXT
- PACKAGE_TERM
- RETRIEVE_CATALOG
- RETRIEVE_DATASET
- RETRIEVE_FDB
- RETRIEVE_FILE
- RETRIEVE_HTML
- RETRIEVE_MDDB
- RETRIEVE_NESTED
- RETRIEVE_PACKAGE
- RETRIEVE_REF
- RETRIEVE_SQLVIEW
- RETRIEVE_VIEWER
- Filtering Packages and Package Entries
- Example: Publishing in the Data Step
- Example: Publishing in a Macro
- Example: Publishing with the FTP Access Method
- Publish Event Interface (CALL Routines)
- EVENT_BEGIN
- EVENT_BODY
- EVENT_PUBLISH
- EVENT_END
- XML Specification for Generic Events
- XML Specification for SASPackage Events
- Examples of Generated Events
- Application Messaging Overview
- Supported Messaging Interface Versions
- Configuring WebSphere MQ with the WebSphere MQ Explorer
- Polling Message Queues from the Object Spawner
- Configuring Multiple Clients To Read From a Single Queue
- Configuring WebSphere MQ to Trigger SAS: An Example
- Sample Trigger Programs
- WebSphere MQ Functional Interface
- Writing WebSphere MQ Applications
- WebSphere MQ Coding Examples
- WebSphere MQ CALL Routines
- WebSphere MQ CALL Routines
- MQCONN
- MQDISC
- MQOPEN
- MQCLOSE
- MQPUT
- MQPUT1
- MQGET
- MQCMIT
- MQBACK
- MQINQ
- MQSET
- MQPMO
- MQGMO
- MQOD
- MQMD
- MQMAP
- MQSETPARMS
- MQGETPARMS
- MQRMH
- MQFREE
- MSMQ Functional Interface
- Writing MSMQ Applications
- MSMQ Code Samples
- MSMQ CALL Routines
- MSMQ CALL Routines
- MSMQCREATEQUEUE
- MSMQDELETEQUEUE
- MSMQOPENQUEUE
- MSMQCLOSEQUEUE
- MSMQPATHTOFORMAT
- MSMQINSTTOFORMAT
- MSMQHNDLTOFORMAT
- MSMQSENDMSG
- MSMQRECEIVEMSG
- MSMQCREATECURSOR
- MSMQCLOSECURSOR
- MSMQBEGINTRANS
- MSMQCOMMITTRANS
- MSMQABORTTRANS
- MSMQRELEASETRANS
- MSMQLOCATE
- MSMQGETQPROP
- MSMQSETQPROP
- MSMQGETQSEC
- MSMQSETQSEC
- MSMQGETSCONTEXT
- MSMQFREESCONTEXT
- MSMQMAP
- MSMQSETPARMS
- MSMQGETPARMS
- MSMQFREE
- Common Messaging Interface
- Writing Applications Using the Common Messaging Interface
- Using TIB/Rendezvous with the SAS Common Messaging Interface
- TIB/Rendezvous Coding Example
- TIB/Rendezvous Certified Messaging Coding Examples
- Using a Repository with Application Messaging
- Using the SAS Registry with the Common Messaging Interface
- Using an LDAP Server with the Common Messaging Interface
- Common Messaging Interface CALL Routines
- SAS CALL Routines for the Common Messaging Interface
- SETALIAS
- SETMAP
- SETMODEL
- GETALIAS
- GETMAP
- GETMODEL
- DELETEALIAS
- DELETEMAP
- DELETEMODEL
- INIT
- TERM
- OPENQUEUE
- CLOSEQUEUE
- SENDMESSAGE
- RECEIVEMESSAGE
- PARSEMESSAGE
- BEGINTRANSACTION
- Commit
- Abort
- FREETRANSACTION
- GETATTACHMENT
- ACCEPTATTACHMENT
- GETQUEUEPROPS
- Attachment Layout for Websphere MQ and MSMQ
- Attachment Layout for TIB/Rendezvous
- Attachment Error Handling
- Developing Java Clients
- Java Client Installation and JRE Requirements
- Java Client Security
- Using the IOM Server
- Using the Java Connection Factory
- Connecting with Directly Supplied Server Attributes
- Connecting with Server Attributes Read from a SAS Metadata Server
- Connecting with Server Attributes Read from an LDAP Server
- Connecting with Server Attributes Read from the Information Service
- Java Connection Factory Language Service Example
- Logging Java Connection Factory Activity
- Using Failover
- Using Load Balancing
- Using Connection Pooling
- Pooling with Directly Supplied Server Attributes
- Pooling with Server Attributes Read from a Metadata Server
- Pooling with Server Attributes Read from the Information Service
- Returning Connections to the Java Connection Factory
- Using Java CORBA Stubs for IOM Objects
- Null References
- Exception Handling
- Output Parameters
- Generic Object References
- IOM Objects that Support More Than One Stub
- Events and Connection Points
- Datetime Values
- Getting a JDBC Connection Object
- Using the Java Workspace Factory
- Connecting with Directly Supplied Server Properties
- Connecting with Server Properties Read from an LDAP Server
- Java Workspace Factory Language Service Example
- Returning a Workspace to the Java Workspace Factory
- SAS Foundation Services
- Connection Service
- Discovery Service
- Event Broker Service
- Information Service
- Logging Service
- Publish Service
- Security Service
- Session Service
- Stored Process Service
- User Service
- Developing Windows Clients
- Client Requirements
- Client Installation
- Windows Client Security
- Selecting a Windows Programming Language
- Programming with Visual Basic
- Programming in the .NET Environment
- Using VBScript
- Programming with Visual C++
- Using the SAS Object Manager
- Creating an Object
- SAS Object Manager Interfaces
- Using a Metadata Server with the SAS Object Manager
- Metadata Configuration Files
- SAS Object Manager Error Reporting
- SAS Object Manager Code Samples
- Using Connection Pooling
- Choosing SAS Integration Technologies or COM+ Pooling
- Using SAS Integration Technologies Pooling
- Using COM+ Pooling
- Pooling Samples
- Using the SAS IOM Data Provider
- Using the Workspace Manager
- Launching IOM Servers
- Administering the SAS Workspace Manager
- SASWorkspaceManager Interfaces
- Error Reporting
- Using Workspace Pooling
- Code Samples
- Directory Services
- Directory Services Overview
- Directory Services and Integration Technologies
- Application Interfaces
- LDAP CALL Routine Interface
- LDAPS_ADD
- LDAPS_ATTRNAME
- LDAPS_ATTRVALUE
- LDAPS_CLOSE
- LDAPS_DELETE
- LDAPS_ENTRY
- LDAPS_FREE
- LDAPS_MODIFY
- LDAPS_OPEN
- LDAPS_SETOPTIONS
- LDAPS_SEARCH
- Adding a Directory Entry to an LDAP Server
- Searching an LDAP Directory
- LDAP SCL Interface
- _ADD
- _CLOSE
- _DELETE
- _MODIFY
- _OPEN
- _SETOPTIONS
- _SEARCH
SAS®9.1.3Integration Technologies
Developer’s Guide, Fifth Edition
The correct bibliographic citation for this manual is as follows: SAS Institute Inc. 2006. SAS® 9.1.3 Integration
Technologies: Developer’s Guide, Fifth Edition. Cary, NC: SAS Institute Inc.
SAS 9.1.3 Integration Technologies: Developer’s Guide, Fifth Edition
Copyright © 2006, SAS Institute Inc., Cary, NC, USA
All rights reserved. Produced in the United States of America.
For a Web download or e-book: Your use of this publication shall be governed by the terms established by the
vendor at the time you acquire this publication.
U.S. Government Restricted Rights Notice. Use, duplication, or disclosure of this software and related
documentation by the U.S. government is subject to the Agreement with SAS Institute and the restrictions set forth in
FAR 52.227-19, Commercial Computer Software-Restricted Rights (June 1987).
SAS Institute Inc., SAS Campus Drive, Cary, North Carolina 27513.
1st printing, November 2006
SAS Publishing provides a complete selection of books and electronic products to help customers use SAS software
to its fullest potential. For more information about our e-books, e-learning products, CDs, and hard-copy books, visit
the SAS Publishing Web site at support.sas.com/pubs or call 1-800-727-3228.
SAS® and all other SAS Institute Inc. product or service names are registered trademarks or trademarks of SAS
Institute Inc. in the USA and other countries. ® indicates USA registration.
Other brand and product names are registered trademarks or trademarks of their respective companies.
Table of Contents
SAS® Integration Technologies: Developer's Guide....................................................................................................1
SAS Stored Processes.......................................................................................................................................................3
Stored Process Software Requirements.........................................................................................................................4
Creating Stored Processes...............................................................................................................................................7
Input Parameters...........................................................................................................................................................10
Result Types....................................................................................................................................................................14
%STPBEGIN and %STPEND.....................................................................................................................................16
Reserved Macro Variables............................................................................................................................................21
Stored Process Server Functions..................................................................................................................................29
STPSRVGETC...............................................................................................................................................................30
STPSRVGETN...............................................................................................................................................................31
STPSRVSET...................................................................................................................................................................33
STPSRV_HEADER.......................................................................................................................................................35
STPSRV_SESSION.......................................................................................................................................................37
STPSRV_UNQUOTE2..................................................................................................................................................38
Sessions............................................................................................................................................................................39
Stored Process Samples.................................................................................................................................................42
Debugging Stored Processes..........................................................................................................................................47
Converting SAS/IntrNet Programs to Stored Processes............................................................................................49
Using Stored Processes..................................................................................................................................................52
Building a Web Application..........................................................................................................................................54
SAS Stored Process Web Application..........................................................................................................................55
SAS Stored Process Web Application Configuration.................................................................................................63
SAS® Integration Technologies: Developer's Guide
i
Table of Contents
Web Application Input..................................................................................................................................................67
HTTP Headers................................................................................................................................................................71
Embedding Graphics.....................................................................................................................................................75
Chaining Stored Processes............................................................................................................................................79
Using Sessions: A Sample Web Application................................................................................................................83
Debugging in the SAS Stored Process Web Application............................................................................................92
Implementing a Repository...........................................................................................................................................94
Creating a Stored Process.............................................................................................................................................95
Invoking a Stored Process.............................................................................................................................................97
Publishing Stored Process Results................................................................................................................................98
Working with Results in the Client Application.......................................................................................................100
SAS BI Web Services...................................................................................................................................................101
Using Web Services......................................................................................................................................................102
Deciding Between .NET and Java..............................................................................................................................103
Writing SAS Programs for Web Services..................................................................................................................104
Discover Method..........................................................................................................................................................106
Execute Method............................................................................................................................................................111
Securing SAS BI Web Services...................................................................................................................................113
Securing SAS BI Web Services for .NET with WSE 2.0..........................................................................................114
Securing SAS BI Web Services for Java....................................................................................................................121
Sample PROC MEANS Using SAS BI Web Services...............................................................................................122
Publishing Framework................................................................................................................................................126
About Packages: Package Content.............................................................................................................................128
SAS® Integration Technologies: Developer's Guide
ii
Table of Contents
Package Rendering......................................................................................................................................................129
Package Transports.....................................................................................................................................................131
Archived Packages.......................................................................................................................................................132
Subscription Channels.................................................................................................................................................134
About Events................................................................................................................................................................135
Package Publishing......................................................................................................................................................137
Publishing Using the SAS Publisher GUI..................................................................................................................138
Publishing Programmatically Using SAS..................................................................................................................141
Publishing Using a Third−Party Client Application................................................................................................142
Package Retrieval.........................................................................................................................................................143
URL Retrieval..............................................................................................................................................................145
Viewer Processing........................................................................................................................................................146
When To Use a Viewer................................................................................................................................................147
How to Create a Viewer...............................................................................................................................................148
How to Apply a Viewer................................................................................................................................................153
<SASINSERT> Tag.....................................................................................................................................................155
Substitution Syntax......................................................................................................................................................156
<SASTABLE> Tag.......................................................................................................................................................160
<SASREPEAT> Tag....................................................................................................................................................162
<SASECHO> Tag........................................................................................................................................................164
Using the <SASINSERT> and <SASTABLE> Tags: Examples..............................................................................165
Sample HTML Viewer.................................................................................................................................................166
Rendered View in E−mail............................................................................................................................................167
SAS® Integration Technologies: Developer's Guide
iii
Table of Contents
SAS Program with an HTML Viewer........................................................................................................................169
Sample Viewer Template.............................................................................................................................................171
Daily Purchase Summary............................................................................................................................................173
SAS Publisher...............................................................................................................................................................174
Package Items...............................................................................................................................................................175
SAS Publisher Requirements......................................................................................................................................176
How SAS Publisher Works.........................................................................................................................................177
Publishing Destination Types......................................................................................................................................178
Starting SAS Publisher................................................................................................................................................179
Publishing a Package...................................................................................................................................................180
Publishing a Package, and Saving and Viewing Publish Code................................................................................181
Defining Package Content (What to Publish)............................................................................................................183
Adding an Item (Specify Item to Insert)....................................................................................................................184
Adding a SAS Data Set to a Package..........................................................................................................................186
Adding a SAS Database, SAS Catalog, or SQL View to a Package........................................................................188
Adding ODS Output to a Package..............................................................................................................................189
Adding an External File to a Package........................................................................................................................192
Adding a Reference to a Package...............................................................................................................................193
Adding a Viewer to a Package....................................................................................................................................194
Specifying Package Destination (Where to Publish).................................................................................................195
Specifying Name/Value Pairs......................................................................................................................................200
Configuring Channels..................................................................................................................................................203
Specifying Package Format (How to Publish)...........................................................................................................204
SAS® Integration Technologies: Developer's Guide
iv
Table of Contents
Using SAS Publisher with SAS/Warehouse Administrator.....................................................................................209
SAS Subscription Manager.........................................................................................................................................210
Overview.......................................................................................................................................................................211
SAS Subscription Manager Requirements................................................................................................................212
Logging On...................................................................................................................................................................213
Subscription Manager Interface.................................................................................................................................214
Channels........................................................................................................................................................................216
Subscribing to a Channel............................................................................................................................................217
Unsubscribing from a Channel...................................................................................................................................218
Viewing Channel Details.............................................................................................................................................219
Searching Channels......................................................................................................................................................220
Subscriptions................................................................................................................................................................221
Viewing Your Subscriptions.......................................................................................................................................222
Viewing Subscription Details......................................................................................................................................223
Defining or Modifying Your Default Subscription Properties................................................................................224
Defining Unique Subscription Properties..................................................................................................................225
Restoring a Subscription to Your Default Subscription Properties........................................................................226
Subscriber Groups.......................................................................................................................................................227
Viewing Your Group Memberships...........................................................................................................................228
SAS Package Reader....................................................................................................................................................229
SAS Package.................................................................................................................................................................230
Overview.......................................................................................................................................................................231
SAS Package Reader Requirements...........................................................................................................................232
SAS® Integration Technologies: Developer's Guide
v
Table of Contents
Package Reader Interface...........................................................................................................................................233
Accessing a SAS Package............................................................................................................................................236
Listing One or More Packages....................................................................................................................................237
Listing Package Entries...............................................................................................................................................238
Viewing Package Properties........................................................................................................................................239
Viewing Package Entry Properties.............................................................................................................................240
Viewing an Entry in a Web Browser..........................................................................................................................241
Viewing SAS Data Sets................................................................................................................................................242
Saving a Package Entry...............................................................................................................................................244
SAS Package Retriever................................................................................................................................................245
SAS Package Retriever Requirements.......................................................................................................................246
Invoking SAS Package Retriever................................................................................................................................247
Obtaining a Package from an Archive.......................................................................................................................248
Advanced Archive Properties.....................................................................................................................................249
Obtaining a Package from a Queue............................................................................................................................251
Advanced Queue Properties........................................................................................................................................252
Obtaining a Package from WebDAV.........................................................................................................................253
Advanced WebDAV Properties..................................................................................................................................254
Selecting Package Entries for Retrieval and Storage...............................................................................................255
Retrieving and Storing a Package Entry...................................................................................................................257
Retrieving and Storing a Data Set..............................................................................................................................258
Retrieving and Storing a Catalog, MDDB, or SQLView Entry...............................................................................260
Retrieving and Storing a Binary File Entry..............................................................................................................261
SAS® Integration Technologies: Developer's Guide
vi
Table of Contents
Storing a Binary CSV File Entry................................................................................................................................262
Retrieving and Storing an HTML File Entry............................................................................................................263
HTML and Viewer Encoding Property.....................................................................................................................266
Storing a Companion File............................................................................................................................................267
Retrieving and Storing a Text File Entry..................................................................................................................268
Retrieving and Storing a Viewer File Entry..............................................................................................................269
Removing the Package from the Transport Location..............................................................................................270
Publish Package Interface...........................................................................................................................................272
Publish/Retrieve Encoding Behavior.........................................................................................................................273
INSERT_CATALOG...................................................................................................................................................275
INSERT_DATASET....................................................................................................................................................277
INSERT_FDB...............................................................................................................................................................280
INSERT_FILE.............................................................................................................................................................282
INSERT_HTML...........................................................................................................................................................284
INSERT_MDDB...........................................................................................................................................................288
INSERT_PACKAGE...................................................................................................................................................290
INSERT_REF...............................................................................................................................................................292
INSERT_SQLVIEW....................................................................................................................................................294
INSERT_VIEWER......................................................................................................................................................296
PACKAGE_BEGIN.....................................................................................................................................................298
PACKAGE_END.........................................................................................................................................................301
PACKAGE_PUBLISH................................................................................................................................................302
Publish to an Archive...................................................................................................................................................306
SAS® Integration Technologies: Developer's Guide
vii
Table of Contents
Publish to E−mail.........................................................................................................................................................308
Publish to Queues.........................................................................................................................................................313
Publish to Subscribers.................................................................................................................................................316
Publish to a WebDAV−Compliant Server.................................................................................................................322
LDAP Channel Store Syntax......................................................................................................................................326
SAS Metadata Repository Channel Store Syntax.....................................................................................................327
COMPANION_NEXT.................................................................................................................................................328
ENTRY_FIRST............................................................................................................................................................330
ENTRY_NEXT.............................................................................................................................................................332
PACKAGE_DESTROY..............................................................................................................................................334
PACKAGE_FIRST......................................................................................................................................................335
PACKAGE_NEXT.......................................................................................................................................................337
PACKAGE_TERM......................................................................................................................................................339
RETRIEVE_CATALOG.............................................................................................................................................340
RETRIEVE_DATASET..............................................................................................................................................341
RETRIEVE_FDB.........................................................................................................................................................343
RETRIEVE_FILE.......................................................................................................................................................344
RETRIEVE_HTML.....................................................................................................................................................345
RETRIEVE_MDDB.....................................................................................................................................................348
RETRIEVE_NESTED.................................................................................................................................................349
RETRIEVE_PACKAGE.............................................................................................................................................351
RETRIEVE_REF.........................................................................................................................................................355
RETRIEVE_SQLVIEW..............................................................................................................................................356
SAS® Integration Technologies: Developer's Guide
viii
Table of Contents
RETRIEVE_VIEWER................................................................................................................................................357
Filtering Packages and Package Entries....................................................................................................................358
Example: Publishing in the Data Step........................................................................................................................360
Example: Publishing in a Macro................................................................................................................................364
Example: Publishing with the FTP Access Method..................................................................................................367
Publish Event Interface (CALL Routines)................................................................................................................370
EVENT_BEGIN...........................................................................................................................................................371
EVENT_BODY............................................................................................................................................................375
EVENT_PUBLISH......................................................................................................................................................377
EVENT_END...............................................................................................................................................................383
XML Specification for Generic Events......................................................................................................................384
XML Specification for SASPackage Events..............................................................................................................386
Examples of Generated Events...................................................................................................................................390
Application Messaging Overview...............................................................................................................................393
Supported Messaging Interface Versions..................................................................................................................395
Configuring WebSphere MQ with the WebSphere MQ Explorer..........................................................................396
Polling Message Queues from the Object Spawner..................................................................................................403
Configuring Multiple Clients To Read From a Single Queue.................................................................................406
Configuring WebSphere MQ to Trigger SAS: An Example....................................................................................410
Sample Trigger Programs...........................................................................................................................................417
WebSphere MQ Functional Interface........................................................................................................................423
Writing WebSphere MQ Applications.......................................................................................................................424
WebSphere MQ Coding Examples.............................................................................................................................427
SAS® Integration Technologies: Developer's Guide
ix
Table of Contents
WebSphere MQ CALL Routines................................................................................................................................465
WebSphere MQ CALL Routines................................................................................................................................466
MQCONN.....................................................................................................................................................................467
MQDISC.......................................................................................................................................................................468
MQOPEN......................................................................................................................................................................469
MQCLOSE...................................................................................................................................................................471
MQPUT.........................................................................................................................................................................472
MQPUT1.......................................................................................................................................................................474
MQGET........................................................................................................................................................................476
MQCMIT......................................................................................................................................................................478
MQBACK.....................................................................................................................................................................479
MQINQ.........................................................................................................................................................................480
MQSET.........................................................................................................................................................................486
MQPMO.......................................................................................................................................................................487
MQGMO.......................................................................................................................................................................490
MQOD...........................................................................................................................................................................493
MQMD..........................................................................................................................................................................495
MQMAP........................................................................................................................................................................500
MQSETPARMS...........................................................................................................................................................502
MQGETPARMS..........................................................................................................................................................503
MQRMH.......................................................................................................................................................................504
MQFREE......................................................................................................................................................................508
MSMQ Functional Interface.......................................................................................................................................509
SAS® Integration Technologies: Developer's Guide
x
Table of Contents
Writing MSMQ Applications......................................................................................................................................510
MSMQ Code Samples..................................................................................................................................................511
MSMQ CALL Routines...............................................................................................................................................529
MSMQ CALL Routines...............................................................................................................................................530
MSMQCREATEQUEUE............................................................................................................................................531
MSMQDELETEQUEUE............................................................................................................................................534
MSMQOPENQUEUE.................................................................................................................................................535
MSMQCLOSEQUEUE...............................................................................................................................................537
MSMQPATHTOFORMAT........................................................................................................................................538
MSMQINSTTOFORMAT..........................................................................................................................................540
MSMQHNDLTOFORMAT........................................................................................................................................541
MSMQSENDMSG.......................................................................................................................................................542
MSMQRECEIVEMSG...............................................................................................................................................546
MSMQCREATECURSOR.........................................................................................................................................551
MSMQCLOSECURSOR............................................................................................................................................552
MSMQBEGINTRANS................................................................................................................................................553
MSMQCOMMITTRANS...........................................................................................................................................554
MSMQABORTTRANS...............................................................................................................................................555
MSMQRELEASETRANS...........................................................................................................................................556
MSMQLOCATE..........................................................................................................................................................557
MSMQGETQPROP....................................................................................................................................................561
MSMQSETQPROP.....................................................................................................................................................564
MSMQGETQSEC.......................................................................................................................................................566
SAS® Integration Technologies: Developer's Guide
xi
Table of Contents
MSMQSETQSEC........................................................................................................................................................568
MSMQGETSCONTEXT............................................................................................................................................570
MSMQFREESCONTEXT..........................................................................................................................................571
MSMQMAP..................................................................................................................................................................572
MSMQSETPARMS.....................................................................................................................................................574
MSMQGETPARMS....................................................................................................................................................575
MSMQFREE................................................................................................................................................................576
Common Messaging Interface....................................................................................................................................577
Writing Applications Using the Common Messaging Interface..............................................................................578
Using TIB/Rendezvous with the SAS Common Messaging Interface.....................................................................581
TIB/Rendezvous Coding Example..............................................................................................................................583
TIB/Rendezvous Certified Messaging Coding Examples.........................................................................................586
Using a Repository with Application Messaging.......................................................................................................593
Using the SAS Registry with the Common Messaging Interface.............................................................................594
Using an LDAP Server with the Common Messaging Interface.............................................................................598
Common Messaging Interface CALL Routines........................................................................................................603
SAS CALL Routines for the Common Messaging Interface...................................................................................604
SETALIAS....................................................................................................................................................................605
SETMAP.......................................................................................................................................................................607
SETMODEL.................................................................................................................................................................609
GETALIAS...................................................................................................................................................................613
GETMAP......................................................................................................................................................................615
GETMODEL................................................................................................................................................................617
SAS® Integration Technologies: Developer's Guide
xii
Table of Contents
DELETEALIAS...........................................................................................................................................................619
DELETEMAP..............................................................................................................................................................621
DELETEMODEL........................................................................................................................................................622
INIT...............................................................................................................................................................................624
TERM............................................................................................................................................................................626
OPENQUEUE..............................................................................................................................................................627
CLOSEQUEUE............................................................................................................................................................631
SENDMESSAGE.........................................................................................................................................................633
RECEIVEMESSAGE..................................................................................................................................................642
PARSEMESSAGE.......................................................................................................................................................647
BEGINTRANSACTION.............................................................................................................................................649
Commit..........................................................................................................................................................................650
Abort.............................................................................................................................................................................651
FREETRANSACTION...............................................................................................................................................652
GETATTACHMENT..................................................................................................................................................653
ACCEPTATTACHMENT..........................................................................................................................................656
GETQUEUEPROPS....................................................................................................................................................658
Attachment Layout for Websphere MQ and MSMQ...............................................................................................661
Attachment Layout for TIB/Rendezvous...................................................................................................................665
Attachment Error Handling.......................................................................................................................................674
Developing Java Clients...............................................................................................................................................677
Java Client Installation and JRE Requirements.......................................................................................................678
Java Client Security.....................................................................................................................................................679
SAS® Integration Technologies: Developer's Guide
xiii
Table of Contents
Using the IOM Server..................................................................................................................................................680
Using the Java Connection Factory............................................................................................................................682
Connecting with Directly Supplied Server Attributes..............................................................................................685
Connecting with Server Attributes Read from a SAS Metadata Server................................................................687
Connecting with Server Attributes Read from an LDAP Server............................................................................690
Connecting with Server Attributes Read from the Information Service................................................................692
Java Connection Factory Language Service Example.............................................................................................694
Logging Java Connection Factory Activity...............................................................................................................695
Using Failover...............................................................................................................................................................697
Using Load Balancing..................................................................................................................................................698
Using Connection Pooling...........................................................................................................................................699
Pooling with Directly Supplied Server Attributes....................................................................................................701
Pooling with Server Attributes Read from a Metadata Server...............................................................................705
Pooling with Server Attributes Read from the Information Service......................................................................706
Returning Connections to the Java Connection Factory.........................................................................................708
Using Java CORBA Stubs for IOM Objects.............................................................................................................710
Null References.............................................................................................................................................................711
Exception Handling......................................................................................................................................................712
Output Parameters......................................................................................................................................................713
Generic Object References..........................................................................................................................................714
IOM Objects that Support More Than One Stub.....................................................................................................715
Events and Connection Points....................................................................................................................................716
Datetime Values............................................................................................................................................................719
SAS® Integration Technologies: Developer's Guide
xiv
Table of Contents
Getting a JDBC Connection Object...........................................................................................................................720
Using the Java Workspace Factory............................................................................................................................721
Connecting with Directly Supplied Server Properties..............................................................................................722
Connecting with Server Properties Read from an LDAP Server............................................................................727
Java Workspace Factory Language Service Example..............................................................................................732
Returning a Workspace to the Java Workspace Factory........................................................................................733
SAS Foundation Services.............................................................................................................................................735
Connection Service.......................................................................................................................................................736
Discovery Service.........................................................................................................................................................737
Event Broker Service...................................................................................................................................................738
Information Service.....................................................................................................................................................739
Logging Service............................................................................................................................................................740
Publish Service.............................................................................................................................................................741
Security Service............................................................................................................................................................742
Session Service..............................................................................................................................................................743
Stored Process Service.................................................................................................................................................744
User Service..................................................................................................................................................................745
Developing Windows Clients.......................................................................................................................................746
Client Requirements....................................................................................................................................................747
Client Installation.........................................................................................................................................................748
Windows Client Security.............................................................................................................................................750
Selecting a Windows Programming Language.........................................................................................................755
Programming with Visual Basic.................................................................................................................................756
SAS® Integration Technologies: Developer's Guide
xv
Table of Contents
Programming in the .NET Environment...................................................................................................................766
Using VBScript.............................................................................................................................................................779
Programming with Visual C++...................................................................................................................................784
Using the SAS Object Manager..................................................................................................................................786
Creating an Object.......................................................................................................................................................788
SAS Object Manager Interfaces.................................................................................................................................791
Using a Metadata Server with the SAS Object Manager.........................................................................................792
Metadata Configuration Files.....................................................................................................................................794
SAS Object Manager Error Reporting......................................................................................................................796
SAS Object Manager Code Samples..........................................................................................................................798
Using Connection Pooling...........................................................................................................................................801
Choosing SAS Integration Technologies or COM+ Pooling....................................................................................803
Using SAS Integration Technologies Pooling............................................................................................................804
Using COM+ Pooling..................................................................................................................................................807
Pooling Samples............................................................................................................................................................810
Using the SAS IOM Data Provider............................................................................................................................811
Using the Workspace Manager...................................................................................................................................812
Launching IOM Servers..............................................................................................................................................813
Administering the SAS Workspace Manager...........................................................................................................815
SASWorkspaceManager Interfaces...........................................................................................................................816
Error Reporting...........................................................................................................................................................819
Using Workspace Pooling............................................................................................................................................821
Code Samples................................................................................................................................................................828
SAS® Integration Technologies: Developer's Guide
xvi
Table of Contents
Directory Services........................................................................................................................................................832
Directory Services Overview.......................................................................................................................................833
Directory Services and Integration Technologies.....................................................................................................838
Application Interfaces..................................................................................................................................................840
LDAP CALL Routine Interface..................................................................................................................................841
LDAPS_ADD................................................................................................................................................................842
LDAPS_ATTRNAME.................................................................................................................................................844
LDAPS_ATTRVALUE...............................................................................................................................................846
LDAPS_CLOSE...........................................................................................................................................................848
LDAPS_DELETE........................................................................................................................................................849
LDAPS_ENTRY...........................................................................................................................................................850
LDAPS_FREE..............................................................................................................................................................852
LDAPS_MODIFY........................................................................................................................................................853
LDAPS_OPEN.............................................................................................................................................................855
LDAPS_SETOPTIONS...............................................................................................................................................857
LDAPS_SEARCH........................................................................................................................................................859
Adding a Directory Entry to an LDAP Server..........................................................................................................861
Searching an LDAP Directory....................................................................................................................................863
LDAP SCL Interface...................................................................................................................................................865
_ADD.............................................................................................................................................................................866
_CLOSE........................................................................................................................................................................868
_DELETE.....................................................................................................................................................................869
_MODIFY.....................................................................................................................................................................870
SAS® Integration Technologies: Developer's Guide
xvii
Table of Contents
_OPEN...........................................................................................................................................................................872
_SETOPTIONS............................................................................................................................................................875
_SEARCH.....................................................................................................................................................................877
SAS® Integration Technologies: Developer's Guide
xviii

SAS® Integration Technologies: Developer's Guide
This Developer's Guide provides guidance and reference materials for performing the various types of development
tasks that might be required for an Integration Technologies implementation, including:
using the Stored Processes interface to enable client applications to execute SAS programs that are stored
centrally on a server. Instructions are provided for the following tasks:
creating a SAS program that can execute as a stored process♦ implementing a repository for stored processes♦ creating a client application that invokes a stored process and which processes the results of a stored
process
♦
using the Publishing Framework to publish the results of a stored process♦
•
using SAS BI Web Services to enable client applications to obtain metadata about and execute SAS Stored
Processes using the XML for Analysis (XMLA) Version 1.1 interface.
•
using the Publishing Framework to implement proactive delivery of information to users throughout the
enterprise. Instructions and reference documentation are provided for the following tasks:
using SAS CALL routines and third−party programs to publish and retrieve packages of digital
content by way of archive locations, channels, e−mail, message queues, and WebDAV−compliant
servers
♦
using SAS CALL routines to publish electronic events♦ creating viewer templates to format package content for display♦ using the SAS Publisher, SAS Package Reader, and SAS Package Retriever applications to publish
and retrieve packages
♦
using the SAS Subscription Manager to manage users' subscriptions to publication channels
Note: Subscription Manager will not be supported in future releases of SAS Integration Technologies.
The Subscription Manager functionality will be delivered via a new interface that will continue to
allow users to manage their own channel subscriptions.
♦
•
using the CALL routines in the Application Messaging Interface to incorporate messaging services into your
SAS programs. Instructions and reference documentation are provided for the following interfaces:
IBM WebSphere MQ Interface♦ Microsoft Message Queuing Services (MSMQ) Interface♦ Common Messaging Interface, which supports TIBCO TIB/Rendezvous as well as WebSphere MQ
and MSMQ.
♦
•
using the IOM Java client interface to write applets, stand−alone applications, servlets, and Enterprise
JavaBeans that interact with IOM servers. This interface supports industry standards such as CORBA and
Java Database Connectivity (JDBC). Instructions and reference documentation are provided for the following
tasks:
installing SAS Java client components♦ using the Connection Factory to connect a Java client to an IOM server♦ using Java CORBA stubs for IOM objects and JDBC connection objects to exploit SAS analytical and
reporting functions in the IOM server
♦
returning a connection to the Connection Factory♦ encrypting messages that are exchanged with IOM servers♦
Instructions are also provided for using the Workspace Factory to access an IOM server.
•
SAS® Integration Technologies: Developer's Guide 1

using the IOM Windows client to write Microsoft Windows applications that interact with IOM servers. The
Microsoft Component Object Model (COM), on which the Windows client interface is based, is built into the
Windows operating system and into all of the leading programming language products. Instructions and
reference documentation are provided for the following tasks:
installing SAS Windows client components♦ implementing security through the use of server user IDs, client user IDs, and encryption♦ developing client applications in the Visual Basic, C++, and VBScript environments♦ using the Object Manager or Workspace Manager to access an IOM server♦ using the SAS IOM Data Provider to access SAS data sets on IOM servers in conformance with
Microsoft's OLE DB specification
♦
•
using the Directory Services to incorporate LDAP directory services functions into your SAS programs.
Instructions and reference documentation are provided for the following tasks:
using LDAP CALL routines to add, delete, modify, and search entries on an LDAP server♦ using the LDAPSERVICES class of the SAS Component Language (SCL) to add, delete, modify, and
search entries on an LDAP server
♦
•
For high level overviews of the Integration Technologies features, refer to the SAS Integration Technologies Technical
Overview. For guidance in performing the system administration tasks associated with Integration Technologies, refer
to the SAS Integration Technologies: Administrator's Guide, the SAS Integration Technologies: Server Administrator's
Guide or the SAS Integration Technologies: Administrator's Guide (LDAP version).
SAS Stored Processes
SAS® Integration Technologies: Developer's Guide
SAS® Integration Technologies: Developer's Guide 2

SAS Stored Processes
A stored process is a SAS program that is stored on a server and can be executed as required by requesting
applications. You can use stored processes for Web reporting, analytics, building Web applications, delivering
packages to clients or to the middle tier, and publishing results to channels or repositories. Stored processes can also
access any SAS data source or external file and create new data sets, files, or other data targets supported by SAS.
The ability to store your SAS programs on the server provides an effective method for change control management.
For example, instead of embedding the SAS code into client applications, you can centrally maintain and manage this
code from the server. This gives you the ability to change your SAS programs and at the same time ensure that every
client that invokes a stored process will always get the latest version available.
The stored process concept becomes even more powerful when you consider that these SAS programs can be invoked
from multiple client contexts. For example, you might deploy Java applets and Windows−based applications that
invoke your stored processes. If your strategy is to use a multi−tiered architecture, you can use Enterprise JavaBeans
(EJB) technology, for example, to invoke the same stored processes from an application server.
Using stored processes also enhances security and application integrity because the programs that access your
sensitive data are contained on the server instead of being widely distributed with the client applications.
There are two different types of stored processes. A limited form of stored processes, IOM Direct Interface Stored
Processes, was introduced in Version 8. This type of stored process operates on a SAS Workspace Server and
produces packages only. IOM Direct Interface Stored Processes are still fully supported. However, the focus of this
documentation is on SAS Stored Processes. SAS Stored Processes are new with SAS Integration Technologies 9, and
they can be used with either a SAS Workspace Server (to produce packages) or a SAS Stored Process Server (to
produce packages or streaming results).
You must use a SAS Metadata Server to administer SAS Stored Processes. To make a stored process accessible to
client applications, you must allocate a storage location that your server can access. Then, use BI Manager to create
metadata that describes the stored process and its location. BI Manager stores this metadata on the SAS Metadata
Server so that it can be accessed by client applications.
Note: BI Manager is available beginning with SAS Foundation Services 1.2. If you have not upgraded to this release,
then you can use Stored Process Manager to register and manage stored processes. BI Manager replaces Stored
Process Manager. For more information about using BI Manager to create and maintain the metadata defining a stored
process, see the Help in SAS Management Console.
SAS Stored Processes
SAS Stored Processes 3
Stored Process Software Requirements
General Requirements
To manage and execute SAS Stored Processes for any client environment, you must have the following components
installed:
SAS System software• SAS Management Console• BI Manager plug−in (a component of SAS Foundation Services)•
Client−Specific Requirements
Stored processes can be accessed from many different client environments. Software requirements vary depending on
the client environment.
To use SAS Stored Processes in a Web application environment, the following components are recommended:
Java Runtime Environment (JRE) or Java Development Kit (JDK)• Servlet container• SAS Web Infrastructure Kit or SAS Information Delivery Portal•
To use SAS Stored Processes in a Java application, the following components are required:
Java Development Kit (JDK)• Servlet container (for servlets or JSPs only)• SAS Foundation Services•
To access SAS Stored Processes from Microsoft Office, the following component is required:
SAS Add−In for Microsoft Office•
To access SAS Stored Processes from a Web services client, install one of the following components:
SAS BI Web Services for Java• SAS BI Web Services for .NET•
To author SAS Stored Processes in a task oriented user interface, install the following component:
SAS Enterprise Guide•
You can install all of the components on a single system or install them across multiple systems. A development
system might have all of the components on a single desktop system while a production system might have SAS
installed on one or more systems, a servlet container on another system, and client software installed on multiple
client desktop systems. See the product documentation for the individual components for specific requirements on
host platforms.
Stored Process Software Requirements 4

Components
SAS System software
Install SAS 9.1 on your designated SAS server. You must install Base SAS and SAS Integration Technologies
to run stored processes. SAS/GRAPH software is required to run some of the sample stored processes. Install
any other products that are used by your stored processes. You must also configure a SAS Metadata Server in
order to create and use stored processes. You must configure one or more stored process servers or workspace
servers to execute stored processes.
SAS Management Console
Install SAS Management Console on any system with network access to your SAS server.
SAS Foundation Services
You must install the BI Manager plug−in component of SAS Foundation Services on the same system where
you have installed SAS Management Console. This plug−in enables you to register and administer stored
processes from within SAS Management Console.
You also must install the SAS Foundation Services on systems where you develop Java applications that
access stored processes.
Java Runtime Environment (JRE)
The Java interface to SAS Stored Processes requires the Java 2 Runtime Environment (JRE), Standard
Edition. See the installation instructions for SAS Foundation Services for information about the specific
version required for your operating environment. Some development environments and servlet containers
include a copy of the appropriate version of the Java 2 JRE. If you need a copy, you can download it from the
Third−Party software CD in the SAS Installation Kit.
If you are developing Java applications or creating Java Server Pages (JSPs), then you also need the Java 2
Software Development Kit (SDK), which includes a copy of the Java 2 JRE.
Java Development Kit (JDK)
Java developers or servlet containers executing Java Server Pages (JSPs) require the Java 2 Software
Development Kit (SDK), Standard Edition. See the installation instructions for SAS Foundation Services for
information about the specific version required for your operating environment. Some development
environments and servlet containers include a copy of the appropriate version of the Java 2 SDK. If you need
a copy, you can download it from the Third−Party software CD in the SAS Installation Kit.
Servlet Container
A servlet container is a Java server that can act as a middle−tier access point to SAS Stored Processes. A
servlet container can be used to host the SAS Web Infrastructure Kit, SAS Information Delivery Portal, or
user−written servlets or Java Server Pages. See the respective product documentation for specific servlet
container requirements for the SAS Web Infrastructure Kit or SAS Information Delivery Portal software.
Servlet containers used for user−written servlets or JSPs must include a JRE version compatible with the SAS
9.1 requirements for the operating environment. The Apache Tomcat servlet container is available at no cost
from the Apache Jakarta project's Web site at http://jakarta.apache.org/.
SAS Web Infrastructure Kit and SAS Information Delivery Portal
The SAS Web Infrastructure Kit is installed on a servlet container and includes the SAS Stored Process Web
Application. This Web application enables you to execute stored processes from a Web browser or other Web
client. The SAS Information Delivery Portal includes the SAS Web Infrastructure Kit and provides the same
Web access to stored processes.
SAS Add−In for Microsoft Office
The SAS Add−In for Microsoft Office must be installed on a client Windows system to execute stored
processes from Microsoft Office on that system. The SAS Integration Technologies client for Windows must
also be installed on the same system.
SAS BI Web Services for Java
SAS® Integration Technologies: Developer's Guide
Stored Process Software Requirements 5
SAS BI Web Services for Java requires that several other components be installed, including the SAS Web
Infrastructure Kit. Refer to the installation instructions for SAS BI Web Services for Java for more
information about required components.
SAS BI Web Services for .NET
SAS BI Web Services for .NET requires the Microsoft IIS Web server.
SAS Enterprise Guide
SAS Enterprise Guide is a Microsoft Windows client application that can be installed on any system with
network access to your SAS server.
SAS Stored Processes
SAS® Integration Technologies: Developer's Guide
Stored Process Software Requirements 6

Creating Stored Processes
A stored process is a SAS program that is hosted on a server and described by metadata. Stored processes can be
written by anyone who is familiar with the SAS programming language or with the aid of a SAS code generator such
as SAS Enterprise Guide. The basic steps to creating a stored process are as follows:
Writing the Stored Process1. Choosing or Defining a Server2. Registering the Metadata3.
Writing the Stored Process
Almost any SAS program can be a stored process. A stored process can be written using the SAS program editor, SAS
Enterprise Guide, or any text editor. The following program is a typical stored process:
*ProcessBody;
%stpbegin;
title "Shoe Sales By Region and Product";
footnote;
proc report data=sashelp.shoes nowindows;
column region product sales;
define region / group;
define product / group;
define sales / analysis sum;
break after region / ol summarize suppress skip;
run;
%stpend;
The program begins with a standard comment that initiates input parameter processing, if any. The %STPBEGIN and
%STPEND macros initialize the Output Delivery System (ODS) and deliver the output (in this case, a report) to the
client. This stored process is capable of generating multiple output formats including HTML, XML, PDF, CSV, and
custom tagsets and then delivering the output through various techniques including streaming output, a client package,
a server−side archive package, or a WebDAV collection.
Note: You should not use the %STPBEGIN and %STPEND macros if your stored process does not use ODS or if
your stored process writes directly to the _WEBOUT fileref.
Choosing or Defining a Server
You must choose a server to host your stored process. Servers are defined in metadata and are actually logical server
definitions that can represent one or more physical server processes. There are many options including pre−started
servers, servers started on demand, and servers distributed across multiple hardware systems. You can use the Server
Manager in SAS Management Console to create or modify server definitions. For more information about server
configurations, see SAS Integration Technologies: Server Administrator's Guide.
Because the logical server description in metadata hides the server implementation details, a stored process can be
moved to or associated with any appropriate server without modifying the stored process. Moving a stored process
from one server to another requires only changing the metadata association and moving the source code if necessary.
Note that a stored process is the combination of a SAS program, the server that hosts that program, and the metadata
that describes and associates the two. It is not possible to create a stored process that is associated with more than one
Creating Stored Processes 7

server, although it is possible to create stored processes that share the same SAS program, or source code file.
Stored processes can be hosted by two types of servers: SAS Stored Process Servers and SAS Workspace Servers. The
two servers are similar, but have different capabilities and are targeted at different use cases.
Stored Process Server
The stored process server is a multi−user server. A single server process can be shared by many clients. The
recommended load−balancing configuration enables client requests to be serviced by multiple server processes across
one or more hardware systems. This approach provides a high−performance, scalable server, but imposes some
restrictions. Because the same server handles requests from multiple users, it cannot easily impersonate that user to
perform security checks. By default, the server runs under a single, shared user identity (defined in metadata) for all
requests. All security checks based on client identity must be performed in the stored process. For more information
about stored process server security, refer to the section about Planning Security on Workspace and Stored Process
Servers.
The stored process server implements several features that are not available on the workspace server, including
streaming output, sessions, and multiple−value input parameters. Stored process Web services are only supported on
the stored process server.
Workspace Server
The workspace server is a single−user server. A new server process is started for each client. This approach is not as
scalable as the load−balanced stored process server, but it has a major security advantage. Each server is started under
the client user identity and is subject to host operating environment permissions and rights for that client user. The
workspace server also provides additional functionality, including data access and execution of client−submitted SAS
code. For more information about workspace server security, refer to the section about Planning Security on
Workspace and Stored Process Servers.
Some features available on the stored process server are not available on the workspace server, as described in the
previous section. Information map stored processes are supported only on the workspace server.
Using Source Code Repositories
Stored processes are stored in external files with a .sas extension. The .sas file must reside in a directory that is
registered with the server that executes the stored process. These directories are known as source code repositories.
Source code repositories are managed using BI Manager. After you choose a server for your stored process in BI
Manager, you are presented with a list of available source code repositories. You can choose an existing source code
repository or click Manage to add or modify source code repositories.
For z/OS, the program can be contained in an HFS .sas file or in a member of a partitioned data set (PDS). Source
code repositories can be either HFS directories or a partitioned data set.
Registering the Stored Process Metadata
After you write the stored process and define or choose a server, you must register the metadata using BI Manager.
(SAS Enterprise Guide users can perform the same steps within the Enterprise Guide application.) The New Stored
Process Wizard can be used to create new stored processes, or you can use the Stored Process Properties dialog box in
BI Manager to modify existing stored processes. BI Manager enables you to specify and manage the following
information for stored processes:
SAS® Integration Technologies: Developer's Guide
Creating Stored Processes 8

Folder specifies a collection of stored processes. The folders are defined in metadata and do not correspond to any
physical location. The folder hierarchies used for stored processes can also hold SAS reports, information
maps, and administrative metadata. You can create and modify folders using BI Manager.
Name specifies the stored process name, which acts as both a display label and as part of the URI for the stored
process.
Description
specifies an optional text description of the stored process.
Keywords
specifies an optional list of keywords to associate with the stored process. Keywords are arbitrary text strings
typically used for searching or to indicate specific capabilities. For example, the keyword XMLA Web
Service is used to indicate a stored process that can be executed by SAS BI Web Services.
SAS server
specifies the server that executes the stored process.
Source Code Repository and Source Code File
specifies the directory and source code file containing the stored process.
Input specifies an optional list of input streams. Input streams can be used to send data that are too large to be
passed in parameters from the client to the executing stored process.
Output specifies the stored process result type.
Parameters
specifies an optional definition of parameters.
Authorization
specifies access controls for the stored process. Currently only the ReadMetadata and WriteMetadata
permissions are honored. A user must have ReadMetadata permission to execute the stored process.
WriteMetadata permission is required to modify the stored process definition.
You are now ready to use the stored process from a variety of clients including the SAS Stored Process Web
Application, the SAS Information Delivery Portal, the SAS Add−In for Microsoft Office, SAS Enterprise Guide, and
user−written Java applications and JSPs.
SAS Stored Processes
SAS® Integration Technologies: Developer's Guide
Creating Stored Processes 9

Input Parameters
Most stored processes require information from the client to perform their intended function. This information can be
in the form of presentation options for a report, selection criteria for data to be analyzed, names of data tables to be
used or created, or an unlimited number of other possibilities. Input parameters are the most common way to deliver
information from a client to a stored process.
Input parameters are defined as name/value pairs. They appear in a stored process program as global macro variables.
For example, if you have a stored process that analyzes monthly sales data, you might accept MONTH and YEAR as
input parameters. The stored process program might be:
*ProcessBody;
%stpbegin;
title "Product Sales for &MONTH, &YEAR";
proc print data=sales;
where Month eq "&MONTH" and Year eq &YEAR;
var productid product sales salesgoal;
run;
%stpend;
Because input parameters are simply macro variables, they can be accessed through normal macro substitution syntax
(¶m−name) or through any other SAS functions that access macro variables (SYMGET, SYMGETC, or
SYMGETN). Parameters follow the same rules as SAS macro variables. Names must start with an alphabetic character
or underscore and can contain only alphanumeric characters or underscores. The name can be no more than 32
characters long and is case−insensitive. Values can contain any character except a null character and can be up to
65534 characters in length on the stored process server. Values are limited to approximately 5950 bytes in length and
cannot contain non−printing characters (including line feeds or carriage returns) on the workspace server.
Each stored process client interface provides one or more methods to set input parameters. The Stored Process Service
API provides a direct programming interface to set name/value pairs. The SAS Stored Process Web Application
allows name/value pairs to be specified directly on a URL or indirectly through posting HTML form data. The SAS
Add−In for Microsoft Office provides a property sheet interface to specify parameters.
There are many reserved parameters that are created by the server or the stored process client interface. See Reserved
Macro Variables for a list of these variables.
Standard Header for Parameters
Parameters are not initialized in the same way for the stored process server and the workspace server. The stored
process server sets parameter values before the stored process begins to execute. This means the first line of code in
the stored process can access any input parameter macro variable. The workspace server does not set input parameters
into macro variables until it reaches a *ProcessBody; comment line in the stored process:
*ProcessBody;
A stored process that does not contain this line will never receive input parameters when executed on a workspace
server.
It is recommended that you begin all stored processes (regardless of the server types) with %GLOBAL declarations for
Input Parameters 10
all of your input parameters followed by the *ProcessBody; comment:
/* *****************************************************
* Standard header comment documenting your
* stored process and input parameters.
* ************************************************** */
%global parmone parmtwo parmthree;
%global parmfour;
*ProcessBody;
... remainder of the stored process ...
The %GLOBAL declarations create an empty macro variable for each possible input parameter and enable you to
reference the macro variable in the stored process even if it was not set by the stored process client. If you do not
declare input parameters in a %GLOBAL statement, then any references to an unset input parameter will result in
WARNING messages in the SAS log.
Defining Parameters
Most stored process client interfaces allow a client to pass any input parameter. There is no requirement to define
parameters before executing the stored process, but there are many advantages to describing parameters in stored
process metadata:
Parameter definitions can specify labels and descriptive text. This information can be used by client interfaces
to present a more attractive and informative user interface. Other presentation options include grouping
parameters and expert flags.
•
Default values can be specified. The default value is used if the parameter value is not specified by the client.• Default values can optionally be flagged as non−modifiable to allow a fixed parameter value to always be
passed into a stored process. This can be useful when using an existing program that accepts many input
parameters. You can register a new, simpler stored process that has some fixed value parameters and fewer
client specified parameters.
You can also register multiple stored processes for a single program. Each stored process definition can pass
in unique fixed parameter values to the executing program to force a particular operation or otherwise affect
the execution of the stored process.
•
Parameters can be flagged as required. A stored process will not run unless the client specifies these
parameters.
•
Parameters can be limited to a specific type such as Boolean, Integer, or Float. Defining a parameter type
causes certain client user interfaces (such as the SAS Add−In for Microsoft Office) to present more
appropriate input controls. All interfaces will reject stored process requests with input parameters that do not
match the specified type.
•
Parameter values can be limited by constraints. Constraints can specify enumerated lists or ranges of valid
values for a parameter. Note that constraints are currently only supported by the SAS Add−In for Microsoft
Office interface. Other stored process interfaces do not enforce constraints.
•
Parameter metadata for a stored process can be added or modified using BI Manager.
Note: Multi−line text parameters are not supported for stored processes on workspace servers.
SAS® Integration Technologies: Developer's Guide
Input Parameters 11

Special Character Quoting
Input parameter values are specified by the stored process client at run time. The author of a stored process has little
control over the values a client can specify. Setting the values directly into SAS macro variables would allow clients
to insert executable macro code into a stored process and could lead to unexpected behavior or unacceptable security
risks. For example, if an input parameter named COMP was set to "Jones&Comp." and passed directly into the
macro variable, any references to &COMP in the stored process program would lead to an invalid recursive macro
reference. To avoid this problem, stored process parameters are masked with SAS macro quoting functions before
being set into macro variables. In the previous example, the parameter COMP would be set with the equivalent of:
%let COMP=%nrstr(Jones&Comp.);
The stored process can then freely use &COMP without special handling for unusual input values. Special characters
that are masked for input parameters are the ampersand (&), apostrophe ('), percent sign (%), quotation marks ("), and
semicolon (;).
There might be special cases where you want to unmask some or all of the special characters in an input parameter.
The STPSRV_UNQUOTE2 function unmasks only matched apostrophe (') or quotation mark (") characters. This can
be useful for passing in parameters that are used as SAS options. The %UNQUOTE macro function unquotes all
characters in an input parameter, but you should only use this function in very limited circumstances. You should
carefully analyze the potential risk from unexpected client behavior before unquoting input parameters. Remember
that stored processes can be executed from multiple clients and some client interfaces perform little or no checking of
input parameter values before they are passed to the stored process.
Note: An input parameter to a stored process executing on a workspace server cannot contain both apostrophe (') and
quotation mark (") characters. Attempting to set such an input parameter will result in an error.
Multiple Values
Parameters with multiple values (or alternatively, multiple input parameters with the same name) can be useful in
some stored processes. For example, an HTML input form used to drive a stored process might contain a group of
four check boxes, each named CBOX. The value associated with each box is optOne, optTwo, optThree, and optFour.
The HTML for these check boxes might be
<input type="CHECKBOX" name="CBOX" value="optOne">
<input type="CHECKBOX" name="CBOX" value="optTwo">
<input type="CHECKBOX" name="CBOX" value="optThree">
<input type="CHECKBOX" name="CBOX" value="optFour">
If you select all four boxes and submit the form to the SAS Stored Process Web Application, then the query string
looks like
&CBOX=optOne&CBOX=optTwo&CBOX=optThree&CBOX=optFour
Macro variables cannot hold more than one value. The two types of servers that execute stored processes handle this
problem in different ways.
Note: Stored processes running on a workspace server have access only to the last value specified for the parameter.
All other values are lost.
SAS® Integration Technologies: Developer's Guide
Input Parameters 12

The stored process server uses a macro variable naming convention to pass multiple values to the stored process. A
numeric suffix is added to the parameter name to distinguish between values. The number of values is set in
<param−name>0, the first value is set in <param−name>1, and so on. In the previous example, the following
macro variables are set as follows:
CBOX = optOne
CBOX0 = 4
CBOX1 = optOne
CBOX2 = optTwo
CBOX3 = optThree
CBOX4 = optFour
Note that the original parameter macro variable (CBOX) is always set to the first parameter value.
Any client application can generate multiple value parameters. The typical uses for multiple values are check box
groups in HTML input forms and selection lists that allow multiple selection.
Hiding Passwords and Other Sensitive Data from the SAS Log
The SAS log exposes programs and input parameters, which could pose a security issue. There are some actions you
can take to hide passwords and other sensitive data from the SAS log. Password values are hidden from the SAS log
for any input parameters with _PASSWORD anywhere in the parameter name (for example, ABC_PASSWORD,
_PASSWORDABC). You can disable the SAS log with the DebugMask Web application initialization parameter.
You can also use the prefix _NOLOG_ with macro variables to hide request variable values.
The _NOLOG_ feature enables you to create special macro variables that can be sent to the stored process server
without publishing the macro variable values in the SAS log. The special macro variables must start with the prefix
_NOLOG_. The prefix is case insensitive. For example:
http://yourserver/SASStoredProcess/do?
&_program=/WebApps/Sales/Employee+Salary&_nolog_salary=secretpw
If _NOLOG_SALARY is displayed in the SAS logs, it shows
_NOLOG_SALARY=XXXXXXXX;
SAS Stored Processes
SAS® Integration Technologies: Developer's Guide
Input Parameters 13

Result Types
A stored process is a SAS program and can produce any kind of output that a valid SAS program can produce. Output
could include data sets, external files, e−mail messages, SAS catalogs, packages, and many other objects. In some
cases, output (or a "result") is delivered to the client application executing the stored process. In other cases, the output
is generated only on the server. When creating a stored process, you must describe any output that is returned to the
client. There are four types of client output.
The simplest result type is None. The client receives no output from the stored process. The stored process is
still able to create or update data sets, external files or other objects, but this output remains on the server.
This result type is indicated by the input parameter _RESULT set to STATUS, because only the program
status is returned to the client.
•
Streaming output delivers a data stream, such as an HTML page or XML document, to the client. This result
type is indicated by _RESULT set to STREAM. The data stream can be textual or binary data and is visible to
the stored process program as the _WEBOUT fileref. Any data written to the _WEBOUT fileref is streamed
back to the client application. Streaming output is supported only on the stored process server. Stored
processes executing on a workspace server cannot use streaming output.
•
Transient package output returns a temporary package to the client. The package can contain multiple entries,
including SAS data sets, HTML files, image files, or any other text or binary files. The package exists only as
long as the client is connected to the server. This result type is a convenient way to deliver multiple output
objects (such as an HTML page with associated GIF or PNG images) to a client application. Transient
package output is available on both stored process and workspace servers, but the implementations differ. On
the stored process server, transient package output is indicated by _RESULT set to PACKAGE_TO_ARCHIVE
and the input parameter _ARCHIVE_PATH set to TEMPFILE. On the workspace server, transient package
output is indicated by _RESULT set to PACKAGE_TO_REQUESTER.
•
Permanent package output creates a package in a permanent location on a WebDAV server or in the server
file system. The package is immediately accessible to the stored process client, but is also permanently
accessible to any client with access to WebDAV or the server file system. This result type is a convenient way
to publish output for permanent access.
Output to WebDAV is indicated by _RESULT set to PACKAGE_TO_WEBDAV. The input parameter
_COLLECTION_URL contains the target location. The input parameters _HTTP_USER and
_HTTP_PASSWORD might be set if the WebDAV server is secured and credentials are available.
_HTTP_PROXY_URL is set if an HTTP proxy server is required to access the WebDAV server. Output to
the server file system is indicated by _RESULT set to PACKAGE_TO_ARCHIVE. The input parameters
_ARCHIVE_PATH and _ARCHIVE_NAME contain the target repository and filename, respectively.
•
Note that although the result type is chosen when you define a stored process, the result type can be changed by the
client application through calls to the Stored Process Service API. Where possible, it is recommended that you write
stored processes to support any appropriate client result type. This enables a client application to select the result type
most appropriate for that application. The program can determine the desired client result type by examining the
_RESULT input parameter. The %STPBEGIN and %STPEND macros include support for any of the four result
types. The following stored process is capable of generating streaming, transient package, or permanent package
output. (It can also be run with _RESULT set to STATUS, but this would produce no useful result.)
*ProcessBody;
%stpbegin;
proc print data=SASHELP.CLASS noobs;
var name age height;
run;
%stpend;
Result Types 14

The input parameters mentioned previously are set by the stored process client APIs and are reserved parameters.
They cannot be overridden by passing in new values through the normal parameter interface. Special API methods are
provided to set the result type and associated parameters for a stored process. See Reserved Macro Variables for more
information about specific input parameters.
SAS Stored Processes
SAS® Integration Technologies: Developer's Guide
Result Types 15

%STPBEGIN and %STPEND
The %STPBEGIN and %STPEND macros provide standardized functionality for generating and delivering output
from a stored process. This enables you to write stored processes that generate content in a variety of formats and
styles with minimal programming effort. A typical stored process using these macros follows:
/* *****************************************************
* Header comment documenting your
* stored process and input parameters.
* ************************************************** */
%global input parameters;
*ProcessBody;
... any pre−processing of input parameters ...
%stpbegin;
... stored process body ...
%stpend;
Note: You must include a semicolon at the end of the %STPBEGIN and %STPEND macro calls.
The %STPBEGIN macro initializes the Output Delivery System (ODS) to generate output from the stored process.
The %STPEND macro terminates ODS processing and completes delivery of the output to the client or other
destinations. The macros must be used as a matched pair for proper operation. Streaming output and package output
are supported. These macros rely on many reserved macro variables to control their actions. See the section on
Reserved Macro Variables for a more detailed description of each macro variable mentioned in the following sections.
Stored processes that do not use ODS to generate output should not use these macros or should set _ODSDEST to
NONE to disable ODS initialization. In this case, your stored process must explicitly create any output.
ODS Options
ODS options are specified by various global macro variables. These variables are normally set by input parameters,
but can be modified by the stored process. The following variables affect ODS output:
_ENCODING• _GOPT_DEVICE• _GOPT_HSIZE• _GOPT_VSIZE• _GOPT_XPIXELS• _GOPT_YPIXELS• _GOPTIONS• _ODSDEST• _ODSOPTIONS• _ODSSTYLE• _ODSSTYLESHEET•
The _ODSDEST variable is important because changing this variable enables your stored process to generate HTML,
PDF, postscript, or a variety of other formats, including user written tagset destinations. Note that there are many
variables that allow you to override ODS options. You must remember to verify whether any options specified by the
%STPBEGIN and %STPEND 16

stored process or its clients are compatible with the output destinations you plan to support.
Note that some ODS options (for example, BASE) are set based on the result options. These options are generally
transparent to the stored process author, but they can make it difficult to modify some ODS options in your stored
process.
Overriding Input Parameters
Macro variables recognized by %STPBEGIN can be set or modified by the stored process. This is usually done to
deny or limit client choices for that variable. For example, a stored process that requires the use of a particular style
might begin with the following:
%global _ODSSTYLE;
*ProcessBody;
%let _ODSSTYLE=MyStyle;
%stpbegin;
Any client specified value for _ODSSTYLE is ignored and the MyStyle style is always used. A more elaborate
implementation might validate an input parameter against a list of supported values and log an error or choose a
default value if the client input is not supported.
A stored process is free to modify the macro variables consumed by %STPBEGIN at any time until %STPBEGIN is
called. Modifying these reserved macro variables after %STPBEGIN has been called is not recommended.
Results
The %STPBEGIN and %STPEND macros implement several options for delivering results. See the section on Result
Types for an introduction to the standard options for stored process results. In most cases, a stored process using these
macros can support all the standard result types with no special coding. The _RESULT variable defines the result
type. The following values are supported:
STATUS
returns only a completion status. An ODS destination is not opened, but the ODS LISTING destination is
closed.
STREAM
returns the body or file output from ODS as a stream. This is the default result type if _RESULT is not set.
There are several values for _RESULT that generate packages. Packages can be delivered directly to the client and
published to a more permanent location on the server file system, a WebDAV server or other destinations. Package
creation and delivery are controlled by many reserved macro variables. Variables that are valid for all package
destinations are as follows:
_ABSTRACT• _DESCRIPTION• _EXPIRATION_DATETIME• _NAMESPACES• _NAMEVALUE•
Additional variables are recognized for specific _RESULT settings, such as
SAS® Integration Technologies: Developer's Guide
%STPBEGIN and %STPEND 17
PACKAGE_TO_ARCHIVE
creates an archive package on the server file system containing the generated output. The _ARCHIVE_PATH
and (optionally) _ARCHIVE_NAME variables specify where the package is created. In addition,
_ARCHIVE_FULLPATH is set by %STPEND to hold the full path name of the created archive package.
PACKAGE_TO_REQUESTER
returns a package to the stored process client. It can also simultaneously create an archive package on the
server file system if _ARCHIVE_PATH and (optionally) _ARCHIVE_NAME are set. This option is valid
only on the workspace server.
PACKAGE_TO_WEBDAV
creates a package as a collection on a WebDAV−compliant server. The location of the package is defined by
_COLLECTION_URL or _PARENT_URL. Other relevant variables include _HTTP_PASSWORD,
_HTTP_PROXY_URL, _HTTP_USER, and _IF_EXISTS.
%STPBEGIN configures ODS to create output files in a temporary working directory. %STPEND then creates the
package from all of the files found in this temporary directory. The temporary directory is defined by the _STPWORK
variable. This variable should not be changed by the stored process, but new entries can be added to the output
package by creating files in this directory. For example, the XML LIBNAME engine might be used to create one or
more XML files that would be included in the package along with any output created by ODS. The temporary
directory and any contained files are automatically deleted when the stored process completes. No clean up is required
in the stored process program.
Errors
Errors in the %STPBEGIN and %STPEND macros are reported in the _STPERROR macro variable. A value of 0
indicates the macro completed successfully. A non−zero value indicates an error occurred.
Note that because these macros allow clients or stored processes to submit SAS language options (for example, see the
_ODSOPTIONS variable) it is possible for the macros to fail in unusual ways. Invalid input parameters can cause the
stored process to go into syntaxcheck mode (set the SAS OBS option to 0) or to terminate immediately.
Advanced Package Publishing
The %STPBEGIN and %STPEND macros support some package publishing options that are not recognized by the
stored process metadata framework. These options are generally accessed by registering a stored process with None
as the output type. This causes the stored process to be executed with _RESULT set to STATUS. The stored process
can then set _RESULT to one of the following values:
PACKAGE_TO_ARCHIVE
PACKAGE_TO_ARCHIVE provides several new options when used in this way. Archive packages can be
created on HTTP servers that support updates, FTP servers, and LDAP servers. Variables that control this
option include
_ARCHIVE_NAME◊ _ARCHIVE_PATH◊ _FTP_PASSWORD◊ _FTP_USER◊ _HTTP_PASSWORD◊ _HTTP_PROXY_URL◊ _HTTP_USER◊ _LDAP_BINDDN◊ _LDAP_BINDPW◊
SAS® Integration Technologies: Developer's Guide
%STPBEGIN and %STPEND 18
PACKAGE_TO_EMAIL
creates a package and mails it to one or more e−mail addresses. An actual archive package can be mailed, or
the package can be created in a public location and a reference URL mailed. Variables that control this option
include the following:
_ADDRESSLIST_DATASET_LIBNAME◊ _ADDRESSLIST_DATASET_MEMNAME◊ _ADDRESSLIST_VARIABLENAME◊ _ARCHIVE_NAME◊ _ARCHIVE_PATH◊ _COLLECTION_URL◊ _DATASET_OPTIONS◊ _EMAIL_ADDRESS◊ _FROM◊ _FTP_PASSWORD◊ _FTP_USER◊ _HTTP_PASSWORD◊ _HTTP_PROXY_URL◊ _HTTP_USER◊ _IF_EXISTS◊ _LDAP_BINDDN◊ _LDAP_BINDPW◊ _PARENT_URL◊ _REPLYTO◊ _SUBJECT◊
PACKAGE_TO_QUEUE
creates a package and sends it to one or more message queues. An actual archive package can be sent, or the
package can be created in a public location and a reference URL sent. Variables that control this option
include the following:
_ARCHIVE_NAME◊ _ARCHIVE_PATH◊ _CORRELATIONID◊ _FTP_PASSWORD◊ _FTP_USER◊ _HTTP_PASSWORD◊ _HTTP_PROXY_URL◊ _HTTP_USER◊ _LDAP_BINDDN◊ _LDAP_BINDPW◊ _MESSAGE_QUEUE◊
PACKAGE_TO_SUBSCRIBERS
creates a package and sends it to a subscriber channel. An actual archive package can be sent, or the package
can be created in a public location and a reference URL sent. Variables that control this option include the
following:
_ARCHIVE_NAME◊ _ARCHIVE_PATH◊ _CHANNEL◊ _CHANNEL_STORE◊ _COLLECTION_URL◊ _CORRELATIONID◊ _FROM◊ _FTP_PASSWORD◊
SAS® Integration Technologies: Developer's Guide
%STPBEGIN and %STPEND 19

_FTP_USER◊ _HTTP_PASSWORD◊ _HTTP_PROXY_URL◊ _HTTP_USER◊ _IF_EXISTS◊ _LDAP_BINDDN◊ _LDAP_BINDPW◊ _PARENT_URL◊ _REPLYTO◊ _SUBJECT◊
Almost all of the package option variables previously listed have directly equivalent properties in the package
publishing API. See the PACKAGE_PUBLISH documentation for more information about these properties. The
property names are the same as the variable names with the underscore prefix removed.
SAS Stored Processes
SAS® Integration Technologies: Developer's Guide
%STPBEGIN and %STPEND 20

Reserved Macro Variables
Many reserved macro variables are reserved for special purposes in stored processes. Reserved names generally are
prefixed with an underscore character. It is recommended that you do not use the underscore prefix for any application
variables to avoid conflicts. Some reserved macro variables are created automatically for all stored processes running
on a particular server. Some are created by specific stored process client or middle−tier interfaces and are not created
or available when other clients call the stored process.
Variable Name Used By Description
_ABSTRACT %STPBEGIN/
%STPEND Text string briefly describing a package created by
%STPBEGIN and %STPEND.
_ACTION Web Clients
Specifies an action for the Web application to take.
Possible values for this variable are as follows:
FORM
displays custom input form if one exists. If
FORM is the only value for _ACTION,
and no form is found, then an error is
generated.
EXECUTE
executes the stored process.
PROPERTIES
displays the property page, which enables
you to set input parameters and execution
options and to execute the stored process.
BACKGROUND
executes the stored process in the
background.
STRIP
removes null parameters. This value can
only be used in combination with
EXECUTE and BACKGROUND.
INDEX
displays a tree of all stored processes.
DATA
displays a summary of general stored
process data.
Values for _ACTION are case insensitive.
Multiple values can be combined (except when
using INDEX or DATA). Two common
combinations are:
_ACTION=FORM,PROPERTIES
displays a custom input form if one exists,
otherwise displays the property page.
_ACTION=FORM,EXECUTE
displays a custom input form if one exists,
otherwise executes the stored process.
Reserved Macro Variables 21

_ADDRESSLIST_DATASET_LIBNAME,
_ADDRESSLIST_DATASET_MEMNAME,
_ADDRESSLIST_VARIABLENAME,
_DATASET_OPTIONS
%STPBEGIN/
%STPEND Specifies a data set containing email addresses
when _RESULT is set to PACKAGE_TO_EMAIL.
_APSLIST Stored Process
Server List of the names of all the parameters that were
passed to the program.
_ARCHIVE_FULLPATH %STPBEGIN/
%STPEND
Full path and name of an archive package created
by %STPEND when _RESULT is set to
PACKAGE_TO_ARCHIVE or
PACKAGE_TO_REQUESTER. This value is set by
%STPEND and is an output value only. Setting it
before %STPEND has no effect.
_ARCHIVE_NAME %STPBEGIN/
%STPEND
Name of the archive package to be created when
_RESULT is set to PACKAGE_TO_ARCHIVE. If
this value is not specified or is blank and
_RESULT is set to PACKAGE_TO_ARCHIVE or
PACKAGE_TO_REQUESTER, then the package is
created with a new, unique name in the directory
specified by _ARCHIVE_PATH. This value is set
through the stored process service API and cannot
be directly overridden by a client input parameter.
_ARCHIVE_PATH %STPBEGIN/
%STPEND
Path of the archive package to be created when
_RESULT is set to PACKAGE_TO_ARCHIVE or
PACKAGE_TO_REQUESTER. This value is set
through the stored process service API and cannot
be directly overridden by a client input parameter.
The special value TEMPFILE causes the archive
package to be created in a temporary directory that
exists only until the stored process completes
executing and the client disconnects from the
server.
_AUTHTYP Web Clients
Specifies the name of the authentication scheme
used to identify a Web client, for example, BASIC
or SSL, or "null" (no authentication.) This variable
is not set by default but can be enabled in the
params.config file.
_CHANNEL %STPBEGIN/
%STPEND
Specifies a subscriber channel when _RESULT is
set to PACKAGE_TO_SUBSCRIBERS. See
PACKAGE_PUBLISH for more information about
channel names.
_COLLECTION_URL %STPBEGIN/
%STPEND
URL of the WebDAV collection to be created
when _RESULT is set to
PACKAGE_TO_WEBDAV. See also _IF_EXISTS.
This value is set through the stored process service
API and cannot be directly overridden by a client
input parameter.
_DEBUG Web Clients Debugging flags. For information about setting the
default value of _DEBUG, see Setting the Default
SAS® Integration Technologies: Developer's Guide
Reserved Macro Variables 22

Value of _Debug.
_DESCRIPTION %STPBEGIN/
%STPEND Descriptive text embedded in a package created by
%STPBEGIN and %STPEND.
_DOMAIN Web Clients Authentication domain for the SAS Stored Process
Web Application.
_EMAIL_ADDRESS %STPBEGIN/
%STPEND
Specifies destination e−mail addresses when
_RESULT is set to PACKAGE_TO_EMAIL.
Multiple addresses can be specified using the
multiple value convention for stored process
parameters.
_ENCODING %STPBEGIN/
%STPEND Sets the encoding for all ODS output.
_EXPIRATION_DATETIME %STPBEGIN/
%STPEND
Expiration datetime embedded in a package
created by %STPBEGIN and %STPEND. Must be
specified in a valid SAS datetime syntax.
_FROM %STPBEGIN/
%STPEND Specifies the e−mail address of the sender when
_RESULT is set to PACKAGE_TO_EMAIL.
_GOPT_DEVICE, _GOPT_HSIZE,
_GOPT_VSIZE, _GOPT_XPIXELS,
_GOPT_YPIXELS
%STPBEGIN/
%STPEND
Sets the corresponding SAS/GRAPH option. See
the DEVICE, HSIZE, VSIZE, XPIXELS, and
YPIXELS options in "Graphics Options and
Device Parameters Dictionary" in the SAS/GRAPH
Reference in SAS Help and Documentation for
more information.
_GOPTIONS %STPBEGIN/
%STPEND
Sets any SAS/GRAPH option documented in
"Graphics Options and Device Parameters
Dictionary" in the SAS/GRAPH Reference in SAS
Help and Documentation. You must specify the
option name and its value in the syntax used for
the GOPTIONS statement. For example, set
_GOPTIONS to ftext=Swiss htext=2 to
specify the Swiss text font with a height of 2.
_GRAFLOC Web Clients URL for the location of SAS/GRAPH applets. This
variable is set to /sasweb/graph for most
installations.
_HTACPT Web Clients Specifies the MIME types accepted by the stored
process client. This variable is not set by default
but can be enabled in the params.config file.
_HTCOOK Web Clients Specifies all of the cookie strings the client sent
with this request. This variable is not set by default
but can be enabled in the params.config file.
_HTREFER Web Clients Specifies the address of the referring page. This
variable is not set by default but can be enabled in
the params.config file.
_HTTP_PASSWORD %STPBEGIN/
%STPEND Password used (with _HTTP_USER) to access the
WebDAV server when _RESULT is set to
PACKAGE_TO_WEBDAV. This value is set through
SAS® Integration Technologies: Developer's Guide
Reserved Macro Variables 23
the stored process service API and cannot be
directly overridden by a client input parameter.
_HTTP_PROXY_URL %STPBEGIN/
%STPEND
Proxy server used to access the WebDAV server
when _RESULT is set to
PACKAGE_TO_WEBDAV. This value is set through
the stored process service API and cannot be
directly overridden by a client input parameter.
_HTTP_USER %STPBEGIN/
%STPEND
User name used (with _HTTP_PASSWORD) to
access the WebDAV server when _RESULT is set
to PACKAGE_TO_WEBDAV. This value is set
through the stored process service API and cannot
be directly overridden by a client input parameter.
_HTUA Web Clients Specifies the name of the user agent. This variable
is not set by default but can be enabled in the
params.config file.
_IF_EXISTS %STPBEGIN/
%STPEND
Can be NOREPLACE, UPDATE, or
UPDATEANY. See PACKAGE_PUBLISH
options for more information.
_MESSAGE_QUEUE %STPBEGIN/
%STPEND
Specifies a target queue when _RESULT is set to
PACKAGE_TO_QUEUE. See
PACKAGE_PUBLISH for more information about
queue names. Multiple queues can be specified
using the multiple value convention for stored
process parameters.
_METAPERSON All
Specifies the Person metadata name that is
associated with the _METAUSER login variable.
The value of this variable can be UNKNOWN. This
variable cannot be modified by the client.
_METAUSER All Specifies the login username that is used to
connect to the metadata server. This variable
cannot be modified by the client.
_NAMESPACES %STPBEGIN/
%STPEND Applies to packages only. See PACKAGE_BEGIN
for more information about this variable.
_NAMEVALUE %STPBEGIN/
%STPEND
A list of one or more name/value pairs used for
filtering when generating packages. See
PACKAGE_BEGIN for more information about
this variable.
_ODSDEST %STPBEGIN/
%STPEND Specifies the ODS destination. The default ODS
destination is HTML if _ODSDEST is not
specified. Valid values of _ODSDEST include the
following:
CSV• CSVALL• TAGSETS.CSVBYLINE• HTML• LATEX•
SAS® Integration Technologies: Developer's Guide
Reserved Macro Variables 24

NONE (no ODS output is generated)• PDF• PS• RTF• SASREPORT• WML• XML• any tagset destination•
_ODSOPTIONS %STPBEGIN/
%STPEND
Specifies options to be appended to the ODS
statement. Do not use this macro to override
options defined by a specific macro variable. For
example, do not specify ENCODING=value in
this variable because it conflicts with
_ODSENCODING.
Note: NOGTITLE and NOGFOOTNOTE are
appended to the ODS statement as default options.
You can override this behavior by specifying
GTITLE or GFOOTNOTE for _ODSOPTIONS.
_ODSSTYLE %STPBEGIN/
%STPEND Sets the ODS STYLE= option. You can specify
any ODS style that is valid on your system.
_ODSSTYLESHEET %STPBEGIN/
%STPEND
Sets the ODS STYLEHEET= option. To store a
generated style sheet in a catalog entry and
automatically replay it using the SAS Stored
Process Web Application, specify myfile.css
(url="myfile.css")
_PROGRAM All
Name of the stored process. The value of
_PROGRAM is frequently a path, such as
/Sales/Southwest/
Quarterly Summary
In some cases _PROGRAM can also contain the
metadata repository name or use a full URL
syntax:
//West/Sales/Southwest/
Quarterly Summary
sbip://West/Sales/Southwest/
Quarterly Summary
(StoredProcess)
If your stored process uses the value of
_PROGRAM, then it should accept any of these
variations.
_QRYSTR Web Clients
Specifies the query string that is contained in the
request URL after the path. This variable is not set
by default but can be enabled in the params.config
file.
_REPLAY
SAS® Integration Technologies: Developer's Guide
Reserved Macro Variables 25

Stored Process
Server/Web
Client
A complete URL for use with programs that use
the Output Delivery System (ODS). It is composed
from the values of _THISSESSION and
_TMPCAT. ODS uses this URL to create links
that replay stored output when they are loaded by
the user's Web browser. This variable is created by
the stored process server and is not one of the
symbols passed from the SAS Stored Process Web
Application. The _REPLAY variable is set only if
the _URL variable is passed in from the client or
middle tier.
_REPLYTO %STPBEGIN/
%STPEND
Specifies a designated e−mail address to which
package recipients might respond when _RESULT
is set to PACKAGE_TO_EMAIL.
_REPOSITORY Web Clients
The metadata repository where the stored process
is registered. This is the repository name defined in
the InformationService configuration. It is usually
the same as the metadata repository name seen in
SAS Management Console, but the name might be
different in some configurations. This value is
normally set in the params.config file to
define a default repository if the SAS Stored
Process Web Application client does not specify a
repository in the _PROGRAM variable.
_REQMETH Web Clients
Specifies the name of the HTTP method with
which this request was made, for example, GET,
POST, or PUT. This variable is not set by default
but can be enabled in the params.config file.
_RESULT All Specifies the type of client result to be created by
the stored process. See Result Types for more
information. Possible values for this variable are as
follows:
STATUS
no output to client.
STREAM
output is streamed to client through
_WEBOUT fileref.
PACKAGE_TO_ARCHIVE
package is published to an archive file.
PACKAGE_TO_REQUESTER
package is returned to the client. The
package can also be published to an
archive file in this case.
PACKAGE_TO_WEBDAV
package is published to a WebDAV
server.
SAS® Integration Technologies: Developer's Guide
Reserved Macro Variables 26
The _RESULT value is set through the stored
process service API and cannot be directly
overridden by a client input parameter. The value
can be overridden in the stored process program to
use these additional values:
PACKAGE_TO_EMAIL
package published to one or more e−mail
addresses.
PACKAGE_TO_QUEUE
package published to a message queue.
PACKAGE_TO_SUBSCRIBERS
package published to a subscriber channel.
See %STPBEGIN and %STPEND for more
information about these options.
_RMTADDR Web Clients
Specifies the Internet Protocol (IP) address of the
client that sent the request. For many installations
with a firewall between the client and the Web
server or servlet container, this value is the firewall
address instead of the Web browser client. This
variable is not set by default but can be enabled in
the params.config file.
_RMTHOST Web Clients
Specifies the fully qualified name of the client that
sent the request, or the IP address of the client if
the name cannot be determined. For many
installations with a firewall between the client and
the Web server or servlet container, this value is
the firewall name instead of the Web browser
client. This variable is not set by default but can be
enabled in the params.config file.
_RMTUSER Web Clients
Specifies the login of the user making this request,
if the user has been authenticated, or null if the
user has not been authenticated. This variable is
not set by default but can be enabled in the
params.config file.
_SESSIONID Stored Process
Server
A unique identifier for the session. The
_SESSIONID variable is created only if a session
has been explicitly created.
_SRVNAME Web Clients Specifies the host name of the server that received
the request.
_SRVPORT Web Clients Specifies the port number on which this request
was received.
_SRVPROT Web Clients
Specifies the name and version of the protocol the
request uses in the form
protocol/majorVersion.minorVersion, for example,
HTTP/1.1. This variable is not set by default but
can be enabled in the params.config file.
SAS® Integration Technologies: Developer's Guide
Reserved Macro Variables 27

_SRVSOFT Web Clients Identifies the Web server software. This variable is
not set by default but can be enabled in the
params.config file.
_STPERROR %STPBEGIN/
%STPEND
Global error variable. Set to 0 if %STPBEGIN and
%STPEND complete successfully. Set to a
non−zero numeric value if an error occurs.
_STPWORK %STPBEGIN/
%STPEND
Specifies a temporary working directory to hold
files that are published in a package. This variable
is set by %STPBEGIN and is not modified by the
stored process.
_SUBJECT %STPBEGIN/
%STPEND Specifies a subject line when _RESULT is set to
PACKAGE_TO_EMAIL.
_THISSESSION Stored Process
Server/Web
Client
A URL composed from the values of _URL and
_SESSIONID. This variable is created by the
stored process server and is used as the base URL
for all URL references to the current session. The
_THISSESSION variable is created only if the
_URL variable is passed in and a session has been
explicitly created.
_TMPCAT Stored Process
Server
A unique, temporary catalog name. This catalog
can be used to store temporary entries to be
retrieved later. In socket servers, the _TMPCAT
catalog is deleted after a number of minutes
specified in the variable _EXPIRE. This variable is
created by the stored process server and is not one
of the symbols passed from the SAS Stored
Process Web Application.
_URL Web Clients Specifies the URL of the Web server middle tier
used to access the stored process.
_USERNAME Web Clients Specifies the value for the user name obtained
from Web client authentication.
_VERSION Web Clients Specifies the SAS Stored Process Web Application
version and build number.
VAR All Reserved. Do not use this variable in a parameter
definition.
Most of the reserved macro variables related to package publishing have an equivalent property or parameter in the
Publishing Framework. See the documentation for PACKAGE_PUBLISH and PACKAGE_BEGIN for a more
complete description of these variables.
SAS Stored Processes
SAS® Integration Technologies: Developer's Guide
Reserved Macro Variables 28

Stored Process Server Functions
Stored process server functions are DATA step functions that you use to define character, numeric, and alphanumeric
strings to generate output in the desired format. The following list of SAS Stored Process Server functions can be used
to return the correct character, numeric, or alphanumeric value of a parameter setting.
STPSRVGETC• STPSRVGETN• STPSRVSET• STPSRV_HEADER• STPSRV_SESSION• STPSRV_UNQUOTE2•
Note: You can also use APPSRV syntax from the Application Dispatcher in place of these functions. See the
Application Dispatcher documentation for more information.
SAS Stored Processes
Stored Process Server Functions 29
STPSRVGETC
Returns the character value of a server property
Syntax
Arguments
Details
Examples
Syntax
VALUE = STPSRVGETC( valuecode )
Note: The APPSRVGETC function can be used in place of STPSRVGETC. This feature is provided in order to
enable you to convert existing SAS/IntrNet programs to stored processes.
Arguments
valuecode
is the character string name of the property.
Details
The STPSRVGETC function takes one character string property and returns a character string result.
Examples
SAS Statements Results
sencoding=stpsrvgetc('Default
Output Encoding');
put sencoding=;
sencoding=WLATIN1
version=stpsrvgetc('version');
put version=;
version=SAS Stored Processes
Version 9.1 (Build 18)
SAS Stored Processes
STPSRVGETC 30

STPSRVGETN
Returns the numeric value of a server property
Syntax
Arguments
Details
Examples
Syntax
VALUE = STPSRVGETN( valuecode )
Note: The APPSRVGETN function can be used in place of STPSRVGETN. This feature is provided in order to
enable you to convert existing SAS/IntrNet programs to stored processes.
Arguments
valuecode
is the character string name of the property.
Details
The STPSRVGETN function takes one character string property and returns a numeric string result.
Examples
SAS Statements Results
dsesstimeout=stpsrvgetn('default
session timeout');
put dsesstimeout=;
dsesstimeout=900
sessmaxtimeout=stpsrvgetn('maximum
session timeout');
put sessmaxtimeout=;
sessmaxtimeout=3600
session=stpsrvgetn('session
timeout');
put session=;
session=900
maxconreqs=stpsrvgetn('maximum
concurrent requests');
put maxconreqs=;
maxconreqs=1
deflrecl=stpsrvgetn('default
output lrecl');
put deflrecl=;
deflrecl=65535
version=stpsrvgetn('version');
put version=;
version=9.1
STPSRVGETN 31
SAS Stored Processes
SAS® Integration Technologies: Developer's Guide
STPSRVGETN 32

STPSRVSET
Sets the value of a server property
Syntax
Arguments
Details
Examples
Syntax
RC = STPSRVSET( valuecode, newvalue )
Note: The APPSRVSET function can be used in place of STPSRVSET. This feature is provided in order to enable
you to convert existing SAS/IntrNet programs to stored processes. The following Application Dispatcher properties
are not supported by the SAS Stored Process Server: REQUIRE COOKIE, REQUEST TIMEOUT, and
AUTOMATIC HEADERS.
Arguments
valuecode
is the character string name of the property.
newvalue
is the numeric string name of the property.
The following table lists the valid properties for valuecode and provides a description of each.
Valuecode Description
PROGRAM
ERROR specifies the return code when there is an error. This can be set to any value.
SESSION
TIMEOUT specifies the number of seconds that elapse before a session expires. The default session
timeout is 900 (15 minutes).
Details
The STPSRVSET function takes one character string property and one numeric string property and returns a numeric
string result. The return code is zero for success, non−zero for failure.
Examples
SAS Statements
rc=stpsrvset('session timeout',900);
rc=stpsrvset('program error',256);
STPSRVSET 33
SAS Stored Processes
SAS® Integration Technologies: Developer's Guide
STPSRVSET 34
STPSRV_HEADER
The DATA step function used to add or modify a header
Syntax
Arguments
Details
Examples
Syntax
OLD−HEADER = STPSRV_HEADER(Header Name,Header Value);
Note: The APPSRV_HEADER function can be used in place of STPSRV_HEADER. This feature is provided in
order to enable you to convert existing SAS/IntrNet programs to stored processes.
Arguments
Header Name
is the name of the header to set or reset.
Header Value
is the new value for the header.
See HTTP Headers for a list of commonly used HTTP headers.
Details
The STPSRV_HEADER function enables automatic header generation. You can add a header to the default list or
modify an existing header from the list. When you modify the value of an existing header, the old value becomes the
return value of the function.
The automatic HTTP header generation feature recognizes Output Delivery System (ODS) output types and generates
appropriate default content−type headers. If no content type is specified with STPSRV_HEADER, ODS is not used
and no HTTP header is written to _WEBOUT, and a default Content−type: text/html header is generated.
Examples
SAS Statements Resulting Headers
No calls to stpsrv_header Content−type: text/html
/* add expires header */
rc = stpsrv_header('Expires','Thu,
18 Nov 1999 12:23:34 GMT');
Content−type: text/html
Expires: Thu, 18 Nov 1999
12:23:34 GMT
/* add expires header */
rc = stpsrv_header('Expires','Thu,
18 Nov 1999 12:23:34 GMT');
Content−type: text/html
Expires: Thu, 18 Nov 1999
12:23:34 GMT
STPSRV_HEADER 35

/* add pragma header*/
rc = stpsrv_header('Cache−control',
'no−cache');
Cache−control: no−cache
/* add expires header */
rc = stpsrv_header('Expires','Thu,
18 Nov 1999 12:23:34 GMT');
/* add pragma header*/
rc = stpsrv_header('Cache−control',
'no−cache');
...
/* remove expires header, rc
contains old value */
rc = stpsrv_header('Expires','');
Content−type: text/html
Cache−control: no−cache
SAS Stored Processes
SAS® Integration Technologies: Developer's Guide
STPSRV_HEADER 36
STPSRV_SESSION
Creates or deletes a session
Syntax
Arguments
Details
Examples
Syntax
RC = STPSRV_SESSION( 'command' , <timeout> )
Note: The APPSRV_SESSION function can be used in place of STPSRV_SESSION. This feature is provided in
order to enable you to convert existing SAS/IntrNet programs to stored processes.
Arguments
command
is the command to be performed. Allowed values are "CREATE" and "DELETE".
timeoutis the optional session timeout in seconds. This property is valid only when you specify a value of "CREATE"
for the command property.
Details
The STPSRV_SESSION function creates or deletes a session. The function returns zero for a successful completion.
A non−zero return value indicates an error condition.
Examples
SAS Statements
rc=stpsrv_session('create', 600);
rc=stpsrv_session('delete');
SAS Stored Processes
STPSRV_SESSION 37
STPSRV_UNQUOTE2
Unmasks quotation mark characters in an input parameter
Syntax
Arguments
Details
Example
Syntax
call STPSRV_UNQUOTE2( paramname )
Arguments
paramname
is the character string name of the parameter.
Details
The STPSRV_UNQUOTE2 call routine takes the name of an input parameter (or any global macro variable) and
unmasks matched pairs of single or double quotation marks. The call routine does not return a value; instead it
modifies the specified macro variable. This call routine can be used to selectively remove quotation marks from stored
process input parameters so that they can be used in statements that require quotation mark characters.
Example
This call routine is typically called with %SYSCALL in open macro code, as follows:
/* MYGOPTIONS is an input parameter and might contain quotation
marks, for example: dashline='c000000000000000'x */
%SYSCALL STPSRV_UNQUOTE2(MYGOPTIONS);
/* Quote characters are now interpreted as expected */
goptions &MYGOPTIONS;
...
SAS Stored Processes
STPSRV_UNQUOTE2 38

Sessions
The Web is a stateless environment. A client request to a server knows nothing of any preceding requests. This creates
a simple environment for client and server developers, but it is difficult for application programmers. Often,
programmers want to carry information from one request to the next. This is known as maintaining state. Sessions
provide a convenient way to maintain state across multiple stored process requests.
A session is the data that is saved from one stored process execution to the next. It consists of macro variables and
library members (data sets and catalogs) that the stored process has explicitly saved. The session data is scoped so that
all users have independent sessions. See Using Sessions for a sample Web application that uses sessions.
Creating a Session
The stored process must explicitly create a session with the STPSRV_SESSION function, as follows:
In macro
%let rc=%sysfunc(stpsrv_session(create));
In DATA step or SCL
rc=stpsrv_session('create');
Creating a session will set the global macro variables _SESSIONID and _THISSESSION and create the SAVE
session library.
Using the Session
A session saves all global macro variables whose names begin with SAVE_. For example, the statements
%global save_mytext;
%let save_mytext="Text to be saved
for the life of the session";
cause the macro variable save_mytext to be available in subsequent stored processes that share the same session.
Data sets and catalogs can also be saved across program requests using the SAVE library. Data sets and catalogs that
are created in or copied to this library are available to all future stored processes that execute in the same session.
Creating a session causes the automatic variables _THISSESSION and _SESSIONID to be set. Sample values for
these variables are as follows:
0010 %let rc=%sysfunc(stpsrv_session(create));
0011 %put _SESSIONID=&_SESSIONID;
_SESSIONID=7CF645EB−6E23−4853−8042−BBEA7F866B55
0012 %put _THISSESSION=&_THISSESSION;
_THISSESSION=/SASStoredProcess/do?_sessionid=
7CF645EB−6E23−4853−8042−BBEA7F866B55
These variables can be used to construct URLs or HTML forms that execute another stored process in the same
session. For example,
%let rc=%sysfunc(stpsrv_session(create));
data _null;
Sessions 39

file _webout;
put '<HTML>';
put '<BODY>';
put '<H1>Session Test Page</H1>';
/* Link to another stored process in the same session */
put '<A HREF="' "&_THISSESSION"
'&_PROGRAM=/Test/Test2">Test</A>';
put '</BODY>';
put '</HTML>';
run;
Note: The _THISSESSION variable is not identical to the _THISSESSION variable used in SAS/IntrNet. If you are
converting an existing SAS/IntrNet program to a stored process, any references to symget('_THISSESSION')
should generally be replaced with "&_THISSESSION". See Converting SAS/IntrNet Programs for more
information.
Deleting the Session
Sessions expire after a period of inactivity. The default expiration time is 15 minutes. The expiration time can be
changed using the STPSRVSET function, as follows
In macro
%let rc=%sysfunc(stpsrvset(session timeout,300));
In DATA step or SCL
rc=stpsrvset('session timeout',300);
where the timeout is specified in seconds. If the session is not accessed for the length of the timeout, the server will
delete the session, the associated SAVE library, and all associated macro values. Any further attempts to access the
session will result in an invalid or expired session error.
Sessions can be explicitly destroyed using the STPSRV_SESSION function, as follows:
In macro
%let rc=%sysfunc(stpsrv_session(delete));
In DATA step or SCL
rc=stpsrv_session('delete');
Submitting this code does not immediately destroy the session. The session is only marked for deletion at the
completion of the stored process. For this reason, a stored process cannot delete a session and create a new session.
Limitations
Stored process sessions are supported only by the stored process server. Stored processes executing on a workspace
server cannot create or access sessions.
A session exists in the server process where it was created. All stored processes that access that session must execute
in the same server process. Load balancing and other execution dispatching features are typically ignored when using
sessions that might have an impact on application performance and scalability. Sessions are not recommended for
applications with small amounts of state information; use a client−based method for maintaining state instead.
SAS® Integration Technologies: Developer's Guide
Sessions 40
SAS Stored Processes
SAS® Integration Technologies: Developer's Guide
Sessions 41
Stored Process Samples
The following samples demonstrate how a stored process generates different types of output using the %STPBEGIN
and %STPEND macros. All of the samples are based on the following stored process:
*ProcessBody;
%STPBEGIN;
title 'Age analysis by sex';
footnote;
proc sort data=sashelp.class out=class; by sex age; run;
proc gchart data=class;
vbar3d age / group=sex
discrete
nozero
shape=cylinder
patternid=group;
run; quit;
title;
proc print data=class;
by sex age;
id sex age;
var name height weight;
run;
%STPEND;
This code generates a bar chart and a table. The exact format and appearance of the output depends upon various input
parameters. For these samples, assume the following input parameters were specified:
Variable Value Comments
_ODSDEST HTML Default destination. Not required.
_ODSSTYLE SASWeb
_GOPT_DEVICE ActxImg Generates a PNG image file. Available only on Windows
platforms.
_GOPT_XPIXELS 384 Image width in pixels
_GOPT_YPIXELS 288 Image height in pixels
Note: See the section on Reserved Macro Variables for a more detailed description of each macro variable mentioned
in the previous table and in the following sections.
Streaming Output
Streaming output is generally used when you are executing a stored process from a Web−based application using the
SAS Stored Process Web Application or when you are returning a single output file with no embedded links to
companion files such as images. Because the stored process was registered with a result type of Streaming, the
following input parameters are passed to the stored process:
Variable Value
_RESULT STREAM
_ODSDEST HTML
Stored Process Samples 42
_ODSSTYLE SASWeb
_GOPT_DEVICE ActxImg
_GOPT_XPIXELS 384
_GOPT_YPIXELS 288
The HTML output from the stored process is streamed to the client though the server−created _WEBOUT fileref. The
PNG image file is streamed through a separate replay connection to the server, as described in the section on
Embedding Graphics.
Creating a Transient Package
Transient packages are a convenient way to deliver a collection of multiple output files to a client application.
Transient packages are implemented in different ways for the stored process server and the workspace server as
described in the following sections.
Stored Process Server
A stored process registered with a result type of Transient result package on a stored process server is
executed with _RESULT set to PACKAGE_TO_ARCHIVE and _ARCHIVE_PATH set to TEMPFILE. The input
parameters are as follows:
Variable Value
_RESULT PACKAGE_TO_ARCHIVE
_ARCHIVE_NAME TEMPFILE
_ODSDEST HTML
_ODSSTYLE SASWeb
_GOPT_DEVICE ActxImg
_GOPT_XPIXELS 384
_GOPT_YPIXELS 288
Workspace Server
The same stored process registered on a workspace server is executed with _RESULT set to
PACKAGE_TO_REQUESTER and no value for _ARCHIVE_PATH. The input parameters are as follows:
Variable Value
_RESULT PACKAGE_TO_REQUESTER
_ODSDEST HTML
_ODSSTYLE SASWeb
_GOPT_DEVICE ActxImg
_GOPT_XPIXELS 384
_GOPT_YPIXELS 288
SAS® Integration Technologies: Developer's Guide
Stored Process Samples 43
Creating a Permanent Package Archive
Permanent packages are published to a permanent location where they can be accessed at a later time. Permanent
packages are also immediately available to the stored process client through the same interfaces used for a transient
package. This sample assumes that the stored process was registered with the following metadata, in addition to the
parameters already listed:
Metadata Field Value
Output type Permanent result package
File system Selected
Archive path c:\My Packages
Archive name AgeAnalysis.spk
Again, implementation differs between the stored process server and the workspace server. _RESULT is set to
PACKAGE_TO_ARCHIVE or PACKAGE_TO_REQUESTOR, respectively. The input parameters are as follows:
Variable Value
_RESULT PACKAGE_TO_ARCHIVE or PACKAGE_TO_REQUESTER
_ARCHIVE_PATH C:\My Packages
_ARCHIVE_NAME AgeAnalysis.spk
_ODSDEST HTML
_ODSSTYLE SASWeb
_GOPT_DEVICE ActxImg
_GOPT_XPIXELS 384
_GOPT_YPIXELS 288
The archive package is created at C:\My Packages\AgeAnalysis.spk, and the variable
_ARCHIVE_FULLPATH is set by %STPEND.
Creating a Permanent Package on a WebDAV Server
Permanent packages can also be published to WebDAV servers by specifying the appropriate options when registering
the stored process. This sample assumes that the stored process was registered with the following metadata, in
addition to the parameters already listed:
Metadata Field Value
Output type Permanent result package
DAV location Selected
Server http://server1.abc.com/
Base path /dav
Base path /reports
SAS® Integration Technologies: Developer's Guide
Stored Process Samples 44
Create new instance Selected
The input parameters are as follows:
Macro Variable Name Value
_RESULT PACKAGE_TO_WEBDAV
_PARENT_URL http://server1.abc.com/dav/reports
_ODSDEST HTML
_ODSSTYLE SASWeb
_GOPT_DEVICE ActxImg
_GOPT_XPIXELS 384
_GOPT_YPIXELS 288
The package is created in a uniquely named collection under http://server1.abc.com/dav/reports.
Publishing a Package to E−Mail
As discussed in the section on Advanced Package Publishing, packages can be published to other destinations with
minor modifications to the stored process. Adding two lines to the stored process such as
*ProcessBody;
%let _RESULT=PACKAGE_TO_EMAIL;
%let _ARCHIVE_PATH=TEMPFILE;
%STPBEGIN;
title 'Age analysis by sex';
footnote;
proc sort data=sashelp.class out=class; by sex age; run;
proc gchart data=class;
vbar3d age / group=sex
discrete
nozero
shape=cylinder
patternid=group;
run; quit;
title;
proc print data=class;
by sex age;
id sex age;
var name height weight;
run;
%STPEND;
and registering the stored process with None as the result type enables you to publish a package to e−mail addresses.
Additional input parameters specify the e−mail address, a subject line, and a reply−to address, as follows:
Variable Value
_RESULT STATUS (is modified in the stored process)
_EMAIL_ADDRESS DeptManagers@abc.com
SAS® Integration Technologies: Developer's Guide
Stored Process Samples 45

_REPLYTO ReportAdmin@abc.com
_SUBJECT Age Analysis Report
_ODSDEST HTML
_ODSSTYLE SASWeb
_GOPT_DEVICE ActxImg
_GOPT_XPIXELS 384
_GOPT_YPIXELS 288
The package is created and mailed to the DeptManagers@abc.com address. If you make slight modifications to
the input parameters, then you can publish the package to a WebDAV location and mail a reference to the package to
one or more e−mail addresses.
SAS Stored Processes
SAS® Integration Technologies: Developer's Guide
Stored Process Samples 46
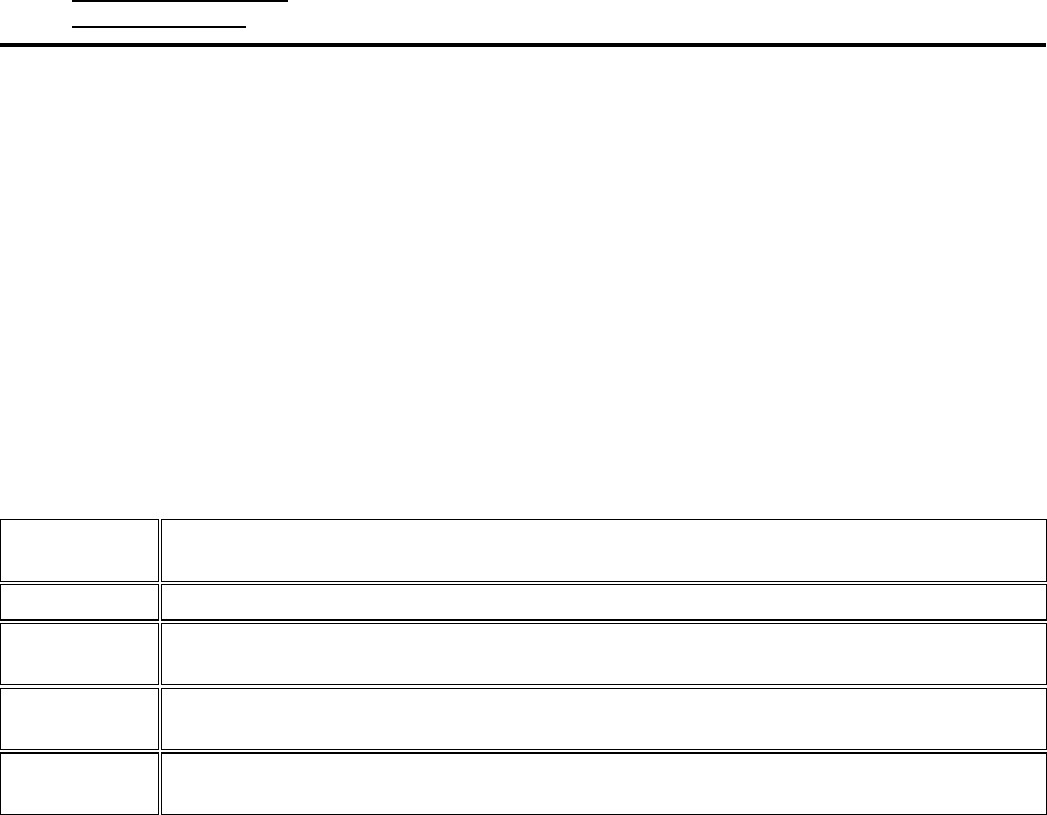
Debugging Stored Processes
There are two techniques for debugging stored processes:
Examining the SAS Log• Using SAS Options•
Examining the SAS Log
The client interfaces provided to stored processes usually include a mechanism for retrieving the SAS log from a
stored process. For example, passing an input parameter _DEBUG=LOG to the SAS Stored Process Web Application
causes the SAS log to be returned with the stored process output. The SAS log is directly accessible from the Stored
Process Service API. Assuming your installation is configured correctly, most run−time stored process errors will
appear in the SAS log.
If you are unable to access the SAS log from the client interface, you might be able to access the SAS log from the
server log files. The server administrator controls the level of server logging enabled and the location of the server log
files. Server log options vary depending on the server type.
The stored process server enables you to capture the SAS log for each stored process in the server log with the
APPLEVEL option. The APPLEVEL option can be specified in the Object Server Parameters field in the Server
Manager definition for the server in SAS Management Console. The following table describes the supported values
for the APPLEVEL option:
APPLEVEL
Value Logging Behavior
0 Summary. The stored process server only logs an identifying build statement and error conditions.
1Default. The stored process server logs APPLEVEL=0 messages, minimal processing statements,
as well as the SAS log for each stored process that completes with an error status.
2Full. The stored process server logs APPLEVEL=1 messages, except that the SAS log is included
for every stored process executed on the server.
3Debug. The stored process server logs verbose processing statements as well as the APPLEVEL=2
messages. Not recommended except for special debugging circumstances.
The workspace server also supports the APPLEVEL option, but does not log the same information. The logging
behavior in the previous table is supported only by the stored process server. Client−side access is generally
recommended for the SAS log. The IOMLEVEL=2 option can be enabled in cases where debugging must be
performed from server logs, but this option is not recommended for production servers. The log output with this
option is very verbose and might affect server performance.
Using SAS Options
There are several SAS options that can help you debug problems in your stored processes. If you can return the SAS
log to your browser, activating some of these options can make that log more useful. If you are debugging a stored
process that contains macro code, you should supply one or more of these options at the beginning of your stored
process: MPRINT, SYMBOLGEN, MLOGIC, MERROR.
Debugging Stored Processes 47
If, for security reasons, you have disabled the display of submitted source code in your stored process using the
NOSOURCE option when you are debugging, you should enable this feature by supplying the SOURCE option. You
can then see your submitted SAS code in the log that is returned to your browser. After you are finished debugging,
you can revert to using NOSOURCE if your security model requires it.
SAS Stored Processes
SAS® Integration Technologies: Developer's Guide
Debugging Stored Processes 48

Converting SAS/IntrNet Programs to Stored Processes
Stored processes provide a conversion path for existing SAS/IntrNet applications, enabling them to take advantage of
the SAS 9 BI Architecture. Many features are implemented in the stored process server and SAS Stored Process Web
Application to minimize code changes required during a conversion. Existing SAS/IntrNet Application Dispatcher
programs can usually be converted to streaming stored processes with minimal or no modifications. Conversion of
existing programs requires the following steps:
Install and configure the SAS Web Infrastructure Kit, a component of SAS Integration Technologies that
includes the SAS Stored Process Web Application used to emulate Application Dispatcher.
1.
Modify the program as required to address the compatibility issues discussed in the Issues section.2. Copy the program to a valid source code repository for a stored process server. SAS/IntrNet programs must be
registered on a stored process server; workspace servers do not support streaming output or a number of other
SAS/IntrNet compatibility features.
3.
Register the stored process using BI Manager. Choose Streaming for the type of output. You do not need
to register any parameter definitions.
4.
Convert any HTML input forms or HTML pages that link to your stored process to use the SASStoredProcess
URL syntax as described in the Issues section.
5.
Run the stored process.6.
Note: SAS/IntrNet programs converted to stored processes using the techniques described here are intended to run in
the SAS Stored Process Web Application. These stored processes might not run in other stored process clients (such
as SAS Web Report Studio or SAS Add−In for Microsoft Office.) Each client application has its own requirements for
stored process behavior.
Compatibility Features
The SAS Stored Process Web Application (a component of the SAS Web Infrastructure Kit) provides the
middle−tier equivalent of the Application Broker. The SAS Stored Process Web Application is a Java−based
application and requires a servlet container host such as Apache Tomcat. See the SAS Web Infrastructure Kit
installation instructions for other requirements.
•
The SAS Stored Process Server (a component of SAS Integration Technologies) provides the equivalent of
the Application Server. The typical stored process server configuration (a load−balanced cluster) is very
similar in functionality to a SAS/IntrNet pool service. New servers are started as demand increases to provide
a highly scalable system.
•
Streaming output from a stored process is written to the _WEBOUT fileref. The underlying access method has
changed, but the functionality is very similar. ODS, HTML Formatting Tool, DATA step, or SCL programs
can continue to write output to _WEBOUT.
•
The Application Server functions (APPSRVSET, APPSSRVGETC, APPSRVGETN, APPSRV_HEADER,
APPSRV_SESSION, and APPSRV_UNSAFE) are supported in stored processes except as noted in the
following issues. In many cases, there are equivalent STPSRV functions that are recommended for new
programs.
•
The _REPLAY mechanism is supported by the stored process server. The value of the _REPLAY URL has
changed, but this does not affect most programs.
•
The SAS/IntrNet sessions feature has been implemented by the stored process server. The same SAVE
library, session macro variables, and session lifetime management functions are available.
•
Converting SAS/IntrNet Programs to Stored Processes 49
Issues
There are a number of differences in the stored process server environment that might affect existing SAS/IntrNet
programs. Use this list as a review checklist for your existing programs.
HTTP headers cannot be written directly to _WEBOUT using a DATA step PUT statement or SCL fwrite
function. You must use the STPSRV_HEADER (or APPSRV_HEADER) functions to set header values.
Automatic header generation cannot be disabled with appsrvset("automatic headers", 0).
The Location header record does not currently work with stored processes because the HTTP status code
cannot be set.
•
Unsafe processing is different for stored processes — there is no UNSAFE option. Unsafe characters are
quoted instead of removed from the input parameters, so you can safely use the &VAR syntax without
worrying about unsafe characters. The following examples work without using the APPSRV_UNSAFE
function.
%if &MYVAR eq %nrstr(A&P) %then do something...;
Another example:
data _null_;
file _webout;
put "MYVAR=&MYVAR";
run;
APPSRV_UNSAFE works in the stored process server and still returns the complete, unquoted input value.
This change might cause subtle behavioral differences if your program relies on the SAS/IntrNet unsafe
behavior.
•
The stored process server cannot directly execute SOURCE, MACRO, or SCL catalog entries. You must write
a wrapper .sas source code file that executes the catalog entry.
•
The _REPLAY macro variable does not have the same syntax in stored processes as it did in Application
Dispatcher. References to &_REPLAY are not recommended for SAS/IntrNet programs, but can be used in
stored processes. The DATA step function symget('_REPLAY') does not return a usable URL in a stored
process and should be replaced with "&_REPLAY". For example,
url = symget('_REPLAY') || ...url parameters...
should be changed to
url = "&_REPLAY" || ...url parameters...
•
_SERVICE, _SERVER, and _PORT do not exist for stored processes. You must review any code that uses
these macro variables. Usually, they are used to create drill−down URLs or forms. In many cases, this code
does not require any change; input values for these variables are ignored.
•
_PROGRAM refers to a stored process path, and not a three or four−level program name. Any programs that
create drill−down links or forms with _PROGRAM must generally be modified to use the stored process path.
•
There is no REQUEST TIMEOUT functionality in SAS Stored Processes. appsrvset('request
timeout') is not supported.
•
The Application Server functions APPSRV_AUTHCLS, APPSRV_AUTHDS, and APPSRV_AUTHLIB are
not supported in stored processes. There are no STPSRV functions that are equivalent to these Application
Server functions.
•
Stored processes do not support automatic user exit programs such as REQUEST INIT, REQUEST TERM,•
SAS® Integration Technologies: Developer's Guide
Converting SAS/IntrNet Programs to Stored Processes 50
REQUEST LOGIN, SESSION INIT, SESSION TERM, and SESSION INVSESS. SAS/IntrNet applications
that rely on these features will require modifications to implement equivalent functionality. In most cases, all
relevant stored process source code must be changed to explicitly call user exits when necessary. There is no
support for REQUEST LOGIN or SESSION INVSESS functionality in the SAS Stored Process Web
Application, although similar functionality can be implemented in a custom Web interface.
If you are writing to _WEBOUT using PUT statements while ODS has _WEBOUT open, when you execute
the code the PUT statement data might be out of sequence with the data generated by ODS. This problem
occurs because both your code and ODS are opening the same fileref at the same time. For example, the
following code might not always work as expected:
ods listing close;
ods html body=_webout path=&_tmpcat
(url=&_replay) Style=Banker;
... other code ...
data _null_;
file _webout;
put '<p align="center"> </p>' ;
put '<p align="center"><b>Test.
If you see this in order, it worked.</b></p>';
run;
... other code ...
ods html close;
This code might work in some SAS/IntrNet programs, but it can cause data order problems even in
SAS/IntrNet. This code is more likely to fail in a stored process. This problem can be fixed by inserting your
PUT statements before you open ODS, closing ODS while you write directly to the fileref, or using the ODS
HTML TEXT="string" option to write data. The following code is an example of how you can both close
ODS while you write directly to the fileref, and insert your PUT statements before you open ODS:
ods html body=_webout (no_bottom_matter)...;
... other code ...
ods html close;
data _null_;
file _webout;
put '<p align="center"> </p>' ;
put '<p align="center"><b>Test.
If you see this in order, it worked.</b></p>';
run;
ods html body=_webout (no_top_matter)...;
... other code ...
ods html close;
The following code is an example of how you can use the ODS HTML TEXT="string" option to write data:
ods listing close;
ods html body=_webout path=&_tmpcat
(url=&_replay) Style=Banker;
... other code ...
ods html text='<p align="center"> </p>' ;
ods html text='<p align="center"><b>Test.
If you see this in order, it worked.</b></p>';
... other code ...
ods html close;
•
SAS Stored Processes
SAS® Integration Technologies: Developer's Guide
Converting SAS/IntrNet Programs to Stored Processes 51

Using Stored Processes
SAS Stored Processes can be used in many different client applications. The following list gives a brief overview of
each so that you can determine which client best suits your needs.
SAS Add−In for Microsoft Office
The SAS Add−In for Microsoft Office is a Component Object Model (COM) add−in that extends Microsoft
Office by enabling you to dynamically execute stored processes and embed the results in Microsoft Word
documents, Microsoft Excel spreadsheets, and Microsoft PowerPoint presentations. Additionally, within
Excel you can use the SAS add−in to access and view SAS data sources or any data source that is available
from your SAS server, and analyze SAS or Excel data by using analytic tasks. For more information, refer to
the SAS Add−In for Microsoft Office Online Help, which is located within the product.
SAS BI Web Services
SAS BI Web Services provide a Web service interface to SAS Stored Processes. Web services can be hosted
on a Java servlet container or Windows IIS. SAS BI Web Services implement the Discover and Execute Web
methods specified by the XML for Analysis standard. The Discover method returns the metadata for a stored
process, and the Execute method calls the SAS Stored Process Server to invoke a stored process.
SAS Data Integration Studio
SAS Data Integration Studio enables its administrators to publish jobs as stored processes. SAS Data
Integration Studio can generate code that converts a job into a stored process, which is saved to a file and can
be executed later by the SAS Stored Process Server. Metadata about the stored process is saved in the current
metadata repository. Refer to the SAS Data Integration Studio product Help for more information.
SAS Enterprise Guide
SAS Enterprise Guide provides an integrated solution for authoring, editing, and testing stored processes. You
can create stored processes from existing or new SAS code and create stored processes automatically from
SAS Enterprise Guide tasks. Metadata registration and source code management are handled from one
interface. SAS Enterprise Guide also has the capability to execute stored processes, which enables you to
modify and test your stored process without leaving the SAS Enterprise Guide environment. Refer to the SAS
Enterprise Guide product Help for more information.
SAS Information Delivery Portal
The SAS Information Delivery Portal provides integrated Web access to SAS reports, stored processes,
information maps, and channels. If you have installed the SAS Information Delivery Portal, you can make
stored processes available to be executed from the portal without the need for additional programming. The
SAS Information Delivery Portal includes the SAS Stored Process Web Application.
SAS Information Map Studio
Stored processes can be used to implement information map data sources. Stored processes can use the full
power of SAS procedures and the DATA step to generate or update the data in an information map. Refer to
the SAS Information Map Studio product Help for more information about stored process information maps.
SAS Stored Process Web Application
The SAS Stored Process Web Application is a Java Web application that can execute stored processes and
return results to a Web browser. The SAS Stored Process Web Application is similar to the SAS/IntrNet
Application Broker and has the same general syntax and debug options as the Application Broker. See the
Building Web Applications section for examples of this component. The SAS Stored Process Web
Application is included with the SAS Web Infrastructure Kit, a component of SAS Integration Technologies.
SAS Web Report Studio
You can use SAS Web Report Studio to execute stored processes and to include stored processes or stored
process results in a report. Refer to the SAS Web Report Studio product Help for more information.
Stored Process Service
The Stored Process Service is a Java application programming interface (API) that enables you to execute
stored processes from a Java program. This API is commonly used in JSP pages, but can also be used from
Using Stored Processes 52

servlets, custom tagsets and other Java applications. The Stored Process Service API is part of SAS
Foundation Services; you must deploy SAS Foundation Services in order to use the Stored Process Service
API. For more information, see the Stored Process Service package description in the Foundation Services
class documentation in the SAS Integration Technologies: Developer's Guide.
SAS Stored Processes
SAS® Integration Technologies: Developer's Guide
Using Stored Processes 53

Building a Web Application
Stored processes are frequently used in Web−based applications. While almost any stored process can be executed
through a Web interface, the typical Web application design might require special techniques. This section and the
following sections document special issues you might encounter when building a Web application.
Web applications are typically implemented by streaming output stored processes. Streaming output stored processes
deliver their output through the _WEBOUT fileref. You can write directly to the _WEBOUT fileref using PUT
statements or use the Output Delivery System (ODS) to generate output. The example code throughout this section
demonstrates both approaches. Streaming output is only supported by the stored process server: the workspace server
is not an appropriate host for many Web applications.
Web applications can be implemented using the SAS Stored Process Web Application, the Stored Process Service API
or a combination of both. The SAS Stored Process Web Application is a Java middle−tier application that executes
stored processes on behalf of a Web client. Only SAS and HTML programming skills are required; no Java
programming is required. Most of the examples in the remainder of this section assume the use of the SAS Stored
Process Web Application. The Stored Process Service API enables the Java developer to embed stored processes
within a Java Web application.
SAS Stored Processes
Building a Web Application 54
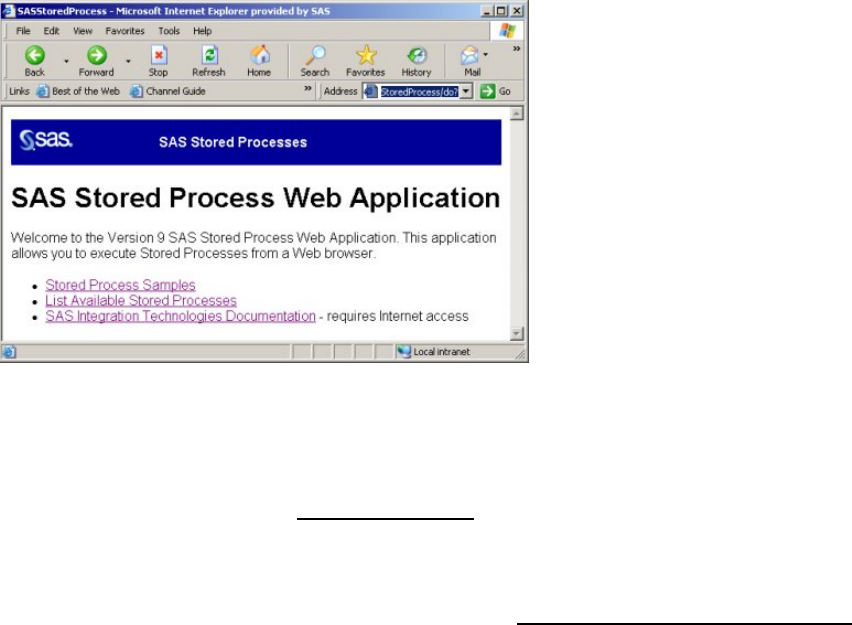
SAS Stored Process Web Application
The SAS Stored Process Web Application is a Java Web application that can execute stored processes and return
results to a Web browser. The SAS Stored Process Web Application is similar to the SAS/IntrNet Application Broker,
and has the same general syntax and debug options. The SAS Stored Process Web Application is included with the
SAS Web Infrastructure Kit, a component of SAS Integration Technologies.
To execute the SAS Stored Process Web Application, enter the application's URL in the Web browser. Either the
default Welcome page or static data is displayed.
Here is an example of a URL for the SAS Stored Process Web Application:
http://yourserver.com:8080/SASStoredProcess/do?
In this example, if the Welcome.htm file is installed, then the Welcome page is displayed. The Welcome page might
look like this:
The Welcome page contains the following three links:
Stored Process Samples
Click this link to display a page of stored process samples that are installed with the SAS Web Infrastructure
Kit. See the section about custom input forms for more information.
List Available Stored Processes
Click this link to display a page that contains a tree view of metadata repositories, folders, and stored
processes. You can select a stored process in the tree view in order to view metadata for the stored process or
to run the stored process. See the section about the stored process list and summary page for more
information.
SAS Integration Technologies Documentation
Click this link to display the SAS Integration Technologies documentation library, which contains detailed
documentation about each feature of the SAS Integration Technologies product. This link requires Internet
access.
In the previous example, if the Welcome.htm file has not been installed, then static data is displayed. The static data
might look like this:
Stored Process Web Application
SAS Stored Process Web Application 55
Version 9.1 (Build 286)
Note that instead of navigating through this interface from the Welcome page, you can also use the _ACTION and
_PROGRAM variables in the URL to open different pages.
Stored Process List and Summary Page
From the Welcome page, you can click the List Available Stored Processes link in order to display a page that is split
into sections. (You can also append the _ACTION variable with a value of INDEX (_ACTION=INDEX) to the SAS
Stored Process Web Application URL in order to display this page.) On the left is a tree view of metadata repositories,
folders, and stored processes. If you drill down in the tree view and select a stored process, then a summary of that
stored process is displayed on the right:
You can also display this summary page by specifying _ACTION=DATA&_PROGRAM=<stored−process−path>
on the SAS Stored Process Web Application URL.
The following items are included on this page:
Path
specifies the path to the stored process metadata in the metadata repository. You can use this path as the value
for the _PROGRAM variable.
Directory
specifies the source code repository, where the SAS code is located.
File name
specifies the name of the file that contains the SAS code.
SAS server type
specifies the type of server that is used to run the stored process (either a stored process server or a workspace
SAS® Integration Technologies: Developer's Guide
SAS Stored Process Web Application 56
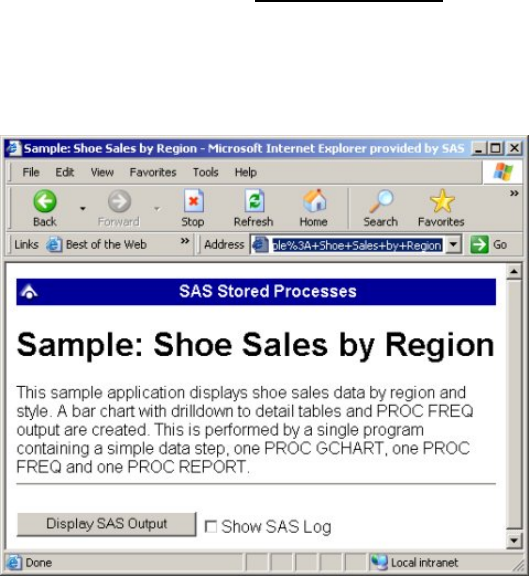
server).
Creation date
specifies the date and time that the stored process metadata was first registered.
Last modified
specifies the date and time that the stored process metadata was last modified.
Keywords
specifies any keywords that are associated with the stored process. These keywords are part of the stored
process metadata.
Description
contains a description of the stored process. This description is part of the stored process metadata.
Click Execute at the bottom of the summary to run the stored process. If there are no parameters or input forms, then
the stored process will execute immediately and the results will be displayed. If there are parameters or input forms,
then you will be taken to the custom input form or property page.
Custom Input Form
If you want the SAS Stored Process Web Application to display a custom input form for a stored process, then you
can use any of the following methods:
On the Welcome page, click the Stored Process Samples link to display a page of stored process samples that
are installed with the SAS Web Infrastructure Kit. Each of these samples has a link and a description. Click
any of these links to display the custom input form for that stored process.
•
Use the _PROGRAM variable along with _ACTION=FORM in the URL to display the custom input form for
a stored process. See Custom Input Forms for more information.
•
On the stored process summary page, click Execute at the bottom of the summary. If the stored process has a
custom input form, then it will be displayed.
•
A custom input form might look like this:
You can use the custom input form to execute the stored process. In this example, clicking Display SAS Output
generates the following results:
SAS® Integration Technologies: Developer's Guide
SAS Stored Process Web Application 57

Property Page
A stored process property page can consist of one or more parameters pages and an execution options page. If there
are no parameters pages, then the execution options page is displayed. However, if there are any parameters pages,
then the top parameters page is displayed first. In order to display the property page for a stored process, you can do
one of the following:
Use the _PROGRAM variable along with _ACTION=PROPERTIES in the URL to display the property page
for a stored process. See Property Pages for more information.
•
On the stored process summary page, click Execute at the bottom of the summary. If the stored process does
not have a custom input form, then the property page will be displayed.
•
Parameters Page
You can click Parameters in the menu on the left side of the property page to display the parameters page. If you have
defined parameters groups, then the groups are shown as items in the menu on the left side of the property page. You
can click each group name to display the parameters that are in that group. A parameters page without groups might
look like this:
SAS® Integration Technologies: Developer's Guide
SAS Stored Process Web Application 58

This sample parameters page shows four parameters: Date (a date type parameter), Color (a color type parameter),
Comment (a multi−line text type parameter), and Name (a string type parameter). Parameters must be defined in the
stored process metadata for them to be visible in a property page. The stored process metadata is where the label, type,
default value, and constraints for a parameter are defined. Parameter constraints can specify any of the following:
a list of values, number of selections allowed, and whether additional values are allowed for date, color, file
name, and string parameters.
•
string length for string and multi−line text parameters.• a range of values, and the way in which values are incremented for float and integer parameters.•
The metadata also indicates whether each parameter is required, modifiable, or visible, and whether each parameter is
for expert users only. The asterisks (*) beside Date and Name in the previous example indicate that these are required
parameters, which means that the stored process cannot execute until values are provided for these parameters. In this
example, all of the parameters are also visible and modifiable.
The parameter type determines how that parameter is displayed in the property page. You can have any of the
following types of parameters in this page:
Boolean
displays the parameter label and two radio boxes. You must choose whether the value should be true or
false. The default value is false.
Color
displays the parameter label and either a drop−down list, or a text box and a browse [...] button. You can use
the text box or drop−down list to specify or select values in the form CXrrggbb, where rr, gg, and bb are
two−digit hexadecimal numbers. Any characters that you specify are case−insensitive. You can also click the
browse button to display the Choose a Color dialog box, where you can click available colors, specify values,
and preview the resulting color.
SAS® Integration Technologies: Developer's Guide
SAS Stored Process Web Application 59
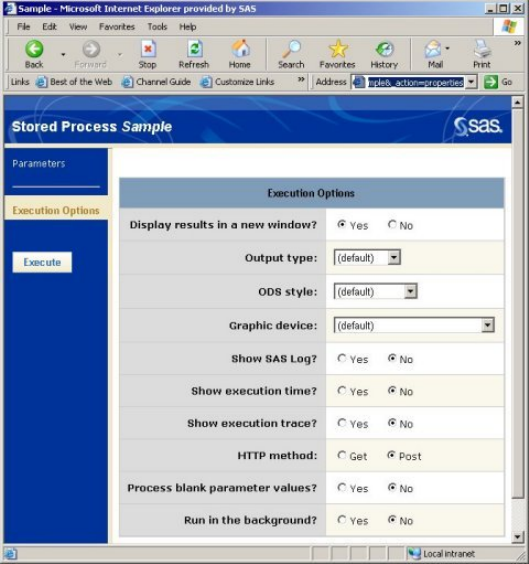
Date
displays the parameter label and either a drop−down list, or a text box and an browse [...] button. You can use
the text box or drop−down list to specify or select values for Date parameters. Date values can be specified
with any legal Java date syntax for your locale or with ddmmmyyyy where dd is a one or two digit day,
mmm is the English month abbreviation, and yyyy is the four digit year. You can also click the browse button
to display the Choose a Date dialog box, where you can click to select a date in the calendar.
File Name
displays a text box or drop−down list where you can enter or select a file name.
Float
displays a text box where you can enter a floating number.
Integer
displays a text box where you can enter an integer.
Multi−line Text
displays a text box, with a scroll bar, where you can enter multiple lines of text.
Note: Multi−line text parameters are not supported for stored processes on workspace servers.
String
displays a text box or drop−down list, where you can enter or select a string.
Execution Options Page
You can click Execution Options in the menu on the left side of the property page in order to view the execution
options page, which might look like this:
The following execution options are available by default:
Display results in a new window?
specifies whether to open a new browser window to display the stored process results.
SAS® Integration Technologies: Developer's Guide
SAS Stored Process Web Application 60

Output type
specifies what kind of output object to deliver. The options are HTML, Rich Text, PDF, and PostScript.
ODS style
specifies the ODS style to use when displaying ODS output.
Graphic device
specifies the type of graphic to generate. The options are GIF, JPEG, ActiveX, Java, ActiveX image, Java
image, and SAS EMF.
Show SAS log?
specifies whether to show the SAS log with the stored process results.
Show execution time?
specifies whether to show the amount of time used to process the request. A message like this appears under
the stored process results:
This request took n.nn seconds of real time.
Show execution trace?
specifies whether to set _DEBUG=TRACE for the stored process. See Debugging in the SAS Stored Process
Web Application for more information about this debug option.
HTTP method
specifies which HTTP method to use, either GET or POST. See Specifying Name/Value Pairs in an HTML
Form for more information about these methods.
Process blank parameter values?
specifies whether parameter values that include blank values are passed to the stored process. If you select No,
then blank parameter values are ignored.
Run in the background?
specifies that when the stored process is executed, control is returned to the browser. This option is only
available for stored processes with non−streaming results. Running a stored process in the background causes
an alert to be created. Your alerts (and any results from the stored process) can be viewed from the Alerts
portlet in the SAS Information Delivery Portal. For more information, see Adding and Administering SAS
Stored Processes in the "Adding Content to the Portal" chapter in the SAS Intelligence Platform: Web
Application Administration Guide.
Click Execute in the menu on the left side of the property page to execute the stored process. If you choose to run a
stored process in the background, then you will see a message similar to the following text:
Stored Process //Repository/path/stored process
submitted for background processing.
When executing a stored process using the Web application or Information Delivery Portal, the execution options
page will be displayed unless a JSP file exists for the stored process. If you want to customize the execution options
page, you can hide or customize some of the options.
To hide or customize an execution option, add an input parameter with a name that corresponds to the execution
option. For example, the input parameter named _ODSDEST corresponds to the Output type execution option.
The following table contains a list of the execution options you can hide or customize, and the properties of the input
parameters you need to add in order to hide or customize them. This must be done for each individual stored process.
For each of these input parameters, specify the type as String. You should select Visible if you are customizing the
execution option, but deselect this check box if you are hiding the execution option. You can specify any label for the
input parameters.
Default Value of Input Parameter
SAS® Integration Technologies: Developer's Guide
SAS Stored Process Web Application 61
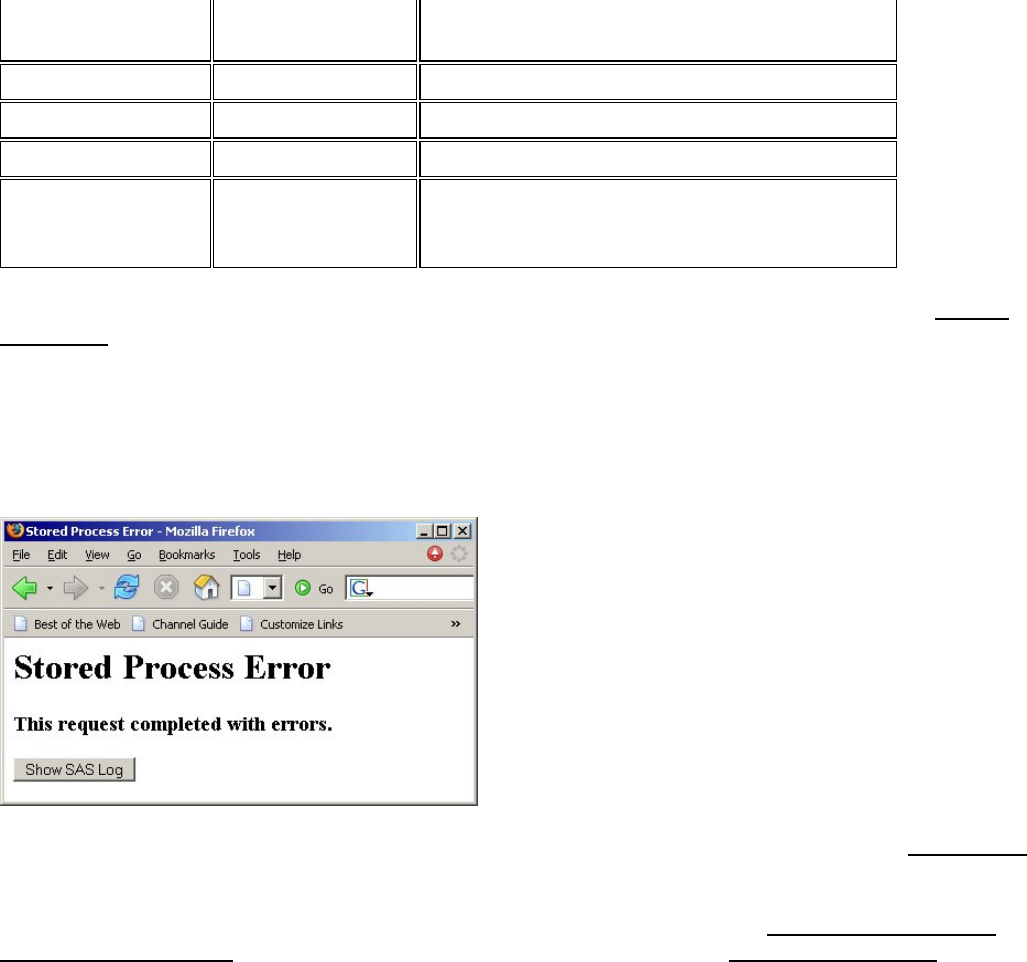
Execution Option
to Customize SAS Variable Name
of Input Parameter
Output type _ODSDEST <blank, or any valid ODS destination>
ODS style _ODSSTYLE <blank, or any valid ODS style>
Graphics device _GOPT_DEVICE <blank, or any valid SAS/GRAPH device driver>
Show SAS Log
Show execution time
Show execution trace _DEBUG <blank, or any valid value for the debugging flag>
You can completely eliminate the execution options page by creating a JSP file for the stored process. See Custom
Input Forms for more information.
Error Page
If there is an error while the stored process is running, then you will get an error message with a button that you can
click to show the SAS log.
In order to disable the Show SAS Log button, you can set the Web application initialization parameter DebugMask
to disable debug logging.
For more information about customizing the SAS Stored Process Web Application, see SAS Stored Process Web
Application Configuration. For more information about Web application input, see Web Application Input.
SAS Stored Processes
SAS® Integration Technologies: Developer's Guide
SAS Stored Process Web Application 62
SAS Stored Process Web Application Configuration
The SAS Stored Process Web Application can be customized for your site through various configuration files and
servlet initialization parameters.
Configuration Files
The following table describes the external files that are read by the SAS Stored Process Web Application.
File Description
Params.config
contains stored process input parameters that are set before any client parameters are
processed. The parameters are defined in the form name=value on a separate line with a '#'
character in column one indicating a comment. Continuation lines can be specified with a '\'
character at the end of a line. See the section about Web Application Properties for properties
that can be substituted into input parameters in the params.config file. Parameters defined in
the params.config file cannot be overridden.
Resources.properties contains name/value pairs for locale−defined output strings. This file is normally not altered.
Welcome.htm specifies an optional page to display when the SAS Stored Process Web Application is invoked
with no parameters.
Initialization Parameters
The following table describes the initialization parameters that are available. Initialization parameters are values that
are set when the SAS Stored Process Web Application is started. These parameters control various Web Application
processing options. Initialization parameters are defined in the SAS Stored Process Web Application initialization area
of the SAS Stored Process Web Application server.
Initialization
Parameter Description
AuthMechanism
specifies how users are authenticated when logging into the SAS Stored Process Web
Application. This parameter is set to Trusted for Web authentication. If the AuthMechanism
parameter is set to Trusted, then the Web server must set the remote user value or an error will
be returned. See Changing to Trusted Web Authentication in the SAS Intelligence Platform: Web
Application Administration Guide for a description of Web authentication.
Debug specifies default _DEBUG values.
DebugMask specifies the _DEBUG values that users are allowed to set. The default is to allow all keywords.
Valid names can be specified as a comma−separated list.
InputEncoding specifies the default input character encoding, for example, utf−8.
OutputEncoding specifies the default output character encoding, for example, utf−8.
ParamsFile specifies the file that contains the preset input parameters. The default preset file name is
Params.config in the SAS Stored Process Web Application root context directory.
PrivilegedUser specifies a stored process privileged user for pooled workspaces.
SessionTimeout specifies the number of seconds that elapse before a servlet session expires. The default session
SAS Stored Process Web Application Configuration 63

timeout is 900 (15 minutes).
WelcomePage
specifies an HTML page to display if no parameters are entered in the URL. The value that you
specify should be a fully expanded file specification. The default file name is Welcome.htm in the
SAS Stored Process Web Application root context directory. If the welcome file cannot be read,
the SAS Stored Process Web Application version and build number are displayed.
Web Application Properties
Various reserved values, or properties, are available to be passed as input parameters to stored processes executed by
the SAS Stored Process Web Application. To pass a property to every stored process executed by the SAS Stored
Process Web Application, add a line of the form name=$reserved_name to the params.config file. For example,
to add request cookie information as an input parameter, add the following line to params.config:
_HTCOOK=$servlet.cookies
The input parameter _HTCOOK is then created, containing the HTTP header cookie data. _HTCOOK is added to the
input parameters for the stored process.
Note: Any unresolved values result in the corresponding parameter being set to a zero length string.
Reserved Name Recommended
SAS Variable
Name Description
servlet.auth.type _AUTHTYP
specifies the name of the authentication scheme used to protect the
SAS Stored Process Web Application, for example, BASIC or SSL,
or null if the SAS Stored Process Web Application was not
protected.
servlet.character.encoding specifies the name of the character encoding used in the body of the
request.
servlet.content.length specifies the length, in bytes, of the request body and made available
by the input stream, or −1 if the length is not known.
servlet.content.type specifies the MIME type of the body of the request, or null if the
type is not known.
servlet.context.path specifies the portion of the request URL that indicates the context of
the request.
servlet.cookies _HTCOOK specifies all of the cookie strings the client sent with this request.
servlet.header specifies the HTTP request header as received by the SAS Stored
Process Web Application.
servlet.header.accept _HTACPT specifies the MIME types accepted by the stored process client.
servlet.header.referer _HTREFER specifies the address of the referring page.
servlet.header.user−agent _HTUA specifies the name of the user agent.
servlet.header.<name>specifies a particular HTTP request header line as received by the
SAS Stored Process Web Application, where <name> is the header
keyword name.
SAS® Integration Technologies: Developer's Guide
SAS Stored Process Web Application Configuration 64

servlet.info specifies any information about the SAS Stored Process Web
Application, such as author, version, and copyright.
servlet.jsessionid specifies the Java servlet session ID.
servlet.locale specifies the preferred locale that the client will accept content in,
based on the Accept−Language header.
servlet.method _REQMETH specifies the name of the HTTP method with which this request was
made, for example, GET, POST, or PUT.
servlet.name specifies the name of this SAS Stored Process Web Application
instance.
servlet.path specifies the part of the request URL that calls the SAS Stored
Process Web Application.
servlet.path.info specifies any extra path information associated with the URL the
client sent when it made this request.
servlet.path.translated specifies any extra path information after the SAS Stored Process
Web Application name but before the query string, and translates it
to a real path.
servlet.protocol _SRVPROT specifies the name and version of the protocol the request uses in the
form protocol/majorVersion.minorVersion, for example, HTTP/1.1.
servlet.query.string _QRYSTR specifies the query string that is contained in the request URL after
the path.
servlet.remote.addr _RMTADDR specifies the Internet Protocol (IP) address of the client that sent the
request.
servlet.remote.host _RMTHOST specifies the fully qualified name of the client that sent the request,
or the IP address of the client if the name cannot be determined.
servlet.remote.user _RMTUSER specifies the login of the user making this request, if the user has
been authenticated, or null if the user has not been authenticated.
servlet.request.uri _URL specifies the part of this request's URL from the protocol name up to
the query string in the first line of the HTTP request.
servlet.root specifies the SAS Stored Process Web Application root context
directory.
servlet.scheme specifies the name of the scheme used to make this request, for
example, HTTP, HTTPS, or FTP.
servlet.secure returns true or false indicating whether this request was made using
a secure channel, such as HTTPS.
servlet.server.name _SRVNAME specifies the host name of the server that received the request.
servlet.server.port _SRVPORT specifies the port number on which this request was received.
servlet.server.software _SRVSOFT specifies the Web server software.
servlet.user.name _USERNAME specifies the value for the user name obtained from the browser
authentication.
servlet.user.password specifies the value for the password obtained from the browser
authentication.
SAS® Integration Technologies: Developer's Guide
SAS Stored Process Web Application Configuration 65

servlet.version _VERSION specifies the SAS Stored Process Web Application version and build
number.
There are numerous system properties (for example, user.name) that can be obtained. Setting _DEBUG to ENV will
show all the available values.
SAS Stored Processes
SAS® Integration Technologies: Developer's Guide
SAS Stored Process Web Application Configuration 66

Web Application Input
A Web application that uses stored processes must have a way of sending input parameters to the stored processes.
Input parameters are normally generated by an HTML page and passed through the Stored Process Web Application
or a user written JSP to the stored process. Input parameters can be specified in the following:
fields in an HTML form. The user provides the required information and submits the request. The Web
browser sends data from the form (including both user entered data and hidden fields) to the server. HTML
forms are generally used where user input is required to control the execution of the stored process.
•
a hypertext link in an anchor tag. The link URL includes parameter values that are passed to the server when
the user selects the link. Hypertext links are generally used where the input parameters have fixed values, for
example, as drill−down links in a table or image.
•
an inline image or other embedded link in the HTML page. This case also includes frames within an HTML
frameset. In most cases, the Web browser fetches the embedded object when the user loads the HTML page.
Fetching the embedded object can cause input parameters to be passed to a stored process.
•
URLs or forms created and submitted by JavaScript or a similar scripting technology in the Web browser.•
The HTML page using these techniques can be a static HTML page or a dynamic page generated on demand by
another stored process or by a Java Server Page (JSP). In all cases, the input parameters must follow the naming
conventions and other basic rules described in the Input Parameters section. Reserved parameter names should be used
only as recommended.
All of the previously mentioned techniques for specifying input parameters rely on URLs or HTML forms. The
following sections discuss how parameters are passed in both cases. These sections assume the use of the Stored
Process Web Application. JSPs generally will use similar conventions, but the details are determined by the author of
the JSP.
Specifying Input Parameters in a URL
You can specify input parameters as a sequence of name/value pairs in a URL by using the query string syntax. For
example, the URL
http://yourserver/SASStoredProcess/do?
_program=/WebApps/Sales/Weekly+Report®ion=West
specifies two name/value pairs. The URL specifies your server, an absolute path to your Stored Process Web
Application and the query string (following the question mark character). Each name in the query string is separated
from the following value by an equals (=). Multiple name/value pairs are separated by ampersands (&). In this
example, _program=/WebApps/Sales/Weekly+Report is the reserved input parameter that specifies the
stored process to be executed. The second name/value pair (region=West) is another input parameter to be passed
to the stored process.
There are special rules for the formatting of name/value pairs in a URL. Special characters (most punctuation
characters, including spaces) in a value must be URL encoded. Spaces can be encoded as a plus (+) or %20. Other
characters are encoded using the %nn convention, where nn is the hexadecimal representation of the character in the
ASCII character set. In the previous example, the value /WebApps/Sales/Weekly+Report actually identifies
the stored process named "Weekly Report". The space in the name is encoded as a plus (+). If your parameter values
might contain special characters, it is important that they are URL encoded. Use the URLENCODE DATA step
function when creating URLs in a stored process.
Web Application Input 67
URLs are typically used in an HTML tag attribute and this might require extra encoding to be properly interpreted.
The ampersand characters used in the URL query string can cause the Web browser to interpret them as HTML
markup. The parameter ®ion=West is interpreted as ®ion=West in some browsers. Use HTML
encoding to avoid this problem. For example, use
<A HREF="http://yourserver/SASStoredProcess/do?
_program=/WebApps/Sales/Weekly+Report&region=West">
instead of
<A HREF="http://yourserver/SASStoredProcess/do?
_program=/WebApps/Sales/Weekly+Report®ion=West">
The HTMLENCODE DATA step function can be used to encode the URL in a stored process. If we assume the
variable myurl contains a URL with various input parameters, then the following code:
atag = '<A HREF="' || htmlencode(myurl,
'lt gt amp quot') || '">';
creates an anchor tag in the variable atag that is properly encoded.
Note that some browsers and Web servers might impose a limit on the total length of a URL. URLs with many
parameter values that exceed this limit can be truncated without warning, resulting in incomplete or inconsistent input
data for your stored process. URL length limits are not well documented and might require experimentation with your
particular configuration.
Specifying Name/Value Pairs in an HTML Form
HTML forms provide the most versatile mechanism for sending input parameters to a stored process. A form
definition begins with the <FORM> tag and ends with the </FORM> tag. Between these two tags, other HTML tags
define the various components of the form, including labels, input fields, selection lists, push buttons, and more. Any
HTML reference book will document forms and provide numerous examples. A few issues related to stored process
input parameters in HTML forms are discussed below.
The ACTION attribute of the <FORM> tag generally points to the Stored Process Web Application or a JSP that will
execute the stored process. The METHOD attribute of the <FORM> tag can be set to GET or POST:
The GET method causes the Web browser to construct a URL from all of the field values in the form. The
URL will be exactly like the URLs discussed in the previous section. The GET method enables the user to
bookmark a specific stored process execution, including all input parameters, but might be limited in the total
length of all parameters. Web servers typically log all requested URLs and this method causes all input
parameters to be included in the Web server log (a possible security issue).
•
The POST method uses a special post protocol for sending the parameters to the server. The POST method
allows an unlimited number of input parameters and usually hides them from the Web server log, but does not
allow the execution to be bookmarked in a browser.
•
Hidden fields are name/value pairs in a form that do not appear as buttons, selection lists, or other visible fields in the
HTML page. Hidden fields are frequently used to hold fixed input parameters that do not require user input. For
example,
<INPUT TYPE="hidden"
NAME="_program" VALUE="/WebApps/Sales/Weekly Report">
SAS® Integration Technologies: Developer's Guide
Web Application Input 68

specifies the stored process to be executed by this form. Note that the space in the stored process name is not encoded
as in the previous URL section. Values in hidden fields and other field types should not be URL encoded, but might
still need to be HTML encoded if they contain HTML syntax characters such as less than (<), greater than (>),
ampersand (&), or quotation marks (").
Custom Input Forms
The SAS Stored Process Web Application will look for a custom input form if you add the parameter
_ACTION=FORM to the Web application URL. Custom input forms are JSPs under the input folder in the
SASStoredProcess directory. For example, the Shoe Sales by Region sample stored process can be accessed
with:
http://yourserver/SASStoredProcess/do?
_program=/Samples/Stored+Processes/
Sample:+Shoe+Sales+by+Region&_action=form
Your browser will be forwarded to
http://yourserver/SASStoredProcess
/input/Samples/Stored_Processes/
Sample__Shoe_Sales_by_Region.jsp?
_program=/Samples/Stored+Processes/
Sample:+Shoe+Sales+by+Region
In order to create the input form path and name, all names in the stored process path (both folders and the stored
process itself in the _PROGRAM parameter) are converted to an equivalent file system path for a JSP file. The
following special characters in a folder or stored process name are converted to underscore characters: ' " : * ? < > |
and blank spaces.
For example,
/Samples/John's Test Area/Test: Hello World (English) V1.0
would be converted to
<webapp−home>/input/Samples/John_s_Test_Area/
Test__Hello_World_(English)_V1.0.jsp
For more information about the SAS Stored Process Web Application and custom input forms, see Custom Input
Form.
Custom input forms are provided with most of the sample stored processes that are included in the SAS Web
Infrastructure Kit.
As a best practice, custom input form JSP files should be deployed from the Stored Process Web Application install
area. For the previous Shoe Sales by Region example, in a Windows environment, this would be:
<install root>\Web\Portal2.0.1\SASStoredProcess\
input\Samples\Stored_Processes
The path to the custom input form is determined by the location of the stored process entry in metadata. For example,
a stored process located in the repository as
SAS® Integration Technologies: Developer's Guide
Web Application Input 69

/Reports/East Region/Sales Summary 2005
would have a custom input form maintained and deployed from this location:
<install root>\Web\Portal2.0.1\SASStoredProcess\
input\Reports\East_Region
with the file name, Sales_Summary_2005.jsp. Custom input forms should be deployed as part of the
SASStoredProcess.war file. The SASStoredProcess.war file is built and deployed by the SAS Web Infrastructure Kit
redeployment process (see Re−Create and Redeploy the Portal Web Application in the SAS Intelligence Platform:
Web Application Administration Guide).
Property Pages
Property pages provide a parameter input page for stored processes that do not have custom input forms. The property
page is accessed by adding the parameter _ACTION=PROPERTIES to the Web application URL. Parameters must be
defined in the stored process metadata for them to be visible in a property page. For more information about the SAS
Stored Process Web Application and property pages, see Property Page.
If you are unsure whether a stored process has a custom input form, you can specify
_ACTION=FORM,PROPERTIES on the Web application URL. This causes the Web application to display the
custom input form if it exists or display the property page if the input form does not exist. This is the default action for
a stored process accessed from the SAS Information Delivery Portal.
SAS Stored Processes
SAS® Integration Technologies: Developer's Guide
Web Application Input 70

HTTP Headers
Stored process streaming output is always accompanied by an HTTP header. The HTTP header consists of one or
more header records that identify the content type of the output and can provide other information such as encoding,
caching, and expiration directives. A streaming stored process client is free to use or ignore the HTTP header as
desired. The SAS Stored Process Web Application forwards the HTTP client on to the Web browser (or other HTTP
client).
HTTP headers are defined by the HTTP protocol specification (RFC 2616), which can be found at the World Wide
Web Consortium. Each header record is a single text line consisting of a name and a value separated by a colon (:).
The following is an example of records in an HTTP header:
Content−type: text/html; encoding=utf−8
Expires: Wed, 03 Nov 2004 00:00:00 GMT
Pragma: nocache
You can set any HTTP record for your stored process output by calling the STPSRV_HEADER function. The
following DATA step function calls generate the previous example header records:
old = stpsrv_header("Content−type",
"text/html; encoding=utf−8");
old = stpsrv_header("Expires",
"Wed, 03 Nov 2004 00:00:00 GMT");
old = stpsrv_header("Pragma", "nocache");
You can also call this function directly from SAS macro code outside a DATA step. Note that string parameters are
not enclosed in quotation marks and macro characters such as semicolon (;) must be masked in this case:
%let old = %sysfunc(stpsrv_header(Content−type,
text/html%str(;) encoding=utf−8);
%let old = %sysfunc(stpsrv_header(Expires,
Wed, 03 Nov 2004 00:00:00 GMT));
%let old = %sysfunc(stpsrv_header(Pragma, nocache));
Commonly Used Headers
The following are few commonly used HTTP header records:
Content−type• Expires• Pragma• Set−Cookie•
Note: The Location header record does not currently work with stored processes because the HTTP status code
cannot be set.
Content−type
The Content−type header record is generated automatically for you. The value is set based on the ODS destination
that you use in your stored process. The value is determined by looking up the ODS destination in the file types
section of the SAS and, if appropriate, the Windows registry. If you do not use ODS to generate the output,
HTTP Headers 71
Content−type defaults to text/html. Use the STPSRV_HEADER function if you want to override the default
value. Override the value of Content−type when you want to do any of the following:
specify the encoding of the data. This might be important in Web applications where the client (typically a
Web browser) might expect a different encoding than the stored process output. Examples:
Content−type: text/xml; encoding=utf−8
Content−type: text/plain; encoding=iso−8859−1
Content−type: text/html; encoding=windows−1252
•
direct the output to a specific content handler. For example, HTML output can be directed to Microsoft Excel
(in later versions of Microsoft Office) by setting the Content−type to application/vnd.ms−excel.
•
override the default text/html value. This typically occurs if you are using ODS custom tagsets or you are
not using ODS at all to generate the output.
•
Commonly used Content−type values include the following:
Content−type Description
application/octet−stream Unformatted binary data.
image/gif GIF (Graphics Interchange Format) images.
image/jpeg JPEG (Joint Photographic Expert Group) format images.
image/png PNG (Portable Network Graphics) format images.
text/html HTML (Hypertext Markup Language).
text/plain Plain unformatted text.
text/xml XML (eXtensible Markup Language).
text/x−comma−separated−values Spreadsheet data.
Content−type values are also known as MIME types. For a list of all official MIME types, see the IANA registry.
An unregistered MIME type or subtype can be used; the value should be preceded with x−.
Expires
Web clients frequently cache HTML and other content. Accessing the same URL might return the cached content
instead of causing the output to be regenerated by the server. This is often desirable and reduces server and network
loads, but can lead to unexpected or stale data. The Expires header record enables you to control how long a Web
client will cache the content.
The Expires header record requires that the expiration time be specified in Greenwich Mean Time (GMT) and in a
particular format. A SAS picture format can be used to create this value. Use PROC FORMAT to create a custom
format:
proc format;
picture httptime (default=29)
other='%a, %0d %b %Y %0H:%0M:%0S GMT'
(datatype=datetime);
run;
This format can be created one time and saved in a global format library, or you can create it dynamically as needed in
your stored process. The format generates a date in the form
SAS® Integration Technologies: Developer's Guide
HTTP Headers 72

Sun, 24 AUG 2003 17:13:23 GMT
DATA step functions can then be used to set the desired expiration time, adjust to GMT and format, as shown in the
following examples:
/* Expire this page in six hours */
data _null_;
exptime = datetime() + '6:00:00't;
old = stpsrv_header('Expires',
put(exptime − gmtoff(), httptime. ));
run;
/* Expire this page at the beginning of next
week (Sunday, 00:00 local time) */
data _null_;
exptime = intnx('dtweek', datetime(), 1);
old = stpsrv_header('Expires',
put(exptime − gmtoff(), httptime. ));
run;
Specifying an expiration time in the past causes caching to be disabled for your output. It is recommended that you
also use the Pragma: nocache header record in this case. Specify an expiration time far in the future if you want
your content to be cached indefinitely.
Pragma
The Pragma header record is used to specify information not formally defined in the HTTP specification. The most
commonly used value is nocache. This value disables Web client caching of content for most Web browsers.
Set−Cookie
The Set−Cookie header record sends a cookie to the Web client to maintain client−side state. The format is
Set−Cookie: name=value; name2=
value2; ...; expires=date;
path=path; domain=domain_name; secure
where EXPIRES, PATH, DOMAIN, and SECURE are all optional. The date must be specified in the HTTP GMT
format described in the section on the Expires header record.
For example:
old = stpsrv_header("Set−Cookie",
"CUSTOMER=WILE_E_COYOTE; path=/SASStoredProcess/do; " ||
"expires=Wed, 06 Nov 2002 23:12:40 GMT");
The next time your application is run, any matching cookies are returned in the _HTCOOK environment variable,
assuming this variable has been enabled in your SAS Stored Process Web Application environment. You must parse
the cookie string to retrieve the information that you saved in the cookie. Use the scan DATA step function to split
the name/value pairs on the semicolon (;) delimiters; then split the name/value pairs on the equals sign (=) delimiter.
Most Web browsers support cookies, but some users disable them due to privacy concerns, site policies, or other
issues. If you use cookies, explain to your users why you need them and if they must be enabled to use your
application. Some Web clients might not support cookies at all.
SAS® Integration Technologies: Developer's Guide
HTTP Headers 73
SAS Stored Processes
SAS® Integration Technologies: Developer's Guide
HTTP Headers 74
Embedding Graphics
Web pages frequently contain embedded graphic images. For static images, an <IMG> tag is enough to embed the
image:
<IMG SRC="mykids.gif">
Dynamically generated images, such as charts that vary over time or due to input parameters, are more complicated.
Stored processes can generate graphics in addition to HTML output. The following stored process creates a bar chart
followed by a tabular report:
/* Sales by Region and Product */
*ProcessBody;
%stpbegin;
title "Sales by Region and Product";
legend1 label=none frame;
proc gchart data=sashelp.shoes;
hbar3d region / sumvar=sales
sum space=.6
subgroup=product
shape=cylinder
patternid=subgroup
legend=legend1;
label product='Shoe Style';
run;
proc report data=sashelp.shoes;
column region product sales;
define region / group;
define product / group;
define sales / analysis sum;
break after region / ol summarize suppress skip;
run;
%stpend;
Depending on input parameters, this stored process might produce the following:
Embedding Graphics 75
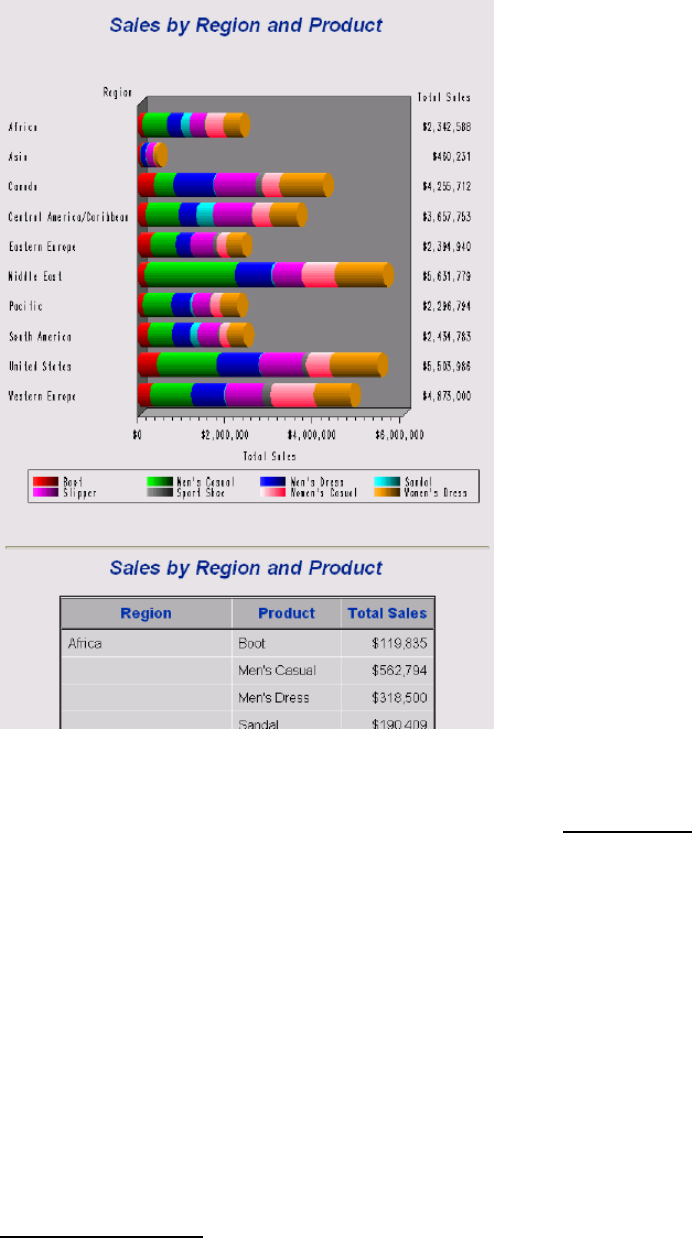
Note that no special code was added to handle the image. ODS and the stored process framework takes care of the
details of delivering both the HTML and the image to the Web browser. This code will handle different image types,
through the _GOPT_DEVICE input parameter supported by the %STPBEGIN macro. The image is delivered to the
Web browser in different ways depending on the chosen graphics device. JAVA and ACTIVEX images are generated
by embedding an <OBJECT> tag in the generated HTML containing the attributes and parameters necessary to invoke
the viewer and display the graphic. There is no <IMG> tag in this case. Other commonly used drivers (GIF, JPEG,
PNG, ACTXIMG, and JAVAIMG) do use the <IMG> tag. The following code is an HTML fragment generated by the
previous stored process using the GIF image driver:
<IMG SRC="/SASStoredProcess/do?_sessionid=
7CF645EB−6E23−4853−8042−BBEA7F866B55
&_program=replay&entry=
STPWORK.TCAT0001.GCHART.GIF">
The image URL in the <IMG> tag is actually a reference to the SAS Stored Process Web Application using the
special stored process named REPLAY. The REPLAY stored process takes two parameters, _SESSIONID and
ENTRY. _SESSIONID is new, unique value each time the original stored process is executed. ENTRY is the name of
a temporary SAS catalog entry containing the generated image. Image replay uses a special, lightweight version of the
stored process sessions feature to hold image files temporarily until the Web browser retrieves them.
You can use the REPLAY stored process to replay entries other than embedded images, such as CSS stylesheets,
JavaScript include files, PDF files, and HTML or XML files to be displayed in a pop−up window, frame or
<IFRAME>. The special macro variable _TMPCAT contains the name of the temporary catalog used for REPLAY
SAS® Integration Technologies: Developer's Guide
Embedding Graphics 76
entries and the variable _REPLAY contains the complete URL used to reference the REPLAY stored process (except
the actual entry name). The _TMPCAT catalog remains on the server only for a limited time. If the catalog is not
accessed within a timeout period (typically 15 minutes), the catalog and its contents are deleted.
Direct Graphic Output
In some cases, you might want to generate image output directly from a stored process with no HTML container. This
might be useful if you want to include a dynamically generated graphic in static HTML pages or HTML generated by
an unrelated stored process. For example,
/* Sales by Product − pie chart stored process
*
* XPIXELS and YPIXELS input parameters are required */
/* assume we want a new image generated
* each time the image is viewed −
* disable browser caching of this image */
%let old=%sysfunc(stpsrv_header(Pragma, nocache));
/* need test here in case XPIXELS
* or YPIXELS are not defined */
/* set up graph display options */
goptions gsfname=_webout gsfmode=replace
dev=png cback=cxE0E0E0 xpixels=&XPIXELS
ypixels=&YPIXELS ftext=swiss;
pattern1 color=yellow;
pattern2 color=cyan;
pattern3 color=green;
pattern4 color=black;
pattern5 color=red;
pattern6 color=blue;
/* create a simple pie chart */
proc gchart data=sashelp.shoes;
pie3d product/sumvar=sales;
run;
quit;
This stored process expects XPIXELS and YPIXELS to be passed as input parameters. A typical IMG tag to invoke
this stored process might be
<IMG SRC="/SASStoredProcess/do?_program=
/WebApps/Utilities/Sales+by+Product&XPIXELS=
400&YPIXELS=300">
which results in
SAS® Integration Technologies: Developer's Guide
Embedding Graphics 77

Note: There is a defect in some Web browser versions that ignores the NOCACHE and Expires directives in the
HTTP header. This defect causes the browser to re−use the previously generated image from its cache even if the
HTTP header directed that no caching was to occur. This might happen when embedding an image in an HTML page
or when directly entering an image URL in the Web browser. The old image might be updated by manually
performing a browser REFRESH or RELOAD, but it is difficult to work around this problem without manual
intervention.
SAS Stored Processes
SAS® Integration Technologies: Developer's Guide
Embedding Graphics 78
Chaining Stored Processes
Only the simplest stored process Web applications contain a single Web page. With the addition of a second and
subsequent pages, you face the problem of passing information from one page to another. It is also typical to have an
application that contains more than a single stored process. This means that you must find a way to connect the stored
processes that compose your application and make sure that all of the data collected along the way is available in the
appropriate places.
It is good programming practice to design applications so that they do not request the same information multiple
times. Because HTTP is a stateless environment, each request is separate from all other requests. If a user enters a
phone number on the first page of an application and submits the form, that phone number is available as an input
parameter to the first stored process. After that stored process completes, the input parameters are lost unless they are
explicitly saved. If the second or third stored process in the application needs to know the specified phone number, the
application must ask for the phone number again. There are several ways to solve this problem. You can store data
values in the following locations:
on the client in hidden form fields or URL parameters• on the client in cookies• on the server using sessions.•
Passing Data Through Form Fields or URL Parameters
Storing data on the client in hidden fields or URL parameters is the simplest technique. To do this, you must
dynamically generate all of the HTML pages in your application except for the initial page. Because each page
functions as a mechanism for transporting data values from the previous stored process to the next stored process, it
cannot be static HTML stored in a file.
Usually, the application takes the following steps:
The first HTML page is a welcome or login screen for the application. After the user enters any required
information, the first stored process is executed by submitting a form or clicking on a link.
1.
The first stored process performs any necessary validation on the submitted parameters and any required
application initialization.
2.
The first stored process writes an HTML page to the _WEBOUT output stream. This HTML page might be an
initial report or it might be the next navigation page in the application. Links in this page typically execute
another stored process and pass user identity, user preferences, application state or any other useful
information through hidden form fields or URL parameters.
3.
Each succeeding link in the application executes another stored process and passes any required information
through the same technique.
4.
Each hidden field in the second form can contain one name/value data pair passed from the first form. You should use
unique names for all of the data values in the entire application. In this way you can pass all of the application data
throughout the entire application.
When you dynamically generate the second form, you can write out the name of the second stored process in the
hidden field _PROGRAM. Because the first stored process contains the logic to determine the second stored process,
this is referred to as chaining stored processes. A stored process can chain to multiple stored processes depending on
the link a user chooses or on data entered by the users. The stored process can even chain back to itself.
Chaining Stored Processes 79
Example
The MyWebApp application starts with a static HTML welcome page.
<!−− Welcome page for MyWebApp −−>
<HTML>
<HEAD><TITLE>Welcome to MyWebApp
</TITLE></HEAD>
<BODY><H1>Welcome to MyWebApp</H1>
<FORM ACTION="/SASStoredProcess/do">
Please enter your first name:
<INPUT TYPE="text" NAME="FNAME"><BR>
<INPUT TYPE="hidden" NAME="_program"
VALUE="/WebApps/MyWebApp/Ask Color">
<INPUT TYPE="submit" VALUE="Run Program">
</FORM>
</BODY></HTML>
This page prompts the user for a first name and passes the value as the FNAME input parameter to the
/WebApps/MyWebApp/Ask Color stored process, as follows:
/* Ask Color stored process
*
* This stored process prompts for the user's favorite
* and passes it to the Print Color stored process.
*/
data _null_;
file _webout;
put '<HTML>';
put '<H1>Welcome to MyWebApp</H1>';
/* Create reference back to the Stored Process
Web Application from special automatic
macro variable _URL. */
put "<FORM ACTION='&_URL'>";
/* Specify the stored process to be executed using
the _PROGRAM variable. */
put '<INPUT TYPE="hidden" NAME="_program" ' ||
'VALUE="/WebApps/MyWebApp/Print Color">';
/* Pass first name value on to next program.
The value is user entered text, so you must
encode it for use in HTML. */
fname = htmlencode("&FNAME", 'amp lt gt quot');
put '<INPUT TYPE="hidden" NAME="fname" VALUE="'
fname +(−1) '"><BR>';
put 'What is your favorite color?';
put '<SELECT SIZE=1 NAME="fcolor">';
put '<OPTION VALUE="red">red</OPTION>';
put '<OPTION VALUE="green">green</OPTION>';
put '<OPTION VALUE="blue">blue</OPTION>';
put '<OPTION VALUE="other">other</OPTION>';
put '</SELECT><BR>';
put '<INPUT TYPE="submit" VALUE="Run Program">';
put '</FORM>';
put '</HTML>';
run;
SAS® Integration Technologies: Developer's Guide
Chaining Stored Processes 80
This stored process simply creates an HTML form prompting the user for more information. The reserved macro
variable _URL is used to refer back to the SAS Stored Process Web Application. This enables you to move the Web
application without modifying each stored process. The _PROGRAM variable specifies the stored process that will
process the contents of the form when it is submitted. In order to keep the FNAME that was entered in the initial page,
place it in the form as a hidden field. Because the value was entered by the user, it must be encoded using the
HTMLENCODE function in case it contains any character that might be interpreted as HTML syntax. The form
prompts the user for a color choice and chains to a new stored process named Print Color, as follows:
/* Print Color stored process
*
* This stored process prints the user's
* first name and favorite color.
*/
data _null_;
file _webout;
put '<HTML>';
fname = htmlencode("&FNAME");
put 'Your first name is <b>'
fname +(−1) '</b>';
put '<BR>';
put "Your favorite color is
<b>&FCOLOR</b>";
put '<BR>';
put '</HTML>';
run;
The Print Color stored process prints the values of the variables from both the first and second forms, illustrating
that the data has been correctly passed throughout the entire application.
A variation of this technique uses URL parameters instead of hidden form fields. An alternate implementation of the
Ask Color stored process might be as follows:
/* Ask Color stored process
*
* This stored process prompts for the user's favorite
* and passes it to the Print Color stored process.
*/
data _null_;
file _webout;
put '<HTML>';
put '<H1>Welcome to MyWebApp</H1>';
/* Build a URL referencing the next stored process.
* Use URLENCODE to encode any special characters in
* any parameters. */
length nexturl $500;
nexturl = "&_URL?_program=
/WebApps/MyWebApp/Print Color" ||
'&fname=' || urlencode("&FNAME");
put 'What is your favorite color?';
put '<UL>';
put '<LI><A HREF="' nexturl +(−1)
'&color=red">red</A><LI>';
put '<LI><A HREF="' nexturl +(−1)
'&color=green">green</A><LI>';
put '<LI><A HREF="' nexturl +(−1)
'&color=blue">blue</A><LI>';
SAS® Integration Technologies: Developer's Guide
Chaining Stored Processes 81

put '<LI><A HREF="' nexturl +(−1)
'&color=other">other</A><LI>';
put '</UL>';
put '</HTML>';
run;
This stored process generates a separate URL link for each color choice. The end result is the same as the first
implementation of Ask Color: the Print Color stored process is executed with both FNAME and COLOR
input parameters.
The technique of passing data by using hidden fields or URL parameters has the following advantages:
simple to perform• easy to debug• state is maintained indefinitely• allows stored processes to be distributed across multiple servers•
The major disadvantages of this technique are the necessity to use dynamically generated HTML for all pages in the
application and the security and visibility of the data. The data in hidden fields is readily visible to the client by
viewing the HTML source (and is directly visible in the URL when using GET method forms). The data is easily
changed by the user and falsified or inconsistent data can be submitted to the application. Sensitive data should be
validated in each new stored process, even if it is passed from generated hidden fields.
Passing Data Through Cookies
HTTP cookies are packets of information that are stored in the client Web browser. They are shuttled back and forth
with the application requests. In a general sense, they are quite similar to hidden form fields, but they are
automatically passed with every request to the application. Cookies have the advantage of being nearly invisible to the
user. They contain a built−in expiration mechanism, and they are slightly more secure than hidden fields. They also
work seamlessly across multiple stored process servers and Web applications and are preserved even if your
application uses static HTML pages. See the HTTP Header documentation for more information about setting and
using cookies. You must enable HTTP cookies in your Web application configuration.
HTTP cookies can be complex to generate and parse. You must carefully consider names, paths and domains to
ensure your cookie values do not conflict with other applications installed on the same Web server. HTTP cookies
might also be disabled by some clients due to privacy concerns.
Passing Data Through Sessions
Sessions provide a simple way to save state on the server. Instead of passing all of the saved information to and from
the Web client with each request, a single session key is passed and the data is saved on the server. Applications must
use all dynamically generated HTML pages, but the hidden fields or URL parameters are much simpler to generate. In
addition, sessions provide a method to save much larger amounts of state information including temporary data sets or
catalogs. Sessions have the disadvantage of binding a client to a single server process, which can affect the
performance and scalability of a Web application. Sessions are not recommended for simple applications that pass
small amounts of data from one stored process to another. See the sessions documentation for more information.
SAS Stored Processes
SAS® Integration Technologies: Developer's Guide
Chaining Stored Processes 82
Using Sessions: A Sample Web Application
The following sample Web application demonstrates some of the features of stored process sessions. The sample
application is an online library. Users can log on, select one or more items to check out of the library, and request by
e−mail that the selected items be delivered. The sample code shows how to create a session and then create, modify,
and view macro variables and data sets in that session. See the section about Sessions for more information.
Sample Data
This sample requires a LIB_INVENTORY data set in the SAMPDAT library that is used for other SAS Integration
Technology samples. You can create the data set in Windows using the following code. You can also use the code in
other operating environments by making the appropriate modifications to the SAMPDAT LIBNAME statement.
libname SAMPDAT 'C:\My Demos\Library';
data SAMPDAT.LIB_INVENTORY;
length type $10 desc $80;
input refno 1−5 type 7−16 desc 17−80;
datalines4;
17834 BOOK SAS/GRAPH Software: Reference
32345 BOOK SAS/GRAPH Software: User's Guide
52323 BOOK SAS Procedures Guide
54337 BOOK SAS Host Companion for UNIX Environments
35424 BOOK SAS Host Companion for OS/390 Environment
93313 AUDIO The Zen of SAS
34222 VIDEO Getting Started with SAS
34223 VIDEO Introduction to AppDev Studio
34224 VIDEO Building Web Applications with
SAS Stored Processes
70001 HARDWARE Cellphone − Model 5153
70002 HARDWARE Video Projector − Model 79F15
;;;;
Main Aisle Stored Process
The main aisle page is generated by the Main Aisle stored process. This page acts as a welcome page if new users. A
session is created the first time a user executes this stored process.
/* Main Aisle of the Online Library */
data _null_;
file _webout;
if libref('SAVE') ne 0 then
rc = stpsrv_session('create');
put '<HTML>';
put '<HEAD><TITLE>Online Library
Main Aisle</TITLE></HEAD>';
put;
put '<BODY vlink="#004488" link="#0066AA"
bgcolor="#E0E0E0">';
put '<H1>Online Library Main Aisle</H1>';
put;
put 'Select one of the following
areas of the library:';
Using Sessions: A Sample Web Application 83
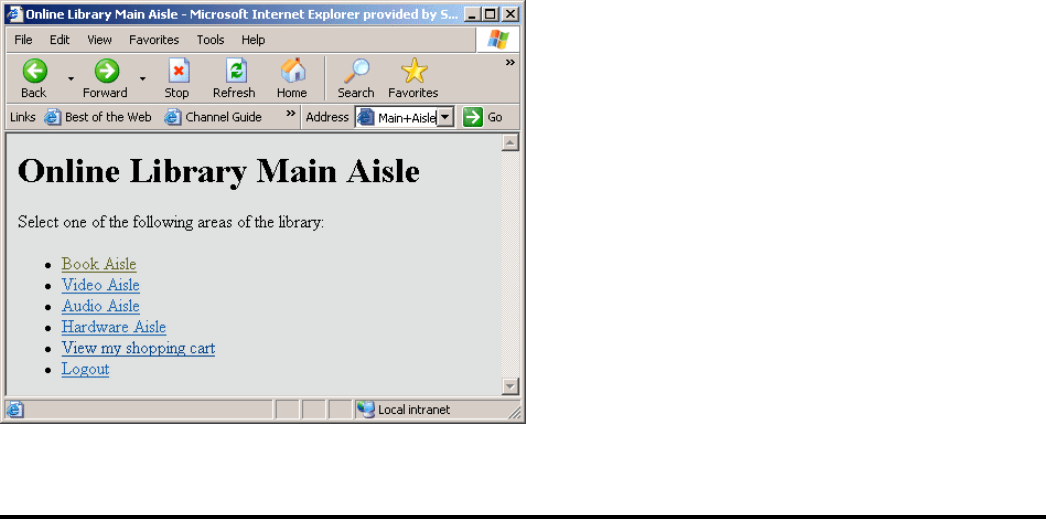
put '<UL>';
length hrefroot $400;
hrefroot = symget('_THISSESSION') ||
'&_PROGRAM=/WebApps/Library/';
put '<LI><A HREF="' hrefroot +(−1)
'Aisles&type=Book">Book Aisle</A></LI>';
put '<LI><A HREF="' hrefroot +(−1)
'Aisles&type=Video">Video Aisle</A></LI>';
put '<LI><A HREF="' hrefroot +(−1)
'Aisles&type=Audio">Audio Aisle</A></LI>';
put '<LI><A HREF="' hrefroot +(−1)
'Aisles&type=Hardware">Hardware Aisle</A></LI>';
put '<LI><A HREF="' hrefroot +(−1)
'Shopping Cart">View my shopping cart</A></LI>';
put '<LI><A HREF="' hrefroot +(−1)
'Logout">Logout</A></LI>';
put '</UL>';
put '</BODY>';
put '</HTML>';
run;
The main aisle page consists of a list of links to specific sections of the Online Library.
Each link in this page is built using the _THISSESSION macro variable. This variable includes both the _URL value
pointing back to the Stored Process Web Application and the _SESSIONID value identifying the session.
Aisles Stored Process
The library is divided into aisles for different categories of library items. The pages for each aisle are generated by one
shared Aisles stored process. The stored process accepts a TYPE input variable that determines which items to
display.
/* Aisles − List items in a specified aisle.
The aisle is specified by the TYPE variable. */
libname SAMPDAT 'C:\My Demos\Library';
SAS® Integration Technologies: Developer's Guide
Using Sessions: A Sample Web Application 84
/* Build a temporary data set that contains the
selected type, and add links for selecting
and adding items to the shopping cart. */
data templist;
if libref('SAVE') ne 0 then
rc = stpsrv_session('create');
set SAMPDAT.LIB_INVENTORY;
where type="%UPCASE(&type)";
length select $200;
select = '<A HREF="' || symget("_THISSESSION") ||
'&_program=/WebApps/Library/Add+Item&REFNO=' ||
trim(left(refno)) || '&TYPE=' || "&TYPE" ||
'">Add to cart</A>';
run;
ods html body=_webout(nobot) rs=none;
title Welcome to the &type Aisle;
proc print data=templist noobs label;
var refno desc select;
label refno='RefNo' desc='Description' select='Select';
run;
ods html close;
data _null_;
file _webout;
put '<P>';
put 'Return to <A HREF="' "&_THISSESSION"
'&_PROGRAM=/WebApps/Library/Main+Aisle'
'">main aisle</A><BR>';
put 'View my <A HREF="' "&_THISSESSION"
'&_PROGRAM=/WebApps/Library/Shopping+Cart'
'">shopping cart</A><BR>';
put '</BODY>';
put '</HTML>';
run;
The stored process selects a subset of the LIB_INVENTORY data set using a WHERE clause, and then uses PROC
PRINT to create an HTML table. A temporary data set is created that contains the selected items in order for an
additional column to be generated that has an HTML link for users to add the item to their shopping cart.
In this stored process, both ODS and a DATA step are used to generate HTML. The ODS HTML statement includes
the NOBOT option that indicates that more HTML will be appended after the ODS HTML CLOSE statement. The
navigation links are then added using a DATA step.
SAS® Integration Technologies: Developer's Guide
Using Sessions: A Sample Web Application 85
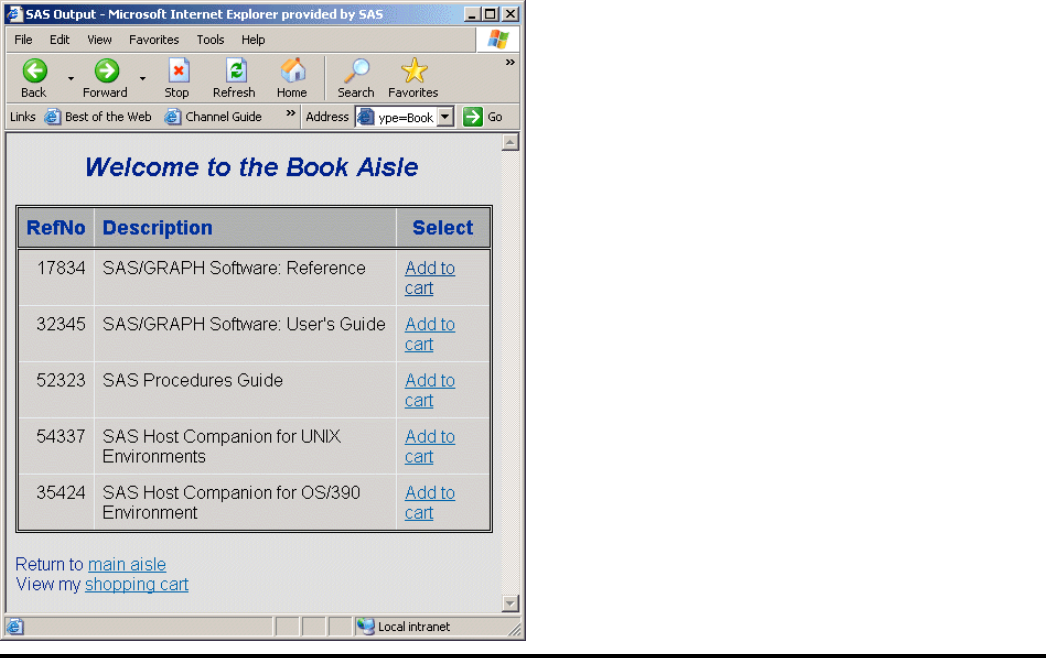
Add Item Stored Process
The Add Item stored process is run when the user clicks the Add to cart link in the aisle item table. The specified
item is copied from the LIB_INVENTORY data set to a shopping cart data set in the session library (SAVE.CART).
The session and the data set will remain accessible to all programs in the same session until the session is deleted or it
times out.
/* Add Item − Add a selected item to the shopping cart.
This stored process uses REFNO and TYPE input
variables to identify the item. */
libname SAMPDAT 'C:\My Demos\Library';
/* Perform REFNO and TYPE verification here. */
/* Append the selected item. */
proc append base=SAVE.CART data=SAMPDAT.LIB_INVENTORY;
where refno=&refno;
run;
/* Print the page. */
data _null_;
file _webout;
put '<HTML>';
put '<HEAD><TITLE>Selected Item Added to
Shopping Cart</TITLE></HEAD>';
put '<BODY vlink="#004488" link="#0066AA"
bgcolor="#E0E0E0">';
put "<H1>Item &refno Added</H1>";
SAS® Integration Technologies: Developer's Guide
Using Sessions: A Sample Web Application 86
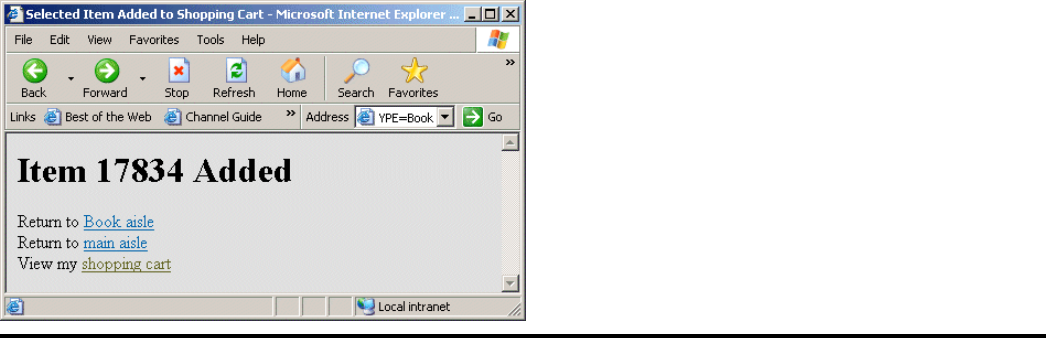
put 'Return to <A HREF="' "&_THISSESSION"
'&_PROGRAM=/WebApps/Library/Aisles'
'&TYPE=' "&TYPE" '">' "&TYPE aisle</A><BR>";
put 'Return to <A HREF="' "&_THISSESSION"
'&_PROGRAM=/WebApps/Library/Main+Aisle'
'">main aisle</A><BR>';
put 'View my <A HREF="' "&_THISSESSION"
'&_PROGRAM=/WebApps/Library/Shopping+Cart'
'">shopping cart</A><BR>';
put '</BODY>';
put '</HTML>';
run;
The program prints an information page that has navigation links.
Shopping Cart Stored Process
The Shopping Cart stored process displays the contents of the shopping cart.
/* Shopping Cart − Display contents of the shopping cart
* (SAVE.CART data set). */
%macro lib_cart;
%let CART=%sysfunc(exist(SAVE.CART));
%if &CART %then %do;
/* This program could use the same technique as the
LIB_AISLE program in order to add a link to each
line of the table that removes items from the
shopping cart. */
/* Print the CART contents. */
ods html body=_webout(nobot) rs=none;
title Your Selected Items;
proc print data=SAVE.CART noobs label;
var refno desc;
label refno='RefNo' desc='Description';
run;
ods html close;
%end;
%else %do;
/* No items in the cart. */
SAS® Integration Technologies: Developer's Guide
Using Sessions: A Sample Web Application 87
data _null_;
file _webout;
put '<HTML>';
put '<HEAD><TITLE>No items
selected</TITLE></HEAD>';
put '<BODY vlink="#004488" link="#0066AA"
bgcolor="#E0E0E0">';
put '<H1>No Items Selected</H1>';
put;
run;
%end;
/* Print navigation links. */
data _null_;
file _webout;
put '<P>';
if &CART then do;
put '<FORM ACTION="' "&_url" '">';
put '<INPUT TYPE="HIDDEN" NAME="_program"
VALUE="/WebApps/Library/Logout">';
put '<INPUT TYPE="HIDDEN" NAME="_sessionid"
VALUE="' "&_sessionid" '">';
put '<INPUT TYPE="HIDDEN" NAME="CHECKOUT"
VALUE="YES">';
put '<INPUT TYPE="SUBMIT"
VALUE="Request these items">';
put '</FORM><P>';
end;
put 'Return to <A HREF="' "&_THISSESSION"
'&_PROGRAM=/WebApps/Library/Main+Aisle'
'">main aisle</A><BR>';
put '<A HREF="' "&_THISSESSION"
'&_PROGRAM=/WebApps/Library/Logout'
'&CHECKOUT=NO">Logout</A><BR>';
put '</BODY>';
put '</HTML>';
run;
%mend;
%lib_cart;
The contents of the shopping cart are displayed using a PROC PRINT statement. The page also includes a request
button and navigation links. The request button is part of an HTML form. In order to connect to the same session,
include the _SESSIONID value in addition to the normal _PROGRAM value. These values are usually specified as
hidden fields. This program also has a hidden CHECKOUT field that is initialized to YES in order to indicate that the
user is requesting the items in the cart.
SAS® Integration Technologies: Developer's Guide
Using Sessions: A Sample Web Application 88
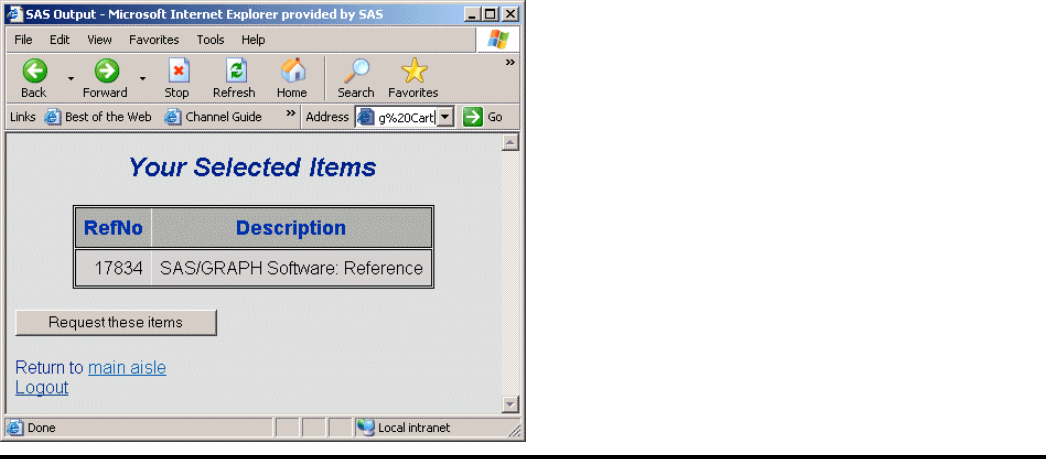
Logout Stored Process
The Logout stored process checks the user out of the Online Library. If the CHECKOUT input variable is YES, then
all of the items in the user's shopping cart are requested via e−mail.
/* Logout − logout of Online Library application.
Send e−mail to the library@abc.com account with
requested item if CHECKOUT=YES is specified. */
%macro lib_logout;
%global CHECKOUT;
/* Define CHECKOUT in case it was not input. */
%if %UPCASE(&CHECKOUT) eq YES %then %do;
/* Checkout − send an e−mail request to the library.
See the documentation for the email access method
on your platform for more information on the
required options. */
/* ***************** disabled for demo *************
filename RQST EMAIL 'library@abc.com'
SUBJECT='Online Library Request for &_USERNAME';
ods listing body=RQST;
title Request for &_USERNAME;
proc print data=SAVE.CART label;
var refno type desc;
label refno='RefNo' type='Type'
desc='Description';
run;
ods listing close;
* *********************************************** */
data _null_;
file _webout;
put '<HTML>';
put '<HEAD><TITLE>Library
Checkout</TITLE></HEAD>';
put '<BODY vlink="#004488" link="#0066AA"
bgcolor="#E0E0E0">';
SAS® Integration Technologies: Developer's Guide
Using Sessions: A Sample Web Application 89
put '<H1>Library Checkout</H1>';
put;
put 'The items in your shopping cart have
been requested.';
put '<P>Requested items will normally
arrive via interoffice';
put 'mail by the following day. Thank you
for using the Online Library.';
put '<P><A HREF="' "&_URL"
'?_PROGRAM=/WebApps/Library/Main+Aisle"
>Click here</A>';
put 'to re−enter the application.';
put '</BODY>';
put '</HTML>';
run;
%end;
%else %do;
/* Logout without requesting anything. */
data _null_;
file _webout;
put '<HTML>';
put '<HEAD><TITLE>Logout</TITLE></HEAD>';
put '<BODY vlink="#004488" link="#0066AA"
bgcolor="#E0E0E0">';
put '<H1>Library Logout</H1>';
put;
put '<P>Thank you for using the Online Library.';
put '<P><A HREF="' "&_URL"
'?_PROGRAM=/WebApps/Library/Main+Aisle"
>Click here</A>';
put 'to re−enter the application.';
put '</BODY>';
put '</HTML>';
run;
%end;
%mend;
%lib_logout;
/* User is finished − delete the session. */
%let rc=%sysfunc(stpsrv_session(delete));
An information page is displayed if the user chooses to request the shopping cart items.
SAS® Integration Technologies: Developer's Guide
Using Sessions: A Sample Web Application 90
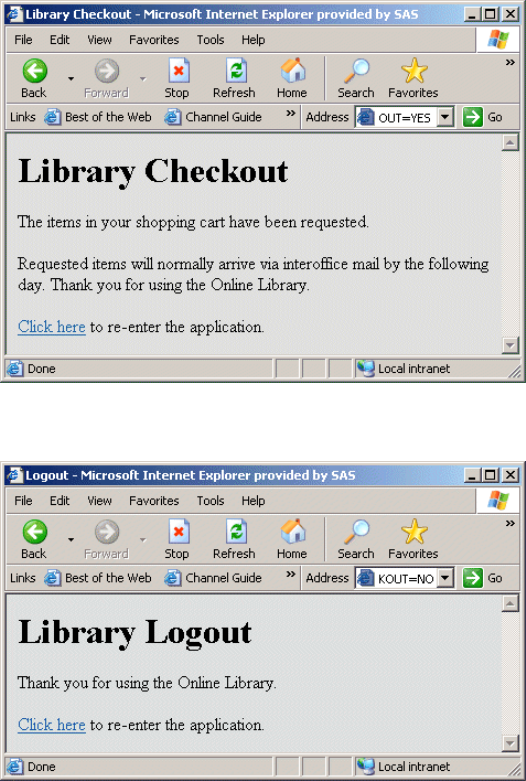
A simple logout screen is displayed if the user selects the Logout link.
Note: Logging out is not required. All sessions have an associated timeout (the default is 15 minutes). If the session is
not accessed for the duration of the timeout, the session and all temporary data in the session will be deleted. In this
sample, the SAVE.CART data set would be automatically deleted when the session timeout is reached. You can
change the session timeout using the STPSRVSET('session timeout',seconds) function inside the program.
SAS Stored Processes
SAS® Integration Technologies: Developer's Guide
Using Sessions: A Sample Web Application 91
Debugging in the SAS Stored Process Web Application
After the SAS Stored Process Web Application has been installed, it can be tested by invoking it directly from a Web
browser. To execute the SAS Stored Process Web Application, enter the Web application URL in the Web browser,
and either the default Welcome page or static version data gets returned.
For example, if the SAS Stored Process Web Application URL entered is
http://yourserver.com:8080/SASStoredProcess/do?
then you either get the data from the Welcome.htm page if it has been installed, or a display similar to
Stored Process Web Application
Version 9.1 (Build 286)
If an error is returned, then the installation was not completed successfully or the URL that was entered is incorrect.
The reserved macro variable _DEBUG provides you with several diagnostic options. Using this variable is a
convenient way to debug a problem, because you can supply the debug values by using the Web browser to modify
your HTML or by editing the URL in your browser location field. For example, to see the installed environment for
the SAS Stored Process Web Application, the URL can be entered with _DEBUG=ENV appended. A table is
returned, which contains the system values for the SAS Stored Process Web Application environment.
List of Valid Debug Keywords
You can activate the various debugging options by passing the _DEBUG variable to the SAS Stored Process Web
Application. Keywords are used to set the debug options. Multiple keywords can be specified separated by commas or
spaces. For instance,
_DEBUG=TIME,TRACE
Some debug flags might be locked out at your site for security reasons. Verify with your administrator which flags are
locked out at your site. The following chart is a list of valid debug keywords:
Keyword Description
FIELDS Displays the stored process input parameters.
TIME Returns the processing time for the stored process.
DUMP Displays output in hexadecimal.
LOG Returns the SAS log file. This is useful for diagnosing problems in the SAS code.
TRACE Traces execution of the stored process. This is helpful for diagnosing the SAS Stored Process Web
Application communication process. You can also use this option to see the HTTP headers that the server
returns.
LIST Lists known stored processes.
ENV Displays the SAS Stored Process Web Application environment parameters.
Debugging in the SAS Stored Process Web Application 92

Some debug options, such as showing the SAS log, showing the stored process execution time, and tracing stored
process execution, are available from the Execution Options page of the SAS Stored Process Web Application.
Setting the Default Value of _DEBUG
Web application initialization parameters can be used to set default values for the _DEBUG parameter or to limit the
allowable values. Any of the valid keywords listed in the previous table can be specified as a comma−separated list
for the Debug initialization parameter. These values become the default debug values for each request. The
initialization parameter DebugMask can be used to specify a list of _DEBUG values that are disallowed. Refer to the
section about Web Application Configuration for more information about initialization parameters.
IOM Direct Interface Stored Processes
SAS® Integration Technologies: Developer's Guide
Debugging in the SAS Stored Process Web Application 93
Implementing a Repository
Implementing a repository for your stored processes is simple. You first need to allocate a storage location that your
servers can access to hold your stored processes. This storage location, or repository, is implemented as a file system
directory with the stored processes instances represented as files, by name, with a .sas extension if appropriate for the
file system. Clients invoke the stored process utilizing this file name minus the .sas extension.
Once you have created the repository, you can catalogue its existence using the Administrator utility if you want to
manage your stored process definitions in an LDAP directory. This is not required in order to utilize the facility but
can be useful for resource management and discovery purposes. In this case, a repository is defined with information
about the file system location and IOM server associations to gain access to the file system from a distributed client.
The individual stored process instances are assigned a logical name and a set of properties are defined including the
implementation file name, any name/value parameter pairs, and descriptive labels.
IOM Direct Interface Stored Processes
Implementing a Repository 94
Creating a Stored Process
A SAS language stored process is a normal SAS program with an additional feature that enables you to customize its
execution. This feature enables the invoking application to supply name/value parameters at the time that the stored
process is invoked. For example, if you have a stored process that analyzes monthly sales data, you could create a
MONTH variable in the stored process. Then at execution time, to analyze the May sales data, you would supply a
name/value pair of MONTH=MAY.
The following is an example of a stored process:
%let tempdir = ;
%let source = ;
%let intable = ;
%let svar = ;
%let filter = ;
%let outtitle = ;
*ProcessBody;
libname datain "&source";
proc sql;
create table xQuery as
select product, &svar
from datain.&intable
where &filter;
proc sort data=xQuery;
by &svar;
proc print data=xQuery;
by &svar;
filename outgif "c:\Temp\&tempdir\xQuery.gif";
goptions reset=all;
goptions device=gif gsfname=outgif gsfmode=replace;
title1 f=swiss &outtitle;
proc gchart data=xQuery;
hbar3d product/sumvar=&svar patternid=midpoint;
run;
As you can see in the example above, SAS Macro Language variables implement the stored process's execution
parameters within the source body. The macro variables are initialized to default values in the prologue section of the
stored process. The *ProcessBody comment is a marker that identifies the end of the prologue. This marker is
required syntax that delineates the boundary between the default parameter prologue and the source body, where
invocation parameters are applied.
The remainder of the stored process is an ordinary SAS program−−in this case, a general purpose analysis routine that
both prints the results and graphs them in a three−dimensional horizontal bar chart.
When the stored process is executed, the IOM StoredProcessService applies the client−provided name/value
parameters that override the default values of the macro variables.
Creating a Stored Process 95
IOM Direct Interface Stored Processes
SAS® Integration Technologies: Developer's Guide
Creating a Stored Process 96

Invoking a Stored Process
Using the IOM StoredProcessService to invoke a stored process from a client application is straightforward. You first
define the location of the repository. You do this by setting the Repository property of the StoredProcessService.
For example, if you are using file system objects to implement the repository and have allocated a UNIX directory of
/SASPrograms/StoredProcesses to hold your programs, the following Visual Basic code sets the repository property of
the StoredProcessService.
Dim sp as SAS.StoredProcessService
Set sp = obWS.LanguageService.StoredProcessService
sp.Repository = "file:/SASPrograms/StoredProcesses"
Note: This assumes that you already have a reference (obWS in this case) to a Workspace object. Please see Working
With Object Variables and Creating a Workspace for details on how to obtain this reference.
Then, to execute a stored process on the server, you invoke the Execute method and pass the filename of the stored
process as well as any required name/value parameters to be used in this execution of the stored process.
For example, if the stored process shown in the example above was in a file named SP01, you might invoke it using
the following Visual Basic code:
sp.Execute "SP01", "tempdir=scratch
source=salesdata intable=monthly _
svar=sales filter=MONTH=MAY
outtitle=Monthly Sales Data"
IOM Direct Interface Stored Processes
Invoking a Stored Process 97

Publishing Stored Process Results
At this point, if you have read the section, Invoking a Stored Process, and you have seen how the IOM
StoredProcessService is used to invoke the stored process on the server, you may be wondering what happens to the
results. This is where packages come into play.
One of the main features of SAS Integration Technologies is the Publishing Framework. Central to the publishing
framework is the ability to create or collect data, including SAS output, in the form of packages.
One of the ways in which you can create packages is with the Publish Package Interface. This is a library of SAS
CALL routines that you can use within your stored processes to create a package and then publish it to various
delivery transports including an e−mail address(es), a message queue, subscribers to a predefined channel, a
WebDAV−Compliant server, and to an archive. (See the Publish Package Interface for more details.)
An additional method of delivering a published package is to send it back to the requesting application. This transport
is sometimes referred to as the To_Requester transport because that is the value of the parameter in the
PACKAGE_PUBLISH CALL routine that controls how the package is delivered.
Follow these basic steps to use the Publish Package Interface:
Initialize the package. For example, the following SAS language code initializes a package:
packageId=0;
rc=0;
PkgDesc = "package contains a printed report
and graph for the May Sales Data.";
nameValue='';
CALL PACKAGE_BEGIN(packageId, desc, nameValue, rc);
1.
Add one or more entries to the package. The following example uses the SAS Output Delivery System (ODS)
to generate HTML files that are subsequently inserted into the package. Note that the statements below for
PROC SQL, PROC SORT, and PROC PRINT are from the example stored process that is used in Creating a
Stored Process.
ItemDesc='HTML output for May Sales Data';
nameValue = '';
filename f '/users/f.html';
filename c '/users/c.html';
filename b '/users/b.html';
filename p '/users/p.html';
ods html frame=f contents=c(url='c.html')
body=b(url='b.html') page=p(url='p.html');
proc sql;
create table xQuery as
select &svar
from datain.&intable
where &filter;
proc sort data=xQuery;
by &svar;
proc print data=xQuery;
by &svar;
ods html close;
2.
Publishing Stored Process Results 98

/* The statement below inserts the
resulting HTML into the package */
CALL INSERT_HTML(packageId, 'fileref:b', "b.html",
'fileref:f', "f.html", 'fileref:c', "c.html",
'fileref:p', "p.html", ItemDesc, nameValue, rc);
You can add additional items to the package as needed. The example below adds another item; in this case,
the GIF file that was produced from SAS/GRAPH from the example stored process that is used in Creating a
Stored Process.
filename = 'filename:c:\Temp\&tempdir\xQuery.gif';
filetype ='binary';
desc = 'Graph of the SP01 results in GIF format.';
nameValue = '';
mimetype = 'Image/gif';
CALL INSERT_FILE(packageId, filename, filetype,
mimetype, desc, nameValue, rc);
Publish the package. The following SAS language code shows an example of publishing the package back to
the requesting application:
call package_publish(packageId,
"TO_REQUESTER", rc, "", "");
3.
Release the package resources. This is the last step of the publish process using the Publish Package interface.
It frees the SAS system resources that were associated with the package that was just published. The
following SAS language code shows an example of how to use this CALL routine:
call package_end(packageId, rc);
4.
IOM Direct Interface Stored Processes
SAS® Integration Technologies: Developer's Guide
Publishing Stored Process Results 99

Working with Results in the Client Application
If your stored process publishes the package back to the requesting application as discussed in Publishing the Results,
then you will need to use the ExecuteWithResults method that is a part of the StoredProcessService. This method
causes the IOM server to return to the client application a reference to the package that was created in the stored
process.
The following Visual Basic code shows how this method is used:
Dim sp as SAS.StoredProcessService
Dim rp as SAS.ResultPackage
Set sp = obWS.LanguageService.StoredProcessService
sp.Repository = "file:/SASPrograms/StoredProcesses"
sp.ExecuteWithResults "SP01", "tempdir=scratch
source=salesdata intable=monthly _ svar=sales
filter=MONTH=MAY outtitle=Monthly Sales Data", _ rp
Note: The ExecuteWithResults method is used instead of the Execute method.
You can then use the returned reference to the package, rp in this case, to manipulate the package with the methods
that are available for the IOM ResultPackage object. This object has methods available to list and view the package
entries as well as the package metadata. Please see the ResultPackage Object for the complete reference
documentation for this object.
SAS BI Web Services
Working with Results in the Client Application 100
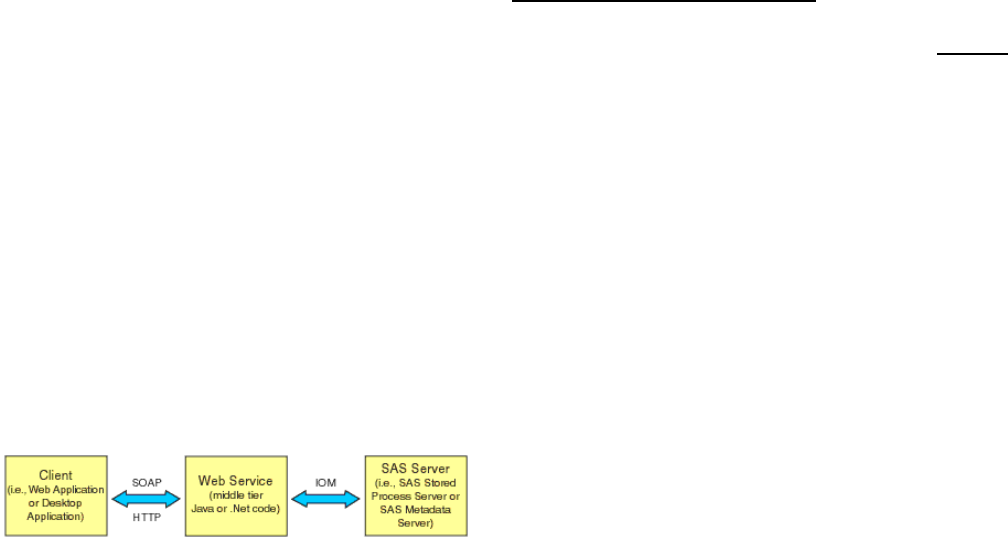
SAS BI Web Services
A Web service is an interface that enables communication between distributed applications. Web services enable
cross−platform integration by enabling applications written in various programming languages to communicate using
a standard Web−based protocol, typically the Simple Object Access Protocol (SOAP). This functionality makes it
possible for businesses to bridge the gaps between different applications and systems.
There are two implementations of SAS BI Web Services: one written in Java that requires a servlet container, and
another written in C# using the .NET framework. For information about the differences between SAS BI Web
Services for .NET and SAS BI Web Services for Java, see Deciding Between .NET and Java.
The SAS BI Web Services interface is based on the XML for Analysis (XMLA) Version 1.1 specification. XMLA is a
standard specification developed by several companies for use as a Web service interface to access online analytical
processing (OLAP) and data−mining functions. For the first release of SAS BI Web Services, a client application can
use this interface to invoke and get metadata about SAS Stored Processes. Support for OLAP technology is under
development for future releases of SAS BI Web Services.
The following figure shows how Web services work. A client, such as a Web application or desktop application, starts
out by obtaining the Web Service Description Language (WSDL) from the Web service. The WSDL describes the
methods available, endpoint (where to call the Web service), and the format of the XML required to call the Web
service.
Web service clients and servers transport XML data using a data envelope called a SOAP envelope. Any client that
can send and receive SOAP messages can access Web services. SAS supports SOAP bindings over HTTP. The client
sends XML requests and parameters in a SOAP envelope to the Web service, telling the Web service to either
Discover or Execute stored processes.
Discover() and Execute() are the two methods that are specified for XMLA. The Discover method consists of
middle−tier code that calls the SAS Metadata Server to get the requested metadata. The Execute method consists of
middle−tier code that calls the SAS Stored Process Server to invoke stored processes.
During execution, the requested stored process is executed by a SAS Stored Process Server. Usually any number of
simple string parameters are passed to the stored process, and a stream of XML data is returned. The input parameters
to the stored process can be nothing or a combination of simple string parameters and any number of XML streams.
The output from a stored process called by a SAS BI Web Service is always an XML stream.
SAS BI Web Services
SAS BI Web Services 101

Using Web Services
Before you can use Web services, you need to follow these steps on the server side:
Decide whether you want to use SAS BI Web Services for .NET or SAS BI Web Services for Java. Install
SAS BI Web Services and the SAS Metadata Server.
1.
Write a SAS program to use as a stored process with Web services.2. Define a stored process server.3. Define a stored process using BI Manager. Use XMLA Web Service as a keyword when defining a stored
process to be called by a SAS BI Web Service. Also, when defining a stored process to be called by a SAS BI
Web Service, specify Streaming as the stored process output type.
Note: BI Manager is available beginning with SAS Foundation Services 1.2. If you have not upgraded to this
release, then you can use Stored Process Manager to register and manage stored processes. BI Manager
replaces Stored Process Manager. For more information about using BI Manager or Stored Process Manager,
see the Help in SAS Management Console.
4.
On the client side, follow these steps to use Web services:
Locate the WSDL.1. Write the code for the client application that uses either the Discover method or Execute method to call the
Web service.
2.
Run the code.3.
The SAS code that implements the Web service, the metadata, and the client code that calls the Web service must all
be synchronized. The following table shows how to synchronize these three items:
SAS Program Metadata Client Code
Name The name of the file
containing the SAS code. Matches the name of the SAS Stored
Process with the name of the file.
<StoredProcess name=
'MyStoredProcess'>
Input Data Reads XML from the
fileref.
libname instream
xml;
The name of the fileref, which must
match the name of the input stream.
<Stream name='instream'>
<XMLDataFromClientHere...
</Stream>
Input
Parameters Macros.
&tablename
The parameter name is specified in the
metadata. Parameters are treated as
strings regardless of the type specified
in the metadata.
<Parameter
name='tablename'>
myParam</Parameter>
Output Data Writes output to the
_WEBOUT fileref as
XML.
libname _WEBOUT
xml xmlmeta=
&_XMLSCHEMA;
Designates the output as 'Streaming'. Uses the returned XML.
SAS BI Web Services
Using Web Services 102
Deciding Between .NET and Java
There are some differences between SAS BI Web Services for .NET and SAS BI Web Services for Java. Following
are some frequently asked questions that you can use to help you decide which version is the right one for you to
install, and some differences that exist for the Web service client.
Installation and Administration Differences
What operating environment are you using?
SAS BI Web Services for .NET can only be installed in the Windows XP, Windows 2000, and
Windows 2003 operating environments.
♦
SAS BI Web Services for Java can be installed in any operating environment that can understand
Java.
♦
•
How do you want to administer the Web services?
SAS BI Web Services for .NET are administered using IIS.♦ SAS BI Web Services for Java are administered using Apache Tomcat or BEA Weblogic. If you
install SAS BI Web Services for Java, you will also need to have a Java Virtual Machine for an
application server.
♦
•
SAS BI Web Services for .NET and SAS BI Web Services for Java also differ in the way they handle logging and
configuration. SAS BI Web Services for .NET use .NET logging, and SAS BI Web Services for Java use SAS
Foundation Services for logging.
Client Differences
Web service clients cannot generally identify differences between SAS BI Web Services for .NET and SAS BI Web
Services for Java. As long as the client adheres to the usage rules for Web services, the client should be able to use
either platform.
One difference for the Web service client is how you get the WSDL. If you use SAS BI Web Services for .NET, you
get the WSDL by using a URL that ends with sasxmla.asmx?WSDL. If you use SAS BI Web Services for Java,
you get the WSDL by using a URL that ends with xmla.wsdl. In both cases, the actual endpoint is specified in the
WSDL file.
Another difference for the Web service client is how the path is returned for the name of the stored process
(DataSourceName). SAS BI Web Services for Java return a BIP URL. SAS BI Web Services for .NET return a simple
path. In both cases, you get the name of the stored process to invoke by using the Discover method of the same Web
service.
SAS BI Web Services
Deciding Between .NET and Java 103
Writing SAS Programs for Web Services
To use the Web service to call your SAS code, you must configure your SAS code as a stored process. The stored
process used with Web Services needs to conform to a few rules which enable the Web service to both receive data
from the client and return data to the client.
You can author a stored process manually by using SAS or a text editor to write the code and then registering the
program through SAS Management Console. Alternatively, you can use a program such as Enterprise Guide or
another SAS code generator to author a stored process using the "point−and−click" method. Use the modifications
below to make a stored process that can be used with SAS BI Web Services. Keep in mind that SAS BI Web Services
can only return data; no images can be returned.
SAS programs are stored in external files that usually have a .SAS filename extension in directory−based operating
environments. For z/OS, the files must be contained in a partitioned data set (PDS). SAS programs can contain a
DATA step, procedures, and macro code.
The following list explains unique details about Web service stored processes:
The data returned by the stored process must be XML.• The %STPBEGIN or %STPEND macros are not used with Web service stored processes. These macros set up
ODS statements for the stored process, but Web services do not use ODS.
•
Web service stored processes produce streaming results, which means that the SAS program writes output to
_WEBOUT, typically by using the following LIBNAME statement:
libname _WEBOUT xml xmlmeta=&_XMLSCHEMA;
•
The _XMLSCHEMA macro is unique to Web services. This macro is passed to the SAS program when it is
invoked from the Web service. The _XMLSCHEMA macro is set to one of three values depending on the
Content property that gets passed to the Execute call. The possible values for _XMLSCHEMA are Schema,
SchemaData (which is the default), or Data. For example,
libname _WEBOUT xml xmlmeta=SchemaData;
causes SAS to write both the XML schema and the data into the libref _WEBOUT. A libref uses a fileref of
the same name when a source is not specified on the LIBNAME statement. For example,
libname _WEBOUT xml xmlmeta=_XMLSCHEMA;
causes the libname, called _WEBOUT, to read from the fileref called _WEBOUT. For Web services, SAS
defines the filerefs for _WEBOUT and the input parameter streams before invoking the SAS code.
Note: Applications should not try to write multiple data sets into a library when a schema is being created.
•
Input streams are unique to Web services. Input streams are filerefs that contain XML.•
The following example code displays a stored process used as a Web service.
libname instream xml;
libname _WEBOUT xml xmlmeta=&_XMLSCHEMA;
proc means data=instream.&tablename;
output out=_WEBOUT.mean;
run;
Writing SAS Programs for Web Services 104
The first LIBNAME statement in the sample code defines the input stream. This code corresponds to the definition of
the input stream in the Streaming Details dialog box in BI Manager. The name of the input stream is instream. In
this example, the input stream provides the data to run PROC MEANS against.
The second LIBNAME statement in the sample code defines the output for the stored process as streaming output, or
_WEBOUT. In BI Manager, Streaming is specified as the type of output on the Execution tab of the Stored Process
Properties dialog box.
The &tablename in the sample code defines a parameter called tablename. In BI Manager, this parameter is
specified through the Add Parameter dialog box, and can be modified using the Modify Parameter dialog box. In this
example, tablename is a string parameter that specifies the name of the table to run PROC MEANS against.
Note: The dialog boxes mentioned in the previous example are available from both the Stored Process Properties
dialog box and the New Stored Process Wizard, which are both part of BI Manager. For more information about using
BI Manager to define metadata for stored processes, see the product Help.
SAS BI Web Services
SAS® Integration Technologies: Developer's Guide
Writing SAS Programs for Web Services 105

Discover Method
The Discover method retrieves information, such as stored process metadata or a list of available data sources, from
the SAS Metadata Repository. The Discover method returns a list of all the stored processes that have the keyword
"XMLA Web Service" on the SAS Metadata Server. The SAS Stored Process Server is not invoked to service the
Discover call.
The syntax for the Discover method follows:
Discover (
[in] RequestType As EnumString,
[in] Restrictions As Restrictions,
[in] Properties As Properties,
[out] Result As Rowset)
RequestType
RequestType is a required parameter for the Discover method. The value of RequestType is an enumeration value that
corresponds to a return rowset. The RequestType parameter specifies the type of information to be returned by the
Discover request.
There are two main request types that are normally used with SAS BI Web Services: DISCOVER_DATASOURCES
and STOREDPROCESS_PARAMETERS. DISCOVER_DATASOURCES and
STOREDPROCESS_PARAMETERS both return a list of the stored processes that can be invoked.
DISCOVER_DATASOURCES is a standard XMLA request type that returns a list of available data sources for the
server or Web service so that you can select a data source with which to connect. The information returned by the
DISCOVER_DATASOURCES request type includes the name and a description of the data source, a URL to connect
to the data source, the name and data type of the provider, and the type of security mode that the data source uses, as
well as any additional information that is needed to connect to the data source. STOREDPROCESS_PARAMETERS
is a request type specific to SAS, and this request type returns a list of all the available stored processes along with a
list of the parameters that are specified in each stored process.
Other request types that might be useful with SAS BI Web Services are DISCOVER_PROPERTIES and
DISCOVER_SCHEMA_ROWSETS. DISCOVER_SCHEMA_ROWSETS returns a list of all the available request
types along with their enumeration values and other information. See the Properties section for more information
about what the DISCOVER_PROPERTIES request type returns.
Note: Although the SAS XMLA Stored Process provider supports the DISCOVER_KEYWORDS,
DISCOVER_LITERALS, and DISCOVER_ENUMERATORS request types, these request types are not useful for
calling stored processes.
See the XML for Analysis Specification for more information about standard XML for Analysis request types.
DISCOVER_DATASOURCES
The SAS BI Web Service returns one data source for each stored process that has been defined in the metadata for use
with Web services.
For each returned stored process, the returned rowset contains:
Discover Method 106
DataSourceName
specifies the name of the stored process, as specified in BI Manager. For example,
/Samples/Stored Processes/
Sample: MEANS Procedure Web Service
DataSourceDescription
specifies the description of the stored process, as specified in BI Manager. For example,
(PROC MEANS Stored Process that can be invoked by
the SAS BI Web Services for Java/.Net mid−tier.)
URL
specifies the URL to invoke the XMLA methods. This is usually the same as the URL that is used to invoke
this Discover method. For example,
http://yourserver/xmla/SASSPSProvider/sasxmla.asmx
DataSourceInfo
specifies which data source to use. The SAS Stored Process Server data source is "Provider=SASSPS;".
ProviderName
specifies the provider behind the data source. For the SAS Stored Process Server, this is the "SAS XML for
Analysis Stored Process Provider".
ProviderType
specifies the type of provider that is behind the data source. The Stored Process Service only supports "TDP"
(Tabular Data Provider).
AuthenticationMode
specifies the authentication required for the given data source (that is, indicates whether a user name and
password are required). SAS BI Web Services for .NET only return "Authenticated" if a user name and
password are required. SAS BI Web Services for Java always return "Authenticated," meaning that you are
required to authenticate to the SAS Metadata Repository whether you pass in credentials or only use default
credentials that are configured by the administrator.
STOREDPROCESS_PARAMETERS
STOREDPROCESS_PARAMETERS is a custom request type that is only used by the SAS Stored Process Service
provider. It returns metadata describing the parameters that are necessary to call the stored process. A stream
parameter is always a required parameter and it never has a default. This does not mean that you are required to have a
stream parameter for each stored process, but it means that any stream parameters defined for the stored process must
be provided when the stored process is called using the Execute method.
For each returned stored process, the returned rowset contains:
StoredProcessName
specifies the name of the stored process.
Parameters
specifies a container that includes all of the parameters for the stored process.
Parameter
specifies a container that includes all of the details for a stored process parameter.
Name
specifies the name of the stored process parameter.
Description
specifies the description of the stored process parameter.
Type
SAS® Integration Technologies: Developer's Guide
Discover Method 107

specifies the parameter type. The possible parameter types are specified in BI Manager. Note that all
parameters are passed to SAS as macro variables, so the SAS program does not know the parameter type
specified in the metadata.
Required
specifies whether the stored process parameter is required.
Default
specifies a default value for the stored process parameter.
Streams
specifies a container that includes all of the input streams for the stored process.
Stream
specifies a container that includes all of the details for a stored process input stream.
The following is an example of the response for a stored process that takes a single string and a single stream as input:
<row xmlns="urn:schemas−sas−com:xml−analysis:rowset">
<StoredProcessName>
/BIP Tree/copyintoout</StoredProcessName>
<Parameters>
<Parameter>
<Name>inputname</Name>
<Description>A simple string that we are
passing as a parameter.</Description>
<Required>true</Required>
<Default />
<Type>String</Type>
</Parameter>
</Parameters>
<Streams>
<Stream>
<Name>DataName</Name>
<Description>This stream does allow
multi−pass reads, so you do not have to
use an XMLMap.</Description>
</Stream>
</Streams>
</row>
Restrictions
You can use the Restrictions parameter to filter which results get returned from a call to the Discover method. The
restriction name specifies a column in a rowset that you desire to restrict. The restriction value specifies which data to
restrict in the column. Use the DISCOVER_SCHEMA_ROWSETS request type to get restriction information about
the rowsets that are available in each request type. The DISCOVER_SCHEMA_ROWSETS request type returns a list
of all the request types supported by the provider, along with restriction information and descriptions for each request
type.
The Restrictions parameter is required in the Discover method, but it can be empty. Invalid values for restrictions are
ignored.
The following RestrictionList element restricts a call to Discover STOREDPROCESS_PARAMETERS based on the
name of the stored process:
<RestrictionList
xmlns="urn:schemas−microsoft−com:xml−analysis">
SAS® Integration Technologies: Developer's Guide
Discover Method 108
<StoredProcessName>
/Samples/Stored Processes/
Sample: MEANS Procedure Web Service
</StoredProcessName>
</RestrictionList>
See the rowset tables in "XML for Analysis Rowsets” in the XML for Analysis Specification for more information
about restricting columns.
Properties
The Properties parameter enables you to specify properties of the Discover method, such as the return format of the
result set or the timeout value.
Use the DISCOVER_PROPERTIES request type to get information about properties that are available for each
request type and the values that are associated with those properties. The DISCOVER_PROPERTIES request type
returns information about both standard and provider−specific properties. The returned information includes the name,
description, data type, access, and current value of each property. The information also shows whether each property
is required.
The following table contains a list of properties and property information, including sample values, that the
DISCOVER_PROPERTIES request type returns. The value of PropertyType for each of these properties is string.
PropertyName PropertyDescription PropertyAccessType Value
Content specifies the content of the XML result:
None, Schema, Data, or Both. ReadWrite SchemaData
StateSupport specifies the support for state maintenance
offered by the provider: None or Sessions. Read Sessions
UserName specifies the user name to use for database
authentication. ReadWrite
Password specifies the password to use for database
authentication. Write
Domain specifies the domain to use for database
authentication. ReadWrite
ProviderName specifies the name of the XML for Analysis
provider. Read SAS XML for Analysis
StoredProcess Provider
ProviderVersion specifies the version of the XML for
Analysis provider. Read 1.0
Format specifies the format of the XML result:
Tabular or Multidimensional. Read Tabular
DataSourceInfo specifies the identifying information that is
required to retrieve data from a data source. ReadWrite Provider=SASSPS
Timeout specifies the number of seconds until a
request fails due to a timeout. Read
SAS® Integration Technologies: Developer's Guide
Discover Method 109

See "XML for Analysis Properties" in the XML for Analysis Specification for more information about standard XML
for Analysis properties.
You can list properties in any order. The Properties parameter is required in the Discover method. The only call to the
Discover method that can have empty properties is DISCOVER_DATASOURCES. All other request types require at
least DataSourceInfo to be specified, such as:
<PropertyList
xmlns="urn:schemas−microsoft−com:xml−analysis">
<DataSourceInfo>
Provider=SASSPS
</DataSourceInfo>
</PropertyList>
To cause a call to Discover to execute under a specific user's identity, a UserName and Password property can be
included in the PropertyList element, such as:
<PropertyList xmlns="urn:schemas−microsoft−com:xml−analysis">
<DataSourceInfo>
Provider=SASSPS
</DataSourceInfo>
<UserName>username</UserName>
<Password>password</Password>
</PropertyList>
If you choose to include the UserName or Password properties, it is important to ensure that access to your Web
service is secure and encrypted. For more information, see Securing SAS BI Web Services.
Result
The Result parameter is required. This parameter specifies the result set that the provider returns. The information that
is returned can vary according to which values are used in the RequestType, Restrictions, and Properties parameters.
SAS BI Web Services
SAS® Integration Technologies: Developer's Guide
Discover Method 110

Execute Method
Client applications of the Web service call the Execute method to run a SAS Stored Process.
When an application calls the Execute method, the following actions occur. The Web service does the following:
receives the call and validates the SOAP request against the WSDL.• validates the Command against the Command schema.• searches in the SAS Metadata Server to find the SAS server to connect to that can service the request. If the
user name and password are provided in the Properties parameter, then they are used to connect to the SAS
Metadata Server. The credentials to use when connecting to the SAS Stored Process Server are obtained from
the metadata.
•
invokes the SAS code that represents the stored process on the SAS Stored Process Server.• checks the value of the SYSCC macro in SAS. If SYSCC is non−zero, then the Web service throws a SOAP
fault and includes the value of SYSMSG in the fault.
•
returns all data that was written to _WEBOUT.•
Syntax
The syntax for the Execute method follows:
Execute (
[in] Command As Command,
[in] Properties As Properties,
[out] Result As Resultset)
Command
The Execute method takes the Command and Properties parameters as input. Both of these parameters are in XML.
The following code shows the command passed to the Execute method:
<StoredProcess name="MyStoredProcess">
<Stream name="DataName"> <myXML>data</myXML> </Stream>
<Parameter name="InputName">myData</Parameter>
</StoredProcess>
When the previous code is passed to Execute(), the SAS code will have a macro defined whose name corresponds to
the String parameter:
%LET InputName=ThisIsTheValue
The SAS code will also have a libref assigned that corresponds to the name of the Data parameter:
libname DataName;
The SAS program should write output to the pre−assigned fileref _WEBOUT. Most applications will do this by using
the XML LIBNAME engine, as follows:
libname _WEBOUT xml xmlmeta=&_XMLSCHEMA;
Execute Method 111

data _WEBOUT.a;
Properties
The Properties parameter enables you to specify properties of the Execute method. Properties describe how to invoke
the Command parameter. Calling applications specify the SASSPS (Stored Process Service) Provider to be used in
DataSourceInfo, as shown in the following example:
<PropertyList>
<DataSourceInfo>
Provider=SASSPS;
</DataSourceInfo>
</PropertyList>
Use the DISCOVER_PROPERTIES request type in the Discover method to get information about properties that are
available for each request type and the values that are associated with those properties. The
DISCOVER_PROPERTIES request type returns information about both standard and provider−specific properties.
The returned information includes the name, description, data type, access, and current value of each property. The
information also shows whether each property is required.
See "XML for Analysis Properties" in the XML for Analysis Specification for more information about standard XML
for Analysis properties.
You can list properties in any order. The Properties parameter is required in the Discover method, but it can be empty.
The Properties parameter must be specified for the Execute method, and must include at least the DataSourceInfo
property.
Note: After you have selected a data source from the DISCOVER_DATASOURCES rowset, set the DataSourceInfo
property in the Properties parameter, which is sent to the server using the Command parameter by the Execute
method. Do not attempt to write in your own value for the DataSourceInfo property, only use a value from the
DISCOVER_DATASOURCES rowset.
To cause a call to Execute to run under a specific user's identity, a UserName and Password property can be included
in the PropertyList element, such as:
<PropertyList xmlns="urn:schemas−microsoft−com:xml−analysis">
<DataSourceInfo>
Provider=SASSPS
</DataSourceInfo>
<UserName>username</UserName>
<Password>password</Password>
</PropertyList>
If you choose to include the UserName or Password properties, it is important to ensure that access to your Web
service is secure and encrypted. For more information, see Securing SAS BI Web Services.
Result
The Result parameter is required. This parameter specifies the result set that the provider returns. The information that
is returned can vary according to which values are used in the Command and Properties parameters.
SAS BI Web Services
SAS® Integration Technologies: Developer's Guide
Execute Method 112

Securing SAS BI Web Services
A default installation of SAS BI Web Services for Java or .NET is not highly secure. All requests and responses are
sent as cleartext, and if a user wants to authenticate as a specific user, then they must send a user name and password
as cleartext as part of the Properties element. Whenever user names and passwords must be sent as cleartext, SSL
should be enabled to provide transport layer security. See the following links for more information about enabling
SSL:
The Tomcat 4 Servlet−JSP Container: SSL Configuration HOW−TO• Managing WebLogic Security: Configuring SSL• How To Enable SSL for All Customers Who Interact with Your Web Site in Internet Information Services•
With SAS 9.1.3 Service Pack 4, SAS BI Web Services for Java can be secured using trusted Web server
authentication. This provides a way for SAS BI Web Services for Java to identify the calling user using basic Web
server authentication. See Securing SAS BI Web Services for Java for more information.
SAS BI Web Services for .NET can be secured using Web Services Enhancements 2.0 for Microsoft .NET, which
enables support for the latest security and interoperability standards for Web services. For detailed information about
using Web Services Enhancements 2.0, WS−Security, and WS−Policy to secure SAS BI Web Services, see Securing
SAS BI Web Services for .NET with WSE 2.
The current release of SAS BI Web Services for Java does not support WS−Security or WS−Policy.
SAS BI Web Services
Securing SAS BI Web Services 113
Securing SAS BI Web Services for .NET with WSE 2.0
Web Services Enhancements for Microsoft .NET (WSE) is a tool that provides developers with advanced Web
services capabilities, and enables developers to secure SAS BI Web Services for .NET. WSE is a supported add−on to
Microsoft Visual Studio .NET and the Microsoft .NET Framework. You can use WSE to secure SAS BI Web Services
for .NET by performing the following tasks:
modifying the Web.config file to enable WSE• adding a new policy file that indicates the security policy required by SAS BI Web Services• modifying client applications to use WSE, and to also use a security policy that matches the Web service•
You can use the tools that are provided with WSE to configure SAS BI Web Services to authenticate users by using a
Kerberos security context token, and to encrypt all transmissions using Kerberos encryption.
Configuration Steps
Install WSE 2.01. Launch WSE 2.0 Configuration Utility2. Configure SAS BI Web Services for .NET to use WSE 2.03. Configure Policy for SAS BI Web Services for .NET4. Configure Microsoft .NET Client to use WSE 2.05. Configure Policy for Microsoft .NET Client6. Update Client Code7. Test the New Security Policy8.
Install WSE 2.0
You can download Web Service Enhancements 2.0 from the Web Services and Other Distributed
Technologies Developer Center on the Microsoft Web site. This documentation was written using WSE 2.0
Service Pack 3. It is recommended that you get the latest version of WSE 2.0 in order to ensure that you have
all the latest features and bug fixes.
1.
Launch WSE Settings 2.0 Tool
The WSE Settings 2.0 tool can modify an application configuration file to enable WSE 2.0, as well as
configure the options that are available with WSE 2.0. To use the WSE Settings 2.0 tool from the Start menu,
select Start All Programs Microsoft WSE 2.0 Configuration Editor.
2.
Configure SAS BI Web Services for .NET to use WSE 2.0
Select File Open, and then open the Web.config file for the installation of SAS BI Web Services for .NET
that you are modifying. By default, the Web.config file is located here:
C:\Inetpub\wwwroot\SASWS\Web.config
On the General tab, select Enable this project for Web Services Enhancements. Also, select Enable
Microsoft Web Services Enhancement Soap Extensions.
3.
Securing SAS BI Web Services for .NET with WSE 2.0 114
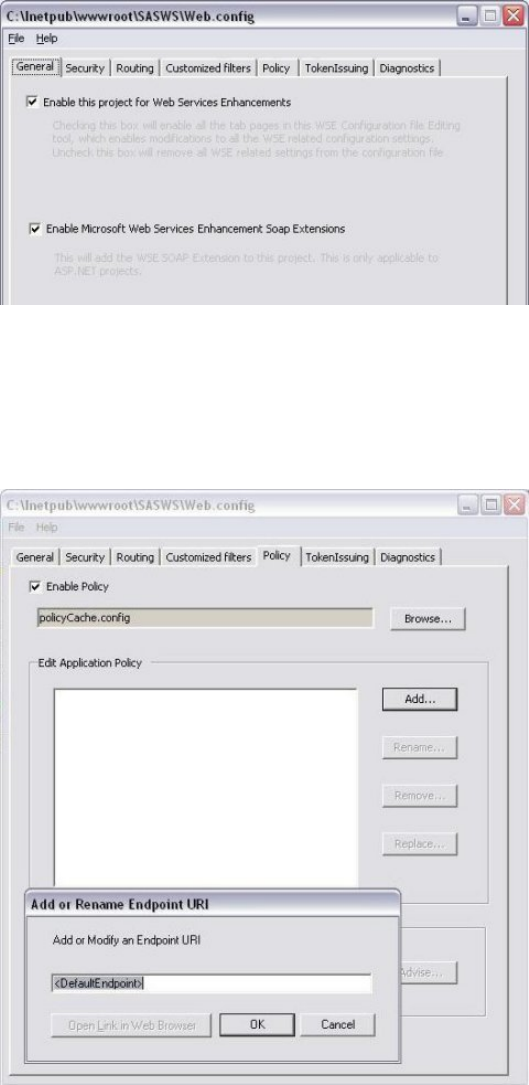
Configure Policy for SAS BI Web Services for .NET
On the Policy tab, select Enable Policy and use the default file name policyCache.config. Under Edit
Application Policy, click Add. In the Add or Rename Endpoint URI dialog box, accept the default of
<DefaultEndpoint>. This causes the policy to apply to any endpoint and operation that is defined for
SAS BI Web Services for .NET. Click OK to launch the WSE Security Setting Tool.
Click Next to proceed to the Choose the Type of Application page. Select Secure a service application. You
can leave Use Secure Conversation unselected. If you want to use secure conversation, then you will need to
supply an X.509 certificate. Click Next to continue.
4.
SAS® Integration Technologies: Developer's Guide
Securing SAS BI Web Services for .NET with WSE 2.0 115
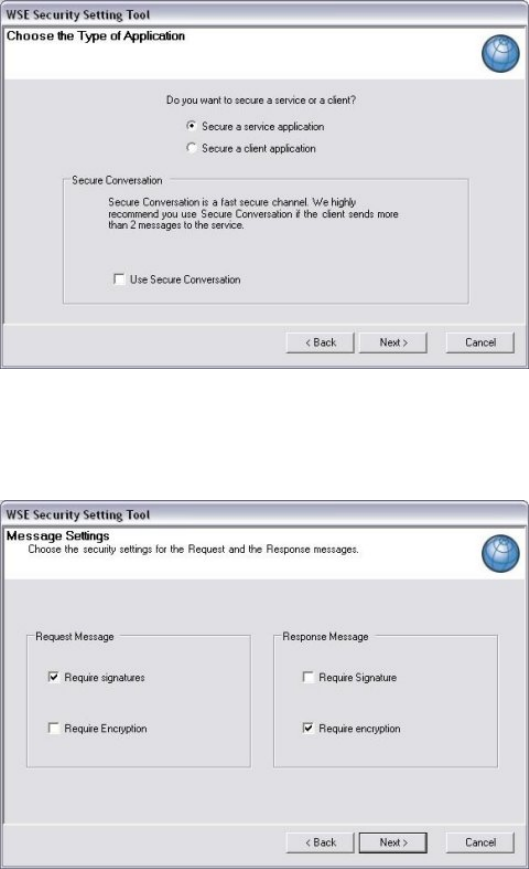
On the Message Settings page, accept the default settings to sign the request and encrypt the response. This
simplifies the configuration so that no X.509 certificates are required. If you prefer to encrypt the request or
sign the response, then you will need to supply an X.509 certificate. Click Next to continue.
On the Client Authentication Token page, select Kerberos. A Kerberos token is an authentication token that
is used by Windows to authenticate clients with remote servers. To use the Kerberos token option, both the
client and server must be in a Windows Server 2000 or later Active Directory domain.
SAS® Integration Technologies: Developer's Guide
Securing SAS BI Web Services for .NET with WSE 2.0 116

If the client and server machines are not in the same domain, then you can select the Username token type in
order to create a token in the client code. This configuration is not covered here, but you can find more
information on the Username token in the Web Services Enhancements 2.0 documentation.
Click Next to continue to the Kerberos Token Claims page. Specify the name of the machine that the service
is on, and add users or roles that are allowed access to the Web service.
Click Next to view the confirmation page, and click Finish to save the changes to the policy.
While you are testing various security settings, it is helpful to look at the input and output trace files that can
be enabled on the Diagnostics tab of the configuration utility.
When you are finished making changes to the configuration file, select File Save to save the changes to the
Web.config file and to create a new policyCache.config file.
Configure Microsoft .NET Client to use WSE 2.0
If you are using Visual Studio .NET, then you can launch the WSE Settings 2.0 tool from Visual Studio .NET.
In Solution Explorer, right−click on the client project and select WSE Settings 2.0 to launch the WSE
Settings 2.0 tool.
5.
SAS® Integration Technologies: Developer's Guide
Securing SAS BI Web Services for .NET with WSE 2.0 117
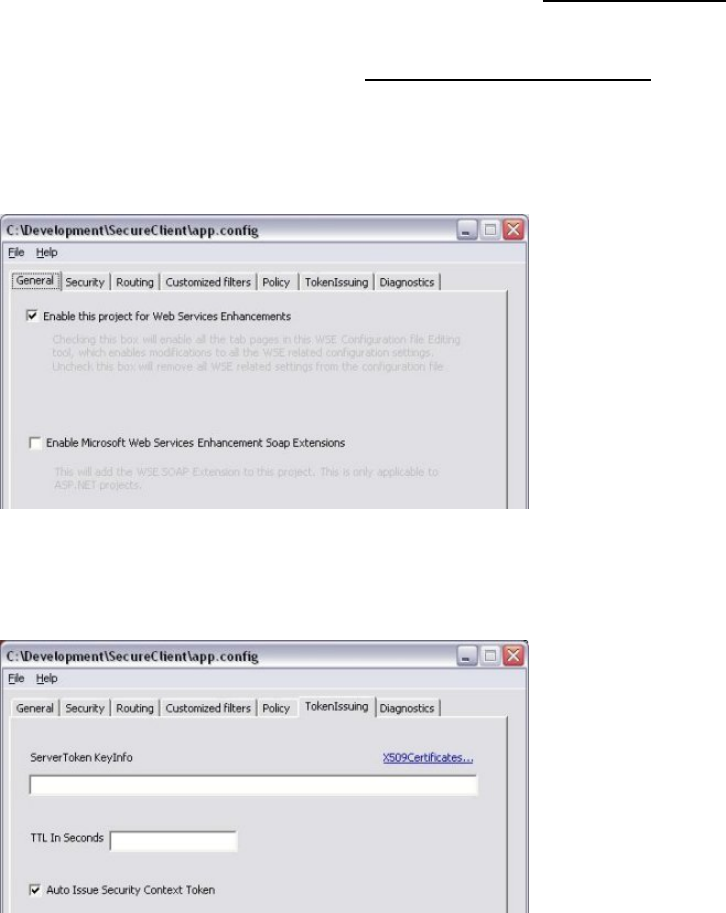
Alternatively, you can use the WSE Settings 2.0 tool that was launched previously to open the configuration
file (Web.config, App.config, or AppName.exe.config) for the application that calls SAS BI Web Services for
.NET. If the application doesn't have a configuration file, then you will need to create one. For more
information about configuration files, see Application Configuration Files in the MSDN Library.
On the General tab, select Enable this project for Web Services Enhancements. If this is an ASP.NET
application and the Web service should also use WSE 2.0, then you can also select Enable Microsoft Web
Services Enhancement Soap Extensions.
On the TokenIssuing tab, make sure that Auto Issue Security Context Token is selected. This will
automatically issue a SecurityContextToken for the currently logged−on user to use when authenticating with
SAS BI Web Services for .NET.
Configure Policy for Microsoft .NET Client
The configuration of the policy on the client is nearly identical to the configuration of the server policy. The
only differences are as follows:
When prompted to secure a service application or a client application, select Secure a client
application.
♦
The path to the policyCache.config file might be slightly different. Visual Studio .NET will set an
appropriate path for the policyCache.config file automatically. If you aren't using Visual Studio .NET,
then be sure to specify a path that is relative to the location of the executable file.
♦
If you are accessing Web services from the client application other than SAS BI Web Services for
.NET, then you will need to provide a specific endpoint URI when you configure the policy instead of
using the default value of <DefaultEndpoint>.
♦
6.
Update Client Code7.
SAS® Integration Technologies: Developer's Guide
Securing SAS BI Web Services for .NET with WSE 2.0 118

Visual Studio .NET Project
After WSE is enabled in a Visual Studio .NET project, you should right−click the Web Reference for SAS BI
Web Services for .NET and select Update Web Reference to force the proxy class to be re−generated with
the new WSE features. Rebuild the project for the changes to take effect.
You will see a new class available in the proxy namespace called SASAnalysisWse. This is the class that
you should use to call SAS BI Web Services for .NET. Replace all instances of SASAnalysis with
SASAnalysisWse in order to start using WSE in the client project.
Microsoft .NET Framework Project
If you don't have Visual Studio .NET, you will need to generate a new Web service proxy class using the
WseWsdl2.exe tool. By default, this tool is located in the WSE 2.0 installation folder in the Tools\Wsdl
folder. The command will be similar to the following:
"C:\Program Files\Microsoft WSE\v2.0\
Tools\Wsdl\WseWsdl2.exe"
http://localhost/SASWS/sasxmla.asmx?
WSDL localhost.cs
You will need to modify the code to use the new generated proxy, because the proxy class that is generated by
WseWsdl2.exe is different from the proxy class that is generated by the standard wsdl.exe tool that ships with
the Microsoft .NET Framework.
Test the New Security Policy
At this point, the installation of SAS BI Web Services should be secured by Kerberos authentication and
encryption, and only users who are specified in the policy configuration should be able to access the Web
service. Verify the security policy as follows:
Enable input and output message tracing on the Diagnostics tab in the WSE Settings 2.0 tool.1. Execute the client.2. View the log files to confirm that the request was signed and the response was encrypted.3.
8.
SAS® Integration Technologies: Developer's Guide
Securing SAS BI Web Services for .NET with WSE 2.0 119
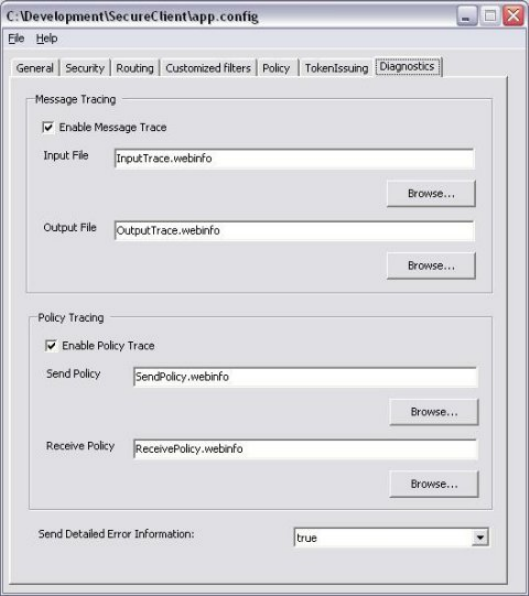
SAS BI Web Services
SAS® Integration Technologies: Developer's Guide
Securing SAS BI Web Services for .NET with WSE 2.0 120

Securing SAS BI Web Services for Java
In order for SAS BI Web Services for Java to look up stored processes in the SAS Metadata Server, it must first
authenticate to a metadata server. A Web service can pass a set of credentials to the SAS Metadata Server to use for
authentication. This is defined as SAS Metadata Server host authentication because the host running the SAS
Metadata Server will perform the authentication. Otherwise, a Web service can enable a Web container to perform the
authentication against an incoming client's credentials via basic authentication semantics, and then connect to the SAS
Metadata Server in a trusted configuration. This is defined as trusted authentication because the Web container
performs the authentication against an incoming client's credentials and the middle tier connects to the SAS Metadata
Server using a set of trusted credentials. The Web container then performs trusted authentication on behalf of the
authenticated Web user.
For host authentication (auth_mechanism=host), the client's credentials must be specified in the SOAP message
body as UserName, Password, and Domain properties. Alternatively, you can specify default or guest credentials
as the following configuration properties: default_user, default_password, and default_domain.
These credentials are used to authenticate to a SAS Metadata Server to determine what stored processes a user can run
as well as how and where they are executed.
For trusted authentication (auth_mechanism=trusted), a Web container will perform basic authentication. You
will need to add privileged users to the webuserRole role (or to the webuserGroup group, if you are using BEA
WebLogic). After the Web tier has successfully authenticated an incoming client, the client's principal name is then
used to connect to the SAS Metadata Server in a trusted configuration. For trusted authentication to succeed, a SAS
Metadata Server user login must exist for this client with the appropriate user ID and trusted authentication domain
(trusted_domain). See Changing to Trusted Web Authentication in the SAS Intelligence Platform: Web
Application Administration Guide for additional instructions on setting up a trusted configuration.
SAS BI Web Services
Securing SAS BI Web Services for Java 121
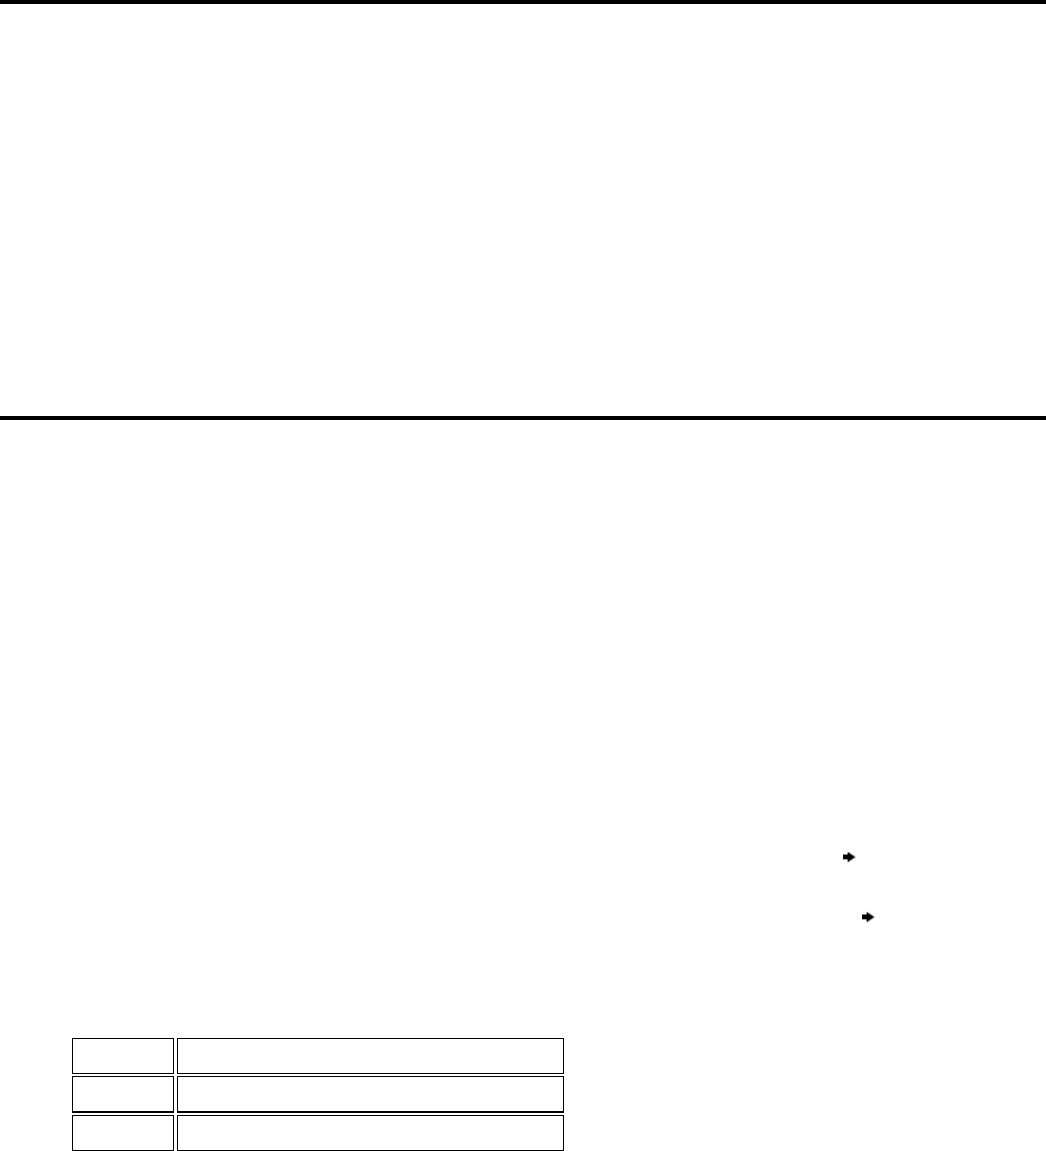
Sample PROC MEANS Using SAS BI Web Services
The following sample shows how to write, define, and invoke a sample stored process that can be used with SAS BI
Web Services.
Write the Stored Process
The following SAS code is a sample stored process called stpwsmea.sas. This program is installed with SAS
Integration Technologies; by default it is located in C:\Program Files\SAS\SAS 9.1\inttech\sample.
%put &tablename;
libname _WEBOUT xml xmlmeta = &_XMLSCHEMA;
libname instream xml;
proc means data=instream.&tablename;
output out=_WEBOUT.mean;
run;
libname _WEBOUT clear;
libname instream clear;
Define the Metadata
The stored process must be defined in a SAS Metadata Repository that is used by SAS BI Web Services to determine
how and where to run the stored process. Stored process metadata is defined using BI Manager. The tables in this
section show the values for each field in BI Manager.
Note: If you have previously installed the SAS Stored Process sample metadata as part of the SAS Configuration
Wizard or the Web Infrastructure Kit installation, you might not need to re−create the metadata for the "Sample:
MEANS Procedure Web Service" sample stored process. The sample metadata should already be available from the
Samples\Stored Processes folder in BI Manager. If you do not have the sample metadata, you can define the
metadata for the stored process on your SAS Metadata Server using the following steps.
Open SAS Management Console and connect to the appropriate metadata repository.1. From the SAS Management Console navigation tree, select the folder under BI Manager in which you would
like to create the new stored process. (If you would like to first create a new folder, you can select the location
in the navigation tree in which you want to add the new folder, and then select Actions New Folder from
the menu bar to open the New Folder Wizard. Follow the wizard instructions to create the new folder.)
2.
After you select the folder in which you want to add a new stored process, select Actions New Stored
Process from the menu bar. The New Stored Process Wizard displays.
3.
In the Name window of the New Stored Process Wizard, enter the following values in their corresponding
fields for the sample Web service:
Field Value
Name Sample: MEANS Procedure Web Service
Keywords XMLA Web Service
4.
Sample PROC MEANS Using SAS BI Web Services 122
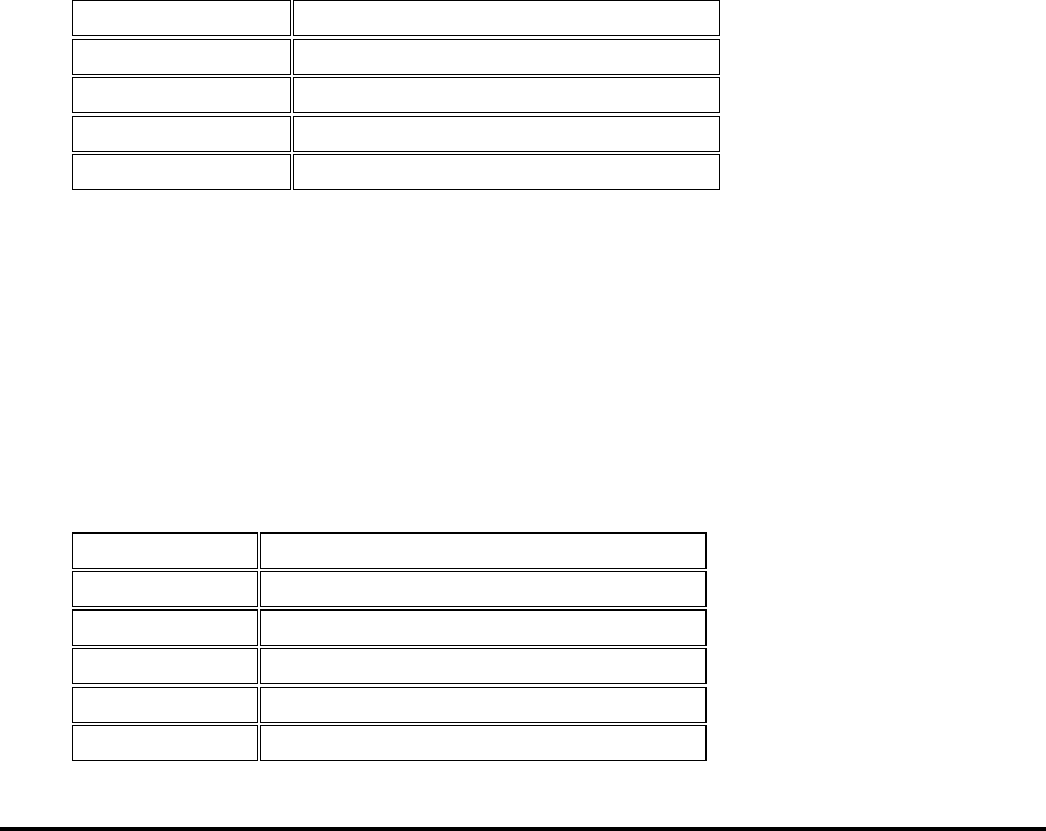
Note: To add the keyword, click Add to open the Add Keyword dialog box, then enter the name of the
keyword. Click OK to return to the Name window.
Using the Name window to add a description for the stored process is optional.
Click Next to go to the Execution window.5. In the Execution window of the New Stored Process Wizard, enter the following values in their corresponding
fields for the sample Web service:
Field Value
SAS server Main − Logical Stored Process Server
Source code repository C:\Program Files\SAS\SAS 9.1\inttech\sample
Source code file stpwsmea.sas
Output Streaming
6.
In the Execution window of the New Stored Process Wizard, click Streams to open the Input Stream Details
window. Then click Add to open the Add Input Stream dialog box, where you must define the input stream.
In this example, the input stream is named instream. Click OK to save the input stream definition.
Note: You must also select the Supports multi−pass reads check box in the Add Input Stream dialog box.
Otherwise, an XMLMap would need to be specified on the XML LIBNAME statement to define the XML
schema for instream.
7.
Click OK in the Streaming Details window to return to the Execution window; then click Next to open the
Parameters window.
8.
In the Parameters window of the New Stored Process Wizard, click Add to open the Add Parameter window.
In the Add Parameter window, enter the following values in their corresponding fields for the sample Web
service:
Field Value
Label tablename
SAS variable name tablename
Boolean properties Modifiable, Visible, and Required (are selected)
Type String
Default value InData
9.
Click OK to return to the Parameters window.10. Review your stored process information and click Finish to define the metadata for the stored process.11.
Invoke the Stored Process
SOAP Request
The stored process we just created can be invoked by SAS BI Web Services for Java and .NET middle−tier clients. A
Web service client invokes the middle−tier Web service with an Execute() command. The SOAP request body, or
client code, follows:
<soap−env:Body>
<Execute>
<Command>
SAS® Integration Technologies: Developer's Guide
Sample PROC MEANS Using SAS BI Web Services 123
<StoredProcess
name="/Samples/Stored Processes/Sample:
MEANS Procedure Web Service">
<Parameter name="tablename">InData</Parameter>
<Stream name="instream">
<Table>
<InData>
<Column1>1</Column1>
<Column2>20</Column2>
<Column3>99</Column3>
</InData>
<InData>
<Column1>50</Column1>
<Column2>200</Column2>
<Column3>9999</Column3>
</InData>
<InData>
<Column1>100</Column1>
<Column2>2000</Column2>
<Column3>1000000</Column3>
</InData>
</Table>
</Stream>
</StoredProcess>
</Command>
<Properties>
<PropertyList>
<DataSourceInfo>Provider=SASSPS;</DataSourceInfo>
</PropertyList>
</Properties>
</Execute>
</soap−env:Body>
SOAP Response
After you run the client code, the resulting SOAP response body is as follows:
<soap−env:Body>
<ExecuteResponse>
<return>
<root>
<TABLE>
<MEAN>
<_TYPE_> 0 </_TYPE_>
<_FREQ_> 3 </_FREQ_>
<_STAT_> N </_STAT_>
<COLUMN3> 3 </COLUMN3>
<COLUMN2> 3 </COLUMN2>
<COLUMN1> 3 </COLUMN1>
</MEAN>
<MEAN>
<_TYPE_> 0 </_TYPE_>
<_FREQ_> 3 </_FREQ_>
<_STAT_> MIN </_STAT_>
<COLUMN3> 99 </COLUMN3>
<COLUMN2> 20 </COLUMN2>
<COLUMN1> 1 </COLUMN1>
</MEAN>
<MEAN>
<_TYPE_> 0 </_TYPE_>
SAS® Integration Technologies: Developer's Guide
Sample PROC MEANS Using SAS BI Web Services 124
<_FREQ_> 3 </_FREQ_>
<_STAT_> MAX </_STAT_>
<COLUMN3> 1000000 </COLUMN3>
<COLUMN2> 2000 </COLUMN2>
<COLUMN1> 100 </COLUMN1>
</MEAN>
<MEAN>
<_TYPE_> 0 </_TYPE_>
<_FREQ_> 3 </_FREQ_>
<_STAT_> MEAN </_STAT_>
<COLUMN3> 336699.333 </COLUMN3>
<COLUMN2> 740 </COLUMN2>
<COLUMN1> 50.3333333 </COLUMN1>
</MEAN>
<MEAN>
<_TYPE_> 0 </_TYPE_>
<_FREQ_> 3 </_FREQ_>
<_STAT_> STD </_STAT_>
<COLUMN3> 574456.555 </COLUMN3>
<COLUMN2> 1094.89726 </COLUMN2>
<COLUMN1> 49.5008417 </COLUMN1>
</MEAN>
</TABLE>
</root>
</return>
</ExecuteResponse>
</soap−env>
Publishing Framework
SAS® Integration Technologies: Developer's Guide
Sample PROC MEANS Using SAS BI Web Services 125

Publishing Framework
The Publishing Framework feature of SAS Integration Technologies provides a complete and robust publishing
environment for enterprise−wide information delivery. The Publishing Framework consists of SAS CALL routines,
application programming interfaces (APIs), and graphical user interfaces that enable both users and applications to
publish SAS files (including data sets, catalogs, and database views), other digital content, and system−generated
events to a variety of destinations including the following:
E−mail addresses• message queues• publication channels and subscribers• WebDAV−compliant servers• archive locations.•
The Publishing Framework also provides tools that enable both users and applications to receive and process
published information. For example, users can receive packages with content, such as charts and graphs, that is ready
for viewing; and SAS programs can receive packages with SAS data sets that might in turn trigger additional analyses
on that data.
The functions of the Publishing Framework include channel definition, subscription management, package publishing,
package retrieval, package viewing, and event publishing.
Channel Definition and Subscription Management
The Publishing Framework enables you to define SAS publication channels, which are conduits for publishing
particular categories of information. You can set up a channel for a particular topic, organizational group, user
audience, or any other category. Once publication channels have been defined, authorized users can subscribe to them
and automatically receive information whenever it is published to those channels.
If your organization has installed the SAS Information Delivery Portal, users can manage their subscriptions from
within the portal. The portal enables users to select channels to subscribe to, specify the desired delivery transport
(such as an e−mail address or message queue), and specify filters that indicate which information is to be included or
excluded.
For more information about defining channels and managing subscriptions, refer to Administering the Publishing
Framework in the SAS Integration Technologies: Administrator's Guide. If you are using an LDAP directory server as
your metadata repository, refer to Administering the Publishing Framework in the SAS Integration Technologies:
Administrator's Guide (LDAP Version).
Package Publishing
The Publishing Framework enables you to create packages containing one or more information entities, including
SAS data sets, SAS catalogs, SAS databases, and almost any other type of digital content. You can also define viewers
that will make the information entities easier to display.
After creating a package, you can publish the package and its associated viewers to one or more channels. This causes
the information to be delivered to each user who has subscribed to those channels, if the package and its contents meet
the subscriber's filtering criteria. In addition to channels, you can publish packages directly to one or more E−mail
addresses, message queues, WebDAV−compliant servers, and archive locations.
Publishing Framework 126

To create and publish packages, you can use any of the following methods:
use the SAS Publisher user interface, which is provided as part of Base SAS• use the publish CALL routines to create packages and publish them from within a SAS program• use the APIs that are provided with Integration Technologies to create packages and publish them from within
a third−party application.
•
You can also use SAS Enterprise Guide or the SAS Information Delivery Portal to create and publish packages via the
Publishing Framework.
Package Retrieval and Viewing
The Publishing Framework provides the SAS Package Retriever, which is a graphical user interface to enable users to
extract and save information from packages that have been published through the Publishing Framework. The SAS
Package Reader user interface enables users to display the contents of packages. If the SAS Information Delivery
Portal has been installed, users can view published information from the portal.
In addition, you can use CALL routines to extract and process published information from within SAS programs; and
APIs are provided to enable third− party programs to extract and process published information.
Event Publishing
SAS Integration Technologies 9 includes the Publish Event Interface. This interface consists of CALL routines that
enable you to write SAS programs, including stored processes, that create and publish events. Events can be generated
and published explicitly, or they can be generated implicitly as part of the publication of a package. Implicit event
generation occurs when packages are published to a channel that has event subscribers defined.
Events are published as well−formed XML documents. They can be published to HTTP servers, message queues, or
to publication channels and their associated subscribers. You can develop custom applications that receive and process
events generated by the Publishing Framework.
Publishing Framework Documentation
For information about how to perform publishing tasks, or how to incorporate publishing tasks into your SAS
programs or applications, refer to the topics in the table of contents at left.
For information about how to administer publication channels and subscriber information, refer to Administering the
Publishing Framework in the SAS Integration Technologies: Administrator's Guide. If you are using an LDAP
directory server as your metadata repository, refer to Administering the Publishing Framework in the SAS Integration
Technologies: Administrator's Guide (LDAP Version).
Publishing Framework
SAS® Integration Technologies: Developer's Guide
Publishing Framework 127
About Packages: Package Content
Package: Definition
A package is a container for knowledge, or digital content, that is generated or collected for delivery to a consumer.
Knowledge takes the form of package entries, which can be either of two types:
SAS results• unstructured content.•
SAS Results
A category of package entry type is SAS results, which can take the form of any of the following:
SAS catalog• SAS data set• SAS database (such as FDB and MDDB)• SAS SQL view.•
Note: A package that contains only SAS results is referred to as a result set package.
Unstructured Content
Unstructured content is any package entry that is created external to SAS. Supported unstructured content types
include the following:
binary file (such as Excel, GIF, JPG, PDF, PowerPoint, and Word)• HTML file (including ODS output)• reference string (such as URL)• text file (such as a SAS program)• viewer file (such as an HTML or plain text template that formats SAS file items for viewing in e−mail).•
File Name Extensions for Package Entry Types
Each entry in a package is implicitly contained in a file whose file name extension reflects the entry type. Knowing
file name extensions might be useful when retrieving packages from the archive and WebDAV transports.
Default file name extensions follow:
.csv − Comma separated values
.ref − Reference
.sac − SAS Catalog
.sad − SAS Dataset
.sam − SAS MDDB
.sav − SAS SQL View
.spk − Nested archive
Publishing Framework
About Packages: Package Content 128

Package Rendering
When determining how to render packages, the publisher should consider the following:
the company's business requirements• the configuration of the business enterprise (for example, hardware, software, business processes, and
communications protocols)
•
the package content (structured and unstructured data)• the transport (such as archive, channel, e−mail, message queue, or Web) that is used to deliver the package.•
The following scenarios depict business factors that might affect how a package is rendered:
Consumer Need Publisher Solution
Access to packages, but
have limited system
storage resources
Render the package as an archive.
Access to package
without having SAS
software installed
Render the package as an archive and
attach the archive to e−mail for access
using SAS Package Reader.
Only executive−level
summaries (for example,
text reports, graphics, and
Web links)
Render the package as unstructured content
to known consumers via e−mail or to
unknown consumers via
subscription−based channels.
Access to SAS results, but
do not want to access the
package for continued
processing
Apply a template to the SAS data package
entry for viewing in e−mail and on the
Web.
Access to SAS results, but
do not have Web access
or do not use HTML
Apply a template in plain−text format to
the SAS results for viewing in e−mail.
Direct access to SAS
results for continued data
processing
Deliver SAS results package entries to
message queues or archives to enable
programmatic access to SAS data.
To span a broad
professional range
(executive, manager,
programmer, and
knowledge worker)
Apply name/value metadata to the package
and package entries to enable consumers to
filter packages or package entries for
relevancy.
Before the publisher can begin the publishing process, the administrator must first configure the publishing
environment, which might include archives, channels, subscribers, and subscriptions. For details, see Administering
the Publishing Framework in the SAS Integration Technologies: Administrator's Guide. If you are using an LDAP
Package Rendering 129

directory server as your metadata repository, see Administering the Publishing Framework in the SAS Integration
Technologies: Administrator's Guide (LDAP Version).
Publishing Framework
SAS® Integration Technologies: Developer's Guide
Package Rendering 130
Package Transports
The destination (or transport) for delivering a package is defined in the Where to Publish tab of the SAS Publisher
GUI or programmatically in a SAS application using PACKAGE_PUBLISH CALL routines.
Transports are the following:
Archive
a single binary collection of all the items in a package. An archived package is also referred to as an SPK file,
which is short for SAS Package.
Channel
a conduit through which the defined transport (either e−mail or message queue) delivers package items to the
subscriber of the channel. The subscriber defines the preferred transport using personal subscription
properties.
E−mail
mechanism for delivering selected package items to identified recipients.
Message Queue
in application messaging, a place where the publisher can send a message (or a package) that can be retrieved
by another program for continued processing.
WebDAV−Compliant Server
an acronym for Web Distributed Authoring and Versioning. Whereas the traditional transports (archive,
channel, e−mail, and message queue) are repositories for published package data that can be retrieved and
reprocessed in a synchronous fashion, a WebDAV−compliant server facilitates concurrent access to and
update of package data on the Internet.
Publishing Framework
Package Transports 131

Archived Packages
An archive is a location to which an archived package is delivered or stored. An archival location can contain only
archived packages. An archive is a single binary collection of all of the items in a package. Archived packages are also
referred to as SPK files, which is short for SAS Package. The consumer can use the stand−alone product SAS Package
Reader subsequently to uncompress, or unzip, and use the file. SAS Package Retriever can be used to access the
package from the archive and to store the package elsewhere.
Archiving a Package
Publishing a package to an archive provides the following advantages:
You conserve disk resources.• The package stays in a static location, allowing consumers, persons or programs, to retrieve the package at
their convenience
•
The SAS data package entries are available to consumers who do not have SAS software installed on their
systems.
•
After the administrator has configured archive paths (and optionally configured channels that have default archive
paths), the publisher can publish packages directly to an archive. The publisher can use the following methods to
publish an archive:
using SAS Publisher GUI• publishing programmatically using SAS• using a third−party client application.•
Configuring Archives
The administrator configures archives under the following conditions:
to support package archiving, which is the process of collecting all package entries into a single binary file• to use as a repository for archived packages that contain data that consumers can access at their convenience.•
If the organization chooses to implement archiving in the publishing environment, the administrator must configure
the following objects:
Archival paths
enable publishers to select from a list of predefined paths to which they can publish a package as an archived
file to an archive. The administrator can define paths as directory locations or LDAP URLs. The administrator
must know about an LDAP server environment and LDAP metadata storage in order to specify archival paths.
Default archive path for each configured channel
can be associated with a channel to which subscribers can subscribe. Channels that are configured for access
to all subscribers are made available for subscription in SAS Subscription Manager, SAS Management
Console, and the SAS Information Delivery Portal. Likewise, restricted channels do not appear in the channels
list for subscribers who are not configured to access them. Consumers are notified of a package delivery to an
archive by way of subscription to a channel that has a default archive location that is associated with it.
For detailed instructions on setting up archives, see Administering the Publishing Framework in the SAS Integration
Technologies: Administrator's Guide. If you are using an LDAP directory server as your metadata repository, see
Archived Packages 132

Administering the Publishing Framework in the SAS Integration Technologies: Administrator's Guide (LDAP
Version).
Publishing Framework
SAS® Integration Technologies: Developer's Guide
Archived Packages 133

Subscription Channels
A channel is a conduit for sending information from a publisher to all users subscribed to the channel. Whereas
publishing to e−mail is identity−centered (the publisher delivers packages to recipients whose identities are known),
publishing to channels is subject−centered, allowing both the publisher and the consumer to concentrate on the subject
of the package rather than on the recipients for the package.
Creating Channels
The administrator must create a channel for each distinct topic or audience. For example, users of a particular
application might want a channel for discussion and data exchange, while the programmers of that application might
want another channel to discuss technical problems and future enhancements. Although the topic is the same
application, the discussion about the topic will be different. Therefore, two separate channels would probably best
serve the needs of the two groups of users.
A channel can be created within a SAS Metadata Repository or an LDAP Repository. The administrator uses SAS
Management Console to create a channel object with the specified attributes in the SAS Metadata Repository. If
LDAP is used as the metadata repository, the administrator uses the Integration Technologies Administrator
application.
Creating Subscribers
The administrator must create a subscriber for each potential user of a channel. Subscribers must be defined before
subscriptions to channels can be created.
Creating Subscriptions
The association of a subscriber to a channel is a subscription. A subscription enables the information that is published
to a channel to be delivered to the interested (subscribed) subscribers.
Subscriptions can be created by either the administrator or the subscriber. The administrator can create subscriptions
when a publishing environment is initially configured. Individual subscribers can create personal subscriptions after
the publishing environment has been configured.
For information about configuring channels, subscribers, and subscriptions, Administering the Publishing Framework
in the SAS Integration Technologies: Administrator's Guide. If you are using an LDAP directory server as your
metadata repository, refer to Administering the Publishing Framework in the SAS Integration Technologies:
Administrator's Guide (LDAP Version).
Publishing Framework
Subscription Channels 134

About Events
Version 9 of the Publishing Framework supports the generation and publication of events. In this context, an event is
an action or occurrence that can be detected by a computer program. The Publishing Framework creates events using
well−formed XML specifications that contain the name of the event, a set of associated properties, and a message
body.
The Publishing Framework provides two methods for publishing an event:
Explicit event publication. This feature enables a SAS program to generate any type of event and publish it
using HTTP, message queuing, or a publication channel.
•
Implicit event publication. This feature enables a channel's subscribers to be designated as "event"
subscribers. The Publishing Framework then automatically notifies event subscribers whenever new
information is published to the channel.
•
Using Explicit Event Publication
Explicit event publication enables a SAS program to generate an event of any kind and publish it explicitly. First, the
event is defined using the CALL routines EVENT_BEGIN and EVENT_BODY. The CALL routine
EVENT_PUBLISH is used to generate the event and publish it using HTTP, message queuing, or a publication
channel. The event is generated using a well−formed XML specification for generic events. The CALL routine
EVENT_END is then used to free all resources associated with the event.
For details about using the event CALL routines, refer to the Event Publish CALL Routines documentation. For
details about the format used to generate explicit events, refer to the XML Specification for Generic Events.
Note: The SAS Publisher user interface does not currently support explicit event generation, and the Publishing
Framework does not currently support event retrieval. However, custom programs can be developed to provide this
functionality.
To collect and process events that the Publishing Framework generates, you can develop customized programs using
the Event Broker service. The Event Broker is one of the Foundation Services provided with Integration
Technologies. For more information, see com.sas.services.events.broker in the Foundation Services class
documentation.
Using Implicit Event Publication
With Version 9 of the Publishing Framework, the PACKAGE_PUBLISH CALL routine and the SAS Publisher
interface automatically generate a SASPackage event whenever a package is published to a channel. The SASPackage
event is captured as a well−formed XML document that describes the package. For details, see the XML Specification
for SASPackage Events.
Subscribers to the channel who are designated as "event" subscribers then receive the event via their chosen transport
methods. This feature enables subscribers to be aware that new information has been published to the channel.
To designate a subscriber as an event subscriber, use the Publishing Framework plug−in of SAS Management
Console. For details, see the Publishing Framework section of the SAS Integration Technologies: Administrator's
Guide.
About Events 135

Note: If you are using LDAP (instead of a SAS Metadata Server) as your metadata repository, you will need to
develop custom programs to designate subscribers as event subscribers. The Subscription Manager interface does not
currently support this function.
To collect and process events that the Publishing Framework generates, you can develop customized programs using
the Event Broker service. The Event Broker is one of the Foundation Services provided with Integration
Technologies. For more information, see com.sas.services.events.broker in the Foundation Services class
documentation.
XML Specifications for Events
The Publishing Framework uses well−formed XML specifications to generate events. For detailed information, see
the following topics:
the XML Specification for Generic Events, which is used for explicit event publishing• the XML Specification for SASPackage Events, which is used for implicit event publishing• Examples of Generated Events using both of these specifications•
Publishing Framework
SAS® Integration Technologies: Developer's Guide
About Events 136

Package Publishing
The following activities are performed in order to publish a package:
Entries are inserted into the package.1. The transport for delivering the package to the consumer is defined.2. Other properties are defined that are specific to the transport or the rendering of the package.3. The package is published.4.
The following scenarios depict how the package publishing method can depend on your role in the business enterprise
or your experience as a programmer:
Type of Publisher Package Publishing Method
Novice user or someone
who prefers to use a GUI Publish by using the SAS Publisher GUI.
SAS programmer Publish programmatically by using the
Publish Package CALL routines.
Programmer who uses a
language other than SAS Publish by writing a third−party client
application.
Publishing Framework
Package Publishing 137
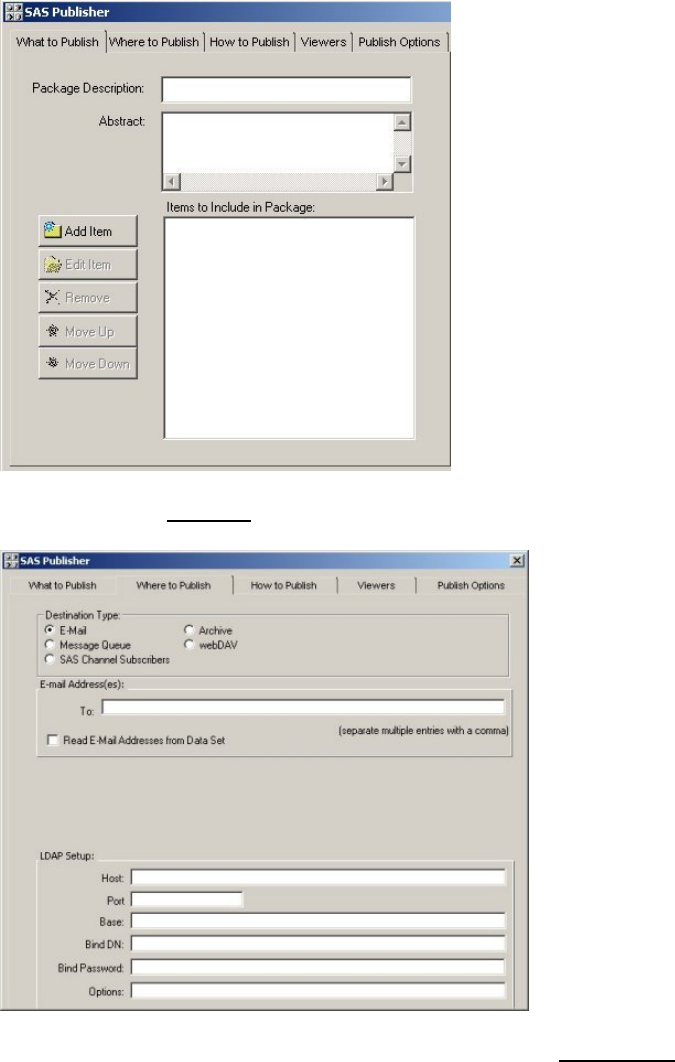
Publishing Using the SAS Publisher GUI
SAS Publisher can be used to define the following basic information for publishing a package:
Items to include in the package are defined in the What to Publish tab:
The destination (or transport) for delivering the package is defined in the Where to Publish tab:
Other package properties, such as the package's rendering as an archived file (or SPK package), are defined in the
How to Publish tab:
Publishing Using the SAS Publisher GUI 138
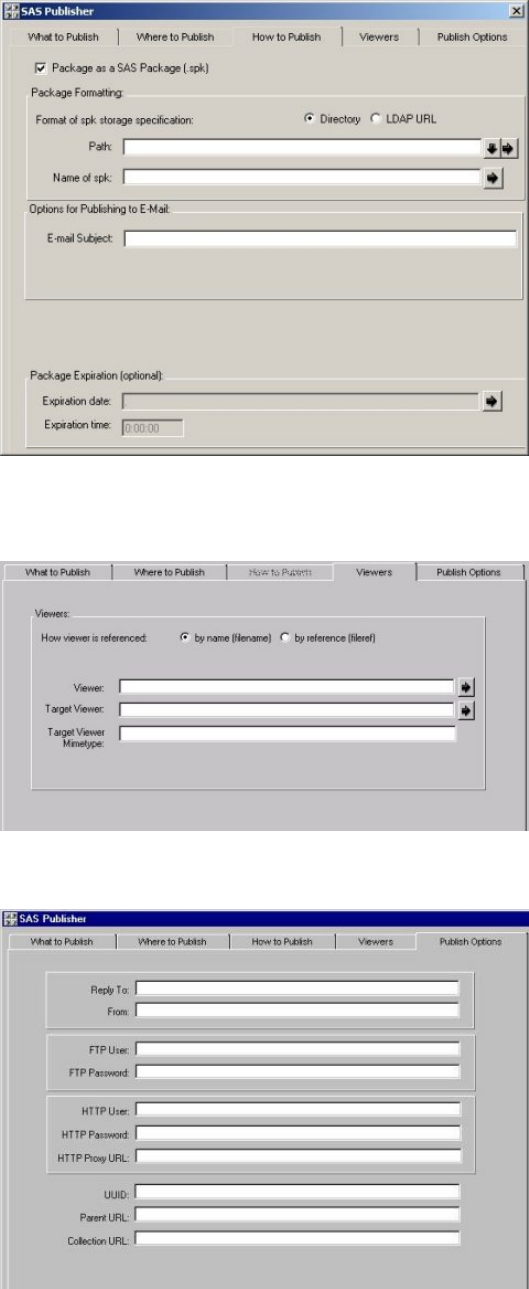
The Viewers tab is available when you are working with the e−mail, channel, and WebDAV transports. Use this tab to
specify a particular viewer template file and to indicate the reference type of the viewer.
Use the Publish Options tab to specify additional options or properties based on the destination type.
SAS® Integration Technologies: Developer's Guide
Publishing Using the SAS Publisher GUI 139
After the package has been defined, an appropriate action is taken, such as publishing the package (clicking the OK
(Publish Package) button):
For complete details about how to use the SAS Publisher GUI to publish a package, see SAS Publisher.
Publishing Framework
SAS® Integration Technologies: Developer's Guide
Publishing Using the SAS Publisher GUI 140

Publishing Programmatically Using SAS
The Interface to the Publish Package CALL Routines can be used to write a SAS program to publish a package:
A package and its properties are defined using the PACKAGE_BEGIN CALL routine.
Example:
CALL PACKAGE_BEGIN(pid, desc, nameValue, rc);
1.
Items are inserted in the package using an appropriate CALL routine.
CALL routines fall into two categories of item types:
SAS results:
INSERT_CATALOG
INSERT_DATASET
INSERT_MDDB
INSERT_SQLVIEW
♦
unstructured content:
INSERT_FILE
INSERT_HTML
INSERT_REF
INSERT_VIEWER
♦
Example:
Call INSERT_DATASET(pid, libname, memname, description, NameValue, rc);
2.
The destination (or transport) for delivering the package is defined using the PACKAGE_PUBLISH CALL
routine.
CALL routines for supported transports are as follows:
TO_ARCHIVE♦ TO_EMAIL♦ TO_QUEUE♦ TO_SUBSCRIBERS♦ TO_WEBDAV♦
Example:
publishType = "TO_ARCHIVE"
.
.
.
CALL PACKAGE_PUBLISH (pid, publishType, rc, properties, archivePath,
archiveName);
3.
The end of the package is defined using the PACKAGE_END CALL routine.
Example:
CALL PACKAGE_END(pid, rc);
4.
For complete details about how to use the Publish Package CALL routines to publish a package, see Publish Package
Interface.
Publishing Framework
Publishing Programmatically Using SAS 141

Publishing Using a Third−Party Client Application
The publisher can write a third−party client application that uses SAS Integration Technologies to access Integrated
Object Model (IOM) servers.
The Integrated Object Model provides distributed object interfaces for conventional SAS features. This enables the
publisher to develop component−based applications that integrate SAS features into the enterprise application.
Client development in the Java environment enables the publisher to write applets, stand−alone applications, servlets,
and even Enterprise JavaBeans that interact with IOM servers. By supporting industry standards (such as Java
Database Connectivity (JDBC) and CORBA), the Integration Technologies software enables the publisher to take
advantage of existing programming skills and tool sets for writing client applications. For more information, see
Developing Java Clients.
Client development in the Windows environment is based on the Microsoft Component Object Model (COM).
Because COM support is built into the operating system and in all the leading programming language products, the
publisher can integrate SAS (and existing SAS programs) into client applications. Integration Technologies software
provides the type libraries that are necessary to use the IOM server with Visual Basic and Visual C++. For more
information, see Developing Windows Clients.
Publishing Framework
Publishing Using a Third−Party Client Application 142

Package Retrieval
After a package is created, the transport, or destination, and other properties control how the package is delivered to
the consumer.
Packages can be retrieved from these destinations:
Archive• E−mail• Message Queue• WebDAV−Compliant Server•
Archive
An archive is a single binary collection of all the items in a package. An archived package is also referred to as an
SPK (SAS Package) file. Depending on your needs and on whether you have SAS installed, you can choose from the
following products to access an archived package:
You can use the stand−alone product SAS Package Reader to uncompress, or unzip, and use SPK files. SAS
Package Reader can be used to read packages whether or not the consumer has SAS installed.
•
The consumer can use SAS Package Retriever to access an archived package and to store it elsewhere for
continued use. SAS must be installed in order to use the SAS Package Retriever.
•
If SAS is installed, then you can also use the Publish Package CALL routines in order to write SAS programs,
including stored processes, that create, populate, publish, and retrieve packages.
•
If SAS is not installed, then you can use third−party client software in order to write a third−party client
application that uses SAS Integration Technologies to access Integrated Object Model (IOM) servers. The
Integrated Object Model provides distributed object interfaces for conventional SAS features. This enables
you to develop component−based applications that integrate SAS features into the enterprise application.
•
For more information about configuring and publishing to an archive, see Archived Packages.
E−mail
When the publisher publishes a package via e−mail, the package is delivered to a list of recipients which is submitted
to SAS software for processing. Choosing e−mail gives the publisher authority over who receives the package. The
recipient, however, requires no knowledge about the publishing environment from which the package was sent, nor
must the recipient subscribe to a delivery channel. Also, recipients do not have to be SAS users. A recipient who has
not installed SAS can use SAS Package Reader or a Web browser in order to read the package.
Message Queue
A message queue is a named location to which the publisher can publish a package for subsequent retrieval and
continued processing. Although e−mail is suited for delivering reports and views of data to a limited audience, a
message queue is best used for collecting package data entries for continued processing and publishing in
time−critical environments. Publishing to a queue, and retrieval from a queue, are entirely independent activities. The
publishing software (SAS Publisher or programmatic software) and the retrieval software (SAS Package Retriever or
programmatic software) communicate asynchronously without any knowledge of the location of the other software, or
even whether the other software is running.
Package Retrieval 143

You can use the following products to access a package on a message queue:
The consumer can use SAS Package Retriever to access a package on the queue and to store it elsewhere for
continued use. SAS must be installed in order to use the SAS Package Retriever.
•
If SAS is installed, then you can also use the Publish Package CALL routines in order to write SAS programs,
including stored processes, that create, populate, publish, and retrieve packages.
•
If SAS is not installed, then you can use third−party client software in order to write a third−party client
application that uses SAS Integration Technologies to access Integrated Object Model (IOM) servers. The
Integrated Object Model provides distributed object interfaces for conventional SAS features. This enables
you to develop component−based applications that integrate SAS features into the enterprise application.
•
WebDAV−Compliant Server
Whereas the traditional transports (archive, channel, e−mail, and message queue) are repositories for published
package data that can be retrieved and reprocessed in a synchronous fashion, package delivery to a
WebDAV−compliant server facilitates concurrent access to and update of package data on the Internet.
WebDAV is an acronym for Web Distributed Authoring and Versioning. WebDAV is not only a delivery mechanism,
but also a core technology that extends the HTTP network protocol, enabling distributed Web authoring tools to be
broadly interoperable. WebDAV extends the capability of the Web from that of a primarily read−only service, to a
writable, collaborative medium.
You can use the following products to access a package on a WebDAV server:
The consumer can use SAS Package Retriever to access a package on the WebDAV server and to store it
elsewhere for continued use. SAS must be installed in order to use the SAS Package Retriever.
•
If SAS is installed, then you can also use the Publish Package CALL routines in order to write SAS programs,
including stored processes, that create, populate, publish, and retrieve packages.
•
If SAS is not installed, then you can use third−party client software in order to write a third−party client
application that uses SAS Integration Technologies to access Integrated Object Model (IOM) servers. The
Integrated Object Model provides distributed object interfaces for conventional SAS features. This enables
you to develop component−based applications that integrate SAS features into the enterprise application.
•
Publishing Framework
SAS® Integration Technologies: Developer's Guide
Package Retrieval 144
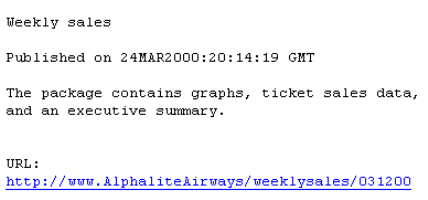
URL Retrieval
E−mail supports the delivery only of a reference to a URL that is accessible from a Web browser. Here is an example
of an e−mail message in which the URL reference is identified:
Clicking the link automatically invokes the consumer's configured Web browser and the URL package entry is
presented for viewing in the Web browser window.
Publishing Framework
URL Retrieval 145
Viewer Processing
SAS Integration Technologies provides a viewer facility that combines the robust text rendering capabilities of HTML
and plain text with the efficiency of e−mail delivery. This facility enables you to create and apply a viewer, which is a
template that contains formatting directives for rendering a specific view to an entire package or to selected package
entries.
The viewer facility consists of a set of tagging extensions to HTML, which you can use to create a unique template
according to the specific package data that is being rendered. For example, you can write formatting directives to
stream package entries (such as a text file or a URL reference) or to extract SAS data file entries for presentation in
e−mail. A viewer creates a presentation quality look and feel to package data entries for distribution to a view−only
audience.
A primary benefit of applying viewers to packages is that e−mail recipients can now view package entries that
otherwise would not be viewable. For example, an archive that contains a SAS data set can be attached to e−mail, but
is not viewable in e−mail unless a viewer is applied. The viewer renders the SAS data set as a populated table.
Furthermore, a viewer facilitates publishing in the traditional sense using, for example, an electronic newsletter. An
electronic newsletter template that is coded in HTML or plain text format can dynamically build your content, which
can consist of links to Web sites for up−to−date information about topics of interest to its readers.
Publishing Framework
Viewer Processing 146
When To Use a Viewer
A viewer is useful under the following conditions:
Publishing to the E−mail Transport
You want to publish a result−set package for delivery to consumers who use a view−only transport (such as e−mail).
Because a SAS data set is not viewable in e−mail, an HTML or text viewer is needed to format the SAS data for a
view−only presentation.
Publishing to Channel Subscribers
If you are publishing to a channel, the transports that are used by subscribers are unknown to you. Therefore, you
might decide to format the entire package with the aid of a viewer to ensure maximum viewability for the broadest
consumer audience. The viewer is applied to a package that is published only to subscribers who use e−mail delivery.
The viewer is not applied to a package that is published to subscribers who specify delivery to message queues.
Extracting and Formatting SAS Data
With a viewer, you can extract specific package items and variables from a SAS data set entry and distribute to
subscribers who use e−mail. Subscribers who use e−mail receive the package entries that the viewer extracts and
formats. Subscribers who use queues receive the full package.
Formatting an Entire Package
Besides formatting a SAS data set package entry, you can also use a viewer to format other entries in the package
(such as another HTML file, a text file, a binary file, or a reference) as input streams. Applying a viewer to the entire
package provides a comprehensive presentation for viewing purposes only.
Publishing an Electronic Newsletter
A popular form of package output is an electronic newsletter. The basic template that imposes the look and feel of the
document can contain static text or HTML coding. However, you can code the dynamic information (in the form of
news articles or SAS data) as links to Web sites whose source data is continuously refreshed.
Publishing an Executive Level Summary
Delivery of SAS result sets and other text and graphical information via e−mail has the greatest value for an executive
level consumer. The executive might have a requirement to view the data (for example in the form of summary tables)
and to read text but might not necessarily need access to the raw data for continued processing, extraction, and
delivery throughout the enterprise.
Publishing Framework
When To Use a Viewer 147

How to Create a Viewer
The publisher (or the person who creates the viewer template) must have a thorough understanding of the contents of
the package in order to successfully create the template. You choose the appropriate viewer tags in order to design a
template that formats the rendered view of the package.
The Sample Package
This sample package contains four entries, in the following order:
SAS data set1. text file2. Reference URL3. HTML file.4.
This package also contains the following description:
AlphaliteAirways Sales Force Briefing
The SAS Data Set
Here is an example of a SAS data set that contains six observations, each containing four variables: FNAME,
LNAME, YEARS, and TERRITORY.
John Smith 32 NE
Gary DeStephano 20 SE
Arthur Allen 40 MW
Jean Forest 3 NW
Tony Votta 30 SW
Dakota Smith 3 HA
The Basic Viewer
The file that contains the viewer template contains code that is surrounded by tagsSASINSERT> open tag and end
with the </SASINSERT> closing tag.
The viewer contains sections that format each package entry using the appropriate technique.
Extracting and formatting a variable from a SAS data set into a list1. Extracting and formatting an entire SAS data set into a table2. Streaming a text file and a reference URL3. Filtering package entries.4.
For a single, comprehensive viewer that contains all of the preceding examples, see Sample HTML Viewer.
Extracting and Formatting a Variable from a SAS Data Set into a List
Delivery of a single variable from all observations in a SAS data set is well suited to an unordered list.
Here is the first section from the sample template that formats a single variable from a SAS data set into a list.
How to Create a Viewer 148

<!−−Section 1: Formatting a Data Set
Variable in an HTML List−−>
<SASINSERT>
<h2>Congratulations!</h2>
$(entry=1 attribute=description)
<ul>
<SASTABLE ENTRY=1>
<li>$(VARIABLE=fname)</li>
</SASTABLE>
</ul>
</SASINSERT>
The ENTRY=1 attribute is necessary to identify the SAS data set as the first entry in the package. The description
attribute extracts the description of the package.
The <UL> HTML tag specifies an unordered list after which the <SASTABLE> tag with the ENTRY=1 option are
necessary to identify the SAS data set as the first entry in the package. The <LI> HTML tag is used with variable
substitution syntax to identify that the variable fname is to be extracted from the SAS data file and formatted as a list
entry in the rendered view. Implicit in the <SASTABLE> construct is looping. Each observation in the data set is read
and formatted until the end of file is reached.
The following SAS HTML tags are used in this example:
SASINSERT Tag• Substitution Syntax• SASTABLE Tag.•
This section of the template is rendered for viewing in e−mail as follows:
Congratulations!
AlphaliteAirways Sales Force Briefing
John• Gary• Arthur• Jean• Tony• Dakota•
Extracting and Formatting a SAS Data Set into a Table
Delivery of multiple variables or all variables from the observations in a SAS data set is well suited to a tabular
presentation.
Here is an example of a template that extracts three of four variables from a SAS data set into a table.
<!−−Section 2: Formatting a SAS Data
Set into a Table−−>
<SASINSERT>
<h2>Record Sales from these Salespeople</h2>
$(entry=1 attribute=description)
<table border cellspacing=0 cellpadding=5
SAS® Integration Technologies: Developer's Guide
How to Create a Viewer 149
rules=groups>
<thead>
<tr>
<th>First Name</th>
<th>Last Name</th>
<th>Territory</th>
</tr>
</thead>
<tbody>
<SASTABLE ENTRY=1>
<tr>
<td> $(Variable=fname)</td>
<td> $(Variable=lname)</td>
<td> $(Variable=territory)</td>
</tr>
</tbody>
</SASTABLE>
</table>
</SASINSERT>
The ENTRY=1 attribute is necessary to identify the SAS data set as the first entry in the package. The description
attribute extracts the description of the entry from the package. Standard HTML table tags set up the tabular
framework that defines a row with three columns of header text and accompanying tabular data. The <TD> tag is used
with the variable substitution syntax to identify the following variables for extraction and insertion into the table:
fname, lname, and territory. Implicit in the <SASTABLE> construct is looping. Each observation in the data set is
read and formatted until the end of file is reached.
The following SAS HTML tags are used in this example:
SASINSERT Tag• Substitution Syntax• SASTABLE Tag.•
This section of the template is rendered for viewing in e−mail as follows:
Record Sales from these Salespeople
AlphaliteAirways Sales Force Briefing
First Name Last Name Territory
John Smith NE
Gary DeStephano SE
Arthur Allen MW
Jean Forest NW
Tony Votta SW
Dakota Smith HA
SAS® Integration Technologies: Developer's Guide
How to Create a Viewer 150

Streaming a Text File and a Reference URL
The viewer template might also include the entire contents of a text file, another HTML file, a reference URL, or a
binary file.
Here is the third section from the sample template that inserts a text file and a reference URL into the viewer.
<!−−Section 3: Inserting a Text File
and a Reference URL−−>
<SASINSERT>
<h2>Letter of Congratulations</h2>
<p>Below is a copy of the letter that was sent
to each recipient of the top sales award.</p>
$(entry=2 attribute=stream)
<p>
See <a href="$(entry=3 attribute=stream)">
for detailed sales figures.</p>
</SASINSERT>
The <H2> tag defines a descriptive heading for the text document and the reference URL. The ENTRY=2 attribute
identifies the entry (a text document) to be substituted as an input stream to the HTML output. The ENTRY=3
attribute identifies the reference URL.
The following SAS HTML tags are used in this example:
SASINSERT Tag• Substitution Syntax.•
This section of the template is rendered for viewing in e−mail as follows:
Letter of Congratulations
Below is a copy of the letter that was sent to each recipient of the top sales award.
December 30, 2000
International Sales
AlphaliteAirways Headquarters
Dear AlphaliteAirways Salesperson,
Congratulations on your much deserved recognition as
outstanding salesperson for AlphaliteAirways for 2000.
To express our gratitude for your excellent contribution,
we wish to present you with 25 stock options in
AlphaliteAirways.
Wishing you continued success in your career with
AlphaliteAirways.
Sincerely,
Alvin O. Taft, Jr.
Director−in−Chief
SAS® Integration Technologies: Developer's Guide
How to Create a Viewer 151

See http://www.AlphaliteAirways.com/headquarters/sales
for detailed sales figures.
Filtering Package Entries
Another method for locating package entries for inclusion in the viewer is name/value filtering. You can filter package
entries that are assigned an optional name/value pair when they are created according to specified criteria. Entries that
match are included in the rendered view. Filtering is especially powerful for searching large, nested packages.
In our example, we filter for all entries that have a name/value pair of type=report and include the matching entries in
the viewer. In our fictitious package, one HTML entry matches the name/value pair and so it is filtered for inclusion in
the viewer.
Here is the fourth section from the sample template that inserts an HTML file (according to matched criterion) into the
viewer.
<!−−Section 4: Filtering an Entry−−>
<SASINSERT>
<h2>Message from the President</h2>
<SASREPEAT>
$(entry="(type=report)" attribute=stream)
</SASREPEAT>
</SASINSERT>
The ENTRY="(type=report)" attribute filters all package entries that contain a name/value pair of type=report. The
<SASREPEAT> open tag and the </SASREPEAT> closing tag surround the search string in order to perform a
repetitive search for the name/value pair. Without this tag, the search would end after the first match. In this example,
only one HTML entry is matched. This entry is substituted as an input stream to the HTML output.
The following SAS HTML tags are used in this example:
SASINSERT Tag• Substitution Syntax• SASREPEAT Tag.•
This section of the template is rendered for viewing in e−mail as follows:
Message from the President
AlphaliteAirways delivers service. AlphaliteAirways is the
recognized industry leader according to its safety
record, volume of passengers served, and number of
routes serviced.
How are we able to live up to such high expectations
consistently? First and foremost, we do it through the
abilities of our top salespeople. We owe a huge debt to
these hard−working individuals who actively pursue
revenue for this company.
Publishing Framework
SAS® Integration Technologies: Developer's Guide
How to Create a Viewer 152
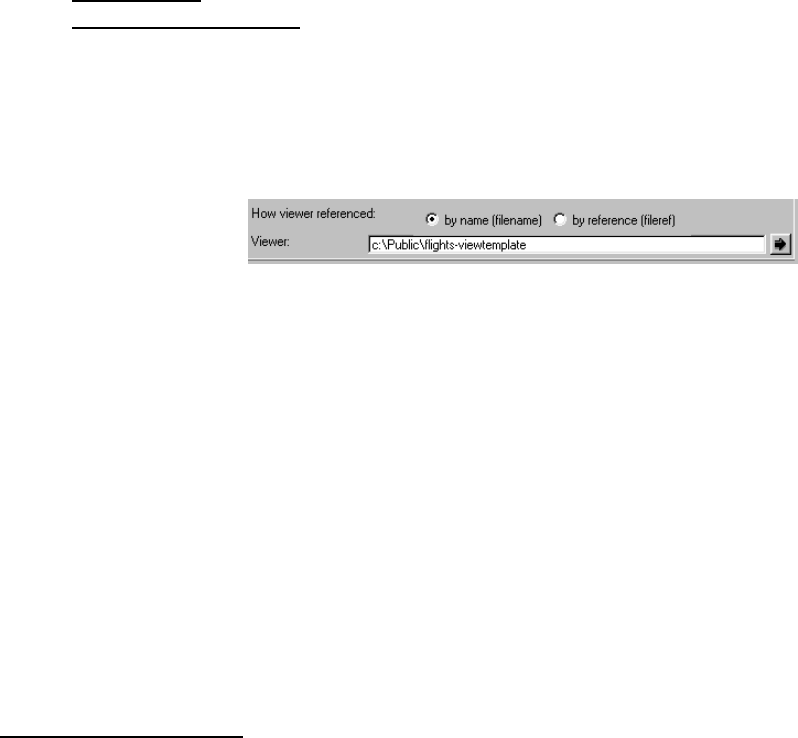
How to Apply a Viewer
After you create a viewer template for a package, the publisher can apply it when publishing the package to e−mail
using the following methods:
SAS Publisher• Publish Package Interface•
Using SAS Publisher to Apply a Viewer
For the e−mail, channel subscriber, and WebDAV transports only, you can specify a viewer in the appropriate
transport type tab. Here is an example of completed viewer properties:
Viewer Field in the How Viewer Referenced Group Box
You specify the location of the viewer in the form of either a physical filename (for example,
c:\Public\viewtemplate.html or c:\Public\viewtemplate.txt) or a SAS fileref (for example, template).
Specify a file name extension that is appropriate to the type of template that is to be used:
.HTML• .TXT•
Arrow buttons are provided to the right of the Viewer field, allowing you to browse directories or to select from
previously defined locations.
Regardless of the selection for viewer reference, leaving the Viewer field blank causes optional viewer properties to
be ignored.
For more information about how to complete viewer options in the Where to Publish SAS Publisher tab, see
Specifying Package Format.
Using the Publish Package Interface to Apply a Viewer
For the e−mail, channel subscriber, and WebDAV delivery types only, you specify a viewer as a property to the
PACKAGE_PUBLISH SAS CALL routine.
You specify the VIEWER_NAME property and assign to it a viewer in the form of either an external filename or a
SAS fileref.
For example, the following code shows the application of an HTML viewer to a package that is published to e−mail:
publishType = "TO_EMAIL";
properties = "VIEWER_NAME";
viewerFile = "filename:c:\dept\saletemp.html";
emailAddress = "JohnDoe@alphalite.com";
Call package_publish(pid, publishType, rc,
properties, viewerFile, emailAddress);
How to Apply a Viewer 153

The following code shows the application of a text viewer to a package that is published to e−mail:
publishType = "TO_EMAIL";
properties = "TEXT_VIEWER_NAME";
viewerFile = "filename:c:\dept\saletemp.txt";
emailAddress = "JohnDoe@alphalite.com";
Call package_publish(pid, publishType, rc,
properties, viewerFile, emailAddress);
The following code publishes the package (to which an HTML viewer is applied) to all subscribers of the HR channel.
The subject property is specified so that all e−mail subscribers will receive the message with the specified subject.
pubType = "TO_SUBSCRIBERS";
storeInfo =
"LDAP://alpair02.unx.com:8010/o=Alphalite Airways,c=US";
viewerFile = "filename:c:\dept\saletemp.html";
channel = 'HR';
subject = "Weekly HR Updates:";
props = "VIEWER_NAME, SUBJECT, CHANNEL_STORE";
CALL PACKAGE_PUBLISH(packageId, "TO_SUBSCRIBERS", rc,
props, viewerFile, subject, storeInfo, channel);
The following code publishes the package (to which an HTML viewer is applied) to a WebDAV−compliant server.
rc = 0;
pubType = "TO_WEBDAV"
subject = "Nightly Maintenance Report"
properties= "VIEWER_NAME, COLLECTION_URL"
viewerFile = "filename:c:\dept\saletemp.html"
cUrl = "http://www.alpair.web/NightlyMaintReport"
CALL PACKAGE_PUBLISH(packageId, pubType,
rc, properties, viewerFile, cUrl);
For complete details about how to programmatically specify a viewer when you publish to the e−mail and the channel
subscriber types, see PACKAGE_PUBLISH CALL routine syntax.
Publishing Framework
SAS® Integration Technologies: Developer's Guide
How to Apply a Viewer 154

<SASINSERT> Tag
Marks a section of the viewer file for viewer processing.
Syntax
<SASINSERT>
</SASINSERT>
Details
All viewer processing occurs within the opening <SASINSERT> tag and the closing </SASINSERT> tag. SAS tags
and substitution statements are recognized only when they appear within the <SASINSERT> and </SASINSERT>
tags.
The data that is inserted into the rendered view comes from a specified package entry. The data that is extracted from
the entry can be any of the following:
value of a SAS variable• description of the entry or package• entire entry, which is to be streamed into the HTML file• reference to the entry• package or nested package abstract.•
Example
See the Using the SASINSERT and SASTABLE Tags example.
Publishing Framework
<SASINSERT> Tag 155

Substitution Syntax
A substitution statement within the <SASINSERT> opening tag and the </SASINSERT> closing tag inserts data from
the specified package entry into a viewer file for delivery as HTML or text output.
Syntax
To specify a substitution, use the following syntax within the <SASINSERT> tag:
$(nested=z entry=x attribute=value)
The attributes of the SASINSERT substitution are defined as follows:
$( ) indicates the start of substitution mode using the dollar sign ($) followed by the open parenthesis. The close
parenthesis indicates the end of substitution mode.
nested=z
identifies the nested package within the main package that is to be involved in the substitution. If the
NESTED attribute is not specified, only the entries in the main package are involved in the substitution. For
information about the syntax of the z value, see Specifying Values for the NESTED and ENTRY Attributes.
entry=xidentifies the entry within the specified package that is to be targeted for the substitution. For information
about the syntax of the x value, see Specifying Values for the NESTED and ENTRY Attributes.
name=someName
identifies a name of a name/value pair. The value of this name/value pair will be substituted. The name= and
attribute= keywords cannot be specified on the same substitution string.
If entry= is specified along with name=, the entry's name/value specification will be used to make the
substitution. For example, the following substitution takes the first entry in the package and determines the
value of the name "title". This value is inserted into the HTML or text output:
$(entry=1 name="title")
This example evaluates the name/value that is specified at the main package level. The value for the name
"title" is substituted:
($name="title")
attribute=value
identifies the attributes of the specified entry that are to be inserted into the HTML or text output. The value
that is associated with this attribute can be any of the following:
description
inserts the description of the specified entry. For example, the following substitution inserts the
description of the specified entry into the HTML or text output:
$(entry=1 attribute=description)
stream streams the specified entry into the HTML or text output. The streamed entry must be one of the
following entry types:
Substitution Syntax 156

reference string (added to the package with the INSERT_REFERENCE CALL routine)• text file (added with INSERT_FILE routine)• binary file (added with INSERT_FILE routine)• HTML file (added with INSERT_HTML routine).•
For example:
$(entry=1 attribute=stream)
reference
inserts a reference by substituting the entry's file name into the rendered view. For example, the
following substitution inserts the file name of the first entry:
$(entry=1 attribute=reference)
abstractInsert the package abstract at this location. If the NESTED attribute is not specified, the abstract of
the main package is inserted in the HTML or text output. If the NESTED attribute is specified, the
abstract of the nested package is inserted in the HTML or text output. The ENTRY attribute is not
valid when the abstract attribute is specified. For example, the following substitution inserts the main
package abstract into the HTML or text output:
$(attribute=abstract)
Variable substitution is another type of substitution. It must be specified within the <SASTABLE> tag.
Details
Specifying Values for the NESTED and ENTRY Attributes
The NESTED and ENTRY attributes are used in substitution syntax within the <SASINSERT> tag and as attributes
on the <SASTABLE> tag. The examples that appear in this section apply to substitution syntax within the
<SASINSERT> tag, but all of the syntax rules also apply to the use of the NESTED and ENTRY attributes in the
<SASTABLE> tag.
You can specify the values of the NESTED and ENTRY attributes in two formsor name/value.
Identifying an Entry by its Order in the Package
You use the entry's numerical order in the package to identify which entry is to be involved in a substitution operation.
An example of package entry order follows:
SAS data set1. binary file2. reference string3. HTML file.4.
The SAS data set is the first entry, the binary file is the second entry, and so on.
For the NESTED attribute, a numeric value identifies the package that is involved in the substitution based on order of
nesting into the package. For example, nested=3 specifies the third package that is nested in the main package. To
accommodate packages with multiple levels of nesting, a period (.) differentiates levels of nesting. For example,
nested=2.5 specifies the fifth package that is nested in the second package that is nested in the main package.
SAS® Integration Technologies: Developer's Guide
Substitution Syntax 157

For the ENTRY attribute, a numeric value identifies the entry that is to be used in the substitution that is based on the
order of insertion into the package. For example, $(entry=2) specifies the second entry in the package.
If the NESTED attribute is not specified, the specified entry in the main package is used for the substitution.
Identifying an Entry by Filtering the Package
Name/value pairs are used in the NESTED and ENTRY attributes to specify filters that determine which nested
packages and entries are to be involved in a substitution operation. You must quote the name/value and contain it
within parentheses. For example,
$(nested="(type=report)" entry="(a=b)")
When the name/value pair is specified outside the <SASREPEAT> tags, only the first entry that matches the filter is
substituted. When the name/value pair is used inside the <SASREPEAT> tags, all entries that match the filter are
substituted into the HTML or text output.
To limit the search for an entry to the main package only, omit the NESTED attribute. For example,
$(entry="(type=report)") specifies that the entry that is to be involved in the substitution operation is the
first entry in the main package that has a name/value pair of type=report.
Entries in the main package are always candidates for name/value substitution, even when the NESTED attribute is
specified. In the following example, the entry that is involved in the substitution is either the first entry in the main
package that matches the a=b name/value pair or it is the first entry that matches a=b in the first nested package with
the type=report name/value pair.
$(nested="(type=report)" entry="(a=b)")
To substitute all entries that match the name/value pairs, enclose the substitution within the <SASREPEAT> tag. If
the preceding example were enclosed in <SASREPEAT> tags, the entries that are involved in the substitution would
be all those in the main package and the nested packages that match the a=b name/value pair.
The name/value syntax also supports the asterisk (*) wildcard on the NESTED attribute. The asterisk indicates "all
levels below." For example, to substitute "all entries in all nested packages beneath this level," use a period (.) and an
asterisk (*) in the NESTED attribute, as follows:
$(nested="(type=report).*" entry="(a=b)")
The preceding example identifies for the substitution all entries that match the a=b name/value pair in the following
packages:
the main package• the first nested package that contains a match of the type=report name/value pair, regardless of the nesting
level of that package
•
any package, regardless of name/value pair, that is nested beneath the first nested package.•
To substitute all matching entries in the main package and in all nested packages, use an asterisk in the NESTED
attribute, as shown in the following example:
$(nested="*" entry="(a=b)")
SAS® Integration Technologies: Developer's Guide
Substitution Syntax 158
The preceding example substitutes all entries in the main package and in all nested packages at any level that match
the name/value pair a=b.
Examples
$(entry=1 attribute=description)
Indicates that the description for package entry 1 is to be substituted at this location.
$(nested=1 entry=4 attribute=stream)
indicates that the fourth entry within the first nested package should be streamed at this location. The entry
must be either a reference, a text file, a binary file, or an HTML file.
$(nested=1.2 entry=2 attribute=stream)
identifies for streaming the second entry in the second package that is nested in the first package that is nested
in the main package.
$(nested="*" entry="(type=report)" attribute=description)
indicates that the description of the first entry within the main package or any nested packages, that matches
the type=report name/value pair is to be substituted into the HTML or text output.
If the substitution is contained within <SASREPEAT> tags, all entries in the main and nested packages that
match the type=report name/value pair would be substituted into the HTML or text output.
$(nested="(type=report)" attribute=abstract)
indicates that the abstract from the nested package within the main package that matches the type=report
name/value pair is to be substituted into the HTML or text output. If this substitution were specified within
<SASREPEAT> tags, the abstracts of all matching nested package entries in the main package would be
inserted into the HTML or text output.
$(name=title entry=1)
indicates that the first entry in the package will be used for the substitution. Because name= is specified, a
name/value substitution will occur. Name= identifies the name of a name/value pair; therefore, in this case, it
indicates a name of title. If the first entry's name/value specification contains a name of title, its value will be
substituted.
$(name=Definition entry="(type?report)")
indicates that the substitution will occur for the first entry within the main package that possesses the
type=report name/value pair. The name= syntax indicates that a name/value substitution will occur. If the
entry that matches the type?report filter has a name/value pair with the name of Definition, its value will be
substituted. Note that if this substitution is contained in a <SASREPEAT> tag, the name/value substitution
will occur for all entries in the main package that match the type?report filter.
$(name=title)
indicates that because entry= is not used in this substitution string, the name/value for the main package will
be used for the substitution. Name= identifies the name of a name/value pair, so in this case it indicates a
name of title. If the package's name/value specification contains a name of title, its value will be substituted.
Publishing Framework
SAS® Integration Technologies: Developer's Guide
Substitution Syntax 159

<SASTABLE> Tag
Populates HTML or text tables and lists.
Syntax
<SASTABLE nested=z entry=x
attribute=value>
/* insert HTML tags or static text as needed here */
$(variable=variableName)
/* insert HTML tags or static text as needed here */
</SASTABLE>
The attributes of the <SASTABLE> tag are defined as follows:
nested=z
identifies an optional nested package within the main package that is to be used to build the table or list. If the
NESTED attribute is not specified, only the main package is used to build the table or list. The numerical and
name/value syntax options available for the z value are defined in Specifying Values for the NESTED and
ENTRY Attributes.
entry=xidentifies the entry within the specified package that is to be used to build the table or list. The numerical and
name/value syntax options available for the x value are defined in Specifying Values for the NESTED and
ENTRY Attributes.
first=a specifies an optional numeric that designates the first row that is to be inserted into the table or list. The
default value is 1.
last=b specifies the last row of optional numeric data that is to be inserted into the table or list. The default is the last
row in the specified entry.
Note: The LAST attribute and the N attribute are mutually exclusive. If both are specified, the last one is
used.
n=c specifies the total number of optional rows that are to be inserted into the table or list, beginning with the first
row in the entry. The default is all rows in the entry.
Note: The N attribute and the LAST attribute are mutually exclusive. If both are specified, the last one is
used.
Details
Within the <SASINSERT> tags, the <SASTABLE> tag supports the development of HTML lists and tables. The
<SASTABLE> tag populates tables and lists by repetitively inserting HTML tags or static text and specified data into
HTML or text output. The insertion repeats for each row of data that has been specified for insertion. The location of
the data and the rows of data to be inserted are determined by the attributes of the <SASTABLE> tag.
<SASTABLE> Tag 160
Variable Substitution
Variable substitution is valid within the <SASTABLE> open tag and the </SASTABLE> closing tag. The variable
substitution syntax is
$(VARIABLE=variableName)
The variable substitution syntax specifies that the value of the VARIABLE attribute in the data set is to be substituted
into the tables and lists in either HTML or plain text format. This attribute is valid only within the <SASTABLE> tag.
The entry that is named in the <SASTABLE> tag must be a valid SAS data set. Any number of variable substitutions
can be specified within the <SASTABLE> tag as long as each one references a valid variable in the SAS data set.
Examples
The following example uses the <SASINSERT> and <SASTABLE> tags to build a list. The SAS data set that is used
is the second entry that is added to the main package. The value of the fileName variable is substituted on each
repetition.
<p>
<SASINSERT>
<ul>
<SASTABLE ENTRY=2>
<li>$(VARIABLE=fileName)</li>
</SASTABLE>
</ul>
</SASINSERT>
The following example uses the <SASINSERT> and <SASTABLE> tags to build a table. The SAS data set entry is
the first entry in the main package. The value of the variables fname, lname, state, and homepage are used to create
the table. The newly created table will contain one row for each row in the main package.
<SASINSERT>
<h1>Table Example using SASTABLE</h1>
<table border cellspacing=0 cellpadding=5
rules=groups>
<thead>
<tr><th>First Name</th>
<th>Last Name</th>
<th>State </th>
<th>HomePage</th></tr>
<tbody>
<SASTABLE ENTRY=1>
<tr> <td> $(VARIABLE=fname)</td>
<td> $(VARIABLE=lname)</td>
<td> $(VARIABLE=state)</td>
<td> <a href=$(VARIABLE=homepage)>
$(VARIABLE=homepage)</a></td></tr>
</SASTABLE>
</table>
</SASINSERT>
Publishing Framework
SAS® Integration Technologies: Developer's Guide
<SASTABLE> Tag 161

<SASREPEAT> Tag
Repeats a substitution for all entries that match given criteria.
Syntax
<SASREPEAT>
</SASREPEAT>
Details
The <SASREPEAT> tag causes a substitution that is enclosed within the tag to repeat for all entries that match the
specified name/value pair, as described in Specifying Name/Value Pairs. Without the <SASREPEAT> tag, the
substitution stops after matching the first entry.
Any HTML tags or static text that are included in the <SASREPEAT> tag are inserted into the output along with the
substitution data, and those tags are repeatedly inserted each time a new entry matches the name/value pair.
The <SASREPEAT> tag is recognized only within the <SASINSERT> tag and is relevant only when it is used with
name/value pair substitutions.
Examples
The following example uses the <SASREPEAT> tag to build a list of reports. The substitutions and the HTML tag
within the <SASREPEAT> tag are repeated for each entry that matches the type=report name/value pair.
<SASINSERT>
Available reports include the following:
<ul>
<SASREPEAT>
<li> $(entry="(type=report)"
attribute=description)</li>
</SASREPEAT>
</ul>
</SASINSERT>
An example of the rendered view follows:
Available reports include the following:
President's State of the Union address• AlphaliteAirways Annual Report• Sales Quotas for Midwest Territory•
The next example uses the <SASREPEAT> tag to build a table. The substitutions and the HTML tags within the
<SASREPEAT> tag are repeated for each entry in the main package that matches the type=report name/value pair.
<table border="1" cellspacing="0" cellpadding="3">
<SASREPEAT> Tag 162

<SASINSERT>
<SASREPEAT>
<tr><td>$(entry="(type=report)"
attribute=description)</td></tr>
</SASREPEAT>
</SASINSERT>
</table>
An example of the rendered view follows:
President's State of the Union Address AlphaliteAirways Annual Report Sales Quotas for Midwest Territory
Publishing Framework
SAS® Integration Technologies: Developer's Guide
<SASREPEAT> Tag 163
<SASECHO> Tag
Stores a text string to send to the SAS Log.
Syntax
<SASECHO text="text">
The <SASECHO> open tag has no corresponding closing tag.
Details
The <SASECHO> tag aids in the diagnosis of viewer parsing and processing problems by printing a message to the
SAS LOG window as the viewer file is processed.
The <SASECHO> tag is recognized only within the <SASINSERT> tags. If the text value contains embedded
punctuation and spaces, surround the text with quotation marks.
Example
<SASECHO text="Correctly executed first segment.">
Publishing Framework
<SASECHO> Tag 164

Using the <SASINSERT> and <SASTABLE> Tags:
Examples
The following example uses the <SASINSERT> and <SASTABLE> tags to build a list. The SAS data set that is used
is the second entry that is added to the main package. The value of the fileName variable is substituted on each
repetition.
<p>
<SASINSERT>
<ul>
<SASTABLE ENTRY=2>
<li>$(VARIABLE=fileName)</li>
</SASTABLE>
</ul>
</SASINSERT>
The following example uses the <SASINSERT> and <SASTABLE> tags to build a table. The SAS data set entry is
the first entry in the main package. The value of the variables fname, lname, state, and homepage are used to
create the table. The newly created table will contain one row for each row in the main package.
<SASINSERT>
<h1>Table Example using SASTABLE</h1>
<table border cellspacing=0 cellpadding=5
rules=groups>
<thead>
<tr><th>First Name</th>
<th>Last Name</th>
<th>State </th>
<th>HomePage</th></tr>
<tbody>
<SASTABLE ENTRY=1>
<tr> <td> $(Variable=fname)</td>
<td> $(Variable=lname)</td>
<td> $(Variable=state)</td>
<td> <a href=$(Variable=homepage)>
$(variable=homepage)</a></td></tr>
</SASTABLE>
<tr><td colspan=4 align=center>
Note: Simple table example.</td></tr>
</table>
</SASTABLE>
Refer to A Sample Viewer Template to see formatted output from <SASINSERT> and <SASTABLE> examples.
Publishing Framework
Using the <SASINSERT> and <SASTABLE> Tags: Examples 165

Sample HTML Viewer
This sample HTML viewer example is a collection of viewer coding sections that are described in Creating a Viewer.
<!−−Section 1: Formatting a Data Set
Variable in an HTML List−−>
<SASINSERT>
<h2>Congratulations!</h2>
$(entry=1 attribute=description)
<p>
<ul>
<SASTABLE ENTRY=2>
<li>$(VARIABLE=fname)
</SASTABLE>
</ul>
<!−−Section 2: Formatting a SAS Data Set
in a Table−−>
<h2>Record Sales from these Salespeople</h2>
$(entry=1 attribute=description)
<table border cellspacing=0 cellpadding=5
rules=groups>
<thead>
<tr>
<th>First Name</th>
<th>Last Name</th>
<th>Territory</th>
</tr>
</thead>
<tbody>
<SASTABLE ENTRY=1>
<tr>
<td> $(VARIABLE=fname)</td>
<td> $(VARIABLE=lname)</td>
<td> $(VARIABLE=territory)</td>
</tr>
</tbody>
</SASTABLE>
</table>
<!−−Section 3: Inserting a Text File
and a Reference−−>
<h2>Letter of Congratulations</h2>
Below is a copy of the letter that was sent
to each recipient of the top sales award.
$(entry=2 attribute=stream)
<p>
See <a href="$(entry=3 attribute=stream)">$(entry=3
attribute=stream)</a> for detailed sales figures.
<!−−Section 4: Filtering an Entry−−>
<h2>Message from the President</h2>
<SASREPEAT>
$(entry="(type=report)" attribute=stream)
</SASREPEAT>
</SASINSERT>
Sample HTML Viewer 166

Rendered View in E−mail
The rendered view appears in e−mail as follows:
Congratulations!
AlphaliteAirways Sales Force Briefing
John• Gary• Arthur• Jean• Tony• Dakota•
Record Sales from these Salespeople
AlphaliteAirways Sales Force Briefing
First Name Last Name Territory
John Smith NE
Gary DeStephano SE
Arthur Allen MW
Jean Forest NW
Tony Votta SW
Dakota Smith HA
Letter of Congratulations
Below is a copy of the letter that was sent to each recipient of the top sales award.
December 30, 2000
International Sales
AlphaliteAirways Headquarters
Dear AlphaliteAirways Salesperson,
Congratulations on your much deserved recognition as
outstanding salesperson for AlphaliteAirways for 2000.
To express our gratitude for your excellent contribution,
we wish to present you with 25 stock options in
AlphaliteAirways.
Wishing you continued success in your career with
AlphaliteAirways.
Rendered View in E−mail 167

Sincerely,
Alvin O. Taft, Jr.
Director−in−Chief
See http://www.AlphaliteAirways.com/headquarters/sales
for detailed sales figures.
Message from the President
AlphaliteAirways delivers service. AlphaliteAirways is the
recognized industry leader according to its safety
record, volume of passengers served, and routes serviced.
How are we able to live up to such high expectations
consistently? First and foremost, we do it through the
abilities of our top salespeople. We owe a huge debt to
these hard−working individuals who actively pursue
revenue for this company.
Publishing Framework
SAS® Integration Technologies: Developer's Guide
Rendered View in E−mail 168
SAS Program with an HTML Viewer
The following SAS program example includes two parts:
SAS code that creates two SAS data sets• Package publishing CALL routines that create a package, insert package entries, and publish the package to
e−mail with the aid of a viewer file.
•
The PACKAGE_PUBLISH CALL routine applies a viewer that is named realview.html to the package that is
rendered in e−mail.
See the viewer properties and attributes that are set in bold in the code below.
data empInfo;
length homePage $256;
input fname $ lname $ ages state $ siblings homePage $;
datalines;
John Smith 32 NY 4 http://alphaliteairways.com/~jsmith
Gary DeStephano 20 NY 2 http://alphaliteairways.com/~gdest
Arthur Allen 40 CA 2 http://alphaliteairways.com/~aallen
Jean Forest 3 CA 1 http://alphaliteairways.com/~jforest
Tony Votta 30 NC 2 http://www.pizza.com/~tova
Dakota Smith 3 NC 1 http://~alphaliteairways.com/~dakota
;
run;
quit;
data fileInfo;
length fileName $256;
input fileName $;
datalines;
Sales
Marketing
R&D
;
run;
quit;
data _null_;
rc=0; pid = 0;
call package_begin(pid,"Daily Orders Report.",'', rc);
if (rc eq 0) then put 'Package begin successful.';
else do;
msg = sysmsg();
put msg;
end;
call insert_ref(pid, "HTML",
"http://www.alphaliteairways.com",
"Check out the Alphalite Airways Web site
for more information." , "", rc);
if (rc eq 0) then put 'Insert Reference successful.';
else do;
msg = sysmsg();
put msg;
end;
SAS Program with an HTML Viewer 169

call insert_dataset(pid, "work", "empInfo",
"Data Set empInfo" , "", rc);
if (rc eq 0) then put 'Insert Data Set successful.';
else do;
msg = sysmsg();
put msg;
end;
call insert_dataset(pid, "work", "fileInfo",
"Data Set fileInfo" , "", rc);
if (rc eq 0) then put 'Insert Data Set successful.';
else do;
msg = sysmsg();
put msg;
end;
viewerName='filename:realview.html';
prop='VIEWER_NAME';
address="John.Smith@alphaliteairways.com";
call package_publish(pid, "TO_EMAIL", rc,
prop, viewerName, address);
if rc ne 0 then do;
msg = sysmsg();
put msg;
end;
else
put 'Publish successful';
call package_end(pid,rc);
if rc ne 0 then do;
msg = sysmsg();
put msg;
end;
else
put 'Package termination successful';
run;
To look at the content of the viewer template, see Sample Viewer Template.
To look at a rendered view of the package that is delivered to e−mail, see Simulated Rendered View of the Package in
E−mail.
Publishing Framework
SAS® Integration Technologies: Developer's Guide
SAS Program with an HTML Viewer 170
Sample Viewer Template
A SAS program creates a package and applies a viewer template that is named realview.html. During package
publishing, viewer tag processing renders a view of the package for delivery via e−mail.
<html>
<HEAD>
<META HTTP−EQUIV="Content−Type CONTENT="text/html;
charset=ISO−8859−1">
<TITLE>Daily Purchase Summary</TITLE>
</HEAD>
<BODY>
<p>
<SASINSERT>
<h1>Table Example using SASTABLE</h1>
<table border cellspacing=0 cellpadding=5
rules=groups>
<thead>
<tr><th>First Name</th>
<th>Last Name</th>
<th>State </th>
<th>HomePage</th></tr>
</thead>
<tbody>
<SASTABLE ENTRY=2>
<tr><td> $(VARIABLE=fname)</td>
<td> $(VARIABLE=lname)</td>
<td> $(VARIABLE=state)</td>
<td> <a href="$(VARIABLE=homepage)">
$(VARIABLE=homepage)</a> </td>
</tr>
</tbody>
</SASTABLE>
</table>
<p>
<h1>List Example using SASTABLE</h1>
<ul>
<SASTABLE ENTRY=3>
<li>$(VARIABLE=org)</li>
</SASTABLE>
</ul>
<P>
<h2>Example using Stream</h2>
<SASINSERT>
<a href="$(ENTRY=1 ATTRIBUTE=STREAM)">$(ENTRY=1
ATTRIBUTE=STREAM)</a>
</SASINSERT>
<p>
</BODY>
</html>
Simulated Rendered View of the Package in E−mail
The following rendered view simulates the information that is displayed by the preceding viewer template.
Sample Viewer Template 171

SAS® Integration Technologies: Developer's Guide
Sample Viewer Template 172

Daily Purchase Summary
Table Example using SASTABLE
First Name Last Name State HomePage
John Smith NY http://alphaliteairways.com/~jsmith
Gary DeStephano NY http://alphaliteairways.com/~gdest
Arthur Allen CA http://alphaliteairways.com/~aallen
Jean Forest CA http://alphaliteairways.com/~jforest
Tony Votta NC http://pizza.com/~tova
Dakota Smith NC http://alphaliteairways.com/~dakota
List Example using SASTABLE
Sales• Marketing• R&D•
Example using Stream
http://alphaliteairways.com
Publishing Framework
Daily Purchase Summary 173
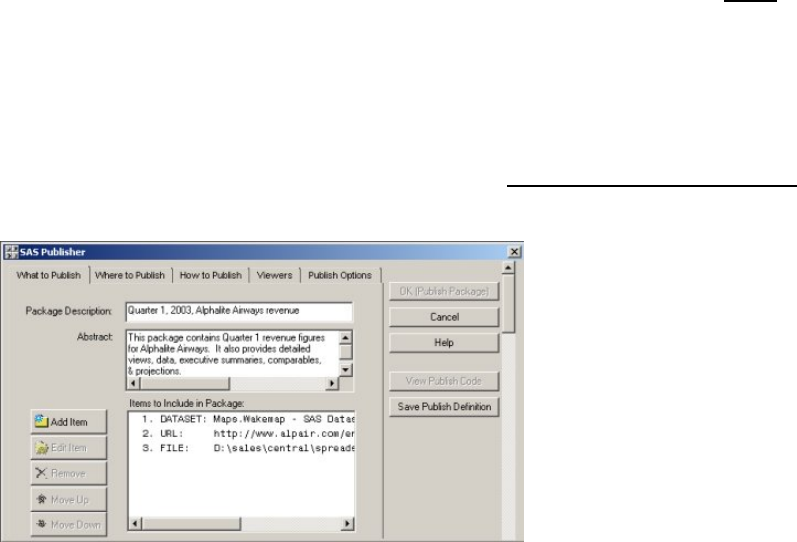
SAS Publisher
SAS Publisher provides an intuitive, easy−to−use graphical interface for you to point and click your way through the
package−publishing process. SAS Publisher serves as the interface to the Publish Package CALL routines that drive
the SAS Integration Technology publish−and−subscribe solution.
SAS Publisher lets the publisher select existing digital content within the business enterprise for inclusion in a single
package for immediate delivery to the people who need it most. Digital content can include both SAS and other
(external) data. In the context of SAS Publisher, package entities are referred to as items.
Package delivery methods span the range from simple to complex: simple e−mail to a list of known recipients,
information channels for end−user and group subscription, message queue or archive for subsequent person or
programmatic access, and collections on WebDAV−compliant servers for subsequent retrieval and reuse.
The ability of SAS Publisher to create and deliver information is the cornerstone of the Publishing Framework.
Underlying the functions of SAS Publisher is a rich set of Publish Package CALL routines, which you can also use
directly to develop programmatic solutions for package publishing.
Publishing Framework
SAS Publisher 174
Package Items
Package content takes the following forms:
SAS fileSAS catalog♦ SAS data set♦ SAS database–such as FDB and MDDB♦ SAS SQL view♦
•
Binary file–such as Excel, GIF, JPG, PDF, PowerPoint, and Word• HTML file, including ODS output• Reference string–such as a URL or HTML• Text file–such as a SAS program• Viewer file–such an HTML or text template that formats SAS file items for viewing in e−mail.•
Publishing Framework
Package Items 175
SAS Publisher Requirements
To run SAS Publisher, you need SAS Release 8 or higher. A license for Base SAS software and the production
version of SAS Integration Technologies is required.
Note: SAS Publisher is not supported in the z/OS operating environment.
Publishing Framework
SAS Publisher Requirements 176

How SAS Publisher Works
You use the SAS Publisher point−and−click interface to:
create a package of items1. deliver the package to one or more specified recipients (persons), or to a destination (for persons or
applications to access directly).
2.
Package creation and delivery is known collectively as publishing.
SAS Publisher functions are organized into the following tabs:
What to Publish
defines the package contents
Where to Publish
identifies either the recipients of or the destination for the package delivery
How to Publish
specifies optional package properties, such as archiving, expiration time and date, and options that are specific
to the specified delivery type.
Viewers
specifies a particular viewer template file (target viewer or applied viewer) and the reference type of the
viewer.
Publish Options
specifies additional options or properties based on the destination type.
Once you specify the required information on all tabs, the buttons along the right side of the What to Publish tab
become available for use. You can either publish the package immediately, or you can delay publishing and save the
underlying metadata that is generated during your SAS Publisher session so that you can continue editing it.
OK (Publish Package)
publishes the package and saves the metadata that defines the package. If you use SAS Publisher from
SAS/Warehouse Administrator, the OK (Save Metadata) button replaces the OK (Publish Package) button.
View Publish Code
displays the SAS code that SAS Publisher uses to create the metadata for publishing the package. You can
then save the code for later reuse–for example, publishing in a batch job.
Save Package Definition
saves the metadata that defines the package. You can then reuse that metadata by specifying the PUBMETA
parameter when starting SAS Publisher. See Starting SAS Publisher for details. All items that you want to
include in the package must already exist and be accessible when you publish it.
Publishing Framework
How SAS Publisher Works 177
Publishing Destination Types
A publishing destination type is the transport that the publisher selects for the delivery of a package to the intended
audience. You can choose from the following destinations:
E−Mailspecifies a common method for delivering a package to recipients whose identities are known to the publisher.
Message Queue
specifies a place in application messaging where one program (such as SAS Publisher) can send messages that
another program (such as SAS Package Retriever or a customized retrieval program) can retrieve. The two
programs communicate asynchronously without any knowledge of where the other program is located or even
whether the other program is running.
SAS Channel Subscribers
specifies a topic or identifier that acts as a conduit for related information. The channel carries the information
from the publisher who creates it to the subscribers who want it.
The Publishing Framework administrator creates a channel for each distinct topic or audience. For example,
users of a particular application might want a channel for discussion and data exchange, while the
programmers of that application might want another channel to discuss technical problems and future
enhancements. To be able to use them, the publisher must be aware of the channels that were defined in the
Publishing Framework.
Archivespecifies a package that is compressed and saved to a directory file. You can also catalog the archive in an
LDAP directory.
The archive contains the contents of a package and metadata that is necessary for extracting the contents. SAS
Publisher compressed an archive using ZIP compression and saves it with an SPK extension. SAS Publisher
then saves it to the location that you specified, which it remains available to users until its expiration date.
WebDAV (Web Distributed Authoring and Versioning−compliant server)
specifies an emerging industry standard that is based on extensions to HTTP 1.1. It lets package publishers,
programmers, and package retrievers collaborate on the development of files and collections of files on
remote Web servers. It also lets publishers publish packages to a Web−compliant server.
Publishing Framework
Publishing Destination Types 178

Starting SAS Publisher
SAS Publisher runs in UNIX and Windows operating environments.
You can start SAS Publisher from a SAS session or from within SAS/Warehouse Administrator.
Starting SAS Publisher from a SAS Session
To start SAS Publisher from a SAS session, enter the following in a SAS command line:
publishpackage <pubmeta=SAS−data−set>;
If you previously saved session metadata to a specific SAS data set, you can use the pubmeta= option to recall it in a
subsequent SAS Publisher session so that you can continue editing it.
As a shortcut, you can also enter the following in the command line:
publish
The following is an example of how to use the publishpackage command with the pubmeta= option:
publishpackage pubmeta=sasuser.code
where sasuser is the libname and code is the member name.
If the libname or the member name does not exist–for example, because of a typographical error–SAS Publisher
presents a message, such as:
Member CODE does not exist. Using SASUSER.ZPUBLISH instead.
To recover, verify the libname and member name that you specified. You can restart SAS Publisher, recalling the
correct libname and member name, or you can accept the metadata that has been saved to SASUSER.ZPUBLISH. All
metadata that is generated in a SAS Publisher session that you publish is automatically saved to
SASUSER.ZPUBLISH.
In addition, metadata from a subsequent SAS Publisher session overwrites the metadata that was generated in the
preceding publishing session.
Starting SAS Publisher from SAS/Warehouse Administrator
To start SAS Publisher as a SAS/Warehouse Administrator add−in, you must first install SAS Publisher as an add−in.
For details, see Using SAS Publisher with SAS/Warehouse Administrator.
After you have installed SAS Publisher as an add−in, select an item in a data warehouse and select Tools Add−ins
Define Package to Publish.
Publishing Framework
Starting SAS Publisher 179

Publishing a Package
You use the SAS Publisher point−and−click interface to:
create a package of items1. deliver the package to one or more specified recipients (persons) or to a destination (for persons or
applications to access directly).
2.
Package creation and delivery is known collectively as publishing.
To publish a package, you must provide the appropriate information using the SAS Publisher tabs and then run the
publish request. Here are the basic steps:
Define the package content in the What to Publish tab.1. Identify either the recipients of or the destination for the package delivery in the Where to Publish tab.2. In the How to Publish tab, specify whether to package the items in compressed (or SPK, short for SAS
Package) format, specify additional package options, and set an expiration date for the package. The fields in
the Options for Publishing panel vary based on the destination type you select on the Where to Publish tab.
3.
In the Viewers tab, specify the reference type of the viewer and whether it is a process viewer. Then select or
enter a viewer template file in the Viewer, Target Viewer, or Applied Viewer fields. Specify a MIME type if
you selected a target viewer.
For more information about viewers, see the section on Viewer Processing.
4.
In the Publish Options tab, specify additional options or properties, which are based on the destination type.5. Run an appropriate publish request by selecting a processing button on the What to Publish tab.6.
Publishing Framework
Publishing a Package 180
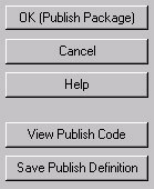
Publishing a Package, and Saving and Viewing Publish
Code
After you specify the required information on all tabs, the buttons along the right side of the What to Publish tab
become available for use.
You can either publish the package immediately, or you can delay publishing and save the underlying metadata that is
generated during your SAS Publisher session for continued editing.
Select a publishing option by clicking the appropriate button.
OK (Publish Package)
publishes the package immediately. If the package is published successfully, SAS Publisher saves the
metadata that describes the package to the SASUSER.ZPUBLISH data set by default. In addition, the saved
metadata repopulates the Items to Include in Package window of the What to Publish tab the next time you
start SAS Publisher. All items that you include in the package must be accessible when you define and
actually publish the package.
This button is available only after you specify all information that is required to publish a package.
View Publish Code
displays the underlying code, in the Generated Code to Publish the Specified Package window, that SAS
Publisher generates automatically when you publish the package. After the code displays, you can save and
run it later–for example, to publish information in a batch job. You can run this code in a SAS session by
cutting and pasting it into the SAS Program Editor window and submitting it.
Save Publish Definition
displays a Save As window that lets you navigate a directory structure so that you can save the package
definition to a file at a specified location. The saved file contains the metadata that is used to generate the
publish code in a SAS data set. You can republish the package by starting SAS Publisher with the
PUBMETA=libref.member parameter, which automatically populates the package information into the SAS
Publisher fields. Because the metadata for each package is saved in a separate data set, you can republish the
same package multiple times. You can also save variations of the same package to separate data sets for
subsequent publishing.
You can save the package definition at any time, even if you have not yet supplied all information that is
required to publish a package.
OK (Save Metadata)
saves the package metadata and exits the window.
This button appears only if you use SAS Publisher from SAS/Warehouse Administrator.
Execute Publish Code
publishes the package.
Publishing a Package, and Saving and Viewing Publish Code 181
This button appears only if you use SAS Publisher from SAS/Warehouse Administrator.
Publishing Framework
SAS® Integration Technologies: Developer's Guide
Publishing a Package, and Saving and Viewing Publish Code 182

Defining Package Content (What to Publish)
You can use the What to Publish tab to specify the items to include in the package.
Activate the What to Publish tab in the SAS Publisher window by selecting the tab title.
When you start SAS Publisher for the first time, the fields in the What to Publish tab are empty. Otherwise,
these fields already contain data from previous SAS Publish sessions. If you specified package metadata when
you started SAS Publisher, the content of that package automatically displays in the fields of this tab. If you
did not specify package metadata, the metadata from the last successful publish displays. By default, SAS
Publisher stores the metadata in SASUSER.ZPUBLISH.
1.
The What to Publish tab includes fields you can use to provide both an optional brief description and an
optional lengthier abstract of the package. It also lists the content of an existing package in the Items to
Include in Package area.
2.
Buttons to the left of the package view area let you add, edit, delete, and reorder package items. To add an
item, click the Add Item button, which opens the Specify Item to Insert window. Use this window to specify
the item and its defining parameters. For details about adding an item, see the section on Adding an Item.
3.
Once you finish specifying items for the package, you must decide on the transport to use for delivering the
package to the intended audience. Select the Where to Publish tab.
4.
Publishing Framework
Defining Package Content (What to Publish) 183
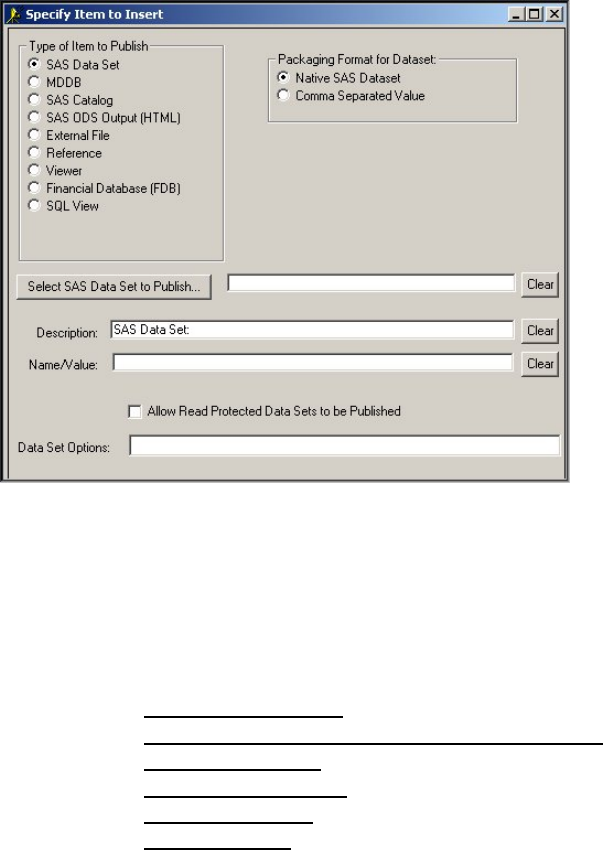
Adding an Item (Specify Item to Insert)
Specify the type of item that you want to add to the package by clicking the appropriate Type of Item to
Publish button. By default, the SAS Data Set item is already selected. Additional fields and buttons might
appear, depending on which item type you select.
For details about specifying options and advanced settings that are specific to the item type, see the following
topics:
Adding a SAS data set♦ Adding a SAS data base, SAS catalog, or SQL view♦ Adding ODS output♦ Adding an external file♦ Adding a reference♦ Adding a viewer.♦
1.
Next to the item type label that appears in the Description field, enter a brief description of the item you
selected. SAS Publisher uses the description as an annotation for the item when it is listed in the Items to
Include in Package field in the What to Publish tab. Though optional, this step is recommended.
Use the Clear button to erase the contents of the field as needed.
2.
In the Item Name/Value (optional) field, enter one or more name/value pairs that describe the content of the
package item.
You should develop conventions for name/value pairs and publicize them throughout your enterprise. When
channel subscribers or developers of package−retrieval programs understand your name/value pair
conventions, they can write filters for incoming package content. For example, some package recipients might
be interested only in result data that can be displayed in tables, graphs, and memos. Others might be package
producers who depend on SAS data inputs for continued processing.
Here is an example of some name/value pairs for a SAS data set package item:
3.
Adding an Item (Specify Item to Insert) 184
type=SAS dataset content=ticketsales priority=low
In this example, the publisher identifies the package item type as a SAS data set. Subscribers who filter out
SAS data sets will not receive this package entry. In addition, a retrieval program that filters only
high−priority package items will not select this package entry for delivery with the package. However, filters
that select content that relates to ticket sales will be delivered.
Once you have finished specifying the item, click OK to return to the What to Publish tab. The added item
displays in the Items to Include in Package window.
You can click the Add Item button to add more items to the package. Or you can select an item from the
window to perform any of the following actions:
edit by clicking Edit Item♦ delete by clicking Remove♦ rearrange by clicking Move Up or Move Down.♦
4.
Publishing Framework
SAS® Integration Technologies: Developer's Guide
Adding an Item (Specify Item to Insert) 185

Adding a SAS Data Set to a Package
If you specify SAS Data Set as the item type in the Specify Item to Insert window, additional fields and an additional
button appear in the Specify Item to Insert window.
Specify the format for the SAS data set by clicking the appropriate Packaging Format for Dataset button:
Native SAS Dataset
maintains SAS data in a proprietary format that is necessary for continued data processing in a SAS
environment.
Comma Separated Value
specifies a delimiter character that SAS Publisher uses to separate data columns, which is useful when
exporting SAS data to an external application, such as a third−party spreadsheet. A comma is the
default delimiter.
If you choose a comma−separated list format, you can accept the default delimiter or enter an alternative
delimiter in the Separator to Use for CSV field. You can also specify whether to exclude variable names,
labels, or both from the file by clicking the appropriate check boxes.
1.
Identify the instance of the item to be included in the package. Click the Select Data Set to Publish button to
display the Select a Member window, which works similarly to an Explorer window and lets you navigate a
directory structure so that you can locate and select the item to be included in the package.
Select a data set and click OK. The Select a Member window closes, and the name of the data set appears
automatically in the Select Data Set to Publish field in the Specify Item to Insert window.
2.
You can also specify a description and a name/value pair. For details, see Adding an Item (Specify Item to
Insert).
3.
In the Data Set Options field, specify options as a text string in the following form:
option1=value option2=value ...
For example:
pw='born2run' keep=empno
Surround string values, such as a password, with single quotation marks.
You can specify a value for data set options that apply to a data set that is opened for input.
The following are examples of options that you can specify in this field.
GENNUM=♦ LABEL=♦ OUTREP=♦ SORTEDBY=♦ TOBSNO=♦ TRANTAB=♦ PW=♦ READ=♦ WRITE=♦ ALTER=♦ FIRSTOBS=♦
4.
Adding a SAS Data Set to a Package 186

OBS=♦ WHERE=♦ IDXNAME=♦ IDXWHERE=♦ DROP=♦ KEEP=♦ RENAME=♦
For a complete list of data set options, refer to the SAS Data Set Options topic in either the SAS Online Help,
Release 9.0, or the SAS Release 9 online documentation.
To include either a read− or password−protected data set in the package, check Allow Read Protected Data
Sets to be Published.
If the data set that you specify is read−protected, you must also assign a password value to the PW= data set
option. This is the same password that the user must supply to access the read−protected data set when
retrieving the package. Publishing fails if you do not select the check box or specify a valid password. If you
do not select the check box, the SAS log contains the following message:
Publish of package failed −
ERROR: Unable to publish read protected data set
5.
From the Specify Item to Insert window, click OK again to return to the What to Publish tab to continue
specifying the package.
6.
Publishing Framework
SAS® Integration Technologies: Developer's Guide
Adding a SAS Data Set to a Package 187

Adding a SAS Database, SAS Catalog, or SQL View to a
Package
If you specify a SAS database type such as FDB or MDDB, a SAS catalog, or an SQL view as the item type in the
Specify Item to Insert window, a standard set of fields appears on the Specify Item to Insert window.
Identify the instance of the item to be included in the package. Click the Select item to Publish button to
display the Select a Member window, which works similarly to an Explorer window, which lets you navigate
a directory structure so that you can locate and select the item to be included in the package.
Select the appropriate item and click OK. Control returns to the Specify Item to Insert window, where the
name of the item appears automatically in the Select item to Publish field.
1.
Optionally, specify a description and a name/value pair. For details, see Adding an Item (Specify Item to
Insert).
2.
From the Specify Item to Insert window, click OK to return to the What to Publish tab to continue specifying
the package.
3.
Publishing Framework
Adding a SAS Database, SAS Catalog, or SQL View to a Package 188

Adding ODS Output to a Package
If you specify SAS ODS Output (HTML) as the item type on the Specify Item to Insert window, some
additional fields appear in the Specify Item to Insert window.
1.
Click the Select ODS Output to Publish button to display the SAS ODS Output to Publish window. The
SAS ODS Output to Publish window enables you to specify the location of ODS files to include in the
package.
2.
The Files Identified By field enables you to specify whether to use the physical filename of the file or a SAS
file reference. Select either the File Name or File Reference radio button to specify your preferred file
referencing method. Subsequent field names reflect your selection.
3.
Specify the HTML files and any additional companion files that are associated with the ODS output in the
Physical Locations of ODS Files panel. For detailed instructions, refer to Specifying the Physical Locations of
ODS Files.
4.
Specify the Web addresses for the ODS files in the ODS File Names panel.5. Once you complete the information in the SAS ODS Output to Publish window, click OK. to return to the
Specify Item to Insert window.
6.
Optionally specify a description and a name/value pair. For details, see Adding an Item (Specify Item to
Insert).
7.
You can optionally specify the encoding property in the Encoding field. Character−set encoding refers to how
a host internally represents character data. Hosts that share common architectures represent character data
identically. For example, UNIX hosts internally represent character data in ASCII−ISO format, z/OS hosts in
EBCDIC format, and Windows hosts in ASCII−ANSI format.
ODS files are published with a character−set encoding that is automatically generated by default or is
user−specified. Under some circumstances–for example, when publishing and retrieving host architectures are
8.
Adding ODS Output to a Package 189

different–you might decide to identify a character−set encoding that is appropriate for the retrieving host. This
information is delivered with the published package. Translation occurs on the retrieving host, not the
publishing host.
For complete details about publish−and−retrieve encoding behavior, see Publish/Retrieve Encoding Behavior.
You can optionally specify a nested directory in the Nested Directory Name field.9. From the Specify Item to Insert window, click OK again to return to the What to Publish tab to continue
specifying the package.
10.
Specifying the Physical Locations of ODS Files
If you use file names, you must specify the root location for the HTML files. This is the directory where the
HTML files are assumed to exist unless you specify otherwise.
You can use the down arrow button if present, to choose previously selected directory locations. You can also
use the right arrow button to explore your directory structure to locate the appropriate file name or fileref.
1.
Specify the file name or fileref for the body, contents, frame, and page files. You can use the down arrow
button if present, to choose previously selected directory locations. You can also use the right arrow button to
explore your directory structure to locate the appropriate file name or fileref.
Body File Name / Reference
specifies the file name or reference of the body file for the ODS output. This file contains the
generated HTML output that is created by the output objects.
If you specify file names, you can use an asterisk as a wildcard character in this field to include
multiple body files. This is useful because ODS names multipage output using a consecutive
numbering system–for example, body.html, body1.html, body2.html. Specifying body*.html lets you
include all generated body files in the package.
Contents File Name / Reference
specifies the file name or reference for the output's contents file. The contents file contains a link to
the body file for each HTML table that ODS creates from procedure or DATA step results.
Frame File Name / Reference
specifies the file name or reference for the output's frame file. The frame file lets you view the body
and contents files, the page file, or all three files.
Page File Name / Reference
specifies the file name or reference for the output's page file. The page file contains a link to the body
file for each page of HTML output that ODS creates from procedure or DATA step results.
2.
Specify the file name or fileref for any companion files. You can use the down arrow button (next to the
Companion File number field) to choose previously selected directory locations. You can also use the right
arrow button to explore your directory structure to locate the appropriate file name or fileref.
A companion file is an HTML file that you can add to a set of HTML files. Typically not an ODS−generated
file, a companion file is an HTML file that is referenced for inclusion in the ODS−generated file. Therefore,
one or more HTML files serve as companions to the ODS−generated file.
3.
To include graphics in the ODS output, specify the path to the graphics directory and the HTML file name of
the graphics file in the Graphics Path and the Graphics URL fields. You can use the down arrow button (next
to the Graphics Path field) to choose previously selected directory locations. You can also use the right arrow
button to explore your directory structure.
4.
SAS® Integration Technologies: Developer's Guide
Adding ODS Output to a Package 190
Specifying ODS File Names
The following fields enable you to specify Web addresses for the ODS files.
Body URL
specifies the HTML file name of the body file. If you specify File Name in the Files Identified By field, you
cannot enter a value in this field; rather, the value is that specified in the Body File Name field.
Contents URL
specifies the HTML file name of the contents file. If you specify File Name in the Files Identified By field,
you cannot enter a value in this field; rather, the value is that specified in the Contents File Name field.
Frame URL
specifies the HTML file name of the frame file. If you specify File Name in the Files Identified By field, you
cannot enter a value in this field; rather, the value is that specified in the Frame File Name field.
Page URL
specifies the HTML file name of the page file. If you specify File Name in the Files Identified By field, you
cannot enter a value in this field; rather, the value is that specified in the Page File Name field.
Companion URL number
specifies the HTML file name of the companion file. If you specify File Name in the Files Identified By field,
you cannot enter a value in this field; rather, the value is that specified in the Companion File number field.
Publishing Framework
SAS® Integration Technologies: Developer's Guide
Adding ODS Output to a Package 191

Adding an External File to a Package
If you specify External File as the item type on the Specify Item to Insert window, some additional fields appear in the
Specify Item to Insert window.
Specify whether the file contains text or binary data by clicking the appropriate button in the External File
Type field.
1.
Specify the type of data that the file contains and the data format of the file by selecting a value for the
Mimetype field. For example, a mime type of image/gif specifies that the file contains an image in GIF
format. A mime type of application/postscript specifies that the file contains application data that should be
treated as a postscript file.
You can customize the drop−down menu of mime types that appears for this field. The default field values are
contained in SASHELP.PUBLISH.MIMETYPES.SLIST. You can add your own mime values to either of the
following locations:
WORK.PUBLISH.MIMETYPES.SLIST♦ SASUSER.PUBLISH.MIMETYPES.SLIST♦
You can write an SCL application to create a MIMETYPES.SLIST in the WORK.PUBLISH or
SASUSER.PUBLISH catalog. For details about writing such an SCL application, refer to the SAS Component
Language: Reference in the SAS online documentation.
2.
Identify the instance of the external file that you want to include in the package. You can specify an external
file in either of the following ways:
Enter the name of the external file directly in the field to the right of the Select External File to
Publish button.
♦
Click the Select External File to Publish button to display the Open window that lets you navigate a
directory structure so that you can locate and select the external file that you want to include in the
package. Select an external file and click OK.
Focus returns to the Specify Item to Insert window, where the external file name appears
automatically in the Select External File to Publish field.
♦
3.
Optionally, specify a description and a name/value pair.
For details, refer to Adding an Item (Specify Item to Insert).
4.
Once you finish specifying external file options, click OK to return to the What to Publish tab.5.
Publishing Framework
Adding an External File to a Package 192

Adding a Reference to a Package
If you specify Reference as the item type on the Specify Item to Insert window, some additional fields appear in the
Specify Item to Insert window.
In the Reference Type panel, indicate whether the reference type is a URL or HTML.1. You can specify the reference in either of two ways:
Enter a prefix and a name directly in the field to the right of the Select Reference to Publish button.
The following prefixes are acceptible:
http://
ftp://
file:///
For instance, a typical URL specification is
http://www.mycorp.com/chart.html
As an alternative, you can specify a URL that is relative to a base URL location. For example, if the
base URL is www.mycorp.com, then the relative URL ./news/article.html locates article.html in the
news subdirectory, which is relative to the base URL.
♦
Click the Select Reference to Publish button, which displays the Open window. This window lets
you navigate a directory structure so that you can locate and select the item that you want to include
in the package.
Select a URL and click OK. Focus returns to the Specify Item to Insert window, where the reference
address appears automatically in the Select Reference to Publish field.
♦
2.
Optionally, specify a description and a name/value pair. For details, see Adding an Item (Specify Item to
Insert).
3.
Publishing Framework
Adding a Reference to a Package 193

Adding a Viewer to a Package
If you specify Viewer as the item type on the Specify Item to Insert window, some additional fields appear in the
Specify Item to Insert window.
In the Viewer Type panel, indicate whether the viewer type is HTML or Text.1. Specify the type of data that the file contains and the data format of the file by selecting a value for the
Mimetype field. For example, a mime type of image/gif specifies that the file contains an image in GIF
format. A mime type of application/postscript specifies that the file contains application data that should be
treated as a postscript file.
You can customize the drop−down menu of mime types that appears for this field. The default field values are
contained in SASHELP.PUBLISH.MIMETYPES.SLIST. You can add your own mime values to either of the
following locations:
WORK.PUBLISH.MIMETYPES.SLIST♦ SASUSER.PUBLISH.MIMETYPES.SLIST♦
You can write an SCL application to create a MIMETYPES.SLIST in the WORK.PUBLISH or
SASUSER.PUBLISH catalog. For details about writing such an SCL application, refer to the SAS Component
Language: Reference in the SAS Version 8 online documentation.
2.
Identify the instance of the viewer that you want to include in the package. You can specify a viewer in either
of the following ways:
Enter the name of the viewer file directly in the field to the right of the Select Viewer to Publish
button.
♦
Click the Select Viewer to Publish button to display the Open window that lets you navigate a
directory structure so that you can locate and select the viewer that you want to include in the
package. Select a viewer and click OK.
Focus returns to the Specify Item to Insert window, where the viewer name appears automatically in
the Select Viewer to Publish field.
♦
3.
Optionally, specify a description and a name/value pair.
For details, refer to Describing an Instance of the Item.
4.
You can optionally specify the encoding property in the Encoding field. Character−set encoding refers to how
a host internally represents character data. Hosts that share common architectures represent character data
identically. For example, UNIX hosts internally represent character data in ASCII−ISO format, z/OS hosts in
EBCDIC format, and Windows hosts in ASCII−ANSI format.
Under some circumstances–for example, when publishing and retrieving host architectures are different–you
might decide to identify a character−set encoding that is appropriate for the retrieving host. This information
is delivered with the published package. Translation occurs on the retrieving host, not the publishing host.
For complete details about publish−and−retrieve encoding behavior, refer to Publish/Retrieve Encoding
Behavior.
5.
Once you finish specifying viewer options, click OK to return to the What to Publish tab.6.
Publishing Framework
Adding a Viewer to a Package 194

Specifying Package Destination (Where to Publish)
Once you specify the contents of the package in the What to Publish tab, you must use the Where to Publish tab to
specify the transport to use for delivering the package to the intended audience. The delivery transport is considered
the package destination.
Follow these steps:
In the Destination Type panel, identify the transport that you want to use to deliver the package.
E−mail
sends the package in an e−mail message to the specified recipients.
Message Queue
publishes the package to a message queue.
SAS Channel Subscribers
sends the package to the channel that you specify. All users who are subscribed to that channel
receive a copy.
Archive
sends the package to a storage location to be archived and possibly retrieved later.
webDAV
sends the package to a WebDAV−compliant server for subsequent access.
1.
In the recipients field, specify who or what–such as e−mail recipients, a message queue, or a SAS
channel–receives the package.
The field label changes based on the delivery transport that you select. For example, E−mail Address(es),
Message Queue(s), or SAS Channel). The field does not appear if you select Archive or WebDAV as the
destination type. Additional windows to collect more transport information might also display, based on the
delivery transport that you select.
2.
Once you specify the destination information, select the How to Publish tab.3.
Using E−mail to Send a Package
You can send a package by e−mail and identify the e−mail recipients in either of the following ways:
Explicitly specify the e−mail addresses of the recipients in the To field, separating each entry with a
comma.
If you choose this option, after you specify e−mail recipients, you can specify other package
properties in the How to Publish tab.
♦
Select the Read E−Mail Addresses From Data Set check box to identify a SAS data set that
contains e−mail addresses. This displays the Data Set fields, where you specify the data set options,
data set name, and a variable.
♦
1.
To specify the data set, you can make an entry in the form library.member in the Data Set Name field.
Alternatively, you can click the right arrow to display the Select A Member window, where you can browse
for and select the appropriate data set. Click OK to return to the Where to Publish tab.
2.
Specifying Package Destination (Where to Publish) 195

To identify the variable in the data set that stores the e−mail address, click the right arrow that is next to the
Variable field. This displays the Select Table Variables window, where you either select the variable name
from a scroll list or search for the variable in the list. Select only one variable from the list. You can also
deselect the chosen variable from the selected list.
3.
Optionally, specify SAS options to open the data set for reading in the Options field found in the Select Table
Variables window. Specify options as a text string in the following form:
option1=value option2=value ...
For example:
pw='born2run' keep=empno
Surround only string values, such as a password, with single quotation marks.
For a complete list of data set options, refer to the SAS Data Set Options topic in the SAS online
documentation.
4.
Once you specify data set options in the Select Table Variables window, click OK to return to the Where to
Publish tab.
5.
Once you specify the destination information, you can specify other package properties in the How to Publish
tab.
6.
Sending a Package to a Message Queue
You can send a package to a message queue by entering the name of the message queue in the To field of the
Where to Publish tab in one of the following formats:
MSMQ://machineName\queueName♦ MQSERIES://queueManager:queueName♦ MQSERIES−C://queueManager:queueName♦
For multiple entries, separate each entry with a comma.
1.
Once you specify the destination information, you can specify other package properties in the How to Publish
tab.
2.
Using a Channel to Send a Package
Clicking the Channel button displays the Select Destination Channel window, where you can select a single channel
for your package.
If you have not already configured channels before you attempt to publish a package to a channel, you receive the
following error message:
Insufficient LDAP Directory Server information supplied. Please provide values
for HOST, PORT, and BASE.
For details about setting these SAS macros in a SAS session, see Configuring Channels.
To select a channel, position the cursor over the channel name in the Select Destination Channel panel and
left−click.
1.
SAS® Integration Technologies: Developer's Guide
Specifying Package Destination (Where to Publish) 196
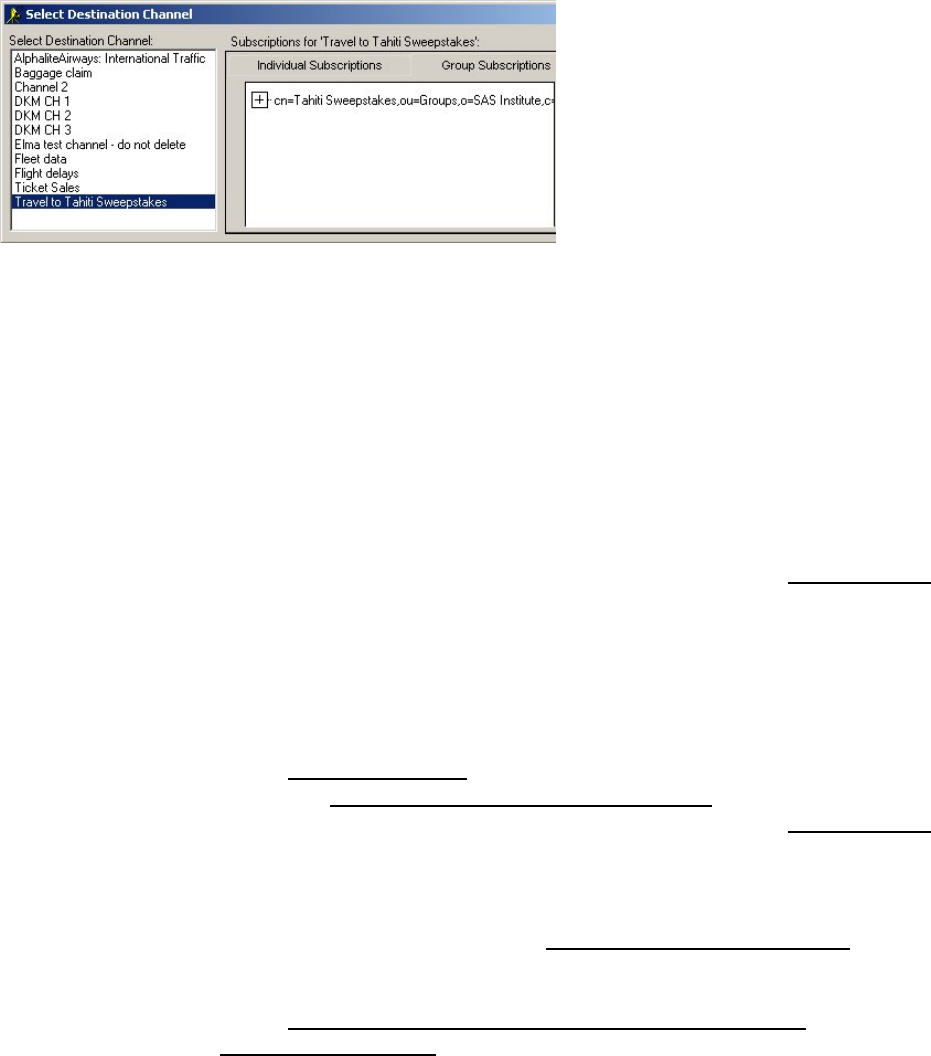
The channel expands to a list of subscribers on the Individual Subscriptions tab in the Subscriptions for
channel−name window.
If the selected channel has a group that is subscribed to it, selecting the Group Subscriptions tab displays the
group subscription, which is specified as a distinguished name (DN).
2.
Once you select the channel that you want to publish to, click OK to return to the Where to Publish tab.
The name of the selected channel appears in the SAS channel field. The channel name is gray to indicate that
the field is not available.
To change the channel name, open the Select Destination Channel window by clicking the Channel button
and select another channel.
3.
Once you specify the channel destination, you can specify other package properties in the How to Publish tab.4.
Sending a Package to an Archive
You can publish a package as an archive for storage on a host or server.
If the host or server is secure and does not accept anonymous user access, you must supply a user ID and
password. In that case, select the Publish Options tab to specify the user ID and password for access to the
remote host or server. For details, see Options for Archives and Message Queues.
1.
Once you specify the channel destination, you can specify other package properties in the How to Publish tab.2.
Sending a Package to a WebDAV−compliant Server
You can send a package to a WebDAV−compliant server by using the Viewers and Publish Options tabs, to display
the WebDAV Properties.
Select the Publish Options tab to Specify Properties for Server Access and Package Storage.1. Select the Viewers tab to Render a Package View.2.
Specifying Properties for Server Access and Package Storage
You must supply a user ID and password in the HTTP User and HTTP Password fields only if the
WebDAV−compliant server runs secure and the Web server does not accept anonymous access. Specifying a
user ID and a password lets the publisher bind to the Web server when publishing the package.
1.
Specify the URL of the proxy server in the HTTP Proxy URL field.2. Identify the URL, in the form of a string, into which the collection of package entries is placed. Make an entry
in either of these fields, but not both.
3.
SAS® Integration Technologies: Developer's Guide
Specifying Package Destination (Where to Publish) 197

Collection URL
specifying a collection URL lets package consumers easily recognize package names for retrieval. An
example of a collection URL is http://www.host.com/AlphaliteAirways/revenue/quarter1. The
collection name is quarter1.
Caution: A disadvantage of specifying a collection URL is that subsequent publications of the same
package overwrite the original package.
Parent URL
specifying a parent URL generates a name for the collection on the Web server that is unique in the
destination directory. Specifying a parent URL also allows subsequent publications of the same
package under unique names. A generated name is limited to eight characters, the first character being
an s. An example of a parent URL directory location is
http://www.host.com/AlphaliteAirways/revenue. An example of a collection name that is
automatically generated might be s9811239.
Optionally, enter one or more namespaces in the Namespaces field to uniquely define the contexts for the
package that is published to a server.
Here is an example of a namespace definition that you might enter in the Namespaces field:
HOUSTON='http://www.AlphaliteAirways.com/revenue'
The namespace HOUSTON is stored with the URL on the server to signify that the package contains data
about revenue that only the Houston office generated.
A namespace specification is case−sensitive, with single quotation marks surrounding embedded values. To
specify multiple namespaces, separate each namespace definition with a space.
Storing a namespace with a package on a server lets developers write retrieval applications to filter package
data that meets specific criteria.
For details about using namespaces in a filter, see Specifying Name/Value Pairs.
4.
Rendering a Package View
You can use the Viewers tab to specify a viewer. A viewer file is a template that contains formatting directives for
rendering a specific view of the published package. For complete details about viewers, see Viewer Processing.
Click the appropriate button to specify the location of the viewer either as a physical filename or a SAS
fileref. Here are some examples:
by name (filename) by reference (fileref)
c:\Public\flights−viewtemplate viewtemplate
1.
Specify the name of the viewer file as a character string. By default, SAS Publisher stores the rendered view
in the root collection of the published package as index.html.
You can use the arrow buttons to the right of the Viewer field to browse directories or select from previously
defined locations.
2.
Specify the name of the rendered target view in the Target Viewer field. The specified target viewer name
overrides the default name, which is index.html.
3.
SAS® Integration Technologies: Developer's Guide
Specifying Package Destination (Where to Publish) 198

Identify the mime type of the target view in the Target Viewer Mimetype field. The target viewer mime type
overrides the default viewer mime type, which is automatically inferred from the viewer file. Typical MIME
types are HTML (.htm) and plain text (.txt) files. If this field remains blank, SAS Publisher uses the viewer
filename extension to locate the MIME type in the appropriate registry. Windows hosts use the Windows
Registry, while all other host types use the SAS Registry.
4.
Options for Archives and Message Queues
Advanced options are available on the Publish Options tab for archives and message queues under the following
conditions:
You selected an Archive destination in the Where to Publish tab.• You selected a Message Queue destination in the Where to Publish tab.•
Decide whether FTP or HTTP protocol is appropriate for the host or server to which the transport will deliver
the package. Then supply an appropriate user ID and password.
1.
You must supply a user ID that grants access to a secure remote host or server where the package is to be
delivered only if the host or server does not accept anonymous user access.
2.
If you specify a user ID, you must also specify a password.3. If you use HTTP protocol, then specify the URL of the proxy server in the HTTP Proxy URL field.4. Once you specify the appropriate user ID and password, return to the appropriate tab to continue specifying
the package.
5.
Publishing Framework
SAS® Integration Technologies: Developer's Guide
Specifying Package Destination (Where to Publish) 199

Specifying Name/Value Pairs
Publishers can specify name/value pairs that describe the contents of the entire package and of individual package
items. With these descriptors, primarily SAS channel subscribers who use SAS Subscription Manager can construct
filters for determining what packages get delivered to them in their entirety. Although subscribers can filter at the
package item level for the message queue only, a developer can write retrieval programs that filter at both the package
level and the package item level for all transports.
The publisher can specify one or more space−separated name/value pairs for package items and entire packages in the
following forms:
name• name=value• name="value"• name="single value with spaces"• name=(value)• name=("value")• name=(value1, "value 2",... valueN).•
Specifying Name/Value Pairs for a Package Item
Here is an example of specifying a single name/value pair for a package item:
type=dataset
The publisher identifies the item in the package as a data set.
To describe the package item with finer granularity, the publisher can specify multiple name/value pairs. A space
separates each name/value pair. Here is an example of specifying multiple name/value pairs for a package item:
type=dataset hub=RDU
The publisher identifies the item in the package as a data set, which is relevant only to the RDU hub.
Although a subscriber can filter at the package item level for a message queue only, a developer can write a retrieval
program that filters at the package item level for all transports.
The publisher can specify name/value pairs when publishing a package item using the following methods:
SAS Publisher• Publish Package Interface.•
Using SAS Publisher to Specify Name/Value Pairs for a Package Item
For an item inserted in a package, you can specify one or more name/value pairs in the optional Name/Value field in
the Specify Item to Insert window. For example, you could specify
type=dataset hub=RDU
This package entry is a data set, whose data is relevant to the RDU hub only.
Specifying Name/Value Pairs 200

You can specify one or more name/value pairs. When you leave the field blank, SAS Publisher ignores the option.
For more information about specifying name/value pairs in the How To Publish tab, see Specifying Package Format.
Using the Publish Package Interface to Specify Name/Value Pairs for a Package
Item
When creating a package entry, you assign name/value pairs to the nameValue property in the INSERT_entry−type
SAS CALL routine, where values for entry−type are as follows:
CATALOG• DATASET• FDB• FILE• HTML• MDDB• REF• SQLVIEW• VIEWER.•
The following code shows the assignment of name/value pairs to a data set package entry.
libname = "HR";
memname = "capacityHistory";
description = "Flight Capacity History (Data)";
nameValue = "type=dataset hub=RDU";
call insert_dataset(pid, libname, memname,
description, nameValue, rc);
This nameValue property specifies a data set whose data is relevant only to the RDU hub.
For complete details about programmatically specifying name/value pairs, see PACKAGE_BEGIN CALL routine
syntax.
Specifying Name/Value Pairs for an Entire Package
Here is an example of specifying a single name/value pair for an entire package:
market=US
The publisher identifies the entire package as relevant only to a US market.
To describe the contents of an entire package with finer granularity, the publisher can specify multiple name/value
pairs. A space separates each name/value pair. Here is another example of specifying multiple name/value pairs for an
entire package:
market=US type=report content=ticketsales
Quarter4 priority=high
This high−priority package contains one or more reports about fourth−quarter ticket sales that is relevant only to a US
market.
SAS® Integration Technologies: Developer's Guide
Specifying Name/Value Pairs 201

When both subscribers and developers of package−retrieval applications know about package name/value pairs, they
can construct and apply filters that control package delivery.
The publisher can specify name/value pairs when publishing the package using these methods:
SAS Publisher• Publish Package Interface.•
Using SAS Publisher to Specify Name/Value Pairs for Entire Packages
For the archive, message queue, and SAS channel subscriber delivery types only, you can specify one or more
name/value pairs in the optional Package Name/Value group box in the How to Publish tab. For example, you could
specify
market=US type=report content=ticketsales
Quarter4 priority=high
This high−priority package contains one or more reports about fourth−quarter ticket sales that are relevant only to a
US market.
You can specify one or more name/value pairs. When you leave the field blank, SAS Publisher ignores the option.
For more information about specifying name/value pairs in the How to Publish tab, see Specifying Package Format.
Using the Publish Package Interface to Specify Name/Value Pairs for an Entire
Package
For the archive, message queue, and SAS channel subscriber delivery types only, you assign name/value pairs to the
nameValue property in the PACKAGE_BEGIN CALL routine.
The following code shows the assignment of name/value pairs to an entire package:
packageID=0;
rc=0;
desc = "Nightly run.";
nameValue = "market=US type=report content=ticketsales
Quarter4 priority=high";
CALL PACKAGE_BEGIN(packageId, desc, nameValue, rc);
This nameValue property specifies a high−priority package that contains one or more reports about fourth−quarter
ticket sales that are relevant only to a US market.
For complete details about programmatically specifying name/value pairs for an entire package, see
PACKAGE_BEGIN CALL routine syntax.
Publishing Framework
SAS® Integration Technologies: Developer's Guide
Specifying Name/Value Pairs 202

Configuring Channels
You must configure channels only when delivering packages by means of SAS channel transports.
When preparing to publish to channels, you must configure a default LDAP directory server by assigning values to the
following macros in a SAS session:
Macro Description Example
LDAP_HOST specifies the DNS of the IP address
of the host that runs the LDAP
server.
%let LDAP_HOST=myhost.com;
LDAP_PORT specifies the port number for the
LDAP server. 389 is the default. %let LDAP_PORT=8010;
LDAP_BASE specifies the distinguished name
(DN) in the LDAP Directory
Information Tree (DIT) of the root.
%let LDAP_BASE=o=AlphaliteAirways,c=US;
LDAP_BINDDN
specifies the LDAP bind DN. You
must specify this macro when you
use Simple Authentication.
Otherwise, it is optional.
%let LDAP_BINDDN=cn=Reservations,
o=AlphaliteAirways,c=US;
LDAP_BINDPW
specifies the LDAP password for
bind DN. You must specify this
macro when you use Simple
Authentication. Otherwise, it is
optional.
%let LDAP_BINDPW=*****;
LDAP_OPTIONS
specifies the options to pass to the
LDAP directory server when the
server connection is opened. This
macro is optional.
Here is an example that shows how to set up these macros in a SAS session:
%let LDAP_HOST=myhost.com;
%let LDAP_PORT=8010;
%let LDAP_BASE=o=AlphaliteAirways,c=US;
%let LDAP_BINDDN=cn=Reservations,o=AlphaliteAirways,c=US;
%let LDAP_BINDPW=born2run;
Publishing Framework
Configuring Channels 203

Specifying Package Format (How to Publish)
You can specify the format of the published package using the How to Publish tab.
The fields that display on this tab change based on the destination type that you selected on the Where to Publish tab.
E−mail• Message Queue• SAS Channel Subscribers• Archive• WebDAV•
Formatting a Package for E−mail
Follow these steps to specify parameters in the How to Publish tab that format a package for delivery to e−mail.
Specify whether to format the package as a SAS package. For details, see SAS Package Format.1. Specify options for publishing to e−mail. For details, see E−mail Publishing Options.2. Identify whether to apply a rendered view of the package for viewing in e−mail. For details, see Viewer
Template.
3.
Specify an optional package expiration date and time. For details, see Package Expiration Date and Time.4. Once you specify the package format in the How to Publish tab, you are ready to publish the package. For
details, see Publishing a Package, Saving and Viewing Publish Code.
5.
Formatting a Package for a Message Queue
Follow these steps to specify parameters in the How to Publish tab that format a package for delivery to a message
queue.
Specify whether to format the package as a SAS package. For details, see SAS Package Format.1. Specify options for publishing to message queue. For details, see Message Queue Publishing Options.2. Identify whether to apply a rendered view of the package for delivery to the message queue. For details, see
Viewer Template.
3.
Optionally, specify attributes that describe the package in the Package Name/Value (optional) panel. With
this information, subscribers to SAS channels and developers of package retrieval applications can specify
filters to control package delivery.
For example, if you publish to a channel and describe the package as:
market=(Canada, US)
then the package is sent to subscribers who specify a filter of market=(US, Canada) but does not go to
subscribers who specify a filter of market=(US, Asia).
For complete details about filters, see Specifying Name/Value Pairs.
4.
Specify an optional package expiration date and time. For details, see Package Expiration Date and Time.5. Once you specify the package format in the How to Publish tab, you are ready to publish the package. For
details, see Publishing a Package, Saving and Viewing Publish Code.
6.
Specifying Package Format (How to Publish) 204

Formatting a Package for a Channel
Follow these steps to specify parameters in the How to Publish tab that format a package for delivery to a channel.
Specify whether to format the package as a SAS package. For details, see SAS Package Format.1. Although a channel is used to identify information topics for subscription, the channel does not actually
deliver the package to the end user. The package is delivered to the channel by a transport, which is defined in
each subscriber's channel subscription properties that are stored in the LDAP directory. Therefore, enter
appropriate values in the fields for E−mail Subject and Correlation ID. The channel's configured transports
use these values to send the package to the subscribers.
To specify options for e−mail delivery, see Options for e−mail.
To specify a message queue delivery, specify a correlation ID in the Correlation ID field. The correlation ID
is a binary string that identifies the package in the message queue. Package consumers who access the queue
can then use the ID to quickly retrieve a specific package.
2.
Identify whether to apply a rendered view of the package for delivery to e−mail or message queue. For details,
see Viewer Template.
3.
Optionally, specify attributes that describe the package in the Package Name/Value (optional) panel. With
this information, subscribers to SAS channels and developers of package−retrieval applications can specify
filters to control package delivery.
For example, if you publish to a channel and describe the package as:
market=(Canada, US)
then the package is sent to subscribers who specify a filter of market=(US, Canada) but does not go to
subscribers who specify a filter of market=(US, Asia).
For complete details about filters, see Specifying Name/Value Pairs.
4.
Specify an optional package expiration date and time. For details, see Package Expiration Date and Time.5. Once you specify the package format in the How to Publish tab, you are ready to publish the package. For
details about how to publish the package, see Publishing a Package, Saving and Viewing Publish Code.
6.
Formatting a Package for an Archive
Follow these steps to specify parameters in the How to Publish tab that format a package for delivery to an archive.
By definition, an archive transport saves an archive file to a designated location for storage and subsequent access.
The archive file results from the compression of the package into a single file, along with metadata that describes the
package content.
Therefore, the Package as a SAS package (.spk) check box is already selected and cannot be unchecked.
For details about completing the fields in the Package Formatting panel, see SAS Package Format.1. Optionally, specify attributes that describe the package in the Package Name/Value (optional) panel. With
this information, subscribers to SAS channels and developers of package−retrieval applications can specify
filters to control package delivery.
For example, if you publish to a channel and describe the package as:
2.
SAS® Integration Technologies: Developer's Guide
Specifying Package Format (How to Publish) 205

market=(Canada, US)
then the package is sent to subscribers who specify a filter of market=(US, Canada) but does not go to
subscribers who specify a filter of market=(US, Asia).
For complete details about filters, see Specifying Name/Value Pairs.
Specify an optional package expiration date and time. For details, see Package Expiration Date and Time.3. After you specify the package format in the How to Publish tab, you are ready to publish the package. For
details, see Publishing a Package, Saving and Viewing Publish Code.
4.
Formatting a Package for a WebDAV−compliant Server
For the WebDAV−compliant server transport, the How to Publish tab is disabled.
Once you specify the package options in the Viewers and Publish Options tabs, you are ready to publish the package.
For details about how to publish the package, see Publishing a Package, Saving and Viewing Publish Code.
SAS Package Format
A primary reason to save a package as a SAS package (also known as an SPK file) is to save storage resources. A SAS
package and its metadata that describes the package content is compressed and saved as a single file. Storage
constraints for archival purposes in the enterprise might dictate file compression.
Another benefit of package compression is that an SPK file can be delivered to a recipient who does not have access
to a SAS system. Recipients can view an archive by using SAS Package Reader or a third−party unzip utility.
If you selected a destination type of Archive in the in the Where to Publish tab, the Package as a SAS
Package (.spk) check box is already selected and cannot be unchecked.
For the e−mail transport, SAS channel subscriber, and message queue delivery types, the Package as a SAS
Package (.spk) check box is already selected to indicate that the package will be delivered in compressed
format. However, you can override the default selection and send the package in full−text (or uncompressed)
format by clicking the already−selected check box. Removing the check mark delivers the package in
full−text format.
If you are publishing to e−mail but do not publish the package as a SAS package, you can deliver only URL
package items. E−mail cannot convey SAS data files because it is a view−only delivery transport. However,
with the aid of a viewer template, you can render SAS data package content for viewing in e−mail.
If you decided to publish a package in full−text format, then you have completed all steps in this panel.
1.
If you select the Package as a SAS Package (.spk) check box, the Package Formatting panel appears.
These fields let you decide how and where to store the SAS package. Select the appropriate button to indicate
whether the storage location is a Directory name or an LDAP URL.
2.
Specify the location in the Path field. The down arrow control displays all locations that you have specified
previously, and the right arrow control displays all possible locations.
If you specify a storage location as a directory name, you must precede the directory name with the
appropriate protocol: FTP or HTTP.
3.
SAS® Integration Technologies: Developer's Guide
Specifying Package Format (How to Publish) 206

Here is an example: ftp://c:\airways\travel\routes and http://www.travel.org/bestfares.
The Name of spk field also appears. Optionally, specify the name under which the package will be stored in
the archive. The right arrow control displays all package names and locations that you might have previously
defined.
If you leave this field blank, then SAS Publisher assigns the archived file a default name in the form of today's
date and a unique numeric string–for example, 22MAR2000_059105.
4.
Options for Publishing to E−mail
In the E−mail Subject field, enter the subject line for the published e−mail. If you do not specify a subject,
the subject defaults to the package description that is specified in the What to Publish tab.
1.
You can use the Publish Options tab to provide additional properties for e−mail.2. Identify a point−of−contact e−mail address in the Reply To field to let e−mail recipients return a message to a
designated e−mail address. Such an address might belong to the package publisher or to someone else, such as
a subject matter expert or a member of an administrative staff.
3.
Supply the user ID of the sender (or package publisher) of the e−mail message in the From field. Addresses
that you supply in the Reply To and the From fields can be identical.
4.
The next four fields collect a user ID and a password that are needed for publishing an archived file to a
secured host or server. Hosts that use FTP protocol require an FTP user ID and password. Servers that use
HTTP protocol require an HTTP user ID and password.
5.
Identify the URL, in the form of a string, into which the collection of package entries is placed. Make an entry
in either of these fields, but not both.
Collection URL
specifying a collection URL lets package consumers easily recognize package names for retrieval. A
disadvantage is that subsequent publications of the same package overwrite the original package. For
an example of a collection URL, see http://www.host.com/AlphaliteAirways/revenue/quarter1. The
collection name is quarter1.
Parent URL
specifying a parent URL generates a name for the collection on the Web server that is unique in the
destination directory. Specifying a parent URL also allows subsequent publications of the same
package under unique names. A generated name is limited to eight characters, the first character being
an s. For an example of a parent URL directory location, see
http://www.host.com/AlphaliteAirways/revenue. An example of a collection name that is
automatically generated might be s9811239.
6.
Viewer Template
A viewer file is a template that contains formatting directives for rendering a specific view of the published package in
e−mail. Typical viewer templates are written to format packages in HTML or text format. A text viewer template
might be necessary if the destination e−mail program does not support the HTML MIME type. For complete details
about viewers, see Viewer Processing.
In the Viewers tab, click the appropriate button to specify the location of the viewer either as a physical
filename or a SAS fileref. Here is an example:
by name (filename) by reference (fileref)
c:\Public\flights−viewtemplate viewtemplate
1.
SAS® Integration Technologies: Developer's Guide
Specifying Package Format (How to Publish) 207

Specify the name of the viewer file as a character string. You can use the arrow buttons to the right of the
Viewer field to browse directories or to select from previously defined locations.
2.
Options for Publishing to Message Queue
Specify a correlation ID in the Correlation ID field. The correlation ID is a binary string that identifies the
package in the message queue.
Package consumers who access the queue can then use the ID to quickly retrieve a specific package.
1.
The Publish Options tab enables you to specify a user ID and password to bind to the remote host or server
where the package will be published. For details, see Options for Archives and Message Queues.
2.
Package Expiration Date and Time
The Expiration date and the Expiration time fields display in the How to Publish tab for all delivery transports.
In the Expiration date field, specify the date when the package information expires or is no longer valid.
Select the right arrow to display a calendar window, from which you can choose an expiration date. Click End
to return to the How to Publish tab.
The name of the selected date appears in the Expiration date field. The date is gray to indicate that the field
is not available.
1.
In the Expiration time field, specify the time at which the package information expires or is no longer valid.
The default value is midnight.
2.
Publishing Framework
SAS® Integration Technologies: Developer's Guide
Specifying Package Format (How to Publish) 208

Using SAS Publisher with SAS/Warehouse Administrator
You can install and use SAS Publisher to work as an add−in with SAS/Warehouse Administrator.
PC Instructions for Installing SAS Publisher as an Add−In
Before you can use SAS Publisher from within SAS/Warehouse Administrator, you must install SAS Publisher as an
add−in. If you are using a PC, follow these steps:
Create an ADDTOOL directory on your C: drive. This is a temporary directory that is used during the
installation process. You can delete it once installation completes. If you already have a C:\ADDTOOL
directory from a previous installation, delete or move all files in this directory before continuing.
1.
Download and save the ZPUBSUB.EXE file into the C:\ADDTOOL directory. This is a self−extracting
archive that creates all necessary files when you execute it. Execute the ZJPUBSB.EXE file by
double−clicking it, using the Windows RUN command, or entering the filename at a DOS prompt.
2.
Start a SAS session. Make sure that you have allocated a libref for _SASWA.3. Within the SAS session, include the CIMPORT.SAS file from the C:\ADDTOOL directory into the Program
Editor. Then submit the code. CIMPORT copies all necessary files and updates the Tool Registry.
4.
Running SAS Publisher in SAS/Warehouse Administrator
To start SAS Publisher from within SAS/Warehouse Administrator, select an item in a warehouse, then select:
Tools−> Add−Ins−> Define Package to Publish
Once SAS Publisher starts, it works as it does
when you run it outside SAS/Warehouse Administrator. For details about defining a package, see Publishing a
Package.
Once you define the package, the buttons for publishing the package become available for you to use. The following
buttons appear only if you use SAS Publisher within SAS/Warehouse Administrator:
OK (Save Metadata)
saves the package metadata and exits the window.
Execute Publish Code
publishes the package.
Publishing Framework
Using SAS Publisher with SAS/Warehouse Administrator 209
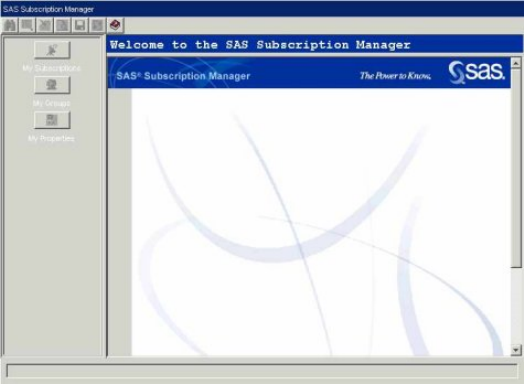
SAS Subscription Manager
The SAS Subscription Manager is a Java applet that runs in a Web browser. The SAS Subscription Manager enables
you to subscribe to and unsubscribe from channels and to specify how information is delivered to you. Managing
subscription services is like managing other resources that you may already be familiar with, such as e−mail alias lists,
or Internet listservs.
The Subscription Manager applet is signed with SAS credentials. When you navigate the browser to access this
plug−in, a security dialog box asks if you want to trust SAS credentials. Clicking Yes or Always in this dialog box
grants the applet the permissions it needs (for example, you do not have to edit a Java policy file).
Note: Subscription Manager will not be supported in future releases of SAS Integration Technologies. The
Subscription Manager functionality will be delivered via a new interface that will continue to allow users to manage
their own channel subscriptions.
Publishing Framework
SAS Subscription Manager 210

Overview
You use SAS Subscription Manager to subscribe to channels and to manage your subscriptions. One such managing
task is setting properties to control transport delivery by means of e−mail or message queue.
Subscription management is a task that you, the subscriber, and the administrator share. The administrator is
responsible for declaring users as subscribers and setting up the channels to which users can subscribe (and
unsubscribe) and subsequently manage. The administrator is responsible for creating and entirely managing groups to
which you can be added as a member. SAS Subscription Manager does not let you join groups and manage your group
memberships. However, you can use SAS Subscription Manager to view a list of groups to which the administrator
has added you.
Publishing Framework
Overview 211
SAS Subscription Manager Requirements
To run SAS Subscription Manager:
Install an LDAP directory server, if you do not have one already.1. Ensure that you have authorization to connect to the host on which the LDAP server runs. If the hosts that run
the LDAP server and the Web server that delivers the applet are different, then you must implement the
appropriate Java security policy.
2.
Set up the appropriate access control to the SAS directory tree on your LDAP server.3.
Publishing Framework
SAS Subscription Manager Requirements 212
Logging On
To log on to SAS Subscription Manager, supply a valid user ID and a password. There must be a subscriber
that has the same name as the user ID of the person who is logging on. In other words, you must use a value
for user ID that matches a sassubscribercn value specified in the Integration Technologies
Administrator. Here is an example:
User: gajones
Password: ********
As a security aid, the password is represented as asterisks as you type.
Note: You can also specify a user ID as a full distinguished name (DN). A fully qualified DN is required on
active directory servers. Here is an example:
cn=Gabriela Jones, ou=People, o=Apex Dynamics, c=US
where
cn: common name
ou: organizational unit
o: organization
c: country
1.
After you enter a user ID and a password, click the Login button to activate login.
You now have complete access to SAS Subscription Manager.
2.
Publishing Framework
Logging On 213
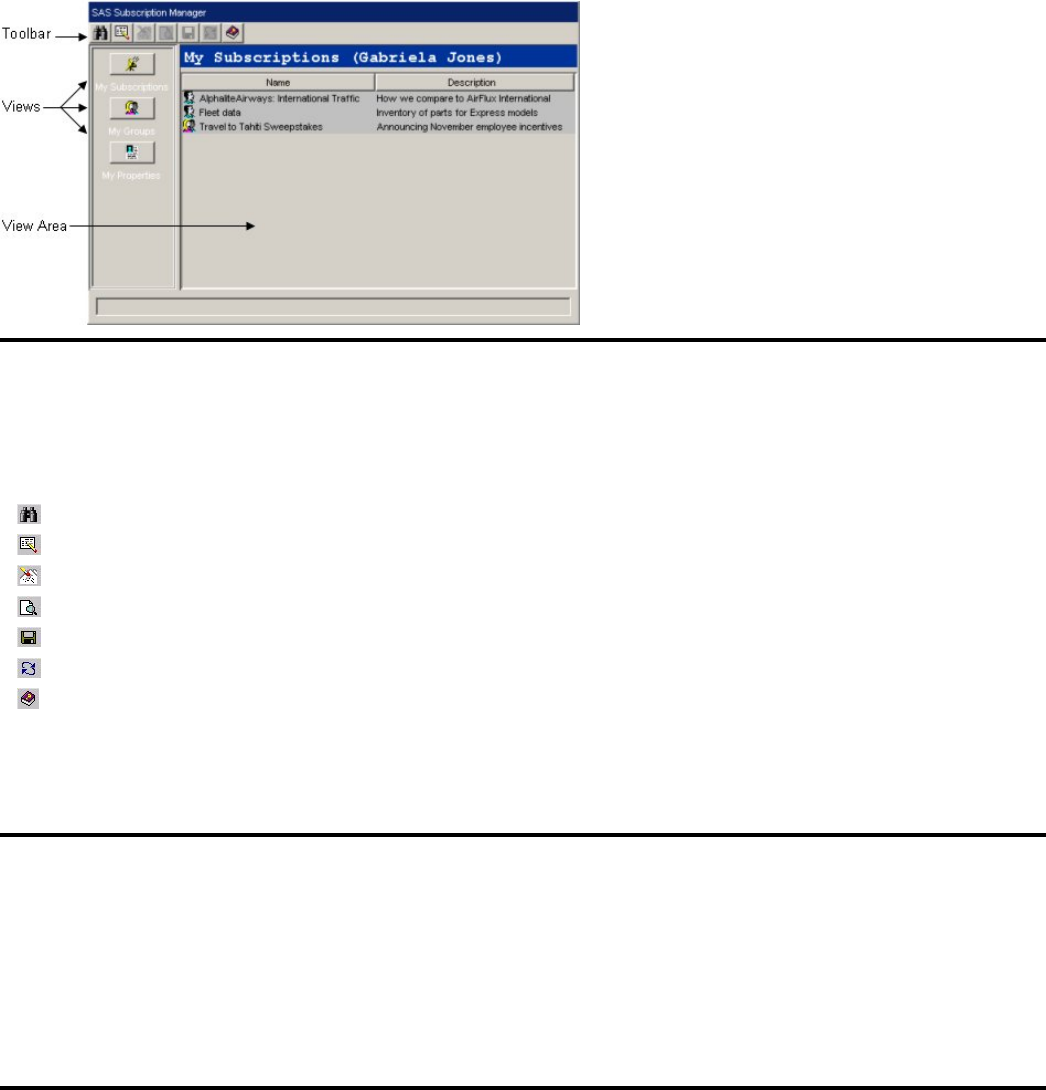
Subscription Manager Interface
The Subscription Manager interface is comprised of three main areas:
Toolbar
The toolbar, which is located across the top of Subscription Manager, contains tools that operate on the contents of the
View Area. The tools include the following:
Search
Subscribe
Unsubscribe
Details
Save
Refresh
Help
The buttons in the toolbar have ToolTips that display when you pause the mouse pointer over a button. Although all
tool buttons are always visible, you can apply them only to certain objects. Tools that are not accessible to selected
objects are presented in gray.
Views
The view buttons let you selectively display the channels that you are subscribed to, groups that you are a member of,
and your properties for receiving published information from channels. You can click a view button to display the
corresponding type of information in the View Area.
You can adjust the division between the Views and the View Area by using your mouse pointer to select and drag the
dividing line that is located between the two areas.
Subscription Manager Interface 214
View Area
The View Area displays a list of individual channels, groups, or your properties, according to the view button that you
selected. To perform toolbar operations on a channel or group, select the channel or group. The appropriate toolbar
operations then become available.
Publishing Framework
SAS® Integration Technologies: Developer's Guide
Subscription Manager Interface 215
Channels
A channel is a topic or identifier that acts as a conduit for related information. The channel carries the information
from the publishers who created it to the subscribers who want it.
Channels have a name, description, subject, keywords, and reference keys that are associated with them. Search
facilities use this information in Subscription Manager to help you locate channels that are of interest to you. They are
also used in the administrator application to locate specific channels for administration purposes. Channels can also
have subscribers who are associated with them.
Each association of a subscriber to a channel is a subscription. A subscription lets the information that is published to
a channel be delivered to the interested (subscribed) subscribers.
Administrators create a channel for each distinct topic or audience. For example, users of a particular application
might want a channel for discussion and data exchange, while the programmers of that application might want another
channel to discuss technical problems and future enhancements. Although the topic is the same application, the
discussion and data exchanged can be very different. Therefore, two separate channels would probably best serve the
needs of the two groups of users.
Publishing Framework
Channels 216
Subscribing to a Channel
To subscribe to a channel and have its contents delivered to you:
Click the Subscribe button ( ) to display the list of channels.1. Select the channel from the Channels list.2. Click OK.3.
The My Subscriptions list is updated immediately.
After you are subscribed to a channel, you can do the following:
Define unique subscription properties for a channel• Unsubscribe from a channel•
Publishing Framework
Subscribing to a Channel 217

Unsubscribing from a Channel
To stop receiving information from a channel, you must unsubscribe from it. To unsubscribe from a channel:
Click the My Subscriptions button.1. Select the channel from the My Subscriptions list.2. Click the Unsubscribe button ( ). You are prompted to confirm your request to unsubscribe. The channel is
then removed from the My Subscriptions list.
3.
To stop receiving information from a channel that you are subscribed to as part of a group, your administrator must
remove you from the group. Users do not have the authority to manage group information.
Publishing Framework
Unsubscribing from a Channel 218

Viewing Channel Details
To view the details of a channel:
Select the channel from the View Area.
You can select a channel from your currently subscribed channels list by clicking on the My Subscriptions
button or from the list of channels that results from a search.
1.
Click the Details button ( ).
Regardless of how you opened the channel, the details of the resulting views are identical. However, if you
selected a channel from your subscribed channels list, you can change the details of your subscription to the
channel. If you selected a channel from a search list, the channel details are read−only and cannot therefore be
changed.
Two tabs contain details about the channel.
The Subscription tab contains the default properties that are associated with your subscription to the
channel.
♦
The Channel tab contains a description of the channel, its subject, and any associated keywords and
reference keys. See Viewing Subscription Details.
♦
Note: If you cannot view existing channels to which you previously subscribed using SAS Subscription
Manager, Release 1.1, your existing channel and subscriber definitions are out of date. To fix this problem,
the publishing framework administrator at your site must explicitly update the schema files to SAS Version 9.
2.
Publishing Framework
Viewing Channel Details 219
Searching Channels
The search tool can help you find new channels that match your interests and can help you sort through your current
subscriptions to channels.
To perform a search:
Click the Search button ( ).1. In the Search For field, enter one or more words. The search tool interprets words that you enter in the
Search For field as either a collection of separate words to be searched for individually or as a single phrase.
By default, it interprets multiple words as a collection of separate words.
2.
In the Search In tab, select the types of objects that you want to search for. If you search across multiple lists,
the results of the search are displayed together in a single list. The default Search field value changes to match
the list view in Subscription Manager when you activated the search tool.
3.
In the For Attributes tab, select the properties for the search tool to examine. By default, it searches in the
Name field.
4.
In the Advanced tab, select the matching criteria and whether the words you entered in the Search For field
represent a collection of individual words or a single phrase. The default matching criterion is Contains one
of the words. Additional criteria are outlined in the following table.
If a field Search criteria
Contains one of
the words An item will be found if one of the words that you specified in the Search For field is
contained in at least one of fields you selected in the For Attributes tab.
Contains the
phrase An item is found if the entire phrase that you specified in the Search For field is
contained in at least one of the fields you selected in the For Attributes tab.
Exactly contains
the phrase An item is found if the phrase that you specified in the Search For field exactly
matches the value in at least one of the fields you selected in the For Attributes tab.
5.
Click OK.6.
The results of a search are displayed in the List View.
Searching is not case−sensitive, and each search matches against all available channels or groups, regardless of the
currently listed channels or groups.
Note: If you cannot view existing channels to which you previously subscribed using SAS Subscription Manager,
Release 1.1, your existing channel and subscriber definitions are out of date. To fix this problem, the publishing
framework administrator at your site must explicitly update the schema files to SAS Version 9.
After the search results display, you can select View channel details.
Publishing Framework
Searching Channels 220
Subscriptions
A subscription is an association of a subscriber or a group to a channel. After the administrator defines users as
subscribers and defines channels, users can use SAS Subscription Manager to subscribe themselves to channels.
Publishing Framework
Subscriptions 221
Viewing Your Subscriptions
To view a list of all your subscriptions, including those subscriptions made through a group, click the My
Subscriptions button.
Subscriptions are divided into the following categories:
Personal subscriptions are those that you created yourself, directly to a channel. They are identified by the
icon.
•
Group subscriptions are those that result from belonging to a group. Group subscriptions are identified by the
icon.
•
You can sort your subscriptions alphabetically according to the name or the description in either ascending or
descending order:
To sort in alphabetical ascending order, click the appropriate column heading. Table rows are sorted
accordingly.
•
To sort in alphabetical descending order, SHIFT−click (hold down the SHIFT key while left−clicking) the
appropriate column heading. Table rows are sorted accordingly.
•
Note: If you cannot view existing subscriptions that you created previously using SAS Subscription Manager, Release
1.1, your existing channel and subscriber definitions are out of date. To fix this problem, the publishing framework
administrator at your site must explicitly update the schema files to SAS Version 9.
Note: The administrator is responsible for adding you to groups.
After your subscriptions are listed, you can do the following:
View subscription details• Unsubscribe from a channel•
Publishing Framework
Viewing Your Subscriptions 222
Viewing Subscription Details
To view the details of a subscription:
Select the subscription from the View Area.1.
Click the Details button ( ).2.
Subscription details are divided between the following two tabs.
The Subscription tab displays the following information:
the source of the subscription. Subscriptions to a channel that you created directly display the personal icon
and are listed as "Personal."
•
a description of the subscription.• the delivery transport (E−mail, Queue, or None). For information about changing your delivery transport or its
properties, see the following topics:
Defining Unique Subscription Properties for a Channel♦ Defining Your Default Subscription Properties♦
•
The Channel tab displays a description of the channel, its subject, and any associated keywords and reference keys.
You cannot view subscription details for channels to which you are subscribed as part of a group. However, to view
the details of a group subscription to a channel, you can duplicate the subscription as a personal subscription and you
can then view those details. Personal ( ) and group ( ) subscriptions appear in your subscription listing.
Regardless of the duplicate subscription, you receive channel information only based on the delivery properties of
your personal channel subscription. Therefore, you receive only one package, not two, based on your personal
subscription properties.
Note: If you cannot view existing subscriptions that you previously created and existing channels to which you
previously subscribed using SAS Subscription Manager, Release 1.1, your existing channel and subscriber definitions
are out of date. To fix this problem, the publishing framework administrator at your site must explicitly update the
schema files to SAS Version 9.
Publishing Framework
Viewing Subscription Details 223
Defining or Modifying Your Default Subscription
Properties
Each subscription you create either directly or through a group gets your description and delivery transport
information from the My Properties window. Changing your description and delivery transport information in the My
Properties window updates all such information for all of your subscriptions for which you did not already set their
properties individually.
To define or modify your default properties:
Click the My Properties button.1.
In the Delivery tab, enter a description and a delivery transport mechanism.
Note: Depending on your selection, a different panel for collecting more information displays. You are
limited to one of the following selections:
e−mail• queue• none.•
2.
Optionally, in the Advanced tab, you can define the following:
Name/Value filters to determine the types of packages that you receive♦ Entry filters to determine the types of package entries that you receive♦ MIME Type filters to determine the types of files that you receive.♦
3.
Click the Save button ( ).4. Clicking the Refresh button ( ) restores your properties to the values before the last time they were set.
Note: If you save and then refresh your properties, you must click the Save button again to reload values to
make them permanent.
5.
See also:
Setting subscription properties for an individual channel• Returning a subscription to your default subscription properties.•
Publishing Framework
Defining or Modifying Your Default Subscription Properties 224

Defining Unique Subscription Properties
You can define on a per−subscription basis how information from a channel is delivered to you.
If you are a member of a group who is also subscribed to the channel, your personal channel subscription properties
override the group subscription properties. Therefore, the override condition causes delivery of only one package, not
two, based on your personal subscription properties.
To set the subscription properties on a single channel:
Select the channel whose subscription properties you want to change.1. Click the Details button ( ).2. In the subscription details dialog box:
Change any of the values in the Subscription tab.♦ You cannot edit values in the Channel tab.♦
In the Delivery tab, edit the description and delivery transport mechanism.
Note: Depending on your selection, a different panel displays so you can collect more information.
You are limited to the following selections:
e−mail♦ queue♦ none.♦
♦
Optionally, in the Advanced tab, you can define the following:
Name/Value filters to determine the types of packages that you receive◊ Entry filters to determine the types of package entries that you receive◊ MIME Type filters to determine the types of files that you receive.◊
♦
3.
Click OK.4.
See also:
Defining Your Default Subscription Properties• Returning a Subscription to Your Default Subscription Properties•
Publishing Framework
Defining Unique Subscription Properties 225

Restoring a Subscription to Your Default Subscription
Properties
To return a subscription to your default properties as defined in the My Properties window:
Select the subscription from the My Subscriptions list.1. Click the Details button ( ).2. Click the Use My Properties button.
The subscription properties are returned to their default values.
3.
Click OK.4.
Publishing Framework
Restoring a Subscription to Your Default Subscription Properties 226
Subscriber Groups
A group is a collection of subscribers. Subscribing groups to channels makes subscription management easier, which
allows convenient delivery of information to group members who share a common interest, such as members of an
accounting group or a development staff. When a group is subscribed to a channel, each group member who has a
defined subscriber entry in the publishing framework receives information that is published to that channel.
Only the administrator has the authority to add members to or remove members from a group. The administrator is
also responsible for subscribing groups to and removing group subscriptions (unsubscribing) from a channel using the
Integration Technologies Administrator. Integration Technologies Administrator is a Java application for creating and
modifying LDAP definitions for objects, such as group subscriptions, that SAS Integration Technologies uses.
Publishing Framework
Subscriber Groups 227

Viewing Your Group Memberships
To view a list of all groups to which your administrator has added you, click the My Groups button.
To discontinue your membership in a group, your administrator must remove you from that group.
Publishing Framework
Viewing Your Group Memberships 228
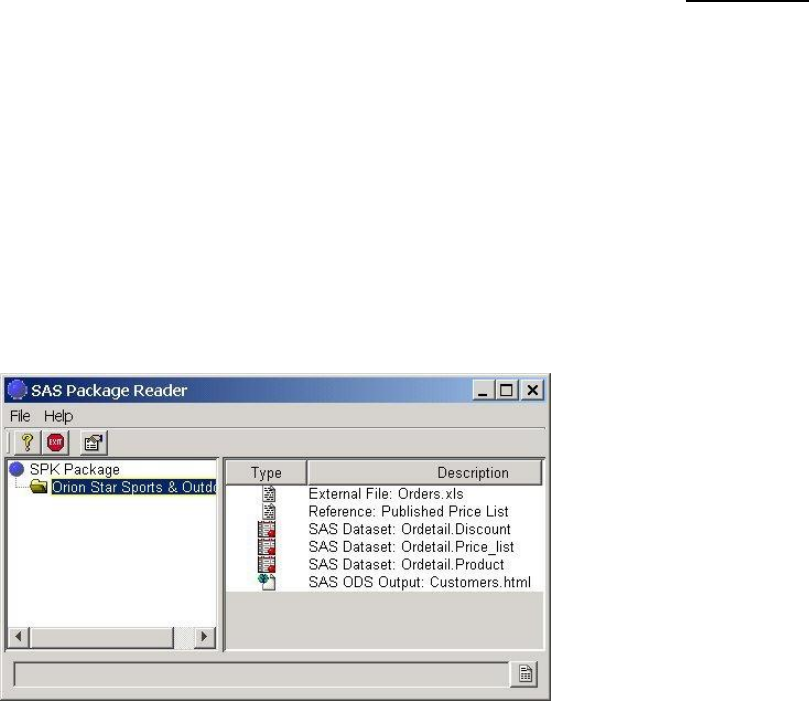
SAS Package Reader
The SAS Package Reader application enables you to retrieve the contents of a SAS package as an archive file from an
archival location or e−mail without having to run SAS. Archives are most commonly delivered to users as attachments
to e−mail messages. An archive is denoted by a .spk file extension, which is an abbreviation for SAS Package.
A read−only tool, SAS Package Reader is useful for viewing individual package entries and saving them to local files.
SAS Package Reader launches an appropriate viewer to allow you to see the content of the package entry. For SAS
data sets, it starts a built−in data set viewer; for all other viewable data, it starts the Web browser that is already
configured on your system.
What you do with a package corresponds to the type of consumer that you are and the type of information that is
contained in the package. Packages are created for specific target consumers for definite purposes.
Because you do not need SAS running in order to use SAS Package Reader, you do not need additional SAS software
licensed in order to retrieve packages.
Publishing Framework
SAS Package Reader 229
SAS Package
SAS package content takes the following forms:
SAS fileSAS catalog♦ SAS data set♦ SAS database (such as DMDB, FDB, and MDDB)♦ SAS SQL view♦
•
binary file (such as Excel, GIF, JPG, PDF, PowerPoint, and Word)• HTML file (including ODS output)• reference string (such as a URL)• text file (such as a SAS program)• viewer file (an HTML template that formats SAS file items for viewing in e−mail).•
Publishing Framework
SAS Package 230

Overview
You use the SAS Package Reader to view packages that have been published to the archive transport through the
Publishing Framework of SAS Integration Technologies. The SAS Package Reader reads content that has been
published as a file of type SPK (an abbreviation for SAS Package), which is a compressed file. SPK files are
commonly delivered to users as attachments to e−mail messages.
The SAS Package Reader displays a listing of the entries within a package. It contains a built−in viewer for SAS data
set entries and it launches a Web browser for all other entry types, such as text, HTML, or graphics.
Note: Some entry types cannot be viewed. Examples include viewer files, SAS catalogs, and SAS databases (MDDB,
FDB, and DMDB files). If the selected entry type is not viewable, then the View icon does not appear in the toolbar.
In addition, if you try to view a SAS data set that is password−protected, a message is displayed saying that the data
set cannot be accessed.
What you do with a package corresponds to the type of consumer that you are and the type of information that is
contained in the package. Packages are created for specific target consumers for definite purposes. Typical consumers
and their corresponding package types are as follows:
Business users and executives
who can view external files in the form of text (for example, Word), HTML, or MIME (for example, GIF or
JPEG) via a Web browser.
Spreadsheet users
who can view SAS data in CSV format that can be loaded into third−party spreadsheet applications, such as
Excel and Lotus.
SAS programmers
who can create SAS programs and data in the form of data sets, catalogs, or SAS databases (for example,
MDDBs, FDBs, and DMDBs).
Publishing Framework
Overview 231
SAS Package Reader Requirements
The following additional software is required in order to run the SAS Package Reader application:
Java Runtime Environment
To install and run the SAS Package Reader application, you must have the Sun Java 2 Runtime Environment,
Standard Edition, v 1.4.1.
Web Browser
For package entries that are viewable via a Web browser, you must have a Web browser installed on your system. All
files, with the exception of SAS data sets, are passed to the Web browser for viewing. For example, if you are trying
to read a file that is in Portable Document Format (.pdf) and you do not have Acrobat Reader installed, the browser
will be unable to read the file and will prompt you for a location to which the file can be saved.
Publishing Framework
SAS Package Reader Requirements 232
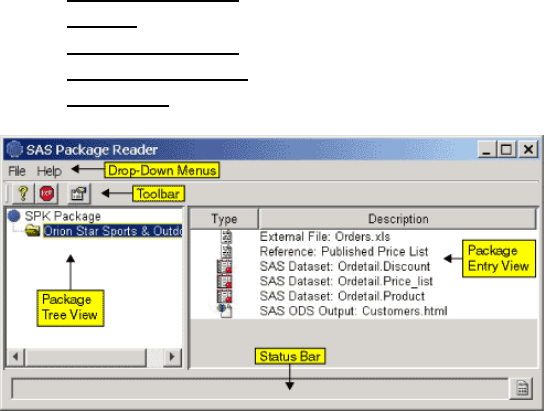
Package Reader Interface
The SAS Package Reader window contains these parts
Drop−down Menus• Toolbar• Package Tree View• Package Entry View• Status Area.•
To adjust the relative sizes of the two areas, use the mouse to drag the vertical bar that separates the areas.
Drop−down Menus
Two drop−down menus are available: File and Help.
The File drop−down menu contains one choice.
Exit exits SAS Package Reader.
The Help drop−down menu contains two choices.
Help opens a Web browser window that displays information about using SAS Package Reader.
About displays a window that contains information about the release of SAS Package Reader that you are using.
An example follows:
Package Reader Interface 233

Clicking OK removes the display.
Toolbar
The toolbar contains icons that represent the actions that you can perform on a selected package or package entry. The
icons in the toolbar change according to what is selected in the window.
Properties
displays the properties that are associated with the currently selected package or package entry.
View
displays the contents of the currently selected entry. The viewer application that is used depends on the entry
type.
If the entry is a SAS data set, then the SAS Package Reader's built−in data set viewer is used.• If the entry is one of the other viewable entry types, then the files that comprise the entry display using
the Web browser that was specified when the SAS Package Reader application was installed.
•
Note: Some entry types cannot be viewed using the SAS Package Reader application. Examples include SAS
catalogs and SAS databases (MDDB, FDB, and DMDB files). If the selected entry type is not viewable, then
the View icon does not appear in the toolbar.
Save
extracts the files that comprise the selected entry and saves them in a directory that you select. You are
prompted for the filename and directory path at which to save the files.
Note: Some entry types cannot be saved using the SAS Package Reader application. Examples include SAS
catalogs and SAS databases (MDDB, FDB, and DMDB files). If the selected entry type cannot be saved, then
the Save icon does not appear in the toolbar.
Help
opens a Web browser window that displays information about using the SAS Package Reader application.
Exit
closes the SAS Package Reader application.
SAS® Integration Technologies: Developer's Guide
Package Reader Interface 234
Package Tree View
Each package is represented by a folder icon
( ).
If the selected package contains a nested package (or if the application has not yet determined whether the selected
package contains a nested package), then the folder icon is accompanied by a to the left of the icon.
Package Entry View
When you select a package from the Package Tree View, the Package Entry View displays entry information in the
following columns:
Type displays an icon that represents the entry type. For example, a SAS data set is represented as ; an external
file (such as a URL) is represented as .
Description
describes the contents of the package's items, as specified by the publisher of the package.
Status Area
The status message area at the bottom of the window is where the SAS Package Reader application displays
informational messages. Click the icon to the right of the message area ( ) to clear the current message.
Note: The appearance of the icon changes according to the type of message that is displayed in the message area.
Publishing Framework
SAS® Integration Technologies: Developer's Guide
Package Reader Interface 235
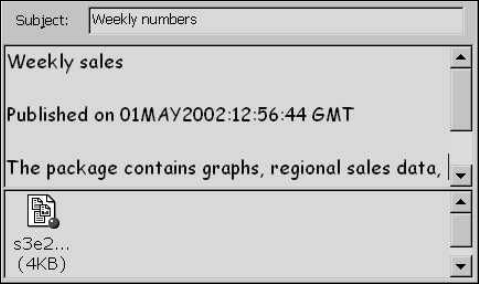
Accessing a SAS Package
You typically access a SAS package (also referred to as an SPK or an archive) from an archival location. You may be
alerted to the availability of an archive via an e−mail message.
Here is an example of the appearance of an archived file attachment to an e−mail message.
Assuming the SAS Package Reader is installed, double−click the icon, which automatically invokes SAS Package
Reader from the e−mail program for viewing the package.
Publishing Framework
Accessing a SAS Package 236
Listing One or More Packages
Each package in the Package Tree View is represented by a folder icon ( ). If the selected package contains a nested
package, then the folder icon is accompanied by a to the left of the icon.
To view a package's entries, click the icon (or the corresponding description).
The icon for the selected package changes to a and the package's entries are listed in the Package Entry
View.
1.
If a icon appears, click the to show the nested package that is contained in the package.
The icon changes to a .
Click the again to collapse the contents of a nested package. The icon changes to a .
2.
After you select a package, you can do the following:
View the package's properties• Select a package entry•
Publishing Framework
Listing One or More Packages 237
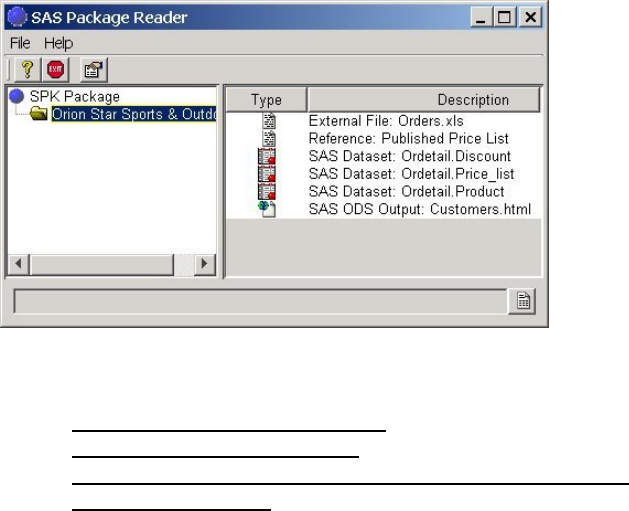
Listing Package Entries
To list a package's entries, select a package from the Package Tree View.
The Package Entry View displays the contents of the package. The view presents a list of icons that represent the entry
types and descriptions of the entry.
An example of a listing of package entries follows.
From the Package Entry View, you can select an entry and do the following:
View the package entry's properties• View the entry in a web browser• View a SAS data set entry by using the built−in data set viewer• Save the entry to a file•
Publishing Framework
Listing Package Entries 238
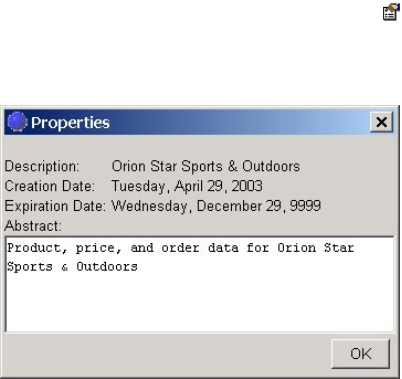
Viewing Package Properties
To view package properties
Select the package from the Package Tree View.1. Select the Properties icon from the toolbar ( ).
A dialog box is displayed that contains the properties for the selected package.
The following properties are displayed:
the description of the package, if one was provided when the package was created.♦ the name/value pair for the package, if one was specified when the package was created (archive,
message queue, and SAS channel subscriber delivery types only).
♦
the date when the package was created.♦ the expiration date of the package, if one was specified when the package was created.♦ the abstract (a longer text description of the package contents), if one was specified when the package
was created.
♦
2.
Publishing Framework
Viewing Package Properties 239
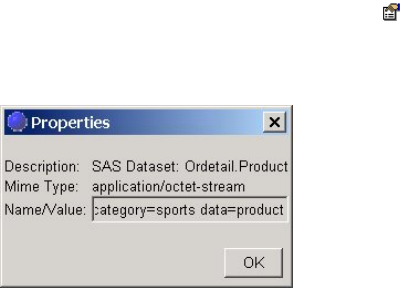
Viewing Package Entry Properties
To view a package entry's properties
Select the package entry from the Package Entry View.1. Select the Properties icon from the toolbar ( ).
A dialog box is displayed that contains the properties for the selected entry.
The following properties are displayed:
the description of the entry.♦ the MIME type of the package entry.♦ name/value pairs for the entry, if they were specified when the entry was created. If all of the
name/value pairs are not visible, use the right arrow key on your keyboard to scroll through the list.
Note: Name/value pairs enable the publisher to provide specific information about individual entries
within the package. With knowledge of name/value pairs, an applications developer can write an
application that retrieves package entries according to specific criteria.
♦
2.
Publishing Framework
Viewing Package Entry Properties 240

Viewing an Entry in a Web Browser
To view an external file (such as a URL),
Select the entry from the Package Entry View.1. Select the View icon ( ) in the toolbar.
Note: If the selected entry is a SAS data set in native format, then the SAS Package Reader application's
built−in data set viewer is used.
If the selected entry is a URL, then it is passed directly to the web browser that was specified when the SAS
Package Reader application was installed.
If the selected entry is one of the other viewable entry types, then the files that comprise the entry are written
to a temporary directory and displayed using your web browser. SAS Package Reader uses the temporary
directory and web browser that was specified during installation.
Note: Some entry types cannot be viewed. Examples include viewer files, SAS catalogs, and SAS databases
(MDDB, FDB, and DMDB files). If the selected entry type is not viewable, then the View icon does not
appear in the toolbar.
2.
Publishing Framework
Viewing an Entry in a Web Browser 241
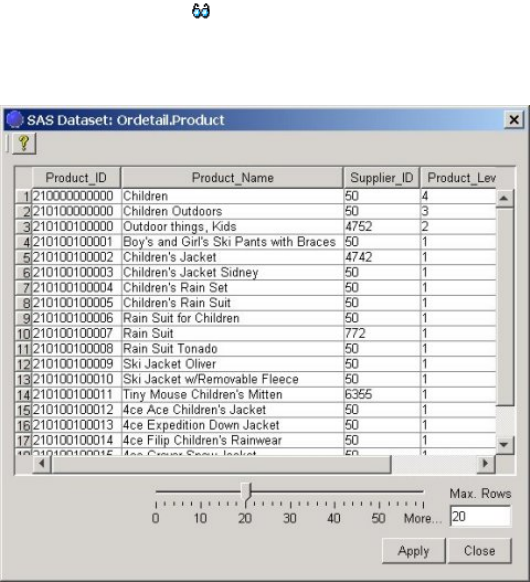
Viewing SAS Data Sets
To view a SAS data set entry,
Select the SAS data set entry from the Package Entry View.1. Select the View icon ( ) in the toolbar.
The contents of the data set are displayed as a table in a separate window.
Note: If the data set is password−protected, a message will be displayed saying that SAS Package Reader
cannot display it.
2.
Use the slider control to reveal additional rows and columns in the viewer window.
Optionally, enter the desired number of rows directly in the Max. Rows field.
The range of observations (rows) that can be viewed is represented by the phrase More... in the slider
control. More rows of data can be scrolled in the window as you move the slider control to the right. After you
set the range of rows to be viewed, you can view the rows and columns by using the vertical and horizontal
scroll bars.
If labels are defined in the data set, column labels are used for the column headings. Otherwise, the
corresponding column names are used for the column headings.
If a column contains character variable values with transcoding set to "no," SAS Package Reader treats the
values as binary data and displays them using hexadecimal digits separated by spaces.
3.
Finding out the Maximum Number of Rows in the Data Set
To find out the maximum number of rows in the data set,
Move the slider control to the far right position.1.
Viewing SAS Data Sets 242
The More... phrase is replaced with the maximum number of rows in the data set.
As an alternative, you can enter a value in the Max. Rows field.
If you enter a value that exceeds the end of the range, the maximum number of records in the data set appears
in the Max. Rows field. Also, the maximum number of records replaces the end point of the slider control,
replacing the More... phrase.
Example
If you specify 5000 rows, which is the maximum number of rows in the data set, the display window reveals
data up to that row.
Although the maximum row number is specified, the More... phrase remains in the slider control.
If you specify 5001 rows, the maximum data set size is exceeded and the maximum number of rows, 5000,
replaces the More... phrase in the slider control.
Therefore, only if you specify a row number that exceeds the maximum number of rows in the data set will
the size of the data set be known.
2.
Publishing Framework
SAS® Integration Technologies: Developer's Guide
Viewing SAS Data Sets 243

Saving a Package Entry
To save a selected package entry to a local file system,
Select the package entry from the Package Entry View.
Note: You can save all SAS package entry types except SAS files. See SAS Package for a list of valid
package entry types.
1.
Select the Save icon in the toolbar ( ).
A dialog box appears in which you specify the desired location for the file to be saved. The default save
location is defined by the TEMP system environment variable.
2.
Publishing Framework
Saving a Package Entry 244

SAS Package Retriever
SAS Package Retriever is an SCL application that enables you to retrieve package data from a transportmessage
queue, or WebDAV−compliant server—an appropriate storage location on your SAS System or an external file
location. After you designate a storage location for the entryexample, at a libref, fileref, or a file locationcan reference
the entry for inclusion in a SAS program for continued package publishing in the business enterprise.
Examples of package data include SAS data (such as a SAS data set, SAS catalog, or a SAS database) and external
data (such as an HTML file, binary file, text file, or viewer file).
Underlying the functions of SAS Package Retriever is a subset of the Publish Package CALL routines that relate
explicitly to retrieving packages, which you could directly use for programmatic package retrieval.
Publishing Framework
SAS Package Retriever 245
SAS Package Retriever Requirements
The SAS Package Retriever application requires SAS Release 8.1 or higher. A license for base SAS software as well
as SAS Integration Technologies (production version) is required.
SAS Package Retriever is supported in the Open VMS Alpha, UNIX, and Windows operating environments.
Publishing Framework
SAS Package Retriever Requirements 246
Invoking SAS Package Retriever
To invoke SAS Package Retriever, enter in the command line
retrievepackage
Note: SAS Package Retriever is supported on the Alpha VMS, UNIX, and Windows operating environments. It is not
supported on the z/OS environment.
Publishing Framework
Invoking SAS Package Retriever 247
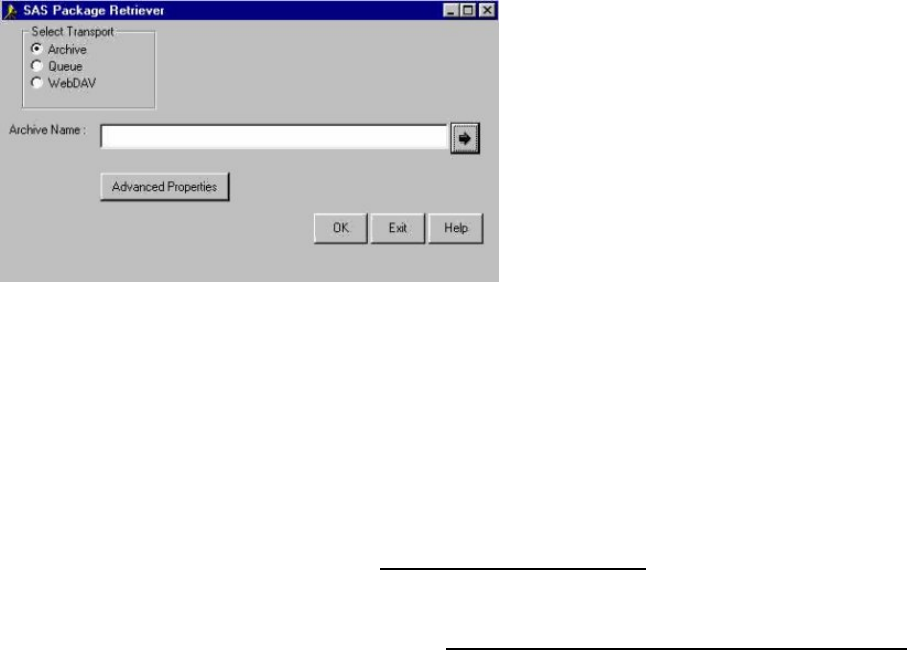
Obtaining a Package from an Archive
To obtain a package from an archive, follow these steps:
Select Archive from the Select Transport field in the SAS Package Retriever window.1.
In the Archive Name field, enter the name of the file that you want to retrieve.
Specify the full path and name of the archive file, excluding the .spk extension.
You can also use the arrow button next to the field to browse and select your package.
2.
If the archive is located on an LDAP server, an HTTP server, or a remote host and is running secured, you
must provide credentials in order to bind to the server or host for package retrieval.
Click Advanced Properties to supply credentials.
For details about supplying credentials, see Advanced Archive Properties.
3.
After you identify the package and the archive retrieval options, click OK to retrieve and store the package.
For details about retrieving and storing entries, see Selecting Package Entries for Retrieval and Storage.
4.
Publishing Framework
Obtaining a Package from an Archive 248
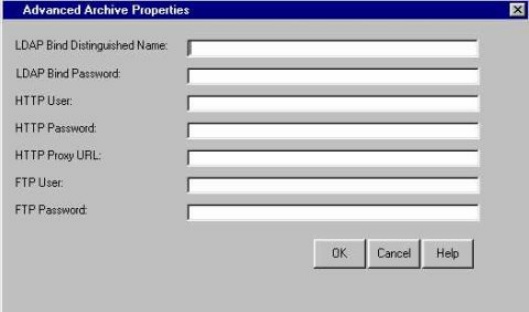
Advanced Archive Properties
You must set advanced archive properties only if you specify an LDAP server, an HTTP server, or a remote host that
is running secured. In order to retrieve the package from a secured server or host, you must supply credentials that are
necessary for binding to the appropriate server or host.
To set parameters for package retrieval from an archive, make the appropriate entries in the following fields:
LDAP Bind Distinguished Name
specifies a character string that indicates the distinguished name that is used to bind to the LDAP
server.
LDAP Bind Password
specifies a character string that indicates the password that is used to bind to the LDAP server.
FTP User
specifies a character string that identifies the user ID of the user who is retrieving from the remote
host.
If the FTP protocol is specified as the archive path and the server does not accept anonymous user
access, then you must specify an FTP user ID. If you specify an FTP user ID, then you must also
specify an FTP password.
FTP Password
specifies the user's password that is needed to retrieve from the remote host
If the FTP protocol is specified as the archive path and the server does not accept anonymous user
access, then you must specify an FTP password. If you specify an FTP password, then you must also
specify an FTP user ID.
HTTP User
specifies a character string that identifies the user ID of the user who binds to the Web server when
retrieving a package. Supplying an HTTP user ID is necessary only if the remote host where the
archive is located runs secured.
HTTP Password
specifies a character string that identifies the password of the user who binds to the Web server when
retrieving a package.
Note:Supplying an HTTP password is necessary only if the remote host where the archive is located
runs secured.
HTTP Proxy URL
1.
Advanced Archive Properties 249

specifies a character string that identifies the URL of the proxy server.
After you make the appropriate field entries, click OK.
Control is returned to the SAS Package Retriever window.
2.
Publishing Framework
SAS® Integration Technologies: Developer's Guide
Advanced Archive Properties 250
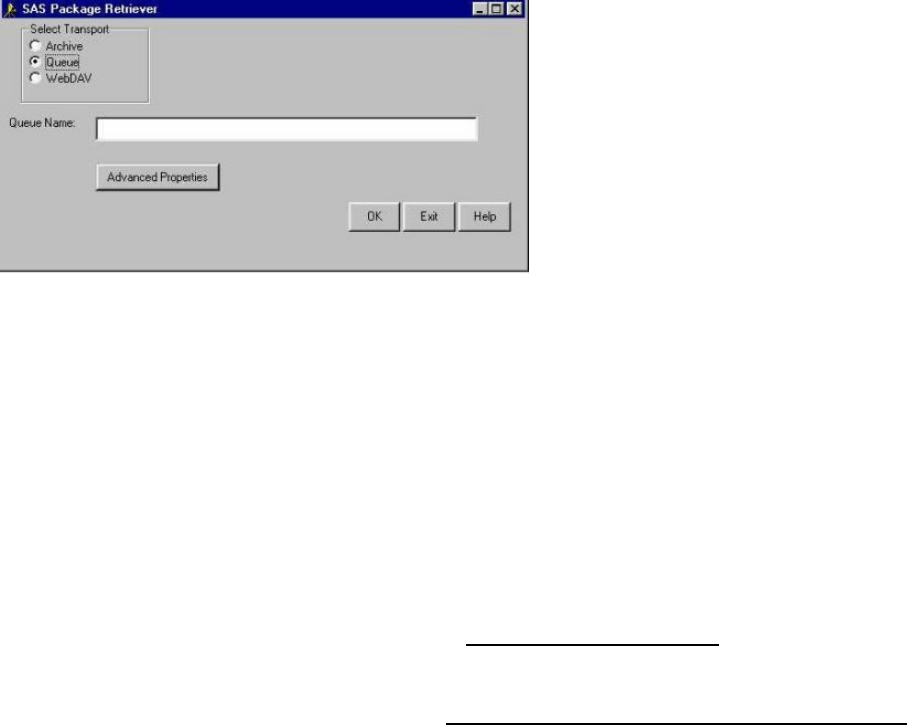
Obtaining a Package from a Queue
To retrieve and store package entries from a queue, follow these steps:
Select Queue from the Select Transport field in the SAS Package Retriever window.1.
In the Queue Name field, specify a queue name in one of the following formats:
MSMQ://machineName\queueName
♦ MQSERIES://queueManager:queueName
♦ MQSERIES−C://queueManager:queueName
♦
For example:
MQSERIES://MYPC:LocalQ
MSMQ://mypc\localq
2.
In order to specify a correlation ID for the package that is being retrieved or to specify a search time for
locating the package on the queue, you must supply additional retrieval properties.
Click Advanced Properties to supply properties.
For details about supplying additional properties, see Advanced Queue Properties.
3.
After you identify the package and retrieval options, click OK to retrieve and store the package.
For details about retrieving and storing entries, see Selecting Package Entries for Retrieval and Storage.
4.
Publishing Framework
Obtaining a Package from a Queue 251
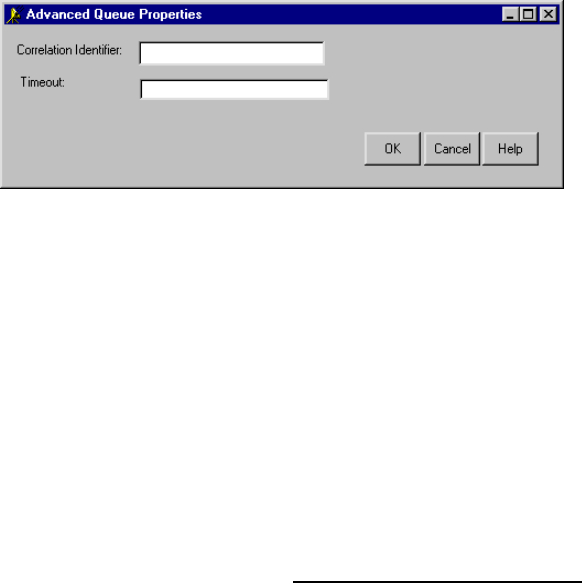
Advanced Queue Properties
You might need to specify additional options to search the queue for the package to be retrieved.
To set parameters for package retrieval from a queue, make the appropriate entries in the following fields:
Correlation Identifier
specifies a binary character string that identifies a package. If specified, only packages that have a
header message with the specified correlation identifier will be retrieved. This is useful if you want to
retrieve only certain packages that have the same correlation identifier.
Timeout
specifies a numeric string that identifies the number of seconds for the operation timeout. By default,
the retrieve operation immediately returns output that lists the number of packages that are found in
the queue. To override this default, specify this property so that the retrieve operation continues to
search for packages until at least one package is found in the queue or until the timeout occurs.
1.
After you make the appropriate field entries, click OK.
Control is returned to the SAS Package Retriever window.
2.
Publishing Framework
Advanced Queue Properties 252
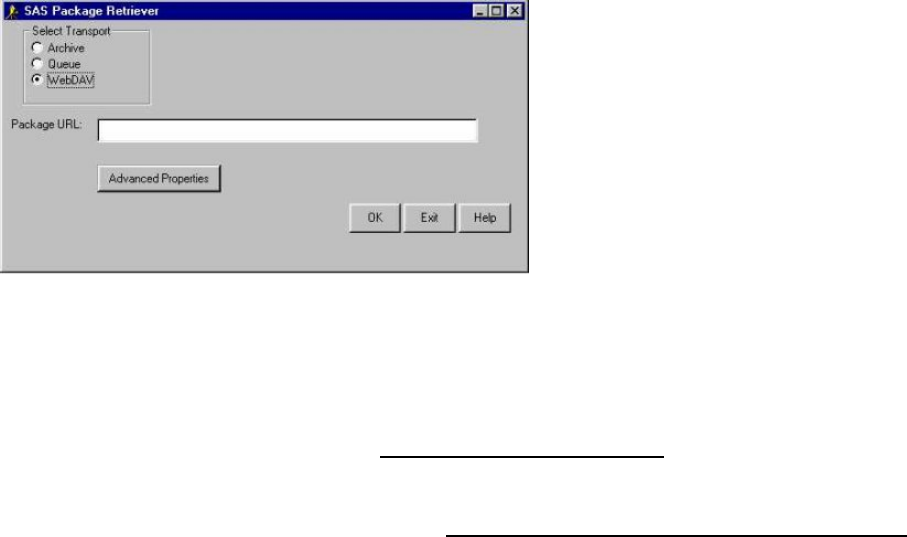
Obtaining a Package from WebDAV
To obtain your package from WebDAV, follow these steps:
Select WebDAV from the Select Transport field in the SAS Package Retriever window.1.
In the Package URL field, enter the URL where the package is located.2. If the package is located on an HTTP server and is running secured, you must provide credentials in order to
bind to the server for package retrieval.
Click Advanced Properties to supply credentials.
For details about supplying credentials, see Advanced WebDAV Properties.
3.
After you identify the package and retrieval parameters, click OK to retrieve and store the package.
For details about storing and retrieving entries, see Selecting Package Entries for Retrieval and Storage.
4.
Publishing Framework
Obtaining a Package from WebDAV 253
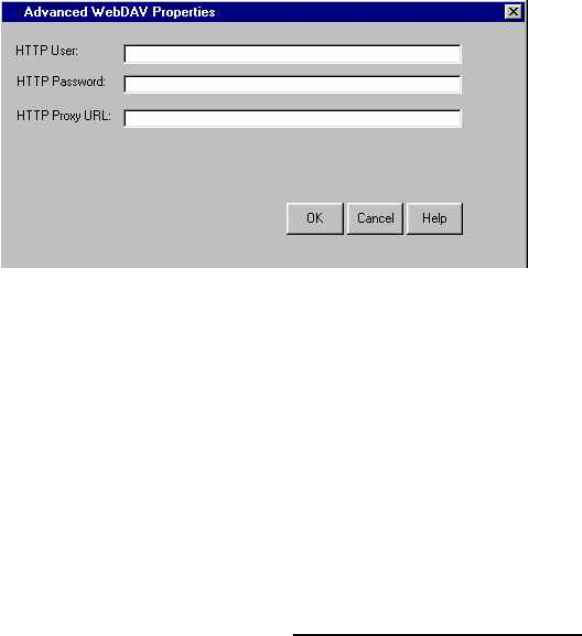
Advanced WebDAV Properties
You must set advanced WebDAV properties only if the HTTP server is running secured. You must provide
credentials in order to bind to the server for package retrieval.
To set parameters for package retrieval from WebDAV, make the appropriate entries in the following fields:
HTTP User
specifies a character string that identifies the user ID of the user who binds to the Web server when
retrieving a package.
HTTP Password
specifies a character string that identifies the password of the user who binds to the Web server when
retrieving a package.
HTTP Proxy URL
specifies a character string that identifies the URL of the proxy server.
1.
After you make the appropriate field entries, click OK.
Control is returned to the SAS Package Retriever window.
2.
Publishing Framework
Advanced WebDAV Properties 254

Selecting Package Entries for Retrieval and Storage
The Result Package Tree View window enables you to browse a tree view of all the packages and entries that you
obtained via the specified transport.
Look at the contents of a package (or to expand the package view) by clicking the plus sign (+) that is next to
the folder that contains the package.
The preceding illustration shows an expanded view of the North American Sales package.
Collapse the view of a folder by clicking the minus sign (−) that is next to the folder.
1.
Retrieve and store a package entry by double−clicking the entry or highlighting the entry and clicking OK.2. Specify properties for retrieving and storing the entry type.
How you retrieve and store an entry depends on its type. For details about retrieving and storing the entry,
double−click the applicable entry type.
SAS file types are as follows:
SAS catalogs and databases♦ SAS data sets.♦
External file types are as follows:
Binary Files♦ Binary CSV Files♦ HTML Files♦ Text Files♦ Viewer Files.♦
3.
After you permanently retrieve and store a package, you might choose to remove the entire package from the
transport. For details, see Removing the Package from the Transport.
4.
Selecting Package Entries for Retrieval and Storage 255
Publishing Framework
SAS® Integration Technologies: Developer's Guide
Selecting Package Entries for Retrieval and Storage 256

Retrieving and Storing a Package Entry
How you retrieve and store a package entry depends on whether it is a SAS file or an external file. For example, you
could retrieve and store a SAS data set in a SAS libref, or you could retrieve and store a binary file directly into a
directory in the target operating environment.
Methods for retrieving and storing entries are provided according to file type as follows:
SAS files
SAS data sets♦ SAS catalogs and databases.♦
•
External files
Binary Files♦ Binary Files of Type CSV♦ HTML Files♦ Text Files♦ Viewer Files.♦
•
Publishing Framework
Retrieving and Storing a Package Entry 257
Retrieving and Storing a Data Set
When you select a data set to retrieve and store from the Result Package Tree View window, the Specify Output
Library Name and Member Name window prompts you to specify the storage location.
Specify the library name and the member name for the data set.
Library Name
specifies the library where you want the retrieved data set to be stored. You can also click the arrow
beside this field to browse possible library selections.
Member Name
specifies the name for the data set.
1.
In the Data Set Options field, specify options as a text string in the following form:
option1=value option2=value ...
Example:
pw='born2run' keep=empno
Surround string values, such as a password, with single quotation marks.
You can specify a value for data set options that apply to a data set that is opened for input.
Examples of options that you can specify on this window are as follows:
GENNUM=♦ LABEL=♦ OUTREP=♦ SORTEDBY=♦ TOBSNO=♦ TRANTAB=♦ PW=♦ READ=♦ WRITE=♦ ALTER=♦ FIRSTOBS=♦ OBS=♦ WHERE=♦
2.
Retrieving and Storing a Data Set 258
IDXNAME=♦ IDXWHERE=♦ DROP=♦ KEEP=♦ RENAME=♦
For a complete list of data set options, see the SAS Data Set Options topic in either the SAS Online Help,
Release 8.2, or the SAS Version 8 online documentation.
Click OK to retrieve and store the data set.3.
Publishing Framework
SAS® Integration Technologies: Developer's Guide
Retrieving and Storing a Data Set 259
Retrieving and Storing a Catalog, MDDB, or SQLView
Entry
When you select a catalog, MDDB, FDB, or SQLView entry to retrieve and store from the Result Package Tree View
window, the Specify Output Library Name and Member Name window prompts you to specify the storage location.
Specify the library name and the member name for the data set.
Library Name
specifies the library where you want the retrieved SAS package entry to be stored. You can also click
the arrow beside this field to browse possible library selections.
Member Name
specifies the name for the entry.
1.
Click OK to retrieve and store the package entry.2.
Publishing Framework
Retrieving and Storing a Catalog, MDDB, or SQLView Entry 260
Retrieving and Storing a Binary File Entry
When you select a binary file entry to retrieve and store from the Result Package Tree View window, the Specify
Output Filename or Fileref window prompts you to specify the storage location.
Under the Select Type option, select either Filename or Fileref.
In the following field, specify the location of the filename or the fileref where you want the retrieved binary
file to be stored. You can also click the arrow beside the field to browse possible filename or fileref selections.
Filename
specifies the name of the external file where you want the entry to be stored.
Fileref specifies the SAS fileref where you want the entry to be stored.
1.
Click OK to retrieve and store the binary file.2.
Publishing Framework
Retrieving and Storing a Binary File Entry 261
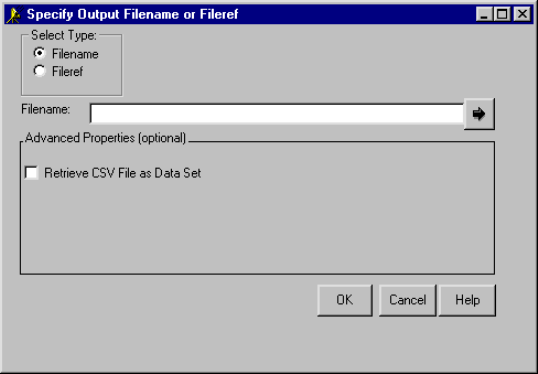
Storing a Binary CSV File Entry
When you select a Binary CSV (Comma Separated Value) file entry to retrieve and store from the Result Package
Tree View window, the Specify Output Filename or Fileref window prompts you to specify the storage location.
Under the Select Type option, select either Filename or Fileref.1. In the following field, specify the location of the filename or the fileref where you want the retrieved binary
file to be stored. You can also click the arrow beside the field to browse possible filename or fileref selections.
Filename
specifies the name of the external file where you want the entry to be stored.
Fileref specifies the SAS fileref where you want the entry to be stored.
2.
You might also optionally check the Retrieve CSV File as Data Set check box to indicate that you want the
CSV file to be stored as a SAS data set.
If you retrieve the CSV file as a SAS data set, you will be prompted for the library and member names.
Library Name
specifies the library where you want the retrieved data set to be stored. You can also click the arrow
beside this field to browse possible library selections.
Member Name
specifies the name for the data set.
3.
Click OK to retrieve and store the binary CSV file.4.
Publishing Framework
Storing a Binary CSV File Entry 262
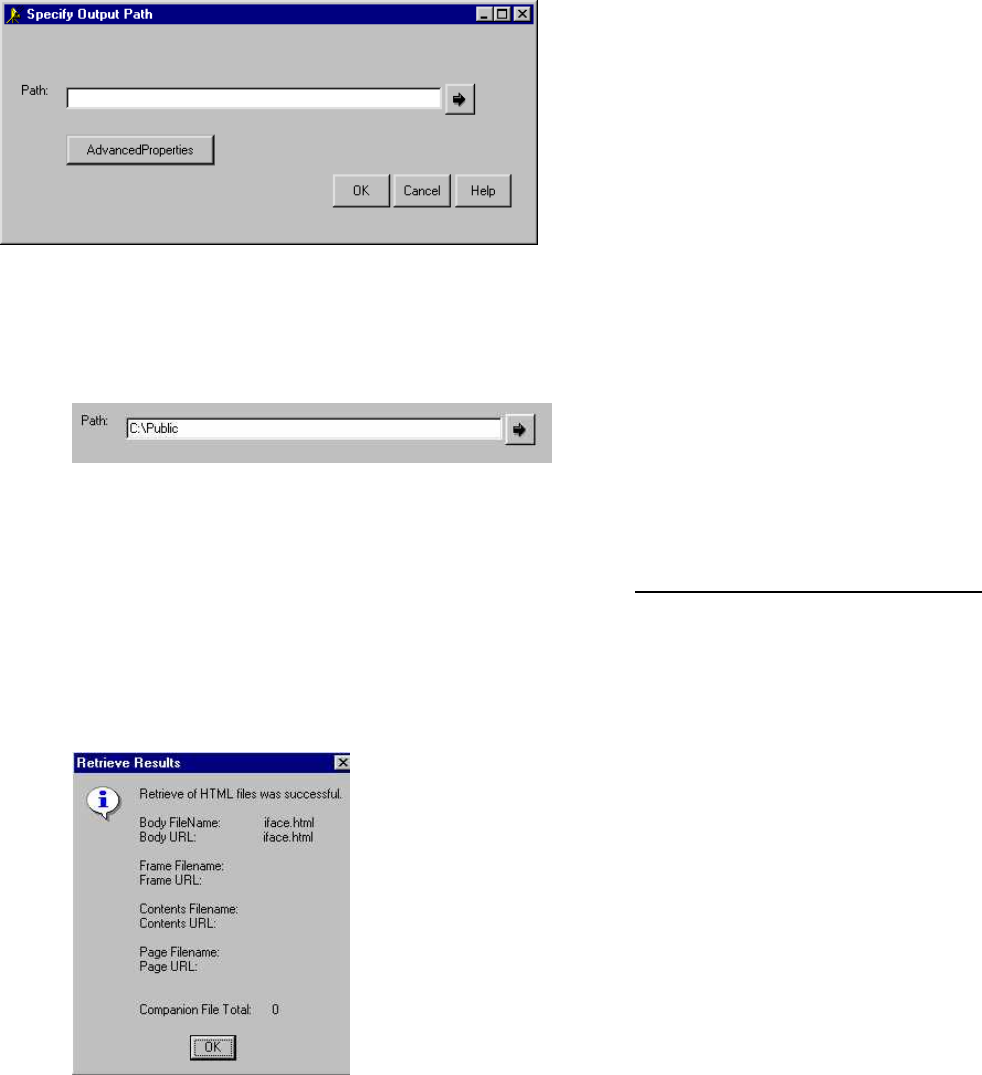
Retrieving and Storing an HTML File Entry
When you select an HTML file entry (with possible accompanying companion files) from the Result Package Tree
View window to retrieve and store, the Specify Output Path window prompts you to specify the storage location.
Enter the location where you want the retrieved HTML files to be stored.
Specify the path in the Path field in the Specify Output Path window or use the arrow button next to the field
to browse and select your location. An example follows:
1.
If you know that the publishing host and the retrieving host do not share a common architecture, you can
specify alternate character set encoding for the retrieved HTML files by clicking the Advanced Properties
button.
For more information about specifying advanced properties, see HTML and Viewer Encoding Property.
2.
Click OK to store the HTML files.3. If companion files are attached to the set of HTML files, skip this step and go to the next.
If no companion files are attached to the set of HTML files that you just retrieved and stored, you see the
following display:
In this example, notice the message:
Companion File Total: 0
4.
Retrieving and Storing an HTML File Entry 263
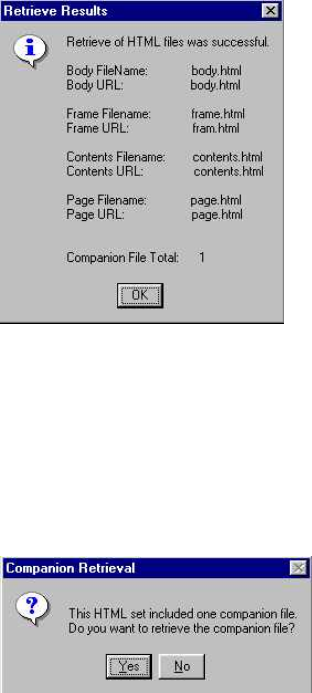
Click OK to acknowledge that the HTML files were successfully retrieved and stored and that no companion
files exist.
You are finished.
If companion files are attached to the set of HTML files that you just retrieved and stored, you see the
following display:
In this example, notice the message:
Companion File Total: 1
Click OK to acknowledge that the HTML files were retrieved and stored and that companion files exist that
might also be retrieved and stored.
5.
The Companion Retrieval Window is displayed to ask if you want to retrieve and store the companion files.
Click Yes to confirm that you want to retrieve and store companion files.
6.
The Specify Output Path for Companion File(s) Window is displayed to prompt for a storage location for the
companion files.
Enter the location where you want the retrieved companion files to be stored.
Note: Storage locations for HTML files and companion files can be different.
An example of a storage location follows:
7.
SAS® Integration Technologies: Developer's Guide
Retrieving and Storing an HTML File Entry 264

Click OK to retrieve and store the companion files at the specified location.8. The following confirmation is displayed:
Click OK to acknowledge that the companion files were successfully retrieved and stored.
You are finished.
9.
Publishing Framework
SAS® Integration Technologies: Developer's Guide
Retrieving and Storing an HTML File Entry 265
HTML and Viewer Encoding Property
Encoding refers to how a host internally represents character data. Hosts that share common architectures represent
character data identically. For example, UNIX hosts internally represent character data in ASCII−ISO format, z/OS
hosts in EBCDIC format, and Windows hosts in ASCII−ANSI format.
HTML files are published with a character set encoding that is either automatically generated, by default, or is
user−specified. Under some circumstances (for example, the publishing host and retrieving host architectures are
different), you might decide to specify a character set encoding that is appropriate for the retrieving host.
To override the default encoding property and supply one that is appropriate to the target host at which the HTML
files are to be stored, supply a suitable encoding property. This encoding property indicates that the HTML files
should be translated into the specified character set encoding. The encoding that is published with the file is used as
the source encoding, and the user−specified encoding is used as the destination encoding.
For complete details about the publish and retrieve encoding behavior topic, see Publish/Retrieve Encoding Behavior.
Publishing Framework
HTML and Viewer Encoding Property 266
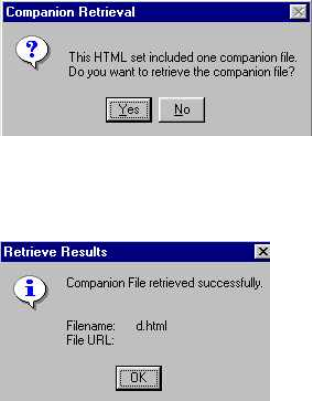
Storing a Companion File
When you store HTML files, one or companion files might also be attached to the set of HTML files. If a companion
file is included, the Retrieve Results window is displayed to report the number of companion files that can be stored.
The Companion Retrieval Window is displayed to ask if you want to store the companion files.
Click Yes to store companion files.
1.
The following confirmation is displayed.
Click OK to store the HTML files and companion files.
2.
Publishing Framework
Storing a Companion File 267

Retrieving and Storing a Text File Entry
When you select a text file entry to retrieve and store from the Result Package Tree View window, the Specify Output
Filename or Fileref window prompts you to specify the storage location.
Under the Select Type option, select either Filename or Fileref. In the following field, specify the location of
the filename or the fileref where you want the retrieved entry to be stored. You can also click the arrow beside
the field to browse possible filename or fileref selections.
Filename
specifies the name of the external file where you want the entry to be stored.
Fileref specifies the SAS fileref where you want the entry to be stored.
1.
Click OK to retrieve and store the text file.2.
Publishing Framework
Retrieving and Storing a Text File Entry 268
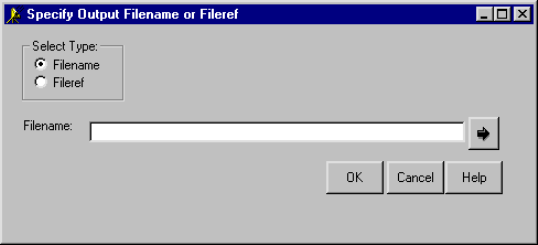
Retrieving and Storing a Viewer File Entry
When you select a viewer file entry to retrieve and store from the Result Package Tree View window, the Specify
Output Filename or Fileref window prompts you to specify the storage location.
Under the Select Type option, select either Filename or Fileref.
In the following field, specify the location of the filename or the fileref where you want the retrieved entry
stored. You can also click the arrow beside the field to browse possible filename or fileref selections.
Filename
specifies the name of the external file where you want the entry to be stored.
Fileref specifies the SAS fileref where you want the entry to be stored.
1.
Click OK to retrieve and store the viewer file.2.
Publishing Framework
Retrieving and Storing a Viewer File Entry 269

Removing the Package from the Transport Location
After you permanently store the retrieved package entry, if you have write privileges to the transport, you might
choose to remove the entire package from the transport location (for example, archive, queue, or WebDAV) via the
Result Package Tree View in order to free resources. Your ability to remove a package from the specified transport
depends on user permissions that already exist in your operating environment.
Caution: Be assured that destroying a package at the transport location does not destroy the package entries that you
retrieved and stored locally. You optionally destroy a package after you permanently retrieve and store the package
entries in the SAS System or the operating environment.
Select the package from the Result Package Tree View that you want to destroy.
The following Result Package Tree View shows a package named North American Sales.
Rules
A package is signified by a plus sign (+) that is next to a package−level folder.♦ You can destroy only entire packages. The Destroy button is visible only when it is available for use.♦ You cannot destroy individual package entries or nested packages. If you select a package entry or a
nested package, the Destroy button is unavailable for use.
For example, if the transport is a queue, clicking Destroy deletes all messages that are associated with
the selected package from the queue.
♦
1.
Click Destroy.
The following confirmation is displayed:
2.
Removing the Package from the Transport Location 270
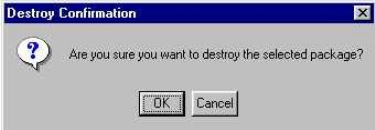
Click OK to remove the package entirely from the transport.
For example, for an archive transport, OK deletes the archive file, which cannot be retrieved again.
3.
Publishing Framework
SAS® Integration Technologies: Developer's Guide
Removing the Package from the Transport Location 271

Publish Package Interface
The Publish Package Interface consists of SAS CALL routines that enable you to write SAS programs, including
stored processes, that create, populate, publish, and retrieve collections of information known as packages.
The process of publishing a package follows:
A package is created using the PACKAGE_BEGIN CALL routine.
This CALL routine assigns a name to the package and any optional name/value pairs that are associated with
it.
Name/value pairs are used to assign metadata to a package or individual package entries. This enables you to
create filters that aid in information retrieval. The filters can be used both by subscribers to channels and by
programs that search the package archive.
1.
A package is populated by adding package entries using the INSERT_* CALL routines.
An entry can be a SAS file (for example, data set, catalog, or SAS MDDB), or almost any other kind of file,
including HTML and images. You can also nest packages by including a package as an entry in another
package. Entries are referenced in the order in which they were added to the package.
Note: If inserting HTML file entries, see Publish/Retrieve Encoding Behavior.
2.
A package is published to a delivery transport using the PACKAGE_PUBLISH CALL routine.
Supported transports are e−mail addresses, a message queue, subscribers to a pre−defined channel, a
WebDAV−Compliant server, and an archive.
3.
A package is retrieved from a delivery transport using the PACKAGE_RETRIEVE* CALL routines.4.
Publishing Framework
Publish Package Interface 272

Publish/Retrieve Encoding Behavior
This section covers the following topics:
Default Publish/Retrieve Behavior• User−Specified Encoding in PACKAGE_PUBLISH• Rules for Determining File Encoding• Specifying an Encoding on the Retrieve•
Default Publish/Retrieve Behavior
All HTML files are published with a file encoding that indicates the character set of the HTML file. This encoding is
either automatically generated or user−specified. All published files are read as binary data.
When retrieved, all HTML files are written as binary data. By default, no translation occurs. However, translation
does occur when a file encoding is specified in the retrieve CALL routine (such as RETRIEVE_PACKAGE, for
example).
User−Specified Encoding in PACKAGE_PUBLISH
You may specify an encoding on the PACKAGE_PUBLISH CALL routine to indicate the file's character set. The
encoding values of ASCII, EBCDIC_R15 and EBCDIC_R25 are treated as special cases in the encoding rules below.
Rules for Determining File Encoding
The file encoding that is published with each HTML file is determined by the following rules.
The HTML file is searched for charset= within the META tags. The following rules govern the search:
The search covers only the META tags found within the HEAD portion of the document.♦ META tags within comments are ignored.♦ By default, the search uses the encoding of the native session. If a special encoding is specified
(ASCII, EBCDIC_RS25 or EBCDIC_RS15), the search uses that encoding rather than the native
session encoding.
♦
The encoding specified within the META tag always takes precedence over user−specified encodings
on the INSERT_HTML CALL routine.
♦
1.
If the encoding value is found within the HTML file, that value is published as the encoding value.2. If the encoding value is not found within the HTML, and if a user−specified encoding value was not provided
on the INSERT_HTML CALL routine, the native session encoding is published as the encoding value.
3.
If the encoding value is not found within the HTML, and if the user−specified encoding is not a special case
(not ASCII, EBCDIC_RS25, or EBCDIC_RS15), then the user−specified encoding value is published as the
encoding value.
4.
If the encoding value is not found within the HTML file, and if a special encoding value of ASCII was
specified, the following rules apply:
If running on an ASCII host at publish time, an attempt is made to use the current locale information
to determine the flavor of ASCII encoding. If the locale information is unavailable, the native session
encoding is used.
♦
5.
Publish/Retrieve Encoding Behavior 273
If running on an EBCDIC host at publish time, an attempt will be made to use the current locale
information to determine the transport format. If set, the transport format is the encoding that is used.
If not set, the default becomes ISO−8859−1.
♦
If the encoding value is not found within the HTML file, and if a special encoding value of EBCDIC_RS15 is
specified, an encoding value of OPEN_ED−1047 is used, regardless of the host operating environment.
6.
If the encoding value is not found within the HTML file, and if a special encoding value of EBCDIC_RS25 is
specified, an encoding value of EBCDIC1047 is used, regardless of the host operating environment.
7.
Specifying an Encoding on the Retrieve
By default, no translation occurs when HTML files are retrieved; the files are written as binary data. To override the
default at retrieve time, supply an encoding property. This property indicates that the HTML files should be translated
into the specified character set encoding. The encoding that is published with the file is used as the source encoding,
and the user−specified encoding is used as the destination encoding.
Publishing Framework
SAS® Integration Technologies: Developer's Guide
Publish/Retrieve Encoding Behavior 274

INSERT_CATALOG
Inserts a SAS catalog into a package.
Syntax
CALL INSERT_CATALOG(packageId, libname, memname, desc, nameValue, rc);
packageID
Numeric, input.
Identifies the package into which the catalog will be inserted.
libnameNumeric, input.
Names the library that contains the catalog.
memname
Character, input.
Specifies the name of the catalog.
desc Character, input.
Describes the catalog.
nameValue
Character, input.
Identifies a list of one or more space−separated name/value pairs, each in one of the following forms:
name◊ name=value◊ name="value"◊ name="single value with spaces"◊ name=(value)◊ name=("value")◊ name=(value1, "value 2",... valueN)◊
Name/value pairs are site−specific; they are used for the purpose of filtering.
rc Numeric, output.
Receives a return code.
Example
The following example inserts the catalog ALPHELP.PUBSUB into the PACKAGEID package.
libname = 'alphelp';
memname = 'pubsub';
desc = 'Publication's catalog';
nameValue='';
CALL INSERT_CATALOG(packageId, libname,
memname, desc, nameValue, rc);
INSERT_CATALOG 275

See Also
PACKAGE_BEGIN• PACKAGE_PUBLISH•
Publishing Framework
SAS® Integration Technologies: Developer's Guide
INSERT_CATALOG 276

INSERT_DATASET
Inserts a SAS data set into a package.
Syntax
CALL INSERT_DATASET(packageId, libname, memname, desc, nameValue, rc <, properties, propValue1,
...propValueN> );
packageID
Numeric, input.
Identifies the package.
libnameCharacter, input.
Names the library that contains the data set.
memname
Character, input.
Names the data set.
desc Character, input.
Describes the data set.
nameValue
Character, input.
Identifies a list of one or more space−separated name/value pairs, each in one of the following forms:
name◊ name=value◊ name="value"◊ name="single value with spaces"◊ name=(value)◊ name=("value")◊ name=(value1, "value 2",... valueN)◊
Name/value pairs are site−specific; they are used for the purpose of filtering.
rc Numeric, output.
Receives a return code.
properties
Character, input.
Identifies a comma−separated list of optional property names. Valid property names are as follows:
ALLOW_READ_PROTECTED_MEMBER◊ DATASET_OPTIONS◊ TRANSFORMATION_TYPE◊ CSV_SEPARATOR◊ CSV_FLAG◊
propValue1, ...propValueN
Character/numeric, input.
Specifies one value for each specified property. The order of the values matches the order of the property
names in the properties parameter. Valid property values are defined as follows:
ALLOW_READ_PROTECTED_MEMBER
INSERT_DATASET 277
Character string with a value of "YES". It is important to note that the password and encryption
attributes are not preserved in the intermediate published format (whether on a queue or in an
archive). Because of this exposure, take care when publishing datasets that are password protected
and/or encrypted.
The ALLOW_READ_PROTECTED_MEMBER property must be asserted on read−protected data
sets in order to be published. This ensures that the publisher realizes that this is a read−protected data
set, and that the read password and encryption attributes will not be preserved when stored in the
intermediate format. If this property is not applied, the publish operation will fail when trying to
publish the read−protected data set.
DATASET_OPTIONS
Character string specifies data set options. For a complete list of data set options, see the SAS Data
Set Options topic in the SAS Online Help, Release 8.2.
TRANSFORMATION_TYPE
Character string indicates that the data set should be transformed to the specified type when
published. At this time, the only supported value for this property is CSV, for Comma Separated
Value.
CSV_SEPARATOR
Character parameter indicates the separator to use when creating the CSV file. The default separator is
a comma (,).
CSV_FLAG
character string indicates a CSV override flag. Supported values include, NO_VARIABLES,
NO_LABELS and EXTENDED.
By default, when writing numeric variable values into the CSV file, BEST is used to format numerics
that have no format associated with them. To override this default, specify the property value
EXTENDED on the CSV_FLAG property. This will extend the number of digits used as the precision
level.
By default, if the data set is transformed into a CSV file, the file's first line will contain all of the
specified variables. The second line will contain all of the specified labels. To override this default
behavior, specify flags with values "NO_VARIABLES" or "NO_LABELS". To specify both values, a
CSV_FLAG property must be specified for each.
Details
When the data set is published, data set attributes are cloned so that when it is retrieved back into SAS, the created
data set will have similar attributes. Attributes that are cloned include encryption, passwords, data set label, data set
type, indexes and integrity constraints. It is important to know that the password and encryption attributes are not
preserved in the intermediate format (whether on a queue or in an archive). Because of this exposure, take care when
publishing data sets that are password−protected and/or encrypted.
Examples
The following example specifies a transformation type of CSV and two CSV_FLAG properties. The data set will be
transformed into a CSV file and published in CSV format.
prop='TRANSFORMATION_TYPE,CSV_SEPARATOR,CSV_FLAG,CSV_FLAG';
ttype='CSV';
separator='/';
flag1 = 'NO_VARIABLES';
SAS® Integration Technologies: Developer's Guide
INSERT_DATASET 278

flag2 = 'NO_LABELS';
CALL INSERT_DATASET(packageId, libname, memname, desc,
nameValue, rc, prop, ttype, separator, flag1, flag2);
The following example inserts the SAS data set FINANCE.PAYROLL into a package.
libname = 'finance';
memname = 'payroll';
desc = 'Monthly payroll data.';
nameValue='';
CALL INSERT_DATASET(packageId, libname,
memname, desc, nameValue, rc);
The following example uses the DATASET_OPTIONS property to apply a password for read access and to apply a
subsetting WHERE statement to the data set when publishing the package. Because the data set is read−protected, you
must specify the ALLOW_READ_PROTECTED_MEMBER property. Package publishing fails without this
property.
libname = 'hr';
memname ='employee';
desc = 'Employee database.';
nameValue='';
properties="DATASET_OPTIONS, ALLOW_READ_PROTECTED_MEMBER";
opt="READ=abc Where=(x<10)";
allow="yes";
CALL INSERT_DATASET(packageId, libname, memname,
desc, nameValue, rc, properties, opt, allow);
The following example uses the TRANSFORMATION_TYPE property to publish a data set in CSV format.
libname = 'hr';
memname = 'employee';
desc = 'Employee database.';
nameValue='';
ttype ='CSV';
prop = "TRANSFORMATION_TYPE";
CALL INSERT_DATASET(packageId, libname, memname,
desc, nameValue, rc, prop, ttype);
See Also
PACKAGE_BEGIN• PACKAGE_PUBLISH•
Publishing Framework
SAS® Integration Technologies: Developer's Guide
INSERT_DATASET 279

INSERT_FDB
Inserts a financial database into a package.
Syntax
CALL INSERT_FDB(packageId, libname, memname, desc, nameValue, rc);
packageID
Numeric, input.
Identifies the package.
libnameCharacter, Input.
Names the library that contains the FDB.
memname
Character, input.
Names the FDB.
desc Character, input.
Describes the FDB.
nameValue
Character, input.
Identifies a list of one or more space−separated name/value pairs, each in one of the following forms:
name◊ name=value◊ name="value"◊ name="single value with spaces"◊ name=(value)◊ name=("value")◊ name=(value1, "value 2",... valueN)◊
Name/value pairs are site−specific; they are used for the purpose of filtering.
rc Numeric, output.
Receives a return code.
Example
The following example inserts the FDB FINANCE.PAYROLL into the package returned in packageId.
libname = 'finance';
memname = 'payroll';
desc = 'Monthly payroll data.';
nameValue='';
CALL INSERT_FDB(packageId, libname,
memname, desc, nameValue, rc);
INSERT_FDB 280

See Also
PACKAGE_BEGIN• PACKAGE_PUBLISH•
Publishing Framework
SAS® Integration Technologies: Developer's Guide
INSERT_FDB 281

INSERT_FILE
Inserts a file into a package.
Syntax
CALL INSERT_FILE(packageId, filename, filetype, mimeType, desc, nameValue, rc);
packageID
Numeric, input.
Identifies the package.
filename
Character, input.
Names the file, using the following syntax:
FILENAME: external_filename◊ FILEREF: sas_fileref◊
filetype Character, input.
Specifies the file type, which must be TEXT or BINARY.
mimeType
Character, input.
Specifies the MIME type, the value of which is determined by the user. Subscribers can filter packages based
on MIME type. See Details below for suggested values.
desc Character, input.
Describes the file.
nameValue
Character, input.
Identifies a list of one or more space−separated name/value pairs, each in one of the following forms:
name◊ name=value◊ name="value"◊ name="single value with spaces"◊ name=(value)◊ name=("value")◊ name=(value1, "value 2",... valueN)◊
Name/value pairs are site−specific; they are used for the purpose of filtering.
rc Numeric, output.
Receives a return code.
Details
The mimeType parameter is a user−specified MIME type that specifies the type of binary file or text file that is being
published. Users might choose to document the supported values in order for publishers to use them or to use their
own content strings.
INSERT_FILE 282

Suggested MIME types include the following:
application/msword• application/octet−stream• application/pdf• application/postscript• application/zip• audio/basic• image/jpeg• image/gif• image/tiff• model/vrml• text/html• text/plain• text/richtext• video/mpeg• video/quicktime•
The following example supplies a content string of Image/gif to provide more information about the type of binary
file that is being inserted.
filename = 'filename:/tmp/Report.gif';
filetype ='binary';
desc = 'Report information';
nameValue = '';
mimetype = 'Image/gif';
CALL INSERT_FILE(packageId, filename, filetype,
mimetype, desc, nameValue, rc);
See Also
PACKAGE_BEGIN• PACKAGE_PUBLISH•
Publishing Framework
SAS® Integration Technologies: Developer's Guide
INSERT_FILE 283

INSERT_HTML
Inserts HTML files into a package.
Syntax
CALL INSERT_HTML(packageId, body, bodyUrl, frame, frameUrl, contents, contentsUrl, page, pageUrl, desc,
nameValue, rc<, properties, propValue1, ...propValueN>);
packageId
Numeric, input.
Identifies the package.
body Character, input.
Names the HTML body file, using the following syntax:
FILEREF: SAS_fileref◊ FILENAME: external_filename◊
Refer to the Details section below for information about inserting multiple body files.
bodyURL
Character, input.
Specifies the URL to be used for the body file.
frame Character, input.
Names the HTML frame file, using the following syntax:
FILEREF: SAS_fileref◊ FILENAME: external_filename◊
frameURL
Character, input.
Specifies the URL to be used for the frame file.
contents
Character, input.
Names the HTML contents file, using the following syntax:
FILEREF: SAS_fileref◊ FILENAME: external_filename◊
contentsURL
Character, input.
Specifies the URL to be used for the contents file.
page Character, input.
Names the HTML page file, using the following syntax:
FILEREF: SAS_fileref◊ FILENAME: external_filename◊
pageURL
Character, input.
Specifies the URL to be used for the page file.
desc Character, input.
Character string describes the inserted HTML package entry.
nameValue
INSERT_HTML 284

Character, input.
Identifies a list of one or more space−separated name/value pairs, each in the form of name=value.
Name/value pairs are site−specific; they are used for the purpose of filtering.
rc Numeric, output.
Receives a return code.
properties
Character, input.
Identifies a comma−separated list of optional property names. Valid property names are as follows:
ENCODING◊ COMPANION_FILE◊ COMPANION_MIMETYPE◊ COMPANION_URL◊ GPATH◊ GPATH_URL◊ NESTED_NAME◊
propValue1, ...propValueN
Character, input
Specifies one value for each specified property name. The order of the property values must match the order
of the property names in the properties parameter. Valid property values are defined as follows:
ENCODING
Character string indicates the character set of the HTML files, such as ISO−8859−1. Refer to
Publish/Retrieve Encoding Behavior for details. The default encoding is assumed from the native
session.
COMPANION_FILE
Character string indicates the name of an additional HTML file that is to be added to this set of
HTML files. Multiple COMPANION_FILE properties and values may be specified. Name the
companion files, using the following syntax:
FILEREF: SAS_fileref• FILENAME: external_filename•
COMPANION_MIMETYPE
Character string indicates the MIME type of the companion file to be added to the inserted HTML
entry. If specified, this property must be preceded by the COMPANION_FILE property.
COMPANION_URL
Character string indicates the URL of an HTML file that is to be added to the inserted HTML entry. If
specified, this property must be preceded by the COMPANION_FILE property.
GPATH
Character string indicates the name of a single directory that contains the ODS−generated graphical
files for inclusion as companion files to the HTML file set.
Note: All files in the specified directory will be included as companion files.
GPATH_URL
Character string indicates the URL of the directory that contains the ODS−generated graphical files.
An example of a URL might be ~ods−output/images.
Alternatively, you can specify "NONE" as the GPATH_URL property value. If the value of "NONE"
is specified, only the file name is used as the URL.
Note: If GPATH_URL is specified, you must also specify the GPATH property.
NESTED_NAME
SAS® Integration Technologies: Developer's Guide
INSERT_HTML 285
Character string indicates the name of the nested directory to create for the storage of the set of
HTML files. If you do not specify a value for this property, a name is generated automatically.
Note: The NESTED_NAME property is valid only when publishing to the WebDAV−compliant
server transport.
Details
The files that may be inserted include the body, frame, contents, and page files.
When the NEWFILE= option is specified in the ODS HTML statement, ODS may generate multiple body files. When
ODS generates multiple body files it uses a numeric file naming sequence of the general form: bodyfilenameNumber,
as in body1.html, body2.html, body3.html. To insert an entire sequence of body files, use the following syntax:
FILENAME: bodyFilename*.extension
When an asterisk is specified in the body parameter, an asterisk should also be specified in the bodyUrl parameter.
For further information about ODS, refer to SAS Language: Reference and SAS Language Reference: Concepts.
Note: As a best practice, it is suggested that a MIME type be provided for any companion files inserted into the
HTML entry. The MIME type is useful for applications that will later consume or display the published package.
Examples
Example 1
The following example generates ODS files and inserts those files into a package.
Desc='HTML output for payroll processing';
nameValue = '';
filename f '/users/f.html';
filename c '/users/c.html';
filename b '/users/b.html';
filename p '/users/p.html';
ods html frame=f contents=c(url='c.html')
body=b(url='b.html') page=p(url='p.html');
/* insert SAS statements here to generate ODS output */
ods html close;
CALL INSERT_HTML(packageId, 'fileref:b', "b.html",
'fileref:f', "f.html", 'fileref:c', "c.html",
'fileref:p', "p.html", desc, nameValue, rc);
Example 2
The following example replaces the INSERT_HTML CALL routine in the example above with another version of the
CALL routine that inserts ODS files using the ENCODING property. In this case the ENCODING property specifies
the ISO−Latin−1 character set.
Desc='HTML output for payroll processing';
nameValue = '';
SAS® Integration Technologies: Developer's Guide
INSERT_HTML 286

CALL INSERT_HTML(packageId, 'fileref:b', "b.html",
'fileref:f', "f.html", 'fileref:c', "c.html",
'fileref:p', "p.html", desc, nameValue, rc,
"encoding", "ISO−8859−1");
Example 3
The following example specifies a character set encoding and adds two HTML files to the original set of inserted files.
Desc='HTML output for payroll processing';
nameValue = '';
properties='encoding, companion_file, companion_file';
encodingV = "ISO−88591−1";
file1 = "filename: report.html";
file2 = "filename: dept.html";
CALL INSERT_HTML(packageId, 'fileref:b', "b.html",
'fileref:f', "f.html", 'fileref:c', "c.html",
'fileref:p', "p.html", desc, nameValue, rc,
properties, encodingV, file1, file2);
Example 4
The following example uses an asterisk (*) to specify that all body files are to be included in the set of inserted HTML
files. The naming sequence used is the same as the naming sequence used in ODS. So the files body.html, body1.html,
body2.html and so on (for all files found in this sequence), will be published. See the SAS Language Reference:
Concepts for further information about the ODS naming sequence used in conjunction with the NEWLINE= option.
Desc='HTML output for payroll processing';
nameValue = '';
CALL INSERT_HTML(packageId,
'filename:/users/jsmith/body*.html', "body*.html",
'fileref:f', "f.html", 'fileref:c', "c.html",
'fileref:p', "p.html", desc, nameValue, rc);
See Also
Refer to Publish/Retrieve Encoding Behavior for more information about HTML publishing and the use of the
ENCODING property.
•
PACKAGE_BEGIN• SAS Language Reference: Language• SAS Language Reference: Concepts• The Complete Guide to the SAS(R) Output Delivery System•
Publishing Framework
SAS® Integration Technologies: Developer's Guide
INSERT_HTML 287

INSERT_MDDB
Inserts a SAS multidimensional database into a package.
Syntax
CALL INSERT_MDDB(packageId, libname, memname, desc, nameValue, rc);
packageID
Numeric, input.
Identifies the package.
libnameCharacter, input.
Names the library that contains the MDDB.
memname
Character, input.
Names the MDDB.
desc Character, input.
Describes the MDDB.
nameValue
Character, input.
Identifies a list of one or more space−separated name/value pairs, each in one of the following forms:
name◊ name=value◊ name="value"◊ name="single value with spaces"◊ name=(value)◊ name=("value")◊ name=(value1, "value 2",... valueN)◊
Name/value pairs are site−specific; they are used for the purpose of filtering.
rc Numeric, output.
Receives a return code.
Details
An MDDB is a multidimensional database (not a data set) offered by SAS. It is a specialized storage facility where
data may be pulled from a data warehouse or other data sources and stored in a matrix−like format for fast and easy
access by tools such as multidimensional data viewers.
The following example inserts the MDDB FINANCE.PAYROLL into the package returned in packageId.
libname = 'finance';
memname = 'payroll';
desc = 'Monthly payroll data.';
nameValue='';
CALL INSERT_MDDB(packageId, libname,
memname, desc, nameValue, rc);
INSERT_MDDB 288

See Also
PACKAGE_BEGIN• PACKAGE_PUBLISH•
Publishing Framework
SAS® Integration Technologies: Developer's Guide
INSERT_MDDB 289

INSERT_PACKAGE
Inserts a package into another package.
Syntax
CALL INSERT_PACKAGE(packageId, insertPackageId, rc<, properties, propValue1, ...propValueN>);
packageId
Numeric, input.
Identifies the package.
insertPackageId
Numeric, input.
Identifies the package that will be nested in the package identified by packageID.
rc Numeric, output.
Receives a return code.
properties
Character, input.
Identifies a comma−separated list of optional property names. At present, only one property is supported:
NESTED_NAME◊
propValue1, ...propValueN
Character, input
Specifies one value for each specified property name. The order of the property values must match the order
of the property names in the properties parameter. Valid property values are defined as follows:
NESTED_NAME
Character string indicates the name of the nested directory to create for the storage of the nested
package. If you do not specify a value for this property, a name is generated automatically.
Note: The NESTED_NAME property is valid only when publishing to the WebDAV−compliant
server transport.
Details
Description and name/value parameters are not allowed on this CALL routine. Instead, this CALL routine uses the
description and name/value parameters specified in the PACKAGE_BEGIN CALL routine.
The following example initializes two packages (PACKAGEID and DSPID). All data sets are inserted into the
package identified by DSPID. The package identified by DSPID is nested within the main package identified by
PACKAGEID.
call package_begin(packageId,
"Main package", '', '', rc);
call package_begin(dsPid, "Package
of just data sets.", '', '', rc);
libname = 'sasuser';
memname = 'payroll';
desc = 'Monthly payroll data.';
INSERT_PACKAGE 290

call insert_dataset(dsPid, libname,
memname, desc, '', rc);
libname = 'sasuser';
memname = 'employees';
desc = 'Employee data.';
call insert_dataset(dsPid, libname,
memname, desc,"", rc);
/* nest data set package in main package */
CALL INSERT_PACKAGE(packageId, dsPid, rc);
See Also
PACKAGE_BEGIN• PACKAGE_PUBLISH•
Publishing Framework
SAS® Integration Technologies: Developer's Guide
INSERT_PACKAGE 291

INSERT_REF
This CALL routine inserts a reference into a package.
Syntax
CALL INSERT_REF(packageId, referenceType, reference, desc, nameValue, rc);
packageID
Numeric, input.
Identifies the package.
referenceType
Character, input.
Specifies the type of the reference. Specify HTML or URL.
reference
Character, input.
Specifies the reference that is to be inserted.
desc Character, input.
Describes the reference.
nameValue
Character, Input.
Identifies a list of one or more space−separated name/value pairs, each in one of the following forms:
name◊ name=value◊ name="value"◊ name="single value with spaces"◊ name=(value)◊ name=("value")◊ name=(value1, "value 2",... valueN)◊
Name/value pairs are site−specific; they are used for the purpose of filtering.
rc Numeric, output.
Receives a return code.
Examples
The following example inserts links to newly created HTML files. The package is sent using the EMAIL transport so
that subscribers receive embedded links within their e−mail messages.
filename myfram ftp 'odsftpf.htm';
filename mybody ftp 'odsftpb.htm';
filename mypage ftp 'odsftpp.htm';
filename mycont ftp 'odsftpc.htm';
ods listing close;
ods html frame=myfram body=mybody
INSERT_REF 292

page=mypage contents=mycont;
/* insert SAS statements here to develop ODS output*/
ods html close;
desc="Proc sort creates a variety of ODS generated
html output." || "An example may be viewed at :";
call insert_ref(packageId, "HTML",
"http://alpair01.sys.com/odsftpf.htm", desc, "", rc);
if rc ne 0 then do;
msg = sysmsg();
put msg;
end;
else
put 'Insert reference OK';
For another example, refer to Example: Publishing with the FTP Access Method.
See Also
PACKAGE_BEGIN• PACKAGE_PUBLISH•
Publishing Framework
SAS® Integration Technologies: Developer's Guide
INSERT_REF 293

INSERT_SQLVIEW
Inserts a PROC SQL view into a package.
CALL INSERT_SQLVIEW(packageId, libname, memname, desc, nameValue, rc);
packageID
Numeric, input.
Identifies the package.
libnameCharacter, input.
Names the library that contains the PROC SQL view.
memname
Character, input.
Names the PROC SQL view.
desc Character, input.
Describes the PROC SQL view.
nameValue
Character, input.
Identifies a list of one or more space−separated name/value pairs, each in one of the following forms:
name◊ name=value◊ name="value"◊ name="single value with spaces"◊ name=(value)◊ name=("value")◊ name=(value1, "value 2",... valueN)◊
Name/value pairs are site−specific; they are used for the purpose of filtering.
rc Numeric, output.
Receives a return code.
Example
This example inserts the PROC SQL view FINANCE.PAYROLL into the package returned in packageId.
libname = 'finance';
memname = 'payroll';
desc = 'Monthly payroll data.';
nameValue='';
CALL INSERT_SQLVIEW(packageId, libname,
memname, desc, nameValue, rc);
See Also
PACKAGE_BEGIN• PACKAGE_PUBLISH•
INSERT_SQLVIEW 294
Publishing Framework
SAS® Integration Technologies: Developer's Guide
INSERT_SQLVIEW 295

INSERT_VIEWER
Inserts a viewer into a package.
Syntax
CALL INSERT_VIEWER(packageId, filename, mimeType, desc, nameValue, rc
<, properties, propValue1, ...propValueN>);
packageID
Numeric, input.
Identifies the package.
filename
Character, input.
Names the viewer, using the following syntax:
FILENAME: external_filename◊ FILEREF: sas_fileref◊
mimeType
Character, input.
Specifies the MIME type, the value of which is determined by the user. Subscribers can filter packages based
on MIME type. See INSERT_FILE for suggested values.
desc Character, input.
Describes the viewer.
nameValue
Character, input.
Identifies a list of one or more space−separated name/value pairs, each in one of the following forms:
name◊ name=value◊ name="value"◊ name="single value with spaces"◊ name=(value)◊ name=("value")◊ name=(value1, "value 2",... valueN)◊
Name/value pairs are site−specific; they are used for the purpose of filtering.
rc Numeric, output.
Receives a return code.
properties
Character, input.
Identifies a comma−separated list of optional property names. Valid property names are as follows:
ENCODING◊ VIEWER_TYPE◊
propValue1, ...propValueN
Character, input.
Specifies one value for each specified property. The order of the values matches the order of the property
names in the properties parameter. Valid property values are defined as follows:
ENCODING
INSERT_VIEWER 296

Character string indicates the character set of the viewer file, such as ISO−8859−1. Refer to
Publish/Retrieve Encoding Behavior for details.
VIEWER_TYPE
Character string indicates the type of the viewer. Valid values are HTML and TEXT. The default
value is HTML.
Example
The following example inserts the external file HVIEWER.HTML into the package specified by packageId.
filename = 'filename:/tmp/hviewer.html';
desc = 'HTML viewer';
nameValue = '';
mimeType = 'text/html';
CALL INSERT_VIEWER(packageId, filename,
mimeType, desc, nameValue, rc);
See Also
PACKAGE_BEGIN• PACKAGE_PUBLISH•
Publishing Framework
SAS® Integration Technologies: Developer's Guide
INSERT_VIEWER 297

PACKAGE_BEGIN
Initializes a package and returns a unique package identifier.
Syntax
CALL PACKAGE_BEGIN(packageId, desc, nameValue, rc
<, properties, propValue1, ...propValueN>);
packageId
Numeric, output.
Identifies the new package.
desc Character, input.
Describes the package.
nameValue
Character, input.
Identifies a list of one or more space−separated name/value pairs, each in one of the following forms:
name◊ name=value◊ name="value"◊ name="single value with spaces"◊ name=(value)◊ name=("value")◊ name=(value1, "value 2",... valueN)◊
Name/value pairs are site−specific; they are used for the purpose of filtering.
rc Numeric, output.
Return code.
properties
Character, input.
Identifies a comma−separated list of optional property names. Valid property names are as follows:
ABSTRACT◊ EXPIRATION_DATETIME◊ NAMESPACES◊
propValue1, ...propValueN
Character/numeric, input.
Specifies one value for each specified property name. The order of the property values must match the order
of the property names in the properties parameter. Valid property values are defined as follows:
ABSTRACT
Character string provides an abstract (short summary) of the inserted package.
EXPIRATION_DATETIME
Numeric SAS datetime value. This value should be specified in GMT format. See SAS Language:
Reference for details.
NAMESPACES
specifies unique names that associate published packages with specific contexts on a
WebDAV−compliant server. The association of a namespace with a package organizes package data
on a server according to meaningful criteria, or contexts. A namespace is an additional scoping
criterion for a name/value description of a package or package entry. When you publish a package to
WebDAV, the name/value descriptors are stored with the package or its entries to the specified
PACKAGE_BEGIN 298

WebDAV namespaces.
As an example, a package might be described as containing first quarter profits that were generated by
the Houston office. The specified description and scope uniquely define the package so that
consumers can filter name/value pairs on packages or entries unambiguously.
An example of a namespace definition that you enter in the Namespaces field follows:
HOUSTON='http://www.AlphaliteAirways.com/revenue/final'
A namespace specification is case−sensitive with single quotation marks surrounding embedded
values. To specify multiple namespaces, separate each namespace definition with a space.
For details about retrieving packages with the aid of scoping and filtering criteria, see Specifying
Name/Value Pairs.
Details
The package identifier returned by this CALL routine is used in subsequent INSERT and PACKAGE CALL routines.
Examples
The following example initializes a package and returns the package identifier in packageId.
packageId=0;
rc=0;
desc = "Nightly run.";
nameValue='';
CALL PACKAGE_BEGIN(packageId, desc, nameValue, rc);
The following example initializes a package with an expiration date and returns the package identifier in packageId.
packageId=0;
rc=0;
desc = "Nightly run.";
nameValue='';
dtValue = '20apr2010:08:30:00'dt;
CALL PACKAGE_BEGIN(packageId, desc, nameValue,
rc, "EXPIRATION_DATETIME", dtValue);
The following example initializes a package with an expiration date and an abstract character string and returns the
package identifier in packageId.
packageId=0;
rc=0;
desc = "Nightly run.";
nameValue='';
dtValue = '20apr2010:08:30:00'dt;
abstract = "This package contains company
confidential information.";
properties="EXPIRATION_DATETIME, ABSTRACT";
CALL PACKAGE_BEGIN(packageId, desc, nameValue,
rc, properties, dtValue, abstract);
SAS® Integration Technologies: Developer's Guide
PACKAGE_BEGIN 299

The following example initializes a package with two namespaces and returns the package identifier in packageId.
packageId=0;
rc=0;
desc = "Nightly run.";
nameValue='';
namespaces = 'A="http://www.alpair.com/myNamespace1"
B="http://www.alpair.com/myNamespace2"';
CALL PACKAGE_BEGIN(packageId, desc, nameValue,
rc, "NAMESPACES", namespaces);
See Also
The various INSERT CALL routines.• PACKAGE_END• PACKAGE_PUBLISH•
Publishing Framework
SAS® Integration Technologies: Developer's Guide
PACKAGE_BEGIN 300

PACKAGE_END
Frees the resources that are associated with a package.
Syntax
CALL PACKAGE_END(packageId, rc);
packageID
Numeric, input.
Identifies the package.
rc Numeric, output.
Receives a return code.
Details
This CALL should be made after the completion of package publishing.
The following example frees the resources that are associated with the package.
CALL PACKAGE_END(packageId, rc);
See Also
PACKAGE_DESTROY• PACKAGE_TERM•
Publishing Framework
PACKAGE_END 301

PACKAGE_PUBLISH
The PACKAGE_PUBLISH CALL routine publishes the specified package. The method of publication depends on the
following types of delivery transport:
Publish to an Archive• Publish to E−mail• Publish to Queues• Publish to Subscribers• Publish to a WebDAV−Compliant Server•
Transport Properties
Valid property values are defined as follows:
ADDRESSLIST_DATASET_LIBNAME
an alternative to specifying explicit e−mail addresses, specifies a character string that indicates the name of
the SAS library in which resides the data set from which an e−mail list can be extracted. (Applies to the
following transport: e−mail.)
ADDRESSLIST_DATASET_MEMNAME
an alternative to specifying explicit e−mail addresses, specifies a character string that indicates the name of
the SAS member in which resides the data set from which an e−mail list can be extracted. The data set is fully
specified by library.member. (Applies to the following transport: e−mail.)
ADDRESSLIST_VARIABLE_NAME
specifies a character string that indicates the name of the variable (or column) in the data set that contains the
e−mail addresses. (Applies to the following transports: e−mail.)
APPLIED_TEXT_VIEWER_NAME
specifies a character string that names the rendered package view, which results from the application of the
text viewer template to the package for viewing in e−mail. You can use the following syntax to specify the
name of the rendered package view:
FILENAME: external_filename◊ FILEREF: sas_fileref◊
This property is valid only when the TEXT_VIEWER_NAME property is also specified. By default, the
rendered view is created as a temporary file. This property overrides the default, causing the rendered view to
be saved permanently to a file. (Applies to the following transports: e−mail, subscriber.)
APPLIED_VIEWER_NAME
specifies a character string that indicates the name of the rendered package view, which results from the
application of the HTML viewer template to the package for viewing in e−mail. You can use the following
syntax to specify the name of the rendered package view:
FILENAME: external_filename◊ FILEREF: sas_fileref◊
This property is valid only when the VIEWER_NAME property is also specified. By default, the rendered
view is created as a temporary file. This property overrides the default, causing the rendered view to be saved
permanently to a file. (Applies to the following transports: e−mail, subscriber.)
ARCHIVE_NAME
specifies a character string that indicates the name of the archive file. (Applies to the following transports:
archive, e−mail, queue, subscriber, WebDAV.)
ARCHIVE_PATH
specifies a character string that indicates the path where the archive should be created. (Applies to the
following transports: archive, e−mail, queue, subscriber, WebDAV.)
PACKAGE_PUBLISH 302

CHANNEL_STORE
specifies a character string that indicates the repository containing the channel and subscriber metadata. The
channel can be defined in LDAP or in a SAS Metadata Repository. See LDAP Channel Store Syntax for
details on how to identify a channel defined in LDAP. See SAS Metadata Repository Channel Store Syntax
for details on how to identify a channel defined in a SAS Metadata Repository. (Applies to this transport:
subscriber.)
COLLECTION_URL
specifies a character string that indicates the URL in which the WebDAV collection is placed. You assign an
explicit file name to the collection. (Applies to the following transports: e−mail, subscriber, WebDAV.)
Note: When you use COLLECTION_URL, the default behavior is to replace the existing collection at that
location.
CORRELATIONID
specifies a binary character string correlator that is used on the package header message. (Applies to the
following transports: queue, subscriber.)
DATASET_OPTIONS
specifies a character string that indicates the options to use for opening and accessing a SAS data set that
contains e−mail addresses that are used to populate addressn. Specify this property as option1=value
option2=value .... For a complete list of data set options, see the SAS Data Set Options topic in the SAS
Online Help, Release 8.2 . (Applies to the following transports: e−mail, subscriber.)
FROM
specifies a character string that indicates the sender (or package publisher) of the e−mail message. (Applies to
the following transports: e−mail, subscriber.)
Note: The FROM field is valid only with the SMTP e−mail interface.
FTP_PASSWORD
indicates the password that is needed to log on to the remote host at which the archive will be stored. Specify
this property only when the remote host is secured. (Applies to the following transports: archive, e−mail,
queue, subscriber.)
FTP_USER
indicates the user ID that is needed to log on to the remote host at which the archive will be stored. Specify
this property only when the remote host is secured. (Applies to the following transports: archive, e−mail,
queue, subscriber.)
HTTP_PASSWORD
Indicates the password that is needed to bind to the Web server on which the package is published. Specify
this property only when the Web server is secured. (Applies to the following transports: archive, e−mail,
queue, subscriber, WebDAV.)
HTTP_PROXY_URL
indicates the URL of the proxy server. (Applies to the following transports: archive, e−mail, queue,
subscriber, WebDAV.)
HTTP_USER
indicates the user ID that is needed to bind to the Web server on which the package is published. Specify this
property only when the Web server is secured. (Applies to the following transports: archive, e−mail, queue,
subscriber, WebDAV.)
IF_EXISTS
specifies one of the following character strings. Use the IF_EXISTS property to control the treatment of
same−named collections already existing on the server. (Applies to the following transports: e−mail,
subscriber, WebDAV.)
"NOREPLACE" indicates that if the package being published contains a collection that already exists
on the server, the PUBLISH_PACKAGE call is to return immediately without affecting the contents
◊
SAS® Integration Technologies: Developer's Guide
PACKAGE_PUBLISH 303
of the existing collection.
"UPDATE" indicates that if the collection already exists on the server, the PUBLISH_PACKAGE
call is to update the existing collection by replacing like−named entities and adding newly named
entities. If "UPDATE" is specified and both the package to publish and the existing collection have an
HTML set (created with INSERT_HTML) with the same NESTED_NAME, the HTML set in the
published package replaces the HTML set in the existing collection.
◊
"UPDATEANY" is identical to "UPDATE" except that the PUBLISH_PACKAGE CALL routine can
be used to update a collection that SAS did not create. A consequence of using "UPDATEANY" is
that SAS will be unable to retrieve the published package.
◊
Note: When names are generated automatically for HTML set collections, the publish code ensures that name
collisions will not occur.
LDAP_BINDDN
specifies a character string that indicates the distinguished name that is used to bind to the LDAP server.
Specify this property only when the ARCHIVE_PATH is an LDAP URL and when the LDAP server is
running secured. (Applies to the following transports: archive, e−mail, queue, subscriber.)
LDAP_BINDPW
specifies a character string that indicates the password that is used to bind to the LDAP server. Specify this
property only when the ARCHIVE_PATH is an LDAP URL and when the LDAP server is running secured.
(Applies to the following transports: archive, e−mail, queue, subscriber.)
METAPASS
specifies the password to use when binding to the SAS Metadata Server. (Applies to this transport:
subscriber.) If the METAPASS property is not specified on the PACKAGE_PUBLISH CALL routine, then
the METAPASS system option, if set, will be used when binding to the SAS Metadata Server.
METAUSER
specifies the user name to use when binding to the SAS Metadata Server. (Applies to this transport:
subscriber.) If the METAUSER property is not specified on the PACKAGE_PUBLISH CALL routine, then
the METAUSER system option, if set, will be used when binding to the SAS Metadata Server.
PARENT_URL
specifies a character string that indicates the URL under which the WebDAV collection is placed. The
collection is automatically assigned a unique name. (Applies to the following transports: archive, e−mail,
subscriber, WebDAV.)
PROCESS_VIEWER
specifies a character string of "yes" to indicate that the rendered view will be delivered in e−mail. If you
specify the PROCESS_VIEWER property with the ARCHIVE_PATH property, the archive is created but is
not sent as an attachment in e−mail. Instead, viewer processing occurs and the rendered view is sent in
e−mail. (Applies to the following transports: e−mail, subscriber.)
REPLYTO
specifies a character string that indicates the designated e−mail address to which package recipients might
respond. (Applies to the following transports: e−mail, subscriber.)
Note: The REPLYTO field is valid only with the SMTP e−mail interface.
SUBJECT
specifies a character string that provides the subject line for the e−mail message. (Applies to the following
transports: e−mail, subscriber.)
TARGET_VIEW_NAME
specifies a character string that indicates the name of the rendered view for delivery to a WebDAV−compliant
server. The specified target view name overrides the default name, which is index.html. (Applies to the
following transports: e−mail, subscriber, WebDAV.)
TARGET_VIEW_MIMETYPE
specifies a character string that indicates the MIME type of the rendered view for delivery to a
WebDAV−compliant server. The target view mimetype overrides the default view mimetype, which is
SAS® Integration Technologies: Developer's Guide
PACKAGE_PUBLISH 304

automatically inferred from the viewer. Typical MIME types are HTML (.htm) and plain text (.txt) files. If
this field remains blank, the viewer filename extension is used to locate the MIME type in the appropriate
registry. Windows hosts use the Windows Registry; other hosts use the SAS Registry. (Applies to the
following transports: e−mail, subscriber, WebDAV.)
TEXT_VIEWER_NAME
specifies a character string that indicates the name of a text viewer template that formats package content for
viewing in e−mail using the following syntax:
FILENAME: external_filename◊ FILEREF: sas_fileref◊
A text viewer template might be necessary if the destination e−mail program does not support the HTML
MIME type. (Applies to the following transports: e−mail, subscriber, WebDAV.)
See Viewer Processing for more information.
UUID
specifies a character string that serves as a unique ID, which is assigned to the sasGUID attribute of the
sasArchive instance. The UUID identifies a package that is published to an archive at an LDAP URL.
(Applies to the following transports: archive, e−mail, queue, subscriber.)
VIEWER_NAME
specifies a character string that indicates the name of the HTML viewer template to be applied when
publishing e−mail using the following syntax:
FILENAME: external_filename◊ FILEREF: sas_fileref◊
(Applies to the following transports: e−mail, channel, WebDAV.)
See Viewer Processing for more information.
Publishing Framework
SAS® Integration Technologies: Developer's Guide
PACKAGE_PUBLISH 305

Publish to an Archive
Publishes a package to an archive.
Syntax
CALL PACKAGE_PUBLISH(packageId, publishType, rc, properties,< propValue1, ...propValueN>);
packageID
Numeric, input.
Identifies the package that is to be published.
publishType
Character, input.
Indicates how to publish the package. To publish the package using the archive transport, specify
TO_ARCHIVE.
rc Numeric, output.
Receives a return code.
properties
Character, input.
Identifies a comma−separated list of optional property names. Specify any of the following property names, or
specify '' to indicate that no properties are to be applied:
ARCHIVE_NAME◊ ARCHIVE_PATH◊ FTP_PASSWORD◊ FTP_USER◊ HTTP_PASSWORD◊ HTTP_PROXY_URL◊ HTTP_USER◊ LDAP_BINDDN◊ LDAP_BINDPW◊ UUID◊
propValue1, ...propValueN
Character, input.
Specifies a value for each specified property name. The order of the property values must match the order of
the property names in the properties parameter.
Details
The ARCHIVE_NAME property identifies the name of the archive file to create. If this property is omitted, the
archive transport generates a unique name by default.
The ARCHIVE_PATH property identifies where the archive is created. This property can be a physical path name, an
LDAP URL, an FTP URL, or an HTTP URL.
Note: In the z/OS operating environment, an archive can be published only to UNIX System Services directories.
How to Specify an ARCHIVE_PATH
Publish to an Archive 306
If ARCHIVE_PATH is an LDAP URL, it should represent the sasArchivePath distinguished name. The
sasArchivePath entry within the LDAP directory contains a saspath attribute that is used to create the archive.
Furthermore, if an LDAP URL is specified and the LDAP server is running secured, you must specify the
LDAP_BINDDN and LDAP_BINDPW properties (or bindname and password LDAP URL extensions) in order to
bind to the LDAP server.
If ARCHIVE_PATH is an HTTP URL on a secured server, you must specify the HTTP_USER and
HTTP_PASSWORD properties. Specifying the HTTP_PROXY_URL property is optional.
If ARCHIVE_PATH is an FTP URL on a secured host, you must specify the FTP_USER and FTP_PASSWORD
properties.
Examples
Example 1
The following example creates the archive file named results in the /u/users directory.
pubType = "TO_ARCHIVE";
properties='archive_path, archive_name';
path = '/u/users';
name = 'results';
CALL PACKAGE_PUBLISH(packageId, pubType,
rc, properties, path, name);
Example 2
The following example specifies the archive path as an LDAP URL that is the SasArchivePath distinguished name.
The sasArchivePath entry contains a saspath attribute, which identifies where the archive will be created. In this
example, because archive_name is omitted, the archive transport generates a unique name automatically.
apath =
"ldap://pcc.host.com:389/sasarchivepathcn=HrArchive,
saschannelcn=HR,cn=saschannels,
sasComponent=sasPublishSubscribe,
cn=SAS,o=Alphalite Airways,c=US";
pubType = "TO_ARCHIVE";
properties='archive_path';
CALL PACKAGE_PUBLISH(packageId, pubType,
rc, properties, apath);
Publishing Framework
SAS® Integration Technologies: Developer's Guide
Publish to an Archive 307

Publish to E−mail
Publishes a package using the e−mail transport.
Syntax
CALL PACKAGE_PUBLISH(packageId, publishType, rc, properties, <propValue1, ...propValueN> , address1<,
...addressN>);
packageID
Numeric, input.
Identifies the package that is to be published.
publishType
Character, input.
Indicates how to publish the package. To publish the package using the e−mail transport, specify TO_EMAIL.
rc Numeric, output.
Specifies a return code.
properties
Character, input.
Identifies a comma−separated list of optional property names. Specify any of the following property names, or
specify '' to indicate that no properties are to be applied:
ADDRESSLIST_DATASET_LIBNAME◊ ADDRESSLIST_DATASET_MEMNAME◊ ADDRESSLIST_VARIABLE_NAME◊ APPLIED_TEXT_VIEWER_NAME◊ APPLIED_VIEWER_NAME◊ ARCHIVE_NAME◊ ARCHIVE_PATH◊ COLLECTION_URL◊ DATASET_OPTIONS◊ FROM◊ FTP_PASSWORD◊ FTP_USER◊ HTTP_PASSWORD◊ HTTP_PROXY_URL◊ HTTP_USER◊ IF_EXISTS◊ LDAP_BINDDN◊ LDAP_BINDPW◊ PARENT_URL◊ PROCESS_VIEWER◊ REPLYTO◊ SUBJECT◊ TARGET_VIEW_NAME◊ TARGET_VIEW_MIMETYPE◊ TEXT_VIEWER_NAME◊ UUID◊ VIEWER_NAME◊
Publish to E−mail 308

propValue1, ...propValueN
Specifies a value for each specified property name. The order of the property values must match the order of
the property names in the properties parameter.
address1 <, ...addressN>
Character, input.
Specifies one or more e−mail addresses to use when publishing the package.
Details
Default Behavior
When publishing to e−mail, the e−mail message is sent in plain text format by default. Only inserted reference entries
are published to e−mail. For details about inserting reference entries, see the INSERT_REF CALL routine.
The package description field precedes the reference value in the e−mail message. All other entries that are inserted
into the package are ignored.
To override the default behavior, you can specify the ARCHIVE_PATH, COLLECTION_URL, PARENT_URL,
TEXT_VIEWER_NAME, or VIEWER_NAME properties.
Note: If the mailer is not running in a Windows NT operating environment, you will be prompted for the mail profile
to use when you send the e−mail message. To avoid being prompted, specify the EMAILID and EMAILPW options at
SAS invocation. For example:
sas −EMAILID "Microsoft Outlook"
Archive Path Properties
If you specify the ARCHIVE_PATH property, an archive is created and published as an e−mail attachment. All
entries that are inserted into the package are published as an archive. If you specify a value for ARCHIVE_PATH, the
created archive is stored at the designated location. To create a temporary archive that is deleted after the package is
published, specify an ARCHIVE_PATH value of "" or "tempfile".
If you specify ARCHIVE_PATH as an LDAP URL, an FTP URL, or an HTTP URL, see How to Specify an
ARCHIVE_PATH for details about archive properties.
Note: In order to create an archive under the z/OS operating environment, the z/OS environment must support UNIX
System Services directories.
If you specify the PROCESS_VIEWER property (with either the VIEWER_NAME or TEXT_VIEWER_NAME
property) along with the ARCHIVE_PATH property, the archive is created but is not sent as an attachment in e−mail.
Instead, viewer processing occurs and the rendered view is sent in e−mail.
For more information about the application of viewer properties, see Viewer Processing.
When publishing to an archive with the e−mail transport, you can specify the following archive properties:
ARCHIVE_NAME, ARCHIVE_PATH, FTP_PASSWORD, FTP_USER, HTTP_PASSWORD,
HTTP_PROXY_URL, HTTP_USER, LDAP_BINDDN, or LDAP_BINDPW.
SAS® Integration Technologies: Developer's Guide
Publish to E−mail 309

Viewer Properties
If you specify the VIEWER_NAME or TEXT_VIEWER_NAME property, the viewer is used to create the e−mail
message and to apply substitutions. VIEWER_NAME renders the view in HTML format. TEXT_VIEWER_NAME
renders the view in text format. Only the package information that is rendered by the viewer is published.
If you specify the PROCESS_VIEWER property (with either the VIEWER_NAME or TEXT_VIEWER_NAME
property) along with the ARCHIVE_PATH property, the archive is created but is not sent as an attachment in e−mail.
Instead, viewer processing occurs and the rendered view is sent in e−mail.
WebDAV Properties
If you specify the COLLECTION_URL property, the package is published to the specified URL on a
WebDAV−compliant Web server. An example of a collection URL is
http://www.host.com/AlphaliteAirways/revenue/quarter1. The collection is named quarter1. The e−mail message that
is sent to subscribers will contain a reference to the URL that is specified in the COLLECTION_URL property.
The PARENT_URL property is similar to the COLLECTION_URL property except that it specifies the location
under which the new WebDAV collection is to be placed. The PUBLISH_PACKAGE CALL routine generates a
unique name for the new collection. The unique name is limited to eight characters, with the first character as an s. An
example of a parent URL directory location is http://www.host.com/AlphaliteAirways/revenue. An example of a
collection name that is automatically generated might be s9811239. The e−mail message contains a reference to the
collection, which is URL that you specified in the PARENT_URL property.
The specifications of COLLECTION_URL and PARENT_URL are mutually exclusive.
When publishing to a WebDAV−compliant server with the e−mail transport, you can specify the following WebDAV
properties: HTTP_PASSWORD, HTTP_PROXY_URL, HTTP_USER, IF_EXISTS, TARGET_VIEW_MIMETYPE,
TARGET_VIEW_NAME, and VIEWER_NAME (or TEXT_VIEWER_NAME).
WebDAV publishing uses the following file extensions for each item type:
Item Type File Extension
CATALOG .sac
DATA .sad
FDB .saf
MDDB .sam
VIEW .sav
Examples
Example 1
The following example publishes a package to three e−mail addresses. Because no properties are specified, the e−mail
message will contain only inserted references and will be published in plain text format.
pubType = "TO_EMAIL";
SAS® Integration Technologies: Developer's Guide
Publish to E−mail 310
properties='';
CALL PACKAGE_PUBLISH(packageId, pubType, rc, properties,
"user1@alphaliteairways.com", "John Smith",
"jsmith@alphaliteairways.com");
Example 2
The following example publishes a package to one e−mail address and designates text for the subject line of the
message:
pubType = "TO_EMAIL";
subject = "Nightly Builds Update";
properties="SUBJECT";
Addr = "admins−l@alphaliteair03.vm.com";
CALL PACKAGE_PUBLISH(packageId, pubType,
rc, properties, subject, Addr);
Example 3
The following example publishes a package to two e−mail addresses and designates the viewer to be used when
formatting the e−mail message. The e−mail message will contain only content that can be rendered in a view. The
rendered view is deleted after it is published.
In order to save the rendered view explicitly, you can specify the APPLIED_VIEWER_NAME property and a file
name value.
pubType = "TO_EMAIL";
properties="SUBJECT, VIEWER_NAME";
subject = "Nightly Build Updates";
viewer = "filename:template.html";
Addr = "admins−l@alphaliteair03.vm.com";
CALL PACKAGE_PUBLISH(packageId, pubType,
rc, properties, subject, viewer,
"buildmonitor@alphaliteairways.com", Addr);
Example 4
The following example uses the ARCHIVE_PATH property to publish an archive as an e−mail attachment. All entries
in the package are contained within the archive.
pubType = "TO_EMAIL";
properties="ARCHIVE_PATH";
apath = "/u/users1";
Addr = "admins−l@alphaliteair05";
CALL PACKAGE_PUBLISH(packageId, pubType,
rc, properties, apath, Addr);
Example 5
The following example uses the e−mail transport to publish a collection URL on a WebDAV−compliant server. The
HTTP user ID and password enable the publisher to bind to the secured HTTP server. All e−mail recipients who are
members of the mail list receive the e−mail announcement that the best rates are accessible at the specified URL.
pubType = "TO_EMAIL";
SAS® Integration Technologies: Developer's Guide
Publish to E−mail 311
properties="COLLECTION_URL, SUBJECT",
"HTTP_USER", "HTTP_PASSWORD";
collurl="http://www.alphaliteairways/fares/discount";
subj="Announcing Best Rates Yet";
http_user="vicdamone";
http_password="myway";
Addr = "admins−l@alphaliteair05";
CALL PACKAGE_PUBLISH(packageId, pubType, rc, properties,
collurl, subj, http_user, http_password, Addr);
Example 6
The following example specifies e−mail addresses that are stored in a variable in a password−protected SAS data set.
pubType = "TO_EMAIL";
properties = "SUBJECT, ADDRESS_DATASET_LIBNAME,
ADDRESS_DATASET_MEMNAME, ADDRESSLIST_VARIABLE_NAME,
DATASET_OPTIONS";
subject = "Get out and Vote!";
lib = "voterreg";
mem = "northeast";
var = "emailaddr";
opt = "pw='born2run'";
CALL PACKAGE_PUBLISH(packageId, pubType, rc,
properties, subject, lib, mem, var, opt);
Publishing Framework
SAS® Integration Technologies: Developer's Guide
Publish to E−mail 312

Publish to Queues
Publishes a package to one or more message queues.
Syntax
CALL PACKAGE_PUBLISH(packageId, publishType, rc, properties, <propValue1, ...propValueN>, queue1<,
...queueN>);
packageID
Numeric, input.
Identifies the package that is to be published.
publishType
Character, input.
Indicates how to publish the package. To publish the package using the queue transport, specify a publishType
of TO_QUEUE.
rc Numeric, output.
Receives a return code.
properties
Character, input.
Identifies a comma−separated list of optional property names. Specify any of the following property names, or
specify '' to indicate that no properties are to be applied:
ARCHIVE_NAME◊ ARCHIVE_PATH◊ CORRELATIONID◊ FTP_PASSWORD◊ FTP_USER◊ HTTP_PASSWORD◊ HTTP_PROXY_URL◊ HTTP_USER◊ LDAP_BINDDN◊ LDAP_BINDPW◊ UUID◊
propValue1, ...propValueN
Character/numeric, input.
Specifies one value for each specified property name. The order of the property values must match the order
of the property names in the properties parameter.
queue1 <, ...queueN>
Character string that specifies the queue(s) that will be used to publish the package. Specify the queue name
using the following syntax:
When publising to MSMQ queues, use the following syntax:
MSMQ://queueHostMachineName\queueName
When publishing to MQSeries queues, use the following syntax:
MQSERIES://queueManager:queueName
Publish to Queues 313

or
MQSERIES−C://queueManager:queueName
Details
When publishing to a queue, all entries in the package are published to the queue by default. To override this default,
specify the ARCHIVE_PATH property, which indicates that an archive is to be created and only the archive will be
published to the queue. The archive will contain all package entries.
If you specify a value for ARCHIVE_PATH, the archive is stored at the designated location. To create a temporary
archive that is deleted after the package is published, specify an ARCHIVE_PATH value of "" or "tempfile".
If you specify ARCHIVE_PATH as an LDAP URL, an FTP URL, or an HTTP URL, see How to Specify
ARCHIVE_PATH for details about specifying archive properties.
Note: In the z/OS operating environment, you can publish archives only to UNIX System Services directories.
Queues that support transactional units of work are recommended. By using these types of queues, the queue transport
prevents partial packages from remaining on the queue in cases where errors are encountered during package
publishing. For MSMQ, this means that the queue should be transactional. For MQSeries, this means that the queue
should support synchronization points.
When you specify the CORRELATIONID property, the package message uses the specified CORRELATIONID
value. You can retrieve packages from the queue by correlation ID.
Examples
Example 1
The following example publishes a package to two queues. One queue is an MQSeries queue that is named PCONE;
the second queue is an MSMQ queue that is specified by the queue manager who is named JSMITH. A
CORRELATIONID of 12345678901234567890 is assigned to the package to be published to both queues.
PubType = "TO_QUEUE";
FirstQ = "MQSERIES://PCONE:LOCAL";
SecondQ = "MSMQ://JSMITH:TRANSQ";
CorrValue = "12345678901234567890";
Call PACKAGE_PUBLISH(packageId, pubType, rc,
"CORRELATIONID", CorrValue, firstQ, secondQ);
Example 2
The following example publishes the package to one queue and does not apply any additional queue properties:
pubType = "TO_QUEUE";
firstQ = "MQSERIES://PCONE:MYQ";
Call PACKAGE_PUBLISH(packageId,
pubType, rc, '', firstQ);
SAS® Integration Technologies: Developer's Guide
Publish to Queues 314
Example 3
The following example creates an archive and publishes it to a queue. The ARCHIVE_PATH property is specified as
"tempfile". After the archive is published to the queue, the temporary, local copy is deleted automatically. The archive
contains all entries that are inserted into the package.
pubType = "TO_QUEUE";
firstQ = "MQSERIES://PCONE:MYQ";
prop = "ARCHIVE_PATH";
archivePath = "tempfile";
Call PACKAGE_PUBLISH(packageId, pubType,
rc, prop, archivePath, firstQ);
Publishing Framework
SAS® Integration Technologies: Developer's Guide
Publish to Queues 315

Publish to Subscribers
Publishes a package to subscribers who are associated with specified channel.
Syntax
CALL PACKAGE_PUBLISH(packageId, publishType, rc, properties, < propValue1, ...propValueN>, channel);
packageID
Numeric, input.
Identifies the package that is to be published.
publishType
Character, input.
Indicates how to publish the package. To publish a package to the subscribers of a channel, specify a
publishType value of TO_SUBSCRIBERS.
rc Numeric, output.
Receives a return code.
properties
Character, input.
Identifies a comma−separated list of optional property names. Specify any of the following property names, or
specify '' to indicate that no properties are to be applied:
APPLIED_TEXT_VIEWER_NAME◊ APPLIED_VIEWER_NAME◊ ARCHIVE_NAME◊ ARCHIVE_PATH◊ CHANNEL_STORE◊ COLLECTION_URL◊ CORRELATIONID◊ FROM◊ FTP_PASSWORD◊ FTP_USER◊ HTTP_PASSWORD◊ HTTP_PROXY_URL◊ HTTP_USER◊ IF_EXISTS◊ LDAP_BINDDN◊ LDAP_BINDPW◊ METAPASS◊ METAUSER◊ PARENT_URL◊ PROCESS_VIEWER◊ REPLYTO◊ SUBJECT◊ TARGET_VIEW_NAME◊ TARGET_VIEW_MIMETYPE◊ TEXT_VIEWER_NAME◊ UUID◊ VIEWER_NAME◊
Publish to Subscribers 316

propValue1, ...propValueN
Character/Numeric, input.
Specifies one value for each specified property name. The order of the property values must match the order
of the property names in the properties parameter.
channelCharacter, input.
specifies the name of the channel as it is defined in the repository. The channel can be defined in an LDAP
repository or in a SAS Metadata Repository. The channel contains a list of subscribers to whom the package
will be published.
Details
When a package is published to a channel, the package is published to each subscriber of the channel. Each
subscriber's entry contains an attribute that specifies the publishing transport method: e−mail, message queue,
WebDAV−Compliant server, or none.
Channel and subscriber metadata can be defined in an LDAP repository or in a SAS Metadata Repository. If defining
publishing metadata in LDAP, the SAS Integration Technologies Administrator can be used to define channels and
subscribers and the SAS Subscription Manager can be used to manage subscribers. If defining the publishing metadata
in a SAS Metadata Repository, the SAS Management Console's Publishing Framework plug−in can be used to
configure channels and subscribers. All of these tools allow you to define/manage channels and subscribers, including
the ability for subscribers to define filters that determine what packages are published to them. Refer to Filtering
Packages and Package Entries for details on filters.
When publishing to subscribers, the PACKAGE_PUBLISH CALL routine ensures that the package is published to
each subscriber only once, thus eliminating any duplication. When the delivery transport is a message queue, the
queue name is used as the key to enforce uniqueness. When the delivery transport is WebDAV, the collection URL is
used as the key to enforce uniqueness. A parent URL is always unique because the WebDAV transport always creates
a unique collection name for parent URLs. When the delivery transport is e−mail, the subscriber's e−mail address is
used as the key to enforce uniqueness.
Default Properties
For channel subscribers who specify an e−mail delivery transport, the default action is to publish the e−mail message
in plain text format. Only inserted references are published to the e−mail subscriber.
See the INSERT_REF CALL routine for details.
The package description field precedes the reference value in the e−mail message.
All other inserted entries are ignored.
For channel subscribers who specify a queue delivery transport, the default action is to publish all inserted entries to
the queue.
Viewer Properties
To override the default e−mail behavior, you can specify the VIEWER_NAME or TEXT_VIEWER_NAME property
on the PACKAGE_PUBLISH CALL routine. The specified viewer is used to create the content of the e−mail message
and to apply substitutions. If you specify VIEWER_NAME, the e−mail message is published in HTML format. If you
SAS® Integration Technologies: Developer's Guide
Publish to Subscribers 317

specify TEXT_VIEWER_NAME, the e−mail message is published in text format. Only the package information that
is rendered by the viewer is published.
E−mail subscribers can configure the format in which they want to receive the e−mail, either in HTML or text format.
The default behavior is that the message is published in HTML format. If the e−mail subscriber specifies text format,
the viewer is not used and the subscriber receives reference entries only. Refer to Viewer Processing for more
information about the viewer facility.
The VIEWER_NAME and TEXT_VIEWER_NAME properties override the default behavior for WebDAV
subscribers as well. If you specify VIEWER_NAME, the view is rendered in HTML format. If you specify
TEXT_VIEWER_NAME, the view is rendered in text format. The specified viewer is used to create a rendered view
that is named index.html. To override the default name that is assigned the rendered view, use the
APPLIED_VIEWER_NAME or APPLIED_TEXT_VIEWER_NAME, as appropriate, to specify a file name for the
rendered view.
The VIEWER_NAME and TEXT_VIEWER_NAME properties are ignored by the queue and archive transports.
If you specify the VIEWER_NAME or TEXT_VIEWER_NAME property with the COLLECTION_URL or
PARENT_URL property, the e−mail message contains a reference to a URL. The specified viewer is used to create a
rendered view that is named index.html. To override the default name that is assigned to the rendered view, use the
TARGET_VIEW_NAME or TARGET_VIEW_MIMETYPE, as appropriate, to specify a file name for the rendered
view. The package is published to a WebDAV−compliant server. For channel subscribers who specify an e−mail
delivery transport, the default action is to notify subscribers of the URL of the published package. For channel
subscribers who specify a message queue delivery transport, no notification is given to indicate the package's
availability on the Web.
Archive Path Property
When publishing to subscribers, the ARCHIVE_PATH property indicates that the package is to be persisted to an
archive using the specified archive path. The ARCHIVE_PATH property identifies where the archive is to be
persisted. This property can be a physical path name, an LDAP URL, an FTP URL, or an HTTP URL. The channel
metadata can be defined with a default persistent store. A persistent store identifies a default transport that is used to
persist the package before publishing to the channel subscribers. The persistent store can be defined as a default
archive path. If you specify a blank value for the ARCHIVE_PATH property, the channel's default archive path is
used to determine where the archive is to be persisted.
For channel subscribers who specify e−mail as the delivery transport, the created archive is included as an attachment
to the e−mail message. If you specify the PROCESS_VIEWER property along with the ARCHIVE_PATH property,
then the archive is created but is not sent as an attachment in e−mail. Instead, viewer processing occurs and the
rendered view is sent in e−mail. For channel subscribers who specify a queue delivery transport, the created archive is
published to the queue. For channel subscribers who specify a WebDAV delivery transport, the archive is published as
a binary package to the WebDAV server.
If the ARCHIVE_PATH property is specified with a blank value, then the channel's default archive path metadata is
used to determine where the archive is to be persisted. The name of the archive is automatically generated and the
archive metadata is then cataloged in the channel metadata. Refer to the SAS Integration Technologies Administrator
documentation for details on how to define a channel's default archive path in LDAP. Refer to the help in the
Publishing Framework plug−in within SAS Management Console for details on how to define a channel's default
archive in a SAS Metadata Repository.
SAS® Integration Technologies: Developer's Guide
Publish to Subscribers 318
If the ARCHIVE_PATH property is specified as an LDAP URL, then the URL identifies the sasArchivePath entry
within the LDAP repository. This archive path entry identifies what path is to be used when creating the archive. If the
LDAP server is running secured, then you must specify the LDAP_BINDDN and LDAP_BINDPW properties (or
bindname and password LDAP URL extensions) in order to provide the information that is needed to bind to the
LDAP server. If the ARCHIVE_PATH property is specified as an LDAP URL, then the created archive is cataloged
in LDAP as a sasArchive entry. The sasArchive entry is a child of the specified sasArchivePath entry.
If the ARCHIVE_PATH is an HTTP URL, then the URL identifies the HTTP server to use when persisting the
archive. If it is a secured server, then you must specify the HTTP_USER and HTTP_PASSWORD properties.
Specifying the HTTP_PROXY_URL property is optional. If the ARCHIVE_PATH is an FTP URL, then the URL
identifies the FTP server to use when persisting the archive. If it is a secured host, then you must specify the
FTP_USER and FTP_PASSWORD properties.
Note: If you specify both the ARCHIVE_PATH and either the VIEWER_NAME or TEXT_VIEWER_NAME
properties, the viewer property is ignored.
Note: In order to create an archive under the z/OS operating environment, the z/OS environment must support UNIX
System Services directories.
WebDAV Properties
The channel metadata can be defined with a default persistent store. A persistent store identifies a default transport
that is used to persist the package before publishing to the channel subscribers. The persistent store can be defined as a
default WebDAV server.
If the COLLECTION_URL or PARENT_URL property value is blank, then the package is published to the default
WebDAV server configured in the channel metadata. If you specify a non−blank COLLECTION_URL or
PARENT_URL property value, then the specified URL is used as the persisted location. When a non−blank value is
specified for COLLECTION_URL, the URL identifies the full path and the explicit collection name. When a
non−blank value is specified for PARENT_URL, the URL identifies the full path and a unique name is assigned to the
collection automatically.
Channel subscribers who specify an e−mail delivery transport are notified about the availability of the new collection.
The e−mail message contains a reference to the value of the COLLECTION_URL or PARENT_URL property, which
specifies the URL to which the package is published. For channel subscribers who specify a message queue delivery
transport, no notification is given to announce the collection's availability.
The COLLECTION_URL (or PARENT_URL) property and the ARCHIVE_PATH property are mutually exclusive.
When publishing to a WebDAV−compliant server with the COLLECTION_URL or PARENT_URL properties, you
can specify the following WebDAV properties: HTTP_PASSWORD, HTTP_PROXY_URL, HTTP_USER,
IF_EXISTS, TARGET_VIEW_MIMETYPE, TARGET_VIEW_NAME, and VIEWER_NAME (or
TEXT_VIEWER_NAME).
WebDAV publishing uses the following file extensions for each item type:
Item Type File Extension
CATALOG .sac
DATA .sad
SAS® Integration Technologies: Developer's Guide
Publish to Subscribers 319

FDB .saf
MDDB .sam
VIEW .sav
Examples
Example 1
The following example publishes the specified package to all subscribers of the Report channel. The SAS Metadata
Server on ALPAIR03 is searched for the stored channel and subscriber information. The SAS Metadata Server is
using port 4059 and the repository to use is MyRepos.
channelStore =
"SAS−OMA://alpair03.sys.com:4059/reposname=MyRepos";
channelName = "Report";
prop = "channel_store,metauser,metapass";
user = "myUserName";
password = "myPassword";
Call package_publish(pid, "TO_SUBSCRIBERS", rc, prop,
channelStore, user, password, channelName);
Example 2
The following example publishes the specified package to all subscribers of the WeeklyPayroll channel. The LDAP
server on ALPAIR02 will be searched for the stored channel and subscriber information. The LDAP server is using
port 8010, and the base of 'o=Alphalite Airways, c=US' is to be used during the search. If the bindname contains
commas or question marks, you must replace them with a percent sign followed by their ASCII hexadecimal values.
This example replaces the commas in the bindname field with the hexadecimal value of %2c.
pubType = "TO_SUBSCRIBERS";
props='CHANNEL_STORE';
storeInfo =
"LDAP://alpair02.sys.com:8010/o=Alphalite Airways,c=US
????bindname=cn=John Smith%2c o=Alphalite Airways%2c c=US,
password=JSmith3";
channel = 'WeeklyPayroll';
CALL PACKAGE_PUBLISH(packageId, pubType,
rc, props, storeInfo, channel);
Example 3
The following publishes the package to all subscribers of the HR channel. The subject property is specified so that all
e−mail subscribers will receive the message with the specified subject.
pubType = "TO_SUBSCRIBERS";
storeInfo =
"LDAP://alpair02.sys.com:8010/o=Alphalite Airways,c=US";
channel = 'HR';
property = "SUBJECT, CHANNEL_STORE";
subject = "Weekly HR Updates:"
CALL PACKAGE_PUBLISH(packageId, "TO_SUBSCRIBERS",
rc, property, subject, storeInfo, channel);
SAS® Integration Technologies: Developer's Guide
Publish to Subscribers 320
Publishing Framework
SAS® Integration Technologies: Developer's Guide
Publish to Subscribers 321

Publish to a WebDAV−Compliant Server
Publishes a package to a WebDAV−compliant server.
Syntax
CALL PACKAGE_PUBLISH(packageId, publishType, rc, properties,< propValue1, ...propValueN>
packageID
Numeric, input.
Identifies the package that is to be published.
publishType
Character, input.
Indicates how to publish the package. To publish the package using the WebDAV transport, specify a
publishType of TO_WEBDAV.
rc Numeric, output.
Receives a return code.
properties
Character, input.
Identifies a comma−separated list of optional property names. Specify any of the following property names, or
specify '' to indicate that no properties are to be applied:
ARCHIVE_NAME◊ ARCHIVE_PATH◊ COLLECTION_URL◊ HTTP_PASSWORD◊ HTTP_PROXY_URL◊ HTTP_USER◊ IF_EXISTS◊ PARENT_URL◊ TARGET_VIEW_MIMETYPE◊ TARGET_VIEW_NAME◊ TEXT_VIEWER_NAME◊ VIEWER_NAME◊
propValue1, ...propValueN
Character/Numeric, input.
Specifies one value for each specified property name. The order of the property values must match the order
of the property names in the properties parameter.
Details
Default Behavior
Publishing with a publishType of TO_WEBDAV publishes a package to a specified URL on a WebDAV−compliant
server. WebDAV servers enable distributed authoring and versioning, which enables collaborative development of
Web files on remote servers.
The WebDAV transport stores package entries as members of a collection.
Publish to a WebDAV−Compliant Server 322
If you specify the COLLECTION_URL property, the package is published to the specified URL on a
WebDAV−compliant Web server. When you use COLLECTION_URL, the default behavior is to replace the existing
collection and its nested directories at that location. If you do not want to replace an existing collection and its nested
directories, you must use the IF_EXISTS property. An example of a collection URL is
http://www.host.com/AlphaliteAirways/revenue/quarter1
The collection is named quarter1.
The PARENT_URL property is similar to the COLLECTION_URL property except that it specifies the location
under which the new WebDAV collection is to be placed. The PUBLISH_PACKAGE CALL routine generates a
unique name for the new collection. The unique name is limited to eight characters with the first character as an s. An
example of a parent URL directory location is http://www.host.com/AlphaliteAirways/revenue. An example of a
collection name that is automatically generated might be s9811239.
The specifications of the COLLECTION_URL property and the PARENT_URL property are mutually exclusive.
To announce the availability of new WebDAV collections on WebDAV−compliant servers, use a publishType of
TO_SUBSCRIBERS or TO_EMAIL.
WebDAV publishing uses the following file extensions for each item type:
Item Type File Extension
CATALOG .sac
DATA .sad
FDB .saf
MDDB .sam
VIEW .sav
Viewer Properties
If you specify the VIEWER_NAME property with the COLLECTION_URL or PARENT_URL property, the view is
rendered in HTML format. If you specify the TEXT_VIEWER_NAME with the COLLECTION_URL or
PARENT_URL properties, the view is rendered in text format.
The specified viewer is used to create a rendered view that is named index.html. To override the default name that is
assigned to the rendered view, use the APPLIED_VIEWER_NAME or APPLIED_TEXT_VIEWER_NAME, as
appropriate, to specify a file name for the rendered view.
Archive Path Properties
If you specify the ARCHIVE_PATH property, an archive is created and published as a binary package on a
WEBDAV−compliant server. All entries that are inserted into the package are published as an archive. If you specify
a value for ARCHIVE_PATH, the created archive is stored at the designated location. To create a temporary archive
that is deleted after the package is published, specify an ARCHIVE_PATH value of "" or "tempfile".
For more details on how to use the archive properties, see How to Specify an ARCHIVE_PATH.
SAS® Integration Technologies: Developer's Guide
Publish to a WebDAV−Compliant Server 323

Note: In order to create an archive under the z/OS operating environment, the z/OS environment must support UNIX
System Services directories.
When publishing a binary package with the WEBDAV transport, you can specify the following archive properties:
ARCHIVE_NAME, ARCHIVE_PATH, HTTP_PASSWORD, HTTP_PROXY_URL, or HTTP_USER.
Applying a Name/Value Pair to a Package and a Package Item
When publishing to a WebDAV−compliant server, optionally specified name/value pairs are transmitted to the
WebDAV server in XML format. XML format requires that the name portion of the name/value pair specification
follow these conventions:
It must begin with an alphabetic character or an underscore• It can contain these types of characters only: alphabetic, numeric, and these special characters:
. (period)♦ − (hyphen)♦ _ (underscore)♦
•
If a namespace is associated with the name portion of a name/value pair, the name can also include a colon (:).
Name/value pairs not explicitly associated with a namespace might not be retained by the WebDAV server. For
details about the NAMESPACE property, see PACKAGE_BEGIN.
For details about specifying the nameValue parameter for an entire package, see PACKAGE_BEGIN. For details
about specifying the nameValue parameter for a single package item, see the applicable INSERT_item CALL routine,
where item can be any of the following:
CATALOG• DATASET• FILE• HTML• MDDB• PROC SQL VIEW• REFERENCE• VIEWER•
Examples
Example 1
The following example publishes a package to the specified URL:
rc = 0;
pubType = "TO_WEBDAV";
properties="COLLECTION_URL";
cUrl = "http://www.alpair.web/NightlyMaintReport";
CALL PACKAGE_PUBLISH(packageId, pubType,
rc, properties, cUrl);
SAS® Integration Technologies: Developer's Guide
Publish to a WebDAV−Compliant Server 324
Example 2
The following example publishes a package to a URL via the specified proxy server using the specified credentials:
rc = 0;
pubType = "TO_WEBDAV";
properties="COLLECTION_URL,HTTP_PROXY_URL,
IF_EXISTS,HTTP_USER,HTTP_PASSWORD";
cUrl = "http://www.alpair.secureweb/NightlyMaintReport";
pUrl = "http://www.alpair.proxy:8000/";
exists = "update";
user = "JohnSmith";
password = "secret";
CALL PACKAGE_PUBLISH(packageId, pubType, rc, properties,
cUrl, pUrl, exists, user, password);
Example 3
The following example uses the e−mail transport to publish a collection URL on a WebDAV−compliant server. The
HTTP user ID and password enable the publisher to bind to the secured HTTP server. All e−mail recipients who are
members of the mail list receive the e−mail announcement that the best rates are accessible at the specified URL.
pubType = "TO_EMAIL";
properties="COLLECTION_URL, SUBJECT,
HTTP_USER, HTTP_PASSWORD";
collurl="http://www.alphaliteairways/fares/discount.html";
subj="Announcing Best Rates Yet";
http_user="vicdamone";
http_password="myway";
Addr = "admins−l@alphaliteair05";
CALL PACKAGE_PUBLISH(packageId, pubType, rc, properties,
collurl, subj, http_user, http_password, Addr);
Example 4
The following example uses the ARCHIVE_PATH property to publish a binary package to the WebDAV−compliant
server. The archive path is specified as "tempfile" so that the locally created archive file will be deleted once it has
been published to the WebDAV server.
pubType = "TO_WEBDAV";
properties="COLLECTION_URL, ARCHIVE_PATH";
cUrl = "http://www.alpair.secureweb/Reports";
apath = "tempfile";
CALL PACKAGE_PUBLISH(packageId, pubType, rc,
properties, cUrl, apath);
Publishing Framework
SAS® Integration Technologies: Developer's Guide
Publish to a WebDAV−Compliant Server 325

LDAP Channel Store Syntax
If channel definitions and subscriber definitions are maintained in an LDAP directory, then the syntax for the
CHANNEL_STORE property is as follows:
LDAP://hostname:port/dn?attributes?scope?filter?bindname=bindname, password=password; Where:
hostname
name of LDAP server that contains channel information. HOSTNAME must be DNS name or IP address of a
host that is running an LDAP server. If HOSTNAME is left blank or is not specified, the macro variable
LDAP_HOST is used. If this too is blank or not defined, the LDAP host is assumed to be the host that is
running the application that placed the CALL.
Port
TCP port of the LDAP server. If zero or not specified, the macro variable or environment variable
LDAP_PORT is used. If this too is blank or not defined, the standard port of 389 is used.
dn
distinguished name is the base object that specifies the point in the LDAP tree where the channel search is to
begin. If this value is blank, the macro variable or environment variable LDAP_BASE is used for the
definition of the base.
bindname
base distinguished name used to bind to the server. When specifying the bindname on the LDAP store
information string, any commas or question marks that are contained within the bindname must be replaced
with their ASCII hexadecimal equivalents. The format of the ASCII hexadecimal equivalent consists of a
percent sign followed by the ASCII hexadecimal value of the character. For example, if the bindname
contains commas, replace the commas as shown:
bindname=cn=John Smith%2c o=Alphalite Airways%2c
c=US, password=JSmith3
password
password used to bind to the server.
Publishing Framework
LDAP Channel Store Syntax 326

SAS Metadata Repository Channel Store Syntax
If channel definitions and subscriber definitions are maintained in a SAS Metadata Repository, then the syntax for the
CHANNEL_STORE property is as follows:
SAS−OMA://hostname[:port]/reposname=repositoryName; Where:
hostname
name of SAS Metadata Server that contains channel information. HOSTNAME must be a DNS name or IP
address of a host that is running a SAS Metadata Server.
port
TCP port of the SAS Metadata Server. If no port is specified, then 8561 is used as a default.
reposname
name of the repository.
Publishing Framework
SAS Metadata Repository Channel Store Syntax 327
COMPANION_NEXT
Retrieves the next companion HTML file in the ODS HTML set.
Syntax
CALL COMPANION_NEXT(entryId, path, filename, url, rc <, properties, propValue1, ...propValueN>);
entryId Numeric, input.
Identifies the companion HTML file entry.
path Character, input.
Specifies the full path of the location that will receive the retrieved file.
filename
Character, output.
Returns the name of the new file.
url Character, output.
Returns the URL of the companion file.
properties
Character, input.
Identifies a comma−separated list of optional property names. Valid property names are as follows:
ENCODING◊ MIMETYPE◊
propValue1, ...propValueN
Character, input.
Specifies one value for each specified property name. The order of the property values must match the order
of the property names in the properties parameter. Valid property values are defined as follows:
ENCODING
Input character string specifies the target encoding for the companion file. The companion file is
translated into the specified encoding. An example of a target encoding value is ISO−8859−1.
MIMETYPE
Character output parameter identifies the MIME type of the companion file. The MIME type is
returned in the MIMETYPE variable. The publisher of the companion file can set the user−specified
MIME type after the companion file is published. If the publisher does not specify the MIME type,
the returned value is blank.
rc Numeric, output.
Receives a return code.
Details
The publisher can choose to publish any combination of the HTML files. Included in the set of published files can be
any number of additional HTML files or companion files.
The filename and url parameters are character variables that are updated by the CALL routine. Because they are
updated, they must be initialized with a length large enough to contain the name of the file or the URL that is being
COMPANION_NEXT 328

returned. If not, the returned value will be truncated and a warning will be printed indicating that one or more
parameters were truncated. When called from within the data step, use the LENGTH statement to define the length of
the variable. When called from within a macro, initialize the variable to some value so that it will have an appropriate
length.
For details about how HTML files are published and how the optional encoding property can be used to provide
encoding information to package recipients, see Publish/Retrieve Encoding Behavior.
Examples
Example 1
The following example retrieves an HTML file and then retrieves the next companion HTML file in the set.
data _null_;
length contents $64 frame $64 pages $64
body $64 contentsUrl $256 frameUrl $256
PagesUrl $256 bodyUrl $256;
path ='/finance/accounting/doc';
CALL RETRIEVE_HTML(entryId, path, body, bodyUrl, frame,
frameUrl, contents, contentsUrl, pages, pagesUrl,rc);
CALL COMPANION_NEXT(entryId, path, fname, url, rc);
Example 2
The following example retrieves an HTML file and then retrieves the next companion HTML file in the set. If the
publisher specifies a MIME type when publishing a package, the optional MIMETYPE property is specified in order
for its MIME type to be returned. The MIME type will be returned in the mime variable.
data _null_;
length contents $64 frame $64 pages $64 body $64
contentsUrl $256 frameUrl $256 PagesUrl $256
bodyUrl $256 mime $64;
path ='/finance/accounting/doc';
CALL RETRIEVE_HTML(entryId, path, body, bodyUrl, frame,
frameUrl, contents, contentsUrl, pages, pagesUrl,rc);
properties="MIMETYPE";
CALL COMPANION_NEXT(entryId, path, fname,
url, rc, properties, mime);
Publishing Framework
SAS® Integration Technologies: Developer's Guide
COMPANION_NEXT 329

ENTRY_FIRST
Returns header information for the first entry in a package.
Syntax
CALL ENTRY_FIRST(packageId, entryId, entryType, userSpecString, desc, nameValue, rc);
packageId
Numeric, input.
Identifies the package.
entryId Numeric, output.
Returns the identifier of the entry.
entryType
Character, output.
Returns the type of the entry. Available types include the following:
BINARY◊ CATALOG◊ DATASET◊ FDB◊ HTML◊ MDDB◊ NESTED_PACKAGE◊ REFERENCE◊ SQLVIEW◊ TEXT◊ VIEWER◊
userSpecString
Character, output.
Returns a string from the specified entry. See Details for string content.
desc Character, output.
Returns the entry description from the specified entry.
nameValue
Returns the name/value pairs assigned to the specified entry. Name/value pairs are site−specific; they are used
for the purpose of filtering.
rc Numeric, output.
Receives a return code.
Details
The header information returned by this CALL routine identifies the type of the entry and provides descriptive
information.
The ENTRY_FIRST CALL routine repositions the entry cursor to the start of the list of entries. When the packages
are retrieved by way of the RETRIEVE_PACKAGE, CALL routine, the entry cursor is positioned at the start of the
ENTRY_FIRST 330

entry list by default. As a consequence, the ENTRY_FIRST CALL routine does not have to be called before the
ENTRY_NEXT CALL routine.
The userSpecString parameter is returned to provide further content information about the entry. The value
returned is the value that was provided by the publisher at insert time. At this time, only file entries can return a value
for this parameter. All other entry types return a blank value. For file entries, this field is the user−specified MIME
type.
The following example returns header information for the first entry in the package.
CALL ENTRY_FIRST(packageId, entryid, type,
uSpec, desc, nv, rc);
Publishing Framework
SAS® Integration Technologies: Developer's Guide
ENTRY_FIRST 331

ENTRY_NEXT
Returns header information from the next entry in a package.
Syntax
CALL ENTRY_NEXT(packageId, entryId, entryType, userSpecString, desc, nameValue, rc);
packageId
Numeric, input.
Identifies the package.
entryId Numeric, output.
Returns the identifier of the entry.
entryType
Character, output.
Returns the type of the entry. Available types include the following:
BINARY◊ CATALOG◊ DATASET◊ FDB◊ HTML◊ MDDB◊ NESTED_PACKAGE◊ REFERENCE◊ SQLVIEW◊ TEXT◊ VIEWER◊
userSpecString
Character, output.
Returns a string from the specified entry. See Details for string content.
desc Character, output.
Returns the entry description from the specified entry.
nameValue
Character, output.
Returns the name/value pairs assigned to the specified entry. Name/value pairs are site−specific; they are used
for the purpose of filtering.
rc Numeric, output.
Receives a return code.
Details
The header information returned by this CALL routine identifies the type of the entry and provides descriptive
information.
ENTRY_NEXT 332

The userSpecString parameter provides content information about the entry. The value returned is the value that
was provided by the publisher when the entry was inserted in the package. For this release, only file entries can return
a value for this parameter. All other entry types return a blank value. For file entries, this field is the user−specified
MIME type.
When a package is retrieved, the entry cursor is positioned at the start of the entry list by default. As a consequence,
the ENTRY_FIRST CALL routine does not have to be called before ENTRY_NEXT CALL routine. The
ENTRY_FIRST CALL routine can be used at a later time in order to move the entry cursor back to the start of the
entry list.
The following example positions the cursor at the start of an entry list.
CALL ENTRY_NEXT(packageId, entryid, type,
uSpec, desc, nv, rc);
Publishing Framework
SAS® Integration Technologies: Developer's Guide
ENTRY_NEXT 333

PACKAGE_DESTROY
Deletes a package.
Syntax
CALL PACKAGE_DESTROY(packageId, rc);
packageId
Numeric, input.
Identifies the package to be deleted.
rc Numeric, output.
Receives a return code.
Details
If the queue transport is used, the package is removed from the queue, along with all messages that are associated with
the package. If the package contains nested packages, all entries that are contained within the nested packages as are
also removed from the queue. If the archive transport is used, the archive is deleted.
The PACKAGE_DESTROY CALL routine does not support package identifiers that represent nested packages,
which are returned by way of the RETRIEVE_NESTED CALL routine. The PACKAGE_DESTROY CALL routine
supports only top−level package identifiers, which are returned by PACKAGE_FIRST and PACKAGE_NEXT.
The following example removes a package from a queue.
rc=0;
CALL PACKAGE_DESTROY(packageId, rc);
See Also
PACKAGE_END• PACKAGE_TERM•
Publishing Framework
PACKAGE_DESTROY 334

PACKAGE_FIRST
Returns the header information for the first package in the package list.
Syntax
CALL PACKAGE_FIRST(pkgListId, packageId, numEntries, desc, dateTime, nameValue, channel, rc<, properties,
propValue1, ...propValueN>);
pkgListId
Numeric, output.
Identifies the list of retrieved packages.
packageId
Numeric, output.
Identifies the retrieved package.
numEntries
Numeric, output.
Returns the number of entries in the package.
desc Character, output.
Returns a description of the package.
dateTime
Numeric, output.
Returns the date and time that the package was published, in GMT format.
nameValue
Character, output.
Returns the name/value pairs assigned to the package. Name/value pairs are site−specific; they are used for
the purpose of filtering.
channelCharacter, output.
Returns the name of a channel to which the package was published.
rc Numeric, output.
Receives a return code.
properties
Character, input.
Identifies a comma−separated list of optional property names to be returned from the package. Valid property
names are as follows:
ABSTRACT◊ EXPIRATION_DATETIME◊
propValue1, ...propValueN
Character/numeric, output.
Returns one value for each specified property. The order of the values matches the order of the property
names in the properties parameter. Valid property values are defined as follows:
ABSTRACT
Character string variable.
If specified, is returned to the ABSTRACT variable.
EXPIRATION_DATETIME
PACKAGE_FIRST 335
Numeric variable.
The package expiration date/time stamp is returned to the EXPIRATION_DATETIME variable. The
date/time stamp is in GMT format.
Examples
The following example opens the JSMITH queue and retrieves the descriptive header information for all packages,
then returns the header information for the first package.
plist=0;
qname = "MQSERIES://LOCAL:JSMITH";
rc=0;
total=0;
nameValue='';
CALL RETRIEVE_PACKAGE(plist, "FROM_QUEUE",
qname, total, rc);
packageId = 0;
desc='';
num=0;
dt=0;
nv='';
ch='';
rc=0;
CALL PACKAGE_FIRST(plist, packageId,
num, desc, dt, nv, ch, rc);
The following example demonstrates the use of properties.
plist=0;
qname = "MQSERIES://LOCAL:JSMITH";
rc=0;
total=0;
nameValue='';
CALL RETRIEVE_PACKAGE(list, "FROM_QUEUE",
qname, total, rc);
packageId = 0;
desc='';
num=0;
exp=0;
abstract='';
dt=0;
nv='';
ch='';
rc=0;
props='ABSTRACT, EXPIRATION_DATETIME';
CALL PACKAGE_FIRST(plist, packageId, num, desc,
dt, nv, ch, rc, props, abstract, exp);
Publishing Framework
SAS® Integration Technologies: Developer's Guide
PACKAGE_FIRST 336

PACKAGE_NEXT
Returns the header information for the next package in the package list.
Syntax
CALL PACKAGE_NEXT(pkgListId, packageId, numEntries, desc, dateTime, nameValue, channel, rc<, properties,
propValue1, ...propValueN>);
pkgListId
Numeric, input.
Identifies the list of retrieved packages.
packageId
Numeric, output.
Returns the name of the retrieved package.
numEntries
Numeric, output.
Returns the total number of entries in the package.
desc Character, output.
Describes the package.
dateTime
Numeric, output.
Returns the date and time value that the package was published, in GMT format.
nameValue
Character, output.
Returns the name/value pairs assigned to the package. Name/value pairs are site−specific; they are used for
the purpose of filtering.
channelCharacter, output.
Returns the name of the channel to which the package was published.
rc Numeric, output.
Receives a return code.
properties
Character, input.
Identifies a comma−separated list of optional property names to be returned from the package. Valid property
names are as follows:
ABSTRACT◊ EXPIRATION_DATETIME◊
propValue1, ...propValueN
Character/numeric, output.
Returns one value for each specified property. The order of the values matches the order of the property
names in the properties parameter. Valid property values are defined as follows:
ABSTRACT
Character string variable.
If specified, is returned to the ABSTRACT variable.
EXPIRATION_DATETIME
PACKAGE_NEXT 337
Numeric variable.
The package expiration date/time stamp is returned to the EXPIRATION_DATETIME variable. The
date/time stamp is in GMT format.
Examples
The following example returns the header information for the next package associated with the list of packages named
PLIST.
packageId = 0;
desc='';
num=0;
exp=0;
dt=0;
nv='';
ch='';
rc=0;
CALL PACKAGE_NEXT(plist, packageId,
num, desc, dt, nv, ,ch, rc);
The following example uses the ABSTRACT property so that the abstract value is returned in the abs variable.
packageId = 0;
desc='';
num=0;
exp=0;
dt=0;
nv='';
ch='';
abs='';
props="ABSTRACT";
rc=0;
CALL PACKAGE_NEXT(plist, packageId, num,
desc, dt, nv, ch, rc, props, abs);
Publishing Framework
SAS® Integration Technologies: Developer's Guide
PACKAGE_NEXT 338

PACKAGE_TERM
Frees all resources associated with the package list identifier.
Syntax
CALL PACKAGE_TERM(pkgListId, rc);
pkgListId
Numeric, input.
Identifies the list of packages.
rc Numeric, output.
Receives a return code.
Details
Freeing resources closes all queues and files associated with the package list identifier.
The following example frees all resources associated with pkgListId.
CALL PACKAGE_TERM(pkgListId, rc);
See Also
PACKAGE_DESTROY• PACKAGE_END•
Publishing Framework
PACKAGE_TERM 339
RETRIEVE_CATALOG
Retrieves a catalog from a package.
Syntax
CALL RETRIEVE_CATALOG(entryId, libname, memname, rc);
entryId Numeric, input.
Identifies the catalog entry.
libnameCharacter, input.
Specifies the SAS library that will contain the retrieved catalog.
memname
Character, input.
Names the retrieved catalog.
rc Numeric, output.
Receives a return code.
Details
If the memname parameter is blank, the RETRIEVE_CATALOG CALL routine creates the catalog using the original
member name as it was defined at publish time.
The following example retrieves a catalog from the package and creates the catalog WORK.TMPCAT.
lib = 'work';
mem = 'tmpcat';
CALL RETRIEVE_CATALOG(entryId, lib, mem, rc);
Publishing Framework
RETRIEVE_CATALOG 340
RETRIEVE_DATASET
This CALL routine retrieves a data set entry from a package.
Syntax
CALL RETRIEVE_DATASET(entryId, libname, memname, rc
<, properties, propValue1, ...propValueN>);
entryId Numeric, input.
Identifies the data set entry.
libnameCharacter, input.
Specifies the SAS library that will contain the retrieved data set.
memname
Character, input
Names the retrieved data set.
rc Numeric, output.
Receives a return code.
properties
Character, input.
Identifies a comma−separated list of optional property names. Valid property names are as follows:
DATASET_OPTIONS◊ CSV_SEPARATOR◊ CSV_FLAG◊
propValue1, ...propValueN
Character, input.
Specifies one value for each specified property name. The order of the property values must match the order
of the property names in the properties parameter. Valid property values are defined as follows:
DATASET_OPTIONS
Character parameter SAS data set options that are to be applied to the retrieved data set. For a
complete list of data set options, see the SAS Data Set Options topic in the SAS Online Help, Release
8.2.
CSV_SEPARATOR
Character property applies only when the RETRIEVE_DATASET CALL routine is called on a CSV
file entry. When this occurs, the CSV file is transformed into a SAS data set. A binary CSV file is
identified by a MIME type of application/x−comma−separated−values. Use the
CSV_SEPARATOR property to indicate the separator to be used when creating the CSV file. The
default separator is a comma. If the CSV file was created at publish time by transforming a SAS data
set into a CSV file, the separator used to create the CSV file will always take precedence. If the CSV
file was not created at publish time, the CSV_SEPARATOR property may be used to specify the
separator value used. If the CSV file was not created at publish time and no separator property is
specified, the separator is specified as a comma, by default.
CSV_FLAG
Character property only applies when calling the RETRIEVE_DATASET CALL routine for a binary
file entry. A binary CSV file is identified by a MIME type of
application/x−comma−separated−values. This property is a CSV override flag. By
RETRIEVE_DATASET 341
default when converting this binary CSV file into a SAS data set, the first line will be processed as
variable names. The second line will be processed as variable label names. All remaining lines will be
processed as data. To override this default behavior, the CSV_FLAG value must be
NO_VARIABLES or NO_LABELS. To specify both values, specify two CSV_FLAG properties, one
with a value of NO_VARIABLES, the other with a value of NO_LABELS.
By default, when a CSV file is converted into a data set, the variable lengths are determined by the
first row of data. If subsequent rows have greater lengths, the variable data is truncated. To override
this default behavior, specify the CSV_FLAG with a property of NO_TRUNCATION. When this flag
value is specified, truncation will not occur, but multiple passes of the data may be necessary in order
to perform the resizing.
Details
If the MEMNAME parameter is blank, the RETRIEVE_DATASET CALL routine creates the data set using the
original member name as it was defined at publish time.
The following example retrieves the data set WORK.OUTDATA entry from the package.
lib = 'work';
mem = 'outdata';
CALL RETRIEVE_DATASET(rid, lib, mem, rc);
The following example specifies two CSV_FLAG properties.
prop='CSV_SEPARATOR,CSV_FLAG,CSV_FLAG';
separator='/';
flag1 = 'NO_VARIABLES';
flag2 = 'NO_LABELS';
CALL RETRIEVE_DATASET(entryId, libname, memname,
rc, prop, separator, flag1, flag2);
Publishing Framework
SAS® Integration Technologies: Developer's Guide
RETRIEVE_DATASET 342
RETRIEVE_FDB
Retrieves a financial database entry from a package.
Syntax
CALL RETRIEVE_FDB(entryId, libname, memname, rc);
entryId Numeric, input.
Identifies the FDB entry.
libnameCharacter, input.
Specifies the SAS library that will contain the retrieved FDB.
memname
Character, input.
Specifies the member name of the retrieved FDB.
rc Numeric, output.
Receives a return code.
Details
If the memname parameter is blank, the RETRIEVE_FDB CALL routine creates the FDB using the original member
name as it was defined at publish time.
The following example retrieves an FDB entry WORK.OUTDATA from the package.
lib = 'work';
mem = 'outdata';
CALL RETRIEVE_FDB(entryId, lib, mem, rc);
Publishing Framework
RETRIEVE_FDB 343
RETRIEVE_FILE
Retrieves an external binary or text file from a package.
Syntax
CALL RETRIEVE_FILE(entryId, filename, rc);
entryId Numeric, input.
Identifies the file entry.
filename
Character, input.
Specifies the name of the file or fileref, using the following syntax:
FILENAME: external_filename◊ FILEREF: SAS_fileref◊
rc Numeric, output.
Receives a return code.
Details
Specifying "FILENAME:" (without a filename) applies to the retrieved file the name of the original file, when that
file was inserted in the package.
The following example retrieves a binary file from a queue.
fname = "filename: /users/jsmith.bin";
CALL RETRIEVE_FILE(entryId, fname, rc);
Publishing Framework
RETRIEVE_FILE 344
RETRIEVE_HTML
Retrieves an HTML entry from a package.
Syntax
CALL RETRIEVE_HTML(entryId, path, body, bodyUrl, frame, frameUrl, contents, contentsUrl, pages, pagesUrl,
rc<, properties, propValue1, ...propValueN>);
entryId Numeric, input.
Identifies the HTML entry.
path Character, input.
Specifies the full designation of the location that will receive the retrieved files.
body Character, output.
Returns the name of the HTML body file.
bodyUrlCharacter, output.
Returns the URL of the HTML body file.
frame Character, output.
Returns the name of the HTML frame file.
frameUrl
Character, output.
Returns the URL of the HTML frame file.
contents
Character, output.
Returns the name of the HTML contents file.
contentsUrl
Character, output.
Returns the URL of the HTML contents file.
pages Character, output.
Returns the name of the HTML page file.
pagesUrl
Character, output.
Returns the URL of the HTML page file.
rc Numeric, output.
Receives a return code.
properties
Character, input.
Identifies a comma−separated list of optional property names. Valid property names are as follows:
ENCODING◊ BODY_TOTAL◊ FILE_TOTAL◊ COMPANION_TOTAL◊
propValue1, ...propValueN
RETRIEVE_HTML 345

Character/numeric, input/output.
Specifies one value for each specified property name. The order of the property values must match the order
of the property names in the properties parameter. Valid property values are defined as follows:
ENCODING
Input character string indicates the target encoding for the retrieved HTML file. An example of a
target encoding value is ISO−8859−1. Refer to Publish/Retrieve Encoding Behavior for further
information.
BODY_TOTAL
Numeric output parameter returns the total number of HTML body files published as part of this set.
FILE_TOTAL
Numeric output parameter returns the total number of all HTML files published as part of this set.
This includes all body, page, contents, frame, and additional HTML files and companion files.
COMPANION_TOTAL
Numeric output parameter returns the total number of extraneous HTML files that were published as
part of this set.
Details
The ODS entry may contain any combination of the following: ODS HTML file, contents file, pages file, or frame
file.
The publisher can choose to publish any combination of the HTML files. To indicate those files that were not
published as part of this set, the output parameter that contains the created file name will be updated to "". For
example, if only the body was published, then the page, contents, and frame parameters will be returned as "".
The pages, pagesUrl, body, bodyUrl, frame, frameUrl, contents, and contentsUrl parameters are
character variables that are updated by the CALL routine. Because they are updated, they must be initialized with a
length large enough to contain the name of the returned filename or URL. If the length of the character variable is less
than the length of the returned filename or URL, the filename or URL will be truncated and a warning will be issued.
When calling the RETRIEVE_HTML CALL routine from within the data step, use the LENGTH statement to define
the length of the character variable. When calling RETRIEVE_HTML from within a macro, initialize the variable to
some value so that it will have an appropriate length, as shown in the second example below.
Refer to Publish/Retrieve Encoding Behavior for information on how HTML files are published and how the optional
encoding property can be used to provide encoding information to package recipients.
Examples
The following example retrieves HTML entry information from the package.
data _null_;
length contents $64 frame $64 pages $64 body $64
contentsUrl $256 frameUrl $256
PagesUrl $256 bodyUrl $256;
path ='/maintenance/schedule/doc';
CALL RETRIEVE_HTML(entryId, path, body,
bodyUrl, frame, frameUrl, contents,
contentsUrl, pages, pagesUrl, rc);
SAS® Integration Technologies: Developer's Guide
RETRIEVE_HTML 346
The following example uses a macro to initialize a variable to a specific length and then retrieves HTML information
from the package.
%macro initLen(variable, len);
%let &variable=.;
%do i=2 %to &len;
%let &variable=&&&variable...;
%end;
%mend;
%initLen(contents, 64);
%initLen(contentsUrl, 256);
%initLen(pages, 64);
%initLen(pagesUrl, 256);
%initLen(body, 64);
%initLen(bodyUrl, 256);
%initLen(frame, 64);
%initLen(frameUrl, 256);
%let path =/users/maintenance/doc;
%let rc=0;
%syscall RETRIEVE_HTML(entryId, path, body,
bodyUrl, frame, frameUrl, contents, contentsUrl,
pages, pagesUrl, rc);
Publishing Framework
SAS® Integration Technologies: Developer's Guide
RETRIEVE_HTML 347
RETRIEVE_MDDB
Retrieves an MDDB entry from a package.
Syntax
CALL RETRIEVE_MDDB(entryId, libname, memname, rc);
entryId Numeric, input.
Identifies the MDDB entry.
libnameCharacter, input.
Specifies the SAS library that will contain the retrieved MDDB.
memname
Character, input.
Specifies the name of the retrieved MDDB.
rc Numeric, output.
Receives a return code.
Details
An MDDB is a multidimensional database (not a data set) offered by SAS. An MDDB is a specialized storage facility
that can be created by tools such as multidimensional data viewers, which populate the MDDB with data retrieved
from sources such as a data warehouse. The matrix format of MDDBs allows the viewer to access data quickly and
easily.
If the memname parameter is blank, the RETRIEVE_MDDB CALL routine creates the MDDB using the original
member name as it was defined at publish time.
The following example retrieves an MDDB entry WORK.OUTDATA from the package.
lib = 'work';
mem = 'outdata';
CALL RETRIEVE_MDDB(entryId, lib, mem, rc);
Publishing Framework
RETRIEVE_MDDB 348

RETRIEVE_NESTED
Retrieves the descriptive header information for a nested package entry.
Syntax
CALL RETRIEVE_NESTED(entryId, packageId, numEntries, desc, dateTime, nameValue, rc);
entryId Numeric, input.
Identifies the nested package entry.
packageId
Numeric, output.
Returns the identifier of the nested package.
numEntries
Numeric, output.
Returns the number of entries in the nested package.
desc Character, output.
Returns the description of the nested package entry.
dateTime
Returns the date and time that the nested package was published, in GMT format.
nameValue
Character, output.
Returns the name/value pairs assigned to the specified entry. Name/value pairs are site−specific; they are used
for the purpose of filtering.
rc Numeric, output.
Receives a return code.
Details
The descriptive header information that is returned on this CALL routine includes the nested package description,
name/value string, datetime stamp, and total number of entries that are contained in the nested package.
The returned packageId can then be used on subsequent ENTRY_FIRST and ENTRY_NEXT calls to retrieve the
entry information.
Package identifiers that are returned on the RETRIEVE_NESTED CALL routine cannot be used on the
PACKAGE_DESTROY CALL routine. The RETRIEVE_NESTED CALL routine supports only top−level packages,
excluding nested packages. When PACKAGE_DESTROY is called on a top−level package, all entries, including all
nested packages and their entries, are removed from the queue.
The following example retrieves the descriptive header information for the nested package entry associated with
entryId.
packageId=0;
num=0;
desc='';
dt=0;
RETRIEVE_NESTED 349
nv='';
rc=0;
CALL RETRIEVE_NESTED(entryId, packageId,
num, desc, dt, nv, rc);
Publishing Framework
SAS® Integration Technologies: Developer's Guide
RETRIEVE_NESTED 350
RETRIEVE_PACKAGE
This CALL routine retrieves descriptive header information for all packages.
Syntax
CALL RETRIEVE_PACKAGE(pkgListId, retrievalType, retrievalInfo, totalPackages, rc<, properties, propValue1,
propValueN>);
pkgListId
Numeric, output.
Identifies the list of packages.
retrievalType
Character, input.
Specifies the transport to use when retrieving a package. Valid values include the following:
FROM_QUEUE◊ FROM_ARCHIVE◊ FROM_WEBDAV◊
retrievalInfo
Character, input.
Specifies transport−specific information that determines the package to retrieve. When retrieving from an
archive, specify the physical path and name of the archive, excluding the extension. When retrieving from a
WebDAV−compliant server, specify the URL that identifies the package to retrieve. When retrieving from
MSMQ queues, use the following syntax:
MSMQ://queueHostMachineName\queueName
When retrieving from MQSeries queues, use the following syntax:
MQSERIES://queueManager:queueName
or
MQSERIES−C://queueManager:queueName
totalPackages
Numeric, output.
Provides the total number of packages found.
rc Numeric, output.
Receives a return code.
properties
Character, input.
Identifies a comma−separated list of optional property names. Valid property names are as follows:
CORRELATIONID◊ FTP_PASSWORD◊ FTP_USER◊ HTTP_PASSWORD◊ HTTP_PROXY_URL◊ HTTP_USER◊ LDAP_BINDDN◊
RETRIEVE_PACKAGE 351
LDAP_BINDPW◊ NAMESPACES◊ QUEUE_TIMEOUT◊
propValue1, ...propValueN
Specifies a value for each specified property name. The order of the property values must match the order of
the property names specified in the properties parameter. Valid property values are defined as follows:
CORRELATIONID
Character string specifies retrieval of only those packages that possess the specified correlation
identifier. (Applies only to the message queue transport.)
FTP_PASSWORD
When retrieving with the archive transport (FROM_ARCHIVE), this character string indicates the
password that is used to connect to the remote host. Specify this property only when the host does not
accept anonymous access. (Applies to the FROM_ARCHIVE property when the FTP protocol is
used.)
FTP_USER
When retrieving with the archive transport, this character string indicates the name of the user to
connect to the remote host. (Applies to the FROM_ARCHIVE property when the FTP protocol is
used.)
HTTP_PASSWORD
When retrieving with the WebDAV transport (FROM_WEBDAV), this character string indicates the
password used to bind to the Web server. Specify this property only when the Web server does not
accept anonymous access. (Applies to the FROM_ARCHIVE property when the HTTP protocol is
used.)
HTTP_PROXY_URL
When retrieving with the WebDAV transport, this character string indicates the URL of the proxy
server. (Applies to the archive transport when the HTTP protocol is used with archive specifications.)
HTTP_USER
When retrieving with the WebDAV transport, this character string indicates the name of the user to
bind to the Web server. (Applies to the FROM_ARCHIVE property when the HTTP protocol is
used.)
LDAP_BINDDN
Character string indicates the distinguished name used to bind to the LDAP server. This property is
necessary only when an archive is retrieved using an LDAP URL.
LDAP_BINDPW
Character string indicates the password used to bind to the LDAP server. This property is necessary
only when retrieving an archive using an LDAP URL.
NAMESPACES
When retrieving with the WebDav transport, this character string lists one or more namespaces that
you are interested in, using the syntax shown in the following example:
a="http://www.host.com/myNamespace"
A="http://www.host.com/myNamespace1"
B="http://www.host.com/myNamespace2"
QUEUE_TIMEOUT
Numeric value identifies the number of seconds for the poll timeout. By default, if this property is not
specified, the RETRIEVE_PACKAGE CALL routine polls and returns immediately with the number
of packages found, if any. To override this default, specify the QUEUE_TIMEOUT property so that
the RETRIEVE_PACKAGE CALL routine will continue to poll for packages until at least one
package is found on the queue or until the timeout occurs, whichever occurs first.
SAS® Integration Technologies: Developer's Guide
RETRIEVE_PACKAGE 352

Details
When retrieving FROM_QUEUE, this CALL routine retrieves descriptive header information for all packages that are
found on the specified queue. The total number of packages found is returned. The descriptive header information for
each package can be obtained by executing the PACKAGE_FIRST and PACKAGE_NEXT CALL routines.
When retrieving from the queue transport, no entries or packages are removed or deleted from the queue. Packages
may be removed by calling the PACKAGE_DESTROY CALL routine.
The ARCHIVE_PATH property identifies where the archive is created. When retrieving from an archive, the name of
the archive can be specified as a physical path name, an LDAP URL, an FTP URL, or an HTTP URL. The archive
entry in LDAP contains attributes that identify the name of the archive to retrieve. Refer to SAS Integration
Technologies Administrator for details on the archive LDAP entries.
When retrieving from a WebDAV−compliant server, the name of the archive can be specified as an FTP URL or an
HTTP URL.
In the z/OS operating environment, archives can be retrieved only from UNIX System Services directories.
Examples
The following example opens the queue JSMITH and retrieves the descriptive header information for all packages on
that queue and the total number of packages on the queue.
plist=0;
qname = "MQSERIES://LOCAL:JSMITH";
rc=0;
total=0;
nameValue='';
CALL RETRIEVE_PACKAGE(plist, "FROM_QUEUE",
qname, total, rc);
The following example retrieves the archive named STATUS.
plist=0;
archiveName = "/maintenance/status";
rc=0;
total=0;
CALL RETRIEVE_PACKAGE(plist, "FROM_ARCHIVE",
archiveName, total, rc);
The following example retrieves the package from WebDAV using the specified URL.
plist=0;
url = "http://AlphaliteAirways.host.com/~flights";
rc=0;
total=0;
property='namespaces';
ns="homePage='http://AlphaliteAirs.com/'";
CALL RETRIEVE_PACKAGE(plist, "FROM_WEBDAV",
url, total, rc, property, ns);
The following example applies a queue polling timeout value of 120 seconds. The RETRIEVE routine seeks packages
SAS® Integration Technologies: Developer's Guide
RETRIEVE_PACKAGE 353
on the queue until at least one package is located or the 120−second timeout expires, whichever occurs first.
plist=0;
qname = "MQSERIES://LOCAL:JSMITH";
rc=0;
total=0;
nameValue='';
prop='queue_timeout';
timeout = 120;
CALL RETRIEVE_PACKAGE(plist, "FROM_QUEUE",
qname, total, rc, prop, timeout);
The following example uses an LDAP URL to retrieve the archive. The LDAP URL is the sasArchive
distinguished name.
plist=0;
archiveName =
"ldap://pcc.host.com:389/sasarchivecn=weekOne,
saschannelcn=HR,cn=saschannels,
sasComponent=sasPublishSubscribe,
cn=SAS,o=Alphalite Airways,c=US";
rc=0;
total=0;
CALL RETRIEVE_PACKAGE(plist, "FROM_ARCHIVE",
archiveName, total, rc);
The following example is a SAS program that extracts entries from an archive. The RETRIEVE_PACKAGE routine
opens the archive file and retrieves the headers for all package entries. Subsequent RETRIEVE routines are called to
retrieve the contents of the entries (in this example, data sets, catalogs, and MDDBs) and to dispose of them
appropriately.
data _null_;
length description nameValue type userSpec msg $255;
length libname $8;
length memname $32;
call retrieve_package(pid,"FROM_ARCHIVE",
"AlphaliteAir",tp,rc);
do while (rc = 0);
call entry_next(pid,eid,type,userSpec,
description,nameValue,rc);
if (rc = 0) then select (type);
when ("DATASET")
call retrieve_dataset(eid,libname,memname,rc);
when ("CATALOG")
call retrieve_catalog(eid,libname,memname,rc);
when ("MDDB")
call retrieve_mddb(eid,libname,memname,rc);
otherwise;
end;
end;
call package_term(pid,rc);
run;
Publishing Framework
SAS® Integration Technologies: Developer's Guide
RETRIEVE_PACKAGE 354
RETRIEVE_REF
Retrieves a reference from a package.
Syntax
CALL RETRIEVE_REF(entryId, referenceType, reference, rc);
entryId Numeric, input.
Identifies the reference entry to be retrieved.
referenceType
Character, output.
Returns the type of the reference, the value of which can be HTML or URL.
reference
Character, output.
Returns the value of the reference.
rc Numeric, output.
Receives a return code.
Example
The following example retrieves a reference entry from a package.
refType='';
ref='';
CALL RETRIEVE_REF(rid, refType, ref, rc);
Publishing Framework
RETRIEVE_REF 355
RETRIEVE_SQLVIEW
Retrieves a PROC SQL view from a package.
Syntax
CALL RETRIEVE_SQLVIEW(entryId, libname, memname, rc);
entryId Numeric, input.
Identifies the PROC SQL view entry.
libnameCharacter, input.
Specifies the SAS library that will contain the retrieved PROC SQL view.
memname
Character, input.
Specifies the member name of the PROC SQL view.
rc Numeric, output.
Receives a return code.
Details
If the memname parameter is blank, the RETRIEVE_SQLVIEW CALL routine creates the PROC SQL view using
the original member name as it was defined at publish time.
The following example retrieves the PROC SQL view WORK.OUTDATA from the package.
lib = 'work';
mem = 'outdata';
CALL RETRIEVE_SQLVIEW(entryId, lib, mem, rc);
Publishing Framework
RETRIEVE_SQLVIEW 356

RETRIEVE_VIEWER
Retrieves a viewer entry from a package.
Syntax
CALL RETRIEVE_VIEWER(entryId, filename, rc<, properties, propValue1, ...propValueN>);
entryId Numeric, input.
Identifies the file entry.
filename
Character, input.
Specifies the name of the file or fileref, using the following syntax:
FILENAME: external_filename◊ FILEREF: SAS_fileref◊
rc Numeric, output.
Receives a return code.
properties
Character, input.
Identifies a comma−separated list of optional property names. Valid property names are as follows:
ENCODING◊
propValue1, ...propValueN
Character, input.
Specifies one value for each specified property name. The order of the property values must match the order
of the property names in the properties parameter. Valid property values are defined as follows:
ENCODING
Input character string indicates the target encoding for the retrieved viewer file. An example of a
target encoding value is ISO−8859−1. Refer to Publish/Retrieve Encoding Behavior for further
information.
Details
Specifying "FILENAME:", without an external filename, applies to the retrieved file the same name that was used
when the file was initially inserted into the package.
The following example retrieves a viewer from a package.
fname = "filename: /users/jsmith.bin";
CALL RETRIEVE_VIEWER(entryId, fname, rc);
Publishing Framework
RETRIEVE_VIEWER 357

Filtering Packages and Package Entries
When packages are published to channels, name/value filters can be used to limit the packages published to individual
subscribers. Subscriber−specified name/value filters are compared to the name/value pairs in the published packages.
If the filters match the package, the package is published to the subscriber.
Subscribers use the SAS Subscription Manager applet to specify default filters and per−channel override filters. The
applet manages filtering attributes in the subscriber's LDAP entry.
Subscribers also use the Subscription Manager applet to specify a delivery transport. If a subscriber specifies a
delivery transport of queue, that subscriber can specify additional filters to limit the package entries included in the
packages published to that subscriber. Package entry or MIME type filters are compared to the entry type or MIME
type of each package entry. If the package entry type or MIME type matches the subscriber's entry type or MIME type
filters, that package entry is included in the package published to that queue subscriber.
Enabling Filtering When Publishing Packages
During package development, user−defined name/value pairs are added to packages in the PACKAGE_BEGIN CALL
routine. Entry types are added to package entries automatically in the various INSERT CALL routines. User−defined
MIME types are added to package entries in the INSERT_FILE CALL routine.
At publish time, filtering takes place when a package is published with the PACKAGE_PUBLISH CALL routine with
a publishType of TO_SUBSCRIBERS.
Implementing Name/Value Filters
To implement name/value filters across your enterprise, the name/value pairs applied to packages must agree with the
name/value pairs that appear in subscriber filters. Maintaining a global list of agreed−upon name/value pairs and
including definitions and usage information for each name/value pair enables accurate package description and
subscriber filtering in your enterprise.
The name/value filters used in your enterprise depend on the types of packages that you publish and on the types of
subscribers that receive those packages. For example, you could define a channel called Maintenance that includes
e−mail subscribers and an archive subscriber named MaintReports. You could add a name/value filter to the LDAP
entry for the MaintReports archive subscriber that would refuse to accept packages that contain a name/value pair of
noarchive. For this filter to be effective, packages published to the Maintenance channel would need to include the
noarchive name/value pair in the appropriate way in order to keep unwanted packages out of the MaintReports
archive. A global list of name/value pairs would help ensure that the filters and the packages both used the
noarchive name/value pair appropriately.
A wide variety of syntax options for name/value filters gives subscribers many filtering options, including filtering
based on logical relationships between multiple name/value pairs. For information about the syntax of name/value
filters, refer to Specifying Name/Value Filters in the documentation for the Subscription Manager application.
For additional information about defining channels and name/value pairs for your enterprise, see Administering the
Publishing Framework in the SAS Integration Technologies: Administrator's Guide. If you are using an LDAP
directory server as your metadata repository, see Administering the Publishing Framework in the SAS Integration
Technologies: Administrator's Guide (LDAP Version).
Filtering Packages and Package Entries 358

Implementing MIME−Type Filters
The mimeType filters are case−insensitive filters. Like name/value pairs, MIME types are user−defined and as such
need to be maintained globally to ensure consistent filtering. See the INSERT_FILE CALL routine for a list of
suggested MIME types.
Implementing Entry−Type Filters
Entry types are specified automatically in the various INSERT CALL routines. For a list of available package entry
types, see the syntax description of the ENTRY_FIRST CALL routine.
Publishing Framework
SAS® Integration Technologies: Developer's Guide
Filtering Packages and Package Entries 359
Example: Publishing in the Data Step
The following example builds a package, and then explicitly publishes to two queues, and then publishes to a channel
defined within the LDAP directory. This example uses the data step, but easily can be changed to use the macro
interface.
filename f 'c:\frame.html';
filename c 'c:\contents.html';
filename p 'c:\page.html';
filename b 'c:\body.html';
ods html frame = f contents =c(url="contents.html")
body = b(url="body.html") page=p(url="page.html");
/* run some data steps/procs to generate ODS output */
data b;
do i= 1 to 1000;
output;
end;
run;
data emp;
input fname $ lname $ ages state $ siblings;
cards;
Steph Lyons 32 NC 4
Richard Jones 40 NC 2
Mary White 74 NC 1
Kai Burns 3 NC 1
Dakota Nelson 1 NC 1
Paul Black 79 NC 8
Digger Harris 5 NC 0
Coby Thomas 1 NC 0
Julie Mack 6 NC 1
Amy Gill 3 NC 1
Brian Meadows 16 HA 1
Richard Wills 17 HA 1
Diane Brown 48 CO 4
Pamela Smith 42 HA 4
Joe Thompson 44 WA 10
Michael Grant 23 IL 1
Michael Ford 31 NM 4
Ken Bush 28 NC 1
Brian Carter 27 NC 1
Laurie Clinton 32 NC 1
Kevin Anderson 33 NC 1
Steve Kennedy 33 NC 1
run;
quit;
proc print;run;
proc contents;run;
ods html close;
data _null_;
rc=0;a='a';b='b';c='c';d='d';
length filename $64 mimeType $24 fileType
$10 nameValue $100 description $100;
pid = 0;
nameValue="type=(test) coverage=(filtering,
Example: Publishing in the Data Step 360
transports)";
call package_begin(pid,"Main results package.",
nameValue, rc);
if (rc eq 0) then put 'Package begin successful.';
else do;
msg = sysmsg();
put msg;
end;
gifpid=0;
call package_begin(gifpid,"Gif nested package.",'', rc);
if (rc eq 0) then put 'Gif package begin successful.';
else do;
msg = sysmsg();
put msg;
end;
nameValue="type=report, topic=census";
description="North Carolina residents.";
libname = "WORK";
memname="EMP";
call insert_dataset(pid, libname, memname,
description, nameValue, rc);
if rc ne 0 then do;
msg = sysmsg();
put msg;
end;
else
put 'Insert data set successful.';
call insert_html(pid,"fileref:b", "",
"fileref:f", "",
"fileref:c", "",
"fileref:p", "", "ODS HTML Output",'', rc);
if rc ne 0 then do;
msg = sysmsg();
put msg;
end;
else
put 'Insert html successful.';
call insert_dataset(pid,"WORK","b",
"B dataset...",'', rc);
if rc ne 0 then do;
msg = sysmsg();
put msg;
end;
else
put 'Insert data set successful';
/* insert package (nested package */
call insert_package(pid, gifpid,rc);
if rc eq 0 then put 'Insert package successful';
else do;
msg = sysmsg();
put msg;
end;
SAS® Integration Technologies: Developer's Guide
Example: Publishing in the Data Step 361
description = "Gif for marketing campaign.";
filename = "filename:campaign01.01.gif";
fileType = "Binary";
mimeType = "Image/Gif";
call insert_file(gifpid, filename, fileType,
mimeType, description,'', rc);
if rc ne 0 then do;
msg = sysmsg();
put msg;
end;
else
put 'Insert file (gif) successful.';
description = "Test VRML file.";
filename = "filename:test.wrl";
fileType = "text";
mimeType = "model/vrml";
call insert_file(pid,filename, fileType,
mimeType, description,'', rc);
if rc ne 0 then do;
msg = sysmsg();
put msg;
end;
else
put 'Insert file (vrml) successful.';
/* send package to the two queues that are specified */
properties='';
call package_publish(pid, "TO_QUEUE", rc, properties,
"MQSERIES://JSMITH.LOCAL", "MSMQ://JSMITH\transq");
if rc ne 0 then do;
msg = sysmsg();
put msg;
end;
else
put 'Publish successful';
/* publish to the filter test channel
defined in LDAP directory */
ldapinfo =
"LDAP://alpair01.unx.sas.com:8010/o=Alphalite Airways,
c=US";
channel1= 'FilterTest1';
properties='channel_store, subject';
subject="Filter Testing Results";
call package_publish(pid, "TO_SUBSCRIBERS", rc,
properties, ldapinfo, subject, channel1);
if rc ne 0 then do;
msg = sysmsg();
put msg;
end;
else
put 'Publish successful';
call package_end(pid,rc);
if rc ne 0 then do;
msg = sysmsg();
put msg;
SAS® Integration Technologies: Developer's Guide
Example: Publishing in the Data Step 362
end;
else
put 'Package end successful';
run;
quit;
Publishing Framework
SAS® Integration Technologies: Developer's Guide
Example: Publishing in the Data Step 363
Example: Publishing in a Macro
The following example builds a package, and then publishes the package to a channel defined within the LDAP
directory and then explicitly publishes to one queue.
This example uses macro variables rather than the DATA step, which allows you the flexibility to use CALL routines
throughout your code, as other processing completes.
This example illustrates how publish CALL routines are used with other SAS statements.
%macro chkrc(function);
%if &rc = 0 %then %put "NOTE: &function succeeded.";
%else %do;
%let msg= %sysfunc(sysmsg());
%put &function failed − &msg;
%end;
%mend;
%let pid = 0;
%let nameValue=type=(test) coverage=(filtering,
transports);
%let rc = 0;
%let pid = 0;
%let description=main results package;
%syscall package_begin(pid,description, nameValue, rc);
%chkrc(Package Begin);
%let gifpid=0;
%let description=Gif nested package. ;
%let nameValue=;
%syscall package_begin(gifpid, description,
nameValue, rc);
%chkrc(Package Begin);
filename f 'c:\frame.html';
filename c 'c:\contents.html';
filename p 'c:\page.html';
filename b 'c:\body.html';
ods html frame = f
contents =c(url="contents.html")
body = b(url="body.html")
page=p(url="page.html");
/* run some data steps/procs to generate ODS output */
data b;
do i= 1 to 1000;
output;
end;run;
%let nameValue=;
%let description= B, testing dataset;
%let libname = WORK;
%let memname= B;
%syscall insert_dataset(pid,libname , memname,
description, nameValue, rc);
Example: Publishing in a Macro 364
%chkrc(Insert Dataset);
data emp;
input fname $ lname $ ages state $ siblings;
cards;
Steph Jones 32 NC 4
Richard Long 40 NC 2
Mary Robins 74 NC 1
Kai Mack 3 NC 1
Dakota Wills 1 NC 1
Paul Thomas 79 NC 8
Digger Johnson 5 NC 0
Coby Gregson 1 NC 0
Julie Thomson 6 NC 1
Amy Billins 3 NC 1
Brian Gere 16 HA 1
Richard Carter 17 HA 1
Diane Ford 48 CO 4
Pamela Aarons 42 HA 4
Joe Ashford 44 WA 10
Michael Clark 23 IL 1
Michael Harris 31 NM 4
Ken Porter 28 NC 1
Brian Harrison 27 NC 1
Laurie Smith 32 NC 1
Kevin Black 33 NC 1
Steve Jackson 33 NC 1
run;
quit;
%let nameValue= type=report, topic=census;
%let description=North Carolina residents.;
%let libname = WORK;
%let memname= EMP;
%syscall insert_dataset(pid, libname, memname,
description, nameValue, rc);
%chkrc(Insert Dataset);
proc print;run;
proc contents;run;
ods html close;
%let body=fileref:b;
%let frame=fileref:f;
%let contents=fileref:c;
%let pages=fileref:p;
%let description=Generated ODS output.;
%let curl="contents.html";
%let burl = "body.html";
%let furl = "frame.html";
%let purl = "page.html";
%syscall insert_html(pid, body, burl, frame,
frameurl, contents, curl, pages, purl,
description, nameValue, rc);
%chkrc(Insert Html);
SAS® Integration Technologies: Developer's Guide
Example: Publishing in a Macro 365
/* insert nested package */
%syscall insert_package(pid, gifpid,rc);
%chkrc(Insert Package);
%let giffile=filename:Boeing747.gif;
%let description=New 747 paint scheme.;
%let filetype = text;
%let mimetype = %quote(Image/gif);
%syscall insert_file(gifpid, giffile, filetype,
mimetype, description, nameValue, rc);
%chkrc(Insert File);
/* publish to the FilterTest channel
defined in LDAP directory */
%let ldapinfo = "LDAP://alpair01:8010/o=Alphalite
Airways,c=US";
%let channel1= FilterTest;
%let properties=Subject,Channel_Store;
%let subject=Filter Testing Results;
%let pubType = to_subscribers;
%syscall package_publish(pid, pubType, rc, properties,
subject, ldapinfo, channel1);
%chkrc(publish package);
/* publish one queue */
%let property=;
%let pubType = to_queue;
%let queueName=mqseries://JSMITH:LOCAL;
%syscall package_publish(pid, pubType,
rc, property, queueName);
%chkrc(publish package);
%syscall package_end(pid,rc);
%chkrc(Package End);
run;
quit;
Publishing Framework
SAS® Integration Technologies: Developer's Guide
Example: Publishing in a Macro 366
Example: Publishing with the FTP Access Method
The following example uses the FTP access method to put ODS−generated output onto the server jsmith.pc.alpair.com
in the Windows operating environment. Note that the INSERT_REFERENCE CALL routine is used so that only
references to the newly create HTML files are inserted into the package. Subscribers using the EMAIL transport
engine will receive an e−mail message, with an embedded link to the HTML files within it.
filename myfram ftp 'odsftpf.htm'
host='jsmith.pc.alpair.com'
user='anonymous'
pass='smi96Gth';
filename mybody ftp 'odsftpb.htm'
host='jsmith.pc.alpair.com'
user='anonymous'
pass='smi96Gth';
filename mypage ftp 'odsftpp.htm'
host='jsmith.pc.alpair.com'
user='anonymous'
pass='smi96Gth';
filename mycont ftp 'odsftpc.htm'
host='jsmith.pc.alpair.com'
user='anonymous'
pass='smi96Gth';
ods listing close;
ods html frame=myfram body=mybody page=mypage
contents=mycont;
title 'ODS HTML Generation to PC Files via
FTP Access Method';
data retail;
set alpairhelp.retail;
decade = floor(year/10) * 10;
run;
proc format;
/* maps foreground colors for total sales */
value salecol
low−1500 = 'red'
1500−2000 = 'yellow'
2000−high = 'green';
/* gives the row labels some color */
value decbg
1980 = '#00aaaa'
1990 = '#00cccc';
/* gives the decade flyovers */
value decfly
1980 = 'Me Me Me Generation'
1990 = 'Kinder Gentler Generation';
run;
proc tabulate data=retail;
class year decade;
Example: Publishing with the FTP Access Method 367
classlev decade / s={background=decbg.
flyover=decfly.};
classlev year / s=<parent>;
var sales;
table decade * year ,
sales *
( sum * f=dollar12. *
{style={foreground=salecol. font_weight=bold}}
median * f=dollar12. * {style={foreground=black}}
);
run;
data a;
do j=1 to 5;
do k=1 to 5;
do i = 1 to 10;
x=ranuni(i);
output;end; end; end;
run;
proc sort data=a; by j;
run;
proc sort data=a; by j k;
run;
proc univariate; by j k; var i;
run;
title1;
quit;
ods html close;
data _null_;
length desc $ 1000;
rc=0;a='a';b='b';c='c';d='d';
pid = 0;
call package_begin(pid,"Weekly Activities Report",
'Type=Report', rc);
if (rc eq 0) then put 'Package begin successful.';
else do;
msg = sysmsg();
put msg;
end;
desc="Retail sales information and miscellaneous
statistics viewed at :";
nv="";
call insert_ref(pid, "HTML",
"http://jsmith.pc.alpair.com/odsftpf.htm",
desc, nv, rc);
if rc ne 0 then do;
msg = sysmsg();
put msg;
end;
else
put 'Insert reference ok';
SAS® Integration Technologies: Developer's Guide
Example: Publishing with the FTP Access Method 368
ldap =
"LDAP://alpsrvr03.unx.alpair.com:8001/o=Alphalite Airways,
c=US";
channel1= 'emailonly';
subject = "Monday's Update";
properties = 'subject, channel_store';
call package_publish(pid, "TO_SUBSCRIBERS", rc,
properties, subject, ldap, channel1);
if rc ne 0 then do;
msg = sysmsg();
put msg;
end;
else
put 'Publish successful';
call package_end(pid,rc);
if rc ne 0 then do;
msg = sysmsg();
put msg;
end;
else
put 'Package term successful';
run;
quit;
Publishing Framework
SAS® Integration Technologies: Developer's Guide
Example: Publishing with the FTP Access Method 369

Publish Event Interface (CALL Routines)
Version 9 of the Publishing Framework supports the generation and publication of events. Explicit event publication
enables a SAS program to generate an event of any kind and publish it explicitly.
First, you use the following CALL routines to define the event:
EVENT_BEGIN• EVENT_BODY•
Once the event is defined, you can do the following:
use the EVENT_PUBLISH CALL routine to generate an event that can be published using HTTP, message
queuing, or a publication channel.
The event is generated using a well−formed XML specification that contains the name of the event, a set of
associated properties, and a message body. For detailed information, see the XML Specification for Generic
Events and the Examples of Generated Events
•
use the EVENT_END CALL routine to free all resources associated with the event•
Note: The SAS Publisher user interface does not currently support explicit event generation, and the Publishing
Framework does not currently support event retrieval.
To collect and process events that the Publishing Framework generates, you can develop customized programs using
the Event Broker service. The Event Broker is one of the Platform Services provided with Integration Technologies.
For more information, see com.sas.services.events.broker in the Foundation Services class documentation.
Version 9 of the Publishing Framework also supports implicit event publication. This feature enables a channel's
subscribers to be designated as "event" subscribers. The Publishing Framework then automatically notifies event
subscribers whenever new information is published to the channel. For more information, see About Events.
Publishing Framework
Publish Event Interface (CALL Routines) 370

EVENT_BEGIN
Initializes an event and returns an event identifier that uniquely identifies it.
Syntax
CALL EVENT_BEGIN(eventId, name, rc
<,properties, propValue1, ...propValueN>);
eventId Numeric, output.
Identifies the new event.
name Character, input.
Identifies a user−specified name of the event. The name should correspond to the name of an event that is
defined in the Event Broker Service Process Flow Configuration. For more information, see
com.sas.services.events.broker in the Foundation Services class documentation.
rc Numeric, input.
Receives a return code.
properties
Character, input.
Identifies a comma−separated list of optional property names. There are two types of properties: well−known
and user−defined.
EVENT CALL routines recognize and process well−known properties. Some of the well−known properties
are used to build the header portion of the event. Other well−known properties are used by the CALL routines
to manage results that are returned as a result of the event execution. Well−known properties are as follows:
DOMAIN◊ IDENTITY◊ PASSWORD◊ PRIORITY◊ RESPONSE◊ RESULT_URL◊ SENT_FROM◊ USER◊
In addition to the well−known properties, you can also specify user−defined properties. The user−defined
properties are passed to the Event Broker, which passes these properties to the processing nodes, as needed.
For more information, see com.sas.services.events.broker in the Foundation Services class documentation.
If a user−defined property is specified, the property value can be any user−specified character string.
propValue1, ...propValueN
Character/numeric, input.
Specifies a value for each specified property name. The order of the property values must match the order of
the property names in the properties parameter. A value must be specified for each property that is specified
in the properties parameter. Valid property values are defined as follows:
DOMAIN
EVENT_BEGIN 371
recognized and processed by the Event Broker, it is the domain for authenticating the user ID and
password that are associated with a process flow. If this property is not specified, the default domain
configured with the UserService will be used.
IDENTITY
recognized and processed by the Event Broker, uniquely identifies the message. It enables the client
to distinguish among possible responses.
PASSWORD
recognized and processed by the Event Broker, it is the password that is associated with a process
flow. For example, if a node in your process flow communicates with IOM, PASSWORD can be used
to authenticate the user who is attempting to access the server.
PRIORITY
recognized and processed by the Event Broker, it specifies the Java priority. The default is 10.
RESPONSE
recognized and processed by the Event Broker, it identifies whether the Event Broker will send an
acknowledgement or a result of the event execution.
RESPONSE is not supported when publishing the event to subscribers. It is supported only when the
event is published to an explicit delivery transport, such as to a queue or to an HTTP server.
Valid values are as follows:
ACK
specifies that an acknowledgement message will be sent.
NONE
specifies that no response will be sent.
RESULT
specifies that a complete result set will be sent.
RESULT_URL
recognized and processed by the CALL routines, it manages results that are returned. If the
RESPONSE property is specified with a value of RESULT or ACK, then the event execution will
return results or an acknowledgement message, respectively. If a result or acknowledgement is
expected, then the RESULT_URL property must be specified. This property is a URL that identifies
where to write the results to. At this time, only a URL is supported.
SENT_FROM
recognized and processed by the Event Broker, it is a user−specified text string that identifies where
the event was sent from. This property is used by the Event Broker to log the origination of the event
message.
USER
recognized and processed by the Event Broker, it is the user ID that is associated with a process flow.
For example, if a node in your process flow communicates with IOM, USER can be used to
authenticate the user who is attempting to access the server.
Examples
Example 1
The following example initializes an event and returns the event identifier in eventId. No properties are specified.
eventId=0;
rc=0;
name = "startEvent";
SAS® Integration Technologies: Developer's Guide
EVENT_BEGIN 372

CALL EVENT_BEGIN(eventId, name, rc);
Example 2
The following example sets two user−defined properties. The user−defined property COMPANY has a value of
"Alphalite Airways, Inc.". The user−defined property YEAR has a value of "1993".
name = "Salary";
prop = "Company, Year";
value1 = "Alphalite Airways, Inc";
value2 = "1993";
CALL EVENT_BEGIN(eventId, name,
rc, prop, value1, value2);
Example 3
The following example sets the well−known property PRIORITY.
name = "Sales Figures";
prop = "Priority"
priority = "10";
CALL EVENT_BEGIN(eventId, name,
rc, prop, priority);
Example 4
The following example sets a combination of well−known and user−defined properties. It specifies the well−known
property SENT_FROM and a user−defined property STATE.
name = "Regional Figures";
prop = "sent_From, State";
from = "d1234.us.apex.com";
state = "NC";
CALL EVENT_BEGIN(eventId, name,
rc, prop, from, state);
Example 5
The following example sets the RESPONSE property to "Result" because results are expected from the event
execution. Because the RESPONSE property is specified, the destination for the response must also be specified.
Therefore, the RESULT_URL property must also be set to indicate where the response should be written to.
name = "Regional Figures";
prop = "Response, Result_Url";
resp = "Result";
furl = "file:/c:/testsrc/output.xml");
CALL EVENT_BEGIN(eventId, name,
rc, prop, resp, furl);
See Also
EVENT_BODY• EVENT_PUBLISH•
SAS® Integration Technologies: Developer's Guide
EVENT_BEGIN 373

EVENT_END•
Publishing Framework
SAS® Integration Technologies: Developer's Guide
EVENT_BEGIN 374
EVENT_BODY
Sets the body of the event message, which should be specified as a file that contains an XML document fragment.
Note: The EVENT_BODY CALL routine can be omitted if the event body is intended to be empty.
Syntax
CALL EVENT_BODY(eventId, filename, rc);
eventId Numeric, output.
Identifies the event.
filename
Character, input.
Identifies the name of the file that contains the XML fragment that constitutes the event message. The
filename parameter can be specified as either:
FILENAME: external_filename◊ FILEREF: sas_fileref◊
rc Numeric, input.
Identifies the return code.
Examples
Example 1
The following is an example of an XML fragment that might be defined as the body. This XML fragment is located in
the file that is specified by FILENAME or FILEREF in the CALL routine.
<Company name='Alphalite Airways'>
<Sales region='South'>
<Projection>1000000</Projection>
<Actual1000050</Actual>
</Sales>
<Sales region='West'>
<Projection>750000</Projection>
<Actual>685000</Actual>
</Sales>
<Sales region='North'>
<Projection>500000</Projection>
<Actual>600000</Actual>
</Sales>
<Sales region='East'>
<Projection>1000000</Projection>
<Actual>950000</Actual>
</Sales>
</Company>
EVENT_BODY 375
Example 2
The following example uses FILENAME to specify the name of the file that contains the body portion of the event.
fname = "filename:c:\eventBody.xml";
CALL EVENT_BODY(eventId, fname, rc);
See Also
EVENT_BEGIN• EVENT_PUBLISH• EVENT_END•
Publishing Framework
SAS® Integration Technologies: Developer's Guide
EVENT_BODY 376

EVENT_PUBLISH
The EVENT_PUBLISH CALL routine publishes the specified event. The method of publication depends on the
following types of delivery transport:
Publish Event to HTTP• Publish Event to Queues• Publish Event to Subscribers•
Publish Event to HTTP
Publishes an event using the HTTP protocol.
Syntax
CALL EVENT_PUBLISH(eventId, publishType, rc,
properties,< propValue1, ...propValueN>, url <,url2, ...urlN>);
eventIDNumeric, input.
Identifies the event that is to be published.
publishType
Character, input.
Indicates how to publish the event. To publish the event using the HTTP protocol, specify a publishType of
TO_HTTP.
rc Numeric, output.
Receives a return code.
properties
Character, input.
Identifies a comma−separated list of optional property names. Specify any of the following property names, or
specify double quotation marks to indicate that no properties are to be applied:
HTTP_PASSWORD◊ HTTP_PROXY_URL◊ HTTP_USER◊
propValue1, ...propValueN
Character/Numeric, input.
Specifies one value for each specified property name. The order of the property values must match the order
of the property names in the properties parameter. A value must be specified for each property that is
specified in the properties parameter. Valid property values are defined as follows:
HTTP_PASSWORD
specifies the password that is needed to bind to the network resources.
HTTP_PROXY_URL
specifies the URL of the proxy server.
HTTP_USER
specifies the user ID that is needed to bind to the network resources.
url <,url2, ...urlN>
EVENT_PUBLISH 377
Character, input.
Identifies the URL(s) that will be used to publish the event.
Details
If you specify multiple URLs, and if you specify the RESPONSE property in the EVENT_BEGIN CALL routine,
then the response will be received and processed only for the URL that you specified first. The event is published to
the first URL, and the response is written to the RESULT_URL location. For all remaining URLs, the event will be
published, but the EVENT_PUBLISH CALL routine will not write the response to the RESULT_URL location. To
process results from multiple URLs, issue EVENT_PUBLISH for each URL. Executing an EVENT_PUBLISH for
each URL creates an explicit RESULT_URL for each response.
Example
The following example publishes the event to the network resource using the HTTP protocol. HTTP URL identifies
the machine and port to use.
pubType = "TO_HTTP";
url = "http://myhost.com:40";
CALL EVENT_PUBLISH(eventId,
pubType, rc, '', url);
Publish Event to Queues
Publishes an event to one or more message queues. After EVENT_PUBLISH creates the event and delivers it to a
message queue, the Event Broker then retrieves the event and distributes it to other applications. EVENT_PUBLISH
supports event delivery to the IBM MQSeries and MQSeries−C message queues, which are JMS compliant.
Syntax
CALL EVENT_PUBLISH(eventId, publishType, rc, properties,
<propValue1, ...propValueN>, queue1 <,queue2, ...queueN>);
eventIDNumeric, input.
Specifies the event that is to be published.
publishType
Character, input.
Specifies how to publish the event. To publish the event using the queue transport, specify a publishType of
TO_QUEUE.
rc Numeric, output.
Receives a return code.
properties
Character, input.
Identifies a comma−separated list of optional property names. Specify any of the following property names, or
specify double quotation marks to indicate that no properties are to be applied:
QUEUE_TIMEOUT◊ RESPONSE_QUEUE◊
SAS® Integration Technologies: Developer's Guide
EVENT_PUBLISH 378
SELECTOR◊
propValue1, ...propValueN
Character/numeric, input.
Specifies one value for each specified property name. The order of the property values must match the order
of the property names in the properties parameter. A value must be specified for each property that is
specified in the properties parameter. Valid property values are defined as follows:
QUEUE_TIMEOUT
specifies the poll timeout value in seconds. If the event expects a result or acknowledgement
response, the response queue will identify the queue to receive the response. By default, the
EVENT_PUBLISH CALL routine will continue to poll until the response is received or until a
15−second timeout occurs. You can override the default timeout value by specifying an explicit queue
timeout value. The value must be greater than zero.
RESPONSE_QUEUE
used by the Event Broker, specifies the name of a queue to receive the result or an acknowledgement.
After the event is published, the queue is queried for the response, which is written to a target file that
is specified by the RESULT_URL property value.
SELECTOR
specified on the CALL routine, it identifies the name/value properties to define on the event messages
that are published. These properties can be used by the Event Broker to determine what messages
should be removed from the queue. The Event Broker can be configured so that it only removes
messages from the queue that match particular name/value selectors. If the Event Broker configures
selectors, only messages that have properties that match the configured selector are delivered to the
Event Broker. Other messages remain on the queue.
queue1 <,queue2, ...queueN>
Character, input.
Identifies the queue(s) that will be used to publish the event. IBM MQSeries queues are supported.
MQSERIES://queueManager:queueName
MQSERIES−C://queueManager:queueName
queueManager
specifies the name of the queue manager.
queueName
specifies the name of the queue.
Details
If you specify multiple queues, and if you specify the RESPONSE property in the EVENT_BEGIN CALL routine,
then the response will be received and processed only for the queue that you specified first. The event is published to
the first queue, and the response is written to the RESULT_URL location. For all remaining queues, the event will be
published, but the EVENT_PUBLISH CALL routine will not query the response queue for a result. To process results
from multiple queues, issue EVENT_PUBLISH for each queue. Executing an EVENT_PUBLISH for each queue
creates an explicit RESULT_URL for each response.
Examples
SAS® Integration Technologies: Developer's Guide
EVENT_PUBLISH 379
Example 1
The following example publishes the event to one queue and does not apply any additional queue properties.
pubType = "TO_QUEUE";
firstQ = "MQSERIES://PCONE:MYQ";
Call EVENT_PUBLISH(eventId,
pubType, rc, '', firstQ);
Example 2
The following example publishes the event to one queue. Because a response is expected, the RESPONSE_QUEUE
property and a timeout value of 30 seconds are specified. If the response is not received in 30 seconds, a timeout will
occur.
pubType = "TO_QUEUE";
firstQ = "MQSERIES://PCONE:MYQ";
prop="RESPONSE_QUEUE, QUEUE_TIMEOUT";
respQ = "PCONE:MYQ";
timeout = "30";
Call EVENT_PUBLISH(eventId, pubType, rc,
prop, respQ, timeout, firstQ);
Example 3
The following example publishes the event to one queue. The SELECTOR property is used in this example to publish
only event messages that are fourth quarter reports from the HR department. The value of the SELECTOR property
should be one or more name/value pairs.
pubType = "TO_QUEUE";
firstQ = "MQSERIES://PCONE:MYQ";
prop="SELECTOR";
propValue="type=report quarter=four dept=hr";
qName="MQSERIES://QMGR:LocalQ";
Call event_publish(pid, "TO_QUEUE",
rc, prop, propValue, qName);
Publish Event to Subscribers
Publishes an event to subscribers of the specified channel.
Syntax
CALL EVENT_PUBLISH(eventId, publishType, rc,
properties, < propValue1, ...propValueN>, channel);
eventIDNumeric, input.
Specifies the event that is to be published.
publishType
Character, input.
Indicates how to publish the event. To publish an event to the subscribers of a channel, specify a publishType
value of TO_SUBSCRIBERS.
SAS® Integration Technologies: Developer's Guide
EVENT_PUBLISH 380

rc Numeric, output.
Receives a return code.
properties
Character, input.
Specify the following property name, or specify double quotation marks to indicate that the property is not to
be applied:
CHANNEL_STORE◊ SELECTOR◊
propValue1, ...propValueN
Character/Numeric, input.
Specifies one value for each specified property name. Valid property values are defined as follows:
CHANNEL_STORE
specifies a character string that indicates the repository containing the channel and subscriber
metadata. The channel can be defined in a SAS Metadata Repository. See SAS Metadata Repository
Channel Store Syntax for details on how to identify a channel defined in a SAS Metadata Repository.
SELECTOR
specified on the CALL routine, it identifies the name/value properties to define on the event messages
that are published. These properties can be used by the Event Broker to determine what messages
should be removed from the queue. The Event Broker can be configured so that it only removes
messages from the queue that match particular name/value selectors. If the Event Broker configures
selectors, only messages that have properties that match the configured selector are delivered to the
Event Broker. Other messages remain on the queue.
channelCharacter, input.
Specifies the name of the channel where the event will be published.
Details
When an event is published to a channel, the event is published to each subscriber of the channel. Each subscriber
definition specifies the event publishing transport method to use for the subscriber. Valid transports are HTTP and
message queues.
PUBLISH_EVENT ensures that the event is published to each subscriber only once, thus eliminating any duplication.
For the message queue transport, the name of the queue is used as the key to enforce uniqueness. For an HTTP server
transport, the URL is used as the key to enforce uniqueness.
Publishing an event to subscribers does not support the RESPONSE property.
Example
The following example publishes the event to all subscribers of the WeeklyPayroll channel.
channelStore =
"SAS−OMA://alpair03.sys.com:4059/reposname=MyRepos";
channelName = "WeeklyPayroll";
prop = "CHANNEL_STORE,METAUSER,METAPASS";
user = "myUserName";
password = "myPassword";
CALL EVENT_PUBLISH(eventId, "TO_SUBSCRIBERS",
SAS® Integration Technologies: Developer's Guide
EVENT_PUBLISH 381

rc, prop, channelStore, user, password, channelName);
See Also
EVENT_BEGIN• EVENT_BODY• EVENT_END•
Publishing Framework
SAS® Integration Technologies: Developer's Guide
EVENT_PUBLISH 382

EVENT_END
Frees all resources associated with the specified event.
Syntax
CALL EVENT_END(eventId, rc);
eventId Numeric, input.
Identifies the event that is to be published.
rc Numeric, output.
Receives a return code.
Details
Freeing resources closes all queues and files that are associated with the specified event.
Example
The following example frees all resources that are associated with the specified event:
CALL EVENT_END(eventId,rc);
See Also
EVENT_BEGIN• EVENT_BODY• EVENT_END•
Publishing Framework
EVENT_END 383
XML Specification for Generic Events
Events are published using well−formed XML documents. The following XML specification is used for generic
events, that is, events that are generated explicitly using the event publishing CALL routines.
The EVENT_PUBLISH CALL routine automatically generates the header portion of the document using information
that you provide in the EVENT_BEGIN CALL routine properties; and it creates the body portion of the document
using information that you provide in the EVENT_BODY CALL routine properties.
<?xml version="1.0" encoding="UTF−8"?>
<sas−event:Event
xmlns:sas−event=
"http://support.sas.com/xml/namespace/services.events−1.1"
sas−event:name="event_name">
<sas−event:Header>
<sas−event:Version>1.0</Version>
<sas−event:Identity>guid</sas−event:Identity>
<sas−event:Credentials
sas−event:name="userid"
sas−event:password="password"
sas−event:domain="domain"/>
<sas−event:Priority>priority</sas−event:Priority>
<sas−event:SentFrom>originator_description</sas−event:SentFrom>
<sas−event:SentAt>timestamp</sas−event:SentAt>
<sas−event:Response
sas−event:type="none|ack|result"/>
<sas−event:Properties>
<PropertyName>property_value</PropertyName>
....
</sas−event:Properties>
</sas−event:Header>
<sas−event:Body>
body content
...
</sas−event:Body>
</sas−event:Event>
Explanations of the elements follow:
Element Description
Event Root element that names the event. The sas−event namespace is defined in this element.
Header Begins the event header properties.
Version Version of the event message is required to support multiple specifications as the service matures.
Identity Unique identifier. Responses echo this identifier so that the originator can use it for correlation.
Credentials Credentials that are used for authentication and authorization checks. Events defined at a broker can
be configured so that the sender of the event must be authenticated and authorized to run the event. A
configured event can also specify a security context under which it should be run.
Priority Priority is mapped to a Java thread priority so that process flows and listener dispatchers can be run
at different priority levels.
SentFrom Description of event originator that is used for logging purposes if available.
XML Specification for Generic Events 384

SentAt The time that the event was sent. This information is echoed to the sender along with completion
times. All times should be formatted according to the International Standard ISO 8601 standard. A
brief summary is available on the W3C Web site at http://www.w3.org/TR/NOTE−datetime.html.
Response The sender of an event can specify the type of response that it wants. The supported types are no
response (NONE), acknowledgement (ACK), and request/response (RESULT). Both NONE and
ACK act as broadcast events.
Properties The originator can also send user−defined properties that can be utilized during event execution.
PropertyName Value assigned to the property called PropertyName.
Body The actual message content to be acted upon.
Publishing Framework
SAS® Integration Technologies: Developer's Guide
XML Specification for Generic Events 385
XML Specification for SASPackage Events
Implicitly generated events (SASPackage events) are published using well−formed XML documents whose details are
generated as a result of the package publishing process.
In the following example, the published package contains each entry type: SAS catalog, SAS data set, external file,
FDB, MDDB, HTML file, file reference, SQL view, viewer, and nested package.
<?xml version="1.0" encoding="UTF−8">
<sas−event:Event
xmlns:sas−event=
"http://support.sas.com/xml/namespace/services.events−1.1"
sas−event:name="SASPackage.ChannelName">
<sas−event:Header>
<sas−event:Version>1.0</sas−event:Version>
<sas−event:SentAt>timestamp</sas−event:SentAt>
</sas−event:Header>
<sas−event:Body>
<sas−publish:Package
xmlns:sas−publish=
"http://support.sas.com/xml/namespace/services.publish−1.1"
xmlns:userSpecPkgNamespace="userSpecPkgNamespaceValue"
sas−publish:version="1.0"
sas−publish:packageUrl="URL to saved package"
sas−publish:description="package description"
sas−publish:abstract="package abstract"
sas−publish:channel="channel on which
the package was published"
userSpecName="value">
<sas−publish:Entries>
<sas−publish:Entry sas−publish:type="catalog"
sas−publish:description="description"
userSpecName="value">
<sas−publish:Catalog
sas−publish:name="member name"/>
</sas−publish:Entry>
<sas−publish:Entry sas−publish:type="dataset"
sas−publish:description="description"
userSpecName="value">
<sas−publish:Dataset
sas−publish:name="member name"/>
</sas−publish:Entry>
<sas−publish:Entry sas−publish:type="fdb"
sas−publish:description="description"
userSpecName="value">
<sas−publish:FDB
sas−publish:name="member name"/>
</sas−publish:Entry>
<sas−publish:Entry sas−publish:type="file"
sas−publish:description="description"
userSpecName="value">
<sas−publish:File
sas−publish:type="text or binary"
sas−publish:name="file name"
sas−publish:mimetype="MIME
type"/>
</sas−publish:Entry>
<sas−publish:Entry sas−publish:type="html"
sas−publish:description="description"
XML Specification for SASPackage Events 386
userSpecName="value">
<sas−publish:HTML
sas−publish:type="body, frame,
contents or page"
sas−publish:name="file name"
sas−publish:url="URL"/>
<sas−publish:Companion
sas−publish:name="file name"
sas−publish:url="URL"
sas−publish:mimetype="MIME
type"/>
</sas−publish:Entry>
<sas−publish:Entry sas−publish:type="mddb"
sas−publish:description="description"
userSpecName="value">
<sas−publish:MDDB
sas−publish:name="member name"/>
</sas−publish:Entry>
<sas−publish:Entry
sas−publish:type="reference"
sas−publish:description="description"
userSpecName="value">
<sas−publish:Reference
sas−publish:type="html or url"
sas−publish:reference="reference"/>
</sas−publish:Entry>
<sas−publish:Entry
sas−publish:type="sqlview"
sas−publish:description="description"
userSpecName="value">
<sas−publish:SQLview
sas−publish:name="member name"/>
</sas−publish:Entry>
<sas−publish:Entry
sas−publish:type="viewer"
sas−publish:description="description"
userSpecName="value">
<sas−publish:Viewer
sas−publish:type="text or html"
sas−publish:name="file name"
sas−publish:mimetype="MIME
type"/>
</sas−publish:Entry>
<sas−publish:Entry
sas−publish:type="nestedpackage"
sas−publish:description="description"
userSpecName="value">
<sas−publish:Package
xmlns:userSpecPackageNamespace=
"userSpecPackageNamespaceValue"
sas−publish:description="package
description"
sas−publish:abstract="package
abstract"
userSpecName="value" >
<sas−publish:Entries>
<sas−publish:Entry
sas−publish:type="entry type"
sas−publish:description="description"
userSpecName="value">
</sas−publish:Entry>
SAS® Integration Technologies: Developer's Guide
XML Specification for SASPackage Events 387
.
.
additional Entry elements for
this nested package
.
.
</sas−publish:Entries>
</sas−publish:Package>
</sas−publish:Entry>
</sas−publish:Entries/>
</sas−publish:Package>
</sas−event:Body>
</sas−event:Event>
Header Elements
The header elements are standard event elements. The event name is specified as:
"SASPackage.ChannelName"
Explanations of the header elements follow:
Element Description
Version Version of the event message.
SentAt A timestamp that specifies when the event was sent.
Explanations of the body elements follow:
Element Description
Package
Begins the package definition. The following attributes are supported for this element:
version
the version of SASPackage.
packageUrl
URL to saved package.
description
the package description.
abstract
the package abstract.
channel
the channel that the package was published to.
packageUrl
a URL to the saved package. Packages saved to an archive or to a WebDAV server.
one or more user−specified name/value pairs.
The sas−publish namespace is defined in this element. Additionally, other user−specified
namespaces can be declared in this element via the xmlns: prefix. These will be included if the
user specified the NAMESPACES property when creating the package.
Entries Define the entries contained within the package.
Entry
SAS® Integration Technologies: Developer's Guide
XML Specification for SASPackage Events 388
Defines an individual package entry. This element will contain the required attribute, type. This
attribute identifies the type of entry. Valid types include catalog, dataset, fdb, file, html, mddb,
reference, sqlview, viewer, and nestedpackage.
If the entry description was specified at publish time, the description attribute will be included. If
a name/value was specified for the entry, one or more user−specified name/value attributes will
be included in the element. The name portion of the name/value specification will be provided as
the attribute, and the value portion will be provided as the attribute value.
Catalog Defines an individual catalog entry. The required name attribute provides the catalog member
name.
Dataset Defines an individual data set entry. The required name attribute provides the data set member
name.
FDB Defines an individual FDB entry. The required name attribute provides the FDB member name.
File Defines an individual file entry. The name and type attributes are required. They provide the
filename and the file type. Valid file types include text or binary. Optionally, the user−specified
MIME type of the file entry will be provided in the mimetype attribute.
HTML Defines an individual HTML entry. The required type and name attributes identify the type of
HTML file and its file name. Valid types include body, frame, contents, and page. Optionally, the
url attribute identifies the URL.
Companion Defines an individual companion file in an HTML entry. The required name attribute identifies
name of the file. Optionally, the url and mimetype attributes can be provided. They identify the
URL and the MIME type of the file, respectively.
MDDB Defines an individual MDDB entry. The required name attribute provides the MDDB member
name.
Reference Defines an individual reference entry. The required type attribute identifies the type of reference,
either html or url. The actual reference inserted into the package is provided in the reference
attribute.
SQLview Defines an individual SQL view. The required name attribute provides the SQL view member
name.
Viewer Defines an individual viewer entry. The viewer type is provided in the type attribute. Valid types
include text or html. The name attribute identifies the name of the viewer file. Optionally, the
user−specified MIME type for the viewer entry will be provided in the mimetype attribute.
Publishing Framework
SAS® Integration Technologies: Developer's Guide
XML Specification for SASPackage Events 389
Examples of Generated Events
Example 1: Explicitly Generated Event
In the following example, a company's sales information is reported in an explicitly generated event.
<sas−event:Event xmlns:sas−event=
"http://support.sas.com/xml/namespace/services.events−1.1"
sas−event:name="event1">
<sas−event:Header>
<sas−event:Version>1.0</sas−event:Version>
<sas−event:Identity>
7FBBA000−32C4−11D6−8001−363139363230
</sas−event:Identity>
<sas−event:Response type="result"/>
<sas−event:Properties>
<Company>Alphalite Airways</Company>
</sas−event:Properties>
</sas−event:Header>
<sas−event:Body>
<Company name="Alphalite Airways">
<Sales region="South">
<Projection>1000000</Projection>
<Actual>1000050</Actual>
</Sales>
<Sales region="West">
<Projection>750000</Projection>
<Actual>685000</Actual>
</Sales>
<Sales region="North">
<Projection>500000</Projection>
<Actual>600000</Actual>
</Sales>
<Sales region="East">
<Projection>1000000</Projection>
<Actual>950000</Actual>
</Sales>
</Company>
</sas−event:Body>
</sas−event:Event>
Example 2: Implicitly Published Event
In the following example, the published package contains an external file and a reference. Because the package is
published to a WebDAV server, the sas−publish:packageUrl attribute is specified. This attribute is a URL to an
archived package. The package was published with a name/value specification of "report=revenue
department=research".
<?xml version="1.0" encoding="UTF−8"?>
<sas−event:Event xmlns:sas−event=
"http://support.sas.com/xml/namespace/services.events−1.1"
sas−event:name='SASPackage.AirlineChannel'>
<sas−event:Header>
<sas−event:Version>1.0<sas−event:Version>
<sas−event:SentAt>26SEP2001:19:15:37</sas−event:SentAt>
<sas−event:Header>
Examples of Generated Events 390
<sas−event:Body>
<sas−publish:Package
xmlns:sas−publish=
"http://support.sas.com/xml/
namespace/services.publish−1.1"
sas−publish:version="1.0"
sas−publish:description="Revenue Info"
sas−publish:channel="Revenue Channel"
sas−publish:packageUrl=
"http://alphaliteAirways.com/
revenue/reports/2001/quarter3"
report="revenue"
department="research">
<sas−publish:Entries>
<sas−publish:Entry sas−publish:type="file"
sas−publish:description="Revenue graph">
<sas−publish:File
sas−publish:type="binary"
sas−publish:name="revenue.gif"
sas−publish:mimetype="image/gif" />
</sas−publish:Entry>
<sas−publish:Entry sas−publish:type="reference"
sas−publish:description="Revenue details.">
<sas−publish:Reference sas−publish:type="html"
sas−publish:reference=
"http://www.alphaliteAirways.com/revenue.html" />
</sas−publish:Entry>
</sas−publish:Entries>
</sas−publish:Package>
</sas−event:Body>
</sas−event:Event>
Example 3: Implicitly Published Event
In the following example, the published package contains a SAS data set, an external text file, and an HTML file.
Because the published package is not archived, the sas−publish:packageUrl attribute is not specified. The SAS data set
is defined using the name/value specification of "quarter=third region=south quarterly". The HTML file contains a
body, a frame, the contents, a page, and a companion file.
<?xml version="1.0" encoding="UTF−8"?>
<sas−event:Event xmlns:sas−event=
"http://support.sas.com/xml/namespace/services.events−1.1"
sas−event:name='SASPackage.ReportChannel'>
<sas−event:Header>
<sas−event:Version>1.0</sas−event:Version>
<sas−event:SentAt>26SEP2001:19:15:37
</sas−event:SentAt>
</sas−event:Header>
<sas−event:Body>
<sas−publish:Package version="1.0"
xmlns:sas−publish=
"http://support.sas.com/xml/
namespace/services.publish−1.1"
sas−publish:version="1.0"
sas−publish:Description="Sales Reporting Data"
sas−publish:Abstract="Data necessary to create and
manage the Sales reports."
sas−publish:Channel="SalesChannel">
<sas−publish:Entries>
SAS® Integration Technologies: Developer's Guide
Examples of Generated Events 391
<sas−publish:Entry sas−publish:type="dataset"
sas−publish:Description="Employee
information data set"
quarter="third" region="south"
quarterly="">
<sas−publish:Dataset
sas−publish:name="SalesData"/>
</sas−publish:Entry>
<sas−publish:Entry sas−publish:type="file"
sas−publish:description="Defects SAS job.">
sas−publish:File sas−publish:type="text"
sas−publish:name="defects.sas"
sas−publish:mimetype="application/sas"/>
</sas−publish:Entry
<sas−publish:Entry sas−publish:type="html"
sas−publish:description="ODS
generated HTML.">
<sas−publish:HTML sas−publish:type="body"
sas−publish:name="body.html"
sas−publish:url="body.html"/>
<sas−publish:HTML sas−publish:type="frame"
sas−publish:name="frame.html"
sas−publish:url="frame.html"/>
<sas−publish:HTML
sas−publish:type="contents"
sas−publish:name="contents.html"
sas−publish:url="contents.html"/>
<sas−publish:HTML sas−publish:type="page"
sas−publish:name="page.html"
sas−publish:url="page.html"/>
<sas−publish:Companion
sas−publish:name="graph.gif"
sas−publish:url="graph.gif"
sas−publish:mimetype="image/gif"/>
</sas−publish:Entry>
</sas−publish:Entries>
</sas−publish:Package>
</sas−event:Body>
</sas−event:Event>
Application Messaging
SAS® Integration Technologies: Developer's Guide
Examples of Generated Events 392
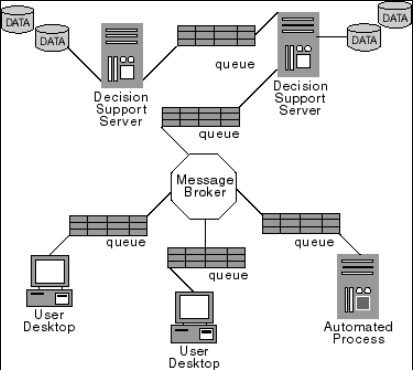
Application Messaging Overview
Application messaging architectures provide a platform that supports interoperability among loosely coupled
applications over a message passing bus. When the targeted scope of interoperability is broad (for example, spanning
multiple application systems and organizational boundaries), application messaging architectures might be required.
This is because the likelihood of conformance in the software implementation base (for example, the selected
distributed object standard) across the set of participating applications is diminished. Additionally, the set of
participating applications can exhibit asynchronous, disconnected operation, executing with no direct point−to−point
communication session, yet requiring guaranteed fulfillment of requests for service or event delivery.
This degree of operational heterogeneity introduces several requirements that are reflected in the application
messaging infrastructure. Heterogeneity in the implementation base of the various applications (including perhaps,
retrofitted legacy applications) suggests a need for a reasonably non−intrusive integration mechanism. The semantics
of application messaging satisfy this need, generally expressing open, close, send, and receive functionality with
flexible application−defined message structures. Heterogeneity with respect to the asynchronous, disconnected
execution and notification modes of end−point participants introduces requirements for service qualities that include
routing, assured just−once delivery, and retained sequencing. The architecture that has emerged within commercial
application messaging products to express these quality−of−service properties is store−and−forward queuing.
In a store−and−forward model, messages are sent to named queues, which are in turn hosted at specific destination
network addresses. The navigation of messages from their origin occurs through a transmission network that ensures
the integrity of message delivery to the destination queue and presentation to the recipient process.
Ever more frequently, the simple design pattern of two identifiable applications that interoperate over a message
passing bus is inconsistent with the realities of an event−driven enterprise. Interdependencies across multiple
applications with respect to events occurring within an enterprise combined with an ever−changing topology of event
supplier and consumer applications is often present. Decision−makers require information pertinent to their domain of
responsibility regardless of the reporting applications. Automated business processes require modification in rapid
response to changing operational conditions. The ability to satisfy these requirements in a timely manner, and thereby
reduce the latencies too common in information interchange, is critical to efficient and effective enterprise
performance.
To support such dynamism, extended application messaging infrastructure facilities in the form of message brokers
are emerging. Message brokers are being effectively positioned as enterprise application integration and
event−management focal points, which function as hub processes that manage the information flow throughout an
Application Messaging Overview 393
enterprise. Operationally, message brokers provide rules−based message routing and distribution as well as message
transformation and augmentation capabilities that enable the removal of this aspect of implementation logic from
participating applications.
Interfaces to three principal commercial messaging platforms, IBM's WebSphere MQ (previously named MQSeries),
Microsoft's MSMQ, and TIBCO Software's TIB/Rendezvous (including the Certified Message Delivery transport) are
provided with SAS Integration Technologies. Support for these platforms enables SAS software's information delivery
capabilities to be leveraged within various enterprise solution scenarios, including application integration,
asynchronous/mobile synchronization, and event notification.
Support for client environments is broad. IBM provides WebSphere MQ on a vast array of operating system platforms
with programming language support including C/C++, Java, and Cobol as well as ActiveX control support that
enables Visual Basic participation. The Enterprise Java JMS facility also anticipates a provider for WebSphere MQ.
Microsoft likewise provides full language support for MSMQ.
Application Messaging
SAS® Integration Technologies: Developer's Guide
Application Messaging Overview 394

Supported Messaging Interface Versions
WebSphere MQ Functional Interface and the SAS Common
Messaging Interface
The SAS interfaces to WebSphere MQ V5.1 are supported in the following operating environment:
HP Tru64 UNIX•
The SAS interfaces to WebSphere MQ V5.2 are supported in the following operating environment:
Linux•
The SAS interfaces to WebSphere MQ Client V5.2 are supported in the following operating environments:
AIX 5.1• HP−UX 11.0• Solaris 8•
The SAS interfaces to WebSphere MQ V5.3 are supported in the following operating environments:
z/OS• Windows NT/2000/XP• Solaris 8•
MSMQ Functional Interface
Microsoft Message Queuing Services (MSMQ) is available on Windows NT and Windows 2000, using the MSMQ
provided with each operating environment.
TIB/Rendezvous
Integration Technologies 9.1 supports both the reliable and certified message delivery features of TIB/Rendezvous
Release 7.1.
Support for using TIB/Rendezvous with the SAS Common Messaging Interface is available in the following operating
environments:
AIX 5.1 (64−bit)• HP Tru64 UNIX• HP−UX 11.0 (64−bit)• Linux• Solaris 8 (64−bit)• Windows NT/2000/XP•
Application Messaging
Supported Messaging Interface Versions 395
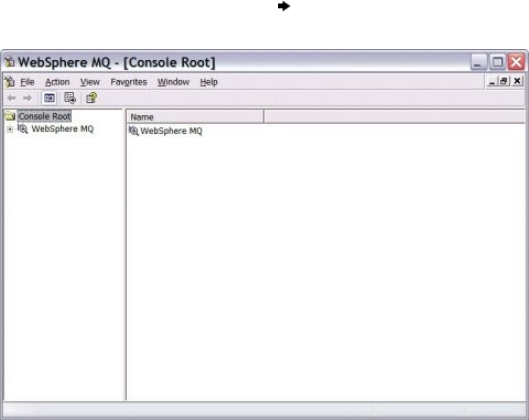
Configuring WebSphere MQ with the WebSphere MQ
Explorer
Before you use the WebSphere MQ applications, you must create a queue manager. The queue manager is a
system program that is responsible for maintaining the queues and ensuring that the messages in the queues
reach their destination. It also performs other functions associated with message queuing.
A queue is a named destination that applications use to put and get messages. A queue name must be unique
within a queue manager. Special queue types can be defined, such as transmission queues and dead letter
queues.
A transmission queue is a queue that holds messages that will eventually be sent to a remote queue
when a communication channel becomes available. Unless otherwise specified, these messages will
be transmitted through the default transmission queue.
♦
A dead letter queue is a local queue where messages that cannot be delivered are sent, either by the
queue manager or an application. Some method should be in place in production environments to
monitor and process messages in this queue.
♦
From the WebSphere MQ Explorer window, expand the WebSphere MQ label, then right−click
Queue Managers. Select New Queue Manager from the pop−up menu.
1.
Enter the name for your queue manager. The name MYQMGR will be used in the following example.
All names in WebSphere MQ are case sensitive. Using all capital letters for names helps avoid
confusion. The names in the example are suggestions. You can use different names if you choose. Fill
in names for the default transmission queue and dead letter queue. Check the box to make this your
default queue manager.
2.
1.
Configuring WebSphere MQ with the WebSphere MQ Explorer 396
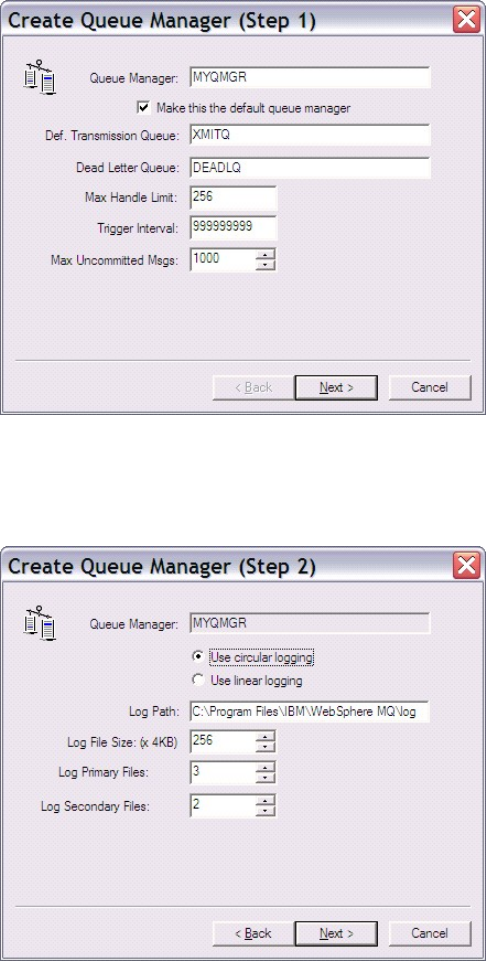
Click Next to continue.
The next screen indicates the type of logging that the queue manager will perform, and the maximum
number of log files that can be produced.
Click Next to accept the suggested values and continue.
3.
Verify that Start Queue Manager is checked.4.
SAS® Integration Technologies: Developer's Guide
Configuring WebSphere MQ with the WebSphere MQ Explorer 397
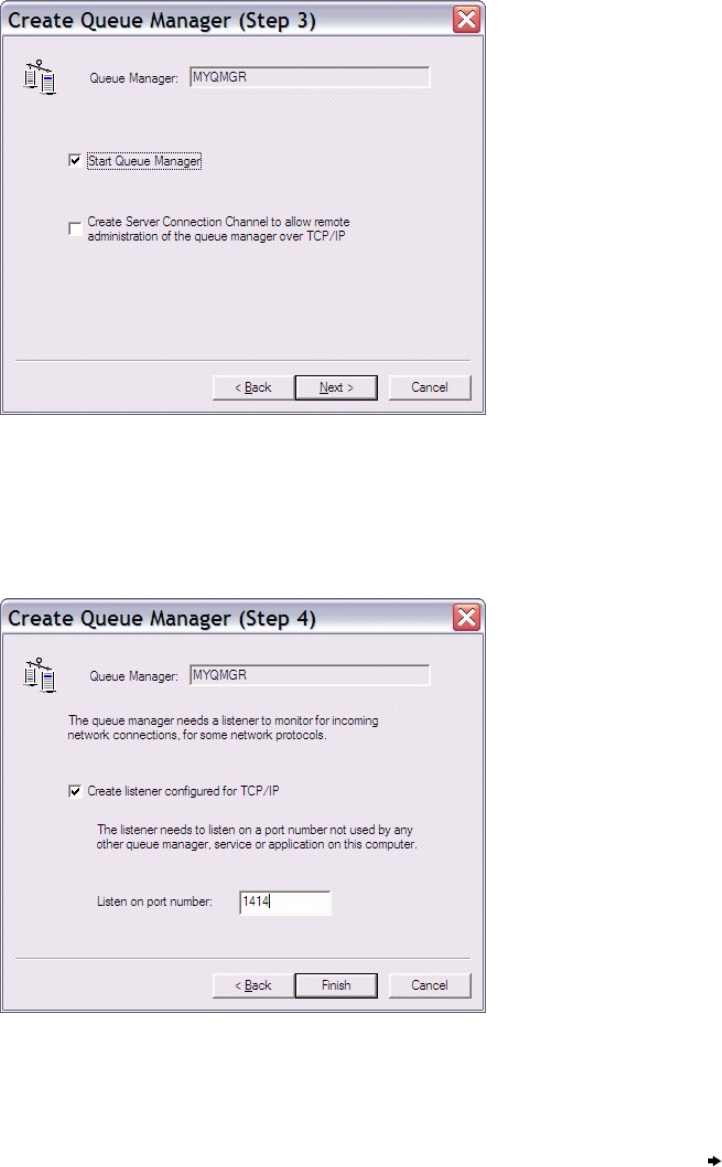
Click Next to continue.
The following step enables the WebSphere MQ applications that are running on your machine to
communicate with other machines. Make sure that Create listener configured for TCP/IP is
selected, and enter 1414 for the port number. This is the default port number for WebSphere MQ.
Check with your system administrator to verify that this is the correct port to use.
Click Finish to create your queue manager. It might take a minute to create and start the queue
manager.
5.
Create one or more local queues for exchanging messages on your queue manager. These are the queues that
SAS applications will use to exchange messages with other applications. In the tree, find your newly created
queue manager and click "+" to expand the menu. Right−click Queues, then select New Local Queue from
the popup menu.
In the Queue Name field, enter the name of the local queue that you want to create. This queue name is
specified in any application programs that use WebSphere MQ. On this screen, you might want to change the
Default Persistence value from Not Persistent to Persistent. This enables messages to remain in
the queue even if the queue manager is shut down. Click the various tabs to see the types of values that can be
2.
SAS® Integration Technologies: Developer's Guide
Configuring WebSphere MQ with the WebSphere MQ Explorer 398
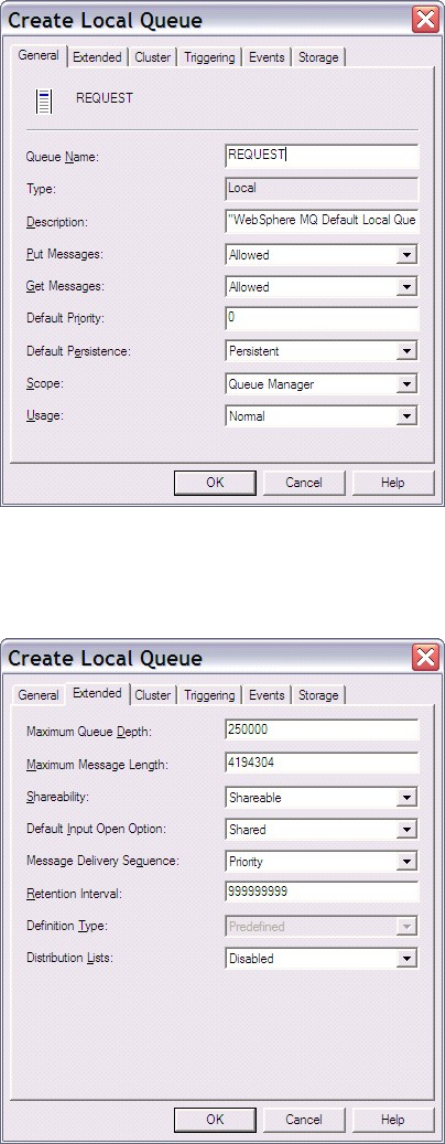
defined.
If you will be using high−volume messaging applications like scoring, you might want to change another
default value. Click the Extended tab and increase the Maximum Queue Depth to 100,000 or more. This
value represents the maximum number of messages that a queue can hold.
You can also change the properties after the queue has been defined. Click OK to create the queue. Repeat the
process for any additional local queues that you want to create. For example, the REQUEST queue that was
previously defined can be used for messages that will be read by a SAS application, while a queue named
REPLY could be used by the SAS application to write the response to the request message.
SAS® Integration Technologies: Developer's Guide
Configuring WebSphere MQ with the WebSphere MQ Explorer 399
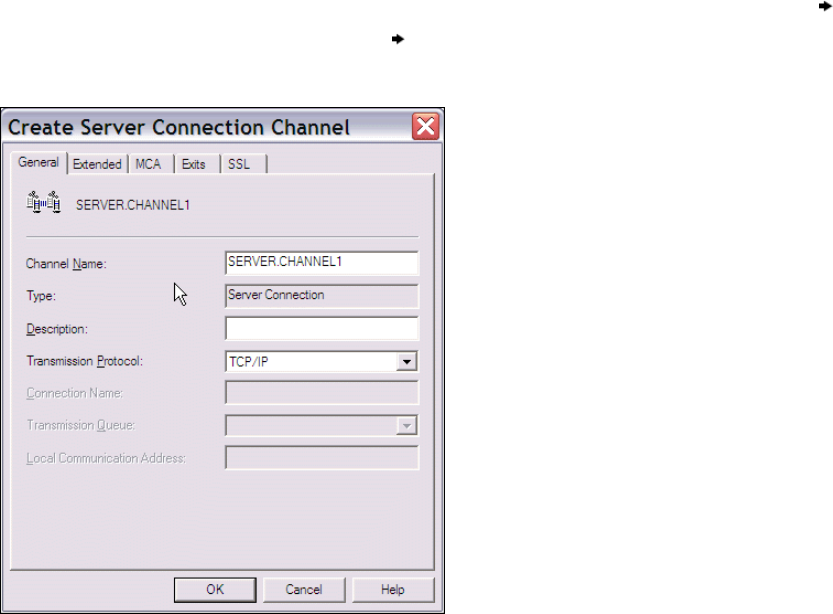
You should also create the dead letter queue that was defined when you created the queue manager. It is also a
local queue. You will need to create the default transmission queue if you will be exchanging messages with
queues on other queue managers. See IBM's WebSphere MQ documentation for information about
configuring channels and transmission queues.
At this point, WebSphere MQ has enough information for you to run applications that use message queuing
locally within your machine through a single queue manager.
Configuration Required for WebSphere MQ Client Access
IBM also provides a lighter client version of WebSphere MQ that can be installed and used separately from the full
WebSphere MQ Base or server installation. The client can be installed on the same machine as the server, or on a
separate machine. The client does not have its own queue manager, and must communicate over the network or within
a machine to a queue manager that is defined elsewhere.
There are two requirements that must be completed before you can configure the client/server communication.
First, you must define a server connection channel on the queue manager that will provide support to the client. A
channel is a definition that enables intercommunication between queue managers, or between clients and queue
managers.
To define a server connection channel from the WebSphere MQ Explorer, click MYQMGR Advanced to expand
the list. Right−click Channels, select NEW Server Connection Channel and enter the channel name (for example,
SERVER.CHANNEL1).
Second, the WebSphere MQ Client must be installed and configured on the client, which might or might not be on the
same machine as the server. The client is included as part of the typical installation. Use the MQSERVER Windows
environment variable to define the client connection to the server. The following code is an example of how to set this
variable in Windows operating environments:
SAS® Integration Technologies: Developer's Guide
Configuring WebSphere MQ with the WebSphere MQExplorer 400

set MQSERVER=ChannelName/TransportType/ConnectionName
For example:
set MQSERVER=SERVER.CHANNEL1/TCP/server_address(port)
In this example, server_address is the TCP/IP host name (either the IP address or complete host name) of the server,
and port is the number of the TCP/IP port on which the server is listening. The port is defined when you create the
queue manager. The default port number is 1414. For example:
set MQSERVER=SERVER.CHANNEL1/TCP/1.2.3.4(1414)
Using the Configured Values in a SAS Datastep Application
The queue and queue manager values are required in SAS applications that use the WebSphere MQ functional
interface. In the previous examples, the queue manager is named MYQMGR, and the queue is named REQUEST.
These values are used as follows in the SAS DATA step application:
hConn=0;
Name="MYQMGR";
compCode=0;
reason=0;
CALL MQCONN(Name, hConn, compCode, reason);
action = "GEN";
parms="OBJECTNAME";
objname="REQUEST";
call mqod(hod, action, rc, parms, objname);
options="INPUT_SHARED";
call mqopen(hconn, hod, options, hobj, compCode, reason);
If a SAS application is running as a WebSphere MQ Client, then you must include the following line of code before
making any calls using the WebSphere MQ Functional Interface. This line should be placed at the beginning of the
application, before the DATA step. For example:
%let MQMODEL=CLIENT;
data _null_;
...
run;
Explanations of Common WebSphere MQ Application Error Codes
Reason
Code Explanation Suggested Action
2018 Connection handle
is invalid. A connection handle that is created by an MQCONN call must be used within the
same DATA step where it was created.
2035
User is not
authorized to
perform the
attempted action.
Verify that you are connecting to the correct queue and queue manager. Verify that
you are authorized to connect to the queue manager. If error is reported to a client
connecting to a queue manager, you might need to set the user ID under the MCA
tab in the server connection channel definition properties to a user ID that has
permission to access the queue manager on the server machine.
SAS® Integration Technologies: Developer's Guide
Configuring WebSphere MQ with the WebSphere MQExplorer 401

2058 Error in Queue
Manager Name. Check spelling and case of the queue manager name that is used in the application
and is defined in the queue manager.
2059 Queue Manager is
not available. Restart the queue manager.
2085 Unknown Object
Name. Check spelling and case of the queue name that is used in the application and is
defined in the queue manager.
Others See the Messages book in the WebSphere MQ documentation.
Application Messaging
SAS® Integration Technologies: Developer's Guide
Configuring WebSphere MQ with the WebSphere MQExplorer 402

Polling Message Queues from the Object Spawner
You can use the object spawner to perform message queue polling in order to monitor queues and to start SAS
programs. This feature can be useful when you want to deploy the WebSphere MQ Functional Interface in
high−volume, time−sensitive situations. Message queue polling is only supported for WebSphere MQ (MQSeries) and
the WebSphere MQ Client (MQSeries−C).
Message queue polling is most useful for DATA step applications that receive messages from an MQSeries message
queue, and for incoming messages that are independent of each other. Reply messages can be sent, but this feature
should not be used to start programs that are primarily used to send messages.
The object spawner application can monitor the queue depth for a message queue, and can start additional SAS
processes to process messages on the queue. Message queue polling enables the user to configure the application
monitor so that new SAS sessions can be started as needed. Message queue polling enables load balancing across
multiple SAS sessions. The user can configure any number of definitions to specify which queues to monitor, the
transport (MQSeries or MQSeries−C), the number of messages (the queue depth) required to start a new SAS session,
and the wait interval between queries. The administrator can customize the configuration so that sufficient processes
are running to handle the number of messages on the queue.
When the object spawner is stopped, it sends a high−priority stop message with a unique identifier for its current
session to each SAS process that it started. By setting the SASQSID in the get message options (on the MQGMO
CALL routine), the MQGET call will check for this message. If the message is found, and the session IDs match,
MQGET returns a return code of −2. The DATA step program must check for this, do cleanup, and close immediately
upon receiving the stop message.
The corresponding parameter option for the MQGMO CALL routine is SASQSID. This option expects a value equal
to the environment variable of the same name, which is a 36 character string. The environment variable can be
retrieved by using the following code in a SAS DATA step:
sid = sysget('SASQSID');
For queues that are monitored by the object spawner, the MsgDeliverySequence property must be set to Priority.
See Message Queue Polling for more information about configuring the object spawner to perform message queue
polling.
Example
The following code is a sample application that you can run with the QSID feature.
data _null_;
length hconn hobj cc reason 8;
length rc hod hgmo hmd hmap msglen 8;
length parms $ 200 options $ 200 action $ 3 msg $ 200;
length desc $ 50;
msglen=0;
hconn=0;
hobj=0;
hod=0;
hgmo=0;
hmd=0;
Polling Message Queues from the Object Spawner 403
hmap=0;
/* Get the unique identifier set by the object spawner for this session */
sid = sysget('SASQSID');
put "Spawner job started. Sid = " sid;
qmgr="MYQMGR";
call mqconn(qmgr, hconn, cc, reason);
action = "GEN";
parms="OBJECTNAME";
objname="LOCAL";
call mqod(hod, action, rc, parms, objname);
if rc ^= 0 then do;
put 'MQOD: failed with rc= ' rc;
msg = sysmsg();
put msg;
goto exit;
end;
options="INPUT_SHARED";
call mqopen(hconn, hod, options, hobj, cc, reason);
if cc ^= 0 then do;
put 'MQOPEN: failed with reason= ' reason;
goto exit;
end;
parms= "SASQSID";
call mqgmo(hgmo, action, rc, parms, sid);
if rc ^= 0 then do;
put 'MQGMO: failed with rc= ' rc;
msg = sysmsg();
put msg;
goto exit;
end;
desc="CHAR,,100";
call mqmap(hmap, rc, desc);
if rc ^= 0 then do;
put 'MQMAP: failed with rc= ' rc;
msg = sysmsg();
put msg;
goto exit;
end;
reason = 0;
do until (reason = 2033);
action = "GEN";
call mqmd(hmd, action, rc);
if rc ^= 0 then do;
put 'MQMD: failed with rc= ' rc;
msg = sysmsg();
put msg;
end;
call mqget(hconn, hobj, hmd, hgmo, msglen, cc, reason);
if cc ^= 0 then do;
if reason = 2033 then do;
put 'No message available';
end;
SAS® Integration Technologies: Developer's Guide
Polling Message Queues from the Object Spawner 404
else do;
if reason = −2 then do;
/* −2 indicates that a session specific stop message has */
/* been received from the object spawner queue monitor */
/* application. We should clean up and shutdown immediately. */
put "MQGET: received stop message from object spawner";
goto exit;
end;
else put 'MQGET: failed with reason= ' reason;
end;
end;
else put 'MQGET: message received: ';
/* Do any application specific processing of messages here. */
if hmd ^= 0 then do;
call mqfree(hmd);
end;
end; /* end do loop */
exit:
if hobj ^= 0 then do;
options="NONE";
call mqclose(hconn, hobj, options, cc, reason);
if cc ^= 0 then do;
put 'MQCLOSE: failed with reason= ' reason;
end;
end;
if hconn ^= 0 then do;
call mqdisc(hconn, cc, reason);
if cc ^= 0 then do;
put 'MQDISC: failed with reason= ' reason;
end;
end;
if hod ^= 0 then do;
call mqfree(hod);
end;
if hgmo ^= 0 then do;
call mqfree(hgmo);
end;
if hmd ^= 0 then do;
call mqfree(hmd);
end;
if hmap ^= 0 then do;
call mqfree(hmap);
end;
run;
Application Messaging
SAS® Integration Technologies: Developer's Guide
Polling Message Queues from the Object Spawner 405
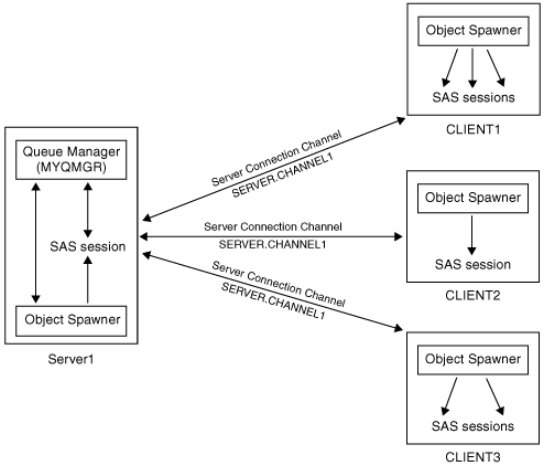
Configuring Multiple Clients To Read From a Single
Queue
The WebSphere MQ interfaces and the message queue polling feature of the object spawner can be used to distribute
the processing of messages on a message queue across one or more machines. The result is enhanced performance,
load balancing, and hardware redundancy.
Messages can only be retrieved from local queues. In order to enable multiple machines to process messages on a
single queue, you must have a full WebSphere MQ (server) installation on the machine that will act as the server. The
WebSphere MQ Clients use the queue manager on the server as their queue manager, so any local queues that are
defined on that queue manager are also local to the client installations. The WebSphere MQ Clients can connect to a
WebSphere MQ server on any supported platform. Note that message queuing applications on the machine where the
queue manager is installed can access the queues directly, and they do not need to be configured as clients, although
they can be.
The following diagram illustrates a sample configuration. The queue manager (MYQMGR) is running on Server1 and
is managing the queue for each of the WebSphere MQ Clients (CLIENT1, CLIENT2, and CLIENT3). All three
clients are communicating with the queue manager through the same server connection channel
(SERVER.CHANNEL1). The object spawners on each of the clients can start one or more SAS sessions as needed in
order to receive messages from the queue. SAS sessions can also be started by the object spawner and run on the
server. A SAS session running on the server does not need to run as a WebSphere MQ Client application; it behaves
as a WebSphere MQ server application.
To configure the queue manager on the server:
Define a queue manager if this has not already been done. In the following example, the queue manager is
called MYQMGR.
crtmqm MYQMGR
1.
Start the queue manager using the WebSphere MQ Explorer (Windows platforms). You can also use the
following command on the command line:
2.
Configuring Multiple Clients To Read From a Single Queue 406
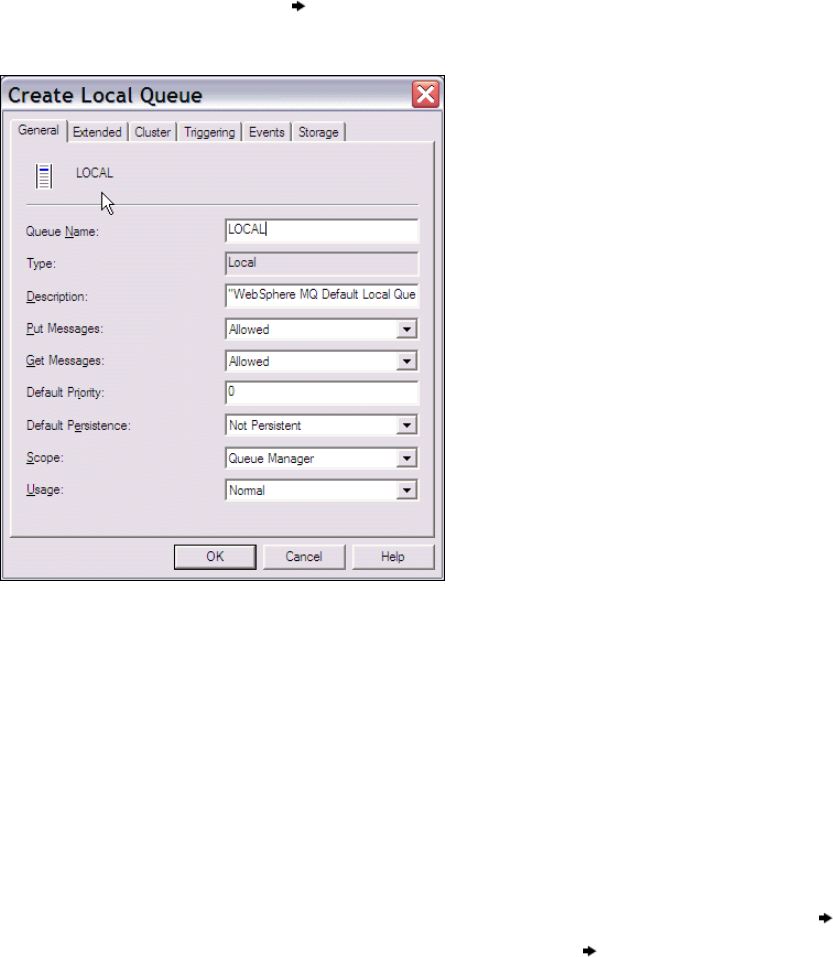
strmqm MYQMGR
Define one or more local queues that will be used by the applications.
To define a local queue from the command line, start the WebSphere MQ command program MQSC.
For example:
runmqsc MYQMGR
DEFINE QLOCAL(LOCAL) DEFPSIST(YES) DESCR('Local Queue')
Type end to exit MQSC.
♦
To define a local queue from the WebSphere MQ Explorer, click MYQMGR to expand the list.
Right−click Queues, select New Local Queue and enter the queue name and properties. For
example:
♦
3.
Define a server connection channel to enable WebSphere MQ Clients to communicate with MYQMGR. You
can also define a separate server connection channel for each client.
To define a server connection channel from the command line, start the WebSphere MQ command
program MQSC. For example:
runmqsc MYQMGR
DEFINE CHANNEL(SERVER.CHANNEL1) CHLTYPE(SVRCONN)
TRPTYPE(TCP) + MCAUSER(' ') DESCR('Server
connection channel for Client1')
Type end to exit MQSC.
♦
To define a server connection channel from the WebSphere MQ Explorer, click MYQMGR
Advanced to expand the list. Right−click Channels, select NEW Server Connection Channel and
enter the channel name. For example:
♦
4.
SAS® Integration Technologies: Developer's Guide
Configuring Multiple Clients To Read From a Single Queue 407

On each client, install and configure the WebSphere MQ Client. Use the MQSERVER environment variable
to define the client connection to the server. The following code shows examples of how to do this in
Windows and UNIX operating environments.
For Windows:
set MQSERVER=ChannelName/TransportType/ConnectionName
For example:
set MQSERVER=SERVER.CHANNEL1/TCP/server_address(port)
where server_address is the TCP/IP host name of the server and port is the number of the TCP/IP port
on which the server is listening. The default port number is 1414. For example:
set MQSERVER=SERVER.CHANNEL1/TCP/10.12.0.0(1414)
♦
For UNIX:
export MQSERVER=ChannelName/TransportType/ConnectionName
For example:
export MQSERVER=SERVER.CHANNEL1/TCP/'10.12.0.0(1414)'
♦
5.
The queue and queue manager values are required in SAS applications that use the WebSphere MQ functional
interface. In the previous examples, the queue manager is named MYQMGR, and the queue is named
LOCAL. These values are used as follows in the SAS DATA step application:
hConn=0;
Name="MYQMGR";
compCode=0;
reason=0;
CALL MQCONN(Name, hConn, compCode, reason);
action = "GEN";
6.
SAS® Integration Technologies: Developer's Guide
Configuring Multiple Clients To Read From a Single Queue 408

parms="OBJECTNAME";
objname="LOCAL";
call mqod(hod, action, rc, parms, objname);
options="INPUT_SHARED";
call mqopen(hconn, hod, options, hobj, compCode, reason);
If a SAS application is running as a WebSphere MQ Client, then you must include the following line of code
before making any calls using the WebSphere MQ Functional Interface. This line should go at the beginning
of the application before the DATA step, for example:
%let MQMODEL=CLIENT;
data _null_;
...
run;
This example provides basic configuration information for configuring several clients to receive messages from a
queue on one server. See the WebSphere MQ System Administration, Quick Beginnings, or Clients manuals in the
WebSphere MQ Information Center for additional information about the MCAUSER ID, Access Control, and
configuring queue managers, queues, channels, clients, and other objects.
Application Messaging
SAS® Integration Technologies: Developer's Guide
Configuring Multiple Clients To Read From a Single Queue 409

Configuring WebSphere MQ to Trigger SAS: An Example
Introduction• Configuration on the Windows XP Machine• Configuration on the AIX Machine• Notes•
Introduction
SAS Integration Technologies provides two interfaces that can be used to send and receive messages using
WebSphere MQ, the Common Messaging Interface, and the WebSphere MQ Interface. WebSphere MQ (formerly
called MQSeries) enables you to trigger, or start, an application automatically when a message arrives on a message
queue. There are many situations where it is useful to have a SAS DATA step application started when a message
arrives on a specific queue. However, SAS cannot be started directly by the trigger monitor. An intermediate batch job
is started by WebSphere MQ, and this batch job calls SAS. The details of one such configuration and batch job are
included here.
The following example shows a SAS client running on Windows XP communicating using WebSphere MQ with a
SAS server running on AIX. This SAS client sends a message to a queue and queue manager on AIX. When the
message arrives on the queue, it triggers a batch job which starts the SAS server to receive the message and return the
requested data set. The details of this example are specific to SAS 9.1. On AIX, the 64−bit WebSphere Client libraries
are required by the SAS interfaces. The WebSphere MQ Client can connect to a WebSphere MQ server on any
supported platform. WebSphere MQ requires that the trigger monitor and the application to be started be on the same
system, but they can be on either the client or the server. The process definition, which defines the application to be
triggered, must be defined on the WebSphere MQ server. In this example, the WebSphere MQ Queue Manager (server
installation) is on the same AIX system as the WebSphere MQ Client. See IBM's WebSphere MQ Clients manual for
more information about how to set up triggering when the client and server are on different systems. Refer to Notes
for more details.
The following two sample programs demonstrate the triggering process:
mqclient.sas•
mqserver.sas•
The SAS DATA step mqclient.sas runs on the XP machine and requests a data set. The mqserver.sas
program is triggered by the startsas batch program described below. It runs on the AIX machine. The
mqserver.sas program reads the message off of the queue and returns the requested data set.
Configuring WebSphere MQ to Trigger SAS: An Example 410
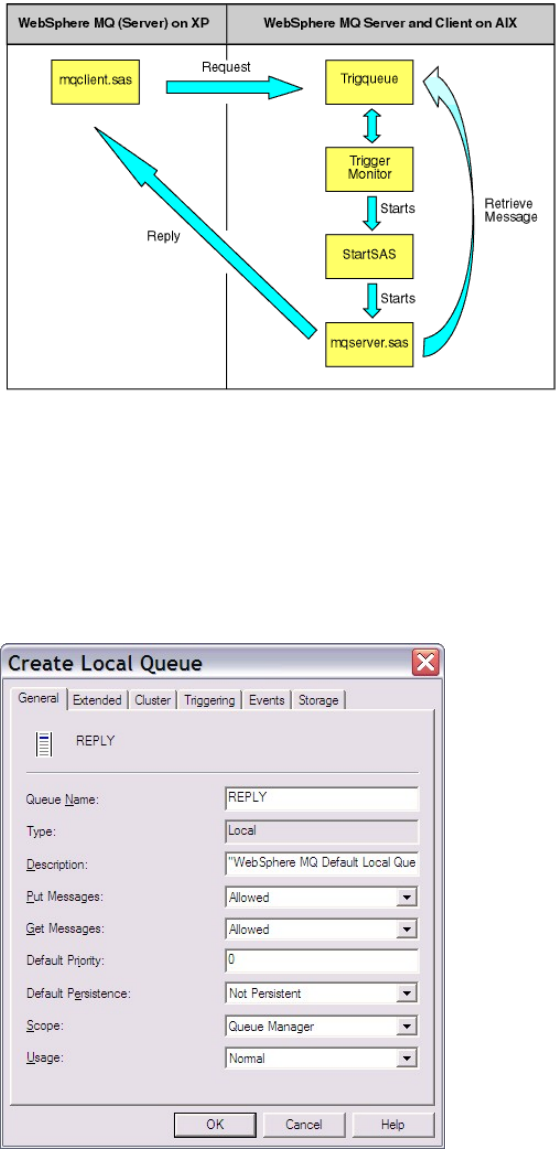
Configuration on the Windows XP Machine
For the sample programs to work, the following objects must be defined for the Windows queue manager, which is
called XPQMGR in this example. The windows shown are taken from the IBM WebSphere® MQ Version 5.3
Explorer.
Define the local queue to receive replies from the triggered program.
Define the remote queue definition for the queue on the AIX queue manager that triggers SAS.
SAS® Integration Technologies: Developer's Guide
Configuring WebSphere MQ to Trigger SAS: An Example 411
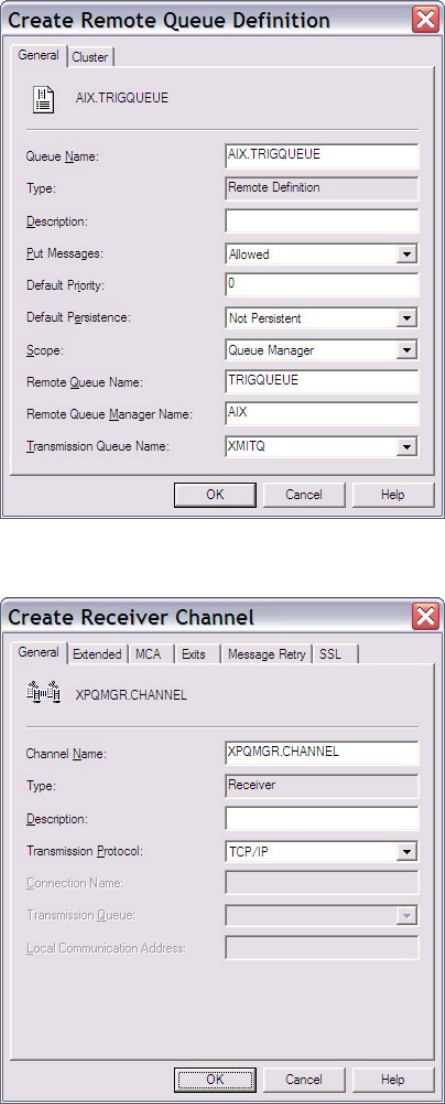
Define the receiver channel to listen for incoming messages.
Define the sender channel to send messages to the AIX queue manager.
SAS® Integration Technologies: Developer's Guide
Configuring WebSphere MQ to Trigger SAS: An Example 412
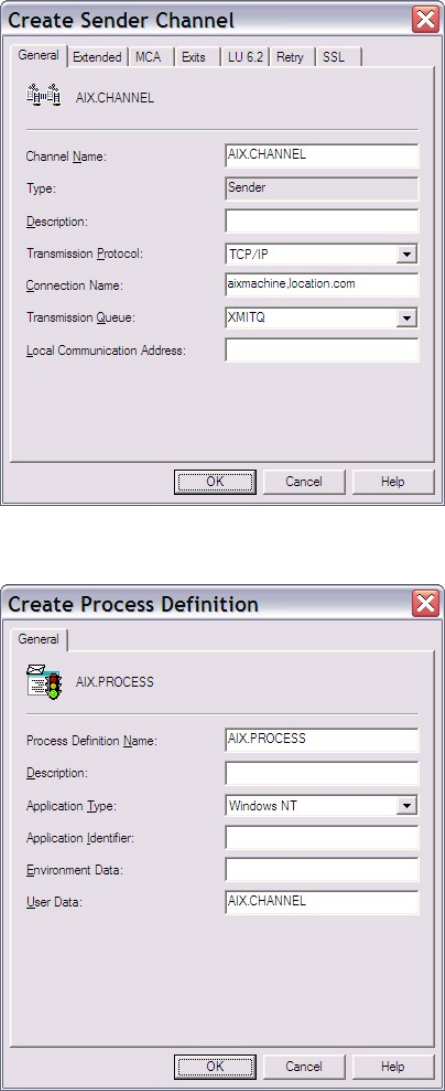
Define the process definition to start the sender channel.
Define the transmission queue.
SAS® Integration Technologies: Developer's Guide
Configuring WebSphere MQ to Trigger SAS: An Example 413
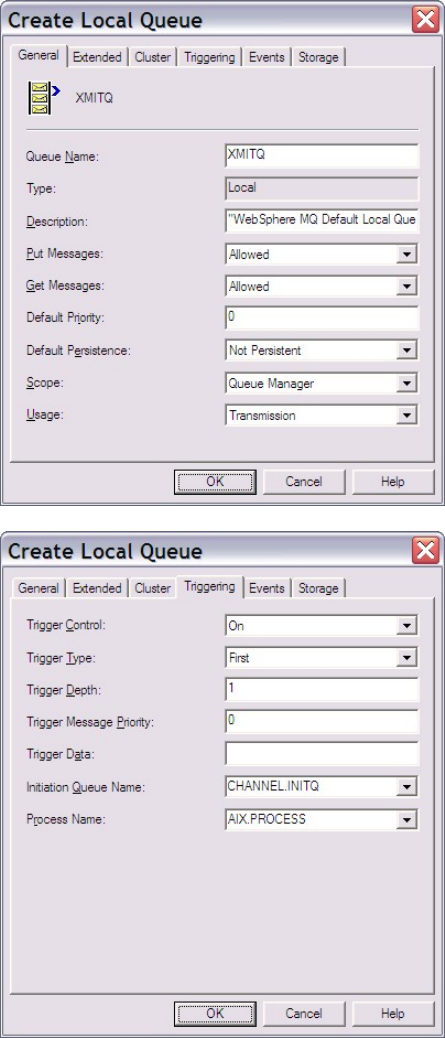
Configuration on the AIX Machine
The following code can either be a part of a configuration file, or stanzas that can be entered in the runmqsc tool.
Modify the following templates and use the WebSphere MQ tool runmqsc to define the required objects on a queue
manager that is named AIX for this example.
* Local Queue that triggers the batch job to start SAS
DEFINE QLOCAL(TRIGQUEUE) +
REPLACE DEFPSIST(YES) DESCR('TRIGQUEUE Queue') +
INITQ(MY.INITQ) +
TRIGGER TRIGTYPE(EVERY) PROCESS(TRIGSAS.PROCESS)
SAS® Integration Technologies: Developer's Guide
Configuring WebSphere MQ to Trigger SAS: An Example 414
* TRIGTYPE can also be FIRST or DEPTH. EVERY will trigger
* the batch job every time a message arrives on the queue.
* Process to start the batch file that starts SAS
DEFINE PROCESS (TRIGSAS.PROCESS) +
REPLACE APPLICID('/users/userid/startsas') APPLTYPE(UNIX)
DEFINE QLOCAL(MY.INITQ)
* Receiver Channel for AIX Queue Manager
DEFINE CHANNEL(AIX.CHANNEL) CHLTYPE(RCVR) +
REPLACE DESCR('Receiver Channel on AIX') +
TRPTYPE(TCP)
*−−− remote definitions for Windows XP queue manager −−−*
* Remote Queue at XPQMGR
DEFINE QREMOTE(XPQMGR.REPLY) +
REPLACE RNAME(REPLY) RQMNAME(XPGMGR) XMITQ(XPQMGR.XMITQ)
* Transmission Queue
DEFINE QLOCAL(XPQMGR.XMITQ) +
REPLACE DESCR('Transmit Queue to XP system') +
USAGE(XMITQ) TRIGGER TRIGTYPE(FIRST) +
INITQ(SYSTEM.CHANNEL.INITQ) PROCESS(XPQMGR.PROCESS)
* Process definition for XMITQ trigger
DEFINE PROCESS(XPQMGR.PROCESS) +
REPLACE DESCR('Process definition +
to start XPQMGR Channel') +
USERDATA('XPQMGR.CHANNEL')
* Sender Channel − started automatically
* when first message written to XMITQ
DEFINE CHANNEL(XPQMGR.CHANNEL) CHLTYPE(SDR) +
REPLACE DESCR('Sender Channel to XPQMGR') +
TRPTYPE(TCP) XMITQ(XPQMGR.XMITQ) +
CONNAME('XPMACHINE.MYLOCATION.MYCOMPANY.COM')
*−−−− Setup Client/Server Server Connection Channel −−−−*
DEFINE CHANNEL(MQCLIENT.CHANNEL) +
CHLTYPE(SVRCONN) TRPTYPE(TCP) +
REPLACE DESCR('Server connection for client access') +
MCAUSER(' ')
This example uses /users/userid/startsas as the name of the batch file triggered to run a SAS DATA step.
The contents of this file are:
# Make sure the 64−bit WebSphere MQ client
# libraries are in your LIBPATH.
export LIBPATH=/usr/mqm/lib64
# Define the server that the SAS WebSphere MQ
# client interface will connect through.
export MQSERVER=
MQCLIENT.CHANNEL/TCP/'<server IP address>(port)'
sas −sysin /users/userid/mqserver.sas
You must also make sure that the trigger monitor has been started on the AIX machine for the proper initiation queue:
SAS® Integration Technologies: Developer's Guide
Configuring WebSphere MQ to Trigger SAS: An Example 415
runmqsc −m AIX −q MY.INITQ
Notes
Note that support of WebSphere MQ 64−bit Client code in SAS requires SAS 9.1, WebSphere MQ Client and Server
Version 5.2+PTF U482982, and the MACS Support Pac for MQSeries Client Library support for AIX. WebSphere
MQ was not supported on AIX in SAS 9. Client and server support are available in SAS 8.2. The client−specific
considerations of this example are not required when using SAS 8.2.
Application Messaging
SAS® Integration Technologies: Developer's Guide
Configuring WebSphere MQ to Trigger SAS: An Example 416
Sample Trigger Programs
mqclient.sas
data _null_;
length msg $ 200;
length qid2 tid rc 8;
length map $80;
length recv1 $50;
length event $10;
length rpname $256;
length type $8;
length qual1 qual2 $40;
libname out '.';
tid=0;
rc=0;
put '−−−−';
put 'Call INIT';
CALL INIT(tid, 'MQSERIES', rc);
if rc ^= 0 then do;
put 'INIT: failed';
msg = sysmsg();
put msg;
end;
else put 'INIT: succeeded';
rc=0;
qid=0;
put '−−−−';
put 'Call OPENQUEUE to open the response queue';
CALL OPENQUEUE(qid, tid, 'XPQMGR:REPLY', 'fetch',
rc, "POLL(TIMEOUT=20)");
if rc ^= 0 then do;
put 'OPENQUEUE: failed';
msg = sysmsg();
put msg;
end;
else put 'OPENQUEUE: succeeded';
rc=0;
qid2=0;
put 'Call OPENQUEUE to open the request queue on qid2';
CALL OPENQUEUE(qid2, tid, 'XPQMGR:AIX.TRIGQUEUE',
'DELIVERY', rc, "POLL(Timeout=15)");
if rc ^= 0 then do;
put 'OPENQUEUE: failed';
msg = sysmsg();
put msg;
end;
else put 'OPENQUEUE: succeeded';
rc=0;
put '−−−−';
put 'Call SETMAP';
CALL SETMAP('mqclientmap', 'REGISTRY', rc, 'CHAR,,50');
if rc ^= 0 then do;
Sample Trigger Programs 417
put 'SETMAP: failed';
msg = sysmsg();
put msg;
end;
else put 'SETMAP: succeeded';
parm1="calories";
put '−−−− Send a message to the request queue qid
requesting the specified dataset −−−−−';
put 'Call SENDMESSAGE';
call sendmessage(qid2,rc,"map, respqueue",
"mqclientmap","R64:D8650",parm1);
if rc ^= 0 then do;
put 'send message failed: ';
msg=sysmsg();
put msg;
end;
else put 'send message succeeded';
slept = sleep(1);
rc = 0;
put '−−−− receive a dataset from the reply queue −−−−';
put 'Call RECEIVEMESSAGE';
map = "mqclientmap";
call receivemessage(qid, rc, event,
attchflg,"map", map, recv1);
put 'response queue =' rpname;
put 'qid =' qid;
put 'event = ' event;
put 'attchflg =' attchflg;
if rc ^= 0 then do;
put 'receive message failed: ';
msg=sysmsg();
put msg;
end;
else do;
put 'receive message succeeded';
put "map =" map;
put "recv1 =" recv1;
end;
if event eq 'DELIVERY' then
do;
put 'Message has been delivered';
if attchflg = 1 then
do;
put '−−−− check for attachments −−−−';
call getattachment(qid, lastflag, attachid,
type, qual1, qual2, rc);
if rc ^= 0 then do;
put 'get attachment failed: ';
msg=sysmsg();
put msg;
end;
else put 'get attachment succeeded';
if type="DATASET" then
do;
put '−−− accept attachment into a dataset −−−';
put "qual2 = " qual2;
call acceptattachment(qid, attachid,
SAS® Integration Technologies: Developer's Guide
Sample Trigger Programs 418

"out", qual2, rc);
if rc ^= 0 then do;
put 'accept DATASET failed: ';
msg=sysmsg();
put msg;
end;
else put 'accept DATASET succeeded';
end;
end;
end;
rc=0;
put '−−−−';
put 'Call CLOSEQUEUE for queue1';
CALL CLOSEQUEUE(qid, rc);
if rc ^= 0 then do;
put 'CLOSEQUEUE: failed';
msg = sysmsg();
put msg;
end;
else put 'CLOSEQUEUE: succeeded';
rc=0;
put '−−−−';
put 'Call CLOSEQUEUE for queue2';
CALL CLOSEQUEUE(qid2, rc);
if rc ^= 0 then do;
put 'CLOSEQUEUE: failed';
msg = sysmsg();
put msg;
end;
else put 'CLOSEQUEUE: succeeded';
rc=0;
put '−−−−';
put 'Call TERM';
CALL TERM(tid, rc);
if rc ^= 0 then do;
put 'TERM: failed';
msg = sysmsg();
put msg;
end;
else put 'TERM: succeeded';
run;
mqserver.sas
data calories;
input item $ 1 − 16 calories 18−20 ;
datalines;
ground beef 230
hot dog 100
banana 100
broccoli 45
skim milk 50
;
data _null_;
SAS® Integration Technologies: Developer's Guide
Sample Trigger Programs 419
length msg $ 200;
length qid qid2 tid rc 8;
length map $80;
length recv1 $50;
length attachname $21;
length event $10;
length rpname $256;
tid=0;
rc=0;
put '−−−−';
put 'Call INIT';
CALL INIT(tid, 'MQSERIES−C', rc);
if rc ^= 0 then do;
put 'INIT: failed';
msg = sysmsg();
put msg;
end;
else put 'INIT: succeeded';
rc=0;
qid=0;
put '−−−−';
put 'Call OPENQUEUE for queue1';
CALL OPENQUEUE(qid, tid, 'AIX:TRIGQUEUE',
'fetch', rc, "POLL(Timeout=10)");
if rc ^= 0 then do;
put 'OPENQUEUE: failed';
msg = sysmsg();
put msg;
end;
else put 'OPENQUEUE: succeeded';
rc=0;
put '−−−−';
put 'Call SETMAP';
CALL SETMAP('mqservermap', 'REGISTRY', rc, 'CHAR,,50');
if rc ^= 0 then do;
put 'SETMAP: failed';
msg = sysmsg();
put msg;
end;
else put 'SETMAP: succeeded';
rc = 0;
put '−−−− recieve a message from the remote queue −−−−';
put 'Call RECEIVEMESSAGE';
map = "mqservermap";
rpname=' ';
call receivemessage(qid, rc, event, attchflg,"map,
respqueue", map, rpname, recv1);
put 'recv1 =' recv1;
put 'response queue =' rpname;
put 'qid =' qid;
put 'event = ' event;
put 'attchflg =' attchflg;
if rc ^= 0 then do;
put 'receive message failed: ';
SAS® Integration Technologies: Developer's Guide
Sample Trigger Programs 420
msg=sysmsg();
put msg;
end;
else do;
put 'receive message succeeded';
put map;
end;
if event eq 'DELIVERY' then
do;
rc = 0;
qid2=0;
put '−−−− open the response queue qid2 −−−−';
put 'Call OPENQUEUE for queue2';
CALL OPENQUEUE(qid2, tid, rpname, 'delivery',
rc, "POLL(Timeout=15)");
if rc ^= 0 then do;
put 'OPENQUEUE: failed';
msg = sysmsg();
put msg;
end;
else put 'OPENQUEUE: succeeded';
put 'rpname =' rpname;
put '−−−− send the requested dataset
to the response queue −−−−';
put 'Call SENDMESSAGE';
attachname = 'dataset,work,' || recv1;
put "attachname = " attachname;
call sendmessage(qid2,rc,"map, attachlist",
"mqservermap",attachname, recv1 );
if rc ^= 0 then do;
put 'send message failed: ';
msg=sysmsg();
put msg;
end;
else put 'send message succeeded';
rc=0;
put '−−−−';
put 'Call CLOSEQUEUE for queue2';
CALL CLOSEQUEUE(qid2, rc);
if rc ^= 0 then do;
put 'CLOSEQUEUE: failed';
msg = sysmsg();
put msg;
end;
else put 'CLOSEQUEUE: succeeded';
end;
rc=0;
put '−−−−';
put 'Call CLOSEQUEUE for queue1';
CALL CLOSEQUEUE(qid, rc);
if rc ^= 0 then do;
put 'CLOSEQUEUE: failed';
msg = sysmsg();
put msg;
end;
else put 'CLOSEQUEUE: succeeded';
SAS® Integration Technologies: Developer's Guide
Sample Trigger Programs 421
rc=0;
put '−−−−';
put 'Call TERM';
CALL TERM(tid, rc);
if rc ^= 0 then do;
put 'TERM: failed';
msg = sysmsg();
put msg;
end;
else put 'TERM: succeeded';
run;
Application Messaging
SAS® Integration Technologies: Developer's Guide
Sample Trigger Programs 422

WebSphere MQ Functional Interface
SAS Integration Technologies allows application developers to combine the power of both SAS information delivery
and IBM message queuing capabilities by providing a SAS interface to the IBM WebSphere MQ product (formerly
called MQSeries). With this interface, SAS programs can create new WebSphere MQ message queues or take
advantage of existing ones that are available throughout the enterprise. This section explains how to implement this
interface using the SAS Data Step and SAS Macro Language.
Note: WebSphere MQ enables you to trigger, or start, an application automatically when a message arrives on a
message queue. See Configuring WebSphere MQ to Trigger SAS for more information.
For information about support for different versions of the SAS interface to WebSphere MQ, see the page on
Supported Messaging Interface Versions.
Application Messaging
WebSphere MQ Functional Interface 423
Writing WebSphere MQ Applications
With WebSphere MQ messaging, two or more applications communicate with each other indirectly and
asynchronously using message queues. The applications do not have to be running at the same time or even in the
same operating environment. An application wishing to communicate with another application simply sends a
message to a queue. The receiving application retrieves the message when it is ready.
A typical SAS program using WebSphere MQ services performs the following tasks:
The program must first establish a connection to a WebSphere MQ queue manager. The queue manager is
responsible for maintaining the queues and for ensuring that the messages in the queues reach their
destination. This insulates the application developer from the details of the network. When a successful
connection is made, the queue manager issues a connection handle that is used to identify the connection in
subsequent function calls.
Note: A program can have connections to more than one queue manager if the platform supports multiple
queue managers running on it.
1.
Next, the program must open the desired queue before it can use it. When opening a queue, the program must
define how it intends to use it. For example, the program can send (put) messages to the queue, or receive
(get) messages from the queue, or it can do both. If a queue is opened using the INQUIRE option, then the
queue can be queried for information about the queue itself. Similarly, if the queue is opened using the SET
option, then various queue attributes can be set. If the queue is opened successfully, the queue manager issues
an object handle that is used to identify the queue in subsequent function calls.
2.
A program that opens a queue for sending can put messages on the queue using the SAS CALL routine
MQPUT. The queue is identified using the connection handle for the queue manager and the object handle for
the queue. In addition, several other functions are available for creating and manipulating the data in the
message as well as setting options that help the receiving program locate the message in the queue.
3.
A program can also open the same queue (or a different one) for retrieving messages. The program uses the
MQGET routine specifying the connection handle to the queue manager and the object handle for the queue
from which it wants to retrieve the message. There are a number of options that can set to help identify the
message to get from the queue.
4.
A program also has the ability to release the resources allocated by a SAS internal handle. These resources are
associated with message options and descriptors.
5.
Interface Models
WebSphere MQ provides two Message Queue Interface (MQI) models:
The program resides on the same machine as the WebSphere MQ Base product and Server (called the
Base/Server model)
•
The program resides on a different machine from the WebSphere MQ Base product and Server (called the
CLIENT model or the MQI Client component)
•
IBM requires programs to be linked with different libraries according to the model that will be used. The default
model that is assumed by SAS is the Base/Server model. If you do not want the default model, you must specify the
MQMODEL SAS macro variable and set it to a value of CLIENT. For example,
%let MQMODEL=CLIENT;
Writing WebSphere MQ Applications 424
You must set this variable before calling any WebSphere MQ interface function.
If the program is using the client model, it will open a remote queue manager, since WebSphere MQ clients always
connect across a network.
Data Conversion
If you will be putting or getting messages from heterogeneous systems, then data conversion must be considered. Data
conversion is usually categorized as follows:
Character data conversion• Numeric data conversion•
The Coded Character Set ID (CCSID) or code page is a number that represents a character translation table to be used
between two distinct systems. Encoding is the term generally used to represent how numeric data is represented on a
particular system. WebSphere MQ channel communication (Transmission Segment Header and Message Descriptor)
data are converted internally by WebSphere MQ, however, the user portion of a message is not. It is the responsibility
of the program to convert this data to the native code page and numeric encoding.
Data conversion of this user portion can be handled by either WebSphere MQ conversion exit routines or by SAS
using data mapping control. If you want WebSphere MQ to do the data conversion of the user portion of a message,
you must adhere to the following protocol:
When putting (MQPUT) a message on a queue, you should specify the FORMAT (conversion exit) that the
receiver should use to convert the incoming message (see MQMD − message descriptor parameters).
1.
Convert a message.
WebSphere MQ provides an internal conversion format, MQSTR, that can be used to convert a
message comprised entirely of character data.
♦
If the message is not comprised entirely of character data, you will have to create a conversion exit.
Refer to WebSphere MQ DQM (Distributed Queuing Guide) for more information about setting up
conversion exits.
♦
2.
The receiving (MQGET) program must tell WebSphere MQ to do the required data conversion based on the
incoming message format and data encoding. The program does this by specifying the CONVERT option on
the Get Message Options (see MQGMO − options parameters) which is part of the MQGET call. If you do
not want to set up static conversion exit routines, you can let SAS convert the data for you as an alternative
solution.
3.
By default, if you do not specify the CONVERT Get Message Option, SAS performs data conversion if required
(when incoming message encoding does not match native encoding). If you want to disable or turn off this type of
transparent data conversion, specify the MQSASCNV SAS macro variable and set it to a value of DISABLE or OFF.
For example,
%let MQSASCNV=OFF
SAS will perform data conversion based upon the data mapping (MQMAP) being passed to the MQGETPARMS
routine. SAS performs origin−to−destination code page translation by using supplied or user−generated translation
tables (TRANTAB entries in SASHELP.HOST or SASUSER.PROFILE). To override internal TRANTAB name
generation, you can specify the MQSASTBL SAS macro variable and set it to the TRANTAB (translation table) that
you want to use.
SAS® Integration Technologies: Developer's Guide
Writing WebSphere MQ Applications 425
Application Messaging
SAS® Integration Technologies: Developer's Guide
Writing WebSphere MQ Applications 426

WebSphere MQ Coding Examples
This section contains examples of using the WebSphere MQ interface to send and receive messages to and from
application messaging queues.
There are two examples of using DATA step code to send and receive text files. The first shows how to do it without
using WebSphere MQ V5 features. The second example shows how to simplify the process using WebSphere MQ V5
features.
An example that shows how to send and receive binary files is here.
Examples of using the WebSphere MQ interface with the SAS Macro Language are here.
Please note the following points about freeing resources used in conjunction with the WebSphere MQ Interface:
When a SAS DATA step ends, all resources consumed by this DATA step are automatically freed. That is, all
internal SAS handles are automatically freed, as well as being disconnected from all queue managers that
were connected during this DATA step execution. However, it is good programming practice to free these
resources using the functions provided.
•
When using the SAS Macro Language to interface with WebSphere MQ, care should be taken to ensure that
all resources are freed programmatically. Unlike the DATA step, resources consumed by the SAS Macro
Language are never implicitly freed during SAS execution.
•
DATA Step Coding Examples
This example puts a message on a queue.
data _null_;
length hconn hobj cc reason 8;
length rc hod hpmo hmd hmap hdata 8;
length parms $ 200 options $ 200 action $ 3 msg $ 200;
hconn=0;
hobj=0;
hod=0;
hpmo=0;
hmd=0;
hmap=0;
hdata=0;
put '−−−−−−−−−−−−−−−− Connect to QMgr −−−−−−−−−−−−−−';
qmgr="TEST";
call mqconn(qmgr, hconn, cc, reason);
if cc ^= 0 then do;
if reason = 2002 then do;
put 'Already connected to QMgr ' qmgr;
end;
else do;
if reason = 2059 then
put 'MQCONN: QMgr not available...
needs to be started';
else
put 'MQCONN: failed with reason= ' reason;
WebSphere MQ Coding Examples 427
goto exit;
end;
end;
else put 'MQCONN: successfully connected to QMgr ' qmgr;
put '−−−−−−−−−− Generate object descriptor −−−−−−−−−';
action="GEN";
parms="OBJECTNAME";
objname="TEST";
call mqod(hod, action, rc, parms, objname);
if rc ^= 0 then do;
put 'MQOD: failed with rc= ' rc;
msg = sysmsg();
put msg;
goto exit;
end;
else put 'MQOD: successfully generated
object descriptor';
put '−−−−−−−− Open queue object for output −−−−−−−−−';
options="OUTPUT";
call mqopen(hconn, hod, options, hobj, cc, reason);
if cc ^= 0 then do;
put 'MQOPEN: failed with reason= ' reason;
goto exit;
end;
else put 'MQOPEN: successfully opened queue for output';
put '−−−−−−−−− Generate put message options −−−−−−−−';
call mqpmo(hpmo, action, rc);
if rc ^= 0 then do;
put 'MQPMO: failed with rc= ' rc;
msg = sysmsg();
put msg;
goto exit;
end;
else put 'MQPMO: successfully generated put
message options';
put '−−−−−−−−− Generate message descriptor −−−−−−−−−';
parms="PERSISTENCE";
persist="PERSISTENT"; /* persistent message */
call mqmd(hmd, action, rc, parms, persist);
if rc ^= 0 then do;
put 'MQMD: failed with rc= ' rc;
msg = sysmsg();
put msg;
goto exit;
end;
else put 'MQMD: successfully generated
message descriptor';
put '−−−−−−−−−−− Generate map descriptor −−−−−−−−−−−';
/* data will not be aligned */
desc1="SHORT";
desc2="LONG";
SAS® Integration Technologies: Developer's Guide
WebSphere MQ Coding Examples 428
desc3="DOUBLE";
desc4="CHAR,,50"; /* blank pad to 50 bytes */
call mqmap(hmap, rc, desc1, desc2, desc3, desc4);
if rc ^= 0 then do;
put 'MQMAP: failed with rc= ' rc;
msg = sysmsg();
put msg;
goto exit;
end;
else put 'MQMAP: successfully generated map descriptor';
put '−−− Generate data descriptor − actual data −−−−';
parm1=100;
parm2=9999;
parm3=9999.9999;
parm4="This is a test.";
call mqsetparms(hdata, hmap, rc, parm1,
parm2, parm3, parm4);
if rc ^= 0 then do;
put 'MQSETPARMS: failed with rc= ' rc;
msg = sysmsg();
put msg;
goto exit;
end;
else put 'MQSETPARMS: successfully generated
data descriptor';
put '−−−−−−−−−−−−− Put message on queue −−−−−−−−−−−−';
call mqput(hconn, hobj, hmd, hpmo, hdata, cc, reason);
if cc ^= 0 then do;
put 'MQPUT: failed with reason= ' reason;
goto exit;
end;
else do;
put 'MQPUT: successfully put message on queue';
/* inquire about message descriptor
output parameters */
action="INQ";
parms="MSGID,PUTAPPLTYPE,PUTAPPLNAME,
PUTDATE,PUTTIME";
length msgid $ 48 applname $ 28 date $ 8 time $ 8;
call mqmd(hmd, action, rc, parms, msgid, appltype,
applname, date, time);
if rc ^= 0 then do;
put 'MQMD: failed with rc= ' rc;
msg = sysmsg();
put msg;
end;
else do;
put 'Message descriptor output parameters are:';
put 'MSGID= ' msgid;
put 'PUTAPPLTYPE= ' appltype;
put 'PUTAPPLNAME= ' applname;
put 'PUTDATE= ' date;
put 'PUTTIME= ' time;
end;
end;
SAS® Integration Technologies: Developer's Guide
WebSphere MQ Coding Examples 429
exit:
if hobj ^= 0 then do;
put '−−−−−−−−−−−−−−−−− Close queue −−−−−−−−−−−−−−−';
options="NONE";
call mqclose(hconn, hobj, options, cc, reason);
if cc ^= 0 then do;
put 'MQCLOSE: failed with reason= ' reason;
end;
else put 'MQCLOSE: successfully closed queue';
end;
if hconn ^= 0 then do;
put '−−−−−−−−−−−− Disconnect from QMgr −−−−−−−−−−−';
call mqdisc(hconn, cc, reason);
if cc ^= 0 then do;
put 'MQDISC: failed with reason= ' reason;
end;
else put 'MQDISC: successfully disconnected
from QMgr';
end;
if hod ^= 0 then do;
call mqfree(hod);
put 'Object descriptor handle freed';
end;
if hpmo ^= 0 then do;
call mqfree(hpmo);
put 'Put message options handle freed';
end;
if hmd ^= 0 then do;
call mqfree(hmd);
put 'Message descriptor handle freed';
end;
if hmap ^= 0 then do;
call mqfree(hmap);
put 'Map descriptor handle freed';
end;
if hdata ^= 0 then do;
call mqfree(hdata);
put 'Data descriptor handle freed';
end;
run;
This example retrieves a message from a queue.
data _null_;
length hconn hobj cc reason 8;
length rc hod hgmo hmd hmap msglen 8;
length parms $ 200 options $ 200 action $ 3 msg $ 200;
hconn=0;
hobj=0;
hod=0;
hgmo=0;
hmd=0;
SAS® Integration Technologies: Developer's Guide
WebSphere MQ Coding Examples 430
hmap=0;
put '−−−−−−−−−−−−−−−− Connect to QMgr −−−−−−−−−−−−−−';
qmgr="TEST";
call mqconn(qmgr, hconn, cc, reason);
if cc ^= 0 then do;
if reason = 2002 then do;
put 'Already connected to QMgr ' qmgr;
end;
else do;
if reason = 2059 then
put 'MQCONN: QMgr not available...
needs to be started';
else
put 'MQCONN: failed with reason= ' reason;
goto exit;
end;
end;
else put 'MQCONN: successfully connected to QMgr ' qmgr;
put '−−−−−−−−−− Generate object descriptor −−−−−−−−−';
action="GEN";
parms="OBJECTNAME";
objname="TEST";
call mqod(hod, action, rc, parms, objname);
if rc ^= 0 then do;
put 'MQOD: failed with rc= ' rc;
msg = sysmsg();
put msg;
goto exit;
end;
else put 'MQOD: successfully generated
object descriptor';
put '−−−−−−−−− Open queue object for input −−−−−−−−−';
options="INPUT_SHARED";
call mqopen(hconn, hod, options, hobj, cc, reason);
if cc ^= 0 then do;
put 'MQOPEN: failed with reason= ' reason;
goto exit;
end;
else put 'MQOPEN: successfully opened queue for output';
put '−−−−−−−−− Generate get message options −−−−−−−−';
call mqgmo(hgmo, action, rc);
if rc ^= 0 then do;
put 'MQGMO: failed with rc= ' rc;
msg = sysmsg();
put msg;
goto exit;
end;
else put 'MQGMO: successfully generated get
message options';
put '−−−−−−−−− Generate message descriptor −−−−−−−−−';
call mqmd(hmd, action, rc);
if rc ^= 0 then do;
SAS® Integration Technologies: Developer's Guide
WebSphere MQ Coding Examples 431
put 'MQMD: failed with rc= ' rc;
msg = sysmsg();
put msg;
goto exit;
end;
else put 'MQMD: successfully generated
message descriptor';
put '−−−−−−−−−−− Generate map descriptor −−−−−−−−−−−';
desc1="SHORT";
desc2="LONG";
desc3="DOUBLE";
desc4="CHAR,,50";
call mqmap(hmap, rc, desc1, desc2, desc3, desc4);
if rc ^= 0 then do;
put 'MQMAP: failed with rc= ' rc;
msg = sysmsg();
put msg;
goto exit;
end;
else put 'MQMAP: successfully generated map descriptor';
put '−−−−−−−−−−−− Get message from queue −−−−−−−−−−−';
call mqget(hconn, hobj, hmd, hgmo, msglen, cc, reason);
if cc ^= 0 then do;
if reason = 2033 then put 'No message available';
else put 'MQGET: failed with reason= ' reason;
goto exit;
end;
else do;
put 'MQGET: successfully retrieved message
from queue';
put 'message length= ' msglen;
/* inquire about message descriptor
output parameters */
action="INQ";
parms="REPORT,MSGTYPE,FEEDBACK,MSGID,
CORRELID,USERIDENTIFIER,PUTAPPLTYPE,
PUTAPPLNAME,PUTDATE,PUTTIME";
length report $ 30 msgtype 8 feedback 8 msgid $ 48
correlid $ 48 userid $ 12 appltype 8
applname $ 28 date $ 8 time $8;
call mqmd(hmd, action, rc, parms, report,
msgtype, feedback, msgid, correlid, userid,
appltype, applname, date, time);
if rc ^= 0 then do;
put 'MQMD: failed with rc ' rc;
msg = sysmsg();
put msg;
end;
else do;
put 'Message descriptor output parameters are:';
put 'REPORT= ' report;
put 'MSGTYPE= ' msgtype;
put 'FEEDBACK= ' feedback;
put 'MSGID= ' msgid;
SAS® Integration Technologies: Developer's Guide
WebSphere MQ Coding Examples 432
put 'CORRELID= ' correlid;
put 'USERIDENTIFIER= ' userid;
put 'PUTAPPLTYPE= ' appltype;
put 'PUTAPPLNAME= ' applname;
put 'PUTDATE= ' date;
put 'PUTTIME= ' time;
end;
end;
if msglen > 0 then do;
/* retrieve SAS variables from GET buffer */
length parm1 parm2 parm3 8 parm4 $ 50;
call mqgetparms(hmap, rc, parm1,
parm2, parm3, parm4);
put 'Display SAS variables:';
put 'parm1= ' parm1;
put 'parm2= ' parm2;
put 'parm3= ' parm3;
put 'parm4= ' parm4;
if rc ^= 0 then do;
put 'MQGETPARMS: failed with rc= ' rc;
msg = sysmsg();
put msg;
end;
end;
else put 'No data associated with message';
exit:
if hobj ^= 0 then do;
put '−−−−−−−−−−−−−−−−− Close queue −−−−−−−−−−−−−−−';
options="NONE";
call mqclose(hconn, hobj, options, cc, reason);
if cc ^= 0 then do;
put 'MQCLOSE: failed with reason= ' reason;
end;
else put 'MQCLOSE: successfully closed queue';
end;
if hconn ^= 0 then do;
put '−−−−−−−−−−−− Disconnect from QMgr −−−−−−−−−−−';
call mqdisc(hconn, cc, reason);
if cc ^= 0 then do;
put 'MQDISC: failed with reason= ' reason;
end;
else put 'MQDISC: successfully disconnected
from QMgr';
end;
if hod ^= 0 then do;
call mqfree(hod);
put 'Object descriptor handle freed';
end;
if hgmo ^= 0 then do;
call mqfree(hgmo);
put 'Get message options handle freed';
end;
SAS® Integration Technologies: Developer's Guide
WebSphere MQ Coding Examples 433
if hmd ^= 0 then do;
call mqfree(hmd);
put 'Message descriptor handle freed';
end;
if hmap ^= 0 then do;
call mqfree(hmap);
put 'Map descriptor handle freed';
end;
run;
Text File Processing Example
This example puts a text file on a queue.
data _null_;
length rc 8;
length msg $ 200;
length hconn hod hpmo hobj hmd hmap hdata 8;
length cc reason 8;
length corrid $ 48;
length record $ 256;
length seqno 8 seqstr $ 4;
/* send this file to the queue */
infile 'd:\test.txt' length=reclen end=eof;
call mqconn("TESTQMGR", hconn, cc, reason);
if cc ^= 0 then do;
if reason = 2002 then do;
put 'Already connected to QMgr';
end;
else do;
if reason = 2059 then
put 'MQCONN: QMgr not available...
needs to be started';
else
put 'MQCONN: failed with reason= ' reason;
goto exit;
end;
end;
put '−−−−−−−−−− Generate object descriptor −−−−−−−−−';
call mqod(hod, "GEN", rc, "OBJECTNAME", "TESTQ");
if rc ^= 0 then do;
put 'MQOD: failed with rc= ' rc;
msg = sysmsg();
put msg;
goto exit;
end;
put '−−−−−−−− Open queue object for output −−−−−−−−−';
call mqopen(hconn, hod, "OUTPUT", hobj, cc, reason);
if cc ^= 0 then do;
put 'MQOPEN: failed with reason= ' reason;
goto exit;
end;
put '−−−−−−−−− Generate put message options −−−−−−−−';
SAS® Integration Technologies: Developer's Guide
WebSphere MQ Coding Examples 434
call mqpmo(hpmo, "GEN", rc);
if rc ^= 0 then do;
put 'MQPMO: failed with rc= ' rc;
msg = sysmsg();
put msg;
goto exit;
end;
put '−−−−−−−−− Generate message descriptor −−−−−−−−−';
call mqmd(hmd, "GEN", rc, "PERSISTENCE,MSGTYPE",
"PERSISTENT", 100000);
if rc ^= 0 then do;
put 'MQMD: failed with rc= ' rc;
msg = sysmsg();
put msg;
goto exit;
end;
put '−−−−−−−−−−− Generate map descriptor −−−−−−−−−−−';
/* longest record in file is 255 bytes+1 length byte... */
/* therefore all messages on the queue pertaining to */
/* this file will be blank−padded for 256 bytes... */
call mqmap(hmap, rc, "char,,256");
if rc ^= 0 then do;
put 'MQMAP: failed';
msg = sysmsg();
put msg;
goto exit;
end;
/* all of these messages will have the
same correlationid+seqno */
corrid="46696c65212121"; /* File!!! */
seqno = 0;
do until(eof);
input @;
input record $varying256. reclen;
call mqsetparms(hdata, hmap, rc, record);
if( rc ) then do;
put 'MQSETPARMS: failed';
msg = sysmsg();
put msg;
goto exit;
end;
/* add sequence # to correlationid */
seqstr = put(seqno, hex4.);
substr(corrid,15,4) = seqstr;
seqno+1;
/* set correlation id and let MQ generate msgid
for this message */
call mqmd(hmd, "SET", rc, "CORRELID,MSGID",
corrid, "");
if rc ^= 0 then do;
put 'MQMD: failed with rc= ' rc;
msg = sysmsg();
SAS® Integration Technologies: Developer's Guide
WebSphere MQ Coding Examples 435
put msg;
goto exit;
end;
put '−−− Put msg on queue −−−−';
call mqput(hconn, hobj, hmd, hpmo, hdata, cc, reason);
if cc ^= 0 then do;
put 'MQPUT: failed with reason= ' reason;
msg = sysmsg();
put msg;
goto exit;
end;
/* free data */
call mqfree(hdata);
end;
exit:
if( hobj ) then do;
call mqclose(hconn, hobj, "NONE", cc, reason);
if( cc ) then do;
put 'MQCLOSE: failed with reason = ' reason;
msg = sysmsg();
put msg;
end;
end;
if( hconn ) then do;
call mqdisc(hconn, cc, reason);
if( cc ) then do;
put 'MQDISC: failed with reason = ' reason;
msg = sysmsg();
put msg;
end;
end;
if hod ^= 0 then do;
call mqfree(hod);
put 'Object descriptor handle freed';
end;
if hpmo ^= 0 then do;
call mqfree(hpmo);
put 'Put message options handle freed';
end;
if hmd ^= 0 then do;
call mqfree(hmd);
put 'Message descriptor handle freed';
end;
if hmap ^= 0 then do;
call mqfree(hmap);
put 'Map descriptor handle freed';
end;
stop;
run;
SAS® Integration Technologies: Developer's Guide
WebSphere MQ Coding Examples 436
Getting a Text File From a Queue
This example retrieves the first text file on a queue. The message type msgtype is equal to 100000.
filename output 'd:\testdup.txt';
data _null_;
length rc 8;
length msg $ 200;
length cc reason 8;
length hconn hod hgmo hobj hobj2 hmap 8;
length corrid filecorrid $ 48;
length record $ 256;
length seqno 8;
fileid = fopen('output', 'o', 256, 'v');
if( fileid = 0 ) then do;
put 'Error opening output file...';
goto exit;
end;
put '−−−−−−−−−−−−−−−− Connect to QMgr −−−−−−−−−−−−−−';
call mqconn("TESTQMGR", hconn, cc, reason);
if cc ^= 0 then do;
if reason = 2002 then do;
put 'Already connected to QMgr';
end;
else do;
if reason = 2059 then
put 'MQCONN: QMgr not available...
needs to be started';
else
put 'MQCONN: failed with reason= ' reason;
goto exit;
end;
end;
put '−−−−−−−−−− Generate object descriptor −−−−−−−−−';
call mqod(hod, "GEN", rc, "OBJECTNAME", "TESTQ");
if rc ^= 0 then do;
put 'MQOD: failed with rc= ' rc;
msg = sysmsg();
put msg;
goto exit;
end;
put '−−−−−−−−− Open queue object for input −−−−−−−−−';
call mqopen(hconn, hod, "INPUT_SHARED,BROWSE", hobj,
cc, reason);
if cc ^= 0 then do;
put 'MQOPEN: failed with reason= ' reason;
goto exit;
end;
put '−−−−−−−−− Generate get message options −−−−−−−−';
call mqgmo(hgmo, "GEN", rc, "options", "browse_next");
SAS® Integration Technologies: Developer's Guide
WebSphere MQ Coding Examples 437
if rc ^= 0 then do;
put 'MQGMO: failed with rc= ' rc;
msg = sysmsg();
put msg;
goto exit;
end;
put '−−−−−−−−− Generate message descriptor −−−−−−−−−';
call mqmd(hmd, "GEN", rc);
if rc ^= 0 then do;
put 'MQMD: failed with rc= ' rc;
msg = sysmsg();
put msg;
goto exit;
end;
seqno=0;
recv:
call mqget(hconn, hobj, hmd, hgmo, msglen, cc, reason);
if( cc ) then do;
if( reason = 2033 ) then do;
put 'reached end of queue';
goto exit;
end;
else do;
put 'MQGET: failed with reason = ' reason;
msg = sysmsg();
put msg;
goto exit;
end;
end;
/* inquire about msg properties */
call mqmd(hmd, "INQ", rc, "CORRELID,MSGTYPE",
corrid, msgtype);
if( rc ) then do;
put 'MQMD failed';
msg = sysmsg();
put msg;
goto exit;
end;
/* default for getting next msg on queue */
call mqgmo(hgmo, "SET", rc, "options", "browse_next");
if rc ^= 0 then do;
put 'MQGMO: failed with rc= ' rc;
msg = sysmsg();
put msg;
goto exit;
end;
if( msgtype = 100000 ) then do;
/* file processing... */
outofseq=0;
if( filecorrid = "" ) then do;
/* file begins at this message */
SAS® Integration Technologies: Developer's Guide
WebSphere MQ Coding Examples 438
/* write all correlating messages to this file */
filecorrid = substr(corrid,1,14);
put '−−−−−−−−− Generate map descriptor −−−−−−−−−';
/* all file messages were sent to the queue as
256 bytes blank−padded */
call mqmap(hmap, rc, "char,,256");
if( rc ) then do;
put 'MQMAP: failed';
msg = sysmsg();
put msg;
goto exit;
end;
end;
/* make sure message belongs to this file */
if( substr(corrid,1,14) = filecorrid ) then do;
if( seqno ^= input(substr(corrid,15,4), hex4.) )
then do;
/* this message is out of sequence
so search for it */
outofseq=1;
/* open another instance to search for
out−of−seq message */
call mqopen(hconn, hod, "INPUT_SHARED,BROWSE",
hobj2, cc, reason);
if cc ^= 0 then do;
put 'MQOPEN: failed with reason= ' reason;
goto exit;
end;
corrid = filecorrid;
substr(corrid,15,4) = put(seqno, hex4.);
call mqmd(hmd, "SET", rc, "MSGID,CORRELID",
"", corrid);
if( rc ) then do;
put 'MQMD: failed';
msg = sysmsg();
put msg;
end;
call mqgmo(hgmo, "SET", rc, "OPTIONS",
"BROWSE_FIRST");
if( rc ) then do;
put 'MQGMO: failed';
msg = sysmsg();
put msg;
goto exit;
end;
call mqget(hconn, hobj2, hmd, hgmo, msglen,
cc, reason);
if( cc ) then do;
if( reason = 2033 ) then do;
put 'Error: reached end of queue while
searching for out−of−sequence msg';
goto exit;
end;
else do;
put 'MQGET: failed with reason = ' reason;
SAS® Integration Technologies: Developer's Guide
WebSphere MQ Coding Examples 439
msg = sysmsg();
put msg;
goto exit;
end;
end;
end;
/* increment sequence number for next
expected message */
seqno+1;
/* retrieve record from internal buffer */
call mqgetparms(hmap, rc, record);
if( rc ) then do;
put 'MQGETPARMS: failed';
msg = sysmsg();
put msg;
goto exit;
end;
put 'write record to file';
rc = fput(fileid, record);
if( rc ) then do;
put 'Error writing to output file buffer...';
goto exit;
end;
/* flush it to disk */
rc = fwrite(fileid);
if( rc ) then do;
put 'Error writing to output file...';
goto exit;
end;
/* now remove it from the queue... */
call mqgmo(hgmo, "SET", rc, "OPTIONS",
"MSG_UNDER_CURSOR");
if( rc ) then do;
put 'MQGMO: failed';
msg = sysmsg();
put msg;
goto exit;
end;
if( outofseq ) then do;
call mqget(hconn, hobj2, hmd, hgmo, msglen,
cc, reason);
if( cc ) then do;
put 'problems removing message from queue';
msg = sysmsg();
put msg;
goto exit;
end;
/* close queue */
call mqclose(hconn, hobj2, "NONE", cc, reason);
/* re−read previous message */
call mqgmo(hgmo, "SET", rc, "OPTIONS",
"BROWSE_MSG_UNDER_CURSOR");
SAS® Integration Technologies: Developer's Guide
WebSphere MQ Coding Examples 440
if( rc ) then do;
put 'MQGMO: failed';
msg = sysmsg();
put msg;
goto exit;
end;
end;
else do;
call mqget(hconn, hobj, hmd, hgmo, msglen,
cc, reason);
if( cc ) then do;
put 'problems removing message from queue';
msg = sysmsg();
put msg;
goto exit;
end;
/* browse next message */
call mqgmo(hgmo, "SET", rc, "OPTIONS",
"BROWSE_NEXT");
if( rc ) then do;
put 'MQGMO: failed';
msg = sysmsg();
put msg;
goto exit;
end;
end;
end;
end;
/* finish retrieving all messages belonging
to this file */
/* reset message descriptor */
call mqmd(hmd, "SET", rc, "MSGID,CORRELID", "", "");
if( rc ) then do;
put 'MQMD: failed';
msg = sysmsg();
put msg;
goto exit;
end;
goto recv;
exit:
if( hobj ) then do;
call mqclose(hconn, hobj, "NONE", cc, reason);
if( cc ) then do;
put 'MQCLOSE: failed with reason = ' reason;
msg = sysmsg();
put msg;
end;
end;
if( hconn ) then do;
call mqdisc(hconn, cc, reason);
if( cc ) then do;
put 'MQDISC: failed with reason = ' reason;
msg = sysmsg();
put msg;
end;
SAS® Integration Technologies: Developer's Guide
WebSphere MQ Coding Examples 441
end;
if( hod ) then
call mqfree(hod);
if( hgmo ) then
call mqfree(hgmo);
if( hmd ) then
call mqfree(hmd);
if( hmap ) then
call mqfree(hmap);
/* close file */
rc = fclose(fileid);
if( rc ) then put 'Error closing output file';
run;
Text File Processing Example Using WebSphere MQ V5 Features
This example puts a text file to a queue using V5 features.
/** bits within md.msgflags **/
%let segment_allow=1;
%let segment=2;
%let last_segment=4;
%let group=8;
%let last_group=16;
data _null_;
length rc 8;
length msg $ 200;
length hconn hod hpmo hobj hmd hmap hdata 8;
length cc reason 8;
length record $ 256;
length msgflags 8;
/* send this file to the queue */
infile 'd:\test.txt' length=reclen end=eof;
call mqconn("TESTQMGR", hconn, cc, reason);
if cc ^= 0 then do;
if reason = 2002 then do;
put 'Already connected to QMgr';
end;
else do;
if reason = 2059 then
put 'MQCONN: QMgr not available...
needs to be started';
else
put 'MQCONN: failed with reason= ' reason;
goto exit;
end;
end;
put '−−−−−−−−−− Generate object descriptor −−−−−−−−−';
call mqod(hod, "GEN", rc, "OBJECTNAME", "TESTQ");
if rc ^= 0 then do;
put 'MQOD: failed with rc= ' rc;
msg = sysmsg();
put msg;
SAS® Integration Technologies: Developer's Guide
WebSphere MQ Coding Examples 442
goto exit;
end;
put '−−−−−−−− Open queue object for output −−−−−−−−−';
call mqopen(hconn, hod, "OUTPUT", hobj, cc, reason);
if cc ^= 0 then do;
put 'MQOPEN: failed with reason= ' reason;
goto exit;
end;
put '−−−−−−−−− Generate put message options −−−−−−−−';
/** QMgr will generate a unique msgid on every put as **/
/** well as generate a groupid for all of the msgs **/
/** and incrementally keep up with the sequencing... **/
call mqpmo(hpmo, "GEN", rc, "OPTIONS",
"NEW_MSGID,LOGICAL_ORDER");
if rc ^= 0 then do;
put 'MQPMO: failed with rc= ' rc;
msg = sysmsg();
put msg;
goto exit;
end;
put '−−−−−−−−− Generate message descriptor −−−−−−−−−';
/** specify the message belongs to a group **/
msgflags=&group;
call mqmd(hmd, "GEN", rc, "PERSISTENCE,MSGTYPE,MSGFLAGS",
"PERSISTENT", 100000, msgflags);
if rc ^= 0 then do;
put 'MQMD: failed with rc= ' rc;
msg = sysmsg();
put msg;
goto exit;
end;
put '−−−−−−−−−−− Generate map descriptor −−−−−−−−−−−';
/* longest record in file is 255 bytes+1 length byte... */
/* therefore all messages on the queue pertaining to */
/* this file will be blank−padded for 256 bytes... */
call mqmap(hmap, rc, "char,,256");
if rc ^= 0 then do;
put 'MQMAP: failed';
msg = sysmsg();
put msg;
goto exit;
end;
do until(eof);
input @;
input record $varying256. reclen;
call mqsetparms(hdata, hmap, rc, record);
if( rc ) then do;
put 'MQSETPARMS: failed';
msg = sysmsg();
put msg;
goto exit;
end;
/** set last in group if eof **/
SAS® Integration Technologies: Developer's Guide
WebSphere MQ Coding Examples 443
if( eof ) then do;
msgflags + &last_group;
call mqmd(hmd, "SET", rc, "MSGFLAGS", msgflags);
if rc ^= 0 then do;
put 'MQMD: failed with rc= ' rc;
msg = sysmsg();
put msg;
goto exit;
end;
end;
put '−−− Put msg on queue −−−−';
call mqput(hconn, hobj, hmd, hpmo, hdata,
cc, reason);
if cc ^= 0 then do;
put 'MQPUT: failed with reason= ' reason;
msg = sysmsg();
put msg;
goto exit;
end;
/* free data */
call mqfree(hdata);
end;
exit:
if( hobj ) then do;
call mqclose(hconn, hobj, "NONE", cc, reason);
if( cc ) then do;
put 'MQCLOSE: failed with reason = ' reason;
msg = sysmsg();
put msg;
end;
end;
if( hconn ) then do;
call mqdisc(hconn, cc, reason);
if( cc ) then do;
put 'MQDISC: failed with reason = ' reason;
msg = sysmsg();
put msg;
end;
end;
if hod ^= 0 then do;
call mqfree(hod);
put 'Object descriptor handle freed';
end;
if hpmo ^= 0 then do;
call mqfree(hpmo);
put 'Put message options handle freed';
end;
if hmd ^= 0 then do;
call mqfree(hmd);
put 'Message descriptor handle freed';
end;
if hmap ^= 0 then do;
call mqfree(hmap);
put 'Map descriptor handle freed';
end;
SAS® Integration Technologies: Developer's Guide
WebSphere MQ Coding Examples 444
stop;
run;
Getting a Text File From a Queue
/* Get first text file on a queue... ie. msgtype=100000 */
/* use V5 features to perform the sequencing... */
/* This example opens queue with a browse cursor and */
/* browses the first msg in every group looking for */
/* a msg with msgtype=100000... once it is found, */
/* open a fetch instance to remove all msgs in that */
/* particular group... */
/* if you knew upfront the groupid that you wanted, you */
/* could just open a single instance of the queue and */
/* remove the group in logical order without having to */
/* do any initial browsing... */
/* bit test macros */
%let segment_allow_mask='.......1'b;
%let segment_mask='......1.'b;
%let last_segment_mask='.....1..'b;
%let group_mask='....1...'b;
%let last_group_mask='...1....'b;
filename output 'd:\testdup.txt';
data _null_;
length rc 8;
length msg $ 200;
length cc reason 8;
length hconn hod hgmo hobj hmap 8;
length record $ 256;
length msgtype seqno msgflags 8;
length groupid $ 48;
fileid = fopen('output', 'o', 256, 'v');
if( fileid = 0 ) then do;
put 'Error opening output file...';
goto exit;
end;
put '−−−−−−−−−−−−−−−− Connect to QMgr −−−−−−−−−−−−−−';
call mqconn("TESTQMGR", hconn, cc, reason);
if cc ^= 0 then do;
if reason = 2002 then do;
put 'Already connected to QMgr';
end;
else do;
if reason = 2059 then
put 'MQCONN: QMgr not available... needs to
be started';
else
put 'MQCONN: failed with reason= ' reason;
goto exit;
end;
end;
SAS® Integration Technologies: Developer's Guide
WebSphere MQ Coding Examples 445
put '−−−−−−−−−− Generate object descriptor −−−−−−−−−';
call mqod(hod, "GEN", rc, "OBJECTNAME", "TESTQ");
if rc ^= 0 then do;
put 'MQOD: failed with rc= ' rc;
msg = sysmsg();
put msg;
goto exit;
end;
put '−−−−−−−−− Open queue object for input −−−−−−−−−';
call mqopen(hconn, hod, "INPUT_SHARED,BROWSE", hobj,
cc, reason);
if cc ^= 0 then do;
put 'MQOPEN: failed with reason= ' reason;
goto exit;
end;
put '−−−−−−−−− Generate get message options −−−−−−−−';
call mqgmo(hgmo, "GEN", rc, "options, matchoptions",
"browse_next", "seqnumber");
if rc ^= 0 then do;
put 'MQGMO: failed with rc= ' rc;
msg = sysmsg();
put msg;
goto exit;
end;
put '−−−−−−−−− Generate message descriptor −−−−−−−−−';
/** browse first msg in group only **/
call mqmd(hmd, "GEN", rc, "msgseqnumber", 1);
if rc ^= 0 then do;
put 'MQMD: failed with rc= ' rc;
msg = sysmsg();
put msg;
goto exit;
end;
recv:
call mqget(hconn, hobj, hmd, hgmo, msglen, cc, reason);
if( cc ) then do;
if( reason = 2033 ) then do;
put 'reached end of queue';
goto exit;
end;
else do;
put 'MQGET: failed with reason = ' reason;
msg = sysmsg();
put msg;
goto exit;
end;
end;
/* inquire about msg properties */
call mqmd(hmd, "INQ", rc,
"MSGTYPE,GROUPID,MSGSEQNUMBER,MSGFLAGS",
msgtype, groupid, seqno, msgflags);
SAS® Integration Technologies: Developer's Guide
WebSphere MQ Coding Examples 446
if( rc ) then do;
put 'MQMD failed';
msg = sysmsg();
put msg;
goto exit;
end;
put msgtype=;
put groupid=;
put seqno=;
put msgflags=;
if( msgtype = 100000 ) then do;
/* file processing... */
put '−−−−−−−−−− Generate map descriptor −−−−−−−−−−';
/* all file messages were sent to the queue as
256 bytes blank−padded */
call mqmap(hmap, rc, "char,,256");
if( rc ) then do;
put 'MQMAP: failed';
msg = sysmsg();
put msg;
goto exit;
end;
/* close browse instance */
call mqclose(hconn, hobj, "NONE", cc, reason);
if( cc ) then do;
put 'MQCLOSE: failed with reason = ' reason;
msg = sysmsg();
put msg;
end;
/* open queue in fetch mode */
hobj=0;
call mqopen(hconn, hod, "INPUT_SHARED", hobj,
cc, reason);
if cc ^= 0 then do;
put 'MQOPEN: failed with reason= ' reason;
goto exit;
end;
call mqgmo(hgmo, "SET", rc, "options, matchoptions",
"logical_order,complete_msg,all_msgs_available",
"groupid");
if rc ^= 0 then do;
put 'MQGMO: failed with rc= ' rc;
msg = sysmsg();
put msg;
goto exit;
end;
call mqmd(hmd, "SET", rc, "groupid", groupid);
if rc ^= 0 then do;
put 'MQMD: failed with rc= ' rc;
msg = sysmsg();
put msg;
goto exit;
end;
SAS® Integration Technologies: Developer's Guide
WebSphere MQ Coding Examples 447
next:
call mqget(hconn, hobj, hmd, hgmo, msglen,
cc, reason);
if( cc ) then do;
put 'MQGET: failed with reason = ' reason;
msg = sysmsg();
put msg;
goto exit;
end;
/* inquire about msg properties */
call mqmd(hmd, "INQ", rc,
"MSGTYPE,GROUPID,MSGSEQNUMBER,MSGFLAGS",
msgtype, groupid, seqno, msgflags);
if( rc ) then do;
put 'MQMD failed';
msg = sysmsg();
put msg;
goto exit;
end;
put msgtype=;
put groupid=;
put seqno=;
put msgflags=;
/* retrieve record from internal buffer */
call mqgetparms(hmap, rc, record);
if( rc ) then do;
put 'MQGETPARMS: failed';
msg = sysmsg();
put msg;
goto exit;
end;
put 'write record to file';
rc = fput(fileid, record);
if( rc ) then do;
put 'Error writing to output file buffer...';
goto exit;
end;
/* flush it to disk */
rc = fwrite(fileid);
if( rc ) then do;
put 'Error writing to output file...';
goto exit;
end;
/** receive until last in group **/
if( (msgflags=&group_mask) AND
(NOT(msgflags=&last_group_mask)) )
then goto next;
else goto exit;
end;
else goto recv;
exit:
SAS® Integration Technologies: Developer's Guide
WebSphere MQ Coding Examples 448
if( hobj ) then do;
call mqclose(hconn, hobj, "NONE", cc, reason);
if( cc ) then do;
put 'MQCLOSE: failed with reason = ' reason;
msg = sysmsg();
put msg;
end;
end;
if( hconn ) then do;
call mqdisc(hconn, cc, reason);
if( cc ) then do;
put 'MQDISC: failed with reason = ' reason;
msg = sysmsg();
put msg;
end;
end;
if( hod ) then
call mqfree(hod);
if( hgmo ) then
call mqfree(hgmo);
if( hmd ) then
call mqfree(hmd);
if( hmap ) then
call mqfree(hmap);
/* close file */
rc = fclose(fileid);
if( rc ) then put 'Error closing output file';
run;
Binary File Processing Example
This example puts a binary file on a queue.
data _null_;
length rc 8;
length msg $ 200;
length hconn hod hpmo hobj hmd hmap hdata 8;
length cc reason 8;
length corrid $ 48;
length msgbuf $ 256;
length seqno 8 seqstr $ 4;
/* send this file to the queue */
infile 'd:\test.exe' recfm=f lrecl=1 end=eof;
call mqconn("TESTQMGR", hconn, cc, reason);
if cc ^= 0 then do;
if reason = 2002 then do;
put 'Already connected to QMgr';
end;
else do;
if reason = 2059 then
put 'MQCONN: QMgr not available... needs to
be started';
else
put 'MQCONN: failed with reason= ' reason;
SAS® Integration Technologies: Developer's Guide
WebSphere MQ Coding Examples 449
goto exit;
end;
end;
put '−−−−−−−−−− Generate object descriptor −−−−−−−−−';
call mqod(hod, "GEN", rc, "OBJECTNAME", "TESTQ");
if rc ^= 0 then do;
put 'MQOD: failed with rc= ' rc;
msg = sysmsg();
put msg;
goto exit;
end;
put '−−−−−−−− Open queue object for output −−−−−−−−−';
call mqopen(hconn, hod, "OUTPUT", hobj, cc, reason);
if cc ^= 0 then do;
put 'MQOPEN: failed with reason= ' reason;
goto exit;
end;
put '−−−−−−−−− Generate put message options −−−−−−−−';
call mqpmo(hpmo, "GEN", rc);
if rc ^= 0 then do;
put 'MQPMO: failed with rc= ' rc;
msg = sysmsg();
put msg;
goto exit;
end;
put '−−−−−−−−− Generate message descriptor −−−−−−−−−';
call mqmd(hmd, "GEN", rc, "PERSISTENCE,MSGTYPE",
"PERSISTENT", 100001);
if rc ^= 0 then do;
put 'MQMD: failed with rc= ' rc;
msg = sysmsg();
put msg;
goto exit;
end;
put '−−−−−−−−−−− Generate map descriptor −−−−−−−−−−−';
/* send 256 byte messages to the queue */
call mqmap(hmap, rc, "char,,256");
if rc ^= 0 then do;
put 'MQMAP: failed';
msg = sysmsg();
put msg;
goto exit;
end;
/* all of these messages will have the same
correlationid+seqno */
corrid="42696e46696c65212121"; /* BinFile!!! */
seqno = 0;
i=1;
do until(eof);
/* read a byte at a time */
input x $char1.;
i+1;
substr(msgbuf,i,1) = x;
SAS® Integration Technologies: Developer's Guide
WebSphere MQ Coding Examples 450
if( i = 256 or eof ) then do;
/* set length of this record embedded
as first byte of message */
substr(msgbuf,1,1) = put(i−1,pib1.);
call mqsetparms(hdata, hmap, rc, msgbuf);
if( rc ) then do;
put 'MQSETPARMS: failed';
msg = sysmsg();
put msg;
goto exit;
end;
/* add sequence # to correlationid */
seqstr = put(seqno, hex4.);
substr(corrid,21,4) = seqstr;
seqno+1;
/* set correlation id and let MQ generate
msgid for this message */
call mqmd(hmd, "SET", rc, "CORRELID,MSGID",
corrid, "");
if rc ^= 0 then do;
put 'MQMD: failed with rc= ' rc;
msg = sysmsg();
put msg;
goto exit;
end;
put '−−− Put msg on queue −−−−';
call mqput(hconn, hobj, hmd, hpmo, hdata,
cc, reason);
if cc ^= 0 then do;
put 'MQPUT: failed with reason= ' reason;
msg = sysmsg();
put msg;
goto exit;
end;
/* free data */
call mqfree(hdata);
/* reset message buffer entities */
i=1;
msgbuf="";
end;
end;
exit:
if( hobj ) then do;
call mqclose(hconn, hobj, "NONE", cc, reason);
if( cc ) then do;
put 'MQCLOSE: failed with reason = ' reason;
msg = sysmsg();
put msg;
end;
end;
if( hconn ) then do;
call mqdisc(hconn, cc, reason);
SAS® Integration Technologies: Developer's Guide
WebSphere MQ Coding Examples 451
if( cc ) then do;
put 'MQDISC: failed with reason = ' reason;
msg = sysmsg();
put msg;
end;
end;
if hod ^= 0 then do;
call mqfree(hod);
put 'Object descriptor handle freed';
end;
if hpmo ^= 0 then do;
call mqfree(hpmo);
put 'Put message options handle freed';
end;
if hmd ^= 0 then do;
call mqfree(hmd);
put 'Message descriptor handle freed';
end;
if hmap ^= 0 then do;
call mqfree(hmap);
put 'Map descriptor handle freed';
end;
stop;
run;
Getting a Binary File From a Queue
This example get the first binary file on a queue.
filename output 'd:\testdup.exe';
data _null_;
length rc 8;
length msg $ 200;
length cc reason 8;
length hconn hod hgmo hobj hobj2 hmap 8;
length corrid filecorrid $ 48;
length msgbuf stream $ 256;
length len 8;
length seqno 8;
fileid = fopen('output', 'o', 0, 'b');
if( fileid = 0 ) then do;
put 'Error opening output file...';
goto exit;
end;
put '−−−−−−−−−−−−−−−− Connect to QMgr −−−−−−−−−−−−−−';
call mqconn("TESTQMGR", hconn, cc, reason);
if cc ^= 0 then do;
if reason = 2002 then do;
put 'Already connected to QMgr';
end;
else do;
if reason = 2059 then
put 'MQCONN: QMgr not available... needs to be
SAS® Integration Technologies: Developer's Guide
WebSphere MQ Coding Examples 452
started';
else
put 'MQCONN: failed with reason= ' reason;
goto exit;
end;
end;
put '−−−−−−−−−− Generate object descriptor −−−−−−−−−';
call mqod(hod, "GEN", rc, "OBJECTNAME", "TESTQ");
if rc ^= 0 then do;
put 'MQOD: failed with rc= ' rc;
msg = sysmsg();
put msg;
goto exit;
end;
put '−−−−−−−−− Open queue object for input −−−−−−−−−';
call mqopen(hconn, hod, "INPUT_SHARED,BROWSE", hobj, cc,
reason);
if cc ^= 0 then do;
put 'MQOPEN: failed with reason= ' reason;
goto exit;
end;
put '−−−−−−−−− Generate get message options −−−−−−−−';
call mqgmo(hgmo, "GEN", rc, "options", "browse_next");
if rc ^= 0 then do;
put 'MQGMO: failed with rc= ' rc;
msg = sysmsg();
put msg;
goto exit;
end;
put '−−−−−−−−− Generate message descriptor −−−−−−−−−';
call mqmd(hmd, "GEN", rc);
if rc ^= 0 then do;
put 'MQMD: failed with rc= ' rc;
msg = sysmsg();
put msg;
goto exit;
end;
seqno=0;
recv:
call mqget(hconn, hobj, hmd, hgmo, msglen, cc, reason);
if( cc ) then do;
if( reason = 2033 ) then do;
put 'reached end of queue';
goto exit;
end;
else do;
put 'MQGET: failed with reason = ' reason;
msg = sysmsg();
put msg;
goto exit;
SAS® Integration Technologies: Developer's Guide
WebSphere MQ Coding Examples 453
end;
end;
/* inquire about msg properties */
call mqmd(hmd, "INQ", rc, "CORRELID,MSGTYPE",
corrid, msgtype);
if( rc ) then do;
put 'MQMD failed';
msg = sysmsg();
put msg;
goto exit;
end;
/* default for getting next msg on queue */
call mqgmo(hgmo, "SET", rc, "options", "browse_next");
if rc ^= 0 then do;
put 'MQGMO: failed with rc= ' rc;
msg = sysmsg();
put msg;
goto exit;
end;
if( msgtype = 100001 ) then do;
/* file processing... */
outofseq=0;
if( filecorrid = "" ) then do;
/* file begins at this message */
/* write all correlating messages to this file */
filecorrid = substr(corrid,1,20);
put '−−−−−−−−− Generate map descriptor −−−−−−−−−';
/* all file messages were sent to the queue as 256
bytes blank−padded */
call mqmap(hmap, rc, "char,,256");
if( rc ) then do;
put 'MQMAP: failed';
msg = sysmsg();
put msg;
goto exit;
end;
end;
/* make sure message belongs to this file */
if( substr(corrid,1,20) = filecorrid ) then do;
if( seqno ^= input(substr(corrid,21,4), hex4.) )
then do;
/* this message is out of sequence so
search for it */
outofseq=1;
/* open another instance to search for
out−of−seq message */
call mqopen(hconn, hod, "INPUT_SHARED,BROWSE",
hobj2, cc, reason);
if cc ^= 0 then do;
put 'MQOPEN: failed with reason= ' reason;
goto exit;
end;
SAS® Integration Technologies: Developer's Guide
WebSphere MQ Coding Examples 454
corrid = filecorrid;
substr(corrid,21,4) = put(seqno, hex4.);
call mqmd(hmd, "SET", rc, "MSGID,CORRELID",
"", corrid);
if( rc ) then do;
put 'MQMD: failed';
msg = sysmsg();
put msg;
end;
call mqgmo(hgmo, "SET", rc, "OPTIONS",
"BROWSE_FIRST");
if( rc ) then do;
put 'MQGMO: failed';
msg = sysmsg();
put msg;
goto exit;
end;
call mqget(hconn, hobj2, hmd, hgmo, msglen,
cc, reason);
if( cc ) then do;
if( reason = 2033 ) then do;
put 'Error: reached end of queue while
searching for out−of−sequence msg';
goto exit;
end;
else do;
put 'MQGET: failed with reason = ' reason;
msg = sysmsg();
put msg;
goto exit;
end;
end;
end;
/* increment sequence number for
next expected message */
seqno+1;
/* retrieve record from internal buffer */
call mqgetparms(hmap, rc, msgbuf);
if( rc ) then do;
put 'MQGETPARMS: failed';
msg = sysmsg();
put msg;
goto exit;
end;
/* length of this stream is embedded
as 1st byte in msg */
len = input(substr(msgbuf,1,1), pib1.);
stream = substr(msgbuf,2);
put 'write stream to file';
rc = fput(fileid, substr(stream,1,len));
if( rc ) then do;
put 'Error writing to output file buffer...';
goto exit;
end;
SAS® Integration Technologies: Developer's Guide
WebSphere MQ Coding Examples 455
/* flush it to disk */
rc = fwrite(fileid);
if( rc ) then do;
put 'Error writing to output file...';
goto exit;
end;
/* now remove it from the queue... */
call mqgmo(hgmo, "SET", rc, "OPTIONS",
"MSG_UNDER_CURSOR");
if( rc ) then do;
put 'MQGMO: failed';
msg = sysmsg();
put msg;
goto exit;
end;
if( outofseq ) then do;
call mqget(hconn, hobj2, hmd, hgmo, msglen,
cc, reason);
if( cc ) then do;
put 'problems removing message from queue';
msg = sysmsg();
put msg;
goto exit;
end;
/* close queue */
call mqclose(hconn, hobj2, "NONE", cc, reason);
/* re−read previous message */
call mqgmo(hgmo, "SET", rc, "OPTIONS",
"BROWSE_MSG_UNDER_CURSOR");
if( rc ) then do;
put 'MQGMO: failed';
msg = sysmsg();
put msg;
goto exit;
end;
end;
else do;
call mqget(hconn, hobj, hmd, hgmo, msglen,
cc, reason);
if( cc ) then do;
put 'problems removing message from queue';
msg = sysmsg();
put msg;
goto exit;
end;
/* browse next message */
call mqgmo(hgmo, "SET", rc, "OPTIONS",
"BROWSE_NEXT");
if( rc ) then do;
put 'MQGMO: failed';
msg = sysmsg();
put msg;
goto exit;
end;
end;
SAS® Integration Technologies: Developer's Guide
WebSphere MQ Coding Examples 456
end;
end;
/* finish retrieving all messages belonging
to this file */
/* reset message descriptor */
call mqmd(hmd, "SET", rc, "MSGID,CORRELID", "", "");
if( rc ) then do;
put 'MQMD: failed';
msg = sysmsg();
put msg;
goto exit;
end;
goto recv;
exit:
if( hobj ) then do;
call mqclose(hconn, hobj, "NONE", cc, reason);
if( cc ) then do;
put 'MQCLOSE: failed with reason = ' reason;
msg = sysmsg();
put msg;
end;
end;
if( hconn ) then do;
call mqdisc(hconn, cc, reason);
if( cc ) then do;
put 'MQDISC: failed with reason = ' reason;
msg = sysmsg();
put msg;
end;
end;
if( hod ) then
call mqfree(hod);
if( hgmo ) then
call mqfree(hgmo);
if( hmd ) then
call mqfree(hmd);
if( hmap ) then
call mqfree(hmap);
/* close file */
rc = fclose(fileid);
if( rc ) then put 'Error closing output file';
run;
Macro Language Coding Examples
This section shows examples of using the SAS Macro Language to make calls to the MQSeries Interface.
%macro putmsg;
%let hconn=0;
%let hobj=0;
%let hod=0;
%let hpmo=0;
SAS® Integration Technologies: Developer's Guide
WebSphere MQ Coding Examples 457
%let hmd=0;
%let hmap=0;
%let hdata=0;
%put −−−−−−−−−−−−−−−− Connect to QMgr −−−−−−−−−−−−−−;
%let qmgr=TEST;
%let cc=0;
%let reason=0;
%syscall mqconn(qmgr, hconn, cc, reason);
%if &cc ^= 0 %then %do;
%if &reason = 2002 %then %do;
%put Already connected to QMgr &qmgr;
%end;
%else %do;
%if &reason = 2059 %then
%put MQCONN: QMgr not available...
needs to be started;
%else
%put MQCONN: failed with reason= &reason;
%goto exit;
%end;
%end;
%put −−−−−−−−−− Generate object descriptor −−−−−−−−−;
%let action=GEN;
%let rc=0;
%let parms=OBJECTNAME;
%let objname=TEST;
%syscall mqod(hod, action, rc, parms, objname);
%if &rc ^= 0 %then %do;
%put MQOD: failed with rc= &rc;
%put %sysfunc(sysmsg());
%goto exit;
%end;
%else %put MQOD: successfully generated
object descriptor;
%put −−−−−−−− Open queue object for output −−−−−−−−−;
%let options=OUTPUT;
%syscall mqopen(hconn, hod, options, hobj, cc, reason);
%if &cc ^= 0 %then %do;
%put MQOPEN: failed with Reason= &reason;
%goto exit;
%end;
%else %put MQOPEN: successfully opened queue for output;
%put −−−−−−−−− Generate put message options −−−−−−−−;
%syscall mqpmo(hpmo, action, rc);
%if &rc ^= 0 %then %do;
%put MQPMO: failed with rc= &rc;
%put %sysfunc(sysmsg());
%goto exit;
%end;
%else %put MQPMO: successfully generated put
message options;
%put −−−−−−−−− Generate message descriptor −−−−−−−−−;
%let parms=PERSISTENCE;
SAS® Integration Technologies: Developer's Guide
WebSphere MQ Coding Examples 458
%let persist=PERSISTENT;
%syscall mqmd(hmd, action, rc, parms, persist);
%if &rc ^= 0 %then %do;
%put MQMD: failed with rc= &rc;
%put %sysfunc(sysmsg());
%goto exit;
%end;
%else %put MQMD: successfully generated
message descriptor;
%put −−−−−−−−−−− Generate map descriptor −−−−−−−−−−−;
/* data will not be aligned */
%let desc1=SHORT;
%let desc2=LONG;
%let desc3=DOUBLE;
%let desc4=CHAR,,50;
%syscall mqmap(hmap, rc, desc1, desc2, desc3, desc4);
%if &rc ^= 0 %then %do;
%put MQMAP: failed with rc= &rc;
%put %sysfunc(sysmsg());
%goto exit;
%end;
%else %put MQMAP: successfully generated map descriptor;
%put −−− Generate data descriptor − actual data −−−−;
%let parm1=100;
%let parm2=9999;
%let parm3=9999.999;
%let parm4=This is a test.;
%syscall mqsetparms(hdata, hmap, rc, parm1,
parm2, parm3, parm4);
%if &rc ^= 0 %then %do;
%put MQSETPARMS: failed with rc= &rc;
%put %sysfunc(sysmsg());
%goto exit;
%end;
%else %put MQSETPARMS: successfully generated
data descriptor;
%put −−−−−−−−−−−−− Put message on queue −−−−−−−−−−−−;
%syscall mqput(hconn, hobj, hmd, hpmo,
hdata, cc, reason);
%if &cc ^= 0 %then %do;
%put MQPUT: failed with reason= &reason;
%goto exit;
%end;
%else %do;
%put MQPUT: successfully put message on queue;
/* inquire about message descriptor
output parameters */
%let action=INQ;
%let parms=MSGID,PUTAPPLTYPE,PUTAPPLNAME,
PUTDATE,PUTTIME;
/* initialize msgid for return length of 48 */
%let msgid=" ";
%let appltype=0;
/* initialize applname for return length of 28 */
SAS® Integration Technologies: Developer's Guide
WebSphere MQ Coding Examples 459
%let applname=" ";
/* initialize data, time for return length of 8 */
%let date=" ";
%let time=" ";
%syscall mqmd(hmd, action, rc, parms, msgid,
appltype, applname, date, time);
%if &rc ^= 0 %then %do;
%put MQMD: failed with rc= &rc;
%put %sysfunc(sysmsg());
%end;
%else %do;
%put Message descriptor output parameters are:;
%put MSGID= &msgid;
%put PUTAPPLTYPE= &appltype;
%put PUTAPPLNAME= &applname;
%put PUTDATE= &date;
%put PUTTIME= &time;
%end;
%end;
%exit:
%if &hobj ^= 0 %then %do;
%put −−−−−−−−−−−−−−−−−− Close queue −−−−−−−−−−−−−−−−;
%let options=NONE;
%syscall mqclose(hconn, hobj, options, cc, reason);
%if &cc ^= 0 %then %do;
%put MQCLOSE: failed with reason= &reason;
%end;
%else %put MQCLOSE: successfully closed queue;
%end;
%if &hconn ^= 0 %then %do;
%put −−−−−−−−−−−−− Disconnect from QMgr −−−−−−−−−−−−;
%syscall mqdisc(hconn, cc, reason);
%if &cc ^= 0 %then %do;
%put MQDISC: failed with reason= &reason;
%end;
%else %put MQDISC: successfully disconnected
from QMgr;
%end;
%if &hod ^= 0 %then %do;
%syscall mqfree(hod);
%put Object descriptor handle freed;
%end;
%if &hpmo ^= 0 %then %do;
%syscall mqfree(hpmo);
%put Put message options handle freed;
%end;
%if &hmd ^= 0 %then %do;
%syscall mqfree(hmd);
%put Message descriptor handle freed;
%end;
%if &hmap ^= 0 %then %do;
%syscall mqfree(hmap);
%put Map descriptor handle freed;
%end;
SAS® Integration Technologies: Developer's Guide
WebSphere MQ Coding Examples 460
%if &hdata ^= 0 %then %do;
%syscall mqfree(hdata);
%put Data descriptor handle freed;
%end;
%mend putmsg;
/** invoke macro to Put a message on a queue **/
%putmsg;
%macro getmsg;
%let hconn=0;
%let hobj=0;
%let hod=0;
%let hgmo=0;
%let hmd=0;
%let hmap=0;
%put −−−−−−−−−−−−−−−− Connect to QMgr −−−−−−−−−−−−−−;
%let qmgr=TEST;
%let cc=0;
%let reason=0;
%syscall mqconn(qmgr, hconn, cc, reason);
%if &cc ^= 0 %then %do;
%if &reason = 2002 %then %do;
%put Already connected to QMgr &qmgr;
%end;
%else %do;
%if &reason = 2059 %then
%put MQCONN: QMgr not available...
needs to be started;
%else
%put MQCONN: failed with reason= &reason;
%goto exit;
%end;
%end;
%else %put MQCONN: successfully connected
to QMgr &qmgr;
%put −−−−−−−−−− Generate object descriptor −−−−−−−−−;
%let rc=0;
%let action=GEN;
%let parms=OBJECTNAME;
%let objname=TEST;
%syscall mqod(hod, action, rc, parms, objname);
%if &rc ^= 0 %then %do;
%put MQOD: failed with rc= &rc;
%put %sysfunc(sysmsg());
%goto exit;
%end;
%else %put MQOD: successfully generated
object descriptor;
%put −−−−−−−−− Open queue object for input −−−−−−−−−;
%let options=INPUT_SHARED;
%syscall mqopen(hconn, hod, options, hobj, cc, reason);
%if &cc ^= 0 %then %do;
%put MQOPEN: failed with reason= &reason;
SAS® Integration Technologies: Developer's Guide
WebSphere MQ Coding Examples 461
%goto exit;
%end;
%else %put MQOPEN: successfully opened queue for output;
%put −−−−−−−−− Generate get message options −−−−−−−−;
%syscall mqgmo(hgmo, action, rc);
%if &rc ^= 0 %then %do;
%put MQGMO: failed with rc= &rc;
%put %sysfunc(sysmsg());
%goto exit;
%end;
%else %put MQGMO: successfully generated get
message options;
%put −−−−−−−−− Generate message descriptor −−−−−−−−−;
%syscall mqmd(hmd, action, rc);
%if &rc ^= 0 %then %do;
%put MQMD: failed with rc= &rc;
%put %sysfunc(sysmsg());
%goto exit;
%end;
%else %put MQMD: successfully generated
message descriptor;
%put −−−−−−−−−−− Generate map descriptor −−−−−−−−−−−;
%let desc1=SHORT;
%let desc2=LONG;
%let desc3=DOUBLE;
%let desc4=CHAR,,50;
%syscall mqmap(hmap, rc, desc1, desc2, desc3, desc4);
%if &rc ^= 0 %then %do;
%put MQMAP: failed with rc= &rc;
%put %sysfunc(sysmsg());
%goto exit;
%end;
%else %put MQMAP: successfully generated map descriptor;
%put −−−−−−−−−−−− Get message from queue −−−−−−−−−−−;
%let msglen=0;
%syscall mqget(hconn, hobj, hmd, hgmo, msglen, cc,
reason);
%if &cc ^= 0 %then %do;
%if &reason = 2033 %then %put No message
available;
%else %put MQGET: failed with reason= &reason;
%goto exit;
%end;
%else %do;
%put MQGET: successfully retrieved message from queue;
%put message length= &msglen;
/* inquire about message descriptor
output parameters */
%let action=INQ;
%let parms=REPORT,MSGTYPE,FEEDBACK,MSGID,CORRELID,
USERIDENTIFIER,PUTAPPLTYPE,PUTAPPLNAME,PUTDATE,
PUTTIME;
SAS® Integration Technologies: Developer's Guide
WebSphere MQ Coding Examples 462
/* initialize report for return length of 30 */
%let report=" ";
%let msgtype=0;
%let feedback=0;
/* initialize msgid, correlid for
return length of 48 */
%let msgid=" ";
%let correlid=" ";
/* initialize userid for return length of 12 */
%let userid=" ";
%let appltype=0;
/* initialize applname for return length of 28 */
%let applname=" ";
/* initiailze data, time for return length of 8 */
%let date=" ";
%let time=" ";
%syscall mqmd(hmd, action, rc, parms, report,
msgtype, feedback, msgid, correlid, userid,
appltype, applname, date, time);
%if &rc ^= 0 %then %do;
%put MQMD: failed with rc &rc;
%put %sysfunc(sysmsg());
%end;
%else %do;
%put Message descriptor output parameters are:;
%put REPORT= &report;
%put MSGTYPE= &msgtype;
%put FEEDBACK= &feedback;
%put MSGID= &msgid;
%put CORRELID= &correlid;
%put USERIDENTIFIER= &userid;
%put PUTAPPLTYPE= &appltype;
%put PUTAPPLNAME= &applname;
%put PUTDATE= &date;
%put PUTTIME= &time;
%end;
%end;
%if &msglen > 0 %then %do;
/* retrieve SAS variables from GET buffer */
%let parm1=0;
%let parm2=0;
%let parm3=0;
/* initialize character return value length of 50 */
%let parm4=" ";
%syscall mqgetparms(hmap, rc, parm1,
parm2, parm3, parm4);
%put Display SAS macro variables:;
%put parm1= &parm1;
%put parm2= &parm2;
%put parm3= &parm3;
%put parm4= &parm4;
%if &rc ^= 0 %then %do;
%put MQGETPARMS: failed with rc= &rc;
%put %sysfunc(sysmsg());
%end;
%end;
%else %put No data associated with message;
SAS® Integration Technologies: Developer's Guide
WebSphere MQ Coding Examples 463
%exit:
%if &hobj ^= 0 %then %do;
%put −−−−−−−−−−−−−−−−−− Close queue −−−−−−−−−−−−−−−−;
%let options=NONE;
%syscall mqclose(hconn, hobj, options, cc, reason);
%if &cc ^= 0 %then %do;
%put MQCLOSE: failed with reason= &reason;
%end;
%else %put MQCLOSE: successfully closed queue;
%end;
%if &hconn ^= 0 %then %do;
%put −−−−−−−−−−−−− Disconnect from QMgr −−−−−−−−−−−−;
%syscall mqdisc(hconn, cc, reason);
%if &cc ^= 0 %then %do;
%put MQDISC: failed with reason= &reason;
%end;
%else %put MQDISC: successfully
disconnected from QMgr;
%end;
%if &hod ^= 0 %then %do;
%syscall mqfree(hod);
%put Object descriptor handle freed;
%end;
%if &hgmo ^= 0 %then %do;
%syscall mqfree(hgmo);
%put Get message options handle freed;
%end;
%if &hmd ^= 0 %then %do;
%syscall mqfree(hmd);
%put Message descriptor handle freed;
%end;
%if &hmap ^= 0 %then %do;
%syscall mqfree(hmap);
%put Map descriptor handle freed;
%end;
%mend getmsg;
/** invoke macro to Get a message from a queue **/
%getmsg;
Application Messaging
SAS® Integration Technologies: Developer's Guide
WebSphere MQ Coding Examples 464
WebSphere MQ CALL Routines
The SAS programming interface to MQSeries was designed to be as similar to WebSphere MQI as possible. Where
WebSphere MQI requires a structure, the SAS programming interface requires a handle that represents a data
structure. A link to each supported SAS CALL routine appears on the left.
Application Messaging
WebSphere MQ CALL Routines 465
WebSphere MQ CALL Routines
WebSphere MQ CALL Routines 466

MQCONN
Connects Base SAS to a WebSphere MQ queue manager.
Syntax
CALL MQCONN(name, hConn, compCode, reason);
name Character48, input
Specifies a case−sensitive identifier (name) of the queue manager that has previously been configured by the
system administrator.
hConn Numeric, output
Returns the WebSphere MQ connection handle. This parameter is used by other CALL routines to identify the
connection created by MQCONN.
compCode
Numeric, output
Returns the WebSphere MQ completion code. This parameter can be used to determine if an error occurred
during the execution of this routine. If an error occurred, the compCode parameter will be non−zero, and the
reason parameter will be set to the appropriate reason code.
reason Numeric, output
Returns the WebSphere MQ reason code that qualifies compCode.
Note: A reason code of −1 reflects a SAS internal error, not a WebSphere MQ error. To obtain a textual
description of a failure (either Base SAS or WebSphere MQ), use the SYSMSG() Base SAS function call.
Example
The following example connects the Base SAS session to the queue manager named TEST.
hConn=0;
Name="TEST";
compCode=0;
reason=0;
CALL MQCONN(Name, hConn, compCode, reason);
MQCONN 467

MQDISC
Breaks the connection between a WebSphere MQ queue manager and Base SAS.
Syntax
CALL MQDISC(hConn, compCode, reason);
hConn Numeric, input
Specifies the WebSphere MQ connection handle (obtained from a previous MQCONN function call).
compCode
Numeric, output
Returns the WebSphere MQ completion code. This parameter can be used to determine if an error occurred
during the execution of this routine. If an error occurred, compCode will be non−zero, and the reason
parameter will be set to the appropriate reason code.
reason Numeric, output
Returns the WebSphere MQ reason code that qualifies compCode.
Note: A reason code of −1 reflects a Base SAS internal error, not a WebSphere MQ error. To obtain a textual
description of a failure (either Base SAS or WebSphere MQ), use the SYSMSG() Base SAS function call.
Example
The following example disconnects the Base SAS session from a queue manager identified by the parameter hConn.
compCode=0;
reason=0;
CALL MQDISC(hConn, compCode, reason);
MQDISC 468
MQOPEN
Establishes access to a WebSphere MQ object (queue, process definition, or queue manager).
Syntax
CALL MQOPEN(hConn, hod, options, hObj, compCode, reason <, compCode1, reason1, compCode2, reason2, ...>);
hConn Numeric, input
Specifies the WebSphere MQ connection handle (obtained from a previous MQCONN function call).
hod Numeric, input
Specifies the Base SAS internal object descriptor handle obtained from a previous MQOD function call.
options Character, input
Specifies a String of open options each separated by a comma. The following open options are valid:
INPUT_AS_Q_DEF
Open to get messages using queue−defined default.
INPUT_SHARED
Open to get messages with shared access.
INPUT_EXCLUSIVE
Open to get messages with exclusive access.
BROWSE
Open to browse messages.
OUTPUT
Open to put messages.
INQUIRE
Open to query object attributes.
SET
Open to set object attributes.
SAVE_ALL_CONTEXT
Save context when message is received.
PASS_IDENTITY_CONTEXT
Allow identity context to be passed.
PASS_ALL_CONTEXT
Allow all context to be passed.
SET_IDENTITY_CONTEXT
Allow identity context to be set.
SET_ALL_CONTEXT
Allow all context to be set.
ALTERNATE_USER_AUTHORITY
Validate with specified user identifier.
FAIL_IF_QUIESCING
Fail if QMgr is quiescing.
hObj Numeric, output
Returns the WebSphere MQ handle that will be used in subsequent message queuing calls to identify the
object being accessed (a queue, a process definition, or queue manager).
MQOPEN 469

compCode
Numeric, output
Returns the WebSphere MQ completion code. This parameter can be used to determine if an error occurred
during the execution of this routine. If an error occurred, the compCode parameter will be non−zero, and the
reason parameter will be set to the appropriate reason code.
reason Numeric, output
Returns the WebSphere MQ reason code that qualifies compCode.
Note: A reason code of −1 reflects a Base SAS internal error, not a WebSphere MQ error. To obtain a textual
description of a failure (either Base SAS or WebSphere MQ), use the SYSMSG() Base SAS function call.
compCodex, reasonx
Numeric, output
The compCodex and reasonx are an optional series of paired values that can be used when opening a
distribution list in order to discern failures for specific queues within the distribution list. These parameters
support features of WebSphere MQ Version 5.1 and later.
Example
This example opens a queue for input and output.
options="INPUT_SHARED,OUTPUT";
hObj=0;
compCode=0;
reason=0;
CALL MQOPEN(hConn, hod, options, hObj,
compCode, reason);
SAS® Integration Technologies: Developer's Guide
MQOPEN 470

MQCLOSE
Relinquishes access to a WebSphere MQ object (queue, process definition, queue manager).
Syntax
CALL MQCLOSE(hConn, hObj, options, compCode, reason);
hConn Numeric, input
Specifies the WebSphere MQ connection handle (obtained from a previous MQCONN function call).
hObj Numeric, input
The hObj Specifies the WebSphere MQ handle to an open object that was obtained from a previous
MQOPEN call.
options Character, input
Specifies a string of options each separated by a comma. The following close options are valid:
NONE
No optional close processing required.
DELETE
Delete the permanent dynamic queue if no messages exist and no uncommitted get or put request is
outstanding.
DELETE_PURGE
Delete and purge any messages on the permanent dynamic queue if no uncommitted get or put request
is outstanding.
compCode
Numeric, output
Returns the WebSphere MQ completion code. This parameter can be used to determine if an error occurred
during the execution of this routine. If an error occurred, the compCode parameter will be non−zero, and the
reason parameter will be set to the appropriate reason code.
reason Numeric, output
Returns the WebSphere MQ reason code that qualifies the completion code.
Note: A reason code of −1 reflects a Base SAS internal error, not an WebSphere MQ error. To obtain a
textual description of a failure (either Base SAS or WebSphere MQ), use the SYSMSG() Base SAS function
call.
Example
This example closes a queue.
options="NONE";
compCode=0;
reason=0;
CALL MQCLOSE(hConn, hObj, options, compCode, reason);
MQCLOSE 471
MQPUT
Puts a message on a WebSphere MQ queue that has been previously opened.
Syntax
CALL MQPUT(hConn, hObj, hmd, hpmo, hData, compCode, reason <, compCode1, reason1, compCode2, reason2,
...>);
hConn Numeric, input
Specifies the WebSphere MQ Connection handle obtained from a previous MQCONN function call.
hObj Numeric, input
Specifies the WebSphere MQ handle to an open object that was obtained from a previous MQOPEN call.
hmd Numeric, input
Specifies the Base SAS internal message descriptor handle obtained from a previous MQMD function call.
hpmo Numeric, input
Specifies the Base SAS internal put message options handle obtained from a previous MQPMO function call.
hData Numeric, input
Specifies the Base SAS internal data descriptor handle obtained from a previous MQSETPARMS function
call. If set to zero, it is assumed that no data will accompany this message.
For WebSphere MQ Version 5.1 and later, hData can also represent a reference message header obtained
from a previous MQRMH function call.
compCode
Numeric, output
Returns the WebSphere MQ completion code. This parameter can be used to determine if an error occurred
during the execution of this routine. If an error occurred, the compCode parameter will be non−zero, and the
reason parameter will be set to the appropriate reason code.
reason Numeric, output
Returns the WebSphere MQ reason code that qualifies compCode.
Note: A reason code of −1 reflects a Base SAS internal error, not a WebSphere MQ error. To obtain a textual
description of a failure (either Base SAS or WebSphere MQ), use the SYSMSG() Base SAS function call.
compCodex, reasonx
Numeric, output
The compCodex and reasonx are an optional series of paired values that can be used when opening a
distribution list in order to discern failures for specific queues within the distribution list. These parameters
support features of WebSphere MQ Version 5.1 and later.
Example
This example sends a message to a queue.
MQPUT 472

compCode=0;
reason=0;
CALL MQPUT(hConn, hObj, hmd, hpmo, hData,
compCode, reason);
SAS® Integration Technologies: Developer's Guide
MQPUT 473
MQPUT1
Sends a single message, often a reply, to a queue.
Syntax
CALL MQPUT1(hConn, hod, hmd, hpmo, hData, compCode, reason <, compCode1, reason2, compCode2, reason2,
...>);
hConn Numeric, input
Specifies the WebSphere MQ connection handle (obtained from a previous MQCONN function call).
hod Numeric, input
Specifies the Base SAS internal object descriptor handle obtained from a previous MQOD function call.
hmd Numeric, input
Specifies the Base SAS internal message descriptor handle obtained from a previous MQMD function call.
hpmo Numeric, input
Specifies the Base SAS internal put message options handle obtained from a previous MQPMO function call.
hData Numeric, input
Specifies the Base SAS internal data descriptor handle obtained from a previous MQSETPARMS function
call. If set to zero, it is assumed that no data will accompany this message.
For WebSphere MQ Version 5.1 and later, hData can also represent a reference message header obtained
from a previous MQRMH function call.
compCode
Numeric, output
Returns the WebSphere MQ completion code. This parameter can be used to determine if an error occurred
during the execution of this routine. If an error occurred, the compCode parameter will be non−zero, and the
reason parameter will be set to the appropriate reason code.
reason Numeric, output
Returns the WebSphere MQ reason code that qualifies the completion code.
Note: A reason code of −1 reflects a Base SAS internal error, not a WebSphere MQ error. To obtain a textual
description of a failure (either Base SAS or WebSphere MQ), use the SYSMSG() Base SAS function call.
compCodex, reasonx
Numeric, output
The compCodex and reasonx are an optional series of paired values that can be used when opening a
distribution list in order to discern failures for specific queues within the distribution list. These parameters
support features of WebSphere MQ Version 5.1 and later.
Details
Essentially, the MQPUT1 routine performs an MQOPEN, MQPUT and MQCLOSE in one API call. Note that the
queue does not have to be open prior to making this call. Also note that the queue will be closed during the execution
MQPUT1 474

of this call.
Example
This example sends a message to a queue that might not already be opened.
compCode=0;
reason=0;
CALL MQPUT1(hConn, hod, hmd, hpmo, hData,
compCode, reason);
SAS® Integration Technologies: Developer's Guide
MQPUT1 475
MQGET
Retrieves a message from a local WebSphere MQ queue that has been previously opened.
Syntax
CALL MQGET(hConn, hObj, hmd, hgmo, msglen, compCode, reason);
hConn Numeric, input
Specifies the WebSphere MQ connection handle (obtained from a previous MQCONN function call).
hObj Numeric, input
Specifies the WebSphere MQ handle to an open object that was obtained from a previous MQOPEN call.
hmd Numeric, input
Specifies the Base SAS internal message descriptor handle obtained from a previous MQMD function call.
hgmo Numeric, input
Specifies the Base SAS internal get message options handle obtained from a previous MQGMO function call.
msglen Numeric, output
Returns the length of the received message. A length of zero signifies a message with no data, in which case
there will be no need to call MQGETPARMS.
compCode
Numeric, output
Returns the WebSphere MQ completion code. This parameter can be used to determine if an error occurred
during the execution of this routine. If an error occurred, the compCode parameter will be non−zero, and the
reason parameter will be set to the appropriate reason code.
reason Numeric, output
Returns the WebSphere MQ reason code that qualifies the completion code.
Note: A reason code of −1 reflects a Base SAS internal error, not a WebSphere MQ error. To obtain a textual
description of a failure (either Base SAS or WebSphere MQ), use the SYSMSG() Base SAS function call.
Details
If data accompanies the message, it is retrieved into an internal Base SAS buffer. After the MQGET call completes,
you should call MQGETPARMS to set Base SAS variables (parms) to that data or to retrieve the data into a physical
binary or text file.
Example
This example gets a message from a queue.
msglen=0;
compCode=0;
reason=0;
MQGET 476

CALL MQGET(hConn, hObj, hmd, hgmo, msglen,
compCode, reason);
SAS® Integration Technologies: Developer's Guide
MQGET 477

MQCMIT
Commits all WebSphere MQ message puts and gets since the last syncpoint.
Syntax
CALL MQCMIT(hConn, compCode, reason);
hConn Numeric, input
Specifies the WebSphere MQ connection handle (obtained from a previous MQCONN function call).
compCode
Numeric, output
Returns the WebSphere MQ completion code. This parameter can be used to determine if an error occurred
during the execution of this routine. If an error occurred, the compCode parameter will be non−zero, and the
reason parameter will be set to the appropriate reason code.
reason Numeric, output
Returns the WebSphere MQ reason code that qualifies the completion code.
Note: A reason code of −1 reflects a Base SAS internal error, not a WebSphere MQ error. To obtain a textual
description of a failure (either Base SAS or WebSphere MQ), use the SYSMSG() Base SAS function call.
Example
This example commits a unit of work.
compCode=0;
reason=0;
CALL MQCMIT(hConn, compCode, reason);
MQCMIT 478

MQBACK
Backs out all WebSphere MQ message puts and gets since the last syncpoint.
Syntax
CALL MQBACK(hConn, compCode, reason);
hConn Numeric, input
Specifies the WebSphere MQ connection handle (obtained from a previous MQCONN function call).
compCode
Numeric, output
Returns the WebSphere MQ completion code. This parameter can be used to determine if an error occurred
during the execution of this routine. If an error occurred, the compCode parameter will be non−zero, and the
reason parameter will be set to the appropriate reason code.
reason Numeric, output
Returns the WebSphere MQ reason code that qualifies the completion code.
Note: A reason code of −1 reflects a Base SAS internal error, not a WebSphere MQ error. To obtain a textual
description of a failure (either Base SAS or WebSphere MQ), use the SYSMSG() Base SAS function call.
Example
This example reverts the messages in a queue back to the last synchronization point.
compCode=0;
reason=0;
CALL MQBACK(hConn, compCode, reason);
MQBACK 479
MQINQ
Queries the attributes of a WebSphere MQ object (queue, process definition, queue manager).
Syntax
CALL MQINQ(hConn, hObj, compCode, reason, parms, value1 <,value2, ...>);
hConn Numeric, input
Specifies the WebSphere MQ connection handle (obtained from a previous MQCONN function call).
hObj Numeric, input
Specifies the WebSphere MQ Object handle obtained from a previous MQOPEN function call that specified
the INQUIRE option. This handle can represent a queue, process definition, or queue manager object.
compCode
Numeric, output
Returns the WebSphere MQ completion code. This parameter can be used to determine if an error occurred
during the execution of this routine. If an error occurred, the compCode parameter will be non−zero, and the
reason parameter will be set to the appropriate reason code.
reason Numeric, output
Returns the WebSphere MQ reason code that qualifies the completion code.
Note: A reason code of −1 reflects a Base SAS internal error, not a WebSphere MQ error. To obtain a textual
description of a failure (either Base SAS or WebSphere MQ), use the SYSMSG() Base SAS function call.
parms Character, input
Specifies a string of attributes that you want to query from the WebSphere MQ object. Each object attribute is
separated by a comma. The value associated with each attribute is returned in a value parameter.
Not all attributes are valid for each type of object (queue, process definition, or queue manager). Valid object
types are listed under each attribute.
value Numeric/character, output
Returns the value for an attribute specified in the parms string. You must provide a value parameter for each
attribute specified parms string. Variables used to store character values should be initialized appropriately to
guarantee that truncation of a returned value does not occur.
The following attributes, objects, and value types are valid:
Numeric Output Types:
APPL_TYPE
(Process Definition)
Application type
CODED_CHAR_SET_ID
(Queue Manager)
Coded character set identifier
CURRENT_Q_DEPTH
MQINQ 480
(Queue)
Number of messages on queue
DEF_INPUT_OPEN_OPTION
(Queue)
Default open−for−input option
DEF_PERSISTENCE
(Queue)
Default message persistence
DEF_PRIORITY
(Queue)
Default message priority
DEFINITION_TYPE
(Queue)
Queue definition type
HARDEN_GET_BACKOUT
(Queue)
Whether to harden backout count
INHIBIT_GET
(Queue)
Whether get operations are allowed
INHIBIT_PUT
(Queue)
Whether put operations are allowed
MAX_HANDLES
(Queue Manager)
Maximum number of handles
USAGE
(Queue)
Usage
MAX_MSG_LENGTH
(Queue Manager and Queue)
Maximum message length
MAX_PRIORITY
(Queue Manager)
Maximum priority
MAX_Q_DEPTH
(Queue)
Maximum number of messages allowed on queue
MSG_DELIVERY_SEQUENCE
(Queue)
Whether message priority is relevant
OPEN_INPUT_COUNT
(Queue)
Number of MQOPEN calls that have the queue open for input
OPEN_OUTPUT_COUNT
(Queue)
Number of MQOPEN calls that have the queue open for output
Q_TYPE
(Queue)
Queue type
RETENTION_INTERVAL
SAS® Integration Technologies: Developer's Guide
MQINQ 481
(Queue)
Queue retention interval
BACKOUT_THRESHOLD
(Queue)
Backout threshold
SHAREABILITY
(Queue)
Whether queue can be shared
TRIGGER_CONTROL
(Queue)
Trigger control
TRIGGER_INTERVAL
(Queue Manager)
Trigger interval
TRIGGER_MSG_PRIORITY
(Queue)
Threshold message priority for triggers
TRIGGER_TYPE
(Queue)
Trigger type
TRIGGER_DEPTH
(Queue)
Trigger depth
SYNCPOINT
(Queue Manager)
Syncpoint availability
COMMAND_LEVEL
(Queue Manager)
Command level supported by queue manager
PLATFORM
(Queue Manager)
Platform on which the queue manager resides
MAX_UNCOMMITTED_MSGS
(Queue Manager)
Maximum number of uncommitted messages within a unit of work
Q_DEPTH_HIGH_LIMIT
(Queue)
High limit for queue depth
Q_DEPTH_LOW_LIMIT
(Queue)
Low limit for queue depth
Q_DEPTH_MAX_EVENT
(Queue)
Control attribute for queue depth max events
Q_DEPTH_HIGH_EVENT
(Queue)
Control attribute for queue depth high events
Q_DEPTH_LOW_EVENT
(Queue)
Control attribute for queue depth low events
SCOPE
SAS® Integration Technologies: Developer's Guide
MQINQ 482
(Queue)
Queue definition scope
Q_SERVICE_INTERVAL_EVENT
(Queue)
Control for queue service interval events
AUTHORITY_EVENT
(Queue Manager)
Control attribute for authority events
INHIBIT_EVENT
(Queue Manager)
Control attribute for inhibit events
LOCAL_EVENT
(Queue Manager)
Control attribute for local events
REMOTE_EVENT
(Queue Manager)
Control attribute for remote events
START_STOP_EVENT
(Queue Manager)
Control attribute for start stop events
PERFORMANCE_EVENT
(Queue Manager)
Control attribute for performance events
Q_SERVICE_INTERVAL
(Queue)
Limit for queue service interval
Character8 Output Types:
CREATION_TIME
(Queue)
Queue creation time
Character12 Output Types:
CREATION_DATE
(Queue)
Queue creation date
Character48 Output Types:
BASE_Q_NAME
(Queue)
Name of queue to which alias resolves
COMMAND_INPUT_Q_NAME
(Queue Manager)
System command input queue name
DEAD_LETTER_Q_NAME
(Queue Manager)
Dead letter queue name
INITIATION_Q_NAME
(Queue)
Initiation queue name
PROCESS_DESC
SAS® Integration Technologies: Developer's Guide
MQINQ 483
(Process Definition)
Description of process definition
PROCESS_NAME
(Process Definition and Queue)
Name of process definition
Q_MGR_NAME
(Queue Manager)
Queue manager name
Q_NAME
(Queue)
Queue name
REMOTE_Q_MGR_NAME
(Queue)
Name of remote queue manager
REMOTE_Q_NAME
(Queue)
Name of remote queue as known on remote queue manager
BACKOUT_REQ_Q_NAME
(Queue)
Excessive backout requeue name
XMIT_Q_NAME
(Queue)
Default transmission queue name
Character64 Output Types:
Q_DESC
(Queue)
Queue description
Q_MGR_DESC
(Queue Manager)
Queue manager description
TRIGGER_DATA
(Queue)
Trigger data
Character128 Output Types:
ENV_DATA
(Process Definition)
Environment data
USER_DATA
(Process Definition)
User data
Character256 Output Types:
APPL_ID
(Process Definition)
Application identifier
SAS® Integration Technologies: Developer's Guide
MQINQ 484

Example
This example queries about a queue's maximum depth and the maximum message length.
length parms $ 30;
compCode=0;
reason=0;
parms="MAX_Q_DEPTH,MAX_MSG_LENGTH";
CALL MQINQ(hConn, hObj, compCode,
reason, parms, maxdepth, maxmsgl);
SAS® Integration Technologies: Developer's Guide
MQINQ 485

MQSET
Changes the attributes of a queue object.
Syntax
CALL MQSET(hConn, hObj, compCode, reason, parms, value1 <,value2, ...>);
hConn Numeric, input
Specifies the WebSphere MQ connection handle (obtained from a previous MQCONN function call).
hObj Numeric, input
Specifies the WebSphere MQ object handle obtained from a previous MQOPEN function call that specified
the SET option. This handle represents a queue object.
compCode
Numeric, output
Returns the WebSphere MQ completion code. This parameter can be used to determine if an error occurred
during the execution of this routine. If an error occurred, the compCode parameter will be non−zero, and the
reason parameter will be set to the appropriate reason code.
reason Numeric, output
Returns the WebSphere MQ reason code that qualifies the completion code.
Note: A reason code of −1 reflects a Base SAS internal error, not a WebSphere MQ error. To obtain a textual
description of a failure (either Base SAS or WebSphere MQ), use the SYSMSG() Base SAS function call.
parms Character, input
Specifies a string of queue attributes that you want to set for a WebSphere MQ queue. Each queue attribute
must be separated by a comma and must have a value associated with it. Only certain attributes (a subset of
list for MQINQ) can be changed using this function call. Refer to the IBM WebSphere MQ documentation for
more details.
value Numeric/character, input
Provides the value for an attribute specified in the parms string. You must provide a value parameter for each
attribute specified in the parms string and the data type must be of the proper type.
Example
This example changes the queue properties by inhibiting messages to be sent (put) to the queue.
length parms $ 30;
compCode=0;
reason=0;
parms="INHIBIT_PUT";
inhibit=1;
CALL MQSET(hConn, hObj, compCode,
reason, parms, inhibit);
MQSET 486
MQPMO
Manipulates WebSphere MQ put message options to be used on a subsequent MQPUT call.
Syntax
CALL MQPMO(hpmo, action, rc <,parms ,value1, value2, ...>);
hpmo Numeric, input/output
On input, it specifies the Base SAS internal put message options handle. The handle should be supplied when
you are setting or querying an option. The handle is generated as output when action is to generate default
WebSphere MQ put options.
action Character, input
Specifies the desired action of this routine. The following action values are valid:
GEN
Generate a handle representing default put message options as defined by WebSphere MQ.
SET
After a put message options handle has been generated, you can continue to set values as necessary.
INQ
After a put message options handle has been generated, you can query its values.
rc Numeric, output
Provides the Base SAS return code from this function. If an error occurred, the return code will be non−zero.
The Base SAS function SYSMSG() can be used to obtain a textual description of the return code.
parms Character, input
Specifies an optional string of put message options that you want to set for subsequent MQPUT calls. Each
option must be separated by a comma and must have a value associated with it in the function's parameter list.
value Numeric/Character, input/output
Provides the value for an option specified in the parms string. You must provide a value parameter for each
option specified in the parms string and the data type must be of the proper type. Variables used to store
character values being returned in an inquiry (INQ action) should be initialized appropriately to guarantee that
truncation of a returned value does not occur.
The following put message options (parms) are valid:
CONTEXT
Numeric, input
Object handle of input queue.
RESOLVEDQNAME
Character48, output
Resolved name of destination queue.
RESOLVEDQMGRNAME
Character48, output
Resolved name of destination queue manager.
OPTIONS
MQPMO 487
Character, input
Character string of the attributes (options) to associate with subsequent MQPUT calls. Each option
must be separated by a comma.
The following OPTIONS values are valid:
NONE
Default
SYNCPOINT
Put message inside current unit of work
NO_SYNCPOINT
Put message outside current unit of work
DEFAULT_CONTEXT
Associate default context with the message
PASS_IDENTITY_CONTEXT
Pass identity context from an input queue handle
PASS_ALL_CONTEXT
Pass all context from an input queue handle
SET_IDENTITY_CONTEXT
Set identity context from the application
SET_ALL_CONTEXT
Set all context from the application
ALTERNATE_USER_AUTHORITY
Validate with specified user identifier
FAIL_IF_QUIESCING
Fail if QMgr is quiescing
NO_CONTEXT
Associate no context with the message
The following OPTIONS values support WebSphere MQ Version 5.1 and later:
NEW_MSGID
Generate a new message identifier
NEW_CORRELID
Generate a new correlation identifier
LOGICAL_ORDER
Messages in groups and segments will be put in logical order
Example
This example demonstrates the generate, set and inquire actions of MQPMO routine.
length parms $ 30;
length rq rqmgr $ 48;
/* generate default put message options */
hpmo=0;
action="GEN";
rc=0;
CALL MQPMO(hpmo, action, rc);
/* set non−default put message options parameters */
action="SET";
parms="OPTIONS";
options="SYNCPOINT,FAIL_IF_QUIESCING";
SAS® Integration Technologies: Developer's Guide
MQPMO 488

CALL MQPMO(hpmo, action, rc, parms, options);
/* inquire about resolved names after successful PUT */
action="INQ";
parms="RESOLVEDQNAME,RESOLVEDQMGRNAME";
CALL MQPMO(hpmo, action, rc, parms, rq, rqmgr);
SAS® Integration Technologies: Developer's Guide
MQPMO 489
MQGMO
Manipulates WebSphere MQ get message options to be used on a subsequent MQGET call.
Syntax
CALL MQGMO(hgmo, action, rc <,parms ,value1,value2, ...>);
hgmo Numeric, input/output
On input, it specifies a Base SAS internal get message options handle. The handle should be supplied when
you are setting or querying an option. The handle is generated as output when action is to generate default
WebSphere MQ get options.
action Character, input
Specifies the desired action of this routine. The following action values are valid:
GEN
Generate a handle representing default get message options as defined by WebSphere MQ.
SET
After a get message options handle has been generated, you can continue to set values as necessary.
INQ
After a get message options handle has been generated, you can query its values.
rc Numeric, output
Provides the Base SAS return code from this function. If an error occurred, the return code will be non−zero.
The Base SAS function SYSMSG() can be used to obtain a textual description of the return code.
parms Character, input
Specifies an optional string of get message options that you want to set for subsequent MQGET calls. Each
option must be separated by a comma and must have a value associated with it in the function's parameter list.
value Numeric/character, input/output
Provides the value for a get message option specified in the parms string. You must provide a value parameter
for each option specified in the parms string and the data type must be of the proper type. Variables used to
store character values being returned in an inquiry (INQ action) should be initialized appropriately to
guarantee that truncation of a returned value does not occur.
The following get message options (parms) and values are valid:
OPTIONS
Character, input
Specifies a string of the attributes (options) to associate with subsequent MQGET calls. Each option
must be separated by a comma.
The following OPTIONS values are valid:
NONE
Used to unset previously set OPTIONS
NO_WAIT (default)
Return immediately if no suitable message
MQGMO 490
WAIT
Wait for message to arrive
SYNCPOINT
Get message with syncpoint control
NO_SYNCPOINT
Get message without syncpoint control
BROWSE_FIRST
Browse from start of queue
BROWSE_NEXT
Browse from current position in queue
MSG_UNDER_CURSOR
Get message under browse cursor
LOCK
Lock message
UNLOCK
Unlock message
BROWSE_MSG_UNDER_CURSOR
Browse message under browse cursor
FAIL_IF_QUIESCING
Fail if QMgr is quiescing
CONVERT
Convert message data
The following OPTIONS values support WebSphere MQ Version 5.1 and later:
LOGICAL_ORDER
Messages in groups and segments of logical messages are returned in logical order
COMPLETE_MSG
Only complete logical messages are retrievable
ALL_MSGS_AVAILABLE
All messages in a group must be available
ALL_SEGMENTS_AVAILABLE
All segments in a logical message must be available
Notes:
ACCEPT_TRUNCATED_MSG is not allowed since Base SAS will internally maintain resizing of
the internal GET buffer to handle any message size.
◊
Specify CONVERT to allow WebSphere MQ to perform data conversion based on the FORMAT of a
PUT message via a conversion exit routine that has been previously established at the QMgr. To
allow Base SAS to perform the data conversion instead of using a WebSphere MQ conversion exit
routine, then do not specify the CONVERT option.
◊
WAITINTERVAL
Numeric, input
Amount of time to wait for message to arrive in milliseconds.
RESOLVEDQNAME
Character48, output
Resolved name of destination queue.
SASQSID
Character36, input
A value equal to the environment variable of the same name, a 36 character string. The environment variable
can be retrieved using the following in a SAS DATA step:
SAS® Integration Technologies: Developer's Guide
MQGMO 491

sid = sysget('SASQSID');
For queues that are monitored by the object spawner, the MsgDeliverySequence property must be set to
Priority. See Using the Object Spawner Message Queue Polling Support for more information about this
option.
The following get message options are supported by WebSphere MQ Version 5.1 and later:
MATCHOPTIONS
Character, input
Character string of match options used to control selection criteria associated with subsequent MQGET calls.
Each option must be separated by a comma.
The following MATCHOPTIONS values are valid:
NONE
No matches
MSGID
Retrieve message with specified message identifier
CORRELID
Retrieve message with specified correlation identifier
GROUPID
Retrieve message with specified group identifier
SEQNUMBER
Retrieve message with specified sequence number
OFFSET
Retrieve message with specified offset
GROUPSTATUS
Character, output
Flag indicating whether message was retrieved within a group.
SEGMENTSTATUS
Character, output
Flag indicating whether message was retrieved within a segment of a logical message.
SEGMENTATION
Character, output
Flag indicating whether further segmentation is allowed for the retrieved message.
Example
This example generates get message options to wait 3 seconds for a GET message operation.
hgmo=0;
action="GEN";
rc=0;
parms="OPTIONS,WAITINTERVAL";
options="WAIT";
interval=3000;
CALL MQGMO(hgmo, action, rc, parms, options, interval);
SAS® Integration Technologies: Developer's Guide
MQGMO 492
MQOD
Manipulates object descriptor parameters to be used on a subsequent MQOPEN or MQPUT1 call.
Syntax
CALL MQOD(hod, action, rc <,parms ,value1, value2, ...>);
hod Numeric, input/output
On input, it specifies a Base SAS internal object descriptor handle. The handle should be supplied when you
are setting or querying a value. The handle is generated as output when action is to generate default object
descriptor parameters.
action Character, input
Specifies the desired action of this routine. The following action values are valid:
GEN
Generate a handle representing default object descriptor parameters as defined by WebSphere MQ.
SET
After an object descriptor handle has been generated, you can continue to set values as necessary.
INQ
After an object descriptor handle has been generated, you can query its values.
rc Numeric, output
Provides the Base SAS return code from this function. If an error occurred, the return code will be non−zero.
The Base SAS function SYSMSG() can be used to obtain a textual description of the return code.
parms Character, input
Specifies an optional string of object descriptor parameters that you want to set for subsequent MQOPEN or
MQPUT1 calls. Each parameter must be separated by a comma and must have a value associated with it in the
function's parameter list.
value Numeric/character, input/output
Provides a value for an object descriptor parameter specified in the parms string. You must provide a value
parameter for each object descriptor parameter specified in the parms string and the data type must be of the
proper type. Variables used to store character values being returned in an inquiry (INQ action) should be
initialized appropriately to guarantee that truncation of a returned value does not occur.
The following object descriptor parameters (parms) and values are valid:
OBJECTTYPE
Character, input
A string containing the object type. Possible OBJECTTYPE values are as follows:
Q (queue)• PROCESS (process)• Q_MGR (queue manager)•
OBJECTNAME
Character48, input/output
Object name
MQOD 493

OBJECTQMGRNAME
Character48, input/output
Object queue manager name
DYNAMICQNAME
Character48, input
Dynamic queue name.
ALTERNATEUSERID
Character12, input
Alternate user identifier
The following parameters support WebSphere MQ Version 5.1 and later:
DISTLIST
Character, input
Character string of queues in a distribution list each separated by commas (input). The format of a
queue name is <qmgr.>queue.
Example
This example generates an object descriptor to OPEN a temporary dynamic queue that begins with the name Base
SAS and is unique within the system. The example then queries the name of the temporary dynamic queue that was
created after a successful OPEN.
length qname $ 48;
hod=0;
action="GEN";
rc=0;
parms="OBJECTNAME,DYNAMICQNAME"
model="SAMPLE.TEMP.MODEL";
qname="SAS*";
CALL MQOD(hod, action, rc, parms, model, qname);
action="INQ";
parms="OBJECTNAME";
CALL MQOD(hod, action, rc, parms, qname);
put 'dynamic queue name = ' qname;
SAS® Integration Technologies: Developer's Guide
MQOD 494
MQMD
Manipulates message descriptor parameters to be used on a subsequent MQPUT, MQPUT1 or MQGET call.
Syntax
CALL MQMD(hmd, action, rc <,parms ,value1, value2, ...>);
hmd Numeric, input/output
On input, specifies a Base SAS internal message descriptor handle. The handle should be supplied when you
are setting or querying a value. The handle is generated as output when action is to generate default "message
descriptor" parameters.
action Character, input
Specifies the desired action of this routine. The following action values are valid:
GEN
Generate a handle representing default message descriptor parameters as defined by WebSphere MQ.
SET
After a message descriptor handle has been generated, you can continue to set values as necessary.
INQ
After a message descriptor handle has been generated, you can query its values.
rc Numeric, output
Provides the Base SAS return code from this function. If an error occurred, the return code will be non−zero.
The Base SAS function SYSMSG() can be used to obtain a textual description of the return code.
parms Character, input
Specifies an optional string of message descriptor parameters that you want to set for subsequent MQPUT,
MQPUT1 or MQGET calls. Each parameter must be separated by a comma and must have a value associated
with it in the function's parameter list.
value Numeric/Character, input/output
Provides a value for a message descriptor parameter specified in the parms string. You must provide a value
parameter for each message descriptor parameter specified in the parms string and the data type must be of the
proper type. Variables used to store character values being returned in an inquiry (INQ action) should be
initialized appropriately to guarantee that truncation of a returned value does not occur.
Note: This routine supports both sending a message (MQPUT and MQPUT1) and receiving a message
(MQGET). Therefore, the parameters and values serve as both input and as output to the function.
The following message descriptor parameters (parms) and values are valid:
REPORT
Character, input (PUT call) / output (GET call)
Character string of the report options to associate with subsequent function calls. Each option must be
separated by a comma.
Possible REPORT option values are as follows:
MQMD 495
NONE
No reports required
PASS_CORREL_ID
Pass correlation identifier
PASS_MSG_ID
Pass message identifier
COA
Confirmation−on−arrival reports required
COA_WITH_DATA
Confirmation−on−arrival reports with data required
COA_WITH_FULL_DATA
Confirmation−on−arrival reports with full data required
COD
Confirmation−on−delivery reports required
COD_WITH_DATA
Confirmation−on−delivery reports with data required
COD_WITH_FULL_DATA
Confirmation−on−delivery reports with full data required
EXPIRATION
Expiration reports required
EXPIRATION_WITH_DATA
Expiration reports with data required
EXPIRATION_WITH_FULL_DATA
Expiration reports with full data required
EXCEPTION
Exception reports required
EXCEPTION_WITH_DATA
Exception reports with data required
EXCEPTION_WITH_FULL_DATA
Exception reports with full data required
DISCARD_MSG
Discard message if undeliverable
The following REPORT option values support WebSphere MQ Version 5.1 and later:
PAN
Positive action notification report required
NAN
Negative action notification report required
MSGTYPE
Numeric, input (Put call)/output (Get call)
Message type. WebSphere MQ reserves the following message types:
1
MQMT_REQUEST
2
MQMT_REPLY
3
MQMT_REPORT
8
MQMT_DATAGRAM
Note: Application defined message types start at 65536 (MQMT_APPL_FIRST).
SAS® Integration Technologies: Developer's Guide
MQMD 496
EXPIRY
Numeric, input (Put call)/output (Get call)
Expiry time
FEEDBACK
Numeric, input (Put call)/output (Get call)
Feedback code
ENCODING
Numeric, input (Put call)/output (Get call)
Data encoding
CODEDCHARSETID
Numeric, input (Put call)/output (Get call)
Coded character set identifier
FORMAT
Character8, input (Put call)/output (Get call)
Format name
PRIORITY
Numeric, input (Put call)/output (Get call)
Message priority
PERSISTENCE
Character, input (Put call)/output (Get call)
Message persistence. Possible persistence values are as follows:
NOT_PERSISTENT
Message is not persistent
PERSISTENT
Message is persistent
PERSISTENT_AS_Q_DEF
Message has default persistence
MSGID
Character, input/output
Message identifier character string representing binary data (2x24 characters: binary format).
CORRELID
Character, input (PUT call) / input/output (GET call)
Correlation identifier character string representing binary data (2x24 characters: binary format).
BACKOUTCOUNT
Numeric, output (GET call)
Backout counter
REPLYTOQ
Character48, input (PUT call) / output (GET call)
Name of reply−to−queue
REPLYTOQMGR
Character, input (PUT call) / output (GET call)
Name of reply queue manager
USERIDENTIFIER
Character12, input/output (PUT call) / output (GET call)
User identifier
ACCOUNTINGTOKEN
Character, input/output (PUT call) / output( GET call)
Accounting token character string representing binary data (2x32 characters: binary format).
APPLIDENTITYDATA
SAS® Integration Technologies: Developer's Guide
MQMD 497
Character32, input/output (PUT call) / output (GET call)
Application data relating to identity
PUTAPPLTYPE
Numeric, input/output (PUT call) / output (GET call)
Type of application that put the message
PUTAPPLNAME
Character28, input/output (PUT call) / output (GET call)
Name of application that put the message
PUTDATE
Character8, input/output (PUT call) / output (GET call)
Date when message was put
PUTTIME
Character8, input/output (PUT call) / output (GET call)
Time when message was put on the queue
APPLORIGINDATA
Character4, input/output (PUT call) / output (GET call)
Application data relating to origin
The following parameters/values support WebSphere MQ Version 5.1 and later:
GROUPID
Character, input/output (PUT call) / input/output (GET call)
Group identifier character string representing binary data (2x24 characters: binary format).
MSGSEQNUMBER
Numeric, input/output (PUT call) / input/output (GET call)
Sequence number of logical message within group
OFFSET
Numeric, input/output (PUT call) / input/output (GET call)
Offset of data in physical message from start of logical message
MSGFLAGS
Numeric, input (PUT call) / output (GET call)
The following message flags are supported:
1
MQMF_SEGMENTATION_ALLOWED
2
MQMF_SEGMENT
4
MQMF_LAST_SEGMENT
8
MQMF_MSG_IN_GROUP
16
MQMF_LAST_MSG_IN_GROUP
Notes:
ENCODING and CODEDCHARSETID should not be set in most situations since you want a message to be
described by its native numeric and character encoding which is the default attributes for these parms.
•
FORMAT should be set if you intend for a WebSphere MQ QMgr conversion exit to be invoked when an
application GETs a message. The FORMAT name is the actual name of the conversion exit that will be
invoked when an application GETs a message with the CONVERT get message option specified. The
FORMAT name in the message descriptor is set when a message is PUT on a queue. Refer to WebSphere MQ
•
SAS® Integration Technologies: Developer's Guide
MQMD 498

literature for details on creating a conversion exit.
MSGID and CORRELID are updated on PUTs and GETs so remember to reset their values appropriately
when performing multiple PUTs or GETs with the same message descriptor.
•
Example
This example sends a message to a queue, and then queries and displays the message descriptor values.
length parms $ 57;
length report $ 30 msgtype $ 8 msgid $ 48 correlid $48
applname $ 28 putdate $ 8 puttime $ 8;
/* generate a message descriptor to PUT a persistent */
/* message on a permanent queue */
hmd=0;
action="GEN";
rc=0;
parms="PERSISTENCE"
persist="PERSISTENT";
CALL MQMD(hmd, action, rc, parms, persist);
/* inquire about message descriptor values after GET */
/* operation completes successfully */
action="INQ";
parms="REPORT,MSGTYPE,MSGID,CORRELID,
PUTAPPLNAME,PUTDATE,PUTTIME";
CALL MQMD(hmd, action, rc, parms, report, msgtype,
msgid, correlid, applname, putdate, puttime);
put 'report type is ' report;
put 'message type is ' msgtype;
put 'message id is ' msgid;
put 'correlation id is ' correlid;
put 'put application name is ' applname;
put 'put date is ' putdate;
put 'put time is ' puttime;
SAS® Integration Technologies: Developer's Guide
MQMD 499
MQMAP
Defines a data map that can be subsequently used on a MQSETPARMS or MQGETPARMS call.
Syntax
CALL MQMAP(hMap, rc, desc1 <,desc2, desc3, ...>);
hMap Numeric, output
Returns a Base SAS internal map descriptor handle. The handle generated will be used to reference the data
map when setting or getting Base SAS variables in a message.
rc Numeric, output
Provides the Base SAS return code from this function. If an error occurred, the return code will be non−zero.
The Base SAS function SYSMSG() can be used to obtain a textual description of the return code.
descs Character, input
Specifies a data map descriptor that defines the data type, data offset from the beginning of the message, and
data length. A descriptor has the following format:
"TYPE<,OFFSET,LENGTH>"
Where TYPE can be one of the following values:
CHAR (character data)◊ SHORT (short integer)◊ LONG (long integer)◊ DOUBLE (double precision floating point)◊
OFFSET is the offset from beginning of the message. This property is optional so that by default data is not
aligned (data starts at next available position in message).
LENGTH is the length of the data being represented. This property is optional in most cases. The only time
length is required is when setting up to receive character data. Specifying length for numeric data is ignored
since length is implicitly defined.
Note: Type coercion is performed transparently when you put Base SAS variables into a WebSphere MQ message
(MQSETPARMS) and also when you get Base SAS variables from a WebSphere MQ message (MQGETPARMS).
That is, if the data that you are sending or receiving is of a different type than the Base SAS variable itself, the data
will be coerced into the appropriate data type.
Example
This example defines a map to use to send and receive a message with a short, a long, a double and a character string.
No alignment is specified for any data type, and strings will always be 200 characters in length (blank padded).
hMap=0;
rc=0;
desc1="SHORT";
desc2="LONG";
MQMAP 500

desc3="DOUBLE";
desc4="CHAR,,200"
CALL MQMAP(hMap, rc, desc1, desc2, desc3, desc4);
SAS® Integration Technologies: Developer's Guide
MQMAP 501

MQSETPARMS
Creates a data descriptor that describes the actual Base SAS variables along with an associated data mapping. This
data descriptor can then be used on a subsequent MQPUT or MQPUT1 call.
Syntax
CALL MQSETPARMS(hData, hMap, rc, parm1 <,parm2, parm3, ...>);
hData Numeric, output
Returns a Base SAS internal data descriptor handle. The handle generated can be used to reference the data
when sending a message to a queue.
hMap Numeric, input
Specifies a Base SAS internal map descriptor handle obtained from a previous MQMAP function call. If set to
zero, no external defined mapping is assumed and therefore, all data will be mapped according to Base SAS
internal representations. That is, all numerics will be mapped as doubles and all strings will be mapped as
character data of the current string length.
rc Numeric, output
Provides the Base SAS return code from this function. If an error occurred, the return code will be non−zero.
The Base SAS function SYSMSG() can be used to obtain a textual description of the return code.
parms Numeric/character, input
Specifies the Base SAS variables to set.
Example
This example sets values of Base SAS variables into a message.
hData=0;
rc=0;
parm1=100;
parm2=9999;
parm3=9999.9999;
parm4="This is a test."
CALL MQSETPARMS(hData, hMap, rc,
parm1, parm2, parm3, parm4);
MQSETPARMS 502

MQGETPARMS
Retrieves values of Base SAS variables from a previous WebSphere MQ message that was received by a MQGET
call.
Syntax
CALL MQGETPARMS(hMap, rc, parm1 <,parm2, parm3, ...>);
hMap Numeric, input
Specifies a handle to a Base SAS internal map descriptor obtained from a previous MQMAP function call.
rc Numeric, output
Provides the Base SAS return code from this function. If an error occurred, the return code will be non−zero.
The Base SAS function SYSMSG() can be used to obtain a textual description of the return code.
parms Numeric/character, output
Returns the Base SAS variables.
Note: Initialize variables appropriately to guarantee that truncation does not occur.
Details
This message is available until the next MQGET call is performed.
Example
This example gets values of Base SAS variables from a received message.
length parm1 parm2 parm3;
length parm4 $ 200;
rc=0;
CALL MQGETPARMS(hMap, rc, parm1, parm2, parm3, parm4);
MQGETPARMS 503
MQRMH
Creates or manipulates a reference message header so that an application can put a message in this format, omitting
the bulk data.
Syntax
CALL MQRMH(hrmh, action, rc, parms, value1, value2, ...);
hrmh Numeric, input/output
Specifies a Base SAS internal handle to a reference message header. The handle is generated as output when
action is to generate default message header parameters. The handle should be supplied when you are setting
or querying a parameter.
action Character, input
Specifies the desired action of this routine. The following action values are valid:
GEN
Generate a handle representing default reference message header parameters as defined by
WebSphere MQ.
SET
After a message header handle has been generated, you can set values as necessary.
INQ
After a message header handle has been generated, you can query its values.
rc Numeric, output
Provides the Base SAS return code from this function. If an error occurred, the return code will be non−zero.
The Base SAS function SYSMSG() can be used to obtain a textual description of the return code.
parms Character, input
Specifies an optional string of reference message header parameters that you want to set. Each parameter must
be separated by a comma and must have a value associated with it in the function's parameter list. The
OBJECTTYPE, SRCNAME, and DESTNAME parameters should be defined.
value Numeric/character, input/output
Provides a value for a reference message header parameter specified in the parms string. You must provide a
value parameter for each reference message header parameter specified in the parms string and the data type
must be of the proper type. Variables used to store character values being returned in an inquiry (INQ action)
should be initialized appropriately to guarantee that truncation of a returned value does not occur.
The following reference message header parameters (parms) and values are valid:
ENCODING
Numeric, input
Data encoding
CODEDCHARSETID
Numeric, input
Coded character set identifier
FORMAT
MQRMH 504
Character8, input
Format name
OBJECTTYPE
Character8, input
Object type
SRCNAME
Character, input
Source object name
DESTNAME
Character, input
Destination object name
Details
This is a new function that supports WebSphere MQ Version 5.1 and later.
When the reference message header is read from the transmission queue by a message channel agent (MCA), a
user−supplied message exit is invoked to process the reference message. A sample message exit is supplied by
WebSphere MQ, amqsxrm. You will need to add this message exit to the sending and receiving channel definitions.
The message exit on the sending side can append to the reference message the bulk data identified by the reference
message header before the MCA sends the message through the channel to the next queue manager. When a reference
message is received, the receiving message exit should create the object from the bulk data that is associated with the
reference message header, and then pass on the reference message without the bulk data so that the reference message
(without the bulk data) can later be retrieved by a program.
Example
This example goes through the process of connecting to a queue manager, preparing the queue, generating the
message, closing the queue, and freeing all resources.
data _null_;
length hconn hobj cc reason 8;
length rc hod hpmo hmd hrmh 8;
length msg $ 200;
hconn=0;
hobj=0;
hod=0;
hpmo=0;
hmd=0;
hrmh=0;
put '−−−−−−−−−−−−−−−− Connect to QMgr −−−−−−−−−−−−−−';
call mqconn("TESTQMGR", hconn, cc, reason);
if cc ^= 0 then do;
if reason = 2002 then do;
put 'Already connected to QMgr ' qmgr;
end;
else do;
if reason = 2059 then
put 'MQCONN: QMgr not available...
needs to be started';
else
put 'MQCONN: failed with reason= ' reason;
SAS® Integration Technologies: Developer's Guide
MQRMH 505
goto exit;
end;
end;
else put 'MQCONN: successfully connected to QMgr ' qmgr;
put '−−−−−−−−−− Generate object descriptor −−−−−−−−−';
call mqod(hod, "GEN", rc, "OBJECTNAME", "TESTQ");
if rc ^= 0 then do;
put 'MQOD: failed with rc= ' rc;
msg = sysmsg();
put msg;
goto exit;
end;
else put 'MQOD: successfully generated
object descriptor';
put '−−−−−−−− Open queue object for output −−−−−−−−−';
call mqopen(hconn, hod, "OUTPUT", hobj, cc, reason);
if cc ^= 0 then do;
put 'MQOPEN: failed with reason= ' reason;
goto exit;
end;
else put 'MQOPEN: successfully opened queue for output';
put '−−−−−−−−− Generate put message options −−−−−−−−';
call mqpmo(hpmo, "GEN", rc);
if rc ^= 0 then do;
put 'MQPMO: failed with rc= ' rc;
msg = sysmsg();
put msg;
goto exit;
end;
else put 'MQPMO: successfully generated put
message options';
put '−−−−−−−−− Generate message descriptor −−−−−−−−−';
/* format must be set to reference message header */
call mqmd(hmd, "GEN", rc, "PERSISTENCE,FORMAT",
"PERSISTENT", "MQHREF");
if rc ^= 0 then do;
put 'MQMD: failed with rc= ' rc;
msg = sysmsg();
put msg;
goto exit;
end;
else put 'MQMD: successfully generated
message descriptor';
/** reference message header **/
call mqrmh(hrmh, "GEN", rc,
"SRCNAME,DESTNAME,OBJECTTYPE",
"d:\test.txt", "d:\testdup.txt", "FLATFILE");
if rc ^= 0 then do;
put 'MQRMH: failed with rc= ' rc;
msg = sysmsg();
put msg;
goto exit;
SAS® Integration Technologies: Developer's Guide
MQRMH 506

end;
else put 'MQRMH: successfully generated reference
message header';
put '−−−−−−−−−−−−− Put message on queue −−−−−−−−−−−−';
call mqput(hconn, hobj, hmd, hpmo, hrmh, cc, reason);
if cc ^= 0 then do;
put 'MQPUT: failed with reason= ' reason;
msg = sysmsg();
put msg;
goto exit;
end;
else put 'MQPUT: successfully put message on queue';
exit:
if hobj ^= 0 then do;
put '−−−−−−−−−−−−−−−−− Close queue −−−−−−−−−−−−−−−';
call mqclose(hconn, hobj, "NONE", cc, reason);
if cc ^= 0 then do;
put 'MQCLOSE: failed with reason= ' reason;
end;
else put 'MQCLOSE: successfully closed queue';
end;
if hconn ^= 0 then do;
put '−−−−−−−−−−−− Disconnect from QMgr −−−−−−−−−−−';
call mqdisc(hconn, cc, reason);
if cc ^= 0 then do;
put 'MQDISC: failed with reason= ' reason;
end;
else put 'MQDISC: successfully disconnected
from QMgr';
end;
if hod ^= 0 then do;
call mqfree(hod);
put 'Object descriptor handle freed';
end;
if hpmo ^= 0 then do;
call mqfree(hpmo);
put 'Put message options handle freed';
end;
if hmd ^= 0 then do;
call mqfree(hmd);
put 'Message descriptor handle freed';
end;
if hrmh ^= 0 then do;
call mqfree(hrmh);
put 'Reference message header handle freed';
end;
run;
SAS® Integration Technologies: Developer's Guide
MQRMH 507
MQFREE
Frees a Base SAS internal handle, thereby releasing its resources.
Syntax
CALL MQFREE(handle);
handle Numeric, input
Specifies the Base SAS internal handle obtained from one of the following previous function calls:
MQPMO (hpmo)◊ MQGMO (hgmo)◊ MQOD (hod)◊ MQMD (hmd)◊ MQMAP (hMap)◊ MQSETPARMS (hData)◊
The following new function supports WebSphere MQ Version 5.1 and later:
MQRMH (hrmh)◊
Example
This example frees the resources allocated by a handle.
CALL MQFREE(handle);
Application Messaging
MQFREE 508
MSMQ Functional Interface
SAS Integration Technologies allows applications developers to combine the power of both SAS information delivery
and Microsoft message queuing capabilities by providing a SAS interface to the Microsoft Message Queuing Services
(MSMQ) which are part of the Windows NT® Server product. With this interface, SAS programs can create new
MSMQ message queues or take advantage of existing ones that are available throughout the enterprise. This document
explains how to use this interface using the SAS Data Step and SAS Macro Language.
Application Messaging
MSMQ Functional Interface 509
Writing MSMQ Applications
With MSMQ messaging, two or more applications communicate with each other indirectly and asynchronously using
message queues. The applications do not have to be running at the same time or even in the same operating
environment. An application wishing to communicate with another application simply sends a message to a queue.
The receiving application retrieves the message when it is ready.
A typical SAS program using MSMQ services performs the following tasks:
A program must first either open an existing queue or create a new queue. A function is available to help find
queues based on their property values. If opening an existing queue, the program supplies a queue identifier to
select the appropriate queue. If creating a new queue, a queue identifier is returned to the program to be used
in subsequent calls. The queue identifier is used by MSMQ in a distributed database that maintains
information about users, queues, queue managers, host machines, and network layout. This database is
referred to as the MSMQ Information Store (MQIS) and helps to insulate the application developer from the
details of the network.
1.
When creating a queue, you can declare it public or private. Public queues are registered in the MQIS and can
be accessed throughout the network. Private queues, on the other hand, can be accessed only by systems that
know the queue's full path name or format name. Other properties can be set when creating a queue such as
security, message handling, and types of services provided by the queue. These same types of properties can
also be retrieved from or set on a queue that has been opened.
2.
A program that has opened a queue can compose and send a message. To compose a message, a function is
used to identify a data map which describes the format, the number and the type of parameters to be sent as
part of the message. The data map is used by a function that creates a data descriptor of the actual values of
the SAS variables to be included in the message. If your distributed application uses a Microsoft Transaction
Server (MTS), a transaction object can be used to send the message based on the success of the transaction.
3.
A program can also retrieve messages from an opened queue. MSMQ uses the concept of a cursor to identify
the location of the message within a queue. A message can be read from the current cursor location or you can
peek at the next location. When a message is read, the program can elect to remove the message or leave it on
the queue. In addition, a number of message properties such as security issues, size, identification, and
statistics on the delivery can also be retrieved.
4.
After a program has sent or retrieved all its messages, queues can also be closed or deleted. This releases the
resources allocated when the queue was opened or created.
5.
Note: MSMQ uses several different representations to identify a queue, such as format name, pathname, instance
GUID, and queue handle. There are functions available that you can use to convert between representations.
Application Messaging
Writing MSMQ Applications 510

MSMQ Code Samples
This section provides examples of using the MSMQ interface with DATA step code to illustrate the semantics of
sending a message to a queue and receiving the same message from the queue.
Additional DATA step code examples are provided to show how to send and receive text files, as well as send and
receive binary files.
Please note that when a SAS DATA step ends, all resources consumed by this DATA step are automatically freed.
That is, all internal SAS handles are automatically freed. When using the SAS Macro Language to interface with
MSMQ, care should be taken to ensure that all resources are freed programmatically. Unlike the DATA step,
resources consumed by the SAS Macro Language are never implicitly freed during SAS execution.
DATA Step Coding Examples
Sending a Message to a Queue
This example sends a message to a queue. Note that it assumes that the queue "respq" has been created prior to this
example.
data _null_;
length rc 8;
length msg $ 200;
length Qid hQueue transobj 8;
length msgid $ 40;
length hData hMap 8;
length parm1 parm2 parm3 8;
length parm4 $ 50;
hQueue=0;
hMap=0;
hData=0;
put '−−−−−−−− Obtain formatname from pathname −−−−−−';
Qid=0;
rc=0;
call msmqpathtoformat("pcpad\testq", Qid, rc);
if rc ^= 0 then do;
if rc = input('03000EC0'x, ib4.) then do;
/* C00E0003 − MSMQ QUEUE_NOT_FOUND error */
/* so create it... */
put 'Queue does not exist so creating it...';
call msmqcreatequeue(Qid, rc, "PATHNAME,LABEL",
"pcpad\testq", "Test Queue");
if rc ^= 0 then do;
put 'MSMQCreateQueue: failed';
msg = sysmsg();
put msg;
goto exit;
end;
else put 'MSMQCreateQueue: succeeded';
end;
else do;
put 'MSMQPathToFormat: failed';
msg = sysmsg();
MSMQ Code Samples 511
put msg;
goto exit;
end;
end;
else put 'MSMQPathToFormat: succeeded';
put '−−−−−−−−−−− Open queue for sending −−−−−−−−−−−';
call msmqopenqueue(Qid, "SEND", "SHARE", hQueue, rc);
if rc ^= 0 then do;
put 'MSMQOpenQueue: failed';
msg = sysmsg();
put msg;
goto exit;
end;
else put 'MSMQOpenQueue: succeeded';
put '−−−−−−−−−−− Generate map descriptor −−−−−−−−−−−';
/* data will not be aligned */
desc1="SHORT";
desc2="LONG";
desc3="DOUBLE";
desc4="CHAR,,50"; /* blank pad to 50 bytes */
call msmqmap(hMap, rc, desc1, desc2, desc3, desc4);
if rc ^= 0 then do;
put 'MSMQMap: failed';
msg = sysmsg();
put msg;
goto exit;
end;
else put 'MSMQMap: succeeded';
put '−−− Generate data descriptor − actual data −−−−';
parm1=100;
parm2=9999;
parm3=9999.9999;
parm4="This is a test.";
call msmqsetparms(hData, hMap, rc, parm1,
parm2, parm3, parm4);
if rc ^= 0 then do;
put 'MSMQSetParms: failed';
msg = sysmsg();
put msg;
goto exit;
end;
else put 'MSMQSetParms: succeeded';
put '−−−−−−−−−−−− Send message to queue −−−−−−−−−−−−';
transobj=0;
msgid="";
call msmqsendmsg(hQueue, hData, transobj, rc,
"BODY_TYPE,CORRELATIONID,LABEL,MSGID,
PRIV_LEVEL,RESP_QUEUE",
999, "0102030405060708090A0B0C0D0E0F1011121314",
"Secret test message", msgid,
"PRIVATE", "pcpad\respq");
if rc ^= 0 then do;
put 'MSMQSendMsg: failed';
SAS® Integration Technologies: Developer's Guide
MSMQ Code Samples 512
msg = sysmsg();
put msg;
end;
else do;
put 'MSMQSendMsg: succeeded';
/* display MSMQ−generated MSGID */
put 'msgid is ' msgid;
end;
exit:
if hQueue ^= 0 then do;
put '−−−−−−−−−−−−−−−−− Close queue −−−−−−−−−−−−−−−';
call msmqclosequeue(hQueue, rc);
if rc ^= 0 then do;
put 'MSMQCloseQueue: failed';
msg = sysmsg();
put msg;
end;
else put 'MSMQCloseQueue: succeeded';
end;
if Qid ^= 0 then do;
call msmqfree(Qid);
put 'Qid handle freed';
end;
if hMap ^= 0 then do;
call msmqfree(hMap);
put 'Map descriptor handle freed';
end;
if hData ^= 0 then do;
call msmqfree(hData);
put 'Data descriptor handle freed';
end;
run;
Receiving a Message From a Queue
This example receives a message from a queue.
data _null_;
length rc 8;
length msg $ 200;
length Qid hQueue transobj 8;
length hMap 8;
length arrivet auth size sentt 8;
length correlid msgid $ 40;
length label $ 80;
length parm1 parm2 parm3 8;
length parm4 $ 50;
length hRespQ 8;
length respq $ 80;
length respQid 8;
hQueue=0;
SAS® Integration Technologies: Developer's Guide
MSMQ Code Samples 513
hMap=0;
hRespQ=0;
respQid=0;
put '−−−−−−−− Obtain formatname from pathname −−−−−−';
Qid=0;
rc=0;
call msmqpathtoformat("pcpad\testq", Qid, rc);
if rc ^= 0 then do;
put 'MSMQPathToFormat: failed';
msg = sysmsg();
put msg;
goto exit;
end;
else put 'MSMQPathToFormat: succeeded';
put '−−−−−−−−−−− Open queue for receiving −−−−−−−−−';
call msmqopenqueue(Qid, "RECEIVE", "SHARE", hQueue, rc);
if rc ^= 0 then do;
put 'MSMQOpenQueue: failed';
msg = sysmsg();
put msg;
goto exit;
end;
else put 'MSMQOpenQueue: succeeded';
put '−−−−−−−−−−Receive message from queue −−−−−−−−−';
transobj=0;
hCursor=0;
call msmqreceivemsg(hQueue, 0, "RECEIVE", hCursor,
transobj, rc, "ARRIVEDTIME,AUTHENTICATED,BODY_SIZE,
CORRELATIONID,LABEL,MSGID,RESP_QUEUE,SENTTIME",
arrivet, auth, size, correlid, label, msgid,
respq, sentt);
if rc ^= 0 then do;
put 'MSMQReceiveMsg: failed';
msg = sysmsg();
put msg;
goto exit;
end;
else do;
put 'MSMQReceiveMsg: succeeded';
/* convert MSMQ arrived time to
SAS datetime format */
arrivet =
arrivet + 10*365*24*3600 + 3*24*3600 − 5*3600;
put 'arrived time is' arrivet datetime.;
if auth = 1 then put 'message was authenticated';
else put 'message was not authenticated';
put 'message body size is ' size;
put 'correlation id is ' correlid;
put 'label is ' label;
put 'msg id is ' msgid;
put 'resp_queue Qid handle is ' respq;
/* convert MSMQ sent time to SAS datetime format */
sentt = sentt + 10*365*24*3600 + 3*24*3600 − 5*3600;
put 'sent time was' sentt datetime.;
end;
SAS® Integration Technologies: Developer's Guide
MSMQ Code Samples 514
if size ^= 0 then do;
put '−−−−−−−−−− Generate map descriptor −−−−−−−−−−';
desc1="SHORT";
desc2="LONG";
desc3="DOUBLE";
desc4="CHAR,,50";
call msmqmap(hMap, rc, desc1, desc2, desc3, desc4);
if rc ^= 0 then do;
put 'MSMQMap: failed';
msg = sysmsg();
put msg;
goto exit;
end;
else put 'MSMQMap: succeeded';
call msmqgetparms(hMap, rc, parm1,
parm2, parm3, parm4);
if rc ^= 0 then do;
put 'MSMQGetParms: failed';
msg = sysmsg();
put msg;
goto exit;
end;
else do;
put 'MSMQGetParms: succeeded';
put 'parm1 = ' parm1;
put 'parm2 = ' parm2;
put 'parm3 = ' parm3;
put 'parm4 = ' parm4;
end;
end;
else put 'No data was associated with the message';
/* post a reply to the response queue if available */
if respq ^= "" then do;
call msmqpathtoformat(respq, respQid, rc);
if rc ^= 0 then do;
put 'MSMQPathToFormat: failed to
open response queue';
msg = sysmsg();
goto exit;
end;
call msmqopenqueue(respQid, "SEND",
"SHARE", hRespQ, rc);
if rc ^= 0 then do;
put 'MSMQOpenQueue: failed to
open response queue';
msg = sysmsg();
put msg;
goto exit;
end;
hMap=0;
call msmqsetparms(hData, hMap, rc,
"Message received OK");
if rc ^= 0 then do;
put 'MSMQSetParms: failed to
send response message';
SAS® Integration Technologies: Developer's Guide
MSMQ Code Samples 515
msg = sysmsg();
put msg;
goto exit;
end;
transobj=0;
call msmqsendmsg(hRespQ, hData, transobj, rc);
if rc ^= 0 then do;
put 'MSMQSendMsg: failed to
send response message';
msg = sysmsg();
put msg;
end;
else put 'reply sent to the response queue';
end;
exit:
if hQueue ^= 0 then do;
put '−−−−−−−−−−−−−−−−− Close queue −−−−−−−−−−−−−−−';
call msmqclosequeue(hQueue, rc);
if rc ^= 0 then do;
put 'MSMQCloseQueue: failed';
msg = sysmsg();
put msg;
end;
else put 'MSMQCloseQueue: succeeded';
end;
if hRespQ ^= 0 then do;
put '−−−−−−−−−−−− Close Response Queue −−−−−−−−−−−';
call msmqclosequeue(hRespQ, rc);
if rc ^= 0 then do;
put 'MSMQCloseQueue: failed to
close response queue';
msg = sysmsg();
put msg;
end;
else put 'MSMQCloseQueue: succeeded
to close response queue';
end;
if Qid ^= 0 then do;
call msmqfree(Qid);
put 'Qid handle freed';
end;
if respQid ^= 0 then do;
call msmqfree(respQid);
put 'respQid handle freed';
end;
if hMap ^= 0 then do;
call msmqfree(hMap);
put 'Map descriptor handle freed';
end;
run;
SAS® Integration Technologies: Developer's Guide
MSMQ Code Samples 516
Text File Processing Example
This example shows how to put a text file on a queue.
data _null_;
length rc 8;
length msg $ 200;
length Qid hQueue hmap 8;
length appspec 8;
length corrid $ 40;
length record $ 256;
length seqno 8 seqstr $ 4;
/* send this file to the queue */
infile 'd:\test.txt' length=reclen end=eof;
put '−−−−−−−−− Obtain Formatname from Pathname −−−−−−−';
call msmqpathtoformat(".\testq", Qid, rc);
if( rc ) then do;
if( rc = input('03000EC0'x,ib4.) ) then do;
put 'Queue does not exist so create it...';
call msmqcreatequeue(Qid, rc, "pathname,label",
".\testq", "test queue");
if( rc ) then do;
put 'MSMQCreateQueue: failed';
msg = sysmsg();
put msg;
goto exit;
end;
end;
else do;
put 'MSMQPathToFormat: failed';
msg = sysmsg();
put msg;
goto exit;
end;
end;
put '−−−−−−−−−−−−−−−−−− Open Queue −−−−−−−−−−−−−−−−−−';
call msmqopenqueue(Qid, "SEND", "SHARE", hQueue, rc);
if( rc ) then do;
put 'MSMQOpenQueue: failed';
msg = sysmsg();
put msg;
goto exit;
end;
put '−−−−−−−−−−− Generate map descriptor −−−−−−−−−−−';
/* longest record in file is 255 bytes+1 length byte... */
/* therefore all messages on the queue pertaining to */
/* this file will be blank−padded for 256 bytes... */
call msmqmap(hmap, rc, "char,,256");
if rc ^= 0 then do;
put 'MSMQMap: failed';
msg = sysmsg();
put msg;
goto exit;
end;
/* designate that messages belong to a text file */
SAS® Integration Technologies: Developer's Guide
MSMQ Code Samples 517
appspec=100000;
/* all of these messages will have
the same correlationid+seqno */
corrid="46696c65212121"; /* File!!! */
seqno = 0;
do until(eof);
input @;
input record $varying256. reclen;
call msmqsetparms(hdata, hmap, rc, record);
if( rc ) then do;
put 'MSMQSetParms: failed';
msg = sysmsg();
put msg;
goto exit;
end;
/* add sequence # to correlationid */
seqstr = put(seqno, hex4.);
substr(corrid,15,4) = seqstr;
seqno = seqno+1;
put '−−− Send message to queue −−−−';
call msmqsendmsg(hQueue, hdata, 0, rc,
"appspecific,correlationid", appspec, corrid);
if( rc ) then do;
put 'MSMQSendMsg: failed';
msg = sysmsg();
put msg;
goto exit;
end;
/* free data */
call msmqfree(hdata);
end;
exit:
if( hQueue ) then do;
call msmqclosequeue(hQueue, rc);
if( rc ) then do;
put 'MSMQCloseQueue: failed';
msg = sysmsg();
put msg;
end;
end;
if( Qid ) then
call msmqfree(Qid);
if( hmap ) then
call msmqfree(hmap);
stop;
run;
SAS® Integration Technologies: Developer's Guide
MSMQ Code Samples 518
Getting a Text File From a Queue
This example shows how to receive the first text file on a queue. The appspecific parameter is equal to 100000.
filename output 'd:\testdup.txt';
data _null_;
length rc 8;
length msg $ 200;
length Qid hQueue hmap hCursor hCursor2 8;
length corrid corrid2 filecorrid $ 40;
length appspec 8;
length action action2 $ 12;
length record $ 256;
length seqno 8;
fileid = fopen('output', 'o', 256, 'v');
if( fileid = 0 ) then do;
put 'Error opening output file...';
goto exit;
end;
put '−−−−−−−−− Obtain Formatname from Pathname −−−−−−−';
call msmqpathtoformat(".\testq", Qid, rc);
if( rc ) then do;
put 'MSMQPathToFormat: failed';
msg = sysmsg();
put msg;
goto exit;
end;
put '−−−−−−−−−−−−−−−−−− Open Queue −−−−−−−−−−−−−−−−−−';
call msmqopenqueue(Qid, "RECEIVE", "SHARE", hQueue, rc);
if( rc ) then do;
put 'MSMQOpenQueue: failed';
msg = sysmsg();
put msg;
goto exit;
end;
call msmqcreatecursor(hQueue, hCursor, rc);
if( rc ) then do;
put 'MSMQCreateCursor failed';
msg = sysmsg();
put msg;
end;
/* peek first to see if belongs to the file you want */
action="PEEK_CURRENT";
seqno=0;
recv:
call msmqreceivemsg(hQueue, 0, action, hCursor, 0, rc,
"APPSPECIFIC,CORRELATIONID", appspec, corrid);
if( rc ) then do;
if( rc = input('1B000EC0'x,ib4.) ) then do;
put 'reached end of queue';
goto exit;
SAS® Integration Technologies: Developer's Guide
MSMQ Code Samples 519
end;
put 'MSMQReceiveMsg: failed';
msg = sysmsg();
put msg;
goto exit;
end;
/* default action */
action="PEEK_NEXT";
if( appspec = 100000 ) then do;
/* file processing... */
outofseq=0;
if( filecorrid = "" ) then do;
/* file begins at this message */
/* write all correlating messages to this file */
filecorrid = substr(corrid,1,14);
put '−−−−−−−−− Generate map descriptor −−−−−−−−−';
/* all file messages were sent to the queue as
256 bytes blank−padded */
call msmqmap(hmap, rc, "char,,256");
if( rc ) then do;
put 'MSMQMap: failed';
msg = sysmsg();
put msg;
goto exit;
end;
end;
/* make sure message belongs to this file */
if( substr(corrid,1,14) = filecorrid ) then do;
if( seqno ^= input(substr(corrid,15,4),
hex4.) ) then do;
/* this message is out of sequence
so search for it */
outofseq=1;
call msmqcreatecursor(hQueue, hCursor2, rc);
if( rc ) then do;
put 'MSMQCreateCursor failed';
msg = sysmsg();
put msg;
end;
action2="PEEK_CURRENT";
peeknxt:
call msmqreceivemsg(hQueue, 0, action2,
hCursor2, 0, rc, "CORRELATIONID", corrid2);
if( rc ) then do;
if( rc = input('1B000EC0'x,ib4.) ) then do;
put 'Error: reached end of queue while
searching for out−of−sequence msg';
goto exit;
end;
put 'MSMQReceiveMsg: failed';
msg = sysmsg();
SAS® Integration Technologies: Developer's Guide
MSMQ Code Samples 520
put msg;
goto exit;
end;
if( seqno ^= input(substr(corrid2,15,4),
hex4.) ) then do;
action2="PEEK_NEXT";
goto peeknxt;
end;
end;
/* increment sequence number for next
expected message */
seqno=seqno+1;
/* retrieve record from internal buffer */
call msmqgetparms(hmap, rc, record);
if( rc ) then do;
put 'MSMQGetParms: failed';
msg = sysmsg();
put msg;
goto exit;
end;
put 'write record to file';
rc = fput(fileid, record);
if( rc ) then do;
put 'Error writing to output file buffer...';
goto exit;
end;
/* flush it to disk */
rc = fwrite(fileid);
if( rc ) then do;
put 'Error writing to output file...';
goto exit;
end;
/* now remove it from the queue...
don't care about receiving body */
body=0;
if( outofseq ) then do;
call msmqreceivemsg(hQueue, 0, "RECEIVE",
hCursor2, 0, rc, "body", body);
/* close this cursor */
call msmqclosecursor(hCursor2, rc);
end;
else do;
call msmqreceivemsg(hQueue, 0, "RECEIVE",
hCursor, 0, rc, "body", body);
end;
/* we are now pointing at the next message */
action="PEEK_CURRENT";
end;
end;
/* finish retrieving all messages belonging
to this file */
SAS® Integration Technologies: Developer's Guide
MSMQ Code Samples 521
goto recv;
exit:
if( hQueue ) then do;
call msmqclosequeue(hQueue, rc);
if( rc ) then do;
put 'MSMQCloseQueue: failed';
msg = sysmsg();
put msg;
end;
end;
if( Qid ) then
call msmqfree(Qid);
if( hmap ) then
call msmqfree(hmap);
/* close file */
rc = fclose(fileid);
if( rc ) then put 'Error closing output file';
run;
Binary File Processing Example
This example shows how to put a binary file on a queue. It assumes that the queue named "adminq" has been created
prior to this.
data _null_;
length rc 8;
length msg $ 200;
length Qid hQueue hmap 8;
length appspec 8;
length corrid $ 40;
length msgbuf $ 256;
length seqno 8 seqstr $ 4;
/* read in as a stream of bytes */
infile 'd:\test.exe' recfm=f lrecl=1 end=eof;
put '−−−−−−−−− Obtain Formatname from Pathname −−−−−−−';
call msmqpathtoformat(".\testq", Qid, rc);
if( rc ) then do;
if( rc = input('03000EC0'x,ib4.) ) then do;
put 'Queue does not exist so create it';
call msmqcreatequeue(Qid, rc, "pathname,label",
".\testq", "test queue:");
if( rc ) then do;
put 'MSMQCreateQueue: failed';
msg = sysmsg();
put msg;
goto exit;
end;
end;
else do;
put 'MSMQPathToFormat: failed';
msg = sysmsg();
SAS® Integration Technologies: Developer's Guide
MSMQ Code Samples 522
put msg;
goto exit;
end;
end;
put '−−−−−−−−−−−−−−−−−− Open Queue −−−−−−−−−−−−−−−−−−';
call msmqopenqueue(Qid, "SEND", "SHARE", hQueue, rc);
if( rc ) then do;
put 'MSMQOpenQueue: failed';
msg = sysmsg();
put msg;
goto exit;
end;
put '−−−−−−−−−−− Generate map descriptor −−−−−−−−−−−';
/* send 256 byte messages to the queue */
call msmqmap(hmap, rc, "char,,256");
if( rc ) then do;
put 'MSMQMap: failed';
msg = sysmsg();
put msg;
goto exit;
end;
/* designate messages belong to a binary file */
appspec=100001;
/* all of these messages will have the
same correlationid */
corrid="42696e46696c65212121"; /* BinFile!!! */
seqno = 0;
i=1;
do until(eof);
/* read a byte at a time */
input x $char1.;
i+1;
substr(msgbuf,i,1) = x;
if i = 256 or eof then do;
/* set length of this record embedded
as first byte of message */
substr(msgbuf,1,1) = put(i−1,pib1.);
call msmqsetparms(hdata, hmap, rc, msgbuf);
if( rc ) then do;
put 'MSMQSetParms: failed';
msg = sysmsg();
put msg;
goto exit;
end;
/* add sequence # to correlationid */
seqstr = put(seqno, hex4.);
substr(corrid,21,4) = seqstr;
seqno = seqno + 1;
put '−−− Send message to queue −−−−';
call msmqsendmsg(hQueue, hdata, 0, rc,
"appspecific,correlationid,acknowledge,
admin_queue", appspec, corrid,
SAS® Integration Technologies: Developer's Guide
MSMQ Code Samples 523
"nack_reach_queue", ".\adminq");
if( rc ) then do;
put 'MSMQSendMsg: failed';
msg = sysmsg();
put msg;
goto exit;
end;
/* free data */
call msmqfree(hdata);
/* reset message buffer entities */
i=1;
msgbuf="";
end;
end;
exit:
if( hQueue ) then do;
call msmqclosequeue(hQueue, rc);
if( rc ) then do;
put 'MSMQCloseQueue: failed';
msg = sysmsg();
put msg;
end;
end;
if( Qid ) then
call msmqfree(Qid);
if( hmap ) then
call msmqfree(hmap);
stop;
run;
Getting a Binary File From a Queue
This example shows how to receive the first binary file on a queue.
filename output 'd:\testdup.exe';
data _null_;
length rc 8;
length msg $ 200;
length Qid hQueue hmap hCursor hCursor2 8;
length corrid corrid2 filecorrid $ 40;
length appspec 8;
length action action2 $ 12;
length msgbuf stream $ 256;
length len 8;
length seqno 8;
fileid = fopen('output', 'o', 0, 'b');
if( fileid = 0 ) then do;
put 'Error opening output file...';
goto exit;
SAS® Integration Technologies: Developer's Guide
MSMQ Code Samples 524
end;
put '−−−−−−−−− Obtain Formatname from Pathname −−−−−−−';
call msmqpathtoformat(".\testq", Qid, rc);
if( rc ) then do;
put 'MSMQPathToFormat: failed';
msg = sysmsg();
put msg;
goto exit;
end;
put '−−−−−−−−−−−−−−−−−− Open Queue −−−−−−−−−−−−−−−−−−';
call msmqopenqueue(Qid, "RECEIVE", "SHARE", hQueue, rc);
if( rc ) then do;
put 'MSMQOpenQueue: failed';
msg = sysmsg();
put msg;
goto exit;
end;
call msmqcreatecursor(hQueue, hCursor, rc);
if( rc ) then do;
put 'MSMQCreateCursor failed';
msg = sysmsg();
put msg;
end;
/* peek first to see if belongs to the file you want */
action="PEEK_CURRENT";
seqno=0;
recv:
call msmqreceivemsg(hQueue, 0, action, hCursor, 0, rc,
"APPSPECIFIC,CORRELATIONID", appspec, corrid);
if( rc ) then do;
if( rc = input('1B000EC0'x,ib4.) ) then do;
put 'reached end of queue';
goto exit;
end;
put 'MSMQReceiveMsg: failed';
msg = sysmsg();
put msg;
goto exit;
end;
/* default action */
action="PEEK_NEXT";
if( appspec = 100001 ) then do;
/* file processing */
outofseq=0;
if( filecorrid = "" ) then do;
/* file begins at this message */
/* write all correlating messages to this file */
filecorrid = substr(corrid,1,20);
put '−−−−−−−−− Generate map descriptor −−−−−−−−−';
SAS® Integration Technologies: Developer's Guide
MSMQ Code Samples 525
/* all file messages were sent to the queue as
256 bytes blank−padded */
call msmqmap(hmap, rc, "char,,256");
if( rc ) then do;
put 'MSMQMap: failed';
msg = sysmsg();
put msg;
goto exit;
end;
end;
/* make sure message belongs to this file */
if( substr(corrid,1,20) = filecorrid ) then do;
if( seqno ^= input(substr(corrid,21,4), hex4.) )
then do;
/* this message is out of sequence
so search for it */
outofseq=1;
call msmqcreatecursor(hQueue, hCursor2, rc);
if( rc ) then do;
put 'MSMQCreateCursor failed';
msg = sysmsg();
put msg;
goto exit;
end;
action2="PEEK_CURRENT";
peeknxt:
call msmqreceivemsg(hQueue, 0, action2,
hCursor2, 0, rc, "CORRELATIONID", corrid2);
if( rc ) then do;
if( rc = input('1B000EC0'x, ib4.) ) then do;
put 'Error: reached end of queue while
searching for out−of−sequence msg';
goto exit;
end;
put 'MSMQReceiveMsg: failed';
msg = sysmsg();
put msg;
goto exit;
end;
if( seqno ^= input(substr(corrid2,21,4), hex4.) )
then do;
action2="PEEK_NEXT";
goto peeknxt;
end;
end;
/* increment sequence number for
next expected message */
seqno=seqno+1;
/* retrieve record from internal buffer */
call msmqgetparms(hmap, rc, msgbuf);
if( rc ) then do;
put 'MSMQGetParms: failed';
msg = sysmsg();
put msg;
SAS® Integration Technologies: Developer's Guide
MSMQ Code Samples 526
goto exit;
end;
/* length of this stream is embedded
as 1st byte in msg */
len = input(substr(msgbuf,1,1), pib1.);
stream = substr(msgbuf,2);
put 'write stream to file';
rc = fput(fileid, substr(stream,1,len));
if( rc ) then do;
put 'Error writing to output file buffer...';
goto exit;
end;
/* flush it to disk */
rc = fwrite(fileid);
if( rc ) then do;
put 'Error writing to output file...';
goto exit;
end;
/* now remove it from the queue...
don't care about receiving body */
body=0;
if( outofseq ) then do;
call msmqreceivemsg(hQueue, 0, "RECEIVE",
hCursor2, 0, rc, "body", body);
/* close this cursor */
call msmqclosecursor(hCursor2, rc);
end;
else do;
call msmqreceivemsg(hQueue, 0, "RECEIVE",
hCursor, 0, rc, "body", body);
end;
/* we are now pointing at the next message */
action="PEEK_CURRENT";
end;
end;
/* finish retrieving all messages belonging
to this file */
goto recv;
exit:
if( hQueue ) then do;
call msmqclosequeue(hQueue, rc);
if( rc ) then do;
put 'MSMQCloseQueue: failed';
msg = sysmsg();
put msg;
end;
end;
if( Qid ) then
call msmqfree(Qid);
if( hmap ) then
SAS® Integration Technologies: Developer's Guide
MSMQ Code Samples 527
call msmqfree(hmap);
/* close file */
rc = fclose(fileid);
if( rc ) then put 'Error closing output file';
run;
Application Messaging
SAS® Integration Technologies: Developer's Guide
MSMQ Code Samples 528
MSMQ CALL Routines
Integration Technologies support a set of SAS CALL routines that interface directly with the MSMQ API. A link for
each supported call appears on the left.
Application Messaging
MSMQ CALL Routines 529
MSMQ CALL Routines
MSMQ CALL Routines 530
MSMQCREATEQUEUE
Creates a queue at a specified MSMQ pathname.
Syntax
CALL MSMQCREATEQUEUE(qid, rc, propids, value1 <,value2, ...>);
qid Numeric, output
Returns the queue identifier that represents the format name of the queue that is created. The format name of
the queue is a unique name generated by MSMQ.
rc Numeric, output
Provides the return code from the CALL routine. If an error occurred, the return code will be non−zero. A
return code of −1 reflects a SAS internal error. Otherwise it represents an MSMQ error code. The SAS
function SYSMSG() can be used to obtain a textual description of the return code.
propids Character, input
Specifies one or more properties that the queue will exhibit once created. This parameter is a character string
with each applicable property separated by a comma. PATHNAME is the only required property.
You must provide a value parameter for each property specified in the propids string. Each property ID in the
propids string is associated positionally with a value parameter.
The following creation properties are valid:
AUTHENTICATE
Specifies whether or not the queue only accepts authenticated messages. The following values are
valid:
"NONE" (default)
Specifies the queue will except either authenticated or non−authenticated messages.
"ALWAYS"
Specifies the queue always requires authenticated messages.
BASEPRIORITY
Specifies a single base priority for all messages sent to a public queue. Values range from −32768 to
32767, where 32767 is the highest priority and 0 is the default priority.
JOURNAL
Determines whether messages retrieved from the queue are also copied to its journal queue. The
following values are valid:
"NONE" (default)
Specifies that messages removed from the queue are discarded.
"ALWAYS"
Specifies that messages removed from the queue are always stored in its journal queue.
JOURNAL_QUOTA
Specifies the maximum size (in kilobytes) of the journal queue. The default size is infinite.
LABEL
Describes the queue. The default is a blank label ("").
MSMQCREATEQUEUE 531
PATHNAME
Specifies the MSMQ pathname of the queue. The format of a public queue is:
MachineName\QueueName
The format of a private queue is
MachineName\PRIVATE$\QueueName
PRIV_LEVEL
Specifies the privacy level that is required by the queue. The following values are valid:
"NONE"
Specifies that the queue accepts only non−private (clear) messages.
"BODY"
Specifies that the queue accepts only private (encrypted) messages.
"OPTIONAL" (default)
Specifies that the queue accepts both private and non−private messages.
QUOTA
Specifies the maximum size (in kilobytes) of the queue. The default size is infinite.
TRANSACTION
Specifies whether the queue is a transaction queue or a non−transaction queue. The following values
are valid:
"NONE" (default)
Specifies that the queue does not accept transaction operations.
"ALWAYS"
Specifies that all messages sent to the queue must always be done through an MSMQ
transaction.
TYPE
Specifies the type of service provided by the queue. The value of the TYPE property is a globally
unique identifier (GUID) in the form of a character string that represents the binary data.
Note: Security of the queue defaults as follows:
Owner: process user• Group: process group• DACL: queue creator − has full control• Queue users
get queue properties♦ get queue security♦ send messages♦
•
These defaults can either be changed programmatically using the MSMQSETQSEC routine or via the MSMQ
Explorer interface.
Details
The routine also registers the queue in the MSMQ Information Store (MQIS) for public queues or registers it on the
local computer for private queues.
SAS® Integration Technologies: Developer's Guide
MSMQCREATEQUEUE 532

Example
This example creates a public queue.
length msg $ 200;
qid=0;
rc=0;
CALL MSMQCREATEQUEUE(qid, rc, "PATHNAME,LABEL", "pcpad\testq", "Test Queue");
if rc ^= 0 then do;
put 'MSMQCreateQueue: failed';
msg = sysmsg();
put msg;
end;
else put 'MSMQCreateQueue: succeeded';
SAS® Integration Technologies: Developer's Guide
MSMQCREATEQUEUE 533

MSMQDELETEQUEUE
Deletes a queue from the MQIS in the case of public queues, or from the local computer in the case of private queues.
Syntax
CALL MSMQDELETEQUEUE(qid, rc);
qid Numeric, input
Specifies the queue identifier that represents the format name of the queue to be deleted.
rc Numeric, output
Provides the return code from the CALL routine. If an error occurred, the return code will be non−zero. A
return code of −1 reflects a SAS internal error. Otherwise it represents an MSMQ error code. The SAS
function SYSMSG() can be used to obtain a textual description of the return code.
Example
This example deletes a queue.
length msg $ 200;
rc=0;
CALL MSMQDELETEQUEUE(qid, rc);
if rc ^= 0 then do;
put 'MSMQDeleteQueue: failed';
msg = sysmsg();
put msg;
end;
else put 'MSMQDeleteQueue: succeeded';
MSMQDELETEQUEUE 534
MSMQOPENQUEUE
Opens a queue for sending message to the queue or for reading its messages.
Syntax
CALL MSMQOPENQUEUE(qid, access, shareMode, hQueue, rc);
qid Numeric, input
Specifies the queue identifier that represents the format name of the queue to be opened.
access Character, input
Indicates the level of access users have to the messages in the queue being opened. The following values are
valid:
"PEEK"
Specifies that messages can only be looked at.
"SEND"
Specifies that messages can only be sent to the queue.
"RECEIVE"
Specifies that messages can be looked at and removed from the queue.
shareMode
Character, input
Specifies how the queue will be shared. The following values are valid:
"SHARE"
Specifies that the queue is available to everyone.
"DENY_SHARE"
Specifies that the process making this function call is the only one that can receive messages from this
queue. If the queue is already opened for receiving messages by another process, this call will fail.
hQueueNumeric, output
Returns the MSMQ handle of the opened queue. This handle is used by subsequent CALL routines to identify
and access the queue.
rc Numeric, output
Provides the return code from the CALL routine. If an error occurred, the return code will be non−zero. A
return code of −1 reflects a SAS internal error. Otherwise it represents an MSMQ error code. The SAS
function SYSMSG() can be used to obtain a textual description of the return code.
Example
This example opens a queue for sending messages.
length msg $ 200;
hQueue=0;
rc=0;
MSMQOPENQUEUE 535

CALL MSMQOPENQUEUE(qid, "SEND", "SHARE", hQueue, rc);
if rc ^= 0 then do;
put 'MSMQOpenQueue: failed';
msg = sysmsg();
put msg;
end;
else put 'MSMQOpenQueue: succeeded';
SAS® Integration Technologies: Developer's Guide
MSMQOPENQUEUE 536

MSMQCLOSEQUEUE
Closes a given queue.
Syntax
CALL MSMQCLOSEQUEUE(hQueue, rc);
hQueueNumeric, input
Specifies the MSMQ handle to an open queue. This parameter was obtained from a previous
MSMQOPENQUEUE function call.
rc Numeric, output
Provides the return code from the CALL routine. If an error occurred, the return code will be non−zero. A
return code of −1 reflects a SAS internal error. Otherwise it represents an MSMQ error code. The SAS
function SYSMSG() can be used to obtain a textual description of the return code.
Example
This example closes a queue.
length msg $ 200;
rc=0;
CALL MSMQCLOSEQUEUE(hQueue, rc);
if rc ^= 0 then do;
put 'MSMQCloseQueue: failed';
msg = sysmsg();
put msg;
end;
else put 'MSMQCloseQueue: succeeded';
MSMQCLOSEQUEUE 537
MSMQPATHTOFORMAT
Returns a qid (queue identifier) handle that represents the format name of the desired queue.
Syntax
CALL MSMQPATHTOFORMAT(pathName, qid, rc);
pathName
Character, input
Represents the queue's pathname or actual format name of the queue, if known.
If a MSMQ pathname is used to represent the queue, it will be converted to a MSMQ format name. Possible
pathName representations are as follows:
Public queue: machineName\QueueName◊ Public queue's journal: machineName\QueueName;Journal◊ Private queue: machineName\PRIVATE$\QueueName◊ Private queue's journal: machineName\PRIVATE$\QueueName;Journal◊ Machine journal queue: machineName\JOURNAL◊ Machine deadletter queue: machineName\DEADLETTER◊ Machine transaction deadletter queue: machineName\DEADXACT◊
Note: machineName can be substituted with '.' to designate the local machine.
If the actual format name of the queue is known, this call may be used to transform it into the expected
unicode string. Possible format name representations are as follows:
Public queue: public=QueueGUID◊ Public queue's journal: public=QueueGUID;JOURNAL◊ Private queue: private=machineGUID\QueueNumber◊ Private queue's journal: private=machineGUID\QueueNumber;JOURNAL◊ Direct public queue: direct=AddressSpec\QueueName◊ Direct private queue: direct=AddressSpec\PRIVATE$\QueueName
where AddressSpec is of the form protocol:address (For example, tcp:10.26.1.177)
◊
Machine journal queue: machine=machineGUID;JOURNAL◊ Machine deadletter queue: machine=machineGUID;DEADLETTER◊ Machine transaction deadletter queue: machine=machineGUID;DEADXACT◊ Foreign queue: connector=ForeignCNGUID◊ Foreign transaction queue: connector=ForeignCNGUID:XACTONLY◊
qid Numeric, output
Returns the queue identifier that represents the format name of the queue.
rc Numeric, output
Provides the return code from the CALL routine. If an error occurred, the return code will be non−zero. A
return code of −1 reflects a SAS internal error. Otherwise it represents an MSMQ error code. The SAS
function SYSMSG() can be used to obtain a textual description of the return code.
MSMQPATHTOFORMAT 538

Example
This example obtains the format name of a queue from the pathname.
length msg $ 200;
qid=0;
rc=0;
CALL MSMQPATHTOFORMAT("pcpad\testq", qid, rc);
if rc ^= 0 then do;
put 'MSMQPathToFormat: failed';
msg = sysmsg();
put msg;
end;
else put 'MSMQPathToFormat: succeeded';
SAS® Integration Technologies: Developer's Guide
MSMQPATHTOFORMAT 539

MSMQINSTTOFORMAT
Returns a queue identifier that represents a format name based on the instance identifier provided.
Syntax
CALL MSMQINSTTOFORMAT(instance, qid, rc);
instance
Character representing binary data, input
Specifies the globally unique identifier (GUID) instance of the queue.
qid Numeric, output
Returns the queue identifier that represents the format name of the queue.
rc Numeric, output
Provides the return code from the CALL routine. If an error occurred, the return code will be non−zero. A
return code of −1 reflects a SAS internal error. Otherwise it represents an MSMQ error code. The SAS
function SYSMSG() can be used to obtain a textual description of the return code.
Example
This example obtains the format name of a queue from an instance GUID.
length msg $ 200;
qid=0;
rc=0;
CALL MSMQINSTTOFORMAT(guid, qid, rc);
if rc ^= 0 then do;
put 'MSMQInstToFormat: failed';
msg = sysmsg();
put msg;
end;
else put 'MSMQInstToFormat: succeeded';
MSMQINSTTOFORMAT 540

MSMQHNDLTOFORMAT
Returns a queue identifier that represents a format name based on its open handle.
Syntax
CALL MSMQHNDLTOFORMAT(hQueue, qid, rc);
hQueueNumeric, input
Specifies the MSMQ handle to an open queue. This parameter was obtained from a previous
MSMQOPENQUEUE function call.
qid Numeric, output
Returns the queue identifier that represents the format name of the queue.
rc Numeric, output
Provides the return code from the CALL routine. If an error occurred, the return code will be non−zero. A
return code of −1 reflects a SAS internal error. Otherwise it represents an MSMQ error code. The SAS
function SYSMSG() can be used to obtain a textual description of the return code.
Example
This example obtains the format name of a queue from a queue handle.
length msg $ 200;
qid=0;
rc=0;
CALL MSMQHDNLTOFORMAT(hQueue, qid, rc);
if rc ^= 0 then do;
put 'MSMQHndlToFormat: failed';
msg = sysmsg();
put msg;
end;
else put 'MSMQHndlToFormat: succeeded';
MSMQHNDLTOFORMAT 541
MSMQSENDMSG
Sends a message to the specified queue.
Syntax
CALL MSMQSENDMSG(hQueue, hData, transObj, rc, propids, value1 <,value2, ...>);
hQueueNumeric, input
Specifies the MSMQ handle to an open queue. This parameter was obtained from a previous
MSMQOPENQUEUE function call.
hData Numeric, input
Specifies the SAS internal data descriptor handle obtained from a previous MSMQSETPARMS function call.
If set to zero, it is assumed that no data will accompany this message.
transObj
Numeric, input
Specifies the transaction object obtained from a previous MSMQBEGINTRANS function call. If set to zero, it
is assumed that this operation will not be part of a transaction.
rc Numeric, output
Provides the return code from the CALL routine. If an error occurred, the return code will be non−zero. A
return code of −1 reflects a SAS internal error. Otherwise it represents an MSMQ error code. The SAS
function SYSMSG() can be used to obtain a textual description of the return code.
propids Character, input
Identifies one or more message properties that affects the message being sent. This parameter is a character
string with each applicable property separated by a comma.
You must provide a value parameter for each property specified in the propids string. Each property ID in the
propids string is associated positionally with a value parameter.
Note: All values are inputs to the MSMQSENDMSG routine except MSGID which returns a message
identifier.
The following send message properties and values are valid:
ACKNOWLEDGE
Specifies the type of acknowledgment messages that MSMQ posts when the message is sent. A
positive acknowledgement indicates the message sent was received successfully. A negative
acknowledgement indicates the message was not received. Possible acknowledge types are as follows:
"NONE" (default)
Specifies no acknowledgment messages are posted.
"FULL_REACH_QUEUE"
Specifies that positive/negative acknowledgments are posted indicating whether or not the
message reaches the queue.
"FULL_RECEIVE"
MSMQSENDMSG 542
Specifies that positive/negative acknowledgments are posted indicating whether or not the
message is retrieved from the queue.
"NACK_REACH_QUEUE"
Specifies that negative acknowledgments are posted when a message cannot reach the queue.
"NACK_RECEIVE"
Specifies that negative acknowledgments are posted when a message cannot be retrieved from
the queue.
ADMIN_QUEUE
Specifies the pathname of the queue used for MSMQ−generated acknowledgment messages. The
value is a character string that represents the pathname of the administration queue.
APPSPECIFIC
Specifies application−generated information. The value is numeric and the default is 0.
AUTH_LEVEL
Specifies whether the message needs to be authenticated. The following AUTH_LEVEL types are
valid:
"NONE" (default)
Specifies that no authentication is necessary. (Messages are not signed.)
"ALWAYS"
Specifies that messages are always signed and authenticated by the destination queue
manager.
BODY_TYPE
Specifies the type of body the message contains. The value is numeric and is defined by the
application and must be coordinated between the sending and receiving portions of the application.
The default value is 0.
CORRELATIONID
Specifies the correlation identifier of the message. The value is a character string representing binary
data.
DELIVERY
Specifies how the message is delivered. The following values are valid:
"EXPRESS" (default)
Specifies faster, non−guaranteed delivery.
"RECOVERABLE"
Specifies guaranteed delivery.
ENCRYPTION_ALG
Specifies the encryption algorithm used to encrypt the message body of a private message. Possible
values are as follows:
"RC2" (Block cipher) (Default)• "RC4" (Stream cipher)•
HASH_ALG
Specifies the hashing algorithm used when authenticating messages. The following values are valid:
"MD2"
Message Digest 2 Algorithm
"MD4"
Message Digest 4 Algorithm
"MD5" (default)
Message Digest 5 Algorithm
JOURNAL
SAS® Integration Technologies: Developer's Guide
MSMQSENDMSG 543
Specifies whether the message should be kept in a machine journal, sent to a dead letter queue, or
neither. The following values are valid:
"NONE" (default)
Specifies the message is not kept in the originating machine's journal queue.
"JOURNAL"
Specifies the message is kept in the originating machine's journal queue.
"DEADLETTER"
Specifies the message is kept in a dead letter queue if it cannot be delivered.
Note: A combination may be specified by separating each value with a comma. For example:
"JOURNAL,DEADLETTER".
LABEL
Specifies a label for the message. The default is a blank label ("").
MSGID
Specifies MSMQ−generated identifier of the message. The value is a character string representing
binary data. Initialize the variable to a size of at least 40 to guarantee that truncation of the returned
value does not occur.
Note: This value is returned as a binary string. MSMQ Explorer displays the message identifier as a
GUID concatenated with a sequence number.
PRIORITY
Specifies the message's priority. The value is a numeric between 0 and 7. The highest priority is 7,
and the default priority is 3.
PRIV_LEVEL
Specifies the privacy level of the message. The following values are valid:
"PUBLIC" (default)
Specifies the message is to be sent as clear text.
"PRIVATE"
Specifies end−to−end encryption of the message body.
RESP_QUEUE
Specifies the pathname of the queue where application−generated response messages are returned.
The value is a character string that represents the pathname of the response queue.
SECURITY_CONTEXT
Specifies security information that MSMQ uses to authenticate messages. The value is the handle to
the security context buffer returned from MSMQGETCONTEXT.
SENDER_CERT
Specifies the name of the system certificate store to use to locate external certificates during the
authentication process. Generally, "MY" is used. For example, if a value of "MY" is used, the registry
location used to retrieve the system certificate is as follows:
HKEY_CURRENTUSER\Software\Microsoft\SystemCertificates\MY\Certificates
TIME_TO_BE_RECEIVED
Specifies the total time (in seconds) the message is to be available. The default value is infinite.
TIME_TO_REACH_QUEUE
Specifies time limit (in seconds) for the message to reach the queue.
TRACE
Specifies where report messages will be sent when tracing a message. The following values are valid:
"NONE" (default)
Specifies no tracing for this message.
SAS® Integration Technologies: Developer's Guide
MSMQSENDMSG 544

"REPORT"
Specifies report messages are to be sent to the report queue specified by the source queue
manager.
Note: The BODY message property is set internally based on whether or not data is present.
Example
This example sends a message.
length msg $ 200;
rc=0;
transobj=0;
CALL MSMQSENDMSG(hQueue,
hData,
transobj,
rc,
"AUTH_LEVEL,APPSPECIFIC,CORRELATIONID,LABEL,PRIV_LEVEL,RESP_QUEUE",
"ALWAYS", 999, "0102030405060708090A0B0C0D0E0F1011121314",
"Secret test message", "PRIVATE", "mypc\respq");
if rc ^= 0 then do;
put 'MSMQSendMsg: failed';
msg = sysmsg();
put msg;
end;
else put 'MSMQSendMsg: succeeded';
SAS® Integration Technologies: Developer's Guide
MSMQSENDMSG 545
MSMQRECEIVEMSG
Reads a message from the queue.
Syntax
CALL MSMQRECEIVEMSG(hQueue, timeout, action, hCursor, transObj, rc <, propids, value1, value2, ...>);
hQueueNumeric, input
Specifies the MSMQ handle to an open queue. This parameter was obtained from a previous
MSMQOPENQUEUE function call.
timeoutNumeric, input
Specifies the amount of time (in milliseconds) to wait for a message to be received from the queue. If you
want to wait indefinitely, for the message to be received, then set the timeout parameter equal to −1.
action Character, input
Determines how and where the message will be read from the queue. This parameter is also used to determine
if the message is removed after reading. Possible values are valid:
"RECEIVE"
Read message at current cursor location and remove it from the queue.
"PEEK_CURRENT"
Reads a message at the current cursor location but does not remove it from the queue. The cursor
remains at the current message. If the hCursor parameter is 0, the queue's cursor can only point to the
first message in the queue.
"PEEK_NEXT"
Reads the next message in the queue (skipping the message at the current cursor location) but does
not remove it from the queue. A cursor must already be created (by calling
MSMQCREATECURSOR) before calling this routine. (hCursor = 0 is not allowed).
hCursor
Numeric, input
Specifies the handle to a cursor used for looking at messages in the queue. The MSMQCREATECURSOR
routine is used to create a cursor and obtain its handle.
transObj
Numeric, input
Specifies the transaction object that was obtained from a previous MSMQBEGINTRANS function call. If set
to zero, it is assumed that this operation will not be part of a transaction.
rc Numeric, output
Provides the return code from the CALL routine. If an error occurred, the return code will be non−zero. A
return code of −1 reflects a SAS internal error. Otherwise it represents an MSMQ error code. The SAS
function SYSMSG() can be used to obtain a textual description of the return code.
propids Character, input
Identifies one or more message properties that affects the message being received from the queue. This
parameter is a character string with each applicable property separated by a comma.
MSMQRECEIVEMSG 546
You must provide a value parameter for each property specified in the propids string. Each property ID in the
propids string is associated positionally with a value parameter. The CALL routine returns the corresponding
property value into each value parameter.
The following receive message properties and values are valid:
ACKNOWLEDGE
Retrieves the type of acknowledgment messages that MSMQ posts when the message was sent.
Initialize the variable appropriately to prevent truncation of the retrieved value from occurring.
Possible acknowledge types are as follows:
"NONE"
Specifies no acknowledgment messages are posted.
"FULL_REACH_QUEUE"
Specifies that positive/negative acknowledgments are posted indicating whether or not the
message reaches the queue.
"FULL_RECEIVE"
Specifies that positive/negative acknowledgments are posted depending on whether or not the
message is retrieved from the queue before its time−to−be−received timer expires.
"NACK_REACH_QUEUE"
Specifies that negative acknowledgments are posted when a message cannot reach the queue.
"NACK_RECEIVE"
Specifies that negative acknowledgments are posted when a message cannot be retrieved from
the queue.
ADMIN_QUEUE
Retrieves the queue used for MSMQ−generated acknowledgment messages. This value is a character
string that represents the pathname of the administration queue. You can use the
MSMQPATHTOFORMAT CALL routine to obtain a queue identifier for this queue. Initialize the
variable appropriately to prevent truncation of the returned value from occurring.
APPSPECIFIC
Retrieves the application−generated information. The value is numeric, and the default is 0.
ARRIVEDTIME
Retrieves the time the message arrived at the queue. The value is a numeric representing the number
of seconds elapsed since midnight (00:00:00), January 1, 1970 (Coordinated Universal time).
AUTHENTICATED
Retrieves whether or not the message was authenticated. The following values are valid:
0 : Message is NOT authenticated.• 1 : Message is authenticated.•
BODY
Specifies whether or not the message body should be received. The following values are valid:
0 : Specifies NOT to retrieve the body of the message.• 1 (default) : Specifies to retrieve the body of the message•
BODY_SIZE
Retrieves the actual size of the message body. The body size is a numeric value.
BODY_TYPE
Retrieves the type of body the message contains. The value is numeric.
CLASS
Retrieves the class of the message. The value is a numeric.
CORRELATIONID
SAS® Integration Technologies: Developer's Guide
MSMQRECEIVEMSG 547
Retrieves the correlation identifier of the message. The value is a character string representing binary
data. Initialize the variable to a size of at lease 40 to guarantee that truncation of the returned value
does not occur.
DELIVERY
Retrieves how the message is delivered. Initialize the variable appropriately to prevent truncation of
the returned value from occurring. The following values are valid:
"EXPRESS"
Specifies faster, non−guaranteed delivery.
"RECOVERABLE"
Specifies guaranteed delivery.
DEST_QUEUE
Retrieves the target queue of the message. This value is a character string that represents the
pathname of the destination queue. You can use the MSMQPATHTOFORMAT CALL routine to
obtain a queue identifier for this queue. Initialize the variable appropriately to prevent truncation of
the returned value from occurring.
JOURNAL
Retrieves journal enablement. Initialize the variable appropriately to prevent truncation of the
returned value from occurring. The following values are valid:
"NONE" (default)
Specifies the message is not kept in the originating machine's journal queue.
"JOURNAL"
Specifies the message is kept in the originating machine's journal queue.
"DEADLETTER"
Specifies the message is kept in a dead letter queue if it cannot be delivered.
Note: A combination may be specified by separating each value with a comma. For example:
"JOURNAL,DEADLETTER".
LABEL
Retrieves a label for the message. The label value is a character string. Initialize the variable
appropriately to prevent truncation of the returned value from occurring.
MSGID
Retrieves MSMQ−generated identifier of the message. The value is a character string representing
binary data. Initialize the variable to a size of at least 40 to guarantee that truncation of the returned
value does not occur.
Note: This value is returned as a binary string. MSMQ Explorer displays the message identifier as a
GUID concatenated with a sequence number.
PRIORITY
Retrieves the message's priority. The value is a numeric between 0 and 7. The highest priority is 7,
and the default priority is 3.
PRIV_LEVEL
Retrieves the privacy level of the message. Initialize the variable appropriately to prevent truncation
of the returned value from occurring. The following values are valid:
"PUBLIC"
Specifies the message is to be sent as clear text.
"PRIVATE"
Specifies end−to−end encryption of the message body.
RESP_QUEUE
SAS® Integration Technologies: Developer's Guide
MSMQRECEIVEMSG 548
Retrieves the pathname of the queue where application−generated response messages are returned.
The value is a character string that represents the pathname of the response queue. You can use the
MSMQPATHTOFORMAT CALL routine to obtain a queue identifier for this queue. Initialize the
variable appropriately to prevent truncation of the returned value from occurring.
SENDER_CERT
Retrieves the certificate that was used to authenticate the message. This value is a character string. If
an external certificate was used to authenticate the message, the information that is returned can be
used to verify who sent the message (subject).
SENDERID
Retrieves who sent the message. The value is a character string.
SENTTIME
Retrieves the time the message was sent. The value is a numeric representing the number of seconds
elapsed since midnight (00:00:00), January 1, 1970 (Coordinated Universal time).
SRC_MACHINE_ID
Retrieves the GUID of the computer where the message was sent. This value is a GUID in the form of
a character string that represents the binary data. Initialize the variable to a size of at least 32 to
guarantee that truncation of the returned value does not occur.
TIME_TO_BE_RECEIVED
Retrieves the total time (in seconds) the message is to be available. The value is a numeric with a
default of infinity.
TIME_TO_REACH_QUEUE
Retrieves time limit (in seconds) for the message to reach the queue.
TRACE
Retrieves where report messages will be sent when tracing a message. Initialize the variable
appropriately to guarantee that truncation of the returned value does not occur. The following values
are valid:
"NONE"
Specifies no tracing for this message.
"REPORT"
Specifies report messages are to be sent to the report queue specified by the source queue
manager.
VERSION
Retrieves the version of MSMQ used to send the message. The value is a numeric.
Details
When reading messages, you can either peek at or retrieve them from the queue. The message is retrieved into an
internal SAS buffer at which time you should call MSMQGETPARMS to set SAS variables (parms) to that data.
Example
This example receives a message.
length msg $ 200;
length arrivet auth size respq sentt 8;
length correlid msgid $ 40;
length label $ 80;
rc=0;
SAS® Integration Technologies: Developer's Guide
MSMQRECEIVEMSG 549

hCursor=0;
transobj=0;
CALL MSMQRECEIVEMSG(hQueue, 0, "RECEIVE", hCursor, transobj, rc,
"ARRIVEDTIME,AUTHENTICATED,BODY_SIZE,CORRELATIONID,
LABEL,MSGID,RESP_QUEUE,SENTTIME",
arrivet, auth, size, correlid, label, msgid, respq, sentt);
if rc ^= 0 then do;
put 'MSMQReceiveMsg: failed';
msg = sysmsg();
put msg;
end;
else do;
put 'MSMQReceiveMsg: succeeded';
/* convert MSMQ arrived time to SAS datetime format */
arrivet = arrivet + 10*365*24*3600 + 3*24*3600 − 5*3600;
put 'arrived time is' arrivet datetime.;
if auth = 1 then put 'message was authenticated';
else put 'message was not authenticated';
put 'message body size is ' size;
put 'correlation id is ' correlid;
put 'label is ' label;
put 'msg id is ' msgid;
put 'resp_queue qid handle is ' respq;
/* convert MSMQ sent time to SAS datetime format */
sentt = sentt + 10*365*24*3600 + 3*24*3600 − 5*3600;
put 'sent time was' sentt datetime.;
end;
SAS® Integration Technologies: Developer's Guide
MSMQRECEIVEMSG 550

MSMQCREATECURSOR
Creates a cursor used to maintain a specific location in a queue when reading its messages.
Syntax
CALL MSMQCREATECURSOR(hQueue, hCursor, rc);
hQueueNumeric, input
Specifies the MSMQ handle to an open queue. This parameter was obtained from a previous
MSMQOPENQUEUE function call.
hCursor
Numeric, output
Returns the handle of the cursor used for looking at messages in the queue. The MSMQCREATECURSOR
routine is used to create a cursor and obtain its handle.
rc Numeric, output
Provides the return code from the CALL routine. If an error occurred, the return code will be non−zero. A
return code of −1 reflects a SAS internal error. Otherwise it represents an MSMQ error code. The SAS
function SYSMSG() can be used to obtain a textual description of the return code.
Example
This example creates a cursor.
length msg $ 200;
hCursor=0;
rc=0;
CALL MSMQCREATECURSOR(hQueue, hCursor, rc);
if rc ^= 0 then do;
put 'MSMQCreateCursor: failed';
msg = sysmsg();
put msg;
end;
else put 'MSMQCreateCursor: succeeded';
MSMQCREATECURSOR 551

MSMQCLOSECURSOR
Closes a given cursor thereby allowing MSMQ to release the associated resources.
Syntax
CALL MSMQCLOSECURSOR(hCursor, rc);
hCursor
Numeric, input
Specifies the handle to a cursor used for looking at messages in the queue. The MSMQCREATECURSOR
routine is used to create a cursor and obtain its handle.
rc Numeric, output
Provides the return code from the CALL routine. If an error occurred, the return code will be non−zero. A
return code of −1 reflects a SAS internal error. Otherwise it represents an MSMQ error code. The SAS
function SYSMSG() can be used to obtain a textual description of the return code.
Example
This example closes a cursor.
length msg $ 200;
rc=0;
CALL MSMQCLOSECURSOR(hCursor, rc);
if rc ^= 0 then do;
put 'MSMQCloseCursor: failed';
msg = sysmsg();
put msg;
end;
else put 'MSMQCloseCursor: succeeded';
MSMQCLOSECURSOR 552

MSMQBEGINTRANS
Creates an internal MSMQ transaction object that can be used to send messages to a queue or read messages from a
queue.
Syntax
CALL MSMQBEGINTRANS(transObj, rc);
transObj
Numeric, output
Returns the transaction object.
rc Numeric, output
Provides the return code from the CALL routine. If an error occurred, the return code will be non−zero. A
return code of −1 reflects a SAS internal error. Otherwise it represents an MSMQ error code. The SAS
function SYSMSG() can be used to obtain a textual description of the return code.
Example
This example creates a transaction object.
length msg $ 200;
transobj=0;
rc=0;
CALL MSMQBEGINTRANS(transobj, rc);
if rc ^= 0 then do;
put 'MSMQBeginTrans: failed';
msg = sysmsg();
put msg;
end;
else put 'MSMQBeginTrans: succeeded';
MSMQBEGINTRANS 553

MSMQCOMMITTRANS
Commits a unit of work from an MSMQ transaction.
Syntax
CALL MSMQCOMMITTRANS(transObj, rc);
transObj
Numeric, input
Specifies the transaction object that was obtained from a previous MSMQBEGINTRANS function call.
rc Numeric, output
Provides the return code from the CALL routine. If an error occurred, the return code will be non−zero. A
return code of −1 reflects a SAS internal error. Otherwise it represents an MSMQ error code. The SAS
function SYSMSG() can be used to obtain a textual description of the return code.
Example
This example commits a unit of work from an MSMQ transaction.
length msg $ 200;
rc=0;
CALL MSMQCOMMITTRANS(transobj, rc);
if rc ^= 0 then do;
put 'MSMQCommitTrans: failed';
msg = sysmsg();
put msg;
end;
else put 'MSMQCommitTrans: succeeded';
MSMQCOMMITTRANS 554

MSMQABORTTRANS
Aborts a unit of work from an MSMQ transaction.
Syntax
CALL MSMQABORTTRANS(transObj, rc);
transObj
Numeric, input
Specifies the transaction object that was obtained from a previous MSMQBEGINTRANS function call.
rc Numeric, output
Provides the return code from the CALL routine. If an error occurred, the return code will be non−zero. A
return code of −1 reflects a SAS internal error. Otherwise it represents an MSMQ error code. The SAS
function SYSMSG() can be used to obtain a textual description of the return code.
Example
This example aborts a unit of work from an MSMQ transaction.
length msg $ 200;
rc=0;
CALL MSMQABORTTRANS(transobj, rc);
if rc ^= 0 then do;
put 'MSMQAbortTrans: failed';
msg = sysmsg();
put msg;
end;
else put 'MSMQAbortTrans: succeeded';
MSMQABORTTRANS 555

MSMQRELEASETRANS
Releases an internal MSMQ transaction object thereby allowing MSMQ to release the associated resources.
Syntax
CALL MSMQRELEASETRANS(transObj, rc);
transObj
Numeric, input
Specifies the transaction object that was obtained from a previous MSMQBEGINTRANS function call.
rc Numeric, output
Provides the return code from the CALL routine. If an error occurred, the return code will be non−zero. A
return code of −1 reflects a SAS internal error. Otherwise it represents an MSMQ error code. The SAS
function SYSMSG() can be used to obtain a textual description of the return code.
Example
This example releases a transaction unit of work.
length msg $ 200;
rc=0;
CALL MSMQRELEASETRANS(transobj, rc);
if rc ^= 0 then do;
put 'MSMQReleaseTrans: failed';
msg = sysmsg();
put msg;
end;
else put 'MSMQReleaseTrans: succeeded';
MSMQRELEASETRANS 556
MSMQLOCATE
Provides a means of locating a single public queue (or set of public queues) based on a set of criteria.
Syntax
CALL MSMQLOCATE(criteria, sortpref, rc, cProps, propids, value1 <,value2, ...>);
criteria Character, input
Identifies the criteria to use for locating the queue(s). The criteria is based on a queue's properties and each
property's value. The criteria parameter uses the following format:
"propid:op:value, ..."
where propid is a queue property, value is the propid value, and op is an operator used as the selection criteria.
The op parameter can be:
LT (Less than)◊ LE (Less than or equal)◊ EQ (Equal)◊ NE (Not equal)◊ GE (Greater than or equal)◊ GT (Greater than)◊
sortprefCharacter, input
Specifies the queue sorting preference. This parameter uses the following format:
"propid:order, ..."
where propid is a queue property, and order is the order preference. The order parameter can be specified as:
ASCEND (Ascending order)◊ DESCEND (Descending order)◊
rc Numeric, output
Provides the return code from the CALL routine. If an error occurred, the return code will be non−zero. A
return code of −1 reflects a SAS internal error. Otherwise it represents an MSMQ error code. The SAS
function SYSMSG() can be used to obtain a textual description of the return code.
cProps Numeric, output
Returns the number of property values that resulted from the criteria search.
propids Character, input
Identifies one or more properties that you want to retrieve. This parameter is a character string with each
applicable property separated by a comma.
Note: The number of values specified should be a multiple of propids specified. For example, if you specified
2 propids and wanted to retrieve these properties for the first 3 queues that meet the specified criteria, you
must specify 6 (3x2) value parameters in order to retrieve these property values for all of the queues.
MSMQLOCATE 557
The following propids and values are valid:
AUTHENTICATE
Retrieves whether or not the queue only accepts authenticated messages. Initialize the variable
appropriately to prevent truncation of the returned value from occurring. The following values are
valid:
"NONE"
Specifies the queue will accept either authenticated or non−authenticated messages.
"ALWAYS"
Specifies the queue always requires authenticated messages.
BASEPRIORITY
Retrieves the base priority for all messages sent to a public queue. The value is a numeric that ranges
from −32768 to 32767, where 32767 is the highest priority and 0 is the default priority.
CREATE_TIME
Retrieves the time and date when the queue was created. The value is a numeric representing the
number of seconds elapsed since midnight (00:00:00), January 1, 1970 (Coordinated Universal time).
INSTANCE
Retrieves the queue's identifier (GUID). The value is a character string representing binary data.
Initialize the variable to a size of at least 32 to guarantee that truncation of the returned value does not
occur.
JOURNAL
Queries whether or not messages are also copied to its journal queue. Initialize the variable to a size
of at least 32 to guarantee that truncation of the returned value does not occur. The following values
are valid:
"NONE"
Specifies that messages removed from the queue are discarded.
"ALWAYS"
Specifies that messages removed from the queue are always stored in its journal queue.
JOURNAL_QUOTA
Retrieves the maximum size (in kilobytes) of the journal queue.
LABEL
Retrieves a description of the queue. The value is a character string. Initialize the variable
appropriately to prevent truncation of the returned value from occurring.
PATHNAME
Retrieves the MSMQ pathname of the queue. The value is a character string. Initialize the variable
appropriately to prevent truncation of the returned value from occurring.
PRIV_LEVEL
Retrieves the privacy level that is required by the queue. The value is a character string. Initialize the
variable appropriately to prevent truncation of the returned value from occurring. The following
values are valid:
"NONE"
Specifies that the queue accepts only non−private (cleartext) messages.
"BODY"
Specifies that the queue accepts only private (encrypted) messages.
"OPTIONAL"
Specifies that the queue accepts both private and non−private messages.
QUOTA
Retrieves the maximum size (in kilobytes) of the queue.
SAS® Integration Technologies: Developer's Guide
MSMQLOCATE 558
TRANSACTION
Retrieves whether or not the queue uses MSMQ transactions. The value is a character string. Initialize
the variable appropriately to prevent truncation of the returned value from occurring. The following
values are valid:
"NONE"
Specifies that the queue does not accept transaction operations.
"ALWAYS"
Specifies that all messages sent to the queue must always be done through an MSMQ
transaction.
TYPE
Retrieves the type of service provided by the queue. The value of the TYPE property is a globally
unique identifier (GUID) in the form of a character string that represents the binary data. Initialize the
variable to a size of at least 32 to guarantee that truncation of the returned value does not occur.
Example
This example locates the first 3 queues with a label "Test Queue" and returns AUTHENTICATE, PRIV_LEVEL, and
PATHNAME properties.
length msg $ 200;
length cProps 8;
length auth1 auth2 auth3 priv1 priv2 priv3 $ 10;
length path1 path2 path3 $ 80;
rc=0;
cProps=0;
CALL MSMQLOCATE("LABEL:EQ:Test Queue", "", rc, cProps,
"AUTHENTICATE,PRIV_LEVEL,PATHNAME",
auth1, priv1, path1, auth2, priv2, path2, auth3, priv3, path3);
if rc ^= 0 then do;
put 'MSMQLocate: failed';
msg = sysmsg();
put msg;
end;
else do;
put 'MSMQLocate: succeeded';
if cProps = 0 then put 'no queues were found';
else do;
cProps = cProps/3; /* # queues */
if cProps GE 1 then do;
put 'queue 1 − authenticate is ' auth1;
put 'queue 1 − privacy is ' priv1;
put 'queue 1 − pathname is ' path1;
end;
if cProps GE 2 then do;
put 'queue 2 − authenticate is ' auth2;
put 'queue 2 − privacy is ' priv2;
put 'queue 2 − pathname is ' path2;
end;
if cProps EQ 3 then do;
put 'queue 3 − authenticate is ' auth3;
put 'queue 3 − privacy is ' priv3;
SAS® Integration Technologies: Developer's Guide
MSMQLOCATE 559

put 'queue 3 − pathname is ' path3;
end;
end;
SAS® Integration Technologies: Developer's Guide
MSMQLOCATE 560
MSMQGETQPROP
Retrieves properties for a specific queue.
Syntax
CALL MSMQGETQPROP(qid, rc, propids, value1 <,value2, ...>);
qid Numeric, input
Specifies the queue identifier that represents the format name of the queue.
rc Numeric, output
Provides the return code from the CALL routine. If an error occurred, the return code will be non−zero. A
return code of −1 reflects a SAS internal error. Otherwise it represents an MSMQ error code. The SAS
function SYSMSG() can be used to obtain a textual description of the return code.
propids Character, input
Identifies one or more properties that you want to retrieve. This parameter is a character string with each
applicable property separated by a comma.
For each property identified by propids, you must provide a value parameter that specifies a variable name to
use to hold the returned property value.
The following propids and values are valid:
AUTHENTICATE
Retrieves whether or not the queue only accepts authenticated messages. Initialize the variable
appropriately to prevent truncation of the returned value from occurring. The following values are
valid:
"NONE"
Specifies the queue will accept either authenticated or non−authenticated messages.
"ALWAYS"
Specifies the queue always requires authenticated messages.
BASEPRIORITY
Retrieves the base priority for all messages sent to a public queue. The value is a numeric that ranges
from −32768 to 32767, where 32767 is the highest priority and 0 is the default priority.
CREATE_TIME
Retrieves the time and date when the queue was created. The value is a numeric representing the
number of seconds elapsed since midnight (00:00:00), January 1, 1970 (Coordinated Universal time).
INSTANCE
Retrieves the queue's identifier (GUID). The value is a character string representing binary data.
Initialize the variable appropriately to guarantee that truncation of the returned value does not occur.
JOURNAL
Retrieves if messages are also copied to its journal queue. Initialize the variable to a size of at least 32
to guarantee that truncation of the returned value does not occur. The following values are valid:
"NONE"
Specifies that messages removed from the queue are discarded.
MSMQGETQPROP 561
"ALWAYS"
Specifies that messages removed from the queue are always stored in its journal queue.
JOURNAL_QUOTA
Retrieves the maximum size (in kilobytes) of the journal queue.
LABEL
Retrieves a description of the queue. The value is a character string. Initialize the variable
appropriately to prevent truncation of the returned value from occurring.
MODIFY_TIME
Retrieves the last time the queue's properties were modified. The value is a numeric representing the
number of seconds elapsed since midnight (00:00:00), January 1, 1970 (Coordinated Universal time).
PATHNAME
Retrieves the MSMQ pathname of the queue. The value is a character string. Initialize the variable
appropriately to prevent truncation of the returned value from occurring.
PRIV_LEVEL
Retrieves the privacy level that is required by the queue. The value is a character string. Initialize the
variable appropriately to prevent truncation of the returned value from occurring. The following
values are valid:
"NONE"
Specifies that the queue accepts only non−private (cleartext) messages.
"BODY"
Specifies that the queue accepts only private (encrypted) messages.
"OPTIONAL"
Specifies that the queue accepts both private and non−private messages.
QUOTA
Retrieves the maximum size (in kilobytes) of the queue.
TRANSACTION
Retrieves whether or not the queue uses MQMQ transactions. The value is a character string.
Initialize the variable appropriately to prevent truncation of the returned value from occurring. The
following values are valid:
"NONE"
Specifies that the queue does not accept transaction operations.
"ALWAYS"
Specifies that all messages sent to the queue must always be done through an MSMQ
transaction.
TYPE
Retrieves the type of service provided by the queue. The value of the TYPE property is a globally
unique identifier (GUID) in the form of a character string that represents the binary data. Initialize the
variable to a size of at least 32 to guarantee that truncation of the returned value does not occur.
Example
This example gets the queue properties and displays them.
length msg $ 200;
length base createt jquota modifyt quota 8;
length auth journal priv trans $ 10;
length inst type $ 32;
length label path $ 80;
SAS® Integration Technologies: Developer's Guide
MSMQGETQPROP 562

rc=0;
CALL MSMQGETQPROP(qid, rc, "AUTHENTICATE,BASEPRIORITY,CREATE_TIME,INSTANCE,JOURNAL,
JOURNAL_QUOTA,LABEL,MODIFY_TIME,PATHNAME,PRIV_LEVEL,
QUOTA,TRANSACTION,TYPE",
auth, base, createt, inst, journal, jquota, label,
modifyt, path, priv, quota, trans, type);
if rc ^= 0 then do;
put 'MSMQGetQProp: failed';
msg = sysmsg();
put msg;
end;
else do;
put 'MSMQGetQProp: succeeded';
put 'authenticate is ' auth;
put 'base priority is ' base;
/* convert MSMQ create time to SAS datetime format */
createt = createt + 10*365*24*3600 + 3*24*3600 − 5*3600;
put 'create time was ' createt datetime.;
put 'instance identifier is ' inst;
put 'journal enablement is ' journal;
put 'journal quota is ' jquota;
put 'label is ' label;
/* convert MSMQ modify time to SAS datetime format */
modifyt = modifyt + 10*365*24*3600 + 3*24*3600 − 5*3600;
put 'last modification time was ' modifyt datetime.;
put 'pathname is ' path;
put 'privacy level is ' priv;
put 'quota is ' quota;
put 'transaction requirement is ' trans;
put 'type of service is ' type;
end;
SAS® Integration Technologies: Developer's Guide
MSMQGETQPROP 563
MSMQSETQPROP
Sets the properties of a specific queue.
Syntax
CALL MSMQSETQPROP(qid, rc, propids, value1 <,value2, ...>);
qid Numeric, input
Specifies the queue identifier that represents the format name of the queue.
rc Numeric, output
Provides the return code from the CALL routine. If an error occurred, the return code will be non−zero. A
return code of −1 reflects a SAS internal error. Otherwise it represents an MSMQ error code. The SAS
function SYSMSG() can be used to obtain a textual description of the return code.
propids Character, input
Identifies one or more properties that you want to set. This parameter is a character string with each applicable
property separated by a comma.
For each property identified by propids, you must provide a value parameter that specifies the value to use to
set the property.
The following propids and values are valid:
AUTHENTICATE
Specifies whether or not the queue only accepts authenticated messages. The following values are
valid:
"NONE"
Specifies the queue will accept either authenticated or non−authenticated messages.
"ALWAYS"
Specifies the queue always requires authenticated messages.
BASEPRIORITY
Specifies the base priority for all messages sent to a public queue. The value is a numeric that ranges
from −32768 to 32767, where 32767 is the highest priority and 0 is the default priority.
JOURNAL
Specifies if messages are also copied to its journal queue. The following values are valid:
"NONE"
Specifies that messages removed from the queue are discarded.
"ALWAYS"
Specifies that messages removed from the queue are always stored in its journal queue.
JOURNAL_QUOTA
Specifies the maximum size (in kilobytes) of the journal queue.
LABEL
Specifies a description of the queue. The value is a character string.
PRIV_LEVEL
MSMQSETQPROP 564

Specifies the privacy level that is required by the queue. The value is a character string. The following
values are valid:
"NONE"
Specifies that the queue accepts only non−private (cleartext) messages.
"BODY"
Specifies that the queue accepts only private (encrypted) messages.
"OPTIONAL"
Specifies that the queue accepts both private and non−private messages.
QUOTA
Specifies the maximum size (in kilobytes) of the queue.
TYPE
Specifies the type of service provided by the queue. The value of the TYPE property is a globally
unique identifier (GUID) in the form of a character string that represents the binary data.
Example
This example sets the queue properties.
length msg $ 200;
rc=0;
CALL MSMQSETQPROP(qid, rc, "AUTHENTICATE,BASEPRIORITY,JOURNAL,JOURNAL_QUOTA,
LABEL,PRIV_LEVEL,QUOTA,TYPE",
"ALWAYS", 1, "ALWAYS", 32767, "New Label",
"BODY", 32767, "0A0B0C0D0E0F0102030405060708090A");
if rc ^= 0 then do;
put 'MSMQSetQProp: failed';
msg = sysmsg();
put msg;
end;
else put 'MSMQSetQProp: succeeded';
SAS® Integration Technologies: Developer's Guide
MSMQSETQPROP 565
MSMQGETQSEC
Retrieves the access control security information for the specified queue.
Syntax
CALL MSMQGETQSEC(qid, rc, owner, dacl);
qid Numeric, input
Specifies the queue identifier that represents the format name of the queue.
rc Numeric, output
Provides the return code from the CALL routine. If an error occurred, the return code will be non−zero. A
return code of −1 reflects a SAS internal error. Otherwise it represents an MSMQ error code. The SAS
function SYSMSG() can be used to obtain a textual description of the return code.
owner Character, output
Returns the owner of the queue. Initialize this variable appropriately to guarantee that truncation of the
returned value does not occur.
dacl Character, output
Returns the discretionary access control list for the queue. Initialize this variable appropriately to guarantee
that truncation of the returned value does not occur. This parameter will be returned in the form of
"Domain\Account:accessType:Permissions,..."
where accessType is one of the following:
"ALLOW" (Permissions allowed)◊ "DENY" (Permissions denied)◊
Permissions is one or more of the following separated by '+':
Rj (Receive Journal)◊ Rq (Receive Message)◊ Pq (Peek Message)◊ Sq (Send Message)◊ Sp (Set Properties)◊ Gp (Get Properties)◊ D (Delete Queue)◊ Pg (Get Permissions)◊ Ps (Set Permissions)◊ O (Take Ownership)◊
Example
This example gets the queue security properties and displays them.
length msg $ 200;
MSMQGETQSEC 566

length owner $ 60;
length dacl $ 200;
rc=0;
CALL MSMQGETQSEC(qid, rc, owner, dacl);
if rc ^= 0 then do;
put 'MSMQGetQSec: failed';
msg = sysmsg();
put msg;
end;
else do;
put 'MSMQGetQSec: succeeded';
put 'owner is ' owner;
put 'dacl is ' dacl;
end;
SAS® Integration Technologies: Developer's Guide
MSMQGETQSEC 567
MSMQSETQSEC
Sets the access control information for a specified queue.
Syntax
CALL MSMQSETQSEC(qid, rc <,owner, dacl>);
qid Numeric, input
Specifies the queue identifier that represents the format name of the queue.
rc Numeric, output
Provides the return code from the CALL routine. If an error occurred, the return code will be non−zero. A
return code of −1 reflects a SAS internal error. Otherwise it represents an MSMQ error code. The SAS
function SYSMSG() can be used to obtain a textual description of the return code.
owner Character, input (Optional)
Identifies the owner of the queue. This parameter must be specified as "Domain\Account".
dacl Character, input (Optional)
Specifies the discretionary access control list for the queue. This parameter must be specified in the form of
"Domain\Account:accessType:Permissions,..."
where accessType is one of the following:
"ALLOW"
Permissions allowed
"DENY" (see note below)
Permissions denied
Note: Windows NT 4.0 supports DENY access control entries but cannot edit security information which uses
them. Therefore, this access type is not recommended until Windows NT 5.0 or later.
Permissions is one or more of the following separated by '+':
Rj (Receive Journal)◊ Rq (Receive Message)◊ Pq (Peek Message)◊ Sq (Send Message)◊ Sp (Set Properties)◊ Gp (Get Properties)◊ D (Delete Queue)◊ Pg (Get Permissions)◊ Ps (Set Permissions)◊ O (Take Ownership)◊
MSMQSETQSEC 568

Example
This example sets the queue security properties to allow NTDOMAIN\User6 to Receive Messages (Rq), Get
Properties (Gp), and Get Permissions (Pg).
length msg $ 200;
rc=0;
CALL MSMQSETQSEC(qid, rc, "", "NTDOMAIN\User6:ALLOW:Rq+Gp+Pg");
if rc ^= 0 then do;
put 'MSMQSetQSec: failed';
msg = sysmsg();
put msg;
end;
else put 'MSMQSetQSec: succeeded';
SAS® Integration Technologies: Developer's Guide
MSMQSETQSEC 569

MSMQGETSCONTEXT
Retrieves security information needed to authenticate messages.
Syntax
CALL MSMQGETSCONTEXT(certStor, hContext, rc);
certStorCharacter, input
Specifies the name of the system certificate store to use to locate the desired external certificate. If NULL, the
internal security certificate provided by MSMQ is used.
Generally, "MY" is used. The corresponding registry entry is:
HKEY_CURRENTUSER\Software\Microsoft\SystemCertificates\MY\Certificates
hContext
Numeric, output
Returns a handle to the security context buffer allocated by MSMQ.
rc Numeric, output
Provides the return code from the CALL routine. If an error occurred, the return code will be non−zero. A
return code of −1 reflects a SAS internal error. Otherwise it represents an MSMQ error code. The SAS
function SYSMSG() can be used to obtain a textual description of the return code.
Example
This example gets the security context from internal MSMQ certificate.
length msg $ 200;
hContext=0;
rc=0;
CALL MSMQGETSCONTEXT("", hContext, rc);
if rc ^= 0 then do;
put 'MSMQGetSContext: failed';
msg = sysmsg();
put msg;
end;
else put 'MSMQGetSContext: succeeded';
MSMQGETSCONTEXT 570

MSMQFREESCONTEXT
Frees the memory allocated by MSMQGETSCONTEXT.
Syntax
CALL MSMQFREESCONTEXT(hContext, rc);
hContext
Numeric, input
Specifies the handle to the security context buffer allocated by MSMQ.
rc Numeric, output
Provides the return code from the CALL routine. If an error occurred, the return code will be non−zero. A
return code of −1 reflects a SAS internal error. Otherwise it represents an MSMQ error code. The SAS
function SYSMSG() can be used to obtain a textual description of the return code.
Example
This example frees the security context buffer.
length msg $ 200;
rc=0;
CALL MSMQFREESCONTEXT(hContext, rc);
if rc ^= 0 then do;
put 'MSMQFreeSContext: failed';
msg = sysmsg();
put msg;
end;
else put 'MSMQFreeSContext: succeeded';
MSMQFREESCONTEXT 571
MSMQMAP
Defines a data map that can be subsequently used on a MSMQSETPARMS or MSMQGETPARMS call.
Syntax
CALL MSMQMAP(hMap, rc, desc1 <,desc2, desc3, ...>);
hMap Numeric, output
Returns the SAS internally−generated map descriptor handle.
rc Numeric, output
Provides the return code from the CALL routine. If an error occurred, the return code will be non−zero. The
SAS function SYSMSG() can be used to obtain a textual description of the return code.
descs Character, input
Specifies descriptor parameters that are used to describe the different data types in a map. Each description
(desc1, desc2, ...) defines the data type, an offset from the beginning of the message, and the length of the
data. A descriptor has the following format:
"TYPE<,OFFSET,LENGTH>"
where:
TYPE is one of the following:
CHAR (Character data)• SHORT (Short binary)• LONG (Long binary)• DOUBLE (Floating point double)•
OFFSET
The offset from the beginning of the message. This property is optional, so by default the data is not
aligned (data starts at next available position in message).
LENGTH
The length of the data being represented. This property is optional in most cases. The only time length
is required is when setting up to receive character data. Specifying length for numeric data is ignored
since length is implicitly defined.
Note: Type coercion is performed transparently when you put SAS variables into a MSMQ message
(MSMQSETPARMS) and also when you get SAS variables from a MSMQ message (MSMQGETPARMS).
That is, if the data that you are sending or receiving is a different type than the SAS variable itself, the data
will be coerced into the appropriate data type.
Example
This example defines a map to use to send and receive a message with a short, a long, a double and a character string.
No alignment is specified for any data type, and strings will always be 200 characters in length (blank padded).
hMap=0;
MSMQMAP 572

rc=0;
desc1="SHORT";
desc2="LONG";
desc3="DOUBLE";
desc4="CHAR,,200"
CALL MSMQMAP(hMap, rc, desc1, desc2, desc3, desc4);
SAS® Integration Technologies: Developer's Guide
MSMQMAP 573

MSMQSETPARMS
Creates a data descriptor that describes the actual SAS variables along with an associated data mapping. This data
descriptor can then be used on a subsequent MSMQSENDMSG call.
Syntax
CALL MSMQQSETPARMS(hData, hMap, rc, parm1 <,parm2, parm3, ...>);
hData Numeric, output
Returns the SAS internal data descriptor handle that is generated.
hMap Numeric, input
Specifies the SAS internal map descriptor handle obtained from a previous MSMQMAP function call. If set to
zero, no external defined mapping is assumed and therefore, all data will be mapped according to SAS
internal representations. That is, all numerics will be mapped as doubles and all strings will be mapped as
character data of the current string length.
rc Numeric, output
Provides the return code from the CALL routine. If an error occurred, the return code will be non−zero. The
SAS function SYSMSG() can be used to obtain a textual description of the return code.
parms Numeric/character, input
Specifies one or more parameters used to define the values of SAS variables in a message.
Example
This example sets values of SAS variables into a message.
hData=0;
rc=0;
parm1=100;
parm2=9999;
parm3=9999.9999;
parm4="This is a test."
CALL MSMQSETPARMS(hData, hMap, rc, parm1, parm2, parm3, parm4);
MSMQSETPARMS 574

MSMQGETPARMS
Retrieves values of SAS variables from a previous MSMQ message that was received by a MSMQRECEIVEMSG
call.
Syntax
CALL MSMQGETPARMS(hMap, rc, parm1 <,parm2, parm3, ...>);
hMap Numeric, input
Specifies the SAS internal map descriptor handle obtained from a previous MSMQMAP function call.
rc Numeric, output
Provides the return code from the CALL routine. If an error occurred, the return code will be non−zero. The
SAS function SYSMSG() can be used to obtain a textual description of the return code.
parms Numeric/character, input
Specifies one or more parameters used to define the values of SAS variables in a message. Initialize the
variables appropriately to guarantee that truncation of the returned values does not occur.
Details
This message is available until the next MSMQRECEIVEMSG call is performed.
Example
This example gets values of SAS variables from a received message.
length parm1 parm2 parm3;
length parm4 $ 200;
rc=0;
CALL MSMQGETPARMS(hMap, rc, parm1, parm2, parm3, parm4);
MSMQGETPARMS 575
MSMQFREE
Frees a SAS internal handle, thereby, releasing its resources.
Syntax
CALL MSMQFREE(handle);
handle Numeric, input
Specifies a SAS internal handle obtained from a previous CALL routine. The following CALL routines return
handles that may be used as input to this routine (the type of handle is also shown after the CALL routine
name):
MSMQCREATEQUEUE − qid (format name representation)◊ MSMQPATHTOFORMAT − qid◊ MSMQINSTTOFORMAT − qid◊ MSMQHNDLTOFORMAT − qid◊ MSMQMAP − hMap◊ MSMQSETPARMS − hData◊
Example
This example frees a handle and its resources.
CALL MSMQFREE(Handle);
Application Messaging
MSMQFREE 576

Common Messaging Interface
The SAS Common Messaging Interface provides the following:
a seamless environment for writing applications that access message queues of the IBM WebSphere MQ
(previously named MQSeries), Microsoft MSMQ, and TIBCO TIB/Rendezvous transports
•
a way to use the local SAS registry or a distributed LDAP repository to store and retrieve messaging
information.
•
The common interface to WebSphere MQ, MSMQ, and Rendezvous enables your application programs to interact in
a consistent manner that is independent of your transport.
This section describes the use of the interface and provides reference information for each SAS CALL routine.
Application Messaging
Common Messaging Interface 577

Writing Applications Using the Common Messaging
Interface
Two general types of programs can use the common messaging interface. One uses the interface to administer
information about the message transports. Another uses the interface to send and receive messages between
applications. These two types of programs are discussed in the sections below.
Important Note: In Version 9 of the Common Messaging Interface, Version 9 enhanced data sets are the default
format for sending and receiving data sets. In order to send and receive Version 8 data sets, you must include the
"ATTACH_VERSION=VERSION_8" option in the Dataset option list on the SENDMESSAGE call. If you do not
use the "ATTACH_VERSION=VERSION_8" option on the SENDMESSAGE call, received data sets will be stored
in the Version 9 format. If you might be sending data sets to another SAS session that is running Release 8.2 or
earlier, use this option to exchange data sets in a format that can be interpreted by both applications.
Administrator Programs
SAS programs can utilize the common messaging interface in order to administer the information in the repository for
the queues. The goal of such an administrator program is to encapsulate all information about the queues so that all
other programs in the application can focus on using the queues rather than configuring them. This not only simplifies
the other programs, but also makes the queues easier to administer by having all of this information in one location.
An administrator program performs general functions. For example:
defining the transport−specific details that are required by the queue. The available transports are: MQSeries
(refers to WebSphere MQ), MSMQ, Rendezvous, or Rendezvous−CM.
•
setting aliases for new transports and queues and retrieving aliases for existing ones• retrieving the properties of a queue• defining and retrieving maps to data descriptors that identify the data type, offset, and length• setting and retrieving dynamic creation queue models for the MSMQ transport.• setting and retrieving transport definition models for Rendezvous (optional) and Rendezvous−CM (required).•
The following SAS CALL routines are used to administer the information repository:
SETALIAS• SETMAP• SETMODEL• GETALIAS• GETMAP• GETMODEL• GETQUEUEPROPS•
Other functions of the administration process include removing any unneeded information in the repository. This
encompasses functions such as the following:
deleting a transport or queue alias definition• deleting a data descriptor definition map•
Writing Applications Using the Common Messaging Interface 578

deleting a dynamic or transport model definition.•
The following SAS CALL routines are used to administer these aspects of the information repository:
DELETEALIAS• DELETEMAP• DELETEMODEL•
User Programs
This section describes how a SAS program can use the common messaging interface in order to access message
queues to send and receive messages to other programs. The common interface alleviates the need for these user
programs to use transport−specific code. This makes the user programs less vulnerable to changes in the queue's
attributes. The programs interact with each queue in a consistent matter, independent of the transport.
User programs perform general functions such as the following:
initializing the type of transport and obtaining a unique identifier• opening an existing queue by using a known transport identifier• sending messages to a queue by using a unique queue identifier• receiving messages (and possibly attachments) from a queue• parsing the message• getting attachments associated with a message (if necessary)• copying any desired attachment(s) to local storage• closing all queues upon completion of the program tasks• terminating transports initialized by the program.•
The following SAS CALL routines are the basis for initializing/terminating a transport, opening/closing a queue, and
sending/receiving messages and attachments:
INIT• TERM• OPENQUEUE• CLOSEQUEUE• SENDMESSAGE• RECEIVEMESSAGE• PARSEMESSAGE• GETATTACHMENT• ACCEPTATTACHMENT•
In addition, user programs can perform transaction processing on transaction queues. Such functions include the
following:
creating a transaction object in order to begin progressing• committing or aborting work that is performed by using a transaction object• releasing a transaction object and any resource that is associated with it.•
The following SAS CALL routines are provided for applications that require transaction processing:
SAS® Integration Technologies: Developer's Guide
Writing Applications Using the Common MessagingInterface 579

BEGINTRANSACTION• COMMIT• ABORT• FREETRANSACTION•
Application Messaging
SAS® Integration Technologies: Developer's Guide
Writing Applications Using the Common MessagingInterface 580

Using TIB/Rendezvous with the SAS Common Messaging
Interface
Starting with Release 8.2 of SAS Integration Technologies, the SAS Common Messaging Interface included support
for TIB/Rendezvous Release 6.3. Integration Technologies 9.1 supports both the reliable and certified message
delivery features of TIB/Rendezvous Release 7.1.
TIB/Rendezvous is a leading messaging middleware product from TIBCO Software, Inc. Like IBM's WebSphere MQ
(previously named MQSeries) and Microsoft's MSMQ, TIB/Rendezvous makes it easy to create distributed
applications across heterogeneous systems.
The SAS Common Messaging Interface includes messaging functions that are common to WebSphere MQ, MSMQ,
and Rendezvous. However, the TIB/Rendezvous message delivery system differs from the other transports in some
important ways. Developers must take these differences into account when using the Common Messaging Interface to
support Rendezvous−based applications. The main differences are as follows:
Rendezvous uses an approach called subject−based addressing. While both WebSphere MQ and MSMQ
deliver messages to specific destination queues using queue names, Rendezvous broadcasts messages that
have been labeled with user−defined subject names. Data consumer applications listen for particular subject
names and receive messages only when the subject name matches a name being listened for. The
communicating programs must agree in advance on the subject names to be used and the forms of messages to
be exchanged.
•
Because messages are broadcast to subject names instead of specific destination queues, a message can be
received only by stations that are online and actively listening for the subject name associated with the
message.
•
Our detailed CALL routine documentation explains how to use the SAS Common Messaging Interface to access the
unique features of TIB/Rendezvous. Example code showing how to use the SAS Common Messaging Interface with
TIB/Rendezvous is also provided. For additional information, please consult the TIBCO documentation.
Rendezvous Certified Message Delivery (Rendezvous−CM)
Certified message delivery features offers a stronger assurance of delivery than reliable message delivery. Certified
message delivery protocols also offer the following:
tighter control• greater flexibility• fine−grained reporting•
To determine whether or not you should use Rendezvous certified message delivery, please consult the TIBCO
documentation.
The CALL routine documentation explains how to use the SAS Common Messaging Interface to access the features
of TIB/Rendezvous Certified Message Delivery. Example code showing how to use the SAS Common Messaging
Interface with TIB/Rendezvous Certified Message Delivery is also provided. For additional information, please
consult the TIBCO documentation.
Using TIB/Rendezvous with the SAS Common Messaging Interface 581

For information about support for different versions of TIB/Rendezvous, see the page on Supported Messaging
Interface Versions.
Application Messaging
SAS® Integration Technologies: Developer's Guide
Using TIB/Rendezvous with the SAS Common Messaging Interface 582
TIB/Rendezvous Coding Example
The following example of a SAS DATA step shows how to use the SAS Common Messaging Interface with the
TIB/Rendezvous transport to send and receive messages using subject−based addressing.
data _null_;
%let ldap_host=mynode.alphalite.com;
%let ldap_port=8001;
%let ldap_base=o=Alphalite Airways,c=US;
length msg $ 200;
length qid qid2 tid rc attchflg 8;
length parm1 parm2 parm3 recv1 recv2 recv3 8;
length parm4 recv4 $50;
length map $ 80;
length event $ 10;
tid=0;
rc=0;
put '−−−−';
put 'Call INIT';
CALL INIT(tid, 'RENDEZVOUS', rc);
if rc ^= 0 then do;
put 'INIT: failed';
msg = sysmsg();
put msg;
end;
else put 'INIT: succeeded';
rc=0;
qid=0;
put '−−−−';
put 'Call OPENQUEUE for queue1 to listen
for and receive messages';
CALL OPENQUEUE(qid, tid, 'test.subject',
'FETCH', rc, "POLL(Timeout=15)");
if rc ^= 0 then do;
put 'OPENQUEUE: failed';
msg = sysmsg();
put msg;
end;
else put 'OPENQUEUE: succeeded';
rc=0;
qid2=0;
put '−−−−';
put 'Call OPENQUEUE for queue2 to send messages';
CALL OPENQUEUE(qid2, tid, 'test.subject',
'DELIVERY', rc);
if rc ^= 0 then do;
put 'OPENQUEUE: failed';
msg = sysmsg();
put msg;
end;
else put 'OPENQUEUE: succeeded';
rc=0;
put '−−−−';
TIB/Rendezvous Coding Example 583
put 'Call SETMAP';
CALL SETMAP('mymap', 'LDAP', rc,
'SHORT;LONG;DOUBLE;CHAR,,50');
if rc ^= 0 then do;
put 'SETMAP: failed';
msg = sysmsg();
put msg;
end;
else put 'SETMAP: succeeded';
parm1=100;
parm2=9999;
parm3=9999.1234;
parm4="ABCDEFGHIJKLMNOPQRSTUVWXYZ";
put '−−−−';
put 'Call SENDMESSAGE';
call sendmessage(qid2,rc,"map","mymap" ,
parm1,parm2,parm3,parm4);
if rc ^= 0 then do;
put 'send message failed: ';
msg=sysmsg();
put msg;
end;
else put 'send message succeeded';
rc = 0;
put '−−−−';
put 'Call RECEIVEMESSAGE';
map = "mymap";
call receivemessage(qid, rc, event,
attchflg,"map",map,recv1,recv2,recv3,recv4);
put 'qid =' qid;
put 'event = ' event;
put 'attchflg =' attchflg;
if rc ^= 0 then do;
put 'receive message failed: ';
msg=sysmsg();
put msg;
end;
else do;
put 'receive message succeeded';
put map;
end;
if event eq 'DELIVERY' then
do;
put 'Message has been delivered';
put 'recv1 = ' recv1;
put 'recv2 = ' recv2;
put 'recv3 = ' recv3;
put 'recv4 = ' recv4;
end;
rc=0;
put '−−−−';
put 'Call CLOSEQUEUE for queue2';
CALL CLOSEQUEUE(qid2, rc);
if rc ^= 0 then do;
put 'CLOSEQUEUE: failed';
msg = sysmsg();
SAS® Integration Technologies: Developer's Guide
TIB/Rendezvous Coding Example 584
put msg;
end;
else put 'CLOSEQUEUE: succeeded';
rc=0;
put '−−−−';
put 'Call CLOSEQUEUE for queue1';
CALL CLOSEQUEUE(qid, rc);
if rc ^= 0 then do;
put 'CLOSEQUEUE: failed';
msg = sysmsg();
put msg;
end;
else put 'CLOSEQUEUE: succeeded';
rc=0;
put '−−−−';
put 'Call TERM';
CALL TERM(tid, rc);
if rc ^= 0 then do;
put 'TERM: failed';
msg = sysmsg();
put msg;
end;
else put 'TERM: succeeded';
run;
Application Messaging
SAS® Integration Technologies: Developer's Guide
TIB/Rendezvous Coding Example 585
TIB/Rendezvous Certified Messaging Coding Examples
The following examples of SAS DATA steps show how to use the SAS Common Messaging Interface with the
TIB/Rendezvous Certified Messaging transport to send and receive messages.
Example 1
In the first example, the sender and listener use the same DATA step.
data _null_;
%let ldap_host=mynode.alphalite.com;
%let ldap_port=8001;
%let ldap_base=o=Alphalite Airways,c=US;
length msg $ 200;
length qid qid2 tid rc 8;
length map $80;
length recv1 recv2 recv3 8;
length recv4 $50;
length event $10;
tid=0;
rc=0;
put '−−−−';
put 'Call INIT';
CALL INIT(tid, 'RENDEZVOUS−CM', rc);
if rc ^= 0 then do;
put 'INIT: failed';
msg = sysmsg();
put msg;
end;
else put 'INIT: succeeded';
call setmodel("RENDEZVOUS−CM", "RENDCMSENDER",
"LDAP", rc, "CMNAME, LEDGER",
"cmsender", "c:\cmsendledger.txt");
if rc ^= 0 then do;
put 'SETMODEL: failed';
msg = sysmsg();
put msg;
end;
else put 'SETMODEL: succeeded';
call setmodel("RENDEZVOUS−CM", "RENDCMRECEIVE",
"LDAP", rc, "CMNAME, LEDGER, REQUESTOLD,
SYNCLEDGER", "cmreceive", "c:\cmrcvledger.txt",
"YES", "NO");
if rc ^= 0 then do;
put 'SETMODEL: failed';
msg = sysmsg();
put msg;
end;
else put 'SETMODEL: succeeded';
rc=0;
put '−−−−';
put 'Call SETMAP';
TIB/Rendezvous Certified Messaging Coding Examples 586
CALL SETMAP('rendmap', 'LDAP', rc,
'SHORT;LONG;DOUBLE;CHAR,,50');
if rc ^= 0 then do;
put 'SETMAP: failed';
msg = sysmsg();
put msg;
end;
else put 'SETMAP: succeeded';
rc=0;
qid2=0;
put '−−−−';
put 'Call OPENQUEUE';
CALL OPENQUEUE(qid2, tid, 'testcm.subject',
'DELIVERY', rc, "DYNAMIC(Model=rendcmsender)");
if rc ^= 0 then do;
put 'OPENQUEUE: failed';
msg = sysmsg();
put msg;
end;
else put 'OPENQUEUE: succeeded';
put "qid2= " qid2;
rc=0;
qid=0;
put '−−−−';
put 'Call OPENQUEUE';
CALL OPENQUEUE(qid, tid, 'testcm.subject', 'FETCH', rc,
"DYNAMIC(Model=rendcmreceive)", "POLL(Timeout=15)");
if rc ^= 0 then do;
put 'OPENQUEUE: failed';
msg = sysmsg();
put msg;
end;
else put 'OPENQUEUE: succeeded';
put "qid= " qid;
/* send a message */
parm1=100;
parm2=9999;
parm3=9999.1234;
parm4="Demonstrating the rendezvous message api.";
put '−−−−';
put 'Call SENDMESSAGE';
call sendmessage(qid2,rc,"map","rendmap" ,
parm1,parm2,parm3,parm4);
if rc ^= 0 then do;
put 'send message failed: ';
msg=sysmsg();
put msg;
end;
else put 'send message succeeded';
rc = 0;
put '−−−−';
put 'Call RECEIVEMESSAGE';
map = "rendmap";
call receivemessage(qid, rc, event,
attchflg,"map",map,recv1,recv2,recv3,recv4);
SAS® Integration Technologies: Developer's Guide
TIB/Rendezvous Certified Messaging Coding Examples 587
put 'qid =' qid;
put 'event = ' event;
put 'attchflg =' attchflg;
if rc ^= 0 then do;
put 'receive message failed: ';
msg=sysmsg();
put msg;
end;
else do;
put 'receive message succeeded';
put map;
end;
if event eq 'DELIVERY' then
do;
put 'Message has been delivered';
if attchflg eq 1 then do;
put 'Attachment(s) are associated
with this message';
/* process attachments...*/
end;
put 'recv1 = ' recv1;
put 'recv2 = ' recv2;
put 'recv3 = ' recv3;
put 'recv4 = ' recv4;
end;
rc=0;
put '−−−−';
put 'Call CLOSEQUEUE for sender';
put "qid2= " qid2;
CALL CLOSEQUEUE(qid2, rc, "DELETE_PURGE");
if rc ^= 0 then do;
put 'CLOSEQUEUE: failed';
msg = sysmsg();
put msg;
end;
else put 'CLOSEQUEUE: succeeded';
rc=0;
put '−−−−';
put 'Call CLOSEQUEUE for receiver';
put "qid= " qid;
CALL CLOSEQUEUE(qid, rc, "DELETE_PURGE");
if rc ^= 0 then do;
put 'CLOSEQUEUE: failed';
msg = sysmsg();
put msg;
end;
else put 'CLOSEQUEUE: succeeded';
rc=0;
put '−−−−';
put 'Call TERM';
CALL TERM(tid, rc);
if rc ^= 0 then do;
put 'TERM: failed';
msg = sysmsg();
put msg;
end;
else put 'TERM: succeeded';
SAS® Integration Technologies: Developer's Guide
TIB/Rendezvous Certified Messaging Coding Examples 588
run;
Example 2
In the second example, the sender and listener use separate DATA steps. Each DATA step is run in a separate SAS
session. The receiving DATA step needs to start running before the sending DATA step ends.
Sending DATA Step
/* SAS DATA step to send a certified message */
%let ldap_host=mynode.alphalite.com;
%let ldap_port=389;
%let ldap_base=o=Alphalite Airways,c=US;
data _null_;
length msg $ 200;
length qid2 tid rc 8;
length map $80;
length recv4 $50;
length event $10;
length queue $ 80;
tid=0;
rc=0;
call setmodel("RENDEZVOUS−CM", "RENDCMSENDER",
"LDAP", rc, "CMNAME, LEDGER", "cmsender",
"c:\sendledger.txt");
if rc ^= 0 then do;
put 'SETMODEL: failed';
msg = sysmsg();
put msg;
end;
else put 'SETMODEL: succeeded';
rc=0;
put '−−−−';
put 'Call SETMAP';
CALL SETMAP('rendmap', 'LDAP', rc,
'SHORT;LONG;DOUBLE;CHAR,,50');
if rc ^= 0 then do;
put 'SETMAP: failed';
msg = sysmsg();
put msg;
end;
else put 'SETMAP: succeeded';
call setalias("queue", "tibcmalias", "LDAP",
rc, "RENDEZVOUS−CM", "send.cmmsg");
if rc ^= 0 then do;
put 'set_alias failed: ';
msg=sysmsg();
put msg;
end;
SAS® Integration Technologies: Developer's Guide
TIB/Rendezvous Certified Messaging Coding Examples 589
else put 'set_alias succeeded';
put ' this should be next';
rc=0;
qname = "tibcmalias";
qid2=0;
put '−−−−';
put 'Call OPENQUEUE for queue2';
CALL OPENQUEUE(qid2, tid, qname, 'DELIVERY',
rc, "DYNAMIC(Model=rendcmsender)");
if rc ^= 0 then do;
put 'OPENQUEUE: failed';
msg = sysmsg();
put msg;
end;
else put 'OPENQUEUE: succeeded';
/* send a message */
parm1=100;
parm2=9999;
parm3=9999.1234;
parm4="Demonstrating the rendezvous message api.";
put '−−−−';
put 'Call SENDMESSAGE';
call sendmessage(qid2,rc,"map, addlistener","rendmap",
"cmreceive",parm1,parm2,parm3,parm4);
if rc ^= 0 then do;
put 'send message failed: ';
msg=sysmsg();
put msg;
end;
else put 'send message succeeded';
/*
* This or another instance of the certified transport
* named cmsender must be active to deliver certified
* messages to the listener.
*/
slept = sleep(15);
rc=0;
put '−−−−';
put 'Call CLOSEQUEUE for queue2';
CALL CLOSEQUEUE(qid2, rc);
if rc ^= 0 then do;
put 'CLOSEQUEUE: failed';
msg = sysmsg();
put msg;
end;
else put 'CLOSEQUEUE: succeeded';
run;
Receiving DATA Step
/* SAS DATA step to receive certified messages */
%let ldap_host=mynode.alphalite.com;
SAS® Integration Technologies: Developer's Guide
TIB/Rendezvous Certified Messaging Coding Examples 590
%let ldap_port=389;
%let ldap_base=o=Alphalite Airways,c=US;
data _null_;
length msg $ 200;
length qid tid rc 8;
length map $80;
length event $10;
length queue $ 80;
length token $300;
length attach $10;
length recv1 recv2 recv3 8;
length recv4 $50;
length certified $8;
length sendername $50;
rc=0;
call setmodel("RENDEZVOUS−CM", "RENDCMRECEIVE",
"LDAP", rc, "CMNAME, LEDGER, REQUESTOLD",
"cmreceive", "c:\recvledger.txt", "YES");
if rc ^= 0 then do;
put 'SETMODEL: failed';
msg = sysmsg();
put msg;
end;
else put 'SETMODEL: succeeded';
call setalias("queue", "tibcmalias", "LDAP",
rc, "RENDEZVOUS−CM", "send.cmmsg");
if rc ^= 0 then do;
put 'set_alias failed: ';
msg=sysmsg();
put msg;
end;
else put 'set_alias succeeded';
rc=0;
qid=0;
tid = 0;
qname = "tibcmalias";
put '−−−−';
put 'Call OPENQUEUE';
CALL OPENQUEUE(qid, tid, qname, 'FETCH', rc,
"DYNAMIC(Model=rendcmreceive)", "POLL(TIMEOUT=30)");
if rc ^= 0 then do;
put 'OPENQUEUE: failed';
msg = sysmsg();
put msg;
end;
else put 'OPENQUEUE: succeeded';
put "qid= " qid;
put "CALL receivemessage";
map = "rendmap";
call receivemessage(qid, rc, event,
attchflg,"map,certified,sendername",map, certified,
sendername, recv1,recv2,recv3,recv4);
put 'qid =' qid;
put 'event = ' event;
SAS® Integration Technologies: Developer's Guide
TIB/Rendezvous Certified Messaging Coding Examples 591
put 'attchflg =' attchflg;
put 'certified = ' certified;
put 'sendername = ' sendername;
if rc ^= 0 then do;
put 'receive message failed: ';
msg=sysmsg();
put msg;
end;
else do;
put 'receive message succeeded';
put map;
end;
if event eq 'DELIVERY' then
do;
put 'Message has been delivered';
if attchflg eq 1 then do;
put 'Attachment(s) are associated
with this message';
/* process attachments...*/
end;
put 'recv1 = ' recv1;
put 'recv2 = ' recv2;
put 'recv3 = ' recv3;
put 'recv4 = ' recv4;
end;
rc=0;
put '−−−−';
put 'Call CLOSEQUEUE for queue1';
CALL CLOSEQUEUE(qid, rc);
if rc ^= 0 then do;
put 'CLOSEQUEUE: failed';
msg = sysmsg();
put msg;
end;
else put 'CLOSEQUEUE: succeeded';
rc=0;
put '−−−−';
run;
Application Messaging
SAS® Integration Technologies: Developer's Guide
TIB/Rendezvous Certified Messaging Coding Examples 592

Using a Repository with Application Messaging
The common messaging interface enables you to store information about message queues in either the local SAS
registry or a distributed Lightweight Directory Access Protocol (LDAP) repository or a combination of both. The
information that can be stored and retrieved include the following:
Transport alias
is an alias name that describes a transport (MQSeries (refers to WebSphere MQ), MSMQ, Rendezvous, or
Rendezvous−CM)
Queue alias
is an alias name that describes a transport and queue
Dynamic queue model
is a model name that describes a queue's properties
Transport model
is a model name that describes a Rendezvous or Rendezvous−CM transport
Data map description
is a map name that describes the format of data within a message.
Placing this type of information in storage provides both reusability and encapsulation. A repository can contain all
queue definitions, thereby enabling you to focus on the application usage rather than the specific definition of a queue.
By using an LDAP Server repository, you can access queues across your network, including queues defined by other
users.
The SAS registry provides methods for defining your own queues or overriding globally defined queues. It provides
you with complete control and flexibility over a queue. You might be required to use the SAS Registry if LDAP
services are not available on your network.
If you are using both the SAS registry and an LDAP server, the local SAS registry is searched first. If the required
information is not found, the distributed LDAP server is searched.
To bypass the SAS Registry altogether, specify the following macro variable:
%let REGISTRY_BYPASS=1.
Please see the following sections for more information about using a repository with application messaging:
Using the SAS Registry with the Common Messaging Interface• Using an LDAP Server with the Common Messaging Interface•
Application Messaging
Using a Repository with Application Messaging 593
Using the SAS Registry with the Common Messaging
Interface
The SAS registry can be used to store information about objects used for application messaging. This document
provides information about using the SAS registry editor to view registry entries. It also provides a sample program
for managing registry objects under program control.
Using the SAS Registry Editor
The SAS Registry Editor can be used to verify that values set programmatically for application messaging objects
were set properly. To invoke the Registry Editor, from the SAS pull−down menu:
Select Solutions →
1. Select Accessories →
2. Select Registry Editor →
3.
The SAS registry has the following hierarchy for application messaging objects:
Products
Base
SAS Messaging
Transports
transport1 transportname MQSeries(trantab=
SAS_trantab_override)
transport2 transportname MQSeries−C(trantab=
SAS_trantab_override)
transport3 transportname MSMQ
transport4 transportname Rendezvous
transport5 transportname Rendezvous−CM
Queues
queue1 transportname MQSeries(trantab=
SAS_trantab_override)
queuename QMgr:queue
queue2 transportname MSMQ
queuename pathname
queue3 transportname Rendezvous
queuename subjectname
Maps
map1 descriptor type,offset,length;
type,offset,length;...
map2 descriptor type,offset,length;
type,offset,length;...
Models
MSMQ
model1 authenticate none,always
basepriority short
journal none,always
journalquota unsigned long
label queue description
privlevel none,body,optional
quota unsigned long
transaction none,always
type binary GUID
REND
model2 service name or port number
Using the SAS Registry with the Common Messaging Interface 594
network name or identifier
daemon socket number
model3 cmname name
ledger filename
relayagent name
requestold yes,no
syncledger yes,no
Writing Applications to Access the SAS Registry
A typical program would configure information such as:
Map data descriptor• Queue and transport aliases• Dynamic model for transport processing.•
The following code illustrates how to set and retrieve information within the SAS Registry.
data _null_;
length rc 8 msg $ 200;
length descriptor transport queue label $ 80;
length type $ 32;
length auth journal priv trans $ 10;
length basep journalq quota 8;
put 'Registry Map creation...';
call setmap('mymap', 'registry', rc,
'char,0,80;double;');
if rc ne 0 then do;
put 'Setmap failed';
msg = sysmsg();
put msg;
end;
else put 'Setmap was successful';
put 'Registry Map retrieval...';
call getmap('mymap', 'registry', rc, descriptor);
if rc ne 0 then do;
put 'Getmap failed';
msg = sysmsg();
put msg;
end;
else do;
put 'Getmap was successful';
put 'descriptor = ' descriptor;
end;
put 'Registry Map deletion...';
call deletemap('mymap', 'registry', rc);
if rc ne 0 then do;
put 'Deletemap failed';
msg = sysmsg();
put msg;
end;
else put 'Deletemap was successful';
put '−−−−−−−−−−−−−−−−−−−−−−−−−−−−−−−';
SAS® Integration Technologies: Developer's Guide
Using the SAS Registry with the Common MessagingInterface 595
put 'Registry Queue creation...';
call setalias('queue', 'myqueue', 'registry',
rc, 'msmq', 'machine_name\queue_name');
if rc ne 0 then do;
put 'Setalias failed';
msg = sysmsg();
put msg;
end;
else put 'Setalias succeeded';
put 'Registry Queue retrieval...';
call getalias('queue', 'myqueue', 'registry',
rc, transport, queue);
if rc ne 0 then do;
put 'Getalias failed';
msg = sysmsg();
put msg;
end;
else do;
put 'Getalias succeeded';
put 'transport = ' transport;
put 'queue = ' queue;
end;
put '−−−−−−−−−−−−−−−−−−−−−−−−−−−−−−−';
put 'Registry Transport creation...';
call setalias('transport', 'mytransport',
'registry', rc, 'MSMQ');
if rc ne 0 then do;
put 'Setalias failed';
msg = sysmsg();
put msg;
end;
else put 'Setalias succeeded';
put 'Registry Transport retrieval...';
call getalias('transport', 'mytransport',
'registry', rc, transport);
if rc ne 0 then do;
put 'Getalias failed';
msg = sysmsg();
put msg;
end;
else do;
put 'Getalias succeeded';
put 'transport = ' transport;
put 'queue = ' queue;
end;
put '−−−−−−−−−−−−−−−−−−−−−−−−−−−−−−−';
put 'Registry Model creation...';
call setmodel('msmq', 'mymodel', 'registry', rc,
'authenticate, label',
'always', 'Test Queue of MyModel');
if rc ne 0 then do;
put 'Setmodel failed';
msg = sysmsg();
put msg;
SAS® Integration Technologies: Developer's Guide
Using the SAS Registry with the Common MessagingInterface 596
end;
else put 'Setmodel succeeded';
put 'Registry Model retrieval...';
call getmodel('msmq', 'mymodel', 'registry', rc,
'authenticate,basepriority,journal,
journalquota,label,privlevel,quota,
transaction,type',
auth, basep, journal, journalq,
label, priv, quota, trans, type);
if rc ne 0 then do;
put 'Getmodel failed';
msg = sysmsg();
put msg;
end;
else do;
put 'Getmodel succeeded';
put 'authenticate = ' auth;
put 'base priority = ' basep;
put 'journal = ' journal;
put 'journal quota = ' journalq;
put 'label = ' label;
put 'privacy level = ' priv;
put 'quota = ' quota;
put 'transaction = ' trans;
put 'type = ' type;
end;
run;
quit;
Application Messaging
SAS® Integration Technologies: Developer's Guide
Using the SAS Registry with the Common MessagingInterface 597
Using an LDAP Server with the Common Messaging
Interface
To specify a Lightweight Directory Access Protocol (LDAP) server, the following macro variables must be set within
your application:
/* required LDAP information */
%let ldap_host=;
/* IP address of the host running LDAP server */
%let ldap_port=;
/* port associated with LDAP service (default=389) */
%let ldap_base=;
/* base of SAS messaging tree within database */
/* authentication information */
%let ldap_dn=;
/* distinguished name for authentication */
%let ldap_pw=;
/* password for authentication */
LDAP Object Class Definitions Required for Messaging
The following LDAP object class definitions are used for application messaging.
objectclass sasContainer
requires
objectClass
allows
cn,
sasComponent,
Description
objectclass sasTransportAlias
requires
objectClass,
sasTransportAliascn,
sasTransportName
objectclass sasQueueAlias
requires
objectClass,
sasQueueAliascn,
sasTransportName,
sasQueueName
objectclass sasMap
requires
objectClass,
sasMapcn,
sasDescriptor
objectclass sasModel
requires
objectClass,
sasModelcn
allows
sasPermanent,
Using an LDAP Server with the Common Messaging Interface 598
sasMsgPsist,
sasNotice,
sasMaxDepth,
sasMaxMsgl,
sasRequired
objectclass sasMSMQModel
requires
objectClass,
sasMSMQModelcn
allows
sasAuthenticate,
sasBasePriority,
sasJournal,
sasJournalQuota,
sasLabel,
sasPrivLevel,
sasQuota,
sasTransaction,
sasType
objectclass sas−MsgRendModel
requires
objectClass,
sasMsgRendModelcn
allows
sas−msgservice,
sas−msgnetwork,
sas−msgdaemon,
sas−msgcmname,
sas−msgledger,
sas−msgrelayagent,
sas−msgrequestold,
sas−msgsyncledger
Sample LDIF Entries
The following is a sample of object class definition entries in the LDAP Data Interchange Format (LDIF). This sample
specifies the object definitions for the organization, SAS System, transport, queue, aliases, map, and a MSMQ model.
After object classes are defined in this file, they are loaded into the LDAP repository by a network administrator.
Note: The LDAP repository uses a blank line followed by the distinguished name (DN) statement to indicate start of a
definition entry.
dn: o=Alphalite Airways,c=US
objectclass: top
objectclass: organization
o: Alphalite Airways
st: North Carolina
st: NC
postalAddress: 615 Alphalite Airways Dr.
postalCode: 27504
telephoneNumber: (919)123−4545
dn: cn=SAS,o=Alphalite Airways,c=US
objectclass: top
objectclass: sasContainer
description: The SAS System
SAS® Integration Technologies: Developer's Guide
Using an LDAP Server with the Common MessagingInterface 599
dn: sascomponent=sasMessaging¹,
cn=SAS,o=Alphalite Airways,c=US
objectclass: top
objectclass: sasContainer
description: Common Messaging Abstraction for SAS
Domain Server, MQSeries, and MSMQ
dn: cn=Transports,sascomponent=sasMessaging¹,
cn=SAS,o=Alphalite Airways,c=US
objectclass: top
objectclass: sasContainer
description: Transport definitions
dn: sastransportaliascn=transport1,cn=Transports,
sascomponent=sasMessaging¹,
cn=SAS,o=Alphalite Airways,c=US
objectclass: top
objectclass: sasTransportAlias
sastransportaliascn: transport1
sastransportname: MQSeries
dn: sastransportaliascn=transport2,cn=Transports,
sascomponent=sasMessaging¹,
cn=SAS,o=Alphalite Airways,c=US
objectclass: top
objectclass: sasTransportAlias
sastransportaliascn: transport2
sastransportname: MSMQ
dn: sastransportaliascn=transport3,cn=Transports,
sascomponent=sasMessaging¹,
cn=SAS,o=Alphalite Airways,c=US
objectclass: top
objectclass: sasTransportAlias
sastransportaliascn: transport3
sastransportname: Rendezvous
dn: sastransportaliascn=transport4,cn=Transports,
sascomponent=sasMessaging¹,
cn=SAS,o=Alphalite Airways,c=US
objectclass: top
objectclass: sasTransportAlias
sastransportaliascn: transport4
sastransportname: Rendezvous−CM
dn:cn=Queues,sasComponent=sasMessaging¹,
cn=SAS,o=Alphalite Airways,c=US
objectclass: top
objectclass: sasContainer
description: Queue definitions
dn: sasqueuealiascn=queue1,cn=Queues,
sascomponent=sasMessaging¹,cn=SAS,
o=Alphalite Airways,c=US
objectclass: top
objectclass: sasQueueAlias
sasqueuealiascn: queue2
sastransportname: MQSeries
sasqueuename: QMgr:Queue
dn: sasqueuealiascn=queue2,cn=Queues,
SAS® Integration Technologies: Developer's Guide
Using an LDAP Server with the Common MessagingInterface 600
sascomponent=sasMessaging¹,cn=SAS,
o=Alphalite Airways,c=US
objectclass: top
objectclass: sasQueueAlias
sasqueuealiascn: queue2
sastransportname: MSMQ
sasqueuename: pathname
dn: sasqueuealiascn=queue3,cn=Queues,
sascomponent=sasMessaging¹,cn=SAS,
o=Alphalite Airways,c=US
objectclass: top
objectclass: sasQueueAlias
sasqueuealiascn: queue3
sastransportname: Rendezvous
sasqueuename: subject name
dn: cn=Maps,sascomponent=sasMessaging¹,
cn=SAS,o=Alphalite Airways,c=US
objectclass: top
objectclass: sasContainer
description: Map definitions
dn: sasmapcn=map1,cn=Maps,
sascomponent=sasMessaging¹,cn=SAS,
o=Alphalite Airways,c=US
objectclass: top
objectclass: sasMap
sasmapcn: map1
sasdescriptor: type,offset,length;type,offset,length;...
dn: cn=Models,sascomponent=sasMessaging¹,
cn=SAS,o=Alphalite Airways,c=US
objectclass: top
objectclass: sasContainer
description: Model definitions
dn: sasmsmqmodelcn=model1,cn=Models,
sascomponent=sasMessaging¹,
cn=SAS,o=Alphalite Airways,c=US
objectclass: top
objectclass: sasMSMQModel
sasmsmqmodelcn: model1
sasauthenticate: none,always
sasbasepriority: short
sasjournal: none,always
sasjournalquota: unsigned long
saslabel: queue description
sasprivlevel: none,body,optional
sasquota: unsigned long
sastransaction: none,always
sastype: binary GUID
dn: sas−msgRendModelcn=model2,cn=Models,
sascomponent=sasMessaging¹,
cn=SAS,o=Alphalite Airways,c=US
objectclass: top
objectclass: sasMsgRendModel
sas−msgRendModelcn: model2
sas−msgService: name or port number
sas−msgNetwork: name or identifier
SAS® Integration Technologies: Developer's Guide
Using an LDAP Server with the Common MessagingInterface 601
sas−msgdaemon: socket number
dn: sas−msgRendModelcn=model3,cn=Models,
sascomponent=sasMessaging¹,
cn=SAS,o=Alphalite Airways,c=US
objectclass: top
objectclass: sasMsgRendModel
sas−msgRendModelcn: model3
sas−msgcmname: name
sas−msgledger: filename
sas−msgrelayagent: name
sas−msgrequestold: yes,no
sas−msgsyncledger: yes,no
Important Note
¹Prior to Version 8 (TS M1), the name of the sascomponent was "Messaging." Starting with Version 8 (TS M1), the
sascomponent is renamed to "sasMessaging." In order to accommodate this change, a new macro variable,
cmqmsgcomp, has been defined in Version 8 (TS M1).
If you are writing programs (using Integration Technologies Version 8 (TS M1) or later) that will access an LDAP
server that was configured for SAS Integration Technologies using the containers.ldif file supplied with Version 8.0 or
earlier, then you need to issue the following SAS macro statement before running any programs that access that LDAP
directory through the Common Messaging interface:
%let cmqmsgcomp=Messaging;
This macro variable enables your SAS programs running on Version 8 (TS M1) or later to access definitions that were
created using the sascomponent name of "Messaging." However, any new definitions that are created will be stored in
the cn=sasMessaging container.
Note: SAS Integration Technologies Version 8 (TS M1) and higher does not provide any mechanism for changing or
deleting definitions that are stored in the cn=Messaging container. If you created LDAP entries for the common
interface under SAS Integration Technologies Version 8.0 or earlier and you need to alter or delete these definitions,
then you will need to use the administrative tools supplied by your LDAP server vendor.
Setting the LDAP Search Base
To interface with the LDAP directory successfully, you need to set the search base to the start of the SAS tree in the
LDAP object hierarchy. For example, for the sample hierarchy shown above, the macro statement to set the search
base correctly would be:
%let ldap_base=cn=SAS,o=Alphalite Airways,c=US;
However, if you intend to administer (update) the LDAP with the CALL routines provided (SET***, DELETE***),
you will need to set the base to a position just below the start of the SAS tree hierarchy to ensure that all DNs
(distinguished names) are generated appropriately. For example,
%let ldap_base=o=Alphalite Airways,c=US;
Application Messaging
SAS® Integration Technologies: Developer's Guide
Using an LDAP Server with the Common MessagingInterface 602
Common Messaging Interface CALL Routines
This section documents all of the available CALL routines within the common messaging interface. At left, a link is
provided to each supported CALL.
The beginning of the documentation for each CALL indicates which transports are supported. Within the CALL
Routines and CALL documentation, the term MQSeries is used to refer to WebSphere MQ. When support for
MQSeries (now known as WebSphere MQ) is noted, this includes both MQSeries Base/Server and MQSeries Client
Application Messaging
Common Messaging Interface CALL Routines 603
SAS CALL Routines for the Common Messaging Interface
Note: For these CALL Routines and CALL documentation, MQSeries refers to WebSphere MQ.
SAS CALL Routines for the Common Messaging Interface 604

SETALIAS
Defines a transport or queue alias in the information repository.
Transports supported: MQSeries, MQSeries−C, MSMQ, Rendezvous, Rendezvous−CM
Syntax
CALL SETALIAS(type, name, storage, rc, transport <, queue>);
type Character, input
Specifies the type of alias to be defined. The following types are valid:
TRANSPORT◊ QUEUE◊
name Character, input
Identifies the transport alias or queue alias that is assigned.
storage Character, input
Specifies the location for the alias definition. The following locations are valid:
REGISTRY◊ LDAP◊
rc Numeric, output
Provides the return code from the CALL routine. If an error occurs, the return code is non−zero. You can use
the SAS function SYSMSG() to obtain a textual description of the return code.
transport
Character, input
Identifies the name of the transport. The following transports are valid:
MQSERIES(trantab=SAS_trantab_override)◊ MQSERIES−C(trantab=SAS_trantab_override)◊ MSMQ◊ RENDEZVOUS◊ RENDEZVOUS−CM◊
Note: With the MQSeries transport, if you use SAS to perform the conversion instead of using an MQSeries
conversion exit, then you can specify which TRANTAB to use for converting the application data. If the
TRANTAB is not specified, SAS will use the session encoding information to convert the data.
queue Character, input
Identifies the name of the queue that is defined. This parameter is optional.
Note: This queue is valid only if a queue alias is being defined.
Details
An alias provides a level of indirection that simplifies the programming interface by encapsulating information for all
other programs. See Writing Applications Using the Common Messaging Interface for details on Administrator
SETALIAS 605

Programs.
If you are using Version 8 (TS M1) or later of Integration Technologies with an LDAP server that was configured
with Version 8 or earlier, please read this Important Note.
Example
This example defines an MSMQ queue alias in the LDAP repository.
%let ldap_host=mynode.alphalite.com;
%let ldap_port=8001;
%let ldap_base=o=Alphalite Airways,c=US;
length msg $ 200;
length rc 8;
rc=0;
call setalias('QUEUE', 'MYQUEUE', 'LDAP', rc,
'MSMQ', 'machine_name\queue_name');
if rc ^= 0 then do;
put 'SETALIAS: failed';
msg = sysmsg();
put msg;
end;
else put 'SETALIAS: succeeded';
SAS® Integration Technologies: Developer's Guide
SETALIAS 606

SETMAP
Defines a map data descriptor in the information repository.
Transports supported: MQSeries, MQSeries−C, MSMQ, Rendezvous, Rendezvous−CM
Syntax
CALL SETMAP(name, storage, rc, descriptor);
name Character, input
Identifies the map data descriptor that is assigned.
storage Character, input
Specifies the location for the map definition. The following locations are valid:
REGISTRY◊ LDAP◊
rc Numeric, output
Provides the return code from the CALL routine. If an error occurs, the return code is nonzero. You can use
the SAS function SYSMSG() in order to obtain a textual description of the return code.
descriptor
Character, input
Describes the layout of the data within a message body. This parameter is a string containing the data type, the
offset (optional), and (for character data) the length of each SAS variable, presented in the order in which the
data will be passed to a SENDMESSAGE call and returned from a RECEIVEMESSAGE call.
The descriptor has the following format:
"type,offset,length;type,offset,length;..."
where:
type is the type of data (SHORT, LONG, DOUBLE, or CHAR).◊ offset is the offset from the beginning of the message, which is the cursor location in the case of the
PARSEMESSAGE routine. This parameter is optional.
◊
length is the length of the data, which is valid only for the CHAR data type.◊
Details
A map specifies the layout of the data within a message body. Maps can be used with the MQSeries, MQSeries−C,
MSMQ, Rendezvous, or Rendezvous−CM transport when sending and receiving data.
If you are using Version 8 (TS M1) or later of Integration Technologies with an LDAP server that was configured
with Version 8 or earlier, please read this Important Note.
SETMAP 607

Example
The following example defines a map data descriptor in the LDAP repository:
%let ldap_host=mynode.alphalite.com;
%let ldap_port=8001;
%let ldap_base=o=Alphalite Airways,c=US;
length msg $ 200;
length rc 8;
rc=0;
call setmap('MYMAP', 'LDAP', rc,
'SHORT;LONG,2;SHORT;DOUBLE,6;CHAR,,50');
if rc ^= 0 then do;
put 'SETMAP: failed';
msg = sysmsg();
put msg;
end;
else put 'SETMAP: succeeded';
SAS® Integration Technologies: Developer's Guide
SETMAP 608

SETMODEL
For the MSMQ transport, defines a dynamic creation queue model. For the Rendezvous transport, the SETMODEL
call enables you to change one or more transport attributes from the default values. For the Rendezvous−CM
transport, defines a model definition for certified message delivery.
Transports supported: MSMQ, Rendezvous, Rendezvous−CM
Syntax
CALL SETMODEL(transport, name, storage, rc, props, value1 <, value2,...>)
transport
Character, input
Specifies the transport that is associated with this model. MSMQ, Rendezvous, and Rendezvous−CM are the
only valid transports for this CALL routine.
name Character, input
Identifies the dynamic model or transport model that is assigned.
storage Character, input
Specifies the location for the model definition. The following locations are valid:
REGISTRY◊ LDAP◊
rc Numeric, output
Provides the return code from the CALL routine. If an error occurs, the return code is nonzero. You can use
the SAS function SYSMSG() to obtain a textual description of the return code.
props Character, input
Identifies one or more properties that the queue exhibits once created. This parameter is a character string.
Each applicable property is separated by a comma.
You must associate a value with each property that is identified by props.
values Character/numeric, input
Inputs the values for each property that is specified. Use one of the following values for each of the properties
listed in the props parameter.
For MSMQ, the following creation properties and their values are valid:
AUTHENTICATE
Character
Specifies whether or not the queue accepts only authenticated messages. The following values are
valid:
"NONE" (Default)
Specifies the queue accepts either authenticated or nonauthenticated messages.
"ALWAYS"
SETMODEL 609
Specifies the queue always requires authenticated messages.
BASEPRIORITY
Numeric
Specifies a single base priority for all messages sent to a public queue. Values range from –32768 to
32767, where 32767 is the highest priority and 0 is the default priority.
JOURNAL
Character
Specifies whether messages retrieved from the queue are also copied to its journal queue. The
following values are valid:
"NONE" (default)
Indicates that messages that are removed from the queue are not stored in a journal.
"ALWAYS"
Indicates that messages that are removed from the queue are always stored in its journal
queue.
JOURNALQUOTA
Numeric
Specifies the maximum size (in kilobytes) of the journal queue. The default size is infinite.
LABEL
Character
Specifies a description of the queue. The default is a blank label ("").
PRIVLEVEL
Character
Specifies the privacy level that is required by the queue. The following values are valid:
"NONE"
Specifies that the queue accepts only nonprivate (cleartext) messages.
"BODY"
Specifies that the queue accepts only private (encrypted) messages.
"OPTIONAL" (default)
Specifies that the queue accepts both private and nonprivate messages.
QUOTA
Numeric
Specifies the maximum size (in kilobytes) of the queue. The default size is infinite.
TRANSACTION
Character
Specifies whether the queue is a transactional queue or a nontransactional queue. The following
values are valid:
"NONE" (default)
Indicates that the queue does not accept transactional operations.
"ALWAYS"
Indicates that all messages that are sent to the queue must be done through an MSMQ
transaction.
TYPE
Binary string
Specifies the type of service that is provided by the queue. The value of the TYPE property is a global
unique identifier (GUID) character string that represents binary data. The default is NULL_GUID.
For Rendezvous and Rendezvous−CM, the following transport properties are valid:
SERVICE
SAS® Integration Technologies: Developer's Guide
SETMODEL 610
Character
Specifies the service name or port number. If you specify a null value, the transport creation function
looks for the service name "rendezvous" and uses 7500 if "rendezvous" is not found. The
TIB/Rendezvous documentation strongly recommends that administrators define "rendezvous" as a
service, especially if UDP port 7500 is already in use. For more information, consult the
TIB/Rendezvous documentation.
NETWORK
Character
Specifies the network name, Host IP, host name, or other identifier of the network. Refer to the
TIB/Rendezvous documentation for more details.
DAEMON
Character
Specifies the TCP socket number for a local daemon, or the remote host name and socket number for
a remote daemon. Refer to the TIB/Rendezvous documentation for more details.
Note: A model is not required if you are using default Rendezvous values.
For Rendezvous−CM only, the following transport properties are valid:
CMNAME
Character
Specifies the reusable name of a certified message (CM) transport. This is the CM Correspondent
name, which can be omitted if persistent correspondents are not required.
LEDGER
Character
Specifies the name of the file in which to store a file−based ledger. This property can be omitted if
persistent correspondents are not required.
RELAYAGENT
Character
Specifies the name of the relay agent. If you use this property, then it must be configured by the
Rendezvous administrator.
REQUESTOLD
Character
Indicates whether a persistent correspondent requires delivery of unacknowledged messages that were
sent to a previous certified delivery transport with the same CMNAME. Possible types are as follows:
NO (default)
Specifies that the new CM transport does not require certified senders to retain
unacknowledged messages. Certified senders can delete those messages from their ledgers.
YES
Specifies that the new CM transport requires certified senders to retain unacknowledged
messages sent to this persistent correspondent. When the new CM transport begins listening
to the appropriate subjects, the senders can complete delivery. It is an error to specify YES
when CMNAME is null.
SYNCLEDGER
Character
Specifies how to synchronize the ledger to its storage medium. Possible types are as follows:
NO (default)
Specifies that the operating system writes changes to the storage medium asynchronously.
YES
Specifies that the operations updating the ledger file do not return until the changes are
written to the storage medium.
SAS® Integration Technologies: Developer's Guide
SETMODEL 611

Details
Dynamic models for MQSeries are defined within its own configuration.
If you are using Version 8 (TS M1) or later of Integration Technologies with an LDAP server that was configured
with Version 8 or earlier, please read this Important Note.
Example
The following example defines an MSMQ model queue in the LDAP repository:
%let ldap_host=mynode.alphalite.com;
%let ldap_port=8001;
%let ldap_base=o=Alphalite Airways,c=US;
length msg $ 200;
length rc 8;
rc=0;
/* private queue model */
call setmodel('MSMQ', 'MYMODEL', 'LDAP', rc,
'AUTHENTICATE,PRIVLEVEL,LABEL', 'ALWAYS',
'BODY', 'Private dynamic queue');
if rc ^= 0 then do;
put 'SETMODEL: failed';
msg = sysmsg();
put msg;
end;
else put 'SETMODEL: succeeded';
SAS® Integration Technologies: Developer's Guide
SETMODEL 612

GETALIAS
Obtains the current definition of a transport alias or queue alias that is set by the SETALIAS function in the
information repository.
Transports supported: MQSeries, MQSeries−C, MSMQ, Rendezvous, Rendezvous−CM
Syntax
CALL GETALIAS(type, name, storage, rc, transport <, queue>);
type Character, input
Specifies the type of alias. The following types are valid:
TRANSPORT◊ QUEUE◊
name Character, input
Identifies the transport alias or queue alias that is set by the SETALIAS function.
storage Character, input
Specifies the location for the alias definition. The following locations are valid:
REGISTRY◊ LDAP◊
rc Numeric, output
Provides the return code from the CALL routine. If an error occurs, the return code is nonzero. You can use
the SAS function SYSMSG() to obtain a textual description of the return code.
transport
Character, output
Returns the transport name.
queue Character, output
Returns the queue name.
Details
If you are using Version 8 (TS M1) or later of Integration Technologies with an LDAP server that was configured
with Version 8 or earlier, please read this Important Note.
Example
The following example obtains a queue alias in the LDAP repository:
%let ldap_host=mynode.alphalite.com;
%let ldap_port=8001;
%let ldap_base=o=Alphalite Airways,c=US;
length msg $ 200;
GETALIAS 613

length rc 8;
length transport queue $ 80;
rc=0;
transport='';
queue='';
call getalias('QUEUE', 'MYQUEUE', 'LDAP',
rc, transport, queue);
if rc ^= 0 then do;
put 'GETALIAS: failed';
msg = sysmsg();
put msg;
end;
else do;
put 'GETALIAS: succeeded';
put 'Transport = ' transport;
put 'Queue = ' queue;
end;
SAS® Integration Technologies: Developer's Guide
GETALIAS 614

GETMAP
Obtains the current definition of a map data descriptor in the information repository.
Transports supported: MQSeries, MQSeries−C, MSMQ, Rendezvous, Rendezvous−CM
Syntax
CALL GETMAP(name, storage, rc, descriptor);
name Character, input
Identifies the map data descriptor that is defined by a previous SETMAP function call.
storage Character, input
Specifies the location for the map definition. The following locations are valid:
REGISTRY◊ LDAP◊
rc Numeric, output
Provides the return code from the CALL routine. If an error occurs, the return code is nonzero. You can use
the SAS function SYSMSG() to obtain a textual description of the return code.
descriptor
Character, output
Returns a string that describes the layout of the data. The format of the descriptor is as follows:
"type,offset,length;type,offset,length;..."
where:
type is the type of data (SHORT, LONG, DOUBLE, CHAR)◊ offset is the offset from the beginning of the message which is the cursor location in the case of the
PARSEMESSAGE routine
◊
length is the length of the data which is valid only for CHAR data type◊
Details
If you are using Version 8 (TS M1) or later of Integration Technologies with an LDAP server that was configured
with Version 8.0 or earlier, please read this Important Note.
Example
The following example obtains a map data descriptor definition in the LDAP repository:
%let ldap_host=mynode.alphalite.com;
%let ldap_port=8001;
%let ldap_base=o=Alphalite Airways,c=US;
length msg $ 200;
GETMAP 615

length rc 8;
length descriptor $ 80;
rc=0;
descriptor='';
call getmap('MYMAP', 'LDAP', rc, descriptor);
if rc ^= 0 then do;
put 'GETMAP: failed';
msg = sysmsg();
put msg;
end;
else do;
put 'GETMAP: succeeded';
put 'descriptor = ' descriptor;
end;
SAS® Integration Technologies: Developer's Guide
GETMAP 616

GETMODEL
For MSMQ, obtains a dynamic creation queue model from the information repository. For Rendezvous and
Rendezvous−CM, obtains transport attributes.
Transports supported: MSMQ, Rendezvous, Rendezvous−CM
Syntax
CALL GETMODEL(transport, name, storage, rc, props, value1, <, value2, value3,...>)
transport
Character, input
Specifies the transport that is associated with this model. MSMQ, Rendezvous, and Rendezvous−CM are the
only valid transports for this CALL routine.
name Character, input
Identifies the dynamic model.
storage Character, input
Specifies the location for the model definition. The following locations are valid:
REGISTRY◊ LDAP◊
rc Numeric, output
Provides the return code from the CALL routine. If an error occurs, the return code is nonzero. You can use
the SAS function SYSMSG() to obtain a textual description of the return code.
props Character, input
Identifies one or more properties to be queried.
values Character/numeric, output
Identifies one or more queue properties to be queried. This parameter is a character string with each applicable
output variable separated by a comma.
You must associate a variable with each property that is identified by props.
For MSMQ, the following properties are valid:
AUTHENTICATE character
BASEPRIORITY numeric
JOURNAL character
JOURNALQUOTA numeric
LABEL character
PRIVLEVEL character
QUOTA numeric
TRANSACTION character
TYPE binary string
For Rendezvous and Rendezvous−CM, the following transport properties are valid:
GETMODEL 617

DAEMON character
NETWORK character
SERVICE character
For Rendezvous−CM only, the following transport properties are valid:
CMNAME character
LEDGER character
RELAYAGENT character
REQUESTOLD character
SYNCLEDGER character
Details
If you are using Version 8 (TS M1) or later of Integration Technologies with an LDAP server that was configured
with Version 8 or earlier, please read this Important Note.
Example
The following example obtains an MSMQ model queue definition in the LDAP repository:
%let ldap_host=mynode.alphalite.com;
%let ldap_port=8001;
%let ldap_base=o=Alphalite Airways,c=US;
length msg $ 200;
length rc 8;
length auth priv $ 10;
length label $ 80;
rc=0;
auth='';
priv='';
label='';
call getmodel('MSMQ', 'MYMODEL', 'LDAP', rc,
'AUTHENTICATE,PRIVLEVEL,LABEL', auth, priv, label);
if rc ^= 0 then do;
put 'GETMODEL: failed';
msg = sysmsg();
put msg;
end;
else do;
put 'GETMODEL: succeeded';
put 'authenticate = ' auth;
put 'privacy level = ' priv;
put 'label = ' label;
end;
SAS® Integration Technologies: Developer's Guide
GETMODEL 618

DELETEALIAS
Deletes a transport or queue alias definition from the information repository.
Transports supported: MQSeries, MQSeries−C, MSMQ, Rendezvous, Rendezvous−CM
Syntax
CALL DELETEALIAS(type, name, storage, rc);
type Character, input
Specifies the type of alias that is to be deleted. The following types are valid:
TRANSPORT◊ QUEUE◊
name Character, input
Identifies the transport alias or queue alias that is to be deleted.
storage Character, input
Specifies the location of the alias definition. The following locations are valid:
REGISTRY◊ LDAP◊
rc Numeric, output
Provides the return code from the CALL routine. If an error occurs, the return code is nonzero. You can use
the SAS function SYSMSG() to obtain a textual description of the return code.
Details
If you are using Version 8 (TS M1) or later of Integration Technologies with an LDAP server that was configured
with Version 8 or earlier, please read this Important Note.
Example
The following example deletes a queue alias from the LDAP repository:
%let ldap_host=mynode.alphalite.com;
%let ldap_port=8001;
%let ldap_base=o=Alphalite Airways,c=US;
length msg $ 200;
length rc 8;
rc=0;
call deletealias('QUEUE', 'MYQUEUE', 'LDAP', rc);
if rc ^= 0 then do;
put 'DELETEALIAS: failed';
msg = sysmsg();
put msg;
DELETEALIAS 619

end;
else put 'DELETEALIAS: succeeded';
SAS® Integration Technologies: Developer's Guide
DELETEALIAS 620

DELETEMAP
Deletes a map data descriptor definition from the information repository.
Transports supported: MQSeries, MQSeries−C, MSMQ, Rendezvous, Rendezvous−CM
Syntax
CALL DELETEMAP(name, storage, rc);
name Character, input
Identifies the map data descriptor that is defined by a previous SETMAP function call.
storage Character, input
Specifies the location for the map definition. The following locations are valid:
REGISTRY◊ LDAP◊
rc Numeric, output
Provides the return code from the CALL routine. If an error occurs, the return code is nonzero. You can use
the SAS function SYSMSG() to obtain a textual description of the return code.
If you are using Version 8 (TS M1) or later of Integration Technologies with an LDAP server that was configured
with Version 8.0 or earlier, please read this Important Note.
Example
The following example deletes a map data descriptor definition from the LDAP repository:
%let ldap_host=mynode.alphalite.com;
%let ldap_port=8001;
%let ldap_base=o=Alphalite Airways,c=US;
length msg $ 200;
length rc 8;
rc=0;
call deletemap('MYMAP', 'LDAP', rc);
if rc ^= 0 then do;
put 'DELETEMAP: failed';
msg = sysmsg();
put msg;
end;
else put 'DELETEMAP: succeeded';
DELETEMAP 621

DELETEMODEL
Deletes a dynamic creation queue model from the information repository.
Transports supported: MSMQ, Rendezvous, Rendezvous−CM
Syntax
CALL DELETEMODEL(transport, name, storage, rc);
transport
Character, input
Specifies the transport that is associated with this model. MSMQ, Rendezvous, and Rendezvous−CM are the
only valid transports for this CALL routine.
name Character, input
Identifies the dynamic model.
storage Character, input
Specifies the location for the model definition. The following locations are valid:
REGISTRY◊ LDAP◊
rc Numeric, output
Provides the return code from the CALL routine. If an error occurs, the return code is nonzero. You can use
the SAS function SYSMSG() to obtain a textual description of the return code.
Details
If you are using Version 8 (TS M1) or later of Integration Technologies with an LDAP server that was configured
with Version 8 or earlier, please read this Important Note.
Example
The following example deletes an MSMQ model queue definition from the LDAP repository:
%let ldap_host=mynode.alphalite.com;
%let ldap_port=8001;
%let ldap_base=o=Alphalite Airways,c=US;
length msg $ 200;
length rc 8;
rc=0;
call deletemodel('MSMQ', 'MYMODEL', 'LDAP', rc);
if rc ^= 0 then do;
put 'DELETEMODEL: failed';
msg = sysmsg();
put msg;
end;
else put 'DELETEMODEL: succeeded';
DELETEMODEL 622

SAS® Integration Technologies: Developer's Guide
DELETEMODEL 623

INIT
Initializes a particular transport. You must use the TERM CALL routine to terminate the transport after you've
completed a session.
Transports supported: MQSeries, MQSeries−C, MSMQ, Rendezvous, Rendezvous−CM
Syntax
CALL INIT(tid, tname, rc);
tid Numeric, output
Returns the transport handle that is used to open a queue or to begin transaction processing.
tname Character, input
Specifies the name of the transport that is initialized. The following transport names are valid:
MQSERIES(trantab=SAS_trantab_override)◊ MQSERIES−C(trantab=SAS_trantab_override)◊ MSMQ◊ RENDEZVOUS◊ RENDEZVOUS−CM◊ alias that is defined in the information repository◊
Note: With the MQSeries transport, if you use SAS to perform the conversion instead of using an MQSeries
conversion exit, then you can specify which TRANTAB to use for converting the application data.
rc Numeric, output
Provides the return code from the CALL routine. If an error occurs, the return code is nonzero. You can use
the SAS function SYSMSG() to obtain a textual description of the return code.
Details
The following transports are valid: MQSeries (MQSeries Base/Server), MQSeries−C (MQSeries Client), and MSMQ
(Microsoft Message Queue), RENDEZVOUS (TIBCO TIB/Rendezvous), and RENDEZVOUS−CM (TIBCO
TIB/Rendezvous Certified Message Delivery). In addition, you can use a transport alias name that is defined in the
information repository to indirectly specify one of the transports.
Example
The following example initializes an MQSeries Base/Server transport:
length msg $ 200;
length tid rc 8;
tid=0;
rc=0;
call init(tid, 'MQSERIES', rc);
if rc ^= 0 then do;
put 'INIT: failed';
msg = sysmsg();
INIT 624

put msg;
end;
else put 'INIT: succeeded';
SAS® Integration Technologies: Developer's Guide
INIT 625

TERM
Terminates a particular transport. If you initiate a transport with the INIT CALL routine, you must use the TERM
CALL routine to terminate the transport after you've completed the session.
Transports supported: MQSeries, MQSeries−C, MSMQ, Rendezvous, Rendezvous−CM
Syntax
CALL TERM(tid, rc);
tid Numeric, input
Specifies the transport handle that is obtained from the INIT function.
rc Numeric, output
Provides the return code from the CALL routine. If an error occurs, the return code is nonzero. You can use
the SAS function SYSMSG() to obtain a textual description of the return code.
Example
The following example terminates a transport:
length msg $ 200;
length tid rc 8;
rc=0;
call term(tid, rc);
if rc ^= 0 then do;
put 'TERM: failed';
msg = sysmsg();
put msg;
end;
else put 'TERM: succeeded';
TERM 626

OPENQUEUE
Opens a message queue. You must use the CLOSEQUEUE CALL routine to close the message queue.
Transports supported: MQSeries, MQSeries−C, MSMQ, Rendezvous, Rendezvous−CM
Note: For Rendezvous Certified Message Delivery (Rendezvous−CM), you must define a model definition for
certified message delivery. Use the SETMODEL call to define a model definition.
Syntax
CALL OPENQUEUE(qid, tid, qname, mode, rc <, attr1 <, attr2>>);
qid Numeric, output
Returns the queue handle for the opened queue. This handle is used in subsequent calls to send, receive, and
parse messages and attachments, and close the queue.
tid Numeric, input
Specifies the transport handle that is obtained from the INIT function.
Note: If transport handle is set to 0, then qname is assumed to be a queue alias name that is defined in the
information repository, and the transport will be initialized (and terminated at close) automatically.
qname Character, input
Specifies the name of the queue to open.
The syntax for an MQSeries transport is
MQSeries: QMgr:Queue
The syntax for an MSMQ transport is
MSMQ: PathName or FormatName
The following PathName representations are valid:
machineName\QueueName (public queue)⋅ machineName\QueueName;Journal (public queue's journal)⋅ machineName\PRIVATE$\QueueName (private queue)⋅ machineName\PRIVATE$\QueueName;Journal (private queue's journal)⋅ machineName\Journal (machine journal queue)⋅ machineName\DeadLetter (machine deadletter queue)⋅ machineName\DeadXACT (machine transaction deadletter queue)
Note: machineName can be substituted with "." to designate the local machine.
⋅
◊
The following FormatName representations are valid:
PUBLIC=QueueGUID (public queue)⋅ PUBLIC=QueueGUID;Journal (public queue's journal)⋅
◊
OPENQUEUE 627
PRIVATE=machineGUID\QueueNumber (private queue)⋅ PRIVATE=machineGUID\QueueNumber;Journal (private queue's journal)⋅ DIRECT=AddressSpecification\QueueName (direct format for public queue)⋅ DIRECT=AddressSpecification\PRIVATE$\QueueName (direct format for private queue)⋅
where AddressSpecification is protocol:address (for example, tcp:10.26.1.177).
Notes:
You can use direct format in certain situations. Consult MSMQ documentation for details.⋅ You can also use a queue alias name that is defined in the information repository as the
qname parameter.
⋅
Rendezvous and Rendezvous−CM: Subject name or inbox name.
Subject name: Consists of one or more elements separated by dot characters (periods). The elements
can represent a subject name hierarchy. Examples:
RUN.HOME
RUN.for.Elected_office.President
◊
Inbox name: Generated by the Rendezvous software. Syntax is the same as subject name, but must
begin with _INBOX as the first element.
◊
Notes:
If an inbox name is specified, the name must have already been created and returned by another call.
For example, a RECEIVEMESSAGE call might have returned an inbox name in its respq attribute.
◊
When the queue is being opened for sending, wildcard characters ('*' and '>') are not allowed.◊
mode Character, input
Identifies the operational mode of the queue that is opened. You can only use one mode to open a queue.
The following modes for the MSMQ and MQSeries transports are valid:
DELIVERY
Enables messages to be sent to a queue
FETCH
Enables messages to be destructively retrieved
FETCHX
The same as FETCH except it ensures exclusive usage
BROWSE
Enables messages to be nondestructively retrieved.
The following modes for the Rendezvous and Rendezvous−CM transport are valid:
DELIVERY
enables messages to be sent to a queue
FETCH
enables messages to be retrieved
FETCHX
same as FETCH except used for point−to−point or private messages (using inboxes) instead of
broadcast messages (using subject names). The qname property must be left blank ('') on the open
call. A private inbox name is generated and associated with the qid. To access this queue, retrieve the
inbox name using GETQUEUEPROPS. Use the value returned as the response queue value on send
message calls when notifying a partner application of the private inbox name to send responses to. For
SAS® Integration Technologies: Developer's Guide
OPENQUEUE 628
Rendezvous−CM, if persistent messaging is not required, then you can use the FETCHX mode. The
FETCHX mode should not be used with persistent messaging because inbox names do not survive
transport invalidation.
REQUEST
enables request messages to be sent to a subject (queue) that is being monitored by a remote program
serving as an information supplier. The qname parameter should specify the name of the queue to
which the request message is to be sent. Any responses received will arrive on the queue specified in
the respqueue parameter of the SENDMESSAGE call.
REQUESTX
same as REQUEST except used for point−to−point or private messages (using inboxes) instead of
broadcast messages (using subject names). The qname parameter should specify the name of the
queue on which the request message is to be sent. Any responses received will use the inbox name
associated with the qid. This inbox name is created internally by Rendezvous when the respqueue
parameter is initialized to null. For Rendezvous−CM, if persistent messaging is not required then you
can use the REQUESTX mode. The REQUESTX mode should not be used with persistent messaging
because inbox names do not survive transport invalidation.
Note: Before any messages are sent with the Rendezvous transport, the queues that will be receiving
the messages must be running and must have a listener (that is, the queues must be opened for
FETCH, FETCHX, REQUEST, or REQUESTX). Otherwise, data will be lost. Queues that are
opened for REQUEST and REQUESTX automatically have their receiving (response) queues open to
listen for incoming messages when the initial request is sent.
rc Numeric, output
Provides the return code from the CALL routine. If an error occurs, the return code is nonzero. You can use
the SAS function SYSMSG() to obtain a textual description of the return code.
attrs Character, input
Specifies one or more attributes to be associated with the queue. Each attribute constitutes a separate
parameter in the open call. The following attributes are valid:
POLL(Timeout=wait_period_in_seconds)
Allows you to specify how message reception is handled for this queue. By default, the timeout period
is set to INFINITE and a receive is blocked until a message arrives. To override the default, specify
POLL and the timeout period.
DYNAMIC(Model=model_name)
Signifies that the queue is to be dynamically created, and specifies a model name that is defined in the
information repository which specifies how to create the queue. For the MQSeries transport, the
model is defined in the MQSeries configuration, not in the SAS information repository.
Example
The following example opens a queue for delivery by using an alias name:
length msg $ 200;
length qid tid rc 8;
/* MYQUEUE exists as a queue alias definition
in the SAS information repository. */
rc=0;
qid=0;
tid=0;
SAS® Integration Technologies: Developer's Guide
OPENQUEUE 629

call openqueue(qid, tid, 'MYQUEUE',
'DELIVERY', rc, "POLL(Timeout=5)");
if rc ^= 0 then do;
put 'OPENQUEUE: failed';
msg = sysmsg();
put msg;
end;
else put 'OPENQUEUE: succeeded';
SAS® Integration Technologies: Developer's Guide
OPENQUEUE 630

CLOSEQUEUE
Closes a message queue.
Transports supported: MQSeries, MQSeries−C, MSMQ, Rendezvous, Rendezvous−CM
Syntax
CALL CLOSEQUEUE(qid, rc <, attr>);
qid Numeric, input
Specifies the handle of a queue that is obtained from a previous OPENQUEUE function call.
rc Numeric, output
Provides the return code from the CALL routine. If an error occurs, the return code is nonzero. You can use
the SAS function SYSMSG() to obtain a textual description of the return code.
attr Character, input
Specifies a delete attribute. The following attributes are valid:
DELETE
Specifies that the queue is to be deleted after it successfully closes, but only if there are no messages
on the queue. This attribute is supported with MQSeries only. It is not supported with MSMQ because
there is no way to programmatically determine the depth of the queue. It is not supported with
Rendezvous because Rendezvous handles this function internally.
DELETE_PURGE
Causes the queue to be deleted, even if the queue depth is greater than zero. This attribute is supported
with MQSeries, MQSeries−C, MSMQ, and Rendezvous−CM. It is not supported with Rendezvous
because Rendezvous handles this function internally.
If you are using Rendezvous Certified Message Delivery, when you close a listener queue the default
setting is for the sender to save messages for persistent messaging. If you do not want messages to be
saved by the sender or do not want persistent messaging, specify the DELETE_PURGE attribute
when you close the queue. Setting the DELETE_PURGE attribute is the same as setting the
cancelAgreements argument on TIBRVCM_CANCEL(TRUE).
Example
The following example closes a queue:
length msg $ 200;
length qid rc 8;
rc=0;
call closequeue(qid, rc);
if rc ^= 0 then do;
put 'CLOSEQUEUE: failed';
msg = sysmsg();
put msg;
CLOSEQUEUE 631

end;
else put 'CLOSEQUEUE: succeeded';
SAS® Integration Technologies: Developer's Guide
CLOSEQUEUE 632

SENDMESSAGE
Sends a message and optional attachments to a queue.
Syntax
CALL SENDMESSAGE(qid, rc, props <, value1, value2,...<, data1, data2,...>>);
Transports supported: MQSeries, MQSeries−C, MSMQ, Rendezvous, Rendezvous−CM
qid Numeric, input
Specifies the handle of an open queue that is obtained from a previous OPENQUEUE function call.
rc Numeric, output
Provides the return code from the CALL routine. If an error occurs, the return code is nonzero. You can use
the SAS function SYSMSG() to obtain a textual description of the return code.
props Character, input
Identifies one or more message properties that affect the message being sent. This parameter is a character
string with each applicable property separated by a comma. All values except MSGID are input to the
SENDMESSAGE routine.
The following are valid send message properties for MQSeries:
ACCOUNTINGTOKEN◊ APPLIDENTITYDATA◊ APPLORIGINDATA◊ CODEDCHARSETID◊ ENCODING◊ FEEDBACK◊ FORMAT◊ PUTAPPLNAME◊ PUTAPPLTYPE◊ PUTDATE◊ PUTTIME◊ REPORT◊ USERID◊
The following are valid send message properties for MSMQ:
ACKNOWLEDGE◊ ADMINQUEUE◊ AUTHENTICATE◊ DESCRIPTION◊ ENCRYPT◊ ENCRYPTALG◊ HASHALG◊ JOURNAL◊ SENDERCERT◊
SENDMESSAGE 633
The following are valid send message properties for both MQSeries and MSMQ:
ALLOWREADPROTECT◊ ATTACHLIST◊ CORRELATIONID◊ MAP◊ MSGID◊ MSGTYPE◊ PERSIST◊ PRIORITY◊ RESPQUEUE◊ TIMEOUT◊ TRANSACTION◊
The following are valid send message properties for Rendezvous and Rendezvous−CM:
ATTACHLIST◊ ALLOWREADPROTECT◊ MAP◊ RESPQUEUE◊
The following are valid send message properties for Rendezvous−CM only:
ADDLISTENER◊ ALLOWLISTENER◊ DISALLOWLISTENER◊ RELAYAGENTACTION◊ TIMEOUT◊
values Character/numeric, input/output
Provides values that are associated with the properties specified via the props parameter. You must associate a
value with each property that is specified by props. All values except MSGID are input to the routine. For the
MQSeries transport, MSGID is input and output. For the MSMQ transport, MSGID is only output.
Descriptions and values for the send message properties, which are listed above by transport, and the
following values for them are valid:
ACCOUNTINGTOKEN
Binary string
MQSeries accounting token.
ACKNOWLEDGE
Character
MSMQ acknowledgement types. Possible acknowledge types are as follows:
NONE (Default)
Specifies that no acknowledgment messages are posted.
FULL_REACH_QUEUE
Specifies that positive or negative acknowledgments are posted depending on whether or not
the message reaches the queue.
FULL_RECEIVE
Specifies that positive or negative acknowledgments are posted depending on whether or not
the message is retrieved from the queue.
NACK_REACH_QUEUE
SAS® Integration Technologies: Developer's Guide
SENDMESSAGE 634
Specifies that negative acknowledgments are posted when a message cannot reach the queue.
NACK_RECEIVE
Specifies that negative acknowledgments are posted when a message cannot be retrieved from
the queue.
ADDLISTENER
Character
Identifies one or more certified message names (CMNAMEs) of the listeners. This parameter is a
character string with each CMNAME separated by a comma.
Anticipates a listener (or listeners) for certified delivery agreement.
Note: If a listener is added, this feature applies to all future messages within the session.
ADMINQUEUE
Character
Specifies the MSMQ administrator queue.
ALLOWLISTENER
Character
Identifies one or more certified message names (CMNAMEs) of the listeners. This parameter is a
character string with each CMNAME separated by a comma.
Allows listeners on the specified CMNAME to reinstate certified delivery. This feature overrides any
DISALLOWLISTENER for listener CMNAME.
Note: If a listener is allowed, this feature applies to all future messages within the session.
ALLOWREADPROTECT
Character
value is "YES"
Must be asserted on read−protected data sets in order for that data set to be sent as an attachment.
This ensures that the user realizes that the read password and encryption attributes are not preserved
when this data set is sent as a message attachment. If this property is not applied, then the
SENDMESSAGE call fails when the user tries to send a read protected data set, and an error is
returned.
Note:This property is supported in Version 8 (TS M1) and later releases. The password and
encryption attributes are not preserved in the intermediate message format when the attachment is on
a message queue. Because of this exposure, take care when sending password−protected or encrypted
data sets as message attachments.
APPLIDENTITYDATA
Character
Specifies the MQSeries application identity data.
APPLORIGINDATA
Character
Specifies the MQSeries application origin data.
ATTACHLIST
Character
Specifies that a list of attachments is included with message. The format of the list is as follows:
"type,qual1,qual2,options;
type,qual1,qual2,options;..."
where the parameters are defined as follows:
type
SAS® Integration Technologies: Developer's Guide
SENDMESSAGE 635
Is the attachment type, which can be one of the following:
EXTERNAL_TEXT
Is an external text file
EXTERNAL_BIN
Is an external binary file
DATASET
Is a SAS data set
qual1
Is a qualifier. For EXTERNAL_TEXT and EXTERNAL_BIN attachment types, this qualifier
specifies the file specification type which can be one of the following:
FILENAME◊ FILEREF◊
For the DATASET attachment type, this qualifier specifies the library name.
qual2
Is a qualifier. For EXTERNAL_TEXT and EXTERNAL_BIN attachment types, this qualifier
specifies the actual filename or fileref. For the DATASET attachment type, this qualifier
specifies the member name.
options
Specifies optional attachment specifications. Multiple options must be separated by spaces.
The following options are valid for all attachment types:
DESC=attachment description◊ MINOR=user specified minor version◊ MAJOR=user specified major version◊
The following options are valid for the Dataset attachment type:
DATASET_OPTIONS=data set options◊ WHERE=where clause◊ INDEX=yes|no (default is yes so that indexes are sent)◊ IC=yes|no (default is yes so that integrity constraints are sent)◊ ATTACH_VERSION=VERSION_8
If the ATTACH_VERSION option is specified and value=VERSION_8
then the data set is sent using the column types available in the data sets prior
to Version 9. Use this option if you might be sending data sets to another
SAS session that is running Release 8.2 or earlier.
If the ATTACH_VERSION option is omitted or if any other value is specified, then
the full data set, including all new types, is sent.
◊
AUTHENTICATE
Character
Specifies MSMQ authentication enablement. Possible authenticate types are as follows:
NO (default)
specifies that no authentication is necessary. The message is not signed.
YES
specifies that the message is signed and authenticated by the destination queue manager.
CODEDCHARSETID
Numeric
Specifies the MQSeries coded character set.
SAS® Integration Technologies: Developer's Guide
SENDMESSAGE 636
CORRELATIONID
Binary string
Specifies the correlation identifier.
DESCRIPTION
Character
Specifies the Message description.
DISALLOWLISTENER
Character
Specifies one or more certified message names (CMNAMEs) of the listeners. This parameter is a
character string with each CMNAME separated by a comma.
Cancels certified delivery to listeners with the specified CMNAME.
Note: If a listener is disallowed, this feature applies to all future messages within the session.
ENCODING
Numeric
Specifies MQSeries data encoding.
ENCRYPT
Character
Specifies MSMQ encryption enablement. Possible encryption types are as follows:
NO (Default)
specifies that the message is to be sent as clear text.
YES
specifies end−to−end encryption of the message body.
ENCRYPTALG
Character
Specifies the MSMQ encryption algorithms. The following choices are valid:
RC2 (default)• RC4•
FEEDBACK
Numeric
Specifies MQSeries feedback code.
FORMAT
Character
Specifies MQSeries format name.
HASHALG
Character
Specifies MSMQ hash algorithms. Possible hash types are as follows:
MD2• MD4• MD5 (default)•
JOURNAL
Character
Specifies MSMQ journaling. Possible journal types are as follows:
NO (default)
specifies that the message is not kept in the originating machine's journal queue.
YES
specifies that the message is kept in the originating machine's journal queue.
DEADLETTER
specifies that the message is kept in a dead letter queue if it cannot be delivered.
SAS® Integration Technologies: Developer's Guide
SENDMESSAGE 637
MAP
Character
Specifies the data map name.
MSGID
Binary string
Specifies the message identifier.
MSGTYPE
Numeric
Specifies the message type.
PERSIST
Character
Specifies message persistence. Possible persist types are as follows:
NO
(default) message is not persistent.
YES
message is persistent.
PRIORITY
Numeric
Specifies message priority.
PUTAPPLNAME
Character
Specifies MQSeries application name.
PUTAPPLTYPE
Numeric
Specifies MQSeries application type.
PUTDATE
Character
Specifies MQSeries put date.
PUTTIME
Character
Specifies MQSeries put time.
RELAYAGENTACTION
Character
Specifies the connect and disconnect actions for the relay agent. The following values are valid:
CONNECT
Indicates to connect to the relay agent before sending messages and attachments.
DISCONNECT
Indicates to disconnect from the relay agent after all messages associated with the call have
been processed. The disconnect happens at the end of the call before the call returns to the
DATA step.
BOTH
Indicates to connect to the relay agent, send all messages, then disconnect from the relay
agent. The disconnect happens at the end of the call before the call returns to the DATA step.
REPORT
Character
Specifies the MQSeries reporting types. Possible report types are as follows:
NONE
specifies that no reports required
SAS® Integration Technologies: Developer's Guide
SENDMESSAGE 638
PASS_CORREL_ID
specifies to pass a correlation identifier
PASS_MSG_ID
specifies to pass a message identifier
COA
specifies that confirmation−on−arrival reports are required
COA_WITH_DATA
specifies that confirmation−on−arrival reports with data are required
COA_WITH_FULL_DATA
specifies that confirmation−on−arrival reports with full data are required
COD
specifies that confirmation−on−delivery reports are required
COD_WITH_DATA
specifies that confirmation−on−delivery reports with data are required
COD_WITH_FULL_DATA
specifies that confirmation−on−delivery reports with full data are required
EXPIRATION
specifies that expiration reports are required
EXPIRATION_WITH_DATA
specifies that expiration reports with data are required
EXPIRATION_WITH_FULL_DATA
specifies that expiration reports with full data are required
EXCEPTION
specifies that exception reports are required
EXCEPTION_WITH_DATA
specifies that exception reports with data are required
EXCEPTION_WITH_FULL_DATA
specifies that exception reports with full data required
DISCARD_MSG
specifies to discard message if it is undeliverable
RESPQUEUE
Character
Specifies the response queue name.
Note: If this attribute is specified with an empty string value ('') when using a Rendezvous or
Rendezvous−CM queue that was opened using REQUESTX mode, the generated inbox name will be
sent. If another name is specified, it will be used instead.
SENDERCERT
Character
Specifies the MSMQ certificate store name that is used in order to search for external certificates.
"MY" is typically specified. This results in a search of the current user's certificates with their
associated private keys. For example, if "MY" is used, the corresponding registry entry is
HKEY_CURRENT_USER\Software\Microsoft\
SystemCertificates\MY
TIMEOUT
Numeric
Specifies the timeout value in seconds.
For Rendezvous−CM, specify this timeout as the length of time this message is to be sent using
certified message delivery.
TRANSACTION
SAS® Integration Technologies: Developer's Guide
SENDMESSAGE 639

Numeric
Specifies the transaction object that is obtained from BEGINTRANSACTION.
USERID
Character
Specifies the MQSeries user identifier.
data
Character/numeric, input
Specifies the individual pieces of data that are sent with the message.
Details
If you are sending Version 8 data sets, please read this Important Note.
If you intend to send attachments, use a queue that supports transactional processing. In this way, all messages
associated with a failed attachment can be backed out if any part of the attachment processing fails. The IBM
MQSeries queue manager supports the syncpoint function. An MSMQ queue is a transactional queue. See Attachment
Error Handling for information about exception processing when using attachments.
Before any messages are sent with the TIB/Rendezvous transport, the queues that will be receiving the messages must
be running and must have a listener (that is, the queues must be opened for FETCH, FETCHX, REQUEST, or
REQUESTX). Otherwise, data will be lost. Queues that are opened for REQUEST and REQUESTX automatically
have their receiving (response) queues open to listen for incoming messages.
Note: If you are sending certified messages using Rendezvous−CM, and plan to close the sending queue immediately
after sending the message, then you might want to put a sleep() call in to sleep for a couple of seconds to allow the
Certified Delivery Agreement to be established between the sending transport and the receiving transport. This delay
can also occur when a listener is first opened to receive certified messages.
Example
The following example sends an employee name and ID with records attached:
length msg $ 200;
length qid rc 8;
length msgtype 8 corrid $ 48 alist $ 80;
length employee $ 20 id 8;
rc=0;
/* message properties */
msgtype=1;
corrid='0102030405060708090A0B0C0D0E0F';
alist='DATASET,EMPLOYEE,RECORDS,
DESC=employee records for John Doe';
/* message data */
employee='John Doe ';
id=9999;
call sendmessage(qid, rc,
'MSGTYPE,CORRELATIONID,ATTACHLIST',
msgtype, corrid, alist, employee, id);
if rc ^= 0 then do;
put 'SENDMESSAGE: failed';
SAS® Integration Technologies: Developer's Guide
SENDMESSAGE 640

msg = sysmsg();
put msg;
end;
else put 'SENDMESSAGE: succeeded';
SAS® Integration Technologies: Developer's Guide
SENDMESSAGE 641

RECEIVEMESSAGE
Receives a message and optional attachments from a queue.
Transports supported: MQSeries, MQSeries−C, MSMQ, Rendezvous, Rendezvous−CM
Syntax
CALL RECEIVEMESSAGE(qid, rc, event, attchflg, props <, value1, value2,...< data1, data2,...>>);
qid Numeric, input
Specifies the handle of an open queue that is obtained from a previous OPENQUEUE function call.
rc Numeric, output
Provides the return code from the CALL routine. If an error occurs, the return code is nonzero. You can use
the SAS function SYSMSG() to obtain a textual description of the return code.
event Character, output
Contains a description of the event that occurs as a result of the message being received.
Possible event types are
DELIVERY
Specifies that the message was delivered
NO_MESSAGE
Specifies that no message is on queue
ERROR
Specifies that an error has occurred. This event results in a non−zero value for rc.
You need to initialize this parameter to a length of at least 10 before making the call so that there is room for
the value to be placed in the string. Otherwise, it could get truncated.
attchflgNumeric, output
Indicates whether an attachment is associated with the received message. Possible return values are as
follows:
0
Specifies that no attachments are associated with this message
1
Specifies that attachments are associated with this message. You can call GETATTACHMENT to
receive the attachments.
props Character, input
Identifies one or more message properties that are associated with the message that is received. This
parameter is a character string. Each property is separated by a comma.
The following receive message properties are valid for MQSeries:
ACCOUNTINGTOKEN◊
RECEIVEMESSAGE 642
APPLIDENTITYDATA◊ APPLORIGINDATA◊ PUTAPPLNAME◊ PUTAPPLTYPE◊
The following receive message properties are valid for MSMQ:
ADMINQUEUE◊ AUTHENTICATE◊ DESCRIPTION◊ SENDERCERT◊
The following receive message properties are valid for both MQSeries and MSMQ:
CORRELATIONID◊ FEEDBACK◊ MAP◊ MSGID◊ MSGTYPE◊ OPTIONS◊ QUEUEDTIME◊ RESPQUEUE◊ TRANSACTION◊ USERID◊
The following receive message properties are valid for Rendezvous and Rendezvous−CM:
MAP◊ RESPQUEUE◊
The following receive message properties are valid for Rendezvous−CM only:
CERTIFIED◊ RELAYAGENTACTION◊ SENDERNAME◊
values Character/numeric
Provides the values that are associated with each property that is specified via the props parameter. You must
associate a value with each property that is identified with the props parameter. The property values can be an
input, output, or both.
Descriptions and values for the received message properties which are listed above by transport are
ACCOUNTINGTOKEN
Binary string, output
Specifies an MQSeries accounting token.
ADMINQUEUE
Character, output
Specifies an MSMQ administrator queue.
APPLIDENTITYDATA
Character, output
Specifies MQSeries application identity data.
APPLORIGINDATA
Character, output
Specifies MQSeries application origin data.
SAS® Integration Technologies: Developer's Guide
RECEIVEMESSAGE 643
AUTHENTICATE
Character, output
Indicates MSMQ authentication enablement. Possible authenticate return values are as follows:
NO
Specifies that the message was not authenticated.
YES
Specifies that the message was authenticated.
CORRELATIONID
Binary string, input/output
Correlation identifier. For MQSeries and MSMQ transports, on input this property can be used for
filtering purposes. However, do not try to filter with this property when you are receiving attachment
messages. The original CORRELATIONID is not associated with the attachment header message,
although the original CORRELATIONID is embedded within the attachment header itself and will be
presented accurately. This type of processing is needed because an attachment is made up of multiple
messages that must be uniquely identified. A CORRELATIONID that is set by the application is not
guaranteed to be unique.
CERTIFIED
Character, output
Specifies a Certified Message (CM) indicator. Possible return values are as follows:
NO
Specifies that the message was received by the normal transport or the listener has not been
certified.
YES
Specifies that the message was received within the certified delivery transport.
DESCRIPTION
Character, output
Specifies a message description.
FEEDBACK
Numeric, output
For MQSeries, it is a feedback code. For MSMQ, it is a class.
MAP
Character, input
Specifies a data map name
MSGID
Binary string, input/output
Indicates the message identifier. On input, this property can be used for filtering purposes for both
MQSeries and MSMQ transports.
MSGTYPE
Numeric, output
Indicates the message type.
OPTIONS
Character, input
Specifies the receive options. The following options are valid:
POSITIONFIRST
(MQSeries/MSMQ)
Indicates to reposition to the first message in the queue.
CONVERSION_EXIT
SAS® Integration Technologies: Developer's Guide
RECEIVEMESSAGE 644
(MQSeries only)
Specifies to use the MQSeries conversion exit. Otherwise, SAS performs all necessary data
conversion internally.
PUTAPPLNAME
Character, output
Indicates an MQSeries application name.
PUTAPPLTYPE
Character, output
Indicates an MQSeries application type.
QUEUEDTIME
Character, output
Indicates the time at which the message was queued.
RELAYAGENTACTION
Character, input
Specifies connect or disconnect actions for the relay agent. The following values are valid:
CONNECT
Indicates to connect to the relay agent before receiving messages and attachments.
DISCONNECT
Indicates to disconnect from the relay agent after all messages associated with the call have
been processed. If an attachment is received, the disconnect call is issued after the
ACCEPTATTACHMENT call has processed all of the messages associated with the
attachment and before the call returns to the data step. If ACCEPTATTACHMENT is not
called, then the connection is not closed. If a connection was made to the relay agent during
the call and an error occurs, then the error causes a disconnect from the relay agent.
BOTH
Indicates to connect to the relay agent, receive all messages, then disconnect from the relay
agent. If an attachment is received, the disconnect call is issued after the
ACCEPTATTACHMENT call has processed all of the messages associated with the
attachment and before the call returns to the data step. If ACCEPTATTACHMENT is not
called, then the connection is not closed. If an error occurs in a call, then if a connection was
made to the relay agent during the call, an error causes a disconnect from the relay agent.
RESPQUEUE
Character, output
Indicates the response queue name.
SENDERCERT
Character, output
Indicates the subject within received certificate (MSMQ).
SENDERNAME
Character, output
Indicates the name of the certified message (CM) transport used by the sender.
TRANSACTION
Numeric, input
Indicates the transaction object obtained from BEGINTRANSACTION.
USERID
Character, output
Indicates the user identifier who sent the message.
data
Character/numeric, output
When you issue RECEIVEMESSAGE, all data that is associated with a message is placed into an internal
buffer. You can parse this data during the RECEIVEMESSAGE call with these optional parameters, or you
SAS® Integration Technologies: Developer's Guide
RECEIVEMESSAGE 645

can call PARSEMESSAGE at a later time to parse the data.
Example
The following example receives a message such as the one sent in the SENDMESSAGE example:
length msg $ 200;
length qid rc attchflg 8 event $ 10;
length msgtype 8 corrid $ 48 map $ 80;
length employee $ 20 id 8;
rc=0;
corrid='';
/* no filtering */
map='employeerecord';
/* data descriptor defined in repository...
for example, "char,,20;double" */
call receivemessage(qid, rc, event, attchflg,
'MSGTYPE,CORRELATIONID,MAP', msgtype, corrid,
map, employee, id);
if rc ^= 0 then do;
put 'RECEIVEMESSAGE: failed';
msg = sysmsg();
put msg;
end;
else do;
put 'RECEIVEMESSAGE: succeeded';
put 'Event = ' event;
if event eq 'DELIVERY' then do;
put 'Message has been delivered';
if attchflg eq 1 then do;
put 'Attachment(s) are associated
with this message';
/* process attachments...*/
end;
put 'employee = ' employee;
put 'id = ' id;
end;
end;
SAS® Integration Technologies: Developer's Guide
RECEIVEMESSAGE 646

PARSEMESSAGE
Parses a message body that has been received.
Transports supported: MQSeries, MQSeries−C, MSMQ, Rendezvous, Rendezvous−CM
Syntax
CALL PARSEMESSAGE(qid, cursor, rc, map, data);
qid Numeric, input
Specifies the handle of an open queue that is obtained from a previous OPENQUEUE function call.
cursor Numeric, input/output
Sets the cursor to zero in order to parse from the beginning. Upon return, the cursor is positioned at the next
data location, according to the specified map.
rc Numeric, output
Provides the return code from the CALL routine. If an error occurs, the return code is nonzero. You can use
the SAS function SYSMSG() to obtain a textual description of the return code.
map Character, input
Specifies the map data descriptor that is defined by a previous SETMAP function call.
data Character/numeric, output
Identifies the data to be parsed from the internal receive buffer.
Example
The following example parses a message:
length msg $ 200;
length qid rc attchflg 8 event $ 10;
length msgtype 8 corrid $ 48 map $ 80;
length employee $ 20 id 8;
rc=0;
map='employeerecord';
/* data descriptor defined in repository...
ie., "char,,20;double" */
cursor=0;
call parsemessage(qid, cursor, rc, map, employee, id);
if rc ^= 0 then do;
put 'PARSEMESSAGE: failed';
msg = sysmsg();
put msg;
end;
else do;
put 'PARSEMESSAGE: succeeded';
PARSEMESSAGE 647

put 'employee = ' employee;
put 'id = ' id;
end;
SAS® Integration Technologies: Developer's Guide
PARSEMESSAGE 648

BEGINTRANSACTION
Begins transaction processing by creating a transaction object.
Transports supported: MQSeries, MQSeries−C, MSMQ
Syntax
CALL BEGINTRANSACTION(transid, tid, rc);
transid Numeric, output
Returns a handle to a transaction object that is generated for committing and aborting transactional processing,
as well as freeing the resources that are associated with the transaction object.
tid Numeric, input
Specifies the transport handle that is obtained from the INIT function.
rc Numeric, output
Provides the return code from the CALL routine. If an error occurs, the return code is nonzero. You can use
the SAS function SYSMSG() to obtain a textual description of the return code.
Details
The created transaction object is used to commit or abort prior processing (SENDMESSAGE and
RECEIVEMESSAGE calls) that use the transaction object as a message property. Transaction processing is supported
only by the MQSeries, MQSeries−C, and MSMQ transports.
Example
The following example begins a transaction:
length msg $ 200;
length transid tid rc 8;
rc=0;
transid=0;
call begintransaction(transid, tid, rc);
if rc ^= 0 then do;
put 'BEGINTRANSACTION: failed';
msg = sysmsg();
put msg;
end;
else put 'BEGINTRANSACTION: succeeded';
BEGINTRANSACTION 649

Commit
Commits prior work that has been done via a transaction object.
Transports supported: MQSeries, MQSeries−C, MSMQ
Syntax
CALL COMMIT(transid, rc);
transid Numeric, input
Specifies the handle to a transaction object that is obtained from the BEGINTRANSACTION function.
rc Numeric, output
Provides the return code from the CALL routine. If an error occurs, the return code is nonzero. You can use
the SAS function SYSMSG() in order to obtain a textual description of the return code.
Details
For MQSeries, all transactions are associated with a particular queue manager. So when you commit a unit of work
that is associated with a particular queue manager, all work that is performed by that particular queue manager under
syncpoint control is committed at once. You can associate more than one transaction object with the same queue
manager, but it is not a good practice. Under MSMQ, all transaction objects are autonomous.
Example
The following example commits a transactional unit of work for processing:
length msg $ 200;
length transid rc 8;
rc=0;
call commit(transid, rc);
if rc ^= 0 then do;
put 'COMMIT: failed';
msg = sysmsg();
put msg;
end;
else put 'COMMIT: succeeded';
Commit 650

Abort
Aborts prior work that has been done via a transaction object.
Transports supported: MQSeries, MQSeries−C, MSMQ
Syntax
CALL ABORT(transid, rc);
transid Numeric, input
Specifies the handle to a transaction object that is obtained from the BEGINTRANSACTION function.
rc Numeric, output
Provides the return code from the CALL routine. If an error occurs, the return code is nonzero. You can use
the SAS function SYSMSG() in order to obtain a textual description of the return code.
Details
For MQSeries, all transactions are associated with a particular queue manager. So when you abort a unit of work that
is associated with a particular queue manager, all work performed by that particular queue manager under syncpoint
control is aborted at once. You can associate more than one transaction object with the same queue manager, but it is
not a good practice.) Under MSMQ, all transaction objects are autonomous.
Example
The following example aborts the processing of a transactional unit of work:
length msg $ 200;
length transid rc 8;
rc=0;
call abort(transid, rc);
if rc ^= 0 then do;
put 'ABORT: failed';
msg = sysmsg();
put msg;
end;
else put 'ABORT: succeeded';
Abort 651

FREETRANSACTION
Frees a transaction object and its associated resources.
Transports supported: MQSeries, MQSeries−C, MSMQ
Syntax
CALL FREETRANSACTION(transid, rc);
transid Numeric, input
Specifies the handle to a transaction object that is obtained from the BEGINTRANSACTION function.
rc Numeric, output
Provides the return code from the CALL routine. If an error occurs, the return code is nonzero. You can use
the SAS function SYSMSG() in order to obtain a textual description of the return code.
Example
The following example frees the resources that are associated with a transaction object:
length msg $ 200;
length transid rc 8;
rc=0;
call freetransaction(transid, rc);
if rc ^= 0 then do;
put 'FREETRANSACTION: failed';
msg = sysmsg();
put msg;
end;
else put 'FREETRANSACTION: succeeded';
FREETRANSACTION 652

GETATTACHMENT
Gets attachment information that is associated with a particular message.
Transports supported: MQSeries, MQSeries−C, MSMQ, Rendezvous, Rendezvous−CM
Note: If you send a data set with a SAS 9 or later attachment type to a SAS session running Release 8.2 or earlier, the
GETATTACHMENT call fails and returns an error indicating that an unrecognized attachment type was received. See
the SENDMESSAGE CALL routine for information about sending SAS 9 attachments in a format for an earlier
version.
Syntax
CALL GETATTACHMENT(qid, lastflag, attachid, type, qual1, qual2, rc <, desc <, minor <, major>>
qid Numeric, input
Specifies the handle of an opened queue obtained from a previous OPENQUEUE function call.
lastflag Numeric, output
Indicates whether you have reached the last attachment in a message. Possible values are as follows:
0
Specifies that more attachments are to be presented
1
Specifies that this is the final attachment
attachidNumeric, output
Returns an attachment identifier that is used with the ACCEPTATTACHMENT function call when this
attachment is accepted.
type Character, output
Returns the type of attachment. The following types are valid:
EXTERNAL_TEXT◊ EXTERNAL_BIN◊ DATASET◊
qual1 Character, output
Returns the first attachment qualifier. If this is an external attachment, then this qualifier designates the file
specification that is used to send it (either FILENAME or FILEREF). Otherwise, this qualifier designates the
sending library name.
qual2 Character, output
Returns the second attachment qualifier. If this is an external attachment, then this qualifier designates the
sending filename or fileref. Otherwise, this qualifier designates the sending member name.
rc Numeric, output
Provides the return code from the CALL routine. If an error occurs, the return code is nonzero. You can use
the SAS function SYSMSG() in order to obtain a textual description of the return code.
GETATTACHMENT 653

desc Character, output
Returns a description of the attachment if the sender provides one. This parameter is optional.
minor Numeric, output
Returns a user−specified minor version number. This parameter is optional.
major Numeric, output
Returns a user−specified major version number. This parameter is optional.
Details
You can repeatedly call this function until the final attachment has been presented.
Note: To receive an attachment from outside of the SAS environment, you must know the layout of an attachment.
For MQSeries (now known as WebSphere MQ) or MSMQ queue, see the attachment layout for more
information.
•
For TIB/Rendezvous or TIB/Rendezvous−CM, see the attachment layout for more information.•
Example
The following example gets all of the attachment information from a message:
length msg $ 200;
length qid lastflag attachid rc 8;
length type $ 13;
length qual1 qual2 $ 80;
length desc $ 80;
length minor major 8;
next:
rc=0;
lastflag=0;
attachid=0;
type='';
qual1='';
qual2='';
desc='';
minor=0;
major=0;
call getattachment(qid, lastflag, attachid, type,
qual1, qual2, rc, desc, minor, major);
if rc ^= 0 then do;
put 'GETATTACHMENT: failed';
msg = sysmsg();
put msg;
end;
else do;
put 'GETATTACHMENT: succeeded';
put 'Attachment type is ' type;
if type eq 'EXTERNAL_TEXT' OR type eq
'EXTERNAL_BIN' then do;
put "Sender's " qual1 " was " qual2;
SAS® Integration Technologies: Developer's Guide
GETATTACHMENT 654

/* process external file... */
end;
else do;
put "Sender's library name was ' qual1;
put "Sender's member name was ' qual2;
/* process library member... */
end;
if lastflag eq 0 then goto next;
SAS® Integration Technologies: Developer's Guide
GETATTACHMENT 655

ACCEPTATTACHMENT
Accepts an attachment by recreating it on the local machine.
Transports supported: MQSeries, MQSeries−C, MSMQ, Rendezvous, Rendezvous−CM
Syntax
CALL ACCEPTATTACHMENT(qid, attachid, qual1, qual2, rc);
qid Numeric, input
Specifies the handle of an open queue that is obtained from a previous OPENQUEUE function call.
attachidNumeric, input
Specifies an attachment identifier that is obtained from a previous GETATTACHMENT function call.
qual1 Character, input
Specifies the first attachment qualifier. If this is an external file attachment, then this qualifier designates the
file specification that is used to receive it (either FILENAME or FILEREF). Otherwise, this qualifier
designates the receiving library name.
qual2 Character, input
Specifies the second attachment qualifier. If this is an external file attachment, then this qualifier designates
the receiving filename or fileref. Otherwise, this qualifier designates the receiving member name.
rc Numeric, output
Provides the return code from the CALL routine. If an error occurs, the return code is nonzero. You can use
the SAS function SYSMSG() in order to obtain a textual description of the return code.
Details
See Attachment Error Handling for information about exception processing when you use attachments.
Example
This example accepts attachments from a message and stores them in the file d:\myexternalfile.tmp.
length msg $ 200;
length qid lastflag attachid rc 8;
length type $ 13;
length qual1 qual2 $ 80;
length desc $ 80;
length minor major 8;
next:
rc=0;
lastflag=0;
attachid=0;
type='';
ACCEPTATTACHMENT 656

qual1='';
qual2='';
desc='';
minor=0;
major=0;
call getattachment(qid, lastflag, attachid, type,
qual1, qual2, rc, desc, minor, major);
if rc ^= 0 then do;
put 'GETATTACHMENT: failed';
msg = sysmsg();
put msg;
end;
else do;
put 'GETATTACHMENT: succeeded';
put 'Attachment type is ' type;
if type eq 'EXTERNAL_TEXT' OR type eq
'EXTERNAL_BIN' then do;
put "Sender's " qual1 " was " qual2;
/* accept/receive the external attachment */
call acceptattachment(qid, attachid, 'filename',
'd:\myexternalfile.tmp', rc);
if rc ^= 0 then do;
put 'ACCEPTATTACHMENT: failed';
msg = sysmsg();
put msg;
end;
else
put 'ACCEPTATTACHMENT: succeeded';
end;
else do;
put "Sender's library name was ' qual1;
put "Sender's member name was ' qual2;
/* accept/receive the library/member */
libname tmp 'd:\tmp';
call acceptattachment(qid, attachid,
'tmp', 'test', rc);
end;
if lastflag eq 0 then goto next;
SAS® Integration Technologies: Developer's Guide
ACCEPTATTACHMENT 657

GETQUEUEPROPS
Gets information pertaining to a queue's properties and security.
Transports supported: MQSeries, MQSeries−C, MSMQ, Rendezvous, Rendezvous−CM
Syntax
CALL GETQUEUEPROPS(qid, rc, ttype, pmask, depth, maxdepth, maxmsgl, ctime, desc<, inbox>);
qid Numeric, input
Specifies the handle to an open queue that is obtained from a previous OPENQUEUE function call.
rc Numeric, output
Provides the return code from the CALL routine. If an error occurs, the return code is nonzero. You can use
the SAS function SYSMSG() in order to obtain a textual description of the return code.
ttype Character, output
Identifies the transport type of the queue. Possible values are as follows:
MQSeries◊ MQSeries−C◊ MSMQ◊ Rendezvous◊ Rendezvous−CM◊
pmask Numeric, output
Returns the property assertion mask that the queue accepts. This property is valid only for the MQSeries,
MQSeries−C, and MSMQ transports. Possible values are as follows:
bit 0
In MSMQ, specifies that the queue only accepts authenticated messages.
bit 1
In MSMQ, specifies that the queue only accepts private messages.
bit 2
In MSMQ, specifies that the queue only accepts public messages.
bit 4
In MSMQ, specifies that the queue only accepts transactional messages. In MQSeries, bit 4 specifies
that the QMgr supports syncpoint.
depth Numeric, output
Returns the current depth of the queue.
maxdepth
Numeric, output
Returns the maximum depth that is configured for the queue. This property is valid only for the MQSeries,
MQSeries−C, and MSMQ transports.
maxmsgl
Numeric, output
Returns the maximum length that is configured for the queue. This property is valid only for the MQSeries,
GETQUEUEPROPS 658
MQSeries−C, and MSMQ transports.
ctime Character, output
Returns the queue creation time stamp. This property is valid only for the MQSeries, MQSeries−C, and
MSMQ transports.
desc Character, output
Returns a description of the queue. This property is valid only for the MQSeries, MQSeries−C, and MSMQ
transports.
inbox Character, output
Returns the name of the private inbox created for a session opened with FETCHX. This property is valid only
for the Rendezvous transports. This parameter is optional.
Details
If a transport does not support a particular property, then the routine returns −2 for numeric property values but does
not change character property values.
Example
The following example obtains the properties of a queue:
length msg $ 200;
length qid rc 8;
length ttype $ 13;
length pmask depth maxdepth maxmsgl 8;
length ctime desc $ 80;
rc=0;
ttype='';
pmask=0;
depth=0;
maxdepth=0;
maxmsgl=0;
ctime='';
desc='';
call getqueueprops(qid, rc, ttype, pmask, depth,
maxdepth, maxmsgl, ctime, desc);
if rc ^= 0 then do;
put 'GETQUEUEPROPS: failed';
msg = sysmsg();
put msg;
end;
else do;
put 'GETQUEUEPROPS: succeeded';
put 'transport type = ' ttype;
if ttype eq 'MQSERIES' then do;
if pmask='1...'b then put 'Syncpoint is enabled';
else put 'Syncpoint is disabled';
end;
else if ttype eq 'MSMQ' then do;
if pmask='1'b then put 'Authenticated
messages are required';
SAS® Integration Technologies: Developer's Guide
GETQUEUEPROPS 659
if pmask='1.'b then put 'Private
messages are required';
else if pmask='1..'b then put 'Public
messages are required';
else put 'Privacy is optional';
if pmask='1...'b then put 'Transactional
messages are required';
else put 'Transactional messages
are not permitted';
end;
put 'depth = ' depth;
put 'maxdepth = ' maxdepth;
put 'maxmsgl = ' maxmsgl;
put 'creation time = ' ctime;
put 'description = ' desc;
end;
Application Messaging
SAS® Integration Technologies: Developer's Guide
GETQUEUEPROPS 660
Attachment Layout for Websphere MQ and MSMQ
Attachments are made up of multiple physical messages. The beginning of an attachment is recognized by possessing
a message type of 100000. To identify this message, it will be referred to as the attachment header.
Layout of an attachment header message:
Note: All character strings are null terminated.
byte[24] − header correlid (correlationid of this header
message)
long − original msg type (msg type provided by the
sending application)
byte[24] − original msg correlid (msg correlationid
provided by the sending application)
byte[24] − message correlid (generated correlationid for
the msg)
int − number of attachments
−−−−−−−−−−−−−−−−−−−−−−−−−−−−−−−−−−−−−−−−−−−−−−−−−−−−−−−−
int − attachment type
1 − SAS Dataset
2 − External text file
3 − External binary file
byte[24] − attachment correlid (correlationid associated
with this attachment)
int − length of qualifier 1
char[] − qualifier 1
external files: designates the sending file
specification "FILENAME" or "FILEREF"
dataset: designates the sending library name
int − length of qualifier 2
char[] − qualifier 2
external files: designates the sending
filename or fileref
dataset: designates the sending member name
int − length of attachment description
char[] − attachment description
int − user specified minor version number
int − user specified major version number
−−−−−−−−−−−−−−−−−−−−−−−−−−−−−−−−−−−−−−−−−−−−−−−−−−−−−−−−
.
.
. repeat for each attachment in the list
Other physical messages are also needed to make up a complete attachment. These messages will be called
subordinated messages and they all possess a message type of 100001.
The subordinate message that usually follows after the attachment header message is the application message. It can
be filtered using the message correlid located in the attachment header message. It contains the actual application
generated message.
The attachment (external file or SAS data set) subordinate messages follow next. They contain the necessary
information to recreate the file or data set.
To locate the subordinate message that contains the number of physical messages associated with this attachment,
filter it by using the attachment correlid located in the attachment header message. The content of this message is a
Attachment Layout for Websphere MQ and MSMQ 661
single numeric integer that corresponds to the number of messages associated with this attachment excluding this
message. To filter the rest of the messages associated with this attachment, you will use the same attachment correlid
located in the attachment header message (16 bytes) with a sequence number (4 bytes) added to the end of it. For
instance, if the attachment correlid was 000102030405060708090A0B0C0D0E0F, you would filter this message to
find out how many more messages are associated with this attachment. For example purposes let's say that three more
messages make up this attachment. You can then locate these messages by filtering a correlid of
000102030405060708090A0B0C0D0E0F00000001, 000102030405060708090A0B0C0D0E0F00000002, and
000102030405060708090A0B0C0D0E0F00000003, respectively. The sequenced attachment correlid messages are
actually sent to the queue before the non−sequenced attachment correlid message so that if you are able to receive the
non−sequenced attachment correlid message (iethat ismessage that tells you how many messages make up this
attachment), you can be rest assured that the complete attachment has been queued.
At this point, attachment processing differs depending on the attachment type.
For external files, the first sequenced attachment correlid message (attachment_correlid+00000001) contains two
numeric integers that correspond to the file's logical record length and size, respectively. The rest of the attachment
correlid messages make up the file itself. The contents of these messages are as follows:
−−−−−−−−−−−−−−−−−−−−−−−−−−−−−−−−
long − size of logical record
char[] − actual record
−−−−−−−−−−−−−−−−−−−−−−−−−−−−−−−−
.
.
. repeat until the end of file or 32K limit is reached
These messages are limited to 32K so if a file is too large to fit, it will have to span multiple physical messages.
Here is an example of an external file attachment residing on a queue.:
msg type msg correlid msg contents
−−−−−−−− −−−−−−−−−−−− −−−−−−−−−−−−
100000 1111111111111111111111111111111100000000 1111111111111111111111111111111100000000
00000001
0000000000000000000000000000000000000000
2222222222222222222222222222222200000000
00000001
00000003
3333333333333333333333333333333300000000
00000008
"FILENAME"
0000000D
"d:\mytext.txt"
0000000C
"Text file..."
00000000
00000000
100001 2222222222222222222222222222222200000000 "This is the actual application message."
100001 3333333333333333333333333333333300000001 lrecl|filesize
100001 3333333333333333333333333333333300000002 len|record|len|record|len|record...
100001 3333333333333333333333333333333300000003 len|record|len|record|len|record...
100001 3333333333333333333333333333333300000000 00000003
For data sets, the sequenced attachment correlid messages begin with a type identifier. This identifier signifies the
type of information that is in this message. A type identifier of one signifies data set definitions. A type identifier of
two signifies variable definitions. A type identifier of three signifies actual observations. Type identifiers four
SAS® Integration Technologies: Developer's Guide
Attachment Layout for Websphere MQ and MSMQ 662
(indexes) and five (integrity constraints) will probably have no use so they can be ignored.
Note: All character strings are null terminated.
Layout of a dataset definition message:
int − type (dataset definition=1)
int − version (future)
long − dataset type length
char[] − dataset type
long − dataset label length
char[] − dataset label
long − number of observations
long − number of variables
long − observation length
long − length of compress
char[] − compress
char − reuse
long − length of encrypt
char[] − encrypt
long − number of variables in sort key
long − length of sort collating sequence
char[] − sort collating sequence
short − sort flags
int − read password flag
byte[4] − read password (encrypted)
int − write password flag
byte[4] − write password (encrypted)
int − alter password flag
byte[4] − alter password (encrypted)
Layout of a variable definition message:
int − type (variable definition=2)
−−−−−−−−−−−−−−−−−−−−−−−−−−−−−−−−−−−
long − length of variable name
char[] − variable name
long − length of format name
char[] − format name
long − length of informat name
char[] − informat name
long − variable label length
char[] − variable label
char − variable type (1=double, otherwise character)
long − variable length
long − format field length
long − format decimal
long − informat field length
long − informat decimal
char − nsort
−−−−−−−−−−−−−−−−−−−−−−−−−−−−−−−−−−−
.
.
. repeat for each variable
Note: Variable definitions may span multiple physical
messages if definitions are larger than 32K.
SAS® Integration Technologies: Developer's Guide
Attachment Layout for Websphere MQ and MSMQ 663
Layout of an observation message:
int − type (observation=3)
data − the layout of data is defined by the variable
definition above
Note: Observations may span multiple physical messages
if they are larger than 32K.
Layout of an index message:
int − type (index=4)
−−−−−−−−−−−−−−−−−−−−−−−−−−−−−−−−−−−
long − upercmx
long − length of index/key name
char[] − index/key name
long − flags
long − number of variables in the index/key
long − variable lengths added together
char[] − all variables null terminated
−−−−−−−−−−−−−−−−−−−−−−−−−−−−−−−−−−−
.
.
. repeat for each index
Application Messaging
SAS® Integration Technologies: Developer's Guide
Attachment Layout for Websphere MQ and MSMQ 664

Attachment Layout for TIB/Rendezvous
An attachment is comprised of multiple physical messages. Each physical message has a specific message type. The
field name of the first field in each message specifies the message type. Subsequent fields in the same message should
use the same field name.
Data Message Layout
The following table shows the field name and purpose of the "MSG," or "DATA," type.
Note: The message type "MSG," or "DATA," can be retrieved without a field ID. All other message types must use a
field ID.
Field Name Purpose
"MSG" or "DATA" message data sent using a map
Data Set Attachment Layout
All attachments are required to have an attachment header and a "LST" message. However, not all messages are
required. For example, many data sets do not use integrity constraints or indexes. If a data set does not contain the
information contained in a message type, then the message is not required to be sent. The following table shows the
field name, purpose of each message type, and the order in which messages should be sent for a data set.
Field Name Purpose
"HDR" attachment header.
"MSG" or "DATA" message data sent using a map
"DAT" data set descriptor
"VAR" variable definition for data set
"ATO" data set observations
"ATI" data set index
"ATC" data set integrity constraints
"LST" last message of attachment
External File Attachment Layout
All attachments are required to have an attachment header and a "LST" message. However, not all messages are
required. For each "FDC" record, send either a text file or a binary file. You can send more than one file in an
attachment. Each file must have an "FDC" message and then one of the following:
one or more "ATX" messages for the text file(s)• one or more "ATB" messages for the binary file(s)•
The following table shows the field name, purpose of each message type, and the order in which messages should be
sent for an external file.
Attachment Layout for TIB/Rendezvous 665
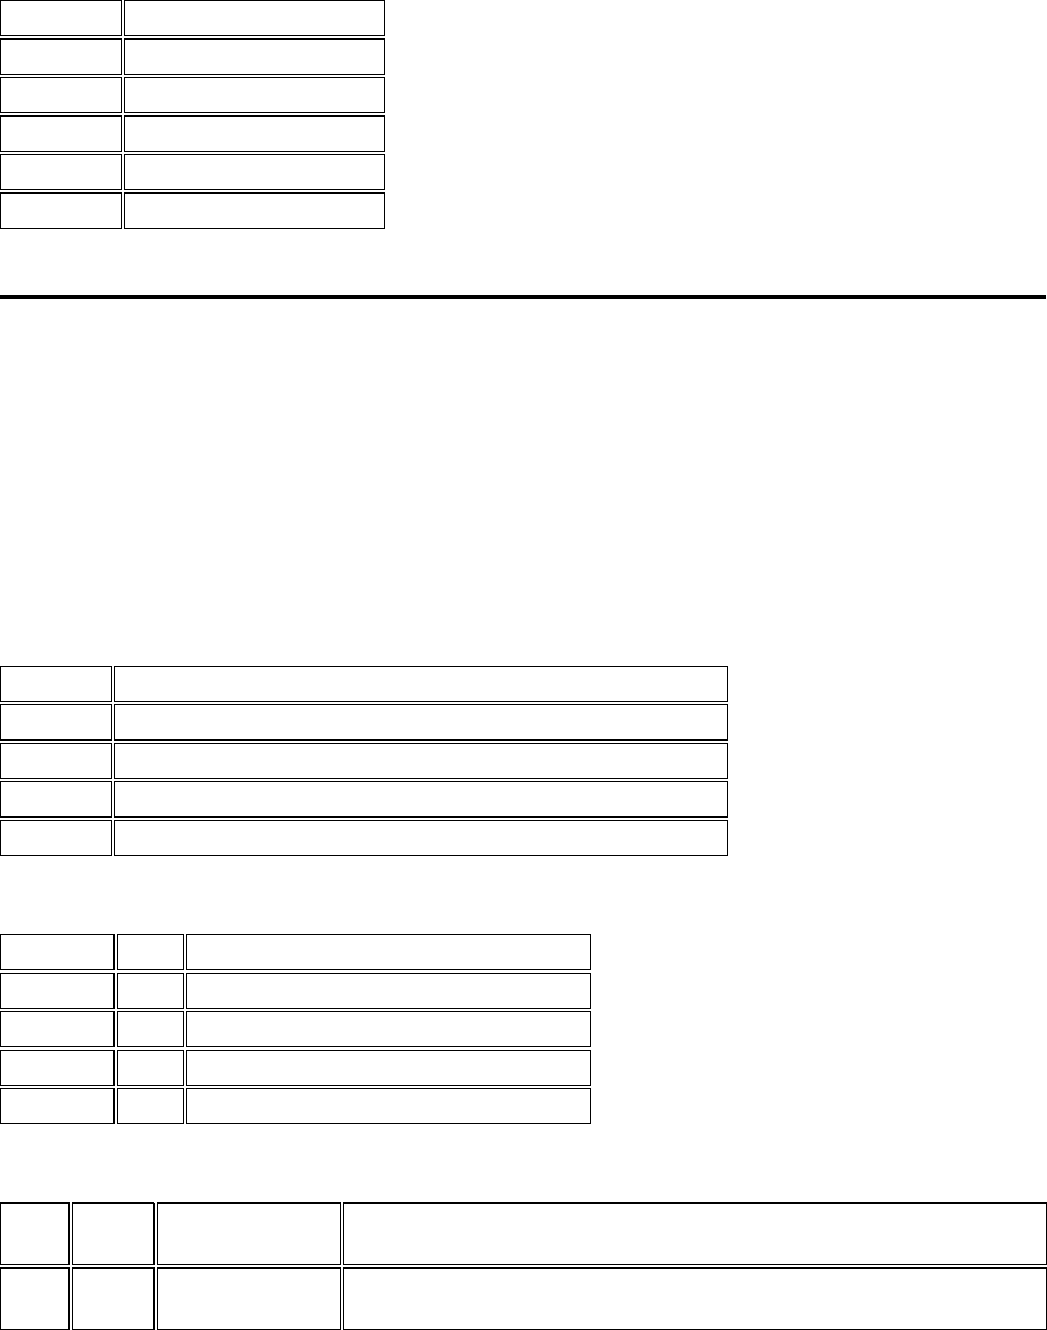
Field Name Purpose
"HDR" attachment header
"FDC" external file descriptor
"ATX" text file attachment body
"ATB" binary file attachment body
"LST" last message of attachment
The following sections contain the description and required format for each message type.
Message Data − "MSG" or "DATA"
Note: The message type "MSG," or "DATA," can be retrieved without a field ID. All other message types must use a
field ID.
If any message data is to be sent along with an attachment, that message is sent following the attachment header. The
field name for this type of message is either "MSG" or "DATA." The following sample is based on the map used in
the code example provided on the Common Messaging Interface documentation.
The map for this message is described as: 'SHORT;LONG;DOUBLE;CHAR,,50'
The following table shows the data values for the message data.
Parameter Value
parm1 100;
parm2 9999;
parm3 9999.1234;
parm4 "ABCDEFGHIJKLMNOPQRSTUVWXYZ"; (blank padded to 50)
The following table shows the data type values for the message data.
Data Type Value Description
short 1 add with tibrvMsg_AddI16()
long 2 add with tibrvMsg_AddI32() as appropriate
double 3 add with tibrvMsg_AddF64()
string(char) 4 add with tibrvMsg_AddString()
The following table shows the layout of the message data.
Field
ID Field
Type Function Description
1 int tibrvMsg_AddI32() The number of data pieces to follow. For this example, the value of the field is
"4".
SAS® Integration Technologies: Developer's Guide
Attachment Layout for TIB/Rendezvous 666

2 int tibrvMsg_AddI32() The data type of the first data item. Because this data item is a short, the value
for this field is "1".
3 short tibrvMsg_AddI16() The actual value of the first parameter being sent. In this case, because it is a
short, the value is added to the message using tibrvMsg_AddI16(). The value
for this field is "100".
For each parameter that is sent, repeat fields 2 and 3 in the previous table, setting the appropriate values and
incrementing the field ID's.
Attachment Header − "HDR"
The beginning of an attachment is recognized by processing the attachment header message. This message type is
recognized by the "HDR" field name in all fields.
The following table shows the layout of the attachment header.
Note: All character strings are null terminated.
Field
ID Field Type Function Description
1 byte[24] tibrvMsg_AddString() header correlid: can be set to all blanks
2unsigned
long tibrvMsg_AddU32() reserved: set to 0
3 byte[24] tibrvMsg_AddString() reserved: set to all blanks
4 byte[24] tibrvMsg_AddString() message correlid: can be set to all blanks
5 integer tibrvMsg_AddI32() number of attachments in message (1 per data set)
6 integer tibrvMsg_AddI32()
attachment type: value is
"1" for SAS data set.• "2" for an external text file• "3" for an external binary file•
7 byte[24] tibrvMsg_AddString() attachment correlid: can be set to all blanks
8 int tibrvMsg_AddI32() length of qualifier 1 in field 9
9 char[] tibrvMsg_AddString()
qualifier 1:
external files: designates the sending file specification
"FILENAME" or "FILEREF"
•
data set: designates the sending library name•
10 int tibrvMsg_AddI32() length of qualifier 2 in field 11
11 char[] tibrvMsg_AddString()
qualifier 2:
external files: designates the sending filename or fileref• data set: designates the sending member name•
SAS® Integration Technologies: Developer's Guide
Attachment Layout for TIB/Rendezvous 667
12 int tibrvMsg_AddI32() length of attachment description
13 char[] tibrvMsg_AddString() attachment description
14 int tibrvMsg_AddI32() user−specified minor version number
15 int tibrvMsg_AddI32() user−specified major version number
For each attachment in the list, repeat fields 6−15 in the previous table, incrementing the field ID each time.
The attachment header is usually followed by the subordinate messages that contain the information necessary to
re−create the data set or the external file.
Data Set Definition − "DAT"
The data set definition message is sent following the message data. This message type is recognized by the "DAT"
field name in all fields.
The following table shows the layout of the data set definition.
Note: All character strings are null terminated.
Field ID Field Type Function Description
1 int tibrvMsg_AddI32() type of record is data set definition= 1
2 int tibrvMsg_AddI32() version information or 0
3 long tibrvMsg_AddI32() data set type length
4 char[] tibrvMsg_AddString() data set type
5 long tibrvMsg_AddI32() data set label length
6 char[] tibrvMsg_AddString() data set label
7 long tibrvMsg_AddI32() number of observations
8 long tibrvMsg_AddI32() number of variables
9 long tibrvMsg_AddI32() observation length
10 long tibrvMsg_AddI32() length of compress
11 char[] tibrvMsg_AddString() compress
12 char tibrvMsg_AddString() reuse ("R" or "E")
13 long tibrvMsg_AddI32() length of encrypt
14 char[] tibrvMsg_AddString() encrypt
15 long tibrvMsg_AddI32() number of variables in sort key
16 long tibrvMsg_AddI32() length of sort collating sequence or 1
17 char[] tibrvMsg_AddString() sort collating sequence or NULL
18 short tibrvMsg_AddI16() sort flags or 0
19 int tibrvMsg_AddI32() read password flag
SAS® Integration Technologies: Developer's Guide
Attachment Layout for TIB/Rendezvous 668

20 byte[4] tibrvMsg_AddOpaque() read password (encrypted)
21 int tibrvMsg_AddI32() write password flag
22 byte[4] tibrvMsg_AddOpaque() write password (encrypted)
23 int tibrvMsg_AddI32() alter password flag
24 byte[4] tibrvMsg_AddOpaque() alter password (encrypted)
25 int tibrvMsg_AddI32() max_gen data set attribute
Variable Definition − "VAR"
The variable definition message is sent following the data set definition message. This message type is recognized by
the "VAR" field name in all fields.
The following table shows the layout of the variable definition.
Note: All character strings are null terminated.
Field ID Field Type Function Description
1 int tibrvMsg_AddI32() number of variables
2 int tibrvMsg_AddI32() type of record is variable definition=2
3 long tibrvMsg_AddI32() length of variable name
4 char[] tibrvMsg_AddString() name of variable
5 long tibrvMsg_AddI32() length of format name
6 char[] tibrvMsg_AddString() format name
7 long tibrvMsg_AddI32() length of informat name
8 char[] tibrvMsg_AddString() informat name
9 long tibrvMsg_AddI32() length of variable label
10 char[] tibrvMsg_AddString() variable label
11 char tibrvMsg_AddString() type of variable (1=numeric, 2=char)
12 long tibrvMsg_AddI32() length of variable
13 long tibrvMsg_AddI32() format field length
14 long tibrvMsg_AddI32() format decimal
15 long tibrvMsg_AddI32() informat field length
16 long tibrvMsg_AddI32() informat decimal
17 char tibrvMsg_AddString() nsort information
For each variable, repeat the fields in the previous table.
Note: If definitions are larger than 32K, variable messages may span multiple physical messages.
SAS® Integration Technologies: Developer's Guide
Attachment Layout for TIB/Rendezvous 669
Data Set Observations − "ATO"
The data set observations message is sent following the variable definition message. This message type is recognized
by the "ATO" field name in all fields.
The following table shows the layout of the data set observations.
Note: All character strings are null terminated.
Field ID Field Type Function Description
1 int tibrvMsg_AddI32() number of observations
2 int tibrvMsg_AddI32() type of record is observation =
3
3 int tibrvMsg_AddI32() observation type (vtype)
4 double−observation tibrvMsg_AddF64() if observation type in field 3 is
numeric
4 char[] − observation tibrvMsg_AddString() if observation type in field 3 is
character
For each observation, repeat the fields in the previous table.
Note: If observations are larger than 32K, they may span multiple physical messages.
Data Set Index − "ATI"
If the data set index message is needed, the data set index message is sent following the data set observations message.
This message type is recognized by the "ATI" field name in all fields.
The following table shows the layout of the index definition.
Note: All character strings are null terminated.
Field ID Field Type Function Description
1 int tibrvMsg_AddI32() type of record is index = 4
2 int tibrvMsg_AddI32() number of records in this message
3 long tibrvMsg_AddI32() upercmx
4 long tibrvMsg_AddI32() length of index/key name
5 char[] tibrvMsg_AddString() index/key name
6 long tibrvMsg_AddI32() flags
7 long tibrvMsg_AddI32() number of variables in the index/key
8 long tibrvMsg_AddI32() number of keys
9 char[] tibrvMsg_AddString() key name
SAS® Integration Technologies: Developer's Guide
Attachment Layout for TIB/Rendezvous 670
For each key, repeat field 9 in the previous table. For each record, repeat fields 3−9 in the previous table.
Data Set Integrity Constraints − "ATC"
If the data set integrity constraints message is needed, the data set integrity constraints message is sent following the
data set index message. This message type is recognized by the "ATC" field name in all fields.
The following table shows the layout of the integrity constraints definition.
Note: All character strings are null terminated.
Field ID Field Type Function Description
1 int tibrvMsg_AddI32() type of record is integrity constraint = 5
2 int tibrvMsg_AddI32() number of records in this message
3 long tibrvMsg_AddI32() IC type
Based on the value of field 3 in the previous table, use one of the following tables
If the field type is CHECK for field 3, then use the fields in the following table.
Field ID Field Type Function Description
4 long tibrvMsg_AddI32() max length for this IC
5 char[] tibrvMsg_AddString() name of IC
6 long tibrvMsg_AddI32() retval
7 long tibrvMsg_AddI32() total length
8 char[] tibrvMsg_AddString() list of wtnames
9 long tibrvMsg_AddI32() whlen
10 long tibrvMsg_AddI32() number of members in tree
11 byte[] tibrvMsg_AddOpaque() whbuf buffer
For each buffer, repeat field 11 in the previous table, incrementing the field ID each time.
•
If the field type is not CHECK for field 3, then use the fields in the following table.
Field ID Field Type Function Description
4 long tibrvMsg_AddI32() max length for this IC
5 char[] tibrvMsg_AddString() name of IC
6 long tibrvMsg_AddI32() nvar − number of variables
7 long tibrvMsg_AddI32() number of NNAME records
8 char[] tibrvMsg_AddString() NNAME
For each NNAME value, repeat field 8 in the previous table, incrementing the field ID each time. Subsequent
field ID's will increase from here.
•
SAS® Integration Technologies: Developer's Guide
Attachment Layout for TIB/Rendezvous 671
Based on the value of field 3 in the first table of this section, use one of the following tables:
If the field type is not CHECK or FOREIGN KEY for field 3, then use the following table for field 9.
Field ID Field Type Function Description
9 long tibrvMsg_AddI32() filler value = 1
•
If the field type is not CHECK but it is FOREIGN KEY for field 3, then use the fields in the following table.
Field ID Field Type Function Description
9 long tibrvMsg_AddI32() total length of following fields
10 long tibrvMsg_AddI32() fkdelt
11 long tibrvMsg_AddI32() fkupd
12 long tibrvMsg_AddI32() pklng + 1
13 char[] tibrvMsg_AddString() pkname
14 char[8] tibrvMsg_AddString() pkfname libref
15 long tibrvMsg_AddI32() length of member name
16 char[] tibrvMsg_AddString() member name.
17 long tibrvMsg_AddI32() ICP attributes
•
For each record in the message, repeat field 3 and all subsequent fields in the previous tables.
External File Descriptor − "FDC"
This message type is recognized by the "FDC" field name in all fields. For each "FDC" record, send either a text file
or a binary file. You can send more than one file in an attachment but the files must be either all text files or all binary
files. Each file must have an "FDC" message and then one of the following:
one or more "ATX" messages for the text file(s)• one or more "ATB" messages for the binary file(s)•
The following table shows the layout of the external file descriptor.
Field ID Field Type Function Description
1 int tibrvMsg_AddI32() size of logical record
2 int tibrvMsg_AddI32() file size
Text File Attachment − "ATX"
This message type is recognized by the "ATX" field name in all fields.
The following table shows the layout of the text file attachment body.
Field ID Field Type Function Description
SAS® Integration Technologies: Developer's Guide
Attachment Layout for TIB/Rendezvous 672
1 int tibrvMsg_AddI32() number of records in this message
2 long tibrvMsg_AddI32() length of data in field 3
3 char[] tibrvMsg_AddString file data
For each record in the message, repeat fields 2 and 3.
Binary File Attachment − "ATB"
This message type is recognized by the "ATB" field name in all fields.
The following table shows the layout of the binary file attachment body.
Field ID Field Type Function Description
1 int tibrvMsg_AddI32() number of records in this message
2 long tibrvMsg_AddI32() length of data in field 3
3 tibrv_u8 tibrvMsg_AddOpaque file data
For each record in the message, repeat fields 2 and 3.
Last Message of Attachment − "LST"
All attachments must end with an "LST" message. This message type is recognized by the "LST" field name in all
fields. This message type contains a count of the number of messages sent for the attachment, not including itself.
The following table shows the layout of the last message.
Field ID Field Type Function Description
1 int tibrvMsg_AddI32() number of messages sent for attachment
Application Messaging
SAS® Integration Technologies: Developer's Guide
Attachment Layout for TIB/Rendezvous 673

Attachment Error Handling
Transfer Errors: Queue versus Point−To−Point
When sending a message to a message queue, all attachments (along with the message) are transferred to the queue
when the _SEND_ or _SENDLIST_ is invoked. The attachments are stored at the domain server until fetched by a
user. If an error occurs sending the attachments to the queue, neither the message nor the attachments will be delivered
to the queue. In this scenario, the return code from _SEND_/_SENDLIST_ will be set to _SEATTXF. This is an error
indicating that neither the message nor the attachments were delivered because one or more errors occurred during
attachment transfer.
When a message is sent using point−to−point messaging, only the attachment list, along with the message, is sent to
the receiving side initially. The receiver is then responsible for determining, which, if any attachments should actually
be transferred. Because the message is delivered to the receiver before any attachments are actually transferred, an
error encountered during attachment transfer will not cause the _SEND_ to terminate. If an error is encountered, the
current attachment transfer is terminated, but the remaining attachments selected to be received are sent to the
receiving side. If any errors are encountered during attachment transfer, the return code from _SEND_/_SENDLIST_
will be set to _SWATTXF. This is only a warning indicating that the message was successfully sent, but one or more
errors occurred during attachment transfer.
Accept Errors
When a message includes attachments, the receiver has the responsibility to determine which attachments are
ultimately transferred, via the _ACCEPT_ATTACHMENT_ method. If an error is encountered during attachment
transfer, the current attachment transfer is terminated, but the transfer continues with the next attachment in the
attachlist. If any errors are encountered, the return code from _ACCEPT_ATTACHMENT_ will be set to
_SWATTXF. This is only a warning indicating that one or more errors occurred during attachment transfer.
Attachment Error Codes
To review what was mentioned above, a specific return code will be set if an error is encountered during attachment
transfer.
when sending on a Cnction instance, _SWATTXF is returned• when sending on a Queue instance, _SEATTXF is returned• when accepting attachments on either a Queue or Cnction instance, _SWATTXF is returned•
When one of these scenarios occurs, the attachlist parameter passed to these methods will be updated. An additional
named item, RC, will be added to each separate attachment list. The value of RC will be a numeric return code that
can be used to determine what caused the error for this particular attachment transfer. The defined return codes
include the following:
Input File Errors (error occurred on input file):
Value Meaning
−−−− −−−−−−−−−−−−−−−−−−−−
20 general I/O error
21 libname does not exist
22 memname does not exist
23 invalid or missing password
24 invalid data set option value
Attachment Error Handling 674

25 invalid data set option name
26 general error parsing data set options
27 error parsing where stmt
28 bad physical filename
29 file in use
30 file does not exist
31 invalid authorization for external file
32 open failed for some reason other than
mentioned above
33 error obtaining Integrity Constraints
information
34 variable contains unsupported characters or
is too long
35 key name contains unsupported characters or
is too long
Output File Errors (error occurred on output file):
Value Meaning
−−−− −−−−−−−−−−−−−−−−−−−−
80 general I/O error
81 libname does not exist
82 invalid or missing password
83 bad physical filename
84 file in use
85 file does not exist
86 invalid authorization for external file
87 open failed for some reason other than
mentioned above
87 file already exists
88 engine does not support read passwords
89 engine does not support encryption
General/Misc. Errors:
Value Meaning
−−−− −−−−−−−−−−−−−−−−−−−−
1 Out of memory error
2 Open of catalog by queue manager failed
3 Read error (of catalog) encountered by queue
manager
4 Write error (of catalog) encountered by queue
manager
5 Index create failure
6 Backwards compatibility error
7 Only SQL views supported
Example
In the following example, one attachment is accepted into an non−existent library name:
/* build one attachment list, att1 */
att1 = makelist();
rc = setnitemc(att1, 1, "ATTACH_ID");
rc = setnitemc(att1, "NOEXIST", "OUTLIB");
rc = setnitemc(att1, "A , "OUT");
/* insert att1 into the main attachment list, alist */
alist = makelist();
alist = insertl(alist, att1, −1);
/* accept the attachment */
SAS® Integration Technologies: Developer's Guide
Attachment Error Handling 675
call send(obj, "_ACCEPT_ATTACHMENT_", alist, rc);
/* if error, dump out attachment list to view rc */
if (rc NE 0) then
call putlist(alist, "Attachment
list after accept:", 1);
After the accept method call, the attachment list alist will have the following named items:
named item ATTACH_ID will have a value of 1• named item OUTLIB will have a value of "NOEXIST"• named item OUT will have a value of "A"• named item RC will have a value of 81•
The error code list maps the return code of 81 into output library is non−existent. Similarly, when the sender returns
from the _SEND_/_SENDLIST_, the attachlist parameter will be updated with the RC named item to reflect that the
attachment transfer failed.
att1 = makelist();
rc = setnitemc(att1, "SASUSER", "LIBNAME");
rc = setnitemc(att1, "NAMES", "MEMNAME");
rc = setnitemc(att1, "DATASET", "TYPE");
attachlist = makelist();
attachlist = insertl(attachlist, att1, −1);
call send(cnctionObj, "_SEND_", msgtype, attachlist,
rc, "Message One");
if (%sysrc(_SWATTXF) = rc) then do;
call putlist(attachlist, "attachlist after send", −1);
end;
Assuming that the attachment was accepted by the receiving side as shown above, the attachment list, attachlist, after
the send will be updated with the RC named item to reflect that the attachment transfer failed.
named item LIBNAME will have a value of "SASUSER"• named item MEMNAME will have a value of "NAMES"• named item TYPE will have a value of "DATASET"• named item RC will have a value of 81•
Again, the error code list maps the return code of 81 into output library is non−existent.
Java Clients
SAS® Integration Technologies: Developer's Guide
Attachment Error Handling 676

Developing Java Clients
The application programming interfaces provided with SAS Integration Technologies enable you to develop
Java−based distributed applications that are integrated with the SAS platform. SAS 9.1 Integration Technologies
includes:
The Java Connection Factory interface, which enables Java programs to communicate with IOM servers
through an IOM Bridge connection. The connection factory allows you to obtain server attributes from a SAS
Metadata Server, from the Information Service (which is part of SAS Foundation Services), from an LDAP
server, or directly from an application program.
When used with the SAS Open Metadata Architecture, the Java Connection Factory interface provides the
following:
connections to new types of IOM servers (SAS Metadata Servers, SAS Stored Process Servers, and
SAS OLAP Servers) in addition to SAS Workspace Servers
♦
the ability to use load balancing for workspace and stored process servers and spawners♦
•
SAS Foundation Services, which extend Java application development beyond access to IOM servers. The
following core infrastructure services are provided:
client connections to application servers (including the Java Connection Factory interface previously
mentioned)
♦
dynamic service discovery♦ user authentication and profile management♦ session context management♦ metadata and content repository access♦ activity logging♦
Extension services for event management, information publishing, and stored process execution are also
included.
•
The SAS Foundation Services Facade, which includes convenience services that Web application developers
can use to easily access the most commonly used SAS Foundation Services methods and objects.
•
The Workspace Factory interface that was introduced with SAS 8.2 Integration Technologies is still supported for
access to workspace servers. However, it is recommended that you use the Java Connection Factory interface in order
to take advantage of the newly available features.
Use of this software requires some knowledge of distributed programming. However, every effort has been made to
limit difficulty in using the software by rigorously adhering to Java distributed programming standards such as
CORBA and JDBC. Whether you are developing an applet, a stand−alone application, a servlet, or an enterprise
JavaBean, you can focus your attention on exploiting the features of the SAS platform rather than determining how to
communicate with it.
SAS Integration Technologies supports any Java integrated development environment (IDE), including IBM's
VisualAge, WebGain's VisualCafe, Borland's JBuilder, and SAS webAF (which is part of SAS AppDev Studio).
Java Clients
Developing Java Clients 677

Java Client Installation and JRE Requirements
This information applies to Release 9.1 of the Java client software for SAS Integration Technologies.
Client Installation
To install the Java client software, you must install SAS Foundation Services from the software distribution CD.
JRE Requirements
The current release of the Java client software requires Java 2 Runtime Environment, Standard Edition, Version 1.4.1.
The Java Runtime Environments can be obtained from the Third−Party Software Components CD included in your
SAS Installation Kit.
To compile and run the code examples included in the Java client development documentation, you must include java
archives in your classpath as specified in the following table:
Samples Java Archives Needed
all samples sas.core.jar
sas.svc.connection.jar
SAS Metadata Server Samples
sas.oma.joma.jar
sas.oma.joma.rmt.jar
sas.oma.omi.jar
sas.oma.util.jar
sas.svc.connection.platform.jar
To run the IDL−to−Java compiler or run the binder utility, you must include sas.iom.tools.jar in your
classpath.
See the documentation for your Java Runtime Environment for help on setting your classpath.
Java Clients
Java Client Installation and JRE Requirements 678

Java Client Security
For an overview and understanding of security for the SAS Open Metadata Architecture, see Security in the SAS
Integration Technologies: Server Administrator's Guide.
The IOM Bridge for Java has the ability to encrypt all messages exchanged with the IOM server, using a two−tiered
security solution. The first tier is a SAS proprietary encryption algorithm. The second tier is made up of
standards−based RC2, RC4, DES, and Triple DES encryption algorithms.
The SAS proprietary encryption algorithm (SASPROPRIETARY) is appropriate for use in applications where you
want to prevent accidental exposure of information while it is being transmitted over a network between an IOM
Bridge for Java and an IOM server. Access to this encryption algorithm is included with your Base SAS license, and
the Java implementation is integrated into the IOM Bridge for Java.
The second−tier encryption algorithms are appropriate for use in applications where you want to prevent exposure of
secret information. In other words, using these algorithms makes it extremely difficult to discover the content of
messages exchanged between an IOM Bridge for Java and an IOM server. To use these algorithms you must license
SAS/SECURE software.
In addition to encryption, SAS/SECURE software also supports message authentication codes (MAC). A MAC is a
few bytes of information that is appended to a message to allow the receiver to be sure that the message has not been
altered in transit.
Usage instructions for the security features of the IOM Bridge for Java are included with the documentation for the
com.sas.services.connection class. Those instructions contain some tips on how to configure the IOM
server, but more complete information is available in the documentation for Base SAS software. Installation
instructions and usage information for second−tier encryption algorithms is provided in the documentation for
SAS/SECURE software.
Java Clients
Java Client Security 679

Using the IOM Server
This section introduces the steps necessary to construct and execute a Java application that uses the IOM server. As
you become more familiar with Java client programming for the IOM server, you can build on these steps to exploit
the more sophisticated features of the IOM server.
With SAS 9 Integration Technologies, Java clients can access an IOM server using the Java Connection Factory
interface of the new Connection Service. The Java Connection Factory interface can access metadata from either of
the following:
a metadata server (SAS Metadata Server or LDAP server).• server parameters supplied directly in the source code. (You can supply a
ManualConnectionFactoryConfiguration object directly in the source code. For details, see
Connecting with Directly Supplied Server Properties).
•
If you are using a SAS Metadata Server or supplying server parameters directly in the source code, the Connection
Service can connect to SAS Workspace Servers, other metadata servers, SAS OLAP Servers, and SAS Stored Process
Servers.
Note: If you are using an LDAP server, the Connection Service interface can only connect to workspace servers.
Under LDAP, Integration Technologies does not support access to other types of IOM servers.
Note: The Version 8 Workspace Factory interface is still supported. However, it is recommended that you use the
Java Connection Factory interface in order to take advantage of the new features available with SAS 9 Integration
Technologies.
Using a Metadata Server with the Connection Service
If you are using a metadata server, the first step in developing and running a client program is to make sure you have
access to a properly configured server. You can access a server by reading the connection information from a
metadata server:
If you are using a SAS Metadata Server, refer to the SAS Integration Technologies: Server Administrator's
Guide for information about server configuration in various environments.
•
If you are using an LDAP server, refer to the SAS Integration Technologies: Administrator's Guide (LDAP
Version) for information about server configuration in various environments.
•
As is the case in client development, you can start with a basic server configuration and then move into more a
sophisticated configuration over time.
After the IOM server has been configured, you can begin developing a Java client for the IOM server.
Connecting a Java Client to an IOM Server
With SAS 9 Integration Technologies, Java clients can use the Java Connection Factory interface to access an IOM
server as follows:
From the Java Connection Factory, obtain a connection to an IOM server. Then, obtain the remote object
reference connected to that IOM server and narrow it to the appropriate remote interface.
1.
Using the IOM Server 680

Use Java CORBA stubs for IOM objects and JDBC connection objects to exploit the power of SAS in the
IOM server.
2.
Return the Connection to the Java Connection Factory for disconnection or reuse.3.
Java clients can also still use the Workspace Factory to access an IOM server as follows:
From the Workspace Factory, obtain a Workspace remote object reference connected to an IOM server.1. Use Java CORBA stubs for IOM objects and JDBC connection objects to exploit the power of SAS in the
IOM server.
2.
Return the Workspace object to the Workspace Factory for disconnection or reuse.3.
To get started, you can put together a simple client application by composing the examples given for each step. Then
you can continue to read the additional documentation that is provided and learn about Java client programming for
the IOM server in greater detail.
Java Clients
SAS® Integration Technologies: Developer's Guide
Using the IOM Server 681

Using the Java Connection Factory
The Java Connection Factory interface of the Connection Service provides the following features:
IOM Bridge connections to IOM servers• scalability through pooling and server failover• support for load−balancing spawners.•
Configuring the Java Connection Factory and obtaining a connection are the first steps in using an IOM server. To
connect to an IOM server, you can use methods in the classes that implement the
ConnectionFactoryInterface interface.
Supplying Connection Information
In a Java client program, there are several ways to supply the Java Connection Factory with the information that it
needs in order to connect to an IOM server:
You can place the required information directly in the client program. For details, see Connecting with
Directly Supplied Server Properties. Connections can be made one at a time on an as−needed basis; or, you
can set up a pool of connections (see Supplying Connection Pooling Features Directly in the Source Code) to
be shared and reused across multiple Java client applications and multiple connection requests. Connection
pooling is secure, and it can dramatically reduce connection times in environments where one or more client
applications make frequent but brief requests for IOM services.
•
Alternatively, you can obtain the required information from a managed, secure SAS Metadata Server using
indirect logical names. The Java Connection Factory supports metadata access from a SAS Metadata Server.
For details, see Connecting with Server Properties Read from a SAS Metadata Server. When you use this
method, the decision about whether to use connection pooling is made by the metadata server administrator.
(See Using Pooling and a Metadata Server.)
•
You can also obtain the required information from a managed, secure LDAP metadata directory using indirect
logical names. The Java Connection Factory supports metadata access from LDAP. For details, see
Connecting with Server Properties Read From an LDAP Server. When you use this method, the decision
about whether to use connection pooling is made by the metadata server administrator. (See Using Pooling
and a Metadata Server.)
•
If you configure SAS Foundation Services, then you can obtain the required information from an LDAP
server or a SAS Metadata Server using the Information Service. For details, see Connecting with Server
Properties Read from the Information Service. When you use this method, the decision about whether to use
connection pooling is made by the metadata server administrator. (See Using Pooling and a Metadata Server.)
•
Using Connection Factory Configurations, Connection Factories, and
Connections
To create a connection to an IOM server, use the following steps:
Create the connection factory configuration. You must configure a connection factory to identify the
location and type of IOM server to which you want to connect. For example, to create a connection to host
foo.bar.abc.com at port 1234:
1.
Using the Java Connection Factory 682

String classID = Server.CLSID_SAS;
String host = "foo.bar.abc.com";
int port = 1234;
Server server = new BridgeServer(classID,host,port);
ConnectionFactoryConfiguration cxfConfig =
new ManualConnectionFactoryConfiguration(server);
Create the connection factory. After creating a connection factory configuration, you must find or create a
connection factory that matches the configuration. The connection factory manager maintains a set of
connection factories, and, if one of these connection factories matches your configuration, that factory is
returned. Otherwise, the connection factory manager creates a new connection factory and returns it. For
example, to create a connection factory that matches the connection factory configuration in step 1, use the
following code:
ConnectionFactoryConfiguration cxfConfig = ...
ConnectionFactoryManager cxfManager =
new ConnectionFactoryManager();
ConnectionFactoryInterface cxf =
cxfManager.getFactory(cxfConfig);
2.
Create the connection. To obtain a connection to the IOM server, you must provide a user name and a
password that are valid on the server. For example, to get a connection from the connection factory you
created in step 2:
ConnectionFactoryInterface cxf = ...
String userName = "myName";
String password = "mySecret";
ConnectionInterface cx =
cxf.getConnection(userName,password);
3.
Narrow the connection. When a connection factory returns a connection, the connection is a generic
interface for communicating with remote objects on the server. You can convert the generic interface to a
server−specific interface through a mechanism called narrowing. Narrowing is equivalent to the casting
mechanism used with remote object references. The connection factory contains classes necessary to narrow a
generic interface reference to a workspace server reference. Narrowing to other server interfaces will require
additional software packages. To narrow the connection obtained in step 3, use the following code:
ConnectionInterface cx = ...
org.omg.CORBA.Object obj = cx.getObject();
com.sas.iom.SAS.IWorkspace iWorkspace =
com.sas.iom.SAS.IWorkspaceHelper.narrow(obj);
4.
End the connection. After you are finished using a connection that you have obtained from the Java
Connection Factory, you must return it to the factory by calling the close() method on the connection. For
details, see Returning a Connection to the Connection Factory.
This process is the same whether you are using connection pooling or making single connections. It is also the
same whether you provide information about the IOM servers directly in your client program or indirectly
using a metadata server.
5.
Shut down the connection factory. When you are finished with the instance of the Java Connection Factory
itself and you no longer need to request connections from it, you must shut it down by calling the
shutdown() method or the destroy() method. For details, see Shutting Down the Java Connection
Factory.
6.
Connection Factory Logging
The Java Connection Factory logs diagnostic and status messages and writes them to output for use in debugging or
performance monitoring. For details, see Logging Java Connection Factory Activity.
SAS® Integration Technologies: Developer's Guide
Using the Java Connection Factory 683
Java Clients
SAS® Integration Technologies: Developer's Guide
Using the Java Connection Factory 684

Connecting with Directly Supplied Server Attributes
In order to make a connection to an IOM server, you must give the Java Connection Factory specific information
about the server and about the desired connection. The quickest and simplest method of providing this information is
to place it directly into the client program when creating the BridgeServer object. The following attributes can be
provided:
host specifies the IP address of the machine hosting the IOM server or object spawner. This attribute is required.
port specifies the TCP port that the IOM server or object spawner is listening on for connections. This attribute is
required.
encryptionPolicy
specifies whether IOM Bridge for Java should attempt to negotiate with the server over which encryption
algorithm to use and what to do if the negotiations fail. This attribute is optional. Possible values are as
follows:
none specifies not to use encryption. This is the default.
optionalspecifies to attempt to use encryption but, if algorithm negotiation fails, continue with an unencrypted
connection.
required
specifies to attempt to use encryption but, if algorithm negotiation fails, fail the connection.
encryptionAlgorithms
specifies the list of algorithms you are willing to use in order of preference. Values in the list should be
separated by commas and chosen from SASPROPRIETARY, RC2, RC4, DES, or TRIPLEDES. This attribute
is optional. If no value is specified, then one of the server's preferred algorithms will be used. It is ignored
entirely if the value for encryptionPolicy is none.
Note: If you do not have a license for SAS/SECURE software, only the SASPROPRIETARY algorithm is
available.
encryptionContent
specifies which messages should be encrypted if encryption is used. This attribute is optional, and it is ignored
entirely if the value for encryptionPolicy is none. Possible values are as follows:
all encrypts all messages. This is the default.
authentication
encrypts only messages that contain user name and password information.
Example
The Java code in this example demonstrates how to create a BridgeServer object to provide information to the Java
Connection Factory and obtain a connection. For an example showing how to use a connection, see Language Service
Example.
Connecting with Directly Supplied Server Attributes 685

The last two statements in this example show how to dispose of a connection. For details about this procedure, see
Returning a Connection to the Java Connection Factory.
import com.sas.iom.SAS.IWorkspace;
import com.sas.iom.SAS.IWorkspaceHelper;
import com.sas.services.connection.BridgeServer;
import com.sas.services.connection.ConnectionFactoryAdminInterface;
import com.sas.services.connection.ConnectionFactoryConfiguration;
import com.sas.services.connection.ConnectionFactoryInterface;
import com.sas.services.connection.ConnectionFactoryManager;
import com.sas.services.connection.ConnectionInterface;
import com.sas.services.connection.ManualConnectionFactoryConfiguration;
import com.sas.services.connection.Server;
// identify the IOM server
String classID = Server.CLSID_SAS;
String host = "rnd.fyi.sas.com";
int port = 5310;
Server server = new BridgeServer(classID,host,port);
// make a connection factory configuration with the server
ConnectionFactoryConfiguration cxfConfig =
new ManualConnectionFactoryConfiguration(server);
// get a connection factory manager
ConnectionFactoryManager cxfManager = new ConnectionFactoryManager();
// get a connection factory that matches the configuration
ConnectionFactoryInterface cxf = cxfManager.getFactory(cxfConfig);
// get the administrator interface
ConnectionFactoryAdminInterface admin = cxf.getAdminInterface();
// get a connection
String userName = "abcserv";
String password = "abcpass";
ConnectionInterface cx = cxf.getConnection(userName,password);
org.omg.CORBA.Object obj = cx.getObject();
IWorkspace iWorkspace = IWorkspaceHelper.narrow(obj);
< insert iWorkspace workspace usage code here >
cx.close();
// tell the factory that it can destroy unused connections
admin.shutdown();
In an effort to make the previous example more readable, we have removed most of the code structuring elements. The
example will not compile as it is shown.
Java Clients
SAS® Integration Technologies: Developer's Guide
Connecting with Directly Supplied Server Attributes 686

Connecting with Server Attributes Read from a SAS
Metadata Server
Note: You can read the metadata by either connecting to the metadata server directly, or by using the Information
Service. For details about using the Information Service, see Connecting with Server Attributes Read from the
Information Service.
The Java Connection Factory enables you to obtain the server connection information from a SAS Metadata Server
using indirect logical server names. The main advantage of this method is that you can maintain and update the IOM
server and connection information without changing your client programs. This method also provides additional
security features if you are using connection pooling.
To use this method, you must provide the client program with instructions for connecting to the metadata server, the
name of the information you want to search for, and the repository within the metadata server for performing the
search. To connect to the metadata server, you must first create an instance of BridgeServer containing the
appropriate attributes for the metadata server. For a complete list of the attributes that you can provide, refer to the
documentation for the BridgeServer class.
Example
The following example code shows how to initialize and use the Java Connection Factory with information from a
SAS Metadata Server directory. For information about how to use the object reference, see Language Service
Example. The example code performs the following steps:
Creates a connection factory configuration (ManualConnectionFactoryConfiguration) to connect
to a SAS Metadata Server.
1.
Creates a connection factory that matches the connection factory configuration for the SAS Metadata Server.2. Creates a connection to the metadata server.3. Narrows the connection from the metadata server.4. Uses the server metadata from the SAS Metadata Server to create a new connection factory configuration
(ConnectionFactoryConfiguration) for the server with the logical name login015Logical.
5.
Creates a new connection factory for the connection factory configuration
(ConnectionFactoryConfiguration).
6.
Sets up logging.7. Creates a connection to the server with logical name login015Logical.8. Narrows the connection from the server.9. Closes the connection.10. Shuts down the connection factory.11.
The last three statements in the example code show how to dispose of object references. For details about this
procedure, see Returning Connections to the Java Connection Factory.
import com.sas.iom.SAS.IWorkspace;
import com.sas.iom.SAS.IWorkspaceHelper;
import com.sas.meta.SASOMI.IOMI;
import com.sas.meta.SASOMI.IOMIHelper;
import com.sas.services.connection.BridgeServer;
import com.sas.services.connection.ConnectionFactoryAdminInterface;
import com.sas.services.connection.ConnectionFactoryConfiguration;
import com.sas.services.connection.ConnectionFactoryInterface;
import com.sas.services.connection.ConnectionFactoryManager;
Connecting with Server Attributes Read from a SAS Metadata Server 687
import com.sas.services.connection.ConnectionInterface;
import com.sas.services.connection.ManualConnectionFactoryConfiguration;
import com.sas.services.connection.omr.OMRConnectionFactoryConfiguration;
import com.sas.services.connection.Server;
String classID = Server.CLSID_SASOMI;
String host = "omr.pc.abc.com";
int port = 8561;
// Set the credentials for the metadata server connection. If connecting to
// a pooled server, these should be the credentials for the pooling
// administrator.
String userName_omr = "Adm1";
String password_omr = "Adm1pass";
// Step 1. Create a connection factory configuration for the metadata server
// and get a connection factory manager.
Server omrServer = new BridgeServer(classID,host,port);
ConnectionFactoryConfiguration cxfConfig_omr =
new ManualConnectionFactoryConfiguration(omrServer);
ConnectionFactoryManager cxfManager = new ConnectionFactoryManager();
// Step 2. Create a connection factory for the metadata server connection
// factory configuration.
ConnectionFactoryInterface cxf_omr = cxfManager.getFactory(cxfConfig_omr);
// Step 3. Get a connection to the metadata server.
ConnectionInterface cx_omr = cxf_omr.getConnection(userName_omr,password_omr);
// Step 4. Narrow the connection from the metadata server.
org.omg.CORBA.Object obj_omr = cx_omr.getObject();
IOMI iOMI = IOMIHelper.narrow(obj_omr);
String reposID = "A0000001.A1234567";
String name= "login015Logical";
// Step 5. Create a connection factory configuration for the server by passing
// the server logical name to the metadata server.
ConnectionFactoryConfiguration cxfConfig =
new OMRConnectionFactoryConfiguration(iOMI,reposID,name);
// Step 6: Get a connection factory that matches the server's connection
// factory configuration.
ConnectionFactoryInterface cxf = cxfManager.getFactory(cxfConfig);
// Set the credentials for the server connection.
String userName = "citynt\\use1";
String password = "use1pass";
String domain = "citynt";
// Step 7: Get a connection to the server.
ConnectionInterface cx = cxf.getConnection(userName,password,domain);
// Step 8: Narrow the connection from the server.
org.omg.CORBA.Object obj = cx.getObject();
IWorkspace iWorkspace = IWorkspaceHelper.narrow(obj);
< insert iWorkspace workspace usage code here >
// Step 9: Close the workspace connection and shutdown the connection factory.
SAS® Integration Technologies: Developer's Guide
Connecting with Server Attributes Read from a SAS Metadata Server 688
cx.close();
cxf.shutdown();
// Step 10: Close the metadata server connection and shutdown the connection
// factory.
cx_omr.close();
cxf_omr.shutdown();
In an effort to make the previous example more readable, we have removed most of the code structuring elements. The
example will not compile as it is shown.
Java Clients
SAS® Integration Technologies: Developer's Guide
Connecting with Server Attributes Read from a SASMetadata Server 689

Connecting with Server Attributes Read from an LDAP
Server
Note: You can read the metadata by either connecting to the metadata server directly, or by using the Information
Service. For details about using the Information Service, see Connecting with Server Attributes Read from the
Information Service.
The Java Connection Factory enables you to obtain server connection information from a managed, secure LDAP
directory using indirect logical names. The main advantage of this method is that you can maintain and update the
IOM server and connection information without changing your client programs. This method also provides additional
security features if you are using connection pooling.
To use this method, you must provide the client program with instructions for connecting to the LDAP directory, the
logical name of the information you want to search for, and the context within the directory for performing the search.
To provide this information, you can create an instance of java.util.Hashtable containing the appropriate
attributes. For a complete list of the attributes you can provide, refer to the documentation for the class
javax.naming.Context. Note that the property names are string constants on the javax.naming.Context
interface instead of literal strings.
The following five attributes are required:
javax.naming.Context.INITIAL_CONTEXT_FACTORY
specifies the name of the main class implementing LDAP. If you are using the LDAP implementation from
JavaSoft, this value should be com.sun.jndi.ldap.LdapCtxFactory.
javax.naming.Context.PROVIDER_URL
specifies the URL for the LDAP directory server. This value takes the form ldap://host:port.
javax.naming.Context.SECURITY_AUTHENTICATION
specifies the type of authentication to use when connecting to the LDAP directory server. This value is either
none, simple, or strong.
javax.naming.Context.SECURITY_PRINCIPAL
specifies the name, such as the distinguished name of a person object in the directory, under which the
connection to the LDAP directory server should be made. This property is not required if the value for
javax.naming.Context.SECURITY_AUTHENTICATION is none.
javax.naming.Context.SECURITY_CREDENTIALS
specifies the credentials, such as a password, corresponding to the principal given as the value of
javax.naming.Context.SECURITY_PRINCIPAL. This property is not required if the value for
javax.naming.Context.SECURITY_AUTHENTICATION is none.
Example
The following example code shows how to initialize and use the Java Connection Factory using information from an
LDAP directory. For information about how to use the workspace object reference, see Language Service Example.
The last two statements in the example show how to dispose of a workspace object reference. For details about this
procedure, see Returning Connections to the Connection Factory.
import java.util.Hashtable;
import javax.naming.Context;
import javax.naming.NamingException;
import javax.naming.directory.DirContext;
Connecting with Server Attributes Read from an LDAP Server 690
import javax.naming.directory.InitialDirContext;
import com.sas.iom.SAS.IWorkspace;
import com.sas.iom.SAS.IWorkspaceHelper;
import com.sas.services.connection.ConnectionFactoryAdminInterface;
import com.sas.services.connection.ConnectionFactoryConfiguration;
import com.sas.services.connection.ConnectionFactoryInterface;
import com.sas.services.connection.ConnectionFactoryManager;
import com.sas.services.connection.ConnectionInterface;
import com.sas.services.connection.jndi.JNDIConnectionFactoryConfiguration;
Hashtable env = new Hashtable();
env.put(Context.INITIAL_CONTEXT_FACTORY,"com.sun.jndi.ldap.LdapCtxFactory");
env.put(Context.PROVIDER_URL,"ldap://ldsrv.alphaliteairways.com:389");
env.put(Context.SECURITY_AUTHENTICATION,"simple");
env.put(Context.SECURITY_PRINCIPAL,"cn=adm1,o=Alphalite Airways,c=US");
env.put(Context.SECURITY_CREDENTIALS,"adm1pass");
InitialDirContext ctx = new InitialDirContext(env);
<insert LDAP directory usage code here >
private static final String baseDN = "o=Alphalite Airways,c=US";
private static final String logicalName = "abclog";
private static final String repositoryDomain = "LDAP";
// make a connection factory configuration with the server
ConnectionFactoryConfiguration cxfConfig = null;
cxfConfig = new JNDIConnectionFactoryConfiguration(ctx,baseDN,
logicalName,repositoryDomain);
// get a connection factory manager
ConnectionFactoryManager cxfManager = new ConnectionFactoryManager();
// get a connection factory that matches the configuration
ConnectionFactoryInterface cxf = cxfManager.getFactory(cxfConfig);
// get a connection
String userName = "cn=use1,o=Alphalite Airways,c=US";
String password = "use1pass";
ConnectionInterface cx =
cxf.getConnection(userName,password,repositoryDomain);
org.omg.CORBA.Object obj = cx.getObject();
IWorkspace iWorkspace = IWorkspaceHelper.narrow(obj);
<insert workspace usage code here >
// close the workspace connection
cx.close();
// shut down the connection factory
cxf.shutdown();
// close the LDAP context
javax.naming.directory.DirContext.close();
In an effort to make the previous example more readable, we have removed most of the code structuring elements. The
example will not compile as it is shown.
Java Clients
SAS® Integration Technologies: Developer's Guide
Connecting with Server Attributes Read from an LDAPServer 691

Connecting with Server Attributes Read from the
Information Service
Note: The ConnectionFactory class that is used in the other connection methods is not integrated with SAS
Foundation Services. To use the Information Service to connect, you must use the PlatformConnectionFactory class in
com.sas.services.connection.platform.
The Java Connection Factory enables you to obtain server connection information from a metadata server using the
Information Service component of SAS Foundation Services. The Information Service enables you to access multiple
SAS Metadata Repositories and LDAP servers simultaneously and perform searches across all metadata sources.
Before you use this method, you must do the following:
set up the User Service. For more information, see Understanding and Editing the User Service in the SAS
Integration Technologies: Administrator's Guide and com.sas.services.user in the Foundation Service class
documentation.
•
set up the Information Service. For more information, see Modifying the Logging Service Configuration in
the SAS Integration Technologies: Administrator's Guide and com.sas.services.information in the Foundation
Services class documentation.
•
Example
The following example code shows how to initialize and use the Java Connection Factory with information from the
Information Service. For information about how to use the object reference, see Language Service Example. The
example code performs the following steps:
Creates a user context for the user "user1", which is used to access the metadata repository1. Gets an interface to a metadata repository "repos"2. Retrieves the logical server definition through the Information Service3. Creates a connection factory configuration using the logical server definition4. Gets a connection factory manager5. Gets a connection factory using the connection factory configuration6. Connects to the server7. Narrows the server connection8. Closes the connection and connection factory9.
The last three statements in the example code show how to dispose of object references. For details about this
procedure, see Returning Connections to the Java Connection Factory.
import com.sas.iom.SAS.IWorkspace;
import com.sas.iom.SAS.IWorkspaceHelper;
import com.sas.services.connection.ConnectionFactoryConfiguration;
import com.sas.services.connection.ConnectionInterface;
import com.sas.services.connection.platform.PlatformConnectionFactoryInterface;
import com.sas.services.connection.platform.PlatformConnectionFactoryConfiguration;
import com.sas.services.information.RepositoryInterface;
import com.sas.services.information.metadata.LogicalServerInterface;
import com.sas.services.user.UserContextInterface;
import com.sas.services.user.UserServiceInterface;
Connecting with Server Attributes Read from the Information Service 692
< set up the User Service and create a UserServiceInterface uService >
// Step 1. Create a user context using the User Service
UserContextInterface cxfUser = uService.newUser("user1","user1pw",
"user1domain");
< set up the Information Service and define a repository repos >
// Step 2. Identify the repository
RepositoryInterface cxfRepos cxfUser.getRepository("repos");
// Step 3. Identify the IOM service
LogicalServerInterface logicalServer =
cxfRepos.fetch("A50IFJQG.AQ000002/LogicalServer");
// Step 4. Create a connection factory configuration
ConnectionFactoryConfiguration cxfConfig = new
PlatformConnectionFactoryConfiguration(logicalServer);
// Step 5. Get a connection factory manager
PlatformConnectionFactoryManager cxfManager = new
PlatformConnectionFactoryManager();
// Step 6. Get a connection factory using the configuration
PlatformConnectionFactoryInterface cxf =
cxfManager.getPlatformFactory(cxfConfig);
// Step 7. Get a connection
ConnectionInterface cx = cxf.getConnection(cxfUser);
// Step 8. Narrow the connection
org.omg.CORBA.Object obj = cx.getObject();
IWorkspace iWorkspace = IWorkspaceHelper.narrow(obj);
< insert iWorkspace workspace usage code here >
// Step 9. Close the connection when finished
cx.close();
cxf.getAdminInterface().destroy();
In an effort to make the previous example more readable, we have removed most of the code structuring elements. The
example will not compile as it is shown.
Java Clients
SAS® Integration Technologies: Developer's Guide
Connecting with Server Attributes Read from theInformation Service 693

Java Connection Factory Language Service Example
The SAS language component of the IOM server allows you to submit SAS code for processing and to obtain output
and information in the SAS log. The following example shows you how to do this, and also shows you how to use
CORBA holder classes to handle output parameters.
The following example assumes that you already have a reference (see Using the Java Connection Factory) to a
workspace object.
import com.sas.iom.SAS.ILanguageService;
import com.sas.iom.SAS.ILanguageServicePackage.CarriageControlSeqHolder;
import com.sas.iom.SAS.ILanguageServicePackage.LineTypeSeqHolder;
import com.sas.iom.SAS.IWorkspace;
import com.sas.iom.SASIOMDefs.StringSeqHolder;
//use the Connection Factory to get a reference to a workspace object stub
//IWorkspace iWorkspace = ...
ILanguageService sasLanguage = iWorkspace.LanguageService();
sasLanguage.Submit("data a;x=1;run;proc print;run;");
CarriageControlSeqHolder logCarriageControlHldr =
new CarriageControlSeqHolder();
LineTypeSeqHolder logLineTypeHldr = new LineTypeSeqHolder();
StringSeqHolder logHldr = new StringSeqHolder();
sasLanguage.FlushLogLines(Integer.MAX_VALUE,logCarriageControlHldr,
logLineTypeHldr,logHldr);
String[] logLines = logHldr.value;
CarriageControlSeqHolder listCarriageControlHldr =
new CarriageControlSeqHolder();
LineTypeSeqHolder listLineTypeHldr = new LineTypeSeqHolder();
StringSeqHolder listHldr = new StringSeqHolder();
sasLanguage.FlushListLines(Integer.MAX_VALUE,listCarriageControlHldr,
listLineTypeHldr,listHldr);
String[] listLines = listHldr.value;
In an effort to make the previous example more readable, we have removed most of the code structuring elements. The
example will not compile as it is shown.
Java Clients
Java Connection Factory Language Service Example 694

Logging Java Connection Factory Activity
If you connect using the PlatformConnectionFactory class, logging is handled by the Logging Service component of
SAS Foundation Services. The logging context for a Java Connection Factory is "com.sas.services.connection". For
more information about the Logging Service, see Modifying the Logging Service Configuration in the SAS Integration
Technologies: Administrator's Guide and com.sas.services.logging in the Foundation Services class documentation.
If you are connecting using the ConnectionFactory class, logging is handled by the java.util.logging package.
The Java Connection Factory writes diagnostic and status messages to the console by default. These messages will be
useful for debugging or performance monitoring.
Note: The following sections apply to the ConnectionFactory class only.
Changing the Message Level
To change the types of messages that are logged, create a Logger object using the Logger.getLogger() method
in java.util.logging, then use the setLevel() method to set the level of messages that the logger uses. The
default message level is INFO.
The following code fragment specifies that detailed tracing messages should be logged in addition to the default
messages:
import java.util.logging.*;
ConnectionFactoryManager cxfManager = new ConnectionFactoryManager();
ConnectionFactoryConfiguration cxfConfig = ...
String loggerName = cxfManager.getFactoryLoggerName(cxfConfig);
Logger logger = Logger.getLogger(loggerName);
logger.setLevel(Level.FINEST);
The following code fragment specifies that no messages are logged:
import java.util.logging.*;
ConnectionFactoryManager cxfManager = new ConnectionFactoryManager();
ConnectionFactoryConfiguration cxfConfig = ...
String loggerName = cxfManager.getFactoryLoggerName(cxfConfig);
Logger logger = Logger.getLogger(loggerName);
logger.setLevel(Level.OFF);
Logging to a File
To log messages to a file, create a FileHandler object using the constructor method in java.util.logging and
add it to your connection factory's Logger object.
The following code fragment specifies that verbose messages are logged to a file and console logging is disabled:
import java.util.logging;
ConnectionFactoryManager cxfManager = new ConnectionFactoryManager();
ConnectionFactoryConfiguration cxfConfig = ...
String loggerName = cfxManager.getFactoryLoggerName(cxfConfig);
Logger logger = Logger.getLogger(loggerName);
logger.setLevel(Level.FINEST);
FileHandler handler = new FileHandler("file−path");
handler.setLevel(Level.FINEST);
Logging Java Connection Factory Activity 695
logger.addHandler(handler);
logger.setUseParentHandlers(false);
Note: If you do not specify setUseParentHandlers(false), messages are sent to both the log file and the
console.
Java Clients
SAS® Integration Technologies: Developer's Guide
Logging Java Connection Factory Activity 696
Using Failover
Failover enables a Java Connection Factory to redirect connection requests in the event of server unavailability.
Connection factories that are configured to use failover provide enhanced reliability by using a group of redundant
servers called a failover cluster rather than single server. If a server in the failover cluster is unavailable, the
connection factory redirects connection requests to the next server in the failover cluster.
The following code fragment configures a connection factory to use failover:
String classID = Server.CLSID_SAS;
Server server0 = new BridgeServer(classID,"foo0.bar.abc.com",1234);
Server server1 = new BridgeServer(classID,"foo1.bar.abc.com",1234);
Server[] servers = {server0,server1};
Cluster cluster = new FailoverCluster(servers);
ConnectionFactoryConfiguration cxfConfig =
new ManualConnectionFactoryConfiguration(cluster);
Note: The connection factory uses the servers in a failover cluster in the order in which they are specified.
Java Clients
Using Failover 697

Using Load Balancing
Load balancing enables a Java Connection Factory to distribute server load between a cluster of redundant servers. For
more information about load balancing, see Load Balancing Overview in the SAS Integration Technologies: Server
Administrator's Guide.
Note: Load balancing can only be used with SAS Stored Process Servers and SAS Workspace Servers.
A connection factory that is configured for load balancing uses a group of redundant servers called a load−balancing
cluster to send connection requests to the server that has the least load. If a server in the load−balancing cluster is
unavailable, connection requests are sent to other servers instead.
The following code fragment configures a connection factory to use load balancing:
String classID = Server.CLSID_SAS;
Server server0 = new BridgeServer(classID,"foo0.bar.abc.com",1234);
Server server1 = new BridgeServer(classID,"foo1.bar.abc.com",1234);
Server[] servers = {server0,server1};
Cluster cluster = new LoadBalancingCluster(servers);
ConnectionFactoryConfiguration cxfConfig =
new ManualConnectionFactoryConfiguration(cluster);
Note: Load−balancing clusters require additional configuration on the server side. For details, see Planning and
Configuring a Load−Balancing Cluster in the SAS Integration Technologies: Server Administrator's Guide.
Java Clients
Using Load Balancing 698

Using Connection Pooling
Pooling enables you to create a pool of connections to IOM servers. These connections are then shared and reused
among multiple client applications. Pooling improves the efficiency of connections between clients and servers
because clients use the connections only when they need to process a transaction.
When to Use Pooling
Note: Pooling can only be used with SAS Workspace Servers.
Pooling is most useful for applications that require the use of an IOM server for a short period of time. Because
pooling reduces the wait that an application incurs when establishing a connection to SAS, pooling can reduce
connection times in environments where one or more client applications make frequent but brief requests for IOM
services. For example, pooling is useful for Web applications, such as JavaServer Pages (JSPs).
Pooling is least useful for applications that acquire an IOM server and use the server for a long period of time. A
pooled connection does not offer any advantage in applications that use connections for an extended period of time.
Locations for Specifying Pooling Parameters
For Java clients using an IOM Bridge connection, specify pool parameters in one of the following locations:
the source code. For details, see Pooling with Directly Supplied Server Attributes.• a metadata server (LDAP or SAS Metadata Server). For details, see Pooling with Server Attributes Read From
a Metadata Server.
•
Using Pooled Connections
When a request for a connection arrives, the request is handled as follows:
if an existing pooled connection is available, then the Java Connection Factory returns that connection.• if an existing pooled connection is not available, then the Java Connection Factory creates a new connection.•
Users must notify the factory when they are finished with the connection so that it can be returned to the pool or
destroyed.
The factory might have a limit on the number of connections it is allowed to create and manage at a time. If a factory
has already allocated all of the connections that it can manage and a new connection request arrives, the factory cannot
serve the request immediately. You can specify how long to wait for another user to return a connection to the
factory's pool. For details about waiting for connections, see Waiting for Connections to Become Available.
Waiting for Connections to Become Available
At the time of a client's request for an object, it is possible that all of the available connections in a connection pool
will be already allocated to other clients. For example, the Java Connection Factory might not be able to make an
additional connection to a server because it would violate the sasMaxClients value that has been set for the
server. In such cases, the client's request cannot be fulfilled until one of the other clients is finished with its object.
Using Connection Pooling 699

To indicate what action you want the Java Connection Factory to take when a request cannot be fulfilled immediately,
you can use a long parameter with the getConnection method in the client program. The following table shows
how the value of the long parameter indicates which action to take:
If the long
parameter is The Java Connection Factory will
A number
greater than zero Try to fulfill the request for up to that number of milliseconds. After that number of
milliseconds has passed, if no other client has returned its connection to the pool, then
the Java Connection Factory will throw an exception to the caller.
Equal to zero Try to fulfill the request for an unlimited amount of time.
A number less
than zero Try to fulfill the request, but, if the request cannot be fulfilled immediately, throw an
exception to the caller.
Java Clients
SAS® Integration Technologies: Developer's Guide
Using Connection Pooling 700

Pooling with Directly Supplied Server Attributes
With just a few changes to the example program in Connecting with Directly Supplied Server Attributes, you can use
the Java Connection Factory to manage a pool of connections to an IOM server rather than a single factory−managed
connection.
When set up for connection pooling, the Java Connection Factory tries to fulfill each client's requests for connections
by using an existing connection to an IOM server. This is less time consuming than creating a new connection. Behind
the scenes, the Java Connection Factory keeps a configurable number of connections alive at all times. For connection
pooling to work properly, you must notify the Java Connection Factory when you are finished using a connection by
calling close() on a factory−managed connection. For more details, see Returning Connections to the Java
Connection Factory. When a client uses an object, it has exclusive access to the connection serving that object. When
the client is finished using the object, the object is closed before the connection is returned to the pool. These actions
help preserve the performance and security of the single connection case.
To create a pool:
Create the servers.1. Create the puddles.2.
You can maintain performance standards by spreading a pool of connections over more than one server and then
setting an upper limit on the number of connections that each server can contribute to the pool. To specify multiple
servers, provide a separate Server object for each server that is to participate in the pool. You can specify the
following properties for each server (Server object) in addition to the other server properties described earlier.
MaxClients
specifies the maximum number of connections that the pool will be allowed to make to the server at one time.
Factors you should consider when determining a value for this field include the number and type of processors
on the machine, the amount of memory present, the type of clients that will be requesting objects, and the
number of different pools the server participates in. This property is optional. The default value is 10.
RecycleActivationLimit
specifies the number of times a connection to the server will be reused in a pool before it is disconnected
("recycled"). If the value is 0, then there will be no limit on the number of times a connection to the server can
be reused. This property is optional. The default value is 0.
ServerRunForever
must be either true or false. If the value is false, then unallocated live connections will be disconnected
after a period of time (determined by the value of ServerShutdownAfter) unless they are allocated to a user
before that period of time passes. Otherwise, unallocated live connections will remain alive indefinitely. This
property is optional. The default value is true.
ServerShutdownAfter
specifies the period of time, in minutes, that an unallocated live connection will wait to be allocated to a user
before shutting down. This property is optional and it is ignored if the value of ServerRunForever is true.
The value must not be less than 0, and it must not be greater than 1440 (the number of minutes in a day). The
default value is 3. If the value is 0, then a connection returned to a pool by a user will be disconnected
immediately unless another user is waiting for a connection from the pool.
Pooling with Directly Supplied Server Attributes 701

A pool consists of one or more puddles (Puddle objects). A puddle is an association of one or more IOM servers
with exactly one IOM login. In addition to the information about the servers that participate in a connection pool, you
must specify information in order to create the puddles. You provide this information to the Java Connection Factory
on the Puddle object. Here is a list of the properties that can be specified:
Credential
specifies the login credential object that is associated with the puddle.
MinSizespecifies the minimum number of connections that the Java Connection Factory can maintain for a puddle
(after the initial startup period). This number includes both the connections that are in use and the connections
that are idle. This property is optional. The default value is 0.
MinAvail
specifies the minimum number of idle connections that the Java Connection Factory can maintain for a
puddle. This number includes only the connections that are idle. This property is optional. The default value is
0.
To specify multiple puddles, provide a separate Puddle object for each puddle that is to participate in the pool. You
can then make a connection factory configuration with the list of puddles. For more details about supplying pooling
and puddle information directly in the source code, refer to the Java API class documentation for the Java Connection
Service.
Example
The following example demonstrates how to specify server properties to the Java Connection Factory and obtain four
object references using only two connections to IOM servers. In this example, the pool consists of a puddle with 2
servers. For information about how to use the object reference, see Language Service Example.
The last part of this example shows how to dispose of an object reference. For details about this procedure, see
Returning Connections to the Java Connection Factory.
import java.util.HashSet;
import java.util.Set;
import com.sas.iom.SAS.IWorkspace;
import com.sas.iom.SAS.IWorkspaceHelper;
import com.sas.services.connection.BridgeServer;
import com.sas.services.connection.Cluster;
import com.sas.services.connection.ConnectionFactoryAdminInterface;
import com.sas.services.connection.ConnectionFactoryConfiguration;
import com.sas.services.connection.ConnectionFactoryInterface;
import com.sas.services.connection.ConnectionFactoryManager;
import com.sas.services.connection.ConnectionInterface;
import com.sas.services.connection.Credential;
import com.sas.services.connection.LoadBalancingCluster;
import com.sas.services.connection.ManualConnectionFactoryConfiguration;
import com.sas.services.connection.PasswordCredential;
import com.sas.services.connection.Puddle;
import com.sas.services.connection.Server;
import org.omg.CORBA.Object;
// identify the IOM servers
String classID = Server.CLSID_SAS;
SAS® Integration Technologies: Developer's Guide
Pooling with Directly Supplied Server Attributes 702
int port = 5310;
String domain = "unx";
Server server0 = new BridgeServer(classID,"serv1.unx.abc.com",port,domain);
Server server1 = new BridgeServer(classID,"serv2.unx.abc.com",port,domain);
Server[] servers = {server0,server1};
Cluster cluster = new LoadBalancingCluster(servers);
// create a login for these servers
Credential login = new PasswordCredential("adm1","adm1pass",domain);
// create a set of users allowed to use the connections to the servers
Credential user1 = new PasswordCredential("use1","use1pass");
Credential user2 = new PasswordCredential("use2","use2pass");
Set authorizedLogins = new HashSet(2);
authorizedLogins.add(user1);
authorizedLogins.add(user2);
// make a puddle with the servers
Puddle puddle = new Puddle(cluster,login);
puddle.setUserCredentials(authorizedLogins);
// make a connection factory configuration with the puddle
ConnectionFactoryConfiguration cxfConfig =
new ManualConnectionFactoryConfiguration(puddle);
// get a connection factory that matches the configuration
ConnectionFactoryManager cxfManager = new ConnectionFactoryManager();
ConnectionFactoryInterface cxf =
cxfManager.getFactory(cxfConfig); /* Use a private factory */
// cxfManager.getConnectionFactory(cxfConfig); /* Use a shared factory */
// get connections
ConnectionInterface cx1 = cxf.getConnection(user1);
Object obj1 = cx1.getObject();
IWorkspace iWorkspace1 = IWorkspaceHelper.narrow(obj1);
System.out.println(iWorkspace1.UniqueIdentifier());
ConnectionInterface cx2 = cxf.getConnection(user2);
Object obj2 = cx2.getObject();
IWorkspace iWorkspace2 = IWorkspaceHelper.narrow(obj2);
System.out.println(iWorkspace2.UniqueIdentifier());
< insert iWorkspace1 and iWorkspace2 usage code here >
cx1.close();
cx2.close();
ConnectionInterface cx3 = cxf.getConnection(user1);
Object obj3 = cx3.getObject();
IWorkspace iWorkspace3 = IWorkspaceHelper.narrow(obj3);
ConnectionInterface cx4 = cxf.getConnection(user1);
CORBA.Object obj4 = cx4.getObject();
IWorkspace iWorkspace4 = IWorkspaceHelper.narrow(obj4);
< insert iWorkspace3 and iWorkspace4 usage code here >
cx3.close();
cx4.close();
// tell the factory that it can destroy unused connections
admin.shutdown();
SAS® Integration Technologies: Developer's Guide
Pooling with Directly Supplied Server Attributes 703
In an effort to make the previous example more readable, we have removed most of the code structuring elements. The
example will not compile as it is shown.
Java Clients
SAS® Integration Technologies: Developer's Guide
Pooling with Directly Supplied Server Attributes 704

Pooling with Server Attributes Read from a Metadata
Server
Note: If you are using the Information Service to obtain the server metadata, see Pooling with Server Attributes Read
from the Information Service.
When you connect to an IOM server using information from a metadata server, all of the information about the IOM
server and how to connect to it is created and maintained by the metadata server administrator. The person developing
the Java client application does not need to make a decision about whether to use connection pooling, because that
decision is made by the metadata server administrator.
SAS Metadata Server
If you are using a SAS Metadata Server, you can specify the pooling parameters with SAS Management
Console. For details about planning for pooling and puddles on a SAS Metadata Server, see Planning and
Configuring Pooling in the SAS Integration Technologies: Server Administrator's Guide. For details about
security for pooling, see Planning Server Pooling Security in the SAS Integration Technologies: Server
Administrator's Guide.
The code example in Connecting with Server Attributes Read from a SAS Metadata Server can be used to
connect to a pooled server without any changes. However, the credentials that you specify for the metadata
server connection must be the credentials for the pooling administrator.
LDAP Server
If you are using LDAP, you can specify the pooling parameters with the IT Administrator. For details about
how to use the IT Administrator to set up pooling for LDAP, see Setting up Workspace Pooling in the SAS
Integration Technologies: Administrator's Guide (LDAP Version).
The code example in Connecting with Server Attributes Read from LDAP can be used to connect to a pooled
server without any changes.
Java Clients
Pooling with Server Attributes Read from a Metadata Server 705

Pooling with Server Attributes Read from the Information
Service
The process of creating a pooling server by using the Information Service is basically the same as the process that is
described at Connecting with Server Attributes Read from the Information Service, but the following additional steps
are required when you create a pooling server:
create a user context for the pooling administrator user, who can access the metadata for the puddle logins.
For more information about the pooling administrator, see Planning the Pooling Security in SAS Integration
Technologies: Server Administrator's Guide.
•
specify the name or the user context for the pooling administrator in the constructor method for
PlatformConnectionFactoryConnection.
•
Example
The following example code shows how to create a pooling server using the Information Service. For information
about how to use the object reference, see Language Service Example. The example code performs the following
steps:
Creates a user context for the pooling administrator, which is used to create the connection factory1. Creates a user context for the user "user1", which is used to access the metadata repository2. Gets an interface to a metadata repository "repos"3. Retrieves the logical server definition through the Information Service4. Creates a connection factory configuration using the logical server definition5. Gets a connection factory manager6. Gets a connection factory using the connection factory configuration7. Connects to the server8. Narrows the server connection9. Closes the connection and connection factory10.
The last three statements in the example code show how to dispose of object references. For details about this
procedure, see Returning Connections to the Java Connection Factory.
import com.sas.iom.SAS.IWorkspace;
import com.sas.iom.SAS.IWorkspaceHelper;
import com.sas.services.connection.ConnectionFactoryConfiguration;
import com.sas.services.connection.ConnectionInterface;
import com.sas.services.connection.platform.PlatformConnectionFactoryInterface;
import com.sas.services.connection.platform.PlatformConnectionFactoryConfiguration;
import com.sas.services.information.RepositoryInterface;
import com.sas.services.information.metadata.LogicalServerInterface;
import com.sas.services.user.UserContextInterface;
import com.sas.services.user.UserServiceInterface;
<set up the User Service and create a UserServiceInterface uService >
// Step 1. Create a user context for the pool administrator
UserContextInterface poolUser = uService.newUser("pooladm","pooladmpw",
"pooladmdomain");
// Step 2. Create a user context for a connection factory user
Pooling with Server Attributes Read from the Information Service 706
UserContextInterface cxfUser = uService.newUser("user1","user1pw",
"user1domain");
<set up the Information Service and define a repository repos >
// Step 3. Identify the repository
RepositoryInterface cxfRepos = cxfUser.getRepository("repos");
// Step 4. Identify the IOM service
LogicalServerInterface logicalServer =
cxfRepos.fetch("A50IFJQG.AQ000002/LogicalServer");
// Step 5. Create a connection factory configuration
String poolUserName = poolUser.getName();
ConnectionFactoryConfiguration cxfConfig = new
PlatformConnectionFactoryConfiguration(logicalServer, poolUserName);
// Step 6. Get a connection factory manager
PlatformConnectionFactoryManager cxfManager = new
PlatformConnectionFactoryManager();
// Step 7. Get a connection factory using the configuration
PlatformConnectionFactoryInterface cxf =
cxfManager.getPlatformFactory(cxfConfig);
// Step 8. Get a connection
ConnectionInterface cx = cxf.getConnection(cxfUser);
// Step 9. Narrow the connection
org.omg.CORBA.Object obj = cx.getObject();
IWorkspace iWorkspace = IWorkspaceHelper.narrow(obj);
<insert iWorkspace workspace usage code here >
// Step 10. Close the connection when finished
cx.close();
cxf.getAdminInterface().destroy();
In an effort to make the previous example more readable, we have removed most of the code structuring elements. The
example will not compile as it is shown.
Java Clients
SAS® Integration Technologies: Developer's Guide
Pooling with Server Attributes Read from the InformationService 707
Returning Connections to the Java Connection Factory
When you are finished using a connection that you have obtained from the Java Connection Factory, you must return
the connection to the factory so that it can be either reused or canceled.
Returning a Connection to the Java Connection Factory
To return a connection to the Java Connection Factory, call the close() method on the connection that was returned
when you called the getConnection method.
The objects that implement the IWorkspace interface also have a Close() method. You do not need to call this
method when you are closing an object because the close() method on the connection object will call it for you.
However, no harm will occur if you call the close() method on both objects.
If you do not explicitly close a connection, it will close itself when it is no longer referenced and is garbage collected.
However, you generally cannot determine when or if garbage collection will occur. Therefore, it is recommended that
you explicitly close your connection if at all possible rather than depending on garbage collection.
Shutting Down the Java Connection Factory
When you are finished with the instance of the Java Connection Factory itself and you no longer need to request
connections from it, you must shut it down so that any remaining connections can be canceled and other resources can
be released.
To shut down the Java Connection Factory, call one of the following methods:
The shutdown() method. This method immediately cancels all idle connections in the pool. If connections
are currently allocated to users, the connection factory waits and cancels these connections after the users
return the connections to the factory. In addition, the Java Connection Factory will no longer honor new
requests for connections.
After shutdown() has been called, later calls to shutdown() have no effect.
•
The destroy() method. This method immediately cancels connections in the pool, including connections
that have been allocated to users. Any attempt to use a connection from the factory will result in an exception.
In addition, the Java Connection Factory will no longer honor new requests for connections.
For user−managed connections, the destroy() method never destroys the connection.
After destroy() has been called, later calls to shutdown() or destroy() have no effect.
•
It is often possible to cancel all connections and release all resources in an instance of the Java Connection Factory by
calling shutdown() and being sure to call close() on all the connections. However, in some cases you might
want to call destroy() instead of (or after) calling shutdown() to ensure that an instance of the Java Connection
Factory has been properly cleaned up.
Returning Connections to the Java Connection Factory 708
Note: If you are using the PlatformConnectionFactory and the Session Service, you can shut down servers
automatically by destroying a session. When you destroy a session, any repository connections associated with the
session are destroyed. Additionally, all connection factories that were configured with the repository connections are
shut down as with the shutdown() method.
Java Clients
SAS® Integration Technologies: Developer's Guide
Returning Connections to the Java Connection Factory 709

Using Java CORBA Stubs for IOM Objects
This section describes some of the differences between Java client programming with CORBA and regular,
non−distributed Java programming. This information should help you understand the more complex elements of Java
client programming for the IOM server because the Java software for using the IOM server is based on CORBA
standards.
CORBA is a set of standards defined by the OMG(Object Management Group) computer industry consortium that
enables software objects to communicate with each other regardless of the language used to write the objects and the
communications medium used to connect the objects. For more information, see the OMG Web site.
In the Java client environment, there are two important parts of CORBA communication software: an object request
broker (ORB) and stubs for IOM objects. The stubs are Java classes that have methods that correspond to the
operations and attributes of a remote object. When you want to invoke an operation on a remote object, you instantiate
the appropriate stub and call the corresponding method. The stubs do not actually implement the functionality of
remote objects. Rather, when the stubs receive a method call, they collect information about it (such as the method
name and parameters), repackage that information into a request, and then forward the request through a Java ORB to
the remote server that hosts the remote object.
A Java ORB is a library of Java classes that sends requests from a stub over a communications medium (typically a
TCP/IP network) to an object that implements the method. The format of a request is specified in strict detail by the
CORBA standard, but the way that an ORB sends a request over a network is not standardized. The CORBA standard
does specify a protocol called Internet Inter−ORB Protocol (IIOP) that ORBs must use if they are to interoperate with
other ORBs (perhaps created by other vendors). In the most common CORBA applications, a stub calls into an IIOP
ORB which communicates via IIOP with another IIOP ORB which calls out to an object implementing the desired
functionality. However, if interoperation with other ORBs is not a priority, then protocols other than IIOP can be used
to send requests across a network.
SAS Integration Technologies features a Java ORB called the IOM Bridge for Java that communicates with the IOM
server through a proprietary network protocol called IOM Bridge. Though the IOM Bridge for Java does not use IIOP,
it does adhere to the CORBA standard for the format of a request. SAS Integration Technologies also provides stubs
for all of the IOM objects that are included in the IOM object hierarchy. The ORB and the stubs give you all you need
to begin writing Java programs that can access the IOM Server.
Our ORB, the IOM Bridge for Java, is used internally by the Java Connection Factory (or the Version 8 Workspace
Factory) and by the stubs so you will rarely need to know any details about the operation of the ORB or about its
interface. However, the stubs collectively provide the primary interface for exploiting the functionality of the IOM
server. Therefore, the Java programming information provided in this section deals with the use of IOM object stubs.
Java Clients
Using Java CORBA Stubs for IOM Objects 710
Null References
In Java programming, null can be assigned to any variable of a reference type (that is, a non−primitive type) to
indicate that the variable does not refer to any object or array. CORBA also allows null object references, but it is
important to note that not all Java reference types map to CORBA object references. Therefore, you might encounter
situations where a null object reference that would be appropriate in a non−distributed Java program is not appropriate
in a distributed Java program using CORBA. If null is used improperly in a method call on a Java CORBA stub, the
method will throw a java.lang.NullPointerException.
When calling methods on Java CORBA stubs like the IOM object stubs, null might only be used in place of a
reference to any Java object that implements org.omg.CORBA.Object. That means that null cannot be used in
place of a reference to a Java object like an instance of java.lang.String or a Java array.
The GetApplication method on the Java CORBA IOM stub com.sas.iom.SAS.IWorkspace provides a
good example. Here is the method signature for this method.
public org.omg.CORBA.Object GetApplication
(
java.lang.String application
)
throws
com.sas.iom.SASIOMDefs.GenericError
When calling this method, the value of the parameter application cannot be null because its type,
java.lang.String, does not implement org.omg.CORBA.Object. However, the return value of the method
can be null because the returned value does implement org.omg.CORBA.Object.
Java Clients
Null References 711

Exception Handling
Exception handling for Java clients for the IOM server is not significantly different from exception handling for any
other Java program. Many methods in the stubs declare that they throw checked exceptions. When calling those
methods, you must do so in a try block, and you must be sure to provide a catch block that handles each possible
exception. Documentation for the stubs provides information about why each exception is thrown and what to do
when one is thrown.
Methods in the stubs can also throw unchecked exceptions when there is an error related to the distributed nature of
your application. For example, an unchecked exception might be thrown when the communications subsystem fails or
when the stubs are out of date relative to the IOM objects. All of these exceptions are subclasses of
org.omg.CORBA.SystemException. A complete list of all subclasses is available in the CORBA specification.
Because they are unchecked exceptions, the Java compiler does not require you to place your method calls inside a
try block, but you might want to anyway.
Java Clients
Exception Handling 712

Output Parameters
CORBA includes the concept of output parameters, which are parameters that are uninitialized at the time of a call to
a CORBA operation (CORBA operations map to Java methods), then initialized by the operation, and returned to the
caller. Many IOM objects have operations that use output parameters.
Unfortunately, the concept of output parameters does not map well into Java. In Java method calls, parameters of
primitive types are always passed by value and parameters of reference types are always passed by reference. In
general, only the member variables of an object or elements of an array can be modified during a method call and
returned to the caller. Furthermore, some objects are immutable, which means their members cannot be changed after
the objects are constructed. Java CORBA programmers need a general way to use both primitive types and reference
types for output parameters in method calls on Java CORBA stubs.
For this purpose, each data type that can be used for an output parameter in a method call on a Java CORBA stub is
associated with a Holder class. A Holder class is a wrapper that has one public member variable of the targeted
data type. When a Holder is used in a method call on a Java CORBA stub, the method implementation can set the
member variable of the Holder to be the output value of the parameter, and the caller can fetch that value by getting
the value of the member variable.
The value of the member variable in a Holder object before it is used in a method call with an output parameter is
ignored, and, in the case of Holder classes for reference types, it can be null.
CORBA also includes the concept of update parameters, which are parameters that are initialized by the caller of a
CORBA operation, possibly modified by the operation, and returned to the caller. In Java CORBA stubs, Holder
classes are also used to handle update parameters.
As an example, here is the definition of the class org.omg.CORBA.IntHolder, which is the Holder class for
the Java primitive type int.
final public class IntHolder
{
public int value;
public IntHolder()
{
}
public IntHolder(int initial)
{
value = initial;
}
}
The following example shows how the org.omg.CORBA.IntHolder class could be used in a method call that
requires an output int parameter.
org.omg.CORBA.IntHolder intHolder = new org.omg.CORBA.IntHolder();
myApplication.myMethod(intHolder);
int intValue = intHolder.value;
The language service example shows a more practical use of Holder classes.
Java Clients
Output Parameters 713
Generic Object References
When you obtain a reference to a stub for an IOM object, you usually call a method on another stub, and the stub takes
care of the details necessary to connect the new stub with the new IOM object. However, sometimes a method is
designed to produce a generic stub, which is a stub with no specialized methods.
Whenever a method on a stub has an output or return parameter of type org.omg.CORBA.Object, that parameter
is considered a generic stub. Before you can do anything useful with a generic stub, you need to narrow it to a more
specific stub.
Every stub is associated with a Helper class that contains a method called narrow. You can use the narrow
method to convert a generic stub into a more useful one. If you attempt to narrow a generic stub to a specific stub that
the underlying object cannot support, the narrow method returns null.
The following code fragment demonstrates the proper usage of narrowing.
org.omg.CORBA.Object generic =
sasWorkspace.GetApplication("MY_APP");
IMyApp myApp = IMyAppHelper.narrow(generic);
myApp.myMethod();
Java Clients
Generic Object References 714
IOM Objects that Support More Than One Stub
Java CORBA stubs for IOM objects represent an interface that is implemented by the IOM object. Some IOM objects
implement more than one interface, so you can use more than one stub to communicate with those objects. If you have
a reference to a stub for one interface that an IOM object implements, you can get a reference to a stub for any other
interface that the IOM object implements using the narrow() method on the Helper class for that stub. If you try
to narrow an object reference to a stub for an interface that the IOM object does not implement, then the narrow()
method returns null.
The following example uses the Fileref object, which implements the interfaces
com.sas.iom.SAS.IFileref and com.sas.iom.SAS.IFileInfo:
com.sas.iom.SAS.IFileref iFileRef =
sasFileService.UseFileref("MY_FILE");
com.sas.iom.SAS.IFileInfo iFileInfo =
com.sas.iom.SAS.IFileInfoHelper.narrow(iFileRef);
Java Clients
IOM Objects that Support More Than One Stub 715

Events and Connection Points
Some IOM objects support one or more event interfaces, which are interfaces that contain operations that are to be
implemented by the client (in Java). The operations are called by the IOM object whenever some particular event
occurs. For example, the SAS Language Component supports an event interface and calls operations on it whenever a
SAS procedure or DATA step finishes execution, which allows you to check the progress of a submitted SAS
program. To listen for events from an IOM object, you need to know how to use skeletons and connection points.
Extending Skeletons
A skeleton is the complement of a stub. While a stub is a Java class that repackages method calls into requests and
forwards them to the IOM server, a skeleton is a Java class that accepts requests from the IOM server and repackages
them into Java method calls. You provide the implementation of the method calls by extending the skeleton with
implementations of all the methods in the event interface. When an event arrives, the IOM Bridge for Java provides a
temporary thread of execution and calls the appropriate method through the skeleton.
The following example demonstrates how to extend the skeleton for the event interface supported by the SAS
Language Component:
public class LanguageEventsListener extends
com.sas.iom.SASEvents._ILanguageEventsImplBase
{
// implement declared methods in com.sas.iom.SASEvents.ILanguageEvents
public void ProcStart(java.lang.String procname) {
/* your implementation */ }
public void SubmitComplete(int sasrc) { /* your implementation */ }
public void ProcComplete(java.lang.String procname) {
/* your implementation */ }
public void DatastepStart() { /* your implementation */ }
public void DatastepComplete() { /* your implementation */ }
public void StepError() { /* your implementation */ }
}
Note that all the methods return void, have only input parameters, and declare no exceptions. By definition, events
do not produce any output and throw no checked exceptions so, when an IOM object sends an event, it is not obligated
to wait for a response. If your implementation of a method in an event interface throws an unchecked exception, the
ORB catches it and ignores it. Furthermore, because no event requires output, you can provide trivial implementations
for events that you are not interested in.
Finding a Connection Point
After you have written an event listener using the preceding example as a guide, you then make the listener known to
the IOM object using a connection point. A connection point is, in effect, a child component of an IOM object that
serves as a conduit for passing events from the IOM object to its listeners. IOM objects that support event interfaces
implement an interface called com.sas.iom.SASIOMDefs.ConnectionPointContainer which includes a
method called FindConnectionPoint(). To call the FindConnectionPoint() method, you must narrow
your object reference to com.sas.iom.SASIOMDefs.ConnectionPointContainer, as discussed in
Generic Object References and IOM Objects that Support More Than One Stub.
The FindConnectionPoint() method provides you with a reference to the correct connection point. Because
IOM objects can support more than one event interface, you must identify which connection point you want when you
Events and Connection Points 716
call FindConnectionPoint() using the unique interface identifier of the event interface and the
com.sas.iom.SASIOMDefs.CP_ID structure. The unique interface identifier for the event interface can be
found by calling the id() method on the Helper class of the event interface.
The following example shows you how to get a unique interface identifier and use it to initialize the
com.sas.iom.SASIOMDefs.CP_ID structure:
String cpidString = com.sas.iom.SASEvents.ILanguageEventsHelper.id();
int d1 = (int)java.lang.Long.parseLong(cpidString.substring(4,12),16);
short d2 = (short)java.lang.Integer.parseInt(cpidString.substring(13,17),16);
short d3 = (short)java.lang.Integer.parseInt(cpidString.substring(18,22),16);
byte[] d4 = new byte[8];
for (int i=0;i<2;i++)
{
d4[i] = (byte)java.lang.Short.parseShort(
cpidString.substring(23+(i*2),25+(i*2)),16);
}
for (int i=0;i<6;i++)
{
d4[i+2] = (byte)java.lang.Short.parseShort(
cpidString.substring(28+(i*2),30+(i*2)),16);
}
com.sas.iom.SASIOMDefs.CP_ID cpid=new com.sas.iom.SASIOMDefs.CP_ID(
d1,d2,d3,d4);
After you have constructed the com.sas.iom.SASIOMDefs.CP_ID structure, you are ready to call
FindConnectionPoint() and obtain a reference to the connection point component. Note that
FindConnectionPoint() uses an output parameter to return a reference to the connection point, which means
that you must use the Holder class com.sas.iom.SASIOMDefs.ConnectionPointHolder. Do not
confuse that class with the com.sas.iom.SASIOMDefs.ConnectionPointContainer class.
The following example shows you how to find the connection point for the
com.sas.iom.SASEvents.ILanguageEvents event interface:
com.sas.iom.SASIOMDefs.ConnectionPointContainer cpContainer =
com.sas.iom.SASIOMDefs.ConnectionPointContainerHelper.narrow(sasLanguage);
com.sas.iom.SASIOMDefs.ConnectionPointHolder cpHolder =
new com.sas.iom.SASIOMDefs.ConnectionPointHolder();
cpContainer.FindConnectionPoint(cpid,cpHolder);
com.sas.iom.SASIOMDefs.ConnectionPoint cp = cpHolder.value;
Using a Connection Point
After you have obtained a reference to a connection point, the final step is to make the connection point aware of your
event listener. This step is done using the Advise() method. When you are no longer interested in receiving events,
call the Unadvise() method.
The following example illustrates the use of a connection point:
org.omg.CORBA.IntHolder handleHolder = new org.omg.CORBA.IntHolder();
cp.Advise(sasLanguageEventsListener,handleHolder);
int handle = handleHolder.value;
SAS® Integration Technologies: Developer's Guide
Events and Connection Points 717
/* event listener can now receive events */
cp.Unadvise(handle);
Java Clients
SAS® Integration Technologies: Developer's Guide
Events and Connection Points 718
Datetime Values
Java, CORBA, and SAS all use different datetime formats:
Language Starting Date Increments
Java January 1, 1970 milliseconds
CORBA October 15, 1582 100s of nanoseconds
SAS January 1, 1960 seconds
The IOM Bridge for Java and the Java CORBA stubs for IOM objects specify datetimes using the CORBA datetime
format and a data type of long. To assist with conversions between Java and CORBA datetime formats, use the
DateConverter class, as described in the SAS Foundation Services class documentation. Conversions between
CORBA and SAS datetime formats are handled automatically by the IOM Bridge for Java.
Java Clients
Datetime Values 719
Getting a JDBC Connection Object
Java Database Connectivity (JDBC) defines the standard way for Java programmers to access and manipulate data in a
database. The IOM server supports IOM objects that provide all the functionality of a JDBC driver, but, instead of
having to learn to program for those IOM objects, SAS Integration Technologies provides you with a JDBC
implementation that uses IOM objects internally.
After you have established a connection to an IOM server and obtained a reference to a stub for the workspace
component, you can get a java.sql.Connection object for the SAS JDBC Driver, as shown in the following
example:
import java.sql.Connection;
import java.sql.SQLException;
import java.util.Properties;
import com.sas.iom.SAS.IDataService;
import com.sas.rio.MVAConnection;
//use workspace factory to get reference to workspace stub
//IWorkspace sasWorkspace = ...
IDataService rio = sasWorkspace.DataService();
Connection sqlConnection = new MVAConnection(rio,new Properties());
.
.
.
(standard JDBC method calls)
.
.
.
The following example shows you how to release the connection:
sqlConnection.close();
Java Clients
Getting a JDBC Connection Object 720

Using the Java Workspace Factory
Note: It is recommended that you use the Java Connection Factory interface in order to take advantage of the new
features available with SAS 9 Integration Technologies.
The SAS workspace is the highest−level component in the IOM object hierarchy, and connecting to a workspace
object is the first step in using an IOM server. The WorkspaceFactory class provides methods for creating and
connecting to a SAS workspace on an IOM server.
The Java Workspace Factory provides a consistent interface for connecting client programs to IOM servers through all
the various permutations of communications technologies. While IOM servers are designed to integrate with many
different communications technologies and support many different usage scenarios, the Java Workspace Factory hides
these complexities. In addition, the Java Workspace Factory is flexible enough to support a Java client program from
its early development stages through its deployment in a production environment.
In a Java client program, you can use either of two methods to supply the Java Workspace Factory with the
information that it needs in order to connect to an IOM server:
You can place the required information directly in the client program. For details, see Connecting with
Directly Supplied Server Properties. Connections can be made one at a time on an as−needed basis; or you
can set up a pool of connections to be shared and reused across multiple Java client applications and multiple
connection requests. Connection pooling is secure, and it can dramatically reduce connection times in
environments where one or more client applications make frequent but brief requests for IOM services.
•
Alternatively, you can obtain the required information from a managed, secure LDAP directory using indirect
logical names. For details, see Connecting with Server Properties Read from an LDAP Server. When you use
this method, the decision about whether to use connection pooling is made by the LDAP administrator. In
addition, when using the LDAP server, the Java Workspace Factory can be configured to control access to
workspace objects and to the Java Workspace Factory's administrative functions.
•
The Java Workspace Factory can log diagnostic and status messages and write them to output for use in debugging or
performance monitoring. For details, see Logging Java Workspace Factory Activity.
After you are finished using a workspace object that you have obtained from the Java Workspace Factory, you must
return it to the factory by calling the close() method on the WorkspaceConnector. For details, see Returning a
Workspace to the Java Workspace Factory. When you are finished with the instance of the Java Workspace Factory
itself and you no longer need to request workspace objects from it, you must shut it down by calling the
shutdown() method or the destroy() method. For details, see Shutting Down the Java Workspace Factory.
These processes are the same whether you are using connection pooling or making single connections, and whether
you provide information about the IOM servers directly in your client program or indirectly using an LDAP directory
server.
Java Clients
Using the Java Workspace Factory 721
Connecting with Directly Supplied Server Properties
In order to make a connection to an IOM server, you must give the Java Workspace Factory specific information
about the server and about the desired connection. The quickest and simplest method of providing this information is
to place it directly into the client program using name/value pairs in a java.util.Properties object. The
following properties can be provided:
host specifies the IP address of the machine hosting the IOM server or object spawner. This property is required.
port specifies the TCP port that the IOM server or object spawner is listening to for connections. This property is
required.
userName
specifies a valid user name on the host machine. This property is required unless the connection is being made
to an object spawner that is running with the −nosecurity option.
password
specifies the password corresponding to userName on the host machine. This property is required unless the
connection is being made to an object spawner that is running with the −nosecurity option.
encryptionPolicy
specifies whether IOM Bridge for Java should attempt to negotiate with the server over which encryption
algorithm to use and what to do if the negotiations fail. This property is optional. Possible values are
none
specifies not to use encryption. This is the default.
optional
attempts to use encryption but, if algorithm negotiation fails, continues with an unencrypted
connection.
required
attempts to use encryption but, if algorithm negotiation fails, fails the connection.
encryptionAlgorithms
specifies the list of algorithms you are willing to use in order of preference. Values in the list should be
separated by commas and chosen from SASPROPRIETARY, RC2, RC4, DES, or TRIPLEDES. This
property is optional. If no value is specified, then one of the server's preferred algorithms will be used. It is
ignored entirely if the value for encryptionPolicy is none.
encryptionContent
specifies which messages should be encrypted if encryption is used. This property is optional, and it is ignored
entirely if the value for encryptionPolicy is none. Possible values are
all
encrypts all messages. This is the default.
authentication
encrypts only messages that contain user name and password information.
Connecting with Directly Supplied Server Properties 722

Example
The Java code in this example demonstrates how to use name/value pairs in a java.util.Properties object to
provide information to the Java Workspace Factory and obtain a workspace object reference. For information about
how to use the workspace object reference, see Language Service Example.
The last two statements in the example show how to dispose of a workspace object reference. For details about this
procedure, see Returning a Workspace to the Java Workspace Factory.
import com.sas.iom.WorkspaceConnector;
import com.sas.iom.WorkspaceFactory;
import com.sas.iom.SAS.IWorkspace;
import java.util.Properties;
Properties iomServerProperties = new Properties();
iomServerProperties.put("host",host);
iomServerProperties.put("port",port);
iomServerProperties.put("userName",user name);
iomServerProperties.put("password",password);
Properties[] serverList = {iomServerProperties};
WorkspaceFactory wFactory = new WorkspaceFactory(serverList,null,null);
WorkspaceConnector connector = wFactory.getWorkspaceConnector(0L);
IWorkspace workspace = connector.getWorkspace();
< insert workspace usage code here >
wFactory.shutdown();
connector.close();
In the preceding example, exception handling statements have been removed for the sake of clarity. The example will
not compile as shown.
Adding Connection Pooling Features
With minor changes to the preceding example program, you can use the Java Workspace Factory to manage a pool of
connections to an IOM server rather than a single connection. When set up for connection pooling, the Java
Workspace Factory tries to fulfill each client's requests for workspace objects by opening a new workspace object on
an existing connection to an IOM server. This is less time consuming than creating a new connection. Behind the
scenes, the Java Workspace Factory keeps a configurable number of connections alive at all times. For connection
pooling to work properly, you must notify the Java Workspace Factory when you are finished using a workspace
object by calling com.sas.iom.WorkspaceConnector.close(). For more details, Returning a Workspace
to the Java Workspace Factory.
When a client uses a workspace object, it has exclusive access to the connection serving that workspace object. When
the client is finished using the workspace object, the workspace object is closed before the connection is returned to
the pool. These actions help preserve the performance and security of the single connection case.
You can also maintain performance standards by spreading a pool of connections over more than one server and then
setting an upper limit on the number of connections that each server can contribute to the pool. To specify multiple
servers, simply provide a separate java.util.Properties object for each server that is to participate in the
pool.
SAS® Integration Technologies: Developer's Guide
Connecting with Directly Supplied Server Properties 723

To implement connection pooling, you can specify the following properties for each server in addition to the other
server properties described previously.
sasMaxPerWorkspacePool
specifies the maximum number of connections that the pool will be allowed to make to the server at one time.
Factors you should consider when determining a value for this field include the number and type of processors
on the machine, the amount of memory present, the type of clients that will be requesting workspaces, and the
number of different pools in which the server participates. This property is optional. The default value is 10.
sas−RecycleActivationLimit
specifies the number of times a connection to the server will be reused in a pool before it is disconnected
("recycled"). If the value is 0, then there will be no limit on the number of times a connection to the server can
be reused. This property is optional. The default value is 0.
sas−ServerRunForever
must be either true or false. If the value is false, then unallocated live connections will be disconnected
after a period of time (determined by the value of sas−ServerShutdownAfter) unless they are allocated to a
user before that period of time passes. Otherwise, unallocated live connections will remain alive indefinitely.
This property is optional. The default value is true.
sas−ServerShutdownAfter
specifies the period of time, in minutes, that an unallocated live connection will wait to be allocated to a user
before shutting down. This property is optional and it is ignored if the value of sas−ServerRunForever is
true. The value must not be less than 0, and it must not be greater than 1440 (the number of minutes in a
day). The default value is 3. If the value is 0, then a connection returned to a pool by a user will be
disconnected immediately unless another user is waiting for a connection from the pool.
In addition to the information about the servers that participate in a connection pool, you can also specify information
about the pool itself. Again, the information can be provided to the Java Workspace Factory as name/value pairs in a
java.util.Properties object. Here is a list of the properties that can be specified.
sasMinSize
specifies the minimum number of connections that the Java Workspace Factory can maintain for a pool (after
the initial startup period). This number includes both the connections that are in use and the connections that
are idle. This property is optional. The default value is 0.
sasMinAvail
specifies the minimum number of idle connections that the Java Workspace Factory can maintain for a pool.
This number includes only the connections that are idle. This property is optional. The default value is 0.
Example
The following example demonstrates how to specify server properties to the Java Workspace Factory and obtain four
workspace object references using only two connections to IOM servers. For information about how to use the
workspace object reference, see Language Service Example.
The last part of this example shows how to dispose of a workspace object reference. For details about this procedure,
see Returning a Workspace to the Java Workspace Factory.
import com.sas.iom.WorkspaceConnector;
import com.sas.iom.WorkspaceFactory;
import com.sas.iom.SAS.IWorkspace;
import java.util.Properties;
Properties serverProperties0 = new Properties();
serverProperties0.put("host",host 0);
SAS® Integration Technologies: Developer's Guide
Connecting with Directly Supplied Server Properties 724

serverProperties0.put("port",port 0);
serverProperties0.put("userName",user name 0);
serverProperties0.put("password",password 0);
serverProperties0.put("sasMaxPerWorkspacePool","1");
serverProperties0.put("sas−RecycleActivationLimit","2");
Properties serverProperties1 = new Properties();
serverProperties1.put("host",host 1);
serverProperties1.put("port",port 1);
serverProperties1.put("userName",user name 1);
serverProperties1.put("password",password 1);
serverProperties1.put("sasMaxPerWorkspacePool","1");
serverProperties1.put("sas−RecycleActivationLimit","2");
Properties[] serverList = {serverProperties0,serverProperties1};
Properties poolProperties = new Properties();
poolProperties.put("sasMinSize","2");
WorkspaceFactory wFactory =
new WorkspaceFactory(serverList,poolProperties,null);
WorkspaceConnector connector0 = wFactory.getWorkspaceConnector(0L);
IWorkspace workspace0 = connector0.getWorkspace();
WorkspaceConnector connector1 = wFactory.getWorkspaceConnector(0L);
IWorkspace workspace1 = connector1.getWorkspace();
< insert workspace0 and workspace1 usage code here >
connector0.close();
connector1.close();
WorkspaceConnector connector2 = wFactory.getWorkspaceConnector(0L);
IWorkspace workspace2 = connector2.getWorkspace();
WorkspaceConnector connector3 = wFactory.getWorkspaceConnector(0L);
IWorkspace workspace3 = connector3.getWorkspace();
< insert workspace2 and workspace3 usage code here >
wFactory.shutdown();
connector2.close();
connector3.close();
In the preceding example, exception handling statements have been removed for the sake of clarity. The example will
not compile as shown.
Waiting for Connections to Become Available
At the time of a client's request for a workspace object, it is possible that all of the available connections in a
connection pool will already be allocated to other clients. For example, the Java Workspace Factory might not be able
to make an additional connection to a server because it would violate the sasMaxPerWorkspacePool value that
has been set for the server. In such cases, the client's request cannot be fulfilled until one of the other clients is
finished with its workspace object.
To indicate what action you want the Java Workspace Factory to take when a request cannot be fulfilled immediately,
you can use a long parameter with the getWorkspaceConnector() method in the client program. The
following table shows how the value of the long parameter indicates which action to take:
The Java Workspace Factory will:
SAS® Integration Technologies: Developer's Guide
Connecting with Directly Supplied Server Properties 725

If the long
parameter is:
A number
greater than zero Try to fulfill the request for up to that number of milliseconds. After that number of
milliseconds has passed, if no other client has returned its connection to the pool, then
the Java Workspace Factory will throw an exception to the caller.
Equal to zero Try to fulfill the request for an unlimited amount of time.
A number less
than zero Not try to fulfill the request, and throw an exception to the caller immediately.
Logging Java Workspace Factory Activity
The Java Workspace Factory will write diagnostic and status messages to an instance of
java.util.PrintWriter if you provide one. The information that the Java Workspace Factory writes to this
object will be useful for debugging or performance monitoring.
Example
The following example shows how to make the Java Workspace Factory write messages to standard output:
import com.sas.iom.WorkspaceConnector;
import com.sas.iom.WorkspaceFactory;
import com.sas.iom.SAS.IWorkspace;
import java.io.PrintWriter;
import java.util.Properties;
PrintWriter logWriter = new PrintWriter(System.out);
Properties iomServerProperties = new Properties();
iomServerProperties.put("host",host);
iomServerProperties.put("port",port);
iomServerProperties.put("userName",user name);
iomServerProperties.put("password",password);
Properties[] serverList = {iomServerProperties};
WorkspaceFactory wFactory = new WorkspaceFactory(serverList,null,logWriter);
WorkspaceConnector connector = wFactory.getWorkspaceConnector(0L);
IWorkspace workspace = connector.getWorkspace();
< insert workspace usage code here >
wFactory.shutdown();
connector.close();
In the preceding example, exception handling statements have been removed for the sake of clarity. The example will
not compile as shown.
Java Clients
SAS® Integration Technologies: Developer's Guide
Connecting with Directly Supplied Server Properties 726

Connecting with Server Properties Read from an LDAP
Server
It is not necessary to place the information needed to connect to an IOM server directly in the client program. As an
alternative, the Java Workspace Factory allows you to obtain the needed information from a managed, secure LDAP
directory using indirect logical names. The main advantage of this method is that you can maintain and update the
IOM server and connection information without changing your client programs. This method also provides additional
security features if you are using connection pooling.
To use this method, you must provide the client program with instructions for connecting to the LDAP directory, the
logical name of the information you want to search for, and the context within the directory for performing the search.
To provide this information, you can create an instance of java.util.Hashtable containing the appropriate
properties. For a complete list of the properties you can provide, refer to the documentation for the class
javax.naming.Context. Note that the property names are string constants on the javax.naming.Context
interface instead of literal strings.
The following five properties are required:
javax.naming.Context.INITIAL_CONTEXT_FACTORY
specifies the name of the main class implementing LDAP. If you are using the LDAP implementation from
JavaSoft, this value should be com.sun.jndi.ldap.LdapCtxFactory.
javax.naming.Context.PROVIDER_URL
specifies the URL for the LDAP directory server. This value takes the form ldap://host:port.
javax.naming.Context.SECURITY_AUTHENTICATION
specifies the type of authentication to use when connecting to the LDAP directory server. This value is either
none, simple, or strong.
javax.naming.Context.SECURITY_PRINCIPAL
specifies the name, such as the distinguished name of a person object in the directory, under which the
connection to the LDAP directory server should be made. This property is not required if the value for
javax.naming.Context.SECURITY_AUTHENTICATION is none.
javax.naming.Context.SECURITY_CREDENTIALS
specifies the credentials, such as a password, corresponding to the principal given as the value of
javax.naming.Context.SECURITY_PRINCIPAL. This property is not required if the value for
javax.naming.Context.SECURITY_AUTHENTICATION is none.
Example
The following example code shows how to initialize and use the Java Workspace Factory using information from an
LDAP directory. For information about how to use the workspace object reference, see Language Service Example.
The last two statements in the example show how to dispose of a workspace object reference. For details about this
procedure, see Returning a Workspace to the Java Workspace Factory.
import java.io.PrintWriter;
import java.util.Hashtable;
import javax.naming.Context;
import com.sas.iom.WorkspaceConnector;
import com.sas.iom.WorkspaceFactory;
import com.sas.iom.SAS.IWorkspace;
Hashtable ldapProperties = new Hashtable();
Connecting with Server Properties Read from an LDAP Server 727
ldapProperties.put(Context.INITIAL_CONTEXT_FACTORY,
"com.sun.jndi.ldap.LdapCtxFactory");
ldapProperties.put(Context.PROVIDER_URL,"ldap://host:port");
ldapProperties.put(Context.SECURITY_AUTHENTICATION,"simple");
ldapProperties.put(Context.SECURITY_PRINCIPAL,distinguished name);
ldapProperties.put(Context.SECURITY_CREDENTIALS,password);
PrintWriter logWriter = new PrintWriter(System.out);
WorkspaceFactory wFactory = new WorkspaceFactory(ldapProperties,
ldap search context,logical name,false,false,logWriter);
WorkspaceConnector connector = wFactory.getWorkspaceConnector(0L);
IWorkspace workspace = connector.getWorkspace();
< insert workspace usage code here >
wFactory.shutdown();
connector.close();
In the preceding example, exception handling statements have been removed for the sake of clarity. The example will
not compile as shown.
Using an Existing Connection to an LDAP Server
If a Java client application is already accessing an LDAP directory server for purposes other than connecting to an
IOM server, the Java Workspace Factory can use an existing connection. This mode of operation can reduce the
overall number of connections to the LDAP directory server that your Java client application needs to make.
Example
Here is an example showing how to initialize and use the Java Workspace Factory using an existing instance of
javax.naming.directory.DirContext.
import java.io.PrintWriter;
import java.util.Hashtable;
import javax.naming.Context;
import javax.naming.directory.DirContext;
import javax.naming.directory.InitialDirContext;
import com.sas.iom.WorkspaceConnector;
import com.sas.iom.WorkspaceFactory;
import com.sas.iom.SAS.IWorkspace;
Hashtable ldapProperties = new Hashtable();
ldapProperties.put(Context.INITIAL_CONTEXT_FACTORY,
"com.sun.jndi.ldap.LdapCtxFactory");
ldapProperties.put(Context.PROVIDER_URL,"ldap://host:port");
ldapProperties.put(Context.SECURITY_AUTHENTICATION,"simple");
ldapProperties.put(Context.SECURITY_PRINCIPAL,distinguished name);
ldapProperties.put(Context.SECURITY_CREDENTIALS,password);
DirContext ldapDirectory = new InitialDirContext(ldapProperties);
< insert LDAP directory usage code here >
PrintWriter logWriter = new PrintWriter(System.out);
WorkspaceFactory wFactory = new WorkspaceFactory(ldapDirectory,
ldap search context,logical name,false,false,logWriter);
WorkspaceConnector connector = wFactory.getWorkspaceConnector(0L);
IWorkspace workspace = connector.getWorkspace();
SAS® Integration Technologies: Developer's Guide
Connecting with Server Properties Read from an LDAPServer 728
< insert workspace usage code here >
wFactory.shutdown();
connector.close();
ldapDirectory.close();
In the preceding example, exception handling statements have been removed for the sake of clarity. The example will
not compile as shown.
Using Connection Pooling and an LDAP Server
When you connect to an IOM server using information from an LDAP directory, all of the information about the IOM
server and how to connect to it is created and maintained by the LDAP directory server administrator. The person
developing the Java client application does not need to make a decision about whether to use connection pooling,
because that decision is made by the LDAP server administrator.
Using Puddles
The LDAP server administrator can choose to partition a pool of connections into "puddles." Each puddle is a fully
functioning connection pool that uses a specific user name and password when connecting to an IOM server. From the
perspective of the Java Workspace Factory user, it is not important to distinguish between pools made up of several
puddles and pools made up of only one; the Java Workspace Factory automatically routes requests for workspace
objects to the most appropriate puddle.
There are two reasons that an LDAP server administrator might choose to partition a connection pool into more than
one puddle:
To enable connections over multiple domains. For example, the LDAP administrator might place connections
to UNIX servers in one puddle and connections to Windows NT servers in another puddle, because the two
server types require different login information.
•
To tailor server permissions to particular classes of users. For example, the LDAP administrator might give
one puddle read and write access to a table on an IOM server, while giving another puddle only read access.
In such a case, the Java Workspace Factory will automatically route a user's request for a workspace object to
a puddle that the user is authorized to use (subject to the access control features described in the next section).
•
Controlling Access to the Java Workspace Factory
The Java Workspace Factory can be configured to control access to the workspace objects it creates. In addition, the
Java Workspace Factory can be configured to control access to its administrative functions, such as shutdown().
These access control features are available only when the Java Workspace Factory is using an LDAP server.
When the Java Workspace Factory is constructed, the access control features can be either enabled or disabled. If they
are enabled, then all further calls to Java Workspace Factory methods must contain the valid distinguished name and
password of a person object that is present on the LDAP directory. The Java Workspace Factory authenticates the
distinguished name and password by using them to bind to the LDAP directory that it used to construct the factory.
SAS® Integration Technologies: Developer's Guide
Connecting with Server Properties Read from an LDAPServer 729
In performing the authentication, the Java Workspace Factory follows one of two procedures, depending on whether
the call is a request for a workspace object or an attempt to shut down the factory.
If the call is a request for a workspace object, then the Java Workspace Factory authorizes the caller by
comparing the provided distinguished name with the values of the sasAllowedClientDN attributes for all
sasLogin objects that have the appropriate logical name.
The caller is authorized to use a puddle only if one of the following is true:
the caller's distinguished name matches a value of the puddle's sasAllowedClientDN attribute♦
the caller's distinguished name is a member of a group whose distinguished name matches a value of
the puddle's sasAllowedClientDN attribute.
♦
•
If the call is a request to shutdown() or destroy (), then the Java Workspace Factory authorizes the
caller by binding to the LDAP directory server under the provided credentials and searching for all the
sasLogin objects that have the appropriate logical name. If the search returns the same set of sasLogin
objects that was returned when the factory was constructed, then the call is authorized.
•
Example
The following example shows how to enable access control for users and administrators and how users and
administrators should provide their credentials.
import java.io.PrintWriter;
import java.util.Hashtable;
import javax.naming.Context;
import com.sas.iom.WorkspaceConnector;
import com.sas.iom.WorkspaceFactory;
import com.sas.iom.SAS.IWorkspace;
Hashtable ldapProperties = new Hashtable();
ldapProperties.put(Context.INITIAL_CONTEXT_FACTORY,
"com.sun.jndi.ldap.LdapCtxFactory");
ldapProperties.put(Context.PROVIDER_URL,"ldap://host:port");
ldapProperties.put(Context.SECURITY_AUTHENTICATION,"simple");
ldapProperties.put(Context.SECURITY_PRINCIPAL,
administrator 1 distinguished name);
ldapProperties.put(Context.SECURITY_CREDENTIALS,
administrator 1 password);
WorkspaceFactory wFactory = new WorkspaceFactory(ldapProperties,
ldap search context,logical name,true,true,null);
WorkspaceConnector connector = wFactory.getWorkspaceConnector(
user distinguished name,user password,0L);
IWorkspace workspace = connector.getWorkspace();
< insert workspace usage code here >
wFactory.shutdown(administrator 2 distinguished name,
administrator 2 password);
connector.close();
SAS® Integration Technologies: Developer's Guide
Connecting with Server Properties Read from an LDAPServer 730
In the preceding example, exception handling statements have been removed for the sake of clarity. The example will
not compile as shown.
Java Clients
SAS® Integration Technologies: Developer's Guide
Connecting with Server Properties Read from an LDAPServer 731

Java Workspace Factory Language Service Example
The SAS language component of the IOM server allows you to submit SAS code for processing and to obtain output
and information in the SAS log. The following example shows you how to do this, and also shows you how to use
CORBA holder classes to handle output parameters.
The following example assumes that you already have a reference to a workspace component.
import com.sas.iom.SAS.ILanguageService;
import com.sas.iom.SAS.ILanguageServicePackage.CarriageControlSeqHolder;
import com.sas.iom.SAS.ILanguageServicePackage.LineTypeSeqHolder;
import com.sas.iom.SAS.IWorkspace;
import com.sas.iom.SASIOMDefs.StringSeqHolder;
//use workspace factory to get reference to workspace stub
//IWorkspace sasWorkspace = ...
ILanguageService sasLanguage = sasWorkspace.LanguageService();
sasLanguage.Submit("data a;x=1;run;proc print;run;");
CarriageControlSeqHolder logCarriageControlHldr =
new CarriageControlSeqHolder();
LineTypeSeqHolder logLineTypeHldr = new LineTypeSeqHolder();
StringSeqHolder logHldr = new StringSeqHolder();
sasLanguage.FlushLogLines(Integer.MAX_VALUE,logCarriageControlHldr,
logLineTypeHldr,logHldr);
String[] logLines = logHldr.value;
CarriageControlSeqHolder listCarriageControlHldr =
new CarriageControlSeqHolder();
LineTypeSeqHolder listLineTypeHldr = new LineTypeSeqHolder();
StringSeqHolder listHldr = new StringSeqHolder();
sasLanguage.FlushListLines(Integer.MAX_VALUE,listCarriageControlHldr,
listLineTypeHldr,listHldr);
String[] listLines = listHldr.value;
For the sake of clarity, all exception handling statements have been removed from the preceding example. The example
will not compile as shown.
Java Clients
Java Workspace Factory Language Service Example 732
Returning a Workspace to the Java Workspace Factory
When you are finished using a workspace object that you have obtained from the Java Workspace Factory, you must
return it to the factory so that the object can be closed and the supporting connection can be either reused or canceled.
To return a workspace object to the Java Workspace Factory, call the close() method on the
WorkspaceConnector object that was returned when you called the getWorkspaceConnector() method.
Workspace objects themselves (the objects that implement IWorkspace) also have a Close() method. You do not
need to call this method when you are closing a workspace object, because the close() method on the
WorkspaceConnector object will call it for you. However, no harm will occur if you call the Close() method
on both objects.
If you do not explicitly close a WorkspaceConnector object, it will close itself when it is no longer referenced
and is garbage collected. However, you generally cannot determine when or if garbage collection will occur.
Therefore, it is recommended that you explicitly close your WorkspaceConnector objects if at all possible rather
than depending on garbage collection.
Shutting Down the Java Workspace Factory
When you are finished with the instance of the Java Workspace Factory itself and you no longer need to request
workspace objects from it, you must shut it down so that any remaining connections can be canceled and other
resources can be released.
To shut down the Java Workspace Factory, call one of the following methods:
The shutdown() method. This method immediately cancels all idle connections in the pool. If connections
are currently allocated to users, the method waits and cancels these connections after the users return the
workspace objects to the factory. In addition, the Java Workspace Factory will no longer honor new requests
for workspace objects.
After shutdown() has been called, later calls to shutdown() have no effect.
•
The destroy() method. This method immediately cancels connections in the pool, including connections
that have been allocated to users. Any attempt to use a connection from the factory will result in an exception.
In addition, the Java Workspace Factory will no longer honor new requests for workspace objects.
After destroy() has been called, later calls to shutdown() or destroy() have no effect.
•
It is often possible to cancel all connections and release all resources in an instance of the Java Workspace Factory by
calling shutdown() and being sure to call close() on all the WorkspaceConnector objects. However, in
some cases it might be desirable to call destroy() instead of (or after) calling shutdown() to ensure that an
instance of the Java Workspace Factory has been properly cleaned up.
Example
The following example shows how to return a workspace object to the Java Workspace Factory and how to shut down
a Java Workspace Factory.
Returning a Workspace to the Java Workspace Factory 733
import com.sas.iom.WorkspaceConnector;
import com.sas.iom.WorkspaceFactory;
import com.sas.iom.SAS.IWorkspace;
import java.util.Properties;
Properties iomServerProperties = new Properties();
iomServerProperties.put("host",host);
iomServerProperties.put("port",port);
iomServerProperties.put("userName",user name);
iomServerProperties.put("password",password);
Properties[] serverList = {iomServerProperties};
WorkspaceFactory wFactory = new WorkspaceFactory(serverList,null,null);
WorkspaceConnector connector = wFactory.getWorkspaceConnector(0L);
IWorkspace workspace = connector.getWorkspace();
< insert workspace usage code here >
wFactory.shutdown();
connector.close();
In the preceding example, exception handling statements have been removed for the sake of clarity. The example will
not compile as shown.
In the preceding code example (and in other code examples in our documentation), the final call to the close()
method on the WorkspaceConnector object occurs after the call to shutdown() the Java Workspace Factory.
This pattern displays a useful optimization that you should take advantage of whenever possible. If the
WorkspaceConnector object is closed after the Java Workspace Factory is shut down, the Java Workspace
Factory does not have to decide what to do with the returned connection. It can always be canceled immediately.SAS
Foundation Services
SAS® Integration Technologies: Developer's Guide
Returning a Workspace to the Java Workspace Factory 734

SAS Foundation Services
SAS Foundation Services is a set of infrastructure and extension services which support the development of
integrated, scalable, and secure applications based on Java. SAS Foundation Services is based on the following design
principles:
implementation modularity• location transparency• robust and adaptive resource management• run−time monitoring• consistent deployment methodology• client neutrality•
The design model of SAS Foundation Services supports both local and remote resource deployment and promotes
resource sharing among applications. Sharing can occur for a specific session, for a specific user, or globally, as
appropriate. At the same time, the model controls access to protected resources based on privileged−user status and
group membership.
SAS Foundation Services contains the following services: (use the following links to display a short description of
each service, with links to detailed documentation for developers.):
Connection Service• Discovery Service• Event Broker Service• Information Service• Logging Service• Publish Service• Security Service• Session Service• Stored Process Service• User Service•
The connection, publish, and stored process services are extensions of similar services that are part of the Integrated
Object Model (IOM) services published with SAS 8.2 Integration Technologies. The IOM Services continue to be
supported. However, the SAS Foundation Services provide enhanced features, including support for the use of a SAS
Metadata Server for storing configuration information, and support for the use of shared remote service deployments.
For information about configuring and administering SAS Foundation Services, refer to the SAS Foundation Services
section of the SAS Integration Technologies: Administrator's Guide.
SAS Foundation Services
SAS Foundation Services 735

Connection Service
The Connection Service enables applications to do the following:
connect to IOM servers that use the IOM Bridge Protocol.• use the Java Connection Factory to access existing connection objects and to create new connection objects
for various server configurations.
•
use advanced connection management features such as connection pooling, failover, and load balancing which
are available through the Java Connection Factory.
•
For detailed usage documentation and examples, see Using the Java Connection Factory in this section and
com.sas.services.connection.platform in the Foundation Services class documentation.
For information about configuring IOM servers, see the SAS Integration Technologies: Server Administrator's Guide.
SAS Foundation Services
Connection Service 736

Discovery Service
The Discovery Service enables applications to do the following:
find implementations of SAS Foundation Services based on desired service capabilities and, optionally,
service attributes. Service capabilities are specified in terms of the Java interfaces that they implement.
Discovery occurs without requiring the client to have any knowledge of the underlying lookup mechanisms
that are being used.
•
rediscover a previously discovered service using its discovery service ID.•
The Discovery Service can find service implementations that have been deployed locally for the application's
exclusive use, as well as service implementations that have been deployed remotely for the use of multiple
applications.
For detailed usage documentation and examples, see com.sas.services.discovery in the Foundation Services class
documentation.
For information about deploying and configuring services either locally or remotely so that they can be found by
Discovery Services, see Understanding Service Deployments and Understanding How Applications Locate SAS
Foundation Services in the SAS Integration Technologies: Administrator's Guide.
SAS Foundation Services
Discovery Service 737

Event Broker Service
The Event Broker Service enables applications to send and deliver events to the appropriate handling agents for
processing. A handler can be either of the following:
a statically defined process flow that runs in its own thread within the Event Broker Service to process the
event. You can use the Foundation Services Manager plug−in to SAS Management Console to define the
event and the process flow configuration.
•
an application that has registered itself at run time with the Event Broker Service so that it can receive event
notifications.
•
An Event Broker Service can also format a response to the processing of an event and send it as a reply to the event
originator. It is the responsibility of the requester to specify the type of response that is desired: none
(fire−and−forget), acknowledgement (acknowledge that the event was received), or result (send a formatted
response).
An event is specified as a well−formed XML fragment that contains the name of the event, any associated properties,
and a body. For details, refer to the Event Message Specification in the Foundation Services class documentation.
For detailed usage documentation and examples, see com.sas.services.events.broker and
com.sas.services.events.discovery in the Foundation Services class documentation.
For details about editing the Event Broker Service configuration, see Understanding the Event Broker Service in the
SAS Integration Technologies: Administrator's Guide.
For information about using the Publishing Framework to generate and publish events, see About Events.
SAS Foundation Services
Event Broker Service 738

Information Service
The Information Service enables you to do the following:
perform a federated search of any repositories that a user has a connection to. The term federated means
connected and treated as one. The classes in the Information Service package enable the creation of a single
filter which can search disparate repositories (for example, SAS Metadata Repositories and LDAP
repositories).
•
limit searches to a specific repository, so that efficient searching can be achieved.• retrieve an item from a repository using a URL, using a convenience method.• (in conjunction with the User Services and the Authentication Service) authenticate users, create User
Contexts, locate servers that the user has access to, and create repository definitions to use in making server
connections.
•
For detailed usage documentation and examples, see com.sas.services.information in the Foundation Services class
documentation.
For information about configuring Information Services, see Modifying the Information Service Configuration in the
SAS Integration Technologies: Administrator's Guide.
SAS Foundation Services
Information Service 739

Logging Service
The Logging Service enables applications to do the following:
send run−time messages to one or more output destinations, including consoles, files, and socket connections.• configure and control the format of information sent to a particular destination. Configuration can be
performed through static configuration files or by invoking run−time methods that control logging output.
•
perform remote logging, which involves sending log messages generated in one Java virtual machine (JVM)
to another JVM.
•
perform logging either by user session or by JVM.•
For detailed usage documentation and examples, see com.sas.services.logging in the Foundation Services class
documentation.
For information about configuring a Logging Service, see Modifying the Logging Service Configuration in the SAS
Integration Technologies: Administrator's Guide.
SAS Foundation Services
Logging Service 740

Publish Service
The Publish Service enables applications to do the following:
create and populate collections of information that are called packages. Reports, tables, and documents are
examples of the types of information that a package can contain.
•
publish and retrieve packages using the following delivery transports:
archive transport, which is used to publish and retrieve binary archive files♦ channel transport, which is used to publish to a publication channel♦ requester transport, which is used to retrieve packages that are accessible by a SAS Workspace Server♦ WebDAV transport, which is used to publish to and retrieve from a WebDAV server.♦
•
generate a SASPackage Event, which contains information about a package that has been published.•
For detailed usage documentation and examples, see com.sas.services.publish in the Foundation Services class
documentation.
For information about using publish and subscribe software components and SAS CALL routines, see Publishing
Framework.
For instructions about configuring and administering channels and subscriptions for the Publishing Framework, see
the Publishing Framework section in the SAS Integration Technologies: Administrator's Guide.
SAS Foundation Services
Publish Service 741

Security Service
The Security Service enables applications to do the following:
authenticate the credentials of users. Authentication is the process of verifying that a user ID and its password
are valid. The Security Service uses the Java Authentication and Authorization Service (JAAS) classes and
interfaces to provide a pluggable authentication mechanism.
•
propagate user identity contexts across distributed security domains.• implement a single sign−on environment by saving credentials in the user context of an authenticated user.• request a user's credentials from a user context that another application created. If credentials exist for the
specified domain, the application can use them to access resources without requiring additional authentication
input from the user.
•
For detailed usage documentation and example code, see com.sas.services.security in the Foundation Services class
documentation.
For detailed information about implementing security in your environment, see the Security section in the SAS
Integration Technologies: Administrator's Guide.
SAS Foundation Services
Security Service 742

Session Service
The Session Service enables applications to do the following:
create a session context. A session context is a control structure that maintains state information within a
bound session, facilitating resource management and context passing.
•
bind objects to a session context.• use the session context as a convenience container for passing multiple contexts.• use the session context as a convenience container for passing other services, such as User Services and
Logging Services.
•
notify bound objects when they are removed from the session context or when the session context is
destroyed, so that objects can perform any necessary cleanup.
•
For detailed usage documentation and examples, see com.sas.services.session in the Foundation Services class
documentation.
For information about configuring a Session Service, see Modifying the Session and User Service Configurations in
the SAS Integration Technologies: Administrator's Guide.
SAS Foundation Services
Session Service 743

Stored Process Service
The Stored Process Service enables applications to do the following:
synchronously or asynchronously execute a stored process, which is a SAS language program that is stored on
a SAS server. Execution can include accessing SAS data sources or external files and creating new data sets,
files, or other data targets that are supported by SAS.
•
receive values that have been assigned to input parameters and pass them to a stored process.• return output from a stored process, either in a results package or in a streaming interface.•
For detailed usage documentation and examples, see com.sas.services.storedprocess in the Foundation Services class
documentation.
For information about configuring SAS Stored Processes, see SAS Stored Processes in the SAS Integration
Technologies: Administrator's Guide.
For information about writing and implementing SAS Stored Processes, see SAS Stored Processes in this guide.
SAS Foundation Services
Stored Process Service 744

User Service
The User Service enables applications to do the following:
create, locate, maintain, and aggregate information about users of SAS Foundation Services.• store and retrieve user context objects for sharing between applications. The user context contains the user's
active repository connections, identities, and profile.
•
manage and access user profiles. A profile is a collection of name/value pairs that specify preferences and
configuration or initialization data for a user for a particular application.
•
access group profiles. A group profile specifies preferences and configuration or initialization data for a group
of users for a particular application.
•
For detailed usage documentation and example code, see com.sas.services.user in the Foundation Services class
documentation.
For information about configuring a User Service, see Understanding Service Deployments and Modifying the
Session and User Service Configurations in the SAS Integration Technologies: Administrator's Guide.
Windows Clients
User Service 745
Developing Windows Clients
When developing Microsoft Windows clients, you interact with the SAS Integrated Object Model (IOM) using the
Microsoft Component Object Model (COM). In all the leading programming language products under Windows, and
in most Windows applications, COM is the predominant mechanism for software interoperability on the Windows
platform.
For the benefit of Windows applications, SAS manifests its Integrated Object Model as a COM component that uses
the automation type system. Microsoft calls this type of COM component an ActiveX component or an OLE
Automation server.
Manifesting SAS as an ActiveX component has a number of benefits:
It can be called from a wide variety of programming language environments such as Microsoft Visual Basic
(including Visual Basic for Applications and VBScript), Microsoft Visual C++, Borland C++Builder, Visual
Basic .NET, and Visual C# .NET, Perl, Borland Delphi, and others.
•
SAS processing can be invoked from the macro language of many popular applications including those in
Microsoft Office.
•
The programming language skills most commonly used to build solutions in the Windows environment can
also be applied to developing solutions that involve SAS.
•
Operating system−level security, configuration and management are the same for SAS as for other
applications and systems utilities.
•
In addition to these standard advantages for integration via COM, the SAS Integrated Object Model offers a superior
capability that is not commonly available to ActiveX components. This function, known as the IOM Bridge for COM,
provides the ability to transparently run the server on platforms other than Windows. Using this bridge, a Windows
application can request SAS analytical processing against the often voluminous data on a UNIX or z/OS server and
receive the results without knowing that SAS is processing the request on a platform other than Windows. Given the
heavy use of UNIX and z/OS servers to store and process large−scale enterprise data, this is a significant advantage.
The exact interfacing technique used by Windows language products has evolved over the years. The initial approach
documented in COM was to support calls from Visual Basic through an interface known as IDispatch. When using the
IDispatch interface, calls into an interface go through a single method (IDispatch:Invoke) and then the appropriate
implementation code is looked up at run time. This technique was compatible with early versions of Visual Basic, but
was sub−optimal because of the amount of run−time interpretation involved in a method call. To improve
performance, subsequent versions of Visual Basic and other languages developed the ability to call methods directly.
This is known as v−table binding. Besides yielding better performance, v−table binding is also the most natural
approach for COM calls from C++. The IOM implementation of ActiveX component interfaces uses the dual interface
layout that provides both IDispatch and v−table binding. This gives the best performance from newer language
implementations, but still supports the Dispatch technique for client languages (including VBScript and JScript) that
use the older, sub−optimal approach.
SAS 9 Integration Technologies includes a new client−side component called the object manager. The Version 8
workspace manager—which can only use the LDAP server—will still be supported, but it is recommended that you
use the object manager interface in order to take advantage of the new features.
If you are using a SAS Metadata Server, the object manager allows you to launch and manage objects on other SAS
Metadata Servers, SAS Workspace Servers, SAS Stored Process Servers, and SAS OLAP Servers.
Windows Clients
Developing Windows Clients 746
Client Requirements
The SAS Integration Technologies client for the Windows operating environment has the following software
requirements:
Windows NT 4.0, Windows 2000, Windows XP, or Windows Server 2003. The client can connect to SAS
using all three methods (COM, DCOM, IOM Bridge for COM).
•
If your client machines will use the IOM Bridge for COM (a component of SAS Integration Technologies) to
attach to an IOM server, then each client machine will need a valid TCP/IP configuration.
•
If you are using the IOM Data Provider (a component of SAS Integration Technologies) you will need the
Microsoft Data Access Components (MDAC) Version 2.1 or higher on each client machine. MDAC is
available from the Microsoft Web site.
•
Windows Clients
Client Requirements 747

Client Installation
The SAS Integration Technologies client for the Windows operating environment can be installed in multiple ways:
Installing Base SAS for Windows
On a Windows platform, the SAS Integration Technologies client is installed with Base SAS software.
•
Installing an enterprise client (such as SAS Enterprise Guide)
The setup program for the enterprise client component will install the SAS Integration Technologies client.
•
Installing the SAS Integration Technologies client by itself
The SAS Integration Technologies client is packaged into a single executable file that can be copied to
Windows machines for easy installation of the SAS Integration Technologies client.
•
The default installation directory is as follows:
C:\Program Files\SAS Institute\Shared Files\ (if you have previously installed SAS 8.2 or earlier)• C:\Program Files\SAS\Shared Files\ (if you have NOT previously installed SAS 8.2 or earlier)•
Note: If you are using the SAS Integration Technologies client with 64−bit SAS, extra setup steps are required for
IOM COM servers on 64−bit Windows. For details, see the SAS installation documentation.
Components of the SAS Integration Technologies Client
Regardless of which method is used to install the SAS Integration Technologies client, the core function is installed
via the inttech.exe file. When this file executes, it unbundles and installs the following components:
An executable to test IOM connections and edit the parameters that client applications use to connect to a
metadata server (itconfig.exe)
•
SAS Package Reader (SASspk.dll, with Help in sasspk.chm)• IOM Bridge for COM (SASComb.dll)• Object Manager (SASOMan.dll, help file in sasoman.chm)• Workspace Manager (SASWMan.dll, help file in saswman.chm)• SAS Stored Process Service (sassps.dll, help file in sassps.chm)• SAS Metadata Service (SAS.Metadata.dll)
Note: Using this component directly is experimental for 9.1.
•
SAS IOM Data Provider (sasaorio.dll)• SAS type libraries (sas.tlb with Help in SAS.chm, asp.tlb, gms.tlb, iml.tlb, mqx.tlb, olap.tlb)• An executable to register type libraries (RegTypeLib.exe)• Scripto (Scripto.dll)• The Encryption Algorithm Manager (tcpdeam.dll) and the SAS Proprietary Encryption Algorithm
(tcpdencr.dll), which are used by the IOM spawner and the IOM Bridge for COM components for encrypting
the communication across the network
•
The Xerces library from Apache Software Foundation•
Note: The SAS Integration Technologies Windows client includes software developed by the Apache Software
Foundation. For more details, see the Apache Web site at http://www.apache.org.
Client Installation 748

Encryption Support
Windows clients (and Windows servers) that need to use strong encryption need additional support that is supplied
through SAS/SECURE software. SAS/SECURE software supplies the support necessary to enable SAS Integration
Technologies to use encryption algorithms that are available through the Microsoft Cryptographic Application
Program Interface (CryptoAPI).
If you have also licensed SAS/SECURE software, you should install the SAS/SECURE client for Windows. You can
install the SAS/SECURE client from the SAS Installation Kit.
When executed on the client, this program installs the tcpdcapi.dll file that is necessary for the IOM Bridge for COM
to use the CryptoAPI algorithms to communicate with the IOM server. The file is installed to the shared file area on
the client.
For more information, see the online product overview for SAS/SECURE Software. on the SAS Products and
Solutions Web site.
Windows Clients
SAS® Integration Technologies: Developer's Guide
Client Installation 749

Windows Client Security
This section discusses security issues when developing Windows client applications that connect to IOM servers.
Security Contexts
Beginning in SAS 9.0, separate client and server security contexts within the SAS Workspace Server are not
supported. All file access checks are now performed solely with the user ID under which the server was launched. The
additional level of security checking, which was based on the client user ID, has been removed.
This change affects sites that were relying on two levels of access checking, one under the ServerUserID and an
additional level under a ClientUserID that can be distinct. Before upgrading to SAS 9 from SAS 8, the following sites
should review their security policies:
Sites that launch COM workspace servers using the "This user" identity setting in the dcomcnfg utility.• Sites that use COM+ pooling.• Sites that use Web applications configurations where the site administration has control of the client security
settings.
•
This change fixes several cases in which SAS running as a workspace server acted differently than SAS running
interactively.
IOM Bridge for COM Security
Specifying the ServerUserID
When using the IOM Bridge for COM, the spawner uses the client−provided login name and password as the identity
under which to launch the server. The server that is launched receives its ServerUserID (OS process user ID) from the
login name provided by the client. The operating system then performs access checks using the ServerUserID.
Specifying Encryption
The IOM Bridge for COM supports encryption of network traffic between the client and the IOM server. Weak
encryption support (through the SASPROPRIETARY encryption algorithm) is available with Base SAS software.
Stronger encryption requires a license to SAS/SECURE on the server machine.
On the Windows platform, the SAS/SECURE license allows the encryption algorithms available through the
CryptoAPI to be used. On other platforms, encryption algorithms are included in the SAS/SECURE software.
Note: The SAS/SECURE Client for Windows must be installed on the Windows client machines to use the
CryptoAPI. (See Windows Client Installation for more information.)
When you define a ServerDef, you can use the BridgeEncryptionAlgorithm and BridgeEncryptionLevel attributes to
specify the encryption algorithm and what gets encrypted. See the Object Manager package documentation
(sasoman.chm) for details.
Windows Client Security 750

COM/DCOM Security
Specifying the ServerUserID
On Windows NT, the COM Service Control Manager (SCM) is responsible for launching COM and DCOM
processes. The SCM reads values from the Windows registry to determine which identity to use when launching a
process. These registry settings are configured using the Windows dcomcnfg utility on the server.
The ServerUserID is set under the Identity tab for the properties of the SAS.Workspace (SAS Version 9.1)
application. For specific details about how to access this tab, see Setting Permissions per Application on Windows
NT/2000 and Setting Permissions per Application on Windows XP in the SAS Integration Technologies: Server
Administrator's Guide.
You can choose one of the following options for the identity to use to run the IOM server (the ServerUserID):
Interactive User
allows the interactive user to kill the SAS server process through the task manager, because the interactive
user owns the process. This is a security risk for the interactive user, because SAS will be running under his or
her user ID. Someone must be logged on, or the SAS process will not run.
Note: For SAS 9.0 and later, there is no longer an additional level of security checking based on the client
user ID. All file access checks are performed based solely on the user ID of the interactive user. This setting is
not recommended for production environments.
Launching User
specifies the default option, and is more secure than the other two identity settings. This ensures that the
ServerUserID will be the same as the client who created it. This setting provides a single−signon environment
for launching the server; however, it does require the use of network authentication to set up the identity of the
server. The NTLM network authentication mechanism (which is the default if any Windows NT4 machines
are involved or if Windows 2000 Kerberos is not set up) cannot pass the client identity across more than one
machine boundary. If you configure IOM servers to use "launching user" for DCOM connections, they are not
able to access network files unless special Windows registry settings are adjusted on the file server. They are
also not able to deliver events back to a DCOM client unless one of the following is true:
the client permits "Everyone" to access its COM interfaces◊ the client turns off authentication and authorization by setting the AuthenticationLevel to "None"◊
This user
allows you to configure a specific user name and password that will be used to run the IOM server. This has
the same security considerations as the interactive user, but you do not have to worry about always having
someone logged on. Also, the identity you run under does not change based on who is logged on.
Note: For SAS 9.0 and later, there is no longer an additional level of security checking based on the client
user ID. All file access checks are performed based solely on the user ID that you specify for "This user."
Specifying Encryption
For DCOM, encryption is enabled by using an AuthenticationLevel of "Packet Privacy".
Authentication and Impersonation Levels for COM/DCOM Security
Authentication levels must be set on both the client and server machines. The stronger of the two authentication levels
is then selected. The available authentication levels are listed below. For more details, consult Microsoft
SAS® Integration Technologies: Developer's Guide
Windows Client Security 751
documentation.
None The client is not authenticated. It is not possible for the server to determine the identity of the caller.
Connect
The client is authenticated when the connection is first established, and never again.
Call The client is authenticated each time a method call is made.
Packet Client authentication occurs for each packet (there may be multiple network packets used for a given call).
PacketIntegrity
Each packet is authenticated and verified to have the same content as when it was sent.
PacketPrivacy
All data is encrypted across the wire. Note that for local COM, the AuthenticationLevel appears to be
"PacketPrivacy", but no encryption actually occurs on the local machine.
The impersonation level set on the client machine determines the impersonation level used for the connection. The
impersonation level set on the server machine is not used. The available impersonation levels are listed below.
Anonymous
Impersonation is not allowed.
IdentifyThe server is allowed to know who is calling, but cannot make calls using the credentials of the caller.
Impersonate
The server can access resources using the security credentials of the caller. The server cannot pass on the
credentials. The IOM server attempts to impersonate the caller. This is the recommended setting.
Delegate
The server can access resources using the security credentials of the caller and pass on those credentials to
other servers, possibly those on different hosts. Note that delegation is only supported on Windows 2000. SAS
software does not currently support this option.
Programming Examples
This Visual Basic example retrieves the ClientUserID and the ServerUserID from the IOM server.
Public Sub sectest()
' This example prints both the client user ID and the server user ID.
' In SAS 9, the ServerUserID and the ClientUserID will always be the same.
' Create a local COM connection.
Dim sinfo As String
Dim swinfo() As String
Dim hwinfo() As String
Dim obWSMgr As New SASWorkspaceManager.WorkspaceManager
Set obSAS = obWSMgr.Workspaces.CreateWorkspaceByServer(
"MyServer", VisibilityNone, Nothing, "", "", sinfo)
' Get the host properties.
obSAS.Utilities.HostSystem.GetInfo swinfo, hwinfo
Debug.Print "ServerUserID: " & swinfo(
SAS.HostSystemSoftwareInfoIndexServerUserID)
Debug.Print "ClientUserID: " & swinfo(
SAS® Integration Technologies: Developer's Guide
Windows Client Security 752

SAS.HostSystemSoftwareInfoIndexClientUserID)
obSAS.Close
End Sub
COM Security Considerations for Client Applications
Here are a few additional points to consider when developing client applications:
Always test your application and configuration before making sensitive information available. This allows
you to ensure that people who are not authorized cannot see the data.
•
Security settings and performance are inversely related. In general, the stronger the security, the slower things
run. This may be due to the CPU time used to encrypt the data at one end and decrypt the data at the other
end, or the overhead involved with launching a new process each time a new user connects to an IOM server.
Security settings are highly configurable to allow the administrator to optimize performance for the required
level of security.
•
No system is completely secure, even at the strongest security settings.• For maximum security when using the IOM Bridge for COM, use a BridgeEncryptionLevel of "All" and a
strong BridgeEncryptionAlgorithm, such as RC4. For maximum performance, use a BridgeEncryptionLevel
of "None". (In this case, the setting for the BridgeEncryptionAlgorithm is ignored.)
•
In general, for maximum security with DCOM, use an Impersonationlevel of "Impersonate", and an
Authenticationlevel of "Packet Privacy". In SAS 9.0 and later,
for SAS Workspace Servers, impersonation will not be applied♦ for SAS Metadata Servers, SAS Stored Process Servers, and SAS OLAP servers, an impersonation
level of Impersonate is currently required.
♦
•
The use of connectionless transports (mainly UDP) can cause difficulty with configuring and debugging. If
your system (particularly Windows NT4) still uses a connectionless transport, then you might avoid
complications by naming a connection−oriented transport (typically TCP) as the primary default.
•
COM Security Settings for Threaded Multi−User IOM Servers
SAS 9 Integration Technologies provides three new threaded multi−user IOM servers. Dcomcnfg has an entry for
each application as follows:
SASMDX.Server (SAS Version 9.1)
SAS 9.1 OLAP Server
SASOMI.OMI (SAS Version 9.1)
SAS 9.1 Metadata Server
StoredProcessServer.StoredProcessServer (SAS Version 9.1)
SAS 9.1 Stored Process Server, which provides interfaces to run user−written SAS programs (stored
processes) to produce HTML output
If you do not specify an objectserverparm of "nosecurity", then clients are authenticated when they connect to the
server.
You can set DCOM security settings for each type of server individually. Use the dcomcnfg utility to specify security
settings. For details about using dcomcnfg to specify security settings, see Setting SAS Permissions on the Server in
the SAS Integration Technologies: Server Administrator's Guide. In dcomcnfg, after you view the properties of a
server, you have several tabs that provide controls to customize the server's security.
SAS® Integration Technologies: Developer's Guide
Windows Client Security 753
Identity Tab
Controls the ServerUserID for COM launches. If you decide to launch the server via COM (rather than via the
object spawner), then the first client that connects must be a Windows client. For multi−user servers, set the
Identity tab to "This user", and specify a user ID and password under which the server will run. The server
runs in its own logon session; therefore, interactive logon/logoff activity on the same machine does not affect
it.
COM does not start the server with any environment variables and does not set a home directory based on the
"This user" setting. You should edit the SAS config file to remove environment variable references and to
specify the "−sasinitialfolder" that you need at startup.
General Tab
Controls the minimum client authentication level that the server accepts (which is also the level that the server
would use on any outward calls). "Connect" (the default) is the minimum setting. Every COM client must also
do the following:
define an authentication level of "Connect" or higher◊ set an impersonation level of "Impersonate."◊
These client settings can be specified specifically by the client program on each calling interface or, through
one of two defaulting mechanisms:
a call to CoInitializeSecurity() in the client program◊ via the machine−wide default settings in COM security configuration◊
The ideal client program would install and use an AppID of its own. However, some commonly used
development languages, such as Visual Basic, do not provide an easy means to install and use an AppID.
Security Tab
Controls access, configuration, and launch permissions. These can either be determined from machine−wide
defaults or set up specifically for the particular IOM server application. Ensure that "System" is included in
any of these permissions that you customize. You can use the access permissions editor to create a standard
access control list to indicate who can use the server.
Location Tab
Indicates that the application should be run on this computer.
Endpoints Tab
Allows you to select the most used protocol. It is recommended you use connection−oriented protocols such
as TCP.
Windows Clients
SAS® Integration Technologies: Developer's Guide
Windows Client Security 754

Selecting a Windows Programming Language
Any language that supports calling ActiveX components (also known as OLE Automation servers), should be able to
make calls to IOM interfaces. This includes virtually every programming language product available on the Windows
platform.
Microsoft designed the ActiveX components technology with a heavy bias towards meeting the needs of Visual Basic.
In fact, much of the technology is effectively a part of the Visual Basic run−time environment. Furthermore, in its
own implementations of ActiveX components (such as in the Microsoft Office Suite), Microsoft has documented the
interfaces in terms of the Visual Basic language.
Based on this convention and on the wide use of Visual Basic as a Windows programming language, we have also
decided to document the SAS IOM interfaces in terms of Visual Basic language syntax and conventions. Programmers
in other languages have already become accustomed to interpreting such documentation and translating it to their
native conventions. Visual C++ programmers are one common group that must do this. This document includes an
additional section to help this group with that task.
The .NET runtime, with its family of languages including C# and VB.NET, represents the latest direction in Windows
programming. ASP.NET is now the environment of choice for Windows web applications. The .NET environment
also supports traditional desktop GUI clients similar to those that were developed with Visual Basic forms in VB6.
IOM integrates fully with .NET through the use of COM Interoperability. For more information, see Programming in
the .NET Environment.
Windows Clients
Selecting a Windows Programming Language 755
Programming with Visual Basic
This section describes the typical steps that are necessary to develop applications using the SAS Integration
Technologies client in the Visual Basic environment.
Referencing the Type Library
ActiveX components can contain numerous classes, each with one or more programming interfaces. These interfaces
can have methods and properties. The components can also have many enumeration constants which are symbolic
names for constants that are passed or returned over the interface. For name scoping and management, each
application defines its own group of these definitions into a type library. The type library is used by programming
languages to check the correctness of calls to the component and it is used by COM when it creates the data packet
which conveys a method call from one Windows process to another. (This data packet creation is called marshalling.)
You must reference at least two type libraries to access IOM servers. One is for Base SAS software and the other is
for the object manager. These type libraries get installed when you install Base SAS or when you install the SAS
Integration Technologies client. However, before you can write Visual Basic code to call the Base SAS IOM
interfaces, you must reference these type libraries from within your Visual Basic project.
To reference these type libraries from Visual Basic:
From the Visual Basic menu bar, find the References menu item. Depending on the version of Visual Basic
that you are running, this is either under the Project (VB6) or under the Tools (VBA) menu.
1.
Select this menu item to bring up the references dialog box. This dialog box lists every registered type library
on the system. This list is divided into two groups. The type libraries that are already referenced by the project
are listed first. All the remaining registered system type libraries are listed after that in alphabetical order. The
first group shows the list that can be referenced in your program. The second group helps you find additional
libraries to add to the first group.
2.
Find the type library labeled "SAS: Integrated Object Model (IOM)" and select the check box to add the
reference to your project. (Simply selecting the line is not sufficient, you have to select the check box.)
3.
Similarly, find the type library labeled "SASObjectManager" and select its check box to add this reference to
your project.
4.
Click OK to activate these changes.5.
After referencing these libraries, you can use them immediately. Also, if you reopen the references dialog box, you
will see that these libraries have been moved up to the top of the list with the other referenced libraries.
Each type library has a name, known as the library name, that is used in programming to qualify (or scope) all names
(such as components, methods, constants, and so on) used within it. (This name is not necessarily the same as the
name of the file containing the type library.) Visual Basic will look up the names in your program by going through
the referenced type libraries in the order that they are listed in the references dialog box. If two type libraries contain
the same name, then Visual Basic will get its definition from the first library in the list, unless the name is qualified
with a library name.
The Base SAS IOM library name is "sas". You can use this to qualify any identifier defined in that library. For
example, the Base SAS library has a FormatService component. If another library in your application has its own
Programming with Visual Basic 756

identifier with the same name, then you would reference the SAS component by using sas.FormatService.
The Visual Basic Development Environment
After the type library is referenced, its definitions become available to the Visual Basic Object Browser. From the
Visual Basic development environment, the Object Browser component is typically available via a toolbar icon, a
menu selection, or the F2 key.
The Object Browser can show all referenced type libraries at one time or can focus on any one of them. To focus on
the Base SAS IOM library, select "SAS" from the drop−down list in the upper left. The left panel of the Object
Browser will then show only the component classes, interfaces, and enumerations for SAS components. If you select a
component (such as FileService) in the left panel, its methods and properties will be shown in the right panel. When
you select an item in the right pane, more complete information (such as the parameters to pass to a method and a
brief description of the method) are shown at the bottom.
Referencing a type library also activates Visual Basic Intellisense ™ for all programming language names in the
library. As you begin to type a name, like SAS.FileService, you will see the Visual Basic editor show you the list of
possible names to complete your typing. As you code a method call, Visual Basic will show you each parameter that
you need to provide.
For VB6 and later or Microsoft Office 2000 VBA or later, the Object Browser and the Visual Basic editor are
connected to the Base IOM interface Help file. In the Object Browser, if you click the "?" button or press the F1
function key, you will see the Help page for the selected item. In the editor, if you press F1 with your cursor on a
name, you will get Help for that name.
Working With Object Variables and Creating a Workspace
Your Visual Basic program's interaction with SAS begins by creating a SAS.Workspace object. This object represents
a session with SAS and is functionally equivalent to a SAS Display Manager session or the execution of Base SAS
software in a batch job. Using a workspace from Visual Basic requires that you declare an object variable in order to
reference it. An example declaration is
Dim obSAS as SAS.Workspace
Note that this statement only declares a variable to reference a workspace. It does not create a workspace or assign a
workspace to the variable. For creating workspaces, the SAS Integration Technologies client provides the object
manager. The object manager is an ActiveX component that can be used to create SAS Workspaces, either locally or
on any server that runs the SAS Integration Technologies product.
If the server is remote, you can create a workspace using either the server's DNS name (such as "unx03.abccorp.com")
or a logical name (like "FinanceDept") given to you by your system administrator. See SAS Object Manager for more
information about creating workspaces on remote servers.
If SAS is installed on your local PC and you want to create a workspace that runs locally, it is very easy to use the
object manager to create the workspace and assign it to your object variable. The example below shows you how this
is done:
Dim obObjectFactory As New SASObjectManager.ObjectFactory
Dim obSAS As SAS.Workspace
Set obSAS = obObjectFactory.CreateObjectByServer(
SAS® Integration Technologies: Developer's Guide
Programming with Visual Basic 757

"", True, Nothing, "", "")
By using the keyword new, you instruct COM to create a SAS Object Factory and assign a reference to it when the
object variable (obObjectFactory in this case) is first used.
After you create the instance of the object factory, you can use it to create a workspace (SAS session) on the local
machine. The object factory has a CreateObjectByServer method for creating a new workspace.
The first parameter to this method is the name of your choice. The name can be useful when your program is creating
several objects and must later distinguish among them. The next parameter indicates whether to create the workspace
synchronously. If this parameter equals true, CreateObjectByServer does not return until a connection is made. If this
parameter equals false, the caller must get the created workspace from the ObjectKeeper.
The next parameter is an object to identify the desired server for the workspace. Because we are creating a workspace
locally, we pass the Nothing (a Visual Basic keyword) to indicate that there is no server object. The next two strings
are for a user ID and password. Again, we do not need these to create a local workspace. This method returns a
reference to the newly created workspace.
To get error information about the connection, you can use the following code:
Dim obSAS As SAS.Workspace
Dim obObjectFactory As New SASObjectManager.ObjectFactory
obObjectFactory.LogEnabled = True
Set obSAS = obObjectFactory.CreateObjectByServer("", True, Nothing, "", "")
Debug.Print obSAS.Utilities.HostSystem.DNSName
Debug.Print "Log:" & obObjectFactory.GetCreationLog(True, True)
For more information about logging errors, see Object Manager Error Reporting.
Note: Whenever you assign a reference to an object variable, the assignment uses the Set keyword. If you do not use
Set, Visual Basic will try to find a default property of the object variable and set that default property. This is very
different from assigning an object reference to the variable itself.
You can prove that the previous example program code works by instructing the server to print its Internet Domain
Name System (DNS) name. The following program creates a SAS workspace on the local computer, then prints the
DNS name, and finally, closes the newly created workspace.
Dim obObjectFactory As New SASObjectManager.ObjectFactory
Dim obSAS As SAS.Workspace
Set obSAS= obObjectFactory.CreateObjectByServer(
"", True, Nothing, "", "")
Debug.print obSAS.Utilities.HostSystem.DNSName
ObSAS.Close
As you use other features of SAS, you will need additional object variables to hold references to objects created
within your SAS Workspace. These are declared similarly. For example, if you want to assign SAS FILEREFs, then
you might want an object variable to reference your workspace's FileService. The declaration would be:
Dim obFS as SAS.FileService
Such declarations never use the keyword new because doing so asks COM to create the object. Object variables for
SAS® Integration Technologies: Developer's Guide
Programming with Visual Basic 758
objects within the workspace will always reference objects created by the workspace, not COM. In fact, when you use
new in a declaration, you will see that Visual Basic Intellisense provides a much shorter list of possibilities because it
lists only those classes of objects that COM knows how to create.
Then, to use the obFS variable to hold a reference to the FileService for the workspace referenced by obSAS, the
statement would be:
Set obFS = obSAS.FileService
Again, note that the assignment of an object variable must use the Set keyword.
Basic Method Calls
After you create an object variable and set it with an object reference, you can make calls against the object and access
the object's properties.
The first example assigns a SAS libref using the IOM DataService.
' Create a workspace on the local machine using the SAS Object Manager
Dim obObjectFactory As New SASObjectManager.ObjectFactory
Dim obSAS As SAS.Workspace
Set obSAS = obObjectFactory.CreateObjectByServer(
"My workspace", Nothing, "", "")
' Get a reference to the workspace's DataService.
Dim obDS as SAS.DataService
Set obDS = obSAS.DataService
' Assign a libref named "mysaslib" within the new workspace
' (This is an example of a method call that returns a value)
' Note: you must have a "c:\mysaslib" directory for this to work
Dim obLibref as SAS.Libref
Set obLibref = obDS.AssignLibref(
"mysaslib", "", "c:\mysaslib", "")
' Should print "mysaslib"
Debug.Print obLibref.Name
' De−assign the libref; this is an example of a method call that does
' not return a value
obDS.DeassignLibref obLibref.name
' Close the workspace; this is another example of a method call that
' does not return a value.
ObSAS.Close
The previous example illustrates three method calls and two property accesses.
In Visual Basic, method calls that use a return value are coded differently from those that do not. The AssignLibref
call returns a reference to a new Libref object. Because the method returns a value and that value is being used in this
call, the method's arguments must be enclosed in parentheses. The calls to DeassignLibref and Close, on the other
hand, do not return a value. (Neither of these methods can return a value.) Thus, no parentheses are used following the
method name. This is true even for DeassignLibref which passes a parameter in the method call.
SAS® Integration Technologies: Developer's Guide
Programming with Visual Basic 759
When passing parameters, you must first understand whether the parameter is for input or output (also known as
ByVal and ByRef in Visual Basic). Unfortunately, the Visual Basic Object Browser does not provide this information.
In many cases, understanding the role of the parameters will make it obvious. For example, the library name string
passed to DeassignLibref is used by that method to know which libref to de−assign but the method does not update the
parameter. Thus, it is an input parameter. If you are not sure which type of parameter is required, then you can consult
the Help or documentation.
Input parameters can be passed by a constant value (such as mysaslib for a string parameter or 0 for a numeric
parameter) or an expression. They can also be passed using a variable whose value is taken as input to the method.
This technique is used in the DeassignLibref call in the example. Output parameters require the use of variables that
will be updated at the time the call returns.
Understanding the data type of the parameter is just as important as understanding the direction. The data type is listed
in the Object Browser. If the provided constant, variable, or expression has the same type as the parameter, then no
conversion is necessary. Otherwise, Visual Basic might try to convert the value. If you do pass a different type than
the method actually defines for that parameter, make sure that you understand Visual Basic's data conversion rules.
The parameters in IOM methods have a range of data types. Many are standard types such as String, Long, Short,
Boolean and Date. Others are object types defined by a type library (such as SAS.Libref in the previous example).
Most parameters are designed to accept or return a single type of object. In these cases, it is best to use an object
variable of that specific type. It is possible, however, to use variables declared with the generic object type Object. In
some cases, methods can return more than one type of object, depending on the situation. For example, the
GetApplication method for a SAS Workspace might return different types of objects (based on the application name
that was requested). It is declared to return the generic object type.
When a parameter can take some fixed set of integer values, its declaration will use an enumeration defined in the type
library. For example, the Fileref:OpenBinaryStream method takes a parameter indicating the open mode of the
stream. The type of this parameter is SAS.StreamOpenMode. In the current version of Visual Basic, you cannot
declare a variable of this type. You must use a Long instead. The declaration is still important because it tells you the
set of possible values and provides a constant for each. For example, if you want to open a stream for writing, you
would pass a constant of SAS.StreamOpenModeForWriting.
Some Visual Basic procedures and subroutines take optional parameters. When calling such routines, you often pass
the parameters by specifying their name (such as "color:="Red"). This feature of Visual Basic is not used by SAS
IOM methods because it does not work naturally with other types of client programming environments including
Visual C++. Therefore, it is best to simply list parameters in order without showing their names.
Many objects have properties that can be obtained simply by naming the property. Libref objects, for example, have a
Name property, which is used in the previous example. Some properties are read−only, but others can also be set.
Such properties can be set using a normal assignment statement. Keep in mind, however, that if the property type is an
object type, then you will need to use Set with your assignment statement (as described in the previous section).
Because SAS servers will often be located on a platform that is remote from the machine running your Visual Basic
program, much better performance is achieved by keeping the number of function calls to a minimum. This means
that many IOM methods have a large number of parameters and accept arrays for those parameters. Visual Basic
Intellisense technology is very helpful for keeping track of parameters as your code them. The next section describes
how to pass arrays in Visual Basic method calls.
SAS® Integration Technologies: Developer's Guide
Programming with Visual Basic 760
Passing Arrays in IOM Method Calls
When SAS generates a listing, it might contain thousands of lines. If the IOM calls to read the listing returned only
one line at a time, then many thousands of calls would be needed to fetch all of the output. In order to get better
performance in situations like this, IOM methods make heavy use of arrays.
By returning an array of lines, the FlushListLines() method can potentially return all LIST output in one call. Similar
situations occur in many other places in IOM including reading and writing files, getting and setting options and
listing SAS librefs and filerefs. It is important, therefore, to understand when arrays are being used and how to declare
and pass them.
Visual Basic arrays can be fixed−size or dynamic. An array dimensioned with a size is fixed−size. An array
dimensioned with no size (empty parentheses) or declared with the Redim statement is dynamic. For array output
parameters you must use dynamic array variables because the size that SAS will return is not known when the array
variable is declared.
The following example lists all librefs in the workspace.
' Create a workspace on the local machine using the SAS Object Manager
Dim obObjectFactory As New SASObjectManager.ObjectFactory
Dim obSAS As SAS.Workspace
Set obSAS = obObjectFactory.CreateObjectByServer(
"My workspace", True, Nothing, "", "")
Dim obDS as SAS.DataService
Dim vName as variant
' Declare a dynamic array of strings to hold libnames
Dim arLibnames() as string
Set obDS = obSAS.DataService
' Pass the dynamic array variable to "ListLibrefs"; upon return,
' the array variable will be filled in with an array of strings,
' one element for each libref in the workspace
obDS.ListLibrefs arLibnames
' Print each name in the returned array
For Each vName in arLibnames
debug.print vName
Next vName
' Print the size of the array
debug.print "Number of librefs was: " & Ubound(arLibnames)+1
ObSAS.Close
In the object browser, you can tell that the ListLibrefs names parameter is an array of strings because it is shown as
follows:
names() as string
The empty parentheses indicate an array. A few of the array parameters in IOM require a two−dimensional array. The
Object Browser does not distinguish the number of dimensions. You must consult the class documentation to
determine the number of dimensions in an array.
After the ListLibrefs call returns, there will be one array element for each libref assigned in the workspace. The For
Each statement can be used to iterate through these elements. You must use variant as the type of the loop control
variable.
SAS® Integration Technologies: Developer's Guide
Programming with Visual Basic 761
In many cases, you will need to know the size of the returned array. Visual Basic allows arrays to be created with a
particular lower and upper bound in each dimension In order to allow better compatibility with other client
programming languages, all IOM calls require that the lower bound be zero. Input arrays will not be accepted if their
lower bound is not zero. Output arrays will always be returned with a lower bound of zero.
The size of the array can be determined by checking its upper bound. For a one−dimensional array, you can get the
upper bound by passing the array name to the Ubound function. Because the array is zero−based and Ubound returns
the number of the last element, you must add one to get the size of the array.
You can get the Ubound for each dimension of a two−dimensional array by passing a dimension index. The following
example illustrates this technique:
Dim table()
Redim table(5,2) ' 6 rows (0 through 5) and 3 columns (0 through 2)
debug.print "Number of rows: " & Ubound(table, 1)+1
debug.print "Number of columns: " & Ubound(table, 2)+1
When passing input arrays, you can pass a fixed size array if you know the size in advance. The following code
provides an example:
' Create a workspace on the local machine using the SAS Object Manager
Dim obObjectFactory As New SASObjectManager.ObjectFactory
Dim obSAS As SAS.Workspace
Set obSAS = obObjectFactory.CreateObjectByServer(
"My workspace", True, Nothing, "", "")
Dim obLS as SAS.LanguageService
' Declare a fixed−size array of strings to hold input statements
Dim arSrc(2) as string
' Declare a dynamic array of strings to hold the list output
Dim arList() as string
' These arrays will return line types and carriage control
Dim arCC() as SAS.LanguageServiceCarriageControl
Dim arLT() as SAS.LanguageServiceLineType
Dim vOutLine as variant
arSrc(0) = "data a; x=1; y=2;"
arSrc(1) = "proc print;"
arSrc(2) = "run;"
Set obLS = obSAS.LanguageService
ObLS.SubmitLines arSrc
' Get up to 1000 lines of output
ObLS.FlushListLines 1000, arCC, arLT, arList
' Print each name in the returned array
For Each vOutLine in arList
debug.print vOutLine
Next vOutLine
ObSAS.Close
The number of input statements are known in advance, so the arSrc array variable can be declared as a fixed size. (A
dynamic array could also have been used.)
For some methods, you might want to pass an input array with no elements. Unfortunately, Visual Basic does not have
syntax for creating either a fixed−size array or a dynamic array with zero elements.
To work around this deficiency in Visual Basic, IOM methods allow you to pass an uninitialized dynamic array
variable. When you do this, it is the same as if you had created an array with no elements.
SAS® Integration Technologies: Developer's Guide
Programming with Visual Basic 762
Visual Basic does handle output arrays with no elements properly. When an array has no elements, the Ubound()
function will return −1 and the For Each statement will not execute the body of the loop.
Notes on Using Enumeration Types in Visual Basic Programs
Older versions of Visual Basic (such as VBA in Microsoft Office 97) do not support defining variables as
enumeration types. For these older versions, you have to define them as type long. From the previous example,
consider the statement:
Dim arCC() as long, arLT() as long
Here, the variables arCC and arLT are being used as arrays of LanguageServiceCarriageControl and
LanguageServiceLineType, respectively. However, because this program was written to execute in a Visual Basic for
Applications (Microsoft Office 97) environment, the variables are defined as arrays of long integers.
For newer versions (such as Visual Basic 6) you need to use enumeration types. To execute this program in a VB6
environment, the line would be changed to:
Dim arCC() as LanguageServiceCarriageControl
Dim arLT() as LanguageServiceLineType
Note that the enumeration constants themselves are available for use in both environments. Given that arCC and arLT
are defined appropriately for the environment, the following statements are valid in both the old and new versions.
arCC(0) = LanguageServiceCarriageControlNormal
arLT(0) = LanguageServiceLineTypeSource
Object Lifetime
You should use the Workspace.Close method to close a workspace when you are finished with it. This will also delete
all objects within the workspace. For some types of objects, such as streams, you can be finished with the object long
before you are finished with the workspace. These objects typically have their own Close method that removes the
object and performs other termination processing (such as closing the file against which the stream is open). The
lifetime of objects that do not have a Close (or similar) method is managed by the workspace in which the object is
created.
In Visual Basic, you can release the reference held by an object variable by assigning the keyword Nothing to that
variable. The syntax is
ObStream = Nothing
Using this technique, it is possible to make Visual Basic release its references to an object. Doing so does not,
however, delete the object because the workspace still references the object.
As a special case, if your program releases its references to all of the objects on a SAS server, then the server will
delete the workspace and all of the objects in it. This behavior is implemented to prevent excess SAS processes from
being left on a machine when clients fail to close their workspaces properly. If a client program terminates abruptly or
is killed by the user from the Task Manager, then COM notifies SAS of this at a later time. In current versions of
COM this notification takes approximately six minutes.
SAS® Integration Technologies: Developer's Guide
Programming with Visual Basic 763
Exceptions
Method calls sometimes fail. When they do, Visual Basic raises an error condition. If you want to write code that
responds to error conditions, then you should code On Error Goto Next after each call. If you want to centralize the
code that responds to error conditions, then code an On Error Goto with a label and place your error handling code at
the label.
When an error occurs, COM and Visual Basic store the error in the err predefined variable of the type VBA.ErrObject.
The two most important fields in this variable are Err.Number and Err.Description. Err.Number can be used by your
program logic to determine what kind of error occurred.
Err.Description provides a text description of the error. It can also provide important details about the error. For
example, in the case of an error in opening a file, the description will provide the name of the file that could not be
opened. SAS 9 servers return the error description in XML format. This allows multiple messages from the server to
be packed into one string. The format is:
<Exceptions>
<Exception>
<SASMessage>ERROR: First message</SASMessage>
</Exception>
<Exception>
<SASMessage>ERROR: Second message</SASMessage>
</Exception>
</Exceptions>
Use an XML parser to break the XML into individual messages to display to a user. You can use the
V8ERRORTEXT objectserverparm to suppress this XML.
Different errors are assigned different codes. IOM method calls can return many different codes. The code that they
return is listed in various enumerations whose names end in "Errors". For example, the IOM DataService defines an
enumeration called DataServiceERRORS in which the constants for all of the possible errors returned by the
DataService are defined. See the documentation and Help for more information about the common errors for a
particular call. In addition to errors that listed explicitly for the method, SAS.GenericError can always be raised.
Receiving Events
Some IOM objects can generate events. For example, The LanguageService generates the events DatastepStart,
DatastepComplete, ProcStart, ProcComplete, SubmitComplete and StepError. In the Object Browser, you can
recognize objects that generate events because the event procedures are marked using a lightning bolt icon.
Your Visual Basic program can implement procedures that receive these events if you declare the interface using the
WithEvents keyword.
Dim WithEvents obLS As SAS.LanguageService
This declaration must be outside any procedure.
After you have declared an interface to receive events, the Visual Basic development environment will provide empty
definitions for the event procedures. The following code segment is a definition that is provided for the ProcStart
event, along with a line that has been added to print a debug message tracing the start of the procedure.
Private Sub obLS_ProcStart(ByVal Procname As String)
SAS® Integration Technologies: Developer's Guide
Programming with Visual Basic 764
Debug.Print "Starting PROC: " & Procname
End Sub
Note that the event procedure name is of the form Object_Event.
In your routine that initializes your workspace variable, you should initialize the LanguageService variable using a
statement such as:
set obLS = obSAS.LanguageService
After this initialization has occurred, your events procedures will be called whenever SAS fires an event.
Windows Clients
SAS® Integration Technologies: Developer's Guide
Programming with Visual Basic 765
Programming in the .NET Environment
.NET Environment Overview
The Windows .NET environment is Microsoft's newest application development platform, superceding technologies
such as Visual Basic 6 and Active Server Pages. .NET defines its own object system with the Common Language
Specification (CLS). This object system is similar to Java, but contains many enhancements and additional features.
.NET supports many languages, including the new C# language and the latest variant of Visual Basic—VB.NET. The
differences among languages are mainly in the syntax used to express the same CLS−defined semantics. For this
reason, the choice of language is primarily a matter of personal taste or management standardization.
C# is popular because of its syntactic resemblance to Java and because it was designed specifically for the .NET CLS.
VB.NET has a syntax that appeals to devoted VB programmers, although the requirements of the .NET environment
have created significant compatibility issues for the existing VB6 code base. Most of the example code in this section
was written in C#, but it should be easy to translate to other .NET languages.
Because .NET is a new environment, interoperability between .NET programs and existing programs is very
important. Microsoft devoted careful attention to this and uses several technologies to provide compatibility:
Web Services (provided via ASP.NET or .NET remoting)
(+) theoretically provides connectivity to the broadest range of software implementations. Web
services toolkits supporting many different environments and languages should be available from a
variety of vendors.
♦
(+) can leverage existing Web server infrastructure to provide connectivity.♦ (−) simplistic mapping into the .NET object system. Method calls cannot return an interface (only
data can be returned) and interface casts are not supported.
♦
♦
COM Interop
(+) creates useful .NET classes for most existing COM interfaces—especially for the Automation
compatible interfaces used by IOM.
♦
(−) some weaknesses in the mapping due to lack of information in COM. For example, specific
exception types are not distinguished because they cannot be declared in a COM type library.
♦
♦
.NET Remoting binary formatter
(+) seamless interfacing when talking to another .NET remoting application. The programming
paradigm is very similar to Java RMI.
♦
(−) does not support traditional executables or other environments.♦
♦
PInvoke
(+) can call existing C APIs in−process.♦ (−) low−level programming required.♦
♦
COM Interop provides the highest quality interfaces for programs that run outside the .NET environment (like SAS
IOM servers). This is the approach used for IOM programming under .NET. While Web Services has received a lot of
attention early in the marketing of .NET, it is important to understand that COM Interop with IOM servers actually
provides a higher quality .NET interface than Web Service proxies would provide, and that IOM has always supported
the connectivity to UNIX and z/OS servers that is a primary goal of the evolving Web Services architectures.
.NET developers wanting to implement a Web Service for use by others have a number of options:
Write an ASP.NET Web Service and call IOM interfaces via COM Interop.• Write a .NET remoting Web Service and call IOM interfaces via COM Interop.•
Programming in the .NET Environment 766

Use the new COM Web Services feature of the SAS Integration Technologies Stored Process Server. This
allows you to implement a Web Service with SAS language programming. For more information, see SAS BI
Web Services Overview.
•
IOM Support for .NET
IOM servers are easily accessible to .NET clients, and the IOM Bridge capability allows calls to servers on UNIX and
z/OS platforms.
.NET clients will naturally require .NET classes to provide any services that they need. With COM Interop, these
.NET classes directly represent the individual IOM interfaces such as IWorkspace and ILanguageService. The .NET
SDK and development environments like Microsoft Visual Studio .NET provide the tlbimp ("type library import")
utility program to read a COM type library and create a .NET assembly that contains .NET classes corresponding to
each of the COM interfaces.
It is possible for the creator of a type library to create an official .NET interop assembly for the type library. This is
called the "primary interop assembly" for the type library. When the type library creator has not done this, developers
should import the type library themselves to make an interop assembly specific to their own project.
SAS 9.1 does not provide a primary COM interop assembly for any of the IOM type libraries or dynamic link libraries
(DLL). Thus, the first step in developing a .NET project that will use IOM is to import the desired type libraries or
DLLs such as "sas.tlb" (which contains the Workspace interfaces) and "SASOMan.dll" (which contains the SAS
Object Manager interfaces).
The following commands create the COM interop assemblies for sas.tlb and SASOMan.dll. You will need to modify
the path to your shared files folder if you did not install SAS in the default location.
tlbimp /sysarray
"c:\Program Files\SAS\Shared Files\Integration Technologies\SAS.tlb"
tlbimp /sysarray
"c:\Program Files\SAS\Shared Files\Integration Technologies\SASOMan.dll"
Because the type library import process is effectively converting between two different object models, there are a
number of idiosyncrasies in the process that will be explained in detail in the following sections.
Classes and Interfaces
Before looking at how .NET handles classes and interfaces, it is important to understand how COM interfaces were
used in Visual Basic 6, because the .NET was designed to have some continuity with the treatment of COM objects in
VB6.
IOM servers provide components that have a default interface and possibly additional interfaces. All access to the
server component must occur through a method in one of its interfaces. While this is the same approach used by
COM, Visual Basic 6 also allowed access to the default interface via the coclass (component) name. IOM type
libraries use the standard COM convention—interface names have a capital "I" prefix, while coclass names do not.
Thus, while the SAS 9 SAS::Fileref component supports both the default SAS::IFileref interface and an additional
SAS::IFileInfo interface, a VB6 programmer was allowed (and encouraged) to call SAS::IFileref methods through a
variable whose type was declared with the coclass name. A typical example follows:
SAS® Integration Technologies: Developer's Guide
Programming in the .NET Environment 767

' VB6 code
' Primary interface declared as coclass name (without the leading "I").
Dim ws as new SAS.Workspace
Dim fref as SAS.Fileref
Dim name as string
Set fref = ws.FileService.AssignFileref("myfilref", _
"DISK", "c:\myfile.txt", "", name)
' Secondary interface must use COM interface name (requires "I").
' There is no "SAS.FileInfo" because this is only an interface,
' not an object (coclass).
Dim finfo as SAS.IFileInfo
' Call a method on the default interface.
debug.print fref.FilerefName
' Obtain a reference to the secondary interface on the object.
set finfo = fref
' Make a call using the secondary interface.
debug.print finfo.PhysicalName
As a result, when Microsoft designed the rules for how COM type libraries would be represented by .NET classes
through COM interop, there was a desire to support not only the fundamental COM idea of calling methods through
interfaces, but also to provide the impression that the coclass type was itself an interface—the default interface of the
coclass.
The interop assembly for an IOM type library will contain the following elements:
A .NET interface for each COM interface. Following the above example, you will see both an IFileref
interface and an IFileInfo interface in the assembly.
•
A .NET interface with the same name as the coclass. Thus, for the Fileref coclass, there would also be a
Fileref interface in the assembly. This .NET interface is called the "coclass interface."
The coclass interface is almost identical to the default .NET interface for the coclass. It inherits from the
default COM interface's .NET interface and defines no additional members. So the SAS assembly's Fileref
interface (a coclass interface) defines no members itself and inherits from the IFileref interface.
The coclass interface plays an additional role for components that can raise events. For more information, see
Receiving Events.
•
A .NET class named with the "Class" suffix. This is represented by the "FilerefClass" in our example. This is
called the "RCW class" (Runtime Callable Wrapper).
•
Given these substitutions, here is the equivalent C# code:
// C#
// Using the "coclass interface" for the workspace and fileref.
// The name without the leading "I" came from the COM coclass,
// but in .NET it is an interface.
SAS.Workspace ws2 =
new SAS.Workspace(); // instantiable interface − see below
SAS.Fileref fref;
String name;
fref = ws2.FileService.AssignFileref("myfilref", "DISK",
SAS® Integration Technologies: Developer's Guide
Programming in the .NET Environment 768
"c:\\myfile.txt", "", out name);
// Secondary interface must use COM interface name (requires "I")
// There is no "SAS.FileInfo" because this is just an interface,
// not an object (coclass).
SAS.IFileInfo finfo;
// Call a method on the default interface.
Trace.Write(fref.FilerefName);
// Obtain a reference to the secondary interface on the object.
finfo = (SAS.IFileInfo) fref;
// Make a call using the secondary interface.
Trace.Write(finfo.PhysicalName);
While the VB6 and C# programs appear to be very similar, there is a difference at a deeper level. Unlike VB6, the
.NET CLS makes a distinction between interface types and class types. All of the variables declared in the C#
example are interfaces. None are classes. "ws" and "fref" are the "coclass interfaces" because the type library importer
created them from the default interface of the "Workspace" and "Fileref" coclasses. "finfo" is a .NET interface
variable of type "IFileinfo"—a type which the type library importer created from the COM IFileInfo interface.
COM coclasses that have the "createable" attribute in the type library can be instantiated directly. This is illustrated in
the previous example by declaration of the workspace variable:
Dim ws as new SAS.Workspace
In order to provide further similarity with VB6, the "coclass interface" on a createable coclass (the .NET interface
named "Workspace" in our example) has a unique feature. The type library importer adds some extra .NET metadata
to the interface so that it can be used for instantiation. Thus, while it would normally be illegal to try to instantiate an
interface, the following statement becomes possible:
SAS.Workspace ws = new SAS.Workspace();
Because of the extra metadata added to the SAS.Workspace interface by the type library importer, the C# and
VB.NET compilers change this statement to the following:
SAS.Workspace ws = new SAS.WorkspaceClass();
Note that this is a transformation done by the compiler. If you get a compilation error with the former syntax when
using a language other than C# or VB.NET, you should try the second approach which includes an actual class name
instead of a "coclass interface" name.
In order to complete the emulation of the type names used by VB6, the type library importer makes a transformation
of method parameters to use the "coclass interface" where possible. Whenever a COM method signature (or attribute
type) refers to a default interface for a coclass in the same type library, the .NET method (or attribute) uses the
"coclass interface" type.
So, in the previous example, while the COM IDataService::AssignFileref() method is defined to return an IFileref
interface, the .NET IFileref interface is not used. Instead, the type library importer recognizes that the COM IFileref
interface is the default interface of the Fileref coclass and substitutes its "coclass interface" (Fileref) as the
AssignFileref() return type.
SAS® Integration Technologies: Developer's Guide
Programming in the .NET Environment 769
With all of these transformations, the VB6 compatible view of the interface is complete. Let's review the rules as they
apply to IOM programming:
There are effectively two types of interface—the default interfaces on an IOM component and additional
interfaces.
default interfaces such as Workspace, FileService and Fileref use the "coclass interface," which has
the same name as the component (no extra leading "I").
♦
additional interfaces might be used by only one component (like SAS::IFileInfo) or might be used by
more than one (like SASIOMCommon::IServerStatus). The names of these interfaces are identical to
the COM interface names (and thus use the leading "I" )
♦
•
Use the .NET variables of either type as interfaces (which they are) even if the type does not have the leading
"I".
•
When you want to instantiate a component such as the Workspace or the ObjectManager, you can use the
"coclass interface" (like "Workspace") in C# and VB6. Other languages might require you to use an actual
class name (like "WorkspaceClass").
•
Simple Data Types
As illustrated in the following table, most of the simple data types from VB6 have the expected equivalents in .NET
programming.
COM VB6 .NET VB.NET C#
unsigned char Byte System.Byte Byte byte
VARIANT_BOOL Boolean System.Boolean Boolean bool
short Integer System.Int16 Short short
long Long System.Int32 Integer int
float Single System.Single Single float
double Double System.Double Double double
BSTR String System.String String string
DATE Date System.DateTime Date System.DateTime
Almost all of the data types are exact equivalents. The most significant difference is that "long", the 32−bit integer
type in COM and VB6 has become "integer" in VB.NET and "int" in C#.
Arrays
An IOM array is represented as a COM SAFEARRAY. The .NET type library import utility (tlbimp) can convert
SAFEARRAYs in one of two ways:
using the /sysarray option—converted to a .NET System.Array• not using the /sysarray option—converted to a one dimensional array with a zero lower bound•
This latter approach is discouraged. It does not work well with IOM type libraries because many arrays in IOM
interfaces are two dimensional. However, when you use the Visual Studio .NET IDE to import a type library, Visual
Studio supplies the /sysarray option.
SAS® Integration Technologies: Developer's Guide
Programming in the .NET Environment 770
This means that, for IOM programming, the resulting .NET arrays are passed in terms of the generic System.Array
base class, instead of using the programming language's array syntax. Furthermore, an array variable is needed for
input as well as output, because IOM follows the VB6 convention of always passing arrays by reference, even for
input parameters.
As an illustration of input and output arrays, here is an example of using the IOM LanguageService in C#.
SAS.LanguageService lang = ws.LanguageService;
string[] sasPgmLines = {
"data _NULL_; ",
" infile \'" + filenameBox.Text + "\';",
" input;" ,
" put _infile_;" ,
"run;" } ;
System.Array linesVar = sasPgmLines; // identical to type of ref parm
lang.SubmitLines(ref linesVar);
bool bMore = true;
while (bMore) {
System.Array CCs;
const int maxLines = 100;
System.Array lineTypes;
System.Array logLines;
lang.FlushLogLines(maxLines, out CCs,
out lineTypes, out logLines);
for (int i=0; i<logLines.Length; i++) {
fileBox.Text += (logLines.GetValue(i) + "\n");
}
if (logLines.Length < maxLines)
bMore = false;
}
The example uses the sasPgmLines C# array to set up the array value. However, C# requires the type in the reference
parameter declaration be identical to (not just implicitly convertible to) the type of the argument being passed. Thus,
the example must use the linesVar variable as the reference parameter.
A similar situation occurs with the output parameters. The parameters must be received into System.Array variables.
At that point, if there are to be only a few lines where the array is accessed, it might be most convenient to access the
array through the System.Array variable, as shown in the previous example. Note that the Length attribute is primarily
applicable to one−dimensional arrays. For two−dimensional arrays, the GetLength() method (which takes a dimension
number) is usually needed.
The input parameter in the previous example shows how to interchange arrays with System.Array objects. This could
also have been done using the output parameter. In that case, the while loop might be changed as follows:
while (bMore) {
System.Array CCs;
const int maxLines = 100;
System.Array lineTypes;
System.Array logLinesVar;
string []logLines;
lang.FlushLogLines(maxLines, out CCs,
out lineTypes, out logLinesVar);
logLines = (string [])logLinesVar; // explicit conversion
for (int i=0; i<logLines.Length; i++) {
fileBox.Text += (logLines[i] + "\n");
}
SAS® Integration Technologies: Developer's Guide
Programming in the .NET Environment 771
if (logLines.Length < maxLines)
bMore = false;
}
The primary benefit from using the previous while loop is the ability to use normal array indexing syntax when
accessing the element within the for loop. Note also the assignment from logLinesVar to LogLines required a
string[] cast, because the conversion from the more general System.Array to the specific array type is an "explicit
conversion."
The examples in this section use for loops to illustrate array indexing with each type of array declaration. In practice,
simple loops can be expressed more concisely using the C# foreach statement. For example,
foreach (string line in loglines){
filebox.Text += (line + "\n");
}
Another alternative, which avoids the use of two variables per array, is to use the Array.CreateInstance() method here
as illustrated with the "optionNames" variable.
Array optionNames, types, isPortable, isStartupOnly, values,
errorIndices, errorCodes, errorMsgs;
optionNames=Array.CreateInstance(typeof(string),1);
optionNames.SetValue("MLOGIC",0);
iOS.GetOptions(ref optionNames, out types, out isPortable,
out isStartupOnly, out values, out errorIndices,
out errorCodes, out errorMsgs);
Enumerations
Many IOM methods accept or return enumeration types, which are declared in the IOM type library. In the previous
while loop, the CCs variable is actually an array of enumeration. The type library importer will create a .NET
enumeration type for each COM enumeration in the type library.
Here is an elaboration of the LanguageService example that uses output enumeration to determine the number of lines
to skip:
while (bMore) {
System.Array CCVar;
const int maxLines = 100;
System.Array lineTypes;
System.Array logLinesVar;
string []logLines;
SAS.LanguageServiceCarriageControl []CCs;
lang.FlushLogLines(maxLines, out CCVar,
out lineTypes, out logLinesVar);
logLines = (string [])logLinesVar;
CCs = (LanguageServiceCarriageControl [])CCVar;
for (int i=0; i<logLines.Length; i++) {
// Simulate some carriage control with newlines.
switch (CCs[i]) {
case LanguageServiceCarriageControl.
LanguageServiceCarriageControlNewPage:
fileBox.Text+="\n\n\n";
break;
case LanguageServiceCarriageControl.
SAS® Integration Technologies: Developer's Guide
Programming in the .NET Environment 772

LanguageServiceCarriageControlSkipTwoLines:
fileBox.Text += "\n\n";
break;
case LanguageServiceCarriageControl.
LanguageServiceCarriageControlSkipLine:
fileBox.Text += "\n";
break;
case LanguageServiceCarriageControl.
LanguageServiceCarriageControlOverPrint:
continue; // Don't do overprints.
}
fileBox.Text += (logLines[i] + '\n');
}
if (logLines.Length < maxLines)
bMore = false;
}
COM does not provide scoping for enumeration constant names, either with respect to the enumeration or with respect
to the interface to which an enumeration might be related. Thus, the name for each constant in the type library must
contain the name of the enumeration type in order to avoid potential clashes. .NET, on the other hand, does provide
scoping for constant names within enumeration names and requires them to be qualified. This combination of factors
results in the very long and repetitive names in the previous example.
IOM places loose constants in enumerations ending in CONSTANTS. An enumeration simply named CONSTANTS
includes constants for the entire type library and some interfaces, have their own set. LibrefCONSTANTS is an
example of this. Enumerations containing the word INTERNAL are collections of constants that, for various reasons,
are not documented for customer use.
Exceptions
The COM type library importer maps all failure HRESULTs into the same .NET exception:
System.Runtime.InteropServices.COMException. This exception will be thrown whenever an IOM method call fails.
The specific type of failure is determined by its HRESULT code, which is found in the ErrorCode property of the
exception.
Types of errors fall into two broad categories: system errors and application errors. The system error codes are
standard to all Windows programming languages. The most common error codes in IOM applications are:
HRESULT
Value Symbolic Name Description
0x8007000E E_OUTOFMEMORY The server ran out of memory.
0x80004001 E_NOTIMPL The method is not implemented.
0x80004002 E_NOINTERFACE The object does not support the
requested interface.
0x80070057 E_INVALIDARG You passed an invalid argument.
0x80070005 E_ACCESSDENIED You lack authorization to
complete the request.
0x80070532 HRESULT_FROM_WIN32(ERROR_PASSWORD_EXPIRED) The supplied password is expired.
0x8007052E HRESULT_FROM_WIN32(ERROR_LOGON_FAILURE) Either the user name or the
SAS® Integration Technologies: Developer's Guide
Programming in the .NET Environment 773

password is invalid.
0x800401FD CO_E_OBJNOTCONNECTED You tried to call an object that no
longer exists.
0x80010114 RPC_E_INVALID_OBJECT You tried to call an object that no
longer exists (equivalent to
CO_E_OBJNOTCONNECTED).
In principle these exceptions can be returned from any call, although exceptions that are related to a password will
only occur when connecting to a server.
The second broad category of errors consists of those that are specific to particular IOM applications. These are
documented by enumerations in the type library, and the IOM class documentation lists which of these (if any) can be
returned from a particular method call. The type library typically has one ERRORS enumeration for errors that are
relevant to more than one interface. It will also have another enumeration for each interface that has its own set of
errors. For example, there is a DataServiceERRORs enumeration for the IDataService interface.
Besides the ErrorCode property, there are several other fields. The most important of these is the ErrorMessage. SAS
9 and later servers return an entire list of messages. Because COM does not support a chain of exceptions, these are
returned as an XML−based list in the ErrorMessage field.
If you want to present an attractive error message to your user, you need to parse the error message using an XML
parser.
The following code fragment shows error handling for a libref assignment call. This code makes an extra check for an
invalid pathname error and illustrates a very simple reformatting of the error message field using XSL.
bool bPathError;
string styleString =
"<?xml version='1.0'?>" +
"<xsl:stylesheet xmlns:xsl= " +
"\"http://www.w3.org/1999/XSL/Transform\" version=\"1.0\">" +
"<xsl:output method=\"text\"/>" +
"<xsl:template match=\"SASMessage\">" +
"[<xsl:value−of select=\"@severity\"/>] " +
"<xsl:value−of select=\".\"/> " +
"</xsl:template>" +
"</xsl:stylesheet>";
try
{
ws.DataService.AssignLibref(nameField, engineField,
pathField, optionsField);
}
catch (COMException libnameEx) {
switch ((DataServiceERRORS)libnameEx.ErrorCode)
{
case DataServiceERRORS.DataServiceNoLibrary:
bPathError = true;
break;
}
try
{
SAS® Integration Technologies: Developer's Guide
Programming in the .NET Environment 774
// Load the style sheet as an XmlReader.
UTF8Encoding utfEnc = new UTF8Encoding();
byte []styleData = utfEnc.GetBytes(styleString);
MemoryStream styleStream = new MemoryStream(styleData);
XmlReader styleRdr = new XmlTextReader(styleStream);
// Load the error message as an XPathDocument.
byte []errorData = utfEnc.GetBytes(libnameEx.Message);
MemoryStream errorStream = new MemoryStream(errorData);
XPathDocument errorDoc = new XPathDocument(errorStream);
// Transform to create a message.
StringWriter msgStringWriter = new StringWriter();
XslTransform xslt = new XslTransform();
xslt.Load(styleRdr);
xslt.Transform(errorDoc,null, msgStringWriter);
// Return the resulting error string to the user.
errorMsgLabel.Text = msgStringWriter.ToString();
errorMsgLabel.Visible = true;
}
catch (XmlException)
{
// Accommodate SAS V8−style error messages with no XML.
errorMsgLabel.Text = libnameEx.Message;
errorMsgLabel.Visible = true;
}
}
The error text for the COM exception will only be XML if you are running against a SAS 9 server. If your client
program runs against a SAS 8 server or against SAS 9 servers with the V8ERRORTEXT object server parameter,
which suppresses the XML in error messages, then the construction of the XPathDocument will throw an exception.
The previous example catches this exception and returns the error message unchanged.
Accessing SAS Data with ADO.NET
The SAS Integration Technologies client includes an OLE DB provider for use with the SAS Workspace. This
provider makes it possible for your program to access SAS data within an IOM Workspace using ADO.NET's OLE
DB adapter. This is a particularly important technique in IOM Workspace programming, because it is often the easiest
way to get results back to the client after a SAS PROC or DATA step.
The following examples, written in VB.NET, show how this is done
Copy an ADO.Net Data Set into a SAS Data Set
' This method sends the given data set to the provided workspace, and
' assigns the WebSvc libref to that input data set
Private Sub SendData(ByVal obSAS As SAS.Workspace,
ByVal inputDS As DataSet)
' Take the provided data set and put it in a fileref in SAS as XML
Dim obFileref As SAS.Fileref
Dim assignedName As String
' Filename websvc TEMP;
obFileref = obSAS.FileService.AssignFileref(
SAS® Integration Technologies: Developer's Guide
Programming in the .NET Environment 775

"WebSvc", "TEMP", "", "", assignedName)
Dim obTextStream As SAS.TextStream
obTextStream = obFileref.OpenTextStream(
SAS.StreamOpenMode.StreamOpenModeForWriting, 2000)
obTextStream.Separator = " "
obTextStream.Write("<?xml version=""1.0"" standalone=""yes"" ?>")
obTextStream.Write(inputDS.GetXml())
obTextStream.Close()
' An ADO.Net data set is capable of holding multiple tables, schemas,
' and relationships. This sample assumes that the ADO.Net data set
' only contains a single table whose name and columns fit within SAS
' naming rules. This would be an ideal location to use XMLMap to
' transform the schema of the provided data set into something that
' SAS may prefer.
' Here, the default mapping is used. Note that the LIBNAME statement
' uses the fileref of the same name because we did not specify a file.
' Using the IOM method is cleaner than using the Submit because an
' error is returned if there is a problem making the assignment
obSAS.DataService.AssignLibref("WebSvc", "XML", "", "")
' obSAS.LanguageService.Submit("libname webSvc XML;")
End Sub
Copy a SAS Data Set into an ADO.Net Data Set
' Copy a single SAS data set into a .NET data set
Private Function GetData(ByVal obSAS As SAS.Workspace, ByVal
sasDataset As String) As DataSet
Dim obAdapter As New System.Data.OleDb.OleDbDataAdapter("select * from "
& sasDataset, "provider=sas.iomprovider.1; SAS Workspace ID=" &
obSAS.UniqueIdentifier)
Dim obDS As New DataSet()
' Copy data from the adapter into the data set
obAdapter.Fill(obDS, "sasdata")
GetData = obDS
End Function
For more information about using OLE DB with IOM, see "Using the IOM Data Provider".
Object Lifetime
In native COM programming, reference counting—whether it be explicitly written or managed by "smart pointer"
wrapper classes—can require careful attention to detail. The VB6 run−time environment did much to alleviate that,
and .NET's garbage collection has a similar simplifying effect. When programming with Interop, COM objects are
normally released via garbage collection. You can also effect the release at any time by making a sufficient number of
calls to System.Runtime.InteropServices.Marshal.ReleaseComObject().
With most IOM objects, the exact timing of releases is unimportant. In the workspace, for example, the various
components maintain references among themselves, so that they do not get destroyed, even if the client releases them.
The workspace as a whole will shut down (and be disconnect from its clients) when the client calls its Close() method.
This will also cause the process to shut down in the typical (not pooled) situation where there is only one workspace in
the process. Releases only become significant when all COM objects for the workspace hierarchy are released. When
all objects are released, the objects cannot be used again (nor can the Close() method be called) and thus the server
SAS® Integration Technologies: Developer's Guide
Programming in the .NET Environment 776
shuts down. If you do not call Close(), then the SAS process (sas.exe) will not terminate until .NET runs garbage
collection.
Receiving Events
When a COM component raises events, the type library provides helper classes to make it easy to receive those events
using delegates and event members, which are the standard .NET event handling mechanisms.
The first (and often the only) event interface supported by a component is included in the coclass interface. You can
add event listener methods to the event members of the coclass interface, which will then be called when the IOM
server raises the events.
Here is an example of collecting SAS Language events.
private void logDSStart() {
progress.Text += "[LanguageService Event] DATASTEP start.\n";
}
private void logDSComplete() {
progress.Text +=
"[LanguageService Event] DATASTEP complete.\n";
}
private void logProcStart(string procName) {
progress.Text += "[LanguageService Event] PROC " +
procName + " start.\n";
}
private void logProcComplete(string procName) {
progress.Text += "[LanguageService Event] PROC " +
procName + " complete.\n";
}
private void logStepError() {
progress.Text += "Step error.\n";
}
private void logSubmitComplete(int sasrc) {
progress.Text +=
"[LanguageService Event] Submit complete return code: " +
sasrc.ToString() + ".\n";
}
// Event listeners use the LanguageService coclass interface.
// The Language Service also includes events for the default event interface.
SAS.LanguageService lang = ws.LanguageService;
lang.DatastepStart += new
CILanguageEvents_DatastepStartEventHandler(this.logDSStart);
lang.DatastepComplete += new
CILanguageEvents_DatastepCompleteEventHandler(
this.logDSComplete);
lang.ProcStart += new
CILanguageEvents_ProcStartEventHandler(this.logProcStart);
lang.ProcComplete += new
CILanguageEvents_ProcCompleteEventHandler(this.logProcComplete);
lang.StepError += new
CILanguageEvents_StepErrorEventHandler(this.logStepError);
SAS® Integration Technologies: Developer's Guide
Programming in the .NET Environment 777
lang.SubmitComplete += new
CILanguageEvents_SubmitCompleteEventHandler(
this.logSubmitComplete);
// Submit source, clear the list and log, etc...
// Stop listening.
// The "new" operator here is confusing.
// Event removal does not really care about the particular
// delegate instance. It just looks at the identity of the
// listening object and the method being raised. Getting a
// new delegate is an easy way to gather that together.
SAS.LanguageService lang = ws.LanguageService;
lang.DatastepStart −= new
CILanguageEvents_DatastepStartEventHandler(this.logDSStart);
lang.DatastepComplete −= new
CILanguageEvents_DatastepCompleteEventHandler(
this.logDSComplete);
lang.ProcStart −= new
CILanguageEvents_ProcStartEventHandler(this.logProcStart);
lang.ProcComplete −= new
CILanguageEvents_ProcCompleteEventHandler(this.logProcComplete);
lang.StepError −= new
CILanguageEvents_StepErrorEventHandler(this.logStepError);
lang.SubmitComplete −= new
CILanguageEvents_SubmitCompleteEventHandler(
this.logSubmitComplete);
Note that IOM event interfaces begin with "CI" (not just "I"), because they are not dual interfaces. They are instead,
ordinary COM vtable interfaces, which makes them easier for some types of clients to implement.
COM Interop also has support for components that raise events from more than one interface. In this case, you must
add your event handlers to the RCW interface (such as LanguageServiceClass in the previous example). But note that
currently, there are no SAS IOM components with a publicly documented interface that is not the default.
Windows Clients
SAS® Integration Technologies: Developer's Guide
Programming in the .NET Environment 778

Using VBScript
The preceding sections provide many examples of using the IOM interfaces in a full Visual Basic environment (or in a
Visual Basic for Applications (VBA) environment like Microsoft Word and Excel).
You can also use the IOM interfaces from a VBScript environment. VBScript is a commonly used scripting language
that is available in Active Server Pages (ASP), Dynamic HTML (DHTML), Microsoft Outlook 97 and later, and
Windows Scripting Host. For configuration information, see Configuring COM/DCOM for Active Server Page
Access in the SAS Integration Technologies: Server Administrator's Guide.
Scripto is an ActiveX DLL that has been developed by SAS in order to provide workarounds for the following
common VBScript limitations:
Method calls in VBScript are limited to a single return value of type Variant•
Arrays can only contain Variants•
There is no support for reading or writing binary files•
Note: If you are developing your code or macros to run in a full Visual Basic or VBA environment, then you do not
need the Scripto DLL.
Scripto is provided with SAS Integration Technologies so that developers who choose to use VBScript can effectively
use the SAS automation interfaces. However, Scripto is not specific to SAS and can be used with other automation
interfaces.
The performance of VBScript is usually less than a VB application for several reasons. First, VBScript provides only
late binding (it uses IDispatch instead of v−table calls). Also, VBScript is interpreted, not compiled. In addition, the
way that VBScript invokes methods (InvokeMethod) causes additional overhead because all parameters must be
copied twice to get them in the proper format in which VBScript expects them.
This is especially evident in the case of safearrays in which SAS expects to contain the actual type of element in the
array (such as string or an enumeration value). VBScript expects it to contain only VARIANTS, which in turn contain
the appropriate type of element. InvokeMethod takes care of this conversion. However, it produces an additional copy
of the array.
Scripto does not address these performance issues. We recommend that if performance is an issue, consider something
other than a scripting language for your implementation. We also recommend that you only use Scripto when calling
methods whose signatures require it.
There are 2 components implemented by the Scripto DLL: Scripto and StreamHelper.
The Scripto Interface: IScripto
IScripto is the single interface to the Scripto component. It provides two methods:
SetInterface IUnknown
This method is used to specify the IOM interface that contains the method that you want to invoke. The
interface must be set prior to using InvokeMethod.
Using VBScript 779
The interface specified must support IDispatch, and that IDispatch implementation must support type
information. If either of these is not true, SetInterface will return E_INVALIDARG(&H80070057).
An instance of the Scripto component can handle only a single interface at a time. Although you can create
multiple instances of Scripto that handle with a different interface, you typically only need a single instance of
Scripto. You would use this instance for all interfaces that need the service. Switching between interfaces does
not consume a significant amount of system resources.
SetInterface performs an AddRef function on the interface that is specified. You can release this reference
when you are finished with the interface using the following statement:
SetInterface Nothing
Also, when you release IScripto, it will release any interface that Scripto still references.
Note that after you set an interface, you can still make calls on it without using Scripto.
retParam InvokeMethod( methodName, params)
This method invokes the desired IOM interface method through the Scripto DLL. This method can only be
invoked after the interface has been set using SetInterface.
methodName is a string that contains the name of the method to invoke on the interface that has been set.
params is an array whose elements contain the parameters for the method to be invoked. The order of the
parameters placed in the array must be in reverse order of how they are specified in the method signature. The
array must have exactly the same number of elements as there are parameters to the method. Otherwise,
InvokeMethod returns DISP_E_BADPARAMCOUNT(&H8002000E) .
Note: If the method has a parameter that uses the [retval] modifier, then this parameter is returned as the
return value to InvokeMethod and you do not need an element in the params array for it.
retParam is the return value from the method you are invoking, if that method returns a value.
Note: If the method returns a reference to an object, make sure to use the Set keyword. For example:
Set obServer = obScripto.InvokeMethod(_
"CreateObjectByServer", ServerDefParms)
The StreamHelper Interface
The StreamHelper interface contains three methods related to working with the SAS BinaryStream (available through
the SAS FileService). These methods are only useful when working with SAS; these methods make calls on
IBinaryStream to read and write binary data.
Microsoft supplies the FileSystemObject, which can be used to read and write text files. The FileSystemObject does
not work with binary files, so SAS has provided the following methods.
The StreamHelper interface is implemented in Scripto.dll using the SASScripto.StreamHelper progid.
WriteBinaryFile IBinaryStream, fileName
This method copies the entire contents of the given IBinaryStream into the specified file. This method can be
useful for copying a SAS ResultPackage from the SAS server to the machine where the VBScript is running.
SAS® Integration Technologies: Developer's Guide
Using VBScript 780
It can also be used to copy GIF images. The BinaryStream that is passed in must have already been opened
with permission to read.
ReadBinaryFile fileName, IBinaryStream
Reads the entire contents of the file into the SAS BinaryStream. This method does the reverse of what
WriteBinaryFile does. The BinaryStream that is passed in must be open for permission to write. Sending
binary data to SAS can be useful if you want to include a binary file in a SAS package.
arrayOfBytes = ReadBinaryArray (IBinaryStream, numBytes)
Reads the specified number of bytes from the BinaryStream and returns them in the arrayOfBytes. If
numBytes is 0, the entire contents of the BinaryStream is returned in the array. The array is a variant
containing a SAFEARRAY of bytes. This array can be passed directly to the Response.BinaryWrite method
of Microsoft Active Server Pages.
Programming Examples
The first example illustrates using the Scripto component to reverse the order of parameters when invoking a
method. Assuming the method has been defined with the following IDL code:
HRESULT MethodToInvoke([in]param1, [out]param2, [out]param3)
To make this call with Scripto:
Dim f(2) 'An array of 3 VARIANTS
obScripto.SetInterface myInterface
f(2) = param1
obScripto.InvokeMethod "MethodToInvoke", f
param3 = f(0) ' Note that the order of parameters is reversed
param2 = f(1)
•
The next example uses the IOM LanguageService to submit SAS language statements to the IOM server. It
then uses Scripto to invoke the FlushLogLines method of the LanguageService. Using Scripto provides two
important advantages over invoking the method directly from VBScript:
It converts the three arrays that are returned from the method from arrays of long integers to arrays of
variants. (Note that VBScript can only use arrays that contain elements of data type variant.)
♦
It allows the VBScript application to receive more than one return parameter from the method that is
invoked. (Note that when you invoke a method directly from VBScript, you are limited to a single
return value.)
♦
set obSAS = CreateObject("SAS.Workspace.1.0")
Set obScripto = CreateObject("SASScripto.Scripto")
obSAS.LanguageService.Submit "proc options;run;"
obScripto.SetInterface obSAS.LanguageService
' This example uses Scripto to invoke the FlushLogLines method
' instead of invoking the method directly from VBScript
' as shown in the following statement:
' obSAS.LanguageService.FlushLogLines 1000, carriageControls,_
' linetypes, logLines
Dim flushLogLinesParams(3)
' Note that the FlushLogLines method takes 4 parameters:
' 1) numLinesRequested (in) Specifies an upper limit on the
' number of lines to be returned.
' 2) carriageControls (out) An array that indicates carriage
' control for each line returned.
' 3) lineTypes (out) An array that indicates the line type
' for each line returned.
•
SAS® Integration Technologies: Developer's Guide
Using VBScript 781
' 4) logLines (out) Contains the SAS log output lines
' retrieved by this call.
flushLogLinesParams(3) = 1000
obScripto.InvokeMethod "FlushLogLines",_
flushLogLinesParams
' flushLogLinesParams(0) now has logLines
' flushLogLinesParams(1) now has lineTypes
' flushLogLinesParams(2) now has carriageControls
' Print the first line
wscript.echo flushLogLinesParams(0)(0)
The CreateObject() call in this previous example creates a server object by providing a COM ProgID. The
ProgID is a string form of the COM class identifier (CLSID). In this case, the ProgID describes a SAS session
providing the Workspace interface. By explicitly specifying the major and minor version "1.0" as a suffix to
the ProgID "SAS.Workspace", you can ensure compatibility with all versions of the SAS Integration
Technologies IOM server (the server can emulate earlier versions). If you are using a Version 9 SAS
Integration Technologies client and you do not specify a version suffix to the ProgID, you cannot connect to a
Version 8 COM server.
Note: Two−level version suffixes were not available in previous versions of the SAS Integration
Technologies Windows client.
The next example illustrates using ReadBinaryArray with Microsoft Active Server Pages. Assume a SAS
program has already run that uses SAS/GRAPH to write a GIF image to a fileref called "img". This example
then uses the FileService to read that file back to the browser, with no intermediate files on the Web server.
set obFref = obSAS.FileService.UseFileref("img")
set obBinaryStream = obFref.OpenBinaryStream(1)
' SAS.StreamOpenModeForReading=1
set obStreamHelper = CreateObject("SASScripto.StreamHelper")
response.contenttype = "image/gif"
response.binarywrite obStreamHelper.ReadBinaryArray(_
obBinaryStream, 0)
•
The next example shows how to use WriteBinaryFile to copy a SAS ResultPackage. Demo.sas is a stored
procedure that creates a ResultPackage in an archive.
obSAS.LanguageService.StoredProcessService.Execute "demo.sas",_
parameters
The following lines move the package that was just created from the SAS server to the local machine.
Set obRemotePackageFileRef = obSAS.FileService.AssignFileref(_
"", "", "./demo.spk", "", "")
Open a binary stream on the SAS server for the package file.
Set obRemotePackageBinaryStream = _
obRemotePackageFileRef.OpenBinaryStream(1)
'StreamOpenModeForReading
Because VBScript cannot handle binary files, use the Scripto object to write the binary file on the local
machine.
•
SAS® Integration Technologies: Developer's Guide
Using VBScript 782
Set obStreamHelper = Server.CreateObject("SASScripto.StreamHelper")
obStreamHelper.WriteBinaryFile obRemotePackageBinaryStream,_
"c:\myfile.spk"
Windows Clients
SAS® Integration Technologies: Developer's Guide
Using VBScript 783

Programming with Visual C++
All SAS IOM interfaces are designed to work well with Microsoft Visual C++.
As is the custom with ActiveX components, the documentation is written in terms of Visual Basic. This means that the
default interface of a component is listed as if it were the interface of the COM object (coclass) itself—even though in
pure COM terms, the default interface is just one of many interfaces implemented by the object. Thus, a C++
programmer would program to the "IWorkspace" interface, even though the Visual Basic documentation shows the
methods as belonging to the "Workspace" object. This section discusses issues with which Visual C++ programmers
must be concerned (in addition to the material covered in Programming with Visual Basic).
All IOM interfaces implemented by SAS are COM dual interfaces. This means methods and property get and set
routines can be called as direction entry points with positional parameters. Although they implement an IDispatch
interface at the beginning of each v−table, this is only for compatibility with older OLE Automation controllers.
Visual C++ programs should not make calls using IDispatch::Invoke; but should instead call through the v−table entry
for the specific method that they want to call. This further implies that the ClassWizard−generated wrappers for
IDispatch (with COleDispatchDriver) should not be used in IOM programming. This feature of Visual C++ is now
useful only for interfaces containing only IDispatch.
All event (also called source) IOM interfaces are COM custom interfaces. This means that callers to the Advise
method should pass interfaces that only derive from IUnknown, not IDispatch. All parameters to the event interfaces
are only in parameters, which means that none of the interfaces support the ability to return data to SAS through the
event interface.
To use the IOM interface in your Visual C++ program, you should "#import" the IOM interface type library. Here is
an example:
#import "sas.tlb"
In order for this to work, you must make sure that the type library directory is listed in your include path.
The import statement causes everything in the type library to be placed in a namespace. The fully qualified name for
IWorkspace would be SAS::IWorkspace. Also see the "using" directive in Visual C++, and the "−no_namespace"
attribute on the import statement.
When you import a type library, the Visual C++ compiler creates a comprehensive set of definitions specific to that
type library and using the helper classes in COM compiler support (as defined through <comdef.h>). The helper
classes perform many useful functions including the following:
Provide smart pointers for interface references• Map COM HRESULTs to C++ exceptions• Use helper classes for BSTRs• Create wrapper functions the return the IDL−defined return value instead of an HRESULT• Provide create instance helpers•
Programming with the Visual C++ COM compiler support is almost as easy as calling the functions in Visual Basic.
Unfortunately, as of Visual C++ V6, the COM compiler support is lacking in one important area. There are no
wrapper functions for handling SAFEARRAYs. You must deal with the OLE Automation SAFEARRAY API
directly.
Programming with Visual C++ 784
Dealing with dimensions in this API requires care. You must be particularly careful if you are dealing with
two−dimensional arrays. The APIs that deal with SAFEARRAYs take a dimension number that is 1−based. In a
two−dimensional array, the rows are indexed in dimension 1 and the columns by dimension 2. When you create an
input array using SafeArrayCreate(), the bounds are also passed in this order (the row bounds are passed in
"rgsabound[0]" and the column bounds are passed in "rgsabound[1]"). Do not be confused by the ordering that you see
when you display a SAFEARRAY structure in the debugger.
Finally, keep in mind that for IOM method calls, lower bounds must always be zero.
Windows Clients
SAS® Integration Technologies: Developer's Guide
Programming with Visual C++ 785

Using the SAS Object Manager
As discussed in the IOM Servers section of the SAS Integration Technologies Technical Overview, Version 9
Windows clients can access an IOM server using the SAS Object Manager. The object manager can access metadata
from either a SAS Metadata Server or an LDAP server. The object manager can also access an IOM server by
supplying server parameters directly in the source code.
If you are using a SAS Metadata Server or supplying server parameters in the source code, the object manager can
connect to SAS Workspace Servers, other SAS Metadata Servers, SAS OLAP Servers, and SAS Stored Process
Servers.
Note: If you are using an LDAP server, the object manager can only connect to SAS Workspace Servers. Under
LDAP, SAS Integration Technologies does not support access to other types of IOM servers.
Note: The SAS 8 Workspace Manager interface is still supported. However, it is recommended that you use the SAS
Object Manager interface in order to take advantage of the new features available with SAS 9 Integration
Technologies.
SAS Object Manager Overview
The SAS Object Manager is a component that executes on the client machine and it is used to create and manage
objects on IOM servers. When using a metadata server, the object manager can use IOM server definitions that are
administered separately from the application. This enables, for example, a client application to connect to a server
simply by using a server name. The definition for this server can change as required without affecting the application.
The object manager can create a SAS object, in one of four ways:
through local COM if the SAS server runs on the same machine as the client• through DCOM if the SAS server runs on another machine that supports DCOM• through the IOM Bridge for COM (SASComb.dll) if the SAS server runs on another machine that does not
support COM/DCOM functionality (z/OS or UNIX [Solaris, HP−UX IPF, HP 64, AIX, ALX, Linux])
•
through the IOM Bridge for COM (SASComb.dll) if the SAS server runs on Windows.•
With the SAS Object Manager, you can perform the following tasks:
launch SAS objects, such as SAS Workspaces• select between running SAS objects• retrieve definitions from a metadata server (SAS Metadata Server or LDAP)• store new definitions on a metadata server (LDAP only).•
The object manager can be used from Visual Basic, C, C++, and VBScript (with the help of Scripto).
The object manager can also be used from the .NET framework using COM Interop.
Code Reference
The reference documentation for the SAS Object Manager is shipped with the object manager as online Help in the
file sasoman.chm.
Using the SAS Object Manager 786
By default, this file is located in C:\Program Files\SAS\Shared Files\Integration Technologies.
Windows Clients
SAS® Integration Technologies: Developer's Guide
Using the SAS Object Manager 787

Creating an Object
The reference documentation for using the SAS Object Manager interfaces is shipped with the SAS Object Manager
as online Help in the sasoman.chm file. The following descriptions provide usage information for two commonly used
methods:
CreateObjectByLogicalName• CreateObjectByServer•
CreateObjectByLogicalName
This method creates a SAS object from a logical name. When you use CreateObjectByLogicalName, you must define
metadata for your connections. Each connection should have a LogicalName associated with it. You can then use the
LogicalName to make a connection. This technique allows you to change the machine(s) where SAS is running
without modifying your code.
The signature for this method is shown below:
Set obSAS = obObjectFactory.CreateObjectByLogicalName("Name",
Synchronous, "LogicalName", "LoginReference")
CreateObjectByLogicalName takes the following parameters:
Name specifies the name that will be associated with the object. The name can be useful when your program is
creating several objects and must later distinguish among them.
Synchronous
indicates whether a connection is synchronous or asynchronous. The synchronous connection (TRUE) is most
frequently used and is the simplest connection to create. If this parameter equals TRUE,
CreateObjectByLogicalName does not return until a connection is made. If this parameter equals FALSE, the
caller must get the created object from the ObjectKeeper.
LogicalName
provides the LogicalName associated with the connection to the server.
LoginReference
provides the user name and password. If you are using a COM/DCOM server connection, the Windows
integrated security is used and this parameter is ignored. If you are using an IOM Bridge connection, the
LoginReference is looked up on the metadata server in order to find the matching Login object which defines
the username and password to use. The lookup is performed based on the domain specified on the server that
is defined for the LogicalName. This mechanism allows a given user to have different logins for different
security domains.
If you are using the SAS Metadata Server, the LoginReference is an object ID that points to an identity. You
associate the identity with one or more Login objects; but a given identity can only have one login for a given
domain. If you specify a null value for LoginReference, a value is retrieved from the metadata server based on
your current connection to the metadata server. In most cases, you should use a null value. For information
about administering logins on the SAS Metadata Server, see the SAS Integration Technologies: Server
Administrator's Guide.
Creating an Object 788

If you are using LDAP, the LoginReference matches the ReferenceDN defined on login objects in LDAP.
You can associate the same ReferenceDN with multiple Logins but the combination of a ReferenceDN and
domain resolves to a unique object. For information about administering logins in LDAP, see the SAS
Integration Technologies: Administrator's Guide (LDAP Version).
The invocation of this method results in the following sequence of steps to create the new object:
Create a list of all ServerDefs that define the provided LogicalName.1. Select the first ServerDef in the list. (Note that the first definition can vary depending on the metadata server.)2. Locate a LoginDef that matches both the DomainName (from the ServerDef) and the provided
LoginReference.
3.
Attempt to create a connection for each MachineDNSName in the ServerDef, until a successful connection is
made. The results are recorded in the log.
4.
If a connection to SAS could not be established, the next ServerDef is tried and the process is repeated from
step 3.
5.
If no object has been created after going through all the hostnames in each ServerDef and all the ServerDefs
that match the given LogicalName, an error is returned. Use the GetCreationLog method to check for errors.
For more details, see SAS Object Manager Error Reporting.
6.
If an object is created and Synchronous was passed in as FALSE, the new interface is added to the object
keeper.
7.
The name that is passed to the method can be used in other IObjectKeeper methods to determine which object to
locate or remove. The name is also set on IObjectKeeper−>Name before this method returns. The SAS Object
Manager never looks at IObjectKeeper−>Name, so a client could change the name after calling Create. The xmlInfo is
only defined when this method returns an IObjectKeeper. See SAS Object Manager Error Reporting for details.
Note that the object keeper should be notified when an object is no longer in use (using the RemoveObject method) if
the object was created with an asynchronous connection or if the object was explicitly added to the object keeper
(using the AddObject method).
Example: Creating an Object with CreateObjectByLogicalName
The following example creates a Workspace object named TestWorkspace using the logical name Test Server. The
null loginReference indicates that the identity associated with the current metadata server login is used to find a Login
object.
Dim obObjectFactory As New SASObjectManager.ObjectFactory
Dim obSAS As SAS.Workspace
' This assumes that either your metadata configuration files are stored in
' the default location, or that the location of your metadata configuration
' files is stored in the registry. If this is not the case, you can specify
' the location of your configuration files by calling
' obObjectFactory.SetMetadataFile(systemFile, userFile, false)
Set obSAS = obObjectFactory.CreateObjectByLogicalName(
"TestWorkspace", True, "Test Server", "")
CreateObjectByServer
This method creates an object from a ServerDef object instead of a logical name. It also accepts the actual user ID and
password instead of a reference to a LoginReference. This method is preferred over CreateObjectByLogicalName
because it does not require username/password pairs to be written to a file or a network directory.
SAS® Integration Technologies: Developer's Guide
Creating an Object 789
The signature for this method is shown below:
Set obSAS = obObjectFactory.CreateObjectByServer("Name", Synchronous,
obServerDef, "Username", "Password")
Name specifies the name that will be associated with the object. The name can be useful when your program is
creating several objects and must later distinguish among them.
Synchronous
indicates whether a connection is synchronous or asynchronous. The synchronous connection is most
frequently used and is the simplest connection to create. If this parameter equals TRUE,
CreateObjectByServer does not return until a connection is made. If this parameter equals FALSE, the
function returns a null value immediately. When a connection is made, the object is stored in the
ObjectKeeper.
obServerDef
specifies a Server Definition object.
Username
specifies the user name that will be used for authentication on the server.
Password
specifies the password that will be used for authentication on the server.
This method attempts to connect to each of the hosts listed in the provided ServerDef, one at a time, until either a
successful connection is made or all hosts have failed. The Username and Password parameters are not required for
ServerDefs that specify a ProtocolCom.
Example: Creating an Object with CreateObjectByServer
The following example creates a new Workspace object named TestWorkspace.
Dim obObjectFactory As New SASObjectManager.ObjectFactory
Dim obSAS As SAS.Workspace
Dim obServer As New SASObjectManager.ServerDef
obServer.MachineDNSName = "RemoteMachine.company.com"
obServer.Protocol = ProtocolBridge
obServer.Port = 8591
Set obSAS = obObjectFactory.CreateObjectByServer("TestWorkspace", True,
obServer, "myUserName", "myPassword")
Windows Clients
SAS® Integration Technologies: Developer's Guide
Creating an Object 790
SAS Object Manager Interfaces
The principal interfaces of the SAS Object Manager are as follows:
IObjectFactory
The IObjectFactory provides collection methods for ServerDefs, LoginDefs, LogicalNameDefs, SAS objects
and ObjectPools. It also provides methods to establish connections to SAS servers and to define metadata
sources.
IObjectKeeper
This interface is used to store an interface and retrieve it later, possibly from another thread. The
IObjectKeeper interface is also used as a rendezvous point for objects created asynchronously from the
ObjectFactory.
ILoginDef
This interface allows you to create and manipulate login definitions (LoginDefs). A LoginDef is only needed
for connections using the IOM Bridge for COM.
ILoginDefs
ILoginDefs contains the standard collection methods Count, _NewEnum, Add, Item, and Remove where the
key is the LoginDefName. It also supports one additional method: CheckAccess.
IServerDef
The SAS Object Manager uses the server definition to determine how to connect to the server. For a local or
DCOM connection, only the Name and Hostname values are needed. The IOM Bridge for COM requires
Protocol to be set to ProtocolBridge; Port and ServiceName can be used with the IOM Bridge for COM.
IServerDefs
IServerDefs contains the standard collection methods Count, _NewEnum, Add, Item, and Remove where the
key is the ServerDefName. It also supports one additional method: CheckAccess.
IObjectPools
This interface is used to create, enumerate, locate, and remove ObjectPool objects.
IObjectPool
This interface is used to configure parameters for an ObjectPool.
IPooledObject
This interface is used to notify a pool when the associated SAS object can be returned to the pool.
The reference documentation for using the SAS Object Manager interfaces is shipped with the SAS Object Manager
in the sasoman.chm Help file.
Windows Clients
SAS Object Manager Interfaces 791

Using a Metadata Server with the SAS Object Manager
If you are using a metadata server, the first step in developing and running a client program is to make sure you have
access to a properly configured server.
If you are using a SAS Metadata Server, refer to the SAS Integration Technologies: Server Administrator's
Guide for information about server configuration in various environments.
•
If you are using an LDAP server, refer to the SAS Integration Technologies: Administrator's Guide (LDAP
Version) for information about server configuration in various environments.
•
After the IOM server has been configured, you can begin developing a Windows client for the server.
Connecting to Metadata
Before you can use server metadata, you must first connect to a metadata server using metadata configuration files.
If you created your configuration files using the ITConfig utility, the SAS Object Manager will connect to the
metadata server automatically when you call a method or interface that requires metadata.
If your configuration files are not in the default location and the location is not stored in the Windows registry, you
must specify the location using the SetMetadataFile method. The SetMetadataFile method has three parameters: the
full path to the system configuration file, the full path to the user configuration file (optional), and a flag that indicates
whether to store the file path values in the registry.
Note: An application should call the SetMetadataFile method one time only. To create a new metadata server
connection, use the CreateOMRConnection method.
Metadata Caching
When a metadata server connection is established, the metadata is read from the server and stored by the SAS Object
Manager in a cache. The cached metadata is used when you call CreateObjectByLogicalName, ServerDefs, or
LoginDefs.
You can use the SetRepository method to refresh the metadata from the current metadata repository or read metadata
from a new repository. For details about the SetRepository method, see the SAS Object Manager reference
documentation (sasoman.chm).
For multi−threaded applications, using the metadata cache in the SAS Object Manager causes performance issues. The
CreateObjectByOMR method enables you to read metadata from the server without caching the metadata.
Object Definitions
There are three definitions that are useful for defining IOM objects. These definitions can be created either in the
source code or on the metadata server:
Server definition (ServerDef)
A server definition must be created before an IOM server can be launched using the SAS Object Manager.
The server definition can either be loaded from a metadata server or created dynamically. The server
Using a Metadata Server with the SAS Object Manager 792
definition is independent of the user. Server definitions include a Logical Name attribute.
Login definition (LoginDef)
A login definition contains user−specific information, including user name, password, and domain. Login
definitions are a convenience and are not required for creating a connection to an IOM server. They provide a
mechanism for storing persistent definitions of user names and passwords.
LoginDefs also allow multiple definitions for the same user on different security domains. For example, you
could use one user name and password on z/OS and a different one for UNIX. This is also possible without
the use of a login definition, but the user will need to enter the user name and password each time a server is
launched.
Logical name definition (LogicalNameDef)
For the SAS Metadata Server, this corresponds to a logical server name on the SAS Metadata Server.
For LDAP, the logical name definition allows a description to be associated with each logical name used in a
server definition. Logical name definitions are not used to launch a server. However, a logical name is
required to launch a server when using the login definition.
For each type of definition, there is a container interface that enables you to manage the definitions. For example,
ServerDef objects are managed using the ServerDefs interface. You can retrieve definitions by name using the Item
method. For LDAP, you can store new definitions on the metadata server using the Add method.
Security Considerations
The user ID that is used to log on to SAS will be determined when the object is launched. After the object is
launched, the user ID cannot be changed.
•
The information in a file is only restricted by the permissions on the file. If you are concerned about security,
you might not want to use files to store LoginDefs.
•
Administrators of metadata servers should configure the directory such that the right to read each LoginDef is
restricted to the owner of the LoginDef. Granting access to a LoginDef allows a user to start SAS and log on
as the user defined in the LoginDef. It also allows the user to view the password.
•
Windows Clients
SAS® Integration Technologies: Developer's Guide
Using a Metadata Server with the SAS Object Manager 793

Metadata Configuration Files
Metadata configuration files contain information about how to access the metadata server (SAS Metadata Server or
LDAP server).
You can create metadata configuration files in three ways:
using the METACON command in SAS• using the SAS Integration Technologies configuration utility (ITConfig)• using the WriteConfigFile method•
You can generate two types of metadata configuration files—a system configuration file and a user configuration file.
COM connections only use the system configuration file (any user information is ignored). IOM Bridge connections
can use both the system and user configuration files.
The system configuration file contains information about how to access the metadata server and might also contain
user and password information for connecting to the metadata server. The user configuration file contains user and
password information for connecting to the metadata server. ITConfig enables you to create user configuration files so
that each user can have a specific login configuration.
Creating Metadata Configuration Files to Access the SAS Metadata Server
Use one of the methods previously listed to generate the metadata configuration file(s). For the SAS Metadata Server,
the system configuration file contains the following connection information:
port• machine• encryption• repository name•
Note: You can also specify the user identity (user name, password, domain) in the system configuration file.
However, if a user configuration file is specified, the user configuration file overrides the user in the system
configuration file.
Note: The METACON command does not create user configuration files. The METACON command stores user
information and system information in the same configuration file.
The user configuration file can contain the following user identity information for connecting to the metadata server:
user name• password• domain•
For more information about using the ITConfig utility to generate metadata configuration files, see the ITConfig
utility Help or refer to Using ITConfig with COM Connections or Using ITConfig with IOM Bridge Connections in
the SAS Integration Technologies: Server Administrator's Guide.
For more information about using the METACON command to generate metadata configuration files, see Creating a
Metadata Config File in SAS (COM) or Creating a Metadata Config File in SAS (IOM Bridge) in the SAS Integration
Technologies: Server Administrator's Guide.
Metadata Configuration Files 794

For more information about using WriteConfigFile, see the SAS Object Manager reference (sasoman.chm).
Creating Metadata Configuration Files to Access the LDAP Server
Use the ITConfig utility or the WriteConfigFile method to generate the metadata file(s). For LDAP servers, the system
configuration file contains the following connection information:
port• machine• base distinguished name•
Note: You can also specify the user identity (user name, password) in the system configuration file. However, if a user
configuration file is specified, the user configuration file overrides the user in the system configuration file.
The user configuration file can contain the following user identity information for connecting to the metadata server:
user name• password•
For more information about using the ITConfig utility to generate metadata configuration files, see the ITConfig
utility Help or refer to Using the IT Configuration Application with COM Connections or Using the IT Configuration
Application with IOM Bridge Connections in the SAS Integration Technologies: Administrator's Guide (LDAP
Version).
For more information about WriteConfigFile, see the SAS Object Manager reference documentation (sasoman.chm).
Windows Clients
SAS® Integration Technologies: Developer's Guide
Metadata Configuration Files 795
SAS Object Manager Error Reporting
If a call succeeds in obtaining an object, the method returns S_OK. However, there are many reasons an error might
occur. Sometimes an error might occur even before the connection attempt is made. An example of such an error
follows:
Requested logical name was not found•
Other errors can occur during the connection attempt. Examples include the following:
Invalid userid/password• Couldn't connect to a SAS server• Invalid hostname• Server configuration error•
Errors can occur even though a successful connection is established. Errors that occur during connection can be
reported through the logging mechanism. To enable logging, set the ObjectFactory.LogEnabled property to TRUE.
When LogEnabled equals TRUE, both successful and failed connection attempts are recorded in the log. You can
obtain error information by calling GetCreationLog as follows:
ObjectFactory.GetCreationLog(erase,allThreads)
The parameters for GetCreationLog follow:
erase Indicates whether to erase all of the accumulated logging information. Values are TRUE or FALSE.
allThreads
Indicates the threads for which to obtain connectionAttempts log information. The values for the allThreads
parameter are
FALSE
Obtain log information for your current thread.
TRUE
Obtain log information for all threads in the process.
Error XML
The error information returned through XML allows applications to fix detected problems. Applications can be used
to fix these errors by parsing the XML and possibly providing a user interface or sending a message to an
administrator to have the errors fixed.
The following example is an output from GetCreationLog. The first attempt establishes an IOM Bridge connection to
the SAS Metadata Server, and the second attempt establishes a COM connection to a workspace server. Note that the
sasport and sasmachinednsname are not reported for COM connections.
<connectionAttempts>
<connectionAttempt>
<description>Connected.</description>
<status>0x0</status>
<saslogin>myDomain\myLogin</saslogin>
<sasmachinednsname>myMachine</sasmachinednsname>
<sasport>1235</sasport>
<sasclassid>2887E7D7−4780−11D4−879F−00C04F38F0DB</sasclassid>
SAS Object Manager Error Reporting 796
<sasprogid>SASOMI.OMI.1</sasprogid>
<sasserver>SAS Metadata Server</sasserver>
<threadid>3324</threadid>
<name>OMR</name>
</connectionAttempt>
<connectionAttempt>
<description>Connected.</description>
<status>0x0</status>
<saslogin></saslogin>
<sasmachinednsname>myOtherMachine</sasmachinednsname>
<sasclassid>440196D4−90F0−11D0−9F41−00A024BB830C</sasclassid>
<sasprogid>SAS.Workspace.1</sasprogid>
<sasserver>myOtherMachineCOM − Workspace Server</sasserver>
<threadid>3324</threadid>
</connectionAttempt>
</connectionAttempts>
The following error message shows a failed IOM Bridge connection attempt. Note that the port number, machine
name, and login are listed for IOM Bridge connections.
<connectionAttempts>
<connectionAttempt>
<description>Could not establish a connection to the SAS server on
the requested machine. Verify that the SAS server has been
started with the −objectserver option or that the SAS
spawner has been started. Verify that the port Combridge is
attempting to connect to is the same as the port SAS (or the
spawner) is listening on.</description>
<status>0x8004274d</status>
<saslogin>Username</saslogin>
<sasmachinednsname>machineName</sasmachinednsname>
<sasport>1234</sasport>
<sasclassid>440196D4−90F0−11D0−9F41−00A024BB830C</sasclassid>
<sasprogid>SAS.Workspace.1</sasprogid>
<sasserver>myWorkspace − Workspace Server</sasserver>
<threadid>3324</threadid>
</connectionAttempt>
</connectionAttempts>
Windows Clients
SAS® Integration Technologies: Developer's Guide
SAS Object Manager Error Reporting 797
SAS Object Manager Code Samples
Using CreateObjectByServer to Make a Connection
Samples 1 through 5 show how to create a connection by specifying server parameters (machine, protocol, port)
directly in the source code.
Samples 1, 2, and 3 show synchronous connections. The synchronous connection is the most frequently used and is
the simplest connection to create. The advantage of making an asynchronous connection is that the client application
can continue executing code while the connection is being established. The application could start several connections
at the same time, then wait for all of them to complete. This could be useful for applications that need to run multiple
SAS servers at the same time.
Samples 4 and 5 use asynchronous connections. When making asynchronous connections, the ObjectKeeper maintains
a reference to the created object until you call ObjectKeeper.RemoveObject; this call is not shown in the sample 4 and
5 example code.
The ObjectFactory adds the newly created object to the ObjectKeeper as soon as the connection is established. You
can then use the ObjectKeeper to get the connection.
Sample 1. Make a connection to a local workspace using COM:
Dim obObjectFactory As New SASObjectManager.ObjectFactory
Dim obSAS As SAS.Workspace
Set obSAS = obObjectFactory.CreateObjectByServer(
"myName", True, Nothing, "", "")
Sample 2. Make a connection to a remote workspace using DCOM:
Dim obObjectFactory As New SASObjectManager.ObjectFactory
Dim obSAS As SAS.Workspace
Dim obServer As New SASObjectManager.ServerDef
obServer.MachineDNSName = "RemoteMachine.company.com"
Set obSAS = obObjectFactory.CreateObjectByServer(
"myName", True, obServer, "", "")
Sample 3. Make a connection to a remote workspace using IOM Bridge:
Dim obObjectFactory As New SASObjectManager.ObjectFactory
Dim obSAS As SAS.Workspace
Dim obServer As New SASObjectManager.ServerDef
obServer.MachineDNSName = "RemoteMachine.company.com"
obServer.Protocol = ProtocolBridge
obServer.Port = 6903
Set obSAS = obObjectFactory.CreateObjectByServer("myName", True, obServer,
"myUserName", "myPassword")
SAS Object Manager Code Samples 798
Sample 4. Start multiple connections asynchronously
Dim obObjectFactory As New SASObjectManager.ObjectFactory
Dim obObjectKeeper As New SASObjectManager.ObjectKeeper
Dim obSAS As SAS.Workspace
Dim obSAS2 As SAS.Workspace
Dim obServer As New SASObjectManager.ServerDef
Dim obServer2 As New SASObjectManager.ServerDef
obServer.MachineDNSName = "MachineA.company.com"
obServer.Protocol = ProtocolBridge
obServer.Port = 6903
obObjectFactory.CreateObjectByServer "myName", False, obServer,
"myUsername", "myPassword"
obServer2.MachineDNSName = "MachineB.company.com"
obServer2.Protocol = ProtocolBridge
obServer2.Port = 6903
obObjectFactory.CreateObjectByServer "myName2", False, obServer2,
"myUsername", "myPassword"
' Note that the first parameter here matches the first parameter in the
' call to CreateObjectByServer
Set obSAS = obObjectKeeper.WaitForObject("myName", 10000)
Set obSAS2 = obObjectKeeper.WaitForObject("myName2", 10000)
Sample 5. Listen for events using asynchronous connections
Public WithEvents obObjectKeeperEvents As SASObjectManager.ObjectKeeper
Private Sub Form_Load()
Dim obObjectFactory As New SASObjectManager.ObjectFactory
Dim obObjectKeeper As New SASObjectManager.ObjectKeeper
Dim obSAS As SAS.Workspace
Dim obSAS2 As SAS.Workspace
Dim obServer As New SASObjectManager.ServerDef
Dim obServer2 As New SASObjectManager.ServerDef
Set obObjectKeeperEvents = obObjectKeeper
obServer.MachineDNSName = "MachineA.company.com"
obServer.Protocol = ProtocolBridge
obServer.Port = 6903
obObjectFactory.CreateObjectByServer "myName", False, obServer,
"myUsername", "myPassword"
obServer2.MachineDNSName = "Machineb.company.com"
obServer2.Protocol = ProtocolBridge
obServer2.Port = 6903
obObjectFactory.CreateObjectByServer "myName2", False, obServer2,
"myUsername", "myPassword"
End Sub
Private Sub obObjectKeeperEvents_ErrorAdded(ByVal objectName As String,
ByVal errInfo As String)
Debug.Print "Error creating " & objectName & ": " & errInfo
End Sub
Private Sub obObjectKeeperEvents_ObjectAdded(ByVal objectName As String,
SAS® Integration Technologies: Developer's Guide
SAS Object Manager Code Samples 799
ByVal objectUUID As String)
Debug.Print "Added object " & objectName & ": " & objectUUID
Dim obSAS As SAS.Workspace
Set obSAS = obObjectKeeperEvents.GetObjectByUUID(objectUUID)
Debug.Print obSAS.UniqueIdentifier
End Sub
Using CreateObjectByLogicalName to Make a Connection
The CreateObjectByLogicalname method creates a SAS object from a logical name definition. When you use
CreateObjectByLogicalname, you must define server metadata for your connections and associate a logical name with
the connection. This technique enables you to administratively change the machines where SAS is running without
modifying your source code.
The following sample shows how to make a connection to a logical server.
Dim obObjectFactory As New SASObjectManager.ObjectFactory
Dim obSAS As SAS.Workspace
' This assumes that your metadata configuration files are in the default
' location, or that the location of your configuration files is stored
' in the registry. If this is not the case, or you want each application
' on a given machine to use its own metadata repository, then you should
' call
' obObjectFactory.SetMetadataFile systemFile, userFile, false
Set obSAS = obObjectFactory.CreateObjectByLogicalName("myName", True,
"LogicalName", "LoginReference")
Windows Clients
SAS® Integration Technologies: Developer's Guide
SAS Object Manager Code Samples 800

Using Connection Pooling
Pooling enables you to create a pool of connections to IOM servers. The connection pool can be shared between
multiple connection requests within the same process, and the connections can be reused. Pooling improves the
efficiency of connections between clients and servers because clients use the connections only when they need to
process a transaction.
When to Use Pooling
Note: Pooling can only be used with SAS Workspace Servers.
Pooling is most useful for applications that require the use of an IOM server for a short period of time. Because
pooling reduces the wait that an application incurs when establishing a connection to SAS, pooling can reduce
connection times in environments where one or more client applications make frequent but brief requests for IOM
services. For example, pooling is useful for Web applications, such as Active Server Pages (ASP).
Pooling is least useful for applications that acquire an IOM server and use the server for a long period of time. A
pooled connection does not offer any advantage to applications that use connections for an extended period of time.
What Kind of Pooling to Use
The SAS Object Manager supports two different pooling mechanisms: SAS Integration Technologies pooling and
COM+ pooling. The most noticeable difference between the two mechanisms is the way in which the pools are
administered. The two pooling mechanisms also differ in the way the programmer makes the call to get the pooled
object connection.
For Windows clients, you can choose between SAS Integration Technologies and COM+ pooling. For information,
see Choosing SAS Integration Technologies or COM+ Pooling.
Note: Java applications and COM applications cannot share the same pool, but they can share the administration
model used for the pools.
Using the Pooled Connection Object
In both the COM+ case and the SAS Integration Technologies case, the ObjectManager represents a pooled
connection with the PooledObject COM object. The PooledObject COM object has the 'SASObject' property, which
holds the interface pointer to the object actually being pooled. It also has the ReturnToPool() method to allow the
object to be reused.
When a PooledObject object is obtained, the calling application keeps a reference to the PooledObject object for as
long as it needs to use the object. You can use ReturntoPool to release the PooledObject connection and return the
associated connection to the pool. Returning the PooledObject connection to the pool also causes the object to be
cleaned up so that no further calls can be made on the object.
For more information about the client−side coding for pooling, see the online Help shipped with the SAS Object
Manager.
Using Connection Pooling 801
Using Puddles
Each pool can have any number of puddle objects. The metadata server administrator can choose to partition a pool of
connections into several puddles in order to allow different users connecting to the pool different permissions when
running in SAS. For example, one user might be granted access to a puddle that can access summary data sets within
SAS; another executive user might be granted access to a different puddle that can access more detailed data.
Windows Clients
SAS® Integration Technologies: Developer's Guide
Using Connection Pooling 802

Choosing SAS Integration Technologies or COM+
Pooling
The SAS Object Manager (or Version 8 SAS Workspace Manager) supports two different pooling mechanisms: SAS
Integration Technologies and COM+ pooling. The main differences between the two pooling mechanisms are as
follows
the way in which the pools are administered• the way the programmer makes the call to get the pooled connection (workspace).•
COM+ connection pooling has the following limitations:
COM+ pooling cannot be used on Windows NT.• COM+ does not allow multiple pooling configurations on the same machine (Windows 2000 only).•
You might choose SAS Integration Technologies pooling instead of COM+ if any of the following are true:
you use Windows NT• you use Windows 2000 and want multiple pools on the same machine• you want to use the security mechanism available in SAS Integration Technologies pooling• you want to use the same administration model for Java applications and COM applications• you want to specify the pooling parameters in the source code.•
Note: Java applications and COM applications cannot share the same pool; however, for SAS Integration
Technologies pooling, they can share the administration model used for the pools.
Note: You cannot use SAS Integration Technologies and COM+ pooling configurations on the same machine.
For information about setting up SAS Integration Technologies pooling, see Using SAS Integration Technologies
Pooling
For information about setting up COM+ pooling, see Using COM+ Pooling.
Windows Clients
Choosing SAS Integration Technologies or COM+ Pooling 803

Using SAS Integration Technologies Pooling
SAS Integration Technologies pooling uses the SAS Object Manager's implementation as a COM singleton object so
that only a single instance of the ObjectFactory component is created in any given process. This mechanism makes the
same pools available to all callers in the same process.
Note: You define a pool by a logical name. When using ObjectPools.CreatePoolByLogicalName, a single pool can
contain connections from multiple servers and multiple logins. When using ObjectPools.CreatePoolByServer, a pool
consists of objects from a single server and a single login.
To implement pooling in your application:
Create the pool (use CreatePoolByServer or CreatePoolByLogicalName). You only need to create the pool
one time, usually when the application is started. If you try to create a pool using a logical name that has
already been used in a pool, you will receive an error.
1.
Use GetPooledObject to get a PooledObject object from the pool. The PooledObject is a wrapper around the
SASObject that is being pooled. This PooledObject wrapper is necessary to notify the pooling code when you
are finished using the pooled workspace. When you use pooling, keep a reference to the PooledObject for as
long as you keep a reference to the object.
2.
Use the object for processing such as running a stored process and receiving output from SAS.3. Use ReturnToPool to return the PooledObject object to the pool so it can be used again.4. Release the object. In VB, you can release these objects by either letting them go out of scope or by calling
set obPooledObject = Nothing
5.
The pool continues to run until either your process exits or you call Shutdown() on each pool. Releasing your
reference to ObjectManager does not release the pool.
6.
For example code, see SAS Object Manager pooling example.
In an ASP application, you can create a pool in one of two ways:
in the Application_OnStart callback in the global.asa• in the code that calls to get the PooledObject•
When a pool is running, methods and properties are available on the SASObjectManager.ObjectPool object to look at
statistics—how many total connections are in the pool, and how many are in use—about the pool, and shut down the
pool.
Supplying Pooling Parameters Directly in the Source Code
To supply pooling parameters in the source code:
Create both a Server object and a Login object.1. Fill out the relevant properties.2. Pass the objects to ObjectManager.ObjectPools.CreatePoolByServer.3.
The following properties are used to configure SAS Integration Technologies pooling. You specify some of the
properties on the LoginDef object and some of the properties on the ServerDef object.
ServerDef.MaxPerObjectPool
Using SAS Integration Technologies Pooling 804

Specifies the maximum number of servers that should be created from the provided ServerDef object. A good
starting place for this number is the number of CPUs that are available on the machine that is running SAS.
ServerDef.RecycleActivationLimit
Specifies the number of times that a workspace is used before the process it is running in is replaced. This is
useful for capping any memory leaks or non−scalable resource usage. A value of 0 means to never recycle the
processes.
ServerDef.RunForever
The value for this property must be either TRUE or FALSE. If the value is FALSE, then unallocated live
connections will be disconnected after a period of time (specified by the value of ServerDef.ShutdownAfter).
If the value is TRUE (the default value), unallocated live connections will remain alive indefinitely.
ServerDef.ShutdownAfter
Specifies the number of minutes that an unallocated live connection will wait to be allocated to a user before
shutting down. This property is optional and it is ignored if the value of ServerDef.ServerRunForever is
TRUE. The value must not be less than 0, and it must not be greater than 1440 (the number of minutes in a
day). The default value is 3. If the value is 0, then a connection returned to a pool by a user will be
disconnected immediately unless another user is waiting for a connection from the pool.
LoginDef.MinSize
Specifies the minimum number of workspaces using this LoginDef that are created when the pool is created.
LoginDef.MinAvail
Specifies the minimum number of workspaces using this LoginDef that need to be available. Note that
MaxPerObjectPool will never be exceeded.
LoginDef.LogicalName
This is only used when a pool is created using CreatePoolByLogicalName. It is used to determine which set of
LoginDefs in LDAP to use in the pool.
For more information about the client−side coding for pooling, see the online Help shipped with the Object Manager.
Administering Pooling Using a SAS Metadata Server
When using a SAS Metadata Server with the SAS Object Manager, you create a pool by specifying a logical name
that matches a logical server name on the SAS Metadata Server.
The administrator can associate puddles with the pooled logical server name and administer pooling and puddle
parameters using SAS Management Console. For more information, see Planning and Configuring Pooling in the SAS
Integration Technologies: Server Administrator's Guide.
Authentication and Authorization Checking
The authentication and authorization checking in SAS Integration Technologies pooling allows you to create a pool
that contains connections that have been authenticated using different user IDs. This is useful for allowing the access
to sensitive data to be controlled on the server machine instead of the middle tier.
Checking is only performed in pools that were created with CreatePoolByLogicalName where the
checkCredentialsOnEachGet parameter is set to TRUE.
Authentication is performed by using the user ID and password to authenticate a new connection to a SAS Metadata
Server. The pool is searched for a puddle whose access group has the authenticated user as a member.
Authentication is performed using the following steps:
Binding to the SAS Metadata Server using the credentials provided to GetPooledObject.1.
SAS® Integration Technologies: Developer's Guide
Using SAS Integration Technologies Pooling 805

If that bind fails, then GetPooledObject will return an error.
If that bind is successful, then it is released and not used; it is only connected to authenticate the credentials.
Authorization is then performed against the set of identities in the puddle:
If a match is not found, then ERROR_ACCESS_DENIED is returned (0x80004005).♦ Otherwise, a pooled object is returned when one becomes available.♦
2.
Use of this feature allows user IDs and passwords to be used by people who are not allowed to know what those user
IDs and passwords are (assuming the security settings are specified properly on the SAS Metadata Server).
Administering Pooling Using an LDAP Server
For LDAP, you can specify pool parameters using the IT Administrator. For more information, see Setting up
Workspace Pooling in the SAS Integration Technologies: Administrator's Guide (LDAP Version).
Authentication and Authorization Checking
The authentication and authorization checking in SAS Integration Technologies pooling allows you to create a pool
that contains connections that have been authenticated using different user IDs. This is useful for allowing the access
to sensitive data to be controlled on the server machine instead of the middle tier.
Checking is only performed in pools that were created with CreatePoolByLogicalName where the
checkCredentialsOnEachGet parameter is set to TRUE.
Authentication is performed using the following steps:
Binding to the LDAP server using the referenceDN and referenceDNPassword provided to GetPooledObject.1. If that bind fails, then GetPooledObject will return an error.
If the bind is successful, that connection will be released, and the main LDAP connection will then be used to
look up the allowedClientDN attribute on logins that are appropriate for the requested pool.
If a match is not found, then ERROR_ACCESS_DENIED is returned (0x80004005).♦ Otherwise, a pooled object is returned when one becomes available.♦
2.
Use of this feature allows user IDs and passwords to be used by people who are not allowed to know what those user
IDs and passwords are (assuming the security settings are specified properly on the LDAP server). Only the userDN
specified in SASObjectManager.SetLDAPUser needs to have access to the login information.
Windows Clients
SAS® Integration Technologies: Developer's Guide
Using SAS Integration Technologies Pooling 806

Using COM+ Pooling
To obtain a PooledObject object, create a new PooledObject object using COM. The COM+ interceptors detect this
creation and take care of pooling the PooledObject objects. The PooledObject object has been written to support the
COM+ pooling mechanism.
See using COM+ pooling for an example.
Administering COM+ Pooling
To administer a COM+ pool, use the COM+ Component Services administrative tool, which is a standard Microsoft
Management Console (MMC) plug−in that ships with Windows 2000.
You can configure COM+ pools in two different ways:
Library application — each process has its own pool.• Server application — the pool is shared by all processes on the same machine.•
To create a new COM+ server application:
Start the Component Services administrative tool: select Start Programs Administrative Tools
Component Services.
1.
Expand Component Services Computer COM+ Applications. Right−click COM+ Applications and
select New Application. This starts a wizard. Click Next.
2.
Select Create an Empty Application.3. Enter a name of your choice, and select Server application as the Activation Type. Click Next.4. Specify an identity, and click Next.5. Click Finish.6.
To add the PooledObject component to the application:
In the tree view, expand the application you previously created in order to see Components and Roles.1. Right−click Components and select New Component, which brings up a wizard.2.
Click Next, then click Import components that are already registered.3. Select SASObjectManager.PooledObject.1, then click Next and Finish.4.
To administer the pooling properties:
Right−click SASObjectManager.PooledObject.1 under the Components node of the application you created
and select Properties from the pop−up menu.
1.
Select the Activation tab.2. Select the Enable object pooling check box. Enter the properties.3. You can also enter a constructor string, which allows you to specify which machine SAS should run on. For
more information, see Constructor Strings.
Note: If you do not specify a constructor string, the SAS Object Manager will create workspaces on the local
machine using COM. It is only necessary to configure a metadata server with pooling metadata if you specify
a logicalName.
4.
Using COM+ Pooling 807
Constructor Strings
The constructor string is a single string that specifies the parameters that are used to initially create the pool. The SAS
Object Manager (or Version 8 SAS Workspace Manager) requires that the constructor string contain a set of
name/value pairs, with the names separated from the values by an equals sign(=), and the pairs separated by a
semi−colon (;). If no parameters are specified, then a pool consisting of SAS servers running on the local machine will
be created. You should never use quotation marks (") in the constructor string. The constructor string contains the only
attributes specific to SAS.
If errors occur when creating a workspace, the SAS Object Manager (or Version 8 SAS Workspace Manager) writes
entries to the Event Log.
Constructor Parameters Used to Connect with Metadata
logicalName
Specifies which sasServer objects to use when creating objects in the pool.
referencedn
Specifies the login to use for authentication. This is only necessary for an IOM Bridge connection. For the
SAS Metadata Server, specifying only the logicalName parameter will set the value of referencedn as the
identity of the user that is specified in the metadata configuration file.
Here is an example of a valid constructor string for LDAP:
logicalname=pooltest;referencedn=cn=Dan,cn=Users,dc=dtd−dom,dc=sas,dc=com
Here is an example of a valid constructor string for a SAS Metadata Server:
logicalname=pooltest;referencedn=A5YEODSG.AE00005L
Constructor Parameters Used to Connect without Metadata
classIdentifier
specifies the class ID number. For example, 2887E7D7−4780−11D4−879F−00C04F38F0DB specifies a
SAS Metadata Server. The default value is 440196D4−90F0−11D0−9F41−00A024BB830C, which
specifies a SAS Workspace Server.
machineDNSName
specifies the name of the machine to connect to.
protocolcan be either com or bridge.
port specifies the port number of a server to connect to. (This should only be specified for an IOM Bridge
connection.)
serviceName
used to resolve a TCP/IP service to a port number. This should only be specified for an IOM Bridge
connection. Only one of the port or serviceName parameters should be specified.
loginName
specifies the user ID to use when connecting to a SAS server. This should only be specified for an IOM
Bridge connection.
password
defines the password that authenticates the loginName. This should only be specified for an IOM Bridge
connection.
SAS® Integration Technologies: Developer's Guide
Using COM+ Pooling 808
Windows Clients
SAS® Integration Technologies: Developer's Guide
Using COM+ Pooling 809
Pooling Samples
Using COM+ Pooling
The following code sample shows how to create and use a Workspace object using a COM+ pooling configuration:
' Create the pooled object
Dim obPooledObject As New SASObjectManager.PooledObject
Dim obSAS As SAS.Workspace
Set obSAS = obPooledObject.SASObject
' Test the object
Debug.Print obSAS.Utilities.HostSystem.DNSName
' Return the object to the pool
set obSAS=Nothing
obPooledObject.ReturnToPool
Using SAS Integration Technologies Pooling
The following code sample shows how to create and use a Workspace object using a SAS Integration Technologies
pooling configuration:
Set obServer = CreateObject("SASObjectManager.ServerDef")
Set obLogin = CreateObject("SASObjectManager.LoginDef")
Set obObjectFactory = CreateObject("SASObjectManager.ObjectFactory")
' Define a ServerDef and LoginDef for the pool
obServer.MachineDNSName = "localhost"
' For VBScript, set obServer.Protocol to 2 instead of ProtocolBridge
obServer.Protocol = ProtocolBridge
obServer.Port = 8591
obServer.ShutdownAfter = 1
obServer.RunForever = False
obServer.RecycleActivationLimit = 10000
obLogin.LoginName = "mydomain\myuserid"
obLogin.Password = "myPassword"
' Create the pool
Set obPool = obObjectFactory.ObjectPools.CreatePoolByServer(
"myPool", obServer, obLogin)
' Create a pooled object
Set obPooledWorkspace = obPool.GetPooledObject("", "", 10000)
Set obSAS = obPooledWorkspace.SASObject
' Test the object
Debug.Print obSAS.Utilities.HostSystem.DNSName
' Return the object to the pool
Set obSAS = Nothing
obPooledWorkspace.ReturnToPool
Set obPooledWorkspace = Nothing
Windows Clients
Pooling Samples 810

Using the SAS IOM Data Provider
The SAS IOM Data Provider is an OLE DB data provider that supports access to SAS data sets that are managed by
SAS Integrated Object Model (IOM) servers. Although an object server is a scriptable interface to SAS, manipulating
data in that server context is best accomplished with the IOM Data Provider.
OLE DB is a set of interfaces that evolved from the Microsoft Open Database Connectivity (ODBC) data access
interface. OLE DB interfaces provide a standard by which applications can uniformly access data located over an
enterprise's entire network and stored in a variety of formats—such as SAS data sets, database files, and nonrelational
data stores. OLE DB interfaces can provide much of the same functionality that is provided by database management
systems. In addition, OLE DB for Online Analytical Processing (OLAP) extends the OLE DB interfaces to provide
support for multidimensional data stores.
Through the OLE DB interfaces, the IOM Data Provider adds the following functionality to consumer programs:
simultaneous user updates• SQL processing• a choice of either exclusive access (member−level lock) or multiple user access (record−level lock) to SAS
data files, selectable on a per−rowset open basis
•
access to SAS data files on SAS System 8 and later SAS IOM servers• integrated SAS formatting services, which are the included core set of SAS formats used when reading or
modifying data
•
use of basic OLE DB schema rowsets, which enable consumers to obtain metadata about the data source that
they use
•
support for random access using the ADO adOpenDynamic cursor type and recordset bookmarks.•
OLE DB data providers—including the IOM Data Provider—may be accessed through the low−level OLE DB
interfaces using Visual C++. Alternatively, they may be accessed through the higher−level ActiveX Data Objects
(ADO) using Visual C++, VBScript, Java, JScript, or Visual Basic. In .NET programming languages like C# and
VB.NET, the IOM Data Provider can be used via the ADO.NET OLE DB data provider. For examples using
ADO.NET, see Accessing SAS Data with ADO.NET.
The IOM Data Provider is documented in the SAS 9.1 Data Providers: ADO/OLE DB Cookbook . This cookbook,
which applies to all four SAS Data Providers, contains ADO examples written in Microsoft Visual Basic as well as
OLE DB examples written in Microsoft Visual C++. You can either apply the examples directly or modify them to fit
your needs.
Note: When you create an IOM Data Provider connection, you specify the unique identifier of a workspace object.
The IOM Data Provider can only locate the specified workspace if it is stored in either a WorkspaceManager or an
ObjectKeeper. Depending on the interface that you use, store your workspace as follows:
If you use the ObjectManager, create an ObjectKeeper and add your workspace to it manually by using the
ObjectKeeper's AddObject function. When you have finished using the IOM Data Provider, remove the
workspace by using the RemoveObject function.
•
If you use the WorkspaceManager, specify VisibilityProcess when you create your workspace. When
you specify this attribute, the WorkspaceManager stores the workspace automatically. When you have
finished using the IOM Data Provider, remove the workspace by using the RemoveWorkspace function.
•
Windows Clients
Using the SAS IOM Data Provider 811

Using the Workspace Manager
Note: It is recommended that you use the Object Manager interface in order to take advantage of the new features
available with Version 9 Integration Technologies.
As discussed in Using IOM to Develop Applications in the SAS Integration Technologies Technical Overview, the
SAS IOM components are arranged in a hierarchy and the root of the hierarchy is a SAS workspace object. A SAS
workspace represents a session with the SAS System and is functionally equivalent to a SAS Display Manager session
or the execution of base SAS software in a batch job.
The SAS Workspace Manager is a component that executes on the client machine and it is used to create and manage
SAS workspaces on IOM servers. The Workspace Manager uses IOM server definitions that are administered
separately from the application. This enables, for example, a client application to connect to a server simply by using a
logical name. The definition for this server can change as required without affecting the application.
The Workspace Manager can create a SAS Workspace in one of three ways:
Through local COM if the SAS Server runs on the same machine as the client• Through DCOM if the SAS Server runs on another machine that supports DCOM• Through the IOM Bridge for COM (SASComb.dll) if the SAS Server runs on another machine that does not
support COM/DCOM functionality (UNIX [Solaris, HP/UX, AIX] or z/OS)
•
With the Workspace Manager, you can perform the following tasks:
Launch SAS Workspaces• Select between running SAS Workspaces• Share IWorkspace pointers within a process• Access a Workspace from within Web pages• Use ADO within a SAS Workspace• Store and retrieve definitions using LDAP or a flat file•
The Workspace Manager can be used from Visual Basic, C, C++, and VBScript (with the help of Scripto).
Windows Clients
Using the Workspace Manager 812
Launching IOM Servers
Definitions
You can specify parameters for the definitions in either of two locations:
source code.• LDAP server or LDIF−file.•
There are three definitions that can be created to assist in launching an IOM Server:
Server definition (ServerDef)
A server definition must be created before an IOM Server can be launched with the workspace manager. The
server definition can either be loaded from persistent storage (a file or LDAP server), or created dynamically.
A ServerDef includes a Logical Name attribute. The server definition is independent of the user.
1.
Login definition (LoginDef)
This is user−specific information such as a user name and password. Login definitions are a convenience and
are not required for creating a connection to an IOM server. They provide a mechanism for storing persistent
definitions of user names and passwords.
LoginDefs also allow multiple definitions for the same user on different security domains. For example, you
could use one user name and password on MVS and a different one for UNIX. This is also possible without
the use of a login definition, but the user will need to enter the username/password each time a server is
launched.
2.
Logical name definition (LogicalNameDef)
The logical Name definition allows a description to be associated with each logical name used in a server
definition. Logical name definitions are not used to launch a server. However, a logical name is required to
launch a server when using the login definition.
3.
These definitions may be stored in a file on the local system or may be stored in a network directory (LDAP server).
Finding Definitions
The SAS Workspace Manager can access system−wide state information that is stored in the Windows registry. This
system−wide state consists of three search specifications for finding launch information:
A per−user file for local computer storage.1. A local computer system−wide file.2. An LDAP container (network directory folder) in which server definitions may be found. The
SASWorkspaceManager will find definitions directly in this folder and can also find pointers to other
containers in this folder.
3.
This information is designed to make it easy to find launch information in a standard location. Also, UI applications
can immediately list launch definitions found there.
Launching IOM Servers 813
Definition Persistence
Login and Server definitions can be stored using either LDAP or via an LDIF file.
LDAP
Persistence in LDAP is done through two objectclasses: sasServer and sasLogin. The BaseDN parameter of
SetLDAPServer specifies the start of the SAS application tree.
LDIF file
The LDAP Data Interchange Format (LDIF) is the standard for the interchange of LDAP data. The SAS Workspace
Manager has the ability to read LDIF files.
Note that LDIF specifies that each object definition start with a DN, but we don't actually know the full DN of any
object. The part that is not known is replaced with "$SUFFIX$" to allow administrators to use an automated
search/replace mechanism should they want to import a file into LDAP.
This format is also supported by the SAS Spawner.
Security Considerations
The userid that is used to log on to SAS will be determined when the workspace is launched. Once launched, the
userid cannot be changed.
Stored passwords are not encrypted. This applies to both LDAP entries and files.
The information in a file is only restricted by the permissions on the file. If you are concerned about security, you may
not want to use files to store LoginDefs.
Administrators of LDAP servers should configure the directory such that the right to read each LoginDef is restricted
to the owner of the LoginDef. Granting access to a LoginDef allows a user to start SAS and log on as the User defined
in the LoginDef. It also allows the user to view the password. Also note that the password is sent across the wire in
plaintext.
Windows Clients
SAS® Integration Technologies: Developer's Guide
Launching IOM Servers 814
Administering the SAS Workspace Manager
For the SAS Workspace Manager, administration tasks include creating and saving LoginDefs, ServerDefs, and
LogicalNameDefs. There are several alternatives for the administration of definitions. Definitions can be
administrated directly through the IWorkspaceManager interfaces. These interfaces can write to LDAP and files. Note
that the WorkspaceManager will only read/write those attributes that are of interest to it. If you are using files, any
existing definitions or attributes that are not used by the Workspace Manager will be deleted, so caution should be
used. Additional attributes that are defined for these objects are ignored.
Administration can also be performed on LDAP using a generic LDAP modification tool, such as LDIFDE (included
with Windows 2000) or ldapadd and ldapmodify (included with the UMich slapd distribution.) LDIF files can also be
imported to LDAP.
A text editor is used to modify the LDIF files.
Most (if not all) administration should be done using the SAS Integration Technologies Administrator, which
consolidates the administration chores of the SAS Workspace Manager, the SAS Spawner, and SAS
Publish/Subscribe technologies.
Note that it is not necessary to perform any administration at all. Definitions can be created, used, then discarded
without ever being persisted.
Windows Clients
Administering the SAS Workspace Manager 815
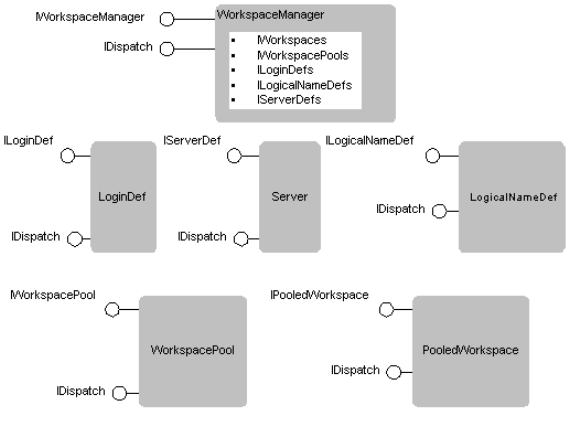
SASWorkspaceManager Interfaces
The figure below shows the relationship of the interfaces provided with the Workspace Manager.
As the figure shows, the principal interfaces of the SASWorkspaceManager are as follows:
IWorkspaceManager
The IWorkspaceManager interface is the top level interface. It provides collection methods for ServerDefs,
LoginDefs, LogicalNameDefs, SAS Workspaces and WorkspacePools.
•
IWorkspaces
This interface is used to create, enumerate, locate, and remove running SAS Workspace instances. The only
SAS Workspaces that can be manipulated through IWorkspaces are those which are created from
IWorkspaces.
•
ILoginDef
This interface allows you to create and manipulate login definitions (LoginDefs). A loginDef is only needed
for connections using the IOM Bridge for COM. SSPI, the default NT security, is used for COM/DCOM
connections.
•
ILoginDefs
ILoginDefs contains the standard collection methods Count, _NewEnum, Add, Item, and Remove where the
key is the loginDefName. It also supports one additional method: CheckAccess.
•
IServerDef
The workspace manager uses the server def to determine how to connect to the server. For a local or dcom
server, only the Name and Hostname values need be filled out. The IOM Bridge for Com requires Protocol to
be set to ProtocolBridge; Port and ServiceName may be used with the IOM Bridge for COM.
•
IServerDefs
IServerDefs contains the standard collection methods Count, _NewEnum, Add, Item, and Remove where the
key is the serverDefName. It also supports one additional method: CheckAccess.
•
SASWorkspaceManager Interfaces 816

IWorkspacePools
This interface is used to create, enumerate, locate, and remove WorkspacePool objects.
•
IWorkspacePool
This interface is used to configure parameters for a WorkspacePool.
•
IPooledWorkspace
This interface is used to notify a pool when the associated SAS workspace can be returned to the pool.
•
Creating a Workspace
The reference documentation for using the SASWorkspaceManager interfaces is shipped with the Workspace
Manager as online help in .chm format. The following descriptions provide usage information for two commonly used
methods:
CreateWorkspaceByLogicalName• CreateWorkspaceByServer•
CreateWorkspaceByLogicalName
This method creates a SAS Workspace from a logical name definition. The signature for this method is shown below:
CreateWorkspaceByLogicalName([in]BSTR name,
[in] enum Visibility visibility, [in]BSTR logicalName,
[in]BSTR referenceDN, [out]BSTR *xmlInfo, [out, retval]IWorkspace
**newWorkspace)
The invocation of this method results in the following sequence of steps to create the new workspace:
Create a list of all ServerDefs that define the provided logicalName1. Select the first serverDef in the list (Note that the first may vary depending on the LDAP server.)2. Locate a LoginDef that matches both the DomainName (from the ServerDef) and the provided referenceDN3. Attempt to create a connection, once for each MachineDNSName in the serverDef, adding the results (either
success or failure) into the xmlInfo.
4.
If a connection to SAS could not be established, the next serverDef is tried and the process is repeated from
step 3
5.
If no Workspace has been created after going through all the hostnames in each serverDef and all the
serverDefs that match the given logicalName, an error is returned (SEE_XML). Also, the table of
connectionAttempts is returned in Err.Description (and if IWorkspaces.UseXMLInErrorInfo is true).
6.
If a Workspace is created, the IWorkspace is added to an internal list in the WorkspaceManager. In this case,
the errorString will still show all failed attempts, if any.
7.
The name that is passed to the method can be used in other IWorkspaces methods to determine which workspace to
locate or remove. The name is also set on IWorkspace−>Name before this method returns. The SAS Workspace
Manager does not ever look at IWorkspace−>Name, so a client could change the name after calling Create. The
xmlInfo is only defined when this method returns an IWorkspace. See Error Reporting for details.
Note that the WorkspaceManager should be notified when a Workspace is no longer in use, so the workspace can be
removed from the internal list, and so the reference the WorkspaceManager holds on the Workspace can be released.
SAS® Integration Technologies: Developer's Guide
SASWorkspaceManager Interfaces 817
CreateWorkspaceByServer
This method creates a workspace from a ServerDef object instead of a logical name. It also accepts the actual
userName and password instead of a reference to a LoginDef. This method is preferred over
CreateWorkspaceByLogicalName since it does not require username/password pairs to be written to a file or a
network directory.
The signature for this method is shown below:
CreateWorkspaceByServer([in]BSTR workspaceName, [in] enum
SASWorkspaceManagerVisibility visibility, [in]IServerDef *serverDef,
[in]BSTR userName, [in]BSTR password, [out]BSTR *xmlInfo,
[out, retval]IWorkspace **newWorkspace)
This method attempts to connect to each of the hosts listed in the provided serverDef, one at a time, until either a
successful connection is made or all hosts have failed. The userName/password is not required for serverDefs that
specify ProtocolCom.
Windows Clients
SAS® Integration Technologies: Developer's Guide
SASWorkspaceManager Interfaces 818
Error Reporting
If the call succeeds in obtaining a workspace, the method returns S_OK. However, there are many reasons an error
may occur. Sometimes an error can occur even before the connection attempt is made. The following is an example of
such an error:
Requested logical name was not found•
Other errors can occur during the connection attempt. Examples include the following:
Invalid userid/password• Couldn't connect to a SAS server• Invalid hostname• Server configuration error•
Errors can occur even though a successful connection is established. Errors that occur when connecting are reported
either through the IErrorInfo mechanism (if no SAS workspace is created) or returned in the errorString parameter (if
a SAS workspace is created.) The Err.Description (IErrorInfo−>Description() in C) and errorString both use the same
format which is XML.
If UseXMLInErrorInfo is set to false (it defaults to true), Err.Description will only contain a single error string, that
refers to the last connection attempted.
Error XML
The error information returned through XML allows applications to fix the problems detected. Applications interested
in fixing these errors will need to parse the XML and possibly provide a UI to the user, or send a message to the
administrator to get the errors fixed so they don't occur again. Here is a sample of the error XML that gets generated
(and returned in the errorString parameter of either CreateWorkspaceByLogicalName or CreateWorkspaceByServer)
when there is a successful connection made, but the first attempt failed:
<connectionAttempts>
<connectionAttempt>
<sasservername>MyServer</sasservername>
<machineDNSName>MyServer.MyCompany.com</machineDNSName>
<saslogin>MyUserID</saslogin>
<status>0x8004274d</status>
<description>Could not establish a connection to the SAS
server on the requested machine. Verify that the SAS server has
been started with the −objectserver option or that the SAS
spawner has been started. Verify that the port Combridge is
attempting to connect to is the same as the port SAS (or the
spawner) is listening on.</description>
</connectionAttempt>
<connectionAttempt>
<sasserver>MyServer</sasserver>
<machineDNSName>MyServer.MyCompany.com</machineDNSName>
<saslogin>MyUserID</saslogin>
<status>0x0</status>
<description>Connected</description>
</connectionAttempt>
</connectionAttempts>
Error Reporting 819
Windows Clients
SAS® Integration Technologies: Developer's Guide
Error Reporting 820
Using Workspace Pooling
Workspace pooling enables you to create a pool of connections to IOM servers that are shared and reused amongst
multiple client applications. This feature can dramatically reduce connection times in environments where one or
more client applications make frequent but brief requests for IOM services. This is typically the case, for example, in
Active Server Pages (ASP) applications. Pooling reduces the wait that an application incurs when establishing a
connection to SAS and is therefore most efficient when used in such applications. A pooled workspace does not offer
any significant advantage in applications that use workspaces for an extended period of time.
The Workspace Manager supports two different pooling mechanisms: COM+ pooling and Integration Technologies
pooling. The most noticeable difference between the two mechanisms is the way in which the pools are administered.
They also differ in the way the programmer makes the call to get the pooled workspace.
In both the COM+ case and the Integration Technologies case, the WorkspaceManager represents a pooled workspace
with the PooledWorkspace COM object. This object has a single property: workspace. Once a PooledWorkspace
object is obtained, the calling application keeps a reference to the PooledWorkspace object for as long as it needs to
use the workspace. Releasing the PooledWorkspace object returns the associated workspace to the pool. It also causes
the workspace to be cleaned up, so it is impossible to make any more calls on the workspace once the associated
PooledWorkspace is released.
COM+ Pooling
COM+ Workspace Pooling is only available on operating systems that support COM+, for example, Windows 2000. It
cannot be used on Windows NT, Windows 95, or Windows 98. Another limitation of the COM+ mechanism is that it
only allows a single pool on any given machine at a time (Microsoft may change this in future releases of Windows
2000).
COM+ pools can be configured in two different ways:
Library application
With a library application, each process has it's own pool.
•
Server application
With a server application, the pool is shared by all processes on the same machine.
•
Administration
Administration of a COM+ pool is done using the COM+ Component Services administrator, which is a standard
Microsoft Management Console (MMC) snap−in that comes with Windows 2000.
To create a new COM+ server application:
Start the Component Services administrator: select Start−>Programs−>Administrative Tools−>Component
Services
1.
Expand Component Services−>Computer−>COM+ Applications. Right click on COM+ Applications and
select New−>Application. This starts a wizard. Click next.
2.
Select to Create an Empty Application3. Enter a name of your choice, and select an Activation Type of Server application. Click next.4.
Using Workspace Pooling 821
Specify an identity, and click next.5. Click finish6.
To add the PooledWorkspace component to the application:
Expand the application your created above in the tree view, so you see Components and Roles.1. Click on Components, then right click and select New−>Component, which brings up a wizard.2. Click next, then Import components that are already registered.3. Select SASWorkspaceManager.PooledWorkspace.1, then click Next and Finish.4.
To administer the pooling properties:
Click on SASWorkspaceManager.PooledWorkspace.1 under the Components node of the application you
created.
1.
Right click on SASWorkspaceManager.PooledWorkspace.1, and select properties.2. Select the Activation tab.3. Click the "Enable object pooling" check box. Now enter the properties you want.4. You can also enter a constructor string here, which allows you to specify which machine SAS should run on.
The constructor string is described below.
5.
The Constructor String
The only SAS−specific attributes here are those that are necessary in the Constructor String. The constructor string is
a single string that specifies the parameters that are used to initially create the pool. The Workspace Manager requires
that the constructor string contain a set of name value pairs, with the names separated from the values by an equal (=),
and the pairs separated by a semi colon (;). If no parameters are specified, then a pool consisting of SAS servers
running on the local machine will be created. You should never use quotes in the constructor string.
logicalname
Specifies which sasServer objects to use when creating Workspaces in the pool. This can only be used when
workspace definitions are persisted in a file or LDAP. The location of the file or LDAP server is found by the
workspace manager in the system registry.
referencedn
Specifies the referenceDN to use for authentication. This is only necessary when a sasServer is found that
requires the bridge.
machineDNSName
The name of the machine to connect to.
protocol
Either "com" or "bridge" (don't use the quotes).
port
The port number of a bridge server to connect to.
serviceName
Used to resolve a TCP/IP service to a port number. This should only be specified for a "bridge" protocol. Only
one of port or serviceName should be specified.
loginName
The userid to use when connecting to a SAS server with the "bridge" protocol.
password
The password which authenticates the loginName.
Here is an example of a valid constructor string:
SAS® Integration Technologies: Developer's Guide
Using Workspace Pooling 822

logicalname=pooltest;referencedn=cn=Dan,cn=Users,dc=dtd−dom,dc=sas,dc=com
The WorkspaceManager will write entries to the Event Log if errors occur when creating a workspace. This log will
include the constructor string being used.
Using COM+ Pooling
To obtain a PooledWorkspace object, the programmer simply creates a new PooledWorkspace object using COM, just
as he would with any other COM component. The COM+ interceptors detect this and take care of pooling the
PooledWorkspace objects. The PooledWorkspace object has been written to support the COM+ pooling mechanism.
Here is an example of using COM+ pooling.
Integration Technologies Pooling
There are several reasons why you might choose Integration Technologies pooling instead of COM+:
You don't have COM+.1. You want multiple pools on the same machine.2. You want to use the security mechanism available in Integration Technologies pooling.3. You want to use the same administration model for Java applications and COM applications.4. You want to specify the pooling parameters in the source code.5.
Note that Java applications and COM applications cannot share the same pool, but they can share the administration
model used for the pools.
An important concept to note is that a pool is defined by a logical name. When using
WorkspacePools.CreatePoolByLogicalName, a single pool can contain Workspaces from multiple Servers and
multiple logins. When using WorkspacePools.CreatePoolByServer, a pool will consist of Workspaces from a single
Server and a single Login.
The authentication and authorization checking in Integration Technologies pooling allows you to create a pool that
contains SAS Workspaces that have been authenticated using different user id's. This is useful for allowing the access
to sensitive data to be controlled on the server machine instead of the middle tier. Checking is only performed in pools
that were created with CreatePoolByLogicalName where the checkCredentialsOnEachGet parameter is set to TRUE.
Authentication is done by binding to the LDAP server using the referenceDN and referenceDNPassword provided to
GetPooledWorkspace. If that bind fails, then GetPooledWorkspace will return INVALID_LDAP_CREDENTIALS.
That connection will be released, and the main LDAP connection (as defined by calls to
IWorkspaceManager.SetLDAPServer and IWorkspaceManager.SetLDAPUser) will then be used to lookup the
allowedClientDN attribute on Logins that are appropriate for the requested pool. If a match is not found, then
ERROR_ACCESS_DENIED is returned (0x80004005). Otherwise, a pooled workspace will be returned when one
becomes available. Use of this feature allows user IDs and passwords to be used by people who are not allowed to
know what those user ID and/or passwords are (assuming the security settings are specified properly in the LDAP
server.) Only the userDN specified in SASWorkspaceManager.SetLDAPUser needs to have access to the login
information.
SAS® Integration Technologies: Developer's Guide
Using Workspace Pooling 823
Administration
Pool parameters can be specified in one of three places:
In LDAP. This is done using the IT Administrator. This requires the WorkspaceManager.Scope property to be
ScopeGlobal.
1.
In an LDIF−formatted file. Editing of the file is done by your favorite text editor. This requires the
WorkspaceManager.Scope property to be either ScopeLocal or ScopeUser. The location of the file is
determined by WorkspaceManager.FilePath.
2.
In source code. Create both a sasServer object and a sasLogin object, then fill out the relevant properties, then
pass those to WorkspaceManager.WorkspacePools.CreatePoolByServer. In the above code, the line below
could be added to specify the maximum number of workspaces that can be created in this pool:
obServer.MaxPerWorkspacePool = 6
3.
The following parameters are used to configure Integration Technologies pooling. The parameters are specified in
either the serverDef or loginDef object.
ServerDef.MaxPerWorkspacePool
Specifies the maximum number of servers that should be created from the provided ServerDef object. A good
starting place for this number is the number of CPUs that are available on the machine that's running SAS.
ServerDef.RecycleActivationLimit
Specifies the number of times that a Workspace is used before the process it is running in is replaced. This is
useful for capping any memory leaks or non−scalable resource usage. A value of 0 means to never recycle the
processes.
ServerDef.RunForever
The value for this property must be either true or false. If the value is false, then unallocated live connections
will be disconnected after a period of time (specified by the value of ServerDef.ShutdownAfter). If the value
is true (the default value), unallocated live connections will remain alive indefinitely. This property is
optional.
ServerDef.ServerShutdownAfter
Specifies the number of minutes that an unallocated live connection will wait to be allocated to a user before
shutting down. This property is optional and it is ignored if the value of ServerDef.ServerRunForever is true.
The value must not be less than 0, and it must not be greater than 1440 (the number of minutes in a day). The
default value is 3. If the value is 0, then a connection returned to a pool by a user will be disconnected
immediately unless another user is waiting for a connection from the pool.
LoginDef.AllowedClientDN
This is a variant property that can contain a single string or an array of strings. The DN's can be specific
UserDN's or Groups. This is used to specify who is allowed to access a Workspace that is created with the
associated LoginName/Password.
LoginDef.MinSize
Specifies the minimum number of Workspaces using this LoginDef that are created when the pool is created.
LoginDef.MinAvail
Specifies the minimum number of Workspaces using this LoginDef that need to be available. Note that
MaxPerWorkspacePool will never be exceeded.
LoginDef.LogicalName
This is only used when a pool is created using CreatePoolByLogicalName. It is used to determine which set of
LoginDef's in LDAP to use in the Pool.
SAS® Integration Technologies: Developer's Guide
Using Workspace Pooling 824

Using Integration Technologies Pooling
The Pooling takes advantage of the WorkspaceManager being a COM singleton object (which means only a single
instance of the WorkspaceManager component will be created any given process.) In other words, every time a call to
CoCreateInstance (which is what VB's CreateObject and dim x as New object use) is made in the same process, the
same WorkspaceManager object will be returned. This makes the same pools available to all callers in the same
process.
All applications that use pooling will follow these general steps:
Create the Pool (use CreatePoolByServer or CreatePoolByLogicalName). This step needs to be only
performed once, usually when the application is started. You will get an error if you try to create a pool using
a logical name that has already been used in a pool.
1.
Get a PooledWorkspace object from the pool (use GetPooledWorkspace). The PooledWorkspace is really just
a wrapper around the SAS.Workspace object that is being pooled. This wrapper is necessary to notify the
pooling code when you are done using the pooled workspace. In pooling, you will want to keep a reference to
the pooled workspace for as long as you keep a reference to the workspace.
2.
Use the workspace. Run a stored process; get the output from SAS, do whatever you need to do with SAS.3. Release the workspace and the PooledWorkspace. In VB, you can release these objects by either letting them
go out of scope or by calling
set obPooledWorkspace = Nothing
4.
The pool will continue to run until either your process exits or you call Shutdown() on each pool. Simply
releasing your reference to the WorkspaceManager is not enough.
5.
In an ASP application, there are two ways the pool can be created: in the Application_OnStart callback in the
global.asa, or in the code that calls to get the PooledWorkspace. The following code is written in VB; some changes
are needed to write it in VBScript.
Once a pool is running, methods and properties are available on the SASWorkspaceManager.WorkspacePool object to
look at statistics (how many total workspaces are in the pool, and how many are in use) about the pool, and shutdown
the pool.
Here is an example of using Integration Technologies pooling.
Example Scenario
Here's an example of a pool with a single server and two logins, using the Integration Technologies security
mechanisms. For this example, assume that you have an application that presents payroll data. You want some users to
see all data (those that work in the payroll department); but you want others to be restricted to only seeing the
summary data (those that work in the HR department). This is a good example of where the security mechanisms in
Integration Technologies pooling can help you out.
The first thing to do is create or determine two user IDs: one that the people in the payroll department will use and one
that the people in the HR department will use. For this example, these will be payroll_ID and HR_ID.
The next step is to secure your data on your server. Use file permissions to restrict access of the detailed data to the
payroll_ID, and grant access to both payroll_ID and HR_ID to the summary data.
In LDAP, you will need two groups: one for the payroll department (we'll call it payroll_GROUP), and one for the HR
department (HR_GROUP). The users in the payroll department should be in the payroll_GROUP, and the users in the
SAS® Integration Technologies: Developer's Guide
Using Workspace Pooling 825
HR department should be in the HR_GROUP. Use the IT Administrator to create two sasLogin definitions: one for
payroll_ID and one for HR_ID. These will both have a logical name of PayrollViewer. In the payroll_ID login,
specify an allowedClientDN of payroll_GROUP. In the HR_ID login, specify an allowedClientDN of HR_GROUP.
While IT Administrator is still up, you can specify some pooling parameters. Let's set minSize for both to 1, and
MinAvail to 0.
Now, in IT Administrator, configure the Server. This needs to contain all the information needed by the client
machine to establish a connection to the server machine. This includes specifying the Protocol (Bridge in this case),
the machine(myUnixMachine.MyCompany.com), port(5678), and logicalname (PayrollViewer). We'll configure a
MaxPerWorkspacePool of 4, and a RecycleActivationLimit of 100.
The administrative steps are now complete. Now we need some code that makes use of it. We'll assume that the
application is an ASP application written to use VB Webclasses (also called IIS Applications). We'll also put the code
to create the pool in with the code that uses it; this could also be written in VBScript and put in your
Application_OnStart callback.
The following code is called after the web application has collected the LDAP user name and LDAP password of the
caller:
' Get the pool. If it doesn't exist, create it
Dim obWorkspaceManager As New SASWorkspaceManager.WorkspaceManager
Dim obPool As SASWorkspaceManager.WorkspacePool
On Error Resume Next
' Assume the pool already exists
Set obPool = obWorkspaceManager.WorkspacePools("PayrollViewer")
On Error GoTo 0
If (obPool Is Nothing) Then
' The pool doesn't exist; create it
' Set checkCredentialsOnEachGet to true
Set obPool = obWorkspaceManager.WorkspacePools.CreatePoolByLogicalName(
"PayrollViewer", true)
End If
' Now the pool is created, get a Workspace from it:
Dim obPooledWorkspace As SASWorkspaceManager.PooledWorkspace
'This assumes that the initial page collects the user's LDAPDN and
' password, and some code has set those in variables.
set obPooledWorkspace = obPool.GetPooledWorkspace(theGuysLDAPDN,
theGuysLDAPPassword, 1000)
Dim obSAS As SAS.Workspace
Set obSAS = obPooledWorkspace.Workspace
' Now use obSAS. Try to access some data
Dim obConnection as new ADODB.Connection
Dim rsSecret as new ADODB.Recordset
Dim rsPublic as new ADODB.Recordset
obConnection.Open "provider=SAS.IOMProvider.1; SAS Workspace ID=" &
obSAS.UniqueIdentifier
' Everyone can access the public data
rsPublic.Open "payroll.public", obConnection, adOpenDynamic,
adCmdTableDirect
On Error Resume Next
obRecordset.Open "payroll.secret", obConnection, adOpenDynamic,
adCmdTableDirect
SAS® Integration Technologies: Developer's Guide
Using Workspace Pooling 826
If Err.Number <> 0 then
'We couldn't open the sensitive data; we must be dealing with an HR guy
Response.Write "<p>You must be an HR guy.</p>"
Else
Response.Write "<p>" & rsSecret!name & " makes " & rsSecret!salary
& "</p>"
End If
' Tell everyone the average salary:
Response.Write "<p>The average salary here is: " & rsPublic!avg & "</p>"
'When done, release the obPooledWorkspace to return it to the pool.
Set obPooledWorkspace = Nothing
Windows Clients
SAS® Integration Technologies: Developer's Guide
Using Workspace Pooling 827
Code Samples
Using Local SAS with ADO
Dim obSAS As SAS.Workspace
Dim obWorkspaceManager As New SASWorkspaceManager.WorkspaceManager
Private Sub Form_Load()
Dim obConnection As New ADODB.Connection
Dim obRecordSet As New ADODB.Recordset
Dim errorString As String
Set obSAS = obWorkspaceManager.Workspaces.CreateWorkspaceByServer(
"MyWorkspaceName", VisibilityProcess, Nothing, "", "",
errorString)
obSAS.LanguageService.Submit "data a; x=1; y=100; output; x=2;
y=200; output; run;"
obConnection.Open "provider=sas.iomprovider.1; SAS Workspace ID="
+ obSAS.UniqueIdentifier
obRecordSet.Open "work.a", obConnection, adOpenStatic,
adLockReadOnly, adCmdTableDirect
obRecordSet.MoveFirst
Debug.Print obRecordSet(1).Value
End Sub
Private Sub Form_Unload(Cancel As Integer) ' If we don't close SAS, the
' SAS process might run forever
If Not (obSAS is Nothing) Then
obWorkspaceManager.Workspaces.RemoveWorkspace obSAS
obSAS.Close
End If
End Sub
Using Remote SAS with ADO and No Persisted ServerDefs or LoginDefs
Dim obSAS As SAS.Workspace
Dim obWorkspaceManager As New SASWorkspaceManager.WorkspaceManager
Private Sub Form_Load()
Dim obConnection As New ADODB.Connection
Dim obRecordSet As New ADODB.Recordset
Dim obServerDef As New SASWorkspaceManager.ServerDef
Dim xmlString As String
obServerDef.Port = ObjectServerPort
obServerDef.Protocol = ProtocolBridge ' Multiple hostNames can be provided
' for failover; order is unreliable.
obServerDef.MachineDNSName = "myServer.myCompany.com"
Set obSAS = obWorkspaceManager.Workspaces.CreateWorkspaceByServer(
"MyWorkspaceName", VisibilityProcess, obServerDef, "MyUserID",
"MyPassword", xmlString)
obSAS.LanguageService.Submit "data a; x=1; y=100; output; x=2; y=200;
output; run;"
obConnection.Open "provider=sas.iomprovider.1; SAS Workspace ID="
+ obSAS.UniqueIdentifier
obRecordSet.Open "work.a", obConnection, adOpenStatic, adLockReadOnly,
adCmdTableDirect
obRecordSet.MoveFirst
Code Samples 828
Debug.Print obRecordSet(1).Value
End Sub
Private Sub Form_Unload(Cancel As Integer)
If not (obSAS is Nothing) Then
obWorkspaceManager.Workspaces.RemoveWorkspace obSAS
obSAS.Close
End If
End Sub
Establishing LDAP parameters and Listing Server Definitions in the Current Scope
This example shows how to set the properties on a SASWorkspaceManager object so that the program can read and
write definitions from an LDAP server.
If the persistInRegistry parameter is true on SetLDAPServer, the provided LDAP URL is written to the system
registry (HKEY_LOCAL_MACHINE). If persistInRegistry is true on SetLDAPUser, then the LDAP User and
Password are persisted in the CurrentUser registry. An error will occur if persistInRegistry is True and the user does
not have permission to write to the registry.
Private Sub Form_Load()
' Set parameters to access definitions from LDAP server
set obWorkspaceManager = CreateObject("SASWorkspaceManager.WorkspaceManager")
' Remember that VBScript can't use VB enums...replace "ScopeGlobal"
' with 3, or add this line for VBSCript:
' ScopeGlobal = 3
obWorkspaceManager.Scope = ScopeGlobal
obWorkspaceManager.SetLDAPServer
"LDAP://myServer.myCompany.com:myServerPort/o=MyCompany,
c=US", True
obWorkspaceManager.SetLDAPUser "cn=myLDAPUserID, o=myCompany,
c=US", "myLDAPPassword", True
'Now list all server definitions in the current scope
for each def in obWorkspaceManager.ServerDefs
debug.print def.Name
next
End Sub
Parsing the returned XML
This example illustrates how to parse the XML that is returned when an error occurs.
Dim obSAS As SAS.Workspace
Dim obWorkspaceManager As New SASWorkspaceManager.WorkspaceManager
Private Sub Form_Load()
Dim errorXML As String
On Error GoTo CREATEERROR
' Establish LDAP/File parameters
Set obSAS = obWorkspaceManager.Workspaces.CreateWorkspaceByLogicalName(
"MyWorkspaceName", VisibilityProcess, "", "", errorXML)
' errorXML only gets returned when there is a successful connection,
' otherwise err.description gets the XML
If (Len(errorXML) > 0) Then ParseXML errorXML
SAS® Integration Technologies: Developer's Guide
Code Samples 829
CREATEERROR:
If (Err.Number <> SASWorkspaceManager.Errors.SEE_XML) Then
GoTo TROUBLE
End If
DISPLAYXML:
ParseXML Err.Description
GoTo NOTROUBLE
TROUBLE:
Debug.Print Str(Err.Number) + ": " + Err.Source + ": " + Err.Description
NOTROUBLE:
End Sub
Private Sub ParseXML(xml As String)
' Another option would be to create some XML to make this look nice.
' Write the XML to a file so it can be parsed
' Form2 simply has a WebBrowser control in it
Dim f As New Scripting.FileSystemObject
Dim fname As String
Dim tstream As Scripting.TextStream
fname = f.BuildPath(f.GetSpecialFolder(TemporaryFolder), f.GetTempName)
Set tstream = f.OpenTextFile(fname, ForWriting, True)
tstream.Write ("<html><body><xml id=""combridgeOutput"">")
tstream.Write (xml)
tstream.Write ("</xml><table datasrc=""#combridgeOutput""><thead>
<th>sasServer</th><th>sasLogin</th>")
tstream.Write ("<th colspan=50>machineDNSName</th><th colspan=20>
port</th><th colspan=40>status</th>")
tstream.Write ("<th colspan=200>description</th></thead><tbody><tr>
<td><span datafld=""sasserver"">")
tstream.Write ("</span></td><td><span
datafld=""saslogin""></span></td>
<td colspan=50>")
tstream.Write ("<span datafld=""sasmachinednsname""></span></td>
<td colspan=50><span datafld=""sasport"">")
tstream.Write ("</span></td><td colspan=40><span datafld=""status"">
</span></td><td colspan=200>")
tstream.Write ("<span
datafld=""description""></span></td></tr></tbody>
</table></body></html>")
tstream.Close
Form2.WebBrowser1.Navigate "file://" + fname
Form2.Show
End Sub
Using COM+ Pooling
This example illustrates how to use the COM+ pooling feature.
' Either of these lines will create a PooledWorkspace using COM+
dim obPooledWorkspace as new SASWorkspaceManager.PooledWorkspace
set obPooledWorkspace =
CreateObject("SASWorkspaceManager.PooledWorkspace")
' Note that from this point on, the code is the same in both the COM+
SAS® Integration Technologies: Developer's Guide
Code Samples 830
' and the Integration Technologies pooling.
Dim obSAS as SAS.Workspace
Set obSAS = obPooledWorkspace.Workspace
' Now use obSAS.
Debug.Print obSAS.UniqueIdentifier
'When done, release the obPooledWorkspace to return it to the pool.
Set obPooledWorkspace = Nothing
Using Integration Technologies Pooling
This example illustrates how to use the Integration Technologies pooling feature.
' Get the pool. If it doesn't exist, create it
Dim obWorkspaceManager As New SASWorkspaceManager.WorkspaceManager
Dim obPool As SASWorkspaceManager.WorkspacePool
On Error Resume Next
' Assume the pool already exists
Set obPool = obWorkspaceManager.WorkspacePools("MyLogical")
On Error GoTo 0
If (obPool Is Nothing) Then
' The pool doesn't exist; create it
Dim obServer As New SASWorkspaceManager.ServerDef
Dim obLogin As New SASWorkspaceManager.LoginDef
obServer.Protocol = ProtocolBridge
obServer.Port = 4321 ' A random number
obServer.MachineDNSName = "MyMachine.MyCompany.com"
obLogin.LoginName = "MyLogin"
obLogin.Password = "MyPassword"
Set obPool = obWorkspaceManager.WorkspacePools.CreatePoolByServer(
"MyLogical", obServer, obLogin)
End If
' Now the pool is created, get a Workspace from it:
Dim obPooledWorkspace As SASWorkspaceManager.PooledWorkspace
set obPooledWorkspace = obPool.GetPooledWorkspace("", "", 1000)
' Note that from this point on, the code is the same in both the COM+
' and the Integration Technologies pooling.
Dim obSAS As SAS.Workspace
Set obSAS = obPooledWorkspace.Workspace
' Now use obSAS.
Debug.Print obSAS.UniqueIdentifier
'When done, release the obPooledWorkspace to return it to the pool.
Set obPooledWorkspace = Nothing
Directory Services
SAS® Integration Technologies: Developer's Guide
Code Samples 831

Directory Services
Today's enterprise computing environments support an extensive array of users and resources. Frequently, users
require access to computing resources from multiple operating environments across the distributed enterprise. This
makes the administration and tracking of user profiles and resource attributes difficult, if not completely
unmanageable. It also makes it difficult for applications to access data about resources that are located on other
systems.
Enterprise directory services solves these problems by providing a common repository for user, resource, and security
data that can be administered in one place using one interface. SAS Integration Technologies software provides
application interfaces that enable you to develop SAS programs using either the DATA step or SAS Component
Language (SCL) that utilize directory services. These interfaces enable SAS distributed application components to
share a common application directory with components that execute in other run−time environments across the
distributed enterprise.
Additionally, SAS Integration Technologies uses directory services to host all of its product infrastructure and
run−time configuration information. This includes server and transport bindings, publish/subscribe channel and
subscriber profiles, package archive repositories, and data source locators.
For Version 9 of Integration Technologies, SAS provides the SAS Open Metadata Architecture. The Open Metadata
Architecture provides a central repository for metadata for the entire enterprise. For more information about the SAS
Open Metadata Architecture, refer to the SAS 9.1 Open Metadata Interface: Reference. For the SAS Metadata Server,
SAS includes the SAS Management Console which enables you to administer the configuration information using a
graphical user interface. For details on administering the SAS Metadata Server, refer to the SAS Intelligence Platform:
System Administration Guide.
Another type of directory service is the Lightweight Directory Access Protocol (LDAP). LDAP was developed at the
University of Michigan with support from the Internet Engineering Task Force (IETF). Using this access protocol,
applications can search, retrieve, add, delete, and modify objects in an enterprise directory from anywhere within the
distributed environment. For the LDAP server, SAS includes the IT Administrator which enables you to administer
the configuration information using a graphical user interface. For details on administering the LDAP server, refer to
the SAS Integration Technologies: Administrator's Guide (LDAP Version).
This Directory Services section provides information on how to incorporate the LDAP directory services functions
into your SAS programs.
Directory Services
Directory Services 832
Directory Services Overview
Directory services has become an important facet of the enterprise computing environment. Directory services enables
you to collect information that describes users, applications, file and print resources, access control, and other
resources into a common directory that is accessible from all users and applications on the network.
Directory services is not specific to any one application; all directory−enabled applications in the enterprise can use it.
This eliminates the islands of information that can be created when applications implement their own specialized
repositories to manage resource information.
Directory services also greatly improves administration because the information is centrally managed. Any adds or
changes that you make to the information in the directory are immediately available to all users and directory−enabled
applications. For example, instead of changing an access control list for a resource on each system that accesses it,
you only have to change the information once and each application can use this information to control access to the
resource.
The Lightweight Directory Access Protocol (LDAP)
In 1987, the International Telecommunications Union (ITU)¹ X.500 recommendation on directory services was
adopted. This recommendation included a specification for a Directory Access Protocol (DAP) that defined a protocol
used to control communication between a user and the directory. This DAP was based on the Open Systems
Interconnect (OSI) protocol stack.
The X.500 recommendation set the stage for several successful commercial implementations of directory services.
(One early implementation of particular note was the Novell Directory Services (NDS) first introduced in NetWare
Version 4.0.) However, one of the obstacles to broader acceptance of the X.500 standard was the reliance of the DAP
on the OSI protocol stack. The OSI stack has yet to gain widespread acceptance by the industry, in part because of its
complexity.
To address this issue, the University of Michigan, with support from the Internet Engineering Task Force (IETF),
developed a simpler DAP called the Lightweight Directory Access Protocol (LDAP). LDAP was developed to provide
access to a directory server without the overhead of the OSI protocol stack. LDAP is based on TCP/IP and is therefore
applicable for use on LANs, WANs, as well as over the Internet.
LDAP is an open, vendor−neutral standard that enables you to work with any LDAP−compliant server. LDAP
specifies only the interface protocol to the directory and does not specify how the actual directory is implemented. For
example, the Microsoft Active Directory in Windows 2000 is implemented quite differently than the iPlanet Directory
Server (previously known as the Netscape Directory Server), but, because they both support an LDAP interface, you
can use the same applications to work with them.
LDAP is supported in most network operating systems and collaborative applications. LDAP support has also been
implemented in most network−oriented middleware products.
Specific platform support for LDAP access is broad. Client bindings are available for various platforms in C/C++
from the OpenLDAP and Mozilla organizations as well as commercial vendors. PERL support is available from
Mozilla, and Java support is provided through Sun Microsystems' JNDI facility. Support for Windows is provided
through the Active Directory Services Interface (ADSI) and third−party ActiveX controls.
Draft specifications have been developed to extend LDAP by adding a standard access control model, dynamic
directories, server−side sorting of search results, LDAP server discovery, and other extensions. For more information
Directory Services Overview 833
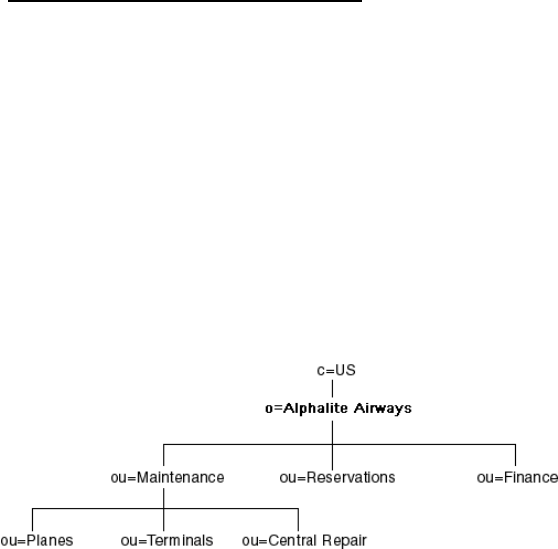
on these extensions, visit the IETF LDAP Extension Working Group Web site.
Directory Structure
A directory is a specialized database that is designed to retrieve information quickly and securely. It is optimized for
read access because the type of information in the directory is searched often, but changes infrequently. For example,
a user name that you add for a new employee is not likely to change for the entire period of employment.
Information about the services, resources, users, and other objects that are accessible from the applications is
organized as a collection of individual entries that contain information about each resource. To make accessing these
entries as efficient as possible, they are organized in a hierarchy called the Directory Information Tree (DIT).
The following diagram shows an example of a DIT:
The root of the tree is typically a country (C) followed by an organization (O). For example, in the figure above, the
root of the tree is o=Alphalite Airways,c=US. One or more organizational units (OU) typically appear below the root.
These are container objects in that they can contain other directory entries. Directory entries that store information
about a specific resource are referred to as leaf objects and they are added to the tree under an existing container
object.
The path to each entry in the tree is called its distinguished name (DN), and each DN in the tree is unique. For
example, using the DIT in the figure above, the DN for the Airplane Maintenance Department of Alphalite Airways
would be ou=Planes,ou=Maintenance,o=Alphalite Airways,c=US.
Directory Entries
A directory entry contains a set of name/value pairs, which are called attributes. An objectclass attribute is required
for each entry in the directory. The object class determines which attributes are allowed for the entry as well as any
that are required. The set of defined attributes and object classes that defines the content of acceptable entries within
the directory server is called the Directory Schema.
An attribute for a given entry may have multiple values. For example, because an OU can have multiple values
assigned to it, a person might belong to more than one organization unit. When the DIT is searched, the order in which
the attributes are returned cannot be guaranteed. Therefore, no implicit priority or hierarchy of attribute values can
exist within an entry.
Here is an example of a directory entry for a person in our example airline enterprise:
cn=John Smith,o=Alphalite Airways,c=US
cn=John Smith
cn=John_Smith
SAS® Integration Technologies: Developer's Guide
Directory Services Overview 834

sn=Smith
objectclass=top
objectclass=person
objectclass=salesPerson
l=Chicago
title=Senior Sales Manager
ou=Finance
ou=Marketing
mail=Smith.John@alphaliteairways.com
telephonenumber=312−258−8655
roomnumber=117
uid=jsmith
Searching a Directory Information Tree
Entries in an LDAP directory can be read directly if the exact DN is known. Usually, however, the directory is
searched for entries that match a particular set of specifications. In order to perform a search, the directory server has
to know the starting place in the tree (called the base), how deep in the tree the user wants to look (called the scope),
and the search criteria (called the filter).
The base can be any DN that is served by the directory server that is being queried. If the DN is outside the domain of
the server, it may return a referral. The referral has the data that is necessary to connect to another server that may
have more entries that match the filter. The client might decide either to chase (peruse possible filter matches on the
other server) the referral or to ignore it.
A search can also contain a scope. The scope determines how far down in the tree from the base the search is made. A
scope of BASE will only return the base object if it exists and matches the filter. (The filter is required even with a
scope of BASE). A scope of ONE will only search the base and entries immediately below the base entry. A scope of
SUB will search the entire sub tree starting at the base entry. Limiting the scope of a search makes it more efficient. If
you know that an entry is one level below the base, limiting the search to that scope makes it run faster. If you want to
search all entries that are below the base, though, search the sub tree.
A scope of BASE is used when you retrieve special entries. For example, most servers support a special entry with a
DN of cn=monitor that returns information about the state of the server. When you search for that entry, a scope of
BASE is required.
The search filter determines which entries below the base will be returned. A simple filter is composed of an attribute
name, an operator, and a value. The following table describes the valid search operators.
LDAP Search Filter Operators
Operator Definition Description Example
= Equality Attribute must
exactly match
value.
cn=Jean Smith
=<string>*<string> Substring(s) Substring attribute
must contain
substring(s)
(cn=*Smith, title=*Manager*)
SAS® Integration Technologies: Developer's Guide
Directory Services Overview 835

provided. The
asterisk (*)
matches zero or
more characters.
>= Greater than
or equal to
Attribute must be
greater than or
equal to value.
age>=30
<= Less than or
equal to
Attribute must be
less than or equal
to value.
roomnumber<=3999
=* Presence
matches Entry has attribute
of specified name. (objectclass=*)
~= Approximate
Usually
implemented as a
"sounds like"
algorithm.
Attribute must be
"approximately
equal" to value.
cn~=Jean Smits
&Boolean
AND All filters must be
true. (&(sn=Smith)(ou=Reservations))
| Boolean OR Any of the filters
might be true.
(|(manager=cn=Jean
Smith,ou=Reservations,o=Alphalite
Airways,c=US)(ou=Marketing))
!Boolean
NOT None of the filters
might be true. (&(!(ou=Maintenance)(!(ou=Finance))))
LDAP Security
While the intent of the directory is to share much of the information in it across many applications, it must also be
protected in order to prevent unauthorized access to sensitive data.
Security within the directory is achieved using both authentication and access control. Authentication identifies a
user's credentials to the directory server. Access control determines which entries a user is allowed to access based on
that identity. Both of these topics are discussed next.
Authentication
A user establishes a connection to a directory server by performing a bind operation. Part of the information that is
used in performing this operation is the user's identity and password. There are three basic bind mechanisms —
anonymous, simple, or secure.
The simplest bind mechanism is an anonymous bind. Access is granted based on the user having no identity within the
directory. While it is normal to provide read access to certain entries and attributes for anonymous users, most
SAS® Integration Technologies: Developer's Guide
Directory Services Overview 836
application data will be protected against retrieval by unknown users.
A simple bind operation is performed when the user provides a DN for an entry within the directory and a password
that goes with that entry. The entry must have a USERPASSWORD attribute, which is checked against the password
provided. If the bind is successful, the user's identity will become that DN for the duration of the connection and
access to entries will be based on that identity.
While the simple bind is adequate for most environments, it requires that you send the password in clear text over the
network. Some directory servers implement secure authentication methods, such as Kerberos or certificate−based
authentication like SSL. Any authentication method that is used must resolve to a directory entry in order to permit a
comparison with the access control list (ACL). After authentication, the ACL specifies access controls that are based
on the DN for the user.
Access Control
There are literally as many access control schemes as there are directory servers. The OpenLDAP server keeps the
access control lists in the configuration file and uses regular expressions for the comparison of ACL targets (what is
being secured) and subjects (who is being allowed access) while iPlanet (previously Netscape) and IBM keep the
access control information in the directory tree as an attribute of the entries. However, the basic ideas are similar
across server implementations. The ACLs can control access to the entire directory tree, or portions of it, down to the
attribute level. Special access can be granted so that users can access their own DNs. A user may be allowed access to
attributes on his own entry that no one else has access to, such as the USERPASSWORD attribute. There is usually a
default access mode, and the ACLs are used to override that default. For instance, iPlanet directory servers have a
default access of none, so if there are no ACLs that are defined on a directory tree, no users can access it except the
directory manager. ACLs can be added to allow access to parts of the tree or specific entries based on user DN or
group membership.
¹ In 1987 when the X.500 recommendation was adopted, the ITU was called the Comité Consultatif International
Téléphonique et Télégraphique (CCITT).
Directory Services
SAS® Integration Technologies: Developer's Guide
Directory Services Overview 837

Directory Services and Integration Technologies
The SAS implementation of directory services is based on LDAP Version 2. Integration Technologies versions 8.2
and 9 include support for UTF−8 character encoding which means that you can use either an LDAP Version 2 or
LDAP Version 3 server.
Integration Technologies software includes several facilities that can be used to add, modify, delete, and search entries
in an LDAP server:
the LDAP CALL Routine Interface• the LDAP SCL Interface• Integration Technologies Administrator.•
The LDAP CALL Routine Interface and the LDAP SCL Interface are application facilities that enable you to utilize
an enterprise directory server from within a SAS application environment.
The Integration Technologies Administrator is a Java application that is used to manage the LDAP directory entries
for objects that are used by components within the SAS Integration Technologies product.
All of these facilities interact with a directory server using either LDAP Version 2 or Version 3. SAS Integration
Technologies supports the following directory servers that have been tested for use with the product:
iPlanet Directory Server• IBM eNetwork LDAP Directory Server• Microsoft Active Directory.•
Active Directory is Microsoft’s implementation of directory services that runs on Windows 2000 Server platforms.
While more than a generic LDAP server, it does support an LDAP interface through the Active Directory Service
Interface (ADSI).
While commercial enterprise directory servers are currently recommended, SAS Institute acknowledges the LDAP
open−source initiative and will make executables of the openLDAP slapd server generally available across a variety
of platforms. If your site has not yet implemented an LDAP−enabled directory, contact your SAS account
representative for deployment options.
SAS Application LDAP Structure
SAS application data begins at a sasContainer object with a relative distinguished name of cn=SAS, as shown in the
following image. The user must provide the location of the relative distinguished name during the installation of the
directory services portion of SAS Integration Technologies.
Directory Services and Integration Technologies 838

Below the cn=SAS container are containers for each SAS component that uses information from the LDAP directory.
The following list provides a brief description of each container that is used in the SAS application sub tree.
sasPublishSubscribe
Holds entries with descriptive information about channels that are used to publish information to a list of
subscribers. It also holds entries for each subscriber as well as the delivery mechanism for that subscriber and
other preferences. This information is retrieved and used by the Publish Package Interface when a publish
request is made.
sasServer
Holds definitions of IOM servers and spawners that are used to instantiate these servers, as well as logical
names (optional) for the servers. These entries are used by distributed clients to find the information that is
needed to establish a session with an IOM server. The spawner (objspawn) also utilizes this container to
retrieve its configuration information during startup. These entries are created and managed by an
administrator. For example, if a server becomes unavailable, the administrator can change the entry for the
logical name of the server (if a logical name has been configured) so that it points to another server that can
provide the same service.
Archiving
Holds information about packages that have been published to the archive. This package metadata can be used
to facilitate information retrieval as well as manage the life cycle of the packages.
sasMessaging
Used for entries that hold configuration information that is required to interface to message queues for the
IBM MQ Series, Microsoft MSMQ, and the SAS common messaging interfaces.
Below the SAS component containers are containers for the entry types that are used by those components. For
example, the cn=transports container holds entries that contain information about an available message queueing
transport.
Directory Services
SAS® Integration Technologies: Developer's Guide
Directory Services and Integration Technologies 839
Application Interfaces
SAS Integration Technologies software provides two interfaces that you can use to interact with an LDAP server from
a SAS program.
the LDAP CALL Routine Interface is a set of CALL routines that you can use to add, delete, modify, and
search entries in the LDAP server.
•
the LDAPSERVICES class for the SAS Component Language (SCL) provides methods that add, delete,
modify, and search entries in the LDAP server.
•
A link to the reference documentation for each of these interfaces appears on the left.
Directory Services
Application Interfaces 840

LDAP CALL Routine Interface
The LDAP CALL Routine Interface consists of a set of SAS CALL routines that enable your SAS programs to
manipulate LDAP directory entries.
A link to the reference information for each supported CALL routine appears on the left.
The following are two examples of SAS programs that use the LDAP CALL Routine Interface to manipulate LDAP
server entries:
Searching an LDAP Server• Adding a directory entry to an LDAP Server.•
LDAP directory entries can also be manipulated using the LDAP SCL Interface as well as by using the Integration
Technologies Administrator application.
Directory Services
LDAP CALL Routine Interface 841
LDAPS_ADD
Adds new entries to an LDAP directory.
Syntax
CALL LDAPS_ADD(lHandle, entryName, rc, attr, numValues, attrVal1, ...attrValN, <attr, numValues, attrVal1,
...attrValN>);
lHandleNumeric, input.
Identifies the connection handle returned by a successful LDAPS_OPEN call. The connection handle
identifies the open connection to use when adding entries.
entryname
Character, input.
Names the directory entry to be created.
rc Numeric, output.
Receives a numeric code that indicates success or failure.
attr Character, input.
Names an attribute for this particular entry.
numValues
Numeric, input.
Specifies the number of values associated with the attr parameter.
attrVal1, ... attrValN
Numeric or character, input.
Specifies one or more attribute values. The number of values is determined by the numValues parameter.
Details
One or more attributes may be specified. Each attribute name must be followed by the number of attribute values, then
followed by a comma separated list of one or more attribute values.
Example
The following example adds two single−value entries to a distinguished name.
dn = "cn=alpair02.unx.com,o=Alphalite Airways,c=US";
attrName = "objectclass";
objValue = "SASDomain";
attrName2 = "node";
nodeValue = "oak.unx.com";
CALL LDAPS_ADD(lHandle, dn, rc, attrName, 1, objValue, attrName2, 1, nodeValue);
The following example adds three attributes, one with multiple values.
LDAPS_ADD 842
dn="sasSubscriberCn=JohnSmith,cn=sassubscribers,
sasComponent=sasPublishSubscribe,cn=SAS,o=Alphalite Airways,c=US";
attrName = "objectclass";
objValue = "sassubscriber";
attrName2 = "sasEntryInclusionFilter";
val = "gif";
val2 = "dataset";
htmlvalue = "html";
attrnName3 = "sasPersonDN";
val3 = "uid=JSmith,ou=people,o=Alphalite Airways,c=us";
CALL LDAPS_ADD(lHandle, dn, rc, attrName, 1, objValue,
attrName2, 3, val, val2, htmlvalue, attrName3, 1, val3);
Directory Services
SAS® Integration Technologies: Developer's Guide
LDAPS_ADD 843

LDAPS_ATTRNAME
Returns the name and the number of values of an attribute in an LDAP entry.
Syntax
CALL LDAPS_ATTRNAME(sHandle, entryIndex, attributeIndex, attributeName, numValues, rc);
sHandle
Numeric, input.
Specifies the search handle returned by the LDAPS_SEARCH CALL routine. The search handle identifies the
entry list returned in the search.
entryIndex
Numeric, input.
Specifies the index into the entry list. This index is 1−based.
attributeIndex
Numeric, input.
Specifies the index into the attribute list for the specified entry. This index is 1−based.
attributeName
Character, output.
Returns the name of the specified attribute.
numValues
Numeric, output.
Returns the number of values for the specified attribute.
rc Numeric, output.
Receives a return code that indicates success or failure.
Example
The following example prints to the SAS log the names and values of all attributes in all entries in a given LDAP
directory.
call ldaps_search(lhandle, sHandle, filter, attribs, numEntries, rc);
do entryIndex = 1 to numEntries;
numAttributes = 0;
entryName='';
/* retrieve entry indexed by integer entryIndex */
call ldaps_entry(sHandle, entryIndex, entryName, numAttributes, rc);
put 'Entry name is ' entryName;
put 'Number of attributes returned is ' numAttributes;
do attrIndex = 1 to numAttributes;
call LDAPS_ATTRNAME(sHandle, entryIndex, attrIndex,
attribName, numValues, rc);
put 'Attribute name is ' attribName;
put 'Number of values for this attribute is ' numValues;
do attrValueIndex = 1 to numValues;
call ldaps_attrvalue(sHandle, entryIndex, attrindex,
attrValueIndex, value, rc);
LDAPS_ATTRNAME 844
put "Attribute value is " value;
end;
end;
end;
Directory Services
SAS® Integration Technologies: Developer's Guide
LDAPS_ATTRNAME 845

LDAPS_ATTRVALUE
Retrieves an attribute value.
Syntax
CALL LDAPS_ATTRVALUE(sHandle, entryIndex, attributeIndex, valueIndex, value, rc);
sHandle
Numeric, input.
Specifies the search handle returned by the LDAPS_SEARCH CALL routine. The search handle identifies the
entry list returned in the search.
entryIndex
Numeric, input.
Specifies an index into the entry list. This index is 1−based.
attributeIndex
Numeric, input.
Specifies an index into the attribute list for the specified entry.
valueIndex
Numeric, input.
Specifies an index into the list of attribute values.
value Character, output.
Returns the value of the specified attribute.
rc Numeric, output.
Receives a return code that indicates success or failure.
Examples
The following example prints to the SAS log the names and values of all attributes in all entries in a given LDAP
directory.
call ldaps_search(lhandle, sHandle, filter, attribs, numEntries, rc);
do entryIndex = 1 to numEntries;
numAttributes = 0;
entryName='';
/* retrieve entry indexed by integer entryIndex */
call ldaps_entry(sHandle, entryIndex, entryName, numAttributes, rc);
put 'Entry name is ' entryName;
put 'Number of attributes returned is ' numAttributes;
do attrIndex = 1 to numAttributes;
call ldaps_attrname(sHandle, entryIndex, attrIndex, attribName,
numValues, rc);
put 'Attribute name is ' attribName;
put 'Number of values for this attribute is ' numValues;
do attrValueIndex = 1 to numValues;
value='';
call LDAPS_ATTRVALUE
LDAPS_ATTRVALUE 846
(sHandle, entryIndex, attrindex, attrValueIndex, value,
rc);
put "Attribute value is " value;
end;
end;
end;
Directory Services
SAS® Integration Technologies: Developer's Guide
LDAPS_ATTRVALUE 847

LDAPS_CLOSE
Closes a connection to an LDAP server.
Syntax
CALL LDAPS_CLOSE(lHandle, rc);
lHandleNumeric, input.
Specifies the connection handle returned by the LDAPS_OPEN CALL routine.
rc Numeric, output.
Receives a return code that specifies success or failure.
Details
When invoked, the LDAPS_CLOSE CALL routine closes the connection to the LDAP server. All resources
associated with the connection are freed; therefore, any valid search handles associated with this connection will no
longer be valid.
Example
The following example closes an open connection to an LDAP server.
call ldaps_close(lHandle, rc);
Directory Services
LDAPS_CLOSE 848

LDAPS_DELETE
Deletes an entry from an LDAP directory.
Syntax
CALL LDAPS_DELETE(lHandle, entryName, rc);
lHandleNumeric, input.
Specifies the connection handle returned by the LDAPS_OPEN CALL routine.
entryName
Character, input.
Names the entry to be deleted from the LDAP directory.
rc Numeric, output.
Receives a return code that indicates success or failure.
Example
The following example deletes an entry from an LDAP directory.
dn = "cn=alpair02.unx.com,o=Alphalite Airways,c=US";
rc=0;
call ldaps_delete(lHandle, entryName, rc);
Directory Services
LDAPS_DELETE 849

LDAPS_ENTRY
Retrieves information about a specific entry returned in a search.
Syntax
CALL LDAPS_ENTRY(sHandle, entryIndex, entryName, numAttributes, rc);
sHandle
Numeric, input.
Specifies the search handle returned by the LDAPS_SEARCH CALL routine. The search handle identifies the
entry list returned in the search.
entryIndex
Numeric, input.
Index into the entry list returned by the search. This index is 1−based.
entryName
Character, output.
Returns the name of the entry.
numAttributes
Numeric, output.
Returns the total number of attributes for the specified entry.
rc Numeric, output
Receives a return code that indicates success or failure.
Example
The following example prints to the SAS log the names and values of all attributes in all entries in a given LDAP
directory.
call ldaps_search(lhandle, sHandle, filter, attribs, numEntries, rc);
do entryIndex = 1 to numEntries;
numAttributes = 0;
entryName='';
/* retrieve entry indexed by integer entryIndex */
call LDAPS_ENTRY(sHandle, entryIndex, entryName, numAttributes, rc);
put 'Entry name is ' entryName;
put 'Number of attributes returned is ' numAttributes;
do attrIndex = 1 to numAttributes;
call ldaps_attrname(sHandle, entryIndex, attrIndex, attribName,
numValues, rc);
put 'Attribute name is ' attribName;
put 'Number of values for this attribute is ' numValues;
do attrValueIndex = 1 to numValues;
call ldaps_attrvalue(sHandle, entryIndex, attrindex, attrValueIndex,
value, rc);
put "Attribute value is " value;
end;
end;
LDAPS_ENTRY 850
end;
Directory Services
SAS® Integration Technologies: Developer's Guide
LDAPS_ENTRY 851

LDAPS_FREE
Frees search resources.
Syntax
CALL LDAPS_FREE(sHandle, rc);
sHandle
Numeric, input.
Specifies the search handle returned by the LDAPS_SEARCH CALL routine. The search handle identifies the
entry list returned in the search.
rc Numeric, output.
Receives a return code that indicates success or failure.
Details
When invoked, the LDAPS_FREE CALL routine frees all resources associated with the specified search handle. The
resources freed include all returned entry and attribute information, as shown in the following example:
call ldaps_free(sHandle, rc);
Directory Services
LDAPS_FREE 852

LDAPS_MODIFY
Modifies an LDAP directory entry.
Syntax
CALL LDAPS_MODIFY(lHandle, entryName, rc, modifyType1, attr1, numValues1 <, attr1Val1, ...attr1ValN> <...,
modifyTypeN, attrN, numValuesN <, attrNVal1..., attrNValN>>);
1Handle
Numeric, input.
Specifies the connection handle returned by the LDAPS_OPEN CALL routine. The connection handle
identifies the open connection to use when modifying the LDAP directory entry.
entryname
Character, input.
Names the directory entry to be modified.
rc Numeric, output.
Receives a return code that indicates success or failure.
modifyType
Character, input.
Specifies the type of modification. Valid values are "ADD", "DELETE", and "REPLACE".
attr Character, input.
Identifies the attribute to be modified.
numValues
Numeric, input.
Specifies the number of values to be modified for the specified attribute.
attrVal1, ...attrValN
Numeric or character, input.
Specifies zero or more attribute values, the number of which is specified by the numValues parameter.
Details
Zero or more attributes may be specified.
If the value of the modifyType parameter is DELETE and if the value of the numValues parameter is 0, then the
entire attribute and all of its values are deleted.
If the value of the modifyType parameter is DELETE and if the value of the numValues parameter is 1 or greater,
only the specified values will be deleted.
If the value of the modifyType parameter is REPLACE the existing attribute and all of its values are deleted and
replaced with the specified attribute and its newly specified values.
Examples
The following example modifies the node associated with a distinguished name.
LDAPS_MODIFY 853
dn = "cn=alpair02.unx.com,o=Alphalite Airways,c=US";
attrName = "objectclass";
objValue = "SASDomain";
attrName2 = "node";
nodeValue = "oak.unx.com";
CALL LDAPS_MODIFY(lHandle, dn, rc, "ADD", attrName, 1, objValue,
"DELETE", attrName2, 0);
The following example modifies a filter associated with an LDAP entry.
dn="sasSubscriberCn=JohnSmith,cn=sassubscribers,
sasComponent=sasPublishSubscribe,cn=SAS,o=Alphalite Airways,c=US";
attrName = "sasDescription";
attrName2 = "sasEntryInclusionFilter";
val = "gif";
val2 = "dataset";
htmlvalue = "html";
CALL LDAPS_MODIFY(lHandle, dn, rc, "DELETE", attrName, 0, "REPLACE",
attrName2, 3, val, val2, htmlvalue);
Directory Services
SAS® Integration Technologies: Developer's Guide
LDAPS_MODIFY 854

LDAPS_OPEN
Opens a connection to an LDAP server.
Syntax
CALL LDAPS_OPEN(lHandle, ldapServerName, port, base, bindDN, password, rc, <options>);
lHandleNumeric, output.
Returns a connection handle that is used in subsequent CALL routines to access the LDAP server session.
ldapServerName
Character, input.
Identifies the LDAP server that is to be connected to. If blank, the value defaults to the host that issued the
CALL. Otherwise, the value must be the DNS name or IP address of a host on which an LDAP server is
running.
port Numeric, input.
Specifies the TCP port of the LDAP server. If the value is zero, the standard port of 389 is used.
base Character, input.
Specifies a distinguished name that establishes the base object for the search. The base object is the point in
the LDAP tree at which you want to start searching. If this value is blank, the default value is the macro
variable or environment variable LDAP_BASE.
bindDNCharacter, input.
Specifies the distinguished name used to bind to the server. If this value is blank, the macro variable or
environment variable LDAP_BINDDN is used as the bind distinguished name. If a value of "" is specified and
the LDAP_BINDDN variable has not been set, an unauthenticated bind is performed.
password
Character, input.
Specifies the password associated with bindDN. If this value is blank, the macro variable or environment
variable LDAP_BINDPW is used as the bind distinguished name. If a value of "" is specified and the
LDAP_BINDPW variable has not been set, an unauthenticated bind is performed.
Passwords that have been encoded by using the PWENCODE procedure can be used to bind to the server. For
more information, see The PWENCODE Procedure in Base SAS Procedures Guide.
rc Numeric, output.
Receives a return code that identifies success or failure.
options Character, input.
Specifies one or more session options to use with this bind. The following session options are valid:
OPT_REFERRALS_OFF
Instructs the server to not chase referrals. Specifying this option overrides the default value of
OPT_REFERRALS_ON.
SUBTREE_SEARCH_SCOPE
Sets the scope of the search to include all subtrees. This is the default.
BASE_SEARCH_SCOPE
LDAPS_OPEN 855

Sets the scope of the search to include only the base. This value overrides the default value of
SUBTREE_SEARCH_SCOPE.
ONELEVEL_SEARCH_SCOPE
Sets the scope of the search to include the base and one additional level. This overrides the default
value of SUBTREE_SEARCH_SCOPE.
Note: Specify only one search scope option. If multiple search scope options are specified, the one that
appears last is used. If none of the search scope options are specified, the default value of
SUBTREE_SEARCH_SCOPE is used.
Details
The options specified in the LDAPS_OPEN CALL routine include only those that must be specified when the server
connection is first opened. Additional options can be specified after the connection is opened using the
LDAPS_SETOPTIONS CALL routine.
Examples
The following example opens a connection to an LDAP server using an anonymous bind and default session options.
server="alpair01.unx.com";port=8010;
base="sasComponent=sasPublishSubscribe,cn=SAS,o=Alphalite Airways,c=US";
bindDN="";
Pw="";
call LDAPS_OPEN(lHandle, server, port, base, bindDN, Pw, rc);
The following example opens a connection to an LDAP server, binds to the server, and passes in a session option of
OPT_REFERRALS_OFF. This instructs the LDAP server not to chase referrals.
server = "alpair02.unx.com";
base = "o=Alphalite Airways,c=US";
bindDN ="cn=John Doe,o=Alphalite Airways,c=us";
bindPW ="myPass1";
option= "OPT_REFERRALS_OFF";
call LDAPS_OPEN(lHandle, server,8001,base,bindDN,bindPW,rc, option);
Directory Services
SAS® Integration Technologies: Developer's Guide
LDAPS_OPEN 856

LDAPS_SETOPTIONS
Sets options on an open LDAP server session.
Syntax
CALL LDAPS_SETOPTIONS(lHandle, timeLimit, sizeLimit, base, referral, restart, rc <,Property, propertyValue>);
lHandleNumeric, input.
Specifies the connection handle returned by the LDAPS_OPEN CALL routine. The connection handle
identifies the open connection to use when specifying options on the LDAP server session.
timeLimit
Numeric, input.
Specifies the maximum number of seconds that the client will wait for an answer to a search request. A value
of 0 indicates that no limit will be imposed. The default value is 0 unless another value is specified. A value of
−1 specifies that the server retain its current timeLimit value; the value will not be changed.
sizelimitNumeric, input.
Specifies the maximum number of entries that the server is to return from the search. A value of 0 indicates
that no limit should be imposed. The default value is 0 unless another value is specified. A value of −1
specifies that the server is to retain its current sizeLimit setting; the value will not be changed.
base Character, input.
Specifies the base object (distinguished name) for the search operation. An initial base object was specified
when the connection to the LDAP server was established with the LDAPS_OPEN CALL routine. Specifying
a non−blank value for the base parameter overrides the existing base object definition. To retain the existing
base object definition, specify a blank value for the base parameter.
referralCharacter, input.
Indicates whether or not to chase referrals, by setting either the OPT_REFERRALS_ON option or the
OPT_REFERRALS_OFF option. One or the other of these options was specified when the connection to the
LDAP server was established with the LDAPS_OPEN CALL routine. Specifying either option as the value of
the referral parameter overrides the existing value. Specifying a blank value retains the existing value.
restart Character, input.
Indicates whether or not to restart a query if EINTR occurs. At ldaps_open time, the default session settings
are determined. ldaps_setOptions can be used to change these defaults. Valid values for restart are
OPT_RESTART_ON or OPT_RESTART_OFF. A blank value can be passed in to indicate that the default
value of OPT_RESTART_OFF should be used.
rc Numeric, output.
Receive a return code that indicates success or failure.
property
Character, input.
Specifies the name of an optional property that is being set. Currently, the only property that is supported is
the SEARCH_SCOPE property which specifies the scope of searches in the LDAP directory. Specify the
value of the property using the propertyValue parameter.
propertyValue
LDAPS_SETOPTIONS 857
Character, input.
Specifies the value for the property parameter. The following values for the SEARCH_SCOPE property are
valid:
SUBTREE_SEARCH_SCOPE
Sets the scope of the search to include all subtrees. This is the default.
BASE_SEARCH_SCOPE
Sets the scope of the search to include only the base. This value overrides the default value of
SUBTREE_SEARCH_SCOPE.
ONELEVEL_SEARCH_SCOPE
Sets the scope of the search to include the base and one additional level. This overrides the default
value of SUBTREE_SEARCH_SCOPE.
Examples
The following example specifies maximum limits on search time and number of entries returned. This example also
specifies that the server is to refrain from chasing referrals. The existing base object definition is to remain unchanged.
timeLimit=120;
sizeLimit=100;
base=""; /* use default set at _open time */
referral = "OPT_REFERRALS_OFF";
restart = "";
call ldaps_setOptions(lHandle, timeLimit, sizeLimit, base,
referral, restart, rc);
The following example uses the optional properties parameter to set the scope of LDAP searches.
timelimit = −1; /* use current setting */
sizelimit = −1; /* use current setting */
base=""; /* use default set at _open time */
referral = ""; /* use default set at _open time */
restart = ""; /* use default */
prop = "SEARCH_SCOPE";
propValue = "BASE_SEARCH_SCOPE"; /* only search the base */
call ldaps_setOptions(lHandle, timelimit, sizelimit, base, referral, restart, prop, propValue);
Directory Services
SAS® Integration Technologies: Developer's Guide
LDAPS_SETOPTIONS 858

LDAPS_SEARCH
Searches and retrieves information from the specified LDAP directory.
Syntax
CALL LDAPS_SEARCH(lHandle, sHandle, filter, attributes, numEntries, rc);
lHandleNumeric, input.
Specifies the connection handle returned by the LDAPS_OPEN CALL routine. The connection handle
identifies the open connection to use when searching the LDAP server.
sHandle
Numeric, output.
Returns the search handle that identifies the list of entries returned in the search. The search handle is used in
subsequent CALL routines to access the search results. The search handle remains valid until it is closed with
the LDAPS_FREE or LDAPS_CLOSE CALL routine.
filter Numeric, input.
Specifies search criteria which determine that the entries are to be added to the entry list returned by the
search.
attributes
Character, input.
Specifies the attributes to return along with each entry that matches the search criteria. If more than one
attribute is specified, the attributes must be separated by blank spaces, as follows:
attrs = "objectclass sasdeliverytransport sasnamevalueinclusionfilter";
Specifying a null string indicates that all available attributes are to be returned, as follows:
attrs = ""
numEntries
Numeric, output.
Returns the total number of result entries found during the search.
rc Numeric, output.
Receives a return code that indicates success or failure.
Details
The LDAPS_SEARCH CALL routine selects and retrieves entries from a specified LDAP directory. A search handle
is returned so that information about specific entries and attributes can be obtained. The search information identified
by the search handle can be used until it is explicitly freed using the LDAPS_FREE call routine or until the
connection is closed using the LDAPS_CLOSE call routine.
Note: This CALL routine should not be used to retrieve internal attributes from a Microsoft Active Directory server.
LDAPS_SEARCH 859
Examples
The following example returns a list of entries on the LDAP server that match the values of the specified filter. The
list of entries returned from the search includes the values of two attributes for each matching entry.
filter="(&(saschannelcn=DeleteTest)(objectclass=*))";
attrs="description objectclass";
rc=0;
numEntries=0;
sHandle=0;
call LDAPS_SEARCH(lhandle, sHandle, filter, attrs, numEntries, rc);
The following example prints to the SAS log the names and values of all attributes in all entries in a given LDAP
directory.
call LDAPS_SEARCH(lhandle, sHandle, filter, attribs, numEntries, rc);
do entryIndex = 1 to numEntries;
numAttributes = 0;
entryName='';
/* retrieve entry indexed by integer entryIndex */
call ldaps_entry(sHandle, entryIndex, entryName, numAttributes, rc);
put 'Entry name is ' entryName;
put 'Number of attributes returned is ' numAttributes;
do attrIndex = 1 to numAttributes;
call ldaps_attrname
(sHandle,entryIndex, attrIndex, attribName, numValues, rc);
do attrValueIndex = 1 to numValues;
call ldaps_attrvalue
(sHandle, entryIndex, attrindex, attrValueIndex, value, rc);
put "Attribute value is " value;
end;
end;
end;
Directory Services
SAS® Integration Technologies: Developer's Guide
LDAPS_SEARCH 860
Adding a Directory Entry to an LDAP Server
The following example uses the LDAP CALL Routine Interface to add an entry to an LDAP directory.
data _null_;
rc =0; handle=0;
server="alpair.unx.sas.com";
port=8010;
base="sasComponent=sasPublishSubscriber,cn=SAS,o=Alphalite Airways,c=US";
bindDN=""; Pw="";
/* open connection to LDAP server */
call ldaps_open(handle, server, port, base, bindDn, Pw, rc);
if rc ne 0 then do;
msg = sysmsg();
put msg;
end;
else
put "LDAPS_OPEN call successful.";
/* add the following entry, which has 6 attributes */
entryName="saschannelcn=DeleteTest,cn=saschannels,sasComponent=sasPublishSubscribe,cn=SAS,o=SAS Institute,c=US";
a1="objectclass";
a1Value="saschannel";
a2="sasSubject";
a2Value="Steph's channel to test";
a3="description";
a3Value="Entry include/exclude testing";
a4="sasFrequency";
a4Value="bi−monthly";
a5="SASDeliveryTransport";
a5Value="queue";
a5Value2="email";
a5Value3="ftp";
a6="sasSubscriberCn";
a6Value="stephEmail";
/* add entry (including all attributes and attribute values) */
call ldaps_add(handle, entryName, rc, a1, 1, a1Value,
a2, 1, a2Value,
a3, 1, a3Value,
a4, 1, a4Value,
a5, 3, a5Value, a5Value2, a5Value3,
a6, 1, a6Value);
if rc ne 0 then do;
msg = sysmsg();
put msg;
end;
else
put "LDAPS_ADD call successful.";
/* close connection to LDAP server */
call ldaps_close(handle,rc);
if rc ne 0 then do;
msg = sysmsg();
put msg;
end;
else
Adding a Directory Entry to an LDAP Server 861
put "LDAPS_CLOSE call successful.";
run;
quit;
Directory Services
SAS® Integration Technologies: Developer's Guide
Adding a Directory Entry to an LDAP Server 862
Searching an LDAP Directory
The following example uses LDAP call routines to search an LDAP directory and process the search results.
data _null_;
length entryname $200 attrName $100 value $100 filter $100;
rc =0; handle =0;
server="alpair01.unx.com";
port=8010;
base="sasComponent=sasPublishSubscribe,cn=SAS,o=Alphalite Airways,c=US";
bindDN=""; Pw="";
/* open connection to LDAP server */
call ldaps_open(handle, server, port, base, bindDn, Pw, rc);
if rc ne 0 then do;
msg = sysmsg();
put msg;
end;
else
put "LDAPS_OPEN call successful.";
shandle=0;
num=0;
filter="(&(saschannelcn=DeleteTest)(objectclass=*))";
attrs="description";
/* search the LDAP directory */
call ldaps_search(handle,shandle,filter, attrs, num, rc);
if rc ne 0 then do;
msg = sysmsg();
put msg;
end;
else do;
put " ";
put "LDAPS_SEARCH call successful.";
put "Num entries returned is " num;
put " ";
end;
do eIndex = 1 to num;
numAttrs=0;
entryname='';
/* retrieve each entry name and number of attributes */
call ldaps_entry(shandle, eIndex, entryname, numAttrs, rc);
if rc ne 0 then do;
msg = sysmsg();
put msg;
end;
else do;
put " ";
put "LDAPS_ENTRY call successful.";
put "Num attributes returned is " numAttrs;
end;
Searching an LDAP Directory 863
/* for each attribute, retrieve name and values */
do aIndex = 1 to numAttrs;
attrName='';
numValues=0;
call ldaps_attrName(shandle, eIndex, aIndex, attrName, numValues, rc);
if rc ne 0 then do;
msg = sysmsg();
put msg;
end;
else do;
put " ";
put "Attribute name is " attrName;
put "Num values returned is " numValues;
end;
do vIndex = 1 to numValues;
call ldaps_attrValue(shandle, eIndex, aIndex, vIndex, value, rc);
if rc ne 0 then do;
msg = sysmsg();
put msg;
end;
else do;
put "Value : " value;
end;
end;
end;
end;
/* free search resources */
call ldaps_free(shandle,rc);
if rc ne 0 then do;
msg = sysmsg();
put msg;
end;
else
put "LDAPS_FREE call successful.";
/* close connection to LDAP server */
call ldaps_close(handle,rc);
if rc ne 0 then do;
msg = sysmsg();
put msg;
end;
else
put "LDAPS_CLOSE call successful.";
run;
quit;
Directory Services
SAS® Integration Technologies: Developer's Guide
Searching an LDAP Directory 864

LDAP SCL Interface
The LDAP SAS Component Language (SCL) Interface consists of an SCL class that is named LDAPSERVICES that
enables you to write SCL programs to manipulate LDAP directory entries.
A link to the reference information for each supported method in the class appears on the left.
The LDAPSERVICES class is included in the base SAS catalog and is available for use when you license SAS
Integration Technologies software.
LDAP directory entries can also be manipulated using the LDAP CALL Routine Interface as well as by using the
Integration Technologies Administrator application.
Directory Services
LDAP SCL Interface 865
_ADD
Adds a new entry to an LDAP directory.
Syntax
_ADD(entryName, entry);
entryName
Character, input.
Names the new directory entry.
entry SCL list, input.
Specifies the attributes and values of the new directory entry.
Details
When invoked on an LDAPSERVICES instance, the _add method adds a new entry to the specified LDAP directory.
The entry parameter is an SCL list that specifies the attributes of the new directory entry, as well as the values
associated with each attribute. The format of the entry parameter is a list of lists. Each list contains the attribute
name as well as its values and should have the following format:
Item Number Value
−−−−−−−−−−− −−−−−
1 Character value representing the attribute name.
2 Numeric or character attribute value.
...
n Numeric or character attribute value.
Example
The following example adds an entry to an LDAP directory by creating three attribute/value lists, combining the three
lists, and using the combined list as the entry parameter in the _ADD method.
dn = "cn=myhost.pc.com,o=Alphalite Airways,c=US";
entry = makelist();
alist1 = makelist();
rc = insertc(alist1, "objectclass", −1);
rc = insertc(alist1, "SASDomain", −1);
alist2 = makelist();
rc = insertc(alist2, "cn", −1);
rc = insertc(alist2, server, −1);
alist3 = makelist();
rc = insertc(alist3, "node", −1);
rc = insertc(alist3, "oak.unx.com", −1);
rc = insertl(entry, alist1, −1);
rc = insertl(entry, alist2, −1);
rc = insertl(entry, alist3, −1);
_ADD 866
rc = ds._ADD(dn,entry);
rc = dellist(alist1);
rc = dellist(alist2);
rc = dellist(alist3);
Directory Services
SAS® Integration Technologies: Developer's Guide
_ADD 867
_CLOSE
Closes the connection to the LDAP server
Syntax
_CLOSE
Details
When invoked on an LDAPSERVICES instance, the _CLOSE method closes the connection to the LDAP server, as
shown in the following example:
rc = ds._CLOSE();
Directory Services
_CLOSE 868
_DELETE
Deletes an entry in an LDAP directory.
Syntax
_DELETE(entryName);
entryName
Character, input
Names the directory entry that is to be deleted.
Details
When invoked on an LDAPSERVICES instance, the _DELETE method deletes an entry from the LDAP directory, as
shown in the following example:
dn = "cn=myhost.net.com,o=Alphalite Airways,c=US";
rc = ds._DELETE(dn);
Directory Services
_DELETE 869
_MODIFY
Modifies an LDAP directory entry.
Syntax
_MODIFY(entryName, attrs);
entryName
Character, input.
Names the directory entry that is to be modified.
attrs SCL list, input.
Specifies the modify type, attributes, and values that are to be modified in the LDAP directory entry.
Details
When invoked on an LDAPSERVICES instance, the _MODIFY method modifies the attributes and attribute values in
an LDAP directory entry.
The attrs parameter specifies the attributes and the values in each attribute that are to be modified. The format of
the attrs parameter is a list of lists. Each list contains the modify type, attribute name, and attribute values, if any.
The lists must have the following format:
Item Number Value
−−−−−−−−−−− −−−−−
1 Character value representing the type of modification,
which can be "ADD", "DELETE", or "REPLACE".
2 Character value representing an attribute name.
3 Numeric or character attribute value.
...
n Numeric or character attribute value.
If the type of modification is DELETE and if no attribute values are specified, the entire attribute and all values are
deleted. If DELETE is specified with one or more attribute values, only the specified values are deleted.
If the type of modification is REPLACE, the existing attribute is deleted and is replaced with the specified attribute
and attribute values. You must specify all attribute values, because all of the existing attribute values are replaced with
the attribute values specified with this method.
Example
The following example modifies three attributes in an LDAP directory entry.
dn = "cn=srvr01.unx.com,o=Alphalite Airways,c=US";
entry = makelist();
alist1 = makelist();
rc = insertc(alist1, "ADD", −1); /* modify type */
rc = insertc(alist1, "sasFrequency", −1); /* attribute name */
rc = insertc(alist1, "monthly", −1); /* attribute value */
_MODIFY 870
rc = insertc(alist1, "weekly", −1); /* attribute value */
alist2 = makelist();
rc = insertc(alist2, "DELETE", −1); /* modify type */
rc = insertc(alist2, "sasNameValueFilter", −1); /* attribute name */
alist3 = makelist();
rc = insertc(alist3, "REPLACE", −1); /* modify type */
rc = insertc(alist3, "sasDeliveryTransport", −1); /* attribute name */
rc = insertc(alist3, "email", −1);
rc = insertl(entry, alist1, −1);
rc = insertl(entry, alist2, −1);
rc = insertl(entry, alist3, −1);
rc = ds._MODIFY(dn,entry);
rc = dellist(alist1);
rc = dellist(alist2);
rc = dellist(alist3);
Directory Services
SAS® Integration Technologies: Developer's Guide
_MODIFY 871

_OPEN
Opens a connection to an LDAP server.
Syntax
_OPEN(ldapServerName, port, base, bindDN, password, <session_options>);
ldapServerName
Character, input.
Names the LDAP server to connect to. If the ldapServerName parameter is left blank, the default server
name is that of the host that is running the application that called this method. Otherwise, the value of the
ldapServerName parameter must be the DNS name or IP address of a host on which an LDAP server is
running.
port Numeric, input.
Specifies the TCP port of the LDAP server. If a value of 0 is specified, the standard port of 389 is used.
base Character, input.
Specifies the base object for the upcoming search operation. The base object is the point in the LDAP tree at
which you want to start searching. Its value is a distinguished name. If this value is blank, the macro variable
or environment variable LDAP_BASE is used for the definition of the base object.
bindDNCharacter, input.
Specifies the distinguished name used to bind to the server. If this value is blank, the macro variable or
environment variable LDAP_BINDDN is used as the bind distinguished name. If a value of "" is specified and
the LDAP_BINDDN variable has not been set, an unauthorized bind is performed.
password
Character, input.
Specifies the password used to bind to the server. If this value is blank, the macro variable or environment
variable LDAP_BINDPW is used as the bind password. If the value of this attribute is specified as "" and the
LDAP_BINDPW variable has not been set, an unauthenticated bind is performed.
Passwords that have been encoded by using the PWENCODE procedure can be used to bind to the server. For
more information, see The PWENCODE Procedure in Base SAS Procedures Guide.
session_options
Character, input.
Specifies one or more session options to use with this bind. Valid session options are as follows:
OPT_REFERRALS_OFF
Instructs the server to not chase referrals. Specifying this option overrides the default value of
OPT_REFERRALS_ON.
SUBTREE_SEARCH_SCOPE
Sets the scope of the search to include all subtrees. This is the default.
BASE_SEARCH_SCOPE
Sets the scope of the search to include only the base. This value overrides the default value of
SUBTREE_SEARCH_SCOPE.
ONELEVEL_SEARCH_SCOPE
Sets the scope of the search to include the base and one additional level. This overrides the default
value of SUBTREE_SEARCH_SCOPE.
_OPEN 872
Note: Specify only one search scope option. If multiple search scope options are specified, the one that
appears last is used. If none of the search scope options are specified, the default value of
SUBTREE_SEARCH_SCOPE is used.
Details
When invoked on an LDAPSERVICES instance, the _OPEN method initializes the connection to the specified LDAP
server.
The %SYSRC macro can be used to check for errors returned from the _OPEN method. Possible error return codes
include the following:
_SELDBOS
Indicates that the specified bind distinguished name is outside the scope of the directory server.
_SELDNSO
Indicates that the bind DN doesn't exist.
_SELDICR
Indicates that an invalid password was specified.
_SELDDWN
Indicates that the SAS system was unable to connect to the LDAP server.
If the return code is not one of these pre−defined system return codes, use SYSMSG() to determine the exact error
message. See the examples section for a sample code snippet that shows how to check for these return codes.
Examples
The following example opens a connection to an LDAP server using an anonymous bind and the default session
options. It also shows how to check for error conditions from the _OPEN method.
dclass = loadclass('sashelp.base.ldapservices.class');
ds = instance(dclass);
server = "myhost.net.com";
base = "Alphalite Airways,c=US";
bindDn="";
pw="";
rc = ds._open(server,8001,base,bindDn,pw);
if rc ne 0 then do;
if (rc = %sysrc(_SELDBOS)) then
put 'Bind outside of scope.';
else if (rc = %sysrc(_SELDNSO)) then
put 'No such object.';
else if (rc = %sysrc(_SELDICR)) then
put 'Invalid credentials.';
else if (rc = %sysrc(_SELDDWN)) then
put 'Unable to contact LDAP server.';
else do;
msg = sysmsg();
put msg;
end;
end;
SAS® Integration Technologies: Developer's Guide
_OPEN 873
The following example opens a connection to an LDAP server, binding as user John Doe. It passes in a session option
of OPT_REFERRALS_OFF; this instructs the LDAP server not to chase referrals.
server = "myhost.net.com";
base = "Alphalite Airways,c=US";
bindDN ="cn=John Doe,ou=People,o=Alphalite Airways,c=us";
pw="myPass1";
referral= "OPT_REFERRALS_OFF";
rc = ds._OPEN(server,8001,base,bindDn,pw,referral);
Directory Services
SAS® Integration Technologies: Developer's Guide
_OPEN 874
_SETOPTIONS
Sets options on an open LDAP server session.
Syntax
_SETOPTIONS(timeLimit, sizeLimit, base, referral, restart, property, propertyValue);
timeLimit
Numeric, input.
Specifies the maximum number of seconds that the client is willing to wait for a response to a search request.
A value of 0 indicates no time limit. The time limit is set to 0 by default. The default value is in effect until it
is changed. A value of −1 indicates that the existing value is to remain unchanged.
sizeLimit
Numeric, input.
Specifies the maximum number of entries to return in a search result. A value of 0 indicates no size limit. The
size limit is set to 0 by default. The default value remains in effect until it is changed. A value of −1 indicates
that the existing value is to remain unchanged.
base Character, input.
Specifies the base object for the search operation, which must be a distinguished name. An initial base object
was specified when the connection to the LDAP server was established. Specifying a non−blank value for the
base parameter overrides the existing base object definition. Specifying a blank value retains the existing
value.
referralCharacter, input.
Indicates whether or not to chase referrals, by setting either the OPT_REFERRALS_ON option or the
OPT_REFERRALS_OFF option. One or the other of these options was specified when the connection to the
LDAP server was established. Specifying either option as the value of the referral parameter overrides the
existing value. Specifying a blank value retains the existing value.
restart Character, input.
Indicates whether or not to restart a query if EINTR occurs. At _open time, the default session settings are
determined. _setOptions can be used to change these defaults. Valid values for restart are
OPT_RESTART_ON or OPT_RESTART_OFF. A blank value can be passed in to indicate that the default
value of OPT_RESTART_OFF should be used.
property
Character, input.
Specifies the name of an optional property that is being set. Currently, the only property that is supported is
the SEARCH_SCOPE property which specifies the scope of searches in the LDAP directory. Specify the
value of the property using the propertyValue parameter.
propertyValue
Character, input.
Specifies the value for the property parameter. Valid values for the SEARCH_SCOPE property are as follows:
SUBTREE_SEARCH_SCOPE
Sets the scope of the search to include all subtrees. This is the default.
BASE_SEARCH_SCOPE
Sets the scope of the search to include only the base. This value overrides the default value of
SUBTREE_SEARCH_SCOPE.
_SETOPTIONS 875
ONELEVEL_SEARCH_SCOPE
Sets the scope of the search to include the base and one additional level. This overrides the default
value of SUBTREE_SEARCH_SCOPE.
Details
When invoked on an LDAPSERVICES instance, the _SETOPTIONS method configures an LDAP session by
changing session options. Once changed, these values remain in effect until they are overridden by a subsequent call.
Examples
The following example sets various session options.
timelimit=120;
sizelimit=100;
base=''; /* use default set at _open time */
referral = "OPT_REFERRALS_OFF";
restart = ""; /* use default */
rc = ds._SETOPTIONS(timelimit, sizelimit, base, referral, restart);
The following example uses the optional properties parameter to set the search scope.
timelimit = −1; /* use current setting */
sizelimit = −1; /* use current setting */
base=''; /* use default set at _open time */
referral = ""; /* use default set at _open time */
restart = ""; /* use default */
prop = "SEARCH_SCOPE";
propValue = "BASE_SEARCH_SCOPE"; /* only search the base */
rc = ds._setOptions(timelimit, sizelimit, base, referral, restart, prop, propValue);
Directory Services
SAS® Integration Technologies: Developer's Guide
_SETOPTIONS 876
_SEARCH
Searches and retrieves information from an LDAP directory.
Syntax
_SEARCH(filter, attribs, results);
filter Character, input.
Specifies search criteria which determine that the entries are to be added to the entry list returned by the
search.
attribs SCL list, input.
Specifies in an SCL list the names of the attributes to be returned in the search results for each entry that
matches the search criteria. A value of 0 or "" indicates that all attributes are to be returned.
results SCL list, output.
Returns the results of the search.
Details
When invoked on an LDAPSERVICES instance, the _SEARCH method allows you to select and retrieve entries from
an LDAP directory.
The content returned in the results parameter is a list of SCL lists containing the entries, attributes, and values that
match the search criteria. Each entry in the entry list contains a sublist in the following format:
Item Type Value
1 Character Distinguished name of entry.
2 Numeric Number of attributes and values in entry.
3 SCL list Attribute name and values.
... SCL list Attribute name and values.
num_attrs+2 SCL list Attribute name and values.
The SCL list that contains the attribute names and values (see item 3 above) has the following format:
Item Type Value
1 Character Attribute name
2 Numeric Number of values returned for this attribute
3 Character Attribute value
... Character Attribute value
_SEARCH 877
num_values+2 Character Attribute value
Note: This method should not be used to retrieve internal attributes from a Microsoft Active Directory server.
Examples
For a single LDAP directory entry, the following example returns four attributes and the values of those attributes.
/* list of attributes to be returned */
attribs = makelist();
rc = insertc(attribs, "uid", −1);
rc = insertc(attribs, "mail", −1);
rc = insertc(attribs, "roomnumber", −1);
rc = insertc(attribs, "employeenumber", −1);
r = makelist(); /* results returned in r */
rc = ds._SEARCH('cn=John Smith', attribs, r);
The following example searches an LDAP directory and extracts from the search results the attribute names and all the
values of those attributes.
results=makelist();
rc = dirInst._SEARCH(filter, attribs, results);
total_entries = listlen(results);
do i = 1 to total_entries;
/* each list in results is entry matching criteria */
entry = getiteml(results, i);
/* distinguished name */
dn = getitemc(entry, 1);
/* total number of attributes returned */
attribNum = getitemn(entry, 2);
do k= 3 to (attribNum+2);
/* each attribute is its own list, get first attrib */
attrib = getiteml(entry, k);
/* name of attribute */
attribname = getitemc(attrib,1 );
/* number of values */
numValues = getitemn(attrib, 2);
/* retrieve values */
do z = 3 to (numValues + 2);
value = getitemc(attrib, z);
end;
end;
end;
SAS® Integration Technologies: Developer's Guide
_SEARCH 878

Your Turn
If you have comments or suggestions about
SAS 9.1.3 Integration Technologies:
Developer’s Guide, Fourth Edition
, please send them to us on a photocopy of this page or
send us electronic mail.
For comments about this book, please return the photocopy to
SAS Publishing
SAS Campus Drive
Cary, NC 27513
E-mail: yourturn@sas.com
For suggestions about the software, please return the photocopy to
SAS Institute Inc.
Technical Support Division
SAS Campus Drive
Cary, NC 27513
E-mail: suggest@sas.com
