DR 3_e Roland Corporation 3 Owner's Manual Om
Roland Corporation DR-3 Owner's Manual dr-3_om Roland Corporation - DR-3 - Owner's Manual
boss-dr-3-manual
User Manual: Roland Corporation DR-3 Owner's Manual Roland Corporation - DR-3 - Owner's Manual
Open the PDF directly: View PDF ![]() .
.
Page Count: 128 [warning: Documents this large are best viewed by clicking the View PDF Link!]
- IMPORTANT NOTES
- Main Features
- Contents
- Panel Descriptions
- Before You Play
- Let’s Listen to the Demo
- Let’s Play a Style
- Let’s Use a Foot Switch
- Let’s Perform with the Patterns Switched Automatically ([AUTO])
- Let’s Change the Overall Tone of the Sound and Acoustics (TSC)
- Chapter 1 Overview of the DR-3
- Chapter 2 Playing Styles (Manual Mode [MANU])
- Chapter 3 Playing Styles (Auto Mode [AUTO])
- Chapter 4 Controlling the Styles with a Foot Switch
- Chapter 5 Changing the Overall Tone of the Sound and Acoustics (TSC)
- Chapter 6 Performing with the Pads
- Chapter 7 Creating Styles
- Chapter 8 Creating and Performing Songs ([SONG])
- Chapter 9 Changing the Operating Environment (System)
- Chapter 10 Creating Your Own Kits
- Chapter 11 Connecting and Using External MIDI Devices
- Troubleshooting
- Message List
- Parameter List
- Instrument/Bass Tone List
- Preset Kit List
- Preset Style List
- MIDI Implementation Chart
- Specifications
- Index
Owner’s Manual
03236845 1*SX
Thank you, and congratulations on your choice of the BOSS DR-3 Dr. Rhythm.
Before using this unit, carefully read the sections entitled:
• USING THE UNIT SAFELY (page 2–4)
• IMPORTANT NOTES (page 5)
These sections provide important information concerning the proper operation of the unit.
Additionally, in order to feel assured that you have gained a good grasp of every feature provided by
your new unit, Owner's manual should be read in its entirety. The manual should be saved and kept
on hand as a convenient reference.
■
Printing Conventions in This Manual
• Text or numerals enclosed in square brackets [ ] indicate buttons.
[SONG] SONG button
START [ ] START button
• Reference such as (p. **) indicate pages in this manual to which you can refer.
Copyright © 2003 BOSS CORPORATION
All rights reserved. No part of this publication may be reproduced in any form without the written permission of BOSS
CORPORATION.
2
This product complies with the requirements of European Directive 89/336/EEC.
For EU Countries
For Canada
This Class B digital apparatus meets all requirements of the Canadian Interference-Causing Equipment Regulations.
Cet appareil numérique de la classe B respecte toutes les exigences du Règlement sur le matériel brouilleur du Canada.
NOTICE
AVIS
For the USA
FEDERAL COMMUNICATIONS COMMISSION
RADIO FREQUENCY INTERFERENCE STATEMENT
This equipment has been tested and found to comply with the limits for a Class B digital device, pursuant to Part 15 of the
FCC Rules. These limits are designed to provide reasonable protection against harmful interference in a residential
installation. This equipment generates, uses, and can radiate radio frequency energy and, if not installed and used in
accordance with the instructions, may cause harmful interference to radio communications. However, there is no guarantee
that interference will not occur in a particular installation. If this equipment does cause harmful interference to radio or
television reception, which can be determined by turning the equipment off and on, the user is encouraged to try to correct the
interference by one or more of the following measures:
– Reorient or relocate the receiving antenna.
– Increase the separation between the equipment and receiver.
– Connect the equipment into an outlet on a circuit different from that to which the receiver is connected.
– Consult the dealer or an experienced radio/TV technician for help.
This device complies with Part 15 of the FCC Rules. Operation is subject to the following two conditions:
(1) This device may not cause harmful interference, and
(2) This device must accept any interference received, including interference that may cause undesired operation.
Unauthorized changes or modification to this system can void the users authority to operate this equipment.
This equipment requires shielded interface cables in order to meet FCC class B Limit.
USING THE UNIT SAFELY
001
• Before using this unit, make sure to
read the instructions below, and the
Owner’s Manual.
..................................................................................................
002c
• Do not open (or modify in any way)
the unit or its AC adaptor.
..................................................................................................
003
• Do not attempt to repair the unit, or
replace parts within it (except when
this manual provides specific instruc-
tions directing you to do so). Refer all
servicing to your retailer, the nearest
Roland Service Center, or an autho-
rized Roland distributor, as listed on
the “Information” page.
..................................................................................................
004
• Never use or store the unit in places
that are:
• Subject to temperature extremes
(e.g., direct sunlight in an enclosed
vehicle, near a heating duct, on top
of heat-generating equipment); or
are
• Damp (e.g., baths, washrooms, on
wet floors); or are
• Humid; or are
• Exposed to rain; or are
• Dusty; or are
• Subject to high levels of vibration.
..................................................................................................
007
• Make sure you always have the unit
placed so it is level and sure to remain
stable. Never place it on stands that
could wobble, or on inclined surfaces.
..................................................................................................
008b
• Use only the specified AC adaptor
(PSA-series), and make sure the line
voltage at the installation matches the
input voltage specified on the AC
adaptor’s body. Other AC adaptors
may use a different polarity, or be
designed for a different voltage, so
their use could result in damage,
malfunction, or electric shock.
..................................................................................................
009
• Do not excessively twist or bend the
power cord, nor place heavy objects
on it. Doing so can damage the cord,
producing severed elements and short
circuits. Damaged cords are fire and
shock hazards!
..................................................................................................
Used for instructions intended to alert
the user to the risk of injury or material
damage should the unit be used
improperly.
* Material damage refers to damage or
other adverse effects caused with
respect to the home and all its
furnishings, as well to domestic
animals or pets.
Used for instructions intended to alert
the user to the risk of death or severe
injury should the unit be used
improperly.
The ● symbol alerts the user to things that must be
carried out. The specific thing that must be done is
indicated by the design contained within the circle. In
the case of the symbol at left, it means that the power-
cord plug must be unplugged from the outlet.
The symbol alerts the user to important instructions
or warnings.The specific meaning of the symbol is
determined by the design contained within the
triangle. In the case of the symbol at left, it is used for
general cautions, warnings, or alerts to danger.
The symbol alerts the user to items that must never
be carried out (are forbidden). The specific thing that
must not be done is indicated by the design contained
within the circle. In the case of the symbol at left, it
means that the unit must never be disassembled.
3
010
• This unit, either alone or in combi-
nation with an amplifier and
headphones or speakers, may be
capable of producing sound levels that
could cause permanent hearing loss.
Do not operate for a long period of
time at a high volume level, or at a
level that is uncomfortable. If you
experience any hearing loss or ringing
in the ears, you should immediately
stop using the unit, and consult an
audiologist.
..................................................................................................
011
• Do not allow any objects (e.g.,
flammable material, coins, pins); or
liquids of any kind (water, soft drinks,
etc.) to penetrate the unit.
..................................................................................................
012c
• Immediately turn the power off,
remove the AC adaptor from the
outlet, and request servicing by your
retailer, the nearest Roland Service
Center, or an authorized Roland
distributor, as listed on the “Infor-
mation” page when:
• The AC adaptor or the power-
supply cord has been damaged; or
• If smoke or unusual odor occurs
• Objects have fallen into, or liquid
has been spilled onto the unit; or
• The unit has been exposed to rain
(or otherwise has become wet); or
•The unit does not appear to operate
normally or exhibits a marked
change in performance.
..................................................................................................
013
• In households with small children, an
adult should provide supervision until
the child is capable of following all the
rules essential for the safe operation of
the unit.
..................................................................................................
014
• Protect the unit from strong impact.
(Do not drop it!)
..................................................................................................
015
• Do not force the unit’s power-supply
cord to share an outlet with an unrea-
sonable number of other devices. Be
especially careful when using
extension cords—the total power used
by all devices you have connected to
the extension cord’s outlet must never
exceed the power rating (watts/
amperes) for the extension cord.
Excessive loads can cause the
insulation on the cord to heat up and
eventually melt through.
..................................................................................................
016
• Before using the unit in a foreign
country, consult with your retailer, the
nearest Roland Service Center, or an
authorized Roland distributor, as
listed on the “Information” sheet.
..................................................................................................
019
• Batteries must never be recharged,
heated, taken apart, or thrown into fire
or water.
..................................................................................................
4
101b
• The unit and the AC adaptor should
be located so their location or position
does not interfere with their proper
ventilation.
..................................................................................................
102d
• Always grasp only the output plug or
the body of the AC adaptor when
plugging into, or unplugging from,
this unit or an outlet.
..................................................................................................
103b
•Any accumulation of dust between the
AC adaptor and the power outlet can
result in poor insulation and lead to
fire. Periodically wipe away such dust
with a dry cloth. Also, disconnect the
power plug from the power outlet
whenever the unit is to remain unused
for an extended period of time.
..................................................................................................
104
• Try to prevent cords and cables from
becoming entangled. Also, all cords
and cables should be placed so they
are out of the reach of children.
..................................................................................................
106
•Never climb on top of, nor place heavy
objects on the unit.
..................................................................................................
107d
•Never handle the AC adaptor body, or
its output plugs, with wet hands when
plugging into, or unplugging from, an
outlet or this unit.
..................................................................................................
108b
•Before moving the unit, disconnect the
AC adaptor and all cords coming from
external devices.
..................................................................................................
109b
• Before cleaning the unit, turn off the
power and unplug the AC adaptor
from the outlet (P. 16).
..................................................................................................
110b
• Whenever you suspect the possibility
of lightning in your area, disconnect
the AC adaptor from the outlet.
..................................................................................................
111: Selection
• If used improperly, batteries may
explode or leak and cause damage or
injury. In the interest of safety, please
read and observe the following
precautions (P. 15).
1
• Carefully follow the installation
instructions for batteries, and make
sure you observe the correct
polarity.
2
• Avoid using new batteries together
with used ones. In addition, avoid
mixing different types of batteries.
3
• Remove the batteries whenever the
unit is to remain unused for an
extended period of time.
5
• If a battery has leaked, use a soft
piece of cloth or paper towel to
wipe all remnants of the discharge
from the battery compartment.
Then install new batteries. To avoid
inflammation of the skin, make sure
that none of the battery discharge
gets onto your hands or skin.
Exercise the utmost caution so that
none of the discharge gets near
your eyes. Immediately rinse the
affected area with running water if
any of the discharge has entered the
eyes.
6
• Never keep batteries together with
metallic objects such as ballpoint
pens, necklaces, hairpins, etc.
..................................................................................................
112
• Used batteries must be disposed of in
compliance with whatever regula-
tions for their safe disposal that may
be observed in the region in which you
live.
..................................................................................................

5
IMPORTANT NOTES
291a
In addition to the items listed under “USING THE UNIT SAFELY” on page 2–4, please read and
observe the following:
Power Supply: Use of Batteries
301
•
Do not use this unit on the same power circuit
with any device that will generate line noise (such
as an electric motor or variable lighting system).
302
• The AC adaptor will begin to generate heat after
long hours of consecutive use. This is normal,
and is not a cause for concern.
303a
•The use of an AC adaptor is recommended as the
unit’s power consumption is relatively high.
Should you prefer to use batteries, please use the
alkaline type.
304a
• When installing or replacing batteries, always
turn off the power on this unit and disconnect
any other devices you may have connected. This
way, you can prevent malfunction and/or
damage to speakers or other devices.
306b
• Batteries are supplied with the unit. The life of
these batteries may be limited, however, since
their primary purpose was to enable testing.
307
•Before connecting this unit to other devices, turn
off the power to all units. This will help prevent
malfunctions and/or damage to speakers or
other devices.
Placement
351
•
Using the unit near power amplifiers (or other
equipment containing large power transformers)
may induce hum. To alleviate the problem,
change the orientation of this unit; or move it
farther away from the source of interference.
352a
• This device may interfere with radio and
television reception. Do not use this device in the
vicinity of such receivers.
352b
• Noise may be produced if wireless communica-
tions devices, such as cell phones, are operated
in the vicinity of this unit. Such noise could occur
when receiving or initiating a call, or while
conversing. Should you experience such
problems, you should relocate such wireless
devices so they are at a greater distance from this
unit, or switch them off.
354a
•
Do not expose the unit to direct sunlight, place it
near devices that radiate heat, leave it inside an
enclosed vehicle, or otherwise subject it to
temperature extremes. Excessive heat can deform
or discolor the unit.
355b
•When moved from one location to another where
the temperature and/or humidity is very
different, water droplets (condensation) may
form inside the unit. Damage or malfunction
may result if you attempt to use the unit in this
condition. Therefore, before using the unit, you
must allow it to stand for several hours, until the
condensation has completely evaporated.
Maintenance
401a
• For everyday cleaning wipe the unit with a soft,
dry cloth or one that has been slightly dampened
with water. To remove stubborn dirt, use a cloth
impregnated with a mild, non-abrasive
detergent. Afterwards, be sure to wipe the unit
thoroughly with a soft, dry cloth.
402
• Never use benzine, thinners, alcohol or solvents
of any kind, to avoid the possibility of discolor-
ation and/or deformation.
Additional Precautions
551
•Please be aware that the contents of memory can
be irretrievably lost as a result of a malfunction,
or the improper operation of the unit. To protect
yourself against the risk of loosing important
data, we recommend that you periodically save a
backup copy of important data you have stored
in the unit’s memory on a paper.
552
• Unfortunately, it may be impossible to restore
the contents of data that was stored in another
MIDI device (e.g., a sequencer) once it has been
lost. Roland Corporation assumes no liability
concerning such loss of data.
553
• Use a reasonable amount of care when using the
unit’s buttons, sliders, or other controls; and
when using its jacks and connectors. Rough
handling can lead to malfunctions.
554
• Never strike or apply strong pressure to the
display.
556
• When connecting / disconnecting all cables,
grasp the connector itself—never pull on the
cable. This way you will avoid causing shorts, or
damage to the cable’s internal elements.
558a
• To avoid disturbing your neighbors, try to keep
the unit’s volume at reasonable levels. You may
prefer to use headphones, so you do not need to
be concerned about those around you (especially
when it is late at night).
559a
• When you need to transport the unit, package it
in the box (including padding) that it came in, if
possible. Otherwise, you will need to use equiv-
alent packaging materials.

6
Main Features
■
Making Your Own Rhythm Pattern Arrangements with Style Play
With the DR-3, you can enjoy performing rhythm patterns made up of drum and bass sounds.
You can add fill-ins and switch patterns while you play, making it easy to develop choruses,
bridges, and solos for your songs.
■
100 Different Preset Styles
The DR-3 comes with 100 different prepared Styles in a variety of genres, including Rock, Funk,
Hip Hop, Jazz, Latin, and more. You can also create up to 100 of your own original Styles.
■
TSC (Total Sound Control) Function
This includes two types of effects, “Sound Shape,” which adjusts the overall tone of the sound,
and “Ambience,” which alters the overall acoustic characteristics.
This feature makes it easy to attain the sound you want, whether it be a harder sound for Rock,
an acoustic sound for Jazz, or the sound you get when performing live on stage.
Sound Shape and Ambience each includes eight presets and eight memories you can use to store
your own favorite settings.
■
Control the DR-3 with a Foot Switch
The DR-3 allows you to connect up to two (optional) foot switches. You can use your foot to
control the DR-3 as you perform, making this perfect for jam sessions and live performances.
You can a variety of functions to the foot switches, including switching patterns and turning the
Variation function on and off.
■
Variation Function Lets You Enjoy a Wide Variety of Arrangements
The DR-3 includes a Variation function that lets you play different arrangements within songs,
for example arrangements to build up the excitement, quieter ones for vocal solos, along with a
wide variety of other arrangements.
■
Produce Rhythm Patterns Automatically in Auto Mode
In Auto mode, you can produce songs by having the rhythm patterns be changed automatically
every eight or sixteen measures, allowing you to enjoy jam sessions once you start a song,
without having to operate the DR-3.
■
High-Quality Instrument Sounds–Ghost Notes, Too
The DR-3 features special “soft shot,” “double shot,” and “buzz shot” sounds for use as snare
ghost notes. Using these makes it possible to get even more realistic rhythm patterns.
■
Dynamics-Capable Pad Keys
The pad keys on the DR-3 are capable of producing dynamics. The volume changes in response
to the force you use to play the pads.
This lets you alter the sound you play depending on how hard you hit the pads, such as for hard
shots and soft shots on the snare.

7
Main Features
■
Setting the Tempo with Tap Tempo Function
You can set tempos just by tapping the button at the desired timing.
■
Key Shift Function
You can easily change the key in which you are playing.
You can also easily get flat-tuning of a guitar, or match the key used by a different instrument,
such as a sax.
■
Convenient Song Composing and Performing Functions
While basically following procedures similar to those used in performing Styles, you can create
songs intuitively with the panel pads.
After you create a song, you can add cymbal crashes, change bass phrases, and edit specific
portions of songs.
■
Synchronize Performances with Digital Recorders and Sequencers
Using MIDI, you can synchronize performances with digital recorders (such as those in the BR
Series) and sequencers, or start and stop the DR-3 using a GT-6.
■
Equipped with Both Phono Jacks and Phone Jacks
In addition to 1/4” phone jacks, the DR-3 also features RCA phono jacks, which let you connect
a variety of other devices, such as mixers, amps, and audio systems.
■
Compact Body
The DR-3 is lightweight, compact, and very portable. And since the unit can be powered with
batteries, you can use it just about anywhere.

8
Contents
USING THE UNIT SAFELY ..................................................................... 2
IMPORTANT NOTES............................................................................... 5
Main Features ......................................................................................... 6
Panel Descriptions ............................................................................... 12
Before You Play .................................................................................... 15
Install Batteries.......................................................................................................... 15
Making Connections................................................................................................. 16
Turning On/Off the Power ..................................................................................... 17
Reset to Default Factory Settings (Factory Reset) ................................................ 18
Quick Start.......................................................20
Let’s Listen to the Demo...................................................................... 21
Let’s Play a Style .................................................................................. 22
Performing Styles with Selecting Patterns ([MANU]) ........................................ 22
Performing Variations on Styles (VARIATION).................................................. 24
Selecting Styles.......................................................................................................... 26
Changing the Tempo ([TEMPO]) ........................................................................... 27
Setting the Tempo by Tapping It Out (Tap Tempo)..................................... 27
Changing the Key ([KEY SHIFT]) .......................................................................... 28
Let’s Use a Foot Switch ....................................................................... 29
Connecting the Foot Switch .................................................................................... 29
Using the Foot Switch .............................................................................................. 30
Let’s Perform with the Patterns Switched Automatically ([AUTO]) ....... 31
Let’s Change the Overall Tone of the Sound and Acoustics (TSC) ...... 32
Chapter 1 Overview of the DR-3.......................................................... 34
The DR-3’s Performance Modes ............................................................................. 34
Style Play Mode ........................................................................................................ 34
Makeup of a Style ..................................................................................................... 35
Song Mode ................................................................................................................. 37
Switching the Pad Functions................................................................................... 37
Main Screens and Functions.................................................................................... 38
Starting and Stopping Performances and Recording ................................... 40
Adjusting the Tempo ([TEMPO]).................................................................... 41
Changing the Key of the Performance ([KEY SHIFT])................................. 42
Chapter 2 Playing Styles (Manual Mode [MANU]) ............................. 43
How the Pads Work When Performing Styles .............................................. 43
Selecting Styles.......................................................................................................... 43
Selecting the Patterns to be Played......................................................................... 44
Starting/Stopping.............................................................................................. 44
How to Change Patterns................................................................................... 44
Selecting Variations (VARIATION) ....................................................................... 45

9
Contents
Chapter 3 Playing Styles (Auto Mode [AUTO]) .................................. 46
Selecting a Style......................................................................................................... 46
Performing in Auto Mode ....................................................................................... 46
Changing the Pattern Progression in Auto Mode......................................... 47
Chapter 4 Controlling the Styles with a Foot Switch ........................ 48
Starting and Stopping Performances ..................................................................... 48
Switching Verses....................................................................................................... 48
Assigning Functions to the Foot Switch................................................................ 49
Chapter 5 Changing the Overall Tone of the Sound and Acoustics (TSC).......... 51
Changing the Overall Tone of the Sound ([SOUND SHAPE]) .......................... 51
Altering the Acoustic Characteristics of the Overall Sound ([AMBIENCE])... 52
Changing the Sound Shape Parameters ................................................................ 53
How to Make the Settings ................................................................................ 53
Changing the Equalizer Parameters ............................................................... 53
Changing the Compressor Parameters........................................................... 54
Naming the Settings .......................................................................................... 55
Copying the Settings ......................................................................................... 55
Changing the Ambience Parameters ..................................................................... 56
How to Make the Settings ................................................................................ 56
Changing the Ambience Parameters .............................................................. 56
Naming the Settings .......................................................................................... 57
Copying the Settings ......................................................................................... 57
Chapter 6 Performing with the Pads................................................... 58
Playing Drum Sounds.............................................................................................. 59
Playing Percussion Sounds ..................................................................................... 59
Playing Bass Sounds................................................................................................. 59
Selecting a Different Sound (VARIATION [KIT])................................................ 60
Chapter 7 Creating Styles.................................................................... 61
Procedure for Creating Styles ................................................................................. 61
<1> Selecting a Number for the Style .................................................................... 62
<2> Making the Settings for the New Style .......................................................... 62
Setting the Tempo for the Style ....................................................................... 62
Setting the Beat................................................................................................... 62
Setting Up the Kit .............................................................................................. 63
Changing the Sound to Be Muted ................................................................... 63
Making the TSC Settings for the Style ............................................................ 64
Determining the Number of Measures for Each Pattern ............................. 64
<3> Recording the Patterns ..................................................................................... 65
Using Realtime Recording................................................................................ 65
• Recording the Drum Part .............................................................................. 65
• Recording the Bass Part................................................................................. 66
Using Step Recording........................................................................................ 67
• Recording the Drum Part .............................................................................. 67
• Recording the Bass Part................................................................................. 68
Adding Dynamics to the Sounds (Velocity Edit).......................................... 69
Transposing the Pattern’s Bass Part................................................................ 70
Playing Back Recorded Patterns...................................................................... 70

10
Contents
<4> Confirming the Created Style.......................................................................... 70
Performing the Created Style........................................................................... 70
Editing the Settings............................................................................................ 70
Naming, Copying, and Deleting Styles ................................................................. 71
Naming the Style ............................................................................................... 71
Copying the Style............................................................................................... 71
Clearing the Style............................................................................................... 72
Copying and Deleting Patterns .............................................................................. 72
Copying Patterns ............................................................................................... 72
Clearing Patterns ............................................................................................... 73
Chapter 8 Creating and Performing Songs ([SONG]) ....................... 74
What is a Song? .................................................................................................. 74
Procedure for Creating Songs ................................................................................. 74
<1> Selecting a Number for the Song .................................................................... 75
<2> Make the Settings for the New Song.............................................................. 75
Setting the Basic Tempo.................................................................................... 75
Making the TSC Settings for the Song ............................................................ 76
<3> Recording the Song........................................................................................... 76
When Using Step Recording ............................................................................ 76
When Using Realtime Recording .................................................................... 77
Editing Notes to Drum Parts and Bass Parts in the Song ............................ 78
<4> Editing Songs..................................................................................................... 80
Adding Patterns In the Song (INSERT).......................................................... 80
Deleting Specified Segments (DELETE)......................................................... 81
Copying Specified Segments (COPY)............................................................. 82
Changing the Tempo Part Way Through a Song (TEMPO)........................ 83
<5> Checking the Created Song ............................................................................. 83
Performing the Created Song........................................................................... 83
Editing the Settings............................................................................................ 83
Naming, Copying, and Deleting Songs................................................................. 84
Naming the Song ............................................................................................... 84
Copying the Song .............................................................................................. 84
Clearing the Song............................................................................................... 85
Performing Songs ..................................................................................................... 85
Performing Songs .............................................................................................. 85
Switching Patterns With a Foot Switch .......................................................... 86
Playing Multiple Songs Continuously (Song Chain) ................................... 87
Chapter 9 Changing the Operating Environment (System).............. 88
How to Make the Settings ................................................................................ 88
Setting the Parts To Be Output from the OUTPUT Jacks.................................... 89
Adjusting the Pad Sensitivity.................................................................................. 89
Setting the Reference Pitch for the Bass Part ........................................................ 89
Changing the Volume of the Metronome Sound................................................. 89
Chapter 10 Creating Your Own Kits.................................................... 90
How to Make the Settings ................................................................................ 90
Selecting the Sounds Assigned to the Pads........................................................... 91
Setting the Volume ................................................................................................... 91
Setting the Position of the Sound ........................................................................... 91
Naming the Kit.......................................................................................................... 91
Copying the Kit......................................................................................................... 92

11
Contents
Chapter 11 Connecting and Using External MIDI Devices ............... 93
What is MIDI? .................................................................................................... 93
Starting/Stopping and Synchronizing Performances on the DR-3
from an External MIDI Device................................................................................ 93
Setting the MIDI Channels ............................................................................... 94
Setting Sync Mode ............................................................................................. 95
Using An External MIDI Device to Play the DR-3............................................... 95
Using the DR-3 to Record Performances Played by External MIDI Devices ... 96
Appendices......................................................98
Troubleshooting ................................................................................... 99
Message List ....................................................................................... 100
Parameter List..................................................................................... 101
Instrument/Bass Tone List ................................................................ 104
Preset Kit List ..................................................................................... 106
Preset Style List.................................................................................. 116
MIDI Implementation .......................................................................... 117
MIDI Implementation Chart ................................................................ 120
Specifications ..................................................................................... 122
Index .................................................................................................... 123
12
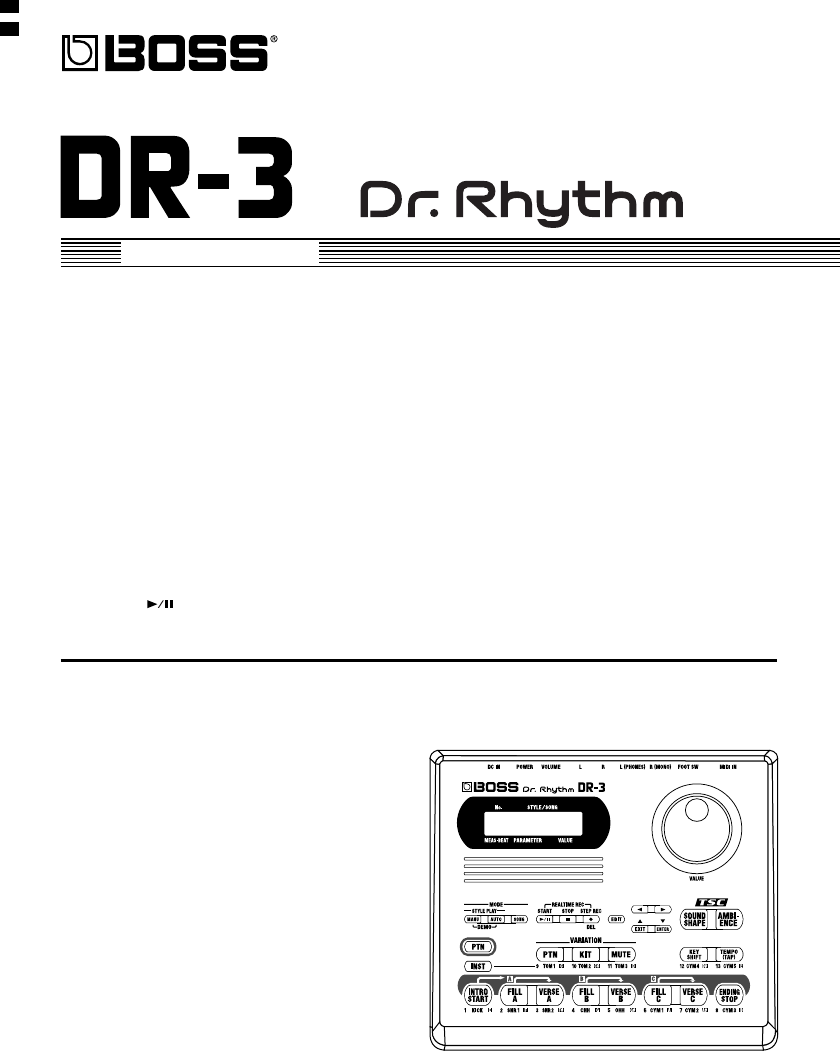
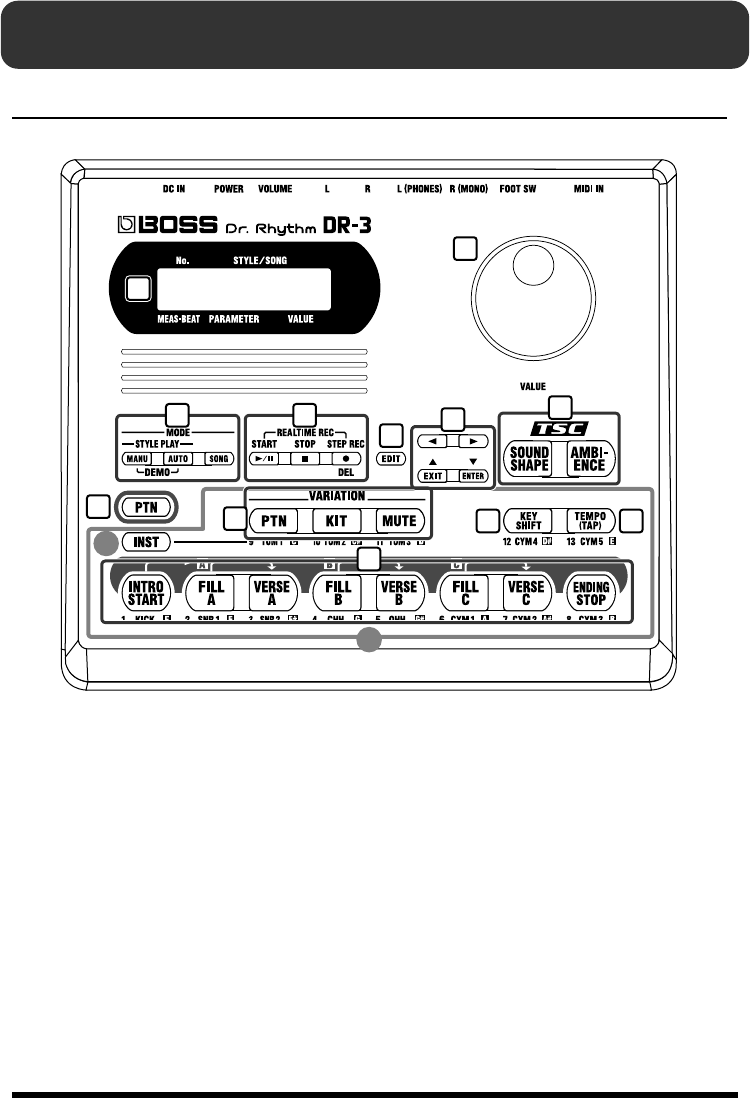
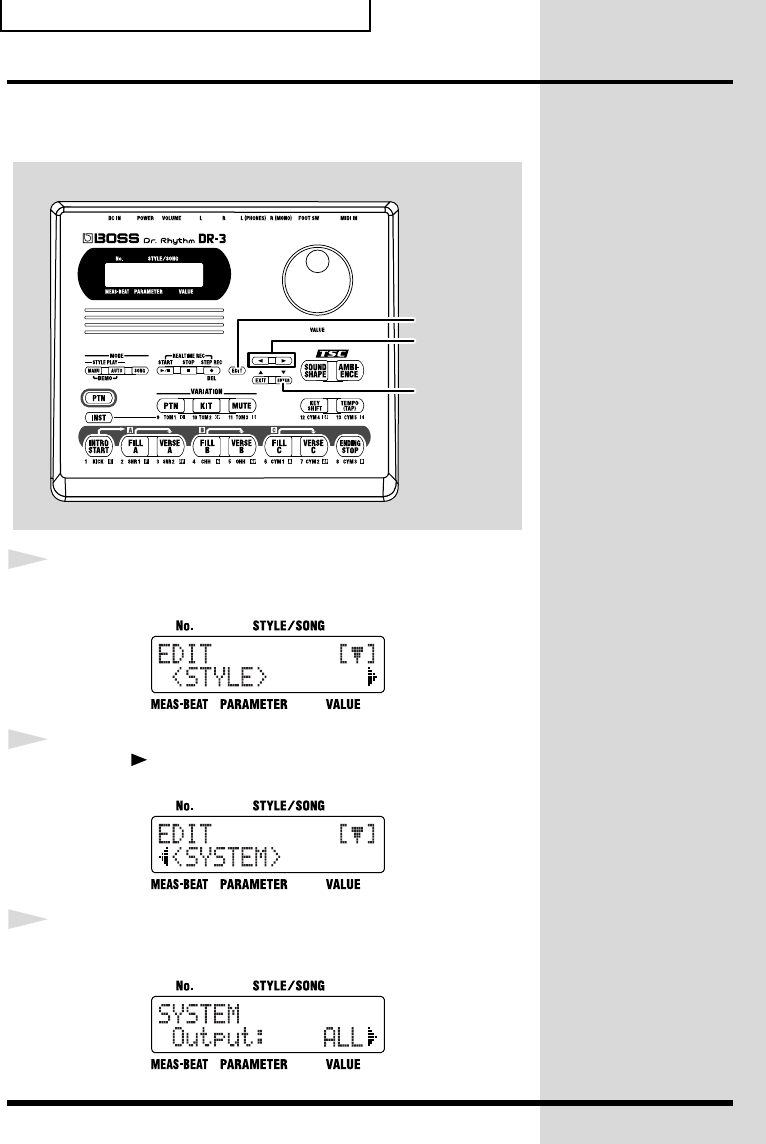
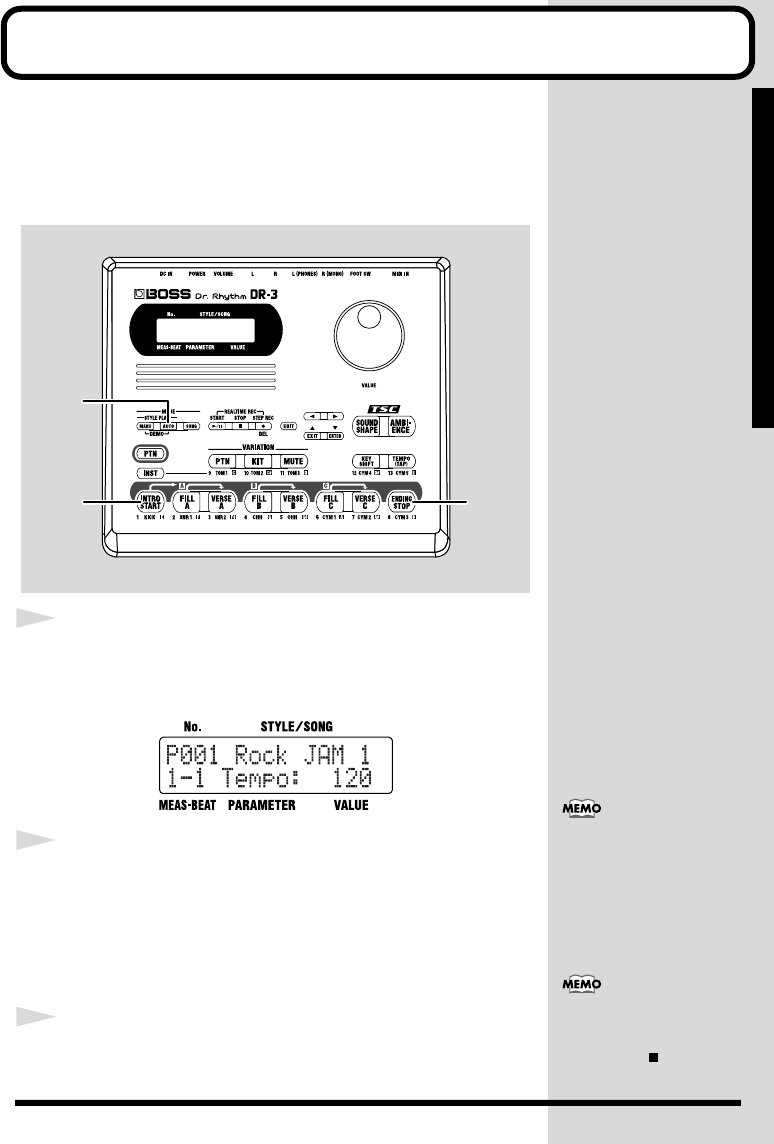
Panel Descriptions
Front Panel
fig.Panel
1. Display
* The explanations in this manual include
illustrations that depict what should
typically be shown by the display. Note,
however, that your unit may incorporate a
newer, enhanced version of the system (e.g.,
includes newer sounds), so what you actually
see in the display may not always match what
appears in the manual.
2. VALUE dial
Selects Styles and songs.
You can set tempos by rotating the dial
after pressing the TEMPO button (11).
This is also used during editing to input
settings values.
3. MODE button
MANU (Manual) button
Press this button to switch to Manual
mode, in which you perform by switching
the patterns yourself.
AUTO button
Press this button to switch to Auto mode,
in which the patterns are switched
automatically during play of Styles.
SONG button
Press this button to switch to Song mode,
in which you play songs.
13
14
1
2
34
567
8910 11
12
13
Panel Descriptions
4.
START button
Starts and pauses Styles/songs playback
or recording.
STOP button
This stops the performance of the Styles or
songs.
STEP REC button
This starts Step Recording of Styles and
songs.
Pressing START button during Step
Recording then starts Realtime Recording.
5. EDIT button
Uses this when making settings related to
the performance and the usage
environment for the DR-3.
6. / /
/EXIT /
/ENTER buttons
The four buttons, , , and
are called the cursor buttons.
Cursor buttons are used to select
parameters and changes screens (pages).
EXIT button is pressed to stop an operation.
ENTER button is used to “lock in” a value
you’ve set or to execute an operation.
7. TSC (Total Sound Control)
buttons
SOUND SHAPE button
Adjusts the overall tone of the sound.
AMBIENCE button
Alters the acoustic characteristics of the
overall sound.
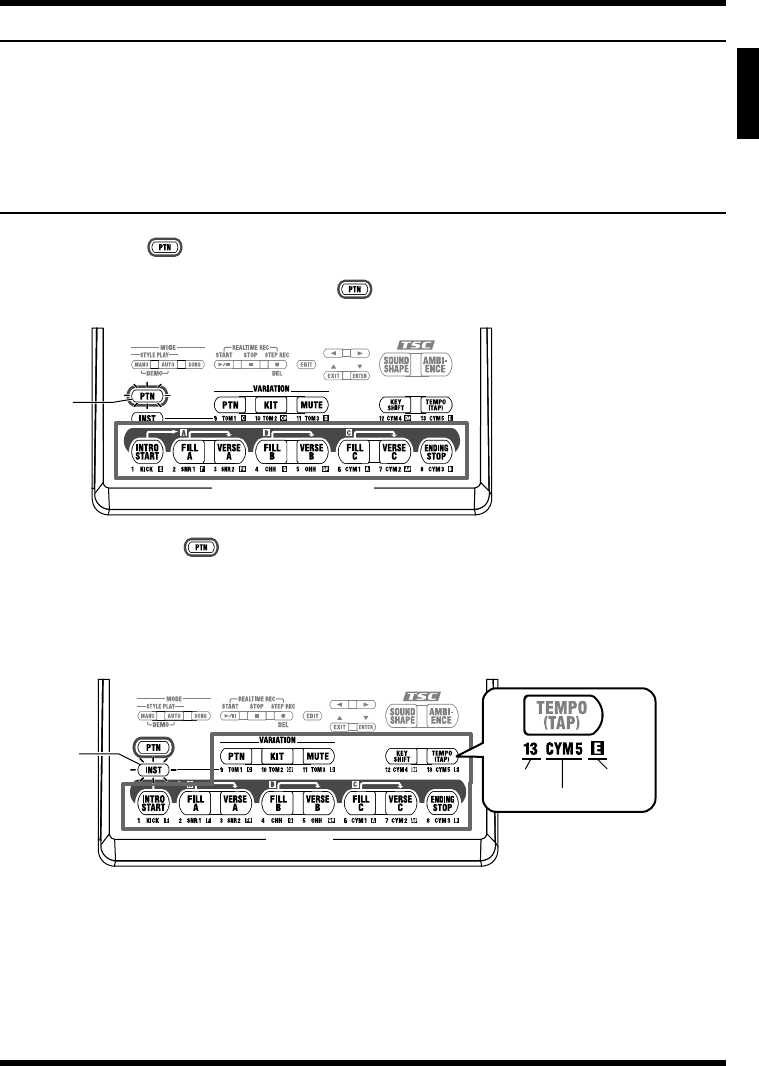
8. PTN button
* These are indicated in this manual as [ ].
Press this button to switch patterns with
the pads (12).
When this button is ON (lit), the 9–12
buttons switch to the following functions.
9. VARIATION buttons
PTN button
The Pattern’s variation is played.
KIT button
Plays with the Kit’s variation sound.
MUTE button
Some instrument sounds of the pattern are
muted.
10. KEY SHIFT button
Changes the key of the Patterns and songs
(transposing).
11. TEMPO (TAP) button
Adjusts the tempo.
You can tap this button at least four times
to set the tempo to the interval between the
taps.
12. Pattern Pads
When the PTN button (8) is on, you can
switch the patterns with these eight pads.
13. INST (Instrument) button
Press this button to use the pads to play
drum and bass sounds.
When this button is on (lit), the 9–12
buttons play the drum and bass sounds.
Also, you can press this button to switch
the sound groups for the pads (14).
14. Pads
When INST button (13) is ON (lit), drum
and bass sounds are played with these
pads.
14
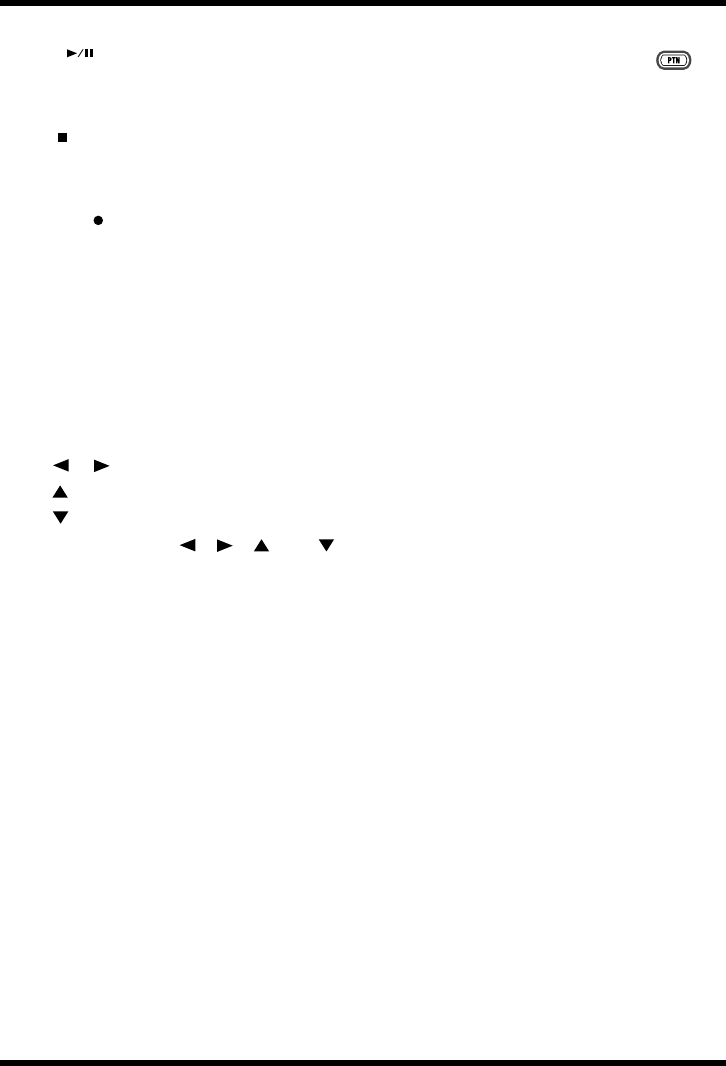
Panel Descriptions
Rear Panel
fig.jack
1. MIDI IN connector
External MIDI device can be connected to this connector.
2. FOOT SW (Switch) jack
By connecting a foot switch, you can obtain pedal control over the start and stop of performances,
switching the patterns, or other actions.
3. OUTPUT jack R (MONO) / L (PHONES)
Provides output of the audio signals. Connect to your amp, stereo system, or similar equipment.
For monaural output use the R (MONO) jack.
For a set of headphones use the L (PHONES) jack.
* You cannot get monaural output while simultaneously using the headphones.
4. OUTPUT jack R / L
Provides output of the audio signals. Connect to your amp, stereo system, or similar equipment.
Connect cables having RCA phono plugs here.
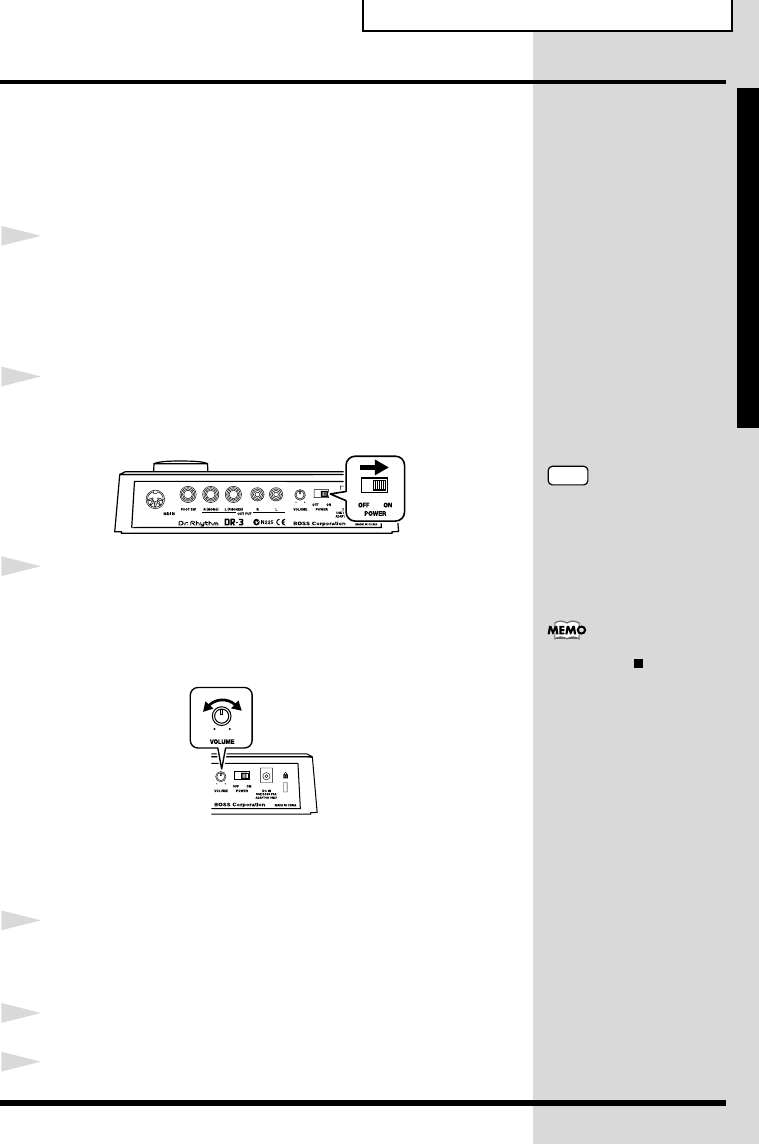
5. VOLUME knob
Adjusts the volume from the OUTPUT jacks.
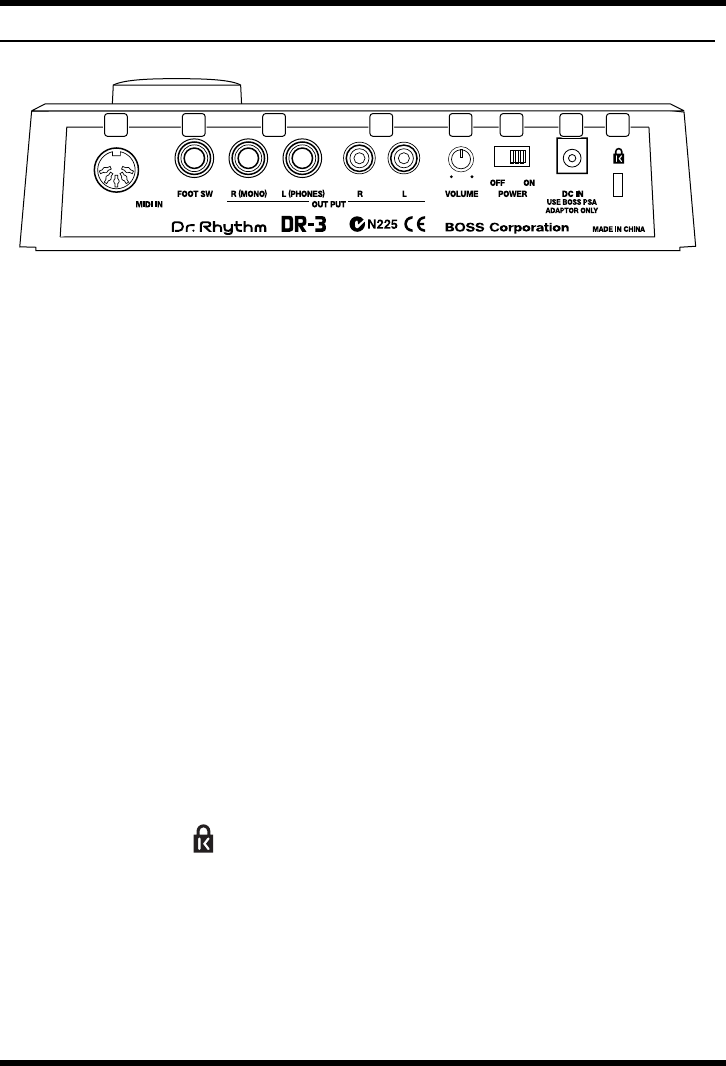
6. POWER switch
Switches the power on and off.
7. AC Adaptor jack
You can use a separately sold AC adapter (BOSS PSA series).
8. Security Slot ( )
http://www.kensington.com/
123 45678
15
B
e
f
ore
Y
ou
Pl
ay
Before You Play
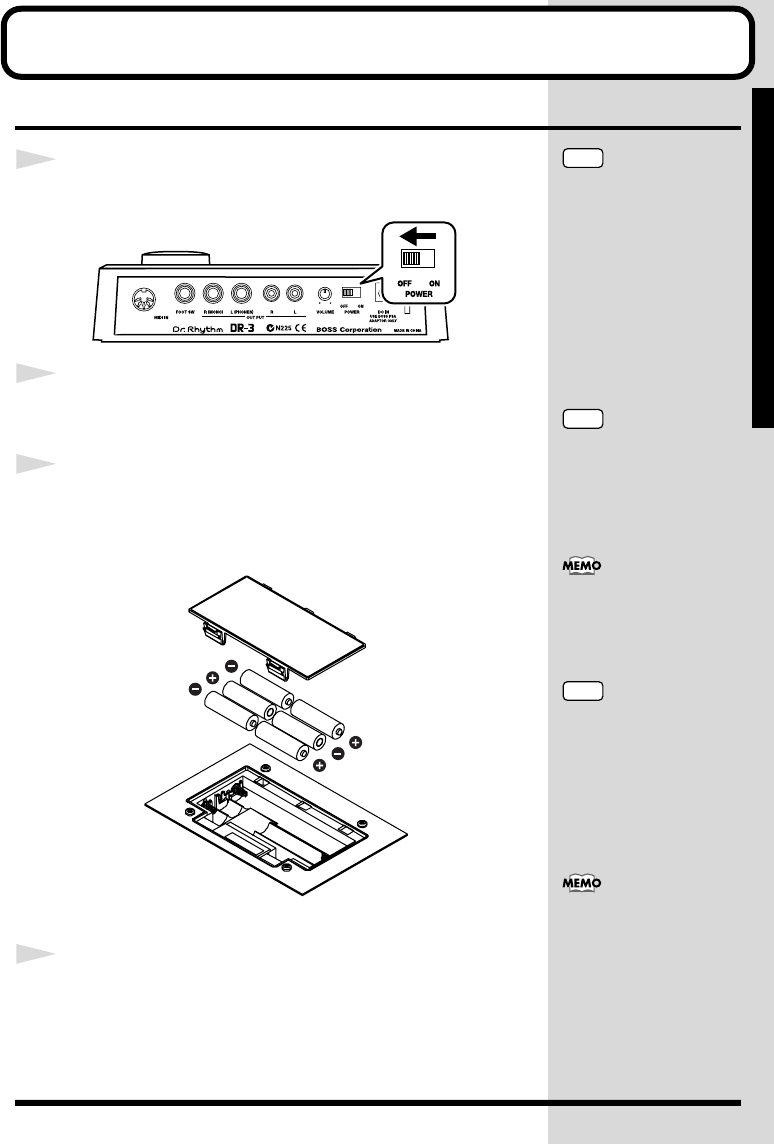
Install Batteries
1
Make sure that the power is turned off.
fig.00-01
2
Remove the battery cover on the unit’s underside.
3
Insert six AA batteries in the battery case, taking care
to ensure that the positive (+) and negative (-)
terminals are not reversed.
fig.00-02
4
Close the battery cover.
NOTE
When turning the unit upside-
down, get a bunch of
newspapers or magazines, and
place them under the four
corners or at both ends to
prevent damage to the buttons
and controls. Also, you should
try to orient the unit so no
b
uttons or controls get
damaged.
NOTE
When turning the unit upside-
down, handle with care to
avoid dropping it, or allowing
it to fall or tip over.
We recommend the use of
alkaline batteries for extended
b
attery life.
NOTE
Do not mix new batteries with
partially used batteries, and do
not mix batteries of differing
types.
When the battery power
b
egins to run low, “Battery
Low!” appears in the display
when the power is turned on.
When this occurs, replace with
new (six AA) batteries.
16
Before You Play
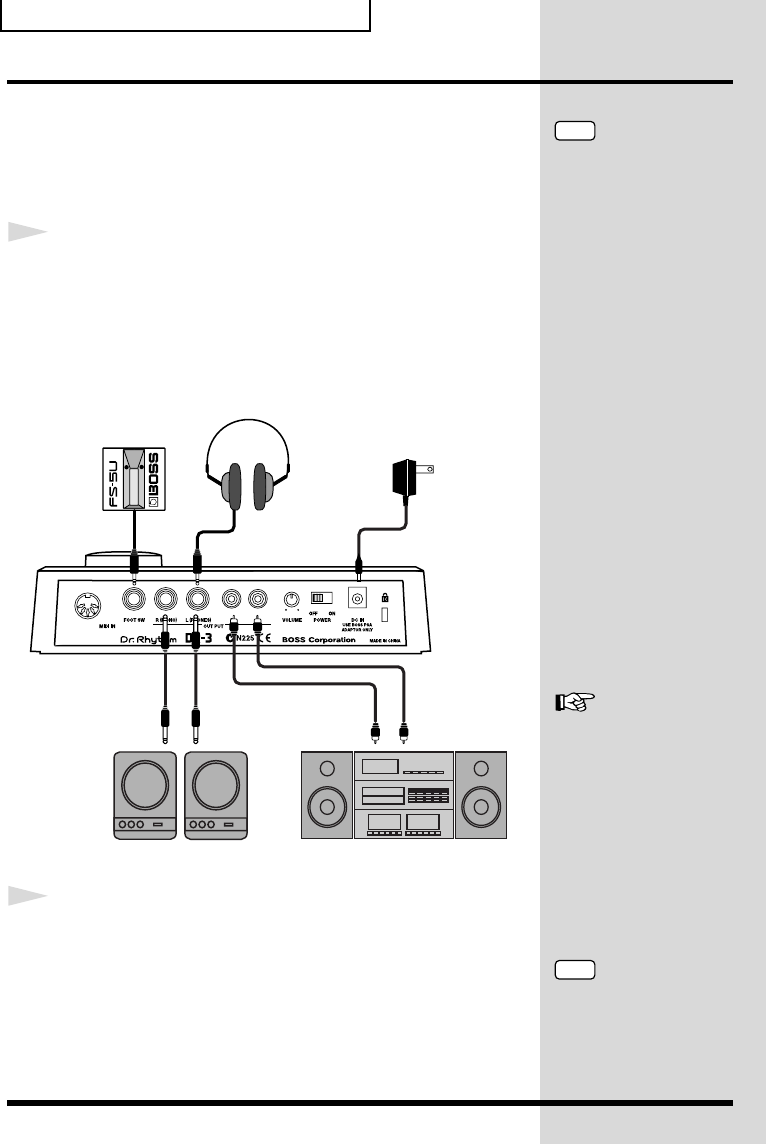
Making Connections
The DR-3 is not equipped with an internal amp or speakers. To
hear sound, either connect an amplifier and speakers or use stereo
headphones.
Audio cables, MIDI cables, Stereo headphones, and foot switches
are not included. Please purchase these items from your dealer.
1
Before you begin making connections, confirm the
following.
• Is the volume level of the DR-3 or connected amp turned all the
way down?
• Is the power to the DR-3 or connected amp turned off?
fig.00-03
2
Connect the amp and audio gear, or the headphones
as shown in the diagram.
In order to take full advantage of the DR-3’s sound we
recommend that you play it in stereo.
When using the system in mono, connect to the OUTPUT R
(MONO) jack.
NOTE
To prevent malfunction and/
or damage to speakers or other
devices, always turn down the
volume, and turn off the
power on all devices before
making any connections with
the DR-3.
Stereo Headphones
Foot Switch AC Adoptor
(PSA-series: option)
Monitor Speaker Audio Set
For instructions on connecting
to the MIDI connectors, refer
to p. 93.
For instructions on
connecting to the FOOT
SW jack, refer to p. 29.
NOTE
You cannot get monaural
output while simultaneously
using the headphones.
17
Before You Play
B
e
f
ore
Y
ou
Pl
ay
Turning On/Off the Power
■Turning on the power
Once the connections have been completed (p. 16), turn on power
to your various devices in the order specified. By turning on
devices in the wrong order, you risk causing malfunction and/or
damage to speakers and other devices.
1
Before you turn the power on, make sure of the
following points.
• Are external devices connected correctly?
• Is the volume level of the DR-3 or connected amp turned all the
way down?
2
Turn on the POWER switch located on the rear panel
of the DR-3.
fig.00-04
3
Turn on the power of the amp.
Press the flashing [INTRO/START] button to start the performance.
Rotate the VOLUME knob on the rear panel to adjust the DR-3’s
volume level.
fig.00-05
Also adjust the volume levels for amps and other connected gear.
■Turning Off the Power
1
Before turning off the DR-3’s power, make sure that:
• Is the volume level of the DR-3 or connected amp turned all the
way down?
2
Switch off any amps and other external equipment.
3
Turn off the power of the DR-3.
Press STOP [ ] to stop the
performance.
NOTE
This unit is equipped with a
protection circuit. A brief
interval (a few seconds) after
power up is required before
the unit will operate normally.
18
Before You Play
Reset to Default Factory Settings (Factory Reset)
This returns all settings on the DR-3 to the values they had when
the unit shipped from the factory. This is called Factory Reset.
fig.00-06p
1
With the performance stopped, press [EDIT].
fig.00-07d
2
Press [ ] to select a <SYSTEM>.
fig.00-08d
3
Press [ENTER].
fig.00-09d
1
2, 4
3, 5, 6
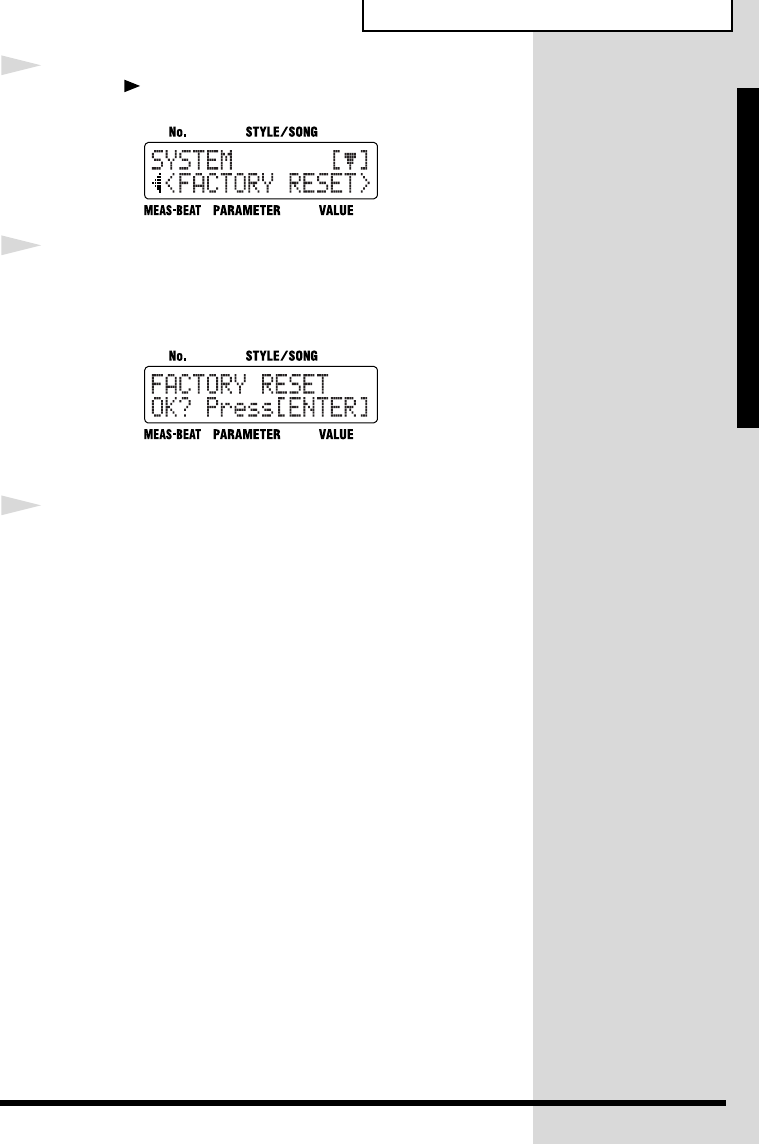
19
Before You Play
B
e
f
ore
Y
ou
Pl
ay
4
Press [ ] to select a <FACTORY RESET>.
fig.00-10d
5
Press [ENTER].
A message confirming that you want to proceed with Factory
Reset is displayed.
fig.00-11d
To cancel, press [EXIT].
6
To execute Factory Reset, press [ENTER].
Factory Reset is executed.
When Factory Reset is done, the previous screen is displayed.
All of the settings are restored to their original factory status.

20
Quick Start
This Quick Start manual describes how to enjoy performing the
rhythm used in the DR-3’s Styles.
Pre-programmed Styles are provided in Rock, Jazz, and a variety of
other musical genres.
Once you select a Style in the desired genre, you can put together
backing that matches your own performances by switching Patterns.
The Patterns prepared for each Style include not only an “intro” and
“ending,” but up to three types of “fill-ins” and “verses” (main rhythm
patterns). You can perform the rhythm in a variety of ways.
21
Q
u
i
c
k
St
ar
t
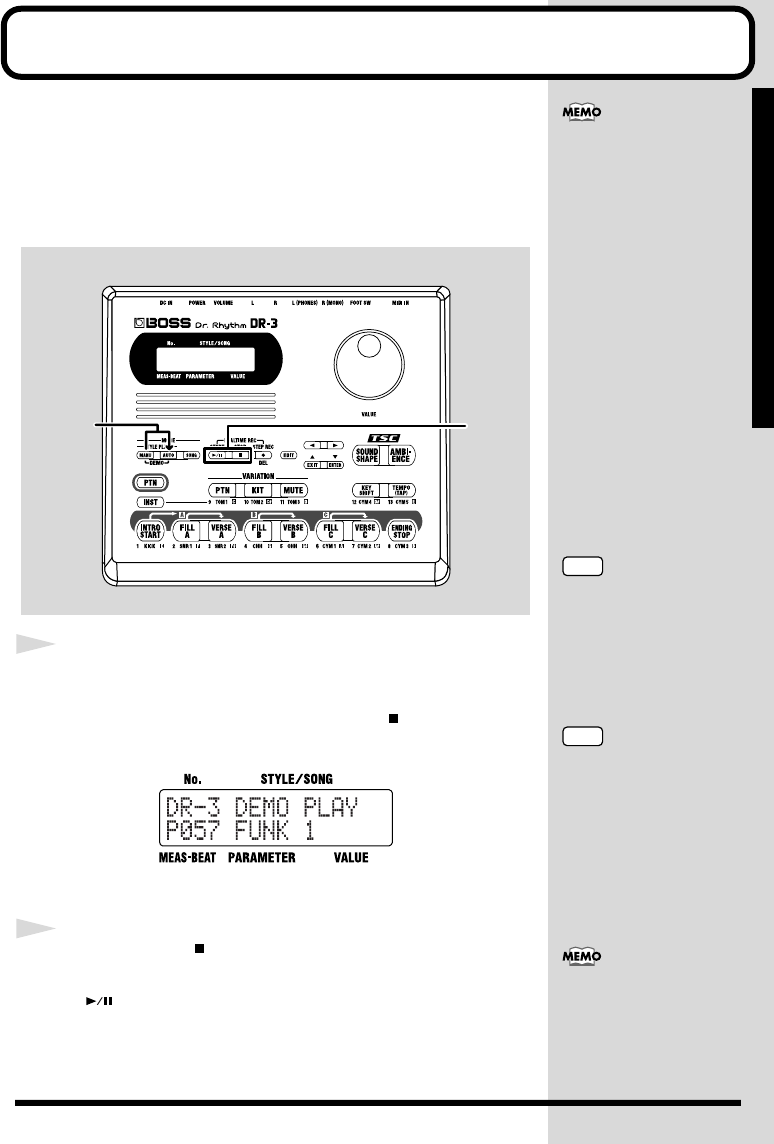
Let’s Listen to the Demo
Now listen to the demo performance, which brings the DR-3’s
“Styles” to life.
The “Patterns” in the demo performance are switched
automatically. The pattern pads light when the corresponding
Patterns are playing.
fig.QS-01p
1
Hold down [MANU] and press [AUTO].
The DR-3 switches to Demo mode, and the performance begins.
If a Pattern or song is playing, press STOP [ ] to stop the
performance, then perform Step 1.
fig.QS-02d
The Style name which is playing, is displayed.
2
Press STOP [ ] to stop the demo performance.
If you want to listen to the demo performance again, press START
[].
Styles and Patterns —
Song performances require
rhythm patterns that vary a
little for each section of the
performance (intro, fill-ins,
ending, and so on). The DR-3
features eight prepared
rhythm patterns expressing
these variations within the
songs. Eight patterns are
grouped together in what is
called a “Style.” The DR-3
features 100 pre-programmed
internal Styles (Preset Styles)
to suit a variety of musical
genres. You can also put
together your own
combinations of Patterns to
create whole new Styles (User
Styles).
NOTE
You cannot switch Patterns by
pressing the pattern pads
while the demo performance is
playing. For information about
performances which do allow
you to switch the Patterns,
refer to “Let’s Play a Style” (p.
22).
12
NOTE
All rights reserved.
Unauthorized use of this
material for purposes other
than private, personal
enjoyment is a violation of
applicable laws.
When using [MANU],
[AUTO], or [SONG] to switch
modes, stop the performance
first before you press the
b
utton.
22
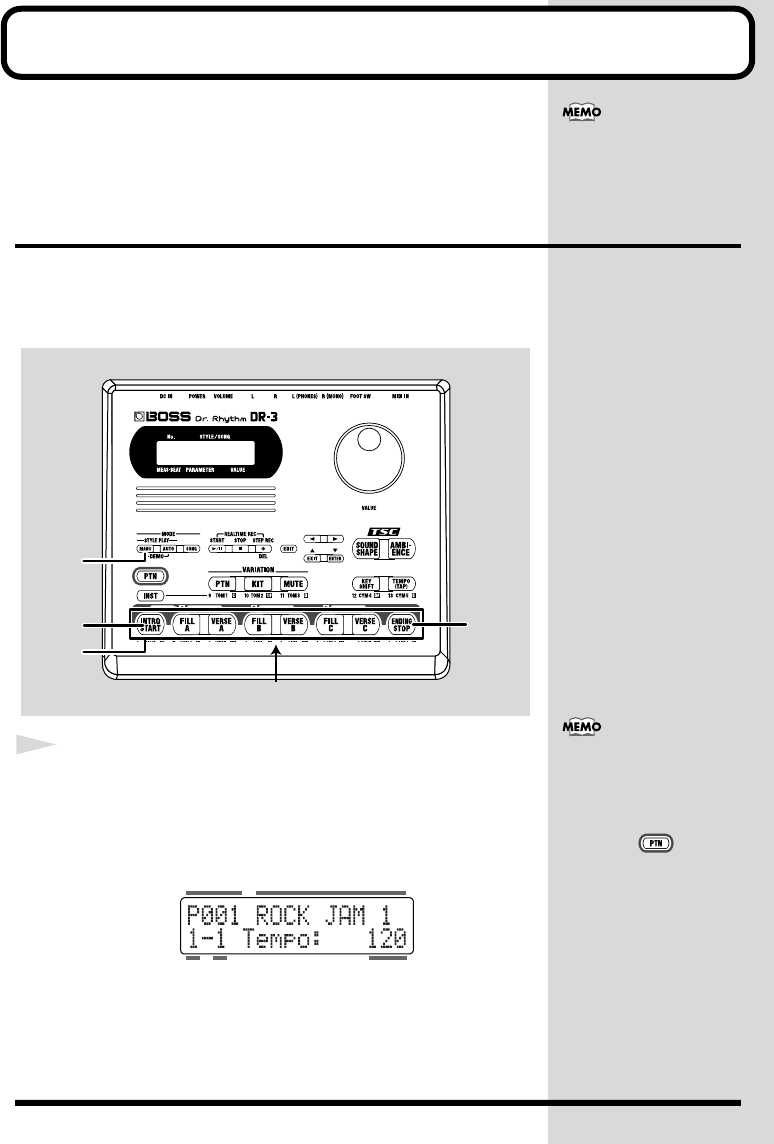
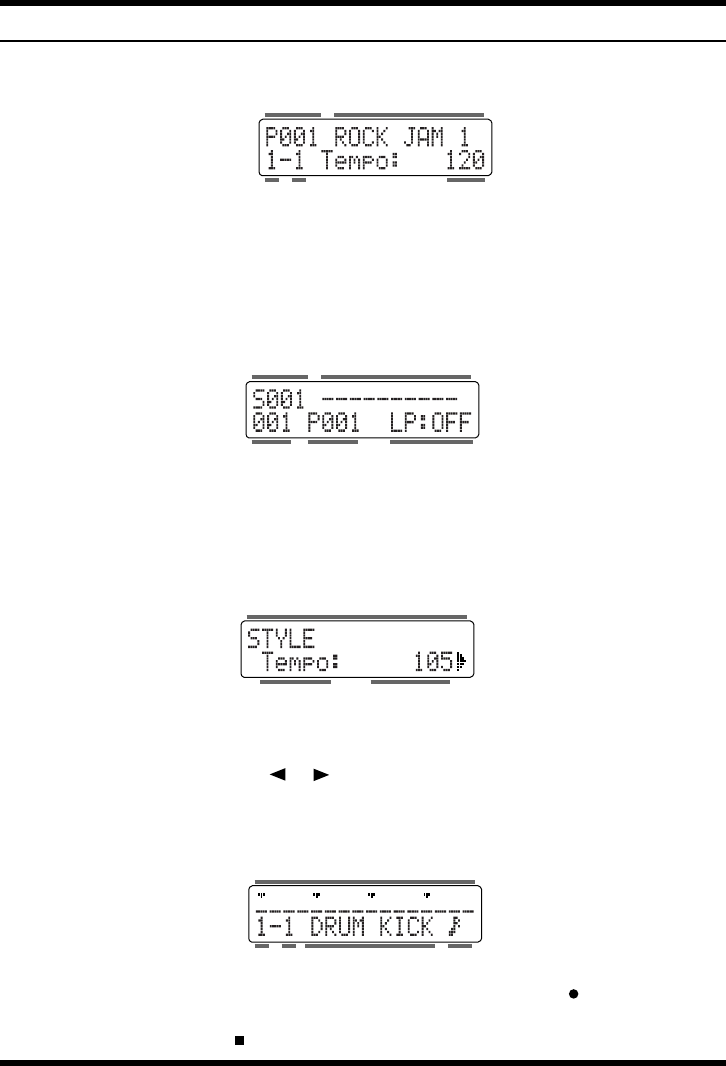
Let’s Play a Style
There are two ways to perform Styles, using “Manual mode,” in
which you switch the Pattern yourself, or “Auto mode,” where
the DR-3 switches Patterns automatically.
Now, try performing in Manual mode.
Performing Styles with Selecting Patterns ([MANU])
Each Style includes eight prepared rhythm patterns; intro, fill-in
A, verse A, fill-in B, verse B, fill-in C, verse C and ending.
In Manual mode, you play switching Patterns yourself.
fig.QS-03p
1
With the performance stopped, press [MANU] so the
button lights up.
This puts the DR-3 in Manual mode.
The Style screen appears in the display.
fig.QS-04d
For more information on
“Auto mode,” please refer to
p. 31.
1
3
2
Pattern Pad
4
Style No. Style Name
TempoBeatMeasure
If [INST] is lit, then drum or
b
ass sounds are played when
you press the pads (p. 58).
To switch Patterns with the
pads, press [ ] so that this
b
utton lights up.
23
Let’s Play a Style
Q
u
i
c
k
St
ar
t
2
Press [INTRO/START] to start the performance from
the intro.
3
Press one of the pattern pads to switch Patterns.
The Patterns assigned to the pattern pads are shown below.
When you press a pattern pad, the pattern for the pad you've
pressed will start playing as soon as the one that's currently
playing has finished.
When you press [FILL], the fill-in is played, and then the verse
corresponding to that fill-in is automatically played. For example,
if you press [FILL A], the DR-3 automatically switches to [VERSE
A] after the fill-in.
4
When you press [ENDING/STOP], the ending is
played and then the performance stops.
Pad
Name
INTRO/
START FILL A VERSE A FILL B VERSE B FILL C VERSE C ENDING/
STOP
Descrip-
tion
After the
intro is
played, the
Style pro-
ceeds to
Verse A.
After Fill-In
A is played,
the Style
proceeds to
Verse A.
This is the
main per-
formance
Pattern.
After Fill-In
B is played,
the Style
proceeds to
Verse B.
This is a
comple-
mentary
Pattern to
Verse A.
After Fill-In
C is played,
the Style
proceeds to
Verse C.
This is the
most elab-
orate of
the Pat-
terns A–C.
The ending
is played,
and then
the perfor-
mance
stops.
When you press a pattern pad
other than [INTRO/START],
the performance begins from
that pattern.
What is a Fill-In? —These are
lively performance Patterns
inserted in spaces between
phrases and other points in
songs and Styles. Fill-ins of up
to one whole measure in
length are played according to
when you press the [FILL].
To stop the Style without
having the ending played,
press STOP [ ].
24
Let’s Play a Style
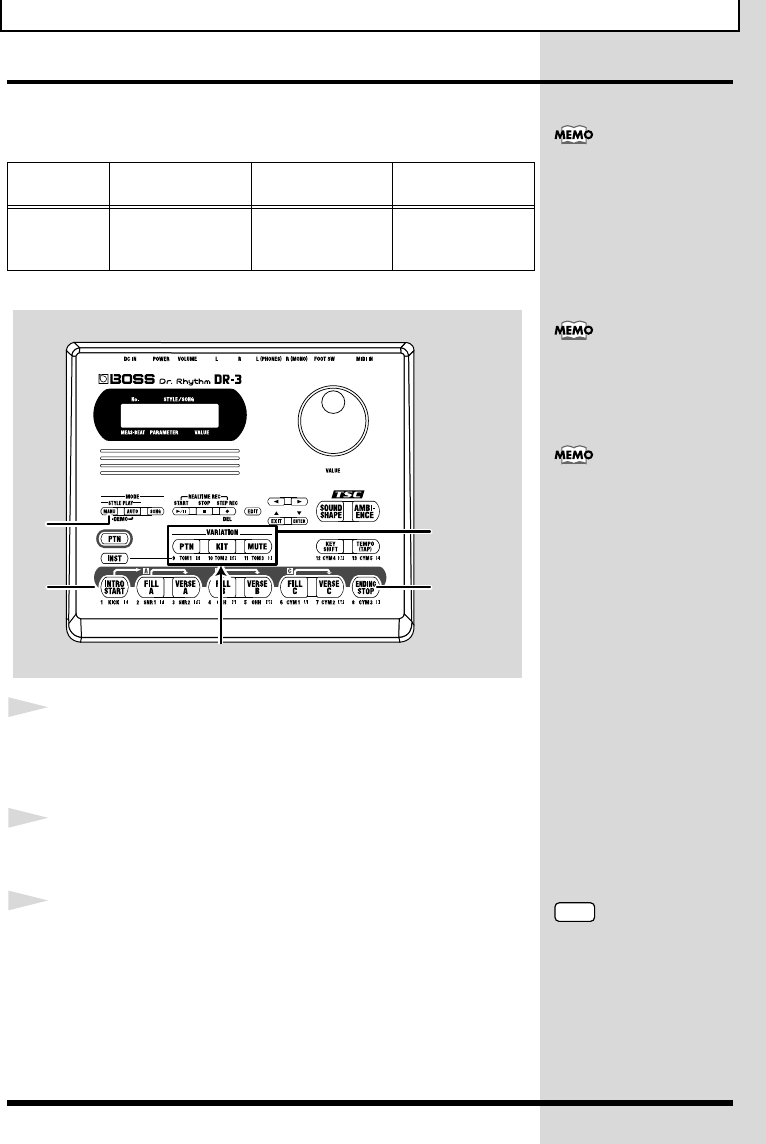
Performing Variations on Styles (VARIATION)
You can use the three VARIATION buttons to add variety to the
performance, even with the same Style.
fig.QS-05p
1
With the performance stopped, press [MANU] so the
button lights up.
This puts the DR-3 in Manual mode.
2
When you press [INTRO/START], the performance
starts from the intro.
3
Press VARIATION [PTN].
VARIATION [PTN] lights up, and the variation for the Pattern
currently being performed is played.
When you press VARIATION [PTN] once again, the button’s
light goes out, and the original Pattern is played.
Button
Name PTN KIT MUTE
Description The Pattern’s vari-
ation is played.
This substitutes
the kits, thereby
changing the tone.
This mutes a part
of the drum set.
What is a Kit? — These are
sounds, selected from those
b
uilt into the DR-3, consisting
of 26 drum sounds and one
b
ass sound that are grouped
together as a single set.
The settings used when you
press a VARIATION button
differ according to the Style.
You can use the VARIATION
b
uttons not only in Manual
mode, but in Auto mode and
Song mode (p. 37) as well.
NOTE
The VARIATION [PTN]
b
utton does not have any
effect on patterns other than
verses.
1
2
VARIATION Button
6
3, 4, 5
25
Let’s Play a Style
Q
u
i
c
k
St
ar
t
4
Press VARIATION [KIT].
VARIATION [KIT] lights up, and the drum set and bass sounds
changes.
When you press VARIATION [KIT] once again, the button’s light
goes out, and the original Pattern is played.
5
Press VARIATION [MUTE].
VARIATION [MUTE] lights up, and a part of sounds are muted.
When you press VARIATION [MUTE] once again, the button’s
light goes out, and the muted sounds play again.
6
When you press [ENDING/STOP], the ending is
played and then the performance stops.
With some Styles, the sound
may not change.
26
Let’s Play a Style
Selecting Styles
The DR-3 comes with 100 pre-programmed Styles already built
in.
Now try listening to some of the different Styles.
fig.QS-06p
1
With the performance stopped, press [MANU] so the
button lights up.
The Style screen appears in the display.
fig.QS-04d
2
Turn the VALUE dial to select a Style.
3
Press [INTRO/START] to start the performance from
the intro.
You can change Styles by turning the VALUE dial, even during
the performance.
4
When you press [ENDING/STOP], the ending is
played and then the performance stops.
You can also create your own
Styles. For more information,
refer to “Chapter 7 Creating
Styles” (p. 61).
1
34
2
If you switch the style during
its performance, a “ ” mark
appears in front of the style
name which will be played
next.
The style switches after the
currently playing pattern ends,
and the “ ” mark disappears.
Style No. Style Name
TempoBeatMeasure
When you press a pattern pad
other than [INTRO/START],
the performance begins from
that pattern.
“Preset Style List” (p. 116)
27
Let’s Play a Style
Q
u
i
c
k
St
ar
t
Changing the Tempo ([TEMPO])
Now let’s try changing the performance tempo.
fig.QS-08p
1
Press [TEMPO (TAP)].
The Tempo screen appears.
fig.QS-09d
2
Adjust the tempo with the VALUE dial.
The tempo can be set to any value from 20 to 260.
3
Press [EXIT] to return you to the previous screen.
■Setting the Tempo by Tapping It Out (Tap Tempo)
You can have the tempo be set to match an interval that you’ve
demonstrated by tapping the button. This function is called “Tap
Tempo.”
1
Press [TEMPO (TAP)] at least four times.
The interval between presses of the button is set as the tempo.
1
2
3
28
Let’s Play a Style
Changing the Key ([KEY SHIFT])
You can perform Styles in different keys (transposed).
This function is called “Key Shift.”
fig.QS-10p
1
Press [KEY SHIFT].
The Key Shift screen appears.
fig.QS-11d
2
Set the key with the VALUE dial.
You can set the value in semitone units within the range from -12
to +12, or one octave lower to one octave higher.
This changes the key of the performance.
3
Press [EXIT] to return you to the previous screen.
To return to the original key, press [KEY SHIFT], then set the key
to “0” using the VALUE dial.
1
2
3
29
Q
u
i
c
k
St
ar
t
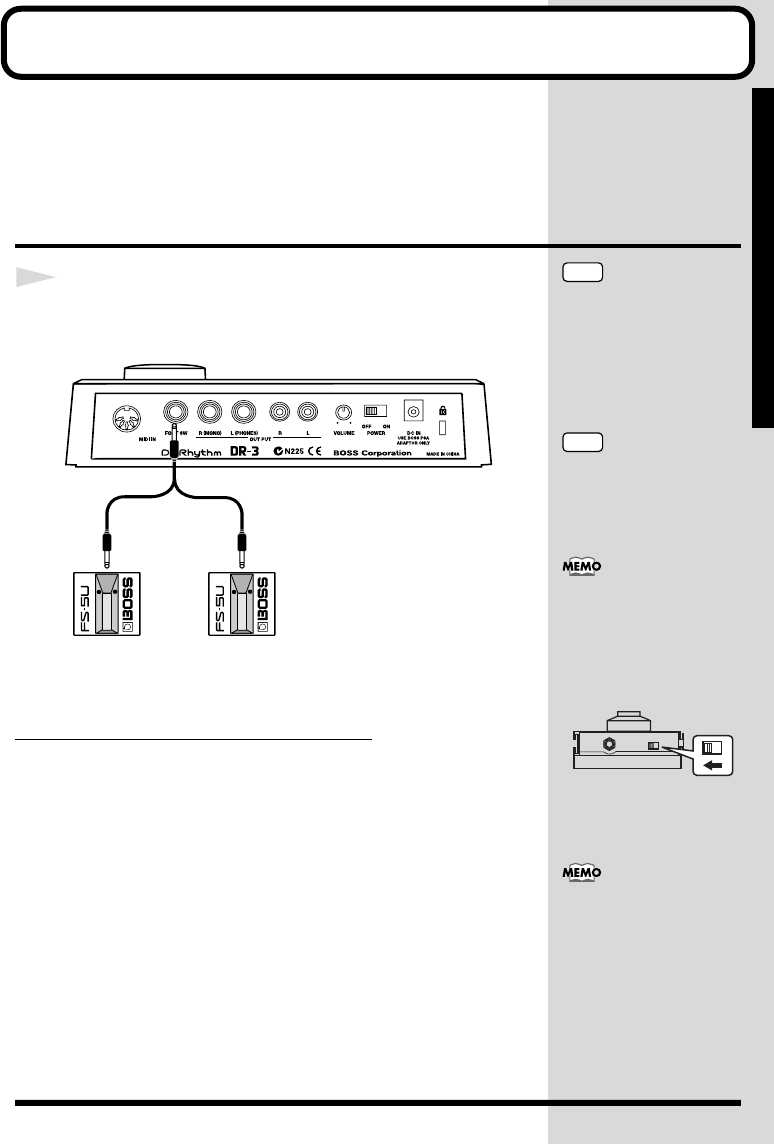
Let’s Use a Foot Switch
You can use a foot switch (such as the optional FS-5U) to start and
stop performances and switch verses (p. 23). This is convenient, as
it allows you to switch the Patterns with your foot.
You can connect up to two foot switches.
Connecting the Foot Switch
1
Connect the foot switch to the FOOT SW jack on the
rear panel.
fig.QS-14
When Connecting Two Foot Switches
With the factory settings, foot switches connected using the plug
with a white ring are used for starting and stopping
performances, and foot switches connected using the plug with a
red ring are used for switching verses.
PCS-31: Option
White
Start/Stop
(
Performance
)
(Switching Verses)
Red
NOTE
To prevent malfunction and/
or damage to speakers or other
devices, always turn down the
volume, and turn off the
power on all devices before
connecting a foot switch.
NOTE
A special PCS-31 cable
(optional) is required when
connecting two foot switches.
When connecting the foot
switch (the optional FS-5U) to
the FOOT SW jack, set the
polarity switch as shown in the
following figure.
Polarity Switch
You can change the foot switch
functions. For more details,
refer to “Assigning Functions
to the Foot Switch” (p. 49).

30
Let’s Use a Foot Switch
Using the Foot Switch
The example here describes use of the DR-3 with two foot
switches connected.
When you have only one foot switch connected, you can only use
it to start and stop the performance.
1
With the performance stopped, press [MANU] so the
button lights up.
This puts the DR-3 in Manual mode.
2
When you press the foot switch connected with the
plug with a white ring, the performance begins.
The performance starts from the intro.
3
Pressing the foot switch connected with the plug that
has a red ring switches to the next verse after the
verse currently being played.
4
When you press the foot switch connected with the
plug with the white ring, the ending is played, and
then the performance stops.
You can change the foot switch
functions. For more details,
refer to “Assigning Functions
to the Foot Switch” (p. 49).
When you press the foot
switch with the red ring, a fill-
in is played after the verse
currently being played, and
the performance switches to
the next verse. Pressing the
foot switch while Verse A is
playing switches the
performance to Verse B,
pressing the foot switch
during Verse B switches the
performance to Verse C, and
pressing the foot switch
during Verse C switches the
performance to Verse A.
By continuing to press the foot
switch, you can select
subsequent verses according to
the number of times you press
the foot switch.
31
Q
u
i
c
k
St
ar
t
Let’s Perform with the Patterns Switched
Automatically ([AUTO])
When you perform Styles in Auto mode, the DR-3 switches the
Patterns automatically, even without the pattern pads being
pressed.
This lets you enjoy session-like performances without having to
take your hands off the guitar or other instrument you are playing.
fig.QS-12p
1
With the performance stopped, press [AUTO] so the
button lights up.
This puts the DR-3 in Auto mode.
fig.QS-13d
2
Press [INTRO/START] to start the performance from
the intro.
In Auto mode, the Patterns are played automatically, repeating the
sequence of INTRO
→
VERSE A
→
FILL B
→
VERSE B
→
FILL C
→
VERSE C
→
FILL A
→
VERSE A... and so on (according to the factory
settings).
3
When you press [ENDING/STOP], the ending is
played and then the performance stops.
1
23
You can change the Pattern
progression in Auto mode. For
more details, refer to
“Changing the Pattern
Progression in Auto Mode” (p.
47).
To stop the Style without
having the ending played,
press STOP [ ].
32
Let’s Change the Overall Tone of the
Sound and Acoustics (TSC)
“TSC,” short for “Total Sound Control,” is a function that lets you
change the acoustic effects for the overall performance just by
pressing a few buttons.
TSC includes two types of effect, “Sound Shape,” which changes
the overall tone of the sound, and “Ambience,” which alters the
overall acoustic characteristics.
fig.QS-16p
1
With the performance stopped, press [MANU] or
[AUTO] so the button lights up.
2
Press [INTRO/START] to start the performance.
3
Press TSC [SOUND SHAPE].
The TSC screen is displayed.
fig.QS-17d
4
Turn the VALUE dial to select a Sound Shape effect.
You can save your preferred
“Sound Shape” and
“Ambience” settings.
For more details, refer to
“Changing the Sound Shape
Parameters” (p. 53) and
“Changing the Ambience
Parameters” (p. 56).
1
2
4, 8
7, 9
3, 5
6, 10
33
Let’s Change the Overall Tone of the Sound and Acoustics (TSC)
Q
u
i
c
k
St
ar
t
5
Press [SOUND SHAPE] so the button lights up.
Sound Shape is applied to the performance.
Each time you press [SOUND SHAPE], it alternately turns the
button on (lit) and off (unlit).
6
Press [EXIT] to return you to the previous screen.
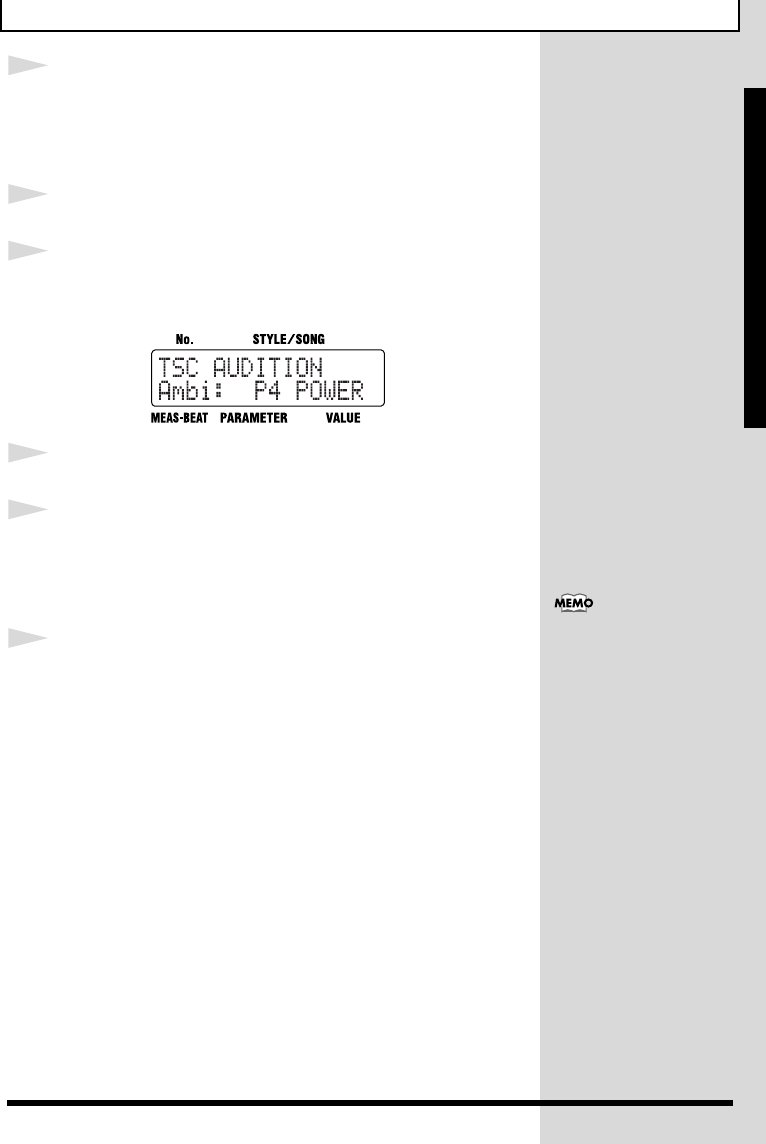
7
Press TSC [AMBIENCE].
The TSC screen is displayed.
fig.QS-18d
8
Turn the VALUE dial to select a Ambience effect.
9
Press [AMBIENCE] so the button light up.
Ambience is applied to the performance.
Each time you press [AMBIENCE], it alternately turns the button
on (lit) and off (unlit).
10
Press [EXIT] to return you to the previous screen.
When you press [ENDING/STOP], the ending is played and then
the performance stops.
For more details about Sound
Shape and Ambience, refer to
“Chapter 5 Changing the
Overall Tone of the Sound and
Acoustics (TSC)” (p. 51).
34
Chapter 1 Overview of the DR-3
The DR-3’s Performance Modes
The DR-3 features two performance modes, Style Play mode, in which the rhythm patterns are
switched as you play, and Song mode, in which you create data by arranging the patterns
beforehand, and then perform.
Furthermore, “Style Play mode” features a Manual mode, in which you switch the rhythm
patterns yourself, and an Auto mode, where the rhythm patterns are switched automatically.
A Style contains a set of rhythm patterns that are needed for performance of a song.
In order to perform a song, you need to have different rhythm patterns set in different parts of
the song. For example, a rhythm pattern may change like this: Intro/melody A/melody B/
chorus/ending. To express the variation in such a song, each Style includes eight prepared
rhythm patterns.
The DR-3 includes 100 different Preset Styles (internal Styles) in rock, jazz, and various other
genres, so you can play all the rhythm patterns for a single song by selecting the genre you want
to play in and then switching the patterns.
A Song is created by arranging the sequence of rhythm patterns that make up the song.
You can also create a song by setting up a sequence of patterns from different Styles. What's
more, you can prepare further song data after you have created a song by editing parts of a song,
for example by changing bass phrases.
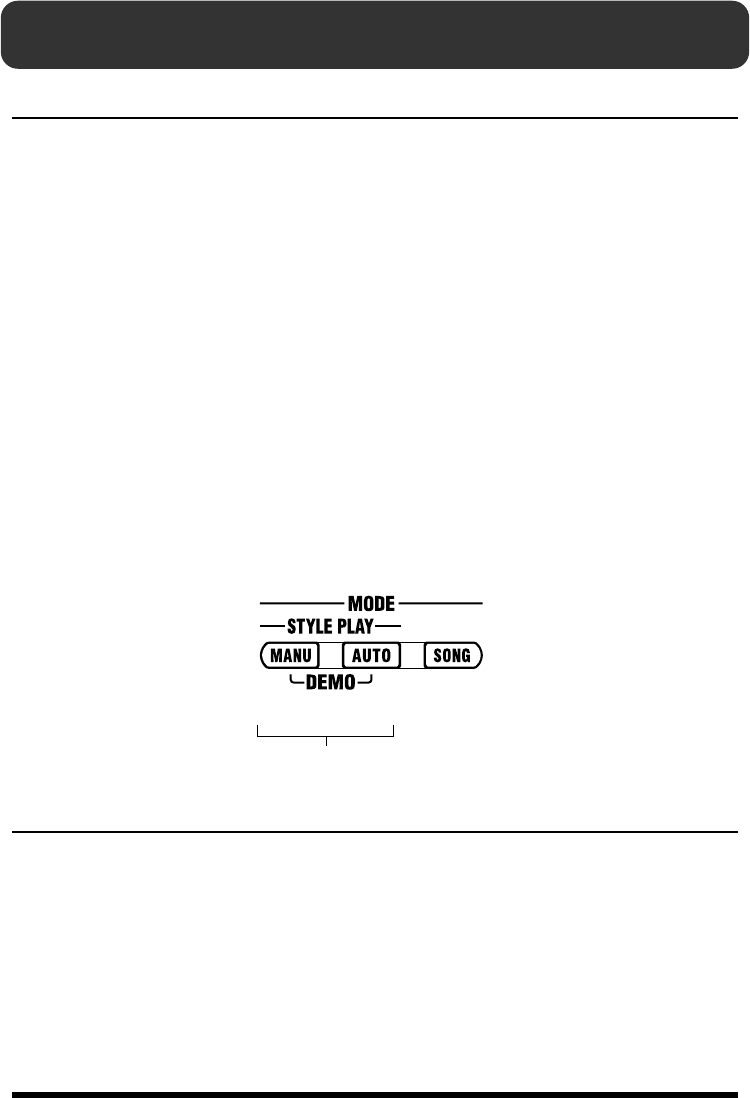
Switch between these three modes with the MODE button shown below.
fig.01-mode
Style Play Mode
Manual Mode
Switch to Manual mode by pressing the MODE [MANU] button.
In Manual mode, you can switch patterns by pressing the pattern pads. You can perform freely
as you switch the patterns.
Auto Mode
Switch to Auto mode by pressing the MODE [AUTO] button.
In AUTO mode, you can have patterns switch automatically after the performance starts, which
then lets you enjoy jamming.
*When using a MODE button to switch modes, stop the performance first before you press the button.
Manual
Mode
Auto
Mode
Song
Mode
Style Play Mode
35
Chapter 1 Overview of the DR-3
Ch
ap
t
er
1
Makeup of a Style
fig.01-01
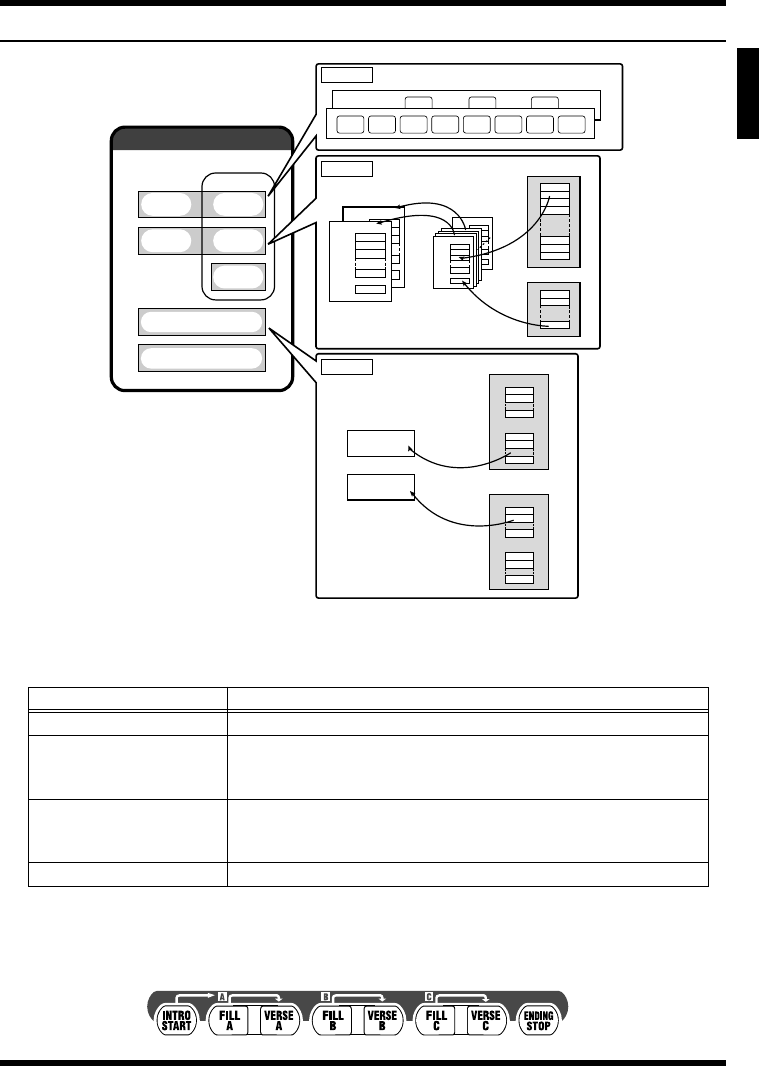
Patterns
The following eight patterns are set up for the different parts of the song.
Each of the eight patterns is assigned to a pattern pad. Press the pattern pads as the Style is
played to switch the patterns.
fig.01-03p
Pattern Name Description
INTRO This is played at the beginning of the song.
VERSE A, B, C
These are the main performance Patterns.
A is the basic performance Pattern, and B and C are Patterns complemen-
tary to Verse A.
FILL A, B, C
These are lively performance Patterns inserted in spaces between phrases
and other points in songs. Select Fill-In A, B, or C according to the verse you
want to have played after the fill-in.
ENDING This is the performance Pattern used to finish the song.
Sound Shape
Variation
Mute
KitKit
PatternsPatterns
TSC
Tempo
Style
Sound
Shape
Preset
User
Ambience
Ambience
Preset
User
1
2
8
1
2
8
1
2
8
1
2
8
1
2
3
4
254
255
256
1
2
16
Instrument
TOM3
BASS
KICK
SNR1
No.128
SNR2
TOM3
BASS
Bass Tone
Kit
TOM3
BASS
KICK
SNR1
No.1
SNR2
TOM3
BASS
TOM3
BASS
KICK
SNR1
Variation
SNR2
TOM3
BASS
TOM3
BASS
KICK
SNR1
Kit
SNR2
TOM3
BASS
Verse A Verse B Verse C
Intro EndingFill A Verse A Fill B Verse B Fill C Verse C
Variation
Patterns
TSC
Kit
Pattern Pad
36
Chapter 1 Overview of the DR-3
Kits
The drum, percussion, and bass sounds used in performing patterns are referred to as “kits.”
The Styles have predetermined kits assigned to them, so you can change kits by changing Styles,
and thus change the sounds played with the pads.
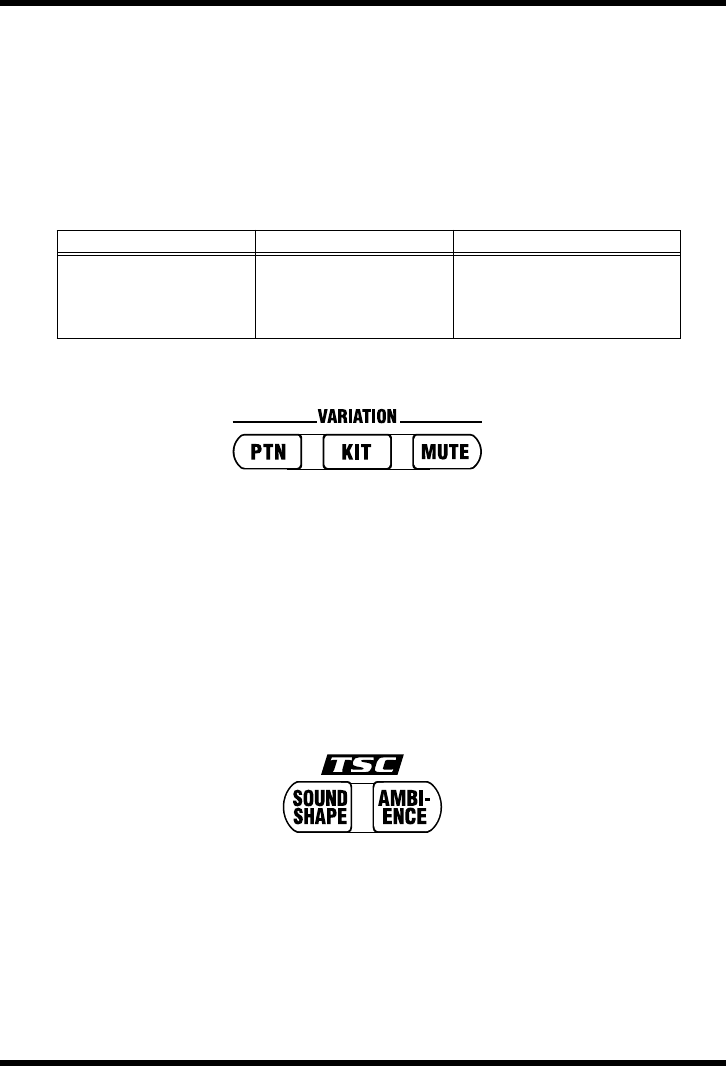
Variation
Variation is a function that alters performances, for example building up the performance or
toning it down.
There are three kinds of variations, [PTN] (Pattern), [KIT], and [MUTE].
The three kinds of variations are switched on and off with the VARIATION [PTN], [KIT] and
[MUTE].
fig.01-vari
TSC
“TSC,” short for “Total Sound Control,” is a function that lets you change the overall tone of the
sound and acoustics.
TSC includes two kinds of effects, “SOUND SHAPE” and “AMBIENCE.”
“SOUND SHAPE” adjusts the overall tone of the sound with a three-band equalizer and three-
band compressor that are used to boost or cut specific pitches (frequency bands).
“AMBIENCE” adjusts the breadth of the sound by altering the acoustic characteristics of the
sound.
You can select the TSC settings that sound best with each Style, and you can switch [SOUND
SHAPE] and [AMBIENCE] on and off independently.
fig.01-tsc
Tempo
Each Style includes a tempo setting suited to that Style.
After you select a Style, you can perform with a different tempo, and even change the tempo
while the performance is in progress.
[PTN] [KIT] [MUTE]
This alternates the Pattern. This substitutes the kits,
thereby changing the sound.
This mutes a part of the drum
set. This is used to tone down the
performance and bring solos out
to the forefront.
Pattern Kit Mute
37
Chapter 1 Overview of the DR-3
Ch
ap
t
er
1
Song Mode
Switch to Song mode by pressing the MODE [SONG] button.
In Song mode, you create songs by recording the sequence in which the patterns are to be
played, or play the song that you have created.
*When using a MODE button to switch modes, stop the performance first before you press the button.
Switching the Pad Functions
The DR-3’s [ ] and [INST] are used to switch between two different functions.
Specifying Patterns with the Pads ([ ] is Lit)
fig.01-padptn
When you press [ ], you can then switch the patterns with the pattern pads.
Furthermore, you can press the VARIATION [PTN], [KIT], [MUTE], [KEY SHIFT], and [TEMPO
(TAP)] to use the functions marked for each of these buttons.
Playing Instruments (Instrument Sounds) with the Pads ([INST] is Lit)
fig.01-padinst
When you press [INST], different sounds are assigned to the pads, and you can then press the
pads to play these drum and bass sounds. The instrument names and the bass pitch names
assigned to the pads are printed under each pads.
You cannot use the VARIATION [PTN], [KIT], [MUTE], [KEY SHIFT], and [TEMPO (TAP)]
functions when [INST] is lit.
Also, when [INST] is lit, you can use the VALUE dial or [INST] to switch the sound groups
(drums, percussion, bass) for the pads.
Pattern Pads
Lit
Pads
Lit
Pad No.
Instrument Name
Bass Pitch
38
Chapter 1 Overview of the DR-3
Main Screens and Functions
Style screen
fig.01-d1
With the performance stopped, pressing [MANU] or [AUTO] causes the button to light up,
switches the DR-3 to Style Play mode, and calls up the Style screen.
When the DR-3 is in Style Play mode, pressing the [EXIT] button returns the Style screen to the
display.
Song screen
fig.01-d2
With the performance stopped, pressing [SONG] causes the button to light up, switches the DR-
3 to Song mode, and calls up the Song screen.
When the DR-3 is in Song mode, pressing the [EXIT] button returns the Song screen to the display.
Edit screen
fig.01-d3
With the performance stopped, pressing [EDIT], switches the DR-3 to Edit mode, and calls up
the Edit screen.
In Edit mode, you can press [ ] [ ] to switch “pages,” turn the VALUE dial to change the
values, press [ENTER] to set the values, and press [EXIT] to cancel operations.
Step Recording screen
fig.01-d4
In Style Play mode ([MANU] or [AUTO] lit), you can press STEP REC [ ] to start Step
Recording and call up the Step Recording screen.
When you press STOP [ ], recording stops and you're returned to the Style screen.
TempoBeatMeasure
Style No. Style Name
Song No. Song Name
Style No.Measure Loop Play Mode
Item
Item Value
BeatMeasure
Step Display
Pad Name Quantize
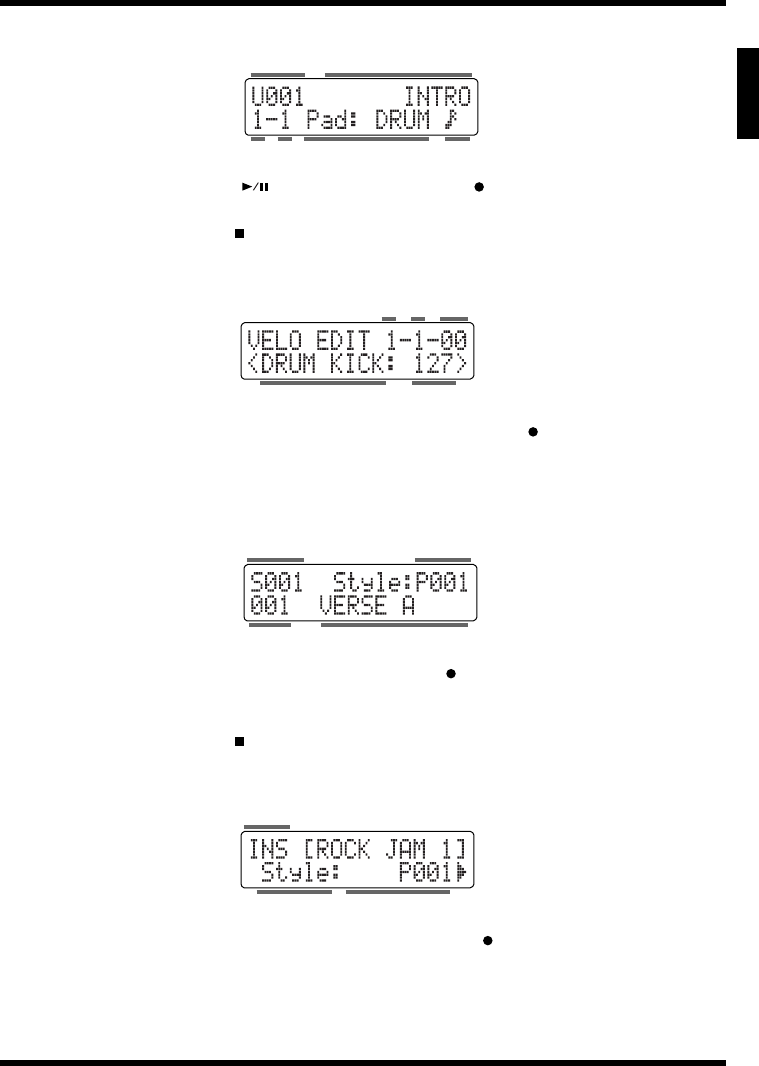
39
Chapter 1 Overview of the DR-3
Ch
ap
t
er
1
Realtime Recording screen
fig.01-d5
When you press START [ ] after pressing STEP REC [ ] in Style Play mode ([MANU] or
[AUTO] lit), Realtime Recording starts and the Realtime Recording screen is displayed.
When you press STOP [ ], recording stops and you're returned to the Style screen.
Velocity Edit screen
fig.01-d6
When you press [EDIT] during Style Step Recording (STEP REC [ ] lit), the Velocity Edit
screen is displayed.
Pressing [EXIT] returns you to the Step Recording screen.
Song Recording screen
fig.01-d7
In Song mode ([SONG] lit), you can press STEP REC [ ] to start Step Recording and call up
the Song Recording screen.
In Song mode, the Song Recording screen is also displayed during Realtime Recording.
When you press STOP [ ], recording stops and you're returned to the Song screen.
Song Edit screen
fig.01-d8
When you press [EDIT] during Step Recording (STEP REC [ ] lit) in Song mode ([SONG] lit),
the Song Edit screen is displayed.
Pressing [EXIT] returns you to the Song Recording screen.
BeatMeasure
Pattern Name
Sound Group Quantize
Style No.
Pad Name Velocity
TickMeasure Beat
Measure Pattern Name
Style No.Song No.
Value
Item
Item
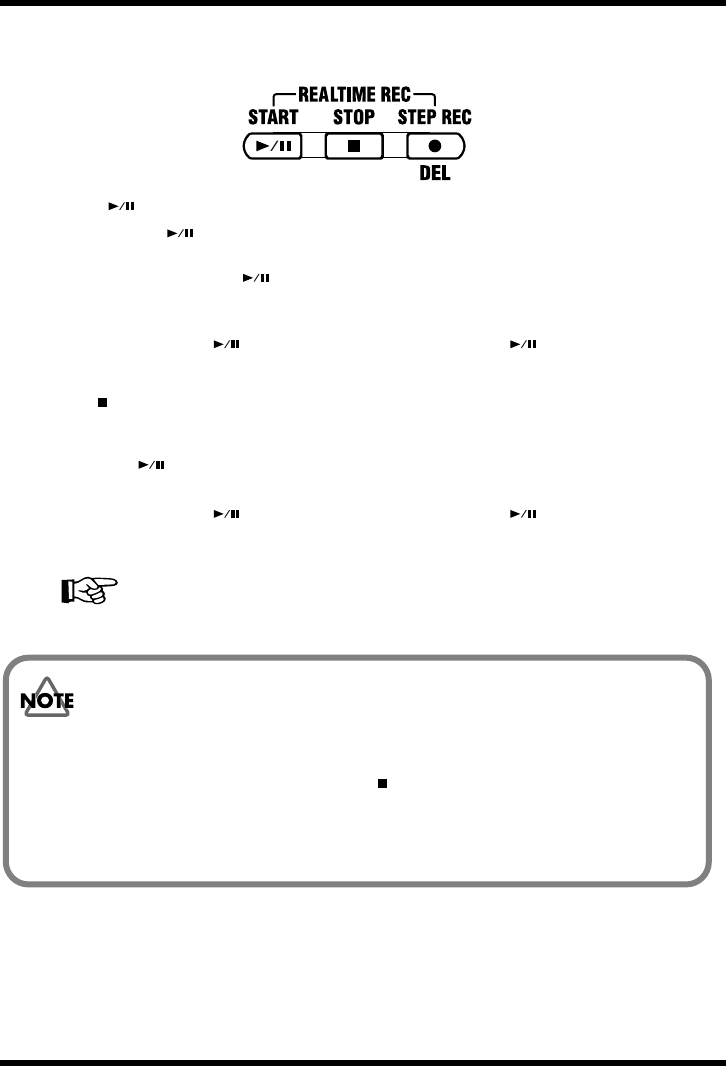
40
Chapter 1 Overview of the DR-3
■Starting and Stopping Performances and Recording
Use these buttons to start, pause, stop, and record performances of Styles and songs.
fig.01-plystp
START [ ]
Press START [ ] when the performance is stopped to start the performance of the Style or
song.
When you press START [ ] while the performance is playing, the performance of the Style
or song is paused. Press the button once again to resume the performance from the point where
it was paused.
If you press START [ ] while Step Recording (STEP REC [ ] lit) is in progress,
Realtime Recording will start.
STOP [ ]
This stops the performance and recording of the Style or song.
STEP REC [ ]
This starts Step Recording of Styles and songs.
If you press START [ ] while Step Recording (STEP REC [ ] lit) is in progress,
Realtime Recording will start.
Realtime recording...p. 65, p. 77
Step recording...p. 67, p. 76
Notes Concerning Editing and Recording
Edited or recorded data is not saved if the power is turned off while editing or
recording is still in progress. Be sure to carry out the following.
- To quit editing, press [EXIT].
- To finish recording press STOP [ ].
The message “Keep Power ON! Now Working...” appears when these operations are
in progress.
Never turn off the power while this message is displayed.
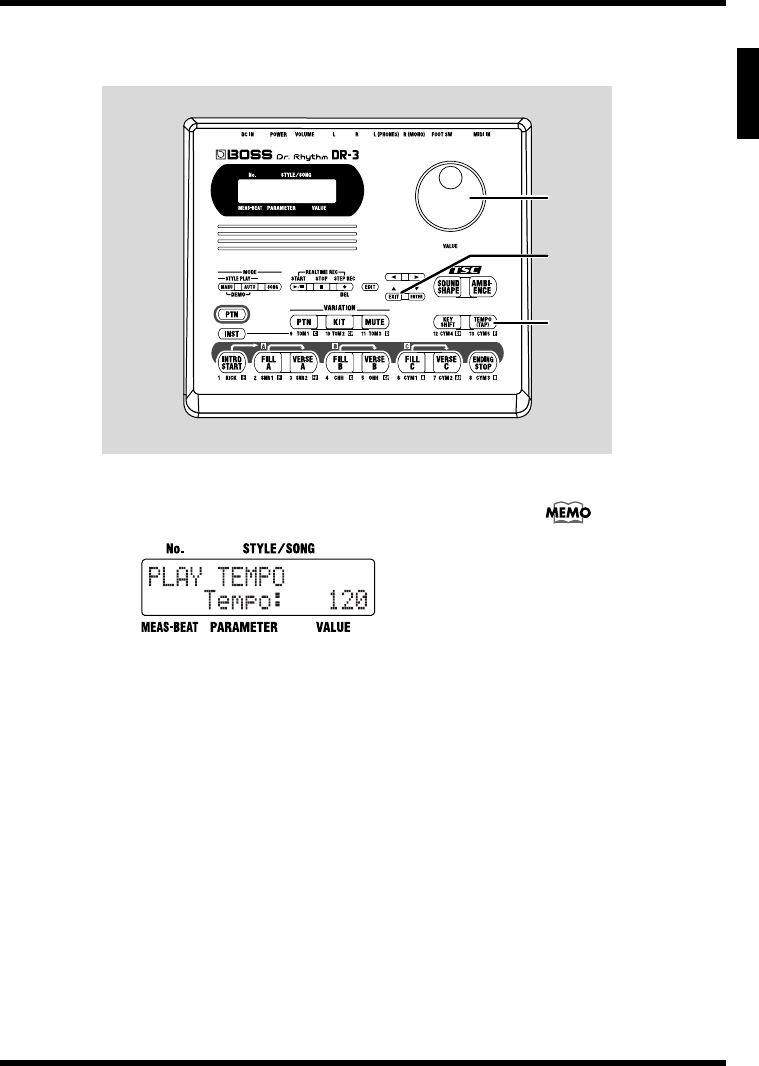
41
Chapter 1 Overview of the DR-3
Ch
ap
t
er
1
■Adjusting the Tempo ([TEMPO])
Use the following procedure to adjust Style and song tempos.
fig.01-03p
1. Press [TEMPO (TAP)].
The Tempo screen appears in the display.
fig.01-04d
2. Adjust the tempo with the VALUE dial.
The tempo can be set to any value from 20 to 260.
3. Press [EXIT] to return to the previous screen.
1
2
3
You can tap [TEMPO (TAP)] at
least four times to set the
tempo to the interval between
the taps. For more details, refer
to “Setting the Tempo by
Tapping It Out (Tap Tempo)”
(p. 27).
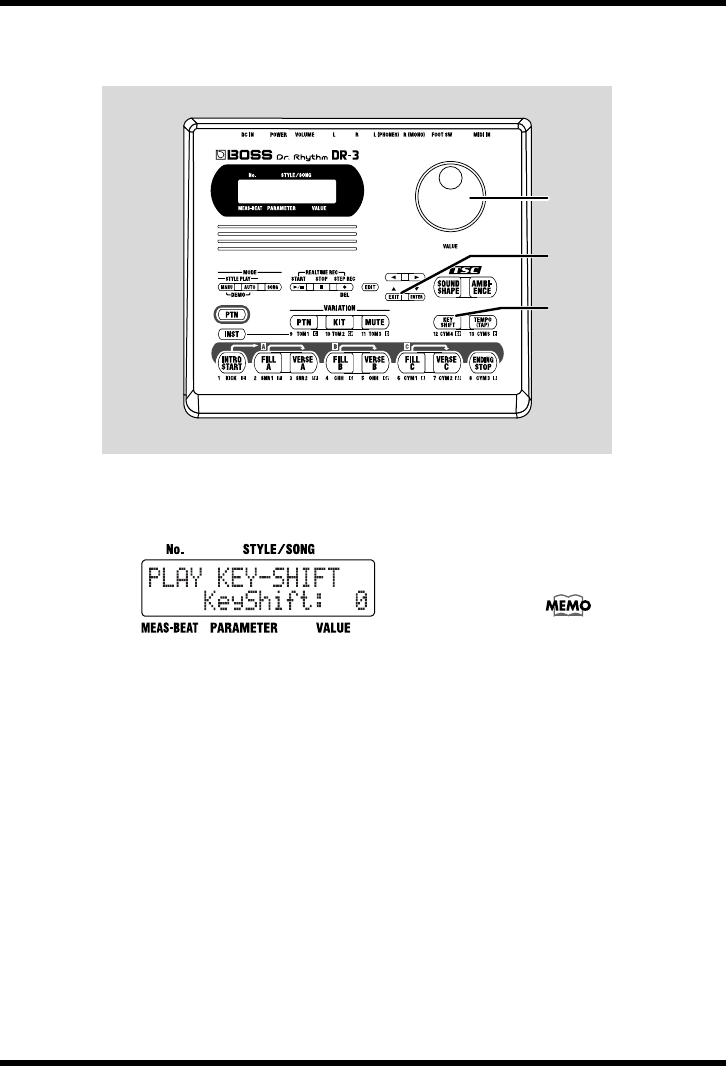
42
Chapter 1 Overview of the DR-3
■Changing the Key of the Performance ([KEY SHIFT])
Use the following procedure to change the key of the Styles and songs (transposing).
fig.01-04p
1. Press [KEY SHIFT].
The Key Shift screen appears in the display.
fig.01-05d
2. Set the key with the VALUE dial.
You can set the value in semitone units within the range from -12
to +12, or one octave lower to one octave higher.
This changes the key of the performance.
3. Press [EXIT] to return to the previous screen.
To return to the original key, press [KEY SHIFT], then set the key
to “0” using the VALUE dial.
1
2
3
If notes whose pitches are
changed using the Key Shift
function are in registers that
are unplayable for the DR-3,
the notes in the expressible
range above or below that
octave are sounded.
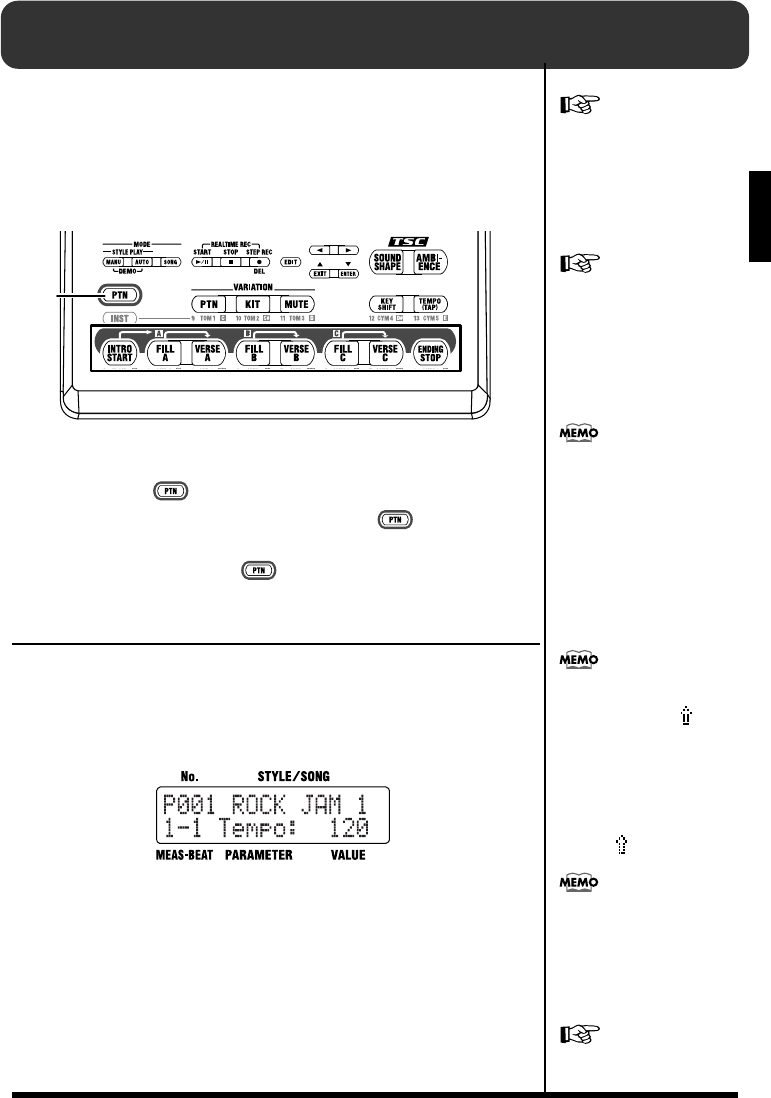
43
Ch
ap
t
er
2
Chapter 2 Playing Styles (Manual Mode [MANU])
The DR-3 features 100 pre-programmed internal Styles in a
variety of musical genres. You can perform by selecting the Styles
and switching the Patterns in “Manual mode.”
■How the Pads Work When Performing Styles
fig.02-01p
The DR-3’s pads can be switched between two modes of
operation, [ ] and [INST] (p. 37).
Patterns are switched with the pads when [ ] is lit.
When switching Patterns and performing Styles in Manual mode,
be sure to confirm that [ ] is lit.
Selecting Styles
Use this procedure to select the Styles to be performed.
1. With the performance stopped, press [MANU] so the button
lights up.
fig.02-02d
2. Turn the VALUE dial to select a Style.
Style numbers for the Preset Styles (internal Styles) are preceded
by a “P”; Style numbers for the User Styles (p. 61) are preceded by
a “U.”
For more on “Auto mode,” in
which the Patterns are selected
automatically, refer to
“Chapter 3 Playing Styles
(Auto Mode [AUTO])” (p. 46).
For more on creating Styles,
refer to “Chapter 7 Creating
Styles” (p. 61).
Pattern Pad
Lit
When [INST] is lit, drum and
b
ass sounds are played with
the pads while the patterns are
in progress.
For more information on
[INST], refer to “Chapter 6
Performing with the Pads” (p.
58).
If you switch the style during
its performance, a “ ” mark
appears in front of the style
name which will be played
next.
The style switches after the
currently playing pattern ends,
and the “ ” mark disappears.
“Preset Style List” (p. 116)
Depending on its settings,
there may be some delay for
the TSC (p. 51) to change, if the
style is switched while it is
b
eing performed.
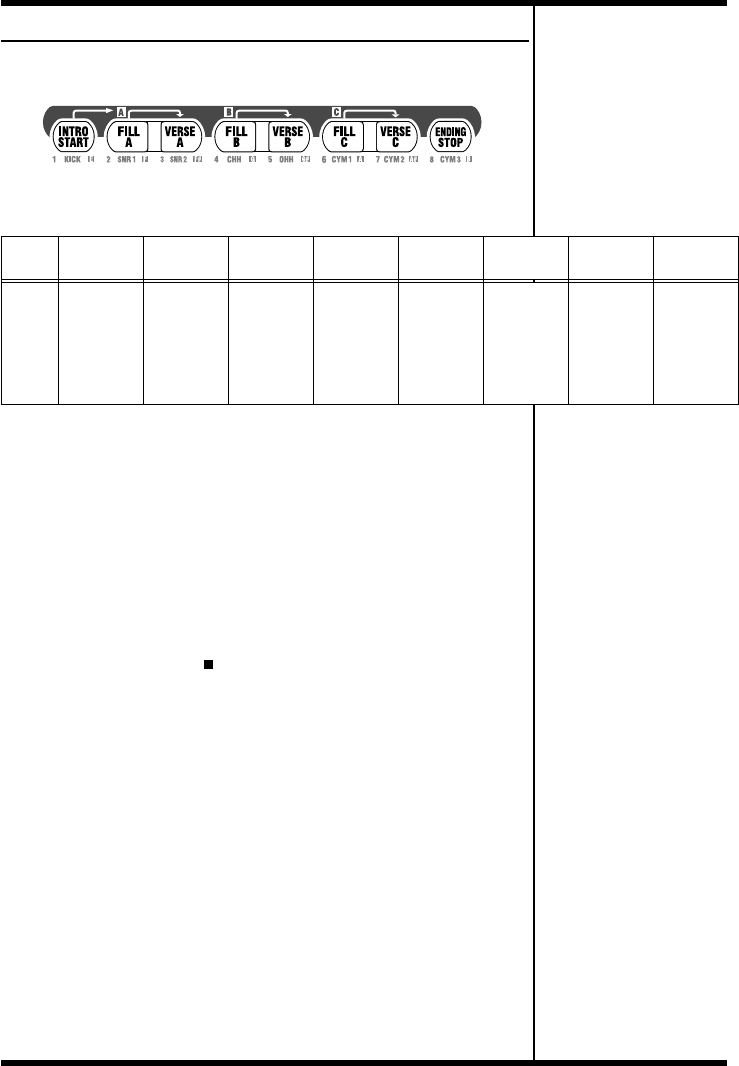
44
Chapter 2 Playing Styles (Manual Mode [MANU])
Selecting the Patterns to be Played
fig.02-03p
A single Style is divided into eight performance units called
“Patterns,” which are assigned to the pattern pads.
■Starting/Stopping
1. Press any pattern pad.
With the performance stopped, press any of the pattern pads to
start the performance.
When you press [INTRO/START], the performance starts from
the intro. After the intro is played, the Style proceeds to Verse A.
2. Press [ENDING/STOP].
The ending is played, and then the performance stops.
If you press STOP [ ], the performance stops without the
ending being played.
■How to Change Patterns
1. Press any of the pattern pads while the performance is in
progress.
If while a Pattern is being played you press a pad for a different
Pattern, the pad you have pressed begins to flash, indicating that
this is to be the next Pattern played. When the currently playing
pattern ends, the pattern is switched, and the pad that was
flashing will instead light steadily.
When you press any of the [FILL A–C] buttons, a fill-in of up to
one measure in length is played, and that is followed by the
corresponding [VERSE A–C].
When you press [ENDING/STOP], the ending is played, and
then the performance stops.
Pattern
Pad
INTRO/
START FILL A VERSE A FILL B VERSE B FILL C VERSE C ENDING/
STOP
Descrip-
tion
After the
intro is
played, the
Style pro-
ceeds to
Verse A.
After Fill-In
A is played,
the Style
proceeds to
Verse A.
This is the
main per-
formance
Pattern.
After Fill-In
B is played,
the Style
proceeds to
Verse B.
This is a
comple-
mentary
Pattern to
Verse A.
After Fill-In
C is played,
the Style
proceeds to
Verse C.
This is the
most elabo-
rate of the
Patterns A–
C.
The ending
is played,
and then
the perfor-
mance
stops.
Pattern Pads
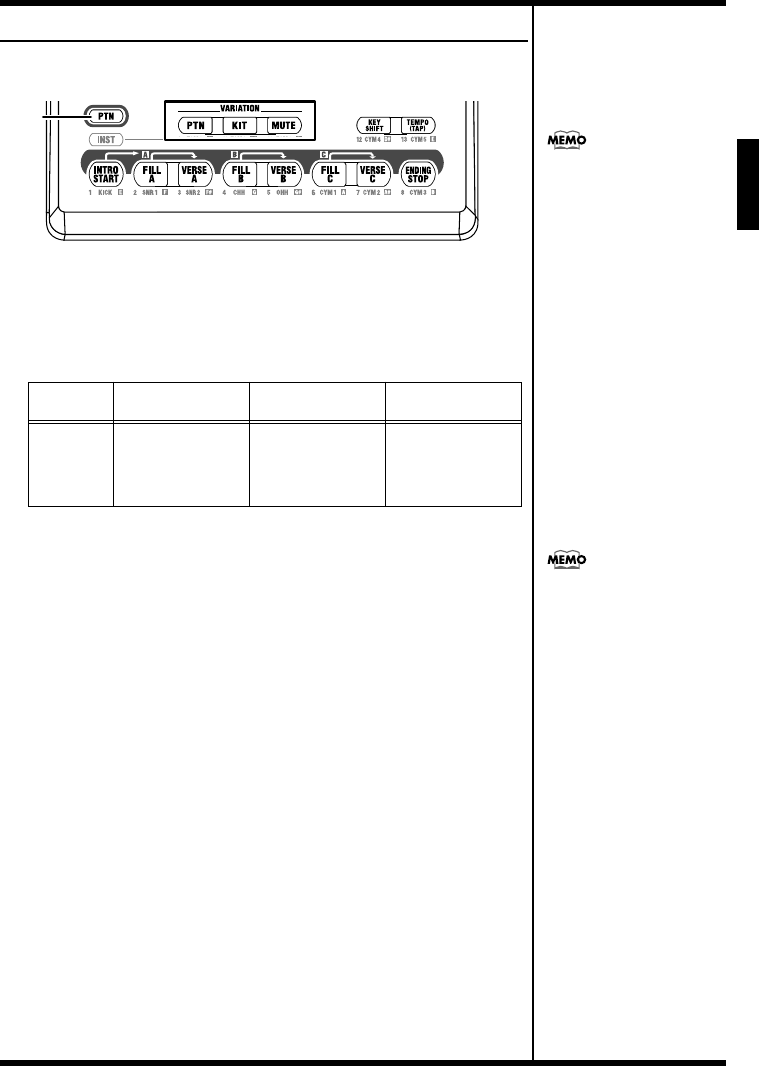
45
Chapter 2 Playing Styles (Manual Mode [MANU])
Ch
ap
t
er
2
Selecting Variations (VARIATION)
fig.02-04p
Each Style includes three different variations, which you can use
to add variety to the performance, even with the same Style.
The functions of the three VARIATION buttons are described
below.
1. While the performance is in progress, press VARIATION
[PTN], [KIT], or [MUTE] so the button lights up.
The pressed button lights up (indicating it is on).
When you press the button once more, the button’s light goes out
(indicating it is off), and the original Pattern is played.
You can also perform with more than one of these buttons on.
Button
Name PTN KIT MUTE
Descrip-
tion
This alternates the
Patterns.
This substitutes
the kits, thereby
changing the
sound.
This mutes a part
of the drum set.
VARIATION Buttons
Lit
The settings used when you
press a VARIATION button
differ according to the Style.
You can use the VARIATION
b
uttons not only in Manual
mode, but in Auto mode (p.
46) and Song mode (p. 85) as
well.

46
Chapter 3 Playing Styles (Auto Mode [AUTO])
When you perform Styles in Auto mode, the DR-3 switches the
Patterns automatically, even without the pattern pads being
pressed.
This lets you enjoy session-like performances without having to
take your hands off the guitar or other instrument you are playing.
When performing in Auto mode, the Patterns are basically played
in the following sequence. You can also press a button other than
[INTRO/START] to begin the performance from that Pattern.
fig.03-01
Selecting a Style
fig.03-01
1. With the performance stopped, press [AUTO] so the button
lights up.
2. Turn the VALUE dial to select a Style.
Style numbers for the Preset Styles (internal Styles) are preceded by a
“P”; Style numbers for the User Styles (p. 61) are preceded by a “U.”
Performing in Auto Mode
1. Press any of the pattern pads.
When the performance of the Pattern initially specified is
finished, the next Pattern is played automatically.
To see the sequence in which the Patterns are played, please refer
to the figure “Pattern Progression in Auto Mode.”
If you press a pattern pad while the performance is in progress,
the Style switches to the Pattern corresponding to the pressed
pad, and the performance then continues by repeating the Pattern
progression sequence.
2. When you press [ENDING/STOP], the ending is played and
then the performance stops.
To stop the Style without having the ending played, press STOP [ ].
“Patterns” (p. 35)
Intro Verse A Fill-in B Verse B Fill-in C Verse C Fill-in A Ending
Play Repeat Automatically
● Pattern Progression in Auto Mode
You can change the Pattern
progressions and the number
of measures repeated.
Refer to “Changing the Pattern
Progression in Auto Mode” (p.
47).
When [INST] is lit, drum and
b
ass sounds are played with
the pads while the patterns are
in progress.
For more information on
[INST], refer to “Chapter 6
Performing with the Pads” (p.
58).
When the performance is
stopped, pressing any pattern
pad will start the performance.
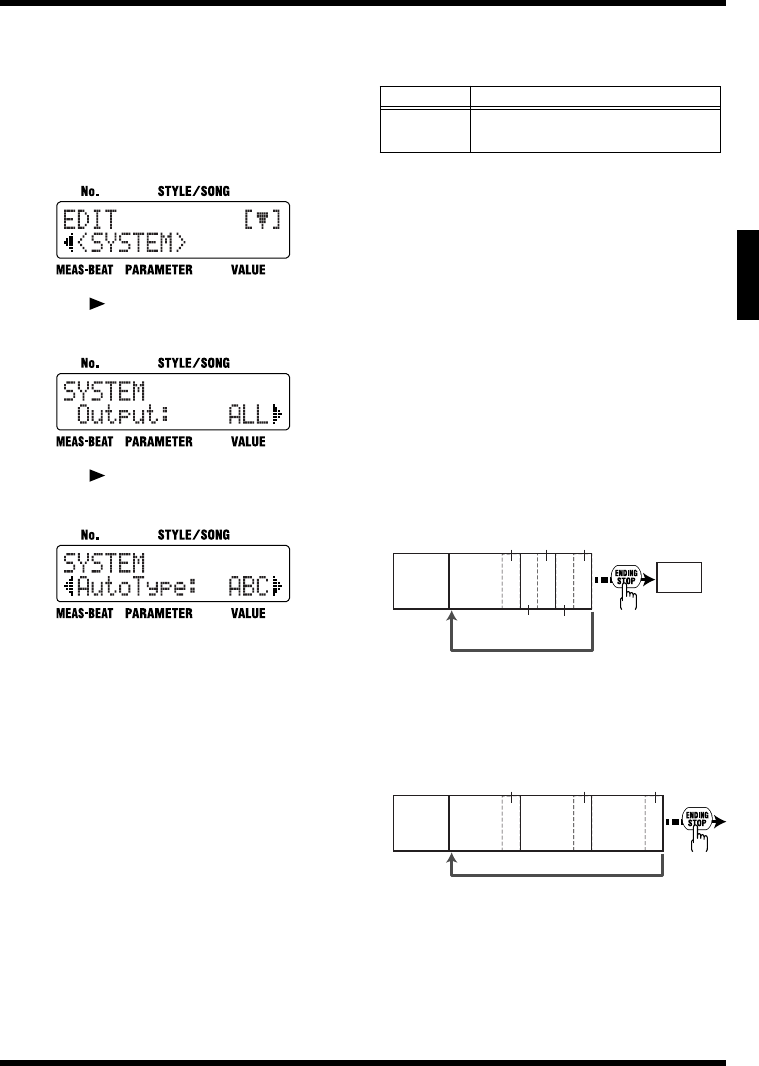
47
Chapter 3 Playing Styles (Auto Mode [AUTO])
Ch
ap
t
er
3
■Changing the Pattern Progression in Auto Mode
You can change the pattern progression
when performing in Auto mode.
1. With the performance stopped, press
[EDIT].
The Edit Menu screen appears.
fig.09-01d
2. Press [ ], select a <SYSTEM>, then
press [ENTER].
fig.09-02d
3. Press [ ], select a <Auto Type> to be
set.
fig.09-04d
4. Turn the VALUE dial to set the value.
The letters indicates the sequence of the
verses.
The numeral represents the number of
measures performed in each verse.
When the number of measures has been
specified by means of a value that has been
set, then regardless of the original number of
measures in each verse, the verse is repeated
only for the number of measures specified.
Example: When performing a Style with a
Verse A of four measures, a Verse B of two
measures, and Verse C of two measures.
- With “ABC” for “AutoType”
The sequence with Verses A, B, and C played
once each is repeated.
fig.09-ABC4
- With “ABC4” for “AutoType”
The sequence in which four measures of
Verses A, B, and C are played is repeated.
fig.09-ABC4
5. Press [EXIT] a number of times until you
exit Edit mode.
Parameter Value
AutoType ABC, ABC 4, ABC 8, ABC 16,
AB, AB 4, AB 8, AB 16
Verse B
(2 meas.)
Verse C
(2 meas.)
Intro
Ending
Fill-in AFill-in CFill-in B
Performance repeats automatically
Verse A
(4 meas.)
Verse Bx2
(4 meas.)
Verse Cx2
(4 meas.)
Intro
Fill-in AFill-in CFill-in B
Performance repeats automatically
Verse A
(4 meas.)
48
Chapter 4 Controlling the Styles with a Foot Switch
You can use a foot switch (such as the optional FS-5U) to start and
stop performances and switch verses (p. 44). This is convenient, as
it allows you to switch the Patterns with your foot.
You can connect up to two foot switches.
When using the special cable (PCS-31), the foot switch connected
with the white-striped plug is used to start and stop
performances, and the foot switch connected with the red-striped
plug is used to switch verses (as set at the factory).
Starting and Stopping Performances
You can use a foot switch to start and stop the performance of
Styles and songs (p. 85).
1. With the performance stopped, press the foot switch.
When [MANU] or [AUTO] is lit: performance of the Style begins
from the intro.
When [SONG] is lit: performance of the song begins.
2. Press the foot switch while the performance is in progress.
When [MANU] or [AUTO] is lit: the ending is played, and then
the performance stops.
When [SONG] is lit: the song stops.
Switching Verses
You can press the foot switch during performance of the Style to
have a fill-in inserted in the current verse and then switch to the
next verse. For example, if you press the foot switch while Verse
A is playing, the DR-3 inserts a fill-in B and switches to Verse B.
1. Press the foot switch while the performance is in progress.
A fill-in is inserted, and the DR-3 switches to the verse following
the verse currently being played.
Pressing the foot switch while Verse A is playing switches the
performance to Verse B, pressing the foot switch during Verse B
switches the performance to Verse C, and pressing the foot switch
during Verse C switches the performance to Verse A.
By continuing to press the foot switch, you can select subsequent
verses according to the number of times you press the foot switch.
Pressing the switch while the performance is in progress switches
the DR-3 to the next verse specified for the song.
For instructions on connecting
the foot switch, refer to
“Connecting the Foot Switch”
(p. 29).
Wiring diagrams for the foot
switch jack is shown at below.
FS1
FS2
NOTE
During recording or editing in
Edit mode (p. 38), depressing
the foot switch will have no
effect.
If two foot switches are
connected, press the foot
switch connected using the
plug with the white ring.
When connecting two foot
switches, press the foot switch
connected using the plug with
the red ring. If you have only
one foot switch connected, use
the procedure described in the
following section “Assigning
Functions to the Foot Switch”
to assign “VERSE, LOOP” to
the foot switch.
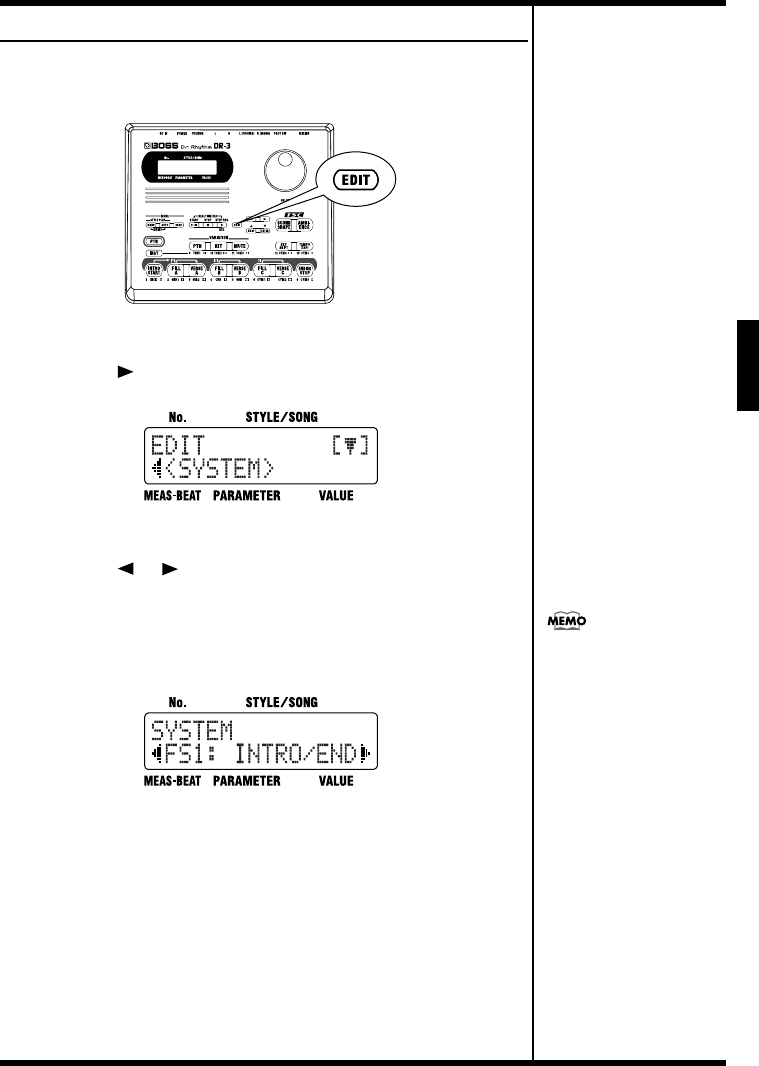
49
Chapter 4 Controlling the Styles with a Foot Switch
Ch
ap
t
er
4
Assigning Functions to the Foot Switch
You can assign functions other than starting and stopping
performances and switching verses to the foot switch.
fig.04-01p
1. Press the [EDIT] button.
2. Press [ ] to select a <SYSTEM>.
fig.04-02d
3. Press [ENTER].
4. Press [ ] [ ] to select a <FS1> or a <FS2>.
If you have two foot switches connected using the special cable
(PCS-31), select <FS1> when making settings for the foot switch
with the white ring, and <FS2> when making settings for the foot
switch connected using the plug with the red ring.
fig.04-03d
5. Turn the VALUE dial to select the function to be assigned.
Refer to the following chart to see which functions can be
assigned.
Press [EXIT] a number of times to return to the previous screen.
With the factory settings,
<FS1> is set to “INTRO/END”
and <FS2> is set to “VERSE,
LOOP.”
50
Chapter 4 Controlling the Styles with a Foot Switch
Functions That Can Be Assigned to Foot Switches
Settings Function
INTRO/
END
When [MANU] or [AUTO] is lit:
When the foot switch is pressed while
the performance is stopped, the per-
formance starts from the intro. If the
foot switch is pressed while the per-
formance is in progress, the ending is
played, and then the performance
stops.
When [SONG] is lit:
When the foot switch is pressed while
the performance is stopped, the per-
formance of the song begins, and if
pressed while the performance is in
progress, the performance stops.
VERSE,
LOOP
When [MANU] or [AUTO] is lit:
A fill-in is played after the verse cur-
rently being played, and the perfor-
mance switches to the next verse in
the Pattern. Pressing the foot switch
while Verse A is playing switches the
performance to Verse B, pressing it
during Verse B switches the perfor-
mance to Verse C, and pressing it
during Verse C switches the perfor-
mance to Verse A. No action results
when the foot switch is pressed dur-
ing the intro or ending.
By continuing to press the foot
switch, you can select subsequent
verses according to the number of
times you press the foot switch.
When [SONG] is lit:
The function that is used when you
press the pedal varies according to
the [EDIT] <SONG> “LoopType” set-
ting.
* Refer to “Switching Patterns With a
Foot Switch” (p. 86)
VAR PTN This has the same function as VARIA-
TION [PTN] (p. 45).
VAR KIT This has the same function as VARIA-
TION [KIT] (p. 45).
VAR
MUTE
This has the same function as VARIA-
TION [MUTE] (p. 45).
TAP
TEMPO
When the foot switch is pressed four
or more times, the tempo is specified
according to the interval between
each press (Tap Tempo, p. 27).
STRT/
PAUSE
This has the same function as START
[].
START/
STOP
When the foot switch is pressed while
the performance is stopped, the per-
formance begins, and if pressed while
the performance is in progress, the
performance stops.
STYLE
FWD
This switches from the Style currently
being played to the next higher-num-
bered Style.
* If the current Style number is
“P100,” the DR-3 switches to “U001”;
if the current Style number is “U100,”
the DR-3 switches to “P001.”
STYLE
BWD
This switches from the Style currently
being played to the Style one number
lower.
* If the current Style number is
“P001,” the DR-3 switches to “U100”;
if the current Style number is “U001,”
the DR-3 switches to “P100.”
INTRO This has the same function as [IN-
TRO/START].
FILL A
This has the same function as [FILL A].
VERSE A
This has the same function as [VERSE A].
FILL B
This has the same function as [FILL B].
VERSE B
This has the same function as [VERSE B].
FILL C
This has the same function as [FILL C].
VERSE C
This has the same function as [VERSE C].
ENDING This has the same function as [END-
ING/STOP].
DRUM
KICK–
DRUM
CYM5
This plays the sounds assigned to
DRUM KICK – DRUM CYM5 in the
kit (p. 58) currently being played.
PERC 1–
PERC 13
This plays the sounds assigned to
PERC 1 – PERC 13 in the kit (p. 58)
currently being played.
Settings Function
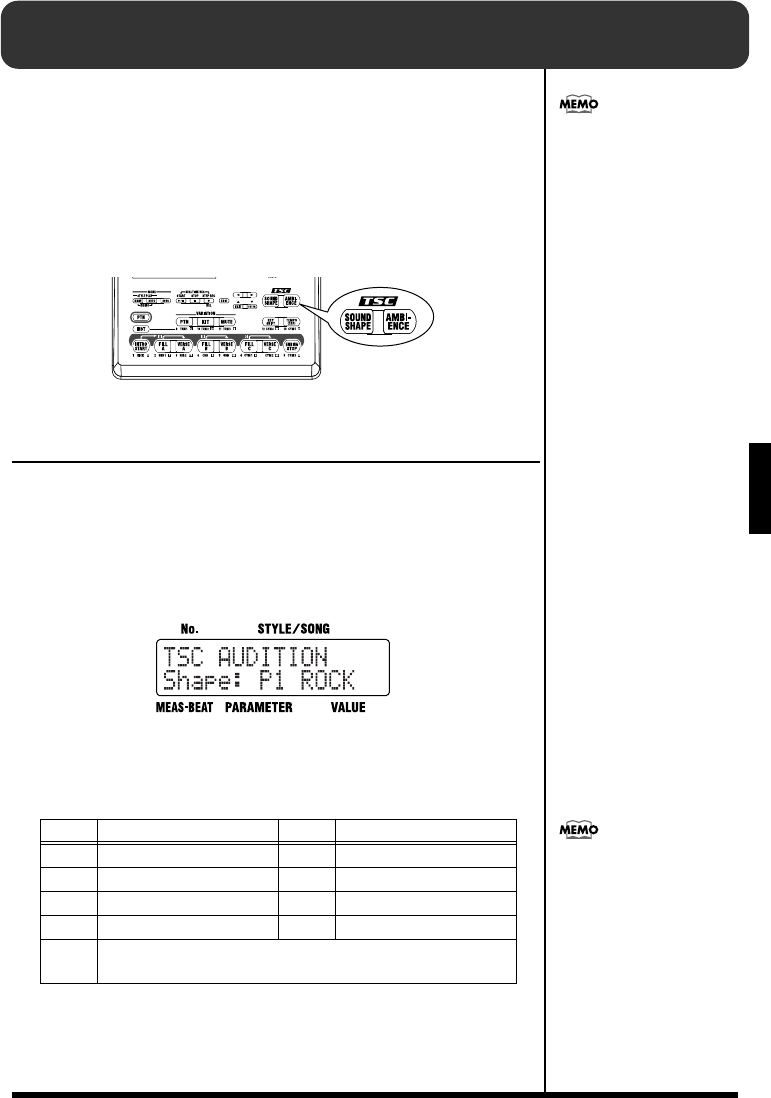
51
Ch
ap
t
er
5
Chapter 5 Changing the Overall Tone of the
Sound and Acoustics (TSC)
“TSC,” short for “Total Sound Control,” is a function that lets you
change the overall tone of the sound and acoustics.
TSC includes two types of effect, “Sound Shape,” which changes
the overall tone of the sound, and “Ambience,” which alters the
acoustic characteristics of the overall sound.
“Sound Shape” and “Ambience” each feature eight pre-
programmed groups of settings (Preset), but you can also add up
to eight more of your own settings (User settings) to these.
fig.05-01p
Changing the Overall Tone of the Sound
([SOUND SHAPE])
“Sound Shape” allows you to adjust the overall tone of the sound
with a three-band equalizer and three-band compressor that are
used to boost or cut specific pitches (frequency bands).
1. Press [SOUND SHAPE].
The TSC screen appears.
fig.05-02d
Each time you press [SOUND SHAPE], it alternately turns the
button on (lit) and off (unlit).
2. Turn the VALUE dial to select the effect.
3. Press [EXIT] to return you to the previous screen.
Value
Name
Value
Name
P1 ROCK P2 LOUD
P3 TIGHT P4 ENHANC
P5 ACSTIC P6 LIVE
P7 LO-FI P8 HRDCMP
U1–8 When the unit left the factory, the User settings (U1–U8) con-
tained the same settings as the Preset (P1–P8).
With the Preset Styles, settings
for the two types of TSC effects
are predetermined for each
Style individually, allowing
you to attain the acoustic effect
most suitable for each Style.
You can change the
parameters of the Sound Shape
settings and name the settings.
You can store up to eight
settings. For more details, refer
to “Changing the Sound Shape
Parameters” (p. 53).
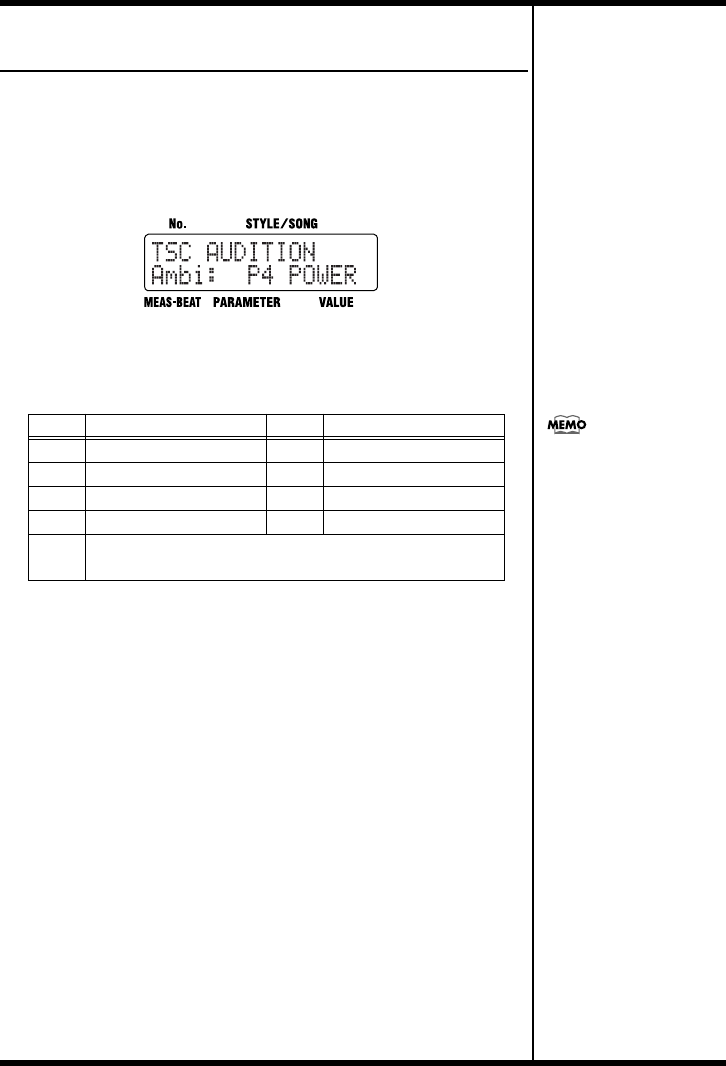
52
Chapter 5 Changing the Overall Tone of the Sound and Acoustics (TSC)
Altering the Acoustic Characteristics of
the Overall Sound ([AMBIENCE])
“Ambience” adjusts the breadth of the sound by altering the
acoustic characteristics of the sound.
1. Press [AMBIENCE].
The TSC screen appears.
fig.05-03d
Each time you press [AMBIENCE], it alternately turns the button
on (lit) and off (unlit).
2. Turn the VALUE dial to select the effect.
3. Press [EXIT] to return you to the previous screen.
Value
Name
Value
Name
P1 NATURL P2 LARGE
P3 BRIGHT P4 POWER
P5 ROOM 1 P6 ROOM 2
P7 ROOM 3 P8 HALL
U1–8 When the unit left the factory, the User settings (U1–U8) con-
tained the same settings as the Preset (P1–P8).
You can change the
parameters of the Ambience
settings and name the settings.
You can store up to eight
settings. For more details, refer
to “Changing the Ambience
Parameters” (p. 56).
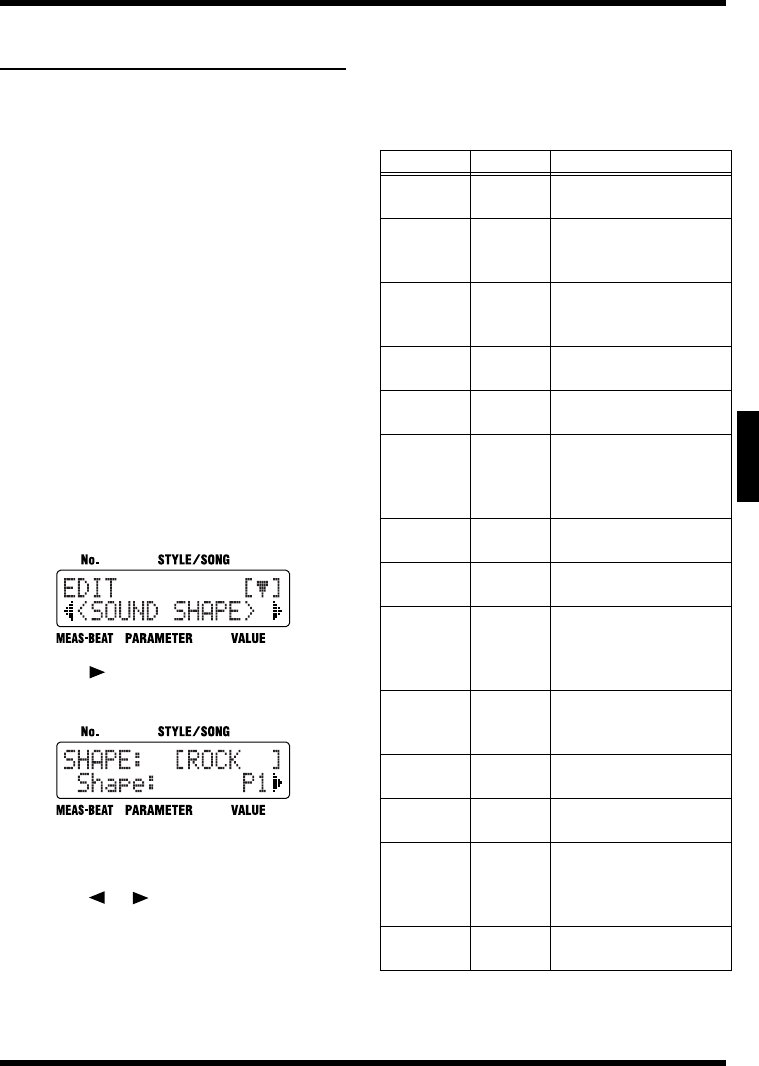
53
Chapter 5 Changing the Overall Tone of the Sound and Acoustics (TSC)
Ch
ap
t
er
5
Changing the Sound Shape
Parameters
You can store up to eight edited Sound Shape
parameters.
*Unable to change the settings for the Preset Sound Shape,
with a “P” appended to their number.
*When the unit left the factory, the User settings (U1–U8)
contained the same settings as the Preset (P1–P8).
* If the parameters below are changed during the
performance of a style or song, the changes are nullified
when you press [EDIT], restoring the settings for the
currently selected style or song.
- Key Shift value (p. 42)
- Tempo value (p. 41)
- Sound Shape and Ambience values (p. 51, p. 52)
*Certain data cannot be changed while it is being performed.
First stop the performance, then make the changes.
■How to Make the Settings
1.
With the performance stopped, press [EDIT].
The Edit Menu screen appears.
fig.09-23d
2. Press [ ], select a <SOUND SHAPE>,
then press [ENTER].
fig.09-24d
3. Turn the VALUE dial to select the Sound
Shape number to be set.
4. Press [ ] [ ], select the parameter to
be set.
5. Turn the VALUE dial to set the value.
6. When you have finished making the
setting, press [EXIT] a number of times
until you exit Edit mode.
■
Changing the Equalizer Parameters
This changes the parameters of the Sound Shape
3-Band equalizer.
The values that can be set for each of the
parameters are shown below.
(*1) The “EQ (Low) / Q” and “EQ (High) / Q” is disabled
when “Shelving” (shelving type equalization) is selected
for the “EQ (Low) /Type” or “EQ (High) / Type.”
Parameter Value Description
EQ / Switch OFF, ON This parameter turns the
equalizer effect on/off.
EQ /
Input
-24 dB–
+12 dB
Sets the overall volume be-
fore passing through the
equalizer.
EQ (Low) /
Type
Shelving,
Peaking
Sets the equalizer type
(shelving, peaking) for the
lower range.
EQ (Low) /
Gain
-12 dB–
+12 dB
Sets the amount of boost or
cut in the lower range.
EQ (Low) /
Freq
20 Hz–
2.0 kHz
Sets the center frequency
for the lower range.
EQ (Low) /
Q (*1) 0.3–16.0
Sets the steepness of the fre-
quency response curve for
the lower range’s center
frequency.
EQ (Mid) /
Gain
-12 dB–
+12 dB
Sets the amount of boost or
cut in the middle range.
EQ (Mid) /
Freq
20 Hz–
8.0 kHz
Sets the center frequency
for the middle range.
EQ (Mid) /
Q0.3–16.0
Sets the steepness of the fre-
quency response curve for
the middle range’s center
frequency.
EQ (High) /
Type
Shelving,
Peaking
Sets the equalizer type
(shelving, peaking) for the
upper range.
EQ (High) /
Gain
-12 dB–
+12 dB
Sets the amount of boost or
cut in the upper range.
EQ (High) /
Freq
500 Hz–
14.0 kHz
Sets the center frequency
for the upper range.
EQ (High) /
Q (*1) 0.3–16.0
Sets the steepness of the fre-
quency response curve for
the upper range’s center
frequency.
EQ / Out
Level
-24 dB–
+12 dB
Sets the overall volume lev-
el after equalization.

54
Chapter 5 Changing the Overall Tone of the Sound and Acoustics (TSC)
■Changing the Compressor
Parameters
This changes the parameters of the Sound Shape
compressor.
The Compressor compresses the overall output
signal when the input volume level exceeds a set
value.
The values that can be set for each of the
parameters are shown below.
Parameter Value Description
COMP /
Switch OFF, ON This parameter turns the
compressor effect on/off.
COMP /
SplitL
20 Hz–
800 Hz
This sets the frequency (in the
lower range) at which the
source sound is split into
three separate ranges.
COMP /
SplitH
1.6 kHz–
14.0 kHz
This sets the frequency (in the
upper range) at which the
source sound is split into
three separate ranges.
COMP
(Low) /
Thres
-30 dB–
+6 dB
This sets the volume level at
which the lower-range com-
pressor goes into effect.
COMP
(Low) /
Ratio
1:1.00–
1:16.0,
1:INF
This sets the ratio of suppres-
sion of the lower-range out-
put when the input level
exceeds the Lo threshold lev-
el (COMP (Low) / Thres).
COMP
(Low) /
Attack
0 ms–
100 ms
This sets the time it takes for
the lower-range compressor
to go into effect once the in-
put level exceeds the Lo
threshold level.
COMP
(Low) /
Release
50 ms–
5000 ms
This sets the time it takes for
the lower-range compressor
effect to stop once the input
level falls below the Lo
threshold level.
COMP(Mid)
/ Thres
-30 dB–
+6 dB
This sets the volume level at
which the midrange com-
pressor goes into effect.
COMP(Mid)
/ Ratio
1:1.00–
1:16.0,
1:INF
This sets the ratio of suppres-
sion of the midrange output
when the input level exceeds
the Middle threshold level
(COMP(Mid) / Thres).
COMP(Mid)
/ Attack
0 ms–
100 ms
This sets the time it takes for
the midrange compressor to
go into effect once the input
level exceeds the Middle
threshold level.
COMP(Mid)
/ Release
50 ms–
5000 ms
This sets the time it takes for
the lower-range compressor
effect to stop once the input
level falls below the Middle
threshold level.
COMP(Hi)
/ Thres
-30 dB–
+6 dB
This sets the volume level at
which the upper-range com-
pressor goes into effect.
COMP(Hi)
/ Ratio
1:1.00–
1:16.0,
1:INF
This sets the ratio of suppres-
sion of the upper-range out-
put when the input level
exceeds the Hi threshold lev-
el (COMP(Hi) / Thres).
COMP(Hi)
/ Attack
0 ms–
100 ms
This sets the time it takes for
the upper-range compressor
to go into effect once the in-
put level exceeds the Hi
threshold level.
COMP(Hi)
/ Release
50 ms–
5000 ms
This sets the time it takes for
the upper-range compressor
effect to stop once the input
level falls below the Hi
threshold level.
*With the compressor, the level is automatically adjusted
to the optimum setting according to the threshold
(Thres) and ratio (Ratio) settings. In addition, since
lengthening the attack (Attack) setting may result in
distortion, a buffer (margin) of -6 dB is provided. Adjust
the following parameter levels as needed.
COMP /
Low Lev
-60 dB–
+6 dB
Sets the volume level of the
lower range after the signal
passes through the expander
and compressor.
COMP /
Mid Lev
-60 dB–
+6 dB
Sets the volume level of the
midrange after the signal
passes through the expander
and compressor.
COMP /
High Lev
-60 dB–
+6 dB
Sets the volume level of the
upper range after the signal
passes through the expander
and compressor.
COMP /
OutLevel
-60 dB–
+6 dB
Sets the overall volume level
after compressor.
Parameter Value Description
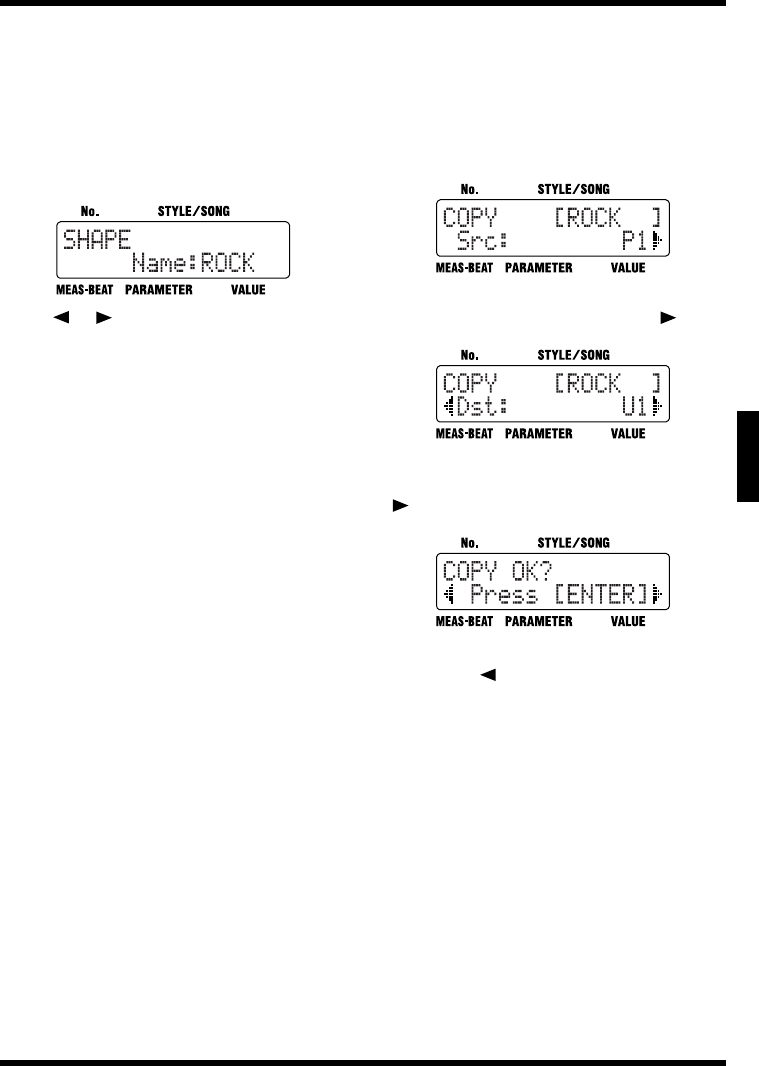
55
Chapter 5 Changing the Overall Tone of the Sound and Acoustics (TSC)
Ch
ap
t
er
5
■Naming the Settings
Select a <NAME> on step 4 in p. 53, then press
[ENTER].
You can edit the name of the currently selected
Sound Shape setting, using up to six characters
for the name.
fig.09-27d
Press [ ] [ ] to move to the point where you
want to enter the character(s).
Each time you press [ENTER], it switches
between upper and lower case for the text being
input.
Turn the VALUE dial to select the character.
When you have finished making the setting,
press [EXIT] a number of times until you exit Edit
mode.
■Copying the Settings
Select a <COPY> on step 4 in p. 53, then press
[ENTER].
Copy the currently selected Sound Shape setting
to the User settings (U1–U8).
fig.09-28d
Turn the VALUE dial to select the number for the
Sound Shape to be copied, then press [ ].
fig.09-29d
Turn the VALUE dial to select the copy-
destination Sound Shape number, then press
[].
fig.09-30d
Press [ENTER] to execute the copy.
If you press [ ], the copy is cancelled, and
you’re taken back to the screen you were in
immediately before that.
When you have finished making the setting,
press [EXIT] a number of times until you exit Edit
mode.
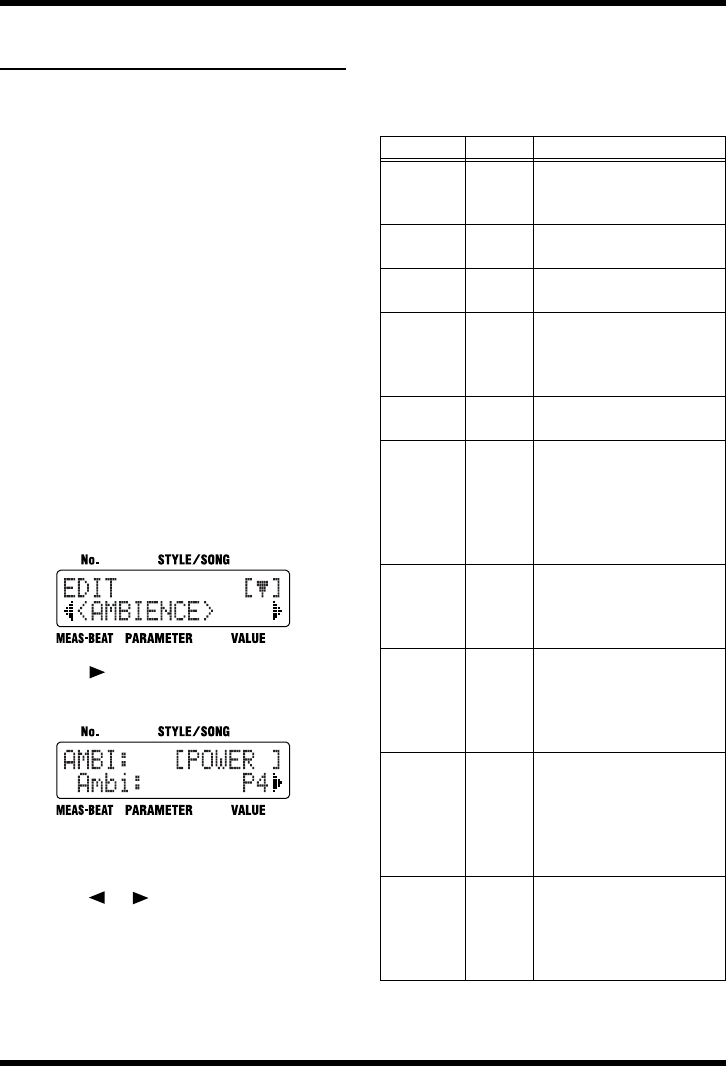
56
Chapter 5 Changing the Overall Tone of the Sound and Acoustics (TSC)
Changing the Ambience
Parameters
You can store up to eight edited Ambience
parameters.
* Unable to change the settings for the Preset Ambience,
with a “P” appended to their number.
*When the unit left the factory, the User settings (U1–U8)
contained the same settings as the Preset (P1–P8).
* If the parameters below are changed during the
performance of a style or song, the changes are nullified
when you press [EDIT], restoring the settings for the
currently selected style or song.
- Key Shift value (p. 42)
- Tempo value (p. 41)
- Sound Shape and Ambience values (p. 51, p. 52)
*Certain data cannot be changed while it is being performed.
First stop the performance, then make the changes.
■How to Make the Settings
1.
With the performance stopped, press [EDIT].
The Edit Menu screen appears.
fig.09-23d
2. Press [ ], select a <AMBIENCE>, then
press [ENTER].
fig.09-24d
3. Turn the VALUE dial to select the
Ambience number to be set.
4. Press [ ] [ ], select the parameter to
be set.
5. Turn the VALUE dial to set the value.
6. When you have finished making the
setting, press [EXIT] a number of times
until you exit Edit mode.
■Changing the Ambience
Parameters
The values that can be set for each of the
parameters are shown below.
Parameter Value Description
Size 5.6 m–
20.5 m
This parameter adjusts the
size of the room which is sim-
ulated.
Time 0.1–32.0 This parameter adjusts the
duration (time) of the reverb.
Level 0–100 This parameter adjusts the ef-
fect level.
PreDelay 0 ms–
20 ms
This parameter adjusts the
time interval between the di-
rect sound and the beginning
of the reverb sound.
Density 0–100 Adjust the density of the
whole reverb sound.
ErLevel 0–100
This parameter adjusts the
volume level of the sound
(Early Reflections) that ar-
rives at the listener after
bouncing off the walls once
or a few times.
RelDensity 0–100
This parameter adjusts the
density of the sound that
reaches the listener after
many repeated reflections.
Low Damp
/ Gain
-36.0 dB–
0.0 dB
This parameter adjusts the
amount of damping for Low
Damp. No low-frequency
damping occurs when set to
“0.”
Low Damp
/ Freq
55 Hz–
4.00 kHz
This parameter adjusts the
standard frequency at which
the low-frequencies are
damped. The reverb sound in
the band below this frequen-
cy is damped.
Hi Damp /
Gain
-36.0 dB–
0.0 dB
This parameter adjusts the
amount of damping for High
Damp. No high-frequency
damping occurs when set to
“0.”
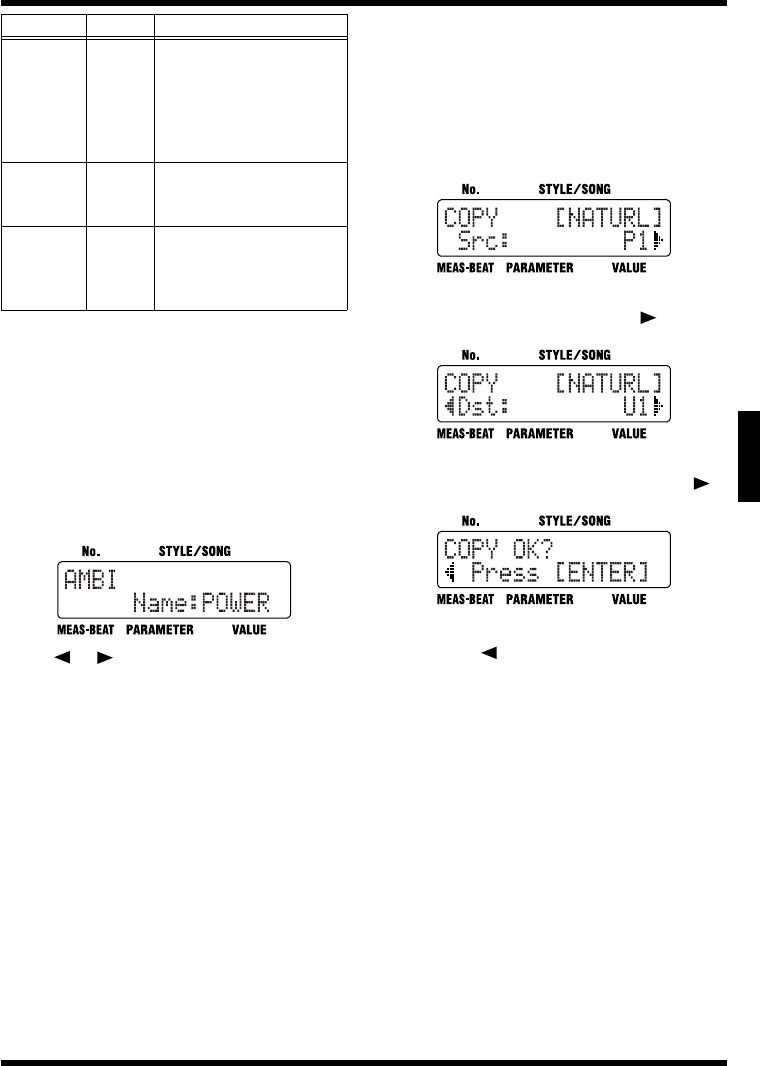
57
Chapter 5 Changing the Overall Tone of the Sound and Acoustics (TSC)
Ch
ap
t
er
5
■Naming the Settings
Select a <NAME> on step 4 in p. 56, then press
[ENTER].
You can edit the name of the currently selected
Ambience setting, using up to six characters for
the name.
fig.09-27d
Press [ ] [ ] to move to the point where you
want to enter the character(s).
Each time you press [ENTER], it switches
between upper and lower case for the text being
input.
Turn the VALUE dial to select the character.
When you have finished making the setting,
press [EXIT] a number of times until you exit Edit
mode.
■Copying the Settings
Select a <COPY> on step 4 in p. 56, then press
[ENTER].
Copy the currently selected Ambience setting to
the User settings (U1–U8).
fig.09-28d
Turn the VALUE dial to select the number for the
Ambience to be copied, then press [ ].
fig.09-29d
Turn the VALUE dial to select the copy-
destination Ambience number, then press [ ].
fig.09-30d
Press [ENTER] to execute the copy.
If you press [ ], the copy is cancelled, and
you’re taken back to the screen you were in
immediately before that.
When you have finished making the setting,
press [EXIT] a number of times until you exit Edit
mode.
Hi Damp /
Freq
400 Hz–
16 kHz
This parameter adjusts the
standard frequency at which
the high-frequencies are
damped. The reverb sound in
the band above the standard
frequency is damped.
Low Cut /
Freq
20 Hz–
2.0 kHz
This parameter adjusts the
frequency at which the low-
frequencies are cut.
High Cut /
Freq
250 Hz–
14.0 kHz,
FLAT
This parameter adjusts the
frequency at which the low-
frequencies are cut. No effect
occurs when set to “FLAT.”
Parameter Value Description
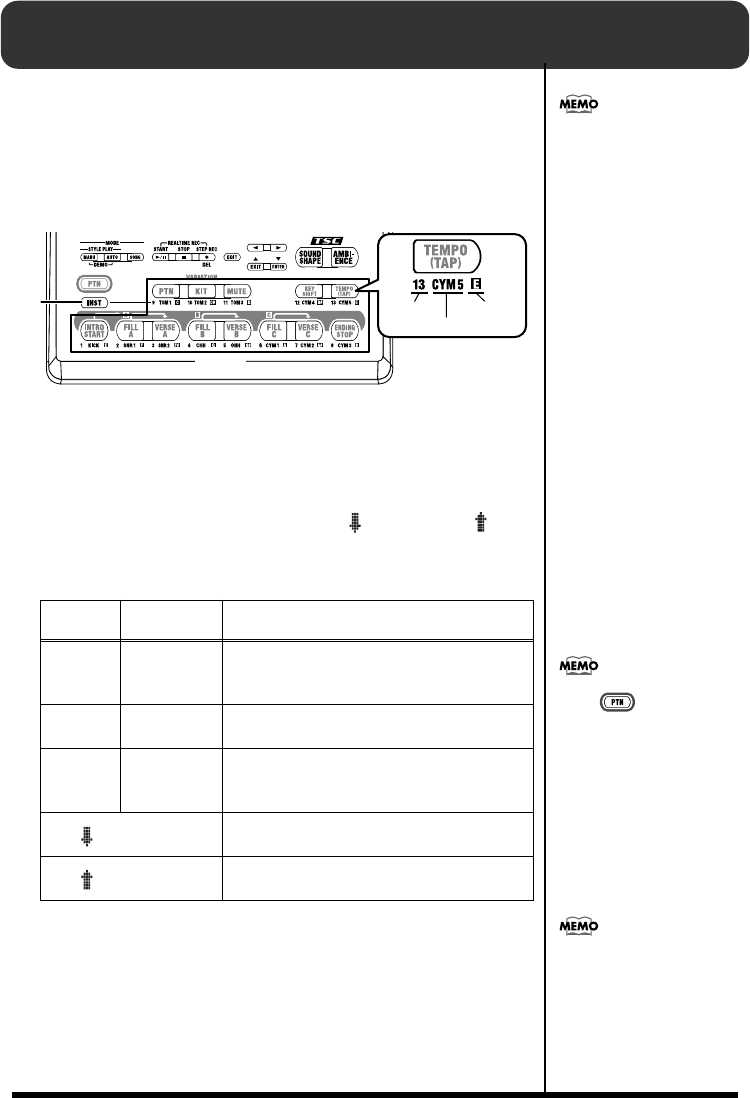
58
Chapter 6 Performing with the Pads
When you press [INST], the button lights up, and you can then
play drum set and bass sounds by pressing the pads. You can also
turn [INST] on while Styles and songs are in progress to play
sounds with the pads.
You can perform using the following pads when [INST] is lit.
fig.06-01p
You can perform with the pads using three groups of sounds
(DRUM, PERC, BASS).
Select the desired group by pressing [INST], and cycling through
the available choices:
“DRUM” → “PERC” → “BASS” → “oct BASS” → “oct
BASS” → “DRUM” and so on.
The name of the sound group appears in the display.
When you tap a pad, the sound of the instrument assigned to that
pad or the specified pitch is played.
The volume and tone change according to how hard you tap the
pads.
Dis-
played
Group
Name Sound
DRUM Drum Set
The sounds in the drum set are assigned to the
pads. The sound names are printed under the
pads.
PERC Percussion Various percussion instrument sounds are as-
signed to the pads.
BASS Bass
The various pitches of the scale for the speci-
fied bass sound are assigned to the pads. The
note names are printed under the pads.
oct BASS
The bass sound one octave lower is assigned to
the pads.
oct BASS
The bass sound one octave higher is assigned
to the pads.
The tones that are assigned to
the pads in the Preset Styles
are predetermined for each
Style.
Pads
Lit Pad No.
Instrument Name
Bass Note
You can adjust the pad
sensitivity. For more details,
refer to “Adjusting the Pad
Sensitivity” (p. 89).
Press [ ] when using the
pads to switch Patterns. For
more details, refer to
“Switching the Pad Functions”
(p. 37).
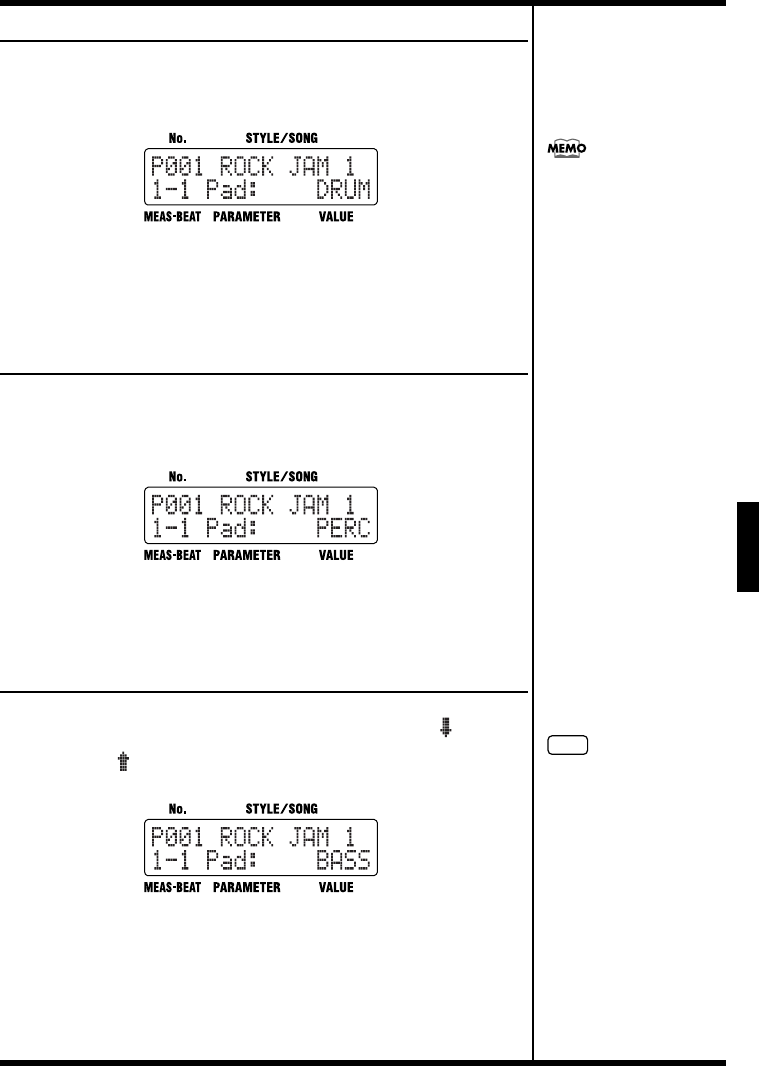
59
Chapter 6 Performing with the Pads
Ch
ap
t
er
6
Playing Drum Sounds
1. Press [INST] a number of times until “DRUM” appears in the
display.
fig.06-02d
2. Tap the pads to perform.
The instrument sounds assigned to the pads are played.
The names of the assigned instruments are printed under the pads.
Playing Percussion Sounds
1. Press [INST] a number of times until “PERC” appears in the
display.
fig.06-03d
2. Tap the pads to perform.
The instrument sounds assigned to the pads are played.
Playing Bass Sounds
1. Press [INST] a number of times until “BASS,” “oct BASS”
or “oct BASS” appears in the display.
fig.06-04d
2. Tap the pads to perform.
The bass sound is played at the pitch assigned to a particular pad.
The bass sound stops playing when you release the pad.
The names of the notes assigned to the pads are printed under the pads.
For details on the sounds
assigned to the pads, refer to
the “Preset Kit List” (p. 106).
NOTE
You cannot play more than
one bass sound at the same
time.
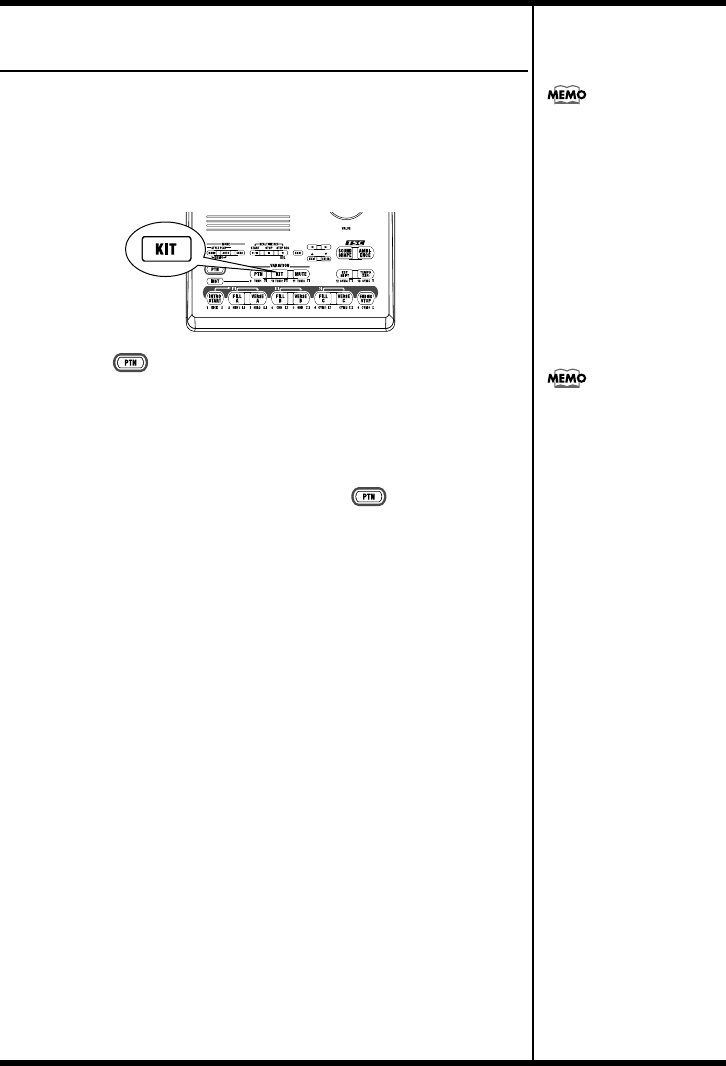
60
Chapter 6 Performing with the Pads
Selecting a Different Sound
(VARIATION [KIT])
When [INST] is on, the set of three groups of sounds played with
the pads (DRUM, PERC, BASS) is called the “drum kit.”
A single Style has two drum kits included with it, and you can
switch between these two drum kits by turning VARIATION
[KIT] on and off.
fig.06-06p
1. Press [ ] so the button lights up.
2. Press VARIATION [KIT] so the button lights up.
3. Press [INST] so the button lights up.
When you press the pads, the variation drum kit plays.
To return to the original drum kit, press [ ] and then
VARIATION [KIT], causing the button lights to go out.
Turning VARIATION [KIT] on
switches not only the pad
drum kit, but also the drum kit
for the Style or song currently
b
eing played.
You can change the instrument
sounds contained in a drum
kit, and create original drum
kits. You can also change the
volume and pan (sound
localization) settings.
For further details, refer to
“Chapter 10 Creating Your
Own Kits” (p. 90).
61
Ch
ap
t
er
7
Chapter 7 Creating Styles
Even though the DR-3 comes with a great variety
of styles, representing many genres, you can also
create your own original styles. Such original
styles are called “User styles.”
User styles have a “U” at the beginning of the
style number, for example “U001.” You can
create and store up to 100 User styles in the DR-3.
Procedure for Creating
Styles
Here are the steps you need to take to create a
new style:
fig.07-01
There are two ways to record the patterns in Step
<3>
.
Realtime Recording
With this method, the key pads are played in time
with a metronome count, with the pattern being
recorded just as it is performed. Even if there is a little
unevenness in the timing used in tapping the key
pads, the Quantize function allows you to record
with the timing corrected. (Refer to step 3 on p. 65)
Step Recording
With this method, you “record” by specifying the
timing (step), volume, etc., of each instrument
sound, one at a time. This allows patterns to be
recorded accurately, even those that are hard to
record using Realtime Recording.
You can also record patterns using both Realtime
and Step Recording.
After recording the basic pattern using Step
Recording, finish creating the Pattern by using
Realtime Recording to add sounds in a freer ad-
lib style.
Convenient Functions for Creating Styles
You can speed up the process of creating a new
style by first copying a Preset style, or the
patterns in a Preset style to a User style, and then
modifying that to create the new style.
• Copying and Deleting Styles (p. 71)
• Copying and Deleting Patterns (p. 72)
Creating Two-Measure Patterns from Four-Measure
Patterns
When you copy a four-measure pattern, and then, using
the procedure described in “Determining the Number
of Measures for Each Pattern” (p. 64), set the number of
measures to “2,” it results in a pattern in which only the
first two measures of the original pattern are played.
In this manner, you can use the setting described on p.
64 to create a pattern after copying a pattern that is
shorter than the one you start with.
Changing the Key of the Bass Part (Key Transpose)
After copying or recording a pattern, you can change
the key of its bass part.
<1> Select a Number for the Style
You Are Creating
<2> Make the Settings for the New Style
<3> Record the Patterns
(Realtime Recording/Step Recording)
<4> Check the Created Style
- Set the Tempo
- Set the Beat
- Set Up the Drum Kit
- Set VARIATION [MUTE]
- Make the TSC Settings
- Determine the Number of Measures for Each Pattern
(These settings can be changed after the patterns are
recorded.)
- Record the Drum Part
- Record the Bass Part
- Change Dynamics to the Sounds (Velocity Edit)
- Transpose the Bass Part
- Edit the Settings
<Finish the Style>
- Name the Style
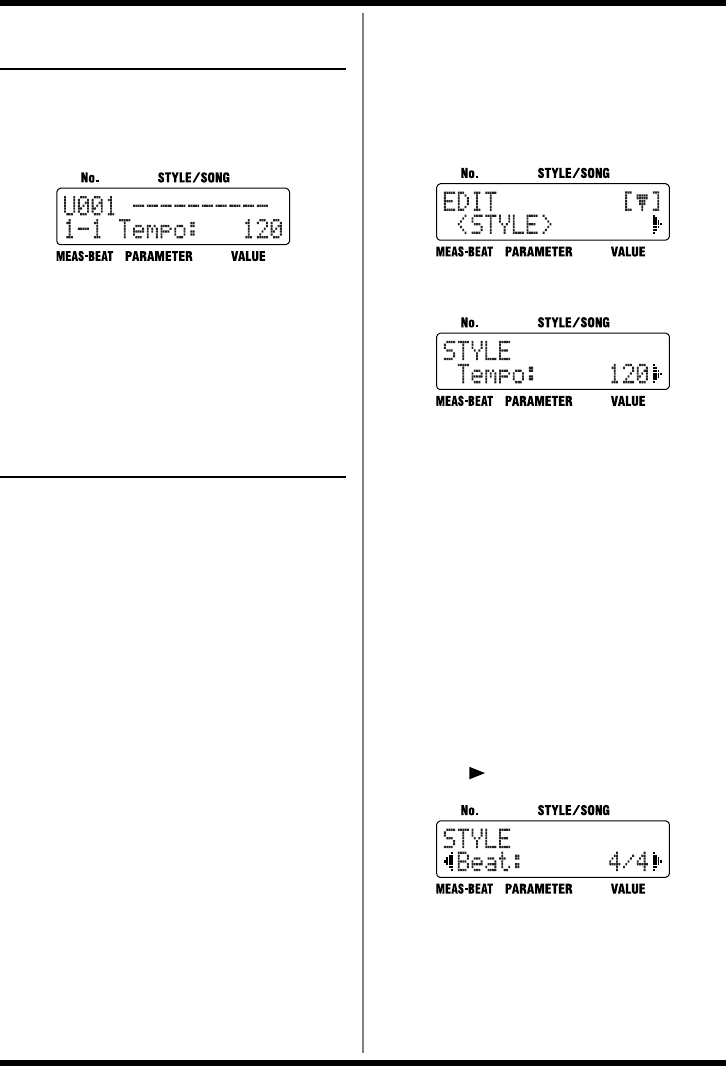
62
Chapter 7 Creating Styles
<1> Selecting a Number
for the Style
1. With the performance stopped, press
[MANU].
The Style screen appears.
fig.07-02d
2. Turn the VALUE dial to select the number
(U001–U100) for the style you are
creating.
You cannot record to the Preset styles (P001–
P100).
<2> Making the Settings
for the New Style
* If the parameters below are changed during the
performance of a style, the changes are nullified when you
press [EDIT], restoring the settings for the currently
selected style or song.
- Key Shift value (p. 42)
- Tempo value (p. 41)
- Sound Shape and Ambience values (p. 51, p. 52)
*Certain data cannot be changed while it is being performed.
First stop the performance, then make the changes.
* VARIATION [PTN] [KIT] and [MUTE] will have no
effect in Edit mode.
■
Setting the Tempo for the Style
1. Select the style to be set, then press
[EDIT].
The Edit Menu screen appears.
2. Select a <STYLE>, then press [ENTER].
fig.07-03d
3. Select a <Tempo>.
fig.07-04d
4. Turn the VALUE dial to set the tempo.
The tempo can be set to any value from 20 to 260.
5. When you press [EXIT], the setting is
changed, and you’re returned to the
previous screen.
■Setting the Beat
*When you copy a style, the new style uses the beat of the
original style.
1. Select the style to be set, then press
[EDIT].
The Edit Menu screen appears.
2. Select a <STYLE>, then press [ENTER].
3. Press [ ], select a <Beat>.
fig.07-05d
4. Turn the VALUE dial to set the beat.
2/4, 3/4,... 8/4,
4/8, 5/8,... 16/8
5. When you press [EXIT], the setting is
changed, and you’re returned to the
previous screen.
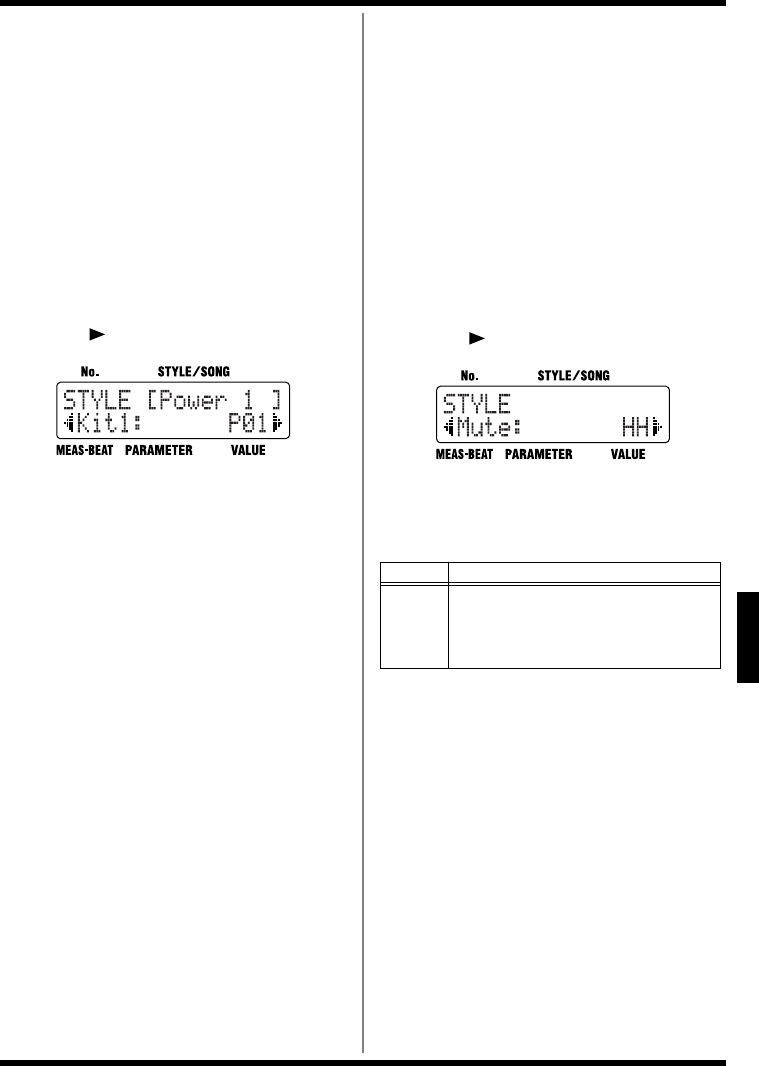
63
Chapter 7 Creating Styles
Ch
ap
t
er
7
■Setting Up the Kit
Changing the kit changes the sounds used in the
style being created.
When setting kit’s variation (p. 36), select <Kit2>
in Step 3 below.
*You can also create kits using the instruments you prefer
(User kits). For more details, refer to “Chapter 10
Creating Your Own Kits” (p. 90).
1. Select the style to be set, then press
[EDIT].
The Edit Menu screen appears.
2. Select a <STYLE>, then press [ENTER].
3. Press [ ], select a <Kit1> or a <Kit2>.
fig.07-07d
4. Turn the VALUE dial to select the kit.
Each contains settings P01–P50 and U01–
U50.
For more on the instrument that make up
each kit, refer to the “Preset Kit List” (p. 106).
5. When you press [EXIT], the setting is
changed, and you’re returned to the
previous screen.
■Changing the Sound to Be
Muted
When VARIATION [MUTE] is on, this sets the
sound to be played.
If you press VARIATION [MUTE] while the
currently selected style is playing, the sound
selected in this setting is played, and all other
sounds are muted.
1. Select the style to be set, then press
[EDIT].
The Edit Menu screen appears.
2. Select a <STYLE>, then press [ENTER].
3. Press [ ], select a <Mute>.
fig.07-17d
4. Turn the VALUE dial to select the sound
to be performed with VARIATION [MUTE]
is set to ON.
5. When you press [EXIT], the setting is
changed, and you’re returned to the
previous screen.
Item Value
Mute
HH (High Hat and Cymbal), Kick, Bass,
HH&Kc (High Hat & Kick),
Kc&Bs (Kick & Bass),
HH&Bs (High Hat & Bass), Drums
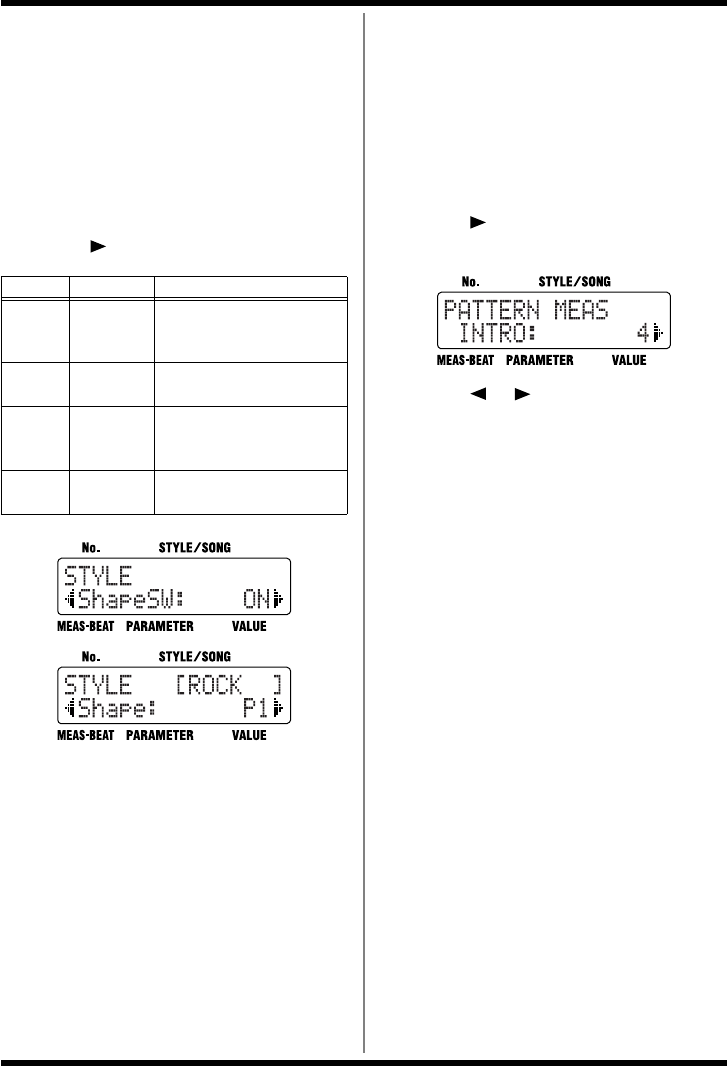
64
Chapter 7 Creating Styles
■Making the TSC Settings for
the Style
Make the TSC (Sound Shape and Ambience)
settings for the style you are creating.
1. Select the style to be set, then press
[EDIT].
The Edit Menu screen appears.
2. Select a <STYLE>, then press [ENTER].
3. Press [ ], select the item to be set.
fig.07-08d
4. Turn the VALUE dial to set the value.
5. When you press [EXIT], the setting is
changed, and you’re returned to the
previous screen.
■Determining the Number of
Measures for Each Pattern
* Fill-Ins A–C are set at one measure each. This setting
cannot be changed.
1. Press [EDIT].
The Edit Menu screen appears.
2. Select a <STYLE>, then press [ENTER].
3. Press [ ], select a <PATTERN>, then
press [ENTER].
fig.07-06d
4. Press [ ] [ ] to select the pattern to
change the setting.
Select the pattern with “PATTERN MEAS”
displayed the upper part of the screen.
*For more on “PTN KEY TRANS” in the upper row and
the screens that are displayed, refer to “Transposing the
Pattern’s Bass Part” (p. 70).
5. Turn the VALUE dial to select the number
of measures.
You can set patterns to a maximum length of
four measures.
6. When you press [EXIT] twice, the setting
is changed, and you’re returned to the
previous screen.
* When changing the number of measures in a copied
pattern, even though you set the copied pattern so it has
fewer measures than the original pattern, the amount of
data remains the same as that of the original.
Item Value Description
Shape
Sw ON, OFF
This sets the Sound Shape
On/Off setting to be used
when this Style is selected.
Shape P1–P8,
U1–U8
This sets the Sound Shape
when this Style is selected.
Ambi
Sw ON, OFF
This sets the Ambience
On/Off setting to be used
when this Style is selected.
Ambi P1–P8,
U1–U8
This sets the Ambience
when this Style is selected.
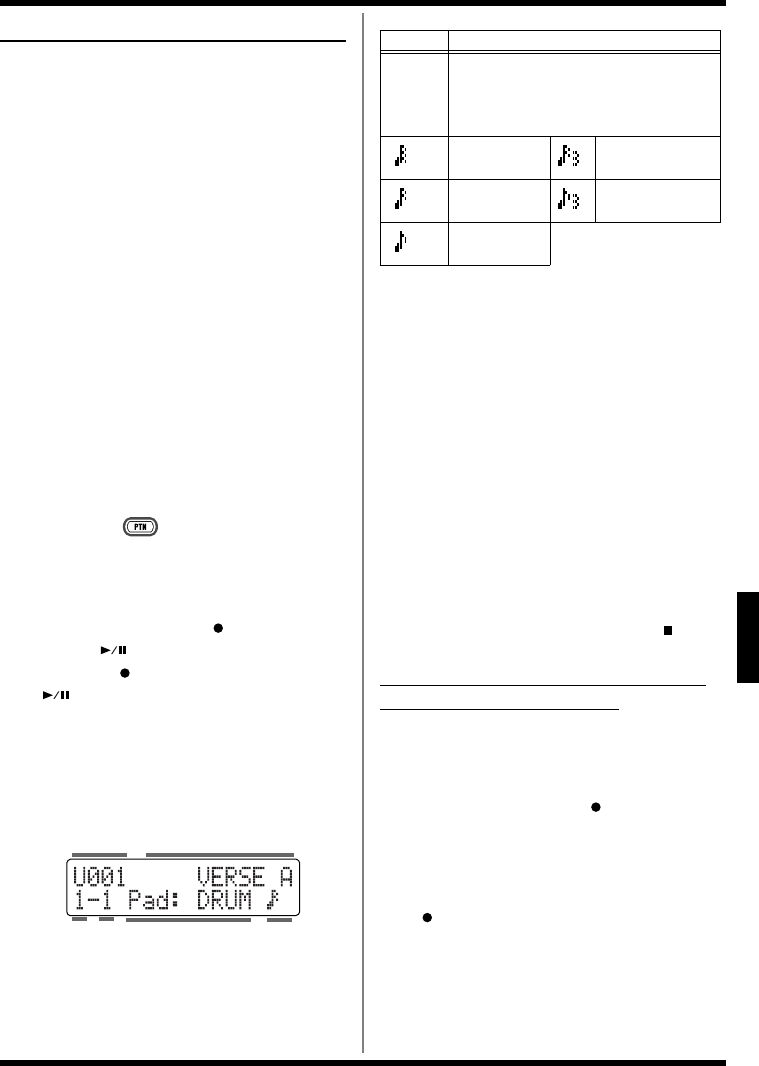
65
Chapter 7 Creating Styles
Ch
ap
t
er
7
<3> Recording the Patterns
■Using Realtime Recording
The following explains the Realtime Recording
procedure, in which you record by pressing the
pads in time with the tempo provided by the
metronome.
* When you record to a pattern which has already been
recorded, the sounds are layered without the previously
recorded sounds being erased.
* You cannot record to the Preset Styles (P001–P100).
*The tempo, Sound Shape, and Ambience settings that are
set at the time of recording are saved to the recorded
pattern.
• Recording the Drum Part
* With the drum part, you cannot record multiple notes
from the same pad number at the same step (timing).
Make sure you have pressed [MANU] to switch
to Manual mode.
1. Hold down [ ] and press any of the
pattern pads to specify the pattern to be
recorded.
The pattern pad flashes when pressed.
2. Hold down STEP REC [ ] and press
START [ ].
STEP REC [ ] lights up, and START
[] flashes. Recording begins after one
measure metronome count. The “MEAS-
BEAT” indication counts in time with the
metronome count.
[INST] lights up, and the pads are enabled for
performing instrument sounds.
fig.07-08d
3. Turn the VALUE dial to set the
quantization.
This corrects mistakes in the rhythm played
to the closest selected note value.
* For more detailed information about the Quantize
function, refer to the column on p. 66.
4. Press [INST] to select either “DRUM” or
“PERC” as the instrument to be recorded.
5. Record the performance, pressing the
pads while following the rhythm provided
by the metronome.
The force used to tap the pads is recorded as
velocity (the strength or stress of the sound).
Recorded sounds are played back repeatedly.
Sounds continue to be layered as the sounds
that have already been recorded are played
back.
6. Repeat Steps 3–5 as needed.
7. To stop recording, press STOP [ ].
Erasing Previously Recorded Sounds
As You Continue Recording
You can use the following procedure to erase
specified instrument sounds in the pattern
currently being recorded.
1. Hold down STEP REC [ ] and press the
pad to which the instrument whose
sound you want to erase is assigned.
For example, when recording with “DRUM”
selected for [INST], holding down STEP REC
[] and pressing [VERSE A (SNR 2)] erases
the SNR 2 sounds that have already been
recorded.
BeatMeasure
Style No. Pattern Name
Sound Group Quantize
Display Description
– –
Off
Sounds are recorded without quantiza-
tion, with the same timing used in tapping
the pads.
32th note 16th note triplets
16th note 8th note triplets
8th note
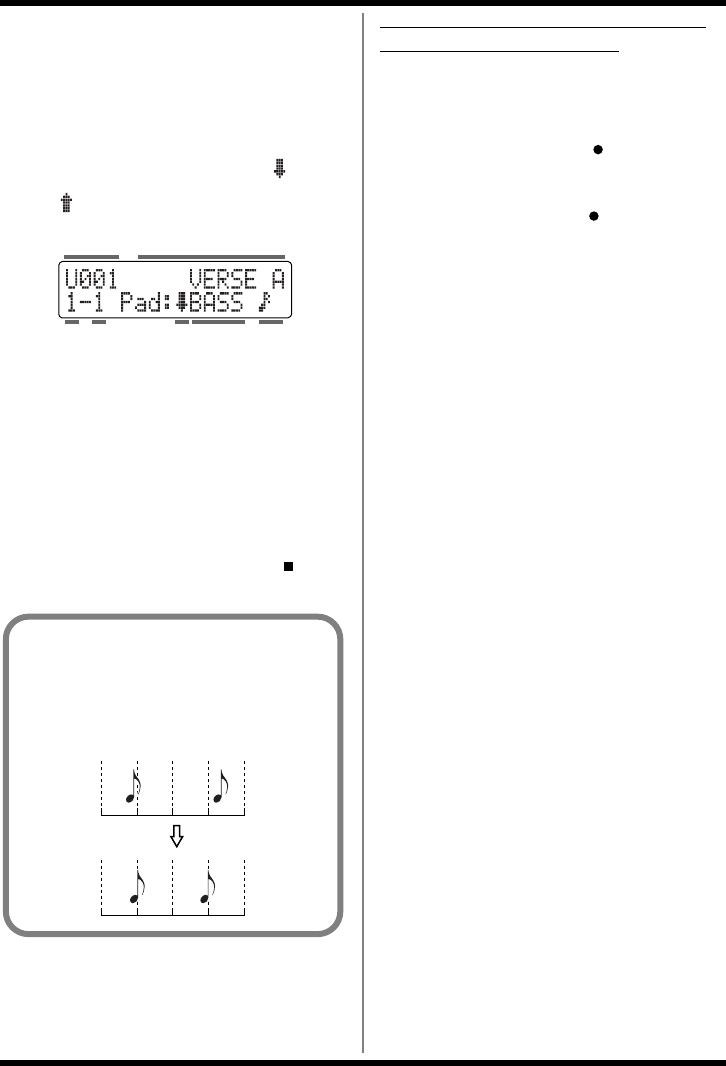
66
Chapter 7 Creating Styles
• Recording the Bass Part
* Bass parts are monophonic. Even if multiple notes are
layered in a recording, only one sound is played.
Steps 1–3 are identical to those in “Recording
the Drum Part” above.
4. Press [INST] to select “BASS,” “ BASS”
or “ BASS.”
fig.07-09d
5. Record the performance, pressing the
pads while following the rhythm provided
by the metronome.
The force used to tap the pads is recorded as
velocity (the strength or stress of the sound).
Recorded sounds are played back repeatedly.
6. Repeat Steps 4–5 as needed.
7. To stop recording, press STOP [ ].
Erasing Previously Recorded Sounds
As You Continue Recording
You can use the following procedure to erase the
bass sounds in the pattern currently being
recorded.
1. Hold down STEP REC [ ] and press
any one pad.
All bass sounds, regardless of pitch, are
erased while STEP REC [ ] and the pad are
held down.
*When erasing long note sounds, press the key pad at the
point the sound begins to play. Regardless of the length of
the note, the entire sound recorded at that time is erased.
Style No. Pattern Name
Sound
Group
Octave
for bass
Quantize
BeatMeasure
What is Quantize?
You can correct for timing discrepancies in a
recorded performance by automatically
aligning the music with the timing you
specify. This is called “Quantizing.”
Quantize
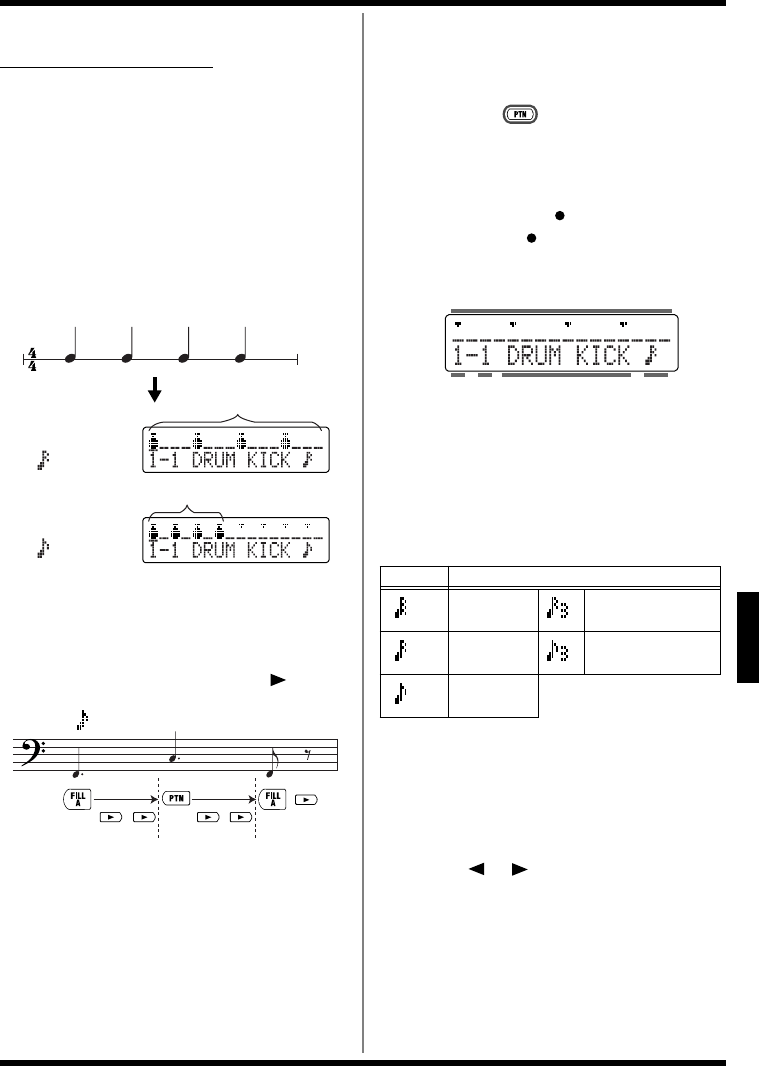
67
Chapter 7 Creating Styles
Ch
ap
t
er
7
■Using Step Recording
What is Step Recording?
This is a recording method whereby measures
are divided into units called “steps,” and the
timing of each sound to be played is specified.
The step length is set in “Quantize.” For example,
if the value in Quantize is set to the eighth note,
then when the time signature (beat) is set to 4/4,
eight notes can be input in one measure.
When you press the pads while recording drum
parts, one step length of the sound assigned to
that pad will be input.
fig.07-10
When recording bass parts, pressing a pad inputs
one step length of the pitch corresponding to that
pad. To record a long note, input the note by
holding down the pad and pressing [ ].
fig.07-11
• Recording the Drum Part
Make sure you have pressed [MANU] to switch
to Manual mode.
1. Hold down [ ] and press any of the
pattern pads to specify the pattern to be
recorded.
The pattern pad flashes when pressed.
2. Press STEP REC [ ].
The STEP REC [ ] button lights up, and the
“Step Recording screen” is displayed.
fig.07-12d
3. Press [ENTER] to move the cursor to the
quantization value, then turn the VALUE
dial to set the quantization.
In Step Recording, the quantization value
represents the unit for the length of one note
(the step).
4. Press [EXIT].
The cursor moves to the step display.
5. Press [INST] to select either “DRUM” or
“PERC” as the sound group to be
recorded.
6. Press [ ] [ ] to specify the step to be
recorded.
Quantize (16th note)
Quantize (8th note)
One Measure
One Measure
Hold down Hold down
• Quantize (8th note)
Display Description
32th note 16th note triplets
16th note 8th note triplets
8th note
BeatMeasure Pad Name Quantize
Step Display
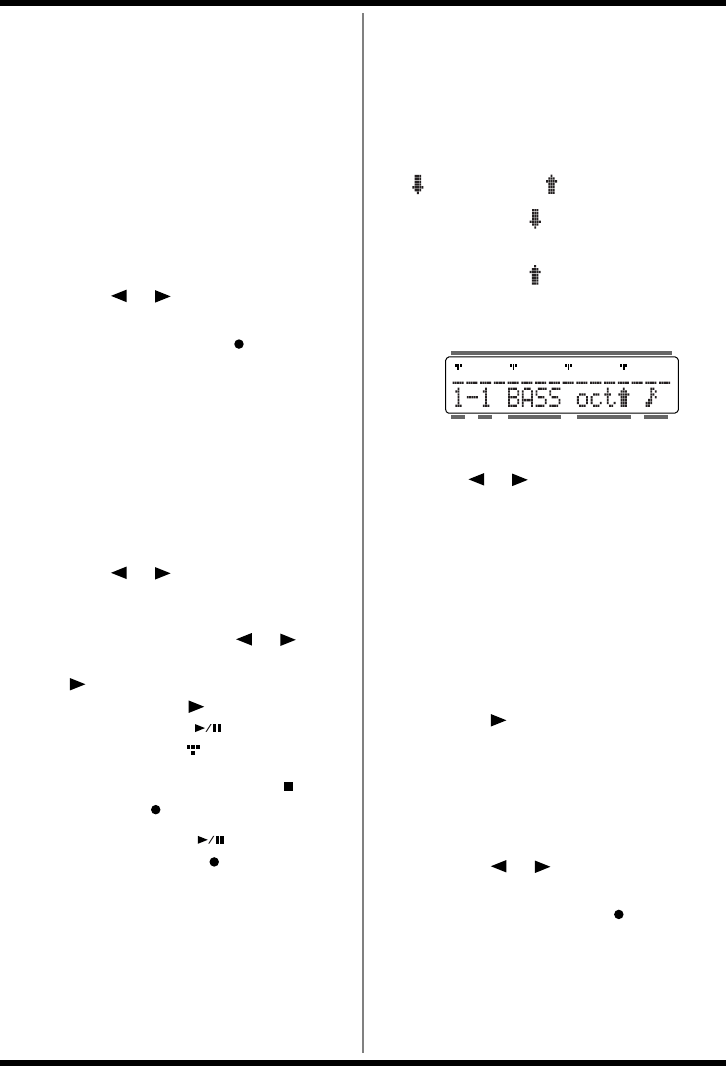
68
Chapter 7 Creating Styles
7. Tap the pad for the instrument to be
recorded.
At this time, the force used to tap the key
pads is recorded as velocity.
The recording automatically advances by one
step.
When you press the pad for an instrument
other than the instrument shown in the
screen, the indication in the display changes.
The screen always shows the step for the
instrument currently being input.
Erasing Sounds That’ve Been Input
1. Press [ ] [ ] to move to the step to
be deleted.
2. Hold down STEP REC [ ] and press
the pad to which the instrument you
want to erase is assigned.
Changing the Instrument Displayed
Without Inputting
Hold down [INST] and press the pad for
the instrument you want to display.
8. Repeat Steps 3–7 as needed.
Confirming the Input Sound
Press [ ] [ ] in the Step Recording
screen to move to other steps.
You can move continuously through
steps by holding down [ ] [ ]. If
there is a note present when you press
[ ], the note is played.
When you press [ ] to move through
the steps, START [ ] lights up at the
start of the beat ( ).
9. To stop recording, press STOP [ ].
The STEP REC [ ] goes out.
* Note that pressing START [ ] during Step
Recording (while STEP REC [ ] is lit) switches the
DR-3 to Realtime Recording (p. 65).
• Recording the Bass Part
* Bass parts are monophonic. Even if multiple notes are
layered in a recording, only one sound is played.
Steps 1–4 are identical to those in “Recording
the Drum Part” above.
5. Press [INST] to select “BASS,” “BASS oct
” or “BASS oct .”
Select “BASS oct ” when you want to input
the bass sound one octave lower.
Select “BASS oct ” when you want to input
the bass sound one octave higher.
fig.07-13d
6. Press [ ] [ ] to specify the step to be
recorded.
7. Tap the pad for the instrument to be
recorded.
At this time, the force used to tap the key
pads is recorded as velocity.
The recording automatically advances by one
step.
Inputting Long Notes
Hold down the pad being recorded and
press [ ]; press this the same number
of times as the number of steps that you
want the sound to be extended.
The length of the note is then set when
you release the pad.
Erasing Sounds That’ve Been Input
1. Press [ ] [ ] to move to the step to
be deleted.
2. Hold down STEP REC [ ] and press
one of the pad.
BeatMeasure Quantize
Sound
Group
Octave
for Bass
Step Display
69
Chapter 7 Creating Styles
Ch
ap
t
er
7
8. Repeat Steps 5–7 as needed.
Confirming the Input Sound
Press [ ] [ ] in the Step Recording
screen to move to other steps.
You can move continuously through
steps by holding down [ ] [ ].
If there is a note present when you press
[ ], the note is played.
With extended notes, only the sound in
the first step is played.
* Using a rougher Quantize value (such as eighth
notes) makes it easier to check detailed phrases.
When you press [ ] to move through
the steps, START [ ] lights up at the
start of the beat ( ).
9. To stop recording, press STOP [ ].
The STEP REC [ ] goes out.
* Note that pressing START [ ] during Step
Recording (while STEP REC [ ] is lit) switches the
DR-3 to Realtime Recording (p. 65).
■Adding Dynamics to the
Sounds (Velocity Edit)
You can change the dynamics (velocity) of
specific notes in patterns that have already been
recorded. Adding accents to the notes lets you
give the rhythm greater liveliness.
Make sure you have pressed [MANU] to switch
to Manual mode.
1.
Hold down [ ] and press any of the pattern
pads to specify the pattern to be recorded.
The pattern pad flashes when pressed.
2. Press STEP REC [ ] to display the Step
Recording screen.
3. Press [EDIT].
The Velocity Edit screen is displayed.
fig.07-15d
The position of the note is indicated as
“measure-beat-tick.”
Tick is a term used to refer to units of time
shorter than a beat.
4. Press [ ] [ ] to find the note whose
velocity is to be changed.
When you press [ ] [ ], all notes are
displayed one by one, regardless of whether
they are in the drum part or bass part.
Hold down the button to seek the note
(moving through the notes continuously).
When you press [ ], the sound for the
displayed note is played.
When you press [ENTER], the sound for the
displayed note is played. This does not move
you to another note.
5.
Turn the VALUE dial to change the value.
You can set the velocity to any value from 1 to 127.
6. Repeat Steps 4 and 5 as needed.
7. Press [EXIT] to quit Velocity Edit.
The Step Recording screen appears.
When you press STOP [ ], you're returned
to the Style screen.
Instrument Velocity
TickMeasure Beat
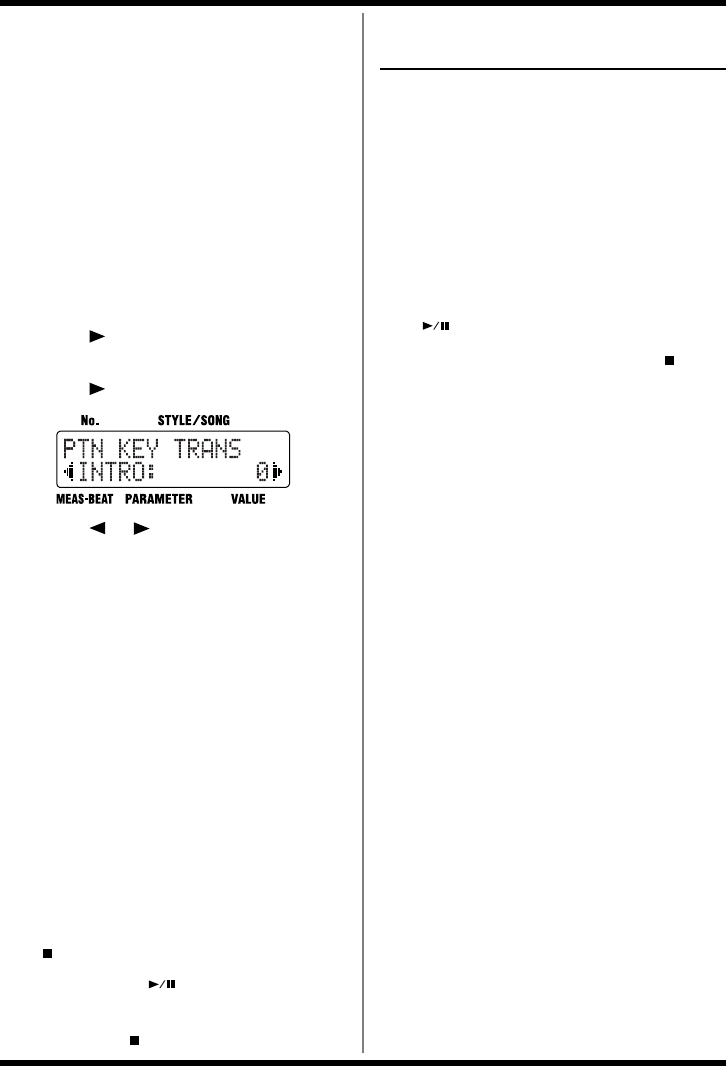
70
Chapter 7 Creating Styles
■Transposing the Pattern’s
Bass Part
Use this procedure to transpose the bass part and
store the pattern (Key Transpose).
* Key Transpose settings are disregarded when recording
patterns.
* If notes whose pitches are changed using the Key
Transpose function are in registers that are unplayable
for the DR-3, the notes in the expressible range above or
below that octave are sounded.
1. Press [EDIT].
The Edit Menu screen appears.
2. Select a <STYLE>, then press [ENTER].
3. Press [ ], select a <PATTERN>, then
press [ENTER].
4. Press [ ], select a <PTN KEY TRANS>.
fig.07-18d
5. Press [ ] [ ] to select the pattern to
be set the key.
Select the pattern with “PTN KEY TRANS”
displayed the upper part of the screen.
The pattern names appear as “VERSE Av,”
“VERSE Bv,” and “VERSE Cv” when
VARIATION [PTN] is on.
6. Turn the VALUE dial to select the key.
You can set the value in semitone units
within the range from -12 to +12.
7. When you press [EXIT] twice, the setting
is changed, and you’re returned to the
previous screen.
■
Playing Back Recorded Patterns
After recording each of the patterns, play them
back to check out how they sound.
1. If recording is in progress, press STOP
[] to stop the recording.
2. Press START [ ].
The recorded pattern is played.
3.
Press STOP [ ] to stop the performance.
<4> Confirming the
Created Style
Now play back the new style to check the tempo
and drum kits.
You can also press the TSC and VARIATION
[PTN], [KIT] and [MUTE] to check the settings,
and adjust these settings if necessary.
■Performing the Created Style
1. Press [MANU] or [AUTO].
2. Press any of Pattern Pads or START
[] to start the performance.
3. Press [ENDING/STOP] or STOP [ ] to
stop the performance.
■Editing the Settings
You can make changes to the following settings,
even after creation of the style is finalized.
• Style Tempo —
“Setting the Tempo for the Style” (p. 62)
• Kit Settings —
“Setting Up the Kit” (p. 63)
• TSC Settings —
“Making the TSC Settings for the Style” (p.
64)
• VARIATION [MUTE] Settings —
“Changing the Sound to Be Muted” (p. 63)
71
Chapter 7 Creating Styles
Ch
ap
t
er
7
Naming, Copying, and
Deleting Styles
■Naming the Style
You can edit the name of the currently selected
style, using up to ten characters for the name.
1. Select the style to be set, then press
[EDIT].
The Edit Menu screen appears.
2. Select a <STYLE>, then press [ENTER].
3. Press [ ], select a <NAME>, then press
[ENTER].
fig.07-24d
4. Press [ ] [ ] to move to the point
where you want to enter the character(s).
5. Turn the VALUE dial to select the
character.
Each time you press [ENTER], it switches
between upper and lower case for the text
being input.
6. Repeat Steps 4–5 as needed.
7. When you press [EXIT] twice, the setting
is changed, and you’re returned to the
previous screen.
■Copying the Style
This copies the Style to the User styles.
1. Press [EDIT].
The Edit Menu screen appears.
2. Select a <STYLE>, then press [ENTER].
3. Press [ ], select a <COPY>, then press
[ENTER].
fig.07-19d
4. Turn the VALUE dial to select the number
for the Style to be copied, then press
[].
fig.07-20d
5. Turn the VALUE dial to select the copy-
destination Style number, then press
[].
fig.07-21d
If you press [ ], you’re taken back to the
screen you were in immediately before that.
6. Press [ENTER] to execute the copy.
You can press [EXIT] to cancel the procedure,
and go back to the previous screen.
72
Chapter 7 Creating Styles
■Clearing the Style
1. Press [EDIT].
The Edit Menu screen appears.
2. Select a <STYLE>, then press [ENTER].
3. Press [ ], select a <CLEAR>, then
press [ENTER].
fig.07-22d
4. Turn the VALUE dial to select the number
for the Style to be cleared, then press
[].
fig.07-23d
If you press [ ], you’re taken back to the
screen you were in immediately before that.
5. Press [ENTER] to execute the clearing.
You can press [EXIT] to cancel the procedure,
and go back to the previous screen.
Copying and Deleting Patterns
■Copying Patterns
This copies patterns and User Styles to specified
patterns.
1. Press [EDIT].
The Edit Menu screen appears.
2. Select a <STYLE>, then press [ENTER].
3. Press [ ], select a <PATTERN>, then
press [ENTER].
4. Press [ ], select a <COPY>, then press
[ENTER].
fig.07-25d
5. Turn the VALUE dial to select the number
for the Style to be copied, then press
[].
fig.07-26d
6. Turn the VALUE dial to select the pattern
to be copied, then press [ ].
fig.07-27d
7. Turn the VALUE dial to select the copy-
destination Style number, then press
[].
fig.07-28d
73
Chapter 7 Creating Styles
Ch
ap
t
er
7
8. Turn the VALUE dial to select the copy-
destination pattern, then press [ ].
fig.07-29d
If you press [ ], you’re taken back to the
screen you were in immediately before that.
9. Press [ENTER] to execute the copy.
You can press [EXIT] to cancel the procedure,
and go back to the previous screen.
■Clearing Patterns
This clears the specified pattern.
1. Press [EDIT].
The Edit Menu screen appears.
2. Select a <STYLE>, then press [ENTER].
3. Press [ ], select a <PATTERN>, then
press [ENTER].
4. Press [ ], select a <CLEAR>, then
press [ENTER].
fig.07-30d
5. Turn the VALUE dial to select the Style,
then press [ ].
fig.07-31d
6. Turn the VALUE dial to select the pattern
to be cleared, then press [ ].
fig.07-31d
If you press [ ], you’re taken back to the
screen you were in immediately before that.
7. Press [ENTER] to execute the clearing.
You can press [EXIT] to cancel the procedure,
and go back to the previous screen.
74
Chapter 8 Creating and Performing Songs ([SONG])
With the DR-3, it’s easy and convenient to create
“songs” by arranging patterns in the sequence
they are to be played.
This chapter explains how to create and perform
such songs.
■What is a Song?
A number of patterns arranged in the sequence in
which they are played is called a “song.”
You can create and save up to 100 songs on the
DR-3.
You can record up to a maximum of 250 patterns
in one song.
* The DR-3 contains no song data when shipped from the
factory.
* For more on performing songs, refer to “Performing
Songs” (p. 85).
Procedure for Creating Songs
Here are the steps you need to take to create a
new song:
fig.08-01
There are two ways to record the patterns in Step
<3>.
Realtime Recording
Performances in Manual mode (p. 43) are
recorded as songs just as they are.
You can use Realtime Recording to record the
drum part and bass part independently. After
arranging the patterns to create a song, you can
then add drum and bass sounds, and make other
changes to the song (p. 78).
Step Recording
This is a recording method whereby patterns are
arranged in a sequence, one by one.
<1> Select a Number for the Song
You Are Creating
<2> Make the Settings for the New Song
<3> Record the Song
<4> Edit the Song
- Set the Initial Tempo
- Make the TSC Settings
(These settings can be changed after the patterns are
recorded.)
- Place the Patterns
(Step Recording / Realtime Recording)
- Edit Notes to Drum Parts and Bass Parts in the Song
- Insert
- Delete
- Copy
- Change the Tempo Part Way Through a Song
<5> Check the Created Song
- Edit the Settings
<Finish the Song>
- Name the Song
75
Chapter 8 Creating and Performing Songs ([SONG])
Ch
ap
t
er
8
Convenient Functions for Creating Songs
Copying a song is useful and convenient
whenever you want to take a previously created
song, replace some of its patterns, change the
tempo and other settings, and then store the
result as a new song.
• Copying and Deleting Songs (p. 84)
<1> Selecting a Number
for the Song
1. With the performance stopped, press
[SONG].
2. Turn the VALUE dial to select the number
(S001–S100) for the song you are
creating.
fig.08-01d
<2> Make the Settings for
the New Song
* If the parameters below are changed during the
performance of a song, the changes are nullified when you
press [EDIT], restoring the settings for the currently
selected style or song.
- Key Shift value (p. 42)
- Tempo value (p. 41)
- Sound Shape and Ambience values (p. 51, p. 52)
■Setting the Basic Tempo
This sets the tempo that serves as the reference
(the initial tempo) when the song is performed.
1. Press [EDIT].
The Edit Menu screen appears.
fig.08-02d-1
2. Select a <SONG>, then press [ENTER].
3. Select a <InitTempo>.
fig.08-02d-2
4. Turn the VALUE dial to set the initial
tempo.
The tempo can be set to any value from 20 to
260.
5. When you press [EXIT], the setting is
changed, and you’re returned to the
previous screen.
Using a Foot Switch to Specify
Switching of Song Patterns
By using a foot switch while playing back
songs, you can set the DR-3 so that a single
pattern plays back repeatedly until you
press the foot switch, at which point the
song advances to the next pattern.
Using these settings, you don’t have to
determine how many times the patterns are
to be played, but instead you can record
each pattern just one time each in the
sequence they are to be played, then use the
foot switch to switch the patterns during
playback.
When using a foot switch to switch song
patterns, set the [EDIT] <SONG>
“LoopType” to “BLOCK.” For more details,
refer to “Setting a Specified Segment for
Playing Repeatedly” (p. 87).
Measure Style No. Loop Play Mode
Song NameSong No.
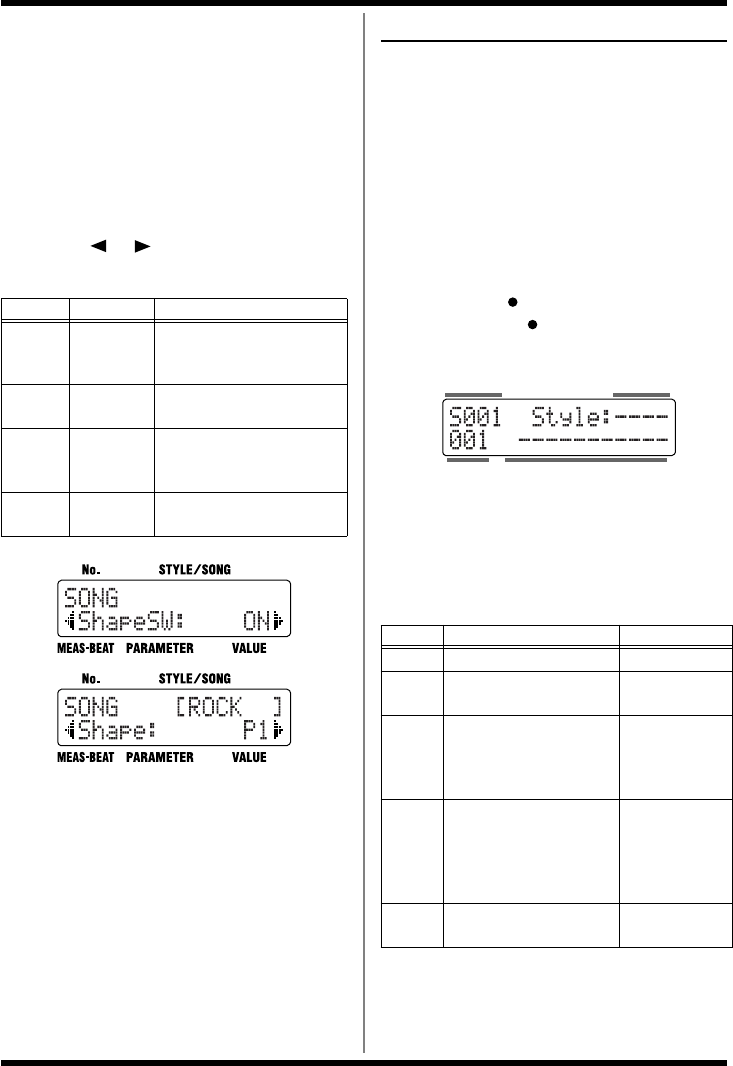
76
Chapter 8 Creating and Performing Songs ([SONG])
■Making the TSC Settings for
the Song
Make the TSC (Sound Shape and Ambience)
settings for the song you are creating.
1. Select the song to be set, then press
[EDIT].
The Edit Menu screen appears.
2. Select a <SONG>, then press [ENTER].
3. Press [ ] [ ], select the item to be
set.
fig.08-03d
4. Turn the VALUE dial to set the value.
5. When you press [EXIT], the setting is
changed, and you’re returned to the
previous screen.
<3> Recording the Song
■When Using Step Recording
This lets you record the song by specifying
patterns one at a time in the order they are to be
played.
* With Step Recording, the data is recorded in pattern
units. You cannot record specified measures.
Make sure you have pressed [SONG] to switch to
Song mode.
1. With the performance stopped, press
STEP REC [ ].
The STEP REC [ ] button lights up, and the
“Step Recording screen” is displayed.
fig.08-04d
2. Turn the VALUE dial to select the style,
use the pattern pads to select the pattern
to record, and specify the Variation with
the VARIATION [PTN], [KIT] and [MUTE].
The screen appears as follows.
* Normally, fill-ins are added at the end of the verse, but
you can also input fill-ins in empty steps. Empty steps
are indicated by “- - - -” when [EXIT] is pressed in the
Song screen.
Item Value Description
Shape
Sw ON, OFF
This sets the Sound Shape
On/Off setting to be used
when this song is selected.
Shape P1–P8,
U1–U8
This sets the Sound Shape
when this song is selected.
Ambi
Sw ON, OFF
This sets the Ambience
On/Off setting to be used
when this song is selected.
Ambi P1–P8,
U1–U8
This sets the Ambience
when this song is selected.
Display Step Description
INTRO Press [INTRO/START] INTRO is input
VERSE
A–C Press [VERSE A–C] Verse A–C is in-
put
/FA
/FB
/FC
These are alternately
shown or are hidden in the
display each time [FILL
A–C] is pressed
Fill A–C is input
The last measure
of the verse be-
comes a fill-in.
v
These are alternately
shown or are hidden in the
display each time VARIA-
TION [PTN], [KIT] or
[MUTE] is pressed
Indicates one or
more VARIA-
TIONs are on
END-
ING Press [ENDING/STOP] ENDING is
input
Measure Pattern Name
Style No.Song No.
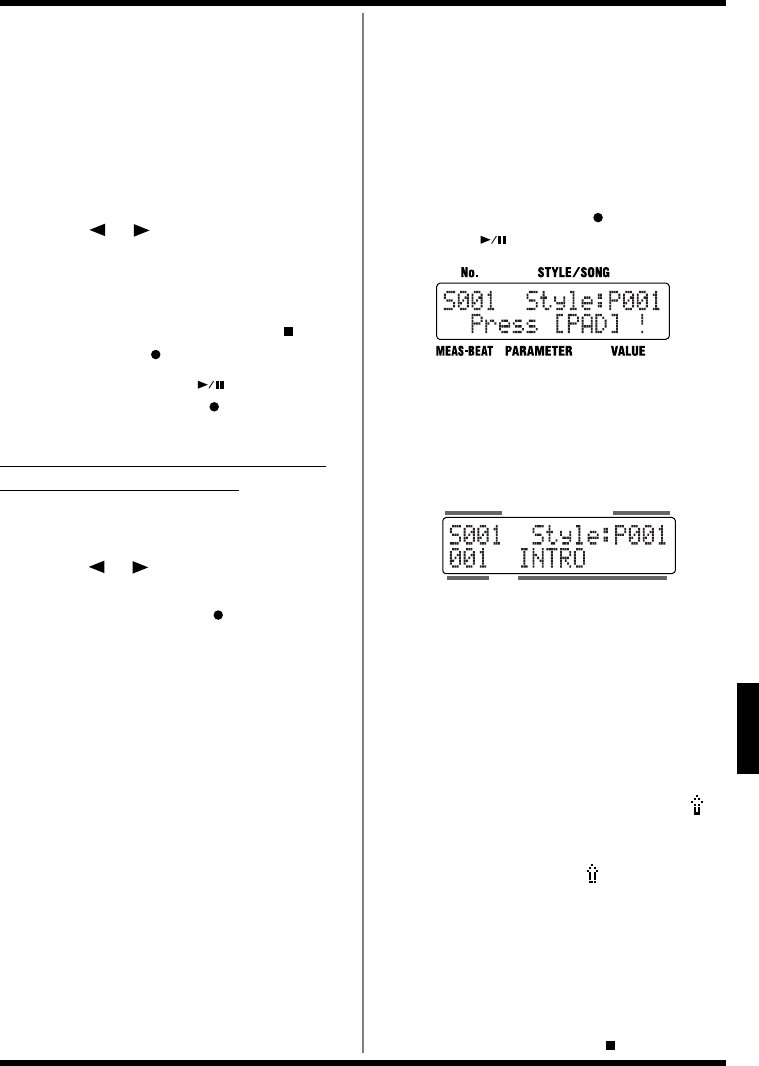
77
Chapter 8 Creating and Performing Songs ([SONG])
Ch
ap
t
er
8
3. Press [ENTER] to determine the pattern
to be recorded.
The measure numbers advance automatically.
The asterisk (*) indicates that the pattern
displayed has not been confirmed. If you press
[EXIT] at this point, the pattern that has already
been set appears in the display. If no pattern has
been confirmed, “- - - -” is displayed. Once you
confirm the pattern, the asterisk disappears.
4. Press [ ] [ ] to change the step to
be recorded.
5. Repeat Steps 2–4 as needed to record the
data for the song.
6. To stop recording, press STOP [ ].
The STEP REC [ ] goes out.
* Note that pressing START [ ] during Step
Recording (while STEP REC [ ] is lit) switches the
DR-3 to Realtime Recording.
Erasing Previously Recorded Sounds
As You Continue Recording
You can use the following procedure to delete the
displayed pattern.
1. Press [ ] [ ] to display the pattern to
be deleted.
2. Hold down STEP REC [ ] and press
[ENTER].
The pattern is deleted, and the subsequent
patterns are shifted forward.
■
When Using Realtime Recording
The sounds are recorded as the patterns are
switched with the pads.
* When recording over a song that has already been
recorded, the newly recorded data overwrites the
previously recorded data, which is discarded.
Make sure you have pressed [SONG] to switch to
Song mode.
1. Hold down STEP REC [ ] and press
START [ ].
fig.08-02d-1
2. Turn the VALUE dial to select the style,
and press a pattern pad to specify the
first pattern to be recorded.
Recording begins from the pattern specified.
The Song Recording screen appears.
fig.08-05d
3. Perform by switching the patterns with
the pattern pads.
Perform exactly as in Style Manual mode (p. 43).
The ON/OFF status of the VARIATION
[PTN], [KIT] and [MUTE] (p. 45) is also
recorded.
You can also change styles by turning the
VALUE dial.
* If you switch the style during its performance, a “ ”
mark appears in front of the style name which will be
played next. The style switches after the currently
playing pattern ends, and the “ ” mark disappears.
* The ON/OFF status of the VARIATION buttons and
fill-ins can be recorded only in a unit of pattern.
4. When you press [ENDING/STOP], the
ending is played, and then both the
performance and the recording stop.
If you want to stop the recording
immediately, press STOP [ ].
Measure Pattern Name
Style No.Song No.
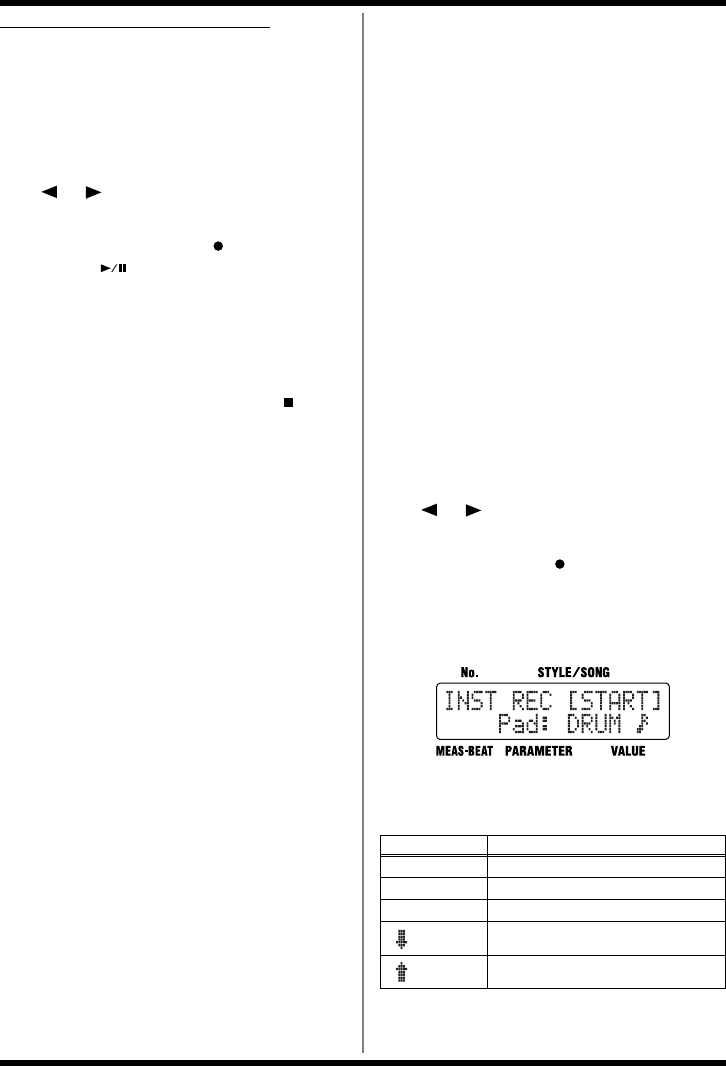
78
Chapter 8 Creating and Performing Songs ([SONG])
Substituting Recorded Patterns
When you record using Realtime Recording into
a song that already has material recorded in it,
the patterns in the segment in which you record
are overwritten, allowing you to replace them
with the new patterns.
1. With the performance stopped, press
[] [ ] to select a measure slightly
ahead of where you want to record.
2. Hold down STEP REC [ ] and press
START [ ].
The prerecorded pattern starts to play.
3. When you reach the measure before the
one you want to substitute, select the
next pattern to be recorded.
4. To stop recording, press STOP [ ].
The previously recorded pattern data after
the point where you stop the recording
remains unchanged.
■Editing Notes to Drum Parts
and Bass Parts in the Song
You can use Realtime Recording to add and edit
notes to drum and bass parts in songs you have
recorded.
When editing sounds, begin recording from a
point slightly before the point where you want to
edit the sounds.
* You cannot record notes into empty songs that contain
no recorded data.
*The performance recorded here is only stored in the song
as exclusive patterns. The edited notes are not reflected in
performances of patterns in Style Play mode (when
[MANU] or [AUTO] is lit). Additionally, changing
patterns in Style Play mode has no effect on the songs.
* You can have up to 100 exclusive patterns for all of the
songs.
Make sure you have pressed [SONG] to switch to
Song mode.
1. With the performance stopped, press
[] [ ] to select a measure slightly
ahead of where you want to record.
2. Press STEP REC [ ].
The Song Recording screen appears.
3. Press [INST].
A massage screen is displayed.
fig.08-02d-1
4. Press [INST] to select the sound group to
be recorded.
Displayed Group Name
DRUM Drum Set
PERC Percussion
BASS Bass
BASS The bass sound one octave lower
BASS The bass sound one octave higher
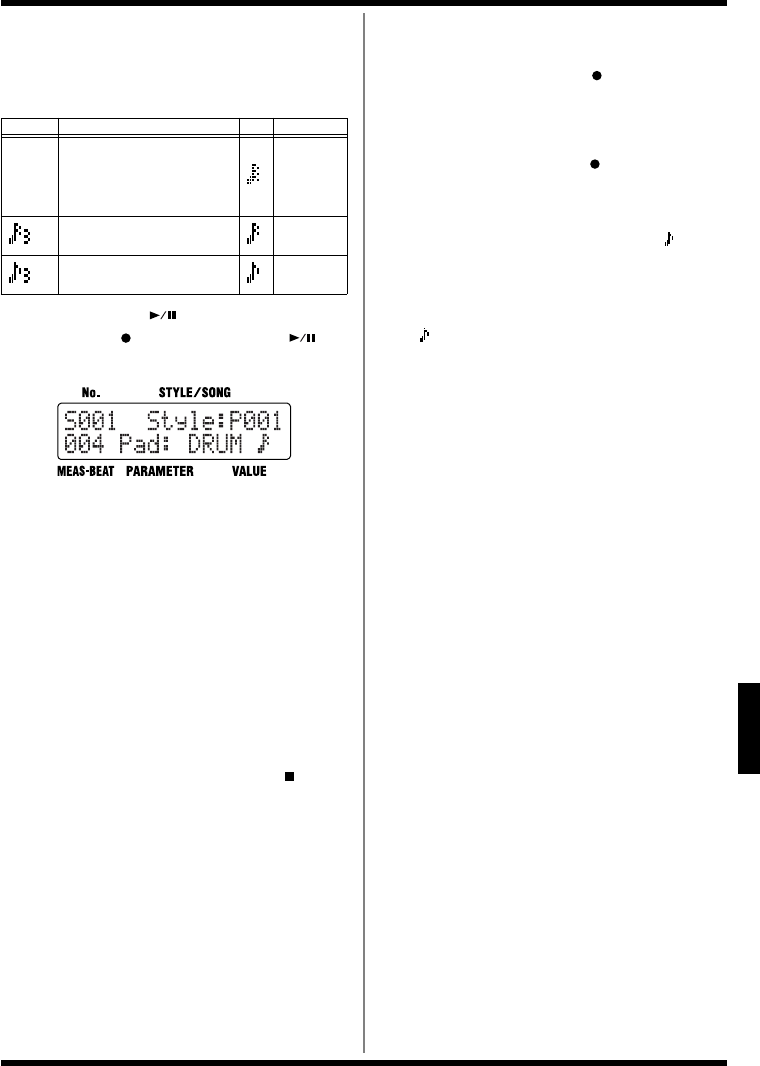
79
Chapter 8 Creating and Performing Songs ([SONG])
Ch
ap
t
er
8
5. Turn the VALUE dial to set the
quantization.
This corrects mistakes in the rhythm played
to the closest selected note value.
6. Press START [ ].
STEP REC [ ] lights up, START [ ]
flashes, and the metronome begins playing.
fig.08-06d
7. Record the performance, pressing the
pads while following the rhythm provided
by the metronome.
The force used to tap the pads is recorded as
velocity (the strength or stress of the sound).
Only the bass sounds recorded afterwards
are stored.
*When too many notes are recorded within one recording
period, a “Memory Full!!” message appears, and the
recording stops.
You can edit the notes continuously once the recording is
stopped.
8. To stop recording, press STOP [ ].
Erasing Previously Recorded Sounds As You
Continue Recording
1. Hold down STEP REC [ ] and press the
pad to which the instrument whose
sound you want to erase is assigned.
All bass sounds, regardless of pitch, are
erased while STEP REC [ ] and the pad are
held down.
* In both Step Recording and Realtime Recording,
patterns with edited notes are indicated by a mark
before the pattern name.
* If you record a different pattern to a pattern that has
edited notes, the previous pattern is replaced, and the
“” mark disappears from the pattern name. You cannot
turn on VARIATION [PTN] or add fill-ins with
patterns that have edited notes.
Turning on VARIATION [PTN] or adding fill-ins
deletes the pattern if it has edited notes.
Display Description
Description
– –
Off. Sounds are recorded
without quantization, with
the same timing used in
tapping the pads.
32th note
16th note triplets 16th note
8th note triplets 8th note
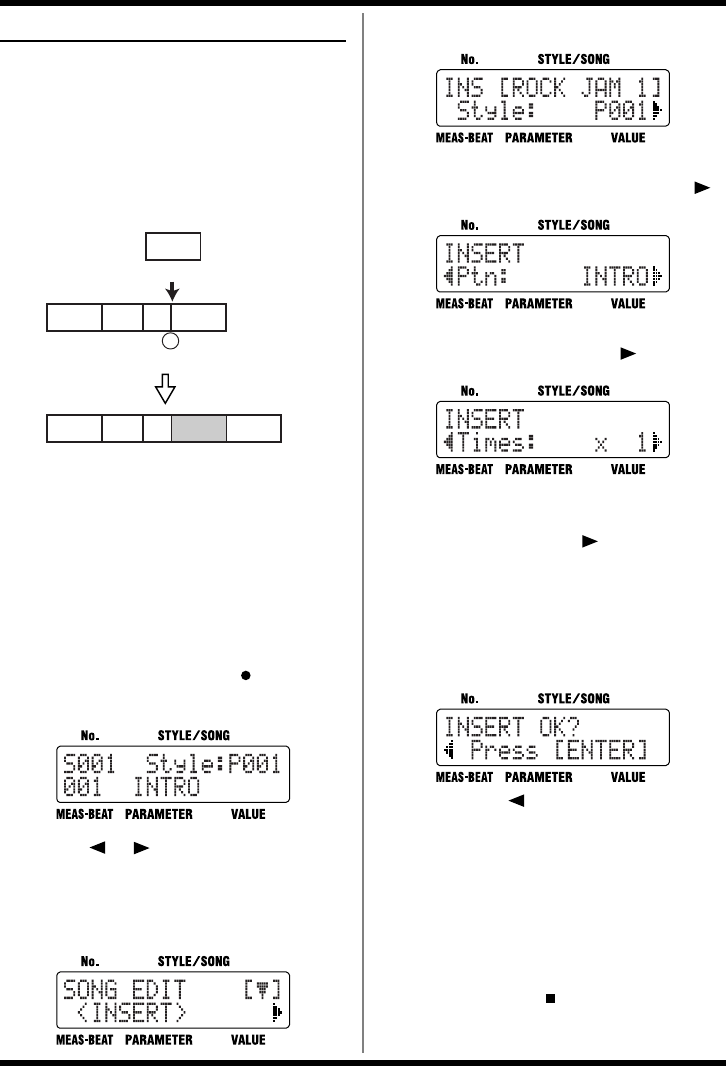
80
Chapter 8 Creating and Performing Songs ([SONG])
<4> Editing Songs
You can copy and delete specified segments of
recorded songs.
■Adding Patterns In the Song
(INSERT)
This operation inserts a pattern at a point within
the song.
fig.08-ins
* Patterns are inserted in units of a whole pattern.
You cannot specify only a certain number of measures
within a recorded pattern to be inserted.
*You cannot turn the VARIATION on and off or add fill-
ins. If you want to turn the VARIATION on or off, or
add a fill-in, first insert the pattern, then edit using Step
Recording.
1. Press [SONG] so that the button lights
up, then press STEP REC [ ].
The Song Recording screen appears.
fig.08-07d
2. Press [ ] [ ] until the measure in
which you want to insert a pattern is
displayed.
3. Press [EDIT].
fig.08-08d
4. Select a <INSERT>, then press [ENTER].
fig.08-09d
5.
Turn the VALUE dial to select the Style of
the pattern to be inserted, then press [ ].
fig.08-10d
6. Turn the VALUE dial to select the pattern
to be inserted, then press [ ].
fig.08-11d
7. Turn the VALUE dial to set the number of
times the inserted pattern is to be
repeated, then press [ ].
* The maximum number of steps permitted for a song is
250. For this reason, the “Times” setting cannot be given
a value that would cause the song to have more than the
maximum number of steps.
A confirmation screen is displayed.
fig.08-12d
If you press [ ], the immediately
preceding screen returns to the display.
8. Press [ENTER] and the pattern will be
inserted.
If you press [EXIT], the operation is cancelled,
and you’re returned to the previous screen.
9. Press [EXIT] a number of times to return
to the Song Recording screen.
If you press Stop [ ], the Song screen is
appeared.
Intro
1 2 3 4 5 6 7 8 9 10 11 12
measure
Verse A Fill
BVerse B
Intro Verse A Fill
BVerse B Verse B
Verse B
Insert
Measure to be specified
1 2 3 4 5 6 7 8 9 10 11 12 13 14 15 16
measure
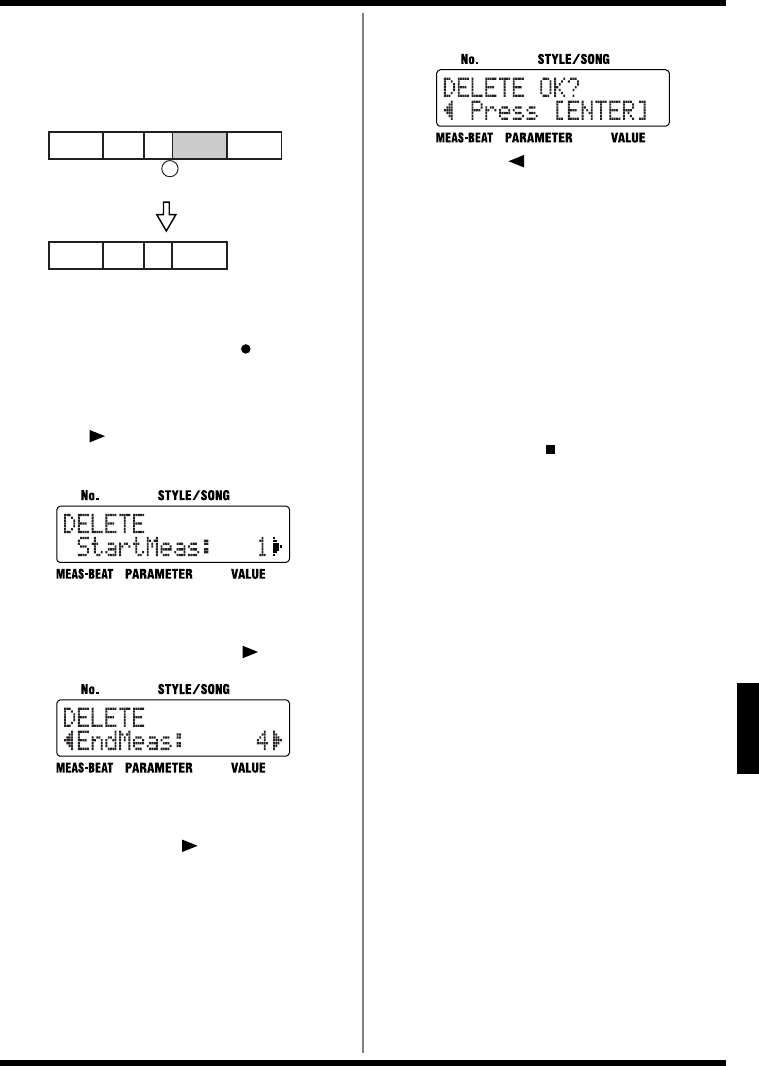
81
Chapter 8 Creating and Performing Songs ([SONG])
Ch
ap
t
er
8
■Deleting Specified Segments
(DELETE)
This deletes unneeded patterns from songs.
fig.08-del
1. Press [SONG] so that the button lights
up, then press STEP REC [ ].
The Song Recording screen appears.
2. Press [EDIT].
3. Press [ ], select a <DELETE>, then
press [ENTER].
fig.08-13d
4. Turn the VALUE dial to select the
beginning measure of the segment you
want to delete, then press [ ].
fig.08-14d
5. Turn the VALUE dial to select the last
measure of the segment you want to
delete, then press [ ].
* You cannot set the final measure of the segment to be
deleted ahead of the beginning measure.
A confirmation screen is displayed.
fig.08-13d
If you press [ ], the immediately
preceding screen returns to the display.
6. Press [ENTER] to delete the segment
you’ve specified.
If you press [EXIT], the operation is
cancelled, and you’re returned to the
previous screen.
* Note that the delete process may take up to a minute or
more to complete when the data contains exclusive
patterns (p. 78).
7. Press [EXIT] a number of times to return
to the Song Recording screen.
If you press Stop [ ], the Song screen is
appeared.
Delete
Measure to be specified
Intro
1 2 3 4 5 6 7 8 9 10 11 12
measure
Verse A Fill
BVerse B
Intro Verse A Fill
BVerse B Verse B
1 2 3 4
measure 5 6 7 8 9 10 11 12 13 14 15 16
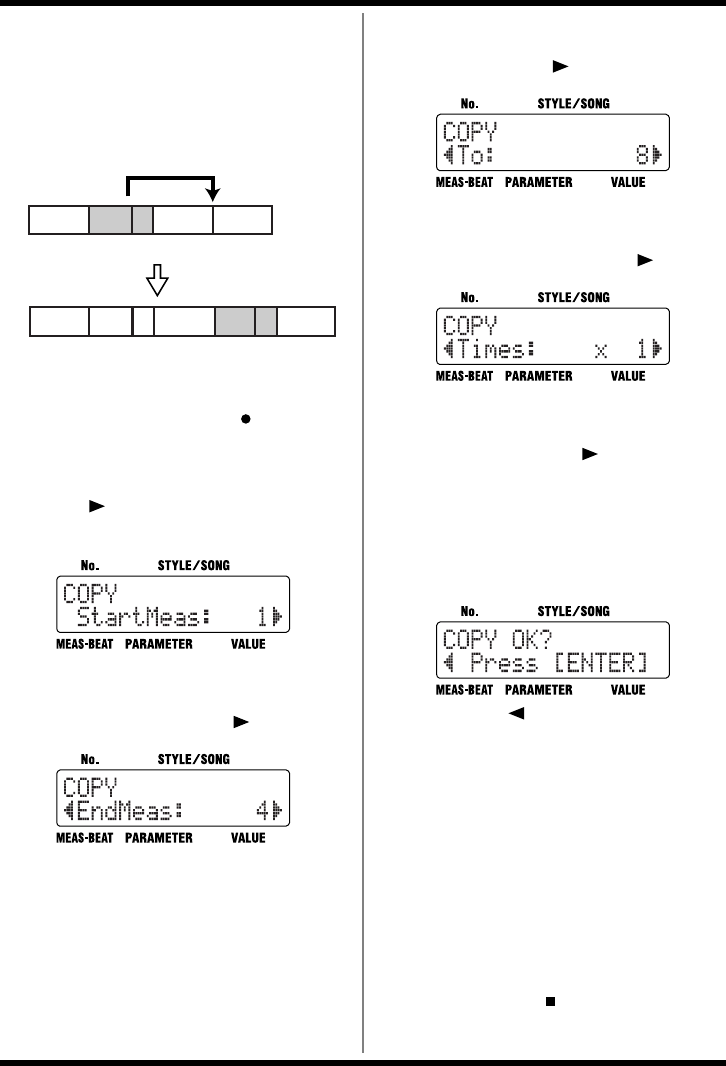
82
Chapter 8 Creating and Performing Songs ([SONG])
■Copying Specified Segments
(COPY)
You can copy a specified segment of a song, and
then insert the segment elsewhere in the same
song.
fig.08-copy
1. Press [SONG] so that the button lights
up, then press STEP REC [ ].
The Song Recording screen is displayed.
2. Press [EDIT].
3. Press [ ], select a <COPY>, then press
[ENTER].
fig.08-16d
4. Turn the VALUE dial to select the
beginning measure of the segment you
want to copy, then press [ ].
fig.08-17d
* The maximum number of steps permitted for a song is
250. For this reason, the “EndMeas” setting cannot be
given a value that would cause the song to have more
than the maximum number of steps.
5. Turn the VALUE dial to select the last
measure of the segment you want to
copy, then press [ ].
fig.08-18d
6. Turn the VALUE dial to select the
measure in which you want to insert the
copied segment, then press [ ].
fig.08-19d
7. Turn the VALUE dial to set the number of
times the inserted pattern is to be
repeated, then press [ ].
* The maximum number of steps permitted for a song is
250. For this reason, the “Times” setting cannot be given
a value that would cause the song to have more than the
maximum number of steps.
A confirmation screen is displayed.
fig.08-20d
If you press [ ], the immediately
preceding screen returns to the display.
8. Press [ENTER] and the pattern will be
copied.
If you press [EXIT], the operation is
cancelled, and you’re returned to the
previous screen.
* Note that the copy process may take up to a minute or
more to complete when the data contains exclusive
patterns (p. 78).
9. Press [EXIT] a number of times to return
to the Song Recording screen.
If you press Stop [ ], the Song screen is
appeared.
1 2 3 4 5 6 7 8 9 10 11 12 13 14 15 1617 18 19 20
measure
Verse A Fill
BVerse B
1 2 3 4
measure
5 6 7 8 9 10 11 12 13 14 15 16
Verse A Fill
BVerse B Verse B
Verse A Fill
BVerse BIntro
Intro
Copy
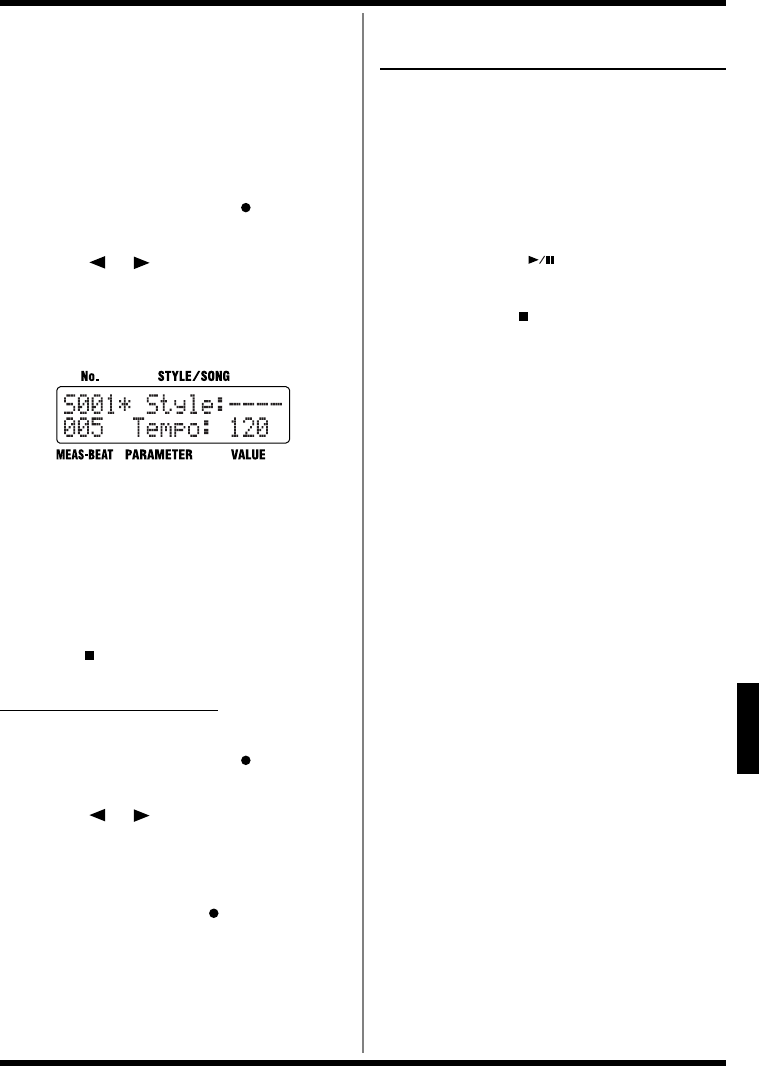
83
Chapter 8 Creating and Performing Songs ([SONG])
Ch
ap
t
er
8
■Changing the Tempo Part Way
Through a Song (TEMPO)
You can have the tempo change at a specified
measure within the song.
This changes the tempo setting in all measures
following the specified measure.
1. Press [SONG] so that the button lights
up, then press STEP REC [ ].
The Song Recording screen is displayed.
2. Press [ ] [ ] until the measure
where you want the tempo to change is
displayed.
3. Press [TEMPO (TAP)].
fig.08-21d
4. Turn the VALUE dial to select the tempo.
You can tap [TEMPO (TAP)] at least four times to
set the tempo.
5. Press [ENTER] and the tempo change will
be recorded.
If you press [EXIT], the immediately
preceding screen returns to the display.
Press [ ] and the Song display appears.
Undoing Tempo Changes
1. Press [SONG] so that the button lights
up, then press STEP REC [ ].
The Song Recording screen is displayed.
2. Press [ ] [ ] to move to the step in
which the tempo has been changed.
“Tempo” appears in the display for steps in
which the tempo has been changed.
3. Hold down STEP REC[ ] and press
[ENTER].
The tempo change is cancelled.
<5> Checking the Created
Song
Play back the recorded song to confirm the tempo
and TSC settings.
Change the settings as needed.
■Performing the Created Song
1. Press [SONG].
2. Press START [ ] to start the
performance.
3. Press STOP [ ] to stop the
performance.
■Editing the Settings
You can make changes to the following settings,
even after creation of the song is finalized.
• Initial Tempo —
“Setting the Basic Tempo” (p. 75)
• TSC Settings —
“Making the TSC Settings for the Song” (p. 76)
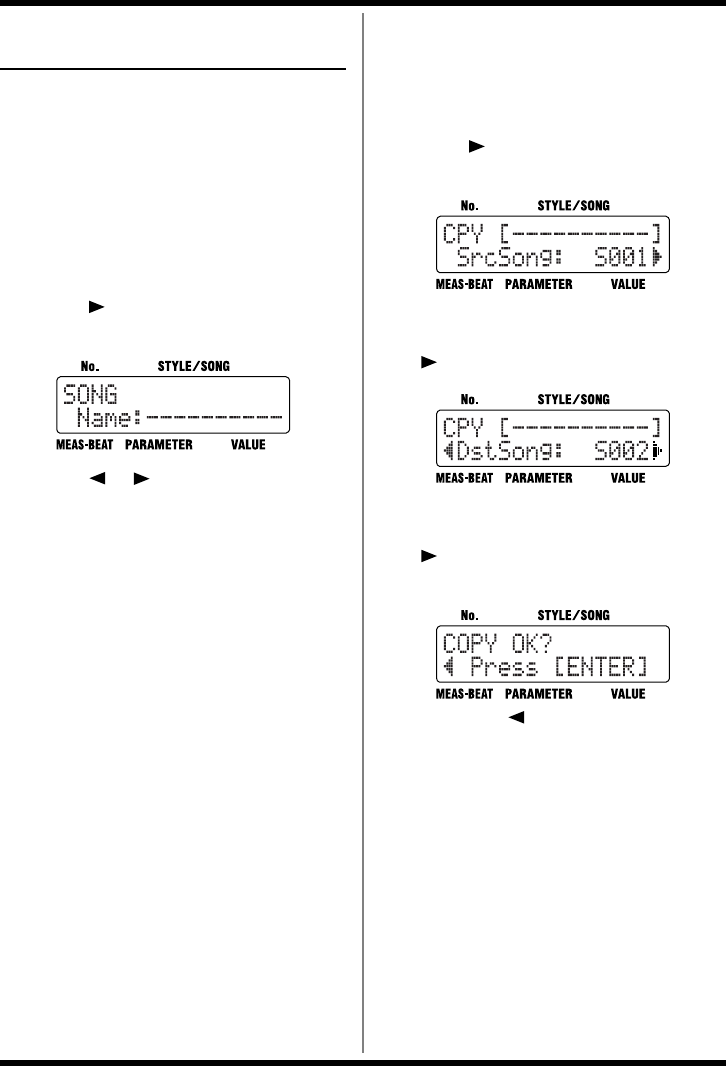
84
Chapter 8 Creating and Performing Songs ([SONG])
Naming, Copying, and
Deleting Songs
■Naming the Song
You can edit the name of the currently selected
song, using up to ten characters for the name.
1. Select the song to be set, then press
[EDIT].
The Edit Menu screen appears.
2. Select a <SONG>, then press [ENTER].
3. Press [ ], select a <NAME>, then press
[ENTER].
fig.08-23d
4. Press [ ] [ ] to move to the point
where you want to enter the character(s).
5. Turn the VALUE dial to select the
character.
Each time you press [ENTER], it switches
between upper and lower case for the text
being input.
6. When you press [EXIT] twice, the setting
is changed, and you’re returned to the
previous screen.
■Copying the Song
1. Press [EDIT].
The Edit Menu screen appears.
2. Select a <SONG>, then press [ENTER].
3. Press [ ], select a <COPY>, then press
[ENTER].
fig.08-24d
4. Turn the VALUE dial to select the number
for the song to be copied, then press
[].
fig.08-25d
5. Turn the VALUE dial to select the copy-
destination song number, then press
[].
A confirmation screen is displayed.
fig.08-26d
If you press [ ], you’re taken back to the
screen you were in immediately before that.
6. Press [ENTER] to execute the copy.
You can press [EXIT] to cancel the procedure,
and go back to the screen you were in right
before that.
* Note that the copy process may take up to a minute or
more to complete when the data contains exclusive
patterns (p. 78).
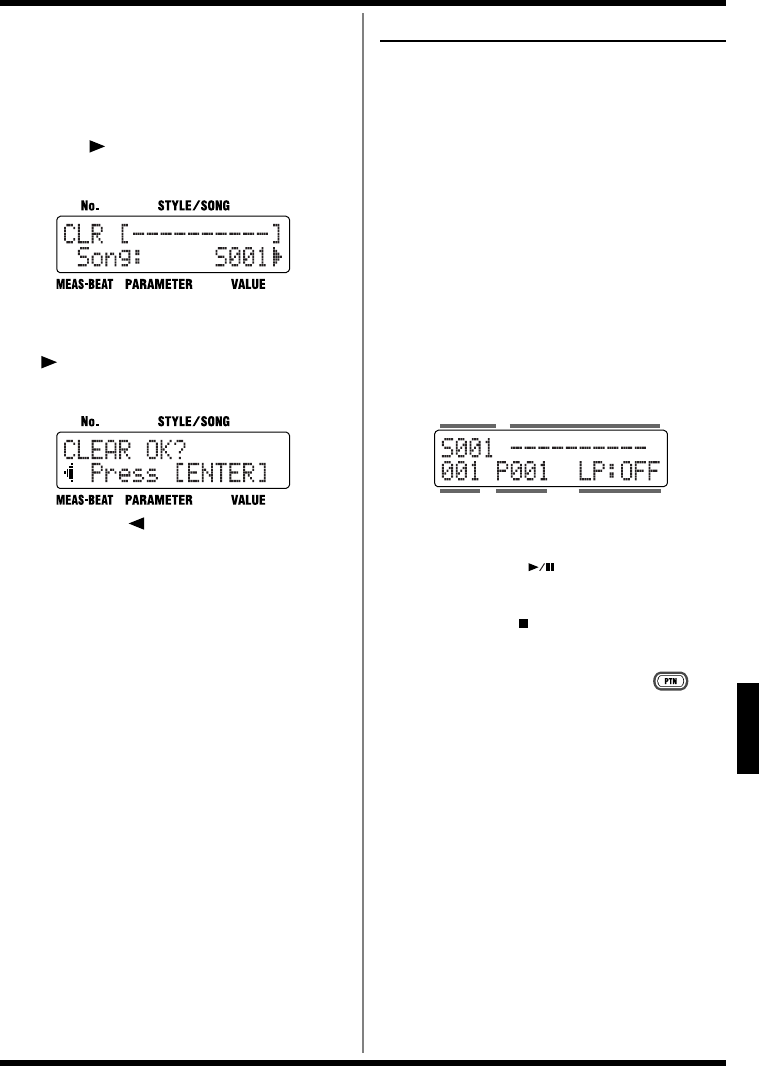
85
Chapter 8 Creating and Performing Songs ([SONG])
Ch
ap
t
er
8
■Clearing the Song
1. Press [EDIT].
The Edit Menu screen appears.
2. Select a <SONG>, then press [ENTER].
3. Press [ ], select a <CLEAR>, then
press [ENTER].
fig.08-28d
4. Turn the VALUE dial to select the number
for the song to be cleared, then press
[].
A confirmation screen is displayed.
fig.08-29d
If you press [ ], you’re taken back to the
screen you were in immediately before that.
5. Press [ENTER] to execute the clearing.
You can press [EXIT] to cancel the procedure,
and go back to the screen you were in right
before that.
* Note that the clear process may take up to a minute or
more to complete when the data contains exclusive
patterns (p. 78).
Performing Songs
Play back the recorded song.
In addition to the normal way of performing
songs, you can also do the following.
• Repeat playback of a specified segment
(Loop Play)
• Switch patterns with a foot switch (Block
Loop)
• Play multiple songs in succession (Song
Chain)
■Performing Songs
1. With the performance stopped, press
[SONG] so the button lights up.
This puts the DR-3 in Song mode.
fig.08-30d
2. Turn the VALUE dial to select a song.
3. Press START [ ] to start the
performance.
4. Press STOP [ ] to stop the
performance.
*Pressing a pattern pad in Song mode while [ ] is on
and the performance is stopped starts the performance.
You cannot switch the patterns with the pattern pads.
Style No.Measure Loop Play Mode
Song No. Song Name
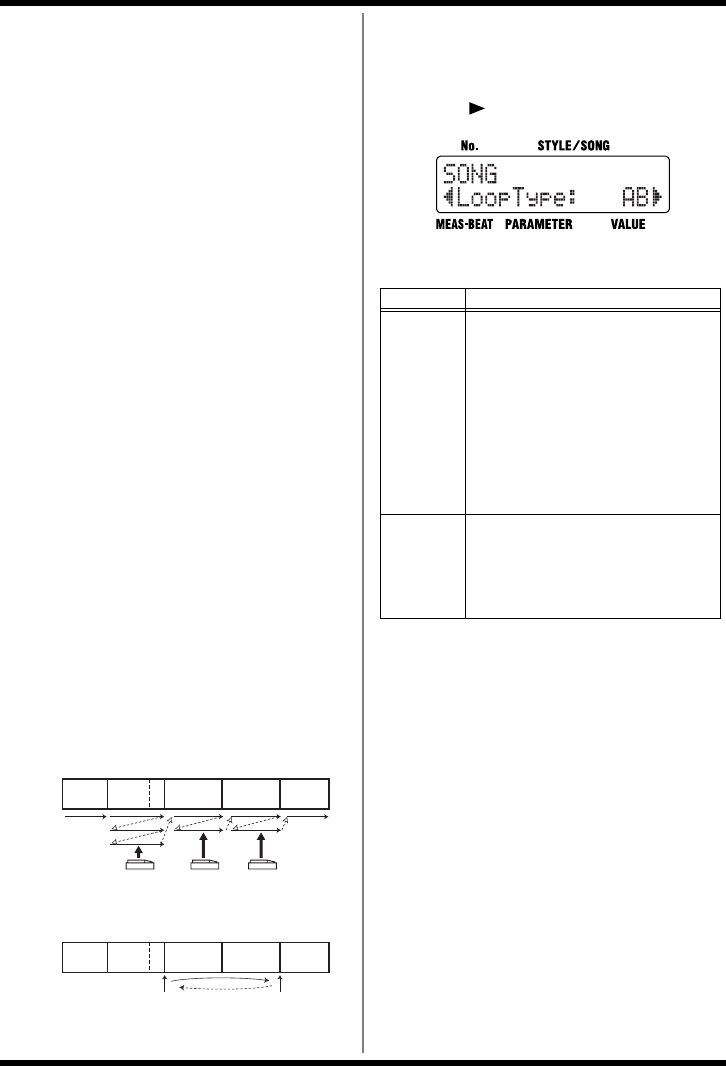
86
Chapter 8 Creating and Performing Songs ([SONG])
■Switching Patterns With a
Foot Switch
Normally, when a song is played, the patterns in
the song switch in the same sequence as they are
recorded in the song. However, you can set the
DR-3 so that a single pattern plays back
repeatedly until you press the foot switch, at
which point the song advances to the next pattern
with “Loop Type” set to “BLOCK” (Block Loop).
When recording a song, you can record each
pattern just once in the desired sequence, without
having to determine the number of repeats for
any pattern. You can then control how many
times any one pattern is to be repeated by
pressing the foot switch during playback.
You can press the foot switch during
performances with “Loop Type” set to “AB” to
repeat the performance of the segment specified
with the following “LoopStart” and “LoopEnd”
parameters (Loop Play). Press the foot switch
once again to exit Loop Play and resume playing
the rest of the performance.
If you want to switch patterns with a foot switch,
first assign the “VERSE,LOOP” function to the
foot switch. For more detailed information, refer
to “Assigning Functions to the Foot Switch” (p.
49).
You can also execute this same function by
pressing [ENTER] instead of the foot switch.
fig.08-ftsw
1. Select the song to play, then press [EDIT].
The Edit Menu screen appears.
2. Select a <SONG>, then press [ENTER].
3. Press [ ], select a <LoopType>.
fig.08-33d
4. Turn the VALUE dial to select the value.
*“LP:OFF” appears in the Song screen when Loop Play is
switched OFF.
5. When you press [EXIT], the setting is
changed, and you’re returned to the
previous screen.
Intro Verse A Fill
B
Fill
B
Verse B Verse C Ending
Song
Pressing the foot switch advances the performance to the next verse.
• When Set to “Block”
Intro Verse A Verse B Verse C Ending
Song
Loop Play is switched on and off.
• When Set to “AB”
LoopStart LoopEnd
Value Description
AB
Loop Play is alternately switched on
and off each time you press the foot
switch or [ENTER]. “LP:ON” appears
in the display when Loop Play is ON.
The measures at which Loop Play be-
gins and ends are set with “Loop-
Start” and “LoopEnd.”
Please refer to “Setting a Specified
Segment for Playing Repeatedly” (p.
87).
BLOCK
When the foot switch or [ENTER] is
pressed, then the song proceeds to the
next pattern.
“LP:BLK” appears in the display
when Block Loop is ON.
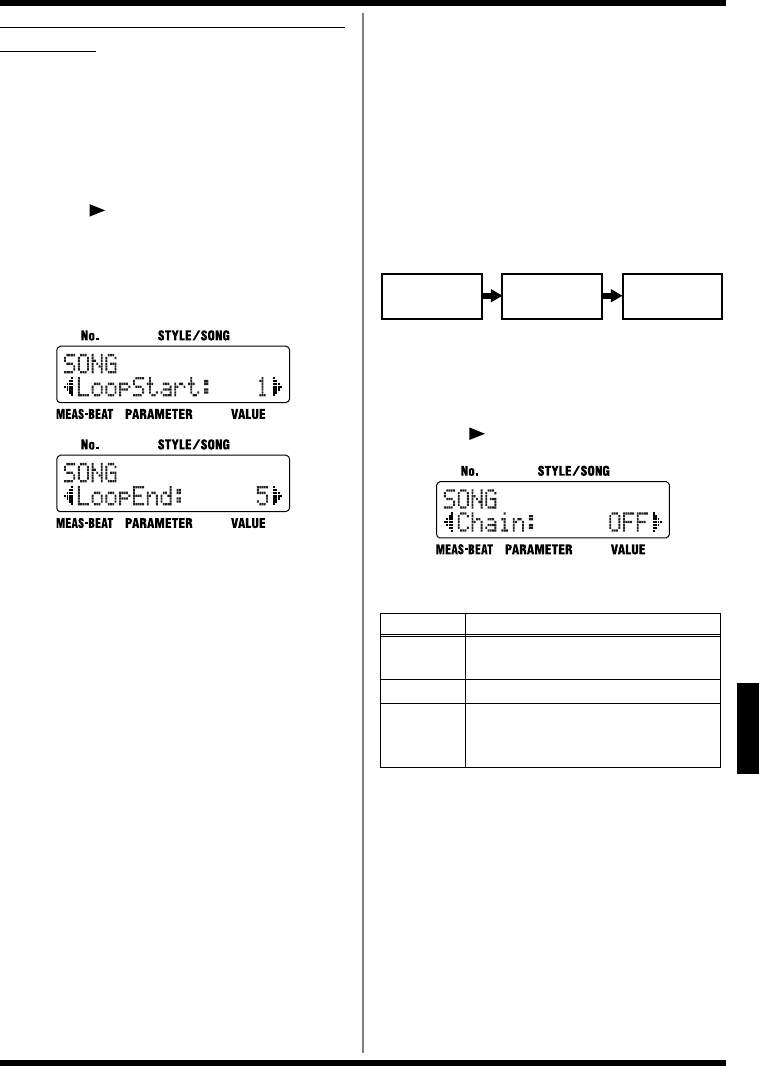
87
Chapter 8 Creating and Performing Songs ([SONG])
Ch
ap
t
er
8
Setting a Specified Segment for Playing
Repeatedly
This sets the specified segment for playing repeatedly
(Loop Play).
1. Select the song to play, then press [EDIT].
The Edit Menu screen appears.
2. Select a <SONG>, then press [ENTER].
3. Press [ ] to select a <LoopStart> or a
<LoopEnd>, then press [ENTER].
The measure where Loop Play begins is set
with “LoopStart”; the measure where Loop
Play stops is set with the “LoopEnd” setting.
fig.08-31d
4. Turn the VALUE dial to set the starting or
ending measure for Loop Play.
5. When you press [EXIT], the setting is
changed, and you’re returned to the
previous screen.
■Playing Multiple Songs
Continuously (Song Chain)
You can specify the song number of the song that
you want to have played right after the currently
selected song, when it is played. By setting in
each song the number of the song that is to follow
it, you can achieve continuous playback of up to
100 songs.
You can also have the performance of any
particular song(s) be repeated.
fig.08-chain
1. Select the song to play, then press [EDIT].
The Edit Menu screen appears.
2. Select a <SONG>, then press [ENTER].
3. Press [ ], select a <Chain>.
fig.08-35d
4. Turn the VALUE dial to select the value.
5. When you press [EXIT], the setting is
changed, and you’re returned to the
previous screen.
* Depending on its settings, there may be some delay for
the TSC (p. 51) to change, if the song is switched while
Song Chain is in progress.
Value Description
OFF Plays back the currently selected song
one time and then stops.
REPEAT Playback of the song(s) is repeated.
S001–
S100
The selected song is played back, and
is followed by playback of the next
specified song.
Song 001
Song Chain: 002
Song 002
Song Chain: 003
Song 003
Song Chain: OFF
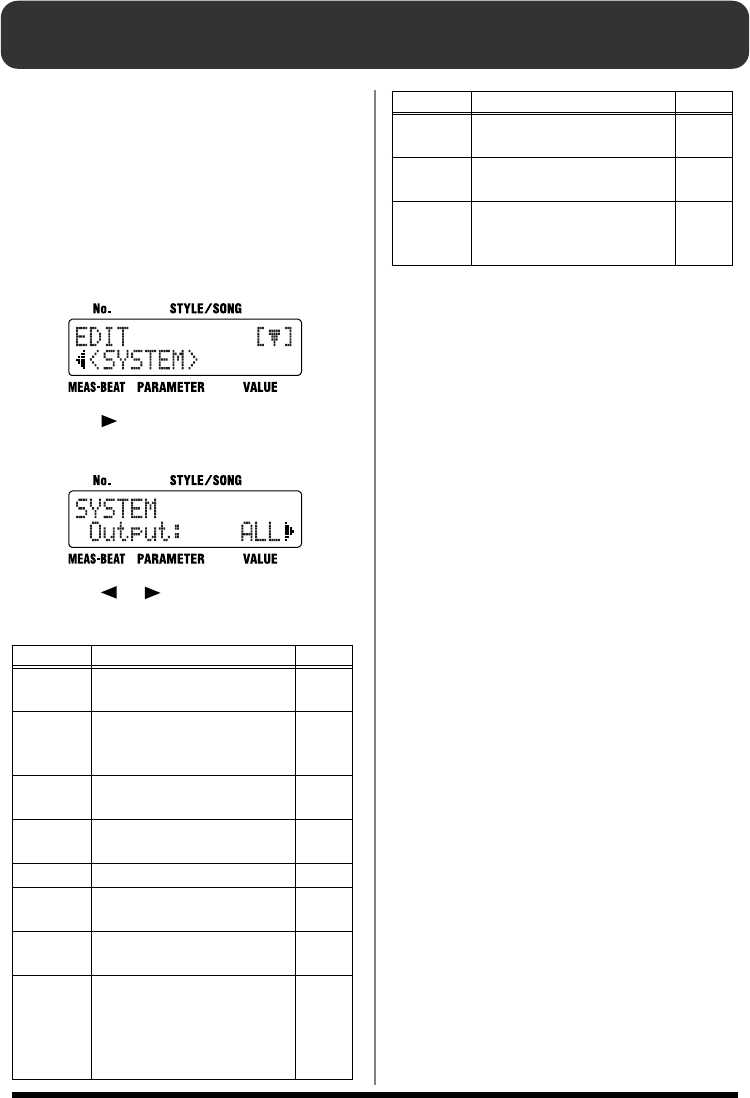
88
Chapter 9 Changing the Operating Environment (System)
These settings include those for the DR-3’s pad
sensitivity, Master Tuning, and other global
settings.
■How to Make the Settings
1. With the performance stopped, press
[EDIT].
The Edit Menu screen appears.
fig.09-01d
2. Press [ ], select a <SYSTEM>, then
press [ENTER].
fig.09-02d
3. Press [ ] [ ], select the parameter to
be set.
4. Turn the VALUE dial to set the value.
5. When you press [EXIT], the setting is
changed, and you’re returned to the
previous screen.
Display Description Page
Output Sets the parts output from
the OUTPUT jacks. p. 89
Auto
Type
Changes the pattern progres-
sion when performing in
Auto mode.
p. 47
FS1 Assigns the function con-
trolled with Foot Switch 1. p. 49
FS2 Assigns the function con-
trolled with Foot Switch 2. p. 49
PadSens Adjust the pad sensitivity p. 89
Mstr
Tune
Sets the reference pitch for
the bass part. p. 89
Click
Level
Adjusts the volume of the
metronome sound. p. 89
Sync
When connecting an external
MIDI device and synchroniz-
ing the performance, this de-
termines whether the DR-3 is
to be the slave.
p. 95
Drum
MidiCh
Sets the MIDI channel for the
drum part. p. 94
Bass
MidiCh
Sets the MIDI channel for the
bass part. p. 94
<FAC-
TORY
RESET>
Restores all of the settings to
the original factory settings. p. 18
Display Description Page
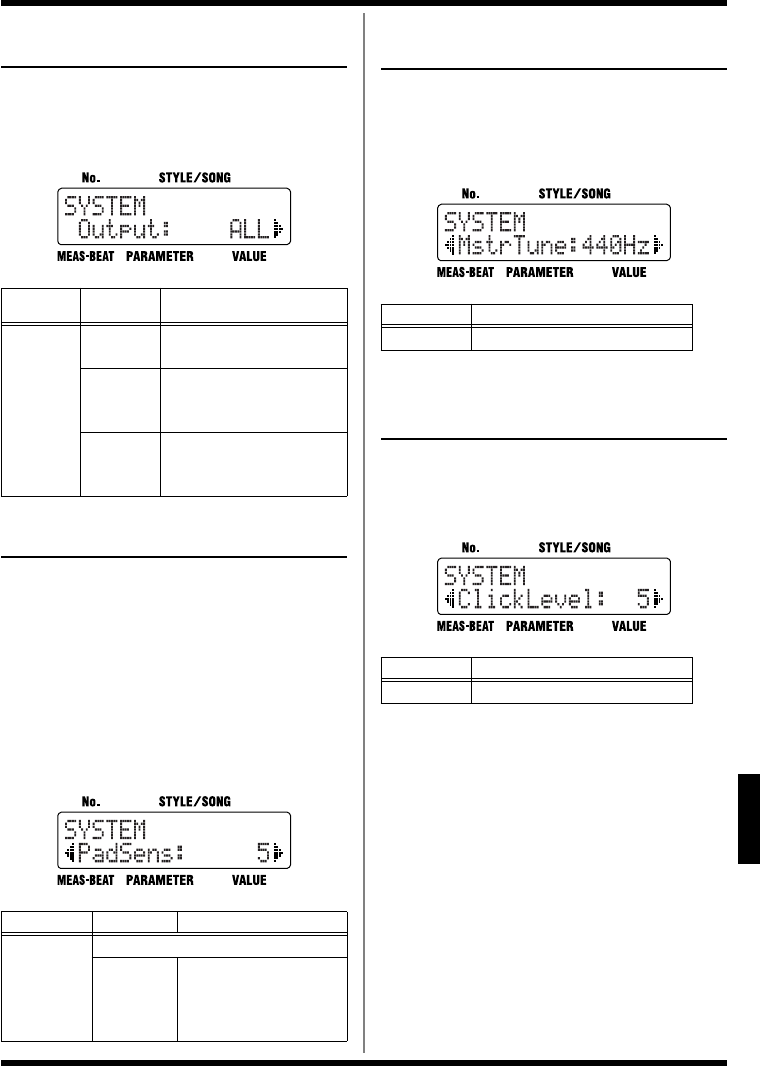
89
Chapter 9 Changing the Operating Environment (System)
Ch
ap
t
er
9
Setting the Parts To Be Output
from the OUTPUT Jacks
You can set the parts that are to be heard from the
external audio device connected to the OUTPUT
jacks.
fig.09-03d
Adjusting the Pad Sensitivity
The pads are less sensitive when this is set to a
lower value. Although strong accents are not
produced unless you tap the pads with force, it
allows you to impart more subtlety and nuance to
your performances.
Raising the value increases the sensitivity.
Although this allows you to produce strong
accents even with gentle taps, you lose the ability
to add subtle changes.
fig.09-05d
Setting the Reference Pitch
for the Bass Part
The reference pitch for the bass part can be set
within the range of A = 438 Hz to A = 445 Hz.
* Changing this setting does not change the drum parts.
fig.09-06d
Changing the Volume of
the Metronome Sound
This changes the metronome volume when
Realtime Recording (p. 65) is used to record
patterns.
fig.09-07d
Parame-
ter Value Description
Output
ALL The sounds from all parts
are played.
DRUM
Only the drum part
sounds are played. The
bass part is muted.
BASS
Only the bass part sounds
are played. The drum part
is muted.
Parameter Value Description
PadSens
1–10
Fix
The velocity will not be
affected by the strength
of your tapping the
pads.
Parameter Value
MstrTune 438–445 Hz
Parameter Value
ClickLevel 1–10
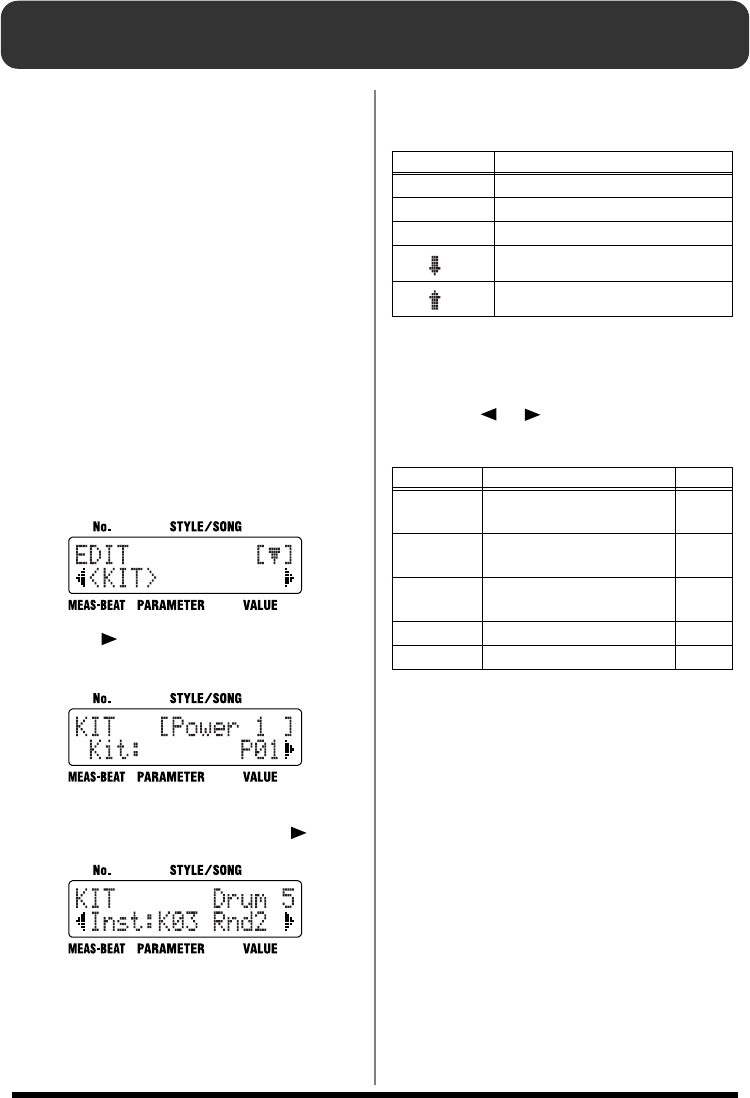
90
Chapter 10 Creating Your Own Kits
You can change (edit) the settings for the User
style kits, including those for the kit instruments
and the way the sounds are played.
You can store up to 50 kits with edited settings as
“User kits.”
* Unable to change the settings for the Preset kit, with a
“P” appended to their number.
*When the unit left the factory, the User kits (U01–U50)
contained the same settings as the Preset kits (P01–P50).
* Certain data cannot be changed while it is being
performed. First stop the performance, then make the
changes.
■How to Make the Settings
1. With the performance stopped, press
[EDIT].
The Edit Menu screen appears.
fig.09-10d
2. Press [ ], select a <KIT>, then press
[ENTER].
fig.09-11d
3. Turn the VALUE dial to select the number
for the kit to be set, then press [ ].
fig.09-12d
4. Turn the VALUE dial to select the sound
group.
5. Press the pad to be edited.
There is no need to specify the pad when
“BASS” is selected for the sound group.
6. Press [ ] [ ], select the parameter to
be set.
7. Turn the VALUE dial to set the value.
8. Repeat Steps 4–7 as needed.
9. When you have finished making the
setting, press [EXIT] a number of times
until you exit Edit mode.
* When you exit Edit mode, the kit values return to those
set in the style or song (p. 63).
Displayed Group Name
DRUM Drum Set
PERC Percussion
BASS Bass
oct BASS The bass sound one octave lower
oct BASS The bass sound one octave higher
Display Description Page
Inst Selects the sound assigned
to the pad. p. 91
Level Sets the instrument’s vol-
ume level. p. 91
Pan Sets the positioning (pan)
of the instrument’s sound. p. 91
<NAME> Names the drum kit. p. 91
<COPY> Copies the drum kit. p. 92
91
Chapter 10 Creating Your Own Kits
Ch
ap
t
er
10
Selecting the Sounds
Assigned to the Pads
This selects the instruments to be assigned to the
pads.
fig.09-14d
* You cannot select bass tones for the drum parts, and
cannot select drum instruments for the bass part.
Setting the Volume
This sets the volume (the level) for each
instrument. The velocity when you actually tap
the key pads is changed within the level range set
here.
fig.09-15d
Setting the Position of the
Sound
This sets the placement (Pan) of each instrument,
with fifteen degrees of adjustment.
fig.09-16d
fig.09-pan
Naming the Kit
You can edit the name of the currently selected
kit, using up to eight characters for the name.
fig.09-17d
Press [ENTER].
fig.09-18d
Press [ ] [ ] to move to the point where you
want to enter the character(s).
Each time you press [ENTER], it switches
between upper and lower case for the text being
input.
Turn the VALUE dial to select the character.
Parameter Value
Inst Refer to the “Instrument/Bass Tone
List” (p. 104).
Parameter Value
Level 0–15
Parameter Value
Pan L7–CENTER–R7
CENTER R7L7 L1 R1

92
Chapter 10 Creating Your Own Kits
Copying the Kit
This copies the kit to the User kit (U01–U50).
fig.09-19d
Press [ENTER].
fig.09-20d
Turn the VALUE dial to select the number for the
kit to be copied, then press [ ].
fig.09-21d
Turn the VALUE dial to select the copy-
destination kit number, then press [ ].
fig.09-22d
Press [ENTER] to execute the copy.
If you press [ ], you’re taken back to the screen
you were in immediately before that.
You can press [EXIT] to cancel the procedure, and
go back to the previous screen.
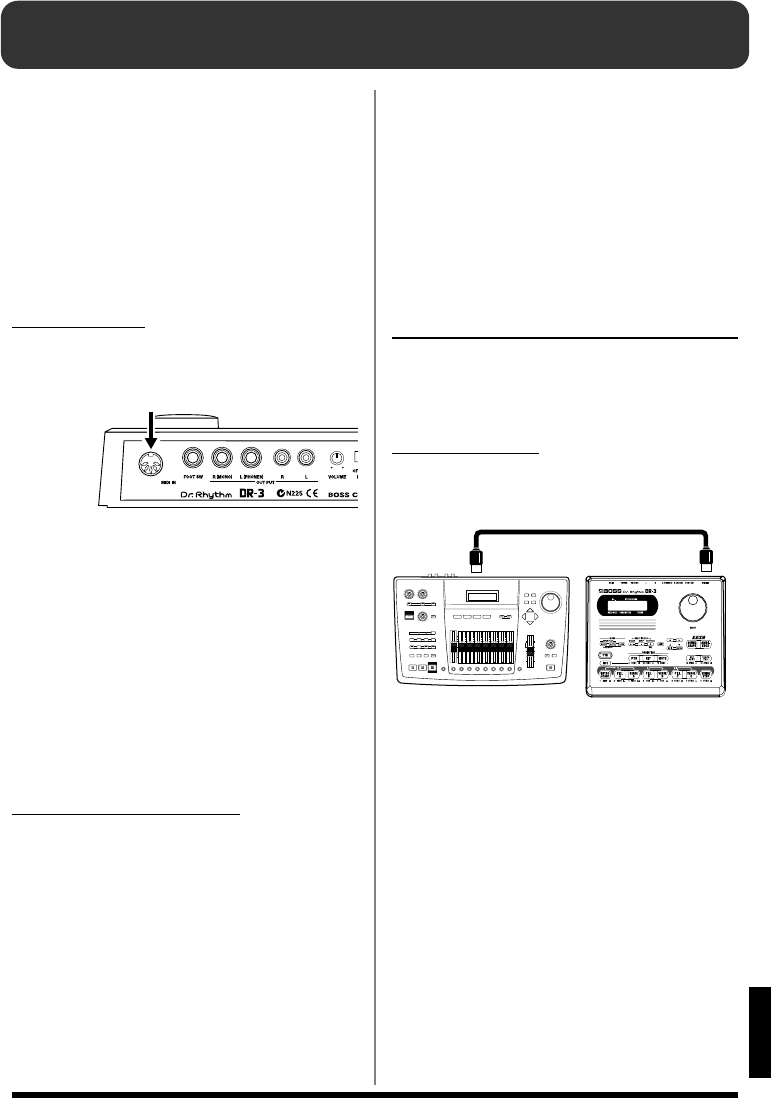
93
Ch
ap
t
er
11
Chapter 11 Connecting and Using External MIDI Devices
■What is MIDI?
MIDI (Musical Instrument Digital Interface) is a
universal standard that allows for the exchange
of performance data and other information
among electronic musical instruments and
computers. Once MIDI cables are used to connect
together devices equipped with MIDI connectors,
each device can send data to, or receive data from
any of the others.
MIDI Connector
The DR-3 is equipped with a MIDI IN connector.
fig.10-01
MIDI IN
Receives data from an external MIDI device.
Connect to the MIDI OUT connector on the
external MIDI device.
With the DR-3, you can use MIDI data to do the
following.
•Use an external MIDI device to play the DR-3
• Starting/stopping and synchronizing
performances on the DR-3 from a digital
recorder or MIDI sequencer
• Using the DR-3 to record performances
played by external MIDI devices
MIDI Implementation Chart
In order to exchange MIDI data, the data
transmitted by the MIDI devices must be
common to both. The owner’s manuals for a
MIDI device always includes a MIDI
Implementation Chart, which allows you to
quickly check the compatibility of that device
with other devices. By comparing the MIDI
Implementation Charts of each device you are
using, you can confirm which kinds of data can
be exchanged.
* For more details concerning the way MIDI has been
implemented on this unit, please refer to “MIDI
Implementation” (p. 117).
*Some MIDI messages cannot be received while editing is
in progress.
Starting/Stopping and
Synchronizing Performances on
the DR-3 from an External MIDI
Device
You can synchronize the DR-3’s performances
with digital recorders, MIDI sequencers, rhythm
machines, and other such devices.
Master and Slave
When synchronizing two or more devices, one is
made the “master” device and all others “slaves.”
fig.10-02
When the master device is started or stopped, a
MIDI message for that operation is transmitted.
The slave or slaves then start or stop in
accordance with the transmitted MIDI message.
Furthermore, timing clock data corresponding to
the tempo is transmitted by the master device.
Slave devices synchronize their performances to
this timing clock.
Other data transmitted from the master device to
slave devices includes song numbers (Song
Select) and the position of song performances
(Song Position Pointer).
MIDI IN
Connector
MIDI OUT
Master
MIDI IN
Slave (DR-3)
94
Chapter 11 Connecting and Using External MIDI Devices
Data Synchronized with the DR-3
The following MIDI messages are handled
during synchronization with the DR-3.
• Start
• Timing Clock
• Continue
• Song Select
• Stop
• Song Position Pointer
*For more information on the MIDI messages handled by
the devices you are connecting, refer to the owner’s
manual for each device.
* When synchronizing a drum machine connected to the
DR-3, you should set things up so that sounds are not
played by the DR-3’s internal sound generator in
response to Note messages received from the connected
drum machine. Either prevent Note messages from being
transmitted by the connected device, or set the DR-3 so it
doesn’t receive Note messages. For more on the DR-3’s
MIDI channel settings, refer to the following.
■Setting the MIDI Channels
To enable proper reception of performance data,
the MIDI channels for the transmitting and
receiving devices must be matched.
You can assign the drum part and bass part to
different MIDI channels.
1. With the performance stopped, press
[EDIT].
The Edit Menu screen appears.
2. Press [ ], select a <SYSTEM>, then
press [ENTER].
3. Press [ ], select a <DrumMidiCh> or a
<BassMidiCh> to be set.
fig.09-08d
4. Turn the VALUE dial to set the value.
*Program Change messages are received on the drum part
MIDI channel.
5. Press [EXIT] a number of times until you
exit Edit mode.
Parameter Value
Drum
MidiCh
OFF,
1–16
Sets the drum part MIDI
channel
When set to “OFF,” Note
and Program Change mes-
sages are not received.
Bass
MidiCh
OFF,
1–16
Sets the bass part MIDI
channel
When set to “OFF,” Note
messages are not received.

95
Chapter 11 Connecting and Using External MIDI Devices
Ch
ap
t
er
11
■Setting Sync Mode
When connecting an external MIDI device and
synchronizing the performance, this determines
whether the DR-3 is to be the slave.
1. With the performance stopped, press
[EDIT].
The Edit Menu screen appears.
2. Press [ ], select a <SYSTEM>, then
press [ENTER].
3. Press [ ], select a <Sync>.
fig.10-03d
4. Turn the VALUE dial to set the value.
5. Press [EXIT] a number of times until you
exit Edit mode.
* When the DR-3 is functioning as a slave device, the
tempo cannot be controlled from the DR-3.
Using An External MIDI
Device to Play the DR-3
You can use performance data transmitted from
an external MIDI device to play the DR-3.
fig.10-05
MIDI Channels
In order to exchange performance data between
an external MIDI device and the DR-3, the MIDI
channel settings must be the same for both
devices. Performance data can be exchanged
successfully only when the MIDI channels match.
For more on the DR-3’s MIDI channel settings,
refer to “Setting the MIDI Channels” (p. 94).
Param-
eter Value Description
Sync
AUTO
When the performance is
stopped and a Start mes-
sage is input from an exter-
nal MIDI device, the DR-3
automatically switches to
slave.
REMOTE
Messages input from the
external MIDI device are
used only to control start-
ing and stopping.
INT
You can use Note messages
from external MIDI devices
to play the DR-3's internal
sound generator, without
synchronization.
MIDI OUT
MIDI IN
MIDI Keyboard
DR-3
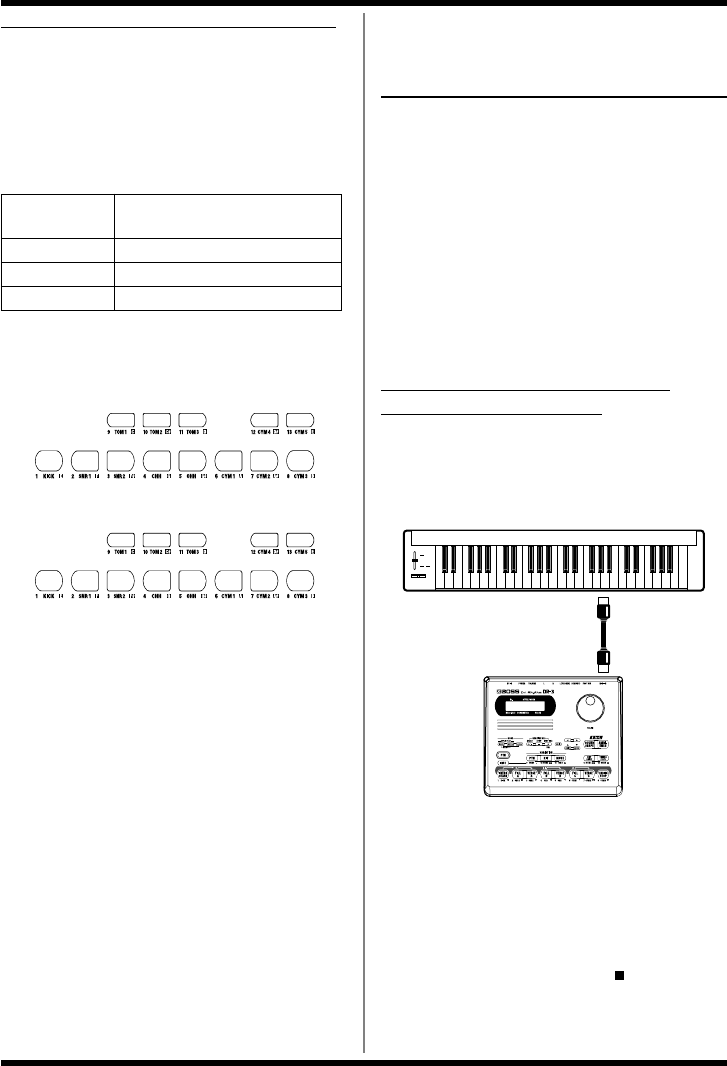
96
Chapter 11 Connecting and Using External MIDI Devices
Performance Data Handled by the DR-3
• Note Messages
These are messages that convey the performance
status of drum parts and bass parts. These are
equivalent to the performance data for keys on a
keyboard. The different kinds of Note messages
are shown below.
This correspondence of the DR-3’s pads to Note
Number as shown below.
fig.10-06
• Note numbers are 28–64 when BASS is
selected for INST.
When you tap one of the DR-3’s pads, the Note
Number for that pad is transmitted.
When a Note Number is received from an
external MIDI device, the instrument or bass tone
assigned to the pad corresponding to that Note
Number is played.
*Note Numbers that do not correspond to any of the pads
are disregarded if received.
• Program Change
This message switches the drum kit.
*Program Change messages are received on the drum part
MIDI channel.
* For more information on the messages that can be
handled by the devices you are connecting, refer to the
owner’s manual for each device.
Using the DR-3 to Record
Performances Played by
External MIDI Devices
The DR-3 can be used to record, in real time, what
is being played on a MIDI keyboard or MIDI
pads. You can also use the DR-3 to record
performance data from sequencers and rhythm
machines.
* When recording performances from an external device,
set “Sync” in [EDIT] <SYSTEM> to “AUTO” (p. 95).
*To enable proper reception of performance data, the MIDI
channels for the transmitting and receiving devices must
be matched. For more on MIDI channel settings, refer to
p. 94.
Recording Performances on MIDI
Keyboards and MIDI Pads
When recording MIDI keyboard or MIDI pad
performances as DR-3 patterns, the patterns are
recorded in real time.
fig.10-05
First, follow the instructions in “<2> Making the
Settings for the New Style” (p. 62) to make the
necessary settings. Follow the instructions in Step
5 of “• Recording the Drum Part” (p. 65) (or “•
Recording the Bass Part” (p. 66)) to play the MIDI
keyboard or MIDI pad performance.
To stop recording, press STOP [ ].
Note Number Pad number to which an instru-
ment or bass tone is assigned
Note On Pad is tapped
Note Off Pad is released
Velocity Force used to tap the pad
48
36 38 37 42 46 53 51 49
45 41 57 58
• Select “DRUM” for the “INST”
69
62 63 64 60 61 39 56 54
75 70 67 68
• Select “PERC” for the “INST”
MIDI OUT
MIDI IN
MIDI Keyboard
DR-3
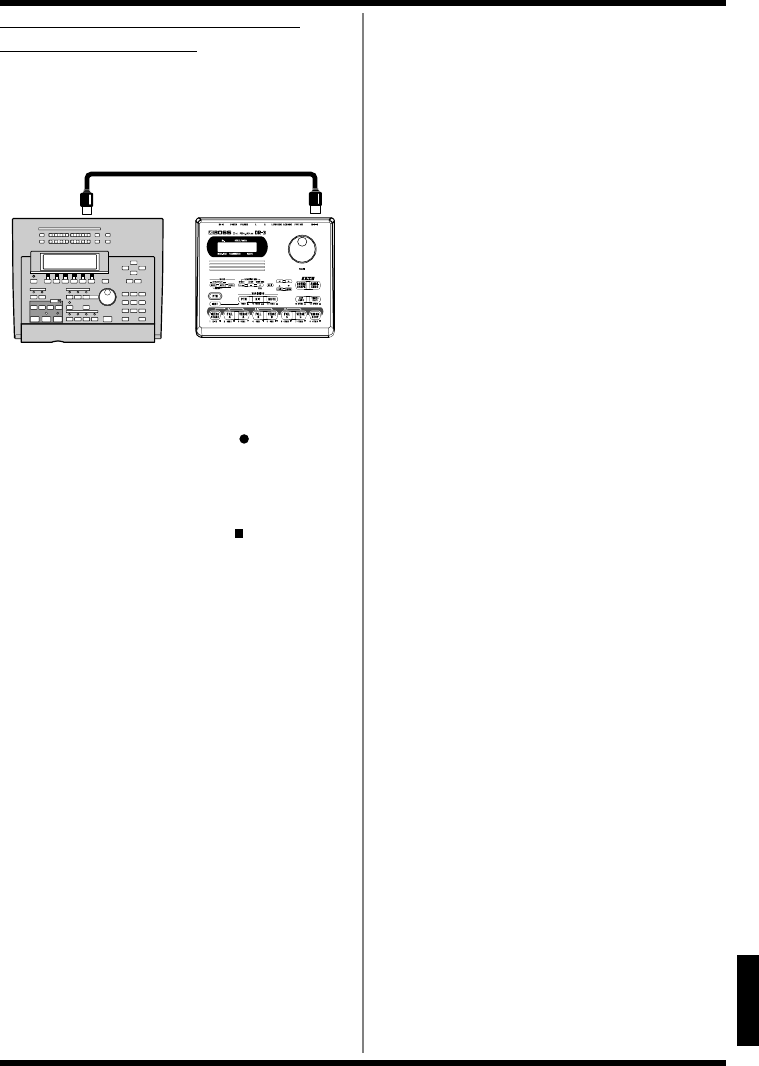
97
Chapter 11 Connecting and Using External MIDI Devices
Ch
ap
t
er
11
Recording Sequencer and Rhythm
Machine Performances
When connecting a sequencer or rhythm machine
and recording the performance data from it, the
start of recording with the DR-3 is controlled
from the connected device.
fig.10-08
Press [MANU] on the DR-3 so that the button
lights up, then press STEP REC [ ]. The DR-3
begins recording at the same time the
performance from the connected sequencer or
rhythm machine is played back.
To stop recording, press STOP [ ].
MIDI OUT MIDI IN
MIDI Sequencer
etc.
DR-3

98
Appendices
99
A
ppen
di
ces
Troubleshooting
If you find the DR-3 is not operating correctly, check the items listed below.
If the DR-3 still does not work properly after you check these points, consult your local Roland Service
or your dealer.
Problem Check/Solution
No sound
Is the volume turned down (p. 17)?
Is the Output set to “DRUM” or “BASS” (p. 89)?
Is the instrument’s level set to “0” (p. 91)?
Have you selected a style, pattern or song containing no perfor-
mance data?
Sounds drop out Are you playing too many sounds simultaneously?
The DR-3 has a maximum polyphony of 12 sounds.
Performance does not start
when START [ ] is
pressed
Have you selected a style, pattern or song containing no perfor-
mance data?
The button does not flash
when STEP REC [ ] is
pressed / Recording does not
start STEP REC [ ] is held
down and START [ ] is
pressed
Have you selected a Preset Style?
Select User Styles with a “U” appended to their number (p. 62).
Have you selected Edit mode?
Press [EXIT] in number of times until you exit Edit mode.
No metronome sound when
Realtime Recording is used Is the metronome level (Click Level) set to “0” (p. 89)?
Cannot change the settings
(Kits, Styles, TSC)
Have you selected a Preset?
Select User settings with a “U” appended to their number (p.
90, p. 62, p. 75)
Certain data cannot be changed while it is being performed.
First stop the performance, then make the changes.
Cannot play the DR-3 using an
external MIDI device / Cannot
play external MIDI device from
the DR-3
Are the MIDI channel settings correct (p. 94)?
Are the note numbers correct (p. 96)?
Some MIDI messages cannot be received while editing is in
progress.
Press [EXIT] in number of times until you exit Edit mode.
Foot switch does not work
Are the foot switch properly connected (p. 29)?
During recording or editing, depressing the foot switch will
have no effect.

100
Message List
Message Keep Power On!
Now Working...
Cause Data is being saved to memory.
Action Never turn off the power while this
message is displayed. This may cause
damage to the internal memory,
rendering it useless.
Message Battery Low!
Cause The DR-3’s batteries are running low.
Action Use the AC adapter, or change the
batteries promptly (p. 15).
Press any button to clear the message.
Sounds may become distorted, or the
DR-3 may not operate correctly if you
continue to use it in this condition.
Message Can Not Edit!
Cause Unable to change the settings for the
Preset Styles, Preset kits, or TSC presets
with a “P” appended to their number.
Action Select User Styles, User kits, and TSC
presets with a “U” appended to their
number.
Action When basing your data on Preset data,
copy the preset data to the User
memory before changing the settings.
Message Can Not Record
Cause Unable to record on the Preset Styles.
Action Select User Style and record
performance.
Message Data Empty!
Cause No data.
Massage Memory Full!
Cause Memory is full.
Action Try the operation once again.
Action Delete unneeded patterns or songs
(p. 73, p. 85).
Message Song Data Full!
Cause No space remains in the song for any
more patterns to be recorded.
Action You can record or copy up to a
maximum of 250 patterns in one song.
Message Excl. Ptn Full!
Cause The exclusive patterns for songs are full
(p. 78).
Action To continue recording or copying, first
delete the exclusive patterns.
Message Stop SEQ!
Cause The operation you attempted cannot be
carried out while a Style or song is
being performed or recorded.
Action Press STOP [ ] to stop the
performance or recording of the Style
or song, then try the operation again.
Message MIDI Off Line!
Cause A MIDI Active Sensing error has
occurred. A abnormality has been
detected in the device or cable
connected to MIDI IN.
Action Check the device or cable connected to
MIDI IN.
Message MIDI Full!
Cause Too many MIDI messages were
received all at once, and the DR-3 was
unable to process all of them.
Action Reduce the volume of the MIDI
messages being sent by the
transmitting device.
Message Too Busy!
Cause The system attempted to concurrently
process abnormally large amounts of
data, but was unable to succeed.
Action Make sure that the unit is not being
forced to handle an overly large
amount of data (in patterns, or received
MIDI messages) all at once, and try to
reduce the amount of data.
Message System Error!
Cause An unknown error has occurred in the
system.
Action Immediately stop using the unit, and
consult your dealer or nearest Roland
Service Center.
101
A
ppen
di
ces
Parameter List
Parameter Display Value
Temporary (These parameters are not saved. These are reset each time the DR-3’s power is turned on.)
Sound Shape TSC AUDITION / Shape P1 - P8, U1 - U8
Ambience TSC AUDITION / Ambi P1 - P8, U1 - U8
Tempo PLAY TEMPO / Tempo 20 - 260
Key Shift PLAY KEY SHIFT / KeyShift -12 - +12
Style (This is selectable in Style Play Mode)
Tempo Tempo 20 - 260
Beat Beat 2/4 - 8/4, 4/8 - 16/8
Kit Kit1 P01 - P50, U01 - U50
Kit Variation Kit2 P01 - P50, U01 - U50
Mute Variation Mute HH, Kick, Bass, HH&Kick, Kick&Bass,
HH&Bass, Drums
Sound Shape Switch ShapeSw OFF, ON
Sound Shape Shape P1 - P8, U1 - U8
Ambience Switch AmbiSw OFF, ON
Ambience Ambi P1 - P8, U1 - U8
<Pattern> <PATTERN>
Pattern Measure /
PATTERN MEAS
INTRO, VERSE A, VERSE B,
VERSE C, ENDING 1 - 4
Pattern Key Transpose /
PTN KEY TRANS
INTRO, FILL A, VERSE A,
VERSE Av, FILL B, VERSE B,
VERSE Bv, FILL C, VERSE C,
VERSE Cv, ENDING
-12 - +12
Pattern Copy <COPY>
Pattern Clear <CLEAR>
Style Name <NAME> 10 letters
Style Copy <COPY>
Style Clear <CLEAR>
Song (This is selectable in Song Mode)
Initial Tempo InitTempo 20 - 260
Sound Shape Switch ShapeSw OFF, ON
Sound Shape Shape P1 - P8, U1 - U8
Ambience Switch AmbiSw OFF, ON
Ambience Ambi P1 - P8, U1 - U8
Loop Type LoopType AB, BLOCK
Loop Start LoopStart 1 - Last mesure number of the song
Loop End LoopEnd 1 - Last mesure number of the song
Song Chain Chain OFF, REPEAT, S001 - S100
Song Name <NAME> 10 letters
Song Copy <COPY>
Song Clear <CLEAR>
102
Parameter List
Kit
Kit Kit P1 - P50, U1 - U50
Instrument Inst “Instrument/Bass Tone List” (p. 104)
Level Level 0 - 15
Pan Pan L7 - CENTER - R7
Kit Name <NAME> 8 letters
Kit Copy <COPY>
Sound Shape
Sound Shape Shape P1 - P8, U1 - U8
Equalizer Switch EQ / Switch OFF, ON
Equalizer Input EQ / Input -24 dB - +12 dB
Equalizer Low Type EQ (Low) / Type Shelving, Peaking
Equalizer Low Gain EQ (Low) / Gain -12 dB - +12 dB
Equalizer Low Frequency EQ (Low) / Freq 20 Hz - 2.0 kHz
Equalizer Low Q EQ (Low ) / Q 0.3 - 16.0
Equalizer Middle Gain EQ (Mid) / Gain -12 dB - +12 dB
Equalizer Middle Frequency EQ (Mid) / Freq 20 Hz - 8.0 kHz
Equalizer Middle Q EQ (Mid) / Q 0.3 - 16.0
Equalizer High TYPE EQ (High) / Type Shelving, Peaking
Equalizer High Gain EQ (High) / Gain -12 dB - +12 dB
Equalizer High Frequency EQ (High) / Freq 500 Hz - 14.0 kHz
Equalizer High Q EQ (High) / Q 0.3 - 16.0
Equalizer Out Level EQ / OutLevel -24 dB - +12 dB
Compressor Switch COMP / Switch OFF, ON
Compressor Sprit Frequency L COMP / SpritL 20 Hz - 800 Hz
Compressor Sprit Frequency H COMP / SpritH 1.6 kHz - 14.0 kHz
Compressor Low Threshold COMP(Low) / Thres -30 dB - +6 dB
Compressor Low Ratio COMP(Low) / Ratio 1: 1.00 - 1: 16.0, 1: INF
Compressor Low Attack COMP(Low) / Attack 0 ms - 100 ms
Compressor Low Release COMP(Low) / Release 50 ms - 5000 ms
Compressor Middle Threshold COMP(Mid) / Thres -30 dB - +6 dB
Compressor Middle Ratio COMP(Mid) / Ratio 1: 1.00 - 1: 16.0, 1: INF
Compressor Middle Attack COMP(Mid) / Attack 0 ms - 100 ms
Compressor Middle Release COMP(Mid) / Release 50 ms - 5000 ms
Compressor High Threshold COMP(Hi) / Thres -30 dB - +6 dB
Compressor High Ratio COMP(Hi) / Ratio 1: 1.00 - 1: 16.0, 1: INF
Compressor High Attack COMP(Hi) / Attack 0 ms - 100 ms
Compressor High Release COMP(Hi) / Release 50 ms - 5000 ms
Compressor Low Level COMP / Low Lev -60 dB - +6 dB
Compressor Middle Level COMP / Mid Lev -60 dB - +6 dB
Compressor High Level COMP / High Lev -60 dB - +6 dB
Compressor Out Level COMP / OutLevel -60 dB - +6 dB
Sound Shape Name <NAME> 6 letter
Sound Shape Copy <COPY>
103
Parameter List
A
ppen
di
ces
Ambience
Ambience Ambi P1 - P8, U1 - U8
Reverb Size Size 5.6 m - 20.5 m
Reverb Time Time 0.1 - 32.0
Reverb Level Level 0 - 100
Pre Delay PreDelay 0 ms - 20 ms
Density Density 0 - 100
Early Reflection Level ErLevel 0 - 100
Release Density RelDensity 0 - 100
Low Damp Gain Low Damp / Gain -36.0 dB - 0.0 dB
Low Damp Frequency Low Damp / Freq 55 Hz - 4.00 kHz
High Damp Gain Hi Damp / Gain -36.0 dB - 0.0 dB
High Damp Frequency Hi Damp / Freq 400 Hz - 14 kHz
Low Cut Frequency Low Cut / Freq 20 Hz - 2.0 kHz
High Cut Frequency High Cut / Freq 250 Hz - 14.0 kHz, FLAT
Ambience Name <NAME> 6 letters
Ambience Copy <COPY>
System
Output Output ALL, DRUM, BASS
Auto Repeat Type AutoType ABC, ABC4, ABC8, ABC16, AB, AB4, AB8,
AB16
Foot Switch 1 FS1 INTRO/END, VERSE,LOOP, VAR PTN,
VAR KIT, VAR MUTE, TAP TEMPO,
STRT/PAUSE, START/STOP, STYLE FWD,
STYLE BWD, INTRO, FILL A, VERSE A,
FILL B, VERSE B, FILL C, VERSE C, ENDING,
DRUM KICK - DRUM CYM5,
PERC 1 - PERC 13
Foot Switch 2 FS2
Pad Sensitivity PadSens 1 - 10, FIX
Master Tune MstrTune 438 Hz - 445 Hz
Click Level ClickLevel 0 - 10
MIDI Synchro Mode Sync AUTO, REMOTE, INT
Drum MIDI Channel DrumMidiCh OFF, 1 - 16
Bass MIDI Channel BassMidiCh OFF, 1 - 16
Factory Reset <FACTORY RESET>
104
Instrument
Inst. No. v
Display
Instrument Inst. No. v
Display
Instrument
Instrument/Bass Tone List
K01 Maple Maple Kick
K02 Rnd1 Round Kick 1
K03 Rnd2 Round Kick 2
K04 Dry Dry Hard Kick
K05 Comp Comp Kick
K06 Rev1 Reverb Kick 1
K07 Rev2 Reverb Kick 2
K08 Stdio Studio Kick
K09 26"dp 26" Deep Kick
K10 Jazz Jazz Kick
K11 Elec Electronic Kick
K12 TR909 TR-909 Kick
S01 v Wet Wet Snare / Soft Shot
S02 Warm Warm Snare Hard Shot
S03 Maple Maple Snare
S04 v Maple Maple Snare / Beach Soft Shot
S05 BchH Beech Snare Hard Rim Shot
S06 BchS Beech Snare Soft Shot
S07 v Beech Beech Snare Rim / Beech Snare Soft
S08 Open Open Snare Rim Shot
S09 v Open Open Sanre / Beech Snare Soft Shot
S10 Dry Dry Snare Hard Shot
S11 v Dry Dry Snare Hard Shor / Med Soft Shot
S12 MdSft Medium Soft Shot
S13 Natrl Natural Snare
S14 v Natrl Natural Snare / BeechSoft
S15 v Rock Rock Rim Shot / Med Soft
S16 Picco Piccolo Rim Shot Snare
S17 House House Snare
S18 Soft Soft Shot
S19 BrshR Brush Roll
S20 BrshS Brush Slap
S21 v BrshS Brush Slap / Swish
S22 Whack Whack Snare
S23 Regga Reggae Snare
S24 Elec Electronic Snare
S25 TR808 TR-808 Snare
S26 Doubl Double Shot Ghost
S27 Buzz Buzz Snare Ghost
S28 Stck1 Ambient Cross Stick
S29 Stck2 Natural Cross Stick
S30 Stck3 TR-808 Cross Stick
T01 VintH Vintage Tom High
T02 VintM Vintage Tom Mid
T03 VintL Vintage Tom Low
T04 AmbiH Ambient Tom High
T05 AmbiM Ambient Tom Mid
T06 AmbiL Ambient Tom Low
T07 DblH Double Head Tom High
T08 DblM Double Head Tom Mid
T09 DblL Double Head Tom Low
T10 RockH Rock Tom High
T11 RockM Rock Tom Mid
T12 RockL Rock Tom Low
T13 BrshH Brush Slap Tom High
T14 BrshM Brush Slap Tom Mid
T15 BrshL Brush Slap Tom Low
T16 ElecH Electronic Tom High
T17 ElecM Electronic Tom Mid
T18 ElecL Electronic Tom Low
T19 TR H TR-808 Tom High
T20 TR M TR-808 Tom Mid
T21 TR L TR-808 Tom Low
H01 PureC Pure Closed Hi-Hat *1
H02 PureO Pure Open Hi-Hat *1
H03 PureP Pure Pedal Closed Hi-Hat *1
H04 v PureO Pure HH Open / Pedal *1
H05 16"C 16" Closed Hi-Hat *1
H06 16"O 16" Open Hi-Hat *1
H07 16"P 16" Pedal Closed Hi-Hat *1
H08 v 16"O 16" HH Open / Pedal *1
H09 RealC Real Closed Hi-Hat *1
H10 RealO Real Open Hi-Hat *1
H11 v RealO Real HH Open / Pedal *1
H12 BrshC Brush Closed Hi-Hat *1
H13 BrshO Brush Open Hi-Hat *1
C01 Crsh1 Crash Cymbal 1 *2
C02 Crsh2 Crash Cymbal 2 *3
C03 Crsh3 Crash Cymbal 3 *4
C04 Chok1 Choked Crash 1 *2
C05 Chok2 Choked Crash 2 *3
C06 Chok3 Choked Crash 3 *4
C07 Splsh Splash Cymbal
C08 China Chinese Cymbal
105
Instrument/Bass Tone List
A
ppen
di
ces
Inst. No. v
Display
Instrument
Bass Tone
I
Inst. No.
Display
Instrument
C09 Ride1 Ride Cymbal 1
C10 Ride2 Ride Cymbal 2
C11 Bell1 Ride Bell Cymbal 1
C12 Bell2 Ride Bell Cymbal 2
C13 BrshC Brush Crash Cymbal
C14 BrshR Brush Ride Cymbal
C15 Gong Large Gong
P01 Cowbl Cowbell
P02 Tmbrn Tambourine
P03 BngoH Bongo High
P04 BngoL Bongo Low
P05 CngHM Conga High Mute
P06 CngHO Conga High Open
P07 CngaL Conga Low Open
P08 TmblH Timbale High
P09 TmblL Timbale Low
P10 Clave Clave
P11 Vibra Vibraslap
P12 GuirS Guiro Short
P13 GuirL Guiro Long
P14 Marcs Maracas
P15 Shakr Shaker
P16 Cabas Cabasa
P17 WhslS Whistle Short
P18 WhslL Whistle Long
P19 AgogH Agogo High
P20 AgogL Agogo Low
P21 CuicH Cuica High
P22 CuicL Cuica Low
P23 SurdM Surdo Mute
P24 SurdO Surdo Open
P25 Tbla1 Tabla 1
P26 Tbla2 Tabla 2
P27 Tbla3 Tabla 3
P28 Clap1 Real Clap
P29 Clap2 TR-808 Clap
v...The sound will alter depending on the
strength you tap the pads.
*1–*4...will not sound simultaneously with other
percussion instruments of the same number.
B01 Fing1 Fingered Bass 1
B02 Fing2 Fingered Bass 2
B03 MuteB Mute Bass
B04 Frtls Fretless Bass
B05 Pick1 Picked Bass 1
B06 Pick2 Picked Bass 2
B07 Acous Acoustic Bass
B08 Slap Slap Bass
B09 Stick Stick
B10 Solid Solid Bass
B11 Pluck Pluck Bass
B12 Sine Sine Wave Bass

106
Kit No.
Kit Name
DRUM KICK
DRUM SNR1
DRUM SNR2
DRUM CHH
DRUM OHH
DRUM CYM1
DRUM CYM2
DRUM CYM3
DRUM TOM1
DRUM TOM2
DRUM TOM3
DRUM CYM4
DRUM CYM5
PERC 1
PERC 2
PERC 3
PERC 4
PERC 5
PERC 6
PERC 7
PERC 8
PERC 9
PERC 10
PERC 11
PERC 12
PERC 13
Bass
Preset Kit List
No. P01
Power1
Inst.
No. Instrument
K03 Rnd2
S01 v Wet
S28 Stck1
H05 16"C
H08 v 16"O
C12 Bell2
C10 Ride2
C01 Crsh1
T07 DblH
T08 DblM
T09 DblL
C02 Crsh2
C08 China
P05 CngHM
P06 CngHO
P07 CngaL
P03 BngoH
P04 BngoL
P29 Clap2
P01 Cowbl
P02 Tmbrn
P16 Cabas
P10 Clave
P14 Marcs
P19 AgogH
P20 AgogL
B05 Pick1
No. P02
BigFunk
Inst.
No. Instrument
K01 Maple
S01 v Wet
S27 Buzz
H09 RealC
H10 RealO
C12 Bell2
C10 Ride2
C01 Crsh1
T07 DblH
T08 DblM
T09 DblL
C04 Chok1
C08 China
P05 CngHM
P06 CngHO
P07 CngaL
P03 BngoH
P04 BngoL
P29 Clap2
P01 Cowbl
P02 Tmbrn
P16 Cabas
P10 Clave
P14 Marcs
P19 AgogH
P20 AgogL
B09 Stick
No. P03
Groove
Inst.
No. Instrument
K02 Rnd1
S01 v Wet
S27 Buzz
H09 RealC
H11 v RealO
C12 Bell2
C10 Ride2
C01 Crsh1
T07 DblH
T08 DblM
T09 DblL
C03 Crsh3
C08 China
P05 CngHM
P06 CngHO
P07 CngaL
P03 BngoH
P04 BngoL
P29 Clap2
P01 Cowbl
P02 Tmbrn
P16 Cabas
P10 Clave
P14 Marcs
P19 AgogH
P20 AgogL
B08 Slap
No. P04
Studio 1
Inst.
No. Instrument
K04 Dry
S09 v Open
S26 Doubl
H05 16"C
H08 v 16"O
C12 Bell2
C10 Ride2
C01 Crsh1
T04 AmbiH
T05 AmbiM
T06 AmbiL
C07 Splsh
C08 China
P05 CngHM
P06 CngHO
P07 CngaL
P03 BngoH
P04 BngoL
P29 Clap2
P01 Cowbl
P02 Tmbrn
P16 Cabas
P10 Clave
P14 Marcs
P19 AgogH
P20 AgogL
B01 Fing1
No. P05
Room 1
Inst.
No. Instrument
K06 Rev1
S08 Open
S28 Stck1
H09 RealC
H10 RealO
C12 Bell2
C10 Ride2
C01 Crsh1
T04 AmbiH
T05 AmbiM
T06 AmbiL
C03 Crsh3
C07 Splsh
P05 CngHM
P06 CngHO
P07 CngaL
P03 BngoH
P04 BngoL
P29 Clap2
P01 Cowbl
P02 Tmbrn
P16 Cabas
P10 Clave
P14 Marcs
P19 AgogH
P20 AgogL
B05 Pick1

107
Preset Kit List
A
ppen
di
ces
Kit No.
Kit Name
DRUM KICK
DRUM SNR1
DRUM SNR2
DRUM CHH
DRUM OHH
DRUM CYM1
DRUM CYM2
DRUM CYM3
DRUM TOM1
DRUM TOM2
DRUM TOM3
DRUM CYM4
DRUM CYM5
PERC 1
PERC 2
PERC 3
PERC 4
PERC 5
PERC 6
PERC 7
PERC 8
PERC 9
PERC 10
PERC 11
PERC 12
PERC 13
Bass
No. P06
Loud
Inst.
No. Instrument
K06 Rev1
S02 Warm
S28 Stck1
H05 16"C
H08 v 16"O
C08 China
C10 Ride2
C01 Crsh1
T10 RockH
T11 RockM
T12 RockL
C02 Crsh2
C15 Gong
P05 CngHM
P06 CngHO
P07 CngaL
P03 BngoH
P04 BngoL
P29 Clap2
P01 Cowbl
P02 Tmbrn
P16 Cabas
P10 Clave
P14 Marcs
P19 AgogH
P20 AgogL
B05 Pick1
No. P07
Power 2
Inst.
No. Instrument
K07 Rev2
S02 Warm
S28 Stck1
H05 16"C
H08 v 16"O
C12 Bell2
C10 Ride2
C01 Crsh1
T04 AmbiH
T05 AmbiM
T06 AmbiL
C02 Crsh2
C15 Gong
P05 CngHM
P06 CngHO
P07 CngaL
P03 BngoH
P04 BngoL
P29 Clap2
P01 Cowbl
P02 Tmbrn
P16 Cabas
P10 Clave
P14 Marcs
P19 AgogH
P20 AgogL
B06 Pick2
No. P08
Big
Inst.
No. Instrument
K09 26"dp
S07 v Beech
S26 Doubl
H05 16"C
H08 v 16"O
C11 Bell1
C10 Ride2
C01 Crsh1
T07 DblH
T08 DblM
T09 DblL
C02 Crsh2
C08 China
P05 CngHM
P06 CngHO
P07 CngaL
P03 BngoH
P04 BngoL
P29 Clap2
P01 Cowbl
P02 Tmbrn
P16 Cabas
P10 Clave
P14 Marcs
P19 AgogH
P20 AgogL
B09 Stick
No. P09
Funk 1
Inst.
No. Instrument
K04 Dry
S07 v Beech
S26 Doubl
H01 PureC
H04 v PureO
C12 Bell2
C09 Ride1
C02 Crsh2
T01 VintH
T02 VintM
T03 VintL
C07 Splsh
C08 China
P05 CngHM
P06 CngHO
P07 CngaL
P03 BngoH
P04 BngoL
P29 Clap2
P01 Cowbl
P02 Tmbrn
P16 Cabas
P10 Clave
P14 Marcs
P19 AgogH
P20 AgogL
B08 Slap
No. P10
Natural1
Inst.
No. Instrument
K05 Comp
S14 v Natrl
S28 Stck1
H01 PureC
H04 v PureO
C11 Bell1
C09 Ride1
C01 Crsh1
T07 DblH
T08 DblM
T09 DblL
C02 Crsh2
C08 China
P05 CngHM
P06 CngHO
P07 CngaL
P03 BngoH
P04 BngoL
P29 Clap2
P01 Cowbl
P02 Tmbrn
P16 Cabas
P10 Clave
P14 Marcs
P19 AgogH
P20 AgogL
B06 Pick2

108
Preset Kit List
Kit No.
Kit Name
DRUM KICK
DRUM SNR1
DRUM SNR2
DRUM CHH
DRUM OHH
DRUM CYM1
DRUM CYM2
DRUM CYM3
DRUM TOM1
DRUM TOM2
DRUM TOM3
DRUM CYM4
DRUM CYM5
PERC 1
PERC 2
PERC 3
PERC 4
PERC 5
PERC 6
PERC 7
PERC 8
PERC 9
PERC 10
PERC 11
PERC 12
PERC 13
Bass
No. P11
Gospel
Inst.
No. Instrument
K01 Maple
S14 v Natrl
S29 Stck2
H05 16"C
H08 v 16"O
C12 Bell2
C10 Ride2
C01 Crsh1
T07 DblH
T08 DblM
T09 DblL
C07 Splsh
C08 China
P05 CngHM
P06 CngHO
P07 CngaL
P03 BngoH
P04 BngoL
P28 Clap1
P01 Cowbl
P02 Tmbrn
P16 Cabas
P10 Clave
P14 Marcs
P19 AgogH
P20 AgogL
B01 Fing1
No. P12
Room 2
Inst.
No. Instrument
K06 Rev1
S15 v Rock
S28 Stck1
H01 PureC
H04 v PureO
C12 Bell2
C10 Ride2
C01 Crsh1
T04 AmbiH
T05 AmbiM
T06 AmbiL
C02 Crsh2
C08 China
P05 CngHM
P06 CngHO
P07 CngaL
P03 BngoH
P04 BngoL
P29 Clap2
P01 Cowbl
P02 Tmbrn
P16 Cabas
P10 Clave
P14 Marcs
P19 AgogH
P20 AgogL
B01 Fing1
No. P13
Ambient
Inst.
No. Instrument
K06 Rev1
S15 v Rock
S01 v Wet
H05 16"C
H08 v 16"O
C12 Bell2
C09 Ride1
C01 Crsh1
T10 RockH
T11 RockM
T12 RockL
C02 Crsh2
C08 China
P05 CngHM
P06 CngHO
P07 CngaL
P03 BngoH
P04 BngoL
P29 Clap2
P01 Cowbl
P02 Tmbrn
P16 Cabas
P10 Clave
P14 Marcs
P19 AgogH
P20 AgogL
B02 Fing2
No. P14
HeavyFnk
Inst.
No. Instrument
K03 Rnd2
S15 v Rock
S27 Buzz
H09 RealC
H11 v RealO
C11 Bell1
C10 Ride2
C01 Crsh1
T07 DblH
T08 DblM
T09 DblL
C02 Crsh2
C08 China
P05 CngHM
P06 CngHO
P07 CngaL
P03 BngoH
P04 BngoL
P29 Clap2
P01 Cowbl
P02 Tmbrn
P16 Cabas
P10 Clave
P14 Marcs
P19 AgogH
P20 AgogL
B09 Stick
No. P15
Whack
Inst.
No. Instrument
K03 Rnd2
S22 Whack
S15 v Rock
H05 16"C
H08 v 16"O
C11 Bell1
C10 Ride2
C01 Crsh1
T04 AmbiH
T05 AmbiM
T06 AmbiL
C02 Crsh2
C08 China
P05 CngHM
P06 CngHO
P07 CngaL
P03 BngoH
P04 BngoL
P29 Clap2
P01 Cowbl
P02 Tmbrn
P16 Cabas
P10 Clave
P14 Marcs
P19 AgogH
P20 AgogL
B05 Pick1

109
Preset Kit List
A
ppen
di
ces
Kit No.
Kit Name
DRUM KICK
DRUM SNR1
DRUM SNR2
DRUM CHH
DRUM OHH
DRUM CYM1
DRUM CYM2
DRUM CYM3
DRUM TOM1
DRUM TOM2
DRUM TOM3
DRUM CYM4
DRUM CYM5
PERC 1
PERC 2
PERC 3
PERC 4
PERC 5
PERC 6
PERC 7
PERC 8
PERC 9
PERC 10
PERC 11
PERC 12
PERC 13
Bass
No. P16
Standrd1
Inst.
No. Instrument
K04 Dry
S11 v Dry
S29 Stck2
H01 PureC
H04 v PureO
C12 Bell2
C10 Ride2
C01 Crsh1
T07 DblH
T08 DblM
T09 DblL
C02 Crsh2
C08 China
P05 CngHM
P06 CngHO
P07 CngaL
P03 BngoH
P04 BngoL
P29 Clap2
P01 Cowbl
P02 Tmbrn
P16 Cabas
P10 Clave
P14 Marcs
P19 AgogH
P20 AgogL
B01 Fing1
No. P17
Express
Inst.
No. Instrument
K02 Rnd1
S10 Dry
S26 Doubl
H01 PureC
H04 v PureO
C11 Bell1
C10 Ride2
C01 Crsh1
T04 AmbiH
T05 AmbiM
T06 AmbiL
C02 Crsh2
C08 China
P05 CngHM
P06 CngHO
P07 CngaL
P03 BngoH
P04 BngoL
P29 Clap2
P01 Cowbl
P02 Tmbrn
P16 Cabas
P10 Clave
P14 Marcs
P19 AgogH
P20 AgogL
B02 Fing2
No. P18
Vintage
Inst.
No. Instrument
K01 Maple
S04 v Maple
S28 Stck1
H01 PureC
H02 PureO
C11 Bell1
C09 Ride1
C01 Crsh1
T01 VintH
T02 VintM
T03 VintL
C02 Crsh2
C08 China
P05 CngHM
P06 CngHO
P07 CngaL
P03 BngoH
P04 BngoL
P29 Clap2
P01 Cowbl
P02 Tmbrn
P16 Cabas
P10 Clave
P14 Marcs
P19 AgogH
P20 AgogL
B01 Fing1
No. P19
Fusion
Inst.
No. Instrument
K08 Stdio
S04 v Maple
S26 Doubl
H01 PureC
H04 v PureO
C12 Bell2
C10 Ride2
C01 Crsh1
T07 DblH
T08 DblM
T09 DblL
C07 Splsh
C08 China
P05 CngHM
P06 CngHO
P07 CngaL
P03 BngoH
P04 BngoL
P29 Clap2
P01 Cowbl
P02 Tmbrn
P16 Cabas
P10 Clave
P14 Marcs
P19 AgogH
P20 AgogL
B05 Pick1
No. P20
Funk 2
Inst.
No. Instrument
K05 Comp
S16 Picco
S28 Stck1
H09 RealC
H11 v RealO
C11 Bell1
C09 Ride1
C02 Crsh2
T07 DblH
T08 DblM
T09 DblL
C07 Splsh
C08 China
P05 CngHM
P06 CngHO
P07 CngaL
P03 BngoH
P04 BngoL
P29 Clap2
P01 Cowbl
P02 Tmbrn
P16 Cabas
P10 Clave
P14 Marcs
P19 AgogH
P20 AgogL
B09 Stick

110
Preset Kit List
Kit No.
Kit Name
DRUM KICK
DRUM SNR1
DRUM SNR2
DRUM CHH
DRUM OHH
DRUM CYM1
DRUM CYM2
DRUM CYM3
DRUM TOM1
DRUM TOM2
DRUM TOM3
DRUM CYM4
DRUM CYM5
PERC 1
PERC 2
PERC 3
PERC 4
PERC 5
PERC 6
PERC 7
PERC 8
PERC 9
PERC 10
PERC 11
PERC 12
PERC 13
Bass
No. P21
Electro
Inst.
No. Instrument
K11 Elec
S24 Elec
S30 Stck3
H12 BrshC
H13 BrshO
C11 Bell1
C10 Ride2
C01 Crsh1
T16 ElecH
T17 ElecM
T18 ElecL
C07 Splsh
C08 China
P27 Tbla3
P26 Tbla2
P25 Tbla1
P03 BngoH
P04 BngoL
P29 Clap2
P01 Cowbl
P02 Tmbrn
P16 Cabas
P10 Clave
P14 Marcs
P19 AgogH
P20 AgogL
B10 Solid
No. P22
Dance
Inst.
No. Instrument
K12 TR909
S25 TR808
S13 Natrl
H12 BrshC
H13 BrshO
C12 Bell2
C10 Ride2
C01 Crsh1
T19 TR H
T20 TR M
T21 TR L
C03 Crsh3
C07 Splsh
P05 CngHM
P06 CngHO
P07 CngaL
P03 BngoH
P04 BngoL
P29 Clap2
P01 Cowbl
P02 Tmbrn
P16 Cabas
P10 Clave
P14 Marcs
P19 AgogH
P20 AgogL
B12 Sine
No. P23
Hip Hop
Inst.
No. Instrument
K02 Rnd1
S17 House
S05 BchH
H12 BrshC
H13 BrshO
C12 Bell2
C09 Ride1
C03 Crsh3
T16 ElecH
T17 ElecM
T18 ElecL
C02 Crsh2
C15 Gong
P05 CngHM
P06 CngHO
P07 CngaL
P03 BngoH
P04 BngoL
P29 Clap2
P01 Cowbl
P02 Tmbrn
P16 Cabas
P10 Clave
P14 Marcs
P19 AgogH
P20 AgogL
B10 Solid
No. P24
Techno
Inst.
No. Instrument
K12 TR909
S17 House
S30 Stck3
H12 BrshC
H13 BrshO
C11 Bell1
C10 Ride2
C02 Crsh2
T16 ElecH
T17 ElecM
T18 ElecL
C03 Crsh3
C07 Splsh
P05 CngHM
P06 CngHO
P07 CngaL
P03 BngoH
P04 BngoL
P29 Clap2
P01 Cowbl
P02 Tmbrn
P16 Cabas
P10 Clave
P14 Marcs
P19 AgogH
P20 AgogL
B11 Pluck
No. P25
Drm'n'Bs
Inst.
No. Instrument
K12 TR909
S17 House
S25 TR808
H12 BrshC
H13 BrshO
C12 Bell2
C10 Ride2
C02 Crsh2
T19 TR H
T20 TR M
T21 TR L
C03 Crsh3
C07 Splsh
P05 CngHM
P06 CngHO
P07 CngaL
P03 BngoH
P04 BngoL
P29 Clap2
P01 Cowbl
P02 Tmbrn
P16 Cabas
P10 Clave
P14 Marcs
P19 AgogH
P20 AgogL
B12 Sine

111
Preset Kit List
A
ppen
di
ces
Kit No.
Kit Name
DRUM KICK
DRUM SNR1
DRUM SNR2
DRUM CHH
DRUM OHH
DRUM CYM1
DRUM CYM2
DRUM CYM3
DRUM TOM1
DRUM TOM2
DRUM TOM3
DRUM CYM4
DRUM CYM5
PERC 1
PERC 2
PERC 3
PERC 4
PERC 5
PERC 6
PERC 7
PERC 8
PERC 9
PERC 10
PERC 11
PERC 12
PERC 13
Bass
No. P26
House
Inst.
No. Instrument
K12 TR909
S25 TR808
S30 Stck3
H12 BrshC
H13 BrshO
C12 Bell2
C10 Ride2
C02 Crsh2
T19 TR H
T20 TR M
T21 TR L
C03 Crsh3
C07 Splsh
P27 Tbla3
P26 Tbla2
P25 Tbla1
P03 BngoH
P04 BngoL
P28 Clap1
P01 Cowbl
P02 Tmbrn
P16 Cabas
P10 Clave
P14 Marcs
P19 AgogH
P20 AgogL
B10 Solid
No. P27
Boom
Inst.
No. Instrument
K12 TR909
S25 TR808
S30 Stck3
H12 BrshC
H13 BrshO
C12 Bell2
C10 Ride2
C02 Crsh2
T19 TR H
T20 TR M
T21 TR L
C03 Crsh3
C07 Splsh
P05 CngHM
P06 CngHO
P07 CngaL
P03 BngoH
P04 BngoL
P29 Clap2
P01 Cowbl
P02 Tmbrn
P16 Cabas
P10 Clave
P14 Marcs
P19 AgogH
P20 AgogL
B11 Pluck
No. P28
Jazz 1
Inst.
No. Instrument
K10 Jazz
S06 BchS
S29 Stck2
H01 PureC
H04 v PureO
C11 Bell1
C10 Ride2
C01 Crsh1
T01 VintH
T02 VintM
T03 VintL
C02 Crsh2
C03 Crsh3
P05 CngHM
P06 CngHO
P07 CngaL
P03 BngoH
P04 BngoL
P28 Clap1
P01 Cowbl
P02 Tmbrn
P16 Cabas
P10 Clave
P14 Marcs
P19 AgogH
P20 AgogL
B07 Acous
No. P29
Jazz 2
Inst.
No. Instrument
K10 Jazz
S11 v Dry
S28 Stck1
H01 PureC
H04 v PureO
C09 Ride1
C10 Ride2
C01 Crsh1
T01 VintH
T02 VintM
T03 VintL
C02 Crsh2
C03 Crsh3
P05 CngHM
P06 CngHO
P07 CngaL
P03 BngoH
P04 BngoL
P28 Clap1
P01 Cowbl
P02 Tmbrn
P16 Cabas
P10 Clave
P14 Marcs
P19 AgogH
P20 AgogL
B07 Acous
No. P30
Country
Inst.
No. Instrument
K01 Maple
S12 MdSft
S29 Stck2
H09 RealC
H10 RealO
C12 Bell2
C10 Ride2
C01 Crsh1
T07 DblH
T08 DblM
T09 DblL
C02 Crsh2
C08 China
P05 CngHM
P06 CngHO
P07 CngaL
P03 BngoH
P04 BngoL
P28 Clap1
P01 Cowbl
P02 Tmbrn
P16 Cabas
P10 Clave
P14 Marcs
P19 AgogH
P20 AgogL
B01 Fing1

112
Preset Kit List
Kit No.
Kit Name
DRUM KICK
DRUM SNR1
DRUM SNR2
DRUM CHH
DRUM OHH
DRUM CYM1
DRUM CYM2
DRUM CYM3
DRUM TOM1
DRUM TOM2
DRUM TOM3
DRUM CYM4
DRUM CYM5
PERC 1
PERC 2
PERC 3
PERC 4
PERC 5
PERC 6
PERC 7
PERC 8
PERC 9
PERC 10
PERC 11
PERC 12
PERC 13
Bass
No. P31
Ballad 1
Inst.
No. Instrument
K09 26"dp
S12 MdSft
S29 Stck2
H05 16"C
H08 v 16"O
C11 Bell1
C09 Ride1
C01 Crsh1
T04 AmbiH
T05 AmbiM
T06 AmbiL
C02 Crsh2
C07 Splsh
P05 CngHM
P06 CngHO
P07 CngaL
P03 BngoH
P04 BngoL
P29 Clap2
P01 Cowbl
P02 Tmbrn
P16 Cabas
P10 Clave
P14 Marcs
P19 AgogH
P20 AgogL
B04 Frtls
No. P32
Folk
Inst.
No. Instrument
K10 Jazz
S20 BrshS
S26 Doubl
H01 PureC
H04 v PureO
C12 Bell2
C14 BrshR
C01 Crsh1
T01 VintH
T02 VintM
T03 VintL
C13 BrshC
C07 Splsh
P05 CngHM
P06 CngHO
P07 CngaL
P03 BngoH
P04 BngoL
P28 Clap1
P01 Cowbl
P02 Tmbrn
P16 Cabas
P10 Clave
P14 Marcs
P19 AgogH
P20 AgogL
B03 MuteB
No. P33
Brushes1
Inst.
No. Instrument
K10 Jazz
S21 v BrshS
S19 BrshR
H03 PureP
H13 BrshO
C11 Bell1
C14 BrshR
C13 BrshC
T13 BrshH
T14 BrshM
T15 BrshL
C02 Crsh2
C03 Crsh3
P05 CngHM
P06 CngHO
P07 CngaL
P03 BngoH
P04 BngoL
P28 Clap1
P01 Cowbl
P02 Tmbrn
P16 Cabas
P10 Clave
P14 Marcs
P19 AgogH
P20 AgogL
B07 Acous
No. P34
Ballad 2
Inst.
No. Instrument
K01 Maple
S04 v Maple
S29 Stck2
H01 PureC
H04 v PureO
C11 Bell1
C09 Ride1
C01 Crsh1
T01 VintH
T02 VintM
T03 VintL
C02 Crsh2
C07 Splsh
P05 CngHM
P06 CngHO
P07 CngaL
P03 BngoH
P04 BngoL
P29 Clap2
P01 Cowbl
P02 Tmbrn
P16 Cabas
P10 Clave
P14 Marcs
P19 AgogH
P20 AgogL
B04 Frtls
No. P35
Pops 1
Inst.
No. Instrument
K01 Maple
S09 v Open
S29 Stck2
H01 PureC
H04 v PureO
C12 Bell2
C10 Ride2
C01 Crsh1
T07 DblH
T08 DblM
T09 DblL
C02 Crsh2
C07 Splsh
P05 CngHM
P06 CngHO
P07 CngaL
P03 BngoH
P04 BngoL
P29 Clap2
P01 Cowbl
P02 Tmbrn
P16 Cabas
P10 Clave
P14 Marcs
P19 AgogH
P20 AgogL
B01 Fing1

113
Preset Kit List
A
ppen
di
ces
Kit No.
Kit Name
DRUM KICK
DRUM SNR1
DRUM SNR2
DRUM CHH
DRUM OHH
DRUM CYM1
DRUM CYM2
DRUM CYM3
DRUM TOM1
DRUM TOM2
DRUM TOM3
DRUM CYM4
DRUM CYM5
PERC 1
PERC 2
PERC 3
PERC 4
PERC 5
PERC 6
PERC 7
PERC 8
PERC 9
PERC 10
PERC 11
PERC 12
PERC 13
Bass
No. P36
Punk
Inst.
No. Instrument
K04 Dry
S15 v Rock
S26 Doubl
H09 RealC
H11 v RealO
C12 Bell2
C10 Ride2
C01 Crsh1
T04 AmbiH
T05 AmbiM
T06 AmbiL
C02 Crsh2
C08 China
P05 CngHM
P06 CngHO
P07 CngaL
P03 BngoH
P04 BngoL
P29 Clap2
P01 Cowbl
P02 Tmbrn
P16 Cabas
P10 Clave
P14 Marcs
P19 AgogH
P20 AgogL
B01 Fing1
No. P37
Pops 2
Inst.
No. Instrument
K04 Dry
S07 v Beech
S28 Stck1
H01 PureC
H04 v PureO
C12 Bell2
C09 Ride1
C02 Crsh2
T01 VintH
T02 VintM
T03 VintL
C07 Splsh
C08 China
P05 CngHM
P06 CngHO
P07 CngaL
P03 BngoH
P04 BngoL
P29 Clap2
P01 Cowbl
P02 Tmbrn
P16 Cabas
P10 Clave
P14 Marcs
P19 AgogH
P20 AgogL
B01 Fing1
No. P38
Standrd2
Inst.
No. Instrument
K01 Maple
S04 v Maple
S26 Doubl
H01 PureC
H02 PureO
C11 Bell1
C09 Ride1
C01 Crsh1
T07 DblH
T08 DblM
T09 DblL
C02 Crsh2
C08 China
P05 CngHM
P06 CngHO
P07 CngaL
P03 BngoH
P04 BngoL
P29 Clap2
P01 Cowbl
P02 Tmbrn
P16 Cabas
P10 Clave
P14 Marcs
P19 AgogH
P20 AgogL
B01 Fing1
No. P39
Natural2
Inst.
No. Instrument
K04 Dry
S14 v Natrl
S28 Stck1
H01 PureC
H04 v PureO
C11 Bell1
C10 Ride2
C01 Crsh1
T04 AmbiH
T05 AmbiM
T06 AmbiL
C02 Crsh2
C07 Splsh
P05 CngHM
P06 CngHO
P07 CngaL
P03 BngoH
P04 BngoL
P29 Clap2
P01 Cowbl
P02 Tmbrn
P16 Cabas
P10 Clave
P14 Marcs
P19 AgogH
P20 AgogL
B01 Fing1
No. P40
Studio 2
Inst.
No. Instrument
K02 Rnd1
S09 v Open
S26 Doubl
H05 16"C
H08 v 16"O
C12 Bell2
C10 Ride2
C01 Crsh1
T07 DblH
T08 DblM
T09 DblL
C02 Crsh2
C08 China
P05 CngHM
P06 CngHO
P07 CngaL
P03 BngoH
P04 BngoL
P29 Clap2
P01 Cowbl
P02 Tmbrn
P16 Cabas
P10 Clave
P14 Marcs
P19 AgogH
P20 AgogL
B01 Fing1

114
Preset Kit List
Kit No.
Kit Name
DRUM KICK
DRUM SNR1
DRUM SNR2
DRUM CHH
DRUM OHH
DRUM CYM1
DRUM CYM2
DRUM CYM3
DRUM TOM1
DRUM TOM2
DRUM TOM3
DRUM CYM4
DRUM CYM5
PERC 1
PERC 2
PERC 3
PERC 4
PERC 5
PERC 6
PERC 7
PERC 8
PERC 9
PERC 10
PERC 11
PERC 12
PERC 13
Bass
No. P41
Power 3
Inst.
No. Instrument
K02 Rnd1
S01 v Wet
S26 Doubl
H09 RealC
H11 v RealO
C12 Bell2
C10 Ride2
C01 Crsh1
T04 AmbiH
T05 AmbiM
T06 AmbiL
C02 Crsh2
C08 China
P05 CngHM
P06 CngHO
P07 CngaL
P03 BngoH
P04 BngoL
P29 Clap2
P01 Cowbl
P02 Tmbrn
P16 Cabas
P10 Clave
P14 Marcs
P19 AgogH
P20 AgogL
B01 Fing1
No. P42
Room 3
Inst.
No. Instrument
K06 Rev1
S08 Open
S28 Stck1
H09 RealC
H10 RealO
C12 Bell2
C10 Ride2
C01 Crsh1
T04 AmbiH
T05 AmbiM
T06 AmbiL
C03 Crsh3
C07 Splsh
P05 CngHM
P06 CngHO
P07 CngaL
P03 BngoH
P04 BngoL
P29 Clap2
P01 Cowbl
P02 Tmbrn
P16 Cabas
P10 Clave
P14 Marcs
P19 AgogH
P20 AgogL
B01 Fing1
No. P43
Brushes2
Inst.
No. Instrument
K10 Jazz
S21 v BrshS
S19 BrshR
H03 PureP
H13 BrshO
C11 Bell1
C14 BrshR
C13 BrshC
T13 BrshH
T14 BrshM
T15 BrshL
C02 Crsh2
C03 Crsh3
P05 CngHM
P06 CngHO
P07 CngaL
P03 BngoH
P04 BngoL
P28 Clap1
P01 Cowbl
P02 Tmbrn
P16 Cabas
P10 Clave
P14 Marcs
P19 AgogH
P20 AgogL
B04 Frtls
No. P44
Latin
Inst.
No. Instrument
K04 Dry
S11 v Dry
S29 Stck2
H12 BrshC
H13 BrshO
C12 Bell2
P21 CuicH
P22 CuicL
P08 TmblH
P09 TmblL
T09 DblL
C10 Ride2
P11 Vibra
P05 CngHM
P06 CngHO
P07 CngaL
P03 BngoH
P04 BngoL
P28 Clap1
P01 Cowbl
P02 Tmbrn
P16 Cabas
P10 Clave
P14 Marcs
P19 AgogH
P20 AgogL
B01 Fing1
No. P45
Samba
Inst.
No. Instrument
K01 Maple
S06 BchS
S29 Stck2
P23 SurdM
P24 SurdO
C12 Bell2
P21 CuicH
P22 CuicL
P08 TmblH
P09 TmblL
T09 DblL
P17 WhslS
P18 WhslL
P05 CngHM
P06 CngHO
P07 CngaL
P03 BngoH
P04 BngoL
P28 Clap1
P01 Cowbl
P02 Tmbrn
P16 Cabas
P10 Clave
P14 Marcs
P19 AgogH
P20 AgogL
B04 Frtls

115
Preset Kit List
A
ppen
di
ces
Kit No.
Kit Name
DRUM KICK
DRUM SNR1
DRUM SNR2
DRUM CHH
DRUM OHH
DRUM CYM1
DRUM CYM2
DRUM CYM3
DRUM TOM1
DRUM TOM2
DRUM TOM3
DRUM CYM4
DRUM CYM5
PERC 1
PERC 2
PERC 3
PERC 4
PERC 5
PERC 6
PERC 7
PERC 8
PERC 9
PERC 10
PERC 11
PERC 12
PERC 13
Bass
No. P46
Salsa
Inst.
No. Instrument
K10 Jazz
S16 Picco
S29 Stck2
H12 BrshC
H13 BrshO
C12 Bell2
C10 Ride2
C03 Crsh3
P08 TmblH
P09 TmblL
T09 DblL
P15 Shakr
P11 Vibra
P05 CngHM
P06 CngHO
P07 CngaL
P03 BngoH
P04 BngoL
P28 Clap1
P01 Cowbl
P02 Tmbrn
P16 Cabas
P10 Clave
P14 Marcs
P19 AgogH
P20 AgogL
B07 Acous
No. P47
Reggae
Inst.
No. Instrument
K05 Comp
S23 Regga
S29 Stck2
H01 PureC
H02 PureO
C12 Bell2
C10 Ride2
C07 Splsh
P08 TmblH
P09 TmblL
T03 VintL
C03 Crsh3
P11 Vibra
P05 CngHM
P06 CngHO
P07 CngaL
P03 BngoH
P04 BngoL
P28 Clap1
P01 Cowbl
P02 Tmbrn
P16 Cabas
P10 Clave
P14 Marcs
P19 AgogH
P20 AgogL
B03 MuteB
No. P48
India
Inst.
No. Instrument
K01 Maple
S13 Natrl
S29 Stck2
H01 PureC
H04 v PureO
C12 Bell2
C10 Ride2
C01 Crsh1
P25 Tbla1
P26 Tbla2
P27 Tbla3
C02 Crsh2
C07 Splsh
P05 CngHM
P06 CngHO
P07 CngaL
P03 BngoH
P04 BngoL
P29 Clap2
P01 Cowbl
P02 Tmbrn
P16 Cabas
P10 Clave
P14 Marcs
P19 AgogH
P20 AgogL
B07 Acous
No. P49
Afro 1
Inst.
No. Instrument
K01 Maple
S13 Natrl
S29 Stck2
H05 16"C
H08 v 16"O
C12 Bell2
C10 Ride2
C07 Splsh
P08 TmblH
P09 TmblL
T05 AmbiM
P13 GuirL
P21 CuicH
P05 CngHM
P06 CngHO
P07 CngaL
P03 BngoH
P04 BngoL
P29 Clap2
P01 Cowbl
P02 Tmbrn
P16 Cabas
P10 Clave
P14 Marcs
P19 AgogH
P20 AgogL
B03 MuteB
No. P50
Afro 2
Inst.
No. Instrument
K05 Comp
P09 TmblL
S29 Stck2
H01 PureC
H02 PureO
C12 Bell2
C10 Ride2
C07 Splsh
T07 DblH
T08 DblM
T09 DblL
P24 SurdO
P11 Vibra
P05 CngHM
P06 CngHO
P07 CngaL
P03 BngoH
P04 BngoL
P28 Clap1
P01 Cowbl
P02 Tmbrn
P16 Cabas
P10 Clave
P14 Marcs
P19 AgogH
P20 AgogL
B07 Acous

116
No. Style Name No. Style Name No. Style Name
Preset Style List
P001 ROCK JAM 1
P002 ROCK JAM 2
P003 SHFFL JAM
P004 ROCK HOP
P005 STREET HOP
P006 MIAMI
P007 FUNK ROCK
P008 HARD ROCK1
P009 HARD ROCK2
P010 HARD ROCK3
P011 HARD ROCK4
P012 HARD ROCK5
P013 HARD ROCK6
P014 HVY ROCK 1
P015 HVY ROCK 2
P016 HVY ROCK 3
P017 FAST ROCK1
P018 FAST ROCK2
P019 FAST ROCK3
P020 ROCK SWING
P021 ROCK 1
P022 ROCK 2
P023 ROCK 3
P024 ROCK 4
P025 ROCK 5
P026 ROCK 6
P027 ROCK 7
P028 ROCK 8
P029 TRIBE ROCK
P030 JELLY JAM
P031 KNCKL HEAD
P032 GROOVE CUT
P033 AC ROCK
P034 ELEC ROCK1
P035 ELEC ROCK2
P036 SURF ROCK
P037 8TH FEEL 1
P038 8TH FEEL 2
P039 8TH FEEL 3
P040 8TH FEEL 4
P041 16TH FEEL1
P042 16TH FEEL2
P043 16TH FEEL3
P044 SHUFFLE
P045 BALLAD 1
P046 BALLAD 2
P047 BALLAD 3
P048 BALLAD 4
P049 COUNTRY 1
P050 COUNTRY 2
P051 BLUE GRASS
P052 BLUES 1
P053 BLUES 2
P054 CHICAGO
P055 ROCK BLUES
P056 LATIN ROCK
P057 FUNK 1
P058 FUNK 2
P059 FUNK 3
P060 FUNK 4
P061 FUNK 5
P062 FUNK 6
P063 SOUL 1
P064 SOUL 2
P065 NEW R&B
P066 HIP HOP 1
P067 HIP HOP 2
P068 HIP HOP 3
P069 FUSION 1
P070 FUSION 2
P071 FUSION 3
P072 FUSION 4
P073 GROOVE SIX
P074 HEAVY FUNK
P075 GOSPEL 1
P076 GOSPEL 2
P077 MED BLUES
P078 SWING 1
P079 SWING 2
P080 BRUSH
P081 BIG BAND
P082 JAZZ WALTZ
P083 JAZZ FIVE
P084 DRM'N'BSS1
P085 DRM'N'BSS2
P086 TECHNO 1
P087 TECHNO 2
P088 HOUSE 1
P089 HOUSE 2
P090 BOSSA JAM
P091 BOSSA NOVA
P092 SAMBA 1
P093 SAMBA 2
P094 SAMBA 3
P095 SALSA 1
P096 SALSA 2
P097 LATIN JAM
P098 LATIN POP1
P099 LATIN POP2
P100 REGGAE

117
A
ppen
di
ces
Dr. Rhythm Date: Dec. 27, 2002
Model: DR-3 MIDI Implementation Version:1.00
1. RECOGNIZED RECEIVE DATA
■Channel Voice Message
●Note Off
Status Second Third
8nH kkH vvH
9nH kkH 00H
n = MIDI Channel Number: 0H–FH (ch.1–ch.16)
kk = Note Number: 00H–7FH (0–127)
vv = Velocity: 00H–7FH (0–127)
* Velocity value is not recognized.
*Not recognized in case that MIDI Channel value is “OFF” for each part.
●Note On
Status Second Third
9nH kkH vvH
n = MIDI Channel Number: 0H–FH (ch.1–ch.16)
kk = Note Number: 00H–7FH (0–127)
vv = Velocity: 01H–7FH (1–127)
*Not recognized in case that MIDI Channel value is “OFF” for each part.
* For drum part, note number of recognized data is as follows:
DRUM PERC
Pad number Note number Pad number Note number
Pad 1 36 (24H) (C2) Pad 1 62 (3EH) (D4)
Pad 2 38 (26H) (D2) Pad 2 63 (3FH) (D#4)
Pad 3 37 (25H) (C#2) Pad 3 64 (40H) (E4)
Pad 4 42 (2AH) (F#2) Pad 4 60 (3CH) (C4)
Pad 5 46 (2EH) (A#2) Pad 5 61 (3DH) (C#4)
Pad 6 53 (35H) (F3) Pad 6 39 (27H) (D#2)
Pad 7 51 (33H) (D#3) Pad 7 56 (38H) (G#3)
Pad 8 49 (31H) (C#3) Pad 8 54 (36H) (F#3)
Pad 9 48 (30H) (C3) Pad 9 69 (45H) (A4)
Pad 10 45 (2DH) (A2) Pad 10 75 (4BH) (D#5)
Pad 11 41 (29H) (F2) Pad 11 70 (46H) (A#4)
Pad 12 57 (39H) (A3) Pad 12 67 (43H) (G4)
Pad 13 58 (3AH) (A#3) Pad 13 68 (44H) (G#4)
*For the bass part, the range of note numbers are 1CH–40H (28–64, E1–E4). Though the other note numbers can be received, they are
sounded converting into the range of the note numbers E1–E4.

118
MIDI Implementation
●Program Change
Status Second
CnH ppH
n = MIDI Channel Number: 0H–FH (ch.1–ch.16)
pp = Program Number: 00H–63H (prog.1–prog.100)
*MIDI Channel Number is same as drum part channel.
*Not recognized in case that drum part channel is “OFF”.
*Recognizing Program Change message, DR-3 switches Drum Kit of the same number as Program Number. Consequently, bass tone
changes as the Drum kit including.
The prog.1–50 correspond to the P01–P50, and the prog.51–100 correspond to the U01–U50.
* After recognizing a Program Change message, new voices will sound as a switch, but sounding voices will not change then.
■System Common Message
●Song Position Pointer
Status Second Third
F2H llH mmH
mm, ll = Value: 00 00H–7F 7FH (0–16383)
* Recognized under stop state of performances in Song Play mode or Style Play mode, and located the start position to play as a Value.
●Song Select
Status Second
F3H ssH
ss = Song Number: 00H–63H (1–100)
* Recognized under stop state of performances in Song Play Mode, and switched song to play.
■System Real-time Message
●Timing Clock
Status
F8H
* Recognition regards Sync Mode setting as follows:
Sync Mode: AUTO
Starting by receiving Start message (FAH) or Continue message (FBH), performances are synchronized to Timing Clock message
(F8H).
Sync Mode: REMOTE
Not recognized.
Sync Mode: INT
Not recognized.
●Start
Status
FAH

119
MIDI Implementation
A
ppen
di
ces
●Continue
Status
FBH
●Stop
Status
FCH
●Active Sensing
Status
FEH
*Once receiving Active Sensing message, DR-3 begins checking intervals of receiving messages. If an interval is over 500msec, DR-3
will stop sounding tones temporarily and not check intervals after this.
2. Messages stored in patterns
■Channel Voice Message
●Note Off
Status Second Third
9nH kkH 00H
n = MIDI Channel Number: 0H–FH (ch.1–ch.16)
kk = Note Number: 00H–7FH (0–127)
●Note On
Status Second Third
9nH kkH vvH
n = MIDI Channel Number: 0H–FH (ch.1–ch.16)
kk = Note Number: 00H-7FH (0–127)
vv = Velocity: 01H–7FH (1–127)
* For drum part, note number of stored data is as follows:
DRUM PERC
Pad number Note number Pad number Note number
Pad 1 36 (24H) (C2) Pad 1 62 (3EH) (D4)
Pad 2 38 (26H) (D2) Pad 2 63 (3FH) (D#4)
Pad 3 37 (25H) (C#2) Pad 3 64 (40H) (E4)
Pad 4 42 (2AH) (F#2) Pad 4 60 (3CH) (C4)
Pad 5 46 (2EH) (A#2) Pad 5 61 (3DH) (C#4)
Pad 6 53 (35H) (F3) Pad 6 39 (27H) (D#2)
Pad 7 51 (33H) (D#3) Pad 7 56 (38H) (G#3)
Pad 8 49 (31H) (C#3) Pad 8 54 (36H) (F#3)
Pad 9 48 (30H) (C3) Pad 9 69 (45H) (A4)
Pad 10 45 (2DH) (A2) Pad 10 75 (4BH) (D#5)
Pad 11 41 (29H) (F2) Pad 11 70 (46H) (A#4)
Pad 12 57 (39H) (A3) Pad 12 67 (43H) (G4)
Pad 13 58 (3AH) (A#3) Pad 13 68 (44H) (G#4)
* All note numbers are stored in bass part.
120
Function...
Basic
Channel
Mode
Note
Number :
Velocity
After
Touch
Pitch Bend
Control
Change
Transmitted Recognized Remarks
Default
Changed
Default
Messages
Altered
True Voice
Note On
Note Off
Key's
Channel's
**************
**************
**************
X
X
X
**************
X
X
X
XX
1–16
1–16
Storable in Memory
Mode 3
X
O
X
9n v=1–127
0–127
28–64
X
X
X
Dr. Rhythm
Model DR-3
Date: Dec. 27, 2002
Version : 1.00
MIDI Implementation Chart
**************
**************
MIDI
Implementation
Cha
r
t
121
A
ppen
di
ces
Program
Change
System Exclusive
System
Common
System
Real Time
Aux
Messages
Notes
: True Number
: Song Position
: Song Select
: Tune Request
: Clock
: Commands
: Local On/Off
: All Notes Off
: Active Sensing
: Reset
X
**************
X
X
X
X
X
X
X
X
X
X
O
X
O
O
X
0–99
1–100
O SYNC=AUTO *1
O SYNC=AUTO *1
X
X
O
X
* 1 Received when Sync Mode is AUTO and unit is functioning as slave
Mode 1 : OMNI ON, POLY
Mode 3 : OMNI OFF, POLY
Mode 2 : OMNI ON, MONO
Mode 4 : OMNI OFF, MONO
O : Yes
X : No

122
Specifications
Styles
User Style: 100 styles
Preset Style: 100 styles
* 11 patterns for a style
Songs
User Song: 100
Song Length: Maximum 250 patterns for a song
TSC (Total Sound Control)
Sound Shape
Preset Patch: 8 patches
User Patch: 8 patches
Ambience
Preset Patch: 8 patches
User Patch: 8 patches
Max Polyphony
12 voices
Instrument
Drum and Perc: 120
Bass: 12
Resolution
96 per quarter note
Tempo
20–260 bpm
Recording Method
Realtime / Step
Pads
13 (Velocity-sensitive)
Display
Backlit LCD (16 Characters x 2 Lines)
Connectors
Output Jack: L, R (RCA phono type),
L (PHONES), R (MONO) (1/4 inch phone type)
Foot Switch Jack (Stereo 1/4 inch phone type)
MIDI IN Connector
DC IN (AC Adaptor Jack)
Power Supply
DC 9V: Dry Battery x 6, AC Adapter (PSA series)
Power Consumption
200 mA
* Expected battery life under continuous use:
Alkaline: approx. 5 hours
This figures will vary depending on the actual
conditions of use.
Dimensions
213 (W) x 185 (D) x 53 (H) mm
8-7/16 (W) x 7-5/16 (D) x 2-1/8 (H) inches
Weight
710 g / 1 lb 10 oz (excluding dry batteries)
Accessories
Alkaline Dry Battery (LR6 (AA) type) x 6
Owner's Manual
Roland Service (Information Sheet)
Options
AC Adaptor: PSA Series
Foot Switch: FS-5U
Foot Switch Cable: PCS-31 (Roland)
(1/4inch Phone Plug (stereo)–1/4inch Phone
Plug (mono) x 2)
* In the interest of product improvement, the
specifications and/or appearance of this unit are
subject to change without prior notice.

123
A
ppen
di
ces
Index
Buttons
[AMBIENCE] ........................................................ 52
[AUTO] .................................................................. 46
[INST] .................................................................... 58
[KEY SHIFT] .........................................................42
[MANU] ................................................................ 43
[SONG] .................................................................. 74
[SOUND SHAPE] ................................................. 51
[TEMPO] ............................................................... 41
A
AMBIENCE ........................................................... 36
Ambience .............................................................. 33
Copying .......................................................... 57
Naming ........................................................... 57
Parameters ..................................................... 56
Auto Mode ......................................................34, 46
B
Bass Part ..........................................................66, 68
Bass Sounds .......................................................... 59
Batteries ................................................................. 15
Beat ......................................................................... 62
Block Loop ............................................................ 86
C
Clearing
Patterns ........................................................... 73
Song ................................................................ 85
Style ................................................................. 72
Compressor ........................................................... 54
Connection ............................................................ 16
Foot Switch .................................................... 29
MIDI Devices ................................................. 93
COPY ..................................................................... 82
Copying
Kit .................................................................... 92
Patterns ........................................................... 72
Song ................................................................ 84
Style ................................................................. 71
D
DELETE ................................................................. 81
Demo ...................................................................... 21
Drum Part .......................................................65, 67
Drum Sounds ........................................................ 59
E
Edit screen .............................................................38
Editing
Notes ...............................................................78
Songs ...............................................................80
ENDING ................................................................35
Equalizer ................................................................53
F
Factory Reset .........................................................18
FILL ........................................................................35
Foot Switch ......................................................29, 48
H
Headphones ..........................................................16
I
Initial tempo ..........................................................75
INSERT ..................................................................80
Instruments ...........................................................37
INTRO ....................................................................35
K
Key Shift ..........................................................28, 42
Key Transpose ......................................................70
Kit ...........................................................................90
Copying ..........................................................92
Naming ...........................................................91
Style .................................................................63
Kits .........................................................................36
L
Loop Play ..............................................................86
LP:OFF ...................................................................86
LP:BLK ...................................................................86
LP:ON ....................................................................86
M
Manual Mode .......................................................34
Manual mode ........................................................43
Master ....................................................................93
Metronome Volume .............................................89
MIDI .......................................................................93
MIDI Channels .....................................................94
MIDI Connector ...................................................93
Mute .................................................................45, 63

124
Index
N
Naming
Kit .................................................................... 91
Song ................................................................ 84
Style ................................................................. 71
Note Messages ...................................................... 96
O
OUTPUT Jack ....................................................... 89
P
Pad ......................................................................... 58
Pad Functions ....................................................... 37
Pad Sensitivity ...................................................... 89
Pan .......................................................................... 91
Pattern ................................................................... 44
Clearing .......................................................... 73
Copying .......................................................... 72
Measures ........................................................ 64
Recording ....................................................... 65
Substituting .................................................... 78
Pattern pads .............................................. 23, 35, 44
Pattern Progression .............................................. 47
Patterns .................................................................. 35
Pause ...................................................................... 40
Percussion Sounds ............................................... 59
Performing
Songs ............................................................... 85
Polarity switch ...................................................... 29
Power ..................................................................... 17
POWER switch ..................................................... 17
Preset Style ............................................................43
Q
Quantize ................................................................ 66
R
Realtime Recording .................................61, 65, 77
Realtime Recording screen .................................39
Recording
Patterns ........................................................... 65
Song ................................................................ 76
Reference Pitch .....................................................89
S
Slave .......................................................................93
Song ..................................................................34, 74
Changing the Tempo ....................................83
Clearing ..........................................................85
Copying ..........................................................84
Creating ..........................................................74
Edit ..................................................................80
Naming ...........................................................84
Performing .....................................................85
Playing Repeatedly (Loop Play) .................87
Recording .......................................................76
Tempo .............................................................75
TSC ..................................................................76
Song Chain ............................................................87
Song Edit screen ...................................................39
Song Mode ............................................................37
Song Recording screen ........................................39
Song screen ...........................................................38
Sound group .........................................................58
SOUND SHAPE ...................................................36
Sound Shape .........................................................32
Copying ..........................................................55
Naming ...........................................................55
Parameters .....................................................53
Step Recording .........................................61, 67, 76
Step Recording screen .........................................38
Style ..................................................................22, 34
Beat ..................................................................62
Clearing ..........................................................72
Copying ..........................................................71
Creating ..........................................................61
Kit ....................................................................63
Mute ................................................................63
Naming ...........................................................71
Selecting ....................................................26, 43
Starting/Stopping .........................................44
Tempo .............................................................62
TSC ..................................................................64
Style Play Mode ....................................................34
Style screen ............................................................38
Sync Mode .............................................................95
Synchronizing .......................................................93
System ....................................................................88

125
Index
A
ppen
di
ces
T
Tempo ........................................................ 27, 36, 41
Song ................................................................ 75
Style ................................................................. 62
TSC ............................................................. 32, 36, 51
Song ................................................................ 76
Style ................................................................. 64
U
User kits ................................................................. 90
V
VARIATION ................................................... 24, 45
Variation ................................................................ 36
VARIATION [KIT] ......................................... 45, 60
VARIATION [MUTE] ......................................... 45
VARIATION [PTN] ............................................. 45
Velocity Edit ......................................................... 69
Velocity Edit screen ............................................. 39
VERSE .................................................................... 35
Volume
Instrument sound .........................................91

126
Memo ...

2
This product complies with the requirements of European Directive 89/336/EEC.
For EU Countries
For Canada
This Class B digital apparatus meets all requirements of the Canadian Interference-Causing Equipment Regulations.
Cet appareil numérique de la classe B respecte toutes les exigences du Règlement sur le matériel brouilleur du Canada.
NOTICE
AVIS
For the USA
FEDERAL COMMUNICATIONS COMMISSION
RADIO FREQUENCY INTERFERENCE STATEMENT
This equipment has been tested and found to comply with the limits for a Class B digital device, pursuant to Part 15 of the
FCC Rules. These limits are designed to provide reasonable protection against harmful interference in a residential
installation. This equipment generates, uses, and can radiate radio frequency energy and, if not installed and used in
accordance with the instructions, may cause harmful interference to radio communications. However, there is no guarantee
that interference will not occur in a particular installation. If this equipment does cause harmful interference to radio or
television reception, which can be determined by turning the equipment off and on, the user is encouraged to try to correct the
interference by one or more of the following measures:
– Reorient or relocate the receiving antenna.
– Increase the separation between the equipment and receiver.
– Connect the equipment into an outlet on a circuit different from that to which the receiver is connected.
– Consult the dealer or an experienced radio/TV technician for help.
This device complies with Part 15 of the FCC Rules. Operation is subject to the following two conditions:
(1) This device may not cause harmful interference, and
(2) This device must accept any interference received, including interference that may cause undesired operation.
Unauthorized changes or modification to this system can void the users authority to operate this equipment.
This equipment requires shielded interface cables in order to meet FCC class B Limit.
USING THE UNIT SAFELY
001
• Before using this unit, make sure to
read the instructions below, and the
Owner’s Manual.
..................................................................................................
002c
• Do not open (or modify in any way)
the unit or its AC adaptor.
..................................................................................................
003
• Do not attempt to repair the unit, or
replace parts within it (except when
this manual provides specific instruc-
tions directing you to do so). Refer all
servicing to your retailer, the nearest
Roland Service Center, or an autho-
rized Roland distributor, as listed on
the “Information” page.
..................................................................................................
004
• Never use or store the unit in places
that are:
• Subject to temperature extremes
(e.g., direct sunlight in an enclosed
vehicle, near a heating duct, on top
of heat-generating equipment); or
are
• Damp (e.g., baths, washrooms, on
wet floors); or are
• Humid; or are
• Exposed to rain; or are
• Dusty; or are
• Subject to high levels of vibration.
..................................................................................................
007
• Make sure you always have the unit
placed so it is level and sure to remain
stable. Never place it on stands that
could wobble, or on inclined surfaces.
..................................................................................................
008b
• Use only the specified AC adaptor
(PSA-series), and make sure the line
voltage at the installation matches the
input voltage specified on the AC
adaptor’s body. Other AC adaptors
may use a different polarity, or be
designed for a different voltage, so
their use could result in damage,
malfunction, or electric shock.
..................................................................................................
009
• Do not excessively twist or bend the
power cord, nor place heavy objects
on it. Doing so can damage the cord,
producing severed elements and short
circuits. Damaged cords are fire and
shock hazards!
..................................................................................................
Used for instructions intended to alert
the user to the risk of injury or material
damage should the unit be used
improperly.
* Material damage refers to damage or
other adverse effects caused with
respect to the home and all its
furnishings, as well to domestic
animals or pets.
Used for instructions intended to alert
the user to the risk of death or severe
injury should the unit be used
improperly.
The ● symbol alerts the user to things that must be
carried out. The specific thing that must be done is
indicated by the design contained within the circle. In
the case of the symbol at left, it means that the power-
cord plug must be unplugged from the outlet.
The symbol alerts the user to important instructions
or warnings.The specific meaning of the symbol is
determined by the design contained within the
triangle. In the case of the symbol at left, it is used for
general cautions, warnings, or alerts to danger.
The symbol alerts the user to items that must never
be carried out (are forbidden). The specific thing that
must not be done is indicated by the design contained
within the circle. In the case of the symbol at left, it
means that the unit must never be disassembled.
Owner’s Manual
03236845 1*SX
Thank you, and congratulations on your choice of the BOSS DR-3 Dr. Rhythm.
Before using this unit, carefully read the sections entitled:
• USING THE UNIT SAFELY (page 2–4)
• IMPORTANT NOTES (page 5)
These sections provide important information concerning the proper operation of the unit.
Additionally, in order to feel assured that you have gained a good grasp of every feature provided by
your new unit, Owner's manual should be read in its entirety. The manual should be saved and kept
on hand as a convenient reference.
■
Printing Conventions in This Manual
• Text or numerals enclosed in square brackets [ ] indicate buttons.
[SONG] SONG button
START [ ] START button
• Reference such as (p. **) indicate pages in this manual to which you can refer.
Copyright © 2003 BOSS CORPORATION
All rights reserved. No part of this publication may be reproduced in any form without the written permission of BOSS
CORPORATION.
