Dvra8 3 Col
User Manual: dvra8 3 col
Open the PDF directly: View PDF ![]() .
.
Page Count: 2
USB-DVR
(4GB)
Model # DVRA8
Instruction Manual
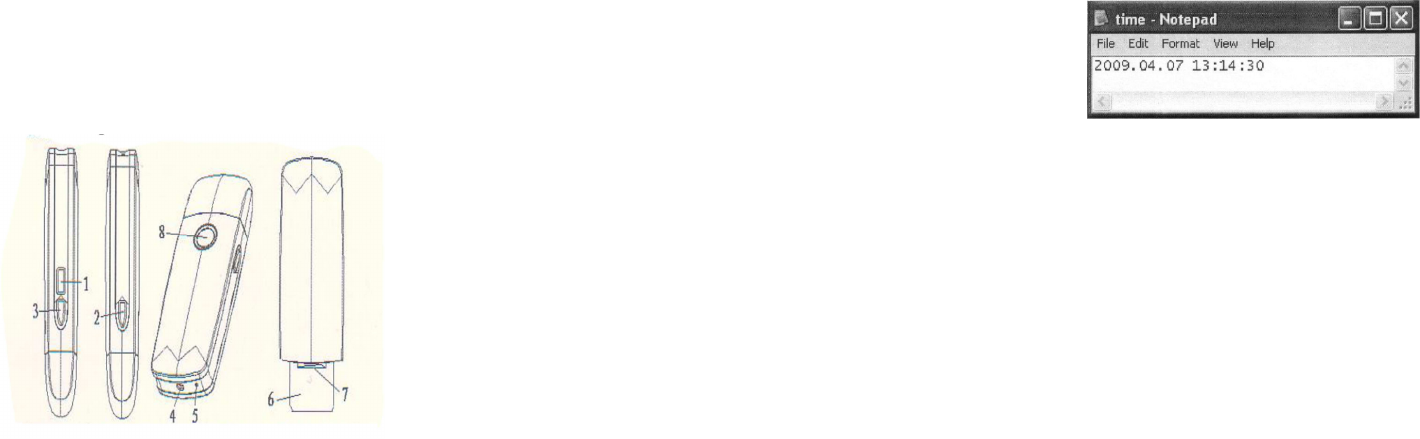
1. Diagram
1. Reset button 2. Take photos or
video 3 Turn on/ Off 4. Camera 5.
Microphone 6. US connector 7. TF
card slot 8. Indicator
1. Turning the DVR ON/ OFF
• Press and hold Button 3 for
about 2 seconds. The DVR will
vibrate for about 5 seconds and
the indicator light will be solid
red. The DVR is now in standby
mode.
• When the DVR is on press and
hold Button 3 for about 2
seconds. The DVR will vibrate 2
times and the red indicator light
will turn off.
2. Taking Photos
• Turn the DVR on
• When in stand-by mode press
and release button 2. The DVR
will vibrate and the red indicator
will turn off and back on
indicating that a photograph has
been taken.
3. Taking videos
• Turn the DVR on
• When in stand-by mode press
and hold button 2 for about 2
seconds. DVR will vibrate 2
times and the indicator light will
flash 2 times. You are now
recording video.
4. Motion Detection
• Turn the DVR on
• When in stand-by mode press
and release Button 3. The
indicator light will flash six times
and the DVR will vibrate 6times
and the indicator light will turn
off.
5. Saving video files
• Press and release button 3. The
indicator will flash 3 times and
the unit will vibrate 3 times as the
file is save.
6. Udisk
• Turn the DVR off, insert into
empty USB port on your
computer. The indicator light
will turn on and the unit will
vibrate about 5 seconds you can
now find the DVR in the My
Computer folder. Your computer
will automatically assign the
drive a letter (Normally E: )
7. Time Setting: The DVR can display the
recording time on the video/ photo file in
the format of year.month.day and
hour:min:second.
• Create a notepad file with the
name “time” and enter the
current date and time in the
format: yyyy.mm.dd hh:mm:ss.
• Connect the DVR to your
computer and copy “time.txt”
into the root directory of the
DVR (usually drive “E”), saving
it to the DVR’s memory card.
• Click “Safely Remove
Hardware”, “Stop”, highlight
“Syntek USB MSDC USB
Device”, and click “OK”.
Disconnect the DVR from the
USB cable, turn it on and turn it
back off. The current date and
time is now set and will appear
on video files.
8. Charging
• When the battery on the DVR
needs to be charge just plug
the unit into an open USB
port on your computer. While
the unit is charging the red
light will turn on. You will
need to charge the battery for
four hours. This DVR has a
high capacity Polymer
Lithium Ion battery so it can
be charged at any time. Note:
When charging the battery for
the first five times, charge the
battery completely after
allowing it to discharge fully.
To completely charge, let it
charge for 5 hours. This will
ensure that maximum battery
life is achieved.
• To avoid damage to the DVR
or computer do not just pull

the DVR out from the USB
port. You will need to click on
the“Safely Remove” icon and
select which item to remove.
Click “OK” and you will see a
balloon on the bottom right
side of your screen, indicating
that it is now safe to remove
the device.
Parameters
Video Format
AVI
Video Encoder
M
-
JPEG
Video
Resoultion 720 x 480 VGA
Video Frame
Rate 30 fps
Playback
software
operating system from with or
mainstream audio and video
playback software (Codec maybe
required)
Image format
4032x3024
Images
5M pix
Image Ration
4:3
Supported OS
Windows ME/ 2000/
XP/ 2003
Vista/ M
Battery
Capacity 200 mAh
Working
time
A
bout
45
minutes
Charge
Voltage DC-5V
Interface
Mini 5pin USB
Storage
Support micro SD card up to 16GB
Battery type
High
-
Capacity Lithium Polymer
Precautions:
• Please note that it is the
responsibility of the customer to
check all local, state, and federal laws
governing the use of video spy
(hidden) cameras (with or without
audio) before ordering and/or using
hidden or covert video and/or audio
surveillance equipment. In most
states, hidden video surveillance is
legal, as long as it is not done in an
area where reasonable privacy is
expected. These areas include, but
are not limited to, bathrooms,
bedrooms and dressing rooms. In
most states, video surveillance does
not require the consent of parties
involved. However, in some states,
the use of audio recording or
surveillance requires consent of all
parties involved. There are also
various federal and state laws
regulating the use and possession of
some types of audio surveillance
equipment. We recommend that you
check all local, state, and federal laws
regarding the use of video spy
(hidden) cameras with or without
audio.
• The battery will need to be charged if
the unit is not used for a while.
• This unit should not be used as
primary storage for your files.
Important files should be loaded onto
your computer’s hard drive and
regular back ups should be done.
• This is not a professional video
recording device and may not
produce professional quality videos.
• This product should not be used in
extreme hot or cold temperatures.
• Use this product in sufficient
lighting, but do not aim it directly at
the sun or other strong light sources,
as the optical components may be
damaged.
• Do not use this product in extremely
dusty environments.
• This product should not be used near
strong magnetic or electrical fields. It
also cannot withstand strong impacts
or vibrations.
Revised 1/14
