E1007 Barcode Reader User Guide
User Manual:
Open the PDF directly: View PDF ![]() .
.
Page Count: 43

About This User Guide
Pls read all the content of the user guide carefully to use the products safely and effectively.
You are advised of keeping it properly for your using reference.
Disclaimer
Please do not dismantle the product or tear up the seal on it, otherwise we won’t provide
warranty or replacement service.
The pictures in this user guide are for reference only. If there are any pictures which not
match the actual product, please take actual products as the standard. Updated information
is subject to change without notice.
All information contained in this guide are protected by copyright, and our company
reserves all rights. All or part of this guide is prohibited to excerpt, copy, bundle other
products, or sell without the written permission from us.
2017 Guangzhou Yoko Electron Co., Ltd all rights reserved.
Service Information
For technical assistant or product service and repair, please go to www.chinayoko.com
用户使用手册
User Guide
This User Guide Applies to E1007、E1005

Version Record
Version number
Version description
Version date
V 1.0.0
Initial version
2016-8-23
V 1.2.3
Optimize menu
2016-9-10
V 1.5.1
Optimize decoding performance
2016-12-01
V 2.0.1
Modify performance menu
2017-03-01
V 2.0.2
Perfect overall performance
2017-07-18
CATALOG
1、Product Introduction ........................................................................................................................................... 1
1.1 Main feature ................................................................................................................................................ 1
1.2 Unpack your device .................................................................................................................................... 1
1.3.1 External view.......................................................................................................... 错误!未定义书签。
1.4 Communication port ................................................................................................................................... 2
1.5 Interface description ................................................................................................................................... 2
1.5.1 Scan module interface CMOS ....................................................................................................... 3
1.5.2 Standard serial port(DB9) ......................................................................................................... 3
1.5.3 USB interface ................................................................................................................................... 3
1.6 Connect your device .................................................................................................................................. 5
1.6.1 Connect with USB ........................................................................................................................... 5
1.6.2 Connect with RS-232 Serial Port .................................................................................................. 5
1.7 Barcode preset parameters ...................................................................................................................... 5
1.8 Start-up, shutdown and restart ................................................................................................................. 6
1.9 Maintenance ................................................................................................................................................ 6
1.10 Reading skills ............................................................................................................................................ 6
2.Command Instruction ............................................................................................................................................ 8
2.1 barcode instructions explain ..................................................................................................................... 8
2.2 Serial port instructions explain ................................................................................................................. 9
2.3 Instruction list ............................................................................................................................................ 10
2.4 Quick instructions(HEX format) ......................................................................................................... 11
3、System setting ................................................................................................................................................... 12
3.1 Mark setting ............................................................................................................................................... 12
3.2 Setting Steps ............................................................................................................................................. 12
3.2.1 Interface mode setting .................................................................................................................. 13
3.2.2 Buzzer and LED setting ............................................................................................................... 13
3.2.3 Baud rate setting ........................................................................................................................... 14
3.2.4 Serial port instructions response setting .................................................................................... 14
3.2.5 Trigger scan and stop scan setting ............................................................................................. 15
3.2.6 Trigger scan model and reading mode setting ......................................................................... 15
3.2.7 Same Barcode Scanning Interval setting .................................................................................. 16
3.2.8 Scan time setting for key trigger scan mode ............................................................................. 16
3.2.9 Scan time setting for serial command/auto scan mode .......................................................... 17
3.2.10 Case switching ............................................................................................................................ 18
3.2.11 auto sense mode setting ............................................................................................................ 18
3.2.12 USB upload speed setting ......................................................................................................... 19
3.2.13 Decode setting ............................................................................................................................ 19
3.2.14 Disable/Enable read all barcodes ............................................................................................. 20
3.2.15 Start character ............................................................................................................................. 21
3.2.16 Ending character setting ............................................................................................................ 21
3.2.17 User-defined start character/ending character ....................................................................... 23
Appendix 1 User-defined start character/ending character ...................................................................... 24
Appendix 2 ASCII table .................................................................................................................................. 33
Appendix 3 barcode sample .......................................................................................................................... 37
第 1 页 共 35 页
1、Product Introduction
This user guide applies to E1005 and E1007, which identify 1D barcodes by red light
scanning pattern, and apply the complete set of patent technology developed by Guangzhou
YOKO Electron Co., Ltd. The scanners above are of strong identification capability, and
support automatic continuous scanning mode with fast and flexible scanning speed.
In this chapter, we will introduce the instruction of scanner with pictures, please
compare to the scanner you bought when reading this user guide, which is good for your
understanding. This chapter applies to regular users, maintenance personnel, and software
developers.
1.1 Main feature
* Complete independent research and development, possessing the complete set of
patent, plug and play without the need to install driver.
* Wide voltage design to avoid the data can’t be transmitted due to voltage fluctuation.
* 32-bit master chip equipped with patented software, the scanner can smoothly decode
reflective, wrinkled, blurred, and colorful barcode, and can also normally scan in light and
dark environment.
* Adopt all tantalum capacitors and anti-oxidation optical technology, avoiding the
problem of sensitivity declining after long-term using.
1.2 Unpack your device
After you open the shipping carton containing the product, take the following steps:
- Take out the accessories from package.
- Check with the packing list to see if everything is complete and in good condition.
If there are any damaged or missing components, please keep the original
package and contact your supplier for after-sales service.
第 2 页 共 35 页
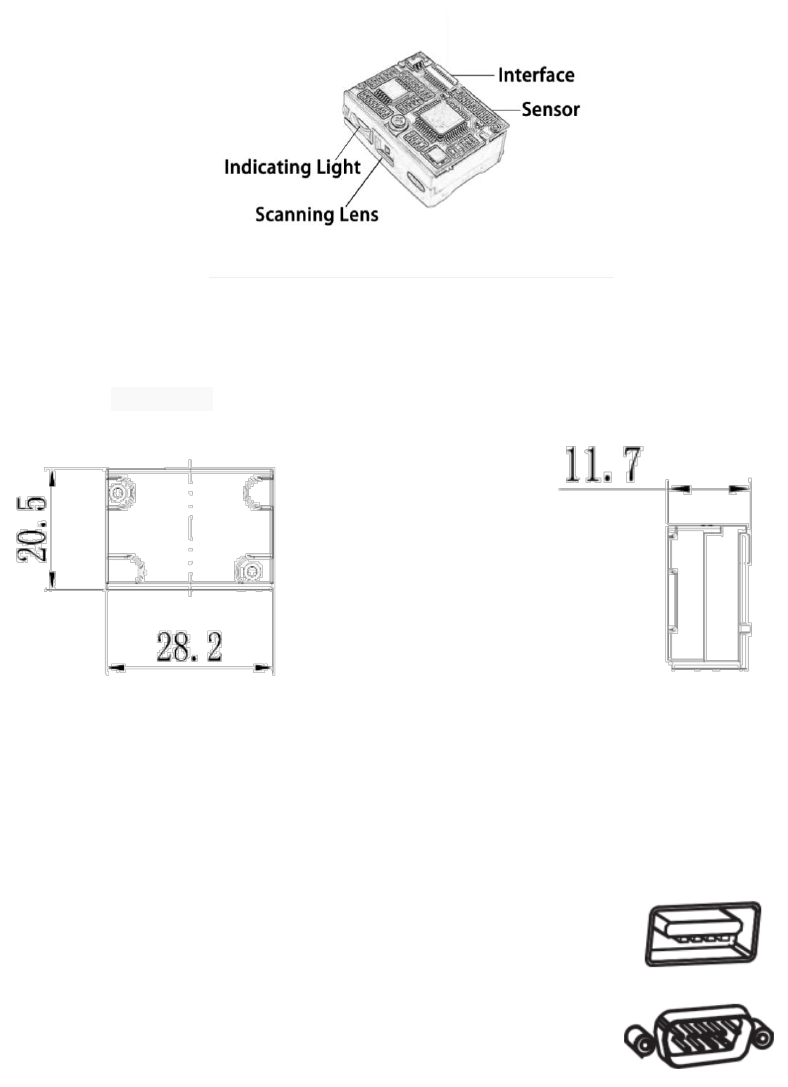
1.3 Product display
1.3.1 External view
1.3.2 Dimention(mm)
Aerial view
Side view
1.4 Communication port
The scanner must be connected to a host to operate. Host can be a PC, POS machine,
intelligent terminal with USB or RS-232 interface.
USB
USB interface on host
RS-232
RS-232 interface on host
1.5 Interface description
Product standard interfaces are: RS232 (DB9 orifice), USB and Keyboard. Standard
interface of different products are not the same, please confirm before purchase, other
第 3 页 共 35 页
interfaces can be customized according to customer needs.
1.5.1 Scan module interface CMOS
Interface NO.
Name
Type
Description
1
NC
Empty
Spare
2
VCC
DC power
supply
DC3.3V or DC5V(depending on the
module)±5%
3
GND
Digital ground
GND
4
Rx
Input
Serial input port TTL level
5
Tx
output
Serial input port TTL level
6
USB_D-
Input / output
USB_D- signal
7
USB_D
+
Input / output
USB_D+ signal
8
NC
Empty
Spare
9
BPR
output
Buzzer output signal
10
LED
output
The light indicates successful decoding, and
outputs low level 150ms
11
NC
Empty
Spare
12
TRIG
Input
Trigger to scan
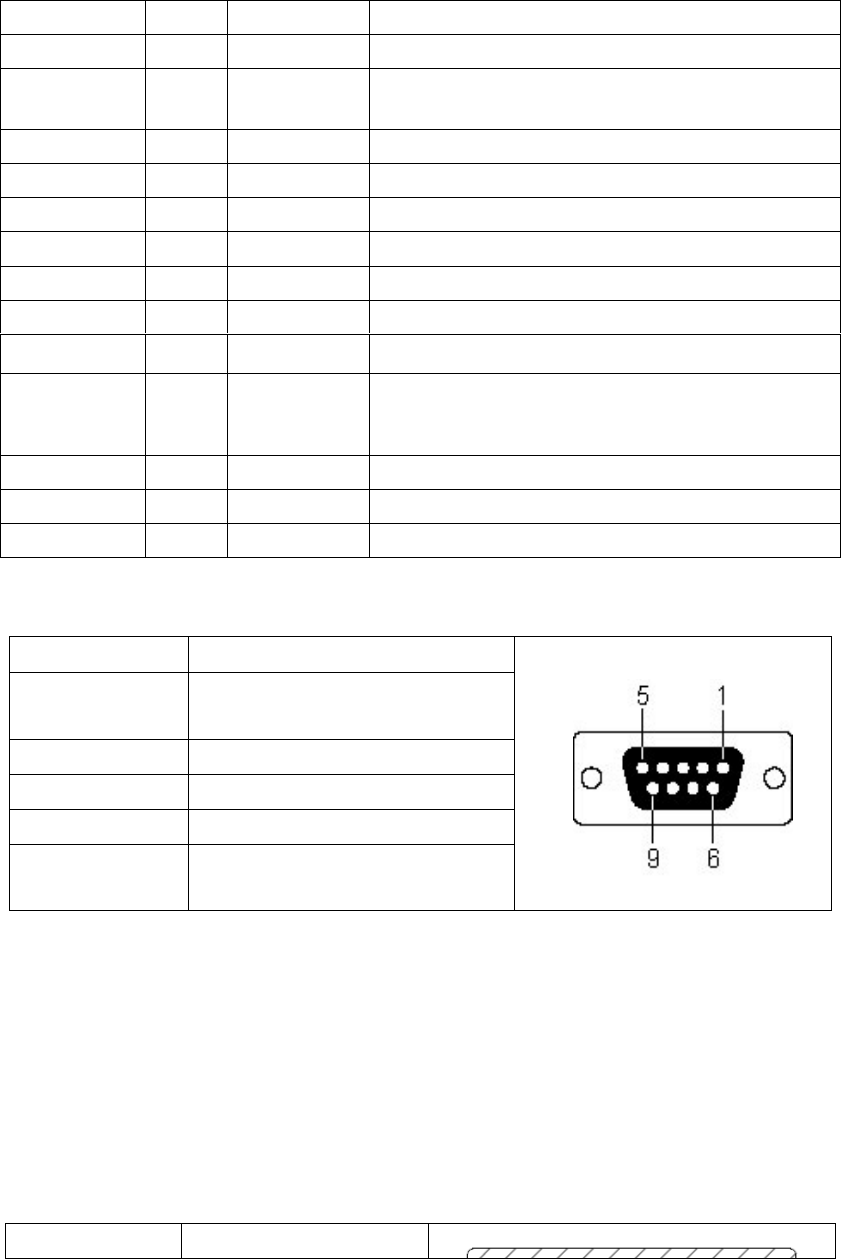
1.5.2 Standard serial port(DB9)
NO.
function
1
Trigger(choose to
connect )
2
Rx
3
Tx
5
GND
9
DC 5V(choose to
connect)
At the 1 pin of the serial port, when the pin receives low level of 10ms, it is equivalent to
press the trigger button, then trigger to scan (this function is optional).
At the 6 pin of the serial port, only for trigger mode, after each trigger, if you do not
recognize the bar code, the pin will output low level of 100ms (this function belongs to
value-added service).
1.5.3 USB interface
No.
Function

第 4 页 共 35 页
1
VCC
2
D-
3
D+
4
GND
According to the actual situation can be divided into two types: usb hid keyboard and
usb virtual serial port. When you connect the engine to the host via USB, you can enable the
USB HID-KBW feature by scanning the bar code below; then the engine's transfer will be
modeled as a USB keyboard input. The host receives the keys of the virtual keyboard.
第 5 页 共 35 页
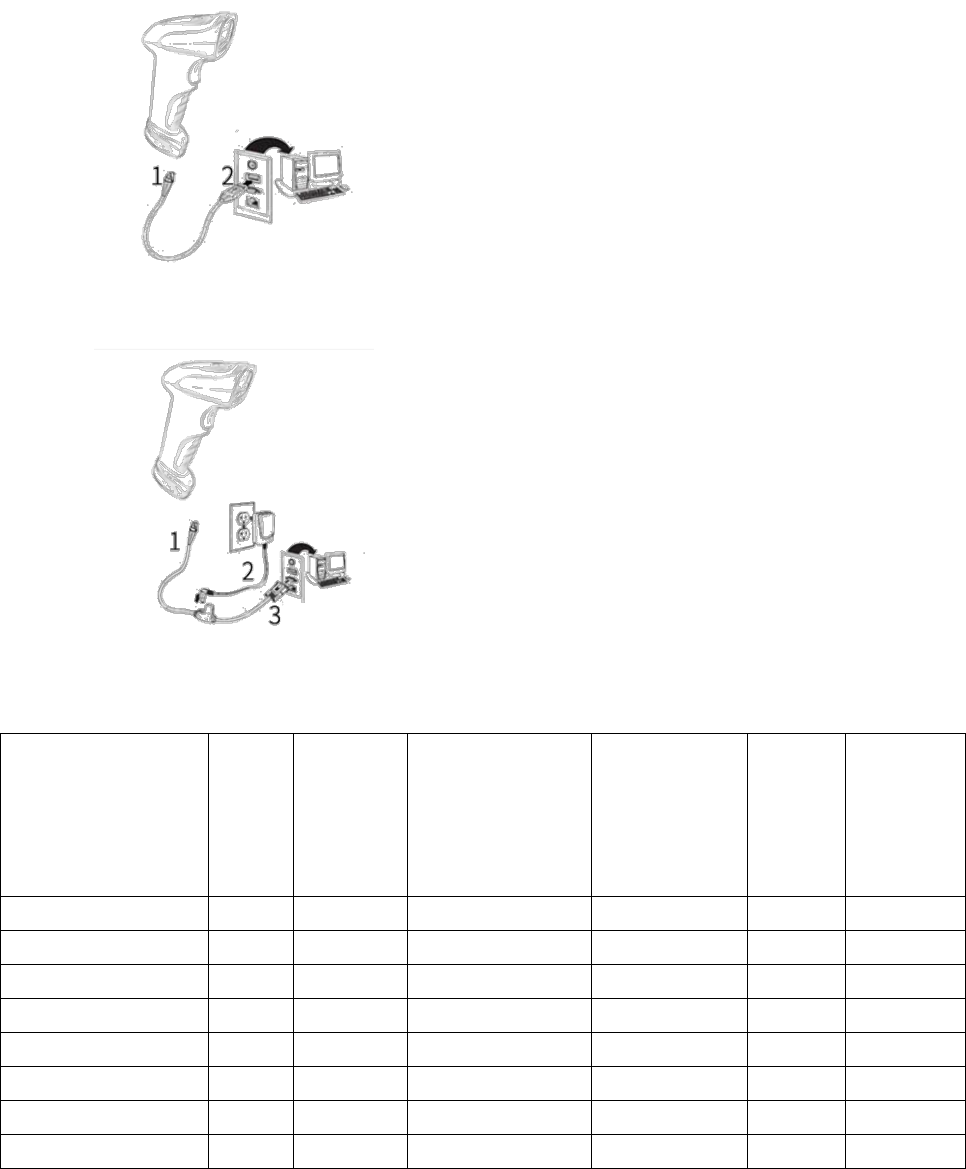
1.6 Connect your device
1.6.1 Connect with USB
1: Connect the device interface of USB with
scanner ;
3: Connect the host interface (USB interface) of
USB with host computer.
1.6.2 Connect with RS-232 Serial Port
1: Connect the device interface of RS-232
serial port with scanner ;
2: Connect the RS-232 serial port with power
adapter;
3: Connect the host interface (RS-232
interface) of the RS-232 serial port with host
computer.
1.7 Barcode preset parameters
barcode type
read
effect
test
effect test
transmission
prefix /postfix
code
transmission
postposition
minimu
m /
maximu
m
length
code ID
(EAN13 & UPC E)
√
√
√
×
13
A
EAN8
√
√
√
×
8
B
UPC A
√
√
√
×
12
C
CODABAR(NW-7)
√
-
√
-
4~70
E
CODE 39
√
-
√
-
3~50
F
CODE 93
√
√
√
×
1~80
G
INTERLEAVED
2OF5
√
-
√
×
4~80
H
CODE 128
√
√
-
×
1~80
K

第 6 页 共 35 页
1、 "√" represents the default parameter is open, "-" denotes the default parameter is close,
"X" means this parameter does not exist in the barcode type;
2、 "2" marked on the upper right corner of minimum / maximum length means bar length is
fixed;
1.8 Start-up, shutdown and restart
Start-up:Connect host computer with scanner, which will automatically start-up and in
working state.
Shutdown:Remove the data cable which is connected with scanner; remove the USB which
is connected with host computer.
Restart:If the scanner crashes or doesn't respond, please switch it off and restart.
1.9 Maintenance
* The window must be kept clean, the supplier do not bear the guarantee responsibility due
to the improper maintenance.
* Avoid the window being wear and tear or scratched by hard object
* Use the hairbrush to remove the stain on the window
* Clean the window with a soft cloth, such as lens cleaning cloth
* Spraying liquid onto the window is prohibited.
* Prohibit any cleaning solvents, except for the cleaning water.
1.10 Reading skills
If the barcode is small, it should be closer to the scanning window; if the barcode is
large, it should be far away from the scanning window a little more, thus easier to be read
correctly.
If the barcode is highly reflective (for example, the coated surface), you may need to tilt
the barcode at an angle to successfully scan it.

第 7 页 共 35 页
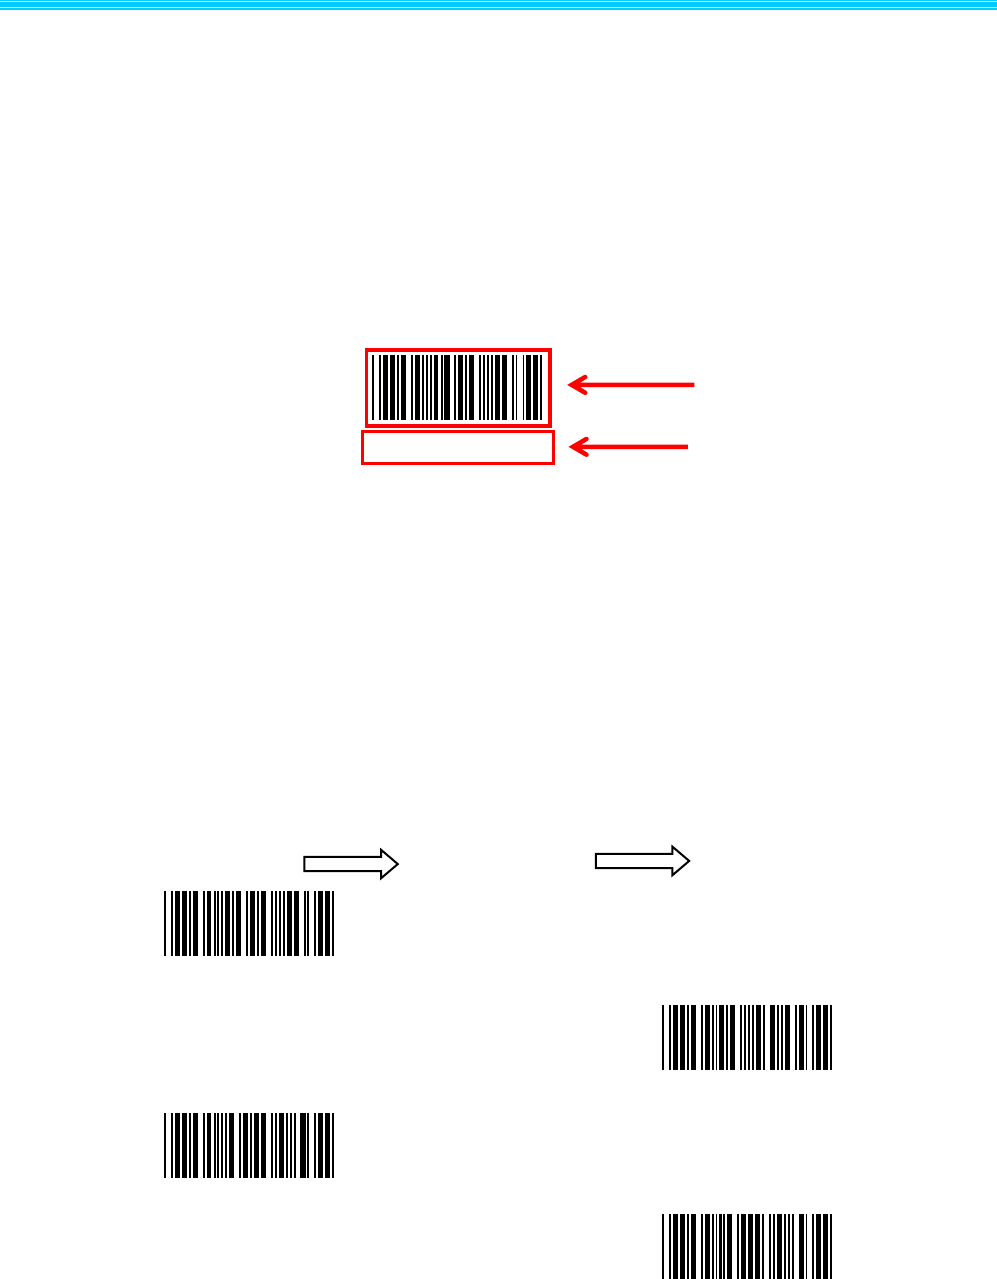
Barcode scanning example:

第 8 页 共 36 页
2.Command Instruction
2.1 barcode instructions explain
1、Instruction barcodes use code 39 type Full-ASCII codes to design and print. The Command value
in instruction barcodes is the same as serial port instructions.
2、The description with an asterisk(*)means factory default。
(1)Scan: Enter setting “YSET”. After enter setting, if you don’t scan any instruction barcodes in 30
seconds, the scanner will exit setting automatically.
(2)Scan: Change settings. You can scan one or multiple instruction barcodes
(3)Scan: Exit and saving changes “YEND”.

第 9 页 共35 页
2.2 Serial port instructions explain
Table 2.2-1 Data format of serial port instructions
Length
Message
Source
Message
target
Reserve
Reserve
Command
beeper
Check Sum
Table 2.2-2 Serial port instructions analysis
Field
Format
Sub-Field
Description
Length
1 Byte
Length
command length,not include
Check Sum,maximum 0xFF
Message
Source
1 Byte
0x04 = Host(PC or IPC);
0x31 = Decoder(barcode scanner)
Sources of command
Message
target
1 Byte
0x04
=
Host
(
PC
机或工控机);
0x31 = Decoder(barcode scanner)
command target address
Reserve
1Byte
reserved(0x00)
Reserve
1Byte
reserved(0x00)
Command
Variable
number of
bytes
Beeper
1 Byte
0x31 = open
0xFF = close
If the buzzer is open
Check Sum
2 Byte
Check sum of message
formatted as High byte low
byte
Remark:
1、Check Sum:
Complement of the command sum, high byte is ahead, low byte is behind.
Check calculation method: all bits(not including two check bits) sum up, then inverse the
result and plus 1
Example:Exit and save(0A 04 31 00 24 25 45 4E 44 FF) add up and equal :02 5E,
Turn to binary(0000 0010 0101 1110), inverse calculate:1111 1101 1010 0001,add 1 and get
the check code(FD A2)。
2、When the command below which format is character(without “0X”as prefix, if you want use
it as serial command, you need to converted them to ASCII which is Hexadecimal.

第 10 页 共 36 页
2.3 Instruction list
Table 2.3-1 instruction list
name
describe
instruction
barcodes 1
Serial port
instructions 2
Serial port
reply3
YSET
Enter setting mode
√
×
×
YEND
Exit and save6
√
√
√
TRIGGER_SCAN
Trigger scan
×
√
√+barcode
4
STOP_SCAN
Stop scanning
√
√
√
FACTORY_DEFAULTS
Restore factory setting
√
√
√
CUSTOM_DEFAULTS
Restore user setting
√
√
√
WR_CUSTOM_DEFAULTS
Write user-defined
default
√
√
√
READ_REVISION
Read the batch
version number
√
√
√+version 5
PARAM_MODIFY
Change parameters
instructions
√
√
√
OPEN_BEEPER
open buzzer
×
√
×
ACK
Shake hands
×
√
×
remark:
1、Whether to support barcode instruction.
2、Whether to support serial instruction.
3、When allowed to answer, do the scanner need to answer the instruction which sent by serial port;
4、When decode successfully, except for answer, the scanner will return the ASCII code of the
barcode.
5、When allowed to answer, the scanner will answer first then return the version number
6、save setting。
第 11 页 共35 页
2.4 Quick instructions(HEX format)
quick instructions must be used in below conditions: Message Source = 0x04(PC or IPC);
Message target = 0x31(Barcode scanner 0x31 );
Beeper = 0xFF(close)。
quick instructions for PC or IPC to barcode scanner:
Table 2.4-1 Host to Decoder
function
instructions(HEX format)
Normal instruction:
Save and exit(YEND)
0A 04 31 00 00 59 45 4e 44 FF FD 92
Trigger the scan(YLTK)
0A 04 31 00 00 59 4c 54 4b FF FD 7E
Stop scanning(YLSK)
0A 04 31 00 00 59 4c 53 4b FF FD 7F
Restore factory default(YDFK)
0A 04 31 00 00 59 44 46 4b FF FD 94
Restore user default(YDCK)
0A 04 31 00 00 59 44 43 4b FF FD 97
Write user default(YWCK)
0A 04 31 00 00 59 57 43 4b FF FD 84
Read the batch version number(YRVK)
0A 04 31 00 00 59 52 56 4b FF FD 76
Change parameters instructions:
single trigger mode(F0000)
0B 04 31 00 00 46 30 30 30 30 FF FD BB
continue scan mode(F0001)
0B 04 31 00 00 46 30 30 30 31 FF FD BA
Not allowed Repeat reading(F0100)
0B 04 31 00 00 46 30 31 30 30 FF FD BA
allowed Repeat reading(F0101)
0B 04 31 00 00 46 30 31 30 31 FF FD B9
Enable/disable allowed Repeat reading
(F0102)
0B 04 31 00 00 46 30 31 30 32 FF FD B8
TTL/RS232 output(A0000)
0B 04 31 00 50 41 30 30 30 30 FF FD 70
USB HID Keyboard output(A0001)
0B 04 31 00 50 41 30 30 30 31 FF FD 6F
Don’t need to answer(E0000)
0B 04 31 00 00 45 30 30 30 30 FF FD BC
Need to answer(E0001)
0B 04 31 00 00 45 30 30 30 31 FF FD BB
Disable Read All barcode(I1000)
0B 04 31 00 00 49 31 30 30 30 FF FD B7
Enable Read All barcodes(I1001)
0B 04 31 00 00 49 31 30 30 31 FF FD B6
Table 2.4-2 Decoder to Host
function
instructions(HEX format)
Setting successful answer
07 31 04 01 01 06 FF FE BE
Setting failed answer
07 1 04 01 01 15 FF FE AF
第 12 页 共 36 页
3、System setting
Option and function setting mainly through reading a series of special barcodes. In this chapter, we
will provide you a detailed introduction of the options and functions available for user setting, and the
corresponding setup code.
This method of setting the scanning is direct, easy to understand and user friendly.
3.1 Mark setting
3.2 Setting Steps
Read the “Enter setting” barcode to activate code setting function. Scanners can be set by reading
one or more setting code.
Scan the "Exit setting" barcode to exit the setup code function. Scan the “Restore factory default
setting" barcode to restore the factory setting.
Take the following setting steps:
1
2
Enter setting
Exit Setting
Restore Factory
Defaults
Restore user defaults
Enter setting
Barcode setting
Exit Setting
Enter setting

第 13 页 共35 页
3.2.1 Interface mode setting
3.2.2 Buzzer and LED setting
Setting user defaults
(Save current setting as user-defined defaults)
RS 232 MODEL
USBMODEL
Shut down start voice
Open start voice(default)
Successful scanning sound on(default)
Successful scanning sound off
Buzze Volume low
Buzze Volume middle(default)
Read production batch version
Read BOOTLOAD version
第 14 页 共 36 页
3.2.3 Baud rate setting
3.2.4 Serial port instructions response setting
Volume high
Successful setting sound off
Successful setting sound on(default)
2400 baud
9600 baud(default)
19200 baud
38400 baud
57600 baud
115200 baud
NO response(default)
4800 baud

第 15 页 共35 页
3.2.5 Trigger scan and stop scan setting
3.2.6 Trigger scan model and reading mode setting
Continue scan model
Not allowed Repeat reading
Single trigger scan model(default)
allowed Repeat reading(default)
Enable/disable allowed
Repeat reading
response
Trigger scan
Stop scan

第 16 页 共 36 页
3.2.7 Same Barcode Scanning Interval setting
3.2.8 Scan time setting for key trigger scan mode
200ms
100ms
0ms(default)
0ms(default)
100ms
200ms
500ms
900ms
1000ms
1500ms
2000ms
9900ms

第 17 页 共35 页
3.2.9 Scan time setting for serial command/auto scan mode
9900ms
6000ms
4000ms
2000ms
1500ms
1000ms
900ms
500ms
100ms
200ms
500ms

第 18 页 共 36 页
3.2.10 Case switching
3.2.11 auto sense mode setting
Uppercase switch to lowercase
Lowercase switch to uppercase
No case switching(default)
Disable(default)
900ms
1000ms
1500ms
2000ms
4000ms(default)
6000ms
9900ms

第 19 页 共35 页
3.2.12 USB upload speed setting
3.2.13 Decode setting
Disable Read(Codabar)
Enable
high sensitivity(default)
low sensitivity
USB upload speed slow(default)
USB upload speed middle
USB upload speed fast
Disable Read(EAN)
Enable Read(EAN)( default)
Enable Read(Codabar)( default)
Disable Read(Code 93)

第 20 页 共 36 页
3.2.14 Disable/Enable read all barcodes
Enable Read(Code 93)( default)
Disable Read(Code 128)
Enable Read(Code 128)( default)
Disable Read(Code 25)
Enable Read(Code 25)( default)
Disable Read All Barcodes
Enable Read All Barcodes

第 21 页 共35 页
3.2.15 Start character
3.2.16 Ending character setting
0x0D as ending character
No ending character(default)
user-defined start character + barcode
Space + barcode
No start character(default)
ID+ user-defined start character +
barcode
user-defined start character + ID +
barcode
ID+barcode

第 22 页 共 36 页
Barcode + user-defined ending
character + Tab(0x09)
Barcode + user-defined ending
character+0x0D 0x0A
Barcode + user-defined ending
character+0x0A
Barcode + user-defined ending
character+0x0D
Barcode + user-defined ending
character
Tab(0x09) 0x0D
Tab(0x09)
0x0D 0x0A as ending character
0x0A as ending character

第 23 页 共35 页
3.2.17 User-defined start character/ending character
remark: User-defined start character/ending character please refer to appendix 1
User-defined start character
User-defined ending character

第 24 页 共 36 页
Appendix
Appendix 1 User-defined start character/ending character
Control character
Hex
barcode
^@(NULL)
YS00
^A(SOH)
YS01
^B(STX)
YS02
^C(ETX)
YS03
^D(EOT)
YS04
^E(ENQ)
YS05
^F(ACK)
YS06
^G(BEL)
YS07
^H(BS)
YS08
^I(HTab)
YS09
^J(LF)
YS0A
^K(VTab)
YS0B
^L(FF)
YS0C
^M(CR)
YS0D
^N(SO)
YS0E
^O(SI)
YS0F

第 25 页 共35 页
^P(DLE)
YS10
^Q(DC1)
YS11
^R(DC2)
YS12
^S(DC3)
YS13
^T(DC4)
YS14
^U(NAK)
YS15
^V(SYN)
YS16
^W(ETB)
YS17
^X(CAN)
YS18
^Y(EM)
YS19
^Z(SUB)
YS1A
^[(ESC)
YS1B
^\(FS)
YS1C
^](GS)
YS1D
^^(RS)
YS1E
^_(US)
YS1F
SPC
YS20

第 26 页 共 36 页
character
Hex
barcode
!
YS21
"
YS22
#
YS23
$
YS24
%
YS25
&
YS26
'
YS27
(
YS28
)
YS29
*
YS2A
+
YS2B
,
YS2C
-
YS2D
.
YS2E
/
YS2F
0
YS30
1
YS31
2
YS32

第 27 页 共35 页
3
YS33
4
YS34
5
YS35
6
YS36
7
YS37
8
YS38
9
YS39
:
YS3A
;
YS3B
<
YS3C
=
YS3D
>
YS3E
?
YS3F
@
YS40
A
YS41
B
YS42
C
YS43
D
YS44
E
YS45
F
YS46

第 28 页 共 36 页
G
YS47
H
YS48
I
YS49
J
YS4A
K
YS4B
L
YS4C
M
YS4D
N
YS4E
O
YS4F
P
YS50
Q
YS51
R
YS52
S
YS53
T
YS54
U
YS55
V
YS56
W
YS57
X
YS58
Y
YS59
Z
YS5A

第 29 页 共35 页
[
YS5B
\
YS5C
]
YS5D
^
YS5E
_
YS5F
`
YS60
a
YS61
b
YS62
c
YS63
d
YS64
e
YS65
f
YS66
g
YS67
h
YS68
i
YS69
j
YS6A
k
YS6B
l
YS6C
m
YS6D
n
YS6E

第 30 页 共 36 页
o
YS6F
p
YS70
q
YS71
r
YS72
s
YS73
t
YS74
u
YS75
v
YS76
w
YS77
x
YS78
y
YS79
z
YS7A
{
YS7B
|
YS7C
}
YS7D
~
YS7E
DEL
YS7F
第 31 页 共35 页
Function keys
Hex
barcode
F1
YS80
F2
YS81
F3
YS82
F4
YS83
F5
YS84
F6
YS85
F7
YS86
F8
YS87
F9
YS88
F10
YS89
F11
YS8A
F12
YS8B
Backspace
YS8C
Tab
YS8D
Return(ENTER)
YS8E
Enter(Numeric Keypad)
YS8F

第 32 页 共 36 页
Esc
YS90
Arrow Down
YS91
Arrow up
YS92
Arrow right
YS93
Arrow left
YS94
Insert
YS95
Home
YS96
End
YS97
Page up
YS98
Page down
YS99
Left Shift
YS9A
Left Ctrl
YS9B
Left Alt
YS9C
Left GUI
YS9D
Right Shift
YS9E
Right Ctrl
YS9F
Right Alt
YSA0
Right GUI
YSA1
Caps Lock
YSA2

第 33 页 共35 页
Appendix 2 ASCII table
Decimal
Octal
Hexadecimal
character
description
0
0
00
NUL
1
1
01
SOH
start of header
2
2
02
STX
start of text
3
3
03
ETX
end of text
4
4
04
EOT
end of transmission
5
5
05
ENQ
enquiry
6
6
06
ACK
acknowledge
7
7
07
BEL
bell
8
10
08
BS
backspace
9
11
09
HT
horizontal tab
10
12
0A
LF
line feed
11
13
0B
VT
vertical tab
12
14
0C
FF
form feed
13
15
0D
CR
carriage return
14
16
0E
SO
shift out
15
17
0F
SI
shift in
16
20
10
DLE
data link escape
17
21
11
DC1
no assignment,but usually XON
18
22
12
DC2
19
23
13
DC3
no assignment,but usually XOFF
20
24
14
DC4
21
25
15
NAK
negative acknowledge
22
26
16
SYN
synchronous idle
23
27
17
ETB
end of transmission block
24
30
18
CAN
cancel
25
31
19
EM
end of medium
26
32
1A
SUB
substitute
27
33
1B
ESC
escape
28
34
1C
FS
file separator
29
35
1D
GS
group separator
30
36
1E
RS
record separator
31
37
1F
US
unit separator
32
40
20
SPC
space
33
41
21
!
34
42
22
"

第 34 页 共 36 页
35
43
23
#
36
44
24
$
37
45
25
%
38
46
26
&
39
47
27
'
40
50
28
(
41
51
29
)
42
52
2A
*
43
53
2B
+
44
54
2C
,
45
55
2D
-
46
56
2E
.
47
57
2F
/
48
60
30
0
49
61
31
1
50
62
32
2
51
63
33
3
52
64
34
4
53
65
35
5
54
66
36
6
55
67
37
7
56
70
38
8
57
71
39
9
58
72
3A
:
59
73
3B
;
60
74
3C
<
61
75
3D
=
62
76
3E
>
63
77
3F
?
64
100
40
@
65
101
41
A
65
101
41
A
66
102
42
B
67
103
43
C
68
104
44
D
69
105
45
E
70
106
46
F
71
107
47
G
72
110
48
H

第 35 页 共35 页
73
111
49
I
74
112
4A
J
75
113
4B
K
76
114
4C
L
77
115
4D
M
78
116
4E
N
79
117
4F
O
80
120
50
P
81
121
51
Q
82
122
52
R
83
123
53
S
84
124
54
T
85
125
55
U
86
126
56
V
87
127
57
W
88
130
58
X
89
131
59
Y
90
132
5A
Z
91
133
5B
[
92
134
5C
\
93
135
5D
]
94
136
5E
^
95
137
5F
_
96
140
60
`
97
141
61
a
98
142
62
b
99
143
63
c
100
144
64
d
101
145
65
e
102
146
66
f
103
147
67
g
104
150
68
h
105
151
69
i
106
152
6A
j
107
153
6B
k
108
154
6C
l
109
155
6D
m
110
156
6E
n
111
157
6F
o

第 36 页 共 36 页
112
160
70
p
113
161
71
q
114
162
72
r
115
163
73
s
116
164
74
t
117
165
75
u
118
166
76
v
119
167
77
w
120
170
78
x
121
171
79
y
122
172
7A
z
123
173
7B
{
124
174
7C
|
125
175
7D
}
126
176
7E
~
127
177
7F
DEL
delete
128
200
80
F1
129
201
81
F2
130
202
82
F3
131
203
83
F4
132
204
84
F5
133
205
85
F6
134
206
86
F7
135
207
87
F8
136
210
88
F9
137
211
89
F10
138
212
8A
F11
139
213
8B
F12
140
214
8C
Backspace
141
215
8D
Tab
142
216
8E
Return
143
217
8F
Enter
144
220
90
Esc
145
221
91
Arrow Down
146
222
92
Arrow up
147
223
93
Arrow right
148
224
94
Arrow left
149
225
95
Insert
150
226
96
Home
第 37 页 共35 页
151
227
97
End
152
230
98
Page up
153
231
99
Page down
154
232
9A
Left Shift
155
233
9B
Left Ctrl
156
234
9C
Left Alt
157
235
9D
Left GUI
158
236
9E
Right Shift
159
237
9F
Right Ctrl
160
240
A0
Right Alt
161
241
A1
Right GUI
162
242
A2
Caps Lock
Appendix 3 barcode sample
name
Barcode sample
remarks
EAN13
UPC-A
EAN8
UPC-E
Default data: 1234565
Codabar
Encoded data: c01235d
Code93
Code39(Regular)
Code 39(FullASCII)
Encoded data: *Code 39

第 38 页 共 36 页

第 39 页 共35 页
