Oracle Database Security Guide E36292Database
Oracle%C2%AE%20Database%20Security%20Guide%20%2011g%20Release%202%20(11.2)
User Manual:
Open the PDF directly: View PDF ![]() .
.
Page Count: 444 [warning: Documents this large are best viewed by clicking the View PDF Link!]
- Contents
- Preface
- What's New in Oracle Database Security?
- 1 Introducing Oracle Database Security
- 2 Managing Security for Oracle Database Users
- About User Security
- Creating User Accounts
- Altering User Accounts
- Configuring User Resource Limits
- Deleting User Accounts
- Finding Information About Database Users and Profiles
- 3 Configuring Authentication
- About Authentication
- Configuring Password Protection
- What Are the Oracle Database Built-in Password Protections?
- Minimum Requirements for Passwords
- Using a Password Management Policy
- About Managing Passwords
- Finding User Accounts That Have Default Passwords
- Configuring Password Settings in the Default Profile
- Disabling and Enabling the Default Password Security Settings
- Automatically Locking a User Account After a Failed Login
- Controlling User Ability to Reuse Previous Passwords
- Controlling Password Aging and Expiration
- Password Change Life Cycle
- Setting the PASSWORD_LIFE_TIME Profile Parameter to a Low Value
- Enforcing Password Complexity Verification
- Enabling or Disabling Password Case Sensitivity
- Ensuring Against Password Security Threats by Using the SHA-1 Hashing Algorithm
- Managing the Secure External Password Store for Password Credentials
- Authenticating Database Administrators
- Using the Database to Authenticate Users
- Using the Operating System to Authenticate Users
- Using the Network to Authenticate Users
- Configuring Global User Authentication and Authorization
- Configuring an External Service to Authenticate Users and Passwords
- Using Multitier Authentication and Authorization
- Preserving User Identity in Multitiered Environments
- Using a Middle Tier Server for Proxy Authentication
- About Proxy Authentication
- Advantages of Proxy Authentication
- Who Can Create Proxy User Accounts?
- Creating Proxy User Accounts and Authorizing Users to Connect Through Them
- Using Proxy Authentication with the Secure External Password Store
- Passing Through the Identity of the Real User by Using Proxy Authentication
- Limiting the Privilege of the Middle Tier
- Authorizing a Middle Tier to Proxy and Authenticate a User
- Authorizing a Middle Tier to Proxy a User Authenticated by Other Means
- Reauthenticating the User Through the Middle Tier to the Database
- Using Client Identifiers to Identify Application Users Not Known to the Database
- Using a Middle Tier Server for Proxy Authentication
- Finding Information About User Authentication
- 4 Configuring Privilege and Role Authorization
- About Privileges and Roles
- Who Should Be Granted Privileges?
- Granting the SYSDBA and SYSOPER Administrative Privileges to Users
- Managing System Privileges
- Managing User Roles
- Managing Object Privileges
- About Object Privileges
- Granting or Revoking Object Privileges
- Managing Object Privileges
- Managing Table Privileges
- Managing View Privileges
- Managing Procedure Privileges
- Using the EXECUTE Privilege for Procedure Privileges
- Procedure Execution and Security Domains
- How Procedure Privileges Affect Definer’s Rights
- How Procedure Privileges Affect Invoker’s Rights
- System Privileges Required to Create or Replace a Procedure
- System Privileges Required to Compile a Procedure
- How Procedure Privileges Affect Packages and Package Objects
- Managing Type Privileges
- Granting a User Privileges and Roles
- Revoking Privileges and Roles from a User
- Granting to and Revoking from the PUBLIC Role
- Granting Roles Using the Operating System or Network
- About Granting Roles Using the Operating System or Network
- Using Operating System Role Identification
- Using Operating System Role Management
- Granting and Revoking Roles When OS_ROLES Is Set to TRUE
- Enabling and Disabling Roles When OS_ROLES Is Set to TRUE
- Using Network Connections with Operating System Role Management
- When Do Grants and Revokes Take Effect?
- Managing Fine-Grained Access in PL/SQL Packages and Types
- About Fine-Grained Access Control to External Network Services
- About Access Control to Wallets
- Upgrading Applications That Depend on Packages That Use External Network Services
- Creating an Access Control List for External Network Services
- Configuring Access Control to a Wallet
- Examples of Creating Access Control Lists
- Example of an Access Control List for a Single Role and Network Connection
- Example of an Access Control List with Multiple Roles Assigned to Multiple Hosts
- Example of an Access Control List for Using Passwords in a Non-Shared Wallet
- Example of an Access Control List for Wallets in a Shared Database Session
- Specifying a Group of Network Host Computers
- Precedence Order for a Host Computer in Multiple Access Control List Assignments
- Precedence Order for a Host in Access Control List Assignments with Port Ranges
- Checking Privilege Assignments That Affect User Access to a Network Host
- Setting the Precedence of Multiple Users and Roles in One Access Control List
- Finding Information About Access Control Lists Configured for User Access
- Finding Information About User Privileges and Roles
- 5 Managing Security for Application Developers
- About Application Security Policies
- Considerations for Using Application-Based Security
- Securing Passwords in Application Design
- Managing Application Privileges
- Creating Secure Application Roles to Control Access to Applications
- Associating Privileges with User Database Roles
- Protecting Database Objects by Using Schemas
- Managing Object Privileges in an Application
- Parameters for Enhanced Security of Database Communication
- Reporting Bad Packets Received on the Database from Protocol Errors
- Terminating or Resuming Server Execution After Receiving a Bad Packet
- Configuring the Maximum Number of Authentication Attempts
- Controlling the Display of the Database Version Banner
- Configuring Banners for Unauthorized Access and Auditing User Actions
- 6 Using Application Contexts to Retrieve User Information
- About Application Contexts
- Types of Application Contexts
- Using Database Session-Based Application Contexts
- About Database Session-Based Application Contexts
- Creating a Database Session-Based Application Context
- Creating a PL/SQL Package to Set the Database Session-Based Application Context
- Creating a Logon Trigger to Run a Database Session Application Context Package
- Tutorial: Creating and Using a Database Session-Based Application Context
- About This Tutorial
- Step 1: Create User Accounts and Ensure the User SCOTT Is Active
- Step 2: Create the Database Session-Based Application Context
- Step 3: Create a Package to Retrieve Session Data and Set the Application Context
- Step 4: Create a Logon Trigger for the Package
- Step 5: Test the Application Context
- Step 6: Remove the Components for This Tutorial
- Initializing Database Session-Based Application Contexts Externally
- Initializing Database Session-Based Application Contexts Globally
- Using Externalized Database Session-Based Application Contexts
- Using Global Application Contexts
- About Global Application Contexts
- Using Global Application Contexts in an Oracle Real Application Clusters Environment
- Creating a Global Application Context
- Creating a PL/SQL Package to Manage a Global Application Context
- About the Package That Manages the Global Application Context
- How Editions Affects the Results of a Global Application Context PL/SQL Package
- Setting the DBMS_SESSION.SET_CONTEXT username and client_id Parameters
- Sharing Global Application Context Values for All Database Users
- Setting a Global Context for Database Users Who Move Between Applications
- Setting a Global Application Context for Nondatabase Users
- Clearing Session Data When the Session Closes
- Embedding Calls in Middle-Tier Applications to Manage the Client Session ID
- Tutorial: Creating a Global Application Context That Uses a Client Session ID
- Global Application Context Processes
- Using Client Session-Based Application Contexts
- Finding Information About Application Contexts
- 7 Using Oracle Virtual Private Database to Control Data Access
- About Oracle Virtual Private Database
- Components of an Oracle Virtual Private Database Policy
- Configuring an Oracle Virtual Private Database Policy
- About Oracle Virtual Private Database Policies
- Attaching a Policy to a Database Table, View, or Synonym
- Enforcing Policies on Specific SQL Statement Types
- Controlling the Display of Column Data with Policies
- Working with Oracle Virtual Private Database Policy Groups
- Optimizing Performance by Using Oracle Virtual Private Database Policy Types
- About Oracle Virtual Private Database Policy Types
- Using the Dynamic Policy Type to Automatically Rerun Policy Functions
- Using a Static Policy to Prevent Policy Functions from Rerunning for Each Query
- Using a Shared Static Policy to Share a Policy with Multiple Objects
- When to Use Static and Shared Static Policies
- Using a Context-Sensitive Policy for Predicates That Do Not Change After Parsing
- Using a Shared Context Sensitive Policy to Share a Policy with Multiple Objects
- When to Use Context-Sensitive and Shared Context-Sensitive Policies
- Summary of the Five Oracle Virtual Private Database Policy Types
- Tutorials: Creating Oracle Virtual Private Database Policies
- Tutorial: Creating a Simple Oracle Virtual Private Database Policy
- Tutorial: Implementing a Policy with a Database Session-Based Application Context
- About This Tutorial
- Step 1: Create User Accounts and Sample Tables
- Step 2: Create a Database Session-Based Application Context
- Step 3: Create a PL/SQL Package to Set the Application Context
- Step 4: Create a Logon Trigger to Run the Application Context PL/SQL Package
- Step 5: Create a PL/SQL Policy Function to Limit User Access to Their Orders
- Step 6: Create the New Security Policy
- Step 7: Test the New Policy
- Step 8: Remove the Components for This Tutorial
- Tutorial: Implementing an Oracle Virtual Private Database Policy Group
- About This Tutorial
- Step 1: Create User Accounts and Other Components for This Tutorial
- Step 2: Create the Two Policy Groups
- Step 3: Create PL/SQL Functions to Control the Policy Groups
- Step 4: Add the PL/SQL Functions to the Policy Groups
- Step 5: Create the Driving Application Context
- Step 6: Test the Policy Groups
- Step 7: Remove the Components for This Tutorial
- How Oracle Virtual Private Database Works with Other Oracle Features
- Using Oracle Virtual Private Database Policies with Editions
- Using SELECT FOR UPDATE in User Queries on VPD-Protected Tables
- How Oracle Virtual Private Database Policies Affect Outer or ANSI Join Operations
- How Oracle Virtual Private Database Security Policies Work with Applications
- Using Automatic Reparsing for Fine-Grained Access Control Policy Functions
- Using Oracle Virtual Private Database Policies and Flashback Query
- Using Oracle Virtual Private Database and Oracle Label Security
- Exporting Data Using the EXPDP Utility access_method Parameter
- User Models and Oracle Virtual Private Database
- Finding Information About Oracle Virtual Private Database Policies
- 8 Developing Applications Using the Data Encryption API
- Security Problems That Encryption Does Not Solve
- Data Encryption Challenges
- Storing Data Encryption by Using the DBMS_CRYPTO Package
- Examples of Using the Data Encryption API
- Finding Information About Encrypted Data
- 9 Verifying Security Access with Auditing
- About Auditing
- Selecting an Auditing Type
- Auditing General Activities with Standard Auditing
- About Standard Auditing
- Configuring Standard Auditing with the AUDIT_TRAIL Initialization Parameter
- What Do the Operating System and Database Audit Trails Have in Common?
- Using the Operating System Audit Trail
- Using the Syslog Audit Trail on UNIX Systems
- How the AUDIT and NOAUDIT SQL Statements Work
- Enabling Standard Auditing with the AUDIT SQL Statement
- Auditing Statement Executions: Successful, Unsuccessful, or Both
- How Standard Audit Records Are Generated
- How Do Cursors Affect Standard Auditing?
- Benefits of Using the BY ACCESS Clause in the AUDIT Statement
- Auditing Actions Performed by Specific Users
- Removing the Audit Option with the NOAUDIT SQL Statement
- Auditing SQL Statements
- Auditing Privileges
- Auditing SQL Statements and Privileges in a Multitier Environment
- Auditing Schema Objects
- About Schema Object Auditing
- Types of Schema Objects That Can Be Audited
- Using Standard Auditing with Editioned Objects
- Schema Object Audit Options for Views, Procedures, and Other Elements
- Configuring Schema Object Auditing
- Removing Object Auditing
- Setting Audit Options for Objects That May Be Created in the Future
- Auditing Directory Objects
- Auditing Functions, Procedures, Packages, and Triggers
- Auditing Network Activity
- Using Default Auditing for Security-Relevant SQL Statements and Privileges
- Auditing Specific Activities with Fine-Grained Auditing
- About Fine-Grained Auditing
- Where Are Fine-Grained Audit Records Stored?
- Advantages of Fine-Grained Auditing
- What Permissions Are Needed to Create a Fine-Grained Audit Policy?
- Activities That Are Always Audited in Fine-Grained Auditing
- Using Fine-Grained Audit Policies with Editions
- Creating an Audit Trail for Fine-Grained Audit Records
- How the Fine-Grained Audit Trail Generates Records
- Using the DBMS_FGA Package to Manage Fine-Grained Audit Policies
- Tutorial: Adding an Email Alert to a Fine-Grained Audit Policy
- About This Tutorial
- Step 1: Install and Configure the UTL_MAIL PL/SQL Package
- Step 2: Create User Accounts
- Step 3: Configure an Access Control List File for Network Services
- Step 4: Create the Email Security Alert PL/SQL Procedure
- Step 5: Create and Test the Fine-Grained Audit Policy Settings
- Step 6: Test the Alert
- Step 7: Remove the Components for This Tutorial
- Tutorial: Auditing Nondatabase Users
- Auditing SYS Administrative Users
- Using Triggers to Write Audit Data to a Separate Table
- Managing Audit Trail Records
- Purging Audit Trail Records
- About Purging Audit Trail Records
- Selecting an Audit Trail Purge Method
- Scheduling an Automatic Purge Job for the Audit Trail
- Step 1: If Necessary, Tune Online and Archive Redo Log Sizes
- Step 2: Plan a Timestamp and Archive Strategy
- Step 3: Initialize the Audit Trail Cleanup Operation
- Step 4: Optionally, Set an Archive Timestamp for Audit Records
- Step 5: Create and Schedule the Purge Job
- Step 6: Optionally, Configure the Audit Trail Records to be Deleted in Batches
- Manually Purging the Audit Trail
- Purging a Subset of Records from the Database Audit Trail
- Other Audit Trail Purge Operations
- Verifying That the Audit Trail Is Initialized for Cleanup
- Setting the Default Audit Trail Purge Interval for Any Audit Trail Type
- Cancelling the Initialization Cleanup Settings
- Enabling or Disabling an Audit Trail Purge Job
- Setting the Default Audit Trail Purge Job Interval for a Specified Purge Job
- Deleting an Audit Trail Purge Job
- Clearing the Archive Timestamp Setting
- Clearing the Database Audit Trail Batch Size
- Example: Directly Calling a Database Audit Trail Purge Operation
- Finding Information About Audited Activities
- 10 Keeping Your Oracle Database Secure
- About the Security Guidelines in This Chapter
- Downloading Security Patches and Contacting Oracle Regarding Vulnerabilities
- Guidelines for Securing User Accounts and Privileges
- Guidelines for Securing Roles
- Guidelines for Securing Passwords
- Guidelines for Securing Data
- Guidelines for Securing the ORACLE_LOADER Access Driver
- Guidelines for Securing a Database Installation and Configuration
- Guidelines for Securing the Network
- Guidelines for Auditing
- Addressing the CONNECT Role Change
- Glossary
- Index

Oracle® Database
Security Guide
11g Release 2 (11.2)
E36292-09
January 2017
Oracle Database Security Guide 11g Release 2 (11.2)
E36292-09
Copyright © 2006, 2017, Oracle and/or its affiliates. All rights reserved.
Primary Author: Patricia Huey
Contributors: Tammy Bednar, Naveen Gopal, Don Gosselin, Sumit Jeloka, Peter Knaggs, Sergei Kucherov,
Nina Lewis, Bryn Llewellyn, Rahil Mir, Narendra Manappa, Gopal Mulagund, Janaki Narasinghanallur,
Paul Needham, Deb Owens, Robert Pang, Preetam Ramakrishna, Vipin Samar, Digvijay Sirmukaddam,
Richard Smith, Sachin Sonawane, James Spiller, Ashwini Surpur, Srividya Tata, Kamal Tbeileh, Rodney
Ward, Daniel Wong
This software and related documentation are provided under a license agreement containing restrictions on
use and disclosure and are protected by intellectual property laws. Except as expressly permitted in your
license agreement or allowed by law, you may not use, copy, reproduce, translate, broadcast, modify, license,
transmit, distribute, exhibit, perform, publish, or display any part, in any form, or by any means. Reverse
engineering, disassembly, or decompilation of this software, unless required by law for interoperability, is
prohibited.
The information contained herein is subject to change without notice and is not warranted to be error-free. If
you find any errors, please report them to us in writing.
If this is software or related documentation that is delivered to the U.S. Government or anyone licensing it
on behalf of the U.S. Government, then the following notice is applicable:
U.S. GOVERNMENT END USERS: Oracle programs, including any operating system, integrated software,
any programs installed on the hardware, and/or documentation, delivered to U.S. Government end users
are "commercial computer software" pursuant to the applicable Federal Acquisition Regulation and
agency-specific supplemental regulations. As such, use, duplication, disclosure, modification, and
adaptation of the programs, including any operating system, integrated software, any programs installed on
the hardware, and/or documentation, shall be subject to license terms and license restrictions applicable to
the programs. No other rights are granted to the U.S. Government.
This software or hardware is developed for general use in a variety of information management
applications. It is not developed or intended for use in any inherently dangerous applications, including
applications that may create a risk of personal injury. If you use this software or hardware in dangerous
applications, then you shall be responsible to take all appropriate fail-safe, backup, redundancy, and other
measures to ensure its safe use. Oracle Corporation and its affiliates disclaim any liability for any damages
caused by use of this software or hardware in dangerous applications.
Oracle and Java are registered trademarks of Oracle and/or its affiliates. Other names may be trademarks of
their respective owners.
Intel and Intel Xeon are trademarks or registered trademarks of Intel Corporation. All SPARC trademarks
are used under license and are trademarks or registered trademarks of SPARC International, Inc. AMD,
Opteron, the AMD logo, and the AMD Opteron logo are trademarks or registered trademarks of Advanced
Micro Devices. UNIX is a registered trademark of The Open Group.
This software or hardware and documentation may provide access to or information about content,
products, and services from third parties. Oracle Corporation and its affiliates are not responsible for and
expressly disclaim all warranties of any kind with respect to third-party content, products, and services
unless otherwise set forth in an applicable agreement between you and Oracle. Oracle Corporation and its
affiliates will not be responsible for any loss, costs, or damages incurred due to your access to or use of
third-party content, products, or services, except as set forth in an applicable agreement between you and
Oracle.

iii
Contents
Preface ............................................................................................................................................................. xxiii
Audience................................................................................................................................................... xxiii
Documentation Accessibility................................................................................................................. xxiii
Related Documents ................................................................................................................................. xxiv
Conventions ............................................................................................................................................. xxiv
What's New in Oracle Database Security?................................................................................ xxv
Oracle Database 11g Release 2 (11.2.0.2) New Security Features..................................................... xxv
Oracle Database 11g Release 2 (11.2.0.1) New Security Features.................................................... xxvii
Oracle Database 11g Release 1 (11.1) New Security Features........................................................... xxxi
1 Introducing Oracle Database Security
About Oracle Database Security ........................................................................................................... 1-1
Additional Database Security Resources ............................................................................................ 1-2
2 Managing Security for Oracle Database Users
About User Security................................................................................................................................. 2-1
Creating User Accounts........................................................................................................................... 2-1
Creating a New User Account.......................................................................................................... 2-2
Specifying a User Name.................................................................................................................... 2-2
Assigning the User a Password........................................................................................................ 2-3
Assigning a Default Tablespace for the User................................................................................. 2-4
Assigning a Tablespace Quota for the User ................................................................................... 2-5
Restricting the Quota Limits for User Objects in a Tablespace............................................ 2-5
Granting Users the UNLIMITED TABLESPACE System Privilege ................................... 2-5
Assigning a Temporary Tablespace for the User .......................................................................... 2-6
Specifying a Profile for the User ...................................................................................................... 2-7
Setting a Default Role for the User .................................................................................................. 2-7
Altering User Accounts ........................................................................................................................... 2-7
About Altering User Accounts......................................................................................................... 2-7
Using the ALTER USER Statement to Alter a User Account....................................................... 2-8
Changing Non-SYS User Passwords............................................................................................... 2-8
Changing the SYS User Password................................................................................................... 2-9
Configuring User Resource Limits ....................................................................................................... 2-9
About User Resource Limits.......................................................................................................... 2-10
iv
Types of System Resources and Limits........................................................................................ 2-10
Limiting the User Session Level............................................................................................. 2-10
Limiting Database Call Levels ............................................................................................... 2-11
Limiting CPU Time.................................................................................................................. 2-11
Limiting Logical Reads ........................................................................................................... 2-11
Limiting Other Resources....................................................................................................... 2-11
Determining Values for Resource Limits of Profiles.................................................................. 2-12
Managing Resources with Profiles ............................................................................................... 2-12
Creating Profiles....................................................................................................................... 2-13
Dropping Profiles..................................................................................................................... 2-14
Deleting User Accounts........................................................................................................................ 2-14
Finding Information About Database Users and Profiles ............................................................ 2-15
Using Data Dictionary Views to Find Information About Users and Profiles....................... 2-15
Listing All Users and Associated Information............................................................................ 2-16
Listing All Tablespace Quotas....................................................................................................... 2-17
Listing All Profiles and Assigned Limits..................................................................................... 2-17
Viewing Memory Use for Each User Session.............................................................................. 2-18
3 Configuring Authentication
About Authentication.............................................................................................................................. 3-1
Configuring Password Protection......................................................................................................... 3-1
What Are the Oracle Database Built-in Password Protections?.................................................. 3-2
Minimum Requirements for Passwords......................................................................................... 3-3
Using a Password Management Policy........................................................................................... 3-3
About Managing Passwords ..................................................................................................... 3-4
Finding User Accounts That Have Default Passwords......................................................... 3-4
Configuring Password Settings in the Default Profile .......................................................... 3-4
Disabling and Enabling the Default Password Security Settings........................................ 3-6
Automatically Locking a User Account After a Failed Login .............................................. 3-6
Controlling User Ability to Reuse Previous Passwords........................................................ 3-7
Controlling Password Aging and Expiration ......................................................................... 3-8
Password Change Life Cycle..................................................................................................... 3-9
Setting the PASSWORD_LIFE_TIME Profile Parameter to a Low Value........................ 3-10
Enforcing Password Complexity Verification ..................................................................... 3-11
Enabling or Disabling Password Case Sensitivity .............................................................. 3-13
Ensuring Against Password Security Threats by Using the SHA-1 Hashing Algorithm..... 3-15
Managing the Secure External Password Store for Password Credentials ............................ 3-16
About the Secure External Password Store.......................................................................... 3-17
How Does the External Password Store Work? .................................................................. 3-17
Configuring Clients to Use the External Password Store .................................................. 3-18
Managing External Password Store Credentials................................................................. 3-20
Authenticating Database Administrators......................................................................................... 3-22
Strong Authentication and Centralized Management for Database Administrators ........... 3-22
Configuring Directory Authentication for Administrative Users .................................... 3-22
Configuring Kerberos Authentication for Administrative Users..................................... 3-23
Configuring Secure Sockets Layer Authentication for Administrative Users................ 3-24
Authenticating Database Administrators by Using the Operating System ........................... 3-25
v
Authenticating Database Administrators by Using Their Passwords .................................... 3-25
Using the Database to Authenticate Users ....................................................................................... 3-26
About Database Authentication.................................................................................................... 3-26
Advantages of Database Authentication..................................................................................... 3-26
Creating a User Who Is Authenticated by the Database........................................................... 3-27
Using the Operating System to Authenticate Users....................................................................... 3-27
Using the Network to Authenticate Users........................................................................................ 3-28
Authentication Using Secure Sockets Layer ............................................................................... 3-28
Authentication Using Third-Party Services ................................................................................ 3-28
Configuring Global User Authentication and Authorization...................................................... 3-30
Creating a User Who Is Authorized by a Directory Service..................................................... 3-31
Creating a Global User Who Has a Private Schema ........................................................... 3-31
Creating Multiple Enterprise Users Who Share Schemas.................................................. 3-31
Advantages of Global Authentication and Global Authorization........................................... 3-31
Configuring an External Service to Authenticate Users and Passwords.................................... 3-32
About External Authentication..................................................................................................... 3-32
Advantages of External Authentication ...................................................................................... 3-33
Creating a User Who Is Authenticated Externally..................................................................... 3-33
Authenticating User Logins Using the Operating System........................................................ 3-34
Authentication User Logins Using Network Authentication................................................... 3-34
Using Multitier Authentication and Authorization ....................................................................... 3-34
Administration and Security in Clients, Application Servers, and Database Servers .......... 3-35
Preserving User Identity in Multitiered Environments................................................................. 3-36
Using a Middle Tier Server for Proxy Authentication............................................................... 3-36
About Proxy Authentication .................................................................................................. 3-36
Advantages of Proxy Authentication.................................................................................... 3-37
Who Can Create Proxy User Accounts?............................................................................... 3-38
Creating Proxy User Accounts and Authorizing Users to Connect Through Them ..... 3-38
Using Proxy Authentication with the Secure External Password Store .......................... 3-40
Passing Through the Identity of the Real User by Using Proxy Authentication............ 3-40
Limiting the Privilege of the Middle Tier............................................................................. 3-41
Authorizing a Middle Tier to Proxy and Authenticate a User.......................................... 3-42
Authorizing a Middle Tier to Proxy a User Authenticated by Other Means.................. 3-42
Reauthenticating the User Through the Middle Tier to the Database ............................. 3-43
Using Client Identifiers to Identify Application Users Not Known to the Database............ 3-44
About Client Identifiers .......................................................................................................... 3-44
How Client Identifiers Work in Middle Tier Systems........................................................ 3-44
Using the CLIENT_IDENTIFIER Attribute to Preserve User Identity ............................ 3-45
Using CLIENT_IDENTIFIER Independent of Global Application Context ................... 3-45
Using the DBMS_SESSION PL/SQL Package to Set and Clear the Client Identifier.... 3-46
Finding Information About User Authentication........................................................................... 3-47
4 Configuring Privilege and Role Authorization
About Privileges and Roles.................................................................................................................... 4-1
Who Should Be Granted Privileges? .................................................................................................... 4-2
Granting the SYSDBA and SYSOPER Administrative Privileges to Users ................................. 4-2
Managing System Privileges.................................................................................................................. 4-2
vi
About System Privileges ................................................................................................................... 4-3
Why Is It Important to Restrict System Privileges? ...................................................................... 4-3
Restricting System Privileges by Securing the Data Dictionary .......................................... 4-3
Allowing Access to Objects in the SYS Schema...................................................................... 4-4
Granting and Revoking System Privileges..................................................................................... 4-4
Who Can Grant or Revoke System Privileges?.............................................................................. 4-5
About ANY Privileges and the PUBLIC Role................................................................................ 4-5
Managing User Roles............................................................................................................................... 4-6
About User Roles................................................................................................................................ 4-6
The Functionality of Roles......................................................................................................... 4-6
Properties of Roles and Why They Are Advantageous ........................................................ 4-7
Common Uses of Roles ............................................................................................................. 4-8
How Roles Affect the Scope of a User’s Privileges ............................................................... 4-9
How Roles Work in PL/SQL Blocks ....................................................................................... 4-9
How Roles Aid or Restrict DDL Usage ................................................................................... 4-9
How Operating Systems Can Aid Roles............................................................................... 4-10
How Roles Work in a Distributed Environment................................................................. 4-11
Predefined Roles in an Oracle Database Installation................................................................. 4-11
Creating a Role ................................................................................................................................ 4-16
Specifying the Type of Role Authorization................................................................................. 4-17
Authorizing a Role by Using the Database.......................................................................... 4-18
Authorizing a Role by Using an Application ...................................................................... 4-18
Authorizing a Role by Using an External Source................................................................ 4-18
Global Role Authorization by an Enterprise Directory Service........................................ 4-19
Granting and Revoking Roles ....................................................................................................... 4-20
About Granting and Revoking Roles.................................................................................... 4-20
Who Can Grant or Revoke Roles? ........................................................................................ 4-20
Dropping Roles................................................................................................................................ 4-21
Restricting SQL*Plus Users from Using Database Roles........................................................... 4-21
Potential Security Problems of Using Ad Hoc Tools.......................................................... 4-21
Limiting Roles Through the PRODUCT_USER_PROFILE Table..................................... 4-22
Using Stored Procedures to Encapsulate Business Logic .................................................. 4-22
Securing Role Privileges by Using Secure Application Roles .................................................. 4-22
Managing Object Privileges................................................................................................................ 4-23
About Object Privileges.................................................................................................................. 4-23
Granting or Revoking Object Privileges...................................................................................... 4-24
Managing Object Privileges........................................................................................................... 4-24
Granting and Revoking Object Privileges............................................................................ 4-25
Who Can Grant Object Privileges?........................................................................................ 4-25
Using Object Privileges with Synonyms .............................................................................. 4-25
Managing Table Privileges ............................................................................................................ 4-26
How Table Privileges Affect Data Manipulation Language Operations......................... 4-26
How Table Privileges Affect Data Definition Language Operations............................... 4-27
Managing View Privileges............................................................................................................. 4-27
About View Privileges ............................................................................................................ 4-27
Privileges Required to Create Views..................................................................................... 4-27
Increasing Table Security with Views................................................................................... 4-28
vii
Managing Procedure Privileges.................................................................................................... 4-29
Using the EXECUTE Privilege for Procedure Privileges ................................................... 4-29
Procedure Execution and Security Domains ....................................................................... 4-29
How Procedure Privileges Affect Definer’s Rights............................................................. 4-29
How Procedure Privileges Affect Invoker’s Rights............................................................ 4-30
System Privileges Required to Create or Replace a Procedure......................................... 4-31
System Privileges Required to Compile a Procedure......................................................... 4-31
How Procedure Privileges Affect Packages and Package Objects.................................... 4-31
Managing Type Privileges ............................................................................................................. 4-33
System Privileges for Named Types ..................................................................................... 4-33
Object Privileges ...................................................................................................................... 4-33
Method Execution Model ...................................................................................................... 4-34
Privileges Required to Create Types and Tables Using Types ......................................... 4-34
Example of Privileges for Creating Types and Tables Using Types ................................ 4-34
Privileges on Type Access and Object Access .................................................................... 4-35
Type Dependencies ................................................................................................................. 4-36
Granting a User Privileges and Roles .............................................................................................. 4-37
Granting System Privileges and Roles......................................................................................... 4-37
Granting the ADMIN Option................................................................................................. 4-38
Creating a New User with the GRANT Statement ............................................................. 4-38
Granting Object Privileges............................................................................................................. 4-38
Specifying the GRANT OPTION Clause.............................................................................. 4-39
Granting Object Privileges on Behalf of the Object Owner ............................................... 4-39
Granting Privileges on Columns ........................................................................................... 4-40
Row-Level Access Control...................................................................................................... 4-41
Revoking Privileges and Roles from a User .................................................................................... 4-41
Revoking System Privileges and Roles........................................................................................ 4-41
Revoking Object Privileges............................................................................................................ 4-42
Revoking Object Privileges on Behalf of the Object Owner .............................................. 4-42
Revoking Column-Selective Object Privileges .................................................................... 4-43
Revoking the REFERENCES Object Privilege ..................................................................... 4-43
Cascading Effects of Revoking Privileges ................................................................................... 4-43
Cascading Effects When Revoking System Privileges ....................................................... 4-44
Cascading Effects When Revoking Object Privileges......................................................... 4-44
Granting to and Revoking from the PUBLIC Role......................................................................... 4-45
Granting Roles Using the Operating System or Network ............................................................ 4-45
About Granting Roles Using the Operating System or Network ............................................ 4-45
Using Operating System Role Identification............................................................................... 4-46
Using Operating System Role Management............................................................................... 4-47
Granting and Revoking Roles When OS_ROLES Is Set to TRUE............................................ 4-47
Enabling and Disabling Roles When OS_ROLES Is Set to TRUE ............................................ 4-47
Using Network Connections with Operating System Role Management.............................. 4-47
When Do Grants and Revokes Take Effect?.................................................................................... 4-48
How the SET ROLE Statement Affects Grants and Revokes.................................................... 4-48
Specifying a Default Role............................................................................................................... 4-48
The Maximum Number of Roles That a User Can Enable........................................................ 4-49
Managing Fine-Grained Access in PL/SQL Packages and Types................................................ 4-49
viii
About Fine-Grained Access Control to External Network Services........................................ 4-50
About Access Control to Wallets.................................................................................................. 4-50
Upgrading Applications That Depend on Packages That Use External Network Services 4-51
Creating an Access Control List for External Network Services.............................................. 4-51
Step 1: Create the Access Control List and Its Privilege Definitions................................ 4-51
Step 2: Assign the Access Control List to One or More Network Hosts.......................... 4-53
Configuring Access Control to a Wallet ...................................................................................... 4-55
Step 1: Create an Oracle Wallet.............................................................................................. 4-55
Step 2: Create an Access Control List that Grants the Wallet Privileges ......................... 4-56
Step 3: Assign the Access Control List to the Wallet .......................................................... 4-57
Step 4: Make the HTTP Request with the Passwords and Client Certificates ................ 4-57
Examples of Creating Access Control Lists................................................................................. 4-59
Example of an Access Control List for a Single Role and Network Connection............ 4-60
Example of an Access Control List with Multiple Roles Assigned to Multiple Hosts .. 4-61
Example of an Access Control List for Using Passwords in a Non-Shared Wallet........ 4-62
Example of an Access Control List for Wallets in a Shared Database Session ............... 4-64
Specifying a Group of Network Host Computers...................................................................... 4-64
Precedence Order for a Host Computer in Multiple Access Control List Assignments ...... 4-65
Precedence Order for a Host in Access Control List Assignments with Port Ranges .......... 4-66
Checking Privilege Assignments That Affect User Access to a Network Host..................... 4-66
How a DBA Can Check User Network Connection and Domain Privileges.................. 4-67
How Users Can Check Their Network Connection and Domain Privileges .................. 4-68
Setting the Precedence of Multiple Users and Roles in One Access Control List.................. 4-69
Finding Information About Access Control Lists Configured for User Access..................... 4-71
Finding Information About User Privileges and Roles................................................................. 4-71
Listing All System Privilege Grants ............................................................................................. 4-73
Listing All Role Grants................................................................................................................... 4-73
Listing Object Privileges Granted to a User ................................................................................ 4-73
Listing the Current Privilege Domain of Your Session ............................................................. 4-74
Listing Roles of the Database ........................................................................................................ 4-74
Listing Information About the Privilege Domains of Roles ..................................................... 4-75
5 Managing Security for Application Developers
About Application Security Policies .................................................................................................... 5-1
Considerations for Using Application-Based Security..................................................................... 5-1
Are Application Users Also Database Users?................................................................................ 5-2
Is Security Better Enforced in the Application or in the Database?............................................ 5-2
Securing Passwords in Application Design........................................................................................ 5-3
General Guidelines for Securing Passwords in Applications...................................................... 5-3
Platform-Specific Security Threats ........................................................................................... 5-3
Designing Applications to Handle Password Input.............................................................. 5-4
Configuring Password Formats and Behavior....................................................................... 5-5
Handling Passwords in SQL*Plus and SQL Scripts............................................................... 5-5
Securing Passwords Using an External Password Store.............................................................. 5-7
Securing Passwords Using the orapwd Utility.............................................................................. 5-7
Example of Reading Passwords in Java.......................................................................................... 5-7
Managing Application Privileges ...................................................................................................... 5-11
ix
Creating Secure Application Roles to Control Access to Applications ...................................... 5-12
Step 1: Create the Secure Application Role ................................................................................. 5-12
Step 2: Create a PL/SQL Package to Define the Access Policy for the Application.............. 5-13
Associating Privileges with User Database Roles .......................................................................... 5-14
Why Users Should Only Have the Privileges of the Current Database Role......................... 5-14
Using the SET ROLE Statement to Automatically Enable or Disable Roles........................... 5-15
Protecting Database Objects by Using Schemas............................................................................. 5-15
Protecting Database Objects in a Unique Schema...................................................................... 5-15
Protecting Database Objects in a Shared Schema....................................................................... 5-16
Managing Object Privileges in an Application............................................................................... 5-16
What Application Developers Need to Know About Object Privileges................................. 5-16
SQL Statements Permitted by Object Privileges......................................................................... 5-17
Parameters for Enhanced Security of Database Communication ................................................ 5-17
Reporting Bad Packets Received on the Database from Protocol Errors................................ 5-17
Terminating or Resuming Server Execution After Receiving a Bad Packet........................... 5-18
Configuring the Maximum Number of Authentication Attempts .......................................... 5-19
Controlling the Display of the Database Version Banner ......................................................... 5-19
Configuring Banners for Unauthorized Access and Auditing User Actions......................... 5-20
6 Using Application Contexts to Retrieve User Information
About Application Contexts................................................................................................................... 6-1
What Is an Application Context? .................................................................................................... 6-1
Components of the Application Context........................................................................................ 6-1
Where Are the Application Context Values Stored? .................................................................... 6-2
Benefits of Using Application Contexts.......................................................................................... 6-2
How Editions Affects Application Context Values....................................................................... 6-3
Types of Application Contexts .............................................................................................................. 6-3
Using Database Session-Based Application Contexts ...................................................................... 6-4
About Database Session-Based Application Contexts.................................................................. 6-4
Creating a Database Session-Based Application Context ............................................................ 6-5
Creating a PL/SQL Package to Set the Database Session-Based Application Context ........... 6-6
About the Package That Manages the Database Session-Based Application Context ..... 6-7
Using SYS_CONTEXT to Retrieve Session Information ....................................................... 6-7
Using Dynamic SQL with SYS_CONTEXT............................................................................. 6-8
Using SYS_CONTEXT in a Parallel Query.............................................................................. 6-9
Using SYS_CONTEXT with Database Links........................................................................... 6-9
Using DBMS_SESSION.SET_CONTEXT to Set Session Information ................................. 6-9
Creating a Logon Trigger to Run a Database Session Application Context Package........... 6-11
Tutorial: Creating and Using a Database Session-Based Application Context...................... 6-12
About This Tutorial ................................................................................................................. 6-13
Step 1: Create User Accounts and Ensure the User SCOTT Is Active.............................. 6-13
Step 2: Create the Database Session-Based Application Context...................................... 6-13
Step 3: Create a Package to Retrieve Session Data and Set the Application Context .... 6-14
Step 4: Create a Logon Trigger for the Package .................................................................. 6-15
Step 5: Test the Application Context..................................................................................... 6-15
Step 6: Remove the Components for This Tutorial............................................................. 6-16
Initializing Database Session-Based Application Contexts Externally ................................... 6-16
x
Obtaining Default Values from Users................................................................................... 6-16
Obtaining Values from Other External Resources.............................................................. 6-17
Initializing Application Context Values from a Middle-Tier Server................................ 6-17
Initializing Database Session-Based Application Contexts Globally ...................................... 6-18
About Initializing Database Session-Based Application Contexts Globally................... 6-18
Using Database Session-Based Application Contexts with LDAP................................... 6-18
How Globally Initialized Database Session-Based Application Contexts Work............ 6-19
Example of Initializing a Database Session-Based Application Context Globally......... 6-19
Using Externalized Database Session-Based Application Contexts........................................ 6-21
Using Global Application Contexts................................................................................................... 6-22
About Global Application Contexts............................................................................................. 6-22
Using Global Application Contexts in an Oracle Real Application Clusters Environment. 6-23
Creating a Global Application Context........................................................................................ 6-23
Creating a PL/SQL Package to Manage a Global Application Context ................................. 6-23
About the Package That Manages the Global Application Context................................. 6-24
How Editions Affects the Results of a Global Application Context PL/SQL Package . 6-24
Setting the DBMS_SESSION.SET_CONTEXT username and client_id Parameters...... 6-25
Sharing Global Application Context Values for All Database Users ............................... 6-26
Setting a Global Context for Database Users Who Move Between Applications........... 6-27
Setting a Global Application Context for Nondatabase Users ......................................... 6-28
Clearing Session Data When the Session Closes................................................................. 6-32
Embedding Calls in Middle-Tier Applications to Manage the Client Session ID................. 6-32
About Managing Client Session IDs Using a Middle-Tier Application .......................... 6-32
Retrieving the Client Session ID Using a Middle-Tier Application ................................. 6-32
Setting the Client Session ID Using a Middle-Tier Application ....................................... 6-33
Clearing Session Data Using a Middle-Tier Application................................................... 6-34
Tutorial: Creating a Global Application Context That Uses a Client Session ID................... 6-35
About This Tutorial ................................................................................................................. 6-35
Step 1: Create User Accounts ................................................................................................. 6-35
Step 2: Create the Global Application Context.................................................................... 6-36
Step 3: Create a Package for the Global Application Context ........................................... 6-36
Step 4: Test the Global Application Context ........................................................................ 6-37
Step 5: Remove the Components for This Tutorial............................................................. 6-39
Global Application Context Processes......................................................................................... 6-39
Simple Global Application Context Process ........................................................................ 6-39
Global Application Context Process for Lightweight Users.............................................. 6-40
Using Client Session-Based Application Contexts......................................................................... 6-42
About Client Session-Based Application Contexts .................................................................... 6-42
Setting a Value in the CLIENTCONTEXT Namespace ............................................................. 6-43
Retrieving the CLIENTCONTEXT Namespace.......................................................................... 6-43
Clearing a Setting in the CLIENTCONTEXT Namespace ........................................................ 6-44
Clearing All Settings in the CLIENTCONTEXT Namespace ................................................... 6-44
Finding Information About Application Contexts......................................................................... 6-45
7 Using Oracle Virtual Private Database to Control Data Access
About Oracle Virtual Private Database ............................................................................................... 7-1
What Is Oracle Virtual Private Database? ..................................................................................... 7-1
xi
Benefits of Using Oracle Virtual Private Database Policies......................................................... 7-2
Basing Security Policies on Database Objects Rather Than Applications .......................... 7-2
Controlling How Oracle Database Evaluates Policy Functions........................................... 7-3
Which Privileges Are Used to Run Oracle Virtual Private Database Policy Functions?......... 7-3
Using Oracle Virtual Private Database with an Application Context........................................ 7-3
Components of an Oracle Virtual Private Database Policy ............................................................. 7-4
Creating a Function to Generate the Dynamic WHERE Clause.................................................. 7-4
Creating a Policy to Attach the Function to the Objects You Want to Protect.......................... 7-5
Configuring an Oracle Virtual Private Database Policy................................................................... 7-5
About Oracle Virtual Private Database Policies............................................................................ 7-6
Attaching a Policy to a Database Table, View, or Synonym........................................................ 7-7
Enforcing Policies on Specific SQL Statement Types.................................................................... 7-7
Controlling the Display of Column Data with Policies................................................................ 7-8
Adding Policies for Column-Level Oracle Virtual Private Database.................................. 7-8
Displaying Only the Column Rows Relevant to the Query ................................................. 7-9
Using Column Masking to Display Sensitive Columns as NULL Values....................... 7-10
Working with Oracle Virtual Private Database Policy Groups................................................ 7-11
About Oracle Virtual Private Database Policy Groups...................................................... 7-11
Creating a New Oracle Virtual Private Database Policy Group ....................................... 7-12
Designating a Default Policy Group with the SYS_DEFAULT Policy Group ................ 7-12
Establishing Multiple Policies for Each Table, View, or Synonym................................... 7-13
Validating the Application Used to Connect to the Database........................................... 7-13
Optimizing Performance by Using Oracle Virtual Private Database Policy Types .............. 7-14
About Oracle Virtual Private Database Policy Types......................................................... 7-14
Using the Dynamic Policy Type to Automatically Rerun Policy Functions ................... 7-15
Using a Static Policy to Prevent Policy Functions from Rerunning for Each Query ..... 7-16
Using a Shared Static Policy to Share a Policy with Multiple Objects ............................. 7-16
When to Use Static and Shared Static Policies..................................................................... 7-17
Using a Context-Sensitive Policy for Predicates That Do Not Change After Parsing ... 7-17
Using a Shared Context Sensitive Policy to Share a Policy with Multiple Objects........ 7-18
When to Use Context-Sensitive and Shared Context-Sensitive Policies.......................... 7-18
Summary of the Five Oracle Virtual Private Database Policy Types............................... 7-19
Tutorials: Creating Oracle Virtual Private Database Policies ...................................................... 7-19
Tutorial: Creating a Simple Oracle Virtual Private Database Policy....................................... 7-19
About This Tutorial ................................................................................................................. 7-20
Step 1: Ensure That the OE User Account Is Active ........................................................... 7-20
Step 2: Create a Policy Function............................................................................................. 7-20
Step 3: Create the Oracle Virtual Private Database Policy................................................. 7-21
Step 4: Test the Policy.............................................................................................................. 7-21
Step 5: Remove the Components for This Tutorial............................................................. 7-22
Tutorial: Implementing a Policy with a Database Session-Based Application Context....... 7-22
About This Tutorial ................................................................................................................. 7-23
Step 1: Create User Accounts and Sample Tables............................................................... 7-23
Step 2: Create a Database Session-Based Application Context ......................................... 7-24
Step 3: Create a PL/SQL Package to Set the Application Context ................................... 7-24
Step 4: Create a Logon Trigger to Run the Application Context PL/SQL Package....... 7-25
Step 5: Create a PL/SQL Policy Function to Limit User Access to Their Orders........... 7-26
xii
Step 6: Create the New Security Policy................................................................................. 7-26
Step 7: Test the New Policy .................................................................................................... 7-27
Step 8: Remove the Components for This Tutorial............................................................. 7-28
Tutorial: Implementing an Oracle Virtual Private Database Policy Group ........................... 7-28
About This Tutorial ................................................................................................................. 7-28
Step 1: Create User Accounts and Other Components for This Tutorial......................... 7-29
Step 2: Create the Two Policy Groups .................................................................................. 7-29
Step 3: Create PL/SQL Functions to Control the Policy Groups...................................... 7-30
Step 4: Add the PL/SQL Functions to the Policy Groups.................................................. 7-31
Step 5: Create the Driving Application Context.................................................................. 7-32
Step 6: Test the Policy Groups................................................................................................ 7-32
Step 7: Remove the Components for This Tutorial............................................................. 7-33
How Oracle Virtual Private Database Works with Other Oracle Features................................ 7-34
Using Oracle Virtual Private Database Policies with Editions................................................. 7-34
Using SELECT FOR UPDATE in User Queries on VPD-Protected Tables............................. 7-34
How Oracle Virtual Private Database Policies Affect Outer or ANSI Join Operations........ 7-34
How Oracle Virtual Private Database Security Policies Work with Applications ................ 7-35
Using Automatic Reparsing for Fine-Grained Access Control Policy Functions.................. 7-35
Using Oracle Virtual Private Database Policies and Flashback Query................................... 7-35
Using Oracle Virtual Private Database and Oracle Label Security.......................................... 7-36
Using Oracle Virtual Private Database to Enforce Oracle Label Security Policies......... 7-36
Oracle Virtual Private Database and Oracle Label Security Exceptions ......................... 7-36
Exporting Data Using the EXPDP Utility access_method Parameter ..................................... 7-37
User Models and Oracle Virtual Private Database .................................................................... 7-38
Finding Information About Oracle Virtual Private Database Policies....................................... 7-39
8 Developing Applications Using the Data Encryption API
Security Problems That Encryption Does Not Solve ........................................................................ 8-1
Principle 1: Encryption Does Not Solve Access Control Problems ............................................ 8-1
Principle 2: Encryption Does Not Protect Against a Malicious Database Administrator ....... 8-2
Principle 3: Encrypting Everything Does Not Make Data Secure ............................................. 8-3
Data Encryption Challenges................................................................................................................... 8-4
Encrypting Indexed Data.................................................................................................................. 8-4
Generating Encryption Keys ............................................................................................................ 8-4
Transmitting Encryption Keys ......................................................................................................... 8-5
Storing Encryption Keys ................................................................................................................... 8-5
Storing the Encryption Keys in the Database ......................................................................... 8-5
Storing the Encryption Keys in the Operating System.......................................................... 8-7
Users Managing Their Own Encryption Keys........................................................................ 8-7
Using Transparent Database Encryption and Tablespace Encryption ............................... 8-7
Changing Encryption Keys............................................................................................................... 8-7
Encrypting Binary Large Objects..................................................................................................... 8-7
Storing Data Encryption by Using the DBMS_CRYPTO Package................................................. 8-8
Examples of Using the Data Encryption API................................................................................... 8-10
Example of a Data Encryption Procedure ................................................................................... 8-10
Example of AES 256-Bit Data Encryption and Decryption Procedures.................................. 8-11
Example of Encryption and Decryption Procedures for BLOB Data ...................................... 8-12
xiii
Finding Information About Encrypted Data ................................................................................... 8-15
9 Verifying Security Access with Auditing
About Auditing......................................................................................................................................... 9-1
What Is Auditing?.............................................................................................................................. 9-2
Why Is Auditing Used?..................................................................................................................... 9-2
Protecting the Database Audit Trail................................................................................................ 9-3
Activities That Are Always Written to the Standard and Fine-Grained Audit Records......... 9-3
Activities That Are Always Audited for All Platforms................................................................ 9-4
Auditing in a Distributed Database................................................................................................. 9-4
Best Practices for Auditing ............................................................................................................... 9-4
Selecting an Auditing Type.................................................................................................................... 9-5
Auditing SQL Statements, Privileges, and Other General Activities......................................... 9-5
Auditing Commonly Used Security-Relevant Activities ............................................................. 9-5
Auditing Specific, Fine-Grained Activities..................................................................................... 9-6
Auditing General Activities with Standard Auditing ...................................................................... 9-6
About Standard Auditing................................................................................................................. 9-7
What Is Standard Auditing?...................................................................................................... 9-7
Who Can Perform Standard Auditing?................................................................................... 9-7
When Are Standard Audit Records Created?......................................................................... 9-8
Configuring Standard Auditing with the AUDIT_TRAIL Initialization Parameter................ 9-8
Enabling or Disabling the Standard Audit Trail .................................................................... 9-8
Settings for the AUDIT_TRAIL Initialization Parameter...................................................... 9-9
What Do the Operating System and Database Audit Trails Have in Common?................... 9-11
Using the Operating System Audit Trail..................................................................................... 9-12
About the Operating System Trail ........................................................................................ 9-13
What Do Operating System Audit Trail Records Look Like?........................................... 9-13
Advantages of the Operating System Audit Trail .............................................................. 9-16
How the Operating System Audit Trail Works................................................................... 9-17
Specifying a Directory for the Operating System Audit Trail........................................... 9-17
Using the Syslog Audit Trail on UNIX Systems......................................................................... 9-18
About the Syslog Audit Trail ................................................................................................. 9-18
Format of the Information Stored in the Syslog Audit Trail ............................................ 9-19
What Does the Syslog Audit Trail Look Like? .................................................................... 9-19
Configuring Syslog Auditing................................................................................................. 9-19
How the AUDIT and NOAUDIT SQL Statements Work.......................................................... 9-20
Enabling Standard Auditing with the AUDIT SQL Statement......................................... 9-20
Auditing Statement Executions: Successful, Unsuccessful, or Both................................. 9-21
How Standard Audit Records Are Generated..................................................................... 9-21
How Do Cursors Affect Standard Auditing? ...................................................................... 9-22
Benefits of Using the BY ACCESS Clause in the AUDIT Statement ................................ 9-22
Auditing Actions Performed by Specific Users .................................................................. 9-23
Removing the Audit Option with the NOAUDIT SQL Statement................................... 9-23
Auditing SQL Statements .............................................................................................................. 9-23
About SQL Statement Auditing............................................................................................. 9-23
Types of SQL Statements That Are Audited........................................................................ 9-23
Configuring SQL Statement Auditing.................................................................................. 9-24
xiv
Removing SQL Statement Auditing...................................................................................... 9-25
Auditing Privileges......................................................................................................................... 9-26
About Privilege Auditing ....................................................................................................... 9-26
Types of Privileges That Can Be Audited ............................................................................ 9-26
Configuring Privilege Auditing............................................................................................. 9-26
Removing Privilege Auditing ................................................................................................ 9-27
Auditing SQL Statements and Privileges in a Multitier Environment.................................... 9-27
Auditing Schema Objects............................................................................................................... 9-28
About Schema Object Auditing ............................................................................................. 9-29
Types of Schema Objects That Can Be Audited .................................................................. 9-29
Using Standard Auditing with Editioned Objects .............................................................. 9-29
Schema Object Audit Options for Views, Procedures, and Other Elements................... 9-29
Configuring Schema Object Auditing................................................................................... 9-30
Removing Object Auditing..................................................................................................... 9-31
Setting Audit Options for Objects That May Be Created in the Future........................... 9-31
Auditing Directory Objects............................................................................................................ 9-32
About Directory Object Auditing.......................................................................................... 9-32
Configuring Directory Object Auditing ............................................................................... 9-32
Removing Directory Object Auditing................................................................................... 9-32
Auditing Functions, Procedures, Packages, and Triggers ........................................................ 9-32
About Auditing Functions, Procedures, Packages, and Triggers..................................... 9-32
Configuring the Auditing of Functions, Procedures, Packages, and Triggers ............... 9-33
Removing the Auditing of Functions, Procedures, Packages, and Triggers................... 9-33
Auditing Network Activity ........................................................................................................... 9-33
About Network Auditing ....................................................................................................... 9-34
Configuring Network Auditing............................................................................................. 9-34
Removing Network Auditing ................................................................................................ 9-35
Using Default Auditing for Security-Relevant SQL Statements and Privileges...................... 9-35
About the Default Auditing Settings ........................................................................................... 9-35
Privileges That Oracle Database Audits by Default .................................................................. 9-35
Disabling and Enabling Default Audit Settings ......................................................................... 9-36
Auditing Specific Activities with Fine-Grained Auditing ........................................................... 9-36
About Fine-Grained Auditing....................................................................................................... 9-37
Where Are Fine-Grained Audit Records Stored?....................................................................... 9-37
Advantages of Fine-Grained Auditing ........................................................................................ 9-38
What Permissions Are Needed to Create a Fine-Grained Audit Policy? ............................... 9-38
Activities That Are Always Audited in Fine-Grained Auditing.............................................. 9-38
Using Fine-Grained Audit Policies with Editions...................................................................... 9-39
Creating an Audit Trail for Fine-Grained Audit Records......................................................... 9-39
How the Fine-Grained Audit Trail Generates Records............................................................. 9-39
Using the DBMS_FGA Package to Manage Fine-Grained Audit Policies .............................. 9-39
About the DBMS_FGA PL/SQL Package ............................................................................ 9-39
Creating a Fine-Grained Audit Policy .................................................................................. 9-40
Disabling and Enabling a Fine-Grained Audit Policy........................................................ 9-43
Dropping a Fine-Grained Audit Policy ................................................................................ 9-44
Tutorial: Adding an Email Alert to a Fine-Grained Audit Policy............................................ 9-44
About This Tutorial ................................................................................................................. 9-44
xv
Step 1: Install and Configure the UTL_MAIL PL/SQL Package ...................................... 9-45
Step 2: Create User Accounts ................................................................................................. 9-46
Step 3: Configure an Access Control List File for Network Services ............................... 9-47
Step 4: Create the Email Security Alert PL/SQL Procedure.............................................. 9-47
Step 5: Create and Test the Fine-Grained Audit Policy Settings....................................... 9-48
Step 6: Test the Alert................................................................................................................ 9-48
Step 7: Remove the Components for This Tutorial............................................................. 9-49
Tutorial: Auditing Nondatabase Users........................................................................................ 9-50
About This Tutorial ................................................................................................................. 9-50
Step 1: Create the User Account and Ensure the User HR Is Active................................ 9-50
Step 2: Create the Fine-Grained Audit Policy...................................................................... 9-51
Step 3: Test the Policy.............................................................................................................. 9-51
Step 4: Remove the Components for This Tutorial............................................................. 9-52
Auditing SYS Administrative Users.................................................................................................. 9-53
Auditing User SYSTEM.................................................................................................................. 9-53
Auditing User SYS and Users Who Connect as SYSDBA and SYSOPER............................... 9-53
Using Triggers to Write Audit Data to a Separate Table............................................................... 9-55
Managing Audit Trail Records ........................................................................................................... 9-57
About Audit Records...................................................................................................................... 9-57
Managing the Database Audit Trail............................................................................................. 9-58
Database Audit Trail Contents............................................................................................... 9-58
Controlling the Size of the Database Audit Trail ................................................................ 9-59
Moving the Database Audit Trail to a Different Tablespace............................................. 9-60
Auditing the Database Audit Trail........................................................................................ 9-61
Archiving the Database Audit Trail...................................................................................... 9-61
Managing the Operating System Audit Trail ............................................................................. 9-62
If the Operating System Audit Trail Becomes Full............................................................. 9-62
Setting the Size of the Operating System Audit Trail ........................................................ 9-62
Setting the Age of the Operating System Audit Trail ........................................................ 9-64
Archiving the Operating System Audit Trail ...................................................................... 9-65
Purging Audit Trail Records ............................................................................................................... 9-65
About Purging Audit Trail Records............................................................................................. 9-66
Selecting an Audit Trail Purge Method....................................................................................... 9-66
Scheduling an Automatic Purge Job for the Audit Trail........................................................... 9-67
Step 1: If Necessary, Tune Online and Archive Redo Log Sizes....................................... 9-68
Step 2: Plan a Timestamp and Archive Strategy ................................................................. 9-68
Step 3: Initialize the Audit Trail Cleanup Operation.......................................................... 9-68
Step 4: Optionally, Set an Archive Timestamp for Audit Records................................... 9-69
Step 5: Create and Schedule the Purge Job........................................................................... 9-70
Step 6: Optionally, Configure the Audit Trail Records to be Deleted in Batches........... 9-71
Manually Purging the Audit Trail................................................................................................ 9-72
Purging a Subset of Records from the Database Audit Trail.................................................... 9-74
Other Audit Trail Purge Operations ............................................................................................ 9-75
Verifying That the Audit Trail Is Initialized for Cleanup.................................................. 9-75
Setting the Default Audit Trail Purge Interval for Any Audit Trail Type....................... 9-76
Cancelling the Initialization Cleanup Settings .................................................................... 9-76
Enabling or Disabling an Audit Trail Purge Job ................................................................. 9-77
xvi
Setting the Default Audit Trail Purge Job Interval for a Specified Purge Job................. 9-77
Deleting an Audit Trail Purge Job......................................................................................... 9-78
Clearing the Archive Timestamp Setting ............................................................................. 9-78
Clearing the Database Audit Trail Batch Size...................................................................... 9-78
Example: Directly Calling a Database Audit Trail Purge Operation ...................................... 9-79
Finding Information About Audited Activities .............................................................................. 9-80
Using Data Dictionary Views to Find Information About the Audit Trail ............................ 9-80
Using Audit Trail Views to Investigate Suspicious Activities.................................................. 9-81
Listing Active Statement Audit Options ............................................................................. 9-82
Listing Active Privilege Audit Options................................................................................ 9-82
Listing Active Object Audit Options for Specific Objects ................................................. 9-83
Listing Default Object Audit Options................................................................................... 9-83
Listing Audit Records ............................................................................................................. 9-83
Listing Audit Records for the AUDIT SESSION Option ................................................... 9-83
Deleting the Audit Trail Views ..................................................................................................... 9-84
10 Keeping Your Oracle Database Secure
About the Security Guidelines in This Chapter ............................................................................. 10-1
Downloading Security Patches and Contacting Oracle Regarding Vulnerabilities ................ 10-2
Applying Security Patches and Workaround Solutions ........................................................... 10-2
Contacting Oracle Security Regarding Vulnerabilities in Oracle Database ........................... 10-2
Guidelines for Securing User Accounts and Privileges ................................................................ 10-2
Guidelines for Securing Roles............................................................................................................ 10-6
Guidelines for Securing Passwords................................................................................................... 10-7
Guidelines for Securing Data ........................................................................................................... 10-10
Guidelines for Securing the ORACLE_LOADER Access Driver .............................................. 10-11
Guidelines for Securing a Database Installation and Configuration....................................... 10-12
Guidelines for Securing the Network............................................................................................. 10-13
Securing the Client Connection................................................................................................... 10-13
Securing the Network Connection ............................................................................................. 10-14
Securing a Secure Sockets Layer Connection............................................................................ 10-16
Guidelines for Auditing .................................................................................................................... 10-18
Auditing Sensitive Information .................................................................................................. 10-18
Keeping Audited Information Manageable .............................................................................. 10-18
Auditing Typical Database Activity........................................................................................... 10-19
Auditing Suspicious Database Activity..................................................................................... 10-20
Recommended Audit Settings..................................................................................................... 10-21
Addressing the CONNECT Role Change....................................................................................... 10-22
Why Was the CONNECT Role Changed?................................................................................. 10-22
How the CONNNECT Role Change Affects Applications..................................................... 10-22
How the CONNECT Role Change Affects Database Upgrades..................................... 10-22
How the CONNECT Role Change Affects Account Provisioning................................. 10-23
How the CONNECT Role Change Affects Applications Using New Databases......... 10-23
How the CONNECT Role Change Affects Users..................................................................... 10-23
How the CONNECT Role Change Affects General Users............................................... 10-23
How the CONNECT Role Change Affects Application Developers.............................. 10-23
How the CONNECT Role Change Affects Client Server Applications......................... 10-23
xvii
Approaches to Addressing the CONNECT Role Change....................................................... 10-24
Approach 1: Create a New Database Role ......................................................................... 10-24
Approach 2: Restore CONNECT Privileges....................................................................... 10-25
Approach 3: Conduct Least Privilege Analysis ................................................................ 10-25
Glossary
Index
xviii
List of Examples
2–1 Creating a User Account with the CREATE SESSION Privilege......................................... 2-2
2–2 Altering a User Account ............................................................................................................ 2-8
2–3 Using ORAPWD to Change the SYS User Password ............................................................ 2-9
2–4 Querying V$SESSION for the Session ID of a User............................................................ 2-14
2–5 Killing a User Session.............................................................................................................. 2-14
2–6 Finding Objects Owned by a User......................................................................................... 2-15
2–7 Dropping a User Account....................................................................................................... 2-15
3–1 Password Creation SQL Statements......................................................................................... 3-3
3–2 Locking an Account with the CREATE PROFILE Statement............................................... 3-7
3–3 Setting Password Aging and Expiration with CREATE PROFILE...................................... 3-9
3–4 Enabling Password Case Sensitivity ..................................................................................... 3-14
3–5 Sample SQLNET.ORA File with Wallet Parameters Set .................................................... 3-20
4–1 Setting O7_DICTIONARY_ACCESSIBILITY to FALSE........................................................ 4-3
4–2 Creating a User Role Authorized by a Password................................................................ 4-17
4–3 Altering a Role to be Authorized by an External Source ................................................... 4-17
4–4 Using SET ROLE for a Password-Authenticated Role ....................................................... 4-18
4–5 Creating a Role Authorized by a PL/SQL Package for an Application .......................... 4-18
4–6 Creating a Role Authorized by an External Source ............................................................ 4-19
4–7 Creating a Global Role ............................................................................................................ 4-19
4–8 Revoking All Object Privileges Using CASCADE CONSTRAINTS ................................ 4-24
4–9 Compiling a Procedure ........................................................................................................... 4-31
4–10 Package Objects Affected by Procedure Privileges............................................................. 4-32
4–11 Granting a System Privilege and a Role to a User .............................................................. 4-37
4–12 Granting the EXECUTE Privilege on a Directory Object ................................................... 4-37
4–13 Granting the ADMIN Option................................................................................................. 4-38
4–14 Creating a New User with the GRANT Statement ............................................................. 4-38
4–15 Granting Object Privileges to Users ...................................................................................... 4-39
4–16 Using SET ROLE to Grant a Role and Specify a Password................................................ 4-48
4–17 Using SET ROLE to Disable All Roles ................................................................................. 4-48
4–18 Using ALTER USER to Set Default Roles............................................................................. 4-49
4–19 Creating an Access Control List for a Single Role and Network Connection................. 4-60
4–20 Creating an Access Control List for Multiple Roles and Network Connections............ 4-61
4–21 Using the DBA_NETWORK_ACL_PRIVILEGES View to Show Granted Privileges ... 4-62
4–22 Using the DBA_NETWORK_ACLS View to Show Host Assignments........................... 4-62
4–23 Configuring ACL Access Using Passwords in a Non-Shared Wallet .............................. 4-63
4–24 Configuring ACL Access for a Wallet in a Shared Database Session............................... 4-64
4–25 Administrator Checking User Permissions for Network Host Connections.................. 4-67
4–26 Administrator Checking Permissions for Domain Name Resolution.............................. 4-68
4–27 User Checking Permissions for Network Host Connections ............................................ 4-69
4–28 User Checking Privileges for Domain Name Resolution................................................... 4-69
5–1 Java Code for Reading Passwords............................................................................................ 5-7
6–1 Creating a Database Session-Based Application Context ..................................................... 6-6
6–2 Finding SYS_CONTEXT Values ............................................................................................... 6-8
6–3 Simple Procedure to Create an Application Context Value .............................................. 6-10
6–4 Creating a Simple Logon Trigger ......................................................................................... 6-11
6–5 Creating a Logon Trigger for a Production Environment ................................................. 6-12
6–6 Creating a Logon Trigger for a Development Environment ............................................. 6-12
6–7 Package to Retrieve Session Data and Set a Database Session Context........................... 6-14
6–8 Creating an Externalized Database Session-based Application Context......................... 6-17
6–9 Creating a Global Application Context ................................................................................ 6-23
6–10 Package to Manage Global Application Values for All Database Users.......................... 6-26
6–11 Package to Manage Global Application Context Values for a User Moving Between
Applications 6-28
6–12 Package to Manage Global Application Context Values for Nondatabase Users.......... 6-30
xix
6–13 Using OCIStmtExecute to Retrieve a Client Session ID Value.......................................... 6-33
6–14 Retrieving a Client Session ID Value for Client Session-Based Contexts........................ 6-44
7–1 Attaching a Simple Oracle Virtual Private Database Policy to a Table............................... 7-7
7–2 Specifying SQL Statement Types with DBMS_RLS.ADD_POLICY.................................... 7-8
7–3 Creating a Column-Level Oracle Virtual Private Database Policy...................................... 7-9
7–4 Adding a Column Masking to an Oracle Virtual Private Database Policy ..................... 7-10
7–5 Creating a DYNAMIC Policy with DBMS_RLS.ADD_POLICY....................................... 7-15
7–6 Creating a STATIC Policy with DBMS_RLS.ADD_POLICY............................................. 7-16
7–7 Creating a SHARED_STATIC Policy with DBMS_RLS.ADD_POLICY .......................... 7-17
7–8 Creating a CONTEXT_SENSITIVE Policy with DBMS_RLS.ADD_POLICY ................. 7-17
7–9 Creating a SHARED_CONTEXT_SENSITIVE Policy with DBMS_RLS.ADD_POLICY 7-18
9–1 Checking the Current Value of the AUDIT_TRAIL Initialization Parameter.................... 9-9
9–2 Enabling the Standard Audit Trail........................................................................................... 9-9
9–3 Text File Operating System Audit Trail................................................................................ 9-13
9–4 XML File Operating System Audit Trail .............................................................................. 9-15
9–5 Syslog Audit Trail for SYS User............................................................................................. 9-19
9–6 Using AUDIT to Audit User Actions.................................................................................... 9-23
9–7 Using AUDIT to Enable SQL Statement Auditing.............................................................. 9-24
9–8 Auditing Unsuccessful Statements........................................................................................ 9-24
9–9 Using NOAUDIT to Remove Session and SQL Statement Auditing............................... 9-25
9–10 Using NOAUDIT to Remove ALL STATEMENTS Auditing............................................ 9-26
9–11 Using AUDIT to Configure Privilege Auditing .................................................................. 9-27
9–12 Using AUDIT to Audit a SQL Statement for a User........................................................... 9-27
9–13 Configuring Auditing for a Schema Table........................................................................... 9-30
9–14 Auditing Successful Statements on a Schema Table........................................................... 9-30
9–15 Configuring Auditing for Any New Objects Using the DEFAULT Clause .................... 9-30
9–16 Auditing the Execution of a Procedure or Function........................................................... 9-31
9–17 Auditing a Directory Object ................................................................................................... 9-32
9–18 Auditing All Functions, Procedures, Packages, and Triggers........................................... 9-33
9–19 Auditing a User’s Execution of Functions, Procedures, Packages, and Triggers........... 9-33
9–20 Auditing the Execution of a Procedure or Function within a Schema............................. 9-33
9–21 Using DBMS_FGA.ADD_POLICY to Create a Fine-Grained Audit Policy.................... 9-42
9–22 Disabling a Fine-Grained Audit Policy................................................................................. 9-43
9–23 Enabling a Fine-Grained Audit Policy.................................................................................. 9-44
9–24 Dropping a Fine-Grained Audit Policy ................................................................................ 9-44
9–25 Auditing Table Insert Operations by User SYSTEM .......................................................... 9-53
9–26 Audit Trigger to Record Before and After Changes to a Table......................................... 9-56
9–27 Directly Calling a Database Audit Trail Purge Operation................................................. 9-79
xx
List of Tables
2–1 Data Dictionary Views That Display Information about Users and Profiles................. 2-15
3–1 Password-Specific Settings in the Default Profile ................................................................. 3-5
3–2 Parameters Controlling Reuse of a Previous Password....................................................... 3-7
3–3 Data Dictionary Views That Describe User Authentication............................................. 3-47
4–1 Roles to Allow Access to SYS Schema Objects ...................................................................... 4-4
4–2 Properties of Roles and Their Description ............................................................................. 4-7
4–3 Oracle Database Predefined Roles........................................................................................ 4-11
4–4 System Privileges for Named Types .................................................................................... 4-33
4–5 Privileges for Object Tables ................................................................................................... 4-35
4–6 Data Dictionary Views That Display Information about Access Control Lists............. 4-71
4–7 Data Dictionary Views That Display Information about Privileges and Roles............. 4-71
5–1 Features Affected by the One Big Application User Model ................................................ 5-2
5–2 How Privileges Relate to Schema Objects........................................................................... 5-16
5–3 SQL Statements Permitted by Database Object Privileges ............................................... 5-17
6–1 Types of Application Contexts................................................................................................. 6-4
6–2 Setting the DBMS_SESSION.SET_CONTEXT username and client_id Parameters..... 6-25
6–3 Data Dictionary Views That Display Information about Application Contexts ........... 6-45
7–1 DBMS_RLS Procedures............................................................................................................. 7-6
7–2 DBMS_RLS.ADD_POLICY Policy Types............................................................................ 7-19
7–3 Oracle Virtual Private Database in Different User Models............................................... 7-39
7–4 Data Dictionary Views That Display Information about VPD Policies.......................... 7-39
8–1 DBMS_CRYPTO and DBMS_OBFUSCATION_TOOLKIT Feature Comparison ............ 8-8
8–2 Data Dictionary Views That Display Information about Encrypted Data ..................... 8-15
9–1 AUDIT_TRAIL Initialization Parameter Settings .............................................................. 9-10
9–2 Common Audited Actions in the Operating System and Database Audit Trails......... 9-12
9–3 Standard Auditing Levels and Their Effects....................................................................... 9-21
9–4 Auditable Network Error Conditions.................................................................................. 9-34
9–5 Comparison of Built-in Auditing and Trigger-Based Auditing....................................... 9-56
9–6 Selecting an Audit Trail Purge Method............................................................................... 9-67
9–7 Data Dictionary Views That Display Information about the Database Audit Trail ..... 9-80
10–1 Columns and Contents for DBA_CONNECT_ROLE_GRANTEES .............................. 10-25
xxi
List of Figures
3–1 Chronology of Password Lifetime and Grace Period......................................................... 3-10
3–2 Multitier Authentication......................................................................................................... 3-35
4–1 Common Uses for Roles............................................................................................................. 4-8
6–1 Location of Application Context in LDAP Directory Information Tree.......................... 6-19
9–1 Auditing Proxy Users.............................................................................................................. 9-28
9–2 Auditing Client Identifier Information Across Sessions.................................................... 9-28
xxii

xxiii
Preface
Welcome to Oracle Database Security Guide. This guide describes how you can configure
security for Oracle Database by using the default database features.
This preface contains these topics:
■Audience
■Documentation Accessibility
■Related Documents
■Conventions
Audience
Oracle Database Security Guide is intended for database administrators (DBAs), security
administrators, application developers, and others tasked with performing the
following operations securely and efficiently:
■Designing and implementing security policies to protect the data of an
organization, users, and applications from accidental, inappropriate, or
unauthorized actions
■Creating and enforcing policies and practices of auditing and accountability for
inappropriate or unauthorized actions
■Creating, maintaining, and terminating user accounts, passwords, roles, and
privileges
■Developing applications that provide desired services securely in a variety of
computational models, leveraging database and directory services to maximize
both efficiency and ease of use
To use this document, you need a basic understanding of how and why a database is
used, and basic familiarity with SQL.
Documentation Accessibility
For information about Oracle's commitment to accessibility, visit the Oracle
Accessibility Program website at
http://www.oracle.com/pls/topic/lookup?ctx=acc&id=docacc
.
Access to Oracle Support
Oracle customers have access to electronic support through My Oracle Support. For
information, visit
http://www.oracle.com/pls/topic/lookup?ctx=acc&id=info
or

xxiv
visit
http://www.oracle.com/pls/topic/lookup?ctx=acc&id=trs
if you are hearing
impaired.
Related Documents
For more security-related information, see these Oracle resources:
■Oracle Database Administrator's Guide
■Oracle Database 2 Day DBA
■Oracle Database 2 Day + Security Guide
■Oracle Database Concepts
■Oracle Database Reference
■Oracle Database Vault Administrator's Guide
Many of the examples in this guide use the sample schemas of the seed database,
which you can create when you install Oracle Database. See Oracle Database Sample
Schemas for information about how these schemas were created and how you can use
them yourself.
Oracle Technology Network (OTN)
You can download free release notes, installation documentation, updated versions of
this guide, white papers, or other collateral from the Oracle Technology Network
(OTN). Visit
http://www.oracle.com/technetwork/index.html
For security-specific information on OTN, visit
http://www.oracle.com/technetwork/topics/security/whatsnew/index.html
For the latest version of the Oracle documentation, including this guide, visit
http://www.oracle.com/technetwork/documentation/index.html
My Oracle Support
You can find information about security patches, certifications, and the support
knowledge base by visiting My Oracle Support (formerly OracleMetaLink) at
https://support.oracle.com
Conventions
The following text conventions are used in this document:
Convention Meaning
boldface Boldface type indicates graphical user interface elements associated
with an action, or terms defined in text or the glossary.
italic Italic type indicates book titles, emphasis, or placeholder variables for
which you supply particular values.
monospace
Monospace type indicates commands within a paragraph, URLs, code
in examples, text that appears on the screen, or text that you enter.

xxv
What's New in Oracle Database Security?
The Oracle Database 11g Release 2 (11.2) security features and enhancements described
in this section comprise the overall effort to provide superior access control, privacy,
and accountability with this release of Oracle Database.
The following sections describe new security features of Oracle Database 11g Release 2
(11.2) and provide pointers to additional information:
■Oracle Database 11g Release 2 (11.2.0.2) New Security Features
■Oracle Database 11g Release 2 (11.2.0.1) New Security Features
■Oracle Database 11g Release 1 (11.1) New Security Features
Oracle Database 11g Release 2 (11.2.0.2) New Security Features
This section contains:
■Enhancements to Fine-Grained Access to External Services and Wallets
■Support for MERGE INTO Statements for Virtual Private Database Policies
■BY ACCESS Audit Trail Option Now the Default for AUDIT Statements
■Enhancements for the UTL_SMTP PL/SQL Package
■New DBMS_SCHEDULER PL/SQL Package Global Scheduler Attributes
■Change to the UNLIMITED TABLESPACE System Privilege
Enhancements to Fine-Grained Access to External Services and Wallets
In this release, when you use fine-grained access control to configure external network
services and wallets, you now can control access to the
DBMS_LDAP
PL/SQL package. In
a default database installation, this package is created with the
EXECUTE
privilege
granted to
PUBLIC
users. This release enhances the security of this package by enabling
you to control access to applications in the database that use this package. As part of
this enhancement, the
DBMS_LDAP
package is now an invoker's rights package. Before a
user can connect to a remote network host, he or she must be granted the
connect
privilege in the access control list that was assigned to the remote network host.
See Oracle Database PL/SQL Packages and Types Reference for more information about the
DBMS_LDAP
package.
Support for MERGE INTO Statements for Virtual Private Database Policies
In previous releases of Oracle Database, when you created an Oracle Virtual Private
Database policy on an application that included the
MERGE INTO
statement, the
MERGE
INTO
statement would be prevented with an
ORA-28132: Merge into syntax does
xxvi
not support security policies
error, due to the presence of the Virtual Private
Database policy. In this release, you can create policies on applications that include
MERGE INTO
operations. To do so, in the
DBMS_RLS.ADD_POLICY
statement_types
parameter, include the
INSERT
,
UPDATE
, and
DELETE
statements, or just omit the
statement_types
parameter altogether.
See "Enforcing Policies on Specific SQL Statement Types" on page 7-7 for more
information.
BY ACCESS Audit Trail Option Now the Default for AUDIT Statements
Starting with this release, the standard audit records will by default be generated
using the
BY ACCESS
clause functionality of the
AUDIT
statement. Both the
BY ACCESS
and
BY SESSION
clauses write an individual audit record for each audited event, but
BY
ACCESS
captures more detail about the audited event.
See "Benefits of Using the BY ACCESS Clause in the AUDIT Statement" on page 9-22
for more information.
Enhancements for the UTL_SMTP PL/SQL Package
Starting with this release, the
UTL_SMTP
PL/SQL package has the following new
functionality:
■You now can configure the
UTL_SMTP
PL/SQL package for use on both Transport
Layer Security (TLS) and Secure Sockets Layer (SSL) servers.
■
UTL_SMTP
now provides support for the
PLAIN
,
LOGON
and
CRAM_MD5
password
authentication schemes.
See Oracle Database PL/SQL Packages and Types Reference for more information about the
UTL_SMTP
package.
New DBMS_SCHEDULER PL/SQL Package Global Scheduler Attributes
The
DBMS_SCHEDULER
PL/SQL package the following two new global scheduler
attributes, which are used to control encryption for connections to a mail server:
■
email_server_credential
, which enables you to specify the schema and name of
an existing credential object on which user
SYS
has the
EXECUTE
object privilege
■
email_server_encryption
, which enables you to set one of three encryption
settings for your mail server:
–
ssl_tls
, which uses SSL or TLS to encrypt the connection to the mail server
form the beginning of the connection
–
starttls
, in which the connection to the mail server starts as unencrypted but
switches to an encrypted connection
–
none
, in which no encryption is used to connect to the mail server
See Oracle Database Administrator's Guide for more information about Scheduler
preferences.
Change to the UNLIMITED TABLESPACE System Privilege
In previous releases, when you revoked the
UNLIMITED TABLESPACE
system privilege
from users, then the explicit quotas again took effect. Starting with this release, after
you revoke the
UNLIMITED TABLESPACE
system privilege, you must explicitly grant
quotas to individual tablespaces.
See "Granting Users the UNLIMITED TABLESPACE System Privilege" on page 2-5 for
more information about the
UNLIMITED TABLESPACE
system privilege.
xxvii
Oracle Database 11g Release 2 (11.2.0.1) New Security Features
This section contains:
■Enhancements to Fine-Grained Access to External Services and Wallets
■Support for MERGE INTO Statements for Virtual Private Database Policies
■Global Application Contexts Available Across Oracle RAC Instances
■Secure Sockets Layer (SSL) Version 2 Support Change
■Enhancements to Directory Objects
■Enhancements to Transparent Data Encryption
■Enhancements to the Audit Trail Cleanup Process
■Deprecated Security-Related Features
Enhancements to Fine-Grained Access to External Services and Wallets
The previous release of Oracle Database introduced the ability to create fine-grained
access control to external network services and wallets. In this release, the following
enhancements are available:
■Updates to the UTL_HTTP PL/SQL package. You now can configure network
services to use the Amazon Simple Storage Service (S3) scheme, which configures
access to the Amazon.com Web site. In addition, an individual application can
make HTTP requests by using its private wallet and HTTP cookie table that will
not be shared with other applications in the same database session. This feature
also offers protection of the wallet using the access control list (ACL) privileges in
place of the password credential.
■Support for IP Version 6 (IPv6) addresses. The
DBMS_NETWORK_ACL_ADMIN
and
DBMS_NETWORK_ACL_UTILTIY
packages, and the PL/SQL network utility packages
(such as
UTL_TCP
,
UTL_SMTP
,
UTL_MAIL
,
UTL_HTTP
, and
UTL_INADDR
), now support
both IP Version 4 (IPv4) and IPv6 addresses.
See "Managing Fine-Grained Access in PL/SQL Packages and Types" on page 4-49 for
more information.
Global Application Contexts Available Across Oracle RAC Instances
In this release, changes to global application context values are automatically
accessible across all Oracle Real Application Clusters (Oracle RAC) instances.
See "Using Global Application Contexts" on page 6-22 for more information about
creating a global application context.
Secure Sockets Layer (SSL) Version 2 Support Change
Starting with Oracle Database 11g Release 2 (11.2), SSL version 2 is no longer included
in the default list of default supported protocols. If your applications must use SSL
version 2, then you can do so by explicitly setting SSL version 2 while maintaining the
connection.
See Oracle Database Advanced Security Administrator's Guide for more information.
Enhancements to Directory Objects
This section contains:
■EXECUTE Privilege Available for Directory Objects
xxviii
■Ability to Audit Directory Objects
EXECUTE Privilege Available for Directory Objects
You now can grant users the
EXECUTE
privilege on directory objects that contain a
user-supplied preprocessor program for use by the
ORACLE_LOADER
access driver. This
prevents the user from accidentally or maliciously corrupting the preprocessor
program. The SQL statements that are affected by the
EXECUTE
privilege are
GRANT
and
REVOKE
. The
ORACLE_LOADER
access parameters now include the
PREPROCESSOR
clause,
which you can use to specify the name and location of a preprocessor program that
modifies the contents of a data file so that the
ORACLE_LOADER
access driver can read it.
For more information about using the
ORACLE_LOADER
access driver preprocessor, see
the following:
■Oracle Database Utilities for more information about the
ORACLE_LOADER
access
driver
■"Granting System Privileges and Roles" on page 4-37 for the syntax of granting the
EXECUTE
privilege for a directory object
■"Guidelines for Securing the ORACLE_LOADER Access Driver" on page 10-11
■Oracle Database SQL Language Reference for updates to the
GRANT
and
REVOKE
SQL
statements
Ability to Audit Directory Objects
You now can audit the
EXECUTE
privilege on directory objects. This enables you to
monitor users who run a preprocessor program (which is used by the
ORACLE_LOADER
access driver) that has been added to a directory object.
See "Auditing Directory Objects" on page 9-32 for more information.
Enhancements to Transparent Data Encryption
This section contains:
■Unified Master Encryption Key
■Tablespace Master Key Rekey: Changing the Encryption Key Password
■Transparent Data Encryption Support for Oracle Exadata
■Automatic Wallet Management Across Oracle RAC Instances
Unified Master Encryption Key
In this release, the master encryption key for transparent tablespace encryption and
transparent column encryption are now combined to one unified master encryption
key. Combining these keys enables transparent re-key operations for both of these
transparent data encryption features, regardless of whether the master encryption key
is stored in the Oracle Wallet or in one of the certified Hardware Security Modules
offered by RSA, SafeNet, Thales (including nCipher), and Utimaco.
For more information about transparent data encryption, see Oracle Database Advanced
Security Administrator's Guide.
Tablespace Master Key Rekey: Changing the Encryption Key Password
In this release, Oracle Advanced Security enables you to change the master key that
protects the encryption keys used to encrypt Oracle Database tablespaces. Industry
initiatives, such as the Payment Card Industry Data Security Standard (PCI DSS),
mandate periodic rotation of encryption keys associated with credit card data.
xxix
For more information about tablespace encryption, see Oracle Database Advanced
Security Administrator's Guide.
Transparent Data Encryption Support for Oracle Exadata
Starting with this release, the master encryption key is copied to the intelligent storage
cells, where data encrypted with transparent tablespace encryption or transparent
column encryption is now decrypted before the pre-filtering of the result set takes
place. This feature improves performance in databases that use transparent data
encryption.
For more information about Oracle Exadata, see Oracle Database High Availability
Overview.
Automatic Wallet Management Across Oracle RAC Instances
When you now open or close an Oracle wallet or re-key the master encryption key on
one Oracle RAC instance, then the changes you make automatically are propagated to
all other Oracle RAC instances.
For more information, see Oracle Database Advanced Security Administrator's Guide.
Enhancements to the Audit Trail Cleanup Process
Oracle Database 11g Release 2 (11.2) introduces several enhancements to the audit trail
cleanup process. In this release, you can:
■Timestamp audit trail records based on their archive date. Later on, you can
purge all records that were created before this archive date.
See "Step 4: Optionally, Set an Archive Timestamp for Audit Records" on page 9-69
for more information.
■Purge audit trail records in one operation or create a purge job. You can purge all
audit trail records in the system, or audit trail records of an individual type, such
as all fine-grained audit trail records within the database audit trail. The purge
operation will either remove audit trail records that were created before their
timestamped archive date, or it will remove all audit trail records of the specified
audit trail type. The purge job enables you to purge records based on a time
interval, and also can remove records based on their timestamped archive date.
See the following sections:
–"Scheduling an Automatic Purge Job for the Audit Trail" on page 9-67
–"Manually Purging the Audit Trail" on page 9-72
■Move the database audit trail table from the SYSTEM tablespace to a different
tablespace. You can move the standard audit trail table, the fine-grained audit trail
table, or both standard and fine-grained audit trail tables together. Consider
moving the database audit trail from the
SYSTEM
tablespace if it is too busy.
See "Moving the Database Audit Trail to a Different Tablespace" on page 9-60 for
more information.
■Set a batch size for the database audit trail records so that when they are purged,
the purge operation deletes each batch. In a purge operation, you remove all or
some of the audit trail records. Typically, you do this after you archive the audit
trail. Afterwards, the audit trail will resume collecting audit data. The batching
process enables you remove the records in groups, for example, 10,000 records at a
time, rather than deleting all records at a time.
xxx
See "Step 6: Optionally, Configure the Audit Trail Records to be Deleted in
Batches" on page 9-71 for more information.
■Set a maximum size and age for the operating system audit trail. When the
current audit file reaches this maximum, Oracle Database stops populating the
current file and creates a new file for the subsequent audit trail records.
See the following sections:
–"Setting the Size of the Operating System Audit Trail" on page 9-62
–"Setting the Age of the Operating System Audit Trail" on page 9-64
Deprecated Security-Related Features
This section contains:
■DB_EXTENDED Setting for the AUDIT_TRAIL Parameter Deprecated
■WKUSER Role and Ultra Search Schemas Deprecated
■Database Configuration Assistant No Longer Provides Default Security Settings
■ALTER USER Clause AUTHENTICATED USING PASSWORD Deprecated
■Password for the listener.ora File Deprecated
DB_EXTENDED Setting for the AUDIT_TRAIL Parameter Deprecated
The
DB_EXTENDED
setting in the
AUDIT_TRAIL
initialization parameter has been
deprecated. Instead, use the
DB, EXTENDED
setting in its place.
See "Configuring Standard Auditing with the AUDIT_TRAIL Initialization Parameter"
on page 9-8 for more information.
WKUSER Role and Ultra Search Schemas Deprecated
The
WKUSER
role and the
WKSYS
,
WKTEST
,
WKPROXY
schemas have been deprecated. For
more information about Oracle Ultra Search, see Oracle Ultra Search Administrator's
Guide.
Database Configuration Assistant No Longer Provides Default Security Settings
In the previous release of Oracle Database, you could use Database Configuration
Assistant (DBCA) to add password security and audit options to a new database. This
option is not available in this release. In this release, DBCA automatically adds audit
options and password policies to new databases.
See the following sections for more information:
■"Configuring Password Settings in the Default Profile" on page 3-4
■"Using Default Auditing for Security-Relevant SQL Statements and Privileges" on
page 9-35
ALTER USER Clause AUTHENTICATED USING PASSWORD Deprecated
The
AUTHENTICATED USING PASSWORD
clause of the
ALTER USER
statement has been
deprecated for this release. If you use this clause, Oracle Database converts it to the
AUTHENTICATION REQUIRED
clause. If you do not specify the
AUTHENTICATION REQUIRED
clause, then Oracle Database uses either the
AUTHENTICATED USING CERTIFICATE
clause or the
AUTHENTICATED USING DISTINGUISHED NAME
clause.
See Oracle Database SQL Language Reference for more information about the
ALTER USER
statement options.
xxxi
Password for the listener.ora File Deprecated
Setting a password for the
listener.ora
file has been deprecated for this release,
because it is no longer needed. In the next release, the listener password will not be
supported.
Oracle Database 11g Release 1 (11.1) New Security Features
This section contains:
■Automatic Secure Configuration
■New Password Protections
■SYSDBA and SYSOPER Strong Authentication
■SYSASM Privilege for Automatic Storage Management
■Encryption Enhancements
■Fine-Grained Access Control on Network Services on the Database
■Change to AUDIT BY SESSION
■Oracle XML DB Security Enhancements
■Directory Security Enhancements
■Oracle Call Interface Security Enhancements
Automatic Secure Configuration
When you create a new database, you can use Database Configuration Assistant
(DBCA) to automatically create a more secure configuration than in previous releases
of Oracle Database. You can enable the following secure configuration settings in one
operation:
■Password-specific settings in the default profile. This feature enables you to
enforce password expiration and other password policies. See "Configuring
Password Settings in the Default Profile" on page 3-4 for more information.
■Auditing. This feature enables auditing for specific events such as database
connections. See "Using Default Auditing for Security-Relevant SQL Statements
and Privileges" on page 9-35 for more information.
To configure your database for greater security, follow the guidelines in Chapter 10,
"Keeping Your Oracle Database Secure".
New Password Protections
Oracle Database now includes the following new password protections:
■Easy ability to find default passwords. If you have upgraded from an earlier
release of Oracle Database, you may have user accounts that still have default
passwords. For greater security, you should find and change these passwords. See
"Finding User Accounts That Have Default Passwords" on page 3-4 for more
information.
■Password verification. Password verification ensures that users set complex
passwords when setting or resetting passwords. You can enforce password by
using the default settings provided by Oracle Database, or create custom
requirements to further secure the password requirements for your site.
"Enforcing Password Complexity Verification" on page 3-11 describes built-in
password verification.
xxxii
■Enforced case sensitivity. See "Enabling or Disabling Password Case Sensitivity"
on page 3-13 for more information.
■Stronger password hashing algorithm. This enhancement enables users to create
passwords that contain mixed case or special characters. See "Ensuring Against
Password Security Threats by Using the SHA-1 Hashing Algorithm" on page 3-15
for more information.
SYSDBA and SYSOPER Strong Authentication
You can now use the Secure Sockets Layer (SSL) and Kerberos strong authentication
methods to authenticate users who have the
SYSDBA
and
SYSOPER
privileges.
See "Strong Authentication and Centralized Management for Database
Administrators" on page 3-22 for more information.
SYSASM Privilege for Automatic Storage Management
The
SYSASM
system privilege has been added to Oracle Database 11g Release 2 (11.2), to
be used exclusively to administer Automatic Storage Management (ASM). Use the
SYSASM
privilege instead of the
SYSDBA
privilege to connect to and administer ASM
instances.
See Oracle Automatic Storage Management Administrator's Guide for more information
about the
SYSASM
privilege.
Encryption Enhancements
This section describes the following enhancements in encryption:
■Intelligent LOB Compression, Deduplication, and Encryption with SecureFiles
■Compressed and Encrypted Dump File Sets
■Transparent Data Encryption with Hardware Security Module Integration
■Transparent Tablespace Encryption
Intelligent LOB Compression, Deduplication, and Encryption with SecureFiles
Oracle Database supports a new, faster, and scalable Large Object (LOB) storage
paradigm called SecureFiles. SecureFiles, in addition to performance, supports
efficient compression, deduplication (that is, coalescing duplicate data), and
encryption. LOB data can now be encrypted with Oracle Database, and is available for
random reads and writes.
For more information about SecureFiles, see Oracle Database SecureFiles and Large
Objects Developer's Guide. See also Oracle Database SQL Language Reference for updates
in the
CREATE TABLE
and
ALTER TABLE
statements to support this feature.
Compressed and Encrypted Dump File Sets
In this release, you can use Oracle Data Pump to compress and encrypt an entire
dump file set. You can optionally compress and encrypt the data, metadata, or
complete dump file set during an Oracle Data Pump export.
For more information, see Oracle Database Utilities.
Transparent Data Encryption with Hardware Security Module Integration
Transparent data encryption (TDE) stores the master key in an encrypted software
wallet and uses this key to encrypt the column keys, which in turn encrypt column
data. While this approach to key management is sufficient for many applications, it
xxxiii
may not be sufficient for environments that require stronger security. TDE has been
extended to use hardware security modules (HSMs). This enhancement provides high
assurance requirements of protecting the master key.
This release enables you to store the TDE master encryption key within a hardware
security module (HSM) at all times, leveraging its key management capabilities. Only
the table keys (for TDE column encryption) and tablespace keys (for TDE tablespace
encryption) are decrypted on the HSM, before they are returned to the database; the
encryption and decryption of application data remains with the database. Oracle
recommends that you encrypt the traffic between HSM device and databases. This
new feature provides additional security for transparent data encryption, because the
master encryption key cannot leave the HSM, neither in clear text nor in encrypted
format. Furthermore, it enables the sharing of the same key between multiple
databases and instances in an Oracle Real Applications Clusters (Oracle RAC) or Data
Guard environment.
To configure transparent data encryption with hardware security module integration,
see Oracle Database Advanced Security Administrator's Guide.
Transparent Tablespace Encryption
Transparent tablespace encryption enables you to encrypt entire application
tablespaces, encrypting all the data within these tablespaces. When a properly
authorized application accesses the tablespace, Oracle Database transparently decrypts
the relevant data blocks for the application.
Transparent tablespace encryption provides an alternative to TDE column encryption:
It eliminates the need for granular analysis of applications to determine which
columns to encrypt, especially for applications with a large number of columns
containing personally identifiable information (PII), such as Social Security numbers or
patient health care records. If your tables have small amounts of data to encrypt, then
you can continue to use the TDE column encryption solution.
For an introduction to transparent encryption, see Oracle Database 2 Day + Security
Guide. For detailed information about transparent tablespace encryption, see Oracle
Database Advanced Security Administrator's Guide.
Fine-Grained Access Control on Network Services on the Database
Oracle Database provides a set of PL/SQL utility packages, such as
UTL_TCP
,
UTL_SMTP
,
UTL_MAIL
,
UTL_HTTP
, and
UTL_INADDR
, that are designed to enable database users to
access network services on the database. Oracle Database PL/SQL Packages and Types
Reference describes the PL/SQL utility packages in detail.
In a default database installation, these packages are created with
EXECUTE
privileges
granted to
PUBLIC
users. This release enhances the security of these packages by
providing database administrators the ability to control access to applications in the
database that use these packages.
See "Managing Fine-Grained Access in PL/SQL Packages and Types" on page 4-49 for
more information.
Change to AUDIT BY SESSION
The
BY SESSION
clause of the
AUDIT
statement now writes one audit record for every
audited event. In previous releases,
BY SESSION
wrote one audit record for all SQL
statements or operations of the same type that were executed on the same schema
objects in the same user session. Now, both
BY SESSION
and
BY ACCESS
write one audit
record for each audit operation. In addition, there are separate audit records for
LOGON
xxxiv
and
LOGOFF
events. If you omit the
BY ACCESS
clause, then
BY SESSION
is used as the
default.
The audit record that
BY SESSION
generates is different from the
BY ACCESS
audit
record. Oracle recommends that you include the
BY ACCESS
clause for all
AUDIT
statements, which results in a more detailed audit record. In the case of
LOGOFF
events,
the timestamp for the audit record has a greater precision than in previous releases.
Be aware that this change applies to schema object audit options, statement options,
and system privileges that audit SQL statements other than data definition language
(DDL) statements. Oracle Database has always audited using the
BY ACCESS
clause on
all SQL statements and system privileges that audit a DDL statement.
See the following sections for more information:
■"How Standard Audit Records Are Generated" on page 9-21
■"Benefits of Using the BY ACCESS Clause in the AUDIT Statement" on page 9-22
Oracle XML DB Security Enhancements
This section contains:
■XML Translation Support for Oracle Database XML
■Support for Web Services
XML Translation Support for Oracle Database XML
Security objects are now stored in the Oracle XML DB repository as XMLType objects.
These security objects can contain strings that need to be translated to different
languages so that they can be searched or displayed in those languages. Developers
can store translated strings with the XMLType and retrieve and operate on these
strings depending on the language settings of the user. The advantage of this feature is
that it reduces the costs associated with developing applications that are independent
of the target preferred language of the user.
To configure security for XMLType objects, see Oracle XML DB Developer's Guide.
Support for Web Services
You can now use the Oracle XML DB HTTP server for service-oriented architecture
(SOA) operations. This allows the database to be treated as simply another service
provider in an SOA environment. Security administrators can control user access to
Oracle Database Web services and their associated database objects by using the
XDB_
WEBSERVICES
,
XDB_WEBSERVICES_OVER_HTTP
, and
XDB_WEBSERVICES_WITH_PUBLIC
predefined roles.
To configure Oracle Database Web services, see Oracle XML DB Developer's Guide.For
information on this feature’s predefined roles, see Table 4–3, " Oracle Database
Predefined Roles" on page 4-11.
Directory Security Enhancements
In this release, administrators can now disallow anonymous access to database service
information in a directory and require clients to authenticate when performing LDAP
directory-based name look-ups. If you are using Microsoft Active Directory-based
name lookups, then Oracle Database uses the native operating system-based
authentication. If you are using Oracle Internet Directory (OID)-based name lookups,
then Oracle Database performs authentication by using wallets.
To configure directory security, see Oracle Database Net Services Reference.
xxxv
Oracle Call Interface Security Enhancements
The following security enhancements are available for Oracle Call Interface (OCI):
■Reporting bad packets that may come from malicious users or intruders
■Terminating or resuming the client or server process on receiving a bad packet
■Configuring the maximum number of authentication attempts
■Controlling the display of the Oracle database version banner, to prevent intruders
from finding information about the security vulnerabilities present in the database
software based on the version
■Adding banner information, such as "Unauthorized Access" and "User Actions
Audited," to server connections so that clients can display this information
Database administrators can manage these security enhancements for Oracle Call
Interface developers by configuring a set of new initialization parameters. See Section ,
"Parameters for Enhanced Security of Database Communication" for more
information. See also Oracle Call Interface Programmer's Guide for detailed information
on Oracle Call Interface.
xxxvi

1
Introducing Oracle Database Security 1-1
1
Introducing Oracle Database Security
This chapter contains:
■About Oracle Database Security
■Additional Database Security Resources
About Oracle Database Security
You can use the default Oracle Database features to configure security in the following
areas for your Oracle Database installation:
■User accounts. When you create user accounts, you can secure them in a variety of
ways. You can also create password profiles to better secure password policies for
your site. Chapter 2, "Managing Security for Oracle Database Users" describes
how to manage user accounts.
■Authentication methods. Oracle Database provides several ways to configure
authentication for users and database administrators. For example, you can
authenticate users on the database level, from the operating system, and on the
network. Chapter 3, "Configuring Authentication" describes how authentication in
Oracle Database works.
■Privileges and roles. You can use privileges and roles to restrict user access to
data. Appendix 4, "Configuring Privilege and Role Authorization" describes how
to create and manage user privileges and roles.
■Application security. The first step to creating a database application is to ensure
that it is properly secure. Appendix 5, "Managing Security for Application
Developers" discusses how to incorporate application security into your
application security policies.
■User session information using application context. An application context is a
name-value pair that holds the session information. You can retrieve session
information about a user, such as the user name or terminal, and restrict database
and application access for that user based on this information. Chapter 6, "Using
Application Contexts to Retrieve User Information" describes how to use
application context.
■Database access on the row and column level using Virtual Private Database. A
Virtual Private Database policy dynamically imbeds a
WHERE
predicate into SQL
statements the user issues. Chapter 7, "Using Oracle Virtual Private Database
to Control Data Access" describes how to create and manage Virtual Private
Database policies.

Additional Database Security Resources
1-2 Oracle Database Security Guide
■Encryption. You can disguise data on the network to prevent unauthorized access
to that data. Appendix 8, "Developing Applications Using the Data Encryption
API" explains how to use the
DBMS_CRYPTO
and PL/SQL package to encrypt data.
■Auditing database activities. You can audit database activities in general terms,
such as auditing all SQL statements, SQL privileges, schema objects, and network
activity. Or, you can audit in a granular manner, such as when the IP addresses
from outside the corporate network is being used. This chapter also explains how
to purge the database audit trail. Appendix 9, "Verifying Security Access with
Auditing" describes how to enable and configure database auditing.
In addition, Chapter 10, "Keeping Your Oracle Database Secure" provides guidelines
that you should follow when you secure your Oracle Database installation.
Additional Database Security Resources
In addition to the security resources described in this guide, Oracle Database provides
the following database security products:
■Advanced security features. See Oracle Database Advanced Security Administrator's
Guide for information about advanced features such as transparent data
encryption, wallet management, network encryption, and the RADIUS, Kerberos,
Secure Sockets Layer authentication.
■Oracle Label Security. Oracle Label Security secures database tables at the row
level, allowing you to filter user access to row data based on privileges. See Oracle
Label Security Administrator's Guide for detailed information about Oracle Label
Security.
■Oracle Database Vault. Oracle Database Vault provides fine-grained access control
to your sensitive data, including protecting data from privileged users. Oracle
Database Vault Administrator's Guide describes how to use Oracle Database Vault.
■Oracle Audit Vault. Oracle Audit Vault collects database audit data from sources
such as Oracle Database audit trail tables, database operating system audit files,
and database redo logs. Using Oracle Audit Vault, you can create alerts on
suspicious activities, and create reports on the history of privileged user changes,
schema modifications, and even data-level access. Oracle Audit Vault
Administrator's Guide explains how to administer Oracle Audit Vault.
■Oracle Enterprise User Security. Oracle Enterprise User Security enables you to
manage user security at the enterprise level. Oracle Database Enterprise User
Security Administrator's Guide explains how to configure Oracle Enterprise User
Security.
In addition to these products, you can find the latest information about Oracle
Database security, such as new products and important information about security
patches and alerts, by visiting the Security Technology Center on Oracle Technology
Network at
http://www.oracle.com/technetwork/topics/security/whatsnew/index.html

2
Managing Security for Oracle Database Users 2-1
2
Managing Security for Oracle Database Users
This chapter contains:
■About User Security
■Creating User Accounts
■Altering User Accounts
■Configuring User Resource Limits
■Deleting User Accounts
■Finding Information About Database Users and Profiles
About User Security
Each Oracle database has a list of valid database users. To access a database, a user
must run a database application, and connect to the database instance using a valid
user name defined in the database. Oracle Database enables you to set up security for
your users in a variety of ways. When you create user accounts, you can specify limits
to the user account. You can also set limits on the amount of various system resources
available to each user as part of the security domain of that user. Oracle Database
provides a set of database views that you can query to find information such as
resource and session information. This chapter also describes profiles. A profile is
collection of attributes that apply to a user. It enables a single point of reference for any
of multiple users that share those exact attributes.
Another way to manage user security is to assign users privileges and roles. Chapter 4,
"Configuring Privilege and Role Authorization" provides detailed information.
Creating User Accounts
This section contains:
■Creating a New User Account
■Specifying a User Name
■Assigning the User a Password
■Assigning a Default Tablespace for the User
■Assigning a Tablespace Quota for the User
■Assigning a Temporary Tablespace for the User
■Specifying a Profile for the User

Creating User Accounts
2-2 Oracle Database Security Guide
■Setting a Default Role for the User
For guidelines about creating and managing user accounts and passwords, see the
following sections:
■"Guidelines for Securing User Accounts and Privileges" on page 10-2
■"Guidelines for Securing Passwords" on page 10-7
Creating a New User Account
You create a database user with the
CREATE USER
statement. To create a user, you must
have the
CREATE USER
system privilege. Because it is a powerful privilege, a database
administrator or security administrator is usually the only user who has the
CREATE
USER
system privilege.
Example 2–1 creates a user and specifies the user password, default tablespace,
temporary tablespace where temporary segments are created, tablespace quotas, and
profile. It also grants the user the minimum privilege,
CREATE SESSION
, to log in to the
database session.
Example 2–1 Creating a User Account with the CREATE SESSION Privilege
CREATE USER jward
IDENTIFIED BY password
DEFAULT TABLESPACE data_ts
QUOTA 100M ON test_ts
QUOTA 500K ON data_ts
TEMPORARY TABLESPACE temp_ts
PROFILE clerk;
GRANT CREATE SESSION TO jward;
Replace
password
with a password that is secure. See "Minimum Requirements for
Passwords" on page 3-3 for more information.
A newly created user cannot connect to the database until you grant the user the
CREATE SESSION
system privileges. So, immediately after you create the user account,
use the
GRANT
SQL statement to grant the user these privileges. If the user must access
Oracle Enterprise Manager, you should also grant the user the
SELECT ANY
DICTIONARY
privilege.
Specifying a User Name
Within each database, a user name must be unique with respect to other user names
and roles. A user and role cannot have the same name. Furthermore, each user has an
Note: As a security administrator, you should create your own
roles and assign only those privileges that are needed. For example,
many users formerly granted the
CONNECT
privilege did not need
the additional privileges
CONNECT
used to provide. Instead, only
CREATE SESSION
was actually needed, and in fact, that is the only
privilege
CONNECT
presently retains.
Creating organization-specific roles gives an organization detailed
control of the privileges it assigns, and protects it in case Oracle
Database changes the roles that it defines in future releases.
Chapter 4, "Configuring Privilege and Role Authorization"
discusses how to create and manage roles.

Creating User Accounts
Managing Security for Oracle Database Users 2-3
associated schema. Within a schema, each schema object must have a unique name. In
the following, the text in bold shows how to create the user name.
User
jward
is stored in the database in upper-case letters. For example:
CREATE USER jward
IDENTIFIED BY password
DEFAULT TABLESPACE data_ts
QUOTA 100M ON test_ts
QUOTA 500K ON data_ts
TEMPORARY TABLESPACE temp_ts
PROFILE clerk
CONTAINER = CURRENT;
SELECT USERNAME FROM ALL_USERS;
USERNAME
---------
JWARD
...
However, if you enclose the user name in double quotation marks, then the name is
stored using the case sensitivity that you used for the name. For example:
CREATE USER "jward" IDENTIFIED BY password;
So, when you query the
ALL_USERS
data dictionary view, you will find that the user
account is stored using the case that you used to create it.
SELECT USERNAME FROM ALL_USERS;
USERNAME
---------
jward
...
User
JWARD
and user
jward
are both stored in the database as separate user accounts.
Later on, if you must modify or drop the user that you had created using double
quotation marks, then you must enclose the user name in double quotation marks.
For example:
DROP USER "jward";
Assigning the User a Password
In Example 2–1 on page 2-2, the new user is to be authenticated using the database. In
this case, the connecting user must supply the correct password to the database to
connect successfully. To specify a password for the user, use the
IDENTIFIED BY
clause
in the
CREATE USER
statement.
CREATE USER jward
IDENTIFIED BY password
DEFAULT TABLESPACE data_ts
QUOTA 100M ON test_ts
QUOTA 500K ON data_ts
TEMPORARY TABLESPACE temp_ts
PROFILE clerk;

Creating User Accounts
2-4 Oracle Database Security Guide
Assigning a Default Tablespace for the User
Each user should have a default tablespace. When a schema object is created in the
user’s schema and the DDL statement does not specify a tablespace to contain the
object, Oracle Database stores the object in the default user’s tablespace.
The default setting for the default tablespaces of all users is the
SYSTEM
tablespace. If a
user does not create objects, and has no privileges to do so, then this default setting is
fine. However, if a user is likely to create any type of object, then you should
specifically assign the user a default tablespace, such as the
USERS
tablespace. Using a
tablespace other than
SYSTEM
reduces contention between data dictionary objects and
user objects for the same data files. In general, do not store user data in the
SYSTEM
tablespace.
You can use the
CREATE TABLESPACE
SQL statement to create a permanent default
tablespace other than
SYSTEM
at the time of database creation, to be used as the
database default for permanent objects. By separating the user data from the system
data, you reduce the likelihood of problems with the
SYSTEM
tablespace, which can in
some circumstances cause the entire database to become nonfunctional. This default
permanent tablespace is not used by system users, that is,
SYS
,
SYSTEM
, and
OUTLN
,
whose default permanent tablespace is
SYSTEM
. A tablespace designated as the default
permanent tablespace cannot be dropped. To accomplish this goal, you must first
designate another tablespace as the default permanent tablespace. You can use the
ALTER TABLESPACE
SQL statement to alter the default permanent tablespace to another
tablespace. Be aware that this will affect all users or objects created after the
ALTER
DDL statement commits.
You can also set a user default tablespace during user creation, and change it later with
the
ALTER USER
statement. Changing the user default tablespace affects only objects
created after the setting is changed.
When you specify the default tablespace for a user, also specify a quota on that
tablespace.
In the following
CREATE USER
statement, the default tablespace for user
jward
is
data_
ts
, and his quota on that tablespace is
500K
:
CREATE USER jward
IDENTIFIED BY password
DEFAULT TABLESPACE data_ts
QUOTA 100M ON test_ts
QUOTA 500K ON data_ts
TEMPORARY TABLESPACE temp_ts
PROFILE clerk;
See Also:
■"Minimum Requirements for Passwords" on page 3-3 for the
minimum requirements for creating passwords
■"Guidelines for Securing Passwords" on page 10-7 for
additional ways to secure passwords
■Chapter 3, "Configuring Authentication" for information about
authentication methods that are available for Oracle Database
users

Creating User Accounts
Managing Security for Oracle Database Users 2-5
Assigning a Tablespace Quota for the User
You can assign each user a tablespace quota for any tablespace (except a temporary
tablespace). Assigning a quota accomplishes the following:
■Users with privileges to create certain types of objects can create those objects in
the specified tablespace.
■Oracle Database limits the amount of space that can be allocated for storage of a
user's objects within the specified tablespace to the amount of the quota.
By default, a user has no quota on any tablespace in the database. If the user has the
privilege to create a schema object, then you must assign a quota to allow the user to
create objects. At a minimum, assign users a quota for the default tablespace, and
additional quotas for other tablespaces in which they can create objects.
The following
CREATE USER
statement assigns the following quotas for the
test_ts
and
data_ts
tablespaces:
CREATE USER jward
IDENTIFIED BY password
DEFAULT TABLESPACE data_ts
QUOTA 100M ON test_ts
QUOTA 500K ON data_ts
TEMPORARY TABLESPACE temp_ts
PROFILE clerk;
You can assign a user either individual quotas for a specific amount of disk space in
each tablespace or an unlimited amount of disk space in all tablespaces. Specific
quotas prevent a user's objects from using too much space in the database. The
maximum amount of space that you can assign for a tablespace is 2 TB. If you need
more space, then specify
UNLIMITED
for the
QUOTA
clause.
You can assign quotas to a user tablespace when you create the user, or add or change
quotas later. (You can find existing user quotas by querying the
USER_TS_QUOTAS
view.)
If a new quota is less than the old one, then the following conditions remain true:
■If a user has already exceeded a new tablespace quota, then the objects of a user in
the tablespace cannot be allocated more space until the combined space of these
objects is less than the new quota.
■If a user has not exceeded a new tablespace quota, or if the space used by the
objects of the user in the tablespace falls under a new tablespace quota, then the
user's objects can be allocated space up to the new quota.
Restricting the Quota Limits for User Objects in a Tablespace
You can restrict the quota limits for user objects in a tablespace by using the
ALTER
USER
SQL statement to change the current quota of the user to zero. After a quota of
zero is assigned, the objects of the user in the tablespace remain, and the user can still
create new objects, but the existing objects will not be allocated any new space. For
example, you could not insert data into one of this user’s existing tables. The operation
will fail with an
ORA-1536 space quota exceeded for tables
error.
Granting Users the UNLIMITED TABLESPACE System Privilege
To permit a user to use an unlimited amount of any tablespace in the database, grant
the user the
UNLIMITED TABLESPACE
system privilege. This overrides all explicit
tablespace quotas for the user. If you later revoke the privilege, then you must
explicitly grant quotas to individual tablespaces. You can grant this privilege only to
users, not to roles.

Creating User Accounts
2-6 Oracle Database Security Guide
Before granting the
UNLIMITED TABLESPACE
system privilege, you must consider the
consequences of doing so.
Advantage:
You can grant a user unlimited access to all tablespaces of a database with one
statement.
Disadvantages:
■The privilege overrides all explicit tablespace quotas for the user.
■You cannot selectively revoke tablespace access from a user with the
UNLIMITED
TABLESPACE
privilege. You can grant selective or restricted access only after
revoking the privilege.
Assigning a Temporary Tablespace for the User
You should assign each user a temporary tablespace. When a user executes a SQL
statement that requires a temporary segment, Oracle Database stores the segment in
the temporary tablespace of the user. These temporary segments are created by the
system when performing sort or join operations. Temporary segments are owned by
SYS
, which has resource privileges in all tablespaces.
In the following, the temporary tablespace of
jward
is
temp_ts
, a tablespace created
explicitly to contain only temporary segments.
CREATE USER jward
IDENTIFIED BY password
DEFAULT TABLESPACE data_ts
QUOTA 100M ON test_ts
QUOTA 500K ON data_ts
TEMPORARY TABLESPACE temp_ts
PROFILE clerk;
To create a temporary tablespace, use the
CREATE TEMPORARY TABLESPACE
SQL
statement.
If you do not explicitly assign the user a temporary tablespace, then Oracle Database
assigns the user the default temporary tablespace that was specified at database
creation, or by an
ALTER DATABASE
statement at a later time. If there is no default
temporary tablespace explicitly assigned, then the default is the
SYSTEM
tablespace or
another permanent default established by the system administrator. Do not store user
data in the
SYSTEM
tablespace. Assigning a tablespace to be used specifically as a
temporary tablespace eliminates file contention among temporary segments and other
types of segments.
You can set the temporary tablespace for a user at user creation, and change it later
using the
ALTER USER
statement. You can also establish tablespace groups instead of
assigning individual temporary tablespaces.
Note: If your
SYSTEM
tablespace is locally managed, then users
must be assigned a specific default (locally managed) temporary
tablespace. They may not be allowed to default to using the
SYSTEM
tablespace because temporary objects cannot be placed in locally
managed permanent tablespaces.

Altering User Accounts
Managing Security for Oracle Database Users 2-7
Specifying a Profile for the User
You can specify a profile when you create a user. A profile is a set of limits on database
resources and password access to the database. If you do not specify a profile, then
Oracle Database assigns the user a default profile.
The following example demonstrates how to assign a user a profile.
CREATE USER jward
IDENTIFIED BY password
DEFAULT TABLESPACE data_ts
QUOTA 100M ON test_ts
QUOTA 500K ON data_ts
TEMPORARY TABLESPACE temp_ts
PROFILE clerk;
Setting a Default Role for the User
A role is a named group of related privileges that you grant as a group to users or
other roles. A default role is automatically enabled for a user when the user creates a
session. You can assign a user zero or more default roles.
You cannot set default roles for a user in the
CREATE USER
statement. When you first
create a user, the default role setting for the user is
ALL
, which causes all roles
subsequently granted to the user to be default roles. Use the
ALTER USER
statement to
change the default roles for the user. For example:
GRANT USER jward clerk_role;
ALTER USER jward DEFAULT ROLE clerk_role;
Before a role can be made the default role for a user, that user must have been already
granted the role.
Altering User Accounts
This section contains:
■About Altering User Accounts
■Using the ALTER USER Statement to Alter a User Account
■Changing Non-SYS User Passwords
■Changing the SYS User Password
About Altering User Accounts
Users can change their own passwords. However, to change any other option of a user
security domain, you must have the
ALTER USER
system privilege. Security
See Also:
■"Temporary Tablespaces" in Oracle Database Administrator's
Guide
■"Multiple Temporary Tablespaces: Using Tablespace Groups" in
Oracle Database Administrator's Guide
See Also: "Managing Resources with Profiles" on page 2-12
See Also: "Managing User Roles" on page 4-6

Altering User Accounts
2-8 Oracle Database Security Guide
administrators are typically the only users that have this system privilege, as it allows
a modification of any user security domain. This privilege includes the ability to set
tablespace quotas for a user on any tablespace in the database, even if the user
performing the modification does not have a quota for a specified tablespace.
Using the ALTER USER Statement to Alter a User Account
You can alter user security settings with the
ALTER USER
SQL statement. Changing user
security settings affects the future user sessions, not current sessions.
Example 2–2 shows how to use the
ALTER USER
statement to alter the security settings
for the user
avyrros
:
Example 2–2 Altering a User Account
ALTER USER avyrros
IDENTIFIED EXTERNALLY
DEFAULT TABLESPACE data_ts
TEMPORARY TABLESPACE temp_ts
QUOTA 100M ON data_ts
QUOTA 0 ON test_ts
PROFILE clerk;
The
ALTER USER
statement here changes the security settings for the user
avyrros
as
follows:
■Authentication is changed to use the operating system account of the user
avyrros
.
■The default and temporary tablespaces are explicitly set for user
AVYRROS
.
■The user
avyrros
is given a 100M quota for the
DATA_TS
tablespace.
■The quota on the
test_ts
is revoked for the user
avyrros
.
■The user
avyrros
is assigned the
clerk
profile.
Changing Non-SYS User Passwords
Most users can change their own passwords with the
PASSWORD
statement, as follows:
PASSWORD andy
Changing password for andy
New password: password
Retype new password: password
No special privileges (other than those to connect to the database and create a session)
are required for a user to change his or her own password. Encourage users to change
their passwords frequently. "Guidelines for Securing Passwords" on page 10-7
provides advice on the best ways to secure passwords. You can find existing users for
the current database instance by querying the
ALL_USERS
view.
Users can also use the
ALTER USER
SQL statement change their passwords. For
example:
ALTER USER andy IDENTIFIED BY password
However, for better security, use the
PASSWORD
statement to change the account’s
password. The
ALTER USER
statement displays the new password on the screen, where
it can be seen by any overly curious coworkers. The
PASSWORD
command does not

Configuring User Resource Limits
Managing Security for Oracle Database Users 2-9
display the new password, so it is only known to you, not to your co-workers. In both
cases, the password is encrypted on the network.
Users must have the
PASSWORD
and
ALTER USER
privilege to switch between methods of
authentication. Usually, only an administrator has this privilege.
Changing the SYS User Password
If you must change the
SYS
user password, then you should use the
ORAPWD
command
line utility to create a new password file that contains the password that you want to
use. Do not use the
ALTER USER
statement or the
PASSWORD
command to change the
SYS
user password. Note the following:
■The
SYS
user account is used by most of the internal recursive SQL. Therefore, if
you try to use the
ALTER USER
statement to change this password while the
database is open, then there is a chance that deadlocks will result.
■If you try to use
ALTER USER
to change the
SYS
user password, and if the instance
initialization parameter
REMOTE_LOGIN_PASSWORDFILE
has been set to
SHARED
, then
you cannot change the
SYS
password. The
ALTER USER
statement fails with an
ORA-28046: Password change for SYS disallowed
error.
Example 2–3 shows how to use
ORAPWD
to create a password file that has a new
SYS
password. In this example, the new password will be stored in a password file that
will be called
orapworcl
. (If the password file already exists, then an
OPW-00005: File
with same name exists - please delete or rename
error warns you so that you
can choose another name. If you want to overwrite the existing password file, then
append the
force=y
argument to the
ORAPWD
command.)
Example 2–3 Using ORAPWD to Change the SYS User Password
orapwd file='orapworcl'
Enter password for SYS: new_password
Configuring User Resource Limits
This section contains:
■About User Resource Limits
■Types of System Resources and Limits
■Determining Values for Resource Limits of Profiles
■Managing Resources with Profiles
See Also:
■"Minimum Requirements for Passwords" on page 3-3 for the
minimum requirements for creating passwords
■"Guidelines for Securing Passwords" on page 10-7 for
additional ways to secure passwords
■Chapter 3, "Configuring Authentication" for information about
authentication methods that are available for Oracle Database
users
See Also: Oracle Database Administrator's Guide for detailed
information about the
orapwd
command syntax and arguments

Configuring User Resource Limits
2-10 Oracle Database Security Guide
About User Resource Limits
You can set limits on the amount of various system resources available to each user as
part of the security domain of that user. By doing so, you can prevent the uncontrolled
consumption of valuable system resources such as CPU time. To set resource limits,
you use Database Resource Manager, which is described in Oracle Database
Administrator's Guide.
This resource limit feature is very useful in large, multiuser systems, where system
resources are very expensive. Excessive consumption of these resources by one or
more users can detrimentally affect the other users of the database. In single-user or
small-scale multiuser database systems, the system resource feature is not as
important, because user consumption of system resources is less likely to have a
detrimental impact.
You manage user resource limits by using Database Resource Manager. You can set
password management preferences using profiles, either set individually or using a
default profile for many users. Each Oracle database can have an unlimited number of
profiles. Oracle Database allows the security administrator to enable or disable the
enforcement of profile resource limits universally.
Setting resource limits causes a slight performance degradation when users create
sessions, because Oracle Database loads all resource limit data for each user upon each
connection to the database.
Types of System Resources and Limits
Oracle Database can limit the use of several types of system resources, including CPU
time and logical reads. In general, you can control each of these resources at the
session level, call level, or both, as discussed in the following sections:
■Limiting the User Session Level
■Limiting Database Call Levels
■Limiting CPU Time
■Limiting Logical Reads
■Limiting Other Resources
Limiting the User Session Level
Each time a user connects to a database, a session is created. Each session uses CPU
time and memory on the computer that runs Oracle Database. You can set several
resource limits at the session level.
If a user exceeds a session-level resource limit, then Oracle Database terminates (rolls
back) the current statement and returns a message indicating that the session limit has
been reached. At this point, all previous statements in the current transaction are
intact, and the only operations the user can perform are
COMMIT
,
ROLLBACK
, or
disconnect (in this case, the current transaction is committed). All other operations
produce an error. Even after the transaction is committed or rolled back, the user
cannot accomplish any more work during the current session.
See Also: Oracle Database Administrator's Guide for detailed
information about managing resources

Configuring User Resource Limits
Managing Security for Oracle Database Users 2-11
Limiting Database Call Levels
Each time a user runs a SQL statement, Oracle Database performs several steps to
process the statement. During this processing, several calls are made to the database as
a part of the different execution phases. To prevent any one call from using the system
excessively, Oracle Database lets you set several resource limits at the call level.
If a user exceeds a call-level resource limit, then Oracle Database halts the processing
of the statement, rolls back the statement, and returns an error. However, all previous
statements of the current transaction remain intact, and the user session remains
connected.
Limiting CPU Time
When SQL statements and other types of calls are made to Oracle Database, a certain
amount of CPU time is necessary to process the call. Average calls require a small
amount of CPU time. However, a SQL statement involving a large amount of data or a
runaway query can potentially use a large amount of CPU time, reducing CPU time
available for other processing.
To prevent uncontrolled use of CPU time, you can set fixed or dynamic limits on the
CPU time for each call and the total amount of CPU time used for Oracle Database
calls during a session. The limits are set and measured in CPU one-hundredth seconds
(0.01 seconds) used by a call or a session.
Limiting Logical Reads
Input/output (I/O) is one of the most expensive operations in a database system. SQL
statements that are I/O-intensive can monopolize memory and disk use and cause
other database operations to compete for these resources.
To prevent single sources of excessive I/O, you can limit the logical data block reads
for each call and for each session. Logical data block reads include data block reads
from both memory and disk. The limits are set and measured in number of block reads
performed by a call or during a session.
Limiting Other Resources
Oracle Database provides for limiting several other resources at the session level:
■You can limit the number of concurrent sessions for each user. Each user can
create only up to a predefined number of concurrent sessions.
■You can limit the idle time for a session. If the time between calls in a session
reaches the idle time limit, then the current transaction is rolled back, the session is
terminated, and the resources of the session are returned to the system. The next
call receives an error that indicates that the user is no longer connected to the
instance. This limit is set as a number of elapsed minutes.
■You can limit the elapsed connect time for each session. If the duration of a
session exceeds the elapsed time limit, then the current transaction is rolled back,
the session is dropped, and the resources of the session are returned to the system.
This limit is set as a number of elapsed minutes.
Note: Shortly after a session is terminated because it has exceeded
an idle time limit, the process monitor (PMON) background
process cleans up after the terminated session. Until PMON
completes this process, the terminated session is still counted in any
session or user resource limit.

Configuring User Resource Limits
2-12 Oracle Database Security Guide
■You can limit the amount of private System Global Area (SGA) space (used for
private SQL areas) for a session. This limit is only important in systems that use
the shared server configuration. Otherwise, private SQL areas are located in the
Program Global Area (PGA). This limit is set as a number of bytes of memory in
the SGA of an instance. Use the characters K or M to specify kilobytes or
megabytes.
Determining Values for Resource Limits of Profiles
Before creating profiles and setting the resource limits associated with them, you
should determine appropriate values for each resource limit. You can base these values
on the type of operations a typical user performs. For example, if one class of user does
not usually perform a high number of logical data block reads, then use the
ALTER
RESOURCE COST
SQL statement to set the
LOGICAL_READS_PER_SESSION
setting
conservatively.
Usually, the best way to determine the appropriate resource limit values for a given
user profile is to gather historical information about each type of resource usage. For
example, the database or security administrator can use the
AUDIT
SESSION
clause to
gather information about the limits
CONNECT_TIME
,
LOGICAL_READS_PER_SESSION
.
You can gather statistics for other limits using the Monitor feature of Oracle Enterprise
Manager (or SQL*Plus), specifically the Statistics monitor.
Managing Resources with Profiles
A profile is a named set of resource limits and password parameters that restrict
database usage and instance resources for a user. You can assign a profile to each user,
Note: Oracle Database does not constantly monitor the elapsed
idle time or elapsed connection time. Doing so reduces system
performance. Instead, it checks every few minutes. Therefore, a
session can exceed this limit slightly (for example, by 5 minutes)
before Oracle Database enforces the limit and terminates the
session.
See Also: For instructions about enabling or disabling resource
limits:
■"Finding Information About Database Users and Profiles" on
page 2-15
■"Managing User Roles" on page 4-6
■Oracle Database Administrator's Guide for detailed information
about managing resources
See Also:
■"Using Data Dictionary Views to Find Information About Users
and Profiles" on page 2-15
■Chapter 9, "Verifying Security Access with Auditing"
■Oracle Database 2 Day DBA for more information about
Database Control
■Enterprise Manager online Help for more information about
the Monitor feature

Configuring User Resource Limits
Managing Security for Oracle Database Users 2-13
and a default profile to all others. Each user can have only one profile, and creating a
new one supersedes an earlier version.
You need to create and manage user profiles only if resource limits are a requirement
of your database security policy. To use profiles, first categorize the related types of
users in a database. Just as roles are used to manage the privileges of related users,
profiles are used to manage the resource limits of related users. Determine how many
profiles are needed to encompass all types of users in a database and then determine
appropriate resource limits for each profile.
In general, the word profile refers to a collection of attributes that apply to a user,
enabling a single point of reference for any of multiple users that share those exact
attributes. User profiles in Oracle Internet Directory contain attributes pertinent to
directory usage and authentication for each user. Similarly, profiles in Oracle Label
Security contain attributes useful in label security user administration and operations
management. Profile attributes can include restrictions on system resources. You can
use Database Resource Manager to set these types of resource limits.
Profile resource limits are enforced only when you enable resource limitation for the
associated database. Enabling this limitation can occur either before starting up the
database (using the
RESOURCE_LIMIT
initialization parameter) or while it is open (using
the
ALTER SYSTEM
statement).
Though password parameters reside in profiles, they are unaffected by
RESOURCE_
LIMIT
or
ALTER SYSTEM
and password management is always enabled. In Oracle
Database, Database Resource Manager primarily handles resource allocations and
restrictions.
Creating Profiles
Any authorized database user can create, assign to users, alter, and drop a profile at
any time (using the
CREATE USER
or
ALTER USER
statement). Profiles can be assigned
only to users and not to roles or other profiles. Profile assignments do not affect
current sessions, instead, they take effect only in subsequent sessions. Be aware that
when you assign a profile to an external user or a global user, the password
parameters do not take effect for that user.
To find information about current profiles, query the
DBA_PROFILES
view.
See Also:
■Oracle Database Administrator's Guide for detailed information
on managing resources
■"Finding Information About Database Users and Profiles" on
page 2-15 for viewing resource information
■Oracle Database SQL Language Reference for information about
ALTER SYSTEM
or
RESOURCE_LIMIT
See Also:
■Oracle Database SQL Language Reference for more information about
the SQL statements that are used to manage profiles, which are
ALTER PROFILE
,
CREATE PROFILE
, and
DROP PROFILE
■Oracle Database Administrator's Guide for detailed information
about managing resources
■"Creating User Accounts" on page 2-1
■"Altering User Accounts" on page 2-7

Deleting User Accounts
2-14 Oracle Database Security Guide
Dropping Profiles
To drop a profile, you must have the
DROP PROFILE
system privilege. You can drop a
profile (other than the default profile) using the SQL statement
DROP PROFILE
.To
successfully drop a profile currently assigned to a user, use the
CASCADE
option.
The following statement drops the profile
clerk
, even though it is assigned to a user:
DROP PROFILE clerk CASCADE;
Any user currently assigned to a profile that is dropped is automatically assigned to
the
DEFAULT
profile. The
DEFAULT
profile cannot be dropped. When a profile is
dropped, the drop does not affect currently active sessions. Only sessions created after
a profile is dropped use the modified pro file assignments.
Deleting User Accounts
When you drop a user account, Oracle Database removes the user account and
associated schema from the data dictionary. It also immediately drops all schema
objects contained in the user schema, if any.
A user that is currently connected to a database cannot be dropped. To drop a
connected user, you must first terminate the user sessions using the SQL statement
ALTER SYSTEM
with the
KILL SESSION
clause. You can find the session ID (SID) by
querying the
V$SESSION
view.
Example 2–4 shows how to query
V$SESSION
and displays the session ID, serial
number, and user name for user
ANDY
.
Example 2–4 Querying V$SESSION for the Session ID of a User
SELECT SID, SERIAL#, USERNAME FROM V$SESSION;
SID SERIAL# USERNAME
------- --------------- ----------------------
127 55234 ANDY
...
Example 2–5 shows how to stop the session for user
andy
.
Example 2–5 Killing a User Session
ALTER SYSTEM KILL SESSION '127, 55234';
You can drop a user from a database using the
DROP USER
statement. To drop a user
and all the user schema objects (if any), you must have the
DROP USER
system
privilege. Because the
DROP USER
system privilege is powerful, a security
administrator is typically the only type of user that has this privilege.
Notes:
■If a user schema and associated objects must remain but the
user must be denied access to the database, then revoke the
CREATE SESSION
privilege from the user.
■Do not attempt to drop the
SYS
or
SYSTEM
user. Doing so
corrupts your database.

Finding Information About Database Users and Profiles
Managing Security for Oracle Database Users 2-15
If the schema of the user contains any dependent schema objects, then use the
CASCADE
option to drop the user and all associated objects and foreign keys that depend on the
tables of the user successfully. If you do not specify
CASCADE
and the user schema
contains dependent objects, then an error message is returned and the user is not
dropped.
Before dropping a user whose schema contains objects, thoroughly investigate which
objects the schema contains and the implications of dropping them. You can find the
objects owned by a particular user by querying the
DBA_OBJECTS
view.
Example 2–6 shows how to find the objects owned by user
andy
.
Example 2–6 Finding Objects Owned by a User
SELECT OWNER, OBJECT_NAME FROM DBA_OBJECTS WHERE OWNER LIKE 'ANDY';
(Enter the user name in capital letters.) Pay attention to any unknown cascading
effects. For example, if you intend to drop a user who owns a table, then check
whether any views or procedures depend on that particular table.
Example 2–7 drops the user
andy
and all associated objects and foreign keys that
depend on the tables owned by
andy
.
Example 2–7 Dropping a User Account
DROP USER andy CASCADE;
Finding Information About Database Users and Profiles
This section contains:
■Using Data Dictionary Views to Find Information About Users and Profiles
■Listing All Users and Associated Information
■Listing All Tablespace Quotas
■Listing All Profiles and Assigned Limits
■Viewing Memory Use for Each User Session
Using Data Dictionary Views to Find Information About Users and Profiles
Table 2–1 lists data dictionary views that contain information about database users and
profiles. For detailed information about these views, see Oracle Database Reference.
See Also: Oracle Database Administrator's Guide for more
information about terminating sessions
Table 2–1 Data Dictionary Views That Display Information about Users and Profiles
View Description
ALL_OBJECTS
Describes all objects accessible to the current user
ALL_USERS
Lists users visible to the current user, but does not describe them
DBA_PROFILES
Displays all profiles and their limits
DBA_TS_QUOTAS
Describes tablespace quotas for users
DBA_OBJECTS
Describes all objects in the database
DBA_USERS
Describes all users of the database

Finding Information About Database Users and Profiles
2-16 Oracle Database Security Guide
The following sections present examples of using these views. These examples assume
that the following statements have been run:
CREATE PROFILE clerk LIMIT
SESSIONS_PER_USER 1
IDLE_TIME 30
CONNECT_TIME 600;
CREATE USER jfee
IDENTIFIED BY password
DEFAULT TABLESPACE users
TEMPORARY TABLESPACE temp_ts
QUOTA 500K ON users
PROFILE clerk;
CREATE USER dcranney
IDENTIFIED BY password
DEFAULT TABLESPACE users
TEMPORARY TABLESPACE temp_ts
QUOTA unlimited ON users;
CREATE USER userscott
IDENTIFIED BY password;
Listing All Users and Associated Information
To find all users and their associated information as defined in the database, query the
DBA_USERS
view. For detailed information on the
DBA_USERS
view, see Oracle Database
Reference.
For example:
SELECT USERNAME, PROFILE, ACCOUNT_STATUS, AUTHENTICATION_TYPE FROM DBA_USERS;
USERNAME PROFILE ACCOUNT_STATUS AUTHENTICATION_TYPE
--------------- --------------- --------------- -------------------
DBA_USERS_WITH_DEFPWD
Lists all user accounts that have default passwords
PROXY_USERS
Describes users who can assume the identity of other users
RESOURCE_COST
Lists the cost for each resource in terms of CPUs for each session,
reads for each session, connection times, and SGA
USER_PASSWORD_LIMITS
Describes the password profile parameters that are assigned to
the user
USER_RESOURCE_LIMITS
Displays the resource limits for the current user
USER_TS_QUOTAS
Describes tablespace quotas for users
USER_OBJECTS
Describes all objects owned by the current user
USER_USERS
Describes only the current user
V$SESSION
Lists session information for each current session, includes user
name
V$SESSTAT
Lists user session statistics
V$STATNAME
Displays decoded statistic names for the statistics shown in the
V$SESSTAT
view
Table 2–1 (Cont.) Data Dictionary Views That Display Information about Users and
View Description

Finding Information About Database Users and Profiles
Managing Security for Oracle Database Users 2-17
SYS DEFAULT OPEN PASSWORD
SYSTEM DEFAULT OPEN PASSWORD
USERSCOTT DEFAULT OPEN PASSWORD
JFEE CLERK OPEN GLOBAL
DCRANNEY DEFAULT OPEN EXTERNAL
Listing All Tablespace Quotas
Use the
DBA_TS_QUOTAS
view to list all tablespace quotas specifically assigned to each
user. (For detailed information on this view, see Oracle Database Reference.) For
example:
SELECT * FROM DBA_TS_QUOTAS;
TABLESPACE USERNAME BYTES MAX_BYTES BLOCKS MAX_BLOCKS
---------- --------- -------- ---------- ------- ----------
USERS JFEE 0 512000 0 250
USERS DCRANNEY 0 -1 0 -1
When specific quotas are assigned, the exact number is indicated in the
MAX_BYTES
column. This number is always a multiple of the database block size, so if you specify
a tablespace quota that is not a multiple of the database block size, then it is rounded
up accordingly. Unlimited quotas are indicated by
-1
.
Listing All Profiles and Assigned Limits
The
DBA_PROFILE
view lists all profiles in the database and associated settings for each
limit in each profile. (For detailed information on this view, see Oracle Database
Reference.) For example:
SELECT * FROM DBA_PROFILES ORDER BY PROFILE;
PROFILE RESOURCE_NAME RESOURCE_TYPE LIMIT
----------------- ------------------------- ------------- --------------
CLERK COMPOSITE_LIMIT KERNEL DEFAULT
CLERK FAILED_LOGIN_ATTEMPTS PASSWORD DEFAULT
CLERK PASSWORD_LIFE_TIME PASSWORD DEFAULT
CLERK PASSWORD_REUSE_TIME PASSWORD DEFAULT
CLERK PASSWORD_REUSE_MAX PASSWORD DEFAULT
CLERK PASSWORD_VERIFY_FUNCTION PASSWORD DEFAULT
CLERK PASSWORD_LOCK_TIME PASSWORD DEFAULT
CLERK PASSWORD_GRACE_TIME PASSWORD DEFAULT
CLERK PRIVATE_SGA KERNEL DEFAULT
CLERK CONNECT_TIME KERNEL 600
CLERK IDLE_TIME KERNEL 30
CLERK LOGICAL_READS_PER_CALL KERNEL DEFAULT
CLERK LOGICAL_READS_PER_SESSION KERNEL DEFAULT
CLERK CPU_PER_CALL KERNEL DEFAULT
CLERK CPU_PER_SESSION KERNEL DEFAULT
CLERK SESSIONS_PER_USER KERNEL 1
DEFAULT COMPOSITE_LIMIT KERNEL UNLIMITED
DEFAULT PRIVATE_SGA KERNEL UNLIMITED
DEFAULT SESSIONS_PER_USER KERNEL UNLIMITED
DEFAULT CPU_PER_CALL KERNEL UNLIMITED
DEFAULT LOGICAL_READS_PER_CALL KERNEL UNLIMITED
DEFAULT CONNECT_TIME KERNEL UNLIMITED
DEFAULT IDLE_TIME KERNEL UNLIMITED
DEFAULT LOGICAL_READS_PER_SESSION KERNEL UNLIMITED
DEFAULT CPU_PER_SESSION KERNEL UNLIMITED

Finding Information About Database Users and Profiles
2-18 Oracle Database Security Guide
DEFAULT FAILED_LOGIN_ATTEMPTS PASSWORD 10
DEFAULT PASSWORD_LIFE_TIME PASSWORD 180
DEFAULT PASSWORD_REUSE_MAX PASSWORD UNLIMITED
DEFAULT PASSWORD_LOCK_TIME PASSWORD 1
DEFAULT PASSWORD_GRACE_TIME PASSWORD 7
DEFAULT PASSWORD_VERIFY_FUNCTION PASSWORD UNLIMITED
DEFAULT PASSWORD_REUSE_TIME PASSWORD UNLIMITED
32 rows selected.
To find the default profile values, run the following query:
SELECT * FROM DBA_PROFILES WHERE PROFILE = 'DEFAULT';
PROFILE RESOURCE_NAME RESOURCE_TYPE LIMIT
----------------- ------------------------- ------------- --------------
DEFAULT COMPOSITE_LIMIT KERNEL UNLIMITED
DEFAULT SESSIONS_PER_USER KERNEL UNLIMITED
DEFAULT CPU_PER_SESSION KERNEL UNLIMITED
DEFAULT CPU_PER_CALL KERNEL UNLIMITED
DEFAULT LOGICAL_READS_PER_SESSION KERNEL UNLIMITED
DEFAULT LOGICAL_READS_PER_CALL KERNEL UNLIMITED
DEFAULT IDLE_TIME KERNEL UNLIMITED
DEFAULT CONNECT_TIME KERNEL UNLIMITED
DEFAULT PRIVATE_SGA KERNEL UNLIMITED
DEFAULT FAILED_LOGIN_ATTEMPTS PASSWORD 10
DEFAULT PASSWORD_LIFE_TIME PASSWORD 180
DEFAULT PASSWORD_REUSE_TIME PASSWORD UNLIMITED
DEFAULT PASSWORD_REUSE_MAX PASSWORD UNLIMITED
DEFAULT PASSWORD_VERIFY_FUNCTION PASSWORD NULL
DEFAULT PASSWORD_LOCK_TIME PASSWORD 1
DEFAULT PASSWORD_GRACE_TIME PASSWORD 7
16 rows selected.
Viewing Memory Use for Each User Session
To find the memory use for each user session, query the
V$SESSION
view. (For detailed
information on this view, see Oracle Database Reference. The following query lists all
current sessions, showing the Oracle Database user and current User Global Area
(UGA) memory use for each session:
SELECT USERNAME, VALUE || 'bytes' "Current UGA memory"
FROM V$SESSION sess, V$SESSTAT stat, V$STATNAME name
WHERE sess.SID = stat.SID
AND stat.STATISTIC# = name.STATISTIC#
AND name.NAME = 'session uga memory';
USERNAME Current UGA memory
------------------------------ ---------------------------------------------
18636bytes
17464bytes
19180bytes
18364bytes
39384bytes
35292bytes
17696bytes
15868bytes
USERSCOTT 42244bytes
SYS 98196bytes
SYSTEM 30648bytes

Finding Information About Database Users and Profiles
Managing Security for Oracle Database Users 2-19
11 rows selected.
To see the maximum UGA memory allocated to each session since the instance started,
replace
'session uga memory'
in the preceding query with
'session uga memory
max'.

Finding Information About Database Users and Profiles
2-20 Oracle Database Security Guide

3
Configuring Authentication 3-1
3
Configuring Authentication
This chapter contains:
■About Authentication
■Configuring Password Protection
■Authenticating Database Administrators
■Using the Database to Authenticate Users
■Using the Operating System to Authenticate Users
■Using the Network to Authenticate Users
■Configuring Global User Authentication and Authorization
■Configuring an External Service to Authenticate Users and Passwords
■Using Multitier Authentication and Authorization
■Preserving User Identity in Multitiered Environments
■Finding Information About User Authentication
About Authentication
Authentication means verifying the identity of someone (a user, device, or other
entity) who wants to use data, resources, or applications. Validating that identity
establishes a trust relationship for further interactions. Authentication also enables
accountability by making it possible to link access and actions to specific identities.
After authentication, authorization processes can allow or limit the levels of access and
action permitted to that entity.
You can authenticate both database and nondatabase users for an Oracle database. For
simplicity, the same authentication method is generally used for all database users, but
Oracle Database allows a single database instance to use any or all methods. Oracle
Database requires special authentication procedures for database administrators,
because they perform special database operations. Oracle Database also encrypts
passwords during transmission to ensure the security of network authentication.
After authentication, authorization processes can allow or limit the levels of access and
action permitted to that entity. Authorization is described in Chapter 4, "Configuring
Privilege and Role Authorization".
Configuring Password Protection
This section contains:

Configuring Password Protection
3-2 Oracle Database Security Guide
■What Are the Oracle Database Built-in Password Protections?
■Minimum Requirements for Passwords
■Using a Password Management Policy
■Ensuring Against Password Security Threats by Using the SHA-1 Hashing
Algorithm
■Managing the Secure External Password Store for Password Credentials
See also "Guidelines for Securing Passwords" on page 10-7 for advice on securing
passwords. If you want to configure Oracle XML DB to authenticate users by
encrypting their passwords but you do not need to encrypt other data (for example, an
Intranet email), see Oracle XML DB Developer's Guide for more information.
What Are the Oracle Database Built-in Password Protections?
Oracle Database provides a set of built-in password protections designed to protect
your users’ passwords. These password protections are as follows:
■Password encryption. Oracle Database automatically and transparently encrypts
passwords during network (client-to-server and server-to-server) connections,
using Advanced Encryption Standard (AES) before sending them across the
network.
■Password complexity checking. In a default installation, Oracle Database
provides the
verify_function_11g
password verification function to ensure that
new or changed passwords are sufficiently complex to prevent intruders who try
to break into the system by guessing passwords. You must manually enable
password complexity checking. You can further customize the complexity of your
users’ passwords. See "Enforcing Password Complexity Verification" on page 3-11
for more information.
■Preventing passwords from being broken. If a user tries to log in to Oracle
Database multiple times using an incorrect password, Oracle Database delays each
login. This protection applies for attempts made from different IP addresses or
multiple client connections. Afterwards, it gradually increases the time before the
user can try another password, up to a maximum of about 10 seconds. If the user
enters the correct password, he or she is able to log in successfully without any
delay.
This feature significantly decreases the number of passwords that an intruder
would be able to try within a fixed time period when attempting to log in. The
failed logon delay slows down each failed logon attempt, increasing the overall
time that is required to perform a password-guessing attack, because such attacks
usually require a very large number of failed logon attempts.
■Enforced case sensitivity for passwords. Passwords are case sensitive. For
example, the password
hPP5620qr
fails if it is entered as
hpp5620QR
or
hPp5620Qr
.
In previous releases, passwords were not case sensitive. See "Enabling or Disabling
Password Case Sensitivity" on page 3-13 for information about how case
sensitivity works, and how it affects password files and database links.
■Passwords hashed using the Secure Hash Algorithm (SHA) cryptographic hash
function SHA-1. Oracle Database uses the SHA-1 verifier is to authenticate the
user password and establish the session of the user. In addition, it enforces case
sensitivity and restricts passwords to 160 bits. The advantage of using the SHA-1
verifier is that it is commonly used by Oracle Database customers and provides
much better security without forcing a network upgrade. It also adheres to
compliance regulations that mandate the use of strong passwords being protected

Configuring Password Protection
Configuring Authentication 3-3
by a suitably strong password hashing algorithm. See "Ensuring Against Password
Security Threats by Using the SHA-1 Hashing Algorithm" on page 3-15 for more
information.
Minimum Requirements for Passwords
Passwords must not exceed 30 characters or 30 bytes. For greater security, however,
follow the additional guidelines described in "Guidelines for Securing Passwords" on
page 10-7.
To create passwords for users, you can use the
CREATE USER
or
ALTER USER
SQL
statements. SQL statements that accept the
IDENTIFIED BY
clause also enable you to
create passwords. Example 3–1 shows several SQL statements that create passwords
with the
IDENTIFIED BY
clause.
Example 3–1 Password Creation SQL Statements
CREATE USER psmith IDENTIFIED BY password;
GRANT CREATE SESSION TO psmith IDENTIFIED BY password;
ALTER USER psmith IDENTIFIED BY password;
CREATE DATABASE LINK AUTHENTICATED BY psmith IDENTIFIED BY password;
Using a Password Management Policy
This section contains:
■About Managing Passwords
■Finding User Accounts That Have Default Passwords
■Configuring Password Settings in the Default Profile
■Disabling and Enabling the Default Password Security Settings
■Automatically Locking a User Account After a Failed Login
■Controlling Password Aging and Expiration
■Password Change Life Cycle
■Setting the PASSWORD_LIFE_TIME Profile Parameter to a Low Value
■Controlling User Ability to Reuse Previous Passwords
■Enforcing Password Complexity Verification
■Enabling or Disabling Password Case Sensitivity
See Also:
■"Enforcing Password Complexity Verification" on page 3-11 for
ways that you can ensure that passwords are sufficiently complex
for your site
■"Guidelines for Securing Passwords" on page 10-7 for more ways
to secure passwords
■"Securing Passwords in Application Design" on page 5-3 for
password protection guidelines application developers should
follow
■Oracle Database SQL Language Reference for more information about
the
CREATE USER
,
ALTER USER
,
GRANT
, and
CREATE DATABASE LINK
SQL statements

Configuring Password Protection
3-4 Oracle Database Security Guide
About Managing Passwords
Database security systems that depend on passwords require that passwords be kept
secret at all times. Because passwords are vulnerable to theft and misuse, Oracle
Database uses a password management policy. Database administrators and security
officers control this policy through user profiles, enabling greater control of database
security.
Use the
CREATE PROFILE
statement to create a user profile. The profile is assigned to a
user with the
CREATE USER
or
ALTER USER
statement. Details of creating and altering
database users are not discussed in this section. This section describes password
parameters that can be specified using the
CREATE PROFILE
(or
ALTER PROFILE
)
statement.
Finding User Accounts That Have Default Passwords
When you create a database in Oracle Database 11g Release 2 (11.2), most of its default
accounts are locked with the passwords expired. If you have upgraded from an earlier
release of Oracle Database, you may have user accounts that have default passwords.
These are default accounts that are created when you create a database, such as the
HR
,
OE
, and
SCOTT
accounts.
For greater security, change the passwords for these accounts. Using a default
password that is commonly known can make your database vulnerable to attacks by
intruders. To find both locked and unlocked accounts that use default passwords, log
onto SQL*Plus using the
SYSDBA
privilege and then query the
DBA_USERS_WITH_DEFPWD
data dictionary view.
For example, to find both the names of accounts that have default passwords and the
status of the account:
SELECT d.username, u.account_status
FROM DBA_USERS_WITH_DEFPWD d, DBA_USERS u
WHERE d.username = u.username
ORDER BY 2,1;
USERNAME ACCOUNT_STATUS
--------- ---------------------------
SCOTT EXPIRED & LOCKED
Then change the passwords for any accounts that the
DBA_USERS_WITH_DEFPWD
view
lists. Oracle recommends that you do not assign these accounts passwords that they
may have had in previous releases of Oracle Database.
ALTER USER SCOTT ACCOUNT UNLOCK IDENTIFIED BY password;
Replace
password
with a password that is secure. "Minimum Requirements for
Passwords" on page 3-3 describes the minimum requirements for passwords.
Configuring Password Settings in the Default Profile
A profile is a collection of parameters that sets limits on database resources. If you
assign the profile to a user, then that user cannot exceed these limits. You can use
profiles to configure database settings such as sessions per user, logging and tracing
See Also:
■"Managing Resources with Profiles" on page 2-12
■Oracle Database SQL Language Reference for syntax and specific
information about SQL statements discussed in this section

Configuring Password Protection
Configuring Authentication 3-5
features, and so on. Profiles can also control user passwords. To find information about
the current password settings in the profile, you can query the
DBA_PROFILES
data
dictionary view.
Table 3–1 lists the password-specific parameter settings in the default profile.
Table 3–1 Password-Specific Settings in the Default Profile
Parameter Default Setting Description
FAILED_LOGIN_ATTEMPTS 10
Sets the maximum times a user try to log in
and to fail before locking the account.
Notes:
■When you set this parameter, take into
consideration users who may log in
using the
CONNECT THROUGH
privilege.
■You can set limits on the number of
times an unauthorized user (possibly an
intruder) attempts to log in to Oracle
Call Interface (OCI) applications by
using the
SEC_MAX_FAILED_LOGIN_
ATTEMPTS
initialization parameter. See
"Configuring the Maximum Number of
Authentication Attempts" on page 5-19
for more information about this
parameter.
See also "Automatically Locking a User
Account After a Failed Login" on
page 3-6 for more information.
PASSWORD_GRACE_TIME 7
Sets the number of days that a user has to
change his or her password before it expires.
See "Controlling Password Aging and
Expiration" on page 3-8 for more
information.
PASSWORD_LIFE_TIME 180
Sets the number of days the user can use his
or her current password.
See "Controlling Password Aging and
Expiration" on page 3-8 for more
information.
PASSWORD_LOCK_TIME 1
Sets the number of days an account will be
locked after the specified number of
consecutive failed login attempts. After the
time passes, then the account becomes
unlocked. This user’s profile parameter is
useful to help prevent brute force attacks on
user passwords but not to increase the
maintenance burden on administrators.
See "Automatically Locking a User Account
After a Failed Login" on page 3-6 for more
information.
PASSWORD_REUSE_MAX UNLIMITED
Sets the number of password changes
required before the current password can be
reused.
See "Controlling User Ability to Reuse
Previous Passwords" on page 3-7 for more
information.

Configuring Password Protection
3-6 Oracle Database Security Guide
For greater security, use the default settings described in Table 3–1, based on your
needs. You can create or modify the password-specific parameters individually by
using the
CREATE PROFILE
or
ALTER PROFILE
statement. For example:
ALTER PROFILE prof LIMIT
FAILED_LOGIN_ATTEMPTS 9
PASSWORD_LOCK_TIME 10;
See Oracle Database SQL Language Reference for more information about
CREATE
PROFILE
,
ALTER PROFILE
, and the password-related parameters described in this
section.
Disabling and Enabling the Default Password Security Settings
If your applications use the default password security settings from Oracle Database
10g Release 2 (10.2), then you can revert to these settings until you modify the
applications to use the Release 11g password security settings. To do so, run the
undopwd.sql
script.
After you have modified your applications to conform to the Release 11g password
security settings, you can manually update your database to use the password security
configuration that suits your business needs, or you can run the
secconf.sql
script to
apply the Release 11g default password settings. You can customize this script to have
different security settings if you like, but remember that the settings listed in the
original script are Oracle-recommended settings.
If you created your database manually, then you should run the
secconf.sql
script to
apply the Release 11g default password settings to the database. Databases that have
been created with Database Configuration Assistant (DBCA) will have these settings,
but manually created databases do not.
The
undopwd.sql
and
secconf.sql
scripts are in the
$ORACLE_HOME/rdbms/admin
directory. The
undopwd.sql
script affects password settings only, and the
secconf.sql
script affects both password and audit settings. They have no effect on other security
settings.
Automatically Locking a User Account After a Failed Login
Oracle Database can lock a user’s account after a specified number of consecutive
failed log-in attempts. You can set the
PASSWORD_LOCK_TIME
user’s profile parameter to
configure the account to unlock automatically after a specified time interval or to
require database administrator intervention to be unlocked. The database
administrator also can lock accounts manually, so that they must be unlocked
explicitly by the database administrator.
You can specify the permissible number of failed login attempts by using the
CREATE
PROFILE
statement. You can also specify the amount of time accounts remain locked.
PASSWORD_REUSE_TIME UNLIMITED
Sets the number of days before which a
password cannot be reused.
See "Controlling User Ability to Reuse
Previous Passwords" on page 3-7 for more
information.
Table 3–1 (Cont.) Password-Specific Settings in the Default Profile
Parameter Default Setting Description

Configuring Password Protection
Configuring Authentication 3-7
Example 3–2 sets the maximum number of failed login attempts for the user
johndoe
to 10 (the default), and the amount of time the account locked to 30 days. The account
will unlock automatically after 30 days.
Example 3–2 Locking an Account with the CREATE PROFILE Statement
CREATE PROFILE prof LIMIT
FAILED_LOGIN_ATTEMPTS 10
PASSWORD_LOCK_TIME 30;
ALTER USER johndoe PROFILE prof;
Each time the user unsuccessfully logs in, Oracle Database increases the delay
exponentially with each login failure.
If you do not specify a time interval for unlocking the account, then
PASSWORD_LOCK_
TIME
assumes the value specified in a default profile. (The recommended value is 1
day.) If you specify
PASSWORD_LOCK_TIME
as
UNLIMITED
, then you must explicitly
unlock the account by using an
ALTER USER
statement. For example, assuming that
PASSWORD_LOCK_TIME
UNLIMITED
is specified for
johndoe
, then you use the following
statement to unlock the
johndoe
account:
ALTER USER johndoe ACCOUNT UNLOCK;
After a user successfully logs into an account, Oracle Database resets the unsuccessful
login attempt count for the user, if it is non-zero, to zero.
The security officer can also explicitly lock user accounts. When this occurs, the
account cannot be unlocked automatically, and only the security officer should unlock
the account. The
CREATE USER
or
ALTER USER
statements explicitly lock or unlock user
accounts. For example, the following statement locks the user account,
susan
:
ALTER USER susan ACCOUNT LOCK;
Controlling User Ability to Reuse Previous Passwords
You can ensure that users do not reuse their previous passwords for a specified
amount of time or for a specified number of password changes. To do so, configure the
rules for password reuse with
CREATE
PROFILE
or
ALTER PROFILE
statements. For the
complete syntax of these statements, see the Oracle Database SQL Language Reference.
Table 3–2 lists the
CREATE PROFILE
and
ALTER PROFILE
parameters that control ability
of a user to reuse a previous password.
If you do not specify a parameter, then the user can reuse passwords at any time,
which is not a good security practice.
Table 3–2 Parameters Controlling Reuse of a Previous Password
Parameter Name Description and Use
PASSWORD_REUSE_TIME
Requires either of the following:
■A number specifying how many days (or a fraction of a day) between the
earlier use of a password and its next use
■The word
UNLIMITED
PASSWORD_REUSE_MAX
Requires either of the following:
■An integer to specify the number of password changes required before a
password can be reused
■The word
UNLIMITED

Configuring Password Protection
3-8 Oracle Database Security Guide
If neither parameter is
UNLIMITED
, then password reuse is allowed, but only after
meeting both conditions. The user must have changed the password the specified
number of times, and the specified number of days must have passed since the
previous password was last used.
For example, suppose that the profile of user A had
PASSWORD_REUSE_MAX
set to
10
and
PASSWORD_REUSE_TIME
set to
30
. User A cannot reuse a password until he or she has
reset the password 10 times, and until 30 days had passed since the password was last
used.
If either parameter is specified as
UNLIMITED
, then the user can never reuse a
password.
If you set both parameters to
UNLIMITED
, then Oracle Database ignores both, and the
user can reuse any password at any time.
Controlling Password Aging and Expiration
You can specify a password lifetime, after which the password expires. This means
that the next time the user logs in with the current, correct password, he or she is
prompted to change the password. By default, there are no complexity or password
history checks, so users can still reuse any previous or weak passwords. You can
control these factors by setting the
PASSWORD_REUSE_TIME
,
PASSWORD_REUSE_MAX
, and
PASSWORD_VERIFY_FUNCTION
parameters. (See "Controlling User Ability to Reuse
Previous Passwords" on page 3-7 and "Enforcing Password Complexity Verification"
on page 3-11 for more information.)
In addition, you can set a grace period, during which each attempt to log in to the
database account receives a warning message to change the password. If the user does
not change it by the end of that period, then Oracle Database expires the account.
As a database administrator, you can manually set the password state to be expired,
which sets the account status to
EXPIRED
. The user must then follow the prompts to
change the password before the logon can proceed.
For example, in SQL*Plus, suppose user
SCOTT
tries to log in with the correct
credentials, but his password has expired. User
SCOTT
will then see the
ORA-28001:
The password has expired
error and be prompted to change his password, as
follows:
Changing password for scott
New password: new_password
Retype new password: new_password
Password changed.
Use the
CREATE PROFILE
or
ALTER PROFILE
statement to specify a lifetime for
passwords. To understand the life cycle of passwords, see "Password Change Life
Cycle" on page 3-9.
Example 3–3 demonstrates how to create and assign a profile to user
johndoe
, and the
PASSWORD_LIFE_TIME
parameter specifies that
johndoe
can use the same password for
180 days before it expires.
Note: If you specify
DEFAULT
for either parameter, then Oracle
Database uses the value defined in the
DEFAULT
profile, which sets
all parameters to
UNLIMITED
. Oracle Database thus uses
UNLIMITED
for any parameter specified as
DEFAULT
, unless you change the
setting for that parameter in the
DEFAULT
profile.

Configuring Password Protection
Configuring Authentication 3-9
Example 3–3 Setting Password Aging and Expiration with CREATE PROFILE
CREATE PROFILE prof LIMIT
FAILED_LOGIN_ATTEMPTS 4
PASSWORD_LOCK_TIME 30
PASSWORD_LIFE_TIME 180;
ALTER USER johndoe PROFILE prof;
You can check the status of any account, whether it is open, in grace, or expired, by
running the following query:
SELECT ACCOUNT_STATUS FROM DBA_USERS WHERE USERNAME = 'username';
Password Change Life Cycle
Figure 3–1 shows the lifecycle of the password lifetime and grace period.
■Phase 1: After the user account is created, or the password of an existing account
is changed, the password lifetime period begins.
■Phase 2: This phase represents the period of time after the password lifetime ends
but before the user logs in again with the correct password. The correct credentials
are needed for Oracle Database to update the account status. Otherwise, the
account status will remain unchanged. Oracle Database does not have any
background process to update the account status. All changes to the account status
are driven by the Oracle Database server process on behalf of authenticated users.
■Phase 3: When the user finally does log in, the grace period begins. Oracle
Database then updates the
DBA_USERS.EXPIRY_DATE
column to a new value using
the current time plus the value of the
PASSWORD_GRACE_TIME
setting from the
account’s password profile. At this point, the user receives an
ORA-28002
warning
message about the password expiring in the near future (for example,
ORA-28002
The password will expire within 7 days
if
PASSWORD_GRACE_TIME
is set to
7
days), but the user can still log in without changing the password. The
DBA_
USERS.EXPIRY_DATE
column shows the time in the future when the user will be
prompted to change their password.
■Phase 4: After the grace period (Phase 3) ends, the
ORA-28001: The password has
expired
error appears, and the user is prompted to change the password after
entering the current, correct password before the authentication can proceed. If the
user has an Oracle Active Data Guard configuration, where there is a primary and
a stand-by database, and the authentication attempt is made on the standby
database (which is a read-only database), then the
ORA-28032: Your password
has expired and the database is set to read-only
error appears. The user
should log into the primary database and change the password there.
During any of these four phases, you can query the
DBA_USERS
data dictionary view to
find the user’s account status in the
DBA_USERS.ACCOUNT_STATUS
column.
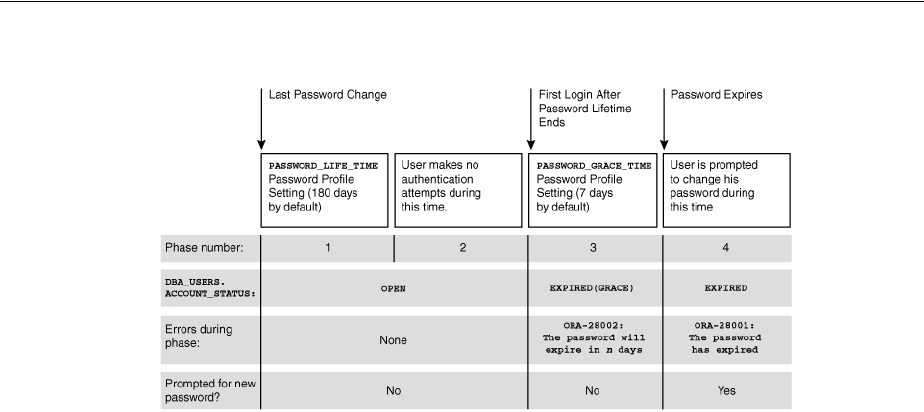
Configuring Password Protection
3-10 Oracle Database Security Guide
Figure 3–1 Chronology of Password Lifetime and Grace Period
In the following example, the profile assigned to
johndoe
includes the specification of
a grace period:
PASSWORD_GRACE_TIME = 3
(the recommended value). The first time
johndoe
tries to log in to the database after 90 days (this can be any day after the 90th
day, that is, the 91st day, 100th day, or another day), he receives a warning message
that his password will expire in 3 days. If 3 days pass, and if he does not change his
password, then the password expires. After this, he receives a prompt to change his
password on any attempt to log in.
CREATE PROFILE prof LIMIT
FAILED_LOGIN_ATTEMPTS 4
PASSWORD_LIFE_TIME 90
PASSWORD_GRACE_TIME 3;
ALTER USER johndoe PROFILE prof;
A database administrator or a user who has the
ALTER USER
system privilege can
explicitly expire a password by using the
CREATE USER
and
ALTER USER
statements.
The following statement creates a user with an expired password. This setting forces
the user to change the password before the user can log in to the database.
CREATE USER jbrown
IDENTIFIED BY password
...
PASSWORD EXPIRE;
There is no "password unexpire" clause for the
CREATE USER
statement, but an account
can be "unexpired" by changing the password on the account.
Setting the PASSWORD_LIFE_TIME Profile Parameter to a Low Value
Be careful if you plan to set the
PASSWORD_LIFE_TIME
parameter of
CREATE PROFILE
or
ALTER PROFILE
to a low value (for example, 1 day). The
PASSWORD_LIFE_TIME
limit of a
profile is measured from the last time that an account’s password is changed, or the
account creation time if the password has never been changed. These dates are
recorded in the
PTIME
(password change time) and
CTIME
(account creation time)
columns of the
SYS.USER$
system table. The
PASSWORD_LIFE_TIME
limit is not
measured starting from the timestamp of the last change to the
PASSWORD_LIFE_TIME
profile parameter, as may be initially thought. Therefore, any accounts affected by the
changed profile whose last password change time was more than
PASSWORD_LIFE_TIME
days ago immediately expire and enter their grace period on their next connection,
issuing the
ORA-28002: The password will expire within
n
days
warning.

Configuring Password Protection
Configuring Authentication 3-11
As a database administrator, you can find an account’s last password change time as
follows:
ALTER SESSION SET NLS_DATE_FORMAT='DD-MON-YYYY HH24:MI:SS';
SELECT PTIME FROM SYS.USER$ WHERE NAME = 'user_name'; -- Password change time
To find when the account was created and the password expiration date, issue the
following query:
SELECT CREATED, EXPIRY_DATE FROM DBA_USERS WHERE USERNAME = 'user_name';
If the user who is assigned this profile is currently logged in when you set the
PASSWORD_LIFE_TIME
parameter and remains logged in, then Oracle Database does not
change the user’s account status from
OPEN
to
EXPIRED(GRACE)
when the currently
listed expiration date passes. The timing begins only when the user logs into the
database.
When making changes to a password profile, a database administrator must be aware
that if some of the users who are subject to this profile are currently logged in to the
Oracle database while their password profile is being updated by the administrator,
then those users could potentially remain logged in to the system even beyond the
expiration date of their password. You can find the currently logged in users by
querying the
USERNAME
column of the
V$SESSION
view.
This is because the expiration date of a user’s password is based on the timestamp of
the last password change on their account plus the value of the
PASSWORD_LIFE_TIME
password profile parameter set by the administrator. It is not based on the timestamp
of the last change to the password profile itself.
Note the following:
■If the user is not logged in when you set
PASSWORD_LIFE_TIME
to a low value, then
the user's account status does not change until the user logs in.
■You can set the
PASSWORD_LIFE_TIME
parameter to
UNLIMITED
, but this only affects
accounts that have not entered their grace period. After the grace period expires,
the user must change the password.
Enforcing Password Complexity Verification
Complexity verification checks that each password is complex enough to provide
reasonable protection against intruders who try to break into the system by guessing
passwords. This forces users to create strong, secure passwords for database user
accounts. You need to ensure that the passwords for your users are complex enough to
provide reasonable protection against intruders who try to break into the system by
guessing passwords.
How Oracle Database Checks the Complexity of Passwords
Oracle Database provides a sample password verification function entitled
verify_
function_11G
in the PL/SQL script
utlpwdmg.sql
(located in
$ORACLE_
HOME/rdbms/admin
) that, when enabled, checks whether users are correctly creating or
modifying their passwords. The
utlpwdmg.sql
script provides two password
verification functions: one for previous releases of Oracle Database and an updated
version for Oracle Database Release 11g.
For better security of passwords, Oracle recommends that you associate the
verify_
function_11G
function with the default profile. "Customizing Password Complexity
Verification" on page 3-12 provides an example of how to accomplish this.

Configuring Password Protection
3-12 Oracle Database Security Guide
The
utlpwdmg.sql
script checks for the following requirements when users create or
modify passwords:
■The password contains no fewer than 8 characters and does not exceed 30
characters.
■The password is not the same as the user name, nor is it the user name spelled
backward or with the numbers 1–100 appended.
■The password is not the same as the server name or the server name with the
numbers 1–100 appended.
■The password is not too simple, for example,
welcome1
,
database1
,
account1
,
user1234
,
password1
,
oracle
,
oracle123
,
computer1
,
abcdefg1
, or
change_on_
install
.
■The password is not
oracle
or
oracle
with the numbers 1–100 appended.
■The password includes at least 1 numeric and 1 alphabetic character.
■The password differs from the previous password by at least 3 letters.
Who Can Use the Password Complexity Functions?
Before you can use the password complexity verification functions in the
CREATE
PROFILE
or
ALTER PROFILE
statement, you must be granted the
EXECUTE
privilege on
them. The password verification functions are located in the
SYS
schema.
Customizing Password Complexity Verification
You can create your own password complexity verification function by backing up and
customizing the
verify_function_11G
function in the
utlpwdmg.sql
script. In fact,
Oracle recommends that you do so to further secure your site’s passwords. See also
Guideline 1 in "Guidelines for Securing Passwords" on page 10-7 for general advice on
creating passwords. However, be aware that the password complexity checking is not
enforced for user
SYS
.
By default, password complexity verification is not enabled. To enable the password
complexity verification:
1. Log in to SQL*Plus with administrative privileges.
For example:
CONNECT SYS AS SYSDBA
Enter password: password
2. Run the
utlpwdmg.sql
script (or your modified version of this script) to create the
password complexity functions in the SYS schema.
@$ORACLE_HOME/RDBMS/ADMIN/utlpwdmg.sql
3. Grant any users who must use this function the
EXECUTE
privilege on it.
For example:
GRANT pmsith EXECUTE ON
verify_function_11G
;
4. In the default profile or the user profile, set the
PASSWORD_VERIFY_FUNCTION
setting
to either the sample password complexity function in the
utlpwdmg.sql
script, or
to your customized function. Use one of the following methods:
■Log in to SQL*Plus with administrator privileges and use the
CREATE PROFILE
or
ALTER PROFILE
statement to enable the function. For example, to update the
default profile to use the
verify_function_11G
function:

Configuring Password Protection
Configuring Authentication 3-13
ALTER PROFILE default LIMIT
PASSWORD_VERIFY_FUNCTION verify_function_11G;
■In Oracle Enterprise Manager, go to the Edit Profiles page and then under
Complexity, select the name of the password complexity function from the
Complexity function list.
After you have enabled password complexity verification, it takes effect immediately.
Enabling or Disabling Password Case Sensitivity
This section contains:
■About Enabling or Disabling Password Case Sensitivity
■Procedure for Enabling Password Case Sensitivity
■Finding the Password Versions of User Accounts
■How Case Sensitivity Affects Password Files
■How Case Sensitivity Affects Accounts Created for Database Link Connections
About Enabling or Disabling Password Case Sensitivity
When you create or modify user accounts, by default, passwords are case sensitive. To
control the use of case sensitivity in passwords, set the
SEC_CASE_SENSITIVE_LOGON
initialization parameter. Only users who have the
ALTER SYSTEM
privilege can set the
SEC_CASE_SENSITIVE_LOGON
parameter. Set it to
TRUE
to enable case sensitivity or
FALSE
to disable case sensitivity.
For greater security, Oracle recommends that you enable case sensitivity in passwords.
However, if you have compatibility issues with your applications, you can use this
parameter to disable password case sensitivity. Examples of application compatibility
issues are passwords for your applications being hard-coded to be case insensitive, or
different application modules being inconsistent about case sensitivity when sending
credentials to start a database session.
Do not set the
SEC_CASE_SENSITIVE_LOGON
parameter to
FALSE
when exclusive mode is
enabled (the
SQLNET.ALLOWED_LOGON_VERSION
parameter is set to
11)
, because the
more secure verifiers used in exclusive mode only support case-sensitive password
checking. For compatibility reasons, Oracle Database does not prevent the use of the
FALSE
setting for
SEC_CASE_SENSITIVE_LOGON
when the
SQLNET.ALLOWED_LOGON_
VERSION
parameter is set to
11
. This can result in accounts becoming inaccessible if
these settings are in effect when users change their passwords or you create new user
accounts.
Note: The
ALTER USER
statement has a
REPLACE
clause. With this
clause, users can change their own unexpired passwords by
supplying the previous password to authenticate themselves.
If the password has expired, then the user cannot log in to SQL to
issue the
ALTER USER
command. Instead, the
OCIPasswordChange()
function must be used, which also requires the previous password.
A database administrator with
ALTER ANY USER
privilege can
change any user password (force a new password) without
supplying the old one.

Configuring Password Protection
3-14 Oracle Database Security Guide
Procedure for Enabling Password Case Sensitivity
To enable case sensitivity in passwords:
1. If you are using a password file, ensure that it was created with the
IGNORECASE
parameter set to
N
.
The
IGNORECASE
parameter overrides the
SEC_CASE_SENSITIVE_LOGON
parameter.
By default,
IGNORECASE
is set to
Y
, which means that passwords are treated as
case-insensitive. For more information about password files, see Oracle Database
Administrator's Guide.
2. Enter the following
ALTER SYSTEM
statement:
ALTER SYSTEM SET SEC_CASE_SENSITIVE_LOGON = TRUE
Finding the Password Versions of User Accounts
In previous releases of Oracle Database, passwords were not case sensitive. If you
import user accounts from a previous release, for example, Release 10g, into the
current database release, the case-insensitive passwords in these accounts remain case
insensitive until the user changes his or her password. If the account was granted
SYSDBA
or
SYSOPER
privilege, it is imported to the password file. (See "How Case
Sensitivity Affects Password Files" on page 3-14 for more information.) When a
password from a user account from the previous release is changed, it then becomes
case sensitive.
You can find users who have case sensitive or case insensitive passwords by querying
the
DBA_USERS
view. The
PASSWORD_VERSIONS
column in this view indicates the release
in which the password was created. For example:
SELECT USERNAME,PASSWORD_VERSIONS FROM DBA_USERS;
USERNAME PASSWORD_VERSIONS
------------------------------ -----------------
JONES 10G 11G
ADAMS 10G 11G
CLARK 10G 11G
PRESTON 11G
BLAKE 10G
The passwords for accounts
jones
,
adams
, and
clark
were originally created in Release
10g and then reset in Release 11g. Their passwords, assuming case sensitivity has been
enabled, are now case sensitive, as is the password for
preston
. However, the account
for
blake
is still using the Release 10g standard, so it is case insensitive. Ask him to
reset his password so that it will be case sensitive, and therefore more secure.
See Oracle Database Reference for more information about the
DBA_USERS
view.
How Case Sensitivity Affects Password Files
You can enable or disable case sensitivity for password files by using the
ignorecase
argument in the
ORAPWD
command line utility. The default value for
ignorecase
is
n
(no), which enforces case sensitivity.
Example 3–4 shows how to enable case sensitivity in password files.
Example 3–4 Enabling Password Case Sensitivity
orapwd file=orapw entries=100 ignorecase=n
Enter password for SYS: password

Configuring Password Protection
Configuring Authentication 3-15
This creates a password file called
orapwd
. Because
ignorecase
is set to n (no), the
password entered for the
password
parameter will be case sensitive. Afterwards, if you
connect using this password, it succeeds—as long as you enter it using the exact case
sensitivity in which it was created. If you enter the same password but with different
case sensitivity, it will fail.
If you set
ignorecase
to
y
, then the passwords in the password file are case insensitive,
which means that you can enter the password using any capitalization that you want.
If you imported user accounts from a previous release and these accounts were created
with
SYSDBA
or
SYSOPER
privileges, then they will be included in the password file. The
passwords for these accounts are case insensitive. The next time these users change
their passwords, and assuming case sensitivity is enabled, the passwords become case
sensitive. For greater security, have these users change their passwords.
See Oracle Database Administrator's Guide for more information about password files.
How Case Sensitivity Affects Accounts Created for Database Link Connections
When you create a database link connection, you must define a user name and
password for the connection. When you create the database link connection, the
password is case sensitive. How this user enters his or her password for connections
depends on the release in which the database link was created:
■Users can connect from a pre-Release 11g database to a Release 11g database. If
case sensitivity is disabled in the Release 11g database, then the user can enter the
password using any case. If case sensitivity is enabled, however, then the user
must enter the password using the case in which the password was created in the
Release 11g database.
■If the user connecting from a Release 11g database to a pre-Release 11g database,
he or she can enter his or her password using any case, because the password is
still case insensitive.
You can find the user accounts for existing database links by running the
V$DBLINK
view. For example:
SELECT DB_LINK, OWNER_ID FROM V$DBLINK;
See Oracle Database Reference for more information about the
V$DBLINK
view.
Ensuring Against Password Security Threats by Using the SHA-1 Hashing Algorithm
The SHA-1 cryptographic hashing algorithm protects against password-based security
threats by including support for mixed case characters, special characters, and
multibyte characters in passwords. In addition, the SHA-1 hashing algorithm adds a
salt to the password when it is hashed, which provides additional protection. This
enables your users to create far more complex passwords, and therefore, makes it more
difficult for an intruder to gain access to these passwords. Oracle recommends that
you use the SHA-1 hashing algorithm.
The password versions (also known as password hash values) are considered to be
extremely sensitive, because they are used as a "shared secret" between the server and
person who is logging in. If an intruder learns this secret, then the protection of the
authentication is immediately and severely compromised. Remember that
administrative users who have account management privileges, administrative users
who have the
SYSDBA
system privilege, or even users who have the
EXP_FULL_
DATABASE
role can immediately access the password hash values. Therefore, this type
of administrative user must be trustworthy if the integrity of the database
password-based authentication is to be preserved. If you cannot trust these

Configuring Password Protection
3-16 Oracle Database Security Guide
administrators, then it is better to deploy a directory server (such as Oracle Database
Enterprise User Security) so that the password versions remain within the Enterprise
User Security directory and are never accessible to anyone except the Enterprise User
Security administrator.
You optionally can configure Oracle Database to run in exclusive mode for Release 11
or later. When you enable exclusive mode, then Oracle Database uses the SHA-1
hashing algorithm exclusively. Oracle Database 11g exclusive mode is compatible with
Oracle Database 10g and later products that use OCI-based drivers, including
SQL*Plus, ODBC, Oracle .NET, Oracle Forms, and various third-party Oracle Database
adapters. However, be aware that exclusive mode for Release 11g is not compatible
with JDBC type-4 (thin) versions earlier than Oracle Database 11g or Oracle Database
Client interface (OCI)-based drivers earlier than Oracle Database 10g. After you
configure exclusive mode, Oracle recommends that you remove the previous
password hash values from the data dictionary.
Follow these steps:
1. Enable exclusive mode.
a. Create a back up copy of the
sqlnet.ora
parameter file, by default located in
the
$ORACLE_HOME/network/admin
directory on UNIX operating systems and
the
%ORACLE_HOME%\network\admin
directory on Microsoft Windows operating
systems.
b. Ensure that the
sqlnet.ora
file has the following line:
SQLNET.ALLOWED_LOGON_VERSION=12
If you have applied the October 2012 CPU or if you are using Oracle Database
Release 11.2.0.3, then ensure that you set
SQLNET.ALLOWED_LOGON_VERSION
to
12, not
11
.
c. Save and exit the
sqlnet.ora
file.
2. Verify that the passwords in test scripts or batch jobs are consistent in their use of
mixed case and special characters.
3. Change all passwords to include mixed case and special characters.
Oracle recommends that you use random passwords with a length of at least
twelve characters. See Guideline 1 under "Guidelines for Securing Passwords" on
page 10-7 for additional guidelines for creating passwords, and techniques for
creating complex but easy to remember passwords.
Managing the Secure External Password Store for Password Credentials
This section contains:
■About the Secure External Password Store
■How Does the External Password Store Work?
■Configuring Clients to Use the External Password Store
■Managing External Password Store Credentials
See Also: "Downloading Security Patches and Contacting Oracle
Regarding Vulnerabilities" on page 10-2

Configuring Password Protection
Configuring Authentication 3-17
About the Secure External Password Store
You can store password credentials for connecting to databases by using a client-side
Oracle wallet. An Oracle wallet is a secure software container that stores
authentication and signing credentials.
This wallet usage can simplify large-scale deployments that rely on password
credentials for connecting to databases. When this feature is configured, application
code, batch jobs, and scripts no longer need embedded user names and passwords.
This reduces risk because the passwords are no longer exposed, and password
management policies are more easily enforced without changing application code
whenever user names or passwords change.
How Does the External Password Store Work?
Typically, users (and as applications, batch jobs, and scripts) connect to databases by
using a standard
CONNECT
statement that specifies a database connection string. This
string can include a user name and password, and an Oracle Net service name
identifying the database on an Oracle Database network. If the password is omitted,
the connection prompts the user for the password.
For example, the service name could be the URL that identifies that database, or a TNS
alias you entered in the
tnsnames.ora
file in the database. Another possibility is a
host:port:sid
string.
The following examples are standard
CONNECT
statements that could be used for a
client that is not configured to use the external password store:
CONNECT salesapp@sales_db.us.example.com
Enter password: password
CONNECT salesapp@orasales
Enter password: password
CONNECT salesapp@ourhost37:1527:DB17
Enter password: password
In these examples,
salesapp
is the user name, with the unique connection string for
the database shown as specified in three different ways. You could use its URL
sales_
db.us.example.com
, or its TNS alias
orasales
from the
tnsnames.ora
file, or its
host:port:sid
string.
However, when clients are configured to use the secure external password store,
applications can connect to a database with the following
CONNECT
statement syntax,
without specifying database login credentials:
See Also:
■"Using Proxy Authentication with the Secure External Password
Store" on page 3-40
■Oracle Database Advanced Security Administrator's Guide for general
information about Oracle wallets
Note: The external password store of the wallet is separate from the
area where public key infrastructure (PKI) credentials are stored.
Consequently, you cannot use Oracle Wallet Manager to manage
credentials in the external password store of the wallet. Instead, use
the command-line utility
mkstore
to manage these credentials.

Configuring Password Protection
3-18 Oracle Database Security Guide
CONNECT /@db_connect_string
CONNECT /@db_connect_string AS SYSDBA
CONNECT /@db_connect_string AS SYSOPER
In this specification,
db_connect_string
is a valid connection string to access the
intended database, such as the service name, URL, or alias as shown in the earlier
examples. Each user account must have its own unique connection string; you cannot
create one connection string for multiple users.
In this case, the database credentials, user name and password, are securely stored in
an Oracle wallet created for this purpose. The autologin feature of this wallet is turned
on, so the system does not need a password to open the wallet. From the wallet, it gets
the credentials to access the database for the user they represent.
Configuring Clients to Use the External Password Store
If your client is already configured to use external authentication, such as Windows
native authentication or Secure Sockets Layer (SSL), then Oracle Database uses that
authentication method. The same credentials used for this type of authentication are
typically also used to log in to the database.
For clients not using such authentication methods or wanting to override them for
database authentication, you can set the
SQLNET.WALLET_OVERRIDE
parameter in
sqlnet.ora
to
TRUE
. The default value for
SQLNET.WALLET_OVERRIDE
is
FALSE
, allowing
standard use of authentication credentials as before.
If you want a client to use the secure external password store feature, then perform the
following configuration task:
1. Create a wallet on the client by using the following syntax at the command line:
mkstore -wrl wallet_location -create
For example:
mkstore -wrl c:\oracle\product\11.2.0\db_1\wallets -create
Enter password: password
wallet_location
is the path to the directory where you want to create and store
the wallet. This command creates an Oracle wallet with the autologin feature
enabled at the location you specify. The autologin feature enables the client to
access the wallet contents without supplying a password. See Oracle Database
Advanced Security Administrator's Guide for information about autologin wallets.
The
mkstore
utility
-create
option uses password complexity verification. See
"Enforcing Password Complexity Verification" on page 3-11 for more information.
2. Create database connection credentials in the wallet by using the following syntax
at the command line:
mkstore -wrl wallet_location -createCredential db_connect_string username
Enter password: password
For example:
mkstore -wrl c:\oracle\product\11.2.0\db_1\wallets -createCredential orcl
system
See Also: Oracle Database Advanced Security Administrator's Guide for
information about autologin wallets

Configuring Password Protection
Configuring Authentication 3-19
Enter password: password
In this specification:
■
wallet_location
is the path to the directory where you created the wallet in
Step 1.
■
db_connect_string
is the TNS alias you use to specify the database in the
tnsnames.ora
file or any service name you use to identify the database on an
Oracle network. By default,
tnsnames.ora
is located in the
$ORACLE_
HOME/network/admin
directory on UNIX systems and in
ORACLE_
HOME\network\admin
on Windows.
■
username
is the database login credential. When prompted, enter the password
for this user.
Repeat this step for each database you want accessible using the
CONNECT /@db_
connect_string
syntax.
3. In the client
sqlnet.ora
file, enter the
WALLET_LOCATION
parameter and set it to the
directory location of the wallet you created in Step 1.
For example, if you created the wallet in
$ORACLE_HOME/network/admin
and your
Oracle home is set to
/private/ora11
, then you need to enter the following into
your client
sqlnet.ora
file:
WALLET_LOCATION =
(SOURCE =
(METHOD = FILE)
(METHOD_DATA =
(DIRECTORY = /private/ora11/network/admin)
)
)
4. In the client
sqlnet.ora
file, enter the
SQLNET.WALLET_OVERRIDE
parameter and set
it to
TRUE
as follows:
SQLNET.WALLET_OVERRIDE = TRUE
This setting causes all
CONNECT /@db_connect_string
statements to use the
information in the wallet at the specified location to authenticate to databases.
When external authentication is in use, an authenticated user with such a wallet
can use the
CONNECT /@db_connect_string
syntax to access the previously
specified databases without providing a user name and password. However, if a
user fails that external authentication, then these connect statements also fail.
Note: The
db_connect_string
used in the
CONNECT /@db_connect_
string
statement must be identical to the
db_connect_string
specified in the
-createCredential
command.

Configuring Password Protection
3-20 Oracle Database Security Guide
Example 3–5 shows a sample
sqlnet.ora
file with the
WALLET_LOCATION
and the
SQLNET.WALLET_OVERRIDE
parameters set as described in Steps 3 and 4.
Example 3–5 Sample SQLNET.ORA File with Wallet Parameters Set
WALLET_LOCATION =
(SOURCE =
(METHOD = FILE)
(METHOD_DATA =
(DIRECTORY = /private/ora11/network/admin)
)
)
SQLNET.WALLET_OVERRIDE = TRUE
SSL_CLIENT_AUTHENTICATION = FALSE
SSL_VERSION = 0
Managing External Password Store Credentials
This section summarizes the following tasks you can perform to manage credentials in
the external password store by using the
mkstore
command-line utility:
■Listing External Password Store Contents
■Adding Credentials to an External Password Store
■Modifying Credentials in an External Password Store
■Deleting Credentials from an External Password Store
Listing External Password Store Contents Periodically, you may want to view all contents
of a client wallet external password store, or you may need to check specific
credentials by viewing them. Listing the external password store contents provides
information you can use to decide whether to add or delete credentials from the store.
To list the contents of the external password store, enter the following command at the
command line:
mkstore -wrl wallet_location -listCredential
For example:
mkstore -wrl c:\oracle\product\11.2.0\db_1\wallets -listCredential
wallet_location
specifies the path to the directory where the wallet, whose external
password store contents you want to view, is located. This command lists all of the
credential database service names (aliases) and the corresponding user name (schema)
for that database. Passwords are not listed.
Note: If an application uses SSL for encryption, then the
sqlnet.ora
parameter,
SQLNET.AUTHENTICATION_SERVICES
, specifies SSL and an
SSL wallet is created. If this application wants to use secret store
credentials to authenticate to databases (instead of the SSL certificate),
then those credentials must be stored in the SSL wallet. After SSL
authentication, if
SQLNET.WALLET_OVERRIDE = TRUE
, then the user
names and passwords from the wallet are used to authenticate to
databases. If
SQLNET.WALLET_OVERRIDE = FALSE
, then the SSL
certificate is used.

Configuring Password Protection
Configuring Authentication 3-21
Adding Credentials to an External Password Store You can store multiple credentials in one
client wallet. For example, if a client batch job connects to
hr_database
and a script
connects to
sales_database
, then you can store the login credentials in the same client
wallet. You cannot, however, store multiple credentials (for logging in to multiple
schemas) for the same database in the same wallet. If you have multiple login
credentials for the same database, then they must be stored in separate wallets.
To add database login credentials to an existing client wallet, enter the following
command at the command line:
mkstore -wrl wallet_location -createCredential db_alias username
For example:
mkstore -wrl c:\oracle\product\11.2.0\db_1\wallets -createCredential orcl system
Enter password: password
In this specification:
■
wallet_location
is the path to the directory where the client wallet to which you
want to add credentials is stored.
■
db_alias
can be the TNS alias you use to specify the database in the
tnsnames.ora
file or any service name you use to identify the database on an Oracle network.
■
username
is the database login credential for the schema to which your application
connects. When prompted, enter the password for this user.
Modifying Credentials in an External Password Store If the database connection strings
change, then you can modify the database login credentials that are stored in the
wallet.
To modify database login credentials in a wallet, enter the following command at the
command line:
mkstore -wrl wallet_location -modifyCredential dbase_alias username
For example:
mkstore -wrl c:\oracle\product\11.2.0\db_1\wallets -modifyCredential sales_db
Enter password: password
In this specification:
■
wallet_location
is the path to the directory where the wallet is located.
■
db_alias
is a new or different alias you want to use to identify the database. It can
be a TNS alias you use to specify the database in the
tnsnames.ora
file or any
service name you use to identify the database on an Oracle network.
■
username
is the new or different database login credential. When prompted, enter
the password for this user.
Deleting Credentials from an External Password Store If a database no longer exists or if you
want to disable connections to a specific database, then you can delete all login
credentials for that database from the wallet.
To delete database login credentials from a wallet, enter the following command at the
command line:
mkstore -wrl wallet_location -deleteCredential db_alias
For example:

Authenticating Database Administrators
3-22 Oracle Database Security Guide
mkstore -wrl c:\oracle\product\11.2.0\db_1\wallets -deleteCredential orcl
In this specification:
■
wallet_location
is the path to the directory where the wallet is located.
■
db_alias
is the TNS alias you use to specify the database in the
tnsnames.ora
file,
or any service name you use to identify the database on an Oracle Database
network.
Authenticating Database Administrators
Database administrators perform special operations, such as shutting down or starting
up a database, that should not be performed by non-administrative database users.
Oracle Database provides the following methods to secure the authentication of
database administrators who have either
SYSDBA
or
SYSOPER
privileges:
■Strong Authentication and Centralized Management for Database Administrators
■Authenticating Database Administrators by Using the Operating System
■Authenticating Database Administrators by Using Their Passwords
Strong Authentication and Centralized Management for Database Administrators
Strong authentication lets you centrally control
SYSDBA
and
SYSOPER
access to multiple
databases. Consider using this type of authentication for database administration for
the following situations:
■You have concerns about password file vulnerability.
■Your site has very strict security requirements.
■You want to separate the identity management from your database. By using a
directory server such as Oracle Internet Directory (OID), for example, you can
maintain, secure, and administer that server separately.
To enable the Oracle Internet Directory server to authorize
SYSDBA
and
SYSOPER
connections, use one of the following methods, depending on your environment:
■Configuring Directory Authentication for Administrative Users
■Configuring Kerberos Authentication for Administrative Users
■Configuring Secure Sockets Layer Authentication for Administrative Users
Configuring Directory Authentication for Administrative Users
To configure directory authentication for administrative users:
1. Configure the administrative user by using the same procedures you would use to
configure a typical user.
2. In Oracle Internet Directory, grant the
SYSDBA
or
SYSOPER
privilege to the user for
the database that this user will administer.
Grant
SYSDBA
or
SYSOPER
only to trusted users. See "Guidelines for Securing User
Accounts and Privileges" on page 10-2 for advice on this topic.
3. Set the
LDAP_DIRECTORY_SYSAUTH
initialization parameter to
YES
:
ALTER SYSTEM SET LDAP_DIRECTORY_SYSAUTH = YES;

Authenticating Database Administrators
Configuring Authentication 3-23
When set to
YES
, the
LDAP_DIRECTORY_SYSAUTH
parameter enables
SYSDBA
and
SYSOPER
users to authenticate to the database by using a strong authentication
method.
See Oracle Database Reference for more information about
LDAP_DIRECTORY_
SYSAUTH
.
4. Set the
LDAP_DIRECTORY_ACCESS
parameter to either
PASSWORD
or
SSL
. For example:
ALTER SYSTEM SET LDAP_DIRECTORY_ACCESS = PASSWORD;
Ensure that the
LDAP_DIRECTORY_ACCESS
initialization parameter is not set to
NONE
.
Setting this parameter to
PASSWORD
or
SSL
ensures that users can be authenticated
using the
SYSDBA
or
SYSOPER
privileges through Oracle Internet Directory. See
Oracle Database Reference for more information about
LDAP_DIRECTORY_ACCESS
.
Afterward, this user can log in by including the net service name in the
CONNECT
statement in SQL*Plus. For example, to log on as
SYSDBA
if the net service name is
orcl
:
CONNECT SOMEUSER@ORCL AS SYSDBA
Enter password: password
If the database is configured to use a password file for remote authentication, Oracle
Database checks the password file first.
Configuring Kerberos Authentication for Administrative Users
To configure Kerberos authentication for administrative users:
1. Configure the administrative user by using the same procedures you would use to
configure a typical user.
See Oracle Database Advanced Security Administrator's Guide for more information.
2. Configure Oracle Internet Directory for Kerberos authentication.
See Oracle Database Enterprise User Security Administrator's Guide for more
information.
3. In Oracle Internet Directory, grant the
SYSDBA
or
SYSOPER
privilege to the user for
the database that this user will administer.
Grant
SYSDBA
or
SYSOPER
only to trusted users. See "Guidelines for Securing User
Accounts and Privileges" on page 10-2 for advice on this topic.
4. Set the
LDAP_DIRECTORY_SYSAUTH
initialization parameter to
YES
:
ALTER SYSTEM SET LDAP_DIRECTORY_SYSAUTH = YES;
When set to
YES
, the
LDAP_DIRECTORY_SYSAUTH
parameter enables
SYSDBA
and
SYSOPER
users to authenticate to the database by using strong authentication
methods. See Oracle Database Reference for more information about
LDAP_
DIRECTORY_SYSAUTH
.
5. Set the
LDAP_DIRECTORY_ACCESS
parameter to either
PASSWORD
or
SSL
. For example:
ALTER SYSTEM SET LDAP_DIRECTORY_ACCESS = SSL;
Ensure that the
LDAP_DIRECTORY_ACCESS
initialization parameter is not set to
NONE
.
Setting this parameter to
PASSWORD
or
SSL
ensures that users can be authenticated
using
SYSDBA
or
SYSOPER
through Oracle Internet Directory. See Oracle Database
Reference for more information about
LDAP_DIRECTORY_ACCESS
.

Authenticating Database Administrators
3-24 Oracle Database Security Guide
Afterward, this user can log in by including the net service name in the
CONNECT
statement in SQL*Plus. For example, to log on as
SYSDBA
if the net service name is
orcl
:
CONNECT /@orcl AS SYSDBA
Configuring Secure Sockets Layer Authentication for Administrative Users
To configure Secure Sockets Layer (SSL) authentication for administrative users:
1. Configure the client to use SSL:
a. Configure the client wallet and user certificate. Update the wallet location in
the
sqlnet.ora
configuration file.
You can use Wallet Manager to configure the client wallet and user certificate.
See Oracle Database Advanced Security Administrator's Guide for more
information.
b. Configure the Oracle net service name to include server DNs and use TCP/IP
with SSL in
tnsnames.ora
.
c. Configure TCP/IP with SSL in
listener.ora
.
d. Set the client SSL cipher suites and the required SSL version, and then set SSL
as an authentication service in
sqlnet.ora
.
2. Configure the server to use SSL:
a. Enable SSL for your database listener on TCPS and provide a corresponding
TNS name. You can use Net Configuration Assistant to configure the TNS
name.
b. Store the database PKI credentials in the database wallet. You can use Wallet
Manager do this.
c. Set the
LDAP_DIRECTORY_ACCESS
initialization parameter to
SSL
:
ALTER SYSTEM SET LDAP_DIRECTORY_ACCESS = SSL;
See Oracle Database Reference for more information about
LDAP_DIRECTORY_
ACCESS
.
3. Configure Oracle Internet Directory for SSL user authentications.
See Oracle Database Enterprise User Security Administrator's Guide for information on
configuring enterprise user security SSL authentication.
4. In Oracle Internet Directory, grant the
SYSDBA
or
SYSOPER
privilege to the user for
the database that the user will administer.
5. On the server computer, set the
LDAP_DIRECTORY_SYSAUTH
initialization parameter
to
YES
.
ALTER SYSTEM SET LDAP_DIRECTORY_SYSAUTH = YES;
When set to
YES
, the
LDAP_DIRECTORY_SYSAUTH
parameter enables
SYSDBA
and
SYSOPER
users to authenticate to the database by using a strong authentication
method. See Oracle Database Reference for more information about
LDAP_
DIRECTORY_SYSAUTH
.
Afterward, this user can log in by including the net service name in the
CONNECT
statement in SQL*Plus. For example, to log on as
SYSDBA
if the net service name is
orcl
:
CONNECT /@orcl AS SYSDBA

Authenticating Database Administrators
Configuring Authentication 3-25
Authenticating Database Administrators by Using the Operating System
Operating system authentication for a database administrator typically involves
establishing a group on the operating system, granting
DBA
privileges to that group,
and then adding the names of persons who should have those privileges to that group.
(On UNIX systems, the group is the dba group.)
On Microsoft Windows systems, users who connect with the
SYSDBA
privilege can take
advantage of the Windows native authentication. If these users work with Oracle
Database using their domain accounts, then you must explicitly grant them local
administrative privileges and
ORA_DBA
membership.
Authenticating Database Administrators by Using Their Passwords
Oracle Database uses database-specific password files to keep track of database user
names that have been granted the
SYSDBA
and
SYSOPER
privileges. These privileges
enable the following activities:
■The
SYSOPER
system privilege lets database administrators perform
STARTUP
,
SHUTDOWN
,
ALTER DATABASE
OPEN/MOUNT
,
ALTER
DATABASE
BACKUP
,
ARCHIVE
LOG
, and
RECOVER
operations.
SYSOPER
also includes the
RESTRICTED
SESSION
privilege.
■The
SYSDBA
system privilege has all system privileges with
ADMIN
OPTION
,
including the
SYSOPER
system privilege, and permits
CREATE
DATABASE
and
time-based recovery.
■A password file containing users with
SYSDBA
or
SYSOPER
privileges can be shared
between different databases. You can have a shared password file that contains
users in addition to the
SYS
user. To share a password file among different
databases, set the
REMOTE_LOGIN_PASSWORDFILE
parameter in the
init.ora
file to
SHARED
.
If you set the
REMOTE_LOGIN_PASSWORDFILE
initialization parameter to
EXCLUSIVE
or
SHARED
from
NONE
, then ensure that the password file is in sync with the
dictionary passwords. See Oracle Database Administrator's Guide for more
information.
■Password file-based authentication is enabled by default. This means that the
database is ready to use a password file for authenticating users that have
SYSDBA
or
SYSOPER
system privileges. Password file based authentication is activated as
soon as you create a password file using the
ORAPWD
utility.
Anyone who has
EXECUTE
privileges and write privileges to the
$ORACLE_HOME/dbs
directory can run the
ORAPWD
utility.
However, be aware that using password files may pose security risks. For this reason,
consider using the authentication methods described in "Strong Authentication and
Centralized Management for Database Administrators" on page 3-22. Examples of
password security risks are as follows:
■An intruder could steal or attack the password file.
■Many users do not change the default password.
■The password could be easily guessed.
■The password is vulnerable if it can be found in a dictionary.
See Also: Your Oracle Database operating system-specific
documentation for information about configuring operating system
authentication of database administrators

Using the Database to Authenticate Users
3-26 Oracle Database Security Guide
■Passwords that are too short, chosen perhaps for ease of typing, are vulnerable if
an intruder obtains the cryptographic hash of the password.
Using the Database to Authenticate Users
This section contains:
■About Database Authentication
■Advantages of Database Authentication
■Creating a User Who Is Authenticated by the Database
About Database Authentication
Oracle Database can authenticate users attempting to connect to a database by using
information stored in that database itself. To configure Oracle Database to use
database authentication, you must create each user with an associated password. User
names can be multibyte, but each password must be composed of single-byte
characters, even if your database uses a multibyte character set. The user must provide
this user name and password when attempting to establish a connection. Oracle
Database stores user passwords in the data dictionary in an encrypted format.
To identify the authentication protocols that are allowed by a client or a database, a
database administrator can explicitly set the
SQLNET.ALLOWED_LOGON_VERSION
parameter in the server
sqlnet.ora
file. Each connection attempt is tested, and if the
client or server does not meet the minimum version specified by its partner,
authentication fails with an
ORA-28040 No matching authentication protocol
error.
The parameter can take the values 11, 10, 9, or 8. The default value is 8. These values
represent database server versions. Oracle recommends the value 11 for the strongest
protection. However, be aware that if you set
SQLNET.ALLOWED_LOGON_VERSION
to 11,
then pre-Oracle Database Release 11.1 client applications or JDBC thin clients cannot
authenticate to the Oracle database using password-based authentication.
To enhance security when using database authentication, Oracle recommends that you
use password management, including account locking, password aging and
expiration, password history, and password complexity verification. See "Using a
Password Management Policy" on page 3-3 for more information about password
management.
Advantages of Database Authentication
The advantages of database authentication are as follows:
■User accounts and all authentication are controlled by the database. There is no
reliance on anything outside of the database.
Note: Connections requested
AS SYSDBA
or
AS SYSOPER
must use
these phrases; without them, the connection fails. The Oracle
Database parameter
O7_DICTIONARY_ACCESSIBILITY
is set to
FALSE
by default, to limit sensitive data dictionary access only to those
authorized. The parameter also enforces the required
AS SYSDBA
or
AS SYSOPER
syntax.
See Also: Oracle Database Administrator's Guide for information
about creating and maintaining password files

Using the Operating System to Authenticate Users
Configuring Authentication 3-27
■Oracle Database provides strong password management features to enhance
security when using database authentication.
■It is easier to administer when there are small user communities.
Creating a User Who Is Authenticated by the Database
The following SQL statement creates a user who is identified and authenticated by
Oracle Database. User
sebastian
must specify the assigned password whenever he
connects to Oracle Database.
CREATE USER sebastian IDENTIFIED BY password;
Using the Operating System to Authenticate Users
Some operating systems permit Oracle Database to use information they maintain to
authenticate users. This has the following benefits:
■Once authenticated by the operating system, users can connect to Oracle Database
more conveniently, without specifying a user name or password. For example, an
operating system-authenticated user can invoke SQL*Plus and omit the user name
and password prompts by entering the following command at the command line:
SQLPLUS /
Within SQL*Plus, you enter:
CONNECT /
■With control over user authentication centralized in the operating system, Oracle
Database need not store or manage user passwords, although it still maintains
user names in the database.
■Audit trails in the database and operating system can use the same user names.
■You can authenticate both operating system and non-operating system users in the
same system. For example:
– Authenticate users by the operating system. You create the user account
using the
IDENTIFIED EXTERNALLY
clause of the
CREATE USER
statement, and
then you set the
OS_AUTHENT_PREFIX
initialization parameter to specify a
prefix that Oracle Database uses to authenticate users attempting to connect to
the server.
– Authenticate non-operating system users. These are users who are assigned
passwords and authenticated by the database.
– Authenticate Oracle Database Enterprise User Security users. These user
accounts where created using the
IDENTIFIED GLOBALLY
clause of the
CREATE
USER
statement, and then authenticated by Oracle Internet Directory (OID)
currently in the same database.
However, you should be aware of the following drawbacks to using the operating
system to authenticate users:
■A user must have an operating system account on the computer that must be
accessed. Not all users have operating system accounts, particularly
non-administrative users.
■If a user has logged in using this method and steps away from the terminal,
another user could easily log in because this user does not need any passwords or
credentials. This could pose a serious security problem.

Using the Network to Authenticate Users
3-28 Oracle Database Security Guide
■When an operating system is used to authenticate database users, managing
distributed database environments and database links requires special care.
Operating system-authenticated database links can pose a security weakness. For
this reason, Oracle recommends that you do not use them.
Using the Network to Authenticate Users
You can authenticate users over a network by using Secure Sockets Layer with
third-party services.
■Authentication Using Secure Sockets Layer
■Authentication Using Third-Party Services
Authentication Using Secure Sockets Layer
The Secure Sockets Layer (SSL) protocol is an application layer protocol. You can use it
for user authentication to a database, and it is independent of global user management
in Oracle Internet Directory. That is, users can use SSL to authenticate to the database
without a directory server in place.
See Oracle Database Advanced Security Administrator's Guide for instructions about
configuring SSL.
Authentication Using Third-Party Services
You need to use third-party network authentication services if you want to
authenticate Oracle Database users over a network. Prominent examples include
Kerberos, PKI (public key infrastructure), the RADIUS (Remote Authentication Dial-In
User Service), and directory-based services, as described in the following sections.
If network authentication services are available to you, then Oracle Database can
accept authentication from the network service. If you use a network authentication
service, then some special considerations arise for network roles and database links.
Authenticating Using Kerberos
Kerberos is a trusted third-party authentication system that relies on shared secrets. It
presumes that the third party is secure, and provides single sign-on capabilities,
centralized password storage, database link authentication, and enhanced PC security.
See Also:
■Oracle Database Administrator's Guide for more information
about authentication, operating systems, distributed database
concepts, and distributed data management
■Operating system-specific documentation by Oracle Database
for more information about authenticating by using your
operating system
Note: To use a network authentication service with Oracle Database,
you need Oracle Database Enterprise Edition with the Oracle
Database Advanced Security option.
See Also: Oracle Database Advanced Security Administrator's Guide
for information about Oracle Enterprise Edition with the Oracle
Database Advanced Security option

Using the Network to Authenticate Users
Configuring Authentication 3-29
It does this through a Kerberos authentication server, or through Cybersafe Active
Trust, a commercial Kerberos-based authentication server.
Authenticating Using RADIUS
Oracle Database supports remote authentication of users through the Remote
Authentication Dial-In User Service (RADIUS), a standard lightweight protocol used
for user authentication, authorization, and accounting. This feature also enables users
to use the RSA One-Time Password Specifications (OTPS) to authenticate to the Oracle
database.
Authenticating Using Directory-Based Services
Using a central directory can make authentication and its administration efficient.
Directory-based services include the following:
■Oracle Internet Directory, which uses the Lightweight Directory Access Protocol
(LDAP), uses a central repository to store and manage information about users
(called enterprise users) whose accounts were created in a distributed
environment. Although database users must be created (with passwords) in each
database that they need to access, enterprise user information is accessible
centrally in the Oracle Internet Directory. You can also integrate this directory with
Microsoft Active Directory and SunOne.
For more information about Oracle Internet Directory, see Oracle Internet Directory
Administrator's Guide.
■Oracle Enterprise Security Manager lets you store and retrieve roles from Oracle
Internet Directory, which provides centralized privilege management to make
administration easier and increase security levels. For more information about
Oracle Enterprise Security Manager, see Oracle Enterprise Manager Advanced
Configuration.
Authenticating Using Public Key Infrastructure
Authentication systems based on public key infrastructure (PKI) issue digital
certificates to user clients, which use them to authenticate directly to servers in the
enterprise without directly involving an authentication server. Oracle Database
provides a PKI for using public keys and certificates, consisting of the following
components:
■Authentication and secure session key management using SSL. See
"Authentication Using Secure Sockets Layer" on page 3-28 for more information.
■Trusted certificates. These are used to identify third-party entities that are trusted
as signers of user certificates when an identity is being validated. When the user
certificate is being validated, the signer is checked by using trust points or a
trusted certificate chain of certificate authorities stored in the validating system. If
there are several levels of trusted certificates in this chain, then a trusted certificate
at a lower level is simply trusted without needing to have all its higher-level
See Also: Oracle Database Advanced Security Administrator's Guide
for more information about Kerberos
See Also:
■Oracle Database Advanced Security Administrator's Guide for
information about configuring RADIUS
■RSA documentation about OTPS

Configuring Global User Authentication and Authorization
3-30 Oracle Database Security Guide
certificates reverified. For more information about trusted certificates, see Oracle
Database Advanced Security Administrator's Guide.
■OracleAS Certificate Authority. This is a component of the Oracle Identity
Management infrastructure, which provides an integrated solution for
provisioning X.509 version 3 certificates for individuals, applications, and servers
that require certificates for PKI-based operations such as authentication, SSL,
S/MIME, and so on. For more information about OracleAS Certificate Authority,
see Oracle Application Server Certificate Authority Administrator's Guide.
■Oracle Wallet Manager. An Oracle wallet is a data structure that contains the
private key of a user, a user certificate, and the set of trust points of a user (trusted
certificate authorities). See Oracle Database Advanced Security Administrator's Guide
for information about managing Oracle wallets.
You can use Oracle Wallet Manager to manage Oracle wallets. This is a standalone
Java application used to manage and edit the security credentials in Oracle
wallets. It performs the following operations:
–Generates a public-private key pair and creates a certificate request for
submission to a certificate authority, and creates wallets
–Installs a certificate for the entity
–Manages X.509 version 3 certificates on Oracle Database clients and servers
–Configures trusted certificates for the entity
–Opens a wallet to enable access to PKI-based services
■X.509 version 3 certificates obtained from (and signed by) a trusted entity, a
certificate authority. Because the certificate authority is trusted, these certificates
verify that the requesting entity’s information is correct and that the public key on
the certificate belongs to the identified entity. The certificate is loaded into an
Oracle wallet to enable future authentication.
Configuring Global User Authentication and Authorization
You can use Oracle Advanced Security to centralize the management of user-related
information, including authorizations, in an LDAP-based directory service. This
allows users and administrators to be identified in the database as global users,
meaning that they are authenticated by SSL and that the management of these users is
handled outside of the database by the centralized directory service. Global roles are
defined in a database and are known only to that database, but the directory service
handles authorizations for global roles.
This centralized management enables the creation of enterprise users and enterprise
roles. Enterprise users are defined and managed in the directory. They have unique
identities across the enterprise and can be assigned enterprise roles that determine
their access privileges across multiple databases. An enterprise role consists of one or
more global roles, and might be thought of as a container for global roles.
Note: You can also have users authenticated by SSL, whose
authorizations are not managed in a directory, that is, they have
local database roles only. See Oracle Database Advanced Security
Administrator's Guide for details.

Configuring Global User Authentication and Authorization
Configuring Authentication 3-31
Creating a User Who Is Authorized by a Directory Service
You have the following options to specify users who are authorized by a directory
service:
■Creating a Global User Who Has a Private Schema
■Creating Multiple Enterprise Users Who Share Schemas
Creating a Global User Who Has a Private Schema
The following statement shows the creation of a global user with a private schema,
authenticated by SSL, and authorized by the enterprise directory service:
CREATE USER psmith IDENTIFIED GLOBALLY AS 'CN=psmith,OU=division1,O=oracle,C=US';
The string provided in the
AS
clause provides an identifier (distinguished name, or
DN) meaningful to the enterprise directory.
In this case,
psmith
is a global user. But, the disadvantage here is that user
psmith
must then be created in every database that he must access, plus the directory.
Creating Multiple Enterprise Users Who Share Schemas
Multiple enterprise users can share a single schema in the database. These users are
authorized by the enterprise directory service but do not own individual private
schemas in the database. These users are not individually created in the database.
They connect to a shared schema in the database.
To create a schema-independent user:
1. Create a shared schema in the database using the following example:
CREATE USER appschema IDENTIFIED GLOBALLY AS '';
2. In the directory, create multiple enterprise users and a mapping object.
The mapping object tells the database how you want to map the DNs for the users
to the shared schema. You can either create a full DN mapping (one directory
entry for each unique DN), or you can map, for each user, multiple DN
components to one schema. For example:
OU=division,O=Oracle,C=US
Most users do not need their own schemas, and implementing schema-independent
users separates users from databases. You create multiple users who share the same
schema in a database, and as enterprise users, they can also access shared schemas in
other databases.
Advantages of Global Authentication and Global Authorization
Some advantages of global user authentication and authorization are as follows:
See Also: "Strong Authentication and Centralized Management for
Database Administrators" on page 3-22 if you want to centralize the
management of
SYSDBA
or
SYSOPER
access
See Also: Oracle Database Enterprise User Security Administrator's
Guide for an explanation of these mappings

Configuring an External Service to Authenticate Users and Passwords
3-32 Oracle Database Security Guide
■Provides strong authentication using SSL, Kerberos, or Windows native
authentication.
■Enables centralized management of users and privileges across the enterprise.
■Is easy to administer: You do not have to create a schema for every user in every
database in the enterprise.
■Facilitates single sign-on: Users need to sign on once to only access multiple
databases and services. Further, users using passwords can have a single
password to access multiple databases accepting password-authenticated
enterprise users.
■Because global user authentication and authorization provide password-based
access, you can migrate previously defined password-authenticated database
users to the directory (using the User Migration Utility) to be centrally
administered. This makes global authentication and authorization available for
earlier Oracle Database release clients that are still supported.
■
CURRENT_USER
database links connect as a global user. A local user can connect as a
global user in the context of a stored procedure, that is, without storing the global
user password in a link definition.
Configuring an External Service to Authenticate Users and Passwords
This section contains:
■About External Authentication
■Advantages of External Authentication
■Creating a User Who Is Authenticated Externally
■Authenticating User Logins Using the Operating System
■Authentication User Logins Using Network Authentication
About External Authentication
When you use external authentication for user accounts, Oracle Database maintains
the user account, but an external service performs the password administration and
user authentication. This external service can be the operating system or a network
service, such as Oracle Net.
With external authentication, your database relies on the underlying operating system
or network authentication service to restrict access to database accounts. A database
password is not used for this type of login. If your operating system or network
service permits, then it can authenticate users before they can log in to the database. To
enable this feature, set the initialization parameter
OS_AUTHENT_PREFIX
, and use this
prefix in Oracle Database user names. The
OS_AUTHENT_PREFIX
parameter defines a
prefix that Oracle Database adds to the beginning of the operating system account
name of every user. Oracle Database compares the prefixed user name with the Oracle
Database user names in the database when a user attempts to connect.
See Also: The following manuals for additional information
about global authentication and authorization and enterprise users
and roles:
■Oracle Database Advanced Security Administrator's Guide
■Oracle Database Enterprise User Security Administrator's Guide

Configuring an External Service to Authenticate Users and Passwords
Configuring Authentication 3-33
You should set
OS_AUTHENT_PREFIX
to a null string (an empty set of double quotation
marks:
""
). Using a null string eliminates the addition of any prefix to operating
system account names, so that Oracle Database user names exactly match operating
system user names.
OS_AUTHENT_PREFIX=" "
After you set
OS_AUTHENT_PREFIX
, it should remain the same for the life of a database.
If you change the prefix, then any database user name that includes the old prefix
cannot be used to establish a connection, unless you alter the user name to have it use
password authentication.
The default value of this parameter is
OPS$
for backward compatibility with previous
versions of Oracle Database. For example, assume that you set
OS_AUTHENT_PREFIX
as
follows:
OS_AUTHENT_PREFIX=OPS$
If a user with an operating system account named
tsmith
is to connect to an Oracle
database installation and be authenticated by the operating system, then Oracle
Database checks that there is a corresponding database user
OPS$tsmith
and, if so, lets
the user connect. All references to a user authenticated by the operating system must
include the prefix,
OPS$
, as seen in
OPS$tsmith
.
Advantages of External Authentication
The advantages of external authentication are as follows:
■More choices of authentication mechanisms are available, such as smart cards,
fingerprints, Kerberos, or the operating system.
■Many network authentication services, such as Kerberos support single sign-on,
enabling users to have fewer passwords to remember.
■If you are already using an external mechanism for authentication, such as one of
those listed earlier, then there may be less administrative overhead to use that
mechanism with the database.
Creating a User Who Is Authenticated Externally
The following statement creates a user who is identified by Oracle Database and
authenticated by the operating system or a network service. This example assumes
that the
OS_AUTHENT_PREFIX
parameter has been set to a blank space (
" "
).
CREATE USER psmith IDENTIFIED EXTERNALLY;
Using the
CREATE USER ... IDENTIFIED EXTERNALLY
statement, you create database
accounts that must be authenticated by the operating system or network service.
Oracle Database then relies on this external login authentication when it provides that
specific operating system user with access to the database resources of a specific user.
Note: The text of the
OS_AUTHENT_PREFIX
initialization parameter
is case-sensitive on some operating systems. See your operating
system-specific Oracle Database documentation for more
information about this initialization parameter.
See Also: Oracle Database Advanced Security Administrator's Guide
for more information about external authentication

Using Multitier Authentication and Authorization
3-34 Oracle Database Security Guide
Authenticating User Logins Using the Operating System
By default, Oracle Database allows operating system-authenticated logins only over
secure connections, which precludes using Oracle Net and a shared server
configuration. This restriction prevents a remote user from impersonating another
operating system user over a network connection.
Setting the
REMOTE_OS_AUTHENT
parameter to
TRUE
in the database initialization
parameter file forces the database to accept the client operating system user name
received over an unsecure connection and use it for account access. Because clients, in
general, such as PCs, are not trusted to perform operating system authentication
properly, it is very poor security practice to turn on this feature.
The default setting,
REMOTE_OS_AUTHENT = FALSE
, creates a more secure configuration
that enforces proper, server-based authentication of clients connecting to an Oracle
database.
Any change to this parameter takes effect the next time you start the instance and
mount the database. Generally, user authentication through the host operating system
offers faster and more convenient connection to Oracle Database without specifying a
separate database user name or password. Also, user entries correspond in the
database and operating system audit trails.
Be aware that the
REMOTE_OS_AUTHENT
parameter was deprecated in Oracle Database
11g Release 1 (11.1), and is retained only for backward compatibility.
Authentication User Logins Using Network Authentication
Oracle Advanced Security performs network authentication, which you can configure
to use a third-party service such as Kerberos. If you are using Oracle Advanced
Security as your only external authentication service, then the
REMOTE_OS_AUTHENT
parameter setting is irrelevant, because Oracle Advanced Security allows only secure
connections.
Using Multitier Authentication and Authorization
In a multitier environment, Oracle Database controls the security of middle-tier
applications by limiting their privileges, preserving client identities through all tiers,
and auditing actions taken on behalf of clients. In applications that use a very busy
middle tier, such as a transaction processing monitor, the identity of the clients
connecting to the middle tier must be preserved. One advantage of using a middle tier
is connection pooling, which allows multiple users to access a data server without
each of them needing a separate connection. In such environments, you need to be
able to set up and break down connections very quickly.
For these environments, you can use the Oracle Call Interface to create lightweight
sessions, which enable database password authentication for each user. This method
preserves the identity of the real user through the middle tier without the overhead of
a separate database connection for each user.
You can create lightweight sessions with or without passwords. However, if a middle
tier is outside of or on a firewall, then security is better when each lightweight session
has its own password. For an internal application server, lightweight sessions without
passwords might be appropriate.
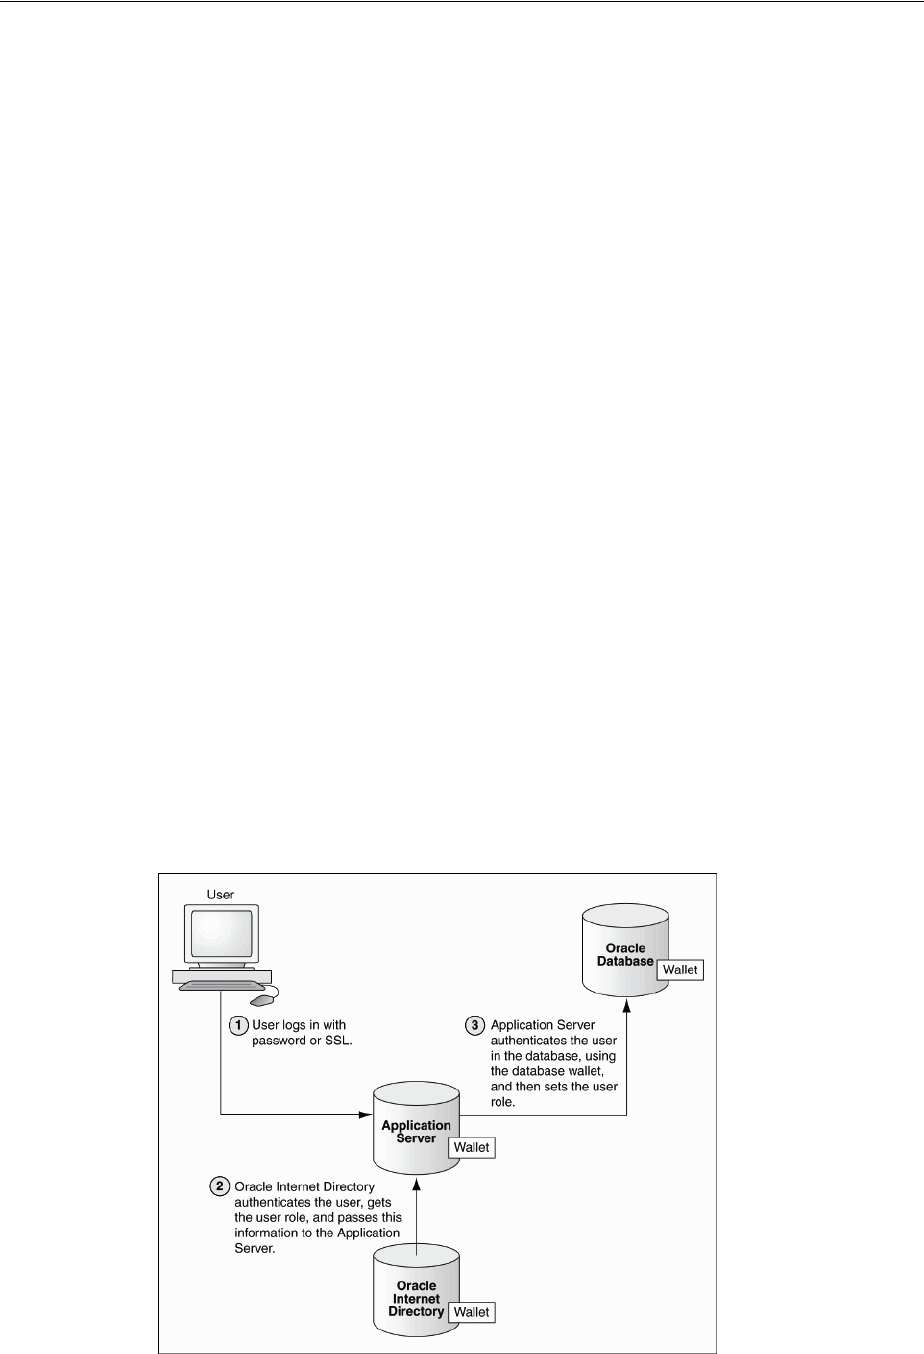
Using Multitier Authentication and Authorization
Configuring Authentication 3-35
Administration and Security in Clients, Application Servers, and Database Servers
In a multitier environment, an application server provides data for clients and serves
as an interface from them to one or more database servers. The application server can
validate the credentials of a client, such as a Web browser, and the database server can
audit operations performed by the application server. These auditable operations
include actions performed by the application server on behalf of clients, such as
requests that information be displayed on the client. A request to connect to the
database server is an example of an application server operation not related to a
specific client.
Authentication in a multitier environment is based on trust regions. Client
authentication is the domain of the application server. The application server itself is
authenticated by the database server. The following operations are performed:
■The end user provides proof of authenticity to the application server, typically, by
using a password or an X.509 certificate.
■The application server authenticates the end user and then authenticates itself to
the database server.
■The database server authenticates the application server, verifies that the end user
exists, and verifies that the application server has the privilege to connect for the
end user.
Application servers can also enable roles for an end user on whose behalf they
connect. The application server can obtain these roles from a directory, which serves as
an authorization repository. The application server can only request that these roles be
enabled. The database verifies the following requirements:
■That the client has these roles by checking its internal role repository
■That the application server has the privilege to connect on behalf of the user and
thus to use these roles as the user could
Figure 3–2 shows an example of multitier authentication.
Figure 3–2 Multitier Authentication

Preserving User Identity in Multitiered Environments
3-36 Oracle Database Security Guide
The following actions take place:
1. The user logs on using a password or Secure Sockets Layer. The authentication
information is passed through Oracle Application Server.
2. Oracle Internet Directory authenticates the user, gets the roles associated with that
user from the wallet, and then passes this information back to Oracle Application
Server.
3. Oracle Application Server checks the identity of the user in Oracle Database,
which contains a wallet that stores this information, and then sets the role for that
user.
Security for middle-tier applications must address the following key issues:
■Accountability. The database server must be able to distinguish between the
actions of the application and the actions an application takes on behalf of a client.
It must be possible to audit both kinds of actions.
■Least privilege. Users and middle tiers should be given the fewest privileges
necessary to perform their actions, to reduce the danger of inadvertent or
malicious unauthorized activities.
Preserving User Identity in Multitiered Environments
Many organizations want to know who the user is through all tiers of an application
without sacrificing the benefits of a middle tier. Oracle Database supports the
following ways to preserve user identity through the middle tier of an application:
■Using a Middle Tier Server for Proxy Authentication
■Using Client Identifiers to Identify Application Users Not Known to the Database
Using a Middle Tier Server for Proxy Authentication
The following sections explain how to use proxy authentication:
■About Proxy Authentication
■Advantages of Proxy Authentication
■Who Can Create Proxy User Accounts?
■Creating Proxy User Accounts and Authorizing Users to Connect Through Them
■Using Proxy Authentication with the Secure External Password Store
■Passing Through the Identity of the Real User by Using Proxy Authentication
■Limiting the Privilege of the Middle Tier
■Authorizing a Middle Tier to Proxy and Authenticate a User
■Authorizing a Middle Tier to Proxy a User Authenticated by Other Means
■Reauthenticating the User Through the Middle Tier to the Database
About Proxy Authentication
Oracle Database provides proxy authentication in Oracle Call Interface (OCI),
JDBC/OCI, or JDBC Thin Driver for database users or enterprise users. Enterprise
See Also: "Auditing SQL Statements and Privileges in a Multitier
Environment" on page 9-27

Preserving User Identity in Multitiered Environments
Configuring Authentication 3-37
users are those who are managed in Oracle Internet Directory and who access a shared
schema in the database.
You can design a middle-tier server to authenticate clients in a secure fashion by using
the following three forms of proxy authentication:
■The middle-tier server authenticates itself with the database server and a client, in
this case an application user or another application, authenticates itself with the
middle-tier server. Client identities can be maintained all the way through to the
database.
■The client, in this case a database user, is not authenticated by the middle-tier
server. The clients identity and database password are passed through the
middle-tier server to the database server for authentication.
■The client, in this case a global user, is authenticated by the middle-tier server, and
passes one of the following through the middle tier for retrieving the client's user
name.
–Distinguished name (DN)
–Certificate
In all cases, an administrator must authorize the middle-tier server to act on behalf of
the client.
Advantages of Proxy Authentication
In multitier environments, proxy authentication controls the security of middle-tier
applications by preserving client identities and privileges through all tiers and by
auditing actions taken on behalf of clients. For example, this feature allows the identity
of a user using a Web application (which acts as a proxy) to be passed through the
application to the database server.
Three-tier systems provide the following benefits to organizations:
■Organizations can separate application logic from data storage, partitioning the
former in application servers and the latter in databases.
■Application servers and Web servers enable users to access data stored in
databases.
■Users like using a familiar, easy-to-use browser interface.
■Organizations can also lower their cost of computing by replacing many thick
clients with numerous thin clients and an application server.
In addition, Oracle Database proxy authentication provides the following security
benefits:
■A limited trust model, by controlling the users on whose behalf middle tiers can
connect and the roles that the middle tiers can assume for the user
■Scalability, by supporting user sessions through OCI, JDBC/OCI, or JDBC Thin
driver and eliminating the overhead of reauthenticating clients
Note: The use of certificates for proxy authentication may not be
supported in future Oracle Database releases.
See Also: Oracle Call Interface Programmer's Guide and Oracle
Database Advanced Application Developer's Guide or details about
designing a middle-tier server to proxy users

Preserving User Identity in Multitiered Environments
3-38 Oracle Database Security Guide
■Accountability, by preserving the identity of the real user through to the database,
and enabling auditing of actions taken on behalf of the real user
■Flexibility, by supporting environments in which users are known to the database,
and in which users are merely application users of which the database has no
awareness
Who Can Create Proxy User Accounts?
To create proxy user accounts, users must have the following minimum privileges:
■The
CREATE USER
system privilege to create a database user account that will be
used as a proxy user account
■The
DV_ACCTMGR
role if Oracle Database Vault is enabled, to create the proxy user
account
■The ability to grant the
CREATE SESSION
system privilege to the proxy user account
■The
ALTER USER
system privilege to enable existing user accounts to connect to the
database through the proxy account
Follow these guidelines when you create proxy user accounts:
■For better security and to adhere to the principle of least privilege, only grant the
proxy user account the
CREATE SESSION
privilege. Do not grant this user any other
privileges. The proxy user account is designed to only enable another user to
connect using the proxy account. Any privileges that must be exercised during the
connection should belong to the connecting user, not to the proxy account.
■As with all passwords, ensure that the password you create for the proxy user is
strong and not easily guessed. Remember that multiple users will be connecting as
the proxy user, so it is especially important that this password be strong. See
"Guidelines for Securing Passwords" on page 10-7 for advice about creating strong
passwords.
■Consider using the Advanced Security option network connection features, to
prevent network eavesdropping.
■For further fine-tuning of the amount of control that the connecting user has,
consider restricting the roles used by the connecting user when he or she is
connected through the proxy account. The
ALTER USER
statement enables you to
configure the user to connect using specified roles, any role except a specified role,
or with no roles at all.
Creating Proxy User Accounts and Authorizing Users to Connect Through Them
The
CREATE USER
statement enables you to create the following types of user accounts,
all of which can be used as proxy accounts:
■Database user accounts, which are authenticated by passwords
■External user accounts, which are authenticated by external sources, such as
Secure Socket Layer (SSL) or Kerberos
■Global user accounts, which are authenticated by an enterprise directory service
(Oracle Internet Directory).
Note: Oracle Database supports this proxy authentication
functionality in three tiers only. It does not support it across
multiple middle tiers.

Preserving User Identity in Multitiered Environments
Configuring Authentication 3-39
To create a proxy user account and authorize users to connect through it:
1. Use the
CREATE USER
statement to create the proxy user account.
For example:
CREATE USER appuser IDENTIFIED BY password;
2. Use the
GRANT CONNECT THROUGH
clause of the
ALTER USER
statement to enable an
existing user to connect through the proxy user account.
For example:
ALTER USER preston GRANT CONNECT THROUGH appuser;
Suppose user
preston
has a large number of roles, but you only want her to use
one role (for example, the
appuser_role
) when she is connected to the database
through the
appuser
proxy account. You can use the following
ALTER USER
statement:
ALTER USER preston GRANT CONNECT THROUGH appuser WITH ROLE appuser_role;
Any other roles that user
preston
will not be available to her as long as she is
connecting as the
appuser
proxy.
After you complete these steps, user
preston
can connect using the
appuser
proxy
user as follows:
CONNECT appuser[preston]
Enter password: appuser_password
Note the following:
■The proxy user can only perform activities that user preston has privileges to
perform. Remember that the proxy user itself,
appuser
, only has the minimum
privileges (
CREATE SESSION
).
■Using roles with middle-tier clients. You can also specify roles that the middle
tier is permitted to activate when connecting as the client. Operations performed
on behalf of a client by a middle-tier server can be audited.
■Finding proxy users. To find the users who are currently authorized to connect
through a middle tier, query the
PROXY_USERS
data dictionary view, for example:
SELECT * FROM PROXY_USERS;
■Removing proxy connections. Use the
REVOKE CONNECT THROUGH
clause of
ALTER
USER
to disallow a proxy connection. For example, to revoke user
preston
from
connecting through the proxy user
appuser
, enter the following statement:
ALTER USER preston REVOKE CONNECT THROUGH appuser
■Password expiration and proxy connections. Middle-tier use of password
expiration does not apply to accounts that are authenticated through a proxy.
Instead, lock the account rather than expire the password.

Preserving User Identity in Multitiered Environments
3-40 Oracle Database Security Guide
Using Proxy Authentication with the Secure External Password Store
If you are concerned about the password used in proxy authentication being obtained
by a malicious user, then you can use the secure external password store with the
proxy authentication to store the password credentials in a wallet. Connecting to
Oracle Database using proxy authentication and the secure external password store is
ideal for situations such as running batch files. When a proxy user connects to the
database and authenticates using a secure external password, the password is not
exposed in the event that a malicious user tries to obtain the password.
To use proxy authentication with the secure external password store:
1. Configure the proxy authentication account, as shown in the procedure under
"Creating Proxy User Accounts and Authorizing Users to Connect Through Them"
on page 3-38.
2. Configure the secure external password store. See "Configuring Clients to Use the
External Password Store" on page 3-18 for more information.
Afterward, the user can connect using the proxy but without having to specify a
password. For example:
sqlplus [preston]/@db_alias
When you use the secure external password store, the user logging in does not need to
supply the user name and password. Only the
SERVICE_NAME
value (that is,
db_alias
)
from the
tnsnames.ora
file must be specified.
Passing Through the Identity of the Real User by Using Proxy Authentication
For enterprise users or database users, Oracle Call Interface, JDBC/OCI, or Thin driver
enables a middle tier to set up several user sessions within a single database
connection, each of which uniquely identifies a connected user (connection pooling).
These sessions reduce the network overhead of creating separate network connections
from the middle tier to the database.
If you want to authenticate from clients through a middle tier to the database, the full
authentication sequence from the client to the middle tier to the database occurs as
follows:
1. The client authenticates to the middle tier, using whatever form of authentication
the middle tier will accept. For example, the client could authenticate to the
See Also:
■Oracle Database SQL Language Reference for detailed information
about the
CREATE USER
statement
■Oracle Database SQL Language Reference for detailed information
about the
ALTER USER
statement
■Oracle Database Enterprise User Security Administrator's Guide for
information about managing proxy users in an enterprise user
environment
■Oracle Database Advanced Security Administrator's Guide for more
information about using network encryption and strong
authentication
■"Auditing SQL Statements and Privileges in a Multitier
Environment" on page 9-27 for details about auditing
operations done on behalf of a user by a middle tier

Preserving User Identity in Multitiered Environments
Configuring Authentication 3-41
middle tier by using a user name and password or an X.509 certificate by means of
SSL.
2. The middle tier authenticates itself to the database by using whatever form of
authentication the database accepts. This could be a password or an authentication
mechanism supported by Oracle Advanced Security, such as a Kerberos ticket or
an X.509 certificate (SSL).
3. The middle tier then creates one or more sessions for users using OCI, JDBC/OCI,
or Thin driver.
■If the user is a database user, then the session must, as a minimum, include the
database user name. If the database requires it, then the session can include a
password (which the database verifies against the password store in the
database). The session can also include a list of database roles for the user.
■If the user is an enterprise user, then the session may provide different
information depending on how the user is authenticated.
Example 1: If the user authenticates to the middle tier using SSL, then the
middle tier can provide the DN from the X.509 certificate of the user, or the
certificate itself in the session. The database uses the DN to look up the user in
Oracle Internet Directory.
Example 2: If the user is a password-authenticated enterprise user, then the
middle tier must provide, as a minimum, a globally unique name for the user.
The database uses this name to look up the user in Oracle Internet Directory. If
the session also provides a password for the user, then the database will verify
the password against Oracle Internet Directory. User roles are automatically
retrieved from Oracle Internet Directory after the session is established.
■The middle tier may optionally provide a list of database roles for the client.
These roles are enabled if the proxy is authorized to use the roles on behalf of
the client.
4. The database verifies that the middle tier has the privilege to create sessions on
behalf of the user.
The
OCISessionBegin
call fails if the application server cannot perform a proxy
authentication on behalf of the client by the administrator, or if the application
server is not allowed to activate the specified roles.
Limiting the Privilege of the Middle Tier
Least privilege is the principle that users should have the fewest privileges necessary
to perform their duties and no more. As applied to middle tier applications, this means
that the middle tier should not have more privileges than it needs. Oracle Database
enables you to limit the middle tier such that it can connect only on behalf of certain
database users, using only specific database roles. You can limit the privilege of the
middle tier to connect on behalf of an enterprise user, stored in an LDAP directory, by
granting to the middle tier the privilege to connect as the mapped database user. For
instance, if the enterprise user is mapped to the
APPUSER
schema, then you must at
least grant to the middle tier the ability to connect on behalf of
APPUSER
. Otherwise,
attempts to create a session for the enterprise user will fail.
However, you cannot limit the ability of the middle tier to connect on behalf of
enterprise users. For example, suppose that user Sarah wants to connect to the
database through a middle tier,
appsrv
(which is also a database user). Sarah has
multiple roles, but it is desirable to restrict the middle tier to use only the
clerk
role on
her behalf.

Preserving User Identity in Multitiered Environments
3-42 Oracle Database Security Guide
An administrator could effectively grant permission for
appsrv
to initiate connections
on behalf of Sarah using her
clerk
role only, using the following syntax:
ALTER USER sarah GRANT CONNECT THROUGH appsrv WITH ROLE clerk;
By default, the middle tier cannot create connections for any client. The permission
must be granted for each user.
To allow
appsrv
to use all of the roles granted to the client Sarah, the following
statement would be used:
ALTER USER sarah GRANT CONNECT THROUGH appsrv;
Each time a middle tier initiates an OCI, JDBC/OCI, or Thin driver session for another
database user, the database verifies that the middle tier is authorized to connect for
that user by using the role specified.
Authorizing a Middle Tier to Proxy and Authenticate a User
The following statement authorizes the middle-tier server
appserve
to connect as user
bill
. It uses the
WITH ROLE
clause to specify that
appserve
activate all roles associated
with
bill
, except
payroll
.
ALTER USER bill
GRANT CONNECT THROUGH appserve
WITH ROLE ALL EXCEPT payroll;
To revoke the middle-tier server (
appserve
) authorization to connect as user
bill
, the
following statement is used:
ALTER USER bill REVOKE CONNECT THROUGH appserve;
Authorizing a Middle Tier to Proxy a User Authenticated by Other Means
Use the
AUTHENTICATION REQURED
clause of the
ALTER USER ... GRANT CONNECT
THROUGH
statement to authorize a user to be proxied, but not authenticated, by a
middle tier. Currently,
PASSWORD
is the only means supported.
The following statement illustrates this form of authentication:
ALTER USER mary
GRANT CONNECT THROUGH midtier
AUTHENTICATION REQUIRED;
Note: Instead of using default roles, create your own roles and
assign only necessary privileges to them. Creating your own roles
enables you to control the privileges granted by them and protects
you if Oracle Database changes or removes default roles. For
example, the
CONNECT
role now has only the
CREATE SESSION
privilege, the one most directly needed when connecting to a
database.
However,
CONNECT
formerly provided several additional privileges,
often not needed or appropriate for most users. Extra privileges can
endanger the security of your database and applications. These
have now been removed from
CONNECT
.
See Chapter 4, "Configuring Privilege and Role Authorization" for
more information about roles.

Preserving User Identity in Multitiered Environments
Configuring Authentication 3-43
In the preceding statement, middle-tier server
midtier
is authorized to connect as user
mary
, and
midtier
must also pass the user password to the database server for
authorization.
Reauthenticating the User Through the Middle Tier to the Database
Administrators can specify that authentication is required by using the
AUTHENTICATION REQUIRED
proxy clause with the
ALTER USER
SQL statement. In this
case, the middle tier must provide user authentication credentials.
For example, suppose that user Sarah wants to connect to the database through a
middle tier,
appsrv
. An administrator could require that
appsrv
provides
authentication credentials for Sarah by using the following syntax:
ALTER USER sarah GRANT CONNECT THROUGH appsrv AUTHENTICATION REQUIRED;
The
AUTHENTICATION REQUIRED
clause ensures that authentication credentials for the
user must be presented when the user is authenticated through the specified proxy.
Using Password-Based Proxy Authentication When you use password-based proxy
authentication, Oracle Database passes the password of the client to the middle-tier
server. The middle-tier server then passes the password as an attribute to the data
server for verification. The main advantage to this is that the client computer does not
have to have Oracle software installed on it to perform database operations.
To pass the password of the client, the middle-tier server calls the
OCIAttrSet()
function as follows, passing
OCI_ATTR_PASSWORD
as the type of the attribute being set.
OCIAttrSet(
session_handle, /* Pointer to a handle whose attribute gets modified. */
OCI_HTYPE_SESSION, /* Handle type: OCI user session handle. */
password_ptr, /* Pointer to the value of the password attribute. */
0, /* The size of the password attribute value is already
known by the OCI library. */
OCI_ATTR_PASSWORD, /* The attribute type. */
error_handle); /* An error handle used to retrieve diagnostic
information in the event of an error. */
Using Proxy Authentication with Enterprise Users If the middle tier connects to the database
as a client who is an enterprise user, then either the distinguished name, or the X.509
certificate containing the distinguished name is passed over instead of the database
user name. If the user is a password-authenticated enterprise user, then the middle tier
must provide, as a minimum, a globally unique name for the user. The database uses
this name to look up the user in Oracle Internet Directory.
To pass over the distinguished name of the client, the application server would call the
Oracle Call Interface method
OCIAttrSet()
with
OCI_ATTR_DISTINGUISHED_NAME
as
the attribute type, as follows:
OCIAttrSet(session_handle,
OCI_HTYPE_SESSION,
distinguished_name,
0,
OCI_ATTR_DISTINGUISHED_NAME,
error_handle);
Note: For backward compatibility, if you use the
AUTHENTICATED
USING PASSWORD
proxy clause, then Oracle Database transforms it
to
AUTHENTICATION REQUIRED
.

Preserving User Identity in Multitiered Environments
3-44 Oracle Database Security Guide
To pass over the entire certificate, the middle tier would call
OCIAttrSet()
with
OCI_
ATTR_CERTIFICATE
as the attribute type, as follows.
OCIAttrSet(session_handle,
OCI_HTYPE_SESSION,
certificate,
certificate_length,
OCI_ATTR_CERTIFICATE,
error_handle);
If the type is not specified, then the database uses its default certificate type of X.509.
If you are using proxy authentication for password-authenticated enterprise users,
then use the same OCI attributes as for database users authenticated by password
(
OCI_ATTR_USERNAME
). Oracle Database first checks the user name against the database.
If it finds no user, then the database checks the user name in the directory. This user
name must be globally unique.
Using Client Identifiers to Identify Application Users Not Known to the Database
The following sections explain how to use client identifiers:
■About Client Identifiers
■How Client Identifiers Work in Middle Tier Systems
■Using the CLIENT_IDENTIFIER Attribute to Preserve User Identity
■Using CLIENT_IDENTIFIER Independent of Global Application Context
■Using the DBMS_SESSION PL/SQL Package to Set and Clear the Client Identifier
About Client Identifiers
Oracle Database provides the
CLIENT_IDENTIFIER
attribute of the built-in
USERENV
application context namespace for application users. These users are known to an
application but unknown to the database. The
CLIENT_IDENTIFIER
attribute can
capture any value that the application uses for identification or access control, and
passes it to the database. The
CLIENT_IDENTIFIER
attribute is supported in OCI,
JDBC/OCI, or Thin driver.
How Client Identifiers Work in Middle Tier Systems
Many applications use session pooling to set up several sessions to be reused by
multiple application users. Users authenticate themselves to a middle-tier application,
which uses a single identity to log in to the database and maintains all the user
connections. In this model, application users are users who are authenticated to the
middle tier of an application, but who are not known to the database. You can use a
Note:
■
OCI_ATTR_CERTIFICATE
is Distinguished Encoding Rules (DER)
encoded.
■Certificate based proxy authentication using
OCI_ATTR_
CERTIFICATE
will not be supported in future Oracle Database
releases. Use the
OCI_ATTR_DISTINGUISHED_NAME
or
OCI_ATTR_
USERNAME
attribute instead

Preserving User Identity in Multitiered Environments
Configuring Authentication 3-45
CLIENT_IDENTIFIER
attribute, which acts like an application user proxy for these types
of applications.
In this model, the middle tier passes a client identifier to the database upon the session
establishment. The client identifier could actually be anything that represents a client
connecting to the middle tier, for example, a cookie or an IP address. The client
identifier, representing the application user, is available in user session information
and can also be accessed with an application context (by using the
USERENV
naming
context). In this way, applications can set up and reuse sessions, while still being able
to keep track of the application user in the session. Applications can reset the client
identifier and thus reuse the session for a different user, enabling high performance.
Using the CLIENT_IDENTIFIER Attribute to Preserve User Identity
You can use the
CLIENT_IDENTIFIER
predefined attribute of the built-in application
context namespace,
USERENV
, to capture the application user name for use with global
application context. You also can use the
CLIENT_IDENTIFIER
attribute independently.
When you use the
CLIENT_IDENTIFIER
attribute independently from a global
application context, you can set
CLIENT_IDENTIFIER
with the
DBMS_SESSION
interface.
The ability to pass a
CLIENT_IDENTIFIER
to the database is supported in Oracle Call
Interface (OCI), JDBC/OCI, or Thin driver.
When you use the
CLIENT_IDENTIFIER
attribute with global application context, it
provides flexibility and high performance for building applications. For example,
suppose a Web-based application that provides information to business partners has
three types of users: gold partner, silver partner, and bronze partner, representing
different levels of information available. Instead of each user having his or her own
session set up with individual application contexts, the application could set up global
application contexts for gold partners, silver partners, and bronze partners. Then, use
the
CLIENT_IDENTIFIER
to point the session at the correct context to retrieve the
appropriate type of data. The application need only initialize the three global contexts
once and use the
CLIENT_IDENTIFIER
to access the correct application context to limit
data access. This provides performance benefits through session reuse and through
accessing global application contexts set up once, instead of having to initialize
application contexts for each session individually.
Using CLIENT_IDENTIFIER Independent of Global Application Context
Using the
CLIENT_IDENTIFIER
attribute is especially useful for those applications in
which the users are unknown to the database. In these situations, the application
typically connects as a single database user and all actions are taken as that user.
Because all user sessions are created as the same user, this security model makes it
difficult to achieve data separation for each user. These applications can use the
CLIENT_IDENTIFIER
attribute to preserve the real application user identity through to
the database.
With this approach, sessions can be reused by multiple users by changing the value of
the
CLIENT_IDENTIFIER
attribute, which captures the name of the real application user.
This avoids the overhead of setting up a separate session and separate attributes for
each user, and enables reuse of sessions by the application. When the
CLIENT_
See Also:
■"Using Global Application Contexts" on page 6-22 for how to
implement global application contexts
■"Tutorial: Creating a Global Application Context That Uses a
Client Session ID" on page 6-35

Preserving User Identity in Multitiered Environments
3-46 Oracle Database Security Guide
IDENTIFIER
attribute value changes, the change is added to the next OCI, JDBC/OCI,
or Thin driver call for additional performance benefits.
For example, the user Daniel connects to a Web Expense application. Daniel is not a
database user; he is a typical Web Expense application user. The application accesses
the built-in application context namespace and sets
DANIEL
as the
CLIENT_IDENTIFIER
attribute value. Daniel completes his Web Expense form and exits the application.
Then, Ajit connects to the Web Expense application. Instead of setting up a new
session for Ajit, the application reuses the session that currently exists for Daniel, by
changing the
CLIENT_IDENTIFIER
to
AJIT
. This avoids the overhead of setting up a
new connection to the database and the overhead of setting up a global application
context. The
CLIENT_IDENTIFIER
attribute can be set to any value on which the
application bases access control. It does not have to be the application user name.
To set the
CLIENT_IDENTIFIER
attribute with OCI, use the
OCI_ATTR_CLIENT_
IDENTIFIER
attribute in the call to
OCIAttrSet()
. Then, on the next request to the
server, the information is propagated and stored in the server sessions. For example:
OCIAttrSet (session,
OCI_HTYPE_SESSION,
(dvoid *) "appuser1",
(ub4)strlen("appuser1"),
OCI_ATTR_CLIENT_IDENTIFIER,
*error_handle);
For applications that use JDBC, be aware that JDBC does not set the client identifier. To
set the client identifier in a connection pooling environment, use Dynamic Monitoring
Service (DMS) metrics. If DMS is not available, then use the
connection.setClientInfo
method. For example:
connection.setClientInfo("E2E_CONTEXT.CLIENT_IDENTIFIER", "appuser");
Using the DBMS_SESSION PL/SQL Package to Set and Clear the Client Identifier
To use the
DBMS_SESSION
package to set and clear the
CLIENT_IDENTIFIER
value on the
middle tier, use the following interfaces:
■
SET_IDENTIFIER
■
CLEAR_IDENTIFIER
The middle tier uses
SET_IDENTIFIER
to associate the database session with a
particular user or group. Then, the
CLIENT_IDENTIFIER
is an attribute of the session
and can be viewed in session information.
If you plan to use the
DBMS_SESSION.SET_IDENTIFIER
procedure, be aware that the
DBMS_APPLICATION_INFO.SET_CLIENT_INFO
procedure can overwrite the value of the
client identifier. Typically, these values should be the same, so if
SET_CLIENT_INFO
is
set, its value can be automatically propagated to the value set by
SET_IDENTIFIER
if
the
CLIENTID_OVERWRITE
event is set to
ON
.
See Also:
■Oracle Call Interface Programmer's Guide about how the
OCI_
ATTR_CLIENT_IDENTIFIER
user session handle attribute is used
in middle-tier applications
■Oracle Database JDBC Developer's Guide for more information
about configuring client connections using JDBC

Finding Information About User Authentication
Configuring Authentication 3-47
To check the status of the
CLIENTID_OVERWRITE
event, log in to SQL*Plus and then
enter the
SHOW PARAMETER
command. For example, assuming that
CLIENTID_OVERWRITE
is enabled:
SHOW PARAMETER EVENT
NAME TYPE VALUE
------------------------------ ------------------ ------------------
event string clientid_overwrite
To enable the
CLIENTID_OVERWRITE
event system-wide, connect to SQL*Plus as
SYS
using the
SYSDBA
privilege, and then enter the following
ALTER SYSTEM
statement:
ALTER SYSTEM SET EVENTS 'CLIENTID_OVERWRITE';
Or, enter the following line in your
init.ora
file:
event="clientid_overwrite"
Then restart the database. To disable the
CLIENTID_OVERWRITE
event, log in to
SQL*Plus as
SYS
with the
SYSDBA
privilege, and then run the following
ALTER SYSTEM
statement:
ALTER SYSTEM SET EVENTS 'CLIENTID_OVERWRITE OFF';
If you prefer to change the
CLIENTID_OVERWRITE
value for the session only, then use
the
ALTER SESSION
statement.
Afterwards, if you set the client identifier using the
DBMS_APPLICATION_INFO.SET_
CLIENT_INFO
procedure, you must then run
DBMS_SESSION.SET_IDENTIFIER
so that the
client identifier settings are the same.
Finding Information About User Authentication
Table 3–3 lists data dictionary views that contain information about user
authentication. For detailed information about these views, see Oracle Database
Reference.
See Also:
■"Using Global Application Contexts" on page 6-22 for information
about using client identifiers in a global application context
■Oracle Database PL/SQL Packages and Types Reference for more
information about the
DBMS_SESSION
package
Table 3–3 Data Dictionary Views That Describe User Authentication
View Description
DBA_PROFILES
Displays information about profiles, including their settings and
limits.
DBA_ROLES
Displays the kind of authentication used for a database role to
log in to the database, such as
NONE
or
GLOBAL
(query the
AUTHENTICATION_TYPE
column)

Finding Information About User Authentication
3-48 Oracle Database Security Guide
DBA_USERS
Among other user information, displays the following:
■The kind of authentication the user used to log in to the
database, such as
PASSWORD
or
EXTERNAL
(
AUTHENTICATION_
TYPE
column)
■The release in which the user created his or her password
(
PASSWORD_VERSIONS
column)
DBA_USERS_WITH_DEFPWD
Displays whether the user account password is a default
password
PROXY_USERS
Displays users who are currently authorized to connect through
a middle tier
V$DBLINK
Displays user accounts for existing database links (
DB_LINK
,
OWNER_ID
columns)
V$SESSION
Querying the
USERNAME
column displays the concurrently logged
in users
Table 3–3 (Cont.) Data Dictionary Views That Describe User Authentication
View Description

4
Configuring Privilege and Role Authorization 4-1
4
Configuring Privilege and Role Authorization
This chapter contains:
■About Privileges and Roles
■Who Should Be Granted Privileges?
■Granting the SYSDBA and SYSOPER Administrative Privileges to Users
■Managing System Privileges
■Managing User Roles
■Managing Object Privileges
■Granting a User Privileges and Roles
■Revoking Privileges and Roles from a User
■Granting to and Revoking from the PUBLIC Role
■Granting Roles Using the Operating System or Network
■When Do Grants and Revokes Take Effect?
■Managing Fine-Grained Access in PL/SQL Packages and Types
■Finding Information About User Privileges and Roles
About Privileges and Roles
Authorization includes primarily two processes:
■Permitting only certain users to access, process, or alter data.
■Applying varying limitations on user access or actions. The limitations placed on
(or removed from) users can apply to objects such as schemas, tables, or rows or to
resources such as time (CPU, connect, or idle times).
A user privilege is the right to run a particular type of SQL statement, or the right to
access an object that belongs to another user, run a PL/SQL package, and so on. The
types of privileges are defined by Oracle Database.
Roles are created by users (usually administrators) to group together privileges or
other roles. They are a way to facilitate the granting of multiple privileges or roles to
users.
This section describes the following general categories:
■System privileges. These privileges allow the grantee to perform standard
administrator tasks in the database. Restrict them only to trusted users. "Managing
System Privileges" on page 4-2 describes system privileges in detail.

Who Should Be Granted Privileges?
4-2 Oracle Database Security Guide
■User roles. A role groups several privileges and roles, so that they can be granted
to and revoked from users simultaneously. You must enable the role for a user
before the user can use it. See "Managing User Roles" on page 4-6 for more
information.
■Object privileges. Each type of object has privileges associated with it. "Managing
Object Privileges" on page 4-23 describes how to manage privileges for different
types of objects.
Who Should Be Granted Privileges?
You grant privileges to users so they can accomplish tasks required for their jobs. You
should grant a privilege only to a user who requires that privilege to accomplish the
necessary work. Excessive granting of unnecessary privileges can compromise
security. For example, you never should grant
SYSDBA
or
SYSOPER
administrative
privilege to users who do not perform administrative tasks.
A user can receive a privilege in two ways:
■You can grant privileges to users explicitly. For example, you can explicitly grant
to user
psmith
the privilege to insert records into the
employees
table.
■You can grant privileges to a role (a named group of privileges), and then grant
the role to one or more users. For example, you can grant the privileges to select,
insert, update, and delete records from the
employees
table to the role named
clerk
, which in turn you can grant to users
psmith
and
robert
.
Because roles allow for easier and better management of privileges, you should
usually grant privileges to roles and not to specific users.
Granting the SYSDBA and SYSOPER Administrative Privileges to Users
As with all powerful privileges, only grant the
SYSDBA
and
SYSOPER
administrative
privileges to trusted users. However, be aware that there is a restriction for users
whose names have non-ASCII characters (for example, the umlaut in the name
HÜBER
).
You can grant administrative privileges to these users, but if the Oracle database
instance is down, the authentication using the granted privilege is not supported if the
user name has non-ASCII characters. If the database instance is up, then the
authentication is supported.
Managing System Privileges
This section contains:
■About System Privileges
■Why Is It Important to Restrict System Privileges?
■Granting and Revoking System Privileges
■Who Can Grant or Revoke System Privileges?
■About ANY Privileges and the PUBLIC Role
See Also:
■"Guidelines for Securing User Accounts and Privileges" on
page 10-2 for best practices to follow when granting privileges
■Oracle Database SQL Language Reference for the complete list of
system privileges and their descriptions

Managing System Privileges
Configuring Privilege and Role Authorization 4-3
About System Privileges
A system privilege is the right to perform a particular action or to perform an action
on any schema objects of a particular type. For example, the privileges to create
tablespaces and to delete the rows of any table in a database are system privileges.
There are over 100 distinct system privileges. Each system privilege allows a user to
perform a particular database operation or class of database operations. Remember that
system privileges are very powerful. Only grant them when necessary to roles and trusted
users of the database. You can find a complete list of system privileges and their
descriptions in Oracle Database SQL Language Reference. To find the system privileges
that have been granted to a user, you can query the
DBA_SYS_PRIVS
data dictionary
view.
Why Is It Important to Restrict System Privileges?
Because system privileges are so powerful, by default the database is configured to
prevent typical (non-administrative) users from exercising the
ANY
system privileges
(such as
UPDATE ANY TABLE
) on the data dictionary. See "Guidelines for Securing User
Accounts and Privileges" on page 10-2 for additional guidelines about restricting
system privileges.
■Restricting System Privileges by Securing the Data Dictionary
■Allowing Access to Objects in the SYS Schema
Restricting System Privileges by Securing the Data Dictionary
To secure the data dictionary, set the
O7_DICTIONARY_ACCESSIBILITY
initialization
parameter to
FALSE
, which is the default value. This feature is called the dictionary
protection mechanism.
The
O7_DICTIONARY_ACCESSIBILITY
initialization parameter controls restrictions on
system privileges when you upgrade from Oracle Database release 7 to Oracle8i and
later releases. If the parameter is set to
TRUE
, then access to objects in the
SYS
schema is
allowed (Oracle Database release 7 behavior). Because the
ANY
privilege applies to the
data dictionary, a malicious user with
ANY
privilege could access or alter data
dictionary tables.
To set the
O7_DICTIONARY_ACCESSIBILTY
initialization parameter, modify it in the
initSID.ora
file. Alternatively, you can log on to SQL*Plus as user
SYS
with the
SYSDBA
privilege and then enter an
ALTER SYSTEM
statement, assuming you have
started the database using a server parameter file (SPFILE).
Example 4–1 shows how to set the
O7_DICTIONARY_ACCESSIBILTY
initialization
parameter to
FALSE
by issuing an
ALTER SYSTEM
statement in SQL*Plus.
Example 4–1 Setting O7_DICTIONARY_ACCESSIBILITY to FALSE
ALTER SYSTEM SET O7_DICTIONARY_ACCESSIBILITY=FALSE SCOPE=SPFILE;
When you set
O7_DICTIONARY_ACCESSIBILITY
to
FALSE
, system privileges that enable
access to objects in any schema (for example, users who have
ANY
privileges, such as
CREATE ANY PROCEDURE
) do not allow access to objects in the
SYS
schema. This means
that access to the objects in the
SYS
schema (data dictionary objects) is restricted to
users who connect using the
SYSDBA
privilege. Remember that the
SYS
user must log in
with either the
SYSDBA
or
SYSOPER
privilege; otherwise, an
ORA-28009: connection as
SYS should be as SYSDBA or SYSOPER
error is raised. If you set
O7_DICTIONARY_
ACCESSIBILITY
to
TRUE
, then you would be able to log in to the database as user
SYS
without having to specify the
SYSDBA
or
SYSOPER
privilege.

Managing System Privileges
4-4 Oracle Database Security Guide
System privileges that provide access to objects in other schemas do not give other
users access to objects in the
SYS
schema. For example, the
SELECT ANY TABLE
privilege
allows users to access views and tables in other schemas, but does not enable them to
select dictionary objects (base tables of dynamic performance views, regular views,
packages, and synonyms). You can, however, grant these users explicit object
privileges to access objects in the
SYS
schema.
See Oracle Database Reference for more information about the
O7_DICTIONARY_
ACCESSIBILITY
initialization parameter.
Allowing Access to Objects in the SYS Schema
Users with explicit object privileges or those who connect with administrative
privileges (
SYSDBA
) can access objects in the
SYS
schema.
Table 4–1 lists roles that you can grant to users who need access to objects in the
SYS
schema.
Additionally, you can grant the
SELECT ANY DICTIONARY
system privilege to users who
require access to tables created in the
SYS
schema. This system privilege allows query
access to any object in the
SYS
schema, including tables created in that schema. It must
be granted individually to each user requiring the privilege. It is not included in
GRANT
ALL PRIVILEGES
, but it can be granted through a role.
Granting and Revoking System Privileges
You can grant or revoke system privileges to users and roles. If you grant system
privileges to roles, then you can use the roles to exercise system privileges. For
example, roles permit privileges to be made selectively available. Ensure that you
follow the separation of duty guidelines described in "Guidelines for Securing Roles"
on page 10-6.
Use either of the following methods to grant or revoke system privileges to or from
users and roles:
■
GRANT
and
REVOKE
SQL statements
■Oracle Enterprise Manager Database Control
Table 4–1 Roles to Allow Access to SYS Schema Objects
Role Description
SELECT_CATALOG_ROLE
Grant this role to allow users
SELECT
privileges on data
dictionary views.
EXECUTE_CATALOG_ROLE
Grant this role to allow users
EXECUTE
privileges for packages
and procedures in the data dictionary.
DELETE_CATALOG_ROLE
Grant this role to allow users to delete records from the system
audit tables
SYS.AUD$
and
SYS.FGA_LOG$
.
Caution: You should grant these roles and the
SELECT ANY
DICTIONARY
system privilege with extreme care, because the
integrity of your system can be compromised by their misuse.

Managing System Privileges
Configuring Privilege and Role Authorization 4-5
Who Can Grant or Revoke System Privileges?
Only two types of users can grant system privileges to other users or revoke those
privileges from them:
■Users who were granted a specific system privilege with the
ADMIN
OPTION
■Users with the system privilege
GRANT
ANY
PRIVILEGE
For this reason, only grant these privileges to trusted users.
About ANY Privileges and the PUBLIC Role
System privileges that use the
ANY
keyword enable you to set privileges for an entire
category of objects in the database. For example, the
CREATE ANY PROCEDURE
system
privilege permits a user to create a procedure anywhere in the database. The behavior
of an object created by users with the
ANY
privilege is not restricted to the schema in
which it was created. For example, if user
JSMITH
has the
CREATE ANY PROCEDURE
privilege and creates a procedure in the schema
JONES
, then the procedure will run as
JONES
. However,
JONES
may not be aware that the procedure
JSMITH
created is running
as him (
JONES
). If
JONES
has
DBA
privileges, letting
JSMITH
run a procedure as
JONES
could pose a security violation.
The
PUBLIC
role is a special role that every database user account automatically has
when the account is created. By default, it has no privileges granted to it, but it does
have numerous grants, mostly to Java objects. You cannot drop the
PUBLIC
role, and a
manual grant or revoke of this role has no meaning, because the user account will
always assume this role. Because all database user accounts assume the
PUBLIC
role, it
does not appear in the
DBA_ROLES
and
SESSION_ROLES
data dictionary views.
You can grant privileges to the
PUBLIC
role, but remember that this makes the
privileges available to every user in the Oracle database. For this reason, be careful
about granting privileges to the
PUBLIC
role, particularly powerful privileges such as
the
ANY
privileges and system privileges. For example, if
JSMITH
has the
CREATE
PUBLIC SYNONYM
system privilege, he could redefine an interface that he knows
everyone else uses, and then point to it with the
PUBLIC SYNONYM
that he created.
Instead of accessing the correct interface, users would access the interface of
JSMITH
,
which could possibly perform illegal activities such as stealing the login credentials of
users.
These types of privileges are very powerful and could pose a security risk if given to
the wrong person. Be careful about granting privileges using
ANY
or
PUBLIC
. As with
all privileges, you should follow the principles of "least privilege" when granting these
privileges to users.
To protect the data dictionary (the contents of the
SYS
schema) against users who have
one or more of the powerful
ANY
system privileges, set the
O7_DICTIONARY_
See Also:
■"Granting a User Privileges and Roles" on page 4-37
■"Revoking Privileges and Roles from a User" on page 4-41
■"When Do Grants and Revokes Take Effect?" on page 4-48
■"Finding Information About User Privileges and Roles" on
page 4-71
■Oracle Database 2 Day DBA for more information about
Database Control

Managing User Roles
4-6 Oracle Database Security Guide
ACCESSIBILITY
initialization parameter to
FALSE
. You can set this parameter by using
an
ALTER SYSTEM
statement (see Example 4–1, "Setting O7_DICTIONARY_
ACCESSIBILITY to FALSE" on page 4-3) or by modifying the
initSID.ora
file. See
"Guidelines for Securing a Database Installation and Configuration" on page 10-12 for
additional guidelines.
Managing User Roles
This section contains:
■About User Roles
■Predefined Roles in an Oracle Database Installation
■Creating a Role
■Specifying the Type of Role Authorization
■Dropping Roles
■Restricting SQL*Plus Users from Using Database Roles
■Securing Role Privileges by Using Secure Application Roles
About User Roles
Managing and controlling privileges is easier when you use roles, which are named
groups of related privileges that you grant as a group to users or other roles. Within a
database, each role name must be unique, different from all user names and all other
role names. Unlike schema objects, roles are not contained in any schema. Therefore, a
user who creates a role can be dropped with no effect on the role.
This section contains:
■The Functionality of Roles
■Properties of Roles and Why They Are Advantageous
■Common Uses of Roles
■How Roles Affect the Scope of a User’s Privileges
■How Roles Work in PL/SQL Blocks
■How Roles Aid or Restrict DDL Usage
■How Operating Systems Can Aid Roles
■How Roles Work in a Distributed Environment
The Functionality of Roles
Roles are useful for quickly and easily granting permissions to users. Although you
can use Oracle Database-defined roles, you have more control and continuity if you
create your own roles that contain only the privileges pertaining to your requirements.
Oracle may change or remove the privileges in an Oracle Database-defined role, as it
has with the
CONNECT
role, which now has only the
CREATE SESSION
privilege.
Formerly, the
CONNECT
role had eight other privileges.
Roles have the following functionality:
■A role can be granted system or object privileges.
■Any role can be granted to any database user.

Managing User Roles
Configuring Privilege and Role Authorization 4-7
■Each role granted to a user is, at a given time, either enabled or disabled. A user’s
security domain includes the privileges of all roles currently enabled for the user
and excludes the privileges of any roles currently disabled for the user. Oracle
Database allows database applications and users to enable and disable roles to
provide selective availability of privileges.
■A role can be granted to other roles. However, a role cannot be granted to itself
and cannot be granted circularly. For example, role
role1
cannot be granted to role
role2
if role
role2
has previously been granted to role
role1
.
■If a role is not password authenticated or a secure application role, then you can
grant the role indirectly to the user. An indirectly granted role is a role granted to
the user through another role that has already been granted to this user. For
example, suppose you grant user
psmith
the
role1
role. Then you grant the
role2
and
role3
roles to the
role1
role. Roles
role2
and
role3
are now under
role1
.
This means
psmith
has been indirectly granted the roles
role2
and
role3
, in
addition to the direct grant of
role1
. Enabling the direct
role1
for
psmith
enables
the indirect roles
role2
and
role3
for this user as well.
■Optionally, you can make a directly granted role a default role. You enable or
disable the default role status of a directly granted role by using the
DEFAULT ROLE
clause of the
ALTER USER
statement. Ensure that the
DEFAULT ROLE
clause refers
only to roles that have been directly granted to the user. To find the directly
granted roles for a user, query the
DBA_ROLE_PRIVS
data dictionary view. This view
does not include the user’s indirectly granted roles. To find roles that are granted
to other roles, query the
ROLE_ROLE_PRIVS
view.
■If the role is password authenticated or a secure application role, then you cannot
grant it indirectly to the user, nor can you make it a default role. You only can
grant this type of role directly to the user. Typically, you enable password
authenticated or secure application roles by using the
SET ROLE
statement.
Properties of Roles and Why They Are Advantageous
Table 4–2 describes the properties of roles that enable easier privilege management
within a database.
Table 4–2 Properties of Roles and Their Description
Property Description
Reduced privilege
administration Rather than granting the same set of privileges explicitly to
several users, you can grant the privileges for a group of related
users to a role, and then only the role must be granted to each
member of the group.
Dynamic privilege
management If the privileges of a group must change, then only the privileges
of the role need to be modified. The security domains of all users
granted the group's role automatically reflect the changes made
to the role.
Selective availability of
privileges You can selectively enable or disable the roles granted to a user.
This allows specific control of a user's privileges in any given
situation.
Application awareness The data dictionary records which roles exist, so you can design
applications to query the dictionary and automatically enable (or
disable) selective roles when a user attempts to execute the
application by way of a given user name.
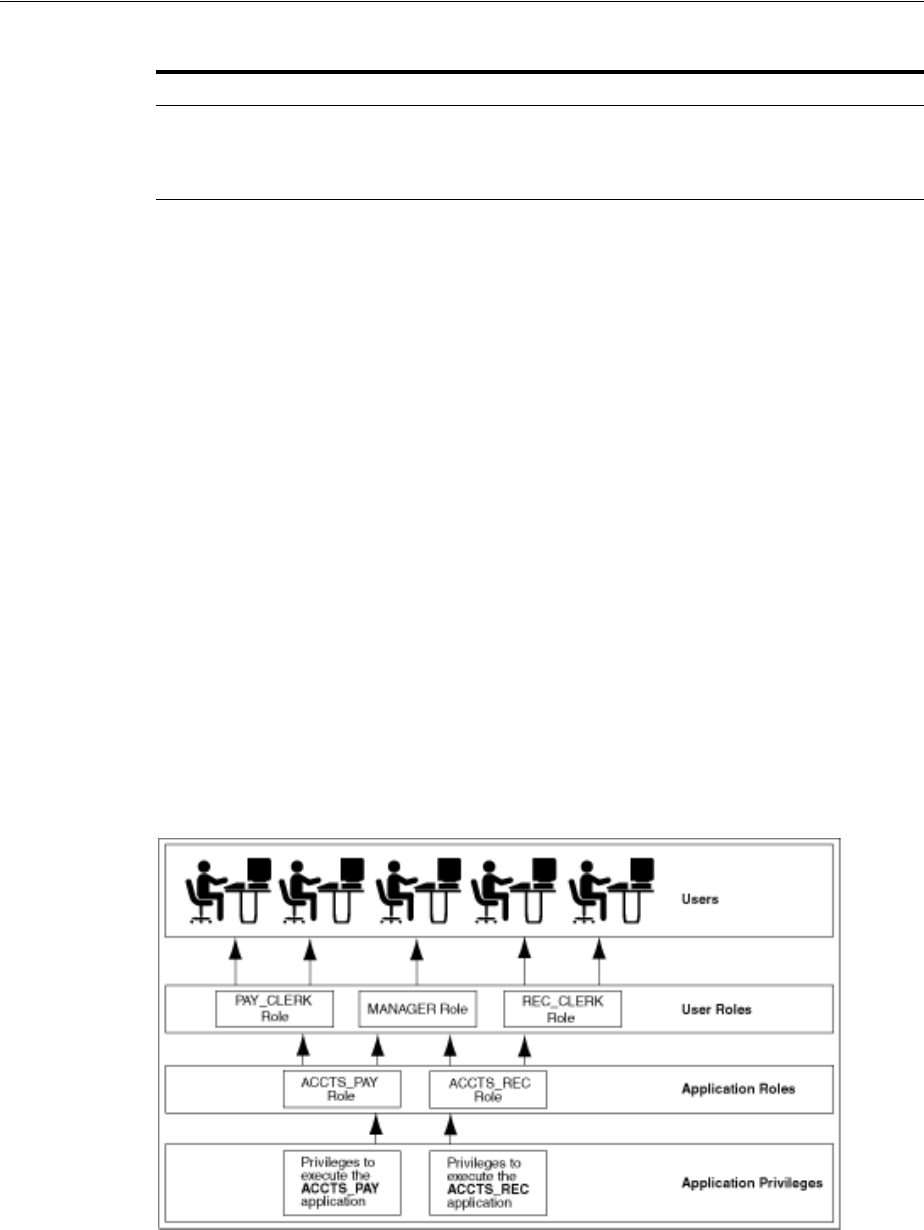
Managing User Roles
4-8 Oracle Database Security Guide
Database administrators often create roles for a database application. You should grant
a secure application role all privileges necessary to run the application. You then can
grant the secure application role to other roles or users. An application can have
several different roles, each granted a different set of privileges that allow for more or
less data access while using the application.
The DBA can create a role with a password to prevent unauthorized use of the
privileges granted to the role. Typically, an application is designed so that when it
starts, it enables the proper role. As a result, an application user does not need to know
the password for an application role.
Common Uses of Roles
In general, you create a role to serve one of two purposes:
■To manage the privileges for a database application (see "Common Uses of
Application Roles" on page 4-8)
■To manage the privileges for a user group (see "Common Uses of User Roles" on
page 4-9)
Figure 4–1 and the sections that follow describe the two uses of roles.
Figure 4–1 Common Uses for Roles
Common Uses of Application Roles Grant an application role all privileges necessary to
run a given database application. Then, grant the secure application role to other roles
or to specific users. An application can have several different roles, with each role
assigned a different set of privileges that allow for more or less data access while using
the application.
Application-specific security You can protect role use with a password. Applications can be
created specifically to enable a role when supplied the correct
password. Users cannot enable the role if they do not know the
password.
See Also: "How Roles Aid or Restrict DDL Usage" on page 4-9 for
information about restrictions for procedures
Table 4–2 (Cont.) Properties of Roles and Their Description
Property Description

Managing User Roles
Configuring Privilege and Role Authorization 4-9
Common Uses of User Roles Create a user role for a group of database users with
common privilege requirements. You can manage user privileges by granting secure
application roles and privileges to the user role and then granting the user role to
appropriate users.
How Roles Affect the Scope of a User’s Privileges
Each role and user has its own unique security domain. The security domain of a role
includes the privileges granted to the role plus those privileges granted to any roles
that are granted to the role.
The security domain of a user includes privileges on all schema objects in the
corresponding schema, the privileges granted to the user, and the privileges of roles
granted to the user that are currently enabled. (A role can be simultaneously enabled
for one user and disabled for another.) This domain also includes the privileges and
roles granted to the role
PUBLIC
. The
PUBLIC
role represents all users in the database.
How Roles Work in PL/SQL Blocks
The use of roles in a PL/SQL block depends on whether it is an anonymous block or a
named block (stored procedure, function, or trigger), and whether it executes with
definer's rights or invoker's rights.
Roles Used in Named Blocks with Definer's Rights All roles are disabled in any named
PL/SQL block (stored procedure, function, or trigger) that executes with definer's
rights. Roles are not used for privilege checking and you cannot set roles within a
definer's rights procedure.
The
SESSION_ROLES
view shows all roles that are currently enabled. If a named
PL/SQL block that executes with definer's rights queries
SESSION_ROLES
, then the
query does not return any rows.
Roles Used in Named Blocks with Invoker's Rights and Anonymous PL/SQL Blocks Named
PL/SQL blocks that execute with invoker's rights and anonymous PL/SQL blocks are
executed based on privileges granted through enabled roles. Current roles are used for
privilege checking within an invoker’s rights PL/SQL block. You can use dynamic
SQL to set a role in the session.
How Roles Aid or Restrict DDL Usage
A user requires one or more privileges to successfully execute a DDL statement,
depending on the statement. For example, to create a table, the user must have the
CREATE
TABLE
or
CREATE
ANY
TABLE
system privilege. To create a view of a table that
belongs to another user, the creator requires the
CREATE VIEW
or
CREATE
ANY
VIEW
system privilege and either the
SELECT
object
privilege for the table or the
SELECT
ANY
TABLE
system privilege.
See Also: Oracle Database Reference
See Also:
■Oracle Database PL/SQL Language Reference for an explanation of
how invoker's and definer's rights can be used for name
resolution and privilege checking
■Oracle Database PL/SQL Language Reference for information
about dynamic SQL in PL/SQL

Managing User Roles
4-10 Oracle Database Security Guide
Oracle Database avoids the dependencies on privileges received by way of roles by
restricting the use of specific privileges in certain DDL statements. The following rules
describe these privilege restrictions concerning DDL statements:
■All system privileges and object privileges that permit a user to perform a DDL
operation are usable when received through a role. For example:
– System privileges:
CREATE
TABLE
,
CREATE
VIEW,
and
CREATE
PROCEDURE
privileges
– Object privileges:
ALTER
and
INDEX
privileges for a table
You cannot use the
REFERENCES
object privilege for a table to define the foreign
key of a table if the privilege is received through a role.
■All system privileges and object privileges that allow a user to perform a DML
operation that is required to issue a DDL statement are not usable when received
through a role. The security domain does not contain roles when a
CREATE VIEW
statement is used. For example, a user who is granted the
SELECT
ANY
TABLE
system privilege or the
SELECT
object
privilege for a table through a role cannot
use either of these privileges to create a view on a table that belongs to another
user. This is because views are definer’s rights objects, so when creating them you
cannot use any privileges (neither system privileges or object privileges) granted
to you through a role. If the privilege is granted directly to you, then you can use
the privilege. However, if the privilege is revoked at a later time, then the view
definition becomes invalid ("contains errors") and must recompiled before it can be
used again.
The following example further clarifies the permitted and restricted uses of privileges
received through roles.
Assume that a user is:
■Granted a role that has the
CREATE
VIEW
system privilege
■Directly granted a role that has the
SELECT
object
privilege for the
employees
table
■Directly granted the
SELECT
object
privilege for the
departments
table
Given these directly and indirectly granted privileges:
■The user can issue
SELECT
statements on both the
employees
and
departments
tables.
■Although the user has both the
CREATE
VIEW
and
SELECT
privilege for the
employees
table through a role, the user cannot create a view on the
employees
table, because the
SELECT
object
privilege for the
employees
table was granted
through a role.
■The user can create a view on the
departments
table, because the user has the
CREATE
VIEW
privilege through a role and the
SELECT
privilege for the
departments
table directly.
How Operating Systems Can Aid Roles
In some environments, you can administer database security using the operating
system. The operating system can be used to grant and revoke database roles and to
manage their password authentication. This capability is not available on all operating
systems.

Managing User Roles
Configuring Privilege and Role Authorization 4-11
How Roles Work in a Distributed Environment
When you use roles in a distributed database environment, ensure that all needed
roles are set as the default roles for a distributed (remote) session. These roles cannot
be enabled when the user connects to a remote database from within a local database
session. For example, the user cannot execute a remote procedure that attempts to
enable a role at the remote site.
Predefined Roles in an Oracle Database Installation
Oracle Database provides a set of predefined roles to help in database administration.
These roles, listed in Table 4–3, are automatically defined for Oracle databases when
you run the standard scripts that are part of database creation. If you install other
options or products, then other predefined roles may be created.
See Also: Your operating system-specific Oracle Database
documentation for details about managing roles through the
operating system
See Also: Oracle Database Heterogeneous Connectivity User's Guide
Table 4–3 Oracle Database Predefined Roles
Predefined Role Description
ADM_PARALLEL_EXECUTE_TASK
Provides privileges to update table data in parallel by using the
DBMS_
PARALLEL_EXECUTE
PL/SQL package.
See Also: Oracle Database PL/SQL Packages and Types Reference for more
information about the
DBMS_PARALLEL_EXECUTE
PL/SQL package.
AQ_ADMINISTRATOR_ROLE
Provides privileges to administer Advanced Queuing. Includes
ENQUEUE
ANY QUEUE
,
DEQUEUE ANY QUEUE
, and
MANAGE ANY QUEUE
,
SELECT
privileges
on Advanced Queuing tables and
EXECUTE
privileges on Advanced Queuing
packages.
AQ_USER_ROLE
Obsolete, but kept mainly for release 8.0 compatibility. Provides
EXECUTE
privileges on the
DBMS_AQ
and
DBMS_AQIN
packages.
AUTHENTICATEDUSER
Used by the XDB protocols to define any user who has logged in to the
system.
CAPI_USER_ROLE
Provides access to packages used for implementing Information Lifecycle
Management (ILM) and hierarchical storage and other applications.
See Also: Oracle Database SecureFiles and Large Objects Developer's Guide
CONNECT
Provides the
CREATE SESSION
system privilege.
This role is provided for compatibility with previous releases of Oracle
Database. You can determine the privileges encompassed by this role by
querying the
DBA_SYS_PRIVS
data dictionary view.
Note: Oracle recommends that you design your own roles for database
security rather than relying on this role. This role may not be created
automatically by future releases of Oracle Database.
See Also: Oracle Database Reference for a description of the
DBA_SYS_PRIVS
view
CSW_USR_ROLE
Provides user privileges to manage the Catalog Services for the Web (CSW)
component of Oracle Spatial.
See Also: Oracle Spatial Developer's Guide for more information

Managing User Roles
4-12 Oracle Database Security Guide
CTXAPP
Provides privileges to create Oracle Text indexes and index preferences, and
to use PL/SQL packages. This role should be granted to Oracle Text users.
See Also: Oracle Text Application Developer's Guide for more information
CWM_USER
Provides privileges to manage Common Warehouse Metadata (CWM),
which is a repository standard used by Oracle data warehousing and
decision support.
See Also: Oracle Database Data Warehousing Guide for more information
DATAPUMP_EXP_FULL_DATABASE
Provides privileges to export data from an Oracle database using Oracle
Data Pump.
Caution: This is a very powerful role because it provides a user access to
any data in any schema in the database. Use caution when granting this role
to users.
See Also: Oracle Database Utilities for more information
DATAPUMP_IMP_FULL_DATABASE
Provides privileges to import data into an Oracle database using Oracle
Data Pump.
Caution: This is a very powerful role because it provides a user access to
any data in any schema in the database. Use caution when granting this role
to users.
See Also: Oracle Database Utilities for more information
DBA
Provides all system privileges that were created with the
ADMIN
option.
This role is provided for compatibility with previous releases of Oracle
Database. You can determine the privileges encompassed by this role by
querying the
DBA_SYS_PRIVS
data dictionary view.
Note: Oracle recommends that you design your own roles for database
security rather than relying on this role. This role may not be created
automatically by future releases of Oracle Database.
See Also: Oracle Database Reference for a description of the
DBA_SYS_PRIVS
view
DBFS_ROLE
Provides access to the DBFS (the Database Filesystem) packages and objects.
See Also: Oracle Database SecureFiles and Large Objects Developer's Guide
DELETE_CATALOG_ROLE
Provides the
DELETE
privilege on the system audit table (
AUD$
).
EJBCLIENT
Provides privileges to connect to EJBs from a Java stored procedure.
EXECUTE_CATALOG_ROLE
Provides
EXECUTE
privileges on objects in the data dictionary.
EXP_FULL_DATABASE
Provides the privileges required to perform full and incremental database
exports using the Export utility (later replaced with Oracle Data Pump). It
includes these privileges:
SELECT ANY TABLE
,
BACKUP ANY TABLE
,
EXECUTE
ANY PROCEDURE
,
EXECUTE ANY TYPE
,
ADMINISTER RESOURCE MANAGER
, and
INSERT
,
DELETE
, and
UPDATE
on the tables
SYS.INCVID
,
SYS.INCFIL
, and
SYS.INCEXP
. Also the following roles:
EXECUTE_CATALOG_ROLE
and
SELECT_
CATALOG_ROLE
.
This role is provided for convenience in using the export and import
utilities.
Caution: This is a very powerful role because it provides a user access to
any data in any schema in the database. Use caution when granting this role
to users.
See Also: Oracle Database Utilities for more information
Table 4–3 (Cont.) Oracle Database Predefined Roles
Predefined Role Description

Managing User Roles
Configuring Privilege and Role Authorization 4-13
GATHER_SYSTEM_STATISTICS
Provides privileges to update system statistics, which are collected using the
DBMS_STATS.GATHER_SYSTEM_STATISTICS
procedure
See Also: Oracle Database Performance Tuning Guide for more information
about managing optimizer statistics
GLOBAL_AQ_USER_ROLE
Provides privileges to establish a connection to an LDAP server, for use
with Oracle Streams AQ.
See Also: Oracle Streams Advanced Queuing User's Guide for more
information
HS_ADMIN_EXECUTE_ROLE
Provides the
EXECUTE
privilege for users who want to use the
Heterogeneous Services (HS) PL/SQL packages.
See Also: Oracle Database Heterogeneous Connectivity User's Guide for more
information
HS_ADMIN_ROLE
Provides privileges to both use the Heterogeneous Services (HS) PL/SQL
packages and query the HS-related data dictionary views.
See Also: Oracle Database Heterogeneous Connectivity User's Guide for more
information
HS_ADMIN_SELECT_ROLE
Provides privileges to query the Heterogeneous Services data dictionary
views.
See Also: Oracle Database Heterogeneous Connectivity User's Guide for more
information
IMP_FULL_DATABASE
Provides the privileges required to perform full database imports using the
Import utility (later replaced with Oracle Data Pump). Includes an extensive
list of system privileges (use view
DBA_SYS_PRIVS
to view privileges) and
the following roles:
EXECUTE_CATALOG_ROLE
and
SELECT_CATALOG_ROLE
.
This role is provided for convenience in using the export and import
utilities.
Caution: This is a very powerful role because it provides a user access to
any data in any schema in the database. Use caution when granting this role
to users.s.
See Also: Oracle Database Utilities for more information
JAVADEBUGPRIV
Provides privileges to run the Oracle Database Java applications debugger.
See Also: Oracle Database Java Developer's Guide for more information about
managing security for Oracle Java applications
JAVAIDPRIV
Deprecated for this release.
JAVASYSPRIV
Provides major permissions to use Java2, including updating Oracle
JVM-protected packages.
See Also: Oracle Database Java Developer's Guide for more information about
managing security for Oracle Java applications
JAVAUSERPRIV
Provides limited permissions to use Java2.
See Also: Oracle Database Java Developer's Guide for more information about
managing security for Oracle Java applications
JAVA_ADMIN
Provides administrative permissions to update policy tables for Oracle
Database Java applications.
See Also: Oracle Database Java Developer's Guide for more information about
managing security for Oracle Java applications
Table 4–3 (Cont.) Oracle Database Predefined Roles
Predefined Role Description

Managing User Roles
4-14 Oracle Database Security Guide
JAVA_DEPLOY
Provides privileges to deploy
ncomp
DLLs into the
javavm/admin
directory
using the
ncomp
and
deployns
utilities. Without this role, the
javavm/deploy
and
javavm/admin
directories can be accessible.
See Also: Oracle Database Advanced Application Developer's Guide for more
information
JMXSERVER
Provides privileges to start and maintain a JMX agent in a database session.
See Also: Oracle Database Java Developer's Guide for more information about
managing Oracle Java applications
LBAC_DBA
Provides permissions to use the
SA_SYSDBA
PL/SQL package.
See Also: Oracle Label Security Administrator's Guide for more information
LOGSTDBY_ADMINISTRATOR
Provides administrative privileges to manage the SQL Apply (logical
standby database) environment.
See Also: Oracle Data Guard Concepts and Administration for more
information
MGMT_USER
Grants the
SELECT
privilege on the different views used for the
SYSMAN
schema.
OEM_ADVISOR
Provides privileges to create, drop, select (read), load (write), and delete a
SQL tuning set through the
DBMS_SQLTUNE
PL/SQL package, and to access
to the Advisor framework using the
ADVISOR
PL/SQL package.
See Also: Oracle Database Performance Tuning Guide for more information
OEM_MONITOR
Provides privileges needed by the Management Agent component of Oracle
Enterprise Manager to monitor and manage the database.
See Also: Oracle Database Performance Tuning Guide for more information
OLAP_DBA
Provides administrative privileges to create dimensional objects in different
schemas for Oracle OLAP.
See Also: Oracle OLAP User's Guide for more information
OLAP_USER
Provides application developers privileges to create dimensional objects in
their own schemas for Oracle OLAP.
See Also: Oracle OLAP User's Guide for more information
OLAP_XS_ADMIN
Provides privileges to administer security for Oracle OLAP.
See Also: Oracle OLAP User's Guide for more information
ORDADMIN
Provides privileges to administer Oracle Multimedia DICOM.
See Also: Oracle Multimedia DICOM Developer's Guide
OWB$CLIENT
Provides privileges to perform standard client-related tasks for Oracle
Warehouse Builder, such as creating projects, modules, tables, views, maps,
and so on. Warehouse Builder automatically grants this role to all
workspace owners and users. (That is, you do not need to explicitly grant it
to anyone who must use Warehouse Builder.) For security reasons, the
OWB$CLIENT
role is not a default role for Warehouse Builder users: Oracle
Warehouse Builder enables this role only when it is needed.
See Also: Oracle Warehouse Builder Installation and Administration Guide for
more information
Table 4–3 (Cont.) Oracle Database Predefined Roles
Predefined Role Description

Managing User Roles
Configuring Privilege and Role Authorization 4-15
OWB_DESIGNCENTER_VIEW
Provides privileges from the database level for any registered Oracle
Warehouse Builder user to query the Warehouse Builder public views, such
as
ALL_IV_PROJECTS
. A Warehouse Builder administrator can use the
ACCESS_PUBLICVIEW_BROWSER
system privilege from the Warehouse Builder
security level to control an Warehouse Builder user's access to those public
views.
See Also: Oracle Warehouse Builder Installation and Administration Guide for
more information
OWB_USER
Provides privileges to create and own an Oracle Warehouse Builder
workspace. When a workspace owner registers other database users to this
workspace, Oracle Database grants this role to these users. Users with this
role also have access to Warehouse Builder Control Center public views and
other Control Center utilities. Oracle Warehouse Builder grants this role to
all Warehouse Builder users.
See Also: Oracle Warehouse Builder Installation and Administration Guide for
more information
RECOVERY_CATALOG_OWNER
Provides privileges for owner of the recovery catalog. Includes:
CREATE
SESSION
,
ALTER SESSION
,
CREATE SYNONYM
,
CREATE VIEW
,
CREATE DATABASE
LINK
,
CREATE TABLE
,
CREATE CLUSTER
,
CREATE SEQUENCE
,
CREATE TRIGGER
,
and
CREATE PROCEDURE
RESOURCE
Provides the following system privileges:
CREATE CLUSTER
,
CREATE
INDEXTYPE
,
CREATE OPERATOR
,
CREATE PROCEDURE
,
CREATE SEQUENCE
,
CREATE
TABLE
,
CREATE TRIGGER
,
CREATE TYPE
.
This role is provided for compatibility with previous releases of Oracle
Database. You can determine the privileges encompassed by this role by
querying the
DBA_SYS_PRIVS
data dictionary view.
Note: Oracle recommends that you design your own roles for database
security rather than relying on this role. This role may not be created
automatically by future releases of Oracle Database.
See Also: Oracle Database Reference for a description of the
DBA_SYS_PRIVS
view
SCHEDULER_ADMIN
Allows the grantee to execute the procedures of the
DBMS_SCHEDULER
package. It includes all of the job scheduler system privileges and is
included in the
DBA
role.
See Also: Oracle Database Administrator's Guide for more information about
the
DBMS_SCHEDULER
package
SELECT_CATALOG_ROLE
Provides
SELECT
privilege on objects in the data dictionary.
SNMPAGENT
Used by the Enterprise Manager Management Agent.
SPATIAL_CSW_ADMIN
Provides administrative privileges to manage the Catalog Services for the
Web (CSW) component of Oracle Spatial.
See Also: Oracle Spatial Developer's Guide for more information
SPATIAL_WFS_ADMIN
Provides administrative privileges to manage the Web Feature Service
(WFS) component of Oracle Spatial.
See Also: Oracle Spatial Developer's Guide for more information
WFS_USR_ROLE
Provides user privileges for the Web Feature Service (WFS) component of
Oracle Spatial.
See Also: Oracle Spatial Developer's Guide for more information
Table 4–3 (Cont.) Oracle Database Predefined Roles
Predefined Role Description

Managing User Roles
4-16 Oracle Database Security Guide
Creating a Role
You can create a role using the
CREATE ROLE
statement, but you must have the
CREATE
ROLE
system privilege to do so. Typically, only security administrators have this system
privilege.
After you create a role, the role has no privileges associated with it. Your next step is to
grant either privileges or other roles to the new role.
You must give each role you create a unique name among existing user names and role
names of the database. Roles are not contained in the schema of any user. In a database
WM_ADMIN_ROLE
Provides administrative privileges for Oracle Workspace Manage. This
enables users to run any
DBMS_WM
procedures on all version enabled tables,
workspaces, and savepoints regardless of their owner. It also enables the
user to modify the system parameters specific to Workspace Manager.
See Also: Oracle Database Workspace Manager Developer's Guide for more
information
XDBADMIN
Allows the grantee to register an XML schema globally, as opposed to
registering it for use or access only by its owner. It also lets the grantee
bypass access control list (ACL) checks when accessing Oracle XML DB
Repository.
See Also: Oracle XML DB Developer's Guide for information about XML
schemas and the XML DB Repository
XDB_SET_INVOKER
Allows the grantee to define invoker’s rights handlers and to create or
update the resource configuration for XML repository triggers. By default,
Oracle Database grants this role to the
DBA
role but not to the
XDBADMIN
role.
See Also: Oracle XML DB Developer's Guide for information about Oracle
Database XML repository triggers
XDB_WEBSERVICES
Allows the grantee to access Oracle Database Web services over HTTPS.
However, it does not provide the user access to objects in the database that
are public. To allow public access, you need to grant the user the
XDB_
WEBSERVICES_WITH_PUBLIC
role. For a user to use these Web services,
SYS
must enable the Web service servlets.
See Also: Oracle XML DB Developer's Guide for information about Oracle
Database Web services
XDB_WEBSERVICES_OVER_HTTP
Allows the grantee to access Oracle Database Web services over HTTP.
However, it does not provide the user access to objects in the database that
are public. To allow public access, you need to grant the user the
XDB_
WEBSERVICES_WITH_PUBLIC
role.
See Also: Oracle XML DB Developer's Guide for information about Oracle
Database Web services
XDB_WEBSERVICES_WITH_PUBLIC
Allows the grantee access to public objects through Oracle Database Web
services.
See Also: Oracle XML DB Developer's Guide for information about Oracle
Database Web services
Note: Each installation should create its own roles and assign only
those privileges that are needed, thus retaining detailed control of
the privileges in use. This process also removes any need to adjust
existing roles, privileges, or procedures whenever Oracle Database
changes or removes roles that Oracle Database defines.
Table 4–3 (Cont.) Oracle Database Predefined Roles
Predefined Role Description

Managing User Roles
Configuring Privilege and Role Authorization 4-17
that uses a multibyte character set, Oracle recommends that each role name contain at
least one single-byte character. If a role name contains only multibyte characters, then
the encrypted role name and password combination is considerably less secure. See
Guideline 1 in "Guidelines for Securing Passwords" on page 10-7 for password
guidelines.
Example 4–2 creates the
clerk
role.
Example 4–2 Creating a User Role Authorized by a Password
CREATE ROLE clerk IDENTIFIED BY password;
You can use the
IDENTIFIED BY
clause to authorize the role with a password. The
IDENTIFIED BY
clause of the
CREATE ROLE
statement specifies how the user must be
authorized before the role can be enabled for use by a specific user to which it has been
granted. If you do not specify this clause, or if you specify
NOT IDENTIFIED
, then no
authorization is required when the role is enabled. Roles can be specified to be
authorized by the following:
■The database using a password
■An application using a specified package
■Externally by the operating system, network, or other external source
■Globally by an enterprise directory service
These authorizations are discussed in the following sections.
As an alternative to creating password-protected roles, Oracle recommends that you
use secure application roles instead. See "Securing Role Privileges by Using Secure
Application Roles" on page 4-22 for more information.
You can set or change the authorization method for a role using the
ALTER ROLE
statement. Remember that you can only directly grant secure application roles or
password-authenticated roles to a user.
Example 4–3 shows how to alter the
clerk
role to specify that the user must have been
authorized by an external source before enabling the role.
Example 4–3 Altering a Role to be Authorized by an External Source
ALTER ROLE clerk IDENTIFIED EXTERNALLY;
To alter the authorization method for a role, you must have the
ALTER ANY ROLE
system privilege or have been granted the role with
ADMIN
option.
Specifying the Type of Role Authorization
The methods of authorizing roles are presented in this section. A role must be enabled
for you to use it.
This section contains:
■Authorizing a Role by Using the Database
■Authorizing a Role by Using an Application
■Authorizing a Role by Using an External Source
See Also: Oracle Database SQL Language Reference for syntax,
restrictions, and authorization information about the SQL
statements used to manage roles and privileges

Managing User Roles
4-18 Oracle Database Security Guide
Authorizing a Role by Using the Database
You can protect a role authorized by the database by assigning the role a password. If a
user is granted a role protected by a password, then you can enable or disable the role
by supplying the proper password for the role in the
SET ROLE
statement. You cannot
authenticate a password-authenticated role on logon, even if you add it to the list of
default roles. You must explicitly enable it with the
SET ROLE
statement using the
required password.
Example 4–4 shows how to set a password-authenticated role by using the
SET ROLE
statement.
Example 4–4 Using SET ROLE for a Password-Authenticated Role
SET ROLE clerk IDENTIFIED BY password;
Example 4–2, "Creating a User Role Authorized by a Password" on page 4-17 shows a
CREATE ROLE
statement that creates a role called
clerk
. When it is enabled, the
password must be supplied.
Authorizing a Role by Using an Application
An application role (secure application role) can be enabled only by applications using
an authorized PL/SQL package. Application developers do not need to secure a role
by embedding passwords inside applications. Instead, they can create an application
role and specify which PL/SQL package is authorized to enable the role.
To create a role enabled by an authorized PL/SQL package, use the
IDENTIFIED USING
package_name
clause in the
CREATE ROLE
SQL statement.
Example 4–5 indicates that the role
admin_role
is an application role and the role can
only be enabled by any module defined inside the PL/SQL package
hr.admin
.
Example 4–5 Creating a Role Authorized by a PL/SQL Package for an Application
CREATE ROLE admin_role IDENTIFIED USING hr.admin;
See the following for more information about secure application roles:
■"Securing Role Privileges by Using Secure Application Roles" on page 4-22
■"Creating Secure Application Roles to Control Access to Applications" on
page 5-12
■Oracle Database 2 Day + Security Guide
Authorizing a Role by Using an External Source
You can define the external role locally in the database, but you cannot grant the
external role to global users, to global roles, or to any other roles in the database. You
can create roles that are authorized by the operating system or network clients.
See Also: "When Do Grants and Revokes Take Effect?" on
page 4-48 for a discussion about enabling roles
Note: In a database that uses a multibyte character set, passwords
for roles must include only single-byte characters. Multibyte
characters are not accepted in passwords. See Guideline 1 in
"Guidelines for Securing Passwords" on page 10-7 for password
guidelines.

Managing User Roles
Configuring Privilege and Role Authorization 4-19
Example 4–6 creates a role named
accts_rec
and requires that the user is authorized
by an external source before it can be enabled:
Example 4–6 Creating a Role Authorized by an External Source
CREATE ROLE accts_rec IDENTIFIED EXTERNALLY;
Authorizing a Role by Using the Operating System Role authentication through the
operating system is useful only when the operating system is able to dynamically link
operating system privileges with applications. When a user starts an application, the
operating system grants an operating system privilege to the user. The granted
operating system privilege corresponds to the role associated with the application. At
this point, the application can enable the application role. When the application is
terminated, the previously granted operating system privilege is revoked from the
operating system account of the user.
If a role is authorized by the operating system, then you must configure information
for each user at the operating system level. This operation is operating system
dependent.
If roles are granted by the operating system, then you do not need to have the
operating system authorize them also.
Authorizing a Role by Using a Network Client If users connect to the database over Oracle
Net, then by default, the operating system cannot authenticate their roles. This
includes connections through a shared server configuration, as this connection
requires Oracle Net. This restriction is the default because a remote user could
impersonate another operating system user over a network connection. Oracle
recommends that you set
REMOTE_OS_ROLES
to
FALSE
, which is the default.
If you are not concerned with this security risk and want to use operating system role
authentication for network clients, then set the initialization parameter
REMOTE_OS_
ROLES
in the database initialization parameter file to
TRUE
. The change will take effect
the next time you start the instance and mount the database.
Global Role Authorization by an Enterprise Directory Service
A role can be defined as a global role, where a (global) user can only be authorized to
use the role by an enterprise directory service. You define the global role locally in the
database by granting privileges and roles to it, but you cannot grant the global role
itself to any user or other role in the database. When a global user attempts to connect
to the database, the enterprise directory is queried to obtain any global roles associated
with the user.
Example 4–7 creates a global role.
Example 4–7 Creating a Global Role
CREATE ROLE supervisor IDENTIFIED GLOBALLY;
Global roles are one component of enterprise user security. A global role only applies
to one database, but you can grant it to an enterprise role defined in the enterprise
directory. An enterprise role is a directory structure that contains global roles on
multiple databases and can be granted to enterprise users.
See Also: "Granting Roles Using the Operating System or
Network" on page 4-45 for more information about roles granted by
the operating system

Managing User Roles
4-20 Oracle Database Security Guide
See "Configuring Global User Authentication and Authorization" on page 3-30 for a
general discussion of global authentication and authorization of users, and its role in
enterprise user management.
Granting and Revoking Roles
This section contains:
■About Granting and Revoking Roles
■Who Can Grant or Revoke Roles?
About Granting and Revoking Roles
You can grant system or object privileges to a role, and any role can be granted to any
database user or to another role (but not to itself). However, a role cannot be granted
circularly, that is, role
X
cannot be granted to role
Y
if role
Y
has previously been
granted to role
X
.
To provide selective availability of privileges, Oracle Database permits applications
and users to enable and disable roles. Each role granted to a user is, at any given time,
either enabled or disabled. The security domain of a user includes the privileges of all
roles currently enabled for the user and excludes the privileges of any roles currently
disabled for the user.
A role granted to a role is called an indirectly granted role. You can explicitly enable or
disable it for a user. However, whenever you enable a role that contains other roles,
you implicitly enable all indirectly granted roles of the directly granted role.
You grant roles to (or revoke roles from) users or other roles by using either of the
following methods:
■Oracle Enterprise Manager Database Control
■The
GRANT
and
REVOKE
SQL statements
Privileges are granted to and revoked from roles using the same options.
You cannot grant a secure role (that is, an
IDENTIFIED BY
role,
IDENTIFIED USING
role,
or
IDENTIFIED EXTERNALLY
role) to a non-secure role. You can use the
SET ROLE
statement to enable the secure role for the session.
Who Can Grant or Revoke Roles?
Any user with the
GRANT
ANY
ROLE
system privilege can grant or revoke any role except
a global role to or from other users or roles of the database. (A global role is managed
See Also: Oracle Database Enterprise User Security Administrator's
Guide for information about implementing enterprise user
management
See Also:
■"Granting a User Privileges and Roles" on page 4-37
■"Revoking Privileges and Roles from a User" on page 4-41
■"When Do Grants and Revokes Take Effect?" on page 4-48
■"Finding Information About User Privileges and Roles" on
page 4-71
■Oracle Database 2 Day DBA for more information about
Database Control

Managing User Roles
Configuring Privilege and Role Authorization 4-21
in a directory, such as Oracle Internet Directory, but its privileges are contained within
a single database.) By default, the
SYS
or
SYSTEM
user has this privilege. You should
grant this system privilege conservatively because it is very powerful.
Any user granted a role with the
ADMIN
OPTION
can grant or revoke that role to or from
other users or roles of the database. This option allows administrative powers for roles
to be granted on a selective basis.
Dropping Roles
In some cases, it may be appropriate to drop a role from the database. The security
domains of all users and roles granted a dropped role are immediately changed to
reflect the absence of the dropped role privileges. All indirectly granted roles of the
dropped role are also removed from affected security domains. Dropping a role
automatically removes the role from all user default role lists.
Because the existence of objects is not dependent on the privileges received through a
role, tables and other objects are not dropped when a role is dropped.
You can drop a role using the SQL statement
DROP ROLE
. To drop a role, you must have
the
DROP ANY ROLE
system privilege or have been granted the role with the
ADMIN
option.
The following statement drops the role
CLERK
:
DROP ROLE clerk;
Restricting SQL*Plus Users from Using Database Roles
This section describes features that you can use to restrict SQL*Plus users from using
database roles and thus, prevent serious security problems.
■Potential Security Problems of Using Ad Hoc Tools
■Limiting Roles Through the PRODUCT_USER_PROFILE Table
■Using Stored Procedures to Encapsulate Business Logic
Potential Security Problems of Using Ad Hoc Tools
Prebuilt database applications explicitly control the potential actions of a user,
including the enabling and disabling of user roles while using the application. By
contrast, ad hoc query tools such as SQL*Plus, permit a user to submit any SQL
statement (which may or may not succeed), including enabling and disabling a
granted role.
Potentially, an application user can exercise the privileges attached to that application
to issue destructive SQL statements against database tables by using an ad hoc tool.
For example, consider the following scenario:
■The Vacation application has a corresponding
vacation
role.
■The
vacation
role includes the privileges to issue
SELECT
,
INSERT
,
UPDATE
, and
DELETE
statements against the
emp_tab
table.
■The Vacation application controls the use of privileges obtained through the
vacation
role.
See Also: Oracle Database Enterprise User Security Administrator's
Guide for information about global roles

Managing User Roles
4-22 Oracle Database Security Guide
Now, consider a user who has been granted the
vacation
role. Suppose that, instead of
using the Vacation application, the user executes SQL*Plus. At this point, the user is
restricted only by the privileges granted to him explicitly or through roles, including
the
vacation
role. Because SQL*Plus is an ad hoc query tool, the user is not restricted
to a set of predefined actions, as with designed database applications. The user can
query or modify data in the
emp_tab
table as he or she chooses.
Limiting Roles Through the PRODUCT_USER_PROFILE Table
You can use the
PRODUCT_USER_PROFILE
table, which is in the
SYSTEM
schema, to
disable certain SQL and SQL*Plus commands in the SQL*Plus environment for each
user. SQL*Plus, not the Oracle Database, enforces this security. You can even restrict
access to the
GRANT
,
REVOKE
, and
SET ROLE
commands to control user ability to change
their database privileges.
The
PRODUCT_USER_PROFILE
table enables you to list roles that you do not want users
to activate with an application. You can also explicitly disable the use of various
commands, such as
SET ROLE
.
For example, you could create an entry in the
PRODUCT_USER_PROFILE
table to:
■Disallow the use of the
clerk
and
manager
roles with SQL*Plus
■Disallow the use of
SET ROLE
with SQL*Plus
Suppose user Marla connects to the database using SQL*Plus. Marla has the
clerk
,
manager
, and
analyst
roles. As a result of the preceding entry in
PRODUCT_USER_
PROFILE
, Marla is only able to exercise her
analyst
role with SQL*Plus. Also, when
Ginny attempts to issue a
SET ROLE
statement, she is explicitly prevented from doing
so because of the entry in the
PRODUCT_USER_PROFILE
table prohibiting use of
SET
ROLE
.
Be aware that the
PRODUCT_USER_PROFILE
table does not completely guarantee security,
for multiple reasons. In the preceding example, while
SET ROLE
is disallowed with
SQL*Plus, if Marla had other privileges granted to her directly, then she could exercise
these using SQL*Plus.
Using Stored Procedures to Encapsulate Business Logic
Stored procedures encapsulate the use of privileges with business logic so that
privileges are only exercised in the context of a well-formed business transaction. For
example, an application developer can create a procedure to update the employee
name and address in the
employees
table, which enforces that the data can only be
updated in normal business hours. Also, rather than grant a human resources clerk the
UPDATE
privilege on the
employees
table, a security administrator may grant the
privilege on the procedure only. Then, the human resources clerk can exercise the
privilege only in the context of the procedures, and cannot update the
employees
table
directly.
Securing Role Privileges by Using Secure Application Roles
A secure application role is a role that can be enabled only by an authorized PL/SQL
package (or procedure). The PL/SQL package itself reflects the security policies
needed to control access to the application.
See Also: SQL*Plus User's Guide and Reference for more
information about the
PRODUCT_USER_PROFILE
table

Managing Object Privileges
Configuring Privilege and Role Authorization 4-23
This method of role creation restricts the enabling of this type of role to the invoking
application. For example, the application can perform authentication and customized
authorization, such as checking whether the user has connected through a proxy.
This type of role strengthens security because passwords are not embedded in
application source code or stored in a table. This way, the actions the database
performs are based on the implementation of your security policies, and these
definitions are stored in one place, the database, rather than in your applications. If
you need to modify the policy, you do so in one place without having to modify your
applications. No matter how users connect to the database, the result is always the
same, because the policy is bound to the role.
To enable the secure application role, you must execute its underlying package by
invoking it directly from the application when the user logs in, before the user
exercises the privileges granted by the secure application role. You cannot use a logon
trigger to enable a secure application role, nor can you have this type of role be a
default role.
When you enable the secure application role, Oracle Database verifies that the
authorized PL/SQL package is on the calling stack, that is, it verifies that the
authorized PL/SQL package is issuing the command to enable the role.
You can use secure application roles to ensure the existence of a database connection.
Because a secure application role is a role implemented by a package, the package can
validate that users can connect to the database through a middle tier or from a specific
IP address. In this way, the secure application role prevents users from accessing data
outside an application. They are forced to work within the framework of the
application privileges that they have been granted.
Managing Object Privileges
This section contains:
■About Object Privileges
■Granting or Revoking Object Privileges
■Managing Object Privileges
■Managing Table Privileges
■Managing View Privileges
■Managing Procedure Privileges
■Managing Type Privileges
About Object Privileges
An object privilege is a right that you grant to a user on a database object. Some
examples of object privileges include the right to:
■Use an edition
■Update a table
See Also:
■"Creating Secure Application Roles to Control Access to
Applications" on page 5-12
■Oracle Database 2 Day + Security Guide

Managing Object Privileges
4-24 Oracle Database Security Guide
■Select rows from another user’s table
■Execute a stored procedure of another user
Granting or Revoking Object Privileges
Each type of object has different privileges associated with it.
You can specify
ALL
[
PRIVILEGES
] to grant or revoke all available object privileges for
an object.
ALL
is not a privilege; rather, it is a shortcut, or a way of granting or revoking
all object privileges with one
GRANT
and
REVOKE
statement. If all object privileges are
granted using the
ALL
shortcut, then individual privileges can still be revoked.
Similarly, you can revoke all individually granted privileges by specifying
ALL
.
However, if you
REVOKE ALL
, and revoking causes integrity constraints to be deleted
(because they depend on a
REFERENCES
privilege that you are revoking), then you must
include the
CASCADE CONSTRAINTS
option in the
REVOKE
statement.
Example 4–8 revokes all privileges on the orders table in the
HR
schema using
CASCADE
CONSTRAINTS
.
Example 4–8 Revoking All Object Privileges Using CASCADE CONSTRAINTS
REVOKE ALL
ON orders FROM hr
CASCADE CONSTRAINTS;
Managing Object Privileges
An object privilege grants permission to perform a particular action on a specific
schema object.
Different object privileges are available for different types of schema objects. The
privilege to delete rows from the
departments
table is an example of an object
privilege.
Some schema objects, such as clusters, indexes, triggers, and database links, do not
have associated object privileges. Their use is controlled with system privileges. For
example, to alter a cluster, a user must own the cluster or have the
ALTER
ANY
CLUSTER
system privilege.
The following sections discuss granting and revoking such privileges:
■"Granting and Revoking Object Privileges" on page 4-25
■"Who Can Grant Object Privileges?" on page 4-25
■"Using Object Privileges with Synonyms" on page 4-25
The following sections discuss object privileges that apply to specific schema objects:
■"Managing Table Privileges" on page 4-26
■"Managing View Privileges" on page 27
■Sequences (see Oracle Database Administrator's Guide for information about
managing sequences)
■"Managing Procedure Privileges" on page 4-29
See Also: Oracle Database SQL Language Reference for a list of
object privileges and the operations they authorize

Managing Object Privileges
Configuring Privilege and Role Authorization 4-25
■Functions and Packages(Oracle Database Administrator's Guide for information
about managing object dependencies)
■"Managing Type Privileges" on page 4-33
Granting and Revoking Object Privileges
Object privileges can be granted to and revoked from users and roles. If you grant
object privileges to roles, then you can make the privileges selectively available.
You can grant or revoke object privileges to or from users and roles using the
following methods:
■The
GRANT
and
REVOKE
SQL statements
■Oracle Enterprise Manager Database Control
Who Can Grant Object Privileges?
A user automatically has all object privileges for schema objects contained in his or her
schema. A user with the
GRANT ANY OBJECT PRIVILEGE
can grant any specified object
privilege to another user with or without the
WITH GRANT OPTION
clause of the
GRANT
statement. A user with the
GRANT ANY OBJECT PRIVILEGE
can also use that privilege to
revoke any object privilege that was granted either by the object owner or by some
other user with the
GRANT ANY OBJECT PRIVILEGE
privilege. Otherwise, the grantee
can use the privilege, but cannot grant it to other users.
Using Object Privileges with Synonyms
You can use the
CREATE SYNONYM
statement to create synonyms for tables, views,
sequences, operators, procedures, stored functions, packages, materialized views, Java
class schema objects, user-defined object types, or other synonyms. If you grant users
the privilege to use the synonym, then the object privileges granted on the underlying
objects apply whether the user references the base object by name or by using the
synonym.
For example, suppose user
OE
creates the following synonym for the
CUSTOMERS
table:
CREATE SYNONYM customer_syn FOR CUSTOMERS;
Then
OE
grants the
SELECT
privilege on the
customer_syn
synonym to user
HR
.
GRANT SELECT ON customer_syn TO HR;
User
HR
then tries either of the following queries:
SELECT COUNT(*) FROM OE.customer_syn;
SELECT COUNT(*) FROM OE.CUSTOMERS;
Both queries will yield the same result:
COUNT(*)
----------
319
See Also: Oracle Database 2 Day DBA for more information about
Database Control
See Also: Oracle Database SQL Language Reference for information
about
GRANT
and
GRANT ANY OBJECT PRIVILEGE

Managing Object Privileges
4-26 Oracle Database Security Guide
Be aware that when you grant the synonym to another user, the grant applies to the
underlying object that the synonym represents, not to the synonym itself. For example,
if user
HR
queries the
ALL_TAB_PRIVS
data dictionary view for his privileges, he will
learn the following:
SELECT TABLE_SCHEMA, TABLE_NAME, PRIVILEGE
FROM ALL_TAB_PRIVS
WHERE TABLE_SCHEMA = 'OE';
TABLE_SCHEMA TABLE_NAME PRIVILEGE
------------ ---------- ----------
OE CUSTOMER SELECT
OE ORDERS UPDATE
The results show that in addition to other privileges, he has the
SELECT
privilege for
the underlying object of the
customer_syn
synonym, which is the
OE.CUSTOMER
table.
At this point, if user
OE
then revokes the
SELECT
privilege on the
customer_syn
synonym from
HR
, here are the results if
HR
checks his privileges again:
TABLE_SCHEMA TABLE_NAME PRIVILEGE
------------ ---------- ---------
OE ORDERS UPDATE
User
HR
no longer has the
SELECT
privilege for the
OE.CUSTOMER
table. If he tries to
query the
OE.CUSTOMERS
table, then the following error appears:
SELECT COUNT(*) FROM OE.CUSTOMERS;
ERROR at line 1:
ORA-00942: table or view does not exist
Managing Table Privileges
Object privileges for tables enable table security at the DML (data manipulation
language) or DDL (data definition language) level of operation.
The following sections discuss table privileges and DML and DDL operations:
■How Table Privileges Affect Data Manipulation Language Operations
■How Table Privileges Affect Data Definition Language Operations
How Table Privileges Affect Data Manipulation Language Operations
You can grant privileges to use the
DELETE
,
INSERT
,
SELECT
, and
UPDATE
DML
operations on a table or view. Grant these privileges only to users and roles that need
to query or manipulate data in a table.
You can restrict
INSERT
and
UPDATE
privileges for a table to specific columns of the
table. With a selective
INSERT
privilege, a privileged user can insert a row with values
for the selected columns. All other columns receive
NULL
or the default value of the
column. With a selective
UPDATE
privilege, a user can update only specific column
values of a row. You can use selective
INSERT
and
UPDATE
privileges to restrict user
access to sensitive data.
For example, if you do not want data entry users to alter the
salary
column of the
employees
table, then selective
INSERT
or
UPDATE
privileges can be granted that
exclude the
salary
column. Alternatively, a view that excludes the
salary
column
could satisfy this need for additional security.

Managing Object Privileges
Configuring Privilege and Role Authorization 4-27
How Table Privileges Affect Data Definition Language Operations
The
ALTER
,
INDEX
, and
REFERENCES
privileges allow DDL operations to be performed
on a table. Because these privileges allow other users to alter or create dependencies
on a table, you should grant these privileges conservatively.
A user attempting to perform a DDL operation on a table may need additional system
or object privileges. For example, to create a trigger on a table, the user requires both
the
ALTER
TABLE
object privilege for the table and the
CREATE
TRIGGER
system privilege.
As with the
INSERT
and
UPDATE
privileges, you can grant the
REFERENCES
privilege on
specific columns of a table. The
REFERENCES
privilege enables the grantee to use the
table on which the grant is made as a parent key to any foreign keys that the grantee
wishes to create in his or her own tables. This action is controlled with a special
privilege because the presence of foreign keys restricts the data manipulation and table
alterations that can be done to the parent key. A column-specific
REFERENCES
privilege
restricts the grantee to using the named columns (which, of course, must include at
least one primary or unique key of the parent table).
Managing View Privileges
This section contains:
■About View Privileges
■Privileges Required to Create Views
■Increasing Table Security with Views
About View Privileges
A view is a presentation of data selected from one or more tables, possibly including
other views. A view shows the structure of the underlying tables. Its selected data can
be thought of as the result of a stored query. A view contains no actual data but rather
derives what it shows from the tables and views on which it is based. You can query a
view, and change the data it represents. Data in a view can be updated or deleted, and
new data inserted. These operations directly alter the tables on which the view is
based, and are subject to the integrity constraints and triggers of the base tables.
You can apply DML object privileges to views, similar to tables. Object privileges for a
view allow various DML operations, which as noted affect the base tables from which
the view is derived.
Privileges Required to Create Views
To create a view, you must meet the following requirements:
■You must have been granted one of the following system privileges, either
explicitly or through a role:
–The
CREATE
VIEW
system privilege (to create a view in your schema)
–The
CREATE
ANY
VIEW
system privilege (to create a view in the schema of
another user)
See Also: Oracle Database SQL Language Reference for more
information about DML operations
See Also: "Data Integrity" in Oracle Database Concepts for more
information about primary keys, unique keys, and integrity
constraints

Managing Object Privileges
4-28 Oracle Database Security Guide
■You must have been explicitly granted one of the following privileges:
–The
SELECT
,
INSERT
,
UPDATE
, or
DELETE
object privileges on all base objects
underlying the view
–Th
e
SELECT
ANY
TABLE
,
INSERT
ANY
TABLE
,
UPDATE
ANY
TABLE
, or
DELETE
ANY
TABLE
system privileges
■In addition, before you can grant other users access to you view, you must have
object privileges to the base objects with the
GRANT
OPTION
clause or appropriate
system privileges with the
ADMIN
OPTION
clause. If you do not have these
privileges, then you cannot to grant other users access to your view. If you try, an
ORA-01720: grant option does not exist for object_name
error is raised,
with
object_name
referring to the view’s underlying object for which you do not
have the sufficient privilege.
Increasing Table Security with Views
To use a view, the user must have the appropriate privileges but only for the view
itself, not its underlying objects. However, if access privileges for the underlying
objects of the view are removed, then the user no longer has access. This behavior
occurs because the security domain that is used when a user queries the view is that of
the definer of the view. If the privileges on the underlying objects are revoked from the
view’s definer, then the view becomes invalid, and no one can use the view. Therefore,
even if a user has been granted access to the view, the user may not be able to use the
view if the definer’s rights have been revoked from the view’s underlying objects.
For example, suppose User A creates a view. User A has definer’s rights on the
underlying objects of the view. User A then grants the
SELECT
privilege on that view to
User B so that User B can query the view. But if User A no longer has access to the
underlying objects of that view, then User B no longer has access either.
Views add two more levels of security for tables, column-level security and
value-based security, as follows:
■A view can provide access to selected columns of base tables. For example, you
can define a view on the
employees
table to show only the
employee_id
,
last_
name
, and
manager_id
columns:
CREATE VIEW employees_manager AS
SELECT last_name, employee_id, manager_id FROM employees;
■A view can provide value-based security for the information in a table. A
WHERE
clause in the definition of a view displays only selected rows of base tables.
Consider the following two examples:
CREATE VIEW lowsal AS
SELECT * FROM employees
WHERE salary < 10000;
The
lowsal
view allows access to all rows of the
employees
table that have a salary
value less than 10000. Notice that all columns of the
employees
table are accessible
in the
lowsal
view.
CREATE VIEW own_salary AS
SELECT last_name, salary
FROM employees
WHERE last_name = USER;
See Also: Oracle Database SQL Language Reference

Managing Object Privileges
Configuring Privilege and Role Authorization 4-29
In the
own_salary
view, only the rows with an
last_name
that matches the current
user of the view are accessible. The
own_salary
view uses the
user
pseudo
column, whose values always refer to the current user. This view combines both
column-level security and value-based security.
Managing Procedure Privileges
This section contains:
■Using the EXECUTE Privilege for Procedure Privileges
■Procedure Execution and Security Domains
■How Procedure Privileges Affect Definer’s Rights
■How Procedure Privileges Affect Invoker’s Rights
■System Privileges Required to Create or Replace a Procedure
■System Privileges Required to Compile a Procedure
■How Procedure Privileges Affect Packages and Package Objects
Using the EXECUTE Privilege for Procedure Privileges
The
EXECUTE
privilege is the only object privilege for procedures, including
standalone procedures and functions, and for those within packages. Grant this
privilege only to users who need to run a procedure or to compile another procedure
that calls a desired procedure.
Procedure Execution and Security Domains
A user with the
EXECUTE
object privilege for a specific procedure can execute the
procedure or compile a program unit that references the procedure. Oracle Database
performs a run-time privilege check when any PL/SQL unit is called. A user with the
EXECUTE
ANY
PROCEDURE
system privilege can execute any procedure in the database.
Privileges to run procedures can be granted to a user through roles.
How Procedure Privileges Affect Definer’s Rights
The owner of a procedure, called the definer, must have all the necessary object
privileges for referenced objects. If the procedure owner grants to another user the
right to use that procedure, then the privileges of the procedure owner (on the objects
referenced by the procedure) apply to the grantee user’s exercise of the procedure. The
privileges of the procedure’s definer must be granted directly to the user, not granted
through roles. These are termed definer’s rights.
The user of a procedure who is not its owner is called the invoker. Additional privileges
on referenced objects are required for invoker’s rights procedures, but not for definer's
rights procedures.
A user of a definer’s rights procedure requires only the privilege to execute the
procedure and no privileges on the underlying objects that the procedure accesses.
This is because a definer's rights procedure operates under the security domain of the
user who owns the procedure, regardless of who is executing it. The owner of the
procedure must have all the necessary object privileges for referenced objects. Fewer
See Also: Oracle Database PL/SQL Language Reference for more
information about how Oracle Database checks privileges at run-time
See Also: "How Roles Work in PL/SQL Blocks" on page 4-9

Managing Object Privileges
4-30 Oracle Database Security Guide
privileges have to be granted to users of a definer’s rights procedure. This results in
stronger control of database access.
You can use definer’s rights procedures to control access to private database objects
and add a level of database security. By writing a definer's rights procedure and
granting only
EXECUTE
privilege to a user, the user can be forced to access the
referenced objects only through the procedure.
At run time, Oracle Database checks whether the privileges of the owner of a definer’s
rights stored procedure allow access to that procedure’s referenced objects, before the
procedure is executed. If a necessary privilege on a referenced object was revoked
from the owner of a definer's rights procedure, then the procedure cannot be run by
the owner or any other user.
How Procedure Privileges Affect Invoker’s Rights
An invoker’s rights procedure executes with all of the invoker’s privileges. Oracle
Database enables the privileges that were granted to the invoker through any of the
invoker’s enabled roles to take effect, unless a definer’s rights procedure calls the
invoker's rights procedure directly or indirectly. A user of an invoker's rights
procedure needs privileges (granted to the user either directly or through a role) on
objects that the procedure accesses through external references that are resolved in the
schema of the invoker.
The invoker needs privileges at run time to access program references embedded in
DML statements or dynamic SQL statements, because they are effectively recompiled
at run time.
For all other external references, such as direct PL/SQL function calls, Oracle Database
checks the privileges of the owner at compile time, but does not perform a run-time
check. Therefore, the user of an invoker's rights procedure does not need privileges on
external references outside DML or dynamic SQL statements. Alternatively, the
developer of an invoker’s rights procedure must only grant privileges on the
procedure itself, not on all objects directly referenced by the invoker's rights
procedure.
You can create a software bundle that consists of multiple program units, some with
definer's rights and others with invoker's rights, and restrict the program entry points
(controlled step-in). A user who has the privilege to run an entry-point procedure can
also execute internal program units indirectly, but cannot directly call the internal
programs. For very precise control over query processing, you can create a PL/SQL
package specification with explicit cursors.
Note: Trigger processing follows the same patterns as definer's
rights procedures. The user runs a SQL statement, which that user
is privileged to run. As a result of the SQL statement, a trigger is
fired. The statements within the triggered action temporarily
execute under the security domain of the user that owns the trigger.
For more information, see "Overview of Triggers" in Oracle Database
Concepts.

Managing Object Privileges
Configuring Privilege and Role Authorization 4-31
System Privileges Required to Create or Replace a Procedure
To create or replace a procedure in your own schema, you must have the
CREATE
PROCEDURE
system privilege. To create or replace a procedure in another user's schema,
you must have the
CREATE ANY PROCEDURE
system privilege.
The user who owns the procedure also must have privileges for schema objects
referenced in the procedure body. To create a procedure, you need to have been
explicitly granted the necessary privileges (system or object) on all objects referenced
by the procedure. You cannot obtain the required privileges through roles. This
includes the
EXECUTE
privilege for any procedures that are called inside the procedure
being created.
System Privileges Required to Compile a Procedure
To compile a standalone procedure, run the
ALTER PROCEDURE
statement with the
COMPILE
clause. To compile a procedure that is part of a package, run the
ALTER
PACKAGE
statement.
Example 4–9 shows how to compile a standalone procedure.
Example 4–9 Compiling a Procedure
ALTER PROCEDURE psmith.remove_emp COMPILE;
If the standalone or packaged procedure is in another user’s schema, you must have
the
ALTER ANY PROCEDURE
privilege to recompile it. You can recompile procedures in
your own schema without any privileges.
How Procedure Privileges Affect Packages and Package Objects
A user with the
EXECUTE
object privilege for a package can execute any public
procedure or function in the package, and can access or modify the value of any public
package variable. You cannot grant specific
EXECUTE
privileges for individual
constructs in a package. Therefore, you may find it useful to consider two alternatives
for establishing security when developing procedures, functions, and packages for a
database application. The following examples describe these alternatives.
See Also:
■"Configuring an Oracle Virtual Private Database Policy" on
page 7-5
■Oracle Database PL/SQL Language Reference for information
about how Oracle Database handles name resolution and
privilege checking at runtime using invoker’s and definer’s
rights
■Oracle Database PL/SQL Language Reference for information
about defining explicit cursors in the
CREATE PACKAGE
statement
Note: Triggers require that privileges on referenced objects be
granted directly to the owner of the trigger. Anonymous PL/SQL
blocks can use any privilege, whether the privilege is granted
explicitly or through a role.

Managing Object Privileges
4-32 Oracle Database Security Guide
Procedure Privileges and Packages and Package Objects: Example 1
Example 4–10 shows four procedures created in the bodies of two packages.
Example 4–10 Package Objects Affected by Procedure Privileges
CREATE PACKAGE BODY hire_fire AS
PROCEDURE hire(...) IS
BEGIN
INSERT INTO employees . . .
END hire;
PROCEDURE fire(...) IS
BEGIN
DELETE FROM employees . . .
END fire;
END hire_fire;
CREATE PACKAGE BODY raise_bonus AS
PROCEDURE give_raise(...) IS
BEGIN
UPDATE employees SET salary = . . .
END give_raise;
PROCEDURE give_bonus(...) IS
BEGIN
UPDATE employees SET bonus = . . .
END give_bonus;
END raise_bonus;
The following
GRANT EXECUTE
statements enable the
big_bosses
and
little_bosses
roles to run the appropriate procedures:
GRANT EXECUTE ON hire_fire TO big_bosses;
GRANT EXECUTE ON raise_bonus TO little_bosses;
Procedure Privileges and Packages and Package Objects: Example 2
This example shows four procedure definitions within the body of a single package.
Two additional standalone procedures and a package are created specifically to
provide access to the procedures defined in the main package.
CREATE PACKAGE BODY employee_changes AS
PROCEDURE change_salary(...) IS BEGIN ... END;
PROCEDURE change_bonus(...) IS BEGIN ... END;
PROCEDURE insert_employee(...) IS BEGIN ... END;
PROCEDURE delete_employee(...) IS BEGIN ... END;
END employee_changes;
CREATE PROCEDURE hire
BEGIN
employee_changes.insert_employee(...)
END hire;
CREATE PROCEDURE fire
BEGIN
employee_changes.delete_employee(...)
END fire;
Note: Granting
EXECUTE
privilege for a package provides uniform
access to all package objects.

Managing Object Privileges
Configuring Privilege and Role Authorization 4-33
PACKAGE raise_bonus IS
PROCEDURE give_raise(...) AS
BEGIN
employee_changes.change_salary(...)
END give_raise;
PROCEDURE give_bonus(...)
BEGIN
employee_changes.change_bonus(...)
END give_bonus;
Using this method, the procedures that actually do the work (the procedures in the
employee_changes
package) are defined in a single package and can share declared
global variables, cursors, on so on. By declaring top-level procedures,
hire
and
fire
,
and an additional package,
raise_bonus
, you can grant selective
EXECUTE
privileges on
procedures in the main package:
GRANT EXECUTE ON hire, fire TO big_bosses;
GRANT EXECUTE ON raise_bonus TO little_bosses;
Managing Type Privileges
The following sections describe the use of privileges for types, methods, and objects:
■System Privileges for Named Types
■Object Privileges
■Method Execution Model
■Privileges Required to Create Types and Tables Using Types
■Example of Privileges for Creating Types and Tables Using Types
■Privileges on Type Access and Object Access
■Type Dependencies
System Privileges for Named Types
Table 4–4 lists system privileges for named types (object types,
VARRAY
s, and nested
tables).
The
RESOURCE
role includes the
CREATE
TYPE
system privilege. The
DBA
role includes all
of these privileges.
Object Privileges
The only object privilege that applies to named types is
EXECUTE
. If the
EXECUTE
privilege exists on a named type, then a user can use the named type to:
Table 4–4 System Privileges for Named Types
Privilege Enables you to ...
CREATE TYPE
Create named types in your own schemas
CREATE ANY TYPE
Create a named type in any schema
ALTER ANY TYPE
Alter a named type in any schema
DROP ANY TYPE
Drop a named type in any schema
EXECUTE ANY TYPE
Use and reference a named type in any schema

Managing Object Privileges
4-34 Oracle Database Security Guide
■Define a table
■Define a column in a relational table
■Declare a variable or parameter of the named type
The
EXECUTE
privilege permits a user to invoke the methods in the type, including the
type constructor. This is similar to the
EXECUTE
privilege on a stored PL/SQL
procedure.
Method Execution Model
Method execution is the same as any other stored PL/SQL procedure.
Privileges Required to Create Types and Tables Using Types
To create a type, you must meet the following requirements:
■You must have the
CREATE
TYPE
system privilege to create a type in your schema or
the
CREATE
ANY
TYPE
system privilege to create a type in the schema of another
user. These privileges can be acquired explicitly or through a role.
■The owner of the type must be explicitly granted the
EXECUTE
object privileges to
access all other types referenced within the definition of the type, or have been
granted the
EXECUTE
ANY
TYPE
system privilege. The owner cannot obtain the
required privileges through roles.
■If the type owner intends to grant access to the type to other users, then the owner
must receive the
EXECUTE
privileges to the referenced types with the
GRANT
OPTION
or the
EXECUTE
ANY
TYPE
system privilege with the
ADMIN
OPTION
. If not, then the
type owner has insufficient privileges to grant access on the type to other users.
To create a table using types, you must meet the requirements for creating a table and
the following additional requirements:
■The owner of the table must have been directly granted the
EXECUTE
object
privilege to access all types referenced by the table, or has been granted the
EXECUTE
ANY
TYPE
system privilege. The owner cannot exercise the required
privileges if these privileges were granted through roles.
■If the table owner intends to grant access to the table to other users, then the
owner must have the
EXECUTE
privilege to the referenced types with the
GRANT
OPTION
or the
EXECUTE
ANY
TYPE
system privilege with the
ADMIN
OPTION
. If not,
then the table owner has insufficient privileges to grant access on the table.
Example of Privileges for Creating Types and Tables Using Types
Assume that three users exist with the
CONNECT
and
RESOURCE
roles:
■
user1
■
user2
■
user3
The following DDL is run in the schema of
user1
:
CREATE TYPE type1 AS OBJECT (
attr1 NUMBER);
See Also: "Managing Procedure Privileges" on page 4-29
See Also: "Managing Table Privileges" on page 4-26 for the
requirements for creating a table

Managing Object Privileges
Configuring Privilege and Role Authorization 4-35
CREATE TYPE type2 AS OBJECT (
attr2 NUMBER);
GRANT EXECUTE ON type1 TO user2;
GRANT EXECUTE ON type2 TO user2 WITH GRANT OPTION;
The following DDL is performed in the schema of
user2
:
CREATE TABLE tab1 OF user1.type1;
CREATE TYPE type3 AS OBJECT (
attr3 user1.type2);
CREATE TABLE tab2 (
col1 user1.type2);
The following statements succeed because
user2
has
EXECUTE
privilege on
user1.type2
with the
GRANT
OPTION:
GRANT EXECUTE ON type3 TO user3;
GRANT SELECT on tab2 TO user3;
However, the following grant fails because
user2
does not have
EXECUTE
privilege on
user1.type1
with the
GRANT
OPTION:
GRANT SELECT ON tab1 TO user3;
The following statements can be successfully run by
user3
:
CREATE TYPE type4 AS OBJECT (
attr4 user2.type3);
CREATE TABLE tab3 OF type4;
Privileges on Type Access and Object Access
Existing column-level and table-level privileges for DML statements apply to both
column objects and row objects.
Table 4–5 lists the privileges for object tables.
Similar table privileges and column privileges apply to column objects. Retrieving
instances does not in itself reveal type information. However, clients must access
named type information to interpret the type instance images. When a client requests
type information, Oracle Database checks for the
EXECUTE
privilege on the type.
Consider the following schema:
Note: Customers should discontinue using the
CONNECT
and
RESOURCE
roles. The
CONNECT
role presently retains only the
CREATE
SESSION
privilege.
Table 4–5 Privileges for Object Tables
Privilege Enables you to...
SELECT
Access an object and its attributes from the table
UPDATE
Modify the attributes of the objects that make up the rows in the table
INSERT
Create new objects in the table
DELETE
Delete rows

Managing Object Privileges
4-36 Oracle Database Security Guide
CREATE TYPE emp_type (
eno NUMBER, ename CHAR(31), eaddr addr_t);
CREATE TABLE emp OF emp_t;
In addition, consider the following two queries:
SELECT VALUE(emp) FROM emp;
SELECT eno, ename FROM emp;
For either query, Oracle Database checks the
SELECT
privilege of the user for the
emp
table. For the first query, the user must obtain the
emp_type
type information to
interpret the data. When the query accesses the
emp_type
type, Oracle Database checks
the
EXECUTE
privilege of the user.
The second query, however, does not involve named types, so Oracle Database does
not check type privileges.
In addition, by using the schema from the previous section,
user3
can perform the
following queries:
SELECT tab1.col1.attr2 FROM user2.tab1 tab1;
SELECT attr4.attr3.attr2 FROM tab3;
Note that in both
SELECT
statements,
user3
does not have explicit privileges on the
underlying types, but the statement succeeds because the type and table owners have
the necessary privileges with the
GRANT
OPTION.
Oracle Database checks privileges on the following events, and returns an error if the
client does not have the privilege for the action:
■Pinning an object in the object cache using its
REF
value causes Oracle Database to
check for the
SELECT
privilege on the containing object table.
■Modifying an existing object or flushing an object from the object cache causes
Oracle Database to check for the
UPDATE
privilege on the destination object table.
■Flushing a new object causes Oracle Database to check for the
INSERT
privilege on
the destination object table.
■Deleting an object causes Oracle Database to check for the
DELETE
privilege on the
destination table.
■Pinning an object of a named type causes Oracle Database to check
EXECUTE
privilege on the object.
Modifying the attributes of an object in a client third-generation language application
causes Oracle Database to update the entire object. Therefore, the user needs the
UPDATE
privilege on the object table. Having the
UPDATE
privilege on only certain
columns of the object table is not sufficient, even if the application only modifies
attributes corresponding to those columns. Therefore, Oracle Database does not
support column-level privileges for object tables.
Type Dependencies
As with stored objects, such as procedures and tables, types being referenced by other
objects are called dependencies. There are some special issues for types on which
tables depend. Because a table contains data that relies on the type definition for
access, any change to the type causes all stored data to become inaccessible. Changes
that can cause this are when necessary privileges required to use the type are revoked,
or the type or dependent types are dropped. If these actions occur, then the table
becomes invalid and cannot be accessed.

Granting a User Privileges and Roles
Configuring Privilege and Role Authorization 4-37
A table that is invalid because of missing privileges can automatically become valid
and accessible if the required privileges are granted again. A table that is invalid
because a dependent type was dropped can never be accessed again, and the only
permissible action is to drop the table.
Because of the severe effects that revoking a privilege on a type or dropping a type can
cause, the SQL statements
REVOKE
and
DROP
TYPE
, by default, implement restricted
semantics. This means that if the named type in either statement has table or type
dependents, then an error is received and the statement cancels. However, if the
FORCE
clause for either statement is used, then the statement always succeeds. If there are
depended-upon tables, then they are invalidated.
Granting a User Privileges and Roles
This section contains:
■Granting System Privileges and Roles
■Granting Object Privileges
■Granting Privileges on Columns
It is also possible to grant roles to a user connected through a middle tier or proxy.
This is discussed in "Using a Middle Tier Server for Proxy Authentication" on
page 3-36.
Granting System Privileges and Roles
You can use the
GRANT
SQL statement to grant system privileges and roles to users and
roles. The following privileges are required:
■To grant a system privilege, a user must be granted the system privilege with the
ADMIN
option or must be granted the
GRANT ANY PRIVILEGE
system privilege.
■To grant a role, a user must be granted the role with the
ADMIN
option or was
granted the
GRANT ANY ROLE
system privilege.
Example 4–11 grants the system privilege
CREATE SESSION
and the
accts_pay
role to
the user
jward
.
Example 4–11 Granting a System Privilege and a Role to a User
GRANT CREATE SESSION, accts_pay TO jward;
Example 4–11 grants the
EXECUTE
privilege on the
exec_dir
directory object to the user
jward
.
Example 4–12 Granting the EXECUTE Privilege on a Directory Object
GRANT EXECUTE ON DIRECTORY exec_dir TO jward;
See Also: Oracle Database Reference for details about using the
REVOKE
,
DROP
TYPE
, and
FORCE
clauses
Note: Object privileges cannot be granted along with system
privileges and roles in the same
GRANT
statement.

Granting a User Privileges and Roles
4-38 Oracle Database Security Guide
Granting the ADMIN Option
If you specify the
WITH ADMIN OPTION
clause when you grant a privilege or role to a
user or role, then the privilege grant has the following expanded capabilities:
■The grantee can grant or revoke the system privilege or role to or from any other
user or role in the database. Users cannot revoke a role from themselves.
■The grantee can grant the system privilege or role with the
ADMIN
option.
■The grantee of a role can alter or drop the role.
Example 4–13 grants the
new_dba
role with the
WITH ADMIN OPTION
clause to user
michael
.
Example 4–13 Granting the ADMIN Option
GRANT new_dba TO michael WITH ADMIN OPTION;
User
michael
is able to not only use all of the privileges implicit in the
new_dba
role,
but he can also grant, revoke, and drop the
new_dba
role as deemed necessary. Because
of these powerful capabilities, use caution when granting system privileges or roles
with the
ADMIN
option. These privileges are usually reserved for a security
administrator, and are rarely granted to other administrators or users of the system.
Creating a New User with the GRANT Statement
Oracle Database enables you to create a new user with the
GRANT
statement. If you
specify a password using the
IDENTIFIED BY
clause, and the user name does not exist
in the database, then a new user with that user name and password is created.
Example 4–14 creates
psmith
as a new user while granting
psmith
the
CREATE SESSION
system privilege.
Example 4–14 Creating a New User with the GRANT Statement
GRANT CREATE SESSION TO psmith IDENTIFIED BY password;
Granting Object Privileges
You can use the
GRANT
statement to grant object privileges to roles and users. To grant
an object privilege, you must fulfill one of the following conditions:
■You own the object specified.
■You have been granted the
GRANT ANY OBJECT PRIVILEGE
system privilege. This
privilege enables you to grant and revoke privileges on behalf of the object owner.
■The
WITH GRANT OPTION
clause was specified when you were granted the object
privilege.
Note: When a user creates a role, the role is automatically granted to
the creator with the
ADMIN
option.
See Also:
■"Creating User Accounts" on page 2-1
■"Minimum Requirements for Passwords" on page 3-3

Granting a User Privileges and Roles
Configuring Privilege and Role Authorization 4-39
Example 4–15 grants the
SELECT
,
INSERT
, and
DELETE
object privileges for all columns
of the
emp
table to the users
jfee
and
tsmith
.
Example 4–15 Granting Object Privileges to Users
GRANT SELECT, INSERT, DELETE ON emp TO jfee, tsmith;
To grant all object privileges on the
salary
view to user
jfee
, use the
ALL
keyword as
shown in the following example:
GRANT ALL ON salary TO jfee;
Specifying the GRANT OPTION Clause
Specify the
WITH GRANT OPTION
clause with the
GRANT
statement to enable the grantee
to grant the object privileges to other users. The user whose schema contains an object
is automatically granted all associated object privileges with the
GRANT OPTION
. This
special privilege allows the grantee several expanded privileges:
■The grantee can grant the object privilege to any user in the database, with or
without the
GRANT OPTION
, and to any role in the database.
■If both of the following conditions are true, then the grantee can create views on
the table, and grant the corresponding privileges on the views to any user or role
in the database:
–The grantee receives object privileges for the table with the
GRANT OPTION
.
–The grantee has the
CREATE VIEW
or
CREATE ANY VIEW
system privilege.
Granting Object Privileges on Behalf of the Object Owner
The
GRANT ANY OBJECT PRIVILEGE
system privilege enables users to grant and revoke
any object privilege on behalf of the object owner. This privilege provides a convenient
means for database and application administrators to grant access to objects in any
schema without requiring that they connect to the schema. Login credentials do not
need to be maintained for schema owners who have this privilege, which reduces the
number of connections required during configuration.
This system privilege is part of the Oracle Database supplied
DBA
role and is thus
granted (with the
ADMIN option
) to any user connecting
AS SYSDBA
(user
SYS
). As with
other system privileges, the
GRANT ANY OBJECT PRIVILEGE
system privilege can only
be granted by a user who possesses the
ADMIN option
.
Note: System privileges and roles cannot be granted along with
object privileges in the same
GRANT
statement.
Note: A grantee cannot regrant access to objects unless the
original grant included the
GRANT OPTION
. Thus in the example just
given,
jfee
cannot use the
GRANT
statement to grant object
privileges to anyone else.
Note: The
GRANT OPTION
is not valid when granting an object
privilege to a role. Oracle Database prevents the propagation of object
privileges through roles so that grantees of a role cannot propagate
object privileges received by means of roles.

Granting a User Privileges and Roles
4-40 Oracle Database Security Guide
The recorded grantor of access rights to an object is either the object owner or the
person exercising the
GRANT ANY OBJECT PRIVILEGE
system privilege. If the grantor
with
GRANT ANY OBJECT PRIVILEGE
does not have the object privilege with the
GRANT
OPTION
, then the object owner is shown as the grantor. Otherwise, when that grantor
has the object privilege with the
GRANT OPTION
, then that grantor is recorded as the
grantor of the grant.
For example, consider the following scenario. User
adams
possesses the
GRANT ANY
OBJECT PRIVILEGE
system privilege. He does not possess any other grant privileges.
He issues the following statement:
GRANT SELECT ON HR.EMPLOYEES TO blake WITH GRANT OPTION;
If you examine the
DBA_TAB_PRIVS
view, then you will see that
hr
is shown as the
grantor of the privilege:
SELECT GRANTEE, GRANTOR, PRIVILEGE, GRANTABLE
FROM DBA_TAB_PRIVS
WHERE TABLE_NAME = 'EMPLOYEES' and OWNER = 'HR';
GRANTEE GRANTOR PRIVILEGE GRANTABLE
-------- ------- ----------- ----------
BLAKE HR SELECT YES
Now assume that user
blake
also has the
GRANT ANY OBJECT PRIVILEGE
system. He
issues the following statement:
GRANT SELECT ON HR.EMPLOYEES TO clark;
In this case, when you query the
DBA_TAB_PRIVS
view again, you see that
blake
is
shown as being the grantor of the privilege:
GRANTEE GRANTOR PRIVILEGE GRANTABLE
-------- -------- --------- ----------
BLAKE HR SELECT YES
CLARK BLAKE SELECT NO
This occurs because
blake
already possesses the
SELECT
privilege on
HR.EMPLOYEES
with the
GRANT OPTION
.
Granting Privileges on Columns
You can grant
INSERT
,
UPDATE
, or
REFERENCES
privileges on individual columns in a
table.
Note: The audit record generated by the
GRANT
statement always
shows the actual user who performed the grant.
See Also: "Revoking Object Privileges on Behalf of the Object
Owner" on page 4-42

Revoking Privileges and Roles from a User
Configuring Privilege and Role Authorization 4-41
The following statement grants the
INSERT
privilege on the
acct_no
column of the
accounts
table to user
psmith
:
GRANT INSERT (acct_no) ON accounts TO psmith;
In the following example, object privilege for the
ename
and
job
columns of the
emp
table are granted to the users
jfee
and
tsmith
:
GRANT INSERT(ename, job) ON emp TO jfee, tsmith;
Row-Level Access Control
You can also provide access control at the row level, that is, within objects, using
Virtual Private Database (VPD) or Oracle Label Security (OLS).
Revoking Privileges and Roles from a User
This section contains:
■Revoking System Privileges and Roles
■Revoking Object Privileges
■Cascading Effects of Revoking Privileges
Revoking System Privileges and Roles
You can revoke system privileges and roles using the SQL statement
REVOKE
. Any user
with the
ADMIN
option for a system privilege or role can revoke the privilege or role
from any other database user or role. The revoker does not have to be the user that
originally granted the privilege or role. Users with
GRANT ANY ROLE
can revoke any
role.
The following statement revokes the
CREATE TABLE
system privilege and the
accts_
rec
role from user
psmith
:
REVOKE CREATE TABLE, accts_rec FROM psmith;
Caution: Before granting a column-specific
INSERT
privilege,
determine if the table contains any columns on which
NOT NULL
constraints are defined. Granting selective insert capability without
including the
NOT NULL
columns prevents the user from inserting
any rows into the table. To avoid this situation, ensure that each
NOT
NULL
column can either be inserted into or has a non-
NULL
default
value. Otherwise, the grantee will not be able to insert rows into the
table and will receive an error.
See Also:
■Chapter 7, "Using Oracle Virtual Private Database
to Control Data Access"
■"Adding Policies for Column-Level Oracle Virtual Private
Database" on page 7-8
■Oracle Label Security Administrator's Guide

Revoking Privileges and Roles from a User
4-42 Oracle Database Security Guide
Revoking Object Privileges
To revoke an object privilege, you must fulfill one of the following conditions:
■You previously granted the object privilege to the user or role.
■You possess the
GRANT ANY OBJECT PRIVILEGE
system privilege that enables you
to grant and revoke privileges on behalf of the object owner.
You can only revoke the privileges that you, the person who granted the privilege,
directly authorized. You cannot revoke grants that were made by other users to whom
you granted the
GRANT OPTION
. However, there is a cascading effect. If the object
privileges of the user who granted the privilege are revoked, then the object privilege
grants that were propagated using the
GRANT OPTION
are revoked as well.
Assuming you are the original grantor of the privilege, the following statement
revokes the
SELECT
and
INSERT
privileges on the
emp
table from users
jfee
and
psmith
:
REVOKE SELECT, INSERT ON emp FROM jfee, psmith;
The following statement revokes all object privileges for the
dept
table that you
originally granted to the
human_resource
role:
REVOKE ALL ON dept FROM human_resources;
Revoking Object Privileges on Behalf of the Object Owner
The
GRANT ANY OBJECT PRIVILEGE
system privilege enables you to revoke any
specified object privilege where the object owner is the grantor. This occurs when the
object privilege is granted by the object owner, or on behalf of the owner by any user
holding the
GRANT ANY OBJECT PRIVILEGE
system privilege.
In a situation where the object privilege was granted by both the owner of the object
and the user executing the
REVOKE
statement (who has both the specific object privilege
and the
GRANT ANY OBJECT PRIVILEGE
system privilege), Oracle Database only
revokes the object privilege granted by the user issuing the
REVOKE
statement. This can
be illustrated by continuing the example started in "Granting Object Privileges on
Behalf of the Object Owner" on page 4-39.
At this point, user
blake
granted the
SELECT
privilege on
HR.EMPLOYEES
to
clark
. Even
though
blake
possesses the
GRANT ANY OBJECT PRIVILEGE
system privilege, he also
holds the specific object privilege, thus this grant is attributed to him. Assume that
user
HR
also grants the
SELECT
privilege on
HR.EMPLOYEES
to user
clark
. A query of the
DBA_TAB_PRIVS
view shows that the following grants are in effect for the
HR.EMPLOYEES
table:
GRANTEE GRANTOR PRIVILEGE GRANTABLE
-------- ------- ----------- ----------
BLAKE HR SELECT YES
CLARK BLAKE SELECT NO
Note: The
ADMIN
option for a system privilege or role cannot be
selectively revoked. Instead, revoke the privilege or role, and then
grant the privilege or role again but without the
ADMIN
option.
Note: The
GRANT OPTION
for an object privilege cannot be
selectively revoked. Instead, revoke the object privilege and then
grant it again but without the
GRANT OPTION
. Users cannot revoke
object privileges from themselves.

Revoking Privileges and Roles from a User
Configuring Privilege and Role Authorization 4-43
CLARK HR SELECT NO
User
blake
now issues the following
REVOKE
statement:
REVOKE SELECT ON HR.EMPLOYEES FROM clark;
Only the object privilege for user
clark
granted by user
blake
is removed. The grant
by the object owner,
HR
, remains.
GRANTEE GRANTOR PRIVILEGE GRANTABLE
-------- ------- ----------- ----------
BLAKE HR SELECT YES
CLARK HR SELECT NO
If
blake
issues the
REVOKE
statement again, then this time the effect is to remove the
object privilege granted by
adams
(on behalf of
HR
), using the
GRANT ANY OBEJCT
PRIVILEGE
system privilege.
Revoking Column-Selective Object Privileges
Although users can grant column-specific
INSERT
,
UPDATE
, and
REFERENCES
privileges
for tables and views, they cannot selectively revoke column-specific privileges with a
similar
REVOKE
statement. Instead, the grantor must first revoke the object privilege for
all columns of a table or view, and then selectively repeat the grant of the
column-specific privileges that the grantor intends to keep in effect.
For example, assume that role
human_resources
was granted the
UPDATE
privilege on
the
deptno
and
dname
columns of the table
dept
. To revoke the
UPDATE
privilege on just
the
deptno
column, issue the following two statements:
REVOKE UPDATE ON dept FROM human_resources;
GRANT UPDATE (dname) ON dept TO human_resources;
The
REVOKE
statement revokes the
UPDATE
privilege on all columns of the
dept
table
from the role
human_resources
. The
GRANT
statement then repeats, restores, or reissues
the grant of the
UPDATE
privilege on the
dname
column to the role
human_resources
.
Revoking the REFERENCES Object Privilege
If the grantee of the
REFERENCES
object privilege has used the privilege to create a
foreign key constraint (that currently exists), then the grantor can revoke the privilege
only by specifying the
CASCADE CONSTRAINTS
option in the
REVOKE
statement:
REVOKE REFERENCES ON dept FROM jward CASCADE CONSTRAINTS;
Any foreign key constraints currently defined that use the revoked
REFERENCES
privilege are dropped when the
CASCADE CONSTRAINTS
clause is specified.
Cascading Effects of Revoking Privileges
Depending on the type of privilege, there may be cascading effects when a privilege is
revoked. This is discussed in the following sections:
■Cascading Effects When Revoking System Privileges
■Cascading Effects When Revoking Object Privileges
See Also: "Granting Object Privileges on Behalf of the Object
Owner" on page 4-39

Revoking Privileges and Roles from a User
4-44 Oracle Database Security Guide
Cascading Effects When Revoking System Privileges
There are no cascading effects when revoking a system privilege related to DDL
operations, regardless of whether the privilege was granted with or without the
ADMIN
option. For example, assume the following:
1. The security administrator grants the
CREATE TABLE
system privilege to user
jfee
with the
ADMIN option
.
2. User
jfee
creates a table.
3. User
jfee
grants the
CREATE TABLE
system privilege to user
tsmith
.
4. User
tsmith
creates a table.
5. The security administrator revokes the
CREATE TABLE
system privilege from user
jfee
.
6. The table created by user
jfee
continues to exist. User
tsmith
still has the table
and the
CREATE TABLE
system privilege.
You can observe cascading effects when you revoke a system privilege related to a
DML operation. If the
SELECT ANY TABLE
privilege is revoked from a user, then all
procedures contained in the user’s schema relying on this privilege can no longer be
executed successfully until the privilege is reauthorized.
Cascading Effects When Revoking Object Privileges
Revoking an object privilege can have cascading effects. Remember the following:
■Object definitions that depend on a DML object privilege can be affected if the
DML object privilege is revoked. For example, assume that the body of the
test
procedure includes a SQL statement that queries data from the
emp
table. If the
SELECT
privilege on the
emp
table is revoked from the owner of the
test
procedure,
then the procedure can no longer be executed successfully.
■When a REFERENCES privilege for a table is revoked from a user, any foreign
key integrity constraints that are defined by the user and require the dropped
REFERENCES privilege are automatically dropped. For example, assume that
user
jward
is granted the
REFERENCES
privilege for the
deptno
column of the
dept
table. This user now creates a foreign key on the
deptno
column in the
emp
table
that references the
deptno
column of the
dept
table. If the
REFERENCES
privilege on
the
deptno
column of the
dept
table is revoked, then the foreign key constraint on
the
deptno
column of the
emp
table is dropped in the same operation.
■The object privilege grants propagated using the GRANT OPTION are revoked
if the object privilege of a grantor is revoked. For example, assume that
user1
is
granted the
SELECT
object privilege on the
emp
table with the
GRANT OPTION
, and
grants the
SELECT
privilege on
emp
to
user2
. Subsequently, the
SELECT
privilege is
revoked from
user1
. This
REVOKE
statement is also cascaded to
user2
. Any objects
that depend on the revoked
SELECT
privilege of
user1
and
user2
can also be
affected, as described earlier.
Object definitions that require the
ALTER
and
INDEX DDL
object privileges are not
affected if the
ALTER
or
INDEX
object privilege is revoked. For example, if the
INDEX
privilege is revoked from a user that created an index on a table that belongs to
another user, then the index continues to exist after the privilege is revoked.

Granting Roles Using the Operating System or Network
Configuring Privilege and Role Authorization 4-45
Granting to and Revoking from the PUBLIC Role
You can grant and revoke privileges and roles from the role
PUBLIC
. Because
PUBLIC
is
accessible to every database user, all privileges and roles granted to
PUBLIC
are
accessible to every database user.
Security administrators and database users should grant a privilege or role to
PUBLIC
only if every database user requires the privilege or role. This recommendation
reinforces the general rule that, at any given time, each database user should have only
the privileges required to accomplish the current group tasks successfully.
Revoking a privilege from
PUBLIC
can cause significant cascading effects. If any
privilege related to a DML operation is revoked from
PUBLIC
(for example, SELECT
ANY TABLE
or
UPDATE ON
emp
), then all procedures in the database, including functions
and packages, must be reauthorized before they can be used again. Therefore, be careful
when you grant and revoke DML-related privileges to or from
PUBLIC
.
Granting Roles Using the Operating System or Network
This section contains:
■About Granting Roles Using the Operating System or Network
■Using Operating System Role Identification
■Using Operating System Role Management
■Granting and Revoking Roles When OS_ROLES Is Set to TRUE
■Enabling and Disabling Roles When OS_ROLES Is Set to TRUE
■Using Network Connections with Operating System Role Management
About Granting Roles Using the Operating System or Network
Instead of a security administrator explicitly granting and revoking database roles to
and from users using
GRANT
and
REVOKE
statements, the operating system on which
Oracle Database runs can grant roles to users at connect time. Roles can be
administered using the operating system and passed to Oracle Database when a user
creates a session. As part of this mechanism, the default roles of a user and the roles
granted to a user with the
ADMIN
option can be identified. If the operating system is
used to authorize users for roles, then all roles must be created in the database and
privileges assigned to the role with
GRANT
statements.
Roles can also be granted through a network service.
The advantage of using the operating system to identify the database roles of a user is
that privilege management for an Oracle database can be externalized. The security
facilities offered by the operating system control user privileges. This option may offer
advantages of centralizing security for several system activities, such as the following
situation:
■MVS Oracle administrators want RACF groups to identify database user roles.
See Also:
■Managing Object Dependencies in Oracle Database
Administrator's Guide for more information about object
dependencies
■"Guidelines for Securing Data" on page 10-10

Granting Roles Using the Operating System or Network
4-46 Oracle Database Security Guide
■UNIX Oracle administrators want UNIX groups to identify database user roles.
■VMS Oracle administrators want to use rights identifiers to identify database user
roles.
The main disadvantage of using the operating system to identify the database roles of
a user is that privilege management can only be performed at the role level. Individual
privileges cannot be granted using the operating system, but they can still be granted
inside the database using
GRANT
statements.
A second disadvantage of using this feature is that, by default, users cannot connect to
the database through the shared server or any other network connection if the
operating system is managing roles. However, you can change this default as
described in "Using Network Connections with Operating System Role Management"
on page 4-47.
Using Operating System Role Identification
To cause a database to use the operating system to identify the database roles of each
user when a session is created, set the initialization parameter
OS_ROLES
to
TRUE
(and
restart the instance, if it is currently running). When a user tries to create a session with
the database, Oracle Database initializes the user security domain using the database
roles identified by the operating system.
To identify database roles for a user, the operating system account for each Oracle
Database user must have operating system identifiers (these may be called groups,
rights identifiers, or other similar names) that indicate which database roles are to be
available for the user. Role specification can also indicate which roles are the default
roles of a user and which roles are available with the
ADMIN
option. No matter which
operating system is used, the role specification at the operating system level follows
the format:
ora_ID_ROLE[[_d][_a][_da]]
In this specification:
■
ID
has a definition that varies on different operating systems. For example, on
VMS,
ID
is the instance identifier of the database; on VMS, it is the computer type;
and on UNIX, it is the system
ID
.
■
ROLE
is the name of the database role.
■
d
is an optional character that indicates this role is to be a default role of the
database user.
■
a
is an optional character that indicates this role is to be granted to the user with
the
ADMIN
option. This allows the user to grant the role to other roles only. Roles
cannot be granted to users if the operating system is used to manage roles.
Note: The features described in this section are available only on
some operating systems. See your operating system-specific Oracle
Database documentation to determine if you can use these features.
Note:
ID
is case-sensitive to match your
ORACLE_SID
.
ROLE
is not
case-sensitive.

Granting Roles Using the Operating System or Network
Configuring Privilege and Role Authorization 4-47
For example, an operating system account might have the following roles identified in
its profile:
ora_PAYROLL_ROLE1
ora_PAYROLL_ROLE2_a
ora_PAYROLL_ROLE3_d
ora_PAYROLL_ROLE4_da
When the corresponding user connects to the
payroll
instance of Oracle Database,
role3
and
role4
are defaults, while
role2
and
role4
are available with the
ADMIN
option.
Using Operating System Role Management
When you use operating system-managed roles, remember that database roles are
being granted to an operating system user. Any database user to which the operating
system user is able to connect will have the authorized database roles enabled. For this
reason, you should consider defining all Oracle Database users as
IDENTIFIED
EXTERNALLY
if you are using
OS_ROLES = TRUE
, so that the database accounts are tied to
the operating system account that was granted privileges.
Granting and Revoking Roles When OS_ROLES Is Set to TRUE
If the
OS_ROLES
parameter is set to
TRUE
, then the operating system completely
manages the granting and revoking of roles to users. Any previous granting of roles to
users using
GRANT
statements do not apply. However, they are still listed in the data
dictionary. Only the role grants to users made at the operating system level apply.
Users can still grant privileges to roles and users.
Enabling and Disabling Roles When OS_ROLES Is Set to TRUE
If the
OS_ROLES
initialization parameter is set to
TRUE
, then any role granted by the
operating system can be dynamically enabled using the
SET ROLE
statement. This still
applies, even if the role was defined to require a password or operating system
authorization. However, any role not identified in the operating system account of a
user cannot be specified in a
SET ROLE
statement, even if a role was granted using a
GRANT
statement when
OS_ROLES = FALSE
. (If you specify such a role, then Oracle
Database ignores it.)
When
OS_ROLES
is set to
TRUE
, then the user can enable up to 148 roles. Remember that
this number includes other roles that may have been granted to the role.
Using Network Connections with Operating System Role Management
If you have the operating system manage roles, then, by default, users cannot connect
to the database through the shared server. This restriction is the default because a
remote user could impersonate another operating system user over an unsecure
connection.
Note: If either the
d
or
a
character is specified, then precede that
character by an underscore (_).
Note: If the operating system grants a role to a user with the
ADMIN
option, then the user can grant the role only to other roles.

When Do Grants and Revokes Take Effect?
4-48 Oracle Database Security Guide
If you are not concerned with this security risk and want to use operating system role
management with the shared server, or any other network connection, then set the
initialization parameter
REMOTE_OS_ROLES
to
TRUE
. The change takes effect the next
time you start the instance and mount the database. The default setting of this
parameter is
FALSE
.
When Do Grants and Revokes Take Effect?
Depending on what is granted or revoked, a grant or revoke takes effect at different
times:
■All grants and revokes of system and object privileges to anything (users, roles,
and
PUBLIC
) take immediate effect.
■All grants and revokes of roles to anything (users, other roles,
PUBLIC
) take effect
only when a current user session issues a
SET ROLE
statement to reenable the role
after the grant and revoke, or when a new user session is created after the grant or
revoke.
You can see which roles are currently enabled by examining the
SESSION_ROLES
data
dictionary view.
How the SET ROLE Statement Affects Grants and Revokes
During the user session, the user or an application can use the
SET ROLE
statement any
number of times to change the roles currently enabled for the session. The user must
already be granted the roles that are named in the
SET ROLE
statement.
Example 4–16 enables the role
clerk
, which you have already been granted, and
specifies the password.
Example 4–16 Using SET ROLE to Grant a Role and Specify a Password
SET ROLE clerk IDENTIFIED BY password;
Replace
password
with a password that is secure. "Minimum Requirements for
Passwords" on page 3-3 describes the minimum requirements for passwords.
Example 4–17 shows how to use
SET ROLE
to disable all roles.
Example 4–17 Using SET ROLE to Disable All Roles
SET ROLE NONE;
Specifying a Default Role
When a user logs on, Oracle Database enables all privileges granted explicitly to the
user and all privileges in the default roles of the user.
You can set and alter a list of default roles for a user by using the
ALTER USER
SQL
statement. The
ALTER USER
statement specifies roles that are to be enabled when a user
connects to the database. The user must have been directly granted the roles with a
GRANT
statement, or the roles must have been created by the user with the
CREATE ROLE
privilege. For information about the restrictions of the
DEFAULT ROLE
clause of the
ALTER USER
statement, see Oracle Database SQL Language Reference.
Example 4–18 sets the default roles
payclerk
and
pettycash
for user
jane
:

Managing Fine-Grained Access in PL/SQL Packages and Types
Configuring Privilege and Role Authorization 4-49
Example 4–18 Using ALTER USER to Set Default Roles
ALTER USER jane DEFAULT ROLE payclerk, pettycash;
You cannot set default roles for a user in the
CREATE USER
statement. When you first
create a user, the default user role setting is
ALL
, which causes all roles subsequently
granted to the user to be default roles. Use the
ALTER USER
statement to limit the
default user roles.
The Maximum Number of Roles That a User Can Enable
A user can enable no more than 148 roles.You can grant a user as many roles as you
want, but you should restrict the number of roles granted to a user to the minimum
roles the user needs. See "Guidelines for Securing Roles" on page 10-6 for additional
guidelines on granting roles to users.
Managing Fine-Grained Access in PL/SQL Packages and Types
You can configure user access control to external network services and wallets through
the
UTL_TCP
,
UTL_SMTP
,
UTL_MAIL
,
UTL_HTTP
, and
UTL_INADDR
PL/SQL packages, the
DBMS_LDAP
PL/SQL package, and the
HttpUriType
type.
■Configuring fine-grained access control for users and roles that need to access
external network services from the database. This way, specific groups of users
can connect to one or more host computers, based on privileges that you grant
them. Typically, you use this feature to control access to applications that run on
specific host addresses.
■Configuring fine-grained access control to Oracle wallets to make HTTP
requests that require password or client-certificate authentication. This feature
enables you to grant privileges to users who are using passwords and client
certificates stored in Oracle wallets to access external protected HTTP resources
through the
UTL_HTTP
package. For example, you can configure applications to use
the credentials stored in the wallets instead of hard-coding the credentials in the
applications. For more information about how you can use wallets to store
passwords and credentials, see Oracle Database Advanced Security Administrator's
Guide.
This section contains:
■About Fine-Grained Access Control to External Network Services
■About Access Control to Wallets
Note: When you create a role (other than a global role or an
application role), it is granted implicitly to you, and your set of
default roles is updated to include the new role. Be aware that only
148 roles can be enabled for a user session. When aggregate roles,
such as the
DBA
role, are granted to a user, the roles granted to the
role are included in the number of roles the user has. For example,
if a role has 20 roles granted to it and you grant that role to the user,
then the user now has 21 additional roles. Therefore, when you
grant new roles to a user, use the
DEFAULT ROLE
clause of the
ALTER
USER
statement to ensure that not too many roles are specified as
that user's default roles.

Managing Fine-Grained Access in PL/SQL Packages and Types
4-50 Oracle Database Security Guide
■Upgrading Applications That Depend on Packages That Use External Network
Services
■Creating an Access Control List for External Network Services
■Configuring Access Control to a Wallet
■Examples of Creating Access Control Lists
■Specifying a Group of Network Host Computers
■Precedence Order for a Host Computer in Multiple Access Control List
Assignments
■Precedence Order for a Host in Access Control List Assignments with Port Ranges
■Checking Privilege Assignments That Affect User Access to a Network Host
■Setting the Precedence of Multiple Users and Roles in One Access Control List
■Finding Information About Access Control Lists Configured for User Access
About Fine-Grained Access Control to External Network Services
To configure fine-grained access control to external network services, you create an
access control list (ACL), which is stored in Oracle XML DB. You can create the access
control list by using Oracle XML DB itself, or by using the
DBMS_NETWORK_ACL_ADMIN
and
DBMS_NETWORK_ACL_UTILITY
PL/SQL packages. This guide explains how to use
these packages to create and manage the access control list. To create an access control
list by using Oracle XML DB and for general conceptual information about access
control lists, see Oracle XML DB Developer's Guide.
This feature enhances security for network connections because it restricts the external
network hosts that a database user can connect to using the PL/SQL network utility
packages
UTL_TCP
,
UTL_SMTP
,
UTL_MAIL
,
UTL_HTTP
, and
UTL_INADDR
, the
DBMS_LDAP
PL/SQL package, and the
HttpUriType
type. Otherwise, an intruder who gained
access to the database could maliciously attack the network, because, by default, the
PL/SQL utility packages are created with the
EXECUTE
privilege granted to
PUBLIC
users. These PL/SQL network utility packages, and the
DBMS_NETWORK_ACL_ADMIN
and
DBMS_NETWORK_ACL_UTILITY
packages, support both IP Version 4 (IPv4) and IP Version
6 (IPv6) addresses. This guide explains how to manage access control to both versions.
For detailed information about how the IPv4 and IPv6 notation works with Oracle
Database, see Oracle Database Net Services Administrator's Guide.
About Access Control to Wallets
When a user accesses Web pages that are protected by a remote Web server, the user
can authenticate himself or herself by supplying the passwords and client certificates
that are stored in an Oracle wallet. The Oracle wallet provides secure storage of user
passwords and client certificates.
To configure access control to a wallet, you need the following components:
■An Oracle wallet. You can create the wallet using the Oracle Database
mkstore
utility or Oracle Wallet Manager. The HTTP request will use the external password
store or the client certificate in the wallet to authenticate the user
See Also: "Tutorial: Adding an Email Alert to a Fine-Grained Audit
Policy" on page 9-44 for an example of configuring access control to
external network services for email alerts

Managing Fine-Grained Access in PL/SQL Packages and Types
Configuring Privilege and Role Authorization 4-51
■An access control list to grant privileges to the user to use the wallet. To create
the access control list, you use the
DBMS_NETWORK_ACL_ADMIN
PL/SQL package.
■A way to associate the wallet with the access control list. To do so, use the
DBMS_
NETWORK_ACL_ADMIN
PL/SQL package.
The use of wallets is beneficial because it provides secure storage of passwords and
client certificates necessary to access protected Web pages.
Upgrading Applications That Depend on Packages That Use External Network Services
If you have upgraded from a release before Oracle Database 11g Release 1 (11.1), and
your applications depend on PL/SQL network utility packages
UTL_TCP
,
UTL_SMTP
,
UTL_MAIL
,
UTL_HTTP
, and
UTL_INADDR
, the
DBMS_LDAP
PL/SQL package, or the
HttpUriType
type, then the following error may occur when you try to run the
application:
ORA-24247: network access denied by access control list (ACL)
Use the procedures in this section to reconfigure the network access for the
application. See also Oracle Database Upgrade Guide for compatibility issues for
applications that depend on the PL/SQL network utility packages. For detailed
information about the network utility packages, see Oracle Database PL/SQL Packages
and Types Reference.
Creating an Access Control List for External Network Services
When you create access control lists for network connections, you should create one
access control list dedicated to a group of common users, for example, users who need
access to a particular application that resides on a specific host computer. For ease of
administration and for good system performance, do not create too many access
control lists. Network hosts accessible to the same group of users should share the
same access control list.
To create the access control list by using the
DBMS_NETWORK_ACL_ADMIN
package, follow
these steps:
■Step 1: Create the Access Control List and Its Privilege Definitions
■Step 2: Assign the Access Control List to One or More Network Hosts
Step 1: Create the Access Control List and Its Privilege Definitions
Use the
DBMS_NETWORK_ACL_ADMIN.CREATE_ACL
procedure to create the content of the
access control list. It contains a name of the access control list, a brief description, and
privilege settings for one user or role that you want to associate with the access control
list. In an access control list, privileges for each user or role are grouped together as an
access control entry (ACE). An access control list must have the privilege settings for at
least one user or role.
for example:
BEGIN
See Also: "Configuring Access Control to a Wallet" on page 4-55
Note: You cannot import or export the access control list settings by
using the Oracle Database import or export utilities such as Oracle
Data Pump.

Managing Fine-Grained Access in PL/SQL Packages and Types
4-52 Oracle Database Security Guide
DBMS_NETWORK_ACL_ADMIN.CREATE_ACL (
acl => 'file_name.xml',
description => 'file description',
principal => 'user_or_role',
is_grant => TRUE|FALSE,
privilege => 'connect|resolve',
start_date => null|timestamp_with_time_zone,
end_date => null|timestamp_with_time_zone);
END;
In this specification:
■
acl
: Enter a name for the access control list XML file. Oracle Database creates this
file relative to the
/sys/acls
directory in the XML DB Repository in the database.
Include the
.xml
extension. For example:
acl => 'us-example-com-permissions.xml',
■
description
: Enter a brief description of the purpose of this file. For example:
description => 'Network connection permission for ACCT_MGR role',
■
principal
: Enter the first user account or role being granted or denied
permissions. For example:
principal => 'ACCT_MGR',
Enter the name of the user account or role in case sensitive characters. For
example, if the database stores the role name
ACCT_MGR
in all capital letters,
entering it in mixed or lower case will not work. You can find the user accounts
and roles in the current database instance by querying the
DBA_USERS
and
DBA_
ROLES
data dictionary views. Typically, user names and roles are stored in
upper-case letters.
If you want to enter multiple users or grant additional privileges to this user or
role, use the
DBMS_NETWORK_ACL.ADD_PRIVILEGE
procedure (described next) after
you have created this access control list XML file.
■
is_grant
: Enter either
TRUE
or
FALSE
, to indicate whether the privilege is to be
granted or denied. For example:
is_grant => TRUE,
■
privilege
: Enter either
connect
or
resolve
. This setting is case sensitive, so
always enter it in lowercase. For example:
privilege => 'connect',
The
connect
privilege grants the user permission to connect to a network service
at an external host. The
resolve
privilege grants the user permission to resolve a
network host name or an IP address.
A database user needs the
connect
privilege to an external network host computer
if he or she is connecting using the
UTL_TCP
,
UTL_SMTP
,
UTL_MAIL
,
UTL_HTTP
, the
DBMS_LDAP
package, and the
HttpUriType
type. To resolve the host name that was
given a host IP address, or the IP address that was given a host name, with the
UTL_INADDR
package, grant the database user the
resolve
privilege instead.
You can use the data dictionary views described in "Finding Information About
Access Control Lists Configured for User Access" on page 4-71 to find more
information about existing privileges and network connections.

Managing Fine-Grained Access in PL/SQL Packages and Types
Configuring Privilege and Role Authorization 4-53
■
start_date
: (Optional) Enter the start date for the access control entry (ACE), in
TIMESTAMP WITH TIME ZONE
format (YYYY-MM-DD HH:MI:SS.FF TZR). When
specified, the access control entry will be valid only on or after the specified date.
The default is
null
. For example, to set a start date of February 28, 2008, at 6:30
a.m. in San Francisco, California, U.S., which is in the Pacific time zone:
start_date => '2008-02-28 06:30:00.00 US/Pacific',
The
NLS_TIMESTAMP_FORMAT
initialization parameter sets the default timestamp
format. See Oracle Database Reference for more information.
■
end_date
: (Optional) Enter the end date for the access control entry (ACE), in
TIMESTAMP WITH TIME ZONE
format (YYYY-MM-DD HH:MI:SS.FF TZR). When
specified, the access control entry expires after the specified date. The
end_date
setting must be greater than or equal to the
start_date
setting. The default is
null
.
For example, to set an end date of December 10, 2008, at 11:59 p.m. in San
Francisco, California, U.S., which is in the Pacific time zone:
end_date => '2008-12-10 23:59:00.00 US/Pacific');
To add more users or roles to the access control list, or grant additional privileges to
one user or role, use the
DBMS_NETWORK_ACL.ADD_PRIVILEGE
procedure. The syntax is
as follows:
BEGIN
DBMS_NETWORK_ACL_ADMIN.ADD_PRIVILEGE (
acl => 'file_name.xml',
principal => 'user_or_role',
is_grant => TRUE|FALSE,
privilege => 'connect|resolve',
position => null|value,
start_date => null|timestamp_with_time_zone,
end_date => null|timestamp_with_time_zone);
END;
As you can see, the parameters to add the privilege are the similar to those in the
CREATE_ACL
procedure, except that
description
is not included and the
position
parameter, which sets the order of precedence for multiple users or roles, was added.
Because you now are adding more than one user or role, you may want to consider
setting their precedence. "Setting the Precedence of Multiple Users and Roles in One
Access Control List" on page 4-69 provides more information.
Other
DBMS_NETWORK_ACL_ADMIN
procedures that are available for this step are
DELETE_
PRIVILEGE
and
DROP_ACL
.
At this stage, you have created an access control list that defines the privileges needed
to connect to a network host. However, the access control list has no effect until you
complete Step 2: Assign the Access Control List to One or More Network Hosts.
Step 2: Assign the Access Control List to One or More Network Hosts
After you create the access control list, then you are ready to assign it to one or more
network host computers. You can use the
DBMS_NETWORK_ACL_ADMIN.ASSIGN_ACL
procedure to do so.
For example:
BEGIN
DBMS_NETWORK_ACL_ADMIN.ASSIGN_ACL (
acl => 'file_name.xml',

Managing Fine-Grained Access in PL/SQL Packages and Types
4-54 Oracle Database Security Guide
host => 'network_host',
lower_port => null|port_number,
upper_port => null|port_number);
END;
In this specification:
■
acl
: Enter the name of the access control list XML file (from Step 1: Create the
Access Control List and Its Privilege Definitions) to assign to the network host.
Oracle Database creates this file relative to the
/sys/acls
directory in the XML DB
Repository in the database. Include the
.xml
extension. For example:
acl => 'us-example-com-permissions.xml',
■
host
: Enter the network host to which this access control list will be assigned. This
setting can be a name or IP address of the network host. Host names are case
insensitive. For example:
host => 'us.example.com',
If you specify
localhost
, and if the host name has not been specified with the
UTL_INADDR
and
UTL_HTTP
PL/SQL packages in situations in which the local host
is assumed, then these packages will search for and use the ACL that has been
assigned
localhost
for the
host
setting.
See the following sections for more information about how network host
computers in access control list assignments work:
–"Specifying a Group of Network Host Computers" on page 4-64
–"Checking Privilege Assignments That Affect User Access to a Network Host"
on page 4-66
–"Precedence Order for a Host Computer in Multiple Access Control List
Assignments" on page 4-65
–"Precedence Order for a Host in Access Control List Assignments with Port
Ranges" on page 4-66
■
lower_port
: (Optional) For TCP connections, enter the lower boundary of the port
range. Use this setting for the
connect
privilege only; omit it for the
resolve
privilege. The default is
null
, which means that there is no port restriction (that is,
the ACL applies to all ports). The range of port numbers is between 1 and 65535.
For example:
lower_port => 80,
■
upper_port
: (Optional) For TCP connections, enter the upper boundary of the port
range. Use this setting for
connect
privileges only; omit it for
resolve
privileges.
The default is
null
, which means that there is no port restriction (that is, the ACL
applies to all ports). The range of port numbers is between 1 and 65535
For example:
upper_port => 3999);
If you enter a value for the
lower_port
and leave the
upper_port
at
null
(or just
omit it), Oracle Database assumes the
upper_port
setting is the same as the
lower_
port
. For example, if you set
lower_port
to
80
and omit
upper_port
, the
upper_
port
setting is assumed to be
80
.

Managing Fine-Grained Access in PL/SQL Packages and Types
Configuring Privilege and Role Authorization 4-55
The
resolve
privilege in the access control list takes no effect when a port range is
specified in the access control list assignment.
Only one access control list can be assigned to any host computer, domain, or IP
subnet, and if specified, the TCP port range. When you assign a new access control list
to a network target, Oracle Database unassigns the previous access control list that was
assigned to the same target. However, Oracle Database does not drop the access
control list. You can drop the access control list by using the
DROP_ACL
procedure. To
remove an access control list assignment, use the
UNASSIGN_ACL
procedure.
Depending on how you create and maintain the access control list, the two steps may
overlap. For example, you can create an access control list that has privileges for five
users in it, and then apply it to two host computers. Later on, you can modify this
access control list to have different or additional users and privileges, and assign it to
different or additional host computers.
All access control list changes, including the assignment to network hosts, are
transactional. They do not take effect until the transaction is committed.
You can find information about existing privileges and network connections by using
the data dictionary views described in Table 4–6, " Data Dictionary Views That Display
Information about Access Control Lists" on page 4-71.
For information about using the
DBMS_NETWORK_ACL_ADMIN
package, see Oracle Database
PL/SQL Packages and Types Reference.
Configuring Access Control to a Wallet
This method lets you grant access to the passwords and client certificates that are
stored in an Oracle wallet to users to authenticate themselves to an external Web
server. This enables the user to retrieve protected Web pages from the Web server.
This section contains:
■Step 1: Create an Oracle Wallet
■Step 2: Create an Access Control List that Grants the Wallet Privileges
■Step 3: Assign the Access Control List to the Wallet
■Step 4: Make the HTTP Request with the Passwords and Client Certificates
Step 1: Create an Oracle Wallet
To create the wallet, you can use either the
mkstore
command-line utility or the Oracle
Wallet Manager user interface. To store passwords in the wallet, you must use
mkstore
. You can use both standard and PKCS11 wallet types, and the wallet can be an
auto-login wallet if you want. For detailed information about creating wallets, see
Oracle Database Advanced Security Administrator's Guide.
When you create the wallet, do the following:
■Ensure that you have exported the wallet to a file.
■Make a note of the directory in which you created the wallet. You will need this
directory path when you complete the procedures in this section.

Managing Fine-Grained Access in PL/SQL Packages and Types
4-56 Oracle Database Security Guide
Step 2: Create an Access Control List that Grants the Wallet Privileges
After you have created the wallet, you are ready to create the access control list that
will assign the password or client certificate privilege the user needs to use password
credentials in the wallet for HTTP authentication.
For example:
BEGIN
DBMS_NETWORK_ACL_ADMIN.CREATE_ACL (
acl => 'file_name.xml',
description => 'description',
principal => 'user_or_role',
is_grant => TRUE|FALSE,
privilege => 'privilege';
...
END;
In this specification:
■
acl
: Enter a name for the ACL, and make a note of this name. You will need this
name in Step 3: Assign the Access Control List to the Wallet, next. Oracle Database
creates this file relative to the
/sys/acls
directory in the XML DB Repository in
the database. Include the
.xml
extension. For example:
acl => 'hr_access_wallet_acl.xml',
■
description
: Enter a brief description of the purpose of this file. For example:
description => 'Wallet ACL for the hr_access application',
■
principal
: Enter the user account or role being granted or denied privileges. For
example:
principal => 'HR_CLERK',
Enter this name using case sensitive characters. For example, if the database stores
the role name
HR_CLERK
in all capital letters, entering it in mixed or lower-case
letters will not work. You can find the user accounts and roles in the current
database instance by querying the
DBA_USERS
and
DBA_ROLES
data dictionary
views. Typically, user names and roles are stored in upper-case letters.
If you want to add multiple users, or if you want to grant this user an additional
privilege, you can use the
DBMS_NETWORK_ACL.ADD_PRIVILEGE
procedure after you
have created this access control list XML file.
■
is_grant
: Enter either
TRUE
or
FALSE
, to indicate whether the privilege is to be
granted or denied. For example:
is_grant => TRUE,
■
privilege
: Enter one of the following settings using lowercase letters and
hyphens. Remember that the privilege name is case-sensitive.
–
use-passwords
to give the user permission to use passwords in the wallet
See Also:
■"Example of an Access Control List for Using Passwords in a
Non-Shared Wallet" on page 4-62
■"Example of an Access Control List for Wallets in a Shared
Database Session" on page 4-64

Managing Fine-Grained Access in PL/SQL Packages and Types
Configuring Privilege and Role Authorization 4-57
–
use-client-certificates
to authenticate the user with a client certificate in
the wallet
For example:
privilege => 'use-client-certificates');
Step 3: Assign the Access Control List to the Wallet
In this step, you assign this access control list to the wallet you created earlier.
Afterward, you can check your settings by querying the
DBA_WALLET_ACLS
data
dictionary view.
For example:
BEGIN
...
DBMS_NETWORK_ACL_ADMIN.ASSIGN_WALLET_ACL (
acl => 'file_name.xml',
wallet_path => 'file:path_to_directory_containing_wallet');
END;
In this specification:
■
acl
: Enter the name that you created for this wallet in Step 2: Create an Access
Control List that Grants the Wallet Privileges, in the previous section. For example:
acl => 'hr_access_wallet_acl.xml',
■
wallet_path
: Enter the path to the directory that contains the wallet. When you
specify the wallet path, you must use an absolute path and include
file:
before
this directory path. Do not use environment variables, such as
$ORACLE_HOME
, nor
insert a space after
file:
and before the path name. For example:
wallet_path => 'file:/oracle/wallets/hr_access_access'
Step 4: Make the HTTP Request with the Passwords and Client Certificates
In this step, you use the
UTL_HTTP
PL/SQL package to create a request context object
that is used privately with the HTTP request and its response. For detailed information
about the
UTL_HTTP
package, see Oracle Database PL/SQL Packages and Types Reference.
For example:
DECLARE
req_context UTL_HTTP.REQUEST_CONTEXT_KEY;
req UTL_HTTP.REQ;
BEGIN
req_context := UTL_HTTP.CREATE_REQUEST_CONTEXT (
wallet_path => 'file:path_to_directory_containing_wallet',
wallet_password => 'wallet_password'|NULL);
req := UTL_HTTP.BEGIN_REQUEST(
url => 'URL_to_application',
request_context => 'request_context'|NULL);
...
END;
In this specification:
■
req_context
: Use the
UTL_HTTP.CREATE_REQUEST_CONTEXT_KEY
datatype to create
the request context object. This object stores a randomly-generated numeric key
that Oracle Database uses to identify the request context. The
UTL_HTTP.CREATE_
REQUEST_CONTEXT
function creates the request context itself.

Managing Fine-Grained Access in PL/SQL Packages and Types
4-58 Oracle Database Security Guide
■
req
: Use the
UTL_HTTP.REQ
datatype to create the object that will be used to begin
the HTTP request. You will refer to this object later on, when you set the user
name and password from the wallet to access a password-protected Web page.
■
wallet_path
: Enter the path to the directory that contains the wallet. Ensure that
this path is the same path you specified when you created access control list in
Step 3: Assign the Access Control List to the Wallet in the previous section.You
must include
file:
before the directory path. Do not use environment variables,
such as
$ORACLE_HOME
.
For example:
wallet_path => 'file:/oracle/wallets/hr_access_access',
■
wallet_password
: Enter the password used to open the wallet. The default is
NULL
,
which is used for auto-login wallets. For example:
wallet_password => NULL);
■
url
: Enter the URL to the application that uses the wallet.
For example:
url => 'www.hr_access.example.com',
■
request_context
: Enter the name of the request context object that you created
earlier in this section. This object prevents the wallet from being shared with other
applications in the same database session.
For example:
request_context => req_context);
Using a Request Context to Hold the Wallet When Sharing the Session with
Other Applications
You should use a request context to hold the wallet when the database session is
shared with other applications. If your application has exclusive use of the database
session, you can hold the wallet in the database session by using the
SET_WALLET
procedure instead.
For example:
DECLARE
req UTL_HTTP.REQ;
BEGIN
UTL_HTTP.SET_WALLET(
path => 'file:path_to_directory_containing_wallet',
password => 'wallet_password'|NULL);
req := UTL_HTTP.BEGIN_REQUEST(
url => 'URL_to_application');
...
END;
If the protected URL being requested requires the user name and password to
authenticate, then use the
SET_AUTHENTICATION_FROM_WALLET
procedure to set the user
name and password from the wallet to authenticate.
Using Only a Client Certificate to Authenticate
If the protected URL being requested requires only the client certificate to authenticate,
the
BEGIN_REQUEST
function sends the necessary client certificate from the wallet.
assuming the user has been granted the
use-client-certificates
privilege in the

Managing Fine-Grained Access in PL/SQL Packages and Types
Configuring Privilege and Role Authorization 4-59
ACL assigned to the wallet. The authentication should succeed at the remote Web
server and the user can proceed to retrieve the HTTP response by using the
GET_
RESPONSE
function.
Using the Password to Authenticate
If the protected URL being requested requires the username and password to
authenticate, you should use the
SET_AUTHENTICATION_FROM_WALLET
procedure to set
the username and password from the wallet to authenticate.
For example:
DECLARE
req_context UTL_HTTP.REQUEST_CONTEXT_KEY;
req UTL_HTTP.REQ;
BEGIN
...
UTL_HTTP.SET_AUTHENTICATION_FROM_WALLET(
r => HTTP_REQUEST,
alias => 'alias_to_retrieve_credentials_stored_in_wallet',
scheme => 'AWS|Basic',
for_proxy => TRUE|FALSE);
END;
In this specification:
■
r
: Enter the HTTP request defined in the
UTL_HTTP.BEGIN_REQUEST
procedure that
you created above, in the previous section. For example:
r => req,
■
alias
: Enter the alias used to identify and retrieve the user name and password
credential stored in the Oracle wallet. For example, assuming the alias used to
identify this user name and password credential is
hr_access
.
alias => 'hr_access',
■
scheme
: Enter one of the following:
–
AWS
: Specifies the Amazon Simple Storage Service (S3) scheme. Use this
scheme only if you are configuring access to the Amazon.com Web site.
(Contact Amazon for more information about this setting.)
–
Basic
: Specifies HTTP basic authentication. The default is
Basic
.
For example:
scheme => 'Basic',
■
for_proxy
: Specify whether the HTTP authentication information is for access to
the HTTP proxy server instead of the Web server. The default is
FALSE
.
For example:
for_proxy => TRUE);
The use of the user name and password in the wallet requires the
use-passwords
privilege to be granted to the user in the ACL assigned to the wallet.
Examples of Creating Access Control Lists
The following examples demonstrate how to create access control lists.
■Example of an Access Control List for a Single Role and Network Connection

Managing Fine-Grained Access in PL/SQL Packages and Types
4-60 Oracle Database Security Guide
■Example of an Access Control List with Multiple Roles Assigned to Multiple Hosts
■Example of an Access Control List for Using Passwords in a Non-Shared Wallet
■Example of an Access Control List for Wallets in a Shared Database Session
Example of an Access Control List for a Single Role and Network Connection
Example 4–19 shows how you would create an access control list called
us-example-com-permissions.xml
to grant users who have the
ACCT_MGR
role access to
network services that run on the host
us.example.com
.
Example 4–19 Creating an Access Control List for a Single Role and Network
Connection
-- 1. Create the access control list, which includes one role:
BEGIN
DBMS_NETWORK_ACL_ADMIN.CREATE_ACL (
acl => 'us-example-com-permissions.xml',
description => 'Network connection permission for ACCT_MGR',
principal => 'ACCT_MGR', -- Must be in upper case
is_grant => TRUE,
privilege => 'connect');
END;
/
-- 2. Assign the access control list a network host:
BEGIN
DBMS_NETWORK_ACL_ADMIN.ASSIGN_ACL (
acl => 'us-example-com-permissions.xml',
host => 'www.us.example.com',
lower_port => 80,
upper_port => 80);
END;
/
This example creates the
us-example-com-permissions.xml
file in the
/sys/acls
directory, which is the default location. The XML file appears as follows:
<acl description="Network connection permission for ACCT_MGR"
xmlns="http://xmlns.oracle.com/xdb/acl.xsd"
xmlns:plsql="http://xmlns.oracle.com/plsql"
xmlns:xsi="http://www.w3.org/2001/XMLSchema-instance"
xsi:schemaLocation="http://xmlns.oracle.com/xdb/acl.xsd
http://xmlns.oracle.com/xdb/acl.xsd">
<security-class>plsql:network</security-class>
<ace>
<grant>true</grant>
<principal>ACCT_MGR</principal>
<privilege><plsql:connect/></privilege>
</ace>
</acl>
The
xmlns
and
xsi
elements are fixed and should not be modified, for example, in a
text editor.
See Also: Oracle Database Vault Administrator's Guide for a tutorial
that demonstrates how to use an access control list when an
administrator must use the
UTL_MAIL
PL/SQL package to configure an
email alert

Managing Fine-Grained Access in PL/SQL Packages and Types
Configuring Privilege and Role Authorization 4-61
You can check the contents of the access control list in SQL*Plus. See Oracle XML DB
Developer's Guide for examples.
Example of an Access Control List with Multiple Roles Assigned to Multiple Hosts
Example 4–20 shows how to create a slightly more complex version of the
us-example-com-permissions.xml
access control list. In this example, you specify
multiple role privileges and their precedence position, and assigned to multiple host
computers.
See"Specifying a Group of Network Host Computers" on page 4-64 and "Precedence
Order for a Host Computer in Multiple Access Control List Assignments" on page 4-65
for more information about host names. See also "Setting the Precedence of Multiple
Users and Roles in One Access Control List" on page 4-69 to determine the order of
multiple
ACE
elements in the access control list XML file.
Example 4–20 Creating an Access Control List for Multiple Roles and Network
Connections
-- 1. Create the access control list:
BEGIN
DBMS_NETWORK_ACL_ADMIN.CREATE_ACL (
acl => 'us-example-com-permissions.xml',
description => 'Network connection permission for ACCT_MGR and ACCT_CLERK',
principal => 'ACCT_MGR', -- Must be in upper case
is_grant => TRUE,
privilege => 'resolve');
DBMS_NETWORK_ACL_ADMIN.ADD_PRIVILEGE ( -- Creates the second role privilege
acl => 'us-example-com-permissions.xml',
principal => 'ACCT_CLERK',
is_grant => TRUE,
privilege => 'connect',
position => null);
END;
/
-- 2. Assign the access control list to hosts:
BEGIN
DBMS_NETWORK_ACL_ADMIN.ASSIGN_ACL ( -- Creates the first target host
acl => 'us-example-com-permissions.xml',
host => '*.us.example.com');
DBMS_NETWORK_ACL_ADMIN.ASSIGN_ACL ( -- Creates the second target host
acl => 'us-example-com-permissions.xml',
host => '*.uk.example.com',
lower_port => 80,
upper_port => 99);
END;
/
The
us-example-com-permissions.xml
appears as follows:
<acl description="Network connection permission for ACCT_MGR and ACCT_CLERK"
xmlns="http://xmlns.oracle.com/xdb/acl.xsd"
xmlns:plsql="http://xmlns.oracle.com/plsql"
xmlns:xsi="http://www.w3.org/2001/XMLSchema-instance"
xsi:schemaLocation="http://xmlns.oracle.com/xdb/acl.xsd
http://xmlns.oracle.com/xdb/acl.xsd">
<security-class>plsql:network</security-class>
<ace>
<grant>true</grant>

Managing Fine-Grained Access in PL/SQL Packages and Types
4-62 Oracle Database Security Guide
<principal>ACCT_MGR</principal>
<privilege><plsql:resolve/></privilege>
</ace>
<ace>
<grant>true</grant>
<principal>ACCT_CLERK</principal>
<privilege><plsql:connect/></privilege>
</ace>
</acl>
Example 4–21 shows how the
DBA_NETWORK_ACL_PRIVILEGES
data dictionary view
displays the privilege granted in the previous access control list.
Example 4–21 Using the DBA_NETWORK_ACL_PRIVILEGES View to Show Granted
Privileges
ACL
ACLID PRINCIPAL PRIVILEGE IS_GRANT INVERT
START_DATE END_DATE
------------------------------------------
-------------------------------- ---------- ------- -------- -------
---------- ----------
/sys/acls/us-example-com-permissions.xml 2EF86135D0E29B2AE040578CE4043250 ACCT_
MGR resolve true false
/sys/acls/us-example-com-permissions.xml 2EF86135D0E29B2AE040578CE4043250 ACCT_
CLERK connect true false
Example 4–22 shows how the
DBA_NETWORK_ACLS
data dictionary view displays the
host assignment of the access control list.
Example 4–22 Using the DBA_NETWORK_ACLS View to Show Host Assignments
HOST LOWER_PORT UPPER_PORT
ACL
ACLID
-------------------- ---------- ----------
------------------------------------------
--------------------------------
*.us.example.com
/sys/acls/us-example-com-permissions.xml 2EF86135D0E29B2AE040578CE4043250
*.uk.example.com 80 99
/sys/acls/us-example-com-permissions.xml 2EF86135D0E29B2AE040578CE4043250
In these examples, the
ACCT_MGR
role has the
resolve
privilege to the first host, and the
ACCT_CLERK
role has the connect privilege to the first and second target hosts. The
ACCT_MGR
role does not have the
resolve
privilege to the second host because a port
range is specified in the assignment to the second host.
To check the contents of the access control list in SQL*Plus, see Oracle XML DB
Developer's Guide for examples.
Example of an Access Control List for Using Passwords in a Non-Shared Wallet
Example 4–23 configures wallet access for two Human Resources department roles,
hr_clerk
and
hr_manager
. These roles use the
use-passwords
privilege to access
passwords stored in the wallet. In this example, the wallet will not be shared with
other applications within the same database session.

Managing Fine-Grained Access in PL/SQL Packages and Types
Configuring Privilege and Role Authorization 4-63
Example 4–23 Configuring ACL Access Using Passwords in a Non-Shared Wallet
/* 1. At a command prompt, create the wallet. The following example uses the
user name hr_access as the alias to identify the user name and password
stored in the wallet. You must use this alias name when you call the
SET_AUTHENTICATION_FROM_WALLET procedure later on. */
$ mkstore -wrl $ORACLE_HOME/wallets/hr_access_access -create
Enter password: password
Enter password again: password
$ mkstore -wrl $ORACLE_HOME/wallets/hr_access_access -createCredential hr_access
hr_usr
Your secret/Password is missing in the command line
Enter your secret/Password: password
Re-enter your secret/Password: password
Enter wallet password: password
/* 2. In SQL*Plus, create an access control list to grant privileges for the
wallet. The following example grants the use-passwords privilege to the
hr_clerk and hr_manager roles, and then it assigns this ACL to the wallet.*/
BEGIN
DBMS_NETWORK_ACL_ADMIN.CREATE_ACL(
acl => 'hr_access_wallet_acl.xml',
description => 'Wallet ACL for hr_access application',
principal => 'HR_CLERK', -- Must be in upper case
is_grant => TRUE,
privilege => 'use-passwords');
DBMS_NETWORK_ACL_ADMIN.ADD_PRIVILEGE(
acl => 'hr_access_wallet_acl.xml',
principal => 'HR_MANAGER',
is_grant => TRUE,
privilege => 'use-passwords');
DBMS_NETWORK_ACL_ADMIN.ASSIGN_WALLET_ACL(
acl => 'hr_access_wallet_acl.xml',
wallet_path => 'file:/oracle/wallets/hr_access_access');
END;
/
COMMIT;
/* 3. Create a request context and request object, and then set the
authentication for the wallet. */
DECLARE
req_context UTL_HTTP.REQUEST_CONTEXT_KEY;
req UTL_HTTP.REQ;
BEGIN
req_context := UTL_HTTP.CREATE_REQUEST_CONTEXT(
wallet_path => 'file:/oracle/wallets/hr_access_access',
wallet_password => NULL,
enable_cookies => TRUE,
max_cookies => 300,
max_cookies_per_site => 20);
req := UTL_HTTP.BEGIN_REQUEST(
url => 'www.hr_access.example.com',
request_context => req_context);
UTL_HTTP.SET_AUTHENTICATION_FROM_WALLET(
r => req,
alias => 'hr_access'),
scheme => 'Basic',
for_proxy => FALSE);

Managing Fine-Grained Access in PL/SQL Packages and Types
4-64 Oracle Database Security Guide
END;
/
Example of an Access Control List for Wallets in a Shared Database Session
Example 4–24 is almost the same as Example 4–23, except that it configures the wallet
to be used for a shared database session; that is, all applications within the current
database session will have access to this wallet.
Example 4–24 Configuring ACL Access for a Wallet in a Shared Database Session
/* Follow these steps:
1. Use Oracle Wallet Manager to create the wallet and add the client
certificate. See Oracle Database Advanced Security Administrator's Guide
for detailed information about using Oracle Wallet Manager.
2. In SQL*Plus, create an access control list to grant privileges for the
wallet. The following example grants the use-client-certificates privilege
to the hr_clerk and hr_manager roles, then it assigns this ACL to the
wallet. */
BEGIN
DBMS_NETWORK_ACL_ADMIN.CREATE_ACL(
acl => 'hr_access_wallet_acl.xml',
description => 'Wallet ACL for hr_access application',
principal => 'HR_CLERK', -- Must be in upper case
is_grant => TRUE,
privilege => 'use-client-certificates');
DBMS_NETWORK_ACL_ADMIN.ADD_PRIVILEGE(
acl => 'hr_access_wallet_acl.xml',
principal => 'HR_MANAGER',
is_grant => TRUE,
privilege => 'use-client-certificates');
DBMS_NETWORK_ACL_ADMIN.ASSIGN_WALLET_ACL(
acl => 'hr_access_wallet_acl.xml',
wallet_path => 'file:/oracle/wallets/hr_access_access');
END;
/
COMMIT;
/* 3. Create a request object to handle the HTTP authentication for the wallet.*/
DECLARE
req UTL_HTTP.req;
BEGIN
UTL_HTTP.SET_WALLET(
path => 'file: $ORACLE_HOME/wallets/hr_access_access',
password => NULL);
req := UTL_HTTP.BEGIN_REQUEST(
url => 'www.hr_access.example.com',
method => 'POST',
http_version => NULL,
request_context => NULL);
END;
/
Specifying a Group of Network Host Computers
If you want to assign an access control list to a group of network host computers, you
can use the asterisk (*) wildcard character. For example, enter
*.example.com
for host

Managing Fine-Grained Access in PL/SQL Packages and Types
Configuring Privilege and Role Authorization 4-65
computers that belong to a domain or
192.0.2.*
for IPv4 addresses that belong to an
IP subnet. The asterisk wildcard must be at the beginning, before a period (.) in a
domain, or at the end, after a period (.), in an IP subnet. For example,
*.example.com
is
valid, but
*example.com
and
*.example.*
are not. Be aware that the use of wildcard
characters affects the order of precedence for multiple access control lists that are
assigned to the same host computer. You cannot use wildcard characters for IPv6
addresses.
The Classless Inter-Domain Routing (CIDR) notation defines how IPv4 and IPv6
addresses are categorized for routing IP packets on the internet. The
DBMS_NETWORK_
ACL_ADMIN
package supports CIDR notation for both IPv4 and IPv6 addresses. This
package considers an IPv4-mapped IPv6 address or subnet equivalent to the
IPv4-native address or subnet it represents. For example,
::ffff:192.0.2.1
is
equivalent to
192.0.2.1
, and
::ffff:192.0.2.1/120
is equivalent to
192.0.2.*
.
Precedence Order for a Host Computer in Multiple Access Control List Assignments
For multiple access control lists that are assigned to the host computer and its
domains, the access control list that is assigned to the host computer takes precedence
over those assigned to the domains. The access control list assigned to a domain has a
lower precedence than those assigned to the subdomains.
For example, Oracle Database first selects the access control list assigned to the host
server.us.example.com
, ahead of other access control lists assigned to its domains. If
additional access control lists were assigned to the sub domains, their order of
precedence is as follows:
1.
server.us.example.com
2.
*.us.example.com
3.
*.example.com
4.
*.com
5.
*
Similarly, for multiple access control lists that are assigned to the IP address (both IPv4
and IPv6) and the subnets it belongs to, the access control list that is assigned to the IP
address takes precedence over those assigned to the subnets. The access control list
assigned to a subnet has a lower precedence than those assigned to the smaller subnets
it contains.
For example, Oracle Database first selects the access control list assigned to the IP
address
192.0.2.3
, ahead of other access control lists assigned to the subnets it
belongs to. If additional access control lists were assigned to the subnets, their order of
precedence is as follows:
1.
192.0.2.3
(or
::ffff:192.0.2.3
)
2.
192.0.2.3/31
(or
::ffff:192.0.2.3/127
)
3.
192.0.2.3/30
(or
::ffff:192.0.2.3/126
)
4.
192.0.2.3/29
(or
::ffff:192.0.2.3/125
)
5. ...
6.
192.0.2.3/24
(or
::ffff:192.0.2.3/120
or
192.0.2.*
)
7.
...
8.
192.0.2.3/16
(or
::ffff:192.0.2.3/112
or
192.0.*
)

Managing Fine-Grained Access in PL/SQL Packages and Types
4-66 Oracle Database Security Guide
9. ...
10.
192.0.2.3/8
(or
::ffff:192.0.2.3/104
or
192.*
)
11. ...
12.
::ffff:192.0.2.3/95
13.
::ffff:192.0.2.3/94
14. ...
15.
*
Precedence Order for a Host in Access Control List Assignments with Port Ranges
When an access control list is assigned to a host computer, a domain, or an IP subnet
with a port range, it takes precedence over the access control list assigned to the same
host, domain, or IP subnet without a port range.
For example, for TCP connections to any port between port 80 and 99 at
server.us.example.com
, Oracle Database first selects the access control list assigned
to port 80 through 99 at
server.us.example.com
, ahead of the other access control list
assigned to
server.us.example.com
that is without a port range.
Checking Privilege Assignments That Affect User Access to a Network Host
Database administrators can use the
DBA_NETWORK_ACL_PRIVILEGES
data dictionary
view to query network privileges that have been granted to or denied from database
users and roles in the access control lists, and whether those privileges take effect
during certain times only. Using the information provided by the view, you may need
to combine the data to determine if a user is granted the privilege at the current time,
the roles the user has, the order of the access control entries, and so on. To simplify this
privilege evaluation, you can use the following
DBMS_NETWORK_ACL_ADMIN
functions to
check the privilege granted to a user in an access control list:
■
CHECK_PRIVILEGE
: Checks if the specified privilege is granted to or denied from
the specified user in an access control list. This procedure identifies the access
control list by its path in the XML DB Repository. Use
CHECK_PRIVILEGE
if you
want to evaluate a single access control list with a known path.
■
CHECK_PRIVILEGE_ACLID
: Similar to the
CHECK_PRIVILEGE
procedure, except that it
enables you to specify the object ID of the access control list. Use
CHECK_
PRIVILEGE_ACLID
if you need to evaluate multiple access control lists, when you
query the
DBA_NETWORK_ACLS
data dictionary view. For better performance, call
CHECK_PRIVILEGE_ACLID
on multiple access control lists rather than using
CHECK_
PRIVILEGE
on each one individually.
Users without database administrator privileges do not have the privilege to access the
access control lists or to invoke those
DBMS_NETWORK_ACL_ADMIN
functions. However,
they can query the
USER_NETWORK_ACL_PRIVILEGES
data dictionary view to check their
privileges instead.
Database administrators and users can use the following
DBMS_NETWORK_ACL_UTILITY
functions to determine if two hosts, domains, or subnets are equivalent, or if a host,
domain, or subnet is equal to or contained in another host, domain, or subnet:
■
EQUALS_HOST
: Returns a value to indicate if two hosts, domains, or subnets are
equivalent

Managing Fine-Grained Access in PL/SQL Packages and Types
Configuring Privilege and Role Authorization 4-67
■
CONTAINS_HOST
: Returns a value to indicate if a host, domain, or subnet is equal to
or contained in another host, domain, or subnet, and the relative order of
precedence of the containing domain or subnet for its ACL assignments
If you do not use IPv6 addresses, database administrators and users can use the
following
DBMS_NETWORK_ACL_UTILITY
functions to generate the list of domains or IPv4
subnet a host belongs to and to sort the access control lists by their order of precedence
according to their host assignments:
■
DOMAINS
: Returns a list of the domains or IP subnets whose access control lists may
affect permissions to a specified network host, subdomain, or IP subnet
■
DOMAIN_LEVEL
: Returns the domain level of a given host
The following sections explain how database administrators and users can check
permissions for the user to connect to a network host or to perform domain name
resolutions:
■How a DBA Can Check User Network Connection and Domain Privileges
■How Users Can Check Their Network Connection and Domain Privileges
How a DBA Can Check User Network Connection and Domain Privileges
A database administrator can query the
DBA_NETWORK_ACLS
view to determine which
access control lists are present for a specified host computer. This view shows the
access control lists that determine the access to the network connection or domain, and
then determines if each access control list grants (
GRANTED
), denies (
DENIED
), or does
not apply (
NULL
) to the access privilege of the user. Only the database administrator
can query this view.
The following sections provide examples that demonstrate how the database
administrator can check user privileges for network connections and domain name
resolution.
■Database Administrator Checking User Connection Privileges
■Database Administrator Checking User Privileges for Domain Name Resolution
Database Administrator Checking User Connection Privileges
Example 4–25 shows how a database administrator can check the privileges for user
preston
to connect to
www.us.example.com
. Remember that the user name you enter
for the
user
parameter in the
CHECK_PRIVILEGE_ACLID
procedure is case sensitive. In
this example, entering the user name
preston
is correct, but entering
Preston
or
preston
is incorrect.
You can find the users in the current database instance by querying the
DBA_USERS
data
dictionary view, for example:
SELECT USERNAME FROM DBA_USERS;
Example 4–25 Administrator Checking User Permissions for Network Host Connections
SELECT HOST, LOWER_PORT, UPPER_PORT, ACL,
DECODE(
DBMS_NETWORK_ACL_ADMIN.CHECK_PRIVILEGE_ACLID(ACLID, 'PRESTON',
'connect'),
1, 'GRANTED', 0, 'DENIED', NULL) PRIVILEGE
FROM (SELECT HOST, LOWER_PORT, UPPER_PORT, ACL, ACLID,
DBMS_NETWORK_ACL_UTILITY.CONTAINS_HOST('www.us.example.com',
HOST) PRECEDENCE
FROM DBA_NETWORK_ACLS)

Managing Fine-Grained Access in PL/SQL Packages and Types
4-68 Oracle Database Security Guide
WHERE PRECEDENCE IS NOT NULL
ORDER BY PRECEDENCE DESC,
LOWER_PORT NULLS LAST,
UPPER_PORT NULLS LAST;
HOST LOWER_PORT UPPER_PORT ACL PRIVILEGE
-------------------- ---------- ---------- -------------------- ---------
www.us.example.com 80 80 /sys/acls/www.xml GRANTED
www.us.example.com 3000 3999 /sys/acls/www.xml GRANTED
www.us.example.com /sys/acls/www.xml GRANTED
*.example.com /sys/acls/all.xml
* /sys/acls/all.xml
In this example, user
preston
was granted privileges for all the network host
connections found for
www.us.example.com
. However, suppose
preston
had been
granted access to a host connection on port 80, but then denied access to the host
connections on ports 3000–3999. In this case, you need to create one access control list
for the host connection on port 80, and a separate access control list for the host
connection on ports 3000–3999.
Database Administrator Checking User Privileges for Domain Name Resolution
Example 4–26 shows how a database administrator can check the privileges of user
preston
to perform domain name resolution for the host
www.us.example.com
. In this
example, only the access control lists assigned to hosts without a port range because
the
resolve
privilege has no effect to those with a port range. (Remember that the user
name you enter for the
user
parameter in
CHECK_PRIVILEGE_ACLID
is case sensitive.)
Example 4–26 Administrator Checking Permissions for Domain Name Resolution
SELECT HOST, ACL,
DECODE(
DBMS_NETWORK_ACL_ADMIN.CHECK_PRIVILEGE_ACLID(ACLID, 'PRESTON',
'resolve'),
1, 'GRANTED', 0, 'DENIED', NULL) PRIVILEGE
FROM (SELECT HOST, LOWER_PORT, UPPER_PORT, ACL, ACLID,
DBMS_NETWORK_ACL_UTILITY.CONTAINS_HOST('www.us.example.com',
HOST) PRECEDENCE
FROM DBA_NETWORK_ACLS
WHERE LOWER_PORT IS NULL AND UPPER_PORT IS NULL)
WHERE PRECEDENCE IS NOT NULL
ORDER BY PRECEDENCE DESC;
HOST ACL PRIVILEGE
-------------------- -------------------- ---------
www.us.example.com /sys/acls/www.xml GRANTED
*.example.com /sys/acls/all.xml
* /sys/acls/all.xml
How Users Can Check Their Network Connection and Domain Privileges
Users can query the
USER_NETWORK_ACL_PRIVILEGES
view to check their network and
domain permissions. The
USER_NETWORK_ACL_PRIVILEGES
view is
PUBLIC
, so all users
can select from it.
This view hides the access control lists from the user. It evaluates the permission status
for the user (
GRANTED
or
DENIED
) and filters out the
NULL
case because the user does not
need to know when the access control lists do not apply to him or her. In other words,
Oracle Database only shows the user on the network hosts that explicitly grant or deny

Managing Fine-Grained Access in PL/SQL Packages and Types
Configuring Privilege and Role Authorization 4-69
access to him or her. Therefore, the output does not display the
*.example.com
and
*
that appear in the output from the database administrator-specific
DBA_NETWORK_ACLS
view.
The following sections provide examples that demonstrate how a database
administrator can check user permissions for network connections and domain name
resolution.
■User Checking His or Her Network Connection Privileges
■User Checking Own Privileges for Domain Name Resolution
User Checking His or Her Network Connection Privileges
Example 4–27 shows how user
preston
can check her privileges to connect to
www.us.example.com
.
Example 4–27 User Checking Permissions for Network Host Connections
SELECT HOST, LOWER_PORT, UPPER_PORT, STATUS PRIVILEGE
FROM (SELECT HOST, LOWER_PORT, UPPER_PORT, STATUS,
DBMS_NETWORK_ACL_UTILITY.CONTAINS_HOST('www.us.example.com',
HOST) PRECEDENCE
FROM USER_NETWORK_ACL_PRIVILEGES
WHERE PRIVILEGE = 'connect')
WHERE PRECEDENCE IS NOT NULL
ORDER BY PRECEDENCE DESC,
LOWER_PORT NULLS LAST,
UPPER_PORT NULLS LAST;
HOST LOWER_PORT UPPER_PORT ACL PRIVILEGE
-------------------- ---------- ---------- -------------------- ---------
www.us.example.com 80 80 /sys/acls/www.xml GRANTED
www.us.example.com 3000 3999 /sys/acls/www.xml GRANTED
www.us.example.com /sys/acls/www.xml GRANTED
User Checking Own Privileges for Domain Name Resolution
Example 4–26 shows how the user
preston
can check her privileges to perform
domain name resolution for
www.us.example.com
:
Example 4–28 User Checking Privileges for Domain Name Resolution
SELECT HOST, STATUS PRIVILEGE
from (SELECT HOST, STATUS,
DBMS_NETWORK_ACL_UTILITY.CONTAINS_HOST('www.us.example.com',
HOST) PRECEDENCE
FROM USER_NETWORK_ACL_PRIVILEGES
WHERE PRIVILEGE = 'resolve' AND
LOWER_PORT IS NULL AND UPPER_PORT IS NULL)
WHERE PRECEDENCE IS NOT NULL
ORDER BY PRECEDENCE DESC;
HOST PRIVILEGE
-------------------- ---------
www.us.example.com GRANTED
Setting the Precedence of Multiple Users and Roles in One Access Control List
By default, Oracle Database grants or denies privileges to users and roles based on
their physical position in the access control list. The first user or role listed is granted

Managing Fine-Grained Access in PL/SQL Packages and Types
4-70 Oracle Database Security Guide
or denied privileges first, followed the second user or role, and so on. For instance,
suppose the code in Example 4–20 defined one role,
ACCT_MGR
, and two users,
sebastian
and
preston
, and the access control list XML file ordered these three as
follows:
<acl ...>
...
<ace>
<principal>ACCT_MGR</principal>
<grant>true</grant>
<privilege><plsql:connect/></privilege>
</ace>
<ace>
<principal>SEBASTIAN</principal>
<grant>false</grant>
<privilege><plsql:connect/></privilege>
</ace>
<ace>
<principal>PRESTON</principal>
<grant>false</grant>
<privilege><plsql:connect/></privilege>
</ace>
</acl>
ACCT_MGR
is granted permissions first, followed by permission denials for
sebastian
and then
preston
. However, if
sebastian
and
preston
have been granted the
ACCT_
MGR
role, they still could log in, because the
ACCT_MGR
role appears first in the list.
Even though these two users were granted the
acct_mgr
role, their specific jobs do not
require them to have access to the
www.example.com
host. If the positions were
reversed—the
acct_mgr
role listed after
sebastian
and
preston
—they would be
denied the privilege of connecting to the network. To set the order of precedence of the
ACE
elements irrespective of their physical location in the
CREATE_ACL
and
ADD_
PRIVILEGE
statements, you can use the
position
attribute.
For example, the following statements set the
ACE
elements in the resultant XML file in
this order:
1. The
ACE
element for
sebastian
appears first.
2. The
ACE
element for
preston
appears second.
3. The
acct_mgr
role appears last.
In this case, neither of these users will be able to connect, because their grant
privileges, which are set to
FALSE
, are evaluated before the
acct_mgr
role.
BEGIN
DBMS_NETWORK_ACL_ADMIN.CREATE_ACL (
acl => 'us-example-com-permissions.xml',
description => 'Network connection permission for ACCT_MGR and users',
principal => 'ACCT_MGR',
is_grant => TRUE,
privilege => 'connect');
DBMS_NETWORK_ACL_ADMIN.ADD_PRIVILEGE (
acl => 'us-example-com-permissions.xml',
principal => 'SEBASTIAN',
is_grant => FALSE,
privilege => 'connect',
position => 1);
DBMS_NETWORK_ACL_ADMIN.ADD_PRIVILEGE (
acl => 'us-example-com-permissions.xml',
Finding Information About User Privileges and Roles
Configuring Privilege and Role Authorization 4-71
principal => 'PRESTON',
is_grant => FALSE,
privilege => 'connect',
position => 2);
END;
/
Finding Information About Access Control Lists Configured for User Access
Table 4–6 lists data dictionary views that you can use to find information about
existing access control lists. See Oracle Database Reference for more information about
these views.
Finding Information About User Privileges and Roles
Table 4–7 lists data dictionary views that you can query to access information about
grants of privileges and roles. See Oracle Database Reference for detailed information
about these views.
Table 4–6 Data Dictionary Views That Display Information about Access Control Lists
View Description
DBA_NETWORK_ACLS
Shows the access control list assignments to the network hosts. The
SELECT
privilege on this view is granted to the
SELECT_CATALOG_ROLE
role only.
DBA_NETWORK_ACL_PRIVILEGES
Shows the network privileges defined in all access control lists that are
currently assigned to network hosts. The
SELECT
privilege on this view is
granted to the
SELECT_CATALOG_ROLE
role only.
DBA_WALLET_ACLS
Lists wallets that have been assigned access control lists.
USER_NETWORK_ACL_PRIVILEGES
Shows the status of the network privileges for the current user to access
network hosts. The
SELECT
privilege on the view is granted to
PUBLIC
.
Table 4–7 Data Dictionary Views That Display Information about Privileges and Roles
View Description
ALL_COL_PRIVS
Describes all column object grants for which the current user or
PUBLIC
is the object owner, grantor, or grantee
ALL_COL_PRIVS_MADE
Lists column object grants for which the current user is object
owner or grantor.
ALL_COL_PRIVS_RECD
Describes column object grants for which the current user or
PUBLIC
is the grantee
ALL_TAB_PRIVS
Lists the grants on objects where the user or
PUBLIC
is the
grantee
ALL_TAB_PRIVS_MADE
Lists the all object grants made by the current user or made on
the objects owned by the current user.
ALL_TAB_PRIVS_RECD
Lists object grants for which the user or
PUBLIC
is the grantee
DBA_COL_PRIVS
Describes all column object grants in the database
DBA_EPG_DAD_
AUTHORIZATION
Describes the database access descriptors (DAD) that are
authorized to use a different user’s privileges.
DBA_TAB_PRIVS
Lists all grants on all objects in the database
DBA_ROLES
Lists all roles that exist in the database, including secure
application roles

Finding Information About User Privileges and Roles
4-72 Oracle Database Security Guide
This section provides some examples of using these views. For these examples, assume
the following statements were issued:
CREATE ROLE security_admin IDENTIFIED BY password;
GRANT CREATE PROFILE, ALTER PROFILE, DROP PROFILE,
CREATE ROLE, DROP ANY ROLE, GRANT ANY ROLE, AUDIT ANY,
AUDIT SYSTEM, CREATE USER, BECOME USER, ALTER USER, DROP USER
TO security_admin WITH ADMIN OPTION;
GRANT SELECT, DELETE ON SYS.AUD$ TO security_admin;
GRANT security_admin, CREATE SESSION TO swilliams;
GRANT security_admin TO system_administrator;
GRANT CREATE SESSION TO jward;
GRANT SELECT, DELETE ON emp TO jward;
GRANT INSERT (ename, job) ON emp TO swilliams, jward;
DBA_ROLE_PRIVS
Lists roles directly granted to users and roles. Note that it does
not list the
PUBLIC
role.
DBA_SYS_PRIVS
Lists system privileges granted to users and roles
ROLE_ROLE_PRIVS
Lists roles granted to other roles. Information is provided only
about roles to which the user has access.
ROLE_SYS_PRIVS
Lists system privileges granted to roles. Information is provided
only about roles to which the user has access.
ROLE_TAB_PRIVS
Lists object privileges granted to roles. Information is provided
only about roles to which the user has access.
SESSION_PRIVS
Lists the privileges that are currently enabled for the user
SESSION_ROLES
Lists all roles that are enabled for the current user. Note that it
does not list the
PUBLIC
role.
USER_COL_PRIVS
Describes column object grants for which the current user is the
object owner, grantor, or grantee
USER_COL_PRIVS_MADE
Describes column object grants for which the current user is the
object owner
USER_COL_PRIVS_RECD
Describes column object grants for which the current user is the
grantee
USER_EPG_DAD_
AUTHORIZATION
Describes the database access descriptors (DAD) that are
authorized to use a different user’s privileges.
USER_ROLE_PRIVS
Lists roles directly granted to the current user
USER_TAB_PRIVS
Lists grants on all objects where the current user is the grantee
USER_SYS_PRIVS
Lists system privileges granted to the current user
USER_TAB_PRIVS_MADE
Lists grants on all objects owned by the current user
USER_TAB_PRIVS_RECD
Lists object grants for which the current user is the grantee
Table 4–7 (Cont.) Data Dictionary Views That Display Information about Privileges and
View Description

Finding Information About User Privileges and Roles
Configuring Privilege and Role Authorization 4-73
Listing All System Privilege Grants
The following query returns all system privilege grants made to roles and users:
SELECT * FROM DBA_SYS_PRIVS;
GRANTEE PRIVILEGE ADM
-------------- --------------------------------- ---
SECURITY_ADMIN ALTER PROFILE YES
SECURITY_ADMIN ALTER USER YES
SECURITY_ADMIN AUDIT ANY YES
SECURITY_ADMIN AUDIT SYSTEM YES
SECURITY_ADMIN BECOME USER YES
SECURITY_ADMIN CREATE PROFILE YES
SECURITY_ADMIN CREATE ROLE YES
SECURITY_ADMIN CREATE USER YES
SECURITY_ADMIN DROP ANY ROLE YES
SECURITY_ADMIN DROP PROFILE YES
SECURITY_ADMIN DROP USER YES
SECURITY_ADMIN GRANT ANY ROLE YES
SWILLIAMS CREATE SESSION NO
JWARD CREATE SESSION NO
See Oracle Database Reference for detailed information about the
DBA_SYS_PRIVS
view.
Listing All Role Grants
The following query returns all the roles granted to users and other roles:
SELECT * FROM DBA_ROLE_PRIVS;
GRANTEE GRANTED_ROLE ADM
------------------ ------------------------------------ ---
SWILLIAMS SECURITY_ADMIN NO
See Oracle Database Reference for detailed information about the
DBA_ROLE_PRIVS
view.
Listing Object Privileges Granted to a User
The following query returns all object privileges (not including column-specific
privileges) granted to the specified user:
SELECT TABLE_NAME, PRIVILEGE, GRANTABLE FROM DBA_TAB_PRIVS
WHERE GRANTEE = 'jward';
TABLE_NAME PRIVILEGE GRANTABLE
----------- ------------ ----------
EMP SELECT NO
EMP DELETE NO
To list all the column-specific privileges that have been granted, use the following
query:
SELECT GRANTEE, TABLE_NAME, COLUMN_NAME, PRIVILEGE
FROM DBA_COL_PRIVS;
GRANTEE TABLE_NAME COLUMN_NAME PRIVILEGE
See Also: Oracle Database Reference for a detailed description of
these data dictionary views

Finding Information About User Privileges and Roles
4-74 Oracle Database Security Guide
----------- ------------ ------------- --------------
SWILLIAMS EMP ENAME INSERT
SWILLIAMS EMP JOB INSERT
JWARD EMP NAME INSERT
JWARD EMP JOB INSERT
See Oracle Database Reference for detailed information about the
DBA_TAB_PRIVS
view.
Listing the Current Privilege Domain of Your Session
The following query lists all roles currently enabled for the issuer:
SELECT * FROM SESSION_ROLES;
If user
swilliams
has the
security_admin
role enabled and issues the previous query,
then Oracle Database returns the following information:
ROLE
------------------------------
SECURITY_ADMIN
The following query lists all system privileges currently available in the security
domain of the issuer, both from explicit privilege grants and from enabled roles:
SELECT * FROM SESSION_PRIVS;
If user
swilliams
has the
security_admin
role enabled and issues the previous query,
then Oracle Database returns the following results:
PRIVILEGE
----------------------------------------
AUDIT SYSTEM
CREATE SESSION
CREATE USER
BECOME USER
ALTER USER
DROP USER
CREATE ROLE
DROP ANY ROLE
GRANT ANY ROLE
AUDIT ANY
CREATE PROFILE
ALTER PROFILE
DROP PROFILE
If the
security_admin
role is disabled for user
swilliams
, then the first query would
return no rows, while the second query would only return a row for the
CREATE
SESSION
privilege grant.
See Oracle Database Reference for detailed information about the
SESSION_ROLES
view.
Listing Roles of the Database
You can use the
DBA_ROLES
data dictionary view to list all roles of a database and the
authentication used for each role. For example, the following query lists all the roles in
the database:
SELECT * FROM DBA_ROLES;
ROLE PASSWORD
---------------- --------

Finding Information About User Privileges and Roles
Configuring Privilege and Role Authorization 4-75
CONNECT NO
RESOURCE NO
DBA NO
SECURITY_ADMIN YES
See Oracle Database Reference for detailed information about the
DBA_ROLES
view.
Listing Information About the Privilege Domains of Roles
The
ROLE_ROLE_PRIVS
,
ROLE_SYS_PRIVS
, and
ROLE_TAB_PRIVS
data dictionary views
contain information about the privilege domains of roles. For example, the following
query lists all the roles granted to the
system_admin
role:
SELECT GRANTED_ROLE, ADMIN_OPTION
FROM ROLE_ROLE_PRIVS
WHERE ROLE = 'SYSTEM_ADMIN';
GRANTED_ROLE ADM
---------------- ----
SECURITY_ADMIN NO
The following query lists all the system privileges granted to the
security_admin
role:
SELECT * FROM ROLE_SYS_PRIVS WHERE ROLE = 'SECURITY_ADMIN';
ROLE PRIVILEGE ADM
----------------------- ----------------------------- ---
SECURITY_ADMIN ALTER PROFILE YES
SECURITY_ADMIN ALTER USER YES
SECURITY_ADMIN AUDIT ANY YES
SECURITY_ADMIN AUDIT SYSTEM YES
SECURITY_ADMIN BECOME USER YES
SECURITY_ADMIN CREATE PROFILE YES
SECURITY_ADMIN CREATE ROLE YES
SECURITY_ADMIN CREATE USER YES
SECURITY_ADMIN DROP ANY ROLE YES
SECURITY_ADMIN DROP PROFILE YES
SECURITY_ADMIN DROP USER YES
SECURITY_ADMIN GRANT ANY ROLE YES
The following query lists all the object privileges granted to the
security_admin
role:
SELECT TABLE_NAME, PRIVILEGE FROM ROLE_TAB_PRIVS
WHERE ROLE = 'SECURITY_ADMIN';
TABLE_NAME PRIVILEGE
--------------------------- ----------------
AUD$ DELETE
AUD$ SELECT
See Oracle Database Reference for detailed information about the
ROLE_ROLE_PRIVS
,
ROLE_SYS_PRIVS
, and
ROLE_TAB_PRIVS
views.

Finding Information About User Privileges and Roles
4-76 Oracle Database Security Guide

5
Managing Security for Application Developers 5-1
5
Managing Security for Application Developers
This chapter contains:
■About Application Security Policies
■Considerations for Using Application-Based Security
■Securing Passwords in Application Design
■Managing Application Privileges
■Creating Secure Application Roles to Control Access to Applications
■Associating Privileges with User Database Roles
■Protecting Database Objects by Using Schemas
■Managing Object Privileges in an Application
■Parameters for Enhanced Security of Database Communication
About Application Security Policies
Creating an application security policy is the first step to create a secure database
application. An application security policy is a list of application security requirements
and rules that regulate user access to database objects.
You should draft security policies for each database application. For example, each
database application should have one or more database roles that provide different
levels of security when executing the application. You then can grant the database
roles to other roles or directly to specific users.
Applications that can potentially allow unrestricted SQL statement processing
(through tools such as SQL*Plus or SQL Developer) also need security policies that
prevent malicious access to confidential or important schema objects. In particular, you
must ensure that your applications handle passwords in a secure manner.
The following sections describe aspects of application security and the Oracle
Database features that you can use to plan and develop secure database applications.
Considerations for Using Application-Based Security
Two main questions to consider when you formulate and implement application
security are covered in the following sections:
■Are Application Users Also Database Users?
■Is Security Better Enforced in the Application or in the Database?

Considerations for Using Application-Based Security
5-2 Oracle Database Security Guide
Are Application Users Also Database Users?
Where possible, you should build applications in which application users are database
users. In this way, you can leverage the intrinsic security mechanisms of the database.
For many commercial packaged applications, application users are not database users.
For these applications, multiple users authenticate themselves to the application, and
the application then connects to the database as a single, highly-privileged user. This is
called the One Big Application User model.
Applications built in this way generally cannot use many of the intrinsic security
features of the database, because the identity of the user is not known to the database.
Table 5–1 describes how the One Big Application User model affects various Oracle
Database security features:
Is Security Better Enforced in the Application or in the Database?
Applications, whose users are also database users, can either build security into the
application, or rely on intrinsic database security mechanisms such as granular
privileges, virtual private databases (fine-grained access control with application
context), roles, stored procedures, and auditing (including fine-grained auditing).
Oracle recommends that applications use the security enforcement mechanisms of the
database as much as possible.
When security is enforced in the database itself, rather than in the application, it
cannot be bypassed. The main shortcoming of application-based security is that
security is bypassed if the user bypasses the application to access data. For example, a
user who has SQL*Plus access to the database can execute queries without going
through the Human Resources application. The user, therefore, bypasses all of the
security measures in the application.
Table 5–1 Features Affected by the One Big Application User Model
Oracle Database Feature Limitations of One Big Application User Model
Auditing A basic principle of security is accountability through auditing.
If One Big Application User performs all actions in the database,
then database auditing cannot hold individual users accountable
for their actions. The application must implement its own
auditing mechanisms to capture individual user actions.
Oracle Advanced Security
enhanced authentication Strong forms of authentication supported by Oracle Advanced
Security (such as client authentication over SSL, tokens, and so
on) cannot be used if the client authenticating to the database is
the application, rather than an individual user.
Roles Roles are assigned to database users. Enterprise roles are
assigned to enterprise users who, though not created in the
database, are known to the database. If application users are not
database users, then the usefulness of roles is diminished.
Applications must then craft their own mechanisms to
distinguish between the privileges which various application
users need to access data within the application.
Enterprise user
management feature of
Oracle Advanced Security
The Enterprise user management feature enables an Oracle
database to use the Oracle Identity Management Infrastructure
by securely storing and managing user information and
authorizations in an LDAP-based directory such as Oracle
Internet Directory. While enterprise users do not need to be
created in the database, they do need to be known to the
database. The One Big Application User model cannot take
advantage of Oracle Identity Management.

Securing Passwords in Application Design
Managing Security for Application Developers 5-3
Applications that use the One Big Application User model must build security
enforcement into the application rather than use database security mechanisms.
Because it is the application, and not the database, that recognizes users; the
application itself must enforce security measures for each user.
This approach means that each application that accesses data must reimplement
security. Security becomes expensive, because organizations must implement the same
security policies in multiple applications, and each new application requires an
expensive reimplementation.
Securing Passwords in Application Design
This section provides strategies for securely invoking password-protected services
from a batch job, script, installation file, or application. In addition to password
protection, most of these strategies can be applied to other sensitive data, such as
cryptographic keys.
This section contains:
■General Guidelines for Securing Passwords in Applications
■Securing Passwords Using an External Password Store
■Securing Passwords Using the orapwd Utility
■Example of Reading Passwords in Java
General Guidelines for Securing Passwords in Applications
These guidelines are in the following categories:
■Platform-Specific Security Threats
■Designing Applications to Handle Password Input
■Configuring Password Formats and Behavior
■Handling Passwords in SQL*Plus and SQL Scripts
Platform-Specific Security Threats
Be aware of the following potential security threats, which may not be obvious:
■On UNIX and Linux platforms, command parameters are available for viewing
by all operating system users on the same host computer. As a result, passwords
entered on the command line could be exposed to other users. However, do not
assume that non-UNIX and Linux platforms are safe from this threat.
■On some UNIX platforms, such as HP Tru64 and IBM AIX, environment
variables for all processes are available for viewing by all operating system
users. However, do not assume that non-UNIX and Linux platforms are safe from
this threat.
See Also: "Potential Security Problems of Using Ad Hoc Tools"
on page 4-21
See Also:
■"Minimum Requirements for Passwords" on page 3-3
■Chapter 10, "Keeping Your Oracle Database Secure" for general
guidelines on securing an Oracle database

Securing Passwords in Application Design
5-4 Oracle Database Security Guide
■On Microsoft Windows, the command recall feature (the Up arrow) remembers
user input across command invocations. For example, if you use the
CONNECT
SYSTEM/password
notation in SQL*Plus, exit, and then press the Up arrow to
repeat the
CONNECT
command, the command recall feature reveals the connect
string and displays the password. In addition, do not assume that non-Microsoft
Windows platforms are safe from this threat.
Designing Applications to Handle Password Input
Follow these guidelines:
■Design applications to interactively prompt for passwords. For command-line
utilities, do not force users to expose passwords at a command prompt.
Check the APIs for the programming language you use to design applications for
the best way to handle passwords from users. For an example of Java code that
handles this functionality, see "Example of Reading Passwords in Java" on
page 5-7.
■Protect your database against SQL injection attacks. A SQL injection attack
occurs when SQL statements are appended or altered in a manner not intended by
the PL/SQL application. For example, an intruder can bypass password
authentication by setting a
WHERE
clause to
TRUE
.
To address the problem of SQL injection attacks, use bind variable arguments or
create validation checks. If you cannot use bind variables, then consider using the
DBMS_ASSERT
PL/SQL package to validate the properties of input values. Oracle
Database PL/SQL Packages and Types Reference describes the
DBMS_ASSERT
package in
detail. You also should review any grants to roles such as
PUBLIC
.
See Oracle Database PL/SQL Language Reference for more information about
preventing SQL injection.
■If possible, design your applications to defer authentication. For example:
–Use certificates for logins.
–Authenticate users by using facilities provided by the operating system. For
example, applications on Microsoft Windows can use domain authentication.
■Mask or encrypt passwords. If you must store passwords, then mask or encrypt
them. For example, you can mask passwords in log files and encrypt passwords in
recovery files.
■Authenticate each connection. For example, if schema A exists in database 1, then
do not assume that schema A in database 2 is the same user. Similarly, the local
operating system user
psmith
is not necessarily the same person as remote user
psmith
.
■Do not store clear text passwords in files or repositories. Storing passwords in
files increases the risk of an intruder accessing them.
■Use a single master password. For example:
–You can grant a single database user proxy authentication to act as other
database users. In this case, only a single database password is needed. See
"Creating Proxy User Accounts and Authorizing Users to Connect Through
Them" on page 3-38 for more information.
–You can create a password wallet, which can be opened by the master
password. The wallet then contains the other passwords. See Oracle Database
Advanced Security Administrator's Guide for more information about Wallet
Manager.

Securing Passwords in Application Design
Managing Security for Application Developers 5-5
Configuring Password Formats and Behavior
Follow these guidelines:
■Limit the lifetime for passwords. You can set a password lifetime, after which the
password expires and must be changed before the user can log in to the account.
See "Controlling Password Aging and Expiration" on page 3-8 for parameters you
can use to control the lifetime of a password.
■Limit the ability of users to reuse old passwords. See "Controlling User Ability to
Reuse Previous Passwords" on page 3-7 for more information.
■Force users to create strong, secure passwords. See "Guidelines for Securing
Passwords" on page 10-7 for advice on creating strong passwords. "Enforcing
Password Complexity Verification" on page 3-11 explains how you can customize
password requirements.
■Enable case sensitivity in passwords. See "Enabling or Disabling Password Case
Sensitivity" on page 3-13 for more information.
Handling Passwords in SQL*Plus and SQL Scripts
Follow these guidelines:
■Do not invoke SQL*Plus with a password on the command line, either in
programs or scripts. If a password is required but omitted, SQL*Plus prompts the
user for it and then automatically disables the echo feature so that the password is
not displayed.
The following examples are secure because passwords are not exposed on the
command line. Oracle Database also automatically encrypts these passwords over
the network.
$ sqlplus system
Enter password: password
SQL> connect system
Enter password: password
The following example exposes the password to other operating system users:
sqlplus system/password
The next example poses two security risks. First, it exposes the password to other
users who may be watching over your shoulder. Second, on some platforms, such
as Microsoft Windows, it makes the password vulnerable to a command line recall
attack.
$ sqlplus /nolog
SQL> connect system/password
■For SQL scripts that require passwords or secret keys, for example, to create an
account or to log in as an account, do not use positional parameters, such as
substitution variables &1, &2, and so on. Instead, design the script to prompt the
user for the value. You should also disable the echo feature, which displays output
See Also:
■"Minimum Requirements for Passwords" on page 3-3
■"Enforcing Password Complexity Verification" on page 3-11
■"Guidelines for Securing Passwords" on page 10-7

Securing Passwords in Application Design
5-6 Oracle Database Security Guide
from a script or if you are using spool mode. To disable the echo feature, use the
following setting:
SET ECHO OFF
A good practice is to ensure that the script makes the purpose of the value clear.
For example, it should be clear whether or not the value will establish a new value,
such as an account or a certificate, or if the value will authenticate, such as logging
in to an existing account.
The following example is secure because it prevents users from invoking the script
in a manner that poses security risks: It does not echo the password; it does not
record the password in a spool file.
SET VERIFY OFF
ACCEPT user CHAR PROMPT ‘Enter user to connect to: ‘
ACCEPT password CHAR PROMPT ‘Enter the password for that user: ' HIDE
CONNECT &user/&password
In this example:
–
SET VERIFY OFF
: Prevents the password from being displayed. (
SET VERIFY
lists each line of the script before and after substitution.) Combining the
SET
VERIFY OFF
command with the
HIDE
command (in Line 3) is a useful
technique for hiding passwords and other sensitive input data.
–
ACCEPT password
: Includes the
HIDE
option for the
ACCEPT password
prompt,
which prevents the input password from being echoed.
The next example, which uses positional parameters, poses security risks because
a user may invoke the script by passing the password on the command line. If the
user does not enter a password and instead is prompted, the danger lies in that
whatever the user types is echoed to the screen and to a spool file if spooling is
enabled.
CONNECT &1/&2
■Control the log in times for batch scripts. For batch scripts that require
passwords, configure the account so that the script can only log in during the time
in which it is supposed to run. For example, suppose you have a batch script that
runs for an hour each evening starting at 8 p.m. Set the account so that the script
can only log in during this time. If an intruder manages to gain access, then he or
she has less of a chance of exploiting any compromised accounts.
■Be careful when using DML or DDL SQL statements that prompt for
passwords. In this case, sensitive information is passed in clear text over the
network. You can remedy this problem by using Oracle Advanced Security. See
Oracle Database Advanced Security Administrator's Guide for more information.
The following example of altering a password is secure because the password is
not exposed:
password psmith
Changing password for psmith
New password: password
Retype new password: password
This example poses a security risk because the password is exposed both at the
command line and on the network:
ALTER USER psmith IDENTIFIED BY password

Securing Passwords in Application Design
Managing Security for Application Developers 5-7
Securing Passwords Using an External Password Store
You can store password credentials for connecting to a database by using a client-side
Oracle wallet. An Oracle wallet is a secure software container that stores the
authentication and signing credentials needed for a user to log in.
See "Managing the Secure External Password Store for Password Credentials" on
page 3-16 for more information about the secure external password store. See also
Oracle Database Advanced Security Administrator's Guide for information about using
Oracle Wallet Manager to configure Oracle wallets.
Securing Passwords Using the orapwd Utility
You can create a password file for users who need to connect to an application using
the
SYSDBA
or
SYSOPER
privileges over a network. To create the password file, use the
ORAPWD
utility. See Oracle Database Administrator's Guide for more information about
creating and maintaining a password file.
Example of Reading Passwords in Java
Example 5–1 demonstrates how to create a Java package that can be used to read
passwords.
Example 5–1 Java Code for Reading Passwords
// Change the following line to a name for your version of this package
package passwords.sysman.emSDK.util.signing;
import java.io.IOException;
import java.io.PrintStream;
import java.io.PushbackInputStream;
import java.util.Arrays;
/**
* The static readPassword method in this class issues a password prompt
* on the console output and returns the char array password
* entered by the user on the console input.
*/
public final class ReadPassword {
//----------------------------------
/**
* Test driver for readPassword method.
* @param args the command line args
*/
public static void main(String[] args) {
char[] pass = ReadPassword.readPassword("Enter password: ");
System.out.println("The password just entered is \""
+ new String(pass) + "\"");
System.out.println("The password length is " + pass.length);
}
* Issues a password prompt on the console output and returns
* the char array password entered by the user on the console input.
* The password is not displayed on the console (chars are not echoed).
* As soon as the returned char array is not needed,
* it should be erased for security reasons (Arrays.fill(charArr, ' '));
* A password should never be stored as a java String.
*
* Note that Java 6 has a Console class with a readPassword method,
* but there is no equivalent in Java 5 or Java 1.4.
* The readPassword method here is based on Sun's suggestions at

Securing Passwords in Application Design
5-8 Oracle Database Security Guide
* http://java.sun.com/developer/technicalArticles/Security/pwordmask.
*
* @param prompt the password prompt to issue
* @return new char array containing the password
* @throws RuntimeException if some error occurs
*/
public static final char[] readPassword(String prompt)
throws RuntimeException {
try {
StreamMasker masker = new StreamMasker(System.out, prompt);
Thread threadMasking = new Thread(masker);
int firstByte = -1;
PushbackInputStream inStream = null;
try {
threadMasking.start();
inStream = new PushbackInputStream(System.in);
firstByte = inStream.read();
} finally {
masker.stopMasking();
}
try {
threadMasking.join();
} catch (InterruptedException e) {
throw new RuntimeException("Interrupt occurred when reading password");
}
if (firstByte == -1) {
throw new RuntimeException("Console input ended unexpectedly");
}
if (System.out.checkError()) {
throw new RuntimeException("Console password prompt output error");
}
inStream.unread(firstByte);
return readLineSecure(inStream);
}
catch (IOException e) {
throw new RuntimeException("I/O error occurred when reading password");
}
}
//----------------------------------
/**
* Reads one line from an input stream into a char array in a secure way
* suitable for reading a password.
* The char array will never contain a '\n' or '\r'.
*
* @param inStream the pushback input stream
* @return line as a char array, not including end-of-line-chars;
* never null, but may be zero length array
* @throws RuntimeException if some error occurs
*/
private static final char[] readLineSecure(PushbackInputStream inStream)
throws RuntimeException {
if (inStream == null) {
throw new RuntimeException("readLineSecure inStream is null");
}
try {
char[] buffer = null;
try {
buffer = new char[128];
int offset = 0;
// EOL is '\n' (unix), '\r\n' (windows), '\r' (mac)

Securing Passwords in Application Design
Managing Security for Application Developers 5-9
loop:
while (true) {
int c = inStream.read();
switch (c) {
case -1:
case '\n':
break loop;
case '\r':
int c2 = inStream.read();
if ((c2 != '\n') && (c2 != -1))
inStream.unread(c2);
break loop;
default:
buffer = checkBuffer(buffer, offset);
buffer[offset++] = (char) c;
break;
}
}
char[] result = new char[offset];
System.arraycopy(buffer, 0, result, 0, offset);
return result;
}
finally {
if (buffer != null)
Arrays.fill(buffer, ' ');
}
}
catch (IOException e) {
throw new RuntimeException("I/O error occurred when reading password");
}
}
//----------------------------------
/**
* This is a helper method for readLineSecure.
*
* @param buffer the current char buffer
* @param offset the current position in the buffer
* @return the current buffer if it is not yet full;
* otherwise return a larger buffer initialized with a copy
* of the current buffer and then erase the current buffer
* @throws RuntimeException if some error occurs
*/
private static final char[] checkBuffer(char[] buffer, int offset)
throws RuntimeException
{
if (buffer == null)
throw new RuntimeException("checkBuffer buffer is null");
if (offset < 0)
throw new RuntimeException("checkBuffer offset is negative");
if (offset < buffer.length)
return buffer;
else {
try {
char[] bufferNew = new char[offset + 128];
System.arraycopy(buffer, 0, bufferNew, 0, buffer.length);
return bufferNew;
} finally {
Arrays.fill(buffer, ' ');
}
}

Securing Passwords in Application Design
5-10 Oracle Database Security Guide
}
//----------------------------------
/**
* This private class prints a one line prompt
* and erases reply chars echoed to the console.
*/
private static final class StreamMasker
extends Thread {
private static final String BLANKS = StreamMasker.repeatChars(' ', 10);
private String m_promptOverwrite;
private String m_setCursorToStart;
private PrintStream m_out;
private volatile boolean m_doMasking;
//----------------------------------
/**
* Constructor.
* @throws RuntimeException if some error occurs
*/
public StreamMasker(PrintStream outPrint, String prompt)
throws RuntimeException {
if (outPrint == null)
throw new RuntimeException("StreamMasker outPrint is null");
if (prompt == null)
throw new RuntimeException("StreamMasker prompt is null");
if (prompt.indexOf('\r') != -1)
throw new RuntimeException("StreamMasker prompt contains a CR");
if (prompt.indexOf('\n') != -1)
throw new RuntimeException("StreamMasker prompt contains a NL");
m_out = outPrint;
m_setCursorToStart = StreamMasker.repeatChars('\010',
prompt.length() + BLANKS.length());
m_promptOverwrite = m_setCursorToStart + prompt + BLANKS
+ m_setCursorToStart + prompt;
}
//----------------------------------
/**
* Begin masking until asked to stop.
* @throws RuntimeException if some error occurs
*/
public void run()
throws RuntimeException {
int priorityOriginal = Thread.currentThread().getPriority();
Thread.currentThread().setPriority(Thread.MAX_PRIORITY);
try {
m_doMasking = true;
while (m_doMasking) {
m_out.print(m_promptOverwrite);
if (m_out.checkError())
throw new RuntimeException("Console output error writing prompt");
try {
Thread.currentThread().sleep(1);
} catch (InterruptedException ie) {
Thread.currentThread().interrupt();
return;
}
}
m_out.print(m_setCursorToStart);
} finally {
Thread.currentThread().setPriority(priorityOriginal);
}

Managing Application Privileges
Managing Security for Application Developers 5-11
}
//----------------------------------
/**
* Instructs the thread to stop masking.
*/
public void stopMasking() {
m_doMasking = false;
}
//----------------------------------
/**
* Returns a repeated char string.
*
* @param c the char to repeat
* @param length the number of times to repeat the char
* @throws RuntimeException if some error occurs
*/
private static String repeatChars(char c, int length)
throws RuntimeException {
if (length < 0)
throw new RuntimeException("repeatChars length is negative");
StringBuffer sb = new StringBuffer(length);
for (int i = 0; i < length; i++)
sb.append(c);
return sb.toString();
}
}
}
Managing Application Privileges
Most database applications involve different privileges on different schema objects.
Keeping track of the privileges that are required for each application can be complex.
In addition, authorizing users to run an application can involve many
GRANT
operations.
To simplify application privilege management, you can create a role for each
application and grant that role all the privileges a user must run the application. In
fact, an application can have several roles, each granted a specific subset of privileges
that allow greater or lesser capabilities while running the application.
For example, suppose every administrative assistant uses the Vacation application to
record the vacation taken by members of the department. To best manage this
application, you should:
1. Create a
VACATION
role.
2. Grant all privileges required by the Vacation application to the
VACATION
role.
3. Grant the
VACATION
role to all administrative assistants. Better yet, create a role
that defines the privileges the administrative assistants have, and then grant the
VACATION
role to that role.
Grouping application privileges in a role aids privilege management. Consider the
following administrative options:
■You can grant the role, rather than many individual privileges, to those users who
run the application. Then, as employees change jobs, you need to grant or revoke
only one role, rather than many privileges.

Creating Secure Application Roles to Control Access to Applications
5-12 Oracle Database Security Guide
■You can change the privileges associated with an application by modifying only
the privileges granted to the role, rather than the privileges held by all users of the
application.
■You can determine the privileges that are necessary to run a particular application
by querying the
ROLE_TAB_PRIVS
and
ROLE_SYS_PRIVS
data dictionary views.
■You can determine which users have privileges on which applications by querying
the
DBA_ROLE_PRIVS
data dictionary view.
Creating Secure Application Roles to Control Access to Applications
As explained in "Securing Role Privileges by Using Secure Application Roles" on
page 4-22, a secure application role is a role that is only enabled through its associated
PL/SQL package or procedure. This package defines the policy needed to control
access to an application.
This section contains:
■Step 1: Create the Secure Application Role
■Step 2: Create a PL/SQL Package to Define the Access Policy for the Application
Step 1: Create the Secure Application Role
You create a secure application role by using the SQL statement
CREATE
ROLE
with the
IDENTIFIED USING
clause. You must have the
CREATE
ROLE
system privilege to execute
this statement.
For example, to create a secure application role called
hr_admin
that is associated with
the
sec_mgr.hr_admin
package, follow these steps:
1. Create the security application role as follows:
CREATE ROLE hr_admin IDENTIFIED USING sec_mgr.hr_admin_role_check;
This statement indicates the following:
■The role
hr_admin
to be created is a secure application role.
■The role can only be enabled by modules defined inside the PL/SQL
procedure
sec_mgr
.
hr_admin_role_check
. At this stage, this procedure does
not need to exist; "Step 2: Create a PL/SQL Package to Define the Access
Policy for the Application" on page 5-13 explains how to create the package or
procedure.
2. Grant the security application role the privileges you would normally associate
with this role.
See Also:
■Chapter 4, "Configuring Privilege and Role Authorization" for a
complete discussion of creating, enabling, and disabling roles,
and granting and revoking privileges
■"Finding Information About User Privileges and Roles" on
page 4-71 for more information about the security uses of the
ROLE_TAB_PRIVS
,
ROLE_SYS_PRIVS
, and
DBA_ROLE_PRIVS
data
dictionary views
See Also: Oracle Database 2 Day + Security Guide for a tutorial on
creating a secure application role

Creating Secure Application Roles to Control Access to Applications
Managing Security for Application Developers 5-13
For example, to grant the
hr_admin
role
SELECT
,
INSERT
,
UPDATE
, and
DELETE
privileges on the
HR.EMPLOYEES
table, you enter the following statement:
GRANT SELECT, INSERT, UPDATE, DELETE ON HR.EMPLOYEES TO hr_admin;
Do not grant the role directly to the user. The PL/SQL procedure or package does
that for you, assuming the user passes its security policies.
Step 2: Create a PL/SQL Package to Define the Access Policy for the Application
To enable or disable the secure application role, you create the security policies of the
role within a PL/SQL package. You also can create an individual procedure to do this,
but a package lets you group a set of procedures together. This lets you group a set of
policies that, used together, present a solid security strategy to protect your
applications. For users (or potential intruders) who fail the security policies, you can
add auditing checks to the package to record the failure. Typically, you create this
package in the schema of the security administrator.
The package or procedure must accomplish the following:
■It must use invoker’s rights to enable the role.To create the package using
invoker’s rights, you must set the
AUTHID
property to
CURRENT_USER
. You cannot
create the package by using definer’s rights.
For more information about invoker’s rights and definer’s rights, see Oracle
Database PL/SQL Language Reference.
■It must include one or more security checks to validate the user. One way to
validate users is to use the
SYS_CONTEXT
SQL function. See Oracle Database SQL
Language Reference for more information about
SYS_CONTEXT
. To find session
information for a user, you can use
SYS_CONTEXT
with an application context. See
Chapter 6, "Using Application Contexts to Retrieve User Information" for details.
■It must issue a SET ROLE SQL statement or DBMS_SESSION.SET_ROLE
procedure when the user passes the security checks. Because you create the
package using invoker’s rights, you must set the role by issuing the
SET ROLE
SQL
statement or the
DBMS_SESSION.SET_ROLE
procedure. (However, you cannot use
the
SET ROLE ALL
statement for this type of role enablement.) The PL/SQL
embedded SQL syntax does not support the
SET ROLE
statement, but you can
invoke
SET ROLE
by using dynamic SQL (for example, with
EXECUTE IMMEDIATE
).
For more information about
EXECUTE IMMEDIATE
, see Oracle Database PL/SQL
Language Reference.
Because of the way that you must create this package or procedure, you cannot use a
logon trigger to enable or disable a secure application role. Instead, invoke the package
directly from the application when the user logs in, before the user must use the
privileges granted by the secure application role.
For example, suppose you wanted to restrict anyone using the
hr_admin
role to
employees who are on site (that is, using certain terminals) and between the hours of 8
a.m. and 5 p.m. As the system or security administrator, follow these steps. (You can
copy and paste this text by positioning the cursor at the start of
CREATE OR REPLACE
in
the first line.)
1. Create the procedure as follows:
CREATE OR REPLACE PROCEDURE hr_admin_role_check
AUTHID CURRENT_USER
AS
BEGIN

Associating Privileges with User Database Roles
5-14 Oracle Database Security Guide
IF (SYS_CONTEXT ('userenv','ip_address')
BETWEEN '192.0.2.10' and '192.0.2.20'
AND
TO_CHAR (SYSDATE, 'HH24') BETWEEN 8 AND 17)
THEN
EXECUTE IMMEDIATE 'SET ROLE hr_admin';
END IF;
END;
/
In this example:
■
AUTHID CURRENT_USER
sets the
AUTHID
property to
CURRENT_USER
so that
invoker’s rights can be used.
■
IF (SYS_CONTEXT ('userenv','ip_address')
validates the user by using the
SYS_CONTEXT
SQL function to retrieve the user session information.
■
BETWEEN ... TO_CHAR
ceates a test to grant or deny access. The test restricts
access to users who are on site (that is, using certain terminals) and working
between the hours of 8:00 a.m. and 5:00 p.m. If the user passes this check, the
hr_admin
role is granted.
■
THEN... EXECUTE
grants the role to the user by issuing the
SET ROLE
statement
using the
EXECUTE IMMEDIATE
command.
2. Grant
EXECUTE
permissions for the
hr_admin_role_check
procedure to any user
who was assigned it.
For example:
GRANT EXECUTE ON hr_admin_role_check TO psmith;
To test the secure application role, log in to SQL*Plus as the user, try to enable the role,
and then try to perform an action that requires the privileges the role grants.
For example:
CONNECT PSMITH
Enter password: password
EXECUTE sec_admin.hr_admin_role_check;
-- Actions requiring privileges granted by the role
Associating Privileges with User Database Roles
Ensure that users have only the privileges associated with the current database role.
This section contains:
■Why Users Should Only Have the Privileges of the Current Database Role
■Using the SET ROLE Statement to Automatically Enable or Disable Roles
Why Users Should Only Have the Privileges of the Current Database Role
A single user can use many applications and associated roles. However, you should
ensure that the user has only the privileges associated with the current database role.
Consider the following scenario:
■The
ORDER
role (for an application called Order) contains the
UPDATE
privilege for
the
INVENTORY
table.

Protecting Database Objects by Using Schemas
Managing Security for Application Developers 5-15
■The
INVENTORY
role (for an application called Inventory) contains the
SELECT
privilege for the
INVENTORY
table.
■Several order entry clerks were granted both the
ORDER
and
INVENTORY
roles.
In this scenario, an order entry clerk who was granted both roles can use the privileges
of the
ORDER
role when running the
INVENTORY
application to update the
INVENTORY
table. The problem is that updating the
INVENTORY
table is not an authorized action for
the
INVENTORY
application. It is an authorized action for the
ORDER
application. To
avoid this problem, use the
SET
ROLE
statement as explained in the following section.
Using the SET ROLE Statement to Automatically Enable or Disable Roles
Use a
SET
ROLE
statement at the beginning of each application to automatically enable
its associated role and to disable all others. This way, each application dynamically
enables particular privileges for a user only when required.
The
SET
ROLE
statement simplifies privilege management. You control what
information users can access and when they can access it. The
SET
ROLE
statement also
keeps users operating in a well-defined privilege domain. If a user obtains privileges
only from roles, then the user cannot combine these privileges to perform
unauthorized operations.
Protecting Database Objects by Using Schemas
A schema is a security domain that can contain database objects. The privileges granted
to each user or role control access to these database objects.
This section contains:
■Protecting Database Objects in a Unique Schema
■Protecting Database Objects in a Shared Schema
Protecting Database Objects in a Unique Schema
You can think of most schemas as user names: the accounts that enable users to
connect to a database and access the database objects. However, a unique schema does
not allow connections to the database, but is used to contain a related set of objects.
Schemas of this sort are created as typical users, and yet are not granted the
CREATE
SESSION
system privilege (either explicitly or through a role). However, you must
temporarily grant the
CREATE
SESSION
and
RESOURCE
privilege to a unique schema if
you want to use the
CREATE
SCHEMA
statement to create multiple tables and views in a
single transaction.
For example, a given schema might own the schema objects for a specific application.
If application users have the privileges to do so, then they can connect to the database
using typical database user names and use the application and the corresponding
objects. However, no user can connect to the database using the schema set up for the
application. This configuration prevents access to the associated objects through the
schema, and provides another layer of protection for schema objects. In this case, the
See Also:
■"When Do Grants and Revokes Take Effect?" on page 4-48 for
information about enabling and disabling roles
■"How the SET ROLE Statement Affects Grants and Revokes" on
page 4-48

Managing Object Privileges in an Application
5-16 Oracle Database Security Guide
application could issue an
ALTER SESSION SET CURRENT_SCHEMA
statement to connect
the user to the correct application schema.
Protecting Database Objects in a Shared Schema
For many applications, users do not need their own accounts or schemas in a database.
These users only need to access an application schema. For example, users John,
Firuzeh, and Jane are all users of the Payroll application, and they need access to the
payroll
schema on the
finance
database. None of them need to create their own
objects in the database. They need to only access the
payroll
objects. To address this
issue, Oracle Advanced Security provides the enterprise users, which are
schema-independent users.
Enterprise users, users managed in a directory service, do not need to be created as
database users because they use a shared database schema. To reduce administration
costs, you can create an enterprise user once in the directory, and point the user at a
shared schema that many other enterprise users can also access.
For more information about managing enterprise users, see Oracle Database Enterprise
User Security Administrator's Guide.
Managing Object Privileges in an Application
As part of designing your application, you need to determine the types of users who
will be working with the application and the level of access that they need to
accomplish their designated tasks. You must categorize these users into role groups,
and then determine the privileges that must be granted to each role.
This section contains:
■What Application Developers Need to Know About Object Privileges
■SQL Statements Permitted by Object Privileges
What Application Developers Need to Know About Object Privileges
End users are typically granted object privileges. An object privilege allows a user to
perform a particular action on a specific table, view, sequence, procedure, function, or
package.
Table 5–2 summarizes the object privileges available for each type of object.
Table 5–2 How Privileges Relate to Schema Objects
Object Privilege
Applies
to Table?
Applies
to View?
Applies to
Sequence?
Applies to
Procedure?1
1Standalone stored procedures, functions, and public package constructs
ALTER
Yes No Yes No
DELETE
Yes Yes No No
EXECUTE
No No No Yes
INDEX
Yes2No No No
INSERT
Yes Yes No No
REFERENCES
Yes No No No
SELECT
Yes Yes3 Yes No
UPDATE
Yes Yes No No

Parameters for Enhanced Security of Database Communication
Managing Security for Application Developers 5-17
See also "Auditing Schema Objects" on page 9-28 for detailed information about how
schema objects can be audited.
SQL Statements Permitted by Object Privileges
As you implement and test your application, you should create each necessary role.
Test the usage scenario for each role to ensure that the users of your application will
have proper access to the database. After completing your tests, coordinate with the
administrator of the application to ensure that each user is assigned the proper roles.
Table 5–3 lists the SQL statements permitted by the object privileges shown in
Table 5–2.
See "About Privileges and Roles" on page 4-1 for a discussion of object privileges. See
also "Auditing SQL Statements" on page 9-23 for detailed information about how SQL
statements can be audited.
Parameters for Enhanced Security of Database Communication
Database administrators can manage security for their applications by following the
procedures in this section.
■Reporting Bad Packets Received on the Database from Protocol Errors
■Terminating or Resuming Server Execution After Receiving a Bad Packet
■Configuring the Maximum Number of Authentication Attempts
■Controlling the Display of the Database Version Banner
■Configuring Banners for Unauthorized Access and Auditing User Actions
Reporting Bad Packets Received on the Database from Protocol Errors
Networking communication utilities such as Oracle Call Interface (OCI) or Two-Task
Common (TTC) can generate a large disk file containing the stack trace and heap
2Privilege that cannot be granted to a role
3Can also be granted for snapshots
Table 5–3 SQL Statements Permitted by Database Object Privileges
Object Privilege SQL Statements Permitted
ALTER ALTER
object (table or sequence)
CREATE
TRIGGER
ON
object (tables only)
DELETE DELETE
FROM
object (table, view, or synonym)
EXECUTE EXECUTE
object (procedure or function)
References to public package variables
INDEX CREATE
INDEX
ON
object (table, view, or synonym)
INSERT INSERT
INTO
object (table, view, or synonym)
REFERENCES CREATE
or
ALTER
TABLE
statement defining a
FOREIGN
KEY
integrity constraint on object (tables only)
SELECT SELECT
...
FROM
object (table, view, synonym, or snapshot)
SQL statements using a sequence

Parameters for Enhanced Security of Database Communication
5-18 Oracle Database Security Guide
dump when the server receives a bad packet, out-of-sequence packet, or a private or
an unused remote procedure call. Typically, this disk file can grow quite large. An
intruder can potentially cripple a system by repeatedly sending bad packets to the
server, which can result in disk flooding and denial of service. An unauthenticated
client can also mount this type of attack.
You can prevent these attacks by setting the
SEC_PROTOCOL_ERROR_TRACE_ACTION
initialization parameter to one of the following values:
■
None
: Configures the server to ignore the bad packets and does not generate any
trace files or log messages. Use this setting if the server availability is
overwhelmingly more important than knowing that bad packets are being
received.
For example:
SEC_PROTOCOL_ERROR_TRACE_ACTION = None
■
Trace
(default setting): Creates the trace files, but it is useful for debugging
purposes, for example, when a network client is sending bad packets as a result of
a bug.
For example:
SEC_PROTOCOL_ERROR_TRACE_ACTION = Trace
■
Log
: Writes a short, one-line message to the server trace file. This choice balances
some level of auditing with system availability.
For example:
SEC_PROTOCOL_ERROR_TRACE_ACTION = Log
■
Alert
: Sends an alert message to a database administrator or monitoring console.
For example:
SEC_PROTOCOL_ERROR_TRACE_ACTION = Alert
Terminating or Resuming Server Execution After Receiving a Bad Packet
After Oracle Database detects a client or server protocol error, it must continue
execution. However, this could subject the server to further bad packets, which could
lead to disk flooding or denial-of-service attacks.
You can control the further execution of a server process when it is receiving bad
packets from a potentially malicious client by setting the
SEC_PROTOCOL_ERROR_
FURTHER_ACTION
initialization parameter to one of the following values:
■
Continue
(default setting): Continues the server execution. However, be aware that
the server may be subject to further attacks.
For example:
SEC_PROTOCOL_ERROR_FURTHER_ACTION = Continue
■
Delay,m
: Delays the client
m
seconds before the server can accept the next request
from the same client connection. This setting prevents malicious clients from
excessively using server resources while legitimate clients experience a
degradation in performance but can continue to function.
For example:
SEC_PROTOCOL_ERROR_FURTHER_ACTION = Delay,3

Parameters for Enhanced Security of Database Communication
Managing Security for Application Developers 5-19
■
Drop,n
: Forcefully terminates the client connection after
n
bad packets. This setting
enables the server to protect itself at the expense of the client, for example, loss of a
transaction. However, the client can still reconnect, and attempt the same
operation again.
For example:
SEC_PROTOCOL_ERROR_FURTHER_ACTION = Drop,10
Configuring the Maximum Number of Authentication Attempts
With Oracle Database, a server process is first started, and then the client authenticates
with this server process. An intruder could start a server process first, and then issue
an unlimited number of authenticated requests with different user names and
passwords in an attempt to gain access to the database.
You can limit the number of failed login attempts for application connections by
setting the
SEC_MAX_FAILED_LOGIN_ATTEMPTS
initialization parameter to restrict the
number of authentication attempts on a connection. After the specified number of
authentication attempts fail, the database process drops the connection. By default,
SEC_MAX_FAILED_LOGIN_ATTEMPTS
is set to 10.
Remember that the
SEC_MAX_FAILED_LOGIN_ATTEMPTS
initialization parameter is
designed to prevent potential intruders from attacking your applications; it does not
apply to valid users. The
sqlnet.ora
INBOUND_CONNECT_TIMEOUT
parameter and the
FAILED_LOGIN_ATTEMPTS
initialization parameter also restrict failed logins, but the
difference is that these two parameters only apply to valid user accounts.
For example, to limit the maximum attempts to 5, set
SEC_MAX_FAILED_LOGIN_
ATTEMPTS
as follows in the
initsid.ora
initialization parameter file:
SEC_MAX_FAILED_LOGIN_ATTEMPTS = 5
Controlling the Display of the Database Version Banner
Detailed product version information should not be accessible before a client
connection (including an Oracle Call Interface client) is authenticated. An intruder
could use the database version to find information about security vulnerabilities that
may be present in the database software.
You can restrict the display of the database version banner to unauthenticated clients
by setting the
SEC_RETURN_SERVER_RELEASE_BANNER
initialization parameter in the
initsid.ora
initialization parameter file to either
TRUE
or
FALSE
. By default,
SEC_
RETURN_SERVER_RELEASE_BANNER
is set to
FALSE
.
For example, if you set it to
TRUE
, the Oracle Database displays the full correct
database version:
Oracle Database 11g Enterprise Edition Release 11.2.0.0 - Production
In the future, if you install Oracle Database 11.2.0.2, for example, it will display the
following banner:
Oracle Database 11g Enterprise Edition Release 11.2.0.2 - Production
However, if in that same release, you set it to
FALSE
, then Oracle Database restricts the
banner to display the following fixed text starting with Release 11.2:
Oracle Database 11g Release 11.2.0.0.0 - Production

Parameters for Enhanced Security of Database Communication
5-20 Oracle Database Security Guide
Configuring Banners for Unauthorized Access and Auditing User Actions
You should create and configure banners to warn users against unauthorized access
and possible auditing of user actions. The notices are available to the client application
when it logs into the database.
To configure these banners to display, set the following
sqlnet.ora
parameters on the
database server side to point to a text file that contains the banner information:
■
SEC_USER_UNAUTHORIZED_ACCESS_BANNER
. For example:
SEC_USER_UNAUTHORIZED_ACCESS_BANNER = /opt/Oracle/11g/dbs/unauthaccess.txt
■
SEC_USER_AUDIT_ACTION_BANNER
. For example:
SEC_USER_AUDIT_ACTION_BANNER = /opt/Oracle/11g/dbs/auditactions.txt
By default, these parameters are not set. In addition, be aware that there is a 512-byte
limitation for the number of characters used for the banner text.
After you set these parameters, the Oracle Call Interface application must use the
appropriate OCI APIs to retrieve these banners and present them to the end user.

6
Using Application Contexts to Retrieve User Information 6-1
6
Using Application Contexts
to Retrieve User Information
This chapter contains:
■About Application Contexts
■Types of Application Contexts
■Using Database Session-Based Application Contexts
■Using Global Application Contexts
■Using Client Session-Based Application Contexts
■Finding Information About Application Contexts
About Application Contexts
This section contains:
■What Is an Application Context?
■Components of the Application Context
■Where Are the Application Context Values Stored?
■Benefits of Using Application Contexts
■How Editions Affects Application Context Values
What Is an Application Context?
An application context is a set of name-value pairs that Oracle Database stores in
memory. The application context has a label called a namespace (for example,
empno_
ctx
for an application context that retrieves employee IDs). Inside the context are the
name-value pairs (an associative array): the name points to a location in memory that
holds the value. An application can use the application context to access session
information about a user, such as the user ID or other user-specific information, or a
client ID, and then securely pass this data to the database. You can then use this
information to either permit or prevent the user from accessing data through the
application. You can use application contexts to authenticate both database and
nondatabase users.
Components of the Application Context
The components of the name-value pair are as follows:

About Application Contexts
6-2 Oracle Database Security Guide
■Name. Refers to the name of the attribute set that is associated with the value. For
example, if the
empno_ctx
application context retrieves an employee ID from the
HR.EMPLOYEES
table, it could have a name such as
employee_id
.
■Value. Refers to a value set by the attribute. For example, for the
empno_ctx
application context, if you wanted to retrieve an employee ID from the
HR.EMPLOYEES
table, you could create a value called
emp_id
that sets the value for
this ID.
Think of an application context as a global variable that holds information that is
accessed during a database session. To set the values for a secure application context,
you must create a PL/SQL package procedure that uses the
DBMS_SESSION.SET_
CONTEXT
procedure. In fact, this is the only way that you can set application context
values if the context is not marked
INITIALIZED EXTERNALLY
or
INITIALIZED
GLOBALLY
. You can assign the values to the application context attributes at run time,
not when you create the application context. Because the trusted procedure, and not
the user, assigns the values, it is a called secure application context. For client-session
based application contexts, another way to set the application context is to use Oracle
Call Interface (OCI) calls.
Where Are the Application Context Values Stored?
Oracle Database stores the application context values in a secure data cache available
in the User Global Area (UGA) or the System (sometimes called "Shared") Global Area
(SGA). This way, the application context values are retrieved during the session.
Because the application context stores the values in this data cache, it increases
performance for your applications. You can use an application context by itself, with
Oracle Virtual Private Databases policies, or with other fine-grained access control
policies. See "Using Oracle Virtual Private Database with an Application Context" on
page 7-3 if you are interested in using application contexts with Virtual Private
Database policies.
Benefits of Using Application Contexts
Most applications contain the kind of information that can be used for application
contexts. For example, in an order entry application that uses a table containing the
columns
ORDER_NUMBER
and
CUSTOMER_NUMBER
, you can use the values in these columns
as security attributes to restrict access by a customer to his or her own orders, based on
the ID of that customer.
Application contexts are useful for the following purposes:
■Enforcing fine-grained access control (for example, in Oracle Virtual Private
Database polices)
■Preserving user identity across multitier environments
■Enforcing stronger security for your applications, because the application context
is controlled by a trusted procedure, not the user
■Increasing performance by serving as a secure data cache for attributes needed by
an application for fine-grained auditing or for use in PL/SQL conditional
statements or loops
This cache saves the repeated overhead of querying the database each time these
attributes are needed. Because the application context stores session data in cache
rather than forcing your applications to retrieve this data repeatedly from a table,
it greatly improves the performance of your applications.

Types of Application Contexts
Using Application Contexts to Retrieve User Information 6-3
■Serving as a holding area for name-value pairs that an application can define,
modify, and access
How Editions Affects Application Context Values
Oracle Database sets the application context in all editions that are affected by the
application context package. The values the application context sets are visible in all
editions the application context affects.
Types of Application Contexts
There are three general categories of application contexts:
■Database session-based application contexts. This type retrieves data that is
stored in the database user session (that is, the UGA) cache. There are three
categories of database session-based application contexts:
– Initialized locally. Initializes the application context locally, to the session of
the user.
– Initialized externally. Initializes the application context from an Oracle Call
Interface (OCI) application, a job queue process, or a connected user database
link.
– Initialized globally. Uses attributes and values from a centralized location,
such as an LDAP directory.
"Using Database Session-Based Application Contexts" on page 6-4 describes this
type of application context.
■Global application contexts. This type retrieves data that is stored in the System
Global Area (SGA) so that it can be used for applications that use a sessionless
model, such as middle-tier applications in a three-tiered architecture. A global
application context is useful if the session context must be shared across sessions,
for example, through connection pool implementations.
"Using Global Application Contexts" on page 6-22 describes this type.
■Client session-based application contexts. This type uses Oracle Call Interface
functions on the client side to set the user session data, and then to perform the
necessary security checks to restrict user access.
"Using Client Session-Based Application Contexts" on page 6-42 describes this
type.
Table 6–1 summarizes the different types of application contexts.
See Also: Oracle Database Advanced Application Developer's Guide for
detailed information about editions
Using Database Session-Based Application Contexts
6-4 Oracle Database Security Guide
Using Database Session-Based Application Contexts
This section contains:
■About Database Session-Based Application Contexts
■Creating a Database Session-Based Application Context
■Creating a PL/SQL Package to Set the Database Session-Based Application
Context
■Creating a Logon Trigger to Run a Database Session Application Context Package
■Tutorial: Creating and Using a Database Session-Based Application Context
■Initializing Database Session-Based Application Contexts Externally
■Initializing Database Session-Based Application Contexts Globally
■Using Externalized Database Session-Based Application Contexts
About Database Session-Based Application Contexts
If you must retrieve session information for database users, then use a database
session-based application context. This type of application context uses a PL/SQL
procedure within Oracle Database to retrieve, set, and secure the data it manages.
The database session-based application context is managed entirely within Oracle
Database. Oracle Database sets the values, and then when the user exits the session,
automatically clears the application context values stored in cache. If the user
connection ends abnormally, for example, during a power failure, then the PMON
background process cleans up the application context data.You do not need to
explicitly clear the application context from cache.
The advantage of having Oracle Database manage the application context is that you
can centralize the application context management. Any application that accesses this
database will need to use this application context to permit or prevent user access to
Table 6–1 Types of Application Contexts
Application Context Type
Stored
in UGA
Stored
in SGA
Supports Connected
User Database Links
Supports Centralized
Storage of Users'
Application Context
Supports Sessionless
Multitier Applications
Database session-based
application context
initialized locally
Yes No No No No
Database session-based
application context
initialized externally
Yes No Yes No No
Database session-based
application context
initialized globally
Yes No No Yes No
Global application context No Yes No No Yes
Client session-based
application context Yes No Yes No Yes
Note: If your users are application users, that is, users who are not in
your database, consider using a global application context instead. See
"Using Global Application Contexts" on page 6-22 for more
information.

Using Database Session-Based Application Contexts
Using Application Contexts to Retrieve User Information 6-5
that application. This provides benefits both in improved performance and stronger
security.
You use the following components to create and use a database session-based
application context:
■The application context. You use the
CREATE CONTEXT
SQL statement to create an
application context. This statement names the application context (namespace)
and associates it with a PL/SQL procedure that is designed to retrieve session data
and set the application context.
■A PL/SQL procedure to perform the data retrieval and set the context. "About the
Package That Manages the Database Session-Based Application Context" on
page 6-7 describes the tasks this procedure must perform. Ideally, create this
procedure within a package, so that you can include other procedures if you want
(for example, to perform error checking tasks).
■A way to set the application context when the user logs on. Users who log on to
applications that use the application context must run a PL/SQL package that sets
the application context. You can achieve this with either a logon trigger that fires
each time the user logs on, or you can embed this functionality in your
applications.
"Tutorial: Creating and Using a Database Session-Based Application Context" on
page 6-12 shows how to create and use a database session-based application context
that is initialized locally.
You can also initialize session-based application contexts either externally or globally.
Either method stores the context information in the user session.
■External initialization. This type can come from an OCI interface, a job queue
process, or a connected user database link. See "Initializing Database
Session-Based Application Contexts Externally" on page 6-16 for detailed
information.
■Global initialization. This type uses attributes and values from a centralized
location, such as an LDAP directory. "Initializing Database Session-Based
Application Contexts Globally" on page 6-18 provides more information.
Creating a Database Session-Based Application Context
To create a database session-based application context, you use the
CREATE
CONTEXT
SQL statement. Here, you create a namespace for the application context and then
associate it with a PL/SQL package that manages the name-value pair that holds the
session information of the user. You must have the
CREATE ANY CONTEXT
system
privilege to run this statement, and the
DROP ANY CONTEXT
privilege to use the
DROP
CONTEXT
statement if you drop the application context. In a database session-based
application context, data is stored in the database user session (UGA) in a namespace
that you create with the
CREATE CONTEXT
SQL statement.
Each application context must have a unique attribute and belong to a namespace.
That is, context names must be unique within the database, not just within a schema.
The ownership of the application context is as follows: Even though a user who has
been granted the
CREATE ANY CONTEXT
and
DROP ANY CONTEXT
privileges can create
and drop the application context, it is owned by the
SYS
schema. Oracle Database
associates the context with the schema account that created it, but if you drop this user,
the context still exists in the
SYS
schema. As user
SYS
, you can drop the application
context.

Using Database Session-Based Application Contexts
6-6 Oracle Database Security Guide
Example 6–1 shows how to use
CREATE CONTEXT
to create a database session-based
application context:
Example 6–1 Creating a Database Session-Based Application Context
CREATE CONTEXT empno_ctx USING set_empno_ctx_pkg;
Here,
empno_ctx
is the context namespace and
set_empno_ctx_pkg
is the package that
sets attributes for the
empno_ctx
namespace. When you create the application context,
the PL/SQL package does not need to exist, but it must exist at run time. "Step 3:
Create a Package to Retrieve Session Data and Set the Application Context" on
page 6-14 shows an example of how to create a package that can be used with this
application context.
Notice that when you create the context, you do not set its name-value attributes in the
CREATE CONTEXT
statement. Instead, you set these in the package that you associate
with the application context. The reason you do this is to prevent a malicious user
from changing the context attributes without proper attribute validation.
For each application, you can create an application context that has its own attributes.
Suppose, for example, you have three applications: General Ledger, Order Entry, and
Human Resources. You can specify different attributes for each application:
■For the order entry application context, you can specify the attribute
CUSTOMER_
NUMBER.
■For the general ledger application context, you can specify the attributes
SET_OF_
BOOKS
and
TITLE.
■For the human resources application context, you can specify the attributes
ORGANIZATION_ID
,
POSITION
, and
COUNTRY
.
The data the attributes access is stored in the tables behind the applications. For
example, the order entry application uses a table called
OE.CUSTOMERS
, which contains
the
CUSTOMER_NUMBER
column, which provides data for the
CUSTOMER_NUMBER
attribute.
In each case, you can adapt the application context to your precise security needs.
Creating a PL/SQL Package to Set the Database Session-Based Application Context
This section contains:
■About the Package That Manages the Database Session-Based Application Context
■Using SYS_CONTEXT to Retrieve Session Information
■Using Dynamic SQL with SYS_CONTEXT
■Using SYS_CONTEXT in a Parallel Query
■Using SYS_CONTEXT with Database Links
■Using DBMS_SESSION.SET_CONTEXT to Set Session Information
Note: You cannot create a context called
CLIENTCONTEXT
. This word
is reserved for use with client session-based application contexts. See
"Using Client Session-Based Application Contexts" on page 6-42 for
more information about this type of application context.

Using Database Session-Based Application Contexts
Using Application Contexts to Retrieve User Information 6-7
About the Package That Manages the Database Session-Based Application Context
The PL/SQL package, usually created in the schema of the security administrator,
defines procedures that manage the session data represented by the application
context. It must perform the following tasks:
■Retrieve session information. To retrieve the user session information, you can
use the
SYS_CONTEXT
SQL function. The
SYS_CONTEXT
function returns the value of
the parameter associated with the context namespace. You can use this function in
both SQL and PL/SQL statements. Typically, you will use the built-in
USERENV
namespace to retrieve the session information of a user. (For detailed information
about the
SYS_CONTEXT
function, see Oracle Database SQL Language Reference.)
■Set the name-value attributes of the application context you created with
CREATE CONTEXT. You can use the
DBMS_SESSION.SET_CONTEXT
procedure to set
the name-value attributes of the application context. The name-value attributes
can hold information such as the user ID, IP address, authentication mode, the
name of the application, and so on. The values of the attributes you set remain
either until you reset them, or until the user ends the session. Note the following:
–If the value of the parameter in the namespace already has been set, then
SET_
CONTEXT
overwrites this value.
–Be aware that any changes in the context value are reflected immediately and
subsequent calls to access the value through the
SYS_CONTEXT
function will
return the most recent value.
■Be executed by users. After you create the package, the user will need to execute
the package when he or she logs on. You can create a logon trigger to execute the
package automatically when the user logs on, or you can embed this functionality
in your applications. Remember that the application context session values are
cleared automatically when the user ends the session, so you do not need to
manually remove the session data.
It is important to remember that the procedure is a trusted procedure: It is designed to
prevent the user from setting his or her own application context attribute values. The
user runs the procedure, but the procedure sets the application context values, not the
user.
"Tutorial: Creating and Using a Database Session-Based Application Context" on
page 6-12 shows how to create a database session-based application context.
Using SYS_CONTEXT to Retrieve Session Information
The syntax for the PL/SQL function
SYS_CONTEXT
is as follows:
SYS_CONTEXT ('namespace','parameter'[,length])
In this specification:
■
namespace
: The name of the application context. You can specify either a string or
an expression that evaluates to a string. The
SYS_CONTEXT
function returns the
value of parameter associated with the context namespace at the current instant. If
the value of the parameter in the namespace already has been set, then
SET_
CONTEXT
overwrites this value.
■
parameter
: A parameter within the
namespace
application context. This value can
be a string or an expression.
■
length
: Optional. The default maximum size of the return type is 256 bytes, but
you can override the length by specifying a value up to 4000 bytes. Enter a value

Using Database Session-Based Application Contexts
6-8 Oracle Database Security Guide
that is a
NUMBER
data type, or a value that can be can be implicitly converted to
NUMBER
. The data type of the
SYS_CONTEXT
return type is a
VARCHAR2
.
The
SYS_CONTEXT
function provides a default namespace,
USERENV
, which describes the
current session of the user logged on. You can use
SYS_CONTEXT
to retrieve different
types of session-based information about a user, such as the user host computer ID,
host IP address, operating system user name, and so on. Remember that you only use
USERENV
to retrieve session data, not set it. The predefined attributes are listed in the
description for the PL/SQL function in the Oracle Database SQL Language Reference.
For example, to retrieve the name of the host computer to which a client is connected,
you can use the
HOST
parameter of
USERENV
as follows:
SYS_CONTEXT ('userenv','host')
You can check the
SYS_CONTEXT
settings by issuing a
SELECT
SQL statement on the
DUAL
table. The
DUAL
table is a small table in the data dictionary that Oracle Database
and user-written programs can reference to guarantee a known result. This table has
one column called
DUMMY
and one row that contains the value
X
.
Example 6–2 demonstrates how to find the host computer on which you are logged,
assuming that you are logged on to the
SHOBEEN_PC
host computer under
EMP_USERS
.
Example 6–2 Finding SYS_CONTEXT Values
SELECT SYS_CONTEXT ('USERENV', 'HOST') FROM DUAL;
SYS_CONTEXT(USERENV,HOST)
-------------------------
EMP_USERS\SHOBEEEN_PC
Using Dynamic SQL with SYS_CONTEXT
During a session in which you expect a change in policy between executions of a given
query, the query must use dynamic SQL. You must use dynamic SQL because static
SQL and dynamic SQL parse statements differently:
■Static SQL statements are parsed at compile time. They are not parsed again at
execution time for performance reasons.
■Dynamic SQL statements are parsed every time they are executed.
Consider a situation in which Policy A is in force when you compile a SQL statement,
and then you switch to Policy B and run the statement. With static SQL, Policy A
remains in force. Oracle Database parses the statement at compile time, but does not
parse it again upon execution. With dynamic SQL, Oracle Database parses the
statement upon execution, then the switch to Policy B takes effect.
For example, consider the following policy:
EMPLOYEE_NAME = SYS_CONTEXT ('USERENV', 'SESSION_USER')
The policy
EMPLOYEE_NAME
matches the database user name. It is represented in the
form of a SQL predicate in Oracle Virtual Private Database: the predicate is considered
a policy. If the predicate changes, then the statement must be parsed again to produce
the correct result.
Note: The
USERENV
application context namespace replaces the
USERENV
function provided in earlier Oracle Database releases.

Using Database Session-Based Application Contexts
Using Application Contexts to Retrieve User Information 6-9
Using SYS_CONTEXT in a Parallel Query
If you use
SYS_CONTEXT
inside a SQL function that is embedded in a parallel query,
then the function includes the application context.
Consider a user-defined function within a SQL statement, which sets the user ID to 5:
CREATE FUNCTION set_id
RETURN NUMBER IS
BEGIN
IF SYS_CONTEXT ('hr', 'id') = 5
THEN RETURN 1; ELSE RETURN 2;
END IF;
END;
Now consider the following statement:
SELECT * FROM emp WHERE set_id( ) = 1;
When this statement is run as a parallel query, the user session, which contains the
application context information, is propagated to the parallel execution servers (query
child processes).
Using SYS_CONTEXT with Database Links
When SQL statements within a user session involve database links, then Oracle
Database runs the
SYS_CONTEXT
SQL function at the host computer of the database
link, and then captures the context information there (at the host computer).
If remote PL/SQL procedure calls are run on a database link, then Oracle Database
runs any
SYS_CONTEXT
function inside such a procedure at the destination database of
the link. In this case, only externally initialized application contexts are available at the
database link destination site. For security reasons, Oracle Database propagates only
the externally initialized application context information to the destination site from
the initiating database link site.
Using DBMS_SESSION.SET_CONTEXT to Set Session Information
After you have used the
SYS_CONTEXT
function to retrieve the session data of a user,
you are ready to set the application context values from the session of this user. To do
so, use the
DBMS_SESSION.SET_CONTEXT
procedure. (Ensure that you have the
EXECUTE
privilege for the
DBMS_SESSION
PL/SQL package.)
Its syntax is as follows:
DBMS_SESSION.SET_CONTEXT (
namespace VARCHAR2,
attribute VARCHAR2,
value VARCHAR2,
username VARCHAR2,
client_id VARCHAR2);
In this specification:
■
namespace
: The namespace of the application context to be set, limited to 30 bytes.
For example, if you were using a namespace called
custno_ctx
, you would specify
it as follows:
namespace => 'custno_ctx',
See Also: "Using Automatic Reparsing for Fine-Grained Access
Control Policy Functions" on page 7-35

Using Database Session-Based Application Contexts
6-10 Oracle Database Security Guide
■
attribute
: The attribute of the application context to be set, limited to 30 bytes.
For example, to create the
ctx_attrib
attribute for the
custno_ctx
namespace:
attribute => 'ctx_attrib',
■
value
: The value of the application context to be set, limited to 4000 bytes.
Typically, this is the value retrieved by the
SYS_CONTEXT
function and stored in a
variable. For example:
value => ctx_value,
■
username
: Optional. The database user name attribute of the application context.
The default is
NULL
, which permits any user to access the session. For database
session-based application contexts, omit this setting so that it uses the
NULL
default.
The
username
and
client_id
parameters are used for globally accessed
application contexts. See "Setting the DBMS_SESSION.SET_CONTEXT username
and client_id Parameters" on page 6-25 for more information.
■
client_id
: Optional. The application-specific
client_id
attribute of the
application context (64-byte maximum). The default is
NULL
, which means that no
client ID is specified. For database session-based application contexts, omit this
setting so that it uses the
NULL
default.
See Oracle Database PL/SQL Packages and Types Reference for detailed information about
the
DBMS_SESSION
package.
For example, remember the application context created in Example 6–1 on page 6-6:
CREATE CONTEXT empno_ctx USING set_empno_ctx_proc;
Example 6–3 shows how to create a simple procedure that creates an attribute for the
empno_ctx
application context.
Example 6–3 Simple Procedure to Create an Application Context Value
In this example:
■
emp_value IN VARCHAR2
takes
emp_value
as the input parameter. This parameter
specifies the value associated with the application context attribute
empno_attrib
.
Its limit is 4000 bytes.
■
DBMS_SESSION.SET_CONTEXT('empno_ctx', 'empno_attrib', emp_value)
sets the
value of the application context by using the
DBMS_SESSION.SET_CONTEXT
procedure:
–
'empno_ctx'
: Refers to the application context namespace. Enclose its name in
single quotation marks.
–
'empno_attrib'
: Creates the attribute associated with the application context
namespace.
CREATE OR REPLACE PROCEDURE set_empno_ctx_proc(
emp_value IN VARCHAR2)
IS
BEGIN
DBMS_SESSION.SET_CONTEXT('empno_ctx', 'empno_attrib', emp_value);
END;
/

Using Database Session-Based Application Contexts
Using Application Contexts to Retrieve User Information 6-11
–
emp_value
: Specifies the value for the
empno_attrib
attribute. Here, it refers to
the
emp_value
parameter defined in Line 2.
At this stage, you can run the
set_empno_ctx_proc
procedure to set the application
context:
EXECUTE set_empno_ctx_proc ('42783');
(In a real world scenario, you would set the application context values in the
procedure itself, so that it becomes a trusted procedure. This example is only used to
show how data can be set for demonstration purposes.)
To check the application context setting, run the following
SELECT
statement:
SELECT SYS_CONTEXT ('empno_ctx', 'empno_attrib') empno_attrib FROM DUAL;
EMPNO_ATTRIB
--------------
42783
You can also query the
SESSION_CONTEXT
data dictionary view to find all the
application context settings in the current session of the database instance. For
example:
SELECT * FROM SESSION_CONTEXT;
NAMESPACE ATTRIBUTE VALUE
--------------------------------------------------
EMPNO_CTX EMP_ID 42783
Creating a Logon Trigger to Run a Database Session Application Context Package
After you create the application context and its associated package, the user must run
the package procedure when he or she logs on. You can create a logon trigger that
handles this automatically. You do not need to grant the user
EXECUTE
permissions to
run the package.
Example 6–4 shows a simple logon trigger that executes a PL/SQL procedure.
Example 6–4 Creating a Simple Logon Trigger
CREATE OR REPLACE TRIGGER set_empno_ctx_trig AFTER LOGON ON DATABASE
BEGIN
sec_mgr.set_empno_ctx_proc;
END;
Example 6–5 shows how to create a logon trigger that uses a
WHEN OTHERS
exception.
Otherwise, if there is an error in the PL/SQL logic that creates an unhandled
exception, then all connections to the database are blocked. This example shows a
WHEN
OTHERS
exception that writes errors to a table in the security administrator’s schema. In
See Also:
■"Tutorial: Creating and Using a Database Session-Based
Application Context" on page 6-12 for how to create a package
that retrieves the user session information and then sets the
application context based on this information
■Oracle Database PL/SQL Packages and Types Reference for detailed
information about the
DBMS_SESSION.SET_CONTEXT
procedure

Using Database Session-Based Application Contexts
6-12 Oracle Database Security Guide
a production environment, this is safer than sending the output to the user session,
where it could be vulnerable to security attacks.
Example 6–5 Creating a Logon Trigger for a Production Environment
CREATE OR REPLACE TRIGGER set_empno_ctx_trig AFTER LOGON ON DATABASE
BEGIN
sec_mgr.set_empno_ctx_proc;
EXCEPTION
WHEN OTHERS THEN
v_code := SQLCODE;
v_errm := SUBSTR(SQLERRM, 1 , 64);
-- Invoke another procedure,
-- declared with PRAGMA AUTONOMOUS_TRANSACTION,
-- to insert information about errors.
INSERT INTO sec_mgr.errors VALUES (v_code, v_errm, SYSTIMESTAMP);
END;
/
Example 6–6 shows how to create the same logon trigger for a development
environment, in which you may want to output errors the user session for debugging
purposes.
Example 6–6 Creating a Logon Trigger for a Development Environment
CREATE TRIGGER set_empno_ctx_trig
AFTER LOGON ON DATABASE
BEGIN
sysadmin_ctx.set_empno_ctx_pkg.set_empno;
EXCEPTION
WHEN OTHERS THEN
RAISE_APPLICATION_ERROR(
-20000, 'Trigger sysadmin_ctx.set_empno_ctx_trig violation. Login denied.');
END;
/
Note the following:
■If the PL/SQL package procedure called by the logon trigger has any unhandled
exceptions or raises any exceptions (because, for example, a security check
failed), then the logon trigger fails. When the logon trigger fails, the logon fails,
that is, the user is denied permission to log in to the database.
■Logon triggers may affect performance. In addition, test the logon trigger on a
sample schema user first before creating it for the database. That way, if there is an
error, you can easily correct it.
■Be aware of situations in which if you have a changing set of books, or if
positions change constantly. In these cases, the new attribute values may not be
picked up right away, and you must force a cursor reparse to pick them up.
Tutorial: Creating and Using a Database Session-Based Application Context
This section contains:
Note: A logon trigger can be used because the user context
(information such as
EMPNO
,
GROUP
,
MANAGER
) should be set before
the user accesses any data.

Using Database Session-Based Application Contexts
Using Application Contexts to Retrieve User Information 6-13
■About This Tutorial
■Step 1: Create User Accounts and Ensure the User SCOTT Is Active
■Step 2: Create the Database Session-Based Application Context
■Step 3: Create a Package to Retrieve Session Data and Set the Application Context
■Step 4: Create a Logon Trigger for the Package
■Step 5: Test the Application Context
■Step 6: Remove the Components for This Tutorial
About This Tutorial
This tutorial shows how to create an application context that checks the employee ID
of any database user who tries to log in to the database.
Step 1: Create User Accounts and Ensure the User SCOTT Is Active
1. Log on as user
SYS
and connect using the
AS SYSDBA
privilege.
sqlplus sys as sysdba
Enter password: password
2. Create the
sysadmin_ctx
account, who will administer the database session-based
application context.
GRANT CREATE SESSION, CREATE ANY CONTEXT, CREATE PROCEDURE, CREATE TRIGGER,
ADMINISTER DATABASE TRIGGER TO sysadmin_ctx IDENTIFIED BY password;
GRANT SELECT ON HR.EMPLOYEES TO sysadmin_ctx;
GRANT EXECUTE ON DBMS_SESSION TO sysadmin_ctx;
Replace
password
with a password that is secure. See "Minimum Requirements for
Passwords" on page 3-3 for more information.
3. Create the following user account for Lisa Ozer, who is listed as having
lozer
for
her email account in the
HR.EMPLOYEES
table.
GRANT CREATE SESSION TO LOZER IDENTIFIED BY password;
Replace
password
with a password that is secure. See "Minimum Requirements for
Passwords" on page 3-3 for more information.
4. The sample user
SCOTT
will also be used in this tutorial, so query the
DBA_USERS
data dictionary view to ensure that
SCOTT
is not locked or expired.
SELECT USERNAME, ACCOUNT_STATUS FROM DBA_USERS WHERE USERNAME = 'SCOTT';
If the
DBA_USERS
view lists user
SCOTT
as locked and expired, then enter the
following statement to unlock the
SCOTT
account and create a new password for
him:
ALTER USER SCOTT ACCOUNT UNLOCK IDENTIFIED BY password;
Enter a password that is secure. For greater security, do not give the
SCOTT
account
the same password from previous releases of Oracle Database. See "Minimum
Requirements for Passwords" on page 3-3 for the minimum requirements for
creating passwords.
Step 2: Create the Database Session-Based Application Context
1. Log on to SQL*Plus as
sysadmin_ctx
.

Using Database Session-Based Application Contexts
6-14 Oracle Database Security Guide
CONNECT sysadmin_ctx
Enter password: password
2. Create the application context using the following statement:
CREATE CONTEXT empno_ctx USING set_empno_ctx_pkg;
Remember that even though user
sysadmin_ctx
has created this application
context, the
SYS
schema owns the context.
Step 3: Create a Package to Retrieve Session Data and Set the Application Context
Example 6–7 shows how to create the package you need to retrieve the session data
and set the application context. Before creating the package, ensure that you are still
logged on as user
sysadmin_ctx
. (You can copy and paste this text by positioning the
cursor at the start of
CREATE OR REPLACE
in the first line.)
Example 6–7 Package to Retrieve Session Data and Set a Database Session Context
This package creates a procedure called
set_empno
that performs the following actions:
■
emp_id HR.EMPLOYEES.EMPLOYEE_ID%TYPE
declares a variable,
emp_id
, to store the
employee ID for the user who logs on. It uses the same data type as the
EMPLOYEE_
ID
column in
HR.EMPLOYEES
.
■
SELECT EMPLOYEE_ID INTO emp_id FROM HR.EMPLOYEES
performs a
SELECT
statement to copy the employee ID that is stored in the
employee_id
column data
from the
HR.EMPLOYEES
table into the
emp_id
variable.
■
WHERE email = SYS_CONTEXT('USERENV', 'SESSION_USER')
uses a
WHERE
clause
to find all employee IDs that match the email account for the session user. The
SYS_CONTEXT
function uses the predefined
USERENV
context to retrieve the user
session ID, which is the same as the
email
column data. For example, the user ID
and email address for Lisa Ozer are both the same:
lozer
.
■
DBMS_SESSION.SET_CONTEXT('empno_ctx', 'employee_id', emp_id)
uses the
DBMS_SESSION.SET_CONTEXT
procedure to set the application context:
–
'empno_ctx'
: Calls the application context
empno_ctx
. Enclose
empno_ctx
in
single quotes.
CREATE OR REPLACE PACKAGE set_empno_ctx_pkg IS
PROCEDURE set_empno;
END;
/
CREATE OR REPLACE PACKAGE BODY set_empno_ctx_pkg IS
PROCEDURE set_empno
IS
emp_id HR.EMPLOYEES.EMPLOYEE_ID%TYPE;
BEGIN
SELECT EMPLOYEE_ID INTO emp_id FROM HR.EMPLOYEES
WHERE email = SYS_CONTEXT('USERENV', 'SESSION_USER');
DBMS_SESSION.SET_CONTEXT('empno_ctx', 'employee_id', emp_id);
EXCEPTION
WHEN NO_DATA_FOUND THEN NULL;
END;
END;
/

Using Database Session-Based Application Contexts
Using Application Contexts to Retrieve User Information 6-15
–
'employee_id'
: Creates the attribute value of the
empno_ctx
application
context name-value pair, by naming it
employee_id
. Enclose
employee_id
in
single quotes.
–
emp_id
: Sets the value for the
employee_id
attribute to the value stored in the
emp_id
variable. The
emp_id
variable was created in Line 8 and the employee
ID was retrieved in Lines 10–11.
To summarize, the
set_empno_ctx_pkg.set_empno
procedure says, "Get the
session ID of the user and then match it with the employee ID and email address
of any user listed in the
HR.EMPLOYEES
table."
■
EXCEPTION ... WHEN_NO_DATA_FOUND
adds a
WHEN NO_DATA_FOUND
system
exception to catch any no data found errors that may result from the
SELECT
statement. Without this exception, the package and logon trigger will work fine
and set the application context as needed, but then any non-system administrator
users other than the users listed in the
HR.EMPLOYEES
table will not be able to log in
to the database. Other users should be able to log in to the database, assuming
they are valid database users. Once the application context information is set, then
you can use this session information as a way to control user access to a particular
application.
Step 4: Create a Logon Trigger for the Package
As user
sysadmin_ctx
, create the following trigger:
CREATE TRIGGER set_empno_ctx_trig AFTER LOGON ON DATABASE
BEGIN
sysadmin_ctx.set_empno_ctx_pkg.set_empno;
END;
/
Step 5: Test the Application Context
1. Log on as user
lozer
.
CONNECT lozer
Enter password: password
When user
lozer
logs on, the
empno_ctx
application context collects her employee
ID. You can check it as follows:
SELECT SYS_CONTEXT('empno_ctx', 'employee_id') emp_id FROM DUAL;
The following output should appear:
EMP_ID
--------------------------------------------------------
168
2. Log on as user
SCOTT
.
CONNECT SCOTT
Enter password: password
User
SCOTT
is not listed as an employee in the
HR.EMPLOYEES
table, so the
empno_
ctx
application context cannot collect an employee ID for him.
SELECT SYS_CONTEXT('empno_ctx', 'employee_id') emp_id FROM DUAL;
The following output should appear:
EMP_ID

Using Database Session-Based Application Contexts
6-16 Oracle Database Security Guide
--------------------------------------------------------
From here, the application can use the user session information to determine how
much access the user can have in the database. You can use Oracle Virtual Private
Database to accomplish this. See Chapter 7, "Using Oracle Virtual Private Database
to Control Data Access" for more information.
Step 6: Remove the Components for This Tutorial
1. Log on as
SYS
and connect using
AS SYSDBA
.
CONNECT SYS/AS SYSDBA
Enter password: password
2. Drop the users
sysadmin_ctx
and
lozer
:
DROP USER sysadmin_ctx CASCADE;
DROP USER lozer;
3. Drop the application context.
DROP CONTEXT empno_ctx;
Remember that even though
sysadmin_ctx
created the application context, it is
owned by the
SYS
schema.
4. If you want, lock and expire
SCOTT
, unless other users want to use this account:
ALTER USER SCOTT PASSWORD EXPIRE ACCOUNT LOCK;
Initializing Database Session-Based Application Contexts Externally
When you initialize a database session-based application context externally, you
specify a special type of namespace that accepts the initialization of attribute values
from external resources and then stores them in the local user session. Initializing an
application context externally enhances performance because it is stored in the UGA
and enables the automatic propagation of attributes from one session to another.
Connected user database links are supported only by application contexts initialized
from OCI-based external sources.
This section contains:
■Obtaining Default Values from Users
■Obtaining Values from Other External Resources
■Initializing Application Context Values from a Middle-Tier Server
Obtaining Default Values from Users
Sometimes you need the default values from users. Initially, these default values may
be hints or preferences, and then after validation, they become trusted contexts.
Similarly, it may be more convenient for clients to initialize some default values, and
then rely on a login event trigger or applications to validate the values.
For job queues, the job submission routine records the context being set at the time the
job is submitted, and restores it when executing the batched job. To maintain the
integrity of the context, job queues cannot bypass the designated PL/SQL package to
set the context. Rather, the externally initialized application context accepts
initialization of context values from the job queue process.
Automatic propagation of context to a remote session may create security problems.
Developers or administrators can effectively handle the context that takes default

Using Database Session-Based Application Contexts
Using Application Contexts to Retrieve User Information 6-17
values from resources other than the designated PL/SQL procedure by using logon
triggers to reset the context when users log in.
Obtaining Values from Other External Resources
You can create an application context that accepts the initialization of attributes and
values through external resources. Examples include an OCI interface, a job queue
process, or a database link.
Externally initialized application contexts provide the following features:
■For remote sessions, automatic propagation of context values that are in the
externally initialized application context namespace
■For job queues, restoration of context values that are in the externally initialized
application context namespace
■For OCI interfaces, a mechanism to initialize context values that are in the
externally initialized application context namespace
Although any client program that is using Oracle Call Interface can initialize this type
of namespace, you can use login event triggers to verify the values. It is up to the
application to interpret and trust the values of the attributes.
Example 6–8 shows how to create a database session-based application context that
obtains values from an external source.
Example 6–8 Creating an Externalized Database Session-based Application Context
CREATE CONTEXT ext_ctx USING ext_ctx_pkg INITIALIZED EXTERNALLY;
Initializing Application Context Values from a Middle-Tier Server
Middle-tier servers can initialize application context values on behalf of database
users. Context attributes are propagated for the remote session at initialization time,
and the remote database accepts the values if the namespace is externally initialized.
For example, a three-tier application creating lightweight user sessions through OCI or
JDBC/OCI can access the
PROXY_USER
attribute in
USERENV
. This attribute enables you
to determine if the user session was created by a middle-tier application. You could
allow a user to access data only for connections where the user is proxied. If users
connect directly to the database, then they would not be able to access any data.
You can use the
PROXY_USER
attribute from the
USERENV
namespace within Oracle
Virtual Private Database to ensure that users only access data through a particular
middle-tier application. For a different approach, you can develop a secure application
role to enforce your policy that users access the database only through a specific proxy.
See Also:
■"Preserving User Identity in Multitiered Environments" on
page 3-36 for information about proxy authentication and
about using the
USERENV
attribute
CLIENT_IDENTIFIER
to
preserve user identity across multiple tiers
■"Using a Middle Tier Server for Proxy Authentication" on
page 3-36 for information about using a secure application role
to enforce a policy through a specific proxy
■Oracle Database JDBC Developer's Guide
■Oracle Call Interface Programmer's Guide

Using Database Session-Based Application Contexts
6-18 Oracle Database Security Guide
Initializing Database Session-Based Application Contexts Globally
This section contains:
■About Initializing Database Session-Based Application Contexts Globally
■Using Database Session-Based Application Contexts with LDAP
■How Globally Initialized Database Session-Based Application Contexts Work
■Example of Initializing a Database Session-Based Application Context Globally
About Initializing Database Session-Based Application Contexts Globally
You can use a centralized location to store the database session-based application
context of the user. This enables applications to set up a user context during
initialization based upon user identity. In particular, this feature supports Oracle Label
Security labels and privileges. Initializing an application context globally makes it
easier to manage contexts for large numbers of users and databases.
For example, many organizations want to manage user information centrally, in an
LDAP-based directory. Enterprise User Security, a feature of Oracle Advanced
Security, supports centralized user and authorization management in Oracle Internet
Directory. However, there may be additional attributes an application must retrieve
from Lightweight Directory Access Protocol (LDAP) to use for Oracle Virtual Private
Database enforcement, such as the user title, organization, or physical location.
Initializing an application context globally enables you to retrieve these types of
attributes.
Using Database Session-Based Application Contexts with LDAP
An application context that is initialized globally uses LDAP, a standard, extensible,
and efficient directory access protocol. The LDAP directory stores a list of users to
which this application is assigned. Oracle Database uses a directory service, typically
Oracle Internet Directory, to authenticate and authorize enterprise users.
The
orclDBApplicationContext
LDAP object (a subclass of
groupOfUniqueNames
)
stores the application context values in the directory. The location of the application
context object is described in Figure 6–1, which is based on the Human Resources
example.
The LDAP object
inetOrgPerson
enables multiple entries to exist for some attributes.
However, be aware that when these entries are loaded into the database and accessed
with the
SYS_LDAP_USER_DEFAULT
context namespace, only the first of these entries is
returned. For example, the
inetOrgPerson
object for a user allows multiple entries for
telephoneNumber
(thus allowing a user to have multiple telephone numbers stored).
When you use the
SYS_LDAP_USER_DEFAULT
context namespace, only the first
telephone number is retrieved.
On the LDAP side, an internal C function is required to retrieve the
orclDBApplicationContext
value, which returns a list of application context values to
the database. In this example,
HR
is the namespace; Title and Project are the attributes;
and Manager and Promotion are the values.
Note:
■Enterprise User Security requires Oracle Advanced Security.
■You can use third-party directories such as Microsoft Active
Directory and Sun Microsystems SunONE as the directory service.
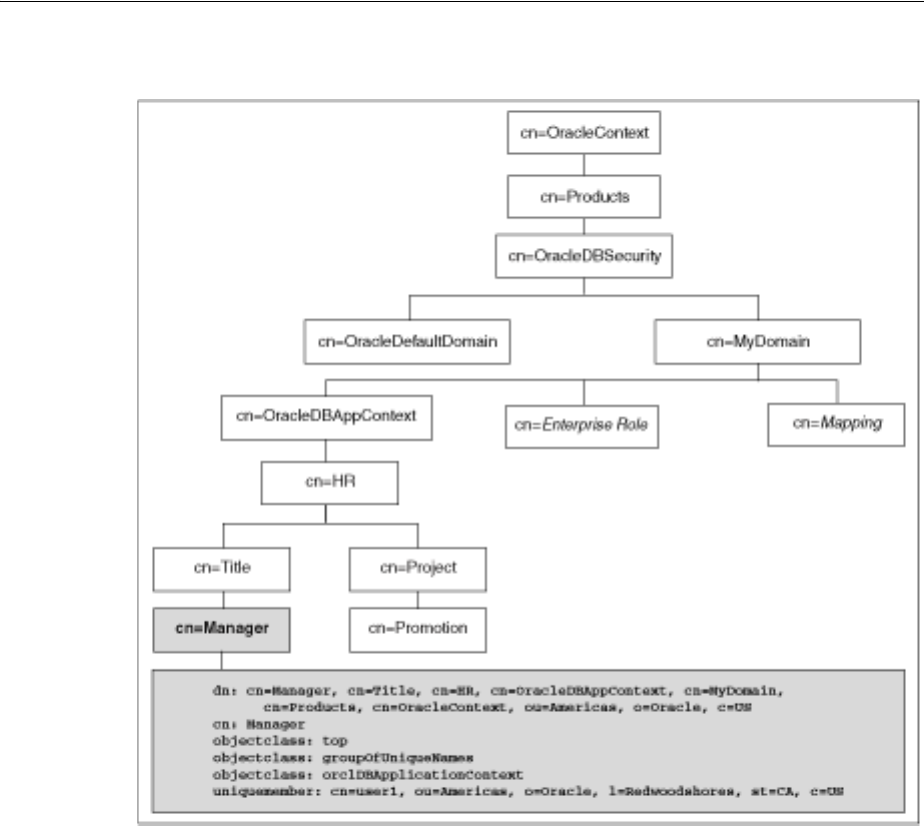
Using Database Session-Based Application Contexts
Using Application Contexts to Retrieve User Information 6-19
Figure 6–1 Location of Application Context in LDAP Directory Information Tree
How Globally Initialized Database Session-Based Application Contexts Work
To use a globally initialized secure application, you need to first configure Enterprise
User Security, a feature of Oracle Advanced Security. Then, you set up the application
context values for the user in the database and the directory.
When a global user (enterprise user) connects to the database, Enterprise User Security
verifies the identity of the user connecting to the database. After authentication, the
global user roles and application context are retrieved from the directory. When the
user logs on to the database, the global roles and initial application context are already
set.
Example of Initializing a Database Session-Based Application Context Globally
You can configure and store the initial application context for a user, such as the
department name and title, in the LDAP directory. The values are retrieved during
user login so that the context is set properly. In addition, any information related to the
user is retrieved and stored in the
SYS_USER_DEFAULTS
application context namespace.
The following procedure shows how this is accomplished:
1. Create the application context in the database.
See Also: Oracle Database Enterprise User Security Administrator's
Guide for information about configuring Enterprise User Security

Using Database Session-Based Application Contexts
6-20 Oracle Database Security Guide
CREATE CONTEXT hr USING hrapps.hr_manage_pkg INITIALIZED GLOBALLY;
2. Create and add new entries in the LDAP directory.
An example of the entries added to the LDAP directory follows. These entries
create an attribute named
Title
with the attribute value
Manager
for the
application (namespace)
HR
, and assign user names
user1
and
user2
. In the
following,
cn=example
refers to the name of the domain.
dn:
cn=OracleDBAppContext,cn=example,cn=OracleDBSecurity,cn=Products,cn=OracleConte
xt,ou=Americas,o=oracle,c=US
changetype: add
cn: OracleDBAppContext
objectclass: top
objectclass: orclContainer
dn:
cn=hr,cn=OracleDBAppContext,cn=example,cn=OracleDBSecurity,cn=Products,cn=Oracl
eContext,ou=Americas,o=oracle,c=US
changetype: add
cn: hr
objectclass: top
objectclass: orclContainer
dn: cn=Title,cn=hr,
cn=OracleDBAppContext,cn=example,cn=OracleDBSecurity,cn=Products,cn=OracleConte
xt,ou=Americas,o=oracle,c=US
changetype: add
cn: Title
objectclass: top
objectclass: orclContainer
dn: cn=Manager,cn=Title,cn=hr,
cn=OracleDBAppContext,cn=example,cn=OracleDBSecurity,cn=Products,cn=OracleConte
xt,ou=Americas,o=oracle,c=US
cn: Manager
objectclass: top
objectclass: groupofuniquenames
objectclass: orclDBApplicationContext
uniquemember: CN=user1,OU=Americas,O=Oracle,L=Redwoodshores,ST=CA,C=US
uniquemember: CN=user2,OU=Americas,O=Oracle,L=Redwoodshores,ST=CA,C=US
3. If an LDAP
inetOrgPerson
object entry exists for the user, then the connection
retrieves the attributes from
inetOrgPerson
, and assigns them to the namespace
SYS_LDAP_USER_DEFAULT
. The following is an example of an
inetOrgPerson
entry:
dn: cn=user1,ou=Americas,O=oracle,L=redwoodshores,ST=CA,C=US
changetype: add
objectClass: top
objectClass: person
objectClass: organizationalPerson
objectClass: inetOrgPerson
cn: user1
sn: One
givenName: User
initials: UO
title: manager, product development
uid: uone
mail: uone@us.example.com

Using Database Session-Based Application Contexts
Using Application Contexts to Retrieve User Information 6-21
telephoneNumber: +1 650 555 0105
employeeNumber: 00001
employeeType: full time
4. Connect to the database.
When
user1
connects to a database that belongs to the
example
domain,
user1
will
have his
Title
set to
Manager
. Any information related to
user1
will be retrieved
from the LDAP directory. The value can be obtained using the following syntax:
SYS_CONTEXT('namespace','attribute name')
For example:
DECLARE
tmpstr1 VARCHAR2(30);
tmpstr2 VARCHAR2(30);
BEGIN
tmpstr1 = SYS_CONTEXT('HR','TITLE);
tmpstr2 = SYS_CONTEXT('SYS_LDAP_USER_DEFAULT','telephoneNumber');
DBMS_OUTPUT.PUT_LINE('Title is ' || tmpstr1);
DBMS_OUTPUT.PUT_LINE('Telephone Number is ' || tmpstr2);
END;
The output of this example is:
Title is Manager
Telephone Number is +1 650 555 0105
Using Externalized Database Session-Based Application Contexts
Many applications store attributes used for fine-grained access control within a
database metadata table. For example, an
employees
table could include cost center,
title, signing authority, and other information useful for fine-grained access control.
Organizations also centralize user information for user management and access
control in LDAP-based directories, such as Oracle Internet Directory. Application
context attributes can be stored in Oracle Internet Directory, and assigned to one or
more enterprise users. They can also be retrieved automatically upon login for an
enterprise user, and then used to initialize an application context.
Note: Enterprise User Security is a feature of Oracle Advanced
Security.
See Also:
■"Initializing Database Session-Based Application Contexts
Externally" on page 6-16 for information about initializing local
application context through external resources such as an OCI
interface, a job queue process, or a database link
■"Initializing Database Session-Based Application Contexts
Globally" on page 6-18 for information about initializing local
application context through a centralized resource, such as
Oracle Internet Directory
■Oracle Database Enterprise User Security Administrator's Guide for
information about enterprise users

Using Global Application Contexts
6-22 Oracle Database Security Guide
Using Global Application Contexts
This section contains:
■About Global Application Contexts
■Using Global Application Contexts in an Oracle Real Application Clusters
Environment
■Creating a Global Application Context
■Creating a PL/SQL Package to Manage a Global Application Context
■Embedding Calls in Middle-Tier Applications to Manage the Client Session ID
■Tutorial: Creating a Global Application Context That Uses a Client Session ID
■Global Application Context Processes
About Global Application Contexts
A global application context enables application context values to be accessible across
database sessions, including Oracle RAC instances.Oracle Database stores the global
application context information in the System (sometimes called "Shared") Global Area
(SGA) so that it can be used for applications that use a sessionless model, such as
middle-tier applications in a three-tiered architecture. These applications cannot use a
session-based application context because users authenticate to the application, and
then it typically connects to the database as a single identity. Oracle Database
initializes the global application context once, rather than for each user session. This
improves performance, because connections are reused from a connection pool.
There are three general uses for global application contexts:
■You must share application values globally for all database users. For example,
you may need to disable access to an application based on a specific situation. In
this case, the values the application context sets are not user-specific, nor are they
based on the private data of a user. The application context defines a situation, for
example, to indicate the version of application module that is running.
■You have database users who must move from one application to another. In this
case, the second application the user is moving to has different access
requirements from the first application.
■You must authenticate nondatabase users, that is, users who are not known to
the database. This type of user, who does not have a database account, typically
connects through a Web application by using a connection pool. These types of
applications connect users to the database as single user, using the One Big
Application User authentication model. To authenticate this type of user, you use
the client session ID of the user.
A global application context has the following components:
■The global application context. You use the
CREATE CONTEXT
SQL statement to
create the global application context, and include the
ACCESSED GLOBALLY
clause in
the statement. This statement names the application context and associates it with
a PL/SQL procedure that is designed to set the application data context data. The
global application context is created and stored in the database schema of the
security administrator who creates it.
■A PL/SQL package to set the attributes. The package must contain a procedure
that uses the
DBMS_SESSION.SET_CONTEXT
procedure to set the global application
context. The
SET_CONTEXT
procedure provides parameters that enable you to create

Using Global Application Contexts
Using Application Contexts to Retrieve User Information 6-23
a global application context that fits any of the three user situations described in
this section. You create, store, and run the PL/SQL package on the database server.
Typically, it belongs in the schema of the security administrator who created it.
■A middle-tier application to get and set the client session ID. For nondatabase
users, which require a client session ID to be authenticated, you can use the Oracle
Call Interface (OCI) calls in the middle-tier application to retrieve and set their
session data. You can also use the
DBMS_SESSION.SET_IDENTIFIER
procedure to set
the client session ID. An advantage of creating a client session ID to store the
nondatabase user’s name is that you can query the
CLIENT_ID
column of
DBA_
AUDIT_TRAIL
,
DBA_FGA_AUDIT_TRAIL
, and
DBA_COMMON_AUDIT_TRAIL
data
dictionary views to audit this user’s activity.
Using Global Application Contexts in an Oracle Real Application Clusters Environment
In an Oracle RAC environment, whenever a global application context is loaded or
changed, it is visible only to the existing active instances. Be aware that setting a global
application context value in an Oracle RAC environment has performance overhead of
propagating the context value consistently to all Oracle RAC instances.
If you flush the global application context (using the
ALTER SYSTEM FLUSH GLOBAL_
CONTEXT
SQL statement) in one Oracle RAC instance, then all the global application
context is flushed in all other Oracle RAC instances as well.
Creating a Global Application Context
To create a global application context, use the
CREATE CONTEXT
SQL statement to create
the application context and include the
ACCESSED GLOBALLY
clause in the statement.
You must have the
CREATE ANY CONTEXT
system privilege before you can use the
CREATE CONTEXT
statement, and the
DROP ANY CONTEXT
privilege before you can drop
the context with the
DROP CONTEXT
statement. As with local application contexts, the
global application context is created and stored in the database schema of a security
administrator.
The ownership of the global application context is as follows: Even though a user who
has been granted the
CREATE ANY CONTEXT
and
DROP ANY CONTEXT
privileges can create
and drop the global application context, it is owned by the
SYS
schema. Oracle
Database associates the context with the schema account that created it, but if you
drop this user, the context still exists in the
SYS
schema. As user
SYS
, you can drop the
application context.
Example 6–9 shows how to create the global application context
global_hr_ctx
, which
is set by the
hr_ctx_pkg
package.
Example 6–9 Creating a Global Application Context
CREATE OR REPLACE CONTEXT global_hr_ctx USING hr_ctx_pkg ACCESSED GLOBALLY;
Creating a PL/SQL Package to Manage a Global Application Context
This section contains:
Note: Be aware that the
DBMS_APPLICATION_INFO.SET_CLIENT_INFO
setting can overwrite the value. See "Using the DBMS_SESSION
PL/SQL Package to Set and Clear the Client Identifier" on page 3-46
for more information.

Using Global Application Contexts
6-24 Oracle Database Security Guide
■About the Package That Manages the Global Application Context
■How Editions Affects the Results of a Global Application Context PL/SQL
Package
■Setting the DBMS_SESSION.SET_CONTEXT username and client_id Parameters
■Sharing Global Application Context Values for All Database Users
■Setting a Global Context for Database Users Who Move Between Applications
■Setting a Global Application Context for Nondatabase Users
■Clearing Session Data When the Session Closes
For detailed information about the
DBMS_SESSION
package, see Oracle Database PL/SQL
Packages and Types Reference.
About the Package That Manages the Global Application Context
The task of the PL/SQL package that you associate with a global application context is
to use the
DBMS_SESSION
package to set and clear the global application context values.
You must have the
EXECUTE
privilege for the
DBMS_SESSION
package before you use its
procedures. Typically, you create and store this package in the database schema of a
security administrator. The
SYS
schema owns the
DBMS_SESSION
package.
Unlike PL/SQL packages used to set a local application context, you do not include a
SYS_CONTEXT
function to get the user session data. You do not need to include this
function because the owner of the session, recorded in the
USERENV
context, is the same
for every user who is connecting.
You can run the procedures within the PL/SQL package for a global application
context at any time. You do not need to create logon and logoff triggers to execute the
package procedures associated with the global application context. A common practice
is to run the package procedures from within the database application. Additionally,
for nondatabase users, you use middle-tier applications to get and set client session
IDs.
How Editions Affects the Results of a Global Application Context PL/SQL Package
You can control the behavior of a global application context package—and for
packages used for Oracle Virtual Private Database and fine-grained audit policies, as
well—across multiple editions, as follows:
■Have the PL/SQL package results be the same across all editions. To do so, create
the package in the schema of a user who has not been editions enabled. To find
users who are not editions enabled, you can query the
DBA_USERS
and
USER_USERS
data dictionary views. Remember that
SYS
,
SYSTEM
, and other default Oracle
Database administrative accounts that are listed in the
DBA_REGISTRY
data
dictionary view are not and cannot be editions enabled.
■Have the PL/SQL package results depend on the current state of the edition in
which the package is run. Here, the results may be different across all editions to
which the package applies. In this case, create the package in the schema of a user
who has been editions enabled. If the schema is editions enabled, then it is likely
that there will be different actual copies of the package in different editions, where
each copy has different behavior. This is useful for the following types of
scenarios:
–The package must use a new application context.
–The package must encode input values using a different scheme.
Using Global Application Contexts
Using Application Contexts to Retrieve User Information 6-25
–The package must apply different validation rules for users logging in to the
database.
For PL/SQL packages that set a global application context, use a single getter
function to wrap the primitive
SYS_CONTEXT
calls that will read the key-value
application context pairs. You can put this getter function in the same package as
the application context setter procedure. This approach lets you tag the value for
the application context key to reflect a relevant concept. For example, the tag can
be the edition in which the setter function is actual. Or, it can be the current edition
of the session that set the context, which you can find by using
SYS_
CONTEXT('USERENV', 'CURRENT_EDITION_NAME')
. This tag can be any specific
notion to which the setter function applies.
Setting the DBMS_SESSION.SET_CONTEXT username and client_id Parameters
In addition to the
namespace
,
attribute
, and
value
parameters, the
DBMS_
SESSION.SYS_CONTEXT
procedure provides the
client_id
and
username
parameters.
Use these settings for global application contexts. Table 6–2 explains how the
combination of these settings controls the type of global application context you can
create.
See Also: Oracle Database Advanced Application Developer's Guide for
detailed information about editions
Table 6–2 Setting the DBMS_SESSION.SET_CONTEXT username and client_id Parameters
Combination Settings Result
username
set to
NULL
client_id
set to
NULL
This combination enables all users to access the application context. See "Sharing
Global Application Context Values for All Database Users" on page 6-26 for more
information.
These settings are also used for database session-based application contexts. See
"Using Database Session-Based Application Contexts" on page 6-4 for more
information.
username
set to a value
client_id
set to
NULL
This combination enables an application context to be accessed by multiple sessions,
as long as the
username
setting is the same throughout. Ensure that the user name
specified is a valid database user. See "Setting a Global Context for Database Users
Who Move Between Applications" on page 6-27 for more information.
username
set to
NULL
client_id
set to a value
This combination enables an application to be accessed by multiple user sessions, as
long as the
client_id
parameter is set to the same value throughout. This enables
sessions of all users to see the application context values.
username
set to a value
client_id
set to a value
This combination enables the following two scenarios:
■Lightweight users. If the user does not have a database account, the username
specified is a connection pool owner. The
client_id
setting is then associated
with the nondatabase user who is logging in.
■Database users. If the user is a database user, this combination can be used for
stateless Web sessions.
Setting the
username
parameter in the
SET_CONTEXT
procedure to
USER
calls the Oracle
Database-supplied
USER
function. The
USER
function specifies the session owner from
the application context retrieval process and ensures that only the user who set the
application context can access the context. See Oracle Database SQL Language Reference
for more information about the
USER
function.
See "Setting a Global Application Context for Nondatabase Users" on page 6-28 for
more information.

Using Global Application Contexts
6-26 Oracle Database Security Guide
Sharing Global Application Context Values for All Database Users
To share global application values for all database users, set the
namespace
,
attribute
,
and
value
parameters in the
SET_CONTEXT
procedure. In this scenario, all users who
have database accounts will potentially have access to data in the database.
Example 6–10 shows how to create a package that sets and clears this type of global
application context.
Example 6–10 Package to Manage Global Application Values for All Database Users
In this example:
■
DBMS_SESSION.SET_CONTEXT ... END set_hr_ctx
uses the
DBMS_SESSION.SET_
CONTEXT
procedure to set values for the namespace, attribute, and value
parameters. The
sec_level
value is specified when the database application runs
the
hr_ctx_pkg.set_hr_ctx
procedure.
The
username
and
client_id
values are not set, hence, they are
NULL
. This enables
all users (database users) to have access to the values, which is appropriate for
server-wide settings.
■
namespace => 'global_hr_ctx
' sets the
namespace
to
global_hr_ctx
.
■
attribute => 'job_role'
creates the
job_role
attribute.
■
value => sec_level
sets the value for the
job_role
attribute to
sec_level
.
■
PROCEDURE clear_hr_context
creates the
clear_hr_context
procedure to clear
the context values. See "Clearing Session Data When the Session Closes" on
page 6-32 for more information.
Typically, you execute this procedure within a database application. For example, if all
users logging in are clerks, and you want to use "clerk" as a security level, you would
embed a call within a database application similar to the following:
BEGIN
hr_ctx_pkg.set_hr_ctx('clerk');
CREATE OR REPLACE PACKAGE hr_ctx_pkg
AS
PROCEDURE set_hr_ctx(sec_level IN VARCHAR2);
PROCEDURE clear_hr_context;
END;
/
CREATE OR REPLACE PACKAGE BODY hr_ctx_pkg
AS
PROCEDURE set_hr_ctx(sec_level IN VARCHAR2)
AS
BEGIN
DBMS_SESSION.SET_CONTEXT(
namespace => 'global_hr_ctx',
attribute => 'job_role',
value => sec_level);
END set_hr_ctx;
PROCEDURE clear_hr_context
AS
BEGIN
DBMS_SESSION.CLEAR_CONTEXT('global_hr_ctx', 'job_role');
END clear_context;
END;
/

Using Global Application Contexts
Using Application Contexts to Retrieve User Information 6-27
END;
/
If the procedure successfully completes, you can check the application context setting
as follows:
SELECT SYS_CONTEXT('global_hr_ctx', 'job_role') job_role FROM DUAL;
JOB_ROLE
-----------
clerk
To clear this application context, enter the following:
BEGIN
hr_ctx_pkg.clear_hr_context;
END;
/
To check that it is really cleared, the following
SELECT
statement should return no
values:
SELECT SYS_CONTEXT('global_hr_ctx', 'job_role') job_role FROM DUAL;
JOB_ROLE
-----------
Setting a Global Context for Database Users Who Move Between Applications
To set a global application context for database users who move from one application
to another, particularly when the applications have different access requirements,
include the
username
parameter in the
SET_CONTEXT
procedure. This parameter
specifies that the same schema be used for all sessions.
Use the following
SET_CONTEXT
parameters:
■
namespace
■
attribute
■
value
■
username
Oracle Database matches the
username
value so that the other application can
recognize the application context. This enables the user to move between applications.
By omitting the
client_id
setting, its value is
NULL
, the default. This means that values
can be seen by multiple sessions if the
username
setting is the same for a database user
who maintains the same context in different applications. For example, you can have a
Note: If Oracle Database returns error messages saying that you
have insufficient privileges, ensure that you have correctly created the
global application context. You should also query the
DBA_CONTEXT
database view to ensure that your settings are correct, for example,
that you are calling the procedure from the schema in which you
created it.
If
NULL
is returned, then you may have inadvertently set a client
identifier. To clear the client identifier, run the following procedure:
EXEC DBMS_SESSION.CLEAR_IDENTIFIER;

Using Global Application Contexts
6-28 Oracle Database Security Guide
suite of applications that control user access with Oracle Virtual Private Database
policies, with each user restricted to a job role.
Example 6–11 demonstrates how to set the
username
parameter so that a specific user
can move between applications. This example is similar to the package that was
created in Example 6–10 on page 6-26. The use of the
username
parameter is indicated
in bold typeface.
Example 6–11 Package to Manage Global Application Context Values for a User Moving
Between Applications
CREATE OR REPLACE PACKAGE hr_ctx_pkg
AS
PROCEDURE set_hr_ctx(sec_level IN VARCHAR2, user_name IN VARCHAR2);
PROCEDURE clear_hr_context;
END;
/
CREATE OR REPLACE PACKAGE BODY hr_ctx_pkg
AS
PROCEDURE set_hr_ctx(sec_level IN VARCHAR2, user_name IN VARCHAR2)
AS
BEGIN
DBMS_SESSION.SET_CONTEXT(
namespace => 'global_hr_ctx',
attribute => 'job_role',
value => sec_level,
username => user_name);
END set_hr_ctx;
PROCEDURE clear_hr_context
AS
BEGIN
DBMS_SESSION.CLEAR_CONTEXT('global_hr_ctx');
END clear_context;
END;
/
Typically, you execute this procedure within a database application by embedding a
call similar to the following example. Ensure that the value for the
user_name
parameter (
scott
in this case) is a valid database user name.
BEGIN
hr_ctx_pkg.set_hr_ctx('clerk', 'scott');
END;
A secure way to manage this type of global application context is within your
applications, embed code to grant a secure application role to the user. This code
should include
EXECUTE
permissions on the trusted PL/SQL package that sets the
application context. In other words, the application, not the user, will set the context
for the user.
Setting a Global Application Context for Nondatabase Users
When a nondatabase user, that is, a user who is not known to the database (such as a
Web application user), starts a client session, the application server generates a client
session ID. Once this ID is set on the application server, it must be passed to the
database server side. You do this by using the
DBMS_SESSION.SET_IDENTIFIER
procedure to set the client session ID. To set the context, you set the
client_id
parameter in the
DBMS_SESSION.SET_CONTEXT
procedure, in a PL/SQL procedure on

Using Global Application Contexts
Using Application Contexts to Retrieve User Information 6-29
the server side. This enables you to manage the application context globally, yet each
client sees only his or her assigned application context.
The
client_id
value is the key here to getting and setting the correct attributes for the
global application context. Remember that the client identifier is controlled by the
middle-tier application, and once set, it remains open until it is cleared.
A typical way to manage this type of application context is to place the
session_id
value (
client_identifier
) in a cookie, and send it to the end user’s HTML page so
that is returned on the next request. A lookup table in the application should also keep
client identifiers so that they are prevented from being reused for other users and to
implement an end-user session time out.
For nondatabase users, configure the following
SET_CONTEXT
parameters:
■
namespace
■
attribute
■
value
■
username
■
client_id
Example 6–12 shows how to create a package that manages this type of global
application context.

Using Global Application Contexts
6-30 Oracle Database Security Guide
Example 6–12 Package to Manage Global Application Context Values for Nondatabase
Users
In this example:
■
session_id_global NUMBER
creates the
session_id_global
variable, which will
hold the client session ID. The
session_id_global
variable is referenced
throughout the package definition, including the procedure that creates the global
application context attributes and assigns them values. This means that the global
application context values will always be associated with this particular session
ID.
CREATE OR REPLACE PACKAGE hr_ctx_pkg
AS
PROCEDURE set_session_id(session_id_p IN NUMBER);
PROCEDURE set_hr_ctx(sec_level_attr IN VARCHAR2,
sec_level_val IN VARCHAR2);
PROCEDURE clear_hr_session(session_id_p IN NUMBER);
PROCEDURE clear_hr_context;
END;
/
CREATE OR REPLACE PACKAGE BODY hr_ctx_pkg
AS
session_id_global NUMBER;
PROCEDURE set_session_id(session_id_p IN NUMBER)
AS
BEGIN
session_id_global := session_id_p;
DBMS_SESSION.SET_IDENTIFIER(session_id_p);
END set_session_id;
PROCEDURE set_hr_ctx(sec_level_attr IN VARCHAR2,
sec_level_val IN VARCHAR2)
AS
BEGIN
DBMS_SESSION.SET_CONTEXT(
namespace => 'global_hr_ctx',
attribute => sec_level_attr,
value => sec_level_val,
username => USER,
client_id => session_id_global);
END set_hr_ctx;
PROCEDURE clear_hr_session(session_id_p IN NUMBER)
AS
BEGIN
DBMS_SESSION.SET_IDENTIFIER(session_id_p);
DBMS_SESSION.CLEAR_IDENTIFIER;
END clear_hr_session;
PROCEDURE clear_hr_context
AS
BEGIN
DBMS_SESSION.CLEAR_CONTEXT('global_hr_ctx', session_id_global);
END clear_hr_context;
END;
/

Using Global Application Contexts
Using Application Contexts to Retrieve User Information 6-31
■
PROCEDURE set_session_id ... END set_session_id
creates the
set_session_
id
procedure, which writes the client session ID to the
session_id_global
variable.
■
PROCEDURE set_hr_ctx ... END set_hr_ctx
creates the
set_hr_ctx
procedure,
which creates global application context attributes and enables you to assign
values to these attributes. Within this procedure:
–
username => USER
specifies the
username
value. This example sets it by calling
the Oracle Database-supplied
USER
function, which adds the session owner
from the context retrieval process. The
USER
function ensures that only the user
who set the application context can access the context. See Oracle Database SQL
Language Reference for more information about the
USER
function.
If you had specified
NULL
(the default for the
username
parameter), then any
user can access the context.
Setting both the
username
and
client_id
values enables two scenarios. For
lightweight users, set the
username
parameter to a connection pool owner (for
example,
APPS_USER
), and then set
client_id
to the client session ID. If you
want to use a stateless Web session, set the
user_name
parameter to the same
database user who has logged in, and ensure that this user keeps the same
client session ID. See "Setting the DBMS_SESSION.SET_CONTEXT username
and client_id Parameters" on page 6-25 for an explanation of how different
username
and
client_id
settings work.
–
client_id => session_id_global
specifies
client_id
value. This example
sets it to the
session_id_global
variable. This associates the context settings
defined here with a specific client session ID, that is, the one that is set when
you run the
set_session_id
procedure. If you specify the
client_id
parameter default,
NULL
, then the global application context settings could be
used by any session.
■
PROCEDURE clear_hr_session ... END clear_hr_session
creates the
clear_hr_
session
procedure to clear the client session identifier. Line 33 sets it to ensure
that you are clearing the correct session ID, that is, the one stored in variable
session_id_p defined in Line 10.
■
PROCEDURE clear_hr_context ... END clear_hr_context
creates the
clear_hr_
context
procedure, so that you can clear the context settings for the current user
session, which were defined by the
global_hr_ctx
variable. See "Clearing Session
Data When the Session Closes" on page 6-32 for more information.
See Also:
■"Tutorial: Creating a Global Application Context That Uses a
Client Session ID" on page 6-35 for a tutorial that demonstrates
how a global application context used for client session IDs
works
■"Setting the Client Session ID Using a Middle-Tier Application"
on page 6-33
■"Using Client Identifiers to Identify Application Users Not
Known to the Database" on page 3-44 for information about
how client identifiers work on middle-tier systems

Using Global Application Contexts
6-32 Oracle Database Security Guide
Clearing Session Data When the Session Closes
The application context exists entirely within memory. When the user exits a session,
you need to clear the context for the
client_identifier
value. This releases memory
and prevents other users from accidentally using any left over values.
To clear session data when a user exits a session, use either of the following methods
in the server-side PL/SQL package:
■Clearing the client identifier when a user exits a session. Use the
DBMS_
SESSION.CLEAR_IDENTIFIER
procedure. For example:
DBMS_SESSION.CLEAR_IDENTIFIER;
■Continuing the session but still clearing the context. If you want the session to
continue, but you still need to clear the context, use the
DBMS_SESSION.CLEAR_
CONTEXT
or the
DBMS_SESSION.CLEAR_ALL_CONTEXT
procedure. For example:
DBMS_SESSION.CLEAR_CONTEXT('my_ctx', 'my_attribute');
The
CLEAR_CONTEXT
procedure clears the context for the current user. To clear the
context values for all users, for example, when you need to shut down the
application server, use the
CLEAR_ALL_CONTEXT
procedure.
Global application context values are available until they are cleared, so you
should use
CLEAR_CONTEXT
or
CLEAR_ALL_CONTEXT
to ensure that other sessions do
not have access to these values. Be aware that any changes in the context value are
reflected immediately and subsequent calls to access the value through the
SYS_
CONTEXT
function will return the most recent value.
Embedding Calls in Middle-Tier Applications to Manage the Client Session ID
This section contains:
■About Managing Client Session IDs Using a Middle-Tier Application
■Retrieving the Client Session ID Using a Middle-Tier Application
■Setting the Client Session ID Using a Middle-Tier Application
■Clearing Session Data Using a Middle-Tier Application
About Managing Client Session IDs Using a Middle-Tier Application
The application server generates the client session ID. From a middle-tier application,
you can get, set, and clear the client session IDs. To do so, embed either Oracle Call
Interface (OCI) calls or
DBMS_SESSION
PL/SQL package procedures into the middle-tier
application code.
The application authenticates the user, sets the client identifier, and sets it in the
current session. The PL/SQL package
SET_CONTEXT
sets the
client_identifier
value
in the application context. See "Setting a Global Application Context for Nondatabase
Users" on page 6-28 for more information.
Retrieving the Client Session ID Using a Middle-Tier Application
When a user starts a client session, the application server generates a client session ID.
To retrieve this client ID, you can use the
OCIStmtExecute
call with any of the
following statements:
SELECT SYS_CONTEXT('userenv', 'client_identifier') FROM dual;
SELECT CLIENT_IDENTIFIER from V$SESSION;

Using Global Application Contexts
Using Application Contexts to Retrieve User Information 6-33
SELECT value FROM session_context WHERE attribute='CLIENT_IDENTIFIER';
Example 6–13 shows how to use the
OCIStmtExecute
call to retrieve a client session ID
value.
Example 6–13 Using OCIStmtExecute to Retrieve a Client Session ID Value
In this example:
■
oratext
,
OCIDefine
,
OCIStmt
, and
oratext
create variables to store the client
session ID, reference call for
OCIDefine
, the statement handle, and the
SELECT
statement to use.
■
OCIStmtPrepar
prepares the statement
selcid
for execution.
■
OCIDefineByPos
defines the output variable
clientid
for client session ID.
■
OCIStmtExecute
executes the statement in the
selcid
variable.
■
printf
prints the formatted output for the retrieved client session ID.
Setting the Client Session ID Using a Middle-Tier Application
After you use the
OCIStmtExecute
call to retrieve the client session ID, you are ready
to set this ID. The
DBMS_SESSION.SET_CONTEXT
procedure in the server-side PL/SQL
package then sets this session ID and optionally, overwrites the application context
values.
Ensure that the middle-tier application code checks that the client session ID value (for
example, the value written to
user_id
in the previous examples) matches the
client_
id
setting defined in the server-side
DBMS_SESSION.SET_CONTEXT
procedure. The
sequence of calls on the application server side should be as follows:
1. Get the current client session ID. The session should already have this ID, but it
is safer to ensure that it truly has the correct value.
2. Clear the current client session ID. This prepares the application to service a
request from a different end user.
3. Set the new client session ID or the client session ID that has been assigned to
the end user. This ensures that the session is using a different set of global
application context values.
oratext clientid[31];
OCIDefine *defnp1 = (OCIDefine *) 0;
OCIStmt *statementhndle;
oratext *selcid = (oratext *)"SELECT SYS_CONTEXT('userenv',
'client_identifier') FROM DUAL";
OCIStmtPrepare(statementhndle, errhp, selcid,
(ub4) strlen((char *) selcid), (ub4) OCI_NTV_SYNTAX, (ub4) OCI_DEFAULT);
OCIDefineByPos(statementhndle, &defnp1, errhp, 1, (dvoid *)clientid, 31,
SQLT_STR, (dvoid *) 0, (ub2 *) 0, (ub2 *) 0, OCI_DEFAULT);
OCIStmtExecute(servhndle, statementhndle, errhp, (ub4) 1, (ub4) 0,
(CONST OCISnapshot *) NULL, (OCISnapshot *) NULL, OCI_DEFAULT);
printf("CLIENT_IDENTIFIER = %s \n", clientid);

Using Global Application Contexts
6-34 Oracle Database Security Guide
You can use the following methods to set the client session ID on the application server
side:
■Oracle Call Interface. Set the
OCI_ATTR_CLIENT_IDENTIFIER
attribute in an
OCIAttrSet
OCI call. This attribute sets the client identifier in the session handle to
track the end user identity.
The following example shows how to use
OCIAttrSet
with the
ATTR_CLIENT_
IDENTIFIER
parameter. The
user_id
setting refers to a variable that stores the ID of
the user who is logging on.
OCIAttrSet((void *)session_handle, (ub4) OCI_HTYPE_SESSION,
(void *) user_id, (ub4)strlen(user_id),
OCI_ATTR_CLIENT_IDENTIFIER, error_handle);
■DBMS_SESSION package. Use the
DBMS_SESSION.SET_IDENTIFIER
procedure to
set the client identifier for the global application context. For example, assuming
you are storing the ID of the user logging on in a variable called
user_id
, you
would enter the following line into the middle-tier application code:
DBMS_SESSION.SET_IDENTIFIER(user_id);
For both
OCIAttrSet
and
DBMS_SESSION.SET_IDENTIFIER
, you can check the value of
this identifier as follows:
SELECT SYS_CONTEXT('userenv', 'client_identifier') FROM dual;
Another way to check this value is to query the
V$SESSION
view:
SELECT CLIENT_IDENTIFIER from V$SESSION;
Clearing Session Data Using a Middle-Tier Application
The application context exists entirely within memory. When the user exits a session,
you need to clear the context for the
client_identifier
value. This releases memory
and prevents other users from accidentally using any left over values
To clear session data when a user exits a session, use either of the following methods
in the middle-tier application code:
■Clearing the client identifier when a user exits a session. Use the
DBMS_
SESSION.CLEAR_IDENTIFIER
procedure. For example:
DBMS_SESSION.CLEAR_IDENTIFIER;
Note: When the application generates a session ID for use as a
CLIENT_IDENTIFIER
, then the session ID must be suitably random and
protected over the network by encryption. If the session ID is not
random, then a malicious user could guess the session ID and access
the data of another user. If the session ID is not encrypted over the
network, then a malicious user could retrieve the session ID and
access the connection.
You can encrypt the session ID by using Oracle Advanced Security.
See Oracle Database Advanced Security Administrator's Guide for more
information. To learn more about encrypting data over a network, see
Oracle Database 2 Day + Security Guide.

Using Global Application Contexts
Using Application Contexts to Retrieve User Information 6-35
■Continuing the session but still clearing the context. If you want the session to
continue, but you still need to clear the context, use the
DBMS_SESSION.CLEAR_
CONTEXT
or the
DBMS_SESSION.CLEAR_ALL_CONTEXT
procedure. For example:
DBMS_SESSION.CLEAR_CONTEXT(namespace, client_identifier, attribute);
The
CLEAR_CONTEXT
procedure clears the context for the current user. To clear the
context values for all users, for example, when you need to shut down the
application server, use the
CLEAR_ALL_CONTEXT
procedure.
Global application context values are available until they are cleared, so you
should use
CLEAR_CONTEXT
or
CLEAR_ALL_CONTEXT
to ensure that other sessions do
not have access to these values.
Tutorial: Creating a Global Application Context That Uses a Client Session ID
This section contains:
■About This Tutorial
■Step 1: Create User Accounts
■Step 2: Create the Global Application Context
■Step 3: Create a Package for the Global Application Context
■Step 4: Test the Global Application Context
■Step 5: Remove the Components for This Tutorial
About This Tutorial
This tutorial shows how to create a global application context that uses a client session
ID for a lightweight user application. It demonstrates how to control nondatabase user
access by using a connection pool.
Step 1: Create User Accounts
You must create two users for this example: a security administrator who will manage
the application context and its package, and a user account that owns the connection
pool.
In this tutorial:
1. Log on to SQL*Plus as
SYS
and connect using
AS SYSDBA
.
sqlplus sys as sysdba
Enter password: password
2. Create the
sysadmin_ctx
account, who will administer the global application
context.
GRANT CREATE SESSION, CREATE ANY CONTEXT, CREATE PROCEDURE TO sysadmin_ctx
IDENTIFIED BY password;
GRANT EXECUTE ON DBMS_SESSION TO sysadmin_ctx;
Replace
password
with a password that is secure. See "Minimum Requirements for
Passwords" on page 3-3 for more information.
3. Create the database account
apps_user
, who will own the connection pool.
GRANT CREATE SESSION TO apps_user IDENTIFIED BY password;

Using Global Application Contexts
6-36 Oracle Database Security Guide
Replace
password
with a password that is secure. See "Minimum Requirements for
Passwords" on page 3-3 for more information.
Step 2: Create the Global Application Context
1. Log on as the security administrator
sysadmin_ctx
.
CONNECT sysadmin_ctx
Enter password: password
2. Create the
cust_ctx
global application context.
CREATE CONTEXT global_cust_ctx USING cust_ctx_pkg ACCESSED GLOBALLY;
The
cust_ctx
context is created and associated with the schema of the security
administrator
sysadmin_ctx
. However, the
SYS
schema owns the application
context.
Step 3: Create a Package for the Global Application Context
1. As
sysadmin_ctx
, create the following PL/SQL package:
CREATE OR REPLACE PACKAGE cust_ctx_pkg
AS
PROCEDURE set_session_id(session_id_p IN NUMBER);
PROCEDURE set_cust_ctx(sec_level_attr IN VARCHAR2,
sec_level_val IN VARCHAR2);
PROCEDURE clear_hr_session(session_id_p IN NUMBER);
PROCEDURE clear_hr_context;
END;
/
CREATE OR REPLACE PACKAGE BODY cust_ctx_pkg
AS
session_id_global NUMBER;
PROCEDURE set_session_id(session_id_p IN NUMBER)
AS
BEGIN
session_id_global := session_id_p;
DBMS_SESSION.SET_IDENTIFIER(session_id_p);
END set_session_id;
PROCEDURE set_cust_ctx(sec_level_attr IN VARCHAR2, sec_level_val IN VARCHAR2)
AS
BEGIN
DBMS_SESSION.SET_CONTEXT(
namespace => 'global_cust_ctx',
attribute => sec_level_attr,
value => sec_level_val,
username => USER, -- Retrieves the session user, in this case, apps_user
client_id => session_id_global);
END set_cust_ctx;
PROCEDURE clear_hr_session(session_id_p IN NUMBER)
AS
BEGIN
DBMS_SESSION.SET_IDENTIFIER(session_id_p);
DBMS_SESSION.CLEAR_IDENTIFIER;
END clear_hr_session;
PROCEDURE clear_hr_context

Using Global Application Contexts
Using Application Contexts to Retrieve User Information 6-37
AS
BEGIN
DBMS_SESSION.CLEAR_CONTEXT('global_cust_ctx', session_id_global);
END clear_hr_context;
END;
/
For a detailed explanation of how this type of package works, see Example 6–12
on page 6-30.
2. Grant
EXECUTE
privileges on the
cust_ctx_pkg
package to the connection pool
owner,
apps_user
.
GRANT EXECUTE ON cust_ctx_pkg TO apps_user;
Step 4: Test the Global Application Context
At this stage, you are ready to explore how this global application context and session
ID settings work.
1. Log on to SQL*Plus as the connection pool owner, user
apps_user
.
CONNECT apps_user
Enter password: password
2. When the connection pool user logs on, the application sets the client session
identifier as follows:
BEGIN
sysadmin_ctx.cust_ctx_pkg.set_session_id(34256);
END;
/
You can test and check the value of the client session identifier as follows:
a. Connect to SQL*Plus as the connection pool user
apps_user
.
b. Set the session ID:
EXEC sysadmin_ctx.cust_ctx_pkg.set_session_id(34256);
c. Check the session ID:
SELECT SYS_CONTEXT('userenv', 'client_identifier') FROM dual;
The following output should appear:
SYS_CONTEXT('USERENV','CLIENT_IDENTIFIER')
--------------------------------------------------
34256
3. As user
apps_user
, set the global application context as follows:
EXEC sysadmin_ctx.cust_ctx_pkg.set_cust_ctx('Category', 'Gold Partner');
EXEC sysadmin_ctx.cust_ctx_pkg.set_cust_ctx('Benefit Level', 'Highest');
(In a real-world scenario, the middle-tier application would set the global
application context values, similar to how the client session identifier was set in
Step 2.)
4. Enter the following
SELECT SYS_CONTEXT
statement to check that the settings were
successful:
col category format a13
col benefit_level format a14

Using Global Application Contexts
6-38 Oracle Database Security Guide
SELECT SYS_CONTEXT('global_cust_ctx', 'Category') category, SYS_
CONTEXT('global_cust_ctx', 'Benefit Level') benefit_level FROM dual;
The following output should appear:
CATEGORY BENEFIT_LEVEL
------------- --------------
Gold Partner Highest
What
apps_user
has done here, within the client session 34256, is set a global
application context on behalf of a nondatabase user. This context sets the
Category
and
Benefit Level
DBMS_SESSION.SET_CONTEXT attributes
to be
Gold Partner
and
Highest
, respectively. The context exists only for user
apps_user
with client ID 34256.
When a nondatabase user logs in, behind the scenes, he or she is really logging on as
the connection pool user
apps_user
. Hence, the
Gold Partner
and
Highest
context
values are available to the nondatabase user.
Suppose the user had been a database user and could log in without using the
intended application. (For example, the user logs in using SQL*Plus.) Because the user
has not logged in through the connection pool user
apps_user
, the global application
context appears empty to our errant user. This is because the context was created and
set under the
apps_user
session. If the user runs the
SELECT SYS_CONTEXT
statement,
the following output appears:
CATEGORY BENEFIT_LEVEL
------------- --------------
Next, try the following test:
1. As user
apps_user
, clear the session ID.
EXEC sysadmin_ctx.cust_ctx_pkg.clear_hr_session(34256);
2. Check the global application context settings again.
SELECT SYS_CONTEXT('global_cust_ctx', 'Category') category, SYS_
CONTEXT('global_cust_ctx', 'Benefit Level') benefit_level FROM dual;
CATEGORY BENEFIT_LEVEL
------------- --------------
Because
apps_user
has cleared the session ID, the global application context
settings are no longer available.
3. Restore the session ID to 34256, and then check the context values.
EXEC sysadmin_ctx.cust_ctx_pkg.set_session_id(34256);
SELECT SYS_CONTEXT('global_cust_ctx', 'Category') category, SYS_
CONTEXT('global_cust_ctx', 'Benefit Level') benefit_level FROM dual;
The following output should appear:
CATEGORY BENEFIT_LEVEL
------------- --------------
Gold Partner Highest
As you can see, resetting the session ID to 34256 brings the application context
values back again. To summarize, the global application context must be set only
once for this user, but the client session ID must be set each time the user logs on.
4. Now try clearing and then checking the global application context values.

Using Global Application Contexts
Using Application Contexts to Retrieve User Information 6-39
EXEC sysadmin_ctx.cust_ctx_pkg.clear_hr_context;
SELECT SYS_CONTEXT('global_cust_ctx', 'Category') category, SYS_
CONTEXT('global_cust_ctx', 'Benefit Level') benefit_level FROM dual;
The following output should appear:
CATEGORY BENEFIT_LEVEL
------------- --------------
At this stage, the client session ID, 34256 is still in place, but the application
context settings no longer exist. This enables you to continue the session for this
user but without using the previously set application context values.
Step 5: Remove the Components for This Tutorial
1. Log on as
SYS
and connect using
AS SYSDBA
.
CONNECT sys/as sysdba
Enter password: password
2. Drop the global application context.
DROP CONTEXT global_cust_ctx;
Remember that even though
sysadmin_ctx
created the global application context,
it is owned by the
SYS
schema.
3. Drop the two sample users.
DROP USER sysadmin_ctx CASCADE;
DROP USER apps_user;
Global Application Context Processes
This section contains:
■Simple Global Application Context Process
■Global Application Context Process for Lightweight Users
Simple Global Application Context Process
Consider the application server,
AppSvr
, that has assigned the client identifier
12345
to
client
SCOTT
. The
AppSvr
application uses the
SCOTT
user to create a session (that is, it is
not a connection pool.) The value assigned to the context attribute can come from
anywhere, for example, from running a
SELECT
statement on a table that holds the
responsibility codes for users. When the application context is populated, it is stored in
memory. As a result, any action that needs the responsibility code can access it quickly
with
SYS_CONTEXT
call, without the overhead of accessing a table. The only advantage
of a global context over a local context in this case is if
SCOTT
were changing
applications frequently and used the same context in each application.
The following steps show how the global application context process sets the client
identifier for
SCOTT
:
1. The administrator creates a global context namespace by using the following
statement:
CREATE OR REPLACE CONTEXT hr_ctx USING hr.init ACCESSED GLOBALLY;

Using Global Application Contexts
6-40 Oracle Database Security Guide
2. The administrator creates a PL/SQL package for the
hr_ctx
application context to
indicate that, for this client identifier, there is an application context called
responsibility
with a value of
13
in the
HR
namespace.:
CREATE OR REPLACE PROCEDURE hr.init
AS
BEGIN
DBMS_SESSION.SET_CONTEXT(
namespace => 'hr_ctx',
attribute => 'responsibility',
value => '13',
username => 'SCOTT',
client_id => '12345' );
END;
/
This PL/SQL procedure is stored in the
HR
database schema, but typically it is
stored in the schema of the security administrator.
3. The AppSvr application issues the following command to indicate the connecting
client identity each time
scott
uses
AppSvr
to connect to the database:
EXEC DBMS_SESSION.SET_IDENTIFIER('12345');
4. When there is a
SYS_CONTEXT('hr_ctx','responsibility')
call within the
database session, the database matches the client identifier,
12345
, to the global
context, and then returns the value
13
.
5. When exiting this database session,
AppSvr
clears the client identifier by issuing
the following procedure:
EXEC DBMS_SESSION.CLEAR_IDENTIFIER( );
6. To release the memory used by the application context,
AppSvr
issues the
following procedure:
DBMS_SESSION.CLEAR_CONTEXT('hr_ctx', '12345');
CLEAR_CONTEXT
is needed when the user session is no longer active, either on an
explicit logout, timeout, or other conditions determined by the
AppSvr
application.
Global Application Context Process for Lightweight Users
The following steps show the global application context process for a lightweight user
application. The lightweight user,
robert
, is not known to the database through the
application.
1. The administrator creates the global context namespace by using the following
statement:
CREATE CONTEXT hr_ctx USING hr.init ACCESSED GLOBALLY;
2. The
HR
application server,
AppSvr
, starts and then establishes multiple connections
to the
HR
database as the
appsmgr
user.
3. User
robert
logs in to the
HR
application server.
Note: After a client identifier in a session is cleared, it becomes a
NULL
value. This implies that subsequent
SYS_CONTEXT
calls only
retrieve application contexts with
NULL
client identifiers, until the
client identifier is set again using the
SET_IDENTIFIER
interface.

Using Global Application Contexts
Using Application Contexts to Retrieve User Information 6-41
4.
AppSvr
authenticates
robert
to the application.
5.
AppSvr
assigns a temporary session ID (or uses the application user ID),
12345
, for
this connection.
6. The session ID is returned to the Web browser used by
robert
as part of a cookie
or is maintained by
AppSvr
.
7.
AppSvr
initializes the application context for this client by calling the
hr.init
package, which issues the following statements:
DBMS_SESSION.SET_CONTEXT( 'hr_ctx', 'id', 'robert', 'APPSMGR', 12345 );
DBMS_SESSION.SET_CONTEXT( 'hr_ctx', 'dept', 'sales', 'APPSMGR', 12345 );
8.
AppSvr
assigns a database connection to this session and initializes the session by
issuing the following statement:
DBMS_SESSION.SET_IDENTIFIER( 12345 );
9. All
SYS_CONTEXT
calls within this database session return application context
values that belong only to the client session.
For example,
SYS_CONTEXT('hr','id')
returns the value
robert
.
10. When finished with the session,
AppSvr
issues the following statement to clean up
the client identity:
DBMS_SESSION.CLEAR_IDENTIFIER ( );
Even if another user logged in to the database, this user cannot access the global
context set by
AppSvr
, because
AppSvr
specified that only the application with user
APPSMGR
logged in can see it. If
AppSvr
used the following, then any user session with
client ID set to
12345
can see the global context:
DBMS_SESSION.SET_CONTEXT( 'hr_ctx', 'id', 'robert', NULL , 12345 );
DBMS_SESSION.SET_CONTEXT( 'hr_ctx', 'dept', 'sales', NULL , 12345 );
Setting
USERNAME
to
NULL
enables different users to share the same context.
You can query the client identifier set in the session as follows:
SELECT SYS_CONTEXT('USERENV','CLIENT_IDENTIFIER') FROM dual;
The following output should appear:
SYS_CONTEXT('USERENV','CLIENT_IDENTIFIER')
-------------------------------------------------
12345
A security administrator can see which sessions have the client identifier set by
querying the
V$SESSION
view for the
CLIENT_IDENTIFIER
and
USERNAME
, for example:
COL client_identifier format a18
SELECT CLIENT_IDENTIFIER, USERNAME from V$SESSION;
Note: Be aware of the security implication of different settings of the
global context.
NULL
in the user name means that any user can access
the global context. A
NULL
client ID in the global context means that a
session with an uninitialized client ID can access the global context. To
ensure that only the user who has logged on can access the session,
specify
USER
instead of
NULL
.

Using Client Session-Based Application Contexts
6-42 Oracle Database Security Guide
The following output should appear:
CLIENT_IDENTIFIER USERNAME
------------------ --------
12345 APPSMGR
To check the amount of global context area (in bytes) being used, use the following
query:
SELECT SYS_CONTEXT('USERENV','GLOBAL_CONTEXT_MEMORY') FROM dual;
The following output should appear:
SYS_CONTEXT('USERENV','GLOBAL_CONTEXT_MEMORY')
----------------------------------------------
584
Using Client Session-Based Application Contexts
This section contains:
■About Client Session-Based Application Contexts
■Setting a Value in the CLIENTCONTEXT Namespace
■Retrieving the CLIENTCONTEXT Namespace
■Clearing a Setting in the CLIENTCONTEXT Namespace
■Clearing All Settings in the CLIENTCONTEXT Namespace
About Client Session-Based Application Contexts
In a client session-based application context, you use Oracle Call Interface (OCI)
functions to set and clear user session information, which is then stored in the User
Global Area (UGA).
The advantage of this type of application context is that an individual application can
check for specific nondatabase user session data, rather than having the database
perform this task. Another advantage is that the calls to set the application context
value are included in the next call to the server, which improves performance.
However, be aware that application context security is compromised with a client
session-based application context: any application user can set the client application
context, and no check is performed in the database.
You configure the client session-based application context for the client application
only. You do not configure any settings on the database server to which the client
connects. Any application context settings in the database server do not affect the
client session-based application context.
To configure a client session-based application context, use the
OCIAppCtxSet
OCI
function. A client session-based application context uses the
CLIENTCONTEXT
See Also: For more information about using the
CLIENT_
IDENTIFIER
predefined attribute of the
USERENV
application context:
■"Using the CLIENT_IDENTIFIER Attribute to Preserve User
Identity" on page 3-45
■Oracle Database SQL Language Reference
■Oracle Call Interface Programmer's Guide

Using Client Session-Based Application Contexts
Using Application Contexts to Retrieve User Information 6-43
namespace, updatable by any OCI client or by the existing
DBMS_SESSION
package for
application context. Oracle Database performs no privilege or package security checks
for this type.
The
CLIENTCONTEXT
namespace enables a single application transaction to both change
the user context information and use the same user session handle to service the new
user request. You can set or clear individual values for attributes in the
CLIENTCONTEXT
namespace, or clear all their values.
■An OCI client uses the
OCIAppCtx
function to set variable length data for the
namespace, called
OCISessionHandle
. The OCI network single, round-trip
transport sends all the information to the server in one round-trip. On the server
side, you can query the application context information by using the
SYS_CONTEXT
SQL function on the namespace. For example:
■A JDBC client uses the
oracle.jdbc.internal.OracleConnection
function to
achieve the same purposes.
Any user can set, clear, or collect the information in the
CLIENTCONTEXT
namespace,
because it is not protected by package-based security.
Setting a Value in the CLIENTCONTEXT Namespace
For Oracle Call Interface, to set a value in the
CLIENTCONTEXT
namespace, use a
command in the following syntax:
err = OCIAppCtxSet((void *) session_handle,(dvoid *)"CLIENTCONTEXT",(ub4) 13,
(dvoid *)attribute_name, length_of_attribute_name
(dvoid *)attribute_value, length_of_attribute_value, errhp,
OCI_DEFAULT);
In this specification:
■
session_handle
: Represents the
OCISessionHandle
namespace.
■
attribute_name
: Name of attribute. For example,
responsibility
, with a length
of
14
.
■
attribute_value
: Value of attribute. For example,
manager
, with a length of
7
.
Retrieving the CLIENTCONTEXT Namespace
To retrieve the
CLIENTCONTEXT
namespace, you can use the Oracle Call Interface
OCIStmtExecute
call with either of the following statements:
SELECT SYS_CONTEXT('CLIENTCONTEXT', 'Attribute-1') FROM dual;
SELECT VALUE FROM SESSION_CONTEXT
WHERE NAMESPACE='CLIENTCONTEXT' AND ATTRIBUTE='attribute-1';
The
Attribute-1
value can be any attribute value that has already been set in the
CLIENTCONTEXT
namespace. Oracle Database only retrieves the set attribute; otherwise,
it returns
NULL
. Typically, you set the attribute by using the
OCIAppCtxSet
call. In
addition, you can embed a
DBMS_SESSION.SET_CONTEXT
call in the OCI code to set the
attribute value.
See Also: Oracle Call Interface Programmer's Guide for more
information about client application contexts
See Also: "Managing Scalable Platforms" in Oracle Call Interface
Programmer's Guide for details about the
OCIAppCtx
function

Using Client Session-Based Application Contexts
6-44 Oracle Database Security Guide
Example 6–13 shows how to use the
OCIStmtExecute
call to retrieve a client session ID
value.
Example 6–14 Retrieving a Client Session ID Value for Client Session-Based Contexts
In this example:
■
oratext
,
OCIDefine
,
OCIStmt
, and
oratext
create variables to store the client
session ID, reference call for
OCIDefine
, the statement handle, and the
SELECT
statement to use.
■
OCIStmtPrepare
prepares the statement
selcid
for execution.
■
OCIDefineByPos
defines the output variable
clientid
for client session ID.
■
OCIStmtExecute
executes the statement in the
selcid
variable.
■
printf
prints the formatted output for the retrieved client session ID.
Clearing a Setting in the CLIENTCONTEXT Namespace
For Oracle Call Interface, to clear a setting in
CLIENTCONTEXT
, set the value to
NULL
or to
an empty string by using one of the following commands:
(void) OCIAppCtxSet((void *) session_handle, (dvoid *)"CLIENTCONTEXT", 13,
(dvoid *)attribute_name, length_of_attribute_name,
(dvoid *)0, 0,errhp
OCI_DEFAULT);
or
(void) OCIAppCtxSet((void *) session_handle, (dvoid *)"CLIENTCONTEXT", 13
(dvoid *)attribute_name, length_of_attribute_name,
(dvoid *)"", 0,errhp,
OCI_DEFAULT);
Clearing All Settings in the CLIENTCONTEXT Namespace
For Oracle Call Interface (OCI), use a command of the following form:
err = OCIAppCtxClearAll((void *) session_handle,
(dvoid *)"CLIENTCONTEXT", 13,
errhp,
OCI_DEFAULT);
oratext clientid[31];
OCIDefine *defnp1 = (OCIDefine *) 0;
OCIStmt *statementhndle;
oratext *selcid = (oratext *)"SELECT SYS_CONTEXT('CLIENTCONTEXT',
attribute) FROM DUAL";
OCIStmtPrepare(statementhndle, errhp, selcid, (ub4) strlen((char *) selcid),
(ub4) OCI_NTV_SYNTAX, (ub4) OCI_DEFAULT);
OCIDefineByPos(statementhndle, &defnp1, errhp, 1, (dvoid *)clientid, 31,
SQLT_STR, (dvoid *) 0, (ub2 *) 0, (ub2 *) 0, OCI_DEFAULT);
OCIStmtExecute(servhndle, statementhndle, errhp, (ub4) 1, (ub4) 0,
(CONST OCISnapshot *) NULL, (OCISnapshot *) NULL, OCI_DEFAULT);
printf("CLIENT_IDENTIFIER = %s \n", clientid);
Finding Information About Application Contexts
Using Application Contexts to Retrieve User Information 6-45
Finding Information About Application Contexts
Table 6–3 lists data dictionary views that you can query to find information about
application contexts. For detailed information about these views, see Oracle Database
Reference.
Table 6–3 Data Dictionary Views That Display Information about Application Contexts
View Description
ALL_CONTEXT
Describes all context namespaces in the current session for which attributes and
values were specified using the
DBMS_SESSION.SET_CONTEXT
procedure. It lists the
namespace and its associated schema and PL/SQL package.
ALL_POLICY_CONTEXTS
Describes the driving contexts defined for the synonyms, tables, and views
accessible to the current user. (A driving context is a context used in a Virtual Private
Database policy.)
DBA_CONTEXT
Provides all context namespace information in the database. Its columns are the
same as those in the
ALL_CONTEXT
view, except that it includes the
TYPE
column. The
TYPE
column describes how the application context is accessed or initialized.
DBA_POLICY_CONTEXTS
Describes all driving contexts in the database that were added by the
DBMS_RLS.ADD_
POLICY_CONTEXT
procedure. Its columns are the same as those in
ALL_POLICY_
CONTEXTS
.
SESSION_CONTEXT
Describes the context attributes and their values set for the current session.
USER_POLICY_CONTEXTS
Describes the driving contexts defined for the synonyms, tables, and views owned
by the current user. Its columns (except for
OBJECT_OWNER
) are the same as those in
ALL_POLICY_CONTEXTS
.
V$CONTEXT
Lists set attributes in the current session. Users do not have access to this view
unless you grant the user the
SELECT
privilege on it.
V$SESSION
Lists detailed information about each current session. Users do not have access to
this view unless you grant the user the
SELECT
privilege on it.
Tip: In addition to these views, check the database trace file if you
find errors when running applications that use application contexts.
See Oracle Database Performance Tuning Guide for more information
about trace files. The
USER_DUMP_DEST
initialization parameter sets the
directory location of the trace files. You can find the value of this
parameter by issuing
SHOW PARAMETER USER_DUMP_DEST
in SQL*Plus.

Finding Information About Application Contexts
6-46 Oracle Database Security Guide

7
Using Oracle Virtual Private Database to Control Data Access 7-1
7
Using Oracle Virtual Private Database
to Control Data Access
This chapter contains:
■About Oracle Virtual Private Database
■Components of an Oracle Virtual Private Database Policy
■Configuring an Oracle Virtual Private Database Policy
■Tutorials: Creating Oracle Virtual Private Database Policies
■How Oracle Virtual Private Database Works with Other Oracle Features
■Finding Information About Oracle Virtual Private Database Policies
About Oracle Virtual Private Database
This section contains:
■What Is Oracle Virtual Private Database?
■Benefits of Using Oracle Virtual Private Database Policies
■Which Privileges Are Used to Run Oracle Virtual Private Database Policy
Functions?
■Using Oracle Virtual Private Database with an Application Context
What Is Oracle Virtual Private Database?
Oracle Virtual Private Database (VPD) enables you to create security policies to control
database access at the row and column level. Essentially, Oracle Virtual Private
Database adds a dynamic
WHERE
clause to a SQL statement that is issued against the
table, view, or synonym to which an Oracle Virtual Private Database security policy
was applied.
Oracle Virtual Private Database enforces security, to a fine level of granularity, directly
on database tables, views, or synonyms. Because you attach security policies directly
to these database objects, and the policies are automatically applied whenever a user
accesses data, there is no way to bypass security.
When a user directly or indirectly accesses a table, view, or synonym that is protected
with an Oracle Virtual Private Database policy, Oracle Database dynamically modifies
the SQL statement of the user. This modification creates a
WHERE
condition (called a
predicate) returned by a function implementing the security policy. Oracle Database
modifies the statement dynamically, transparently to the user, using any condition that

About Oracle Virtual Private Database
7-2 Oracle Database Security Guide
can be expressed in or returned by a function. You can apply Oracle Virtual Private
Database policies to
SELECT
,
INSERT
,
UPDATE
,
INDEX
, and
DELETE
statements.
For example, suppose a user performs the following query:
SELECT * FROM OE.ORDERS;
The Oracle Virtual Private Database policy dynamically appends the statement with a
WHERE
clause. For example:
SELECT * FROM OE.ORDERS
WHERE SALES_REP_ID = 159;
In this example, the user can only view orders by Sales Representative 159.
If you want to filter the user based on the session information of that user, such as the
ID of the user, then you can create the
WHERE
clause to use an application context. For
example:
SELECT * FROM OE.ORDERS
WHERE SALES_REP_ID = SYS_CONTEXT('USERENV','SESSION_USER');
Benefits of Using Oracle Virtual Private Database Policies
Oracle Virtual Private Database policies provide the following benefits:
■Basing Security Policies on Database Objects Rather Than Applications
■Controlling How Oracle Database Evaluates Policy Functions
Basing Security Policies on Database Objects Rather Than Applications
Attaching Oracle Virtual Private Database security policies to database tables, views,
or synonyms, rather than implementing access controls in all your applications,
provides the following benefits:
■Security. Associating a policy with a database table, view, or synonym can solve a
potentially serious application security problem. Suppose a user is authorized to
use an application, and then drawing on the privileges associated with that
application, wrongfully modifies the database by using an ad hoc query tool, such
as SQL*Plus. By attaching security policies directly to tables, views, or synonyms,
fine-grained access control ensures that the same security is in force, no matter
how a user accesses the data.
■Simplicity. You add the security policy to a table, view, or synonym only once,
rather than repeatedly adding it to each of your table-based, view-based, or
synonym-based applications.
■Flexibility. You can have one security policy for
SELECT
statements, another for
INSERT
statements, and still others for
UPDATE
and
DELETE
statements. For example,
you might want to enable Human Resources clerks to have
SELECT
privileges for
all employee records in their division, but to update only salaries for those
employees in their division whose last names begin with
A
through
F
.
Furthermore, you can create multiple policies for each table, view, or synonym.
Note: Oracle Virtual Private Database does not support filtering for
DDLs, such as
TRUNCATE
or
ALTER TABLE
statements.

About Oracle Virtual Private Database
Using Oracle Virtual Private Database to Control Data Access 7-3
Controlling How Oracle Database Evaluates Policy Functions
Running policy functions multiple times can affect performance. You can control the
performance of policy functions by configuring how Oracle Database caches the
Oracle Virtual Private Database predicates. The following options are available:
■Evaluate the policy once for each query (static policies).
■Evaluate the policy only when an application context within the policy function
changes (context-sensitive policies).
■Evaluate the policy each time it is run (dynamic policies).
See "Optimizing Performance by Using Oracle Virtual Private Database Policy Types"
on page 7-14 for information configuring these policy types.
Which Privileges Are Used to Run Oracle Virtual Private Database Policy Functions?
For greater security, the Oracle Virtual Private Database policy function runs as if it
had been declared with definer's rights. Do not declare it as invoker’s rights because
this can confuse yourself and other users who maintain the code.
Using Oracle Virtual Private Database with an Application Context
You can use application contexts with Oracle Virtual Private Database policies. When
you create an application context, it securely caches user information. Only the
designated application package can set the cached environment. It cannot be changed
by the user or outside the package. In addition, because the data is cached,
performance is increased. Chapter 6, "Using Application Contexts
to Retrieve User Information" describes application contexts in detail.
For example, suppose you want to base access to the
ORDERS_TAB
table on the customer
ID number. Rather than querying the customer ID number for a logged-in user each
time you need it, you could store the number in the application context. Then, the
customer number is available in the session when you need it.
Application contexts are especially helpful if your security policy is based on multiple
security attributes. For example, if a policy function bases a
WHERE
predicate on four
attributes (such as employee number, cost center, position, spending limit), then
multiple subqueries must execute to retrieve this information. Instead, if this data is
available through an application context, then performance is much faster.
You can use an application context to return the correct security policy, enforced
through a predicate. For example, consider an order entry application that enforces the
following rules: customers only see their own orders, and clerks see all orders for all
customers. These are two different policies. You could define an application context
with a
position
attribute, and this attribute could be accessed within the policy
function to return the correct predicate, depending on the value of the attribute. Thus,
you can enable a user in the
clerk
position to retrieve all orders, but a user in the
customer
position can see only those records associated with that particular user.
To design a fine-grained access control policy that returns a specific predicate for an
attribute, you need to access the application context within the function that
implements the policy. For example, suppose you want to limit customers to seeing
only their own records. The user performs the following query:
SELECT * FROM orders_tab
See Also: Oracle Database PL/SQL Language Reference for detailed
information about definer’s rights

Components of an Oracle Virtual Private Database Policy
7-4 Oracle Database Security Guide
Fine-grained access control dynamically modifies this query to include the following
WHERE
predicate:
SELECT * FROM orders_tab
WHERE custno = SYS_CONTEXT ('order_entry', 'cust_num');
Continuing with the preceding example, suppose you have 50,000 customers, and you
do not want to have a different predicate returned for each customer. Customers all
share the same
WHERE
predicate, which prescribes that they can only see their own
orders. It is merely their customer numbers that are different.
Using application context, you can return one
WHERE
predicate within a policy function
that applies to 50,000 customers. As a result, there is one shared cursor that executes
differently for each customer, because the customer number is evaluated at execution
time. This value is different for every customer. Use of application context in this case
provides optimum performance, and at row-level security.
The
SYS_CONTEXT
function works much like a bind variable; only the
SYS_CONTEXT
arguments are constants.
Components of an Oracle Virtual Private Database Policy
To implement Oracle Virtual Private Database, you must create a function to generate
the dynamic
WHERE
clause, and a policy to attach this function to the objects that you
want to protect.
■Creating a Function to Generate the Dynamic WHERE Clause
■Creating a Policy to Attach the Function to the Objects You Want to Protect
Creating a Function to Generate the Dynamic WHERE Clause
To generate the dynamic
WHERE
clause (predicate), you must create a function (not a
procedure) that defines the restrictions that you want to enforce. Usually, the security
administrator creates this function in his or her own schema. For more complex
behavior, such as including calls to other functions or adding checks to track failed
logon attempts, create these functions within a package.
The function must have the following behavior:
■It must take as arguments a schema name and an object (table, view, or
synonym) name as inputs. Define input parameters to hold this information, but
do not specify the schema and object name themselves within the function. The
policy that you create with the
DBMS_RLS
package (described in "Creating a Policy
to Attach the Function to the Objects You Want to Protect" on page 7-5) provides
the names of the schema, and object to which the policy will apply. You must
create the parameter for the schema first, followed by the parameter for the object.
■It must provide a return value for the WHERE clause predicate that will be
generated. The return value for the
WHERE
clause is always a
VARCHAR2
data type.
See Also:
■"Which Privileges Are Used to Run Oracle Virtual Private
Database Policy Functions?" on page 7-3
■"Tutorials: Creating Oracle Virtual Private Database Policies" on
page 7-19

Configuring an Oracle Virtual Private Database Policy
Using Oracle Virtual Private Database to Control Data Access 7-5
■It must generate a valid WHERE clause. This code can be as basic as the example
in "Tutorial: Creating a Simple Oracle Virtual Private Database Policy" on
page 7-19, in that its
WHERE
clause is the same for all users who log on.
But in most cases, you may want to design the
WHERE
clause to be different for each
user, each group of users, or each application that accesses the objects you want to
protect. For example, if a manager logs in, the
WHERE
clause can be specific to the
rights of that particular manager. You can do this by incorporating an application
context, which accesses user session information, into the
WHERE
clause generation
code. "Tutorial: Implementing a Policy with a Database Session-Based Application
Context" on page 7-22 demonstrates how to create an Oracle Virtual Private
Database policy that uses an application context.
You can create Oracle Virtual Private Database functions that do not use an
application context, but an application context creates a much stronger Oracle
Virtual Private Database policy, by securely basing user access on the session
attributes of that user, such as the user ID. Chapter 6, "Using Application Contexts
to Retrieve User Information" discusses different types of application contexts in
detail.
In addition, you can embed C or Java calls to access operating system information
or to return
WHERE
clauses from an operating system file or other source.
■It must not select from a table within the associated policy function. Although
you can define a policy against a table, you cannot select that table from within the
policy that was defined against the table.
Creating a Policy to Attach the Function to the Objects You Want to Protect
After you create the function, you need to create an Oracle Virtual Private Database
policy that associates the function with a table, view, or synonym. You create the
policy by using the
DBMS_RLS
package. If you are not
SYS
, then you must be granted
EXECUTE
privileges to use the
DBMS_RLS
package. This package contains procedures
that enable you to manage the policy and set fine-grained access control. For example,
to attach the policy to a table, you use the
DBMS_RLS.ADD_POLICY
procedure. Within
this setting, you set fine-grained access control, such as setting the policy to go into
effect when a user issues a
SELECT
or
UPDATE
statement on the table or view.
The combination of creating the function and then applying it to a table or view is
referred to as creating the Oracle Virtual Private Database policy.
"Tutorials: Creating Oracle Virtual Private Database Policies" on page 7-19 provides
examples of how to create Virtual Private Database policies. See "Configuring an
Oracle Virtual Private Database Policy" on page 7-5 for detailed information.
Configuring an Oracle Virtual Private Database Policy
This section contains:
■About Oracle Virtual Private Database Policies
■Attaching a Policy to a Database Table, View, or Synonym
Note: If you plan to run the function across different editions, you
can control the results of the function: whether the results are uniform
across all editions, or specific to the edition in which the function is
run. See "How Editions Affects the Results of a Global Application
Context PL/SQL Package" on page 6-24 for more information.

Configuring an Oracle Virtual Private Database Policy
7-6 Oracle Database Security Guide
■Enforcing Policies on Specific SQL Statement Types
■Controlling the Display of Column Data with Policies
■Working with Oracle Virtual Private Database Policy Groups
■Optimizing Performance by Using Oracle Virtual Private Database Policy Types
About Oracle Virtual Private Database Policies
After you create a function that defines the actions of the Oracle Virtual Private
Database
WHERE
clause, you need to associate this function with the database table to
which the VPD action applies. You can do this by configuring an Oracle Virtual Private
Database policy. The policy itself is a mechanism for managing the Virtual Private
Database function. The policy also enables you to add fine-grained access control, such
as specifying the types of SQL statements or particular table columns the policy
affects. When a user tries to access the data in this database object, the policy goes into
effect automatically.
This section describes commonly used ways of attaching policies to tables, views, and
synonyms. To manage an Oracle Virtual Private Database policy, you use the
DBMS_RLS
package, which is described in detail in Oracle Database PL/SQL Packages and Types
Reference.
Table 7–1 lists the procedures in the
DBMS_RLS
package.
Table 7–1 DBMS_RLS Procedures
Procedure Description
For Handling Individual Policies
DBMS_RLS.ADD_POLICY
Adds a policy to a table, view, or synonym
DBMS_RLS.ENABLE_POLICY
Enables (or disables) a policy you previously
added to a table, view, or synonym
DBMS_RLS.REFRESH_POLICY
Invalidates cursors associated with nonstatic
policies
DBMS_RLS.DROP_POLICY
To drop a policy from a table, view, or synonym
For Handling Grouped Policies
DBMS_RLS.CREATE_POLICY_GROUP
Creates a policy group
DBMS_RLS.DELETE_POLICY_GROUP
Drops a policy group
DBMS_RLS.ADD_GROUPED_POLICY
Adds a policy to the specified policy group
DBMS_RLS.ENABLE_GROUPED_POLICY
Enables a policy within a group
DBMS_RLS.REFRESH_GROUPED_POLICY
Parses again the SQL statements associated with
a refreshed policy
DBMS_RLS.DISABLE_GROUPED_POLICY
Disables a policy within a group
DBMS_RLS.DROP_GROUPED_POLICY
Drops a policy that is a member of the specified
group
For Handling Application Contexts
DBMS_RLS.ADD_POLICY_CONTEXT
Adds the context for the active application
DBMS_RLS.DROP_POLICY_CONTEXT
Drops the context for the application

Configuring an Oracle Virtual Private Database Policy
Using Oracle Virtual Private Database to Control Data Access 7-7
Attaching a Policy to a Database Table, View, or Synonym
To attach a policy to a table, view, or synonym, you use the
DBMS_RLS.ADD_POLICY
procedure. You need to specify the table, view, or synonym to which you are adding a
policy, and a name for the policy. You can also specify other information, such as the
types of statements the policy controls (
SELECT
,
INSERT
,
UPDATE
,
DELETE
,
CREATE INDEX
,
or
ALTER INDEX
).
Example 7–1 shows how to use
DBMS_RLS.ADD_POLICY
to attach an Oracle Virtual
Private Database policy called
secure_update
to the
HR.EMPLOYEES
table. The function
attached to the policy is
check_updates
.
Example 7–1 Attaching a Simple Oracle Virtual Private Database Policy to a Table
BEGIN
DBMS_RLS.ADD_POLICY(
object_schema => 'hr',
object_name => 'employees',
policy_name => 'secure_update',
policy_function => 'check_updates',
...
If the function was created inside a package, include the package name. For example:
policy_function => 'pkg.check_updates',
...
Enforcing Policies on Specific SQL Statement Types
You can enforce Oracle Virtual Private Database policies for
SELECT
,
INSERT
,
UPDATE
,
INDEX
, and
DELETE
statements. If you do not specify a statement type, by default,
Oracle Database specifies
SELECT
,
INSERT
,
UPDATE
, and
DELETE
, but not
INDEX
. Enter
any combination of these statement types by using the
statement_types
parameter in
the
DBMS_RLS.ADD_POLICY
procedure. Enclose the list in a pair of single quotation
marks.
Example 7–2 shows an how to use the
statement_types
parameter to specify the
SELECT
and
INDEX
statements for a policy.
See Also:
■"Components of an Oracle Virtual Private Database Policy" on
page 7-4 for a description of the type of function that you need to
create to control user access to a database table, view, or synonym
■Chapter 6, "Using Application Contexts
to Retrieve User Information" if you plan to use application
contexts in the Oracle Virtual Private Database policy (which in
most cases, you would)
■"Tutorials: Creating Oracle Virtual Private Database Policies" on
page 7-19 for examples of using application contexts in sample
Oracle Virtual Private Database functions
Note: Although you can define a policy against a table, you
cannot select that table from within the policy that was defined
against the table.

Configuring an Oracle Virtual Private Database Policy
7-8 Oracle Database Security Guide
Example 7–2 Specifying SQL Statement Types with DBMS_RLS.ADD_POLICY
BEGIN
DBMS_RLS.ADD_POLICY(
object_schema => 'hr',
object_name => 'employees',
policy_name => 'secure_update',
policy_function => 'check_updates',
statement_types => 'SELECT,INDEX');
END;
/
When you specify the
statement_types
parameter, be aware of the following
functionality:
■The application code affected by the Virtual Private Database policy can include
the MERGE INTO statement. However, in the Virtual Private Database policy,
you must ensure that the
statement_types
parameter includes all three of the
INSERT
,
UPDATE
, and
DELETE
statements for the policy to succeed. Alternatively,
you can omit the
statement_types
parameter. (This functionality is available with
Oracle Database 11g Release 2 (11.2.0.2).)
■Be aware that a user who has privileges to maintain an index can see all the row
data, even if the user does not have full table access under a regular query such
as SELECT. For example, a user can create a function-based index that contains a
user-defined function with column values as its arguments. During index creation,
Oracle Database passes column values of every row into the user function, making
the row data available to the user who creates the index. You can enforce Oracle
Virtual Private Database policies on index maintenance operations by specifying
INDEX
with the
statement_types
parameter.
Controlling the Display of Column Data with Policies
You can create policies that enforce row-level security when a security-relevant
column is referenced in a query.
■Adding Policies for Column-Level Oracle Virtual Private Database
■Displaying Only the Column Rows Relevant to the Query
■Using Column Masking to Display Sensitive Columns as NULL Values
Adding Policies for Column-Level Oracle Virtual Private Database
Column-level policies enforce row-level security when a query references a
security-relevant column. You can apply a column-level Oracle Virtual Private
Database policy to tables and views, but not to synonyms.
To apply the policy to a column, specify the security-relevant column by using the
SEC_RELEVANT_COLS
parameter of the
DBMS_RLS.ADD_POLICY
procedure. This parameter
applies the security policy whenever the column is referenced, explicitly or implicitly,
in a query.
For example, users who are not in a Human Resources department typically are
allowed to view only their own Social Security numbers. A sales clerk initiates the
following query:
SELECT fname, lname, ssn FROM emp;
The function implementing the security policy returns the predicate
ssn='my_ssn
'.
Oracle Database rewrites the query and executes the following:

Configuring an Oracle Virtual Private Database Policy
Using Oracle Virtual Private Database to Control Data Access 7-9
SELECT fname, lname, ssn FROM emp
WHERE ssn = 'my_ssn';
Example 7–3 shows a Oracle Virtual Private Database policy in which sales
department users cannot see the salaries of people outside the department
(department number 30) of the sales department users. The relevant columns for this
policy are
sal
and
comm
. First, the Oracle Virtual Private Database policy function is
created, and then it is added by using the
DBMS_RLS
PL/SQL package.
Example 7–3 Creating a Column-Level Oracle Virtual Private Database Policy
CREATE OR REPLACE FUNCTION hide_sal_comm (
v_schema IN VARCHAR2,
v_objname IN VARCHAR2)
RETURN VARCHAR2 AS
con VARCHAR2 (200);
BEGIN
con := 'deptno=30';
RETURN (con);
END hide_sal_comm;
Then you configure the policy with the
DBMS_RLS.ADD_POLICY
procedure as follows:
BEGIN
DBMS_RLS.ADD_POLICY (
object_schema => 'scott',
object_name => 'emp',
policy_name => 'hide_sal_policy',
policy_function => 'hide_sal_comm',
sec_relevant_cols => 'sal,comm');
END;
Displaying Only the Column Rows Relevant to the Query
The default behavior for column-level Oracle Virtual Private Database is to restrict the
number of rows returned for a query that references columns containing sensitive
information. You specify these security-relevant columns by using the
SEC_RELEVANT_
COLUMNS
parameter of the
DBMS_RLS.ADD_POLICY
procedure, as shown in Example 7–3
on page 7-9.
For example, consider sales department users with the
SELECT
privilege on the
emp
table, which is protected with the column-level Oracle Virtual Private Database policy
created in Example 7–3. The user (for example, user
SCOTT
) runs the following query:
SELECT ENAME, d.dname, JOB, SAL, COMM
FROM emp e, dept d
WHERE d.deptno = e.deptno;
The database returns the following rows:
ENAME DNAME JOB SAL COMM
---------- -------------- --------- ---------- ----------
ALLEN SALES SALESMAN 1600 300
WARD SALES SALESMAN 1250 500
MARTIN SALES SALESMAN 1250 1400
BLAKE SALES MANAGER 2850
TURNER SALES SALESMAN 1500 0
JAMES SALES CLERK 950

Configuring an Oracle Virtual Private Database Policy
7-10 Oracle Database Security Guide
6 rows selected.
The only rows that are displayed are those that the user has privileges to access all
columns in the row.
Using Column Masking to Display Sensitive Columns as NULL Values
If a query references a sensitive column, then the default action of column-level Oracle
Virtual Private Database restricts the number of rows returned. With column-masking
behavior, all rows display, even those that reference sensitive columns. However, the
sensitive columns display as
NULL
values. To enable column-masking, set the
SEC_
RELEVANT_COLS_opt
parameter of the
DBMS_RLS.ADD_POLICY
procedure.
For example, consider the results of the sales clerk query, described in the previous
example. If column-masking is used, then instead of seeing only the row containing
the details and Social Security number of the sales clerk, the clerk would see all rows
from the
emp
table, but the
ssn
column values would be returned as
NULL
. Note that
this behavior is fundamentally different from all other types of Oracle Virtual Private
Database policies, which return only a subset of rows.
In contrast to the default action of column-level Oracle Virtual Private Database,
column-masking displays all rows, but returns sensitive column values as
NULL
. To
include column-masking in your policy, set the
SEC_RELEVANT_COLS_OPT
parameter of
the
DBMS_RLS.ADD_POLICY
procedure to
DBMS_RLS.ALL_ROWS
.
Example 7–4 shows column-level Oracle Virtual Private Database column-masking. It
uses the same VPD policy as Example 7–3 on page 7-9, but with
sec_relevant_cols_
opt
specified as
DBMS_RLS.ALL_ROWS
.
Example 7–4 Adding a Column Masking to an Oracle Virtual Private Database Policy
BEGIN
DBMS_RLS.ADD_POLICY(
object_schema => 'scott',
object_name => 'emp',
policy_name => 'hide_sal_policy',
policy_function => 'hide_sal_comm',
sec_relevant_cols =>' sal,comm',
sec_relevant_cols_opt => dbms_rls.ALL_ROWS);
END;
Assume that a sales department user with
SELECT
privilege on the
emp
table (such as
user
SCOTT
) runs the following query:
SELECT ENAME, d.dname, job, sal, comm
FROM emp e, dept d
WHERE d.deptno = e.deptno;
The database returns all rows specified in the query, but with certain values masked
because of the Oracle Virtual Private Database policy:
ENAME DNAME JOB SAL COMM
---------- -------------- --------- ---------- ----------
CLARK ACCOUNTING MANAGER
KING ACCOUNTING PRESIDENT
MILLER ACCOUNTING CLERK
JONES RESEARCH MANAGER
FORD RESEARCH ANALYST
ADAMS RESEARCH CLERK
SMITH RESEARCH CLERK
SCOTT RESEARCH ANALYST

Configuring an Oracle Virtual Private Database Policy
Using Oracle Virtual Private Database to Control Data Access 7-11
WARD SALES SALESMAN 1250 500
TURNER SALES SALESMAN 1500 0
ALLEN SALES SALESMAN 1600 300
JAMES SALES CLERK 950
BLAKE SALES MANAGER 2850
MARTIN SALES SALESMAN 1250 1400
14 rows selected.
The column-masking returned all rows requested by the sales user query, but made
the
sal
and
comm
columns
NULL
for employees outside the sales department.
The following considerations apply to column-masking:
■Column-masking applies only to
SELECT
statements.
■Column-masking conditions generated by the policy function must be simple
Boolean expressions, unlike regular Oracle Virtual Private Database predicates.
■For applications that perform calculations, or do not expect
NULL
values, use
standard column-level Oracle Virtual Private Database, specifying
SEC_RELEVANT_
COLS
rather than the
SEC_RELEVANT_COLS_OPT
column-masking option.
■Do not include columns of the object data type (including the
XMLtype
) in the
sec_
relevant_cols
setting. This column type is not supported for the
sec_relevant_
cols
setting.
■Column-masking used with
UPDATE AS SELECT
updates only the columns that
users are allowed to see.
■For some queries, column-masking may prevent some rows from displaying. For
example:
SELECT * FROM emp
WHERE sal = 10;
Because the column-masking option was set, this query may not return rows if the
salary
column returns a
NULL
value.
Working with Oracle Virtual Private Database Policy Groups
This section contains:
■About Oracle Virtual Private Database Policy Groups
■Creating a New Oracle Virtual Private Database Policy Group
■Designating a Default Policy Group with the SYS_DEFAULT Policy Group
■Establishing Multiple Policies for Each Table, View, or Synonym
■Validating the Application Used to Connect to the Database
About Oracle Virtual Private Database Policy Groups
You can group multiple security policies together, and apply them to an application. A
policy group is a set of security policies that belong to an application. You can
designate an application context (known as a driving context or policy context) to
indicate the policy group in effect. Then, when a user accesses the table, view, or
synonym column, Oracle Database looks up the driving context to determine the
See Also: "Tutorial: Implementing an Oracle Virtual Private
Database Policy Group" on page 7-28

Configuring an Oracle Virtual Private Database Policy
7-12 Oracle Database Security Guide
policy group in effect. It enforces all the associated policies that belong to the policy
group.
Policy groups are useful for situations where multiple applications with multiple
security policies share the same table, view, or synonym. This enables you to identify
those policies that should be in effect when the table, view, or synonym is accessed.
For example, in a hosting environment, Company A can host the
BENEFIT
table for
Company B and Company C. The table is accessed by two different applications,
Human Resources and Finance, with two different security policies. The Human
Resources application authorizes users based on ranking in the company, and the
Finance application authorizes users based on department. Integrating these two
policies into the
BENEFIT
table requires joint development of policies between the two
companies, which is not a feasible option. By defining an application context to drive
the enforcement of a particular set of policies to the base objects, each application can
implement a private set of security policies.
To do this, you organize security policies into groups. By referring to the application
context, Oracle Database determines which group of policies should be in effect at run
time. The server enforces all the policies that belong to that policy group.
Creating a New Oracle Virtual Private Database Policy Group
To add a policy to a table, view, or synonym, use the
DBMS_RLS.ADD_GROUPED_POLICY
procedure to specify the group to which the policy belongs. To specify which policies
will be effective, you can add a driving context using the
DBMS_RLS.ADD_POLICY_
CONTEXT
procedure. If the driving context returns an unknown policy group, then an
error is returned.
If the driving context is not defined, then Oracle Database runs all policies. Likewise, if
the driving context is
NULL
, then policies from all policy groups are enforced. An
application accessing the data cannot bypass the security setup module (which sets up
application context) to avoid any applicable policies.
You can apply multiple driving contexts to the same table, view, or synonym, and each
of them will be processed individually. This enables you to configure multiple active
sets of policies to be enforced.
Consider, for example, a hosting company that hosts Benefits and Financial
applications, which share some database objects. Both applications are striped for
hosting using a
SUBSCRIBER
policy in the
SYS_DEFAULT
policy group. Data access is
partitioned first by subscriber ID, then by whether the user is accessing the Benefits or
Financial applications (determined by a driving context). Suppose that Company A,
which uses the hosting services, wants to apply a custom policy that relates only to its
own data access. You could add an additional driving context (such as
COMPANY A
SPECIAL
) to ensure that the additional, special policy group is applied for data access
for Company A only. You would not apply this under the
SUBSCRIBER
policy, because
the policy relates only to Company A, and it is more efficient to segregate the basic
hosting policy from other policies.
Designating a Default Policy Group with the SYS_DEFAULT Policy Group
Within a group of security policies, you can designate one security policy to be the
default security policy. This is useful in situations where you partition security policies
by application, so that they will be always be in effect. Default security policies allow
developers to base security enforcement under all conditions, while partitioning
security policies by application (using security groups) enables layering of additional,
application-specific security on top of default security policies. To implement default
security policies, you add the policy to the
SYS_DEFAULT
policy group.

Configuring an Oracle Virtual Private Database Policy
Using Oracle Virtual Private Database to Control Data Access 7-13
Policies defined in this group for a particular table, view, or synonym are run with
with the policy group specified by the driving context. As described earlier, a driving
context is an application context that indicates the policy group in effect. The
SYS_
DEFAULT
policy group may or may not contain policies. You cannot to drop the
SYS_
DEFAULT
policy group. If you do, then Oracle Database displays an error.
If, to the
SYS_DEFAULT
policy group, you add policies associated with two or more
objects, then each object will have a separate
SYS_DEFAULT
policy group associated
with it. For example, the
emp
table in the
scott
schema has one
SYS_DEFAULT
policy
group, and the
dept
table in the
scott
schema has a different
SYS_DEFAULT
policy
group associated with it. Think of them as being organized in the tree structure as
follows:
SYS_DEFAULT
- policy1 (scott/emp)
- policy3 (scott/emp)
SYS_DEFAULT
- policy2 (scott/dept)
You can create policy groups with identical names. When you select a particular policy
group, its associated schema and object name are displayed in the property sheet on
the right side of the screen.
Establishing Multiple Policies for Each Table, View, or Synonym
You can establish several policies for the same table, view, or synonym. Suppose, for
example, you have a base application for Order Entry, and each division of your
company has its own rules for data access. You can add a division-specific policy
function to a table without having to rewrite the policy function of the base
application.
All policies applied to a table are enforced with
AND
syntax. If you have three policies
applied to the
CUSTOMERS
table, then each policy is applied to the table. You can use
policy groups and an application context to partition fine-grained access control
enforcement so that different policies apply, depending upon which application is
accessing data. This eliminates the requirement for development groups to collaborate
on policies, and simplifies application development. You can also have a default policy
group that is always applicable (for example, to enforce data separated by subscriber
in a hosting environment).
Validating the Application Used to Connect to the Database
The package implementing the driving context must correctly validate the application
that is being used to connect to the database. Although Oracle Database checks the call
stack to ensure that the package implementing the driving context sets context
attributes, inadequate validation can still occur within the package.
For example, in applications where database users or enterprise users are known to the
database, the user needs the
EXECUTE
privilege on the package that sets the driving
context. Consider a user who knows that:
■The
BENEFITS
application enables more liberal access than the
HR
application.
■The
setctx
procedure (which sets the correct policy group within the driving
context) does not perform any validation to determine which application is
actually connecting. That is, the procedure does not check either the IP address of
the incoming connection (for a three-tier system) or the
proxy_user
attribute of the
user session.

Configuring an Oracle Virtual Private Database Policy
7-14 Oracle Database Security Guide
This user could pass to the driving context package an argument setting the context to
the more liberal
BENEFITS
policy group, and then access the
HR
application instead.
Because the
setctx
does no further validation of the application, this user bypasses
the more restrictive HR security policy.
By contrast, if you implement proxy authentication with Oracle Virtual Private
Database, then you can determine the identity of the middle tier (and the application)
that is connecting to the database on behalf of a user. The correct policy will be applied
for each application to mediate data access.
For example, a developer using the proxy authentication feature could determine that
the application (the middle tier) connecting to the database is
HRAPPSERVER
. The
package that implements the driving context can thus verify whether the
proxy_user
in the user session is
HRAPPSERVER
. If so, then it can set the driving context to use the
HR
policy group. If
proxy_user
is not
HRAPPSERVER
, then it can deny access.
In this case, the following query is executed:
SELECT * FROM apps.benefit;
Oracle Database picks up policies from the default policy group (
SYS_DEFAULT
) and
active namespace
HR
. The query is internally rewritten as follows:
SELECT * FROM apps.benefit
WHERE company = SYS_CONTEXT('ID','MY_COMPANY')
and SYS_CONTEXT('ID','TITLE') = 'MANAGER';
Optimizing Performance by Using Oracle Virtual Private Database Policy Types
This section contains:
■About Oracle Virtual Private Database Policy Types
■Using the Dynamic Policy Type to Automatically Rerun Policy Functions
■Using a Static Policy to Prevent Policy Functions from Rerunning for Each Query
■Using a Shared Static Policy to Share a Policy with Multiple Objects
■When to Use Static and Shared Static Policies
■Using a Context-Sensitive Policy for Predicates That Do Not Change After Parsing
■Using a Shared Context Sensitive Policy to Share a Policy with Multiple Objects
■When to Use Context-Sensitive and Shared Context-Sensitive Policies
■Summary of the Five Oracle Virtual Private Database Policy Types
About Oracle Virtual Private Database Policy Types
You can optimize performance each time a policy runs by specifying a policy type for
your policies. Policy types control how Oracle Database caches Oracle Virtual Private
Database policy predicates. Consider setting a policy type for your policies, because
the execution of policy functions can use a significant amount of system resources.
Minimizing the number of times that a policy function can run optimizes database
performance.
You can choose from five policy types:
DYNAMIC
,
STATIC
,
SHARED_STATIC
,
CONTEXT_
SENSITIVE
, and
SHARED_CONTEXT_SENSITIVE
. These enable you to precisely specify
how often a policy predicate should change. To specify the policy type, set the
policy_
type
parameter of the
DBMS_RLS.ADD POLICY
procedure.

Configuring an Oracle Virtual Private Database Policy
Using Oracle Virtual Private Database to Control Data Access 7-15
Using the Dynamic Policy Type to Automatically Rerun Policy Functions
The
DYNAMIC
policy type runs the policy function each time a user accesses the Virtual
Private Database-protected database objects. If you do not specify a policy type in the
DBMS_RLS.ADD_POLICY
procedure, then, by default, your policy will be dynamic. You
can specifically configure a policy to be dynamic by setting the
policy_type
parameter
of the
DBMS_RLS.ADD_POLICY
procedure to
DYNAMIC
.
This policy type does not optimize database performance as the static and context
sensitive policy types do. However, Oracle recommends that before you set policies as
either static or context-sensitive, you should first test them as
DYNAMIC
policy types,
which run every time. Testing policy functions as
DYNAMIC
policies first enables you to
observe how the policy function affects each query, because nothing is cached. This
ensures that the functions work properly before you enable them as static or
context-sensitive policy types to optimize performance.
You can use the
DBMS_UTILITY.GET_TIME
function to measure the start and end times
for a statement to execute. For example:
-- 1. Get the start time:
SELECT DBMS_UTILITY.GET_TIME FROM DUAL;
GET_TIME
----------
2312721
-- 2. Run the statement:
SELECT COUNT(*) FROM HR.EMPLOYEES;
COUNT(*)
----------
107
-- 3. Get the end time:
SELECT DBMS_UTILITY.GET_TIME FROM DUAL;
GET_TIME
----------
2314319
Example 7–5 shows how to create the
DYNAMIC
policy type.
Example 7–5 Creating a DYNAMIC Policy with DBMS_RLS.ADD_POLICY
BEGIN
DBMS_RLS.ADD_POLICY(
object_schema => 'hr',
object_name => 'employees',
policy_name => 'secure_update',
policy_function => 'hide_fin',
policy_type => dbms_rls.DYNAMIC);
END;
/
See Also: "About Auditing Functions, Procedures, Packages, and
Triggers" on page 9-32 for information about how Oracle Database
audits the underlying policy function for dynamic policies

Configuring an Oracle Virtual Private Database Policy
7-16 Oracle Database Security Guide
Using a Static Policy to Prevent Policy Functions from Rerunning for Each Query
The static policy type enforces the same predicate for all users in the instance. Oracle
Database stores static policy predicates in SGA, so policy functions do not rerun for
each query. This results in faster performance.
You can enable static policies by setting the
policy_type
parameter of the
DBMS_
RLS.ADD_POLICY
procedure to either
STATIC
or
SHARED_STATIC
, depending on whether
or not you want the policy to be shared across multiple objects.
Example 7–6 shows how to create the
STATIC
policy type.
Example 7–6 Creating a STATIC Policy with DBMS_RLS.ADD_POLICY
BEGIN
DBMS_RLS.ADD_POLICY(
object_schema => 'hr',
object_name => 'employees',
policy_name => 'secure_update',
policy_function => 'hide_fin',
policy_type => dbms_rls.STATIC);
END;
/
Each execution of the same cursor could produce a different row set for the same
predicate, because the predicate may filter the data differently based on attributes such
as
SYS_CONTEXT
or
SYSDATE
.
For example, suppose you enable a policy as either a
STATIC
or
SHARED_STATIC
policy
type, which appends the following predicate to all queries made against policy
protected database objects:
WHERE dept = SYS_CONTEXT ('hr_app','deptno')
Although the predicate does not change for each query, it applies to the query based
on session attributes of the
SYS_CONTEXT
. In the case of the preceding example, the
predicate returns only those rows where the department number matches the
deptno
attribute of the
SYS_CONTEXT
, which is the department number of the user who is
querying the policy-protected database object.
Using a Shared Static Policy to Share a Policy with Multiple Objects
If, for example, you wanted to apply the policy in Example 7–6 to a second table in the
HR
schema that may contain financial data that you want to side, you would use the
SHARED_STATIC
setting for both tables.
Example 7–7 shows how to set the
SHARED_STATIC
policy type for two tables that share
the same policy.
Note: When using shared static policies, ensure that the policy
predicate does not contain attributes that are specific to a particular
database object, such as a column name.
See Also: "About Auditing Functions, Procedures, Packages, and
Triggers" on page 9-32 for information about how Oracle Database
audits the underlying policy function for static policies

Configuring an Oracle Virtual Private Database Policy
Using Oracle Virtual Private Database to Control Data Access 7-17
Example 7–7 Creating a SHARED_STATIC Policy with DBMS_RLS.ADD_POLICY
-- 1. Create a policy for the first table, employees:
BEGIN
DBMS_RLS.ADD_POLICY(
object_schema => 'hr',
object_name => 'employees',
policy_name => 'secure_update',
policy_function => 'hide_fin',
policy_type => dbms_rls.SHARED_STATIC);
END;
/
-- 2. Create a policy for the second table, fin_data:
BEGIN
DBMS_RLS.ADD_POLICY(
object_schema => 'hr',
object_name => 'fin_data',
policy_name => 'secure_update',
policy_function => 'hide_fin',
policy_type => dbms_rls.SHARED_STATIC);
END;
/
When to Use Static and Shared Static Policies
Static policies are ideal for environments where every query requires the same
predicate and fast performance is essential, such as hosting environments. For these
situations when the policy function appends the same predicate to every query,
rerunning the policy function each time adds unnecessary overhead to the system. For
example, consider a data warehouse that contains market research data for customer
organizations that are competitors. The warehouse must enforce the policy that each
organization can see only their own market research, which is expressed by the
following predicate:
WHERE subscriber_id = SYS_CONTEXT('customer', 'cust_num')
Using
SYS_CONTEXT
for the application context enables the database to dynamically
change the rows that are returned. You do not need to rerun the function, so the
predicate can be cached in the SGA, thus conserving system resources and improving
performance.
Using a Context-Sensitive Policy for Predicates That Do Not Change After Parsing
In contrast to static policies, context-sensitive policies do not always cache the
predicate. With context-sensitive policies, the database assumes that the predicate will
change after statement parse time. But if there is no change in local application context,
Oracle Database does not rerun the policy function within the user session. If there
was a change in context, then the database reruns the policy function to ensure that it
captures any changes to the predicate since the initial parsing.
You can enable context-sensitive policies by setting the
policy_type
parameter of the
DBMS_RLS.ADD_POLICY
procedure to either
CONTEXT_SENSITIVE
or
SHARED_CONTEXT_
SENSITIVE
.
Example 7–8 shows how to create the
CONTEXT_SENSITIVE
policy type.
Example 7–8 Creating a CONTEXT_SENSITIVE Policy with DBMS_RLS.ADD_POLICY
BEGIN
DBMS_RLS.ADD_POLICY(
object_schema => 'hr',

Configuring an Oracle Virtual Private Database Policy
7-18 Oracle Database Security Guide
object_name => 'employees',
policy_name => 'secure_update',
policy_function => 'hide_fin',
policy_type => dbms_rls.CONTEXT_SENSITIVE);
END;
/
Context-sensitive policies are useful when different predicates should apply
depending on which user is executing the query. For example, consider the case where
managers should have the predicate
WHERE group
set to
managers
, and employees
should have the predicate
WHERE empno
set to
emp_id
.
Shared context-sensitive policies operate in the same way as regular context-sensitive
policies, except they can be shared across multiple database objects. For this policy
type, all objects can share the policy function from the UGA, where the predicate is
cached until the local session context changes.
Using a Shared Context Sensitive Policy to Share a Policy with Multiple Objects
Example 7–9 Ishows how to create two shared context sensitive policies that share a
policy with multiple tables.
Example 7–9 Creating a SHARED_CONTEXT_SENSITIVE Policy with DBMS_RLS.ADD_
POLICY
-- 1. Create a policy for the first table, employees:
BEGIN
DBMS_RLS.ADD_POLICY(
object_schema => 'hr',
object_name => 'employees',
policy_name => 'secure_update',
policy_function => 'hide_fin',
policy_type => dbms_rls.SHARED_CONTEXT_SENSITIVE);
END;
/
--2. Create a policy for the second table, fin_data:
BEGIN
DBMS_RLS.ADD_POLICY(
object_schema => 'hr',
object_name => 'fin_data',
policy_name => 'secure_update',
policy_function => 'hide_fin',
policy_type => dbms_rls.SHARED_CONTEXT_SENSITIVE);
END;
/
When to Use Context-Sensitive and Shared Context-Sensitive Policies
Context-sensitive policies are useful when a predicate does not need to change for a
user session, but the policy must enforce two or more different predicates for different
Note: When using shared context-sensitive policies, ensure that
the policy predicate does not contain attributes that are specific to a
particular database object, such as a column name.
See Also: "About Auditing Functions, Procedures, Packages, and
Triggers" on page 9-32 for information about how Oracle Database
audits the underlying policy function for dynamic policies

Tutorials: Creating Oracle Virtual Private Database Policies
Using Oracle Virtual Private Database to Control Data Access 7-19
users or groups. For example, consider a
sales_history
table with a single policy.
This policy states that analysts can see only their own products and regional
employees can see only their own region. In this case, the database must rerun the
policy function each time the type of user changes. The performance gain is realized
when a user can log in and issue several DML statements against the protected object
without causing the server to rerun the policy function.
Summary of the Five Oracle Virtual Private Database Policy Types
Table 7–2 summarizes the types of policy types available.
Tutorials: Creating Oracle Virtual Private Database Policies
This section contains:
■Tutorial: Creating a Simple Oracle Virtual Private Database Policy
■Tutorial: Implementing a Policy with a Database Session-Based Application
Context
■Tutorial: Implementing an Oracle Virtual Private Database Policy Group
Tutorial: Creating a Simple Oracle Virtual Private Database Policy
This section contains:
■About This Tutorial
Note: For session pooling where multiple clients share a database
session, the middle tier must reset the context during client
switches.
Table 7–2 DBMS_RLS.ADD_POLICY Policy Types
Policy Types When the Policy Function Executes Usage Example Shared Across Multiple Objects?
DYNAMIC
Policy function re-executes every time
a policy-protected database object is
accessed.
Applications where policy
predicates must be generated for
each query, such as time-dependent
policies where users are denied
access to database objects at certain
times during the day
No
STATIC
Once, then the predicate is cached in
the SGA1
1Each execution of the same cursor could produce a different row set for the same predicate because the predicate may filter the
data differently based on attributes such as
SYS_CONTEXT
or
SYSDATE
.
View replacement No
SHARED_
STATIC
Same as
STATIC
Hosting environments, such as data
warehouses where the same
predicate must be applied to
multiple database objects
Yes
CONTEXT_
SENSITIVE
■At statement parse time
■At statement execution time
when the local application
context changed since the last
use of the cursor
Three-tier, session pooling
applications where policies enforce
two or more predicates for different
users or groups
No
SHARED_
CONTEXT_
SENSITIVE
First time the object is reference in a
database session.
Predicates are cached in the private
session memory UGA so policy
functions can be shared among
objects.
Same as
CONTEXT_SENSITIVE
, but
multiple objects can share the
policy function from the session
UGA
Yes

Tutorials: Creating Oracle Virtual Private Database Policies
7-20 Oracle Database Security Guide
■Step 1: Ensure That the OE User Account Is Active
■Step 2: Create a Policy Function
■Step 3: Create the Oracle Virtual Private Database Policy
■Step 4: Test the Policy
■Step 5: Remove the Components for This Tutorial
About This Tutorial
Suppose you wanted to create a simple Oracle Virtual Private Database policy that
limits access to all orders in the
OE.ORDERS
table that were created by Sales
Representative 159. In essence, the policy translates the following statement:
SELECT * FROM OE.ORDERS;
To the following statement:
SELECT * FROM OE.ORDERS
WHERE SALES_REP_ID = 159;
Step 1: Ensure That the OE User Account Is Active
1. Log on to SQL*Plus as user
SYSTEM
with the
SYSDBA
privilege.
sqlplus sys as sysdba
Enter password: password
2. Run the following
SELECT
statement on the
DBA_USERS
data dictionary view:
SELECT USERNAME, ACCOUNT_STATUS FROM DBA_USERS WHERE USERNAME = 'OE';
If the
DBA_USERS
view lists user
OE
as locked and expired, then enter the following
statement to unlock the
OE
account and create a new password:
ALTER USER OE ACCOUNT UNLOCK IDENTIFIED BY password;
Replace
password
with a password that is secure. For greater security, do not reuse
the same password that was used in previous releases of Oracle Database. See
"Minimum Requirements for Passwords" on page 3-3 for more information.
Step 2: Create a Policy Function
Create the following function, which will append the
WHERE SALES_REP_ID = 159
clause to any
SELECT
statement on the
OE.ORDERS
table. (You can copy and paste this
text by positioning the cursor at the start of
CREATE OR REPLACE
in the first line.)
CREATE OR REPLACE FUNCTION auth_orders(
schema_var IN VARCHAR2,
table_var IN VARCHAR2
)
RETURN VARCHAR2
IS
return_val VARCHAR2 (400);
BEGIN
return_val := 'SALES_REP_ID = 159';
RETURN return_val;
END auth_orders;
/
In this example:

Tutorials: Creating Oracle Virtual Private Database Policies
Using Oracle Virtual Private Database to Control Data Access 7-21
■
schema_var
and
table_var
create input parameters to specify to store the schema
name,
OE
, and table name,
ORDERS
. First, define the parameter for the schema, and
then define the parameter for the object, in this case, a table. Always create them in
this order. The Virtual Private Database policy you create will need these
parameters to specify the
OE.ORDERS
table.
■
RETURN VARCHAR2
returns the string that will be used for the
WHERE
predicate
clause. Remember that return value is always a
VARCHAR2
data type.
■
IS ... RETURN return_val
encompasses the creation of the
WHERE SALES_REP_ID
= 159
predicate.
Step 3: Create the Oracle Virtual Private Database Policy
Next, create the following policy by using the
ADD_POLICY
procedure in the
DBMS_RLS
package. (You can copy and paste this text by positioning the cursor at the start of
BEGIN
in the first line.)
BEGIN
DBMS_RLS.ADD_POLICY (
object_schema => 'oe',
object_name => 'orders',
policy_name => 'orders_policy',
function_schema => 'sys',
policy_function => 'auth_orders',
statement_types => 'select, insert, update, delete'
);
END;
/
In this example:
■
object_schema => 'oe'
specifies the schema that you want to protect, that is,
OE
.
■
object_name => 'orders'
specifies the object within the schema to protect, that
is, the
ORDERS
table.
■
policy_name => 'orders_policy'
names this policy
orders_policy
.
■
function_schema => 'sys'
specifies the schema in which the
auth_orders
function was created. In this example,
auth_orders
was created in the
SYS
schema.
But typically, it should be created in the schema of a security administrator.
■
policy_function => 'auth_orders'
specifies a function to enforce the policy.
Here, you specify the
auth_orders
function that you created in Step 2: Create a
Policy Function.
■
statement_types => 'select'
specifies the operations to which the policy
applies. In this example, the policy applies to all
SELECT
,
INSERT
,
UPDATE
, and
DELETE
statements the user may perform.
Step 4: Test the Policy
After you create the Oracle Virtual Private Database policy, it goes into effect
immediately. The next time a user, including the owner of the schema, performs a
SELECT
on
OE.ORDERS
, only the orders by Sales Representative 159 will be accessed.
1. Log on as user
OE
.
CONNECT oe
Enter password: password
2. Enter the following
SELECT
statement:

Tutorials: Creating Oracle Virtual Private Database Policies
7-22 Oracle Database Security Guide
SELECT COUNT(*) FROM ORDERS;
The following output should appear:
COUNT(*)
---------
7
The policy is in effect for user
OE
: As you can see, only 7 of the 105 rows in the
orders table are returned.
But users with administrative privileges still have access to all the rows in the
table.
3. Log back on as user
SYS
.
CONNECT sys/as sysdba
Enter password: password
4. Enter the following
SELECT
statement:
SELECT COUNT(*) FROM OE.ORDERS;
The following output should appear:
COUNT(*)
---------
105
Step 5: Remove the Components for This Tutorial
1. As user
SYS
, remove the function and policy as follows:
DROP FUNCTION auth_orders;
EXEC DBMS_RLS.DROP_POLICY('OE','ORDERS','ORDERS_POLICY');
2. If you need to lock and expire the
OE
account, then enter the following statement:
ALTER USER OE ACCOUNT LOCK PASSWORD EXPIRE;
Tutorial: Implementing a Policy with a Database Session-Based Application Context
This section contains:
■About This Tutorial
■Step 1: Create User Accounts and Sample Tables
■Step 2: Create a Database Session-Based Application Context
■Step 3: Create a PL/SQL Package to Set the Application Context
■Step 4: Create a Logon Trigger to Run the Application Context PL/SQL Package
■Step 5: Create a PL/SQL Policy Function to Limit User Access to Their Orders
■Step 6: Create the New Security Policy
■Step 7: Test the New Policy
■Step 8: Remove the Components for This Tutorial

Tutorials: Creating Oracle Virtual Private Database Policies
Using Oracle Virtual Private Database to Control Data Access 7-23
About This Tutorial
This tutorial shows how you can use a database session-based application context to
implement a policy in which customers can see only their own orders. You create the
following layers of security:
1. When a user logs on, a database session-based application context checks whether
the user is a customer. If a user is not a customer, the user still can log on, but this
user cannot access the orders entry table you will create for this example.
2. If the user is a customer, he or she can log on. After the customer has logged on, an
Oracle Virtual Private Database policy restricts this user to see only his or her
orders.
3. As a further restriction, the Oracle Virtual Private Database policy prevents users
from adding, modifying, or removing orders.
Step 1: Create User Accounts and Sample Tables
1. Start SQL*Plus and log on as a user who has administrative privileges.
sqlplus sys as sysdba
Enter password: password
2. Create the following administrative user, who will administer the Oracle Virtual
Private Database policy.
The following SQL statements create this user and then grant the user the
necessary privileges for completing this tutorial.
GRANT CREATE SESSION, CREATE ANY CONTEXT, CREATE PROCEDURE, CREATE TRIGGER,
ADMINISTER DATABASE TRIGGER TO sysadmin_vpd IDENTIFIED BY password;
GRANT EXECUTE ON DBMS_SESSION TO sysadmin_vpd;
GRANT EXECUTE ON DBMS_RLS TO sysadmin_vpd;
Replace
password
with a password that is secure. See "Minimum Requirements for
Passwords" on page 3-3 for more information.
3. Create the following user accounts:
GRANT CREATE SESSION TO tbrooke IDENTIFIED BY password;
GRANT CREATE SESSION TO owoods IDENTIFIED BY password;
Replace
password
with a password that is secure. See "Minimum Requirements for
Passwords" on page 3-3 for more information.
4. Check the status of the sample user
SCOTT
, who you will use for this tutorial:
SELECT USERNAME, ACCOUNT_STATUS FROM DBA_USERS WHERE USERNAME = 'SCOTT';
If the
DBA_USERS
view lists user
SCOTT
as locked and expired, then enter the
following statement to unlock the
SCOTT
account and create a new password for
him:
ALTER USER SCOTT ACCOUNT UNLOCK IDENTIFIED BY password;
Replace
password
with a password that is secure. For greater security, do not reuse
the same password that was used in previous releases of Oracle Database. See
"Minimum Requirements for Passwords" on page 3-3 for more information.
5. Connect as user
SCOTT
, and then create and populate the
customers
table.
CONNECT scott
Enter password: password

Tutorials: Creating Oracle Virtual Private Database Policies
7-24 Oracle Database Security Guide
CREATE TABLE customers (
cust_no NUMBER(4),
cust_email VARCHAR2(20),
cust_name VARCHAR2(20));
INSERT INTO customers VALUES (1234, 'TBROOKE', 'Thadeus Brooke');
INSERT INTO customers VALUES (5678, 'OWOODS', 'Oberon Woods');
When you enter the user email addresses, enter them in upper-case letters. Later
on, when you create the application context PL/SQL package, the
SESSION_USER
parameter of the
SYS_CONTEXT
function expects the user names to be in upper case.
Otherwise, you will be unable to set the application context for the user.
6. User
sysadmin_vpd
will need
SELECT
privileges for the customers table, so as user
SCOTT
, grant him this privilege.
GRANT SELECT ON customers TO sysadmin_vpd;
7. Create and populate the
orders_tab
table.
CREATE TABLE orders_tab (
cust_no NUMBER(4),
order_no NUMBER(4));
INSERT INTO orders_tab VALUES (1234, 9876);
INSERT INTO orders_tab VALUES (5678, 5432);
INSERT INTO orders_tab VALUES (5678, 4592);
8. Users
tbrooke
and
owoods
need to query the
orders_tab
table, so grant them the
SELECT
privilege.
GRANT SELECT ON orders_tab TO tbrooke;
GRANT SELECT ON orders_tab TO owoods;
At this stage, the two sample customers,
tbrooke
and
owoods
, have a record of
purchases in the
orders_tab
order entry table, and if they tried right now, they can see
all the orders in this table.
Step 2: Create a Database Session-Based Application Context
1. Connect as user
sysadmin_vpd
.
CONNECT sysadmin_vpd
Enter password: password
2. Enter the following statement:
CREATE OR REPLACE CONTEXT orders_ctx USING orders_ctx_pkg;
This statement creates the
orders_ctx
application context. Remember that even
though user
sysadmin_vpd
has created this context and it is associated with the
sysadmin_vpd
schema, the
SYS
schema owns the application context.
Step 3: Create a PL/SQL Package to Set the Application Context
As user
sysadmin_vpd
, create the following PL/SQL package, which will set the
database session-based application context when the customers
tbrooke
and
owoods
log onto their accounts. (You can copy and paste this text by positioning the cursor at
the start of
CREATE OR REPLACE
in the first line.)
CREATE OR REPLACE PACKAGE orders_ctx_pkg IS

Tutorials: Creating Oracle Virtual Private Database Policies
Using Oracle Virtual Private Database to Control Data Access 7-25
PROCEDURE set_custnum;
END;
/
CREATE OR REPLACE PACKAGE BODY orders_ctx_pkg IS
PROCEDURE set_custnum
AS
custnum NUMBER;
BEGIN
SELECT cust_no INTO custnum FROM SCOTT.CUSTOMERS
WHERE cust_email = SYS_CONTEXT('USERENV', 'SESSION_USER');
DBMS_SESSION.SET_CONTEXT('orders_ctx', 'cust_no', custnum);
EXCEPTION
WHEN NO_DATA_FOUND THEN NULL;
END set_custnum;
END;
/
In this example:
■
custnum NUMBER
creates the
custnum
variable, which will hold the customer ID.
■
SELECT cust_no INTO custnum
performs a
SELECT
statement to copy the customer
ID that is stored in the
cust_no
column data from the
scott.customers
table into
the
custnum
variable.
■
WHERE cust_email = SYS_CONTEXT('USERENV', 'SESSION_USER')
uses a
WHERE
clause to find all the customer IDs that match the user name of the user who is
logging on.
■
DBMS_SESSION.SET_CONTEXT('orders_ctx', 'cust_no', custnum)
sets the
orders_ctx
application context values by creating the
cust_no
attribute and then
setting it to the value stored in the
custnum
variable.
■
EXCEPTION ... WHEN
adds a
WHEN NO_DATA_FOUND
system exception to catch any
no data found
errors that may result from the
SELECT
statement in Lines 10–11.
To summarize, the
sysadmin_vpd.set_cust_num
procedure identifies whether or not
the session user is a registered customer by attempting to select the user’s customer ID
into the
custnum
variable. If the user is a registered customer, then Oracle Database
sets an application context value for this user. As you will see in Step 5: Create a
PL/SQL Policy Function to Limit User Access to Their Orders, the policy function uses
the context value to control the access a user has to data in the
orders_tab
table.
Step 4: Create a Logon Trigger to Run the Application Context PL/SQL Package
The logon trigger runs the procedure in the PL/SQL package that you created in Step
3: Create a PL/SQL Package to Set the Application Context the next time a user logs
on, so that the application context can be set.
As user
sysadmin_vpd
, create the following trigger:
CREATE TRIGGER set_custno_ctx_trig AFTER LOGON ON DATABASE
BEGIN
sysadmin_vpd.orders_ctx_pkg.set_custnum;
END;
/
See Also: "Creating a Logon Trigger to Run a Database Session
Application Context Package" on page 6-11

Tutorials: Creating Oracle Virtual Private Database Policies
7-26 Oracle Database Security Guide
At this stage, if you log on as either
tbrooke
or
owoods
, the logon trigger should set the
application context for the user when it fires the
sysadmin_vpd.orders_ctx_pkg.set_
custnum
procedure. You can test it as follows:
CONNECT tbrooke
Enter password: password
SELECT SYS_CONTEXT('orders_ctx', 'cust_no') custnum FROM DUAL;
The following output should appear:
EMP_ID
-------------------------------------------------------------------
1234
Step 5: Create a PL/SQL Policy Function to Limit User Access to Their Orders
The next step is to create a PL/SQL function that, when the user who has logged in
performs a
SELECT * FROM scott.orders_tab
query, displays only the orders of that
user.
As user
sysadmin_vpd
, create the following function:
CREATE OR REPLACE FUNCTION get_user_orders(
schema_p IN VARCHAR2,
table_p IN VARCHAR2)
RETURN VARCHAR2
AS
orders_pred VARCHAR2 (400);
BEGIN
orders_pred := 'cust_no = SYS_CONTEXT(''orders_ctx'', ''cust_no'')';
RETURN orders_pred;
END;
/
This function creates and returns a
WHERE
predicate that translates to "where the orders
displayed belong to the user who has logged in." It then appends this
WHERE
predicate
to any queries this user may run against the
scott.orders_tab
table. Next, you are
ready to create an Oracle Virtual Private Database policy that applies this function to
the
orders_tab
table.
Step 6: Create the New Security Policy
As user
sysadmin_vpd
, create the policy as follows:
BEGIN
DBMS_RLS.ADD_POLICY (
object_schema => 'scott',
object_name => 'orders_tab',
policy_name => 'orders_policy',
function_schema => 'sysadmin_vpd',
policy_function => 'get_user_orders',
statement_types => 'select');
END;
/
This statement creates a policy named
orders_policy
and applies it to the
orders_tab
table, which customers will query for their orders, in the
SCOTT
schema. The
get_user_
orders
function implements the policy, which is stored in the
sysadmin_vpd
schema.
The policy further restricts users to issuing
SELECT
statements only.

Tutorials: Creating Oracle Virtual Private Database Policies
Using Oracle Virtual Private Database to Control Data Access 7-27
Step 7: Test the New Policy
1. Log on as user
tbrooke
.
CONNECT tbrooke
Enter password: password
User
tbrooke
can log on because he has passed the requirements you defined in
the application context.
2. As user
tbrooke
, access your purchases.
SELECT * FROM scott.orders_tab;
The following output should appear:
CUST_NO ORDER_NO
---------- ----------
1234 9876
User
tbrooke
has passed the second test. He can access his own orders in the
scott.orders_tab
table.
3. Log on as user
owoods
, and then access your purchases.
CONNECT owoods
Enter password: passwords
SELECT * FROM scott.orders_tab
The following output should appear:
CUST_NO ORDER_NO
---------- ----------
5678 5432
5678 4592
As with user
tbrooke
, user
owoods
can log on and see a listing of his own orders.
Note the following:
■You can create several predicates based on the position of a user. For example, a
sales representative would be able to see records only for his customers, and an
order entry clerk would be able to see any customer order. You could expand the
custnum_sec
function to return different predicates based on the user position
context value.
■The use of an application context in a fine-grained access control package
effectively gives you a bind variable in a parsed statement. For example:
SELECT * FROM scott.orders_tab
WHERE cust_no = SYS_CONTEXT('order_entry', 'cust_num');
This is fully parsed and optimized, but the evaluation of the
cust_num
attribute
value of the user for the
order_entry
context takes place at run-time. This means
that you get the benefit of an optimized statement that executes differently for
each user who issues the statement.
Note: You can improve the performance of the function in this
tutorial by indexing
cust_no
.

Tutorials: Creating Oracle Virtual Private Database Policies
7-28 Oracle Database Security Guide
■You can set context attributes based on data from a database table or tables, or
from a directory server using Lightweight Directory Access Protocol (LDAP).
Compare and contrast this tutorial, which uses an application context within the
dynamically generated predicate, with "About Oracle Virtual Private Database
Policies" on page 7-6, which uses a subquery in the predicate.
Step 8: Remove the Components for This Tutorial
1. Connect as user
OE
and remove the
orders_tab
and
customers
tables.
CONNNECT SCOTT
Enter password: password
DROP TABLE orders_tab;
DROP TABLE customers;
2. Connect as user
SYS
, connecting with
AS SYSDBA
.
CONNECT sys/as sysdba
Enter password: password
3. Run the following statements to drop the components for this tutorial:
DROP CONTEXT orders_ctx;
DROP USER sysadmin_vpd CASCADE;
DROP USER tbrooke;
DROP USER owoods;
Tutorial: Implementing an Oracle Virtual Private Database Policy Group
This section contains:
■About This Tutorial
■Step 1: Create User Accounts and Other Components for This Tutorial
■Step 2: Create the Two Policy Groups
■Step 3: Create PL/SQL Functions to Control the Policy Groups
■Step 4: Add the PL/SQL Functions to the Policy Groups
■Step 5: Create the Driving Application Context
■Step 6: Test the Policy Groups
■Step 7: Remove the Components for This Tutorial
About This Tutorial
"Working with Oracle Virtual Private Database Policy Groups" on page 7-11 describes
how you can group a set of policies for use in an application. When a nondatabase
user logs onto the application, Oracle Database grants the user access based on the
policies defined within the appropriate policy group.
For column-level access control, every column or set of hidden columns is controlled
by one policy. In this tutorial, you must hide two sets of columns. So, you need to
create two policies, one for each set of columns that you want to hide. You only want
one policy for each user; the driving application context separates the policies for you.
See Also: Oracle Database PL/SQL Language Reference for more
information about triggers

Tutorials: Creating Oracle Virtual Private Database Policies
Using Oracle Virtual Private Database to Control Data Access 7-29
Step 1: Create User Accounts and Other Components for This Tutorial
1. Log on as user
SYS
with the
SYSDBA
privilege.
sqlplus sys as sysdba
Enter password: password
2. Create the following users:
GRANT CREATE SESSION TO apps_user IDENTIFIED BY password;
GRANT CREATE SESSION, CREATE PROCEDURE, CREATE ANY CONTEXT TO sysadmin_pg
IDENTIFIED BY password;
Replace
password
with a password that is secure. See "Minimum Requirements for
Passwords" on page 3-3 for more information.
3. Grant the following additional privilege to user
sysadmin_pg
:
GRANT EXECUTE ON DBMS_RLS TO sysadmin_pg;
4. Log on as user
OE
.
CONNECT OE
Enter password: password
If the
OE
account is locked and expired, then reconnect as user
SYS
with the
SYSDBA
privilege and enter the following statement to unlock the account and give it s
new password:
ALTER USER OE ACCOUNT UNLOCK IDENTIFIED BY password;
Replace
password
with a password that is secure. For greater security, do not reuse
the same password that was used in previous releases of Oracle Database. See
"Minimum Requirements for Passwords" on page 3-3 for more information.
5. Create the
product_code_names
table:
CREATE TABLE product_code_names(
group_a varchar2(32),
year_a varchar2(32),
group_b varchar2(32),
year_b varchar2(32));
6. Insert some values into the
product_code_names
table:
INSERT INTO product_code_names values('Biffo','2008','Beffo','2004');
INSERT INTO product_code_names values('Hortensia','2008','Bunko','2008');
INSERT INTO product_code_names values('Boppo','2006','Hortensia','2003');
COMMIT;
7. Grant the
apps_user
user
SELECT
privileges on the
product_code_names
table.
GRANT SELECT ON product_code_names TO apps_user;
Step 2: Create the Two Policy Groups
Next, you must create a policy group for each of the two nondatabase users,
provider_a
and
provider_b
.
1. Connect as user
sysadmin_pg
.
CONNECT sysadmin_pg
Enter password: password

Tutorials: Creating Oracle Virtual Private Database Policies
7-30 Oracle Database Security Guide
2. Create the
provider_a_group
policy group, to be used by user
provider_a
:
BEGIN
DBMS_RLS.CREATE_POLICY_GROUP(
object_schema => 'oe',
object_name => 'product_code_names',
policy_group => 'provider_a_group');
END;
/
3. Create the
provider_b_group
policy group, to be used by user
provider_b
:
BEGIN
DBMS_RLS.CREATE_POLICY_GROUP(
object_schema => 'oe',
object_name => 'product_code_names',
policy_group => 'provider_b_group');
END;
/
Step 3: Create PL/SQL Functions to Control the Policy Groups
Each of the policy groups that you created in Step 2: Create the Two Policy Groups
must have a function that defines how the application can control data access for users
provider_a
and
provider_b
.
1. Create the
vpd_function_provider_a
function, which restricts the data accessed
by user
provider_a
.
CREATE OR REPLACE FUNCTION vpd_function_provider_a
(schema in varchar2, tab in varchar2) return varchar2 as
predicate varchar2(8) default NULL;
BEGIN
IF LOWER(SYS_CONTEXT('USERENV','CLIENT_IDENTIFIER')) = 'provider_a'
THEN predicate := '1=2';
ELSE NULL;
END IF;
RETURN predicate;
END;
/
This function checks that the user logging in is really user
provider_a
. If this is
true, then only the data in the
product_code_names
table columns
group_a
and
year_a
will be visible to
provider_a
. Data in columns
group_b
and
year_b
will not
appear for
provider_a
. This works as follows: Setting
predicate := '1=2'
hides
the relevant columns. In Step 4: Add the PL/SQL Functions to the Policy Groups,
you specify these columns in the
SEC_RELEVANT_COLS
parameter.
See "Creating a Function to Generate the Dynamic WHERE Clause" on page 7-4 for
detailed information on the components of this type of function.
2. Create the
vpd_function_provider_b
, function, which restricts the data accessed
by user
provider_a
.
CREATE OR REPLACE FUNCTION vpd_function_provider_b
(schema in varchar2, tab in varchar2) return varchar2 as
predicate varchar2(8) default NULL;
BEGIN
IF LOWER(SYS_CONTEXT('USERENV','CLIENT_IDENTIFIER')) = 'provider_b'
THEN predicate := '1=2';
ELSE NULL;
END IF;

Tutorials: Creating Oracle Virtual Private Database Policies
Using Oracle Virtual Private Database to Control Data Access 7-31
RETURN predicate;
END;
/
Similar to the
vpd_function_provider_a
function, this function checks that the
user logging in is really user
provider_b
. If this is true, then only the data in the
columns
group_b
and
year_b
will be visible to
provider_b
, with data in the
group_a
and
year_a
not appearing for
provider_b
. Similar to the
vpd_function_
provider_a
function,
predicate := '1=2'
hides the relevant columns specified
Step 4: Add the PL/SQL Functions to the Policy Groups in the
SEC_RELEVANT_COLS
parameter.
Step 4: Add the PL/SQL Functions to the Policy Groups
Now that you have created the necessary functions, you are ready to associate them
with their appropriate policy groups.
1. Add the
vpd_function_provider_a
function to the
provider_a_group
policy
group.
BEGIN
DBMS_RLS.ADD_GROUPED_POLICY(
object_schema => 'oe',
object_name => 'product_code_names',
policy_group => 'provider_a_group',
policy_name => 'filter_provider_a',
function_schema => 'sysadmin_pg',
policy_function => 'vpd_function_provider_a',
statement_types => 'select',
policy_type => DBMS_RLS.CONTEXT_SENSITIVE,
sec_relevant_cols => 'group_b,year_b',
sec_relevant_cols_opt => DBMS_RLS.ALL_ROWS);
END;
/
The
group_b
and
year_b
columns specified in the
sec_relevant_cols
parameter
are hidden from user
provider_a
.
2. Add the
vpd_function_provider_b
function to the
provider_b_group
policy
group.
BEGIN
DBMS_RLS.ADD_GROUPED_POLICY(
object_schema => 'oe',
object_name => 'product_code_names',
policy_group => 'provider_b_group',
policy_name => 'filter_provider_b',
function_schema => 'sysadmin_pg',
policy_function => 'vpd_function_provider_b',
statement_types => 'select',
policy_type => DBMS_RLS.CONTEXT_SENSITIVE,
sec_relevant_cols => 'group_a,year_a',
sec_relevant_cols_opt => DBMS_RLS.ALL_ROWS);
END;
/
The
group_a
and
year_a
columns specified in the
sec_relevant_cols
parameter
are hidden from user
provider_b
.

Tutorials: Creating Oracle Virtual Private Database Policies
7-32 Oracle Database Security Guide
Step 5: Create the Driving Application Context
The application context determines which policy the nondatabase user who is the
logging on should use.
1. As user
sysadmin_pg
, create the driving application context as follows:
CREATE OR REPLACE CONTEXT provider_ctx USING provider_package;
2. Create the PL/SQL
provider_package
package for the application context.
CREATE OR REPLACE PACKAGE provider_package IS
PROCEDURE set_provider_context (policy_group varchar2 default NULL);
END;
/
CREATE OR REPLACE PACKAGE BODY provider_package AS
PROCEDURE set_provider_context (policy_group varchar2 default NULL) IS
BEGIN
CASE LOWER(SYS_CONTEXT('USERENV', 'CLIENT_IDENTIFIER'))
WHEN 'provider_a' THEN
DBMS_SESSION.SET_CONTEXT('provider_ctx','policy_group','PROVIDER_A_GROUP');
WHEN 'provider_b' THEN
DBMS_SESSION.SET_CONTEXT('provider_ctx','policy_group','PROVIDER_B_GROUP');
END CASE;
END set_provider_context;
END;
/
3. Associate the
provider_ctx
application context with the
product_code_names
table, and then provide a name.
BEGIN
DBMS_RLS.ADD_POLICY_CONTEXT(
object_schema =>'oe',
object_name =>'product_code_names',
namespace =>'provider_ctx',
attribute =>'policy_group');
END;
/
4. Grant the
apps_user
account the
EXECUTE
privilege for the
provider_package
package.
GRANT EXECUTE ON provider_package TO apps_user;
Step 6: Test the Policy Groups
Now you are ready to test the two policy groups.
1. Connect as user
apps_user
and then enter the following statements to ensure that
the output you will create later on is nicely formatted.
CONNECT apps_user
Enter password: password
col group_a format a16
col group_b format a16;
col year_a format a16;
col year_b format a16;
2. Set the session identifier to
provider_a
.
EXEC DBMS_SESSION.SET_IDENTIFIER('provider_a');

Tutorials: Creating Oracle Virtual Private Database Policies
Using Oracle Virtual Private Database to Control Data Access 7-33
Here, the application sets the identifier. Setting the identifier to
provider_a
sets
the
apps_user
user to a user who should only see the products available to
products in the
provider_a_group
policy group.
3. Run the
provider_package
to set the policy group based on the context.
EXEC sysadmin_pg.provider_package.set_provider_context;
At this stage, you can check the application context was set, as follows:
SELECT SYS_CONTEXT('USERENV', 'CLIENT_IDENTIFIER') AS END_USER FROM DUAL;
The following output should appear:
END_USER
-----------------
provider_a
4. Enter the following
SELECT
statement:
SELECT * FROM oe.product_code_names;
The following output should appear:
GROUP_A YEAR_A GROUP_B YEAR_B
---------------- ---------------- ---------------- ----------------
Biffo 2008
Hortensia 2008
Boppo 2006
5. Set the client identifier to
provider_b
and then enter the following statements:
EXEC DBMS_SESSION.SET_IDENTIFIER('provider_b');
EXEC sysadmin_pg.provider_package.set_provider_context;
SELECT * FROM oe.product_code_names;
The following output should appear:
GROUP_A YEAR_A GROUP_B YEAR_B
---------------- ---------------- ---------------- ----------------
Beffo 2004
Bunko 2008
Hortensia 2003
Step 7: Remove the Components for This Tutorial
1. Connect as user
OE
and drop the
product_code_names
table.
CONNECT OE
Enter password: password
DROP TABLE product_code_names;
2. Connect as user
SYS
and drop the application context and users for this tutorial.
CONNECT SYS/AS SYSDBA
Enter password: password
DROP CONTEXT provider_ctx;
DROP USER sysadmin_pg cascade;
DROP USER apps_user;

How Oracle Virtual Private Database Works with Other Oracle Features
7-34 Oracle Database Security Guide
How Oracle Virtual Private Database Works with Other Oracle Features
This section contains:
■Using Oracle Virtual Private Database Policies with Editions
■Using SELECT FOR UPDATE in User Queries on VPD-Protected Tables
■How Oracle Virtual Private Database Policies Affect Outer or ANSI Join
Operations
■How Oracle Virtual Private Database Security Policies Work with Applications
■Using Automatic Reparsing for Fine-Grained Access Control Policy Functions
■Using Oracle Virtual Private Database Policies and Flashback Query
■Using Oracle Virtual Private Database and Oracle Label Security
■Exporting Data Using the EXPDP Utility access_method Parameter
■User Models and Oracle Virtual Private Database
Using Oracle Virtual Private Database Policies with Editions
If you are preparing an application for edition-based redefinition, and you cover each
table that the application uses with an editioning view, then you must move the
Virtual Private Database polices that protect these tables to the editioning view.
When an editioned object has a Virtual Private Database t policy, then it applies in all
editions in which the object is visible. When an editioned object is actualized, any VPD
policies that are attached to it are newly attached to the new actual occurrence. When
you newly apply a VPD policy to an inherited editioned object, this action will
actualize it.
Using SELECT FOR UPDATE in User Queries on VPD-Protected Tables
As a general rule, users should not include the
FOR UPDATE
clause when querying
Virtual Private Database-protected tables. The Virtual Private Database technology
depends on rewriting the user’s query against an inline view that includes the VPD
predicate generated by the VPD policy function. Because of this, the same limitations
on views also apply to VPD-protected tables. If a user’s query against a VPD-protected
table includes the
FOR UPDATE
clause in a
SELECT
statement, in most cases, the query
may not work. However, the user’s query may work in some situations if the inline
view generated by VPD is sufficiently simple.
How Oracle Virtual Private Database Policies Affect Outer or ANSI Join Operations
Oracle Virtual Private Database rewrites SQL by using dynamic views. For SQL that
contains outer join or ANSI operations, some views may not merge and some indexes
may not be used. This problem is a known optimization limitation. To remedy this
problem, rewrite the SQL to not use outer joins or ANSI operations.
See Also: Oracle Database Advanced Application Developer's Guide for
detailed information about editions
See Also: Oracle Database SQL Language Reference for more
information about the restrictions of the
FOR UPDATE
clause in the
SELECT
statement

How Oracle Virtual Private Database Works with Other Oracle Features
Using Oracle Virtual Private Database to Control Data Access 7-35
How Oracle Virtual Private Database Security Policies Work with Applications
An Oracle Virtual Private Database security policy is applied within the database
itself, rather than within an application. Hence, a user trying to access data by using a
different application cannot bypass the Oracle Virtual Private Database security policy.
Another advantage of creating the security policy in the database is that you maintain
it in one central place, rather than maintaining individual security policies in multiple
applications. Oracle Virtual Private Database provides stronger security than
application-based security, at a lower cost of ownership.
You may want to enforce different security policies depending on the application that
is accessing data. Consider a situation in which two applications, Order Entry and
Inventory, both access the
orders
table. You may want to have the Inventory
application use a policy that limits access based on type of product. At the same time,
you may want to have the Order Entry application use a policy that limits access based
on customer number.
In this case, you must partition the use of fine-grained access by application.
Otherwise, both policies would be automatically concatenated together, which may
not be the result that you want. You can specify two or more policy groups, and a
driving application context that determines which policy group is in effect for a given
transaction. You can also designate default policies that always apply to data access. In
a hosted application, for example, data access should be limited by subscriber ID. See
"Tutorial: Implementing an Oracle Virtual Private Database Policy Group" on
page 7-28 for an example of how you can create policy groups that use an application
context to determine which group should be used.
Using Automatic Reparsing for Fine-Grained Access Control Policy Functions
By default, queries against objects enabled with fine-grained access control run the
policy function to ensure that the most current predicate is used for each policy. For
example, in the case of a time-based policy function, in which queries are only allowed
between 8:00 a.m. and 5:00 p.m., a cursor execution parsed at noon runs the policy
function at that time, ensuring that the policy is consulted again for the query. Even if
the curser was parsed at 9 a.m., when it runs later on (for example, at noon), then the
Virtual Private Database policy function runs again to ensure that the execution of the
cursor is still permitted at the current time (noon). This ensures that the security check
it must perform is the most recent.
Automatic re-execution of the Virtual Private Database policy function does not occur
when you set the
DBMS_RLS.ADD_POLICY
setting
STATIC_POLICY
to
TRUE
while adding
the policy. This setting causes the policy function to return the same predicate.
Using Oracle Virtual Private Database Policies and Flashback Query
By default, operations on the database use the most recently committed data available.
The flashback query feature enables you to query the database at some point in the
past. To write an application that uses flashback query, you can use the
AS OF
clause in
SQL queries to specify either a time or a system change number (SCN), and then query
against the committed data from the specified time. You can also use the
DBMS_
FLASHBACK
PL/SQL package, which requires more code, but enables you to perform
multiple operations, all of which refer to the same point in time.
However, if you use flashback query against a database object that is protected with
Oracle Virtual Private Database policies, then the current policies are applied to the old
data. Applying the current Oracle Virtual Private Database policies to flashback query
data is more secure because it reflects the most current business policy.

How Oracle Virtual Private Database Works with Other Oracle Features
7-36 Oracle Database Security Guide
Using Oracle Virtual Private Database and Oracle Label Security
This section contains:
■Using Oracle Virtual Private Database to Enforce Oracle Label Security Policies
■Oracle Virtual Private Database and Oracle Label Security Exceptions
Using Oracle Virtual Private Database to Enforce Oracle Label Security Policies
You can use Oracle Virtual Private Database policies to provide column or row-level
access control based on Oracle Label Security user authorizations. In general, you need
to perform the following steps:
1. When you create the Oracle Label Security policy, do not apply the policy to the
table that you want to protect. (The Virtual Private Database policy that you create
handles this for you.) In the
SA_SYSDBA.CREATE_POLICY
procedure, set the
default_options
parameter to
NO_CONTROL
.
2. Create the Oracle Label Security label components and authorize users as you
normally would.
3. When you create the Oracle Virtual Private Database policy, do the following:
■In the PL/SQL function that you create for the policy, use the Oracle Label
Security
DOMINATES
function to compare the authorization of the user with the
label that you created in Step 2. (See Oracle Label Security Administrator's Guide
for more information about the dominance functions.) The
DOMINATES
function
determines if the user authorization is equal to, or if it is more sensitive than,
the label used in the comparison. If the user authorization passes, then the
user is granted access to the column. Otherwise, the user is denied access.
■In the Virtual Private Database policy definition, apply this function to the
table that you want to protect. In the
DBMS_RLS.ADD_POLICY
procedure, use the
sensitive column (
SEC_RELEVANT_COLS
parameter) and column masking (
SEC_
RELEVANT_COLS_OPT
parameter) functionality to show or hide columns based
on Oracle Label Security user authorizations.
For an example of how to accomplish this, visit the following Oracle Technology
Network site:
http://www.oracle.com/technetwork/database/focus-areas/security/ols-cs1-09
9558.html
Oracle Virtual Private Database and Oracle Label Security Exceptions
Be aware of the following exceptions when you use Oracle Virtual Private Database
and Oracle Label Security:
■When you are exporting data, Oracle Virtual Private Database and Oracle Label
Security policies are not enforced during a direct path export operation. In a
See Also:
■Oracle Database Advanced Application Developer's Guide for more
information about the flashback query feature and how to write
applications that use it
■Oracle Database PL/SQL Packages and Types Reference for more
information about the
DBMS_FLASHBACK
PL/SQL package
See Also: Oracle Label Security Administrator's Guide

How Oracle Virtual Private Database Works with Other Oracle Features
Using Oracle Virtual Private Database to Control Data Access 7-37
direct path export operation, Oracle Database reads data from disk into the buffer
cache and transfers rows directly to the Export client. See Oracle Database Utilities
for more information about direct path export operations.
■You cannot apply Oracle Virtual Private Database policies and Oracle Label
Security policies to objects in the SYS schema. The
SYS
user and users making a
DBA-privileged connection to the database (for example,
CONNECT/AS SYSDBA
) do
not have Oracle Virtual Private Database or Oracle Label Security policies applied
to their actions. The database user
SYS
is thus always exempt from Oracle Virtual
Private Database or Oracle Label Security enforcement, regardless of the export
mode, application, or utility used to extract data from the database.
However, you can audit
SYSDBA
actions by enabling auditing upon installation and
specifying that this audit trail be stored in a secure location in the operating
system. See "Auditing SYS Administrative Users" on page 9-53 for more
information. You can also closely monitor the
SYS
user by using Oracle Database
Vault.
■Database users who were granted the EXEMPT ACCESS POLICY privilege,
either directly or through a database role, are exempt from Oracle Virtual
Private Database enforcements. The system privilege
EXEMPT ACCESS POLICY
allows a user to be exempted from all fine-grained access control policies on any
SELECT
or DML operation (
INSERT
,
UPDATE
, and
DELETE
). This provides ease of use
for administrative activities, such as installation and import and export of the
database, through a non-
SYS
schema.
However, the following policy enforcement options remain in effect even when
EXEMPT ACCESS POLICY
is granted:
–
INSERT_CONTROL
,
UPDATE_CONTROL
,
DELETE_CONTROL
,
WRITE_CONTROL
,
LABEL_
UPDATE
, and
LABEL_DEFAULT
–If the Oracle Label Security policy specifies the
ALL_CONTROL
option, then all
enforcement controls are applied except
READ_CONTROL
and
CHECK_CONTROL
.
Because
EXEMPT ACCESS POLICY
negates the effect of fine-grained access control,
you should only grant this privilege to users who have legitimate reasons for
bypassing fine-grained access control enforcement. Do not grant this privilege
using the
WITH ADMIN OPTION
. If you do, users could pass the
EXEMPT ACCESS
POLICY
privilege to other users, and thus propagate the ability to bypass
fine-grained access control.
Exporting Data Using the EXPDP Utility access_method Parameter
If you try to use the Oracle Data Pump Export (
EXPDP
) utility with the
access_method
parameter set to
direct_path
to export data from a schema which contains an object
that has a Virtual Private Database policy defined on it, then the following error
message may appear and the export operation will fail:
Note:
■The
EXEMPT ACCESS POLICY
privilege does not affect the
enforcement of object privileges such as
SELECT
,
INSERT
,
UPDATE
, and
DELETE
. These privileges are enforced even if a user
was granted the
EXEMPT ACCESS POLICY
privilege.
■The
SYS_CONTEXT
values that Oracle Virtual Private Database
uses are not propagated to secondary databases for failover.

How Oracle Virtual Private Database Works with Other Oracle Features
7-38 Oracle Database Security Guide
ORA-31696: unable to export/import TABLE_DATA:"schema.table" using client
specified DIRECT_PATH method
This problem only occurs when you perform a schema-level export as a user who has
not been granted the
EXP_FULL_DATABASE
role. It does not occur during a full database
export, which requires the
EXP_FULL_DATABASE
role. The
EXP_FULL_DATABASE
role
includes the
EXEMPT ACCESS POLICY
system privilege, which bypasses Virtual Private
Database policies.
To find the underlying problem, try the
EXPDP
invocation again, but do not set the
access_method
parameter to
direct_path
. Instead, use either
automatic
or
external_
table
. The underlying problem could be a permissions problem, for example:
ORA-39181: Only partial table data may be exported due to fine grain access
control on "schema_name"."object_name"
User Models and Oracle Virtual Private Database
You can use Oracle Virtual Private Database in the following types of user models:
■Application users who are also database users. Oracle Database enables
applications to enforce fine-grained access control for each user, regardless of
whether that user is a database user or an application user unknown to the
database. When application users are also database users, Oracle Virtual Private
Database enforcement works as follows: users connect to the database, and then
the application sets up application contexts for each session. (You can use the
default
USERENV
application context namespace, which provides many parameters
for retrieve different types of user session data.) As each session is initiated under
a different user name, it can enforce different fine-grained access control
conditions for each user.
■Proxy authentication using OCI or JDBC/OCI. Proxy authentication permits
different fine-grained access control for each user, because each session (OCI or
JDBC/OCI) is a distinct database session with its own application context.
■Proxy authentication integrated with Enterprise User Security. If you have
integrated proxy authentication by using Enterprise User Security, you can
retrieve user roles and other attributes from Oracle Internet Directory to enforce
Oracle Virtual Private Database policies. (In addition, globally initialized
application context can also be retrieved from the directory.)
■Users connecting as One Big Application User. Applications connecting to the
database as a single user on behalf of all users can have fine-grained access control
for each user. The user for that single session is often called One Big Application
User. Within the context of that session, however, an application developer can
create a global application context attribute to represent the individual application
user (for example,
REALUSER
). Although all database sessions and audit records are
created for One Big Application User, the attributes for each session can vary,
depending on who the end user is. This model works best for applications with a
limited number of users and no reuse of sessions. The scope of roles and database
auditing is diminished because each session is created as the same database user.
For more information about global application contexts, see "Using Global
Application Contexts" on page 6-22.
■Web-based applications. Web-based applications typically have hundreds of
users. Even when there are persistent connections to the database, supporting data
See Also: Oracle Database Utilities for more information about using
Data Pump Export.
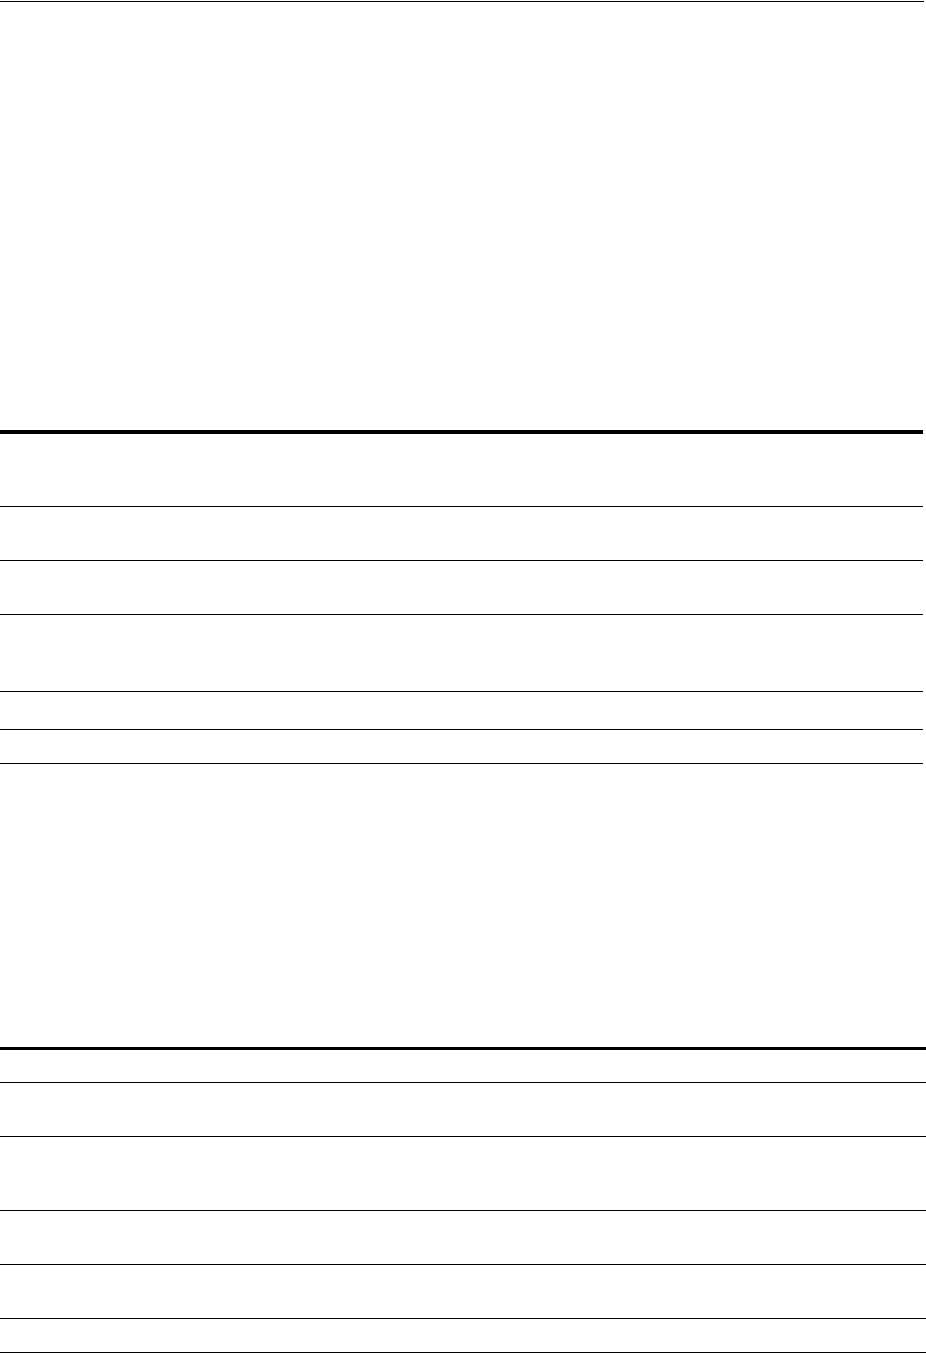
Finding Information About Oracle Virtual Private Database Policies
Using Oracle Virtual Private Database to Control Data Access 7-39
retrieval for many user requests, these connections are not specific to particular
Web-based users. Instead, Web-based applications typically set up and reuse
connections, to provide scalability, rather than having different sessions for each
user. For example, when Web users Jane and Ajit connect to a middle tier
application, it may establish a single database session that it uses on behalf of both
users. Typically, neither Jane nor Ajit is known to the database. The application is
responsible for switching the user name on the connection, so that, at any given
time, it is either Jane or Ajit using the session.
Oracle Virtual Private Database helps with connection pooling by allowing
multiple connections to access more than one global application context. This
ability makes it unnecessary to establish a separate application context for each
distinct user session.
Table 7–3 summarizes how Oracle Virtual Private Database applies to user models.
Finding Information About Oracle Virtual Private Database Policies
Table 7–4 lists data dictionary views that you can use to find information about Oracle
Virtual Private Database policies. See Oracle Database Reference for more information
about these views.
Table 7–3 Oracle Virtual Private Database in Different User Models
User Model Scenario
Individual
Database
Connection
Separate
Application Context
per User
Single
Database
Connection
Application Must
Switch User Name
Application users are also
database users Yes Yes No No
Proxy authentication using OCI
or JDBC/OCI Yes Yes No No
Proxy authentication
integrated with Enterprise User
Security1
1User roles and other attributes, including globally initialized application context, can be retrieved from Oracle Internet
Directory to enforce Oracle Virtual Private Database.
No No Yes Yes
One Big Application User No No2
2Application developers can create a global application context attribute representing individual application users (for example,
REALUSER)
, which can then be used for controlling each session attributes, or for auditing.
No Yes2
Web-based applications No No Yes Yes
Table 7–4 Data Dictionary Views That Display Information about VPD Policies
View Description
ALL_POLICIES
Describes all Oracle Virtual Private Database security policies for objects
accessible to the current user.
ALL_POLICY_CONTEXTS
Describes the driving contexts defined for the synonyms, tables, and views
accessible to the current user. A driving context is an application context used in
an Oracle Virtual Private Database policy.
ALL_POLICY_GROUPS
Describes the Oracle Virtual Private Database policy groups defined for the
synonyms, tables, and views accessible to the current user
ALL_SEC_RELEVANT_COLS
Describes the security relevant columns of the security policies for the tables
and views accessible to the current user
DBA_POLICIES
Describes all Oracle Virtual Private Database security policies in the database.

Finding Information About Oracle Virtual Private Database Policies
7-40 Oracle Database Security Guide
DBA_POLICY_GROUPS
Describes all policy groups in the database.
DBA_POLICY_CONTEXTS
Describes all driving contexts in the database. Its columns are the same as those
in
ALL_POLICY_CONTEXTS
.
DBA_SEC_RELEVANT_COLS
Describes the security relevant columns of all security policies in the database
USER_POLICIES
Describes all Oracle Virtual Private Database security policies associated with
objects owned by the current user. This view does not display the
OBJECT_OWNER
column.
USER_POLICY_CONTEXTS
Describes the driving contexts defined for the synonyms, tables, and views
owned by the current user. Its columns (except for
OBJECT_OWNER
) are the same
as those in
ALL_POLICY_CONTEXTS
.
USER_SEC_RELEVANT_COLS
Describes the security relevant columns of the security policies for the tables
and views owned by the current user. Its columns (except for
OBJECT_OWNER
) are
the same as those in
ALL_SEC_RELEVANT_COLS
.
USER_POLICY_GROUPS
Describes the policy groups defined for the synonyms, tables, and views owned
by the current user. This view does not display the
OBJECT_OWNER
column.
V$VPD_POLICY
Displays all the fine-grained security policies and predicates associated with the
cursors currently in the library cache. This view is useful for finding the policies
that were applied to a SQL statement.
Tip: In addition to these views, check the database trace file if you
find errors in application that use Virtual Private Database policies.
See Oracle Database Performance Tuning Guide for more information
about trace files. The
USER_DUMP_DEST
initialization parameter
specifies the current location of the trace files. You can find the value
of this parameter by issuing
SHOW PARAMETER USER_DUMP_DEST
in
SQL*Plus.
Table 7–4 (Cont.) Data Dictionary Views That Display Information about VPD Policies
View Description

8
Developing Applications Using the Data Encryption API 8-1
8
Developing Applications Using
the Data Encryption API
This chapter contains:
■Security Problems That Encryption Does Not Solve
■Data Encryption Challenges
■Storing Data Encryption by Using the DBMS_CRYPTO Package
■Examples of Using the Data Encryption API
■Finding Information About Encrypted Data
Security Problems That Encryption Does Not Solve
While there are many good reasons to encrypt data, there are many reasons not to
encrypt data. Encryption does not solve all security problems, and may make some
problems worse. The following sections describe some misconceptions about
encryption of stored data:
■Principle 1: Encryption Does Not Solve Access Control Problems
■Principle 2: Encryption Does Not Protect Against a Malicious Database
Administrator
■Principle 3: Encrypting Everything Does Not Make Data Secure
Principle 1: Encryption Does Not Solve Access Control Problems
Most organizations need to limit data access to users who need to see this data. For
example, a human resources system may limit employees to viewing only their own
employment records, while allowing managers of employees to see the employment
records of subordinates. Human resource specialists may also need to see employee
records for multiple employees.
Typically, you can use access control mechanisms to address security policies that limit
data access to those with a need to see it. Oracle Database has provided strong,
See Also:
■ Oracle Database 2 Day + Security Guide for an introduction to
network encryption
■Oracle Database Advanced Security Administrator's Guide for
information about using transparent data encryption and
tablespace encryption

Security Problems That Encryption Does Not Solve
8-2 Oracle Database Security Guide
independently evaluated access control mechanisms for many years. It enables access
control enforcement to a fine level of granularity through Virtual Private Database.
Because human resource records are considered sensitive information, it is tempting to
think that all information should be encrypted for better security. However, encryption
cannot enforce granular access control, and it may hinder data access. For example, an
employee, his manager, and a human resources clerk may all need to access an
employee record. If all employee data is encrypted, then all three must be able to
access the data in unencrypted form. Therefore, the employee, the manager and the
human resources clerk would have to share the same encryption key to decrypt the
data. Encryption would, therefore, not provide any additional security in the sense of
better access control, and the encryption might hinder the proper or efficient
functioning of the application. An additional issue is that it is difficult to securely
transmit and share encryption keys among multiple users of a system.
A basic principle behind encrypting stored data is that it must not interfere with access
control. For example, a user who has the
SELECT
privilege on
emp
should not be limited
by the encryption mechanism from seeing all the data he is otherwise allowed to see.
Similarly, there is little benefit to encrypting part of a table with one key and part of a
table with another key if users need to see all encrypted data in the table. In this case,
encryption adds to the overhead of decrypting the data before users can read it. If
access controls are implemented well, then encryption adds little additional security
within the database itself. A user who has privileges to access data within the database
has no more nor any less privileges as a result of encryption. Therefore, you should
never use encryption to solve access control problems.
Principle 2: Encryption Does Not Protect Against a Malicious Database Administrator
Some organizations, concerned that a malicious user might gain elevated (database
administrator) privileges by guessing a password, like the idea of encrypting stored
data to protect against this threat. However, the correct solution to this problem is to
protect the database administrator account, and to change default passwords for other
privileged accounts. The easiest way to break into a database is by using a default
password for a privileged account that an administrator allowed to remain
unchanged. One example is
SYS
/
CHANGE_ON_INSTALL
.
While there are many destructive things a malicious user can do to a database after
gaining the
DBA
privilege, encryption will not protect against many of them. Examples
include corrupting or deleting data, exporting user data to the file system to email the
data back to himself to run a password cracker on it, and so on.
Some organizations are concerned that database administrators, typically having all
privileges, are able to see all data in the database. These organizations feel that the
database administrators should administer the database, but should not be able to see
the data that the database contains. Some organizations are also concerned about
concentrating so much privilege in one person, and would prefer to partition the DBA
function, or enforce two-person access rules.
It is tempting to think that encrypting all data (or significant amounts of data) will
solve these problems, but there are better ways to protect against these threats. For
example, Oracle Database supports limited partitioning of
DBA
privileges. Oracle
Database provides native support for
SYSDBA
and
SYSOPER
users.
SYSDBA
has all
privileges, but
SYSOPER
has a limited privilege set (such as startup and shutdown of
the database).
Furthermore, you can create smaller roles encompassing several system privileges. A
jr_dba
role might not include all system privileges, but only those appropriate to a
junior database administrator (such as
CREATE TABLE
,
CREATE USER
, and so on).

Security Problems That Encryption Does Not Solve
Developing Applications Using the Data Encryption API 8-3
Oracle Database also enables auditing the actions taken by
SYS
(or
SYS
-privileged
users) and storing that audit trail in a secure operating system location. Using this
model, a separate auditor who has root privileges on the operating system can audit
all actions by
SYS
, enabling the auditor to hold all database administrators accountable
for their actions.
See "Auditing SYS Administrative Users" on page 9-53 for information about ways to
audit database administrators.
You can also fine-tune the access and control that database administrators have by
using Oracle Database Vault. See Oracle Database Vault Administrator's Guide for more
information.
The database administrator function is a trusted position. Even organizations with the
most sensitive data, such as intelligence agencies, do not typically partition the
database administrator function. Instead, they manage their database administrators
strongly, because it is a position of trust. Periodic auditing can help to uncover
inappropriate activities.
Encryption of stored data must not interfere with the administration of the database,
because otherwise, larger security issues can result. For example, if by encrypting data
you corrupt the data, then you create a security problem, the data itself cannot be
interpreted, and it may not be recoverable.
You can use encryption to limit the ability of a database administrator or other
privileged user to see data in the database. However, it is not a substitute for
managing the database administrator privileges properly, or for controlling the use of
powerful system privileges. If untrustworthy users have significant privileges, then
they can pose multiple threats to an organization, some of them far more significant
than viewing unencrypted credit card numbers.
Principle 3: Encrypting Everything Does Not Make Data Secure
A common error is to think that if encrypting some data strengthens security, then
encrypting everything makes all data secure.
As the discussion of the previous two principles illustrates, encryption does not
address access control issues well, and it is important that encryption not interfere
with normal access controls. Furthermore, encrypting an entire production database
means that all data must be decrypted to be read, updated, or deleted. Encryption is
inherently a performance-intensive operation; encrypting all data will significantly
affect performance.
Availability is a key aspect of security. If encrypting data makes data unavailable, or
adversely affects availability by reducing performance, then encrypting everything
will create a new security problem. Availability is also adversely affected by the
database being inaccessible when encryption keys are changed, as good security
practices require on a regular basis. When the keys are to be changed, the database is
inaccessible while data is decrypted and reencrypted with a new key or keys.
There may be advantages to encrypting data stored off-line. For example, an
organization may store backups for a period of 6 months to a year off-line, in a remote
location. Of course, the first line of protection is to secure the facility storing the data,
by establishing physical access controls. Encrypting this data before it is stored may
provide additional benefits. Because it is not being accessed on-line, performance need
not be a consideration. While an Oracle database does not provide this capability, there
are vendors who provide encryption services. Before embarking on large-scale
encryption of backup data, organizations considering this approach should thoroughly

Data Encryption Challenges
8-4 Oracle Database Security Guide
test the process. It is essential to verify that data encrypted before off-line storage can
be decrypted and re-imported successfully.
Data Encryption Challenges
In cases where encryption can provide additional security, there are some associated
technical challenges, as described in the following sections:
■Encrypting Indexed Data
■Generating Encryption Keys
■Transmitting Encryption Keys
■Storing Encryption Keys
■Changing Encryption Keys
■Encrypting Binary Large Objects
Encrypting Indexed Data
Special difficulties arise when encrypted data is indexed. For example, suppose a
company uses a national identity number, such as the U.S. Social Security number
(SSN), as the employee number for its employees. The company considers employee
numbers to be sensitive data, and, therefore, wants to encrypt data in the
employee_
number
column of the
employees
table. Because
employee_number
contains unique
values, the database designers want to have an index on it for better performance.
However, if
DBMS_CRYPTO
or the
DBMS_OBFUSCATION_TOOLKIT
(or another mechanism) is
used to encrypt data in a column, then an index on that column will also contain
encrypted values. Although an index can be used for equality checking (for example,
SELECT * FROM emp WHERE employee_number = '987654321'
), if the index on that
column contains encrypted values, then the index is essentially unusable for any other
purpose. You should not encrypt indexed data.
Oracle recommends that you do not use national identity numbers as unique IDs.
Instead, use the
CREATE SEQUENCE
statement to generate unique identity numbers.
Reasons to avoid using national identity numbers are as follows:
■There are privacy issues associated with overuse of national identity numbers (for
example, identity theft).
■Sometimes national identity numbers can have duplicates, as with U.S. Social
Security numbers.
Generating Encryption Keys
Encrypted data is only as secure as the key used for encrypting it. An encryption key
must be securely generated using secure cryptographic key generation. Oracle
Database provides support for secure random number generation, with the
RANDOMBYTES
function of
DBMS_CRYPTO
. (This function replaces the capabilities
provided by the
GetKey
procedure of the earlier
DBMS_OBFUSCATION_TOOLKIT
.)
DBMS_
CRYPTO
calls the secure random number generator (RNG) previously certified by RSA
Security.

Data Encryption Challenges
Developing Applications Using the Data Encryption API 8-5
Be sure to provide the correct number of bytes when you encrypt a key value. For
example, you must provide a 16-byte key for the
ENCRYPT_AES128
encryption
algorithm.
Transmitting Encryption Keys
If the encryption key is to be passed by the application to the database, then you must
encrypt it. Otherwise, an intruder could get access to the key as it is being transmitted.
Network encryption, such as that provided by Oracle Advanced Security, protects all
data in transit from modification or interception, including cryptographic keys.
Storing Encryption Keys
Storing encryption keys is one of the most important, yet difficult, aspects of
encryption. To recover data encrypted with a symmetric key, the key must be
accessible to an authorized application or user seeking to decrypt the data. At the
same time, the key must be inaccessible to someone who is maliciously trying to access
encrypted data that he is not supposed to see.
The options available to a developer are:
■Storing the Encryption Keys in the Database
■Storing the Encryption Keys in the Operating System
■Users Managing Their Own Encryption Keys
■Using Transparent Database Encryption and Tablespace Encryption
Storing the Encryption Keys in the Database
Storing the keys in the database cannot always provide infallible security if you are
trying to protect against the database administrator accessing encrypted data. An
all-privileged database administrator could still access tables containing encryption
keys. However, it can often provide good security against the casual curious user or
against someone compromising the database file on the operating system.
As a trivial example, suppose you create a table (
EMP
) that contains employee data. You
want to encrypt the employee Social Security number (SSN) stored in one of the
columns. You could encrypt employee SSN using a key that is stored in a separate
column. However, anyone with
SELECT
access on the entire table could retrieve the
encryption key and decrypt the matching SSN.
While this encryption scheme seems easily defeated, with a little more effort you can
create a solution that is much harder to break. For example, you could encrypt the SSN
using a technique that performs some additional data transformation on the
employee_number
before using it to encrypt the SSN. This technique might be as simple
as using an
XOR
operation on the
employee_number
and the birth date of the employee
to determine the validity of the values.
As additional protection, PL/SQL source code performing encryption can be wrapped,
(using the
WRAP
utility) which obfuscates (scrambles) the code. The
WRAP
utility
Note: Do not use the
DBMS_RANDOM
package. The
DBMS_RANDOM
package generates pseudo-random numbers, which, as Randomness
Recommendations for Security (RFC-1750) states that using
pseudo-random processes to generate secret quantities can result in
pseudo-security.

Data Encryption Challenges
8-6 Oracle Database Security Guide
processes an input SQL file and obfuscates the PL/SQL units in it. For example, the
following command uses the
keymanage.sql
file as the input:
wrap iname=/mydir/keymanage.sql
A developer can subsequently have a function in the package call the
DBMS_
OBFUSCATION_TOOLKIT
with the key contained in the wrapped package.
Oracle Database enables you to obfuscate dynamically generated PL/SQL code. The
DBMS_DDL
package contains two subprograms that allow you to obfuscate dynamically
generated PL/SQL program units. For example, the following block uses the
DBMS_
DDL.CREATE_WRAPPED
procedure to wrap dynamically generated PL/SQL code.
BEGIN
......
SYS.DBMS_DDL.CREATE_WRAPPED(function_returning_PLSQL_code());
......
END;
While wrapping is not unbreakable, it makes it harder for an intruder to get access to
the encryption key. Even in cases where a different key is supplied for each encrypted
data value, you should not embed the key value within a package. Instead, wrap the
package that performs the key management (that is, data transformation or padding).
An alternative to wrapping the data is to have a separate table in which to store the
encryption key and to envelope the call to the keys table with a procedure. The key
table can be joined to the data table using a primary key to foreign key relationship.
For example,
employee_number
is the primary key in the
employees
table that stores
employee information and the encrypted SSN. The
employee_number
column is a
foreign key to the
ssn_keys
table that stores the encryption keys for the employee SSN.
The key stored in the
ssn_keys
table can also be transformed before use (by using an
XOR
operation), so the key itself is not stored unencrypted. If you wrap the procedure,
then that can hide the way in which the keys are transformed before use.
The strengths of this approach are:
■Users who have direct table access cannot see the sensitive data unencrypted, nor
can they retrieve the keys to decrypt the data.
■Access to decrypted data can be controlled through a procedure that selects the
encrypted data, retrieves the decryption key from the key table, and transforms it
before it can be used to decrypt the data.
■The data transformation algorithm is hidden from casual snooping by wrapping
the procedure, which obfuscates the procedure code.
■
SELECT
access to both the data table and the keys table does not guarantee that the
user with this access can decrypt the data, because the key is transformed before
use.
The weakness to this approach is that a user who has
SELECT
access to both the key
table and the data table, and who can derive the key transformation algorithm, can
break the encryption scheme.
The preceding approach is not infallible, but it is adequate to protect against easy
retrieval of sensitive information stored in clear text.
See Also: Oracle Database PL/SQL Language Reference for additional
information about the
WRAP
command line utility and the
DBMS_DDL
subprograms for dynamic wrapping

Data Encryption Challenges
Developing Applications Using the Data Encryption API 8-7
Storing the Encryption Keys in the Operating System
Storing keys in a flat file in the operating system is another option. Oracle Database
enables you to make callouts from PL/SQL, which you could use to retrieve
encryption keys. However, if you store keys in the operating system and make callouts
to it, then your data is only as secure as the protection on the operating system. If your
primary security concern is that the database can be broken into from the operating
system, then storing the keys in the operating system makes it easier for an intruder to
retrieve encrypted data than storing the keys in the database itself.
Users Managing Their Own Encryption Keys
Having the user supply the key assumes the user will be responsible with the key.
Considering that 40 percent of help desk calls are from users who have forgotten their
passwords, you can see the risks of having users manage encryption keys. In all
likelihood, users will either forget an encryption key, or write the key down, which
then creates a security weakness. If a user forgets an encryption key or leaves the
company, then your data is not recoverable.
If you do decide to have user-supplied or user-managed keys, then you need to ensure
you are using network encryption so that the key is not passed from the client to the
server in the clear. You also must develop key archive mechanisms, which is also a
difficult security problem. Key archives and backdoors create the security weaknesses
that encryption is attempting to solve.
Using Transparent Database Encryption and Tablespace Encryption
Transparent database encryption and tablespace encryption provide secure encryption
with automatic key management for the encrypted tables and tablespaces. If the
application requires protection of sensitive column data stored on the media, then
these two types of encryption are a simple and fast way of achieving this.
Changing Encryption Keys
Prudent security practice dictates that you periodically change encryption keys. For
stored data, this requires periodically unencrypting the data, and reencrypting it with
another well-chosen key. You would most likely change the encryption key while the
data is not being accessed, which creates another challenge. This is especially true for a
Web-based application encrypting credit card numbers, because you do not want to
shut down the entire application while you switch encryption keys.
Encrypting Binary Large Objects
Certain data types require more work to encrypt. For example, Oracle Database
supports storage of binary large objects (BLOBs), which stores very large objects (for
example, multiple gigabytes) in the database. A BLOB can be either stored internally
as a column, or stored in an external file.
For an example of using
DBMS_CRYPTO
on BLOB data, see "Example of Encryption and
Decryption Procedures for BLOB Data" on page 8-12.
See Also: Oracle Database Advanced Security Administrator's Guide for
more information about transparent data encryption

Storing Data Encryption by Using the DBMS_CRYPTO Package
8-8 Oracle Database Security Guide
Storing Data Encryption by Using the DBMS_CRYPTO Package
The
DBMS_CRYPTO
package provides several ways to address the security issues that
were discussed. (For backward compatibility,
DBMS_OBFUSCATION_TOOLKIT
is also
provided.)
While encryption is not the ideal solution for addressing several security threats, it is
clear that selectively encrypting sensitive data before storage in the database does
improve security. Examples of such data could include:
■Credit card numbers
■National identity numbers
Oracle Database provides the PL/SQL package
DBMS_CRYPTO
to encrypt and decrypt
stored data. This package supports several industry-standard encryption and hashing
algorithms, including the Advanced Encryption Standard (AES) encryption algorithm.
AES was approved by the National Institute of Standards and Technology (NIST) to
replace the Data Encryption Standard (DES).
The
DBMS_CRYPTO
package enables encryption and decryption for common Oracle
Database data types, including
RAW
and large objects (LOBs), such as images and
sound. Specifically, it supports BLOBs and CLOBs. In addition, it provides
Globalization Support for encrypting data across different database character sets.
The following cryptographic algorithms are supported:
■Data Encryption Standard (DES), Triple DES (3DES, 2-key)
■Advanced Encryption Standard (AES)
■SHA-1 Cryptographic Hash
■SHA-1 Message Authentication Code (MAC)
Block cipher modifiers are also provided with
DBMS_CRYPTO
. You can choose from
several padding options, including Public Key Cryptographic Standard (PKCS) #5,
and from four block cipher chaining modes, including Cipher Block Chaining (CBC).
Padding must be done in multiples of eight bytes.
Table 8–1 compares the
DBMS_CRYPTO
package features to the other PL/SQL encryption
package, the
DBMS_OBFUSCATION_TOOLKIT
.
Note:
■DES is no longer recommended by the National Institute of
Standards and Technology (NIST).
■Usage of SHA-1 is more secure than MD5.
■Keyed MD5 is not vulnerable.
Table 8–1 DBMS_CRYPTO and DBMS_OBFUSCATION_TOOLKIT Feature Comparison
Package Feature DBMS_CRYPTO DBMS_OBFUSCATION_TOOLKIT
Cryptographic algorithms DES, 3DES, AES, RC4, 3DES_2KEY DES, 3DES
Padding forms PKCS5, zeroes None supported
Block cipher chaining modes CBC, CFB, ECB, OFB CBC
Cryptographic hash algorithms SHA-1, MD4, MD5 MD5

Storing Data Encryption by Using the DBMS_CRYPTO Package
Developing Applications Using the Data Encryption API 8-9
DBMS_CRYPTO
is intended to replace the
OBFUSCATION_TOOLKIT
package, because it is
easier to use and supports a range of algorithms that accommodate both new and
existing systems. Although 3DES_2KEY and MD4 are provided for backward
compatibility, you achieve better security using 3DES, AES, or SHA-1. Therefore,
3DES_2KEY is not recommended.
The
DBMS_CRYPTO
package includes cryptographic checksum capabilities (MD5), which
are useful for comparisons, and the ability to generate a secure random number (the
RANDOMBYTES
function). Secure random number generation is an important part of
cryptography; predictable keys are easily guessed keys; and easily guessed keys may
lead to easy decryption of data. Most cryptanalysis is done by finding weak keys or
poorly stored keys, rather than through brute force analysis (cycling through all
possible keys).
Key management is programmatic. That is, the application (or caller of the function)
must supply the encryption key. This means that the application developer must find a
way of storing and retrieving keys securely. The relative strengths and weaknesses of
various key management techniques are discussed in the sections that follow. The
DBMS_OBFUSCATION_TOOLKIT
package, which can handle both string and raw data,
requires the submission of a 64-bit key. The DES algorithm itself has an effective key
length of 56-bits.
Keyed hash (MAC) algorithms HMAC_MD5, HMAC_SH1 None supported
Cryptographic pseudo-random number
generator
RAW
,
NUMBER
,
BINARY_INTEGER RAW
,
VARCHAR2
Database types
RAW
,
CLOB
,
BLOB RAW
,
VARCHAR2
Note: Do not use
DBMS_RANDOM
, because it is unsuitable for
cryptographic key generation.
Note: The
DBMS_OBFUSCATION_TOOLKIT
is granted to
PUBLIC
by
default. Oracle recommends that you revoke this grant.
While the
DBMS_OBFUSCATION_TOOLKIT
package can take either
VARCHAR2
or
RAW
data types, it is preferable to use the
RAW
data type
for keys and encrypted data. Storing encrypted data as
VARCHAR2
can cause problems if it passes through Globalization Support
routines. For example, when transferring a database to another
database that uses another character set.
To convert between
VARCHAR2
and
RAW
data types, use the
CAST_TO_
RAW
and
CAST_TO_VARCHAR2
functions of the
UTL_RAW
package.
Table 8–1 (Cont.) DBMS_CRYPTO and DBMS_OBFUSCATION_TOOLKIT Feature Comparison
Package Feature DBMS_CRYPTO DBMS_OBFUSCATION_TOOLKIT

Examples of Using the Data Encryption API
8-10 Oracle Database Security Guide
Examples of Using the Data Encryption API
This section contains:
■Example of a Data Encryption Procedure
■Example of AES 256-Bit Data Encryption and Decryption Procedures
■Example of Encryption and Decryption Procedures for BLOB Data
Example of a Data Encryption Procedure
The following sample PL/SQL program (
dbms_crypto.sql
) shows how to encrypt
data. This example code performs the following actions:
■Encrypts a string (
VARCHAR2
type) using DES after first converting it into the
RAW
data type.
This step is necessary because encrypt and decrypt functions and procedures in
DBMS_CRYPTO
package work on the
RAW
data type only, unlike functions and
packages in the
DBMS_OBFUSCATION_TOOLKIT
package.
■Shows how to create a 160-bit hash using SHA-1 algorithm.
■Demonstrates how MAC, a key-dependent one-way hash, can be computed using
the MD5 algorithm.
The
dbms_crypto.sql
procedure follows:
DECLARE
input_string VARCHAR2(16) := 'tigertigertigert';
raw_input RAW(128) :=
UTL_RAW.CAST_TO_RAW(CONVERT(input_string,'AL32UTF8','US7ASCII'));
key_string VARCHAR2(8) := 'scottsco';
raw_key RAW(128) :=
UTL_RAW.CAST_TO_RAW(CONVERT(key_string,'AL32UTF8','US7ASCII'));
encrypted_raw RAW(2048);
encrypted_string VARCHAR2(2048);
decrypted_raw RAW(2048);
decrypted_string VARCHAR2(2048);
-- Begin testing Encryption:
BEGIN
dbms_output.put_line('> Input String : ' ||
CONVERT(UTL_RAW.CAST_TO_VARCHAR2(raw_input),'US7ASCII','AL32UTF8'));
dbms_output.put_line('> ========= BEGIN TEST Encrypt =========');
encrypted_raw := dbms_crypto.Encrypt(
src => raw_input,
typ => DBMS_CRYPTO.DES_CBC_PKCS5,
key => raw_key);
dbms_output.put_line('> Encrypted hex value : ' ||
rawtohex(UTL_RAW.CAST_TO_RAW(encrypted_raw)));
decrypted_raw := dbms_crypto.Decrypt(
See Also:
■Oracle Database PL/SQL Packages and Types Reference for detailed
information about the
DBMS_CRYPTO
package
■Oracle Database PL/SQL Packages and Types Reference for detailed
information about the
OBFUSCATION_TOOLKIT
package
■Oracle Database PL/SQL Packages and Types Reference for detailed
information about the
UTL_RAW
package

Examples of Using the Data Encryption API
Developing Applications Using the Data Encryption API 8-11
src => encrypted_raw,
typ => DBMS_CRYPTO.DES_CBC_PKCS5,
key => raw_key);
decrypted_string :=
CONVERT(UTL_RAW.CAST_TO_VARCHAR2(decrypted_raw),'US7ASCII','AL32UTF8');
dbms_output.put_line('> Decrypted string output : ' ||
decrypted_string);
if input_string = decrypted_string THEN
dbms_output.put_line('> String DES Encyption and Decryption successful');
END if;
dbms_output.put_line('');
dbms_output.put_line('> ========= BEGIN TEST Hash =========');
encrypted_raw := dbms_crypto.Hash(
src => raw_input,
typ => DBMS_CRYPTO.HASH_SH1);
dbms_output.put_line('> Hash value of input string : ' ||
rawtohex(UTL_RAW.CAST_TO_RAW(encrypted_raw)));
dbms_output.put_line('> ========= BEGIN TEST Mac =========');
encrypted_raw := dbms_crypto.Mac(
src => raw_input,
typ => DBMS_CRYPTO.HMAC_MD5,
key => raw_key);
dbms_output.put_line('> Message Authentication Code : ' ||
rawtohex(UTL_RAW.CAST_TO_RAW(encrypted_raw)));
dbms_output.put_line('');
dbms_output.put_line('> End of DBMS_CRYPTO tests ');
END;
/
Example of AES 256-Bit Data Encryption and Decryption Procedures
The following PL/SQL block shows how to encrypt and decrypt a predefined variable
named
input_string
using the AES 256-bit algorithm with Cipher Block Chaining
and PKCS #5 padding.
declare
input_string VARCHAR2 (200) := 'Secret Message';
output_string VARCHAR2 (200);
encrypted_raw RAW (2000); -- stores encrypted binary text
decrypted_raw RAW (2000); -- stores decrypted binary text
num_key_bytes NUMBER := 256/8; -- key length 256 bits (32 bytes)
key_bytes_raw RAW (32); -- stores 256-bit encryption key
encryption_type PLS_INTEGER := -- total encryption type
DBMS_CRYPTO.ENCRYPT_AES256
+ DBMS_CRYPTO.CHAIN_CBC
+ DBMS_CRYPTO.PAD_PKCS5;
begin
DBMS_OUTPUT.PUT_LINE ('Original string: ' || input_string);
key_bytes_raw := DBMS_CRYPTO.RANDOMBYTES (num_key_bytes);
encrypted_raw := DBMS_CRYPTO.ENCRYPT
(
src => UTL_I18N.STRING_TO_RAW (input_string, 'AL32UTF8'),
typ => encryption_type,
key => key_bytes_raw
);
-- The encrypted value in the encrypted_raw variable can be used here:
decrypted_raw := DBMS_CRYPTO.DECRYPT
(
src => encrypted_raw,
typ => encryption_type,

Examples of Using the Data Encryption API
8-12 Oracle Database Security Guide
key => key_bytes_raw
);
output_string := UTL_I18N.RAW_TO_CHAR (decrypted_raw, 'AL32UTF8');
DBMS_OUTPUT.PUT_LINE ('Decrypted string: ' || output_string);
end;
Example of Encryption and Decryption Procedures for BLOB Data
The following sample PL/SQL program (
blob_test.sql
) shows how to encrypt and
decrypt BLOB data. This example code does the following, and prints out its progress
(or problems) at each step:
■Creates a table for the BLOB column
■Inserts the raw values into that table
■Encrypts the raw data
■Decrypts the encrypted data
The
blob_test.sql
procedure follows:
-- 1. Create a table for BLOB column:
create table table_lob (id number, loc blob);
-- 2. Insert 3 empty lobs for src/enc/dec:
insert into table_lob values (1, EMPTY_BLOB());
insert into table_lob values (2, EMPTY_BLOB());
insert into table_lob values (3, EMPTY_BLOB());
set echo on
set serveroutput on
declare
srcdata RAW(1000);
srcblob BLOB;
encrypblob BLOB;
encrypraw RAW(1000);
encrawlen BINARY_INTEGER;
decrypblob BLOB;
decrypraw RAW(1000);
decrawlen BINARY_INTEGER;
leng INTEGER;
begin
-- RAW input data 16 bytes
srcdata := hextoraw('6D6D6D6D6D6D6D6D6D6D6D6D6D6D6D6D');
dbms_output.put_line('---');
dbms_output.put_line('input is ' || srcdata);
dbms_output.put_line('---');
-- select empty lob locators for src/enc/dec
select loc into srcblob from table_lob where id = 1;
select loc into encrypblob from table_lob where id = 2;
select loc into decrypblob from table_lob where id = 3;
dbms_output.put_line('Created Empty LOBS');
dbms_output.put_line('---');

Examples of Using the Data Encryption API
Developing Applications Using the Data Encryption API 8-13
leng := DBMS_LOB.GETLENGTH(srcblob);
IF leng IS NULL THEN
dbms_output.put_line('Source BLOB Len NULL ');
ELSE
dbms_output.put_line('Source BLOB Len ' || leng);
END IF;
leng := DBMS_LOB.GETLENGTH(encrypblob);
IF leng IS NULL THEN
dbms_output.put_line('Encrypt BLOB Len NULL ');
ELSE
dbms_output.put_line('Encrypt BLOB Len ' || leng);
END IF;
leng := DBMS_LOB.GETLENGTH(decrypblob);
IF leng IS NULL THEN
dbms_output.put_line('Decrypt BLOB Len NULL ');
ELSE
dbms_output.put_line('Decrypt BLOB Len ' || leng);
END IF;
-- 3. Write source raw data into blob:
DBMS_LOB.OPEN (srcblob, DBMS_LOB.lob_readwrite);
DBMS_LOB.WRITEAPPEND (srcblob, 16, srcdata);
DBMS_LOB.CLOSE (srcblob);
dbms_output.put_line('Source raw data written to source blob');
dbms_output.put_line('---');
leng := DBMS_LOB.GETLENGTH(srcblob);
IF leng IS NULL THEN
dbms_output.put_line('source BLOB Len NULL ');
ELSE
dbms_output.put_line('Source BLOB Len ' || leng);
END IF;
/*
* Procedure Encrypt
* Arguments: srcblob -> Source BLOB
* encrypblob -> Output BLOB for encrypted data
* DBMS_CRYPTO.AES_CBC_PKCS5 -> Algo : AES
* Chaining : CBC
* Padding : PKCS5
* 256 bit key for AES passed as RAW
* ->
hextoraw('000102030405060708090A0B0C0D0E0F101112131415161718191A1B1C1D1E1F')
* IV (Initialization Vector) for AES algo passed as RAW
* -> hextoraw('00000000000000000000000000000000')
*/
DBMS_CRYPTO.Encrypt(encrypblob,
srcblob,
DBMS_CRYPTO.AES_CBC_PKCS5,
hextoraw
('000102030405060708090A0B0C0D0E0F101112131415161718191A1B1C1D1E1F'),
hextoraw('00000000000000000000000000000000'));
dbms_output.put_line('Encryption Done');
dbms_output.put_line('---');

Examples of Using the Data Encryption API
8-14 Oracle Database Security Guide
leng := DBMS_LOB.GETLENGTH(encrypblob);
IF leng IS NULL THEN
dbms_output.put_line('Encrypt BLOB Len NULL');
ELSE
dbms_output.put_line('Encrypt BLOB Len ' || leng);
END IF;
-- 4. Read encrypblob to a raw:
encrawlen := 999;
DBMS_LOB.OPEN (encrypblob, DBMS_LOB.lob_readwrite);
DBMS_LOB.READ (encrypblob, encrawlen, 1, encrypraw);
DBMS_LOB.CLOSE (encrypblob);
dbms_output.put_line('Read encrypt blob to a raw');
dbms_output.put_line('---');
dbms_output.put_line('Encrypted data is (256 bit key) ' || encrypraw);
dbms_output.put_line('---');
/*
* Procedure Decrypt
* Arguments: encrypblob -> Encrypted BLOB to decrypt
* decrypblob -> Output BLOB for decrypted data in RAW
* DBMS_CRYPTO.AES_CBC_PKCS5 -> Algo : AES
* Chaining : CBC
* Padding : PKCS5
* 256 bit key for AES passed as RAW (same as used during Encrypt)
* ->
hextoraw('000102030405060708090A0B0C0D0E0F101112131415161718191A1B1C1D1E1F')
* IV (Initialization Vector) for AES algo passed as RAW (same as
used during Encrypt)
* -> hextoraw('00000000000000000000000000000000')
*/
DBMS_CRYPTO.Decrypt(decrypblob,
encrypblob,
DBMS_CRYPTO.AES_CBC_PKCS5,
hextoraw
('000102030405060708090A0B0C0D0E0F101112131415161718191A1B1C1D1E1F'),
hextoraw('00000000000000000000000000000000'));
leng := DBMS_LOB.GETLENGTH(decrypblob);
IF leng IS NULL THEN
dbms_output.put_line('Decrypt BLOB Len NULL');
ELSE
dbms_output.put_line('Decrypt BLOB Len ' || leng);
END IF;
-- Read decrypblob to a raw
decrawlen := 999;
DBMS_LOB.OPEN (decrypblob, DBMS_LOB.lob_readwrite);
DBMS_LOB.READ (decrypblob, decrawlen, 1, decrypraw);
DBMS_LOB.CLOSE (decrypblob);
dbms_output.put_line('Decrypted data is (256 bit key) ' || decrypraw);
dbms_output.put_line('---');
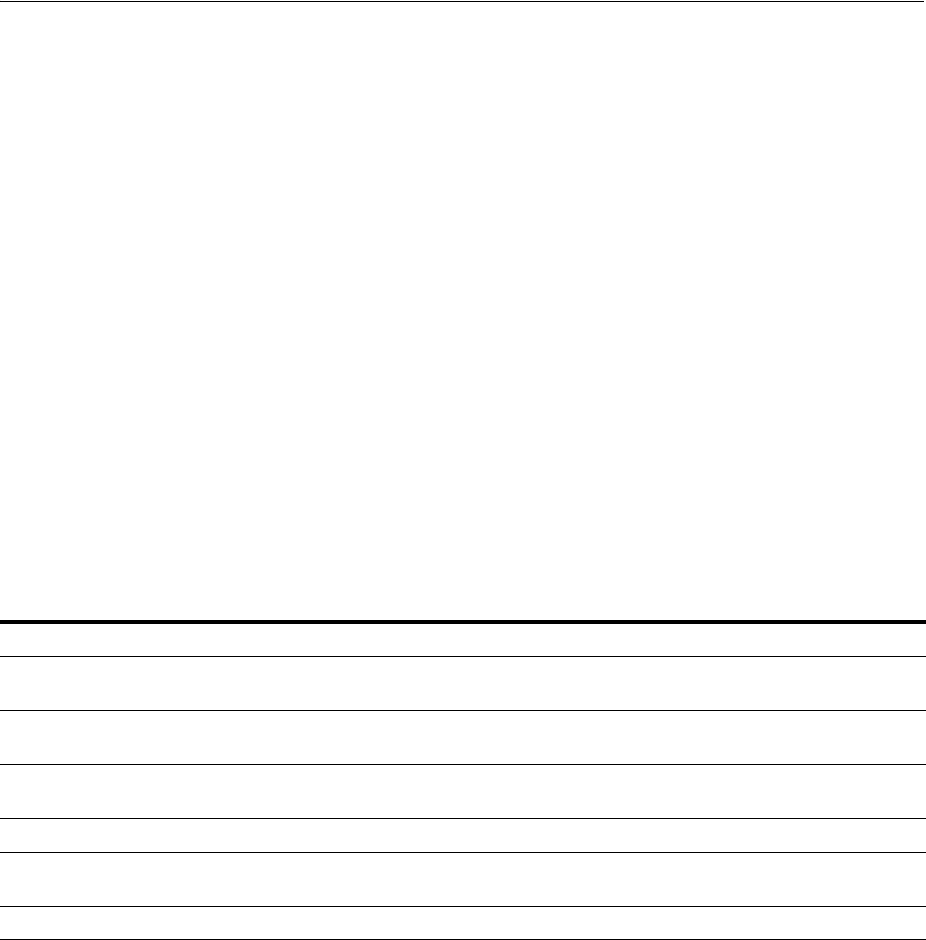
Finding Information About Encrypted Data
Developing Applications Using the Data Encryption API 8-15
DBMS_LOB.OPEN (srcblob, DBMS_LOB.lob_readwrite);
DBMS_LOB.TRIM (srcblob, 0);
DBMS_LOB.CLOSE (srcblob);
DBMS_LOB.OPEN (encrypblob, DBMS_LOB.lob_readwrite);
DBMS_LOB.TRIM (encrypblob, 0);
DBMS_LOB.CLOSE (encrypblob);
DBMS_LOB.OPEN (decrypblob, DBMS_LOB.lob_readwrite);
DBMS_LOB.TRIM (decrypblob, 0);
DBMS_LOB.CLOSE (decrypblob);
end;
/
truncate table table_lob;
drop table table_lob;
Finding Information About Encrypted Data
Table 8–2 lists data dictionary views that you can query to access information about
encrypted data. See Oracle Database Reference for detailed information about these
views.
Table 8–2 Data Dictionary Views That Display Information about Encrypted Data
View Description
ALL_ENCRYPTED_COLUMNS
Describes encryption algorithm information for all encrypted columns in
all tables accessible to the user
DBA_ENCRYPTED_COLUMNS
Describes encryption algorithm information for all encrypted columns in
the database
USER_ENCRYPTED_COLUMNS
Describes encryption algorithm information for all encrypted columns in
all tables in the schema of the user
V$ENCRYPTED_TABLESPACES
Displays information about the tablespaces that are encrypted
V$ENCRYPTION_WALLET
Displays information on the status of the wallet and the wallet location
for transparent data encryption
V$RMAN_ENCRYPTION_ALGORITHMS
Displays supported encryption algorithms.

Finding Information About Encrypted Data
8-16 Oracle Database Security Guide

9
Verifying Security Access with Auditing 9-1
9
Verifying Security Access with Auditing
This chapter contains:
■About Auditing
■Selecting an Auditing Type
■Auditing General Activities with Standard Auditing
■Using Default Auditing for Security-Relevant SQL Statements and Privileges
■Auditing Specific Activities with Fine-Grained Auditing
■Auditing SYS Administrative Users
■Using Triggers to Write Audit Data to a Separate Table
■Managing Audit Trail Records
■Purging Audit Trail Records
■Finding Information About Audited Activities
About Auditing
This section contains:
■What Is Auditing?
■Why Is Auditing Used?
■Protecting the Database Audit Trail
■Activities That Are Always Written to the Standard and Fine-Grained Audit
Records
■Activities That Are Always Audited for All Platforms
■Auditing in a Distributed Database
■Best Practices for Auditing
See Also: "Guidelines for Auditing" on page 10-18 for general
guidelines to follow for auditing your system
See Also: Oracle Audit Vault and Database Firewall Administrator's
Guide for more information about Oracle Audit Vault and Database
Firewall, which provides advanced auditing features

About Auditing
9-2 Oracle Database Security Guide
What Is Auditing?
Auditing is the monitoring and recording of selected user database actions, from both
database users and nondatabase users1. You can base auditing on individual actions,
such as the type of SQL statement executed, or on combinations of data that can
include the user name, application, time, and so on. You can audit both successful and
failed activities. To use auditing, you enable it, and then configure what must be
audited. The actions that you audit are recorded in either data dictionary tables or in
operating system files.
Oracle recommends that you enable and configure auditing. Auditing is an effective
method of enforcing strong internal controls so that your site can meet its regulatory
compliance requirements, as defined in the Sarbanes-Oxley Act. This enables you to
monitor business operations, and find any activities that may deviate from company
policy. Doing so translates into tightly controlled access to your database and the
application software, ensuring that patches are applied on schedule and preventing ad
hoc changes. By enabling auditing by default, you can generate an audit record for
audit and compliance personnel. Be selective with auditing and ensure that it meets
your business compliance needs.
Why Is Auditing Used?
You typically use auditing to perform the following activities:
■Enable accountability for actions. These include actions taken in a particular
schema, table, or row, or affecting specific content.
■Deter users (or others, such as intruders) from inappropriate actions based on
their accountability.
■Investigate suspicious activity. For example, if a user is deleting data from tables,
then a security administrator might decide to audit all connections to the database
and all successful and unsuccessful deletions of rows from all tables in the
database.
■Notify an auditor of the actions of an unauthorized user. For example, an
unauthorized user could be changing or deleting data, or the user has more
privileges than expected, which can lead to reassessing user authorizations.
■Monitor and gather data about specific database activities. For example, the
database administrator can gather statistics about which tables are being updated,
how many logical I/Os are performed, or how many concurrent users connect at
peak times.
■Detect problems with an authorization or access control implementation. For
example, you can create audit policies that you expect will never generate an audit
record because the data is protected in other ways. However, if these policies
generate audit records, then you will know the other security controls are not
properly implemented.
■Address auditing requirements for compliance. Regulations such as the
following have common auditing-related requirements:
–Sarbanes-Oxley Act
–Health Insurance Portability and Accountability Act (HIPAA)
1"Nondatabase users" refers to application users who are recognized in the database using the
CLIENT_IDENTIFIER
attribute. To audit this type of user, you can use a fine-grained audit
policy. See "Auditing Specific Activities with Fine-Grained Auditing" on page 9-36 for more
information.

About Auditing
Verifying Security Access with Auditing 9-3
–International Convergence of Capital Measurement and Capital Standards: a
Revised Framework (Basel II)
–Japan Privacy Law
–European Union Directive on Privacy and Electronic Communications
Protecting the Database Audit Trail
When auditing for suspicious database activity, you should protect the integrity of the
audit trail records to guarantee the accuracy and completeness of the auditing
information.
Oracle Database writes the database audit trail to the
SYS.AUD
$ and
SYS.FGA_LOG$
tables. Audit records generated as a result of object audit options set for the
SYS.AUD
$
and
SYS.FGA_LOG$
tables can only be deleted from the audit trail by someone who has
connected with administrator privileges. Remember that administrators are also
audited for unauthorized use. See "Auditing SYS Administrative Users" on page 9-53
for more information.
Other ways to protect the database audit trail are as follows:
■Set the O7_DICTIONARY_ACCESSIBILITY initialization parameter to FALSE
(the default). This way, only users who have the
SYSDBA
privilege can perform
DML actions on the audit data in the
SYS.AUD$
and
SYS.FGA_LOG$
tables. In a
default installation,
O7_DICTIONARY_ACCESSIBILITY
is set to
FALSE
.
■If you have Oracle Database Vault installed, create a realm around the
SYSTEM.AUD$ table. By default, the
AUD$
table is in the
SYSTEM
schema. (The
synonym
SYS.AUD$
refers to the
SYSTEM.AUD$
table.) See Oracle Database Vault
Administrator's Guide for more information about realms in Oracle Database Vault.
Activities That Are Always Written to the Standard and Fine-Grained Audit Records
When standard auditing is enabled (that is, you set
AUDIT_TRAIL
to
DB
or
DB,EXTENDED
), Oracle Database audits all data manipulation language (DML)
operations, such as
INSERT
,
UPDATE
,
MERGE
, and
DELETE
on the
SYS.AUD$
and
SYS.FGA_
LOG$
tables by non-
SYS
users. (It performs this audit even if you have not set audit
options for the
AUD$
and
FGA_LOGS$
tables.) Typically, non-
SYS
users do not have access
to these tables, except if they have been explicitly granted access. If a non-
SYS
user
tampers with the data in the
SYS.FGA_LOG$
and
SYS.AUD$
tables, then Oracle Database
writes an audit record for each action.
Oracle Database audits
SYS
user’s
DELETE
,
INSERT
,
UPDATE
, and
MERGE
operations on
the
SYS.FGA_LOG$
and
SYS.AUD$
tables if you have set the
AUDIT_SYS_OPERATIONS
initialization parameter to
TRUE
. In this case the audit records of all
SYS
operations are
written to whatever directory the
AUDIT_FILE_DEST
initialization parameter points to.
If
AUDIT_FILE_DEST
is not set, then it writes the records to an operating
system-dependent location.
See Also:
■"Auditing General Activities with Standard Auditing" on page 9-6
■"Auditing Specific Activities with Fine-Grained Auditing" on
page 9-36

About Auditing
9-4 Oracle Database Security Guide
Activities That Are Always Audited for All Platforms
Oracle Database always audits certain database-related operations and writes them to
the operating system audit files. It includes the actions of any user who is logged in
with the
SYSDBA
or
SYSOPER
privilege. This is called mandatory auditing. Even if you
have enabled the database audit trail (that is, setting the
AUDIT_TRAIL
parameter to
DB
),
Oracle Database still writes mandatory records to operating system files.
By default, the operating system files are in the
$ORACLE_BASE/admin/$ORACLE_
SID/adump
directory for both UNIX and Windows systems. On Windows systems,
Oracle Database also writes this information to the Windows Event Viewer. You can
change the location of this directory by setting the
AUDIT_FILE_DEST
initialization
parameter, which is described in "Specifying a Directory for the Operating System
Audit Trail" on page 9-17.
Mandatory auditing includes the following operations:
■Database startup. An audit record is generated that lists the operating system user
starting the instance, the user terminal identifier, and the date and time stamp.
This data is stored in the operating system audit trail because the database audit
trail is not available until after the startup has successfully completed.
■SYSDBA and SYSOPER logins. Oracle Database records all
SYSDBA
and
SYSOPER
connections.
■Database shutdown. An audit record is generated that lists the operating system
user shutting down the instance, the user terminal identifier, and the date and
time stamp.
Auditing in a Distributed Database
Auditing is site autonomous. An instance audits only the statements issued by directly
connected users. A local Oracle Database node cannot audit actions that take place in a
remote database.
Best Practices for Auditing
Follow these best practices guidelines:
■As a general rule, design your auditing strategy to collect the amount of
information that you need to meet compliance requirements, but being sure to
focus on activities that cause the greatest security concerns. For example, auditing
every table in the database is not practical, but auditing table columns that contain
sensitive data, such as salaries, is. With both standard and fine-grained auditing,
See Also:
■"Auditing General Activities with Standard Auditing" on page 9-6
■"Auditing Specific Activities with Fine-Grained Auditing" on
page 9-36
Note: If you set the
AUDIT_SYSLOG_LEVEL
initialization parameter,
mandatory actions are written the to the UNIX syslog. See "Using the
Syslog Audit Trail on UNIX Systems" on page 9-18 for more
information about the syslog audit trail. See also your operating
system-specific Oracle Database documentation for more information
about the operating system and syslog audit trail.

Selecting an Auditing Type
Verifying Security Access with Auditing 9-5
there are mechanisms you can use to design audit policies that focus on specific
activities to audit.
■Periodically archive and purge the audit trail data. See "Purging Audit Trail
Records" on page 9-65 for more information.
Selecting an Auditing Type
You must perform a specific set of steps depending on the type of auditing that you
want to perform: general activities (such as SQL statement actions), commonly used
auditing activities, or fine-grained auditing.
In addition to these types of auditing, remember that Oracle Database mandatorily
audits some activities. See Activities That Are Mandatorily Audited for more
information.
Auditing SQL Statements, Privileges, and Other General Activities
Oracle Database provides a set of default audit settings that you can enable for
commonly used security-relevant SQL statements and privileges.
Location of audit records: Oracle Database writes these audit records to the location
based on the
AUDIT_TRAIL
initialization parameter. See also "About Audit Records" on
page 9-57.
General steps:
1. Follow the instructions in "Using Default Auditing for Security-Relevant SQL
Statements and Privileges" on page 9-35 to enable default auditing.
To understand more about the database audit trail, see "Managing Audit Trail
Records" on page 9-57.
2. To monitor audit activities, periodically query the database audit trail data
dictionary views. See "Finding Information About Audited Activities" on
page 9-80.
3. Perform maintenance on the database audit trail. See "Managing the Database
Audit Trail" on page 9-58.
4. Periodically archive and purge the contents of the audit trail. See "Purging Audit
Trail Records" on page 9-65.
Auditing Commonly Used Security-Relevant Activities
You can audit at the most granular level, data access, and actions based on content,
using Boolean measures, such as
value > 7800
or the IP address from which an action
occurred.
Location of audit records: You can write the audit records to either the database audit
trail or an operating system audit trail in XML format. See also "About Audit Records"
on page 9-57.
General steps:
1. See "Auditing Specific Activities with Fine-Grained Auditing" on page 9-36 to
understand more about auditing specific activities.
See Also: "Guidelines for Auditing" on page 10-18 for general
guidelines to follow for auditing your system

Auditing General Activities with Standard Auditing
9-6 Oracle Database Security Guide
2. Decide whether you want to write audit records to the database audit trail or to an
operating system file. See "Managing the Database Audit Trail" on page 9-58.
3. Use the
DBMS_FGA
PL/SQL package to configure fine-grained auditing policies.
The
DBMS_FGA.ADD_POLICY
procedure provides the
audit_trail
parameter, which
you use to select the audit trail type. You can choose between a database audit trail
or an operating system audit trail using XML files. See the following sections:
"Creating an Audit Trail for Fine-Grained Audit Records" on page 9-39
"Using the DBMS_FGA Package to Manage Fine-Grained Audit Policies" on
page 9-39
4. To monitor audit activities, periodically check the operating system records you
configured, or query the audit trail data dictionary views. See "Finding
Information About Audited Activities" on page 9-80.
5. Perform maintenance on the audit trail. See "Managing Audit Trail Records" on
page 9-57.
6. Periodically archive and purge the contents of the audit trail. See "Purging Audit
Trail Records" on page 9-65.
Auditing Specific, Fine-Grained Activities
You can audit the top-level SQL statements issued by users who have connected using
the
SYSDBA
or
SYSOPER
privilege. (Top-level refers to statements directly issued by a
user. Statements run from a PL/SQL procedure or function are not considered
top-level.)
Location of audit records: Oracle Database writes these audit records to an operating
system audit trail only. On Windows, Oracle Database writes the
SYS
audit records to
the Windows Event log by default. For UNIX systems, you can write records to a
syslog file. See also "About Audit Records" on page 9-57.
General steps:
1. See "Auditing SYS Administrative Users" on page 9-53 to configure administrative
auditing.
2. To understand more about the operating system audit trail, see Managing the
Operating System Audit Trail on page 9-62.
3. To monitor audit activities, periodically check the operating system or syslog
records you configured. If you are writing to an XML file, you can query the
V$XML_AUDIT_TRAIL
and
DBA_COMMON_AUDIT_TRAIL
views. See "Finding
Information About Audited Activities" on page 9-80.
4. Perform maintenance on the audit trail. See "Managing Audit Trail Records" on
page 9-57
5. Periodically archive and purge the contents of the audit trail. See "Purging Audit
Trail Records" on page 9-65.
Auditing General Activities with Standard Auditing
This section contains:
■About Standard Auditing
■Configuring Standard Auditing with the AUDIT_TRAIL Initialization Parameter
■What Do the Operating System and Database Audit Trails Have in Common?

Auditing General Activities with Standard Auditing
Verifying Security Access with Auditing 9-7
■Using the Operating System Audit Trail
■Using the Syslog Audit Trail on UNIX Systems
■How the AUDIT and NOAUDIT SQL Statements Work
■Auditing SQL Statements
■Auditing Privileges
■Auditing SQL Statements and Privileges in a Multitier Environment
■Auditing Schema Objects
■Auditing Directory Objects
■Auditing Functions, Procedures, Packages, and Triggers
■Auditing Network Activity
About Standard Auditing
This section contains:
■What Is Standard Auditing?
■Who Can Perform Standard Auditing?
■When Are Standard Audit Records Created?
What Is Standard Auditing?
In standard auditing, you audit SQL statements, privileges, schema objects, and
network activity. You configure standard auditing by using the
AUDIT
SQL statement
and
NOAUDIT
to remove this configuration. You can write the audit records to either the
database audit trail or to operating system audit files.
Who Can Perform Standard Auditing?
Any user can configure auditing for the objects in his or her own schema, by using the
AUDIT
statement. To undo the audit configuration for this object, the user can use the
NOAUDIT
statement. No additional privileges are needed to perform this task. Users can
run
AUDIT
statements to set auditing options regardless of the
AUDIT_TRAIL
parameter
setting. If auditing has been disabled, the next time it is enabled, Oracle Database will
record the auditing activities set by the
AUDIT
statements. "Enabling or Disabling the
Standard Audit Trail" on page 9-8 explains how to enable standard auditing.
Note the following:
■To audit objects in another schema, the user must have the
AUDIT ANY
system
privilege.
■To audit system privileges, the user must have the
AUDIT SYSTEM
privilege.
■If the
O7_DICTIONARY_ACCESSIBILITY
initialization parameter has been set to
FALSE
(the default), then only users who have the
SYSDBA
privilege can perform
DML actions on the audit data in the
SYS.AUD$
and
SYS.FGA_LOG$
tables. For
See Also:
■"Auditing SYS Administrative Users" on page 9-53 to learn how
to use standard auditing to audit
SYS
users
■Oracle Database 2 Day + Security Guide for a tutorial on creating
a standard audit trail

Auditing General Activities with Standard Auditing
9-8 Oracle Database Security Guide
greater security, set the
O7_DICTIONARY_ACCESSIBILITY
parameter to
FALSE
so that
non-
SYSDBA
users cannot audit
SYS
objects.
When Are Standard Audit Records Created?
You, as the security administrator, enable or disable standard auditing for the entire
database. If it is disabled, then no audit records are created. Configuring audit options
is described in the previous section, "Who Can Perform Standard Auditing?"
When auditing is enabled in the database and an action configured to be audited
occurs, Oracle Database generates an audit record during or after the execution phase
of the SQL statement. Oracle Database individually audits SQL statements inside
PL/SQL program units, as necessary, when the program unit is run.
The generation and insertion of an audit trail record is independent of a user
transaction being committed. That is, even if a user transaction is rolled back, the audit
trail record remains committed.
Statement and privilege audit options in effect at the time a database user connects to
the database remain in effect for the duration of the session. When the session is
already active, setting or changing statement or privilege audit options does not take
effect in that session. The modified statement or privilege audit options take effect
only when the current session ends and a new session is created.
In contrast, changes to schema object audit options become immediately effective for
current sessions.
Configuring Standard Auditing with the AUDIT_TRAIL Initialization Parameter
This section contains:
■Enabling or Disabling the Standard Audit Trail
■Settings for the AUDIT_TRAIL Initialization Parameter
Enabling or Disabling the Standard Audit Trail
You enable the standard audit trail by setting the
AUDIT_TRAIL
initialization parameter.
This setting determines whether to create the audit trail in the database audit trail,
write the audit activities to an operating system file, or to disable auditing.
To enable or disable the standard audit trail, log in to SQL*Plus with administrative
privileges, and use the
ALTER SYSTEM
statement. Afterwards, you need to restart the
database instance.
To check the current value of the
AUDIT_TRAIL
parameter, use the
SHOW PARAMETER
command in SQL*Plus.
Example 9–1 shows how to check the
AUDIT_TRAIL
parameter setting.
See Also:
■
GRANT
in Oracle Database SQL Language Reference for a listing of
available system and object privileges
■
AUDIT
in Oracle Database SQL Language Reference for a full listing of
audit options
See Also: Oracle Database Concepts for information about the
different phases of SQL statement processing and shared SQL

Auditing General Activities with Standard Auditing
Verifying Security Access with Auditing 9-9
Example 9–1 Checking the Current Value of the AUDIT_TRAIL Initialization Parameter
SHOW PARAMETER AUDIT_TRAIL
NAME TYPE VALUE
------------------------------------ ----------- -------
audit_trail string DB
Example 9–2 shows how to log onto SQL*Plus, enable the standard audit trail, and
then restart the database instance.
Example 9–2 Enabling the Standard Audit Trail
CONNECT SYSTEM
Enter password: password
ALTER SYSTEM SET AUDIT_TRAIL=DB SCOPE=SPFILE;
System altered.
CONNECT SYS/AS SYSOPER
Enter password: password
SHUTDOWN
Database closed.
Database dismounted.
ORACLE instance shut down.
STARTUP
ORACLE instance started.
This example uses the
SCOPE
clause because the database instance had been started
using a server parameter file (
SPFILE
). Starting the database with a server parameter
file is the preferred way of starting a database instance. See Oracle Database
Administrator's Guide for information about creating configuring server parameter
files.
Settings for the AUDIT_TRAIL Initialization Parameter
Table 9–1 lists the settings you can use for the
AUDIT_TRAIL
initialization parameter.

Auditing General Activities with Standard Auditing
9-10 Oracle Database Security Guide
Table 9–1 AUDIT_TRAIL Initialization Parameter Settings
AUDIT_TRAIL Value Description
DB
Directs audit records to the database audit trail (the
SYS.AUD$
table), except for mandatory
and
SYS
audit records, which are always written to the operating system audit trail.
("Selecting an Auditing Type" on page 9-5 describes the location of the audit records for
each type of auditing.) Use this setting for a general database for manageability.
DB
is the
default setting for the
AUDIT_TRAIL
parameter.
If the database was started in read-only mode with
AUDIT_TRAIL
set to
DB
, then Oracle
Database internally sets
AUDIT_TRAIL
to
OS
. Check the alert log for details.
See also "Managing the Database Audit Trail" on page 9-58.
DB,EXTENDED
Behaves the same as
AUDIT_TRAIL=DB
, but also populates the SQL bind and SQL text
CLOB-type columns of the
SYS.AUD$
table, when available.
DB,EXTENDED
enables you to capture the SQL statement used in the action that was audited.
You can capture both the SQL statement that caused the audit, and any associated bind
variables. However, be aware that you only can capture data from the following column
datatypes:
CHAR
,
NCHAR
,
VARCHAR
,
VARCHAR2
,
NVARCHAR2
,
NUMBER
,
FLOAT
,
BINARY_FLOAT
,
BINARY_DOUBLE
,
LONG
,
ROWID
,
DATE
,
TIMESTAMP
, and
TIMESTAMP WITH TIMEZONE
. Also be
aware that
DB, EXTENDED
can capture sensitive data, such as credit card information. See
also "Auditing Sensitive Information" on page 10-18.
If the database was started in read-only mode with
AUDIT_TRAIL
set to
DB, EXTENDED
, then
Oracle Database internally sets
AUDIT_TRAIL
to
OS
. Check the alert log for details.
You can specify
DB,EXTENDED
in any of the following ways:
ALTER SYSTEM SET AUDIT_TRAIL=DB,EXTENDED SCOPE=SPFILE;
ALTER SYSTEM SET AUDIT_TRAIL=DB, EXTENDED SCOPE=SPFILE;
ALTER SYSTEM SET AUDIT_TRAIL='DB','EXTENDED' SCOPE=SPFILE;
ALTER SYSTEM SET AUDIT_TRAIL=EXTENDED,DB SCOPE=SPFILE;
ALTER SYSTEM SET AUDIT_TRAIL=EXTENDED, DB SCOPE=SPFILE;
However, do not enclose
DB, EXTENDED
in quotes, for example:
ALTER SYSTEM SET AUDIT_TRAIL='DB, EXTENDED' SCOPE=SPFILE;
In previous releases, the setting was
DB_EXTENDED
. This setting has been retained for
backward compatibility but may not be available in future releases.
OS
Directs all audit records to an operating system file.
Oracle recommends that you use the
OS
setting, particularly if you are using an ultra-secure
database configuration. See "Advantages of the Operating System Audit Trail" on page 9-16
for more information. See also Example 9–3, "Text File Operating System Audit Trail" on
page 9-13.
If you set
AUDIT_TRAIL
to
OS
, then set the following additional initialization parameters:
■
AUDIT_FILE_DEST
, which specifies the location of the operating system audit record
file. On UNIX systems, the default location is
$ORACLE_BASE/admin/$ORACLE_
SID/adump
. For better performance on UNIX systems, set the
AUDIT_FILE_DEST
parameter to a directory on a disk that is locally attached to the host running the
Oracle Database instance. On Windows, the
OS
setting writes the audit trail to the
Application area of the Windows Event Viewer.
■
AUDIT_SYS_OPERATIONS
, if you want to audit the top-level SQL statements directly
issued by users who have connected with the
SYSDBA
or
SYSOPER
privilege. To enable
this auditing, set
AUDIT_SYS_OPERATIONS
to
TRUE
.
If you set
AUDIT_SYS_OPERATIONS
to
TRUE
and
AUDIT_TRAIL
to
XML
or
XML,EXTENDED
,
then Oracle Database writes
SYS
audit records operating system files in XML format.
■
AUDIT_SYSLOG_LEVEL
, which writes
SYS
and standard
OS
audit records to the system
audit log using the
SYSLOG
utility. This option only applies to UNIX environments. See
"Configuring Syslog Auditing" on page 9-19 for more information.
See also "Managing the Operating System Audit Trail" on page 9-62.

Auditing General Activities with Standard Auditing
Verifying Security Access with Auditing 9-11
Note the following:
■You do not need to restart the database after you run the AUDIT or NOAUDIT
statements. You only need to restart the database if you made a universal change,
such as changing the
AUDIT_TRAIL
initialization parameter.
■You do not need to set AUDIT_TRAIL to enable either fine-grained auditing or
SYS auditing. For fine-grained auditing, you add and remove fine-grained audit
policies as necessary, applying them to the specific operations or objects you want
to monitor. To enable
SYS
auditing, set the
AUDIT_SYS_OPERATIONS
parameter to
TRUE
.
What Do the Operating System and Database Audit Trails Have in Common?
The operating system and database audit trails both capture many of the same types of
actions. Table 9–2 lists the operating system audit trail records. Most map to equivalent
columns in the
DBA_AUDIT_TRAIL
view. For a description of these columns, see Oracle
Database Reference.
XML
Writes to the operating system audit record file in XML format. Records all elements of the
AuditRecord
node given by the XML schema in
http://xmlns.oracle.com/oracleas/schema/dbserver_audittrail-11_2.xsd
except
Sql_
Text
and
Sql_Bind
to operating system XML audit files. (This
.xsd
file represents the
schema definition of the XML audit file. An XML schema is a document written in the XML
Schema language.)
See also "Advantages of the Operating System Audit Trail" on page 9-16 and Example 9–4,
"XML File Operating System Audit Trail" on page 9-15.
If you set the
XML
value, then also set the
AUDIT_FILE_DEST
parameter. For all platforms,
including Windows, the default location for XML audit trail records is
$ORACLE_
BASE/admin/$ORACLE_SID/adump
.
The
XML AUDIT_TRAIL
value does not affect syslog audit file. In other words, if you have set
the
AUDIT_TRAIL
parameter to XML, then the syslog audit records will still be in text
format, not XML file format.
You can control the output for
SYS
and mandatory audit records as follows:
■To write SYS and mandatory audit files to operating system files in XML format: Set
AUDIT_TRAIL
to
XML
or
XML,EXTENDED
, set
AUDIT_SYS_OPERATIONS
to
TRUE
, but do not set
the
AUDIT_SYSLOG_LEVEL
parameter.
■To write SYS and mandatory audit records to syslog audit files and standard audit
records to XML audit files: Set
AUDIT_TRAIL
to
XML
or
XML,EXTENDED
, set
AUDIT_SYS_
OPERATIONS
to
TRUE
, and set the
AUDIT_SYSLOG_LEVEL
parameter.
XML, EXTENDED
Behaves the same as
AUDIT_TRAIL=XML
, but also includes SQL text and SQL bind
information in the operating system XML audit files.
You can specify
XML,EXTENDED
in either of the following ways:
ALTER SYSTEM SET AUDIT_TRAIL=XML, EXTENDED SCOPE=SPFILE;
ALTER SYSTEM SET AUDIT_TRAIL='XML','EXTENDED' SCOPE=SPFILE;
However, do not enclose
XML, EXTENDED
in quotes, for example:
ALTER SYSTEM SET AUDIT_TRAIL='XML, EXTENDED' SCOPE=SPFILE;
See also the following sections:
■"Advantages of the Operating System Audit Trail" on page 9-16
■"Auditing Sensitive Information" on page 10-18
NONE
Disables standard auditing.
Table 9–1 (Cont.) AUDIT_TRAIL Initialization Parameter Settings
AUDIT_TRAIL Value Description

Auditing General Activities with Standard Auditing
9-12 Oracle Database Security Guide
Using the Operating System Audit Trail
This section contains:
■About the Operating System Trail
■What Do Operating System Audit Trail Records Look Like?
■Advantages of the Operating System Audit Trail
■How the Operating System Audit Trail Works
■Specifying a Directory for the Operating System Audit Trail
Table 9–2 Common Audited Actions in the Operating System and Database Audit Trails
Operating System Audit Record Equivalent DBA_AUDIT_TRAIL View Column
SESSIONID SESSIONID
ENTRYID ENTRYID
STATEMENT STATEMENTID
USERID USERNAME
USERHOST USERHOST
TERMINAL TERMINAL
ACTION ACTION
SYS$OPTIONS
Indicates what audit option was set with
AUDIT
or
NOAUDIT
, or what privilege was granted or revoked.1
1For example, if the
ACTION
value is
104
(for
AUDIT
) or
105
(for
NOAUDIT
), then the
SYS$OPTIONS
number
represents an audit option listed in the
STMT_AUDIT_OPTION_MAP
table. If the
ACTION
value is
108
(for
GRANT
) or
109
(for
REVOKE
), then the number represents a privilege listed in the
SYSTEM_PRIVILEGE_MAP
table.
RETURNCODE RETURNCODE
OBJ$CREATOR OWNER
OBJ$NAME OBJ_NAME
OBJ$PRIVILEGES OBJ_PRIVILEGE
AUTH$GRANTEE GRANTEE
NEW$OWNER NEW_OWNER
NEW$NAME NEW_NAME
SES$ACTIONS SES_ACTIONS
LOGOFF$PREAD LOGOFF_PREAD
LOGOFF$LWRITE LOGOFF_LWRITE
COMMENT$TEXT COMMENT_TEXT
OS$USERID OS_USERNAME
PRIV$USED PRIV_USED
SES$LABEL CLIENT_ID
SES$TID
Does not have an equivalent in the
DBA_AUDIT_TRAIL
view, but it does appear in the
SYS.AUD$
table
SPARE2
Does not have an equivalent in the
DBA_AUDIT_TRAIL
view, but it does appear in the
SYS.AUD$
table

Auditing General Activities with Standard Auditing
Verifying Security Access with Auditing 9-13
About the Operating System Trail
As an alternative to creating standard audit records in the
DBA_AUDIT_TRAIL
(
SYS.AUD$
table), you can create standard audit records in operating system files. The operating
system file that contains the audit trail can include any of the following data:
■Database audit trail records
■Mandatory audit records (that is, database actions that are always audited)
■Audit records for administrative users (
SYS
)
You can write the operating system audit records to either a text file or an XML file.
What Do Operating System Audit Trail Records Look Like?
The operating system audit trail files are in either text or XML file format. Be aware
that the contents of the text and XML operating system files have some differences,
and that the formats may change across different releases. With each release of Oracle
Database, new enhancements, such as the audit type, have been made to the XML file,
but not the text file. The text operating system file has a different presentation for the
timestamp, for example:
Wed May 6 00:57:36 2009 -07:00
However, this timestamp does not appear in the event log or syslog, which have their
own format for timestamps. The timestamp string only appears in the text operating
system audit files.
Example 9–3 shows a typical text operating system audit trail for a logon operation on
an Oracle database that is installed on Microsoft Windows. (The text in the actual
record wraps around, but for this manual, each item is separated onto its own line for
easier readability.)
Example 9–3 Text File Operating System Audit Trail
Audit trail:
LENGTH: "349"
SESSIONID:[5] "43464"
ENTRYID:[1] "1"
STATEMENT:[1] "1"
USERID:[6] "DBSNMP"
USERHOST:[7] "SHOBEEN"
TERMINAL:[3] "MAU"
ACTION:[3] "100"
RETURNCODE:[1] "0"
COMMENT$TEXT:[97] "Authenticated by: DATABASE; Client address:
(ADDRESS=(PROTOCOL=tcp)(HOST=192.0.2.4)(PORT=2955))"
OS$USERID:[19] "NT AUTHORITY\SYSTEM"
DBID:[10] "1212547373"
PRIV$USED:[1] "5"
In this example:
■
LENGTH
refers to the total number of bytes used in this audit record. This number
includes the trailing newline bytes (
\n
), if any, at the end of the audit record.
■
[]
brackets indicate the length of each value for each audit entry. For example, the
USERID
entry,
DBSNMP
, is 6 bytes long.
■
SESSIONID
indicates the audit session ID number. You can also find the session ID
by querying the
AUDSID
column in the
V$SESSION
data dictionary view.

Auditing General Activities with Standard Auditing
9-14 Oracle Database Security Guide
■
ENTRYID
indicates the current audit entry number, assigned to each audit trail
record. The audit
ENTRYID
sequence number is shared between fine-grained audit
records and regular audit records.
■
STATEMENT
is a numeric ID assigned to the statement the user runs. It appears for
each statement issued during the user session, because a statement can result in
multiple audit records.
■
ACTION
is a numeric value representing the action the user performed. The
corresponding name of the action type is in the
AUDIT_ACTIONS
table. For example,
action
100
refers to
LOGON
.
■
RETURNCODE
indicates if the audited action was successful. 0 indicates success. If
the action fails, the return code lists the Oracle Database error number. For
example, if you try to drop a non-existent table, the error number is
ORA-00903
invalid table name
, which in turn translates to
903
in the
RETURNCODE
setting.
■
COMMENT$TEXT
indicates additional comments about the audit record. For example,
for
LOGON
audit records, it can indicate the authentication method.It corresponds to
the
COMENT_TEXT
column of the
DBA_COMMON_AUDIT_TRAIL
data dictionary view.
■
DBID
is a database identifier calculated when the database is created. It
corresponds to the
DBID
column of the
V$DATABASE
data dictionary view.
■
ECONTEXT_ID
indicates the application execution context identifier.
■
PRIVS$USED
refers to the privilege that was used to perform an action. To find the
privilege, query the
SYSTEM_PRIVILEGE_MAP
table. For example, privilege
5
refers
to
-5
in this table, which means
CREATE SESSION
.
PRIVS$USED
corresponds to the
PRIV_USED
column in the
DBA_COMMON_AUDIT_TRAIL
, which lists the privilege by
name.
Other possible values are as follows:
■
SCN
(for example,
SCN:8934328925
) indicates the System Change Number (SCN).
Use this value if you want to perform a flashback query to find the value of a
setting (for example, a column) at a time in the past. For example, to find the value
of the
ORDER_TOTAL
column of the
OE.ORDERS
table based on the SCN number, use
the following
SELECT
statement:
SELECT ORDER_TOTAL
FROM OE.ORDERS
AS OF SCN = 8934328925
WHERE ORDER_TOTAL = 86;
■
SES_ACTIONS
indicates the actions that took place during the session. This field is
present only if the event was audited with the
BY SESSION
clause. Because this
field does not explain in detail the actions that occurred during the session, you
should configure the audit event with the
BY ACCESS
clause.
The
SES_ACTIONS
field contains 16 characters. Positions 14, 15, and 16 are reserved
for future use. In the first 12 characters, each position indicates the result of an
action. They are:
ALTER
,
AUDIT
,
COMMENT
,
DELETE
,
GRANT
,
INDEX
,
INSERT
,
LOCK
,
RENAME
,
SELECT
,
UPDATE
, and
FLASHBACK
. For example, if the user had successfully
run the
ALTER
statement, the
SES_ACTIONS
setting is as follows:
S---------------
The
S
, in the first position (for
ALTER
), indicates success. Had the
ALTER
statement
failed, the letter
F
would have appeared in its place. If the action resulted in both a
success and failure, then the letter is
B
.

Auditing General Activities with Standard Auditing
Verifying Security Access with Auditing 9-15
■
SES$TID
indicates the ID of the object affected by the audited action.
■
SPARE2
indicates whether the user modified
SYS.AUD$
table.
0
means the user
modified
SYS.AUD$
; otherwise, the value is
NULL
.
Similarly, Example 9–4 shows how an XML audit trail record appears. The text wraps
around in the actual record, but for this manual, each element appears on its own line
for easier readability. To find all the tags that appear in the XML audit file, you can
view its schema in a Web browser at
http://www.oracle.com/technology/oracleas/schema/dbserver_audittrail-11_
2.xsd
Example 9–4 XML File Operating System Audit Trail
<?xml version="1.0" encoding="UTF-8"?>
<Audit xmlns="http://xmlns.oracle.com/oracleas/schema/dbserver_audittrail-11_
2.xsd"
xmlns:xsi="http://www.w3.org/2001/XMLSchema-instance"
xsi:schemaLocation="http://xmlns.oracle.com/oracleas/schema/dbserver_
audittrail-11_2.xsd">
<Version>11.2</Version>
<AuditRecord>
<Audit_Type>1</Audit_Type>
<Session_Id>43535</Session_Id>
<StatementId>1</StatementId>
<EntryId>1</EntryId>
<Extended_Timestamp>2009-04-29T18:32:26.062000Z</Extended_Timestamp>
<DB_User>SYSMAN</DB_User>
<OS_User>SYSTEM</OS_User>
<Userhost>shobeen</Userhost>
<OS_Process>3164:3648</OS_Process>
<Terminal>mau</Terminal>
<Instance_Number>0</Instance_Number>
<Action>100</Action>
<TransactionId>0000000000000000</TransactionId>
<Returncode>0</Returncode>
<Comment_Text>Authenticated by: DATABASE; Client address:
(ADDRESS=(PROTOCOL=tcp)(HOST=192.0.2.4)(PORT=3536))</Comment_Text>
<Priv_Used>5</Priv_Used>
</AuditRecord>
</Audit>
In this example:
■
AuditRecord
element contains the entire audit record. (See Example 9–3 for more
information about the elements within the
Audit_Record
element.)
■
Audit_Type
indicates the type of audit trail. Possible values are as follows:
–1: Standard audit record
–2: Fine-grained audit record
–4:
SYS
audit record
–8: Mandatory audit record
This field only appears in the XML audit files, not the OS text audit files.
■
Extended_Timestamp
indicates the time of the audited operation (timestamp of
user login for entries created by
AUDIT SESSION
), in Coordinated Universal Time

Auditing General Activities with Standard Auditing
9-16 Oracle Database Security Guide
(UTC) or Greenwich Mean Time (GMT). This field only appears in the XML audit
files, not the OS text audit files.
■
Instance_Number
indicates the instance number to which the user is connected, for
an Oracle Real Application Clusters environment. In this example, the number is
0
, which is used for single-instance database installations. The
INSTANCE_NUMBER
initialization parameter specifies this number.
The following values can appear if you set the
AUDIT_TRAIL
parameter to
XML,
EXTENDED
. Both are listed in the
DBA_COMMON_AUDIT_TRAIL
data dictionary view.
■
Sql_Bind
(for example,
<Sql_Bind>#1(5):89</Sql_Bind>
) shows the value of the
bind variable. The syntax is as follows:
VariablePosition(LengthOfVariableValue):ValueofBindVariable
The example
#1(5):89
indicates that there is 1 bind variable; its value is 5
characters long; and the value of the bind variable is
89
.
■
Sql_Text
(for example,
<Sql_Text>begin procedure_one(:num); end; </Sql_
Text>
) appears if you have set the
AUDIT_TRAIL
parameter to
XML, EXTENDED
. It
shows the SQL text that the user entered.
Advantages of the Operating System Audit Trail
Using the operating system audit trail offers these advantages:
■It reduces the likelihood of a denial-of-service (DoS) attack.
■It makes it easier to secure the audit trail. If the auditor is distinct from the
database administrator, then you must use the
OS
,
XML
, or
XML, EXTENDED
setting.
Otherwise, a database administrator can view and modify any auditing
information that is stored in the database.
■Because you are writing the audit trail to a specific location that you can restrict to
specific users, the operating system audit trail enforces separation of duty
concepts.
■Writing the audit trail to an operating system file results in the least amount of
overhead on the database. For this reason, it is excellent for very large databases.
■Audit records stored in operating system files can be more secure than
database-stored audit records because access can require file permissions that
database administrators do not have. Greater availability is another advantage to
operating system storage for audit records, because they remain available even if
the database is temporarily inaccessible.
■If the
AUDIT_TRAIL
initialization parameter is set to
XML
(or
XML, EXTENDED
), then
Oracle Database writes audit records to the operating system as XML files. You
can use the
V$XML_AUDIT_TRAIL
view to make XML audit records available to
database administrators through a SQL query, providing enhanced usability.
■The
DBA_COMMON_AUDIT_TRAIL
view includes the standard and fine grained audit
trails written to database tables, XML-format audit trail records, and the contents
of the
V$XML_AUDIT_TRAIL
dynamic view (standard, fine grained,
SYS
and
mandatory).
■Using your operating system audit trail can enable you to consolidate audit
records from multiple sources, including Oracle Database and other applications.
Examining system activity can be more efficient with all audit records in one place.
If you use XML audit records, then you can use of any standard XML editing tool
to review or extract information from those records.

Auditing General Activities with Standard Auditing
Verifying Security Access with Auditing 9-17
How the Operating System Audit Trail Works
The operating system audit trail writes the audit data to an operating system file. You
can enable this feature by setting the
AUDIT_TRAIL
initialization parameter to one of
the following values:
■
OS
: Writes the audit trail records to a text operating system file on UNIX systems
and to the applications Event Viewer on Microsoft Windows.
■
XML
: Writes the audit trail records to an XML file.
■
XML, EXTENDED
: Writes the audit trail records to an XML file and includes SQL text
and SQL bind information in the operating system XML audit files.
The
AUDIT_FILE_DEST
initialization parameter sets the location of the operating system
audit file. If you want to audit top-level statements issued by users who log in to the
database with the
SYSDBA
or
SYSOPER
privilege, then set the
AUDIT_SYS_OPERATIONS
parameter to
TRUE
. See Table 9–1, " AUDIT_TRAIL Initialization Parameter Settings"
on page 9-10 for more information about these settings.
The records that are written to an operating system file are not recorded to the
SYS.AUD$
and
SYS.FGA_LOG$
tables. You can still view the contents of the XML
operating system audit files by querying the
DBA_COMMON_AUDIT_TRAIL
data dictionary
views. Querying this view parses all XML files (all files with an
.xml
extension) in the
AUDIT_FILE_DEST
directory, and then presents them in relational table format. Because
XML is a standard document format, many utilities are available to parse and analyze
XML data. Consult the operating system-specific Oracle Database documentation to
find if this feature has been implemented on your operating system.
Specifying a Directory for the Operating System Audit Trail
Use the
AUDIT_FILE_DEST
initialization parameter to specify an operating system
directory into which the audit trail is written, when the
AUDIT_TRAIL
initialization
parameter is set to
OS
,
XML
, or
XML, EXTENDED
. You must set
AUDIT_FILE_DEST
to a valid
directory with permissions restricted to the owner of the Oracle software and the
DBA
group. Mandatory auditing information also goes into that directory, as do audit
records for user
SYS
if the
AUDIT_SYS_OPERATIONS
initialization parameter is specified.
You can change the
AUDIT_FILE_DEST
parameter by using the following
ALTER SYSTEM
statement, which enables the new destination to be effective for all subsequent
sessions.
ALTER SYSTEM SET AUDIT_FILE_DEST = directory_path DEFERRED;
To find the current setting of the
AUDIT_FILE_DEST
parameter, issue the following
command:
SHOW PARAMETER AUDIT_FILE_DEST
The location of the operating system files depends on the following:
■If the database is not running and you have not set the
AUDIT_FILE_DEST
parameter, then the operating system files are placed in the first default location
$ORACLE_BASE/admin/$ORACLE_SID/adump
directory.
■If the database is not running and the first default location, the
$ORACLE_
BASE/admin/$ORACLE_SID/adump
directory, is inaccessible or cannot be written to,
or the Oracle process cannot identify the environment variables, then the second
default location,
$ORACLE_HOME/rdbms/audit
is used.
■When the database is open and Oracle Database reads the initialization file
(
initSID.ora
) for the database instance, the value of
AUDIT_FILE_DEST
parameter
is used as the operating system audit file directory.

Auditing General Activities with Standard Auditing
9-18 Oracle Database Security Guide
■For UNIX and Solaris systems, all operating system files are written to a directory
in the operating system. For Windows, the operating system text records are
available from the Windows Event Viewer, but operating system XML files are
available from an operating system directory, as explained in the preceding
bulleted items.
Using the Syslog Audit Trail on UNIX Systems
On UNIX systems, you can audit the activities of users, including privileged users, and
record these activities in a syslog file by creating a syslog audit trail.
This section contains:
■About the Syslog Audit Trail
■Format of the Information Stored in the Syslog Audit Trail
■What Does the Syslog Audit Trail Look Like?
■Configuring Syslog Auditing
About the Syslog Audit Trail
You can use a syslog audit trail to configure centralized audit facility provided by the
operating system Syslog facility. Syslog is a standard protocol on UNIX-based systems
for logging information from different components of a network. Applications call the
syslog()
function to log information to the syslog daemon, which then determines
where to log the information. Be aware that when you configure the use of syslog files,
the messages are sent to the syslog daemon process. The syslog daemon process does
not return an acknowledgement to Oracle Database indicating a committed write to
the syslog files.
Because applications, such as an Oracle process, use the
syslog()
function to log
information to the syslog daemon, a privileged user would not have permissions to
the file system where syslog messages are logged. For this reason, audit records stored
using a syslog audit trail can be more secure than audit records stored using an
operating system audit trail. In addition to restricting permissions to a file system for a
privileged user, for a syslog audit trail to be secure, neither privileged users nor the
Oracle process should have
root
access to the system where the audit records are
written.
Notes: For platforms other than UNIX, Solaris, and Windows,
check the platform documentation to learn the correct target
directory for operating system files.
Caution: You should have a strong understanding of how to work
with
syslog
before enabling
syslog
auditing. See the following
references for more information about syslog:
■Oracle Database Reference for information about the
AUDIT_SYSLOG_
LEVEL
initialization parameter
■The UNIX man page for the
syslogd
utility for more information
about the
facility.priority
settings and their directory paths

Auditing General Activities with Standard Auditing
Verifying Security Access with Auditing 9-19
Format of the Information Stored in the Syslog Audit Trail
Similar to the operating system audit trail records, Oracle Database encodes the syslog
records to ensure greater security. If you have Oracle Audit Vault installed, you can
use its Syslog Collector to extract and transfer syslog audit records to centralized
Oracle Audit Vault server.
What Does the Syslog Audit Trail Look Like?
Example 9–5 shows how the syslog audit trail can appear. (For this example, the text
has been reformatted for easier readability. In reality, the text is all on one line.) As
with other Oracle Database audit trails, the brackets indicate the length of the value
that was audited. For syslog audit trails, the text from (and including)
LENGTH:
is
Oracle Database audit record. The prepended text (the date and
Oracle Audit
[10085]
line) is added by the syslog utility.
Example 9–5 Syslog Audit Trail for SYS User
May 14 23:40:15 shobeen
Oracle Audit[10085]:
LENGTH : '171'
ACTION :[18] 'select * from aud$'
DATABASE USER:[1] '/'
PRIVILEGE :[6] 'SYSDBA'
CLIENT USER:[7] 'laurelh'
CLIENT TERMINAL:[6] 'pts/12'
STATUS:[1] '0'
DBID:[9] '562317007'
Configuring Syslog Auditing
To enable syslog auditing, follow these steps:
1. Assign the value of
OS
to the
AUDIT_TRAIL
initialization parameter, as described in
"Enabling or Disabling the Standard Audit Trail" on page 9-8.
For example:
ALTER SYSTEM SET AUDIT_TRAIL=OS SCOPE=SPFILE;
2. Manually set the
AUDIT_SYSLOG_LEVEL
parameter to the initialization parameter
file,
initsid.ora
.
Set the
AUDIT_SYSLOG_LEVEL
parameter to specify a facility and priority in the
format
AUDIT_SYSLOG_LEVEL
=
facility.priority
.
■
facility
: Describes the part of the operating system that is logging the
message. Accepted values are
user
,
local0
–
local7
,
syslog
,
daemon
,
kern
,
mail
,
auth
,
lpr
,
news
,
uucp
, and
cron
.
The
local0
–
local7
values are predefined tags that enable you to sort the
syslog message into categories. These categories can be log files or other
destinations that the syslog utility can access. To find more information about
these types of tags, refer to the
syslog
utility
MAN
page.
■
priority
: Defines the severity of the message. Accepted values are
notice
,
info
,
debug
,
warning
,
err
,
crit
,
alert
, and
emerg
.
The syslog daemon compares the value assigned to the facility argument of the
AUDIT_SYSLOG_LEVEL
parameter with the
syslog.conf
file to determine where to
log information.

Auditing General Activities with Standard Auditing
9-20 Oracle Database Security Guide
For example, the following statement identifies the facility as
local1
with a
priority level of
warning
:
AUDIT_SYSLOG_LEVEL=local1.warning
See Oracle Database Reference for more information about
AUDIT_SYSLOG_LEVEL
.
3. Log in to the computer that contains the syslog configuration file,
/etc/syslog.conf
, with the superuser (root) privilege.
4. Add the audit file destination to the
syslog
configuration file
syslog.conf
.
For example, assuming you had set the
AUDIT_SYSLOG_LEVEL
to
local1.warning
,
enter the following:
local1.warning /var/log/audit.log
This setting logs all warning messages to the
/var/log/audit.log
file.
5. Restart the syslog logger:
$/etc/rc.d/init.d/syslog restart
Now, all audit records will be captured in the file
/var/log/audit.log
through the
syslog daemon.
6. Restart the database instance:
CONNECT SYS / AS SYSOPER
Enter password: password
SHUTDOWN IMMEDIATE
STARTUP
How the AUDIT and NOAUDIT SQL Statements Work
This section contains:
■Enabling Standard Auditing with the AUDIT SQL Statement
■Auditing Statement Executions: Successful, Unsuccessful, or Both
■How Standard Audit Records Are Generated
■How Do Cursors Affect Standard Auditing?
■Benefits of Using the BY ACCESS Clause in the AUDIT Statement
■Auditing Actions Performed by Specific Users
■Removing the Audit Option with the NOAUDIT SQL Statement
Enabling Standard Auditing with the AUDIT SQL Statement
To configure the standard auditing option, use the
AUDIT
SQL statement.
Table 9–3 lists the categories in which you can use the
AUDIT
statement.
See Also: Oracle Database SQL Language Reference for a description
of the
AUDIT
statement syntax

Auditing General Activities with Standard Auditing
Verifying Security Access with Auditing 9-21
Auditing Statement Executions: Successful, Unsuccessful, or Both
For statement, privilege, and schema object auditing, Oracle Database permits the
selective auditing of successful executions of statements, unsuccessful attempts to
execute statements, or both. This enables you to monitor actions even if the audited
statements do not complete successfully. Monitoring unsuccessful SQL statement can
expose users who are snooping or acting maliciously, though most unsuccessful SQL
statements are neither.
This method of auditing is also useful in that it reduces the audit trail, helping you to
focus on specific actions. This can aid in maintaining good database performance.
The options are as follows:
■WHENEVER SUCCESSFUL clause: This clause audits only successful executions
of the audited statement.
■WHENEVER NOT SUCCESSFUL clause: This clause audits only unsuccessful
executions of the audited statement.
Auditing an unsuccessful statement execution generates an audit report only if a
valid SQL statement is issued but fails, because it lacks proper authorization or
references a nonexistent schema object. Statements that fail to execute because they
were not valid cannot be audited.
For example, an enabled privilege auditing option set to audit unsuccessful
statement executions audits statements that use the target system privilege but
failed for other reasons. One example is when a
CREATE TABLE
auditing condition
is set, but some
CREATE
TABLE
statements fail due to insufficient quota for the
specified tablespace.
■Omitting WHENEVER SUCCESSFUL or WHENEVER NOT SUCCESSFUL: If
you omit these clauses, then Oracle Database audits both successful and
unsuccessful executions of the audited statement.
For example:
AUDIT CREATE TABLE BY ACCESS WHENEVER NOT SUCCESSFUL;
How Standard Audit Records Are Generated
Oracle Database generates an audit record for each execution of an audited statement
or operation, as follows:
Table 9–3 Standard Auditing Levels and Their Effects
Level Effect
Statement Audits specific SQL statements or groups of statements that
affect a particular type of database object. For example,
AUDIT
TABLE
audits the
CREATE TABLE
,
TRUNCATE TABLE
,
COMMENT ON
TABLE
, and
DELETE [FROM] TABLE
statements.
Privilege Audits SQL statements that are authorized by the specified
system privilege. For example,
AUDIT CREATE ANY TRIGGER
audits statements issued using the
CREATE ANY TRIGGER
system
privilege.
Object Audits specific statements on specific objects, such as
ALTER
TABLE
on the
HR.EMPLOYEES
table.
Network Audits unexpected errors in network protocol or internal errors
in the network layer.

Auditing General Activities with Standard Auditing
9-22 Oracle Database Security Guide
■Each time the SQL statement for which auditing was configured is executed. This
also includes the execution of the statements within PL/SQL procedures.
■Each time the privilege for which auditing was configured is used
■Each time the object for which auditing was configured is operated upon
How Do Cursors Affect Standard Auditing?
For each execution of an auditable operation within a cursor, Oracle Database inserts
one audit record into the audit trail. Events that cause cursors to be reused include the
following:
■An application, such as Oracle Forms, holding a cursor open for reuse
■Subsequent execution of a cursor using new bind variables
■Statements executed within PL/SQL loops where the PL/SQL engine optimizes
the statements to reuse a single cursor
Auditing is not affected by whether or not a cursor is shared. Each user creates her or
his own audit trail records on first execution of the cursor.
Benefits of Using the BY ACCESS Clause in the AUDIT Statement
By default, Oracle Database writes a new audit record for every audited event, using
the
BY ACCESS
clause functionality. To use this functionality, either include
BY ACCESS
in the
AUDIT
statement, or if you want, you can omit it because it is the default. (As of
Oracle Database 11g Release 2 (11.2.0.2), the
BY ACCESS
clause is the default setting.)
Oracle recommends that you audit
BY ACCESS
and not
BY SESSION
in your
AUDIT
statements. The benefits of using the
BY ACCESS
clause in the
AUDIT
statement are as
follows:
■The audit records generated through the
BY ACCESS
audit option have more
information, such as execution status (return code), date and time of execution, the
privileges used, the objects accessed, the SQL text itself and its bind values. In
addition, the
BY ACCESS
audit option captures the SCN for each execution and this
can help flashback queries.
■Oracle Database records separately each execution of a SQL statement, the use of a
privilege, and access to the audited object. Given that the values for the return
code, timestamp, SQL text recorded are accurate for each execution, this can help
you find how many times the action was performed.
■The
BY ACCESS
audit records have separate
LOGON
and
LOGOFF
entries, each with
fine-grained timestamps.
For example:
AUDIT SELECT TABLE BY ACCESS;
In this scenario:
■The user
jward
connects to the database and issues five
SELECT
statements against
the table named
departments
and then disconnects from the database.
■The user
swilliams
connects to the database and issues three
SELECT
statements
against the
departments
table and then disconnects from the database.
The audit trail contains eight records, one recorded for each
SELECT
statement.

Auditing General Activities with Standard Auditing
Verifying Security Access with Auditing 9-23
Auditing Actions Performed by Specific Users
Statement and privilege audit options can audit statements issued by any user or
statements issued by a specific list of users. By focusing on specific users, you can
minimize the number of audit records generated.
Example 9–6 shows how to audit statements by users
scott
and
blake
when they
query or update a table or view.
Example 9–6 Using AUDIT to Audit User Actions
AUDIT SELECT TABLE, UPDATE TABLE BY scott, blake BY ACCESS;
See Oracle Database SQL Language Reference for additional information about auditing
by user.
Removing the Audit Option with the NOAUDIT SQL Statement
The
NOAUDIT
statement removes the audit option. Use it to reset statement and
privilege audit options, and object audit options. A
NOAUDIT
statement that sets
statement and privilege audit options can include the
BY
user
clause to specify a list of
users to limit the scope of the statement and privilege audit options.
You can use the
NOAUDIT
statement to disable an audit option selectively using the
WHENEVER
clause. If the clause is not specified, then the auditing option is disabled
entirely, for both successful and unsuccessful cases.
The
NOAUDIT
statement does not support the
BY ACCESS
clause. You can remove audit
options, no matter how they were turned on, by using an appropriate
NOAUDIT
statement.
Auditing SQL Statements
This section contains:
■About SQL Statement Auditing
■Types of SQL Statements That Are Audited
■Configuring SQL Statement Auditing
■Removing SQL Statement Auditing
About SQL Statement Auditing
SQL statement auditing is the selective auditing of related groups of SQL statements
regarding a particular type of database structure or schema object, but not a
specifically named structure or schema object.
Types of SQL Statements That Are Audited
The statements that you can audit are in the following categories:
■DDL statements. For example,
AUDIT
TABLE
audits all
CREATE
and
DROP
TABLE
statements
■DML statements. For example,
AUDIT
SELECT
TABLE
audits all
SELECT
...
FROM
TABLE/VIEW
statements, regardless of the table or view
See Also: Oracle Database SQL Language Reference for a description
of the
NOAUDIT
statement syntax

Auditing General Activities with Standard Auditing
9-24 Oracle Database Security Guide
Statement auditing can be broad or focused, for example, by auditing the activities of
all database users or of only a select list of activities.
Configuring SQL Statement Auditing
Use the
AUDIT
statement to configure SQL statement auditing. You must have the
AUDIT SYSTEM
system privilege before you can enable auditing. Typically, only the
security administrator is granted this system privilege.
Example 9–7 shows how to audit the
SELECT TABLE
SQL statement.
Example 9–7 Using AUDIT to Enable SQL Statement Auditing
AUDIT SELECT TABLE BY ACCESS;
Example 9–8 shows how to audit all unsuccessful
SELECT
,
INSERT
, and
DELETE
statements on all tables by all database users, and by individual audited statement.
Example 9–8 Auditing Unsuccessful Statements
AUDIT SELECT TABLE, INSERT TABLE, DELETE TABLE
BY ACCESS
WHENEVER NOT SUCCESSFUL;
If you plan to audit all SQL statements, individual user connections, or references to
non-existent objects, follow these guidelines:
■Auditing all SQL statements for individual users. You can use the
ALL
STATEMENTS
clause to audit only the top-level SQL statements. The behavior of this
audit option is different from other statement audit options. If the SQL statement
is issued from inside a PL/SQL procedure, then the
ALL STATEMENTS
audit option
does not audit it. This audit option does not affect any other
AUDIT
options that
you may have already set.
For example, to audit all successful statements issued by users
jward
and
jsmith
,
enter the following:
AUDIT ALL STATEMENTS BY jward, jsmith BY ACCESS WHENEVER SUCCESSFUL;
■Auditing all the SQL statement shortcut activities performed by individual
users. You can use the
ALL
clause to audit all the SQL statement shortcuts listed in
Table 13-1 and Table 13-2 in Oracle Database SQL Language Reference.
For example:
AUDIT ALL BY jward BY ACCESS;
■Auditing all SQL statements for the current session, regardless of user. You can
use the
IN SESSION CURRENT
clause for
ALL STATEMENTS
audit option to audit
top-level SQL statements in the lifetime of the user session. You cannot use the
IN
SESSION CURRENT
clause for a specific user. You cannot use the
NOAUDIT
statement
to cancel it, but the auditing lasts only as long as the user session lasts. When the
user ends the session, the auditing ends.
For example, to audit all unsuccessful statements in any current user session:
AUDIT ALL STATEMENTS IN SESSION CURRENT BY ACCESS WHENEVER NOT SUCCESSFUL;
You can use the
AUDIT ALL STATEMENTS
audit option with the
IN SESSION
CURRENT
clause in a database logon trigger. The database logon trigger can use
SYS_CONTEXT
function to configure this auditing only under certain conditions,

Auditing General Activities with Standard Auditing
Verifying Security Access with Auditing 9-25
such as the time a user logs in between 6:30 p.m. to 9:00 a.m. This would enable
you to capture SQL statements performed by users who log in to the database
during non-work hours.
This type of auditing is useful to increase the collection of audit activity when you
suspect this connection may not be secure or could pose an internal threat. For
example, by using a database logon trigger, you can query contents of the
connection context using the
SYS_CONTEXT
function.
The logon trigger functionality can establish that this connection should be
audited more fully. Issue the following SQL command:
AUDIT ALL STATEMENTS IN SESSION CURRENT;
This type of auditing remains in effect until this session is terminated.
■Auditing login and logoff connections and disconnections. The
AUDIT SESSION
statement generates an independent audit record for every login and logoff event.
This enables you to audit all successful and unsuccessful connections to and
disconnections from the database, regardless of user.
For example:
AUDIT SESSION BY ACCESS;
You can set this option selectively for individual users also, as in the following
example:
AUDIT SESSION BY jward, jsmith BY ACCESS;
■Auditing statements that fail because an object does not exist. The
NOT EXISTS
option of the
AUDIT
statement specifies auditing of all SQL statements that fail
because the target object does not exist.
For example:
AUDIT NOT EXISTS;
See Oracle Database SQL Language Reference for detailed information about the
AUDIT
SQL statement.
Removing SQL Statement Auditing
To remove SQL statement auditing, use the use the
NOAUDIT
SQL statement. (Privilege
auditing will still be enabled.) You must have the
AUDIT SYSTEM
system privilege
before you can remove SQL statement auditing. If you have configured the
AUDIT ALL
STATEMENTS
option, then issuing the
NOAUDIT AUDIT STATEMENTS
statement does not
affect other audit options you may have set. If you included the
IN SESSION CURRENT
clause in the
AUDIT
statement, you cannot remove this
AUDIT
statement using the
NOAUDIT
statement. (The audit setting discontinues when the user’s session ends.)
Example 9–9 shows examples of using the
NOAUDIT
statement to remove auditing.
Example 9–9 Using NOAUDIT to Remove Session and SQL Statement Auditing
NOAUDIT session;
NOAUDIT session BY preston, sebastian;
NOAUDIT SELECT TABLE, INSERT TABLE, DELETE TABLE, EXECUTE PROCEDURE;
Example 9–10 shows how to remove all statement auditing by using the
NOAUDIT
statement.

Auditing General Activities with Standard Auditing
9-26 Oracle Database Security Guide
Example 9–10 Using NOAUDIT to Remove ALL STATEMENTS Auditing
NOAUDIT ALL STATEMENTS;
See Oracle Database SQL Language Reference for detailed information about the
NOAUDIT
statement.
Auditing Privileges
This section contains:
■About Privilege Auditing
■Types of Privileges That Can Be Audited
■Configuring Privilege Auditing
■Removing Privilege Auditing
About Privilege Auditing
Privilege auditing audits statements that use a system privilege, such as
SELECT
ANY
TABLE.
In this kind of auditing, SQL statements that require the audited privilege to
succeed are recorded.
Types of Privileges That Can Be Audited
You can audit the use of any system privilege. Similar to statement auditing, privilege
auditing audits the activities of all database users or only a specified list.
If you set similar audit options for both statement and privilege auditing, then only a
single audit record is generated. For example, if the statement clause
TABLE
and the
system privilege
CREATE
TABLE
are both audited, then only a single audit record is
generated each time a table is created.
Privilege auditing does not occur if the action is already permitted by the existing
owner and object privileges. Privilege auditing is triggered only if the privileges are
insufficient, that is, only if what makes the action possible is a system privilege. For
example, suppose that user
SCOTT
has been granted the
SELECT ANY TABLE
privilege
and the
SELECT ANY TABLE
is being audited. If
SCOTT
selects his own table (for
example,
SCOTT.EMP
), then the
SELECT ANY TABLE
privilege is not used. Because he
performed the
SELECT
statement within his own schema, no audit record is generated.
On the other hand, if
SCOTT
selects from another schema (for example, the
HR.EMPLOYEES
table), then an audit record is generated. Because
SCOTT
selected a table
outside his own schema, he needed to use the
SELECT ANY TABLE
privilege.
Privilege auditing is more focused than statement auditing, because each privilege
auditing option audits only specific types of statements, not a related list of
statements. For example, the statement auditing clause,
TABLE
, audits
CREATE
TABLE
,
ALTER
TABLE
, and
DROP
TABLE
statements. However, the privilege auditing option,
CREATE TABLE
, audits only
CREATE TABLE
statements, because only the
CREATE TABLE
statement requires the
CREATE
TABLE
privilege.
See the listing of system privileges in the
GRANT
SQL statement section of Oracle
Database SQL Language Reference.
Configuring Privilege Auditing
Privilege audit options are the same as their corresponding system privileges. For
example, the option to audit use of the
DELETE ANY TABLE
privilege is
DELETE ANY
TABLE
.

Auditing General Activities with Standard Auditing
Verifying Security Access with Auditing 9-27
Example 9–11 shows how to audit the
DELETE ANY TABLE
privilege.
Example 9–11 Using AUDIT to Configure Privilege Auditing
AUDIT DELETE ANY TABLE BY ACCESS;
To audit all successful and unsuccessful uses of the
DELETE ANY TABLE
system
privilege, enter the following statement:
AUDIT DELETE ANY TABLE BY ACCESS;
Removing Privilege Auditing
The following statement removes all privilege audit options:
NOAUDIT ALL PRIVILEGES;
This example disables the audit settings from Example 9–11:
NOAUDIT DELETE ANY TABLE;
To disable privilege auditing options, you must have the
AUDIT SYSTEM
system
privilege. Usually, only the security administrator is granted this system privilege.
Auditing SQL Statements and Privileges in a Multitier Environment
You can use the
AUDIT
statement to audit the activities of a client in a multitier
environment. In a multitier environment, Oracle Database preserves the identity of a
client through all tiers. Thus, you can audit actions taken on behalf of the client by a
middle-tier application, by using the
BY
user
clause in your
AUDIT
statement. The audit
applies to all user sessions, including proxy sessions.
The middle tier can also set the user client identity in a database session, enabling the
auditing of end-user actions through the middle-tier application. The end-user client
identity then shows up in the audit trail.
Example 9–12 shows how to audit
SELECT TABLE
statements issued by the user
jackson
.
Example 9–12 Using AUDIT to Audit a SQL Statement for a User
AUDIT SELECT TABLE BY jackson;
You can audit user activity in a multitier environment. Once audited, you can verify
these activities by querying the
DBA_AUDIT_TRAIL
data dictionary view.
Figure 9–1 illustrates how you can audit proxy users by querying the
COMMENT_TEXT
,
PROXY_SESSIONID
,
ACTION_NAME
, and
SESSION_ID
columns of the
DBA_AUDIT_TRAIL
view. In this scenario, both the database user and proxy user accounts are known to
the database. Session pooling can be used.
Auditing General Activities with Standard Auditing
9-28 Oracle Database Security Guide
Figure 9–1 Auditing Proxy Users
Figure 9–2 illustrates how you can audit client identifier information across multiple
database sessions by querying the
CLIENT_ID
column of the
DBA_AUDIT_TRAIL
data
dictionary view. In this scenario, the client identifier has been set to
CLIENT_A
. As with
the proxy user-database user scenario described in Figure 9–1, session pooling can be
used.
Figure 9–2 Auditing Client Identifier Information Across Sessions
Auditing Schema Objects
This section contains:
See Also: "Preserving User Identity in Multitiered Environments" on
page 3-36 for more information about user authentication in a
multitiered environment

Auditing General Activities with Standard Auditing
Verifying Security Access with Auditing 9-29
■About Schema Object Auditing
■Types of Schema Objects That Can Be Audited
■Using Standard Auditing with Editioned Objects
■Schema Object Audit Options for Views, Procedures, and Other Elements
■Configuring Schema Object Auditing
■Removing Object Auditing
■Setting Audit Options for Objects That May Be Created in the Future
About Schema Object Auditing
Schema object auditing monitors actions performed on the audited schema objects,
such as tables or views. Object auditing applies to all users but is limited to the
audited object only. Users can use the
AUDIT
and
NOAUDIT
statements on objects in their
own schemas.
Types of Schema Objects That Can Be Audited
You can audit statements that refer to tables, views, sequences, standalone stored
procedures or functions, and packages, but not individual procedures within
packages. (See "Auditing Functions, Procedures, Packages, and Triggers" on page 9-32
for more information about auditing these types of objects.)
You cannot directly audit statements that reference clusters, database links, indexes, or
synonyms. However, you can indirectly audit access to these schema objects, by
auditing the operations that affect the base table.
When you audit a schema object, the auditing applies to all users of the database. You
cannot set these options for a specific list of users. You can set default schema object
audit options for all auditable schema objects.
Using Standard Auditing with Editioned Objects
When an editioned object has an audit policy, then it applies in all editions in which
the object is visible. When an editioned object is actualized, any audit policies that are
attached to it are newly attached to the new actual occurrence. When you newly apply
an audit policy to an inherited editioned object, this action will actualize it.
You can find the editions in which audited objects appear by querying the
OBJECT_
NAME
and
OBJ_EDITION_NAME
columns in the
DBA_COMMON_AUDIT_TRAIL
and
V$XML_
AUDIT_TRAIL
data dictionary views.
Schema Object Audit Options for Views, Procedures, and Other Elements
The definitions for views and procedures (including stored functions, packages, and
triggers) reference underlying schema objects. Because of this dependency, some
unique characteristics apply to auditing views and procedures, such as the likelihood
of generating multiple audit records.
Views and procedures are subject to the enabled audit options on the base schema
objects, including the default audit options. These options also apply to the resulting
SQL statements.
See Also: Oracle Database SQL Language Reference for information
about auditable schema objects
See Also: Oracle Database Advanced Application Developer's Guide for
detailed information about editions

Auditing General Activities with Standard Auditing
9-30 Oracle Database Security Guide
Consider the following series of SQL statements:
AUDIT SELECT ON HR.EMPLOYEES BY ACCESS;
CREATE VIEW employees_departments AS
SELECT employee_id, last_name, department_id
FROM employees, departments
WHERE employees.department_id = departments.department_id;
AUDIT SELECT ON employees_departments BY ACCESS;
SELECT * FROM employees_departments;
As a result of the query on the
employees_departments
view, two audit records are
generated: one for the query on the
employees_departments
view and one for the
query on the base table
employees
(indirectly through the
employees_departments
view). The query on the base table
departments
does not generate an audit record
because the
SELECT
audit option for this table is not enabled. All audit records pertain
to the user that queried the
employees_departments
view.
In the given example, if the
AUDIT SELECT ON HR.EMPLOYEES;
statement is omitted,
then using the
employees_departments
view does not generate an audit record for the
EMPLOYEES
table.
Configuring Schema Object Auditing
You can use the
AUDIT
statement to configure object auditing in the current edition.
Oracle Database SQL Language Reference lists valid object audit options for
AUDIT
and
the schema object types for which each option is available.
A user can set any object audit option for the objects contained in his or her schema.
The
AUDIT ANY
system privilege is required to set an object audit option for an object
contained in another user schema or to set the default object auditing option. Usually,
only the security administrator is granted the
AUDIT ANY
privilege.
Figure 9–13 shows how to audit all successful and unsuccessful
DELETE
statements on
the
laurel.emp
table.
Example 9–13 Configuring Auditing for a Schema Table
AUDIT DELETE ON laurel.emp BY ACCESS;
Example 9–14 shows how to audit all successful
SELECT
,
INSERT
, and
DELETE
statements on the
dept
table owned by user
jward
.
Example 9–14 Auditing Successful Statements on a Schema Table
AUDIT SELECT, INSERT, DELETE
ON jward.dept
BY ACCESS
WHENEVER SUCCESSFUL;
Example 9–15 shows how you can use the
ON DEFAULT
clause to apply to any new
objects (tables, views, and sequences) that are created after you set the
AUDIT
statement. In this example, new objects that are created in the future will be audited
for all unsuccessful
SELECT
statements:
Example 9–15 Configuring Auditing for Any New Objects Using the DEFAULT Clause
AUDIT SELECT
ON DEFAULT

Auditing General Activities with Standard Auditing
Verifying Security Access with Auditing 9-31
BY ACCESS
WHENEVER NOT SUCCESSFUL;
Example 9–16 shows how to audit the execution of PL/SQL procedure or function.
Example 9–16 Auditing the Execution of a Procedure or Function
AUDIT EXECUTE ON sec_mgr.auth_orders BY ACCESS;
Removing Object Auditing
Use the
NOAUDIT
statement to remove object auditing. The following statements turn
off the corresponding auditing options:
NOAUDIT DELETE
ON emp;
NOAUDIT SELECT, INSERT, DELETE
ON jward.dept;
To remove all object audit options on the
emp
table, enter the following statement:
NOAUDIT ALL ON emp;
To remove all default object audit options, enter the following statement:
NOAUDIT ALL ON DEFAULT;
All schema objects that are created before this
NOAUDIT
statement is issued continue to
use the default object audit options in effect at the time of their creation, unless
overridden by an explicit
NOAUDIT
statement after their creation.
To remove object audit options for a specific object, you must be the owner of the
schema object. To remove the object audit options of an object in the schema of another
user or to remove default object audit options, you must have the
AUDIT ANY
system
privilege. A user with privileges to remove object audit options of an object can
override the options set by any user.
Setting Audit Options for Objects That May Be Created in the Future
You can create audit settings for objects that do not exist yet, such as the insertion and
deletion of tables to be created. There are two approaches that you can take. One
approach is to use the statement audit options in the
AUDIT
statement. For example, to
audit all inserts on future tables, enter the following SQL statement:
AUDIT INSERT TABLE BY ACCESS;
The second approach is to invoke the
AUDIT
statement using the
ON DEFAULT
clause.
For example:
AUDIT ALL ON DEFAULT BY ACCESS;
This statement audits by default all subsequent object creation statements. The
ON
keyword specifies object auditing. The
ON DEFAULT
clause configures auditing for
subsequently created objects that are affected by the following statements:
Statements A-D Statements E-I Statements I-R Statements S-Y
ALTER EXECUTE INSERT SELECT
AUDIT GRANT LOCK UPDATE
COMMENT FLASHBACK
READ
-

Auditing General Activities with Standard Auditing
9-32 Oracle Database Security Guide
To restrict
ON DEFAULT
to a specific action, enter a statement similar to the following:
AUDIT ALTER, DELETE ON DEFAULT BY ACCESS;
For more information about the audit options and the
ON DEFAULT
clause of the
AUDIT
SQL statement, see Oracle Database SQL Language Reference. To find objects audited by
default, query the
ALL_DEF_AUDIT_OPTS
data dictionary view.
Auditing Directory Objects
This section contains:
■About Directory Object Auditing
■Configuring Directory Object Auditing
■Removing Directory Object Auditing
About Directory Object Auditing
You can audit directory objects. For example, suppose you create a directory object
that contains a preprocessor program that the
ORACLE_LOADER
access driver will use.
You can audit anyone who runs this program within this directory object.
Configuring Directory Object Auditing
Use the
AUDIT
statement to enable object auditing. Example 9–17 shows how to audit
the
EXECUTE
privilege on the directory object
my_exec
.
Example 9–17 Auditing a Directory Object
AUDIT EXECUTE ON DIRECTORY my_exec BY ACCESS;
Removing Directory Object Auditing
Use the
NOAUDIT
statement to disable directory object auditing. For example:
NOAUDIT EXECUTE ON DIRECTORY my_exec;
Auditing Functions, Procedures, Packages, and Triggers
This section contains:
■About Auditing Functions, Procedures, Packages, and Triggers
■Configuring the Auditing of Functions, Procedures, Packages, and Triggers
■Removing the Auditing of Functions, Procedures, Packages, and Triggers
About Auditing Functions, Procedures, Packages, and Triggers
You can audit functions, procedures, PL/SQL packages, and triggers. The areas that
you can audit are as follows:
■You can individually audit standalone functions, standalone procedures, and
PL/SQL packages.
■If you audit a PL/SQL package, Oracle Database audits all functions and
procedures within the package.
DELETE INDEX RENAME
-
Statements A-D Statements E-I Statements I-R Statements S-Y

Auditing General Activities with Standard Auditing
Verifying Security Access with Auditing 9-33
■If you enable auditing for all executions, Oracle Database audits all triggers in the
database, as well as all the functions and procedures within PL/SQL packages.
■You cannot audit individual functions or procedures within a PL/SQL package.
If you want to audit functions that are associated with Oracle Virtual Private database
policies, note the following:
■Dynamic policies: Oracle Database evaluates the policy function twice, once
during SQL statement parsing and again during execution. As a result, two audit
records are generated for each evaluation.
■Static policies: Oracle Database evaluates the policy function once and then
caches it in the SGA. As a result, only one audit record is generated.
■Context-sensitive policies: Oracle Database executes the policy function once,
during statement parsing. As a result, only one audit record is generated.
Configuring the Auditing of Functions, Procedures, Packages, and Triggers
Example 9–18 shows how to audit the execution of any function, procedure, package,
or trigger, by any user in the database.
Example 9–18 Auditing All Functions, Procedures, Packages, and Triggers
AUDIT EXECUTE PROCEDURE BY ACCESS;
Example 9–19 shows how to audit user
psmith
’s successful and unsuccessful
executions of functions, procedures, packages, and triggers.
Example 9–19 Auditing a User’s Execution of Functions, Procedures, Packages, and
Triggers
AUDIT EXECUTE PROCEDURE BY psmith BY ACCESS;
Example 9–20 shows how to audit a standalone procedure entitled
check_work
that is
in the
sales_data
schema. This idea applies to standalone functions as well.
Example 9–20 Auditing the Execution of a Procedure or Function within a Schema
AUDIT EXECUTE ON sales_data.check_work BY ACCESS WHENEVER SUCCESSFUL;
Removing the Auditing of Functions, Procedures, Packages, and Triggers
Use the
NOAUDIT
statement to remove the auditing of functions, procedures, and
triggers. For example:
NOAUDIT EXECUTE PROCEDURE;
NOAUDIT EXECUTE PROCEDURE BY psmith;
NOAUDIT EXECUTE ON sales_data.checkwork;
Auditing Network Activity
This section contains:
■About Network Auditing
■Configuring Network Auditing
■Removing Network Auditing

Auditing General Activities with Standard Auditing
9-34 Oracle Database Security Guide
About Network Auditing
You can use the
AUDIT
statement to audit unexpected errors in network protocol or
internal errors in the network layer. Network auditing captures errors that occur
during communication with the client on the network. These are errors thrown by the
SQL*Net driver. There can be several causes of network errors. For example, an
internal event set by a database engineer for testing purposes can cause a network
error. Other causes include conflicting configuration settings for encryption, such as
the network not finding the information required to create or process expected
encryption. The errors that network auditing uncovers (such as
ACTION 122 Network
Error
) are not connection failures: network auditing is only concerned with data as it
travels across the network.
The audit record for network auditing lists the authentication type and SQL*Net
address of the client (if available) in the
COMMENT_TEXT
field of the audit record, using
the following format:
Authenticated by: authentication_type; Client Address: SQLNetAddress_of_client
The
Client Address: SQLNetAddress_of_client
portion only appears if this
information is available.
Table 9–4 shows how to remedy four common error conditions.
Configuring Network Auditing
To configure network auditing, use the
AUDIT
statement. For example:
AUDIT NETWORK BY ACCESS;
Table 9–4 Auditable Network Error Conditions
Error Cause Action
TNS-02507
Encryption algorithm
not installed
After picking an algorithm, the server
was unable to find an index for it in its
table of algorithms. This should be
impossible because the algorithm was
chosen (indirectly) from that list.
Turn on tracing for further
details, and then rerun the
operation. (Note that this
error is not normally visible
to the user.) If the error
persists, then contact Oracle
Support Services.
TNS-12648
Encryption or data
integrity algorithm
list empty
An Oracle Advanced Security
list-of-algorithms parameter was
empty.
Change the list to contain
the name of at least one
installed algorithm, or
remove the list entirely if
every installed algorithm is
not acceptable.
TNS-12649
Unknown encryption
or data integrity
algorithm
An Oracle Advanced Security
list-of-algorithms parameter included
an algorithm name that was not
recognized.
Remove that algorithm
name, correct it if it was
misspelled, or install the
driver for the missing
algorithm.
TNS-12650
No common encryption
or data integrity
algorithm
The client and server have no
algorithm in common for either
encryption or data integrity or both.
Choose sets of algorithms
that overlap. In other words,
add one of the client
algorithm choices to the
server list, or add one of the
server list choices to the
client algorithm.

Using Default Auditing for Security-Relevant SQL Statements and Privileges
Verifying Security Access with Auditing 9-35
Removing Network Auditing
To remove network auditing:
NOAUDIT NETWORK;
Using Default Auditing for Security-Relevant SQL Statements and
Privileges
This section contains:
■About the Default Auditing Settings
■Privileges That Oracle Database Audits by Default
■Disabling and Enabling Default Audit Settings
About the Default Auditing Settings
When you use Database Configuration Assistant (DBCA) to create a new database,
Oracle Database configures the database to audit the most commonly used
security-relevant SQL statements and privileges. It also sets the
AUDIT_TRAIL
initialization parameter to
DB
. If you decide to use a different audit trail type (for
example,
OS
if you want to write the audit trail records to operating system files), then
you can do that: Oracle Database continues to audit the privileges that are audited by
default. If you disable auditing by setting the
AUDIT_TRAIL
parameter to
NONE
, then no
auditing takes place.
If you manually create a database, then you should run the
secconf.sql
script to
apply the default audit settings to your database. See "Disabling and Enabling Default
Audit Settings" on page 9-36 for more information.
To individually control the auditing of SQL statements and privileges, use the
AUDIT
and
NOAUDIT
statements. For more information, see "Auditing SQL Statements" on
page 9-23 and "Auditing Privileges" on page 9-26.
Privileges That Oracle Database Audits by Default
Oracle Database audits the following privileges by default:
Oracle Database audits the following SQL shortcuts by default:
Privileges A-C Privileges C-D Privileges D-G
ALTER ANY PROCEDURE CREATE ANY LIBRARY
DROP ANY TABLE
ALTER ANY TABLE
CREATE ANY PROCEDURE
DROP PROFILE
ALTER DATABASE CREATE ANY TABLE
DROP USER
ALTER PROFILE CREATE EXTERNAL JOB
EXEMPT ACCESS POLICY
ALTER SYSTEM CREATE PUBLIC DATABASE LINK
GRANT ANY OBJECT PRIVILEGE
ALTER USER CREATE SESSION GRANT ANY PRIVILEGE
AUDIT SYSTEM
CREATE USER
GRANT ANY ROLE
CREATE ANY JOB
DROP ANY PROCEDURE
-

Auditing Specific Activities with Fine-Grained Auditing
9-36 Oracle Database Security Guide
Disabling and Enabling Default Audit Settings
If your applications use the default audit settings from Oracle Database 10g Release 2
(10.2), then you can revert to these audit settings until you modify the applications to
use the Release 11g audit settings. To do so, run the
undoaud.sql
script.
After you have modified your applications to conform to the Release 11g audit
settings, then you can manually update your database to use the audit configuration
that suits your business needs, or you can run the
secconf.sql
script to apply the
Release 11g default audit settings. You can customize this script to have different
security settings if you like, but remember that the settings listed in the original script
are Oracle-recommended settings.
If you created your database manually, then you should run the
secconf.sql
script to
apply the Release 11g default audit settings to the database. Databases that have been
created with Database Configuration Assistant will have these settings, but manually
created databases do not.
The
undoaud.sql
and
secconf.sql
scripts are in the
$ORACLE_HOME/rdbms/admin
directory. The
undoaud.sql
script affects audit settings only, and the
secconf.sql
script affects both audit and password settings. They have no effect on other security
settings.
Auditing Specific Activities with Fine-Grained Auditing
This section contains:
■About Fine-Grained Auditing
■Where Are Fine-Grained Audit Records Stored?
■Advantages of Fine-Grained Auditing
■What Permissions Are Needed to Create a Fine-Grained Audit Policy?
■Activities That Are Always Audited in Fine-Grained Auditing
■Using Fine-Grained Audit Policies with Editions
■Creating an Audit Trail for Fine-Grained Audit Records
■How the Fine-Grained Audit Trail Generates Records
■Using the DBMS_FGA Package to Manage Fine-Grained Audit Policies
■Tutorial: Adding an Email Alert to a Fine-Grained Audit Policy
■Tutorial: Auditing Nondatabase Users
Shortcuts D-P Shortcuts P-R Shortcuts S
DATABASE LINK PUBLIC SYNONYM SYSTEM AUDIT
PROFILE ROLE SYSTEM GRANT
See Also:
■Oracle Database SQL Language Reference for detailed information
about the SQL statements described in this section
sql_statement_shortcut in Oracle Database SQL Language
Reference for a list of accepted SQL shortcuts you can use with
the
AUDIT
statement

Auditing Specific Activities with Fine-Grained Auditing
Verifying Security Access with Auditing 9-37
About Fine-Grained Auditing
Fine-grained auditing enables you to create policies that define specific conditions that
must take place for the audit to occur. This enables you to monitor data access based
on content. It provides granular auditing of queries, and
INSERT
,
UPDATE
, and
DELETE
operations. For example, a central tax authority must track access to tax returns to
guard against employee snooping, with enough detail to determine what data was
accessed. It is not enough to know that
SELECT
privilege was used by a specific user on
a particular table. Fine-grained auditing provides this deeper functionality.
In general, fine-grained audit policies are based on simple, user-defined SQL
predicates on table objects as conditions for selective auditing. During fetching,
whenever policy conditions are met for a row, the query is audited.
You can use fine-grained auditing to audit the following types of actions:
■Accessing a table between 9 p.m. and 6 a.m. or on Saturday and Sunday
■Using an IP address from outside the corporate network
■Selecting or updating a table column
■Modifying a value in a table column
Where Are Fine-Grained Audit Records Stored?
Fine-grained audit records are stored in the
SYS.FGA_LOG$
table. To find the records
have been generated for the audit policies that are in effect, you can query the
DBA_
FGA_AUDIT_TRAIL
data dictionary view. The
DBA_COMMON_AUDIT_TRAIL
data dictionary
view combines both standard and fine-grained audit log records. In addition, you can
query the
V$XML_AUDIT_TRAIL
view to find fine-grained audit records that were
written in XML formatted files. For detailed information about these views, see Oracle
Database Reference.
Oracle Database always audits
DELETE
,
INSERT
,
UPDATE
, and
MERGE
operations on the
SYS.FGA_LOG$
(and
SYS.AUD$
) tables to the
SYS.AUD$
table. It does not allow the audit
records to be deleted, unless user
SYS
performs these operations. If you have set the
AUDIT_SYS_OPERATIONS
initialization parameter to
TRUE
, then user
SYS
's operations are
audited. In this case the audit records of all
SYS
operations are written to whatever
Note:
■Fine-grained auditing is supported only with cost-based
optimization. For queries using rule-based optimization,
fine-grained auditing checks before applying row filtering,
which could result in an unnecessary audit event trigger.
■Policies currently in force on an object involved in a flashback
query are applied to the data returned from the specified
flashback snapshot (based on time or system change number
(SCN).
■If you want to use fine-grained auditing to audit data that is
being directly loaded (for example, using Oracle Warehouse
Builder to execute DML statements), then Oracle Database
transparently makes all direct loads that are performed in the
database instance into conventional loads. If you want to
preserve the direct loading of data, consider using standard
auditing instead.

Auditing Specific Activities with Fine-Grained Auditing
9-38 Oracle Database Security Guide
directory the
AUDIT_FILE_DEST
initialization parameter points to. If
AUDIT_FILE_DEST
is not set, then it writes the records to an operating system-dependent location.
Advantages of Fine-Grained Auditing
Fine-grained auditing creates a more meaningful audit trail, one that includes only
very specific actions that you want to audit. It excludes unnecessary information that
occurs if each table access was recorded. Fine-grained auditing has the following
advantages over standard auditing:
■It performs a Boolean condition check. If the Boolean condition you specify is
met, for example, a table being accessed on a Saturday, then the audit takes place.
■It captures the SQL that triggered the audit. You can capture both the SQL
statement that caused the audit, and any associated bind variables. Be aware that
you can only capture data from scalar column types. You cannot capture data from
object columns, LOBs, or user-defined column types. For example, suppose you
have the following query:
SELECT NAME FROM EMPLOYEE WHERE SSN = :1
If
:1
is of integer type and the value for
SSN
is 987654321, then the audit trail can
capture this information. However, the audit trail cannot capture this information
if
:1
is a BLOB, CLOB, object, or user-defined type.
This feature is available if you create the fine grained audit policy with the
audit_
trail
parameter of the
DBMS_FGA.ADD_POLICY
PL/SQL procedure to
DB+EXTENDED
or
XML+EXTENDED
.
■It adds extra protection to sensitive columns. You can audit specific relevant
columns that may hold sensitive information, such as salaries or Social Security
numbers.
■It provides an event handler feature. For example, you can write a function that
sends an email alert to a security administrator when an audited column that
should not be changed at midnight is updated.
■You do not need to set initialization parameters to enable fine-grained auditing.
Instead of setting initialization parameters such as
AUDIT_TRAIL
, you use the
DBMS_
FGA PL/SQL
package to add and remove fine-grained auditing policies as
necessary applying them to the specific operations or objects you want to monitor.
What Permissions Are Needed to Create a Fine-Grained Audit Policy?
To create a fine-grained audit policy, you must have
EXECUTE
privileges on the
DBMS_
FGA
PL/SQL package. The package is owned by the
SYS
user.
Activities That Are Always Audited in Fine-Grained Auditing
The
SYS.AUD$
table records all data manipulation language (DML) statements, such as
INSERT
,
UPDATE
,
MERGE
, and
DELETE
, that are performed on the
SYS.FGA_LOG$
table by
non-
SYS
users. Oracle Database performs the audit even if auditing has not been
configured for the
SYS.FGA_LOG$
table, which is the table in which these activities
occur. You can check these activities by querying the
DBA_FGA_AUDIT_TRAIL
and
DBA_
COMMON_AUDIT_TRAIL
views. See also "Activities That Are Always Written to the
Standard and Fine-Grained Audit Records" on page 9-3.

Auditing Specific Activities with Fine-Grained Auditing
Verifying Security Access with Auditing 9-39
Using Fine-Grained Audit Policies with Editions
If you are preparing an application for edition-based redefinition, and you cover each
table that the application uses with an editioning view, then you must move the
fine-grained audit polices that protect these tables to the editioning view.
Creating an Audit Trail for Fine-Grained Audit Records
You designate the audit trail format for fine-grained auditing by setting the audit_trail
parameter for the
DBMS_FGA.ADD_POLICY
policy (not to be confused with the
AUDIT_
TRAIL
initialization parameter) when you create the audit policy. Setting this
parameter to
XML
or
XML+EXTENDED
writes the records to the operating system files in
XML format. If you prefer to write the fine-grained audit records to the
SYS.FGA_LOG$
table, then set the
audit_trail
parameter for the
DBMS_FGA.ADD_POLICY
parameter to
DB
or
DB+EXTENDED
. For a list of reasons why writing audit records to operating system
files is beneficial, see "Advantages of the Operating System Audit Trail" on page 9-16.
You can use the
V$XML_AUDIT_TRAIL
data dictionary view to make audit records from
XML files available to DBAs through a SQL query, providing enhanced usability.
Querying this view causes all XML files (all files with an
.xml
extension) in the
AUDIT_
FILE_DEST
directory to be parsed and presented in relational table format.
The
DBA_COMMON_AUDIT_TRAIL
view includes the contents of the
V$XML_AUDIT_TRAIL
dynamic view for standard and fine-grained audit records.
Because the audit XML files are stored in files with the
.xml
extension on all platforms,
the dynamic view presents audit information similarly on all platforms. See Oracle
Database Reference for detailed information about the
V$XML_AUDIT_TRAIL
view
contents.
How the Fine-Grained Audit Trail Generates Records
The fine-grained audit trail captures an audit record for each reference of a table or a
view within a SQL statement. For example, if you run a
UNION
statement that
references the
HR.EMPLOYEES
table twice, then an audit policy for statement generates
two audit records, one for each access of the
HR.EMPLOYEES
table.
Using the DBMS_FGA Package to Manage Fine-Grained Audit Policies
This section contains:
■About the DBMS_FGA PL/SQL Package
■Creating a Fine-Grained Audit Policy
■Disabling and Enabling a Fine-Grained Audit Policy
■Dropping a Fine-Grained Audit Policy
About the DBMS_FGA PL/SQL Package
To manage a fine-grained audit policy, you use the
DBMS_FGA
PL/SQL package. This
package enables you to add all combinations of
SELECT
,
INSERT
,
UPDATE
, and
DELETE
statements to one policy. You also can audit
MERGE
statements, by auditing the
Note: If you audit tables that have sensitive data, remember that
DB+EXTENDED
and
XML+EXTENDED
settings for the
DBMS_FGA.ADD_POLICY
audit_trail
parameter will capture this data. See "Auditing Sensitive
Information" on page 10-18 for ways to handle this scenario.

Auditing Specific Activities with Fine-Grained Auditing
9-40 Oracle Database Security Guide
underlying actions of
INSERT
and
UPDATE
. To audit
MERGE
statements, configure
fine-grained access on the
INSERT
and
UPDATE
statements. Only one record is generated
for each policy for successful
MERGE
operations. To administer fine-grained audit
policies, you must have the
EXECUTE
privilege on the
DBMS_FGA
package.
The audit policy is bound to the table for which you created it. This simplifies the
management of audit policies because the policy only must be changed once in the
database, not in each application. In addition, no matter how a user connects to the
database—from an application, a Web interface, or through SQL*Plus or Oracle SQL
Developer—Oracle Database records any actions that affect the policy.
If any rows returned from a query match the audit condition that you define, then
Oracle Database inserts an audit entry into the fine-grained audit trail. This entry
excludes all the information that is reported in the regular audit trail. In other words,
only one row of audit information is inserted into the audit trail for every fine-grained
audit policy that evaluates to true.
For detailed information about the syntax of the
DBMS_FGA
package, see Oracle Database
PL/SQL Packages and Types Reference. See also Oracle Database Advanced Application
Developer's Guide.
Creating a Fine-Grained Audit Policy
To create a fine-grained audit policy, use the
DBMS_FGA.ADD_POLICY
procedure. This
procedure creates an audit policy using the supplied predicate as the audit condition.
Oracle Database executes the policy predicate with the privileges of the user who
created the policy. The maximum number of fine-grained policies on any table or view
object is 256. Oracle Database stores the policy in the data dictionary table, but you can
create the policy on any table or view that is not in the
SYS
schema.
After you create the fine-grained audit policy, it does not reside in any specific schema,
although the definition for the policy is stored in the
SYS.FGA$
data dictionary table.
You cannot modify a fine-grained audit policy after you have created it. If you need to
modify the policy, drop it and then recreate it.
Be aware that if a table column has a fine-grained audit policy, you cannot encrypt or
decrypt this column (by using the
UPDATE
statement). To do so raises an
ORA-28133:
full table access is restricted by fine-grained security
error. If you want to
update the column, first temporarily disable the fine-grained audit policy and then
encrypt or decrypt the column. Afterwards, re-enable the fine-grained audit policy. See
"Disabling and Enabling a Fine-Grained Audit Policy" on page 9-43 for more
information.
The syntax for the
ADD_POLICY
procedure is:
DBMS_FGA.ADD_POLICY(
object_schema VARCHAR2,
object_name VARCHAR2,
policy_name VARCHAR2,
audit_condition VARCHAR2,
Note: If you plan to use the
DBMS_FGA
package policy across different
editions, then you can control the results of the policy: whether the
results are uniform across all editions, or specific to the edition in
which the policy is used. See "How Editions Affects the Results of a
Global Application Context PL/SQL Package" on page 6-24 for more
information.

Auditing Specific Activities with Fine-Grained Auditing
Verifying Security Access with Auditing 9-41
audit_column VARCHAR2,
handler_schema VARCHAR2,
handler_module VARCHAR2,
enable BOOLEAN,
statement_types VARCHAR2,
audit_trail BINARY_INTEGER IN DEFAULT,
audit_column_opts BINARY_INTEGER IN DEFAULT);
In this specification:
■
object_schema
: Specifies the schema of the object to be audited. (If NULL, the
current log-on user schema is assumed.)
■
object_name
: Specifies the name of the object to be audited.
■
policy_name
: Specifies the name of the policy to be created. Ensure that this name
is unique.
■
audit_condition
: Specifies a Boolean condition in a row.
NULL
is allowed and acts
as
TRUE
. See "Auditing Specific Columns and Rows" on page 9-43 for more
information. If you specify
NULL
or no audit condition, then any action on a table
with that policy creates an audit record, whether or not rows are returned.
Follow these guidelines:
–Do not include functions, which execute the auditable statement on the same
base table, in the
audit_condition
setting. For example, suppose you create a
function that executes an
INSERT
statement on the
HR.EMPLOYEES
table. The
policy’s
audit_condition
contains this function and it is for
INSERT
statements (as set by
statement_types
). When the policy is used, the function
executes recursively until the system has run out of memory. This can raise the
error
ORA-1000: maximum open cursors exceeded
or
ORA-00036: maximum
number of recursive SQL levels (50) exceeded
.
–Do not issue the
DBMS_FGA.ENABLE_POLICY
or
DBMS_FGA.DISABLE_POLICY
statement from a function in a policy’s condition.
■
audit_column
: Specifies one or more columns to audit, including hidden columns.
If set to
NULL
or omitted, all columns are audited. These can include Oracle Label
Security hidden columns or object type columns. The default, NULL, causes audit
if any column is accessed or affected.
■
handler_schema
: If an alert is used to trigger a response when the policy is
violated, specifies the name of the schema that contains the event handler. The
default,
NULL
, uses the current schema. See also "Tutorial: Adding an Email Alert to
a Fine-Grained Audit Policy" on page 9-44.
■
handler_module
: Specifies the name of the event handler. Include the package the
event handler is in. This function is invoked only after the first row that matches
the audit condition in the query is processed.
Follow these guidelines:
–Do not create recursive fine-grained audit handlers. For example, suppose you
create a handler that executes an
INSERT
statement on the
HR.EMPLOYEES
table.
The policy that is associated with this handler is for
INSERT
statements (as set
by the
statement_types
parameter). When the policy is used, the handler
executes recursively until the system has run out of memory. This can raise the
error
ORA-1000: maximum open cursors exceeded
or
ORA-00036: maximum
number of recursive SQL levels (50) exceeded
.

Auditing Specific Activities with Fine-Grained Auditing
9-42 Oracle Database Security Guide
–Do not issue the
DBMS_FGA.ENABLE_POLICY
or
DBMS_FGA.DISABLE_POLICY
statement from a policy handler. Doing so can raise the
ORA-28144: Failed
to execute fine-grained audit handler
error.
■
enable
: Enables or disables the policy using true or false. If omitted, the policy is
enabled. The default is
TRUE
.
■
statement_types
: Specifies the SQL statements to be audited:
INSERT
,
UPDATE
,
DELETE
, or
SELECT
only. The default is
SELECT
.
■
audit_trail
: Specifies the destination (
DB
or
XML
) of fine-grained audit records.
Also specifies whether to populate
LSQLTEXT
and
LSQLBIND
in
FGA_LOG$
. However,
be aware that sensitive data, such as credit card information, can be recorded in
clear text. See "Auditing Sensitive Information" on page 10-18 for how you can
handle this scenario.
If you set the
audit_trail
parameter to
XML
, then the XML files are written to the
directory specified by the
AUDIT_FILE_DEST
initialization parameter.
For read-only databases, Oracle Database writes the fine-grained audit trail to
XML files, regardless of the
audit_trail
setting.
■
audit_column_opts
: If you specify more than one column in the
audit_column
parameter, then this parameter determines whether to audit all or specific
columns. See "Auditing Specific Columns and Rows" on page 9-43 for more
information.
See Oracle Database PL/SQL Packages and Types Reference for additional details about the
ADD_POLICY
syntax.
Example 9–21 shows how to audit statements
INSERT
,
UPDATE
,
DELETE
, and
SELECT
on
table
HR.EMPLOYEES
. Note that this example omits the
audit_column_opts
parameter,
because it is not a mandatory parameter.
Example 9–21 Using DBMS_FGA.ADD_POLICY to Create a Fine-Grained Audit Policy
BEGIN
DBMS_FGA.ADD_POLICY(
object_schema => 'HR',
object_name => 'EMPLOYEES',
policy_name => 'chk_hr_employees',
enable => TRUE,
statement_types => 'INSERT, UPDATE, SELECT, DELETE',
audit_trail => DBMS_FGA.DB);
END;
/
At this point, if you query the
DBA_AUDIT_POLICIES
view, you will find the new policy
listed:
SELECT POLICY_NAME FROM DBA_AUDIT_POLICIES;
POLICY_NAME
-------------------------------
CHK_HR_EMPLOYEES
Afterwards, any of the following SQL statements log an audit event record.
SELECT COUNT(*) FROM HR.EMPLOYEES WHERE COMMISSION_PCT = 20 AND SALARY > 4500;
SELECT SALARY FROM HR.EMPLOYEES WHERE DEPARTMENT_ID = 50;

Auditing Specific Activities with Fine-Grained Auditing
Verifying Security Access with Auditing 9-43
DELETE FROM HR.EMPLOYEES WHERE SALARY > 1000000;
Auditing Specific Columns and Rows
You can fine-tune the audit behavior by targeting a specific column, referred to as a
relevant column, to be audited if a condition is met. To accomplish this, you use the
audit_column
parameter to specify one or more sensitive columns. In addition, you
can audit data in specific rows by using the
audit_condition
parameter to define a
Boolean condition.
Example 9–21 on page 9-42 performs an audit if anyone in Department 50 tries to
access the
salary
and
commission_pct
columns.
audit_condition => 'DEPARTMENT_ID = 50',
audit_column => 'SALARY,COMMISSION_PCT,'
As you can see, this feature is enormously beneficial. It not only enables you to
pinpoint particularly important types of data to audit, but it provides increased
protection for columns that contain sensitive data, such as Social Security numbers,
salaries, patient diagnoses, and so on.
If the
audit_column
lists more than one column, you can use the
audit_column_opts
parameter to specify whether a statement is audited when the query references any
column specified in the
audit_column
parameter or only when all columns are
referenced. For example:
audit_column_opts => DBMS_FGA.ANY_COLUMNS,
audit_column_opts => DBMS_FGA.ALL_COLUMNS,
If you do not specify a relevant column, then auditing applies to all columns.
For more information about the
audit_condition
,
audit_column
, and
audit_column_
opts
parameters in the
DBMS_FGA.ADD_POLICY
procedure, see Oracle Database PL/SQL
Packages and Types Reference. See also the usage notes for the
ADD_POLICY
procedure in
that section.
Disabling and Enabling a Fine-Grained Audit Policy
You can disable a fine-grained audit policy by using the
DBMS_FGA.DISABLE_POLICY
procedure. The syntax for
DISABLE_POLICY
is:
DBMS_FGA.DISABLE_POLICY(
object_schema VARCHAR2,
object_name VARCHAR2,
policy_name VARCHAR2 );
Example 9–22 shows how to disable the fine-grained audit policy created in
Example 9–21 on page 9-42.
Example 9–22 Disabling a Fine-Grained Audit Policy
DBMS_FGA.DISABLE_POLICY(
object_schema => 'HR',
object_name => 'EMPLOYEES',
policy_name => 'chk_hr_employees');
/
For detailed information about the
DISABLE_POLICY
syntax, see Oracle Database PL/SQL
Packages and Types Reference.

Auditing Specific Activities with Fine-Grained Auditing
9-44 Oracle Database Security Guide
Example 9–23 show how to reenable the
chk_hr_emp
policy by using the
DBMS_
FGA.ENABLE_POLICY
procedure:
Example 9–23 Enabling a Fine-Grained Audit Policy
DBMS_FGA.ENABLE_POLICY(
object_schema => 'HR',
object_name => 'EMPLOYEES',
policy_name => 'chk_hr_employees',
enable => TRUE);
/
For detailed information about the
ENABLE_POLICY
syntax, see Oracle Database PL/SQL
Packages and Types Reference.
Dropping a Fine-Grained Audit Policy
Oracle Database automatically drops the audit policy if you remove the object
specified in the
object_name
parameter of the
DBMS_FGA.ADD_POLICY
procedure, or if
you drop the user who created the audit policy.
Example 9–24 shows how to drop a fine-grained audit policy manually by using the
DBMS_FGA.DROP_POLICY
procedure.
Example 9–24 Dropping a Fine-Grained Audit Policy
DBMS_FGA.DROP_POLICY(
object_schema => 'HR',
object_name => 'EMPLOYEES',
policy_name => 'chk_hr_employees');
See Oracle Database PL/SQL Packages and Types Reference for detailed information about
the
DROP_POLICY
syntax.
Tutorial: Adding an Email Alert to a Fine-Grained Audit Policy
This section contains:
■About This Tutorial
■Step 1: Install and Configure the UTL_MAIL PL/SQL Package
■Step 2: Create User Accounts
■Step 3: Configure an Access Control List File for Network Services
■Step 4: Create the Email Security Alert PL/SQL Procedure
■Step 5: Create and Test the Fine-Grained Audit Policy Settings
■Step 6: Test the Alert
■Step 7: Remove the Components for This Tutorial
About This Tutorial
You can add an email alert to a fine-grained audit policy that goes into effect when a
user (or an intruder) violates the policy. To accomplish this, you first must create a
procedure that generates the alert, and then use the following
DBMS_FGA.ADD_POLICY
parameters to call this function when someone violates this policy:
■
handler_schema
: The schema in which the handler event is stored

Auditing Specific Activities with Fine-Grained Auditing
Verifying Security Access with Auditing 9-45
■
handler_module
: The name of the event handler
The alert can come in any form that best suits your environment: an email or pager
notification, updates to a particular file or table, and so on. Creating alerts also helps to
meet certain compliance regulations, such as California Senate Bill 1386. In this
tutorial, you will create an email alert.
In this tutorial, you create an email alert that notifies a security administrator that a
Human Resources representative is trying to select or modify salary information in the
HR.EMPLOYEES
table. The representative is permitted to make changes to this table, but
to meet compliance regulations, we want to create a record of all salary selections and
modifications to the table.
Step 1: Install and Configure the UTL_MAIL PL/SQL Package
1. Log on as user
SYS
with the
SYSDBA
privilege.
sqlplus sys as sysdba
Enter password: password
2. Install the
UTL_MAIL
package.
@$ORACLE_HOME/rdbms/admin/utlmail.sql
@$ORACLE_HOME/rdbms/admin/prvtmail.plb
The
UTL_MAIL
package enables you to manage email. See Oracle Database PL/SQL
Packages and Types Reference for more information about
UTL_MAIL
.
Be aware that currently, the
UTL_MAIL
PL/SQL package does not support SSL
servers.
3. Check the current value of the
SMTP_OUT_SERVER
initialization parameter, and
make a note of this value so that you can restore it when you complete this
tutorial.
For example:
SHOW PARAMETER SMTP_OUT_SERVER
If the
SMTP_OUT_SERVER
parameter has already been set, then output similar to the
following appears:
NAME TYPE VALUE
----------------------- ----------------- ----------------------------------
SMTP_OUT_SERVER string some_imap_server.example.com
4. Issue the following
ALTER SYSTEM
statement:
ALTER SYSTEM SET SMTP_OUT_SERVER="imap_mail_server.example.com";
Replace
imap_mail_server
with the name of your SMTP server, which you can
find in the account settings in your email tool. Enclose these settings in quotation
marks. For example:
ALTER SYSTEM SET SMTP_OUT_SERVER="my_imap_server.example.com"
5. Connect as
SYS
using the
SYSOPER
privilege and then restart the database.
CONNECT SYS/AS SYSOPER
Enter password: password
SHUTDOWN IMMEDIATE
STARTUP

Auditing Specific Activities with Fine-Grained Auditing
9-46 Oracle Database Security Guide
6. Ensure that the
SMTP_OUT_SERVER
parameter setting is correct.
CONNECT SYS/AS SYSDBA
Enter password: password
SHOW PARAMETER SMTP_OUT_SERVER
Output similar to the following appears:
NAME TYPE VALUE
----------------------- ----------------- ----------------------------------
SMTP_OUT_SERVER string my_imap_server.example.com
Step 2: Create User Accounts
1. Ensure that you are connected as
SYS
using the
SYSDBA
privilege, and then create
the
sysadmin_fga
account, who will create the fine-grained audit policy.
For example:
CONNECT SYS/AS SYSDBA
Enter password: password
GRANT CREATE SESSION, DBA TO sysadmin_fga IDENTIFIED BY password;
GRANT EXECUTE ON DBMS_FGA TO sysadmin_fga;
GRANT CREATE PROCEDURE, DROP ANY PROCEDURE TO sysadmin_fga;
GRANT EXECUTE ON UTL_TCP TO sysadmin_fga;
GRANT EXECUTE ON UTL_SMTP TO sysadmin_fga;
GRANT EXECUTE ON UTL_MAIL TO sysadmin_fga;
GRANT EXECUTE ON DBMS_NETWORK_ACL_ADMIN TO sysadmin_fga;
Replace
password
with a password that is secure. See "Minimum Requirements for
Passwords" on page 3-3 for more information.
The
UTL_TCP
,
UTL_SMTP
,
UTL_MAIL
, and
DBMS_NETWORK_ACL_ADMIN
PL/SQL
packages are used by the email security alert that you create.
2. Connect as user
SYSTEM
.
CONNECT SYSTEM
Enter password: password
3. Ensure that the
HR
schema account is unlocked and has a password. If necessary,
unlock
HR
and grant this user a password.
SELECT USERNAME, ACCOUNT_STATUS FROM DBA_USERS WHERE USERNAME = 'HR';
If the
DBA_USERS
view lists user
HR
as locked and expired, then enter the following
statement to unlock the
HR
account and create a new password:
ALTER USER HR ACCOUNT UNLOCK IDENTIFIED BY password;
Enter a password that is secure. For greater security, do not give the
HR
account the
same password from previous releases of Oracle Database. "Minimum
Requirements for Passwords" on page 3-3 for the minimum requirements for
creating passwords.
4. Create a user account for Susan Mavris, who is an HR representative, and then
grant this user access to the
HR.EMPLOYEES
table.
GRANT CREATE SESSION TO smavris IDENTIFIED BY password;
GRANT SELECT, INSERT, UPDATE, DELETE ON HR.EMPLOYEES TO SMAVRIS;

Auditing Specific Activities with Fine-Grained Auditing
Verifying Security Access with Auditing 9-47
Step 3: Configure an Access Control List File for Network Services
Before you can use PL/SQL network utility packages such as
UTL_MAIL
, you must
configure an access control list (ACL) file that enables fine-grained access to external
network services. For detailed information about this topic, see "Managing
Fine-Grained Access in PL/SQL Packages and Types" on page 4-49.
To configure an access control list for the email alert:
1. Connect to SQL*Plus as user
sysadmin_fga
.
CONNECT sysadmin_fga
Enter password: password
2. Create the following access control list and its privilege definitions.
BEGIN
DBMS_NETWORK_ACL_ADMIN.CREATE_ACL (
acl => 'email_server_permissions.xml',
description => 'Enables network permissions for the email server',
principal => 'SYSADMIN_FGA',
is_grant => TRUE,
privilege => 'connect');
END;
/
Ensure that you enter your exact user name for the principal setting, in upper-case
letters. For this tutorial, enter
SYSADMIN_FGA
for the name of the principal.
3. Assign the access control list to the outgoing SMTP network host for your email
server.
BEGIN
DBMS_NETWORK_ACL_ADMIN.ASSIGN_ACL (
acl => 'email_server_permissions.xml',
host => 'SMTP_OUT_SERVER_setting',
lower_port => port);
END;
/
In this example:
■
SMTP_OUT_SERVER_setting
: Enter the
SMTP_OUT_SERVER
setting that you set for
the
SMTP_OUT_SERVER
parameter in "Step 1: Install and Configure the UTL_
MAIL PL/SQL Package" on page 9-45. This setting should match exactly the
setting that your email tool specifies for its outgoing server.
■
port
: Enter the port number that your email tool specifies for its outgoing
server. Typically, this setting is 25. Enter this value for the
lower_port
setting.
(Currently, the
UTL_MAIL
package does not support SSL. If your email server is
an SSL server, then enter 25 for the port number, even if the email server uses a
different port number.)
Step 4: Create the Email Security Alert PL/SQL Procedure
As user
sysadmin_fga
, create the following procedure. (You can copy and paste this
text by positioning the cursor at the start of
CREATE OR REPLACE
in the first line.)
CREATE OR REPLACE PROCEDURE email_alert (sch varchar2, tab varchar2, pol varchar2)
AS
msg varchar2(20000) := 'HR.EMPLOYEES table violation. The time is: ';
BEGIN
msg := msg||TO_CHAR(SYSDATE, 'Day DD MON, YYYY HH24:MI:SS');

Auditing Specific Activities with Fine-Grained Auditing
9-48 Oracle Database Security Guide
UTL_MAIL.SEND (
sender => 'youremail@example.com',
recipients => 'recipientemail@example.com',
subject => 'Table modification on HR.EMPLOYEES',
message => msg);
END email_alert;
/
In this example:
■
CREATE OR REPLACE PROCEDURE ...AS
: You must include a signature that
describes the schema name (sch), table name (tab), and the name of the audit
procedure (pol) that you will define in audit policy in the next step.
■
sender and recipients
: Replace
youremail@example.com
with your email
address, and
recipientemail@example.com
with the email address of the person
you want to receive the notification.
Step 5: Create and Test the Fine-Grained Audit Policy Settings
1. As user
sysadmin_fga
, create the
chk_hr_emp
policy fine-grained audit policy as
follows.
BEGIN
DBMS_FGA.ADD_POLICY (
object_schema => 'HR',
object_name => 'EMPLOYEES',
policy_name => 'CHK_HR_EMP',
audit_column => 'SALARY',
handler_schema => 'SYSADMIN_FGA',
handler_module => 'EMAIL_ALERT',
enable => TRUE,
statement_types => 'SELECT, UPDATE',
audit_trail => DBMS_FGA.DB + DBMS_FGA.EXTENDED);
END;
/
2. Commit the changes you have made to the database.
COMMIT;
3. Test the settings that you have created so far.
EXEC email_alert ('hr', 'employees', 'chk_hr_emp');
SQL*Plus should display a
PL/SQL procedure successfully completed
message,
and in a moment, depending on the speed of your email server, you should
receive the email alert.
If you receive an
ORA-24247: network access denied by access control list
(ACL)
error followed by
ORA-06512: at stringline
string
errors, then check the
settings in the access control list file.
Step 6: Test the Alert
1. Connect to SQL*Plus as user
smavris
, check your salary, and give yourself a nice
raise.
CONNECT smavris
Enter password: password
SELECT SALARY FROM HR.EMPLOYEES WHERE LAST_NAME = 'Mavris';

Auditing Specific Activities with Fine-Grained Auditing
Verifying Security Access with Auditing 9-49
SALARY
-----------
6500
UPDATE HR.EMPLOYEES SET SALARY = 13000 WHERE LAST_NAME = 'Mavris';
2. Now select from a column other than
SALARY
in the
HR.EMPLOYEES
table.
SELECT FIRST_NAME, LAST_NAME FROM HR.EMPLOYEES WHERE LAST_NAME = 'Raphaely';
The following output should appear:
FIRST_NAME LAST_NAME
-------------------- --------------------
Den Raphaely
By now, depending on the speed of you email server, you (or your recipient)
should have received an email with the subject header
Table modification on
HR.EMPLOYEES
notifying you of the tampering of the
HR.EMPLOYEES
table.
3. As user
sysadmin_fga
, query the
DBA_FGA_AUDIT_TRAIL
data dictionary view,
which contains the Susan Mavris’s audited activities.
CONNECT sysadmin_fga
Enter password: password
col dbuid format a10
col lsqltext format a66
col ntimestamp# format a15
SELECT DBUID, LSQLTEXT, NTIMESTAMP# FROM SYS.FGA_LOG$ WHERE POLICYNAME='CHK_HR_
EMP';
Output similar to the following appears:
DBUID LSQLTEXT
---------- ------------------------------------------------------------------
NTIMESTAMP#
--------------------------------------------------------------------------
SMAVRIS SELECT SALARY FROM HR.EMPLOYEES WHERE LAST_NAME = 'Mavris'
23-JUN-09 03.48.59.111000 PM
SMAVRIS UPDATE HR.EMPLOYEES SET SALARY = 13000 WHERE LAST_NAME = 'Mavris'
23-JUN-09 03.49.07.330000 PM
The audit trail captures the two SQL statements that Susan Mavris ran that
affected the
SALARY
column in the
HR.EMPLOYEES
table. The third statement she ran,
in which she asked about Den Raphaely, was not recorded because it was not
affected by the audit policy. This is because Oracle Database executes the audit
function as an autonomous transaction, committing only the actions of the
handler_module
setting and not any user transaction. The function has no effect on
any user SQL transaction.
Step 7: Remove the Components for This Tutorial
1. Connect to SQL*Plus as user
SYSTEM
privilege, and then drop users
sysadmin_fga
(including the objects in the
sysadmin_fga
schema) and
smavris
.
CONNECT SYSTEM
Enter password: password
DROP USER sysadmin_fga CASCADE;

Auditing Specific Activities with Fine-Grained Auditing
9-50 Oracle Database Security Guide
DROP USER smavris;
2. Connect as user
HR
and remove the loftiness of Susan Mavris’s salary.
CONNECT HR
Enter password: password
UPDATE HR.EMPLOYEES SET SALARY = 6500 WHERE LAST_NAME = 'Mavris';
3. If you want, lock and expire
HR
, unless other users want to use this account:
ALTER USER HR PASSWORD EXPIRE ACCOUNT LOCK;
4. Connect as user
SYS
with the
SYSDBA
privilege, and drop the
email_server_
permissions.xml
access control list.
BEGIN
DBMS_NETWORK_ACL_ADMIN.DROP_ACL(
acl => 'email_server_permissions.xml');
END;
/
Access control lists reside in the
SYS
schema, not the schema of the user who
created them.
5. Issue the following
ALTER SYSTEM
statement to restore the
SMTP_OUT_SERVER
parameter to the previous value, from Step 4 under "Step 1: Install and Configure
the UTL_MAIL PL/SQL Package" on page 9-45:
ALTER SYSTEM SET SMTP_OUT_SERVER="previous_value";
Enclose this setting in quotation marks. For example:
ALTER SYSTEM SET SMTP_OUT_SERVER="some_imap_server.example.com"
6. Restart the database instance.
SHUTDOWN
STARTUP
Tutorial: Auditing Nondatabase Users
This section contains:
■About This Tutorial
■Step 1: Create the User Account and Ensure the User HR Is Active
■Step 2: Create the Fine-Grained Audit Policy
■Step 3: Test the Policy
■Step 4: Remove the Components for This Tutorial
About This Tutorial
This tutorial shows how to create a fine-grained audit policy that audits a nondatabase
user’s actions, based on the identity set in the client identifier.
Step 1: Create the User Account and Ensure the User HR Is Active
1. Log on as user
SYS
with the
SYSDBA
privilege.
sqlplus SYS AS SYSDBA
Enter password: password

Auditing Specific Activities with Fine-Grained Auditing
Verifying Security Access with Auditing 9-51
2. Create the
sysadmin_fga
account, who will create the fine-grained audit policy.
GRANT CREATE SESSION, DBA TO sysadmin_fga IDENTIFIED BY password;
GRANT SELECT ON OE.ORDERS TO sysadmin_fga;
GRANT EXECUTE ON DBMS_FGA TO sysadmin_fga;
GRANT SELECT ON SYS.FGA_LOG$ TO sysadmin_fga;
Replace
password
with a password that is secure. See "Minimum Requirements for
Passwords" on page 3-3 for more information.
3. The sample user
OE
will also be used in this tutorial, so query the
DBA_USERS
data
dictionary view to ensure that
OE
is not locked or expired.
SELECT USERNAME, ACCOUNT_STATUS FROM DBA_USERS WHERE USERNAME = 'OE';
If the
DBA_USERS
view lists user
OE
as locked and expired, log in as user
SYSTEM
and
then enter the following statement to unlock the
OE
account and create a new
password:
ALTER USER OE ACCOUNT UNLOCK IDENTIFIED BY password;
Enter a password that is secure. For greater security, do not give the
OE
account the
same password from previous releases of Oracle Database. "Minimum
Requirements for Passwords" on page 3-3 for the minimum requirements for
creating passwords.
Step 2: Create the Fine-Grained Audit Policy
1. Connect to SQL*Plus as user
sysadmin_fga
.
CONNECT sysadmin_fga
Enter password: password
2. Create the following policy:
BEGIN
DBMS_FGA.ADD_POLICY(OBJECT_SCHEMA => 'OE',
OBJECT_NAME => 'ORDERS',
POLICY_NAME => 'ORDERS_FGA_POL',
AUDIT_CONDITION => 'SYS_CONTEXT(''USERENV'', ''CLIENT_
IDENTIFIER'') = ''Robert''',
HANDLER_SCHEMA => NULL,
HANDLER_MODULE => NULL,
ENABLE => True,
STATEMENT_TYPES => 'INSERT,UPDATE,DELETE,SELECT',
AUDIT_TRAIL => DBMS_FGA.DB + DBMS_FGA.EXTENDED,
AUDIT_COLUMN_OPTS => DBMS_FGA.ANY_COLUMNS);
END;
/
In this example, the
AUDIT_CONDITION
parameter assumes the nondatabase user is
named Robert. The policy will monitor any
INSERT
,
UPDATE
,
DELETE
, and
SELECT
statements Robert will attempt.
Step 3: Test the Policy
1. Connect as user
OE
and select from the
OE.ORDERS
table.
CONNECT OE
Enter password: password

Auditing Specific Activities with Fine-Grained Auditing
9-52 Oracle Database Security Guide
SELECT COUNT(*) FROM ORDERS;
The following output appears:
COUNT(*)
----------
105
2. Connect as user
sysadmin_fga
and then check if any audit records were generated.
CONNECT sysadmin_fga
Enter password: password
SELECT DBUID, LSQLTEXT FROM SYS.FGA_LOG$ WHERE POLICYNAME='ORDERS_FGA_POL';
The following output appears:
no rows selected
Because no nondatabase users were logged in to query the
OE.ORDERS
table, the
audit trail is empty.
3. Reconnect as user
OE
, set the client identifier to
Robert
, and then reselect from the
OE.ORDERS
table.
CONNECT OE
Enter password: password
EXEC DBMS_SESSION.SET_IDENTIFIER('Robert');
SELECT COUNT(*) FROM ORDERS;
The following output should appear:
COUNT(*)
----------
105
4. Reconnect as user
sysadmin_fga
and then check the audit trail again.
CONNECT sysadmin_fga
Enter password: password
SELECT DBUID, LSQLTEXT FROM SYS.FGA_LOG$ WHERE POLICYNAME='ORDERS_FGA_POL';
This time, because
Robert
has made his appearance and queried the
OE.ORDERS
table, the audit trail captures his actions:
DBUID LSQLTEXT
---------------- ----------------------------
OE SELECT COUNT(*) FROM ORDERS;
Step 4: Remove the Components for This Tutorial
1. Connect to SQL*Plus as user
SYSTEM
, and then drop user
sysadmin_fga
(including
the objects in the
sysadmin_fga
schema).
CONNECT SYSTEM
Enter password: password
DROP USER sysadmin_fga CASCADE;

Auditing SYS Administrative Users
Verifying Security Access with Auditing 9-53
2. If you want, lock and expire
OE
, unless other users want to use this account:
ALTER USER OE PASSWORD EXPIRE ACCOUNT LOCK;
Auditing SYS Administrative Users
This section contains:
■Auditing User SYSTEM
■Auditing User SYS and Users Who Connect as SYSDBA and SYSOPER
Auditing User SYSTEM
You can audit the
SYSTEM
user by using all the standard and fine-grained audit
features. Insofar as auditing is concerned, user
SYSTEM
is a typical database user (such
as
HR
or
OE
) and requires no special configuration to be audited.
Example 9–25 shows how to audit any table insert operations issued by user
SYSTEM
.
Example 9–25 Auditing Table Insert Operations by User SYSTEM
AUDIT INSERT ANY TABLE BY SYSTEM BY ACCESS;
Auditing User SYS and Users Who Connect as SYSDBA and SYSOPER
You can fully audit sessions for users who connect as
SYS
, including all users
connecting using the
SYSDBA
or
SYSOPER
privileges. This enables you to write the
actions of administrative users to an operating system file, even if the
AUDIT_TRAIL
parameter is set to
NONE
,
DB
, or
DB, EXTENDED
. Writing the actions of administrator
users to an operating system audit file is safer than writing to the
SYS.AUD$
table,
because administrative users can remove rows from this table that indicate their bad
behavior.
To configure audit settings for
SYSDBA
and
SYSOPER
users:
1. Set the
AUDIT_SYS_OPERATIONS
initialization parameter to
TRUE
.
ALTER SYSTEM SET AUDIT_SYS_OPERATIONS=TRUE SCOPE=SPFILE;
This setting records the top-level operations directly issued by users who have
connected to the database using the
SYSDBA
or
SYSOPER
privilege. It writes the
audit records to the operation system audit trail. The SQL text of every statement
is written to the
ACTION
field in the operating system audit trail record.
2. If you want to write system administrator activities to XML files, then set the
AUDIT_TRAIL
initialization parameter to either
XML
or
XML, EXTENDED
.
For example:
ALTER SYSTEM SET AUDIT_TRAIL=XML, EXTENDED SCOPE=SPFILE;
In all operating systems, if you set
AUDIT_TRAIL
to either
XML
or
XML,EXTENDED
,
then audit records are written as XML files in the directory specified by the
AUDIT_
FILE_DEST
initialization parameter. By default, Oracle Database writes the audit
records to operating system files.
See Table 9–1, " AUDIT_TRAIL Initialization Parameter Settings" on page 9-10 for
more information about these settings. See also "Enabling or Disabling the
Standard Audit Trail" on page 9-8.
3. Restart the database.

Auditing SYS Administrative Users
9-54 Oracle Database Security Guide
After you restart the database, Oracle Database audits all successful actions performed
by
SYSDBA
and
SYSOPER
users, and writes these audit records to the operating system
audit trail, and not to the
SYS.AUD$
table.
In Windows, if you have set the
AUDIT_TRAIL
initialization parameter
OS
, then Oracle
Database writes audit records as events to the Event Viewer log file.
If you do not specify the
AUDIT_FILE_DEST
initialization parameter, then the default
location is
$ORACLE_BASE/admin/$ORACLE_SID/adump
in Linux and Solaris, and
%ORACLE_BASE%\admin\%ORACLE_SID%\adump
for Microsoft Windows. For other
operating systems, refer to their audit trail documentation.
Oracle Database audits all
SYS
-issued SQL statements indiscriminately and regardless
of the setting of the
AUDIT_TRAIL
initialization parameter.
Consider the following
SYS
session:
CONNECT SYS AS SYSDBA;
Enter password: password
ALTER SYSTEM FLUSH SHARED_POOL;
UPDATE salary SET base=1000 WHERE name='laurel';
When
SYS
auditing is enabled, both the
ALTER SYSTEM
and
UPDATE
statements are
displayed in the operating system audit file, similar to the following output. (Be aware
that this format may change in different Oracle Database releases.)
Tue May 5 04:53:37 2009 -07:00
LENGTH : '159'
ACTION :[7] 'CONNECT'
DATABASE USER:[1] '/'
PRIVILEGE :[6] 'SYSDBA'
CLIENT USER:[7] 'laurelh'
CLIENT TERMINAL:[5] 'pts/0'
STATUS:[1] '0'
DBID:[9] '561542328'
Tue May 5 04:53:40 2009 -07:00
Note: The
$ORACLE_BASE/admin/$ORACLE_SID/adump
directory is the
first default location used if the
AUDIT_FILE_DEST
initialization
parameter is not set or does not point to a valid directory. If writing to
that first default location fails or the database is closed, then Oracle
Database uses the
$ORACLE_HOME/rdbms/audit
directory as the backup
default location. If that attempt fails, then the audited operation fails
and a message is written to the alert log.
When
AUDIT_TRAIL
is set to
OS
, audit file names continue to be in the
following form:
$ORACLE_SID_short_form_process_name_processid_sequence_number.aud
The sequence number starts from number 1.
For example, the short process name
ora
is used for dedicated server
processes, and the names
s001
,
s002
, and so on are used for shared
server processes.
When
AUDIT_TRAIL
is set to
XML
or
XML, EXTENDED
, the same audit file
names have the extension
xml
instead of
aud
.

Using Triggers to Write Audit Data to a Separate Table
Verifying Security Access with Auditing 9-55
LENGTH : '183'
ACTION :[30] 'ALTER SYSTEM FLUSH SHARED_POOL'
DATABASE USER:[1] '/'
PRIVILEGE :[6] 'SYSDBA'
CLIENT USER:[7] 'laurelh'
CLIENT TERMINAL:[5] 'pts/0'
STATUS:[1] '0'
DBID:[9] '561542328'
Tue May 5 04:53:49 2009 -07:00
LENGTH : '200'
ACTION :[47] 'UPDATE salary SET base=1000 WHERE name='laurel''
DATABASE USER:[1] '/'
PRIVILEGE :[6] 'SYSDBA'
CLIENT USER:[7] 'laurelh'
CLIENT TERMINAL:[5] 'pts/0'
STATUS:[1] '0'
DBID:[9] '561542328'
The brackets indicate the length of the value. For example,
PRIVILEGE
is set to
SYSDBA
,
which uses 6 characters. In addition, the values are in single quotes for
SYS
and
mandatory audit records.
Because of the superuser privileges available to users who connect as
SYSDBA
, Oracle
recommends that database administrators rarely use this connection and only when
necessary. Database administrators can usually perform normal day-to-day
maintenance activity. These database administrators are typical database users with
the
DBA
role, or have been granted privileges that are the equivalent of a
DBA
role (for
example,
mydba
or
jr_dba
) that your organization customizes.
Using Triggers to Write Audit Data to a Separate Table
You can use triggers to supplement the built-in auditing features of Oracle Database.
The trigger that you create records user actions to a separate database table. When an
activity fires the trigger, the trigger records the action in this table. Triggers are useful
when you want to record customized information such as before-and-after changes to
a table. For detailed information about creating triggers, see Oracle Database PL/SQL
Language Reference.
You do not need to have auditing enabled for the trigger to work, nor does it matter
what type of auditing you do have enabled. The trigger works outside of the database
audit functionality.
Follow these guidelines if you want to create audit triggers:
■Never write the trigger so that it writes data to the SYS.AUD$ table. In fact, you
should never modify the
SYS.AUD$
table contents. If you try to write values to
SYS.AUD$
and the trigger does not work as expected, then it could adversely affect
standard auditing. The
SYS.AUD$
table is an Oracle Database-owned table, and
only Oracle Database should write to it.
■If possible, create the trigger as an AFTER trigger. The triggering statement is
subjected to any applicable constraints. If no records are found, then the
AFTER
trigger does not fire, and audit processing is not carried out unnecessarily.
■Create the trigger as either an AFTER row or AFTER statement trigger. Choosing
between
AFTER
row and
AFTER
statement triggers depends on the information
being audited. For example, row triggers provide value-based auditing for each
table row. Triggers can also require you to supply a reason code for issuing the

Using Triggers to Write Audit Data to a Separate Table
9-56 Oracle Database Security Guide
audited SQL statement, which can be useful in both row and statement-level
auditing situations.
Table 9–5 provides a comparison of trigger-based auditing and the built-in database
auditing features.
In Example 9–26, a trigger audits modifications to the
emp_tab
table for specific rows.
The trigger writes the old and new values to the
emp_audit_tab
table, including the
user who performed the update and the time the update took place.
Example 9–26 Audit Trigger to Record Before and After Changes to a Table
/* 1. Create the following table: */
CREATE TABLE emp_tab (
empno NUMBER(4),
ename VARCHAR2(10),
job VARCHAR2(9),
mgr NUMBER(4),
hiredate DATE,
sal NUMBER(8,2),
deptno NUMBER(2));
/* 2. Create a table to capture the audit data. */
CREATE TABLE emp_audit_tab (
oldname VARCHAR2(10),
oldjob VARCHAR2(9),
oldsal NUMBER (8,2),
newname VARCHAR2(10),
newjob VARCHAR2(9),
newsal NUMBER(8,2),
user1 varchar2(10),
Table 9–5 Comparison of Built-in Auditing and Trigger-Based Auditing
Audit Feature Description
DML and DDL
auditing Standard auditing options permit auditing of DML and DDL statements
regarding all types of schema objects and structures. Comparatively, triggers
permit auditing of DML statements entered against tables, and DDL auditing
at
SCHEMA
or
DATABASE
level.
Centralized
audit trail All database audit information is recorded centrally and automatically using
the auditing features of the database.
Declarative
method Auditing features enabled using the standard database features are easier to
declare and maintain, and less prone to errors, when compared to auditing
functions defined by triggers.
Auditing
options can be
audited
Any changes to existing auditing options can also be audited to guard against
malicious database activity.
Session and
execution time
auditing
Using the database auditing features, records are generated once every time
an audited statement is entered. With triggers, an audit record is generated
each time a trigger-audited table is referenced.
Auditing of
unsuccessful
data access
Database auditing can be set to audit when unsuccessful data access occurs.
However, unless autonomous transactions are used, any audit information
generated by a trigger is rolled back if the triggering statement is rolled back.
For more information about autonomous transactions, see Oracle Database
Concepts.
Sessions can be
audited Connections, disconnections, and session activity (physical I/Os, logical
I/Os, deadlocks, and so on) can be recorded using standard database
auditing.

Managing Audit Trail Records
Verifying Security Access with Auditing 9-57
systemdate TIMESTAMP);
/* 3. Create a trigger to record the old and new values, the author of the change,
and when the change took place. */
CREATE OR REPLACE TRIGGER emp_audit_trig
AFTER INSERT OR DELETE OR UPDATE ON emp_tab
FOR EACH ROW
BEGIN
INSERT INTO emp_audit_tab (
oldname, oldjob, oldsal,
newname, newjob, newsal,
user1, systemdate
)
VALUES (
:OLD.ename, :OLD.job, :OLD.sal,
:NEW.ename, :NEW.job, :NEW.sal,
user, sysdate
);
END;
/
To test this trigger, add a row to the
emp_tab
table, and then change the value the
ename
,
job
, or
sal
column in the
emp_tab
table. Then query the
emp_audit_tab
table to
find the audit data.
Managing Audit Trail Records
This section contains:
■About Audit Records
■Managing the Database Audit Trail
■Managing the Operating System Audit Trail
About Audit Records
Audit records include information about the operation that was audited, the user who
performed the operation2, and the date and time of the operation. Depending on the
type of auditing you choose, you can write audit records to data dictionary tables,
called the database audit trail, or in operating system files, called the operating
system audit trail.
If you choose to write audit records to the database audit trail, Oracle Database writes
the audit records to the
SYS.AUD$
table for default and standard auditing, and to the
SYS.FGA_LOG$
table for fine-grained auditing. Both of these tables reside in the
SYSTEM
tablespace and are owned by the
SYS
schema. You can check the contents of these
tables by querying the following data dictionary views:
■
DBA_AUDIT_TRAIL
for the
SYS.AUD$
contents
■
DBA_FGA_AUDIT_TRAIL
for the
SYS.FGA_LOG$
contents
■
DBA_COMMON_AUDIT_TRAIL
for both
SYS.AUD$
and
SYS.FGA_LOG$
contents
2Oracle Database records the actions of both database and nondatabase users in the
SYS.AUD$
and
SYS.FGA_LOG$
tables. The
CLIENTID
column in these tables records the name of the
nondatabase user. The
USERID
column in the
SYS.AUD$
table and the
DBUID
column of the
SYS.FGA_LOG$
store the database user account. For nondatabase users, the
USERID
and
DBUID
columns store the database user account that was created to enable the nondatabase user
access to the database. The
DBA_AUDIT_TRAIL
,
DBA_FGA_AUDIT_TRAIL
, and
DBA_COMMON_AUDIT_
TRAIL
views store this information in the
CLIENT_ID
,
USERNAME
, and
DB_USER
columns.

Managing Audit Trail Records
9-58 Oracle Database Security Guide
"Finding Information About Audited Activities" on page 9-80 describes more data
dictionary views that you can use to view to contents of the
SYS.AUD$
and
SYS.FGA_
LOG$
tables.
If you choose to write audit records to an operating system file, you can write them to
either a text file or to an XML file. You can check the contents of the audit XML files by
querying the
V$XML_AUDIT_TRAIL
data dictionary view.
Managing the Database Audit Trail
This section contains:
■Database Audit Trail Contents
■Controlling the Size of the Database Audit Trail
■Moving the Database Audit Trail to a Different Tablespace
■Protecting the Database Audit Trail
■Auditing the Database Audit Trail
■Archiving the Database Audit Trail
Database Audit Trail Contents
The database audit trail is a pair of tables,
AUD$
(for standard auditing) and
FGA_LOG$
(for fine-grained auditing), in the
SYS
schema of each Oracle Database data dictionary.
It records both standard and fine-grained audit activities. Several data dictionary
views can help you use the information in this table. "Finding Information About
Audited Activities" on page 9-80 lists all the auditing-related views.
The database audit trail record contains different types of information, depending on
the events audited and the auditing options set. For example, if you have set the
AUDIT_TRAIL
initialization parameter to
DB, EXTENDED
or
XML, EXTENDED
, then the
SQL_BIND
and
SQL_TEXT
columns show any SQL bind variables used for a SQL
statement and SQL text that triggered the audit, respectively. For full details about the
contents of these views, refer to Oracle Database Reference. However, be aware that the
format and columns of the
DBA_AUDIT_TRAIL
view may change across Oracle Database
releases.
If the database destination for audit records becomes full or unavailable, and,
therefore, unable to accept new records, then an audited action cannot complete.
Instead, Oracle Database generates an error message and does not audit the action.
You can control the size of the audit trail to make it more manageable. (In fact, Oracle
strongly recommends that you do so.) See "Controlling the Size of the Database Audit
Trail" on page 9-59 for more information. See also "Keeping Audited Information
Manageable" on page 10-18.
The audit trail does not store information about any data values that might be
involved in the audited statement. For example, old and new data values of updated
See Also: "Purging Audit Trail Records" on page 9-65
Note: If the
AUDIT_TRAIL
initialization parameter is set to
XML
or
XML,
EXTENDED
, then Oracle Database sends standard audit records to
operating system files in XML format. Because XML is a standard
document format, many utilities are available to parse and analyze
XML data.

Managing Audit Trail Records
Verifying Security Access with Auditing 9-59
rows are not stored when an
UPDATE
statement is audited. However, you can perform
this specialized type of auditing by using fine-grained auditing methods.
You can use the Flashback Query feature to show the old and new values of the
updated rows, subject to any auditing policy presently in force. The current policies
are enforced even if the flashback is to an old query that was originally subject to a
different policy. Current business access rules always apply.
Controlling the Size of the Database Audit Trail
If the database audit trail is full and no more audit records can be inserted, then
underlying statement cannot complete successfully until you purge the audit trail.
Oracle Database issues errors to all users who issue statements that cause the audit.
Therefore, you must control the growth and size of the audit trail.
When auditing is enabled and audit records are being generated, the audit trail
increases according to two factors:
■The number of audit options turned on
■The frequency of execution of audited statements
To control the growth of the audit trail, you can use the following methods:
■Enable and disable database auditing. If it is enabled, then audit records are
generated and stored in the audit trail. If it is disabled, then audit records are not
generated. (Remember that some activities are always audited.)
■Be selective about the audit options that are turned on. If more selective auditing
is performed, then useless or unnecessary audit information is not generated and
stored in the audit trail. You can use fine-grained auditing to selectively audit only
certain conditions.
■Tightly control the ability to perform object auditing. You can accomplish this in
the following ways:
–A security administrator owns all objects and never grants the
AUDIT ANY
system privilege to any other user. Alternatively, all schema objects can belong
to a schema for which the corresponding user does not have
CREATE SESSION
privilege.
–All objects are contained in schemas that do not correspond to real database
users (that is, the
CREATE SESSION
privilege is not granted to the
See Also:
■"Auditing Specific Activities with Fine-Grained Auditing" on
page 9-36 for more information about methods of fine-grained
auditing
■Oracle Database Administrator's Guide for information about
auditing table changes by using Flashback Transaction Query
■Flashback entries in the table of system privileges listed in the
GRANT
SQL statement section of Oracle Database SQL Language
Reference
Note: You can find information about the log history by querying the
V$LOGMNR_CONTENTS
data dictionary view. The
CLIENT_ID
column of
this view records changes to the session client identifier. To query this
view, you must have the
SELECT ANY TRANSACTION
system privilege.

Managing Audit Trail Records
9-60 Oracle Database Security Guide
corresponding user). The security administrator is the only user granted the
AUDIT ANY
system privilege.
In both scenarios, a security administrator controls entirely object auditing.
The maximum size of the database audit trail tables (
AUD$
and
FGA_LOG$
) is
determined by the default storage parameters of the
SYSTEM
tablespace, in which it is
stored by default. If you are concerned that a too-large database audit trail will affect
the
SYSTEM
table performance, then consider moving the database audit trail tables to a
different tablespace.
Moving the Database Audit Trail to a Different Tablespace
By default, the
SYSTEM
tablespace stores the database audit trail
SYS.AUD$
and
SYS.FGA_LOG$
tables. You can change this default location to another tablespace, such
as the
SYSAUX
tablespace or a user-created tablespace. You may want to move the
database audit trail tables to a different tablespace if the
SYSTEM
tablespace is too busy.
Another reason for moving these audit trail tables to a different tablespace is if you
plan to purge them by using the
DBMS_AUDIT_MGMT
PL/SQL package procedures.
Be aware that moving the database audit trail tables to a different tablespace can take a
long time, depending on the amount of audit data in the audit tables, so you may want
to do this during a time when database activity is slow.
To move the database audit trail from
SYSTEM
to a different tablespace:
1. Log in to SQL*Plus as an administrator who has the
EXECUTE
privilege on the
DBMS_AUDIT_MGMT
PL/SQL package.
For more information about the
DBMS_AUDIT_MGMT
PL/SQL package, see Oracle
Database PL/SQL Packages and Types Reference.
2. Check the tablespace to which you want to move the database audit trail tables.
You may need to optimize and allocate more space to this tablespace, including
the
SYSAUX
auxiliary tablespace. For more information, see Oracle Database
Performance Tuning Guide.
3. Run the
DBMS_AUDIT_MGMT.SET_AUDIT_TRAIL_LOCATION
PL/SQL procedure to
specify the name of the destination tablespace.
For example:
BEGIN
DBMS_AUDIT_MGMT.SET_AUDIT_TRAIL_LOCATION(
AUDIT_TRAIL_TYPE => DBMS_AUDIT_MGMT.AUDIT_TRAIL_AUD_STD,
AUDIT_TRAIL_LOCATION_VALUE => 'AUD_AUX');
END;
In this example:
■
AUDIT_TRAIL_TYPE
: Refers to the database audit trail type. Enter one of the
following values:
–
DBMS_AUDIT_MGMT.AUDIT_TRAIL_AUD_STD
: Standard audit trail table,
AUD$
.
–
DBMS_AUDIT_MGMT.AUDIT_TRAIL_FGA_STD
: Fine-grained audit trail table,
FGA_LOG$
.
See Also: Operating system-specific Oracle Database
documentation for more information about managing the operating
system audit trail when directing audit records to that location

Managing Audit Trail Records
Verifying Security Access with Auditing 9-61
–
DBMS_AUDIT_MGMT.AUDIT_TRAIL_DB_STD
: Both standard and fine-grained
audit trail tables.
■
AUDIT_TRAIL_LOCATION_VALUE
: Specifies the destination tablespace. This
example specifies a tablespace named
AUD_AUX
.
Auditing the Database Audit Trail
At times an application must give the
SYS.AUD$
system table access to regular users
(non-
SYSDBA
users). For example, an audit report generator needs access to
AUD$
table
to generate daily reports on possible violations. Also, many installations have a
distinct auditor role to achieve separation of duty.
In this case, be aware that DML statements such as
INSERT
,
UPDATE
,
MERGE
, and
DELETE
are always audited and recorded in the
SYS.AUD$
table. You can check these activities
by querying the
DBA_AUDIT_TRAIL
and
DBA_COMMON_AUDIT_TRAIL
views.
If a user has
SELECT
,
UPDATE
,
INSERT
, and
DELETE
privileges on
SYS.AUD$
and executes
a
SELECT
operation, then the audit trail will have a record of that operation. That is,
SYS.AUD$
will have a row identifying the
SELECT
action on itself, as for example row 1.
If a user later tries to delete this row from
SYS.AUD$
, then the
DELETE
operation
succeeds, because the user has the privilege to perform this action. However, this
DELETE
action on
SYS.AUD$
is also recorded in the audit trail. Setting up this type of
auditing acts as a safety feature, potentially revealing unusual or unauthorized
actions.
Archiving the Database Audit Trail
You should periodically archive and then purge the audit trail to prevent it from
growing too large. Archiving and purging both frees audit trail space and facilitates
the purging of the database audit trail. See "Purging Audit Trail Records" on page 9-65
for different ways of purging the audit trail records.
You can create an archive of the database audit trail by using one of the following
methods:
■Oracle Audit Vault. You install Oracle Audit Vault separately from Oracle
Database. For more information, see Oracle Audit Vault Administrator's Guide.
■Oracle Data Warehouse. Oracle Data Warehouse is automatically installed with
Oracle Database. For more information, see Oracle Warehouse Builder Installation
and Administration Guide.
After you complete the archive, you can purge the database audit trail contents. See
"Purging Audit Trail Records" on page 9-65 for more information.
To archive standard and fine-grained audit records, you can copy the relevant records
to a normal database table. For example:
INSERT INTO table SELECT ... FROM SYS.AUD$ ...;
INSERT INTO table SELECT ... FROM SYS.FGA_LOG$ ...;
Note:
DELETE
,
INSERT
,
UPDATE
, and
MERGE
operations on the
SYS.AUD$
and
SYS.FGA_LOG$
tables are always audited. These audit records are
not allowed to be deleted.
See Also: "Auditing Sensitive Information" on page 10-18

Managing Audit Trail Records
9-62 Oracle Database Security Guide
Managing the Operating System Audit Trail
This section contains:
■If the Operating System Audit Trail Becomes Full
■Setting the Size of the Operating System Audit Trail
■Setting the Age of the Operating System Audit Trail
■Archiving the Operating System Audit Trail
If the Operating System Audit Trail Becomes Full
Be aware that an operating system audit trail or file system, including the Windows
Event Log, can become full, and therefore, unable to accept new records, including
audit records from Oracle Database. In this case, Oracle Database cancels and rolls
back the operation being performed, including operations that normally are always
audited. (See "Activities That Are Always Audited for All Platforms" on page 9-4.) If
the operating system audit trail becomes full, then set the
AUDIT_TRAIL
parameter to
use database audit trail (such as
DB
or
DB, EXTENDED
). This prevents the audited
actions from completing if their audit records cannot be stored. You should
periodically archive and purge the operating system audit file to prevent these types of
failures.
If you plan to use operating system auditing, then ensure that the operating system
audit trail or the file system does not fill completely. Most operating systems provide
administrators with sufficient information and warning to ensure this does not occur.
If you configure auditing to use the database audit trail, you can prevent this potential
loss of audit information. Oracle Database prevents audited events from occurring if
the audit trail is unable to accept the database audit record for the statement.
Periodically archive and then purge the operating system audit trail. See "Archiving
the Operating System Audit Trail" on page 9-65 and "Purging Audit Trail Records" on
page 9-65for more information.
Setting the Size of the Operating System Audit Trail
To control the size of the operating system audit trail, set the
DBMS_AUDIT_MGMT.OS_
FILE_MAX_SIZE
property by using the
DBMS_AUDIT_MGMT.SET_AUDIT_TRAIL_PROPERTY
PL/SQL procedure. Remember that you must have the
EXECUTE
privilege for the
DBMS_
AUDIT_MGMT
PL/SQL package before you can use it. When the operating system file
meets the size limitation you set, Oracle Database stops adding records to the current
See Also: The following sections for information about different
ways of purging the database audit trail
■"Scheduling an Automatic Purge Job for the Audit Trail" on
page 9-67
■"Manually Purging the Audit Trail" on page 9-72
■"Purging a Subset of Records from the Database Audit Trail" on
page 9-74
See Also:
■"Purging Audit Trail Records" on page 9-65
■"Using the Syslog Audit Trail on UNIX Systems" on page 9-18
■"Activities That Are Always Audited for All Platforms"

Managing Audit Trail Records
Verifying Security Access with Auditing 9-63
file and then creates a new operating system file for the subsequent records. For more
information about the
DBMS_AUDIT_MGMT
PL/SQL package, see Oracle Database PL/SQL
Packages and Types Reference.
If you set both the
DBMS_AUDIT_MGMT.OS_FILE_MAX_SIZE
and the
DBMS_AUDIT_MGMT.OS_
FILE_MAX_AGE
(described in "Setting the Age of the Operating System Audit Trail" on
page 9-64) properties, then Oracle Database performs the action based the property
value limit that is met first.
For example:
BEGIN
DBMS_AUDIT_MGMT.SET_AUDIT_TRAIL_PROPERTY(
AUDIT_TRAIL_TYPE => DBMS_AUDIT_MGMT.AUDIT_TRAIL_OS,
AUDIT_TRAIL_PROPERTY => DBMS_AUDIT_MGMT.OS_FILE_MAX_SIZE,
AUDIT_TRAIL_PROPERTY_VALUE => 10240);
END;
/
In this example:
■
AUDIT_TRAIL_TYPE
: Specifies the operating system audit trail. Enter one of the
following values:
–
DBMS_AUDIT_MGMT.AUDIT_TRAIL_OS
: Operating system audit trail files with the
.aud
extension. (This setting does not apply to Windows Event Log entries.
Nor does it apply to syslog audit records, when the
AUDIT_SYSLOG_LEVEL
initialization parameter is set.)
–
DBMS_AUDIT_MGMT.AUDIT_TRAIL_XML
: XML audit trail files.
–
DBMS_AUDIT_MGMT.AUDIT_TRAIL_FILES
: Both operating system and XML audit
trail files.
■
AUDIT_TRAIL_PROPERTY
: Specifies the
DBMS_AUDIT_MGMT.OS_FILE_MAX_SIZE
property, which sets the maximum size. To find the status of the current property
settings, query the
PARAMETER_NAME
and
PARAMETER_VALUE
columns of the
DBA_
AUDIT_MGMT_CONFIG_PARAMS
data dictionary view.
■
AUDIT_TRAIL_PROPERTY_VALUE
: Sets the maximum size to 10240 kilobytes, that is,
10 megabytes. The default setting is 10,000 kilobytes (approximately 10
megabytes). Do not exceed 2 gigabytes.
Clearing the DBMS_AUDIT_MGMT.OS_FILE_MAX_SIZE Setting
To clear the maximum file size setting, use the
DBMS_AUDIT_MGMT.CLEAR_AUDIT_TRAIL_
PROPERTY
procedure.
For example:
BEGIN
DBMS_AUDIT_MGMT.CLEAR_AUDIT_TRAIL_PROPERTY(
AUDIT_TRAIL_TYPE => DBMS_AUDIT_MGMT.AUDIT_TRAIL_OS,
AUDIT_TRAIL_PROPERTY => DBMS_AUDIT_MGMT.OS_FILE_MAX_SIZE,
USE_DEFAULT_VALUES => TRUE );
END;
/
In this example:
■
AUDIT_TRAIL_TYPE
: Specifies the operating system audit trail. Enter one of the
AUDIT_TRAIL_TYPE
values described in "Setting the Size of the Operating System
Audit Trail" on page 9-62.

Managing Audit Trail Records
9-64 Oracle Database Security Guide
■
AUDIT_TRAIL_PROPERTY
: Specifies the
DBMS_AUDIT_MGMT.OS_FILE_MAX_SIZE
property. You can query the
DBA_AUDIT_MGMT_CONFIG_PARAMS
data dictionary view
to find the current status of this property.
■
USE_DEFAULT_VALUES
: Enter one of the following values:
–
TRUE
: Clears the current value and uses the default value, 10,000 kilobytes,
instead.
–
FALSE
: Oracle Database does not use a default maximum size for the operating
system or XML file growth. The files will continue to grow without limitation
unless you configure the
DBMS_AUDIT_MGMT.OS_FILE_MAX_AGE
property. The
default setting is
FALSE
.
Setting the Age of the Operating System Audit Trail
To control the age of the operating system audit trail, use the
DBMS_AUDIT_MGMT.SET_
AUDIT_TRAIL_PROPERTY
PL/SQL procedure. Remember that you must have the
EXECUTE
privilege for the
DBMS_AUDIT_MGMT
PL/SQL package before you can use it.
When the operating system file meets the age limitation you set, Oracle Database stops
adding records to the current file and then creates a new operating system file for the
subsequent records. For more information about the
DBMS_AUDIT_MGMT
PL/SQL
package, see Oracle Database PL/SQL Packages and Types Reference.
If you set both the
DBMS_AUDIT_MGMT.OS_FILE_MAX_AGE
and the
DBMS_AUDIT_MGMT.OS_
FILE_MAX_SIZE
(described in "Setting the Size of the Operating System Audit Trail" on
page 9-62) properties, then Oracle Database controls the growth of the Audit file based
on the property value limit that is met first.
For example:
BEGIN
DBMS_AUDIT_MGMT.SET_AUDIT_TRAIL_PROPERTY(
AUDIT_TRAIL_TYPE => DBMS_AUDIT_MGMT.AUDIT_TRAIL_OS,
AUDIT_TRAIL_PROPERTY => DBMS_AUDIT_MGMT.OS_FILE_MAX_AGE,
AUDIT_TRAIL_PROPERTY_VALUE => 10 );
END;
/
In this example:
■
AUDIT_TRAIL_TYPE
: Specifies the operating system audit trail. Enter one of the
following values:
–
DBMS_AUDIT_MGMT.AUDIT_TRAIL_OS
: Operating system audit trail files with the
.aud
extension. (This setting does not apply to Windows Event Log entries.
Nor does it apply to syslog audit records, when the
AUDIT_SYSLOG_LEVEL
initialization parameter is set.)
–
DBMS_AUDIT_MGMT.AUDIT_TRAIL_XML
: XML audit trail files.
–
DBMS_AUDIT_MGMT.AUDIT_TRAIL_FILES
: Both operating system and XML audit
trail files.
■
AUDIT_TRAIL_PROPERTY
: Specifies the
DBMS_AUDIT_MGMT.OS_FILE_MAX_AGE
property to set the maximum age. To find the status of the current property
setting, query the
DBA_AUDIT_MGMT_CONFIG_PARAMS
data dictionary view.
■
AUDIT_TRAIL_PROPERTY_VALUE
: Sets the maximum age to 10 days. Enter a value
between 1 and 495. The default age is 5 days.

Purging Audit Trail Records
Verifying Security Access with Auditing 9-65
Clearing the DBMS_AUDIT_MGMT.OS_FILE_MAX_AGE Setting
To clear the maximum file age setting, use the
DBMS_AUDIT_MGMT.CLEAR_AUDIT_TRAIL_
PROPERTY
procedure.
For example:
BEGIN
DBMS_AUDIT_MGMT.CLEAR_AUDIT_TRAIL_PROPERTY(
AUDIT_TRAIL_TYPE => DBMS_AUDIT_MGMT.AUDIT_TRAIL_OS,
AUDIT_TRAIL_PROPERTY => DBMS_AUDIT_MGMT.OS_FILE_MAX_AGE,
USE_DEFAULT_VALUES => TRUE );
END;
/
In this example:
■
AUDIT_TRAIL_TYPE
: Specifies operating system audit trail. Enter one of the
AUDIT_
TRAIL_TYPE
values listed in "Setting the Age of the Operating System Audit Trail"
on page 9-64.
■
AUDIT_TRAIL_PROPERTY
: Specifies the
DBMS_AUDIT_MGMT.OS_FILE_MAX_AGE
property. Query the
PARAMETER_NAME
and
PARAMETER_VALUE
columns of the
DBA_
AUDIT_MGMT_CONFIG_PARAMS
data dictionary view to find the current status of this
property.
■
USE_DEFAULT_VALUES
: Specify one of the following values:
–
TRUE
: Clears the current value and uses the default value, 5 days, instead.
–
FALSE
: Oracle Database does not use a default maximum age for the operating
system or XML file growth. In this case, the files will continue to age without
limitation unless you configure the
DBMS_AUDIT_MGMT.OS_FILE_MAX_SIZE
property. The default setting is
FALSE
.
Archiving the Operating System Audit Trail
You should periodically archive the operating system audit trail. Use your
platform-specific operating system tools to create an archive of the operating system
audit files.
Use the following methods to archive the operating system audit files:
■Use Oracle Audit Vault. You install Oracle Audit Vault separately from Oracle
Database. For more information, see Oracle Audit Vault Administrator's Guide.
■Create tape or disc backups. You can create a compressed file of the audit files,
and then store it on tapes or discs. Consult your operating system documentation
for more information.
Afterwards, you should purge (delete) the operating system audit records both to free
audit trail space and to facilitate audit trail management. See "Purging Audit Trail
Records" on page 9-65 for different ways that you can use to purge the operating
system audit trail records.
Purging Audit Trail Records
This section contains:
■About Purging Audit Trail Records
■Selecting an Audit Trail Purge Method
■Scheduling an Automatic Purge Job for the Audit Trail

Purging Audit Trail Records
9-66 Oracle Database Security Guide
■Manually Purging the Audit Trail
■Purging a Subset of Records from the Database Audit Trail
■Other Audit Trail Purge Operations
■Example: Directly Calling a Database Audit Trail Purge Operation
About Purging Audit Trail Records
You should periodically archive and then delete (purge) audit trail records, because
the audit trail cannot accept new records if it grows too large. This section describes a
variety of ways that you can use to purge both the database and operating system
audit trail records. You can purge a subset of database audit trail records. For both
database and operating system audit trail types, you can manually purge the records
or create a purge job that performs at a specified time interval. In that case, the purge
operation either purges the audit trail records that were created before the archive
timestamp, or it purges all audit trail records.
To perform the audit trail purge tasks, in most cases, you use the
DBMS_AUDIT_MGMT
PL/SQL package. You must have the
EXECUTE
privilege for
DBMS_AUDIT_MGMT
before
you can use it.
If you have Oracle Audit Vault installed, the audit trail purge process differs from the
procedures described in this manual. For example, Oracle Audit Vault archives the
audit trail for you. See Oracle Audit Vault Administrator's Guide.
Selecting an Audit Trail Purge Method
Table 9–6 provides a roadmap for selecting an audit trail purge method.
Note: Oracle Database audits all deletions from the audit trail,
without exception. See "Auditing the Database Audit Trail" on
page 9-61 and "Auditing SYS Administrative Users" on page 9-53.
See Also:
■Oracle Database PL/SQL Packages and Types Reference for more
information about the
DBMS_AUDIT_MGMT
PL/SQL package
■Oracle Database Reference for detailed information about the
DBA_
AUDIT_MGMT
-related views

Purging Audit Trail Records
Verifying Security Access with Auditing 9-67
Scheduling an Automatic Purge Job for the Audit Trail
You can purge the entire audit trail, or only a portion of the audit trail that was created
before a timestamp. For the database audit trail, the individual audit records created
before the timestamp can be purged. For the operating system audit trail, you purge
audit files that were created before the timestamp.
Be aware that purging the audit trail, particularly a large one, can take a while to
complete. Consider scheduling the purge job so that it runs during a time when the
database is not busy.
You can create multiple purge jobs for different audit trail types, so long as they do not
conflict. For example, you can create a purge job for the standard audit trail table and
then the fine-grained audit trail table. However, you cannot then create a purge job for
Table 9–6 Selecting an Audit Trail Purge Method
What Do You Want to Purge? About This Type of Purge Method
All audit records, or audit records
created before a specified timestamp,
on a regularly scheduled basis
You can schedule a purge operation to occur an specific times. For
example, you can schedule it for every Saturday at 2 a.m.
General steps:
1. If necessary, tune online and archive redo log sizes to accommodate
the additional records generated during the audit table purge process.
2. Plan a timestamp and archive strategy.
3. Initialize the audit trail cleanup operation.
4. Set an archive timestamp for the audit records.
5. Create and schedule the purge job.
6. Optionally, configure the audit trail to be deleted in batches.
See "Scheduling an Automatic Purge Job for the Audit Trail" on page 9-67
for more information.
All audit records, or records that were
created before a specified timestamp,
when you want
You can manually purge the audit records right away in a one-time
operation, rather than creating a purge schedule.
General steps:
1. If necessary, tune online and archive redo log sizes to accommodate
the additional records generated during the audit table purge process.
2. Plan a timestamp and archive strategy.
3. Initialize the audit trail cleanup operation.
4. Set an archive timestamp for the audit records.
5. Optionally, configure the audit trail to be deleted in batches.
6. Run the purge operation.
See "Manually Purging the Audit Trail" on page 9-72 for more information.
Just a subset of the audit records from
the database audit trail You can manually purge just a subset of the audit records. For example,
you can delete all audit records that were created between May 14, 2010
and June 14, 2010.
General steps:
1. If necessary, tune online and archive redo log sizes to accommodate
the additional records generated during the audit table purge process.
2. Archive the audit records you want to purge.
3. As a user with administrative privileges, delete from the
SYS.AUD$
table.
See "Purging a Subset of Records from the Database Audit Trail" on
page 9-74 for more information.

Purging Audit Trail Records
9-68 Oracle Database Security Guide
both or all types, that is, by using the
DBMS_AUDIT_MGMT.AUDIT_TRAIL_DB_STD
or
DBMS_
AUDIT_MGMT.AUDIT_TRAIL_ALL
property.
To create and schedule an automatic purge job:
■Step 1: If Necessary, Tune Online and Archive Redo Log Sizes
■Step 2: Plan a Timestamp and Archive Strategy
■Step 3: Initialize the Audit Trail Cleanup Operation
■Step 4: Optionally, Set an Archive Timestamp for Audit Records
■Step 5: Create and Schedule the Purge Job
■Step 6: Optionally, Configure the Audit Trail Records to be Deleted in Batches
Step 1: If Necessary, Tune Online and Archive Redo Log Sizes
The purge process may generate additional redo logs. Before you run this process, you
may need to tune online and archive redo log sizes to accommodate the additional
records generated during the audit table purge process. For more information about
tuning log files, see Oracle Database Performance Tuning Guide and Oracle Database
Administrator's Guide.
Step 2: Plan a Timestamp and Archive Strategy
You must record the timestamp of the database and operating system audit records
before you can archive them. You can check the timestamp date by querying the
DBA_
AUDIT_MGMT_LAST_ARCH_TS
data dictionary view. Later on, when the purge takes place,
Oracle Database purges only the audit trail records that were created before the date of
this timestamp. See "Step 4: Optionally, Set an Archive Timestamp for Audit Records"
on page 9-69 for more information.
After you have timestamped the records, you are ready to archive them. See the
following sections for more information:
■"Archiving the Database Audit Trail" on page 9-61
■"Archiving the Operating System Audit Trail" on page 9-65
Step 3: Initialize the Audit Trail Cleanup Operation
Before you can purge the audit trail by using the
DBMS_AUDIT_MGMT.CLEAN_AUDIT_
TRAIL
PL/SQL procedure, you must initialize the audit trail for the cleanup operation.
For the database audit trail, if you have not moved the database audit trail tables
(
SYS.AUD$
and
SYS.FGA_LOG$
) from the
SYSTEM
tablespace to another tablespace, this
process moves these tables to the
SYSAUX
tablespace or to the tablespace that you
specified in "Moving the Database Audit Trail to a Different Tablespace" on page 9-60.
Be aware that moving these tables takes a while, so you may want to schedule the
initialization process during time when the database is not busy.
To initialize the audit trail cleanup operation:
1. Log in to SQL*Plus as an administrative user who has the
EXECUTE
privilege on the
DBMS_AUDIT_MGMT
PL/SQL package.
2. If you have not done so already, initialize the audit trail cleanup operation by
running the
DBMS_AUDIT_MGMT.INIT_CLEANUP
procedure. (You only need to
perform this step once.
You can check if the audit trail has been initialized for cleanup by running the
DBMS_AUDIT_MGMT.IS_CLEANUP_INITIALIZED
function. See "Verifying That the
Audit Trail Is Initialized for Cleanup" on page 9-75.)

Purging Audit Trail Records
Verifying Security Access with Auditing 9-69
For example:
BEGIN
DBMS_AUDIT_MGMT.INIT_CLEANUP(
AUDIT_TRAIL_TYPE => DBMS_AUDIT_MGMT.AUDIT_TRAIL_AUD_STD,
DEFAULT_CLEANUP_INTERVAL => 12 );
END;
/
In this specification:
■
AUDIT_TRAIL_TYPE
: Enter one of the following values:
–
DBMS_AUDIT_MGMT.AUDIT_TRAIL_AUD_STD
: Standard audit trail table,
AUD$
.
–
DBMS_AUDIT_MGMT.AUDIT_TRAIL_FGA_STD
: Fine-grained audit trail table,
FGA_LOG$
.
–
DBMS_AUDIT_MGMT.AUDIT_TRAIL_DB_STD
: Both standard and fine-grained
audit trail tables.
–
DBMS_AUDIT_MGMT.AUDIT_TRAIL_OS
: Operating system audit trail files with
the
.aud
extension. (This setting does not apply to Windows Event Log
entries.)
–
DBMS_AUDIT_MGMT.AUDIT_TRAIL_XML
: XML Operating system audit trail
files.
–
DBMS_AUDIT_MGMT.AUDIT_TRAIL_FILES
: Both operating system and XML
audit trail files.
–
DBMS_AUDIT_MGMT.AUDIT_TRAIL_ALL
: All audit trail records, that is, both
database audit trail and operating system audit trail types.
■
DEFAULT_CLEANUP_INTERVAL
: Specify the desired default hourly purge interval
(for example,
12
for every 12 hours). The
DBMS_AUDIT_MGMT
procedures use this
value to determine how to purge audit records. The timing begins when you
run the
DBMS_AUDIT_MGMT.INIT_CLEANUP
procedure. To update this value later,
set the
DBMS_AUDIT_MGMT.CLEAN_UP_INTERVAL
property of the
DBMS_AUDIT_
MGMT.SET_AUDIT_TRAIL_PROPERTY
procedure.
The
DEFAULT_CLEANUP_INTERVAL
setting must indicate the frequency in which
DBMS_AUDIT_MGMT.CLEAN_AUDIT_TRAIL
is called. If you are uncertain about the
frequency, set it to an approximate value. You can change this value later on
by using the
DBMS_AUDIT_MGMT.SET_AUDIT_TRAIL_PROPERTY
procedure.
Step 4: Optionally, Set an Archive Timestamp for Audit Records
If you want to delete all of the audit trail, you can bypass this step.
You can set a timestamp when the last audit record was archived. Setting an archive
timestamp provides a hint to the cleanup infrastructure that the cleanup operation will
be invoked every 6 hours.
For the database audit trail, you must set the timestamp after you have initialized the
audit trail cleanup operation. To find the last archive timestamps for the audit trail,
you can query the
DBA_AUDIT_MGMT_LAST_ARCH_TS
data dictionary view. After you set
the timestamp, all audit records in the audit trail that indicate a time earlier than that
timestamp are purged when you run the
DBMS_AUDIT_MGMT.CLEAN_AUDIT_TRAIL
PL/SQL procedure. If you want to clear the archive timestamp setting, see "Clearing
the Archive Timestamp Setting" on page 9-78.

Purging Audit Trail Records
9-70 Oracle Database Security Guide
For the operating system audit trail, remember that you cannot delete individual audit
records in the operating system (including XML) audit files. Instead, Oracle Database
removes the entire file that contains the timestamped records.
If you are using Oracle Real Application Clusters (Oracle RAC), then use Network
Time Protocol (NTP) to synchronize the time on each computer where you have
installed an Oracle Database instance. For example, suppose you set the time for one
Oracle RAC instance node at 11:00:00 a.m. and then set the next Oracle RAC instance
node at 11:00:05. As a result, the two nodes have inconsistent times. You can use
Network Time Protocol (NTP) to synchronize the times for these Oracle RAC instance
nodes.
To set the timestamp, use the
DBMS_AUDIT_MGMT.SET_LAST_ARCHIVE_TIMESTAMP
PL/SQL procedure.
For example:
BEGIN
DBMS_AUDIT_MGMT.SET_LAST_ARCHIVE_TIMESTAMP(
AUDIT_TRAIL_TYPE => DBMS_AUDIT_MGMT.AUDIT_TRAIL_AUD_STD,
LAST_ARCHIVE_TIME => '2009-05-28 06:30:00.00'
RAC_INSTANCE_NUMBER => 0 );
END;
/
In this example:
■
AUDIT_TRAIL_TYPE
: Enter one of the following settings:
–
DBMS_AUDIT_MGMT.AUDIT_TRAIL_AUD_STD
: Specified the standard audit trail
table,
AUD$
.
–
DBMS_AUDIT_MGMT.AUDIT_TRAIL_FGA_STD
: Specifies the fine-grained audit trail
table,
FGA_LOG$
.
–
DBMS_AUDIT_MGMT.AUDIT_TRAIL_OS
: Operating system audit trail files with the
.aud
extension. (This setting does not apply to Windows Event Log entries.)
–
DBMS_AUDIT_MGMT.AUDIT_TRAIL_XML
: Specifies XML audit trail files.
■
LAST_ARCHIVE_TIME
: Enter the timestamp in
YYYY-MM-DD HH:MI:SS.FF
UTC
(Coordinated Universal Time) format for
AUDIT_TRAIL_DB_AUD
and
AUDIT_TRAIL_
FGA_STD
(standard and fine-grained audit trails), and in the Local Time Zone for
AUDIT_TRAIL_OS
and
AUDIT_TRAIL_XML
(operating system and XML audit trails).
■
RAC_INSTANCE_NUMBER
: Specifies the instance number for an Oracle RAC
installation. If you specified the
DBMS_AUDIT_MGMT.AUDIT_TRAIL_AUD_STD
or
DBMS_
AUDIT_MGMT.AUDIT_TRAIL_FGA_STD
audit trail types, you can omit the
RAC_
INSTANCE_NUMBER
argument. This is because there is only one
AUD$
and
FGA_LOG$
table, even for an Oracle RAC installation. The default is
0
, which is used for
single-instance database installations.
Typically, after you set the timestamp, you can use the
DBMS_AUDIT_MGMT.CLEAN_
AUDIT_TRAIL
PL/SQL procedure to remove the audit records that were created before
the timestamp date.
Step 5: Create and Schedule the Purge Job
Create and schedule the purge job by running the
DBMS_AUDIT_MGMT.CREATE_PURGE_
JOB
PL/SQL procedure.
For example:

Purging Audit Trail Records
Verifying Security Access with Auditing 9-71
BEGIN
DBMS_AUDIT_MGMT.CREATE_PURGE_JOB (
AUDIT_TRAIL_TYPE => DBMS_AUDIT_MGMT.AUDIT_TRAIL_AUD_STD,
AUDIT_TRAIL_PURGE_INTERVAL => 12,
AUDIT_TRAIL_PURGE_NAME => 'Standard_Audit_Trail_PJ',
USE_LAST_ARCH_TIMESTAMP => TRUE );
END;
/
In this example:
■
AUDIT_TRAIL_TYPE
: Enter one of the following values:
–
DBMS_AUDIT_MGMT.AUDIT_TRAIL_AUD_STD
: Standard audit trail table,
AUD$
–
DBMS_AUDIT_MGMT.AUDIT_TRAIL_FGA_STD
: Fine-grained audit trail table,
FGA_
LOG$
–
DBMS_AUDIT_MGMT.AUDIT_TRAIL_DB_STD
: Both standard and fine-grained audit
trail tables
–
DBMS_AUDIT_MGMT.AUDIT_TRAIL_OS
: Operating system audit trail files with the
.aud
extension. (This setting does not apply to Windows Event Log entries.)
–
DBMS_AUDIT_MGMT.AUDIT_TRAIL_XML
: XML audit trail files
–
DBMS_AUDIT_MGMT.AUDIT_TRAIL_FILES
: Both operating system and XML audit
trail files
–
DBMS_AUDIT_MGMT.AUDIT_TRAIL_ALL
: All audit trail records, that is, both
database audit trail and operating system audit trail types
■
AUDIT_TRAIL_PURGE_INTERVAL
: Specify the hourly interval for this purge job to
run. The timing begins when you run the
DBMS_AUDIT_MGMT.CREATE_PURGE_JOB
procedure, in this case, 12 hours after you run this procedure. Later on, if you want
to update this value, run the
DBMS_AUDIT_MGMT.SET_PURGE_JOB_INTERVAL
procedure.
■
USE_LAST_ARCH_TIMESTAMP
: Enter either of the following settings:
–
TRUE
: Deletes audit records created before the last archive timestamp. To check
the last recorded timestamp, query the
LAST_ARCHIVE_TS
column of the
DBA_
AUDIT_MGMT_LAST_ARCH_TS
data dictionary view. The default value is
TRUE
.
Oracle recommends that you set
USE_LAST_ARCH_TIMESTAMP
to
TRUE
.
–
FALSE
: Deletes all audit records without considering last archive timestamp. Be
careful about using this setting, in case you inadvertently delete audit records
that should not have been deleted.
Step 6: Optionally, Configure the Audit Trail Records to be Deleted in Batches
By default, the
DBMS_AUDIT_MGMT
package procedures delete the database and
operating system audit trail records in batches of 10000 database audit records, or 1000
operating system audit files. You can set this batch size to a different value if you want.
Later on, when Oracle Database runs the purge job, it deletes each batch, rather than
all records together. If the audit trail is very large (and they can grow quite large),
deleting the records in batches facilitates the purge operation.
To find the current batch setting, you can query the
PARAMETER_NAME
and
PARAMETER_
VALUE
columns of the
DBA_AUDIT_MGMT_CONFIG_PARAMS
data dictionary view. To set the
batch size, use the
DBMS_AUDIT_MGMT.SET_AUDIT_TRAIL_PROPERTY
procedure. If you
later want to clear this setting, see "Clearing the Database Audit Trail Batch Size" on
page 9-78.

Purging Audit Trail Records
9-72 Oracle Database Security Guide
For example:
BEGIN
DBMS_AUDIT_MGMT.SET_AUDIT_TRAIL_PROPERTY(
AUDIT_TRAIL_TYPE => DBMS_AUDIT_MGMT.AUDIT_TRAIL_AUD_STD,
AUDIT_TRAIL_PROPERTY => DBMS_AUDIT_MGMT.DB_DELETE_BATCH_SIZE,
AUDIT_TRAIL_PROPERTY_VALUE => 100000);
END;
/
In this example:
■
AUDIT_TRAIL_TYPE
: Specifies the audit trail type, which in this case is the database
system audit trail. Enter one of the following values:
–
DBMS_AUDIT_MGMT.AUDIT_TRAIL_AUD_STD
: Standard audit trail table,
AUD$
.
–
DBMS_AUDIT_MGMT.AUDIT_TRAIL_FGA_STD
: Fine-grained audit trail table,
FGA_
LOG$
.
–
DBMS_AUDIT_MGMT.AUDIT_TRAIL_OS
: Operating system audit files.
–
DBMS_AUDIT_MGMT.AUDIT_TRAIL_XML
: XML audit files.
■
AUDIT_TRAIL_PROPERTY
: Uses the
DBMS_AUDIT_MGMT.DB_DELETE_BATCH_SIZE
property to indicate the database audit trail batch size setting. If you want to batch
the operating system audit trail, then use the
FILE_DELETE_BATCH_SIZE
property.
■
AUDIT_TRAIL_PROPERTY_VALUE
: Sets the number of audit record files to be 100,000
for each batch. Enter a value between
100
and
1000000
. To determine this number,
consider the total number of records being purged, and the time interval in which
the purge operation is performed. The default is
10000
for the database audit trail
and 1000 for the operating system audit trail records.
Manually Purging the Audit Trail
You can manually purge the audit trail right away, without scheduling a purge job.
Similar to a purge job, you can purge audit trail records that were created before an
archive timestamp date or all the records in the audit trail.
Note the following about the
DBMS_AUDIT_MGMT.CLEAN_AUDIT_TRAIL
PL/SQL
procedure:
■Only the current audit directory is cleaned up when you run this procedure.
■On Microsoft Windows, because the
DBMS_AUDIT_MGMT
package does not support
cleanup of Windows Event Viewer, setting the
AUDIT_TRAIL_TYPE
property to
DBMS_AUDIT_MGMT.AUDIT_TRAIL_OS
has no effect. This is because operating system
audit records on Windows are written to Windows Event Viewer. The
DBMS_
AUDIT_MGMT
package does not support this type of cleanup operation.
■On UNIX platforms, if you set the
AUDIT_SYSLOG_LEVEL
initialization parameter to
a valid value as listed in Oracle Database Reference, then Oracle Database writes the
operating system log files to syslog files. If you set the
AUDIT_TRAIL_TYPE
property
to
DBMS_AUDIT_MGMT.AUDIT_TRAIL_OS
, then the procedure only removes
.aud
files
under audit directory (This directory is specified by the
AUDIT_FILE_DEST
initialization parameter).
■When the
AUDIT_TRAIL_TYPE
parameter is set to
DBMS_AUDIT_MGMT.AUDIT_TRAIL_
XML
, this procedure only cleans up XML audit files (
.xml
) in the current audit
directory. Oracle Database maintains an index file, called
adx_$ORACLE_SID.txt
,

Purging Audit Trail Records
Verifying Security Access with Auditing 9-73
which lists the XML files that were generated by the XML auditing. The cleanup
procedure does not remove this file.
For database audit trails, you must initialize the cleanup infrastructure by running the
DBMS_AUDIT_MGMT.INIT_CLEANUP
procedure, and then purging the database audit trail
by using the method described in "Purging a Subset of Records from the Database
Audit Trail" on page 9-74.
To manually purge the audit trail:
1. Follow these steps under "Scheduling an Automatic Purge Job for the Audit Trail"
on page 9-67:
■Step 1: If Necessary, Tune Online and Archive Redo Log Sizes
■Step 2: Plan a Timestamp and Archive Strategy
■Step 3: Initialize the Audit Trail Cleanup Operation
■Step 4: Optionally, Set an Archive Timestamp for Audit Records
■Step 5: Create and Schedule the Purge Job
■Step 6: Optionally, Configure the Audit Trail Records to be Deleted in Batches
2. Purge the audit trail records by running the
DBMS_AUDIT_MGMT.CLEAN_AUDIT_TRAIL
PL/SQL procedure.
For example:
BEGIN
DBMS_AUDIT_MGMT.CLEAN_AUDIT_TRAIL(
AUDIT_TRAIL_TYPE => DBMS_AUDIT_MGMT.AUDIT_TRAIL_AUD_STD,
USE_LAST_ARCH_TIMESTAMP => TRUE );
END;
/
In this example:
■
AUDIT_TRAIL_TYPE
: Enter one of the following values:
–
DBMS_AUDIT_MGMT.AUDIT_TRAIL_AUD_STD
: Standard audit trail table,
AUD$
–
DBMS_AUDIT_MGMT.AUDIT_TRAIL_FGA_STD
: Fine-grained audit trail table,
FGA_LOG$
–
DBMS_AUDIT_MGMT.AUDIT_TRAIL_DB_STD
: Both standard and fine-grained
audit trail tables
–
DBMS_AUDIT_MGMT.AUDIT_TRAIL_OS
: Operating system audit trail files with
the
.aud
extension. (This setting does not apply to Windows Event Log
entries.)
–
DBMS_AUDIT_MGMT.AUDIT_TRAIL_XML
: XML audit trail files
–
DBMS_AUDIT_MGMT.AUDIT_TRAIL_FILES
: Both operating system and XML
audit trail files
–
DBMS_AUDIT_MGMT.AUDIT_TRAIL_ALL
: All audit trail records, that is, both
database audit trail and operating system audit trail types
■
USE_LAST_ARCH_TIMESTAMP
: Enter either of the following settings:
–
TRUE
: Deletes audit records created before the last archive timestamp. To
set the archive timestamp, see "Step 4: Optionally, Set an Archive
Timestamp for Audit Records" on page 9-69. The default (and

Purging Audit Trail Records
9-74 Oracle Database Security Guide
recommended) value is
TRUE
. Oracle recommends that you set
USE_LAST_
ARCH_TIMESTAMP
to
TRUE
.
–
FALSE
: Deletes all audit records without considering last archive
timestamp. Be careful about using this setting, in case you inadvertently
delete audit records that should have been deleted.
Purging a Subset of Records from the Database Audit Trail
You can manually remove records from the database audit trail tables. This method
can be useful if you want to remove a specific subset of records. You can use this
method if the database audit trail table is in any tablespace, including the
SYSTEM
tablespace.
For example, to delete audit records that were created later than the evening of
February 28, 2009 but before March 28, 2009, enter the following statement:
DELETE FROM SYS.AUD$
WHERE NTIMESTAMP# > TO_TIMESTAMP ('28-FEB-09 09.07.59.907000 PM') AND
NTIMESTAMP# < TO_TIMESTAMP ('28-MAR-09 09.07.59.907000 PM');
Alternatively, to delete all audit records from the audit trail, enter the following
statement:
DELETE FROM SYS.AUD$;
Only the user
SYS
or a user to whom
SYS
granted the
DELETE
privilege on
SYS.AUD$
can
delete records from the database audit trail.
After you delete the rows from the database audit trail table, the freed space is
available for reuse by that table. (The
SYS.AUD$
table is allocated only as many extents
as are necessary to maintain current audit trail records.) You do not need to do
anything to make this space available to the table for reuse. If you want to use this
space for another table, then follow these steps:
1. Move the
AUD$
table to an auto segment space managed tablespace.
For example:
BEGIN
DBMS_AUDIT_MGMT.SET_AUDIT_TRAIL_LOCATION
(audit_trail_type => DBMS_AUDIT_MGMT.AUDIT_TRAIL_DB_STD,
audit_trail_location_value => 'USERS');
END;
/
2. Run the following statements:
ALTER TABLE SYSTEM.AUD$ ENABLE ROW MOVEMENT;
ALTER TABLE SYSTEM.AUD$ SHRINK SPACE CASCADE;
Note: If the audit trail is full and connections are being audited
(that is, if the
AUDIT SESSION
statement is set), then typical users
cannot connect to the database because the associated audit record
for the connection cannot be inserted into the audit trail. In this
case, connect as
SYS
with the
SYSDBA
privilege, and make space
available in the audit trail. Remember that operations by
SYS
are
not recorded in the standard audit trail, but they are audited if you
set the
AUDIT_SYS_OPERATIONS
parameter to
TRUE
.

Purging Audit Trail Records
Verifying Security Access with Auditing 9-75
3. If you must move the
AUD$
table back to the
SYSTEM
tablespace, then run the
following statement:
BEGIN
DBMS_AUDIT_MGMT.SET_AUDIT_TRAIL_LOCATION
(audit_trail_type => DBMS_AUDIT_MGMT.AUDIT_TRAIL_DB_STD,
audit_trail_location_value => 'SYSTEM');
END;
/
If you want to both delete all the rows from the database audit trail table and free the
used space for other tablespace objects, use the
TRUNCATE TABLE
statement. For
example:
TRUNCATE TABLE SYS.AUD$;
Other Audit Trail Purge Operations
This section contains:
■Verifying That the Audit Trail Is Initialized for Cleanup
■Setting the Default Audit Trail Purge Interval for Any Audit Trail Type
■Cancelling the Initialization Cleanup Settings
■Enabling or Disabling an Audit Trail Purge Job
■Setting the Default Audit Trail Purge Job Interval for a Specified Purge Job
■Deleting an Audit Trail Purge Job
■Clearing the Archive Timestamp Setting
■Clearing the Database Audit Trail Batch Size
Verifying That the Audit Trail Is Initialized for Cleanup
You can check if the audit trail has been initialized for cleanup by running the
DBMS_
AUDIT_MGMT.IS_CLEANUP_INITIALIZED
function. If the audit trail has been initialized,
then this function returns
TRUE
. If it is not, it returns
FALSE
.
For example:
SET SERVEROUTPUT ON
BEGIN
IF
DBMS_AUDIT_MGMT.IS_CLEANUP_INITIALIZED(DBMS_AUDIT_MGMT.AUDIT_TRAIL_AUD_STD)
THEN
DBMS_OUTPUT.PUT_LINE('AUD$ is initialized for cleanup');
ELSE
DBMS_OUTPUT.PUT_LINE('AUD$ is not initialized for cleanup.');
END IF;
END;
/
This example verifies that the database standard audit trail has been initialized and
returns a message indicating its status. To select a setting for a different audit trail,
choose from the
AUDIT_TRAIL_TYPE
settings described in "Step 3: Initialize the Audit
Note:
SYS.AUD$
and
SYS.FGA_LOG$
are the only
SYS
objects that
can ever be directly modified.

Purging Audit Trail Records
9-76 Oracle Database Security Guide
Trail Cleanup Operation" on page 9-68.
Setting the Default Audit Trail Purge Interval for Any Audit Trail Type
You can set a default purge operation interval, in hours, that must pass before the next
purge operation takes place for a specified audit trail type.
For example:
BEGIN
DBMS_AUDIT_MGMT.SET_AUDIT_TRAIL_PROPERTY(
AUDIT_TRAIL_TYPE => DBMS_AUDIT_MGMT.AUDIT_TRAIL_AUD_STD,
AUDIT_TRAIL_PROPERTY => DBMS_AUDIT_MGMT.CLEAN_UP_INTERVAL,
AUDIT_TRAIL_PROPERTY_VALUE => 24 );
END;
/
In this example:
■
AUDIT_TRAIL_TYPE
: Specifies the audit trail type, which in this case is the database
standard audit trail. Choose from the following settings:
–
DBMS_AUDIT_MGMT.AUDIT_TRAIL_AUD_STD
: Standard audit trail table,
AUD$
–
DBMS_AUDIT_MGMT.AUDIT_TRAIL_FGA_STD
: Fine-grained audit trail table,
FGA_
LOG$
–
DBMS_AUDIT_MGMT.AUDIT_TRAIL_DB_STD
: Both standard and fine-grained audit
trail tables
–
DBMS_AUDIT_MGMT.AUDIT_TRAIL_OS
: Operating system audit trail files with the
.aud
extension. (This setting does not apply to Windows Event Log entries.)
–
DBMS_AUDIT_MGMT.AUDIT_TRAIL_XML
: XML Operating system audit trail files
–
DBMS_AUDIT_MGMT.AUDIT_TRAIL_FILES
: Both operating system and XML audit
trail files
–
DBMS_AUDIT_MGMT.AUDIT_TRAIL_ALL
: All audit trail records, that is, both
database audit trail and operating system audit trail types
You can set a default interval for multiple audit trail types, so long as they do not
conflict. For example, you can set individual intervals for the
DBMS_AUDIT_
MGMT.AUDIT_TRAIL_AUD_STD
and
DBMS_AUDIT_MGMT.AUDIT_TRAIL_FGA_STD
properties, but not for the
DBMS_AUDIT_MGMT.AUDIT_TRAIL_DB_STD
property.
■
AUDIT_TRAIL_PROPERTY
: Sets the
DBMS_AUDIT_MGMT.CLEAN_UP_INTERVAL
property
to indicate the purge operation interval setting. To find the current property
settings, query the
PARAMETER_NAME
and
PARAMETER_VALUE
columns of the
DBA_
AUDIT_MGMT_CONFIG_PARAMS
data dictionary view. The timing begins when you set
the
DBMS_AUDIT_MGMT.CLEAN_UP_INTERVAL
property.
■
AUDIT_TRAIL_PROPERTY_VALUE
: Updates the default hourly interval set by the
DBMS_AUDIT_MGMT.INIT_CLEANUP
procedure. Enter a value between 1 and 999.
Cancelling the Initialization Cleanup Settings
You can cancel the
DBMS_AUDIT_MGMT.INIT_CLEANUP
settings, that is, the default
cleanup interval, by invoking the
DBMS_AUDIT_MGMT.DEINIT_CLEANUP
procedure.
For example, to cancel all purge settings for the standard audit trail:
BEGIN
DBMS_AUDIT_MGMT.DEINIT_CLEANUP(
AUDIT_TRAIL_TYPE => DBMS_AUDIT_MGMT.AUDIT_TRAIL_AUD_STD);

Purging Audit Trail Records
Verifying Security Access with Auditing 9-77
END;
/
In this example:
■
AUDIT_TRAIL_TYPE
: Enter one of the
AUDIT_TRAIL_TYPE
settings listed in "Step 3:
Initialize the Audit Trail Cleanup Operation" on page 9-68.
Enabling or Disabling an Audit Trail Purge Job
To enable or disable an audit trail purge job, use the
DBMS_AUDIT_MGMT.SET_PURGE_
JOB_STATUS
PL/SQL procedure.
For example:
BEGIN
DBMS_AUDIT_MGMT.SET_PURGE_JOB_STATUS(
AUDIT_TRAIL_PURGE_NAME => 'OS_Audit_Trail_PJ',
AUDIT_TRAIL_STATUS_VALUE => DBMS_AUDIT_MGMT.PURGE_JOB_ENABLE);
END;
/
In this example:
■
AUDIT_TRAIL_PURGE_NAME
: Specifies a purge job called
OS_Audit_Trail_PJ
. To find
existing purge jobs, query the
JOB_NAME
and
JOB_STATUS
columns of the
DBA_
AUDIT_MGMT_CLEANUP_JOBS
data dictionary view.
■
AUDIT_TRAIL_STATUS_VALUE
: Enter one of the following properties:
–
DBMS_AUDIT_MGMT.PURGE_JOB_ENABLE
: Enables the specified purge job.
–
DBMS_AUDIT_MGMT.PURGE_JOB_DISABLE
: Disables the specified purge job.
Setting the Default Audit Trail Purge Job Interval for a Specified Purge Job
You can set a default purge operation interval, in hours, that must pass before the next
purge job operation takes place. The interval setting that is used in the
DBMS_AUDIT_
MGMT.CREATE_PURGE_JOB
procedure takes precedence over this setting.
For example:
BEGIN
DBMS_AUDIT_MGMT.SET_PURGE_JOB_INTERVAL(
AUDIT_TRAIL_PURGE_NAME => 'OS_Audit_Trail_PJ',
AUDIT_TRAIL_INTERVAL_VALUE => 24 );
END;
/
In this example:
■
AUDIT_TRAIL_PURGE_NAME
: Specifies the name of the audit trail purge job. To find a
list of existing purge jobs, query the
JOB_NAME
and
JOB_STATUS
columns of the
DBA_
AUDIT_MGMT_CLEANUP_JOBS
data dictionary view.
■
AUDIT_TRAIL_INTERVAL_VALUE
: Updates the default hourly interval set by the
DBMS_AUDIT_MGMT.CREATE_PURGE_JOB
procedure. Enter a value between
1
and
999
.
The timing begins when you run the purge job.

Purging Audit Trail Records
9-78 Oracle Database Security Guide
Deleting an Audit Trail Purge Job
To delete an audit trail purge job, use the
DBMS_AUDIT_MGMT.DROP_PURGE_JOB
PL/SQL
procedure. To find existing purge jobs, query the
JOB_NAME
and
JOB_STATUS
columns of
the
DBA_AUDIT_MGMT_CLEANUP_JOBS
data dictionary view.
For example:
BEGIN
DBMS_AUDIT_MGMT.DROP_PURGE_JOB(
AUDIT_TRAIL_PURGE_NAME => 'FGA_Audit_Trail_PJ');
END;
/
In this example:
■
AUDIT_TRAIL_PURGE_NAME
: Specifies a purge job called
FGA_Audit_Trail_PJ
.
Clearing the Archive Timestamp Setting
To clear the archive timestamp setting, use the
DBMS_AUDIT_MGMT.CLEAR_LAST_
ARCHIVE_TIMESTAMP
PL/SQL procedure.
For example:
BEGIN
DBMS_AUDIT_MGMT.CLEAR_LAST_ARCHIVE_TIMESTAMP(
AUDIT_TRAIL_TYPE => DBMS_AUDIT_MGMT.AUDIT_TRAIL_XML',
RAC_INSTANCE_NUMBER => 1 );
END;
/
In this example:
■
RAC_INSTANCE_NUMBER
: If the
AUDIT_TRAIL_TYPE
property is set to
DBMS_AUDIT_
MGMT.AUDIT_TRAIL_OS
or
DBMS_AUDIT_MGMT.AUDIT_TRAIL_XML
, then you cannot set
RAC_INSTANCE_NUMBER
to
0
. You can omit this setting or specify
1
to indicate an
instance number.
You can omit the
RAC_INSTANCE_NUMBER
setting when
AUDIT_TRAIL_TYPE
is
DBMS_
AUDIT_MGMT.AUDIT_TRAIL_AUD_STD
or
DBMS_AUDIT_MGMT.AUDIT_TRAIL_FGA_STD
, or
if the database is not an Oracle RAC database. Otherwise, specify the correct
instance number. You can find the instance number by issuing the
SHOW PARAMETER
INSTANCE_NUMBER
command in SQL*Plus.
Clearing the Database Audit Trail Batch Size
To clear the batch size setting, use the
DBMS_AUDIT_MGMT.CLEAR_AUDIT_TRAIL_
PROPERTY
procedure.
For example:
BEGIN
DBMS_AUDIT_MGMT.CLEAR_AUDIT_TRAIL_PROPERTY(
AUDIT_TRAIL_TYPE => DBMS_AUDIT_MGMT.AUDIT_TRAIL_AUD_STD,
AUDIT_TRAIL_PROPERTY => DBMS_AUDIT_MGMT.DB_DELETE_BATCH_SIZE,
USE_DEFAULT_VALUES => TRUE );
END;
/
In this example:
■
AUDIT_TRAIL_TYPE
: Specifies the audit trail type, which in this case is the database
system audit trail. Enter one of the
AUDIT_TRAIL_TYPE
values listed in "Step 6:

Purging Audit Trail Records
Verifying Security Access with Auditing 9-79
Optionally, Configure the Audit Trail Records to be Deleted in Batches" on
page 9-71.
■
AUDIT_TRAIL_PROPERTY
: Specifies the
DB_DELETE_BATCH_SIZE
property. Query the
DBA_AUDIT_MGMT_CONFIG_PARAMS
data dictionary view to find the current status of
this property.
■
USE_DEFAULT_VALUES
: Is set to
TRUE
, which clears the current audit record batch
size and uses the default value,
10000
, instead.
Example: Directly Calling a Database Audit Trail Purge Operation
The pseudo code in Example 9–27 creates a database audit trail purge operation that
the user calls by invoking the
DBMS_ADUIT.CLEAN_AUDIT_TRAIL
procedure. The purge
operation deletes records that were created before the last archived timestamp by
using a loop. The loop archives the audit records, calculates which audit records were
archived and uses the
SetCleanUpAuditTrail
call to set the last archive timestamp,
and then calls the
CLEAN_AUDIT_TRAIL
procedure. It deletes the database audit trail
records in batches of 100,000 records each. In this example, major steps are in bold
typeface.
Example 9–27 Directly Calling a Database Audit Trail Purge Operation
-- 1. Initialize the AUD$ table for cleanup:
PROCEDURE CleanUpAuditTrailMain()
BEGIN
-- Connect to the database using appropriate login.
CALL ConnectToDatabase();
-- The login used must have privileges to modify Audit settings.
-- Currently, the DBA will be the authorized user
DBMS_AUDIT_MGMT.INIT_CLEANUP(
AUDIT_TRAIL_TYPE => DBMS_AUDIT_MGMT.AUDIT_TRAIL_AUD_STD,
DEFAULT_CLEANUP_INTERVAL => 12 );
END; /*PROCEDURE */
/
-- 2. Optionally, set the batch size:
BEGIN
DBMS_AUDIT_MGMT.SET_AUDIT_TRAIL_PROPERTY(
AUDIT_TRAIL_TYPE => DBMS_AUDIT_MGMT.AUDIT_TRAIL_AUD_STD,
AUDIT_TRAIL_PROPERTY => DBMS_AUDIT_MGMT.DB_DELETE_BATCH_SIZE,
AUDIT_TRAIL_PROPERTY_VALUE => 100000 /* delete batch size */);
END; /*PROCEDURE */
/
-- 3. Set the last archive timestamp:
PROCEDURE SetCleanUpAuditTrail()
BEGIN
CALL FindLastArchivedTimestamp(AUD$);
DBMS_AUDIT_MGMT.SET_LAST_ARCHIVE_TIMESTAMP(
AUDIT_TRAIL_TYPE => DBMS_AUDIT_MGMT.AUDIT_TRAIL_AUD_STD,
LAST_ARCHIVE_TIME => '20-AUG-2009 00:00:00');
END /* PROCEDURE */
/
-- 4. Run a customized archive procedure to purge the audit trail records:
BEGIN
CALL MakeAuditSettings();
LOOP (/* How long to loop*/)
-- Invoke function for audit record archival
CALL DoAuditRecordArchival(AUD$);
Finding Information About Audited Activities
9-80 Oracle Database Security Guide
CALL SetCleanUpAuditTrail();
IF(/* Clean up is needed immediately */)
DBMS_AUDIT_MGMT.CLEAN_AUDIT_TRAIL(
AUDIT_TRAIL_TYPE => DBMS_AUDIT_MGMT.AUDIT_TRAIL_AUD_STD,
USE_LAST_ARCH_TIMESTAMP => TRUE);
END IF
END LOOP /*LOOP*/
END; /* PROCEDURE */
/
Finding Information About Audited Activities
This section contains:
■Using Data Dictionary Views to Find Information About the Audit Trail
■Using Audit Trail Views to Investigate Suspicious Activities
■Deleting the Audit Trail Views
Using Data Dictionary Views to Find Information About the Audit Trail
Table 9–7 lists data dictionary views that provide auditing information. For detailed
information about these views, see Oracle Database Reference.
Tip: To find error information about audit policies, check the trace
files. The
USER_DUMP_DEST
initialization parameter sets the location of
the trace files.
Table 9–7 Data Dictionary Views That Display Information about the Database Audit Trail
View Description
ALL_AUDIT_POLICIES
Describes the fine-grained auditing policies on the tables and views
accessible to the current user
ALL_AUDIT_POLICY_COLUMNS
Describes the fine-grained auditing policy columns on the tables and
views accessible to the current user.
ALL_DEF_AUDIT_OPTS
Lists default object-auditing options that are to be applied when objects
are created
AUDIT_ACTIONS
Describes audit trail action type codes
DBA_AUDIT_EXISTS
Lists audit trail entries produced
BY AUDIT NOT EXISTS
DBA_AUDIT_MGMT_CLEAN_EVENTS
Displays the history of purge events. Periodically, as user
SYS
connected
with the
SYSDBA
privilege, you should delete the contents of this view so
that it does not grow too large. For example:
DELETE FROM DBA_AUDIT_MGMT_CLEAN_EVENTS;
DBA_AUDIT_MGMT_CLEANUP_JOBS
Displays the currently configured audit trail purge jobs
DBA_AUDIT_MGMT_CONFIG_PARAMS
Displays the currently configured audit trail properties that are used by
the
DBMS_AUDIT_MGMT
PL/SQL package
DBA_AUDIT_MGMT_LAST_ARCH_TS
Displays the last archive timestamps that have set for audit trail purges.
DBA_AUDIT_OBJECT
Lists audit trail records for all objects in the system
DBA_AUDIT_POLICIES
Lists all the fine-grained auditing policies on the system
DBA_AUDIT_SESSION
Lists all audit trail records concerning
CONNECT
and
DISCONNECT
DBA_AUDIT_POLICY_COLUMNS
Describes the fine-grained auditing policy columns on the tables and
views throughout the database.

Finding Information About Audited Activities
Verifying Security Access with Auditing 9-81
Using Audit Trail Views to Investigate Suspicious Activities
This section provides examples that demonstrate how to examine and interpret the
information in the audit trail. Suppose you want to audit the database for the
following suspicious activities:
■Passwords, tablespace settings, and quotas for some database users are altered
without authorization.
■A high number of deadlocks occur, most likely because of users acquiring
exclusive table locks.
■Rows are arbitrarily deleted from the
emp
table in
laurel
's schema.
You suspect the users
jward
and
swilliams
of several of these detrimental actions.
To investigate, you issue the following statements (in the order specified):
AUDIT ALTER, INDEX, RENAME ON DEFAULT;
CREATE VIEW laurel.employee AS SELECT * FROM laurel.emp;
AUDIT SESSION BY jward, swilliams;
AUDIT ALTER USER;
AUDIT LOCK TABLE
BY ACCESS
WHENEVER SUCCESSFUL;
DBA_AUDIT_STATEMENT
Lists audit trail records concerning
GRANT
,
REVOKE
,
AUDIT
,
NOAUDIT
, and
ALTER SYSTEM
statements throughout the database
DBA_AUDIT_TRAIL
Lists all standard audit trail entries in the
AUD$
table
DBA_COMMON_AUDIT_TRAIL
Combines standard and fine-grained audit log records, and includes
SYS
and mandatory audit records written in XML format
DBA_FGA_AUDIT_TRAIL
Lists audit trail records for fine-grained auditing.
DBA_OBJ_AUDIT_OPTS
Displays the objects on which auditing options have been enabled
DBA_PRIV_AUDIT_OPTS
Describes current system privileges being audited across the system and
by user
DBA_STMT_AUDIT_OPTS
Describes current statement auditing options across the system and by
user
USER_AUDIT_OBJECT
Lists audit trail records for statements concerning objects that are
accessible to the current user
USER_AUDIT_POLICIES
Describes the fine-grained auditing policy columns on the tables and
views accessible to the current user.
USER_AUDIT_SESSION
Lists all audit trail records concerning connections and disconnections
for the current user
USER_AUDIT_STATEMENT
Lists audit trail records concerning
GRANT
,
REVOKE
,
AUDIT
,
NOAUDIT
, and
ALTER SYSTEM
statements issued by the user
USER_AUDIT_TRAIL
Lists all standard audit trail entries in the
AUD$
table relating to the
current user
USER_OBJ_AUDIT_OPTS
Describes auditing options on all objects owned by the current user
V$LOGMNR_CONTENTS
Contains log history information. To query this view, you must have the
SELECT ANY TRANSACTION
privilege.
V$XML_AUDIT_TRAIL
Shows standard, fine-grained,
SYS
, and mandatory audit records
written in XML format files.
Table 9–7 (Cont.) Data Dictionary Views That Display Information about the Database Audit Trail
View Description

Finding Information About Audited Activities
9-82 Oracle Database Security Guide
AUDIT DELETE ON laurel.emp
BY ACCESS
WHENEVER SUCCESSFUL;
The following statements are subsequently issued by the user
jward
:
ALTER USER tsmith QUOTA 0 ON users;
DROP USER djones;
The following statements are subsequently issued by the user
swilliams
:
LOCK TABLE laurel.emp IN EXCLUSIVE MODE;
DELETE FROM laurel.emp WHERE mgr = 7698;
ALTER TABLE laurel.emp ALLOCATE EXTENT (SIZE 100K);
CREATE INDEX laurel.ename_index ON laurel.emp (ename);
CREATE PROCEDURE laurel.fire_employee (empid NUMBER) AS
BEGIN
DELETE FROM laurel.emp WHERE empno = empid;
END;
/
EXECUTE laurel.fire_employee(7902);
The following sections display the information relevant to your investigation that can
be viewed using the audit trail views in the data dictionary:
■Listing Active Statement Audit Options
■Listing Active Privilege Audit Options
■Listing Active Object Audit Options for Specific Objects
■Listing Default Object Audit Options
■Listing Audit Records
■Listing Audit Records for the AUDIT SESSION Option
Listing Active Statement Audit Options
The following query returns all the statement audit options that are set:
SELECT * FROM DBA_STMT_AUDIT_OPTS;
Output similar to the following appears:
USER_NAME AUDIT_OPTION SUCCESS FAILURE
-------------------- ------------------- ---------- ---------
JWARD DROP ANY CLUSTER BY ACCESS BY ACCESS
SWILLIAMS DEBUG PROCEDURE BY ACCESS BY ACCESS
MSEDLAK ALTER RESOURCE COST BY ACCESS BY ACCESS
Listing Active Privilege Audit Options
The following query returns all the privilege audit options that are set:
SELECT * FROM DBA_PRIV_AUDIT_OPTS;
Output similar to the following appears:
USER_NAME PRIVILEGE SUCCESS FAILURE
------------------- -------------------- --------- ----------
PSMITH BY ACCESS BY ACCESS

Finding Information About Audited Activities
Verifying Security Access with Auditing 9-83
Listing Active Object Audit Options for Specific Objects
The following query returns all audit options set for any objects with names that start
with the characters
emp
and that are contained in the schema of
laurel
:
SELECT * FROM DBA_OBJ_AUDIT_OPTS
WHERE OWNER = 'LAUREL' AND OBJECT_NAME LIKE 'EMP%';
Output similar to the following appears:
OWNER OBJECT_NAME OBJECT_TY ALT AUD COM DEL GRA IND INS LOC ...
----- ----------- --------- --- --- --- --- --- --- --- --- ...
LAUREL EMP TABLE S/S -/- -/- A/- -/- S/S -/- -/- ...
LAUREL EMPLOYEE VIEW -/- -/- -/- A/- -/- S/S -/- -/- ...
The view returns information about all the audit options for the specified object. The
information in the view is interpreted as follows:
■A dash (
-
)
indicates that the audit option is not set.
■The
S
character indicates that the audit option is set
BY SESSION
.
■The
A
character indicates that the audit option is set
BY ACCESS
.
■Each audit option has two possible settings,
WHENEVER SUCCESSFUL
and
WHENEVER
NOT SUCCESSFUL
, separated by a slash (
/
). For example, the
DELETE
audit option for
laurel.emp
is set
BY ACCESS
for successful
DELETE
statements and not set at all for
unsuccessful
DELETE
statements.
Listing Default Object Audit Options
The following query returns all default object audit options:
SELECT * FROM ALL_DEF_AUDIT_OPTS;
Output similar to the following appears:
ALT AUD COM DEL GRA IND INS LOC REN SEL UPD REF EXE FBK REA
--- --- --- --- --- --- --- --- --- --- --- --- --- --- ---
S/S -/- -/- -/- -/- S/S -/- -/- S/S -/- -/- -/- -/- /- -/-
Notice that the view returns information similar to the
USER_OBJ_AUDIT_OPTS
and
DBA_
OBJ_AUDIT_OPTS
views (refer to previous example).
Listing Audit Records
The following query lists audit records generated for all objects in the database:
SELECT * FROM DBA_AUDIT_OBJECT;
Listing Audit Records for the AUDIT SESSION Option
The following query lists audit information corresponding to the
AUDIT SESSION
statement audit option:
SELECT USERNAME, LOGOFF_TIME, LOGOFF_LREAD, LOGOFF_PREAD,
LOGOFF_LWRITE, LOGOFF_DLOCK
FROM DBA_AUDIT_SESSION;
Output similar to the following appears:
USERNAME LOGOFF_TI LOGOFF_LRE LOGOFF_PRE LOGOFF_LWR LOGOFF_DLO
---------- --------- ---------- ---------- ---------- ----------
JWARD 02-AUG-91 53 2 24 0
SWILLIAMS 02-AUG-91 3337 256 630 0

Finding Information About Audited Activities
9-84 Oracle Database Security Guide
Deleting the Audit Trail Views
If you disable auditing and no longer need the audit trail views, then delete them by
connecting to the database as
SYS
and run the script file
CATNOAUD.SQL
. The location of
the
CATNOAUD.SQL
script is operating system-dependent.

10
Keeping Your Oracle Database Secure 10-1
10
Keeping Your Oracle Database Secure
This chapter contains:
■About the Security Guidelines in This Chapter
■Downloading Security Patches and Contacting Oracle Regarding Vulnerabilities
■Guidelines for Securing User Accounts and Privileges
■Guidelines for Securing Roles
■Guidelines for Securing Passwords
■Guidelines for Securing Data
■Guidelines for Securing the ORACLE_LOADER Access Driver
■Guidelines for Securing a Database Installation and Configuration
■Guidelines for Securing the Network
■Guidelines for Auditing
■Addressing the CONNECT Role Change
About the Security Guidelines in This Chapter
This chapter provides a set of guidelines to keep your Oracle database secure.
Information security, and privacy and protection of corporate assets and data are
critical in any business. Oracle Database comprehensively addresses the need for
information security by providing cutting-edge security features such as deep data
protection, auditing, scalable security, secure hosting, and data exchange.
Oracle Database leads the industry in security. To maximize the security features
offered by Oracle Database in any business environment, it is imperative that the
database itself be well protected.
Security guidelines provide advice about how to configure Oracle Database to be
secure by adhering to and recommending industry-standard and advisable security
practices for operational database deployments. Many of the guidelines described in
this section address common regulatory requirements such as those described in the
Sarbanes-Oxley Act. For more information about how Oracle Database addresses
regulatory compliance, protection of personally identifiable information, and internal
threats, visit:
http://www.oracle.com/technetwork/topics/security/whatsnew/index.html

Downloading Security Patches and Contacting Oracle Regarding Vulnerabilities
10-2 Oracle Database Security Guide
Downloading Security Patches and Contacting Oracle Regarding
Vulnerabilities
This section contains:
■Applying Security Patches and Workaround Solutions
■Contacting Oracle Security Regarding Vulnerabilities in Oracle Database
Applying Security Patches and Workaround Solutions
Always apply all relevant security patches for both the operating system on which
Oracle Database resides and Oracle Database itself, and for all installed Oracle
Database options and components.
Periodically check the security site on Oracle Technology Network for details about
security alerts released by Oracle at
http://www.oracle.com/technetwork/topics/security/alerts-086861.html
Also check the Oracle Worldwide Support Service site, My Oracle Support, for details
about available and upcoming security-related patches at
https://support.oracle.com
Contacting Oracle Security Regarding Vulnerabilities in Oracle Database
If you are an Oracle customer or an Oracle partner, use My Oracle Support to submit a
Service Request on any potential Oracle product security vulnerability. Otherwise,
send an email to
secalert_us@oracle.com
with a complete description of the problem,
including product version and platform, together with any scripts and examples.
Oracle encourages those who want to contact Oracle Security to employ email
encryption, using our encryption key.
Guidelines for Securing User Accounts and Privileges
Follow these guidelines to secure user accounts and privileges:
1. Practice the principle of least privilege.
Oracle recommends the following guidelines:
a. Grant necessary privileges only.
Do not provide database users or roles more privileges than are necessary. (If
possible, grant privileges to roles, not users.) In other words, the principle of
least privilege is that users be given only those privileges that are actually
required to efficiently perform their jobs.
To implement this principle, restrict the following as much as possible:
–The number of
SYSTEM
and
OBJECT
privileges granted to database users.
–The number of people who are allowed to make
SYS
-privileged
connections to the database.
–The number of users who are granted the
ANY
privileges, such as the
DROP
ANY TABLE
privilege. For example, there is generally no need to grant
CREATE ANY TABLE
privileges to a non-DBA-privileged user.

Guidelines for Securing User Accounts and Privileges
Keeping Your Oracle Database Secure 10-3
–The number of users who are allowed to perform actions that create,
modify, or drop database objects, such as the
TRUNCATE TABLE
,
DELETE
TABLE
,
DROP TABLE
statements, and so on.
b. Limit granting the CREATE ANY EDITION and DROP ANY EDITION
privileges.
To maintain additional versions of objects, editions can increase resource and
disk space consumption in the database. Only grant the
CREATE ANY EDITION
and
DROP ANY EDITION
privileges to trusted users who are responsible for
performing upgrades.
c. Restrict the CREATE ANY JOB, BECOME USER, EXP_FULL_DATABASE,
and IMP_FULL_DATABASE privileges.
These are powerful security-related privileges. Only grant these privileges to
users who need them.
d. Restrict library-related privileges to trusted users only.
The
CREATE LIBRARY
,
CREATE ANY LIBRARY
,
ALTER ANY LIBRARY
, and
EXECUTE
ANY LIBRARY
privileges, and grants of
EXECUTE ON
library_name
convey a
great deal of power to users. If you plan to create PL/SQL interfaces to
libraries, only grant the
EXECUTE
privilege to the PL/SQL interface. Do not
grant
EXECUTE
on the underlying library. You must have the
EXECUTE
privilege
on a library to create the PL/SQL interface to it. However, users have this
privilege implicitly on libraries that they create in their own schemas. Explicit
grants of
EXECUTE ON
library_name
are rarely required. Only make an explicit
grant of these privileges to trusted users, and never to the
PUBLIC
role.
e. Restrict synonym-related privileges to trusted users only.
The
CREATE PUBLIC SYNONYM
and
DROP PUBLIC SYNONYM
system privileges
convey a great deal of power to these users. Do not grant these privileges to
users, unless they are trusted.
f. Do not allow non-administrative users access to objects owned by the SYS
schema.
Do not allow users to alter table rows or schema objects in the
SYS
schema,
because doing so can compromise data integrity. Limit the use of statements
such as
DROP TABLE
,
TRUNCATE TABLE
,
DELETE
,
INSERT
, or similar
object-modification statements on
SYS
objects only to highly privileged
administrative users.
The
SYS
schema owns the data dictionary. You can protect the data dictionary
by setting the
O7_DICTIONARY_ACCESSIBILITY
parameter to
FALSE
. See
Guideline 1 under "Guidelines for Securing Data" on page 10-10 for more
information.
g. Only grant the EXECUTE privilege on the DBMS_RANDOM PL/SQL
package to trusted users.
The
EXECUTE
privilege on the
DBMS_RANDOM
package could permit users who
normally should have only minimal access to execute the functions associated
with this package.
h. Restrict permissions on run-time facilities.
Many Oracle Database products use run-time facilities, such as Oracle Java
Virtual Machine (OJVM). Do not assign all permissions to a database run-time
facility. Instead, grant specific permissions to the explicit document root file
paths for facilities that might run files and packages outside the database.

Guidelines for Securing User Accounts and Privileges
10-4 Oracle Database Security Guide
Here is an example of a vulnerable run-time call, which individual files are
specified:
call dbms_java.grant_permission('wsmith',
'SYS:java.io.FilePermission','<<ALL FILES>>','read');
Here is an example of a better (more secure) run-time call, which specifies a
directory path instead:
call dbms_java.grant_permission('wsmith',
'SYS:java.io.FilePermission','<<actual directory path>>','read');
2. Lock and expire default (predefined) user accounts.
Oracle Database installs with several default database user accounts. Upon
successful installation of the database, the Database Configuration Assistant
automatically locks and expires most default database user accounts.
If you perform a manual (without using Database Configuration Assistant)
installation of Oracle Database, then no default database users are locked upon
successful installation of the database server. Or, if you have upgraded from a
previous release of Oracle Database, you may have default accounts from earlier
releases. Left open in their default states, these user accounts can be exploited, to
gain unauthorized access to data or disrupt database operations.
You should lock and expire all default database user accounts. Oracle Database
provides SQL statements to perform these operations. For example:
ALTER USER ANONYMOUS PASSWORD EXPIRE ACCOUNT LOCK;
See Oracle Database SQL Language Reference for more information about the
ALTER
USER
statement.
Installing additional products and components after the initial installation also
results in creating more default database accounts. Database Configuration
Assistant automatically locks and expires all additionally created database user
accounts. Unlock only those accounts that need to be accessed on a regular basis
and assign a strong, meaningful password to each of these unlocked accounts.
Oracle provides SQL and password management to perform these operations.
If any default database user account other than the ones left open is required for
any reason, then a database administrator (DBA) must unlock and activate that
account with a new, secure password.
See Oracle Database 2 Day + Security Guide for a description of the predefined user
accounts that are created when you install Oracle Database.
If a default database user account, other than the ones left open, is required for any
reason, then a database administrator (DBA) can unlock and activate that account
with a new, secure password.
Oracle Enterprise Manager Accounts
If you install Oracle Enterprise Manager, the
SYSMAN
and
DBSNMP
accounts are
open, unless you configure Oracle Enterprise Manager for central administration.
In this case, the
SYSMAN
account (if present) will be locked.
If you do not install Oracle Enterprise Manager, then only the
SYS
and
SYSTEM
accounts are open. Database Configuration Assistant locks and expires all other
accounts (including
SYSMAN
and
DBSNMP
).
3. Use the following data dictionary views to find information about user access to
the database.

Guidelines for Securing User Accounts and Privileges
Keeping Your Oracle Database Secure 10-5
■
DBA_
*
■
DBA_ROLES
■
DBA_SYS_PRIVS
■
DBA_ROLE_PRIVS
■
DBA_TAB_PRIVS
■
DBA_AUDIT_TRAIL
(if standard auditing is enabled)
■
DBA_FGA_AUDIT_TRAIL
(if fine-grained auditing is enabled)
4. Monitor the granting of the following privileges only to users and roles who
need these privileges.
By default, Oracle Database audits the following privileges:
■
ALTER SYSTEM
■
AUDIT SYSTEM
■
CREATE EXTERNAL JOB
Oracle recommends that you also audit the following privileges:
■
ALL PRIVILEGES
(which includes privileges such as
BECOME USER
,
CREATE
LIBRARY
, and
CREATE PROCEDURE
)
■
DBMS_BACKUP_RESTORE
package
■
EXECUTE
to
DBMS_SYS_SQL
■
SELECT ANY TABLE
■
SELECT
on
PERFSTAT.STATS$SQLTEXT
■
SELECT
on
PERFSTAT.STATS$SQL_SUMMARY
■
SELECT
on
SYS.SOURCE$
■Privileges that have the
WITH ADMIN
clause
■Privileges that have the
WITH GRANT
clause
■Privileges that have the
CREATE
keyword
5. Revoke access to the following:
■The
SYS.USER_HISTORY$
table from all users except
SYS
and
DBA
accounts
■The
RESOURCE
role from typical application accounts
■The
CONNECT
role from typical application accounts
■The
DBA
role from users who do not need this role
6. Grant privileges only to roles.
Granting privileges to roles and not individual users makes the management and
tracking of privileges much easier.
7. Limit the proxy account (for proxy authorization) privileges to CREATE
SESSION only.
8. Use secure application roles to protect roles that are enabled by application
code.

Guidelines for Securing Roles
10-6 Oracle Database Security Guide
Secure application roles allow you to define a set of conditions, within a PL/SQL
package, that determine whether or not a user can log on to an application. Users
do not need to use a password with secure application roles.
Another approach to protecting roles from being enabled or disabled in an
application is the use of role passwords. This approach prevents a user from
directly accessing the database in SQL (rather than the application) to enable the
privileges associated with the role. However, Oracle recommends that you use
secure application roles instead, to avoid having to manage another set of
passwords.
9. Discourage users from using the NOLOGGING clause in SQL statements.
In some SQL statements, the user has the option of specifying the
NOLOGGING
clause, which indicates that the database operation is not logged in the online redo
log file. Even though the user specifies the clause, a redo record is still written to
the online redo log file. However, there is no data associated with this record.
Because of this, using
NOLOGGING
has the potential for malicious code to be entered
can be accomplished without an audit trail.
Guidelines for Securing Roles
Follow these guidelines when managing roles:
1. Grant a role to users only if they need all privileges of the role.
Roles (groups of privileges) are useful for quickly and easily granting permissions
to users. Although you can use Oracle-defined roles, you have more control and
continuity if you create your own roles containing only the privileges pertaining to
your requirements. Oracle may change or remove the privileges in an Oracle
Database-defined role, as it has with the
CONNECT
role, which now has only the
CREATE SESSION
privilege. Formerly, this role had eight other privileges.
Ensure that the roles you define contain only the privileges that reflect job
responsibility. If your application users do not need all the privileges encompassed
by an existing role, then apply a different set of roles that supply just the correct
privileges. Alternatively, create and assign a more restricted role.
For example, it is imperative to strictly limit the privileges of user
SCOTT
, because
this is a well known account that may be vulnerable to intruders. Because the
CREATE DBLINK
privilege allows access from one database to another, drop its
privilege for
SCOTT
. Then, drop the entire role for the user, because privileges
acquired by means of a role cannot be dropped individually. Re-create your own
role with only the privileges needed, and grant that new role to that user.
Similarly, for better security, drop the
CREATE DBLINK
privilege from all users who
do not require it.
2. Do not grant user roles to application developers.
Roles are not meant to be used by application developers, because the privileges to
access schema objects within stored programmatic constructs need to be granted
directly. Remember that roles are not enabled within stored procedures except for
invoker’s right procedures. See "How Roles Work in PL/SQL Blocks" on page 4-9
for information about this topic.
3. Create and assign roles specific to each Oracle Database installation.
This principle enables the organization to retain detailed control of its roles and
privileges. This also avoids the necessity to adjust if Oracle Database changes or

Guidelines for Securing Passwords
Keeping Your Oracle Database Secure 10-7
removes Oracle Database-defined roles, as it has with
CONNECT
, which now has
only the
CREATE SESSION
privilege. Formerly, it also had eight other privileges.
4. For enterprise users, create global roles.
Global roles are managed by an enterprise directory service, such as Oracle
Internet Directory. See the following sections for more information about global
roles:
■"Configuring Global User Authentication and Authorization" on page 3-30
■"Global Role Authorization by an Enterprise Directory Service" on page 4-19
■Oracle Database Enterprise User Security Administrator's Guide
Guidelines for Securing Passwords
When you create a user account, Oracle Database assigns a default password policy for
that user. The password policy defines rules for how the password should be created,
such as a minimum number of characters, when it expires, and so on. You can
strengthen passwords by using password policies. See also "Configuring Password
Protection" on page 3-1 for additional ways to protect passwords.
Follow these guidelines to further strengthen passwords:
1. Choose passwords carefully.
"Minimum Requirements for Passwords" on page 3-3 describes the minimum
requirements for passwords. Follow these additional guidelines when you create
or change passwords:
■Make the password between 12 and 30 characters and numbers.
■Have the password contain at least one digit, one upper-case character, and
one lower-case character.
■Use mixed case letters and special characters in the password. (See "Ensuring
Against Password Security Threats by Using the SHA-1 Hashing Algorithm"
on page 3-15 for more information.)
■You can include multibyte characters in the password.
■Use the database character set for the password’s characters, which can
include the underscore (_), dollar ($), and number sign (#) characters.
■You must enclose the following passwords in double-quotation marks:
–Passwords containing multibyte characters.
–Passwords starting with numbers or special characters and containing
alphabetical characters. For example:
"123abc"
"#abc"
"123dc$"
–Passwords containing any character other than alphabetical characters,
numbers, and special characters. For example:
"abc>"
"abc@",
" "

Guidelines for Securing Passwords
10-8 Oracle Database Security Guide
■You do not need to specify the following passwords in double-quotation
marks.
–Passwords starting with an alphabet character (a–z, A–Z) and containing
numbers(0–9) or special characters ($, #, _). For example:
abc123
ab23a
ab$#_
–Passwords containing only numbers.
–Passwords containing only alphabetical characters.
■Do not use an actual word for the entire password.
2. To create a longer, more complex password from a shorter, easier to remember
password, follow these techniques:
■Create passwords from the first letters of the words of an easy-to-remember
sentence. For example, "I usually work until 6 almost every day of the week"
can be
Iuwu6aedotw
.
■Combine two weaker passwords, such as
welcome1
and
binky
into
WelBinkyCome1
.
■Repeat a character at the beginning or end of the password.
■Add a string, another password, or part the same password to the beginning
or end of the password that you want to create. For example, ways that you
can modify the password
fussy2all
are as follows:
–
fussy2all34hj2
–
WelBinkyCome1fussy2all
–
fusfussy2all
■Double some or all of the letters. For example,
welcome13
can become
wwellCcooMmee13
.
3. Ensure that the password is sufficiently complex.
Oracle Database provides a password verification routine, the PL/SQL script
UTLPWDMG.SQL
, that you can run to check whether or not passwords are sufficiently
complex. Ideally, edit the
UTLPWDMG.SQL
script to provide stronger password
protections. See also "Enforcing Password Complexity Verification" on page 3-11
for a sample routine that you can use to check passwords.
4. Associate a password function with the user profile or the default profile.
The
PASSWORD_VERIFY_FUNCTION
clause of the
CREATE PROFILE
and
ALTER PROFILE
statements associates a password function with a user profile or the default
profile. Password functions ensure that users create strong passwords using
guidelines that are specific to your site. Having a password function also requires
a user changing his or her own password (without the
ALTER USER
system
privilege) to provide both the old and new passwords. You can create your own
password functions or use the password functions that Oracle Database provides.
See "Customizing Password Complexity Verification" on page 3-12 for more
information.
5. Change default user passwords.

Guidelines for Securing Passwords
Keeping Your Oracle Database Secure 10-9
Oracle Database installs with a set of predefined, default user accounts. Security is
most easily broken when a default database user account still has a default
password even after installation. This is particularly true for the user account
SCOTT
,
which is a well known account that may be vulnerable to intruders. In Oracle
Database 11g Release 2 (11.2), default accounts are installed locked with the
passwords expired, but if you have upgraded from a previous release, you may
still have accounts that use default passwords.
To find user accounts that have default passwords, query the
DBA_USERS_WITH_
DEFPWD
data dictionary view. See "Finding User Accounts That Have Default
Passwords" on page 3-4 for more information.
6. Change default passwords of administrative users.
You can use the same or different passwords for the
SYS
,
SYSTEM
,
SYSMAN
, and
DBSNMP
administrative accounts. Oracle recommends that you use different
passwords for each. In any Oracle environment (production or test), assign strong,
secure, and distinct passwords to these administrative accounts. If you use
Database Configuration Assistant to create a new database, then it requires you to
enter passwords for the
SYS
and
SYSTEM
accounts, disallowing the default
passwords
CHANGE_ON_INSTALL
and
MANAGER
.
Similarly, for production environments, do not use default passwords for
administrative accounts, including
SYSMAN
and
DBSNMP
.
See Oracle Database 2 Day + Security Guide for information about changing a default
password.
7. Enforce password management.
Apply basic password management rules (such as password length, history, , and
so forth) to all user passwords. Oracle Database has password policies enabled for
the default profile. Guideline 1 in this section lists these password policies. Oracle
Database 2 Day + Security Guide lists initialization parameters that you can use to
further secure user passwords.
You can find information about user accounts by querying the
DBA_USERS
view.
The
PASSWORD
column of the
DBA_USERS
view indicates whether the password is
global, external, or null. The
DBA_USERS
view provides useful information such as
the user account status, whether the account is locked, and password versions.
Oracle also recommends, if possible, using Oracle Advanced Security (an option to
Oracle Database Enterprise Edition) with network authentication services (such as
Kerberos), token cards, smart cards, or X.509 certificates. These services provide
strong authentication of users, and provide protection against unauthorized access
to Oracle Database.
8. Do not store user passwords in clear text in Oracle tables.
For better security, do not store passwords in clear text (that is, human readable) in
Oracle tables. You can correct this problem by using a secure external password
store to encrypt the table column that contains the password. See "Managing the
Secure External Password Store for Password Credentials" on page 3-16 for
information.
When you create or modify a password for a user account, Oracle Database
automatically creates a cryptographic hash or digest of the password. If you query
the
DBA_USERS
view to find information about a user account, the data in the
PASSWORD
column indicates if the user password is global, external, or null.

Guidelines for Securing Data
10-10 Oracle Database Security Guide
Guidelines for Securing Data
Follow these guidelines to secure data on your system:
1. Enable data dictionary protection.
Oracle recommends that you protect the data dictionary to prevent users that have
the
ANY
system privilege from using those privileges on the data dictionary.
Altering or manipulating the data in data dictionary tables can permanently and
detrimentally affect the operation of a database.
To enable data dictionary protection, set the following initialization parameter to
FALSE
(which is the default) in the
initsid.ora
control file:
O7_DICTIONARY_ACCESSIBILITY = FALSE
You can set the
O7_DICTIONARY_ACCESSIBILITY
parameter in a server parameter
file. For more information about server parameter files, see Oracle Database
Administrator's Guide.
After you set
O7_DICTIONARY_ACCESSIBILTY
to
FALSE
, only users who have the
SELECT ANY DICTIONARY
privilege and those authorized users making
DBA-privileged (for example
CONNECT / AS SYSDBA
) connections can use the
ANY
system privilege on the data dictionary. If
O7_DICTIONARY_ACCESSIBILITY
parameter is not set to
FALSE
, then any user with the
DROP ANY TABLE
(for
example) system privilege will be able to drop parts of the data dictionary.
However, if a user needs view access to the data dictionary, then you can grant that
user the
SELECT ANY DICTIONARY
system privilege.
2. Restrict operating system access.
Follow these guidelines:
■Limit the number of operating system users.
■Limit the privileges of the operating system accounts (administrative,
root-privileged, or DBA) on the Oracle Database host computer to the least
privileges required for a user to perform necessary tasks.
■Restrict the ability to modify the default file and directory permissions for the
Oracle Database home (installation) directory or its contents. Even privileged
operating system users and the Oracle owner should not modify these
permissions, unless instructed otherwise by Oracle.
■Restrict symbolic links. Ensure that when you provide a path or file to the
database, neither the file nor any part of the path is modifiable by an
untrusted user. The file and all components of the path should be owned by
the database administrator or trusted account, such as root.
Note:
■In a default installation, the
O7_DICTIONARY_ACCESSIBILITY
parameter is set to
FALSE
. However, in Oracle8i, this parameter
is set to
TRUE
by default, and must be changed to
FALSE
to
enable this security feature.
■The
SELECT ANY DICTIONARY
privilege is not included in the
GRANT ALL PRIVILEGES
statement, but you can grant it through
a role. Chapter 4, "Configuring Privilege and Role
Authorization" describes roles in detail.

Guidelines for Securing the ORACLE_LOADER Access Driver
Keeping Your Oracle Database Secure 10-11
This recommendation applies to all types of files: data files, log files, trace
files, external tables, BFILE data types, and so on.
3. Encrypt sensitive data and all backup media that contains database files.
According to common regulatory compliance requirements, you must encrypt
sensitive data such as credit card numbers and passwords. When you delete
sensitive data from the database, encrypted data does not linger in data blocks,
operating system files, or sectors on disk.
In most cases, you may want to use transparent data encryption to encrypt your
sensitive data. See Oracle Database Advanced Security Administrator's Guide for more
information. See also "Security Problems That Encryption Does Not Solve" on
page 8-1 for when you should not encrypt data.
4. For Oracle Automatic Storage Management (Oracle ASM) environments on
Linux and UNIX systems, use Oracle ASM File Access Control to restrict access
to the Oracle ASM disk groups.
If you use different operating system users and groups for Oracle Database
installations, then you can configure Oracle ASM File Access Control to restrict the
access to files in Oracle ASM disk groups to only authorized users. For example, a
database administrator would only be able to access the data files for the
databases that he or she manages. This administrator would not be able to see or
overwrite the data files belonging (or used by) other databases.
For more information about managing Oracle ASM File Access Control for disk
groups, see Oracle Automatic Storage Management Administrator's Guide. For
information about the various privileges required for multiple software owners on
Linux systems, see also Oracle Automatic Storage Management Administrator's Guide.
Guidelines for Securing the ORACLE_LOADER Access Driver
Follow these guidelines to secure the
ORACLE_LOADER
access driver:
1. Create a separate operating system directory to store the access driver
preprocessors. You (or the operating system manager) may need to create multiple
directories if different Oracle Database users will run different preprocessors. If
you want to prevent one set of users from using one preprocessor while allowing
those users access to another preprocessor, then place the preprocessors in
separate directories. If all the users need equal access, then you can place the
preprocessors together in one directory. After you create these operating system
directories, in SQL*Plus, you can create a directory object for each directory.
2. Grant the operating system user ORACLE the correct operating system
privileges to run the access driver preprocessor. In addition, protect the
preprocessor program from
WRITE
access by operating system users other than the
user responsible for managing the preprocessor program.
3. Grant the EXECUTE privilege to each user who will run the preprocessor
program in the directory object. Do not grant this user the
WRITE
privilege on the
directory object. Never grant users both the
EXECUTE
and
WRITE
privilege for
directory objects.
4. Grant the WRITE privilege sparingly to anyone who will manage directory
objects that contain preprocessors. This prevents database users from accidentally
or maliciously overwriting the preprocessor program.

Guidelines for Securing a Database Installation and Configuration
10-12 Oracle Database Security Guide
5. Create a separate operating system directory and directory object for any data
files that are required for external tables. Ensure that these are separate from the
directory and directory object used by the access directory preprocessor.
Work with the operating system manager to ensure that only the appropriate
operating system users have access to this directory. Grant the
ORACLE
operating
system user
READ
access to any directory that has a directory object with
READ
privileges granted to database users. Similarly, grant the
ORACLE
operating system
user
WRITE
access to any directory that has the
WRITE
privilege granted to database
users.
6. Create a separate operating system directory and directory object for any files
that the access driver generates. This includes log files, bad files, and discarded
files. You and the operating system manager must ensure that this directory and
directory object have the proper protections, similar to those described in
Guideline 5. The database user may need to access these files when resolving
problems in data files, so you and the operating system manager must determine a
way for this user to read those files.
7. Grant the CREATE ANY DIRECTORY and DROP ANY DIRECTORY privileges
sparingly. Users who have these privileges and users who have been granted the
DBA
role have full access to all directory objects.
8. Consider auditing the DROP ANY DIRECTORY privilege. See "Auditing
Privileges" on page 9-26 for more information about auditing privileges.
9. Consider auditing the directory object. See "Auditing Directory Objects" on
page 9-32 for more information.
Guidelines for Securing a Database Installation and Configuration
For this release, changes were made to the default configuration of Oracle Database to
make it more secure. The recommendations in this section augment the new, secure
default configuration.
Follow these guidelines to secure the database installation and configuration:
1. Before you begin an Oracle Database installation on UNIX systems, ensure that
the umask value is 022 for the Oracle owner account.
See Oracle Database Administrator's Reference for Linux and UNIX-Based Operating
Systems for more information about managing Oracle Database on Linux and
UNIX systems.
2. Install only what is required.
Options and Products: The Oracle Database CD pack contains products and
options in addition to the database. Install additional products and options only as
necessary. Use the Custom Installation feature to avoid installing unnecessary
products, or perform a typical installation, and then deinstall options and products
that are not required. There is no need to maintain additional products and
options if they are not being used. They can always be properly installed, as
required.
Sample Schemas: Oracle Database provides sample schemas to provide a
common platform for examples. If your database will be used in a production
environment, then do not install the sample schema. If you have installed the
sample schema on a test database, then before going to production, remove or
See Also: Oracle Database Utilities for more information about the
ORACLE_DATAPUMP
access driver

Guidelines for Securing the Network
Keeping Your Oracle Database Secure 10-13
relock the sample schema accounts. See Oracle Database Sample Schemas for more
information about the sample schemas.
3. During installation, when you are prompted for a password, create a secure
password.
Follow Guidelines 1, 5, and 6 in "Guidelines for Securing Passwords" on page 10-7.
4. Immediately after installation, lock and expire default user accounts.
See Guideline 2 in "Guidelines for Securing User Accounts and Privileges" on
page 10-2.
Guidelines for Securing the Network
Security for network communications is improved by using client, listener, and
network guidelines to ensure thorough protection. Using SSL is an essential element in
these lists, enabling top security for authentication and communications.
These guidelines are as follows:
■Securing the Client Connection
■Securing the Network Connection
■Securing a Secure Sockets Layer Connection
Securing the Client Connection
Because authenticating client computers is problematic, typically, user authentication
is performed instead. This approach avoids client system issues that include falsified
IP addresses, hacked operating systems or applications, and falsified or stolen client
system identities. Nevertheless, the following guidelines improve the security of client
connections:
1. Enforce access controls effectively and authenticate clients stringently.
By default, Oracle allows operating system-authenticated logins only over secure
connections, which precludes using Oracle Net and a shared server configuration.
This default restriction prevents a remote user from impersonating another
operating system user over a network connection.
Setting the initialization parameter
REMOTE_OS_AUTHENT
to
TRUE
forces the database
to accept the client operating system user name received over an unsecure
connection and use it for account access. Because clients, such as PCs, are not
trusted to perform operating system authentication properly, it is poor security
practice to use this feature.
The default setting,
REMOTE_OS_AUTHENT = FALSE
, creates a more secure
configuration that enforces proper, server-based authentication of clients
connecting to an Oracle database. Be aware that the
REMOTE_OS_AUTHENT
was
deprecated in Oracle Database Release 11g (11.1) and is retained only for backward
compatibility.
You should not alter the default setting of the
REMOTE_OS_AUTHENT
initialization
parameter, which is
FALSE
.
Setting this parameter to
FALSE
does not mean that users cannot connect remotely.
It means that the database will not trust that the client has already authenticated,
and will therefore apply its standard authentication processes.

Guidelines for Securing the Network
10-14 Oracle Database Security Guide
Be aware that the
REMOTE_OS_AUTHENT
parameter was deprecated in Oracle
Database 11g Release 1 (11.1), and is retained only for backward compatibility.
2. Configure the connection to use encryption.
Oracle network encryption makes eavesdropping difficult. To learn how to
configure encryption, see Oracle Database Advanced Security Administrator's Guide.
3. Set up strong authentication.
See Oracle Database Advanced Security Administrator's Guide for more information
about using Kerberos and public key infrastructure (PKI).
Securing the Network Connection
Protecting the network and its traffic from inappropriate access or modification is the
essence of network security. You should consider all paths the data travels, and assess
the threats on each path and node. Then, take steps to lessen or eliminate those threats
and the consequences of a security breach. In addition, monitor and audit to detect
either increased threat levels or penetration attempts.
To manage network connections, you can use Oracle Net Manager. For an introduction
to using Oracle Net Manager, see Oracle Database 2 Day DBA. See also Oracle Database
Net Services Administrator's Guide.
The following practices improve network security:
1. Use Secure Sockets Layer (SSL) when administering the listener.
See "Securing a Secure Sockets Layer Connection" on page 10-16 for more
information.
2. Monitor listener activity.
You can monitor listener activity by using Enterprise Manager Database Control.
In the Database Control home page, under General, click the link for your listener.
The Listener page appears. This page provides detailed information, such as the
category of alert generated, alert messages, when the alert was triggered, and so
on. This page provides other information as well, such as performance statistics
for the listener.
3. Prevent online administration by requiring the administrator to have the write
privilege on the listener password and on the listener.ora file on the server.
a. Add or alter this line in the
listener.ora
file:
ADMIN_RESTRICTIONS_LISTENER=ON
b. Use
RELOAD
to reload the configuration.
c. Use SSL when administering the listener by making the TCPS protocol the
first entry in the address list, as follows:
LISTENER=
(DESCRIPTION=
(ADDRESS_LIST=
(ADDRESS=
(PROTOCOL=tcps)
(HOST = sales.us.example.com)
(PORT = 8281)))
To administer the listener remotely, you define the listener in the
listener.ora
file on the client computer. For example, to access listener
USER281 remotely, use the following configuration:

Guidelines for Securing the Network
Keeping Your Oracle Database Secure 10-15
user281 =
(DESCRIPTION =
(ADDRESS =
(PROTOCOL = tcps)
(HOST = sales.us.example.com)
(PORT = 8281))
)
)
For more information about the parameters in
listener.ora
, see Oracle Database
Net Services Reference.
4. Do not set the listener password.
Ensure that the password has not been set in the
listener.ora
file. The local
operating system authentication will secure the listener administration. The
remote listener administration is disabled when the password has not been set.
This prevents brute force attacks of the listener password.
The listener password has been deprecated in this release. It will not be supported
in the next release of Oracle Database.
5. When a host computer has multiple IP addresses associated with multiple
network interface controller (NIC) cards, configure the listener to the specific IP
address.
This allows the listener to listen on all the IP addresses. You can restrict the listener
to listen on a specific IP address. Oracle recommends that you specify the specific
IP addresses on these types of computers, rather than allowing the listener to
listen on all IP addresses. Restricting the listener to specific IP addresses helps to
prevent an intruder from stealing a TCP end point from under the listener process.
6. Restrict the privileges of the listener, so that it cannot read or write files in the
database or the Oracle server address space.
This restriction prevents external procedure agents spawned by the listener (or
procedures executed by an agent) from inheriting the ability to perform read or
write operations. The owner of this separate listener process should not be the
owner that installed Oracle Database or executes the Oracle Database instance
(such as
ORACLE
, the default owner).
For more information about configuring external procedures in the listener, see
Oracle Database Net Services Administrator's Guide.
7. Use encryption to secure the data in flight.
See Oracle Database 2 Day + Security Guide and Oracle Database Advanced Security
Administrator's Guide for more information about network data encryption.
8. Use a firewall.
Appropriately placed and configured firewalls can prevent outside access to your
databases.
■Keep the database server behind a firewall. Oracle Database network
infrastructure, Oracle Net (formerly known as Net8 and SQL*Net), provides
support for a variety of firewalls from various vendors. Supported
proxy-enabled firewalls include Gauntlet from Network Associates and
Raptor from Axent. Supported packet-filtering firewalls include PIX Firewall
from Cisco, and supported stateful inspection firewalls (more sophisticated
packet-filtered firewalls) include Firewall-1 from CheckPoint.
■Ensure that the firewall is placed outside the network to be protected.

Guidelines for Securing the Network
10-16 Oracle Database Security Guide
■Configure the firewall to accept only those protocols, applications, or
client/server sources that you know are safe.
■Use a product such as Oracle Connection Manager to manage multiplex
multiple client network sessions through a single network connection to the
database. It can filter on source, destination, and host name. This product
enables you to ensure that connections are accepted only from physically
secure terminals or from application Web servers with known IP addresses.
(Filtering on IP address alone is not enough for authentication, because it can
be falsified.)
9. Prevent unauthorized administration of the Oracle listener.
For more information about the listener, see Oracle Database Net Services
Administrator's Guide.
10. Check network IP addresses.
Use the Oracle Net valid node checking security feature to allow or deny access to
Oracle server processes from network clients with specified IP addresses. To use
this feature, set the following
sqlnet.ora
configuration file parameters:
tcp.validnode_checking = YES
tcp.excluded_nodes = {list of IP addresses}
tcp.invited_nodes = {list of IP addresses}
The
tcp.validnode_checking
parameter enables the feature. The
tcp.excluded_
nodes
and
tcp.invited_nodes
parameters deny and enable specific client IP
addresses from making connections to the Oracle listener. This helps to prevent
potential Denial of Service attacks.
You can use Oracle Net Manager to configure these parameters. See Oracle
Database Net Services Administrator's Guide for more information.
11. Encrypt network traffic.
If possible, use Oracle Advanced Security to encrypt network traffic among clients,
databases, and application servers. Oracle Database 2 Day + Security Guide provides
an introduction to network encryption. For detailed information about network
encryption, see Oracle Database Advanced Security Administrator's Guide.
12. Secure the host operating system (the system on which Oracle Database is
installed).
Secure the host operating system by disabling all unnecessary operating system
services. Both UNIX and Windows provide a variety of operating system services,
most of which are not necessary for typical deployments. These services include
FTP, TFTP, TELNET, and so forth. Be sure to close both the UDP and TCP ports for
each service that is being disabled. Disabling one type of port and not the other
does not make the operating system more secure.
Securing a Secure Sockets Layer Connection
Secure Sockets Layer (SSL) is the Internet standard protocol for secure communication,
providing mechanisms for data integrity and data encryption. These mechanisms can
protect the messages sent and received by you or by applications and servers,
supporting secure authentication, authorization, and messaging through certificates
and, if necessary, encryption. Good security practices maximize protection and
minimize gaps or disclosures that threaten security. The following guidelines show the

Guidelines for Securing the Network
Keeping Your Oracle Database Secure 10-17
cautious attention to detail necessary for the successful use of SSL. For detailed
information about Oracle SSL configuration, see Oracle Database Advanced Security
Administrator's Guide.
1. Ensure that configuration files (for example, for clients and listeners) use the
correct port for SSL, which is the port configured upon installation.
You can run HTTPS on any port, but the standards specify port 443, where any
HTTPS-compliant browser looks by default. The port can also be specified in the
URL, for example:
https://secure.example.com:4445/
If a firewall is in use, then it too must use the same ports for secure (SSL)
communication.
2. Ensure that TCPS is specified as the PROTOCOL in the ADDRESS parameter
in the tnsnames.ora file (typically on the client or in the LDAP directory).
An identical specification must appear in the
listener.ora
file (typically in the
$ORACLE_HOME/network/admin
directory).
3. Ensure that the SSL mode is consistent for both ends of every communication.
For example, the database (on one side) and the user or application (on the
other) must have the same SSL mode.
The mode can specify either client or server authentication (one-way), both client
and server authentication (two-way), or no authentication.
4. Ensure that the server supports the client cipher suites and the certificate key
algorithm in use.
5. Enable DN matching for both the server and client, to prevent the server from
falsifying its identity to the client during connections.
This setting ensures that the server identity is correct by matching its global
database name against the DN from the server certificate.
You can enable DN matching in the
tnsnames.ora
file. For example:
set:SSL_SERVER_CERT_DN="cn=finance,cn=OracleContext,c=us,o=example"
Otherwise, a client application would not check the server certificate, which could
allow the server to falsify its identity.
6. Do not remove the encryption from your RSA private key inside your server.key
file, which requires that you enter your pass phrase to read and parse this file.
If you decide your server is secure enough, you could remove the encryption from
the RSA private key while preserving the original file. This enables system boot
scripts to start the database server, because no pass phrase is needed. Ideally,
restrict permissions to the root user only, and have the Web server start as
root
,
but then log on as another user. Otherwise, anyone who gets this key can
impersonate you on the Internet, or decrypt the data that was sent to the server.
Note: A server without SSL does not require a pass phrase.

Guidelines for Auditing
10-18 Oracle Database Security Guide
Guidelines for Auditing
This section contains:
■Auditing Sensitive Information
■Keeping Audited Information Manageable
■Auditing Typical Database Activity
■Auditing Suspicious Database Activity
■Recommended Audit Settings
Auditing Sensitive Information
Be aware that sensitive data, such as credit card numbers, appear in the fine-grained
audit trail if you collect SQL text. For standard auditing, setting the
AUDIT_TRAIL
initialization parameter to
DB, EXTENDED
or
XML, EXTENDED
enables the collection of
SQL text. For fine-grained auditing, you would set the
audit_trail
parameter of the
DBMS_FGA
PL/SQL package to
DBMS_FGA.DB + DBMS_FGA.EXTENDED
or
DBMS_FGA.XML +
DBMS_FGA.EXTENDED
.
If you have sensitive data that is being audited, consider using either of the following
solutions:
■Move the audit trail out of the SYSTEM tablespace and into SYSAUX or another
tablespace. See "Moving the Database Audit Trail to a Different Tablespace" on
page 9-60. Afterwards, encrypt this tablespace. For more information about
tablespace encryption, see Oracle Database Advanced Security Administrator's Guide.
■Do not enable the collection of SQL text in the audit trail. Use the following
settings instead:
– Standard auditing: Set the
AUDIT_TRAIL
initialization parameter to
DB
,
OS
, or
XML
. See "Configuring Standard Auditing with the AUDIT_TRAIL
Initialization Parameter" on page 9-8.
– Fine-grained auditing: Set the
DBMS_FGA.ADD_POLICY
audit_trail
parameter
to
DBMS_FGA.DB
or
DBMS_FGA.XML
. See "Creating a Fine-Grained Audit Policy"
on page 9-40.
Keeping Audited Information Manageable
Although auditing is relatively inexpensive, limit the number of audited events as
much as possible. This minimizes the performance impact on the execution of audited
statements and the size of the audit trail, making it easier to analyze and understand.
Follow these guidelines when devising an auditing strategy:
1. Evaluate your reason for auditing.
After you have a clear understanding of the reasons for auditing, you can devise
an appropriate auditing strategy and avoid unnecessary auditing.
See Also:
■Oracle Database Advanced Security Administrator's Guide for
general SSL information, including configuration
■Oracle Database Net Services Reference for TCP-related
parameters in
sqlnet.ora

Guidelines for Auditing
Keeping Your Oracle Database Secure 10-19
For example, suppose you are auditing to investigate suspicious database activity.
This information by itself is not specific enough. What types of suspicious
database activity do you suspect or have you noticed? A more focused auditing
strategy might be to audit unauthorized deletions from arbitrary tables in the
database. This purpose narrows the type of action being audited and the type of
object being affected by the suspicious activity.
2. Audit knowledgeably.
Audit the minimum number of statements, users, or objects required to get the
targeted information. This prevents unnecessary audit information from cluttering
the meaningful information and using valuable space in the
SYSTEM
tablespace.
Balance your need to gather sufficient security information with your ability to
store and process it.
For example, if you are auditing to gather information about database activity,
then determine exactly what types of activities you want to track, audit only the
activities of interest, and audit only for the amount of time necessary to gather the
information that you want. As another example, do not audit objects if you are
only interested in logical I/O information for each session.
3. Before you implement an auditing strategy, consult your legal department.
You should have the legal department of your organization review your audit
strategy. Because your auditing will monitor other users in your organization, you
must ensure that you are correctly following the compliance and corporate policy
of your site.
Auditing Typical Database Activity
When your purpose for auditing is to gather historical information about particular
database activities, use the following guidelines:
1. Audit only pertinent actions.
At a minimum, audit user access, the use of system privileges, and changes to the
database schema structure. To avoid cluttering meaningful information with
useless audit records and reduce the amount of audit trail administration, only
audit the targeted database activities. Remember also that auditing too much can
affect database performance.
For example, auditing changes to all tables in a database produces far too many
audit trail records and can slow down database performance. However, auditing
changes to critical tables, such as salaries in a Human Resources table, is useful.
You can audit specific actions by using fine-grained auditing, which is described in
"Auditing Specific Activities with Fine-Grained Auditing" on page 9-36.
2. Archive audit records and purge the audit trail.
After you collect the required information, archive the audit records of interest and
then purge the audit trail of this information. See the following sections:
■"Archiving the Database Audit Trail" on page 9-61
■"Archiving the Operating System Audit Trail" on page 9-65
■"Purging Audit Trail Records" on page 9-65
■"Controlling the Size of the Database Audit Trail" on page 9-59
■"Setting the Size of the Operating System Audit Trail" on page 9-62
3. Remember your company’s privacy considerations.

Guidelines for Auditing
10-20 Oracle Database Security Guide
Privacy regulations often lead to additional business privacy policies. Most
privacy laws require businesses to monitor access to personally identifiable
information (PII), and monitoring is implemented by auditing. A business-level
privacy policy should address all relevant aspects of data access and user
accountability, including technical, legal, and company policy concerns.
4. Check the Oracle Database log files for additional audit information
The log files generated by Oracle Database contain useful information that you can
use when auditing a database. For example, an Oracle database creates an alert file
to record
STARTUP
and
SHUTDOWN
operations, and structural changes such as adding
data files to the database.
For example, if you want to audit committed or rolled back transactions, you can
use the redo log files.
Auditing Suspicious Database Activity
When you audit to monitor suspicious database activity, use the following guidelines:
1. First audit generally, and then specifically.
When you start to audit for suspicious database activity, often not much
information is available to target specific users or schema objects. Therefore, set
audit options more generally at first, that is, by using the standard audit options
described in Chapter 9, "Verifying Security Access with Auditing" explains how
you can use the standard audit options to audit SQL statements, schema objects,
privileges, and so on.
After you have recorded and analyzed the preliminary audit information, disable
general auditing, and then audit specific actions. You can use fine-grained
auditing, which is described in "Auditing Specific Activities with Fine-Grained
Auditing" on page 9-36, to audit specific actions. Continue this process until you
have gathered enough evidence to draw conclusions about the origin of the
suspicious database activity.
2. Audit common suspicious activities.
Common suspicious activities are as follows:
■Users who access the database during unusual hours
■Multiple failed user login attempts
■Login attempts by non-existent users
In addition, monitor users who share accounts or multiple users who are logging
in from the same IP address. You can query the
DBA_AUDIT_SESSION
data
dictionary view to find this kind of activity. For a very granular approach, create
fine-grained audit policies.
3. Protect the audit trail.
When auditing for suspicious database activity, protect the audit trail so that audit
information cannot be added, changed, or deleted without being audited. You can
audit the standard audit trail by using the
AUDIT
SQL statement.
For example:
AUDIT SELECT ON SYS.AUD$ BY ACCESS;
See also "Auditing the Database Audit Trail" on page 9-61.

Guidelines for Auditing
Keeping Your Oracle Database Secure 10-21
To audit the fine-grained audit trail, as user
SYS
, you would enter the following
statement:
AUDIT SELECT ON SYS.FGA$ BY ACCESS;
If you have Oracle Database Vault enabled, you can further protect the
SYS.AUDIT$
,
SYSTEM.AUD$
,
SYS.FGA$
, and
SYS.FGA_LOG$
tables by enclosing them
in a realm. (In an Oracle Database Vault environment, the
AUD$
table is moved to
the
SYSTEM
schema when Oracle Label Security is enabled.
SYS.AUD$
becomes a
synonym for the
SYSTEM.AUD$
table.) See Oracle Database Vault Administrator's
Guide for more information.
Recommended Audit Settings
Database schema or structure changes. Use the following
AUDIT
statement settings:
■
AUDIT ALTER ANY PROCEDURE BY ACCESS;
■
AUDIT ALTER ANY TABLE BY ACCESS;
■
AUDIT ALTER DATABASE BY ACCESS;
■
AUDIT ALTER SYSTEM BY ACCESS;
■
AUDIT CREATE ANY EDITION;
■
AUDIT CREATE ANY JOB BY ACCESS;
■
AUDIT CREATE ANY LIBRARY BY ACCESS;
■
AUDIT CREATE ANY PROCEDURE BY ACCESS;
■
AUDIT CREATE ANY TABLE BY ACCESS;
■
AUDIT CREATE EXTERNAL JOB BY ACCESS;
■
AUDIT DROP ANY EDITION;
■
AUDIT DROP ANY PROCEDURE BY ACCESS;
■
AUDIT DROP ANY TABLE BY ACCESS;
Database access and privileges. Use these
AUDIT
statement settings:
■
AUDIT ALTER PROFILE BY ACCESS;
■
AUDIT ALTER USER BY ACCESS;
■
AUDIT AUDIT SYSTEM BY ACCESS;
■
AUDIT CREATE PUBLIC DATABASE LINK BY ACCESS;
■
AUDIT CREATE SESSION BY ACCESS;
■
AUDIT CREATE USER BY ACCESS;
■
AUDIT DROP PROFILE BY ACCESS;
■
AUDIT DROP USER BY ACCESS;
■
AUDIT EXEMPT ACCESS POLICY BY ACCESS;
■
AUDIT GRANT ANY OBJECT PRIVILEGE BY ACCESS;
■
AUDIT GRANT ANY PRIVILEGE BY ACCESS;
■
AUDIT GRANT ANY ROLE BY ACCESS;
■
AUDIT ROLE BY ACCESS;

Addressing the CONNECT Role Change
10-22 Oracle Database Security Guide
Addressing the CONNECT Role Change
The
CONNECT
role was introduced with Oracle Database version 7, which added new
and robust support for database roles. The
CONNECT
role is used in sample code,
applications, documentation, and technical papers. In Oracle Database 10g Release 2
(10.2), the
CONNECT
role was changed. If you are upgrading from a release earlier than
Oracle Database 10.2 to the current release, then read this section.
This section contains:
■Why Was the CONNECT Role Changed?
■How the CONNNECT Role Change Affects Applications
■How the CONNECT Role Change Affects Users
■Approaches to Addressing the CONNECT Role Change
Why Was the CONNECT Role Changed?
The
CONNECT
role was originally established with the following privileges:
Beginning in Oracle Database 10g Release 2, the
CONNECT
role has only the
CREATE
SESSION
privilege, all other privileges are removed.
Although the
CONNECT
role was frequently used to provision new accounts in Oracle
Database, connecting to the database does not require all those privileges. Making this
change enables you to enforce good security practices more easily.
Each user should have only the privileges needed to perform his or her tasks, an idea
called the principle of least privilege. Least privilege mitigates risk by limiting
privileges, so that it remains easy to do what is needed while concurrently reducing
the ability to do inappropriate things, either inadvertently or maliciously.
How the CONNNECT Role Change Affects Applications
The effects of the changes to the
CONNECT
role can be seen in database upgrades,
account provisioning, and installation of applications using new databases.
How the CONNECT Role Change Affects Database Upgrades
Upgrading your existing Oracle database to Oracle Database 10g Release 2 (10.2)
automatically changes the
CONNECT
role to have only the
CREATE SESSION
privilege.
Most applications are not affected because the applications objects already exist: no
new tables, views, sequences, synonyms, clusters, or database links need to be created.
Applications that create tables, views, sequences, synonyms, clusters, or database
links, or that use the
ALTER SESSION
command dynamically, may fail due to
insufficient privileges.
Privileges A-C Privileges C
ALTER SESSION CREATE SESSION
CREATE CLUSTER CREATE SYNONYM
CREATE DATABASE LINK CREATE TABLE
CREATE SEQUENCE CREATE VIEW

Addressing the CONNECT Role Change
Keeping Your Oracle Database Secure 10-23
How the CONNECT Role Change Affects Account Provisioning
If your application or DBA grants the
CONNECT
role as part of the account provisioning
process, then only
CREATE SESSION
privileges are included. Any additional privileges
must be granted either directly or through another role.
This issue can be addressed by creating a new customized database role.
How the CONNECT Role Change Affects Applications Using New Databases
New databases created using the Oracle Database 10g Release 2 (10.2) Utility (DBCA),
or using database creation templates generated from DBCA, define the
CONNECT
role
with only the
CREATE SESSION
privilege. Installing an application to use a new
database may fail if the database schema used for the application is granted privileges
solely through the
CONNECT
role.
How the CONNECT Role Change Affects Users
The change to the
CONNECT
role affects three classes of users differently: general users,
application developers, and client/server applications.
How the CONNECT Role Change Affects General Users
The new
CONNECT
role supplies only the
CREATE SESSION
privilege. Users who connect
to the database to use an application are not affected, because the
CONNECT
role still has
the
CREATE SESSION
privilege.
However, appropriate privileges will not be present for a certain set of users if they are
provisioned solely with the
CONNECT
role. These are users who create tables, views,
sequences, synonyms, clusters, or database links, or use the
ALTER SESSION
command.
The privileges they need are no longer provided with the
CONNECT
role. To authorize
the additional privileges needed, the database administrator must create and apply
additional roles for the appropriate privileges, or grant them directly to the users who
need them.
Note that the
ALTER SESSION
privilege is required for setting events. Few database
users should require the
ALTER SESSION
privilege.
ALTER SESSION SET EVENTS ........
The alter session privilege is not required for other alter session commands.
ALTER SESSION SET NLS_TERRITORY = FRANCE;
How the CONNECT Role Change Affects Application Developers
Application developers provisioned solely with the
CONNECT
role do not have
appropriate privileges to create tables, views, sequences, synonyms, clusters, or
database links, nor to use the
ALTER SESSION
statement. The database administrator
must either create and apply additional roles for the appropriate privileges, or grant
them directly to the application developers who need them.
How the CONNECT Role Change Affects Client Server Applications
Most client/server applications that use dedicated user accounts will not be affected
by this change. However, applications that create private synonyms or temporary
tables using dynamic SQL in the user schema during account provisioning or run-time
See Also: Approaches to Addressing the CONNECT Role Change
on page 10-24

Addressing the CONNECT Role Change
10-24 Oracle Database Security Guide
operations will be affected. They will require additional roles or grants to acquire the
system privileges appropriate to their activities.
Approaches to Addressing the CONNECT Role Change
Oracle recommends the following three approaches to address the impact of this
change.
Approach 1: Create a New Database Role
The privileges removed from the
CONNECT
role can be managed by creating a new
database role.
First, connect to the upgraded Oracle database and create a new database role. The
following example uses a role called
my_app_developer
.
CREATE ROLE my_app_developer;
GRANT CREATE TABLE, CREATE VIEW, CREATE SEQUENCE, CREATE SYNONYM, CREATE CLUSTER,
CREATE DATABASE LINK, ALTER SESSION TO my_app_developer;
Second, determine which users or database roles have the
CONNECT
role, and grant the
new role to these users or roles.
SELECT USER$.NAME, ADMIN_OPTION, DEFAULT_ROLE
FROM USER$, SYSAUTH$, DBA_ROLE_PRIVS
WHERE PRIVILEGE# =
(SELECT USER# FROM USER$ WHERE NAME = 'CONNECT')
AND USER$.USER# = GRANTEE#
AND GRANTEE = USER$.NAME
AND GRANTED_ROLE = 'CONNECT';
NAME ADMIN_OPTI DEF
------------------------------ ---------- ---
R1 YES YES
R2 NO YES
GRANT my_app_developer TO R1 WITH ADMIN OPTION;
GRANT my_app_developer TO R2;
You can determine the privileges that users require by using Oracle Auditing. The
audit information can then be analyzed and used to create additional database roles
with finer granularity.
Privileges not used can then be revoked for specific users. Note that before auditing,
the database initialization parameter
AUDIT_TRAIL
must be initialized and the database
restarted.
AUDIT CREATE TABLE, CREATE SEQUENCE, CREATE SYNONYM, CREATE DATABASE LINK, CREATE
CLUSTER, CREATE VIEW, ALTER SESSION;
Database privilege usage can now be monitored periodically.
SELECT USERID, NAME FROM AUD$, SYSTEM_PRIVILEGE_MAP
WHERE - PRIV$USED = PRIVILEGE;
USERID NAME
------------------------------ ----------------
ACME CREATE TABLE
ACME CREATE SEQUENCE
ACME CREATE TABLE
ACME ALTER SESSION

Addressing the CONNECT Role Change
Keeping Your Oracle Database Secure 10-25
APPS CREATE TABLE
APPS CREATE TABLE
APPS CREATE TABLE
APPS CREATE TABLE
8 rows selected.
Approach 2: Restore CONNECT Privileges
Starting with Oracle Database 10g Release 2 (10.2), Oracle provided a script called
rstrconn.sql
in the
$ORACLE_HOME/rdbms/admin
directory. After a database upgrade
or new database creation, this script can be used to grant the privileges that were
removed from the
CONNECT
role in Oracle Database 10g Release 2 (10.2).
If this approach is used, then privileges that are not used should be revoked from
users who do not need them. To identify such privileges and users, the database must
be restarted with the database initialization parameter
AUDIT_TRAIL
initialized, for
example,
AUDIT_TRAIL=DB
. Oracle Database auditing should then be turned on to
monitor what privileges are used, as follows:
AUDIT CREATE TABLE, CREATE SEQUENCE, CREATE SYNONYM, CREATE DATABASE LINK, CREATE
CLUSTER, CREATE VIEW, ALTER SESSION;
Database privilege usage can also be monitored periodically.
SELECT USERID, NAME FROM AUD$, SYSTEM_PRIVILEGE_MAP
WHERE - PRIV$USED = PRIVILEGE;
USERID NAME
------------------------------ ----------------
ACME CREATE TABLE
ACME CREATE SEQUENCE
ACME CREATE TABLE
ACME ALTER SESSION
APPS CREATE TABLE
APPS CREATE TABLE
APPS CREATE TABLE
APPS CREATE TABLE
8 rows selected.
New View Showing CONNECT Grantees A new view enables administrators who continue
using the old
CONNECT
role to see quickly which users have that role.
Table 10–1 shows the columns in the new
DBA_CONNECT_ROLE_GRANTEES
view.
Approach 3: Conduct Least Privilege Analysis
Oracle partners and application providers should use this approach to deliver more
secure products to the Oracle customer base. The principle of least privilege mitigates
risk by limiting privileges to the minimum set required to perform a given function.
Table 10–1 Columns and Contents for DBA_CONNECT_ROLE_GRANTEES
Column Name Contents
Grantee User granted the
CONNECT
role
Path_of_connect_role_grant Role (or nested roles) by which the user is granted
CONNECT
Admin_opt
VARCHAR2(3)
,
YES
if user has the
ADMIN
option on
CONNECT
;
otherwise,
NO

Addressing the CONNECT Role Change
10-26 Oracle Database Security Guide
For each class of users that the analysis shows need the same set of privileges, create a
role with only those privileges. Remove all other privileges from those users, and
assign that role to those users. As needs change, you can grant additional privileges,
either directly or through these new roles, or create new roles to meet new needs. This
approach helps to ensure that inappropriate privileges have been limited, thereby
reducing the risk of inadvertent or malicious harm.

Glossary-1
Glossary
application context
A name-value pair that enables an application to access session information about a
user, such as the user ID or other user-specific information, and then securely pass this
data to the database.
See also global application context.
application role
A database role that is granted to application users and that is secured by embedding
passwords inside the application.
See also secure application role.
certificate
An ITU x.509 v3 standard data structure that securely binds an identify to a public key.
A certificate is created when an entity's public key is signed by a trusted identity, a
certificate authority. The certificate ensures that the entity's information is correct, and
that the public key belongs to that entity.
A certificate contains the entity's name, identifying information, and public key. It is
also likely to contain a serial number, expiration date, and information about the
rights, uses, and privileges associated with the certificate. Finally, it contains
information about the certificate authority that issued it.
certificate revocation list (CRL)
See CRL.
Classless Inter-Domain Routing
See CIDR.
cleartext
Unencrypted plain text.
CIDR
The standard notation used for IP addresses. In CIDR notation, an IPv6 subnet is
denoted by the subnet prefix and the size in bits of the prefix (in decimal), separated
by the slash (/) character. For example,
fe80:0000:0217:f2ff::/64
denotes a subnet
with addresses
fe80:0000:0217:f2ff:0000:0000:0000:0000
through
fe80:0000:0217:f2ff:ffff:ffff:ffff:ffff
. The CIDR notation includes support for
IPv4 addresses. For example,
192.0.2.1/24
denotes the subnet with addresses
192.0.2.1
through
192.0.2.255
.

CRL
Glossary-2
CRL
A set of signed data structures that contain a list of revoked certificates. The
authenticity and integrity of the CRL is provided by a digital signature appended to it.
Usually, the CRL signer is the same entity that signed the issued certificate.
definer’s rights procedure
A procedure (or program unit) that executes with the privileges of its owner, not its
current user. Definer's rights subprograms are bound to the schema in which they are
located.
For example, assume that user
blake
and user
scott
each have a table called
dept
in
their respective user schemas. If user
blake
calls a definer's rights procedure, which is
owned by user
scott
, to update the
dept
table, then this procedure will update the
dept
table in the
scott
schema. This is because the procedure executes with the
privileges of the user who owns (defined) the procedure (that is,
scott
).
See also invoker’s rights procedure.
decryption
Decoding an encyrpted message so that it is readable.
denial-of-service (DoS) attack
An attack that renders a Web site inaccessible or unusable. The denial-of-service attack
can occur in many different ways but frequently includes attacks that cause the site to
crash, reject connections, or perform too slowly to be usable. DoS attacks come in two
forms:
■Basic denial-of-service attacks, which require only one or a few computers
■Distributed denial-of-service (DDoS) attacks, which require many computers to
execute
directly granted role
A role that has been granted directly to the user, as opposed to an indirectly granted
role.
encryption
Disguising a message, rendering it unreadable to all but the intended recipient.
forced cleanup
The ability to forcibly cleanup (that is, remove) all audit records from the database. To
accomplish this, you set the
USE_LAST_ARCH_TIMESTAMP
argument of the
DBMS_AUDIT_
MGMT.CLEAN_AUDIT_TRAIL
procedure to
FALSE
.
See also purge job.
Forwardable Ticket Granting Ticket
A special Kerberos ticket that can be forwarded to proxies, permitting the proxy to
obtain additional Kerberos tickets on behalf of the client for proxy authentication.
See also Kerberos ticket.
global application context
A name-value pair that enables application context values to be accessible across
database sessions.
See also application context.

lightweight user session
Glossary-3
indirectly granted role
A role granted to a user through another role that has already been granted to this
user. Then you grant the
role2
and
role3
roles to the
role1
role. Roles
role2
and
role3
are now under
role1
. This means
psmith
has been indirectly granted the roles
role2
and
role3
, in addition to the direct grant of
role1
. Enabling the direct role1 for
psmith enables the indirect roles role2 and role3 for this user as well.
integrity
A guarantee that the contents of a message received were not altered from the contents
of the original message sent.
invoker’s rights procedure
A procedure (or program unit) that executes with the privileges of the current user,
that is, the user who invokes the procedure. These procedures are not bound to a
particular schema. They can be run by a variety of users and allow multiple users to
manage their own data by using centralized application logic. Invoker's rights
procedures are created with the
AUTHID
clause in the declaration section of the
procedure code.
For example, assume that user
blake
and user
scott
each have a table called
dept
in
their respective user schemas. If user
blake
calls an invoker’s rights procedure, which
is owned by user
scott
, to update the
dept
table, then this procedure will update the
dept
table in the
blake
schema. This is because the procedure executes with the
privileges of the user who invoked the procedure (that is,
blake
.).
See also definer’s rights procedure.
KDC
A computer that issues Kerberos tickets.
See also Kerberos ticket.
Kerberos ticket
A temporary set of electronic credentials that verify the identity of a client for a
particular service. Also referred to as a service ticket.
Key Distribution Center (KDC)
See KDC.
last archive timestamp
A timestamp that indicates the timestamp of the last archived audit record. For the
database audit trail, this timestamp indicates the last audit record archived. For
operating system audit files, it indicates the highest last modified timestamp property
of the audit file that was archived. To set this timestamp, you use the
DBMS_AUDIT_
MGMT.SET_LAST_ARCHIVE_TIMESTAMP
PL/SQL procedure.
See also purge job.
lightweight user session
A user session that contains only information pertinent to the application that the user
is logging onto. The lightweight user session does not hold its own database resources,
such as transactions and cursors; hence it is considered "lightweight." Lightweight
user sessions consume far less system resources than traditional database session.
Because lightweight user sessions consume much fewer server resources, a lightweight
user session can be dedicated to each end user and can persist for as long as the
application deems necessary.

mandatory auditing
Glossary-4
mandatory auditing
Activities that are audited by default, regardless of whether or not auditing was
enabled. These activities include connections to the instance with administrator
privileges, database startups, and database shutdowns. Oracle Database writes these
activities to the operating system audit trail.
namespace
In Oracle Database security, the name of an application context. You create this name
in a
CREATE CONTEXT
statement.
Oracle Virtual Private Database
A set of features that enables you to create security policies to control database access
at the row and column level. Essentially, Oracle Virtual Private Database adds a
dynamic
WHERE
clause to a SQL statement that is issued against the table, view, or
synonym to which an Oracle Virtual Private Database security policy was applied.
PUBLIC role
A special role that every database account automatically has. By default, it has no
privileges assigned to it, but it does have grants to many Java objects. You cannot drop
the
PUBLIC
role, and a manual grant or revoke of this role has no meaning, because the
user account will always assume this role. Because all database user accounts assume
the
PUBLIC
role, it does not appear in the
DBA_ROLES
and
SESSION_ROLES
data
dictionary views.
purge job
A database job created by the
DBMS_AUDIT_MGMT.CREATE_PURGE_JOB
procedure, which
manages the deletion of the audit trail. A database administrator schedules, enables,
and disables the purge job. When the purge job becomes active, it deletes audit records
from the database audit tables, or it deletes Oracle Database operating system audit
files.
See also forced cleanup, last archive timestamp.
role
A named group of related privileges that you grant as a group to users or other roles.
See also indirectly granted role.
salt
In cryptography, a way to strengthen the security of encrypted data. Salt is a random
string that is added to the data before it is encrypted, making it more difficult for
attackers to steal the data by matching patterns of ciphertext to known ciphertext
samples. Salt is often also added to passwords, before the passwords are encrypted, to
avoid dictionary attacks, a method that unethical hackers (attackers) use to steal
passwords. The encrypted salted values make it difficult for attackers to match the
hash value of encrypted passwords (sometimes called verifiers) with their dictionary
lists of common password hash values.
secure application role
A database role that is granted to application users, but secured by using an invoker's
right stored procedure to retrieve the role password from a database table. A secure
application role password is not embedded in the application.
See also application role.

wallet
Glossary-5
separation of duty
Restricting activities only to those users who must perform them. For example, you
should not grant the
SYSDBA
privilege to any user. Only grant this privilege to
administrative users. Separation of duty is required by many compliance policies. See
"Guidelines for Securing User Accounts and Privileges" on page 10-2 for guidelines on
granting privileges to the correct users.
service ticket
See Kerberos ticket.
wallet
A data structure used to store and manage security credentials for an individual entity.

wallet
Glossary-6

Index-1
Index
A
access control
encryption, problems not solved by, 8-1
enforcing, 10-13
object privileges, 4-23
password encryption, 3-2
access control list (ACL)
examples
external network connection for email
alert, 9-44
external network connections, 4-59
wallet access, 4-59
external network services
about, 4-50
adding more users or privileges, 4-53
advantages, 4-49
affect of upgrade from earlier release, 4-51
creating ACL, 4-51
DBMS_NETWORK_ACL_ADMIN package,
general process, 4-51
email alert for audit violation tutorial, 9-44
finding information about, 4-71
hosts, assigning, 4-53
network hosts, using wildcards to
specify, 4-64
ORA-24247 errors, 4-51
order of precedence, hosts, 4-65
port ranges, 4-66
privilege assignments, about, 4-66
privilege assignments, database administrators
checking, 4-67
privilege assignments, users checking, 4-68
setting precedence, multiple roles, 4-69
setting precedence, multiple users, 4-69
syntax for creating, 4-51
hosts
local host, 4-54
localhost setting, 4-54
wallet access
about, 4-50
advantages, 4-51
client certificate credentials, using, 4-55
finding information about, 4-71
non-shared wallets, 4-55
password credentials, 4-55
password credentials, using, 4-55
shared database session, 4-55
wallets with sensitive information, 4-55
wallets without sensitive information, 4-55
account locking
example, 3-7
explicit, 3-7
password management, 3-6
PASSWORD_LOCK_TIME profile parameter, 3-7
ad hoc tools
database access, security problems of, 4-21
ADM_PARALLEL_EXECUTE_TASK role
about, 4-11
ADMIN OPTION
about, 4-38
revoking privileges, 4-41
revoking roles, 4-41
roles, 4-21
system privileges, 4-5
administrative privileges
granting to users, 4-2
administrative user passwords
default, importance of changing, 10-9
administrator privileges
access, 10-14
operating system authentication, 3-25
passwords, 3-25, 10-9
SYSDBA and SYSOPER access, centrally
controlling, 3-22
write, on listener.ora file, 10-14
adump audit files directory, 9-54
alerts, used in fine-grained audit policy, 9-44
"all permissions", 10-3
ALTER ANY LIBRARY statement
security guidelines, 10-3
ALTER privilege statement
SQL statements permitted, 5-17
ALTER PROCEDURE statement
used for compiling procedures, 4-31
ALTER PROFILE statement
password management, 3-4
ALTER RESOURCE COST statement, 2-14
ALTER ROLE statement
changing authorization method, 4-17
ALTER SESSION statement
schema, setting current, 5-16
Index-2
ALTER USER privilege, 2-7
ALTER USER statement
default roles, 4-48
explicit account unlocking, 3-7
GRANT CONNECT THROUGH clause, 3-39
passwords, changing, 2-8
passwords, expiring, 3-10
profiles, changing, 3-10
REVOKE CONNECT THROUGH clause, 3-39
user profile, 3-4
altering users, 2-8
ANSI operations
Oracle Virtual Private Database affect on, 7-34
ANY system privilege
guidelines for security, 10-10
application contexts
about, 6-1
as secure data cache, 6-2
benefits of using, 6-2
bind variables, 7-4
components, 6-1
DBMS_SESSION.SET_CONTEXT procedure, 6-9
driving context, 6-45
editions, affect on, 6-3
finding errors by checking trace files, 6-45
finding information about, 6-45
global application contexts
authenticating user for multiple
applications, 6-27
creating, 6-23
logon trigger, creating, 6-11
Oracle Virtual Private Database, used with, 7-3
performance, 7-27
policy groups, used in, 7-11
returning predicate, 7-3
session information, retrieving, 6-7
support for database links, 6-16
types, 6-3
users, nondatabase connections, 6-22, 6-28
where values are stored, 6-2
See also client session-based application contexts,
database session-based application contexts,
global application contexts
application developers
CONNECT role change, 10-23
application security
restricting wallet access to current
application, 4-55
sharing wallet with other applications, 4-55
specifying attributes, 6-6
application users who are database users
Oracle Virtual Private Database, how it works
with, 7-38
applications
about security policies for, 5-1
database users, 5-2
enhancing security with, 4-8
object privileges, 5-16
object privileges permitting SQL statements, 5-17
One Big Application User authentication
security considerations, 5-3
security risks of, 5-2
Oracle Virtual Private Database, how it works
with, 7-35
password handling, guidelines, 5-4
password protection strategies, 5-3
privileges, managing, 5-11
roles
multiple, 4-8
privileges, associating with database
roles, 5-14
security, 4-21, 5-2
security considerations for use, 5-1
security limitations, 7-35
security policies, 7-12
validating with security policies, 7-13
AQ_ADMINISTRATOR_ROLE role
about, 4-11
AQ_USER_ROLE role
about, 4-11
archiving
operating system audit files, 9-65
standard audit trail, 9-61
timestamping audit trail, 9-69
attacks
See security attacks
AUDIT EXECUTE PROCEDURE statement, 9-33
audit files
activities always written to, 9-4
directory, 9-54
file names, form of, 9-54
operating system audit trail
archiving, setting timestamp, 9-69
audited actions in common with database audit
trail, 9-11
operating system file
advantages of using, 9-16
appearance of text file, 9-13
appearance of XML file, 9-15
archiving, 9-65
contents, 9-13
directory location, 9-17
how it works, 9-17
if becomes too full, 9-62
standard audit trail
archiving, setting timestamp, 9-69
audited actions in common with operating
system audit trail, 9-11
records, archiving, 9-61
where written to, 9-54
AUDIT statement
about, 9-7
schema objects, 9-30
audit trail
about, 9-57
archiving, 9-61
deleting views, 9-84
finding information about, 9-80
interpreting, 9-81
types of, 9-57
Index-3
See also standard audit trail, SYS.AUD$ table,
SYS.FGA_LOG$ table
AUDIT_FILE_DEST initialization parameter
about, 9-17
setting for OS auditing, 9-17
AUDIT_SYS_OPERATIONS initialization parameter
auditing SYS, 9-53
AUDIT_SYSLOG_LEVEL initialization parameter
how it affects mandatory audit records, 9-4
AUDIT_TRAIL initialization parameter
about, 9-8
auditing SYS, 9-54
database, starting in read-only mode, 9-10
DB (database) setting, 9-10
DB, EXTENDED setting, 9-10
disabling, 9-11
OS (operating system) setting, 9-10
setting, 9-8
values, 9-9
XML setting, 9-11
XML, EXTENDED setting, 9-11
auditing
administrators
See standard auditing
audit options, 9-5
audit records, 9-57
audit trail, sensitive data in, 10-18
audit trails, 9-57
before-and-after changes, recording with
triggers, 9-55
committed data, 9-21, 10-20
database user names, 3-27
default auditing, enabling, 9-35
distributed databases and, 9-4
finding information about, 9-80
fine-grained
See fine-grained auditing
functions, 9-32
functions, Oracle Virtual Private Database, 9-33
general steps for, 9-5
guidelines for security, 10-18
historical information, 10-19
keeping information manageable, 10-18
LOBs, auditing
user-defined columns, 9-38
logon and logoff events, 9-25
multitier environments
See standard auditing
network
See standard auditing
object columns, 9-38
objects
See standard auditing
One Big Application User authentication,
compromised by, 5-2
operating system files
appearance, 9-13
configuring, 9-10
managing, 9-62
operating-system user names, 3-27
Oracle Virtual Private Database policy
functions, 9-33
packages, 9-32
performance, 9-4
PL/SQL packages, 9-32
privileges
See standard auditing
procedures, 9-32
range of focus, 9-5
recommended settings, 10-21
Sarbanes-Oxley Act
auditing, meeting compliance through, 9-2
schema objects
See standard auditing
schema objects created in the future, 9-30
SQL statements
See standard auditing
standard
See standard audit trail, standard auditing
statements
See standard auditing
STMT_AUDIT_OPTION_MAP table, 9-12
suspicious activity, 10-20
SYS user, 9-53
SYS.FGA_LOG$ table, 9-38
SYSTEM user, 9-53
SYSTEM_PRIVILEGE_MAP table, 9-12
triggers, 9-32
triggers used for, 9-55
UNIX syslog, 9-4
views
active object options, 9-83
active privilege options, 9-82
active statement options, 9-82
default object options, 9-83
when audit options take effect, 9-8
XML files
appearance, 9-15
configuring, 9-11
See also SYS.AUD$ table, SYS.FGA_LOG$ table,
standard auditing, standard audit trail,
fine-grained auditing
auditing, purging records
about, 9-66
cancelling archive timestamp, 9-78
clearing database audit trail batch size, 9-78
creating audit trail
purge job, 9-67
creating the purge job, 9-70
database audit trail
purging subset of records, 9-74
deleting a purge job, 9-78
disabling purge jobs, 9-77
enabling purge jobs, 9-77
example, 9-79
general steps for, 9-66
initializing
cancelling, 9-76
initializing cleanup operation, 9-68
initializing, checking if done, 9-75

Index-4
purging audit trail manually, 9-72
purging records in batched groups, 9-71
roadmap, 9-66
scheduling the purge job, 9-70
setting archive timestamp, 9-69
time interval for all purge jobs, 9-76
time interval for named purge job, 9-77
AUTHENTICATEDUSER role, 4-11
authentication
about, 3-1
administrators
operating system, 3-25
passwords, 3-25
SYSDBA and SYSOPER access, centrally
controlling, 3-22
by database, 3-26
by SSL, 3-31
client, 10-13
client-to-middle tier process, 3-40
database administrators, 3-22
databases, using
about, 3-26
advantages, 3-26
procedure, 3-27
directory service, 3-31
directory-based services, 3-29
external authentication
about, 3-32
advantages, 3-33
operating system authentication, 3-34
user creation, 3-33
global authentication
about, 3-30
advantages, 3-31
user creation for private schemas, 3-31
user creation for shared schemas, 3-31
middle-tier authentication
proxies, example, 3-42
multitier, 3-34
network authentication
Secure Sockets Layer, 3-28
third-party services, 3-28
One Big Application User, compromised by, 5-2
operating system authentication
about, 3-27
advantages, 3-27
disadvantages, 3-27
proxy user authentication
about, 3-36
expired passwords, 3-39
public key infrastructure, 3-29
RADIUS, 3-29
remote, 10-13
specifying when creating a user, 2-3
strong, 10-9
SYSDBA on Windows systems, 3-25
Windows native authentication, 3-25
See also passwords, proxy authentication
AUTHID DEFINER clause
used with Oracle Virtual Private Database
functions, 7-3
authorization
about, 4-1
changing for roles, 4-17
global
about, 3-30
advantages, 3-31
multitier, 3-34
omitting for roles, 4-17
operating system, 4-19
roles, about, 4-17
automatic reparse
Oracle Virtual Private Database, how it works
with, 7-35
B
banners
auditing user actions, configuring, 5-20
unauthorized access, configuring, 5-20
batch jobs, authenticating users in, 3-17
BFILEs
guidelines for security, 10-11
bind variables
application contexts, used with, 7-4
information captured in audit trail, 9-10
BLOBS
encrypting, 8-7
BY ACCESS clause
about, 9-22
benefits of using, 9-22
finding statement audit options, 9-82
NOAUDIT statement non-support of, 9-23
using, 9-22
C
CAPI_USER_ROLE role, 4-11
cascading revokes, 4-43
CATNOAUD.SQL script
about, 9-84
audit trail views, deleting with, 9-84
certificate key algorithm
Secure Sockets Layer, 10-17
change_on_install default password, 10-9
character sets
role names, multibyte characters in, 4-16
role passwords, multibyte characters in, 4-18
cipher suites
Secure Sockets Layer, 10-17
client connections
guidelines for security, 10-13
secure external password store, 3-18
securing, 10-13
client identifier
setting for applications that use JDBC, 3-46
client identifiers
about, 3-44
auditing users, 9-28
consistency between DBMS_SESSION.SET_

Index-5
IDENTIFIER and DBMS_APPLICATION_
INFO.SET_CLIENT_INFO, 3-46
global application context, independent of, 3-45
setting with DBMS_SESSION.SET_IDENTIFIER
procedure, 6-23
See also nondatabase users
client session-based application contexts
about, 6-42
CLIENTCONTEXT namespace, clearing value
from, 6-44
CLIENTCONTEXT namespace, setting value
in, 6-43
retrieving CLIENTCONTEXT namespace, 6-43
See also application contexts
CLIENT_IDENTIFIER USERENV attribute
setting and clearing with DBMS_SESSION
package, 3-46
setting with OCI user session handle
attribute, 3-46
See also USERENV namespace
CLIENTID_OVERWRITE event, 3-46
column masking behavior, 7-10
column specification, 7-10
restrictions, 7-11
columns
granting privileges for selected, 4-40
granting privileges on, 4-40
INSERT privilege and, 4-40
listing users granted to, 4-73
privileges, 4-40
pseudo columns
USER, 4-29
revoking privileges on, 4-43
command line recall attacks, 5-4, 5-5
committed data
auditing, 9-21, 10-20
configuration
guidelines for security, 10-12
configuration files
listener.ora, 10-14
sample listener.ora file, 10-14
server.key encryption file, 10-17
tsnames.ora, 10-17
typical directory, 10-17
CONNECT role
about, 10-22
applications
account provisioning, 10-23
affects of, 10-22
database upgrades, 10-22
installation of, 10-23
script to create, 4-11
users
application developers, impact, 10-23
client-server applications, impact, 10-23
general users, impact, 10-23
how affects, 10-23
why changed, 10-22
CONNECT role, privilege available to, 4-6
connection pooling
about, 3-34
global application contexts, 6-22
nondatabase users, 6-28
proxy authentication, 3-40
connections
SYS privilege, 10-2
CPU time limit, 2-11
CREATE ANY LIBRARY statement
security guidelines, 10-3
CREATE ANY PROCEDURE system privilege, 4-31
CREATE ANY TABLE statement
non-administrative users, 10-2
CREATE CONTEXT statement
about, 6-5
example, 6-5
CREATE LIBRARY statement
security guidelines, 10-3
CREATE PROCEDURE system privilege, 4-31
CREATE PROFILE statement
account locking period, 3-6
failed login attempts, 3-6
password aging and expiration, 3-8
password management, 3-4
passwords, example, 3-10
CREATE ROLE statement
IDENTIFIED EXTERNALLY option, 4-18
CREATE SCHEMA statement
securing, 5-15
CREATE SESSION statement, 4-6
CONNECT role privilege, 10-7
securing, 5-15
CREATE USER statement
explicit account locking, 3-7
IDENTIFIED BY option, 2-3
IDENTIFIED EXTERNALLY option, 2-3
passwords, expiring, 3-10
user profile, 3-4
CSW_USR_ROLE role, 4-11
CTXAPP role, 4-12
cursors
reparsing, for application contexts, 6-12
shared, used with Virtual Private Database, 7-4
custom installation, 10-12
CWM_USER role, 4-12
D
data definition language (DDL)
roles and privileges, 4-9
standard auditing, 9-23
data dictionary
protecting, 10-10
securing with O7_DICTIONARY_
ACCESSIBILITY, 4-3
data dictionary views
See views
data files, 10-11
guidelines for security, 10-10
data manipulation language (DML)
privileges controlling, 4-26
Index-6
standard auditing, 9-23
data security
encryption, problems not solved by, 8-3
database administrators (DBAs)
access, controlling, 8-2
authentication, 3-22
malicious, encryption not solved by, 8-2
database audit trail
audited actions in common with operating system
audit trail, 9-11
batch size for records during purging, 9-71
protecting, 9-3
tablespace, moving to one other than
SYSTEM, 9-60
Database Configuration Assistant (DBCA)
default passwords, changing, 10-9
user accounts, automatically locking and
expiring, 10-4
database links
application context support, 6-16
application contexts, 6-9
auditing, 9-29
authenticating with Kerberos, 3-28
authenticating with third-party services, 3-28
global user authentication, 3-32
object privileges, 4-24
operating system accounts, care needed, 3-28
session-based application contexts, accessing, 6-9
database session-based application contexts
about, 6-4
cleaning up after user exits, 6-4
components, 6-5
creating, 6-5
database links, 6-9
dynamic SQL, 6-8
externalized, using, 6-21
how to use, 6-4
initializing externally, 6-16
initializing globally, 6-18
ownership, 6-5
parallel queries, 6-9
PL/SQL package creation, 6-6
session information, setting, 6-9
SYS_CONTEXT function, 6-7
trusted procedure, 6-2
tutorial, 6-13
See also application contexts
database upgrades and CONNECT role, 10-22
databases
access control
password encryption, 3-2
additional security resources, 1-2
authentication, 3-26
database user and application user, 5-2
default audit settings
about, 9-35
DBCA-created databases, 9-35
manually-created databases, 9-35
default password security settings, 3-6
DBCA-created databases, 3-6
manually-created databases, 3-6
default security features, summary, 1-1
granting privileges, 4-37
granting roles, 4-37
limitations on usage, 2-10
read-only mode, starting in, 9-10
security and schemas, 5-15
security embedded, advantages of, 5-2
security policies based on, 7-2
DATAPUMP_EXP_FULL_DATABASE role, 4-12
DATAPUMP_IMP_FULL_DATABASE role, 4-12
DBA role
about, 4-12
DBA_NETWORK_ACL_PRIVILEGES view, 4-66
DBA_ROLE_PRIVS view
application privileges, finding, 5-12
DBA_ROLES data dictionary view
PUBLIC role, 4-5
DBFS_ROLE role, 4-12
DBMS_APPLICATION.SET_CLIENT_INFO
procedure
DBMS_SESSION.SET_IDENTIFIER value,
overwriting, 3-46
DBMS_CRYPTO package
about, 8-8
encryption algorithms supported, 8-8
examples, 8-10
DBMS_FGA package
about, 9-39
ADD_POLICY procedure, 9-40
DISABLE_POLICY procedure, 9-43
DROP_POLICY procedure, 9-44
ENABLE_POLICY procedure, 9-44
DBMS_OBFUSCATION_TOOLKIT package
backward compatibility, 8-8
See also DBMS_CRYPTO package
DBMS_RLS package
about, 7-6
DBMS_RLS.ADD_CONTEXT procedure, 7-6
DBMS_RLS.ADD_GROUPED_POLICY
procedure, 7-6
DBMS_RLS.ADD_POLICY
sec_relevant_cols parameter, 7-8
sec_relevant_cols_opt parameter, 7-10
DBMS_RLS.ADD_POLICY procedure
about, 7-6
DBMS_RLS.CREATE_POLICY_GROUP
procedure, 7-6
DBMS_RLS.DELETE_POLICY_GROUPS
procedure, 7-6
DBMS_RLS.DISABLE_GROUPED_POLICY
procedure, 7-6
DBMS_RLS.DROP_CONTEXT procedure, 7-6
DBMS_RLS.DROP_GROUPED_POLICY
procedure, 7-6
DBMS_RLS.DROP_POLICY procedure, 7-6
DBMS_RLS.ENABLE_GROUPED_POLICY
procedure, 7-6
DBMS_RLS.ENABLE_POLICY procedure, 7-6
DBMS_RLS.REFRESH_GROUPED_POLICY

Index-7
procedure, 7-6
DBMS_RLS.REFRESH_POLICY procedure, 7-6
DBMS_SESSION package
client identifiers, using, 3-46
global application context, used in, 6-23
SET_CONTEXT procedure
about, 6-9
application context name-value pair,
setting, 6-7
DBMS_SESSION.SET_CONTEXT procedure
about, 6-9
syntax, 6-9
username and client_id settings, 6-25
DBMS_SESSION.SET_IDENTIFIER procedure
client session ID, setting, 6-23
DBMS_APPLICATION.SET_CLIENT_INFO value,
overwritten by, 3-46
DBSNMP user account
password usage, 10-9
DDL
See data definition language
default passwords, 10-8, 10-9
change_on_install or manager passwords, 10-9
changing, importance of, 3-4
finding, 3-4
default permissions, 10-10
default profiles
about, 3-4
default roles
setting for user, 2-7
specifying, 4-48
default users
accounts, 10-4
Enterprise Manager accounts, 10-4
passwords, 10-9
defaults
tablespace quota, 2-5
user tablespaces, 2-4
definer’s rights
about, 4-29
procedure privileges, used with, 4-29
procedure security, 4-29
secure application roles, 5-13
used with Oracle Virtual Private Database
functions, 7-3
DELETE privilege
SQL statements permitted, 5-17
DELETE_CATALOG_ROLE role
about, 4-12
SYS schema objects, enabling access to, 4-4
denial-of-service (DoS) attacks
bad packets, preventing, 5-18
networks, securing, 10-16
denial-of-service attacks
about, Glossary-2
denial-of-service(DoS) attacks
audit trail, writing to operating system file, 9-16
dictionary protection mechanism, 4-3
direct path load
fine-grained auditing effects on, 9-37
directory authentication, configuring for SYSDBA or
SYSOPER access, 3-22
directory object auditing
configuring, 9-32
removing, 9-32
directory objects
auditing, 9-32
granting EXECUTE privilege on, 4-37
directory-based services authentication, 3-29
disabling unnecessary services
FTP, TFTP, TELNET, 10-16
dispatcher processes (Dnnn)
limiting SGA space for each session, 2-12
distributed databases
auditing and, 9-4
DML
See data manipulation language
driving context, 6-45
DROP PROFILE statement
example, 2-14
DROP ROLE statement
example, 4-21
security domain, affected, 4-21
DROP USER statement
about, 2-14
schema objects of dropped user, 2-15
DUAL table
about, 6-8
dynamic Oracle Virtual Private Database policy
types, 7-15
DYNAMIC policy type, 7-15
E
editions
application contexts, how affects, 6-3
fine-grained auditing packages, results in, 6-24
global application contexts, how affects, 6-24
Oracle Virtual Private Database packages, results
in, 6-24
EJBCLIENT role, 4-12
email alert example, 9-44
encryption
access control, 8-1
BLOBS, 8-7
challenges, 8-4
data security, problems not solved by, 8-3
data transfer, 10-15
DBMS_CRYPTO package, 8-8
deleted encrypted data, 10-11
examples, 8-10
finding information about, 8-15
fine-grained audit policies on encrypted
columns, 9-40
indexed data, 8-4
key generation, 8-4
key storage, 8-5
key transmission, 8-5
keys, changing, 8-7
malicious database administrators, 8-2
Index-8
network traffic, 10-16
problems not solved by, 8-1
transparent data encryption, 8-7
transparent tablespace encryption, 8-7
enterprise directory service, 4-19
Enterprise Edition, 10-9
Enterprise Manager
granting roles, 4-20
statistics monitor, 2-12
enterprise roles, 3-30, 4-19
enterprise user management, 5-2
Enterprise User Security
application context, globally initialized, 6-19
proxy authentication
Oracle Virtual Private Database, how it works
with, 7-38
enterprise users
centralized management, 3-30
global role, creating, 4-19
One Big Application User authentication,
compromised by, 5-2
proxy authentication, 3-36
shared schemas, protecting users, 5-16
errors
OPW-00005, 2-9
ORA-00036, 9-41
ORA-01720, 4-28
ORA-06512, 9-48
ORA-1000, 9-41
ORA-24247, 4-51, 9-48
ORA-28009, 4-3
ORA-28040, 3-26
ORA-28046
ORA-28046 error, 2-9
ORA-28133, 9-40
ORA-28144, 9-42
examples
access control lists
external network connections, 4-59
wallet access, 4-59
account locking, 3-7
audit trail, purging, 9-79
audit trigger to record before-and-after
values, 9-55
data encryption
encrypting and decrypting BLOB data, 8-12
encrypting and decrypting procedure with AES
256-Bit, 8-11
directory objects, granting EXECUTE privilege
on, 4-37
encrypting procedure, 8-10
Java code to read passwords, 5-7
locking an account with CREATE PROFILE, 3-7
login attempt grace period, 3-10
nondatabase user authentication, 6-28
O7_DICTIONARY_ACCESSIBILITY initialization
parameter, setting, 4-3
passwords
aging and expiration, 3-8
changing, 2-8
creating for user, 2-3
privileges
granting ADMIN OPTION, 4-38
views, 4-72
procedure privileges affecting packages, 4-32
profiles, assigning to user, 2-7
roles
altering for external authorization, 4-17
creating for application authorization, 4-18
creating for external authorization, 4-19
creating for password authorization, 4-17
default, setting, 4-48
using SET ROLE for password-authenticated
roles, 4-18
views, 4-72
secure external password store, 3-17
session ID of user
finding, 2-14
terminating, 2-14
system privilege and role, granting, 4-37
tablespaces
assigning default to user, 2-4
quota, assigning to user, 2-5
temporary, 2-6
type creation, 4-34
users
account creation, 2-2
creating with GRANT statement, 4-38
dropping, 2-15
middle-tier server proxying a client, 3-39
naming, 2-3
object privileges granted to, 4-39
proxy user, connecting as, 3-39
See also tutorials
exceptions
WHEN NO DATA FOUND, used in application
context package, 6-15
WHEN OTHERS, used in triggers
development environment (debugging)
example, 6-12
production environment example, 6-11
exclusive mode
SHA-1 password hashing algorithm,
enabling, 3-16
EXECUTE ANY LIBRARY statement
security guidelines, 10-3
EXECUTE privilege
SQL statements permitted, 5-17
EXECUTE_CATALOG_ROLE role
about, 4-12
SYS schema objects, enabling access to, 4-4
execution time for statements, measuring, 7-15
EXEMPT ACCESS POLICY privilege
Oracle Virtual Private Database enforcements,
exemption, 7-37
EXP_FULL_DATABASE role
about, 4-12
expiring a password
explicitly, 3-10
exporting data

Index-9
direct path export impact on Oracle Virtual Private
Database, 7-36
policy enforcement, 7-36
external authentication
about, 3-32
advantages, 3-33
network, 3-34
operating system, 3-34
user creation, 3-33
external network services, fine-grained access to
See access control list (ACL)
external tables, 10-11
F
failed login attempts
account locking, 3-6
password management, 3-6
resetting, 3-7
features, new security
See new features, security
files
BFILEs
operating system access, restricting, 10-11
BLOB, 8-7
data
operating system access, restricting, 10-11
external tables
operating system access, restricting, 10-11
keys, 8-7
listener.ora file
guidelines for security, 10-14, 10-17
log
audit file location for Windows, 9-54
audit file locations, 9-17
operating system access, restricting, 10-11
restrict listener access, 10-15
server.key encryption file, 10-17
symbolic links, restricting, 10-10
tnsnames.ora, 10-17
trace
operating system access, restricting, 10-11
fine-grained access control
See Oracle Virtual Private Database (VPD)
fine-grained auditing
about, 9-37
activities always recorded, 9-38
advantages, 9-38
alerts, adding to policy, 9-44
archiving audit trail, 9-61
columns, specific, 9-43
creating audit trail for, 9-39
DBMS_FGA package, 9-39
direct loads of data, 9-37
edition-based redefinitions, 9-39
editions, results in, 6-24
encrypted table columns, 9-40
finding errors by checking trace files, 9-80
how audit records are generated, 9-39
how to use, 9-37
location of audit records, 9-37
non-SYS activities audited, 9-3
policies
adding, 9-40
disabling, 9-43
dropping, 9-44
enabling, 9-44
modifying, 9-40
where created, 9-40
privileges needed, 9-38
records
archiving, 9-61
See also SYS.FGA_LOG$ table
firewalls
advice about using, 10-15
database server location, 10-15
ports, 10-17
supported types, 10-15
flashback query
auditing, used with, 9-59
Oracle Virtual Private Database, how it works
with, 7-35
foreign keys
privilege to use parent key, 4-27
FTP service, 10-16
functions
auditing, 9-32
Oracle Virtual Private Database
components of, 7-4
privileges used to run, 7-3
privileges for, 4-29
roles, 4-9
G
GATHER_SYSTEM_STATISTICS role, 4-13
global application contexts
about, 6-22
authenticating nondatabase users, 6-28
components, 6-22
editions, affect on, 6-24
example of authenticating nondatabase
users, 6-29
example of authenticating user moving to different
application, 6-27
example of setting values for all users, 6-26
Oracle RAC environment, 6-23
Oracle RAC instances, 6-22
ownership, 6-23
PL/SQL package creation, 6-24
process, lightweight users, 6-40
process, standard, 6-39
sharing values globally for all users, 6-26
system global area, 6-22
tutorial for client session IDs, 6-35
used for One Big Application User scenarios, 7-38
user name retrieval with USER function, 6-25
uses for, 7-38
See also application contexts
global authentication

Index-10
about, 3-30
advantages, 3-31
user creation for private schemas, 3-31
user creation for shared schemas, 3-31
global authorization
about, 3-30
advantages, 3-31
role creation, 4-19
roles, 3-30
global roles
about, 4-19
global users, 3-30
GLOBAL_AQ_USER_ROLE role, 4-13
grace period for login attempts
example, 3-10
grace period for password expiration, 3-9
GRANT ALL PRIVILEGES statement
SELECT ANY DICTIONARY privilege, exclusion
of, 10-10
GRANT ANY OBJECT PRIVILEGE system
privilege, 4-39, 4-42
GRANT ANY PRIVILEGE system privilege, 4-5
GRANT CONNECT THROUGH clause
consideration when setting FAILED_LOGIN_
ATTEMPTS parameter, 3-5
for proxy authorization, 3-39
GRANT statement, 4-37
ADMIN OPTION, 4-38
creating a new user, 4-38
object privileges, 4-38, 5-16
system privileges and roles, 4-37
when takes effect, 4-48
WITH GRANT OPTION, 4-39
granting privileges and roles
about, 4-4
finding information about, 4-71
specifying ALL, 4-24
guidelines for security
auditing, 10-18
custom installation, 10-12
data files and directories, 10-10
encrypting sensitive data, 10-11
installation and configuration, 10-12
networking security, 10-13
operating system accounts, limiting
privileges, 10-10
operating system users, limiting number of, 10-10
Oracle home default permissions, disallowing
modification, 10-10
ORACLE_DATAPUMP access driver, 10-11
passwords, 10-7
Secure Sockets Layer
mode, 10-17
TCPS protocol, 10-17
symbolic links, restricting, 10-10
user accounts and privileges, 10-2
H
hackers
See security attacks
HS_ADMIN_EXECUTE_ROLE role
about, 4-13
HS_ADMIN_ROLE role
about, 4-13
HS_ADMIN_SELECT_ROLE role
about, 4-13
HTTP authentication
See access control lists (ACL), wallet access
HTTPS
port, correct running on, 10-17
I
IMP_FULL_DATABASE role
about, 4-13
INDEX privilege
SQL statements permitted, 5-17
indexed data
encryption, 8-4
indirectly granted roles, 4-7
initialization parameters
application protection, 5-17 to 5-20
AUDIT_FILE_DEST, 9-4, 9-54
AUDIT_SYS_OPERATIONS, 9-53
AUDIT_SYSLOG_LEVEL, 9-19
AUDIT_TRAIL
about, 9-8
using, 9-9
current value, checking, 9-8
MAX_ENABLED_ROLES, 4-49
O7_DICTIONARY_ACCESSIBILITY, 4-3
OS_AUTHENT_PREFIX, 3-32
OS_ROLES, 4-19
REMOTE_OS_AUTHENT, 10-13
RESOURCE_LIMIT, 2-13
SEC_CASE_SENSITIVE_LOGON, 3-13
SEC_MAX_FAILED_LOGIN_ATTEMPTS, 5-19
SEC_PROTOCOL_ERROR_FURTHER_
ACTION, 5-18
SEC_PROTOCOL_ERROR_TRACE_
ACTION, 5-18
SEC_RETURN_SERVER_RELEASE_
BANNER, 5-19
SEC_USER_AUDIT_ACTION_BANNER, 5-20
SEC_USER_UNAUTHORIZED_ACCESS_
BANNER, 5-20
INSERT privilege
granting, 4-40
revoking, 4-43
SQL statements permitted, 5-17
installation
guidelines for security, 10-12
intruders
See security attacks
invoker’s rights
about, 4-30
procedure privileges, used with, 4-29
procedure security, 4-30
secure application roles, 5-13

Index-11
secure application roles, requirement for
enabling, 5-13
IP addresses
falsifying, 10-16
J
JAVA_ADMIN role, 4-13
JAVA_DEPLOY role, 4-14
JAVADEBUGPRIV role, 4-13
JAVAIDPRIV role, 4-13
JAVASYSPRIV role, 4-13
JAVAUSERPRIV role, 4-13
JDBC connections
JDBC Thin Driver proxy authentication
configuring, 3-36
with real user, 3-40
JDBC/OCI proxy authentication, 3-36
multiple user sessions, 3-40
Oracle Virtual Private Database, 7-38
JMXSERVER role, 4-14
K
Kerberos authentication, 3-28
configuring for SYSDBA or SYSOPER
access, 3-23
password management, 10-9
key generation
encryption, 8-4
key storage
encryption, 8-5
key transmission
encryption, 8-5
L
LBAC_DBA role, 4-14
least privilege principle, 10-2
about, 10-2
granting user privileges, 10-2
middle-tier privileges, 3-41
libraries
security guidelines, 10-3
lightweight users
example using a global application context, 6-35
Lightweight Directory Access Protocol
(LDAP), 7-28
listener
not an Oracle owner, 10-15
preventing online administration, 10-14
restrict privileges, 10-15
secure administration, 10-16
listener.ora file
administering remotely, 10-14
default location, 10-17
online administration, preventing, 10-14
TCPS, securing, 10-17
LOBS
auditing, 9-38
lock and expire
default accounts, 10-4
predefined user accounts, 10-4
log files
auditing, default location, 9-17
owned by trusted user, 10-11
Windows Event Viewer, 9-54
logical reads limit, 2-11
logon triggers
auditing current session, 9-25
examples, 6-11
externally initialized application contexts, 6-12
secure application roles, 4-23
LOGSTDBY_ADMINISTRATOR role, 4-14
M
malicious database administrators
See also security attacks
manager default password, 10-9
mandatory auditing
about, 9-4
syslog, written to, 9-4
memory
users, viewing, 2-18
MERGE INTO statement, affected by DBMS_
RLS.ADD_POLICY statement_types
parameter, 7-8
methods
privileges on, 4-33
MGMT_USER role, 4-14
middle-tier systems
client identifiers, 3-44
enterprise user connections, 3-43
password-based proxy authentication, 3-43
privileges, limiting, 3-41
proxies authenticating users, 3-42
proxying but not authenticating users, 3-42
reauthenticating user to database, 3-43
USERENV namespace attributes, accessing, 6-17
monitoring user actions
See also auditing, standard auditing, fine-grained
auditing
multiplex multiple-client network sessions, 10-16
My Oracle Support
security patches, downloading, 10-2
N
Net8
See Oracle Net
network auditing
about, 9-34
removing, 9-35
network authentication
external authentication, 3-34
guidelines for securing, 10-9
roles, granting using, 4-45
Secure Sockets Layer, 3-28
smart cards, 10-9
third-party services, 3-28

Index-12
token cards, 10-9
X.509 certificates, 10-9
network connections
denial-of-service (DoS) attacks, addressing, 10-16
guidelines for security, 10-13, 10-14
securing, 10-14
network IP addresses
guidelines for security, 10-16
new features, security, 3-xxv
NOAUDIT statement
audit options, removing, 9-23
default object audit options, disabling, 9-31
network auditing, removing, 9-35
object auditing, removing, 9-31
privilege auditing, removing, 9-27
statement auditing, removing, 9-25
nondatabase users
about, 6-22
audit record information, 9-57
auditing, 9-50
clearing session data, 6-32
creating client session-based application
contexts, 6-42 to 6-44
global application contexts
package example, 6-29
reason for using, 6-22
setting, 6-28
tutorial, 6-35
One Big Application User authentication
about, 7-38
features compromised by, 5-2
security risks, 5-2
Oracle Virtual Private Database
how it works with, 7-38
tutorial for creating a policy group, 7-28
See also application contexts, client identifiers
O
O7_DICTIONARY_ACCESSIBILITY initialization
parameter
about, 4-3
auditing privileges on SYS objects, 9-3, 9-7
data dictionary protection, 10-10
default setting, 10-10
securing data dictionary with, 4-3
object columns
auditing, 9-38
object privileges, 10-2
about, 4-24
granting on behalf of the owner, 4-39
managing, 5-16
revoking, 4-42
revoking on behalf of owner, 4-42
schema object privileges, 4-24
See also schema object privileges
synonyms, 4-25
objects
applications, managing privileges in, 5-16
granting privileges, 5-17
privileges
applications, 5-16
managing, 4-33
protecting in shared schemas, 5-16
protecting in unique schemas, 5-15
SYS schema, access to, 4-4
OEM_ADVISOR role, 4-14
OEM_MONITOR role, 4-14
OLAP_DBA role, 4-14
OLAP_USER role, 4-14
OLAP_XS_ADMIN role, 4-14
One Big Application User authentication
See nondatabase users
operating system audit trail
age, controlling, 9-64
audited actions in common with database audit
trail, 9-11
size, controlling, 9-62
operating systems
accounts, 4-46
authentication
about, 3-27
advantages, 3-27
disadvantages, 3-27
roles, using, 4-45
authentication, external, 3-34
default permissions, 10-10
enabling and disabling roles, 4-47
operating system account privileges,
limiting, 10-10
role identification, 4-46
roles and, 4-10
roles, granting using, 4-45
users, limiting number of, 10-10
OPW-00005 error, 2-9
ORA-01720 error, 4-28
ORA-06512 error, 9-48
ORA-1536 error, 2-5
ORA-24247 error, 4-51, 9-48
ORA-28009 error, 4-3
ORA-28040 error, 3-26
Oracle Advanced Security
network authentication services, 10-9
network traffic encryption, 10-16
user access to application schemas, 5-16
Oracle Call Interface (OCI)
application contexts, client session-based, 6-42
proxy authentication, 3-36
Oracle Virtual Private Database, how it works
with, 7-38
proxy authentication with real user, 3-40
security-related initialization
parameters, 5-17 to 5-20
Oracle Connection Manager
securing client networks with, 10-16
Oracle Data Pump
exported data from VPD policies, 7-37
Oracle Database Enterprise User Security
password security threats, 3-16
Oracle Enterprise Security Manager
Index-13
role management with, 3-29
Oracle home
default permissions, disallowing
modification, 10-10
Oracle Internet Directory (OID)
authenticating with directory-based service, 3-29
SYSDBA and SYSOPER access, controlling, 3-22
Oracle Java Virtual Machine (OJVM)
permissions, restricting, 10-3
Oracle Label Security (OLS)
Oracle Virtual Private Database, using with, 7-36
Oracle Net
firewall support, 10-15
Oracle Real Application Clusters
archive timestamp for audit records, 9-70
global application contexts, 6-23
global contexts, 6-22
Oracle Technology Network
security alerts, 10-2
Oracle Virtual Private Database (VPD)
about, 7-1
ANSI operations, 7-34
application contexts
tutorial, 7-23
used with, 7-3
applications
how it works with, 7-35
users who are database users, how it works
with, 7-38
applications using for security, 5-2
automatic reparsing, how it works with, 7-35
benefits, 7-2
column level, 7-8
column masking behavior
enabling, 7-10
restrictions, 7-11
column-level display, 7-8
components, 7-4
configuring, 7-5 to 7-19
cursors, shared, 7-4
edition-based redefinitions, 7-34
editions, results in, 6-24
Enterprise User Security proxy authentication,
how it works with, 7-38
exporting data, 7-36
exporting data using Data Pump Export, 7-37
finding information about, 7-39
flashback query, how it works with, 7-35
function
auditing, 9-29
components, 7-4
how it is executed, 7-3
JDBC proxy authentication, how it works
with, 7-38
nondatabase user applications, how works
with, 7-38
OCI proxy authentication, how it works
with, 7-38
Oracle Label Security
exceptions in behavior, 7-36
using with, 7-36
outer join operations, 7-34
performance benefit, 7-3
policies, Oracle Virtual Private Database
about, 7-6
applications, validating, 7-13
attaching to database object, 7-7
column display, 7-8
column-level display, default, 7-9
dynamic, 7-15
multiple, 7-13
optimizing performance, 7-14
privileges used to run, 7-3
SQL statements, specifying, 7-7
policy groups
about, 7-11
benefits, 7-12
creating, 7-12
default, 7-12
tutorial, implementation, 7-28
policy types
context sensitive, about, 7-17
context sensitive, when to use, 7-18
context-sensitive, audited, 9-33
DYNAMIC, 7-15
dynamic, audited, 9-33
shared context sensitive, about, 7-18
shared context sensitive, when to use, 7-18
shared static, about, 7-16
shared static, when to use, 7-17
static, about, 7-16
static, audited, 9-33
static, when to use, 7-17
summary of features, 7-19
SELECT FOR UPDATE statements in
policies, 7-34
tutorial, simple, 7-20
user models, 7-38
Web-based applications, how it works with, 7-38
Oracle Wallet Manager
X.509 Version 3 certificates, 3-30
Oracle wallets
authentication method, 3-30
Oracle Warehouse Builder
roles, predefined, 4-14
ORACLE_DATAPUMP access driver
guidelines for security, 10-11
OracleMetaLink
See My Oracle Support
ORAPWD password utility
case sensitivity in passwords, 3-14
password file authentication, 3-25
permissions to run, 3-25
ORAPWD utility
changing SYS password with, 2-9
ORDADMIN role, 4-14
OS_ROLES initialization parameter
operating system role grants, 4-47
operating-system authorization and, 4-19
REMOTE_OS_ROLES and, 4-47

Index-14
using, 4-46
outer join operations
Oracle Virtual Private Database affect on, 7-34
OWB_DESIGNCENTER_VIEW role, 4-15
OWB_USER role, 4-15
OWB$CLIENT role, 4-14
P
packages
auditing, 9-32
examples, 4-32
examples of privilege use, 4-32
privileges
divided by construct, 4-31
executing, 4-29, 4-31
parallel execution servers, 6-9
parallel query, and SYS_CONTEXT, 6-9
pass phrase
read and parse server.key file, 10-17
password files
case sensitivity, effect on SEC_CASE_SENSITIVE_
LOGON parameter, 3-14
how used to authenticate administrators, 3-25
PASSWORD statement
about, 2-8
PASSWORD_LIFE_TIME profile parameter, 3-8
PASSWORD_LOCK_TIME profile parameter, 3-7
PASSWORD_REUSE_MAX profile parameter, 3-7
PASSWORD_REUSE_TIME profile parameter, 3-7
passwords
about managing, 3-4
account locking, 3-6
administrator
authenticating with, 3-25
guidelines for securing, 10-9
aging and expiration, 3-8
ALTER PROFILE statement, 3-4
altering, 2-8
application design guidelines, 5-4
applications, strategies for protecting
passwords, 5-3
brute force attacks, 3-2
case sensitivity setting, SEC_CASE_SENSITIVE_
LOGIN, 3-13
case sensitivity, configuring, 3-13
changing for roles, 4-17
complexity verification
about, 3-11
guidelines for security, 10-8
connecting without, 3-27
CREATE PROFILE statement, 3-4
danger in storing as clear text, 10-9
database user authentication, 3-26
default profile settings
about, 3-4
default user account, 10-9
default, finding, 3-4
delays for incorrect passwords, 3-2
duration, 10-9
encrypting, 3-2, 10-9
examples of creating, 3-3
expiring
explicitly, 3-10
procedure for, 3-8
proxy account passwords, 3-39
with grace period, 3-9
failed logins, resetting, 3-7
finding version of, 3-14
grace period, example, 3-10
guidelines for security, 10-7
history, 3-7
Java code example to read passwords, 5-7
life time set too low, 3-10
lifetime for, 3-8
lock time, 3-7
management rules, 10-9
managing, 3-3
maximum reuse time, 3-7
ORAPWD password utility, 3-14
password complexity verification, 3-11
password file risks, 3-25
PASSWORD_LOCK_TIME profile parameter, 3-7
PASSWORD_REUSE_MAX profile
parameter, 3-7
PASSWORD_REUSE_TIME profile
parameter, 3-7
policies, 3-3
privileges for changing for roles, 4-17
privileges to alter, 2-7
protections, built-in, 3-2
proxy authentication, 3-43
requirements
additional, 10-7
minimum, 3-3
reusing, 3-7, 10-9
reusing passwords, 3-7
roles authenticated by passwords, 4-17
roles enabled by SET ROLE statement, 4-18
secure external password store, 3-17
security risks, 3-25
SYS account, 2-9
SYS and SYSTEM, 10-9
used in roles, 4-8
UTLPWDMG.SQL password script
password management, 3-11
verified using SHA-1 hashing algorithm, 3-15,
3-16
See also authentication, and access control list
(ACL), wallet access
performance
application contexts, 6-2
auditing, 9-4
database audit trail, moving to different
tablespace, 9-60
Oracle Virtual Private Database policies, 7-3
Oracle Virtual Private Database policy types, 7-14
resource limits and, 2-10
permissions
default, 10-10
Index-15
run-time facilities, 10-3
PKI
See public key infrastructure (PKI)
PL/SQL
auditing of statements within, 9-8
roles in procedures, 4-9
PL/SQL functions
auditing, 9-33
PL/SQL packages
auditing, 9-32, 9-33
PL/SQL procedures
auditing, 9-33
setting application context, 6-7
PMON background process
application contexts, cleaning up, 6-4
positional parameters
security risks, 5-6
principle of least privilege, 10-2
about, 10-2
granting user privileges, 10-2
middle-tier privileges, 3-41
privileges
about, 4-1
access control lists, checking for external network
services, 4-66
altering
passwords, 2-8
users, 2-7
altering role authentication method, 4-17
applications, managing, 5-11
audited when default auditing is enabled, 9-35
auditing use of, 9-26
auditing, recommended settings for, 10-21
cascading revokes, 4-43
column, 4-40
compiling procedures, 4-31
creating or replacing procedures, 4-31
creating users, 2-2
dropping profiles, 2-14
finding information about, 4-71
granting
about, 4-4, 4-37
examples, 4-32
object privileges, 4-25, 4-38
system, 4-37
system privileges, 4-37
grants, listing, 4-73
grouping with roles, 4-6
managing, 5-16
middle tier, 3-41
object, 4-23, 4-24, 5-17
granting and revoking, 4-25
on selected columns, 4-43
procedures, 4-29
creating and replacing, 4-31
executing, 4-29
in packages, 4-31
reasons to grant, 4-2
revoking privileges
about, 4-4
object, 4-42
object privileges, cascading effect, 4-44
object privileges, requirements for, 4-42
schema object, 4-25
revoking system privileges, 4-41
roles
creating, 4-16
dropping, 4-21
restrictions on, 4-10
roles, why better to grant, 4-2
schema object, 4-24
DML and DDL operations, 4-26
packages, 4-31
procedures, 4-29
SQL statements permitted, 5-17
synonyms and underlying objects, 4-25
system
granting and revoking, 4-4
SELECT ANY DICTIONARY, 10-10
SYSTEM and OBJECT, 10-2
system privileges
about, 4-3
trigger privileges, 4-30
used for Oracle Virtual Private Database policy
functions, 7-3
view privileges
creating a view, 4-27
using a view, 4-28
views, 4-27
See also access control list (ACL) and system
privileges.
procedures
auditing, 9-29, 9-32
compiling, 4-31
definer’s rights
about, 4-29
roles disabled, 4-9
examples of, 4-32
examples of privilege use, 4-32
invoker’s rights
about, 4-30
roles used, 4-9
privileges for procedures
create or replace, 4-31
executing, 4-29
executing in packages, 4-31
privileges required for, 4-31
security enhanced by, 4-30
process monitor process (PMON)
cleans up timed-out sessions, 2-11
PRODUCT_USER_PROFILE table, 4-22
SQL commands, disabling with, 4-22
products and options
install only as necessary, 10-12
profile parameters
FAILED_LOGIN_ATTEMPTS, 3-5
PASSWORD_GRACE_TIME, 3-5, 3-10
PASSWORD_LIFE_TIME, 3-5, 3-8, 3-10
PASSWORD_LOCK_TIME, 3-5, 3-7
PASSWORD_REUSE_MAX, 3-5, 3-7

Index-16
PASSWORD_REUSE_TIME, 3-6, 3-7
profiles, 2-12
about, 2-12
creating, 2-13
dropping, 2-14
finding information about, 2-15
finding settings for default profile, 2-18
managing, 2-12
password management, 3-4
privileges for dropping, 2-14
specifying for user, 2-7
viewing, 2-17
proxy authentication
about, 3-36, 3-37
advantages, 3-37
auditing operations, 3-35
auditing users, 9-27
client-to-middle tier sequence, 3-40
creating proxy user accounts, 3-38
middle-tier
authorizing but not authenticating users, 3-42
authorizing to proxy and authenticate
users, 3-42
limiting privileges, 3-41
reauthenticating users, 3-43
passwords, expired, 3-39
privileges required for creating users, 3-38
secure external password store, used with, 3-40
security benefits, 3-37
users, passing real identity of, 3-40
proxy user accounts
privileges required for creation, 3-38
PROXY_USER attribute, 6-17
PROXY_USERS view, 3-39
pseudo columns
USER, 4-29
PUBLIC
procedures and, 4-45
role, 4-45
public key infrastructure (PKI)
about, 3-29
PUBLIC role
about, 4-5
granting and revoking privileges to, 4-45
security domain of users, 4-9
security risk in privileges granted to, 4-5
PUBLIC_DEFAULT profile
profiles, dropping, 2-14
Q
quotas
tablespace, 2-5
temporary segments and, 2-5
unlimited, 2-5
viewing, 2-17
R
RADIUS authentication, 3-29
read-only mode, affect on AUDIT_TRAIL
parameter, 9-10
reads
limits on data blocks, 2-11
RECOVERY_CATALOG_OWNER role
about, 4-15
redo log files
auditing committed and rolled back
transactions, 10-20
REFERENCES privilege
CASCADE CONSTRAINTS option, 4-43
revoking, 4-43
SQL statements permitted, 5-17
remote authentication, 10-13
REMOTE_OS_AUTHENT initialization parameter
guideline for securing, 10-13
setting, 3-34
remote_os_authentication, 10-13
REMOTE_OS_ROLES initialization parameter
OS role management risk on network, 4-48
setting, 4-19
resource limits
about, 2-10
call level, limiting, 2-11
connection time for each session, 2-11
CPU time, limiting, 2-11
determining values for, 2-12
idle time in each session, 2-11
logical reads, limiting, 2-11
private SGA space for each session, 2-12
profiles, 2-12
session level, limiting, 2-10
sessions
concurrent for user, 2-11
elapsed connection time, 2-11
idle time, 2-11
SGA space, 2-12
types, 2-10
RESOURCE privilege
CREATE SCHEMA statement, needed for, 5-15
RESOURCE role, 4-33
about, 4-15
REVOKE CONNECT THROUGH clause
revoking proxy authorization, 3-39
REVOKE statement
system privileges and roles, 4-41
when takes effect, 4-48
revoking privileges and roles
cascading effects, 4-43
on selected columns, 4-43
REVOKE statement, 4-41
specifying ALL, 4-24
when using operating-system roles, 4-47
role identification
operating system accounts, 4-46
ROLE_SYS_PRIVS view
application privileges, 5-12
ROLE_TAB_PRIVS view
application privileges, finding, 5-12
roles
Index-17
about, 4-1, 4-6
ADM_PARALLEL_EXECUTE_TASK role, 4-11
ADMIN OPTION and, 4-38
advantages in application use, 5-11
application, 4-8, 4-21, 5-14, 5-16
application privileges, 5-11
applications, for user, 5-14
AQ_ADMINISTRATOR_ROLE role, 4-11
AQ_USER_ROLE role, 4-11
AUTHENTICATEDUSER role, 4-11
authorization, 4-17
authorized by enterprise directory service, 4-19
CAPI_USER_ROLE role, 4-11
changing authorization for, 4-17
changing passwords, 4-17
CONNECT, 4-6
CONNECT role
about, 4-11
create your own, 10-6
CSW_USR_ROLE role, 4-11
CTXAPP role, 4-12
CWM_USER role, 4-12
database role, users, 5-14
DATAPUMP_EXP_FULL_DATABASE role, 4-12
DATAPUMP_IMP_FULL_DATABASE role, 4-12
DBA role, 4-12
DBFS_ROLE role, 4-12
DDL statements and, 4-9
default, 4-48
default, setting for user, 2-7
definer’s rights procedures disable, 4-9
DELETE_CATALOG_ROLE role, 4-12
dependency management in, 4-10
disabling, 4-48
dropping, 4-21
EJBCLIENT role, 4-12
enabled or disabled, 4-7, 4-20
enabling, 4-48, 5-14
enterprise, 3-30, 4-19
EXECUTE_CATALOG_ROLE role, 4-12
EXP_FULL_DATABASE role, 4-12
finding information about, 4-71
functionality, 4-2, 4-6
functionality of, 4-6
GATHER_SYSTEM_STATISTICS role, 4-13
global authorization, 4-19
about, 4-19
global roles
about, 3-30
creating, 4-19
external sources, and, 4-18
GLOBAL_AQ_USER_ROLE role, 4-13
GRANT statement, 4-47
granted to other roles, 4-7
granting roles
about, 4-37
methods for, 4-20
system, 4-37
system privileges, 4-4
guidelines for security, 10-6
HS_ADMIN_EXECUTE_ROLE role, 4-13
HS_ADMIN_ROLE role, 4-13
HS_ADMIN_SELECT_ROLE role, 4-13
IMP_FULL_DATABASE role, 4-13
in applications, 4-8
indirectly granted, 4-7
invoker’s rights procedures use, 4-9
JAVA_ADMIN role, 4-13
JAVA_DEPLOY role, 4-14
JAVADEBUGPRIV role, 4-13
JAVAIDPRIV role, 4-13
JAVASYSPRIV role, 4-13
JAVAUSERPRIV role, 4-13
JMXSERVER role, 4-14
job responsibility privileges only, 10-6
LBAC_DBA role, 4-14
listing grants, 4-73
listing privileges and roles in, 4-75
listing roles, 4-74
LOGSTDBY_ADMINISTRATOR role, 4-14
management using the operating system, 4-45
managing roles
about, 4-6
categorizing users, 5-16
managing through operating system, 4-10
maximum number a user can enable, 4-49
MGMT_USER role, 4-14
multibyte characters in names, 4-16
multibyte characters in passwords, 4-18
naming, 4-6
network authorization, 4-19
network client authorization, 4-19
OEM_ADVISOR role, 4-14
OEM_MONITOR role, 4-14
OLAP_DBA role, 4-14
OLAP_USER role, 4-14
OLAP_XS_ADMIN role, 4-14
One Big Application User, compromised by, 5-2
operating system, 4-46
operating system authorization, 4-19
operating system granting of, 4-47
operating system identification of, 4-46
operating system management and the shared
server, 4-47
operating system-managed, 4-47
operating-system authorization, 4-18
ORDADMIN role, 4-14
OWB_DESIGNCENTER_VIEW role, 4-15
OWB_USER role, 4-15
OWB$CLIENT role, 4-14
predefined, 4-11
privileges for creating, 4-16
privileges for dropping, 4-21
privileges, changing authorization method
for, 4-17
privileges, changing passwords, 4-17
RECOVERY_CATALOG_OWNER role, 4-15
RESOURCE role, 4-15
restricting from tool users, 4-21
restrictions on privileges of, 4-10

Index-18
REVOKE statement, 4-47
revoking, 4-20, 4-41
revoking ADMIN option, 4-42
SCHEDULER_ADMIN role, 4-15
schemas do not contain, 4-6
security domains of, 4-9
SELECT_CATALOG_ROLE role, 4-15
SET ROLE statement, 4-47
setting in PL/SQL blocks, 4-9
SNMPAGENT role, 4-15
SPATIAL_CSW_ADMIN role, 4-15
SPATIAL_WFS_ADMIN role, 4-15
unique names for, 4-16
use of passwords with, 4-8
user, 4-9, 5-16
users capable of granting, 4-20
uses of, 4-6, 4-8
WFS_USR_ROLE role, 4-15
WITH GRANT OPTION and, 4-39
without authorization, 4-17
WM_ADMIN_ROLE role, 4-16
XDB_SET_INVOKER roles, 4-16
XDB_WEBSERVICES role, 4-16
XDB_WEBSERVICES_OVER_HTTP role, 4-16
XDB_WEBSERVICES_WITH_PUBLIC role, 4-16
XDBADMIN role, 4-16
See also secure application roles
root file paths
for files and packages outside the database, 10-3
row-level security
See fine-grained access control, Oracle Virtual
Private Database (VPD)
RSA private key, 10-17
run-time facilities, 10-3
restriction permissions, 10-3
S
Sample Schemas
remove or relock for production, 10-12
test database, 10-12
sample schemas, 10-12
Sarbanes-Oxley Act
auditing to meet compliance, 9-2
SCHEDULER_ADMIN role
about, 4-15
schema object auditing
enabling, 9-30
removing, 9-31
schema object privileges, 4-24
schema objects
audit options, removing, 9-31
auditing, 9-29
auditing procedures or functions, 9-31
cascading effects on revoking, 4-44
default audit options, 9-30
default tablespace for, 2-4
dropped users, owned by, 2-14
enabling audit options on, 9-30
granting privileges, 4-38
privileges
DML and DDL operations, 4-26
granting and revoking, 4-25
view privileges, 4-27
privileges on, 4-24
privileges to access, 4-24
privileges with, 4-24
removing audit options, 9-27
revoking privileges, 4-42
schema-independent users, 5-16
schemas
auditing, recommended settings for, 10-21
private, 3-31
shared among enterprise users, 3-31
shared, protecting objects in, 5-16
unique, 5-15
unique, protecting objects in, 5-15
SCOTT user account
restricting privileges of, 10-6
script files
audit trail views, removing, 9-84
CATNOAUD.SQL, 9-84
scripts, authenticating users in, 3-17
SEC_CASE_SENSITIVE_LOGON initialization
parameter
about, 3-13
conflict with SQLNET.ALLOWED_LOGON_
VERSION setting, 3-13
SEC_MAX_FAILED_LOGIN_ATTEMPTS
initialization parameter, 5-19
SEC_PROTOCOL_ERROR_FURTHER_ACTION
initialization parameter, 5-18
SEC_PROTOCOL_ERROR_TRACE_ACTION
initialization parameter, 5-18
sec_relevant_cols_opt parameter, 7-10
SEC_RETURN_SERVER_RELEASE_BANNER
initialization parameter, 5-19
SEC_USER_AUDIT_ACTION_BANNER initialization
parameter, 5-20
SEC_USER_UNAUTHORIZED_ACCESS_BANNER
initialization parameter, 5-20
secconf.sql script
audit settings, 9-36
password settings, 3-6
secure application roles
about, 4-22
creating, 5-12
creating PL/SQL package, 5-13
finding with DBA_ROLES view, 4-71
invoker’s rights, 5-13
invoker’s rights requirement, 5-13
package for, 5-13
SET ROLE statement, 5-14
user environment information from SYS_
CONTEXT SQL function, 5-13, 5-14
using to ensure database connection, 4-23
secure external password store
about, 3-17
client configuration, 3-18
examples, 3-17
Index-19
how it works, 3-17
proxy authentication, used with, 3-40
Secure Sockets Layer (SSL)
about, 3-28
certificate key algorithm, 10-17
cipher suites, 10-17
configuration files, securing, 10-17
configuring for SYSDBA or SYSOPER
access, 3-24
global users with private schemas, 3-31
guidelines for security, 10-16
listener, administering, 10-14
mode, 10-17
pass phrase, 10-17
RSA private key, 10-17
securing SSL connection, 10-16
server.key file, 10-17
TCPS, 10-17
security
application enforcement of, 4-8
default user accounts
locked and expired automatically, 10-4
locking and expiring, 10-4
domains, enabled roles and, 4-20
enforcement in application, 5-2
enforcement in database, 5-2
multibyte characters in role names, 4-16
multibyte characters in role passwords, 4-18
passwords, 3-26
policies
applications, 5-1
SQL*Plus users, restricting, 4-21
tables or views, 7-2
procedures enhance, 4-30
resources, additional, 1-2
roles, advantages in application use, 5-11
See also security risks
security alerts, 10-2
security attacks
access to server after protocol errors,
preventing, 5-18
application context values, attempts to
change, 6-6
application design to prevent attacks, 5-3
command line recall attacks, 5-4, 5-5
denial of service, 10-16
denial-of-service
bad packets, addressing, 5-18
denial-of-service attacks through listener, 10-16
disk flooding, preventing, 5-17
eavesdropping, 10-14
encryption, problems not solved by, 8-2
falsified IP addresses, 10-13
falsified or stolen client system identities, 10-13
hacked operating systems or applications, 10-13
intruders, 8-2
non-SYS activities audited, 9-3
password cracking, 3-2
password protections against, 3-2
preventing malicious attacks from clients, 5-17
preventing password theft with proxy
authentication and secure external password
store, 3-40
session ID, need for encryption, 6-34
shoulder surfing, 5-5
SQL injection attacks, 5-4
unlimited authenticated requests,
preventing, 5-19
user session output, hiding from intruders, 6-12
See also security risks
security domains
enabled roles and, 4-7
security patches
about, 10-2
downloading, 10-2
security policies
See Oracle Virtual Private Database, policies
security risks
ad hoc tools, 4-21
application users not being database users, 5-2
applications enforcing rather than database, 5-2
audit records being tampered with, 9-18
bad packets to server, 5-18
database audit trail, protecting, 9-3
database version displaying, 5-19
encryption keys, users managing, 8-7
password files, 3-25
passwords exposed in large deployments, 3-17
passwords, exposing in programs or scripts, 5-5
positional parameters in SQL scripts, 5-6
privileges carelessly granted, 4-5
privileges granted to PUBLIC role, 4-5
remote user impersonating another user, 4-19
sensitive data in audit trail, 10-18
server falsifying identities, 10-17
users with multiple roles, 5-15
See also security attacks
security settings scripts
audit settings
secconf.sql, 9-36
password settings
secconf.sql, 3-6
undoaud.sql, 9-36
undopwd.sql, 3-6
SELECT ANY DICTIONARY privilege
data dictionary, accessing, 10-10
exclusion from GRANT ALL PRIVILEGES
privilege, 10-10
SELECT FOR UPDATE statement in Virtual Private
Database policies, 7-34
SELECT privilege
SQL statements permitted, 5-17
SELECT_CATALOG_ROLE role
about, 4-15
SYS schema objects, enabling access to, 4-4
separation of duty concepts, Glossary-5
sequences
auditing, 9-29
server.key file
pass phrase to read and parse, 10-17
Index-20
SESSION_ROLES data dictionary view
PUBLIC role, 4-5
SESSION_ROLES view
queried from PL/SQL block, 4-9
sessions
listing privilege domain of, 4-74
memory use, viewing, 2-18
time limits on, 2-11
when auditing options take effect, 9-8
SET ROLE statement
application code, including in, 5-15
associating privileges with role, 5-15
disabling roles with, 4-48
enabling roles with, 4-48
secure application roles, 5-14
when using operating-system roles, 4-47
SGA
See System Global Area (SGA)
SHA-1 hashing algorithm
about, 3-15
enabling exclusive mode, 3-16
how it increases password safety, 3-15
recommended by Oracle, 3-15
Shared Global Area (SGA)
See System Global Area (SGA)
shared server
limiting private SQL areas, 2-12
operating system role management
restrictions, 4-47
shoulder surfing, 5-5
SHOW PARAMETER command, 9-8
smart cards
guidelines for security, 10-9
SNMPAGENT role
about, 4-15
SPATIAL_CSW_ADMIN role, 4-15
SPATIAL_WFS_ADMIN role, 4-15
SQL injection attacks, 5-4
SQL statements
audited when default auditing is enabled, 9-35
auditing
about, 9-23
configuring, 9-24
removing, 9-25
when records generated, 9-8
dynamic, 6-8
object privileges permitting in applications, 5-17
privileges required for, 4-24, 5-17
resource limits and, 2-11
restricting ad hoc use, 4-21
SQL*Net
See Oracle Net
SQL*Plus
connecting with, 3-27
restricting ad hoc use, 4-21
statistics monitor, 2-12
SQLNET.ALLOWED_LOGON_VERSION parameter
conflict with SEC_CASE_SENSITIVE_LOGON
FALSE setting, 3-13
SSL
See Secure Sockets Layer
standard audit trail
activities always recorded, 9-4
AUDIT SQL statement, 9-20
auditing standard audit trail, 9-61
controlling size of, 9-59
disabling, 9-8
enabling, 9-8
maximum size of, 9-60
NOAUDIT SQL statement, 9-23
records, purging, 9-65
size, reducing, 9-74
transaction independence, 9-8
when created, 9-8
standard auditing
about, 9-7
administrative users on all platforms, 9-53
affected by editions, 9-29
archiving audit trail, 9-61
audit option levels, 9-20
audit trails
database, 9-58
auditing
default auditing, enabling, 9-35
cursors, affect on auditing, 9-22
database audit trail records, 9-58
DDL statement auditing, 9-23
default options, 9-30
default options, disabling, 9-31
directory object auditing
about, 9-32
configuring, 9-32
removing, 9-32
disabling options versus auditing, 9-23
DML statements, 9-23
information stored in operating system file, 9-13
mandatory auditing, 9-4
network auditing
about, 9-34
configuring, 9-34
error types recorded, 9-34
removing, 9-35
non-SYS activities audited, 9-3
object auditing
See standard auditing, schema object
operating system audit trail, 9-13
file location, 9-17
operating system audit trail using, 9-16
privilege auditing
about, 9-26
configuring, 9-26
multitier environment, 9-27
options, 9-26
removing, 9-27
types, 9-26
privileges needed, 9-7
procedures or functions, 9-31
range of focus, 9-20
records
archiving, 9-61
Index-21
removing, 9-23
schema object
objects created in the future, 9-31
schema object auditing
about, 9-29
enabling, 9-30
example, 9-30
options, 9-29
removing, 9-31
types, 9-29
SQL statement
See standard auditing, statement auditing
statement auditing
about, 9-23
all statements for individual users, 9-24
all statements for the current session, 9-24
configuring, 9-24
multitier environment, 9-27
removing, 9-25
SQL statement shortcuts by individual
users, 9-24
statement level, 9-24
types you can audit, 9-23
statement executions, number of, 9-21
successful or unsuccessful, 9-21
setting, 9-21
SYS users, 9-53
syslog audit trail on UNIX systems, 9-18
user, 9-23
See also auditing, standard audit trail, SYS.AUD$
table
statement_types parameter of DBMS_RLS.ADD_
POLICY procedure, 7-7
STMT_AUDIT_OPTION_MAP table, 9-12
storage
quotas and, 2-5
unlimited quotas, 2-5
stored procedures
using privileges granted to PUBLIC, 4-45
strong authentication
centrally controlling SYSDBA and SYSOPER access
to multiple databases, 3-22
guideline, 10-9
symbolic links
restricting, 10-10
synonyms
object privileges, 4-25
privileges, guidelines on, 10-3
SYS account
changing password, 2-9
policy enforcement, 7-37
SYS and SYSTEM
passwords, 10-9
SYS schema
objects, access to, 4-4
SYS_CONTEXT function
about, 6-7
auditing current session, 9-25
auditing nondatabase users with, 9-51
database links, 6-9
dynamic SQL statements, 6-8
example, 6-10
parallel query, 6-9
STATIC policies, 7-17
syntax, 6-7
validating users, 5-13
SYS_DEFAULT Oracle Virtual Private Database
policy group, 7-12
SYS.AUD$ table
about, 9-58
archiving, 9-61
audit records, writing to, 9-10
contents, 9-58
data values in audited statement, 9-58
location in Oracle Database Vault
environment, 9-3
modifying manually, dangers of, 9-55
non-SYS actions audited, 9-3
purging, 9-61
too full or unavailable, 9-58
See also standard auditing
SYSAUX tablespace
moving database audit trail tables to, 9-60
SYS.FGA_LOG$
fine-grained auditing, 9-38
SYS.FGA_LOG$ table
about, 9-58
archiving, 9-61
contents, 9-58
data values in audited statement, 9-58
non-SYS actions audited, 9-3
purging, 9-61
too full or unavailable, 9-58
SYS.FGA_LOGS$ table
See also fine-grained auditing
syslog audit trail
about, 9-18
appearance, 9-19
configuring, 9-19
format, 9-19
format when AUDIT_TRAIL is set to XML, 9-11
mandatory audit records written to, 9-4
SYSMAN user account, 10-9
SYS-privileged connections, 10-2
System Global Area (SGA)
application contexts, storing in, 6-2
global application context information
location, 6-22
limiting private SQL areas, 2-12
system privileges, 10-2
about, 4-3
ADMIN OPTION, 4-5
ANY
guidelines for security, 10-10
ANY system privileges, 4-3
GRANT ANY OBJECT PRIVILEGE, 4-39, 4-42
GRANT ANY PRIVILEGE, 4-5
granting, 4-37
granting and revoking, 4-4
power of, 4-3

Index-22
restriction needs, 4-3
revoking, cascading effect of, 4-44
SELECT ANY DICTIONARY, 10-10
SYSTEM_PRIVILEGE_MAP table, 9-12
T
tables
auditing, 9-29
privileges on, 4-26
tablespaces
assigning defaults for users, 2-4
default quota, 2-5
quotas for users, 2-5
quotas, viewing, 2-17
temporary
assigning to users, 2-6
unlimited quotas, 2-5
TCPS protocol
Secure Sockets Layer, used with, 10-14
tnsnames.ora file, used in, 10-17
TELNET service, 10-16
TFTP service, 10-16
time measurement for statement execution, 7-15
token cards, 10-9
top-level SQL statements, 9-6
trace files
access to, importance of restricting, 10-11
bad packets, 5-18
location of, finding, 6-45
transparent data encryption, 8-7
transparent tablespace encryption, 8-7
triggers
audit data, recording, 9-55
auditing, 9-29, 9-32, 9-33
CREATE TRIGGER ON, 5-17
logon
examples, 6-11
externally initialized application contexts, 6-12
privileges for executing, 4-30
roles, 4-9
WHEN OTHERS exception, 6-11
troubleshooting
finding errors by checking trace files, 6-45
trusted procedure
database session-based application contexts, 6-2
tsnames.ora configuration file, 10-17
tutorials
application context, database session-based, 6-13
auditing
creating policy to audit nondatabase
users, 9-50
creating policy using email alert, 9-44
external network services, using email alert, 9-44
global application context with client session
ID, 6-35
nondatabase users
creating Oracle Virtual Private Database policy
group, 7-28
global application context, 6-35
Oracle Virtual Private Database
policy groups, 7-28
policy implementing, 7-23
simple example, 7-20
See also examples
types
creating, 4-34
privileges on, 4-33
user defined
creation requirements, 4-34
U
UDP and TCP ports
close for ALL disabled services, 10-16
UGA
See User Global Area (UGA)
undoaud.sql script, 9-36
undopwd.sql script, 3-6
UNIX systems
audit data written to syslog, 9-4
UNIX systems, auditing users on, 9-18
UNLIMITED TABLESPACE privilege, 2-5, 2-6
UPDATE privilege
revoking, 4-43
user accounts
administrative user passwords, 10-9
default user account, 10-9
password guidelines, 10-7
passwords, encrypted, 10-9
proxy users, 3-38
USER function
global application contexts, 6-25
User Global Area (UGA)
application contexts, storing in, 6-2
user names
schemas, 5-15
USER pseudo column, 4-29
user sessions, multiple within single database
connection, 3-40
user-defined columns
auditing, 9-38
USERENV function, 6-8, 8-9
USERENV namespace
about, 6-8
client identifiers, 3-44
See also CLIENT_IDENTIFIER USERENV attribute
users
administrative option (ADMIN OPTION), 4-38
altering, 2-8
application users not known to database, 3-44
assigning unlimited quotas for, 2-5
auditing, 9-23
database role, current, 5-14
default roles, changing, 2-7
default tablespaces, 2-4
dropping, 2-14
dropping profiles and, 2-14
dropping roles and, 4-21
enabling roles for, 5-14

Index-23
enterprise, 3-30, 4-19
enterprise, shared schema protection, 5-16
external authentication
about, 3-32
advantages, 3-33
assigning profiles, 2-13
operating system, 3-34
user creation, 3-33
finding information about, 2-15
finding information about authentication, 3-47
global, 3-30
assigning profiles, 2-13
hosts, connecting to multiple
See external network services, fine-grained
access to
information about, viewing, 2-16
listing roles granted to, 4-73
memory use, viewing, 2-18
network authentication, external, 3-34
nondatabase, 6-22, 6-28
objects after dropping, 2-14
operating system external authentication, 3-34
password encryption, 3-2
privileges
for changing passwords, 2-7
for creating, 2-2
granted to, listing, 4-73
of current database role, 5-14
profiles
creating, 2-13
specifying, 2-7
proxy authentication, 3-36
proxy users, connecting as, 3-37
PUBLIC role, 4-9, 4-45
quota limits for tablespace, 2-5
restricting application roles, 4-21
roles and, 4-7
for types of users, 4-9
schema-independent, 5-16
schemas, private, 3-31
security domains of, 4-9
security, about, 2-1
tablespace quotas, 2-5
tablespace quotas, viewing, 2-17
user accounts, creating, 2-2
user models and Oracle Virtual Private
Database, 7-38
user name, specifying with CREATE USER
statement, 2-2
views for finding information about, 2-15
UTLPWDMG.SQL
about, 3-11
guidelines for security, 10-8
V
V$LOGMNR_CONTENTS data dictionary
view, 9-59
valid node checking, 10-16
views
about, 4-27
access control list data
external network services, 4-71
wallet access, 4-71
application contexts, 6-45
audit trail, 9-80
auditing, 9-29
authentication, 3-47
DBA_COL_PRIVS, 4-73
DBA_NETWORK_ACL_PRIVILEGES, 4-66, 4-71
DBA_NETWORK_ACLS, 4-71
DBA_ROLE_PRIVS, 4-73
DBA_ROLES, 4-74
DBA_SYS_PRIVS, 4-73
DBA_TAB_PRIVS, 4-73
DBA_USERS_WITH_DEFPWD, 3-4
DBA_WALLET_ACLS, 4-71
encrypted data, 8-15
Oracle Virtual Private Database policies, 7-39
privileges, 4-27, 4-71
profiles, 2-15
ROLE_ROLE_PRIVS, 4-75
ROLE_SYS_PRIVS, 4-75
ROLE_TAB_PRIVS, 4-75
roles, 4-71
security applications of, 4-28
SESSION_PRIVS, 4-74
SESSION_ROLES, 4-74
USER_NETWORK_ACL_PRIVILEGES, 4-71
users, 2-15
Virtual Private Database
See Oracle Virtual Private Database
VPD
See Oracle Virtual Private Database
vulnerable run-time call, 10-4
made more secure, 10-4
W
Wallet Manager
See Oracle Wallet Manager
wallets
authentication method, 3-30
See also access control lists (ACL), wallet access
Web applications
user connections, 6-22, 6-28
Web-based applications
Oracle Virtual Private Database, how it works
with, 7-38
WFS_USR_ROLE role, 4-15
WHEN OTHERS exceptions
logon triggers, used in, 6-11
WHERE clause, dynamic SQL, 7-5
Windows native authentication, 3-25
WM_ADMIN_ROLE role, 4-16
X
X.509 certificates
guidelines for security, 10-9
Index-24
XDB_SET_INVOKER role, 4-16
XDB_WEBSERVICES role, 4-16
XDB_WEBSERVICES_OVER_HTTP role
about, 4-16
XDB_WEBSERVICES_WITH_PUBLIC role, 4-16
XDBADMIN role, 4-16
XML
AUDIT_TRAIL XML setting, 9-11
AUDIT_TRAIL XML, EXTENDED setting, 9-11
XML, EXTENDED AUDIT_TRAIL setting
used with DB in AUDIT_TRAIL, 9-10
used with XML in AUDIT_TRAIL, 9-11
