E IDAS Node Demo Tools Installation And Configuration Guide
User Manual:
Open the PDF directly: View PDF ![]() .
.
Page Count: 38

eIDAS-Node Demo Tools
Installation and
Configuration Guide
Version 2.1

eIDAS-Node Demo Tools Installation and Configuration Guide Version 2.1
Copyright European Commission — DIGIT Page 2 of 38
Document history
Version
Date
Modification reason
Modified by
1.0
06/10/2017
Origination
DIGIT
2.0
11/04/2018
Rewritten for version 2.0 to take account of
architectural changes with Demo Specific Connector
and Demo Specific Proxy Service as well as Demo-SP,
Demo IdP.
DIGIT
2.1
09/07/2018
Reuse of document policy updated and version
changed to match the corresponding Release. Minor
document clarifications made.
DIGIT
eIDAS-Node Demo Tools Installation and Configuration Guide Version 2.1
Directorate-General for [Name of the Directorate-General]
[Name of the Programme/Activity]
2014 EUR [number] EN
Disclaimer
This document is for informational purposes only and the Commission cannot be held
responsible for any use which may be made of the information contained therein.
References to legal acts or documentation of the European Union (EU) cannot be
perceived as amending legislation in force or other EU documentation.
The document contains a brief overview of technical nature and is not supplementing
or amending terms and conditions of any procurement procedure; therefore, no
compensation claim can be based on the contents of the present document.
© European Union, 2018
Reuse of this document is authorised provided the source is acknowledged. The Commission's reuse policy is
implemented by Commission Decision 2011/833/EU of 12 December 2011 on the reuse of Commission
documents.

eIDAS-Node Demo Tools Installation and Configuration Guide Version 2.1
Copyright European Commission — DIGIT Page 4 of 38
Table of contents
DOCUMENT HISTORY ....................................................................................... 2
TABLE OF CONTENTS ....................................................................................... 4
LIST OF TABLES .............................................................................................. 6
1. INTRODUCTION ........................................................................................ 7
1.1. Purpose 7
1.2. Document structure .......................................................................... 7
1.3. Other technical reference documentation ............................................. 8
2. DEMO PRODUCTS OVERVIEW ..................................................................... 9
2.1. Integration package .......................................................................... 9
2.2. Modules 9
3. SETUP CONFIGURATION DIRECTORIES ...................................................... 12
4. SETTING UP THE DEMO SERVICE PROVIDER ............................................... 13
5. SETTING UP THE DEMO IDENTITY PROVIDER .............................................. 14
6. SETTING UP THE DEMO MS-SPECIFIC CONNECTOR ...................................... 15
7. SETTING UP THE DEMO MS-SPECIFIC PROXY SERVICE ................................. 16
8. ADDITIONAL ATTRIBUTES ........................................................................ 19
9. DISTRIBUTED MAPS ................................................................................. 20
9.1. Specific Connector ........................................................................... 20
9.1.1. Additional Configuration — Correlation Map Configuration ......... 20
9.2. Specific Proxy Service ...................................................................... 20
9.2.1. Additional Configuration —Correlation Map Configuration .......... 21
10. PREPARING THE INSTALLATION ................................................................ 22
11. BUILDING AND DEPLOYING THE SOFTWARE ............................................... 23
11.1. Tomcat/GlassFish server deployment ................................................. 23
11.2. JBoss7, WildFly 11.0.0 Server deployment .......................................... 24
11.3. WebLogic Server deployment ............................................................ 26
11.4. WebSphere Server deployment ......................................................... 27
11.5. Monolithic Deployment ..................................................................... 28
12. VERIFYING THE INSTALLATION ................................................................. 29
12.1. Tomcat 7, 8 .................................................................................... 29
12.2. JBoss 7 29
12.3. WildFly 11.0 .................................................................................... 29
12.4. GlassFish V4.1, V5 ........................................................................... 29
12.4.1. GlassFish V4 ........................................................................ 29
12.4.2. GlassFish V5 ........................................................................ 30
12.5. WebLogic ........................................................................................ 30
12.6. WebSphere Application Server .......................................................... 30
12.7. Configuration files ............................................................................ 30
13. SIMPLE PROTOCOL .................................................................................. 32

eIDAS-Node Demo Tools Installation and Configuration Guide Version 2.1
Copyright European Commission — DIGIT Page 5 of 38
13.1. Original SAML EIDAS Request information items .................................. 32
13.2. SimpleRequest example ................................................................... 32
13.3. Original SAML EIDAS Response information items ................................ 34
13.4. SimpleResponse example ................................................................. 35

eIDAS-Node Demo Tools Installation and Configuration Guide Version 2.1
Copyright European Commission — DIGIT Page 6 of 38
List of tables
Table 1: List of modules ........................................................................................ 9
Table 2: Setup configuration directories .................................................................12
Table 3: Service Provider Properties ........................................................................13
Table 4: Available eIDAS-Node for Service Provider .................................................13
Table 5: Sample of user.properties content .............................................................14
Table 6: Identity Provider Properties ......................................................................14
Table 7: Specific Connector part properties ..............................................................15
Table 8: Specific part properties .............................................................................16
Table 9: Additional attributes ................................................................................19
Table 10: Specific Connector distributed map ..........................................................20
Table 11: Specific Proxy Service distributed map .....................................................20
Table 12: Parent project build for Tomcat/GlassFish Server deployment ......................23
Table 13: Module-based build for Tomcat/GlassFish Server deployment ......................24
Table 14: Parent project build for JBoss7/WildFly 11.0.0 Server deployment ...............26
Table 15: Module-based build for JBoss7 Server deployment......................................26
Table 16: Parent project build for WebLogic Server deployment .................................27
Table 17: Module-based build for WebLogic Server deployment ..................................27
Table 18: Parent project build for WebSphere Server deployment ...............................28
Table 19: Module-based build for WebSphere Server deployment ...............................28

eIDAS-Node Demo Tools Installation and Configuration Guide Version 2.1
Copyright European Commission — DIGIT Page 7 of 38
1. Introduction
This document is intended for a technical audience consisting of developers,
administrators and those requiring detailed technical information on how to configure,
build and deploy the eIDAS-Node application.
The document describes the installation and configuration settings for the Demo Tools
(SP and IdP) supplied with the package for basic testing.
1.1. Purpose
The purpose of this document is to describe how to quickly install the Demo tools
provided in the Integration Package (Service Provider (SP), Identity Provider (IdP),
Specific Connector and Specific Proxy Service) for testing purposes.
Please note that this is not a guide for your national infrastructure, for implementation
options please read the eIDAS-Node National IdP and SP Integration Guide.
1.2. Document structure
This document is divided into the following sections:
Chapter 1 − Introduction: this section.
Chapter 2 − Demo Products overview provides information on the deliverable
including the package, the modules and dependencies.
Chapter 3 ─ Setup configuration directories describes the setup configuration
directories and environment variables.
Chapter 4 ─ Setting up the Demo Service Provider provides information on the
Demo SP properties to enable set up.
Chapter 5 ─ Setting up the Demo Identity Provider provides information on the
Demo IdP properties to enable set up.
Chapter 6 ─ Setting up the Demo MS-Specific Connector provides information on
the Demo MS-Specific Connector properties to enable set up.
Chapter 7 ─ Setting up the Demo MS-Specific Proxy Service provides information
on the Demo MS-Specific Proxy Service properties to enable set up.
Chapter 8 ─ Additional attributes describes how to add attributes.
Chapter 9 ─ Distributed Maps describes the distributed maps that can be used for
Specific Connector and Specific Proxy Service.
Chapter 10 ─ Preparing the installation for this information you should refer to the
eIDAS-Node Installation and Configuration Guide.
Chapter 11 ─ Building and deploying the software describes the steps to build and
then to deploy the software on the supported servers.
Chapter 12 ─ Verifying the installation shows the final structure of your
application server relevant directories.
Chapter 13 ─ Simple protocol describes the implementation of Simple Protocol for
communication between SP and Specific Connector, and Specific Proxy Service
and IdP

eIDAS-Node Demo Tools Installation and Configuration Guide Version 2.1
Copyright European Commission — DIGIT Page 8 of 38
1.3. Other technical reference documentation
We recommend that you also familiarise yourself with the following eID technical
reference documents which are available on CEF Digital Home > eID > All eID services >
eIDAS Node integration package > View latest version:
eIDAS-Node Installation, Configuration and Integration Quick Start Guide
describes how to quickly install a Service Provider, eIDAS-Node Connector,
eIDAS-Node Proxy Service and IdP from the distributions in the release package.
The distributions provide preconfigured eIDAS-Node modules for running on each
of the supported application servers.
eIDAS-Node Installation and Configuration Guide describes the steps involved
when implementing a Basic Setup and goes on to provide detailed information
required for customisation and deployment.
eIDAS-Node National IdP and SP Integration Guide provides guidance by
recommending one way in which eID can be integrated into your national eID
infrastructure.
eIDAS-Node and SAML describes the W3C recommendations and how SAML XML
encryption is implemented and integrated in eID. Encryption of the sensitive data
carried in SAML 2.0 Requests and Assertions is discussed alongside the use of
AEAD algorithms as essential building blocks.
eIDAS-Node Error and Event Logging provides information on the eID
implementation of error and event logging as a building block for generating an
audit trail of activity on the eIDAS Network. It describes the files that are
generated, the file format, the components that are monitored and the events
that are recorded.
eIDAS-Node Error Codes contains tables showing the error codes that could be
generated by components along with a description of the error, specific behaviour
and, where relevant, possible operator actions to remedy the error.
Disclaimer: The users of the eIDAS-Node sample implementation remain fully responsible for its
integration with back-end systems (Service Providers and Identity Providers), testing, deployment
and operation. The support and maintenance of the sample implementation, as well as any other
auxiliary services, are provided by the European Commission according to the terms defined in
the European Union Public License (EUPL) at
https://ec.europa.eu/cefdigital/wiki/download/attachments/46992716/eupl1.1.-licence-
en.pdf?version=1&modificationDate=1496243904284&api=v2 .
eIDAS-Node Demo Tools Installation and Configuration Guide Version 2.1
Copyright European Commission — DIGIT Page 9 of 38
2. Demo Products overview
This section provides information on the deliverable including the integration package,
the modules and dependencies.
2.1. Integration package
The demo products deliverable consists of the following files:
SP.war
IdP.war
SpecificConnector.war
SpecificProxyService.war
These are web applications that can be deployed in most available Java web containers.
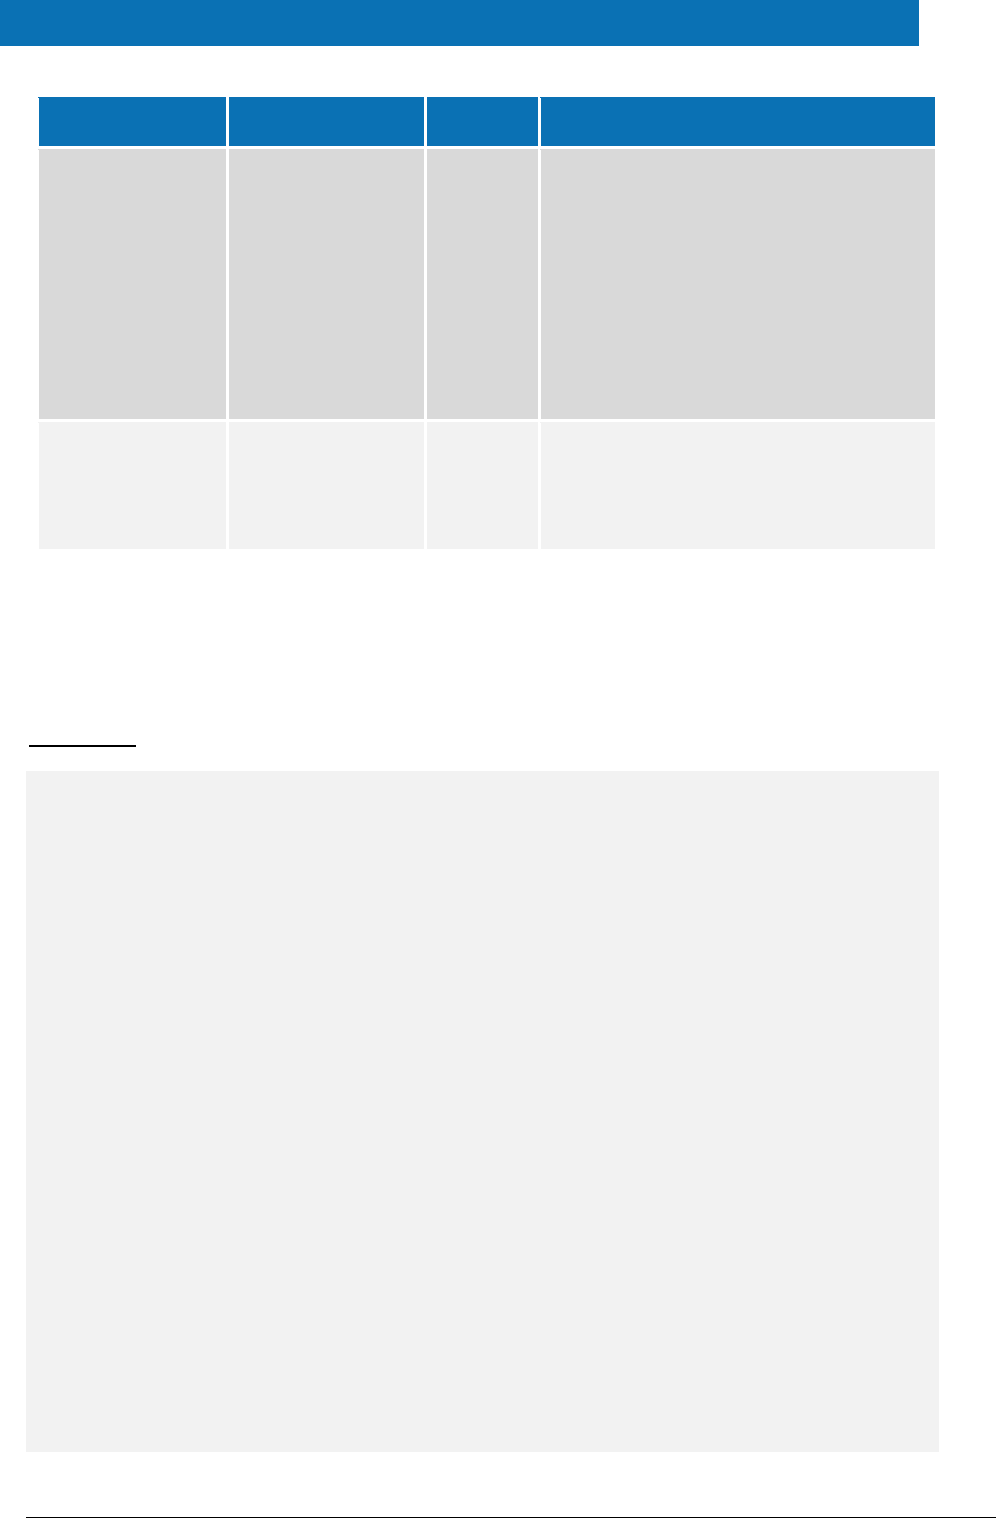
2.2. Modules
The software is composed of several modules. This section describes the binaries and
source code to be installed plus the configuration files.
Table 1: List of modules
Module Name
Folder
Description
Parent
EIDAS-Parent
Module containing a consolidated and
consistent location of the libraries and their
version number to be used across the
different modules.
Light Commons
EIDAS-Light-Commons
Light Common application component and
utility classes used for implementing as
basis for the EIDAS-Commons and MS
Specific Connector and MS Specific Proxy
Service modules.
Simple Protocol
EIDAS-SimpleProtocol
Simple Protocol implementation to
demonstrate a MS-Specific protocol
between SP and Specific-Connector and
between IdP and Specific Proxy Service. Not
to be used in production.
Commons
EIDAS-Commons
Common Applications components and
utility classes for implementing functionality
of authentication service.
Specific
Communication
Definition
EIDAS-
SpecificCommunicationDefinition
The exchange definition (interfaces) and
implementation used to formalise the
exchange definition between the Node and
the Specific module.
eIDAS-Node Demo Tools Installation and Configuration Guide Version 2.1
Copyright European Commission — DIGIT Page 10 of 38
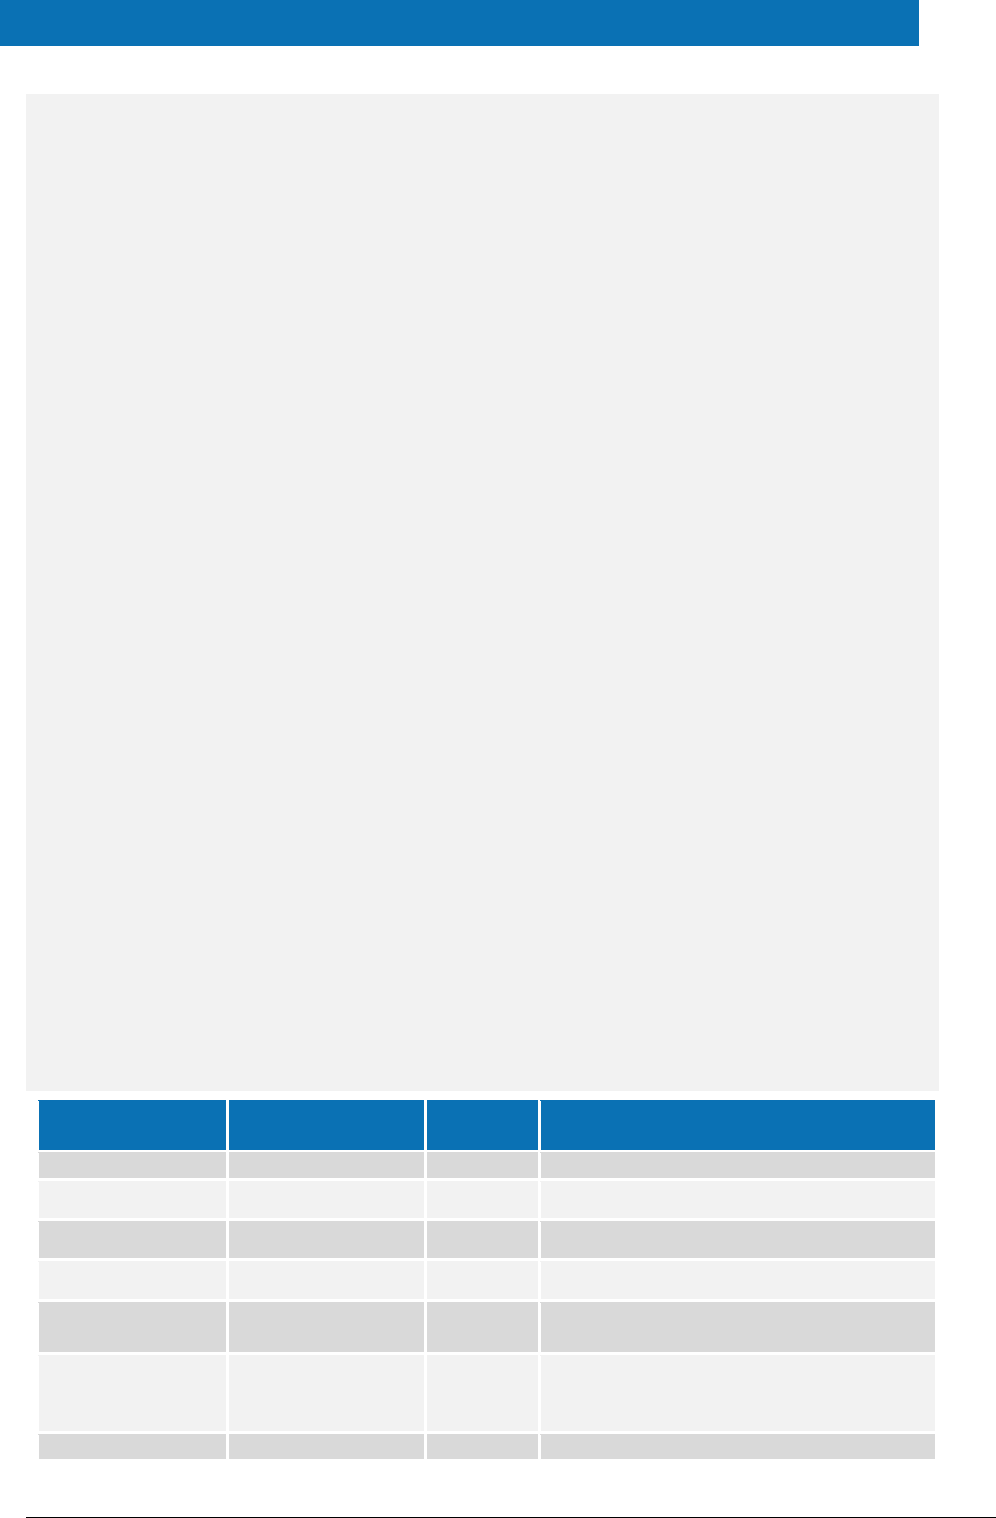
Module Name
Folder
Description
MS Specific
Protocol
EIDAS-SimpleProtocol
Module that provides the code to create
simple protocol request and response used
between the SP and Specific Connector and
between IdP and Specific Proxy. Please see
appendix for further details. Not to be used
in production
MS Specific
Connector
EIDAS-SpecificConnector
Demo implementation of Member State
(MS) specific connector module. Not to be
used in production.
MS Specific Proxy
Service
EIDAS-SpecificProxyService
Demo implementation of Member State
(MS) specific Proxy Service module. Not to
be used in production
Updater
EIDAS-Updater
Module used to change configuration of a
running eIDAS-Node in testing environment.
(To enable, web.xml must be updated.) Not
to be used in production
Service provider
EIDAS-SP
Demo implementation of Service Provider
module. Not to be used in production
Identity provider
EIDAS-IdP-1.0
Sample of Identity Provider module. Not to
be used in production
Basic Setup
configuration
EIDAS-Config
Sample configuration as in 12.7.
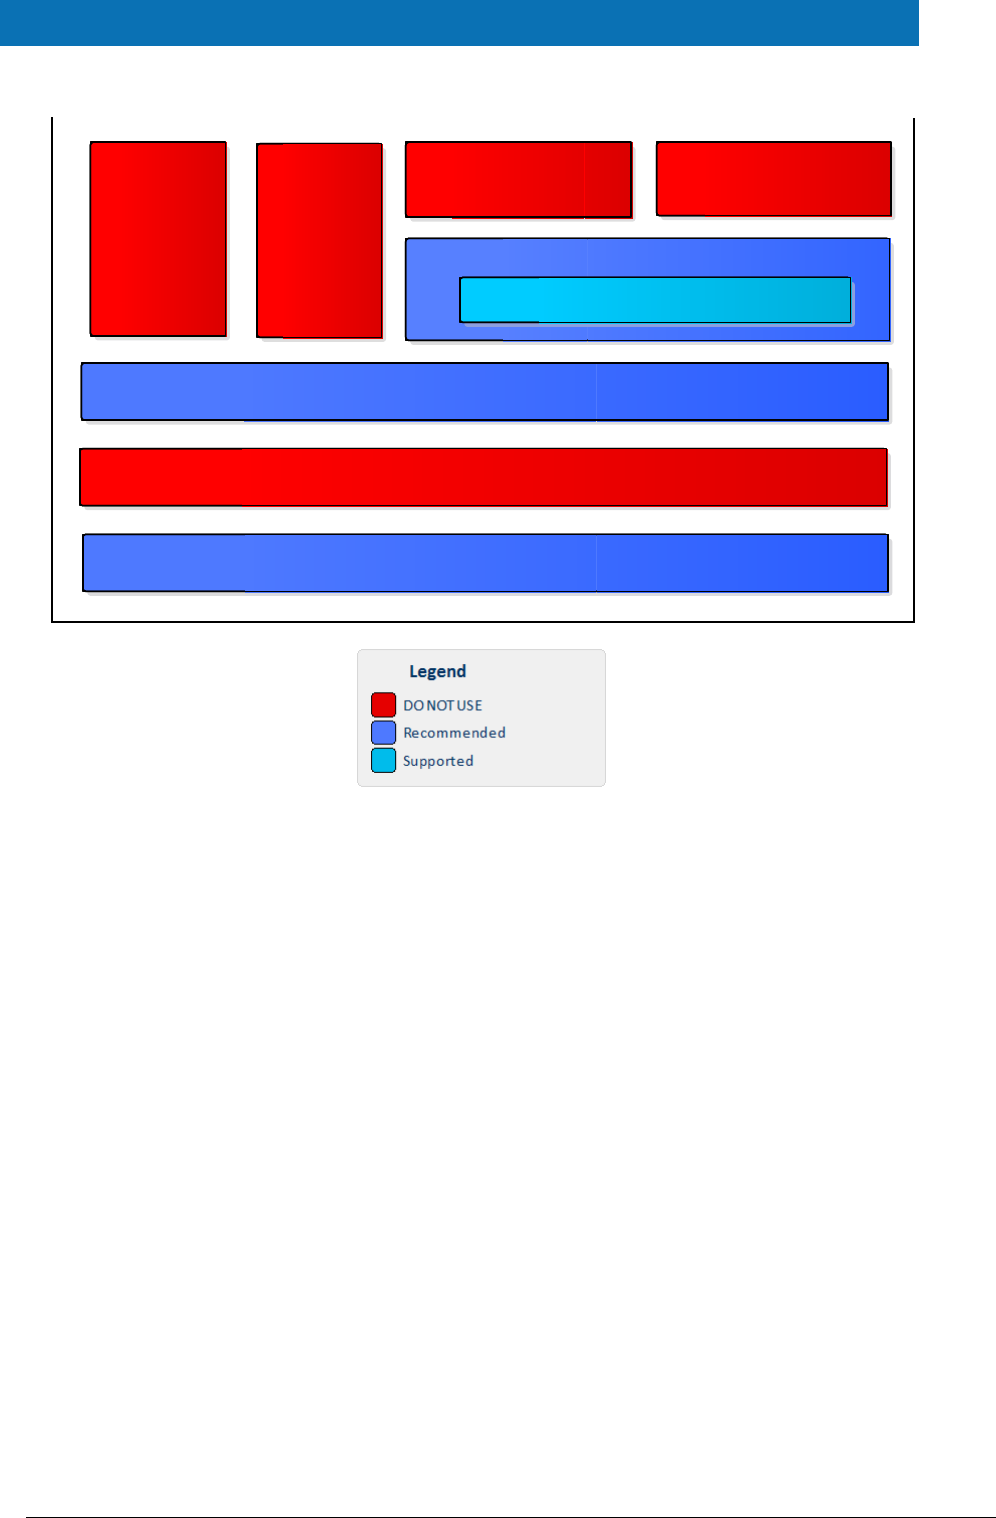
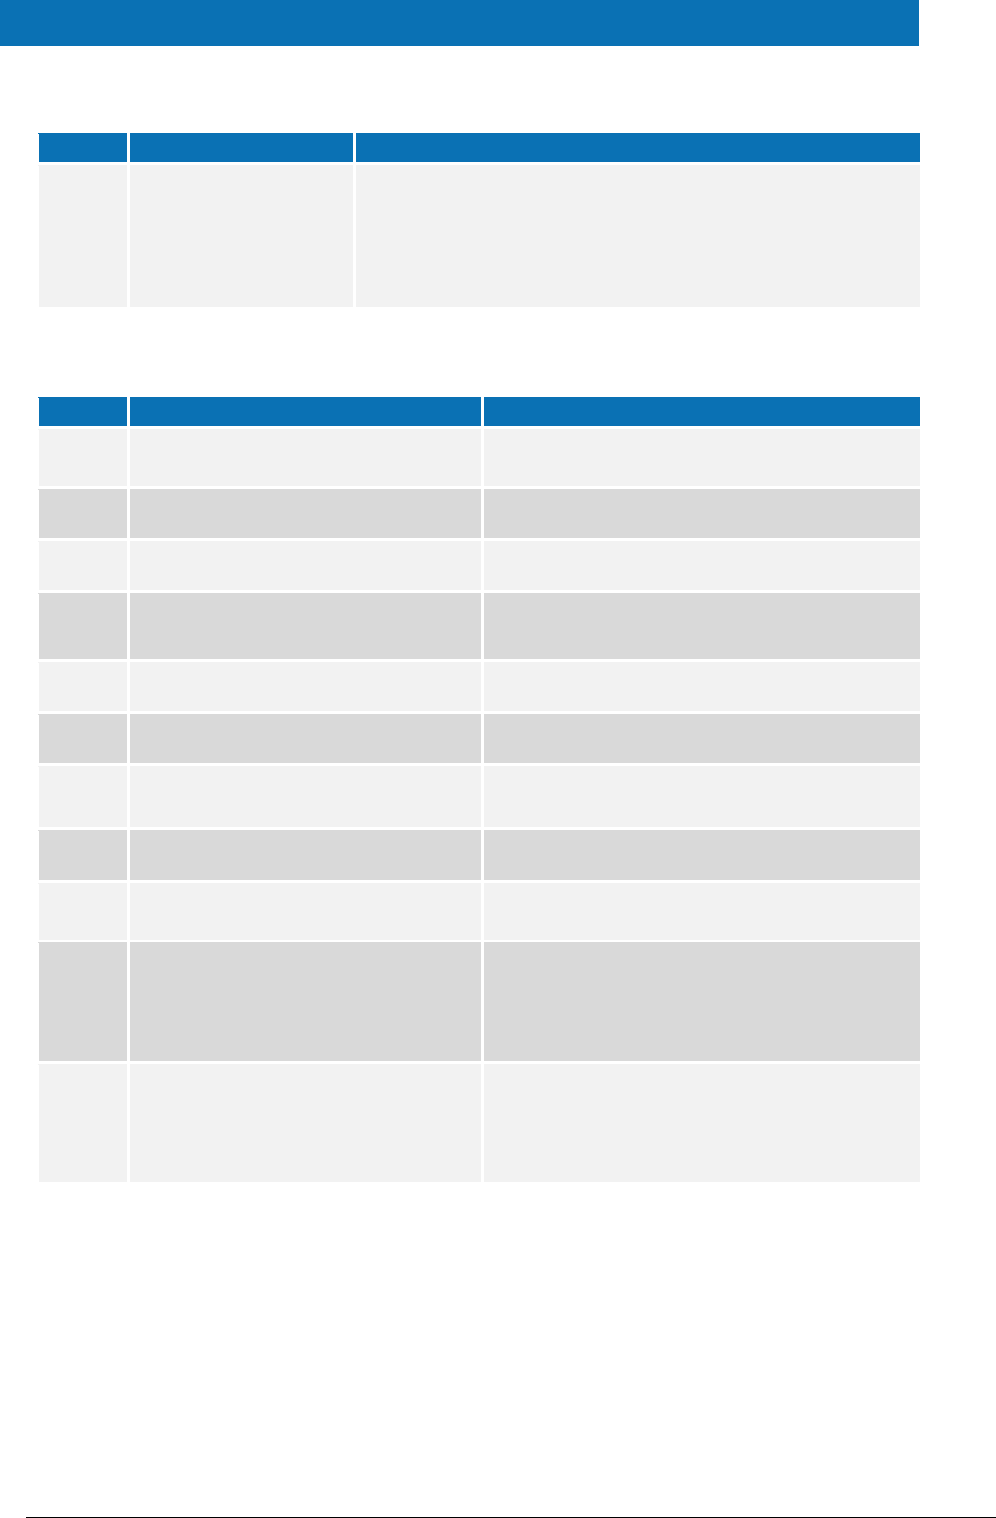
The figure below shows the dependencies between the installed modules. Note that the
modules shown in red are labelled ‘DO NOT USE’ in the legend, this means use only as
samples for demonstration purposes to show that the eIDAS-Node is working, do not use
in production. Furthermore, several security vulnerabilities exist and deploying ‘as is’ in
production carries significant risks.
eIDAS-Node Demo Tools Installation and Configuration Guide Version 2.1
Copyright European Commission — DIGIT Page 11 of 38
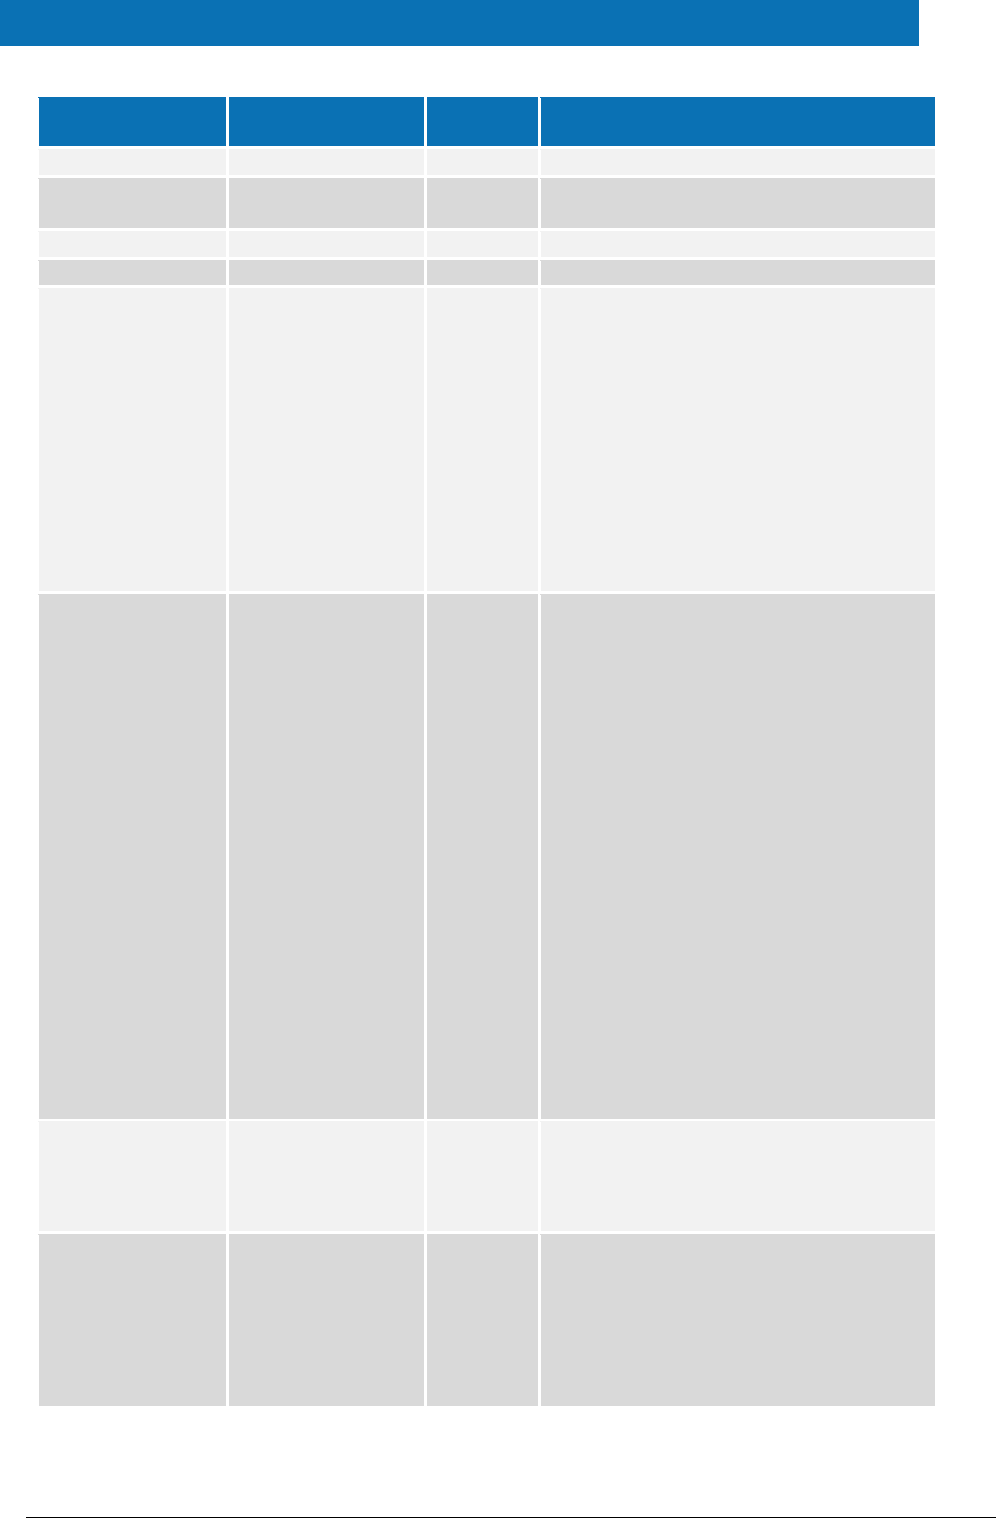
Figure 1: Dependencies between the installed modules
EIDAS-Light-Commons
EIDAS-Commons
Sample Specific Connector
Specific-Communication-v2
Specific-Communication-v2::Hazelcast Shared Map
Sample Specific Proxy Service
Simple Protocol
IdP
SP
eIDAS-Node Demo Tools Installation and Configuration Guide Version 2.1
Copyright European Commission — DIGIT Page 12 of 38
3. Setup configuration directories
This section describes the setup configuration directories and environment variables.
There are five different environment variables used to locate the Demo Tools (Demo-SP,
Demo IdP, Demo Specific Connector and Demo Specific Proxy Service) directories of
configuration files. These can be defined as OS environment variables or setting it to the
runtime environment (by –D switch to JVM or on the AS admin console).
Table 2: Setup configuration directories
Environment variable
Used in
Example target configuration
directory
$SP_CONFIG_REPOSITORY
spApplicationContext.xml
file:/C:/PGM/projects/configEidas/sp/
$SPECIFIC_CONNECTOR_CONFI
G_REPOSITORY
specificConnectorApplicationContext.x
ml
file:/C:/PGM/projects/configEidas/spe
cificConnector/
$SPECIFIC_PROXY_SERVICE_CO
NFIG_REPOSITORY
specificProxyServiceEnvironmentConte
xt.xml
file:/C:/PGM/projects/configEidas/spe
cificProxyService/
$IDP_CONFIG_REPOSITORY
idpApplicationContext.xml
file:/C:/PGM/projects/configEidas/idp/
$EIDAS_CONFIG_REPOSITORY
This configuration is needed to
be able to configure Hazelcast
using the file hazelcast.xml,
also used by the eIDAS-Node,
please see eIDAS-Node
Installation and Configuration
Guide.
specificConnectorApplicationContext.x
ml
specificProxyServiceApplicationContex
t.xml
file:/C:/PGM/projects/configEidas
By default OS environment variables or JVM command line arguments (-D option) must
be set in order to specify the location of configuration files.
It is possible to change or hardcode these variables in the following files:
spEnvironmentContext.xml
specificConnectorEnvironmentContext.xml
specificProxyServiceEnvironmentContext.xml
idpEnvironmentContext.xml
Please look inside these files to see how it is done.
eIDAS-Node Demo Tools Installation and Configuration Guide Version 2.1
Copyright European Commission — DIGIT Page 13 of 38
4. Setting up the Demo Service Provider
This section provides information on the Demo SP properties to enable set up.
The Demo Service Provider (SP) can be used to simulate an MS SP requesting
authentication. It works with the default MS-Specific-Connector part using the simple
protocol language.
The Basic Setup provides a preconfigured version of Demo Service Provider, however you
may need to fine-tune some options.
The Service Provider sp.properties configuration details are described in the following
table. The location of this file must be set by the SP_CONFIG_REPOSITORY environment
variable or command line argument.
Table 3: Service Provider Properties
Key
Description
provider.name
Provider Name for this Service Provider
sp.return
URL used when the eIDAS-Node Connector finishes the process. This must be the value of
the machine running the Service Provider, its format is
http://sp.ip.address:sp.port.number/sp.deployment.name/ReturnPage.
The following table describes the available eIDAS-Node for this Service Provider.
Table 4: Available eIDAS-Node for Service Provider
Key
Description
country.number
The number of possible eIDAS-Nodes that can communicate with this SP
countryX.name
The name of the eIDAS-Node X(= positive integer)
countryX.url
The URL for the eIDAS-Node X. This must be the value of the machine running the eIDAS-
Node using the format:
http://node.ip.address:node.port.number/node.deployment.name/.
This URL is used by the SP to send its request.
eIDAS-Node Demo Tools Installation and Configuration Guide Version 2.1
Copyright European Commission — DIGIT Page 14 of 38
5. Setting up the Demo Identity Provider
This section provides information on the Demo IdP properties to enable set up.
The Demo Identity Provider (IdP) can be used to simulate an MS IdP requesting
authentication. It works with the default MS-Specific-Proxy-Service part using the simple
protocol language.
In order to proceed with the Basic Setup, you may need to modify the configuration of
the Demo Identity Provider.
The user.properties holds the credentials for citizens who are able to log in. The
format is: <username>=<password>.
The idp.properties is used by the IdP to provide the attribute values in the format:
<username>.<attributeName>=<attributeValue>.
Table 5: Sample of user.properties content
Key
Description
myUser=myPassword
A sample username and password
myUser.LegalName=my legal name
A sample attribute definition
The idp.properties holds configuration parameters about the application. The location
of this file must be set by the IDP_CONFIG_REPOSITORY environment variable or
command line argument.
Table 6: Identity Provider Properties
Key
Description
idp.demo
Issuer name for the IdP.
eIDAS-Node Demo Tools Installation and Configuration Guide Version 2.1
Copyright European Commission — DIGIT Page 15 of 38
6. Setting up the Demo MS-Specific Connector
This section provides information on the Demo MS-Specific Connector properties to
enable set up.
The eIDAS-Node integration package contains a Demo Member State Specific Connector
part that is aligned with the use of Demo SP.
There are some configuration items that might need to be customised according to the
test environment. The configuration file name is specificConnector.xml, and is located
by SPECIFIC_CONNECTOR_CONFIG_REPOSITORY environment variable or command line
argument.
Table 7: Specific Connector part properties
Key
Description
issuer.name
Name of the issuer. Responses sent will have this value as
issuer.
distributedMapsSpecificConnector
Boolean value (true|false), which indicates if the application
will activate distributed maps feature, necessary if clusters are
used.
specific.connector.request.url
The URL of the Node to send the binary light token related to
the Light Request.
relaystate.randomize.null
Boolean value (true|false), to activate or de-activate the
behaviour of populating a null relayState with a random
value.
eIDAS-Node Demo Tools Installation and Configuration Guide Version 2.1
Copyright European Commission — DIGIT Page 16 of 38
7. Setting up the Demo MS-Specific Proxy Service
This section provides information on the Demo MS-Specific Proxy Service properties to
enable set up.
The eIDAS-Node integration package contains a Demo Member State Specific Proxy
Service part that is aligned with the use of Demo IdP.
There are some configuration items that might need to be customised according to the
test environment. The configuration file name is specificProxyService.xml, and is
located by SPECIFIC_PROXY_SERVICE_CONFIG_REPOSITORY environment variable or
command line argument.
Table 8: Specific part properties
Key
Description
issuer.name
Name of the issuer for the IdP.
Responses sent will have this
value as issuer.
distributedMapsSpecificProxyService
Boolean value (true|false),
which indicates if the
application will activate
distributed maps feature, to be
used in cluster mode.
idp.url
URL to where the MS request
will be sent.
specific.proxyservice.idp.response.service.url
URL to where the MS Specific
Proxy Service can receive the
response from the Demo IdP. It
is send in the request to the IdP.
ask.consent.request
Boolean value (true|false),
which indicates if the
application will activate the
consent pages for the request.
If set to "true", the Consent
Page will be displayed to the
user when processing the
request from the eIDAS-Node
Connector. Attributes without
consent will be removed from
the response.
eIDAS-Node Demo Tools Installation and Configuration Guide Version 2.1
Copyright European Commission — DIGIT Page 17 of 38
Key
Description
ask.consent.response
Boolean value (true|false),
which indicates if the
application will activate the
consent pages for the response.
If set to "true", the Value
Consent Page (CV) will be
displayed before sending the
response to the eIDAS-Node
Connector. The user is able to
cancel the forwarding of
authentication data, resulting in
an authentication failure.
ask.consent.response.show.only.eidas.attributes
Boolean value (true|false),
which indicates if the
application will activate the
display of the response's
attribute names. Depends on
activation of
ask.consent.response
If set to "true" only the Core
eIDAS attributes/values will be
displayed. On "false", the Value
Consent Page (CV) will display
all the Response
attributes/values, including
additional (specified in XML file)
ones.
ask.consent.response.show.attribute.values
Boolean value (true|false),
which indicates if the
application will activate the
display of the response's
attribute values. Depends on
activation of
ask.consent.response
If set to "true", the Value
Consent Page (CV) will display
attribute names and values for
the Response, "false" will result
in attribute names only.
consent.Request.LightToken.Secret
Secret to be used in the request
consent.
consent.Request.LightToken.Algorithm
Digest Algorithm for the request
consent
consent.Response.LightToken.Secret
Secret to be used in the
response consent
eIDAS-Node Demo Tools Installation and Configuration Guide Version 2.1
Copyright European Commission — DIGIT Page 18 of 38
Key
Description
consent.Request.LightToken.Algorithm
Digest Algorithm for the
response consent
default.specific.proxyservice.idp.response.service.url
URL where the MS Specific
Proxy Service can receive the
response from the Demo IdP. It
is sent in the request to the IdP
when specific modules are
included in the Node as JAR.
specific.proxyservice.response.url
The URL of the Node to send the
binary light token related to the
Light Response.
relaystate.randomize.null
Boolean value (true|false), to
activate or de-activate the
behaviour of populating a
null relayState with a
random value.
eIDAS-Node Demo Tools Installation and Configuration Guide Version 2.1
Copyright European Commission — DIGIT Page 19 of 38
8. Additional attributes
This section describes how to add attributes.
To add additional attributes use the files named additional-attributes.xml, located in
the environment variables:
$SPECIFIC_CONNECTOR_CONFIG_REPOSITORY
$SPECIFIC_PROXY_SERVICE_CONFIG_REPOSITORY
or by command line argument. The file eidas-attributes.xml should remain
unchanged.
The following table contains the additional attribute keys that need to be present to add
an additional attribute.
Table 9: Additional attributes
Key
Description
1.NameUri
URI of the attribute.
1.FriendlyName
Friendly name of the attribute.
1.PersonType
PersonType, either natural or legal , corresponding to the Natural
and Legal Persons
1.Required
If the attribute is to be set as required.
1.XmlType.NamespaceUri
The additional attribute namespace URI.
1.XmlType.LocalPart
The additional attribute local part.
1.XmlType.NamespacePrefix
The additional attribute's namespace prefix.
1.AttributeValueMarshaller
The additional attribute's namespace value marshaller.
To add a second attribute you will need to increment the prefix number (i.e. the
additional attribute would be prefixed “2” and so on).
Also the same has to be done in the eIDAS-Node configuration file for these additional
attributes to be recognised.
eIDAS-Node Demo Tools Installation and Configuration Guide Version 2.1
Copyright European Commission — DIGIT Page 20 of 38
9. Distributed Maps
This section describes the distributed maps that can be used in the Demo Tools Specific
Connector and Specific Proxy Service.
9.1. Specific Connector
In the Specific Connector there is one map that can be distributed:
Table 10: Specific Connector distributed map
bean id
Description
specificMSSpRequestCorrelationMap
Stores the authentication request from the Demo SP.
Necessary to obtain the service URL where the correlated
response should be send to.
9.1.1. Additional Configuration — Correlation Map Configuration
For the Demo MS Specific Connector there is one AuthenticationRequest type map in
specificConnectorApplicationContext, for the Demo SP.
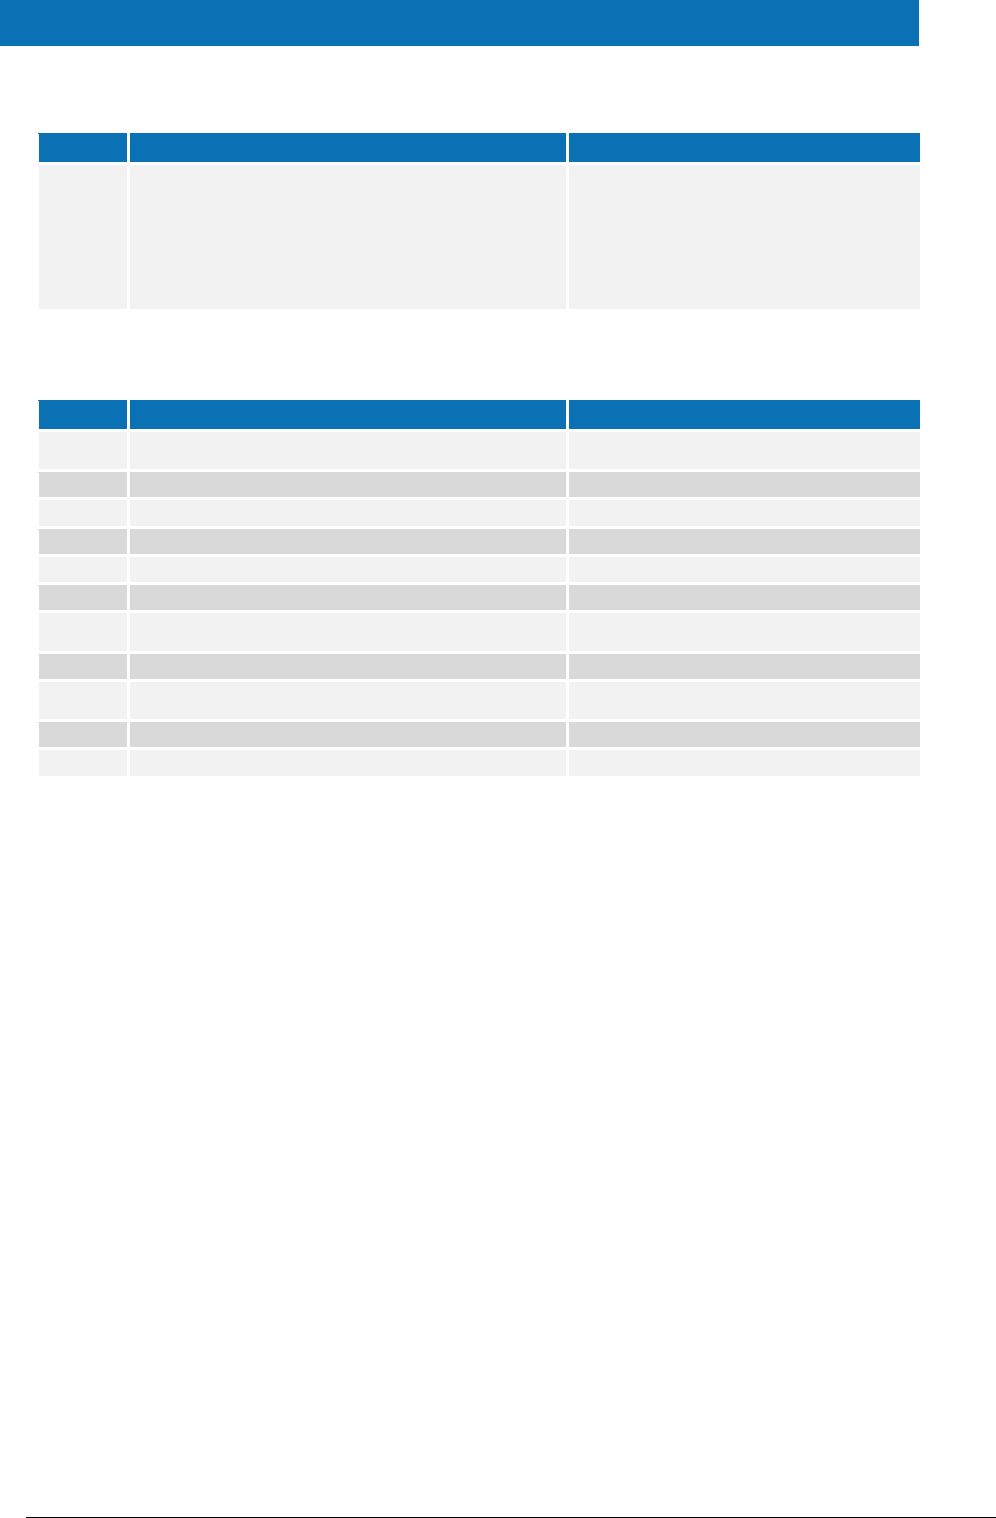
<!-- Correlation maps provided by Hazelcast for distributed environment, use these
in productions! -->
<!-- Authreq correlation maps -->
<bean id="springServiceCMapspecificMSSpCorProviderProd"
class="eu.eidas.auth.commons.cache.ConcurrentMapServiceDistributedImpl" lazy-
init="true">
<property name="hazelcastInstanceInitializer"
ref="eidasHazelcastInstanceInitializer"/>
<property name="cacheName"
value="specificSpRequestCorrelationCacheService"/>
</bean>
Figure 2: Correlation map cache configuration — Hazelcast —
specificApplicationContext.xml
9.2. Specific Proxy Service
In the Specific Proxy Service there are three maps that can be distributed:
Table 11: Specific Proxy Service distributed map
bean id
Description
specificMSIdpRequestCorrelationMap
Stores the authentication request from the demo SP.
Necessary to obtain the service URL where the correlated
response should be send to.
tokenRequestCorrelationMap
Stores the ILightRequest used in the User's Request Consent.
tokenResponseCorrelationMap
Stores the ILightResponse used in the User's Response
Consent.

eIDAS-Node Demo Tools Installation and Configuration Guide Version 2.1
Copyright European Commission — DIGIT Page 21 of 38
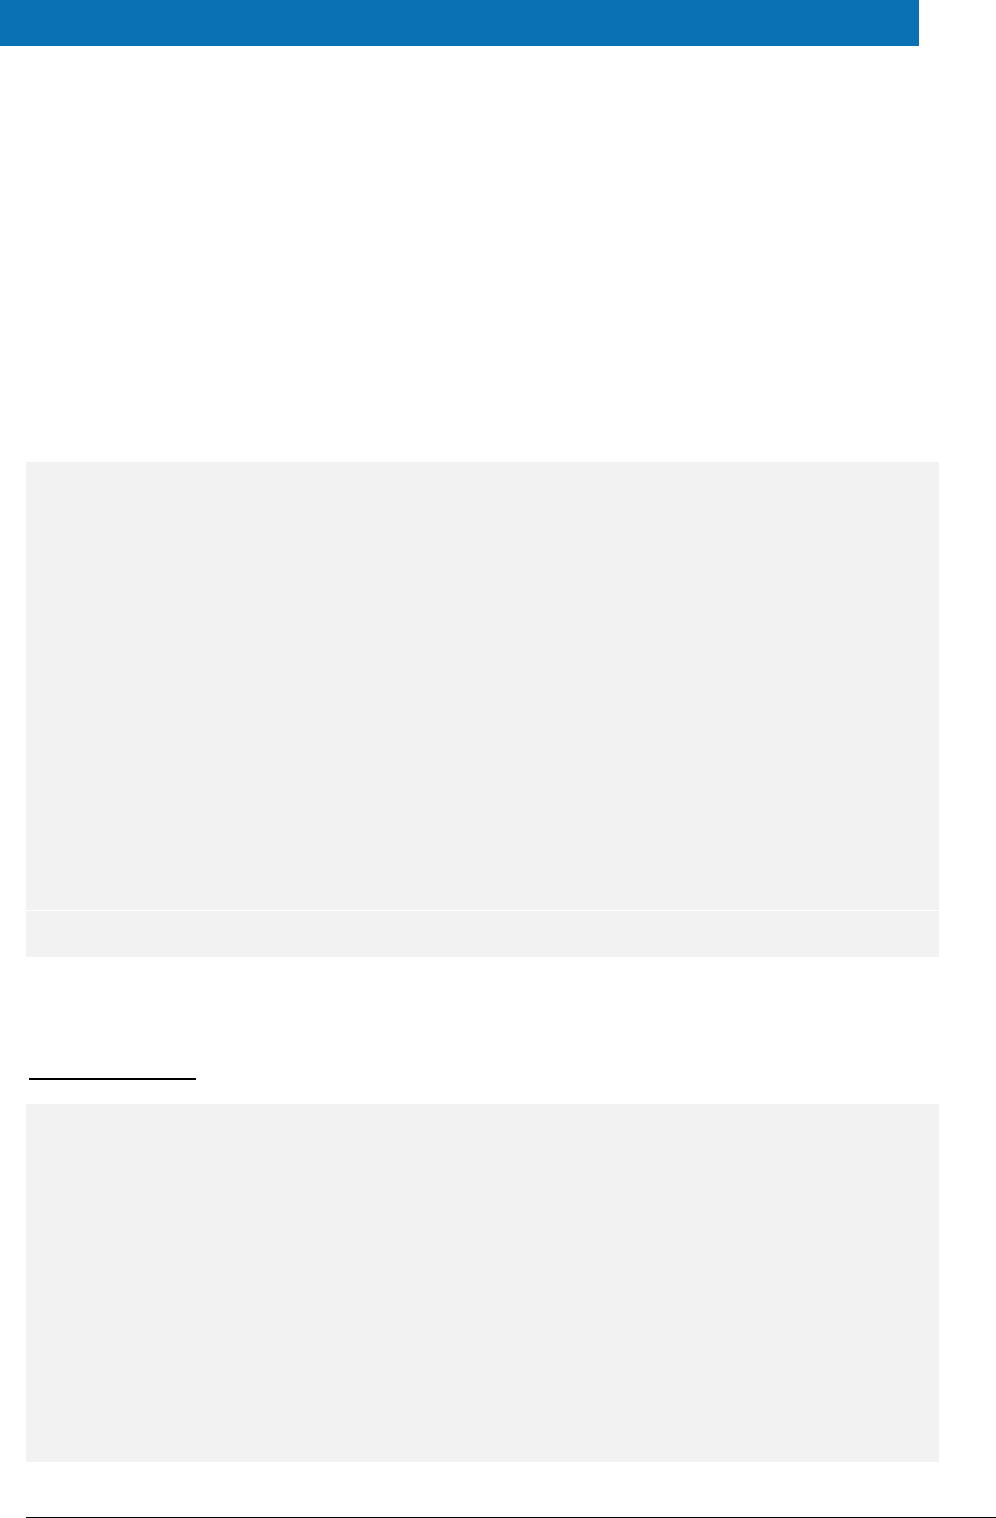
9.2.1. Additional Configuration —Correlation Map Configuration
For the Demo MS Specific Connector there is one AuthenticationRequest type map in
specificProxyServiceApplicationContext, for the Demo SP.
For the Specific Connector part, specificSpRequestCorrelationMap, the map instance
must be the same as used in the eIDAS-Node
(springServiceCMapspecificSpCorProvider). LightRequest map types are defined
here.
<bean id="springServiceCMapspecificIdpCorProviderProd"
class="eu.eidas.auth.commons.cache.ConcurrentMapServiceDistributedImpl" lazy-
init="true">
<property name="hazelcastInstanceInitializer"
ref="eidasHazelcastInstanceInitializer"/>
<property name="cacheName" value="specificIdpRequestCorrelationCacheService"/>
</bean>
<!-- LightRq correlation maps -->
<bean id="springConnectorCMapspecificLightCorProviderProd"
class="eu.eidas.auth.commons.cache.ConcurrentMapServiceDistributedImpl" lazy-
init="true">
<property name="hazelcastInstanceInitializer"
ref="eidasHazelcastInstanceInitializer"/>
<property name="cacheName"
value="specificConnectorLtRequestCorrelationCacheService"/>
</bean>
<bean id="springServiceCMapspecificLightCorProviderProd"
class="eu.eidas.auth.commons.cache.ConcurrentMapServiceDistributedImpl" lazy-
init="true">
<property name="hazelcastInstanceInitializer"
ref="eidasHazelcastInstanceInitializer"/>
<property name="cacheName"
value="specificServiceLtRequestCorrelationCacheService"/>
</bean>
Figure 3: Correlation map cache configuration — Hazelcast —
specificApplicationContext.xml

eIDAS-Node Demo Tools Installation and Configuration Guide Version 2.1
Copyright European Commission — DIGIT Page 22 of 38
10. Preparing the installation
For instructions on how to prepare the servers: Tomcat, JBoss, WildFly, GlassFish,
WebLogic or WebSphere before deploying the Demo Tools please refer to the eIDAS-
Node Installation and Configuration Guide.
eIDAS-Node Demo Tools Installation and Configuration Guide Version 2.1
Copyright European Commission — DIGIT Page 23 of 38
11. Building and deploying the software
This section describes the steps to build and then to deploy the software on the
supported servers.
The project build files are in Maven3 format, so you need to install Maven. Download
instructions are provided at http://maven.apache.org/run-maven/index.html). Recommended
versions of Maven are 3.3.9 and above. Lower versions can result in exceptions.
There are two ways to build the binaries from sources:
1. Parent build: the pom.xml file in the EIDAS-Parent module is a common
reference for all dependent module/external Maven artefact versions, and able to
build all binaries related to EidasNode and/or Demo Tools.
There are various profiles to help tailoring the build to one's particular needs:
these can be split in two main categories.
First: profiles related to application server specifics, for instance profiles named
tomcat (this is active by default, also used to for the glassfish AS build), weblogic,
websphere (also used to for the liberty profile build) and jboss.
Second: two profiles related to the scope of modules to be build, specifically
NodeOnly (this is active by default,) and DemoToolsOnly.
For instance issuing Maven "install" command with the appropriate activation
profile (e.g. for WebLogic: -P weblogic,NodeOnly,DemoTools) will result in a full
build.
2. Module-based build: it is possible to build the artefacts one-by-one, which can
be helpful if there is a need to build just one module. In this case please don't
forget the dependencies between them. There is a certain order that needs to be
followed.
The next sections detail the above two methods for supported application servers.
11.1. Tomcat/GlassFish server deployment
You must compile, install and deploy the projects, either by compiling the parent project
or by compiling each module separately in the order shown below. At a command
prompt, navigate to the folder shown below and enter the corresponding command line.
Note: $GLASSFISH_HOME refers to the base directory of your GlassFish server (e.g.
/home/user/apps/glassfishv3).
Table 12: Parent project build for Tomcat/GlassFish Server deployment
Step
Folder
Command line
1
EIDAS-Parent
mvn clean install –P
tomcat[,NodeOnly],DemoToolsOnly
After the build has been done, deploy
EidasNode.war, IdP.war, SP.war,
SpecificConnector.warand
SpecificProxyService.war .
eIDAS-Node Demo Tools Installation and Configuration Guide Version 2.1
Copyright European Commission — DIGIT Page 24 of 38
Table 13: Module-based build for Tomcat/GlassFish Server deployment
Step
Folder
Command line
1
EIDAS-Parent
mvn clean install
2
EIDAS-Light-Commons
mvn clean install
3
EIDAS-Commons
mvn clean install
4
EIDAS-SpecificCommunicationDefinition
mvn clean install
5
EIDAS-ConfigModule
mvn clean install
6
EIDAS-Updater
mvn clean install
7
SimpleProtocol
mvn clean install
8
EIDAS-SpecificConnector
mvn clean install
9
EIDAS-SpecificProxyService
mvn clean install
10
EIDAS-SP
a. mvn clean package
b.
Tomcat: copy target/SP.war
$TOMCAT_HOME/webapps/SP.war
GlassFish: copy target/SP.war
$GLASSFISH_DOMAIN/autodeploy/SP.w
ar
11
EIDAS-IdP-1.0
a. mvn clean package –P tomcat
b.
Tomcat: copy target/IdP.war
$TOMCAT_HOME/webapps/IdP.war
GlassFish: copy target/IdP.war
$GLASSFISH_DOMAIN/autodeploy/IdP.
war
11.2. JBoss7, WildFly 11.0.0 Server deployment
You must compile, install and deploy the projects, either by compiling the parent project
or by compiling each module separately in the order shown below. At a command
prompt, navigate to the folder shown below and enter the corresponding command line.
Note: The $SERVER_CONFIG variable refers to JBoss server configuration name (e.g.
default)

eIDAS-Node Demo Tools Installation and Configuration Guide Version 2.1
Copyright European Commission — DIGIT Page 25 of 38
If you want to use the 'default' configuration server, your full path will be:
/home/user/apps/jboss-7.4.0.GA/server/default in the case of JBoss and similar for
WildFly.
eIDAS-Node Demo Tools Installation and Configuration Guide Version 2.1
Copyright European Commission — DIGIT Page 26 of 38
Table 14: Parent project build for JBoss7/WildFly 11.0.0 Server deployment
Step
Folder
Command line
1
EIDAS-Parent
mvn clean install –P
jBoss7[,NodeOnly],DemoToolsOnly
After the build has been done, deploy EidasNode.war,
IdP.war, SP.war, SpecificConnector.warand
SpecificProxyService.war .
Table 15: Module-based build for JBoss7 Server deployment
Step
Folder
Command line
1
EIDAS-Parent
mvn clean install
2
EIDAS-Light-Commons
mvn clean install
3
EIDAS-Commons
mvn clean install
4
EIDAS-
SpecificCommunicationDefinition
mvn clean install
5
EIDAS-ConfigModule
mvn clean install
6
EIDAS-Updater
mvn clean install
7
SimpleProtocol
mvn clean install
8
EIDAS-SpecificConnector
mvn clean install
9
EIDAS-SpecificProxyService
mvn clean install
10
EIDAS-SP
a. mvn clean package –P jBoss7
b. copy target/SP.war $JBOSS_HOME/
standalone/deployments/SP.war
11
EIDAS-IdP-1.0
a. mvn clean package -P jBoss7
b. copy target/IdP.war $JBOSS_HOME/
standalone/deployments/IdP.war
11.3. WebLogic Server deployment
You must compile, install and deploy the projects, either by compiling the parent project
or by compiling each module separately in the order shown below. At a command
prompt, navigate to the folder shown below and enter the corresponding command line.
eIDAS-Node Demo Tools Installation and Configuration Guide Version 2.1
Copyright European Commission — DIGIT Page 27 of 38
Table 16: Parent project build for WebLogic Server deployment
Step
Folder
Command line
1
EIDAS-Parent
mvn clean install –P
weblogic[,NodeOnly],DemoToolsOnly
After the build has been done, deploy EidasNode.war, IdP.war,
SP.war, SpecificConnector.warand
SpecificProxyService.war .
Table 17: Module-based build for WebLogic Server deployment
Step
Folder
Command line
1
EIDAS-Parent
mvn clean install
2
EIDAS-Light-Commons
mvn clean install
3
EIDAS-Commons
mvn clean install
4
EIDAS-
SpecificCommunicationDefinition
mvn clean install
5
EIDAS-ConfigModule
mvn clean install
6
EIDAS-Updater
mvn clean install
7
SimpleProtocol
mvn clean install
8
EIDAS-SpecificConnector
mvn clean install –P weblogic
9
EIDAS-SpecificProxyService
mvn clean install –P weblogic
10
EIDAS-SP
a. mvn clean package –P weblogic
b. copy target/SP.war $WLS_HOME/DOMAIN/
autodeploy/SP.war
11
EIDAS-IdP-1.0
a. mvn clean package –P weblogic
b. copy target/IdP.war $WLS_HOME/DOMAIN/
autodeploy/IdP.war
11.4. WebSphere Server deployment
You must compile, install and deploy the projects, either by compiling the parent project
or by compiling each module separately in the order shown below using WebSphere's
Admin Console. At a command prompt, navigate to the folder shown below and enter the
corresponding command line:
eIDAS-Node Demo Tools Installation and Configuration Guide Version 2.1
Copyright European Commission — DIGIT Page 28 of 38
Table 18: Parent project build for WebSphere Server deployment
Step
Folder
Command line
1
EIDAS-Parent
mvn clean install –P
websphere[,NodeOnly],DemoToolsOn
ly
After the build has been done, deploy
EidasNode.war, IdP.war and SP.war.
Table 19: Module-based build for WebSphere Server deployment
Step
Folder
Command line
1
EIDAS-Parent
mvn clean install
2
EIDAS-Light-Commons
mvn clean install
3
EIDAS-Commons
mvn clean install
4
EIDAS-SpecificCommunicationDefinition
mvn clean install
5
EIDAS-ConfigModule
mvn clean install
6
EIDAS-Updater
mvn clean install
7
SimpleProtocol
mvn clean install
8
EIDAS-SpecificConnector
mvn clean install
9
EIDAS-SpecificProxyService
mvn clean install
10
EIDAS-SP
mvn clean package –P websphere
11
EIDAS-IdP-1.0
mvn clean package –P websphere
11.5. Monolithic Deployment
Besides the ‘Basic Deployment’ described in this document, a ‘Monolithic Deployment’ is
possible. In this case the EidasNode.war will include SpecificConnector and
SpecificProxyService modules as JARs.
In this case add –D specificJar to the build commands for the following modules:
EIDAS-SpecificCommunicationDefinition
EIDAS-SpecificConnector
EIDAS-SpecificProxyService modules
EIDAS-SP
EIDAS-IdP-1.0
This also applies to EidasNode modules, so please check the Monolithic Deployment
section in the eIDAS-Node Installation and Configuration Guide for more details.

eIDAS-Node Demo Tools Installation and Configuration Guide Version 2.1
Copyright European Commission — DIGIT Page 29 of 38
12. Verifying the installation
This section shows the final structure of your application server relevant directories; so
that you can confirm that you have made the proper configurations. The structure of the
application’s 'war' files is also shown so you can verify that your applications were built
successfully.
12.1. Tomcat 7, 8
$TOMCAT_HOME/endorsed
resolver-2.9.1.jar
serializer-2.7.2.jar
xalan-2.7.2.jar
xercesImpl-2.11.0.jar
xml-apis-1.4.01.jar
$TOMCAT_HOME/webapps/
IdP.war
SP.war
SpecificConnector.war
SpecificProxyService.war
(server specific directories were not included)
12.2. JBoss 7
1. Check modules directory for the presence of BouncyCastle and xml-apis modules.
2. Copy war files under $JBOSS_HOME/standalone/Deployments.
12.3. WildFly 11.0
1. Check modules directory for the presence of BouncyCastle and xml-apis modules;
2. Copy war files under $WILDFLY_HOME/standalone/Deployments.
12.4. GlassFish V4.1, V5
12.4.1. GlassFish V4
$GLASSFISH_DOMAIN/lib/ext/
resolver-2.9.1.jar
serializer-2.7.2.jar
xalan-2.7.2.jar
xercesImpl-2.11.0.jar
xml-apis-1.4.01.jar
$GLASSFISH_DOMAIN/autodeploy/
IdP.war
SP.war
SpecificConnector.war
SpecificProxyService.war
(server specific directories were not included)

eIDAS-Node Demo Tools Installation and Configuration Guide Version 2.1
Copyright European Commission — DIGIT Page 30 of 38
12.4.2. GlassFish V5
$GLASSFISH_DOMAIN/domains/domain1/lib/ext
resolver-2.9.1.jar
serializer-2.7.2.jar
xalan-2.7.2.jar
xercesImpl-2.11.0.jar
xml-apis-1.4.01.jar
$GLASSFISH_DOMAIN/autodeploy/
IdP.war
SP.war
SpecificConnector.war
SpecificProxyService.war
(server specific directories were not included)
12.5. WebLogic
$WLS_HOME/domain/autodeploy/
IdP.war
SP.war
SpecificConnector.war
SpecificProxyService.war
(server specific directories were not included)
$DOMAIN_HOME/lib/
xml-apis-1.4.01.jar
12.6. WebSphere Application Server
WebSphere Application Server 8.5.5 has no requirement to add/replace endorsed
libraries. The deployment of the WAR files may be done using the admin console.
In Enterprise Applications > EidasNode > ClassLoader choose:
Class loader order to: Classes loaded with local class loader first (parent last);
WAR class loader policy to: Single class loader for application.
Note: for WebSphere Liberty Profile deployment see Configuring WebSphere Liberty
Profile in the eIDAS-Node Installation and Configuration Guide.
12.7. Configuration files
The following configuration and keystore files are needed for the full installation with
Demo Tools. The layout itself can be different, depending on the environment variables,
so this is just an example of Basic Setup:
server/hazelcast.xml
server/idp/additional-attributes.xml
server/idp/idp.properties
server/idp/user.properties
server/sp/additional-attributes.xml
server/sp/sp.properties
server/specificConnector/additional-attributes.xml

eIDAS-Node Demo Tools Installation and Configuration Guide Version 2.1
Copyright European Commission — DIGIT Page 31 of 38
server/specificConnector/eidas-attributes.xml
server/specificConnector/specificCommunicationDefinitionConnector.xml
server/specificConnector/specificConnector.xml
server/specificProxyService/additional-attributes.xml
server/specificProxyService/eidas-attributes.xml
server/specificProxyService/specificCommunicationDefinitionProxyservice.xml
server/specificProxyService/specificProxyService.xml
eIDAS-Node Demo Tools Installation and Configuration Guide Version 2.1
Copyright European Commission — DIGIT Page 32 of 38
13. Simple protocol
Simple Protocol has been implemented for communication between SP and Specific
Connector, and Specific Proxy Service and IdP. The main goal is to show the concept of
integrating SPs, IdPs or similar entities with an eIDAS-Node. This is a simplified protocol
for demonstration purposes only. It does not include security features.
The Simple Protocol was not designed to be used ‘as is’ by Member States, only for
demonstration purposes. Some parts of it may evolve/be changed in future versions.
13.1. Original SAML EIDAS Request information items
Request
AuthnRequest
ID
Destination
ForceAuthn
IssueInstant
ProviderName
Version
AssertionConsumerServiceURL
SPType
RequestedAuthnContext
Comparison
AuthnContextClassRef
RequestedAttributes
RequestedAttribute
FriendlyName
isRequired
Value
LatinScript
Value
13.2. SimpleRequest example
SimpleRequest
{
"authentication_request" : {
"version" : "1",
"id" : "e7d5db08-0818-449f-bec2-d257bf9593d7",
"created_on" : "2012-04-23T20:25:43.511+02:00",
"destination" : "http://", <-------------- TO BE DECOMISSIONED, NO
EIDINT yet
"force_authentication" : true,
"provider_name" : "DEMO-SP",
"sp_type" : "public",
"service_url" : "http://localhost:8088/idpResponse",
"name_id_policy" : "transient",
"citizen_country" : "CA",
"requested_authentication_context" : {
eIDAS-Node Demo Tools Installation and Configuration Guide Version 2.1
Copyright European Commission — DIGIT Page 33 of 38
"comparison" : "minimum",
"context_class" : [ "high" ]
},
"attribute_list" : [ {
"type" : "requested_attribute",
"name" : "gender",
"required" : true
}, {
"type" : "requested_attribute",
"name" : "birth_name",
"required" : true
}, {
"type" : "requested_attribute",
"name" : "date_of_birth",
"required" : true
}, {
"type" : "requested_attribute",
"name" : "current_address",
"required" : false
} ]
}
}
Note: If an attribute value is supplied in the Request, that will be a valueattribute, so
"type" will change from "requested_attribute" to a certain type.
Simple Protocol
LightRequest
Mandatory
Yes/No
Nature
authentication_request
LightRequest
No
abstract
version
Yes
always "1"
id
ID to map
Yes
UUID generated
created_on
Yes
timestamp, local time in json "de facto" format
force_authentication
No
always "true"
provider_name
ProviderName
No
string
service_url
Yes
URL for the Response
sp_type
SPType
No
"public" | "private" | omitted
context_class
LevelOfAssurance
No
Context_class
LevelOfAssurance
"A" | "B"
"http://eidas.europa.eu/L
oA/low "
"C" | "D"
"http://eidas.europa.eu/
LoA/substantial"
"E"
"http://eidas.europa.eu/L
oA/high"
citizen_country
CitizenCountryCode
No
This was an HTTP parameter with SAML, now it is the
part of the message body.
Value: ISO Country Code e.g. "CA"
eIDAS-Node Demo Tools Installation and Configuration Guide Version 2.1
Copyright European Commission — DIGIT Page 34 of 38
Simple Protocol
LightRequest
Mandatory
Yes/No
Nature
name_id_policy
NameIDPolicy
No
Can be omitted OR any of these values: “persistent”
| “transient” | “unspecified”
To map:
persistent => urn:oasis:names:tc:SAML:2.0:nameid-
format:persistent
transient => urn:oasis:names:tc:SAML:2.0:nameid-
format:transient
unspecified => urn:oasis:names:tc:SAML:1.1:nameid-
format:unspecified
attribute_list
ImmutableAttributeMap
(please check example
above)
No
Abstract, the idea is to use the FriendlyName
attribute of eIDAS attributes here, then the
AttributeRegistry.getByFriendlyName can be used in
the mapping. It is possible to add a prefix such as
“sp_”
Attribute type is always ‘requested_attribute’ for Request.
13.3. Original SAML EIDAS Response information items
Response
Response
Destination
ID
InResponseTo
IssueInstant
Version
Issuer
Status
StatusCode
StatusCode
StatusMessage
Assertion
Issuer
Subject
NameID
NameQualifier
Value
SubjectConfirmation
Method
SubjectConfirmationData
Address
InResponseTo
NotOnOrAfter
Recipient
Conditions
NotBefore

eIDAS-Node Demo Tools Installation and Configuration Guide Version 2.1
Copyright European Commission — DIGIT Page 35 of 38
NotOnOrAfter
AudienceRestriction
Audience
AuthnStatement
AuthnInstant
AuthnContext
AuthnContextClassRef
AuthnContextDecl
AttributeStatement
Attribute
FriendlyName
Name
NameFormat
AttributeValue
LatinScript
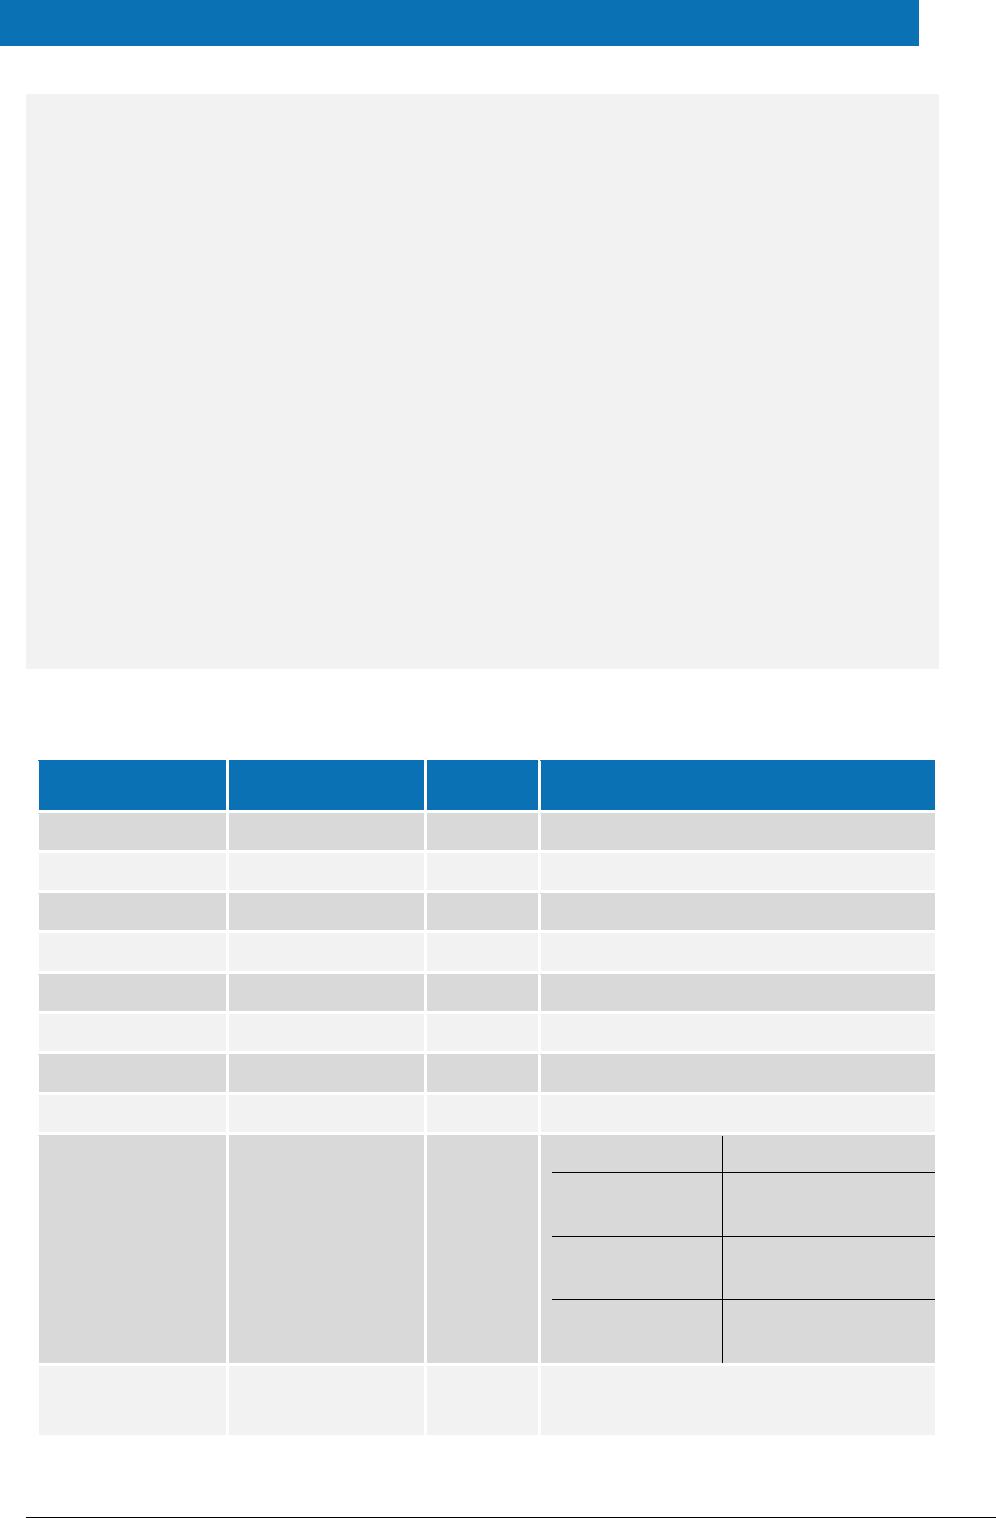
13.4. SimpleResponse example
SimpleResponse
Success:
{
"response" : {
"version" : "1",
"id" : "0a88c46e-24a7-4194-90f1-35485977bb18",
"destination" : "http://", <-------------- TO
BE DECOMISSIONED, NO EIDINT yet
"inresponse_to" : "e7d5db08-0818-449f-bec2-d257bf9593d7",
"created_on" : "2012-04-23T20:28:43.511+02:00",
"authentication_context_class" : "high",
"client_ip_address" : "123.0.0.2",
"issuer" : "DEMO-IDP",
"subject" : "ES/BE/0123456",
"name_id_format" : "transient",
"status" : {
"status_code" : "success",
},
"attribute_list" : [ {
"type" : "string",
"name" : "gender",
"value" : "Male"
}, {
"type" : "string_list",
"name" : "birth_name",
"values" : [ {
"latin_script" : false,
"value" : "Árvíztűrő Tükörfúrógép"
}, {
"value" : "Arvizturo Tukorfurogep"
} ]
}, {
eIDAS-Node Demo Tools Installation and Configuration Guide Version 2.1
Copyright European Commission — DIGIT Page 36 of 38
"type" : "date",
"name" : "date_of_birth",
"value" : "1905-04-20"
}, {
"type" : "address",
"name" : "current_address",
"value" : {
"address_id" : "http://address.example/id/be/eh11aa",
"po_box" : "1234",
"locator_designator" : "28",
"locator_name" : "DIGIT building",
"cv_address_area" : "Etterbeek",
"thoroughfare" : "Rue Belliard",
"post_name" : "ETTERBEEK CHASSE",
"admin_unit_first_line" : "BE",
"admin_unit_second_line" : "ETTERBEEK",
"post_code" : "1040",
"full_cvaddress" : "Rue Belliard 28\nBE-1040 Etterbeek"
}
} ]
}
}
Error:
{
"response" : {
"version" : "1",
"id" : "0a88c46e-24a7-4194-90f1-35485977bb18",
"inresponse_to" : "e7d5db08-0818-449f-bec2-d257bf9593d7",
"created_on" : "2012-04-23T20:28:43.511+02:00",
"issuer" : "DEMO-IDP",
"status" : {
"status_code" : "failure",
"sub_status_code" : "AuthnFailed",
"status_message" : "all hands on deck"
}
}
Simple Protocol
LightResponse
Mandatory
Yes/No
Nature
response
LightResponse
No
abstract
version
Yes
always "1"
id
ID to map
Yes
UUID generated
inresponse_to
Original req ID to map
Yes
Mandatory
subject
Subject
No
New field for the user.properties (eg.: xavi.subject)
Only if message is SUCCESS!
name_id_format
NameIdFormat
No
At the IDP, copy the value of NameIDPolicy from the
Request
Only if message is SUCCESS!
client_ip_address
IPAddress
No
optional address of the client browser
eIDAS-Node Demo Tools Installation and Configuration Guide Version 2.1
Copyright European Commission — DIGIT Page 37 of 38
Simple Protocol
LightResponse
Mandatory
Yes/No
Nature
created_on
Yes
timestamp, local time in json "de facto" format
authentication_context_
class
LevelOfAssurance
No
"high" | "substantial" | "low"
issuer
Issuer
No
string
status
Status
No
abstract structure
status_code
StatusCode
No
mandatory, allowed values: success | failure
To be mapped as full SAML2Core URN (see
SAML2Core):
success =>
"urn:oasis:names:tc:SAML:2.0:status:Success"
failure =>
"urn:oasis:names:tc:SAML:2.0:status:Responder"
(not covered:
"urn:oasis:names:tc:SAML:2.0:status:Requester" and
"urn:oasis:names:tc:SAML:2.0:status:VersionMismat
ch" because it is for the Proxy Node in our simple
implementation)
sub_status_code
SubStatusCode
No
To be mapped as SAML:Core secondary status code
like AuthnFailed, attach this string to the URN (see
SAML2Core), optional: only in case of failure.
Possible values:
AuthnFailed | InvalidAttrNameOrValue |
InvalidNameIDPolicy | NoAuthnContext |
NoAvailableIDP | NoPassive | NoSupportedIDP |
PartialLogout | ProxyCountExceeded |
RequestDenied | RequestUnsupported |
RequestVersionDeprecated |
RequestVersionTooHigh | RequestVersionTooLow |
ResourceNotRecognized | TooManyResponses |
UnknownAttrProfile | UnknownPrincipal |
UnsupportedBinding
The strategy here is just to append
"urn:oasis:names:tc:SAML:2.0:status:" in Specific
Proxy, and remove it in the Specific Connector. The
IDP should implement some of these (as appropriate)
but not all e.g.: AuthnFailed should be the failure
case when the credentials entered in the IDP are
wrong.
status_message
StatusMessage
No
Only in case of failure.
IDP should be able to produce some example text
(e.g. "failed to authenticate because of bad
credentials" for the "AuthnFailed" code)
attribute_list
ImmutableAttributeMap
(please check example
above)
No
Abstract, the idea is to use the FriendlyName
attribute of EIDAS attributes here, then the
AttributeRegistry.getByFriendlyName can be used in
the mapping. It is possible to add a prefix such as
“idp_”.
Only if message is SUCCESS!

eIDAS-Node Demo Tools Installation and Configuration Guide Version 2.1
Copyright European Commission — DIGIT Page 38 of 38
Possible attribute types are: string, string_list, date and address. Add JAXB
implementing class if more required.
