E IDAS Node Installation And Configuration Guide V2.1
User Manual:
Open the PDF directly: View PDF ![]() .
.
Page Count: 62

Copyright European Commission — DIGIT Unit D3
eIDAS-Node Installation
and Configuration Guide
Version 2.1
eIDAS-Node Installation and Configuration Guide Version 2.1
Copyright European Commission — DIGIT Page 1 of 62
Document history
Version
Date
Reason for modification
Modified by
1.0
26/11/2015
Modifications to align with the eIDAS technical
specifications.
DIGIT
1.1
09/09/2016
Configuration improvements including support
for Tomcat 8.
Removal of Attribute Provider.
Documentation of improvements included in
Release 1.1 (see Release notes for eIDAS-Node
version 1.1).
DIGIT
1.2
20/01/2017
Configuration and stability improvements.
Documentation of improvements included in
Release 1.2.0 (see Release notes for eIDAS-
Node version 1.2.0).
DIGIT
1.3
08/06/2017
Modifications to align with changes in Technical
Specifications version 1.1.
Bug fixes and configuration improvements
(for details please see the Version 1.3.0
Release Notes).
Documentation improvements to remove
eIDAS-Nodes error codes and place in separate
document eIDAS Error Codes.
DIGIT
1.4
06/10/2017
Restructuring of reference documentation
Modifications to remove support for JBoss6.
Support WebLogic 12.2 family of servers.
Amend filename conventions to change '\' to '/'.
DIGIT
2.0
11/04/2018
Changes in supported application servers;
Configuration and stability improvements;
Architectural changes (separation of Specific
Connector and Specific Proxy Service).
(for details see the Version 2.0 Release Notes
and the eIDAS-Node Migration Guide)
DIGIT
2.1
05/07/2018
Reuse of document policy updated and version
changed to match the corresponding Release.
DIGIT
eIDAS-Node Installation and Configuration Guide Version 2.1
Copyright European Commission — DIGIT Page 2 of 62
Disclaimer
This document is for informational purposes only and the Commission cannot be held
responsible for any use which may be made of the information contained therein.
References to legal acts or documentation of the European Union (EU) cannot be
perceived as amending legislation in force or other EU documentation.
The document contains information of a technical nature and does not supplement or
amend the terms and conditions of any procurement procedure; therefore, no
compensation claim can be based on the contents of this document.
© European Union, 2018
Reuse of this document is authorised provided the source is acknowledged. The Commission's reuse policy
is implemented by Commission Decision 2011/833/EU of 12 December 2011 on the reuse of Commission
documents.

eIDAS-Node Installation and Configuration Guide Version 2.1
Copyright European Commission — DIGIT Page 3 of 62
Table of contents
DOCUMENT HISTORY ........................................................................................ 1
TABLE OF CONTENTS ........................................................................................ 3
LIST OF FIGURES ............................................................................................. 5
LIST OF TABLES ............................................................................................... 6
LIST OF ABBREVIATIONS .................................................................................. 7
LIST OF DEFINITIONS....................................................................................... 8
REFERENCES ................................................................................................... 9
1. INTRODUCTION....................................................................................... 10
1.1. Document structure ......................................................................... 10
1.2. Purpose 10
1.3. Document aims ............................................................................... 11
1.4. Other technical reference documentation ........................................... 11
1.5. eIDAS Technical specifications and software provided .......................... 12
1.5.1. Further information .............................................................. 12
2. PRODUCT OVERVIEW ............................................................................... 13
2.1. Package 13
2.2. Modules 13
3. PREPARING THE INSTALLATION ................................................................ 15
3.1. Configuring the JVM ......................................................................... 15
3.1.1. Oracle Java JCE Unlimited Strength Jurisdiction Policy .............. 15
3.1.2. IBM SDK Java ..................................................................... 15
3.2. Configuring the application server ..................................................... 16
3.2.1. Configuring Tomcat 7 ........................................................... 16
3.2.2. Configuring Tomcat 8 ........................................................... 17
3.2.3. Configuring JBoss AS 7 ......................................................... 17
3.2.4. Configuring GlassFish V4 ...................................................... 17
3.2.5. Configuring GlassFish V5 ...................................................... 17
3.2.6. Configuring WebSphere ........................................................ 19
3.2.7. Configuring WebSphere Liberty Profile .................................... 19
3.3. Enabling logging.............................................................................. 19
3.3.1. Configuring audit logging ...................................................... 20
3.3.2. Organisation of logs ............................................................. 23
3.4. Configuring application server security ............................................... 24
3.4.1. Security constraints for WebSphere ....................................... 24
4. CONFIGURING THE SOFTWARE ................................................................. 25
4.1. Configuring the project .................................................................... 25
4.1.1. Setup configuration directory ................................................ 25
4.1.2. Setting up your Keystore ...................................................... 25
4.1.3. Configuring with Basic Setup ................................................. 26
4.2. eIDAS-Node configuration files .......................................................... 26
4.2.1. General purpose parameters ................................................. 26

eIDAS-Node Installation and Configuration Guide Version 2.1
Copyright European Commission — DIGIT Page 4 of 62
4.2.2. Attribute registry ................................................................. 28
4.2.3. eIDAS-Node Connector configuration ..................................... 29
4.2.4. eIDAS-Node Proxy Service configuration ................................ 31
4.2.5. Additional configuration — Security ........................................ 34
4.2.6. Specific properties ............................................................... 40
4.2.7. Demo Service Provider ......................................................... 40
4.2.8. Demo Identity Provider ........................................................ 40
5. BUILDING AND DEPLOYING THE SOFTWARE ............................................... 41
5.1. Tomcat/GlassFish server deployment ................................................. 41
5.2. JBoss7, WildFly 11.0.0 Server deployment ......................................... 42
5.3. WebLogic Server deployment ............................................................ 43
5.4. WebSphere Server deployment ......................................................... 44
5.5. Monolithic Deployment ..................................................................... 45
6. VERIFYING THE INSTALLATION ................................................................. 46
6.1. Tomcat 7, 8 .................................................................................... 46
6.2. JBoss 7 46
6.3. WildFly 11.0 ................................................................................... 46
6.4. GlassFish V4.1, V5 .......................................................................... 46
6.4.1. GlassFish V4.1 .................................................................... 46
6.4.2. GlassFish V5 ....................................................................... 47
6.5. WebLogic ....................................................................................... 47
6.6. WebSphere Application Server .......................................................... 47
6.7. Configuration files ........................................................................... 47
7. ADVANCED CONFIGURATION FOR PRODUCTION ENVIRONMENTS ................. 49
7.1. Clustering environment .................................................................... 49
7.1.1. Load balancer ..................................................................... 49
7.1.2. Load balancer with Hazelcast ................................................ 50
7.2. Configuring Tomcat ......................................................................... 50
7.2.1. Setting AJP ports ................................................................. 50
7.2.2. Apache HTTPD .................................................................... 50
7.3. Set up Hazelcast ............................................................................. 51
7.4. Check your installation ..................................................................... 52
7.5. eIDAS-Node compliance ................................................................... 53
APPENDIX A. EIDAS LEVELS OF ASSURANCE .............................................. 55
APPENDIX B. USER CONSENT ................................................................... 56
APPENDIX C. HAZELCAST PROPOSED CONFIGURATION ............................... 57
C.1 Network configuration ...................................................................... 57
C.1.1 Multicast ............................................................................. 57
C.1.2 Discovery by TCP/IP Cluster .................................................. 58
C.1.3 Discovery by AWS (EC2 auto discovery) ................................. 58
C.1.4 Eviction .............................................................................. 59
APPENDIX D. INSTALLATION FREQUENTLY ASKED QUESTIONS .................... 61

eIDAS-Node Installation and Configuration Guide Version 2.1
Copyright European Commission — DIGIT Page 5 of 62
List of figures
Figure 1: Dependencies between the installed modules ...................................... 14
Figure 2: Enabling application security on WebSphere AS ................................... 24
Figure 3: Default Hazelcast instance name ........................................................ 37
Figure 4: Default Hazelcast instance provider bean ............................................. 38
Figure 5: Anti-replay cache configuration — Hazelcast — applicationContext.xml ... 38
Figure 6: Correlation map cache configuration — Hazelcast — applicationContext.xml
............................................................................................................. 39
Figure 7: Clustering environment — Load balancer ............................................ 49
Figure 8: Clustering environment — Load Balancer with Hazelcast ....................... 50
Figure 9: Apache status page.......................................................................... 52
Figure 10: Apache status page (continued) ....................................................... 53
Figure 11: Example Hazelcast multicast declarative configuration ........................ 58
Figure 12: Example Hazelcast configuration for TCP/IP discovery ........................ 58
Figure 13: Hazelcast eviction policy configuration .............................................. 60

eIDAS-Node Installation and Configuration Guide Version 2.1
Copyright European Commission — DIGIT Page 6 of 62
List of tables
Table 1: List of modules ................................................................................. 13
Table 2: Supported servers ............................................................................ 16
Table 3: General purpose parameters .............................................................. 26
Table 4: eIDAS-Node Connector and SP validation ............................................. 30
Table 5: eIDAS-Node Connector dedicated information ...................................... 30
Table 6: Adding eIDAS-Node Proxy Service to Connector ................................... 31
Table 7 : eIDAS-Node Proxy Service setup ........................................................ 31
Table 8: Activating the Proxy Service ................................................................ 33
Table 9: Security policies ................................................................................ 34
Table 10: Security HTTP header parameters ..................................................... 34
Table 11: Check on certificate security parameter ............................................. 35
Table 12: Configuring encryption algorithm ....................................................... 35
Table 13: Signature algorithm ........................................................................ 36
Table 14: SAML binding parameters ................................................................ 36
Table 15: Parent project build for Tomcat/GlassFish Server deployment ................ 42
Table 16: Module-based build for Tomcat/GlassFish Server deployment ................ 42
Table 17: Parent project build for JBoss7/WildFly 11.0.0 Server deployment ......... 43
Table 18: Module-based build for JBoss7/WildFly 11.0.0 Server deployment .......... 43
Table 19: Parent project build for WebLogic Server deployment ........................... 43
Table 20: Module-based build for WebLogic Server deployment ........................... 44
Table 21: Parent project build for WebSphere Server deployment ........................ 44
Table 22: Module-based build for WebSphere Server deployment ......................... 44
Table 23: eIDAS-Node compliance................................................................... 53
eIDAS-Node Installation and Configuration Guide Version 2.1
Copyright European Commission — DIGIT Page 7 of 62
List of abbreviations
The following abbreviations are used within this document.
Abbreviation
Meaning
eIDAS
electronic Identification and Signature. The Regulation
(EU) N°910/2014 governs electronic identification and
trust services for electronic transactions in the internal
market to enable secure and seamless electronic
interactions between businesses, citizens and public
authorities.
IdP
Identity Provider. An institution that verifies the
citizen's identity and issues an electronic ID.
LoA
Level of Assurance (LoA) is a term used to describe the
degree of certainty that an individual is who they say
they are at the time they present a digital credential.
MW
Middleware. Architecture of the integration of eIDs in
services, with a direct communication between SP and
the citizen's PC without any central server. The term
also refers to the piece of software of this architecture
that executes on the citizen's PC.
MS
Member State
SAML
Security Assertion Markup Language
SP
Service Provider

eIDAS-Node Installation and Configuration Guide Version 2.1
Copyright European Commission — DIGIT Page 8 of 62
List of definitions
The following definitions are used within this document.
Term
Meaning
Audit
A function which seeks to validate that controls are in
place, adequate for their purposes, and which reports
inadequacies to appropriate levels of management.
Audit log
An audit log is a chronological sequence of audit
records, each of which contains evidence directly as a
result of the execution of a business process or system
function
Basic Setup
The basic configuration and Demo tools provided in a
package to setup and run an eIDAS-Node strictly for
demo purposes only.
Demo tools
Demo tools comprise the Demo SP, Demo IDP, Specific
Connector and Specific Proxy Service included in the
integration package. These components are not
production ready and should not be deployed or used in
production environments.
eIDAS-Node
An eIDAS-Node is an application component that can
assume two different roles depending on the origin of a
received request. See eIDAS-Node Connector and
eIDAS-Node Proxy Service.
eIDAS-Node
Connector
The eIDAS-Node assumes this role when it is located in
the Service Provider’s Member State. In a scenario
with a Service Provider asking for authentication, the
eIDAS-Node Connector receives the authentication
request from the Service Provider and forwards it to
the eIDAS-Node of the citizen’s country. This was
formerly known as S-PEPS.
eIDAS-Node Proxy
Service
The eIDAS-Node assumes this role when it is located in
the citizen’s Member State. The eIDAS-Node Proxy
Service receives authentication requests from an
eIDAS-Node of another MS (their eIDAS-Node
Connector). The eIDAS-Node Proxy-Service also has an
interface with the national eID infrastructure and
triggers the identification and authentication for a
citizen at an identity and/or attribute provider. This was
formerly known as C-PEPS.
eIDAS-Node Installation and Configuration Guide Version 2.1
Copyright European Commission — DIGIT Page 9 of 62
References
[1] ISO/IEC 27002 - Information technology -- Security techniques -- Code of
practice for information security management, section 10.10, 2005 (www.iso.org)
[2] BSI PD008: Legal Admissibility and Evidential Weight of Information Stored
Electronically, British Standards Institution, 1999
[3] COBIT (Control Objectives for Information and related Technology) from
Information Systems Audit and Control Association (http://www.isaca.org/cobit.htm)
[4] ICT-PSP/2007/1 – STORK 1 : D5.7.3 Functional Design for PEPS, MW models
and interoperability
[5] K. Kent, M. Souppaya. Guide to Computer Security Log Management.
Recommendations of the National Institute of Standards and Technology, NIST
Special Publication 800-92, September 2006
[6] SANS Consensus Policy Resource Community - Information Logging Standard,
http://www.sans.org/security-resources/policies/server-security
[7] NIST: An Introduction to Computer Security: The NIST Handbook, NIST
Special Publication 800-12, December 1997,
http://csrc.nist.gov/publications/nistpubs/800-12/handbook.pdf
[8] Common Criteria: Common Criteria for Information Technology Security
Evaluation, Version 3.1, revision 4, September.2012 Part 2: Security Functional
Components, http://www.commoncriteriaportal.org/files/ccfiles/CCPART2V3.1R4.pdf
[9] ENISA: Privacy Features of European eID Card Specification, Version 1.0.1,
January 2009, http://www.enisa.europa.eu/doc/pdf/deliverables/enisa_privacy_features_eID.pdf

eIDAS-Node Installation and Configuration Guide Version 2.1
Copyright European Commission — DIGIT Page 10 of 62
1. Introduction
This document is intended for a technical audience consisting of developers,
administrators and those requiring detailed technical information on how to
configure, build and deploy the eIDAS-Node application.
The document describes the steps involved when implementing a Basic Setup and
goes on to provide detailed information required for customisation and deployment.
1.1. Document structure
This document is divided into the following sections:
Chapter 1 − Introduction: this section.
Chapter 2 − Product overview describes the binaries and source code to be
installed plus the configuration files.
Chapter 3 − Preparing the installation describes the prerequisites for a
successful installation, including the correct Java version, supported
application servers, environmental variables to be set, keystores etc.
Chapter 4 − Configuring the software describes all configuration settings.
Chapter 5 − Building and deploying the software describes the steps to build
and then to deploy the software on the supported servers. There are two main
types of eIDAS-Node: Connector and Proxy Service.
Chapter 6 ─ Verifying the installation shows the final structure of your
application server relevant directories, so that you can confirm that you have
made the proper configurations.
Chapter 7 − Advanced configuration for production environments provides
detailed descriptions of the configurations to enable you to change specific
aspects as required.
Appendix A − eIDAS Levels of Assurance provides information on the three
Levels of Assurance described in the Implementing Regulation.
Appendix B − User consent provides a brief overview of the meaning of 'user
consent' in the context of privacy legislation.
Appendix C — Hazelcast proposed configuration provides specific information
related to configuration of a cluster environment using Hazelcast.
Appendix D — Installation Frequently Asked Questions provides answers to
questions that may arise during your installation.
1.2. Purpose
The purpose of this document is to give a comprehensive view of eID and its
components (in terms of binaries, source code and configuration files).

eIDAS-Node Installation and Configuration Guide Version 2.1
Copyright European Commission — DIGIT Page 11 of 62
1.3. Document aims
The aims of this document are to:
guide you through the preliminary steps involved when setting up your
servers;
guide you through setting up, compiling and running a project for a basic
configuration with one instance of your Application Server;
cover detailed configuration of eIDAS-Nodes;
provide a check list of files for each application server;
show how to ensure eIDAS regulation compliance and provide a check list of
recommendations;
describe the technologies and configurations used for testing the eIDAS-Node
in cluster mode.
1.4. Other technical reference documentation
We recommend that you also familiarise yourself with the following eID technical
reference documents which are available on CEF Digital Home > eID > All eID services
> eIDAS Node integration package > View latest version:
eIDAS-Node Installation, Configuration and Integration Quick Start Guide
describes how to quickly install a demo Service Provider, eIDAS-Node
Connector, eIDAS-Node Proxy Service and demo IdP from the distributions in
the release package. The distributions provide preconfigured eIDAS-Node
modules for running on each of the supported application servers.
eIDAS-Node National IdP and SP Integration Guide provides guidance by
recommending one way in which eID can be integrated into your national eID
infrastructure.
eIDAS-Node Demo Tools Installation and Configuration Guide describes the
installation and configuration settings for Demo Tools (SP and IdP) supplied
with the package for basic testing.
eIDAS-Node and SAML describes the W3C recommendations and how SAML
XML encryption is implemented and integrated in eID. Encryption of the
sensitive data carried in SAML 2.0 Requests and Assertions is discussed
alongside the use of AEAD algorithms as essential building blocks.
eIDAS-Node Error and Event Logging provides information on the eID
implementation of error and event logging as a building block for generating
an audit trail of activity on the eIDAS Network. It describes the files that are
generated, the file format, the components that are monitored and the events
that are recorded.
eIDAS-Node Security Considerations describes the security considerations that
should be taken into account when implementing and operating your eIDAS-
Node scheme.
eIDAS-Node Error Codes contains tables showing the error codes that could
be generated by components along with a description of the error, specific
behaviour and, where relevant, possible operator actions to remedy the error.

eIDAS-Node Installation and Configuration Guide Version 2.1
Copyright European Commission — DIGIT Page 12 of 62
1.5. eIDAS Technical specifications and software provided
This software package is provided as a reference implementation in accordance with
the eIDAS Technical Specifications v1.1 available at
https://ec.europa.eu/cefdigital/wiki/display/CEFDIGITAL/eIDAS+Profile.
1.5.1. Further information
For further information on the practical implementation of the features listed above,
please refer to section 7.5 — eIDAS-Node compliance which describes the production
mode for ensuring eIDAS regulation compliance.
eIDAS-Node Installation and Configuration Guide Version 2.1
Copyright European Commission — DIGIT Page 13 of 62
2. Product overview
2.1. Package
The main product deliverable is EidasNode.war which is a web application that can
be deployed to most Java web containers on the market. Both the eIDAS-Node
Connector and the eIDAS-Node Proxy Service are implemented in this package. The
actual functionality is activated by configuration.
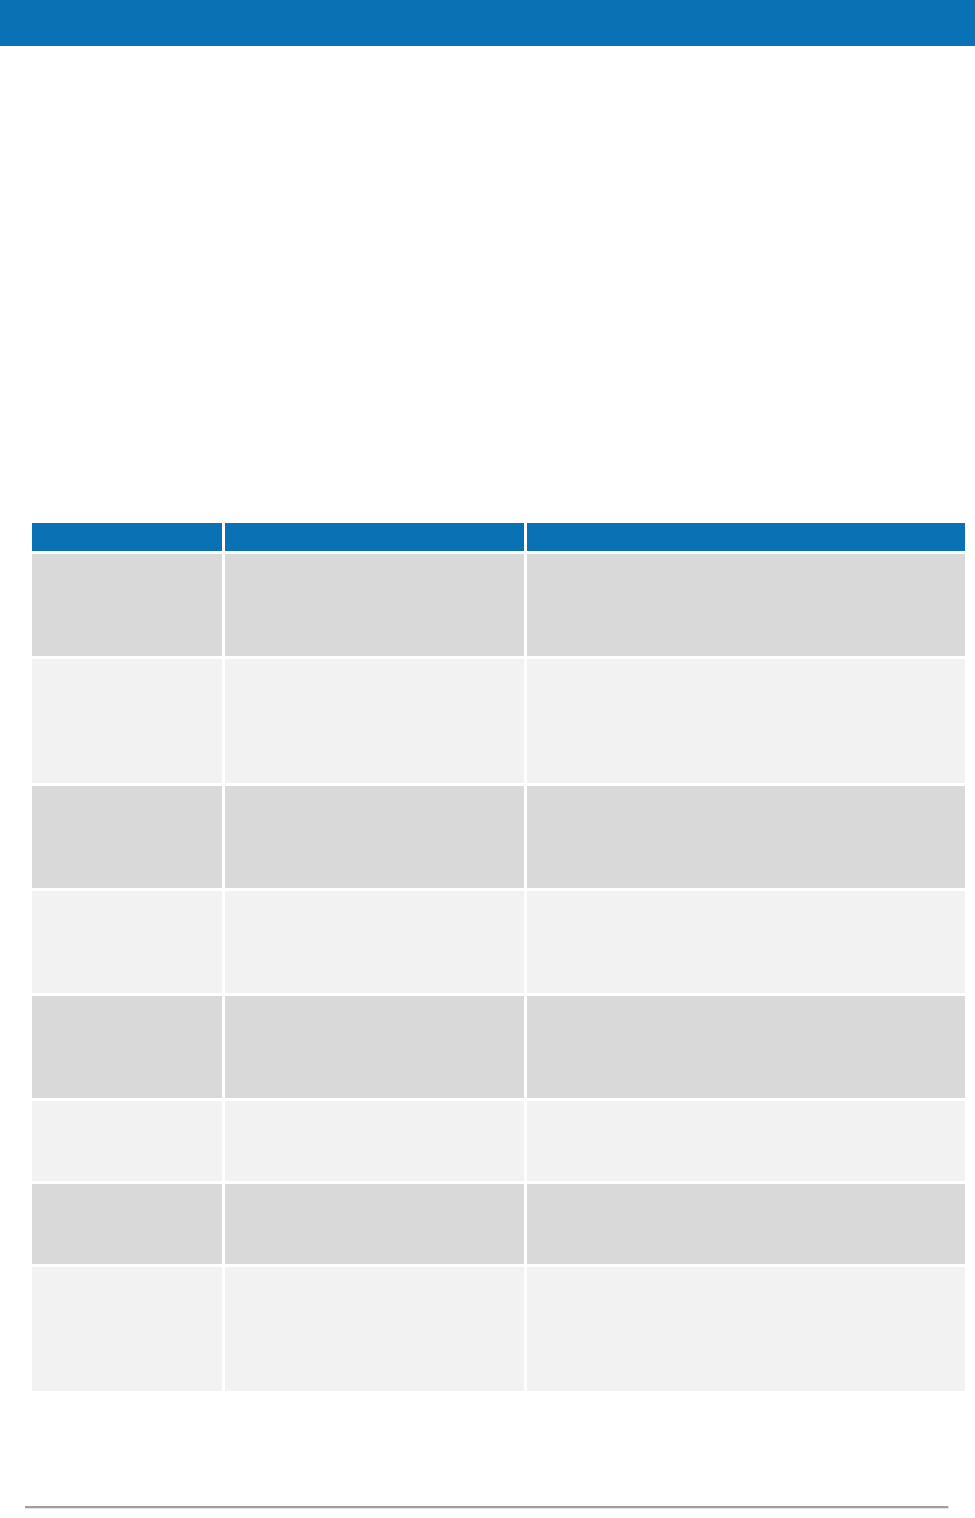
2.2. Modules
The software is composed of several modules. This section describes the binaries and
source code to be installed plus the configuration files.
Table 1: List of modules
Module Name
Folder
Description
Parent
EIDAS-Parent
Module containing a consolidated and consistent
location of the libraries and their version number to
be used across the different modules.
Light Commons
EIDAS-Light-Commons
Light Common application component and utility
classes used for implementing as basis for the
EIDAS-Commons and MS Specific Connector and MS
Specific Proxy Service modules.
Commons
EIDAS-Commons
Common Applications components and utility
classes for implementing functionality of
authentication service.
Encryption
EIDAS-Encryption
Encryption and signature dedicated module.
Contains libraries, including OpenSAML, provided
for the build as Maven local repository.
Metadata
EIDAS-Metadata
Implementation of metadata related functionalities
such as generation and fetching used in both EIDAS-
SAMLEngine and eIDAS-Node.
ConfigModule
EIDAS-ConfigModule
Configuration management module dedicated to
facilitate eIDAS-Node configuration.
SAMLEngine
EIDAS-SAMLEngine
Implementation of EIDAS SAML ProtocolEngine used
in the eIDAS-Node.
Specific
Communication
Definition
EIDAS-
SpecificCommunicationDefinition
The exchange definition (interfaces) and
implementation used to formalise the exchange
definition between the node and the Specific
module.
eIDAS-Node Installation and Configuration Guide Version 2.1
Copyright European Commission — DIGIT Page 14 of 62
Module Name
Folder
Description
Updater
EIDAS-Updater
Module used to change configuration of a running
eIDAS-Node in testing environment. (To enable,
web.xml must be updated.) Not to be used in
production.
EidasNode
EIDAS-NODE
eIDAS-Node module (Proxy Service, Connector).
Basic Setup
configuration
EIDAS-Config
Sample configuration as in 6.7
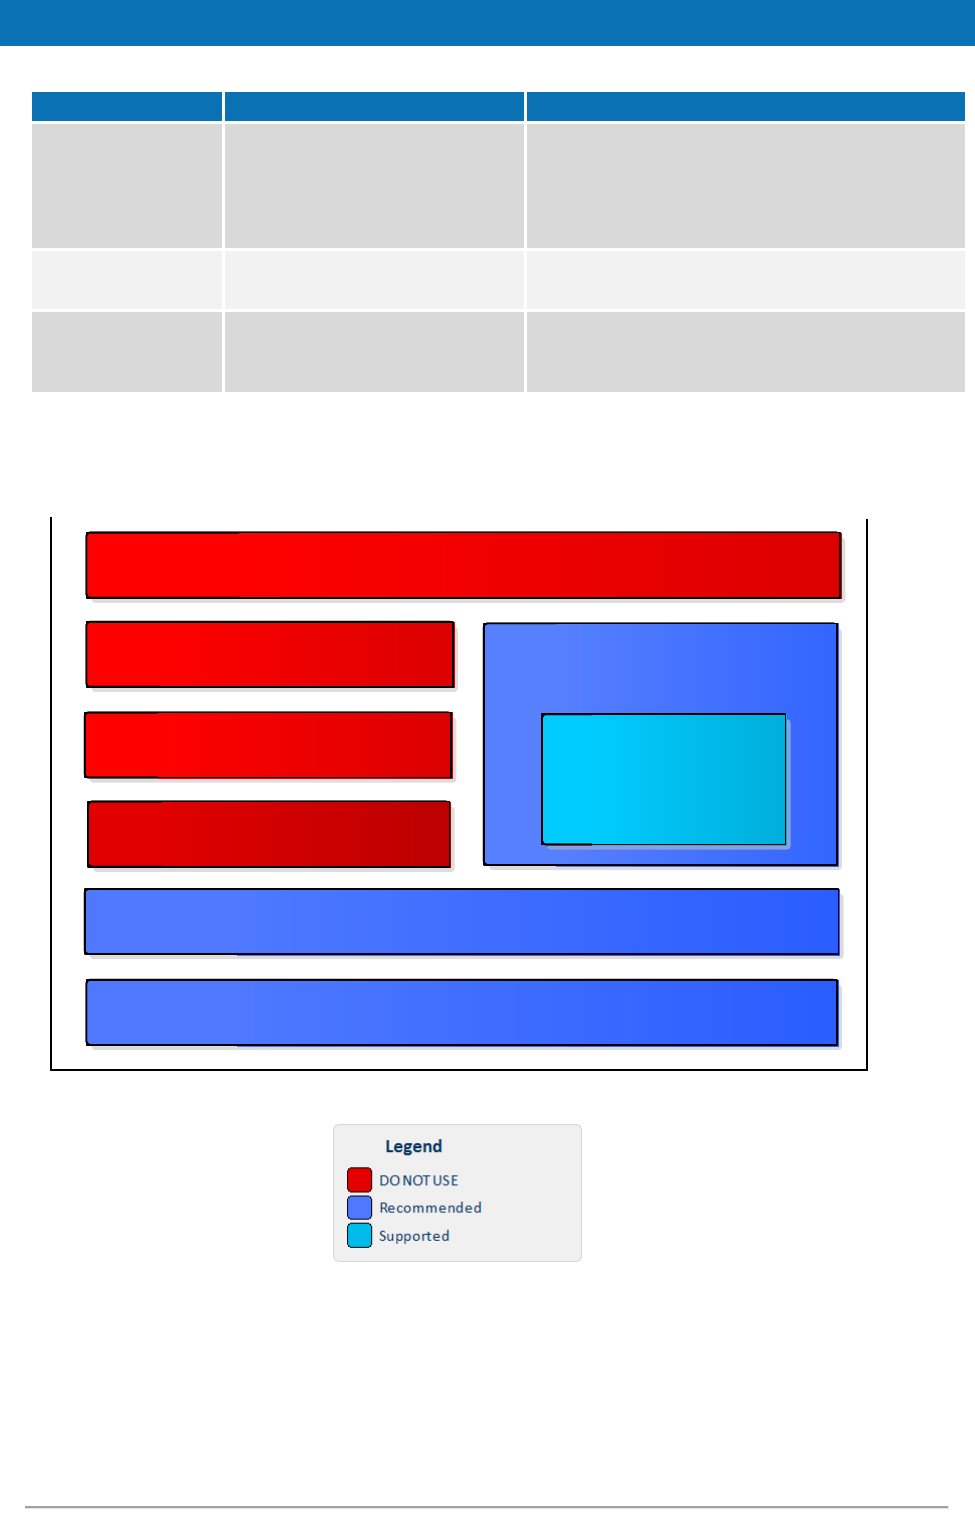
The figure below shows the dependencies between the installed modules.
Figure 1: Dependencies between the installed modules
EIDAS-Light-Commons
EIDAS-Commons
Encryption
SAMLEngine
EIDAS-Node
EIDAS-Metadata
Specific-Communication-v2
Specific-Communication-v2::
Hazelcast Shared Map
eIDAS-Node Installation and Configuration Guide Version 2.1
Copyright European Commission — DIGIT Page 15 of 62
3. Preparing the installation
This section provides instructions on how to deploy the project on Tomcat, JBoss,
GlassFish, WebLogic or WebSphere servers.
The appropriate JVM needs to be installed and configured first. If the selected
application server includes an embedded JVM, the configuration still needs to be
changed.
3.1. Configuring the JVM
The project is built by default using the Java SDK version 1.7 (and can also be built
in Java 1.8).
In order to avoid a possible XML External Entity attack (XXE), the OWASP guidelines
advise to use Java 7 update 67, Java 8 update 20 or above. For more details, please
refer to:
https://www.owasp.org/index.php/XML_External_Entity_(XXE)_Prevention_Cheat_Sheet.
3.1.1. Oracle Java JCE Unlimited Strength Jurisdiction Policy
If Oracle provided JVM is going to be used, then it is necessary to apply the JCE
Unlimited Strength Jurisdiction Policy Files, which contain no restriction on
cryptographic strengths:
1. Download the Java Cryptography Extension (JCE) Unlimited Strength Policy
Files from Oracle (subject to be moved by Oracle to different URI):
For Java 7: http://www.oracle.com/technetwork/java/javase/downloads/jce-7-
download-432124.html
For Java 8: http://www.oracle.com/technetwork/java/javase/downloads/jce8-
download-2133166.html
2. Uncompress and extract the downloaded zip file (it contains README.txt and
two jar files).
3. For the installation, please follow the instructions in the README.txt file.
3.1.2. IBM SDK Java
If the IBM provided JVM is going to be used for the eIDAS-Node, it is necessary to
upgrade at least version 7.
IBM WebSphere Application Server V8.5 comes by default with IBM SDK Java 6.
Using IBM Installation Manager, you can install IBM SDK Java 7 as an optional
feature. SDK Java 7 can be added at any time to the WAS installation by following
the IBM installation procedure described at http://www-
01.ibm.com/support/knowledgecenter/SSEQTP_8.5.5/com.ibm.websphere.installation.base.doc/a
e/tins_installation_jdk7_gui.html (possibly subject to relocation by IBM).
Once this is complete, both IBM SDK Java versions 6 and 7 will coexist. To switch the
SDK used by server profiles, you can use the managesdk command described at
eIDAS-Node Installation and Configuration Guide Version 2.1
Copyright European Commission — DIGIT Page 16 of 62
http://www-01.ibm.com/support/knowledgecenter/SSAW57_8.5.5/com.ibm.websphere.nd.
multiplatform.doc/ae/rxml_managesdk.html (possibly subject to relocation by IBM).
3.1.2.1. Configuring encryption support
The default IBM security provider bundled with JVM does not support the default
encryption algorithm used by eIDAS (http://www.w3.org/2009/xmlenc11#aes256-gcm). One
option is to use BouncyCastleProvider instead of default IBM JVM default provider:
1. Place the bouncycastle jar in $IBM_JRE/lib/ext directory.
2. Copy the IBM unrestricted JCE policy files provided in AdditionalFiles
directory and put them under $IBM_JRE/lib/security to erase the existing
ones. Note that those jars are signed.
3. Add BouncyCastleProvider to the list of providers in the
$IBM_JRE/lib/security/java.security file before the default provider, e.g.
security.provider.1=com.ibm.crypto.pkcs11impl.provider.IBMPKCS11Impl
security.provider.2=org.bouncycastle.jce.provider.BouncyCastleProvider
security.provider.3=com.ibm.crypto.provider.IBMJCE
security.provider.4=com.ibm.jsse2.IBMJSSEProvider2
security.provider.5=com.ibm.security.jgss.IBMJGSSProvider
security.provider.6=com.ibm.security.cert.IBMCertPath
security.provider.7=com.ibm.security.cmskeystore.CMSProvider
security.provider.8=com.ibm.security.jgss.mech.spnego.IBMSPNEGO
security.provider.9=com.ibm.security.sasl.IBMSASL
security.provider.10=com.ibm.xml.crypto.IBMXMLCryptoProvider
security.provider.11=com.ibm.xml.enc.IBMXMLEncProvider
security.provider.12=org.apache.harmony.security.provider.PolicyProvider
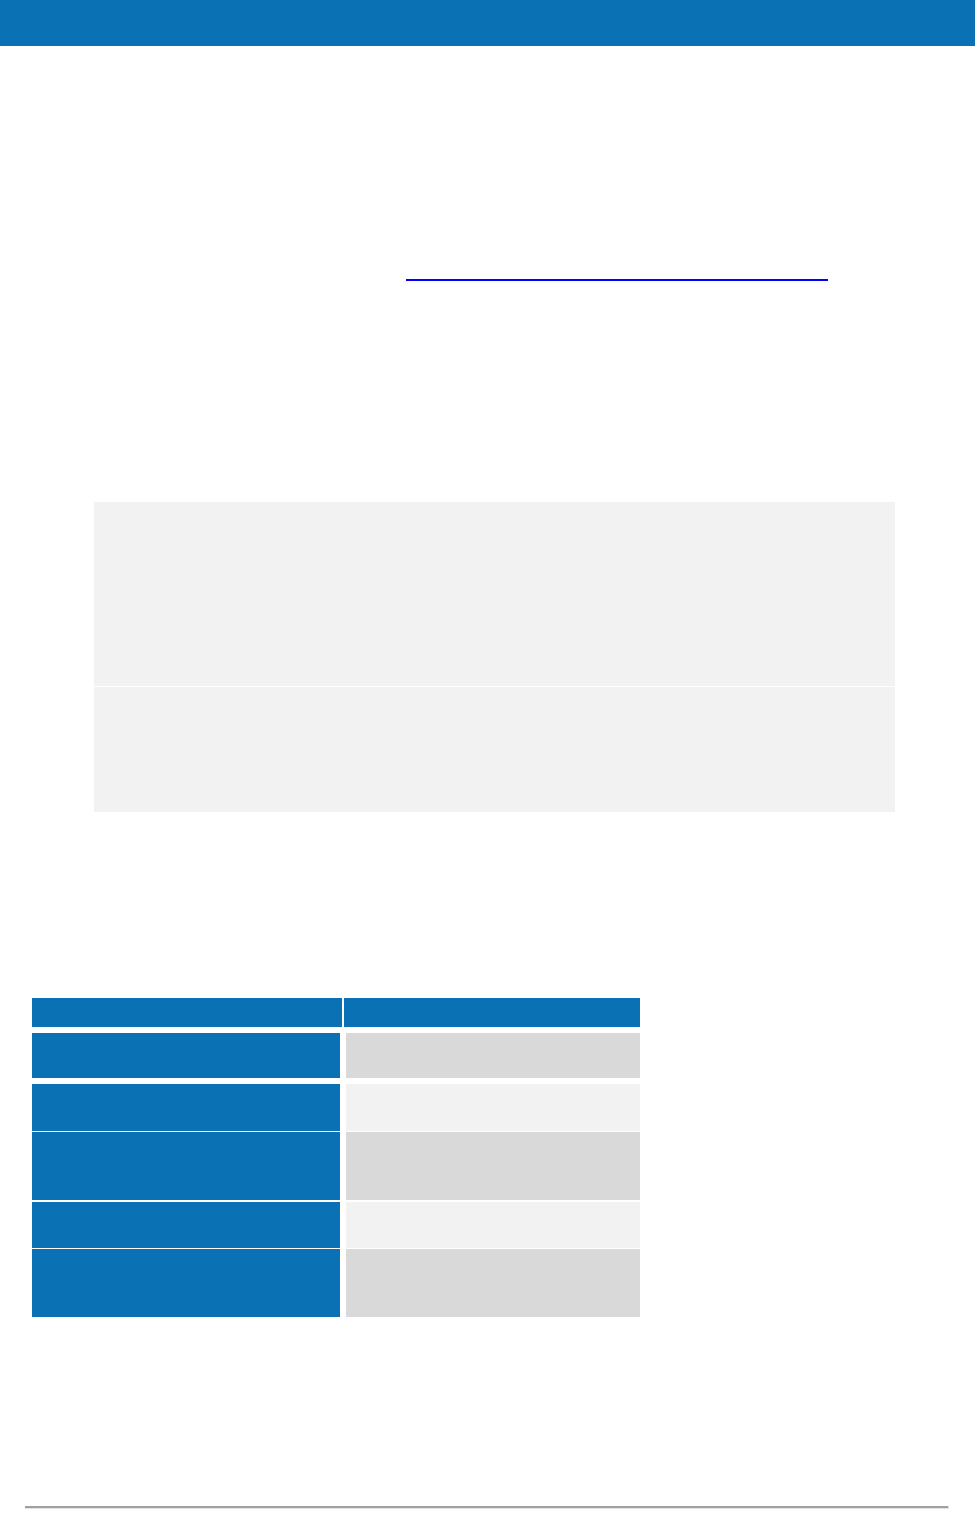
3.2. Configuring the application server
The following is a list of the supported servers.
Table 2: Supported servers
Application Server
Supported version(s)
Tomcat
7, 8
GlassFish
4.1 (full profile), 5 (full profile)
JBoss
WildFly
7
11.0.0 (web distribution)
WebLogic
12.1.2, 12.2.2c
WebSphere/WebSphere Liberty
Profile
8.5.5
Liberty Profile Core 9
3.2.1. Configuring Tomcat 7
1. Create a folder named endorsed in $TOMCAT_HOME.

eIDAS-Node Installation and Configuration Guide Version 2.1
Copyright European Commission — DIGIT Page 17 of 62
2. Create a folder named shared in $TOMCAT_HOME.
3. Edit the file $TOMCAT_HOME/conf/catalina.properties and change the
property shared.loader so that it reads:
shared.loader=${catalina.home}/shared/lib/*.jar
4. Extract from the binary zip file (under AdditionalFiles/endorsed) the
following libs to $TOMCAT_HOME/shared/lib:
xml-apis-1.4.01.jar
resolver-2.9.1.jar
serializer-2.7.2.jar
xalan-2.7.2.jar
xercesImpl-2.11.0.jar
3.2.2. Configuring Tomcat 8
Extract from the binary zip file (under AdditionalFiles/endorsed) the following libs
to $TOMCAT_HOME/lib:
xml-apis-1.4.01.jar
resolver-2.9.1.jar
serializer-2.7.2.jar -> rename this file to serializer.jar
xalan-2.7.2.jar
xercesImpl-2.11.0.jar
3.2.3. Configuring JBoss AS 7
Install the modules found under AdditionalFile/JBOSS7. These modules contain
BouncyCastle JCE provider and xml-apis. They should be copied under
$JBOSS_HOME/modules directory.
3.2.4. Configuring GlassFish V4
Extract from the binary zip file (under AdditionalFiles/endorsed) the following
libs to $GLASSFISH_HOME/glassfish/lib/endorsed
endorsed/resolver-2.9.1.jar
endorsed/serializer-2.7.2.jar
endorsed/xalan-2.7.2.jar
endorsed/xercesImpl-2.11.0.jar
endorsed/xml-apis-1.4.01.jar
where $GLASSFISH_HOME is the base directory of your GlassFish server (e.g.
/home/user/apps/glassfish4).
3.2.5. Configuring GlassFish V5
Extract from the binary zip file (under AdditionalFiles/endorsed) the following
libs to $GLASSFISH_HOME/domains/domain1/lib/ext
endorsed/resolver-2.9.1.jar
endorsed/serializer-2.7.2.jar

eIDAS-Node Installation and Configuration Guide Version 2.1
Copyright European Commission — DIGIT Page 18 of 62
endorsed/xalan-2.7.2.jar
endorsed/xercesImpl-2.11.0.jar
endorsed/xml-apis-1.4.01.jar
where $GLASSFISH_HOME is the base directory of your GlassFish server (e.g.
/home/user/apps/glassfish5).
eIDAS-Node Installation and Configuration Guide Version 2.1
Copyright European Commission — DIGIT Page 19 of 62
3.2.6. Configuring WebSphere
The web applications should be deployed using the WAS Admin Console.
If your WAS installation is using IBM supplied Java SDK, please be sure to execute
steps described in section 3.1.2.
3.2.7. Configuring WebSphere Liberty Profile
The application may be deployed by copying the war files under
$SERVER_HOME/dropins directory.
The IBM Installation Manager can be used to install the IBM SDK Java 7 for Liberty
Profile (please refer to the IBM official documentation at:
http://www.ibm.com/support/knowledgecenter/SSD28V_8.5.5/com.ibm.websphere.wlp.core.doc/a
e/twlp_ins_installation_jdk7.html - possibly subject to being moved by IBM).
In order for eIDAS error messages to be properly displayed by WebSphere, add the
property <webContainer
com.ibm.ws.webcontainer.enableErrorExceptionTypeFirst="true"/> to the file
$SERVER_HOME/usr/servers/defaultServer/server.xml.
The reason being that WebSphere deals with error page handling by first giving
preference to HTTP error code and not to exceptions, which causes it to display an
error page without the eIDAS error code /message.
3.3. Enabling logging
To enable audit logging of the communications between eIDAS-Node Proxy Service
and eIDAS-Node Connector, you should make the following configuration changes.
This is part of EIDAS Audit log, for further information please see the eIDAS-Node
Error and Event Logging guide.
The locations of the audit files are by default configured to use a Java system
properties variable called LOG_HOME.
A value can be assigned to this variable by using: -DLOG_HOME="<myDirectoryName>"
at server start-up.
If modification of the environment variable is not possible, the value of this variable
could also be assigned by adding the following line in the logback.xml file
<property name="LOG_HOME" value ="<myDirectoryName>" />
Note: The eIDAS-Node logs may contain person identification data, hence these logs
should be handled and protected appropriately in accordance with the European
privacy regulations [Dir. 95/46/EC] and [Reg. 2016/679].
[Reg. 2016/679] REGULATION (EU) 2016/679 OF THE EUROPEAN PARLIAMENT AND
OF THE COUNCIL of 27 April 2016 on the protection of natural persons with regard to
the processing of personal data and on the free movement of such data, and
repealing Directive 95/46/EC.
eIDAS-Node Installation and Configuration Guide Version 2.1
Copyright European Commission — DIGIT Page 20 of 62
[Dir. 95/46/EC] Directive 95/46/EC of the European Parliament and of the Council of
24 October 1995 on the protection of individuals with regard to the processing of
personal data and on the free movement of such data.
3.3.1. Configuring audit logging
Edit the project eIDAS-Node file: logback.xml (located in the resources directory)
and add the following lines:
<?xml version="1.0" encoding="UTF-8" ?>
<!--
NOTE :
the environment variable LOG_HOME could be set to indicate the directory
containing the log files
the log configuration files will be scanned periodically each 30 minutes
LOG level is defined as below :
Default level : INFO
Console appender (STDOUT) : inherits from default
eIDASNodeDetail appender : INFO
eIDASNodeSystem appender : INFO
eIDASNodeSecurity appender : INFO
-->
<configuration scan="true" scanPeriod="30 minutes">
<!--
This define the CONSOLE appender - the level of the console appender is based on
the root level
-->
<appender name="STDOUT" class="ch.qos.logback.core.ConsoleAppender">
<encoder>
<pattern>%d{yyyy-MM-dd; HH:mm:ss.SSS} [%thread] %-5level %logger{66} %marker -
%X{sessionId} -%X{remoteHost} -%msg%n</pattern>
</encoder>
</appender>
<!--
This define the FULL Detailed log file appender - the level of the console
appender is INFO by default
-->
<appender name="eIDASNodeDetail"
class="ch.qos.logback.core.rolling.RollingFileAppender">
<file>${LOG_HOME}/eIDASNodeDetail.log</file>
<filter class="ch.qos.logback.classic.filter.ThresholdFilter">
<level>INFO</level>
</filter>
<encoder class="eu.eidas.node.logging.logback_integrity.HashPatternLayoutEncoder">
<pattern>%d{yyyy-MM-dd; HH:mm:ss.SSS} [%thread] %-5level %logger{66} %marker -
%X{sessionId} -%X{remoteHost} -%msg%n</pattern>
</encoder>
<param name="Append" value="true" />
<triggeringPolicy class="ch.qos.logback.core.rolling.SizeBasedTriggeringPolicy">
<maxFileSize>500KB</maxFileSize>
</triggeringPolicy>
<!-- Support multiple-JVM writing to the same log file -->

eIDAS-Node Installation and Configuration Guide Version 2.1
Copyright European Commission — DIGIT Page 21 of 62
<prudent>true</prudent>
<rollingPolicy class="ch.qos.logback.core.rolling.TimeBasedRollingPolicy">
<fileNamePattern>${LOG_HOME}/eIDASNodeDetail.%d{yyyy-MM-
dd}.log</fileNamePattern>
<maxHistory>14</maxHistory>
</rollingPolicy>
</appender>
<!--
This define the SYSTEM Detailed log file appender - the default Filter is
inherited from root level
-->
<appender name="eIDASNodeSystem"
class="ch.qos.logback.core.rolling.RollingFileAppender">
<file>${LOG_HOME}/eIDASNodeSystem.log</file>
<filter class="ch.qos.logback.core.filter.EvaluatorFilter">
<evaluator class="ch.qos.logback.classic.boolex.OnMarkerEvaluator">
<marker>SYSTEM</marker>
</evaluator>
<onMismatch>DENY</onMismatch>
<onMatch>ACCEPT</onMatch>
</filter>
<encoder class="eu.eidas.node.logging.logback_integrity.HashPatternLayoutEncoder">
<pattern>%d{yyyy-MM-dd; HH:mm:ss.SSS} [%thread] %-5level %logger{66} %marker -
%X{sessionId} -%X{remoteHost} -%msg%n</pattern>
</encoder>
<param name="Append" value="true" />
<!-- Support multiple-JVM writing to the same log file -->
<prudent>true</prudent>
<rollingPolicy class="ch.qos.logback.core.rolling.TimeBasedRollingPolicy">
<fileNamePattern>${LOG_HOME}/eIDASNodeSystem.%d{yyyy-MM-
dd}.log</fileNamePattern>
<maxHistory>14</maxHistory>
</rollingPolicy>
</appender>
<!--
This define the SECURITY Detailed log file appender - the default Filter is
inherited from root level
-->
<appender name="eIDASNodeSecurity"
class="ch.qos.logback.core.rolling.RollingFileAppender">
<file>${LOG_HOME}/eIDASNodeSecurity.log</file>
<filter class="ch.qos.logback.core.filter.EvaluatorFilter">
<evaluator class="ch.qos.logback.classic.boolex.OnMarkerEvaluator">
<marker>SECURITY_SUCCESS</marker>
<marker>SECURITY_WARNING</marker>
<marker>SECURITY_FAILURE</marker>
</evaluator>
<onMismatch>DENY</onMismatch>
<onMatch>ACCEPT</onMatch>
</filter>
<encoder class="eu.eidas.node.logging.logback_integrity.HashPatternLayoutEncoder">
<pattern>%d{yyyy-MM-dd; HH:mm:ss.SSS} [%thread] %-5level %logger{66} %marker -
%X{sessionId} -%X{remoteHost} -%msg%n</pattern>
</encoder>
<param name="Append" value="true" />

eIDAS-Node Installation and Configuration Guide Version 2.1
Copyright European Commission — DIGIT Page 22 of 62
<!-- Support multiple-JVM writing to the same log file -->
<prudent>true</prudent>
<rollingPolicy class="ch.qos.logback.core.rolling.TimeBasedRollingPolicy">
<fileNamePattern>${LOG_HOME}/eIDASNodeSecurity.%d{yyyy-MM-
dd}.log</fileNamePattern>
<maxHistory>14</maxHistory>
</rollingPolicy>
</appender>
<!--
This define the SAML exchange Detailed log file appender - the default Filter is
inherited from root level
-->
<appender name="eIDASNodeSAMLExchange"
class="ch.qos.logback.core.rolling.RollingFileAppender">
<file>${LOG_HOME}/eIDASNodeSAMLExchange.log</file>
<filter class="ch.qos.logback.core.filter.EvaluatorFilter">
<evaluator class="ch.qos.logback.classic.boolex.OnMarkerEvaluator">
<marker>SAML_EXCHANGE</marker>
</evaluator>
<onMismatch>DENY</onMismatch>
<onMatch>ACCEPT</onMatch>
</filter>
<encoder class="eu.eidas.node.logging.logback_integrity.HashPatternLayoutEncoder">
<pattern>%d{yyyy-MM-dd; HH:mm:ss.SSS} [%thread] %-5level %logger{66} %marker -
%X{sessionId} -%X{remoteHost} -%msg%n</pattern>
</encoder>
<param name="Append" value="true" />
<!-- Support multiple-JVM writing to the same log file -->
<prudent>true</prudent>
<rollingPolicy class="ch.qos.logback.core.rolling.TimeBasedRollingPolicy">
<fileNamePattern>${LOG_HOME}/eIDASNodeSAMLExchange.%d{yyyy-MM-
dd}.log</fileNamePattern>
<maxHistory>14</maxHistory>
</rollingPolicy>
</appender>
<!--
This define the API fine grained level
-->
<logger name="org.opensaml">
<level value="ERROR" />
<appender-ref ref="STDOUT"/>
<appender-ref ref="eIDASNodeDetail"/>
</logger>
<logger name="com.opensymphony.xwork2">
<level value="WARN"/>
<appender-ref ref="STDOUT"/>
<appender-ref ref="eIDASNodeDetail"/>
</logger>
<logger name=" org.apache.struts2">
<level value="WARN"/>
<appender-ref ref="STDOUT"/>
<appender-ref ref="eIDASNodeDetail"/>
</logger>
<logger name="org.springframework">
<level value="WARN" />

eIDAS-Node Installation and Configuration Guide Version 2.1
Copyright European Commission — DIGIT Page 23 of 62
<appender-ref ref="STDOUT"/>
<appender-ref ref="eIDASNodeDetail"/>
</logger>
<logger name="org.apache.xml.security">
<level value="WARN" />
<appender-ref ref="STDOUT"/>
<appender-ref ref="eIDASNodeDetail"/>
</logger>
<logger name="eu.eidas.communication.requests">
<level value="info" />
<appender-ref ref="STDOUT"/>
<appender-ref ref="eIDASNodeDetail"/>
</logger>
<logger name="eu.eidas.communication.responses">
<level value="info" />
<appender-ref ref="STDOUT"/>
<appender-ref ref="eIDASNodeDetail"/>
</logger>
<!--
The root level is set to debug for development purposes, for production
environment it could be set to INFO
-->
<root level="DEBUG">
<appender-ref ref="STDOUT" />
<appender-ref ref="eIDASNodeSystem" />
<appender-ref ref="eIDASNodeSecurity" />
<appender-ref ref="eIDASNodeDetail" />
<appender-ref ref="eIDASNodeSAMLExchange" />
</root>
</configuration>
3.3.2. Organisation of logs
The root level of logging defines the detail of logged events, for testing and
development purposes, this level should be set to DEBUG. In the production
environment, it should be INFO.
Four different log files are generated by the application, depending on the context of
the event to log (please refer to the eIDAS-Node Error and Event Logging guide for
more details):
the Application System log (eIDASNodeSystem);
the Application Security log (eIDASNodeSecurity);
the Message Exchange log (eIDASNodeSAMLExchange) and
the Application Detailed log (eIDASNodeDetail).
Set ${FILENAME_FULL_PATH} for the location of the file which will contain the logs.
(e.g.: /opt/eidaslogs/eIDASNodeDetail.log).
For further information on logging please refer to the eIDAS-Node Error and Event
Logging and the eIDAS-Node Security Considerations guides.
eIDAS-Node Installation and Configuration Guide Version 2.1
Copyright European Commission — DIGIT Page 24 of 62
3.4. Configuring application server security
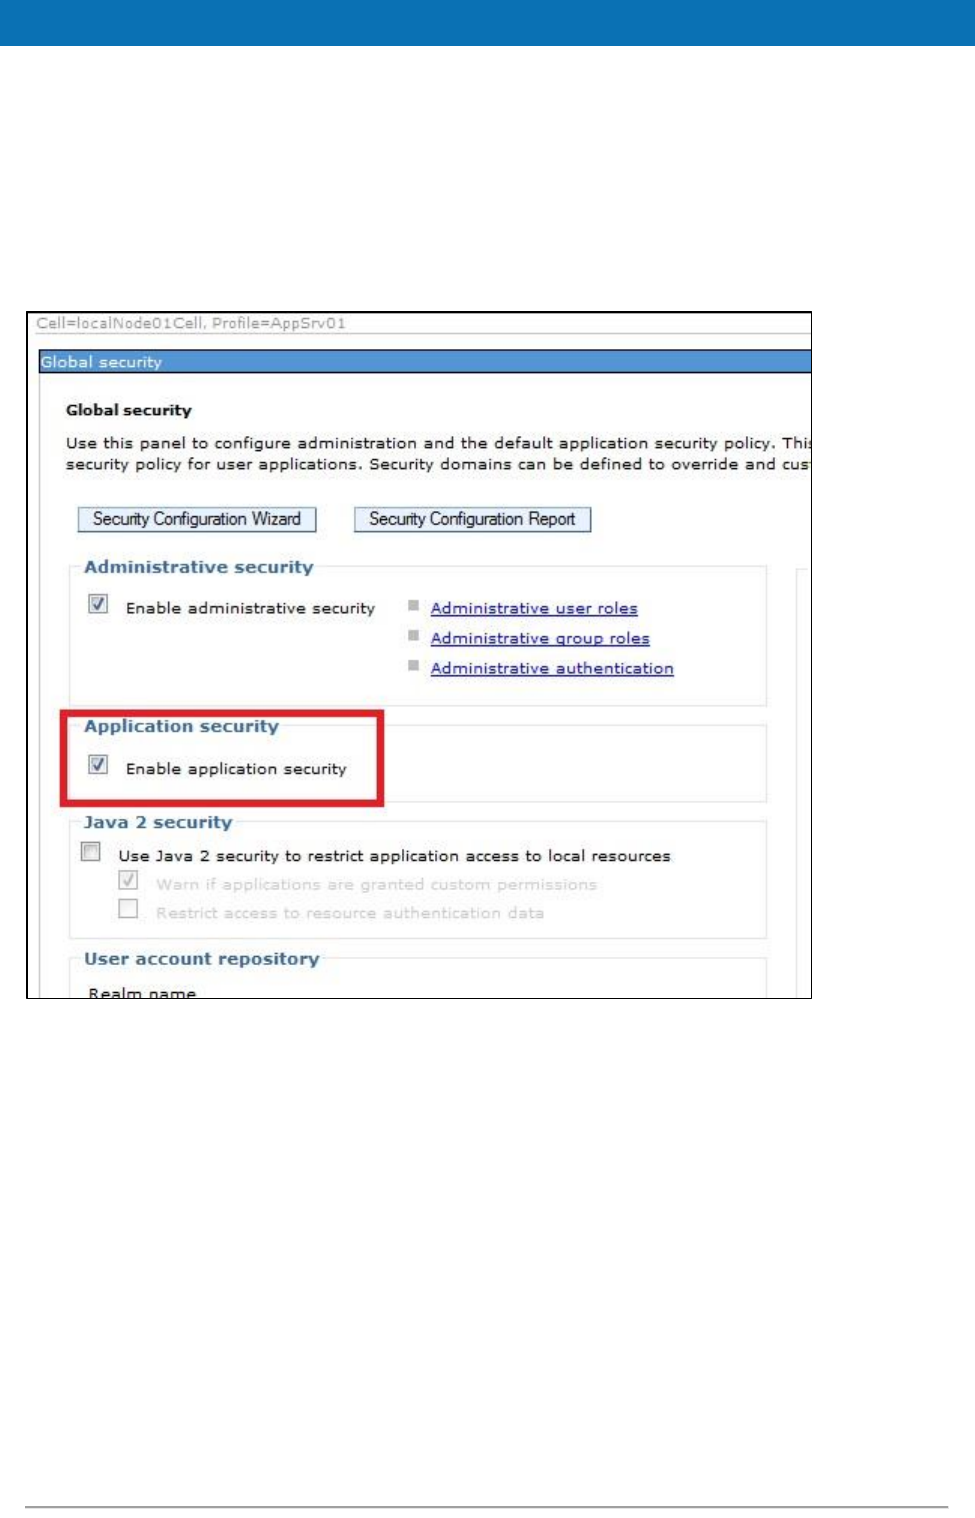
3.4.1. Security constraints for WebSphere
WebSphere AS is configured by default to not observe security constraints in web
applications. To enforce these constraints WebSphere should be configured as shown
below.
Figure 2: Enabling application security on WebSphere AS
eIDAS-Node Installation and Configuration Guide Version 2.1
Copyright European Commission — DIGIT Page 25 of 62
4. Configuring the software
This section describes the configuration settings. Keep in mind that in production you
need to enforce the configuration described in section 7.5 ─ eIDAS-Node compliance.
Before proceeding with these steps your server must be configured, as described in
section 3 — Preparing the installation.
Note: For information on implementing the eIDAS-Node Protocol Engine, please
refer to the CEF eID eIDAS-Node and SAML document.
4.1. Configuring the project
To configure the project in the Basic Setup, follow the steps shown below.
4.1.1. Setup configuration directory
The $EIDAS_CONFIG_REPOSITORY environment variable is used to locate the eIDAS-
Node's directory of configuration files. It can be defined as an OS environment
variable or by setting it to the runtime environment (by –D switch to JVM or on the
AS admin console):
$EIDAS_CONFIG_REPOSITORY – used in applicationContext.xml and points to
the configuration directory of the application (e.g.
file:/C:/PGM/projects/configEidas/).
By default EIDAS_CONFIG_REPOSITORY OS environment or JVM command line
arguments (-D option) must be set in order to specify the location of configuration
files. It is possible to change or hardcode these variables in
environmentalContext.xml. Please refer to environmentalContext.xml for more
details on how to do it.
4.1.2. Setting up your Keystore
Copy your eidasKeystore.jks (the key store with your eIDAS-Node keys,
alternatively you can use the example key store provided with the application) into a
directory of your own choice, and make sure that:
the property keyStorePath on file:
$EIDAS_CONFIG_REPOSITORY/SignModule_Service.xml
reflects the relative location of your Proxy Service eidasKeyStore.jks.
the property keyStorePath on file:
$EIDAS_CONFIG_REPOSITORY/SignModule_Connector.xml reflects the
relative location of your eIDAS-Node Connector eidasKeyStore.jks.
If the eIDAS-Node is configured to use encryption (essential in the production
environment), also ensure that:
the property keyStorePath on file:
$EIDAS_CONFIG_REPOSITORY/EncryptModule_Service.xml reflects the
relative location of your Proxy Service eidasKeyStore.jks.
eIDAS-Node Installation and Configuration Guide Version 2.1
Copyright European Commission — DIGIT Page 26 of 62
the property keyStorePath on file:
$EIDAS_CONFIG_REPOSITORY/EncryptModule_Connector.xml reflects the
relative location of your eIDAS-Node Connector eidasKeyStore.jks.
For more information see the CEF eID eIDAS-Node and SAML manual.
4.1.3. Configuring with Basic Setup
The Basic Setup allows you to use predefined configuration supplied with the
software package, only for demo purposes. Copy the provided configuration files to
the predefined EIDAS_CONFIG_REPOSITORY and then edit the file eidas.xml to
specify the following eIDAS-Node Connector and eIDAS-Node Proxy Service
configuration properties.
connector.assertion.url=
http://insert.your.ip.here:portGoesHere/EidasNode/ColleagueResponse
service1.url=
http://insert.your.ip.here:portGoesHere/EidasNode/ColleagueRequest
To configure the Demo Tools in order to test this Basic Setup, please read eIDAS-
Node Demo Tools Installation and Configuration Guide.
4.2. eIDAS-Node configuration files
This section provides a detailed description of the eIDAS-Node configuration files and
their properties.
The eidas.xml file contains the properties to configure:
General purpose parameters;
eIDAS-Node Connector; and
eIDAS-Node Proxy Service.
4.2.1. General purpose parameters
Table 3 lists general purpose parameters which include additional checks and security
configurations.
Table 3: General purpose parameters
Key
Description
metadata.activate
Allows activation/deactivation of SAML metadata (this parameter
activates/deactivates metadata publishing and requesting on both
Connector and Proxy Service (see also the eIDAS-Node and SAML
manual)
node.metadata.not.signed.descriptors
List of URLs corresponding to entity descriptors whose signatures
have not to be checked. The format to use is
http://descriptorurl1; https://descriptorurl2 etc.
eIDAS-Node Installation and Configuration Guide Version 2.1
Copyright European Commission — DIGIT Page 27 of 62
Key
Description
response.encryption.mandatory
When set to 'true' the node encrypts assertions in the generated
SAML responses (Note that the encryption related configuration must
be in place).
Note: this parameter is used by both Proxy Service and Connector
nodes.
disable.check.mandatory.eidas.attrib
utes
When set to 'false' the node will check if at least one set of
mandatory attributes is included in the request or in the response. If
set to ‘true’ there is no check.
Note: this parameter is used by both Proxy Service and Connector
nodes
disable.check.representative.attribu
tes
When set to false, the ILightRequest is checked if there are
Representative attributes requested, and reject the authentication
request. Default is false.
distributedMaps
When set to 'true' the node will use distributed maps for request-
reply map correlations and anti-replay cache. The integration
package uses Hazelcast technology but alternatives can be used.
nonDistributedMetadata.retention
Retention period for simple metadata cache in seconds. (Note: for
distributed environment it's not used, set I up in hazelcast.xml
instead)
hashDigest.className
Sets the digest class used by the IEidasLogger.
metadata.file.repository
Path to the static metadata files.
metadata.http.retrieval
Boolean value (true|false), which indicates whether the application
will activate the use of the metadata from the HTTP URLs or use the
static metadata.
metadata.sector
Value of the type of SP to be published in Connector's metadata,
possible values: public and private.
saml.connector
Name of the configuration instance for the Connector's SAML Engine
(defined in SamlEngine.xml).
saml.service
Name of the configuration instance for the Proxy Service's SAML
Engine.
response.sign.with.key.value
When set to true the eidas-node signs the Authentication Responses
it originates with its public RSA key instead of the full X509Certificate.
When set to false the eidas-node keeps the behaviour of 2.0.
request.sign.with.key.value
When set to true the eidas-node signs the Authentication Requests it
originates with its public RSA key instead of the full X509Certificate.
When set to false the eidas-node keeps the behaviour of 2.0.
eIDAS-Node Installation and Configuration Guide Version 2.1
Copyright European Commission — DIGIT Page 28 of 62
Key
Description
eidas.protocol.version
Value of eidas protocol version followed by the node, e.g. "1.1".
When not empty, the value will be published in the node's metadata
URLs.
eidas.application.identifier
Value of eidas protocol's application identifier relative to the node's
code and version number., e.g. "CEF:eIDAS-ref:2.1".
When not empty, the value will be published in the node's metadata
URLs.
4.2.2. Attribute registry
Attribute registry holds and supplies information of types, value format and
namespace for creating and validating requests and responses. The registry basically
contains Attribute Definition objects built from custom XML files and hard coded lists
of supported core attributes in LegalPersonSpec, NaturalPersonSpec,
RepresentativeLegalPersonSpec, and RepresentativeNaturalPersonSpec
collected together in EidasSpec class, found in the SAMLEngine module.
Each Protocol Engine has its own configuration files, specified by SamlEngine.xml
files.
The following is an example code to introduce a new attribute to the XML
configuration:
<entry
key="19.NameUri">http://eidas.europa.eu/attributes/natural/NewSomething</entry>
<entry key="19.FriendlyName">NEW_SOMETHING</entry>
<entry key="19.PersonType">NaturalPerson</entry>
<entry key="19.Required">false</entry>
<entry
key="19.XmlType.NamespaceUri">http://eidas.europa.eu/attributes/naturalperson</e
ntry>
<entry key="19.XmlType.LocalPart">NewSomethingType</entry>
<entry key="19.XmlType.NamespacePrefix">eidas-natural</entry>
For the key prefix number, take the last one and increment it. For eIDAS protocol the
person type (natural or legal) must be specified and aligned with namespace.
4.2.2.1. Attribute registry validation and metadata support
Besides the Attribute Registry XML files there is a hard coded list of supported core
attributes in LegalPersonSpec, NaturalPersonSpec,
RepresentativeLegalPersonSpec, and RepresentativeNaturalPersonSpec
collected together in EidasSpec class, can be found in the SAMLEngine module. This
is necessary to get a reference of attribute definitions to perform business rule-based
validations on requests and replies.
Supported attributes are published in the Metadata of the eIDAS-Node Proxy Service.

eIDAS-Node Installation and Configuration Guide Version 2.1
Copyright European Commission — DIGIT Page 29 of 62
4.2.3. eIDAS-Node Connector configuration
The eIDAS-Node Connector configuration is composed of the following parts:
Service Provider configuration;
eIDAS-Node Connector dedicated information; and
Configuration of the recognised Connector.
4.2.3.1. Service Provider configuration
To configure the Service Provider, you must provide a value for the properties.
eIDAS-Node Installation and Configuration Guide Version 2.1
Copyright European Commission — DIGIT Page 30 of 62
Table 4: eIDAS-Node Connector and SP validation
Key
Description
active.module.connector
Allows deactivation of eIDAS-Node Connector functionality: when
setting this parameter to false, eIDAS-Node Connector will answer
with an error message to incoming requests. The default value is
true.
4.2.3.2. eIDAS-Node Connector dedicated information
To identify the eIDAS-Node Connector, the following information needs to be
provided.
Table 5: eIDAS-Node Connector dedicated information
Key
Description
connector.assertion.url
URL of the Action to be called when returning from eIDAS-Node
Proxy Service. (This used as AssertionConsumerServiceURL
in the Request also)
saml.connector
Name of the SAML ProtocolEngine instance used by the eIDAS-Node
Connector in the eIDAS Network (between Connector and Proxy
Service).
connector.contact.support.email
Email address of the support contact (for metadata)
connector.contact.support.company
Company name of the support contact (for metadata)
connector.contact.support.givenname
Given name of the support contact (for metadata)
connector.contact.support.surname
Surname of the support contact (for metadata)
connector.contact.support.phone
Phone number of the support contact (for metadata)
connector.contact.technical.email
Email address of the technical contact (for metadata)
connector.contact.technical.company
Company of the technical contact (for metadata)
connector.contact.technical.givenname
Given name of the technical contact (for metadata)
connector.contact.technical.surname
Surname of the technical contact (for metadata)
connector.contact.technical.phone
Phone number of the technical contact (for metadata)
connector.metadata.url
The URL at which the metadata of eIDAS-Node Connector will be
made available, e.g.
http://server:port/EidasNode/ConnectorMetadata Will be used as
Issuer in the requests that eIDAS-Node Connector sends, but does
not set or validate the physical listener binding, therefore can be a
custom value, like a reverse proxy external URL.
connector.organization.name
Name of the organization displayed in metadata
connector.organization.displayname
Localised display name of the organization for metadata
connector.organization.url
URL of the organisation for metadata containing information
specific.proxyservice.request.receiver
URL for Specific ProxyService requests receiver only used when
Specific ProxyService is built/deployed as WAR
https://<specific ProxyService.yourHostname>:<specific
ProxyService.yourPort>/SpecificProxyService/ProxyServiceRe
quest
specific.connector.response.receiver
URL for Specific Connector response receiver used when Specific
Connector is built/deployed as WAR
https://<specific ProxyService.yourHostname>:<specific
ProxyService.yourPort>/SpecificProxyService/
ConnectorResponse
eIDAS-Node Installation and Configuration Guide Version 2.1
Copyright European Commission — DIGIT Page 31 of 62
Key
Description
connector.url.redirect.location.whitel
ist
A list of urls to be checked against metadata url when redirect is
used
connector.url.post.location.whitelist
A list of urls to be checked against metadata url when POST is used
If you are running tests across the network you must change the
connector.assertion.url to reflect the IP address of the machine running the
eIDAS-Node Connector to:
http://connector.ip.address:connector.port.number/node.deployment.name/ColleagueResponse
4.2.3.3. Configuring the recognised eIDAS-Node Proxy Service
The eIDAS-Node Connector recognises the eIDAS-Node Proxy Services listed in
eidas.xml. Increment the service.number, add their keys and respective values. The
URL must be in the format:
http://service.ip.address:service.port.number/service.deployment.name/ColleagueRequest
Table 6: Adding eIDAS-Node Proxy Service to Connector
Key
Description
service.number
Number of known eIDAS-Node Proxy Service
serviceX.id
Id of the eIDAS-Node Proxy Service X(=unique positive integer)
serviceX.name
Name of the eIDAS-Node Proxy Service X(=unique positive integer)
serviceX.metadata.url
URL where the eIDAS-Node Proxy Service X publishes its metadata
serviceX.skew.notbefore
Time skew in milliseconds to adjust notBefore SAML condition in Connector. The
actual value is added to the received time condition, negative value is possible.
serviceX.skew.notonorafter
Time skew in milliseconds to adjust notOnOrAfter SAML condition in Connector.
The actual value is added to the received time condition. A negative value is
possible.
4.2.4. eIDAS-Node Proxy Service configuration
To activate an eIDAS-Node Proxy Service the following properties need to be
provided:
Table 7 : eIDAS-Node Proxy Service setup
Key
Description
service.id
NOT USED
service.countrycode
The eIDAS-Node Proxy Service country ID in ISO 3166-1 alpha-3
format e.g. PT is the ISO 3166 code for Portugal. Used when the
eIDAS-Node Proxy Service constructs the unique identifier
attributes .
eIDAS-Node Installation and Configuration Guide Version 2.1
Copyright European Commission — DIGIT Page 32 of 62
Key
Description
service.contact.support.email
Email address of the support contact (for metadata)
service.contact.support.company
Company of the support contact (for metadata)
service.contact.support.givenname
Given name of the support contact (for metadata)
service.contact.support.surname
Surname of the support contact (for metadata)
service.contact.support.phone
Phone number of the support contact (for metadata)
service.contact.technical.email
Email address of the technical contact (for metadata)
service.contact.technical.company
Company name of the technical contact (for metadata)
service.contact.technical.givenname
Given name of the technical contact (for metadata)
service.contact.technical.surname
Surname of the technical contact (for metadata)
service.contact.technical.phone
Phone number of the technical contact (for metadata)
service.organization.name
Name of the organisation displayed in the metadata
service.organization.displayname
Localised display name of the organisation for metadata
service.organization.url
URL of the organisation for Metadata containing information
service.metadata.url
The URL under which the metadata of Proxy Service will be made
available, e.g. http://server:port/EidasNode/ServiceMetadata
Will be used as Issuer in the requests that eIDAS-Node Proxy
Service sends, but does not set or validate the physical listener
binding, therefore can be a custom value, like a reverse proxy
external URL.
service.LoA
Sets the Level of Assurance for the service. The following values are
accepted:
http://eidas.europa.eu/LoA/low
http://eidas.europa.eu/LoA/substantial
http://eidas.europa.eu/LoA/high
Checked against the Request.
ssos.serviceMetadataGeneratorIDP.redire
ct.location
The URL for the metadata <md:SingleSignOnService>
location attribute of the SingleSignOnService related to
Binding="urn:oasis:names:tc:SAML:2.0:bindings
:HTTP-POST.
e.g. http://EidasNode:8888/EidasNode/ColleagueRequest
Does not come with physical binding check, so it can be set up for a
reverse proxy external endpoint.
ssos.serviceMetadataGeneratorIDP.post.l
ocation
The URL for the metadata <md:SingleSignOnService>
location attribute of the
SingleSignOnService related to
Binding="urn:oasis:names:tc:SAML:2.0:bindings
:HTTP-Redirect.
e.g. http://EidasNode:8888/EidasNode/ColleagueRequest
Does not come with physical binding check, so it can be set
up for a reverse proxy external endpoint.
eIDAS-Node Installation and Configuration Guide Version 2.1
Copyright European Commission — DIGIT Page 33 of 62
4.2.4.1. eIDAS-Node Proxy Service activation/deactivation
Table 8: Activating the Proxy Service
Key
Description
active.module.service
Whether to activate the Proxy Service module or not. Possible values:
true, false. Default value: true.
4.2.4.2. Additional Configuration — Skew Time
It is possible for clocks to be out of synchronisation between eIDAS-Node instances
(Proxy Service / Connector). To prevent validation errors occurring in the Connector
you can configure a skew time for each Proxy Service. The skew time gives the
Connector an additional tolerance window for validating the timestamps in the SAML
Responses that are sent by the Proxy Service.
Please refer to Table 6: Adding eIDAS-Node Proxy Service to Connector for more
information.
eIDAS-Node Installation and Configuration Guide Version 2.1
Copyright European Commission — DIGIT Page 34 of 62
4.2.5. Additional configuration — Security
This section describes several configuration entries related to security policies. For
more information about the security features please refer to the eIDAS-Node Security
Considerations guide.
Table 9: Security policies
Key
Description
max.requests.ip
Maximum limit of requests per IP within the time frame of max.time.ip
(-1 = unlimited)
max.requests.sp
Maximum limit of requests per SP within the time frame of max.time.sp
(-1 = unlimited)
max.time.ip
Time frame for IP requests (seconds)
max.time.sp
Time frame for SP requests (seconds)
trusted.sp.domains
Allowed SPs to communicate with the eIDAS-Node Connector
(none|all|list;Of;Domains)
validation.bypass
Bypass all SP validations (true|false)
validation.method
Validate the Service Provider by domain or by domain and SPID
(domain|SPID)
min.qaaLevel.value
Minimum valid QAA level (Quality Authentication Assurance)
max.qaaLevel.value
Maximum valid QAA level.
Table 10: Security HTTP header parameters
Key
Description
security.header.CSP.enabled
Enable/disable sending the Content Security Policy (CSP) header. CSP
protects against the injection of foreign content.
security.header.CSP.
includeMozillaDirectives
In the CSP, this additional directive can be added for backward compatibility
with old Mozilla browsers.
security.header.
XXssProtection.block
This header enables the cross-site-scripting (XSS) filter built into most recent
web browsers.
security.header.
XContentTypeOptions.noSniff
The only defined value 'nosniff' prevents Internet Explorer and Google
Chrome from 'MIME-sniffing' by inspecting the content of a response.
security.header.
XFrameOptions.sameOrigin
Prevents the application from being propagated in a frame or iframe, which
in turns protects against key logging, clickjacking and similar attacks. Setting
this option to true will prevent the eIDAS-Node from being framed in
another application.
If the SP needs to frame the eIDAS-Node, the option has to be set to 'false'
(such as on the second tab of the SP Demo where the SAML request is
generated by the eIDAS-Node).
security.header.
HSTS.includeSubDomains
HTTP Strict-Transport-Security (HSTS) instructs browsers to prefer secure
connections to the server (HTTP over SSL/TLS) over insecure ones.

eIDAS-Node Installation and Configuration Guide Version 2.1
Copyright European Commission — DIGIT Page 35 of 62
Key
Description
security.header.CSP.fallbackCh
eckMode
If enabled, CSP fallback check mode includes an enforced CSP violation in
JSP pages in order to check browser CSP feature. The included script
displays a warning message in client browsers if CSP is not supported.
However with CSP enabled browsers it may result in a flood of warning
messages logged by CSP report servlet. Disabled by default. When not set,
the default false value will be applied.
Table 11: Check on certificate security parameter
Key
Description
check.citizenCertificate.
serviceCertificate
Checks that the country code stored in the eIDAS-Node Proxy Service SAML
signing certificate is the same as the citizen country code in the SAML
authentication request.
4.2.5.1. Encryption
Table 12: Configuring encryption algorithm
Key
Description
data.encryption.algorithm
This is an override setting for values set in SAMLEngine
configuration. Contains the encryption algorithm to be used
by Proxy Service and Connector. Possible value must be :
<entry
key="data.encryption.algorithm"></entry>
<!-- List of Encryption algorithms
http://www.w3.org/2009/xmlenc11#aes128-gcm;
http://www.w3.org/2009/xmlenc11#aes256-gcm;
http://www.w3.org/2009/xmlenc11#aes192-gcm;
encryption.algorithm.whitelist
This is an override setting for values set in SAMLEngine
configuration. Contains the encryption algorithms allowed
in the responses received by eIDAS-Node components. As
per specification, this should be:
http://www.w3.org/2009/xmlenc11#aes128-gcm;
http://www.w3.org/2009/xmlenc11#aes256-gcm;
http://www.w3.org/2009/xmlenc11#aes192-gcm;
check_certificate_validity_period
Boolean value (true|false), which indicates if the
application will disallow the use of obsolete certificates.
Applies to the signature check also (see Table 13).
disallow_self_signed_certificate
Boolean value (true|false), which indicates if the
application will disallow of the use of self-signed
certificates. Applies to the signature check also (see Table
13).
eIDAS-Node Installation and Configuration Guide Version 2.1
Copyright European Commission — DIGIT Page 36 of 62
Key
Description
response.encryption.mandatory
Boolean value (true/false), which indicates if the
application will force the encryption of the SAML Response.
4.2.5.2. Signature
Table 13: Signature algorithm
Key
Description
signature.algorithm
This is an override setting for values set in SAMLEngine configuration. The
signing algorithm (SHA2 based) used by the default signer for outgoing requests.
Possible values:
http://www.w3.org/2001/04/xmldsig-more#rsa-sha256
http://www.w3.org/2001/04/xmldsig-more#rsa-sha384
http://www.w3.org/2001/04/xmldsig-more#rsa-sha512
http://www.w3.org/2001/04/xmldsig-more#rsa-ripemd160
http://www.w3.org/2001/04/xmldsig-more#ecdsa-sha256
http://www.w3.org/2001/04/xmldsig-more#ecdsa-sha384
http://www.w3.org/2001/04/xmldsig-more#ecdsa-sha512
http://www.w3.org/2007/05/xmldsig-more#sha256-rsa-MGF1
The default value is:
http://www.w3.org/2001/04/xmldsig-more#rsa-sha512
If another value is set, eIDAS-Nodes will use RSA-SHA512 algorithm and an error
will be logged.
signature.algorithm.whitelist
This is an override setting for values set in SAMLEngine configuration. The list of
allowed signature algorithms (in incoming requests). It contains OpenSAML's
supported signing algorithms, separated by ;.Currently the elements of the list s
may be picked from the following:
http://www.w3.org/2001/04/xmldsig-more#rsa-sha256
http://www.w3.org/2001/04/xmldsig-more#rsa-sha384
http://www.w3.org/2001/04/xmldsig-more#rsa-sha512
http://www.w3.org/2001/04/xmldsig-more#rsa-ripemd160
http://www.w3.org/2001/04/xmldsig-more#ecdsa-sha256
http://www.w3.org/2001/04/xmldsig-more#ecdsa-sha384
http://www.w3.org/2001/04/xmldsig-more#ecdsa-sha512
http://www.w3.org/2007/05/xmldsig-more#sha256-rsa-MGF1
response.sign.assertions
When set to true, the SAML Responses (generated in Proxy Service and
Connector) will have the attribute assertion signed
4.2.5.3. SAML Binding method
Table 14: SAML binding parameters
Key
Description
allow.redirect.binding
Whether to allow the HTTP Redirect binding. Possible values are true/false. (this
was only applicable for STORK 1 message format and for testing purposes). For
eIDAS, there are no bindings in the request.
validate.binding
Whether to validate the actual binding (POST or GET/Redirect) against
ProtocolBinding attribute value of the SAML request. Possible values are
true/false.

eIDAS-Node Installation and Configuration Guide Version 2.1
Copyright European Commission — DIGIT Page 37 of 62
By default, eIDAS-Nodes operate using SAML POST Binding. The parameter
allow.redirect.binding (set to true) instructs the eIDAS-Node to accept HTTP
Redirect Binding SAML requests, normally coming as HTTP GET requests. When HTTP
Redirect Binding is used the following items should be considered:
Most browsers have low limit for the size of GET request.
Most servers have low limit for the size for HTTP header (e.g. in Apache
Tomcat v7 this limit is about 8k; in order to increase this limit, the connector
element in server.xml should contain a maxHttpHeaderSize element with the
new limit);
When this binding is activated, an HTTP redirect binding request received by
Connector will be forwarded also as a redirect to Proxy Service and further (to
IdP);
The response is always sent back through a HTTP Post operation.
4.2.5.4. Additional Configuration — SignModule_Service.xml and
SignModule_Connector.xml
It may be necessary to change the keyStorePath to reflect the location of your
eidasKeyStore.jks and eidasKeyStore_METADATA.jks files, please see the eIDAS-
Node and SAML manual for more information.
4.2.5.5. Additional Configuration — Anti-replay Cache and Correlation Map
Configuration
To prevent a replay of SAML requests an anti-replay cache is implemented at the
eIDAS-Node Connector and eIDAS-Node Proxy Service level. We provide two
different implementations for these caches, which can be configured. By default, the
eIDAS-Node is set up to use a distributed cache with expiration.
This implementation is provided for correlating request and reply pairs both for
AuthenticationRequests and LightRequests.
Hazelcast-backed caches are intended to be used in production environments.
Development environment may use lighter cache implementations (simple
ConcurrentHashMap based), which are activated by setting the parameter
distributedMaps to false in eidas.xml.
By default there is one Hazelcast instance used by the Node for both correlation and
anti-replay map purposes.
<!-- production environment hazelcast instance name -->
<bean id="defaultHazelcastInstance" class="java.lang.String">
<constructor-arg value="eidasHazelcastInstance"/>
</bean>
Figure 3: Default Hazelcast instance name
The default instance is provided by the eidasHazelcastInstanceInitializer bean.

eIDAS-Node Installation and Configuration Guide Version 2.1
Copyright European Commission — DIGIT Page 38 of 62
<!-- production environment hazelcast initializer bean - injected into map
providers -->
<bean id="eidasHazelcastInstanceInitializer" class="
eu.eidas.auth.commons.cache.HazelcastInstanceInitializer" init-
method="initializeInstance" lazy-init="true">
<property name="hazelcastConfigfileName" value="hazelcast.xml"/>
<property name="hazelcastInstanceName" ref="defaultHazelcastInstance"/>
</bean>
Figure 4: Default Hazelcast instance provider bean
This bean is injected into beans that have defined as class
ConcurrentMapServiceDistributedImpl or DistributedMetadataCaching. If the
distributed environment requires setup of multiple Hazelcast instances, the
configuration can be done simply adding more of the above beans to
applicationContext.
<bean id="springServiceCMapAntiReplayProviderProd"
class="eu.eidas.auth.commons.cache.ConcurrentMapServiceDistributedImpl"
lazy-init="true">
<property name="hazelcastInstanceInitializer"
ref="eidasHazelcastInstanceInitializer"/>
<property name="cacheName" value="antiReplayCacheService"/>
</bean>
<bean id="springConnectorCMapAntiReplayProviderProd"
class="eu.eidas.auth.commons.cache.ConcurrentMapServiceDistributedImpl"
lazy-init="true">
<property name="hazelcastInstanceInitializer"
ref="eidasHazelcastInstanceInitializer"/>
<property name="cacheName" value="antiReplayCacheConnector"/>
</bean>
Figure 5: Anti-replay cache configuration — Hazelcast —
applicationContext.xml
For correlation maps, there are two AuthRequest and one LightRequest type maps
in ApplicationContext, one for the Connector, two for the Proxy Service one of
which is for the Specific Connector.
<bean id="springConnectorCMapCorProviderProd"
class="eu.eidas.auth.commons.cache.ConcurrentMapServiceDistributedImpl" lazy-
init="true">
<property name="hazelcastInstanceInitializer"
ref="eidasHazelcastInstanceInitializer"/>
<property name="cacheName"
value="connectorRequestCorrelationCacheService"/>
</bean>
<bean id="springServiceCMapCorProviderProd"
class="eu.eidas.auth.commons.cache.ConcurrentMapServiceDistributedImpl" lazy-
init="true">
<property name="hazelcastInstanceInitializer"
ref="eidasHazelcastInstanceInitializer"/>
<property name="cacheName"
value="proxyServiceRequestCorrelationCacheService"/>
</bean>

eIDAS-Node Installation and Configuration Guide Version 2.1
Copyright European Commission — DIGIT Page 39 of 62
<bean id="springConnectorCMapspecificLightCorProviderProd"
class="eu.eidas.auth.commons.cache.ConcurrentMapServiceDistributedImpl" lazy-
init="true">
<property name="hazelcastInstanceInitializer"
ref="eidasHazelcastInstanceInitializer"/>
<property name="cacheName"
value="specificConnectorLtRequestCorrelationCacheService"/>
</bean>
Figure 6: Correlation map cache configuration — Hazelcast —
applicationContext.xml
For more information about the Hazelcast product, please refer to section 7.3 — Set
up Hazelcast and Appendix C.
4.2.5.6. Error Codes and Error Messages
The full list of eIDAS-Node error codes and related error messages is shown in the
eIDAS-Node Error Codes document. Each error message must be used to match the
error to present to the citizen (errors.properties file), to present to sysadmin
(sysadmin.properties) and to translate in the Connector the errors from the Proxy
Service.
For each error message a new property should exist in the following files:
EIDAS-NODE/src/main/resources/error.properties
EIDAS-NODE/src/main/resources/sysadmin.properties
EIDAS-NODE/src/main/resources/eidastranslation.properties
For example, for the following eidasErrors.properties property:
connectorSAMLResponse.message=error.gen.connector.saml
you must add the following in the error.properties:
authenticationFailed.code=003002
authenticationFailed.message=authentication.failed
You must also add the following property to sysadmin.properties in the native
Proxy Service language:
authentication.failed={0} - Authentication Failed.
Note: This format is mandatory: {0} – Error Message.
Using the same format, you must add the following property to
eidastranslation.properties in the native eIDAS-Node Connector language:
authentication.failed={0} - A autenticação falhou.
Bear in mind that you must have as many error.properties files as the required
languages. The file name follows the standards:
error_pt.properties (i.e. Portuguese language)
error_es.properties (i.e. Spanish language)
error_en.properties (i.e. English language)

eIDAS-Node Installation and Configuration Guide Version 2.1
Copyright European Commission — DIGIT Page 40 of 62
4.2.6. Specific properties
For the Basic Setup, you might need to reconfigure MS-Specific module Configuration
for that application as detailed in the eIDAS-Node Demo Tool Installation and
Configuration Guide.
4.2.7. Demo Service Provider
For the Basic Setup, you might need to reconfigure Demo Service Provider.
Configuration for that application is detailed in the eIDAS-Node Demo Tool
Installation and Configuration Guide.
4.2.8. Demo Identity Provider
In order to proceed with Basic Setup, you might need to modify the configuration of
Demo Identity Provider. The procedure and settings are detailed in the eIDAS-Node
Demo Tool Installation and Configuration Guide.
eIDAS-Node Installation and Configuration Guide Version 2.1
Copyright European Commission — DIGIT Page 41 of 62
5. Building and deploying the software
This section describes the steps to build and then to deploy the software on the
supported servers. There are two main types of eIDAS-Node: Connector and Proxy
Service.
The project build files are in Maven3 format, so you need to install Maven. Download
instructions are provided at http://maven.apache.org/run-maven/index.html).
Recommended versions of Maven are 3.3.9 and above. Lower versions can result in
exceptions.
There are two ways to build the binaries from sources:
1. Parent build: the pom.xml file in the EIDAS-Parent module is a common
reference for all dependent module/external Maven artefact versions, and able
to build all binaries related to EidasNode and/or Demo Tools.
There are various profiles to help tailoring the build to one's particular needs:
these can be split in two main categories.
First: profiles related to application server specifics, for instance profiles
named tomcat (this is active by default, also used to for the glassfish AS
build), weblogic, websphere (also used to for the liberty profile build) and
jboss.
Second: two profiles related to the scope of modules to be built, specifically
NodeOnly (this is active by default,) and DemoToolsOnly.
For instance issuing Maven "install" command with the appropriate activation
profile (e.g. for WebLogic: -P weblogic,NodeOnly,DemoTools) will result in a
full build.
2. Module-based build: it is possible to build the artefacts one-by-one, which
can be helpful if there is a need to build just one module. In this case please
remember the dependencies between them. There is a certain order that
needs to be followed.
The next sections detail the above two methods for supported application servers.
5.1. Tomcat/GlassFish server deployment
You must compile, install and deploy the projects, either by compiling the parent
project or by compiling each module separately in the order shown below. At a
command prompt, navigate to the folder shown below and enter the corresponding
command line.
Note: $GLASSFISH_HOME refers to the base directory of your GlassFish
server (e.g. /home/user/apps/glassfishv3).

eIDAS-Node Installation and Configuration Guide Version 2.1
Copyright European Commission — DIGIT Page 42 of 62
Table 15: Parent project build for Tomcat/GlassFish Server deployment
Step
Folder
Command line
1
EIDAS-Parent
mvn clean install –P
tomcat,NodeOnly[,DemoToolsOnly]
After the build has been done, deploy EidasNode.war, IdP.war,
SP.war, SpecificConnector.war and SpecificProxyService.war .
Table 16: Module-based build for Tomcat/GlassFish Server deployment
Step
Folder
Command line
1
EIDAS-Parent
mvn clean install
2
EIDAS-Light-Commons
mvn clean install
3
EIDAS-Commons
mvn clean install
4
EIDAS-
SpecificCommunicationDefinition
mvn clean install
5
EIDAS-Encryption
mvn clean install
6
EIDAS-ConfigModule
mvn clean install
7
EIDAS-Metadata
mvn clean install
8
EIDAS-SAMLEngine
mvn clean install
9
EIDAS-Updater
mvn clean install
10
EIDAS-Node
a. mvn clean package –P tomcat
b.
Tomcat: copy target/EidasNode.war
$TOMCAT_HOME/webapps/EidasNode.war
GlassFish: copy target/EidasNode.war
$GLASSFISH_DOMAIN/autodeploy/EidasNode.war
5.2. JBoss7, WildFly 11.0.0 Server deployment
You must compile, install and deploy the projects, either by compiling the parent
project or by compiling each module separately in the order shown below. At a
command prompt, navigate to the folder shown below and enter the corresponding
command line.
Note: The $SERVER_CONFIG variable refers to JBoss/WildFly server configuration
name (e.g. default)
eIDAS-Node Installation and Configuration Guide Version 2.1
Copyright European Commission — DIGIT Page 43 of 62
If you want to use the 'default' configuration server, your full path will be:
/home/user/apps/jboss-7.4.0.GA/server/default.
Table 17: Parent project build for JBoss7/WildFly 11.0.0 Server deployment
Step
Folder
Command line
1
EIDAS-Parent
mvn clean install –P jBoss7,NodeOnly,DemoToolsOnly
After the build has been done, deploy EidasNode.war, IdP.war, SP.war,
SpecificConnector.war and SpecificProxyService.war .
Table 18: Module-based build for JBoss7/WildFly 11.0.0 Server deployment
Step
Folder
Command line
1
EIDAS-Parent
mvn clean install
2
EIDAS-Light-Commons
mvn clean install
3
EIDAS-Commons
mvn clean install
4
EIDAS-SpecificCommun
icationDefinition
mvn clean install
5
EIDAS-Encryption
mvn clean install
6
EIDAS-ConfigModule
mvn clean install
7
EIDAS-Metadata
mvn clean install
8
EIDAS-SAMLEngine
mvn clean install
9
EIDAS-Updater
mvn clean install
10
EIDAS-Node
a. mvn clean package –P jBoss7
b. copy target/EidasNode.war $JBOSS_HOME/
standalone/deployments/EidasNode.war
5.3. WebLogic Server deployment
You must compile, install and deploy the projects, either by compiling the parent
project or by compiling each module separately in the order shown below. At a
command prompt, navigate to the folder shown below and enter the corresponding
command line.
Table 19: Parent project build for WebLogic Server deployment
Step
Folder
Command line
1
EIDAS-Parent
mvn clean install –P
weblogic,NodeOnly,DemoToolsOnly
After the build has been done, deploy EidasNode.war, IdP.war,
SP.war, SpecificConnector.war and
SpecificProxyService.war .
eIDAS-Node Installation and Configuration Guide Version 2.1
Copyright European Commission — DIGIT Page 44 of 62
Table 20: Module-based build for WebLogic Server deployment
Step
Folder
Command line
1
EIDAS-Parent
mvn clean install
2
EIDAS-Light-Commons
mvn clean install
3
EIDAS-Commons
mvn clean install
4
EIDAS-SpecificCommun
icationDefinition
mvn clean install
5
EIDAS-Encryption
mvn clean install
6
EIDAS-ConfigModule
mvn clean install
7
EIDAS-Metadata
mvn clean install
8
EIDAS-SAMLEngine
mvn clean install
9
EIDAS-Updater
mvn clean install
10
EIDAS-Node
a. mvn clean package –P weblogic
b. copy target/EidasNode.war $WLS_HOME/DOMAIN/
autodeploy/EidasNode.war
5.4. WebSphere Server deployment
You must compile, install and deploy the projects, either by compiling the parent
project or by compiling each module separately in the order shown below using
WebSphere's Admin Console. At a command prompt, navigate to the folder shown
below and enter the corresponding command line:
Table 21: Parent project build for WebSphere Server deployment
Step
Folder
Command line
1
EIDAS-Parent
mvn clean install –P
websphere,NodeOnly,DemoToolsOnly
After the build has been done, deploy EidasNode.war, IdP.war
and SP.war, SpecificConnector.war and
SpecificProxyService.war.
Table 22: Module-based build for WebSphere Server deployment
Step
Folder
Command line
1
EIDAS-Parent
mvn clean install
2
EIDAS-Light-Commons
mvn clean install
3
EIDAS-Commons
mvn clean install
4
EIDAS-SpecificCommunicationDefinition
mvn clean install

eIDAS-Node Installation and Configuration Guide Version 2.1
Copyright European Commission — DIGIT Page 45 of 62
Step
Folder
Command line
5
EIDAS-Encryption
mvn clean install
6
EIDAS-ConfigModule
mvn clean install
7
EIDAS-Metadata
mvn clean install
8
EIDAS-SAMLEngine
mvn clean install
9
EIDAS-Updater
mvn clean install
10
EIDAS-Node
mvn clean package –P websphere
5.5. Monolithic Deployment
Besides the ‘Basic Deployment’ described in this document, a ‘Monolithic Deployment’
is possible. In this case the EidasNode.war will include SpecificConnector and
SpecificProxyService modules as JARs.
In this case add –D specificJar to the build commands for the following modules:
EIDAS-SpecificCommunicationDefinition
EIDAS-Node
This also applies to Demo Tools modules, so please check the Monolithic Deployment
section in the Demo Tools Installation and Configuration Guide for more details.
Lastly, if monolithic deployment will be performed , the operator will need to follow
and take into consideration the document above (Demo Tools Installation and
Configuration Guide), notably the configuration parameters such
relaystate.randomize.null , etc.
eIDAS-Node Installation and Configuration Guide Version 2.1
Copyright European Commission — DIGIT Page 46 of 62
6. Verifying the installation
This section shows the final structure of your application server relevant directories,
so that you can confirm that you have made the proper configurations. The structure
of the application’s 'war' files is also shown so you can verify that your applications
were built successfully.
6.1. Tomcat 7, 8
$TOMCAT_HOME/endorsed
resolver-2.9.1.jar
serializer-2.7.2.jar
xalan-2.7.2.jar
xercesImpl-2.11.0.jar
xml-apis-1.4.01.jar
$TOMCAT_HOME/webapps/
EidasNode.war
(server specific directories were not included)
6.2. JBoss 7
Check modules directory for the presence of BouncyCastle and xml-apis
modules.
Copy war files under $JBOSS_HOME/standalone/Deployments.
6.3. WildFly 11.0
Check modules directory for the presence of BouncyCastle and xml-apis
modules.
Copy war files under $WILDFLY_HOME/standalone/Deployments.
6.4. GlassFish V4.1, V5
6.4.1. GlassFish V4.1
$GLASSFISH_DOMAIN/lib/ext/
xml-apis-1.4.01.jar
$GLASSFISH_DOMAIN/autodeploy/
EidasNode.war
(server specific directories were not included)
eIDAS-Node Installation and Configuration Guide Version 2.1
Copyright European Commission — DIGIT Page 47 of 62
6.4.2. GlassFish V5
$GLASSFISH_DOMAIN/domains/domain1/lib/ext
resolver-2.9.1.jar
serializer-2.7.2.jar
xalan-2.7.2.jar
xercesImpl-2.11.0.jar
xml-apis-1.4.01.jar
$GLASSFISH_DOMAIN/autodeploy/
EidasNode.war
(server specific directories were not included)
6.5. WebLogic
$WLS_HOME/domain/autodeploy/
EidasNode.war
(server specific directories were not included)
$DOMAIN_HOME/lib/
xml-apis-1.4.01.jar
6.6. WebSphere Application Server
WebSphere Application Server 8.5.5 has no requirement to add/replace endorsed
libraries. The deployment of the WAR files may be done using the admin console.
In Enterprise Applications > EidasNode > ClassLoader choose:
Class loader order to: Classes loaded with local class loader first (parent last);
WAR class loader policy to: Single class loader for application
Note: for WebSphere Liberty Profile deployment see section 3.2.7 — Configuring
WebSphere Liberty Profile.
6.7. Configuration files
The below configuration and keystore files are needed for the installation of the
eIDAS-Node. The layout itself can be different, depending on the environment
variables, so this is just an example of Basic Setup:
server/eidas.xml
server/encryptionConf.xml
server/EncryptModule_Connector.xml
server/EncryptModule_Service.xml
server/hazelcast.xml
server/saml-engine-additional-attributes.xml
server/SamlEngine.xml
server/SamlEngine_Connector.xml
server/SamlEngine_Service.xml
server/SignModule_Connector.xml
server/SignModule_Service.xml
server/specificConnector/specificCommunicationDefinitionConnector.xml

eIDAS-Node Installation and Configuration Guide Version 2.1
Copyright European Commission — DIGIT Page 48 of 62
server/specificProxyService/specificCommunicationDefinitionProxyservice.xml
keystore/eidasKeyStore.jks
keystore/eidasKeyStore_Connector_CA.jks
keystore/eidasKeyStore_Connector_CB.jks
keystore/eidasKeyStore_Connector_CC.jks
keystore/eidasKeyStore_Connector_CD.jks
keystore/eidasKeyStore_Connector_CF.jks
keystore/eidasKeyStore_METADATA.jks
keystore/eidasKeyStore_Service_CA.jks
keystore/eidasKeyStore_Service_CB.jks
keystore/eidasKeyStore_Service_CC.jks
keystore/eidasKeyStore_Service_CD.jks
keystore/eidasKeyStore_Service_CF.jks
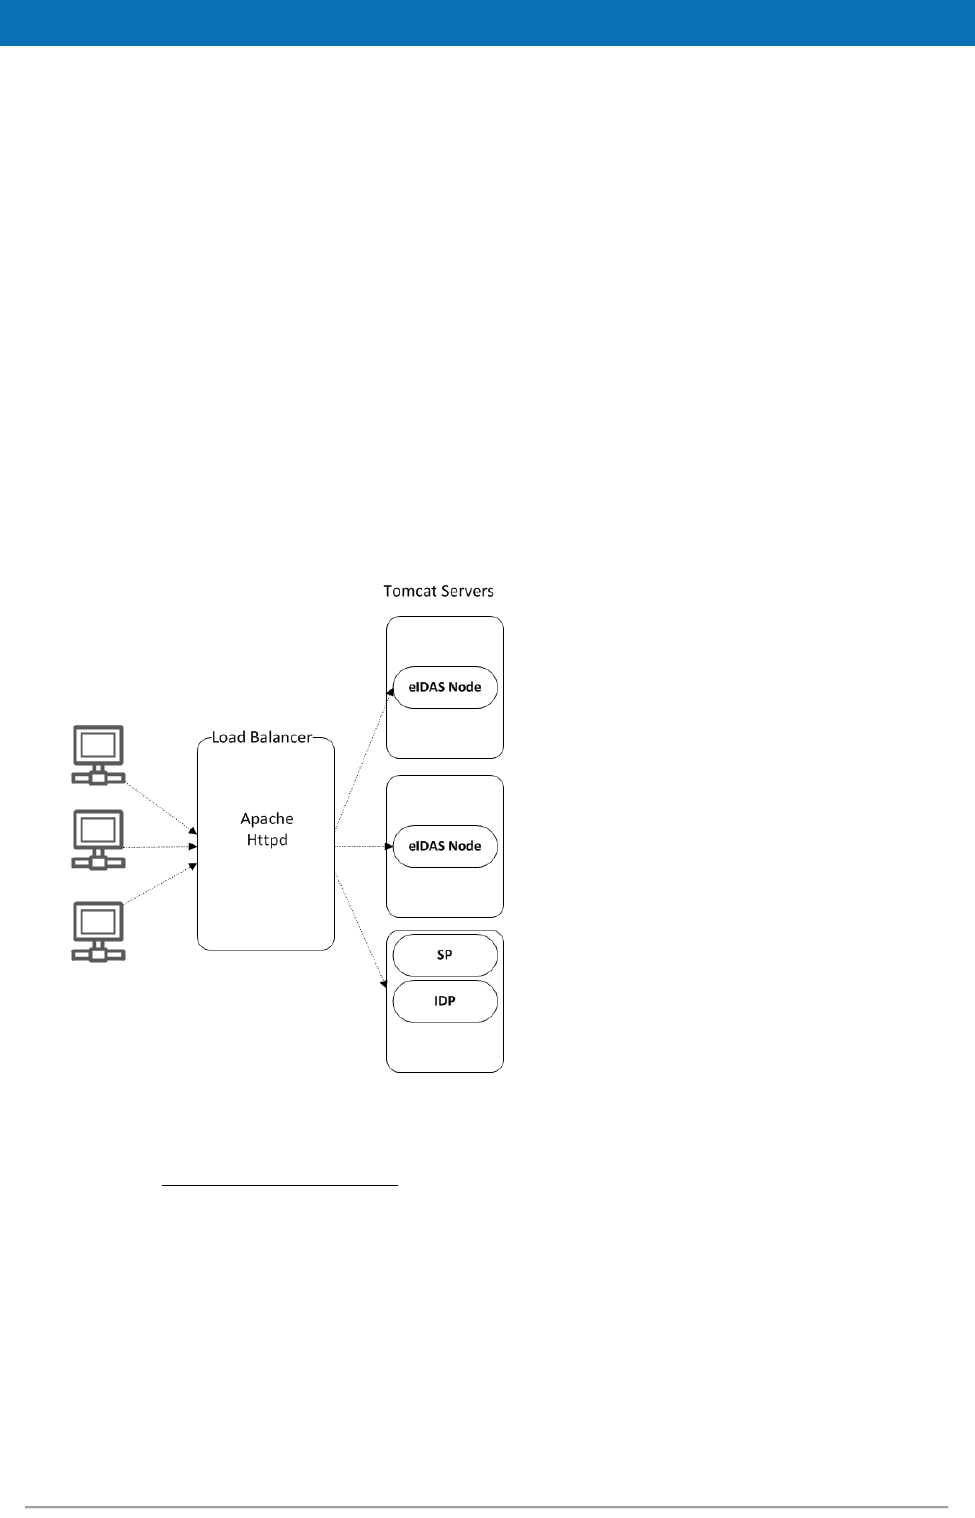
eIDAS-Node Installation and Configuration Guide Version 2.1
Copyright European Commission — DIGIT Page 49 of 62
7. Advanced configuration for production environments
This section provides detailed descriptions of the configurations to enable you to
change specific aspects as required.
7.1. Clustering environment
This section describes the technologies and configurations used by the eIDAS-Node in
cluster mode. The choice of technologies is proposed for testing purpose.
7.1.1. Load balancer
The configuration adopted is the following:
One load balancer composed of two Tomcat 7 (version 7.0.55) servers
including the eIDAS-Node;
One Apache Http server to isolate SP/IDP request.
Figure 7: Clustering environment — Load balancer
The solution is to add one server in-front of all Tomcat clusters to accept all the
requests and distribute to the cluster. So this server acts as a load balancer.
There are several servers available with load balancing capability. Here we are going
to use Apache httpd web server as a load balancer. With mod_jk module.
If one of the Tomcat instances fails then the load balancer dynamically reacts by
ceasing to forward requests to that failed Tomcat instances. Other Tomcat instances
continue as normal.
If the failed Tomcat is recovered from the failed state to normal state the load
balancer will include it in the cluster to receive requests.
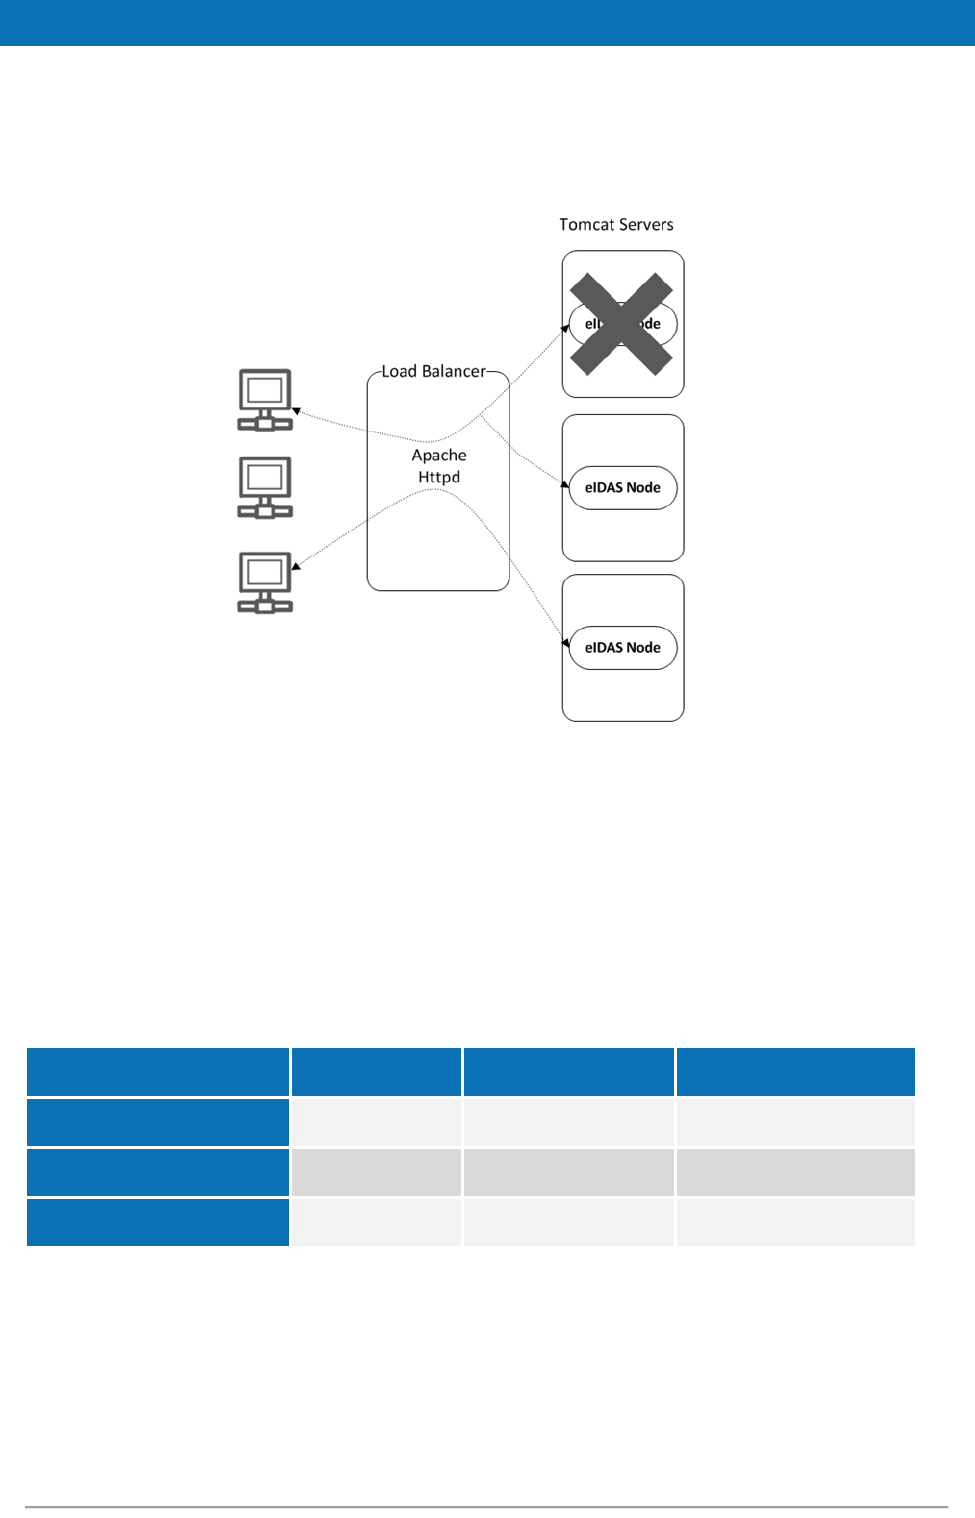
eIDAS-Node Installation and Configuration Guide Version 2.1
Copyright European Commission — DIGIT Page 50 of 62
7.1.2. Load balancer with Hazelcast
Hazelcast gives High availability and full fail-over capability to our clustering
environment.
Figure 8: Clustering environment — Load Balancer with Hazelcast
For Hazelcast, replication of message exchange states (in correlation maps) needs to
be set up (see section 7.3 — Set up Hazelcast).
7.2. Configuring Tomcat
7.2.1. Setting AJP ports
Traffic is passed between Apache and Tomcat(s) uses the binary AJP 1.3 protocol.
Application Server
Http port
AJP port
Requests
Tomcat 7 – instance 1
Tomcat 1 port
8209
Connector, Proxy Service
Tomcat 7 – instance 2
Tomcat 2 port
8309
Connector, Proxy Service
Tomcat 7 - instance 3
Tomcat 3 port
8409
SP, IDP
7.2.2. Apache HTTPD
In this section we will use Apache httpd web server as a Load Balancer.
To provide the load balancing capability to Apache httpd server we need to include
the module mod_jk.

eIDAS-Node Installation and Configuration Guide Version 2.1
Copyright European Commission — DIGIT Page 51 of 62
7.2.2.1. Install and configure mod_jk
The mod_jk module is downloaded from http://www.apache.org/dist/tomcat/tomcat-
connectors/jk/binaries/.
mod_jk is the Apache HTTPD module that will be used to provide our cluster with its
load balancing and proxy capabilities, by default it uses the 'round robin' algorithm to
distribute the requests. It uses the AJP protocol to facilitate fast communication
between Tomcat servers and the Apache Web Server that will receive the client
requests.
Configuration consists of adding a few lines to the main Apache HTTPD configuration
file httpd.conf:
JkMount /status stat
JkMount /EidasNode/* balancer
JkMount /SP/* tomcat3
JkMount /IdP/* tomcat3
7.2.2.2. Configure the cluster workers
'Workers' is a blanket term used within mod_jk to refer to both real Tomcat servers
that will process requests, and virtual servers included in the module to handle load
balancing and monitoring.
File: workers.properties
By default, mod_jk includes three additional load balancing algorithms, some of
which are more appropriate for certain situations, and can be configured with the
'method' directive:
worker.list=balancer,stat,tomcat3
worker.tomcat1.type=ajp13
worker.tomcat1.port=8209
worker.tomcat1.host=localhost
worker.tomcat2.type=ajp13
worker.tomcat2.port=8309
worker.tomcat2.host=localhost
worker.tomcat3.type=ajp13
worker.tomcat3.port=8409
worker.tomcat3.host=localhost
worker.balancer.type=lb
worker.balancer.balance_workers=tomcat1,tomcat2
7.3. Set up Hazelcast
To replicate required information between cluster members, all nodes need to be
configured with Hazelcast. Please refer to section 4.2.5.5 — Additional Configuration
— Anti-replay Cache and Correlation Map Configuration and Appendix C for
information on how to implement the required configuration.
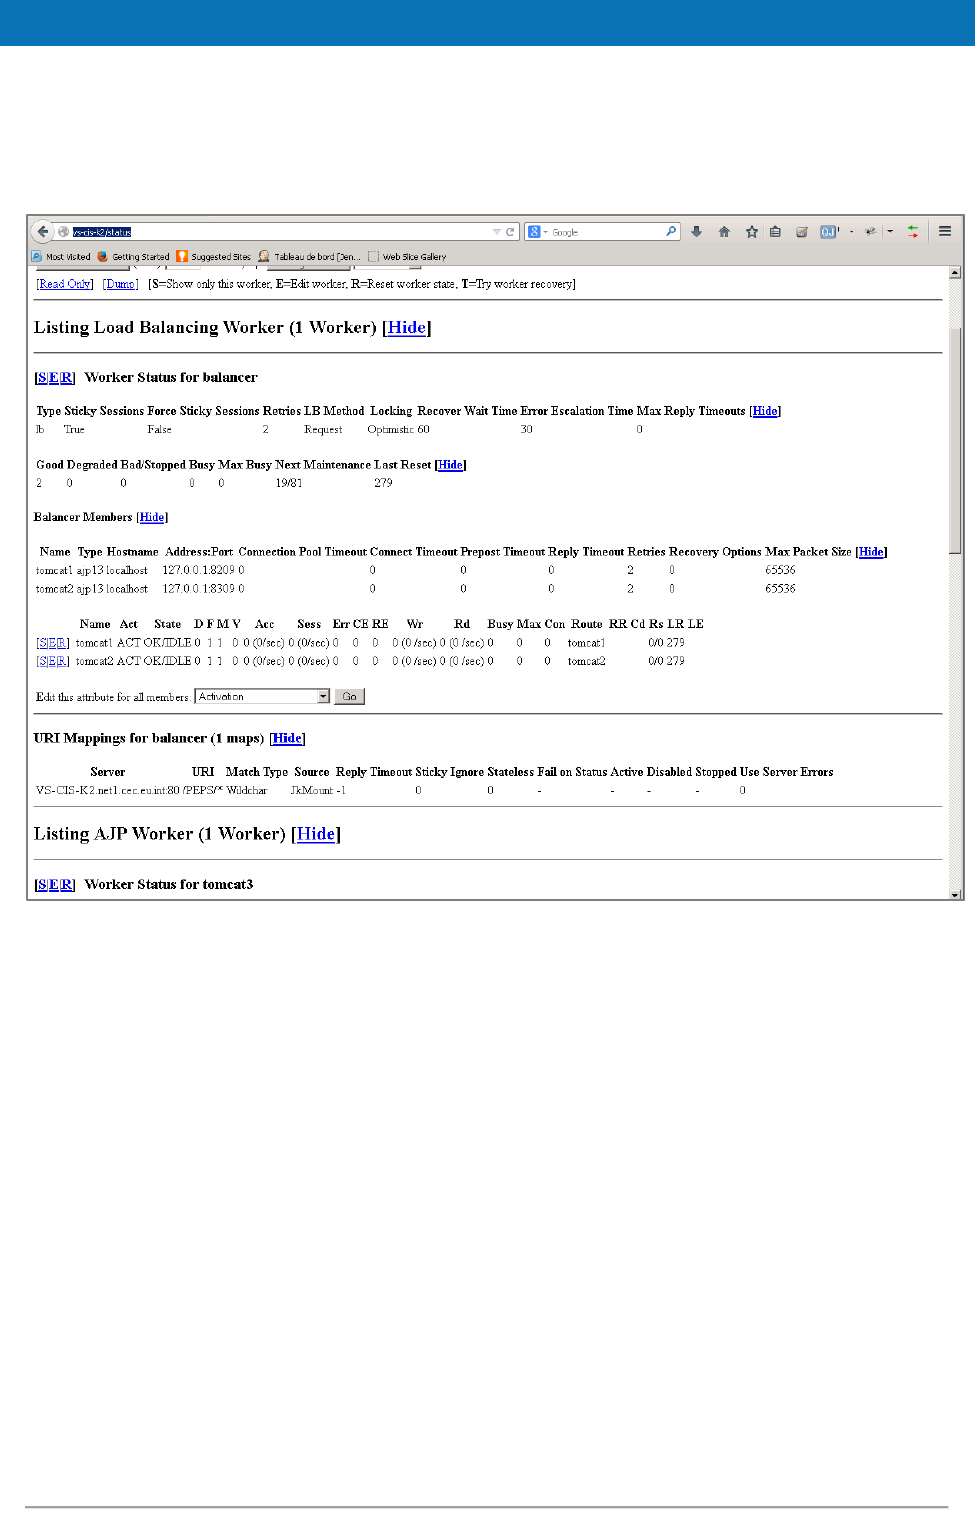
eIDAS-Node Installation and Configuration Guide Version 2.1
Copyright European Commission — DIGIT Page 52 of 62
7.4. Check your installation
Open the Apache status page: http://localhost/status and check that each node is up and
running.
Figure 9: Apache status page
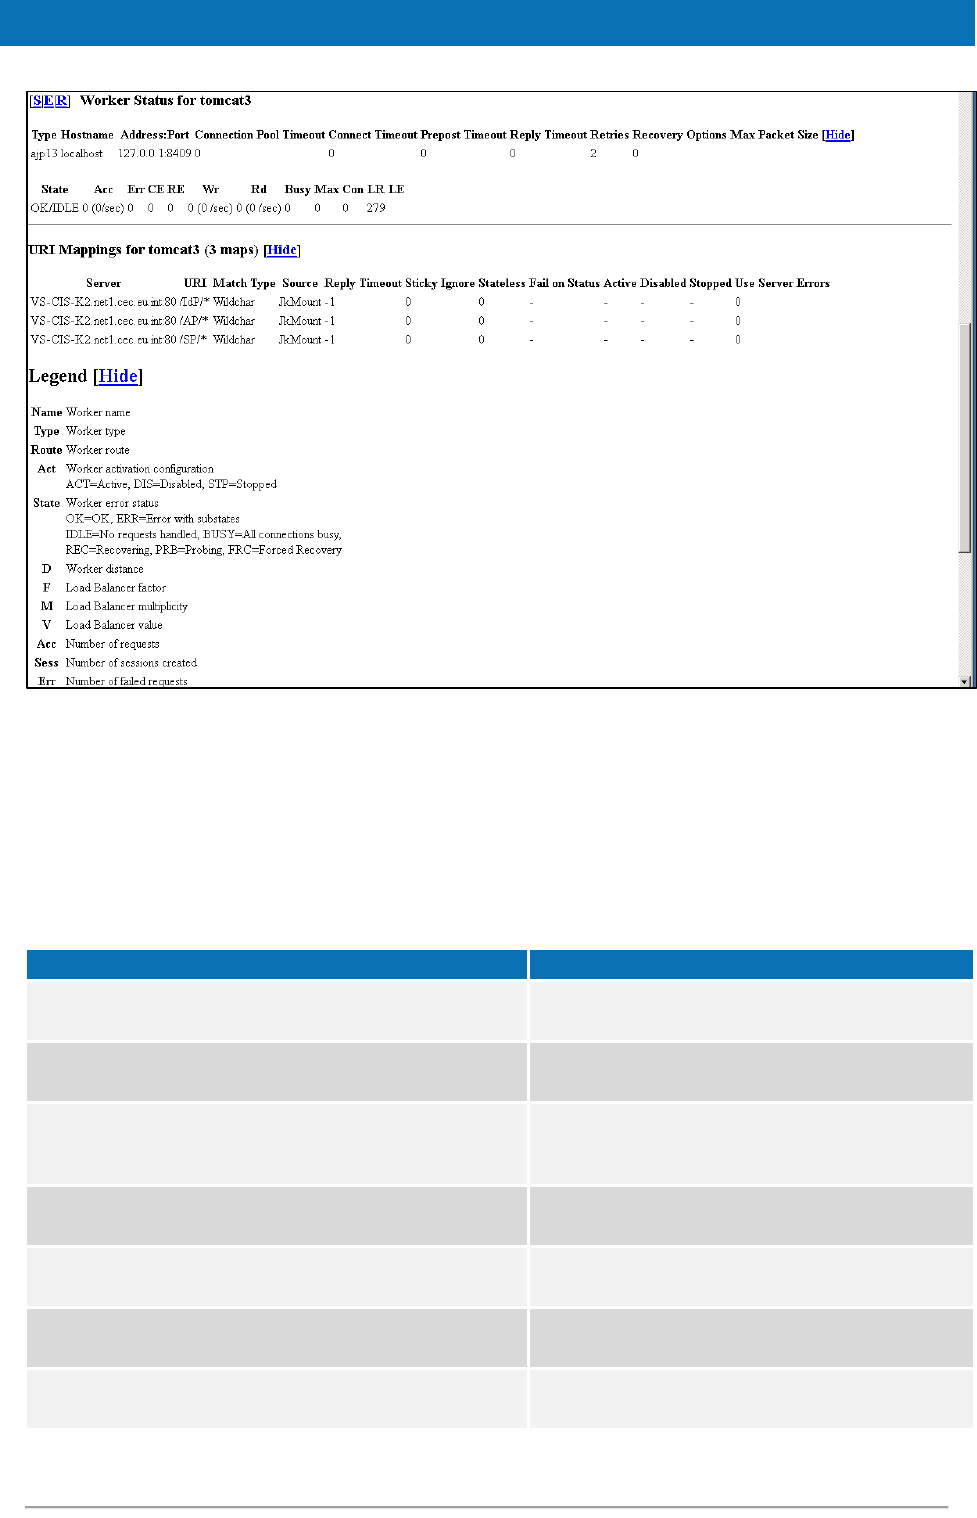
eIDAS-Node Installation and Configuration Guide Version 2.1
Copyright European Commission — DIGIT Page 53 of 62
Figure 10: Apache status page (continued)
7.5. eIDAS-Node compliance
To ensure the eIDAS compliance, there is a list of parameters to specifically set.
Those parameters are listed below.
Table 23: eIDAS-Node compliance
Parameter
Resulting value
disallow_self_signed_certificate
True: do not allow self-signed and expired certificates
check_certificate_validity_period
True: do not allow expired certificates
metadata.activate
True: specifies that metadata is generated by the
Connector
metadata.restrict.http
True : metadata must be only available via HTTPS
tls.enabled.protocols
TLSv1.1,TLSv1.2: SSL/TLS enabled protocols
tls.enabled.ciphers
TLS enabled cipher suites
metadata.check.signature
True : metadata received from a partner must be signed
eIDAS-Node Installation and Configuration Guide Version 2.1
Copyright European Commission — DIGIT Page 54 of 62
Parameter
Resulting value
metadata.validity.duration
Metadata validity period in seconds. Default=86400 (i.e.
one day)
validate.binding
True: the bindings are validated
security.header.csp.enabled
True: the content-security and security checks are
enabled (HSTS, Mozilla directives, X-content-Type-
Options, X-frame-options,
disable.check.mandatory.eidas.attributes
False: check the eIDAS minimum dataset constraint.
Note: this parameter is used by both Proxy Service and
Connector.
disable.check.representative.attributes
False: check the existence of Representative attributes in
requests.
Note: this parameter is used by both eIDAS-Node Proxy
Service and eIDAS-Node Connector.
disable.check.representative.attributes
False: check the eIDAS Request representative rule (must
not contain representative attributes).
Note: this parameter is used by both Proxy Service and
Connector.
response.encryption.mandatory
True : check if the response payload is encrypted
check.citizencertificate.serviceCertificate
True : check if the CN of the certificate used for signing
the response is the same as the citizen country of the
SamlRequest
Note that to ensure compliance, the following checks are also made by the code and
are not parametrized:
the Level of Assurance indicated in the Assertion matches or exceeds the
requested Level of Assurance (see Appendix A); and
the Response will not be transmitted to a URL other than the
AssertionConsumerServiceURL in the metadata of the eIDAS-Node Connector.
Remark: To improve the resilience of the application, we strongly recommend using
the cache instances used for request anti-replay and SAML metadata using Hazelcast
services. (please see Appendix C for further details)
eIDAS-Node Installation and Configuration Guide Version 2.1
Copyright European Commission — DIGIT Page 55 of 62
Appendix A. eIDAS Levels of Assurance
Level of Assurance (LoA) is a term used to describe the degree of certainty that an
individual is who they say they are at the time they present a digital credential.
The eIDAS implementing regulation determines three Levels of Assurance:
Low (service.LoA=http://eidas.europa.eu/LoA/low)
Substantial (service.LoA=http://eidas.europa.eu/LoA/substantial)
High (service.LoA=http://eidas.europa.eu/LoA/high)
(The eIDAS-Node Proxy Service service.LoA key is described in Table 7.)
At the SAML Request level, the level of assurance will limit the comparison attribute to
'minimum':
<saml2p:RequestedAuthnContext Comparison="minimum">
Validations made:
At the eIDAS-Node Proxy Service, if the requested (or higher) Level of Assurance
cannot be fulfilled, the Request must be rejected.
The eIDAS-Node Connector verifies that the Level of Assurance indicated in the
Assertion matches or exceeds the requested Level of Assurance, and sends the
received authenticated person identification data to the requesting relying party.
The legal definitions of the Level of Assurance can be found at
http://eur-lex.europa.eu/legal-content/EN/TXT/PDF/?uri=OJ:JOL_2015_235_R_0002&from=EN.

eIDAS-Node Installation and Configuration Guide Version 2.1
Copyright European Commission — DIGIT Page 56 of 62
Appendix B. User consent
In most Member States (MS), the privacy legislation requires that the user gives
consent to the use of personal data. But the explanation of this requisite, and thus its
implementation may be very different from one MS to another MS. So this general
objective to request the consent of the user to send his/her attributes to a Service
Provider in another Member State leads to the following consent-schemes. The
consent is requested by the eIDAS-Node or by the Middleware of the user's MS.
There are three possible cases:
The requested attributes are displayed and the user's consent is given by
choosing only the attributes that he/she allows to transfer.
The obtained values of the requested attributes are displayed and the user's
consent is given by choosing only the attributes that he/she allows to transfer.
The requested attributes are not displayed because the user's consent is not
required as it was given (for example) when the user registered to the ID
Provider.

eIDAS-Node Installation and Configuration Guide Version 2.1
Copyright European Commission — DIGIT Page 57 of 62
Appendix C. Hazelcast proposed configuration
To correlate between request/response messages, and to prevent a replay of SAML
requests, a caching mechanism is implemented at the eIDAS-Node Connector and
Proxy Service level.
For clustered production mode (see section 7.5 — eIDAS-Node compliance), the
application needs to be configured using Hazelcast product, which will provide a
reliable solution based on a distributed hashmap, cluster-ready and with expiration of
requests. The configuration of the product is done via its configuration file
hazelcast.xml located by EIDAS_CONFIG_REPOSITORY. A default configuration is
provided with the application. It is also possible to implement other clustering
solutions by enriching the provided code. Please note, the provided configuration does
not cover persistence. If persistence is required, a central database and MapStore
interface must be implemented. Spring injection of map provider makes it possible on
an entry level.
Hazelcast maps are activated by setting distributedMaps to "true" in eidas.xml.
C.1 Network configuration
The join configuration element is used to enable the Hazelcast instances to form a
cluster, i.e. to join the members. Three ways can be used to join the members:
multicast;
discovery by TCP/IP; or
discovery by AWS (EC2 auto discovery).
C.1.1 Multicast
In the default configuration, we recommend the multicast configuration for clustering
use.
With the multicast auto-discovery mechanism, Hazelcast allows cluster members to
find each other using multicast communication. The cluster members do not need to
know the concrete addresses of the other members, they just multicast to all the
other members for listening. It depends on your environment whether multicast is
possible or allowed.
The following is an example declarative configuration.
<network>
<join>
<multicast enabled="true">
<multicast-group>224.2.2.3</multicast-group>
<multicast-port>54327</multicast-port>
<multicast-time-to-live>32</multicast-time-to-live>
<multicast-timeout-seconds>2</multicast-timeout-seconds>
<trusted-interfaces>
<interface>192.168.1.102</interface>
</trusted-interfaces>
</multicast>
<tcp-ip enabled="false">
</tcp-ip>
<aws enabled="false">

eIDAS-Node Installation and Configuration Guide Version 2.1
Copyright European Commission — DIGIT Page 58 of 62
</aws>
</join>
<network>
Figure 11: Example Hazelcast multicast declarative configuration
Note: The multicast-timeout-seconds element is significant. This specifies the time
in seconds that a node should wait for a valid multicast response from another node
running in the network before declaring itself as the leader node (the first node joined
to the cluster) and creating its own cluster. This only applies to the startup of nodes
where no leader has yet been assigned. If you specify a high value to multicast-
timeout-seconds, such as 60 seconds, it means that until a leader is selected, each
node will wait 60 seconds before moving on. Be careful when providing a high value.
Also be careful to not set the value too low, or the nodes may give up too early and
create their own cluster.
C.1.2 Discovery by TCP/IP Cluster
If multicast is not preferred as the way of discovery for your environment, then you
can configure Hazelcast for full TCP/IP cluster. As the configuration in Figure 12
shows, when the enable attribute of multicast is set to false, tcp-ip has to be set to
true. For the none-multicast option, all or a subset of nodes' hostnames and/or IP
addresses must be listed. Note that not all of the cluster members have to be listed
there but at least one of them has to be active in the cluster when a new member
joins. The tcp-ip tag accepts an attribute called connection-timeout-seconds
(default value =5). Increasing this value is recommended if you have many IPs listed
and members cannot properly build up the cluster.
<hazelcast>
...
<network>
<port auto-increment="true">5701</port>
<join>
<multicast enabled="false">
<multicast-group>224.2.2.3</multicast-group>
<multicast-port>54327</multicast-port>
</multicast>
<tcp-ip enabled="true">
<member>machine1</member>
<member>machine2</member>
<member>machine3:5799</member>
<member>192.168.1.0-7</member>
<member>192.168.1.21</member>
</tcp-ip>
</join>
...
</network>
...
</hazelcast>
Figure 12: Example Hazelcast configuration for TCP/IP discovery
C.1.3 Discovery by AWS (EC2 auto discovery)
Hazelcast supports EC2 auto discovery. For information on this configuration please
refer to the Hazelcast documentation at http://docs.hazelcast.org/docs/3.2/manual/html-
single/.

eIDAS-Node Installation and Configuration Guide Version 2.1
Copyright European Commission — DIGIT Page 59 of 62
C.1.4 Eviction
Hazelcast also supports policy based eviction for distributed maps. Currently
supported eviction policies are LRU (Least Recently Used) and LFU (Least Frequently
Used). This feature enables Hazelcast to be used as a distributed cache. If time-to-
live-seconds is not 0, entries older than time-to-live-seconds value will be
evicted, regardless of the eviction policy set. In the application, for anti-replay/reply
request-pair correlation cache we set by default the time-to-live-seconds to 300
(five minutes) and for the cache of metadata to one day.
<hazelcast>
...
<map name="antiReplayCacheService">
<time-to-live-seconds>300</time-to-live-seconds> <!-- 5 minutes -->
<eviction-policy>LRU</eviction-policy>
<max-size policy="PER_NODE">500</max-size>
</map>
<map name="antiReplayCacheConnector">
<time-to-live-seconds>300</time-to-live-seconds><!-- 5 minutes -->
<eviction-policy>LRU</eviction-policy>
<max-size policy="PER_NODE">500</max-size>
</map>
<map name="eidasmetadata">
<in-memory-format>BINARY</in-memory-format>
<time-to-live-seconds>86400</time-to-live-seconds><!-- 1 day -->
<eviction-policy>LRU</eviction-policy>
</map>
</hazelcast>
<map name="specificSpRequestCorrelationCacheService">
<in-memory-format>BINARY</in-memory-format>
<time-to-live-seconds>86400</time-to-live-seconds><!-- 1 day -->
<eviction-policy>LRU</eviction-policy>
</map>
<map name="connectorRequestCorrelationCacheService">
<in-memory-format>BINARY</in-memory-format>
<time-to-live-seconds>86400</time-to-live-seconds><!-- 1 day -->
<eviction-policy>LRU</eviction-policy>
</map>
<map name="proxyServiceRequestCorrelationCacheService">
<in-memory-format>BINARY</in-memory-format>
<time-to-live-seconds>86400</time-to-live-seconds><!-- 1 day -->
<eviction-policy>LRU</eviction-policy>
</map>
<map name="specificIdpRequestCorrelationCacheService">
<in-memory-format>BINARY</in-memory-format>
<time-to-live-seconds>86400</time-to-live-seconds><!-- 1 day -->
<eviction-policy>LRU</eviction-policy>
</map>
<map name="specificConnectorLtRequestCorrelationCacheService">
<in-memory-format>BINARY</in-memory-format>
<time-to-live-seconds>86400</time-to-live-seconds><!-- 1 day -->
<eviction-policy>LRU</eviction-policy>
</map>
<map name="specificServiceLtRequestCorrelationCacheService">
<in-memory-format>BINARY</in-memory-format>
eIDAS-Node Installation and Configuration Guide Version 2.1
Copyright European Commission — DIGIT Page 60 of 62
<time-to-live-seconds>86400</time-to-live-seconds><!-- 1 day -->
<eviction-policy>LRU</eviction-policy>
</map>
Figure 13: Hazelcast eviction policy configuration
For more information on the features of this product, please refer to the Hazelcast
official documentation (http://docs.hazelcast.org/docs/3.2/manual/html-single/).

eIDAS-Node Installation and Configuration Guide Version 2.1
Copyright European Commission — DIGIT Page 61 of 62
Appendix D. Installation Frequently Asked Questions
Q: How can I compile the project using external properties (Tomcat)?
A: First you compile EIDAS-NODE and EIDAS-Specific without the “-P embedded”
argument. This will generate the packages without specific properties. Now you need
to place all the properties files in one folder and tell Tomcat to lookup that folder.
If in Linux:
Edit $TOMCAT_HOME/bin/catalina.sh and change
"CLASSPATH="$CLASSPATH""$CATALINA_HOME"/bin/bootstrap.jar" to
"CLASSPATH="$CLASSPATH""$CATALINA_HOME"/bin/bootstrap.jar:/path/to/
config/folder/"
If in Windows:
Edit $TOMCAT_HOME/bin/catalina.bat and change
"CLASSPATH="$CLASSPATH""$CATALINA_HOME"/bin/bootstrap.jar" to
"CLASSPATH="$CLASSPATH""$CATALINA_HOME"/bin/bootstrap.jar:/path/to/
config/folder/"
Q: I’m getting an error that says
“Failed to load class org.slf4j.impl.StaticLoggerBinder” .
A: This error is reported when the org.slf4j.impl.StaticLoggerBinder class could
not be loaded into memory. In this case, you should recompile your projects to ensure
that Maven includes the appropriate jars.
Q: I’m getting an error that says
“com.opensymphony.xwork2.DefaultActionInvocation.invokeAction
(DefaultActionInvocation.java)” .
A: The DefaultActionInvocation class is responsible for calling the user action, if an
error occurs, generally due to missing libraries or missing properties file, the struts
framework will not be able to render the result of the action, thus producing that error
message.
However, in the logs or the stack trace you can usually find another exception. That
exception is the reason for this error, perhaps you can solve it by making sure:
you have the properties files in the right place
you have the right privileges to access jks file (you may need to install JCE and
allow Java to read the file outside the webapp context)
you have all the required libraries.
