Ebs Integration Guide 3.0.1
User Manual:
Open the PDF directly: View PDF ![]() .
.
Page Count: 37
EBS Integration Guide 3.0.1
© Copyright E-Billing Solutions Pvt Ltd.
Page 1
E Billing Solutions Pvt. Ltd.
EBS INTEGRATION GUIDE Version
3.0.1

EBS Integration Guide 3.0.1
© Copyright E-Billing Solutions Pvt Ltd.
Page 2
Table of Contents
1. INTRODUCTION .............................................................................................................. 3
2. PRE-REQUISITE ............................................................................................................. 3
3. ENVIRONMENT DETAILS ............................................................................................. 3
3. SALE PROCESS FLOW ................................................................................................. 4
4. INTERNAL STATUS FLOW ........................................................................................... 5
5. MERCHANT WEBSITE INTEGRATION ...................................................................... 6
APPENDIX A – SECURE HASH VALIDATION............................................................. 15
APPENDIX B – SETTLEMENT CYCLE ......................................................................... 16
APPENDIX C – ISO3 COUNTRY NAME ....................................................................... 18
APPENDIX D – PCI DSS COMPLIANCE ....................................................................... 21

EBS Integration Guide 3.0.1
© Copyright E-Billing Solutions Pvt Ltd.
Page 3
1. INTRODUCTION
This document works as a guide for Merchants on understanding the EBS payment
gateway Integration. This integration will allow the Merchant to have the Payment option
Selection. This integration will also allow Credit card details to be captured on the
Merchant website itself, on meeting the following pre-requisites.
2. PRE-REQUISITE
For capturing Credit card details on the Merchant website, the Merchant application should be
in compliance to PCI DSS. For more details on PCI DSS, please refer APPENDIX D.
EBS should enable the Option for Merchant to capture Credit card data.
3. ENVIRONMENT DETAILS
Test card details that can be used for testing purpose are as below
VISA - 4111111111111111 - 07/16(Exp.) - 123(CVV)
Card Holder Name: Test, Issuing Bank - Test
Please Note: No other card number will be supported in test phase.
i. Payment Request URL:
Production – https://secure.ebs.in/pg/ma/payment/request
ii. Integration Kit
Kindly browse the following link to download Integration Kit/Shopping carts.
http://support .ebs.in/index.php? _m=downloads&_a=view
EBS Integration Guide 3.0.1
© Copyright E-Billing Solutions Pvt Ltd.
Page 4
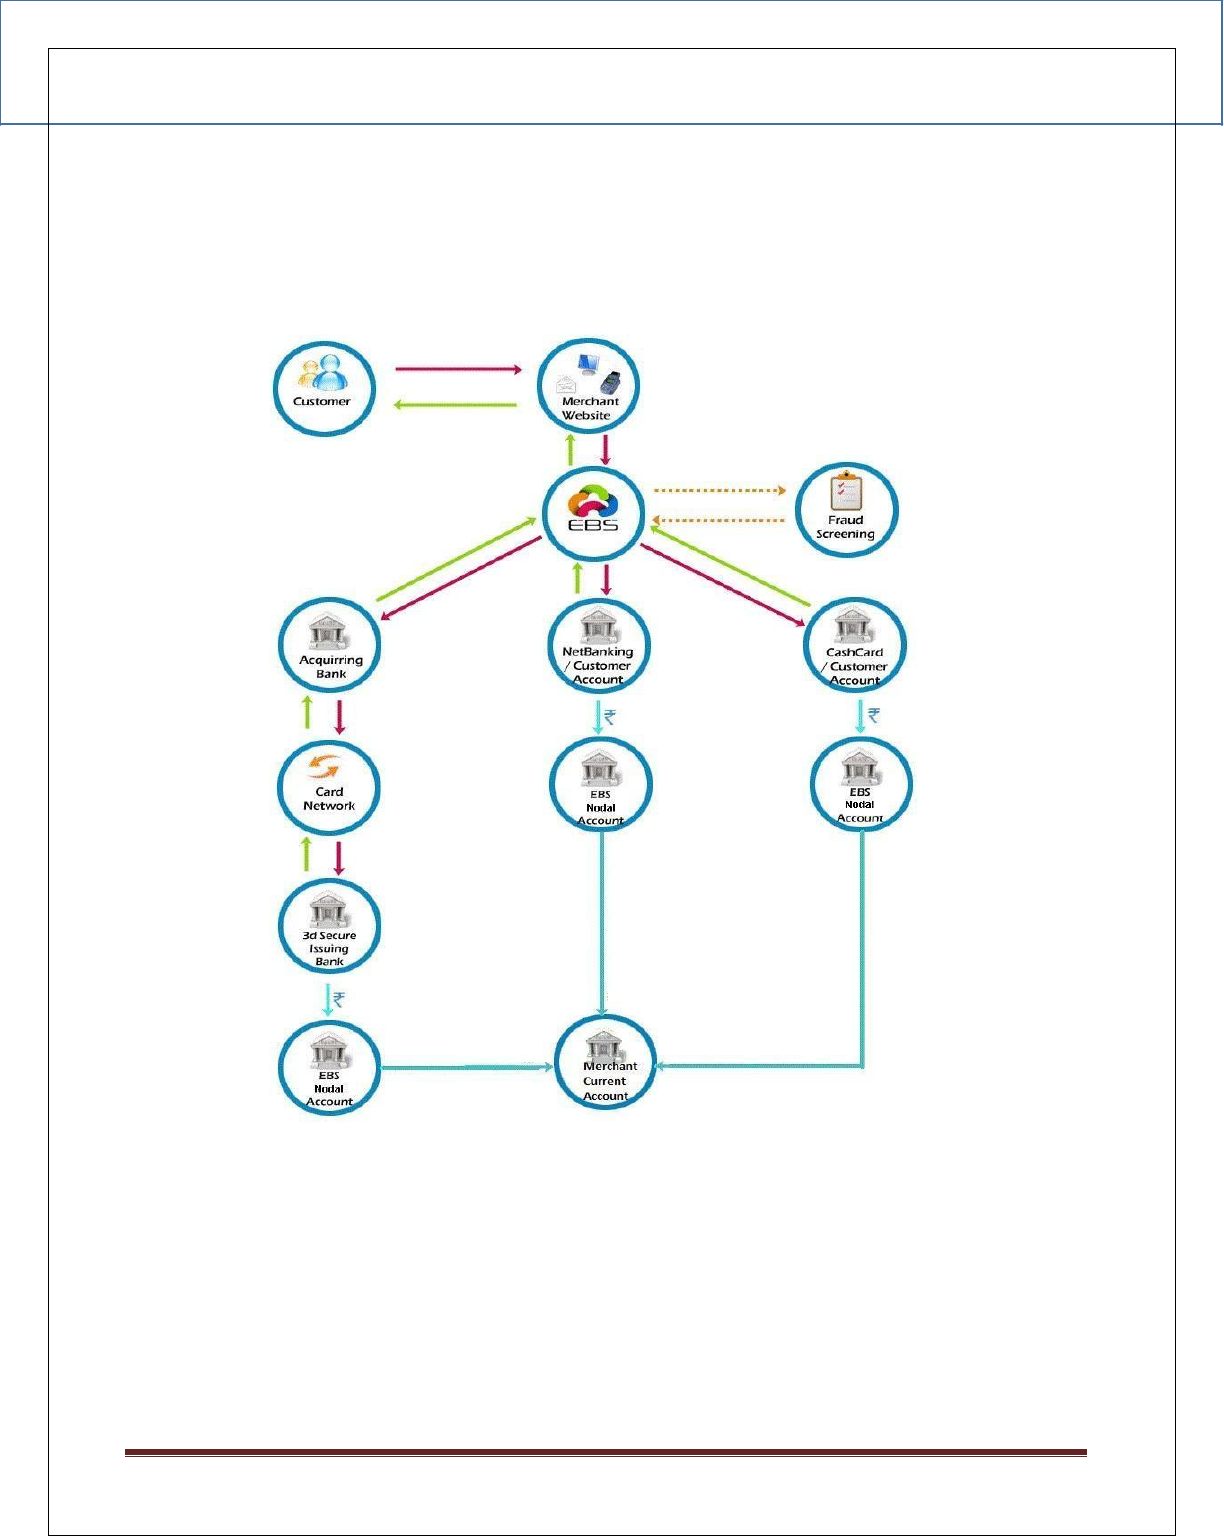
3. SALE PROCESS FLOW
• Customer selects to check out on the Merchant Website.
• Merchant Website will redirect the Customer to EBS Payment Page.
• Customer Selects Payment Method (Credit Card, Debit Card, Net banking, Cash Card)
and Payment option on the Merchant Website. If the Customer selects Credit or Debit
cards, he will be asked to provide the credit card number or the debit card number
respectively.
EBS Integration Guide 3.0.1
© Copyright E-Billing Solutions Pvt Ltd.
Page 5
• Transaction is screened and Customer is redirected to respective Acquirer for processing.
• Customer is redirected back to Merchant Website with the response.
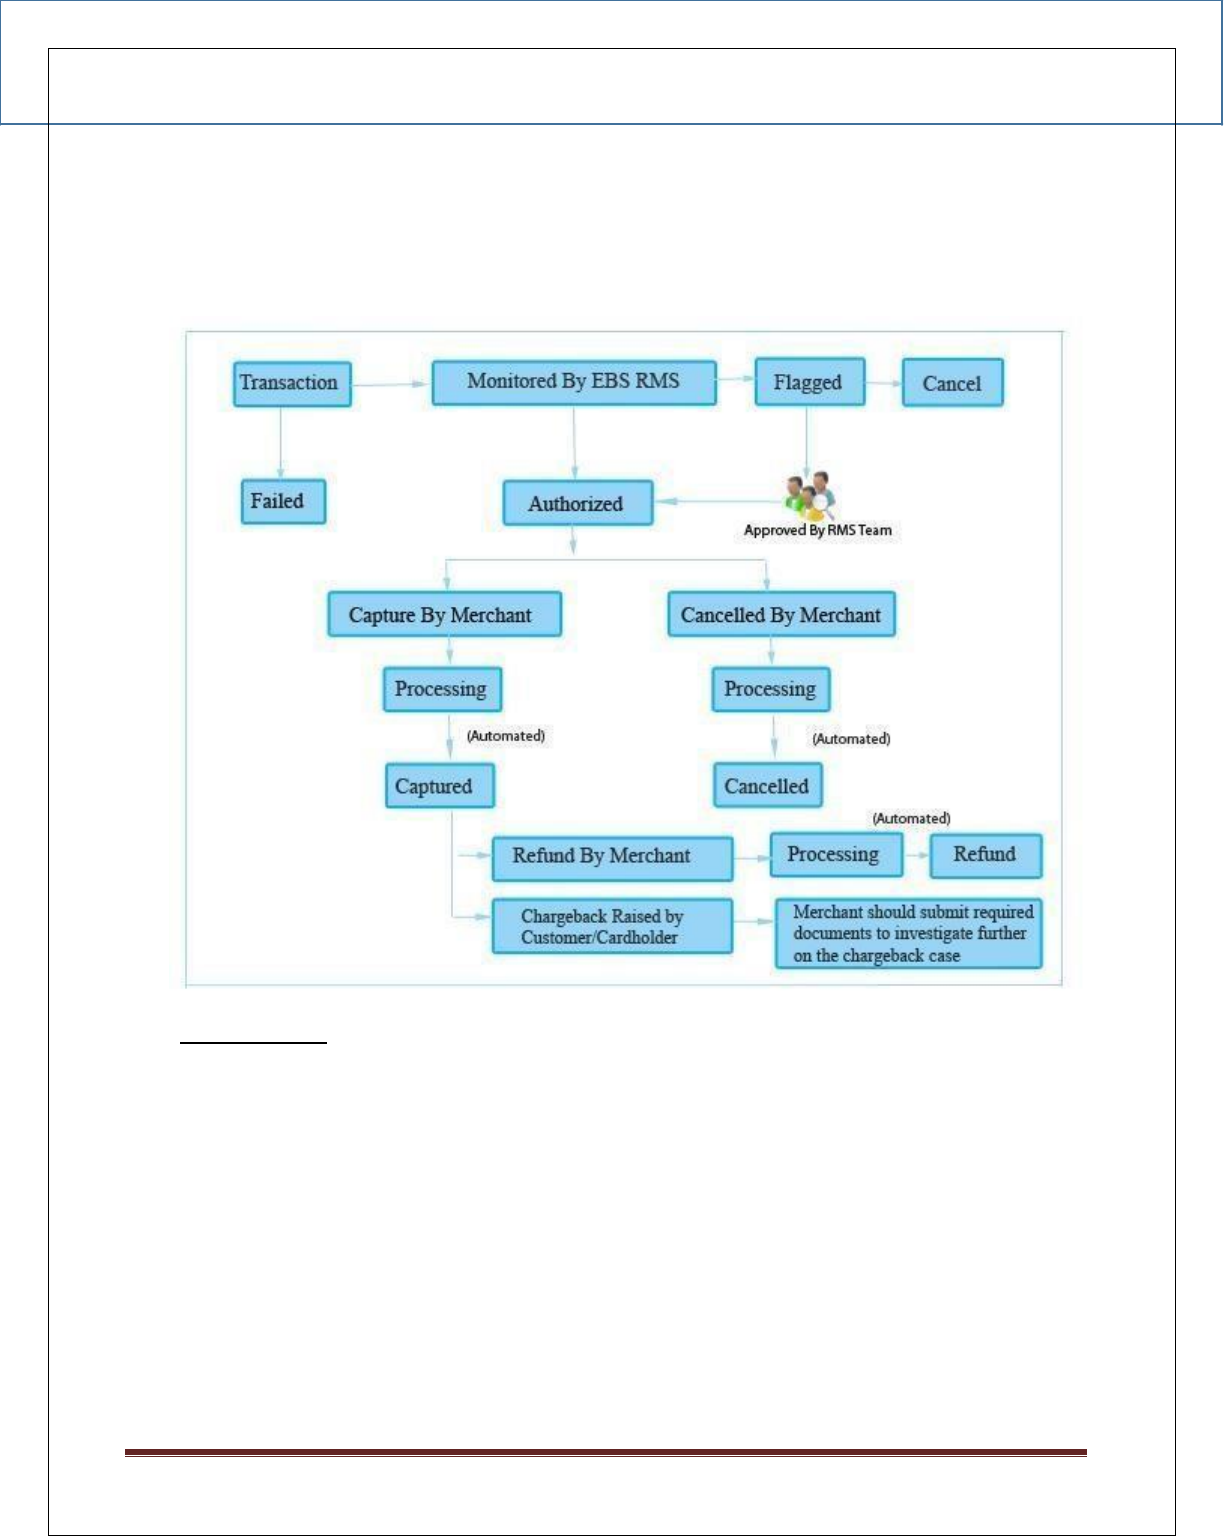
4. INTERNAL STATUS FLOW
Status Details:
I. Authorized Payments–Payments which are completed successfully
II. Flagged Payments – Payments which are completed are successfully and are
flagged by Fraud Screening System. Order will not be processed in
this tate. These payments will be reviewed manually by EBS internal
team and un-flagged or Cancel.
III. Captured – Payments captured by the Merchant.
IV. Refund –Payments refunded by the Merchant to the Customer.
V. Charge Back – Payments which are refunded forcefully by EBS for any
complaints raised by the Customer with the Card provider or Card Brands.
EBS Integration Guide 3.0.1
© Copyright E-Billing Solutions Pvt Ltd.
Page 6
5. MERCHANT WEBSITE INTEGRATION
i. Integration Mode
There are two modes that are provided by the gateway:
Standard mode: In this mode, all the payment details would be collected in the EBS
payment page for payment transaction.
Direct mode: In this mode, payment card details would be collected in the merchant
website and redirected to the appropriate issuing bank to complete the transaction. In
case of net banking using this mode, the merchant should set the channel value to “0”
and pass the payment option parameter to EBS.
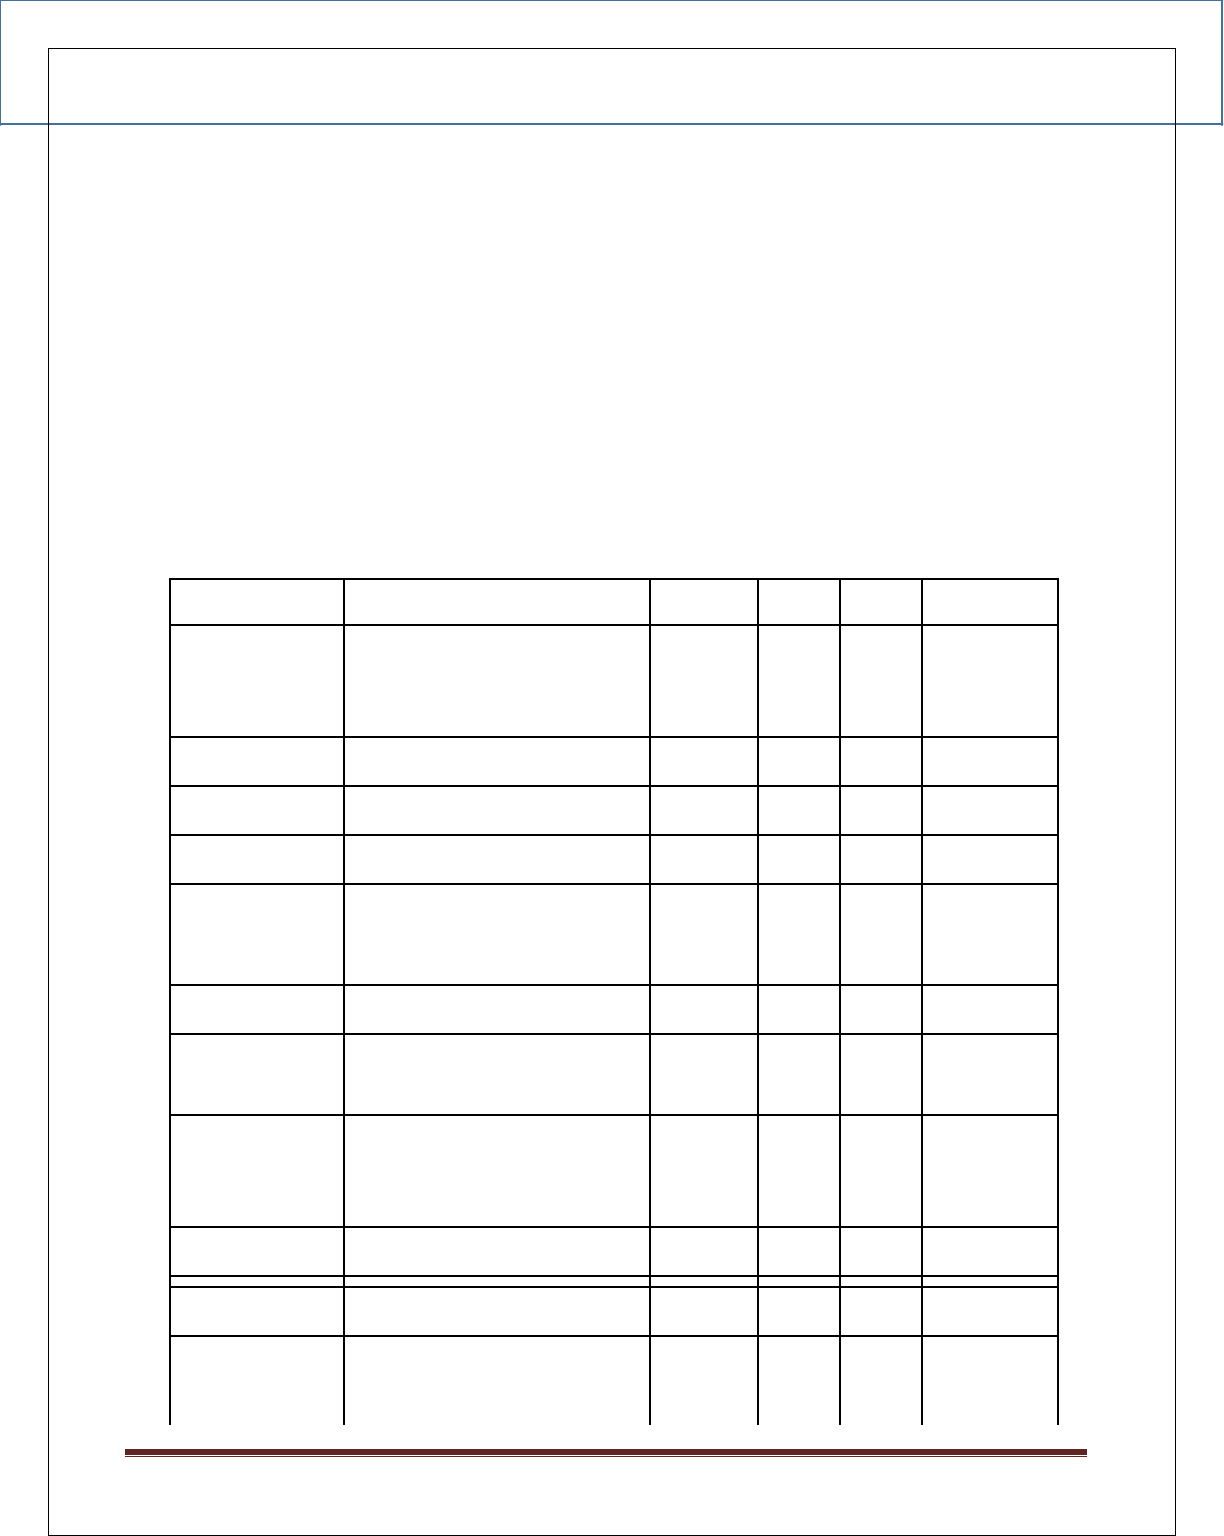
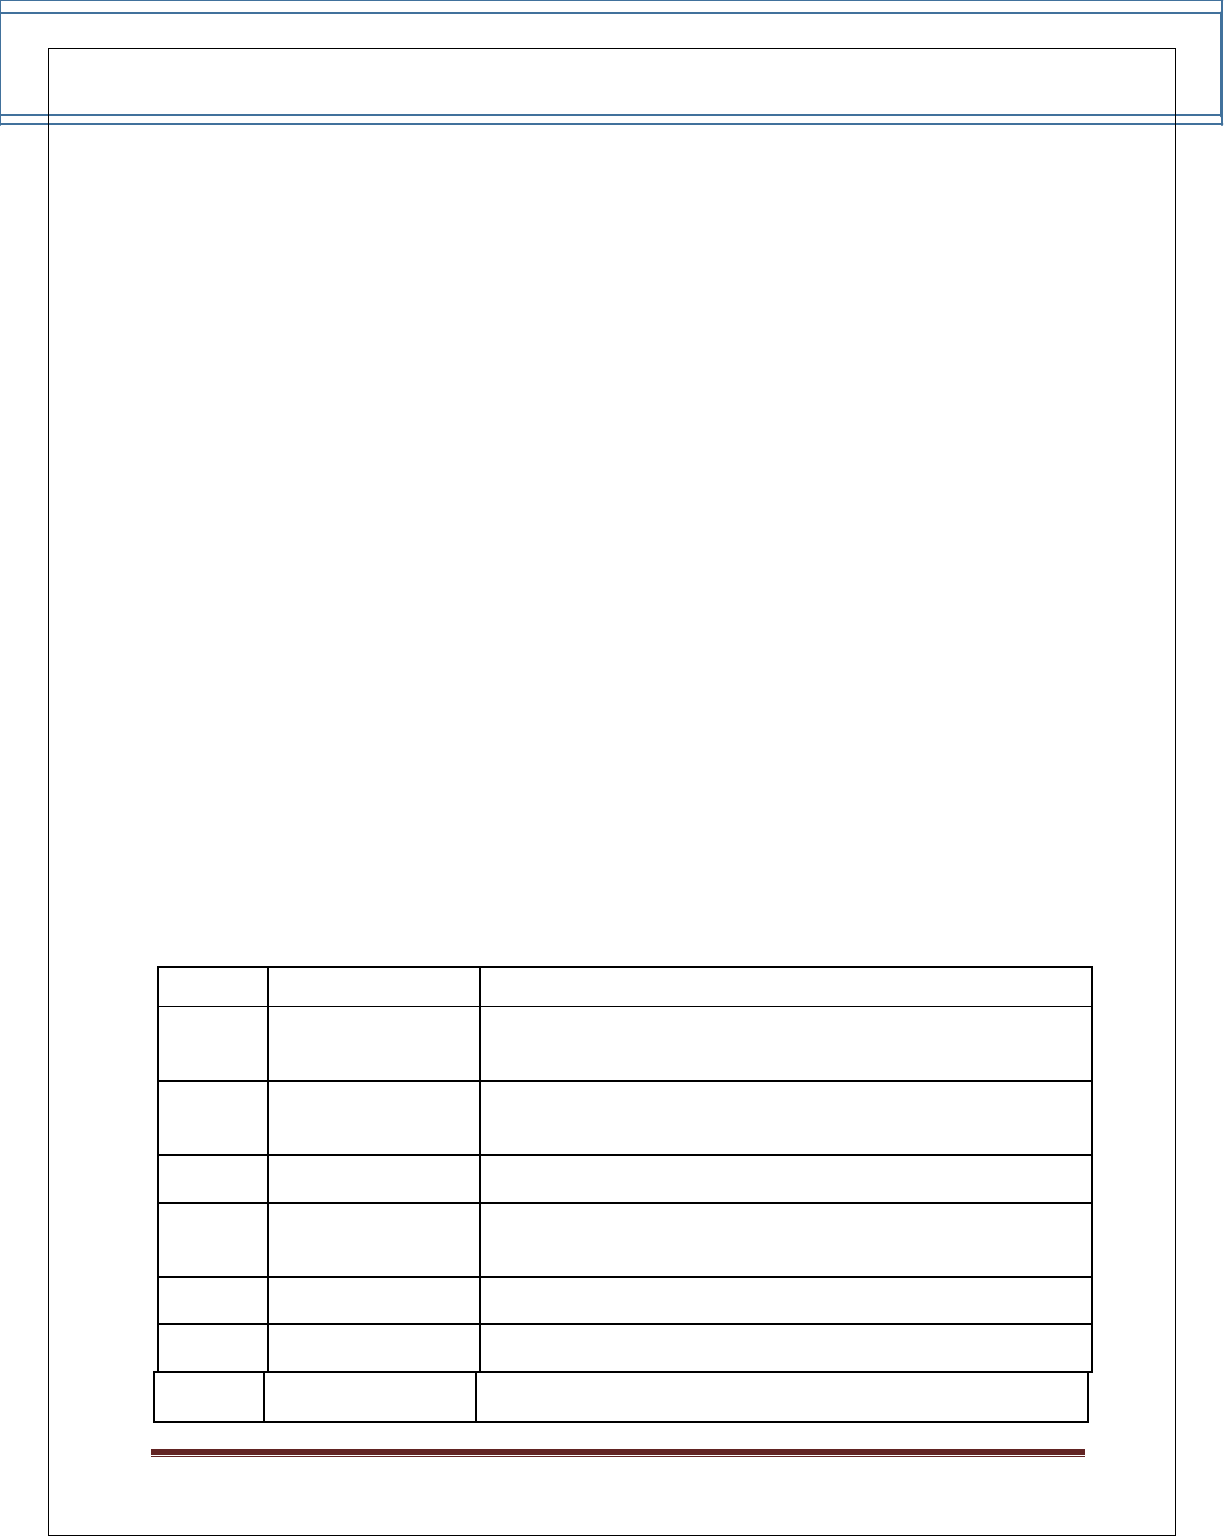
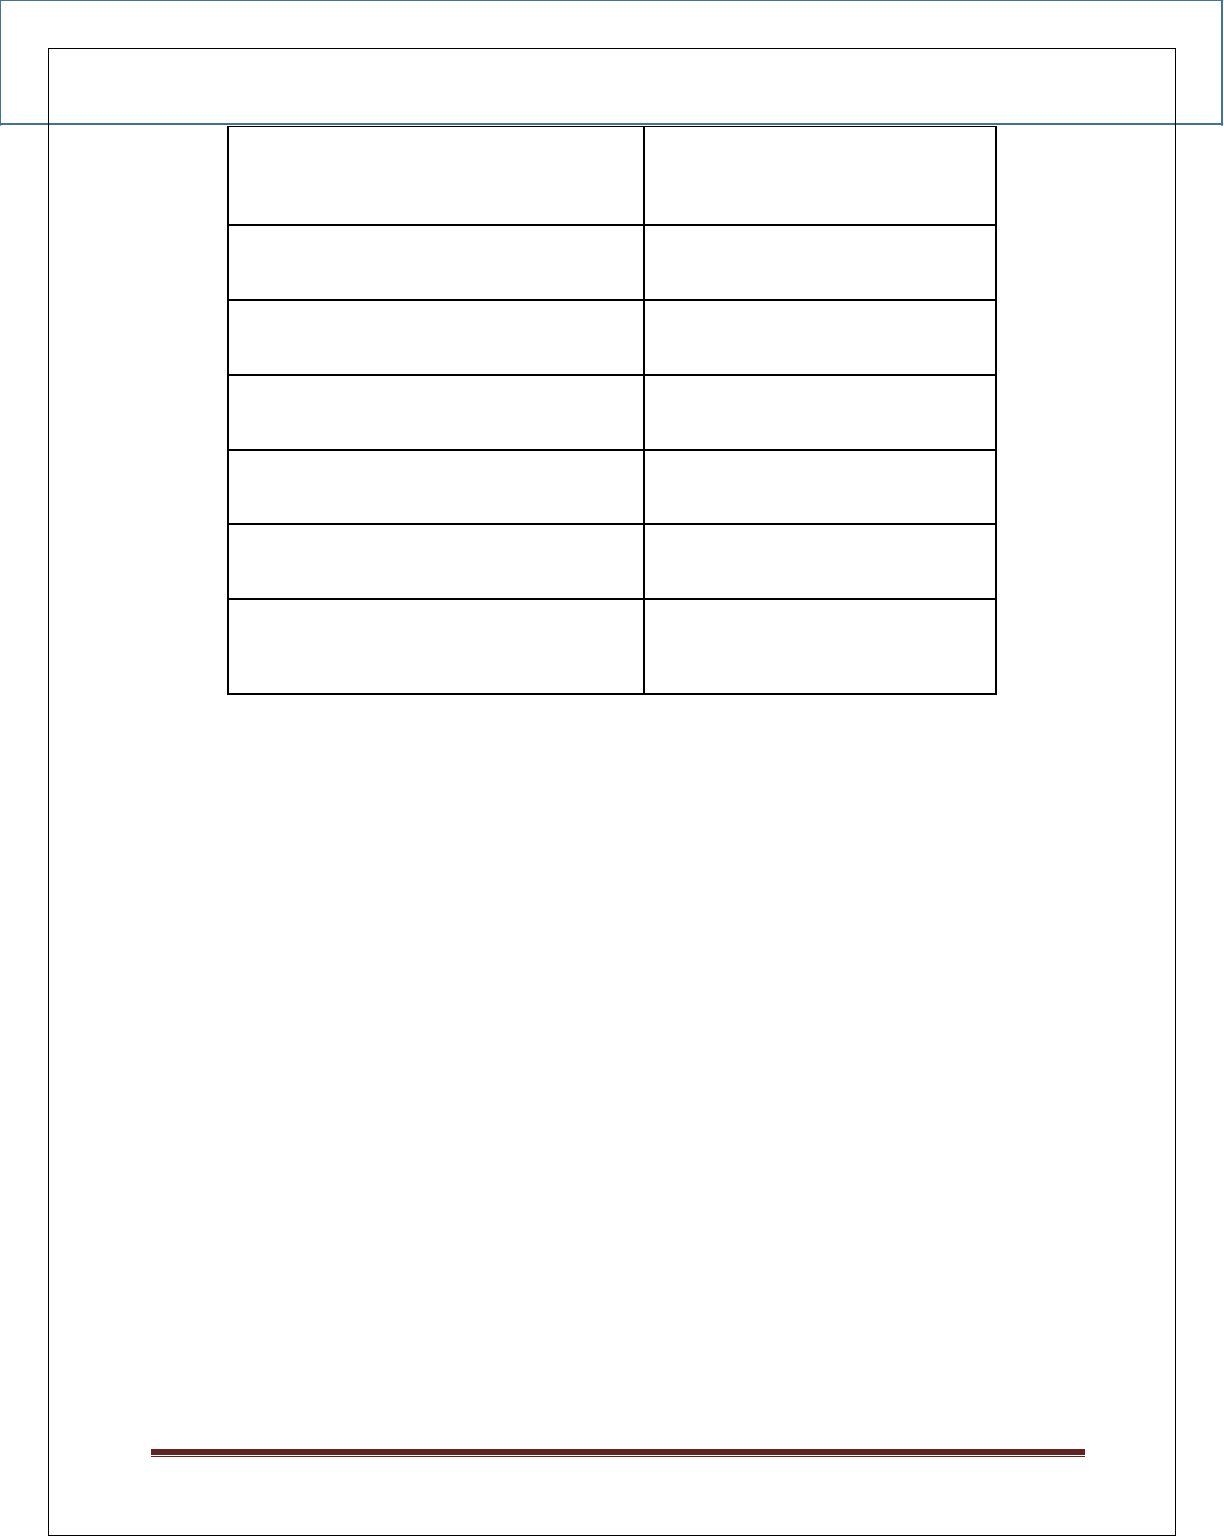
ii. Request Parameter Details
Parameter
Description
Type
Min
Max
Mandatory
channel
The payment channel.
numeric
1
1
YES
Give ‘0’ for Standard or ‘2’ for
Direct Mode
account_id
Your Account ID
numeric
-
-
YES
reference_no
Your Reference Number
char
1
20
YES
amount
Total Sale Amount
decimal
1
14,2
YES
mode
Mode of the LIVE => live, TEST
=> test
char
LIVE or
TEST
LIVE or
TEST
YES
currency
Currency INR
Char
3
3
YES
description
Detail description of the sale
char
1
255
YES
return_url
This is the url you want EBS
char
1
255
YES
to return back after
transaction is successful
name
Customer billing Name
char
1
128
YES
address
Customer billing address
char
1
255
YES

EBS Integration Guide 3.0.1
© Copyright E-Billing Solutions Pvt Ltd.
Page 7
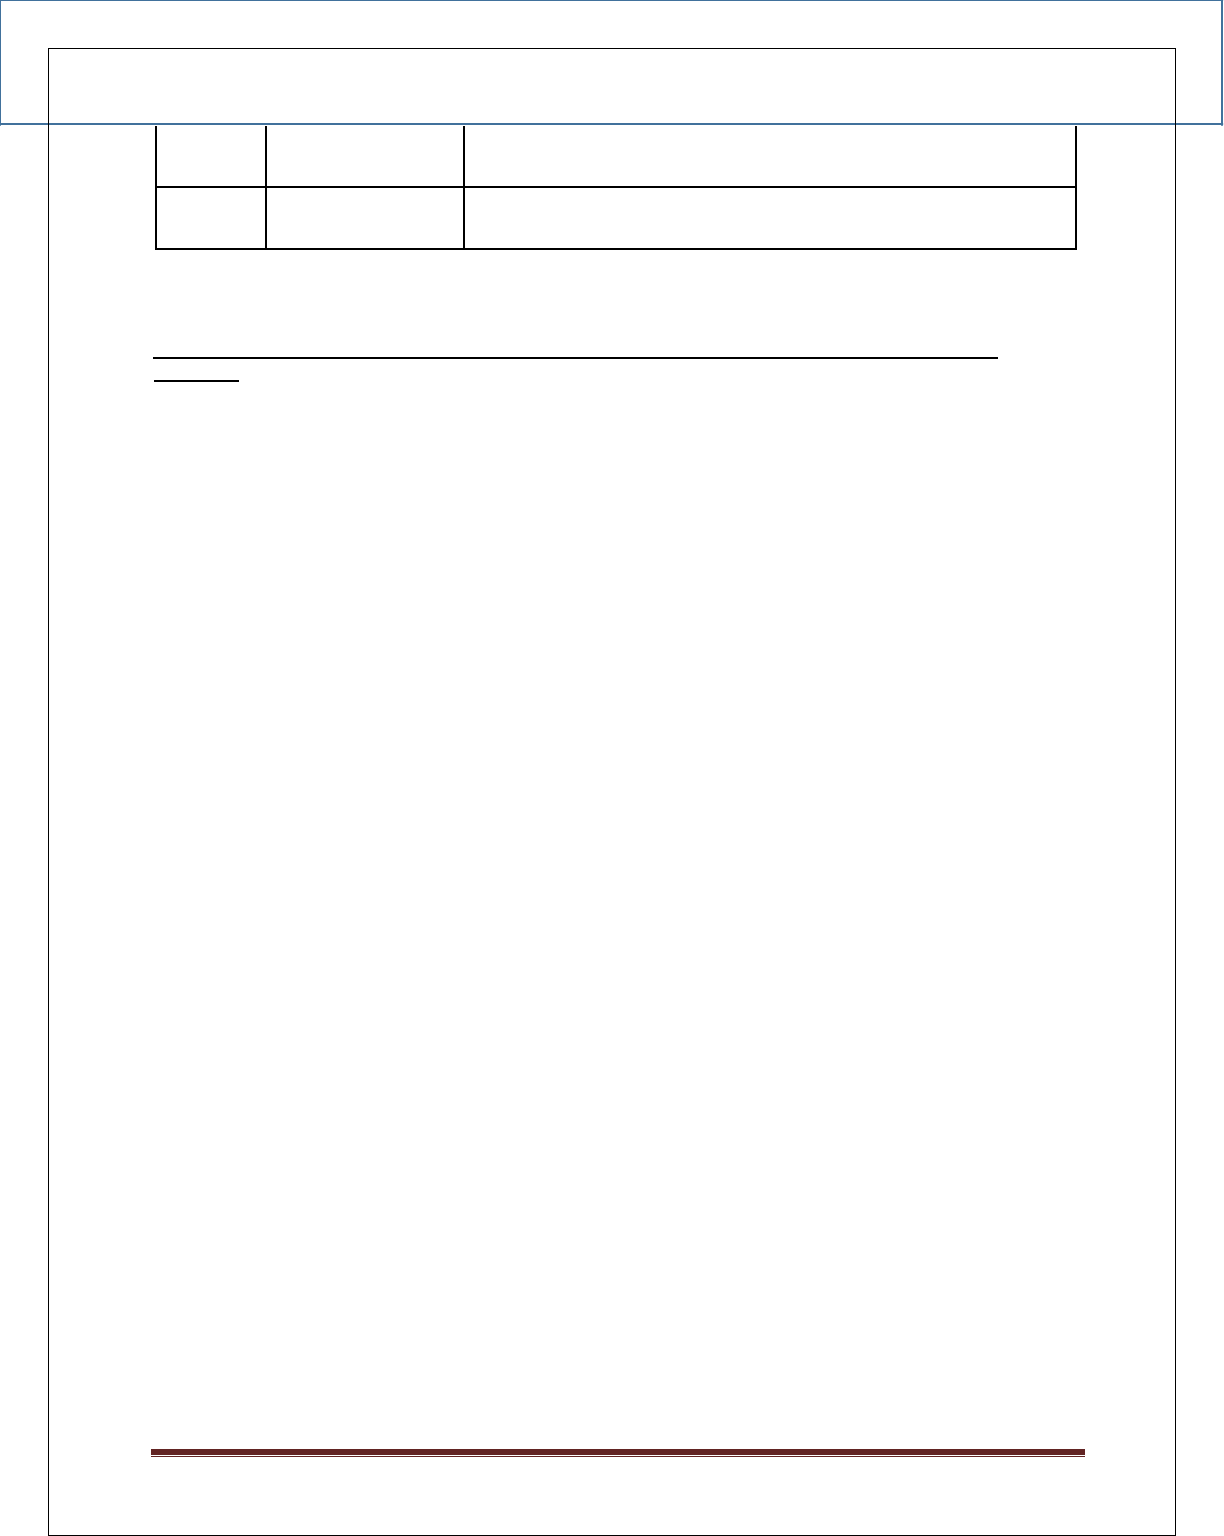
city
Customer billing city
char
1
32
YES
state
Customer billing state
char
1
32
NO
country
Customer billing country.
char
3
3
YES
[3 Digit ISO3 country code-
refer Appendix C]
postal_code
Customer billing postal
char
1
10
YES
code
phone
Customer billing phone
char
5
20
YES
email
Customer billing email
char
1
100
YES
ship_name
Customer delivery Name
char
1
255
NO
ship_address
Customer delivery address
char
1
255
NO
ship_city
Customer delivery city
char
1
32
NO
ship_state
Customer delivery state
char
1
32
NO
ship_country
Customer delivery
char
3
3
NO
country[3 Digit ISO3
country code- refer
Appendix C]
ship_postal_code
Customer delivery postal
char
1
10
NO
code
ship_phone
Customer delivery phone
char
5
20
NO
bank_code
Bank code provided by EBS
char
1
5
NO
name_on_card
Name of the card holder.
char
1
20
YES
Only for Direct mode
card_number
Credit card number. Only
numeric
13
19
YES
for
Direct mode
card_expiry
Expiry date of the credit
numeric
4
4
YES
card. [Format: MMYY]
Only for Direct mode.
payment_option
Payment option code
char
1
5
NO
provided by EBS. Only for
standard mode
payment_mode
Give 1 for Credit Card , 2 for
numeric
-
-
NO
Debit Card,3 for Net Banking,
4 for Cash Card, 5 for Credit
Card – EMI, 6 for Credit Card
EBS Integration Guide 3.0.1
© Copyright E-Billing Solutions Pvt Ltd.
Page 8
card_brand
Give 1 for VISA, 2 for
numeric
-
-
NO
MasterCard, 3 for Maestro, 4
for Diners Club, 5 for
American Express and 6 for
JCB
emi
EMI period like 3, 6,9,12
char
1
2
NO
etc. for Credit Card.
page_id
The id of the customized
char
1
2
NO
page
card_cvv
CVV number of the credit
numeric
3
4
YES
card. Only for Direct mode.
secure_hash
Hash value calculated
char
32
32
YES

EBS Integration Guide 3.0.1
© Copyright E-Billing Solutions Pvt Ltd.
Page 9
iii. Sample HTML form For Direct Mode
The link between Merchant website and EBS Payment page has to be maintained on the last
page of the shopping basket on Merchant website.
Below are the parameters to be posted to EBS.
<form method="post" action=”https://secure.ebs.in/pg/ma/payment/request”
name="frmTransaction" id="frmTransaction" > <input name=”channel” type=”hidden”
value=”2” />
<input name="account_id" type="hidden" value="XXXX" />
<input name="reference_no" type="hidden" value=" XXXX "
/> <input name="amount" type="hidden" value=" XXXX " />
<input name="mode" type="hidden" value=" XXXX " /> <input
name="currency" type="hidden" value="INR" /> <input
name="description" type="hidden" value=" XXXX " /> <input
name="return_url" type="hidden" value=" XXXX " /> <input
name="name" type="hidden" value=" XXXX " />
<input name="address" type="hidden" value=" XXXX " />
<input name="city" type="hidden" value=" XXXX " />
<input name="state" type="hidden" value=" XXXX " />
<input name="country" type="hidden" value=" XXXX " />
<input name="postal_code" type="hidden" value=" XXXX "
/> <input name="phone" type="hidden" value=" XXXX " />
<input name="email" type="hidden" value=" XXXX " />

EBS Integration Guide 3.0.1
© Copyright E-Billing Solutions Pvt Ltd.
Page 10
<input name="ship_name" type="hidden" value=" XXXX " />
<input name="ship_address" type="hidden" value=" XXXX " />
<input name="ship_country" type="hidden" value=" XXXX " />
<input name="ship_state" type="hidden" value=" XXXX " />
<input name="ship_city" type="hidden" value=" XXXX " />
<input name="ship_postal_code" type="hidden" value="" />
<input name="ship_phone" type="hidden" value=" XXXX " />
<input name="bank_code" type="hidden" value=" XXXX " />
<input name="name_on_card” type=”hidden” value=” XXXX”
/> <input name=”card_number” type=”hidden” value=”
XXXX”/> <input name="card_expiry” type=”hidden” value=”
XXXX” /> <input name=”card_cvv” type=”hidden” value=”
XXXX”/> <input name="emi” type=”hidden” value=” XXXX” />
<input name=”page_id” type=”hidden” value=” XXXX”/>
<input name=”secure_hash” type=”hidden” value=” XXXX”
/> <input value=”Submit” type=”submit” />

EBS Integration Guide 3.0.1
© Copyright E-Billing Solutions Pvt Ltd.
Page 11
iv. Sample HTML form For Standard Mode
The link between Merchant website and EBS Payment page has to be maintained on the
last
page of the shopping basket on Merchant website.
Below are the parameters to be posted to EBS.
<form method="post" action=”https://secure.ebs.in/pg/ma/payment/request”
name="frmTransaction" id="frmTransaction" > <input name=”channel”
type=”hidden” value=”0” />
<input name="account_id" type="hidden" value=" XXXX " />
<input name="reference_no" type="hidden" value=" XXXX "
/> <input name="amount" type="hidden" value=" XXXX " />
<input name="mode" type="hidden" value=" XXXX " />
<input name="currency" type="hidden" value="INR" />
<input name="description" type="hidden" value=" XXXX "
/> <input name="return_url" type="hidden" value=" XXXX
" /> <input name="name" type="hidden" value=" XXXX "
/> <input name="address" type="hidden" value=" XXXX "
/> <input name="city" type="hidden" value=" XXXX " />
<input name="state" type="hidden" value=" XXXX " />
<input name="country" type="hidden" value=" XXXX " />
<input name="postal_code" type="hidden" value=" XXXX "
/> <input name="phone" type="hidden" value=" XXXX " />
<input name="email" type="hidden" value=" XXXX " />
<input name="ship_name" type="hidden" value=" XXXX " /> <input
name="ship_address" type="hidden" value=" XXXX " /> <input
name="ship_country" type="hidden" value=" XXXX " />
<input name="ship_state" type="hidden" value=" XXXX " />
<input name="ship_city" type="hidden" value=" XXXX " />
<input name="ship_postal_code" type="hidden" value=" XXXX "
/> <input name="ship_phone" type="hidden" value=" XXXX " />
<input name="payment_option" type="hidden" value=" XXXX " />
<input name="bank_code" type="hidden" value=" XXXX " />
<input name="emi” type=”hidden” value=” XXXX” />
<input name=”page_id” type=”hidden” value=” XXXX”/>
<input name=”secure_hash” type=”hidden” value=” XXXX”
/> <input value=”Submit” type=”submit” />

EBS Integration Guide 3.0.1
© Copyright E-Billing Solutions Pvt Ltd.
Page 12
v. BIN Restrictions
Using this Integration Model, Merchant can also provide BIN restriction (used primarily
for Bank promotional offers to their Customers).
Prerequisite will be, Merchant should share the Bank Name and BIN Range
corresponding to the Bank. On providing these details, EBS will provide a bank code
which should be posted under the parameter name bank_code.
Posting this value will allow the Customer to transact only through the specified Bank
Credit or Debit card.
vi. Payment Page Customization
The main feature of this version is, the merchant can change the Look & Feel of the
payment page by doing some settings on the backend and then sending the page_id
parameter with the payment parameters. For configuration of the page settings,
please refer below.
The page_id parameter will take care of the layout of the payment page, the hashing
algorithm (MD5, SHA1, and SHA512), the http method (GET or POST) in which response is
to be sent etc.
If you are not sending any page_id value, the default will be taken as the configuration
for your payment page.
1.1 Getting Started
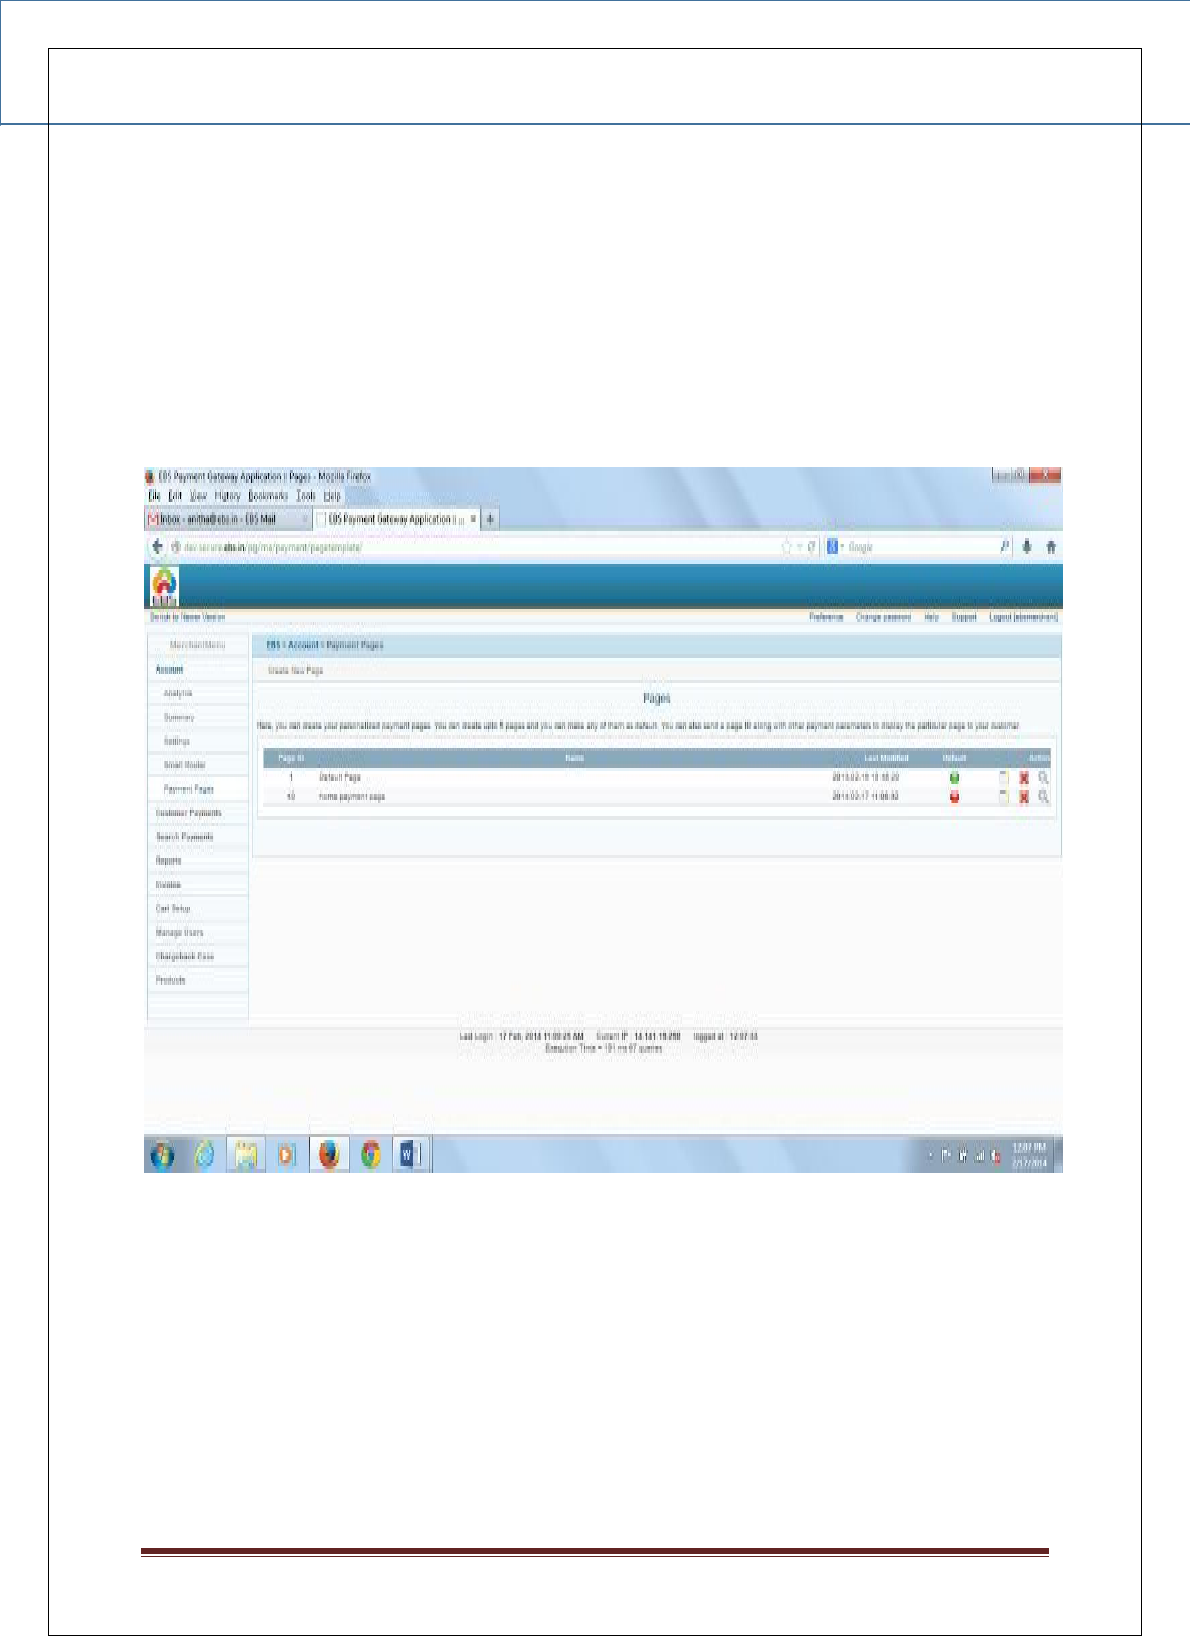
To start using custom payment pages, login to merchant account:
• Click on the Payment Pages link under the Account tab. This will lead to the Pages screen.
• On this screen, you can Add, Edit, Preview, and Remove pages, as well as make any page
style as default.
EBS Integration Guide 3.0.1
© Copyright E-Billing Solutions Pvt Ltd.
Page 13
1.2 Adding a Page
You may add up to 5 pages from your account.
To add a page:
In the payment pages screen, select Create New Page button
Figure 1: Adding a Page
On clicking the Create New Page button, the following page will be displayed:
EBS Integration Guide 3.0.1
© Copyright E-Billing Solutions Pvt Ltd.
Page 14
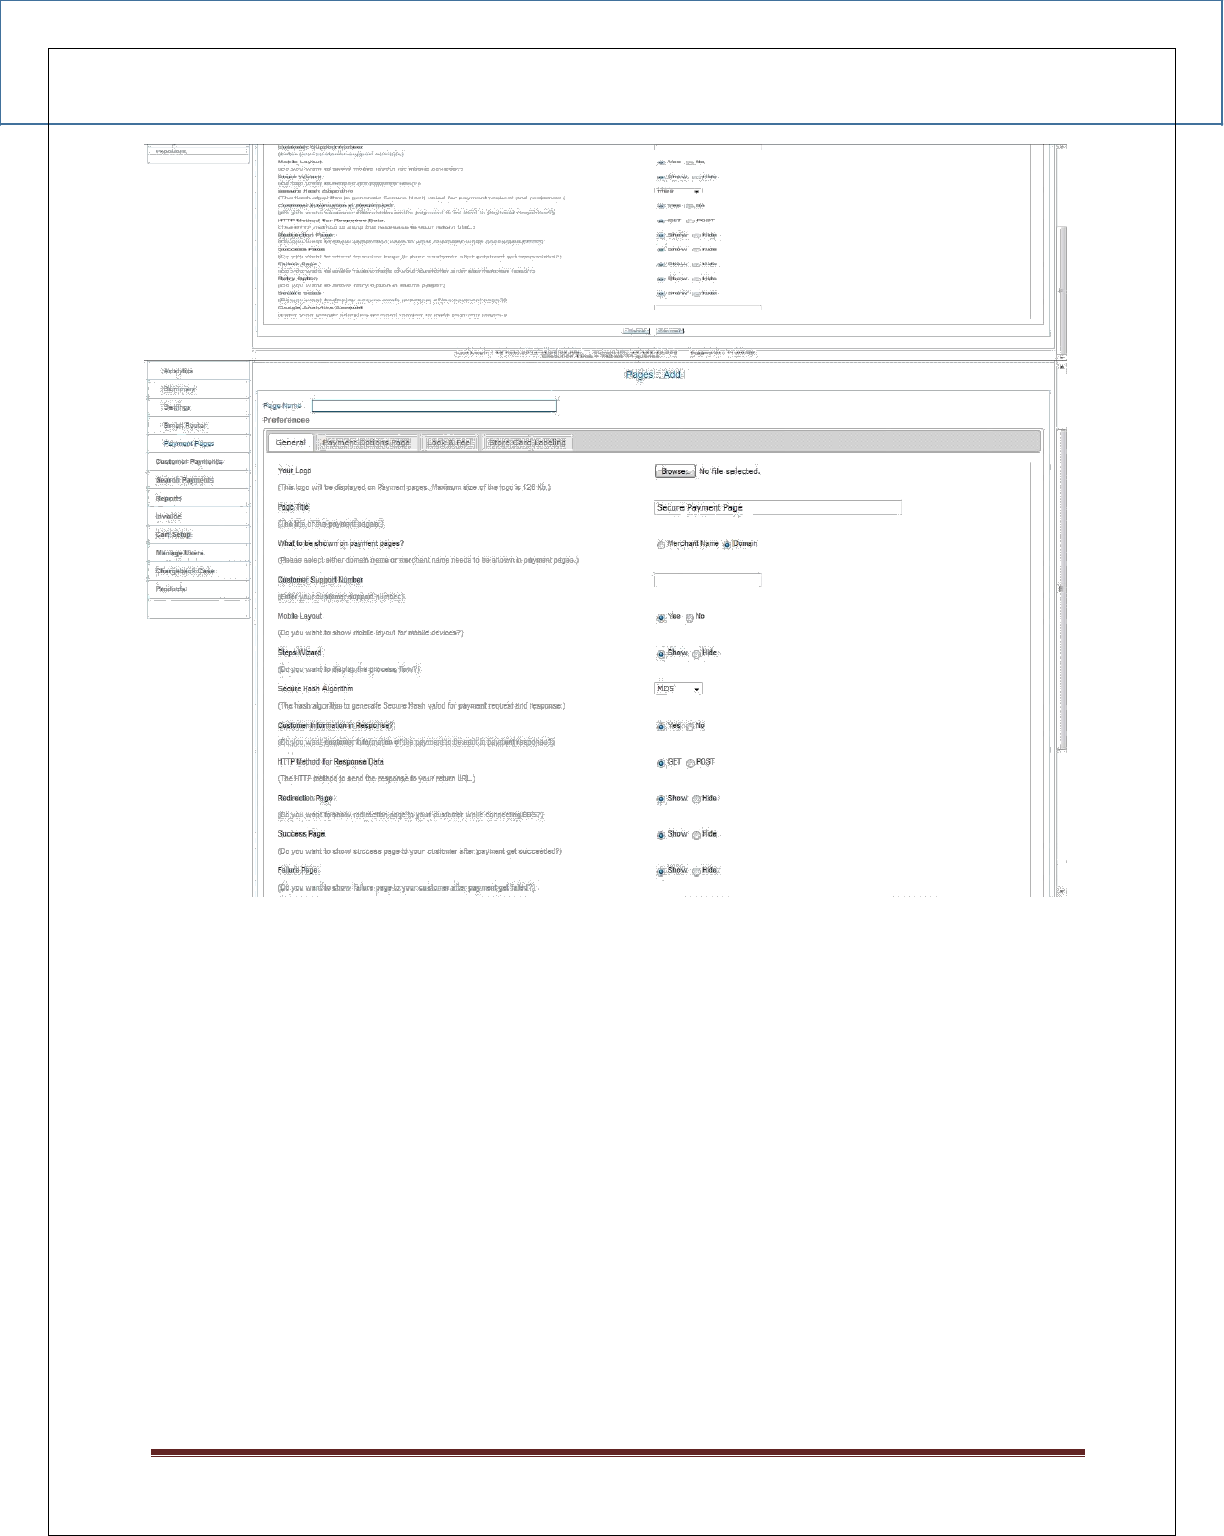
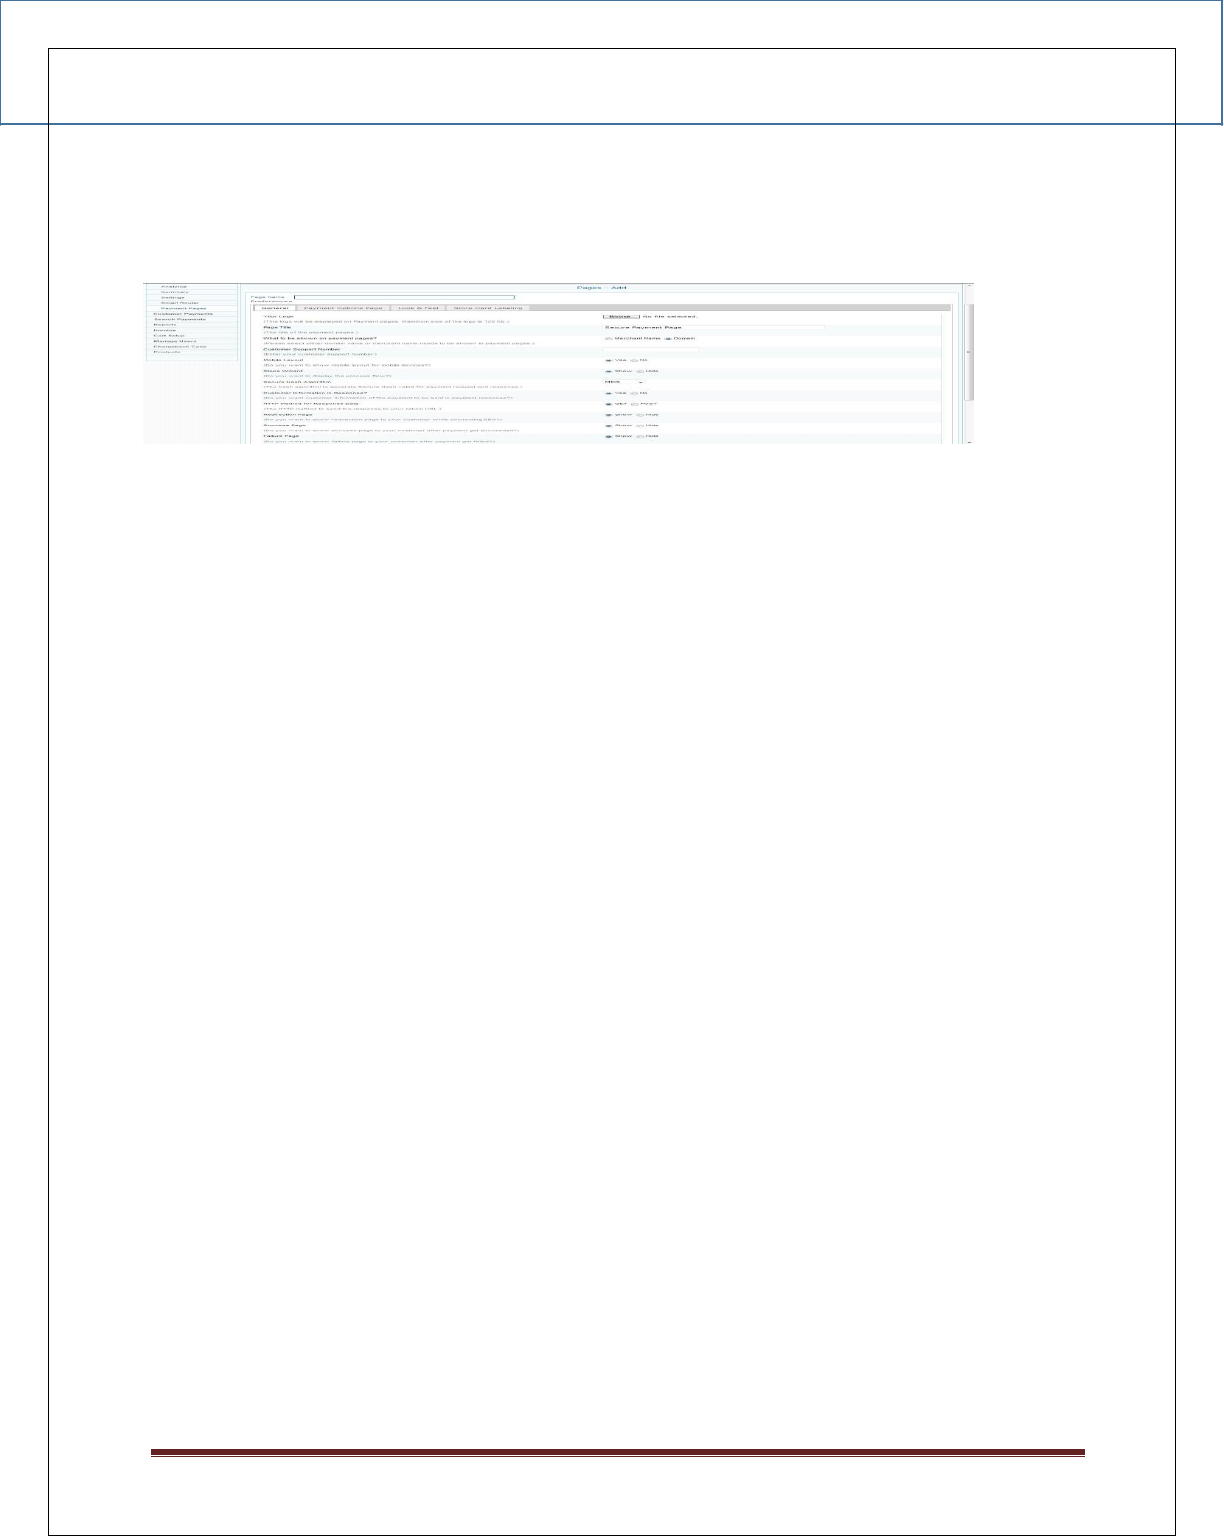
Here you can customize the page according to your preference
Figure 2: Changing page preferences
1.3 Payment Page Preferences
1.3.1 Payment Page Preferences - GENERAL
Page Name
The Page name will be used to refer to the page style within your EBS account payment pages
link. This name will be displayed as the list pf payment pages on clicking the Payment Pages
tab.
EBS Integration Guide 3.0.1
© Copyright E-Billing Solutions Pvt Ltd.
Page 15
Enter a name up to 25 characters in length. The name can contain letters, numbers, and the
underscore mark, but no other symbols or spaces.
Figure 3: Page Name
Logo
You can upload your website logo here. The image must be in a valid graphics format such as
.gif,
.jpg, .png and .jpeg. This logo will be displayed on your payment page. Maximum size of
the logo image you can upload is 128 Kb.
Page Title
The title which you provide here will be used as the title for the payment page.
What to be shown on payment pages?
You can choose if the merchant name is to be displayed on the payment page or the domain
name is to be displayed on the payment page by selecting the desired radio button.
Customer Support Number
Enter the support number for the customer. This number will be shown on the payment
page near to the Domain or Merchant Name.
Mobile Layout
This selection decides whether you want this layout to be shown to your customers when
they access the payment page from mobile devices. If you select No, the desktop version of
layout alone will be shown to the customers even while making payment from mobile devices
as well.
Steps Wizard
If you want the process flow to be displayed on the payment page, you can select yes.
Secure Hash Algorithm

EBS Integration Guide 3.0.1
© Copyright E-Billing Solutions Pvt Ltd.
Page 16
The secure hash algorithm is used to generate secure hash for request and response. You
have to select any one of the method given. The parameters will be hashed according to
the algorithm selected and sent together with the parameters.
Customer Information in Response
If Yes is selected, the customer information will also be sent along with the response.
HTTP Method for Response Data
On Selecting GET method, the response parameters will be sent back along with the return
URL and it will be visible for all. But if POST method is selected, it won’t be visible to others.
Redirection Page
The redirection page while connecting EBS to bank would be visible to the customer if Show
option is selected.
Success Page
If the payment is successful, the customer will be redirected to Success Page. This option
decides whether you want this to happen or bypass the success page and directly go to
Return URL.
Failure Page
Normally Failure Page will be shown once the transaction gets failed. It can be avoided by
selecting Hide here.
Retry Option
Customer is given with the provision of 3 retries per order if the transaction gets failed. Select
SHOW to make Retry link visible in the failure page.
Secure Seals
Merchant can choose to show or hide logos of the secure seals such as Verizon using this
option.
Google Analytics Account
Enter your google analytics account number here to track payment pages.
1.3.2 Payment Page Preferences - PAYMENT OPTIONS PAGE
Other Currency
The approximate value of payment amount in this currency will be displayed additionally
in the payment options page. You can select any of the currency from the dropdown.

EBS Integration Guide 3.0.1
© Copyright E-Billing Solutions Pvt Ltd.
Page 17
Product Information
For displaying the Product Information in the payment page, select Show.
Collect Customer Information
Sometimes the customer information is required to be collected from the payment page.
In that case, you can select Yes.
Customer Information
If it is not required to collect customer information from the payment page, but
customer information needs to be displayed on the payment page, then select
Show.
Payment modes tab Style
With this option, select payment modes tab style, to be either horizontal or vertical.
Go Back Button
If this button is to be shown on the payment page, select Show. On clicking this
button, the customer will be redirected to your website.
Cancel Payment Button
If the customer clicks this button, payment will get cancelled. Select Show or Hide.
Select Payment Options which has to be hidden on the payment options page
Here, two sections are shown. The Available Payment Options block contains all the payment
options which are activated for the merchant. If you want to hide some of the payment
options from the payment page, you can select the required payment option and click on the
Hide button. It will be populated to the right side block and will not be displayed on the
payment page. Later, if you want that payment option as well to be displayed on the payment
page, you can select that payment option and click on the Show button. It will be populated
back to the Available Payment Options block.
1.3.3 Payment Page Preferences - LOOK & FEEL
Background Image
The background image for your payment page can be set as per your requirement. Maximum
size of the image you can upload is 128 Kb. This image will be taken as background image for
all the payment related pages like main payment page, redirection, success, failure etc.
Repeat Background Image

EBS Integration Guide 3.0.1
© Copyright E-Billing Solutions Pvt Ltd.
Page 18
If you want the background image to be repeated, you can either select vertical for vertical
repeat or horizontal for horizontal repeat or on Both Dimensions or NO REPEAT.
Background Color
Enter the background color for the payment page in HTML hex code using the color picker
given. If Background image is not uploaded, the Background Color will be reflected on the
payment page.
Text Style
The text style to be used for your payment page can be selected here. You can select any one
value from the dropdown.
Text Color
This is the text color to be used for your payment page. Enter the color for the payment
page in HTML hex code using the color picker given.
Hyperlink Color
This is the color to be used for hyperlink in your payment page. Enter the color in HTML
hex code using the color picker given.
Content Background Color
This is the color to be used for the content in your payment page. Enter the color in HTML
hex code using the color picker given.
Box Background Color
This is the background color to be used for the blocks in your payment page. Enter the color in
HTML hex code using the color picker given.
Tab Background Color
This is the background color to be used for the tabs in your payment page. Enter the color in
HTML hex code using the color picker given.
Tab Color
This color is to be used for the tab in your payment page. Enter the color in HTML hex code
using the color picker given.
Tab Text Color
This color is to be used for the text inside the payment tabs. Enter the color in HTML hex code
using the color picker given.
Active Tab Color
EBS Integration Guide 3.0.1
© Copyright E-Billing Solutions Pvt Ltd.
Page 19
This color is to be used for the active tab in your payment page. Enter the color in HTML hex
code using the color picker given.
Active Tab Text Color
The color is to be used for the text inside the active tab in your payment page. Enter the
color in HTML hex code using the color picker given.
Button Background Color
The background color used for buttons inside the payment page is to be selected using
this tab. Enter the color in HTML hex code using the color picker given.
Button Text Color
The color to be used for the text inside the buttons in your payment page is selected by this
option. Enter the color in HTML hex code using the color picker given.
Button Border Color
This is the color to be used for the button borders in your payment page. Enter the color in
HTML hex code using the color picker given.
Border Color
The color is used for all the borders in your payment page. Enter the color in the HTML hex
code using the color picker given.
Save/Cancel
After entering all your preferences, click Save to save it.
Now, you will be redirected to the list page where you can preview, edit and delete the
pages created.
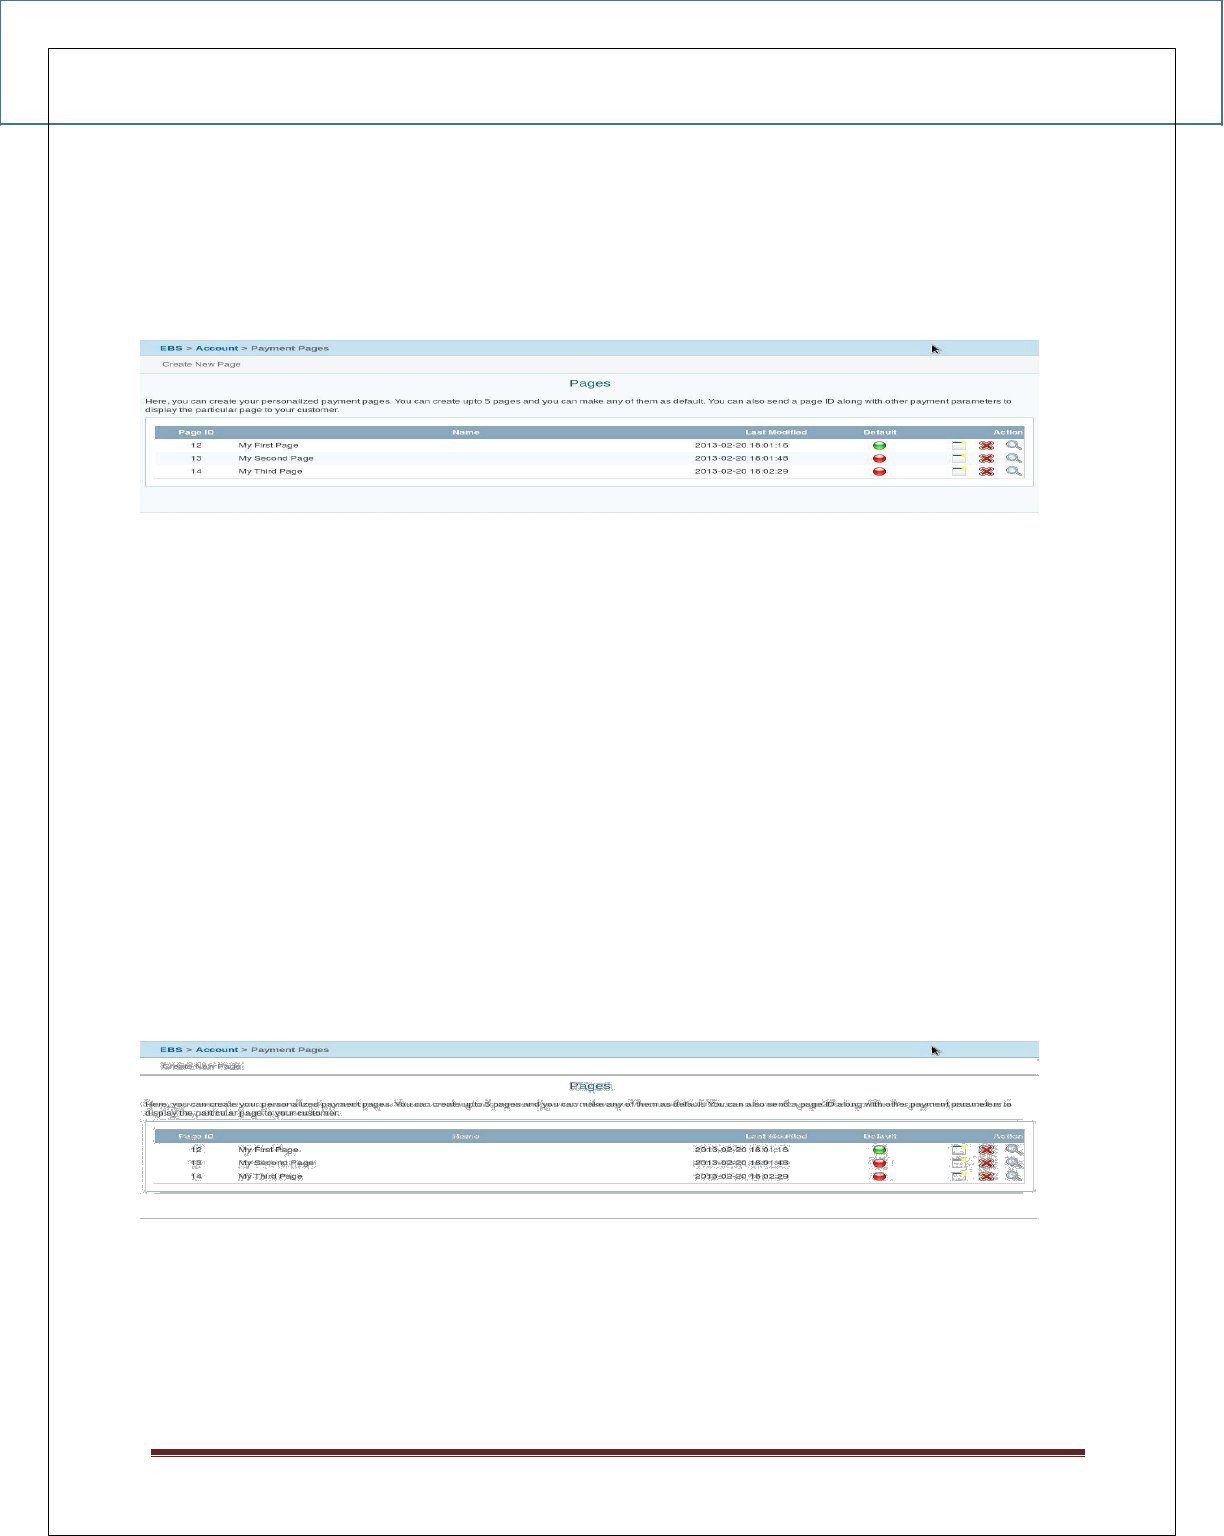
1.4 Previewing a Page
Figure 4: List of Created Payment Pages
EBS Integration Guide 3.0.1
© Copyright E-Billing Solutions Pvt Ltd.
Page 20
To preview a page:
• Select Payment Pages
• Click the preview button at the right side of the page list.
Figure 5: Preview option
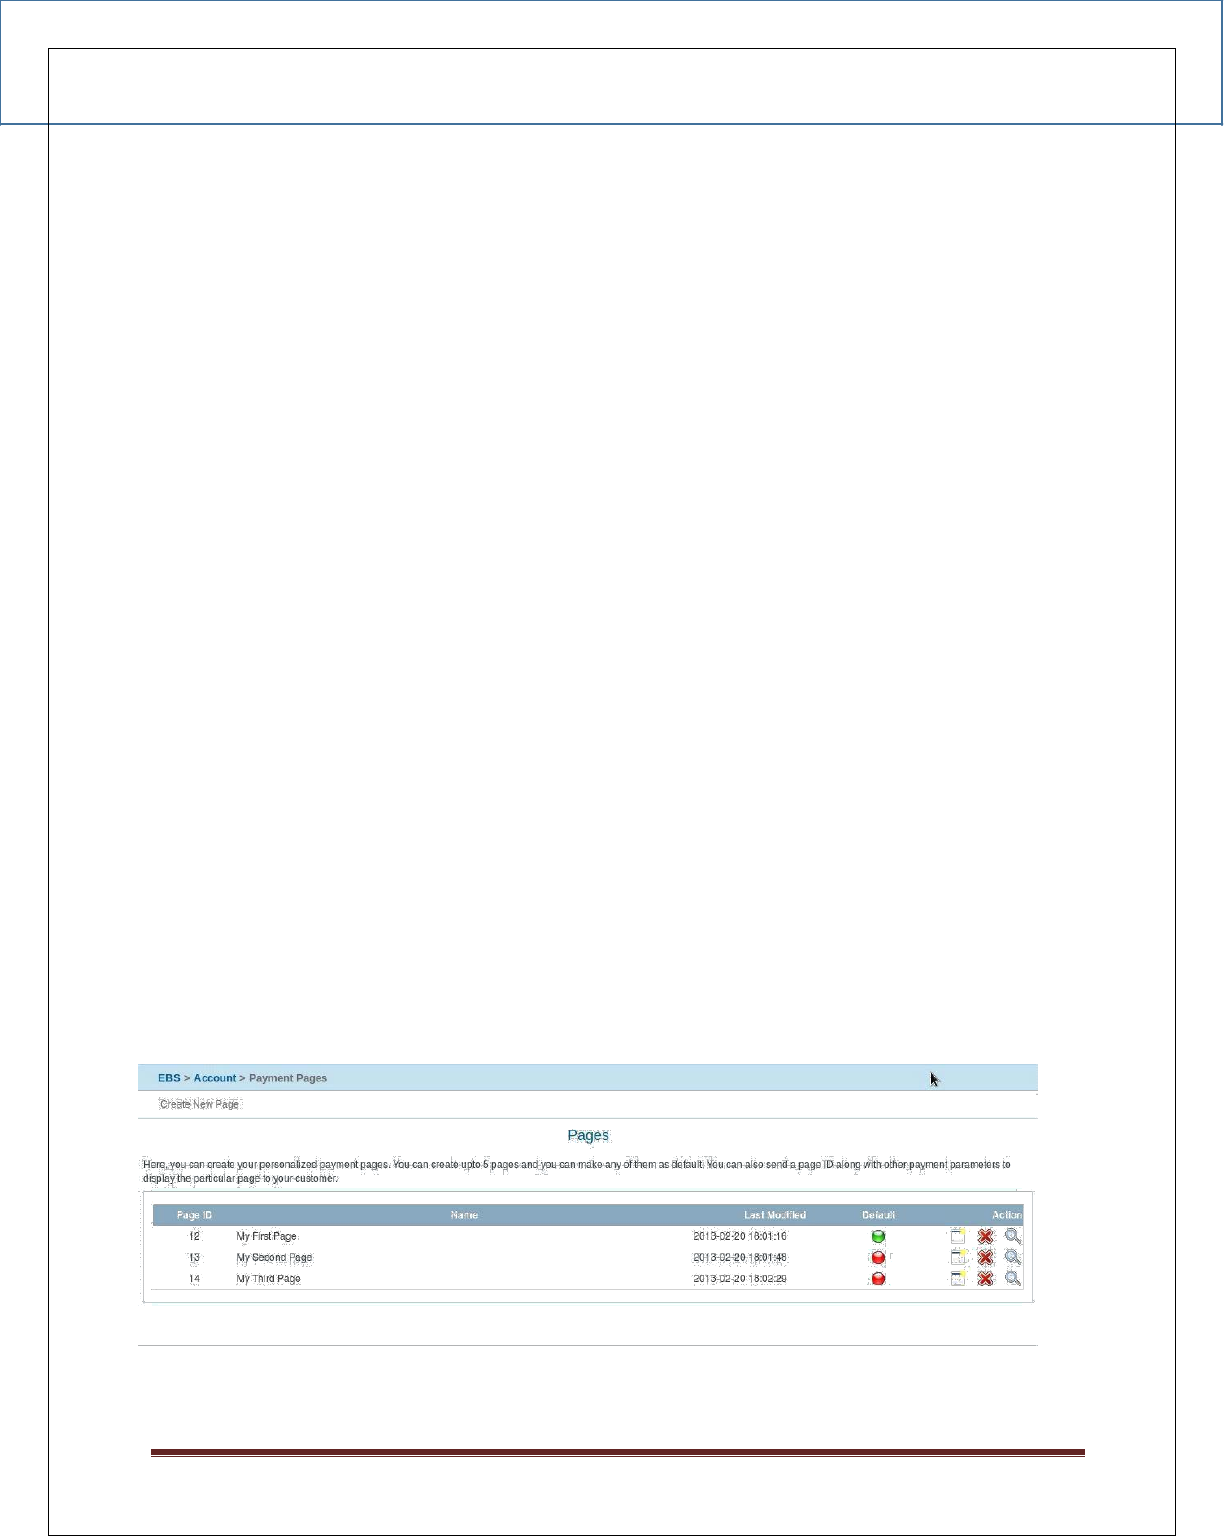
1.5 Setting a page as DEFAULT
If a page is set as default and if the page ID parameter is not sent with the payment
parameters, this page will be taken as default.
To make a page as default:
4. Begin at the Custom Payment Page Styles page (see “Getting Started,” above)
5. Click the default button (red) under the heading default which you wish to make as
default page.
6. The color of the button will be changed to green once it is made default.
Figure 6: Setting as default option
EBS Integration Guide 3.0.1
© Copyright E-Billing Solutions Pvt Ltd.
Page 21
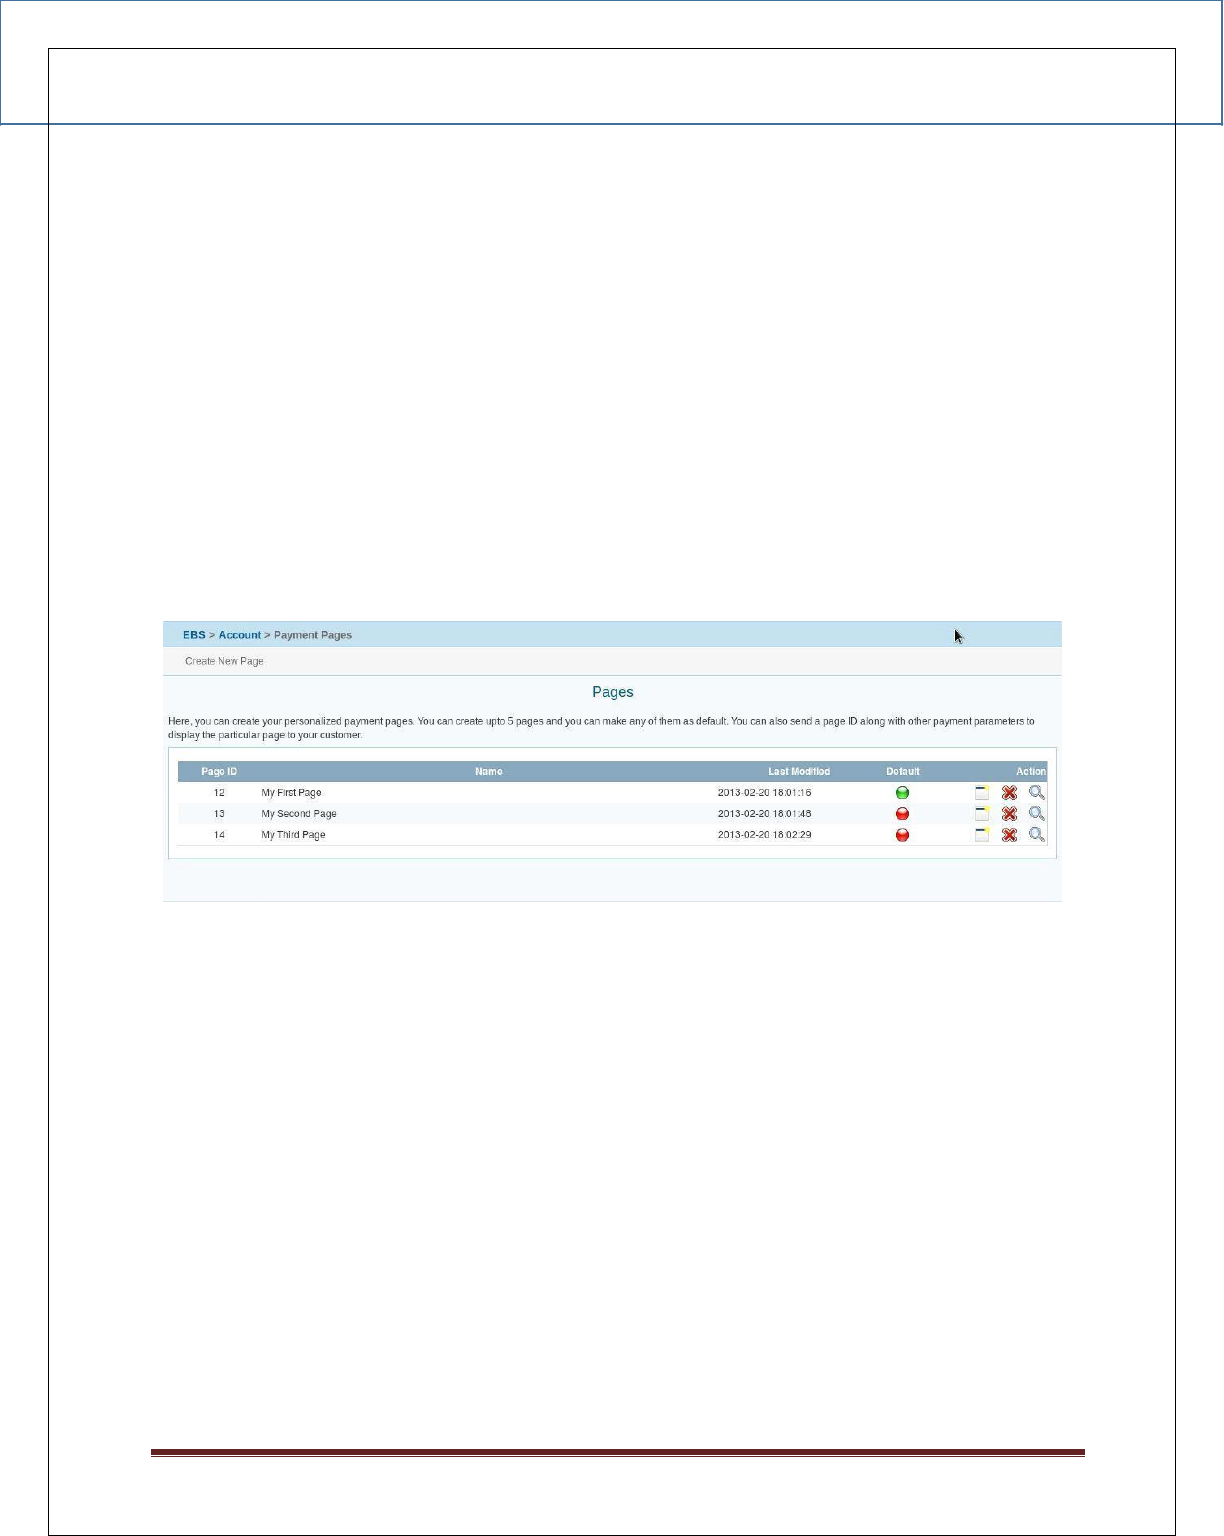
6.6 Removing a Page
When you remove a page and if the page ID is given as a parameter, the payment pages to
which the style was applied will no longer be customized with those specifications. Instead,
your Default page style will be applied to those pages.
To Remove a Page:
• Begin at the Custom Payment Page Styles page (see "Getting Started," above)
• Click the Delete Button on the right side of the list which you wish to delete.
• Confirm your choice.
Figure 7: Deleting a payment page style
EBS Integration Guide 3.0.1
© Copyright E-Billing Solutions Pvt Ltd.
Page 22
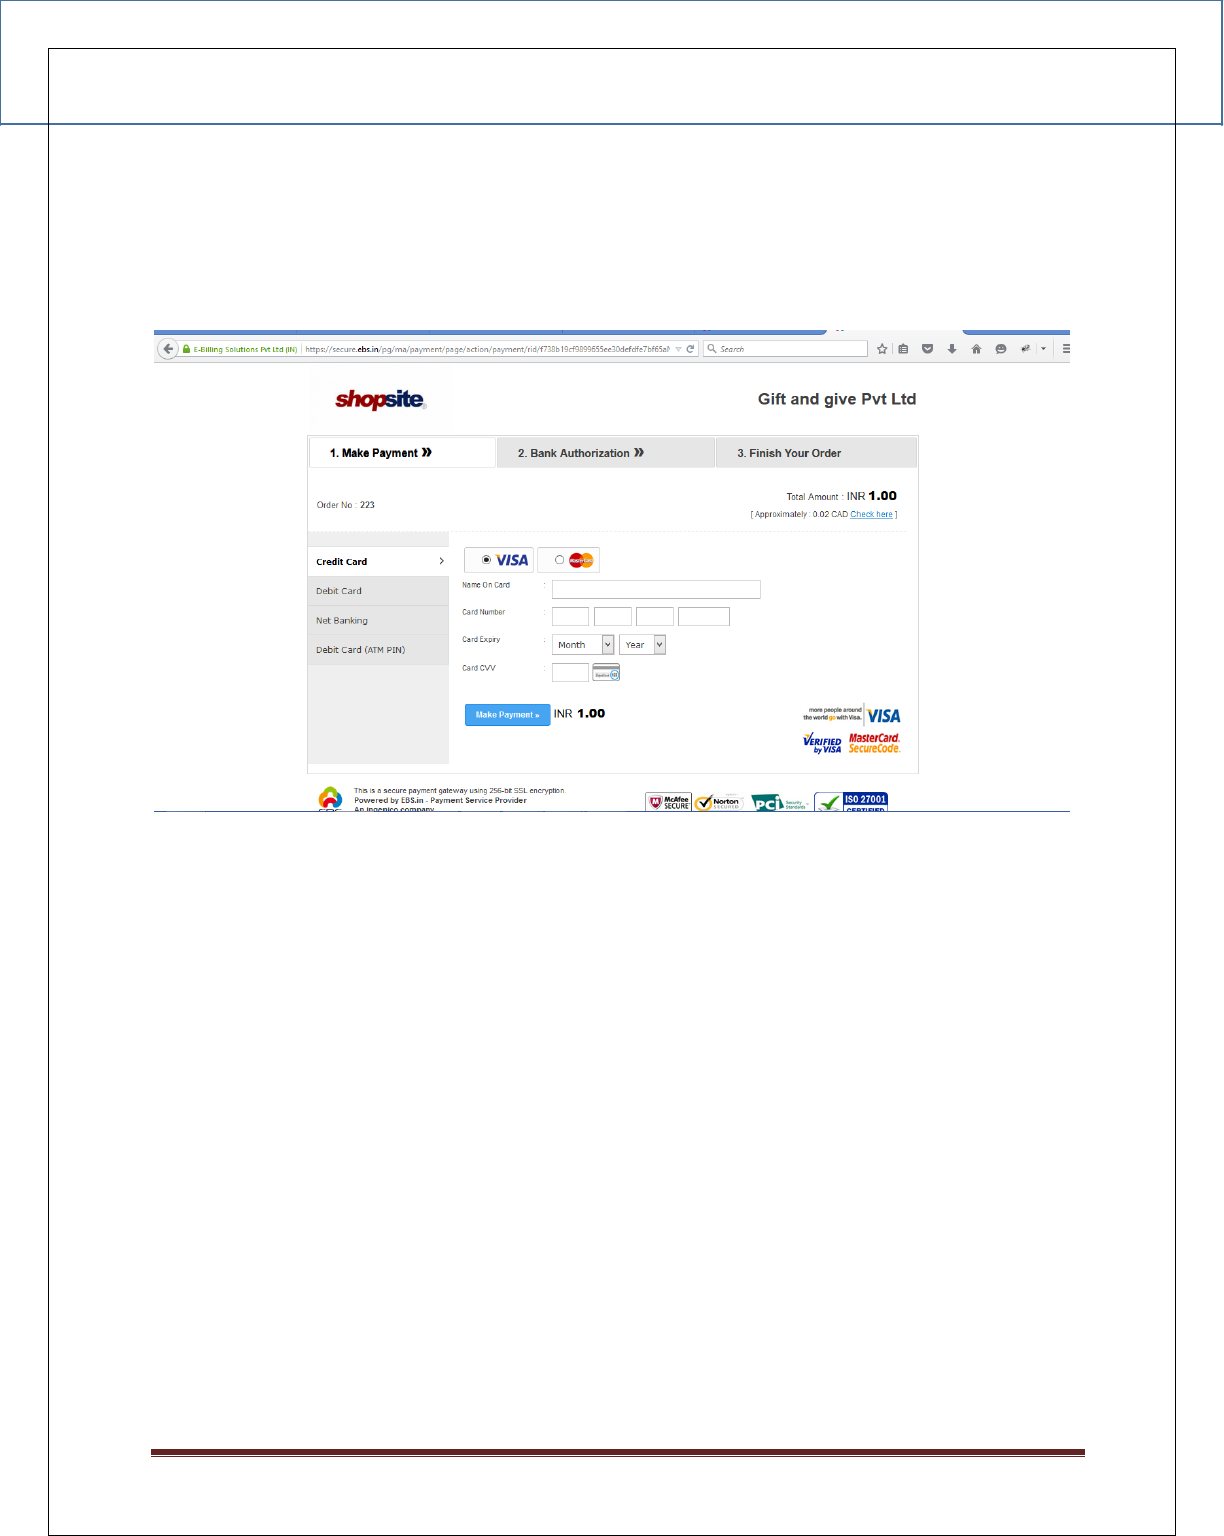
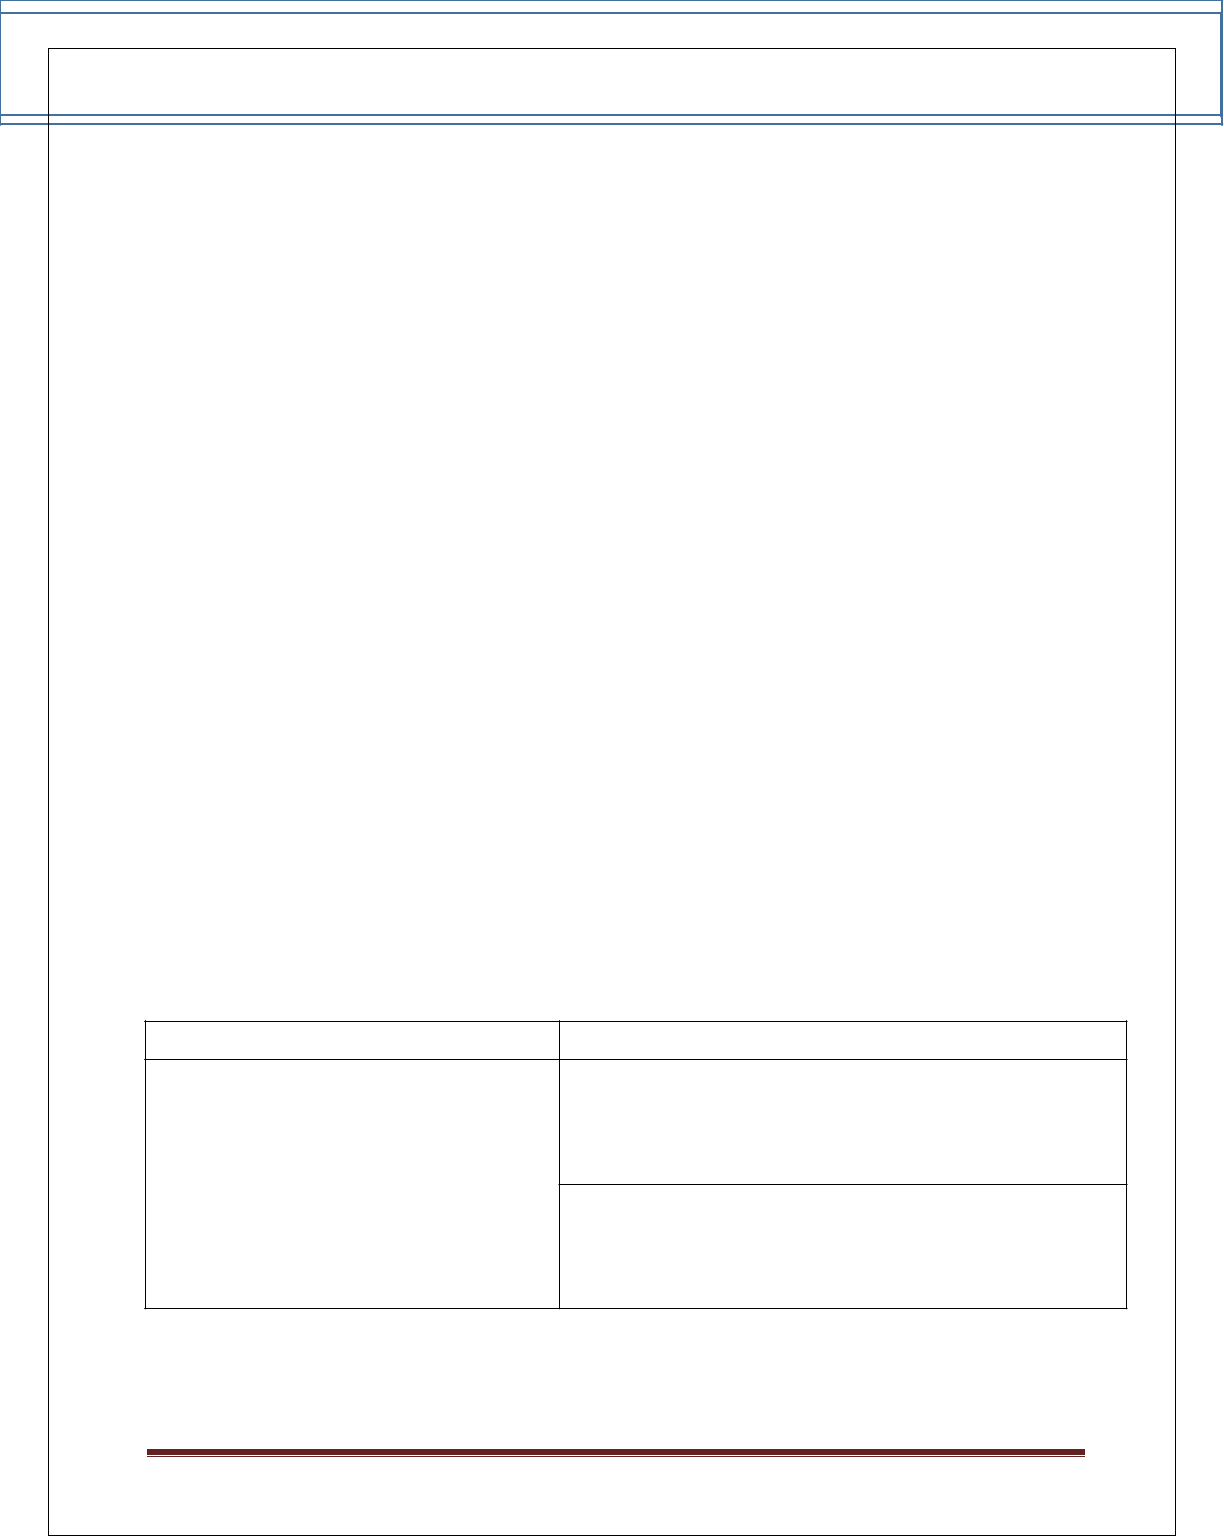
SAMPLE PAYMENT PAGE
EBS Integration Guide 3.0.1
© Copyright E-Billing Solutions Pvt Ltd.
Page 23
vii. Payment Response
In this Response page, you have to edit the secret key with your secret key. To get
the secret Key,
Login to the EBS Merchant Account.
Go to “Settings”. In the Account settings you can view the secret key.
Note: To reset the secret key, send a request Email to support@ebs.in
According to the http method set on the merchant backend page customization section,
the response will be sent back to the return URL. If GET method is selected, the response is
given as query string appended to the return URL. One secure_hash parameter also will be
sent along with the other parameters. The secure hash will be calculated according to the
hash algorithm mentioned in the backend configuration of the payment page.
viii. Payment Response Parameters
Response in case all the validations are passed.
S.No
Parameter
Description
Whether the payment is successful or not 0
1
ResponseCode
=>Successful
Appropriate message explaining about successful or un
2
ResponseMessage
successful payment
3
DateCreated
payment happened date
For that particular payment a id will be created for our
4
PaymentID
reference
5
MerchantRefNo
Merchants reference number
6
Amount
Payment Amount
7
Mode
LIVE

EBS Integration Guide 3.0.1
© Copyright E-Billing Solutions Pvt Ltd.
Page 24
8
BillingName
Customer billing Name
9
BillingAddress
Customer billing address.
10
BillingCity
Customer billing city.
11
BillingState
Customer billing state.
12
BillingPostalCode
Customer billing postal code.
13
BillingCountry
Customer billing country.
14
BillingPhone
Customer billing phone.
15
BillingEmail
Customer billing email.
16
DeliveryName
Customer delivery Name
17
DeliveryAddress
Customer delivery address.
18
DeliveryCity
Customer delivery city.
19
DeliveryState
Customer delivery state
20
DeliveryPostalCode
Customer delivery postal code.
21
DeliveryCountry
Customer delivery country.
22
DeliveryPhone
Customer delivery phone.
23
IsFlagged
YES or NO
Authorized Transaction ID of the generated payment ID. Each
Payment ID will have different transaction id for each actions.
24
TransactionID
For ex: Capture, Cancel, Refund, etc
25
SecureHash
The hashed value of the response parameters.
26
AccountID
Your Account ID
Response in case all the validations are failed
S.No
Parameter
Description
1
SecureHash
The hashed value of the response parameters.
EBS Integration Guide 3.0.1
© Copyright E-Billing Solutions Pvt Ltd.
Page 25
2
Error
Error Message
3
ResponseCode
Response Code of the error
Recommended validation in the response file to avoid duplication of records in your
backend
1) Pass your orderid in the reference_no parameter and in response file, check whether
MerchantRefNo and your orderid matches.
2) Check if the amount of the order and the "amount" parameter in the response is equal.
If both the conditions results as true, insert order in your backend, which nullifies the
duplications.
Response Message:
Transaction Successful
Transaction Failed Invalid
parameters:
Invalid Account ID / VPC is not enabled for the account
Invalid Secure Hash
Amount cannot be less than 1
Invalid Payment Option
Invalid payment request
Invalid mode selected
Selected payment method is NOT available now
Invalid Response
Bank Declined Transaction
3D Secure Authentication Failed
Denied By Risk
Insufficient funds
EBS Integration Guide 3.0.1
© Copyright E-Billing Solutions Pvt Ltd.
Page 26
APPENDIX A – SECURE HASH VALIDATION
Secure hash is a technology to check for the authenticity of the parameters posted to EBS. The
secure hash value is posted along with other post parameters. The received parameters are
hashed at EBS and compared against the Secure hash value received from Merchant.
In a Similar way, the merchant can hash the received values and compare it with
secure hash value received from EBS while taking the payment response.
The Hash Algorithm depends on the page_id parameter which you sent while the
payment request is sent to EBS.
In case of non-conformity, the payment is failed and further processing is stopped.
Procedure to implement the Secure Hash:
Step 1 - Implement the code for Secure hash validation
Sample Code using MD5 Hashing Algorithm in PHP
$secret_key = ’ ’; //Provide your EBS Account’s Secret Key
$hashData = $secret_key; // Intialise with Secret Key ksort ($_POST); // Sort the post
parameters in alphabetical order of parameter names.
//Append the posted values to $hashData
foreach($_POST as $key => $value) {
//create the hashing input leaving out any fields that has no value and by concatenating
the values using a ‘|’ symbol.
if (strlen($value) > 0) {
$hashData .=
'|'.$value;
EBS Integration Guide 3.0.1
© Copyright E-Billing Solutions Pvt Ltd.
Page 27
}
}
// Create the secure hash and append it to the Post data
if (strlen($hashData) > 0) {
$hashvalue = strtoupper(md5($hashData));
}
$SecureHash = $hashvalue;
Step 2 – Posting the Hash Value
Merchant need to generate Secure Hash and pass this value along with other
payment request Parameters. Parameter Name for Secure Hash is "secure_hash"
<input name="secure_hash" type="hidden" value="abcdefghijklmnopqrstuvwxyz012345" />
APPENDIX B – SETTLEMENT CYCLE
This is with reference to the RBI Notification RBI/2009-10/231DPSS.CO.PD.No.
1102/02.14.08/2009-10 dated November24, 2009 captioned "Directions for opening and
operation of accounts and settlement of payments for electronic payment transactions
involving intermediaries".
As per the aforementioned notification, EBS has implemented a T+2 Settlement
Cycle. Below mentioned are the details concerning T+2 Settlement process:
Transaction Day – Day on which Merchant completes the Order from his Customer
by capturing it in the EBS Backend.
Settlement Day- Day on which EBS Settles the Transaction Amount to Merchant for the
Transaction done on Transaction Day
EBS Integration Guide 3.0.1
© Copyright E-Billing Solutions Pvt Ltd.
Page 28
Transaction Day
Settlement Day
Monday(this week)
Wednesday(this week)
Tuesday(this week)
Thursday(this week)
Wednesday(this week)
Friday(this week)
Thursday(this week)
Saturday(this week)
Friday (this week)
Monday(next week)
Saturday, Sunday(this week)
Tuesday(next week)
Note - If any Bank Holidays or Unexpected Holidays happen to be on the
Settlement Day, the Settlement is postponed to the next Working Day.
For Example: If Tuesday happens to be Bank Holiday, The Settlement is
postponed to Wednesday. So the transactions done on Saturday, Sunday (this
week) are settled on Wednesday (next week)

EBS Integration Guide 3.0.1
© Copyright E-Billing Solutions Pvt Ltd.
Page 29
APPENDIX C – ISO3 COUNTRY NAME
ISO 3
Country Name
ABW
Aruba
AFG
Afghanistan
AGO
Angola
AIA
Anguilla
ALA
Aland Islands
ALB
Albania
AND
Andorra
ANT
Netherlands Antilles
ARE
United Arab Emirates
ARM
Armenia
ASM
American Samoa
ATA
Antarctica
ATF
French Southern Territories
ATG
Antigua and Barbuda
AUS
Australia
AUT
Austria
AZE
Azerbaijan
BDI
Burundi
BEL
Belgium
BGD
Bangladesh
BGR
Bulgaria
BHR
Bahrain
BHS
Bahamas
BRB
Barbados
BIH
Bosnia and Herzegovina
BLR
Belarus
BLZ
Belize
BEL
Belgium
BEN
Benin
BMU
Bermuda
BTN
Bhutan
BOL
Bolivia
BWA
Botswana
ISO 3
Country Name
BVT
Bouvet Island
BRA
Brazil
BRN
Brunei Darussalam
BFA
Burkina Faso
CAF
Central African Republic
CAN
Canada
CCK
Cocos (Keeling) Islands
CHE
Switzerland
CHL
Chile
CHN
China
CIV
Cite d'Ivoire
CMR
Cameroon
CYM
Cayman Islands
CYP
Cyprus
CZE
Czech Republic
COD
Democratic Republic of the Congo
COK
Cook Islands
COL
Colombia
COM
Comoros
CPV
Cape Verde
CRI
Costa Rica
CUB
Cuba
CXR
Christmas Island
DEU
Germany
DJI
Djibouti
DMA
Dominica
DNK
Denmark
DOM
Dominican Republic
DZA
Algeria
ECU
Ecuador
ESH
Western Sahara
ESP
Spain
EST
Estonia
EBS Integration Guide 3.0.1
© Copyright E-Billing Solutions Pvt Ltd.
Page 30
ISO 3
Country Name
ETH
Ethiopia
FIN
Finland
FJI
Fiji
FLK
Falkland Islands (Malvinas)
EGY
Egypt
ERI
Eritrea
FRA
France
FRO
Faroe Islands
FSM
Federated States of Micronesia
GAB
Gabon
GBR
United Kingdom
GEO
Georgia
GUF
French Guiana
GUM
Guam
GUY
Guyana
HUN
Hungary
IDN
Indonesia
IMN
Isle of Man
IND
India
IOT
British Indian Ocean Territory
IRL
Ireland
IRN
Iran, Islamic Republic of Iran
IRQ
Iraq
ISL
Iceland
ISR
Israel
ITA
Italy
JAM
Jamaica
JEY
Jersey
JOR
Jordan
JPN
Japan
KHM
Cambodia
KAZ
Kazakhstan
KEN
Kenya
KGZ
Kyrgyzstan
ISO 3
Country Name
KIR
Kiribati
KNA
Saint Kitts and Nevis
KOR
Korea, Republic of Korea
KWT
Kuwait
LAO
Lao People`s Democratic Republic
LBN
Lebanon
LBR
Liberia
LBY
Libyan Arab Jamahiriya
LCA
Saint Lucia
LIE
Liechtenstein LKA
LKA
Sri Lanka
LSO
Lesotho
LTU
Lithuania
LUX
Luxembourg
LVA
Latvia
MAC
Macao
MAF
Saint Martin (French part) MAR
MAR
Morocco
MCO
Monaco
MDA
Moldova
MDG
Madagascar
MDV
Maldives
MNP
Northern Mariana Islands MOZ
MOZ
Mozambique
MRT
Mauritania
MSR
Montserrat
MTQ
Martinique
MUS
Mauritius
MWI
Malawi
MYS
Malaysia
MYT
Mayotte
NAM
Namibia
NCL
New Caledonia
NER
Niger

EBS Integration Guide 3.0.1
© Copyright E-Billing Solutions Pvt Ltd.
Page 31
ISO 3
Country Name
SHN
Saint Helena
SJM
Svalbard and Jan Mayan
SLB
Solomon Islands
SLE
Sierra Leone
SLV
El Salvador
SMR
San Marino
SOM
Somalia
SPM
Saint Pierre and Miquelon
SRB
Serbia
STP
Sao Tome and Principe
SUR
Suriname
SVK
Slovakia
SVN
Slovenia
SWE
Sweden
SWZ
Swaziland
SYC
Seychelles
SYR
Syrian Arab Republic
TCA
Turks and Caicos Islands
TCD
Chad
TGO
Togo
THA
Thailand
TJK
Tajikistan TKL
TKL
Tokelau
TKM
Turkmenistan
TLS
Timor
TON
Tonga
TTO
Trinidad and Tobago
TUN
Tunisia
TUR
Turkey
TUV
Tuvalu
TWN
Taiwan, Province of China
TZA
Tanzania, United Republic of
UGA
Uganda
UKR
Ukraine
ISO 3
Country Name
NFK
Norfolk Island
NGA
Nigeria
NIC
Nicaragua
NIU
Niue
NLD
Netherlands
NOR
R Norway
NPL
Nepal
NRU
Nauru
NZL
New Zealand
OMN
Oman
PAK
Pakistan
PAN
Panama
PCN
Pitcairn
PER
Peru
PHL
Philippines
PLW
Palau
PNG
Papua New Guinea
POL
Poland
PRI
Puerto Rico
PRK
Korea, Democratic People`s Republic
PRT
Portugal
PRY
Paraguay
PSE
Palestinian Territory, Occupied
PYF
French Polynesia
QAT
Qatar
REU
Run ion
ROU
Romania
RUS
Russian Federation
RWA
Rwanda
SAU
Saudi Arabia
SDN
Sudan
SEN
Senegal
SGP
Singapore
SGS
South Georgia and the South Sandwich
Islands
EBS Integration Guide 3.0.1
© Copyright E-Billing Solutions Pvt Ltd.
Page 32
ISO 3
Country Name
UMI
United States Minor Outlying Islands
URY
Uruguay
USA
United States
UZB
Uzbekistan
VAT
Holy See (Vatican City State)
VCT
Saint Vincent and the Grenadines
VEN
Venezuela
VGB
Virgin Islands, British
VIR
Virgin Islands, U.S.
VNM
Viet Nam
VUT
Vanuatu
WLF
Wallis and Futuna
WSM
Samoa
YEM
Yemen
ZAF
South Africa
ZMB
Zambia
ZWE
Zimbabwe
APPENDIX D – PCI DSS COMPLIANCE
Compliance Requirements
Control Objectives
PCI DSS Requirements
1.Install and maintain a firewall configuration
to protect cardholder data
Build and Maintain a Secure Network
2. Do not use vendor-supplied defaults for
system passwords and other security parameters
EBS Integration Guide 3.0.1
© Copyright E-Billing Solutions Pvt Ltd.
Page 33
3. Protect stored cardholder data
Protect Cardholder Data
4. Encrypt transmission of cardholder data across open,
public networks
5. Use and regularly update anti-virus software on all
systems commonly affected by malware
Maintain a Vulnerability Management
Program
6. Develop and maintain secure systems and
applications
7. Restrict access to cardholder data by business need
to-know
Implement Strong Access Control
Measures
8. Assign a unique ID to each person with computer
access
9. Restrict physical access to cardholder data
10. Track and monitor all access to network resources
and cardholder data
Regularly Monitor and Test Networks
11. Regularly test security systems and processes
12. Maintain a policy that addresses information
Maintain an Information Security Policy
security
EBS Integration Guide 3.0.1
© Copyright E-Billing Solutions Pvt Ltd.
Page 34
PCI Self-Assessment Questionnaire (SAQ)
The PCI Data Security Standard Self-Assessment Questionnaire is a validation tool intended to
assist merchants and service providers in self-evaluating their compliance with the Payment
Card Industry Data Security Standard (PCI DSS). All merchants and their service providers are
required to comply with the PCI Data Security Standard in its entirety.
SAQ
Description
Card-not-present (e-commerce or mail/telephone-order) merchants, all
A
cardholder data functions outsourced. This would never apply to face-to-face
merchants.
B
Imprint-only merchants with no electronic cardholder data storage, or
standalone, dial-out terminal merchants with no electronic cardholder data
storage.
C-VT
Merchants using only web-based virtual terminals, no electronic cardholder data
storage.
C
Merchants with payment application systems connected to the Internet, no
electronic cardholder data storage.
All other merchants not included in descriptions for SAQ types A through C
D above, and all service providers defined by a payment brand as eligible to complete an
SAQ.

EBS Integration Guide 3.0.1
© Copyright E-Billing Solutions Pvt Ltd.
Page 35
Merchant PCI DSS Compliance Criteria and PCI levels
Level 1 Criteria
Merchants with over 6 million transactions a year, or merchants whose data has
previously been compromised
Level 1 Validation Requirements
Annual Onsite Security Audit (reviewed by a QSA or Internal Audit if signed by officer of
merchant company and pre-approved by acquirer) and quarterly network security scan
Level 2 Criteria
Merchants with 1,000,000 to 6 million transactions a year
Level 2 Validation Requirements
Annual Self-Assessment Questionnaire
Quarterly Scan by an Approved Scanning Vendor (ASV)
Level 3 Criteria
Merchants with 20,000 to 1,000,000 transactions a year
Level 3 Validation Requirements
Quarterly Scan by an Approved Scanning Vendor (ASV)
Annual Self-Assessment Questionnaire
Level 4 Criteria
Merchants with less than 20,000 transactions
Level 4 Validation Requirements
Annual Self-Assessment Questionnaire
Quarterly Scan by an Approved Scanning Vendor

EBS Integration Guide 3.0.1
© Copyright E-Billing Solutions Pvt Ltd.
Page 36
Achieving Compliance with PCI DSS
The PCI DSS compliance procedure can take anything from a day to many weeks, depending on
what is uncovered by the vulnerability assessment scan and the self-assessment
questionnaire. Organizations that currently have a good level of information security are likely
to be compliant a lot more quickly than those that don't.
QSAs carry out inspections of PCI DSS implementations and determine a recommendation of
compliance to the various payment brands. Each individual payment brand will separately
determine whether to accept the recommendation of compliance and whether a detailed
review of the report of compliance and compensating controls is warranted.
The starting point for all organizations that need to comply is to download the Payment Card
Industry Self-Assessment Questionnaire and to contact a PCI Approved Scanning
Vendor (ASV).
EBS Integration Guide 3.0.1
© Copyright E-Billing Solutions Pvt Ltd.
Page 37
E-Billing Solutions Pvt. Ltd.,
If Any, Please send suggestions or corrections to:
Email:support@ebs.in
