00. Part.0 RS (E) (P.01~12) EOS 1N 1 N Eng Toc
User Manual: EOS-1N
Open the PDF directly: View PDF ![]() .
.
Page Count: 120 [warning: Documents this large are best viewed by clicking the View PDF Link!]
- EOS-1 N / EOS1 N RS
- Welcome to the World of the EOS-1 N, The Flagship Camera of the EOS Series
- Contents
- Camera Care and Precautions
- I Shooting Preparations and Basic Operation
- 1. Loading the Battery
- 2. Checking the Battery Level (Film Shooting Capacity)
- 3. Operating the Main Switch
- 4. Setting and Adjusting Basic Functions .
- 5. Lens Attachment
- 6. Dioptric Adjustment
- 7. Shutter Button Operation and Autofocus
- 8. Film Loading
- 9. Custom Functions
- 10. Program AE mode [P]
- Attaching the Strap
- II Selecting the AF and Metering Modes
- III Selecting the Shooting Mode
- IV Configuring the Camera
- V Using Flash
- VI Custom Functions
- Additional Information for the EOS-1 N DP Model
- Additional Information for the EOS-1 N HS Model
- Attaching the Standard Grip
- Additional Information for the EOS-1 N RS Model
- Troubleshooting
- Program Line Characteristics
- Specifications
- Quick Guide to EOS-1 N Functions

E
English Edition
INSTRUCTIONS
00. Part.0 RS (E) (P.01~12) 27-01-2003 11:51 Page 1

Welcome to the World of the EOS-1 N, The Flagship Camera of the EOS Series
2
Thank you for selecting a Canon EOS camera.
Thousands of professional photographers throughout the world are devot-
ed users of the EOS-1 — a flexible, high-precision tool responsible for
recording on film countless decisive moments and masterpieces of photo-
graphic art. The EOS-1 N continues the EOS-1 tradition and extends the
state of the art even further by combining all of the superb features of the
EOS-1 with several new functions and mechanisms requested by EOS-1
users to create the ultimate professional photographic tool.
New Features include:
1. Advanced Multi-BASIS AF (autofocus) sensor with five selectable
focusing points for wide-area coverage.
2. Improved focus prediction and object tracking performance.
3. Improved shooting speed (up to 6 frames/sec. with Power Drive
Booster E1).
4. Choice of five metering patterns, including 16-zone evaluative, cen-
ter-weighted average, 9% partial, 3.5% spot metering linked to
each focusing point, and 2.3% fine spot metering.
5. Enhanced multiple-zone TTL flash sensor plus built-in flash expo-
sure compensation control up to ±3 steps in 1/3-step increments.
6. Silent drive mechanism for super-quiet film rewinding.
7. Improved and expanded custom functions for greatly enhanced
operational flexibility, letting you customize many facets of the cam-
era's operation to match your shooting style. New custom functions
include:
•Choice of silent or high-speed rewind
•Mirror lock
•Flash output reduction control
•Ability to set shutter speeds and aperture values in 1-step, 1/2-step or
1/3-step increments
•Ability to select individual focusing points with quick control dial
•Ability to change AEB exposure order and prevent cancellation
8. Built-in eyepiece shutter.
00. Part.0 RS (E) (P.01~12) 27-01-2003 11:51 Page 2

3
The EOS-1 N family consists of the following three models in addition to
the standard model:
•EOS-1 N DP: This model combines the BP-E1* AA-size battery pack with the
EOS-1 N, allowing the user to switch between the standard
2CR5 lithium battery or AA-size batteries depending on the
shooting situation. (Refer to page 93.)
•EOS-1 N HS: This model combines the Power Drive Booster E1* with the
EOS-1 N, providing high-speed continuous shooting and
increased shooting capacity. (Refer to page 96.)
•EOS-1 N RS**:
This model features a non-moving, hard-coated new pellicle mirror
which provides non-interrupted viewing through the viewfinder and
rapid-fire continuous shooting at 10 frames/sec. Moreover, the
camera’s release time lag (the time between when the shutter but-
ton is pressed and when the exposure occurs) is reduced to a
mere 0.006 sec. (Refer to page 100.)
* BP-E1 and Power Drive Booster E1 must be purchased separately in North America.
**The EOS-1 N RS is scheduled for availability in Spring 1995.
●General Precautions
•Before an important event such as a trip or wedding, be sure to test the camera to make
sure it is operating correctly.
•The
EOS-1 N will give optimum performance together with exclusively designed Canon
EF lenses, flash and other Canon brand accessories. It is possible that the use of incom-
patible lenses or other accessories may result in unsatisfactory performance or damage to
your EOS-1 N. We therefore suggest the use of Canon EF lenses and accessories.
Damage to your Canon camera as a result of malfunction or improper connections caused
by the use of incompatible products may void its warranty.
●
Throughout this manual special precautions relating to the various camera
operations are enclosed in boxes marked with the following symbols.
:Cautionary measures to ensure proper camera use and prevent undesired
results or malfunction.
:Reference information for helping you gain maximum functionality from your
camera.
:
Helpful hints for using your camera productively and with maximum efficiency.
•To keep your camera in top working condition, be sure to read the Camera Care
and Precautions section on page 6.
•After reading this manual, store it in a convenient place that is quick and easy to
access when necessary.
00. Part.0 RS (E) (P.01~12) 27-01-2003 11:51 Page 3

IV Configuring the
Camera
1. Setting and Resetting Custom
Functions...............................82
●
Setting a Custom Function
.....82
Additional Information for the
EOS-1 N DP Model
........................93
Additional Information for the
EOS-1 N HS Model
........................96
VI Custom Functions
VUsing Flash
1. Selecting the Five Focusing
Points ( ) ............................29
●Selecting a Focusing
Point ..................................29
●Focus Lock ........................31
2. Selecting the AF Mode..........32
●One-Shot Autofocus ..........32
II Selecting the AF and
Metering Modes
IShooting Preparations
and Basic Operation
●Attaching the Strap ............13
1. Loading the Battery ...............14
2. Checking the Battery Level
(Film Shooting Capacity).......15
3. Operating the Main Switch ....16
4.
Setting and Adjusting Basic Functions
.17
Camera Care and Precautions
..........6
1.
Handling, Cleaning and Storage
.......6
2.
Liquid Crystal Display Information
........7
1. Shutter-priority AE [Tv]..........49
2. Aperture-priority AE [Av].......52
3. Depth-of-Field AE [DEP].......55
●Using Manual Focusing
1.
Manually Setting the Film Speed
.....66
2.
Changing the Film Winding Mode
....67
●
Film Winding Automatic Gear
Switching Function
................68
●
Maximum Continuous Shooting
Speed in Different AF Modes
1.
Using EOS Dedicated Speedlites
....77
●Automatic Flash Output
Reduction Control ..............77
III Selecting the Shooting
Mode
4
•
New functions appearing on the EOS-1 N for the first time are indicated by an ( ). If you
are already familiar with the operation of the EOS-1, you can quickly familiarize yourself with
the EOS-1 N by just reading the text sections indicated by an ( ).
00. Part.0 RS (E) (P.01~12) 27-01-2003 11:51 Page 4
Exposure Compensation
.......79
3. Using Non-dedicated Flash
Equipment .............................80
●Combined Use of Custom
Functions F-5 and F-11 .....92
Program Line Characteristics
........108
Specifications............................109
Quick Guide to EOS-1 N Functions
...115
●Removing Film...................25
●
Removing Film in Mid-Roll
()25
9. Custom Functions .................25
10. Program AE mode [P]...........26
●Program Shift Function ......27
●
Remaining Frame Counter
.....27
5. Lens Attachment
.....................
18
●Removing the Lens............18
6. Dioptric Adjustment ...............19
7. Shutter Button Operation
and Autofocus .......................20
8. Film Loading..........................22
3. Blinking “ ” Display ..............7
4. Battery Information..................8
●Partial Metering ( ) .........38
●Fine Spot Metering
()().............................39
6. AE Lock.................................40
7. Exposure Compensation.......42
8. Auto Exposure Bracketing
[AEB].....................................45
5. Bulb Exposure [ ] ...........61
6. Multiple Exposures ( ) .......63
5.
Locking the Mirror Up
()........72
6. Infrared Photography ............73
7.
Checking the Depth of Field
......74
8.
Illuminating the LCD Panel
........74
9. Resetting the Camera to Its
Initial Settings........................75
5
●AI Servo Autofocus ............33
3.
Difficult Subjects for Autofocus
..34
4. Manual Focusing...................36
●Full-time Manual Focusing
with USM Lenses...............36
5.
Selecting the Metering Mode
.....37
●
Evaluative Metering
()........38
Point Selection Mode.........55
●
Using Automatic Focusing
Point Selection Mode
..........57
4. Manual Exposure [M]............59
(frames/sec.)
........................68
3. Changing the Film
Rewinding Mode ( )............69
4.
Using the Self-Timer
().......70
●Using the Eyepiece
Shutter ( ) .......................71
2. Flash Exposure Compensation
().......................................78
●
Speedlites Capable of Flash
●Resetting a Custom
Function .............................83
2.
Custom Function Chart
().......84
Attaching the Standard Grip
............99
Additional Information for the
EOS-1 N RS Model...................100
Troubleshooting ........................106
5. Camera Operation with a Low
Battery ....................................8
Nomenclature ...............................9

Camera Care and Precautions
6
1. Handling, Cleaning and Storage
•This camera is a high-precision instrument. Be careful not to drop it or subject
it to shock.
•The Canon EOS-1 N has been designed for increased resistance to moisture.
However, this camera is not waterproof and must therefore be handled with
reasonable care. Keep the camera out of salt spray and protect it from exces-
sive moisture. If used at the beach, clean it thoroughly afterward with a dry
cloth. If dropped in water, contact an authorized Canon service facility.
•This camera contains high-precision circuits. Do not attempt to disassemble
the camera yourself. Always take it to an authorized Canon service facility for
repair.
•Do not touch the camera’s electronic contacts with your fingers. Touching the
contacts can cause corrosion and affect proper camera operation.
•After removing a lens from the camera, place it face down on a flat surface to
avoid damaging the electronic contacts on the lens mount.
•Condensation is a problem when bringing cold equipment into a warm place.
If the autofocus optics cloud over, accuracy may be seriously affected. Before
entering a warm place, put equipment in a plastic bag so condensation forms
on the outside of the bag.
•
To remove dust from the lens, viewfinder eyepiece, mirror, focusing screen or
film chamber, gently blow the dust away using a commercially-available bulb-
type blower. Avoid directly touching any of these surfaces. Do not wipe the
camera body or lens with any type of cleaner containing organic solvents.
When further cleaning is necessary, consult your nearest Canon service center.
•The shutter curtain operates with extremely high precision and can be easily
damaged if touched. When loading or unloading film, be careful not to touch
the shutter curtain accidentally with your finger or the tip of the film. To
remove dust from the shutter curtain or surrounding area, only use a blower
and be careful not to blow air onto the curtain too strongly. Strongly blowing
air onto the curtain may deform or damage it. Aerosol spray dust removers
are not recommended for the shutter curtain.
•When storing the camera, wrap it in a clean, soft cloth and place it in a well-
ventilated, cool, dry, dust-free place. Be sure to keep the camera out of direct
sunlight, and away from “hot spots” such as the trunk or rear window shelf of
a car. Avoid places where moth balls are used, and in extreme humidity, use
a desiccant. To prevent corrosion, avoid storing the camera in a laboratory or
other location where chemicals are used. Also, do not store the camera in a
drawer or other non-ventilated place. Remove the battery if you do not expect
to use the camera for about three weeks or longer. It is also recommended to
take the camera out and release the shutter occasionally to prevent build up
of mold or corrosion.
00. Part.0 RS (E) (P.01~12) 27-01-2003 11:51 Page 6

Camera Care and Precautions
7
•A minute amount of battery power is used for the display even when the main
switch is set to . This does not affect the camera’s shooting capacity (num-
ber of film rolls possible per battery).
•Carefully check the camera’s operation after lengthy storage. When the cam-
era has not been used for a long time, or before an important trip or shooting
assignment, we recommend having the camera thoroughly tested at a Canon
service center.
2. Liquid Crystal Display Information
The LCD panel uses liquid crystal to indicate camera settings. Due to the charac-
teristics of the liquid crystal, the display may become difficult to read because of its
life span which varies according to the condition of use. If this occurs, have it
replaced at an authorized Canon service facility. Replacement is at the owner’s
expense in case of out of warranty term.
Liquid crystal may also respond relatively slowly in temperatures below 32°F/0°C. It
may also darken in temperatures of around 140°F/60°C. The LCD panel will return
when the temperature returns to normal.
3. Blinking “ ” Display
There are two conditions in which the blinking “ ” will appear in the LCD panel:
(1) when the battery is nearly exhausted or (2) when the camera’s self-test process
detects an internal malfunction. If the blinking “ ” indicator appears, perform the
following operations:
1. Press the battery check button to check the battery level. If the battery level is
low, replace the battery with a new one.
2. If the indicator shows a sufficient battery level, remove the battery, wipe the bat-
tery terminals and reload it.
3. Release the shutter once.
If the “ ” display stops blinking, the problem is corrected and you can contin-
ue using the camera normally. If the blinking does not stop, the camera needs to
be examined by an authorized Canon service facility.
00. Part.0 RS (E) (P.01~12) 27-01-2003 11:51 Page 7

Camera Care and Precautions
8
4. Battery Information
This camera requires battery power for operation. Always check the battery at the
following times:
1. When loading a new battery
2. After lengthy storage
3. If the shutter will not release
4. In cold weather
5. Before an important shooting assignment
•Wipe the battery terminals with a clean, dry cloth to ensure proper contact.
•The battery may explode or cause burns if disassembled, recharged, shorted,
exposed to high temperatures, or disposed of in fire. Be sure to observe all pre-
cautions indicated on the battery package. Always keep batteries out of the
reach of children.
•Lithium battery performance deteriorates slightly in temperatures below
0°C/32°F. Keep the camera and especially a spare battery close to your body or
in an inside pocket to keep it warm until use.
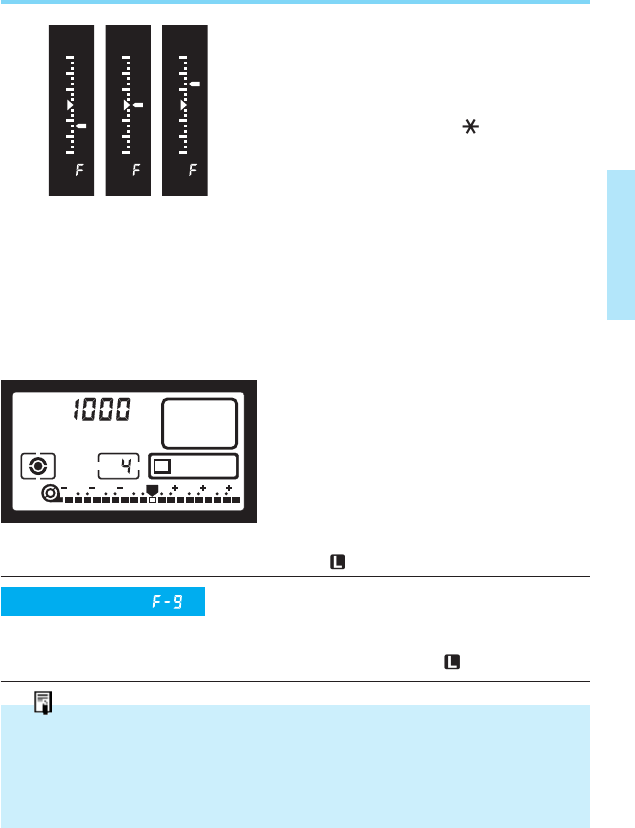
5. Camera Operation with a Low Battery
Even if the battery indicator blinks or does not appear in the LCD panel during bat-
tery check, exposure will be correct as long as the shutter releases. When the bat-
tery power drops below a certain level, film advance and rewinding stop operating
and “ ” blinks in the display. Film winding automatically resumes after a new
battery is loaded. To resume rewinding, press the film rewind button ( ).
00. Part.0 RS (E) (P.01~12) 27-01-2003 11:51 Page 8
9
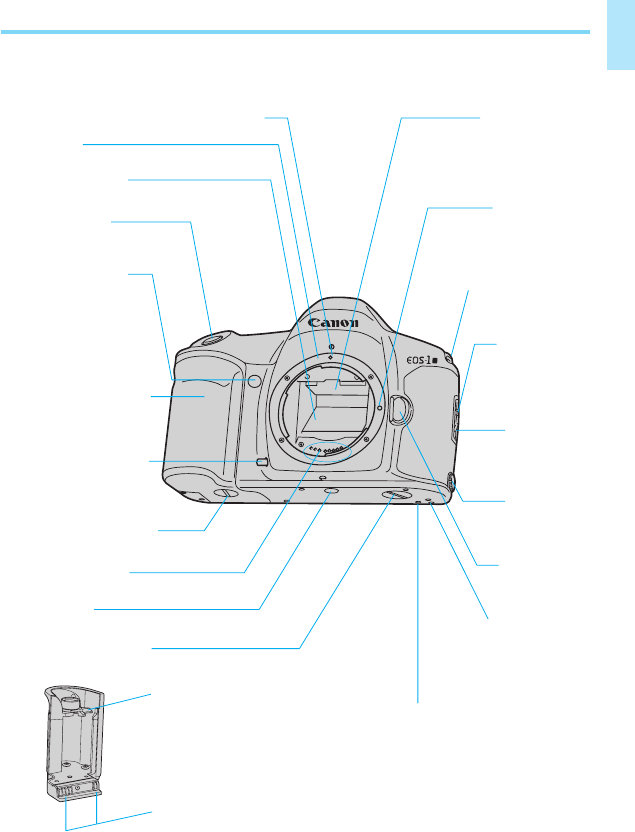
Nomenclature
•Page numbers of sections related to each component are indicated in
parentheses.
N
Lens Attachment Mark (red) (→page 18)
Lens Mount
Mirror (→page 72)
Shutter Button
(→page 20)
Self-Timer Indicator
(→page 70)
Grip / Battery Chamber
(→page 14)
Depth-of-Field Preview
Button (→page 74)
Grip Screw (→page 14)
Electronic Contacts
Tripod Socket
Booster Coupler Cover
Battery Release Lever (→page 14)
Electronic Contacts
Focusing Screen
Lens Lock Pin
Strap Fixture (→page 13)
Back Cover
Lock Release
Button
(→page 23)
Back Cover
Latch
(→page 23)
PC Terminal
(cover)
(→page 80)
Lens Release
Button
(→page 18)
Booster Coupling Pin
Booster / Battery Pack
Attachment Hole
00. Part.0 RS (E) (P.01~12) 27-01-2003 11:51 Page 9
10
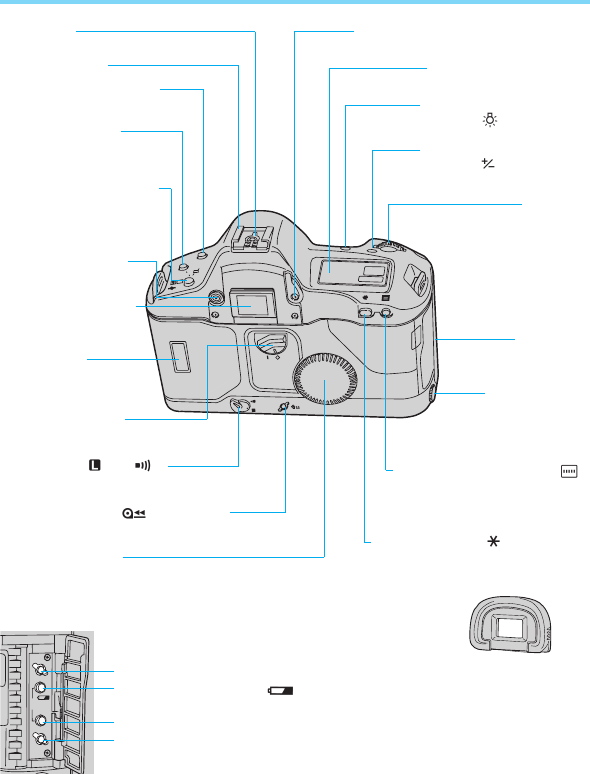
Nomenclature
X Contacts
Accessory Shoe
Shooting Mode Selector
(→page 17)
AF Mode Selector
(→page 32)
Metering Mode Selector /
Flash Exposure
Compensation Button
(→page 37, 78)
Dioptric Adjustment
Dial (→page 19)
Viewfinder Eyepiece
Film Window
Quick Control Dial
Switch
Film Rewind Button ( ) (→page 25)
Quick Control Dial
AE Lock Button ( ) (→page 40)
Focusing Point Selector ( )
(→page 29)
Remote Control
Socket (cover)
(→page 61)
Palm Door
Main Dial
Exposure Compensation
Button ( ) (→page 44)
LCD Panel Illumination
Button ( ) (→page 74)
LCD Panel (→page 11)
Eyepiece Shutter Lever (→page 71)
Custom Function Set Button (→page 82)
Battery Check Button ( ) (→page 15)
Film Winding Mode Selector (blue) (→page 67)
Clear Button (white) (→page 75)
Eyecup Ec II (→page 19)
Main Switch ( , A, )
(→page 16)
A
L
AF
MODE
130
DRIVE
CLEAR
CF
AEB
00. Part.0 RS (E) (P.01~12) 27-01-2003 11:51 Page 10
11
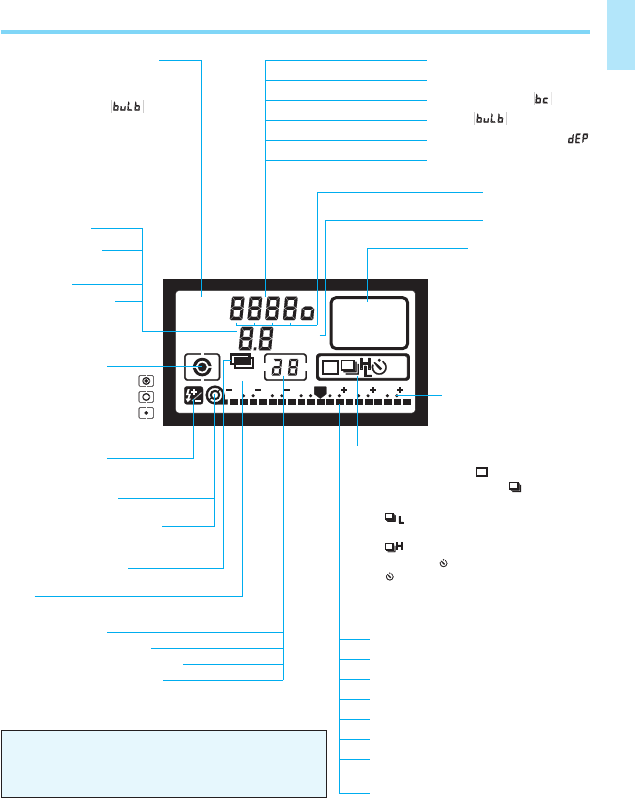
Nomenclature
Shooting Modes
Manual Exposure: M
Shutter-priority AE: Tv
BulbExposure:
Program AE: P
Aperture-priority AE: Av
* Depth-of-Field AE: DEP
Shutter Speed
Film Speed
Battery Check ( )
Bulb ( )
* Depth-of-Field AE ( )
Custom Function Control
Aperture Value
Custom Function
Control
AEB Value
*
Depth-of-Field AE
Metering Modes
Evaluative Metering
Partial Metering
Fine Spot Metering
Flash Exposure
Compensation
Film -Load Check
Film Rewind Completion
Multiple Exposures
AEB
Frame Counter
Bulb Exposure Time
No. of Multiple Exposures
Self-Timer Countdown
This diagram shows all the information displayed
simultaneously for explanation only. The LCD
panel never actually appears like this.
Focusing Points
ISO Indicator
Exposure Compensation
Value Index
AF Mode Indicator
One-shot AF
AI Servo AF
Film Winding Mode Indicator
Single Exposure:
Continuous Exposure:
Low-Speed Continuous Exposure:
(EOS-1 N HS, EOS-1 N RS only)
High-Speed Continuous Exposure:
(EOS-1 N HS, EOS-1 N RS only)
Self-Timer:
10 (10-second timer),
(2-second timer)
2
10
Film Transport (Wind/Rewind )
Film Wind Completion/Error
Battery Check
Exposure Level Indicator
Bulb Exposure Time
AEB Value Amount Indicator
Flash Exposure Compensation
Value Indicator
Custom Function Setting Indicator
ONE SHOT
AI SERVO
10
2
AEB
3 2 1 1 2 3
ISO
v
A
v
M
T
DEP
0
* Not available on the EOS-1 N RS.
00. Part.0 RS (E) (P.01~12) 27-01-2003 11:51 Page 11

12
Nomenclature
M
Focusing Points/Spot Metering Position Indicators
Fine Spot
Metering Area
Laser-matte Screen Ec-CII
Manual Exposure Indicator
AE Lock / AEB Indicator
Shutter Speed
* Depth-of-Field AE Indicator
Aperture Value
Flash Charge Completion Indicator
Exposure Compensation Indicator
Flash Exposure Compensation Indicator
In-focus Indicator
Correct Exposure Indicator
Exposure Step Indicator
(: 1-stop, : 1/3-stop)
Overexposure Indicator
(+3 stops or more)
Exposure Level Indicator
Underexposure Indicator
(–3 stops or more)
Remaining Frame Counter
(F: more than 9, 9~0)
* Not available on the EOS-1 N RS.
Exposure
Level
Display
00. Part.0 RS (E) (P.01~12) 27-01-2003 11:51 Page 12

13
I Shooting Preparations and
Basic Operation
This section explains the preparations neces-
sary to set up the camera before use, as well
as the basic operation of the camera.
●Attaching the Strap
Thread the ends of the strap through
the strap fixtures as shown. Pull firmly
on the strap to make sure it is held
securely by the buckles.
00. Part.1 RS (E) (P.13~27) 27-01-2003 11:54 Page 13
14
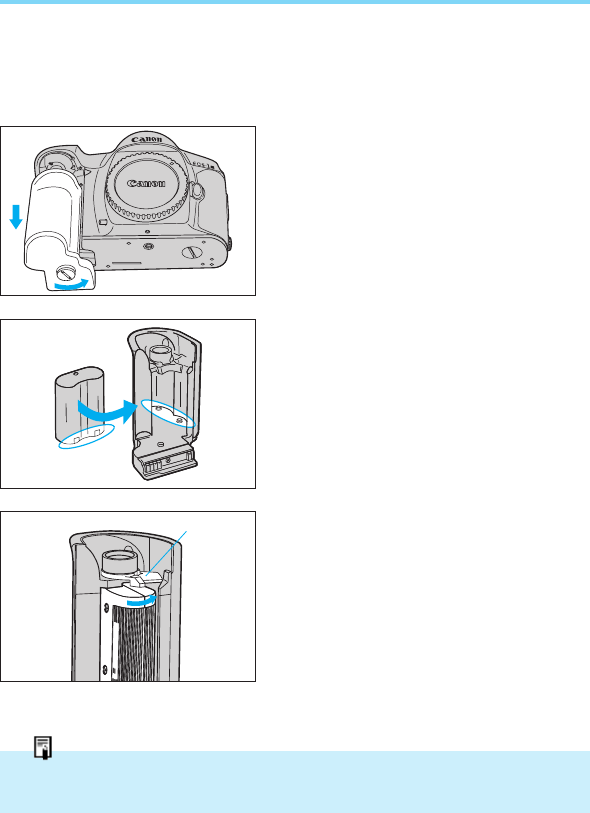
1. Loading the Battery
This camera operates on a 6-volt, 2CR5 lithium battery, housed in the
grip.
•Refer to page 93 for additional information on the batteries of the EOS-1 N DP
model and page 96 for the EOS-1 N HS model and the EOS-1 N RS model.
m
u
I
h
t
I
Lm
u
I
h
t
I
L
1Using a coin or similar object, turn
the grip screw counterclockwise to
loosen the grip. The screw cannot
be removed from the grip.
2Slide the grip down to remove.
3Load the battery upside down into
the grip so that its terminals align
with the terminals in the battery
compartment.
•The battery label should be facing
toward you and the terminals should
be on the bottom after the battery is
installed.
4After placing the battery into the
front of the compartment, push it all
the way into the compartment as
shown in the illustration.
•To remove the battery from the grip,
press the battery ejector lever.
5Replace the grip on the camera and
turn the screw clockwise to firmly
lock it in place.
Lithium batteries may not be available in some areas. Be sure to take along a spare when
going on a trip or embarking on an important shooting assignment.
N
Battery Ejector Lever
1
2
00. Part.1 RS (E) (P.13~27) 27-01-2003 11:54 Page 14
0
15
2CR5 Lithium Battery Shooting Capacity
•Data based on Canon’s Standard Test Method using a new battery, EF50mm
f/1.4 USM lens and 24-exposure film. Values in parentheses are for 36-expo-
sure film.
•Repeated autofocus operation without taking any pictures will reduce the overall
shooting capacity.
•Refer to page 93 for the shooting capacity of the EOS-1 N DP model, page 96
for the EOS-1 N HS model and page 100 for the EOS-1 N RS model.
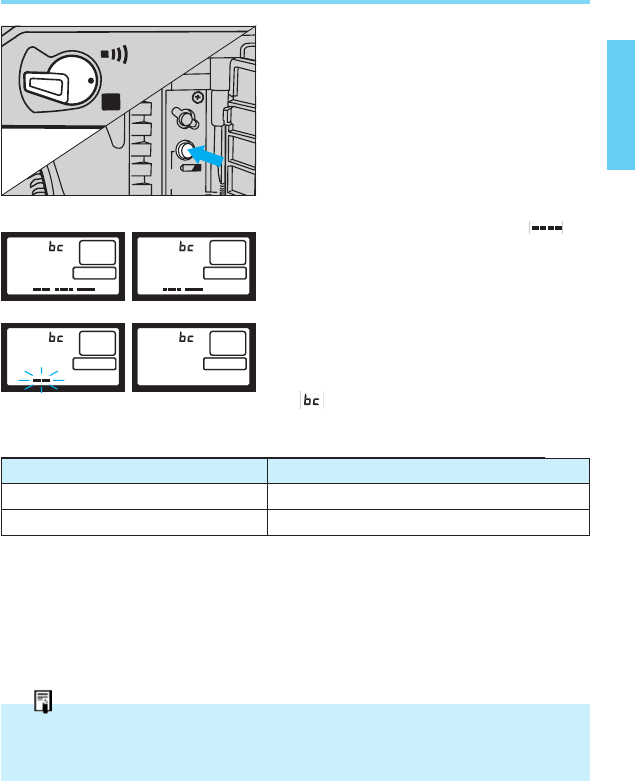
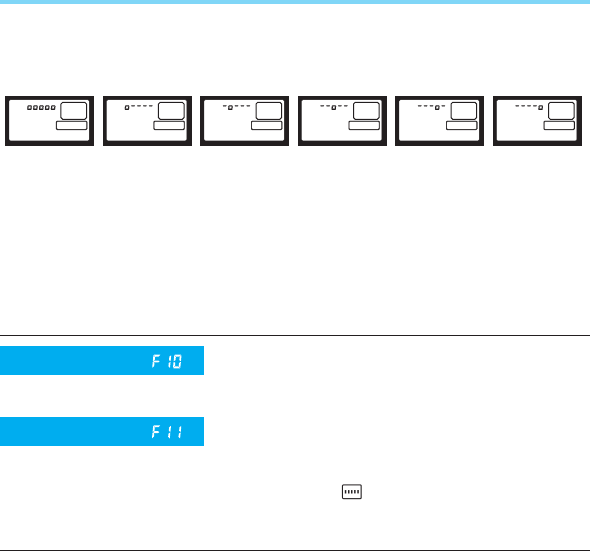
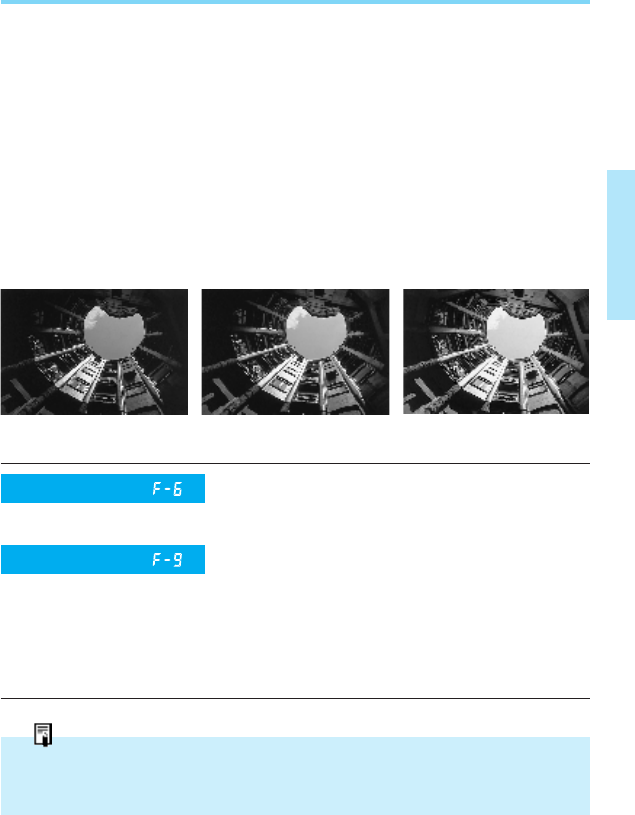
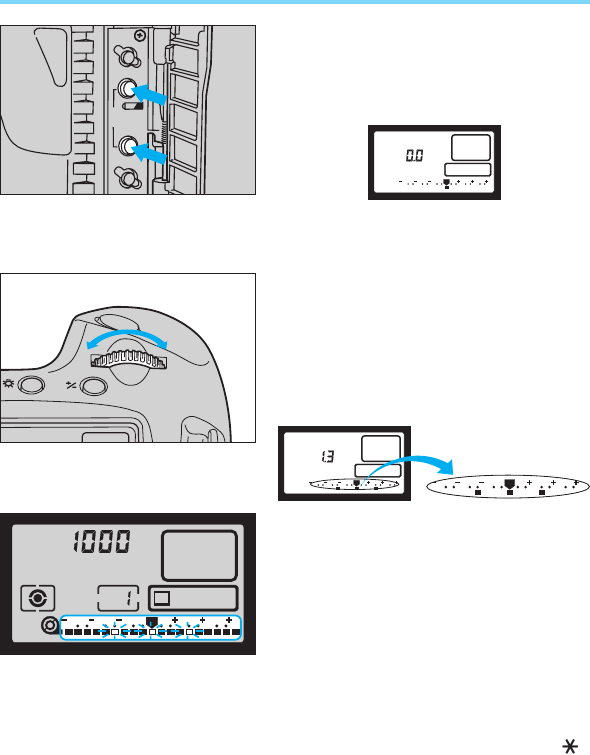
2. Checking the Battery Level
1Set the main switch to “A”.
2Open the palm door and press the
battery check button.
3The battery check indicator ( ) is
displayed in the LCD panel. The
battery level is indicated as follows:
Fig. 1: Battery power sufficient.
Fig. 2:
Have a new spare battery handy.
Fig. 3: (blinking) The battery will soon
be exhausted.
Fig. 4: (no display) Replace the battery
with a new one.
(blinking): Refer to page 7.
•If nothing appears on the LCD panel when the main switch is set to “A”, the battery
may be inserted backwards. Remove the battery and reinsert it correctly.
•Exposure will be okay as long as the shutter releases.
Temperature Shooting capacity (rolls)
Normal (+20°C/68°F) 75 (50)
Low (–20°C/–4°F) 12 ( 8)
A
L
DRIVE
CF
AEB
0 0
12
0
34
00. Part.1 RS (E) (P.13~27) 27-01-2003 11:54 Page 15
●EOS-1 N RS Main Switch
:Turns off the camera and
makes it inoperational.
A:Turns on the camera and
makes it operational.
RS :Same as “A” except that the
RS (Rapid Shot) mode is
also set. This enables a
continuous shooting speed
of about 10 frames per sec-
ond with a shutter release
time lag of 0.006 sec.
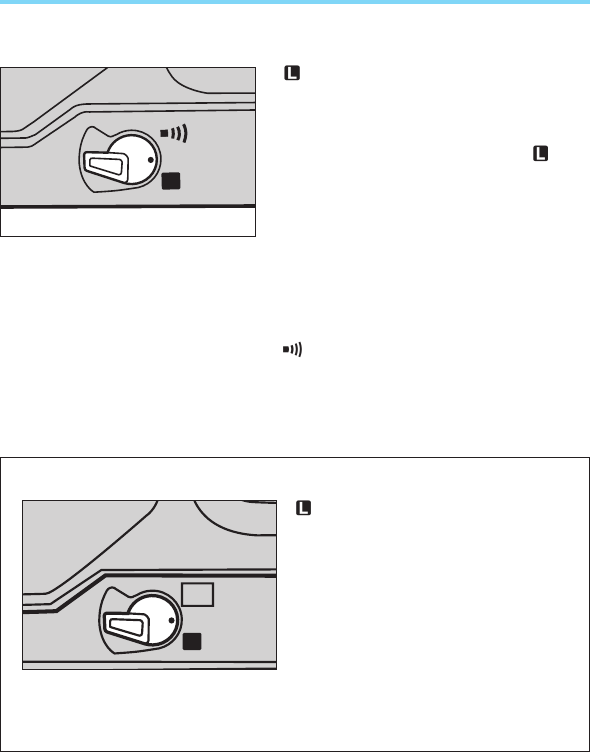
16
3. Operating the Main Switch
The main switch has three settings, as described below:
A
L
RS
A
L
:The power is off and the cam-
era does not operate. Set the
main switch to this position
when not using the camera.
Setting the switch to pre-
vents unintentional power drain
which can be caused by objects
pressing against the shutter
button during transport or stor-
age.
A:Set to this position when
preparing and operating the
camera.
:This position is the same as the
Aposition except that a beep
sound is emitted when the sub-
ject is focused in One-shot AF
or manual focusing mode.
00. Part.1 RS (E) (P.13~27) 27-01-2003 11:54 Page 16
17
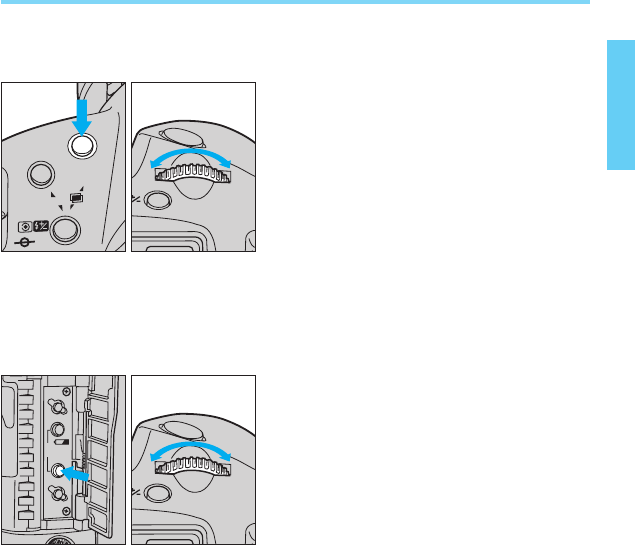
4. Setting and Adjusting Basic Functions
This camera’s shooting mode, AF mode and metering mode are set and
changed as follows:
1Set the main switch to “A”.
2Press the shooting mode selector
(or AF mode selector or metering
mode selector) and hold it down
while turning the main dial to the left
or right until the desired setting
appears in the LCD panel.
3Release the shooting mode selector
(or AF mode selector or metering
mode selector).
To change the film winding mode, use the following procedure:
AF
ISO
MODE
ONE SHOT
1Set the main switch to “A”.
2Open the palm door and press the
film winding mode selector.
3Turn the main dial to the left or right
until the desired setting appears in
the LCD panel.
4The setting is completed when the
shutter button is pressed halfway or
six seconds elapse.
Pressing a button and turning a dial are the basic procedures for setting
most camera functions. Some functions require that two buttons be held
down simultaneously while turning the main dial. Detailed instructions are
provided where necessary throughout this instruction book.
DRIVE
CLEAR
CF
AEB
ONE SHOT
00. Part.1 RS (E) (P.13~27) 27-01-2003 11:54 Page 17
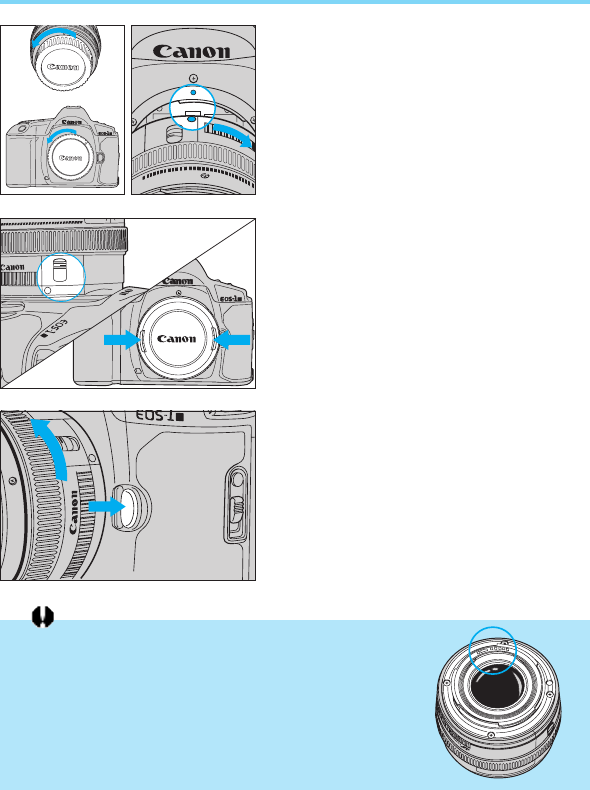
18
5. Lens Attachment
1Remove the lens' rear dust cap and
the camera's body cap by turning
them counterclockwise.
2Align the red dots on the lens and
camera body, then rotate the lens
clockwise until it locks in place with
a click.
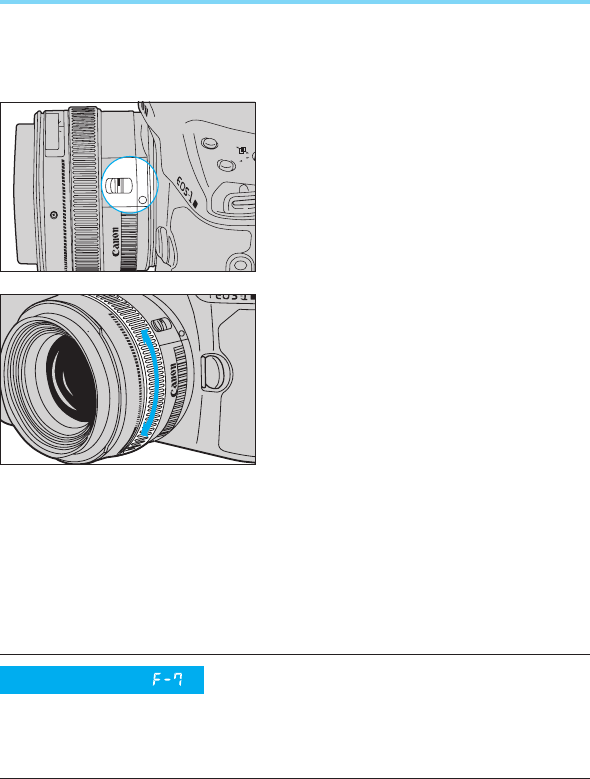
3Set the lens’ focus mode switch to
“AF”.
•Autofocus is not possible when the
switch is set to “M”.
•During autofocusing, do not touch the
rotating part of the lens.
4Remove the front lens cap.
●Removing the Lens
To remove the lens, press the lens
release button and turn counterclock-
wise.
When the lens is removed from the camera, place it face down
on a stable surface to prevent damage to the electronic con-
tacts.
50
m
m
AF
M
AF
N
AF
M
MODE
AF
ISO
AF
M
22 22
50mm
N
AF
M
N
ULTRASONIC
CA
NO
N
N
LE
S
E
F
5
0
m
m
1
1
:
4
CA
NO
N
N
LE
S
M
D
A
E
IN
J
A
A
P
N
N
12
34
00. Part.1 RS (E) (P.13~27) 27-01-2003 11:54 Page 18
19
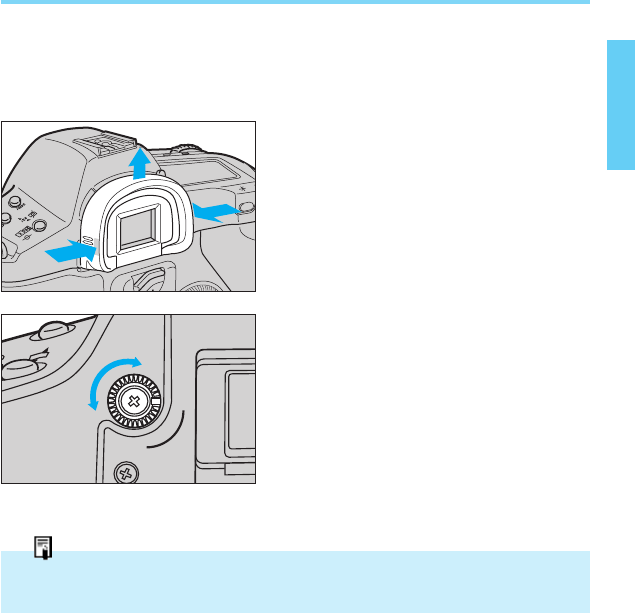
6. Dioptric Adjustment
The viewfinder has a built-in dioptric adjustment mechanism that lets you
adjust the eyesight correction to achieve a sharp viewfinder image. This
also allows near- or far-sighted users to take pictures without wearing
glasses. The diopter can be adjusted within a range of –3~+1 dpt.
1Press inward on both sides (nonslip
grip sections) of the eyecup frame.
2While pressing in on the sides, slide
the eyecup frame up to remove.
3Look into the viewfinder and turn the
dioptric adjustment dial in either
direction until the five focusing
points or the fine spot metering area
mark appear sharp.
•The diagram shows the dial in the
standard position (no compensation:
–1 dpt).
4Reattach the eyecup to the camera.
MODE
{
|
The adjustment range is from –3 dpt to +1 dpt (diopter). For adjustment exceeding this
range, use one of the optionally available Dioptric Adjustment Lenses.
00. Part.1 RS (E) (P.13~27) 27-01-2003 11:54 Page 19

20
7. Shutter Button Operation and Autofocus
The shutter button has a two step construction. Press halfway (to the first
step) to activate focusing and metering, and press completely (to the sec-
ond step) to release the shutter and make the exposure.
1. Pressing Halfway
1) This activates autofocus. When the
subject is focused, the correspond-
ing focusing point momentarily lights
red and the green in-focus indicator
lights up in the viewfinder (in One-
shot AF mode).
•The autofocus system uses five
focusing points.
•The focusing point does not light
up in automatic focus point selec-
tion mode when the AF mode is
set to AI Servo.
•The in-focus indicator does not
light up in AI Servo AF mode.
2) At the same time, the camera deter-
mines the shutter speed and aper-
ture value combination (exposure
value), and the results are displayed
in the LCD panel and viewfinder. If
you remove your finger from the
shutter button, a timer operates to
continuously display the exposure
settings for six seconds.
In-focus indicator
1
00. Part.1 RS (E) (P.13~27) 27-01-2003 11:54 Page 20
Shutter Button Operation and Autofocus
21
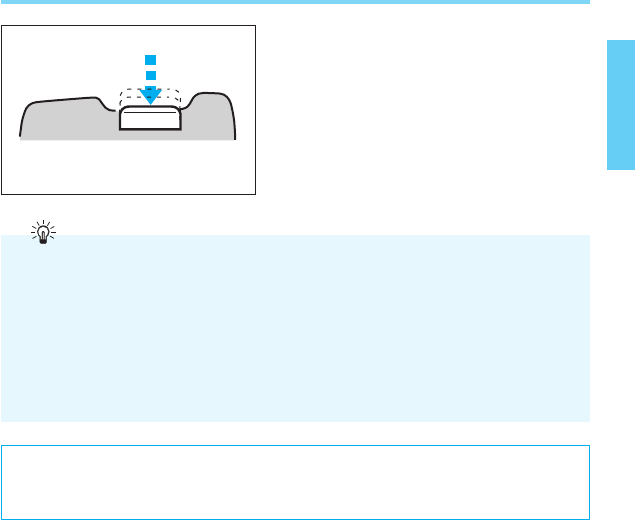
2. Pressing Completely
This releases the shutter and takes the
picture, then advances the film. The
LCD panel’s frame counter displays
the frame number.
•Viewfinder data is extinguished during
exposure.
•If the camera moves at the instant the shutter is released, the motion during exposure
may cause an unsharp picture. This occurrence, called “camera shake,” can be pre-
vented by following these guidelines:
(1) Hold the camera with your right hand and the lens with your left hand firmly so that
they do not move when you take the picture.
(2) Gently press the shutter button from the halfway position to the fully-pressed posi-
tion with the fat part of your index finger. The trick to keeping the camera still when
taking a picture is to press the shutter button by gently squeezing the camera with
your right hand.
•The shutter button stroke (height) can be changed according to your preference by tak-
ing the camera to an authorized Canon service center (modification will be at the own-
er's expense).
2
00. Part.1 RS (E) (P.13~27) 27-01-2003 11:54 Page 21

22
8. Film Loading
When DX film is loaded, the film speed
is set automatically according to the
DX code on the film cartridge.
•The automatic film speed setting
range is ISO 25~5000.
•If non-DX film is loaded, the ISO
indicator and the numbers for the
previously-set film speed blink in the
LCD panel. Set the appropriate film
speed according to instructions in
“1. Manually Setting the Film Speed”
on page 66.
•To set a film speed other than the
automatically-set DX film speed, see
“1. Manually Setting the Film Speed”
on page 66.
•The currently set film speed can be
checked by simultaneously pressing
the AF mode selector and metering
mode selector. The “ISO” indicator
and the currently set film speed are
displayed in the LCD panel.
–vX‘bNJo[˝O˜¤˜”‡¢B
PLEASE REMOVE THIS SHEET
@BEFORE USING CAMERA.
PRIERE D'ENLEVER CETTE FEUILLE
@AVANT D'UTILISER L'APPAREIL.
BITTE ENTFERNEN SIE DIESES BLATT
@VOR GEBRAUCH DER KAMERA.
POR FAVOR, RETIRE ESTA HOJA
@ANTES DE USAR LA CÁMARA.
PRIMA DI USARE L'APPARECCHIO,
@TOGLIERE QUESTO SCHERMO
@DI PLASTICA.
•Before loading film for the first time, be
sure to remove the plastic protector from
inside the back cover.
If the plastic protector is left inside the
camera while taking pictures, the charac-
ters printed on the plastic may appear in
the exposed image.
Plastic protector
400
36
EXP
400
36
EXP
00
XP
00
AF
ISO
MODE
ISO
00. Part.1 RS (E) (P.13~27) 27-01-2003 11:54 Page 22
23
Film Loading
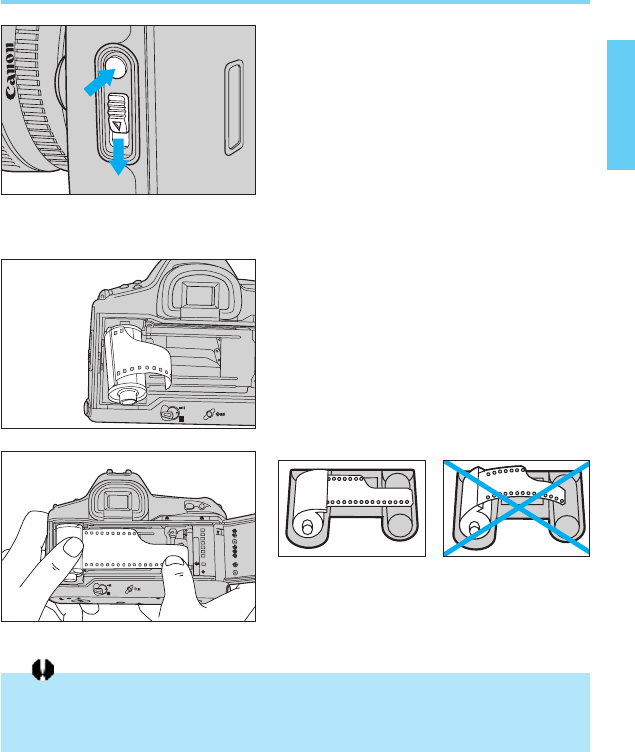
1Set the main switch to “A”.
2Open the back cover by using your
thumb to press the back cover lock
release button while sliding the
latch down.
•If you find it difficult to perform both
operations with one finger, use one fin-
ger to press the back cover release
button and another finger to operate
the latch.
A
L
L
FILM
A
3Insert the film cartridge at a slant
with the flat end facing up and the
bottom end entering the camera
first.
4Carefully pull the film tip across until
it reaches the orange mark.
•Hold down the film cartridge while
aligning the film to prevent slack.
The shutter curtain operates with extremely high precision and can be easily damaged if
touched. When loading or unloading film, BE CAREFUL not to touch the shutter curtain
accidentally with your finger or the tip of the film.
•If you pull out too much film, wind the
excess back into the cartridge.
CORRECT WRONG
1
2
00. Part.1 RS (E) (P.13~27) 27-01-2003 11:54 Page 23
24
Film Loading
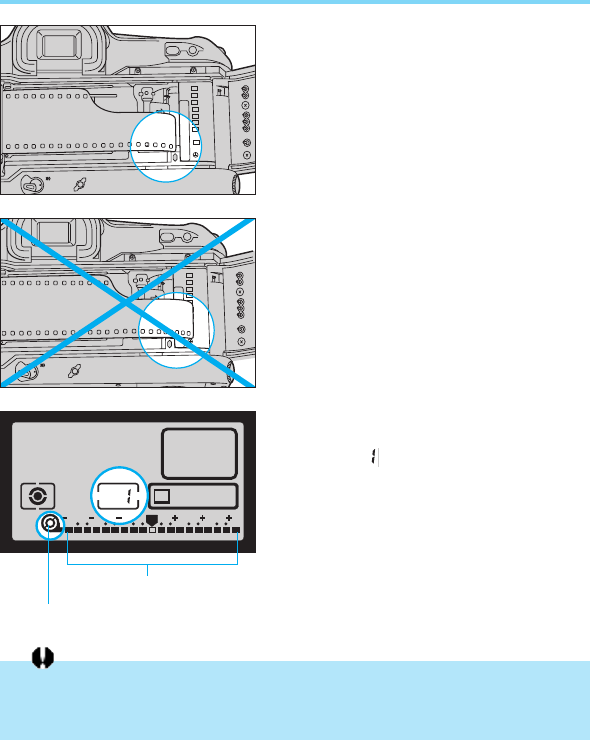
5After checking that the film tip is
aligned with the orange mark and
that the film perforations are
engaged with the sprockets, close
the back cover until it clicks shut.
•DO NOT pull the film tip past the
orange mark. If the film tip passes the
orange mark, advancing the film may
damage the film or cause the camera
to malfunction.
ONE SHOT
3 2 1 1 2 3
P
0
2 1
6The film automatically advances to
the first frame, the frame counter
shows “ ” and the film-load check
symbol is displayed in the LCD
panel.
•If the film transport (wind/rewind)
blinks, the film is not loaded correctly,
and the shutter will not release when
the shutter button is pressed. Reload
the film.
CORRECT
WRONG
Film-load check symbol
Film transport (wind/rewind)
Using film which has been exposed to high humidity may cause the film perforations to
tear when the camera advances the film. In humid locations, do not remove the film from
its original sealed package until immediately prior to loading it into the camera.
L
A
FILM
FILM
L
A
FILM
FILM
00. Part.1 RS (E) (P.13~27) 27-01-2003 11:54 Page 24
25
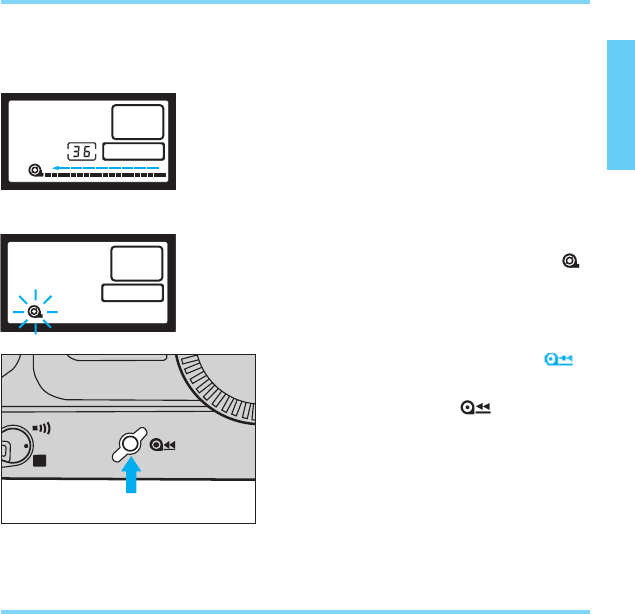
Film Loading
●Removing Film
The film automatically rewinds at the end of the roll.
1When rewinding starts, the film
rewind indicator moves from right to
left to show that the film is rewind-
ing. At the same time, the LCD
panel’s frame counter counts down
the number of frames.
2Automatic rewind stops when com-
pleted. Film rewind completion “ ”
blinks in the LCD panel to indicate
that you can now safely open the
back cover and remove the film.
●Removing Film in Mid-Roll ()
To rewind the film in mid-roll, press the
film rewind button ( ). The film
immediately starts rewinding.
Custom function settings let you modify the camera’s basic functions to
match your shooting style. Custom function numbers appear in various
sections throughout this instruction book, indicating that the function being
described can be further modified by changing the relevant custom func-
tion setting. For details on the types of custom functions available and
how to change them, refer to the “VI Custom Functions” section starting
on page 81.
9. Custom Functions
A
L
00. Part.1 RS (E) (P.13~27) 27-01-2003 11:54 Page 25
26
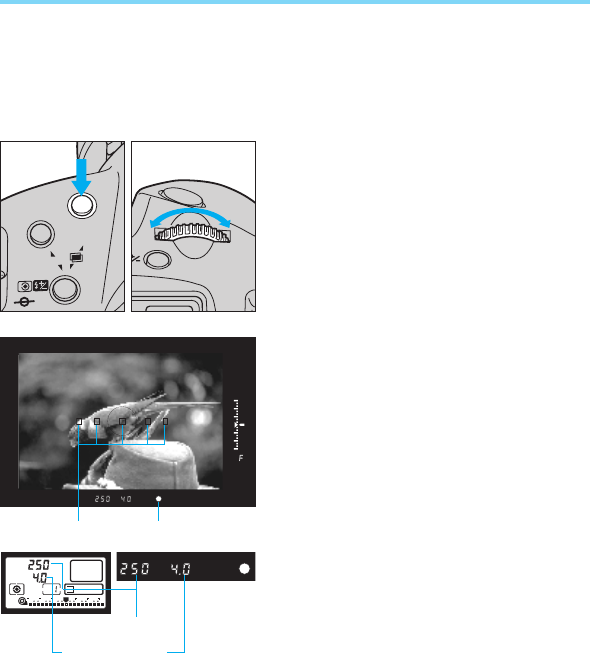
10. Program AE mode [P]
In Program AE mode the camera automatically sets the shutter speed
and aperture value according to the subject brightness. This mode allows
anyone to start taking pictures quickly without worrying about exposure
settings. Five focusing points provide a wide focusing area, making it
easy to try out various picture compositions.
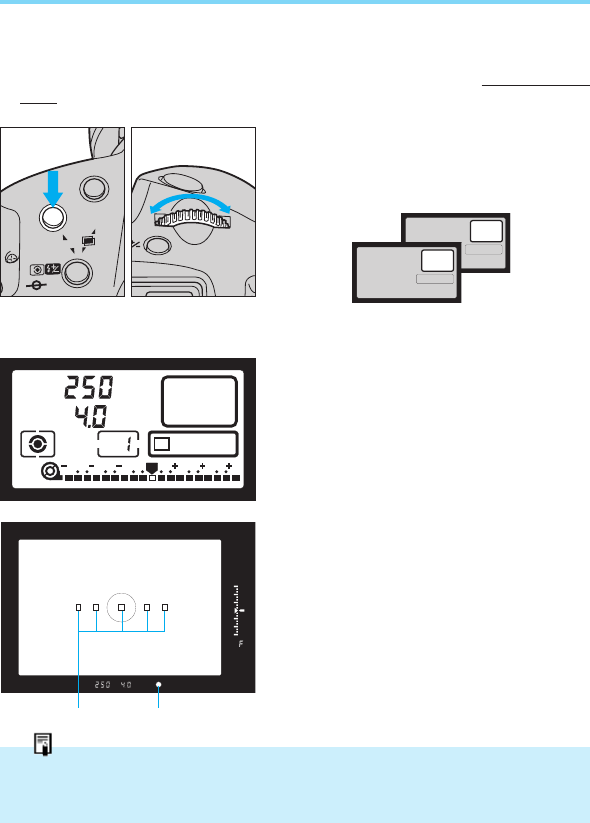
1Turn on the main switch.
2Press the shooting mode selector
while turning the main dial until “P”
appears in the LCD panel.
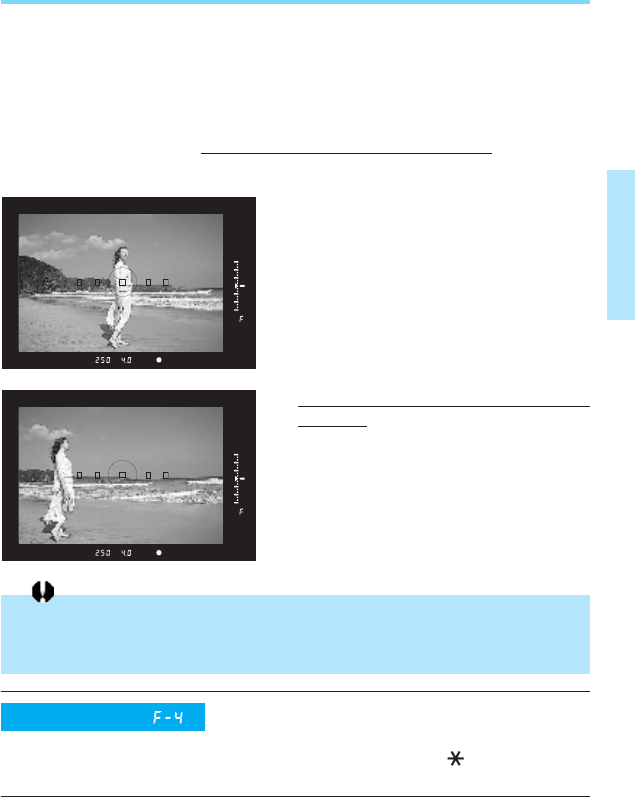
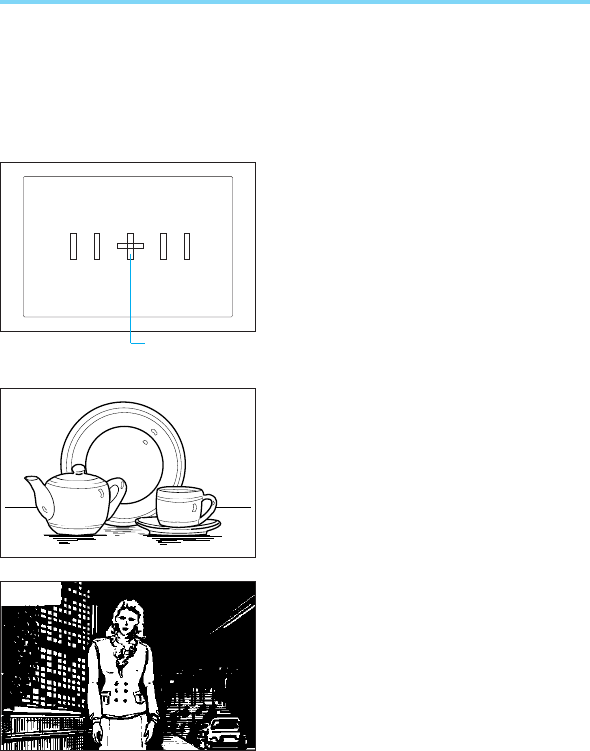
3Look through the viewfinder and
cover the subject with one of the five
focusing points, then press the shut-
ter button halfway to focus it.
•When the subject is focused, the AF
frame used for focusing temporarily
lights red and the in-focus indicator
lights up in the viewfinder in One-shot
AF mode.
•If the in-focus indicator blinks, the aut-
ofocus system cannot focus the sub-
ject and the shutter will not release.
Refer to “4. Manual Focusing” on page
36 for instructions on how to focus the
subject manually.
•Exposure settings are displayed in the
LCD panel and viewfinder.
4After confirming that the exposure
settings are not blinking, press the
shutter button completely to take the
picture.
ONE SHOT
3 2 1 1 2 3
P
0
In-focus IndicatorFocusing points
AF
ISO
MODE
ONE SHOT
Shutter speed
Aperture value
00. Part.1 RS (E) (P.13~27) 27-01-2003 11:54 Page 26
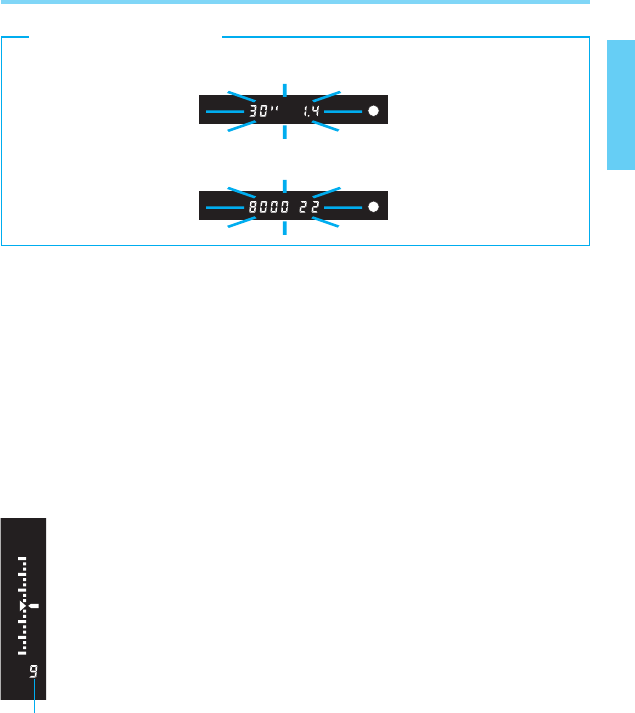
•If a shutter speed of 30” and the maximum aperture value blink in the display, the sub-
ject is too dark. Switch to flash photography, referring to “V. Using Flash” on page 76.
•If a shutter speed of 8000 and the minimum aperture value blink in the display, the
subject is too bright. Attach a neutral density (ND) filter to the lens.
27
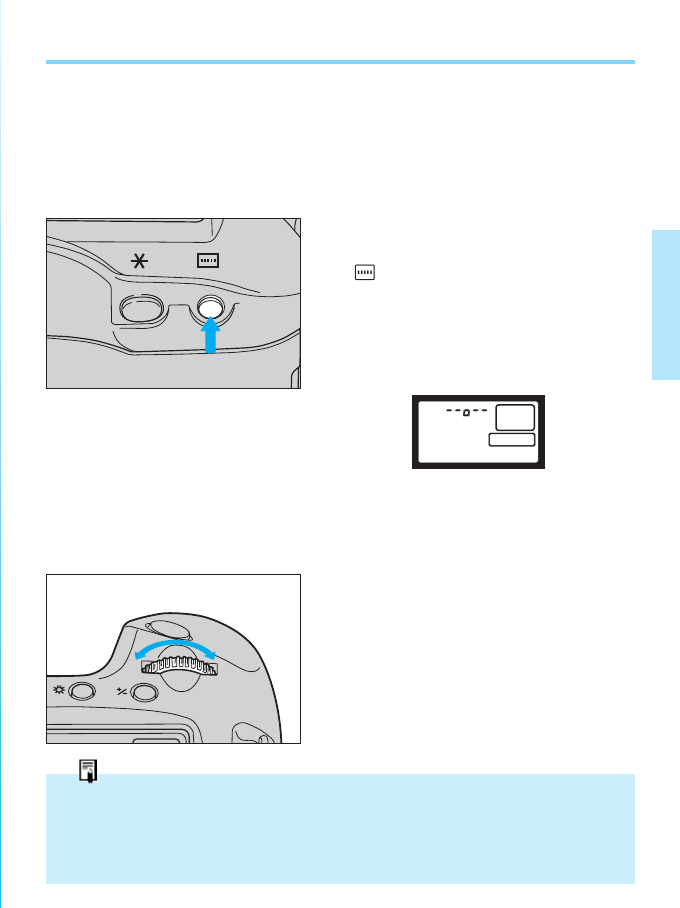
Program AE mode [P]
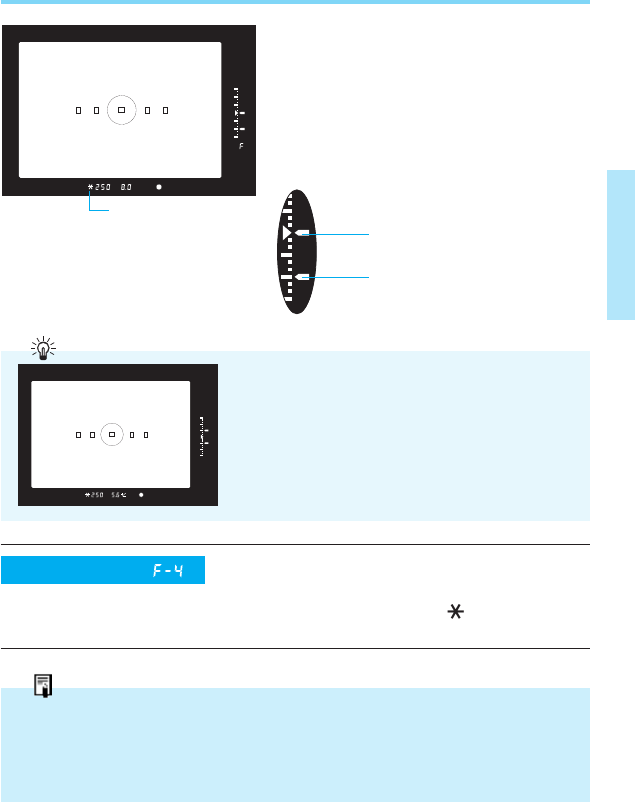
●Six-Second Timer
When you release the shutter button after pressing it halfway, the LCD
panel and viewfinder displays remain active for six seconds.
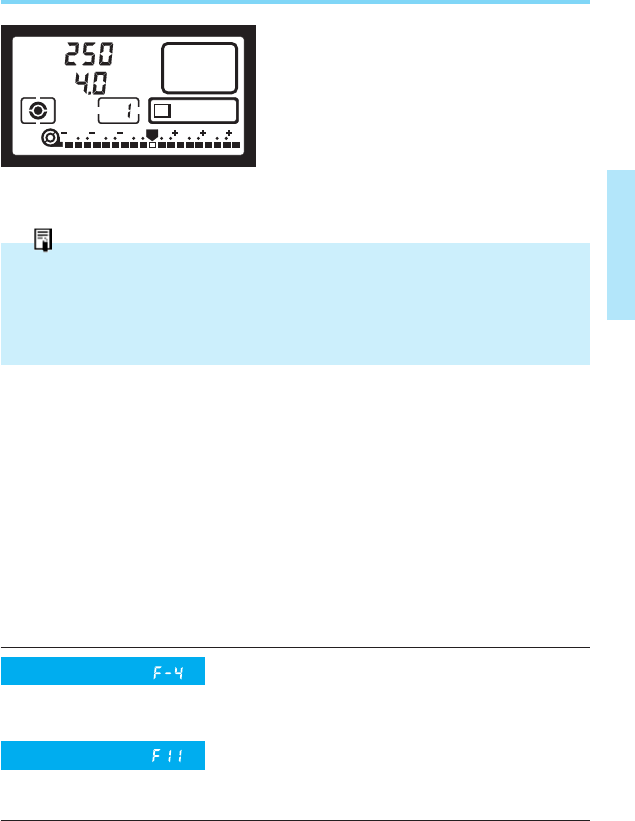
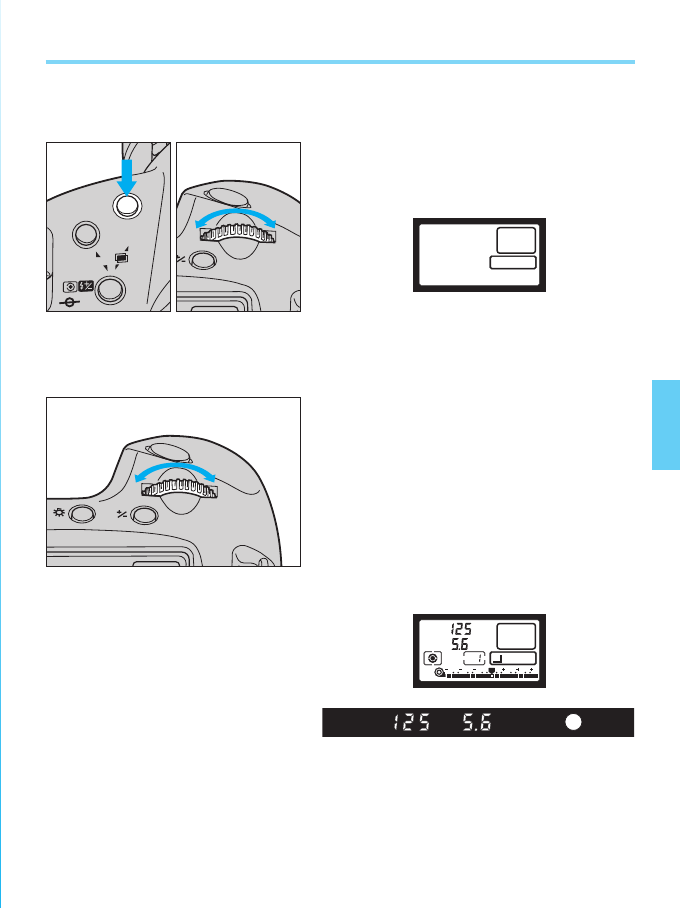
●Program Shift Function
When taking pictures in Program AE mode, you can “shift the program” to
change the set shutter speed and aperture value combination while main-
taining the same exposure.
After pressing the shutter button halfway, turn the main dial until the
desired shutter speed/aperture value combination is displayed.
[Exposure Warnings]
Remaining frame counter
●Remaining Frame Counter
When nine frames or less remain on the roll, the number of
remaining frames is displayed in the viewfinder below the expo-
sure level display. “F” indicates that 10 or more frames remain on
the roll. When less than 10 frames remain, the display counts
down the frames in descending order: 9, 8 ... 2, 1.
•Non-DX films are identified as 36-exposure rolls, and the remaining
frame counter operates accordingly.
00. Part.1 RS (E) (P.13~27) 27-01-2003 11:54 Page 27

28
II Selecting the AF and
Metering Modes
•First make sure the camera's main
switch is set to “A” or “ ”
A
L
This camera’s wide-zone autofocus
system lets you freely select from five
focusing points, allowing you to keep
the scene composed as desired while
concentrating on the subject. Also, a
rich selection of exposure options lets
you select the metering mode appro-
priate for the subject or shooting situ-
ation, and flexible exposure compen-
sation capabilities let you fine tune
the exposure in real time.
00. Part.2 RS (E) (P.28~47) 27-01-2003 11:56 Page 28
29
1. Selecting the Five Focusing Points
This camera incorporates a high-precision AF sensor called Multi-BASIS
(Multi Base-Stored Image Sensor), equipped with five focusing points for
wide autofocusing coverage.
You can freely select any of the focusing points to compose the scene as
desired, or you can let the camera select the focusing point for you (auto-
matic focusing selection mode).
●Selecting a Focusing Point
1Press the focusing point selector
().
2The currently selected focusing
point lights red in the viewfinder and
the focusing point indicator is dis-
played in the LCD panel.
•All five focusing points light up in the
viewfinder and LCD panel when the
camera is set for automatic focusing
point selection mode.
3Turn the main dial to select the
desired focusing point.
ONE SHOT
●Automatic Focusing Point Selection Mode
•
The camera automatically selects an individual focusing point after evaluating all 5 points simultaneously.
•In One-shot AF mode, the system usually gives priority to the closest reliable subject.
•In AI Servo AF mode, the system always gives priority to the central (cross-type) focus-
ing point for the first exposure. (For more information, refer to page 33.)
00. Part.2 RS (E) (P.28~47) 27-01-2003 11:56 Page 29
30
Selecting the Five Focusing Points
•Turning the main dial selects the focusing points in the following order: automat-
ic focusing point selection (all five focusing points are displayed) ↔far left ↔
left center ↔center ↔right center ↔far right.
4The setting is completed when you
press the shutter button halfway or
after six seconds elapse.
•The selected focusing point lights red in the viewfinder and is also displayed in
the LCD panel.
Custom Function
(Refer to pages 88–89)
(Refer to pages 90–91)
This function lets you select the focusing
point using the exposure compensation
button (instead of the focusing point
selector ( )) in combination with the
main dial, or by only turning the quick
control dial.
Prohibits superimposed focusing points in
the viewfinder.
Custom Function
00. Part.2 RS (E) (P.28~47) 27-01-2003 11:56 Page 30
●Focus Lock
When you want to compose a scene with the main subject positioned out
of the zone covered by the five focusing points, follow the procedure
below to first lock the focus on the subject before composing the scene
and taking the picture.
•The focus lock function is available only in One-shot AF mode. (Refer to “2.
Selecting the AF Mode” on page 32.)
31
Selecting the Five Focusing Points
1Cover the subject with the selected
focusing point and press the shutter
button halfway to focus the subject.
2Keeping the shutter pressed
halfway, recompose the picture as
desired.
3Press the shutter button completely
to take the picture.
The exposure settings are determined when the subject is focused. If the subject bright-
ness changes after you lock the focus, the subject may not be properly exposed. For infor-
mation on different types of metering, refer to page 37.
This custom function lets you lock the
exposure with the shutter button instead
of the AE lock button ( ). Pressing the
AE lock button activates autofocusing.
Custom Function
(Refer to pages 84–85)
00. Part.2 RS (E) (P.28~47) 27-01-2003 11:56 Page 31
32
The shutter will not release if the in-focus indicator is blinking. Try refocusing the subject
on an alternate subject with higher contrast at approximately the same distance, or use
manual focusing (refer to “3. Difficult Subjects for Autofocus” on page 34).
2. Selecting the AF Mode
Two types of autofocus are available: One-shot AF and AI Servo AF.
Select the mode most appropriate for the subject and shooting situation.
•To use the camera’s AF modes, the lens’ focus mode switch must be set to
“AF”.
1While pressing the AF mode selec-
tor, turn the main dial to the left or
right until the desired AF mode
appears in the LCD panel.
2Release the AF mode selector.
●One-Shot AF
Use this mode with stationary subjects.
The shutter will not release if the sub-
ject is not in focus, preventing out-of-
focus shots. When the shutter button is
pressed halfway and the subject is
focused, the corresponding focusing
point lights red in the viewfinder, and
the in-focus indicator (●) lights up in
the viewfinder.
•In evaluative metering mode, the shutter
speed and aperture value are deter-
mined at this time, and by keeping the
shutter button pressed halfway, the focus
and exposure settings remain locked,
allowing you to recompose the picture as
desired.
ONE SHOT
3 2 1 1 2 3
P
0
AF
ISO
MODE
ONE SHOT
ONE SHOT
AI SERVO
In-focus IndicatorFocusing points
00. Part.2 RS (E) (P.28~47) 27-01-2003 11:56 Page 32
33
Selecting the AF Mode
●AI Servo AF
Use this mode when taking pictures of
moving subjects. The lens focuses the
subject continuously while the shutter
button is pressed halfway. AI Servo’s
predictive focus control* can track sub-
jects moving toward or away from the
camera. Exposure is determined
immediately before the shutter is
released.
In AI Servo AF mode, this function lets
you select the focusing point with the
quick control dial to manually track the
moving subject.
* Predictive focus control
Predictive focus continuously measures the distance and speed of a sub-
ject that is moving at a relatively constant velocity, and then predicts the
subject position so that the subject will be sharply focused at the instant of
exposure.
When using a manually selected focusing point, it is used for predictive
focusing and lights red in the viewfinder.
In automatic focusing point selection mode, cover the subject with the
center focusing point for initial focusing. After that, even if the subject
moves to a different focusing point, the camera’s predictive focus function
will continue to track the subject as long as it is covered by one of the
focusing points. The focusing point does not light up.
AI SERVO
3 2 1 1 2 3
P
0
•In AI Servo AF mode, the viewfinder’s in-focus indicator does not light up and the beep-
er does not beep even when the subject is in focus.
•The in-focus indicator blinks if the subject cannot be focused.
•Focus lock cannot be used in this mode, but autofocus can be temporarily suspended
through Custom Function 4-2 (refer to pages 86–87).
Custom Function
(Refer to pages 90–91)
Custom Function
(Refer to pages 86–87)
In AI Servo AF mode with predictive
focusing (used for sports photography,
etc.), this function lets you momentarily
lock the focus using the AE lock button.
00. Part.2 RS (E) (P.28~47) 27-01-2003 11:56 Page 33
34
This camera’s autofocus system is very accurate and can quickly focus
most subjects with the high-precision Multi-BASIS (Base-Stored Image
Sensor) AF sensor equipped with five focusing points as shown below.
However, the system may have difficulty focusing the subjects listed
below. When autofocus is impossible, the green in-focus indicator will
blink in the viewfinder.
3. Difficult Subjects for Autofocus
(a) Low contrast subjects (misty scenes,
light-colored or white objects)
(b) Subjects in extremely low-light situa-
tions (a dark room, night scenes)
(c) Subjects in extremely strong backlight,
or with bright spectral reflections (shiny
metal, snow, ice, surface of a lake)
(d) Subjects with an object in front of them
(caged zoo animals)
(e) Subjects having generally horizontal
patterns (only when using the center
focusing point, when using lenses with
maximum aperture smaller than f/2.8)
(f) Subjects having generally vertical pat-
terns (only when using focusing points
other than the center)
Focus these subjects as follows:
1) Particularly with subjects such as (a),
focus on a substitute subject at the same
distance from the camera as your main
subject, then recompose the picture
using the focus lock function.
2)
In the case of (e), there is no problem
when using a lens with a maximum aper-
ture of f/2.8 or larger (except the
EF50mm f/2.5 Compact Macro or EF28-
80mm f/2.8-4L) because the camera’s
central cross-sensor activates to detect
horizontal lines. However, when using a
lens with a maximum aperture smaller
than f/2.8, we recommend to use the
focusing points other than the center that
(a)
(b)
Cross-sensor
•Position of invidual sensor of BASIS
00. Part.2 RS (E) (P.28~47) 27-01-2003 11:56 Page 34

35
Difficult Subjects for Autofocus
have vertical sensors, focus the subject,
then recompose the picture using the
focus lock function.
3) In the case of (f), use the center focusing
point which has a horizontal sensor,
focus the subject, then recompose the
picture using the focus lock function.
4) Set the lens’ focus mode switch to “M”
and manually focus the subject.
•See “4. Manual Focusing” on page 36
for manual focusing instructions.
(d)
00. Part.2 RS (E) (P.28~47) 27-01-2003 11:56 Page 35
36
AF
M
CANON
L
E
N
S
L
ES
N
E
F
N
O
50
mm
1:1
4
N
4. Manual Focusing
Use manual focusing when the subject is difficult to focus with the cam-
era’s autofocus system, or when you need to control the focus for alterna-
tive focus effects.
1Set the lens’ focus mode switch to
“M”.
•The AF mode display is extinguished
in the LCD panel.
2While pressing the shutter button
halfway and looking through the
viewfinder, turn the lens’ manual
focusing ring until the subject
appears sharp.
•When the focus mode is switched from
“AF” to “M”, the focusing point and in-
focus indicator in the viewfinder light
when the subject is in focus.
●Full-time Manual Focusing with USM (Ultrasonic Motor) Lenses
USM lenses are equipped with a full-time manual focusing function that
lets you immediately manually adjust the focus after autofocusing is com-
pleted to achieve the desired effect. Use this function in One-shot AF
mode.
•This method of focus adjustment cannot be used if your USM lens does not
have a distance scale.
MODE
AF
ISO
AF
M
22 22
50mm
N
AF
M
When using a USM lens equipped with an
electronic manual focusing system, setting
this custom function will allow manual focus-
ing only when the lens’ focus mode switch is
set to “M”.
Custom Function
(Refer to pages 86–87)
00. Part.2 RS (E) (P.28~47) 27-01-2003 11:56 Page 36

37
5. Selecting the Metering Mode
Three metering modes are available: evaluative metering ( ), partial
metering ( ) and fine spot metering ( ). Center-weighted average
metering as well as spot metering linked to the focusing points can also
be set with the corresponding custom function. In all metering modes,
pressing the shutter button halfway activates the built-in metering system
and determines the exposure.
Whether outdoors, indoors, at the sea or in the mountains, there is an infi-
nite number of lighting conditions and subject types. Select the metering
mode best suited for each subject.
AI SERVO
3 2 1 1 2 3
P
0
1While pressing the metering mode
selector, turn the main dial to the left
or right until the desired metering
mode indicator appears in the LCD
panel.
Metering mode indicator
2Release the metering mode selec-
tor.
AF
ISO
MODE
ONE SHOT
•The metering mode changes in the
cyclical sequence shown above.
00. Part.2 RS (E) (P.28~47) 27-01-2003 11:56 Page 37

38
Selecting the Metering Mode
●Evaluative Metering ( )
Use this mode for general subjects
and backlit scenes. By dividing the
viewfinder into 16 metering zones
linked with the five focusing points, the
camera evaluates factors such as sub-
ject size, position (based on the focus-
ing point in use), brightness, back-
ground, front lighting and back lighting
to determine the best exposure setting.
In manual focusing mode, evaluative
metering is based on the central focus-
ing point.
•
When the subject is lit by strong backlight-
ing or a narrow beam of light such as a
spotlight, we recommend using partial
metering
()
or fine spot metering
()
.
●Partial Metering ( )
This mode limits the metering area to
the central part of the viewfinder
(approx. 9% of the image area). Select
this mode when the subject is backlit
or positioned near a strong light
source.
This function lets you select center-weighted
average metering instead of evaluative meter-
ing
()
.
(Refer to pages 88–89)
Custom Function
00. Part.2 RS (E) (P.28~47) 27-01-2003 11:56 Page 38
39
Selecting the Metering Mode
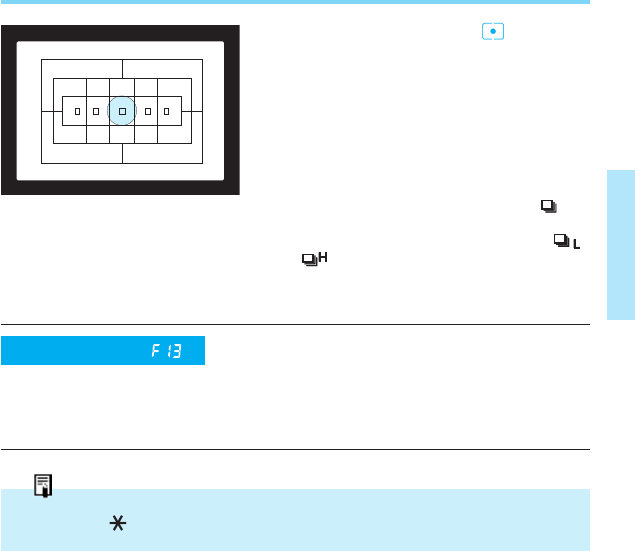
●Fine Spot Metering ( )
This mode limits the metering area to
the center of the viewfinder as defined
by the fine spot metering mark
(approx. 2.3% of the image area). Use
this mode when you need an accurate
exposure reading of a specific subject
area.
•In continuous shooting mode ( ) or
high - speed continuous shooting mode
with the Power Drive Booster E1 ( ,
), the exposure value deter-
mined for the first frame is also used for
the second and consecutive exposures.
This function lets you select spot meter-
ing linked to the focusing points. Metering
is limited to the area of the manually
selected focusing point (approx. 3.5% of
the viewfinder image area).
In One-shot AF mode, exposure setting is locked during continuous shooting, but the AE
lock indicator “ ” does not light in the viewfinder.
Custom Function
(Refer to pages 90–91)
00. Part.2 RS (E) (P.28~47) 27-01-2003 11:56 Page 39
40
6. AE Lock
The EOS-1 N's evaluative metering system is coupled to the five focusing
points. It controls the exposure according to the subject's position, based
on the focusing point in use.
If you want to determine the exposure independently from the focusing
operation, use AE lock. Use it when you also want to change the compo-
sition of the picture after determining the exposure. AE lock is effective for
backlit subjects and other situations where there is extremely strong con-
trast between the subject and background.
1Focus the subject that you want to
measure with the camera’s metering
system.
•The exposure values are displayed in
the viewfinder and LCD panel.
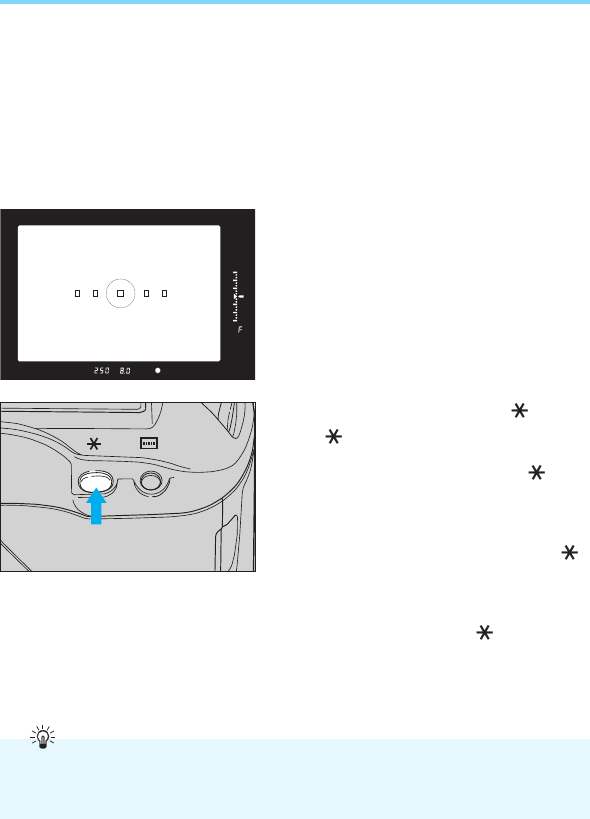
2Press the AE lock button ( ).
•“ ” lights in the viewfinder to indi-
cate that the AE lock is set. When you
release the AE lock button ( ), the
metering timer is activated and the
exposure remains locked for six sec-
onds.
•Pressing the AE lock button ( )
again renews the locked exposure set-
ting.
•AE lock is canceled six seconds after
the AE lock indicator ( ) lights in the
view finder display, or whenever you
press the AF mode selector, metering
mode selector, shooting mode selector
or focusing point selector.
To accurately meter a specific subject area with the AE lock function, we recommend
using partial metering or fine spot metering. Place the subject in the center of the viewfind-
er when activating AE lock.
00. Part.2 RS (E) (P.28~47) 27-01-2003 11:56 Page 40
41
AE Lock
3Refocus the subject, change the
composition as desired, and take
the picture.
•When you change the scene composi-
tion, the difference between the locked
exposure value and the continuously
metered exposure value is displayed
in the viewfinder in real-time.
This custom function lets you lock the
exposure with the shutter button instead
of the AE lock button ( ). Pressing the
AE lock button activates autofocusing.
•When using One-shot AF together with Evaluative metering, the exposure reading is
automatically locked when autofocusing is completed after pressing the shutter button
halfway.
•When using One-shot AF together with Fine Spot or Partial metering, exposure setting
is locked only during continuous shooting.
AE lock indicator
Current metered exposure value
AE lock exposure value
Custom Function
(Refer to pages 84–85)
If you use AE lock to register a shadow read-
ing of your subject and then change the
scene composition to read a highlight area (or
vice versa), you can then use exposure com-
pensation (refer to page 42) to adjust the
exposure level based on the brightness range
of the scene.
00. Part.2 RS (E) (P.28~47) 27-01-2003 11:56 Page 41
42
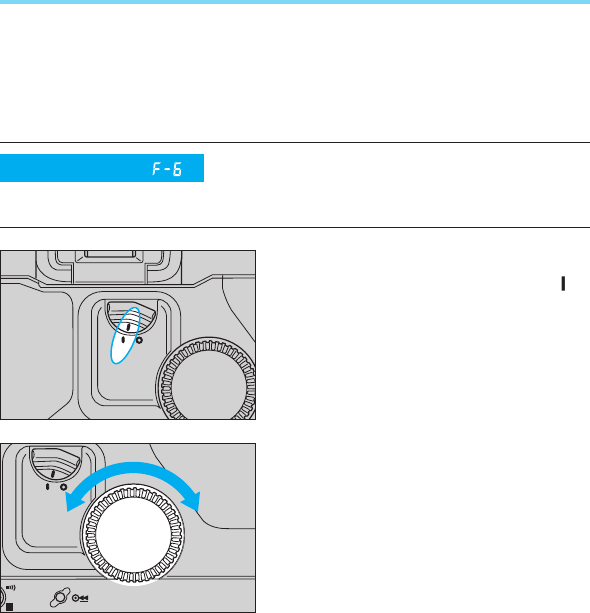
7. Exposure Compensation
When taking pictures in an AE shooting mode, you can compensate the
exposure according to the subject conditions either by using the quick
control dial while looking through the viewfinder or by using the exposure
compensation button and the main dial. Exposure can be compensated
up to ±3 stops in 1/3-stop increments.
●
Using the Quick Control Dial
1
Set the quick control dial switch to
.
2Focus the subject and confirm the
exposure.
3Turn the quick control dial to set the
desired exposure compensation
amount.
•The quick control dial is active only
when the shutter button is half pressed
or while the six-second timer is operat-
ing.
A
L
In addition to 1/3-stop increments, the
exposure compensation amount can also
be input in 1/2-stop increments.
Custom Function
(Refer to pages 86–87)
00. Part.2 RS (E) (P.28~47) 27-01-2003 11:56 Page 42
43
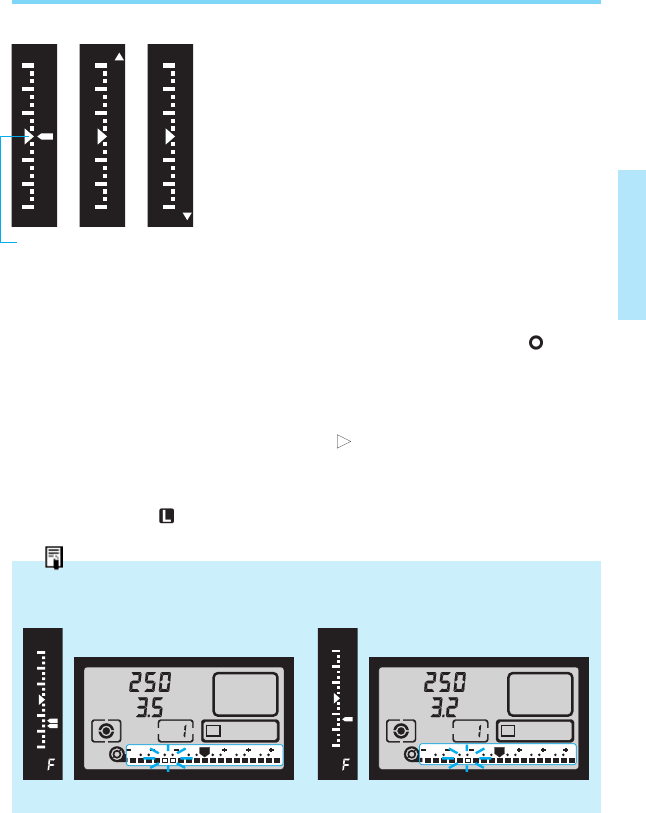
Exposure Compensation
•The exposure level indicator and expo-
sure compensation symbol are dis-
played in the viewfinder, and the com-
pensation amount is displayed in the
LCD panel’s exposure level indicator.
•In the LCD panel, “+” indicates overex-
posure and “–” indicates underexpo-
sure relative to the camera’s meter
reading.
•In the viewfinder display, overexpo-
sure and underexposure are indicated
respectively by exposure compensa-
tion amounts above and below the tri-
angle index at the center of the scale.
•
After setting the desired compensation
amount, it is recommended to set the
quick control dial switch to to pre-
vent accidental alteration of the setting.
•To cancel the exposure compensation,
operate the quick control dial to return
the exposure level indicator to the zero
() position.
1Indicates correct exposure
2Indicates more than 3 stops overex-
posure
3Indicates more than 3 stops underex-
posure
If CF No. 6 is used to set the exposure compensation amount in 1/2-stop or 1/3-stop incre-
ments, the exposure level indicator in the viewfinder display and in the LCD panel appear
as shown below.
1-1/2 stops under
ONE SHOT
3 2 1 1 2 3
v
T
0
3 2 1 1 2 3
0
ONE SHOT
3 2 1 1 2 3
v
T
0
3 2 1 1 2 3
0
1-1/3 stops under
4Take the picture.
•The set exposure compensation amount is not canceled even if the main
switch is set to .
Correct exposure indicator
123
→
→
00. Part.2 RS (E) (P.28~47) 27-01-2003 11:56 Page 43
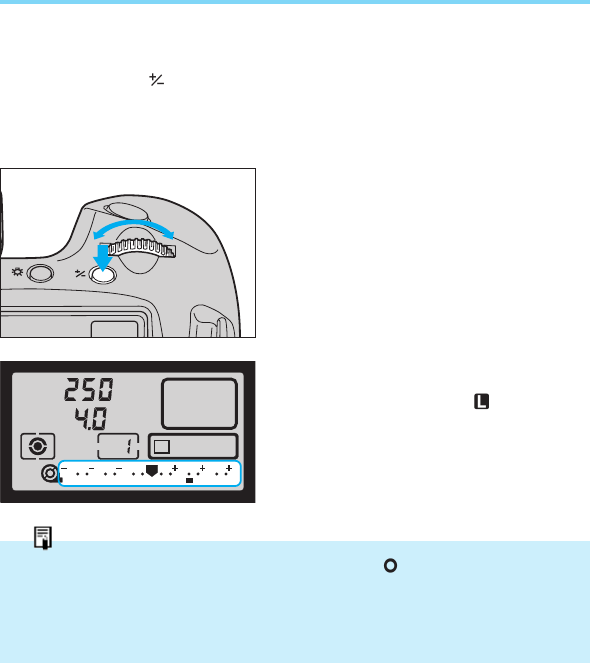
44
Exposure Compensation
●Using the Exposure Compensation Button
Exposure compensation can also be carried out using the exposure com-
pensation button ( ) together with the main dial.
1Focus the subject and confirm the
exposure.
2Press and release the exposure
compensation button, then turn the
main dial (while the six-second timer
is activated) to set the desired expo-
sure compensation amount.
3Take the picture.
•The set exposure compensation
amount is not canceled even if the
main switch is set to “ ”.
P
ONE SHOT
ONE SHOT
3 2 1 1 2 3
P
0
3 2 1 1 2 3
0
•It is recommended to set the quick control dial switch to to prevent accidental opera-
tion.
•The optionally available Command Back E1 does not have a quick control dial. When
using this command back, set the exposure compensation by turning the main dial
while pressing the exposure compensation button.
00. Part.2 RS (E) (P.28~47) 27-01-2003 11:56 Page 44
45
8. Auto Exposure Bracketing [AEB]
Use auto exposure bracketing to take a sequence of pictures at different
exposures. When this function is set, the camera automatically takes
three exposures in sequence while shifting the exposure for each picture.
The bracketing amount can be set in 1/3-stop increments up to ±3 stops
from the metered exposure value. When the shutter button is pressed,
three frames are exposed according to the current film winding mode
(refer to “2. Changing the Film Winding Mode” on page 67), in the
sequence: underexposure →correct (metered) exposure →overexpo-
sure.
Auto exposure bracketing is particularly effective when using slide film,
which produces noticeably different results with even small exposure vari-
ations.
The shooting sequence can be changed
to: correct (metered) exposure →under-
exposure →overexposure. This function
also lets you set the AEB step amount by
simultaneously pressing the AF mode
and shooting mode selectors while turn-
ing the main dial.
The AEB step amount can also be input
in 1/2-stop increments.
Underexposure (–1/3)
Correct (metered) exposure (0)
Overexposure (+1/3)
Custom Function
(Refer to pages 86–87)
Custom Function
(Refer to pages 88–89)
If auto exposure bracketing is used with custom function F-12 set to mirror-up mode, the
camera will operate in single exposure mode regardless of the current film winding mode
(single exposure, continuous exposure).
00. Part.2 RS (E) (P.28~47) 27-01-2003 11:56 Page 45
ONE SHOT
AEB
3 2 1 1 2 3
v
T
0
3 2 1 1 2 3
0
46
Auto Exposure Bracketing [AEB]
1Open the palm door and simultane-
ously press the battery check button
and film winding mode selector.
•AEB appears in the LCD panel.
•The display remains for six seconds
after you release the buttons.
2Turn the main dial to set the desired
bracketing amount.
•The set bracketing amount is shown in
the LCD panel as both a graphic level
display and a numerical value. The
diagram shows the case when setting
a bracketing amount of ±1-1/3 stops.
3When you press the shutter halfway
and then remove your finger, the
bracketing amount is displayed by
the viewfinder’s exposure level indi-
cator.
4Take pictures according to the cur-
rent film winding mode.
•The compensated exposure value for
each shot is displayed in the LCD
panel as the three frames are
exposed, and the AEB indicator ( )
blinks continuously until all three expo-
sures are completed.
AEB
3 2 1 1 2 3
0
AEB
3 2 1 1 2 3
0
DRIVE
CLEAR
CF
AEB
ONE SHOT
•Display when a bracketing amount of
±1-1/3 stops is set.
AEB
3 2 1 1 2 3
0
00. Part.2 RS (E) (P.28~47) 27-01-2003 11:56 Page 46
47
•By setting exposure compensation (see “7. Exposure Compensation” on page 42) after setting
the auto exposure bracketing step amount, you can take three sequential overexposed or under-
exposed shots while varying the compensation for each shot. The bracketing step amount is not
changed even when shifting the standard (metered) exposure.
•Auto exposure bracketing cannot be used in bulb mode or when using flash.
•Auto exposure bracketing cannot be set on the EOS-1 N RS in RS mode.
Auto Exposure Bracketing [AEB]
•The compensation amount for each
shot is also displayed in the viewfinder
by the exposure level indicator.
•It is possible to take one shot at a time
even in continuous exposure mode.
The AEB indicator ( ) blinks contin-
uously until all three exposures are
completed.
•
If the shutter is held completely
pressed in continuous exposure mode,
three frames are exposed in sequence
but the viewfinder’s metering level indi-
cator is not active. Film winding auto-
matically stops after three frames.
•When AEB is used in conjunction with
the self-timer, three frames are auto-
matically exposed in sequence after a
2- or 10-second delay.
5To cancel auto exposure bracketing,
repeat steps 1 and 2 to reset the
bracketing amount to 0.
•Auto exposure bracketing is also can-
celed when the lens is exchanged, the
film is replaced or rewound, bulb
exposure mode is set, flash charge
completion is loaded, the clear button
is pressed, or the main switch is set to
“”.
ONE SHOT
3 2 1 1 2 3
v
T
0
The camera can be set so that auto exposure
bracketing is not canceled when the lens is
exchanged, the film is loaded or rewound, or
the main switch is set to “ ”.
•Display examples of AEB exposures
in the viewfinder
1 2 3
Custom Function
(Refer to pages 88–89)
00. Part.2 RS (E) (P.28~47) 27-01-2003 11:56 Page 47

48
III Selecting the Shooting Mode
This section describes the camera’s various
shooting modes and provides guidelines on
how to select the appropriate mode for differ-
ent subjects.
•First make sure the camera's main
swich is set to “A” or “ ”
A
L
v
A
v
M
T
DEP
00. Part.3 RS (E) (P.48~64) 27-01-2003 11:57 Page 48
49
2Release the shooting mode selec-
tor.
3Turn the main dial until the desired
shutter speed appears in the
viewfinder or LCD panel.
4Press the shutter button halfway to
focus the subject and confirm the
exposure.
•The shutter speed and corresponding
aperture value are displayed in the
viewfinder and LCD panel.
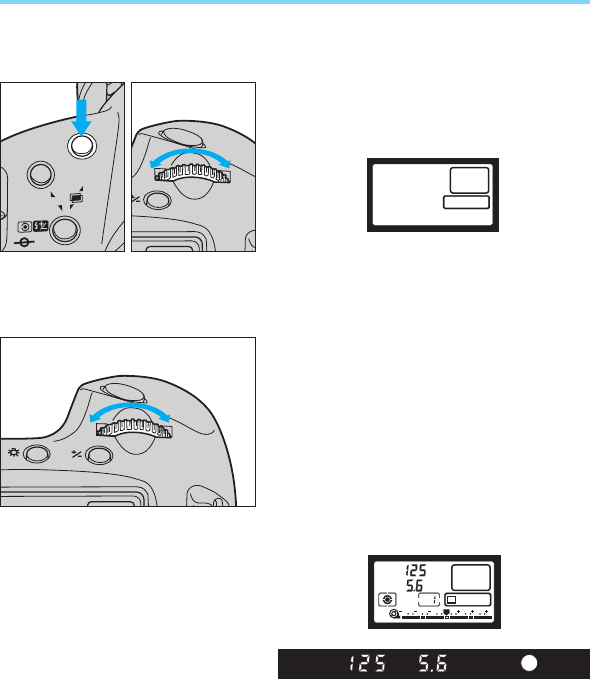
1. Shutter-priority AE [Tv]
In this mode, you set the shutter speed and the camera automatically sets
the aperture according to the lighting conditions.
1While pressing the shooting mode
selector, turn the main dial until “Tv”
appears in the LCD panel.
v
T
ONE SHOT
3 2 1 1 2 3
v
T
0
AF
ISO
MODE
ONE SHOT
ONE SHOT
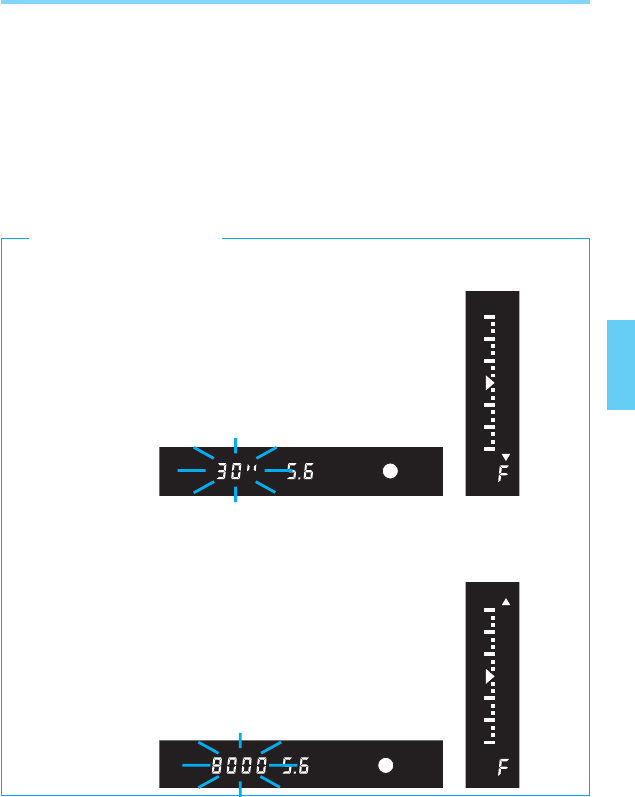
00. Part.3 RS (E) (P.48~64) 27-01-2003 11:57 Page 49
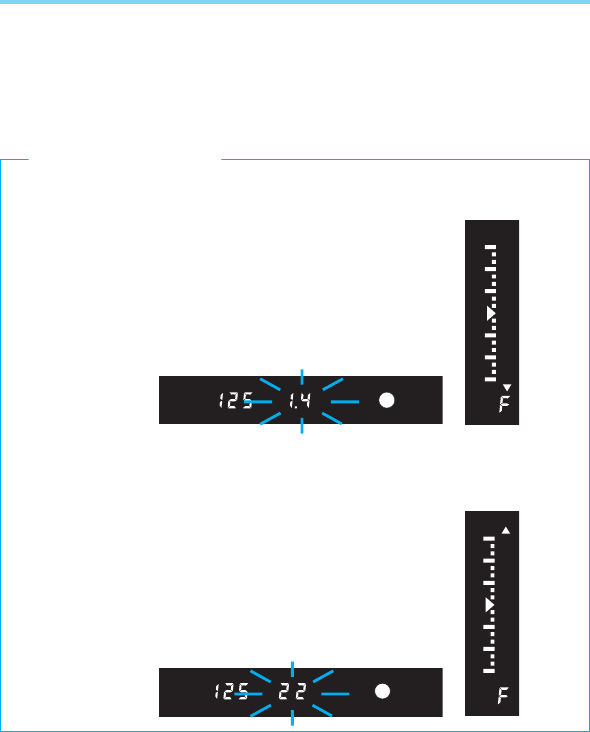
•When the number for the maximum aperture of the lens blinks in the display, the image
will be underexposed. Turn the main dial to a slower shutter speed so the aperture dis-
play stops blinking.
•When the number for the minimum aperture of the lens blinks in the display, the image
will be overexposed. Turn the main dial to a faster shutter speed so the aperture dis-
play stops blinking.
50
Shutter-priority AE [Tv]
5After confirming the aperture value,
press the shutter button completely
to take the picture.
•If the aperture value is not blinking,
proper exposure will be obtained.
[Exposure Warnings]
00. Part.3 RS (E) (P.48~64) 27-01-2003 11:57 Page 50
51
Shutter-priority AE [Tv]
Shutter Speed Display
Shutter speeds are set in 1/3-stop increments. From 8000 to 4, the shutter speeds are dis-
played as the reciprocal of the actual time values. For example, 125 on the display indi-
cates a shutter speed of 1/125 sec. For shutter speeds slower than 4, actual times are dis-
played. For example, 0”3 on the display indicates a shutter speed of 0.3 sec, and 15” indi-
cates a speed of 15 sec. The following shutter speeds are available:
8000 6400 5000 4000 3200 2500 2000 1600 1250 1000 800 640 500 400
320 250 200 160 125 100 80 60 50 40 30 25 20 15 13 10 8 6 5 4
0”3 0”4 0”5 0”6 0”8 1” 1”3 1”6 2” 2”5 3”2 4” 5” 6” 8” 10” 13” 15” 20”
25” 30”
In addition to 1/3-stop increments, shutter
speeds can also be input in 1-stop or 1/2-
stop increments. In these cases, available
shutter speeds are as follows:
•1-stop increments
8000 4000 2000 1000 500 250 125
60 30 15 8 4 0”5 1” 2” 4” 8” 15”
30”
•1/2-stop increments
8000 6000 4000 3000 2000 1500
1000 750 500 350 250 200 180
125 90 60 45 30 20 15 10 8 6 4
0”3 0”5 0”7 1” 1”5 2” 3” 4” 6” 8”
10” 15” 20” 30”
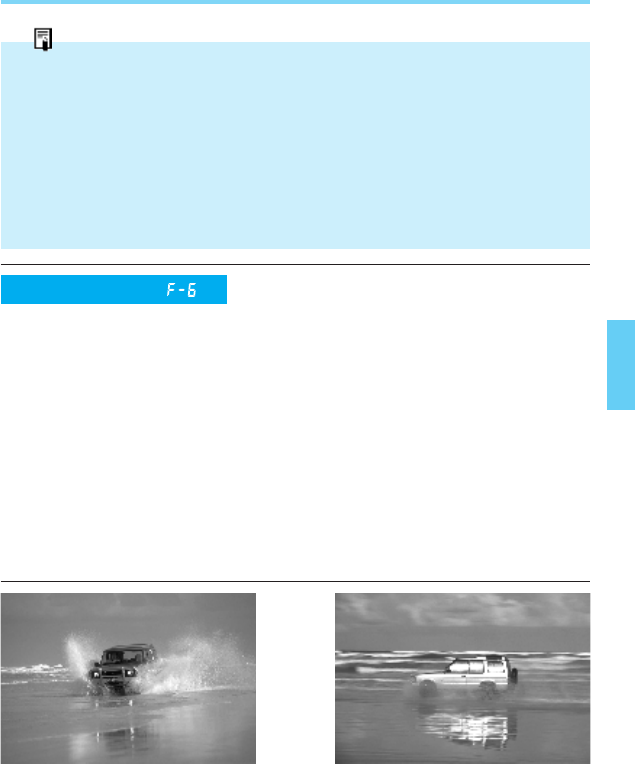
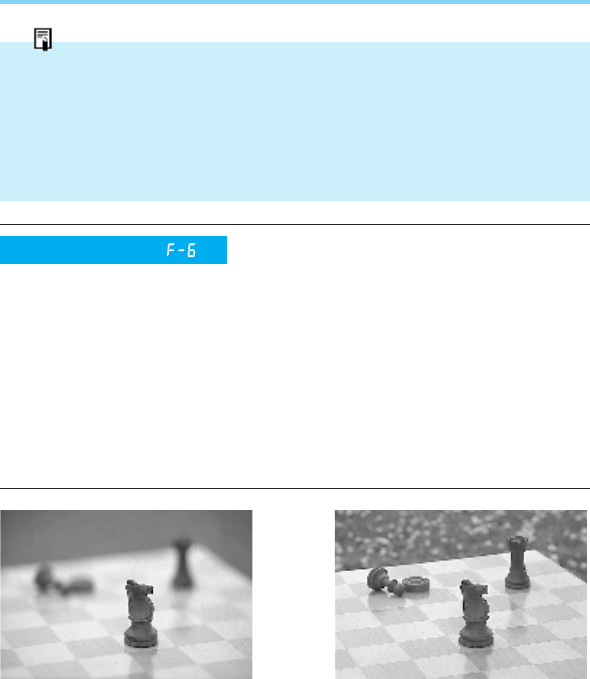
Using a fast shutter speed
(1/1000 sec. at f/5.6)
Using a slow shutter speed
(1/60 sec. at f/22)
Custom Function
(Refer to pages 86–87)
* Using an EF200mm f/2.8L USM lens
00. Part.3 RS (E) (P.48~64) 27-01-2003 11:57 Page 51
52
2. Aperture-priority AE [Av]
In this mode, you set the aperture and the camera automatically sets the
shutter speed according to the lighting conditions.
1While pressing the shooting mode
selector, turn the main dial until “Av”
appears in the LCD panel.
2Release the shooting mode selec-
tor.
3Turn the main dial until the desired
aperture value appears in the
viewfinder or LCD panel.
4Press the shutter button halfway to
focus the subject and confirm the
exposure.
•The aperture value and corresponding
shutter speed are displayed in the
viewfinder and LCD panel.
A
v
AF
ISO
MODE
ONE SHOT
ONE SHOT
ONE SHOT
3 2 1 1 2 3
A
v
0
00. Part.3 RS (E) (P.48~64) 27-01-2003 11:57 Page 52
•When a shutter speed of 30” blinks in the display, the image will be underexposed.
Turn the main dial to set a larger aperture (smaller aperture number) so the shutter
speed stops blinking.
•When a shutter speed of 8000 blinks in the display, the image will be overexposed.
Turn the main dial to set a smaller aperture (larger aperture number) so the shutter
speed stops blinking.
53
Aperture-priority AE [Av]
5After confirming the shutter speed,
press the shutter button completely
to take the picture.
•If the shutter speed is not blinking,
proper exposure will be obtained.
•Caution: Camera shake may produce
an unsharp picture if the shutter speed
becomes slower than “1/focal length of
the lens in use.”
[Exposure Warnings]
00. Part.3 RS (E) (P.48~64) 27-01-2003 11:57 Page 53
54
Aperture-priority AE [Av]
Aperture Value Display
Apertures are set in 1/3-stop increments. Larger numbers indicate smaller lens apertures.
The following aperture settings are provided in the camera, but the actual aperture range
available depends on the lens in use.
1.0 1.1 1.2 1.4 1.6 1.8 2.0 2.2 2.5 2.8 3.2 3.5 4.0 4.5 5.0 5.6 6.3 7.1
8.0 9.0 10 11 13 14 16 18 20 22 25 29 32 36 40 45 51 57 64 72
81 91
In addition to 1/3-stop increments, aper-
ture values can also be input in 1-stop or
1/2-stop increments. In these cases,
available aperture values are as follows:
•1-stop increments
1.0 1.4 2.0 2.8 4.0 5.6 8.0 11 16
22 32 45 64 91
•1/2-stop increments
1.0 1.2 1.4 1.8 2.0 2.5 2.8 3.5 4.0
4.5 5.6 6.7 8.0 9.5 11 13 16 19
22 27 32 38 45 54 64 76 91
Custom Function
(Refer to pages 86–87)
Using a small apertureUsing a large aperture
00. Part.3 RS (E) (P.48~64) 27-01-2003 11:57 Page 54
55
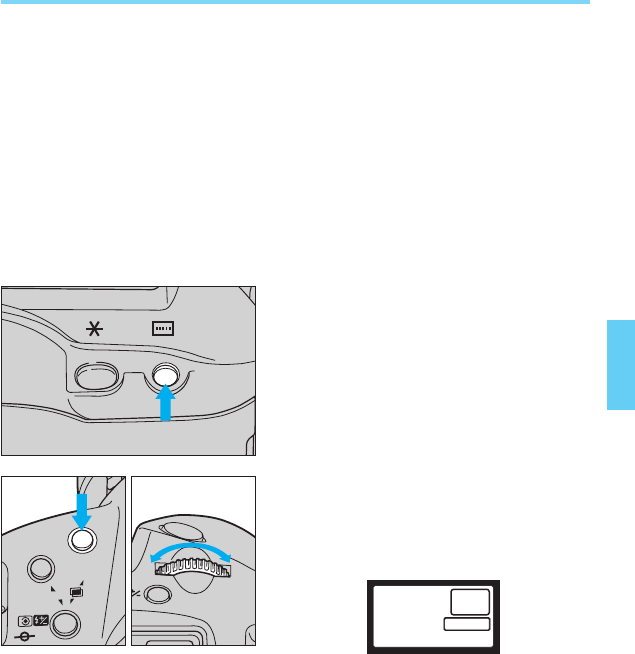
3. Depth-of-Field AE [DEP]
This mode places everything between two freely set points in the fore-
ground and background within the zone of focus, effective for making sure
everyone in a large group picture or everything in a landscape photo is
rendered sharp. After you designate the near and far points in the scene,
the camera automatically sets the optimum focus position and the aper-
ture necessary to achieve the required depth of field, then sets the shutter
speed to achieve the correct exposure. The near and far points can be
designated using the selected focusing point in manual focusing point
selection mode, or using the center point in automatic focusing point
selection mode.
•Depth-of-field AE is not possible when the lens’ focus mode switch is set to “M”.
Make sure the focus mode switch is set to “AF”.
●
Using Manual Focusing Point
Selection Mode
1Select the desired focusing point.
2While pressing the shooting mode
selector, turn the main dial until
“DEP” appears in the LCD panel.
DEP
3Release the shooting mode selec-
tor.
AF
ISO
MODE
ONE SHOT
00. Part.3 RS (E) (P.48~64) 27-01-2003 11:57 Page 55
56
Depth-of-Field AE [DEP]
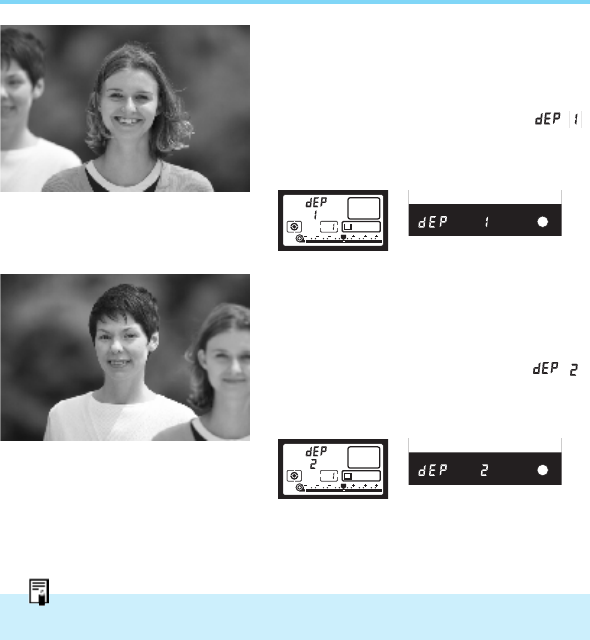
4Place the selected focusing point on
the nearest point you want in focus
(point 1), then press the shutter but-
ton halfway.
•
When the in-focus indicator and “ ”
light up in the viewfinder, remove your fin-
ger from the shutter button.
5Place the same focusing point on
the farthest point you want in focus
(point 2), then press the shutter but-
ton halfway again.
•
When the in-focus indicator and “ ”
light up in the viewfinder, remove your fin-
ger from the shutter button.
•Points 1 and 2 can be reversed if
desired.
ONE SHOT
3 2 1 1 2 3
DEP
0
ONE SHOT
3 2 1 1 2 3
DEP
0
(Point 1)
➔
(Point 2)
➔
Depth-of-Field AE [Dep] is not available on the EOS-1 N RS.
00. Part.3 RS (E) (P.48~64) 27-01-2003 11:57 Page 56
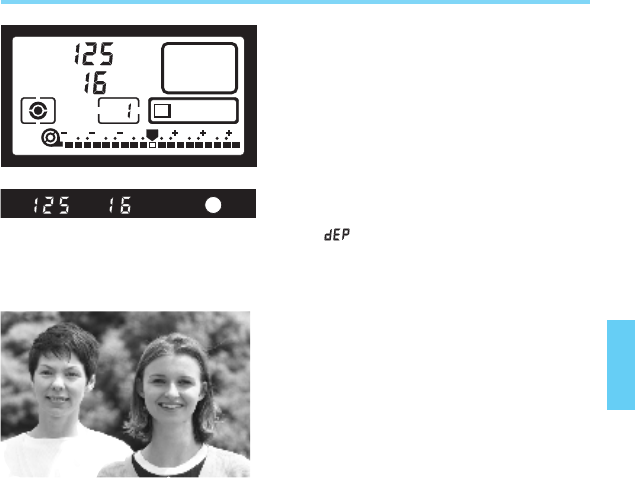
57
Depth-of-Field AE [DEP]
6Compose the picture and press the
shutter button halfway to set the
aperture and focus for the designat-
ed depth of field.
•The correct aperture value for the des-
ignated depth of field and the corre-
sponding shutter speed are displayed
in both the viewfinder and LCD panel.
•If you remove your finger from the
shutter button, the display changes to
“”and the aperture value.
•The exposure is determined immedi-
ately before the shutter is released.
7Press the shutter button completely
to take the picture.
●Using Automatic Focusing Point Selection Mode
In automatic focusing point selection mode, use the center focusing point
to designate the near and far focus points. Otherwise, the basic proce-
dure is the same as for “Depth-of-Field AE Using A Manual Focusing
Point Selection Mode”.
ONE SHOT
3 2 1 1 2 3
DEP
0
00. Part.3 RS (E) (P.48~64) 27-01-2003 11:57 Page 57
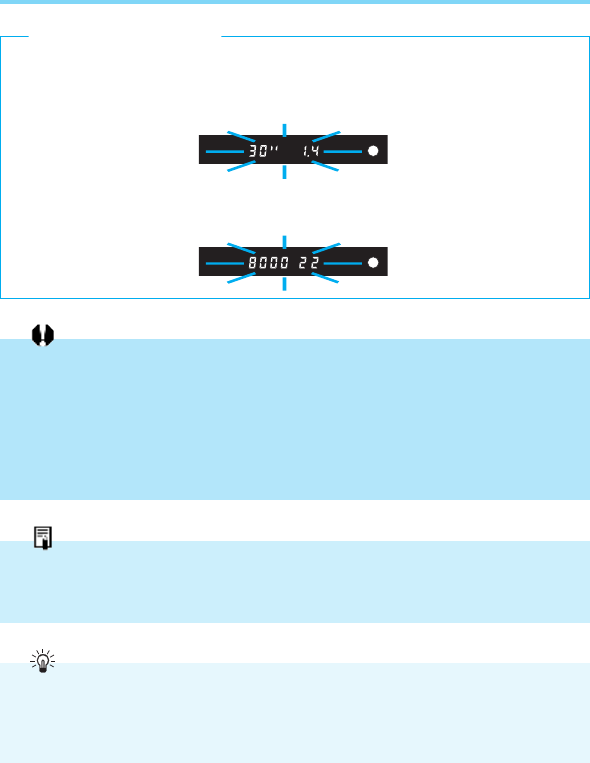
•If the aperture value blinks, the desired depth of field cannot be obtained. Use a wide-
angle lens or move farther from the subject and repeat steps 4 through 6.
•If the shutter speed of 30” and the maximum aperture of the lens blink, the scene will
be underexposed and Depth-of-Field AE cannot be carried out.
•If the shutter speed of 8000 and the minimum aperture of the lens blink, the scene will
be overexposed. Use a neutral density (ND) filter to reduce the amount of light entering
the lens.
58
Depth-of-Field AE [DEP]
•When using a zoom lens, do not zoom the lens until you finish taking the picture.
•Changing the focusing point during Depth-of-Field AE operation cancels any previously
set data.
•Flash cannot be used effectively in depth-of-field AE mode. Use of flash will provide the
same result as using flash in Program AE mode.
•When using a lens equipped with a focus range selector (such as the EF300mm f/2.8L
USM), be sure to set it to the maximum range.
•If the camera sets a slow shutter speed, use a tripod to prevent camera shake.
•To cancel Depth-of-Field AE in mid-operation, press the focusing point selector, the
shooting mode selector, the AF mode selector or the metering mode selector.
•For greater depth of field, we recommend using a wide-angle lens.
•For shallow depth of field, place both points 1 and 2 on the same point. This method is
effective for blurring the foreground and background when shooting portraits. Use a
telephoto lens for best effect.
[Warning Indications]
00. Part.3 RS (E) (P.48~64) 27-01-2003 11:57 Page 58
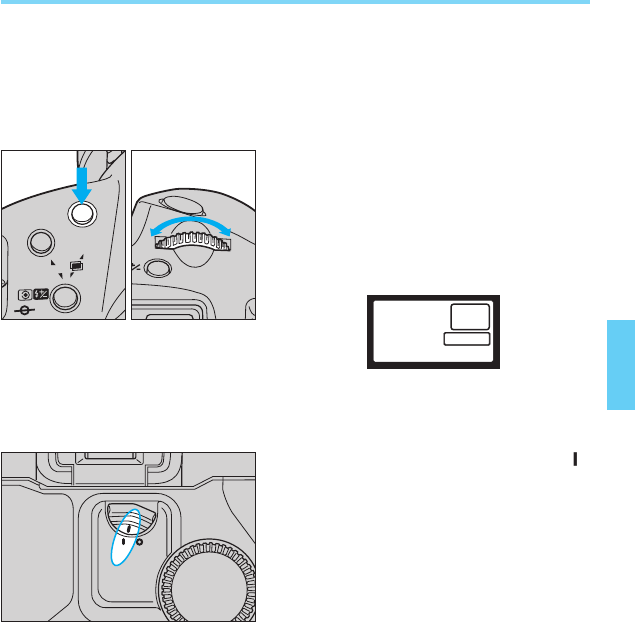
59
4. Manual Exposure [M]
This mode lets you set both the shutter speed and aperture. Use this
mode when you need complete control of exposure for creative effects or
when using a hand-held exposure meter.
The main dial sets the shutter speed and the quick control dial sets the
aperture.
●Using the Camera’s Built-in
Meter
1While pressing the shooting mode
selector, turn the main dial to the left
or right until “M” appears in the LCD
panel.
2Release the shooting mode selec-
tor.
3Set the quick control dial switch to .
4Turn the main dial to the desired
shutter speed and the quick control
dial to the desired aperture.
•The optionally available Command
Back E1 is not equipped with a quick
control dial. When using the Command
Back E1, set the aperture by pressing
the exposure compensation button
and turning the main dial.
M
AF
ISO
MODE
ONE SHOT
00. Part.3 RS (E) (P.48~64) 27-01-2003 11:58 Page 59
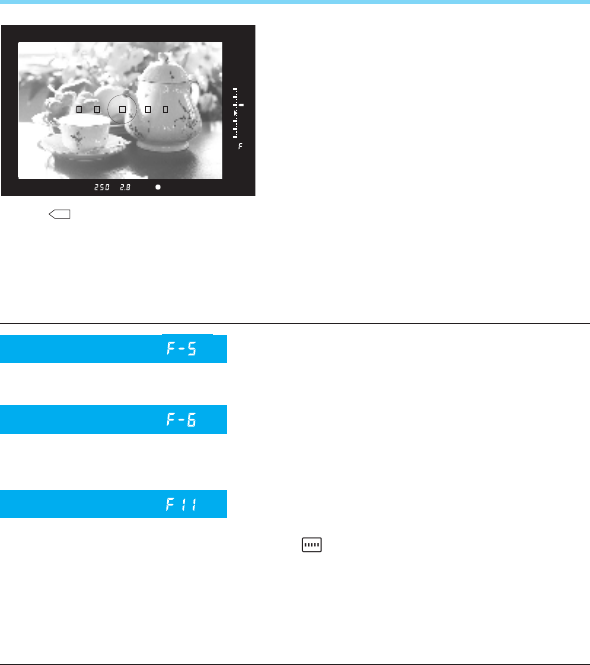
60
Manual Exposure [M]
5Press the shutter button halfway to
focus the subject. “M” and the expo-
sure values are displayed in the
viewfinder. The exposure level indi-
cator at the right of the viewfinder
shows how far the current exposure
setting is from the exposure value
metered by the camera.
6Set the shutter speed and aperture
value as desired while watching the
exposure level display, then press
the shutter button completely to take
the picture.
In addition to 1/3-stop increments, shutter
speeds and aperture values can also be
input in 1-stop or 1/2-stop increments.
This function lets you set the aperture
value using the focusing point select but-
ton ( ) in combination with the main
dial.
•The operation method described in step 4
can be changed in six different ways using
various combinations of custom functions 5
and 11 (refer to page 92).
This custom function lets you switch the
functions of the main dial and quick con-
trol dial.
•The indicator shows that the set
exposure will be one stop over the
metered exposure.
Custom Function
(Refer to pages 86–87)
Custom Function
(Refer to pages 86–87)
Custom Function
(Refer to pages 90–91)
M
00. Part.3 RS (E) (P.48~64) 27-01-2003 11:58 Page 60
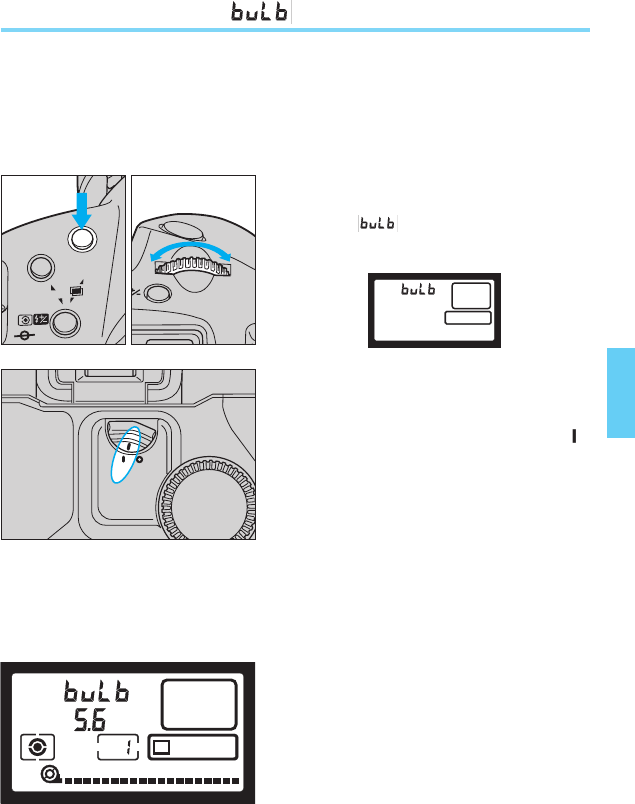
61
5. Bulb Exposure [ ]
The shutter stays open for as long as you press the shutter button. By
connecting the optional Remote Switch 60T3 to the camera’s remote con-
trol socket, you can keep the shutter open without holding the shutter but-
ton pressed. Use this mode when long exposures are required, such as
for pictures of night scenes and fireworks displays.
2Release the shooting mode selec-
tor.
3
Set the quick control dial switch to
.
AF
ISO
MODE
ONE SHOT
1While pressing the shooting
mode selector, turn the main dial
until
“”
appears in the LCD
panel.
4While looking at the LCD panel, turn
the main dial or quick control dial
until the desired aperture value
appears in the display.
5Press the shutter button completely
and hold it pressed for the desired
length of time.
ONE SHOT
00. Part.3 RS (E) (P.48~64) 27-01-2003 11:58 Page 61
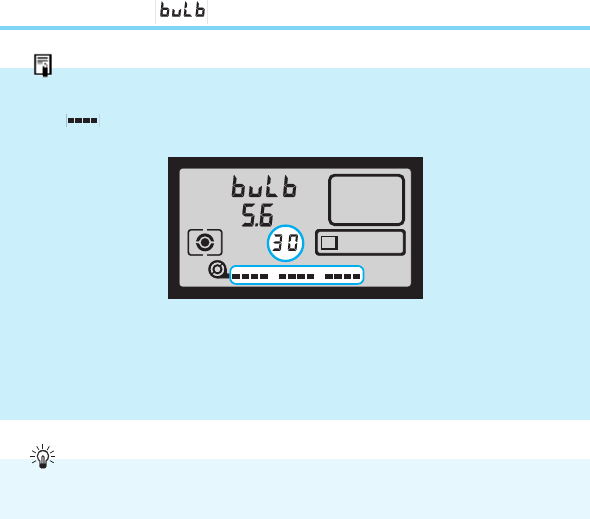
62
•In bulb exposure mode, the LCD panel’s frame counter display counts the elapsed time
from when the shutter was released, starting over every 30 seconds. One battery check
bar ( ) appears on the display after every 30 seconds, allowing time measurement
up to 120 seconds using all three bars.
•This camera’s bulb exposure operation is designed to consume very little power, realiz-
ing virtually no drain on the battery.
•LCD panel illumination is turned off during bulb exposure operation.
Bulb Exposure [ ]
ONE SHOT
This display example shows elapsed time of 120 seconds
•Optional accessory Command Back E1 features a long-release timer for timed expo-
sures up to 23 hours, 59 minutes, 59 seconds, adjustable in 1-second increments.
00. Part.3 RS (E) (P.48~64) 27-01-2003 11:58 Page 62
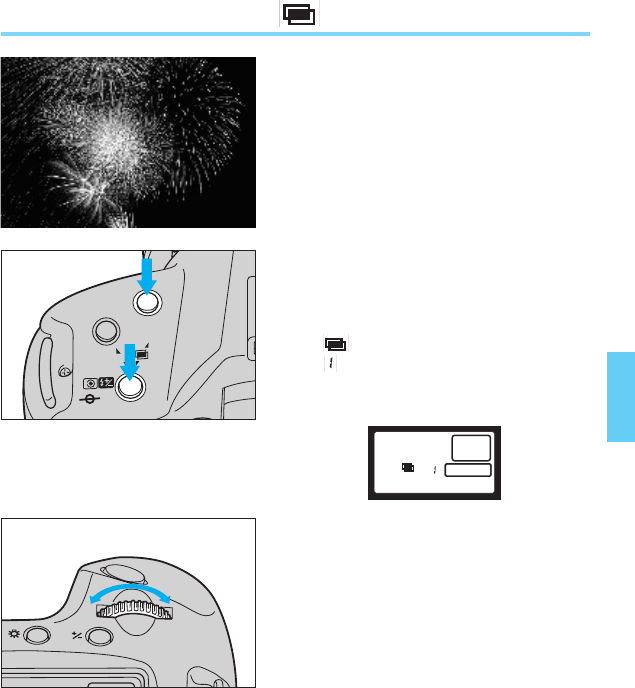
63
Up to nine exposures can be made on
one frame by presetting the number of
multiple exposures with the main dial.
Multiple exposures are possible in any
shooting mode.
1Press the shooting mode selector
and metering mode selector/flash
exposure compensation button at
the same time.
•“ ”appears in the LCD panel and
“” appears in the frame counter.
This number indicates the number of
preset multiple exposures.
2Turn the main dial to set the desired
number of preset multiple expo-
sures.
•To cancel, turn to the left.
6. Multiple Exposures [ ]
AF
ISO
MODE
ONE SHOT
00. Part.3 RS (E) (P.48~64) 27-01-2003 11:58 Page 63
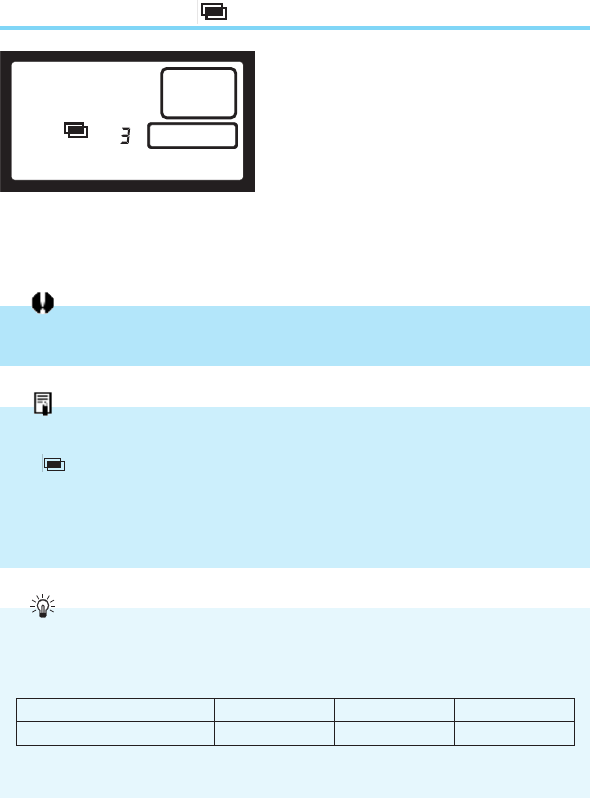
64
3Release the shooting mode selector
and metering mode selector/flash
exposure compensation button.
4Select a shooting mode and take
the desired number of exposures.
5When the preset number of multiple
exposures is completed, the film
automatically advances to the next
frame.
Multiple Exposures [ ]
• Three exposures are set
•When the preset number of multiple exposures is completed, the film automatically
advances to the next frame and multiple exposure mode is canceled.
•“ ” blinks in the LCD panel during multiple exposure photography.
•To cancel multiple exposure mode before starting to take pictures, reset the number of
multiple exposures in the display to “1”.
•To cancel multiple exposure mode in mid-operation, repeat steps 2 and 3 to set the
frame counter to a blank display.
When taking multiple exposures on a single frame, you should decrease the exposure value for each
exposure using exposure compensation. See “7. Exposure Compensation” on page 42.
Approximate exposure compensation
•
The above values should be used only as a guide. The actual compensation amount
required depends on the shooting conditions and should be determined by prior testing.
When taking multiple exposures on the first or last frame of a roll, the curl of the film may
cause subject images to shift slightly out of alignment.
Number of multiple exposures
Compensation amount per exposure
2 exposures
–1.0
3 exposures
–1.5
4 exposures
–2.0
00. Part.3 RS (E) (P.48~64) 27-01-2003 11:58 Page 64
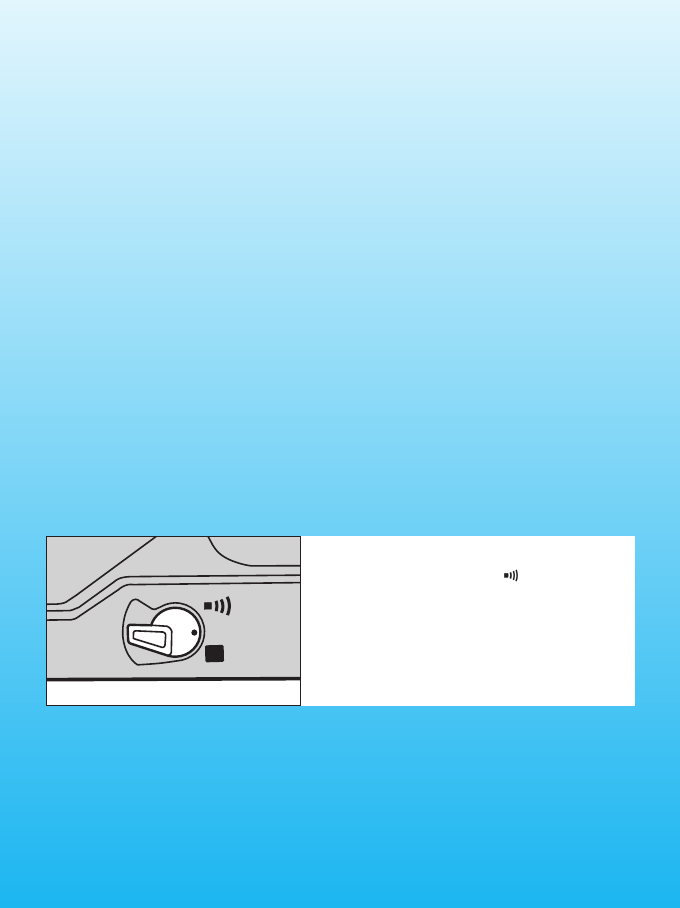
65
IV Configuring the Camera
This section describes how to change vari-
ous camera settings such as the film speed
and film winding and rewinding modes, allow-
ing you to precisely configure the camera for
specific shooting situations.
•First make sure the camera's main
swich is set to “A” or “ ”
A
L
00. Part.4 RS (E) (P.65~75) 27-01-2003 11:59 Page 65
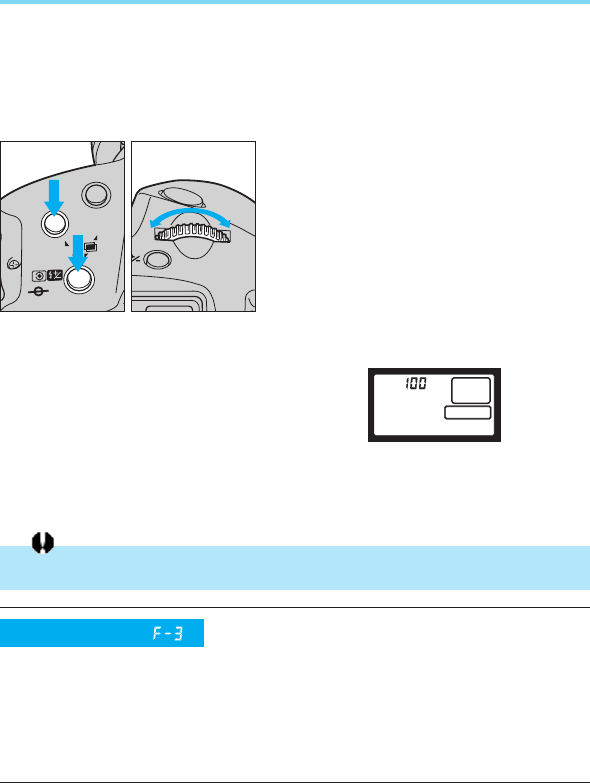
66
1. Manually Setting the Film Speed
The film speed can be set manually when using non-DX film or when you
wish to set a film speed other than the DX-coded film speed.
•Set the film speed after loading the film.
•The manual film speed setting range is ISO 6~6400. When using DX film, the
automatic film speed setting range is ISO 25~5000.
1
While simultaneously pressing the AF
mode selector and metering mode
selector/flash exposure compensa-
tion button, turn the main dial to the
left or right until the desired film
speed is displayed in the LCD panel.
•When the AF mode selector and
metering mode selector are pressed
simultaneously, “ISO” and the current-
ly set film speed are displayed in the
LCD panel.
2Release the AF mode selector and
metering mode selector/flash expo-
sure compensation button to com-
plete the film speed setting.
ISO
0
This custom function can be used to pre-
vent the camera from automatically set-
ting the film speed according to the film’s
DX code. When this function is set, the
camera does not change the manually set
film speed when changing film, handy
when using many rolls of the same type
of film in succession.
AF
ISO
MODE
ONE SHOT
The manually-set film speed is automatically canceled when new DX-coded film is loaded.
Custom Function
(Refer to pages 84–85)
00. Part.4 RS (E) (P.65~75) 27-01-2003 11:59 Page 66
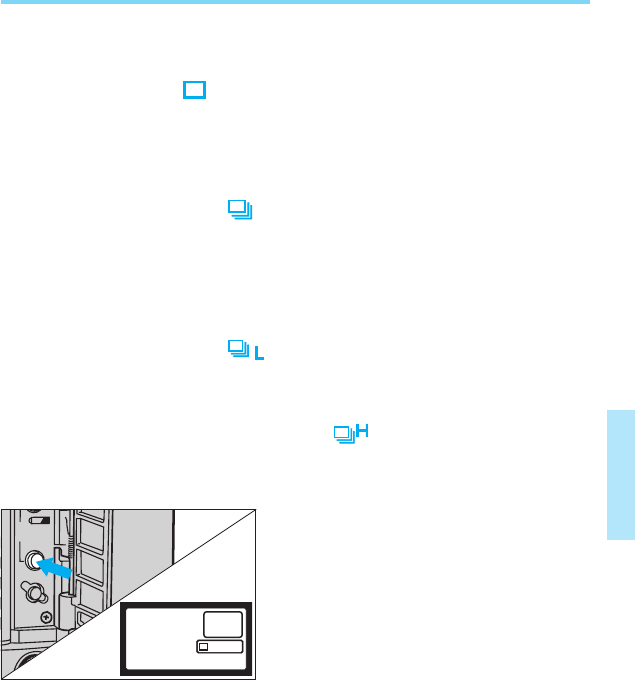
67
2. Changing the Film Winding Mode
Two film winding modes are available: single exposure mode and continu-
ous exposure mode.
●Single Exposure ( )
The film advances one frame after each picture is taken. After taking a picture,
return the shutter button to the half-pressed position to prepare for the next expo-
sure while keeping the exposure value locked (possible only when camera is set to
One-shot AF and evaluative metering mode).
●Continuous Exposure ( )
Pictures are taken continuously at a rate of approx. 3 frames per second as long as
the shutter button is held pressed.
♦Attaching the optional Power Drive Booster E1 provides the following two contin-
uous exposure modes:
●Continuous Exposure ( )
Pictures are taken continuously at a rate of approx. 3 frames per second as long as
the shutter button is held pressed.
●High-Speed Continuous Exposure ( )
Pictures are taken continuously at a rate of approx. 6 frames per second as long as
the shutter button is held pressed.
1Open the palm door and press the
film winding mode selector.
•The current film winding mode is dis-
played in the LCD selector.
•The timer keeps the film winding mode
displayed for approx. 6 seconds after
you release the selector.
DRIVE
CLEAR
AEB
00. Part.4 RS (E) (P.65~75) 27-01-2003 11:59 Page 67
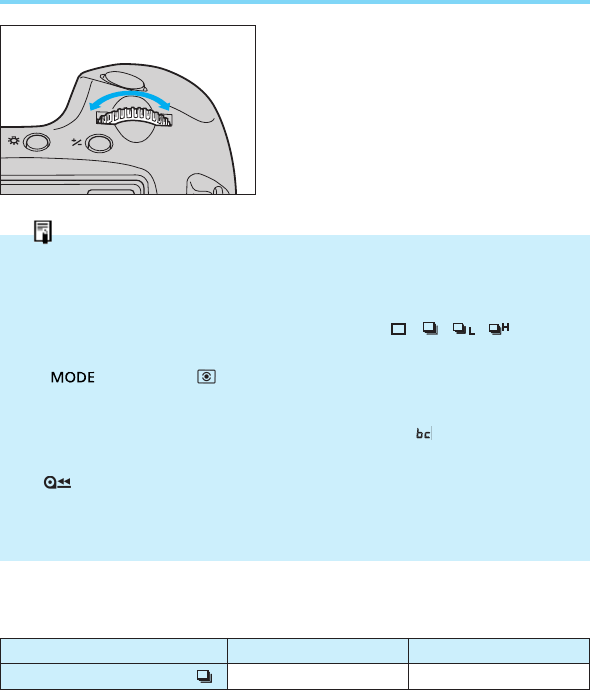
One-shot/Manual AI Servo
Continuous exposure ( ) approx. 3 fps approx. 2.5 fps
68
Changing the Film Winding Mode
2Turn the main dial to the left or right
until the desired film winding mode
is displayed in the LCD panel.
3To complete the setting, press the
shutter halfway or wait until the six-
second timer elapses.
Film Winding Automatic Gear Switching Function
If film winding becomes an excessive burden to the camera due to a sharp drop in battery
capacity (which can occur when shooting in a cold environment), the film winding system
automatically switches gears to reduce the winding speed and minimize battery drain.
When this occurs, one of the film winding mode indicators ( • • • ) blinks in
the LCD panel.
To cancel this function and return to normal-speed winding, open the palm door and press
the < > button and < > button simultaneously or when you replace the film or
battery. When the camera automatically switches to reduced-speed winding, check the
battery level (see page 15) and replace the battery or prepare a new battery as indicated.
•When film winding or rewinding stops in mid-operation, the “ ” indicator blinks in the
LCD panel. When the battery is replaced with a new one, film winding continues auto-
matically. If the camera stopped in the middle of rewinding, press the film rewind button
() to continue the rewinding operation.
•Do not dispose of the battery if its capacity drops due to cold shooting conditions. Its
capacity may return when it returns to normal temperature.
●Maximum Continuous Shooting Speed in Different AF Modes
(frames/sec.)
ONE SHOT
•Refer to page 97 for the maximum shooting speeds in different AF modes with
Power Drive Booster E1.
00. Part.4 RS (E) (P.65~75) 27-01-2003 11:59 Page 68
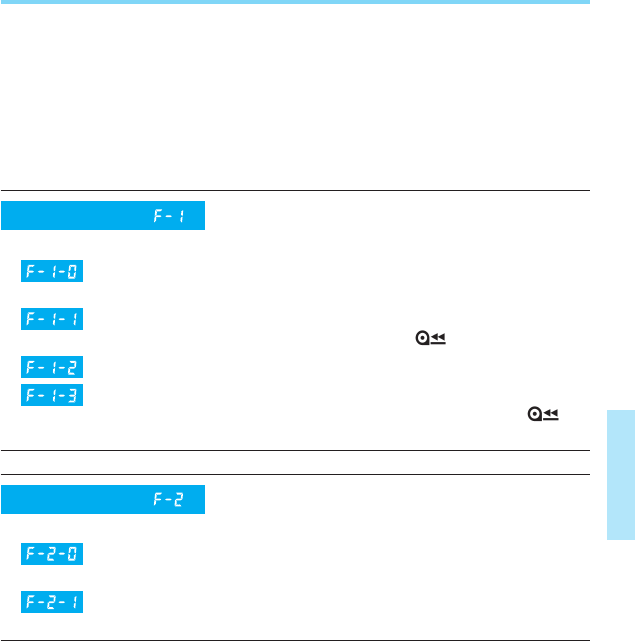
69
High-speed rewinding starts automatically at the end of the
roll.
Rewinding does not start automatically at the end of the roll
and starts when the film rewind button ( ) is pressed.
Silent rewinding starts automatically at the end of the roll.
Rewinding does not start automatically
at
the end of
the roll
.
Silent rewinding starts when the film rewind button ( ) is
pressed.
3. Changing the Film Rewinding Mode
In normal operation at the end of the roll, the camera automatically
rewinds the film at high speed and winds the film leader completely into
the cartridge. Using custom functions F-1 and F-2, however, you can
change the camera’s film rewinding operation as described below:
•Custom Function Nos. F-1 and F-2 can be used in combination.
•For instructions on how to change the custom function settings, see “1. Setting
and Resetting Custom Functions” on page 82.
Settings
At the end of rewinding, the camera winds the film leader all
the way into the cartridge.
At the end of rewinding, the camera leaves the film leader
outside the cartridge.
Settings
Custom Function
Custom Function
(Refer to pages 84–85)
(Refer to pages 84–85)
00. Part.4 RS (E) (P.65~75) 27-01-2003 11:59 Page 69
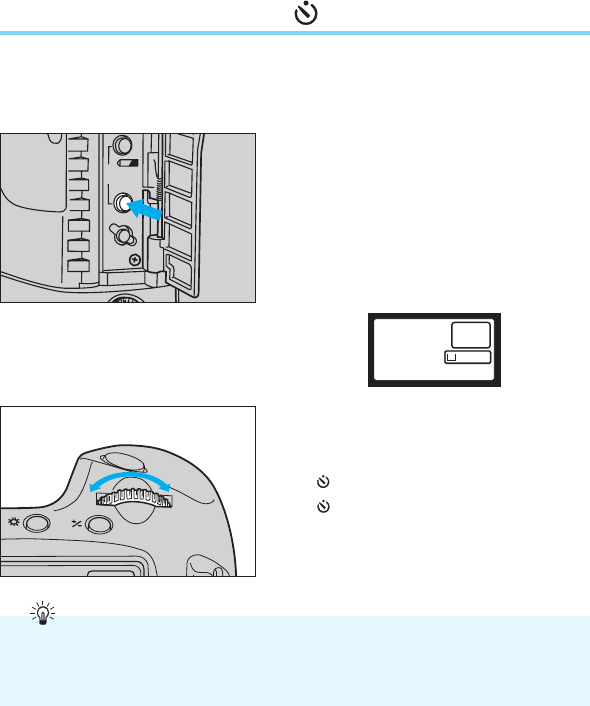
70
4. Using the Self-Timer [ ]
Two built-in self-timer modes let you delay the exposure 10 seconds or 2
seconds from when you press the shutter button. When using the self-
timer, place the camera on a tripod or a steady surface.
DRIVE
CLEAR
AEB
1Open the palm door and press the
film winding mode selector.
•The film winding mode indicator
appears in the LCD panel.
•After the button is released, the timer
function keeps the film winding mode
indicator displayed in the LCD panel
for six seconds.
2Turn the main dial to the left or right
until the desired self-timer mode
appears in the LCD panel.
•: 10-second timer
•: 2-second timer
2
10
ONE SHOT
Use the 10-second self-timer when taking a picture of a group of people or a scene that
you want to be a part of, and use the 2-second self-timer when you want to minimize cam-
era-shake (camera vibration induced when the shutter button is pressed) while taking
close-up pictures or duplicate photos.
00. Part.4 RS (E) (P.65~75) 27-01-2003 11:59 Page 70
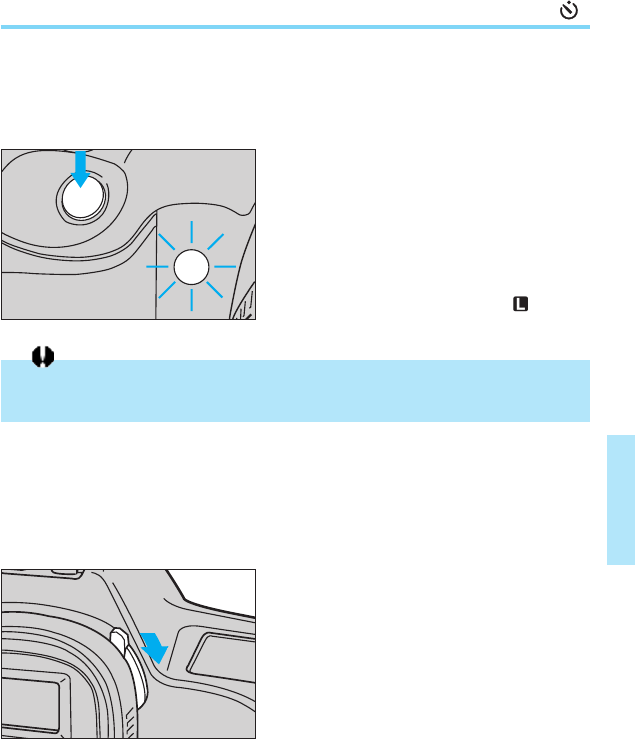
71
Using the Self-Timer [ ]
3Looking into the viewfinder, com-
pose the picture and press the shut-
ter button halfway to focus the sub-
ject and set the exposure.
4Press the shutter button completely.
The self-timer lamp blinks to indi-
cate that the self-timer function is
operating. The lamp starts blinking
faster two seconds before the pic-
ture is taken.
•To cancel the self-timer in mid-opera-
tion, set the main switch to .
●Using the Eyepiece Shutter
To prevent metering errors caused by light entering the eyepiece when
pressing the shutter button with your eye away from the viewfinder, close
the eyepiece shutter before pressing the shutter button. Recommended
when using the self-timer or making long time exposures.
Push down the eyepiece shutter lever
in the direction of the arrow to close
the eyepiece shutter. Lift the lever in
the opposite direction to open.
•Be careful not to stand in front of the lens when pressing the shutter button, as this will
cause the camera to misfocus.
00. Part.4 RS (E) (P.65~75) 27-01-2003 11:59 Page 71
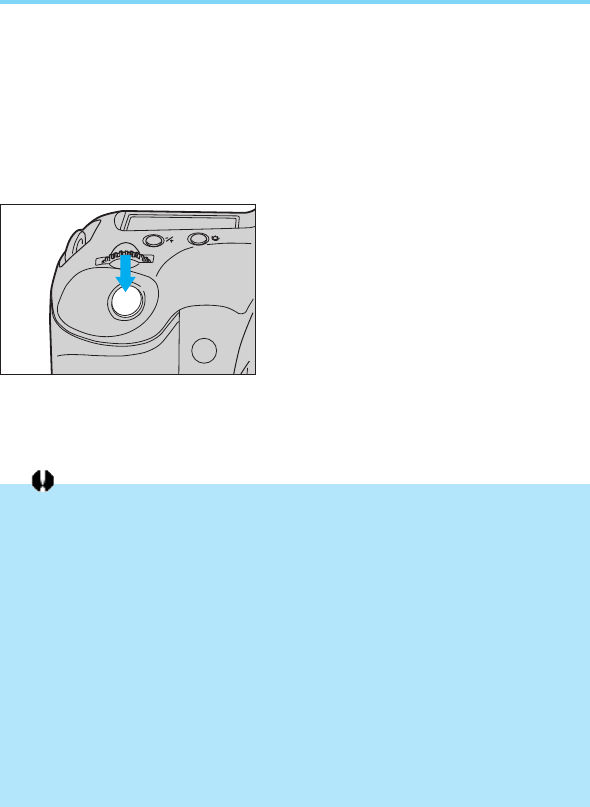
•When shooting outdoors on a bright day or in a bright location such as a ski slope or a
sea shore on a fine day, take the picture within 30 seconds after swinging the mirror up
to avoid burning the shutter curtain.
•Do not point the camera lens at direct sunlight when the mirror is in the up position to
avoid burning the shutter curtain.
•When the mirror-up function is set, the film is wound one frame at a time, regardless of
the film winding mode (single exposure or continuous exposure).
•If the self-timer is used in combination with the mirror-up function, the mirror swings up
when the shutter button is first pressed, then the shutter releases automatically after a
delay of 10 seconds (in 10-second self-timer mode) or 2 seconds (in 2-second self-
timer mode).
•The timer function of the optionally available Command Back E1 cannot be used in mir-
ror-up mode.
•When using the bulb exposure and self-timer modes in combination with the mirror-up
function, a shutter release-type sound is heard when you remove your finger from the
shutter button while the self-timer is operating, but no picture is actually taken.
72
5. Locking the Mirror Up
Setting custom function F-12 (refer to pages 90-91) lets you swing the
mirror up before opening the shutter and starting the exposure. This elimi-
nates the slight vibration caused by mirror shock, ensuring maximum
sharpness when taking close-up photos or using super-telephoto lenses.
•Refer to “1. Setting and Resetting Custom Functions” on page 82 for instructions
on how to set the custom function.
•For best results with mirror-up shooting, we recommend using the optionally
available Remote Switch 60T3.
1Press the shutter button all the way
to swing the mirror up.
•The mirror will stay up for 30 seconds.
If no operation is made within 30 sec-
onds, the mirror will automatically
return to its normal position without
taking a picture. Pressing the shutter
button again will return the mirror to
the raised position.
2Momentarily let up on the shutter button, then press it again completely
to take the picture. The mirror returns to its normal position after the
exposure is completed.
00. Part.4 RS (E) (P.65~75) 27-01-2003 11:59 Page 72
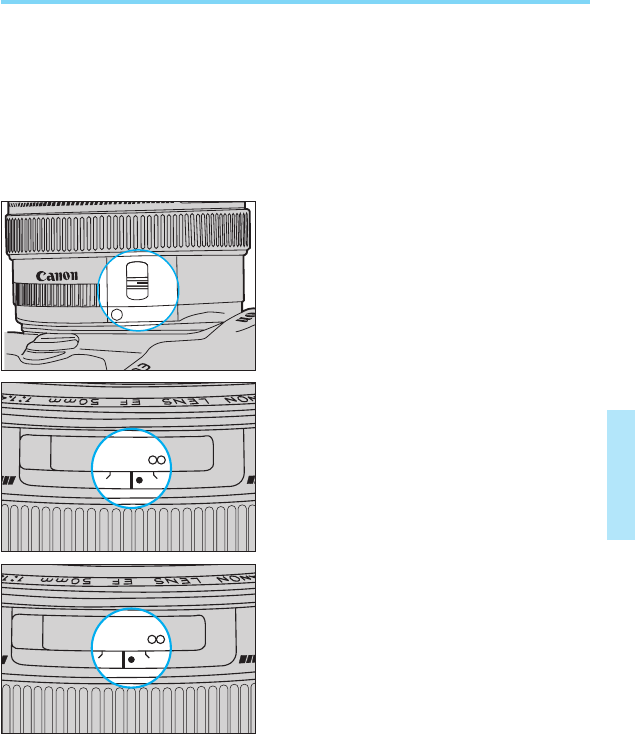
73
Infrared film (film with extended sensitivity to infrared light) can be used to
achieve interesting effects not possible with general-purpose film. When
using black-and-white infrared film, the film’s sensitivity to longer wave-
lengths requires a slight adjustment in focus using the red infrared index
on the lens. Use a deep red filter to maximize the infrared effect.
•
When shooting with infrared film, use a lens equipped with a distance scale window.
•For black-and-white and color infrared photography, read the instructions provid-
ed with the film for proper use.
6. Infrared Photography
AF
M
22 22
50mm
AF
M
AF
M
AF
M
m
ft
3510
81 1.5 3
22 22
510
1.5 3
22 22
510
1.5 3
22 22
m
ft
3510
81 1.5 3
22 22
510
1.5 3
22 22
510
1.5 3
22 22
510
1.5 3
222
1Focus the subject.
2Set the lens’ focus mode switch to
“M”.
3Read the focus distance from the
distance scale window.
•In this example, the distance from the
camera to the subject is 3 m / 10 ft.
4Manually align the lens’ infrared
index with the 3 m / 10 ft index on
the distance scale.
•
The lens’ infrared index is set for a
wavelength of 800 nanometers.
However, the wavelength characteristics
of general black-and-white infrared film
varies depending on the type (750~830
nanometers). Therefore, to ensure prop-
er focus when shooting with infrared
film, we recommend to take extra shots
with the lens adjusted slightly to the
front and rear of the infrared index.
•
The characteristics of the lenses listed
below are such that they do not require
focus adjustment when using black-and-
white infrared film. These lenses are there-
fore not equipped with an infrared index.
EF200mm f/1.8L USM
EF300mm f/2.8L USM
EF500mm f/4.5L USM
EF600mm f/4L USM
00. Part.4 RS (E) (P.65~75) 27-01-2003 11:59 Page 73
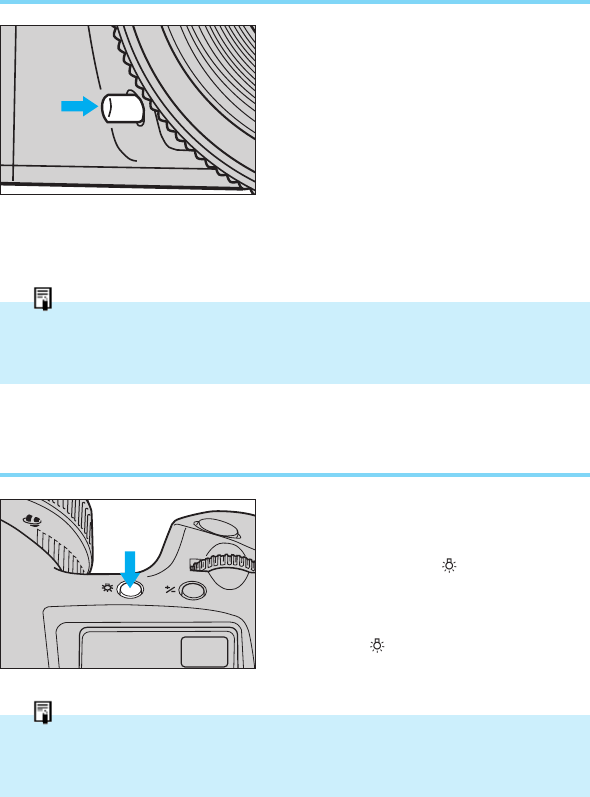
74
7. Checking the Depth of Field
Depth of field is the range of focus in
front of and behind the subject in
which objects appear sharp. The depth
of field varies from shallow to deep
depending on the aperture setting, the
angle of view of the lens in use and the
camera to subject distance. To check
the depth of field before taking a pic-
ture, press the depth-of-field preview
button. The camera will close down the
lens’ diaphragm to the shooting aper-
ture, allowing you to see the range of
sharpness in the viewfinder.
The LCD panel can be illuminated for easy
viewing at night or in low light situations. To
illuminate the LCD panel, press the panel
illumination button ( ). The panel will
remain illuminated for approximately 6 sec-
onds. To turn off the illumination before 6
seconds elapse, press the panel illumina-
tion button ( ) again. The LCD panel illu-
mination goes out automatically approx. 2
seconds after a picture is taken.
P
UL
TRASO
U
M
ONE SHOT
8. Illuminating the LCD Panel
•Exposure setting is locked when the depth-of-field preview button is pressed.
•The depth-of-field preview button does not function during the camera's autofocus
operation.
•You can keep the LCD panel illuminated longer than 6 seconds by pressing any opera-
tion button again while the illumination timer is activated.
•The LCD panel cannot be illuminated during bulb exposures.
00. Part.4 RS (E) (P.65~75) 27-01-2003 11:59 Page 74
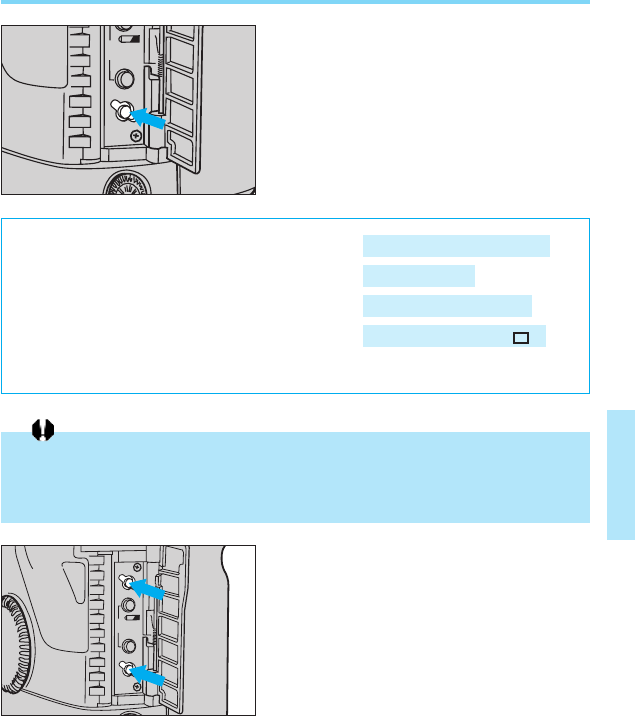
75
•Shooting mode ......................................
•AF mode................................................
•Metering mode ......................................
•Film winding mode ................................
•Custom functions................................... Not affected
Single exposure ( )
Evaluative metering
One-shot AF
Program AE (P) mode
9. Resetting the Camera to Its Initial Settings
●Resetting All Camera Functions
You can reset all of the camera’s func-
tions (except for the custom functions)
to their default settings by opening the
palm door and pressing the clear but-
ton. After resetting, the camera’s func-
tions are set as shown below:
When custom function F-8 is set for center-weighted average metering instead of evalua-
tive metering, and the metering mode is set to partial metering or spot metering, pressing
the clear button will reset all of the camera functions except for the metering mode, which
remains at the current setting.
DRIVE
CLEAR
AEB
DRIVE
CLEAR
CF
AEB
●Resetting All Custom Functions
You can reset all of the custom func-
tions to their initial settings by pressing
the custom function button before
pressing the clear button.
1
2
00. Part.4 RS (E) (P.65~75) 27-01-2003 11:59 Page 75

76
V Using Flash
Attaching an EOS dedicated speedlite to the
camera’s accessory shoe enables advanced
flash photography with the operational sim-
plicity of normal AE shooting. In addition to
overall exposure compensation, independent
compensation of just the flash exposure is
possible from the camera side.
Operation of the built-in three-zone
(center, right, left) automatic flash
sensor corresponds to the five focus-
ing points, increasing flash exposure
precision by automatically weighting
the exposure to the center when aut-
ofocusing at the center point, or to
the left or right when autofocusing at
one of the side points.
00. Part.5 RS (E) (P.76~80) 27-01-2003 12:38 Page 76
77
1. Using EOS Dedicated Speedlites
EOS dedicated Speedlites (540EZ, 430EZ, 420EZ, 300EZ, etc.) make
flash photography as simple as pointing and shooting. Moreover, built-in
advanced functions make it easy to achieve professional fill-in flash
effects in outdoor settings as well as automatic control of flash exposure
when shooting at night or indoors. These units feature a built-in AF auxil-
iary light function that assists autofocus in dark situations.
By simply attaching an EOS Speedlite to the camera and turning it on, an
appropriate flash synchronization speed (1/250 sec. or slower) is auto-
matically set on the camera. As soon as the flash is charged, the flash
charge completion indicator appears in the viewfinder. For details, refer to
your speedlite’s instruction book.
●Automatic Flash Output Reduction Control
When using a dedicated speedlite to take a photo of a subject lit by sky-
light-type illumination, the camera automatically reduces the flash unit’s
light output so as not to overexpose the subject.
•The 540EZ's AF auxiliary light is designed to work with all five of the EOS-1 N’s focus
points. Other EZ Speedlites' AF auxiliary light works with only the center focusing point.
•The 480EG does not emit an AF auxiliary light.
•The aperture values displayed on the camera and speedlite LCD panels may some-
times differ. However, the exposure will be correct.
•When using flash in AI Servo AF mode, the flash unit’s AF auxiliary light will not func-
tion. In situations requiring use of the AF auxiliary light, switch to One-shot AF mode.
You can turn off the automatic flash out-
put reduction control function for strongly-
backlit subjects which need extra illumi-
nation from the flash.
Custom Function
(Refer to pages 90–91)
00. Part.5 RS (E) (P.76~80) 27-01-2003 12:38 Page 77
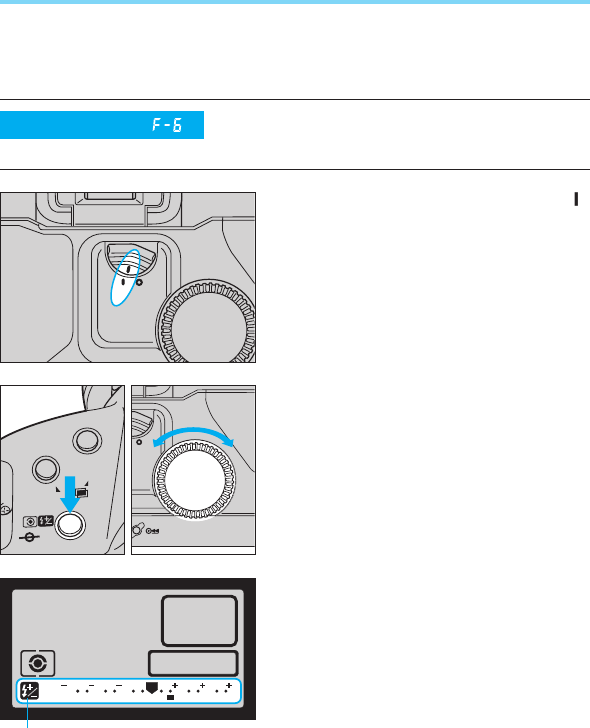
78
2. Flash Exposure Compensation
This function lets you vary the automatic flash exposure level of EOS ded-
icated speedlites. The flash exposure can be compensated up to ±3 stops
in 1/3-stop increments.
1Set the quick control dial switch to .
2While pressing the metering mode
selector / flash exposure compensa-
tion button, turn the quick control
dial to set the desired compensation
amount.
•The flash exposure compensation
amount is displayed in the LCD
panel’s exposure compensation dis-
play.
•In the LCD display, the “+” side indi-
cates overexposure compensation,
and the “–” side indicates underexpo-
sure compensation.
3 2 1 1 2 3
0
3 2 1 1 2 3
0
Flash exposure compensation can also
be set in 1/2-stop increments.
AF
ISO
MODE
Flash exposure compensation
•Example showing +2/3-stop flash
exposure compensation.
Custom Function
(Refer to pages 86–87)
00. Part.5 RS (E) (P.76~80) 27-01-2003 12:38 Page 78

79
When using the 300TL Speedlite, set the flash mode button to a position other than MHi or
MLo. TTL automatic flash exposure is possible.
Canon Speedlites other than those mentioned above can be used in manual mode.
Flash Exposure Compensation
3Releasing the metering mode selec-
tor / flash exposure compensation
button completes the flash expo-
sure compensation setting. The
LCD panel returns to its normal
condition and lights in the dis-
play to indicate that flash exposure
compensation is set. (The compen-
sation amount is not displayed.)
•Flash exposure compensation remains
set until manually canceled. To cancel,
repeat step 2 to return the flash expo-
sure compensation amount to 0.
•The exposure compensation amount
remains set even if the main switch is
set to “ ”.
The optionally available Command Back E1 does not have a quick control dial. When
using this command back, set the flash exposure compensation by turning the main dial
while simultaneously pressing the metering mode selector / flash exposure compensation
button and focusing point selector.
●Speedlites Capable of Flash Exposure Compensation
This camera can perform flash exposure compensation with all Canon EOS dedi-
cated Speedlites. The 540EZ and 430EZ Speedlites are also equipped with a built-
in flash exposure compensation function. When this camera is used with the 540EZ
or 430EZ and flash exposure compensation is set on both the camera and flash
unit, the settings on the flash unit have priority and override the camera setting.
•Flash exposure compensation with EOS dedicated Speedlites is supported with
the Canon Off-camera Shoe Cords and Canon multiple flash accessories con-
nected to the camera by TTL Hot Shoe Adapters 2 and 3.
ONE SHOT
3 2 1 1 2 3
A
v
0
00. Part.5 RS (E) (P.76~80) 27-01-2003 12:38 Page 79

80
3. Using Non-dedicated Flash Equipment
This camera’s shutter can synchronize with non-dedicated portable flash
units at up to 1/250 sec. and with studio strobes at up to 1/125 sec.
Before use, test the flash unit at various shutter speeds to make sure it
synchronizes properly with the camera.
●PC Terminal
Flash units equipped with a synchro cord can be used by connecting the
cord to the camera’s PC terminal. The PC terminal is equipped with a lock
screw to prevent accidental disconnection.
The PC terminal provides only an X-sync contact and synchronizes at all
shutter speeds up to 1/250 sec.
•TTL automatic flash control is not possible.
•Flash units can be connected to both the PC terminal and accessory shoe for multiple
flash setups.
●We recommend using Canon dedicated speedlites with this
camera.
•Use of flash units (having two or more contacts on the hot shoe) or flash accessories
that are designed for dedicated use with other brands of cameras will not work properly
and may result in damage to your EOS camera.
•Use of flash units of other brands with a trigger circuit voltage in excess of 6 volts DC
may damage your camera. Consult your nearest authorized Canon service facility to
confirm the compatibility.
00. Part.5 RS (E) (P.76~80) 27-01-2003 12:38 Page 80

81
VI Custom Functions
Custom function control is provided to let you
customize the camera’s functions according
to your personal preferences and shooting
style.
00. Part.6 RS (E) (P.81~105) 27-01-2003 12:39 Page 81
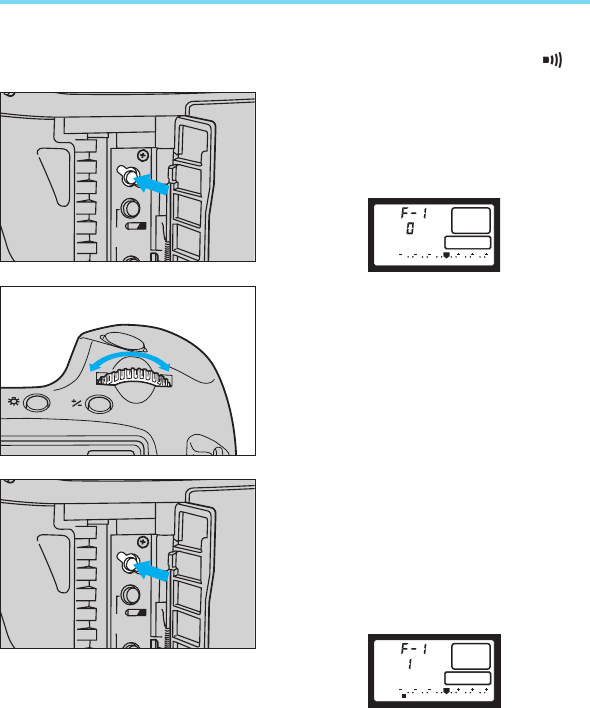
82
1. Setting and Resetting Custom Functions
●Setting a Custom Function
1Set the main switch to “A” or “ ”.
2Open the palm door and press the
custom function button.
•A custom function number is displayed
in the LCD panel.
3Turn the main dial to the left or right
until the desired custom function
number is displayed in the LCD
panel.
4Press the custom function button
until the number corresponding to
the desired setting for the selected
custom function appears in the LCD
panel. The number changes each
time the custom function button is
pressed.
DRIVE
CF
AEB
ONE SHOT
DRIVE
CF
AEB
3 2 1 1 2 3
0
3 2 1 1 2 3
0
00. Part.6 RS (E) (P.81~105) 27-01-2003 12:39 Page 82
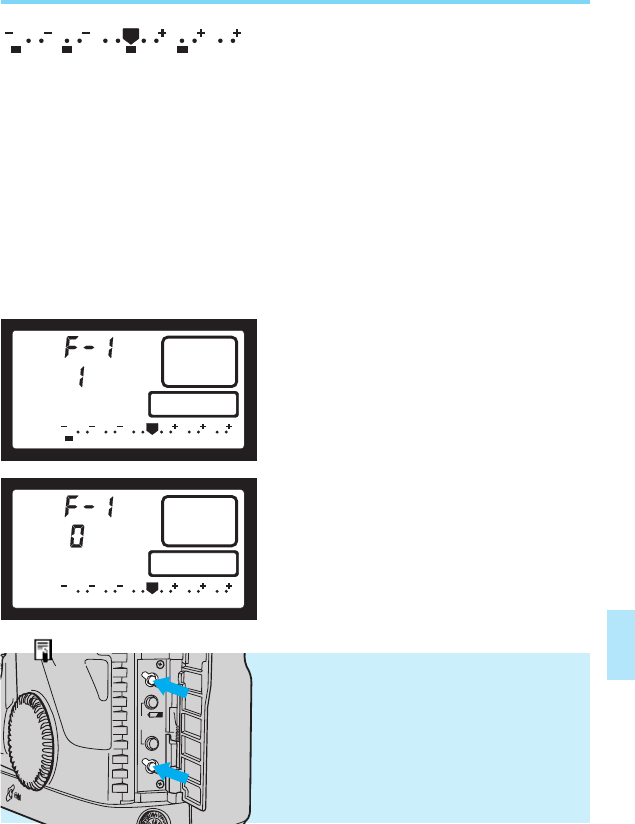
83
Setting and Resetting Custom Functions
5Press the shutter button halfway to
complete the setting and restore the
LCD panel to the original display.
●
Resetting a Custom Function
1To reset a custom function to the
standard setting, select the custom
function and then press the custom
function button to change the num-
ber in the LCD panel to “0”.
3 2 1 1 2 3
0
3 2 1 1 2 3
0
•Dots are displayed below the exposure
scale to indicate custom function settings
which have been selected.
A dot below “–3” indicates that custom
function No. 1 is set. Dots for other custom
functions (Nos. 2~14) are displayed in
sequence to the right of the “–3” position.
•You can check the custom function set-
ting status at any time by pressing the
custom function button to activate the
status display.
3 2 1 1 2 3
0
(CF1) (CF5) (CF10) (CF14)
•Display example indicating that cus-
tom functions No. 1, No. 5, No. 10 and
No. 14 are set.
Resetting All Custom Functions At
Once
You can reset all the custom functions at once
to their default (0) settings by pressing the clear
button after pressing the custom function but-
ton, while the camera is in the custom function
setting mode.
DRIVE
CLEAR
CF
AEB
2Press the shutter button halfway to
complete the reset operation and
restore the LCD panel to the original
display.
←
←
←
←
1
2
00. Part.6 RS (E) (P.81~105) 27-01-2003 12:39 Page 83
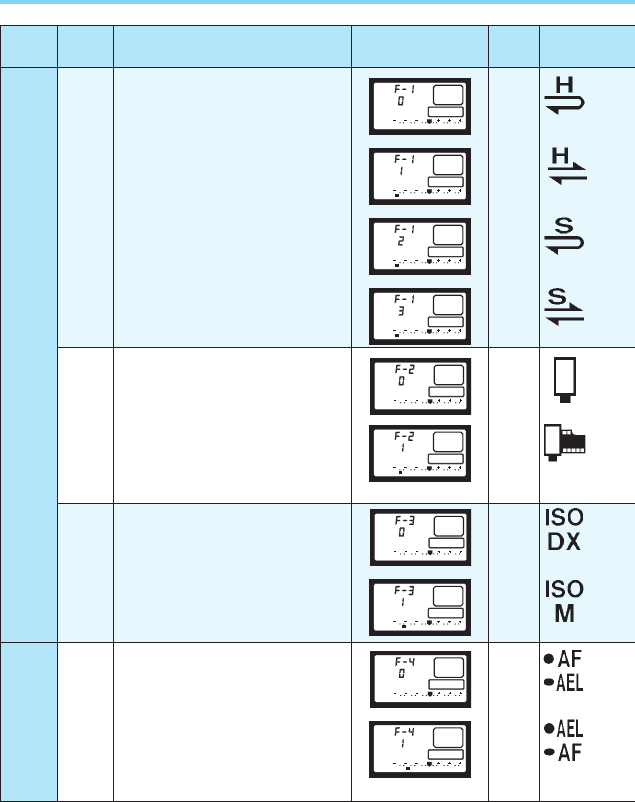
84
2. Custom Function Chart
Film
handling
F-1
F-2
F-3
Custom
Function
No.
Type
Automatic film rewind operation
Film leader retrieval after rewinding
Film speed setting
AF operation method
Affected Function
3 2 1 1 2 3
0
3 2 1 1 2 3
0
3 2 1 1 2 3
0
3 2 1 1 2 3
0
3 2 1 1 2 3
0
3 2 1 1 2 3
0
3 2 1 1 2 3
0
3 2 1 1 2 3
0
3 2 1 1 2 3
0
3 2 1 1 2 3
0
Focus F-4
LCD Panel Display Setting
No.
0
1
2
3
0
1
0
1
0
1
Sticker
Symbol
00. Part.6 RS (E) (P.81~105) 27-01-2003 12:39 Page 84

85
High-speed automatic rewind.
Automatic rewind prohibited.
Silent automatic rewind. (Low speed)
Automatic rewind prohibited.
Rewinds film leader fully into the car-
tridge.
Leaves the film leader outside the car-
tridge after rewinding.
Film speed set automatically according
to DX code.
Film speed set manually. (DX code is
ignored.)
Autofocus starts when shutter button is
pressed halfway. Exposure is locked
when AE lock button ( ) is pressed.
Autofocus starts when AE lock button
() is pressed. Exposure is locked
when shutter button is pressed halfway.
•Pressing film rewind button activates high-
speed rewind.
•Pressing film rewind button activates silent
rewind. (Low speed)
69
69
66
31
41
Operation Useful Situations Reference
Page No.
This function is useful for situations in
which silence is required — for exam-
ple, in a quiet theater or at a pro golf
tournament — where the sudden noise
of a camera’s rewind would cause dis-
ruption and be frowned upon.
This function is useful for individuals or
news companies who do their own film
processing. The film leader is left out-
side of the cartridge after the film is
rewound automatically or in mid-roll.
With this custom function, the shutter
always operates at the fastest 1/8000
sec. with the back cover open.
This option is for photographers who
shoot film at ISO settings determined
from their own tests. Setting this func-
tion frees the photographer from having
to change the film speed every time a
new roll is loaded.
1: This option lets the photographer
carry out metering and autofocusing
independently.
00. Part.6 RS (E) (P.81~105) 27-01-2003 12:39 Page 85
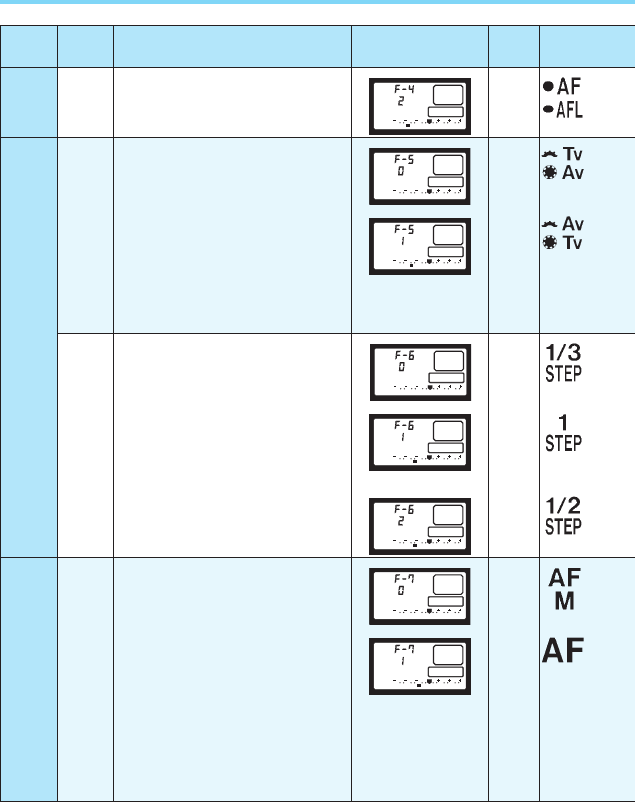
86
AF activation
Shutter speed and aperture value
setting method in manual exposure
mode
EV steps for the shutter speed,
aperture, exposure compensation,
flash exposure compensation, and
AEB
Manual focusing with the electronic
manual focusing ring
F-5
F-6
F-7Focus
3 2 1 1 2 3
0
3 2 1 1 2 3
0
3 2 1 1 2 3
0
3 2 1 1 2 3
0
F-4
Exposure
Focus
Custom
Function
No. Affected Function LCD Panel Display Setting
No.
2
0
1
0
1
2
0
1
Sticker
Symbol
3 2 1 1 2 3
0
3 2 1 1 2 3
0
3 2 1 1 2 3
0
3 2 1 1 2 3
0
Type
00. Part.6 RS (E) (P.81~105) 27-01-2003 12:39 Page 86

87
Autofocus starts when shutter button is
pressed halfway. Focus is locked when
AE lock button ( ) is pressed.
Shutter speed set by main dial. Aperture
value set by quick control dial or by com-
bined operation of exposure compensa-
tion button ( ) and main dial.
Aperture value set by main dial. Shutter
speed set by quick control dial or by
combined operation of exposure com-
pensation button ( ) and main dial.
Shutter speed, aperture value and
exposure compensation, flash exposure
compensation and AEB step amounts
set in 1/3-stop increments.
Shutter speed and aperture value set in
1-stop increments, and exposure com-
pensation, flash exposure compensa-
tion and AEB step amounts set in 1/3-
stop increments.
Shutter speed, aperture value and
exposure compensation, flash exposure
compensation and AEB step amounts
set in 1/2-stop increments.
Manual focusing is possible.
Manual focusing is prohibited.
•AE lock is not possible when “2” is set.
•For operation when combined with custom
function F-11, refer to “Combined Use of
Custom Functions F-5 and F-11” on page
92.
•Manual focusing by setting the lens’ focus
mode switch to “M” is possible.
•This function works only with lenses
equipped with an electronic manual focus-
ing ring.
Custom Function Chart
60
42
45
51
54
60
78
36
Operation Useful Situations Reference
Page No.
2: For sports photography using focus
prediction in AI Servo AF mode, this
option lets the photographer tem-
porarily stop the focus.
When making manual exposure adjust-
ments, this function lets the photograph-
er choose whether to use the main dial
for adjusting the shutter speed or aper-
ture value. This option is convenient for
studio flash photography where the
shutter speed is kept constant while the
aperture is frequently varied to alter
depth of field and exposure.
This function lets the photographer
input shutter speed and aperture set-
tings in any increment that he or she is
used to. 1/2-stop exposure compensa-
tion settings are also possible, providing
wide flexibility to satisfy various shoot-
ing styles.
This option disables the manual focus-
ing capability of the electronic ring pro-
vided on many USM lenses, eliminating
the possibility of accidentally turning the
ring and shifting the focus after autofo-
cusing is completed.
Compatible Lenses
EF 50/1.0L USM EF 85/1.2L USM
EF 200/1.8L USM EF 300/2.8L USM
EF 400/2.8L USM EF 500/4.5L USM
EF 600/4L USM
EF 1200/5.6L USM
EF 28-80/2.8-4L USM
00. Part.6 RS (E) (P.81~105) 27-01-2003 12:39 Page 87
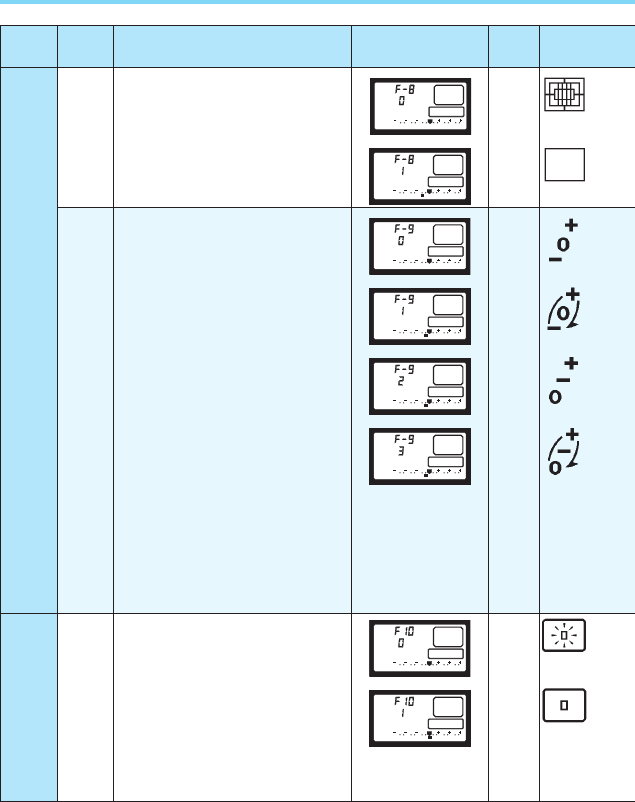
88
Center-weighted average metering
AEB exposure sequence
Elimination of AF frame display
F-9
F-10Focus
3 2 1 1 2 3
0
3 2 1 1 2 3
0
3 2 1 1 2 3
0
3 2 1 1 2 3
0
3 2 1 1 2 3
0
3 2 1 1 2 3
0
3 2 1 1 2 3
0
3 2 1 1 2 3
0
F-8
Exposure
Custom
Function
No. Affected Function LCD Panel Display Setting
No.
0
1
0
1
2
3
0
1
Sticker
Symbol
Type
00. Part.6 RS (E) (P.81~105) 27-01-2003 12:39 Page 88

89
Custom Function Chart
Evaluative metering.
Center-weighted average metering.
Under →Correct →Over
Under →Correct →Over
Correct →Under →Over
Correct →Under →Over
Focusing point superimposed (red).
Superimpose is prohibited.
•The LCD panel still shows the evaluative
metering indication.
•0 & 2: AEB operation is canceled when
main switch is set to “ ”, lens is
exchanged, film is loaded or rewound, bulb
exposure mode is set, flash charge comple-
tion is detected, or the clear button is
pressed.
•1 & 3: AEB operation is not canceled
when main switch is set to “ ”, lens is
exchanged or film is loaded or rewound.
AEB mode can be selected by simultane-
ous pressing AF mode and shooting
mode selectors + main dial operation.
38
45
47
30
Operation Useful Situations Reference
Page No.
Setting this function to center-weighted
average metering provides the photog-
rapher with a predictable metering pat-
tern for determining exposure. This is
useful for experienced photographers
who have over many years developed
an ability to accurately determine expo-
sure combining average metering and
exposure compensation.
2, 3:These settings change the bracket-
ing sequence to “0 →– →+”, which
is useful when shooting live sub-
jects or changing scenes where the
first shot will most likely capture the
best expression or composition.
1, 3:These settings are useful for pho-
tographers who frequently use
AEB, as it prevents AEB mode
from being canceled every time the
lens is exchanged, the main switch
is set to “”, or the film is
rewound or exchanged, and allows
the user to activate AEB mode
using an external setting operation,
eliminating the need to open the
camera’s palm door.
This option is for users who are
annoyed by the AF frame illumination in
the viewfinder, as well as for those who
frequently use manual focusing to
adjust the final focus.
00. Part.6 RS (E) (P.81~105) 27-01-2003 12:39 Page 89
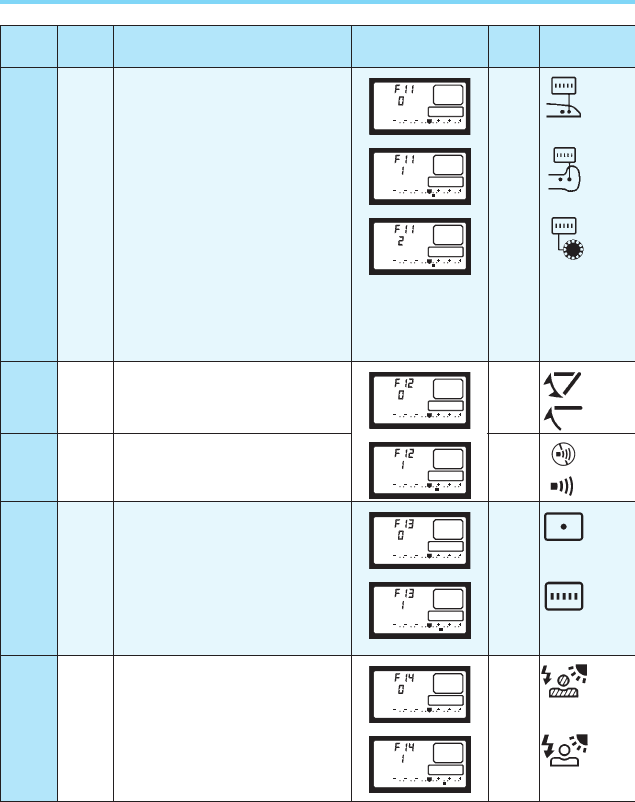
90
Focusing point selection
Mirror up operation
Beeping when in focus
Spot metering at the AF frame
Fill-in flash control
F-11Focus
F-12
F-12
(RS)
Mirror
operation
Beeping
on/off
F-13
Exposure
F-14
Flash
operation
3 2 1 1 2 3
0
3 2 1 1 2 3
0
3 2 1 1 2 3
0
3 2 1 1 2 3
0
3 2 1 1 2 3
0
3 2 1 1 2 3
0
3 2 1 1 2 3
0
3 2 1 1 2 3
0
3 2 1 1 2 3
0
Custom
Function
No. Affected Function LCD Panel Display Setting
No.
0
1
2
0
0
0
1
0
1
Sticker
Symbol
Type
1
1
00. Part.6 RS (E) (P.81~105) 27-01-2003 12:39 Page 90

Custom Function Chart
91
Focusing point selector ( ) + main dial
Exposure compensation button ( ) +
main dial
Independent operation of quick control
dial, or exposure compensation button
() + main dial.
Normal operation.
Mirror up operation.
No beeping when the subject is in focus.
Beeps when the subject is in focus.
Fine spot metering in center of image
area.
Spot metering linked to the manually
selected focusing point.
Automatic flash output reduction control
active.
Automatic flash output reduction control
prohibited.
•
Focusing point selection using the quick con-
trol dial is possible during metering operation,
when the 6-second metering timer is activat-
ed, or during continuous shooting in AI Servo
AF mode.
After the far left or far right focusing point is
selected, selection cannot proceed in the
same direction.
•In automatic focusing point selection mode,
spot metering is carried out for the center
focusing point only.
30
33
60
72
102
39
77
Operation Useful Situations Reference
Page No.
0, 1:This option makes it possible to
match the EOS-1 N’s button opera-
tions to the photographer’s existing
camera (EOS-1 or EOS 5•A2/A2E).
2:
This option lets the user track the subject
with the focusing point in real-time by
operating the quick control dial, which is
useful when tracking a moving subject
using the focus prediction control in AI
Servo AF mode.
To set the aperture during exposure com-
pensation or manual exposure, press the
focusing point selection button and turn
the main dial.
This is effective for preventing camera
shake caused by mirror operation shock
when making long exposures. Use of a
tripod is recommended.
Set to suit your shooting style and the
environment.
•In the RS mode, there is no beeping.
This function links spot metering to the
focusing point, allowing the user to spot
meter the subject without changing the
framing of the scene.
This function prevents underexposure
of strongly backlit subjects, such as
when shooting portraits backed by light
from the late afternoon sun.
00. Part.6 RS (E) (P.81~105) 27-01-2003 12:39 Page 91
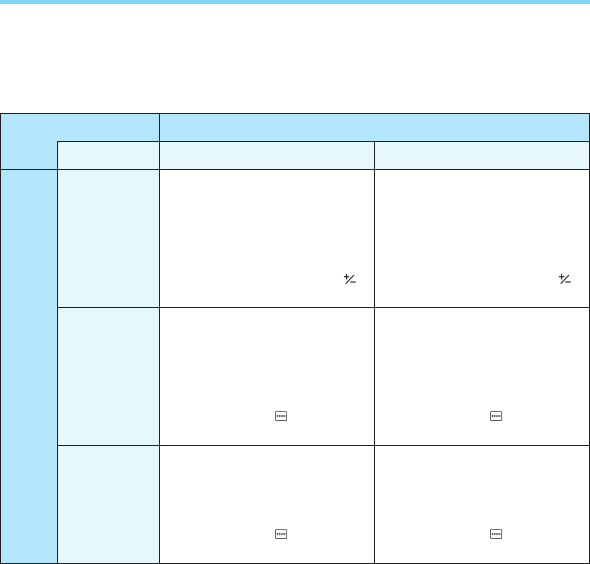
92
Custom Function Chart
●Combined Use of Custom Functions F-5 and F-11
When custom functions F-5 and F-11 are combined, shutter speed and
aperture value settings are carried out as shown in the following table.
Shutter speed:
Set by main dial
Aperture value:
1) Set by quick control dial or
2) Set by exposure com-
pensation button ( )
and main dial
Shutter speed:
Set by main dial
Aperture value:
1) Set by quick control dial or
2) Set by focusing point
selector ( ) and main
dial
Shutter speed:
Set by main dial
Aperture value:
Set by focusing point
selector ( ) and main
dial
Aperture value:
Set by main dial
Shutter speed:
1) Set by quick control dial or
2) Set by exposure com-
pensation button ( )
and main dial
Aperture value:
Set by main dial
Shutter speed:
1) Set by quick control dial or
2) Set by focusing point
selector ( ) and main
dial
Aperture value:
Set by main dial
Shutter speed:
Set by focusing point
selector ( ) and main
dial
F-11
Custom function number
0
1
2
Selection No.
F-5
01
00. Part.6 RS (E) (P.81~105) 27-01-2003 12:39 Page 92
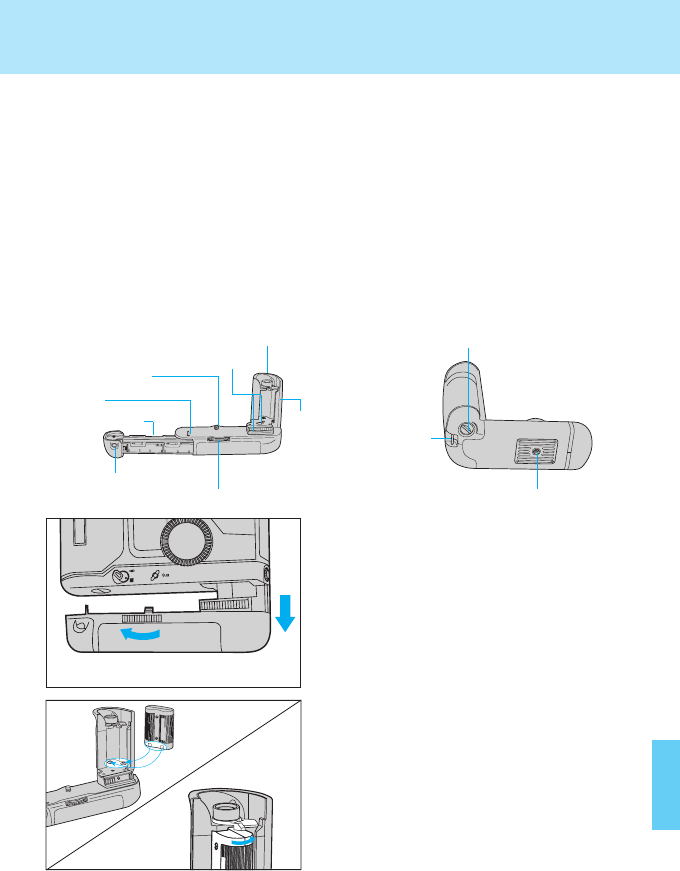
Additional Information for the EOS-1 N DP Model
93
A combination of the EOS-1 N with the compact Battery Pack BP-E1 pro-
vides a switch that lets you power the camera either from the standard
2CR5 lithium battery stored in the grip or from four AA-size (LR6) alkaline-
manganese or Ni-Cd batteries housed in the battery pack. This dual pack
(DP) system lets you use AA-size batteries during normal temperature
shooting and switch to the 2CR5 lithium battery when shooting in cold
conditions. Moreover, the camera will operate even when only one of the
two battery types is installed. Also, the Handstrap E1 (optional) can be
attached to improve holding stability.
•Battery Pack BP-E1 is compatible with both the EOS-1 N and the EOS-1.
●Nomenclature
●Loading Batteries
1Turn the Battery pack BP-E1’s
attachment knob in the direction of
the arrow and remove the BP-E1
from the camera.
2Load the lithium 2CR5 battery so
that battery contacts contact the
Battery pack BP-E1's contacts in the
grip.
L
L
A
Grip
(battery
chamber)
Attachment Screw
Battery Magazine
Release Button
Battery Removal Lever Power Sourse Selector
Handstrap
Attachment
Fixture
Attachment Knob Tripod Socket
Contacts
Guide Pin
Battery Magazine
@@jA›˛¤»Œ“Ł•¯
[dA“A`MA˛AV[g˝
˛¨¢¯›‡¢B@
m
um
u
00. Part.6 RS (E) (P.81~105) 27-01-2003 12:39 Page 93
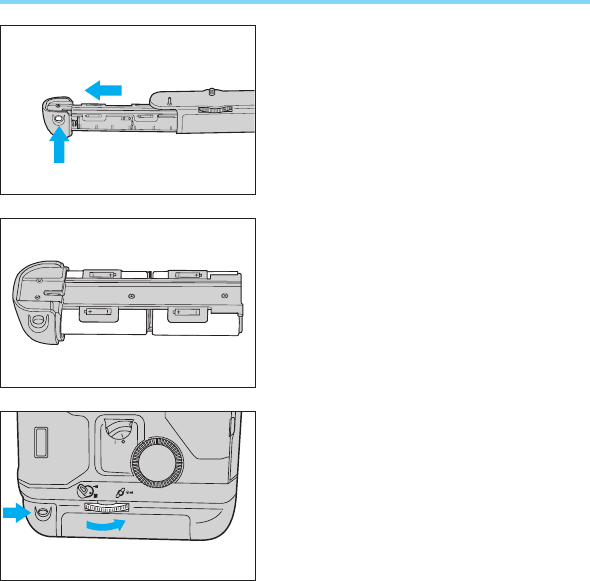
94
Additional Information for the EOS-1 N DP Model
3Press the Battery Pack BP-E1’s bat-
tery magazine release button and
remove the battery magazine.
L
A
4Insert four AA-size batteries into the
battery magazine as shown in the
diagram.
5Insert the battery magazine into the
Battery Pack BP-E1.
•The release button automatically holds
the battery magazine in place.
6Reattach the Battery Pack BP-E1 to
the camera as shown in the dia-
gram, then turn and tighten the
Battery Pack BP-E1’s attachment
knob.
00. Part.6 RS (E) (P.81~105) 27-01-2003 12:39 Page 94
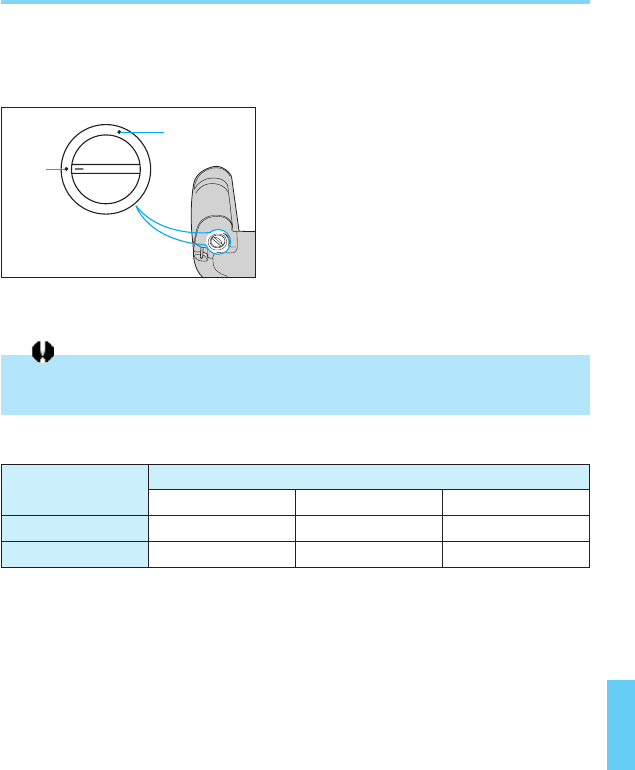
2. Shooting Capacity
•Data based on Canon’s Standard Test Method using new batteries, EF50mm
f/1.4 USM lens and 24-exposure film. Values in parentheses are for 36-expo-
sure film.
•Repeated autofocus operation without taking any pictures will reduce the overall
shooting capacity.
95
1. Power Source Selector
Use the power source selector to select the desired power source. The
relationship between the selector and power source is as follows:
Additional Information for the EOS-1 N DP Model
1) 2CR5: Camera is powered from the
2CR5 lithium battery stored in the
grip.
2) LR6: Camera is powered from the AA-
size alkaline-manganese or Ni-
Cd batteries housed in the bat-
tery magazine.
•Do not change the power source during
camera operation (such as during film
rewinding or long exposures), since it
may cause misoperation.
R
6
L
2
C
R
5
LR6
2CR5
•Canon recommends that AA-size lithium batteries not be used in this product since its
initial high voltage may cause damage to the product.
Temperature Shooting capacity by battery type (rolls)
Normal (+20°C)
Low (–20°C)
2CR5 lithium
75 (50)
12 (8)
AA-size alkaline
45 (30)
0 (0)
AA-size Ni-Cd
18 (12)
12 (8)
00. Part.6 RS (E) (P.81~105) 27-01-2003 12:39 Page 95
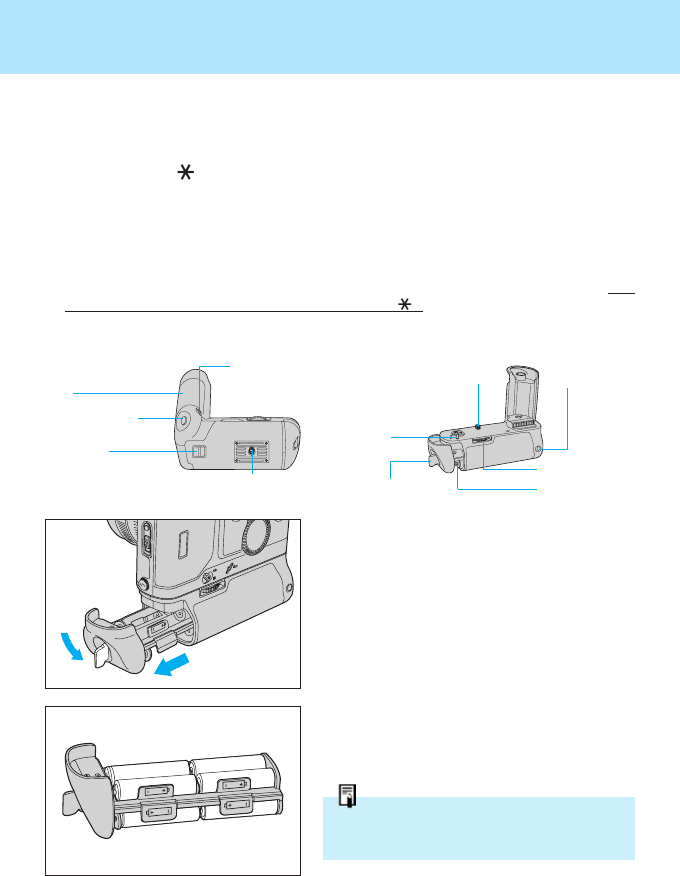
96
A combination of the EOS-1 N with the Power Drive Booster E1 expands
the choice of film winding modes to three and benefits from higher shoot-
ing capacity (refer to page 98). Moreover, the EOS-1 N HS is designed for
improved operability with features such as a separate shutter button and
AE lock button ( ) for vertical shooting.
Power is supplied by eight AA-size alkaline-manganese batteries (or AA-
size Ni-Cd or AA-size lithium batteries*), or by the optionally available Ni-
Cd Pack E1 and dedicated Ni-Cd Charger E1. Also, the Handstrap E1
(optional) can be attached to improve holding stability.
*AA-size lithium batteries can be used with Power Drive Booster E1 models that
are marked with the AE lock button indication “ ”.
●Nomenclature
Additional Information for the EOS-1 N HS Model
●Loading Batteries
1Turn the Power Drive Booster E1’s
battery magazine key 90° (quarter
turn only) and remove the battery
magazine.
•To re-install the battery magazine, per-
form the reverse procedure.
A
A
2Insert eight AA-size batteries into
the battery magazine as shown in
the diagram.
Vertical Control
Switch
Grip
Vertical Shutter
Button
Handstrap
Attachment Fixture
Tripod Socket
Guide Pin
Battery Magazine Key Battery Magazine
Attachment Knob
Attachment Screw Vertical AE Lock
Button
The above procedure is also used when
loading batteries into the EOS-1 N RS.
00. Part.6 RS (E) (P.81~105) 27-01-2003 12:39 Page 96
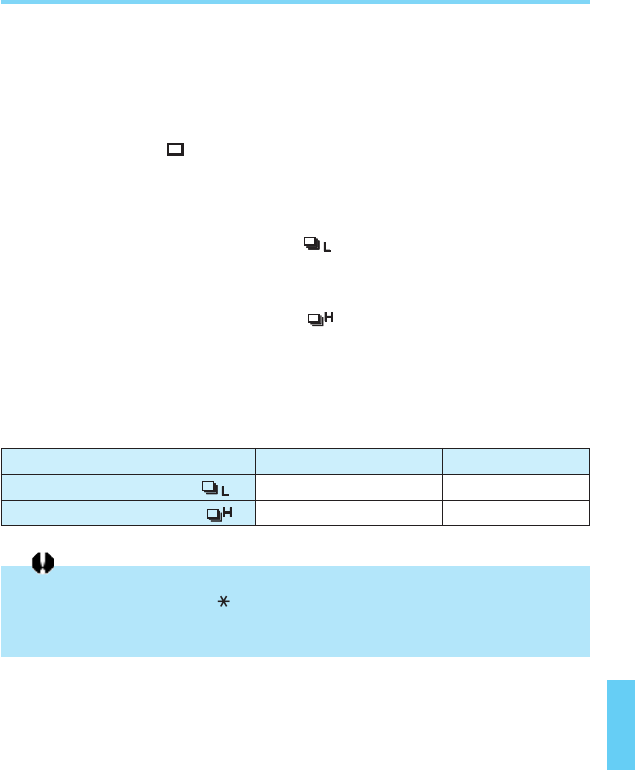
97
1. Vertical Position Shooting
To use the vertical shutter button and AE lock button set the vertical con-
trol switch to the ON position (red dot showing).
2. Film Winding Modes
●Single Exposure ( )
The film advances one frame after each picture is taken. After taking a
picture, return the shutter button to the half-pressed position to prepare
for the next exposure.
●Low-Speed Continuous Exposure ( )
Pictures are taken continuously at a rate of up to approx. 3 frames per
second as long as the shutter button is held pressed.
●High-Speed Continuous Exposure ( )
Pictures are taken continuously at a rate of up to approx. 6 frames per
second as long as the shutter button is held pressed.
3. Maximum
Continuous Shooting Speed in Different AF Modes
Additional Information for the EOS-1 N HS Model
Low-speed continuous ( )
High-speed continuous ( )
One-shot AF/Manual
Approx. 3 fps
Approx. 6 fps
AI Servo AF
Approx. 2.5 fps
Approx. 5 fps
•AA-size lithium batteries can only be used with the EOS-1 N combined with a power
Drive Booster E1 that has a “ ”symbol printed on the AE lock button.
Canon recommends that AA-size lithium batteries not be used in this product since its
initial high voltage may cause damage to the product.
00. Part.6 RS (E) (P.81~105) 27-01-2003 12:39 Page 97

4. Shooting Capacity
•Data based on Canon’s Standard Test Method using new batteries, EF50mm
f/1.4 USM lens and 24-exposure film. Values in parentheses are for 36-expo-
sure film.
•Repeated autofocus operation without taking any pictures will reduce the overall
shooting capacity.
98
Additional Information for the EOS-1 N HS Model
Power source
Temperature
Shooting capacity by battery type (rolls)
Normal (+20°C / 68°F)
Low (–20°C / –4°F)
100 (65)
6 (4)
AA-size alkaline
Ni-Cd Pack E1
Size AA lithium
batteries (FR6x8)
65 (45)
45 (30)
250 (165)
90 (60)
00. Part.6 RS (E) (P.81~105) 27-01-2003 12:39 Page 98
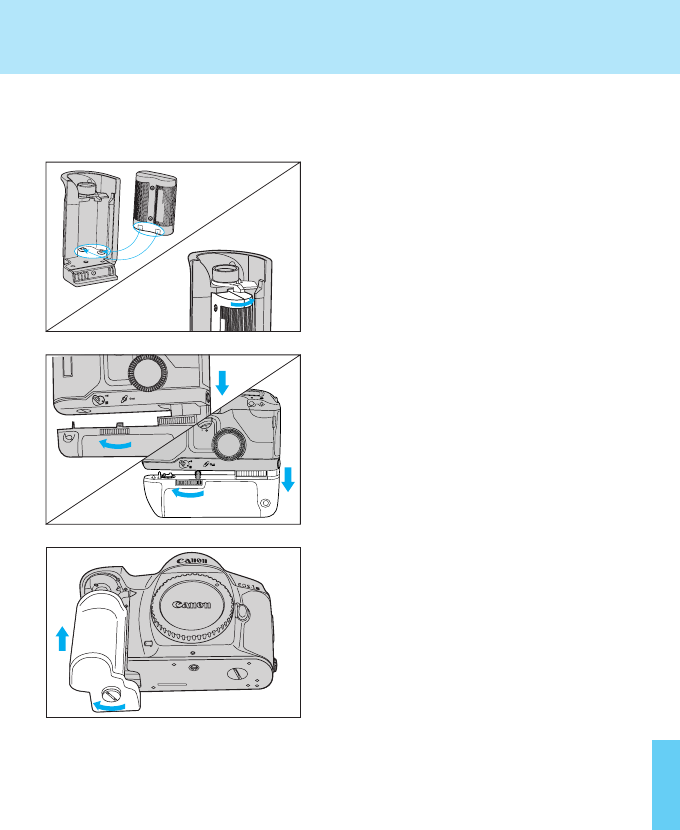
@@j A›˛ ¤»Œ“ Ł•¯
[dA“ A`MA˛ AV [g˝
˛¨¢¯› ‡¢B@
99
Attaching the Standard Grip
The Battery Pack BP-E1 or Power Drive Booster E1 can be removed and
replaced with the EOS-1 N’s standard grip GR-E1 (optional) using the
procedure below.
1Load a battery into the standard grip
GR-E1 (see page 14).
2
Turn the Battery Pack BP-E1/Power
Drive Booster E1’s attachment knob
to loosen, then pull the assembly
downward to remove from the cam-
era.
For EOS-1 N HS users, attach the
booster coupler cover (supplied with
the GR-E1) to the camera’s booster
coupler.
3Attach the standard grip to the cam-
era, and tighten the attachment
screw so that the grip is firmly
attached.
4Attach the contact protector cover
(supplied with the GR-E1) to the
Battery Pack BP-E1/Power Drive
Booster E1 to protect the electronic
contacts.
m
um
u
N
2
1
L
L
A
A
L
00. Part.6 RS (E) (P.81~105) 27-01-2003 12:39 Page 99

100
Additional Information for the EOS-1 N RS Model
In addition to all the features of the EOS-1 N, the EOS-1 N RS also has a
fixed, hard-coat, new pellicle mirror, a high-speed motor drive, and the
RS mode. The EOS-1 N RS is a single-lens reflex camera having the
fastest AF (autofocus) operation.
Major Features of the EOS-1 N RS
■In the RS mode, the short shutter release time lag of 0.006 sec. helps
you capture the decisive moment more easily.
■A high-speed continuous shooting speed of 10 frames per sec. can
be attained.
■Since the hard-coat, new pellicle mirror is fixed, the image in the
viewfinder is not blocked out during the exposure. This brings the fol-
lowing advantages:
•While looking through the viewfinder, you can see the image at the moment of
exposure.
•While looking through the viewfinder, you can confirm whether the flash is syn-
chronized.
•Even during continuous shooting, the subject’s image in the viewfinder is
steady.
•For flash photography at slow shutter speeds, it is easier to decide the timing of
the flash.
•For multiple flash exposures or multiple exposures on a single frame, it is easier
to set the composition.
•You can notice any camera shake during the moment of exposure.
Note:
•The EOS-1 N RS’s battery magazine cannot be separated from the camera
body. Therefore, the battery magazine cannot be replaced with the GR-E1 nor-
mal grip or the BP-E1 size AA battery pack.
00. Part.6 RS (E) (P.81~105) 27-01-2003 12:39 Page 100
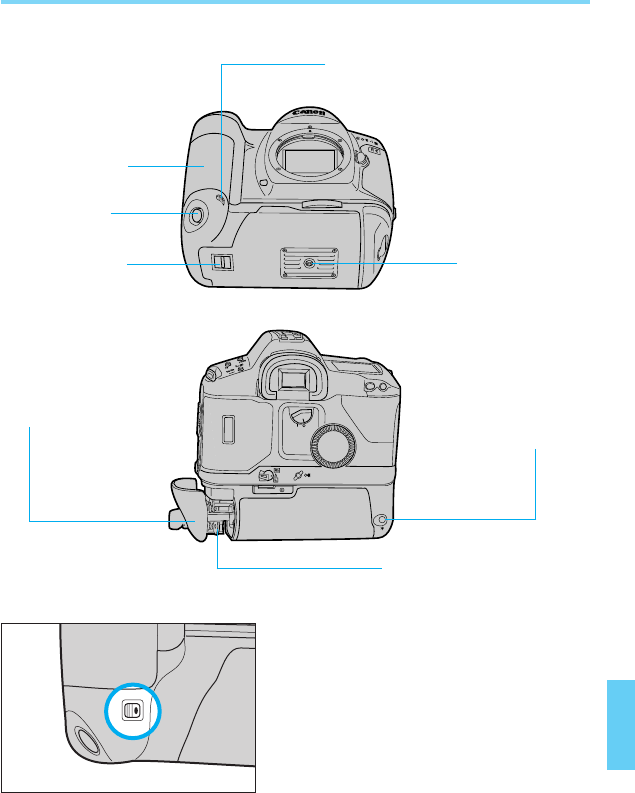
101
Additional Information for the EOS-1 N RS Model
●Using the vertical grip
To use the vertical grip and the corre-
sponding shutter button and AE lock
button, turn on the ON/OFF switch.
●Nomenclature
ON/OFF switch
Grip
Vertical grip
shutter button
Handstrap eyelet Tripod socket
Battery magazine handle Vertical grip
AE lock button
Battery magazine
00. Part.6 RS (E) (P.81~105) 27-01-2003 12:39 Page 101
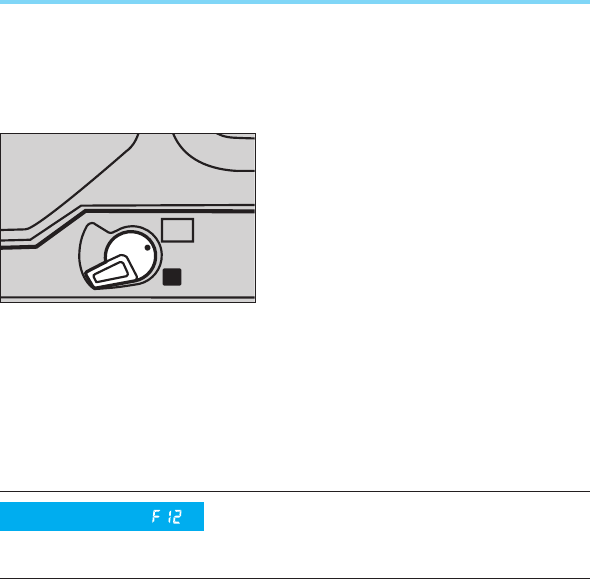
102
Additional Information for the EOS-1 N RS Model
1. Batteries for the EOS-1 N RS
•Load the batteries in the same way as for the EOS-1 N HS. See
page 98.
2. The RS mode
When the main switch is set to RS, the
RS mode will be set and the following
will be set automatically:
(1) One Shot autofocus will be set.
*Al Servo autofocus cannot be set.
(2) When the shutter button is
pressed halfway, the aperture will
stop down immediately after
focusing is achieved.
(3) The shutter release time lag will
be 0.006 sec.
3. Custom functions
Other than custom function No. F-12, the custom functions are the
same as for the EOS-1 N. Custom function No. F-12 is described
below.
RS
A
L
Beeping when the subject is in focus dur-
ing One Shot autofocus or manual focus
can be turned on or off.
Custom Function
(Refer to pages 92)
00. Part.6 RS (E) (P.81~105) 27-01-2003 12:39 Page 102
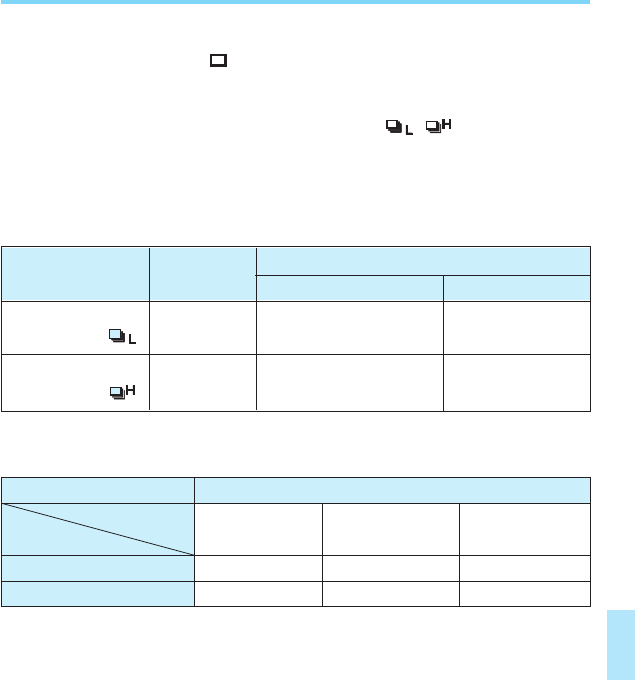
RS Mode
Approx. 10 fps
Approx. 3 fps
Additional Information for the EOS-1 N RS Model
103
4. Film advance mode
●Single frame advance ( )
After a shot is taken, the film will advance by one frame at the same
speed as during continuous shooting.
●Low-speed/High-speed continuous shooting (
/
)
For as long as the shutter button is pressed completely, continuous
shooting will continue at the speeds shown in the table below.
5. Continuous shooting speed according to AF mode (frames/sec. at
shutter speeds 1/250 or faster)
6. Battery service life in terms of film rolls
•Figures are based on Canon tests using new batteries, an EF 50mm f/1.4 lens,
and 24-exposure film. Figures in parentheses indicate the number of 36-expo-
sure rolls.
•Filmless camera operations and autofocus operations will reduce the above fig-
ures.
Low-speed
continuous ( )
High-speed
continuous ( )
One-shot AF/Manual
Normal Modes
Approx. 3 fps Approx. 2.5 fps
Approx. 5 fpsApprox. 6 fps
AI Servo AF
* At shutter speeds 1/1000 sec. or faster.
Power source
Temperature
Shooting capacity by battery type (rolls)
Normal (+20°C / 68°F)
Low (–20°C / –4°F)
100 (65)
6 (4)
AA-size alkaline
Ni-Cd Pack E1
Size AA lithium
batteries (FR6x8)
65 (45)
45 (30)
250 (165)
90 (60)
00. Part.6 RS (E) (P.81~105) 27-01-2003 12:39 Page 103

Additional Information for the EOS-1 N RS Model
104
•When the shutter button is pressed lightly, there will be a sound as if the shutter was
released. This is only the shutter's rear curtain positioning itself.
•Use a blower brush to lightly blow off any dust from the pellicle mirror. If the mirror is
really dirty, consult your nearest Canon Service Center.
•During self-timer operation, etc., when the eyepiece is left uncovered, light entering
through the eyepiece may affect the proper exposure setting. It may even strike the
film. Be sure to cover the eyepiece with the eyepiece shutter.
•If you include the sun or a bright light source within the viewfinder (especially near the
edge), flare may result.
•During manual flash photography, use the following formula to compensate for the
reduced amount of light reaching the film due to the pellicle mirror.
Guide No. x 0.8 / Subject distance = Aperture setting
•When the Canon Speedlite 480EG is used for automatic flash photography, increase
the normal aperture setting by 2/3 stop or decrease the 480EG’s ISO setting by 2/3 EV
(open up) to compensate for the reduced amount of light reaching the film due to the
pellicle mirror.
•The flash distance range for automatic flash exposures will be 20 percent shorter than
the flash unit's specified distance range. (The 420EZ, 430EZ, and 540EZ flash unit's
will display the flash distance range after the compensation is set.)
•When using a handheld exposure meter to set the exposure manually, set an expo-
sure compensation of +2/3 EV or set the handheld meter’s ISO setting to 2/3 EV less
than the normal ISO. This is to compensate for the reduced amount of light reaching
the film due to the pellicle mirror.
•When the EF 50mm f/1.0L USM lens is used, vignetting will occur due to the frame
holding the fixed pellicle mirror in place.
8. EOS-1 N RS Operation Notes
00. Part.6 RS (E) (P.81~105) 27-01-2003 12:39 Page 104
Additional Information for the EOS-1 N RS Model
105
•When custom function CF-4 is set to “1” (AF operation with the AE lock button and AE
lock with the shutter button pressed halfway) and the RS mode is used, allow the auto-
focus operation to be completed before pressing the shutter button halfway.
*If the shutter button is pressed halfway, the autofocus will not operate even when
the AE lock button is pressed.
*If the AE lock button is pressed and the shutter button is pressed halfway during
the autofocus operation, the aperture will stop down after focusing is achieved.
•Do not use Command Back E1 if you want a high continuous shooting speed. Using
Command Back E1 while in the RS mode will give a maximum continuous shooting
speed of only 1 frame/sec. even without any data being imprinted. Also, if data is
imprinted, the maximum continuous shooting speed will vary depending on the film’s
ISO rating. For ISO 64 film, it will be 4 frames/sec.
•In the RS mode, AEB cannot be used.
NICKEL-CADMIUM BATTERY.
MUST BE RECYCLED OR DISPOSED OF PROPERLY.
FOR MORE INFORMATION,PLEASE CONTACT YOUR STATE
ENVIRONMENTAL AGENCY.
RBRC RECYCLING SYSTEM IS AVAILABLE IN THE US ONLY.
NOTE FOR CUSTOMERS IN THE US
NOTE FOR CUSTOMERS IN EUROPE
NICKEL-CADMIUM BATTERY.
MUST BE RECYCLED OR DISPOSED OF PROPERLY.
00. Part.6 RS (E) (P.81~105) 27-01-2003 12:39 Page 105

106
Troubleshooting
If you run into a problem operating your camera, check the following table
to see if you can find the cause of the problem. If the trouble persists, take
the camera to your nearest Canon service center. (A list of service cen-
ters is provided at the back of this instruction book.)
The main switch is set to
.
The battery is exhausted.
The battery is inserted
upside down.
The main switch is set to
.
The film is not loaded cor-
rectly. (The film transport
(wind/rewind) ( ) is
blinking in the LCD panel.)
The main switch is set to
.
The quick control dial
switch is not set to .
The lens’ focus mode
switch is set to M.
Custom function F-4 is set
to 1.
The main switch is set to
.
The film is not loaded cor-
rectly. (The film transport
(wind/rewind) ( ) is
blinking in the LCD panel.)
A roll of rewound film is still
in the camera. (The film
rewind completion (
.
) is
blinking in the LCD panel.)
Set the main switch to Aor
.
Replace the battery with a
new one.
Reload the battery correct-
ly.
Set the main switch to Aor
.
Remove the film and
reload it correctly.
Set the main switch to Aor
.
Set the quick control dial
switch to .
Set the lens’ focus mode
switch to AF.
Press AE lock button to
autofocus, or set custom
function F-4 to 0 and press
shutter button halfway.
Set the main switch to Aor
.
Remove the film and
reload it correctly.
Remove the exposed film
and load a new roll.
Symptom Cause Remedy
Nothing appears in the
LCD panel.
The automatic film load-
ing function does not
operate.
The camera settings
cannot be changed.
Autofocusing does not
operate.
The shutter does not
release.
16
14
14
16
23
16
10
18
82
84
16
23
25
Referral
page
00. Part.7 RS (E) (P.106~120) 27-01-2003 12:42 Page 106
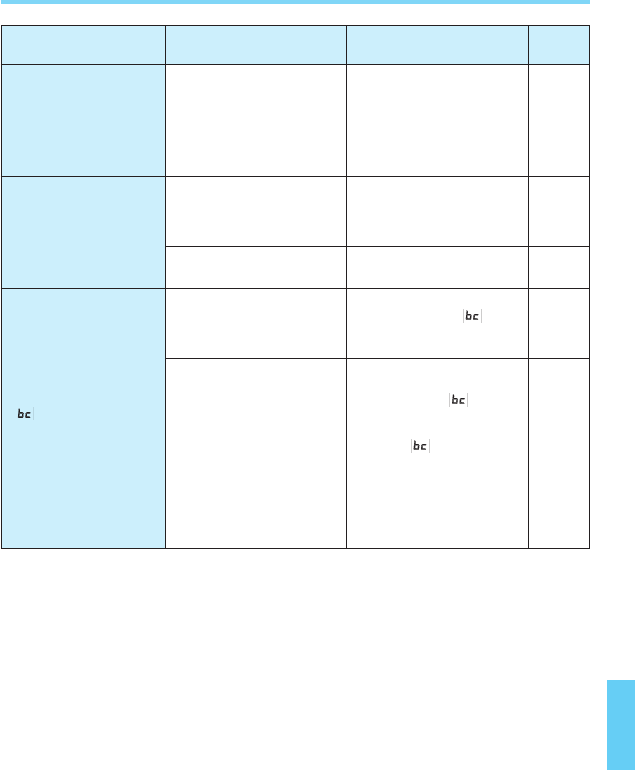
107
Troubleshooting
The subject is not focused.
(The in-focus indicator is
blinking in the viewfinder.)
The camera is being used
in a cold environment.
Custom function F-1 is set
to 1 or 3.
The battery is extremely
depleted.
The camera has under-
gone some type of mal-
function.
Press the shutter button
again halfway to refocus
the subject. If the subject
still cannot be focused,
refer to “3. Difficult
Subjects for Autofocus” on
page 34.
The battery capacity quick-
ly depleted due to the cold.
Replace it with a new bat-
tery.
Set custom function F-1 to
0 or 2.
Replace the battery with a
new one. If the “ ” indi-
cator goes out, the camera
will operate normally.
Remove the battery from
the camera and reload it.
If the blinking “ ” indica-
tor disappears, the camera
will operate normally.
•If the “ ” indicator does
not stop blinking after
repeating the above opera-
tions several times, there is
a malfunction in the camera.
Take the camera to your
nearest Canon service cen-
ter for diagnosis and repair.
Cause Remedy
The shutter does not
release.
The film does not
rewind.
“” blinks in the LCD
panel.
20
14
82
84
7
7
14
Back
cover
Referral
page
Symptom
00. Part.7 RS (E) (P.106~120) 27-01-2003 12:42 Page 107
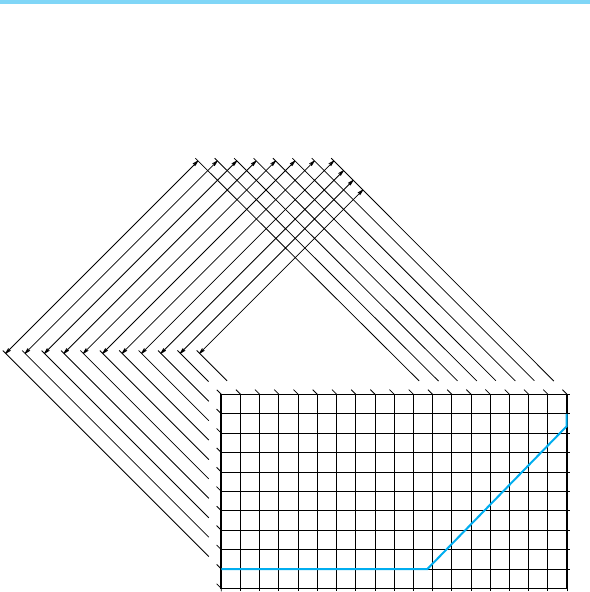
108
6400
ISO 6
3200
1600
800
400
200
100
50
25
12
5
4
3
2
1
0
-1
-2
-3
-4
-5
67891011121314151617181920212223
32
22
16
11
8
5.6
4
2.8
2
1.4
1.0
30" 15" 8" 4" 2" 1" 2 4 8 15 30 60 125 250 500 1000 2000 4000 8000
f / No
¤ SHUTTER SPEED
For EOS-1 N mounted with an EF 50mm f/1.4 USM lens
Program Line Characteristics
Program characteristics for Program AE [P] mode using an EF50mm f/1.4
USM lens.
00. Part.7 RS (E) (P.106~120) 27-01-2003 12:42 Page 108
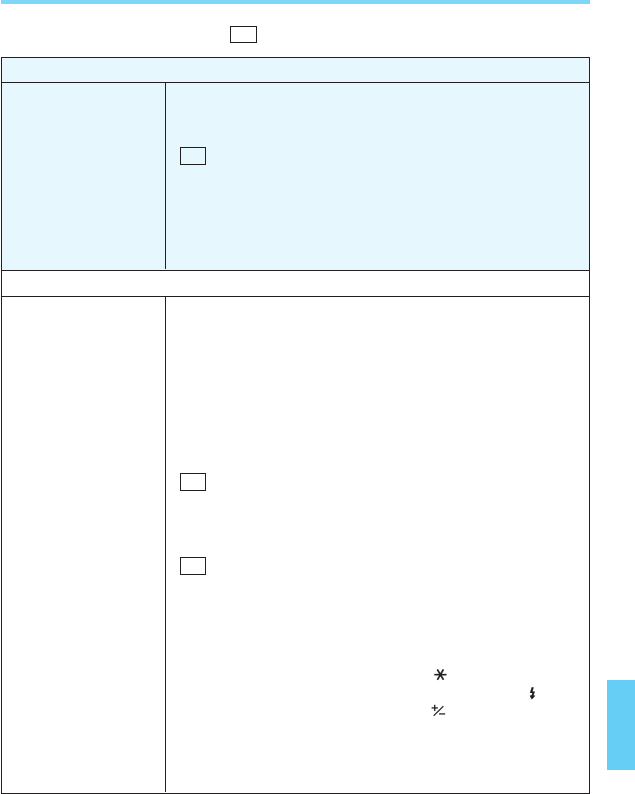
109
Specifications
■TYPE AND MAJOR COMPONENTS
Type: 35mm focal plane shutter SLR (single-lens reflex) cam-
era with autofocus, auto exposure and built-in motor
drive.
Built-in high-speed motor drive, 35mm focal-plane
shutter, fixed half mirror, AF/AE single-lens reflex camera
Format: 24 mm ×36 mm
Usable Lenses: Canon EF lenses
Lens Mount: Canon EF mount (fully electronic signal transfer system)
■VIEWFINDER
Type: Fixed eye-level pentaprism.
Coverage: Gives 100% vertical and horizontal coverage of actual
picture area.
Magnification: 0.72 ×(–1 dpt, with 50mm lens at infinity).
Standard diopter: –1 dpt, built-in dioptric adjustment mechanism provided
with adjustment range of –3 ~ +1 dpt (eyepoint: 20 mm).
Focusing Screen: Interchangeable (8 types available); standard screen: Ec-
CII.
Interchangeable (8 screens) by a Canon Service
Center. Type Ec-R installed as standard equipment.
Mirror: Quick return half-mirror (Mirror blockage: None to
1200mm f/5.6)
Fixed pellicle mirror (transmission:reflection =
65:35)
Viewfinder (1) Within viewing area:
Information: Five focusing points, fine spot metering area mark
(with Ec-CII)
(2) Below viewing area:
Shutter speed, aperture value, (AE lock, blinks at
2 Hz during AEB operation), M(manual), (flash
charge completion indicator), (lights when expo-
sure compensation or flash exposure compensation
is set), ●(in-focus indicator, blinks at 8 Hz when AF
is impossible)
RS
RS
RS
indicates the specification for the EOS-1 N RS
RS
00. Part.7 RS (E) (P.106~120) 27-01-2003 12:42 Page 109

110
Specifications
(3) To the right of viewing area:
Exposure level scale (±3 stops in 1/3-stop incre-
ments), exposure level indicator (1AE mode, expo-
sure compensation amount, 2AE lock, real-time
meter deviation value, 3manual exposure level, 4
AEB step amount, 5background exposure when
using flash), remaining frame number display
Depth-of-Field Possible, by operation of depth-of-field preview button.
Preview:
■EXPOSURE CONTROL
Light Metering: TTL full-aperture metering using a 16-zone SPC (silicon
photocell). Five metering modes available: evaluative
metering, partial metering (covers approx. 9% of the cen-
tral picture area), fine spot metering (covers approx.
2.3% of the central picture area: In continuous exposure
mode, first frame metered in real time, second and suc-
cessive frames shot at same settings (AE lock)), spot
metering (covers approx. 3.5% of the picture area at
each AF frame position) and center-weighted average
metering.
Shooting Modes: 1Shutter-priority AE (1/3-stop increments) 2Aperture-
priority AE (1/3-stop increments) 3Depth-of-Field AE 4
Intelligent Program AE 5A-TTL program flash AE 6
TTL program flash AE 7Manual exposure 8Bulb
No depth-of-field-priority AE.
Metering Range: At normal temperature with 50mm f/1.4 lens at ISO 100:
1Evaluative metering, partial metering: EV 0 ~ 20 2
Fine spot metering: EV 3 ~ 20
1EV 1-20 for evaluative and partial metering*, 2
EV 1-20 for fine spot metering* (*At room temperature
with a 50mm f/1.4 lens and ISO 100 film.)
Usable film speeds: ISO 6~6400 (ISO 25~5000 when automatically set by DX
code)
Exposure (1) AEB:
Compensation: ±3 stops in 1/3-stop increments, shot according to
film winding mode in sequence of underexposure →
correct exposure →overexposure; repeatable, can
be used with self-timer for delayed 3-sequence expo-
sure.
In the RS mode, AEB cannot be set.
RS
RS
RS
00. Part.7 RS (E) (P.106~120) 27-01-2003 12:42 Page 110

111
Specifications
(2) Manual compensation:
±3 stops in 1/3-stop increments, by independent
operation of quick control dial or combination of
exposure compensation button + main dial; can be
used together with AEB.
AE Lock: (1) Auto AE lock:
AE lock occurs simultaneously with AF completion in
one-shot AF mode with evaluative metering.
(1) Auto AE lock. During One Shot autofocus and
evaluative metering, AE locks when focusing is achieved.
(2) Manual AE lock:
Possible in all metering modes by pressing AE lock
button.
(2) Manual AE lock. AE lock button enables all
metering modes. In the RS mode, AE lock will not work
after autofocusing is achieved.
Multiple Exposures: Up to nine exposures can be preset (can be canceled or
reset in mid-operation)
■AUTOFOCUS
AF Control System:
TTL-CT-SIR (Secondary Image Registration) phase
detection type using Cross-type multi-BASIS (Base-
Stored Image Sensor). Focus completion indicated by
LED lamp and audible beep (Lamp blinks at 8 Hz when
autofocusing is impossible; beep sound can be turned off)
Focusing Points: Five focusing points provided.
Focusing Point
Selection: Selected automatically by camera or manually by user.
Focusing modes: (1) One-shot AF:
At focus completion, AF operation stops, AF lock
occurs and the shutter release is enabled.
(2) AI Servo AF:
AF system tracks moving subject until immediately prior
to exposure, includes predictive focusing function, shut-
ter release enabled at all times (however, predictive
focus control has priority in continuous exposure mode);
in-focus indicator does not light when focus is achieved,
but blinks at 8 Hz when autofocusing is impossible.
In the RS mode, Al Servo autofocus cannot be set.
RS
RS
RS
00. Part.7 RS (E) (P.106~120) 27-01-2003 12:42 Page 111
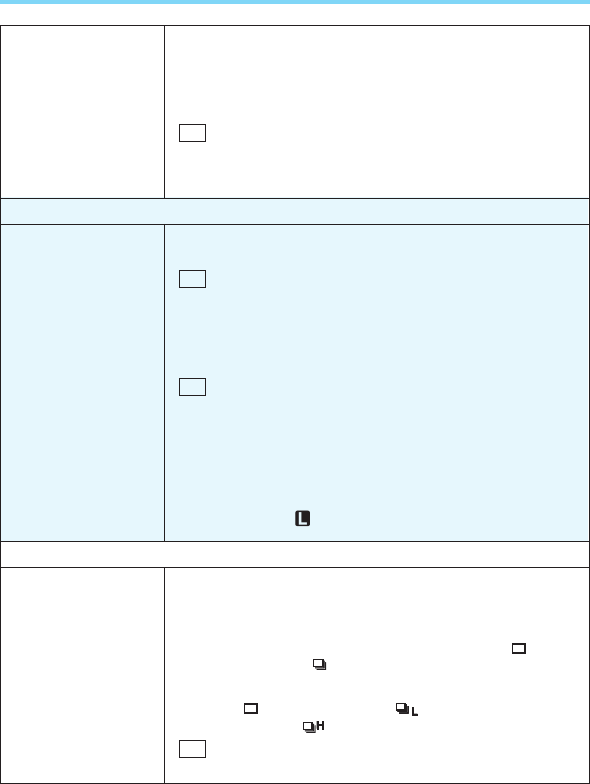
112
Specifications
(3) Manual focusing:
Possible by setting the lens’ focus mode switch to “M”
and operating the lens’ manual focusing ring. In-focus
indicator lights up when focus is achieved (with EF
lenses having maximum aperture of f/5.6 or larger).
Manual focusing with the electronic ring is enabled
during exposure and continuous shooting.
AF Working Range: EV 0 ~ 18 (ISO 100).
■SHUTTER
Type: Vertical-travel, focal plane shutter with all speeds elec-
tronically controlled.
Electronically-controlled (at all speeds), vertical-trav-
el, double curtain focal-plane shutter
Shutter Speed: 1/8000 ~ 30 sec. (in 1/3-stop increments) and bulb.
Maximum X-sync speed: 1/250 sec.
Shutter Release: Soft-touch electromagnetic release.
Shutter release time lag In the RS mode, the exposure
starts 0.006 sec. after the shutter button is pressed down fully.
Self-timer: Electronically controlled with 2- or 10-second delay,
selectable; operation indicated by blinking lamp (blinking
speed: 2 Hz when first activated, increasing to 8 Hz for
final two seconds); self-timer counted down in camera’s
LCD panel; can be automatically canceled by setting the
main switch to “ ”.
■FILM TRANSPORT
Film Loading: Automatic. Film automatically advances to first frame
when back cover is closed.
Film Wind: Automatic using built-in motor.
(1) EOS-1 N alone: Two modes available: (single
exposure) and (continuous exposure).
(2)
With Power Drive Booster E1 attached: Three modes avail-
able: (single exposure), (low-speed continuous
exposure) and (high-speed continuous exposure).
Three modes: (single frame), (low-speed continu-
ous shooting), (high-speed continuous shooting)
RS
RS
RS
RS
00. Part.7 RS (E) (P.106~120) 27-01-2003 12:42 Page 112

113
Specifications
P(program AE)
Tv (Shutter-
priority AE)
Av (Aperture-
priority AE)
M(Manual
exposure)
X-sync shutter speedShooting mode
Automatically set to 1/60
~ 1/250 sec. based on A-
TTL or TTL program
Manually set to any shut-
ter speed of 1/250 or
slower.*
Automatically set
between 30 sec. and
1/250 sec. according to
ambient light level and
set aperture value.
Manually set to any shut-
ter speed of 1/250 or
slower.
Aperture value
Automatically set acord-
ing to A-TTL or TTL pro-
gram
Automatically set accord-
ing to ambient light level
and shutter speed.
Manually set to desired
aperture.
Manually set to desired
aperture.
Film Rewind: Automatic rewind at end of roll using built-in motor.
(Rewind speed with 24-exp. film: approx. 5 sec; with 36-
exp. film: approx. 8 sec.); mid-roll rewind possible.
Rewind noise: Normal mode: 59 dB; Silent mode: 48 dB.
High-speed film rewind: Approx. 5 sec. for 24-expo-
sure film and 8 sec. for 36-exposure film Silent film
rewind for 24-ex. and 36-ex. films: Approx. 13 sec. and
20 sec. respectively
■CAMERA BODY
Flash Contacts: (1) Accessory shoe:
X contact, directly-coupled contacts
(2) PC terminal:
JIS B socket (with lock screw)
*(1) and (2) can be used at the same time.
Automatic Flash • X-sync Shutter Speed and Aperture Settings
Exposure: (with EOS dedicated speedlites)
*
If a shutter speed faster than 1/250 sec is set, the camera
automatically sets the shutter speed to 1/250 sec.
Fourteen built-in custom functions selectable by user: (1)
Automatic film rewind setting, (2) Film leader status at
end of rewind, (3) Film speed setting, (4) AF activation
method, (5) Manual shutter speed and aperture value
setting method, (6) Shutter speed, aperture value, expo-
sure compensation, flash exposure compensation and
AEB setting increments,
RS
00. Part.7 RS (E) (P.106~120) 27-01-2003 12:42 Page 113

(7) Manual focusing using the electronic manual focusing
ring,(8) Selection of center-weighted average metering,
(9) AEB shooting sequence, (10) Cancellation of super-
imposed focusing points, (11) Focusing point selection
method, (12) Mirror up photography, (13) Spot metering
linked to focusing points, (14) flash output control.
Except for custom function No. F-12, same as in the
EOS-1 N.
F-12 set to “0”: No beeping when autofocusing is
achieved in the A mode.
F-12 set to “1”: Beeping when autofocusing is achieved
in the A mode. (No beeping in the RS mode.)
LCD Panel: Displays necessary information including AF mode, film
winding mode, metering mode, shutter speed, aperture
value, film speed, battery condition and exposure com-
pensation.
Remote Control: 3-pin remote control socket provided.
Battery: (1) One six-volt 2CR5 lithium battery, housed in the grip;
(2) When the Power Drive Booster E1 is attached, the
lithium battery is removed and power is supplied from the
booster’s power source (eight AA-size alkaline-man-
ganese batteries [or AA-size Ni-Cd batteries or AA-size
lithium batteries] or Ni-Cd Pack E1); (3) When the AA-
size battery pack BP-E1 is attached, power is supplied
either by the camera’s lithium battery or by four AA-size
alkaline-manganese or Ni-Cd batteries.
8 size AA alkaline manganese batteries (Ni-Cd or
lithium) or Ni-Cd Battery Pack E1
Battery Check: By pressing the battery check button; battery level shown
in four-step display in the LCD panel
Camera Back: Interchangeable with the optionally available Command
Back E1.
Dimensions: 161 (W) ×112.1 (H) ×71.8 (D) mm
6-5/16" (W) ×4-7/16" (H) ×2-13/16" (D)
6-5/16" (W) x 6-1/8" (H) x 3-1/16" (D) mm
Weight: 855 gr / 30 oz without battery (body only, without lithium
battery)
1,295 gr / 36.7 oz (including battery magazine without batteries)
RS
RS
RS
RS
Specifications
114
Custom Function
Control:
All data based on Canon’s Standard Test Method. Subject to change without notice.
00. Part.7 RS (E) (P.106~120) 27-01-2003 12:42 Page 114
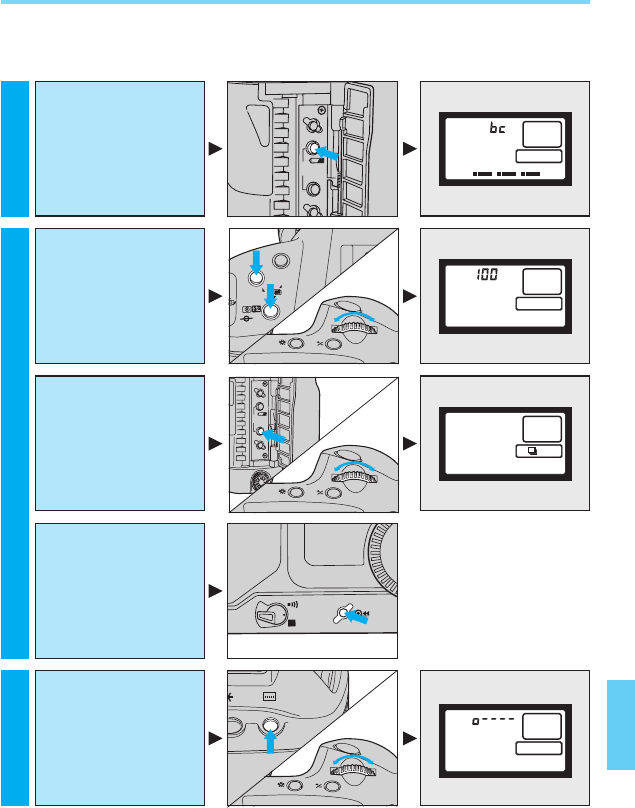
115
Film related
Quick Guide to EOS-1 N Functions
Make sure the main switch is set to “A” before performing the following
operations:
DRIVE
CF
AEB
0
Check the battery
level
(refer to page 15)
Power source related
Focus related
ISO
Check the set film
speed
(refer to page 22)
Take pictures in
rapid sequence
(refer to page 67)
A
L
Rewind the film in
mid-roll
(refer to page 25)
Select the focusing
point
(refer to page 29)
AF
ISO
MODE
UL
TRASO
U
M
DRIVE
CLEAR
CF
AEB
UL
TRASO
U
M
UL
TRASO
U
M
00. Part.7 RS (E) (P.106~120) 27-01-2003 12:42 Page 115
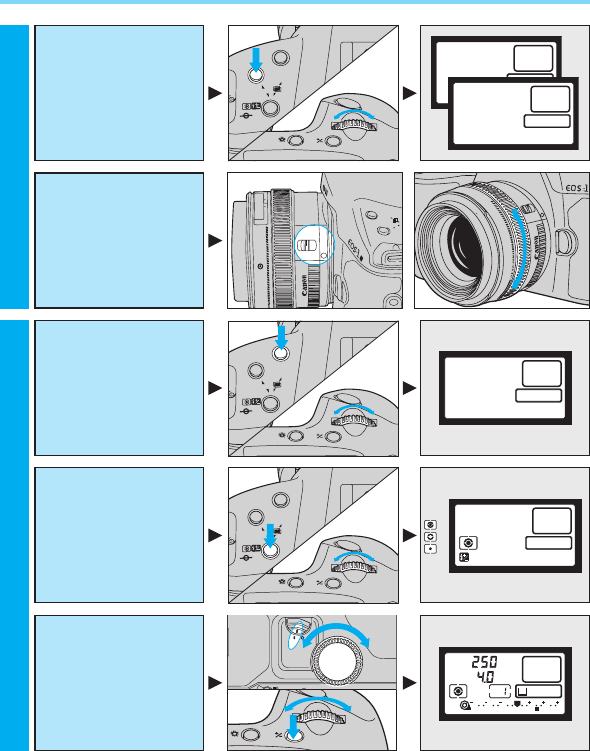
116
Quick Guide to EOS-1 N Functions
AI SERVO
ONE SHOT
AF
M
CANON
L
E
N
S
L
ES
N
E
F
N
O
50
mm
1:1
4
Select the AF
mode
(refer to page 32)
Focus the subject
manually
(refer to page 36)
Select the shooting
mode
(refer to page 48)
Select the metering
mode
(refer to page 37)
Compensate the
exposure
(refer to page 42•44)
0
P
AF
ISO
MODE
UL
TRASO
U
M
MODE
AF
ISO
AF
M
22 22
50mm
N
AF
M
AF
ISO
MODE
UL
TRASO
U
M
ONE SHOT
3 2 1 1 2 3
P
0
AF
ISO
MODE
UL
TRASO
U
M
Focus relatedExposure related
00. Part.7 RS (E) (P.106~120) 27-01-2003 12:42 Page 116
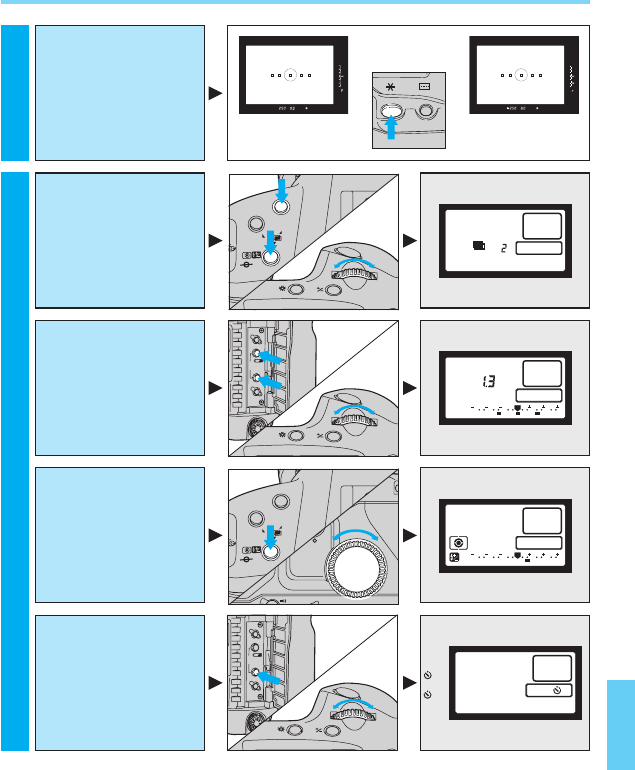
117
Quick Guide to EOS-1 N Functions
Use AE lock to
lock the exposure
reading
(refer to page 40)
AEB
3 2 1 1 2 3
0
3 2 1 1 2 3
0
Take multiple
exposures on one
frame
(refer to page 63)
Use automatic
exposure bracket-
ing
(refer to page 45)
Compensate the
flash exposure
(refer to page 78)
Use the self-timer
(refer to page 70)
DRIVE
CLEAR
CF
AEB
UL
TRASO
U
M
DRIVE
CLEAR
CF
AEB
UL
TRASO
U
M
AF
ISO
MODE
A
10
0
2
1
0
AF
ISO
MODE
UL
TRASO
U
M
Exposure related
Photographic applications
00. Part.7 RS (E) (P.106~120) 27-01-2003 12:42 Page 117
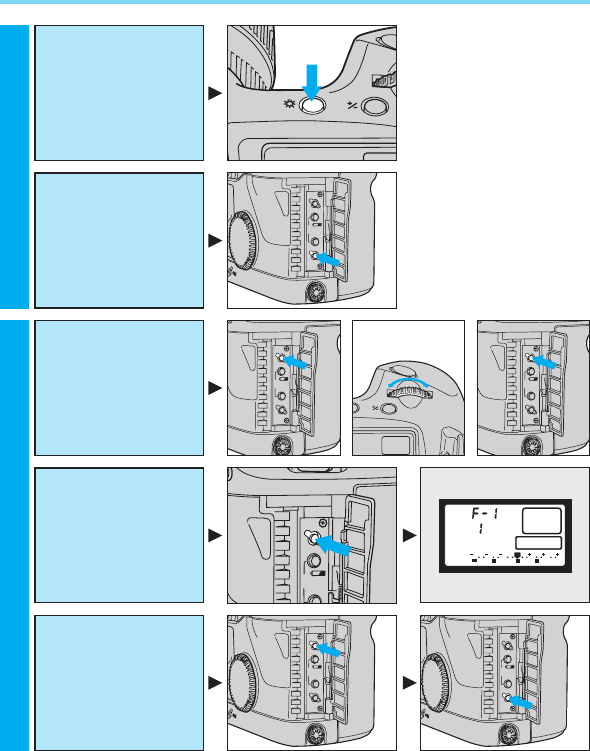
118
Quick Guide to EOS-1 N Functions
UL
TRASO
U
M
ONE SHO
ONE SHOT
Illuminating the
LCD panel
(refer to page 74)
Reset all functions
(clear button)
[except for custom
functions]
(refer to page 75)
DRIVE
CLEAR
CF
AEB
Set a custom
function
(refer to page 82)
3 2 1 1 2 3
0
Check the current
custom function
settings
(refer to page 83)
Reset all custom
functions at once
(refer to page 75)
DRIVE
CLEAR
CF
AEB
DRIVE
CLEAR
CF
AEB
DRIVE
CF
AEB
DRIVE
CLEAR
CF
AEB
Photographic applicationsCustom functions
DRIVE
CLEAR
CF
AEB
00. Part.7 RS (E) (P.106~120) 27-01-2003 12:42 Page 118

119
This device complies with Part 15 of the FCC Rules. Operation is sub-
ject to the following two conditions: (1) This device may not cause
harmful interference, and (2) this device must accept any interference
received, including interference that may cause undesired operation.
Do not make any changes or modifications to the equipment unless
otherwise specified in the instructions. If such changes or modifica-
tions should be made, you could be required to stop operation of the
equipment.
This equipment has been tested and found to comply with the limits
for a class B digital device, pursuant to part 15 of the FCC Rules.
These limits are designed to provide reasonable protection against
harmful interference in a residential installation. This equipment gen-
erates, uses and can radiate radio frequency energy and, if not
installed and used in accordance with the instructions, may cause
harmful interference to radio communications.
However, there is no guarantee that interference will not occur in a
particular installation. If this equipment does cause harmful interfer-
ence to radio or television reception, which can be determined by
turning the equipment off and on, the user is encouraged to try to cor-
rect the interference by one or more of the following measures:
•Reorient or relocate the receiving antenna.
•Increase the separation between the equipment and receiver.
•Consult the dealer or an experienced radio/TV technician for help.
This digital apparatus does not exceed the Class B limits for radio
noise emissions from digital apparatus as set out in the interference-
causing equipment standard entitled “Digital Apparatus”, ICES-003 of
the Industry Canada.
00. Part.7 RS (E) (P.106~120) 27-01-2003 12:42 Page 119

CT1 - 1104 - 007 CCANON INC. 1995 PRINTED IN JAPAN
CANON INC. 30-2, Shimomaruko 3-chome, Ohta-ku, Tokyo 146-8501, Japan
CANON U.S.A., INC.
For all inquiries concerning this camera, call toll free in the U.S. 1-800-828-4040
or write to: Customer Relations, Canon U.S.A., Inc.
One Canon Plaza, Lake Success, N.Y. 11042-1198
CANON CANADA INC. HEADQUARTERS
6390 Dixie Road, Mississauga, Ontario L5T 1P7, Canada
CANON CANADA INC. MONTREAL BRANCH
5990, Côte-de-Liesse, Montréal Québec H4T 1V7, Canada
CANON CANADA INC. CALGARY OFFICE
2828, 16th Street, N.E. Calgary, Alberta T2E 7K7, Canada
For all inquiries concerning this camera, call toll free in Canada 1-800-828-4040
CANON EUROPA N.V.
Bovenkerkerweg 59-61, P.O. Box 2262, 1180 EG Amstelveen, The Netherlands
CANON PHOTO VIDEO FRANCE S.A.
102, avenue Charles de Gaulle 92250 La Garenne Colombes, France
CANON UK LTD.
Brent Trading Centre. North Circular Road, London NW10 0JF, United Kingdom
CANON EURO-PHOTO G.m.b.H
Siemensring 90-92, D-47877 Willich, Germany
CANON ITALIA S.p.A
Palazzo L, Strada 6, 20089 Rozzano, Milanofiori, Milano, Italy
CANON Benelux N.V./S.A.
Bessenveldstraat 7, 1831 Diegem (Machelen), Belgium
CANON Schweiz AG
Geschäftsbereich Wiederverkauf, Industriestrasse 12, CH-8305 Dietlikon, Switzerland
CANON G.m.b.H.
Oberlaaerstrasse 233, 4th floor, 1100 Wien, Austria
CANON LATIN AMERICA, INC. DEPTO DE VENTAS
6505 Blue Lagoon Drive, Suite 325, Miami, FL33126 U.S.A.
CANON LATIN AMERICA, INC. CENTRO DE SERVICIO Y REPARACION
Apartado 2019, Zona Libre de Colón, República de Panamá
CANON SINGAPORE PTE. LTD.
79 Anson Road #09-01/06 Singapore 079906
CANON AUSTRALIA PTY. LTD.
1 Thomas Holt Drive, North Ryde, N.S.W. 2113, Australia
CANON NEW ZEALAND LTD.
Fred Thomas Drive, P.O. Box 33-336, Takapuna, Auckland, New Zealand
CANON SALES CO., INC.
12-15, Mita, 3-Chome, Minato-ku, Tokyo 108-8011, Japan
U.S.A.
CANADA
EUROPE, AFRICA
& MIDDLE EAST
CENTRAL &
SOUTH AMERICA
ASIA
OCEANIA
JAPAN
00. Part.7 RS (E) (P.106~120) 27-01-2003 12:42 Page 120
