User Guide Down Esoms Mobile Operator Rounds Jun16
User Manual: Down user guide_pdf
Open the PDF directly: View PDF ![]() .
.
Page Count: 44

eSOMS Suite / Mobile Operator Rounds
User Guide
Release 2.2
GMDDB-1008-1606-03
June 2016
© Copyright 2016 ABB
All Rights Reserved
Confidential and Proprietary
June 2016
Legal Disclaimer
The product described in this documentation may be connected to, and/or communicate information and
data via, a network interface, which should be connected to a secure network. It is your sole responsibility
to ensure a secure connection to the network and to establish and maintain appropriate measures (such
as but not limited to the installation of firewalls, application of authentication measures, encryption of data,
installation of antivirus programs, etc.) to protect the product, the network, your systems, and the interface
against any kind of security breach, unauthorised access, interference, intrusion, leakage, damage, or
corruption or theft of data. We are not liable for damages or losses related to any such security breach,
unauthorised access, interference, intrusion, leakage, damage, or corruption or theft of data.

Contents
User Guide 3 GMDDB-1008-1606-03
Contents
Chapter 1: Introduction ..................................................................................................................................... 5
Configure Connection Settings ............................................................................................................... 7
Downloading Tours ................................................................................................................................. 9
Chapter 2: Using Mobile Operator Rounds ................................................................................................... 11
Starting The Program ............................................................................................................................ 11
Open Tour ............................................................................................................................................. 13
Reading Tab .......................................................................................................................................... 19
Station List ............................................................................................................................................ 24
Alerts Tab .............................................................................................................................................. 25
Notes Tab .............................................................................................................................................. 26
Attachments Tab ................................................................................................................................... 29
Graph Tab ............................................................................................................................................. 33
Close Tour ............................................................................................................................................. 33
Filtering a Tour ...................................................................................................................................... 34
Chapter 3: Tour Gear Menu Options .............................................................................................................. 36
Tour Details ........................................................................................................................................... 36
About Operator Rounds ........................................................................................................................ 37
Login / Logout ....................................................................................................................................... 38
Removing Tours from the Mobile Device .............................................................................................. 39
Chapter 4: Synchronizing Tour Data .............................................................................................................. 41
Chapter 5: Desktop System Preferences ....................................................................................................... 43
Preference Lists for eSOMS ................................................................................................................. 44

Contents
User Guide 4 GMDDB-1008-1606-03
This page is intentionally left blank.
Chapter 1: Introduction
User Guide 5 GMDDB-1008-1606-03
Chapter 1: Introduction
The eSOMS Suite Mobile Operator Rounds application is the solution for plant operations management data
collection and analysis needs in a mobile environment. Mobile Operator Rounds provides the software tools
that not only eliminate the need for paper-based procedures, rounds, and log sheets in the field, but that also
bring about a whole new level of power and flexibility to plant operators.
Mobile Operator Rounds 2.2 is compatible with iOS, Android and Windows mobile devices and is designed to
automate in-the-field data collection, trending, and analysis activities. It provides tour and record detail,
powerful computational analysis, conditional alerts and instructions, notes, and personnel performance
information. The system is an optional component of the eSOMS Suite Operator Rounds module and can be
used to eliminate the inefficiencies of paper-based data collection and analysis of plant operating data.
Note: The screen captures in this document were generated mainly from an Android tablet device, depending
on your operating system and screen size, the layout of the screen may vary somewhat. Also, the specific
functionality of some of the controls, for example selecting a date, may have a different look and feel.
Mobile Operator Rounds allows multiple plant tours to be downloaded to mobile computers and performed in
the field. During performance readings, calculations, compliance with instructions, notes, user identification
information (user, date, and time) is captured in real-time along with warnings of abnormal or missed
readings. Multi-media (audio, graphics, pictures, and so on) storage capabilities allow a range of data types to
be captured in the field and transferred to the desktop. At any time, data on the mobile computer can be
synchronized to the plant status database.

Chapter 1: Introduction
User Guide 6 GMDDB-1008-1606-03
Mobile Operator Rounds is a natural complement to eSOMS Suite Operator Rounds for the desktop and can
significantly streamline business processes by:
Improving Mobile Worker Productivity
♦ Capturing data at the point-of-performance, the time-consuming paperwork and data entry cycle
is eliminated.
♦ Expanding the range and type of data available to be captured in the field to include:
• Text
• Graphics (still or motion pictures)
• Audio
♦ Delivering critical information in the field not possible in a paper-based system, the mobile worker
can make better informed decisions.
Ensuring Compliance
♦ Application logic enforces internal procedures and external regulatory requirements while
maintaining flexibility for the mobile worker.
Providing More Timely Information to the Enterprise
♦ Allowing managers to make better informed decisions.
♦ Allowing managers to track field activities more closely.
Mobile Operator Rounds 2.2 does not support the following functionality that is available in the previous
Windows Mobile 6.5 platform:
Steam table functions
Chapter 1: Introduction
User Guide 7 GMDDB-1008-1606-03
Configure Connection Settings
The connectivity settings for Mobile Operator Rounds is configured within the application.
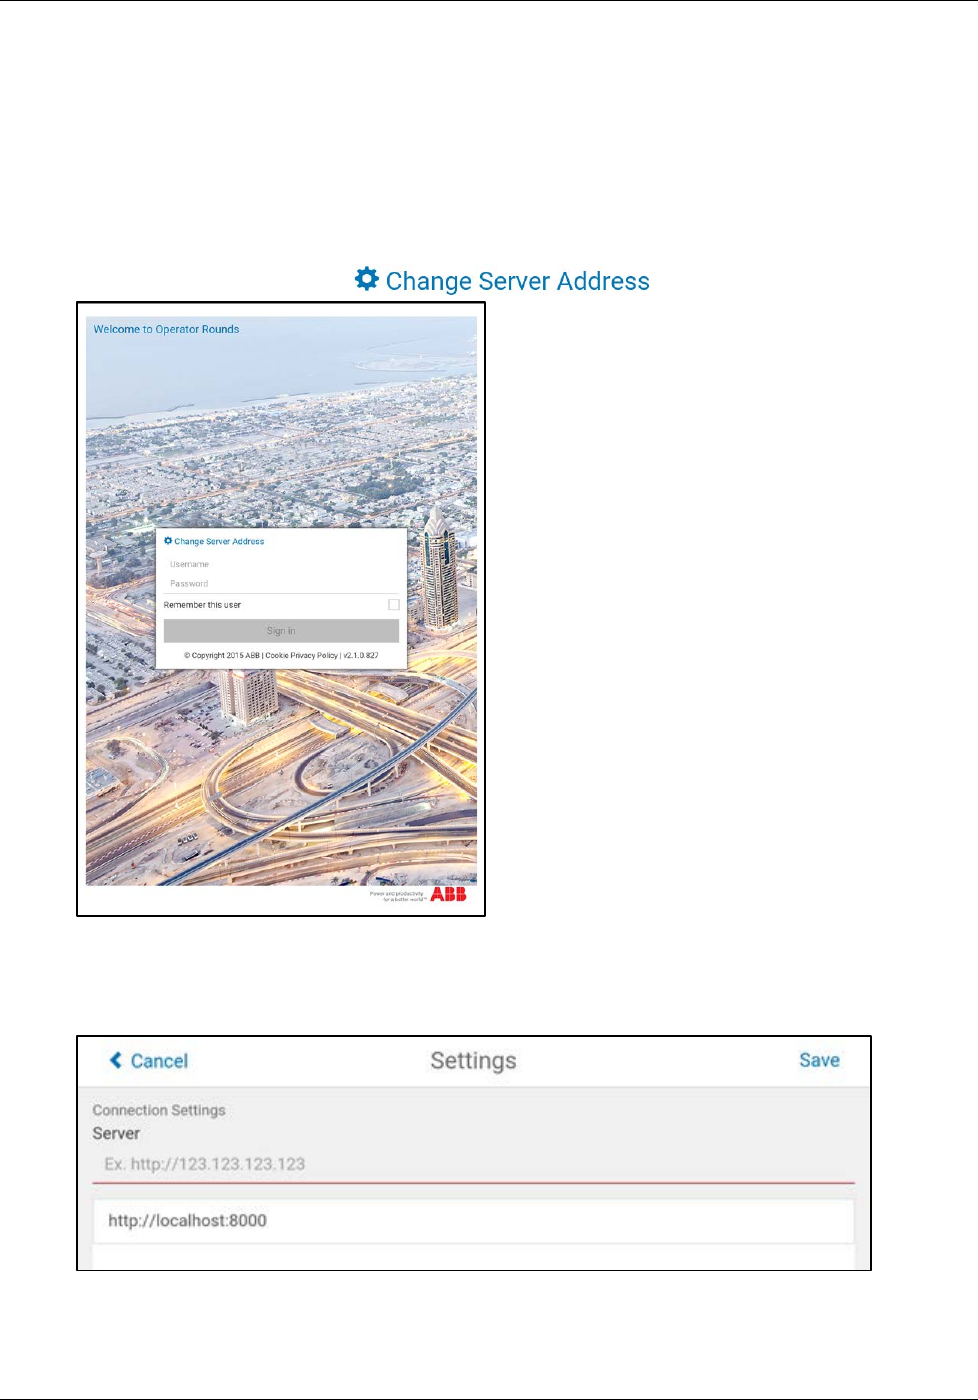
Change Server Address
Before you will be able to login, you will have to configure the server address to which the mobile device will
connect.
1. From the Welcome Screen, tap
2. Specify the address of the server that will be used to synchronize tour information. Normally, this
information would be provided by a system administrator. The format of the server address is
http://xxx.xxx.xxx.xxx:yyyy/rounds, where xxx.xxx.xxx.xxx is the IP address of the server and yyyy is
the port.
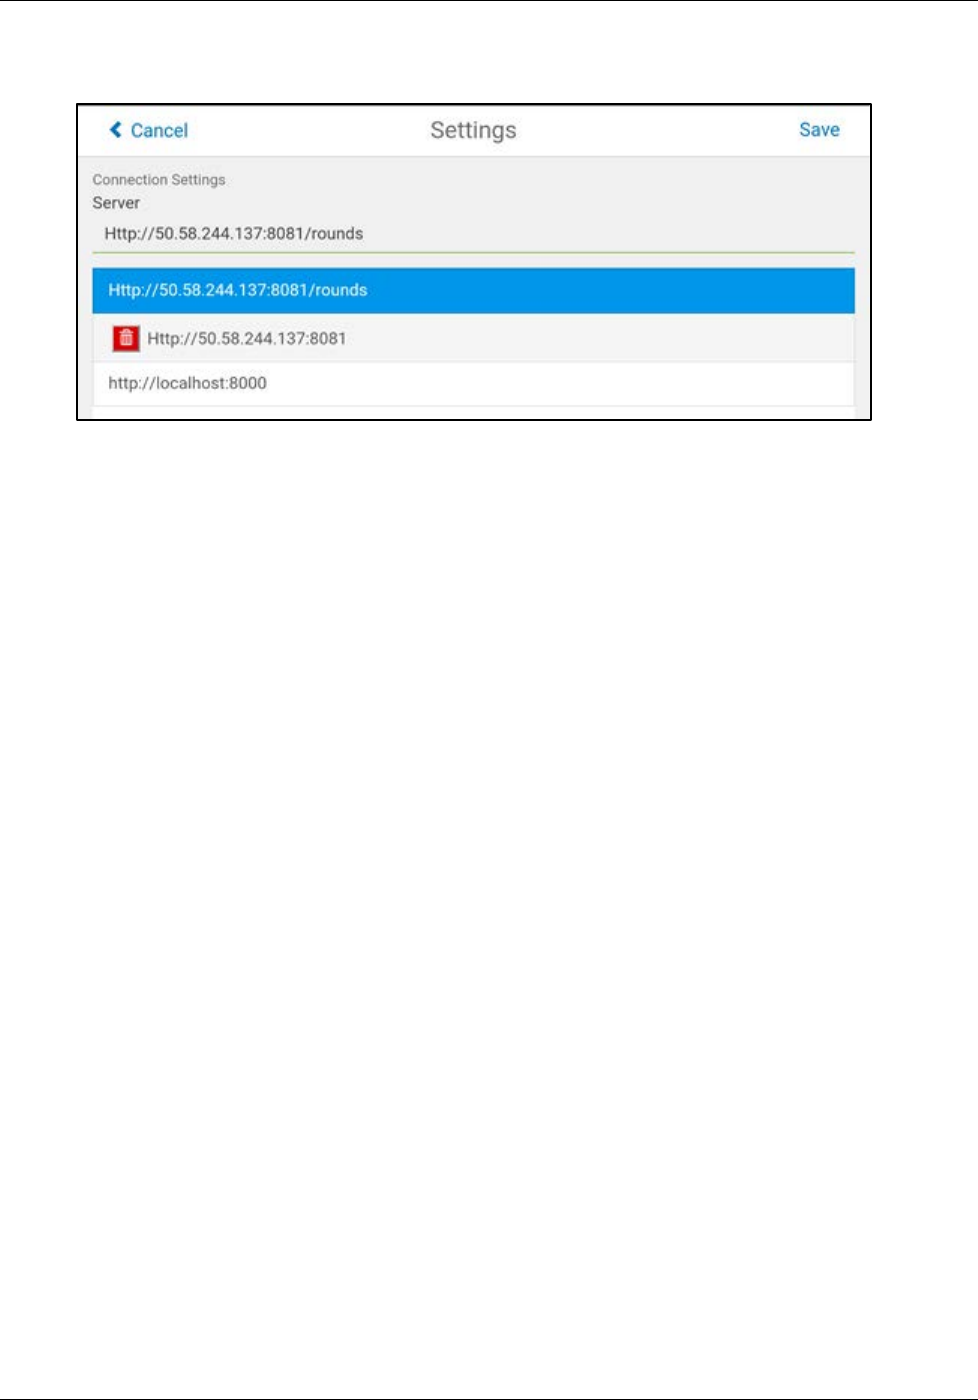
3. To select an address that already exists in the list, simply select it from the list, editing it as
necessary.
Chapter 1: Introduction
User Guide 8 GMDDB-1008-1606-03
4. To remove an address that already exists in the list, swipe to the right on the entry to be removed and
click the Delete icon. Swiping right on the same entry that is currently being used for a connection will
not display the Delete icon.
5. Tap <Save> to set the server address and return to the welcome window.
Chapter 1: Introduction
User Guide 9 GMDDB-1008-1606-03
Downloading Tours
Mobile Operator Rounds replaces the paper rounds sheets printed by eSOMS Suite Operator Rounds for the
desktop and used by operators to record plant operating parameters. With Mobile Operator Rounds, the
process of printing a rounds sheet is replaced with downloading the tour to a mobile device. Once
downloaded, the mobile device is used to collect and analyze rounds data. Multiple tours can be downloaded
to one or more mobile devices.
Downloading Tours Using the Mobile Device
Before downloading, first make sure that the mobile device is on and synchronized to the desktop computer.
Then on the mobile device:
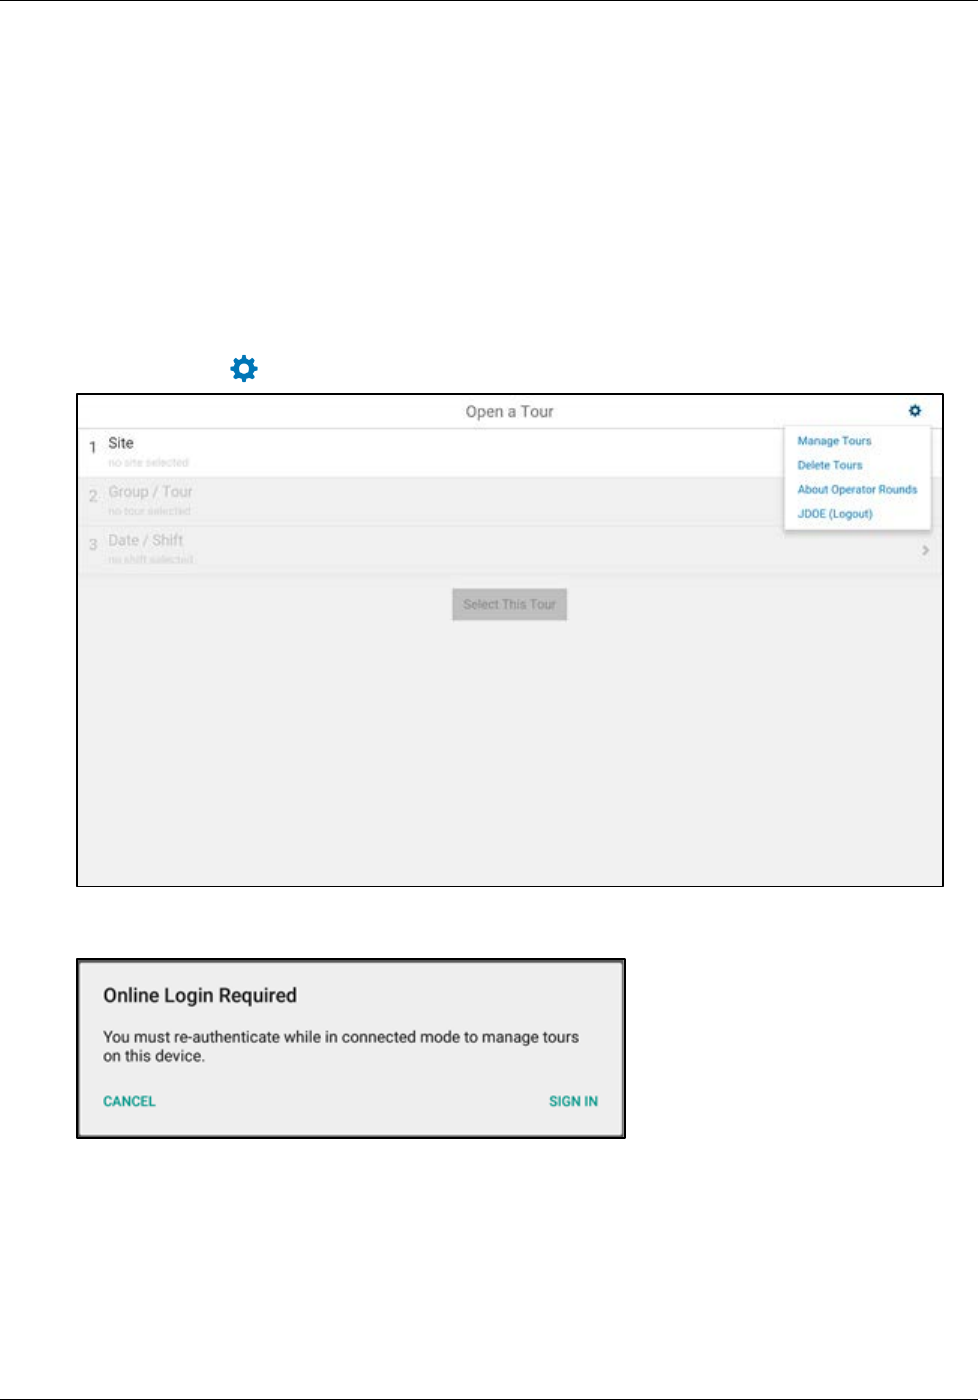
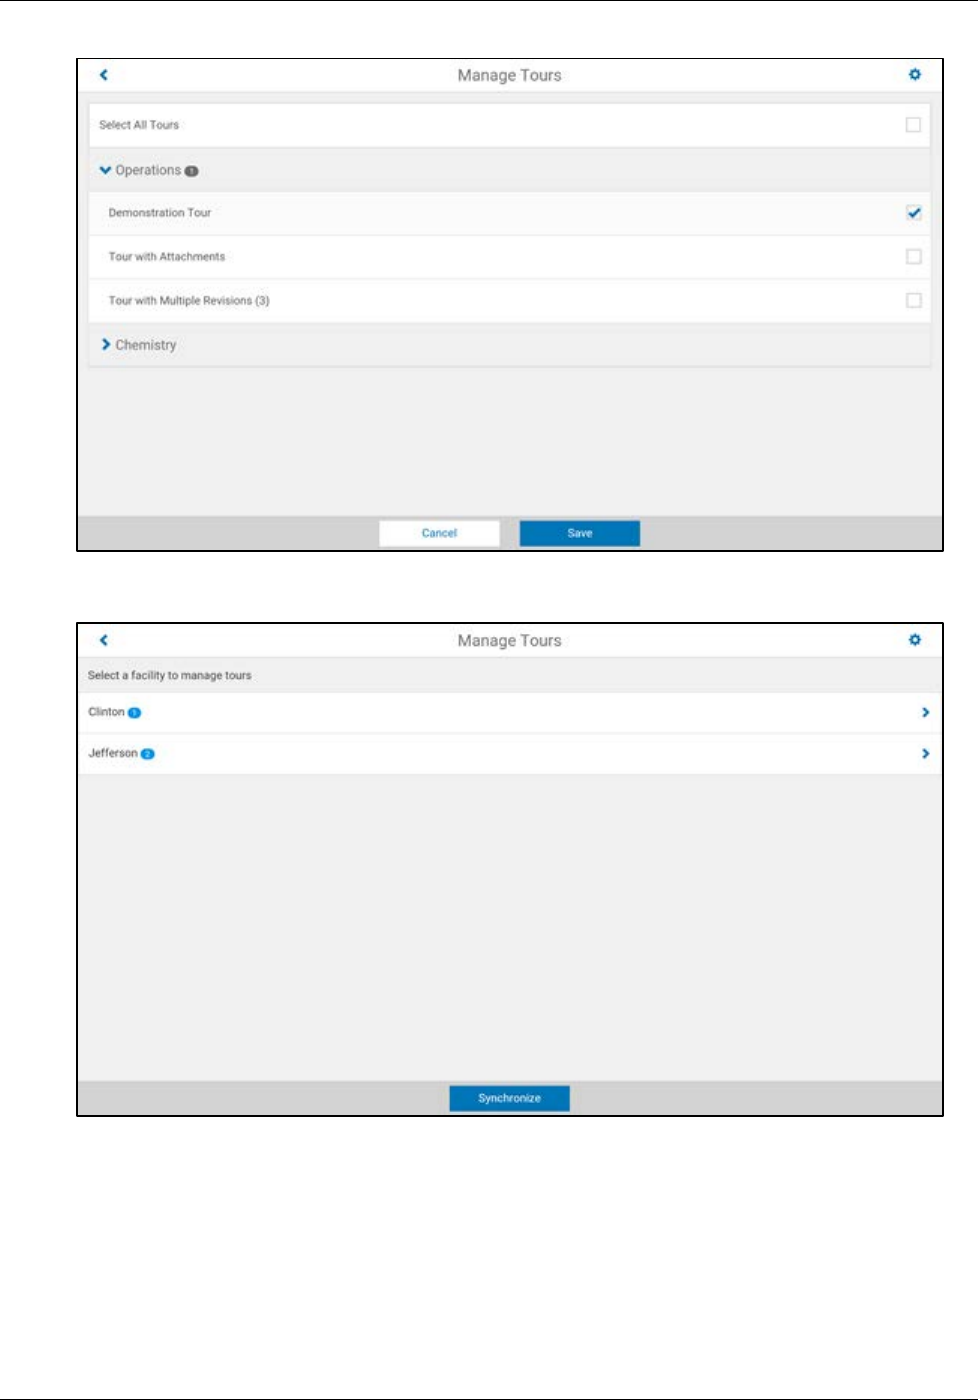
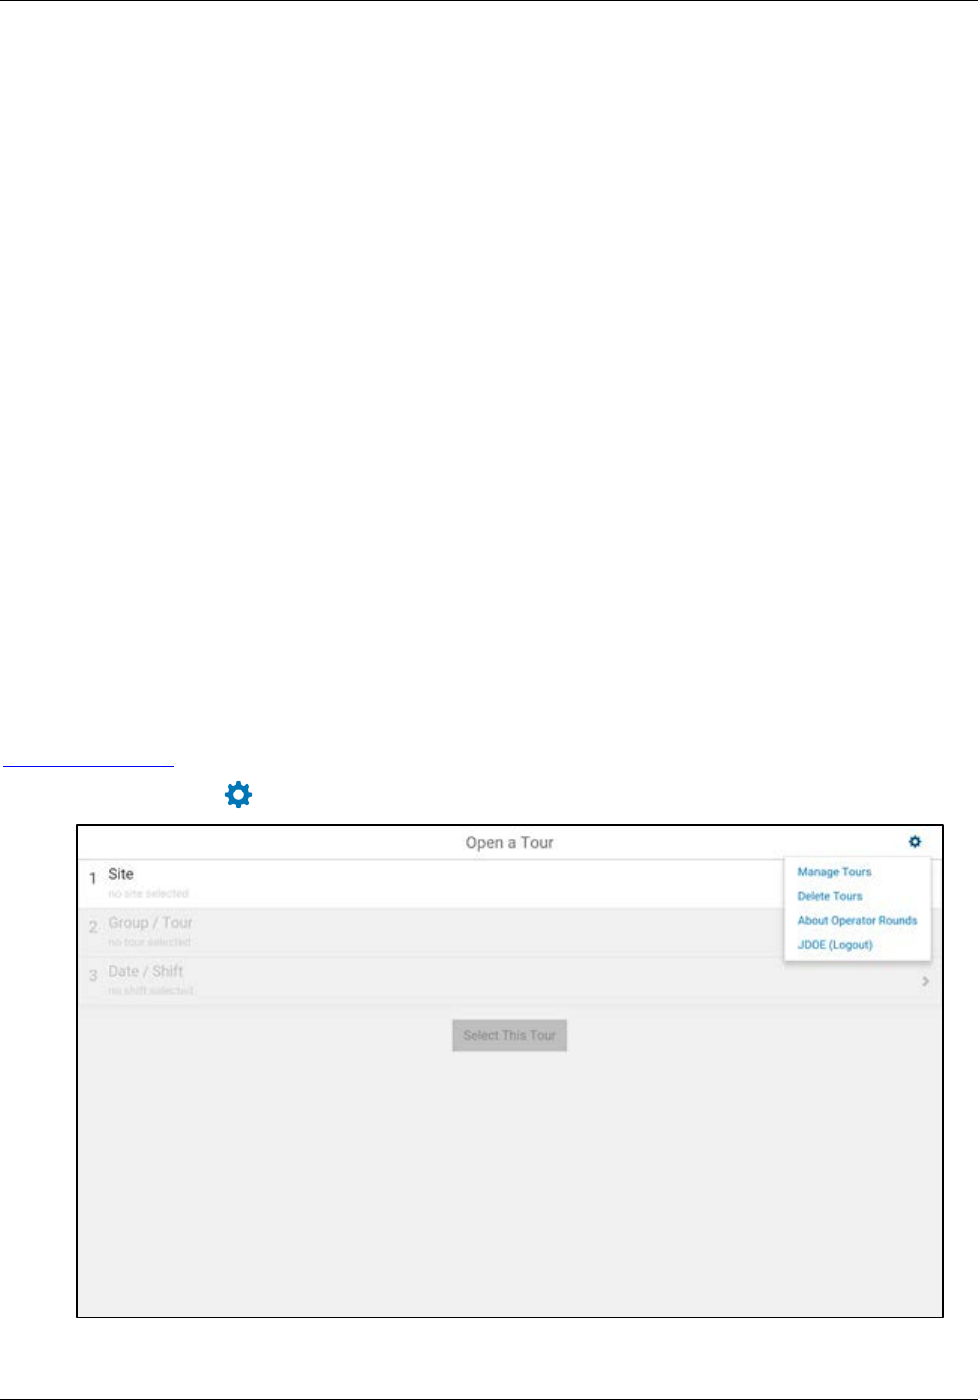
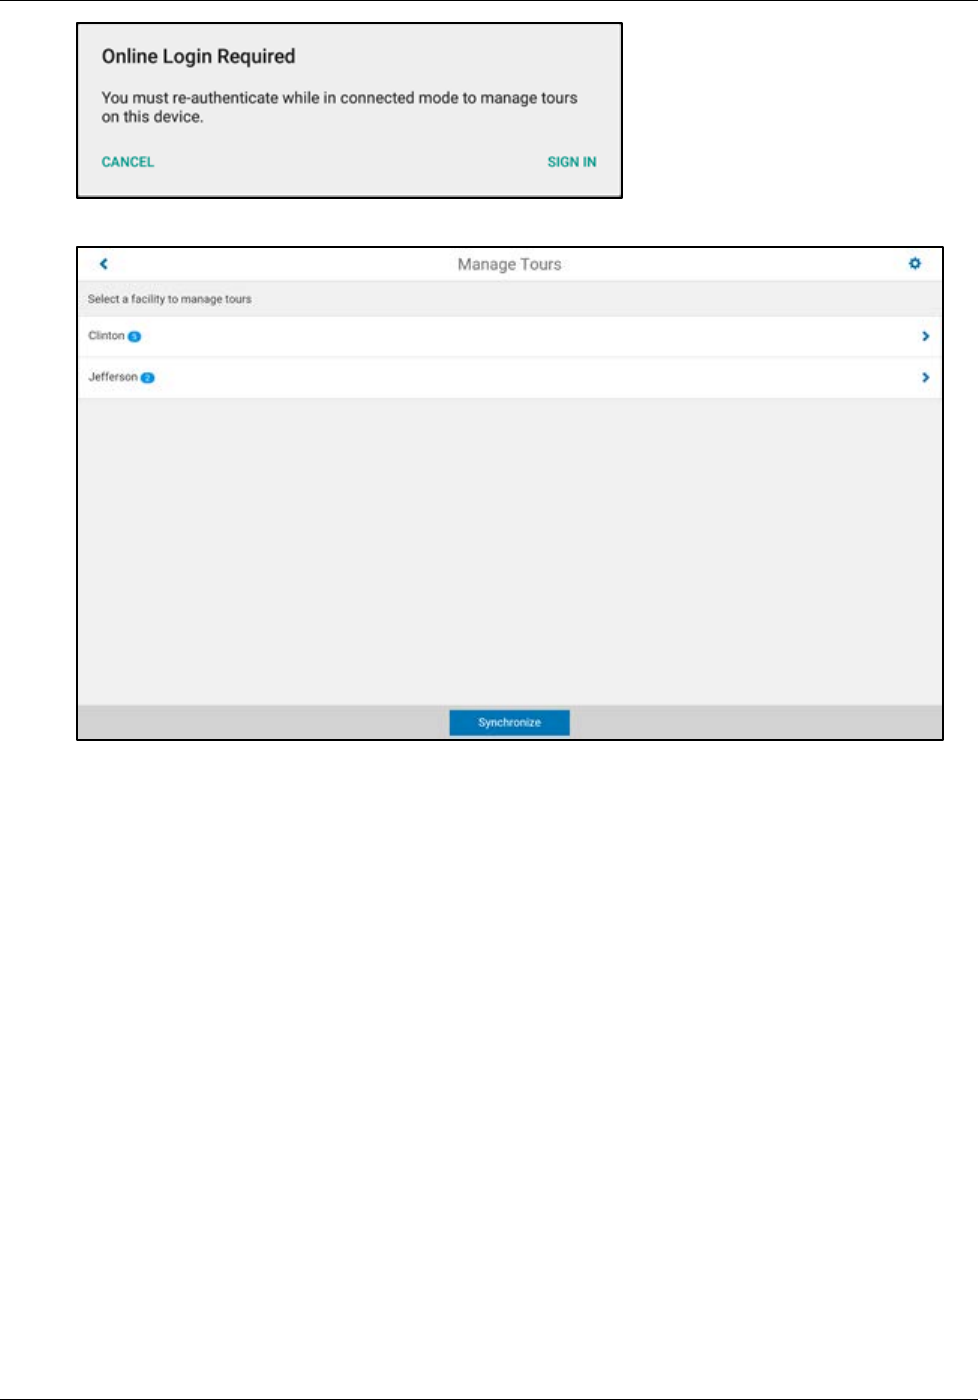
1. Tap on the Gear in the upper right hand corner and tap <Manage Tours>.
You may get a message that you need to re-authenticate while in connected mode to manage tours
on the device, if this is the case re-login.
Chapter 1: Introduction
User Guide 10 GMDDB-1008-1606-03
2. Select the tours to download and click <Save>.
3. After selecting the desired tours, click <Synchronize Tours> and Mobile Operator Rounds will
perform the synchronization process.
When completed, the mobile device is ready to use.
Chapter 2: Using Mobile Operator Rounds
User Guide 11 GMDDB-1008-1606-03
Chapter 2: Using Mobile Operator Rounds
Once you have completed the installation of Mobile Operator Rounds on a mobile device and downloaded at
least one tour, you can begin using that mobile device to collect and analyze rounds data.
Starting The Program
After Mobile Operator Rounds has been installed on a mobile device and at least one tour has been
downloaded, you may begin using the program on the mobile device. As indicated previously, Mobile
Operator Rounds replaces the need to print log sheets from the eSOMS Suite Operator Rounds module.
To start Mobile Operator Rounds:
1. Based on the specifics of your particular operating system, select the Mobile Operator Rounds icon to
start the application.
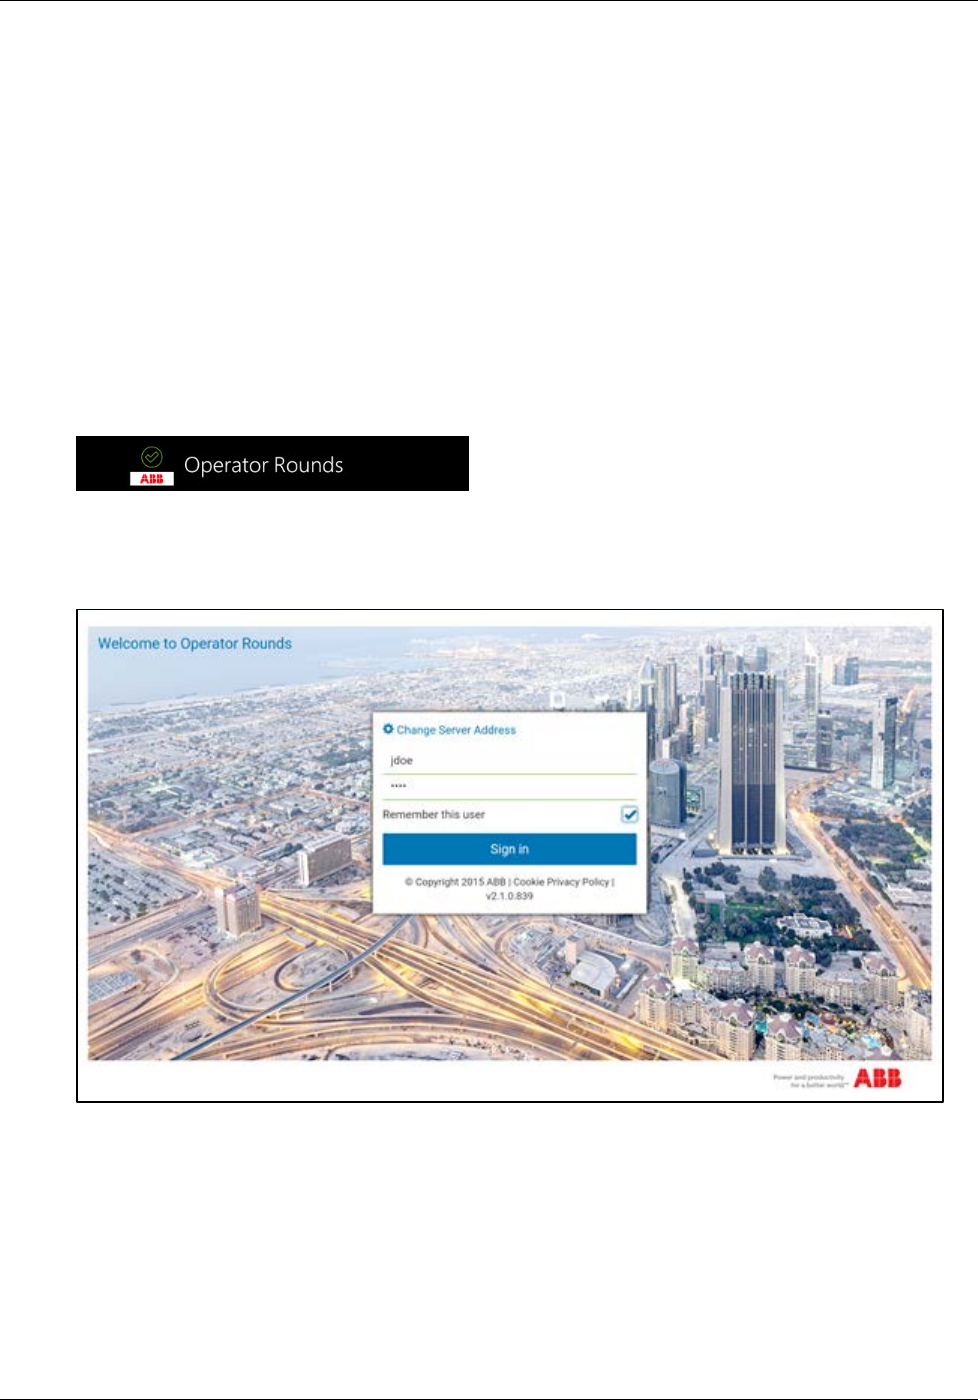
2. The Mobile Operator Rounds login window is displayed and you are prompted to enter your user
Login ID and Password. Your user Login ID and Password for Mobile Operator Rounds are the
same as for eSOMS Suite Operator Rounds for the desktop. A valid Login ID and password are
required in order to continue.

Chapter 2: Using Mobile Operator Rounds
User Guide 12 GMDDB-1008-1606-03
Mobile Operator Rounds supports all of the data input mechanisms available to the operating system
including:
♦ Virtual Keyboard
3. If you will be using the mobile device exclusively, check the ‘Remember this user’ box to save your
Login ID for subsequent logins.
4. When you have entered your Login ID and Password, tap:
<Sign in> to continue
Chapter 2: Using Mobile Operator Rounds
User Guide 13 GMDDB-1008-1606-03
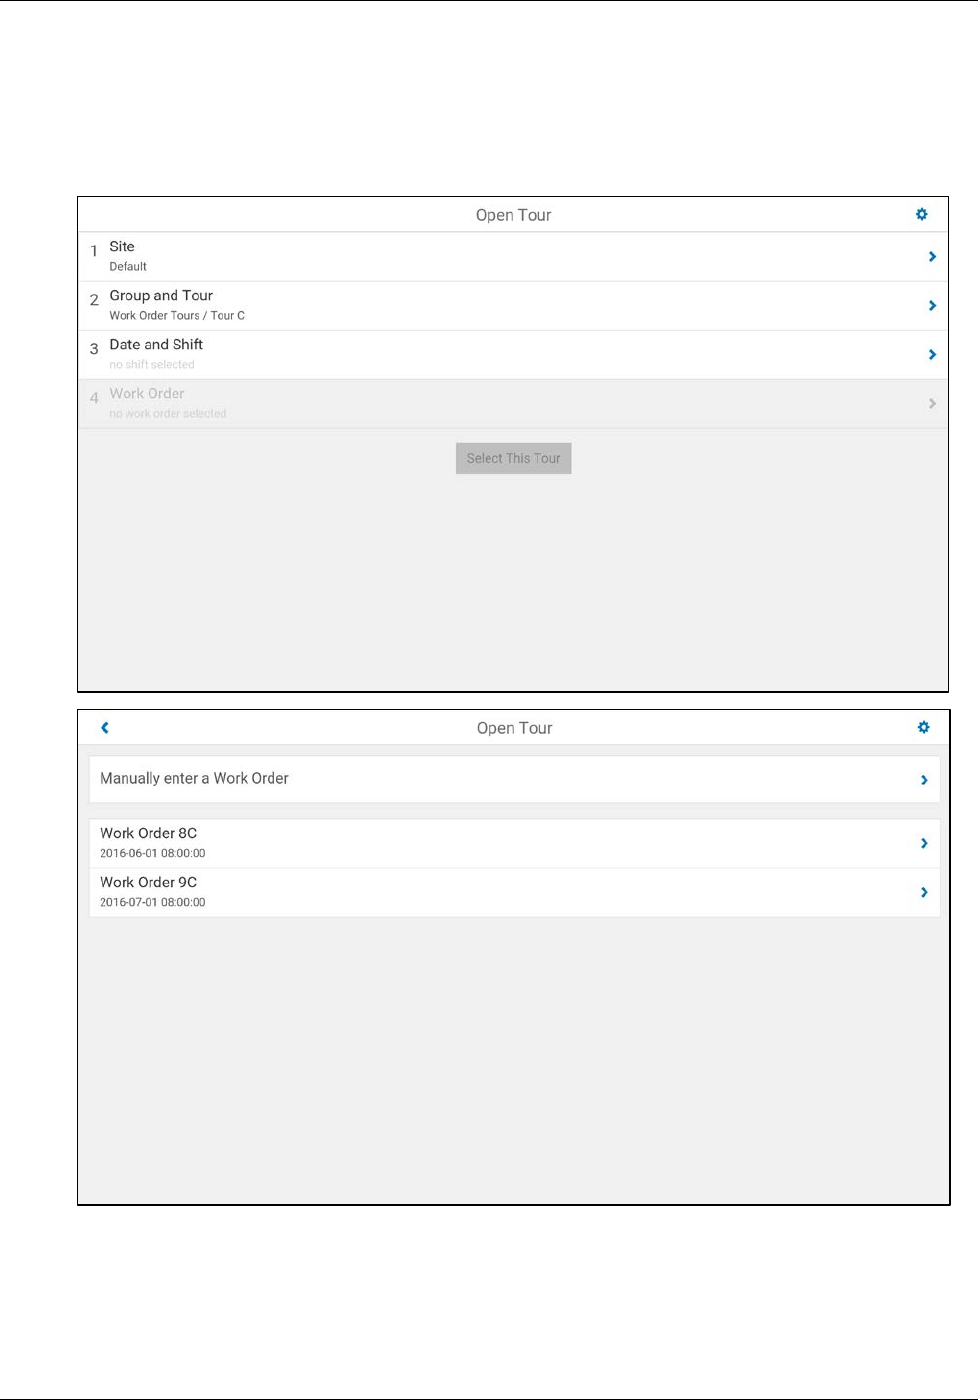
Open Tour
The number of tours that can be downloaded to a mobile device is limited only by the amount of storage
space on the device. This section of the guide details how to open a tour in order to perform or review the
performance of a round.
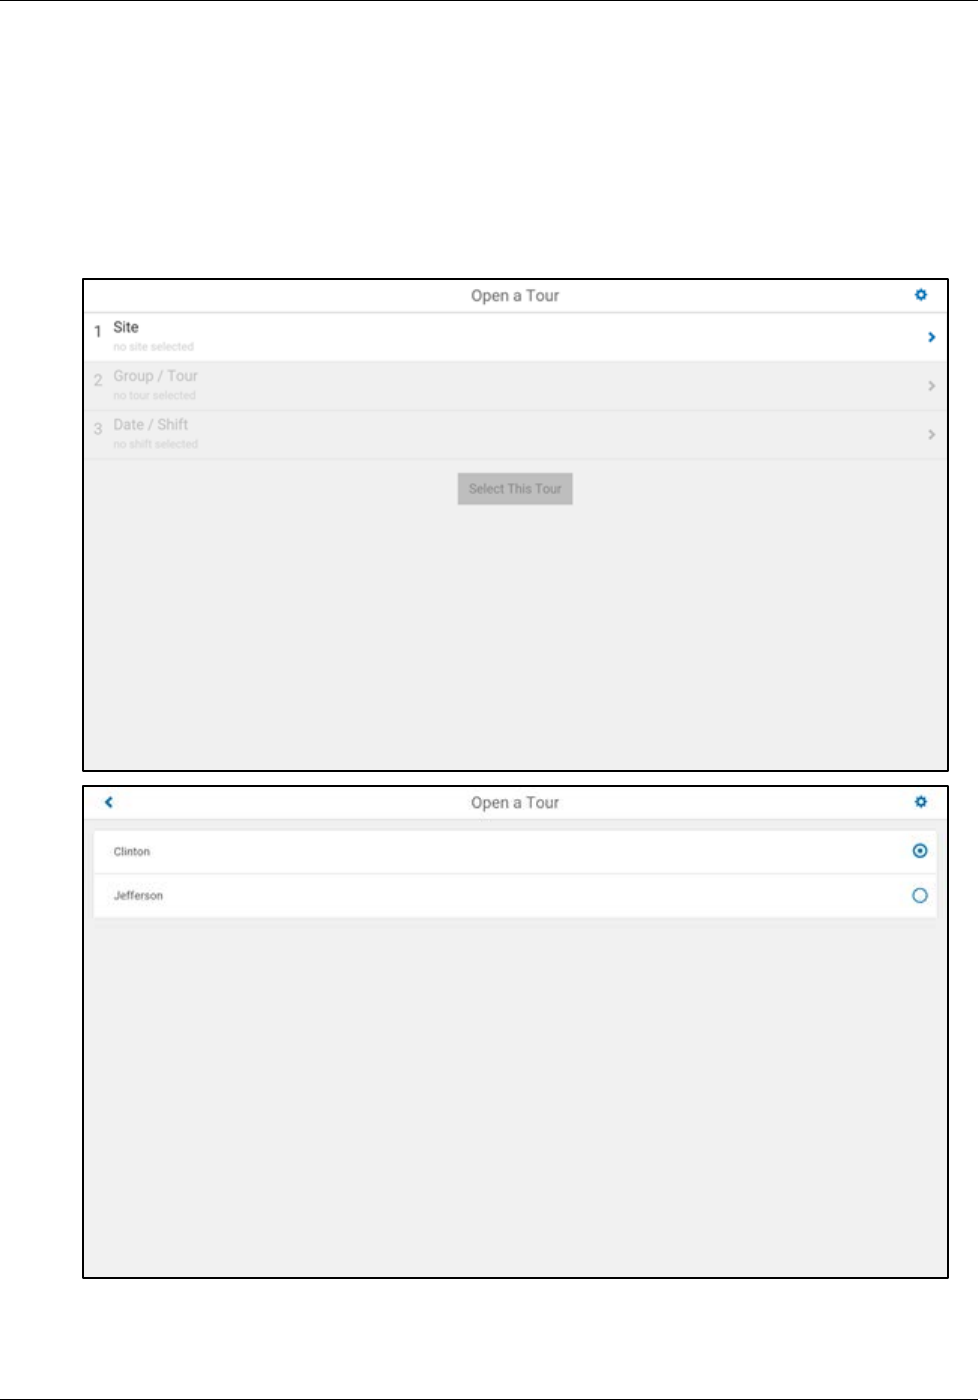
If you have just logged into Mobile Operator Rounds you are automatically taken to the Open a Tour window
and you can skip to step 3.
1. From the Open a Tour window, first choose a tour group from upper by tapping the site selection.
The list of the sites available on the mobile device is displayed, select the desired site.
Chapter 2: Using Mobile Operator Rounds
User Guide 14 GMDDB-1008-1606-03
2. The application will return to the Open a Tour window with the site selected, next click Group / Tour
to select the desired tour. The list of groups will be displayed, expand and select a tour.
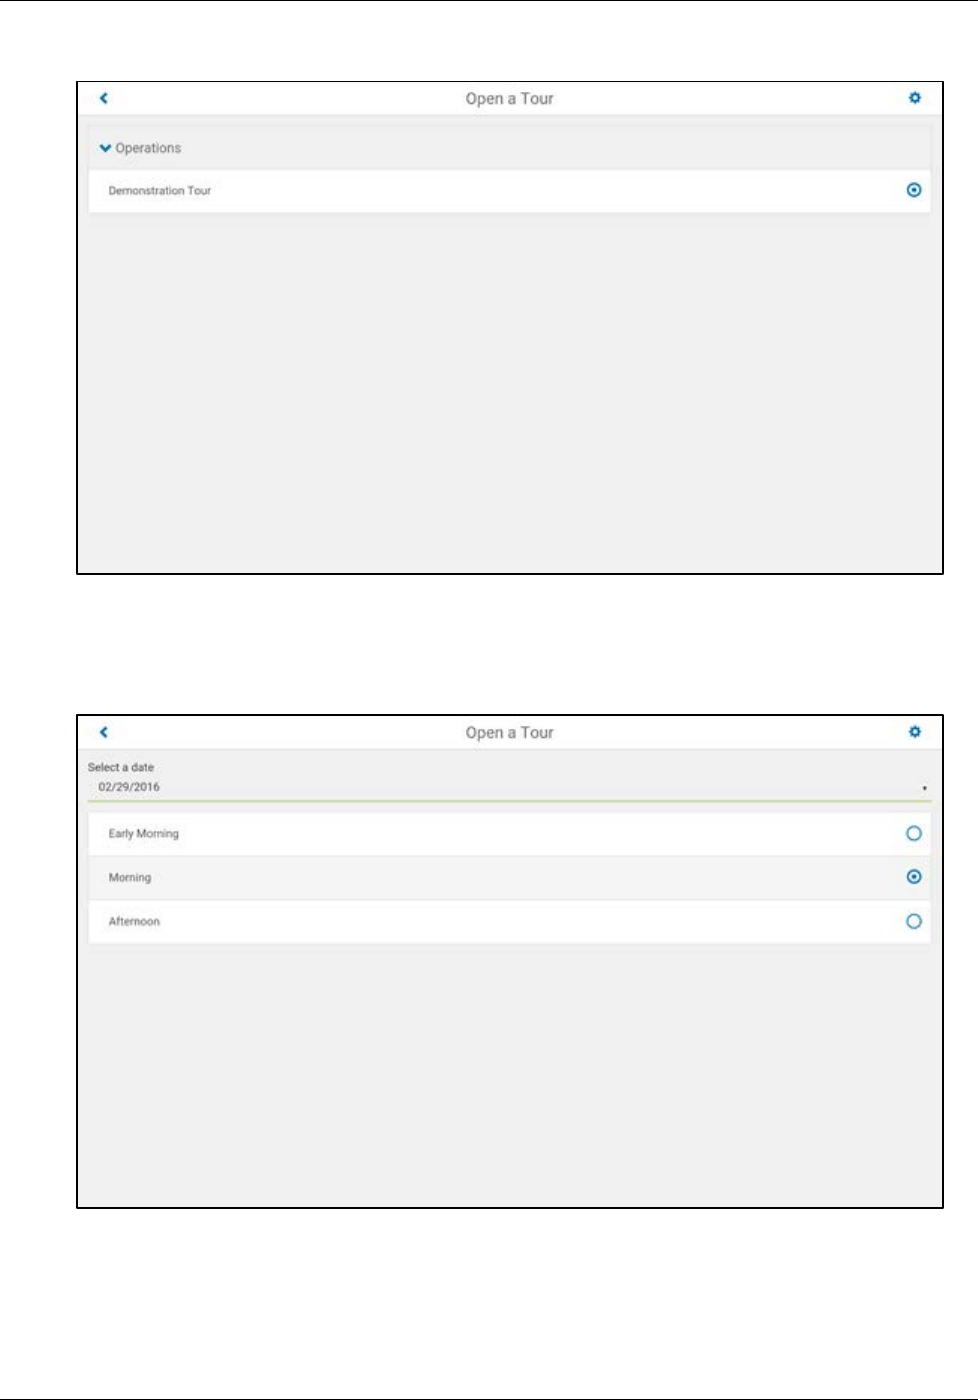
3. Once you have selected a tour to open, click on Date / Shift to select the desired date and shift for
which you want to take readings followed by selecting a shift from the list. It is generally not
necessary to change the date, which comes from the system time on the mobile device. Note also
that depending on the OS you are using, the display and function of the controls may differ slightly,
but the functionality is the same.
4. When you are ready to open the selected tour for the specified date and shift, tap:
<Select This Tour> to open the tour, or change one or more of the parameters to select a different
tour / date / shift.
Chapter 2: Using Mobile Operator Rounds
User Guide 15 GMDDB-1008-1606-03
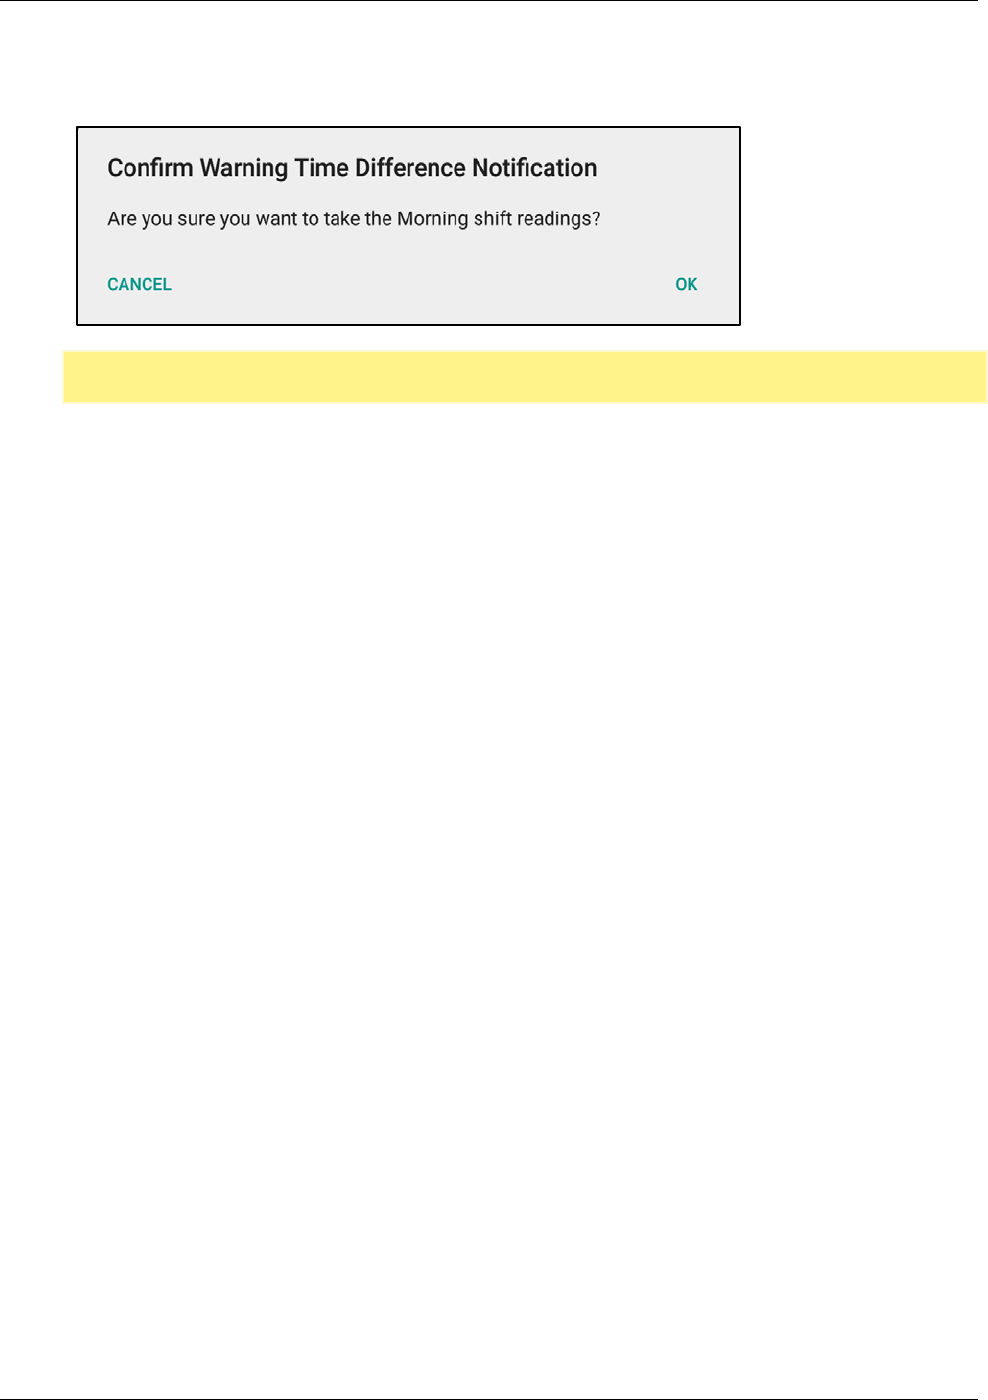
A range of allowable tour start times can be specified for each tour in Operator Rounds Tour
Maintenance Manager. To help prevent you from selecting an incorrect tour date or shift, if what you
have selected is outside the allowable range, a warning message will be displayed alerting you to the
possibility of error.
Note: It is important to make sure that the mobile device date/time is accurate for this feature to work
correctly.
If a message displays asking you to confirm that you want to take these readings, tap:
<OK> to accept the selected shift, or
<CANCEL> to go back and select another tour, date and/or shift
Chapter 2: Using Mobile Operator Rounds
User Guide 16 GMDDB-1008-1606-03
5. If the tour is SOI enabled, an additional Work Order selection item will appear below the Date and
Shift selection item allowing the user to select or change a Work Order task ID. When selected, a
screen will appear that will allow for selecting from a pre-defined list of Work Orders as well as an
option for entering a Work Order manually. The number of pre-defined Work Orders shown is
controlled by the open work orders global preference setting from the desktop. Upon data
synchronization, the work order selected will appear in Attribute 1 of the tour for that reading
date/shift.
Chapter 2: Using Mobile Operator Rounds
User Guide 17 GMDDB-1008-1606-03
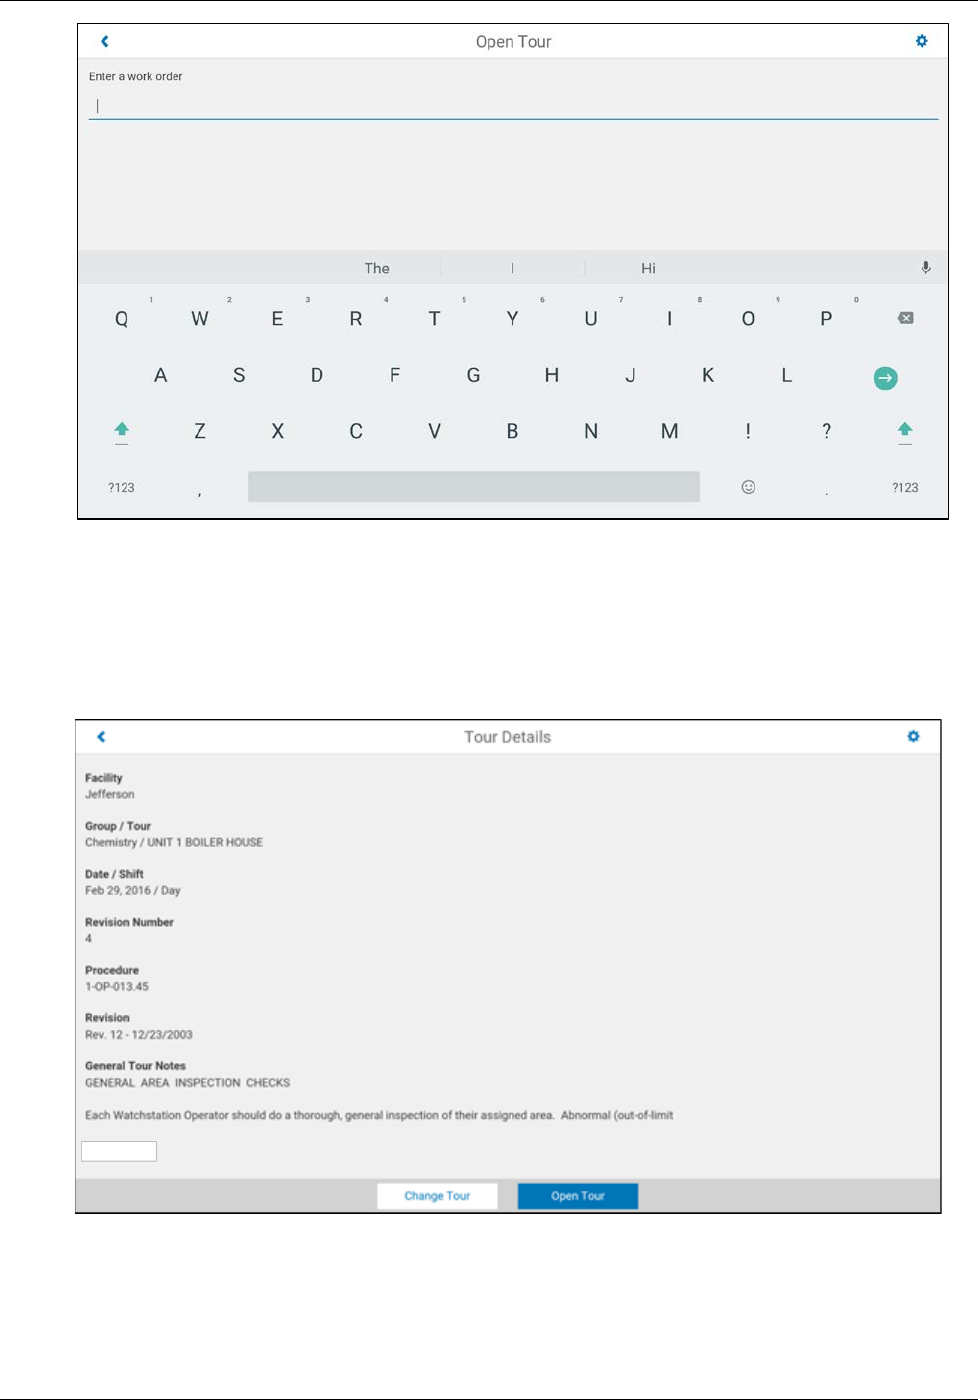
6. After a tour is opened, but prior to data synchronization, the Work Order selected for the currently
open shift may be modified from the Tour Details screen where a (Change) link will appear next to the
currently selected Work Order. Clicking this link will display the same Work Order selection screen
shown above allowing modification of the associated Work Order for the currently open tour.
7. The Tour Details window is displayed so that you can verify all the previously selected information
before continuing with the data collection process. If applicable, General Tour Notes are displayed if
they were specified in Operator Rounds Tour Maintenance Manager.
When you are ready to proceed with data collection, tap:
<Open Tour> to open the tour, or
<Change Tour> to go back and select another tour, date and/or shift
Chapter 2: Using Mobile Operator Rounds
User Guide 18 GMDDB-1008-1606-03
8. The Station List will display showing the stations in sequence order, click the first station to begin the
tour.
Chapter 2: Using Mobile Operator Rounds
User Guide 19 GMDDB-1008-1606-03
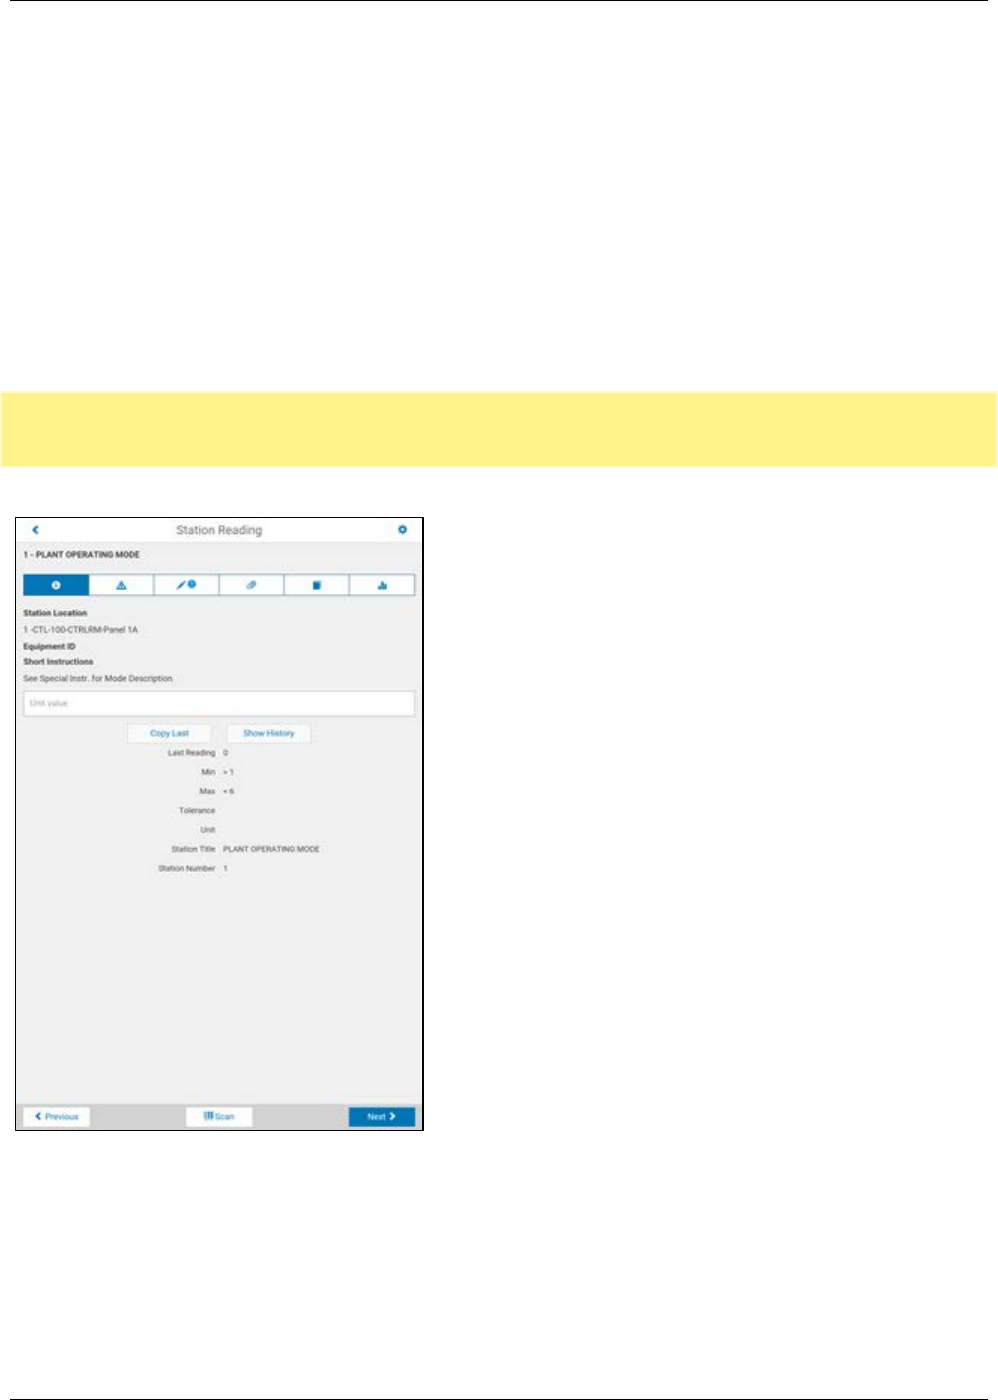
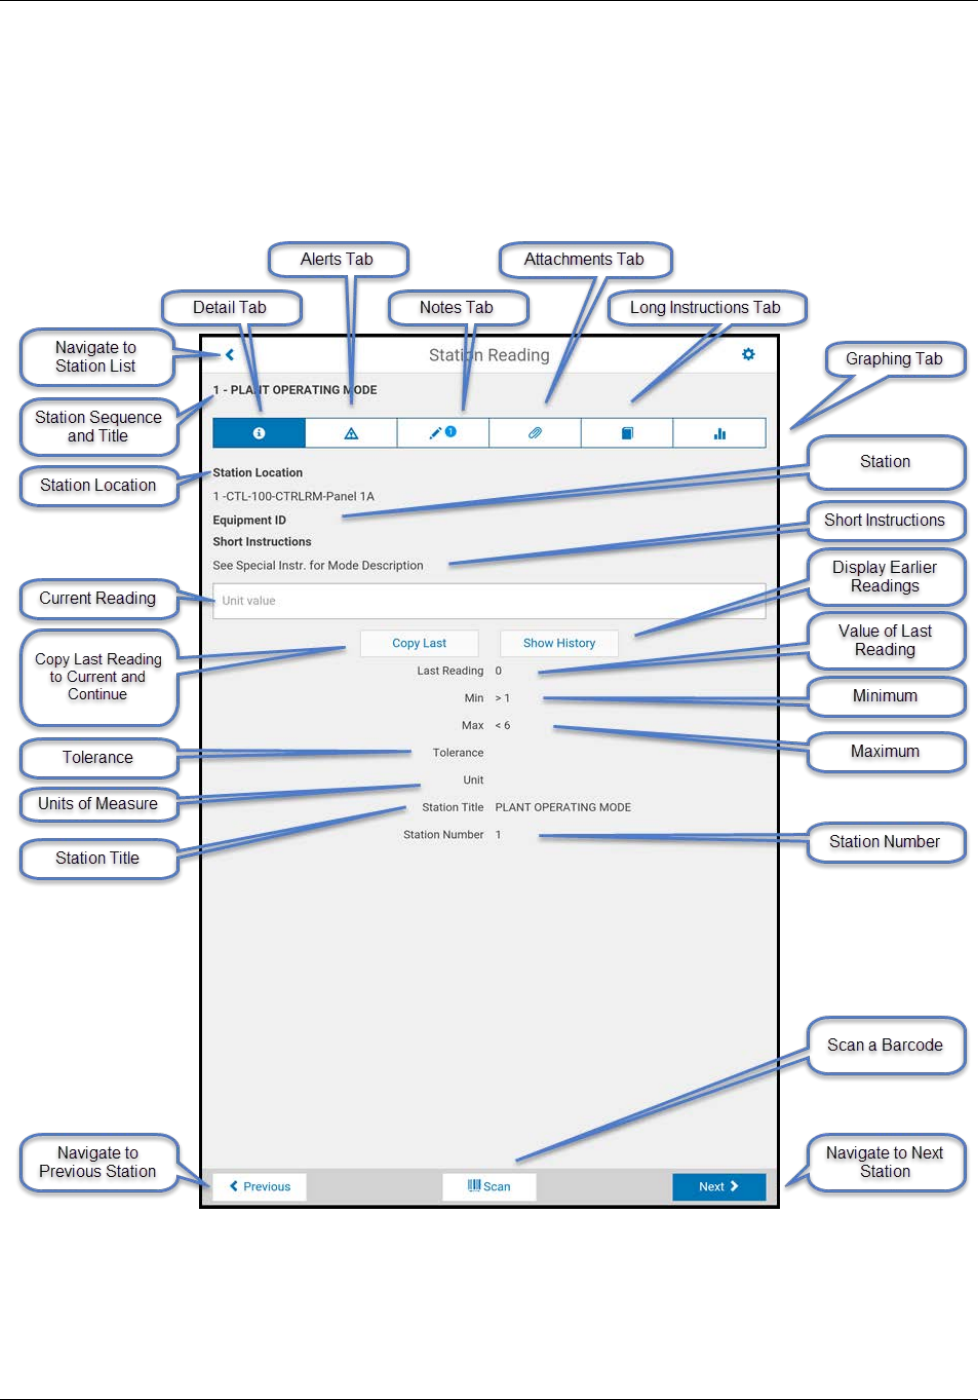
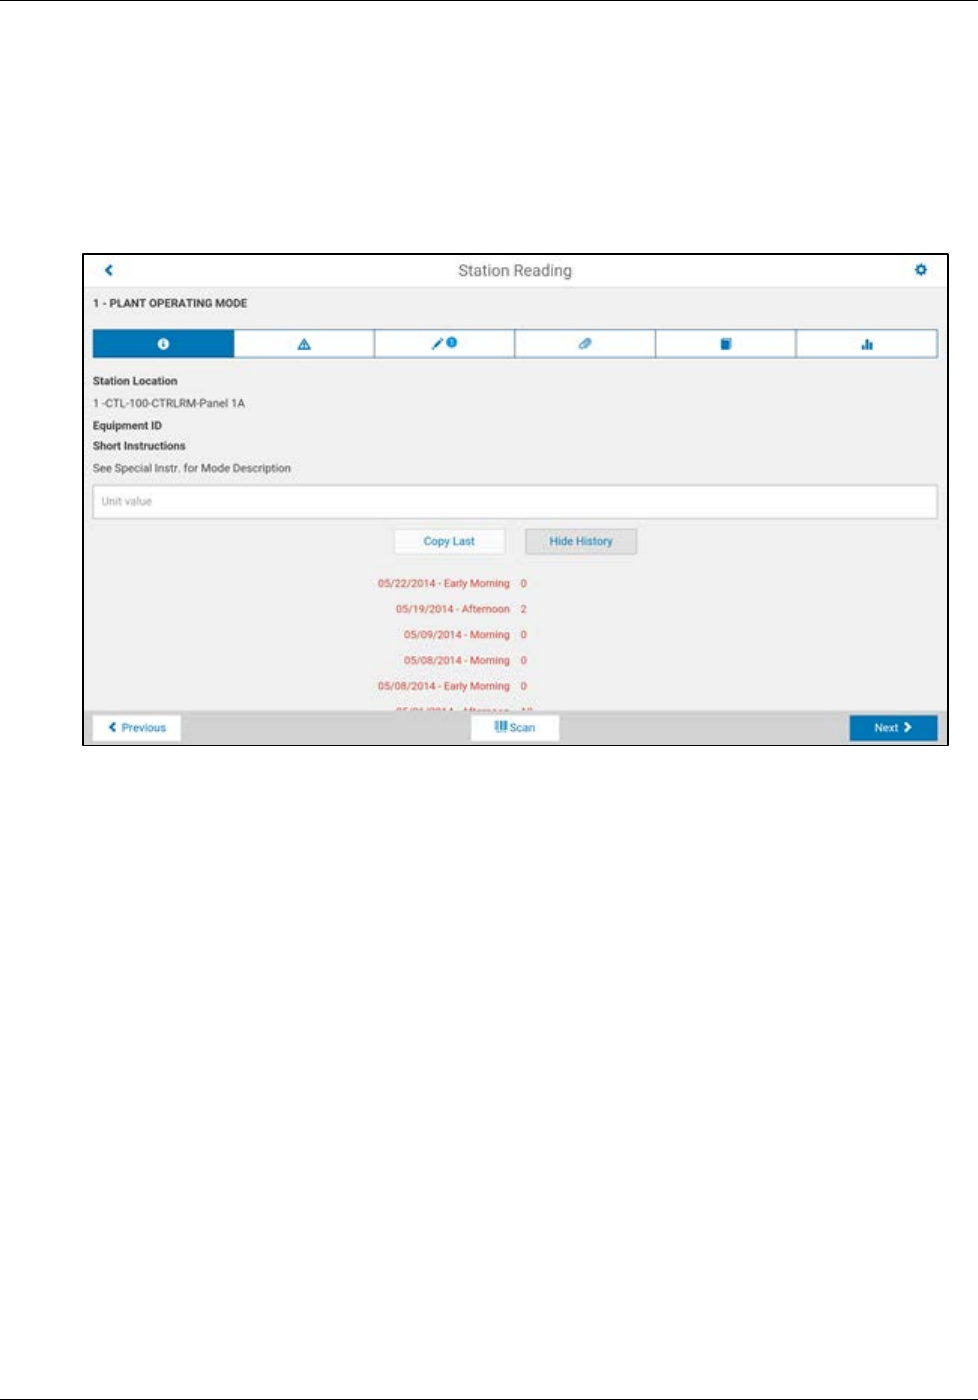
Reading Tab
The Reading Tab is used to provide detailed information to the user regarding the data record to be
collected/calculated and to record a reading. By default, all records in the tour are displayed in the sequence
order as specified. A description of the information and functionality of this tab is shown below:
To enter a reading:
1. If the preference for barcode scanning has been set to ‘Required’ for this tour in eSOMS Suite
Operator Rounds for the desktop’s Tour Maintenance Manager, the system will prompt you to first
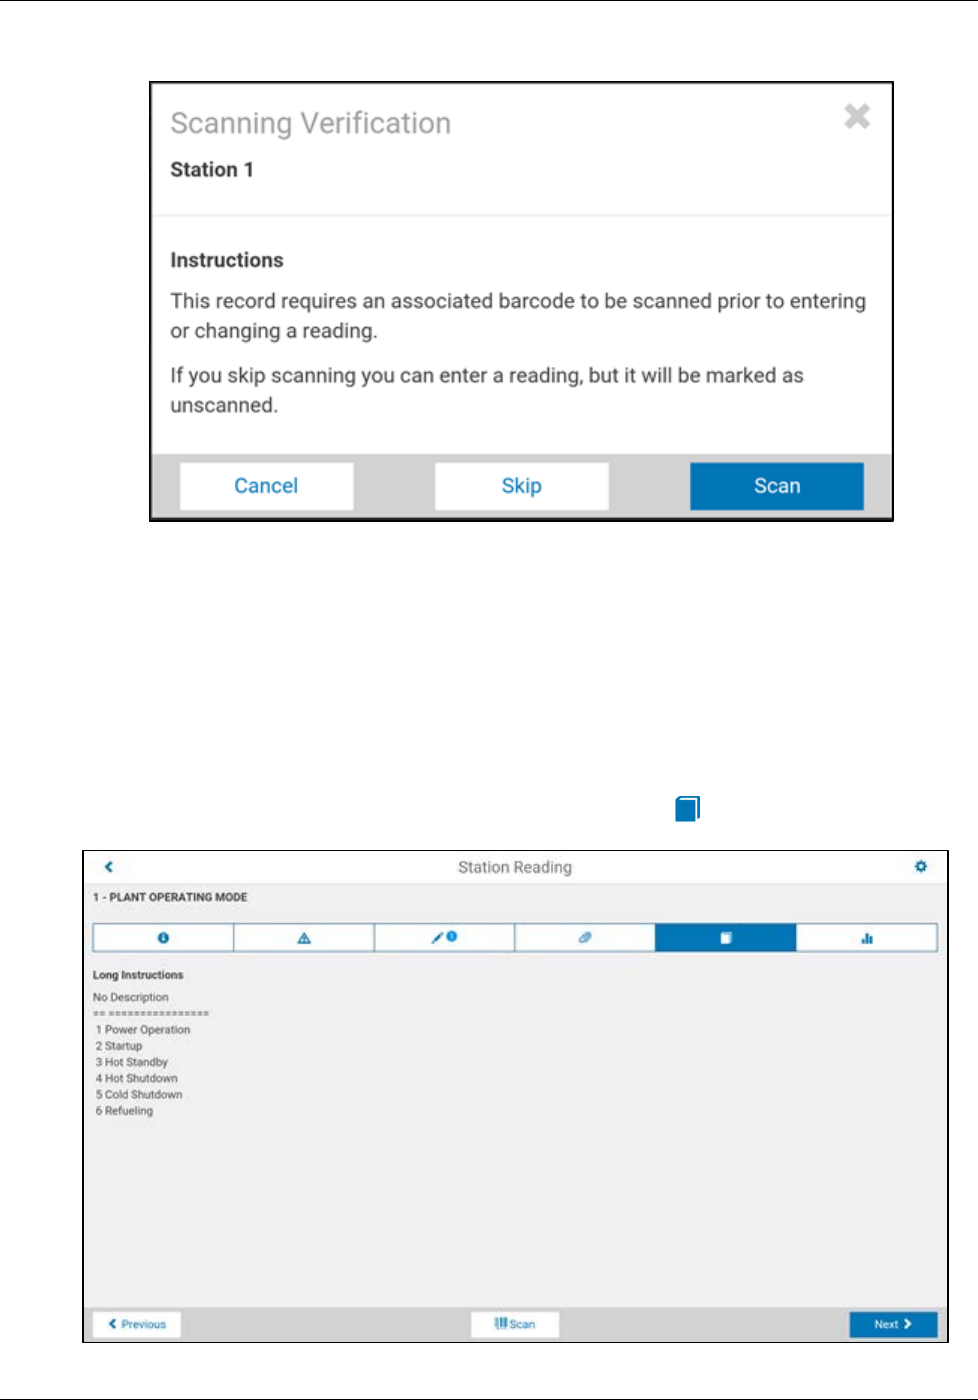
Chapter 2: Using Mobile Operator Rounds
User Guide 20 GMDDB-1008-1606-03
scan the barcode associated with the current record before a reading can be taken; shown in the
screenshot below. Otherwise skip to step 2.
Tap <Scan> to scan the barcode associated with the currently displayed record. If the
scanned barcode is valid, the reading tab will be displayed where a data value can be
entered. If the scanned barcode is invalid, an error message will be displayed and you can try
scanning again.
Tap <Skip> if you want to take the reading without scanning the barcode.
Tap <Cancel> if you do not want to take a reading because of a problem with scanning the
barcode. The program will return to the previously selected record.
2. Verify that the information on this tab (Record Description, Location, Equipment ID, and so on) is
appropriate to the reading to be taken.
3. If there are long instructions associated with a record, the instructions icon will appear in the tab list.
To view the contents of the long instructions, select the tab.
Chapter 2: Using Mobile Operator Rounds
User Guide 21 GMDDB-1008-1606-03
To exit the long instructions, tap the icon to return to the reading tab.
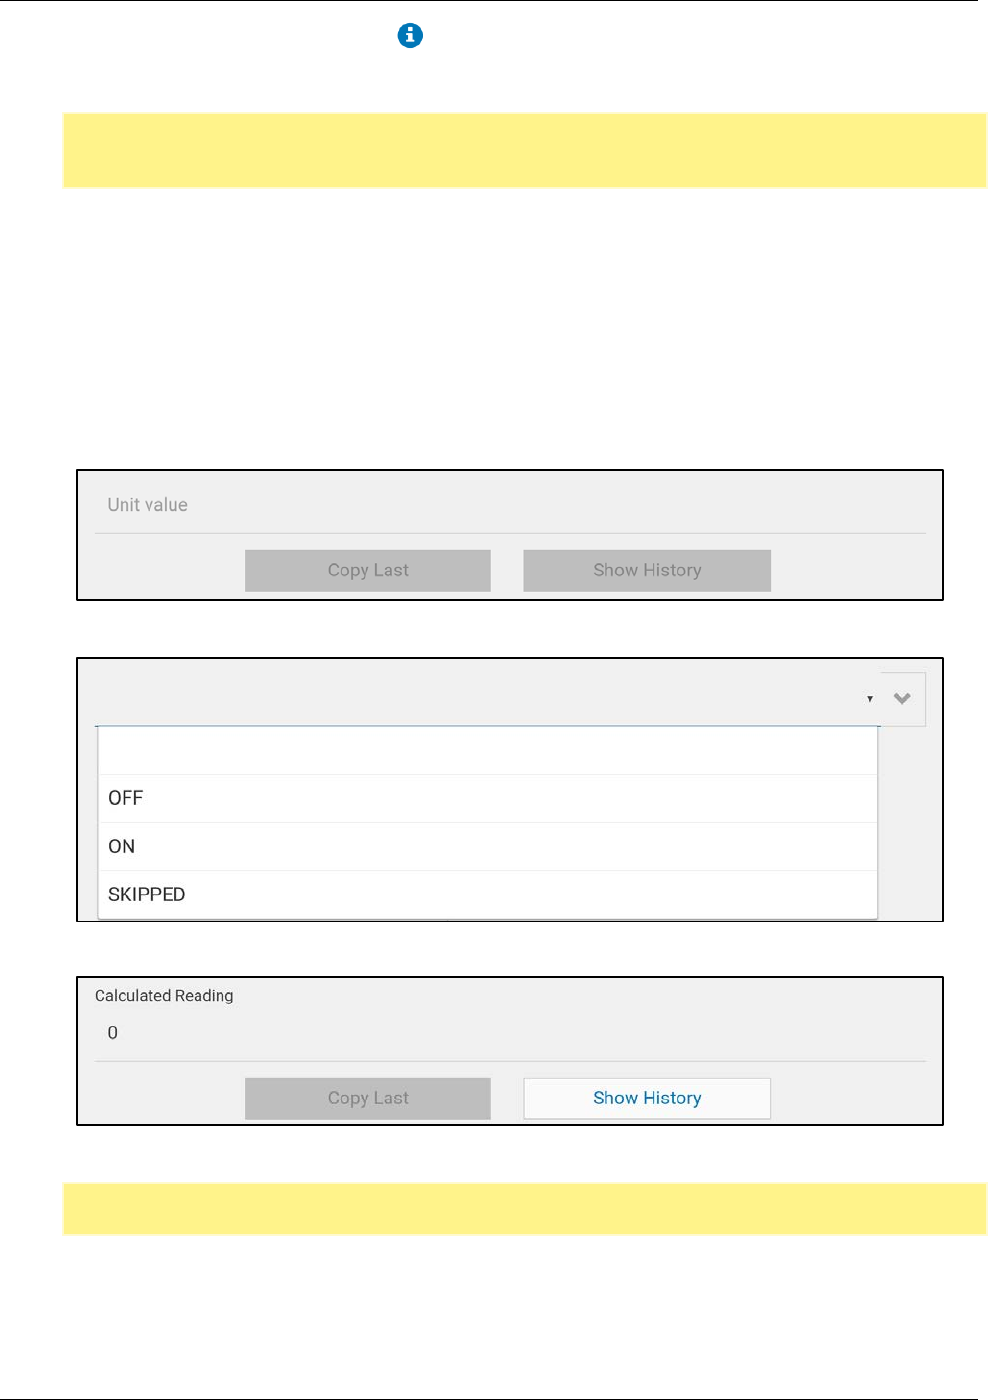
4. A reading can be input in the current reading field.
Note: A list of standard readings can be defined for each record in the desktop Operator Rounds
Tour Maintenance Manager and designated as validated (entered reading must be a standard
reading) or non-validated (entered reading can be any value).
The following basic types of readings are available:
♦ Non-Standard, Non-Validated - any data value can be entered into the reading field, there are no
standard readings in the drop-down list and the readings are not validated
♦ Standard, Non-Validated - any data value can be entered into the reading field, there are one or
more standard readings in the drop-down list and the readings are not validated against this list
♦ Standard, Validated – only values from the drop-down list may be selected, there are one or more
standard readings in the drop-down list and the readings are validated against this list
♦ Calculated - the record is a calculated reading and a data value cannot be entered, the label will
change to Calculated Reading.
Non-Standard, Non-Validated
Standard, Validated or Non-Validated
Calculated
Tip: As a shortcut to entering a current reading which is the same as the previous reading, tap the
<Copy Last> button.
5. Once a reading has been entered or a calculation displayed, you can navigate to other records in the
tour by tapping:
< Previous to go to the previous record, or
Next > to go to the next record
Chapter 2: Using Mobile Operator Rounds
User Guide 22 GMDDB-1008-1606-03
The ability to navigate to other records in a tour are also provided by tapping the icon at the top left
of the screen to view the Station List.
In addition to navigating to other records in the tour, you may want to access additional information
associated with the current record by tapping on the Alert, Note, Attachment, or Long Instruction
tabs at the top of the screen (see the following sections of this guide for descriptions of these tabs).
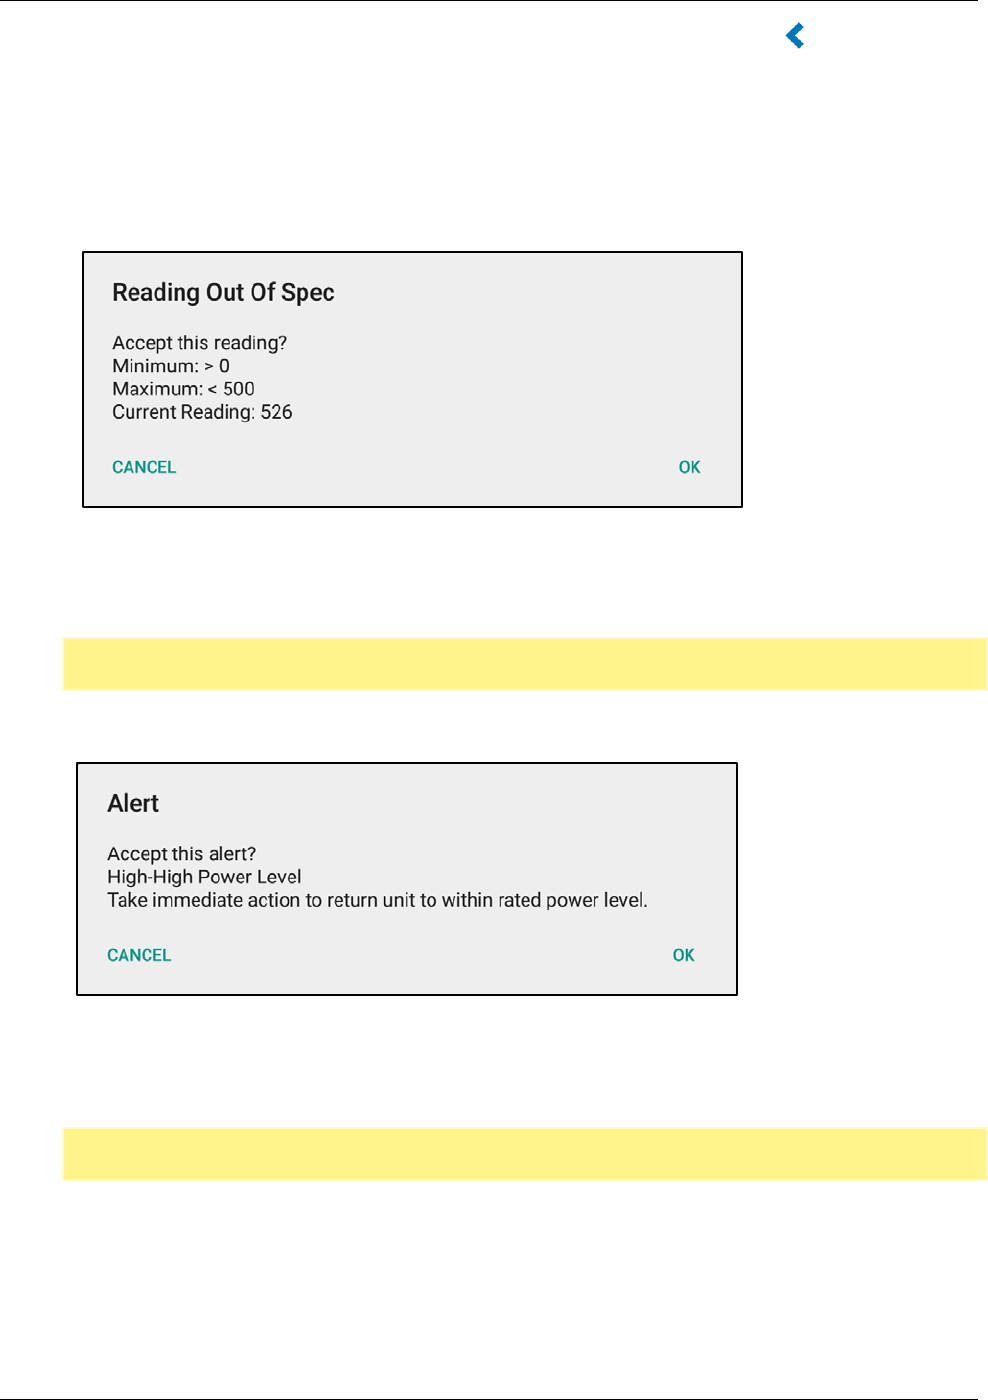
6. Before navigating from the reading tab to the selected destination, the program will check to determine if
the entered reading is within the minimum, maximum and/or tolerance limits shown. If not, a message
will be displayed for each limit asking if you want to accept the reading.
Tap:
<OK> to accept the selected reading and navigate to the desired location, or
<CANCEL> to go back and modify the reading
Note: Records with out-of-limit readings will display the associated limit labels (Min, Max and/or
Tolerance) in red.
7. A reading may also trigger one or more alerts to be displayed. Along with the text of the alert you will be
asked if you want to accept the reading.
8. Tap:
<OK> to accept the selected reading and navigate to the desired location, or
<CANCEL> to go back and modify the reading
Note: You must accept any/all out-of-limit and alert messages in order to proceed to the desired
navigation point.
Chapter 2: Using Mobile Operator Rounds
User Guide 23 GMDDB-1008-1606-03
Show History
Historical readings are available for review for the current record in a tabular format. The range of history that
is available is determined by the number of days of history that is downloaded to the mobile device as
specified in Operator Rounds Tour Maintenance Manager as well as any data collected but not
synchronized.
To access the History:
1. Tap the <Show History> button to display the reading history associated with the current record.
A table of readings is displayed for any history that has been downloaded to the mobile device as well
as collected but not synchronized. The screen can be scrolled to review all of the historical readings.
2. To return to the display of station detail information, tap the <Hide History> button.
Chapter 2: Using Mobile Operator Rounds
User Guide 24 GMDDB-1008-1606-03
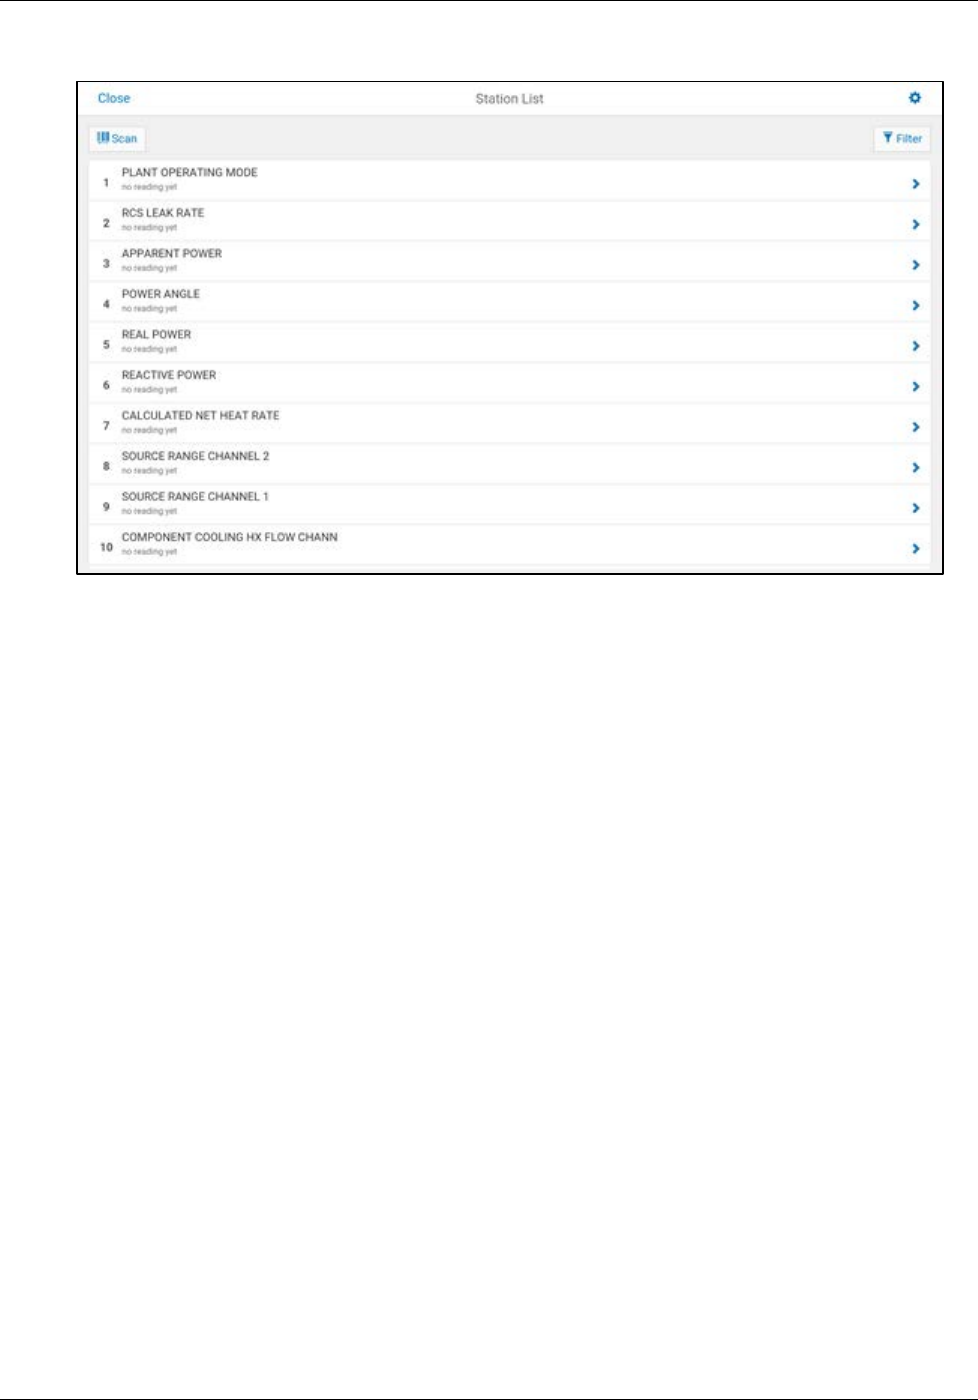
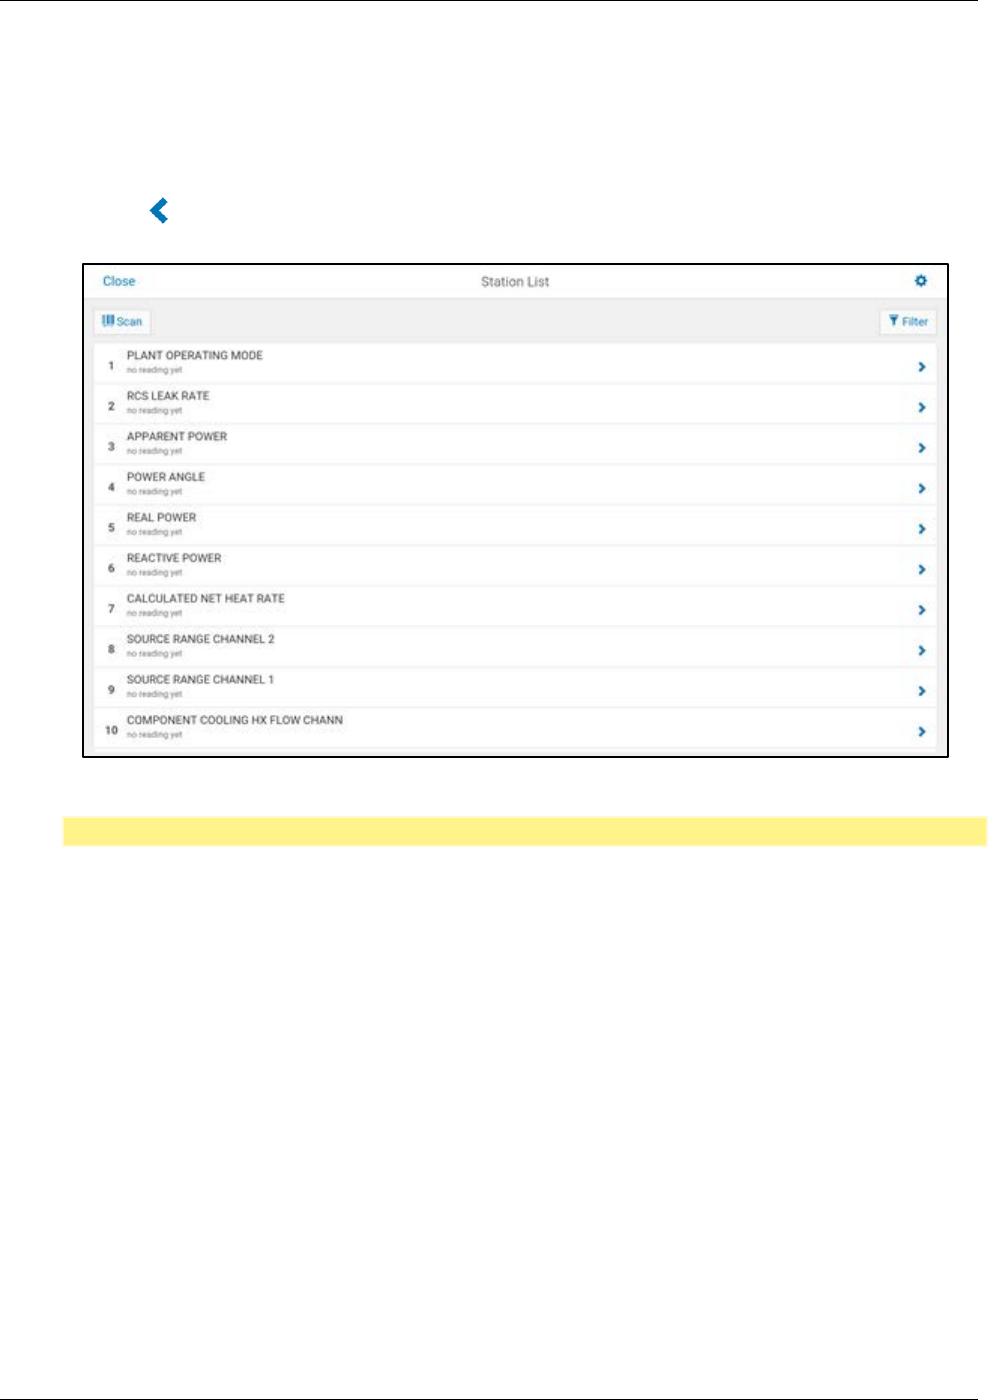
Station List
The Station List displays all records in the tour in a tabular format. The list is sorted by sequence and
displays the Station Description, Sequence Number and the current reading (if any) for the selected date and
shift. The list can be scrolled and tapping on a station will navigate to the reading tab for the selected station.
To access the Station List:
1. Tap the icon at top left of the Station Reading screen. Your current record location in the tour is
highlighted in the table.
2. To navigate to a record in the table, tap any row associated with the record.
Note: Stations that are not applicable based on an expression are no longer displayed in the list.
Chapter 2: Using Mobile Operator Rounds
User Guide 25 GMDDB-1008-1606-03
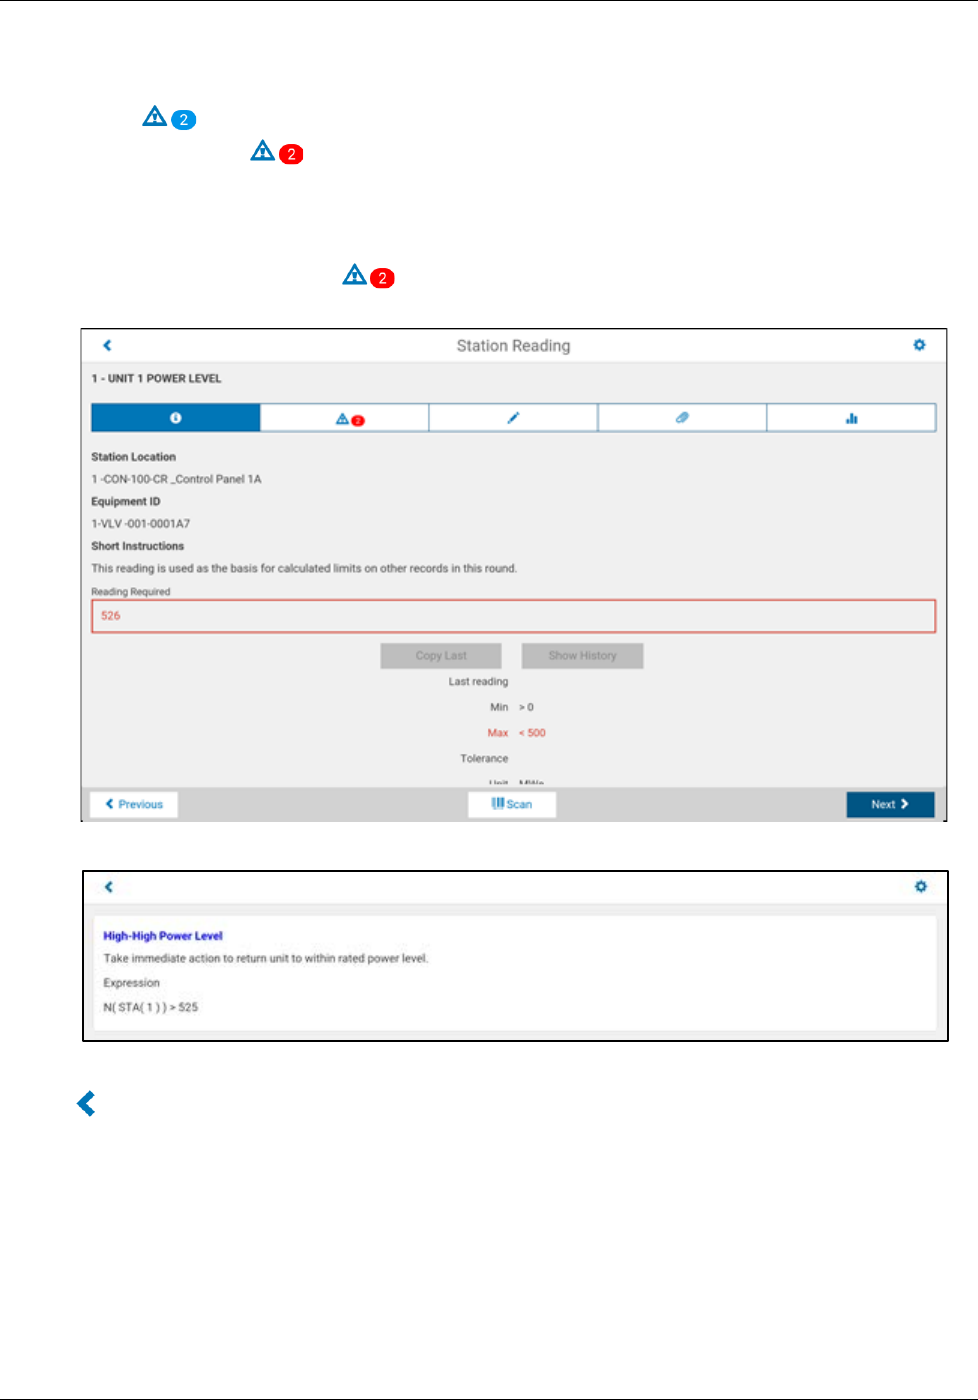
Alerts Tab
The Alerts Tab displays all alerts associated with the current record. If there are alerts for a record, the badge
on the alert tab will indicate the number of related alerts, if any alerts are active (apply based on the
current reading), the badge will be red. Active alerts (that is, alerts which are applicable based upon an
evaluation of the associated alert expression) will be displayed in the color assigned in Operator Rounds Tour
Maintenance Manager. Inactive alerts will be displayed in light gray.
To access the Alerts Tab:
1. Tap the label Alert on the tab at the top of the screen to display alerts associated with the
current record.
2. To obtain detailed information on any alert in the table, tap the row associated with the alert.
To exit the alert detail window, tap:
to return to the alert tab.
Chapter 2: Using Mobile Operator Rounds
User Guide 26 GMDDB-1008-1606-03
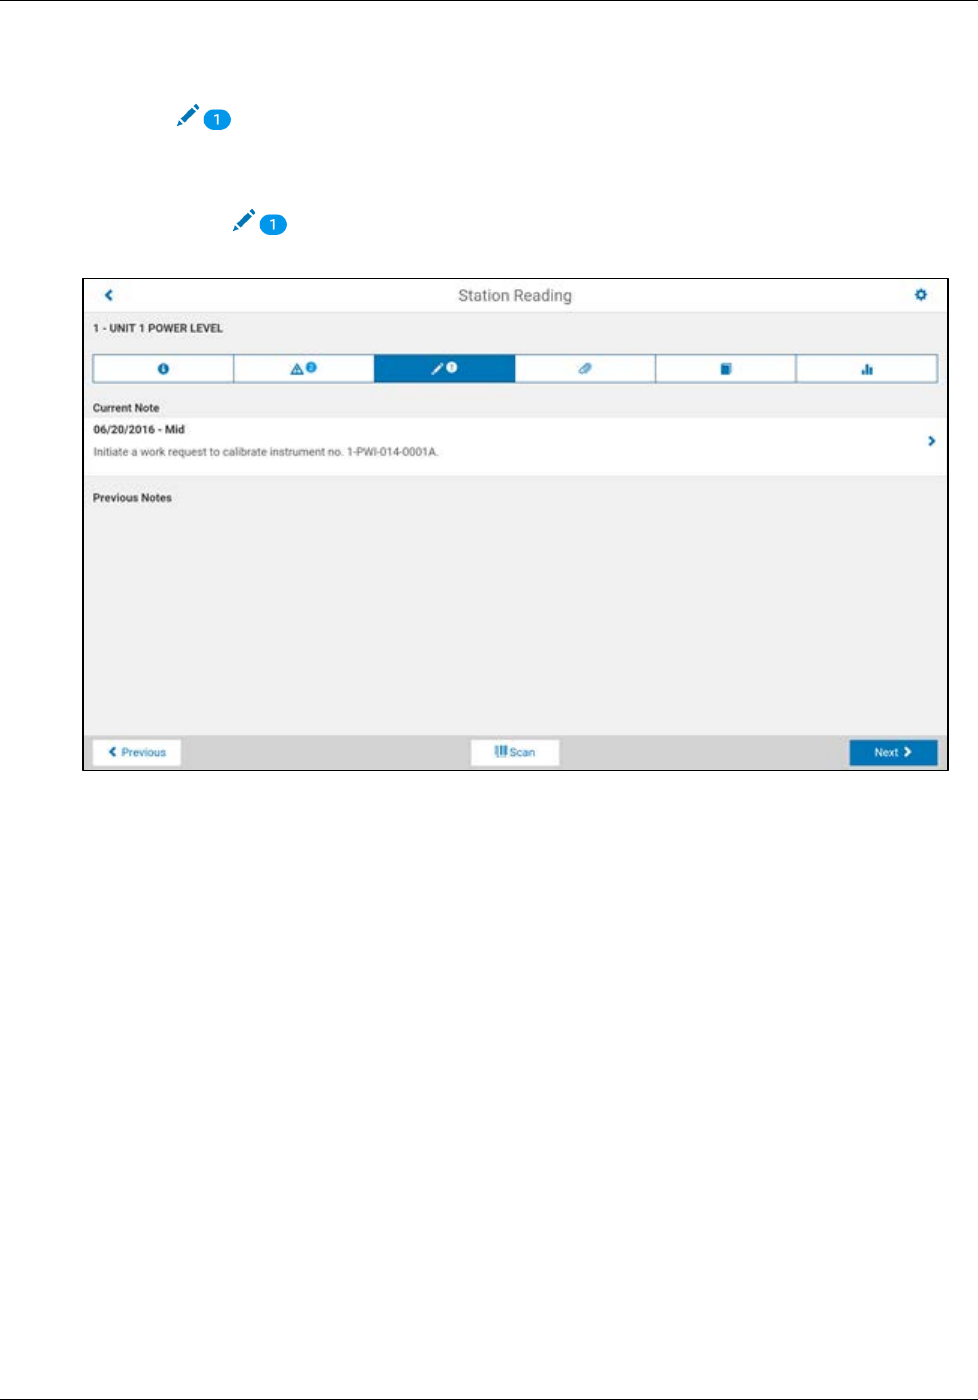
Notes Tab
The Notes Tab is used to associate a note with the current record in the tour. If there is a note for a record,
the note tab badge will display a number indicating the number of notes present for the current station.
Notes from previous shifts are also displayed. Notes can be created from scratch.
To access the Notes Tab:
1. Tap the Note tab on the tab list at the top of the screen to display notes associated with the
current record.

Chapter 2: Using Mobile Operator Rounds
User Guide 27 GMDDB-1008-1606-03
2. To edit the current note, click on the row to access the edit box. Tapping into the edit box will
automatically display the device keyboard:
Note: Notes are a good place to use dictation into a transcriber for data entry.
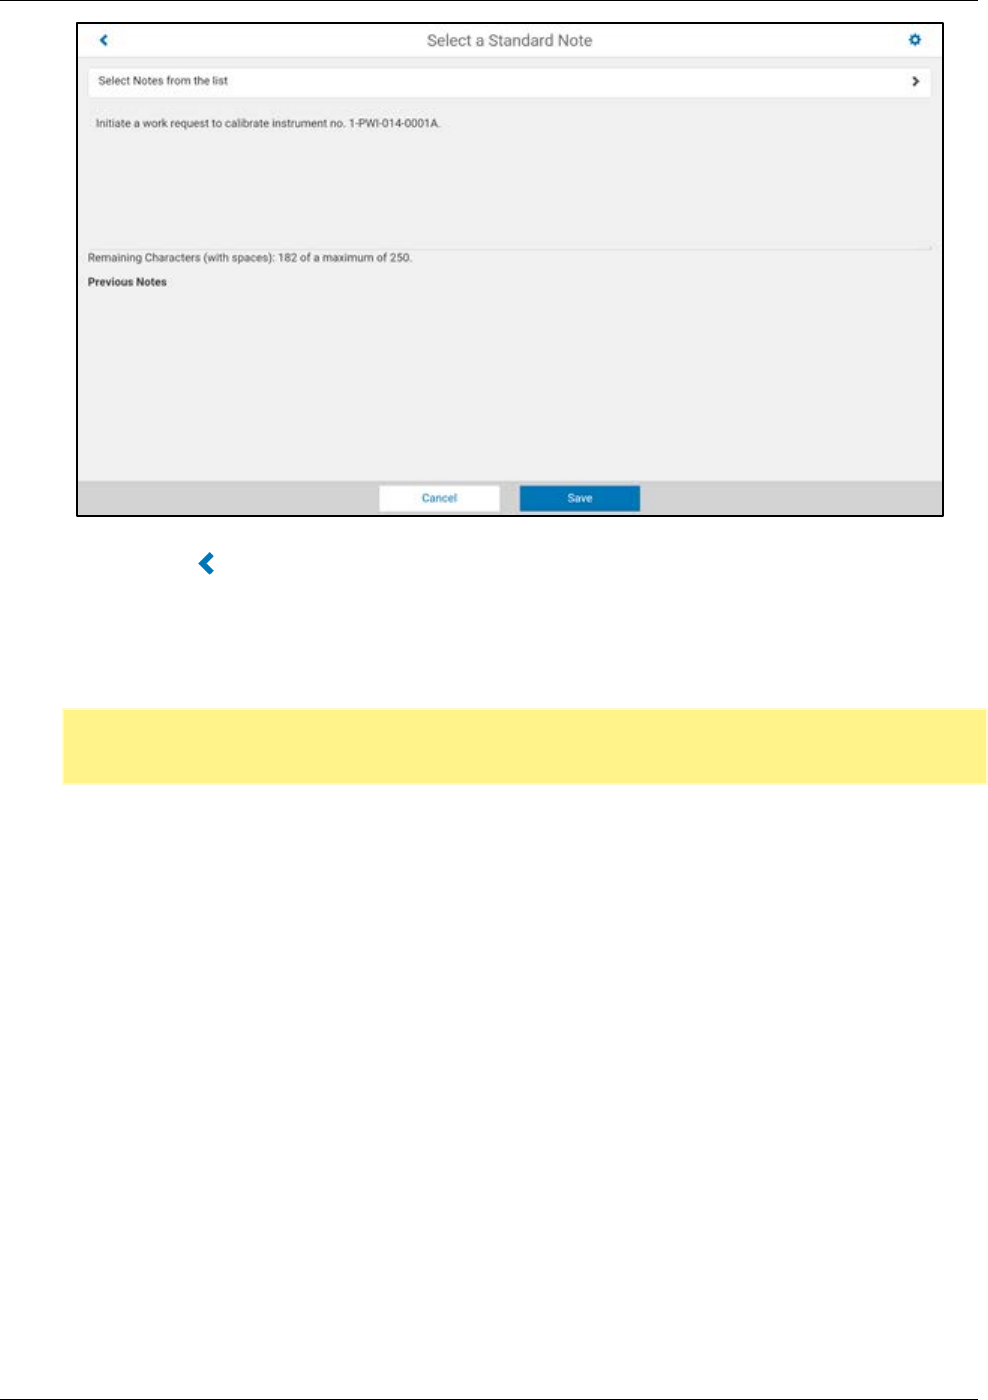
If a station has been set up for standard notes, a control is visible at the top of the screen labeled
<Select Notes from the list> that allows for choosing from a pre-defined set of standard notes.
Tapping on this control will display the full list of available notes.
Selecting one of the standard notes will return to the previous screen where editing of the chosen
standard note is allowed.
Chapter 2: Using Mobile Operator Rounds
User Guide 28 GMDDB-1008-1606-03
Once editing is complete, tap <Save> to save and return to the Note tab of the Station Reading
wiindow. Tap or <Cancel> to abandon any changes and return to the Note tab of the Station
Reading window.
Notes from previous shifts are displayed, but cannot be edited under the Previous Notes label. The
range of historical notes that are available is determined by the number of days of history that is
downloaded to the mobile device as specified in Operator Rounds Tour Maintenance Manager.
Note: A good practice in operator rounds is to ‘carry forward’ notes from previous shifts. Therefore, if
available, the system will automatically copy the last note made for a particular record to the current
note. There it can be edited or deleted entirely if no longer applicable.
Chapter 2: Using Mobile Operator Rounds
User Guide 29 GMDDB-1008-1606-03
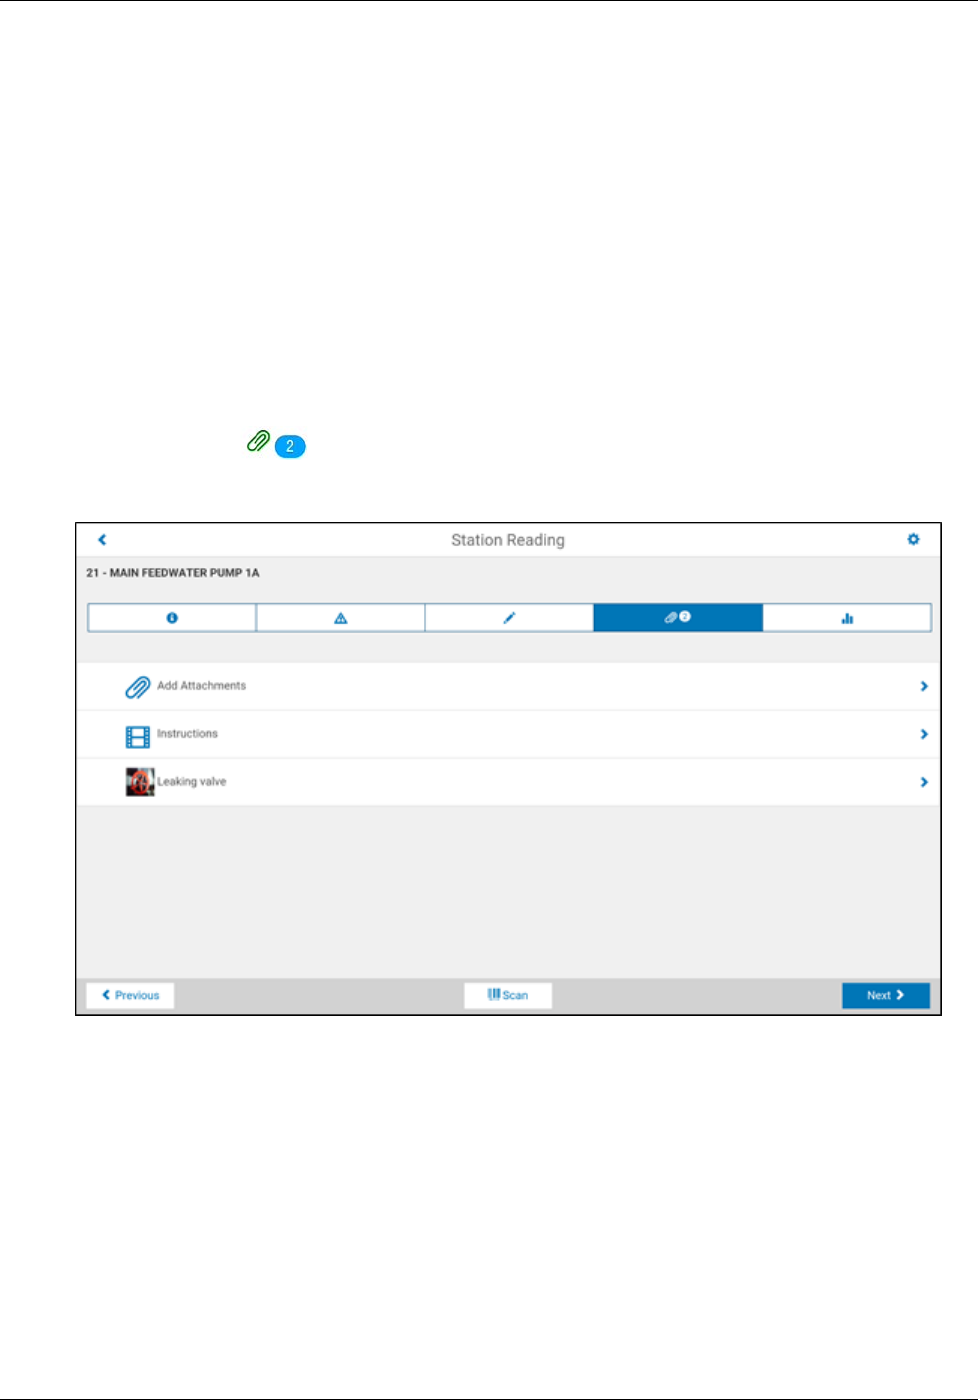
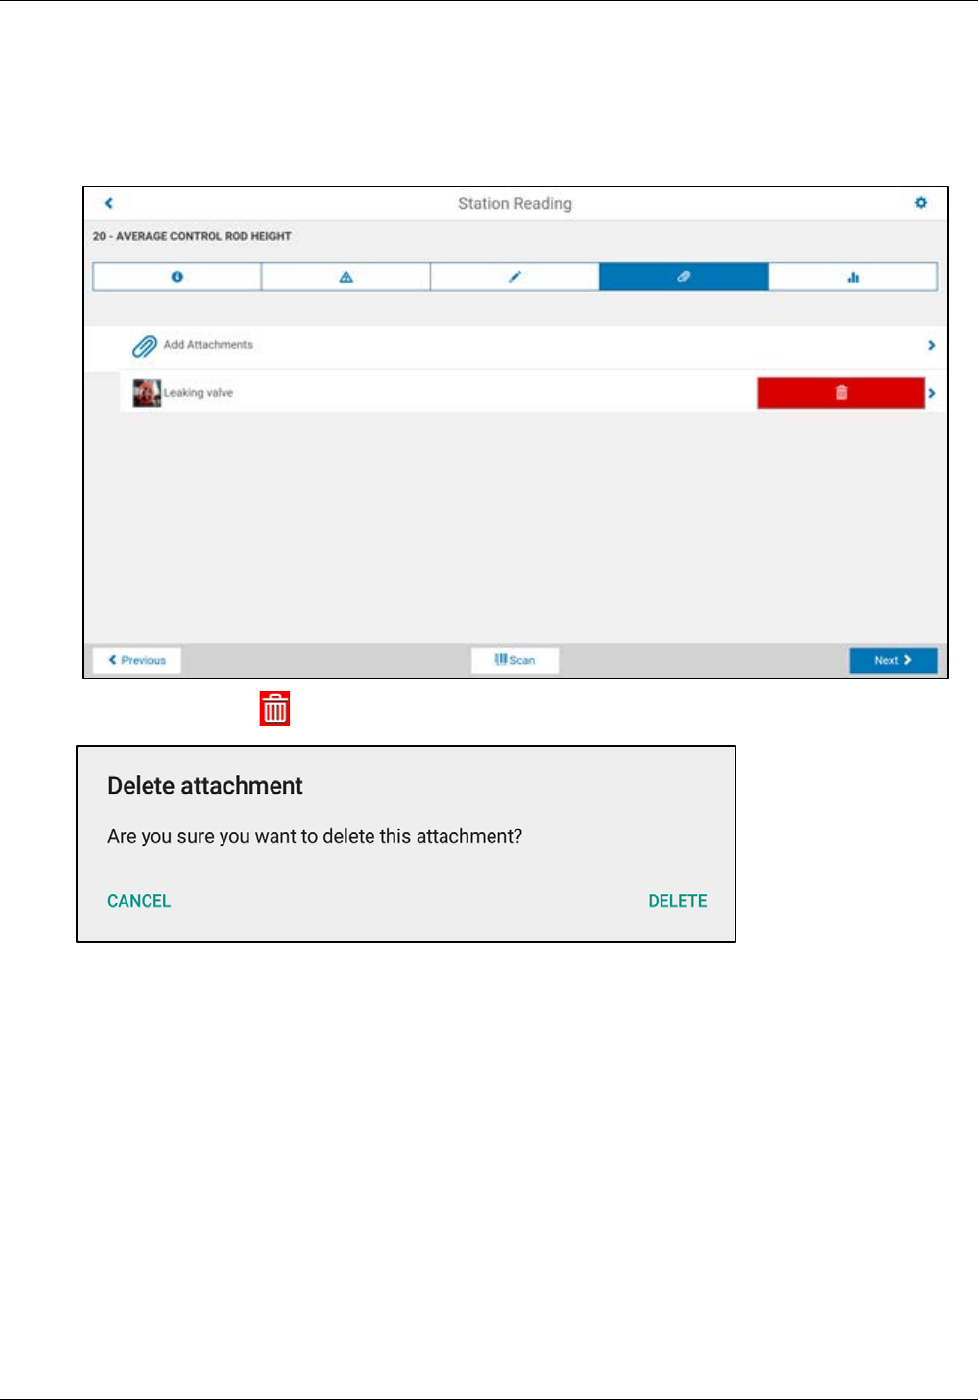
Attachments Tab
Attachments can be attached to an entire tour, or to specific records in a tour as part of either tour
maintenance or performance activities. Attachments are used to provide additional information for a tour,
record, or reading not generally provided as part of the tour procedure. Attachments attached with Operator
Rounds Tour Maintenance Manager are referred to as ‘reference’ attachments since they are for reference
only on the mobile device. Attachments attached on the mobile device are referred to as ‘performance’
attachments during the performance of a tour.
Attachments can be any type of file that is supported by both the desktop and mobile device. Examples
include word processing files, graphic files, audio files, and photo/video files.
The Attachments Tab allows you to access reference attachments and attach performance attachments to a
record in a tour. Attachments associated with an entire tour (that is, no specific record) are displayed on each
record of the tour. If there are attachments for a record, the attachments tab label will be display a badge with
a number indicating the number of attachments present.
To access the Attachments Tab:
1. Tap the paper clip on the tab list at the top of the screen to display the attachments
associated with the current record. The badge on the tab will indicate the number of attachments
associated with the station.
Chapter 2: Using Mobile Operator Rounds
User Guide 30 GMDDB-1008-1606-03
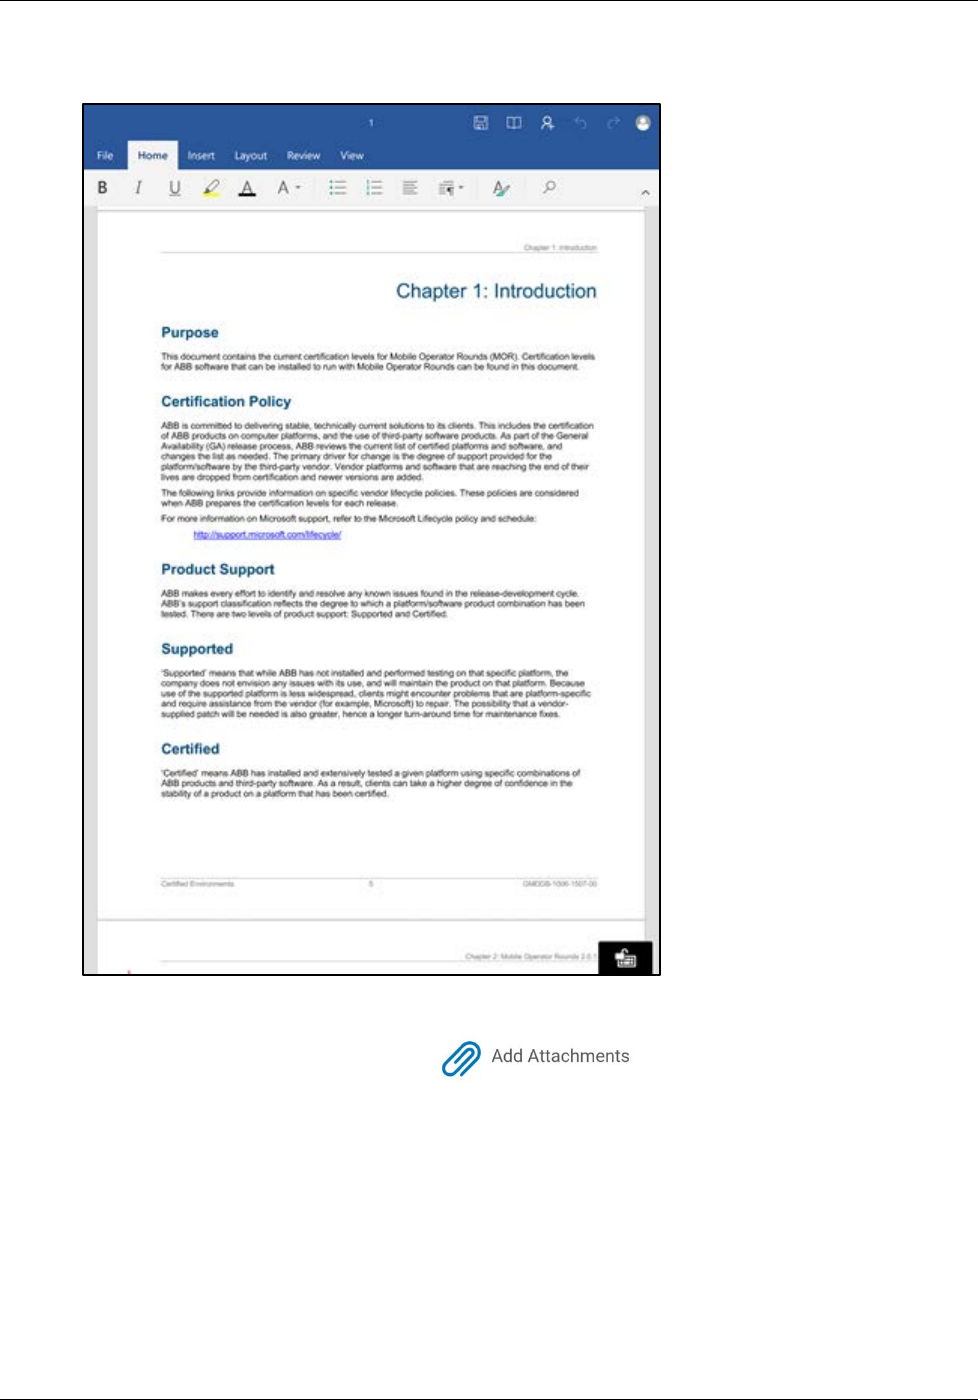
2. To open a reference attachment, tap on the associated row. The application associated with the
attachment file (for example. Word Viewer for .docx files) will be used to open the file. If a native
viewer is not present to view the file type, a message will appear stating this.
3. When you have finished with the attachment file, you can close the file in different ways depending on
what type of file was opened.
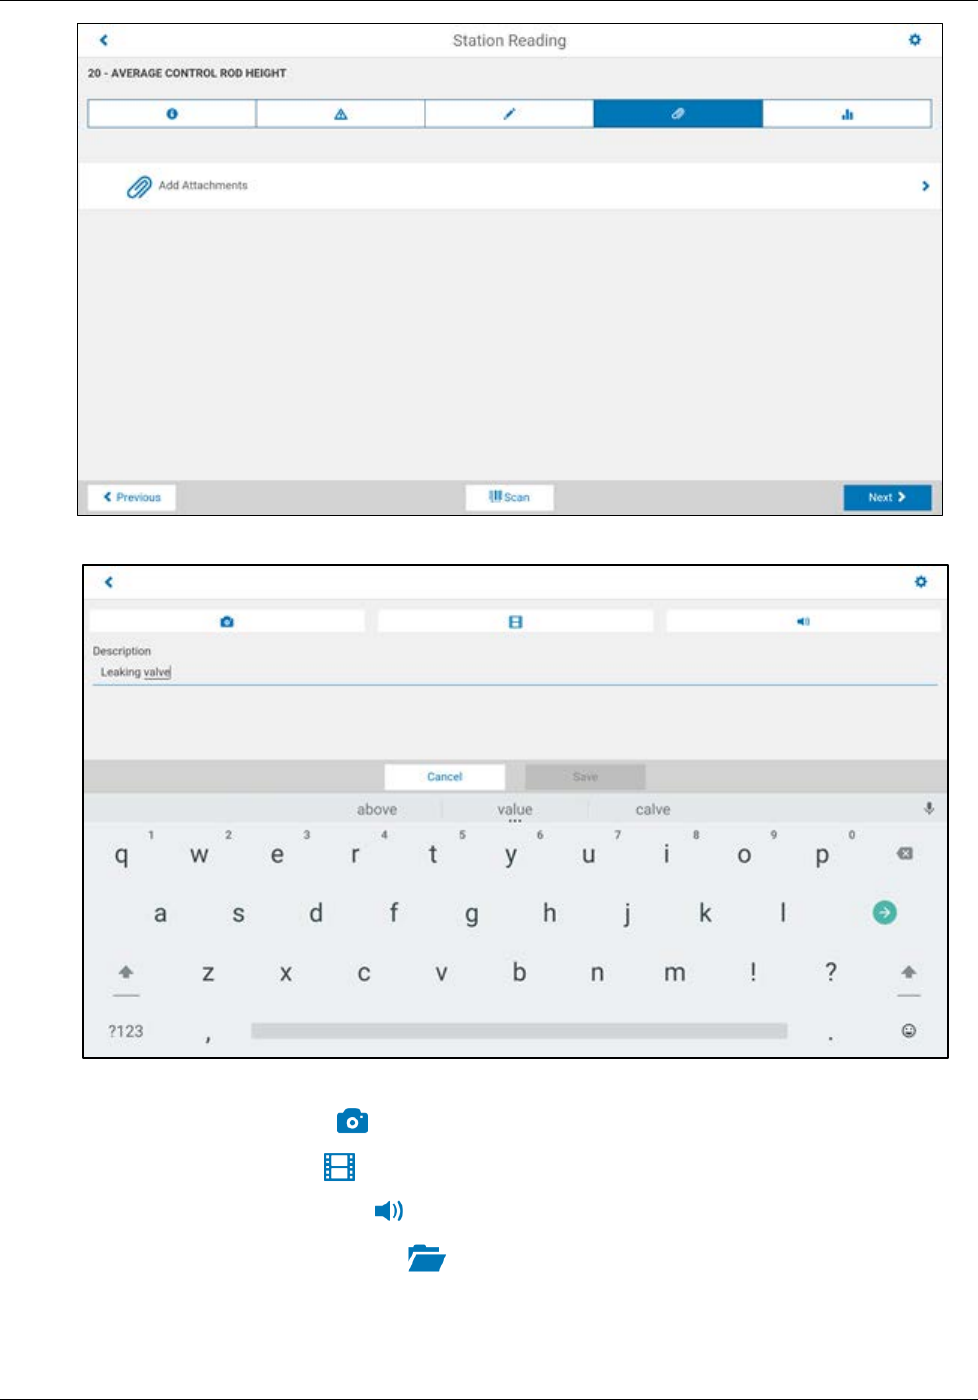
4. To attach a performance attachment, tap
Chapter 2: Using Mobile Operator Rounds
User Guide 31 GMDDB-1008-1606-03
5. In the Attachments dialog, enter a description for the attachment to be attached.
6. Next, select one of the following:
a. Tap the camera icon to activate the still camera to capture a picture.
b. Tap the movie icon to activate the camera to capture a movie with sound.
c. Tap the microphone icon to activate the microphone to record sound.
d. If present, tap the folder icon to open the OS specific file browser and select a file to
attach. This feature is not available in Android.
7. After creating a file attachment from one of the above icons, a preview is possible by tapping the
<Preview> button.
Chapter 2: Using Mobile Operator Rounds
User Guide 32 GMDDB-1008-1606-03
8. With an attachment created and a description provided in the attachment dialog, the <Save> button
will be enabled tap:
<Save> to attach the file as a performance attachment, or
<Cancel> to cancel the entry
9. To delete a performance attachment, swipe the attachment to the left.
Click the delete icon to delete the row, you will be prompted to confirm the delete.
Chapter 2: Using Mobile Operator Rounds
User Guide 33 GMDDB-1008-1606-03
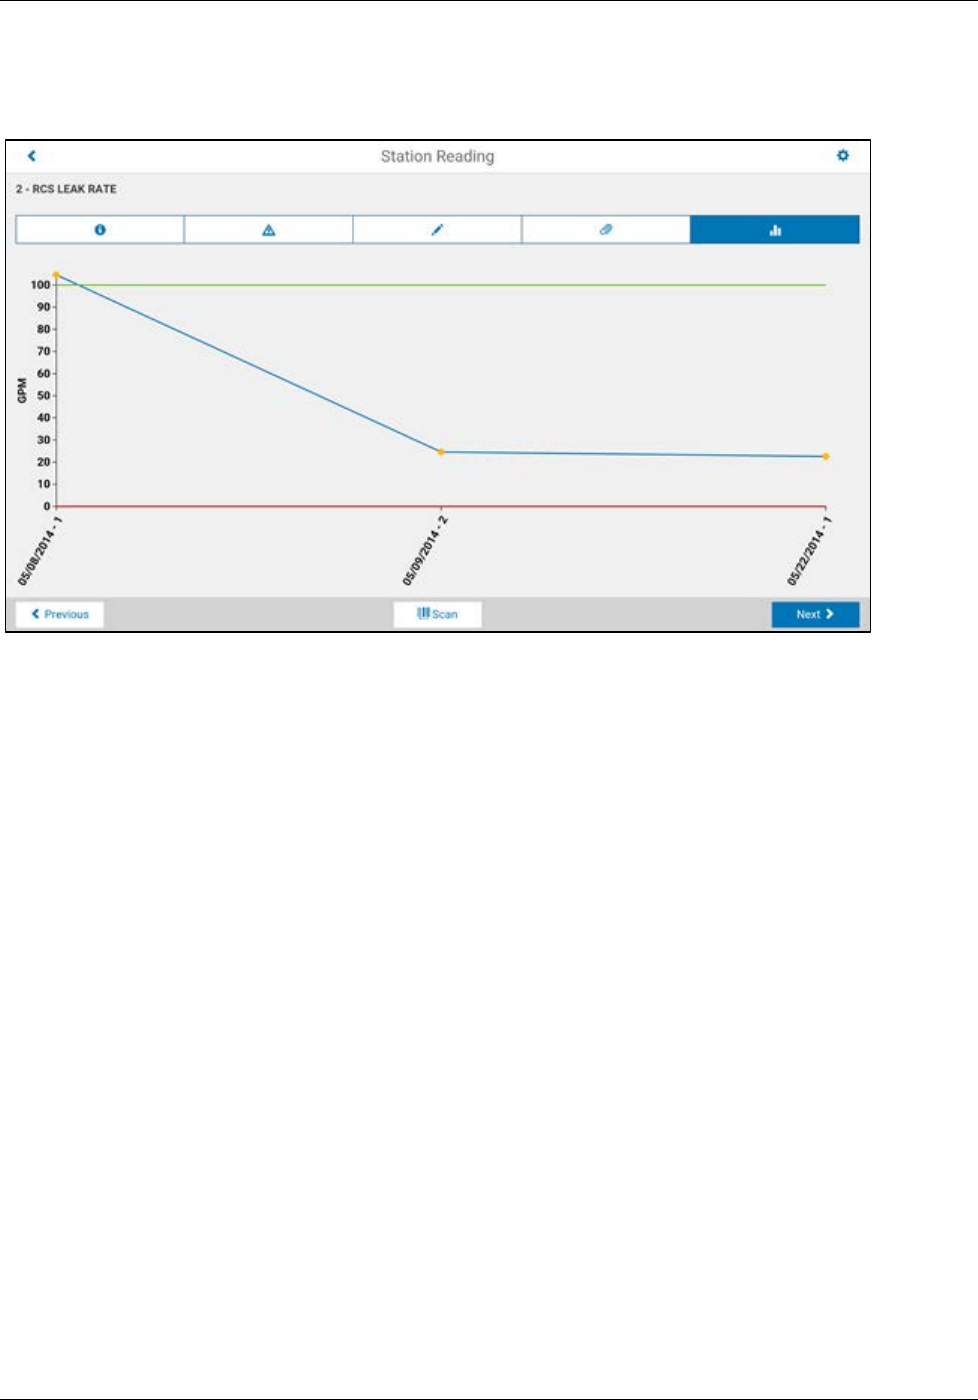
Graph Tab
To display the reading history in graphical format, tap the Graph Tab. If applicable, minimum and maximum
limits are also displayed on the graph.
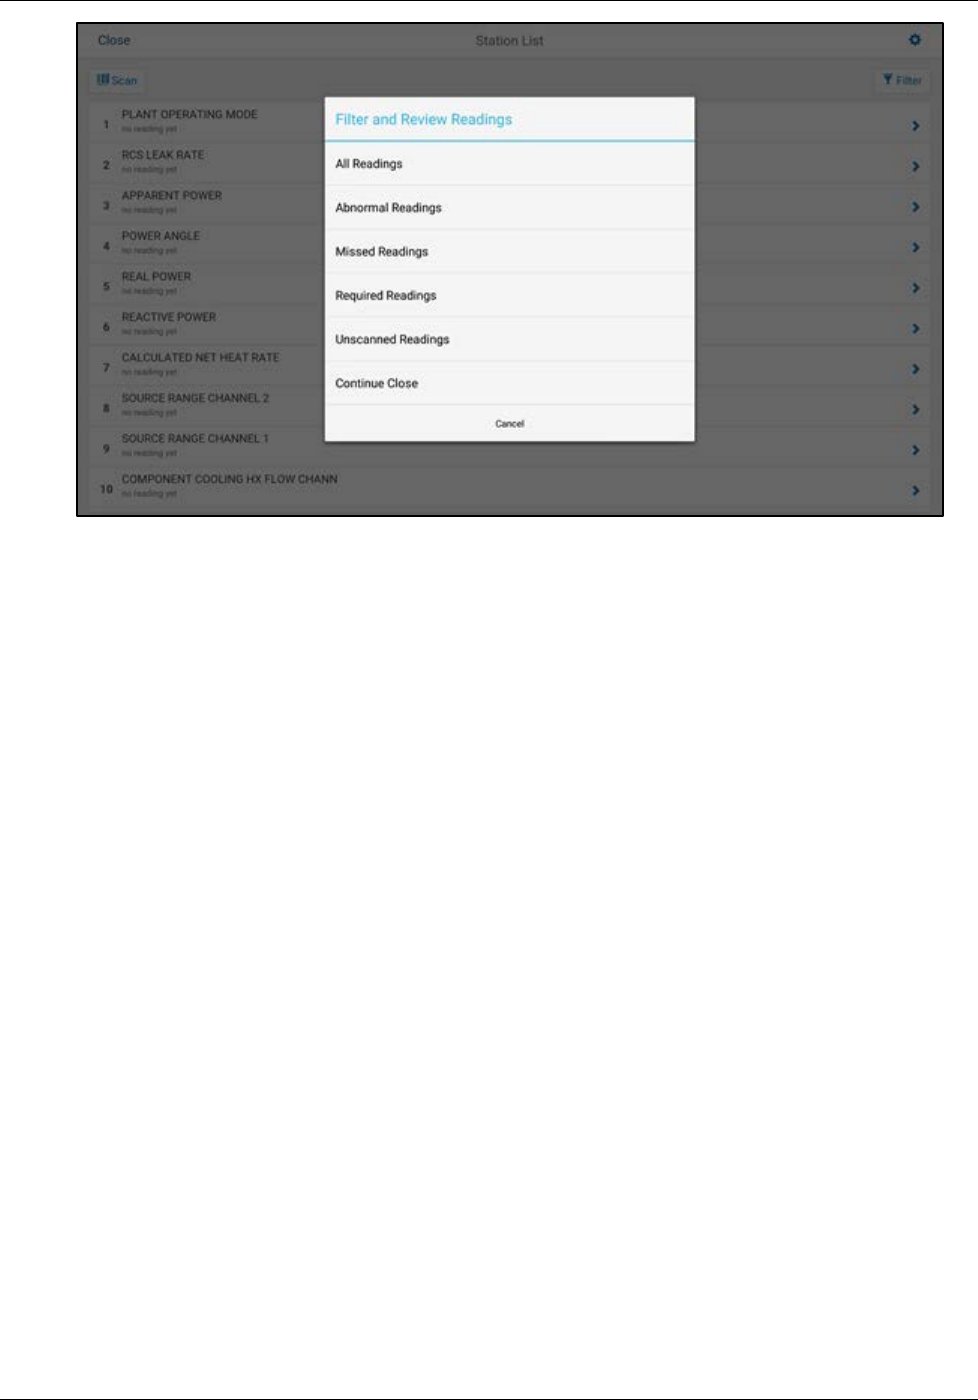
Close Tour
To upload data recorded for a tour on the mobile device back to the desktop system, it is necessary to first
close the open tour on the mobile device. When a tour is closed, all expressions are recalculated, thereby
ensuring that all calculated values are up-to-date.
To close an open tour on the mobile device:
1. Navigate to the Station List
2. Click <Close> in the upper left hand corner.
3. A Filter and Review Readings dialog will appear allowing the user to filter the stations prior to actually
closing the tour. This will aid the user in determining if all stations have been properly addressed.
Chapter 2: Using Mobile Operator Rounds
User Guide 34 GMDDB-1008-1606-03
4. Tapping any of the filter options will cancel the close process and apply the selected filter, returning to
the Station List displaying the selected result set. Tapping the <Continue Close> button will continue
the close process.
5. The status of the closing process is displayed as expressions are recalculated. When complete, the
program will return to the Open a Tour window.
To exit the filter dialog, returning to All Readings, and return to data collection tap:
<Cancel> to exit the filter dialog
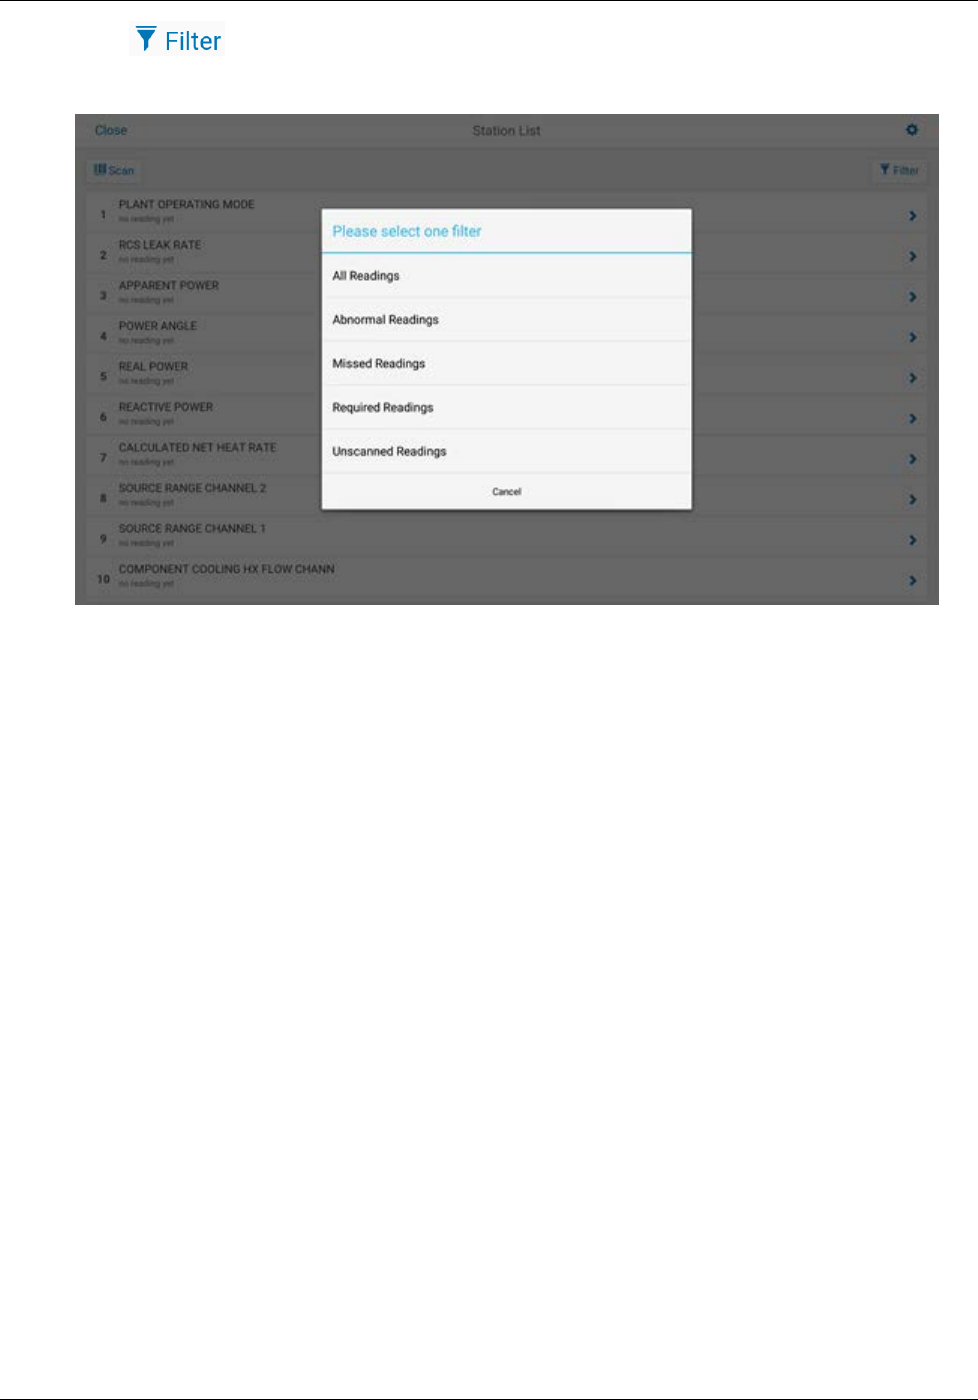
Filtering a Tour
Filter is provided which allows filtering the set of records viewable in a tour to include:
All Readings
Abnormal Readings - only readings that are not within the minimum, maximum, and/or tolerance
limits
Missed Readings - only records that have no readings
Required Readings - only records that have the required reading indicator specified
Unscanned Readings - only records that have NOT been scanned
To filter an open tour on the mobile device:
1. Navigate to the Station List
Chapter 2: Using Mobile Operator Rounds
User Guide 35 GMDDB-1008-1606-03
2. Click in the upper right corner.
3. A filter dialog will appear allowing the user to filter the stations. This will aid the user in determining if all
stations have been properly addressed.
4. Tapping any of the filter options will apply the associated filter.
To exit the filter dialog, leaving the last applied filter in place, and return to data collection tap:
<Cancel> to exit the filter dialog
Filtering can be selected from, and are applied to, all tabs (for example. Detail Tab, Alert Tab, Note Tab).
Some suggested uses include:
Use the Required Readings filter and the Station List to quickly determine which required readings
have been taken or need to be taken.
Use the Abnormal Readings filter and the Notes Tab to ensure that abnormal readings have been
annotated.
Use the Missed Readings filter and the Detail Tab or Station List to quickly locate and complete
missing readings.
Use the Unscanned Readings filter and the Detail Tab or Station List to quickly determine which
records have NOT been scanned.
Chapter 3: Tour Gear Menu Options
User Guide 36 GMDDB-1008-1606-03
Chapter 3: Tour Gear Menu Options
Tour Details
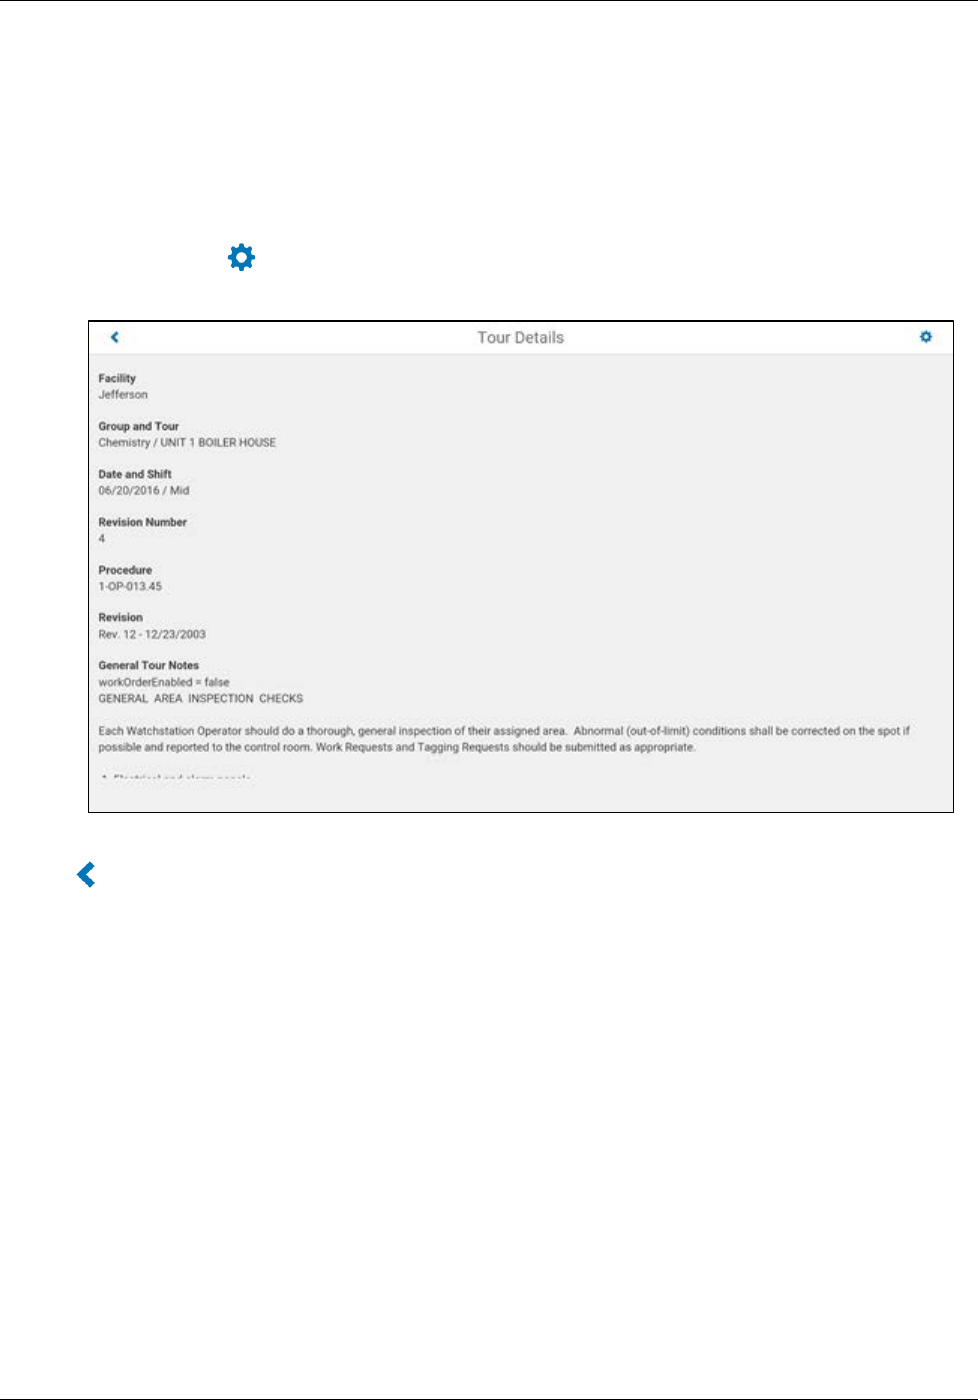
At any time during the data collection process, you can view the tour details.
To view the tour details:
1. Tap on the Gear in the upper right hand corner and tap <Tour Details>.
2. The tour parameters summary window is displayed with General Tour Notes, if applicable:
To exit the tour details and return to data collection tap:
to exit the tour details
Chapter 3: Tour Gear Menu Options
User Guide 37 GMDDB-1008-1606-03
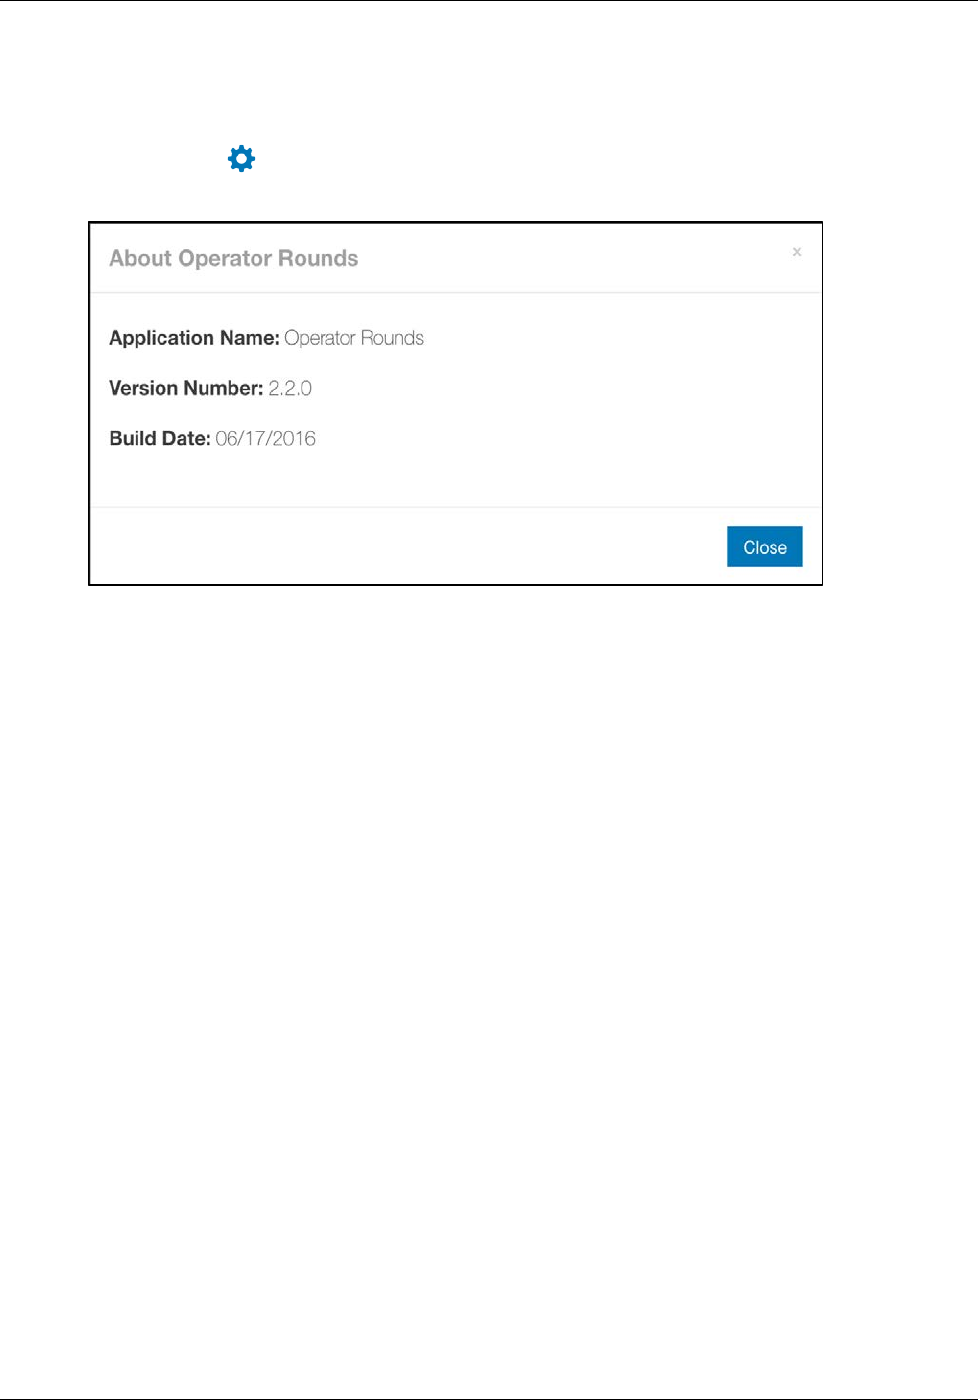
About Operator Rounds
At any time during the data collection process, you can view the application version information.
To view the application version information:
1. Tap on the Gear in the upper right hand corner and tap <About Operator Rounds>.
2. The application version summary window is displayed:
To exit the application version summary and return to data collection tap:
<Close> to exit the About screen

Chapter 3: Tour Gear Menu Options
User Guide 38 GMDDB-1008-1606-03
Login / Logout
It is sometimes necessary for the current user to logout and another user to login to the mobile device without
closing currently opened tour(s). This is most commonly required when one user is taking over for another
user before the entire tour is complete (for example, for a split-shift).
To manually logout the current user and login another user to the mobile device without closing
currently opened tour(s):
1. Tap on the Gear in the upper right hand corner and tap <jdoe (Logout)>, where “jdoe” will be
replaced by your Login ID.
The Welcome to Operator Rounds window is displayed, prompting the new user to enter a Login ID
and password.
2. When you have entered your Login ID and Password, tap:
<Sign in> to login the new user returning to the Open a Tour window.
Chapter 3: Tour Gear Menu Options
User Guide 39 GMDDB-1008-1606-03
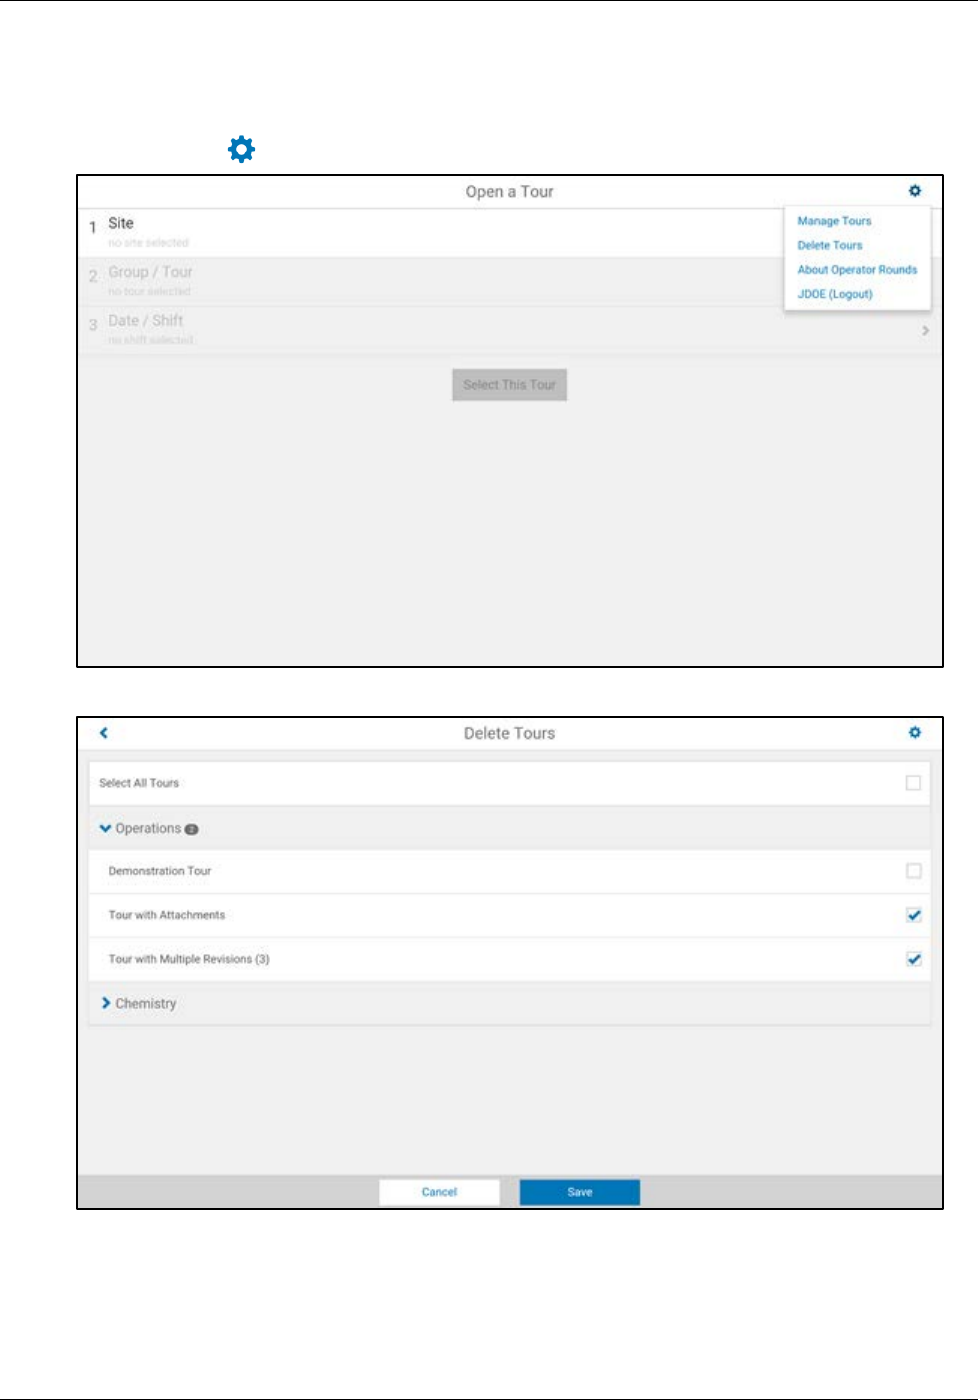
Removing Tours from the Mobile Device
Tours that are no longer needed can be removed from the mobile device in the Delete Tours window. To
remove tours from the mobile device:
1. Tap on the Gear in the upper right hand corner and tap <Delete Tours>.
2. Select tours that are no longer needed on the mobile device and click <Save>.
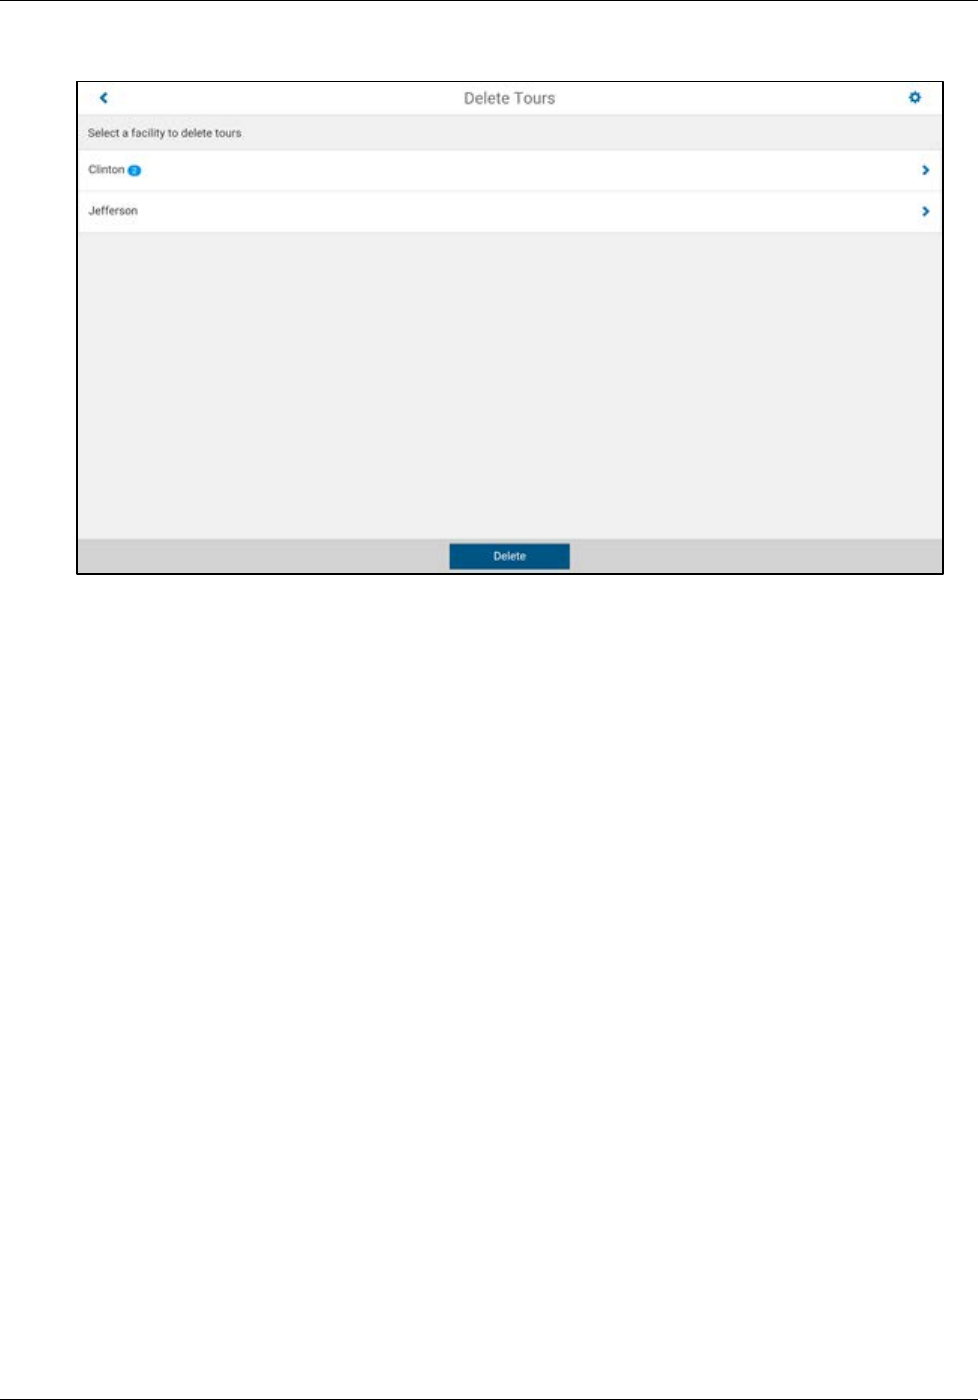
Chapter 3: Tour Gear Menu Options
User Guide 40 GMDDB-1008-1606-03
3. After selecting the desired tours, click <Delete> and Mobile Operator Rounds will remove the tours
from the offline storage.
When completed, the deleted tours are no longer available for opening on the mobile device.
Chapter 4: Synchronizing Tour Data
User Guide 41 GMDDB-1008-1606-03
Chapter 4: Synchronizing Tour Data
Data collected on the mobile device with Mobile Operator Rounds is transferred to the server via the
synchronization process. The data is then available for review in the Operator Rounds module and data may
potentially be promulgated to the Narrative Logs module and perhaps to the plant historian. Data can be
synchronized at any time you have connectivity to the server (you don’t have to complete a tour on the mobile
device) and is initiated from the mobile device. Performance data transferred from the Mobile Operator
Rounds to the server database include:
Readings
Calculations
Verification information (user ID, clock date/time, scan indicator)
Alert confirmation (user ID, clock date/time)
Notes
Performance attachments
Once uploaded, data can be analyzed or edited using Operator Rounds Tour Data Manager.
To prevent the Mobile Operator Rounds database from accumulating historical performance data which could
exceed the available memory on the mobile device, after each synchronization, old performance data is
automatically removed from the Mobile Operator Rounds database. The amount of historical performance
data maintained in the Mobile Operator Rounds database is specified in Operator Rounds Tour Maintenance
Manager (Days History to Download).
Synchronize Tour Data
Before uploading, first make sure that the mobile device has connectivity to the server specified in the
connection settings. Then on the mobile device:
1. Tap on the Gear in the upper right hand corner and tap <Manage Tours >.
You may get a message that you need to re-authenticate while in connected mode to manage tours
on the device, if this is the case re-login.
Chapter 4: Synchronizing Tour Data
User Guide 42 GMDDB-1008-1606-03
2. Tap <Synchronize Tours> and Mobile Operator Rounds will perform the synchronization process.
When completed, the mobile device is ready to use.
Chapter 5: Desktop System Preferences
User Guide 43 GMDDB-1008-1606-03
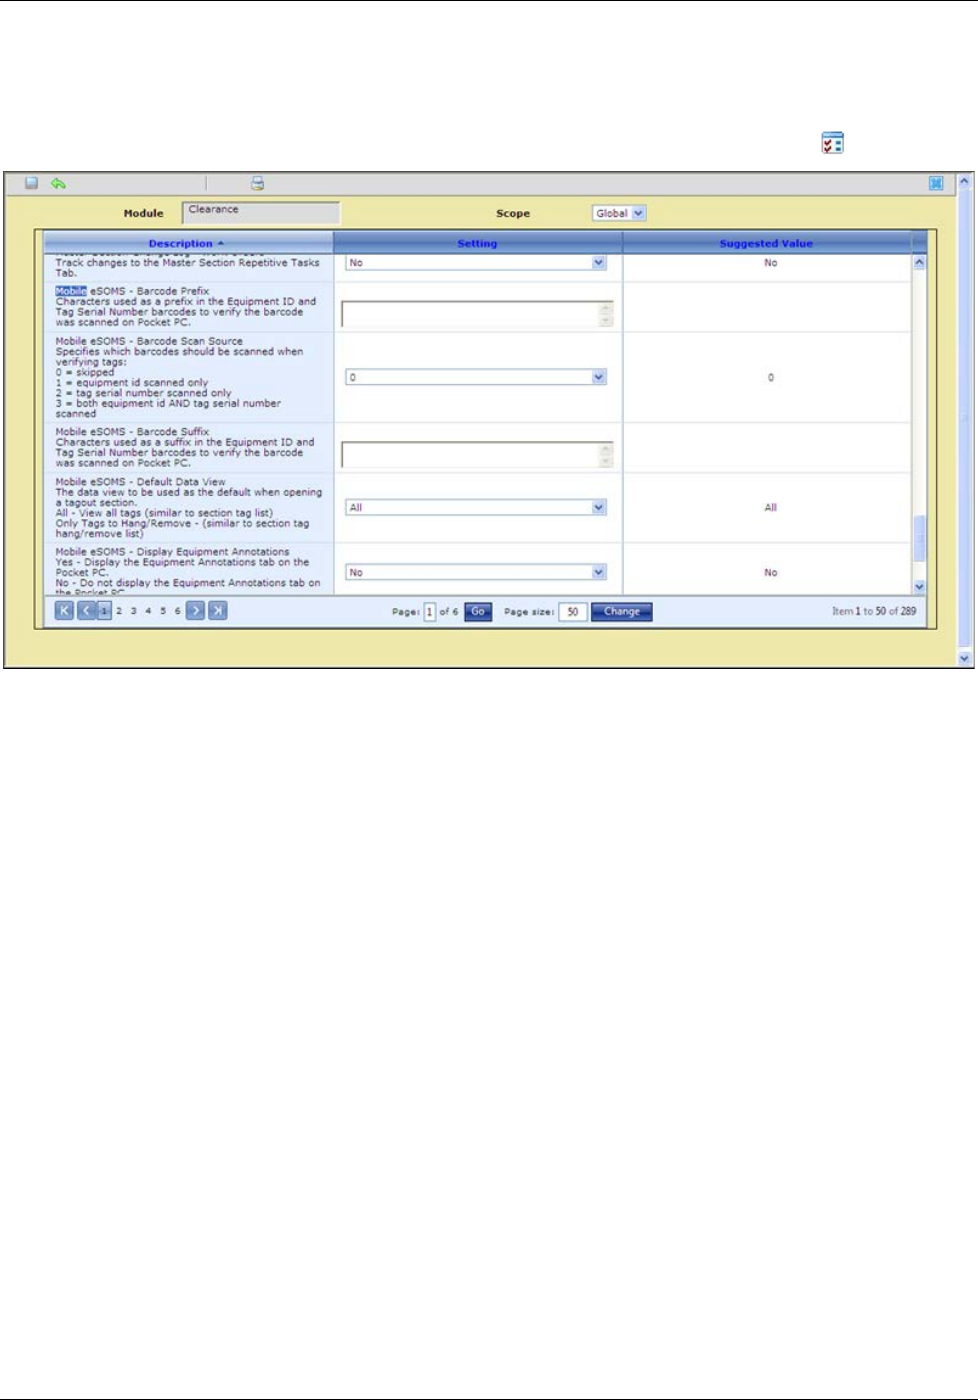
Chapter 5: Desktop System Preferences
Desktop system preferences specifically related to the operation of Mobile Operator Rounds are shown and
described below. These preferences can be set by clicking on the Manage Preferences icon in eSOMS.

Chapter 5: Desktop System Preferences
User Guide 44 GMDDB-1008-1606-03
Preference Lists for eSOMS
Global Preferences
Preferences Settings Default
Mobile eSOMS - Copy Notes
Forward Copy previous notes to the current shift on the mobile
device.
No - do not copy notes
Yes - copy notes to the current shift
Yes
Notes Required Require a note to be entered when an abnormal
(out-of-spec or out-of-tolerance) reading is entered
(desktop, mobile or web):
No - do not require a Note to be entered on abnormal
readings
Yes - require a Note to be entered on abnormal
readings
No
Mobile eSOMS Suite - Notes Display Display the Notes tab automatically when an abnormal
(out-of-spec or out-of-tolerance) reading is entered
on the mobile device:
No - do not automatically display Notes tab on
abnormal readings
Yes - automatically display
No
