Ethereum Dev Guide
User Manual:
Open the PDF directly: View PDF ![]() .
.
Page Count: 26
Ethereum 개발 가이드 (입문용)
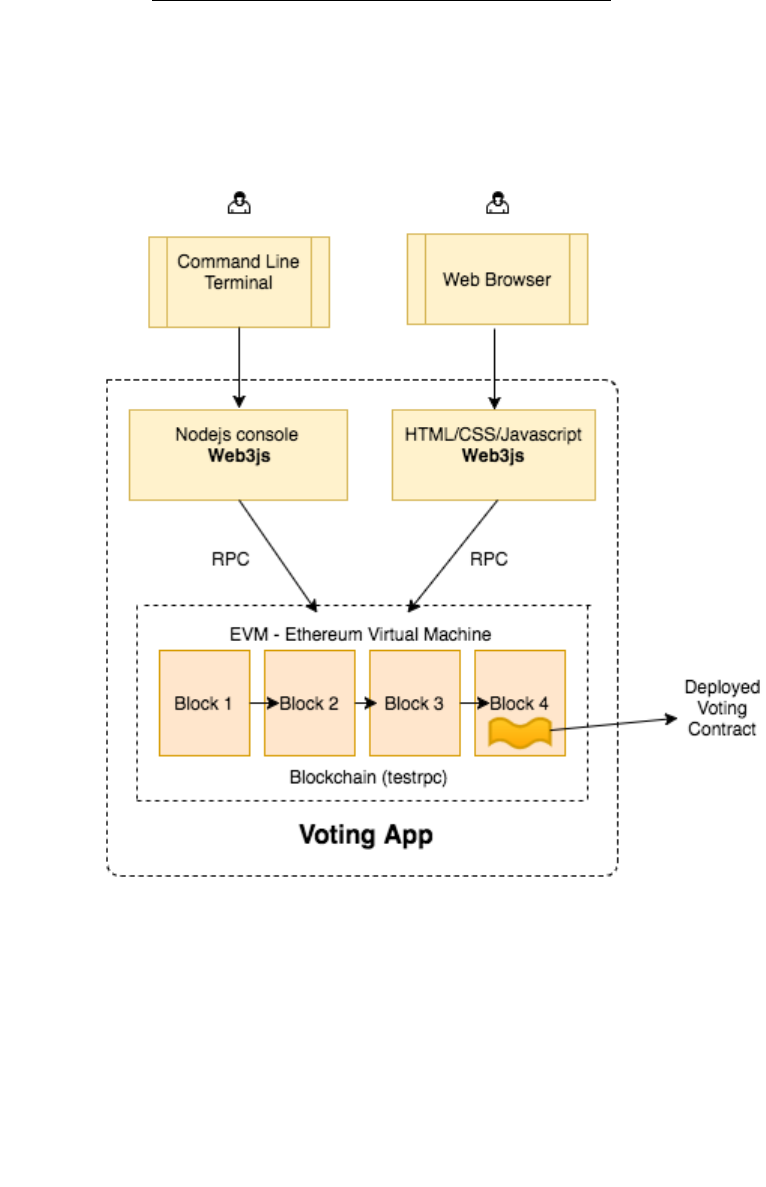
투표를 할 수 있는 dApp을 개발하면서 기본적인 개발툴과 개념들을 익히도록 하겠다.
우리가 개발할 dApp은 다음과 같은 구조를 가질 예정이다:
이 개발 가이드는 두 개의 파트로 나누어 어플리케이션을 개발할 예정이다:
Part 1. Contract를 작성하여 간단한 투표용 dApp을 만든 후 가상환경에서 구동하기
Part 2: 투표용 dApp을 실제 블록체인 위에서 구동하기
1단계: Ethereum 개발 도구 다운로드
시작하기 전에 앞서 리눅스 터미널에 다음과 같이 입력해 폴더들을 만들어 준다.
$ mkdir voting-dapp
$ cd voting-dapp
~/voting-dapp$ mkdir node_modules
그리고 Ethereum 개발에 앞서 리눅스 터미널에서 다음 개발 도구들을 다운로드 받는다:
nodejs: 네트워크 어플리케이션 개발에 사용되는 플랫폼이며 Javascript 언어를 활용한다.
$ sudo apt-get update
$ sudo apt-get install nodejs
* 앞으로 모든 명령어는 ~/voting-dapp 디렉토리 안에서 입력한다.
**리눅스 환경에 따라 앞에 sudo - 관리자 권한 부여 - 를 입력할 수도 안 할 수도 있다
npm: Node.js 패키지 매니저이다.
$ sudo apt-get install npm
Ganache-cli: 10개의 테스트용 Ethereum 계좌(각각 100 ETH 보유)를 만들어 테스트 환경
제공
$ npm install ganache-cli
web3: javascript API to interact with Ethereum node which relies on RPC. It can be used with
any Ethereum node which exposes RPC like GETH, Mist, Parity.
$ npm install web3@0.20.2
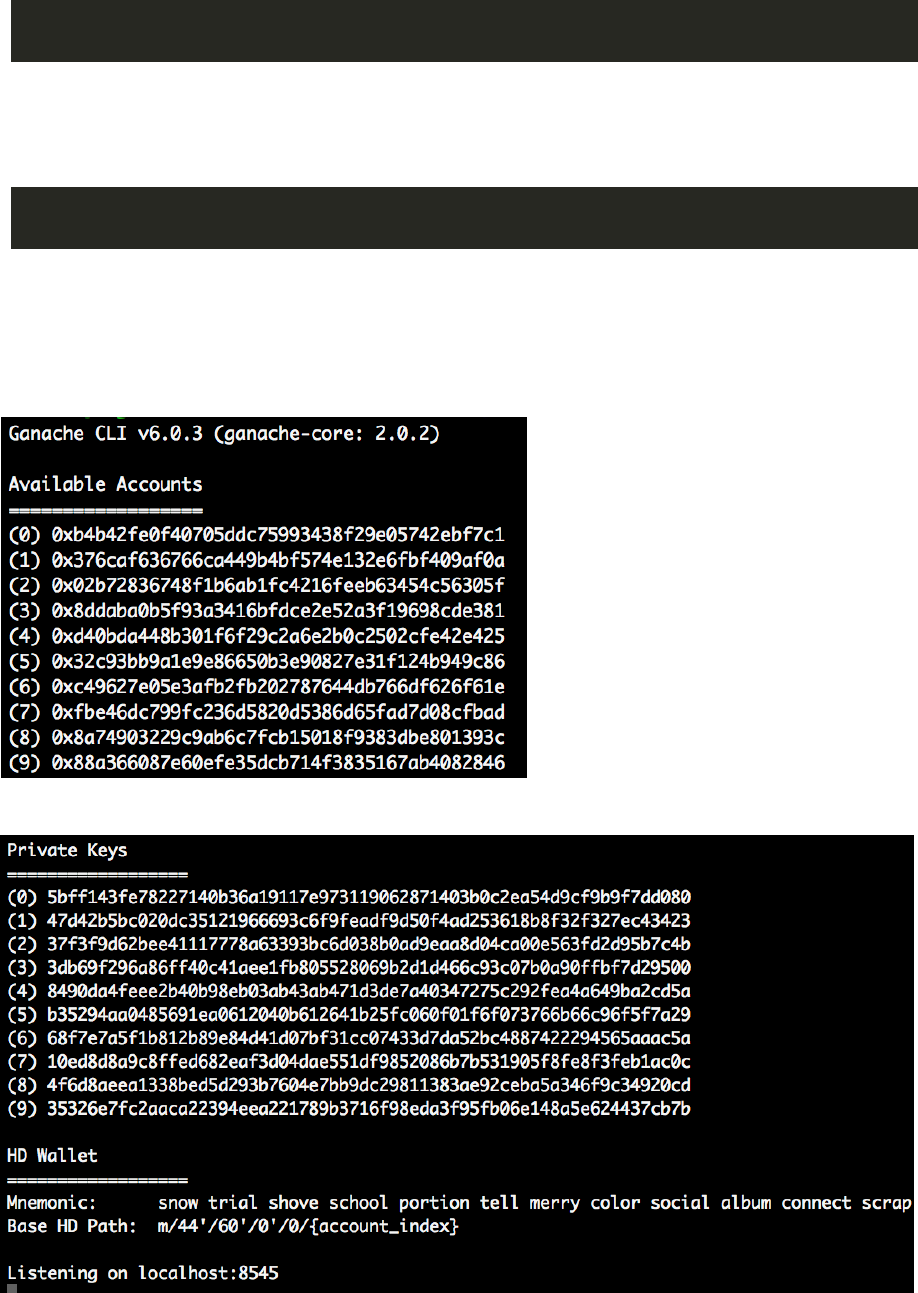
그리고 잘 설치 되었는지 확인하기 위해 ganache-cli를 구동시켜본다.
$ node_modules/.bin/ganache-cli
성공적으로 설치되었다면 아래와 같은 화면이 나올 것이다. 10개의 테스트용 계좌들과 그에
해당하는 개인 키(Private Key)들이 생성된다.

2단계: Voting Contract dApp 개발
개발에 필요한 툴들을 설치했으니 투표용 dApp을 Solidity 언어를 이용하여 개발해보겠다.
Solidity 언어를 작성하기 위해서는 Ethereum이 만든 온라인 IDE인 Remix
(remix.ethereum.org)를 사용하거나, IntelliJ 같이 Solidity 파일 플러그인을 제공하는 IDE들을
사용하면 된다.
$ > Voting.sol
$ vim Voting.sol
Voting.sol 이라는 파일을 만들어 아래 코드를 복사-붙여넣기 해본다.
pragma solidity ^0.4.18;
// We have to specify what version of compiler this code will compile with
contract Voting {
/* mapping field below is equivalent to an associative array or hash.
The key of the mapping is candidate name stored as type bytes32 and value is
an unsigned integer to store the vote count
*/
mapping (bytes32 => uint8) public votesReceived;
/* Solidity doesn't let you pass in an array of strings in the constructor (yet).
We will use an array of bytes32 instead to store the list of candidates
*/
bytes32[] public candidateList;
/* This is the constructor which will be called once when you
deploy the contract to the blockchain. When we deploy the contract,
we will pass an array of candidates who will be contesting in the election
*/

function Voting(bytes32[] candidateNames) public {
candidateList = candidateNames;
}
// This function returns the total votes a candidate has received so far
function totalVotesFor(bytes32 candidate) view public returns (uint8) {
require(validCandidate(candidate));
return votesReceived[candidate];
}
// This function increments the vote count for the specified candidate. This
// is equivalent to casting a vote
function voteForCandidate(bytes32 candidate) public {
require(validCandidate(candidate));
votesReceived[candidate] += 1;
}
function validCandidate(bytes32 candidate) view public returns (bool) {
for(uint i = 0; i < candidateList.length; i++) {
if (candidateList[i] == candidate) {
return true;
}
}
return false;
}
}
solc: 위에 있는 Solidity 파일(.sol 확장자)을 컴파일 해주는 프로그램이다.
$ npm install solc
다음으로는 node.js 콘솔을 열어 solc와 web3 객체를 만들 것이다.

$ node
(여기서부터는 node 콘솔 명령어이다)
> Web3 = require('web3')
> web3 = new Web3(new Web3.providers.HttpProvider("http://localhost:8545"));
web3 객체가 잘 초기화되어 블록체인과 통신할 수 있는지 확인하기 위해 이전에 생성한
10개의 테스트용 계정들을 불러보겠다.
> web3.eth.accounts
['0x9c02f5c68e02390a3ab81f63341edc1ba5dbb39e',
'0x7d920be073e92a590dc47e4ccea2f28db3f218cc',
'0xf8a9c7c65c4d1c0c21b06c06ee5da80bd8f074a9',
'0x9d8ee8c3d4f8b1e08803da274bdaff80c2204fc6',
'0x26bb5d139aa7bdb1380af0e1e8f98147ef4c406a',
'0x622e557aad13c36459fac83240f25ae91882127c',
'0xbf8b1630d5640e272f33653e83092ce33d302fd2',
'0xe37a3157cb3081ea7a96ba9f9e942c72cf7ad87b',
'0x175dae81345f36775db285d368f0b1d49f61b2f8',
'0xc26bda5f3370bdd46e7c84bdb909aead4d8f35f3']
.sol 파일을 컴파일하기 위해 문자열 변수로 불러온 후 solc로 컴파일 한다.
> code = fs.readFileSync('Voting.sol').toString()
> solc = require('solc')
> compiledCode = solc.compile(code)
블록체인과 통신할 준비가 끝났으니 우리가 만든 contract를 블록체인 위에 배치해보겠다.

> abiDefinition = JSON.parse(compiledCode.contracts[':Voting'].interface)
> VotingContract = web3.eth.contract(abiDefinition)
> byteCode = compiledCode.contracts[':Voting'].bytecode
> deployedContract = VotingContract.new(['Rama','Nick','Jose'],{data: byteCode, from:
web3.eth.accounts[0], gas: 4700000})
> deployedContract.address
> contractInstance = VotingContract.at(deployedContract.address)
3단계: 블록체인 위에 있는 우리의 contract와 통신하기
이제 블록체인 위에 있는 우리가 만든 contract와 통신을 해보겠다.
> contractInstance.totalVotesFor.call('Rama')
{ [String: '0'] s: 1, e: 0, c: [ 0 ] }
> contractInstance.voteForCandidate('Rama', {from: web3.eth.accounts[0]})
'0xdedc7ae544c3dde74ab5a0b07422c5a51b5240603d31074f5b75c0ebc786bf53'
> contractInstance.voteForCandidate('Rama', {from: web3.eth.accounts[0]})
'0x02c054d238038d68b65d55770fabfca592a5cf6590229ab91bbe7cd72da46de9'
> contractInstance.voteForCandidate('Rama', {from: web3.eth.accounts[0]})
'0x3da069a09577514f2baaa11bc3015a16edf26aad28dffbcd126bde2e71f2b76f'
> contractInstance.totalVotesFor.call('Rama').toLocaleString()
'3'

4단계: 블록체인과 투표용 어플 연결하기
이제 사용자들이 우리가 만든 contract와 통신할 수 있도록 웹페이지를 만들어보겠다. voting-
dapp 디렉토리에 밑에 있는 index.html과 index.js 파일을 만들고 index.html를 실행한다.
index.html
<!DOCTYPE html>
<html>
<head>
<title>Hello World DApp</title>
<link href='https://fonts.googleapis.com/css?family=Open+Sans:400,700' rel='stylesheet'
type='text/css'>
<link href='https://maxcdn.bootstrapcdn.com/bootstrap/3.3.7/css/bootstrap.min.css'
rel='stylesheet' type='text/css'>
</head>
<body class="container">
<h1>A Simple Hello World Voting Application</h1>
<div class="table-responsive">
<table class="table table-bordered">
<thead>
<tr>
<th>Candidate</th>
<th>Votes</th>
</tr>
</thead>
<tbody>
<tr>
<td>Rama</td>
<td id="candidate-1"></td>
</tr>
<tr>
<td>Nick</td>
<td id="candidate-2"></td>
</tr>
<tr>
<td>Jose</td>
<td id="candidate-3"></td>
</tr>
</tbody>
</table>
</div>
<input type="text" id="candidate" />
<a href="#" onclick="voteForCandidate()" class="btn btn-primary">Vote</a>
</body>
<script src="https://cdn.rawgit.com/ethereum/web3.js/develop/dist/web3.js"></script>
<script src="https://code.jquery.com/jquery-3.1.1.slim.min.js"></script>
<script src="./index.js"></script>
</html>
index.js
web3 = new Web3(new Web3.providers.HttpProvider("http://localhost:8545"));
abi =
JSON.parse('[{"constant":false,"inputs":[{"name":"candidate","type":"bytes32"}],"name":"totalVotesF
or","outputs":[{"name":"","type":"uint8"}],"payable":false,"type":"function"},{"constant":false,"inputs"
:[{"name":"candidate","type":"bytes32"}],"name":"validCandidate","outputs":[{"name":"","type":"bool
"}],"payable":false,"type":"function"},{"constant":true,"inputs":[{"name":"","type":"bytes32"}],"name":
"votesReceived","outputs":[{"name":"","type":"uint8"}],"payable":false,"type":"function"},{"constant":
true,"inputs":[{"name":"x","type":"bytes32"}],"name":"bytes32ToString","outputs":[{"name":"","type":
"string"}],"payable":false,"type":"function"},{"constant":true,"inputs":[{"name":"","type":"uint256"}],"
name":"candidateList","outputs":[{"name":"","type":"bytes32"}],"payable":false,"type":"function"},{"c
onstant":false,"inputs":[{"name":"candidate","type":"bytes32"}],"name":"voteForCandidate","outputs
":[],"payable":false,"type":"function"},{"constant":true,"inputs":[],"name":"contractOwner","outputs":[
{"name":"","type":"address"}],"payable":false,"type":"function"},{"inputs":[{"name":"candidateNames
","type":"bytes32[]"}],"payable":false,"type":"constructor"}]')
VotingContract = web3.eth.contract(abi);
// In your nodejs console, execute contractInstance.address to get the address at which the
contract is deployed and change the line below to use your deployed address
contractInstance = VotingContract.at('0x2a9c1d265d06d47e8f7b00ffa987c9185aecf672');

candidates = {"Rama": "candidate-1", "Nick": "candidate-2", "Jose": "candidate-3"}
function voteForCandidate() {
candidateName = $("#candidate").val();
contractInstance.voteForCandidate(candidateName, {from: web3.eth.accounts[0]}, function() {
let div_id = candidates[candidateName];
$("#" + div_id).html(contractInstance.totalVotesFor.call(candidateName).toString());
});
}
$(document).ready(function() {
candidateNames = Object.keys(candidates);
for (var i = 0; i < candidateNames.length; i++) {
let name = candidateNames[i];
let val = contractInstance.totalVotesFor.call(name).toString()
$("#" + candidates[name]).html(val);
}
});

Part 2: dApp을 실제 블록체인 위에서 구동해보기
첫번째 파트에서는 투표를 할 수 있는 dApp을 만들어 ganache라는 테스트용 환경에서
구동했다. 이번에는 실제 블록체인에서 구동해볼 것이며, 예제이므로 사용하기 위해
Etherium을 지불해야하는 MainNet이 아닌 TestNet에서 contract를 구동할 것이다. 또한
이번 예제는 token 을 이용하여 voting 하는 예제이며, token contract 가 voting contract
보다 먼저 deploy 되었다는 가정하에 한다.(현실에서 voting 을 위해 token 을 발행하지는
않을 것이다..;)
1단계: geth 설치 후 Ethereum 블록체인 동기화 하기
Ethereum을 다운받기 위해서 geth를 먼저 설치 한다.
geth (Go-Ethereum): Ethereum full node (블록체인 전체를 다운받은 노드)를 구동할 수
있는 CLI이며 Go 언어로 개발되었다. C++ 버전은 eth, Python 버전으로는 pyethapp이
있다. eth는 성능 위주 mining 용도, pyethapp은 코드가 읽기 쉬워 연구 용도로 많이
사용된다.
$ sudo apt-get install software-properties-common
$ sudo add-apt-repository -y ppa:ethereum/ethereum
$ sudo apt-get update
$ sudo apt-get install ethereum
Ethereum을 설치했으므로 geth를 이용하여 블록체인을 받아온다.
$ geth --rinkeby --syncmode "fast" --rpc --rpcapi db,eth,net,web3,personal --cache=1024 --
rpcport 8545 --rpcaddr 127.0.0.1 --rpccorsdomain "*"
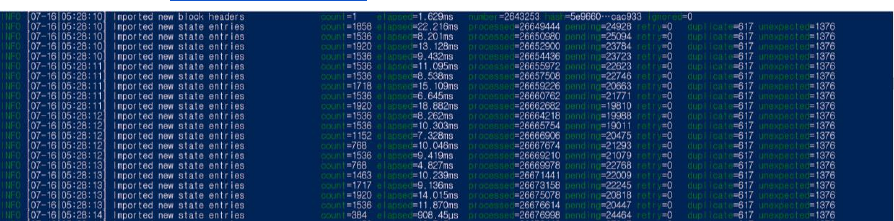
아래 스크린샷처럼 블록체인 다운로드가 시작된다. 맨 윗 줄에 number = 2643253이 바로
2643253번째 블록의 블록 헤더를 다운 받았다는 뜻이다. 동기화가 완전하게 되었는지
확인을 하기 위해 rinkeby.etherscan.io 에서 가장 마지막 블럭의 number와 비교하면 된다.
2018년 7월 16일 기준 rinkeby test network의 블록체인은 약 11GB 정도 되기 때문에
다운로드하는데 어느 정도 시간이 소요될 수 있다. 컴퓨터마다 다르겠지만 일반적인 무선
연결과 8GB RAM으로 약 3시간 정도 걸린다.
블록체인을 전부 다운로드 한 후에 truffle을 설치한다.
2단계: Truffle 설치 및 준비
truffle: Ethereum Development Framework. Contract를 컴파일 후 네트워크로 전송한다.
(이전에 설치한 Ganache-CLI가 truffle 프레임워크에 속해있다)
$ npm install -g truffle
Contract 개발을 위해 디렉토리를 만들고 truffle 프로젝트를 만들어준다.
$ mkdir voting
$ cd voting
~/voting$ npm install -g webpack
~/voting$ truffle unbox webpack
~/voting$ ls
README.md contracts node_modules test
webpack.config.js truffle.js
app migrations package.json
~/voting$ ls app/
index.html javascripts stylesheets
mahesh@projectblockchain:~/voting$ ls contracts/
ConvertLib.sol MetaCoin.sol Migrations.sol
이렇게 truffle은 프로젝트 개발을 굉장히 쉽게 시작할 수 있도록 필요한 파일들을
설치해주고 예시 애플리케이션도 제공한다. 위에 ConvertLib.sol, MetaCoin.sol은
필요없으므로 지워도 된다.
새로 만든 Voting.sol, SafeMath.sol, jjERC223.sol 파일을 만들어 contracts 디렉토리 안에
넣는다.
https://github.com/Singed-jj/token_voting/tree/master/voting-practice5/contracts
~/voting$ ls contracts/
Migrations.sol SafeMath.sol Voting.sol jjERC223.sol
다음은 2_deploy_contracts.js에 있는 내용을 아래 코드로 대체한다. jjERC223.sol 과
Voting.sol 은 SafeMath Library 를 import 하고, Voting.sol 은 jjERC223.sol 도 import 한다.
var Voting = artifacts.require("./Voting.sol");
var jjERC223 = artifacts.require("./jjERC223.sol");
var SafeMath = artifacts.require("./SafeMath.sol");
module.exports = function(deployer) {
deployer.deploy(SafeMath,{gas:6700000});
deployer.link(SafeMath,jjERC223);
deployer.link(SafeMath,Voting);
deployer.deploy(jjERC223,{gas:6700000});
deployer.link(jjERC223, Voting);
deployer.deploy(Voting, ['JAEJIN', 'HANBIN', 'MARKO'],'0x0', {gas: 6700000});
};
또한 truffle.js에 gas 기본값을 넣어준다. 이렇게 하면 gas를 파라미터로 안 넣으면 기본값이
자동으로 입력된다.
require('babel-register')
module.exports = {
networks: {
development: {
host: 'localhost',
port: 8545,
network_id: '*',
gas: 470000
}
}
}

app.js의 내용을 다음 코드로 대체한다.
https://github.com/Singed-jj/token_voting/blob/master/voting-
practice5/app/javascripts/app.js
index.html의 내용을 다음으로 대체한다.
https://github.com/Singed-jj/token_voting/blob/master/voting-practice5/app/index.html
3단계: Contract를 Rinkeby Test Network로 전송
Contract를 전송하려면 Ether가 필요한데, MainNet을 사용하면 실제 돈을 지불해야하지만
Rinkeby Test Network에서는 https://faucet.rinkeby.io/ 에서 무료로 받을 수 있다.
그러나 테스터들이 Ether를 무작위로 소모하는 것을 방지하기 위해 8시간 마다 3 Ether만큼
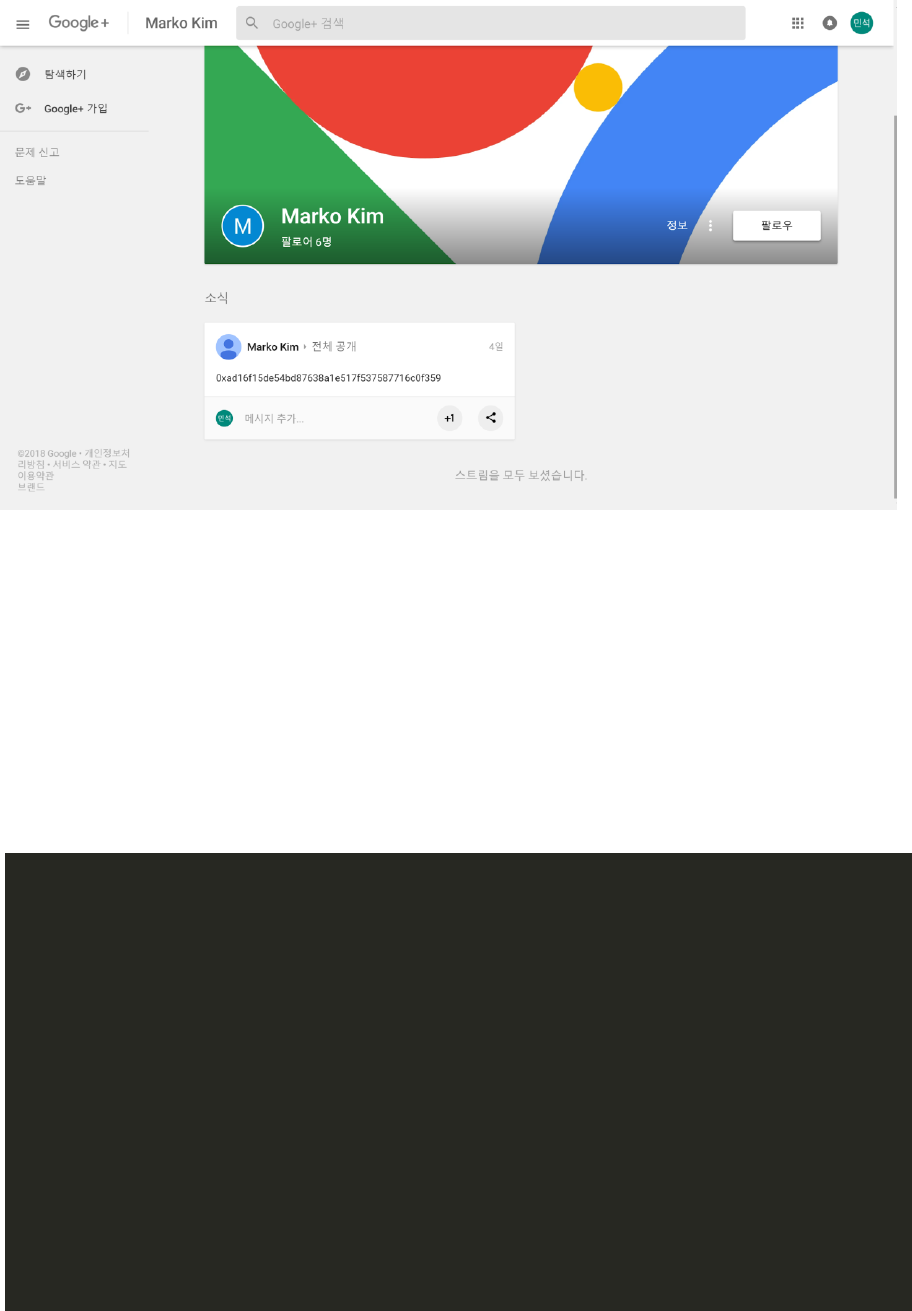
등 일정 금액만 받을 수 있다. Ether를 지급받기 위해서는 Twitter, Google Plus 그리고
Facebook에서 자신의 계정의 hash 값을 포함한 글을 public으로 게시해야 한다.
이제 truffle console을 열어 contract 들을 deploy 해볼 차례이다. “truffle console” 이라고
project directory 에서 입력했을때 error 가 뜬다면, truffle module과 webpack module 이
최신버전이 아니거나, truffle.js 파일내 port 값이 8545 가 아니거나, 아직 testnet 의 블럭
싱크가 되지않았을 것이다. (컴퓨터는 거짓말을 하지않는다..)
~/voting$> truffle console
truffle(development)>
truffle(development)> web3.personal.newAccount('verystrongpassword')
'0x495de7e7a6f09c07691bbc6d58c19b7ae86c7d91'
// Replace 'verystrongpassword' with a good strong password.
// The account is locked by default, make sure to unlock it before using the account for
deploying and interacting with the blockchain.
// Don’t forget 베리스트롱패스워드!
위와 비슷하게 나타난다면, 이제 https://faucet.rinkeby.io/ 로 가서 free ether 를 받아온다.
// eth 가 들어있는 계좌이다. eth 가 들어있는 계좌는 web.eth.accounts[n] 이어야 한다.
truffle(development)> web3.eth.accounts[0]
'0x495de7e7a6f09c07691bbc6d58c19b7ae86c7d91'
// eth를 사용하여 transaction 을 발생시키려면 계좌를 unlock 해야한다.
truffle(development)>
web3.personal.unlockAccount(web3.eth.accounts[0],'verystrongpassword',15000)
true
// contract 들을 deploy 한다.
truffle(development)> migrate
Using network 'development'.
Running migration: 1_initial_migration.js
Replacing Migrations...
... 0x04a27d1d1edcbf79027bcb0b51bac8b49be9f90453a4653bdb4b3546af61e272
Migrations: 0x1b1d75b55c5ff68b61130565445511bb5143082a
Saving successful migration to network...
... 0x711e30cb85864752e9580f7438f0a7a66dbec0a5ca58f25364c9d59a232f12cf
Saving artifacts...
Running migration: 2_deploy_contracts.js
Replacing SafeMath...
... 0x494c623a6ddc60684d794b5e93441981dbc951da7606c31489df0205ff7fc69e
SafeMath: 0xae0aca6be2632c4074f7dbdd9d56a7d0858286cc
Replacing jjERC223...
... 0x24a45c157b93be3cb52ef01d4ee9a923e019e1c09410056a225d59861d11317e
jjERC223: 0xe691e5ee89f5b31242f5ee2ed8549648426b0753
Replacing Voting...
... 0x7b28594ce295f793a02a03362f88118b6cc60820340d357cc0c0ddc0cc8a380a
Voting: 0x326a7b8269aff74ea0d9e6949ae88afccc68387d
Saving successful migration to network...

... 0x46e0df7ac2227567ced9f754f8d2896e172979c65ca983fdf6fefa10bc059c72
Saving artifacts…
// deploy 된 Voting contract 의 주소이다.
truffle(development)> Voting.deployed().then(function(ci){console.log(ci.address)})
0x326a7b8269aff74ea0d9e6949ae88afccc68387d
# deploy 된 jjERC223 contract 의 주소이다.
truffle(development)> jjERC223.deployed().then(function(ci){console.log(ci.address)})
0xe691e5ee89f5b31242f5ee2ed8549648426b0753
# Voting contract, jjERC223 contract를 함께 deploy 했기때문에 deploy 할 때 에는 jjERC223
contract 의 주소를 몰랐다. 그래서 deploy 한 이후에 Voting contract 가 import 할 token
contract(여기서는 jjERC223 contract) 의 주소값을 후에 set 한다.
truffle(development)>
Voting.deployed().then(function(ci){ci.setTokenAddress(“0xe691e5ee89f5b31242f5ee2ed85496484
26b0753”).then(function(v){console.log(v)})})
0xe691e5ee89f5b31242f5ee2ed8549648426b0753
위와 비슷하게 나타난다면 이제 투표를 할 준비가 다 되었다!!
~voting $> npm run dev
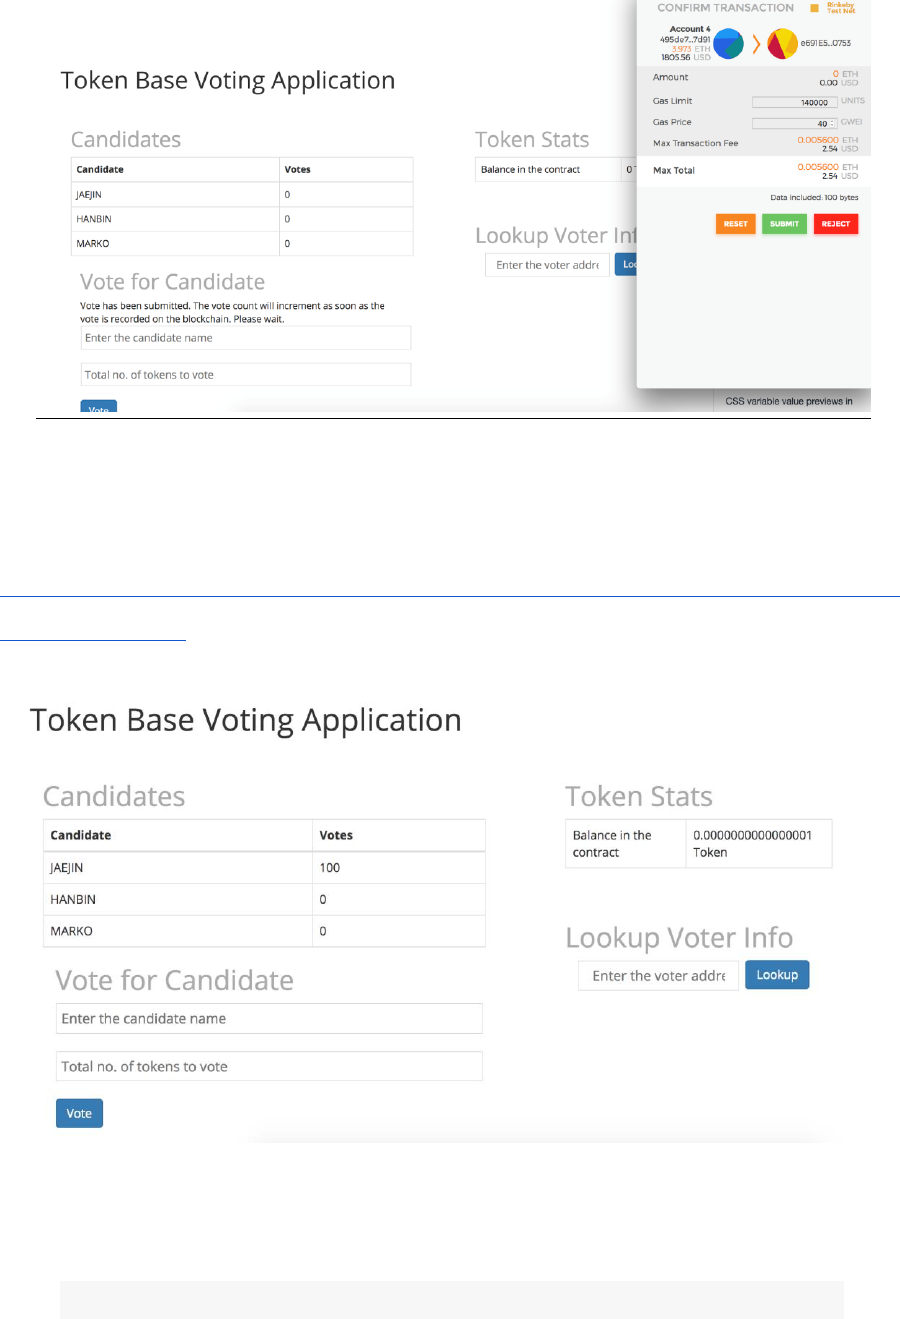
localhost:8080 에 들어가면 위와 같은 화면이 보이는데, 현재는 JAEJIN, HANBIN, MARKO
모두 0표이다. 이제 Vote for Candidate 에서 (candidate name: JAEJIN, Total no. of tokens
to vote: 100) 값을 입력한 뒤 Vote 버튼을 누른다. 그러면 전에 깔아둔 MetaMask 에 의해
아래화면이 뜨는데 , gas Price 값은 항상 40을 주고 SUBMIT 을 클릭한다.

Appendix: Error 대처 방법
1. Truffle 콘솔에서 migrate를 할 때 unlock을 했음에도 unlock 에러가 발생할 수 있다.
Using network 'development'.
Running migration: 1_initial_migration.js
>> Deploying migration
Deploying Migrations...
... undefined
Error encountered, bailing. Network state unknown. Review successful transactions manually.
Error: authentication needed: password or unlock
이럴 경우 migrations 폴더에 있는 1_initial_migrations.js의 내용을 아래 코드로 바꿔준다.
const Web3 = require('web3');
const TruffleConfig = require('../truffle');
var Migrations = artifacts.require("./Migrations.sol");
module.exports = function(deployer, network, addresses) {
const config = TruffleConfig.networks[network];
if (process.env.ACCOUNT_PASSWORD) {
const web3 = new Web3(new Web3.providers.HttpProvider('http://' + config.host + '$
console.log('>> Unlocking account ' + config.from);
web3.personal.unlockAccount(config.from, process.env.ACCOUNT_PASSWORD, 36000);
}
console.log('>> Deploying migration');

deployer.deploy(Migrations);
};
아래처럼 migrate 할 때 unlock 하는 과정을 한 번 더 거쳐주면 unlock 에러를 해결 할 수
있다.
> ACCOUNT_PASSWORD='verystrongpassword' migrate